

Page 1
PLANET Technology, Corp.
Internet Server Appliance
ISA-4000
User's Manual
Page 2

P
RREEFFAACCE
P
E
CCooppyyrriigghhtt
TTrraaddeemmaarrkkss
Copyright by PLANET Technology, Corp. 2002. No part of this manual may be reproduced
or transmitted in any form without the expressed, written permission of PLANET.
All trademarks are the property of their respective holders.
IImmppoorrttaanntt ddaattaa pprrootteeccttiioonn iinnffoorrmmaattiioonn
You should back up all data before installing any drive controller or storage peripheral.
PLANET is not responsible for any loss of data resulting from the use, disuse, or misuse of
this or any other PLANET product.
NNoottiiccee
Although PLANET has attempted to ensure the accuracy of the content of this manual, it is
possible that this document may contain technical inaccuracies, typographical, or other
errors. PLANET Technology, Inc. assumes no liability for any error in this publication, and
for damages, whether direct, indirect, incidental and consequential or otherwise, that may
result from such error, including, but not limited to loss of data or profits.
PLANET provides this publication "as is" without warranty of any kind, either express or
implied, including, but not limited to implied warranties of merchantability or fitness for a
particular purpose. The published information in the manual is subject to change without
notice. PLANET reserves the right to make changes in the product design, layout, and
driver revisions without notifying its users.
RReegguullaattiioonnss
This equipment has been tested and found to comply with the limits for a Class B digital
device, pursuant to Part 15 of the FCC Rules. These limits are designed to provide
reasonable protection against harmful interference in a residential installation. This
equipment generates, uses, and can radiate radio frequency energy and, if not installed
and used in accordance with the instructions, may cause harmful interference to radio
communications. However, there is no guarantee that interference will not occur in a
particular installation. If this equipment does cause harmful interference to radio or
television reception, which can be determined by turning the equipment off and on, the
user is encouraged to try to correct the interference by one or more of the following
measures:
– Re-orient or re-locate the receiving antenna.
– Increase the separation between the equipment and receiver.
– Connect the equipment into an outlet on a circuit different from that to which the
– Consult the dealer or an experienced radio/TV technician for help.
This device complies with Part 15 of the FCC Rules. Operation is subject to the following
conditions: (1) This device may not cause harmful interference, and (2) this device must
accept any interference received, including interference that may cause undesired
operation.
receiver is connected.
Only digital device equipment certified CLASS B having shielded
cables should be attached to this equipment.
Page 3

SSaaffeettyy IInnffoorrmmaattiioonn
Please heed the following safeguards and instructions before using the ISA-4000:
– Read all instructions, warnings, and safety instructions thoroughly
– Turn off the ISA-4000 correctly (refer to page 6)
– Do not obstruct the ISA-4000 chassis ventilation grids
– To reduce the danger of electrical shock, avoid disassembling the ISA-4000
– The ISA-4000 mainboard has a lithium battery that provides power for the realtime
CMOS RAM. This battery should last from 5 ~ 10 years. If the system does not keep
time and date accurately, you may need to have the battery changed. Contact your
dealer for assistance.
Warning: There is danger of explosion if the battery replaced with the wrong battery type.
Only use the same (or equivalent) type of battery to replace the mainboard
lithium battery. Consult the manufacturer for more information. Dispose of the
battery according to the manufacturer’s recommendations or according to local
regulations.
CCuussttoommeerr SSeerrvviiccee
For information on customer service and support for the ISA-4000, please refer to the following
email address and Website URL:
Email: support@planet.com.tw
WWW: www.planet.com.tw
Before contacting customer service, please take a moment to gather the following information:
• ISA-4000 serial number and MAC address
• Additional software installed on the ISA-4000
• Any error messages that displayed when the problem occurred
• Any software running when the problem occurred
• Steps you took to resolve the problem on your own
RReevviissiioonn
User’s Manual for Internet Server Appliance:
Model: ISA-4000
Rev: 1.0 (Jul. 2002)
Part No. EM-ISA4000v1
Page 4

AAbboouutt tthhiiss MMaannuuaall
This manual has seven chapters and three appendices.
Chapter 1 Introducing the ISA-4000
This chapter introduces the product packaging, the
ISA-4000's front and rear panels, the services
provided, and the system requirements for
administration.
Chapter 2 Setting up the Hardware
Chapter 3 Using the Setup Wizard
Chapter 4 Client-Side Settings
Chapter 5 Administrator's Guide
Chapter 6 User's Guide
Chapter 7 System Install and Restore
This chapter explains how to set up the ISA-4000
and how to turn the ISA-4000 on and off.
This chapter explains a quick and easy way to setup
the ISA-4000 using a powerful setup wizard.
This chapter explains how to setup your computer
to be a client of the ISA-4000.
This chapter shows administrators how to configure
and maintain the system.
This chapter shows users how to maintain their
personal accounts.
This chapter explains how to install a hard disk drive
into the ISA-4000 system, and how to configure the
hard drive for use.
Appendix A LCD Console
Appendix B Specifications
Appendix C Licenses
This appendix explains the function and usage of
the three buttons on the front panel, and also
explains the function of the LCD to either display the
ISA-4000 messages, or act as a system console.
This appendix describes the specifications of the
ISA-4000.
This appendix contains all of the licensing
information.
Page 5

Table of Contents
Chapter 1:
1.1 Features..............................................................................................................................................................1
1.2 Package Contents...............................................................................................................................................1
1.3 Software Requirements.......................................................................................................................................1
1.4 Front View..........................................................................................................................................................2
1.5 ISA-4000 Rear Panel..........................................................................................................................................2
1.6 ISA-4000 Services...............................................................................................................................................3
1.7 Configuration Options........................................................................................................................................3
Chapter 2: Setting up the Hardware..........................................................................................................................5
2.1 Connecting to the WAN, LAN, and ADSL Modem..............................................................................................5
2.2 Connecting the Power Cable and Turning on the ISA-4000..............................................................................5
2.3 Turning off the ISA-4000....................................................................................................................................6
2.4 Resetting the ISA-4000.......................................................................................................................................7
Chapter 3: Using the Setup Wizard...........................................................................................................................8
3.1 Configuration of the ISA-4000 using the Wizard................................................................................................8
Introducing the ISA-4000 ........................................................................................................................1
3.2 Logging in as Administrator.............................................................................................................................13
Chapter 4: Client-Side Settings ................................................................................................................................16
4.1 Email Client Settings........................................................................................................................................16
4.2 Sharing Files from ISA-4000............................................................................................................................16
4.2.1 Sharing Files in Windows XP/2000/98/95...............................................................................................16
4.2.2 Sharing Files in Windows NT 4.0............................................................................................................17
4.2.3 Sharing Files in the Macintosh OS...........................................................................................................17
4.2.4 Connecting to the ISA-4000 using FTP....................................................................................................17
4.3 DHCP Client Setup ..........................................................................................................................................17
4.3.1 DHCP Client Setup in WINDOWS 98/95................................................................................................17
4.3.2 DHCP Client Setup in WINDOWS 2000/XP...........................................................................................17
4.3.3 DHCP client setup in WINDOWS NT4.0................................................................................................18
4.3.4 DHCP Client Setup on Mac OS ...............................................................................................................18
4.4 Web Publishing.................................................................................................................................................18
4.4.1 Publishing Web Pages with FrontPage 2000............................................................................................18
4.4.2 Publishing Web Pages using FTP.............................................................................................................19
4.5 Setting Up the Client to Use the Web Caching Server .....................................................................................19
4.5.1 Force Client Site Browsing Through a Web Caching Server...................................................................19
4.5.2 Setting up WINDOWS 2000/98/95/NT4.0 to Access the Web Caching Server ......................................19
4.5.3 Setting up MAC OS to Access the Web Caching Server.........................................................................20
Chapter 5: Administrator's Guide ...........................................................................................................................21
5.1 Logging in as an Administrator........................................................................................................................21
5.2 Users and Groups.............................................................................................................................................22
5.2.1 User List...................................................................................................................................................23
5.2.1.1 Adding a new user................................................................................................................................23
5.2.1.2 Editing user settings.............................................................................................................................24
5.2.1.3 Delete a user.........................................................................................................................................24
5.2.1.4 Edit user defaults..................................................................................................................................24
5.2.2 Group List.................................................................................................................................................24
Page 6

5.2.2.1 Adding a new group .............................................................................................................................25
5.2.2.2 Editing group settings...........................................................................................................................25
5.2.2.3 Deleting a group...................................................................................................................................25
5.2.2.4 Editing group defaults..........................................................................................................................25
5.2.3 Import Users.............................................................................................................................................26
5.3 Network Services..............................................................................................................................................26
5.3.1 DNS..........................................................................................................................................................27
5.3.1.1 Enabling the Domain Name Server......................................................................................................27
5.3.1.2 Adding a new domain name.................................................................................................................28
5.3.1.3 Adding a new host name to a domain...................................................................................................28
5.3.1.4 Editing a host name in a domain name list...........................................................................................30
5.3.1.5 Modifying the SOA..............................................................................................................................31
5.3.1.6 Adding a secondary service..................................................................................................................32
5.3.1.7 Editing a secondary service.................................................................................................... ..............32
5.3.2 Email Service ...........................................................................................................................................33
5.3.2.1 Email servers setting.............................................................................................................................33
5.3.3 Mailing Lists.............................................................................................................................................34
5.3.3.1 Mailing list settings..............................................................................................................................34
5.3.4 File Services.............................................................................................................................................35
5.3.4.1 File services settings.............................................................................................................................36
5.3.5 Web Services............................................................................................................................................37
5.3.5.1 Web services settings ...........................................................................................................................37
5.3.6 DHCP (Dynamic Host Configuration Protocol).......................................................................................38
5.3.6.1 DHCP settings......................................................................................................................................38
5.3.7 Basic Firewall...........................................................................................................................................40
5.3.7.1 Enabling the firewall............................................................................................................................40
5.3.7.2 Adding rules to input/forward/output chains........................................................................................41
5.3.7.3 Modifying a rule in a input/forward/output chain ................................................................................42
5.3.7.4 Deleting a rule in a input/forward/output chain....................................................................................42
5.3.7.5 Changing a chain priority.....................................................................................................................42
5.3.7.6 Changing a default policy.....................................................................................................................42
5.3.8 Telnet........................................................................................................................................................42
5.4 System...............................................................................................................................................................43
5.4.1 Configuring TCP/IP..................................................................................................................................43
5.4.1.1 TCP/IP settings.....................................................................................................................................43
5.4.1.2 Dynamic DNS settings .........................................................................................................................44
5.4.2 Configuring Internet Settings ................................................................................................................... 46
5.4.2.1 Intranet use only...................................................................................................................................46
5.4.2.2 Connection Mode.................................................................................................................................47
5.4.3 Shutting Down and Restarting the ISA-4000...........................................................................................48
5.4.4 Setting the Time .......................................................................................................................................48
5.4.5 Checking the System Information............................................................................................................49
5.5 Maintenance.....................................................................................................................................................49
5.5.1 Backing Up Data......................................................................................................................................50
5.5.2 Restore......................................................................................................................................................51
5.6 Usage Information............................................................................................................................................53
5.6.1 Web Usage ...............................................................................................................................................54
5.6.2 Disk Usage ...............................................................................................................................................56
5.6.3 Network Usage.........................................................................................................................................58
5.7 Software Update...............................................................................................................................................58
5.7.1.1 Software update....................................................................................................................................59
5.7.1.2 Uninstall software.................................................................................................................................59
5.8 Personal Profile ...............................................................................................................................................60
5.8.1 Account ....................................................................................................................................................60
5.8.2 Email ........................................................................................................................................................ 61
5.8.3 Personal Info.............................................................................................................................................62
5.8.4 Disk Usage ...............................................................................................................................................62
Chapter 6: User's Guide............................................................................................................................................64
6.1 Logging in as an User......................................................................................................................................64
6.1.1 Account ....................................................................................................................................................65
6.1.2 Email ........................................................................................................................................................ 65
Page 7

6.1.3 Personal Info.............................................................................................................................................66
6.1.4 Disk Usage ...............................................................................................................................................67
Chapter 7: System Install and Restore.....................................................................................................................68
7.1 Installing the HDD...........................................................................................................................................68
7.2 System Restoration Procedure..........................................................................................................................73
Appendix A: LCD Console............................................................................................................................................74
A.1 LCD Console Overview........................................................................................................................................74
A.2 Displaying Network Settings.................................................................................................................................74
A.3 Setup Network.......................................................................................................................................................74
A.4 Reboot...................................................................................................................................................................74
A.5 Reset Network.......................................................................................................................................................75
A.6 Reset Firewall.......................................................................................................................................................75
A.7 Exit........................................................................................................................................................................75
A.8 Shutdown...............................................................................................................................................................75
Appendix B: Product Specifications.............................................................................................................................76
B.1 PLANET Internet Server Appliance 4000.............................................................................................................76
B.1.1 Software Features..........................................................................................................................................76
B.1.2 Hardware........................................................................................................................................................76
B.2 Supported Network Interface Card.......................................................................................................................77
B.2.1 PCI Cards.......................................................................................................................................................77
B.2.2 PCMCIA Cards.............................................................................................................................................. 77
B.2.3 Cables ............................................................................................................................................................ 77
Appendix C: Licenses.....................................................................................................................................................78
C.1 BSD Copyright......................................................................................................................................................78
C.2 GNU GENERAL PUBLIC LICENSE....................................................................................................................78
C.3 GNU GENERAL PUBLIC LICENSE....................................................................................................................79
C.4 How to Apply These Terms to Your New Programs .............................................................................................82
C.5 SSL License ...........................................................................................................................................................83
Page 8

CChhaapptteerr 11::
Thank you for purchasing the ISA-4000 Internet Server. The ISA-4000 was designed specifically for
SOHO type enterprises and home users.
The ISA-4000 has many versatile functions for use in supporting SOHO Internet and Intranet
services. You can configure your office setup using a single ISA-4000 that provides an interface
between several workstations operating different operating systems and the Internet. Alternatively,
you can configure several ISA-4000 devices to act as Web, email, and file servers for the company
Intranet. Refer to 1.7 Configuration Options for more information.
The ISA-4000 enables users to share a single ADSL or cable modem among all workstations in your
SOHO environment, and has basic firewall features integrated to enhance Intranet security. The
server also has cross-platform support, enabling users on Mac and Windows workstations maximum
flexibility in sharing files.
The ISA-4000 is the best choice for your SOHO Internet server requirements.
IInnttrroodduucciinngg tthhee IISSAA--44000000
1.1 F
1.2 P
If you want to install a new hard disk in the ISA-4000, first refer to
Chapter 7: System Install and Restore.
EATURES
The ISA-4000 Internet Server comes with the following features:
• Integrated web caching, proxy services, and DCHP and DNS support provide fast, secure,
• Website hosting functionality enables you to create a website and host it within the ISA-4000
• IP sharing enables users to share one cable or ADSL modem with the entire office
• Email server capability lets you create and manage company and individual email accounts,
• The basic packet filter firewall feature is easy to configure and protects local data while
• Cross-platform functionality enables users on Macintosh, Windows, and Linux systems file
ACKAGE CONTENTS
The ISA-4000 package should contain the following items:
• ISA-4000 device
• The ISA-4000 System Installation Guide
• One power cord
• One System Installation and user’s manual CD-ROM
• Eight screws
• The ISA-4000 Quick Installation Guide
and reliable Internet access for all workstations in your SOHO environment
create group mailing lists, and schedule automated email delivery
providing users with full Internet access
sharing capability
1.3 S
If any of the contents are missing or damaged, please contact your dealer or distributor immediately.
OFTWARE REQUIREMENTS
The ISA-4000 supports a browser-based user interface, so you will need a browser application
running on your personal computer. The ISA-4000 can be accessed with the following browsers:
• Netscape Navigator, versi on 4.7 or later
• Microsoft Internet Explorer, version 5.0 or later
In order for the browser to work properly with the ISA-4000, you also need to enable cookies and
JavaScript on your browser. Refer to your browser’s online help for more information on enabling
cookies and JavaScript.
Page 9
1.4 F
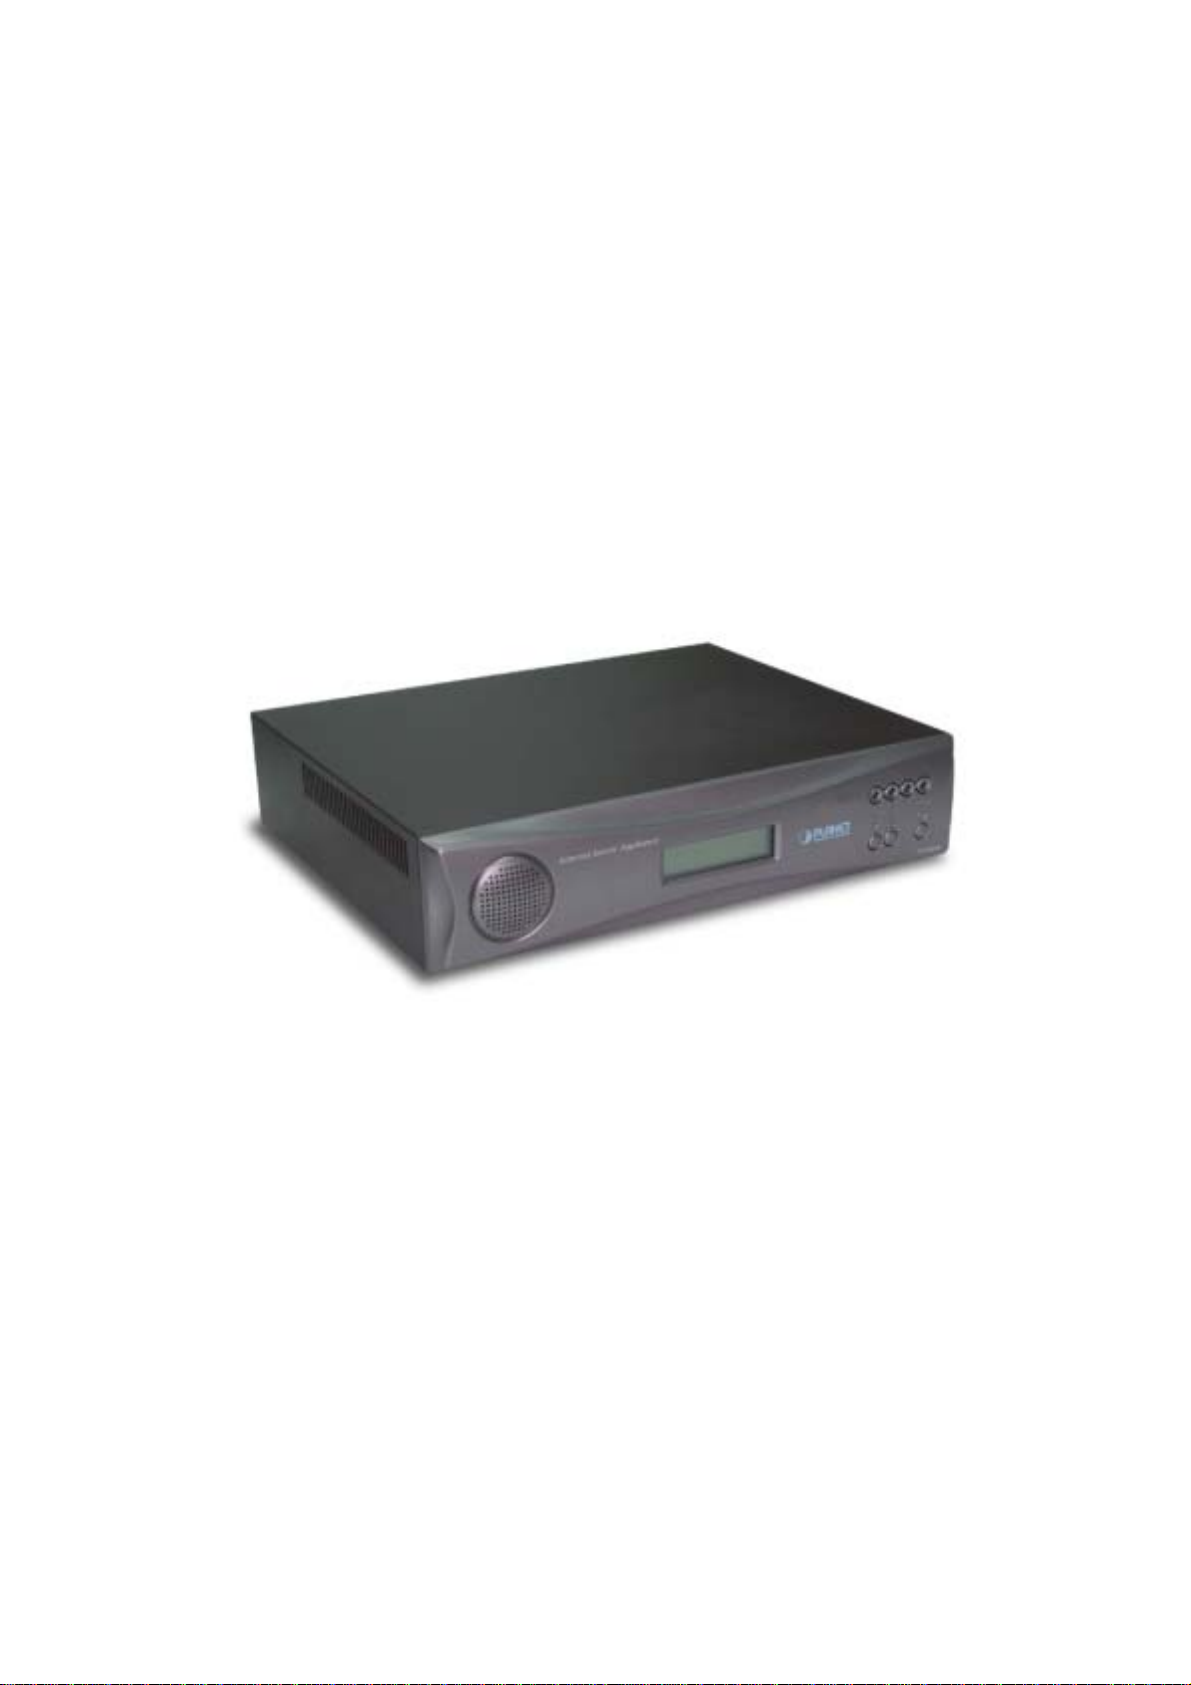
RONT VIEW
Figure 1-1: ISA-4000 front panel.
The LCD can be used to display ISA-4000 messages, or it can act as a console while using the
control panel.
Detailed information about the LCD console can be found in
Appendix A.
The ISA-4000 control panel has four LEDs and three buttons. They are described as follows:
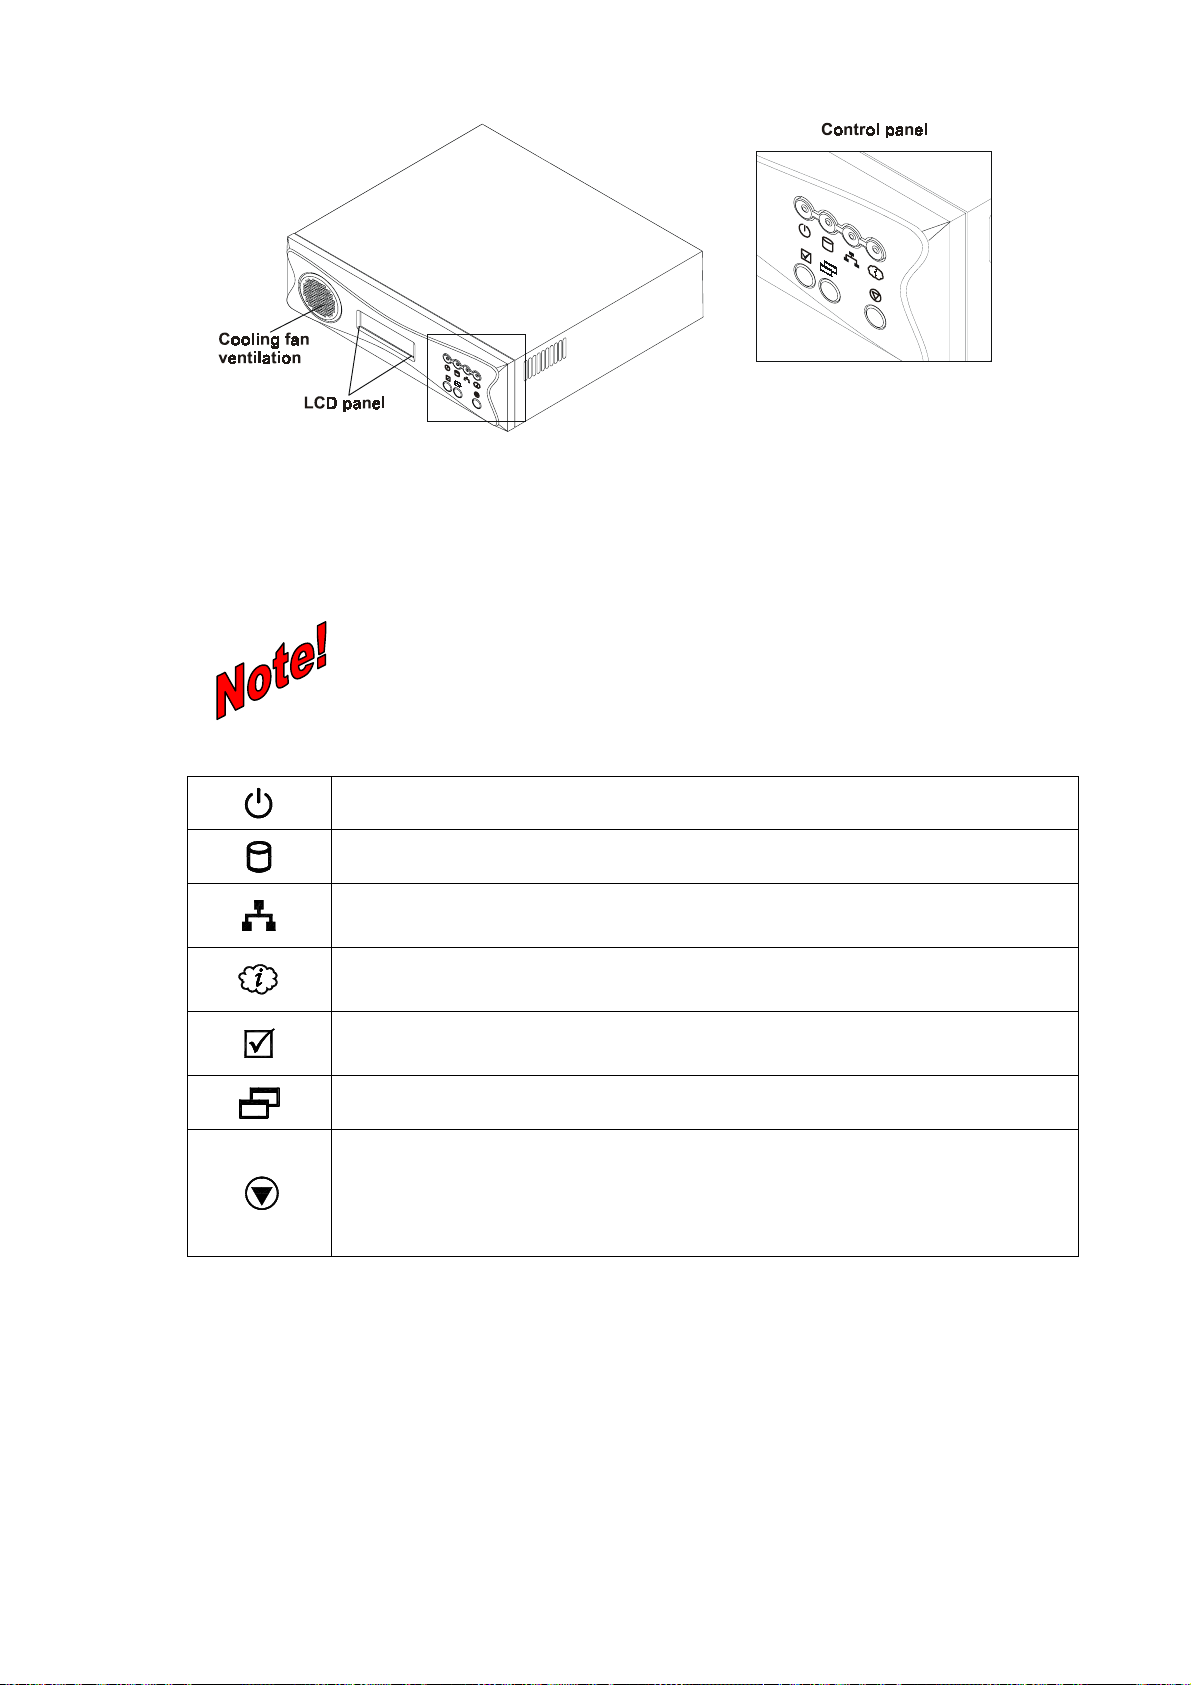
1.5 ISA-4000 R
The ISA-4000 rear panel has one 10/100Mbit Ethernet port, a four-port 10/100Mbit Ethernet switch,
and a RS-232 manufacture console port. The four-port Ethernet switch connects to a local LAN
network and the Ethernet port connects to an ADSL router or a cable modem as a WAN port.
Power-on LED: lights when power is turned on
Hard disk activity LED: blinks when HDD activity occurs
LAN port LED: lights when the LAN port is connected to an active hub or switch;
it blinks when packets are being transmitted or received
WAN port LED: lights when the WAN port is connected to an active ADSL router
or cable modem; blinks when packets are being transmitted or received
Select button: press this button to execute the function currently displayed on
the LCD
Menu button: press this button to scroll through the console menus
System Shutdown button: press this button twice to shut down the system
(refer to 2.3 Turning off the ISA-4000)
Note: To turn the ISA-4000 off, you must press the power button on the rear
panel.
EAR PANEL
The RS-232 console port is for the manufacturer use only.
« 2 »
Page 10
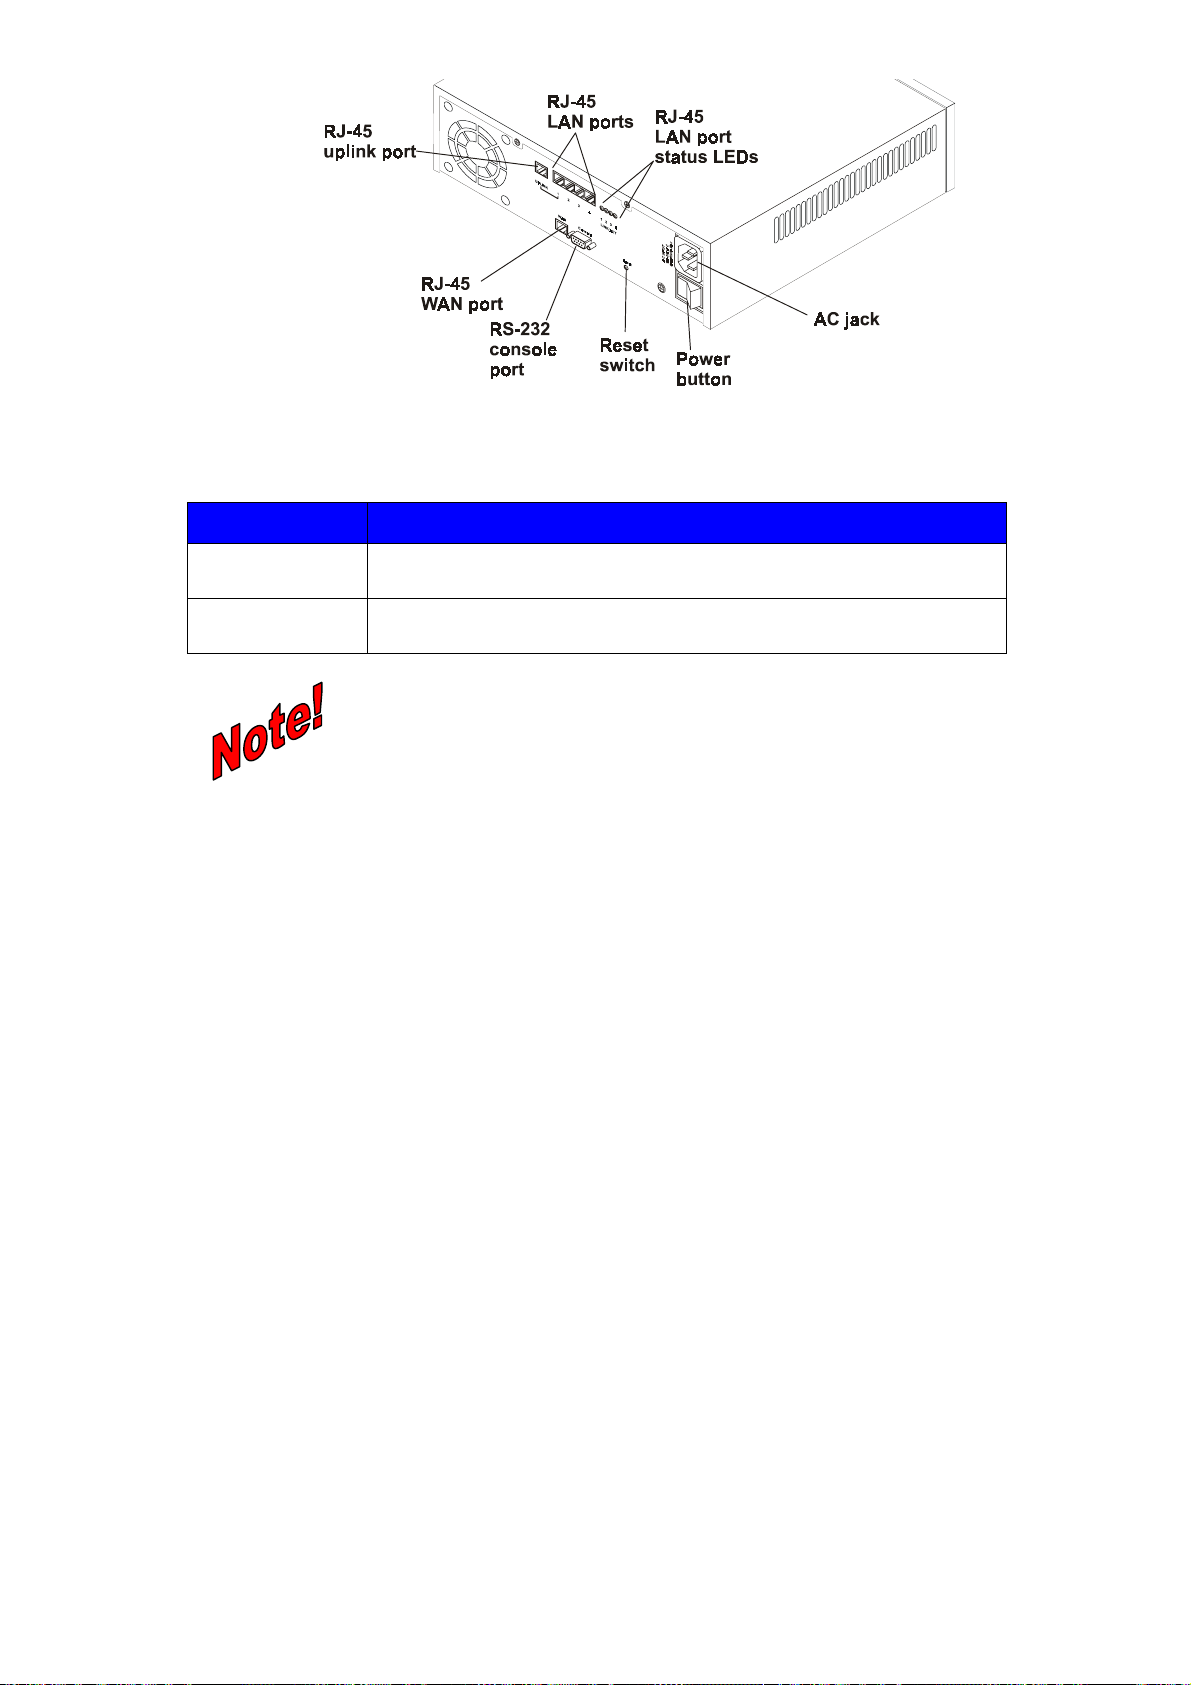
Figure 1-2: ISA-4000 rear panel
The status LEDs indicate the following:
LED MEANING
Act
Link
1.6 ISA-4000 S
The ISA-4000 provides nine main services, including:
• Email server
• Web server
• File server
• Web caching server
• Basic firewall
• DHCP (Dynamic Host Configuration Protocol) server
• DNS (Domain Name System) server
• IP masquerading (also known as NAT [Network Address Translation])
• Mailing lists
For information on resetting the system, refer to 2.4 Resetting the
ISA-4000.
ERVICES
Indicates transmit or receive activity. It is normally off. When there is
packet transmit or receive activity, this LED is on.
Indicates whether the link is active or not. When lit, indicates that the
link is active. When off, indicates that the link is inactive.
1.7 C
These services are described in more detail in Chapter 4.
The ISA-4000 also offers an easy-to-use, browser-based, user-friendly interface, allowing users to
setup and administer the ISA-4000 in an intuitive way. The ISA-4000 GUI (Graphical User Interface)
has two groups of functions:
• one group is for system administrators, and administers the ISA-4000 systems
• one group is for users, and administers each user's personal account
More detailed information can be found in Chapter 4: Administrator's Guide, and in Chapter 5:
User's Guide.
ONFIGURATION OPTIONS
The ISA-4000 provides many scenarios for configuring your SOHO server environment, including
those shown as follows:
« 3 »
Page 11
Figure 1-3 The configuration of ISA-4000
This concludes Chapter 1. The next chapter helps you to get started using the ISA-4000.
« 4 »
Page 12

CChhaapptteerr 22::
This chapter explains how to make LAN and WAN connections, and how to turn on and shut down
the ISA-4000.
SSeettttiinngg uupp tthhee HHaarrddwwaarree
2.1 C
ONNECTING TO THE
Before turning on the ISA-4000, connect all required WAN, LAN, and ADSL modem cables. Refer to
the following illustration and table:
Uplink
LAN
WAN
WAN, LAN,
Figure 2-1: Connecting WAN, LAN, and ADSL/cable modems
Connect a straight cable to connect the ISA-4000 to a switch or hub.
Connect a crossover cable or an isolated Ethernet hub between the host PC and
the LAN port of the ISA-4000.
Connect this jack to an ADSL router or a cable modem as a WAN port.
AND
ADSL M
ODEM
2.2 C
ONNECTING THE POWER CABLE AND TURNING ON THE
Refer to the following instructions and illustrations to connect the power cable:
The ISA-4000 internal power supply auto-senses the AC voltage
ISA-4000
and automatically adjusts for 100 or 240 VAC input.
1. Insert the power cable into the AC jack at the rear of the ISA-4000:
Page 13
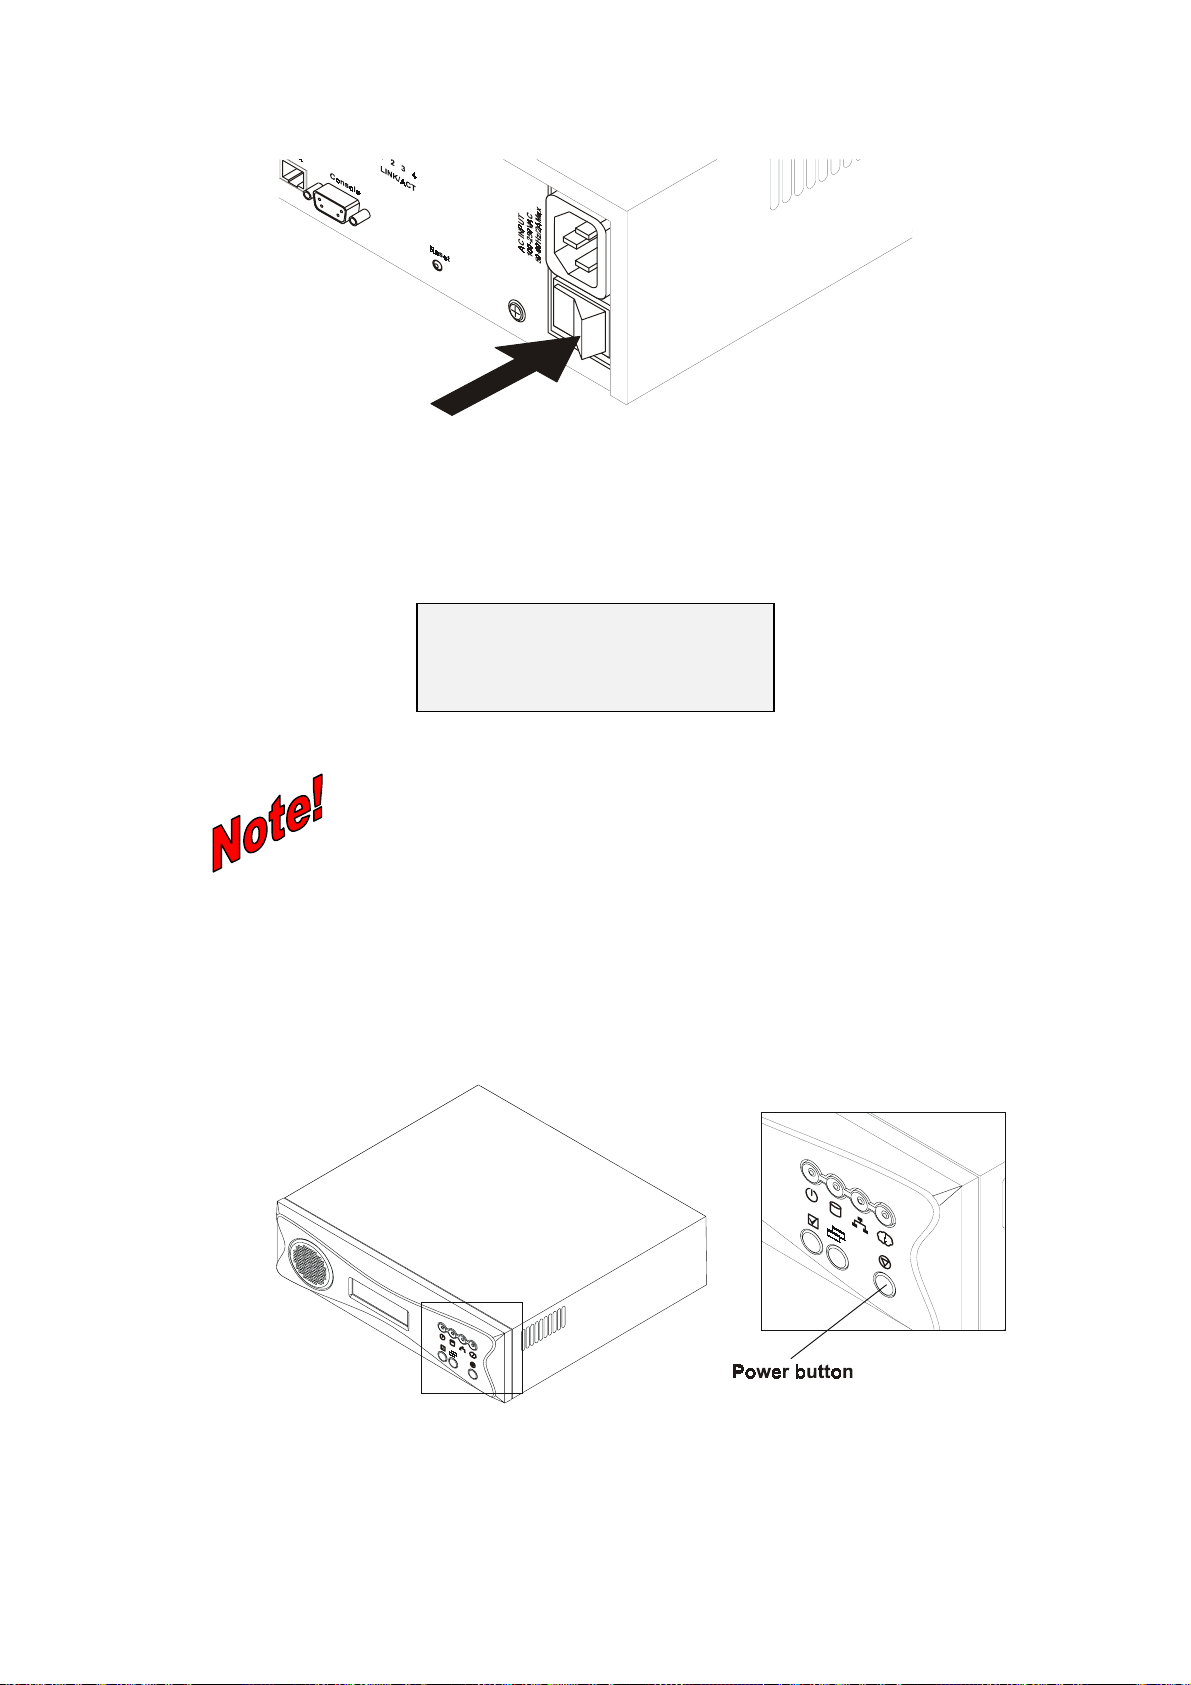
Figure 2-2: Connecting the power cord
2. Press the rear power switch to supply power to the ISA-4000:
Figure 2-3: Turning on the power
After you press the rear power button, the ISA-4000 goes through a boot-up procedure; the boot
messages can be viewed on the LCD screen. When the system has finished booting, the LCD
displays the host, domain, and IP address:
host.domain
2.3 T
10.1.2.3
URNING OFF THE
Follow these instructions to turn off the ISA-4000:
Warning: Ensure that you turn off the ISA-4000 as described in this section to avoid
corrupting or damaging operating system files.
1. Press the ISA-4000 front power button once:
Refer to Chapter 3 to help you set up the ISA-4000 browser
interface.
ISA-4000
The LCD displays the following message:
« 6 »
Page 14
One more to
Shutdown
2. Press the front power button again. The system goes through a power down sequence. After
the power down sequence completes, the following message is displayed:
System
Halt
3. Press the rear power button to turn the server off.
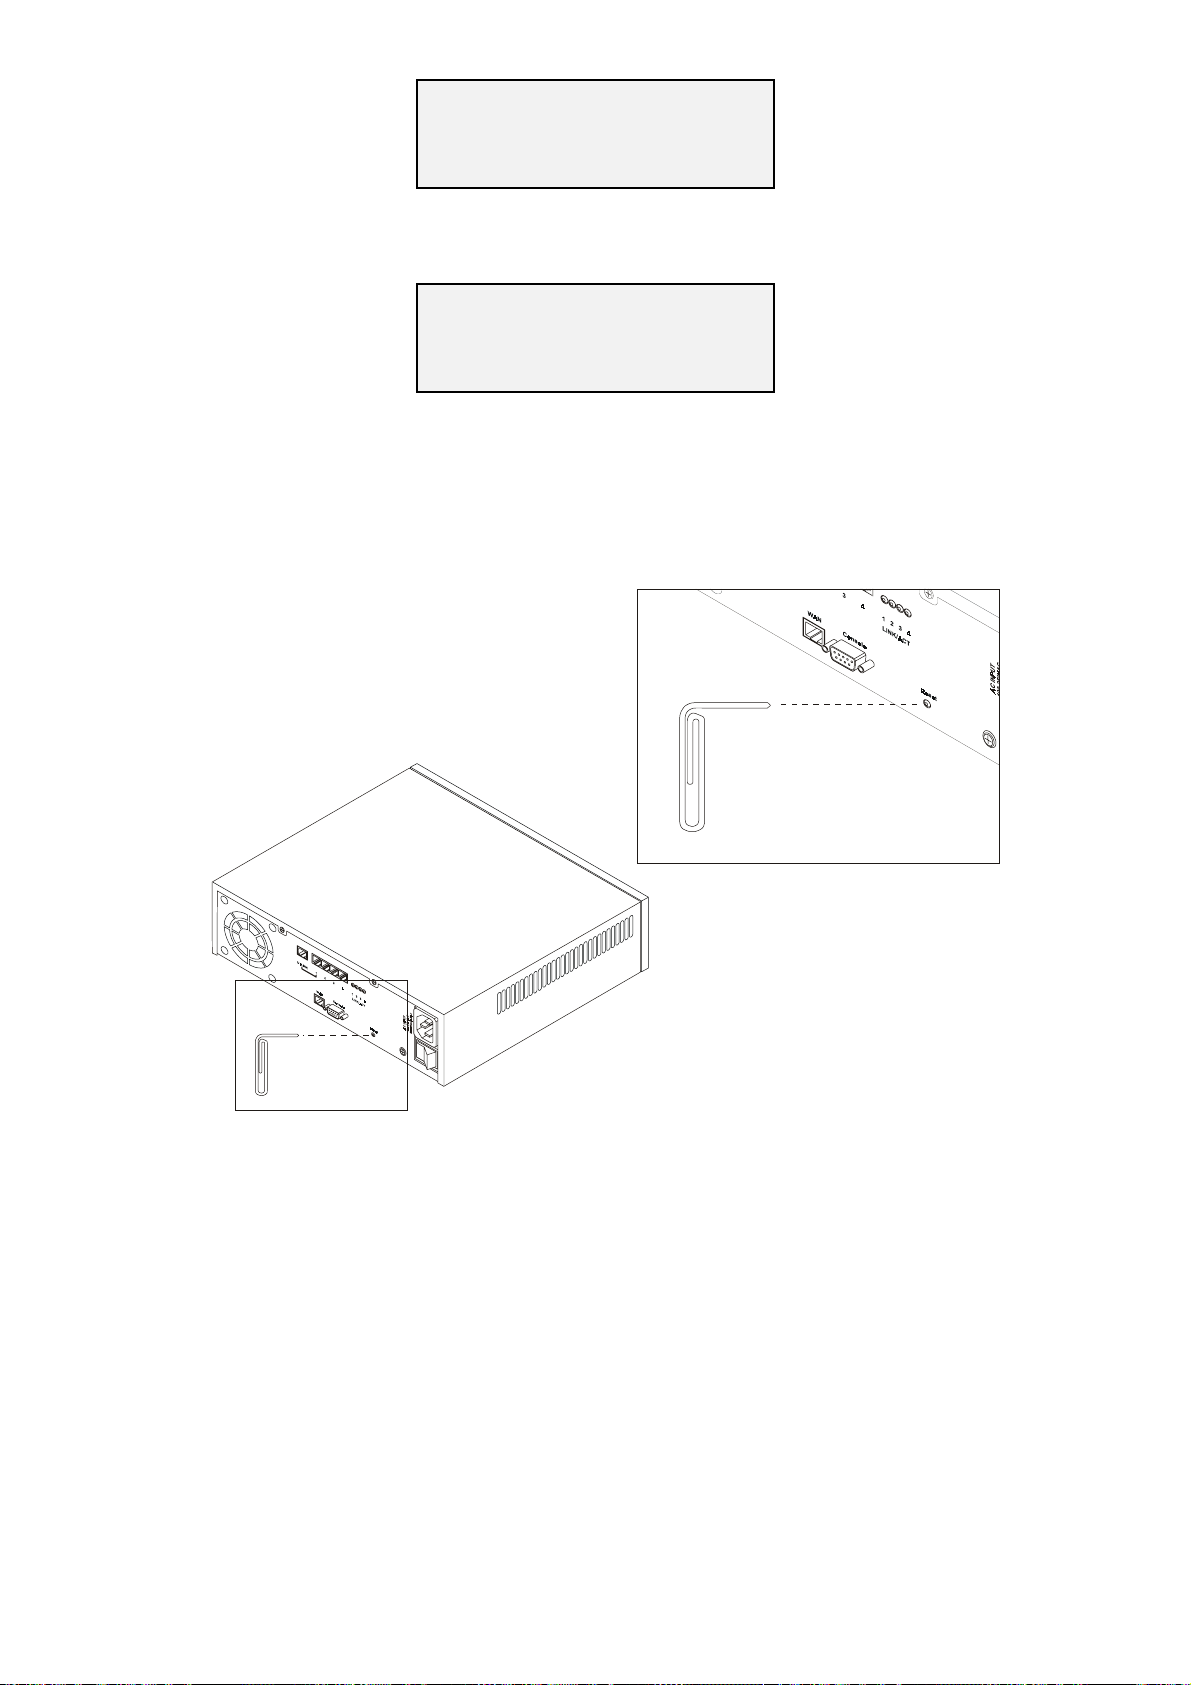
2.4 R
ESETTING THE
If the ISA-4000 locks up, you can reset the system by inserting an unbent paper clip into the reset
hole at the rear of the server:
ISA-4000
Figure 2-4: Resetting the ISA-4000
After inserting the paper clip, the system reboots.
This concludes this chapter. The next chapter helps you set up the ISA-4000 browser interface.
« 7 »
Page 15
CChhaapptteerr 33::
The ISA-4000 GUI provides a powerful and easy-to-use installation wizard. Using the wizard, an
administrator can setup the ISA-4000 in just a few minutes. After using the wizard, the user and
administrator will have access to all of the following services:
• Email server
• Web server
• File server
• Web caching server
• Basic firewall
• DHCP (Dynamic Host Configuration Protocol) server
• DNS (Domain Name System) server
• IP masquerading (also known as NAT [Network Address Translation])
• Mailing lists
Detailed information on how to use the wizard is provided in the next section.
UUssiinngg tthhee SSeettuupp WWiizzaarrdd
3.1 C
ONFIGURATION OF THE
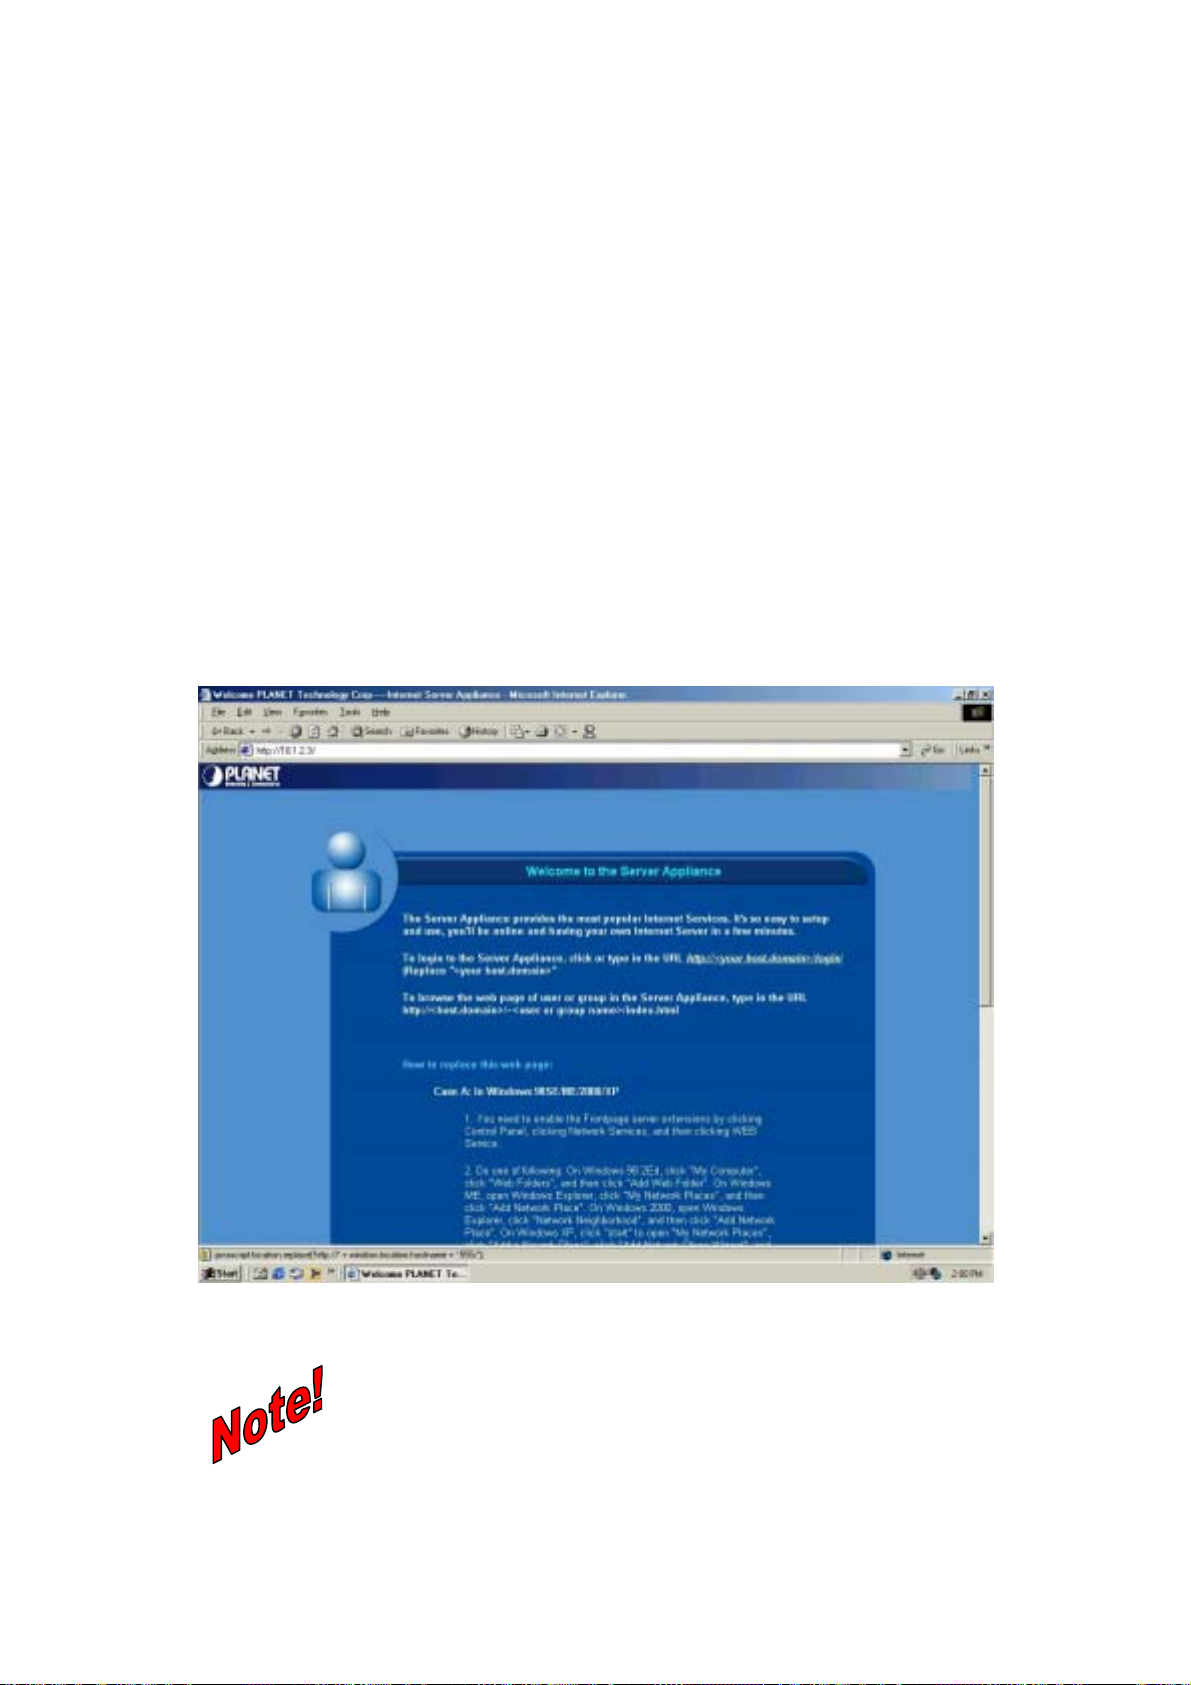
1. Type the IP address of the ISA-4000 in the Address bar of your browser and press <Enter>.
The welcome screen appears:
ISA-4000
USING THE WIZARD
Figure 3-1: ISA-4000 browser interface welcome screen
If you can't connect
If ISA-4000 does not respond, check the following:
Machine is properly installed, LAN connection is OK, and it is powered ON.
You can test the connection by using the "Ping" command:
Open the MS-DOS window or command prompt window.
Page 16
Enter the command:
ping 192.168.0.1
If no response is received, either the connection is not working, or your PC's
IP address is not compatible with ISA-4000's IP Address.
If your PC is using a fixed IP Address, its IP Address must be within the
range 10.1.2.4 to 10.1.2.254 to be compatible with ISA-4000’s default IP
Address of 10.1.2.3. Also, the Network Mask must be set to
255.255.255.0.
If you want to use DHCP to get IP address, please make sure you have followed
the setup procedure on 4.3 DHCP Client Setup.
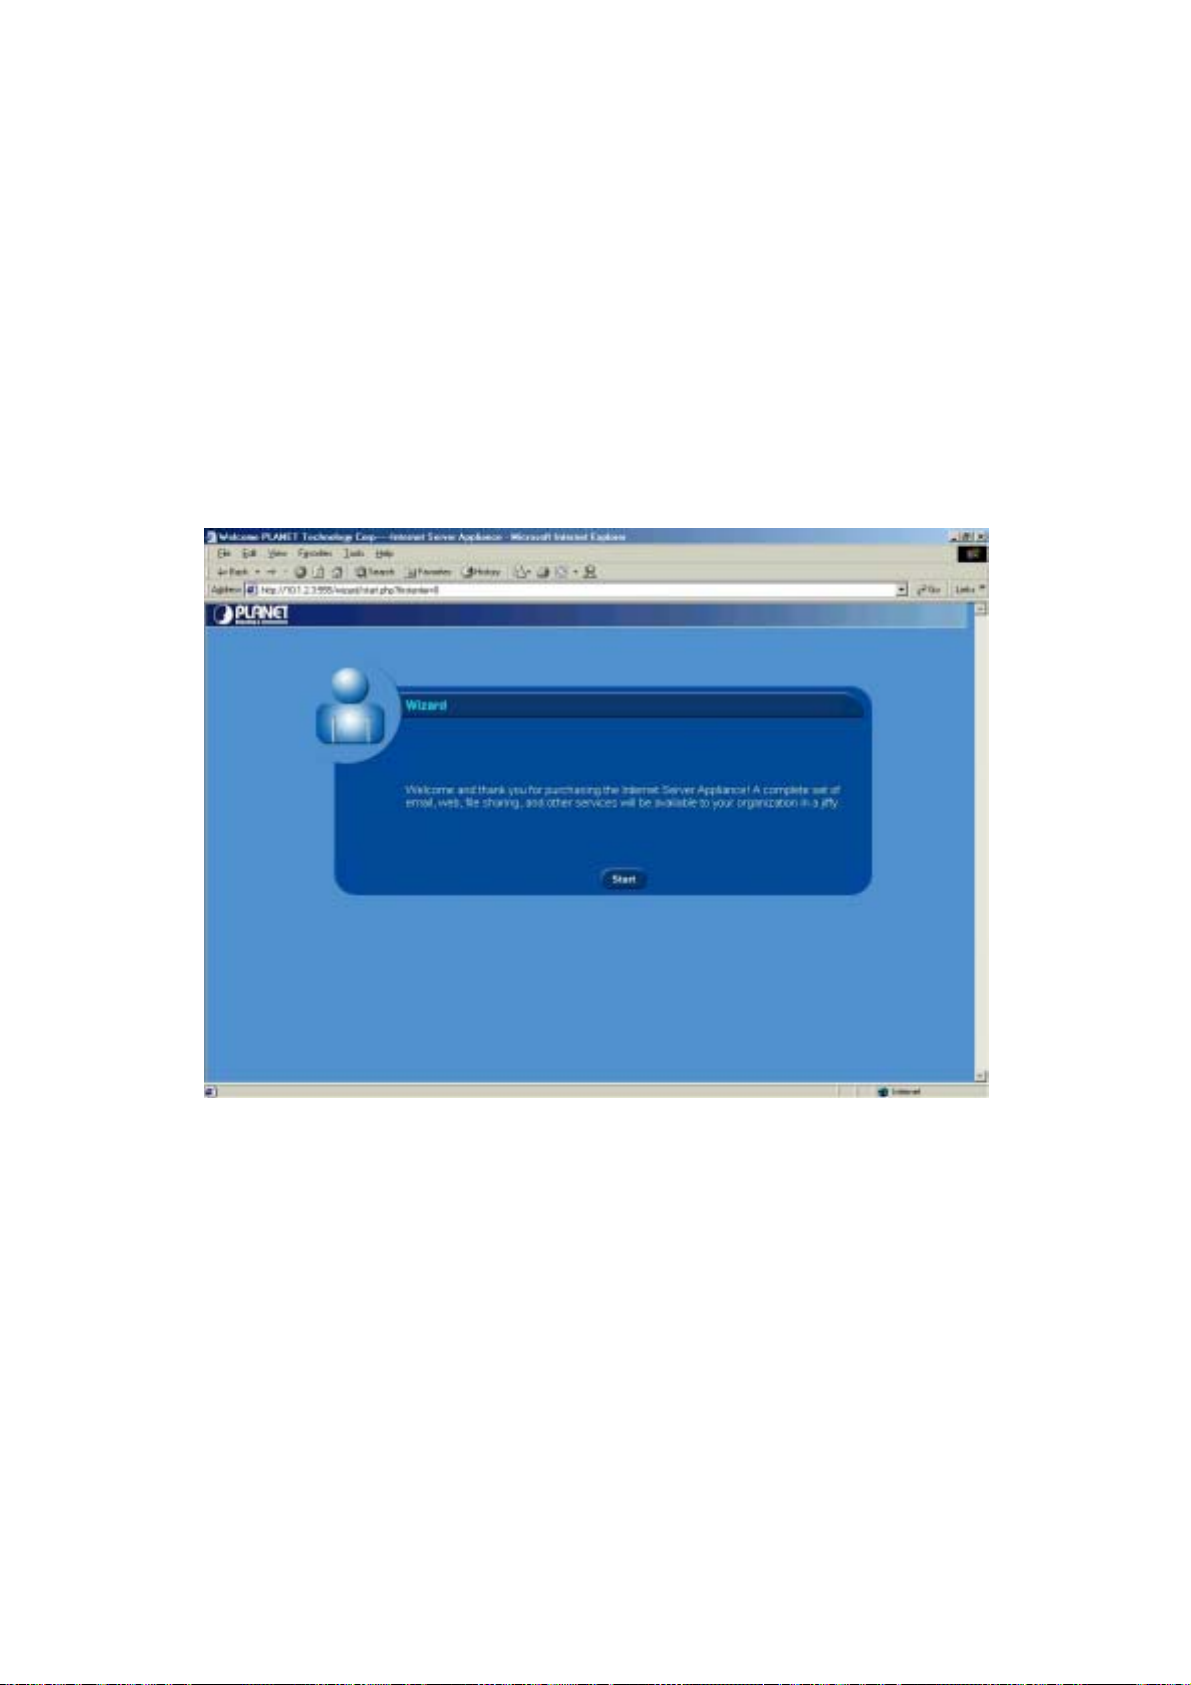
2. Click http://<your host.domain>/login/. The next screen appears prompting you to start the
wizard:
Figure 3-2: ISA-4000 configuration wizard start screen
3. Click Start. You are prompted to select the display language:
« 9 »
Page 17
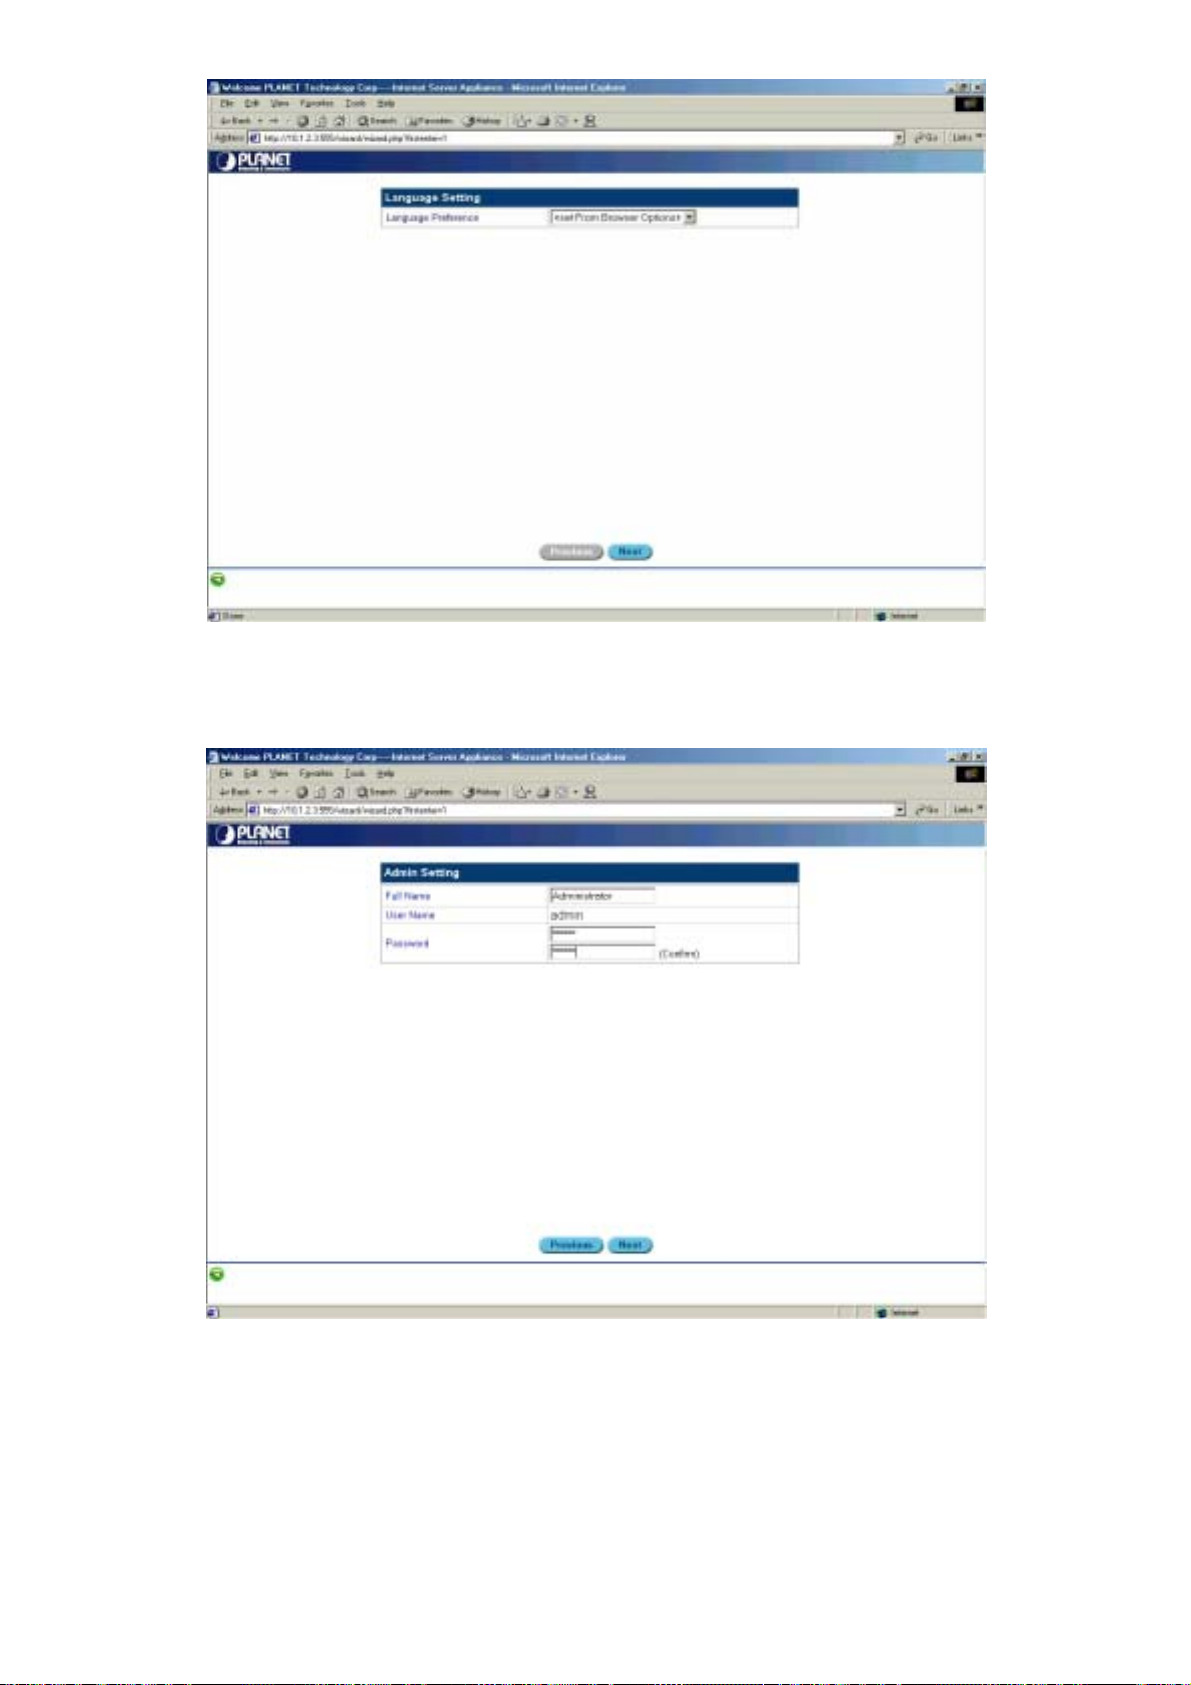
Figure 3-3: Configuration wizard – selecting the browser language
4. Select the desired display language and click Next. You are prompted to select an
administrator password:
Figure 3-4: Configuration wizard – selecting an administrator password
5. Key in the password and click Next. The Time Settings menu appears:
« 10 »
Page 18
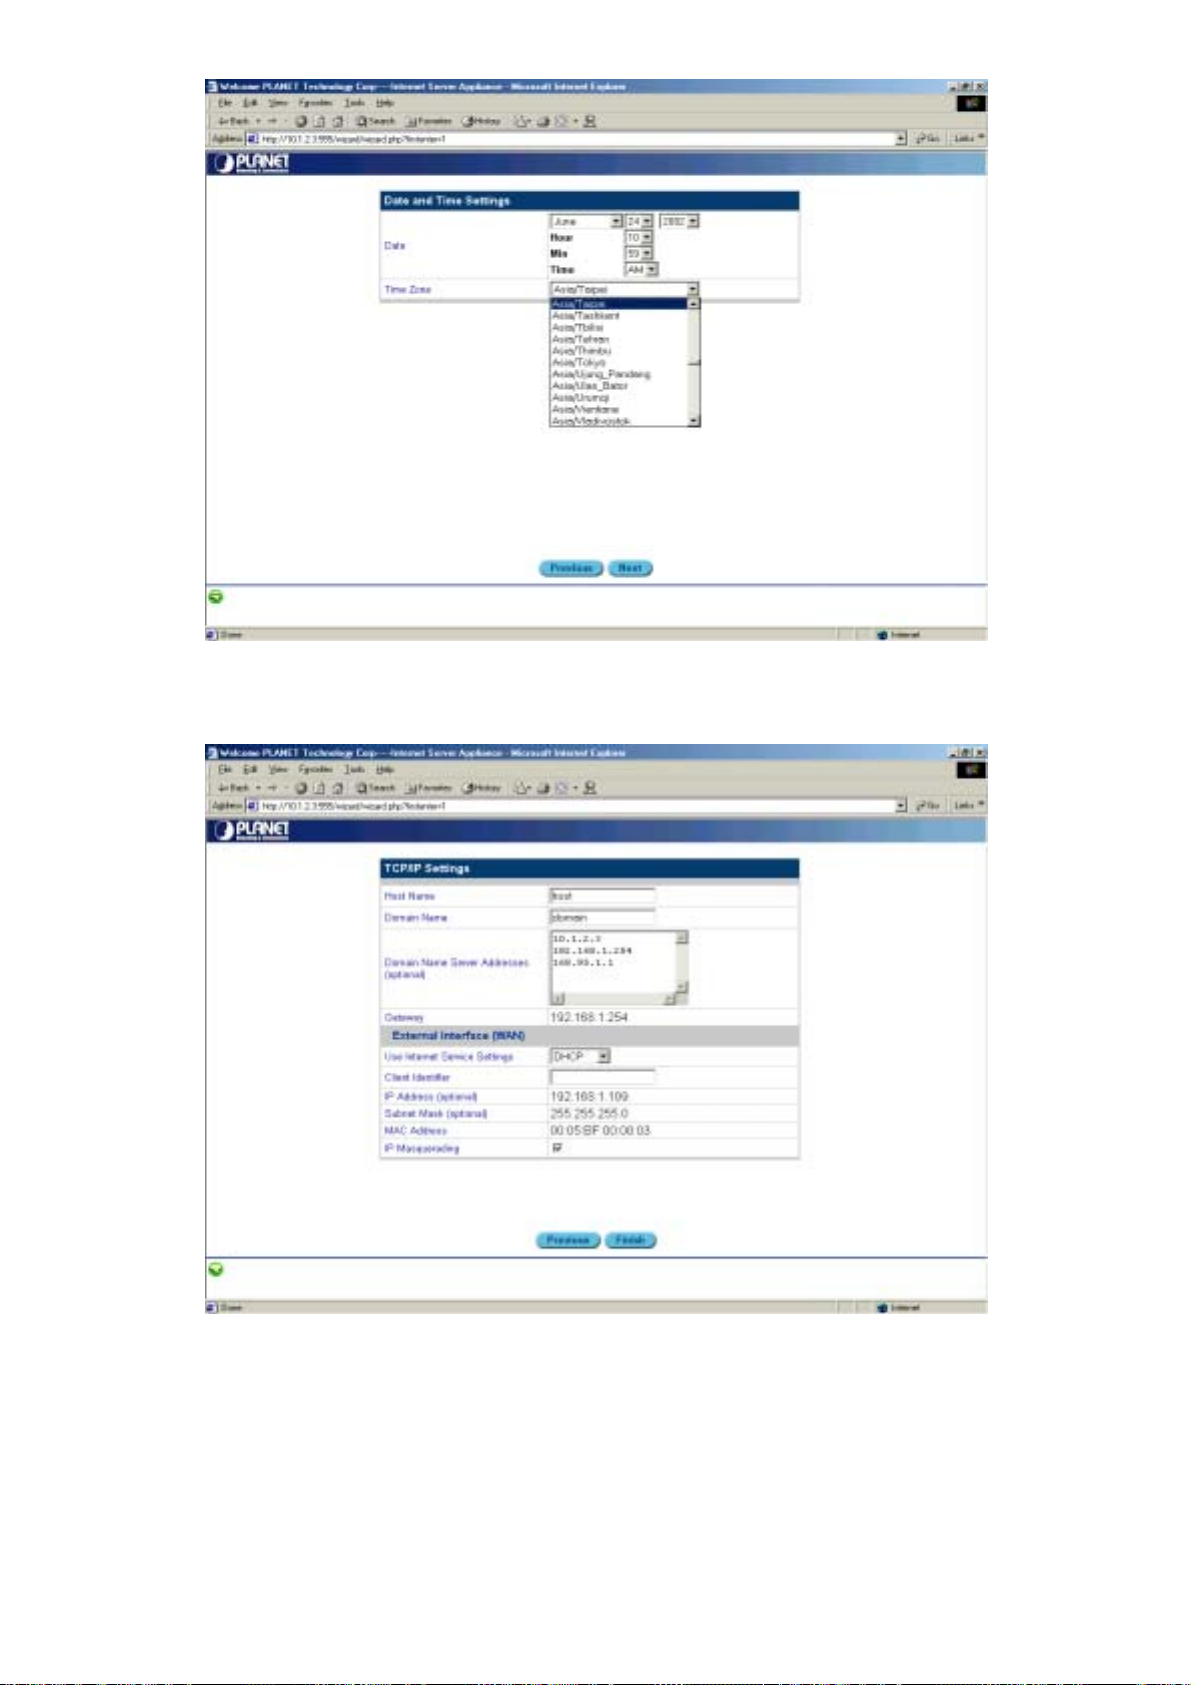
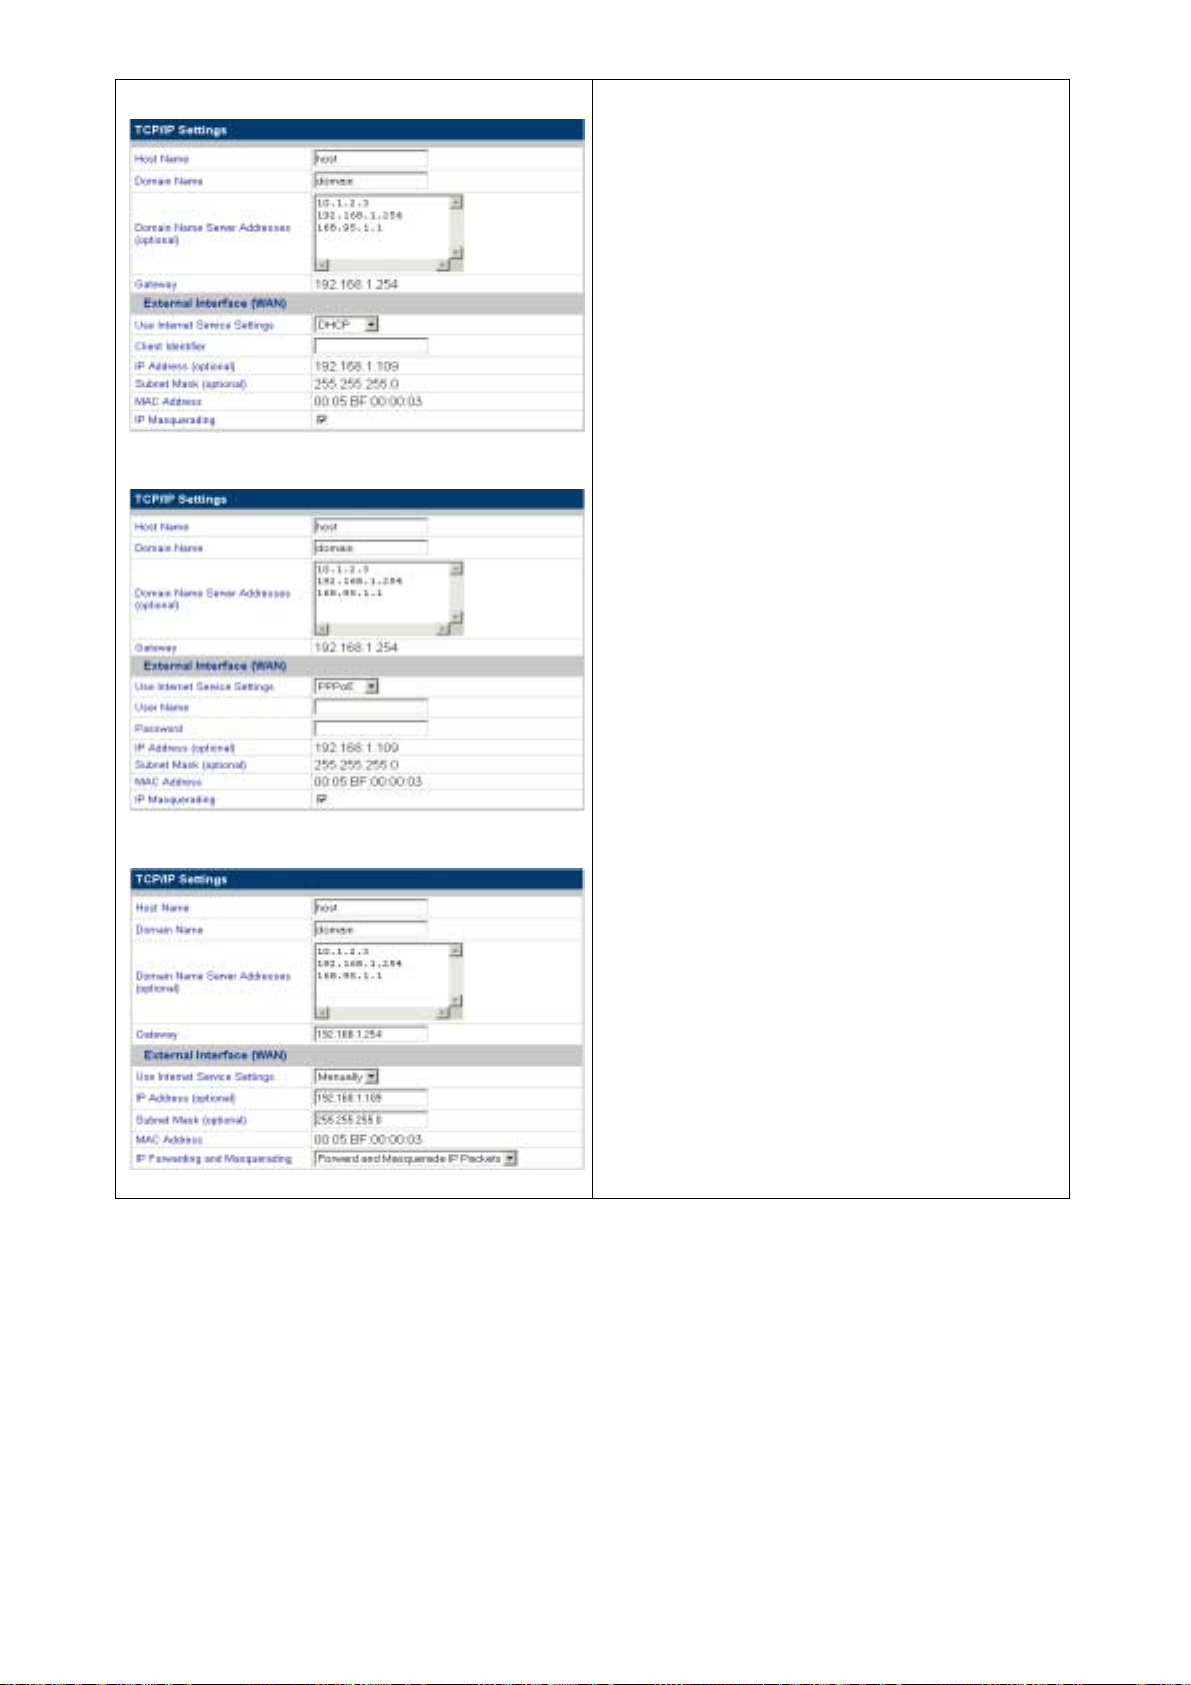
Figure 3-5: Configuration wizard – setting the time
6. Select the appropriate Date and Time Zone. Click Next. The TCP/IP Settings menu appears:
Figure 3-6: Configuration wizard – setting TCP/IP parameters
7. Type the Host Name (for example "isa4000"), the Domain Name (for example
"planet.com.tw" or “YourCompany.com”), and the Domain Name Server Address (for
example "168.95.l.1"). Select the Use Internet Service Settings. The Internet Settings menu
appears:
« 11 »
Page 19

Figure 3-7: Configuration Wizard – setting Internet options
Specify your Internet service settings (WAN port) as DHCP or PPPoE, Manually, or No
Internet. The four fields are described as follows:
No Internet
Selecting No Internet means that a connection to
the Internet is absent.
« 12 »
Page 20
DHCP
PPPoE
If you select DHCP, PPPoE or Manually, you must
specify values for External Interface and IP
Masquerading.
External Interface: The external interface lets you
obtain an IP address using one of three methods:
• DHCP: specify the Client Host Name and the
Client Identifier. If you do not have this
information, you do not need to fill it in.
• PPPoE: specify the User Name and Password
(twice). Your ISP should provide you with the
user name and password.
• Manually: type the IP Address, Subnet Mask,
and Gateway in the fields. You can obtain this
information from your ISP or network
administrator.
When enabled, IP Masquerading configures the
ISA-4000 to provide NAT (Network Address
Translation) service.
Note: Network Address Translation is an IETF
standard that allows an organization to have an
Internet presence with one address. NAT converts
the address of each LAN node into one IP address
for the Internet (and vice versa), and serves as a
firewall by keeping individual IP addresses hidden
from the outside world.
3.2 L
Manually
8. Click Finish to complete the wizard.
OGGING IN AS ADMINISTRATOR
After you have finished the Configuration Wizard, you can log in as administrator. Follow these
instructions.
1. Type the IP address of the ISA-4000 in the Address bar of your browser and press <Enter>.
The welcome screen appears:
« 13 »
Page 21
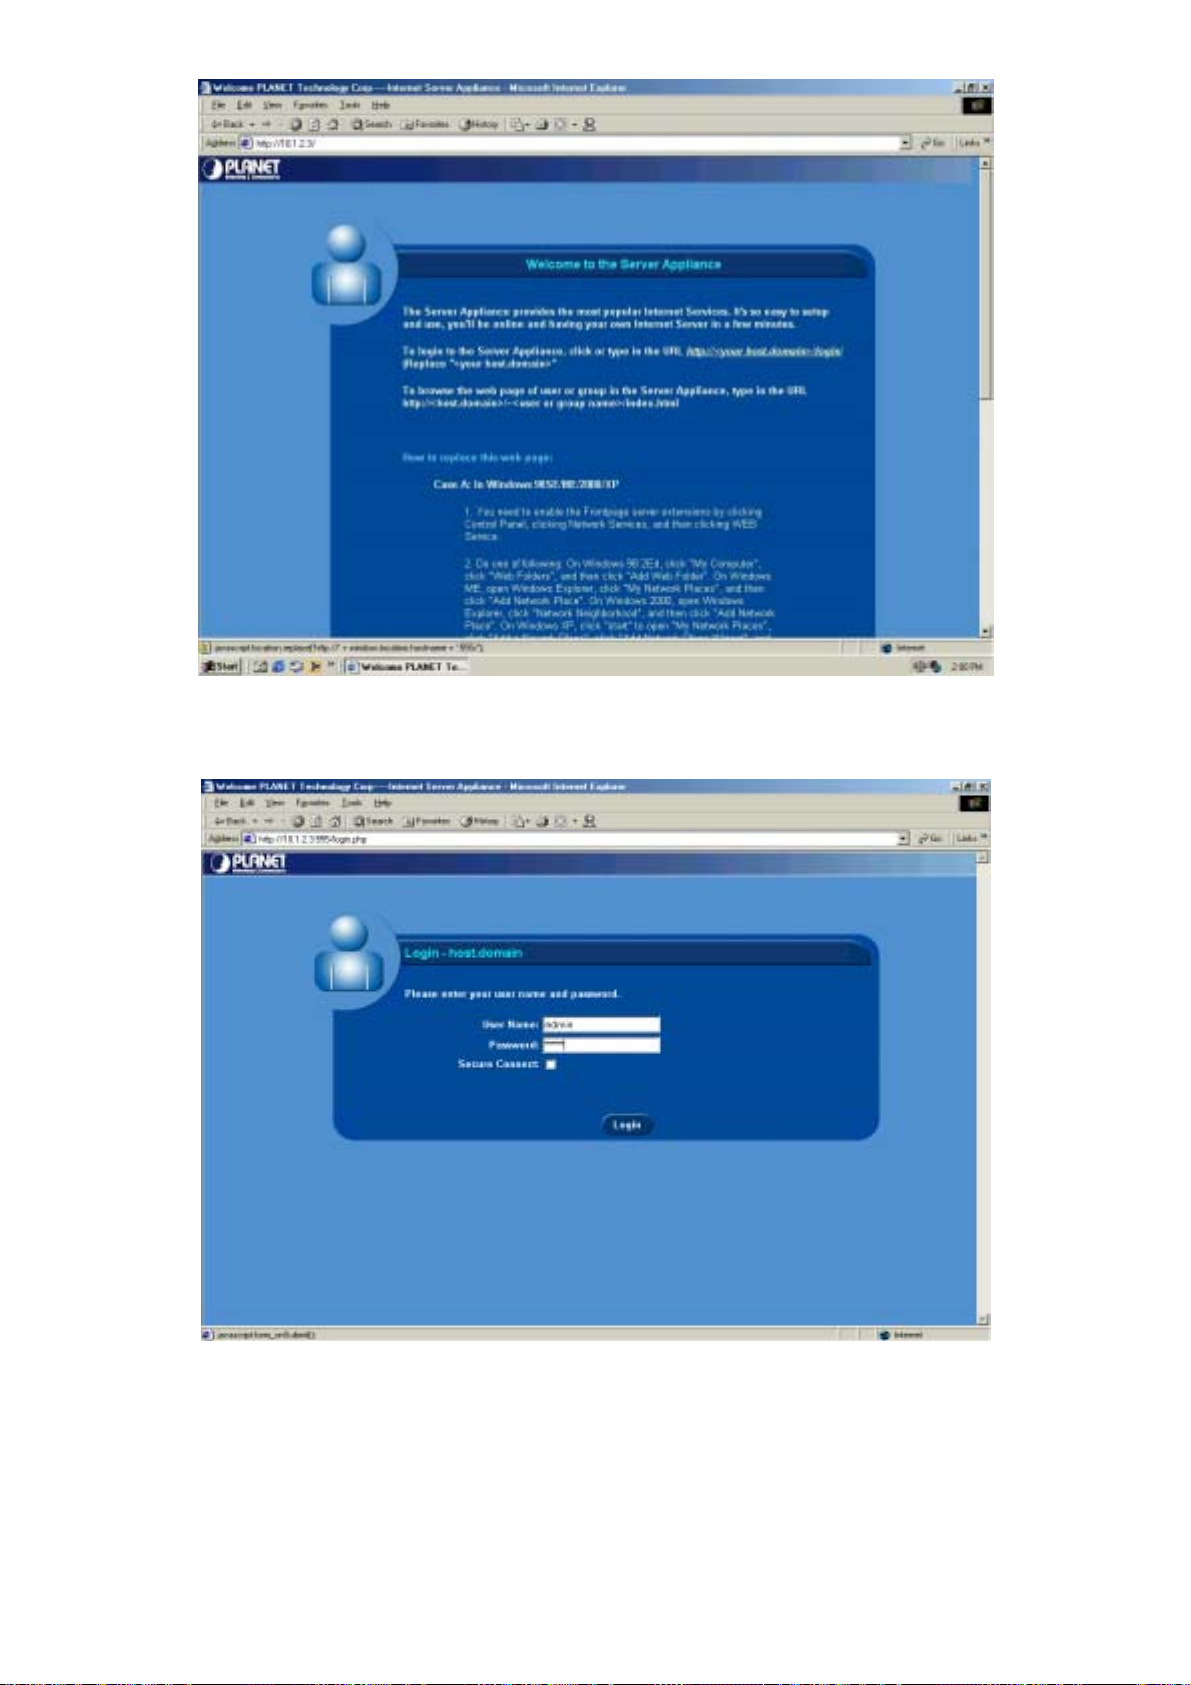
Figure 3-8: Logging in as administrator – welcome screen
2. Click http://<your host.domain>/login/.
Figure 3-9: Logging in as the administrator – user name and password
3. Login as the system administrator (default User Name is admin and Password is the one
you key in on step 5 of chapter 3.1) and click Login. The main menu appears:
« 14 »
Page 22
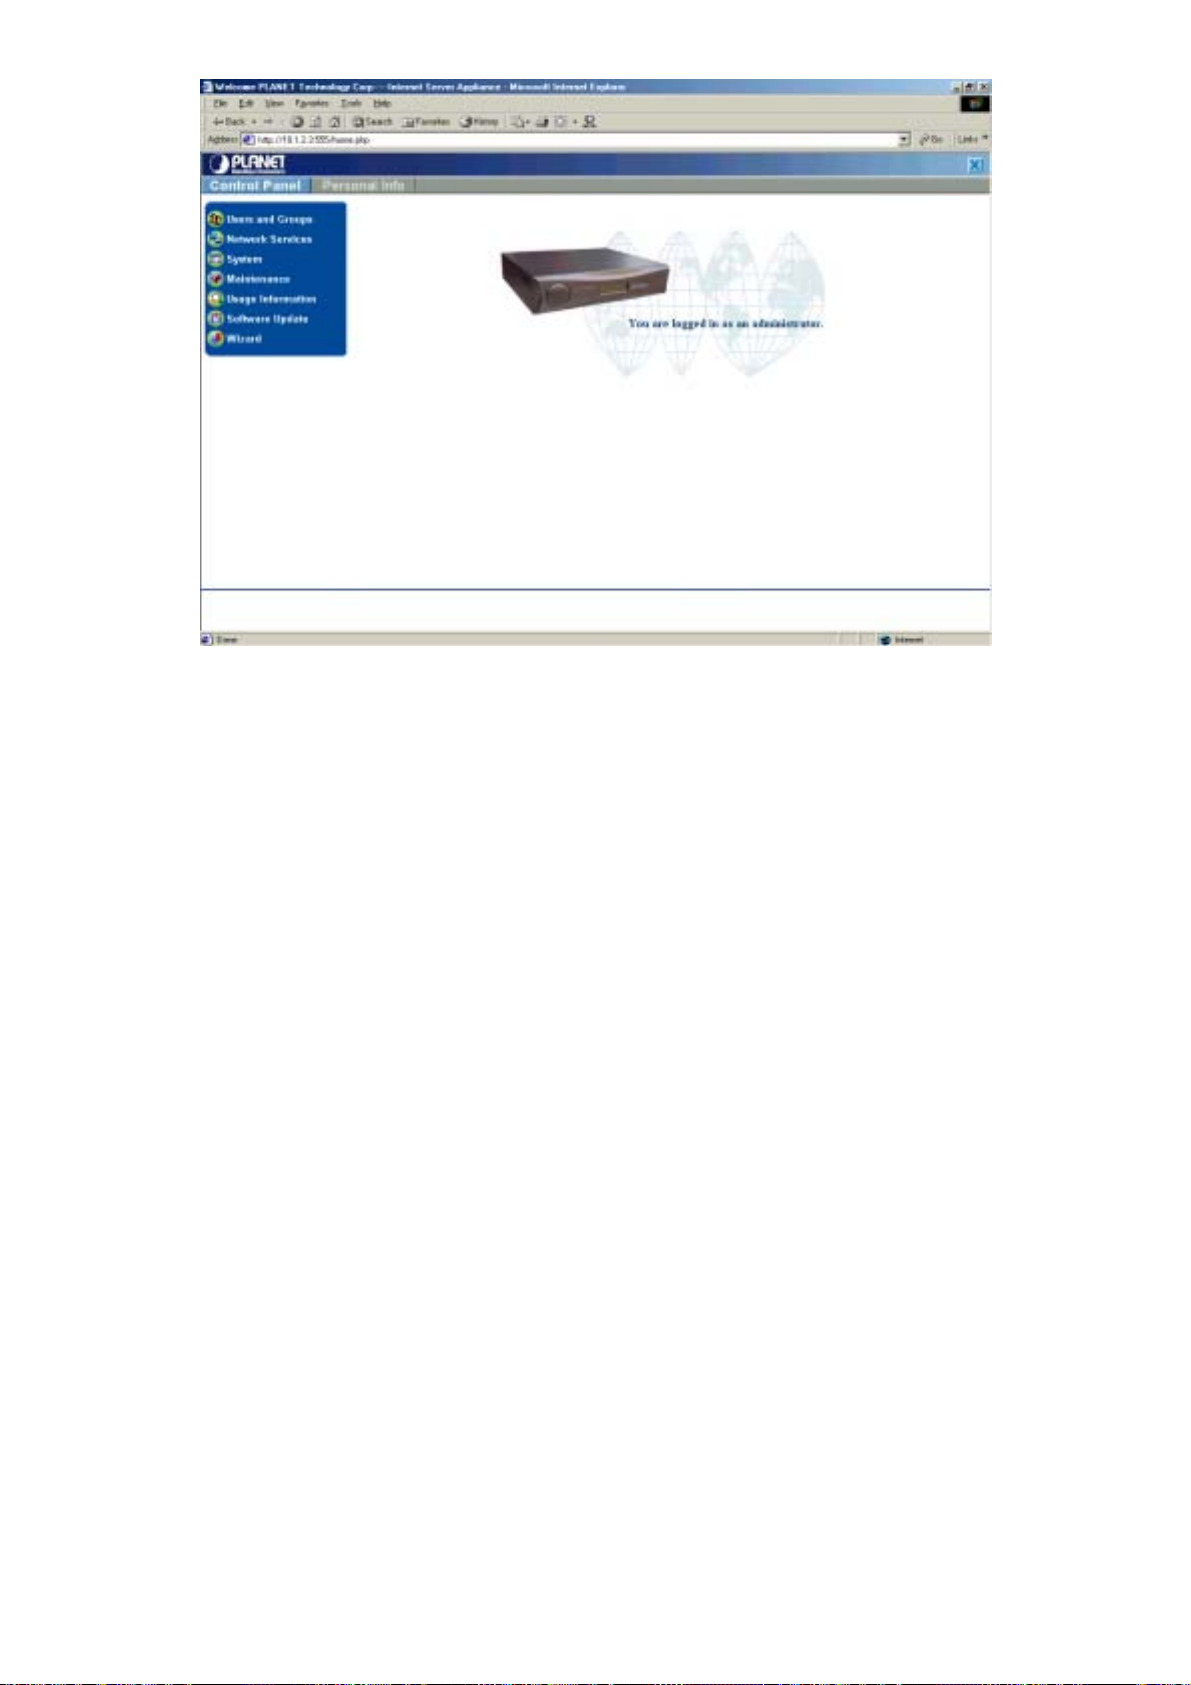
Figure 3-10: Administration main menu
From this menu you can perform all necessary administrative tasks for the server. Refer to Chapter
5 for more information.
This concludes this chapter. The next chapter covers client side settings.
« 15 »
Page 23

CChhaapptteerr 44::
This chapter covers settings that can be made at the client workstation.
CClliieenntt--SSiiddee SSeettttiinnggss
4.1 E
MAIL CLIENT SETTINGS
If you use an external client to check your email (for example, Microsoft Outlook or Netscape
Messenger), then you must specify the following items in the external client’s email configuration:
• Your personal email address
• The SMTP server name (some email applications call it an "outgoing mail server")
• The POP3 server name (some email applications call it an "incoming mail server")
• The IMAP server.
The format of the email address is <username>@<domainname>
Example: isa4000@planet.com.tw
Username
Domain Name
This is the user name assigned to you. In this example, "isa4000" is the user
name.
Domain names are the familiar, easy-to-remember names for computers on
the Internet (in this example, planet.com.tw is the domain name). They
correspond to a series of numbers, called Internet Protocol numbers, which
serve as routing addresses on the Internet. Domain names are generally used
as a convenient way of locating information and reaching others on the
Internet. A domain name may be obtained from ICANN (Internet
Corporation for Assigned Names and Numbers, www.icann.org) or your local
ISP.
In the preceding example, the POP3 server name, the IMAP server name, and the SMTP server
name are all “mail.planet.com.tw"
4.2 S
HARING FILES FROM
The ISA-4000 can act as a cross-platform file server for users. Users can access files from Windows
XP/2000/98/95/NT using SMB (Server Block Message) protocol or CIFS (Common Internet File
System). Macintosh computers may use AppleShare or FTP (File Transfer Protocol). The
procedures to connect to the ISA-4000 from each operating system are listed below.
Before following these instructions, you must log in as either a user (refer to 6.1 Logging in as an
User) or an administrator (refer to 5.1 Logging in as an Administrator). To log in as user, the user
name and password must exist in the ISA-4000's user list (see 5.2.1 User List).
ISA-4000
4.2.1 Sharing Files in Windows XP/2000/98/95
1. Double-click the Network Neighborhood icon; the name of the ISA-4000 is listed:
2. Double-click the server name, and then wait for the available folders to appear. Right-cli ck
the share name and select Map to Network Drive from the drop-down menu to assign a
driver letter to the server and allow it to be listed in Windows Explorer.
Page 24

4.2.2 Sharing Files in Windows NT 4.0
1. Double-click the Network Neighborhood icon.
2. Double-click the name of the ISA-4000 and enter any registered user name and password to
log in to the ISA-4000.
4.2.3 Sharing Files in the Macintosh OS
1. Click Chooser from the Apple menu.
2. Select AppleShare.
3. Select the name of the ISA-4000 and click OK.
4. Type the User Name and Password and click Connect.
5. Select a directory to connect to; click OK.
4.2.4 Connecting to the ISA-4000 using FTP
There are two ways to connect to ISA-4000 using FTP. One way is to use a dedicated FTP
application, and the other way is to use a web browser to access the FTP server via its URL.
Using an FTP application
1. Run your FTP application and enter the IP address or hostname of the ISA-4000.
2. Enter the user name and password to login to the ISA-4000.
3. Choose the files or directories that you want to access.
Using a web browser
1. Run the web browser application.
2. Enter the URL or IP of the ISA-4000 (for example, ftp://10.1.2.3).
3. Enter the user name and password to login to the ISA-4000.
4.3 DHCP C
You can use the client workstation to obtain the IP address, subnet mask, and gateway address
from the ISA-4000, if the client is set to be a DHCP (Dynamic Host Configuration Protocol) client.
LIENT SETUP
4.3.1 DHCP Client Setup in WINDOWS 98/95
1. Click Start.
2. Click Settings, and then select Control Panel.
3. Click Network.
4. Select the TCP/IP protocol.
5. Click Properties.
6. Click IP Address and select “Obtain IP address automatically.”
7. Click the DNS Configuration tab and select Disable DNS.
8. Click OK.
4.3.2 DHCP Client Setup in WINDOWS 2000/XP
1. Click Start.
2. Click Settings, and then select Control Panel.
3. Click Network and Dial-up Connections.
4. Click Local Area Connection.
5. Click Properties.
6. Select Internet Protocol (TCP/IP).
7. Click Properties.
« 17 »
Page 25
8. Select “Obtain an IP address automatically.”
9. Select “Obtain a DNS address automatically.”
10. Click OK.
4.3.3 DHCP client setup in WINDOWS NT4.0
You can configure your WINDOWS NT 4.0 to be a DHCP client during installation, or it can be set
manually after the system is already installed. The steps to manually set it up are listed below.
1. Click Start.
2. Select Settings, and then select Control Panel.
3. Click Network.
4. Click Protocol.
5. Select TCP/IP Protocol.
6. Select “Obtain an IP address from a DHCP Server” and click OK.
4.3.4 DHCP Client Setup on Mac OS
1. Click Apple Menu.
2. Select Control Panel, and then select TCP/IP.
3. Select “Connect via Ethernet” and “Configure: Using DHCP Server,” and then close the
TCP/IP menu.
4. Click Save.
4.4 W
EB PUBLISHING
The ISA-4000 allows users to publish their web pages using FrontPage and FTP.
4.4.1 Publishing Web Pages with FrontPage 2000
The ISA-4000 includes the FrontPage 2000 Server Extensions, which permit the use of the clientside FrontPage application to publish and edit web pages on the ISA-4000.
Before you use FrontPage to publish and edit your web pages, you should enable FrontPage Server
Extensions on the ISA-4000 as follows:
1. Log in to the ISA-4000 as the administrator (refer to 5.1 Lo gging in a s an Admini stra tor).
2. Click Control Panel.
3. In the Administration menu, click Network Services, and then click Web Serv ices:
« 18 »
Page 26

4. Click Enable FrontPage Server Extensions:
After the FrontPage 2000 Server Extensions are enabled, a webmaster account is created that
users can use to login to the ISA-4000 and maintain its web pages ( http://10.1.2.3/~username ).
4.4.2 Publishing Web Pages using FTP
Web pages may also be published to the ISA-4000 using standalone FTP applications.
1. Run the FTP application and use your personal account to login to the ISA-4000.
2. Upload your web pages into your personal web pages directory. The personal web pages
directory is located at:
/home/users/<username>/web/
The file “index.html” is created in the directory as the user's default page, after the user's account
had been created by the administrator (refer to 5.2.1.1 Adding a new user).
4.5 S
ETTING UP THE CLIENT TO USE THE WEB CACHING SERVER
The Web Caching Server stores (caches) the web pages read by its clients, and the client's web
access is redirected to the Web Caching Server. Once a cached web page is visited again, Web
Caching Server directly responds to the client with the cached web page. This reduces network
traffic and speeds up web access.
4.5.1 Force Client Site Browsing Through a Web Caching Server
After finishing the ISA-4000 GUI Wizard, the ISA-4000 enables the Web Caching Server and forces
all browsing access to be redirected to the Web Caching Server. This is done by adding a default
rule in the firewall's Input Chain.
4.5.2 Setting up WINDOWS 2000/98/95/NT4.0 to Access the Web Caching Server
1. Click Start, Settings, and click Control Panel.
2. Click Internet Options.
3. Click the Connections tab:
4. Click the LAN Settings button:
The LAN settings dialog box opens.
« 19 »
Page 27
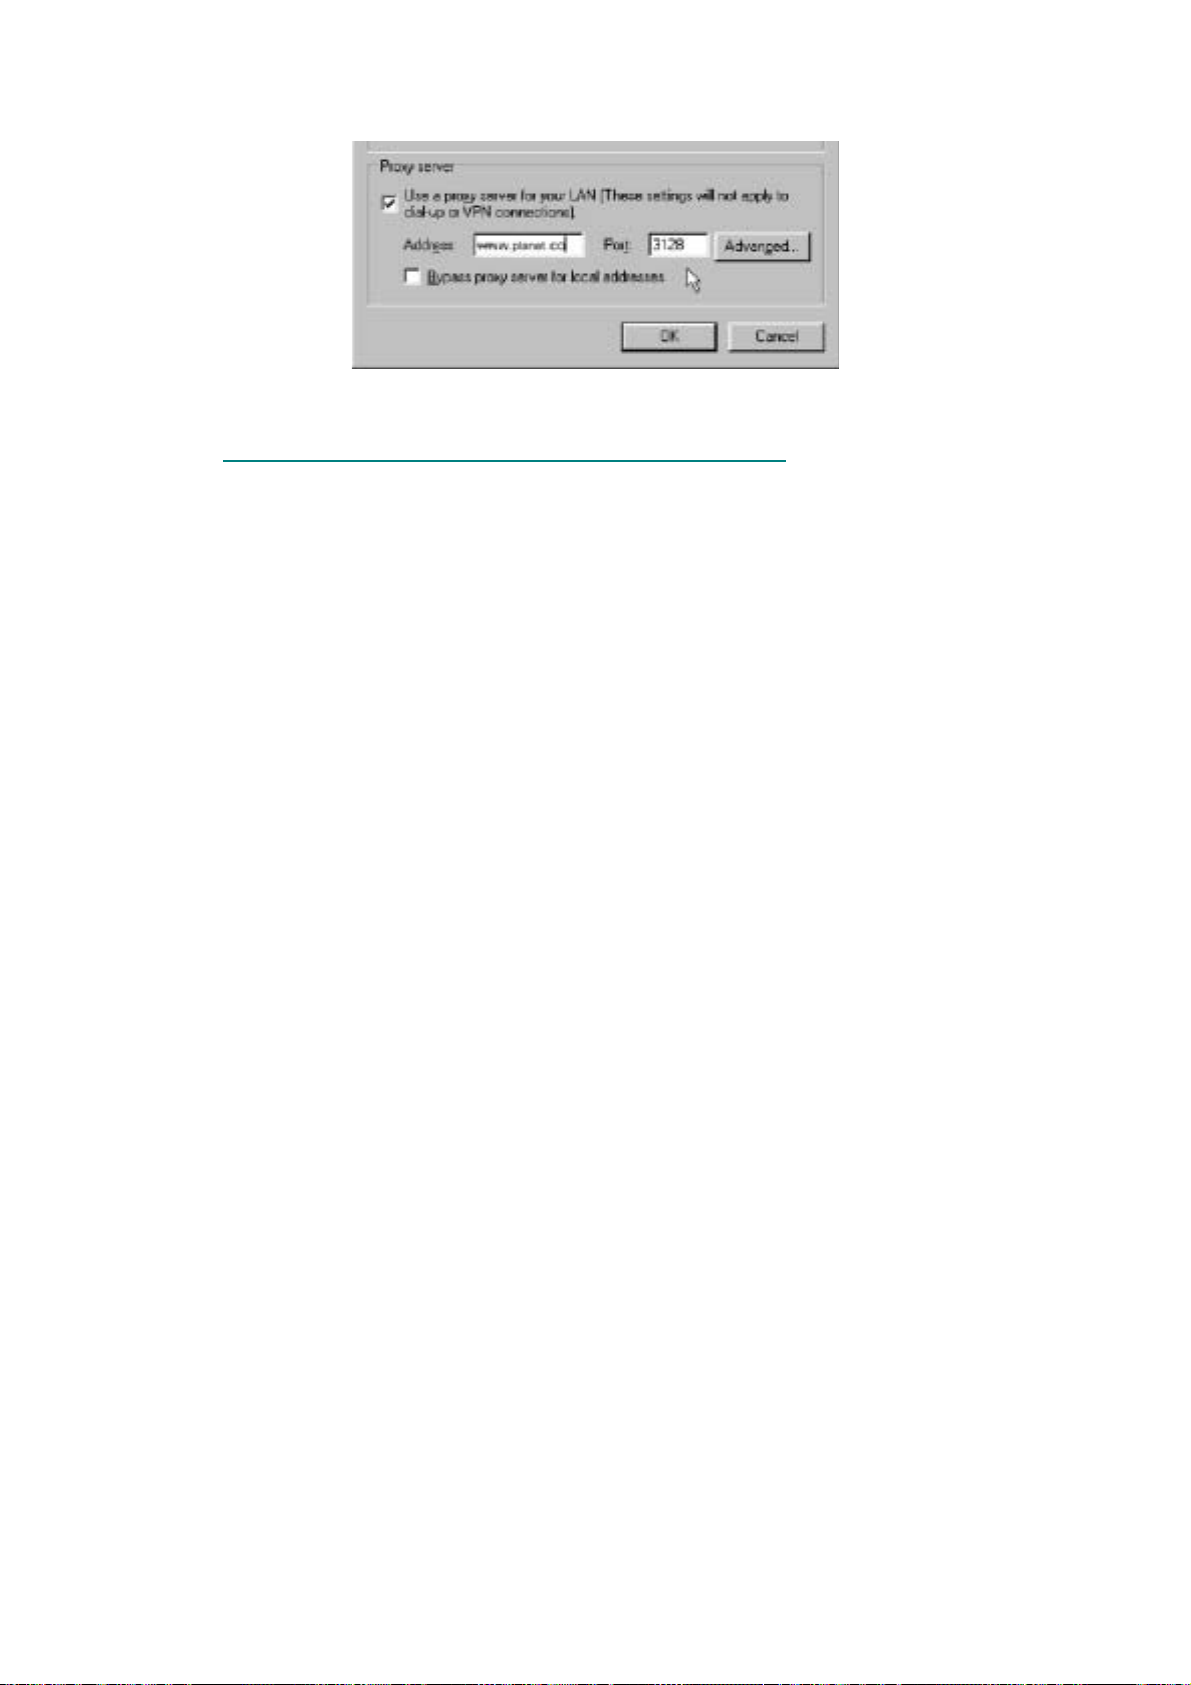
5. Select “Use a Proxy Server” and enter the ISA-4000's proxy server name or IP (for example
10.1.2.3) for the proxy. Enter 3128 for the port number:
6. Click OK.
4.5.3 Setting up MAC OS to Access the Web Caching Server
1. Click the Apple menu.
2. Click Control Panel and then click Internet.
3. Click the Advanced button.
4. Click the Firewall icon.
5. Check the web proxy checkbox and enter the proxy server (for example 10.1.2.3) and port
number 3128.
6. Close the Internet menu.
This concludes this chapter. The next chapter covers administrative tasks using the ISA-4000 and
its software.
« 20 »
Page 28

CChhaapptteerr 55::
This chapter explains the administration and maintenance of the ISA-4000 using the administrator
account.
There are two groups of management functions that can be performed by the administrator; the first
group is "Administration" and the second is "Personal.” The Administration group allows
administrators to manage the ISA-4000 and all associated functions, while the Personal group
allows administrators to maintain their personal accounts.
AAddmmiinniissttrraattoorr''ss GGuuiiddee
5.1 L
OGGING IN AS AN ADMINISTRATOR
1. Type the following URL in the Address bar of your browser:
http://<hostname>.<domainame>:555 or http://< IP address>:555
2. In the login menu type the user name "admin" and the password.
Refer to 5.8.1 Account for information on changing the
administrative password.
Figure 5-1: Administrator login
If you want to establish a secure connection, click the Secure Connect checkbox; it will
establish an SSL (Secure Sockets Layer) connection between your browser and the ISA-
4000.
Compatibility issues allow the SSL security protocol to be used
only with Internet Explorer 5.5 service pack 2 (IE5.5 SP2) and
above, and Netscape 6.2 and above.
Page 29

3. Click Login. The Administration menu appears:
5.2 U
Figure 5-2: Administrator menu
The administration menu may be used by the administrator to manage the ISA-4000 functions. This
chapter describes how to use the administrator menu.
The status line area of the ISA-4000 browser interface provides
you with context sensitive help:
SERS AND GROUPS
The Users and Groups menu enables administrators to configure user and group access, set
passwords, and perform other administrative tasks.
On the Administration menu, click Users and Groups to view the options for this field:
« 22 »
Page 30

Figure 5-3: Administrator – Users and Groups menu
The Users and Groups menu enables the administrator to create and maintain users and groups
information in the ISA-4000. While maintaining user information, users may be listed, users'
information and settings can be edited, new users can be added, and users can be deleted. While
maintaining group information, groups can be listed, groups can be added and deleted, and group
settings may be edited.
5.2.1 User List
1. Click Users and Groups.
2. Click User List to display the User List screen:
Figure 5-4: Users and Groups user list
5.2.1.1 A
1. In the user list screen, click Add New User; the Add New User screen appears.
DDING A NEW USER
« 23 »
Page 31

Figure 5-5: Adding a new user
The field definitions are as follows:
– Full Name: in most cases, the user's first and last name.
– User Name: the name that the user will use to login to the system.
– Password: the password that the user will use to login to the system. You will be
required to type in the password twice for verification—the GUI replaces the characters
typed with asterisks (*) for security.
– Maximum Disk Space (MB): the total disk storage space that is allocated to the user.
– Groups: shows which groups a user is affiliated with (belongs to). To choose which
groups a user is affiliated with, select a group from the list and click the appropriate
arrow. The left arrow adds membership in the selected group, and the right arrow
removes the user from affiliation with the group.
– Email Aliases: enter any aliases the user has for their email account.
– Description: enter additional information for this acco unt.
2. After typing the required information, click Save.
5.2.1.2 E
DITING USER SETTINGS
1. In the User List screen, click the edit icon
for the user that you want to edit.
2. Modify the fields in the Edit User Settings screen as described in Adding a New User.
3. Click Save.
5.2.1.3 D
ELETE A USER
In the User List screen, click the delete icon
icon is gray
5.2.1.4 E
, than you are not allowed to delete the item.
DIT USER DEFAULTS
for the user that you want to delete. If the delete
1. In the User List screen click Edit User Defaults to view the following screen:
2. Enter the total amount of disk space allocated for user storage.
3. Click Save.
5.2.2 Group List
« 24 »
Page 32

1. Click Users and Groups.
2. Click Group List to display the Group List screen:
Figure 5-6: Users and Groups group list
5.2.2.1 A
1. In the Group List screen, click the Add New Group button to display the following screen:
DDING A NEW GROUP
Figure 5-7: Adding a new group
The field definitions are as follows:
– Group Name: the name of the group.
– Maximum Disk Space (MB): the total disk storage space allocated to the group.
– Members: to choose which users are affiliated to the group, select a user from the list
and click the appropriate arrow. The left arrow adds membership in the selected group,
and the right arrow removes the user from affiliation with the group.
– Description: additional information for this group.
2. After typing in the required information, click Save.
5.2.2.2 E
1. In the Group List screen, click the edit icon
2. Modify the fields in the Edit Group Settings screen as described in Adding a New Group.
3. Click Save.
DITING GROUP SETTINGS
You cannot change a group name in this screen. To change a
for the group that you want to edit.
group name, delete the group as described in the next section and
create a new group.
5.2.2.3 D
In the Group List screen, click the Delete icon
icon is gray
5.2.2.4 E
1. In the Group List screen click Edit Group Defaults to view the following screen:
ELETING A GROUP
, than you are not allowed to delete the item.
DITING GROUP DEFAULTS
for the group that you want to delete. If the delete
« 25 »
Page 33
2. Enter the total amount of disk space allocated for group storage.
3. Click Save.
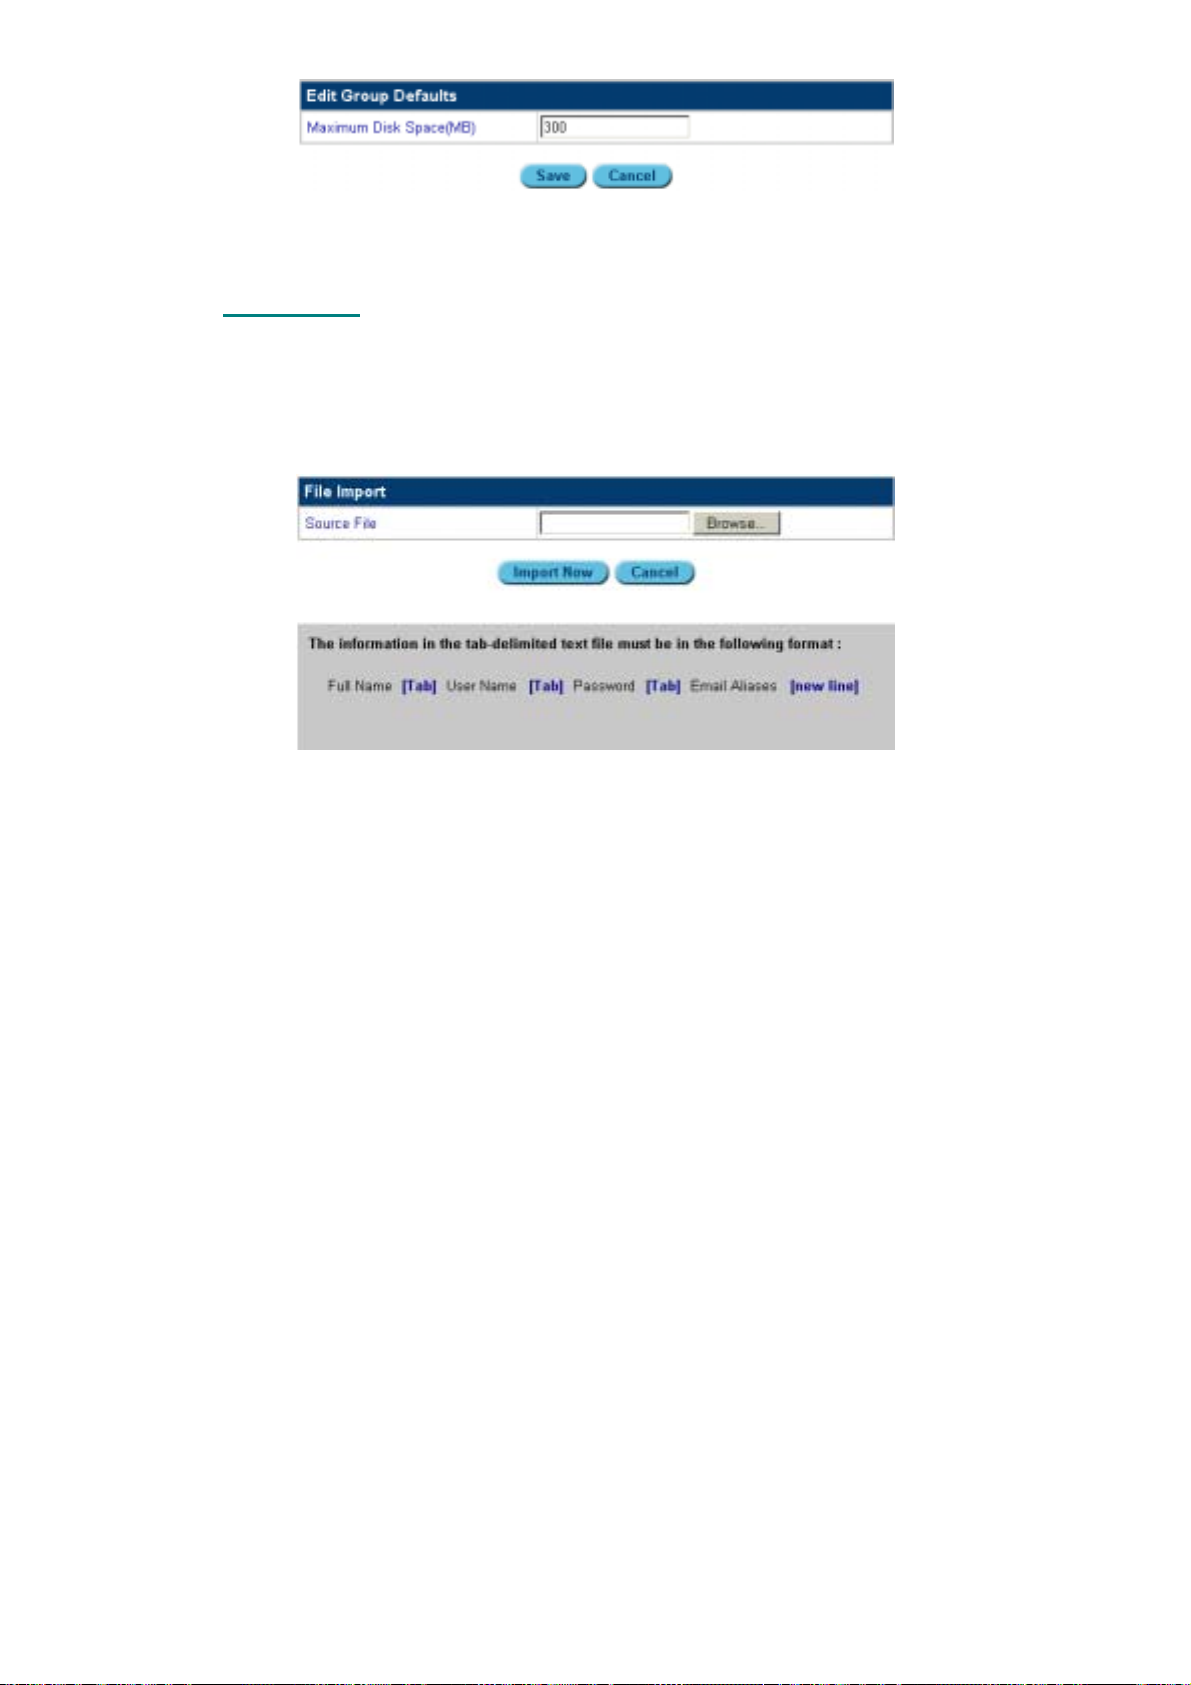
5.2.3 Import Users
The Import feature enables you to import group and user lists.
1. Click Users and Groups.
2. Click User List .
3. Click Import Users to display the Import screen:
5.3 N
Figure 5-8: Importing user lists
4. Click Browse and go to the location of the file to be imported. The file must be a text tab-
delimited file in the following format:
Full Name [TAB] User Name [TAB] Password [TAB] Email Aliases [NEW LINE]
ETWORK SERVICES
The Network Services menu includes settings for DNS, email services, file services, web services,
DHCP, a basic firewall, and telnet. The Network Services menu provides a way to configure all the
Internet services that are provided by the ISA-4000.
On the Administration menu, click Network Services to view the options for this field:
« 26 »
Page 34
Figure 5-9: Network Services
5.3.1 DNS
"DNS" stands for Domain Name System. DNS converts machine names to the IP addresses that all
machines on the net have. It translates from name to address and from address to name.
There are two kinds of domain name servers: one is the primary domain name server; the other is
the secondary domain name server. Each domain name needs a primary domain name server to
keep track of all the names on the domain, and some secondary domain name servers to act as
backup servers for the information on the primary domain name server. Information is configurable
only on the primary domain name server; secondary domain name servers only hold a copy of the
information on the primary domain name server, and are not configurable.
The primary domain name server has three configurable records: the A/PTR record, the MX record and
the CNAME record. The A/PTR is automatically divi ded int o an Addre ss reco rd and PT R record on ce the
A/PTR record is created. The four kinds of records together make up all of the names in a domain.
Also, there is a Start of Authority (SOA record), which contains the domain's primary name server,
its secondary name server, the domain administrator's email address, and some additional
parameters that are set by the ISA-4000.
The definitions of the three configurable records are as follows:
• A/PTR record: this is a name-to-address mapping record; the ISA-4000 automatically
reverses it to an address-to-name mapping (this record is also called a PTR [Pointer
Record]). A/PTR records contain all of the qualified names in the domain.
• CNAME record: this is an alias to another name in the forward record; the alias sho uld map
to a real name that exists in a forward record.
• MX record: this is a mail server name in the domain.
5.3.1.1 E
1. Click Network Services.
2. Click DNS.
3. Check Enable DNS Server:
NABLING THE DOMAIN NAME SERVER
« 27 »
Page 35
4. Click Save.
Figure 5-10: Enabling the Domain Name Server
5.3.1.2 A
DDING A NEW DOMAIN NAME
1. Click Network Services.
2. Click DNS.
3. Click Edit Primary Services:
4. Click Add New Domain Name.
5. Type the Domain Name in the text box:
Figure 5-11: Adding a new domain name.
6. Click Save.
5.3.1.3 A
DDING A NEW HOST NAME TO A DOMAIN
1. Click Network Services.
2. Click DNS.
3. Click Edit Primary Services to view the following screen:
4. Click the Edit icon
in the edit field. The Domain Record List appears.
« 28 »
Page 36
5. Click Add New Record. The following screen appears:
Figure 5-12: Adding a new record.
6. Select the type of record you want: A/PTR, MX, or CNAME. They are described as follows:
A/PTR record
In the A/PTR record section, enter the Host Name (for example "is4000"), the
IP Address, and the Subnet Mask.
MX record
In the MX record section, enter the Host Name and the Mail Server Name
(this is the real email server's name. If this field is entered, the name may be
the same as “HostName.DomainName” or any host name that acts as an
email server for a domain.), and select the appropriate delivery priority for this
email server.
« 29 »
Page 37
CNAME
record
In the CNAME record section, enter the Alias Host Name (for example
"aries"), the Alias Domain Name (for example "zodiac.com") and the Real
Host Name (for example " zodiac.com ").
7. Click Save or click Apply Changes Now to immediately inform the domain name server of
this change.
5.3.1.4 E
DITING A HOST NAME IN A DOMAIN NAME LIST
1. Click Network Services.
2. Click DNS.
3. Click Edit Primary Services.
4. Click the Edit icon
5. Click the Edit icon
in the edit field; the Primary Service List appears:
in the edit field. The following screen appears:
« 30 »
Page 38
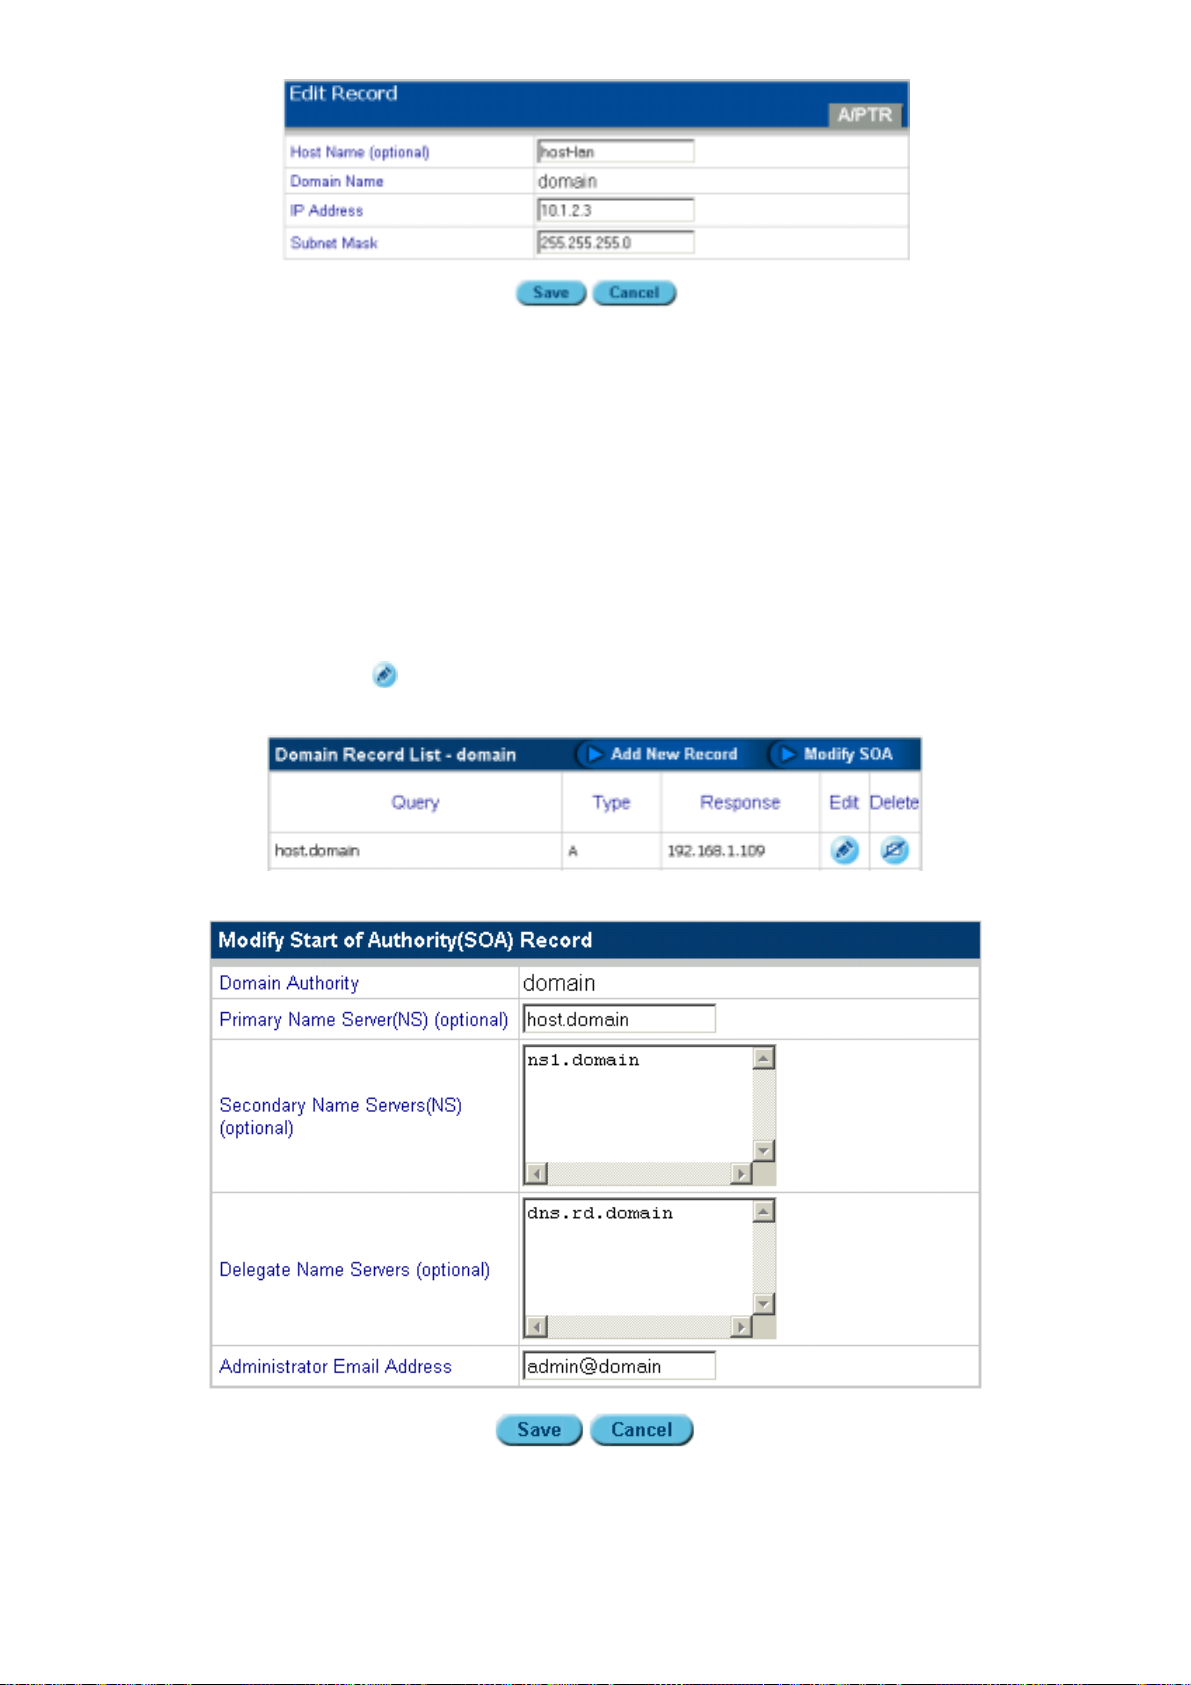
6. Modify the fields in the record:
– Host Name: this is the name assigned to the computer.
– Domain Name: the domain name of the primary server.
– IP Address: the address of the primary server.
– Subnet Mask: the subnet mask of the primary server.
7. Click Save or click Apply Changes Now to immediately inform the domain name server of
this change.
5.3.1.5 M
1. Click Network Services.
2. Click DNS.
3. Click Edit Primary Services.
4. Click the edit
5. Click Modify SOA.
The following screen appears:
ODIFYING THE
icon in the edit field.
SOA
Figure 5-13: Modifying the SOA (Start of Authority)
« 31 »
Page 39

The fields are described as follows:
– Domain Authority: displays the domain name of the ISA-4000
– Primary Name Server: type the primary name server (for example "planet.co m.tw")
– Secondary Name Servers: type the names of any secondary name servers (for
example "hinet.net") that enables users under the Primary Name Server to setup their
own website and email servers
– Administrator's Email Address: the domain administrator’s e m ail address (for
example "admin@planet.com.tw")
You can get this information from your ISP or network administrator.
6. Click Save.
5.3.1.6 A
DDING A SECONDARY SERVICE
1. Click Network Services.
2. Click DNS.
3. Click Edit Secondary Services.
The Secondary Service list appears.
4. Click Add Secondary Service:
5. . The Add Secondary Service screen appears
Figure 5-14: Adding a secondary service
6. The field definitions are as follows:
– Domain Name: type the domain name of the primary server
– IP Address: type the address of the secondary server
– Subnet Mask: type the subnet mask of the secondary server
– Primary DNS Server's IP Address: type the IP address of the Primary Domain Server
You can get this information from your ISP or network administrator.
7. Click Save or click Apply Changes Now to immediately inform the domain name server of
this change.
5.3.1.7 E
DITING A SECONDARY SERVICE
1. Click Network Services.
2. Click DNS.
3. Click Edit Secondary Services.
« 32 »
Page 40
4. Click Modify Secondary Service; the Add Secondary Service screen appears. The field
definitions are as follows:
– Domain Name: the domain name of the primary server.
– IP Address: the address of the primary server.
– Subnet Mask: the subnet mask of the primary server.
– Primary DNS Server's IP Address: the IP address of the Primary Domain Server.
5. Click Save or click Apply Changes Now to immediately inform the domain name server of
this change.
5.3.2 Email Service
The email service supports three server types: SMTP, POP3, and IMAP. SMTP (Simple Mail
Transfer Protocol) is used to send and receive email from the Internet. POP3 (Post Office Protocol 3)
and IMAP4 (Internet Message Access Protocol 4) are used to retrieve email from email servers.
Users can retrieve email using either POP3 or IMAP4, and can send email using SMTP.
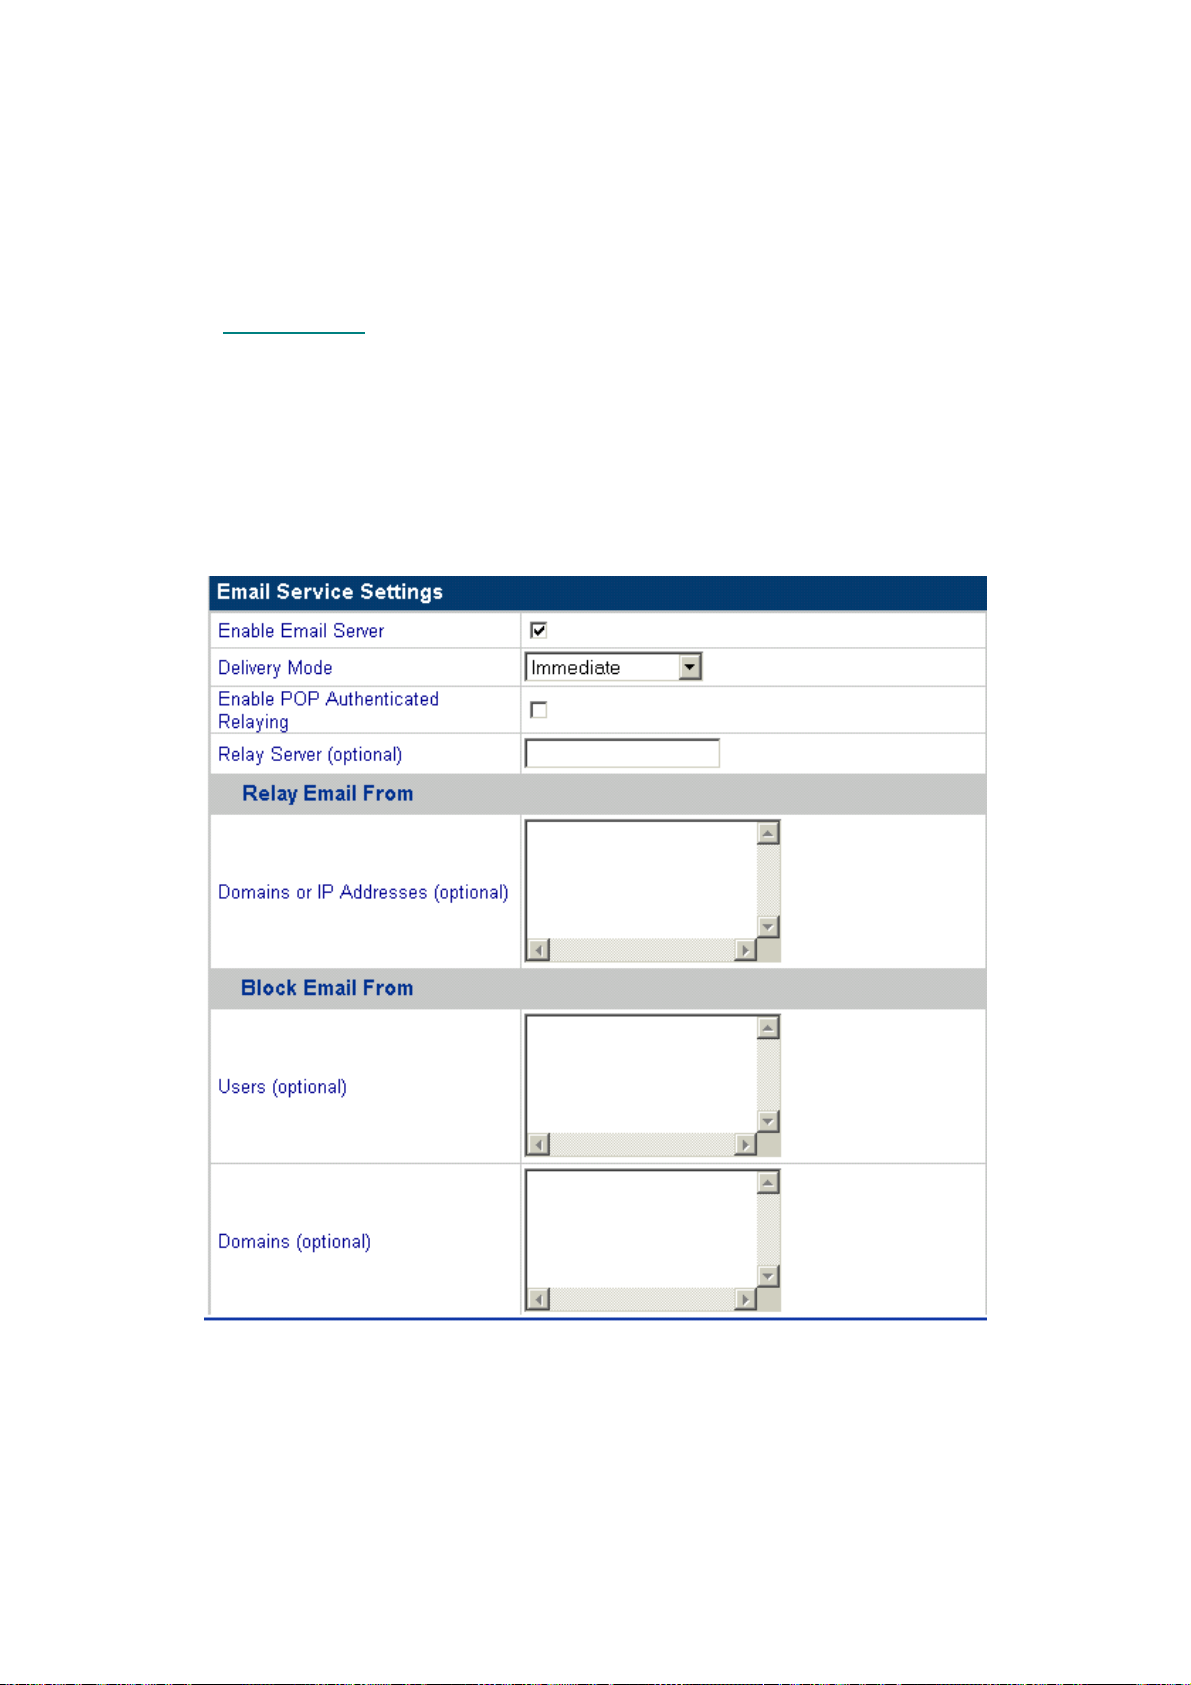
5.3.2.1 E
1. Click Network Services.
2. Click Email Services. The Email Servers Settings screen appears:
MAIL SERVERS SETTING
Figure 5-15: Email servers settings.
3. Check the boxes to enable or disable the Email server.
The field definitions are as follows:
– Delivery Mode: this sets the frequen cy at which emails are sent out from the email
server.
– Relay Server: type the host name for the email server that will relay your email.
– Enable POP Authenticated Relaying: check this box to enable SMTP relays based on
POP authentication.
« 33 »
Page 41

– Relay Email From Domains/IP Addresses: Users' email may be relayed through the
ISA-4000 if their domain name, or IP address are on this list. Users not on the list may
not relay email through the ISA-4000.
– Block Email From Domains: these domains may not send email to this server .
– Block Email From Users: the email server will not send email from the users specified
here.
4. Click Save.
5.3.3 Mailing Lists
The ISA-4000 features a mailing list feature that enables users to sent email to multiple recipients
without having to enter individual addresses.
5.3.3.1 M
1. Click Network Services.
2. Click Mailing Lists, and the Mailing Lists screen appears:
AILING LIST SETTINGS
Figure 5-16: Mailing lists
The field definitions are as follows:
– Name: displays the name assigned to a mailing list
– Local Subscribers: shows the LAN groups or individ uals who are members of the list
– Remote Subscribers: shows the WAN (or Internet) groups or individuals who are
members of the list
– Description: information pertinent to the mailing list
3. Click edit
delete icon is gray
4. Click Add to add another group to the mailing list. The following screen appears:
to edit the information for the group, or click delete to delete the group. If the
, than you are not allowed to delete the group.
« 34 »
Page 42

Figure 5-17: Mailing lists basic options
The field definitions are as follows:
List Name
Local
Subscribers
Remote
Subscribers
Description
Owner/
Moderator
Password
Policies
5. Click Save.
Type a name of the mailing list.
Add local LAN users to the Users Subscribed list to enter the users in
the mailing list.
Type the email address of WAN or Internet users in the text box to
enter the users in the mailing list.
Type any further information here.
Select the owner or moderator (creator) of this list from the drop-down
list. The creator must have already been added in the Users menu.
Enter the password of the owner/moderator.
This item enables the owner/moderator to set email policies related to
the mailing lists:
Posting Policy: Select which users can post messages from the drop-
down list.
Subscription Policy: Select subscription requirements from the drop-
down list.
Maximum Message Length: Select the maximum size allowable for
emails.
Reply Policy: Select whether replies will be sent to the sender or to all
members of the list.
5.3.4 File Services
« 35 »
Page 43

The ISA-4000 provides a cross-platform file service supporting FTP, Apple file sharing, and
y
pp
Windows file sharing. As long as the file services are correctly configured, users may share files with
the ISA-4000.
5.3.4.1 F
1. Click Network Services.
2. Click File Services, and the File Services Settings screen appears:
ILE SERVICES SETTINGS
Figure 5-18: File services settings
The field definitions are as follows:
FTP Server
Apple File
Sharing
Windows File
Sharing
Guest /
Anon
mous
Enable – check the box to enable the FTP server.
Maximum Simultaneous Connections – type a value to specify the
maximum number of connections that may be made to the FTP server
at the same time. The default value is 25 connections.
Enable – check the box to enable the AppleShare service.
Maximum Simultaneous Connections – type a value to specify the
maximum number of connections that may be made to the AppleShare
service at the same time. The default value is 25 connections.
Enable – check the box to enable the SAMBA service (an SMB server
in Linux).
Maximum Simultaneous Connections – type a value to specify the
maximum number of connections that may be made to the SAMBA
service at the same time. The default value is 25 connections.
Workgroup – type a user-friendly name to specify the workgroup or
NT domain that the ISA-4000 will belong to. This entry determines
where the ISA-4000 will appear in the Windows client machine's
Network Neighborhood.
Enable – check this box to specify whether guest users may be
allowed access to the A
leShare and SAMBA services. Checking it
« 36 »
Page 44

Access
p
y
3. Click Save.
also enables anonymous access to the FTP server.
Allow Uploads – check this box to specify whether guest users may
be allowed to upload to the file server. In the text box, type the amount
of disk space on the ISA-4000 that the guest is allowed to use. The
default value is 300 MB.
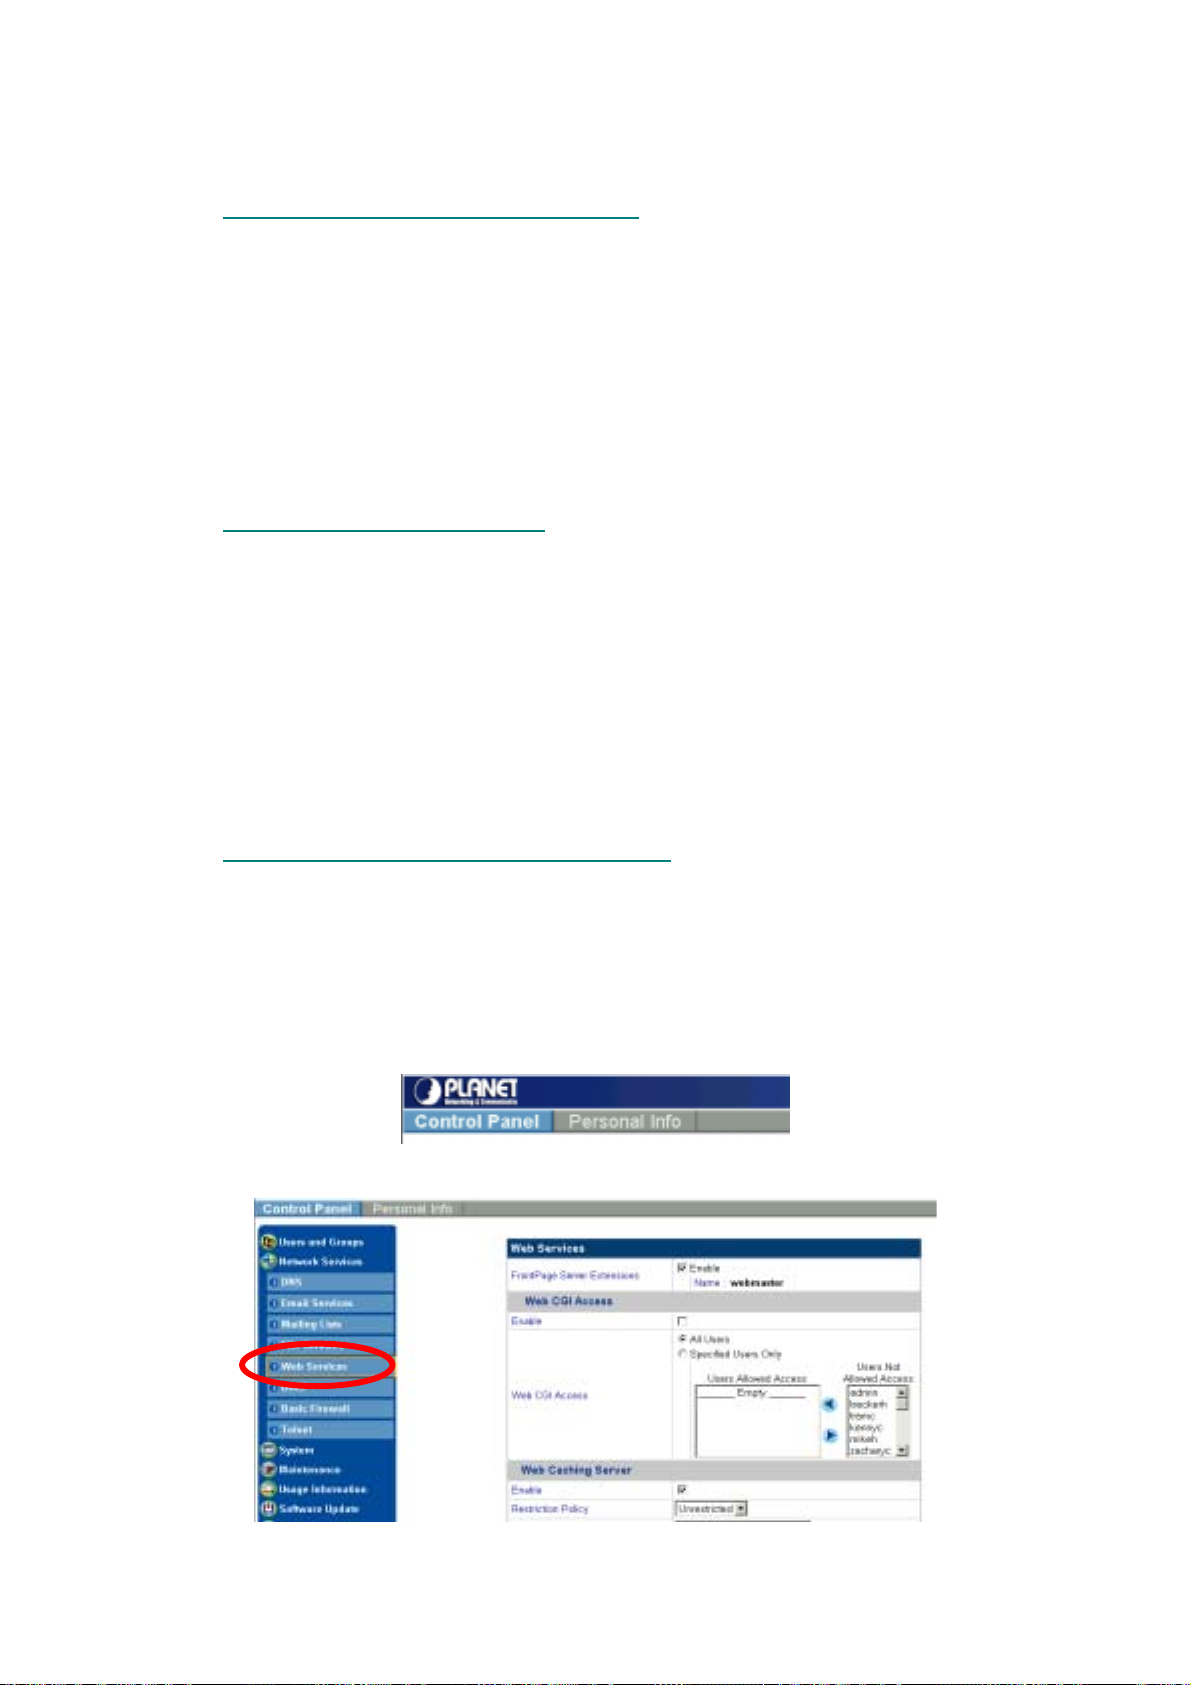
5.3.5 Web Services
In the Web Services screen, FrontPage Server Extensions and the web caching server may be
enabled, and the users with CGI access on the ISA-4000 web server may be specified.
5.3.5.1 W
1. Click Network Services.
2. Click Web Services. The Web Services screen appears:
EB SERVICES SETTINGS
Figure 5-19: Web services
The field definitions are as follows:
FrontPage
Server
Extensions
Enable – check the box to enable FrontPage Server Extensions.
Note: Microsoft FrontPage Server Extensions extend the functionality
of the web by adding page elements such as hit counters, search forms,
and confirmation fields.
Web CGI
Access
Three radio buttons set Web CGI options:
• None – no users have CGI access to CGI programs,
• All Users – all users have access (this is the default value)
• S
ecified Users Onl
– only the specified users have access to
« 37 »
Page 45

CGI programs. Users may be allowed or denied access to CGI
y
programs by selecting the user and clicking the arrows to deny or
allow access.
Web Caching
Server
Enable – check the box to enable the Web Caching Server.
Note: The Web Caching Server Web option enables the ISA-4000 to
keeps copies of the most-recently requested Web pages in memory or
on disk in order to speed up retrieval.
Restriction Policy – Machines that may access the web caching
server can be specified in one of three ways: those permitted, those
restricted, or all machines may access the caching server.
Hosts/Domains/IP Addresses – Type the domains or IP addresses
that the access policy applies to.
3. Click Save.
5.3.6 DHCP (Dynamic Host Configuration Protocol)
The Dynamic Host Configuration Protocol is a protocol that allows clients to obtain IP addresses
automatically from the DHCP server. It is a very convenient way to obtain IP addresses in a TCP/IP
network.
5.3.6.1 DHCP
1. Click Network Services.
2. Click DHCP. The DHCP Screen appears:
SETTINGS
Figure 5-20: DHCP settings
The field definitions are as follows:
Enable DHCP
Server
Enable – check the box to enable the ISA-4000 to act as a DHCP
Server.
Note: A DHCP server is server in the network or a service within a
server that assigns IP addresses.
DHCP Client
Settings
Domain Name Server Addresses – the IP address or addresses of
your local domain name servers that the clients will be automatically
configured to use.
Subnet Mask – the subnet mask that the ISA-4000 will assign to
DHCP clients.
Gateway – the router address that the ISA-4000 will assign to DHCP
clients.
Maximum Lease Time – The networking information that is assigned
to these clients b
the DHCP server is "leased,” "or rented out,” and
« 38 »
Page 46

thus expires after a certain period of time. Enter the maximum period
of time in seconds before the lease expires. Please enter an integer
greater than zero. The default value is 86400 seconds (that is, one
day).
3. Click Save.
4. In the DHCP Settings screen, click Dynamic Lists. The following screen appears:
Figure 5-21: DHCP dynamic assignment list
5. Click Add to open the following screen:
6. Enter the beginning and ending values for the IP Address Range. IP addresses assigned to
DHCP clients will be taken from this range of IP addresses.
7. Click Save.
To edit a dynamic IP address, click the edit button
Lists screen.
8. Click Static Lists to view the following screen:
next to the address in the Dynamic
Figure 5-22: DHCP static assignment list
9. Click Add. The following screen appears:
10. Type an IP Address to be assigned to a specific MAC address, and enter a MAC address as
the owner of the IP address.
11. Click Save.
« 39 »
Page 47

To edit a static IP address, click the edit button next to the address in the Static Lists screen.
5.3.7 Basic Firewall
The ISA-4000 provides basic firewall functions, by filtering all the packets that enter the ISA-4000
using a set of rules. The rules are in an order sequence list—the lower the rule number, the higher
the priority the rule has. Each rule has four characteristics:
Priority
Interface
Protocol
Policy
In the firewall, a collection of rules is called a "chain.” Three chains are provided:
• InputChain: Incoming packets (those originating from an outside network and addresse d to
the internal network) are filtered by the ISA-4000 according to the InputChain rules.
• ForwardChain: When an incoming packet from an external network requests forwarding to
another computer, it is filtered by the ISA-4000 a ccording to the ForwardChain rules.
• OutputChain: Outgoing packets (those originating from the internal network, addressed to
the outside network) are filtered by the ISA-4000 according to the OutputChain rules.
This is an order sequence list; the lower number the rule, the higher the priority.
This specifies which interface the rule applies to.
This specifies which protocol the rule applies to.
This determines what will happen to any packets that match this firewall rule. The
ISA-4000 supports five policies: ACCEPT, DENY, REJECT, MASQ, and REDIRECT.
The definitions of the five policies are as follows:
• ACCEPT: if the packet matches the rule, the ISA-4000 will accept it.
• DENY: if the packet matches the rule, the ISA-4000 will discard it.
• REJECT: if the packet matches the rule, the ISA-4000 will discard it and notify
the sender that the packet was discarded.
• MASQ: if the packet matches the rule, the packet will be masqueraded, or
rewritten to appear as if it originated from the ISA-4000. When this policy is
selected, the ISA-4000 will provide NAT (Network Address Translation) service.
This policy is for forward rules only.
• REDIRECT: If the packet matches the rule, it will be redirected to one of the ISA-
4000's local ports. This port number is specified in the Redirect to Port Number
field. This feature is used for the applications such as proxy server, etc. This
policy is for input rules only.
5.3.7.1 E
1. Click Network Services.
2. Click Basic Firewall. The Basic Firewall screens app ears:
NABLING THE FIREWALL
Figure 5-23: Basic firewall configuration
3. Check Enable Firewall.
4. Click Save. Click Apply Changes Now to activate the changes.
« 40 »
Page 48

5.3.7.2 A
1. Click Network Services.
2. Click Basic Firewall.
3. Click the Input Chain, Forward Chain, or Output Chain button.
4. In the Input/Forward/Output Chain screen, click Add. The Input/Forward/Output Chain
screen appears:
DDING RULES TO INPUT/FORWARD/OUTPUT CHAINS
Figure 5-24: Input, forward, and output chain settings
For IP addresses and port numbers, leave the appropriate field empty to match any value.
The field definitions are as follows:
Source
Address
Destination
Address
Protocol &
Interface
Policy
Source IP Address (Beginning of Range) – This beginning (or
lowest) source IP address should be applied to the input chain.
Source IP Address (End of Range) – This ending (or highest) source
IP address should be applied to the input chain.
Source Port Number(s) – This source port number, or range thereof,
should be applied to the input chain. If you want to specify a range of
ports, use a colon (:) as a separator. For example, 10:20 corresponds
to the range from port 10 to port 20.
Destination IP Address (Beginning of Range) – This beginning (or
lowest) destination IP address should be applied to the input chain.
Destination IP Address (End of Range) – This ending (or highest)
destination IP address should be applied to the input chain.
Destination Port Number(s) – This destination port number, or range
thereof, should be applied to the input chain. If you want to specify a
range of ports, use colon (:) as a separator. For example, 10:20
corresponds to the range from port 10 to port 20.
Network Protocol – this network protocol of the packets should be
applied to the input chain.
Network Interface – this network interface of the packets should be
applied to the input chain.
Policy – this is what happens to any packets that match this firewall
rule. The four policies to choose from are ACCEPT, DENY, REJECT,
and REDIRECT.
Redirect to Local Port Number – If the REDIRECT policy is selected
above, packets that match this firewall rule will be directed to this port
number on the ISA-4000. For other policies, this field is ignored.
5. Click Save.
Note: The Forward and Output Chain screens to not have the Redirect
to Local Port Number option.
« 41 »
Page 49
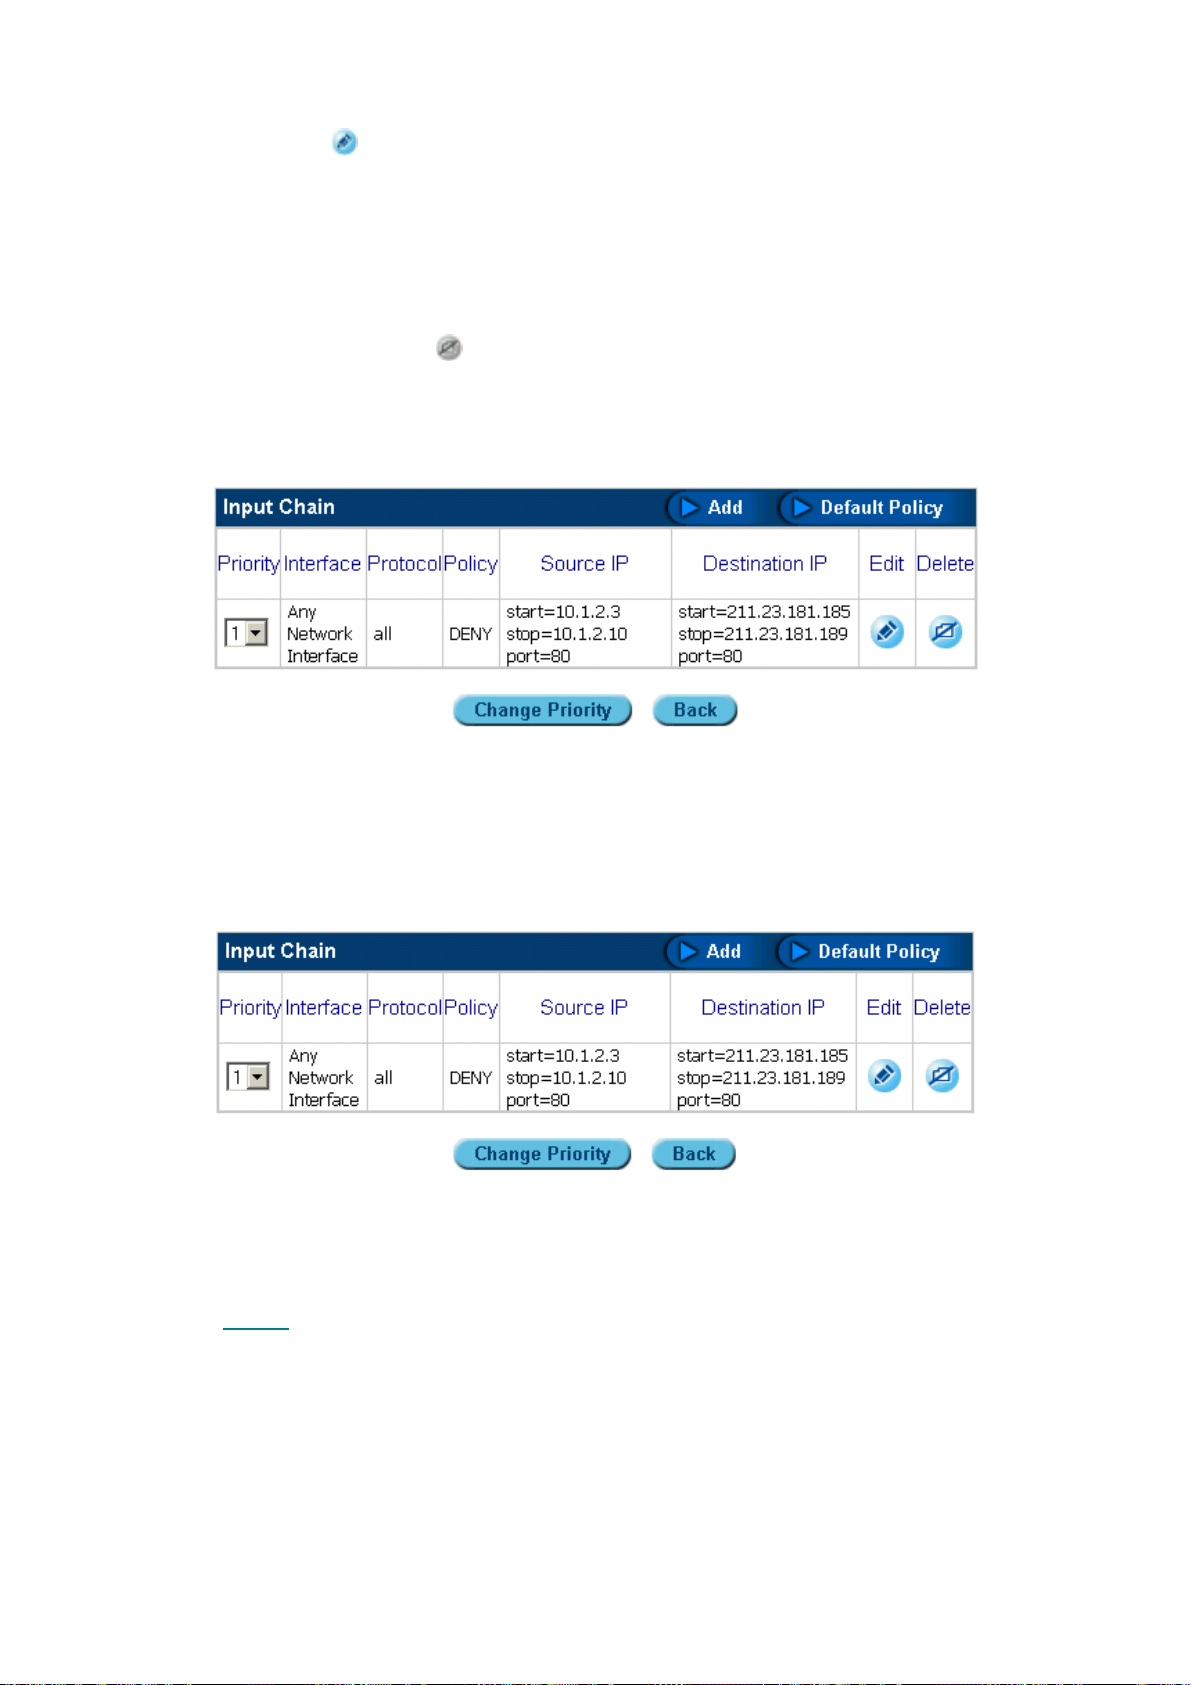
5.3.7.3 M
ODIFYING A RULE IN A INPUT/FORWARD/OUTPUT CHAIN
1. In the Basic Firewall screen, click the Input/Forward/Output Chain button, and then click the
edit icon
. The Modify the Firewall Chain screen appears.
2. Edit the fields according to the steps from Adding Rules to the Input/Forward/Output Chain.
5.3.7.4 D
ELETING A RULE IN A INPUT/FORWARD/OUTPUT CHAIN
1. Click Network Services.
2. Click Basic Firewall.
3. Click Input/Forward/Output Chain.
4. Click the delete icon
5.3.7.5 C
HANGING A CHAIN PRIORITY
.
In the Input/Forward/Output Chain screens, click Change Priority to open a screen that enables
you to change the priority of the chain.
Figure 5-25: Changing the priority of an input/forward/output chain
5.3.7.6 C
HANGING A DEFAULT POLICY
In the Input/Forward/Output Chain screens, click Default Policy to open a screen that enables you
to change the policy of the chain.
Figure 5-26: Changing the default policy of a chain
5.3.8 Telnet
The Telnet settings allow you to specify who may access telnet. Telnet is a terminal emulation
protocol commonly used on the Internet and TCP/IP-based networks which allows users at terminals
to log into a remote device and run a program.
1. Click Network Services.
2. Click Telnet. The Telnet screen appears:
« 42 »
Page 50
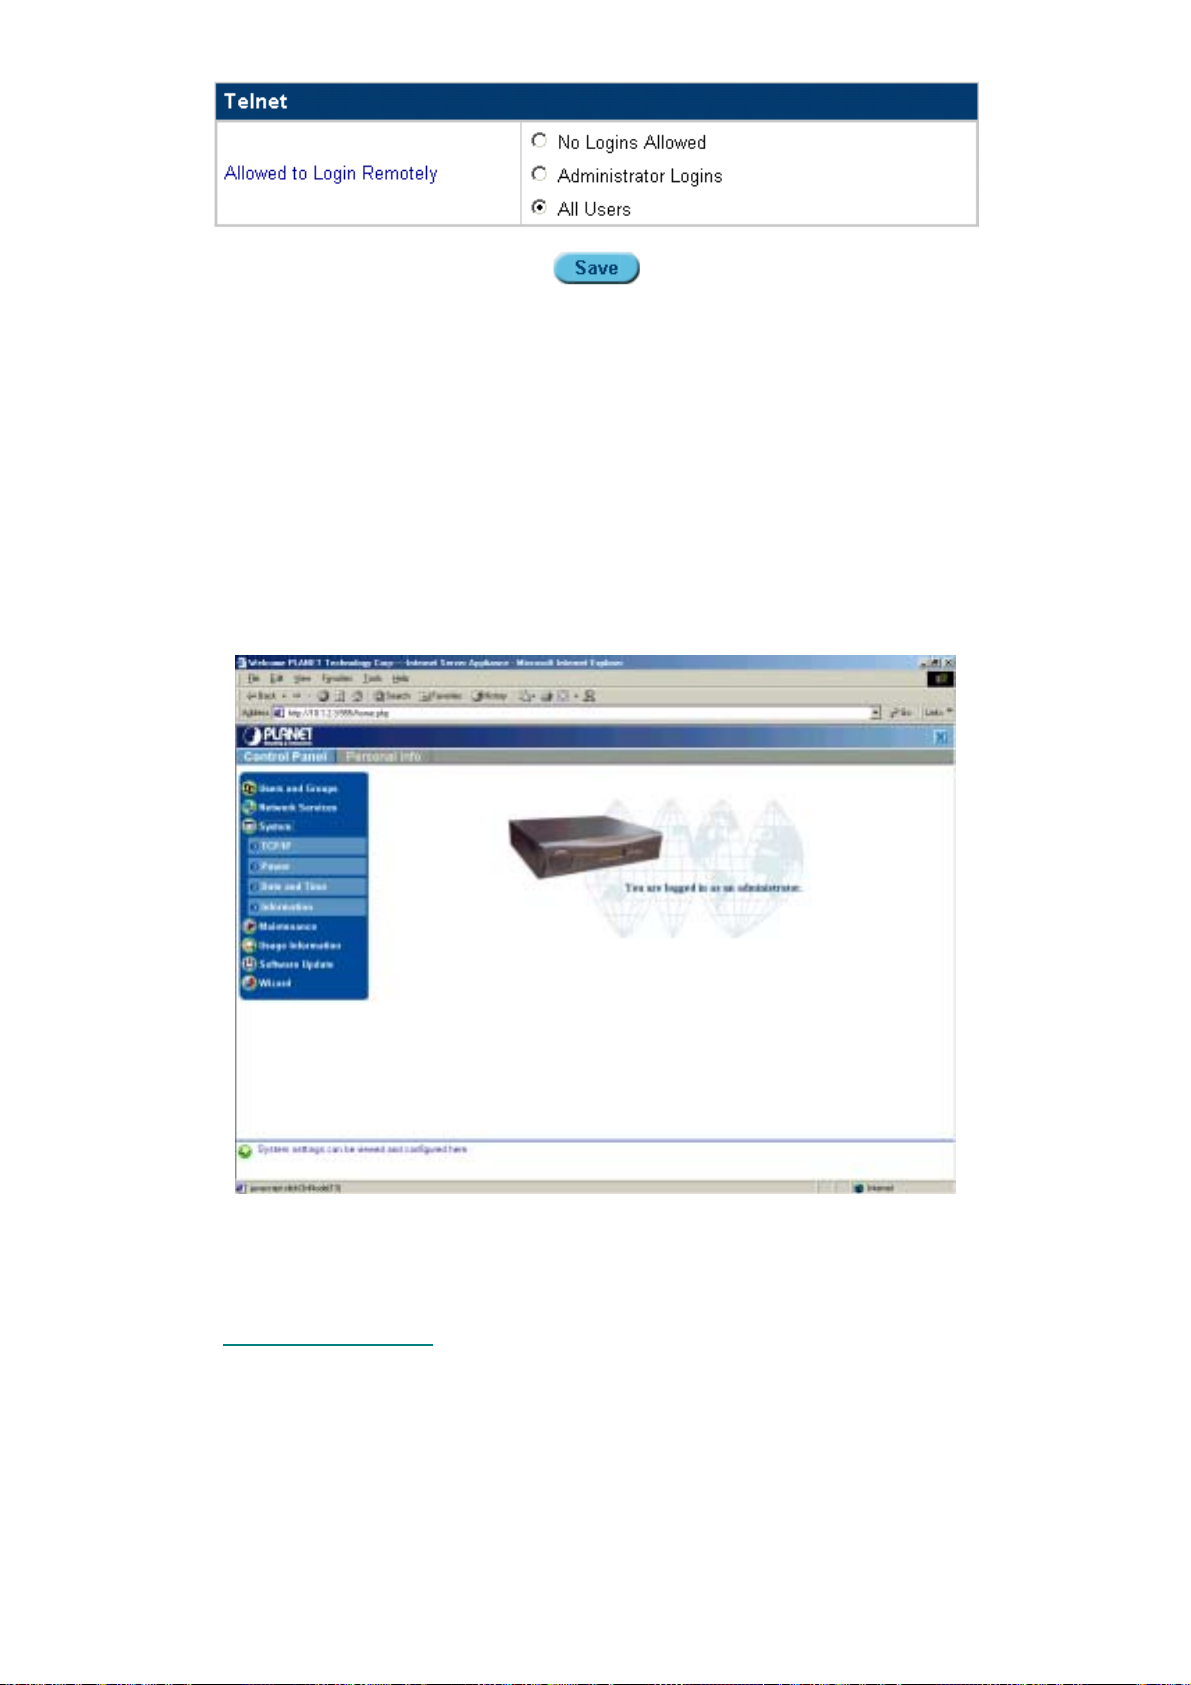
Figure 5-27: The Telnet screen.
3. Select the Access mode.
– No Logins Allowed: No one may telnet into the ISA-4000.
– Administrator Logins: Only the administrator may telnet into the ISA-4000.
– All Users: All registered users may telnet into the ISA-4000.
4. Click Save.
5.4 S
YSTEM
The System menu includes settings for TCP/IP, Power, Date and Time, Information Click System. The System menu opens:
Figure 5-28: System menu options
The System menu provides a way to configure all the basic settings for the ISA-4000.
5.4.1 Configuring TCP/IP
The TCP/IP item enables you to set the ISA-4000 IP address.
5.4.1.1 TCP/IP
1. Click System.
2. Click TCP/IP. The TCP/IP screen appears:
SETTINGS
« 43 »
Page 51
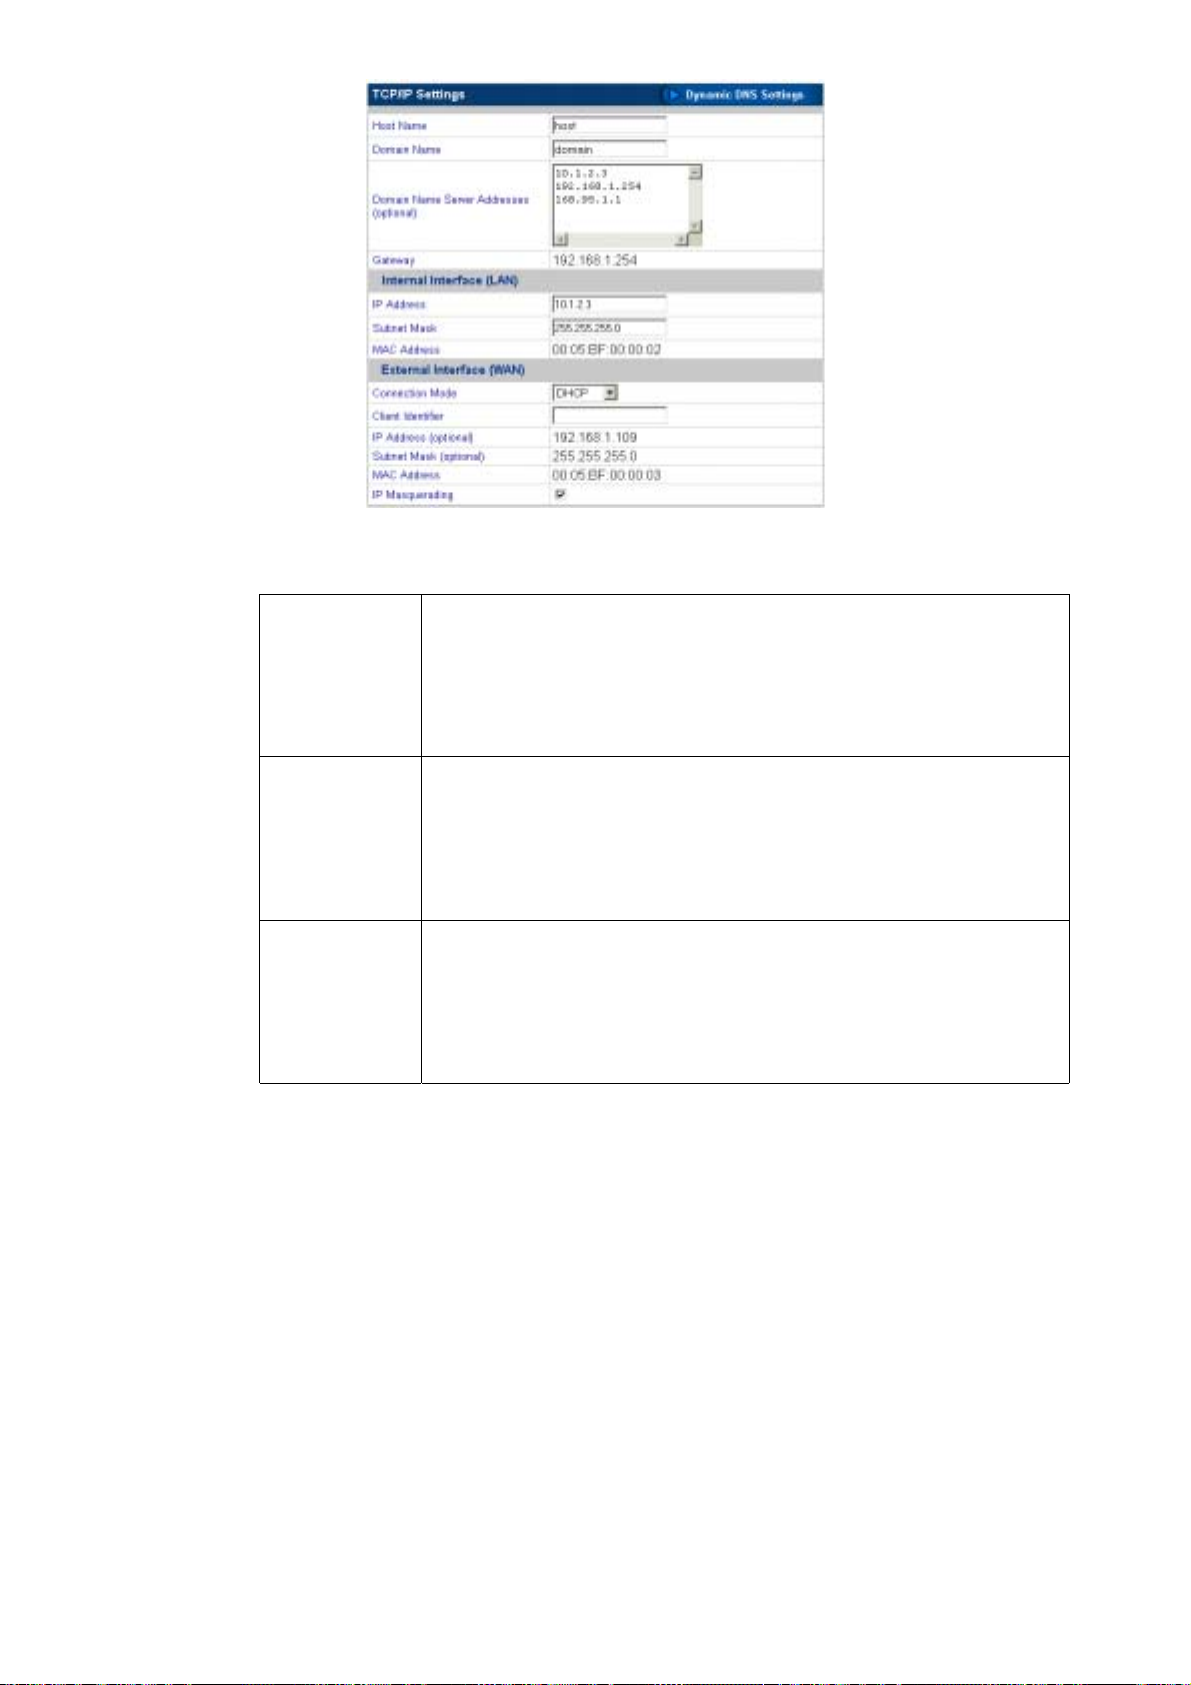
The field definitions are as follows:
Dynamic DNS Settings
Host Name – this is the name of the ISA-4000. For example,
"isa4000."
Domain Name – The domain name of the ISA-4000. For example,
"planet.com.tw.”
Domain Name Server Addresses – the IP address or addressees of
the domain name server or servers.
Internal
Interface
(LAN)
IP Address – (internal, eth0): the IP address of the ISA-4000's LAN
port.
Subnet Mask – (internal, eth0): the subnet mask of the ISA-4000's
LAN port.
MAC Address – This is the serial number that identifies that network
card from all others. This is a display only field.
External
Interface
(WAN)
IP Address – (external, eth1): the IP address of the ISA-4000's WAN
port.
Subnet Mask – (external, eth1): the subnet mask of the ISA-4000's
WAN port.
MAC Address – this is the serial number that identifies that network
card from all others. This is a display only field.
3. Click Save.
Figure 5-29: TCP/IP settings.
5.4.1.2 D
YNAMIC
DNS
SETTINGS
The dynamic DNS (Domain Name Server) features enables cable and DSL modem users to assign
a Dynamic or Static IP address alias to a static host name allowing the computer to be easily
accessed from anywhere over the Internet. When enabled, this service allows you to create your
own Website, email server, and FTP server on the ISA-4000.
1. Click System.
2. Click TCP/IP to open the TCP/IP settings screen.
3. Click Dynamic DNS Settings:
The Dynamic DNS Settings screen opens:
« 44 »
Page 52
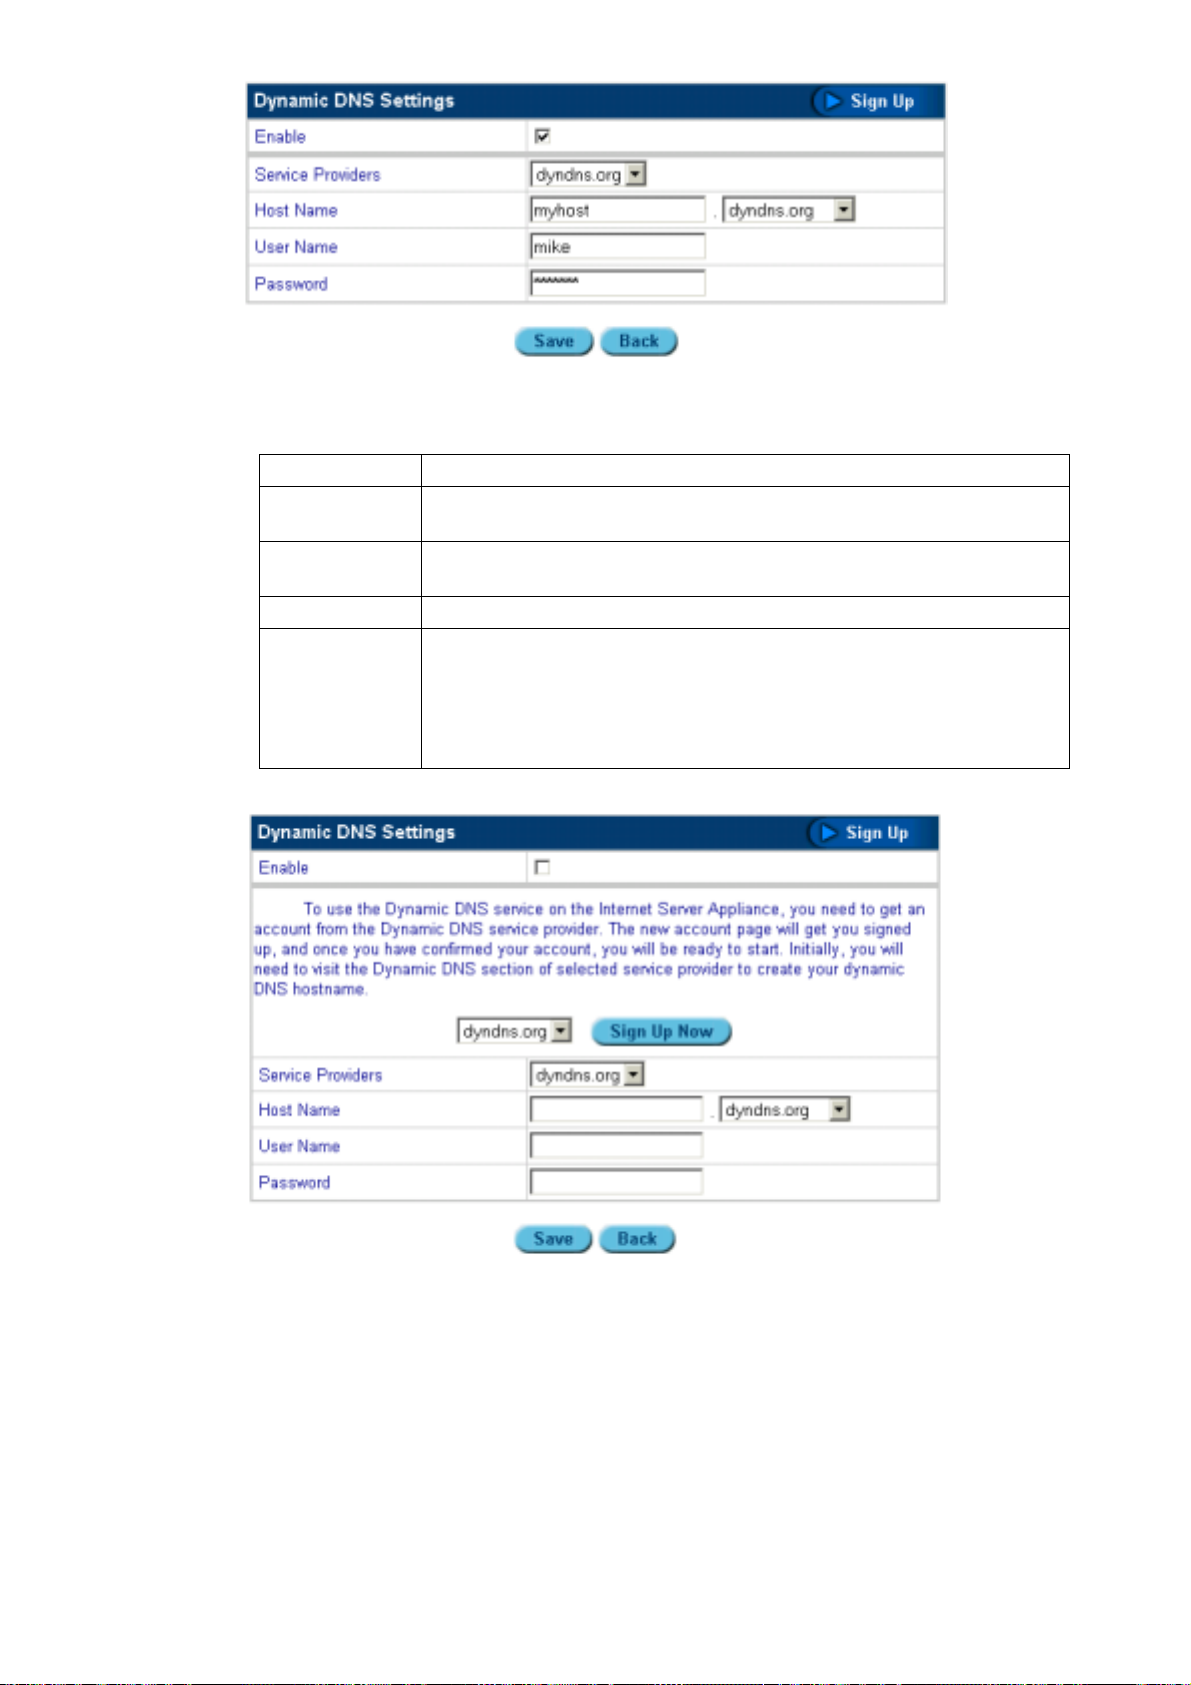
Figure 5-30: Dynamic DNS settings screen
The field definitions are as follows:
Enable
Service
Providers
Host Name
User Name
Password
Check the box to enable the Dynamic Domain Name Server feature.
Select a service provider from the drop-down list.
Type a host name and select the service provider name from the dropdown list.
Type a user name in the text box.
Type a password in the text box. The password should be at least
eight alphanumeric characters with a combination of upper and lower
case (for example, ‘moTO1776’).
Note: The password appears as asterisks when you type it in the text
box.
4. Click Sign Up to view the following screen:
Figure 5-31: Signing up for dynamic DNS services
5. This screen enables you to sign up for the dynamic DNS service on the ISA-4000. Fill in the
information and click Sign Up Now to open the service provider’s web page in your default
browser:
« 45 »
Page 53
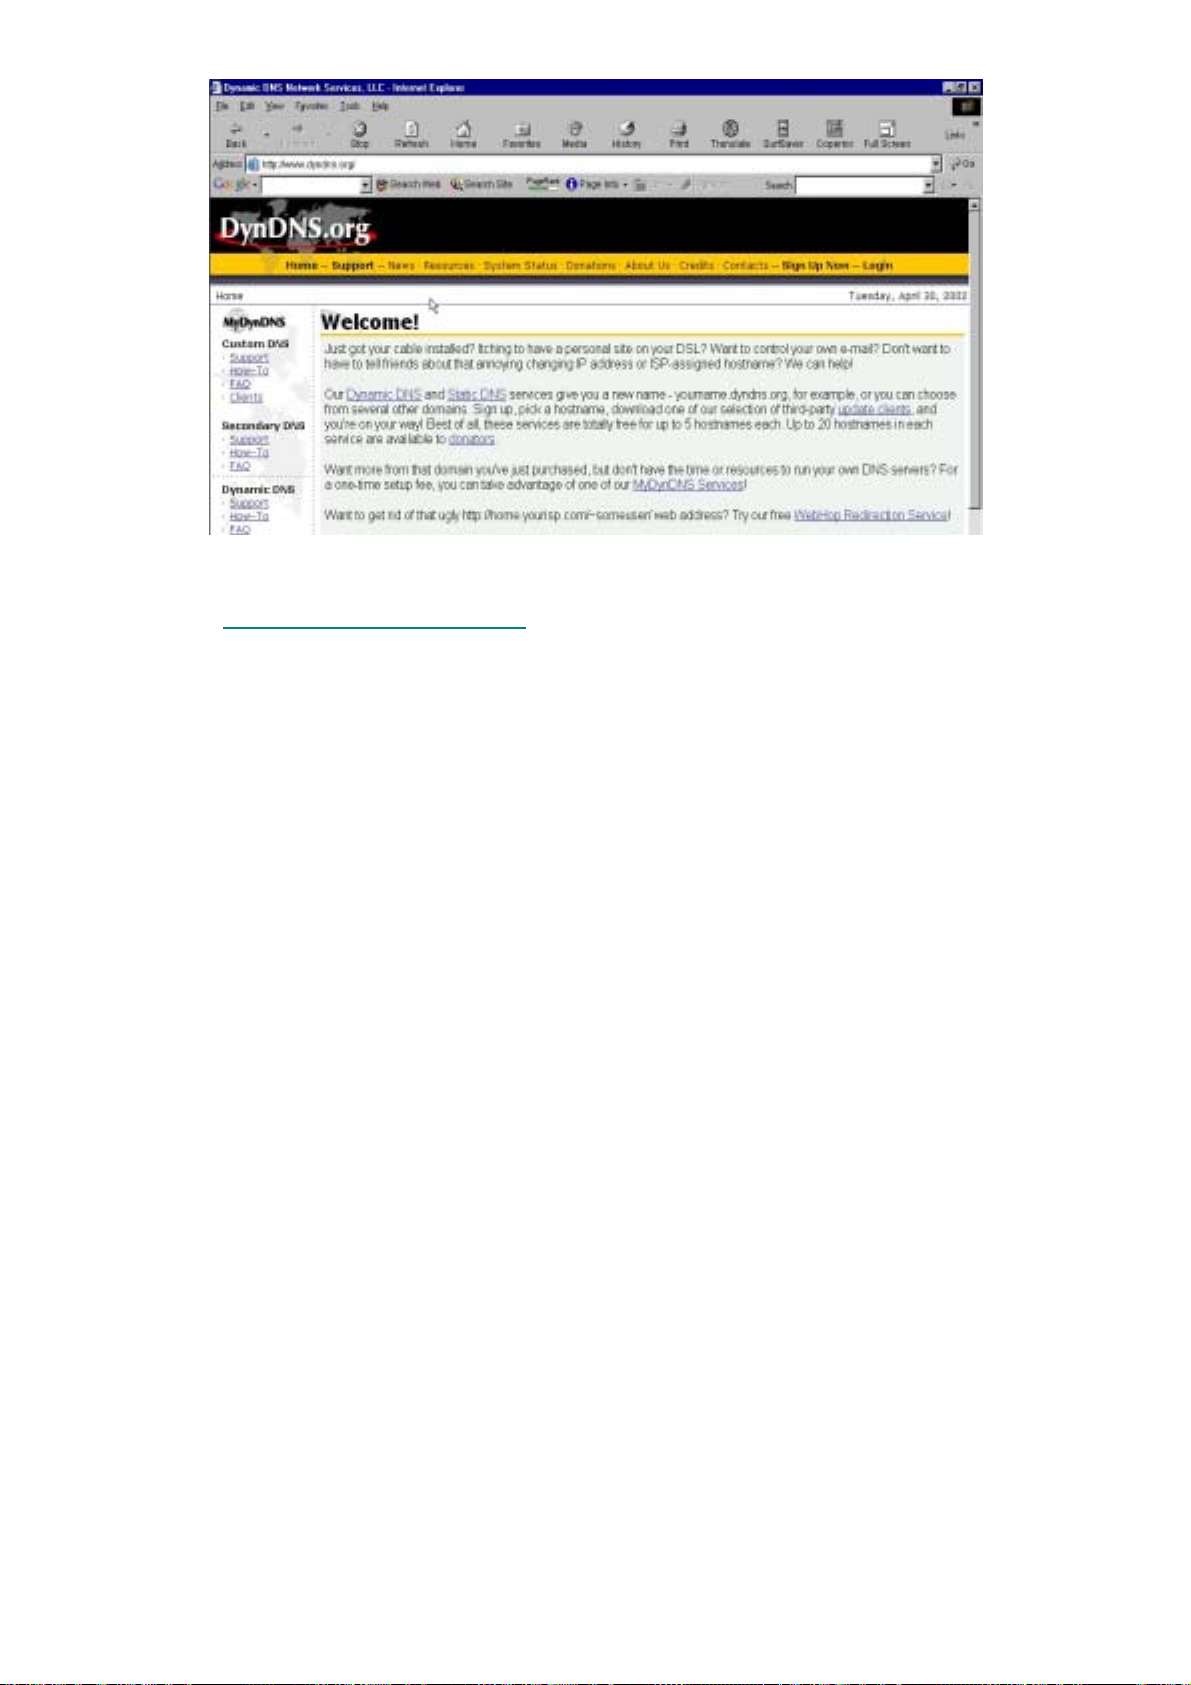
6. Follow the instructions on the site to sign up for the service.
5.4.2 Configuring Internet Settings
The Internet setting specifies how the ISA-4000 connects to the Internet. Three modes of Internet
connections may be selected:
• No Internet: the ISA-4000's WAN port is not connected to the Internet
• Cable Modem or DSL: the ISA-4000's WAN port is conne cted to the Internet via Cable
Modem or DSL
• Gateway: the ISA-4000's WAN port is connected to another gateway on the LAN
5.4.2.1 I
1. Click System.
2. Click TCP/IP.
3. Click None. The following screen appears:
NTRANET USE ONLY
« 46 »
Page 54
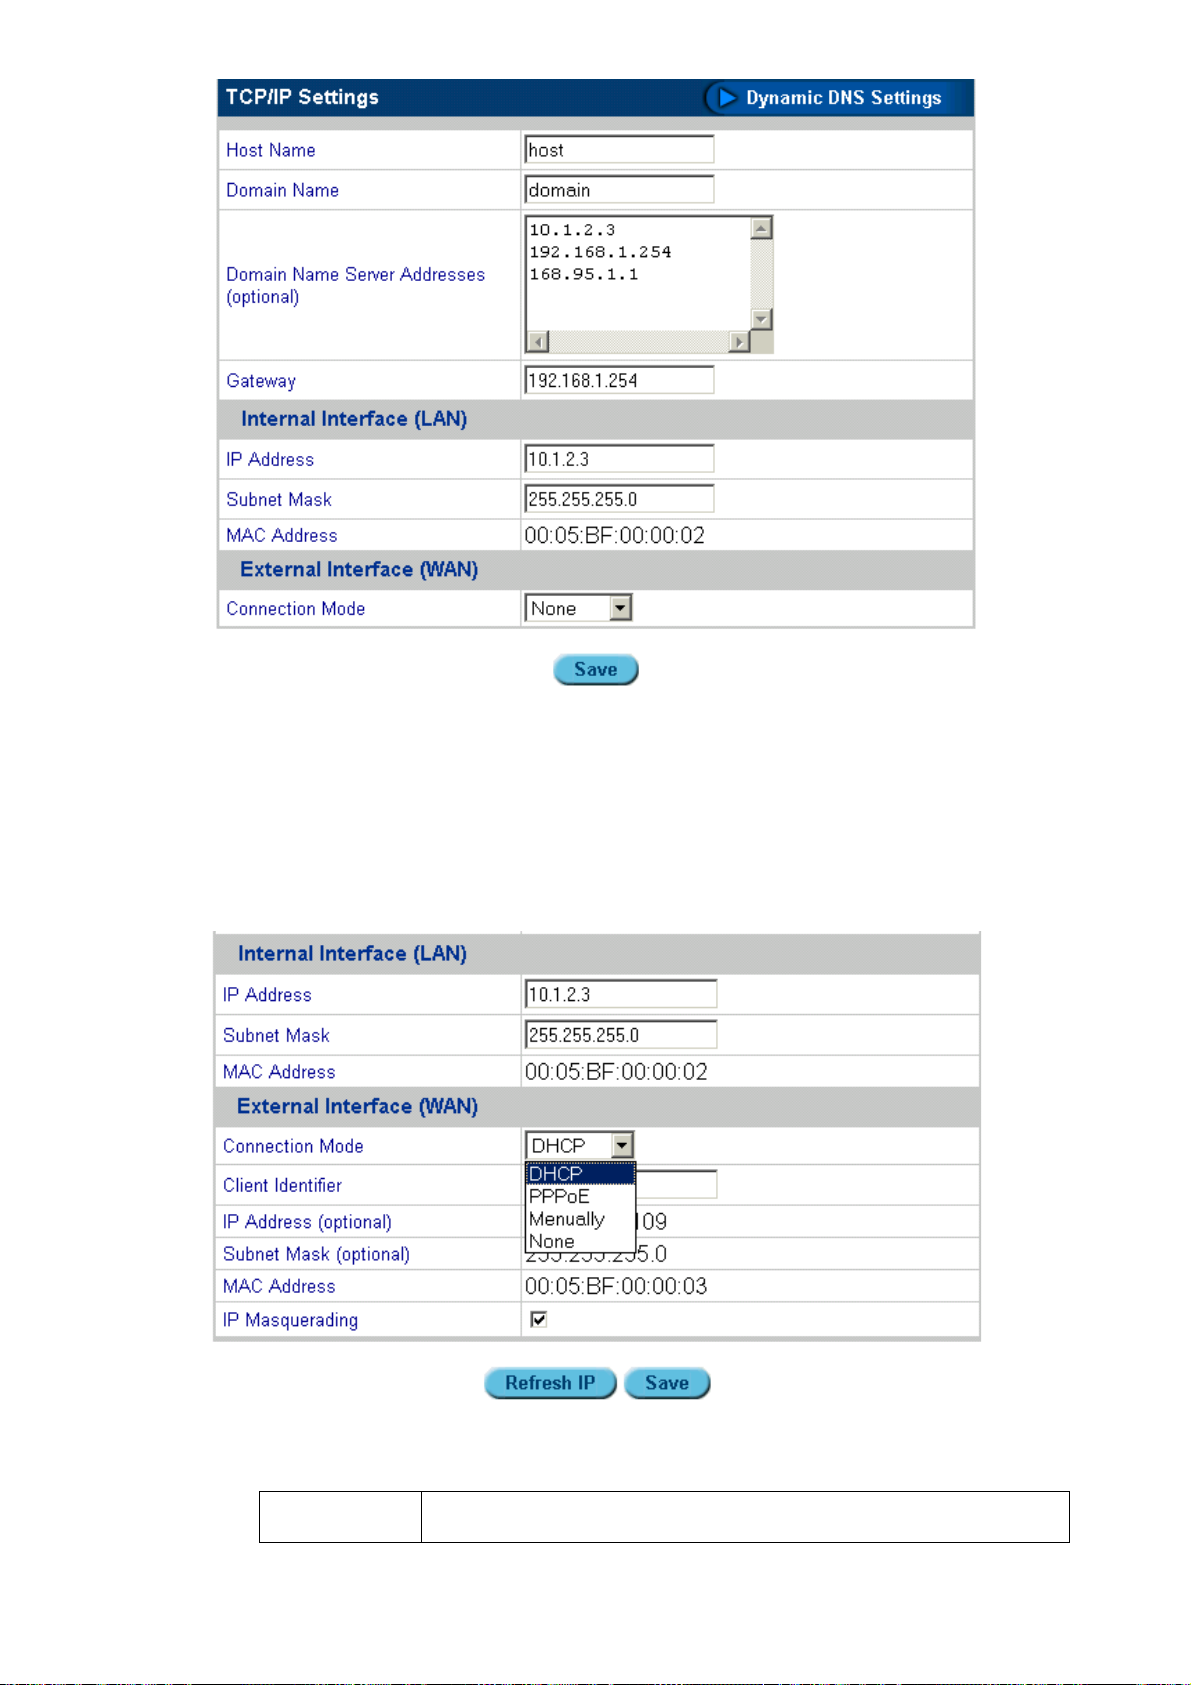
Figure 5-32: Intranet use only
y
4. Click Save. The Internet will not be available through the ISA-4000.
5.4.2.2 C
1. Click System.
2. Click TCP/IP.
3. Select Connection Mode. The following screen appears:
ONNECTION MODE
Figure 5-33: TCP/IP settings
The field definitions are as follows:
External
Interface
Use DHCP – obtains an IP address through DHCP: enter the Client
Host Name and the Client Identifier, if
ou have this information. If you
« 47 »
Page 55

(WAN)
IP
Masquerading
4. Click Save.
5. To refresh the IP address for the ISA-4000, click Refresh IP:
don't know, leave it blank.
Use PPPoE – obtains an IP address from PPPoE: enter the User
Name and the Password, twice. Your ISP should provide you with the
user name and password.
Manually Specify an IP address – enter the IP Address, Subnet
Mask and Gateway. You can get this information from your ISP or
network administrator.
Checking this box enables the ISA-4000 to provide NAT (Network
Address Translation) service.
5.4.3 Shutting Down and Restarting the ISA-4000
The Power item enables you to restart the ISA-4000 or turn off the ISA-4000 and all services
connected with it.
1. Click System.
2. Click Power. The following screen appears:
Figure 5-34: Restarting and shutting down the server
3. Click Restart Now or Shutdown Now.
5.4.4 Setting the Time
1. Click System.
2. Click Date and Time. The Date and Time Settings screen appears
Figure 5-35: Setting the time
The field definitions are as follows:
Date
Set the date and time of the ISA-4000.
« 48 »
Page 56

Time Zone
Network Time
Server
3. Click Save.
Set the time zone of the ISA-4000 (for example, US/Pacific)
The ISA-4000 can automatically update its time from the server
specified here. For example: if the time server is set to "ntp.nasa.gov,”
the ISA-4000 will synchronize with NASA's time server.
5.4.5 Checking the System Information
Click System and then click Information to display a screen that shows the ISA-4000 configuration:
Figure 5-36: System information screen
5.5 M
The field definitions are as follows:
Product Name
Machine Serial
Number
Internal Interface
MAC Address
External Interface
MAC Address
Hard Disk Size (GB)
Memory Size (MB)
AINTENANCE
The maintenance feature enables you to schedule backups and restores of system, user, and group
files.
On the Administration menu, click Maintenance to view the options for this field:
ISA-4000 product name
ISA-4000 serial number
MAC address for the LAN interface.
MAC address for the WAN interface.
The capacity of the ISA-4000 hard disk drive in gigabytes
The capacity of the onboard DRAM in megabytes
« 49 »
Page 57
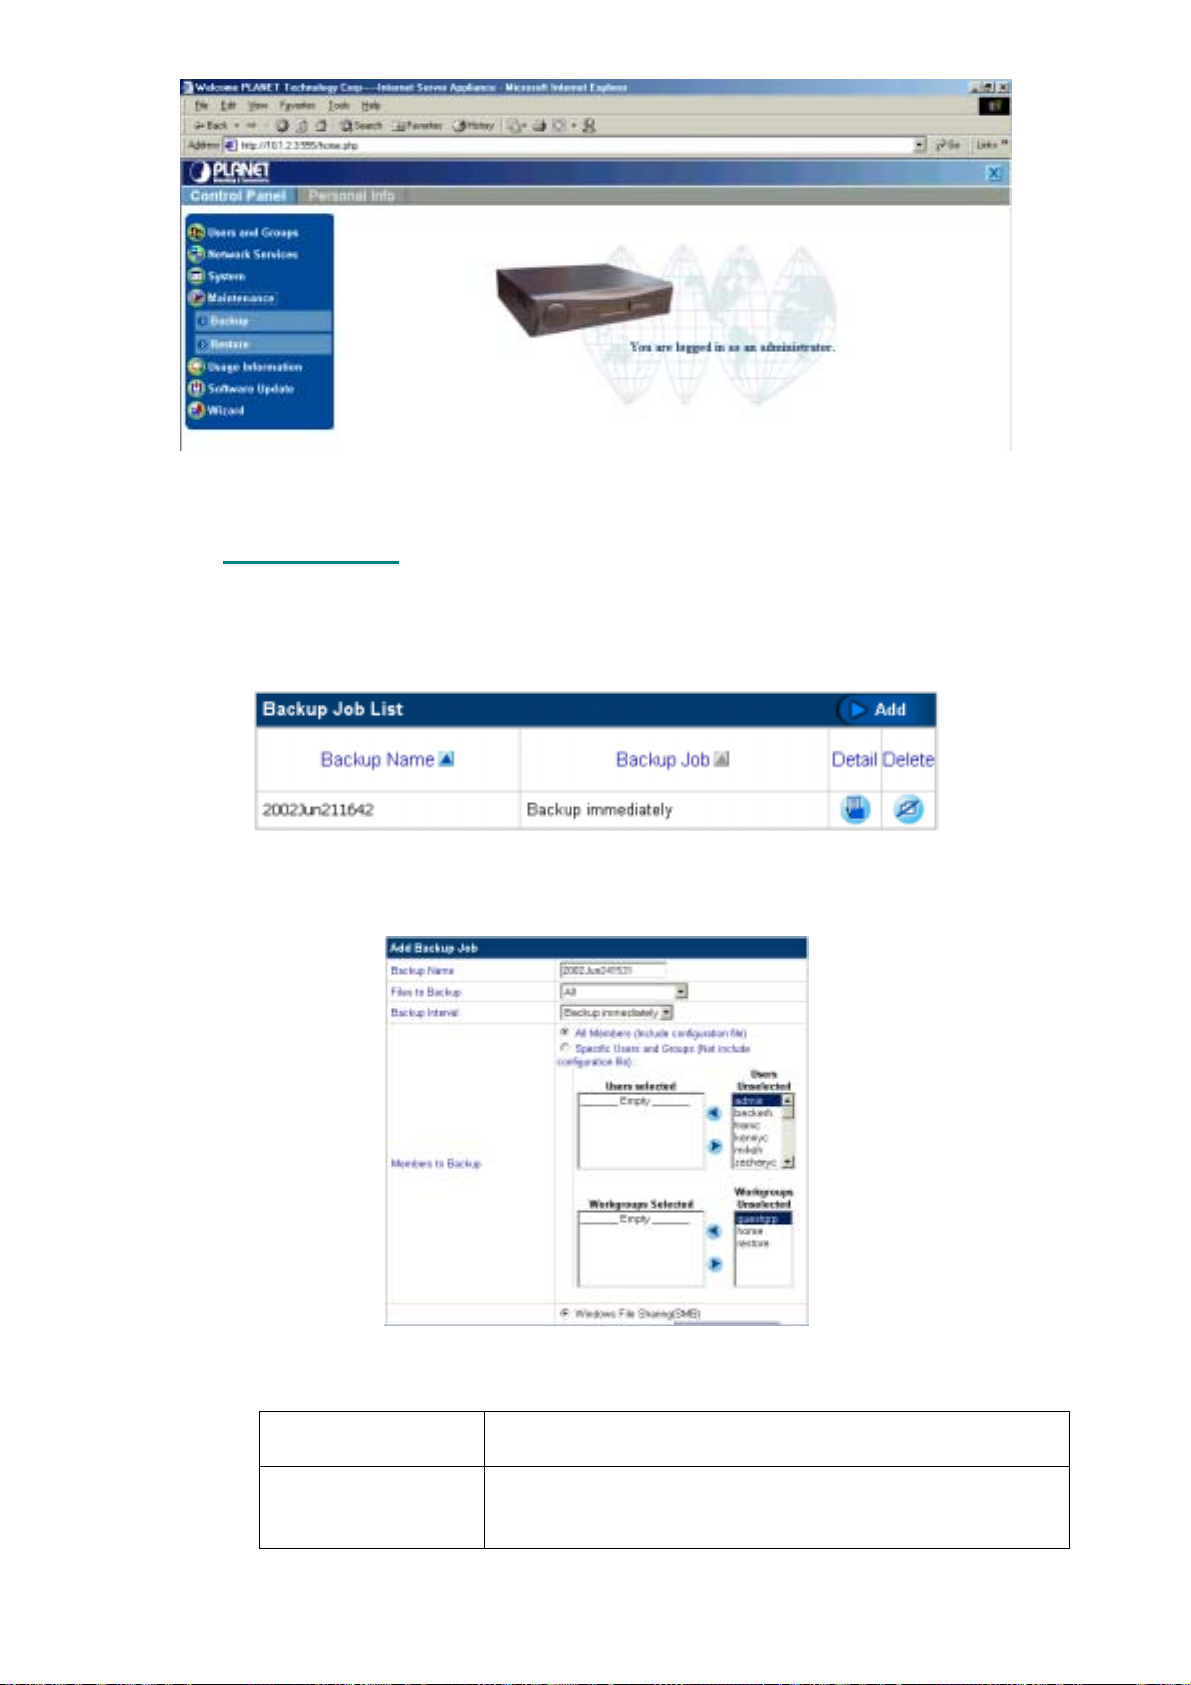
Figure 5-37: Maintenance menu
p
p
5.5.1 Backing Up Data
The Backup option lets you backup files on the ISA-4000 HDD. Follow these instructions:
1. Click Maintenance.
2. Click Backup. The Backup Job List screen appears:
Figure 5-38: Maintenance backup list
3. Click Add to setup a new backup job. The following screen appears:
Figure 5-39: Adding a scheduled backup job
The field definitions are as follows:
Backup Name
Members to Backup
Type a name for this backup. The default name is today’s date
and time.
All Members – click this radio button to backup all system,
user, and workgroup files.
ecific Users and Groups – click this radio button to s
S
ecify
« 50 »
Page 58

Files to Backup
Method of Backup
which users and groups will be backed up. Move the users and
groups to be backed up to the “Users selected” and
“Workgroups Selected” list boxes by clicking the appropriate
arrows.
Select which files are to be backed up from the drop-down list.
You can choose to backup all files or files in a range of from 1
to 31 days old.
Select the backup method:
Windows File Sharing (SMB) – select this method when using
the SMB protocol:
• Computer Name: type the name of the server or PC that
the files will be backed up to.
• Share Directory: type the destination backup directory.
• User Name: type the user name to access the backup
directory drive.
• Password: type the password to access the backup
directory drive.
File Transfer Protocol (FTP) – select this method to use FTP
to backup files:
• Location: type the location that the files will be backed up to
• Share Directory: type the destination backup directory
• User Name: type the user name to access the backup
directory drive.
• Password: type the password to access the backup
directory drive.
Network Files System (NFS) – select this method to use NFS
to backup files:
• Location: type the location of the files to be backed up
• Share Directory: type the destination backup directory
Backup Interval
4. Click Save.
5. Click Detail next to a backup file entry on the Scheduled Backup List screen to view
information about the backup job:
Select when you want the backup to occur from the drop-down
menu
5.5.2 Restore
The Restore option lets you restore backed up files to the ISA-4000 HDD. Follow these instructions:
Automatic Restore
6. Click Remove to delete the selected backup job.
1. Click Maintenance.
« 51 »
Page 59

2. Click Restore. The Restore screen appears:
Figure 5-40: Maintenance restore screen
3. Click the Restore button
The following screen appears:
4. Click Restore. to restore files from backup:
Manual Restore
1. Click Maintenance.
2. Click Restore. The Restore screen appears:
Figure 5-41: Maintenance restore screen
3. Click Restore Manually to view the following screen:
« 52 »
Page 60

Figure 5-42: Restore manually screen
The field definitions are as follows:
Backup Name
Original Method of
Backup
Type the name of the backup to be restored.
Select the method that was used to backup the file:
• Windows File Sharing (SMB)
• File Transfer Protocol (FTP)
• Network Files System (NFS)
Note: refer to the previous section for more detailed
information on these fields.
5.6 U
Location to Restore
Files
4. After filling in the required fields, click Restore.
SAGE INFORMATION
The Usage Information menu provides you with tools to monitor web page, network, and HDD user
activity.
On the Administration menu, click Usage Information to view the options for this field:
Select where you want the files to be restored from the dropdown list. The default is /home/groups/restore/. Choose
Replace Existing Files if you want the files to be restored in
their original location.
« 53 »
Page 61

Figure 5-43: Usage Information menu
5.6.1 Web Usage
This feature enables you to monitor web page traffic.
1. Click Usage Information.
2. Click Web. The following screen appears:
Figure 5-44: Web Page Usage screen
The Web Usage screen provides several options for viewing web traffic statistics. These options are
described as follows:
Web Usage
This item enables you to view the length of time the reports cover for
monitoring web usage.
« 54 »
Page 62

Web Usage – Summary
Client Hosts Accessed
Statistics from – displays the start date for monitoring web usage
statistics. To set the current date for this field, click Reset
To – displays the end date for monitoring web usage statistics.
Refresh – click this button to display the latest web usage statistics
This item displays an overview of web usage statistics. Click
Summary at the top of the screen to view the summary item:
Total Number of Requests – displays the number of times the
website was accessed in the coverage period.
Number of Bad Requests – displays the number of times users tried
and then failed to access the website.
Number of Client Hosts Accessed – displays the number of
individual computers that accessed the website.
Number of Pages Views – displays the number of individual pages
accessed on the website.
Number of Bytes Transferred – displays the total number of bytes
transferred by visitors to the website.
This item showing the name and IP address of the visitors who most
often access the website:
Page Views
Daily Statistics
Client Host – shows the name and IP address of the visitor’s
computer.
Accesses– displays the numbers of how many times the visitor
accessed the website.
This item showing the file name of the most commonly visited website
pages and frequency of visits:
Page – shows the name of the web page.
Accesses – displays the numbers of times the page is visited.
This item showing how often the website is viewed by date:
« 55 »
Page 63

Hourly Requested
Date – date the statistics were gathered
Accesses – displays the numbers showing the frequency of websit e
visits.
This item showing how often the website is viewed by hour:
Hour – time (24-hour clock) that the statistics were gathered.
Requests – displays the numbers showing the frequency of website
visits during the time period.
5.6.2 Disk Usage
This feature enables you to monitor how much HDD space is being used.
1. Click Usage Information.
2. Click Disk. The following screen appears:
Figure 5-45: Disk usage screen
The Disk Usage screen provides options for viewing hard disk drive use statistics. These options are
described as follows:
« 56 »
Page 64

Disk Usage
Disk Usage – Summary
This item enables you to view the last date that the statistics were
made:
Last Checked – displays the date for monitoring disk drive usage
statistics.
Refresh – click this button to display the latest disk drive usage
statistics
This item displays an overview of disk drive usage statistics. Click
Summary at the top of the screen to view the summary item:
Users
Partition – displays the HDD partition
Used (MB) – displays the HDD space used
Free (MB) – displays the HDD space not being used
Total (MB) – displays the total capacity of the partition
Percentage Used – displays bar graphs and a numerical value
showing what percentage of the partition is being used
Shows disk drive usage statistics based on individual users.
Groups
User Name – displays the name of the user
Used (MB) – displays the number of megabytes the user is currently
using
Allowed (MB) – displays the total number of megabytes the user is
allowed to use
Percentage Used – displays bar graphs and a numerical value
showing what percentage of the allowable disk space is being used
Shows disk drive usage statistics based on groups.
« 57 »
Page 65
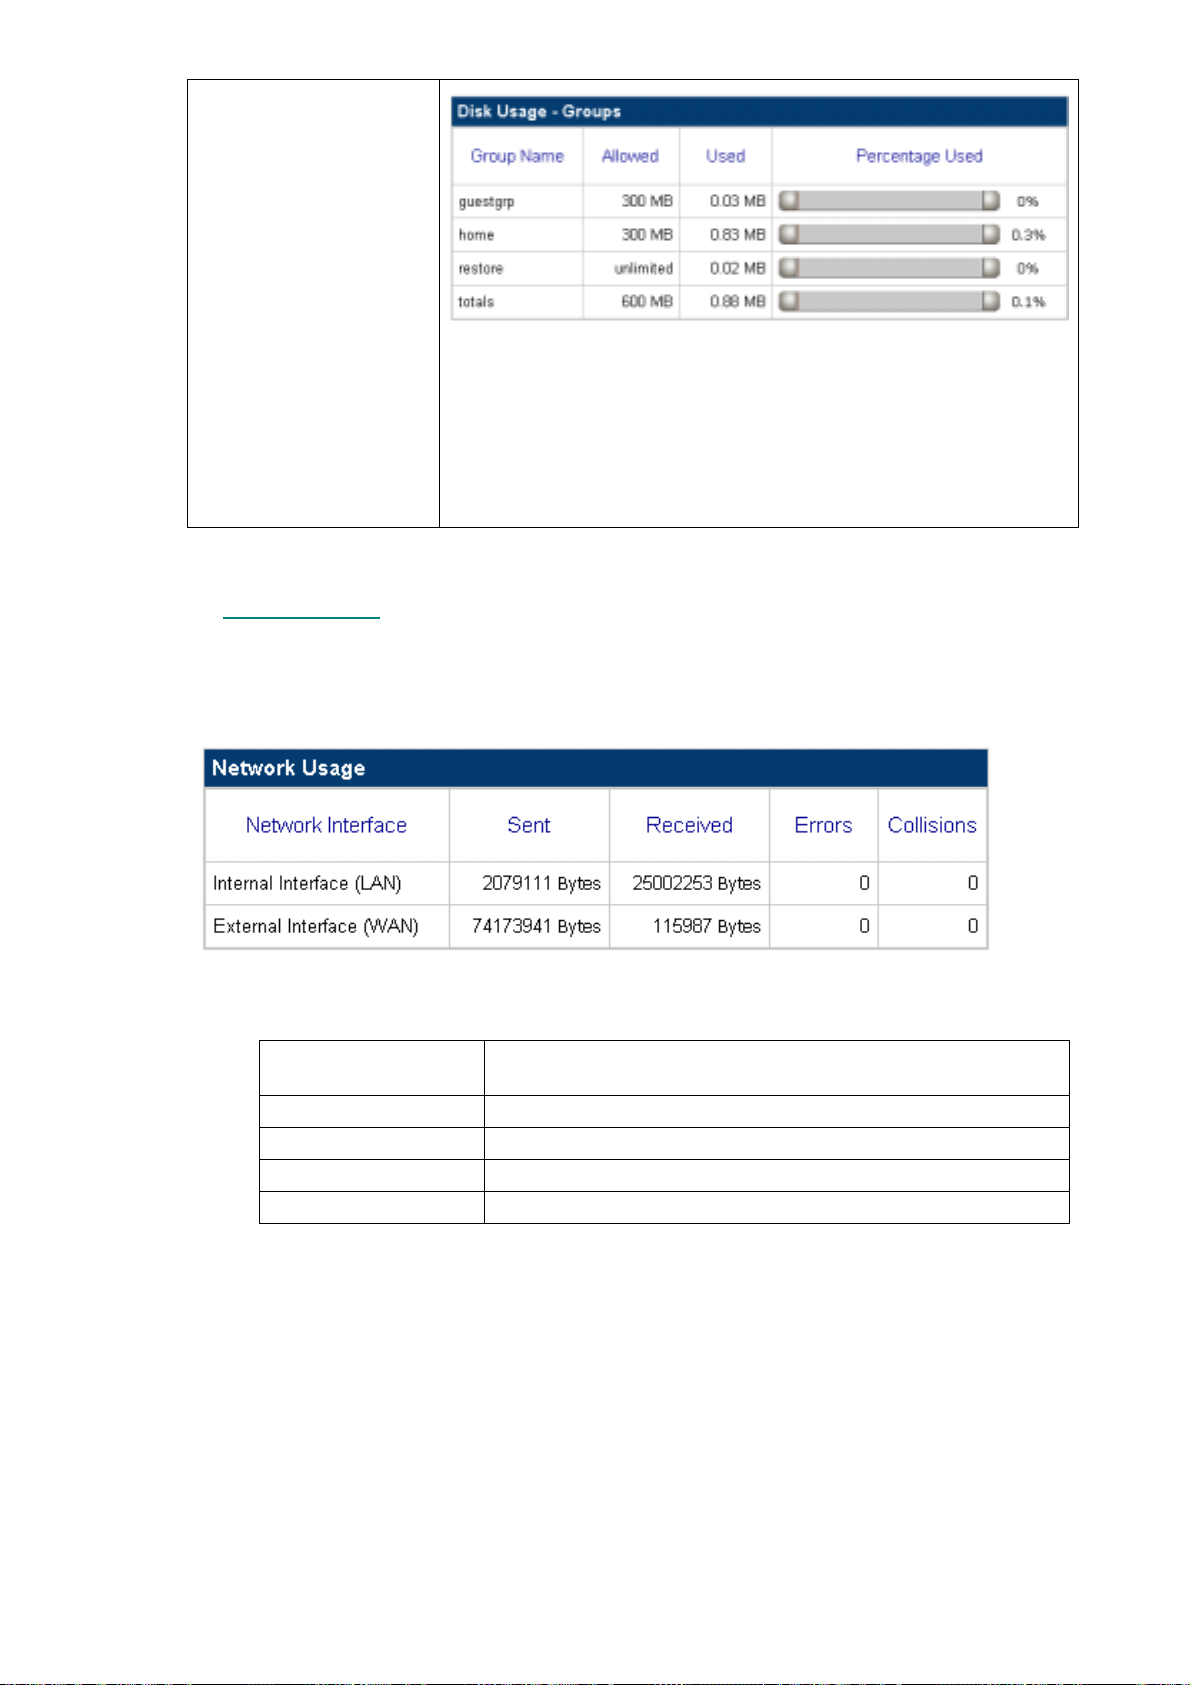
Group Name – displays the name of the group
Used (MB) – displays the number of megabytes the group is
currently using
Allowed (MB) – displays the total number of megabytes the group is
allowed to use
Percentage Used – displays bar graphs and a numerical value
showing what percentage of the allowable disk space is being used
5.6.3 Network Usage
This feature enables you to monitor network traffic.
1. Click Usage Information.
2. Click Network. The following screen appears:
5.7 S
Figure 5-46: Network usage screen
The field definitions are as follows:
Network Interface
Sent
Received
Errors
Collisions
OFTWARE UPDATE
The software update is an enhanced function allowing the user to update his or her ISA-4000
system software to the newest version from the Internet. It also uninstalls the previously-installe d
system software, and allows the user specify an interval of time for the server to periodically check
for software updates from the Internet. Please regularly check PLANET’s website to see if any new
software version of the ISA-4000 available
Displays the WAN (eth1) and LAN (eth0) interfaces being
monitored
Displays the number of bytes sent on the interface
Displays the number of bytes received on the interface
Displays the number of packet errors
Displays the number of collisions
« 58 »
Page 66

Figure 5-47: Software update menu
5.7.1.1 S
1. Click Software Update.
2. Click Install Manually. The New Software List menu appears:
OFTWARE UPDATE
Figure 5-48: Software update
3. Click Browse and go to location of the file to be update software.
4. Click the Prepare button to install the new software.
5.7.1.2 U
1. Click Software Update.
2. Click Installed Software. The Installed Software List appears:
NINSTALL SOFTWARE
Figure 5-49: Installed software list
3. Click the Delete icon next to the software that you want to uninstall. You are prompted to
confirm deletion:
« 59 »
Page 67

4. Click OK to uninstall the software.
5.8 P
ERSONAL PROFILE
In the Personal Profile menu, the administrator's account, personal information and disk usage may all be managed. Click Personal Profile:
The Personal Profile menu appears:
Software items with the gray delete icon cannot be uninstalled.
Figure 5-50: Administrator personal profile
5.8.1 Account
In the Account screen, the administrator's account may be maintained. Click Account; the Account
screen appears:
« 60 »
Page 68
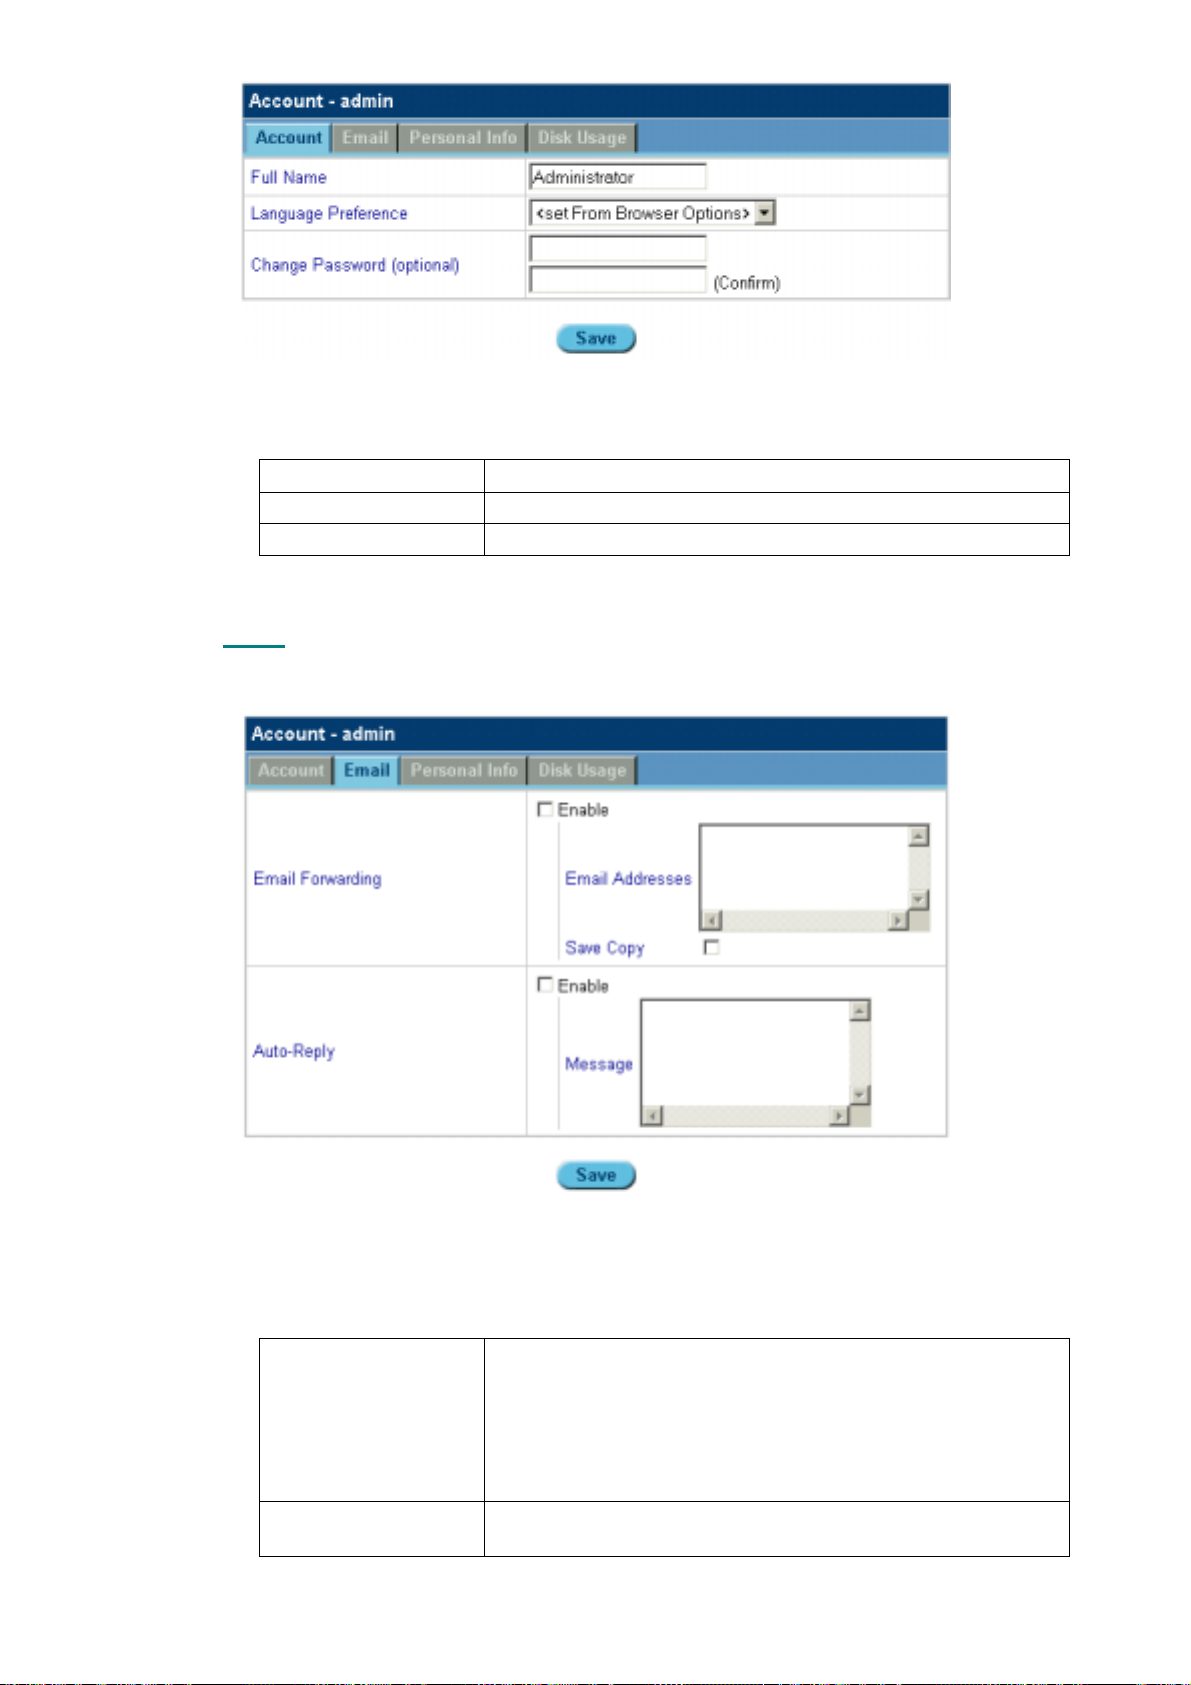
Figure 5-51: Personal profile account screen
Field definitions are as follows:
Full Name
Language Preference
Change Password
After making your changes click Save.
the full name of the administrator
select the display language
the administrator's password. This must be entered twice.
5.8.2 Email
This screen enables you to set email preferences. Click Email. The Email Settings screen opens:
Figure 5-52: Personal Profile Email settings
Field definitions are as follows:
Email Forwarding
Auto-Reply
Enable – check the box to enable your emails to be forwarded
to the email addresses listed in the text list box.
Email addresses – type the email addresses you want your
email to be forwarded to.
Save copy – check the box to save a copy of the email to your
local email account.
Enable – Check the box to enable a vacation message reply to
be sent to any incoming messages.
« 61 »
Page 69

Message – sends an automatic response to all emails
informing the sender that you are on vacation.
After making your changes click Save.
5.8.3 Personal Info
This is the information for the company that owns this ISA-4000. Click Personal Info. The Personal
Info screen appears:
Figure 5-53: Personal profile personal information screen
The field definitions are as follows
Home Page Address
Phone Number
Fax Number
Address
Description
After making your changes click Save.
Type the URL of your company home page
Type your company’s phone number
Type your company’s fax number
Type your company’s address
Type additional information about your company here.
5.8.4 Disk Usage
The Disk Usage screen displays how the total disk space is being utilized. Click Disk Usage; the
Disk Usage screen appears:
Figure 5-54: Personal Profile Disk Usage screen
« 62 »
Page 70

The field definitions are as follows:
Disk Space Used
(MB)
Disk Space Free
(MB)
Percentage Used
This concludes this chapter. The next chapter explains how to configure user settings.
The disk space for administrator that is currently being used
The disk space for administrator that is currently not being
used.
The percentage of the disk space for administrator that is
currently being used.
« 63 »
Page 71
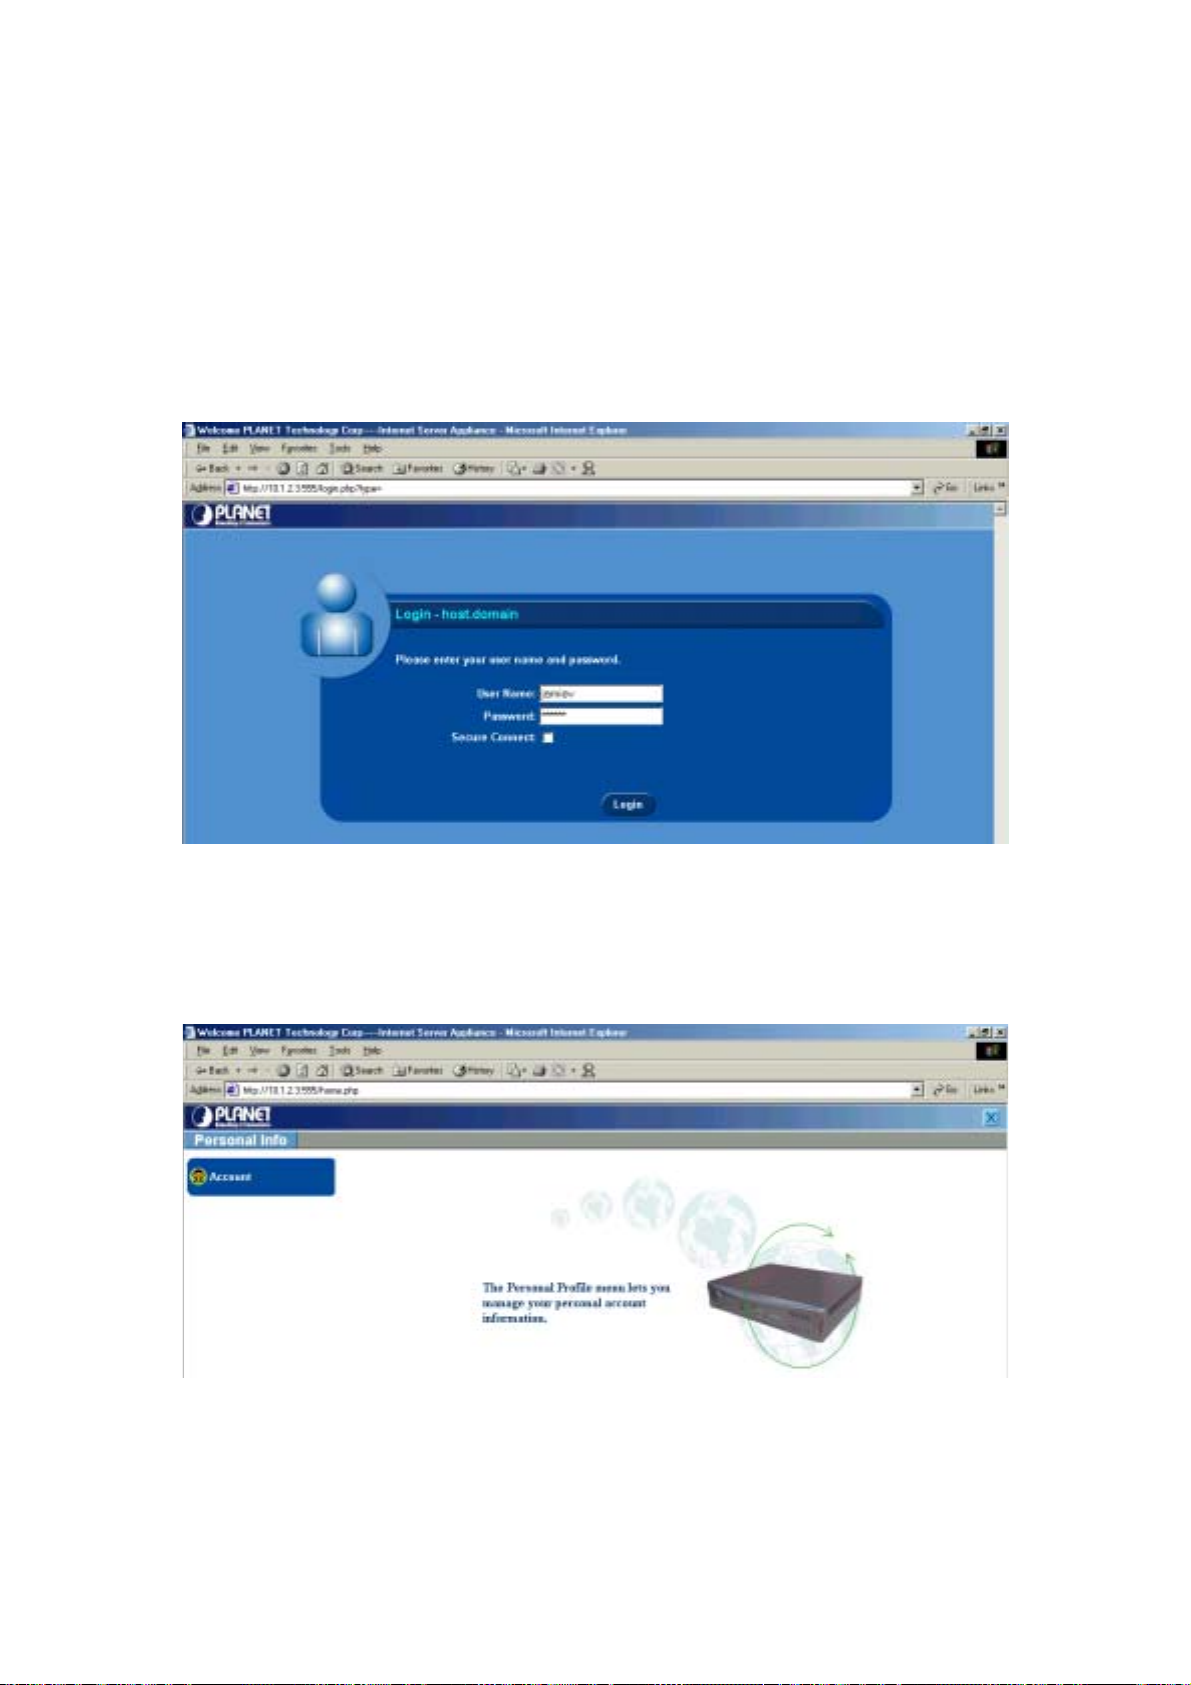
CChhaapptteerr 66::
This chapter shows users how to maintain their personal accounts. The Personal Profile screen
appears after a user has logged into the ISA-4000. The personal profile menu allows users to
configure their account, personal info and disk usage settings.
UUsseerr''ss GGuuiiddee
6.1 L
OGGING IN AS AN USER
Follow these instructions to log in as a user.
1. Enter the following URL in your browser:
http://<hostname>.<domainame>:555
The login screen appears:
Figure 6-1: Login screen
2. Enter a registered user name and password. If you want to establish a secure connection,
click the Secure Connect checkbox; an SSL (Secure Sockets Layer) connection between
your browser and the ISA-4000 will then be established.
3. Click Login. After you have logged into the ISA-4000, the Users screen appears:
Figure 6-2: User’s personal profile screen
The menu items are described as follows.
Page 72
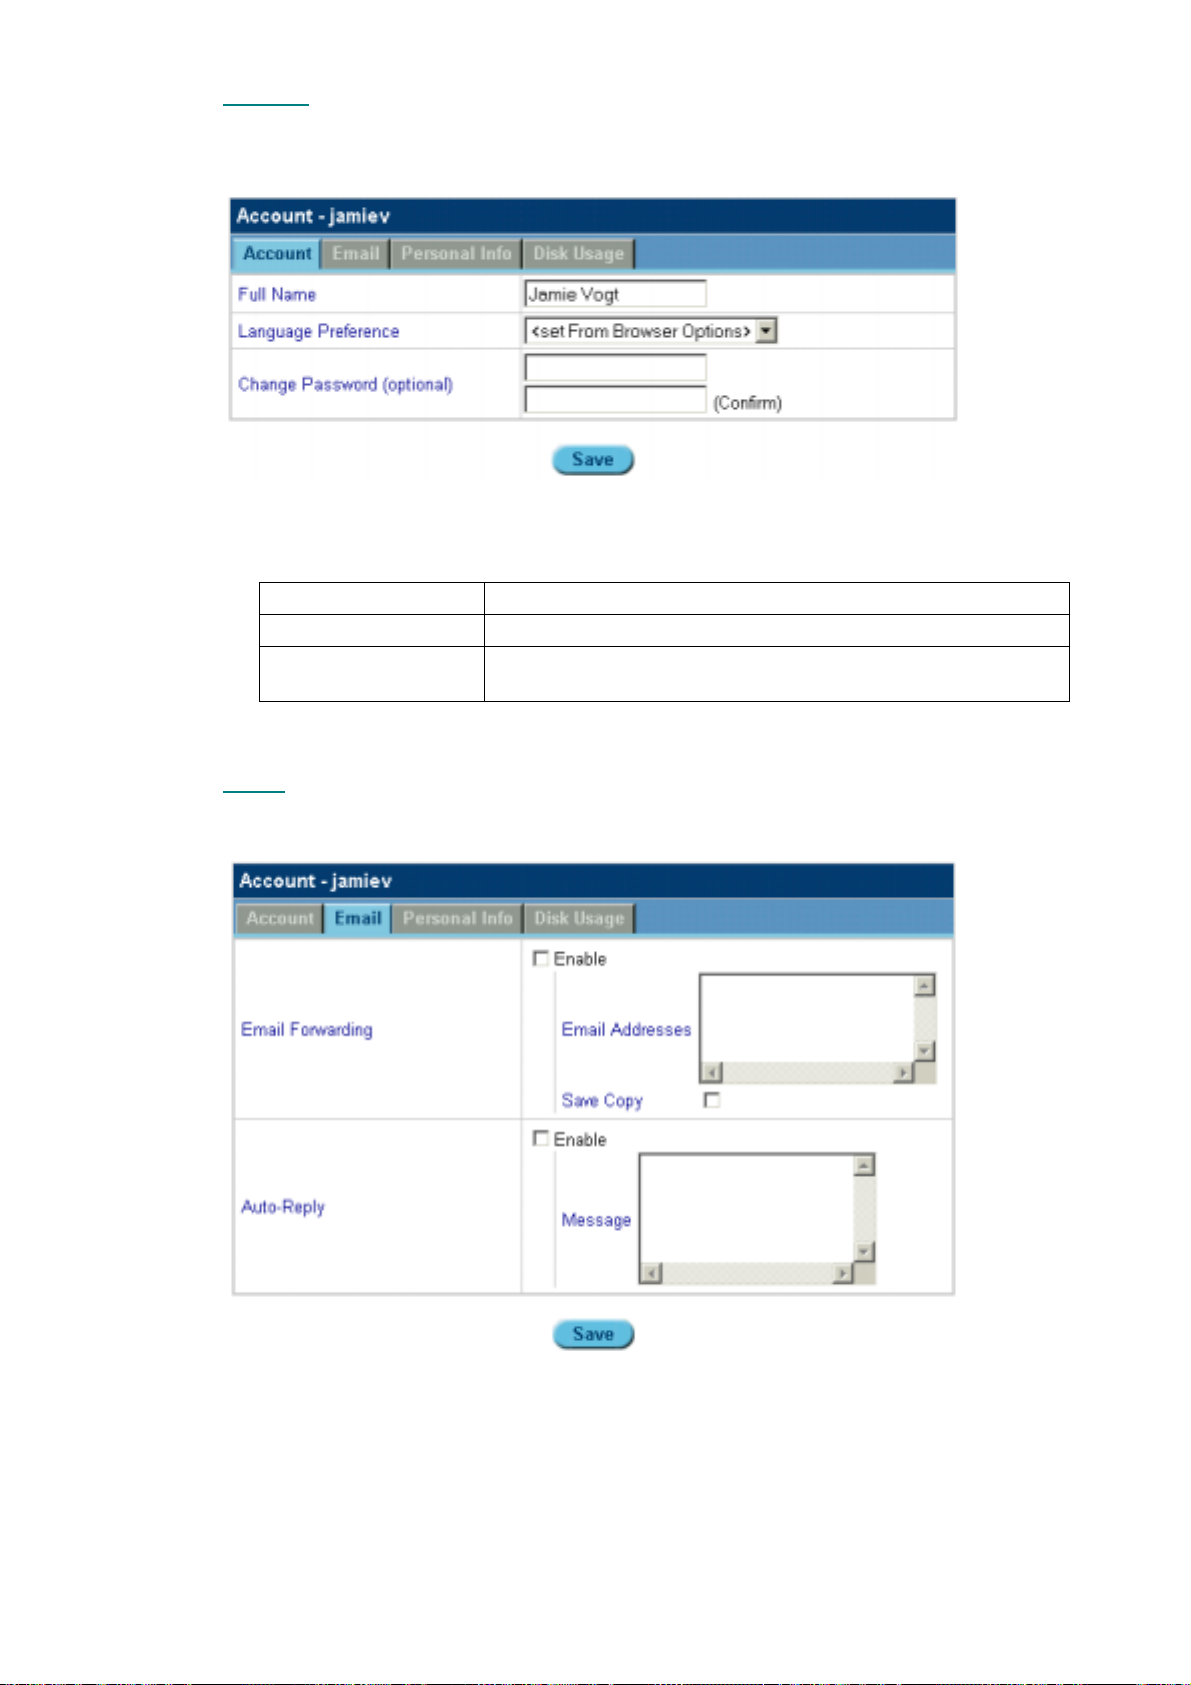
6.1.1 Account
The Account settings allow you to maintain your personal account. Click Account; the Account
screen appears
Figure 6-3: User account screen
The field definitions are as follows:
Full Name
Language Preference
Change Password
After making your changes click Save.
Your account name
Select the display language
Your account password. This must be entered twice. To
change the password, you must enter it twice.
6.1.2 Email
This screen enables you to set email preferences. Click Email. The Email Settings screen opens:
Figure 6-4: User personal – profile email settings
« 65 »
Page 73
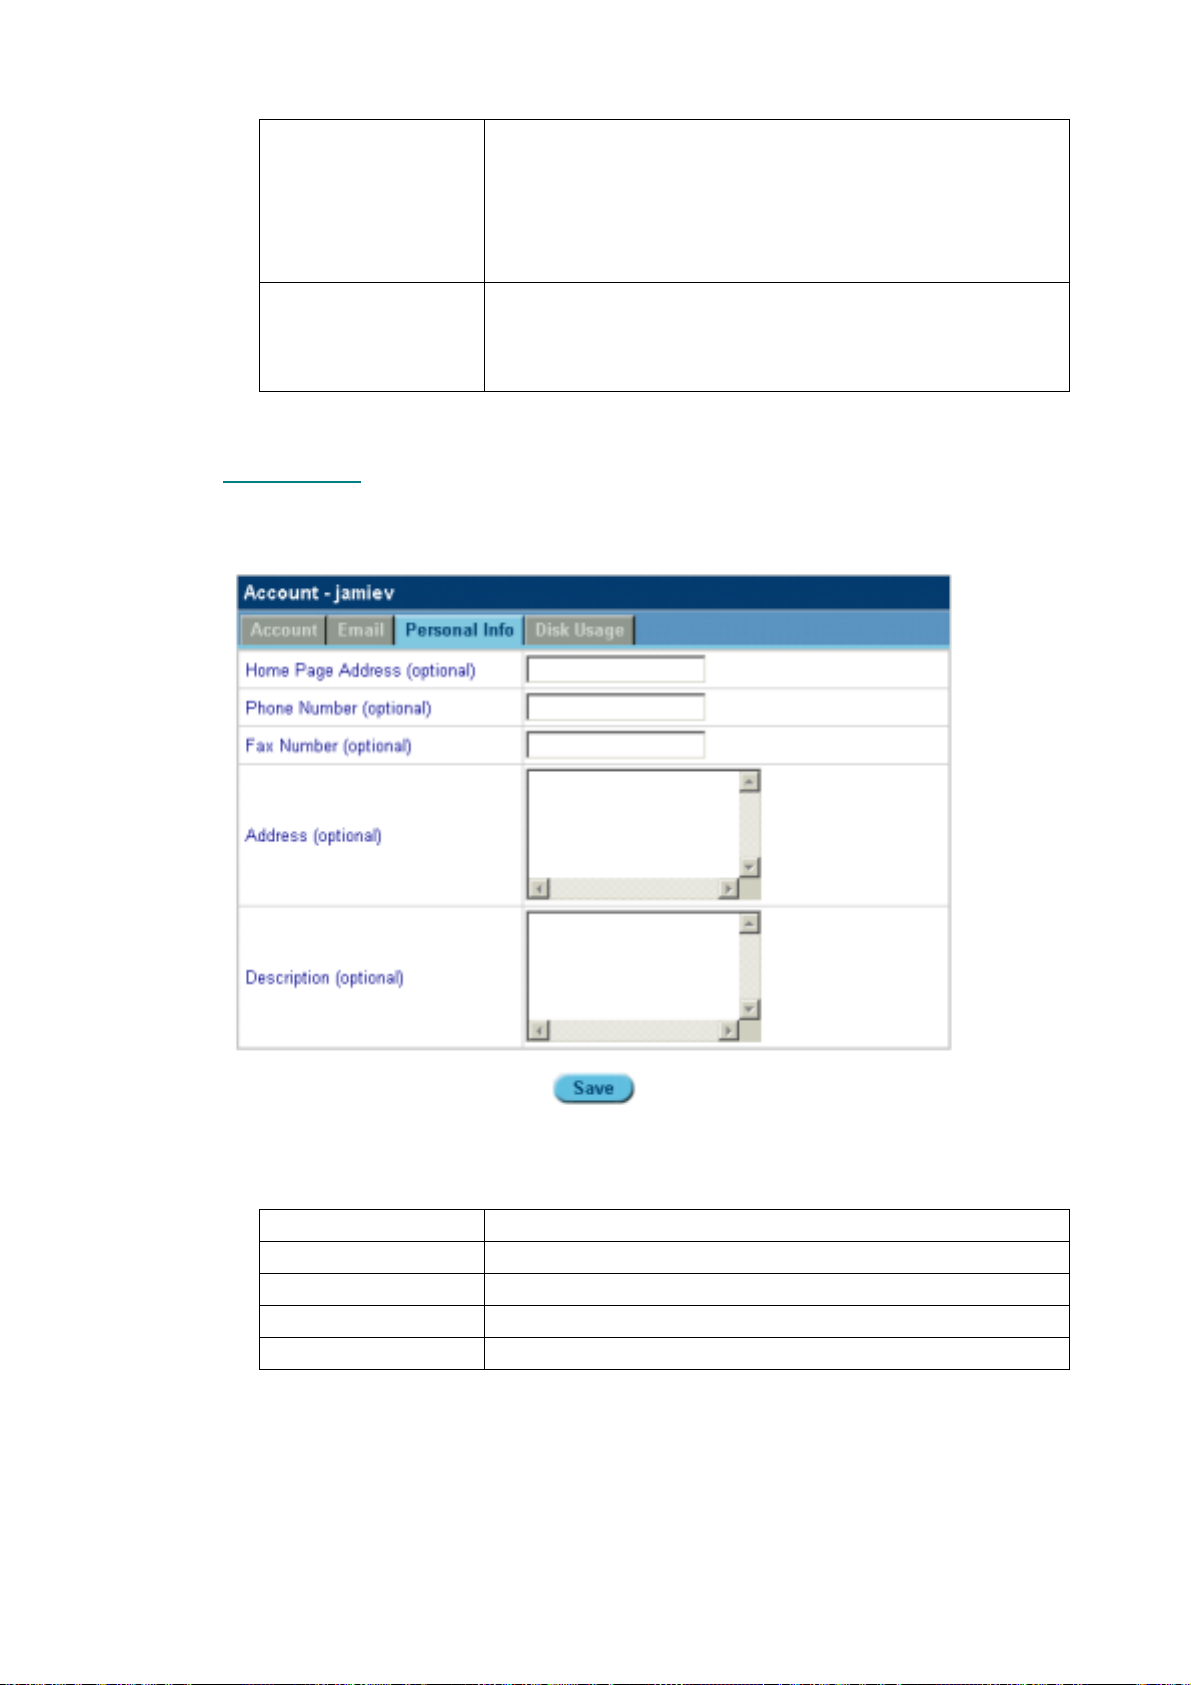
Field definitions are as follows:
Email Forwarding
Auto-Reply
After making your changes click Save.
Enable – check the box to enable your emails to be forwarded
to the email addresses listed in the text list box.
Email addresses – type the email addresses you want your
email to be forwarded to.
Save copy – check the box to save a copy of the email to your
local email account.
Enable – Check the box to enable a vacation message reply to
be sent to any incoming messages.
Message – sends an automatic response to all emails
informing the sender that you are on vacation.
6.1.3 Personal Info
This screen contains your personal information. Click Personal Info. The Personal Info screen
appears:
Figure 6-5: User personal profile – personal information screen
The field definitions are as follows
Web Page Address
Phone Number
Fax Number
Address
Remarks
After making your changes click Save.
Type the URL of your personal home page
Type your phone number
Type your fax number
Type your address
Type additional information about yourself here.
« 66 »
Page 74

6.1.4 Disk Usage
The Disk Usage screen displays how the total disk space is being utilized. Click Disk Usage; the
Disk Usage screen appears:
Figure 6-6: User personal profile – disk usage screen
The field definitions are as follows:
Disk Space Used
(MB)
Disk Space Free
(MB)
Percentage Used
This concludes this chapter. The next chapter explains how to configure user settings.
The disk space you are currently using
The disk space you are not using
The percentage of the disk space that is allocated to you that is
currently being used
« 67 »
Page 75

CChhaapptteerr 77::
Included with the ISA-4000 is an System Installation CD-ROM that allows users to install the system
onto a new hard disk, or to restore a fresh OS to a corrupted system hard disk. This chapter
explains how to install an HDD onto the ISA-4000 and how to install the system.
SSyysstteemm IInnssttaallll aanndd RReessttoorree
7.1 I
NSTALLING THE
Follow these instructions to install an HDD in the ISA-4000:
1. Unscrew the mounting
screws that secure the
cover of your ISA-4000
unit, and slide the cover in
the direction of the arrow:
The System Installation CD-ROM erases all the data on the hard
disk. Make sure to backup your data before performing the system
restore procedure!
HDD
2. Lift up to remove the
cover:
Page 76

3. Disconnect the LAN array
PCB card power cable and
flat cable:
To remove the flat cable,
press both sides of the flat
cable connector in the
direction of the arrows (A)
to loosen the flat cable,
and slide the flat cable out
(B):
ISA-4000 cable disconnection
4. Unscrew the four screws
and remove the drive
mounting tray from the
ISA-4000 chassis as
shown:
« 69 »
Page 77

5. First rotate the end of the
drive mounting tray in the
direction of the arrow (A),
then slide the LAN port
array from the rear bracket
(B):
6. Flip the drive mounting
tray over and secure the
HDD to it using four
screws as shown:
« 70 »
Page 78

7. Before reinstalling the
drive mounting tray,
connect the HDD power
and IDE connectors:
8. First insert the LAN array
into the rear bracket (A),
and then slide the end of
the hard disk mounting
tray down (B):
9. Reconnect the LAN array
power cable and flat cable.
To install the flat cable,
first insert the flat cable
into the connector (A), and
then push the connector
clamp in (B):
« 71 »
Page 79

10. Reinsert the hard disk
mounting tray screws:
11. Slide the chassis cover
over the chassis as
shown:
12. Slide the chassis cover in
and reinsert the chassis
cover screws:
« 72 »
Page 80
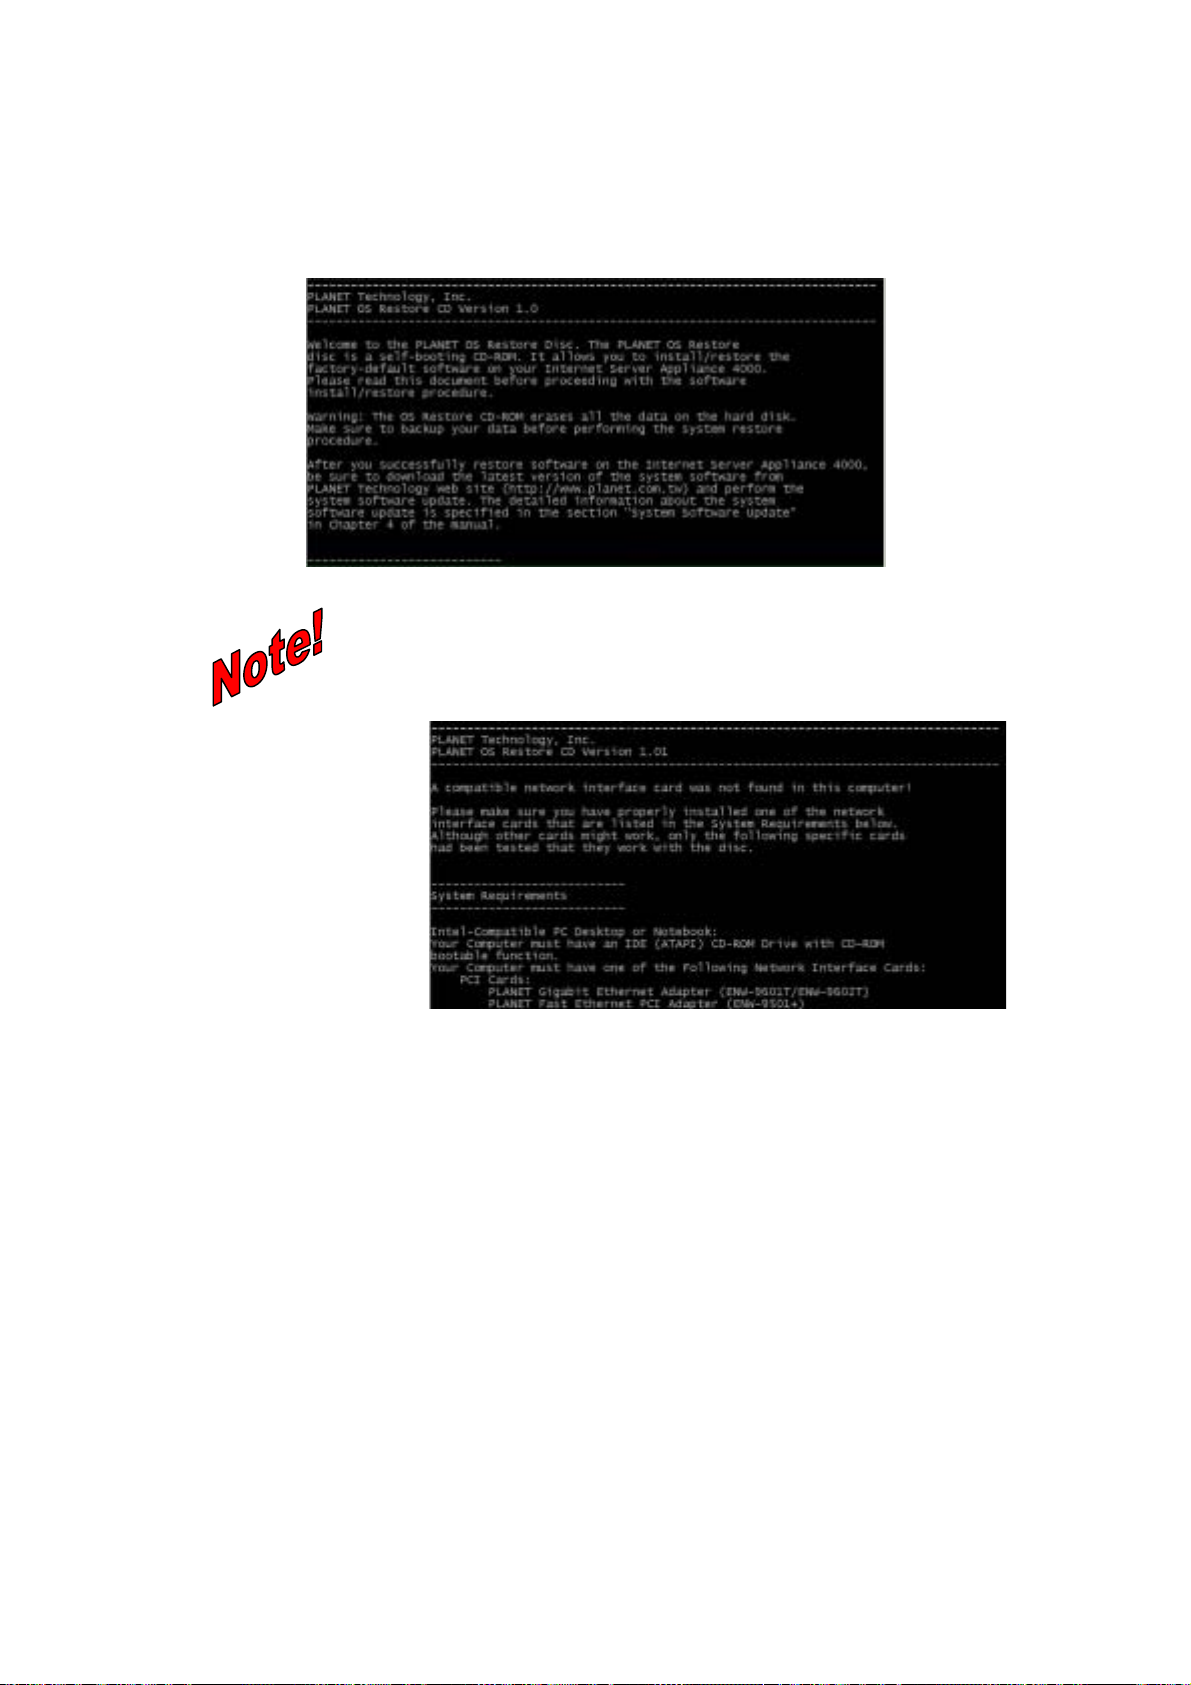
7.2 S
YSTEM RESTORATION PROCEDURE
Before performing the system restoration procedure, ensure that the CD-ROM is set as the first
bootable device in BIOS. Refer to your BIOS documentation or online help for information on setting
the boot devices.
1. Insert the System Installation CD into the bootable CD-ROM drive of the host PC.
2. Reboot the host PC with the Restore CD in the drive. The following screen appears:
If setup does not detect a supported network card installed on your
system, you will see the following screen:
Refer to your network card documentation to see if your card is
one that is on the list shown. If it is listed, and you still see the
screen above, contact your dealer for assistance.
3. Connect a straight cable between the ISA-4000 uplink port and a hub or switch, and a
straight cable between the ISA-4000 LAN port and a PC.
4. Connect a power cord (connected to an AC power source) to the ISA-4000.
5. Locate the buttons on the front panel of the ISA-4000.
6. Hold down any of the buttons on the front panel as the ISA-4000 is powering up.
7. Release the button after the LCD displays the text "boot from net.”
8. The LCD displays the text “please power off now” after done.
9. Remove the CD from your PC, and reboot your computer and ISA-4000.
« 73 »
Page 81

A.1 LCD Console Overview
The ISA-4000 has a simple LCD console. A 2x16-character LCD display, it acts as a system console
when used with the three buttons.
When the system starts up, the systems console displays the ISA-4000's local host name and IP
address, for example, "host.domain" on the first line and "10.1.2.3" on the second line. This screen
displaying the local host and IP address is called the "main screen.”
AAppppeennddiixx AA:: LLCCDD CCoonnssoollee
The ISA-4000 has three buttons. The
for menus, and the
the following functions:
• Display Network Settings
• Setup Network
• Reboot
• Reset the Network
• Reset the Firewall
• Exit
• Shutdown
The detailed procedures for each function are as follows.
button is for selecting items. Using these three buttons, users may perform
A.2 Displaying Network Settings
1. Press the Menu button ( ) until "SELECT:" and "Network Settings" is displayed on the
console.
2. Press the Select button (
console.
3. Press the Select button (
console.
button is for shutting down the system. The button is
); "Default Gateway:" and "10.1.2.254" will be displayed on the
) again; "Internal IP:" and "10.1.2.3" will be displayed on the
4. Press the Select button (
the console.
5. Press the Select button (
the console.
6. Press the Select button (
displayed on the console.
7. Press the Select button (
A.3 Setup Network
1. Press the Menu button ( ) twice; "SELECT:" and "Setup Network" will be displayed on the
console.
2. Press the Select button (
A.4 Reboot
1. Press the Menu button ( ) three times; "SELECT:" and "REBOOT" will be displayed on
the console.
2. Press the Select button (
) again; "Internal NetMask" and "255.0.0.0" will be displayed on
) again; "External IP:" and "61.218.188.88" will be displayed on
) again; "External NetMask:" and "255.255.255.248" will be
) again to return to the main screen.
) and the ISA-4000 refreshes the LAN Port IP address.
) and the ISA-4000 will reboot the system.
Page 82

A.5 Reset Network
1. Press the Menu button ( ) four times; "SELECT:" and "RESET NETWORK" will be
displayed on the console.
2. Press the Select button (
A.6 Reset Firewall
1. Press the Menu button ( ) five times; "SELECT:" and "RESET FIREWALL" will be
displayed on the console.
2. Press the Select button (
filtering policies.
A.7 Exit
1. Press the Menu button ( ) six times; "SELECT:" and "EXIT" will be displayed on the
console.
2. Press the Select button (
A.8 Shutdown
1. Press the Shutdown button ( ) once; "One More to Shutdown" will be displayed on the
console.
2. The console will return to the main screen if the Menu button (
3. The system will shutdown if the Shutdown button (
) twice, and the ISA-4000 will reset the network.
) twice, and the ISA-4000 will clear out all of the firewall's
), and the LCD console will return to the main screen.
) is pressed.
) is pressed again.
« 75 »
Page 83

AAppppeennddiixx BB:: PPrroodduucctt SSppeecciiffiiccaattiioonnss
B.1 PLANET Internet Server Appliance 4000
B.1.1 Software Features
Browser-Based User Interface
International Language Support
Auto Configure Network
Web Publishing
Web Caching
Email Service
Security
IP Sharing
Cross-Platform file service
Internet Authentication
Enhanced Backup/Restore
B.1.2 Hardware
CPU
Memory
Network
Storage
Communication
Display
LED
Power
Environment
Regulatory
Dimensions
IE and Netscape
I18N
DHCP, DNS and NAT
CGI, Perl and PHP scripting
Proxy and Web Caching server
POP3, IMAP4, SMTP
128-bit SSL
NAT
Windows, Mac OS and FTP
PPPoE
Scheduled backup and restore policy
AMD SC520ssor
16KB on-chip L1 Cache
128 MB 66 MHz 32-bit SDRAM (up to 256MB)
WAN - 10/100 Base-T Ethernet network interface
LAN - 10/100 Base-T Ethernet network interface
One ATA IDE interface
One RS-232 manufacture console interface
16X2 characters LCD panel
Power, HD Activity, LAN LINK/ACT, WAN LINK/ACT
LEDs
Rear – 4 LAN LINK/ACT LEDs for switch
Switching power supply
Input rating from 100V~240V, 50/60Hz
Power consumption: MAX 8 watts (256MB RAM, HD
excluded)
Operating - 32º to 108º F (0º to 40º C), 10% to 90%
Humidity (non-condensing)
Non-operating - 14º to 122º F (-10º to 50º C), 5% to 93%
Humidity (non-condensing)
CE Class B, FCC Part 15 Subpart B, VCCI Class B
8.5 x 5.75 x 1.625 inches
(21.59 x 14.605 x 4.128 cm
Page 84

B.2 Supported Network Interface Card
Your Computer must have one of the Following Network Interface Cards:
B.2.1 PCI Cards
• PLANET Gigabit Ethernet Adapter (ENE-9601T / ENW-9602T)
• PLANET Fast Ethernet PCI Adapter (ENW-9501+)
• PLANET Fast Ethernet PCI Adapter (ENW9503 / ENW-9504)
• Intel PRO/100 S Desktop Adapter (PILA8460)
• Intel PRO/100+ Server Adapter (PILA8470B)
• Linksys EtherFast 10/100 LAN Card (LNE100TX)
• Netgear Fast Ethernet PCI Adapter (FA311TX)
• 3Com Fast EtherLink XL PCI NIC (3C905B-TX)
• 3Com EtherLink 10/100 PCI Network Interface Card (3C905C-TX-M)
• 3Com OfficeConnect Fast Ethernet NIC (3CSOHO100-TX)
• D-Link DFE-530TX+ (DFE-530TX+)
B.2.2 PCMCIA Cards
• Netgear Fast Ethernet PCMCIA Adapter (FA4 10TX)
• 3Com Megahertz 10/100 LAN PC Card (3CCFE574BT)
• Xircom CardBus Ethernet 10/100 (CBE2-100BTX)
• D-Link 32-bit 10/100 Mbps CardBus Card (DFE-680TX)
B.2.3 Cables
Either one 100Base-T Ethernet Hub and two Standard Category 5 Cables, or one Category 5
Crossover Cable are required for installation.
« 77 »
Page 85
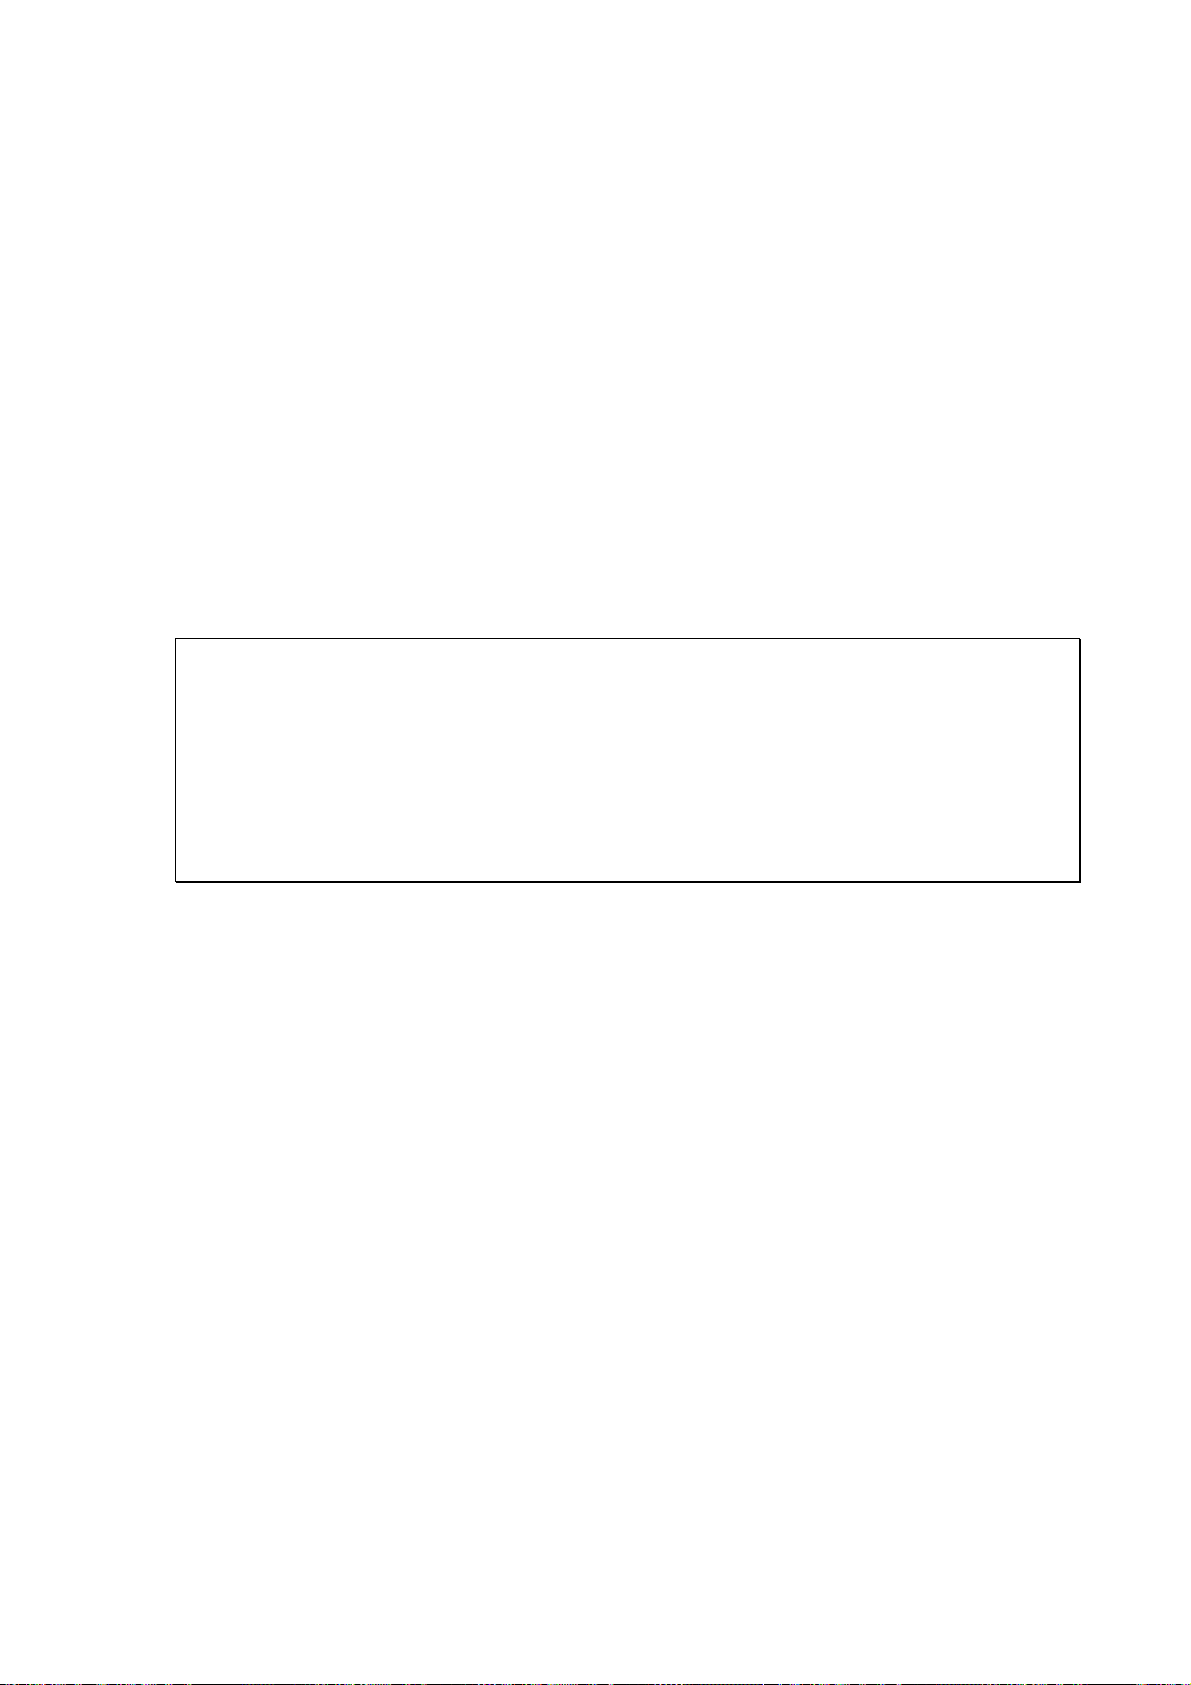
C.1 BSD Copyright
Copyright (c) 1982, 1986, 1990, 1991, 1993 The Regents of the University of California. All rights
reserved.
Redistribution and use in source and binary forms, with or without modification, are permitted
provided that the following conditions are met:
1. Redistributions of source code must retain the above copyright notice, this list of conditions
and the following disclaimer.
2. Redistributions in binary form must reproduce the above copyright notice, this list of
conditions and the following disclaimer in the documentation and/or other materials provided
with the distribution.
3. All advertising materials mentioning features or use of this software must display the
following acknowledgement:
This product includes software developed by the University of California, Berkeley, and its
contributors.
4. Neither the name of the University nor the names of its contributors may be used to endorse
or promote products derived from this software without specific prior written permissi on.
THIS SOFTWARE IS PROVIDED BY THE REGENTS AND CONTRIBUTORS ``AS IS'' AND ANY
EXPRESS OR IMPLIED WARRANTIES, INCLUDING, BUT NOT LIMITED TO, THE IMPLIED
WARRANTIES OF MERCHANTABILITY AND FITNESS FOR A PARTICULAR PURPOSE ARE
DISCLAIMED. IN NO EVENT SHALL THE REGENTS OR CONTRIBUTORS BE LIABLE FOR ANY
DIRECT, INDIRECT, INCIDENTAL, SPECIAL, EXEMPLARY, OR CONSEQUENTIAL DAMAGES
(INCLUDING, BUT NOT LIMITED TO, PROCUREMENT OF SUBSTITUTE GOODS OR
SERVICES; LOSS OF USE, DATA, OR PROFITS; OR BUSINESS INTERRUPTION) HOWEVER
CAUSED AND ON ANY THEORY OF LIABILITY, WHETHER IN CONTRACT, STRICT LIABILITY,
OR TORT (INCLUDING NEGLIGENCE OR OTHERWISE) ARISING IN ANY WAY OUT OF THE
USE OF THIS SOFTWARE, EVEN IF ADVISED OF THE POSSIBILITY OF SUCH DAMAGE.
AAppppeennddiixx CC:: LLiicceennsseess
C.2 GNU GENERAL PUBLIC LICENSE
Version 2, June 1991
Copyright (C) 1989, 1991 Free Software Foundation, Inc.
675 Mass Ave, Cambridge, MA 02139, USA
Everyone is permitted to copy and distribute verbatim copies of this license document, but changing
it is not allowed.
Preamble
The licenses for most software are designed to take away your freedom to share and change it. By
contrast, the GNU General Public License is intended to guarantee your freedom to share and
change free software—to make sure the software is free for all its users. This General Public
License applies to most of the Free Software Foundation's software and to any other program
whose authors commit to using it. (Some other Free Software Foundation software is covered by the
GNU Library General Public License instead.) You can apply it to your programs, too.
When we speak of free software, we are referring to freedom, not price. Our General Public
Licenses are designed to make sure that you have the freedom to distribute copies of free software
(and charge for this service if you wish), that you receive source code or can get it if you want it, that
you can change the software or use pieces of it in new free programs; and that you know you can do
these things.
To protect your rights, we need to make restrictions that forbid anyone to deny you these rights or to
ask you to surrender the rights. These restrictions translate to certain responsibilities for you if you
distribute copies of the software, or if you modify it.
Page 86

For example, if you distribute copies of such a program, whether gratis or for a fee, you must give
the recipients all the rights that you have. You must make sure that they, too, receive or can get the
source code. In addition, you must show them these terms so they know their rights.
We protect your rights with two steps:
(1) copyright the software, and
(2) offer you this license which gives you legal permission to copy, distribute and/or modify
the software.
Also, for each author's protection and ours, we want to make certain that everyone understands that
there is no warranty for this free software. If the software is modified by someone else and passed
on, we want its recipients to know that what they have is not the original, so that any problems
introduced by others will not reflect on the original authors' reputations.
Finally, any free program is threatened constantly by software patents. We wish to avoid the danger
that redistributors of a free program will individually obtain patent licenses, in effect making the
program proprietary. To prevent this, we have made it clear that any patent must be licensed for
everyone's free use or not licensed at all.
The precise terms and conditions for copying, distribution, and modification follow.
C.3 GNU GENERAL PUBLIC LICENSE
TERMS AND CONDITIONS FOR COPYING, DISTRIBUTION AND MODIFICATION
This License applies to any program or other work which contains a notice placed by the
0
copyright holder saying it may be distributed under the terms of this General Public License.
The "Program", below, refers to any such program or work, and a "work based on the Program"
means either the Program or any derivative work under copyright law: that is to say, a work
containing the Program or a portion of it, either verbatim or with modifications and/or translated into
another language. (Hereinafter, translation is included without limitation in the term "modification.”)
Each licensee is addressed as "you.”
Activities other than copying, distribution, and modification are not covered by this License; they are
outside its scope. The act of running the Program is not restricted, and the output from the Program
is covered only if its contents constitute a work based on the Program (independent of having been
made by running the Program). Whether that is true depends on what the Program does.
You may copy and distribute verbatim copies of the Program's source code as you receive it, in
any medium, provided that you conspicuously and appropriately publish on each copy an
1
appropriate copyright notice and disclaimer of warranty; keep intact all the notices that refer to this
License and to the absence of any warranty; and give any other recipients of the Program a copy of
this License along with the Program.
You may charge a fee for the physical act of transferring a copy, and you may at your option offer
warranty protection in exchange for a fee.
You may modify your copy or copies of the Program or any portion of it, thus forming a work
based on the Program, and copy and distribute such modifications or work under the terms of
2
Section 1 above, provided that you also meet all of these conditions:
a) You must cause the modified files to carry prominent notices stating that you changed the
files and the date of any change.
b) You must cause any work that you distribute or publish, that in whole or in part contains
or is derived from the Program or any part thereof, to be licensed as a whole at no charge to
all third parties under the terms of this License.
c) If the modified program normally reads commands interactively when run, you must
cause it, when started running for such interactive use in the most ordinary way, to print or
display an announcement including an appropriate copyright notice and a notice that there
is no warranty (or else, saying that you provide a warranty) and that users may redistribute
the program under these conditions, and telling the user how to view a copy of this License.
(Exception: if the Program itself is interactive but does not normally print such an
announcement, your work based on the Program is not required to print an announceme nt.)
« 79 »
Page 87

These requirements apply to the modified work as a whole. If identifiable sections of that work are
not derived from the Program, and can be reasonably considered independent and separate works
in themselves, then this License, and its terms, do not apply to those sections when you distribute
them as separate works. But when you distribute the same sections as part of a whole which is a
work based on the Program, the distribution of the whole must be on the terms of this License,
whose permissions for other licensees extend to the entire whole, and thus to each and every part
regardless of who wrote it.
Thus, it is not the intent of this section to claim rights or contest your rights to work written entirely by
you; rather, the intent is to exercise the right to control the distribution of derivative or collective
works based on the Program.
In addition, mere aggregation of another work not based on the Program with the Program (or with a
work based on the Program) on a volume of a storage or distribution medium does not bring the
other work under the scope of this License.
You may copy and distribute the Program (or a work based on it, under Section 2) in object
3
code or executable form under the terms of Sections 1 and 2 above provided that you also do
one of the following:
a) Accompany it with the complete corresponding machine-readable source code, which
must be distributed under the terms of Sections 1 and 2 above on a medium customarily
used for software interchange; or,
b) Accompany it with a written offer, valid for at least three years, to give any third party, for
a charge no more than your cost of physically performing source distribution, a complete
machine-readable copy of the corresponding source code, to be distributed under the terms
of Sections 1 and 2 above on a medium customarily used for software interchange; or,
c) Accompany it with the information you received as to the offer to distribute corresponding
source code. (This alternative is allowed only for noncommercial distribution and only if you
received the program in object code or executable form with such an offer, in accord with
Subsection b above.)
The source code for a work means the preferred form of the work for making modifications to it. For
an executable work, complete source code means all the source code for all modules it contains,
plus any associated interface definition files, plus the scripts used to control compilation and
installation of the executable. However, as a special exception, the source code distributed need not
include anything that is normally distributed (in either source or binary form) with the major
components (compiler, kernel, and so on) of the operating system on which the executable runs,
unless that component itself accompanies the executable.
If distribution of executable or object code is made by offering access to copy from a designated
place, then offering equivalent access to copy the source code from the same place counts as
distribution of the source code, even though third parties are not compelled to copy the source along
with the object code.
You may not copy, modify, sublicense, or distribute the Program except as expressly provided
under this License. Any attempt otherwise to copy, modify, sublicense or distribute the
4
Program is void, and will automatically terminate your rights under this License. However, parties
who have received copies, or rights, from you under this License will not have their licenses
terminated so long as such parties remain in full compliance.
You are not required to accept this License, since you have not signed it. However, nothing
5
else grants you permission to modify or distribute the Program or its derivative works. These
actions are prohibited by law if you do not accept this License. Therefore, by modifying or
distributing the Program (or any work based on the Program), you indicate your acceptance of this
License to do so, and all its terms and conditions for copying, distributing or modifying the Program
or works based on it.
Each time you redistribute the Program (or any work based on the Program), the recipient
6
automatically receives a license from the original licensor to copy, distribute or modify the
Program subject to these terms and conditions. You may not impose any further restrictions on the
recipients' exercise of the rights granted herein. You are not responsible for enforcing compliance by
third parties to this License.
« 80 »
Page 88

If, as a consequence of a court judgment or allegation of patent infringement or for any other
reason (not limited to patent issues), conditions are imposed on you (whether by court order,
7
agreement or otherwise) that contradict the conditions of this License, they do not excuse you from
the conditions of this License. If you cannot distribute so as to satisfy simultaneously your
obligations under this License and any other pertinent obligations, then as a consequence you may
not distribute the Program at all. For example, if a patent license would not permit royalty-free
redistribution of the Program by all those who receive copies directly or indirectly through you, then
the only way you could satisfy both it and this License would be to refrain entirely from distribution of
the Program.
If any portion of this section is held invalid or unenforceable under any particular circumstance, the
balance of the section is intended to apply and the section as a whole is intended to apply in other
circumstances.
It is not the purpose of this section to induce you to infringe any patents or other property right
claims or to contest validity of any such claims; this section has the sole purpose of protecting the
integrity of the free software distribution system, which is implemented by public license practices.
Many people have made generous contributions to the wide range of software distributed through
that system in reliance on consistent application of that system; it is up to the author/donor to decide
if he or she is willing to distribute software through any other system and a licensee cannot impose
that choice.
This section is intended to make thoroughly clear what is believed to be a consequence of the rest
of this License.
If the distribution and/or use of the Program is restricted in certain countries either by patents or
8
by copyrighted interfaces, the original copyright holder who places the Program under this
License may add an explicit geographical distribution limitation excluding those countries, so that
distribution is permitted only in or among countries not thus excluded. In such case, this License
incorporates the limitation as if written in the body of this License.
The Free Software Foundation may publish revised and/or new versions of the General Public
9
License from time to time. Such new versions will be similar in spirit to the present version, but
may differ in detail to address new problems or concerns.
Each version is given a distinguishing version number. If the Program specifies a version number of
this License which applies to it and "any later version", you have the option of following the terms
and conditions either of that version or of any later version published by the Free Software
Foundation. If the Program does not specify a version number of this License, you may choose any
version ever published by the Free Software Foundation.
If you wish to incorporate parts of the Program into other free programs whose distribution
10
copyrighted by the Free Software Foundation, write to the Free Software Foundation; we sometimes
make exceptions for this. Our decision will be guided by the two goals of preserving the free status
of all derivatives of our free software and of promoting the sharing and reuse of software generally.
NO WARRANTY
11
LAW. EXCEPT WHEN OTHERWISE STATED IN WRITING THE COPYRIGHT HOLDERS AND/OR
OTHER PARTIES PROVIDE THE PROGRAM "AS IS" WITHOUT WARRANTY OF ANY KIND,
EITHER EXPRESSED OR IMPLIED, INCLUDING, BUT NOT LIMITED TO, THE IMPLIED
WARRANTIES OF MERCHANTABILITY AND FITNESS FOR A PARTICULAR PURPOSE. THE
ENTIRE RISK AS TO THE QUALITY AND PERFORMANCE OF THE PROGRAM IS WITH YOU.
SHOULD THE PROGRAM PROVE DEFECTIVE, YOU ASSUME THE COST OF ALL NECESSARY
SERVICING, REPAIR OR CORRECTION.
conditions are different, write to the author to ask for permission. For software which is
BECAUSE THE PROGRAM IS LICENSED FREE OF CHARGE, THERE IS NO
WARRANTY FOR THE PROGRAM, TO THE EXTENT PERMITTED BY APPLICABLE
« 81 »
Page 89
IN NO EVENT UNLESS REQUIRED BY APPLICABLE LAW OR AGREED TO IN WRITING
12
REDISTRIBUTE THE PROGRAM AS PERMITTED ABOVE, BE LIABLE TO YOU FOR DAMAGES,
INCLUDING ANY GENERAL, SPECIAL, INCIDENTAL OR CONSEQUENTIAL DAMAGES
ARISING OUT OF THE USE OR INABILITY TO USE THE PROGRAM (INCLUDING BUT NOT
LIMITED TO LOSS OF DATA OR DATA BEING RENDERED INACCURATE OR LOSSES
SUSTAINED BY YOU OR THIRD PARTIES OR A FAILURE OF THE PROGRAM TO OPERATE
WITH ANY OTHER PROGRAMS), EVEN IF SUCH HOLDER OR OTHER PARTY HAS BEEN
ADVISED OF THE POSSIBILITY OF SUCH DAMAGES.
END OF TERMS AND CONDITIONS
WILL ANY COPYRIGHT HOLDER, OR ANY OTHER PARTY WHO MAY MODIFY AND/OR
C.4 How to Apply These Terms to Your New Programs
If you develop a new program, and you want it to be of the greatest possible use to the public, the
best way to achieve this is to make it free software which everyone can redistribute and change
under these terms.
To do so, attach the following notices to the program. It is safest to attach them to the start of each
source file to most effectively convey the exclusion of warranty; and each file should have at least
the "copyright" line and a pointer to where the full notice is found:
<One line to give the program's name and a brief idea of what it does.>
Copyright (C) 19yy <name of author>
This program is free software; you can redistribute it and/or modify it under the terms of the GNU
General Public License as published by the Free Software Foundation; either version 2 of the
License, or (at your option) any later version.
This program is distributed in the hope that it will be useful, but WITHOUT ANY WARRANTY;
without even the implied warranty of MERCHANTABILITY or FITNESS FOR A PARTICULAR
PURPOSE. See the GNU General Public License for more details.
You should have received a copy of the GNU General Public License along with this program; if not,
write to the Free Software Foundation, Inc., 675 Mass Ave, Cambridge, MA 02139, USA.
Also, add information on how to contact you by electronic and paper mail.
If the program is interactive, make it output a short notice like this when it starts in an interactive
mode:
Gnomovision version 69, Copyright (C) 19yy name of author
Gnomovision comes with ABSOLUTELY NO WARRANTY; for details type `show w'.
This is free software, and you are welcome to redistribute it under certain conditions; type `show c'
for details.
The hypothetical commands `show w' and `show c' should show the appropriate parts of the
General Public License. Of course, the commands you use may be called something other than
`show w' and `show c'; they could even be mouse-clicks or menu items--whatever suits your
program.
You should also get your employer (if you work as a programmer) or your school, if any, to sign a
"copyright disclaimer" for the program, if necessary. Here is a sample; alter the names:
Yoyodyne, Inc., hereby disclaims all copyright interest in the program
`Gnomovision' (which makes passes at compilers) written by James Hacker.
<Signature of Ty Coon>, 1 April 1989
Ty Coon, President of Vice
This General Public License does not permit incorporating your program into proprietary programs.
If your program is a subroutine library, you may consider it more useful to permit linking proprietary
applications with the library. If this is what you want to do, use the GNU Library General Public
License instead of this License.
« 82 »
Page 90

C.5 SSL License
Copyright (c) 1998-2001 Ralf S. Engelschall. All rights reserved.
Redistribution and use in source and binary forms, with or without modification, are permitted
provided that the following conditions are met:
1. Redistributions of source code must retain the above copyright notice, this list of conditions
and the following disclaimer.
2. Redistributions in binary form must reproduce the above copyright notice, this list of
conditions and the following disclaimer in the documentation and/or other materials provided
with the distribution.
3. All advertising materials mentioning features or use of this software must display the
following acknowledgment: "This product includes software developed by Ralf S. Engelschall
<rse@engelschall.com> for use in the mod_ssl project (http://www.modssl.org/)."
4. The names "mod_ssl" must not be used to endorse or promote products derived from this
software without prior written permission. For written permission, please contact
rse@engelschall.com.
5. Products derived from this software may not be called "mod_ssl" nor may "mod_ssl" appear
in their names without prior written permission of Ralf S. Engelschall.
6. Redistributions of any form whatsoever must retain the following acknowledgment:
"This product includes software developed by
Ralf S. Engelschall <rse@engelschall.com> for use in the
mod_ssl project (http://www.modssl.org/)."
THIS SOFTWARE IS PROVIDED BY RALF S. ENGELSCHALL ``AS IS'' AND ANY EXPRESSED
OR IMPLIED WARRANTIES, INCLUDING, BUT NOT LIMITED TO, THE IMPLIED WARRANTIES
OF MERCHANTABILITY AND FITNESS FOR A PARTICULAR PURPOSE ARE DISCLAIMED. IN
NO EVENT SHALL RALF S. ENGELSCHALL OR HIS CONTRIBUTORS BE LIABLE FOR ANY
DIRECT, INDIRECT, INCIDENTAL, SPECIAL, EXEMPLARY, OR CONSEQUENTIAL DAMAGES
(INCLUDING, BUT NOT LIMITED TO, PROCUREMENT OF SUBSTITUTE GOODS OR
SERVICES; LOSS OF USE, DATA, OR PROFITS; OR BUSINESS INTERRUPTION) HOWEVER
CAUSED AND ON ANY THEORY OF LIABILITY, WHETHER IN CONTRACT,
STRICT LIABILITY, OR TORT (INCLUDING NEGLIGENCE OR OTHERWISE) ARISING IN ANY
WAY OUT OF THE USE OF THIS SOFTWARE, EVEN IF ADVISED OF THE POSSIBILITY OF
SUCH DAMAGE.
P/N: C6101ARIE100000-1
« 83 »
 Loading...