

Page 1

Trademarks
Copyright © PLANET Technology Corp. 2003.
Contents subject to revision without prior notice.
PLANET is a registered trademark of PLANET Technology Corp. All other trademarks belong to their respective owners.
Disclaimer
PLANET Technology does not warrant that the hardware will work properly in
all environments and applications, and makes no warranty and representation, either implied or expressed, with respect to the quality, performance,
merchantability, or tness for a particular purpose.
PLANET has made every effort to ensure that this User’s Manual is accurate;
PLANET disclaims liability for any inaccuracies or omissions that may have
occurred.
Information in this User’s Manual is subject to change without notice and does
not represent a commitment on the part of PLANET. PLANET assumes no responsibility for any inaccuracies that may be contained in this User’s Manual.
PLANET makes no commitment to update or keep current the information in
this User’s Manual, and reserves the right to make improvements to this User’s
Manual and/or to the products described in this User’s Manual, at any time
without notice. If you nd information in this manual that is incorrect, misleading, or incomplete, we would appreciate your comments and suggestions.
FCC Warning
This equipment has been tested and found to comply with the regulations for
a Class B digital device, pursuant to Part 15 of the FCC Rules. These limits
are designed to provide reasonable protection against harmful interference
when the equipment is operated in a commercial environment. This equipment
generates, uses, and can radiate radio frequency energy and, if not installed
and used in accordance with this user’s guide, may cause harmful interference
to radio communications. Operation of this equipment in a residential area is
likely to cause harmful interference, in which case the user will be required to
correct the interference at his own expense.
CE Mark Warning
In a domestic environment, this product may cause radio interference, in
which case the user may be required to take adequate measures.
Revision
User’s manual for PLANET Internet Conferencing Station
Model: ICF-1000S
Rev: 1.0 (August. 2003)
Part No. EM-ICF1000S
Page 2

Safety Instructions
Please read and understand all instructions before using this product.
• All openings on the housing of this product are designed for ventilation. Do not
block or cover them. Do not insert any foreign objects in the openings. Doing
so might cause a short circuit, electrical shock and/or fire.
• Before cleaning, unplug the machine and wipe it gently with soft cloth damped
with water or diluted liquid soap. To avoid damage or malfunction to the ma-
chine, do not use alcohol or other strong solutions.
• Avoiding Electrical Shock:
§ Be sure to ground your machine so that the built-in shock arrester will
function and reduce the chance of being shocked.
§ Do not connect the grounding wire to a gas or water pipe.
§ If possible, switch power off and unplug the machine during a thunder-
storm.
• Do not try to disassemble the machine. Unplug the machine and call for service
in the following situations:
§ The power cord or plug is damaged or frayed.
§ Some liquid is spilled into the machine.
§ The machine appears wet with water.
§ The machine appears faulty and cannot be repaired despite having
followed all instructions in the manual.
§ The machine is damaged from being dropped or the housing is bro-
ken.
• Power Requirements and Power Cords:
§ Use a single wall outlet with the power of 100-240 V AC, 50/60 Hz 1A
depending on label indication.
§ Do not place anything on the power cord. Avoid having people step on
it.
Page 3

Table of Contents
Chapter 1 Introduction 1
1.1 Features 1
1.2 Specification 2
Chapter 2 Installation 5
2.1 Package Contents 5
2.2 Front Panel introduction 6
2.3 Back panel introduction 7
2.4 Hardware Installation 8
Chapter 3 System Configuration 11
3.1 Power On and Access Configuration Menu 11
3.2 General Settings 12
3.3 Network 16
3.4 H.323 20
3.5 Exit the System Configuration 23
3.6 Phone Book Setup 23
Chapter 4 Getting Started 25
4.1 Making Video Calls 25
4.2 Using the Phone Book 25
4.3 Receiving Video Calls 26
Chapter 5 On-line Operation 27
5.1 Picture Quality 27
5.2 Frame Rate 28
5.3 Snapshot 28
5.4 View 29
5.5 Switch the Video source 29
5.6 Show the Connection Status 30
5.7 Adjust on-line video and audio quality 30
5.8 Activate Video Mute 35
5.9 Activate Audio Mute 36
Chapter 6 Troubleshooting 37
Page 4

Chapter 1
INTRODUCTION
PLANET’s Video Conferencing Station, the ICF-1000S, brings you a vivid video
conferencing experience through the Internet. No PC is required and none of the usual
complications of complex web camera, sound card and software settings and specialized
data connections. The ICF-1000S is an easy-to-use integrated system ideal for home
ofces and conference rooms. All that is needed is a TV and a high speed Internet
connection. Using simple setup procedures through a remote control, you can install and
use voice and video conferencing in a few minutes.
ICF-1000S is H.323 compliant, which means you can have a seamless conferencing
experience with other H.323 compliant video conferencing systems, VoIP gateway/phones
and Microsoft NetMeeting. With Gatekeeper and MCU support, the ICF-1000S from
PLANET make communication with your business partners quick and cost-effective.
The ICF-1000S have three video inputs which can be used to connect to external
cameras for group meetings and/or a document camera for showing detailed documents
or photographs. With up to 30 fps frame rate, outstanding picture and sound quality,
the PLANET Internet Video Conferencing Station offer you a superior communications
experience using the Internet.
1.1 Features
• ITU H.323 version 2 compliant
• Support H.263 Video Codec and G.723,1, G.711 Audio Codec
• Compatible with H.323 VoIP gateway, Gatekeeper , MCU (Multipoint Control
Unit) and Microsoft NetMeeting
• Built-in High Quality CCD Camera
• Full-duplex Voice Conversation
• Superior voice quality with Voice Activity Detection(VAD), Automatic
Gain Control(AGC), Acoustic Echo Cancellation(AEC) and Electrical Echo
Cancellation(EEC) support
• Support Static IP, PPPoE, DHCP Connection
• Support Dynamic DNS
• 3 video resolution mode supported, CIF, QCIF and SQCIF
• Control bandwidth to 128K, 256K, 384K, 512K, 768K and no limit
• Supports frame rate up to 30 fps
• Phone book of 100 Names/Addresses and quick search
• On-line change of remote / local video size (PIP)
1
Page 5

3
• On-line video/audio mute function
• On-line snapshot of remote video function
• On-line call status information about Tx/Rx frame rate and bandwidth usage
• Provide Auto-answer mode which allow you to monitor remote location with
real-time picture and voice
• Remote Control and Microphone Pod Included
• 3 RCA Video input interfaces for multiple camera connection
• 1-pair RCA Audio/Video output for TV connection
• 1 VGA Video output for Monitor connection
1.2 Specication
Product Internet Video Conferencing Station
Model ICF-1000S
Hardware
LAN 1 x 10/100Mbps RJ-45 port
Camera Built-in High quality CCD Camera, adjustable
focus/tilt
Audio/Video Input 3 RCA video input
1 MIC connector
Audio/Video Output 1 pair RCA Audio/Video output
1 speaker connector
1 VGA connector
LED indicator 1 PWR/LNK LED
Dimension(WxDxH) 295 x 200 x 71.5 mm
Weight 1.13 kg
Operating Environment 0~40 degree C, 10~90% humidity
Power Requirement 12V DC, 2A
Power Consumption 20W, 68 BTU
EMC/EMI CE, FCC
Protocols and Standard
Standard ITU-T H.323 v.2
Video Standard H.263, H.263+
2
Page 6

Audio Standard G.723.1, G.711
Control Standard H.245
Compatibility Compatible with Gatekeeper, H.323 Videophone,
H.323 VoIP gateway, Microsoft NetMeeting, Mul-
tipoint Control Unit (MCU)
LAN standard IEEE 802.3 Ethernet
IEEE 802.3u Fast Ethernet
Network and Configuration
Connection Type ADSL, Cable, VPN, LAN
Access Mode Static IP, PPPoE, DHCP
Bandwidth Usage 128K, 256K, 384K, 512K, 768K and No Limit
Video Resolution CIF(352x288), QCIF (176x144) and SQCIF
(128x96)
Configuration Interface Remote controller with On Screen Display
(OSD)
3
Page 7

4
5
Page 8
INSTALLATION
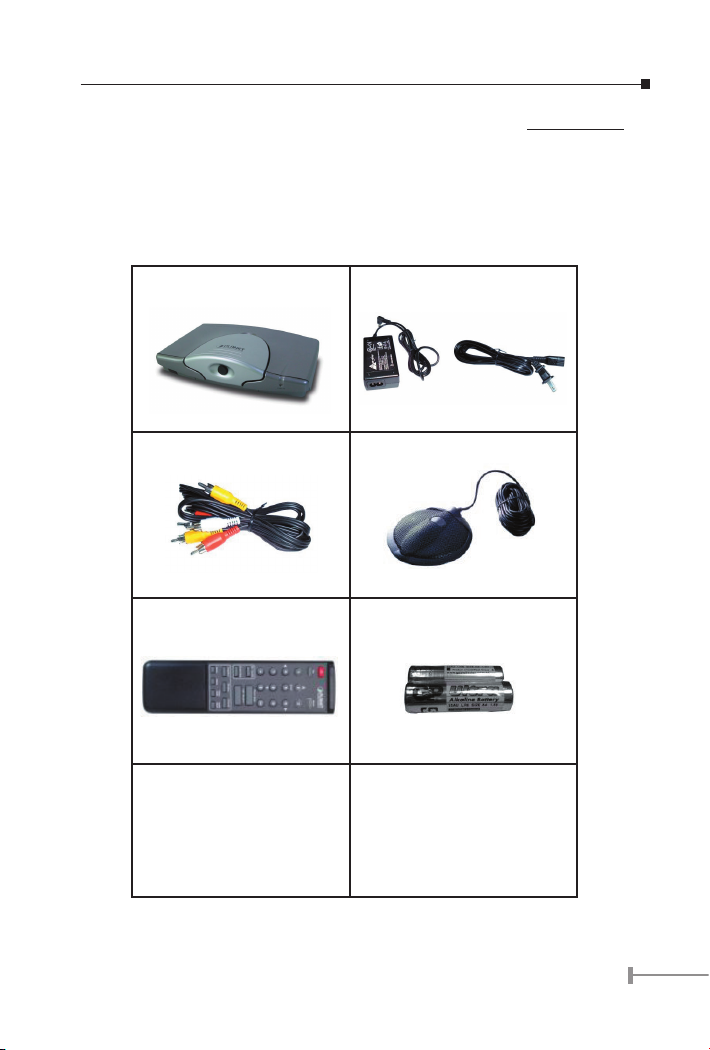
2.1 Package Contents
Check the contents of your package for following parts and quantity:
Chapter 2
1. ICF-1000S x1
3. RCA Cable x1 4. Microphone Pod x 1
5. Remote Controller x 1 6. Battery for remote controller
7. User Manual x1
2. Power Adapter & AC Cord x1
(4A 1.5VDC) x 2
&
5
Page 9

7
If any of these pieces are missing or damaged, please contact your dealer immediately, if
possible, retain the carton including the original packing material, and use them against
to repack the product in case there is a need to return it to us for repair.
2.2 Front Panel introduction
The following show the front panel of ICF-1000S.
Note:
1. Please keep the camera cover in a known place and cap the cover back
if ICF-1000S is not using for long time.
2. The focus of the camera is adjustable, screw the lens gently by clockwise or anti-clockwise to find the best resolutions for the first operating if needed.
6
Page 10

2.3 Back panel introduction
The real panel of ICF-1000S has three video inputs which can be used to connect to
external cameras for group meetings and/or a document camera for showing detailed
documents or photographs. It also provides 1 set of RCA AV output connector for
connecting to TV, projector or stereo.
The following table lists all the connectors on the back panel of ICF-1000P and their
function.
POWER Connect to the DC output of power adapter.
NTSC/PAL Switch Switch between NTSC, PAL.-M, PAL-B
NOTE: To use VGA out, please switch to PAL-M
VGA By connecting with a monitor. ICF-1000S can use a monitor
as an alternative video output device.
NOTE: Please switch to PAL-M and set the bandwidth under
384Kbps to ensure the picture quality.
MIC Microphone jack.
SPK Speaker jack.
Audio Out Output audio to TV.
Video Out Output video to TV.
Video In Input video from external device. ICF-1000S can connect
with up to three external cameras.
Ethernet Connect to your local network or Cable/DSL modem. This
port supports both 10Mbps and 100Mbps speed
NOTE
1. The device is a power-required device, it means, the device will not
work until it is powered. If you need to use it all the time, please consider use an UPS (Uninterrupted Power Supply) for this device.
2. In some area, installing a surge suppression device may also help to
protect your device from being damaged by unregulated surge or current to the device or the power adapter.
7
Page 11
9
2.4 Hardware Installation
The remote controller is the key device to operate ICF-1000S. While using / controlling,
please aim the remote controller at the IR receiver of the ICF-1000S unit. (Please refer to
section 2.2 for the detailed location).
8
Page 12

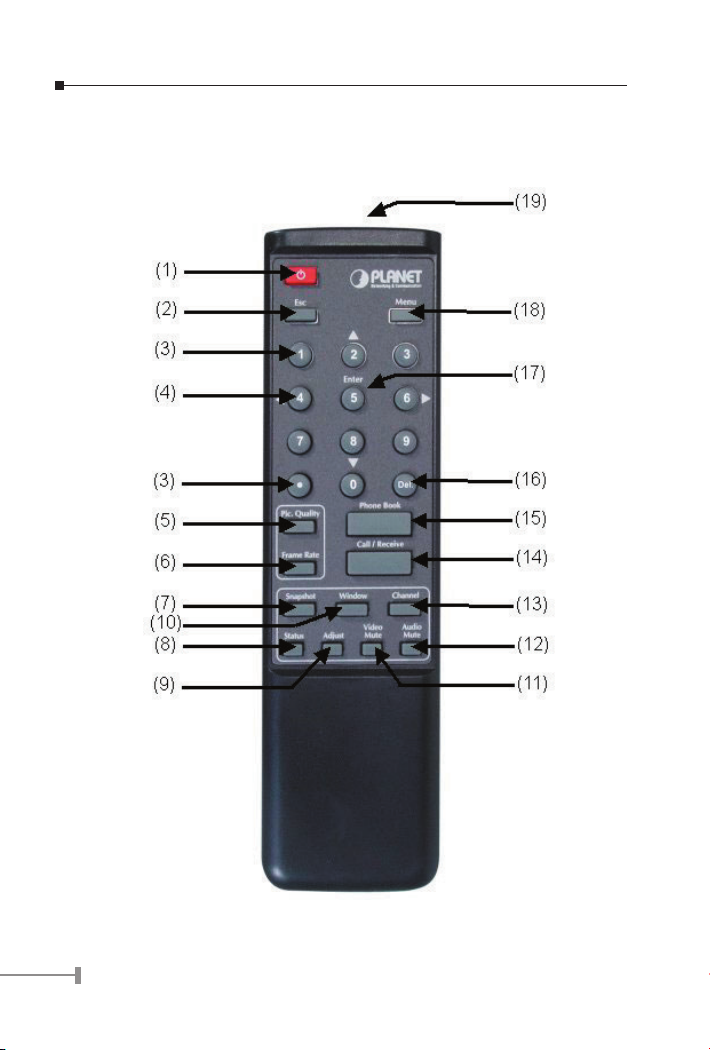
The following table lists the button denition of the remote control.
Button Definition
1. Power To switch the power on/off.
2. Esc Cancel your current selection or reject incom-
ing call.
3. •,1,….,9.0 number key Enter the number to input or edit IP address.
4. p, q, t, u
5. Pic. Quality It shows the picture quality of the system con-
6. Frame Rate To adjust local image. It allows you to alter the
7. Snapshot Freeze remote site image.
8. Status Show the status of Bit Rate, Frame Rate, and
9. Adjust Adjust setting on-line.
10. Window Switch windows of remote site and local site.
11. Video Mute Pause video transmitting from local site to re-
12. Audio Mute Pause audio transmitting from local site to re-
13. Channel Switch camera sources between build-in camera
14. Call/Receive Initiate a call or answer an incoming call, or dis-
15. Phone Book Phone Book provides user with a convenient way
16. Del. For correction purpose.
17. Enter Confirm your current selection.
18. Menu Enter System Configuration.
19. IR Transmitter The IR transmitter that should aim to the IR
Move cursor in System Configuration, phone
book, or on-line adjustment.
figuration that you set.
transmitting speed and sharpness of the video
images displayed on your TV.
Timer on-line.
mote site.
mote site.
and external ones.
connect a video call.
for retrieving the IP addresses of some regularly
called parties.
receiver in front of ICF-1000S
9
Page 13

10
11
Page 14
Chapter 3
System Configuration
3.1 Power On and Access Conguration Menu
After power on, the LED on the front panel turns red to indicate it have received power.
The LED will then turn green if the Ethernet network connection is established. Be
reminded, the conferencing station should take about 50 seconds to complete the power
on self-test (POST) and system start up. In this period, the screen is still blank. Please
do not press any button on this period.
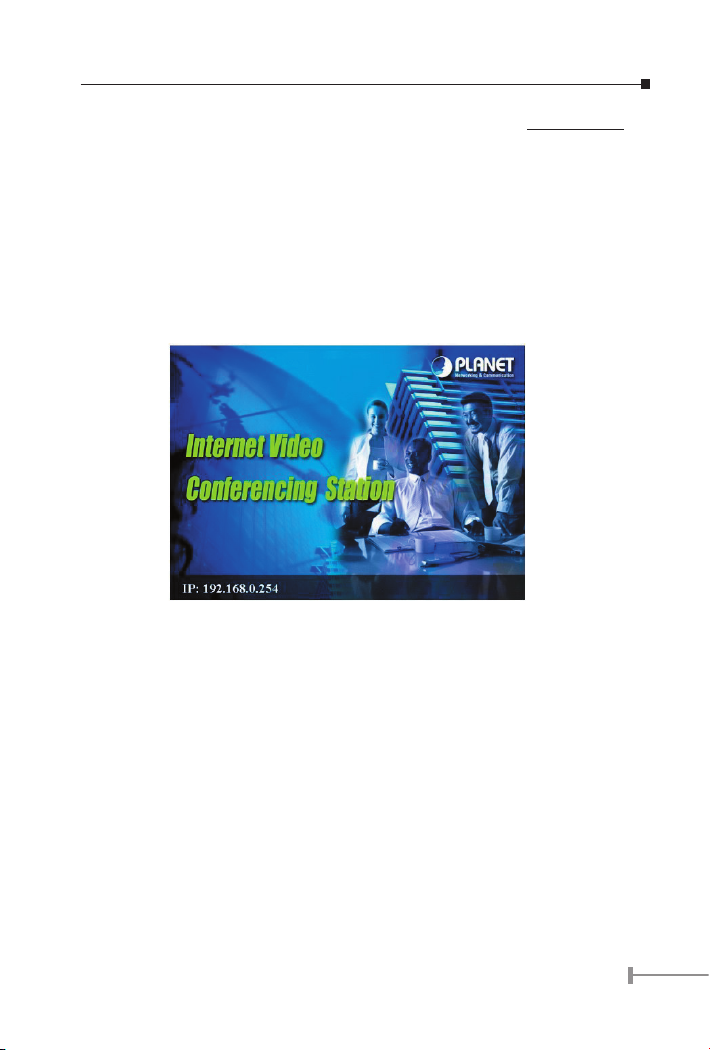
After the booting process is completed, the following page is shown on the screen.
Press [Menu] button, a System Conguration page is shown.
Please use arrow key,[p], [u], [q] and [t] to move the highlight to the function you
need to congure and [Enter] to enter the function menu. After the conguration, press
[Esc] to return to standby-screen as above gure, and save the settings.
11
Page 15
13
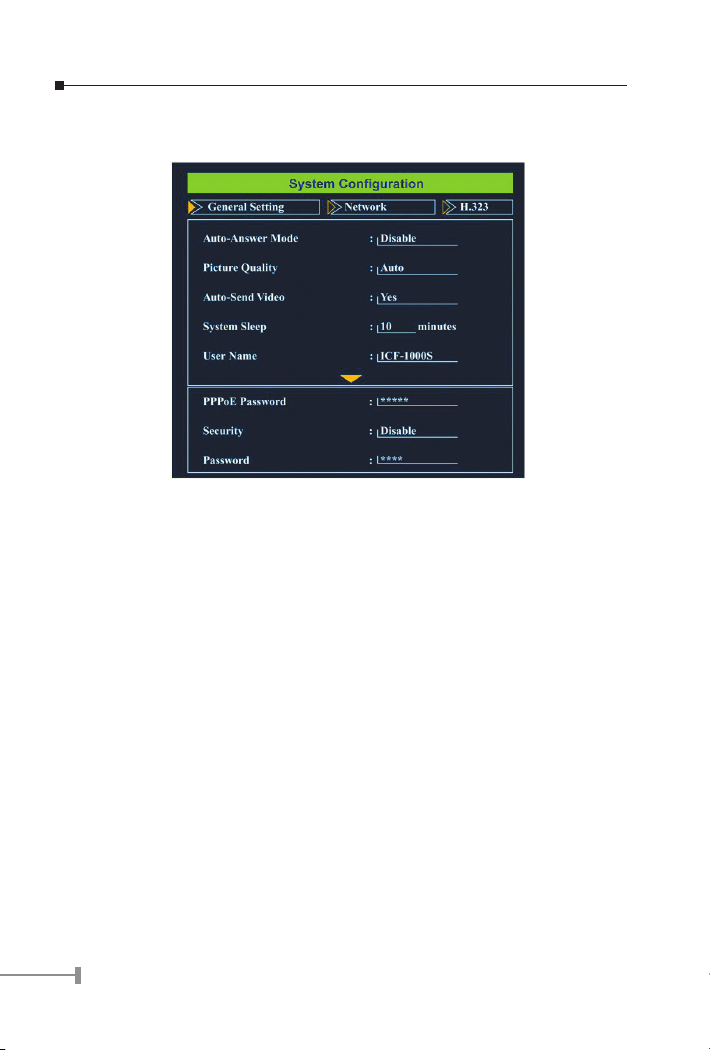
3.2 General Settings
General Settings provides some general parameters on using the ICF-1000S.
3.2.1 Auto-Answer Mode
This feature allows the video station to answer incoming calls automatically.
1. Press [Menu] key to enter the Main Menu of System Configuration.
2. Press [p] or [q] key to highlight “Auto-Answer Mode”.
3. Press [Enter] key to show the choice list.
4. Press [p] or [q] key to select the setting you want.
Enable – ICF-1000S automatically answers any incoming calls.
Disable – Incoming calls can be answered only when receiver press [Call/
5. Press [Enter] key to confirm the setting or press [Esc] key to return to the
previous page.
Receive] button on remote control.
3.2.2 Picture Quality
This function is responsible for the video quality that is sent to the remote site. There are
three kinds of format (CIF, QCIF, SQCIF) provided.
1. Press [Menu] key to enter the Main Menu of System Configuration.
2. Press [p] or [q] key to select the Picture Quality.
3. Press [Enter] key to show the choice list.
12
Page 16

4. Press [p] or [q] key to select the setting you want.
CIF –Common Intermediate Format, also known as Full CIF (FCIF). The
video resolution is 352 x 288 pixels.
QCIF – Quarter CIF. The video resolution is 176 x 144 pixels.
SQCIF – Sub-Quarter CIF. The video resolution is 128 x 96 pixels.
Auto switch –The system automatically switches to a suitable quality.
5. Press [Enter] key to confirm the setting or press [Esc] key to return the previ-
ous page.
NOTE: While bandwidth is low, low-resolution image format (QCIF or SQCIF)
is suggested for getting real-time image. The following table shows
the maximum frame rate for each picture format on different bandwidth settings.
Bandwidth (Kbps) Picture Format Maximum frame rate (fps)
NTSC PAL
No Limit CIF 30 25
QCIF 30 25
SQCIF 30 25
768 CIF 30 25
QCIF 30 25
SQCIF 30 25
512 CIF 25 25
QCIF 30 25
SQCIF 30 25
384 CIF 20 20
QCIF 30 25
SQCIF 30 25
256 CIF 15 15
QCIF 15 15
SQCIF 20 20
128 CIF 10 10
QCIF 15 15
SQCIF 20 20
13
Page 17

15
3.2.3 Auto-Send Video
Allows the user to decide whether to send local image to the remote site automatically or
not. If disabled, no image of local site can be sent to the remote site during the call.
1. Press [Menu] key to enter the Main Menu of System Configuration.
2. Press [p] or [q] key to select the Auto-Send Video.
3. Press [Enter] key to show the choice list.
4. Press [p] or [q] key to select the setting you want.
Yes –> Auto Send Video enabled
No –> Auto Send Video disabled
5. Press [Enter] key to confirm the setting or press [Esc] key to return the previ-
ous page.
3.2.4 System Sleep
System Sleep mode will be on when system is idle for a pre-set period.
1. Press [Menu] key to enter the Main Menu of System Configuration.
2. Press [p] or [q] key to select the System Sleep.
3. Press [Enter] key and use number key to input sleep time. (Up to 99 min-
utes)
NOTE: To disable the System Sleep mode, please set the time to “0” minute.
4. Press [Del.] key for correction.
5. Press [Esc] key to confirm the setting and to return to the previous page.
NOTE: When system is under sleep mode, press any key to wake up the
system.
3.2.5 User Name
The User Name is the name assigned to the PPPoE server.
Press [Menu] key to enter the Main Menu of System Conguration.
1. Press [p] or [q] key to select the User Name.
2. Press [Enter] key to enter the on-screen keyboard to input your name.
3. Press [Del.] key for correction.
4. Press [Esc] key to confirm the setting and to return to the previous page.
14
Page 18

3.2.6 PPPoE Password
The PPPoE Password is the name assigned to the PPPoE server.
1. Press [Menu] key to enter the Main Menu of System Configuration.
2. Press [p] or [q] key to select the PPPoE password.
3. Press [Enter] key to enter the on-screen keyboard to input your PPPoE pass-
word.
4. Press [Del.] key for correction.
5. Press [Esc] key to confirm the setting and to return to the previous page.
3.2.7 Security
When this function is enabled, you need to input the password for entering the System
Conguration.
1. Press [Menu] key to enter the Main Menu of System Configuration.
2. Press [p] or [q] key to select the Security.
3. Press [Enter] key to show the choice list.
4. Press [p] or [q] key to select the setting you want.
Yes –> Security function is enabled.
No –> Security function is disabled.
5. Press [Enter] key to confirm the setting or press [Esc] key to return the previ-
ous page.
If the security is set to enabled, a Password eld is shown below Security. To congure
the password:
1. Press [Menu] key to enter the Main Menu of System Configuration.
2. Press [p] or [q] key to select the Password.
3. Press [Enter] key to enter the on-screen keyboard to input your password.
4. Press [Del.] key for correction.
5. Press [Esc] key to confirm the setting and to return to the previous page.
NOTE: The default password is “0000”.
15
Page 19

17
3.3 Network
Network page allows you to set network relative parameters.
3.3.1 Bandwidth
Select appropriate bandwidth in compliance with your Internet transmission speed when
placing a call.
1. Press [Menu] key to enter the Main Menu of System Configuration.
2. Press [t] or [u] key to go to the Network page.
3. Press [Enter] key to show the choice list.
4. Press [p] or [q] key to select the bandwidth you need. ICF-1000S supports
the following bandwidth settings.
No Limit, 768k, 512k, 384k, 256k and 128k
5. Press [Enter] key to confirm the setting or press [Esc] key to return the previ-
ous page.
3.3.2 Network Mode
The Network Mode function is used for network conguration.
NOTE: You can get the network setup information from your Internet Service
Provider (ISP) or your network administrator.
1. Press [Menu] key to enter the Main Menu of System Configuration.
2. Press [t] or [u] key to go to the Network page.
16
Page 20

3. Press [p] or [q] key to select the Network Mode.
4. Press [Enter] key to show the choice list.
5. Press [p] or [q] key to select the setting you need.
Manual – Fixed IP Mode. Acquire the IP address, default gateway ad-
DHCP – Dynamic Host Configuration Protocol is used to automatically
PPPoE – PPPoE (Point-to-Point Protocol over Ethernet) is a protocol used
6. Press [Enter] key to confirm the setting or press [Esc] key to return the previ-
ous page.
dress, and subnet mask address from your ISP or your network administrator.
assign IP addresses within a LAN. Most cable modem Internet
connection also use DHCP to dynamically assign IP address.
by many Internet Service Providers with ADSL Internet connection. A User Name and PPPoE Password should be provided.
3.3.3 Subnet Mask
Enter the subnet mask for the LAN. (Please acquire Subnet Mask address from your ISP
or your network administrator.)
1. Press [Menu] key to enter the Main Menu of System Configuration.
2. Press [t] or [u] key to go to the Network page.
3. Press [p] or [q] key to select the Subnet Mask.
4. Press [Enter] key and use the number key to input your Subnet Mask Ad-
dress.
5. Press [Del.] key for correction.
6. Press [Esc] key to confirm the setting and to return to the previous page.
3.3.4 User IP Address
Enter the static IP address assigned to the ICF-1000S. (Please acquire Subnet Mask
address from your ISP or your network administrator.)
1. Press [Menu] key to enter the Main Menu of System Configuration.
2. Press [t] or [u] key to go to the Network page.
3. Press [p] or [q] key to select the User IP Address.
4. Press [Enter] and use the number key to input your Router IP Address.
5. Press [Del.] key for correction.
6. Press [Esc] key to confirm the setting and to return to the previous page.
17
Page 21

19
3.3.5 Router IP Address
Enter the network’s default router IP address. (Please acquire Subnet Mask address from
your ISP or your network administrator.)
1. Press [Menu] key to enter the Main Menu of System Configuration.
2. Press [t] or [u] key to go to the Network page.
3. Press [p] or [q] key to select the Router IP Address.
4. Press [Enter] and use the number key to input your Router IP Address.
5. Press [Del.] key for correction.
6. Press [Esc] key to confirm the setting and to return to the previous page.
3.3.6 DNS IP Address
1. Press [Menu] key to enter the Main Menu of System Configuration.
2. Press [t] or [u] key to go to the Network page.
3. Press [p] or [q] key to select the DNS IP Address.
4. Press [Enter] and use number key to input your DNS IP Address.
5. Press [Del.] key for correction.
6. Press [Esc] key to confirm the setting and to return to the previous page.
3.3.7 DDNS Hostname
ICF-1000S currently supports the dynamic DNS service from DynDNS.org. It allows
Internet users to connect to your ICF-1000S using a URL, rather than an IP Address.
This also solves the problem of having a dynamic IP address. With a dynamic IP address,
your IP address may change whenever you connect, which makes it difcult to connect
to you.
The Service works as follows:
1. You must register for the service at http://www.dyndns.org (Registration is
free). Your password will be E-mailed to you.
2. After registration, use the “Create New Host” option (at www.dyndns.org) to
request your desired Domain name.
3. Enter your data from www.dyndns.org in the DDNS Hostname, DDNS User
Name and DDNS Password field.
4. ICF-1000S will then automatically ensure that your current IP Address is re-
corded at http://www.dyndns.org
5. From the Internet, users will be able to connect to ICF-1000S using your Do-
18
Page 22

main name.
The following illustrate the procedures to congure the DDNS Hostname.
1. Press [Menu] key to enter the Main Menu of System Configuration.
2. Press [t] or [u] key to go to the Network page.
3. Press [p] or [q] key to select the DDNS Hostname.
4. Press [Enter] and use the on-screen keyboard to input your DDNS Hostname.
For example, “ICF-1000S.dyndns.org”, “ICF-1000S.homeip.net”, etc.
5. Press [Del.] key for correction.
6. Press [Esc] key to confirm the setting and to return to the previous page.
3.3.8 DDNS User Name
1. Press [Menu] key to enter the Main Menu of System Configuration.
2. Press [t] or [u] key to go to the Network page.
3. Press [p] or [q] key to select the DDNS User Name.
4. Press [Enter] key to enter the on-screen keyboard to input your DDNS User
Name.
5. Press [Del.] key for correction.
6. Press [Esc] key to confirm the setting and to return to the previous page.
3.3.9 DDNS Password
1. Press [Menu] key to enter the Main Menu of System Configuration.
2. Press [t] or [u] key to go to the Network page.
3. Press [p] or [q] key to select the DDNS Password.
4. Press [Enter] key to enter the on-screen keyboard to input your DDNS Pass-
word.
5. Press [Del.] key for correction.
6. Press [Esc] key to confirm the setting and to return to the previous page.
19
Page 23

21
3.4 H.323
3.4.1 Gatekeeper Mode
When register a gatekeeper, you can assign a number to the video station. This makes
the video station user-friendly, as users only have to dial a number instead of entering an
IP address when making a call.
1. Press [Menu] key to enter the Main Menu of System Configuration.
2. Press [t] or [u] key to go to the H.323 sheet.
3. Press [p] or [q] key to select the Gatekeeper Mode.
4. Press [Enter] key to show the choice list.
5. Press [p] or [q] key to select the setting you want.
Disable –> not to register a gatekeeper.
Auto –> Automatically search for gatekeeper IP.
Manual –>User must input gatekeeper IP address.
6. Press [Enter] key to confirm the setting or press [Esc] key to return the previ-
ous page.
20
Page 24

3.4.2 GK IP Address
Enter the Gatekeeper IP address assigned to the ICF-1000S. (Please acquire Subnet Mask
address from your ISP.)
1. Press [Menu] key to enter the Main Menu of System Configuration.
2. Press [t] or [u] key to go to the H.323 sheet.
3. Press [p] or [q] key to select the GK IP Address.
4. Press [Enter] and use number key to input your GK IP Address.
5. Press [Del.] key for correction.
6. Press [Esc] key to confirm the setting and to return to the previous page.
3.4.3 Phone Number
This function is to assign a dedicated number to your video station.
1. Press [Menu] key to enter the Main Menu of System Configuration.
2. Press [t] or [u] key to go to the H.323 sheet.
3. Press [p] or [q] key to select the Phone Number.
4. Press [Enter] key and use number key to input your Phone Number.
5. Press [Del.] key for correction.
6. Press [Esc] key to confirm the setting and to return to the previous page.
3.4.4 Alias Name
The alias name is the GK name given to the ICF-1000S by the GK Manager. It may be used
in place of an IP address when dialing H.323 calls.
1. Press [Menu] key to enter the Main Menu of System Configuration.
2. Press [t] or [u] key to come to the H.323 sheet.
3. Press [p] or [q] key to select the Alias Name.
4. Press [Enter] key to enter the on-screen keyboard to input your Alias name.
5. Press [Del.] key for correction.
6. Press [Esc] key to confirm the setting and to return to the previous page.
21
Page 25

23
3.4.5 Default Setting
You can use this function to reset System Conguration back to factory default value.
1. Press [Menu] key to enter the Main Menu of System Configuration.
2. Press [t] or [u] key to go to the H.323 sheet.
3. Press [p] or [q] key to select the Default Setting.
4. Press [Enter] key to show the choice list.
5. Press [p] or [q] key to select the setting you want.
No Action – Retain the present setting.
Configuration – Initiate System Configuration to default value.
Phone Book – Initiate Phone Book to default value.
6. Press [Enter] key to confirm the setting or press [Esc] key to return the previ-
ous page.
3.4.6 Audio Format
PLANET Video station complies with two audio protocols – G.711 and G.723.
The audio format can be adjusted to compensate for audio distortion caused by high
packet loss. Select a proper audio protocol for audio transmission.
1. Press [Menu] key to enter the Main Menu of System Configuration.
2. Press [t] or [u] key to go to the H.323 sheet.
3. Press [p] or [q] key to select the Audio Format.
4. Press [Enter] key to show the choice list.
5. Press [p] or [q] key to select the setting you need.
Auto – The system automatically switch.(Default)
G.711 – 64kbps
G.723 – 6.3kbps
6. Press [Enter] key to confirm the setting or press [Esc] key to return the previ-
ous page.
22
Page 26

3.4.7 Software Keyboard
Software Keyboard allow you to edit the dial number and Address eld of phone book by
using an on-screen keyboard. Enable this function if you need to dial destination device
by DNS name.
1. Press [Menu] key to enter the Main Menu of System Configuration.
2. Press [t] or [u] key to go to the H.323 sheet.
3. Press [p] or [q] key to select the Software Keyboard.
4. Press [Enter] key to show the choice list.
5. Press [p] or [q] key to select the setting you want.
Disable – The Software Keyboard Mode is off.
Enable – The Software Keyboard Mode is on.
6. Press [Enter] key to confirm the setting or press [Esc] key to return the previ-
ous page.
3.5 Exit the System Conguration
After completing the system conguration, please press [Esc] key to save and exit.
3.6 Phone Book Setup
The ICF-1000S provides an address book to store access names and numbers. You can
make a speed dial directly from the phone book. The ICF-1000S address book can store
up to 100 entries.
23
Page 27

25
1. From the main screen, press [Phone Book] key to enter the Phone Book
page.
2. Press [p] or [q] key to select the entries.
3. Press [t] [u] to switch between Name column and Address column
4. Press [Enter] key to input the Name or Address.
5. Press [Phone Book] key again to save and exit the Phone Book page.
NOTE: You can press a number to jump the phone book entry by 10 by using the
number keypad [1], [3], [7] and [9]. For example, you can press [7] or [9]
to jump from 00th to 10th phone book entry.
3.6.1 Input Name
1. From the Phone Book page, select one entry and switch to the Name column.
2. Press [Enter] key to enter the on-screen keyboard to input your Alias name.
3. Press [Del.] key for correction.
4. Press [Esc] key to confirm the setting and to return to the previous page.
3.6.2 Input Address
1. From the Phone Book sheet, switch to the Address column.
2. Press [Enter] and use number key to input the destination IP Address.
3. Press [Del.] key for correction.
4. Press [Esc] key to confirm the setting and to return to the previous page.
5. Press [Phone Book] key again to save and exit the Phone Book sheet.
NOTE: If software keyboard is enabled (3.4.7), an on-screen keyboard is shown.
Please use [p][u][q][t] to move the highlight to the word you want and
press [Enter] to input. Press [Del.] for correction.
24
Page 28

Chapter 4
Getting Started
Before making a video call, please make sure that the unit has been installed and set up
successfully.
4.1 Making Video Calls
1. From the main screen, press [Call /Receive] key and dial the IP Address of the
remote site.
2. Press [Call/Receive] key again to make a connection.
3. When the connection is set up successfully, the video communication starts
and the remote site video will be shown on the local screen.
4. Use [Call /Receive] key to end the connection.
4.2 Using the Phone Book
This Phone Book provides user with a convenient way for retrieving the IP addresses of
some regularly called parties.
1. From the main screen, press [Phone Book] key to enter the phonebook sheet.
2. From the phonebook sheet, use Select Buttons to select the name/IP address
you want to call.
3. Press [Call/Receive] key to establish a connection.
25
Page 29

27
4. When the connection is set up successfully, the video communication starts
and the remote site video will be shown on the local screen.
5. Press [Call/Receive] key to end the connection.
NOTE: You can press a number to jump the phone book entry by 10 by using
the number keypad [1], [3], [7] and [9]. For example, you can press
[7] or [9] to jump from 00th to 10th phone book entry.
4.3 Receiving Video Calls
4.3.1 Auto-Answer Mode
When a video call comes in, the video station rings and answers it automatically. The
connection will be established within a few seconds.
4.3.2 Manual Mode
When a video call comes in, just pick up the handset or press [Call/Receive] key to answer
the phone.
If you want to reject the video call, you can press [Esc] key.
26
Page 30

On-line Operation
5.1 Picture Quality
It shows the Picture quality of the system conguration that you set.
1. Press [Pic. Quality] key to show the Picture quality info.
2. Press [Pic. Quality] again to hide the picture quality information.
• SQCIF - 128 X 96 pixels
• QCIF - 176 X 144 pixels
• CIF - 352 X 288 pixels
Chapter 5
27
Page 31

29
5.2 Frame Rate
This function is to adjust local image. It allows you to alter the transmitting speed and
sharpness of the video images displayed on your TV.
1. Press [Frame Rate] key to enter Frame Rate adjustment.
2. Press [u] key to increase the TX image quality and decrease the image frame
rate.
3. Press [t] key to decrease the TX image quality and increase the image frame
rate.
5.3 Snapshot
The snapshot function captures the remote image. This function allows the two parties to
see more details of the pictures.
1. Press [Snapshot] key once to take a snapshot of the remote site image.
2. Press [Snapshot] key again to release the image and return to current video
call.
28
Page 32

5.4 View
The ICF-1000S supports PIP (Picture in Picture) for you to view remote site and local site
on same screen. You can use this function to switch the video showing mode. There are
three modes available for selection.
Press [Window] key to switch the video display mode in the sequence as below:
Remote and local video Ú Remote full screen video Ú Local full screen video.
5.5 Switch the Video source
ICF-1000S allows you to connect with three external video sources, for example, a
camera. When external devices are connected to the video station, you can switch to the
video taken by other external devices.
1. Press [Channel] key to enter the channel selecting function.
2. Use [t] or [u] to switch to other cameras.
Main (Built-in camera) Ú Camera 1 Ú Camera 2 Ú Camera 3
29
Page 33

31
5.6 Show the Connection Status
This function is to display the status of Network connecting, for example, connecting time,
TX/RX Bit Rate as well as TX/RX Frame Rate and so on. For getting better quality you can
adjust the settings below under online mode.
1. Press [Status] key once to show the status information.
2. Press [Status] key again to hide the status information.
TX: Transmitting Rate. RX: Receiving Rate
Encode: Encoding Rate Decode: Decoding Rate
5.7 Adjust on-line video and audio quality
For getting better video and audio quality you can adjust the settings below under online
mode.
• Speaker Volume
• Camera Hue
• Camera Saturation
• Camera Contrast
• Camera Brightness
• Display Hue
• Display Saturation
• Display Contrast
• Display Brightness
5.7.1 Adjust Speaker Volume
1. Press [Adjust] key to enter on-line adjustment.
2. Use [p] or [q] key to locate Speaker Volume
3. Use [u] key to increase the speaker volume.
30
Page 34

4. Use [t] key to decrease the speaker volume.
5. Press [Adjust] key again to exit on-line adjustment.
5.7.2 Adjust Camera Hue
This function can adjust video color from camera input.
1. Press [Adjust] key to enter on-line adjustment.
2. Use [p] or [q] key to locate Camera Hue
3. Use [u] key to increase the video hue from camera input.
4. Use [t] key to decrease the video hue from camera input.
5. Press [Adjust] key again to exit on-line adjustment.
5.7.3 Adjust Camera Saturation
This function can adjust video saturation from camera input.
1. Press [Adjust] key to enter on-line adjustment.
2. Use [p] or [q] key to locate Camera Saturation
31
Page 35

33
3. Use [u] key to increase the video saturation from camera input.
4. Use [t] key to decrease the video saturation from camera input.
5. Press [Adjust] key again to exit on-line adjustment.
5.7.4 Adjust Camera Contrast
The function is to adjust the video contrast from camera input.
1. Press [Adjust] key to enter on-line adjustment.
2. Use [p] or [q] key to locate Camera Contrast
3. Use [u] key to increase the video contrast from camera input.
4. Use [t] key to decrease the video contrast from camera input.
5. Press [Adjust] key again to exit on-line adjustment.
5.7.5 Adjust Camera Brightness
The function is to adjust the video brightness from camera input.
1. Press [Adjust] key to enter on-line adjustment.
32
Page 36

2. Use [p] or [q] key to locate Camera Brightness
3. Use [u] key to increase the video brightness from camera input.
4. Use [t] key to decrease the video brightness from camera input.
5. Press [Adjust] key again to exit on-line adjustment.
5.7.6 Adjust Display Hue
The function is to adjust display video hue.
1. Press [Adjust] key to enter on-line adjustment.
2. Use [p] or [q] key to locate Display Hue
3. Use [u] key to increase the display video hue.
4. Use [t] key to decrease the display video hue.
5. Press [Adjust] key again to exit on-line adjustment.
33
Page 37

35
5.7.7 Adjust Display Saturation
The function is to adjust display video saturation.
1. Press [Adjust] key to enter on-line adjustment.
2. Use [p] or [q] key to locate Display Saturation
3. Use [u] key to increase the display video saturation.
4. Use [t] key to decrease the display video saturation.
5. Press [Adjust] key again to exit on-line adjustment.
5.7.8 Adjust Display Contrast
The function is to adjust display video contrast.
1. Press [Adjust] key to enter on-line adjustment.
2. Use [p] or [q] key to locate Display Contrast
3. Use [u] key to increase the display video contrast.
4. Use [t] key to decrease the display video contrast.
5. Press [Adjust] key again to exit on-line adjustment.
34
Page 38

5.7.9 Adjust Display Brightness
The function is to adjust display video brightness.
1. Press [Adjust] key to enter on-line adjustment.
2. Use [p] or [q] to locate Display Brightness
3. Use [u] key to increase t the display video brightness.
4. Use [t] key to decrease the display video brightness.
5. Press [Adjust] key again to exit on-line adjustment.
5.8 Activate Video Mute
If you want to temporarily stop video transmission to remote site during the connection,
you can use this function to conceal the local video.
1. Press [Video Mute] key once to stop transmitting local image.
2. Press [Video Mute] key again to release the image and return to current video
call.
35
Page 39

37
5.9 Activate Audio Mute
If you want to temporarily stop audio transmission to remote site during the connection,
you can use this function to conceal the local audio.
1. Press [Audio Mute] key once to stop transmitting local voice.
2. Press [Audio Mute] key again to release the voice and return to current video
call.
36
Page 40

Chapter 6
Troubleshooting
Your ICF-1000S is a reliable and easy to use video station. If you encounter any problems
when you use this product, please refer to the following solutions, which might help
you solve your problems. If none of these solutions are helpful, please contact us for
assistance.
1. The ICF-1000S can’t be turned on.
Please make sure that the LED on the Adapter is always green and the LED on
the ICF-1000S is always red or green. Also check the input voltage is correct. If
you still can’t turn on the ICF-1000S, please contact the local dealer.
2. ICF-1000S can’t make a call successfully.
• Please make sure that the RJ-45 plug has been put into the socket correctly
and firmly. The LED on ICF-1000S should turn green if well connected with
Ethernet.
• Press the [Menu] key to check all the setting of “Network” and “H.323” is
correct.
• Please reconfirm the remote IP address or DNS name.
3. ICF-1000S can’t receive an incoming call automatically.
Press the [Menu] key and switch the setting page to “General”, and check
whether the function of Auto-Answer Mode has been activated. Otherwise you
should press [Call/Receive] key to receive the incoming call.
4. The IP phone or VoIP Gateway cannot communicate with ICF-1000S.
• Please verify that the devices are compliant with H.323 standard.
• Press the [Menu] key and enter “General” sheet to check the function of Auto
Send Video hasn’t been activated.
5. The remote site only receives the local video without audio.
At the remote site, please adjust the “Speaker Volume” and make sure that the
AV connector has been connected correctly and firmly to the video station.
6. The voice quality is not clear or not continuous.
• The microphone input volume should be moderate.
• If the speaker volume is too high, the echo cancellation might become in-
valid. Please set the speaker volume to default value.
37
Page 41

39
• Please check if your bandwidth is broad enough. The minimum bandwidth
required is 128Kbps for both upstream and downstream.
• Please set the bandwidth of the remote site and local site to the same level.
7. The video quality is low. (The image is blocking or freezing.)
• Please check if your bandwidth is broad enough. The minimum bandwidth
required is 128 Kbps for both upstream and downstream.
• Please set the bandwidth of the remote site and local site to the same level.
8. ICF-1000S can’t receive the audio sent from the remote site.
Check if the remote site microphone is well connected and make sure the local
site speakers are correctly connected and turned on.
9. ICF-1000S can’t send audio to the remote site.
• Please make sure the microphone is well connected.
• Check whether the ”Audio Mute” is on. If so, please disable it.
• In the remote site, please adjust the “Speaker Volume” and make sure that
the AV connector is connected correctly and firmly to the Station.
10. The remote controller is insensitive or can’t work properly.
Please check the battery status.
11. The remote site image is not smooth.
Please use [Frame Rate] key to adjust the receiving frame rate until the remote
image is smooth enough. You can also adjust the transmitting frame rate when
the remote site can’t have a smooth picture from your site.
12. The local image is not clear.
Please adjust the focus by rotating the lens.
13. I can not call or be called from PLANET VoIP Gateway.
For ICF to work with VIP gateway, please first make sure the firmware version
of PLANET VoIP gateway is 3.23 or later. Besides, the VAD function of the voice
profile should be turn off.
The configuration on PLANET VoIP gateway is as the following:
ITG>set coding 0 vad off
ITG>config activate
ITG>config store
38
Page 42

14.How to call a VoIP gateway with extension number?
Please enable the software keyboard function and dial:
“extension number” + “@” + “IP or DNS name”.
For example, if you want to dial IP 192.168.0.253 with extension 201, please
input 201@192.168.0.253 on the address field.
15.How to configure the NAT router if I install the Video conferencing device be-
hind the NAT router.
Please enable the DMZ function of the NAT router and map to the private IP
address of the video conferencing device.
39
Page 43

40
41
Page 44

41
Page 45

42
Page 46

Page 47

Part No.:EM-ICF1000S
 Loading...