

Page 1

Outdoor Speed Dome IP Camera
ICA-650
User’s Manual
Page 2

Copyright
Copyright (C) 2006 PLANET Technology Corp. All rights reserved.
The products and programs described in this User’s Manual are licensed products of PLANET
Technology, This User’s Manual contains proprietary information protected by copyright, and
this User’s Manual and all accompanying hardware, software, and documentation are
copyrighted.
No part of this User’s Manual may be copied, photocopied, reproduced, translated, or reduced
to any electronic medium or machine-readable form by any means by electronic or mechanical.
Including photocopying, recording, or information storage and retrieval systems, for any purpose
other than the purchaser's personal use, and without the prior express written permission of
PLANET Technology.
Disclaimer
PLANET Technology does not warrant that the hardware will work properly in all environments
and applications, and makes no warranty and representation, either impl ied or expressed, with
respect to the quality, performance, merchantability, or fitness for a particular purpose.
PLANET has made every effort to ensure that this User’s Manual is accurate; PLANET
disclaims liability for any inaccuracies or omissions that may have occurred.
Information in this User’s Manual is subject to change without notice and does not represent a
commitment on the part of PLANET. PLANET assumes no responsibility for any inaccuracies
that may be contained in this User’s Manual. PLANET makes no commitment to update or keep
current the information in this User’s Manual, and reserves the right to make improvements to
this User’s Manual and/or to the products described in this User’s Manu al, at any time without
notice.
If you find information in this manual that is incorrect, misleading, or incomplete, we would
appreciate your comments and suggestions.
CE mark Warning
The is a class B device, In a domestic environment, this product may cause radio interference,
in which case the user may be required to take adequate measures.
WEEE Warning
To avoid the potential effects on the environment and human health as a result of
the presence of hazardous substances in electrical and electronic equipment, end
users of electrical and electronic equipment should understand the meaning of the
crossed-out wheeled bin symbol. Do not dispose of WEEE as unsorted municipal
waste and have to collect such WEEE separately.
Trademarks
The PLANET logo is a trademark of PLANET Technology. This documentation may refer to
numerous hardware and software products by their trade names. In most, if not all cases, their
respective companies claim these designations as trademarks or registered trademarks.
Revision
User’s Manual for PLANET Outdoor Speed Dome IP Camera
Model: ICA-650
Rev: 1.0 (Oct. 2006)
Part No. EM-ICA650
ii
Page 3

Table of Contents
CHAPTER 1 INTRODUCTION...................................................................................... 1
Overview................................................................................................................ 1
Physical Details .................................................................................................... 3
Package Contents ................................................................................................ 5
CHAPTER 2 BASIC SETUP.........................................................................................6
System Requirements.......................................................................................... 6
Installation............................................................................................................. 7
Setup...................................................................................................................... 8
CHAPTER 3 ADVANCED VIEWING SETUP............................................................. 10
Introduction......................................................................................................... 10
Adjusting the Video Image ................................................................................ 10
Controlling User Access to the Video Stream................................................. 13
Making Video available from the Internet ........................................................ 14
CHAPTER 4 WEB-BASED MANAGEMENT.............................................................. 18
Introduction......................................................................................................... 18
Connecting to ICA-650....................................................................................... 18
Welcome Screen................................................................................................. 19
Viewing Area....................................................................................................... 20
Control Panel Screen ......................................................................................... 21
Advanced Configuration Area........................................................................... 22
Camera Advanced setting Menu....................................................................... 22
System Screen.................................................................................................... 23
Camera Screen.................................................................................................... 25
Network Screen................................................................................................... 27
User Screen......................................................................................................... 30
IP Filter Screen.................................................................................................... 30
FTP Client Screen............................................................................................... 33
SMTP Screen....................................................................................................... 34
Alarm 1 & Alarm 2 Screen.................................................................................. 35
Schedule Screen................................................................................................. 35
Motion Detection Screen ................................................................................... 36
Time Setting Screen........................................................................................... 37
Popup Screen...................................................................................................... 38
Firmware upgrade Screen ................................................................................. 39
Factory Default Screen ...................................................................................... 40
Reboot ................................................................................................................. 41
ActiveX Control................................................................................................... 42
CHAPTER 5 CLIENT UTILITY.................................................................................... 47
INSTALLATION ................................................................................................... 47
HOW TO USE....................................................................................................... 51
APPENDIX A ALARM I/O CONNECTOR................................................................... 66
Appendix A Alarm I/O Connector...................................................................... 66
APPENDIX B TROUBLESHOOTING......................................................................... 68
Appendix B Troubleshooting............................................................................ 68
APPENDIX C BANDWIDTH CALCULATION ............................................................ 72
Appendix C: Bandwidth Calculation................................................................. 72
i
Page 4

APPENDIX D SPECIFICATIONS................................................................................ 73
Appendix D: Specifications............................................................................... 73
ii
Page 5

Chapter 1
Introduction
1
This Chapter provides details of the ICA-650's features, components
and capabilities.
Overview
The PLANET ICA-650, outdoor speed dome Internet camera offers pan/tilt/zoom
control over TCP/IP networks. With the IP-66 protecting cover, ICA-650 can be setup
into most of the wicked outdoor environment and keep working properly. The ICA-650
features a 216X zooming (18X optical, 12 digital), auto focus, auto iris, fast, accurate,
and continuous 360 panning operations. Plus the 16 presets, 5 camera tour
configurations, combining the motion detection, 2 alarm inputs and 2 alarm outputs,
these Unparalleled surveillance functions of the ICA-650 are able to satisfy the most
demanding surveillance and remote monitoring applications.
The ICA-650 also offers complete secure features; such as IP address filteringand
camera movement control, the ICA-650 is perfect for every surveillance environment
with these benefits, whenever working at traffic center, shopping malls, railway
stations, warehouses, airports, and production facilities. With the Day/Night vision
feature, it can provide better video quality and highly security to the monitoring
environment.
The ICA-650 is supported by the powerful camera management software CamView for
recording, managing and searching video, and integrating alarm control systems. Up
to cameras can be organized in the surveillance networks, and save TOC for
enterprise users.
ICA-650 applications
1
Page 6

Features
• Pan, Tilt, and Zooming capability
ICA-650 is able to perform 360 degree continuous PAN, Tilt (0°~90°) and 216X
Zooming (18X optical, 12X digital) adjustment, which brings more vivid images,
functionalities and flexibility in surveillance application.
• Simple to use
Plug-N-Watch capability to simplify system integration in an existing network
environment
• Meeting most demanded surveillance needs
With the 16 camera position presets, 5 camera tour configurations, email alerting,
FTP upload, motion detection, 2 alarm inputs and 2 alarm outputs, these various
features, the ICA-650 can be deployed in many different situations, such as
library, train station or factory production line to provide efficient, human-resource
reducing, and offers flexibility, affordability, and reliability for the proper
surveillance of manufacturing facilities.
• Outdoor Environment Protection
The venderproof cover provide a prefect protection to this device. With it’s built-in
heater, makes this device keep working in a very low temperate environment that
down to -30 degree C (-22 degree F).
• Day/Night Vision
With the Sony low-lux camera module. ICA-650 can provide the clear Day/Night
vision for user to obtain better video quality.
• Easy configuration
The network administrator can configure and manage ICA-650 via Wind ows-
based utility CamView or Web Browser interface.
• Audio Recording
With the RCA video, and audio output interfaces, the system administrator can
record the video/audio locally onto DVR or other video recording equipment.
• Motion Detection
Monitors any suspicious movement in specific area, and warn the system
administrator via email or pup-up messages.
Internet Features
• User-definable administration port number.
This allows Internet Gateways to use “port mapping” so the ICA-650 and a Web
Server can share the same Internet IP address.
• DDNS Support
In order to view video over Internet, user must know the Internet IP address of the
gateway used by ICA-650. An easy-to-remember DDNS (Dynamic DNS) name
will help you memorize your site more easily.
NTP (Network-Time-Protocol) Support
•
NTP allows the ICA-650 to calibrate its internal clock from an Internet Time-
Server. This ensures that the time stamp on the recorded video from the ICA-650
will be correct.
PPPoE supported
•
2
Page 7

Security Features
• User Authentication
If desired, the camera access can be restricted to known users. Users will have
to enter their username and password before being able to view the video stream.
Up to 10 users can be entered.
IP filter
•
The camera access not only can be restricted by username/password, but also
can be limited by the IP range to bring users more security.
Physical Details
1. Alarm cable
The Network Camera provides 8 pins cable to connect with external alarms.
Color definition for installing alarms:
Pin Color Function
1 Black
2 Brown
3 Red
4 Orange
5 Yellow
6 Green
7 Blue
8 Purple
Alarm Output #2 (NO)
Alarm Output #2 (COM). Max 24VDC, 1A
Alarm Output #1 (NO)
Alarm Output #1 (COM)
Alarm Output #1 (NC). Max 24VDC, 1A
Alarm Input #2 (A). Max 24VDC, 12mA
Alarm Input #1/2 (K).
Alarm Input #1 (A). Max 24VDC, 12mA.
3
Page 8

2. LAN Cable
LAN cable is a 10Base-T Ethernet or 100Base-TX Fast Ethernet cabling. The Ethernet
port built NWay protocol can detect or negotiate the transmission speed of the network
automatically. Provided Category 5 “straight through” cable to connect the Network
Camera to a 100Mbps Fast Ethernet network switch or hub.
3. Video Output Cable
User can connect the ICA-650 video output to their TV monitor or a video recorder to
output the monitor screen.
4. Audio Input Cable
The Network Camera provides 1-channel audio input to connect with external
microphone. User can monitor not only images but sounds.
5. AC Power connector
AC power connector, it is a mail located on the Network Camera’s back p anel. Note
that power supply need user to purchase additionally according to local electrical
specification. In order to prevent the improper power adapter may damage the unit
and result in danger.
The Network Camera also provides video output to connect the Network Camera with
a TV monitor or VCR.
4
Page 9

Package Contents
The following items should be included: If any of these items are damaged or missing,
please contact your dealer immediately.
• Planet ICA-650 Outdoor Speed Dome IP Camera x 1 (with Ethernet, Video, Audio,
Alarm cable and power cord integrated)
• User manual CD x 1
• Quick Installation Guide x 1
• Wall mount kit x 1
5
Page 10

Chapter 2
Basic Setup
2
This Chapter provides details of installing and configuring the ICA-650.
System Requirements
• To use the LAN interface, a standard 10/100Base-TX hub or switch and network
cable is required.
• Minimum System Requirement :
System
Hardware
Microsoft Internet Explorer 5.0 or later
Windows ME, 2000, XP, or 2003
1-4 cameras surveillance application
• CPU: Pentium 4, 1.3G MHz or above
• Memory Size: 256 MB or above
• VGA card resolution: 1024 x 768 or above
4 or more cameras surveillance application
• CPU: Pentium 4, 1.7G MHz or above
L Hint
• Memory Size: 512 MB or above
• VGA card resolution: 1024 x 768 or above
Note: The listed information is minimum system requirements only.
Actual requirement will vary depending on the nature of your
environment.
6
Page 11

Installation
协议码、和地址码开关
Use the rubber ring, nut, and screw to mount the power box and outdoor
speed dome IP cam to the wall.
Note: You need to choose correct screws to fix the outdoor speed dome IP
cam to the wall. Other types of screws need to buy locally.
防坠落保险索
7
Page 12
Setup
Initial setup can be performed either from the web browser or using the supplied
Windows-based camera utilities. This program can locate the ICA-650 even if its IP
address is invalid for your network. You can then configure the ICA-650 with
appropriate TCP/IP settings for your LAN.
Subsequent administration can be performed with your Web browser, as explained in
Chapter 3 - Web-based Administration.
Setup Procedure
Before setup operations
The ICA-650 provides GUI (Web based, Graphical User Interface) for machine
management and maintenance.
To start ICA-650 web configuration, the requirement of the web browser should be:
Microsoft Internet Explorer 5.0 or higher with Java support
L Note
Default LAN interface IP address of ICA-650 is 192.168.0.20. You may now open your
web browser, and insert http://192.168.0.20 in the address bar of your web browser to
logon ICA-650 web configuration page.
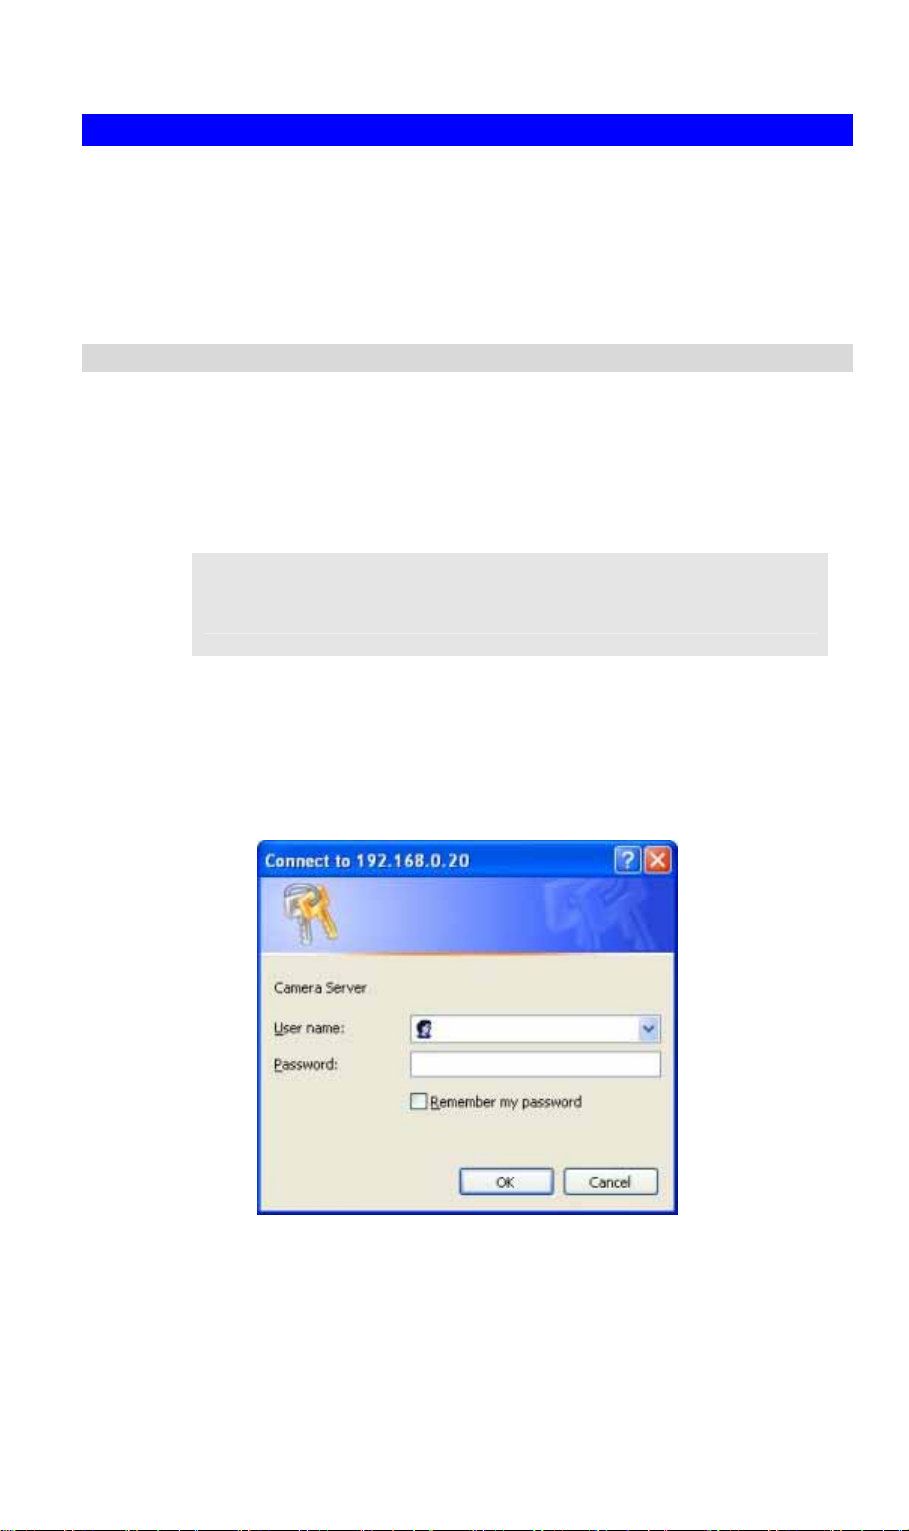
ICA-650 will prompt for User Name and Password, please enter: admin as username
to continue machine Web Management.
Current firmware supports Microsoft Internet Explorer, the Netscape
Navigator support is planned in the future firmware release
Or you may execute IPEdit to discover/edit IP address of ICA-650.
Procedures of IPEdit utility.
• Please find the IPEditV3.1.exe in the Utility folder on user’s manual CD.
• Double-click the IPEditV3.1.exe and the following screen should be prompt on
your computer.
8
Page 13
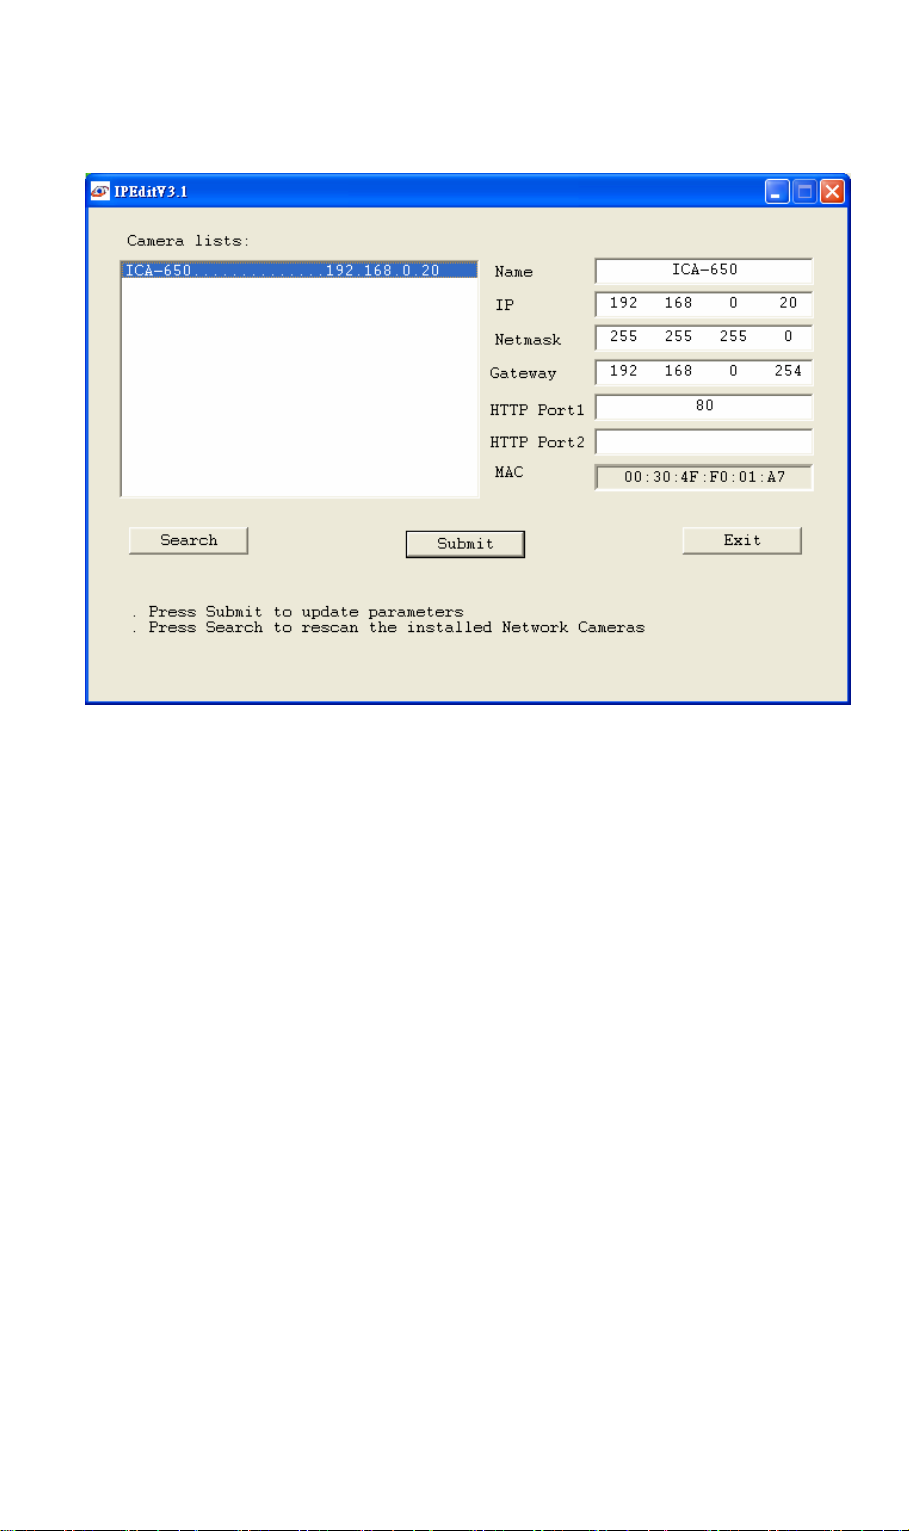
• Choose the destination camera for IP address and device name modifications.
• After modifications, you may now connect the camera via web browser.
9
Page 14

Chapter 3
Advanced Viewing Setup
3
This Chapter provides information about the optional settings and
features for viewing video via the ICA-650. This Chapter is for
Administrators only.
Introduction
After finishing the network setup, the ICA-650 can immediately be used by all users on
your LAN.
This chapter describes some additional settings and options for viewing live Video:
• Adjusting the video image
• Controlling user access to the live video stream
• Making video available from the Internet
Adjusting the Video Image
If necessary, the ICA-650 Administrator can adjust the Video image. Settings are
provided for:
• Image size - Select the desired size. The larger sizes require greater bandwidth.
• Image quality - This determines the degree of compression applied to the Video
stream. Higher quality requires greater bandwidth.
• Saturation, Sharpness, Contrast, Hue adjustment -
To Adjust the Video Image:
1. Connect to the Web-based interface of the ICA-650.
2. On the Administration menu, select Image. You will see a screen like the example
below.
10
Page 15

Camera setting
3. Make the required adjustments, as explained below, and save your changes.
Camera Settings
Image Size
Select the desired video resolution. The default resolution is
set to 320*240.
Available resolution: ‧176x144‧320x240‧352x288 ‧
640x480
Image Quality
Select the desired image quality. The default Image Quality is
set to Standard.
Available selection:
• Clarity: Video is better but frame rate may be slower
• Fluency: Video is not as good as Clarity but frame rate
may be higher
• Standard: System default value.
Note: Higher image quality requires more bandwidth.
Saturation,
Image quality adjustment, the parameter ranges from 0 to 255
Sharpness,
Contrast, Hue
Options
Camera tour
Reset to default
Enable the check box if you want the time to be displayed on
the Video image.
If this option is enabled, all the settings in this page will be
reset to factory default values.
11
Page 16

L Note
Please check the appendix B for more information on the image
adjustment.
12
Page 17

Controlling User Access to the Video Stream
By default, only system administrators can connect to the ICA-650 and view live Video.
If desired, you may apply the access privileges to known users, by requiring each user
to login to the ICA-650 with their individual username and password.
To enable this feature:
1. Connect to the Web-based interface of the ICA-650. (Please check related
chapters for details.)
2. In machine Administration menu, select User.
3. You may add up to 10 users in machine database, choose the user number, and
enter the name, password and access right for each user.
User Setting Screen
Operation
• When each user connects, they will be prompted for their username and password.
They must enter the name and password defined on the User screen above.
• The camera system administrator can have full access/system modification
privileges; the user only has viewing privilege.
13
Page 18
Making Video available from the Internet
If your LAN is connected to the Internet, typically by a Broadband Gateway/Router and
Broadband modem, you can make the ICA-650 available via the Internet.
ICA-650 Setup
The ICA-650 configuration does NOT have be changed, unless:
• You wish to change the port number from the default value (1024).
• You wish to use the DDNS (Dynamic DNS) feature of the ICA-650.
Second HTTP Port Configuration
Normally, HTTP (Web) connections use port 80. Since the ICA-650 uses HTTP, but
port 80 is likely to be used by a Web Server, you can use a different port for the ICA-
650. This port is called the "HTTP Port2". (The first port is port 80.)
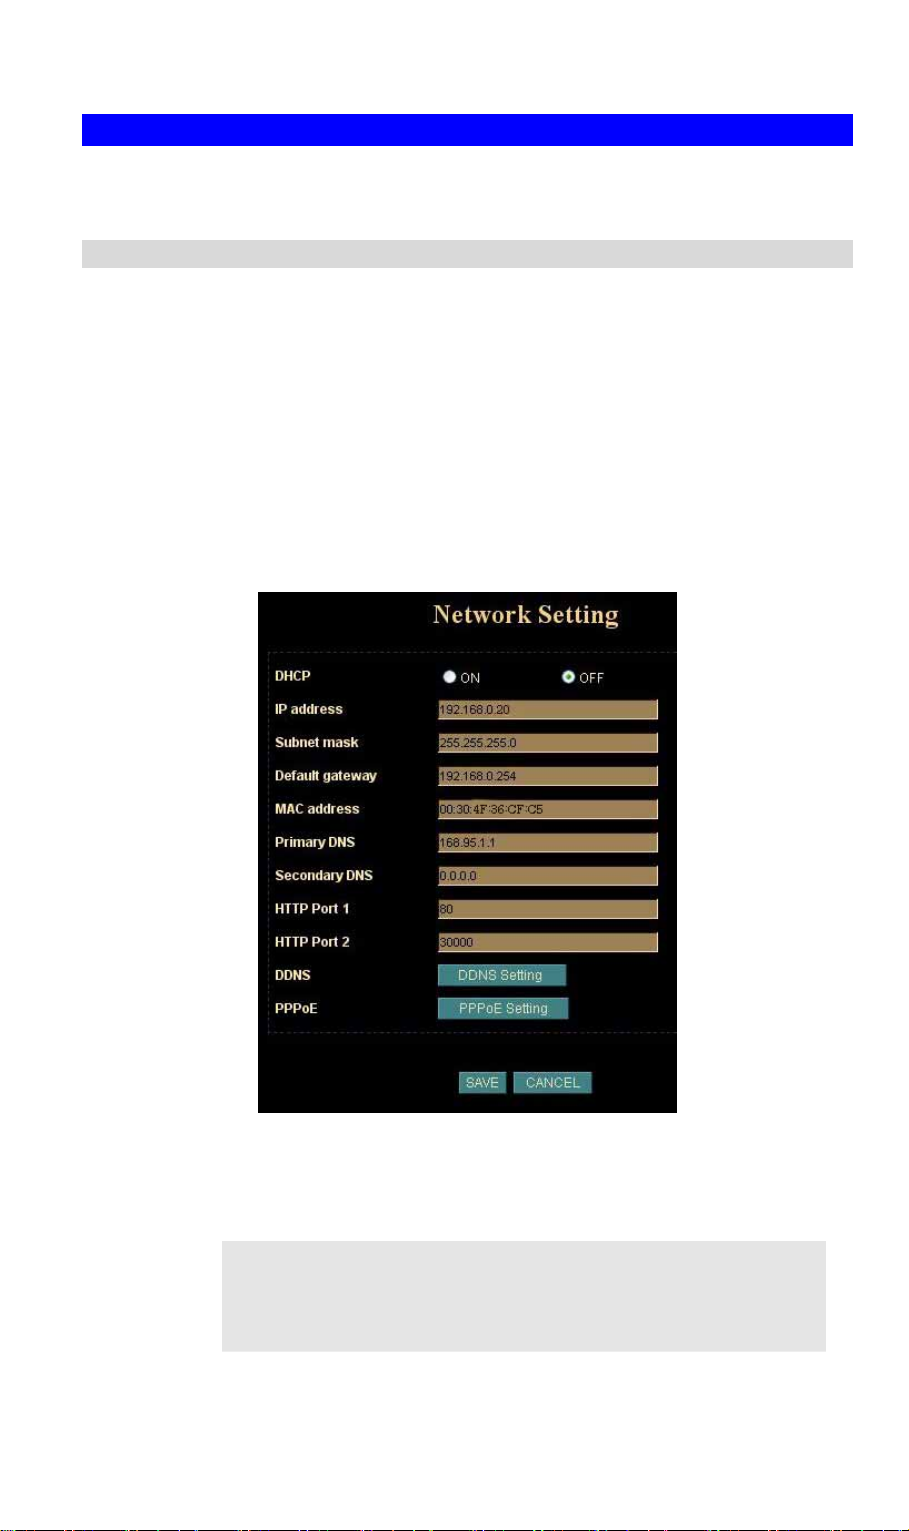
The HTTP port2 is disabled in default settings. If you prefer to use a different port
number than port 80, you can specify the port number on the ICA-650's Network
screen, as shown below.
Network Screen
The Network screen is part of the Web-based Administration interface. See Webbased Management for further details on using this interface.
Viewers need to know this port number in order to connect and
L Hint
view live Video, so the current communication port number has to
be informed to the remote users to connect to.
14
Page 19

DDNS (Dynamic DNS)
Many Internet connections use a "Dynamic IP address", where the Internet IP address
is allocated whenever the Internet connection is established.
This means that other Internet users don't know the IP address, so can't establish a
connection.
DDNS is designed to solve this problem, by allowing users to connect to your LAN
using a domain name, rather than an IP address.
To use DDNS:
1. Register for the DDNS service with a supported DDNS service provider. You can
then apply for, and be allocated, a Domain Name.
2. Enter and save the correct DDNS settings on the DDNS Setting screen in the
Network setting menu.
3. Operation is then automatic:
• The ICA-650 will then automatically contact the DDNS server whenever it
detects that the Internet IP address has changed, and inform the DDNS server
of the new IP address.
• Internet users can then connect to your LAN using the Domain Name
allocated by the DDNS service provider.
• Limitation: if the ICA-650 is installed with private IP address behind the NAT
router, please find and enable the DDNS feature on the router. This can
prevent the remote users not able to connect to the camera.
• Current supported DDNS service provider:
www.dyndns.org , www.no-ip.com
DDNS Setting Screen
Router/Gateway Setup for remote viewing
Your Router or Gateway must be configured to pass incoming TCP (HTTP)
connections (from remote viewers) to the ICA-650. The Router/Gateway uses the Port
Number to determine which incoming connections are intended for the ICA-650.
This feature is normally called Port Forwarding or Virtual Servers in the router. The
Port Forwarding/Virtual Server entry tells the Router/Gateway that incoming TCP
connections should be passed to the ICA-650. If necessary, check the user manual for
your Router/Gateway for further details.
15
Page 20

L Hint
The "Port" for the Port Forwarding / Virtual Server entry above is
the "Second Port" number specified on the Network screen of the
ICA-650.
Viewing via the Internet
Clients (viewers) will need a broadband connection; dial-up connections are NOT
recommended.
Using your Web Browser
If using your Web browser, you need to know the address of the camera (either the
Internet IP address or the Domain name) and the correct communication port n umber.
Enter the address of the ICA-650, and its port number, in the Address (or Location)
field of your Browser.
Example - IP address:
HTTP://203.70.249.52:1024
Where the Router/Gateway's Internet IP address is 203.70.212.52 and the "HTTP
Port2" number on the ICA-650 is 1024.
Example - Domain Name:
HTTP://ipcam.dyndns.org:1024
Where the Router/Gateway's Domain name is ipcam.dyndns.org and the " HTTP
Port2" number on the ICA-650 is 1024.
Using the Windows Viewing/Recording Utility
If using the CamView Utility, the details of the ICA-650 must be entered on the Internet
tab of the Add Camera screen.
CamView - Add Camera Screen
16
Page 21

You can then select the camera in the Cameras list on the main screen, and click OK
to establish a connection and view live video.
Please check respective chapter for further details of viewing Video using either the
Windows Viewing/Recording utility or Web Browser.
17
Page 22

Chapter 4
Web-based Management
4
This Chapter provides Setup details of the ICA-650’s Web-based
Interface. This Chapter is for Administrators only.
Introduction
The ICA-650 can be configured using your Web Browser. The ICA-650 must hav e an
IP address, which is compatible with your PC.
Connecting to ICA-650
• If you have run the CamView utility, the screen provided a button
Clicking this button will immediately connect to the ICA-650 to do web settings.
• If using only Web Browser, use the following procedure to establish a connection
from your PC to the ICA-650:
• Once connected, you can add the ICA-650 to your Browser's Favorites or
Bookmarks.
Connecting using your Web Browser
1. Start your web browser.
2. In the Address box, enter "HTTP://" and the IP Address of the ICA-650, as in this
example, which uses the ICA-650's default IP Address:
HTTP://192.168.0.20
3. Default username/password for machine login: admin/ <no password>
4. If the Administrator ID and Password have been assigned, enter the name and
password you assigned.
18
Page 23

Welcome Screen
When you connect, the camera Home screen will be displayed.
Camera Home Screen
The Home screen can be divided into three areas:
• Viewing Area - Images from the ICA-650
• Control Panel Area – ICA-650 Camera Manipulation and image quality control
• Advanced Configuration area - only available for administrator. Camera
administrator can have full configuration in this menu.
These options are explained in the following sections.
19
Page 24

Viewing Area
This screen is displayed when you log in machine
Viewing Area Screen
• The ICA-650 web page requires ActiveX control to display the video content. The
ActiveX control must be downloaded from the camera and installed on your PC.
• The security settings on the Internet Explorer must allow the ActiveX plug in to be
functional.
• To use the ICA-650, please execute your Internet Explorer and browse to
Î ”Internet Options…” Î ”Security” ΔCustom Level…” and change the settings
as follows:
• Download the signed ActiveX controls
• Download the unsigned ActiveX controls
• Initialize and script the ActiveX controls not masked as safe to Prompt
• After the ActiveX installation completed, video content will start playing
automatically. Due to various network conditions, the video display may be a delay
of a few seconds while the video stream is buffered.
”Tools”
20
Page 25

Control Panel Screen
When you connect, the camera control panel screen will be displayed.
Camera direction Up, Down, Left, Right, Home
Camera speed adjustment
Adjust camera focus Recall/Preset Mode
Camera Preset/Recall positions
Frame rate adjustment via image quality
Video Resolution
Video Brightness adjustment positions
Audio feature On/Off
Camera Control Panel Screen
The function on the control panel can be shown below:
Button Definition
Camera
Direction
Camera
Speed
Recall/Preset
mode
Control camera up/down/left/right and home position
Increase/decrease the camera Pan/Tilt speed
Preset: set up camera fixed locations before operation
Recall: Set camera position to preset location
Adjust Video resolution
The ICA-650 provides 4 resolutions:
Video
Resolution
640x480, 352x288, 320x240, 176x144
For NTSC camera: 320x240 is suitable
For PAL camera: 352x288 and 176x144 are suitable
However, all resolution are available for NTSC and PAL
camera
Preset or
Recall
positions
Video
Brightness
Preset or Recall camera 1~16 location(s)
Ex. If you press 5, then the camera will move to preset
location 5.
Adjust Camera video brightness
21
Page 26

Adjustment
Adjust image quality.
Image
quality
Frame rate
adjustment
directly
Audio On/Off
Clarity: Video is better but frame rate may be slower
Fluency: Video is not as good as Clarity but frame rate may
be higher
Standard: System default value
Adjust video frame rate via giving a number directly.
1, 5, 10, 15, 20, 25, 30
Turn on/off audio output function.
Note: The Microphone is located on the rear panel. You
need to position the MIC hole face to the audio source to
have better audio quality.
Advanced Configuration Area
The Advanced Configuration menu offers more features and camera control
privileges to meet various application demands.
Advanced Configuration Screen
The ICA-650 Advanced Configuration page divided into three sub-menus:
• Camera Advanced Setting
• Camera Trigger Setting
• Screen capture Setting
Respective menu descriptions are illustrated in the following sections.
Camera Advanced setting Menu
Clicking on Setting on the menu provides privileges to all the settings for the ICA-650.
The Advanced Setting menu is divided into 2 categories: Basic and Application
settings:
The Basic menu provides essential configurations of the ICA-650, and the Application
menu is provided for various applications.
Basic Setting
Parameters in the Basic configuration menu provide machine adjustment; the
available configurations are listed below:
Icon Menu Link Definition
System
Define Frame Rate, Turn on/off “Remote
camera control”, and view system log file.
22
Page 27

Camera
Network
User
IP Filter
Adjust camera parameters and set camera
tour
Configure Network setting such as DHCP
On/Off, DDNS and PPPoE
Setup user name, password and login privilege
Setup legal IP address of user login (This
function should be used with function “User”
respectively)
System Screen
After entering machine Home screen, click on the System menu, you will see a
screen like the example below.
Data - System Screen
System Settings
Serial Number
Camera Name
Default frame
rate
Remote
camera
control:
Product serial number
This displays the name for the ICA-650; camera name is useful
while multiple unit installation.
The default frame rate in ICA-650 is 30fps, the video frame rate
can be adjusted in this menu or on the Control panel menu
Enable or disable remote control feature in ICA-650
System Screen
23
Page 28

Log
Administrator can check the log information in machine,
including the Main Info, Appended Info, Operator IP, Operator
MAC, and Time.
Select the “View” button to check the log file.
24
Page 29

Camera Screen
This screen is displayed when the Camera menu option is clicked.
Note: please adjust carefully to have proper machine configurations.
Camera Screen
Data - Camera Screen
Camera Settings
Image Size
Image Quality
Saturation,
Sharpness,
Contrast, Hue
Display resolution selection, supported resolution in ICA-650:
‧176x144
‧ 352x288
‧ 320x240
‧ 640x480
Please check the available network upload bandwidth and
carefully select the proper video resolution.
Video display quality selection in ICA-650:
• Clarity: Video is better but frame rate may be slower
• Fluency: Video is not as good as Clarity but higher frame
• Standard: System default value
Note: The value on the list box displays the current setting all
the modifications will not take effects until it is saved in this
menu.
Key in respective value for image adjustment. It is not required
to adjust this value when the image is vivid.
rate
25
Page 30

Camera Tour
Reset to
Default
To use the camera tour function, user must preset some camera
positions first.
Select the “SET Tour” button to enter the Camera Tour setting
page.
Restore the values of these pages to factory default value.
Camera Tour
In the Camera Tour page, choose the one tour name. Fill the dwelling time and tour
sequence by preset points, can repeat above procedure to set more camera tours.
Data – Camera Tour Screen
Camera Tour Settings
Tour Name
Dwelling Time
Sequence
Enable
L Hint
Choose the one tour name from A to E
The time period between every tour point.
16 points can be assigned.
Enable camera tour group should be activated
To use the camera tour function, user must preset some camera
positions first. The maximum number of preset points is 16.
In the Camera Tour page, choose the one tour name from A to E.
Fill the dwelling time and tour sequence by preset points, and
then save these setting. You can repeat above procedure to set
more camera tours.
Camera Tour Screen
26
Page 31

Network Screen
This screen is displayed configure Network setting such as IP address, DHCP, DDNS
and PPPoE.
Data - Network Screen
Network Settings
DHCP
IP address,
Subnet mask,
Default
gateway,
Primary DNS,
Secondary
DNS
HTTP Port 1,
HTTP Port 2
Enable or disable DHCP client in ICA-650
This parameter allows users to setup the IP address assigned by
ISP. Your ISP should provide all the information requied for
Internet access.
Note: User need to reboot the Network Camera to make this
setting to take effect.
Users could assign the port number of http protocol, and the
WAN users should follow the port number to login.
Network screen
27
Page 32

IP Edit
User can use IP Edit software program to find Internet Cameras
or edit related parameters on the LAN. Disable this option to
restrict the modification of related parameters by IP Edit software
DDNS Setting
The DDNS is designed to solve this problem, by allowing users to connect to your
LAN using a domain name, rather than an IP address.
DDNS screen
DDNS Settings
Enable DDNS
Username,
Password
Domain Name
HTTP Proxy,
Proxy
Username,
Proxy
Password
Enable or disable DDNS function.
Enter the Username/Password for your DDNS account.
Enter the host name, which DDNS service provider assigned.
Enter the parameter, which DDNS service provider assigned.
PPPoE Setting
If the ISP demands PPPoE connection for Internet access, please select PPPoE as
connection type, and insert the username/password by your ISP to connect you to the
Internet.
28
Page 33

PPPoE screen
L Hint
Please consult your ISP personnel to obtain proper PPPoE/IP
address related information, and input carefully. If Internet
connection cannot be established, please check the physical
connection or contact the ISP service staff for support
information.
29
Page 34

User Screen
This User setting can set up to 10 different usernames and passwords. Every one set
of username and password can be acted as an Administrator or just a general user.
User Screen
IP Filter Screen
The IP filter can set 10 different user’s IP address, which are allowing enter or
disregarding by the Network Camera. Please configure “User” before “IP Filter”. Each
“User” username and password matches with one “IP Filter” user.
IP Filter Screen
30
Page 35

Function Notification
The page of user setting is very closely related to the IP filter settings. While the
administrators are setting these two pages, they should notice that login authorities
are not only based on the login names but also the range of IP addresses.
Administrators could reject login users according to both login names and IP
addresses. The administrator accounts have the supreme power; system will always
accept no matter how IP filter setting was set.
Several examples to explain the logical relations between login names and the IP
policy:
-1-.
User page: Login name 1= 12345, Password=12345, Access Authority=any
IP filter page: Default Policy=Allow, login name1 comes from 192.168.0.A to B=Allow
Result: when the remote users login in the name of 12345 and come from the IP
addresses 192.168.0.A to 192.168.0.B, login will be successful. If these users did not
come from the IP addresses A to B, login access will be rejected.
-2-.
User page: Login name 1= 12345, Password=12345, Access Authority=any
IP filter page: Default Policy=Allow, login name1 comes from 192.168.0.A to B=Deny
Result: when the remote users login in the name of 12345 and come from the IP
addresses 192.168.0.A to 192.168.0.B, login will be denied. If these users did not
come from the IP addresses A to B, login access will be successful.
-3-.
(User page: Login name 1= 12345, Password=12345, Access Authority=any
IP filter page: Default Policy=Deny, login name1 comes from 192.168.0.A to B=Deny/
Allow
Result: login of all the login names will be rejected except the login name “admin”.
Application Setting
Parameters in the Basic configuration menu provide machine adjustment; the
available configurations are listed below:
Icon Menu Link Definition
FTP Client
SMTP
Alarm 1
Setup IVS-100 as a FTP client and configure
Server site in order to upload images to server
Setup Mail transferring service configuration
Setup Alarm Output 1 action via manual or
event
31
Page 36

Alarm 2
Schedule
Motion
Detection
Time
Setting
Popup
Firmware
Upgrade
Factory
Default
Setup Alarm Output 2 action via manual or
event
Schedule Motion Detection to send email or
upload images.
Setup motion detection area and sensor
sensitivity
Setup the Network Camera time configuration
Setup event message while motion or sensors
has been activated
Product firmware upgrade
Pre-default the Network Camera factory
default setting
Reboot
Reboot this device
32
Page 37

FTP Client Screen
FTP Client Settings
FTP Client Screen
FTP server
name
Username,
Password
Remote path
Image file
name
Suffix
Sequence No.
clear
Mode
IP address or domain name of the destination FTP server
Please input the Username/Password for the FTP server
Please input the path to the destination.
Please input the basic file name you want to assign to the
images when sending to the FTP server.
Select the suffix to add to the file name.
- None:
No suffix is added. The basic file name is
assigned to the image to be sent to the FTP
server.
- Date/Time:
The date/time suffix is added to the file name. The
- Sequence number:
A consecutive number is added to the basic file name.
Enable or disable clear sequence number
Motion Detection / Sensor1 / Sensor2 / Periodical sending / Off
Please select send a captured image mode.
33
Page 38

SMTP Screen
This screen is displayed when the SMTP menu option is clicked.
SMTP (Simple Mail Transfer Protocol) is a protocol for sending e-mail messages
between servers. The mail server address must be filled in this field.
Network Settings
SMTP server
name
Username,
Password
Sender’s Mail
Box
Receiver’s Mail
Box
Subject
Mode
SMTP Screen
Enter the address of SMTP server used to send the mail. Please
ensure the server is using SMTP protocol and able to relay mails
for you. Some SMTP server may require authentication. Please
enable the “Check Password”, and enter the Account Password
fields below for authentication.
Enter the Username/Password for your SMTP account.
Enter the sender e-mail address in the field. This field must be
entered with a valid e-mail format.
Enter the receiver e-mail address in the field.
Enter the subject of outgoing mail.
Motion Detection / Sensor1 / Sensor2 / Periodical sending / Off
Please select send a captured image mode.
34
Page 39

Alarm 1 & Alarm 2 Screen
This screen is displayed when the Alarm 1/Alarm 2 menu option is clicked. You can
select Manual or Event for the Alarm mode.
Duration:
Set up the alarm duration. “0” means the alarm working always.
Alarm1 Screen
Schedule Screen
The Schedule can enable motion detection in an arranged period in order to avoid
unnecessary images transmitting and catch the desired images.
Schedule Setting Screen
35
Page 40

Motion Detection Screen
This screen is displayed when the Motion Detection menu option is clicked. You can
Enable/Disable function and adjust the sensitivity level
Motion Detection Screen
Motion Detection Settings
Enable Motion
Detection
Sensitivity
Area
Enable or disable Motion Detection function in ICA-650
Select the desired option to suit your environment. If covering a
large area, you usually need higher sensitivity, since a moving
object will take only a small portion of the image.
Use the adjust the determine which areas of the image are
examined for motion
36
Page 41

Time Setting Screen
This screen is displayed when the Time Setting menu option is clicked.
Time Screen
Time Settings
IP Cam Time
PC Time
Set Time
Date
(yy/mm/dd)
Time
(hh:mm:ss)
Time Zone
L Hint
Provides settings of adjusting the camera’s time
This is default time value for PC.
Three options of Synchronize with PC's time / User Input / NTP
are available for your selection to link with the Time Server. The
default setting is Synchronize the time with PC’s time
To set the Date Time manually select “User Input” and system
administrator must enter the Date and Time in the respective
field manually.
System administrator must select the time zone for the region.
Please refer to the appendix for the time zone selection table.
Please find below NTP server web address for your reference to
set the timeserver.
http://www.eecis.udel.edu/~mills/ntp/clock1.htm
http://www.eecis.udel.edu/~mills/ntp/clock2.htm
37
Page 42

Popup Screen
This screen is displayed setting event message while motion or sensors has been
activated
When any one of alarms enabled, and one of them detected, then a message window
will be displayed on the screen.
Pop up Screen
Pop up Settings
Pop-up text
Display mode
Sensor 1,
Sensor 2,
Motion
detection
Input the warming text.
Select display mode for your
Enable or disable the display of a text string in the video image.
Type the text string that you want to display in the adjacent field.
38
Page 43

Firmware upgrade Screen
This screen is displayed when you click the Firmware Upgrade menu on the Status
screen.
Firmware Upgrade Screen
This screen allows you upgrade the Firmware (software) in your ICA-650. Before
using this screen, your must download the upgrade file to your PC.
Please be noted the following notes before proceeding firmware upgrade.
1. Please close the camera tour function.
Please close the motion detection function.
2.
3.
Please reduce the frame rate.
4.
Please modify the resolution to smallest one.
NOTE
Then follow this procedure to upgrading firmware:
1. Click the Browse button, and locate the upgrade file.
2. Select this file, and click OK. The filename will then appear in the Upgrade File
field.
Do not interrupt the upgrading procedure during proceeding; or
the inner component might be permanently damaged.
3. Click the Start Upgrade button to transfer the file to the ICA-650 and start the
upgrade procedure.
Click the “here” button to begin to upgrade firmware.
4.
39
Page 44

5. Click the “OK” button to continue.
6. The upgrade progress status information will be displayed on the screen. Once
the upgrading process completed, the Network Camera will reboot the system
automatically.
Factory Default Screen
This screen is displayed when you click the Factory Default menu on the Status
screen.
Please Click “OK” button to load default settings to camera.
40
Page 45

Reboot
Reboot the Network Camera by hardware reset
Trigger & Capture
Trigger:
This is sending an image or output a trigger to control the alarm output, using Trigger
section on the main page.
Trigger Settings
FTP
Mail
Alarm 1
Alarm 2
Clear Alarm 1
Clear Alarm 2
Upload a captured image to server
Mail captured image to specific mail address
Enable Alarm output 1
Enable Alarm output 2
Clear alarm1 output status
Clear alarm2 output status
Capture:
This screen is displayed when you click the Capture menu and the function can
capture current image and save it to storage media. The image is saved in the JPEG
format.
41
Page 46

ActiveX Control
This feature only supports on the ActiveX control within Microsoft® Internet Explorer.
View
This screen is displayed when you click the “View” menu on the ActiveX control.
42
Page 47

View Settings
Resizable
Actual size
Status Bar
Make the image is resizable, but “Actual size disable”, the
“Splits” is supported on this mode.
Make the image show as the actual size, the “Splits” function
does not work on this mode.
A status bar display on the button of the image.
Split
This screen is displayed when you click the “Split” menu on the ActiveX control.
The Network Camera provides four setting for Window split, it can display different
time frame images of the selected Network Camera. The time string with green
characters is the current displayed image.
Available Split: ‧1 x 1 (Default) ‧ 2 x 2‧ 3 x 3‧ 4 x 4
43
Page 48

Rotate & Quality & Resolution
Rotate:
An image can be rotated in predefined 180-degree increments.
Quality:
Available quality : ‧High (Default)‧Low.
Resolution:
Available resolution: ‧176x144‧320x240‧352x288 ‧640x480
Image Recording
This screen is displayed when you click the “Image Recording” menu on the ActiveX
control.
44
Page 49

Recoding Screen
Save as JPEG:
Select this option and click “Save as JPEG” for detailed configurations. The predefined schedule can be set by JPEG.
45
Page 50

During the JPGEG file recording, a red icon displays on lower right position of the
image to indicate the AVI saving process. If want stop the recording, please press the
“Stop Image Recording” to stop the save as JPEG process.
Save as AVI:
Select this option and click “Save as AVI” for detailed configurations. The pre-defined
schedule can be set by AVI.
During the AVI file recording, a red icon displays on lower right position of the image to
indicate the AVI saving process. If want stop the recording, please press the “Stop
Image Recording” to stop the save as AVI process.
Recording File Path:
Save Current Picture As
This screen is displayed when you click the “Save Current Picture As” menu on the
ActiveX control.
How to configure Motion Detection
• Please select the “Save Current Picture As “ to save the current display image into
the local PC.
• Please input the saved ”file name”, and click “Save” button.
• Please select the file to display the saved image by using any one of graph editing
tools.
46
Page 51

Chapter 5
5
Client UTILITY
INSTALLATION
The CamView utility is a powerful utility for video recording, viewing, and camera
administrations.
Please insert the user’s manual CD and start the CamView installation from the
default page or manually browse the Utility folder in the CD to install the software:
5.1. CamView Installation
• Run the “setup.exe” to start installation. A welcome message is shown as the
following figure, and then hit the Next button to continue.
• Read the license agreement first, please. If you accept the agreement, select I
accept the agreement, and then hit the Next button to continue.
47
Page 52

• Decide which directory to install the software. By default, just hit the Next button to
continue
48
Page 53

• Decide the program group name. By default, just hit the Next button to continue.
• Decide whether to create a desktop icon of the program. Then press Next.
49
Page 54

• Ready to install. By default, just hit the Install button to start installation.
• Installing, wait for a moment.
50
Page 55

• Installation complete. CamView software can be launched after pressing Finish.
HOW TO USE
After successfully installing the utility, this icon will be added to the
desktop. Double click it to launch the program.
User need login authentication while starting to use CamView.
Two pairs of default login ID and password: admin/admin and guest/guest.
Admin ID has supreme authority to adjust any settings.
Guest ID has view related function privilege only, and does not have authority to
adjust machine settings. Such as switch viewer screen layout, switch camera channel
or minimize / close the CamView.
51
Page 56

Note: It is strongly suggested to change the Login ID and Password for security
concerns.
5.2. CamView User Interface
12
3
10
CamView main screen
4
5
6
7
12
5.2.1. Date and Time
The current date and time of the computer are displayed here.
5.2.2. Alert Message
A message box will appear while alert event occurs. Ex: free space is almost
exhausted.
5.2.3. Recording and Playback
Here are the buttons for playback, record / stop record and snapshot.
52
Page 57

5.2.4. Rotate, Full screen and Lock
Press the Rotate button to rotate the up-side-down images.
Press the Full Screen button to enlarge the viewer screen to full computer screen.
Press Esc button on the keyboard to return to main CamView screen.
Press the Lock button to forbid intruders to operate the CamView unless they input
the correct password.
5.2.5. Camera and Application Settings
Press Camera Configuration button to adjust the camera settings in Web.
Press Application Configuration button to adjust and maintain the CamView tasks.
5.2.6. EMap
Press this button to do central location management for 16 cameras.
5.2.7. DVR
Press this button to recall the DVR application and view the DVR images as well.
5.2.8. Camera Pan / Tilt / Zoom Control
Here are the PTZ controllers integrated in the CamView to move the camera direction
to the up / down / left / right / home and zoom in or zoom out on the image
respectively.
Note: camera zoom feature is reserved for future product development.
5.2.9. Viewer Screen
Users may choose different layout to monitor different cameras. The available camera
display modes are shown below:
Each viewer section displays video from the associated camera. Right click on a
viewer section, and then the viewer will change to Single viewer. At this movement,
Right click on the single viewer again, it will change to previous layout mode. The
layout of the screen has the following modes:
z Single: Only one viewer displays video.
z 2x2: The screen is divided into 4 viewer sections.
z 6: The screen is divided into 6 viewer sections.
z 3x3: The screen is divided into 9 viewer sections.
z 13: The screen is divided into 13 viewer sections.
z 4x4: The screen is divided into 16 viewer sections.
5.2.10. Layout Selection
There are six kinds of layout (Please refer to 5.2.9 Viewer Screen) can be chosen.
53
Page 58

5.2.11. Camera Selector
Here are the camera number buttons to select cameras.
Blue color: the normal camera icon.
Pink color: the current selected camera.
5.2.12. Minimize, Audio and Close application button
The right top button is for minimizing the CanView software; all the proceeding tasks
will not be terminated.
Press Audio button to enable the audio from the associated Internet Camera. To
enable audio function from CamView, please also enable audio in Web configuration.
Æ
(Please refer to the Chapter 4 Web-Based Management
Press power symbol button to close the CamView software; all the proceeding t asks
will be terminated.
Control Panel Screen)
5.3. Application Configuration
Press the button below to configure the CamView application program. After the
button is pressed, a dialog form will show up. Users then configure the program by the
form as the following sections.
5.3.1. Application Settings
Figure 5.3.1 shows settings for the global scope of the application including
initialization and basic environment settings. After all settings are complete, press the
OK button to save the configuration, and exit the form.
Note: The Apply button is unused for this tab; always confirm the settings by
pressing the OK button to let configurations take effect.
The following lists descriptions of each setting:
z Initial Viewer Layout: Set the initial layout of viewers at the start of the program.
z Free Space Alert Percent (%): When the free space reaches the specific
percentage, an alert message will appear automatically.
z Free Space Alert Size [MB]: When the free space reaches the specified hard
drive size, an alert message will appear automatically.
54
Page 59

Note: Free Space Alert Percent (%) and Free Space Alert Size [MB] is OR
condition combination, any one above is TRUE, then an alert message will
appear automatically.
z Max Number of Events: Set the number of lines whi c h you want to show in the
alert message window.
z Continuous Recording: IF free space is not enough, CamView will delete the
oldest recording file and keep recording.
z Export: Select the item to save the configuration(Application Configuration)
z Import: Select the item to load the configuration(Application Configuration)
Figure 5.3.1. The Application Tab
5.3.2. Camera Settings
As shown in Figure 5.3.2, users can set parameters of each camera.
If the Restore button is pressed, the current setting modifications of the specified
camera will be cleared and restore to the original.
If the Apply button is pressed, the current setting modifications will be applied to the
specified camera. Note that these modifications are not saved to the persistent
storage like HD on the computer.
If the OK button is pressed, all settings on all tabs will be saved, and exit the form.
Note: The Apply button is unused for this tab; always confirm the settings by
pressing the OK button to let configurations take effect.
55
Page 60

The following lists describe for each setting:
• IP: IP address of the camera.
• Port: Connection port of the camera. The default is 80.
• Login ID: Please input the login ID if you enable authentication function of the
specific camera.
• Password: Please input the password if you enable authentication function of the
specific camera.
• Video Path: A directory to store recorded video files. Double-click the input field or
click the square button to select the directory.
• Video Frame Rate: frame rate of video.
• Video Number of Frame: The maximum number of images are saved in a video
file. If the value is larger, then few files will get. If the value is smaller, then more
files will get.
• Snapshot Path: A directory to store snapsh ots. Double-click the input field or click
the square button to select the directory.
• Motion Rec Interval[Sec]: If Motion Detection is enabled, then when Motion
Detection starts, CamView will do recording for the specified duration. Minimum
unit is second.
Figure 5.3.2 The Camera Tab
Auto Recording: If the box is checked, the program will do recording for the
•
specified camera automatically at the beginning of CamView starts.
Motion Detection: Check this option will enable Motion Detection in CamView.
•
56
Page 61

5.3.3. Scheduling
As shown in Figure 5.3.3, users can schedule recording.
When you press the Add button, the editing task will be added to the Schedule Items
column.
When the Modify button is pressed, the new schedule recording will be updated to the
specified item.
If the Remove button is pressed, the specified task will be removed from the list.
Note: The Apply button is unused for this tab; always confirm the settings by
pressing the OK button to let configurations take effect.
The following lists describe for each setting:
• Hour: Set the hour of time in 24- hour clock format. * stands for all hours.
• Minute: Set the minute of time. * stands for all minutes.
• Month: Set the month for recording tasks. * stands for all months.
• Day: Set the day for recording tasks. * stands for all days.
• Weekday: Set the specific weekday of a week. If no day is specified, All
weekdays will fit.
• Duration (Sec): The duration in seconds for the schedule recording. 0 (ze ro)
means no limit.
For example, set a recording task which begins at 10:00 every Monday with dura tion
3600 seconds. The configuration is like below:
Hour = 10, Minute = 0, Month = *, Day = *, Weekday = Mon, Duration = 3600
Figure 5.3.3 The Scheduling Tab
57
Page 62

5.3.4. User Settings
Two accounts to access CamView.
Admin / Admin: Administrator has the supreme authority to change all the settings.
Guest / Guest: Guest only can view the images only or perform the view related
function. Such as switch viewer screen layout, switch camera channel or minimize /
close the CamView.
Note: The Apply button is unused for this tab; always confirm the settings by
pressing the OK button to let configurations take effect.
Figure 5.3.4 The User Tab
58
Page 63

5.3.5. External Settings
Designate the DVR application path in External tab. Figure 5.3.5 show the setting.
When user presses DVR button, the CamView will switch to DVR application.
Figure 5.3.5. The External Tab
5.4. Camera Configuration
Users can hit the button shown in Figure 5.4 to configure the associated camera
Please refer to Chapter 4 Web-Based Management.
Figure 5.4
59
Page 64

5.5. Recording
Figure 5.5-1. Figure 5.5-2. Figure 5.5-3.
Select a camera by pressing the button with camera number as shown in Figure 5.5-2,
selected camera icon will be like Figure 5.5-3 and then press the toggle button as
shown in Figure 5.5-1. To stop recording is similar to the previous method, just press
the toggle button as shown in Figure 5.5-1.
The second way to record automatically, the method has described in section 5.3.2
Camera SettingÆ Auto Recording.
The last method to record is done by scheduling. Schedule recording tasks are
described in section 5.3.3 Scheduling. The CamView will start to record on time.
5.6. Playback
When you press the Playback button on the panel as shown in Figure 5.6, a form will
appear to show the list of video records and snapshots.
Figure 5.6
5.6.1. Video List
The Video List tab lists video records, and displays the information about the specified
record, for example: Camera number, recording start time and recording file length.
When you hit the Play button, the Windows Media Player will start to play the video.
The Video list is shown in the following figure.
60
Page 65

Figure 5.6.1 The Video List Tab
5.6.2. Snapshot List
The Snapshot List tab lists snapshots, and displays the information about the specified
snapshot file. When you hit the Show button, Internet Explorer will be invoked to
display the snapshot.
Figure 5.6.2 The Snapshot List Tab
61
Page 66

5.6.3. Video Search
The video search tab lists video file information about the specified search.
Press the start time and end time toggle tab, then a calendar form will appear as
Figure 5.6.3-1, then select a proper date and time. After press OK in the calendar form
then hit the Search button, you will get the matched video files in the following column.
Press the Play button to play the selected video file via the Windows Media Player.
Figure 5.6.3-1 The Calendar Form
Note: The pink color indicates the motion recording event.
Figure 5.6.3-2 The Video Search Tab
62
Page 67

5.7. Image Rotation
After the button is pressed, the displayed image rotates 180 degree. It is used for the
camera being installed upside-down direction.
Note: Recorded video / image files will not be rotated.
Figure 5.7
5.8. Full Screen
After this button is pressed, it will show full screen mode and press the keyboard "Esc"
key or the center of screen to return normal mode.
Figure 5.8
5.9. Lock Application
Press this button will avoid strangers to access CamView unless they have correct
password.
Figure 5.9
5.10. EMap
When you press the EMap button on the panel as shown in Figure 5.10, a form will
appear to show the eMap function.
Figure 5.10
5.8.1. EMap Setting
Select the File from the File menu bar and the following are descriptions:
1. New EMap: First, create a new layout.
2. Insert Map Image: Choose a proper image file or map layout to load.
3. Delete EMap: Delete current editing EMap layout.
3. Save: Save all settings.
63
Page 68

4. Exit: Exit Emap function. Before you select it, we recommend you to save the
current settings.
The following describes Edit menu bar:
1. Reset: Remove all camera icons in current layout.
In the menu bar, select Window to change EMap.
As shown in Figure 5.10-1 and Figure 5.10-2, with the map image in layout, you can
drag the camera icons into proper positions to deploy your camera s.
The following describes layout entries:
• Name: Define a name for this layout.
• Position: Describe the layout position.
Figure 5.10-1 Layout example 1
64
Page 69

Figure 5.10-2 Layout example 2
• When your mouse moves over the camera icon, you can click the right button to
display a menu which has options to set the configuration, show the record list,
record, show video and remove the camera icon.
Figure 5.10-3.
65
Page 70

Appendix A Alarm I/O Connector
Appendix A Alarm I/O Connector
Some features of the Network Camera can be activated by an external sensor that
senses physical changes in the area Network Camera is monitoring. These changes
can include intrusion detection or certain physical change in the monitored area. For
examples, the external sensor can be a door switch or an infrared motion detector.
These devices are customer provided, and are available from dealers who carry
surveillance and security products. Electrically, they must be able to provide a
momentary contact closure.
This Network Camera provides a general I/O terminal block with two digital inputs and
two outputs for device control. Pin 1 and 2 can be connected to an external sensor 1.
Pin 2 and 3 can be connected to an external sensor 2. Both of the inputs, the voltage
will be monitored from the initial state ‘LOW’. The relay switch of pin 4, 5 and 6 can be
used to turn on or off the external device. The relay switch of pin 7 and pin 8 can be
used to turn on or off the external device. External Inputs/Outputs are working
independently.
Pin Color Function
1 Black
2 Brown
3 Red
4 Orange
5 Yellow
6 Green
7 Blue
8 Purple
Alarm Output #2 (NO)
Alarm Output #2 (COM). Max 24VDC, 1A
Alarm Output #1 (NO)
Alarm Output #1 (COM)
Alarm Output #1 (NC). Max 24VDC, 1A
Alarm Input #2 (A). Max 24VDC, 12mA
Alarm Input #1/2 (K).
Alarm Input #1 (A). Max 24VDC, 12mA.
66
Page 71

Explanation of External I/O Circuit Diagram Example
CAUTION!
• THE LOW VOAGE/CURRENT CIRCUITS AND HIGH VOAGE/ CURRENT
CIRCUITS ARE IN THE NETWORK CAMERA CIRCUIT. THE QUALIFIED
ELECTRICIAN SHOULD DO THE WIRING NOT BY YOURSELF.
INCORRECT WIRING COULD DAMAGE NETWORK CAMERA. YOU
COULD RECEIVE THE FATAL ELECTRIC SHOCK.
• THE EXTERNAL I/O IS NOT CAPABLE OF CONNECTI NG DIRECTLY TO
DEVICES THAT REQUIRE LARGE AMOUNTS OF CURRENT. IN SOME
CASES, A CUSTOM INTERFACE CIRCUIT (CUSTOMER PROVIDED) MA Y
HAVE TO BE USED. SERIOUS DAMAGE TO NETWORK CAMERA MAY
RESU IF A DEVICE IS CONNECTED TO THE EXTERNAL I/O THAT
EXCEEDS ITS ELECTRICAL CAPABILITY.
67
Page 72

Appendix B Troubleshooting
Appendix B Troubleshooting
Q: The video and audio codec is adopted in the Network Camera?
A: The Network Camera utilizes JPEG compression to providing high quality
images. JPEG is a standard for image compression and can be applied to
various web browsers without the need to install extra software. The audio
codec is ADPCM compression.
Q: The maximum number of users access Network Camera simultaneously.
A: The maximum number of users is depending on the total bandwidth accessed
to Network Camera from clients. The data throughout of Network Camera is
around 5~6Mbps. Therefore, the maximum number of connected clients is
varying by settings of resolution and frame rate. Obviously, the performance of
the each connected client will slow down when many users are logged on.
Q: The Network Camera can be used outdoors or not.
A: The Network Camera is not weatherproof. It needs to be equipped with a
weatherproof case for outdoors using. However, equipped with a weatherproof
case will disable the audio function of Network Camera.
Q: The Network Camera will be installed and work if a firewall exists on the
network.
A: If a firewall exists on the network, port 80 is open for ordinary data
communication. The Network Camera uses port 80(default) only. This port (or
the port you specify from the Configuration screen if you change the default
port) needs to be opened on the firewall.
Q: The username and password for the first time or after factory default
reset
A: Username = admin and leave password blank.
Note that it’s all case sensitivity.
Q: Forgot the username and password
A: Follow the steps below.
•Restore the factory default setting by press pressing and holding down more
than 8 seconds when power on Network Camera.
•Reconfigure the Network Camera.
Q: Forgot the IP address of the Network Camera.
A: Check IP address of Network Camera by using the IP Finder (ipedit) program.
Q: IP Finder program (ipeditv3) cannot find ICA-650
A:• Re power the ICA-650 if cannot find the unit within 1 minute.
• Do not connect ICA-650 over a router. IP Finder program cannot detect ICA-
650.
• If IP address is not assigned to the PC which running IP Finder program, and
then IP Finder program cannot find ICA-650. Make sure that IP address is
assigned to the PC properly.
• Antivirus software on the PC might interfere with the setup program. Disable
the firewall of the antivirus software during setting up ICA-650.
Q: Internet Explorer does not seem to work well with the ICA-650
A: Make sure that your Internet Explorer is version 6.0 or later. If you are
68
Page 73

experiencing problems, try upgrading to the latest version of Microsoft’s Internet
Explorer from the Microsoft webpage at: http://www.microsoft.com/windows/ie.
Q: IP Finder program fails to save the IP address parameters
A:. • Don’t leave any space in the name field. Use underline, “_”, or dash, “-“ to
replace the space, “ “. • Network may have trouble. Confirm the parameters and
connections of the ICA-650.
Q: Internet Explorer does not seem to work well with the ICA-650 Cannot
access the login page and other web pages of ICA-650 from Internet
Explorer
A: • Another device or computer is already using Maybe the IP Address of the
ICA-650. To confirm this possible problem, disconnect the ICA-650 from the
network first, and then run the PING utility to check it out.
• Maybe due to the network cable. Try correcting your network cable and
configuration. Test the network interface by connecting a local computer to the
ICA-650 via a crossover cable.
• Make sure the Internet connection and setting is ok.
• Make sure enter the IP address of Internet Explorer is correct. If ICA-650 has a
dynamic address, it may have changed since you last checked it.
• Network congestion may prevent the web page appearing quickly. Wait for a
while.
The IP address and Subnet Mask of the PC and ICA-650 must be in the same
class of the private IP address on the LAN.
• Make sure the http port used by the ICA-650, default=80, is forward to the ICA650’s private IP address.
• The port number assigned in your ICA-650 might not be available via Internet.
Check your ISP for available port.
• The proxy server may prevent you from connecting directly to ICA-650, set up
not to use the proxy server.
• Confirm that Default Gateway address is correct.
• The router needs Port Forwarding feature. Refer to your router's manual for
details.
• Packet Filtering of the router may prohibit access from an external network.
Refer to your router's manual for details.
• Access ICA-650 from the Internet with the global IP address of the router and
port number of ICA-650.
• Some routers reject the global IP address to access ICA-650 on the same
LAN. Access with the private IP address and correct port number of ICA-650.
• When you use DDNS, you need to set Default Gateway and DNS server
address.
• If it’s not working after above procedure, reset ICA-650 to default setting and
installed it again.
• If the problem is not solved, the ICA-650 might be faulty. Contact your dealer
for further help.
Q: Image or video does not appear in the main page
A: ‧ The first time the PC connects to ICA-650, a pop-up Security Warning
window will appear to download ActiveX Controls. When using Windows NT,
Windows 2000 or Windows XP, log on with an appropriate account that is
authorized to install applications.• Network congestion may prevent the Image
screen from appearing quickly. You may choose lower resolution to reduce
the required bandwidth.
Q: Check the ICA-650’s ActiveX is installed on your computer
A: Go to C:\Windows\Downloaded Program Files and check to see if there is an
entry for the file “WebWatch Class”. The status column should show
“Installed”. If the file is not listed, make sure your Security Settings in Internet
Explorer are configured properly and then try reloading the ICA-650’s home
page. Most likely, the ICA-650 ActiveX control did not download and install
69
Page 74

correctly. Check your Internet Explorer security settings and then close and
restart Internet Explorer. Try to browse and log in again.
Q: Check the ICA-650’s ActiveX is installed on your computer
A: Internet Explorer displays the following message: “Your current security
settings prohibit downloading ActiveX controls”. Setup the IE security
settings or configure the individual settings to allow downloading and scripting of
unsigned ActiveX controls.
Q: The ICA-650 works in local network, but not accessible from remote
network
A: This might be caused from the firewall protection. Check the Internet firewall
with your system or network administrator. The firewall may need to have
some settings changed in order for the ICA-650 to be accessible outside your
LAN.• Make sure that the ICA-650 isn’t conflicting with any other web server
running on your LAN.• Check the configuration of the router settings allow the
ICA-650 to be accessed outside your local LAN.
Q: There are unreadable characters displayed in machine configuration
pages
A: Use the operating system of the selected language. Set the Encoding or the
Character Set of the selected language on the Internet Explorer.
Q: Frame rate is slower than the setting
A: • The traffic of the network and the object of the image affect the frame rate.
The network congestion causes frame rate slower than the setting. • When more
than one client were viewing, the frame rate becomes slower. • Ethernet
switching hub can smooth the frame rate especially in viewing on the MultiCamera screen.
Q: Blank screen or very slow video when audio is enabled
A:Your connection to the ICA-650 does not have enough bandwidth to support a
higher frame rate for the streamed image size. Try reducing the video streami ng
size to 176x144 or 320x240 and/or disabling audio.• Audio will consume 32 to
64 kbps. Disable audio to improve video. Your Internet connection may not have
enough bandwidth to support streaming audio from the ICA-650.
Q: Image Transfer on e-mail or FTP does not work
A: ‧ Default Gateway and DNS server address should be set up correctly. • If
FTP does not work properly, ask your ISP or network administrator about the
transferring mode of FTP server.
Q: The focus on the camera is fuzzy.
A: ‧ The lens is dirty or dust is attached. Fingerprints, dust, stain, etc. on the lens
can degrade the performance camera. Clean the lens with lens cleaner.
• Manual focusing may be setup on the external camera to prevent this.
• Blurred images may have been registered when registering or modifying the
preset button or home position button. Adjust the focus in manual focusing
again
• The image may be out of focus, if the object is too near, or depending on the
zoom position. Move the object off ICA-650, or adjust the zoom position.
• Some objects are difficult to focus on by the camera. When the objects are still
out of focus, adjust the focus using manual focusing, or change the objects
using Pan/Tilt operation.
Q: The color of the image is poor or strange
A:
• To insure the images you are viewing are the best they can be, set the Display
property setting (color quality) to 16bit at least and 24 bit or higher if possible
within your computer.
•The configuration on the ICA-650 image display is incorrect. You need to adjust
the image related parameters such as brightness, contrast, hue and saturation
properly.
70
Page 75

Q:
Image flickers
A: ‧ Wrong power line frequency makes images flicker. Make sure the NTSC or
PAL format of your ICA-650
.• If the object is dark, the image will flicker. Make the condition around the ICA650 brighter.
Q: Noisy images occurs
A: The video images might be noisy if the ICA-650 is located in a very low light
environment. Make the condition around the ICA-650 brighter.
Q: How to Reboot the ICA-650
A: If you just want to reboot system without change anything. Go to Network page
and click SAVE button directly, then system will reboot again.
Q: Can not play the recorded AVI file
A: Have installed Microsoft’s® DirectX 9.0 or later and use the Windows Medi a
Player 9 or later to play the AVI filed recorded by the ActiveX.
71
Page 76

Appendix C Bandwidth Calculation
Appendix C: Bandwidth Calculation
The frame rate of video transmitted from the ICA-650 depends on connection
bandwidth between client and server and quality setting of server. Here is a guideline
to help you roughly estimate the bandwidth requirements form your ICA-650.
Image bandwidth is approximately equal to the average frame rate in frames per
second multiplied by the average frame data size in kilobits. Frame data size, or the
number of bits comprising a single video frame varies a great deal from depending on
scene complexity, lighting conditions, camera noise, etc. The table shown below is
reference figures. Actual results generated by the ICA-650 may be varying.
Image Resolution Average range of Data Sizes
176 x 144 (QCIF) 20 – 40k bit
320 x 240 (QVGA) 56– 92k bit
352 x 288 (CIF) 64 – 112k bit
640 x 480 (VGA) 160 – 320k bit
For example, streaming 2 fps of 320 x 240 video requires 112 to 184 kbps (kilobits per
second). Therefore, with a 128K upload connection; you will typically see 3 to 6
frames per second with 176 x 144 resolution and 1 to 2 frames per second with 320 x
240 resolution without audio stream.
ÍNote
Audio streaming also takes bandwidth around 32 kbps to
64kbps. Most ADSL/Cable modem upload speeds may not
even reach up to 128 kbps. Thus, you may not be able to
receive any video while streaming audio on a 128 kbps
or lower connection. Even though the upload speed is
more than 128kbps, for optimal video performance,
disabling audio streaming will get better video
performance.
72
Page 77

Appendix D Specifications
Appendix D: Specifications
Model
Zoom Module
Image Pick-up Device 1/4" Sony CCD
Optical Zoom 18x
Digital Zoom 12x
Zoom module SONY Day/ Night module (EX480)
Illumination 0.05 Lux
Horizontal Resolution 480 TVL
Lens Size f = 4.1~73.8mm,F 1.4-3.0
BLC On/Off
Iris Control Auto/ Manual
Speed Dome
Variable Pan Speed 0 ~ 300 deg/second
Pan Coverage 360 degree continuous
Variable Tilt Speed 0 - 200 deg/second
Presets 16 presets
Tours (with indents) 5 groups
I/O
Video Out 1 channel video pass through
Audio Streaming 1ch, Line-in
Alarm In/Out 2 alarm input/ 2 alarm output
Power US Model:110V AC
ICA-650
EU Model: 240V AC
Full Set Outdoor speed dome+ Wall mount+ Power box
Construction Level IP-66 weather proof
Operating temperature -30~+50 degree C (-22~122 degree F)
IP
Codec JPEG, 3 levels
Resolution 640*480,352*288, 320*240,176*144
Frame Rate 30fps for all resolutions
Compatibility Windows 2000, XP, Server 2003
LAN Interface 10/100M
Notification Email, FTP, Popup message
73
Page 78

Type Of IP Address Static or Dynamic
IP Filter Yes
Motion Detection Yes. Adjustable area
Viewer Microsoft Internet Explorer 5.0 or later
Network Protocol TCP/IP, HTTP, SMTP, FTP, NTP, DNS, DDNS,
Communication protocol PPPoE
74
 Loading...