

Page 1
Hot Spot
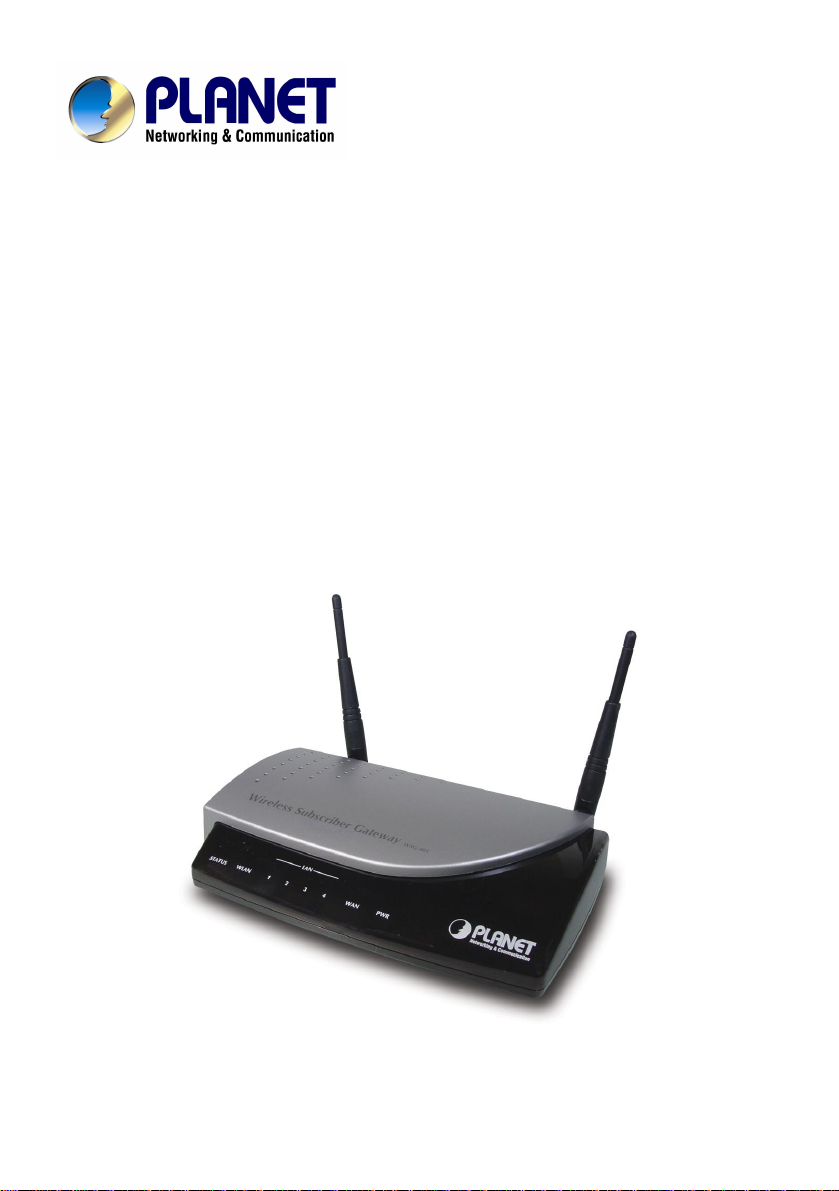
Wireless Subscriber Gateway
WSG-401
User’s Manual
Page 2

2
Copyright
Copyright (C) 2004 PLANET Technology Corp. All rights reserved.
The products and programs described in this User’s Manual are licensed products of PLANET
Technology, This User’s Manual contains proprietary information protected by copyright, and this User’s
Manual and all accompanying hardware, software, and documentation are copyrighted.
No part of this User’s Manual may be copied, photocopied, reproduced, translated, or reduced to any
electronic medium or machine-readable form by any means by electronic or mechanical. Including
photocopying, recording, or information storage and retrieval systems, for any purpose other than the
purchaser's personal use, and without the prior express written permission of PLANET Technology.
Disclaimer
PLANET Technology does not warrant that the hardware will work properly in all environments and
applications, and makes no warranty and representation, either implied or expressed, with respect to
the quality, performance, merchantability, or fitness for a particular purpose.
PLANET has made every effort to ensure that this User’s Manual is accurate; PLANET disclaims
liability for any inaccuracies or omissions that may have occurred.
Information in this User’s Manual is subject to change without notice and does not represent a
commitment on the part of PLANET. PLANET assumes no responsibility for any inaccuracies that may
be contained in this User’s Manual. PLANET makes no commitment to update or keep current the
information in this User’s Manual, and reserves the right to make improvements to this User’s Manual
and/or to the products described in this User’s Manual, at any time without notice.
If you find information in this manual that is incorrect, misleading, or incomplete, we would appreciate
your comments and suggestions.
CE mark Warning
The is a class B device, In a domestic environment, this product may cause radio interference, in which
case the user may be required to take adequate measures.
Trademarks
The PLANET logo is a trademark of PLANET Technology. This documentation may refer to numerous
hardware and software products by their trade names. In most, if not all cases, these designations are
claimed as trademarks or registered trademarks by their respective companies.
Revision
User’s Manual for PLANET Hot Spot WSG-401:
Model: WSG-401
Rev: 1.0 (Dec. 2003)
Part No. EM-WSG401V1
WSG-401 User Manual
Page 3

3
Table of Contents
1. Introduction.....................................................................................................................................4
1.1 Package Contents..................................................................................................................4
1.2 Features.................................................................................................................................4
1.3 WSG-401 Outlook..................................................................................................................6
1.4 Technical Specifications.........................................................................................................8
2. Installation.....................................................................................................................................12
2-1 Wall-Mounting......................................................................................................................12
2.2 Connecting the Antennas.....................................................................................................12
2.3 Installation Requirements.....................................................................................................13
2-4 Getting Start.........................................................................................................................14
3. Configuring the WSG-401.............................................................................................................16
3-1 Setting Wizard......................................................................................................................16
3-2 Advanced Setup...................................................................................................................38
3-3 System Status....................................................................................................................116
3-4 System Tools......................................................................................................................122
Appendix A RJ-45 Connector Description........................................................................................131
WSG-401 User Manual
Page 4

4
1. Introduction
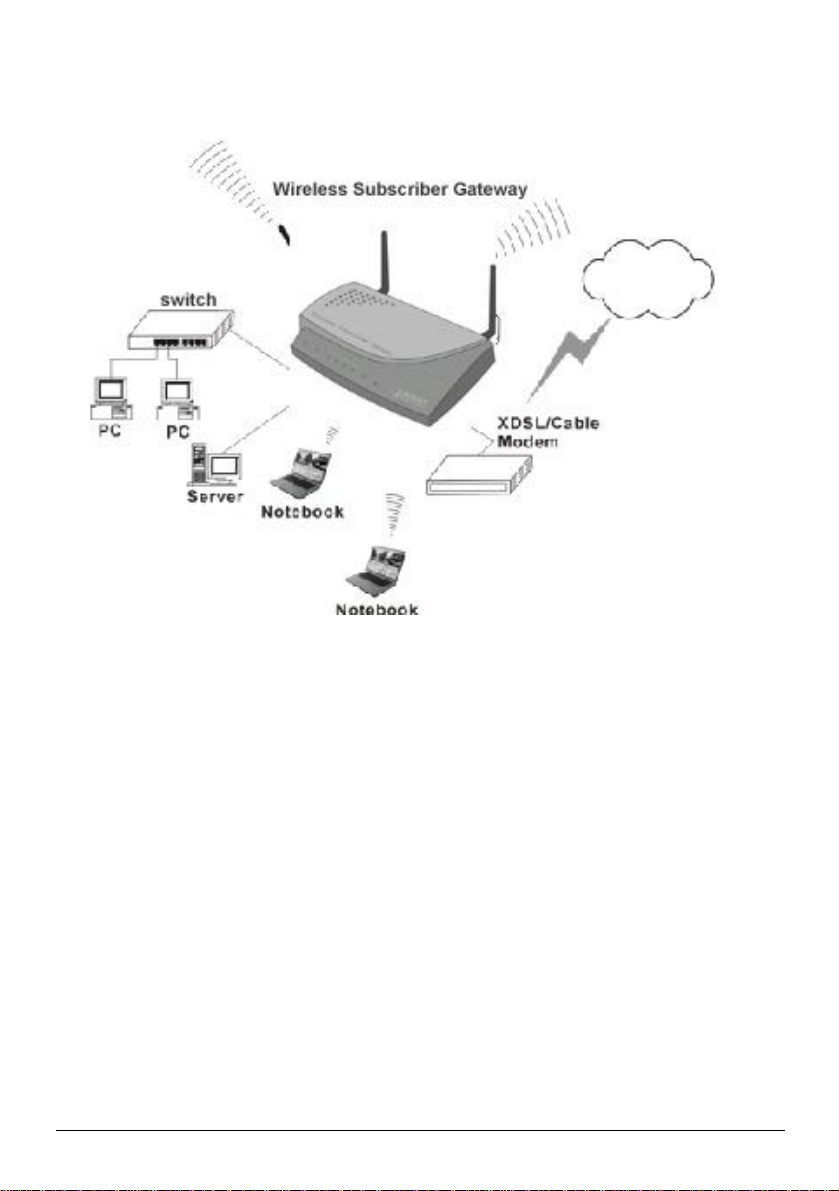
Inheriting the convenience of Plug-n-Play Internet access, the PLANET WSG-401 is the ideal solution
for establishing Hot Spot Internet service applications. Via built-in billing mechanism and integrated with
receipt printing capabilities makes the PLANET WSG-401 suitable for providing Internet access of
businesses and public areas applications, such as hotel, cyber café, train stations, school libraries and
airports.
The PLANET WSG-401 comprises 802.11b+, wireless access point, interface, a 4-port auto-sensing,
auto-MDI/MDI-X 10/100Mbps switch, and a standard 10/100Base-TX WAN port providing superior
Internet access for wired, and wireless subscribers. Internet subscriber gateway WSG-401 combines
all the functionalities in a single, tiny box, WSG-401 can work independently, no enormous RADIUS
system integration, and no much computer expertise required, this benefit customer to deploy their Hot
Spot business faster and easier than ever. WSG-ACG, a compact thermal printer allowing machine
operators, clerks and cashiers to print out billing information.
1.1 Package Contents
Please inspect your package. The following items should be included:
l One WSG-401
l Two antennas
l One AC Power Adapter for WSG-401
l One CD containing User’s Manual
l One Quick Installation Guide
l Two screws for wall-mount
l One UTP Ethernet/Fast Ethernet cable (Cat.5 Twisted-pair)
If any of the above items are damaged or missing, please contact your dealer immediately.
1.2 Features
l Ideal Hot Spot solution
Via the integrated 802.11b wireless interface, mobile users can establish high speed Internet
access without any configuration.
l Zero configuration (Plug-n-Play) Internet access
WSG-401 translates proper IP address information for Internet access, all IP configurations,
DHCP, Private IP or Static IP information will be turned into Internet-ready configurations.
Subscribers won't feel the difference, and no need to face to the inconvenience of IP
reconfigurations.
l Built-in proprietary AAA mechanism and billing system
PLANET WSG-401 integrates Web-based Authentication (including subscriber SSL logon page),
WSG-401 User Manual
Page 5

5
selective Web-based Accounting, and proprietary billing mechanism, which can help you
prepare a billing mechanism in a very short time, and billing system in WSG-401 works without
RADIUS system, and bring most convenience, the least efforts for billing applications.
l Exclusive Printer Accounting
Machine operators may customize the printout information for different billing application.
l Security and Firewall
With built-in 64/128/256-bit RC4 WEP Encryption, VLAN Security for Wireless, subscriber SSL
Login Page / Admin Page, VPN (IPSec/PPTP) Pass through.....various security features,
PLANET WSG-401 bring you an ease-f-use and most comfort safe Internet access environment.
l Ease-of-Use and Management
The built-in web management interface in WSG-401 brings most convenience to system
administrators or machine operators while configuring machine or setting up subscriber
privileges in movements. With time increments, clerks or machine operators may print out, billing
and other user information with time increments are conveniently printed on the button-operated
printer included with the PLANET WSG-401. Time increments may be compiled simply by
pressing the printer button multiple times. No computers or complex back-end subscriber
management systems are required for deployment.
Note: The "PnP" Function only can be used with TCP/IP-based Network.
WSG-401 User Manual
Page 6
6
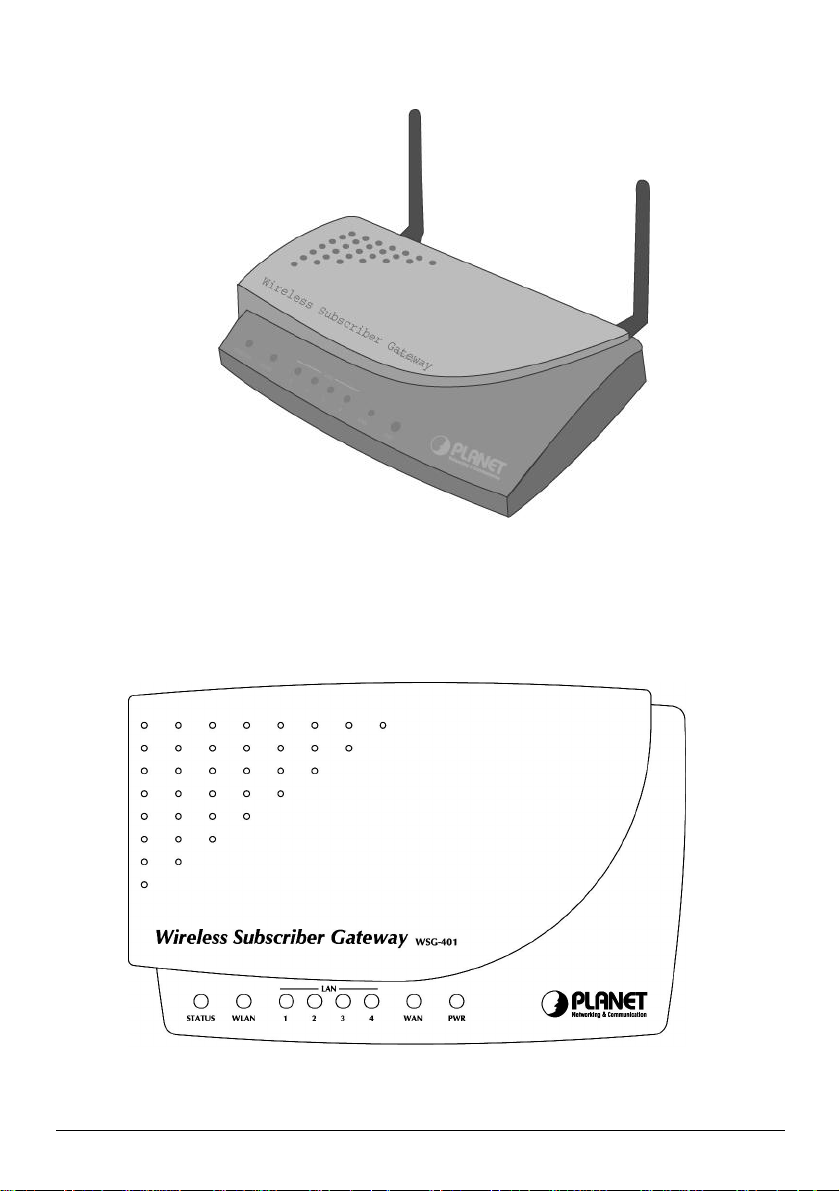
1.3 WSG-401 Outlook
Figure 1-1 WSG-401 Outlook
1-3-1 Top Panel
The top panel of the WSG-401 is shown below.
Figure 1-2 WSG-401 Top Panel
WSG-401 User Manual
Page 7
7
LEDs Indication
LED State Description
Power
WAN
LAN (1-4)
Wireless
Status
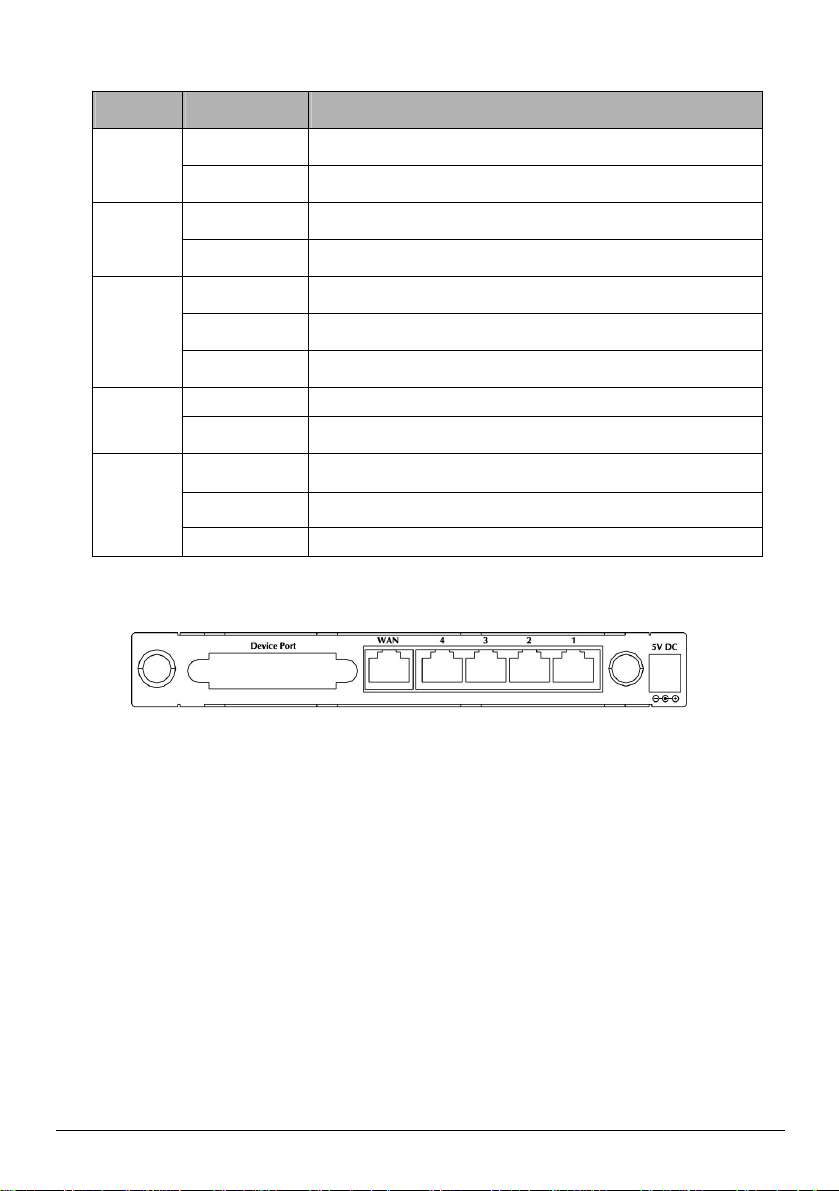
1-3-2 Rear Panel
Rear panel of PLANET WSG-401 is shown below.
1. Power Jack:
Used to connect the external power supply with PLANET WSG-401 device.
2. LAN Port:
WSG-401 supports four auto-sensing RJ-45 ports and all ports can be auto-switched to MDI-II
connections. The LAN ports used for linking hosts or other networking device.
Off
Green
Green The WAN port is used to connect your xDSL or Cable modem.
Green (Blinking) Data is in transmitting and receiving on WAN port.
Green A port has established a valid 10/100Mbps network connection.
Green (Blinking) 10/100Mbps traffic is traversing the port.
Off Port has not established any network connection.
Green The WSG-401 has established a valid wireless connection.
Green (Blinking)
Off The WSG-401 status is defective.
Green (Solid) WSG-401 status is complete.
Green (Blinking) During firmware upgrades, this status LED will blink.
WSG-401 is not receiving electrical power.
WSG-401 is receiving electrical power.
The Wireless connection is active.
Figure 1-3 WSG-401 Rear Panel
3. WAN Port:
One RJ-45 port used for linking xDSL or Cable Mode
4. Device Port
Used to connect the Thermal Printer WSG-ACG.
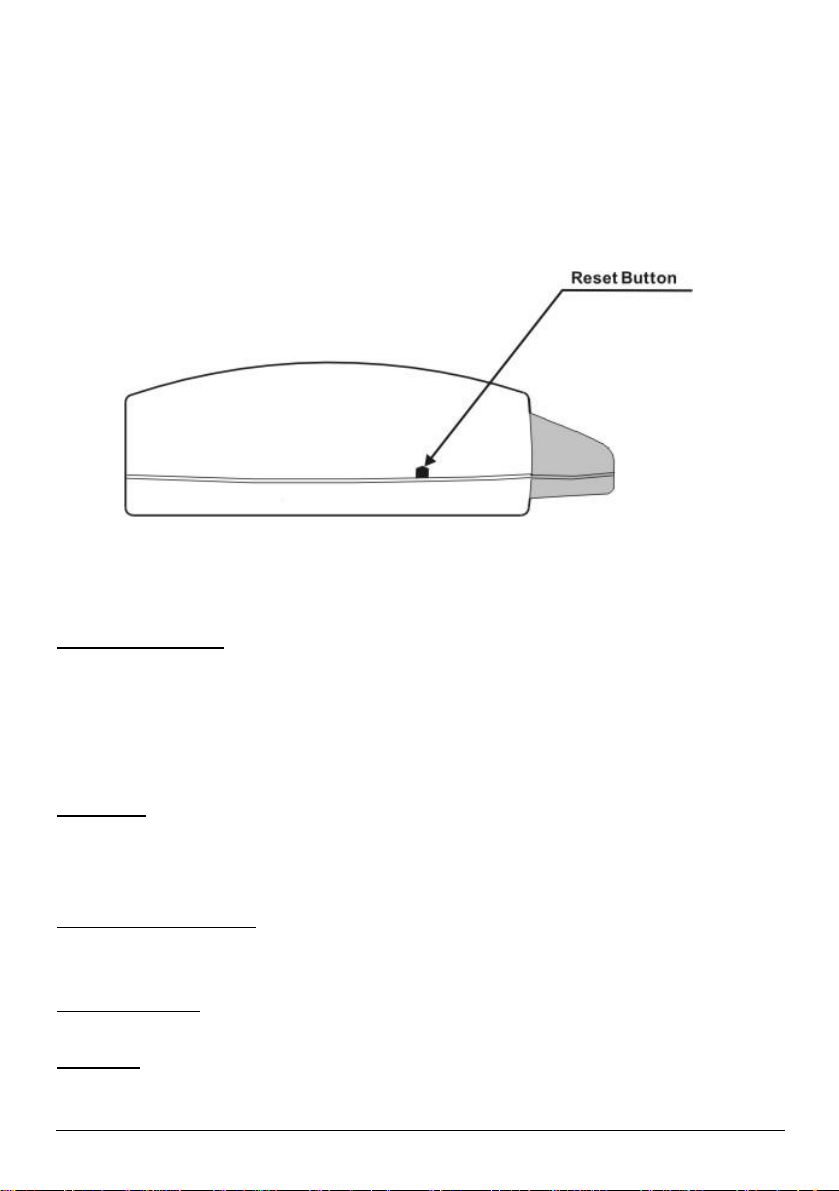
1-3-3 Left Side Panel
The left side panel of the WSG-401 is shown below.
WSG-401 User Manual
Page 8
8
1. Reset Button:
WSG-401 integrates a reset button at the left side panel of the device. Under some circumstances you
might need to reset the device.
Figure 1-4 WSG-401 Left Side Panel
1.4 Technical Specifications
1-4-1 Hardware Specifications
Network Specification
IEE802.3 10BaseT Ethernet
IEE802.3u 100BaseTX Fast Ethernet
IEE802.11b Wireless LAN
ANSI/IEEE 802.3 NWay auto-negotiation
Wi-Fi Compatible
Connectors
Four LAN Ports (10BaseT/100BaseTX Auto cross-over)
One WAN Port (10BaseT/100BaseT)
One Device Port (1 DB25 male RS232 for external device application)
Wireless Operation Range
Open Space: 100~300m
Indoors: 35~100m
Wireless Data Rate
22 Mbps, 11 Mbps, 5.5 Mbps, 2 Mbps, 1 Mbps
Encryption
64/128/256-bit RC4
WSG-401 User Manual
Page 9

9
External Antenna Type
2dBi (Max) Dual detachable diversity antenna with reverse SMA
Power Requirement
External Power Adapter
Input: 100-240 VAC, 50/60 Hz
Output: 5V, min 1.4A
LED Indicators
One POWER LED
One WAN Link/Activity LED
Four LAN Link/Activity LEDs
One Wireless Link/Activity LED
One Status LED
Dimension
Size: 200(L) x 130(W) x 44(H) mm
Weight: About 400g (Net)
WSG-401 User Manual
Page 10

10
Environment Conditions
Operating Temperature: 0 to 50°C
Operating Humidity: 10~90% non-condensing
Certifications
FCC part 15 Class B, CE, Class B, UL,
CE , C-Tick
Mounting
Desktop, Wall mounted
1-4-2 Software Specifications
Networking
• IEEE802.3 10BaseT Ethernet
• IEEE802.3u 100BaseTX Fast Ethernet
• Supports 100 Simultaneous Users
• IP Plug and Play (iPnP)
• HTTP Proxy Support
• WEP Data Encryption
• SMTP Server Redirection
• DHCP Server
• DHCP Relay
• Static IP WAN Client
• DHCP WAN Client
• PPPoE WAN Client
• PPTP WAN Client
• NAT
• IP Routing
• NTP (Network Time Protocol) Support
• IP Multicast support
Marketing Cooperation
• Advertisement URL link
• Walled garden
• Customize Login Page
• Portal Page
WSG-401 User Manual
Page 11

11
AAA / Billing
• Built-in Authentication
• Web-based Login Page Authentication
• Exclusive Printer Accounting without PC operating
• Web-based Accounting
• Flexible Billing Profiles and Price Plan
• Flexible Billing Mechanism (Pre-Paid and Post-Paid)
• Flexible Time Mechanism (Time to Finish and Accumulation)
• Credit Card Support (Authorize.net and iTable)
• External PS/2 Keypad Support
Security
• Layer 2 Isolation
• SSL Login Page
• SSL Administration
• VPN Pass through (IPSec/PPTP/L2TP)
• Customize SSL Certificate
• Pass through Destination IP/URL
• Pass through Source IP/MAC
• Restricted Destination Filtering IP/URL
• Share LAN Resources
Management
• Administrator/Super Subscriber/Account Manager Management Access
• Remote Browser-based Configuration and management
• Authorized remote management (Access Control List)
• Firmware Upgrade via HTTP/TFTP
• Scheduled Firmware Upgrade
• Backup/Restore/Factory Default Setting
• LAN Device Management
• Dynamic DNS
• System Information Table
• Real-time Current User List / DHCP Clients List / Session List / Account List
• Syslog
• Status Report (Daily/Monthly/System/Network)
WSG-401 User Manual
Page 12
12
2. Installation
Following sessions are physical installation steps of WSG-401. Please refer to the illustration and follow
the steps below to complete the installation of your device.
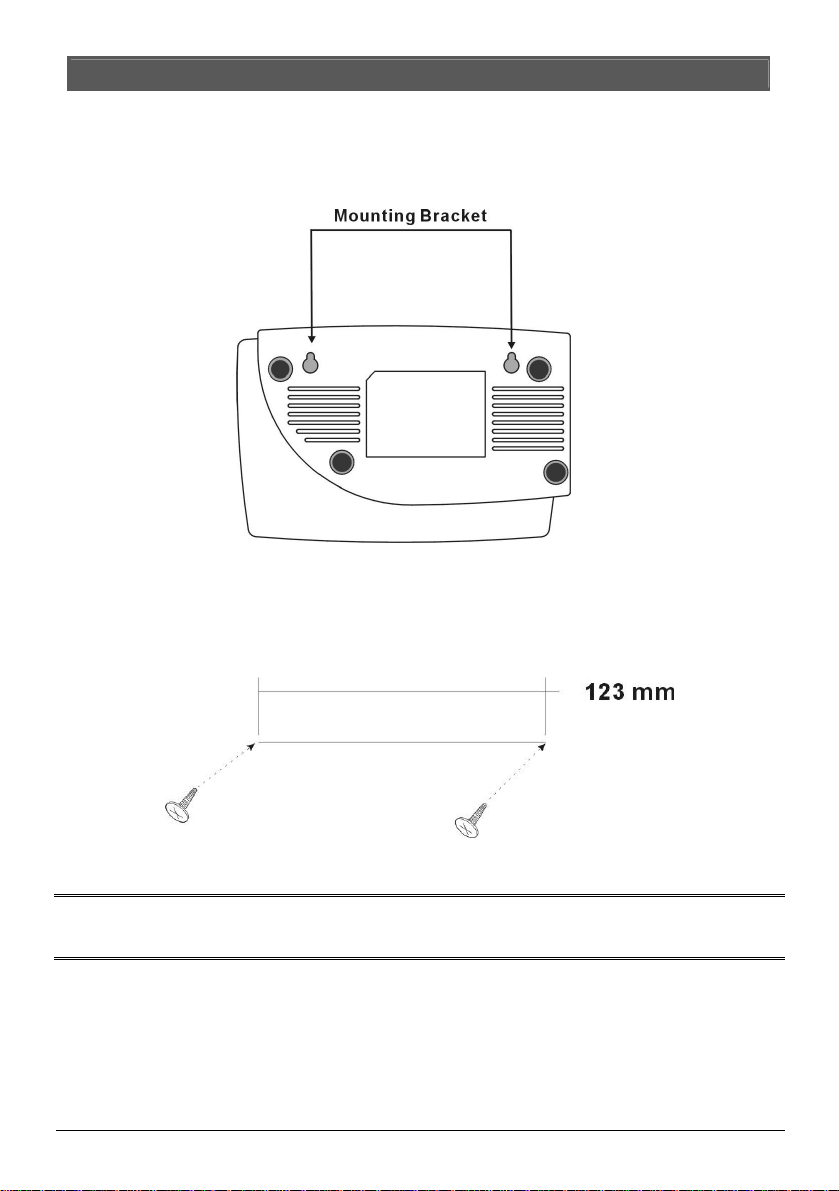
2.1 Wall-Mounting
The WSG-401 can be wall-mounted on a wall by applying the two mounting brackets on screws.
Figure 2-1 Wall-Mounting Bracket - Bottom of WSG-401
Please refer to the following instructions for mounting a WSG-401 on a wall or other surface.
1. Install two screws on a wall according to the relative positions shown below.
Figure 2-2
2. Hang WSG-401 on the wall by sliding the two screws in the mounting brackets.
Note: If the screws are not properly anchored, the strain of the cables connected to the WSG-401 rear
panel connectors could pull out the WSG-401 from the wall.
2.2 Connecting the Antennas
PLANET WSG-401 provides two antenna connectors on the rear of the unit for wireless subscribers.
WSG-401 User Manual
Page 13

13
2.3 Installation Requirements
Before installing the WSG-401, make sure your network meets the following requirements.
System Requirements
The WSG-401 requires one of the following types of software:
l Windows 98 Second Edition/NT/2000/XP
l Red Hat Linux 7.3 or later version
l MAC OS X 10.2.4 or later version
l Any TCP/IP-enabled systems like Mac OS and UNIX (TCP/IP protocol installed)
l Standard phone line for xDSL modem
Or Coaxial cable for Cable modem
l Web Browser Software (Microsoft I.E 5.0 or later version or Netscape Navigator 5.0 or later
version)
l One computer with an installed 10Mbps, 100Mbps or 10/100Mbps Ethernet card
l UTP network Cable with a RJ-45 connection (Package contents)
Note: Prepare twisted-pair cables with RJ-45 plugs. Use Cat.5 cable for all connections. Make sure
each cable not exceed 328 feet (Approximately 100 meters).
ISP Requirements
Verify whether your ISP use fixed or dynamic IP. If it is a fixed IP, be sure to get the IP from your ISP.
For dynamic IP, which is mostly used, the PC will get the IP automatically whenever it hooks up on
the modem.
Dynamic IP
l Dynamic IP Setting
WSG-401 User Manual
Page 14

14
Fixed IP
l Your fixed IP address for the WSG-401
l Your subnet mask for the WSG-401
l Your default gateway IP address
l Your DNS IP address
PPPoE
l Your user name from your ISP
l Your password from your ISP
PPTP
l PPTP Server IP Address from your ISP
l PPTP Local IP address from your ISP.
l PPTP Local IP subnet mask from your ISP.
l Your user name from your ISP
l Your password from your ISP
Your PC Requirements
The Static IP settings for the PC
l Your PC’s fixed IP address
l Your PC’s subnet mask
l Your PC’s default gateway IP address
l Your PC’s primary DNS IP address
Note:
1. The gateway’s default IP address setting is “192.168.0.1”.
2. The gateway’s default subnet mask setting is “255.0.0.0”.
The Dynamic IP settings for the PC
We recommend that you leave your IP settings as automatically assigned. By default, WSG-401 is a
DHCP server, and it will give your PC the necessary IP settings.
2.4 Getting Start
1. Place the WSG-401 and Mini account generator printer on a flat work surface.
2. Connect the DB25 connector of printer cable into the device port on the rear of the WSG-401.
3. Plug the other end of the printer cable into the RJ11 port of the mini account generator printer. Check
that the account generator printer status LED lights.
4. Ensure that your modem and computer are both switched on.
5. Use the supplied cable to connect the WSG-401's WAN port to the modem. Check that the
Cable/xDSL Status LED lights.
6. Connect your computer to one of the 10/100 LAN ports on the WSG-401. Check that the LAN Port
WSG-401 User Manual
Page 15
15
Status LED lights.
7. Configure the further parameters via a web browser.
WSG-401 User Manual
Figure 2-1 WSG-401 Connection
Page 16
16
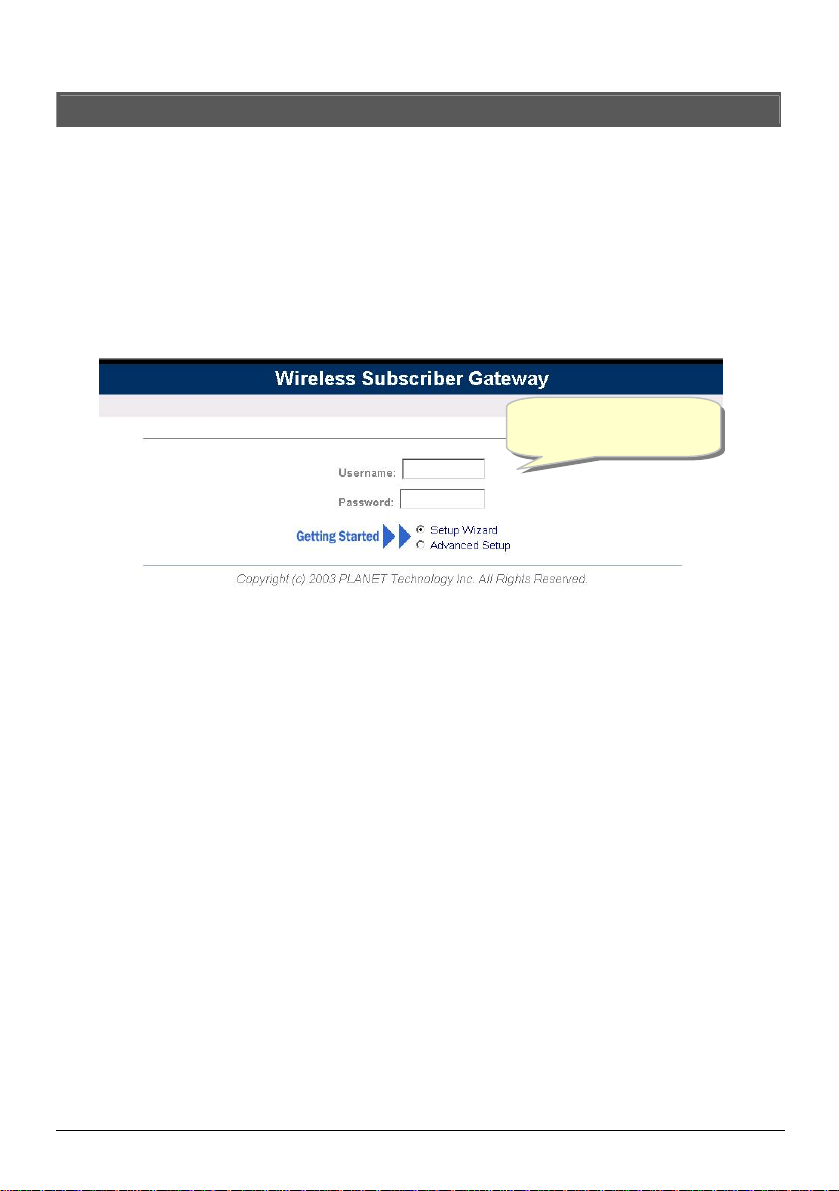
Username:
admin
3. Configuring the WSG-401
3.1 Setting Wizard
Step 1: Start your browser, and then enter the factory default IP address 192.168.0.1 in your browser’s
location box. Press Enter.
Step 2: The WSG-401 configuration tools menu will appear. In the Username and Password field, type
the factory default user name (admin) and password (password) and click “Getting
Started”. If you are first time setting the system, the wizard setup screen will appear. You will
be guided, step-by-step, through a basic setup procedure.
Password: password
Figure 3-1 Configuration Tools Menu
WSG-401 User Manual
Page 17
17
Note:
F If you would like to change the password please see Step 10.
F Username and Password can consist of up to 20 alphanumeric characters and are case sensitive.
F If for some reason your password is lost or you cannot gain access to the WSG-401 Configuration
Program, please press the reset button to load the device to manufacturer defaults.
F If the WSG-401 doesn’t send packet in 5 minutes (default), the WSG-401 wills logout automatically.
F Proxy needs to set disable first when administrator accesses admin UI.
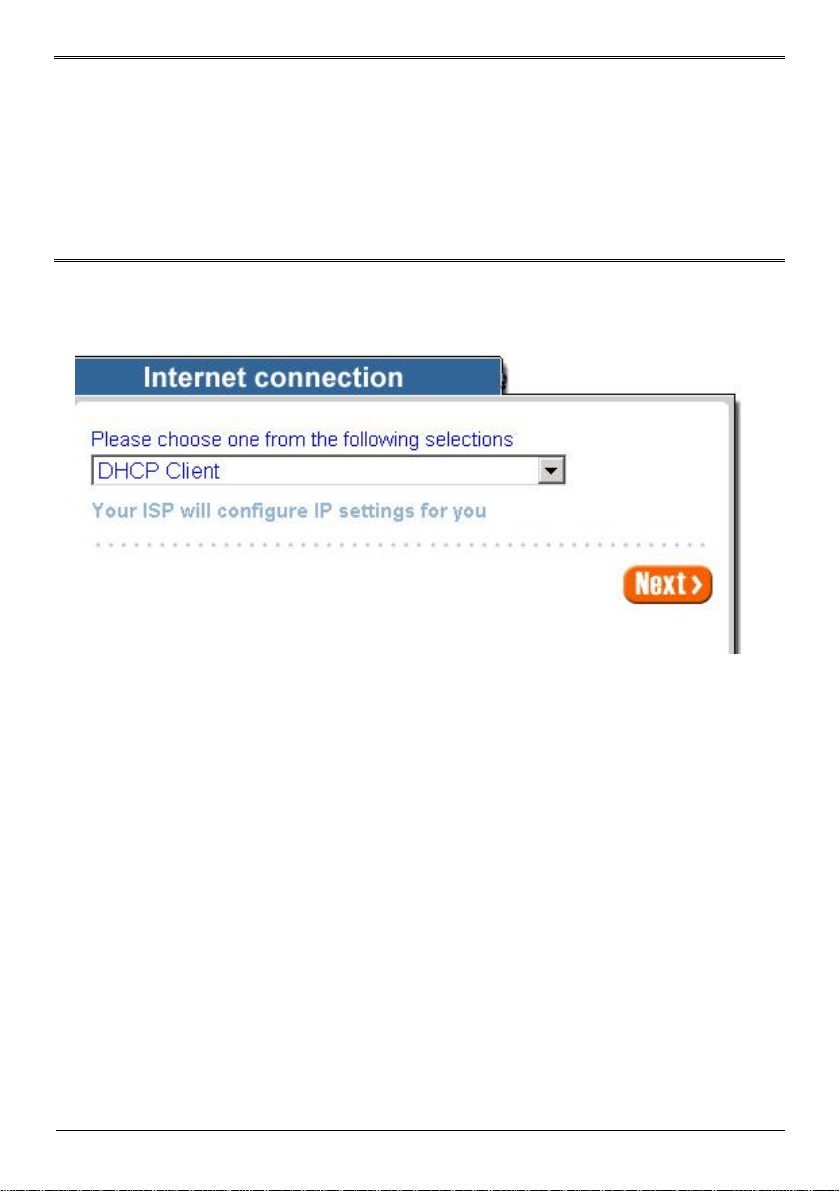
Step 3: Internet Connection Setting
Select the appropriate Internet connection type to connect to your ISP.
l DHCP Client
Figure 3-2 Internet Connection Setting Screen—DHCP Client Setting
The device can work as a DHCP client. This allows the device to obtain the IP address and other
TCP/IP settings from your ISP. If your xDSL/Cable comes with this feature, please enable Use DHCP
Client.
WSG-401 User Manual
Page 18
18
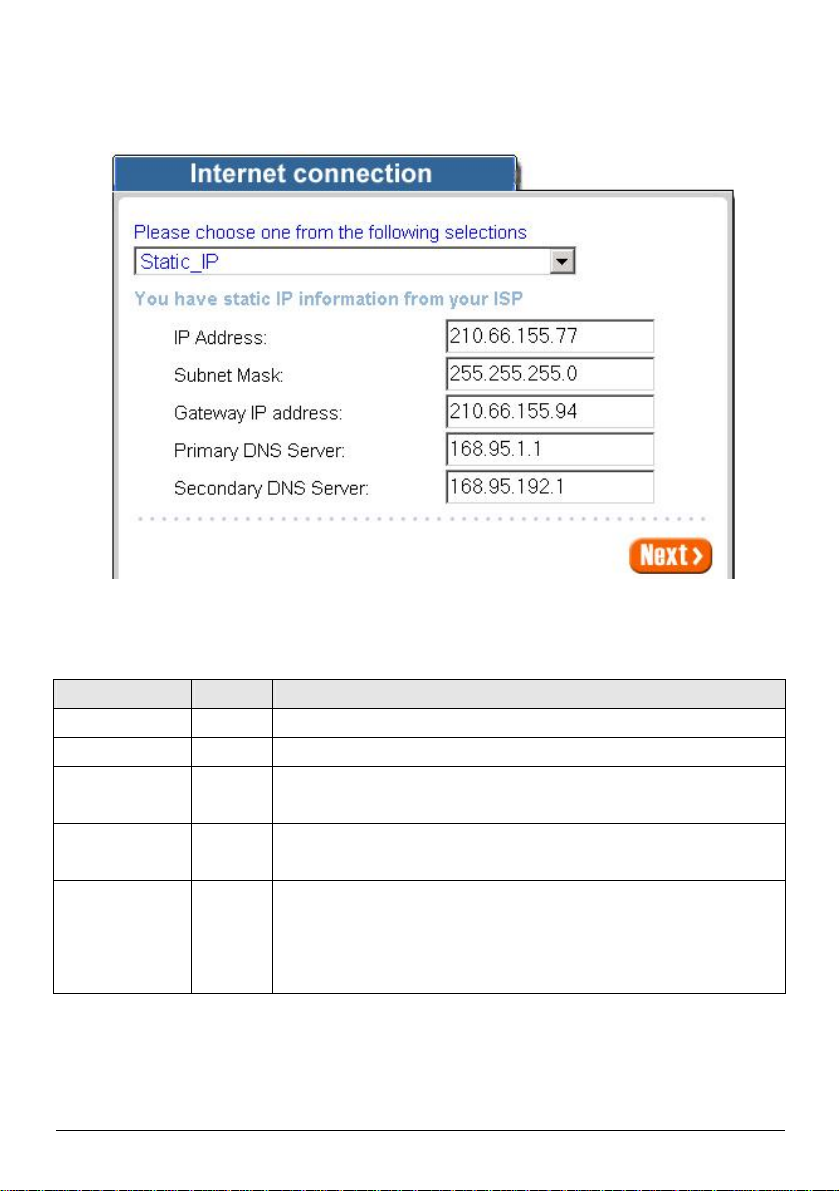
l Static IP Setting
primary DNS server IP address for the xDSL/Cable
ondary DNS server IP address for the xDSL/Cable
DNS Server IP were
not available, meanwhile, Secondary DNS Server IP would start in the
If “Static IP” is selected, then this screen will appear. Enter the IP address information provided by your
ISP.
Figure 3-3 Internet Connection Setting Screen—Static IP Setting
Item Default
Description
IP Address 0.0.0.0 Enter the IP address provided by your ISP.
Subnet Mask 0.0.0.0 Enter the subnet mask provided by your ISP.
Gateway IP
0.0.0.0 Enter the Gateway IP Address provided by your ISP.
Address
Primary DNS
Server
Secondary DNS
Server
Empty Enter the
connection (provided by your ISP).
Empty Enter the sec
connection (provided by your ISP). If the primary
same time.
WSG-401 User Manual
Page 19
19
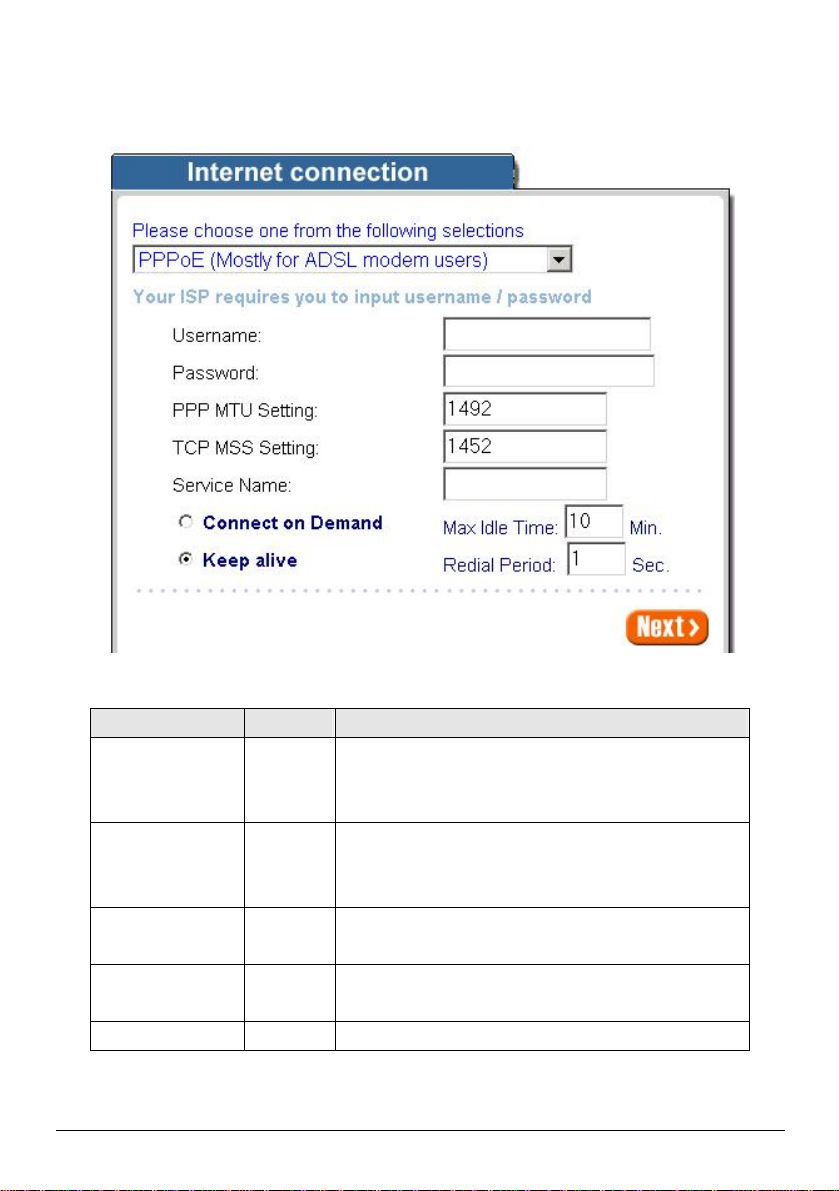
l PPPoE (Point-to-Point Protocol over Ethernet)
e user name
can consist of up to 80 alphanumeric characters and is
. The
password can consist of up to 80 alphanumeric
Maximum Transfer Unit) specifies maximum
MSS (Maximum Segment Size) specifies maximum
If “PPPoE” is selected, then this screen will appear. Enter the username, password and other major
fields.
Figure 3-4 Internet Connection Setting Screen—PPPoE Setting
Item Default
Enter the user name provided by your ISP. Th
Username Empty
case sensitive.
Enter the user password provided by your ISP
Password Empty
characters and is case sensitive.
PPP MTU Setting 1492 MTU (
transmission unit size.
TCP MSS Setting 1452
segment size.
Service name Empty Your ISP will provide the service name.
WSG-401 User Manual
Description
Page 20

20
Item Default
to cut your connection
Idle
Time). If you have been disconnected due to inactivity,
to
as soon as you
attempt to access the Internet again. If you wish to
Connect on Demand, click the check box. If you
check
is
Internet access
Redial
Connect on Demand and Max Idle Time
Connect on Demand Enable
Max Idle Time 10 Minutes
Keep alive and Redial Period
Keep alive Disable
Redial Period 30 Seconds
You can configure your WSG-401
with your ISP after a specified period of time (Max
Connect on Demand enables your WSG-401
automatically re-establish your connection
activate
want your Internet connection to remain, click the
box of keep alive. The Max Idle Time maximum value
65535 minutes.
This option keeps your PPPoE enabled
connected indefinitely, even when it sits idle. The
Period maximum value is 65535 seconds.
Description
WSG-401 User Manual
Page 21

21
l PPTP Client (Point-to-Point Tunneling Protocol)
Subnet Mask IP address provided
by
If “PPTP” is selected, then this screen will appear. Fill out all the information provided by your ISP.
Figure 3-5 Internet Connection Setting Screen—PPTP Client Setting
Item Default
My IP Address Empty Enter the PPTP local IP address provided by your ISP.
My Subnet Mask Empty
Gateway IP Address Empty
PPTP Server IP
Address
WSG-401 User Manual
Description
Enter the PPTP local
by your ISP.
Enter the PPTP server Gateway IP address provided
your ISP.
Empty Enter the PPTP server IP address provided by your ISP.
Page 22
22
Item Default
. The user name
can consist of up to 80 alphanumeric characters and is
provided by your ISP. The
password can consist of up to 80 alphanumeric
aximum Transfer Unit) specifies maximum
MSS (Maximum Segment Size) specifies maximum
ction
Idle
Time). If you have been disconnected due to inactivity,
to
as soon as you
If you wish to
Connect on Demand, click the check box. If you
check
is
Internet access
Redial
Description
Enter the user name provided by your ISP
Username Empty
case sensitive.
Password Empty Enter the user password
characters and is case sensitive.
Connection ID/Name Empty Enter the Connection ID or Connection Name.
PPP MTU Setting 1460
MTU (M
transmission unit size.
TCP MSS Setting 1400
segment size.
Connect on Demand and Max Idle Time
Connect on Demand Enable
You can configure your WSG-401 to cut your conne
with your ISP after a specified period of time (Max
Connect on Demand enables your WSG-401
automatically re-establish your connection
Max Idle Time 10 Minutes
attempt to access the Internet again.
activate
want your Internet connection to remain, click the
box of keep alive. The Max Idle Time maximum value
65535 minutes.
Keep alive and Redial Period
This option keeps your PPTP enabled
Keep alive Disable
connected indefinitely, even when it sits idle. The
Period maximum value is 65535 seconds.
WSG-401 User Manual
Page 23
23
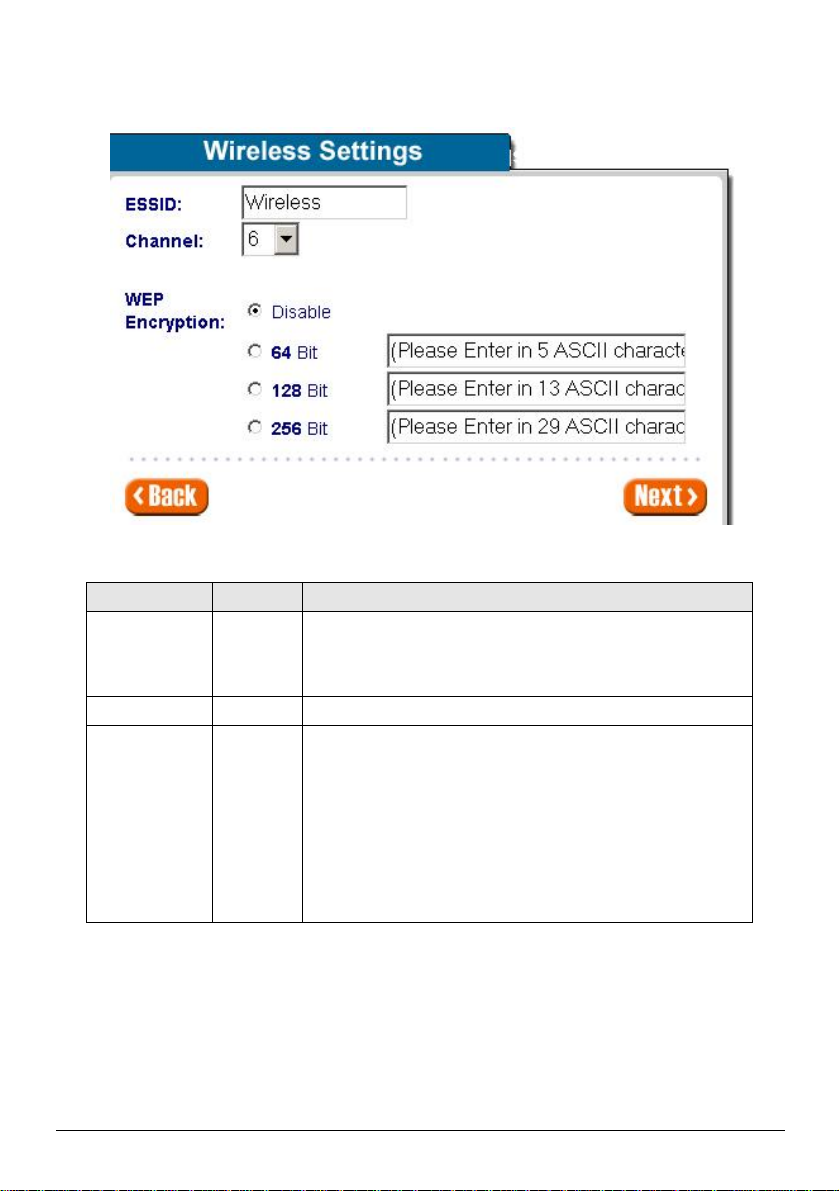
Step 4: Wireless Setting
The ESSID is the unique name that is shared among all points
in a wireless network. It is case sensitive and must not exceed
Enabling the
protect your data while it is transferred from one
it, 128 bit or
This page allows you to define ESSID, Channel ID and WEP encryption for wireless connection.
Figure 3-6 Wireless Setting Screen
Item Default
ESSID Wireless
32 characters.
Channel 6 Enter the channel ID for wireless connection.
WEP Encryption Disable Disables or set the use of the WEP algorithm.
security can
station to another. The WSG-401 supports 64-b
256 bit WEP encryption.
Enter 5 characters for ASCII 64-bit WEP Key.
Enter 13 characters for ASCII 128-bit WEP Key.
Enter 29 characters for ASCII 256-bit WEP Key.
WSG-401 User Manual
Description
Page 24
24
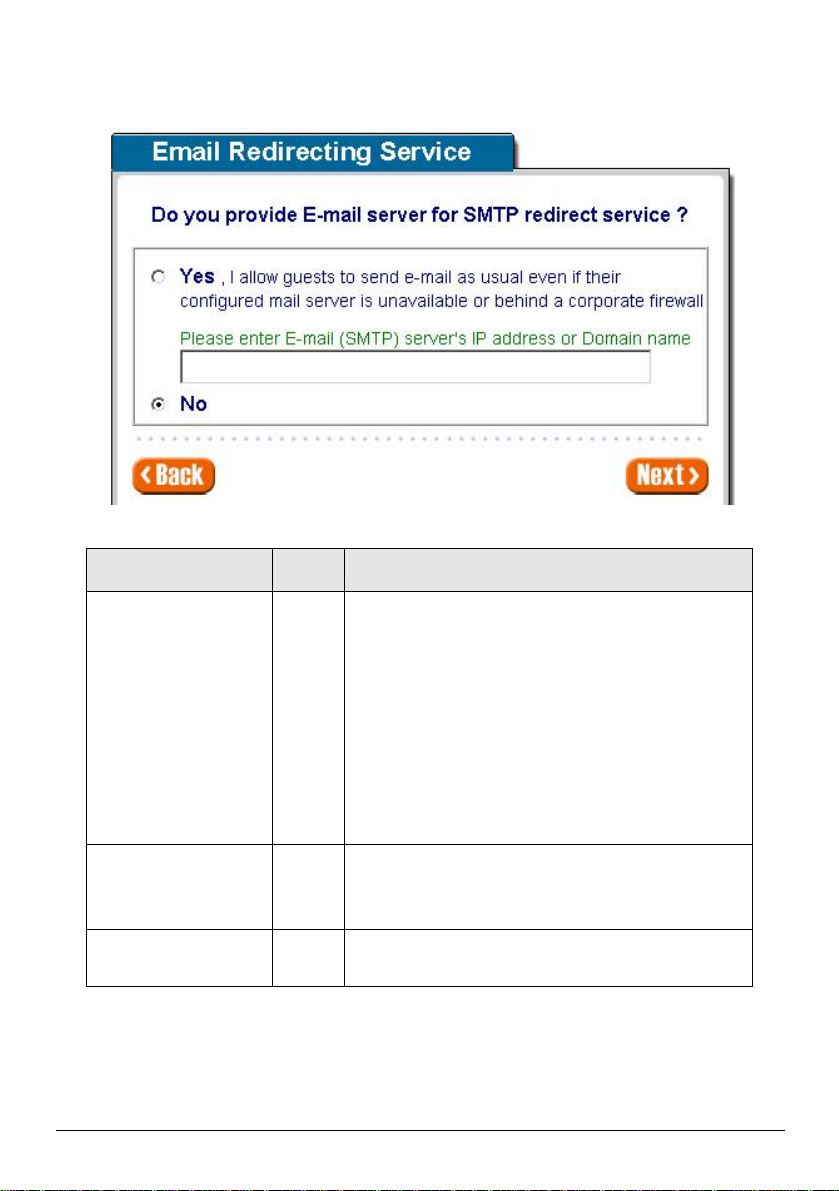
Step 5: E-mail Server Setting
To
prevent some subscriber’s original Email server may
provides an
to forward the subscriber’s
mail server but also changes the
s the
message as if you sent it from your local Internet Service
mail
Enter the SMTP port. The SMTP port allowed range is 25
WSG-401 allows an extra Email server parameter to forward the subscriber’s E-mail.
Figure 3-7 E-mail Service Setting Screen
Item Default
Email Server Redirect No Disables or enables email server redirect function.
Email Server IP address
or Domain name
SMTP Port 25
Empty Before setting this field, please make sure the E-
Description
protect by firewall or NAT network. WSG-401
extra Email server parameter
Email. The WSG-401 not only forwards the subscribers’
E-mail via other ESMTP header. The recipient of your E-mail see
Provide, not form the hotel or other place.
sever relay function is opened. It must not exceed 50
characters.
or 2500 to 2599.
WSG-401 User Manual
Page 25
25
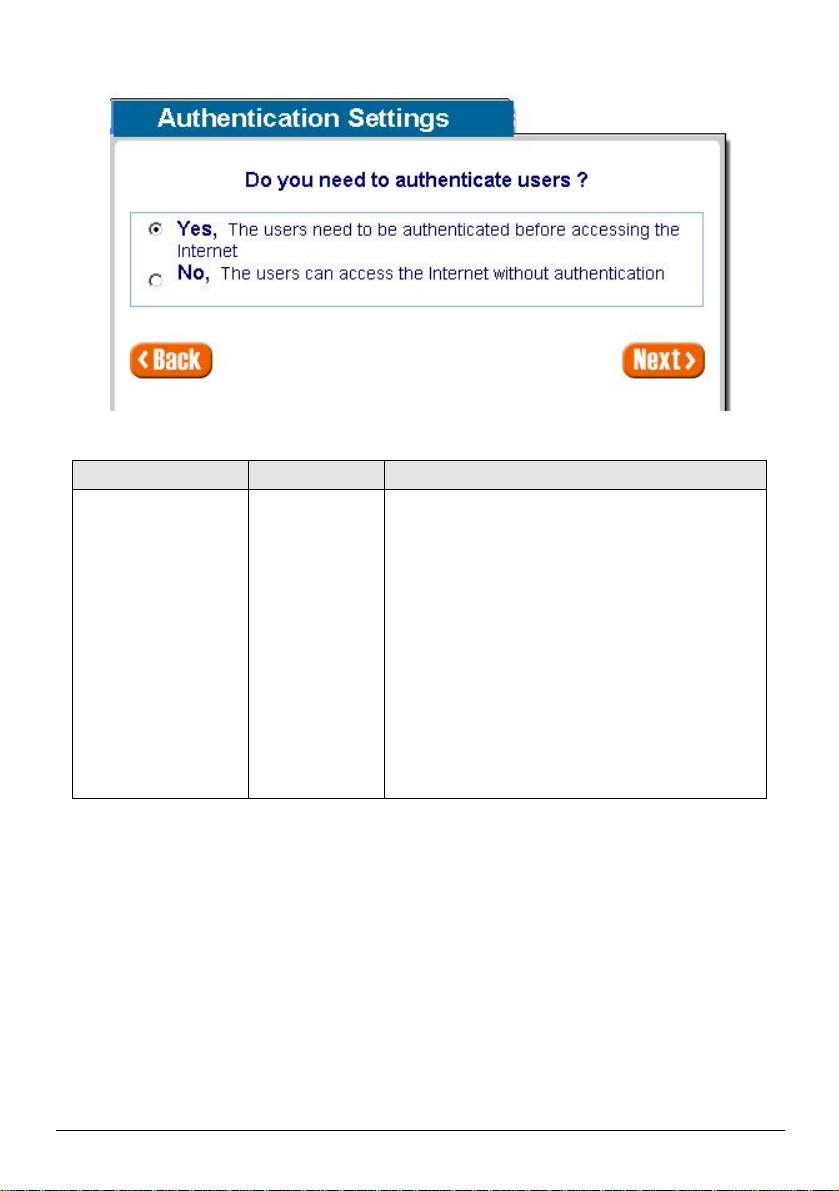
Step 6: Authentication Service Setting
Subscriber can direct access the Internet without
for
service provider to build up an Internet service
in
,
and the system will authenticate the subscriber login
Figure 3-8 Authentication Service Setting Screen
Item Default Description
Built-in Authentication/
No Authentication
No,
No Authentication
No―
entering username and password.
Yes―
WSG-401 provides “Built-in Authentication”
WSG-401 User Manual
without any extra authentication software. If “BuiltAuthentication” is selected, service provider can
generate the subscriber account inside WSG-401
according to the generated account.
Page 26
26
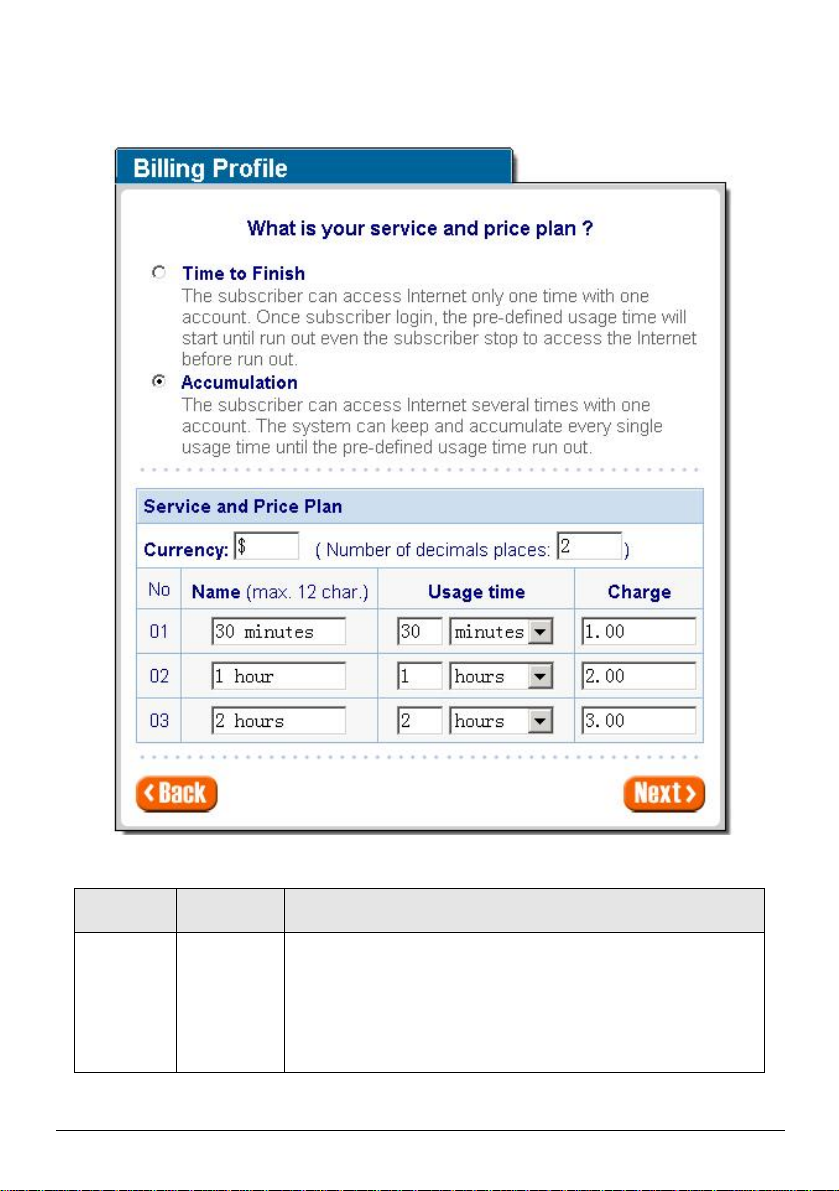
Step 7: Billing Profile Setting
The subscriber can access Internet only one time with one account.
defined usage time will start until run
The function is used to setup a billing profile. A billing profile is a description of how you want to charge
your customer.
Figure 3-9 Billing Profile Setting Screen
Item Default
Service Time to Finish Options: “Time to Finish” or “Accumulation”.
Description
Time to Finish―
Once subscriber login, the preout even the subscriber stop to access the Internet before run out.
WSG-401 User Manual
Page 27
27
Accumulation―
The subscriber can access Internet many times with one account.
The system can keep and accumulate every single usage time until
The index number of billing profile. In Wizard setup, we provide
user
Enter the amount of Internet service. The amount maximum value
the pre-defined usage time run out.
Item Default
Currency $ Enter the appropriate currency unit or currency symbol.
Number of
decimals
places
No 01~03
Name 30 minutes/
Usage Time 30 minutes/
Charge 1.00/2.00/3.00
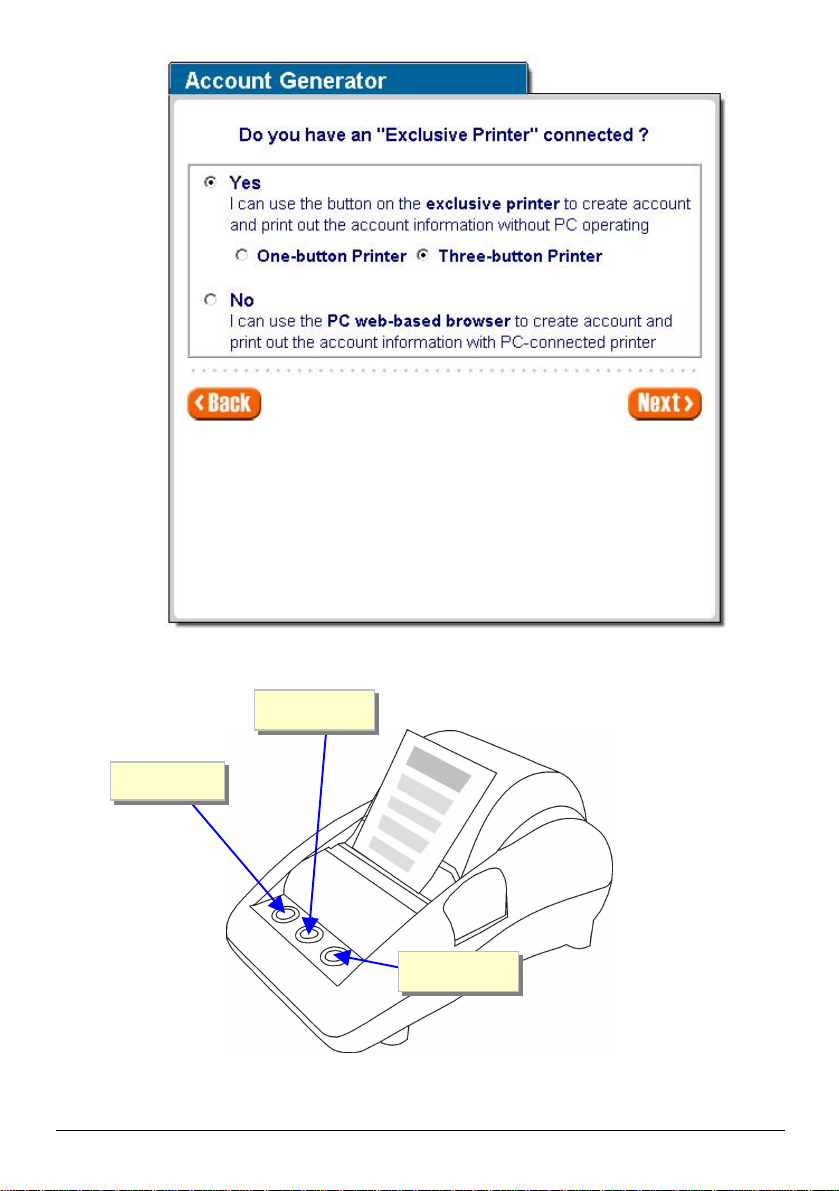
Step 8: Account Generator Printer Setting
There are two different choices, one is exclusive printer (Account Generator Printer), and the other is
non-exclusive printer. Exclusive printer is a portable thermal printer that is integrated with WSG-401 to
press button to generate accounts and receipt immediately without PC operating. Non-exclusive printer
can use the PC Web-based browser to print out user account.
2 The field maximum value is 3.
1 hour/
2 hours
1 hour/
2 hours
Description
only 3 billing profile.
It is the name of billing profile. The maximum allowed characters
length is 12.
The duration of the billing period. When this period expires,
account will be discontinued.
is 999999.
WSG-401 User Manual
Page 28
28
Button A
Figure 3-10 Printer Setting
Button B
Button C
Figure 3-11 Account Generator WSG-ACG
WSG-401 User Manual
Page 29
29
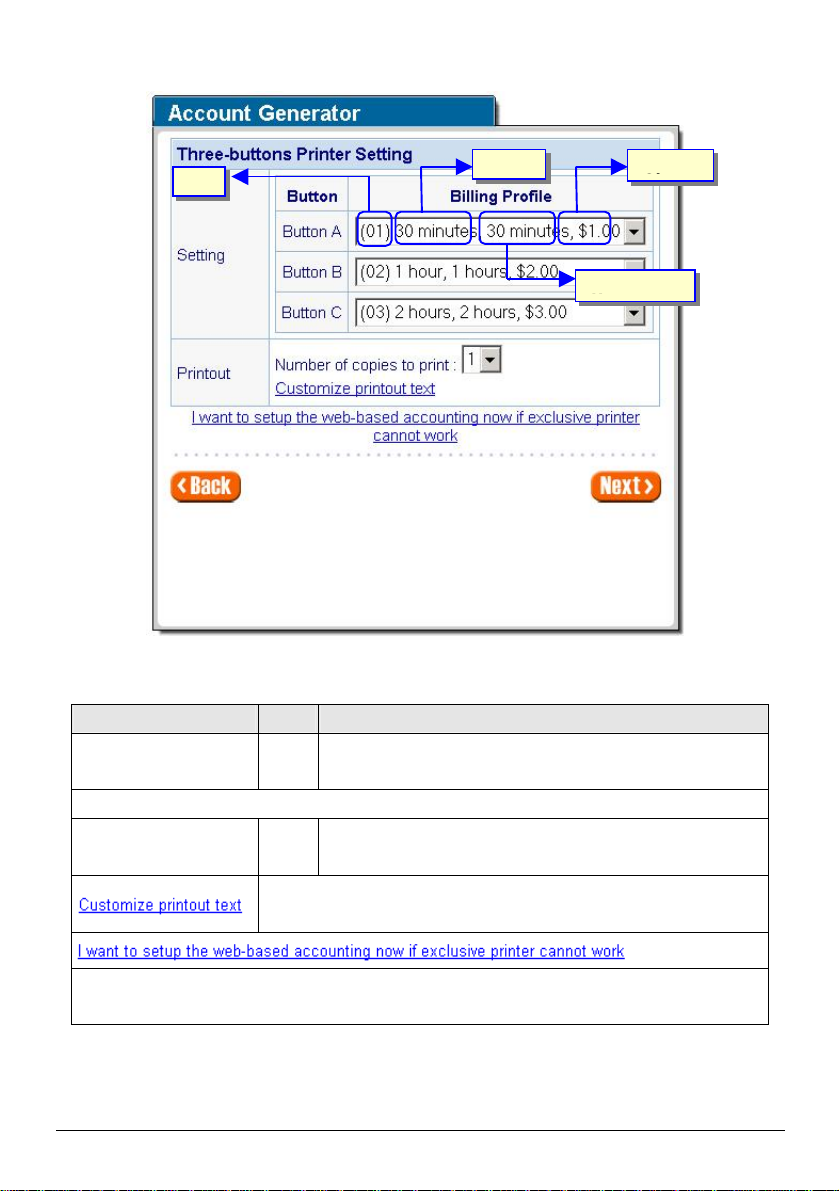
Step 9: Account Generator Setting
billing profile by
you to print all your bills. This value is
bill based on your
based accounting now if exclusive printer cannot work” to open the
Figure 3-12
Item Default
Button A~ C 01
Printout
Number of copies to print 1
This function allows you to produce custom
Click “I want to setup the web“Web-based Account Generator Setting” screen to start the web-based accounting function.
WSG-401 User Manual
Define each button’s billing profile. Select one
clicking in the list box.
The system allows
number of copies.
requirements.
Description
Page 30
30
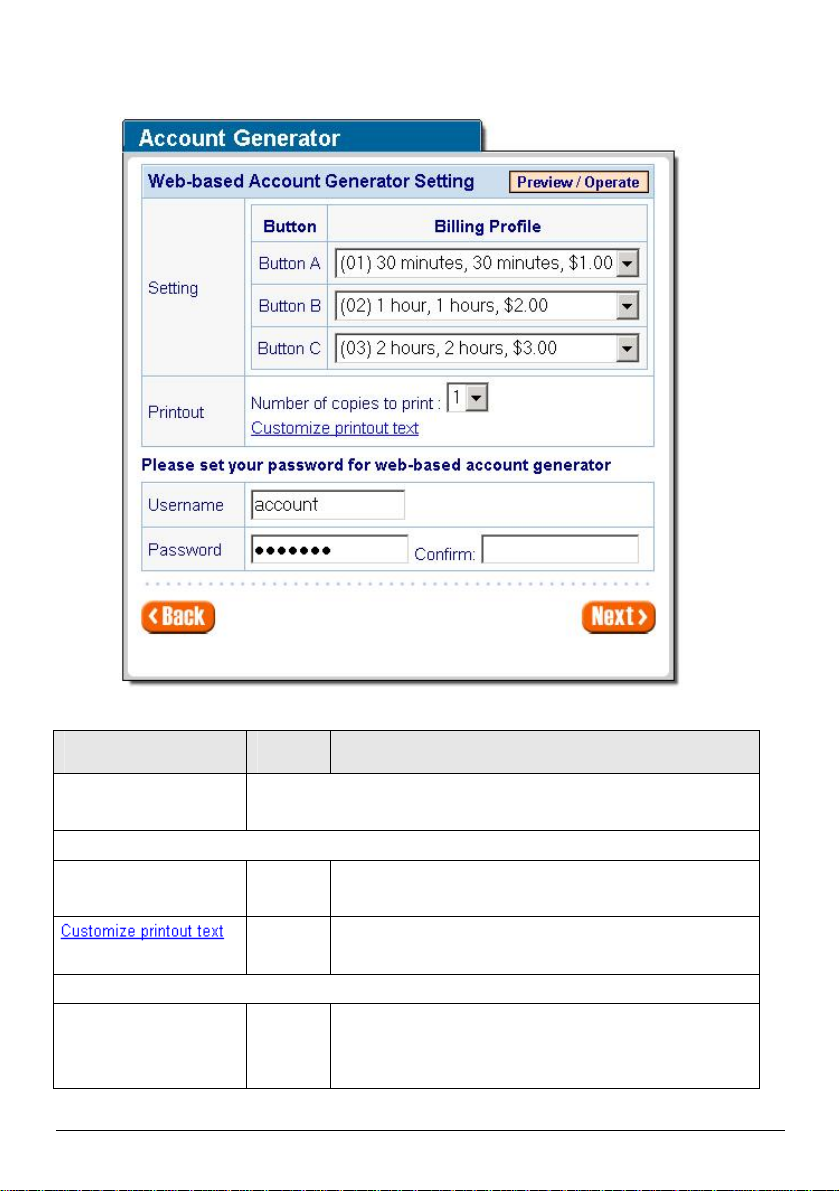
l Web-based Account Generator Setting
Figure 3-13 Web-based Account Generator Setting Screen
Item Default
Billing Profile (Button
A~C)
Printout
Number of copies to
print
- This function allows you to produce custom bill based on
Web-based Account
Username account Enter the user name for web-based account generator.
Define each button’s billing profile. Select one billing profile by clicking
in the list box.
1 The system allows you to print all your bills. This value is
Description
number of copies.
your requirements.
The user name can consist of up to 80 alphanumeric
characters and is case sensitive.
WSG-401 User Manual
Page 31

31
Password account Enter the password for web-based account generator.
Button A
Button B
Button C
The password can consist of up to 80 alphanumeric
characters and is case sensitive.
Confirm Empty Enter the password for confirmation.
Click on button to preview and operate account generator panel.
Figure 3-14 Account Generator Panel
Click on button to add a new account.
WSG-401 User Manual
Page 32

32
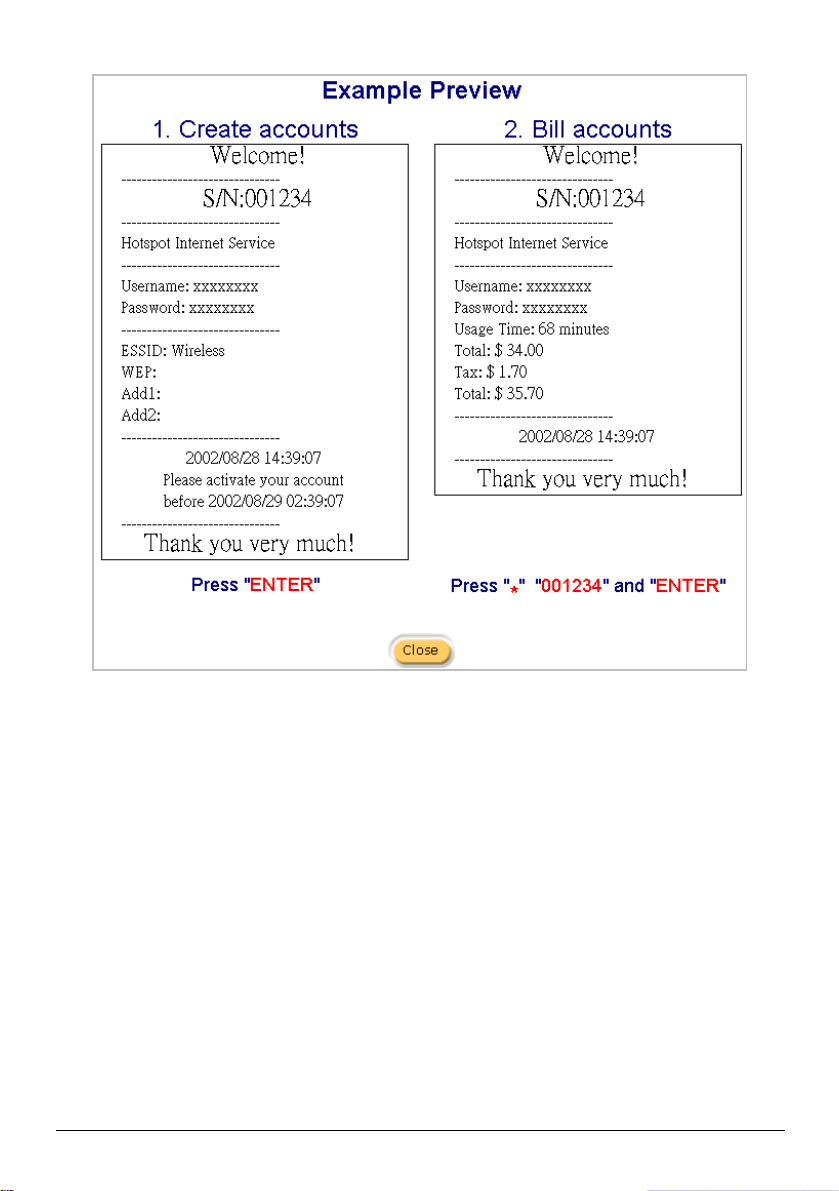
Figure 3-15 Example-Account Printout
WSG-401 User Manual
Page 33

33
Click “View Account List” to display current account information.
Figure 3-16 Account List
Click on refresh button to update the account list page.
The field name button in this list show that this list can be sorted in ascending/descending order
according to the corresponding field name.
Select the check boxes and click ‘Delete’ to delete accounts.
Delete all accounts in account list.
Note: This page will refresh automatically every 5 minutes.
If you would like to leave the account generator panel, please click Logout to exit.
WSG-401 User Manual
Page 34

34
Customize Printout Text
This function allows you to produce custom bill based on your requirements.
Figure 3-17 Customize Printout Text Setting Screen
Click the button to displays the account on the screen as it would appear when printed.
WSG-401 User Manual
Page 35

35
Figure 3-18 Example- PC-connected printer Printout
Figure 3-19 Example- Account Generator Printer Printout
WSG-401 User Manual
Page 36
36
Figure 3-20 Example-Post-paid Printout
WSG-401 User Manual
Page 37

37
Step 10: System Setting
. The user name can consist of up to
. The password can consist of up
and
button to correct the
This function allows remote user to management the
Figure 3-21 System Setting Screen
Item Default Description
Username admin Enter the user name
80 alphanumeric characters and is case sensitive.
Password password Enter the user password
to 80 alphanumeric characters and is case sensitive.
Confirm Empty Enter the password of administrator for confirmation.
System date
Click “Get from my Computer”
time
YYYY/MM/DD
HH:MM:SS
system date and time.
Secure
Administrator IP
Address
All
device. You can specify one or any IP addresses for
remote control the system.
Click the button to save the settings then the system will restart.
WSG-401 User Manual
Page 38

38
3.2 Advanced Setup
Figure 3
-22 Advanced Setting Item Screen
The Advanced Setting enables you to configure advanced settings related to accessing the Internet,
including,
1. System
2. WAN/LAN
3. Server
4. Authentication
5. Billing
6. Accounting
7. Credit Card
8. Keypad
9. Customization
10. Pass Through
11. Filtering
12. Share
13. Portal Page
14. Advertisement
15. Walled Garden
16. DDNS
17. LAN Devices
18. Syslog
19. Wireless
Note: After change the settings of device, please click apply button to save the new settings.
WSG-401 User Manual
Page 39

39
3-2-1 System
Define the WSG-401 System configuration.
WSG-401 User Manual
Figure 3-23 System Setting Screen
Page 40

40
Item Default
system name can consist of up to 40
The Domain name can consist of up to 80
The valid setting of
button to correct the
button to correct the
(Network Time Protocol)
Network Time Protocol can be utilized to
across a network. A
in the correct time
.
or disables NAT Address Translation
.
t change their network
System/Host Name Empty
Description
The
alphanumeric characters.
Domain Name Empty
alphanumeric characters.
Location Information Empty Enter your location information.
Date/Time
Date (Year/Month/Day)
Time (Hour:Minute:Second)
System
Date
System
Time
-
-
The system date of the WSG-401.
year is from 2002 to 2035.
The system time of the WSG-401.
Click “Get from my Computer”
system date and time.
Click “Get from NTP server”
system date and time.
Enables or disables NTP
Time Server.
NTP Setting Disable
synchronize the time on devices
NTP Time Server is utilized to obta
from a time source and adjust the local time.
Server IP/Domain Name Empty Enter the IP address/domain name of NTP server.
Time Zone GMT-12:00 Select the appropriate time zone for your location.
Update Time 0 hours Enter the number of hours for update time.
Disable Enables or disables Daylight Saving Time (DST).
Daylight Saving Time
Month/Day
Set the Daylight Saving Time (DST) on the WSG-401
Adjust the begin time and end time.
NAT (Network Address Translation)
NAT Enable
Enables
function.
Enables or disables plug & play Internet function
Plug and Play Internet access Enable
When enabled, the user needn’
configuration to access the Internet.
WSG-401 User Manual
Page 41

41
Item Default
proxy
require IP addresses, it is
real IP addresses to
NAT is the
es to network
devices, then translating them into a real IP address
is selected, you can
hen the
everyone cannot
IP
addresses or a range to allow remote control access
unction allows for multiple transmissions to
This function allows remote user to ping the
through Internet. Ping is normally used to
two devices, to
Option: default or customize certificate, These are
two ways to create a certificate, one is purchase a
Verisign or
For
DNS Fake IP Reply Enable
Layer 2 Isolation Security Enable
Secure administrator IP
Addresses
Any
Multicast Pass Through Disable
Description
While Internet servers on your LAN such as
server and SMTP server
often not necessary to assign
each end-user workstation on a LAN.
process of assigning fake IP address
for Internet communication.
If plug and play Internet access
enable Layer 2 Isolation Security function. W
“Layer 2 Isolation Security” enabled,
communicate with each other.
Options: Any and Specify. User can specify 5
from network.
This f
specific recipients at same time.
Allow remote user to ping the
device
Enable
WSG-401
test the physical connection between
ensure that everything is working correctly.
SSL Certificate Default
certificate from a certificate authority (Ex.
Thawte), and another is creating a self-certificate (
example: Uses OpenSSL tool).
Click Apply button to save the new settings.
Click Apply button, then Restart dialog box will appear. Click Apply to restart the system.
Figure 3-24 Restart Dialog Box
WSG-401 User Manual
Page 42

42
3-2-2 WAN/LAN
Figure 3-25 WAN/LAN Setting Screen
Click Apply button to save the new settings.
Click Apply button, then Restart dialog box will appear. Click Apply to restart the system.
l Device IP (LAN IP) Setting
Item Default Description
IP Address 192.168.0.1 Internal LAN IP address of your WSG-401.
Subnet Mask 255.255.255.0 Subnet mask of your WSG-401.
Figure 3-26 Restart Dialog Box
Figure 3-27 Device IP (LAN IP) Setting
WSG-401 User Manual
Page 43

43
l WAN MAC Address
rovided by your
Figure 3-28 WAN MAC Address Setting
Item Description
IP Address The default MAC address is set to the WAN physical interface on device.
l WAN Port Mode
Figure 3-29 WAN Port Mode Setting
DHCP Client
The device can work as a DHCP client. This allows the device to obtain the IP address and other
TCP/IP settings from your ISP. If your xDSL/Cable comes with this feature, please enable Use DHCP
Client.
Figure 3-30 DHCP Client Setting Screen
Static IP
Figure 3-31 Static IP Setting Screen
Item Description
IP Address Enter the IP address for the xDSL/Cable connection (p
ISP).
Subnet Mask Enter the subnet mask provided by your ISP.
WSG-401 User Manual
Page 44

44
Item Description
(provided by
the xDSL/Cable connection (provided
A secondary DNS server IP address for the xDSL/Cable connection
DNS Server IP were not available,
The user name can
consist of up to 80 alphanumeric characters and is case
. The password can consist
MTU (Maximum Transfer Unit) specifies maximum
MSS (Maximum Segment Size) specifies maximum
Gateway IP Gateway Enter the Gateway IP address for the xDSL/Cable connection
your ISP).
Primary DNS Server A primary DNS server IP address for
by your ISP).
Secondary DNS Server
(provided by your ISP). If the primary
meanwhile, Secondary DNS Server IP would start in the same time.
PPPoE
Figure 3-32 PPPoE Setting Screen
Item Default Description
User Name Empty Enter your PPPoE account name.
sensitive.
Password Empty Enter your PPPoE password
of up to 80 alphanumeric characters and is case sensitive.
PPP MTU Setting 1492
transmission unit size.
TCP MSS Setting 1452
segment size.
Service Name
(Option)
Empty Your ISP will provide the service name.
WSG-401 User Manual
Page 45

45
Item Default Description
to cut your connection
Idle
Time). If you have been disconnected due to inactivity,
401 to
as soon as you
attempt to access the Internet again. If you wish to
lick the check box. If you
check
is
Internet access
Redial
Connect on Demand and Max Idle Time
Connect on Demand Enable
Max Idle Time 10 Minutes
Keep alive and Redial Period
Keep alive Disable
Redial Period 30 Seconds
l PPTP
You can configure your WSG-401
with your ISP after a specified period of time (Max
Connect on Demand enables your WSG-
automatically re-establish your connection
activate Connect on Demand, c
want your Internet connection to remain, click the
box of keep alive. The Max Idle Time maximum value
65535 minutes.
This option keeps your PPPoE enabled
connected indefinitely, even when it sits idle. The
Period maximum value is 65535 seconds.
Figure 3-33 PPTP Setting Screen
WSG-401 User Manual
Page 46

46
Item Default Description
ress for the xDSL/Cable
IP address for the xDSL/Cable
for the xDSL/Cable
IP address for the xDSL/Cable
The user name can
consist of up to 80 alphanumeric characters and is
. The password can
consist of up to 80 alphanumeric characters and is
MTU (Maximum Transfer Unit) specifies maximum
Size) specifies maximum
to cut your
f
Idle Time). If you have been disconnected
Demand enables your
establish your
as soon as you attempt to access the
Connect on
ick the check box. If you want your
of
is
My IP Address Empty A PPTP local IP add
connection (provided by your ISP).
My Subnet Mask Empty A PPTP local
connection (provided by your ISP).
Gateway IP Address Empty A PPTP local default gateway
connection (provided by your ISP).
PPTP Server IP Address Empty A PPTP server
connection (provided by your ISP).
Username Empty Enter your PPTP account name.
case sensitive.
Password Empty Enter your PPTP password
case sensitive.
PPP MTU Setting 1460
transmission unit size.
TCP MSS Setting 1400 MSS (Maximum Segment
segment size.
Connection ID/Name Empty Connection ID or connection name.
Connect on Demand and Max Idle Time
Connect on Demand Enable
Max Idle Time 10 Minutes
You can configure your WSG-401
connection with your ISP after a specified period o
time (Max
due to inactivity, Connect on
WSG-401 to automatically reconnection
Internet again. If you wish to activate
Demand, cl
Internet connection to remain, click the check box
keep alive. The Max Idle Time maximum value
65535 minutes.
WSG-401 User Manual
Page 47

47
Item Default Description
Internet
access connected indefinitely, even when it sits idle.
Redial Period maximum value is 65535
server port
For access the
system under NAT, please tab the
Keep alive and Redial Period
Keep alive Disable
Redial Period 30 Seconds
3-2-3 Server
This option keeps your PPTP enabled
The
seconds.
Figure 3-34 Server Setting Screen
Item Default
Web Server
Web Server Port 80
SSL Security Disable Enables or disables the SSL security.
WSG-401 User Manual
Description
Enter the Web server port number. The Web
allowed range is 80 or 8010 to 8060.
WSG-401
“http://WAN Port IP Address: Port Number”.
Page 48

48
The idle time out valid range is 1-1440.
If the idle time
will
needs
to enable the DHCP relay and assign a valid DHCP server IP
he DHCP lease time. The DHCP lease time range
Enter the IP address of the network’s primary DNS
Enter the IP address of a second DNS server on the
r may protect by
401 provides an extra Email server
not only
mail server but also
mail sees the
message as if you sent it from your local Internet Service Provide, not
Before setting this sever, please
It must not
Administrator Idle-Timeout 5 Minutes
out is set as 5 minutes, it means if the administrator
doesn’t send packet in 5 minutes, the administrator
logout automatically.
Item Default
Description
There are three types of DHCP Services.
DHCP Server Enable
DHCP Disable—Disable the DHCP server function.
DHCP Relay—Enable DHCP Relay function.
DHCP Server—Enable DHCP server function.
To route DHCP through an external server, the administrator
DHCP Relay
address.
DHCP Server IP Address Empty Enter the IP address of DHCP server.
DHCP Server
DHCP Pool Starting
Address
The WSG-401's DHCP server is turned on and running by default
when you install it in your network.
192.168.0.2 Enter the DHCP Pool Starting IP address.
DHCP Pool Size 253 The DHCP pool size range is 1 to 512.
Lease Time
300
Minutes
Enter t
is 1 to 71582788 minutes.
Primary DNS Server 168.95.1.1
server.
Secondary DNS Server Empty
network.
Email Server Redirect To prevent some subscriber’s original Email serve
firewall or NAT network. WSGparameter to forward the subscriber’s Email. The WSG-401
forwards the subscribers’ E-mail via other Echanges the SMTP header. The recipient of your E-
form the hotel or other place. Note:
make sure the e-mail sever relay function is opened.
exceed 50 characters.
IP Address or Domain
Empty Enter the E-mail server IP address or domain name.
Name
SMTP Port 25 Enter the SMTP port number for mail server. The SMTP
WSG-401 User Manual
Page 49

49
port allowed range is 25 or 2500 to 2599.
Click Apply button to save the new settings.
WSG-401 User Manual
Page 50

50
3-2-4 Authentication
Subscriber can direct access the Internet without
for
service provider to build up an Internet service
n
,
and the system will authenticate the subscriber login
account
This
function allow administrator to adjust the backup
The default value is 1 minute. The Current User
Item Default Description
Authentication Type No
Figure 3-35 Authentication Setting Screen
Option: No Authentication or Built-in Authentication.
Authentication
No Authentication―
enter username and password.
Built-in Authentication―
WSG-401 provides “Built-in Authentication”
without any extra authentication software. If “Built-i
Authentication” is selected, service provider can
generate the subscriber account inside WSG-401
Current User
Information Backup
SSL Login Page Disable Enables or disables SSL security of login page.
Click Apply button to save the new settings.
1 Min(s) The system provides automatically backup
according to the generated account.
information and unused account to flash ROM.
time.
Information Backup valid range is 1 to 1440.
WSG-401 User Manual
Page 51

51
3-2-5 Billing
The function is used to setup a billing profile. A billing profile is a description of how you want to charge
your customer.
WSG-401 User Manual
Figure 3-36 Billing Setting Screen
Page 52

52
Item Default
defined
Before you
enable credit card service, make sure that your credit
section
Pre-Paid Enable The subscribers can access Internet with pre-
usage time.
If you change billing mode (Pre-paidàPost-paid or Post-paidàPre-paid), the system will erase all
account and disconnect all on-line users.
Figure 3-37 Message Box
Description
Item Default
Enable Credit Card Service Disable Enables or disables the credit card service.
service is configured to work. For details, see
3-2-6 Credit Service.
Description
Figure 3-38 Credit Service Setting Screen
WSG-401 User Manual
Page 53

53
Figure 3-39 Error Dialog Box (Credit Card Service=Enable)
The subscriber can access Internet only one time with one
defined usage time will
start until run out even the subscriber stop to access the Internet
The subscriber can access Internet many times with one
very single
If the idle time out is set
t send packet in 5
A
login
finish
Accumulation
Time to Finish
Item Default
Time to Finish Enable
account. Once subscriber login, the pre-
before run out.
Accumulation
Accumulation Disable
account. The system can keep and accumulate e
usage time until the pre-defined usage time run out.
Idle Time Out 5 Min(s) The idle time out valid range is 1-1440.
as 5 minutes, it means if the account doesn’
minutes, the account will logout automatically.
login
Description
A
logout
login
Time Bar
B
C
logout
login
logout
Time Bar
Usage time= A+B+C
Figure 3-40 Accumulation and Time to Finish
WSG-401 User Manual
Usage time= A
Page 54

54
Item Default
The subscribers can access Internet without
defined usage time. This can be operated with an
is connected with
lusive printer. The printout will only show the
username/password. An account can also to be
paid
If the idle time
t
will logout
unit or currency
is used to indicate the taxable status of
Advanced setup,
allowed
hen this period
5.00) that most of
Description
Post-Paid Disable
preoptional external PS/2 keypad that
exc
terminated with the optional keypad.
Note: Only three-button printer supports Postfunction.
Idle Time Out 5 Min(s) The idle time out valid range is 1-1440.
out is set as 5 minutes, it means if the account doesn’
send packet in 5 minutes, the account
automatically.
Billing Profile
Currency $ Enter the appropriate currency
symbol.
Number of decimals places 2 Enter the number. The field maximum value is 3.
Tax Percentage
Disable This check box
the account.
5% Enter the tax rate (i.e. a 5% sales tax is entered as 5).
No. +1~+10 The index number of billing profile. In
we provide 10 billing profile.
Active - Click on check box, active or inactive the billing profile.
Name - It is the name of billing profile. The maximum
characters length is 12.
Account Usage time - The duration of the billing period. W
expires, user account will be discontinued.
Charge - Enter the unit rate amount (i.e. 3
your accounts are charged for one day of service.
WSG-401 User Manual
Page 55

55
Figure 3-41 Post-paid Procedure Diagram
Click Apply button to save the new settings.
Click Apply button, the success dialog box appears. Click on Back to return to Billing setting screen.
Figure 3-42 Success Dialog Box
WSG-401 User Manual
Page 56

56
3-2-6 Accounting
This function allow service provider to generate the subscriber accounts.
Figure 3-43 Accounting Setting Screen
WSG-401 User Manual
Page 57

57
Item Default
The system allows you to print all your bills. Enter the
Expiration
Un-used account will
be deleted after
~hours automatically
Accumulation account
will be deleted after
logged in ~
Printout
Number of copies to
print
Can be replenished by
subscriber
Description
12 hours Enter the number of hours.
3 months Enter the number and select time unit from list box.
1
number of copies.
Enable Click the check box to enable the replenish function.
Figure 3-44 Account Process Diagram
Can be replenished by subscriber=Enable
WSG-401 User Manual
Page 58

58
l Web-based Accounting Generator
billing profile
Figure 3-45 Web-based Account Generator Panel Setting Screen
Item Default Description
Button A~C - Define each button’s billing profile. Select one
by clicking in the list box.
Print to… Account Generator
Printer
Click on button to preview and operate account generator panel.
Figure 3-46 Web-based Account Generator Panel
Select printer to print out your account.
WSG-401 User Manual
Page 59

59
Figure 3-47 Web-based Account Generator Printout
Figure 3-48 PC-connected Printer Printout
WSG-401 User Manual
Page 60

60
in
and
not
The usage time of account is based on the times of pressing
time is button
Item Default
Pre-defined Disable The button presses on the printer will equal the No. “Button”
the web-based account operator.
Press one time is button A, press two times is button B
three times is button C. If press four times, the printer will
do any action.
Incremental based
on Button ~
Discount Price Plan
based on “Button
Presses”
Note: Before configuring the one-button printer accounting, you have to setting the billing profile of
web-based account generator panel.
Enable
Button A
Disable Enables or disables the discount price plan.
button; you have to select one button by clicking in the list box.
EX. If Incremental based on Button A, press one
A, and 3 times is button A x 3, which is same as now.
Description
WSG-401 User Manual
Page 61

61
l WSG-ACG (Three-Button Printer)
Use ~ for Discount Price
Button
by clicking in the list box to assign
the base charge and select enable to active the
Figure 3-49 Web-based Account Generator Panel Setting Screen
Item Default
Print to… Account
Generator
Printer
Button A,
Plan based on “
Presses”
Note: Before configuring the one-button printer accounting, you have to setting the billing profile of
web-based account generator panel.
Disable
Select printer to print out your account.
Select one button
discount price plan.
Description
WSG-401 User Manual
Page 62

62
l Discount Price Plan based on “Button Presses”
Figure 3-50 Discount Price Plan Setting Screen
Item Default
Charge by levels Enable Enables or disables the charge by levels function.
Level 1~10 The level number of charge rate.
Conditions When>= The discount condition.
Button Presses - Enter the times of pressing button.
Unit Price - Enter the amount of charge level.
Click Apply button to save the new settings.
Click Apply button, the success dialog box appears. Click on Back to return to Accounting setting
screen.
Figure 3-51 Success Dialog Box
Description
WSG-401 User Manual
Page 63

63
3-2-7 Credit Card
Enter your Merchant ID. This is a Merchant Identification
Number that you’re received from your Merchant Provider.
The Merchant Transaction Key can be obtained directly
y is
similar to a password and is used by the Payment Gateway
subscriber username and
Indicates whether Email additional information should be
Indicates whether Merchant Name should be sent to the
WSG-401 provides two credit card services (“Authorize.net” and “iTable”) that allow service provider
to authorize, process, and manage credit transactions directly from Internet.
Figure 3-52 Credit Card Setting Screen
Item Default
Authorize.net
Merchant ID Empty
Merchant Transaction Key Empty
from “Authorize.net”. The Merchant Transaction Ke
to authenticate transactions.
Payment Gateway ~ Enter the address of Payment Gateway. The default value
is “https:// cardpresent.authorize.net/gateway/transact.dll”
Email Additional Information The Email Additional Information included
password would be sent to subscriber.
Email Additional Information Disable
sent to the subscriber (customer).
Merchant Name
Enable/Disable
Merchant Name Empty Enter the merchant’s company name. The maximum
Disable
Email of subscriber.
allowed characters length is 40.
Description
WSG-401 User Manual
Page 64

64
Item Default
subscriber
subscriber
Enter your Merchant ID. This is a Merchant Identification
Enter your Terminal ID. This is a Terminal Identification
Enter the secure server address. The default value is
Click
Username and Password
Enable/Disable
Usage Time Enable/Disable Disable The Email Additional Information included
iTable
Merchant ID Empty
Terminal ID Empty
Secure Server Address -
Click Apply button to save the new settings.
Click Apply button, the success dialog box appears. Click on Back to return to Accounting setting
screen.
Disable The Email Additional Information included
username and password would be sent to subscriber.
usage time would be sent to the subscriber.
Number that you’re received from your Merchant Provider.
Number that you’re received from your Merchant Provider.
“https://silverado.trivalley.com/merchant/processcc.asp”.
Description
Figure 3-53 Success Dialog Box
Please follow steps below to pay using credit card.
Step 1: Choose Credit Card service on the login page.
Figure 3-54 Login Page
WSG-401 User Manual
Page 65

65
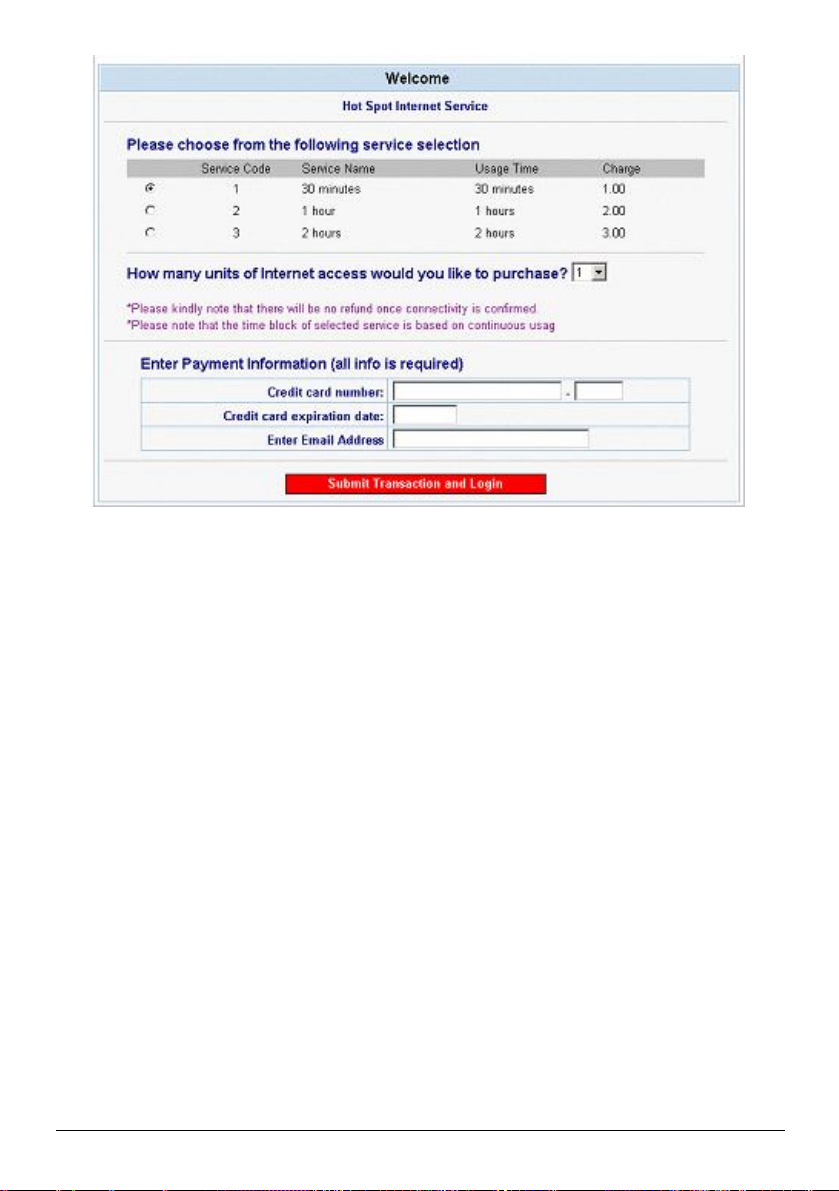
Step 2: Select Service and enter payment information.
mat is
mail you
as
Figure 3-55 Service & Payment Information Setting Screen
Payment Information
Credit card number Empty Enter your credit card number.
Credit card expiration date Empty Enter the credit card expiration date. The allowed for
Enter Email Address Empty Enter your email address. The system will e-
WSG-401 User Manual
Item Default
Description
MM/YY.
account information once your payment information h
been successfully authorized.
Page 66

66
Step 3: After valid payment information has been provided, the subscriber will obtain one valid account
to login or the Figure 3-67 screen will appear.
Figure 3-56 User Account Information
Figure 3-57
WSG-401 User Manual
Page 67

67
3-2-8 Keypad
Figure 3-58 Keypad Setting Screen
Note: This function only support three-button printer
WSG-401 User Manual
Page 68

68
Item Default
The system provides ten user definable hot keys through the use
of the + Key plus the 1 through 0 keys across the top of the
ct the billing profile you want to assign to the
Use for Pre-Paid Billing
keypad.
Keypad Hot Key +1~+0 It is the combination hot key for keypad application.
Billing Profile - Sele
combination hot key.
Use for Post-Paid Billing Define the basic rate of accounts.
Base on ~ Minutes Select the billing unit by clicking in the list box.
Charge by levels Enable Enables or disables the charge by levels function.
Level (1~10) 1~10 The level number of charge rate.
Time Range 0 Enter the number.
Unit Price - Enter the amount of charge level.
Please follow steps below to create accounts using keypad function.
l Use for Pre-Paid Billing
Step 1: Click the Billing in the Advanced Setup menu, select enable Pre-Paid, click Apply.
Description
Figure 3-59 Billing Setting Screen
WSG-401 User Manual
Page 69

69
Step 2: Click the Keypad in Advanced Setup Menu, define the Billing plan of pre-paid, and click Apply.
Figure 3-60 Keypad Hot Key
Step 3: You can use keypad to create subscriber accounts now. Press keypad hot key and then press
Enter. A new subscriber account is generated, and the account information should be printed.
Figure 3-61
Step 4: Subscriber can use this account to access Internet now.
WSG-401 User Manual
Page 70

70
l Use for Post-Paid Billing
Step 1: Click the Billing in the Advanced Setup menu, select enable Post-paid, click Apply.
Figure 3-62 Billing Setting Screen
Step 2: Click the Keypad in Advanced Setup Menu, Define the billing plan of post-paid, click Apply.
Figure 3-63 Keypad Hot Key Setting Screen
WSG-401 User Manual
Page 71

71
Step 3: You can use keypad to create subscriber accounts now. Press Enter, a new subscriber account
is generated, and the account information should be printed. This account information is
including serial number, username, password and account create time.
Figure 3-64
Step 4: When subscriber wants to terminate the Internet service, press *, serial number and then press
Enter, a bill should be printed.
WSG-401 User Manual
Figure 3-65
Page 72

72
l Daily Account Report Printout
WSG
-
ACG operations
PS/2 Keypad
Enter the date (MonthDate)
Figure 3-66 Keypad Hot Key List
Press ABCAA
Figure 3-67 Daily Account
WSG-401 User Manual
Page 73

73
l Monthly Account Report Printout
Press
ABCBB
Press
ABC
CC
l System Status Report Printout
Figure 3-68 Monthly Account
WSG-401 User Manual
Figure 3-69 System Status Report Printout
Page 74

74
l Network Report Printout
Pres
s
ABC
AB
Figure 3-70 Network Report Printout
3-2-9 Customization
l Logo
This function allows uploading the service provider’s logo file, which can be shown on the standard
login page and account printout of PC-connected printer.
Figure 3-71 Logo Setting Screen
Item Description
File Path Enter the file pathname of the logo file in the File Path field.
Click Apply button to save the new settings.
WSG-401 User Manual
Page 75

75
Click Apply button, the success dialog box appears. Click on Back to return to Customization setting
Pleas
. The
screen.
Figure 3-72 Success Dialog Box
l Login Page
Standard
For some service providers, they may hope to have a customize subscriber’s login page to the users.
This function helps them to realize the ideal. The page elements are including welcome image,
background color, article etc. Certainly the administrator can decide to use only standard form. The
WSG-401 provides three different login page formats, including standard, redirect, advanced and frame
format.
Logo Disable Select the check box to display service provider’s logo.
Title Welcome Enter the title name of subscriber login page. The maximum
Subtitle Hot Spot
Footnote Disable Allow the administrator to input the footnote such like “
WSG-401 User Manual
Figure 3-73 Standard Login Page Customization Setting Screen
Item Default Description
allowed characters length is 80.
Enter the subtitle name of subscriber login page. The maximum
Internet
Service
allowed characters length is 80.
Contact to our Customer Service Center, EXT 142”
maximum character of the footnote is 240.
Page 76

76
Item Default Description
. The
color. For the
the color grid. The
Copyright Enable The copyright is allowed the administrator to input a paragraph
in the subscriber login page for copyright information
maximum character of the copyright is 80.
Background Color FFFFFF The background text color can be specified
specified text color format please views
allowed format is Hexadecimal.
Figure 3-74 Login Page Screen
Redirect
This allow service provider to redirect the subscriber’s browser to a specified home page.
Figure 3-75 Redirect Login Page Setting Screen
WSG-401 User Manual
Page 77
77
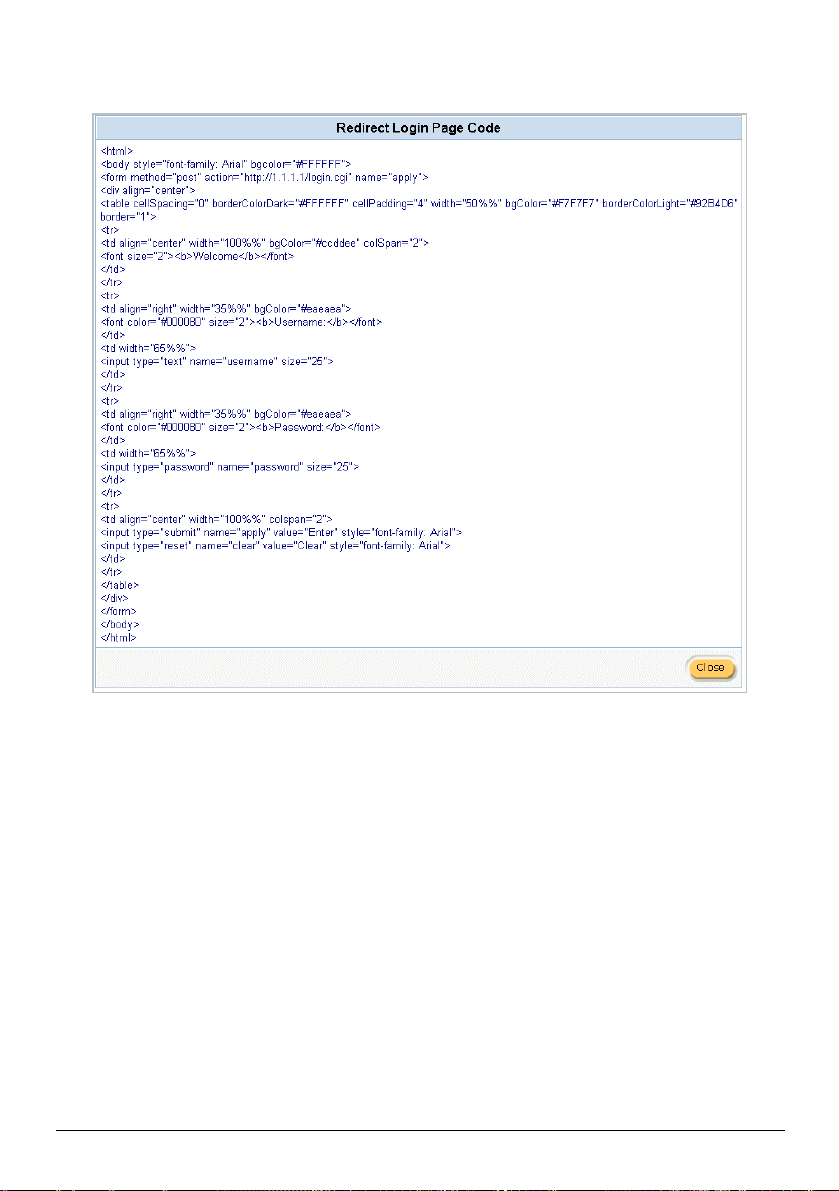
Copy and paste the following HTML Code into your home page to produce redirect subscriber login
page.
WSG-401 User Manual
Figure 3-76 Redirect Login Page Code Screen
Page 78

78
Advanced
color. For the
the color grid. The allowed
RGB values of Red, Green, and Blue, where
each component has a hexadecimal value of from 00 to FF. 000000 is
in the
. The
color. For the specified text color
the color grid. The allowed format is
color. For the background
the color grid. The allowed format is
ike address,
character of the
Pleas
This function allow user to design login page of WSG-401.
Figure 3-77 Advanced Login Page Setting Screen
Item Default
Description
Welcome Slogan Welcome The maximum allowed characters length is 80.
Page Background None The page background can be none or specified
background color format please views
format is Hexadecimal (
black and FFFFFF is white.)
Article Empty The article is allowed the administrator to input a paragraph
subscriber login page for advisement or announcement
maximum character of the article is 1024.
Article Text Color 000000 The article text color can be specified
format please views
Hexadecimal.
Article Background
Color
None The article background can be specified
color format please views
Hexadecimal.
Information Empty Allow the administrator to input the text information such l
telephone number and fax information. The maximum
information is 80.
Comments Empty Allow the administrator to input the text comments such like “
Contact to our Customer Service Center, EXT 142”. The maximum
character of the comment is 80.
WSG-401 User Manual
Page 79

79
Figure 3-78 Color Gird
www.hinet.net
Frame
If “Frame” is selected the subscriber login page will be separate into Top Frame and Bottom Frame.
Bottom Frame is a default format for username and password input, Top Frame is allowed to be
specified a URL to link.
Figure 3-79 Frame Login Page Setting Screen
Item Default
Top Frame URL Link Empty The input format can be http://www.yahoo.com. The maximum
character of the URL Link is 200.
Bottom Frame - This frame will show the standard login page.
l Information Window
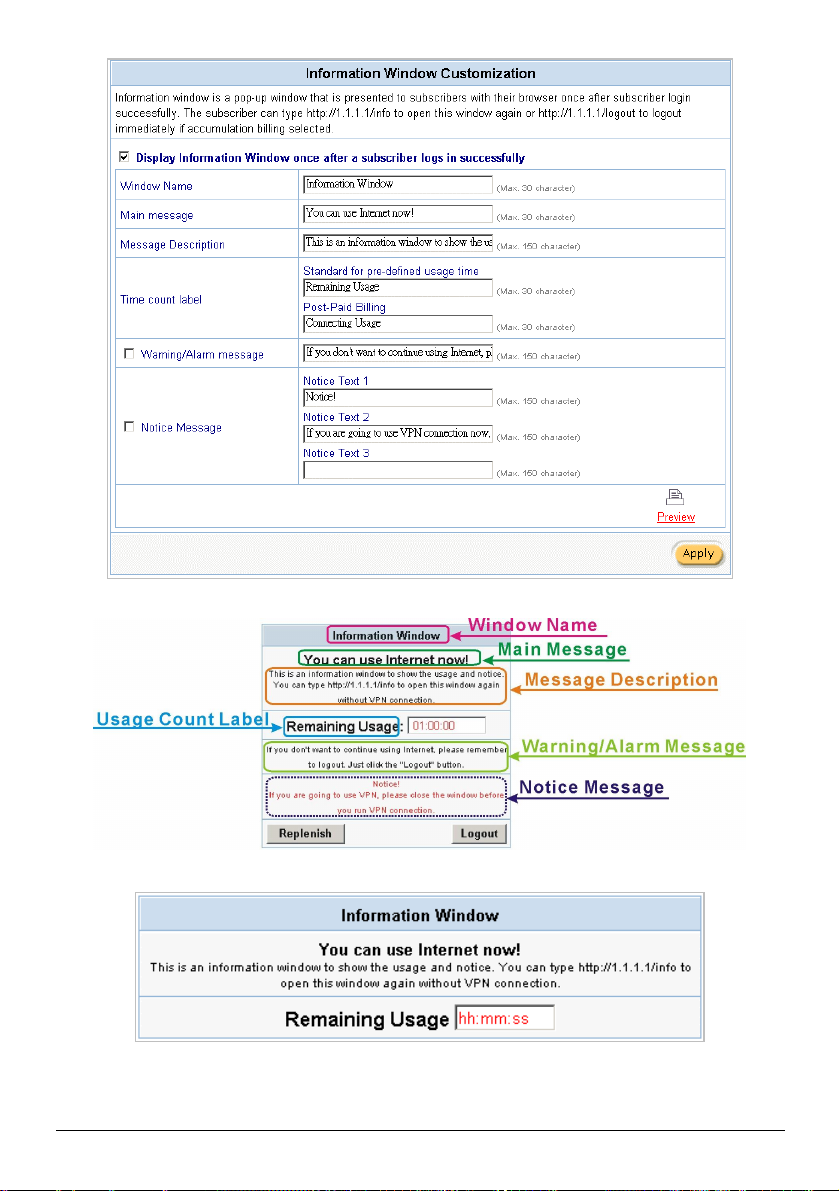
This function allow service provider can decide whether they want an “Information Window” pop-up on
subscriber PC when authenticate successful or not and specified text of information window.
Subscriber can type “http://1.1.1.1/info” to open the information window again or enter
“http://1.1.1.1/logout” to logout immediately if accumulation billing selected.
WSG-401 User Manual
Description
Page 80
80
Figure 3-80 Example-Login Page Screen
Figure 3-81 Example-Login Page Screen
Figure 3-82 Information Window
WSG-401 User Manual
Page 81

81
Billing Type=Time to Finish
Can be replenished by subscriber=Disable
Figure 3-83 Information Window
Billing Type=Time to Finish
Can be replenished by subscriber=Enable
WSG-401 User Manual
Page 82

82
Figure 3-84 Information Window
Billing Type=Accumulation
Can be replenished by subscriber=Disable
Figure 3-85 Information Window
Billing Type=Accumulation
Can be replenished by subscriber=Enable
Figure 3-86Logout Successfully Dialog Box
Billing Type=Accumulation
WSG-401 User Manual
Page 83

83
Figure 3-87 Disconnected Dialog Box
Figure 3-88 Alarm Dialog Box
WSG-401 User Manual
Page 84

84
l Account Printout
This function allow service provider to specified text of account printout.
Figure 3-89 Account Printout Customization Setting Screen
Click Apply button to save the new settings.
WSG-401 User Manual
Page 85

85
Click Apply button, the success dialog box appears. Click on Back to return to Account Printout
Customization setting screen.
Figure 3-90 Success Dialog Box
t
WSG-401 User Manual
Page 86

86
Figure 3-91 Account Generator Printer Printout
Figure 3-92 Account Generator Printer Printout
WSG-401 User Manual
Page 87

87
l Credit Card
Standard Login Page
This function allow service provider to customize the additional credit card message for the standard
login page.
Figure 3-93 Credit Customization Setting Screen
Figure 3-94 Standard Login Page
WSG-401 User Manual
Page 88

88
Service Selection Page
This function allow service provider to customize the additional credit card message for the standard
login page.
Figure 3-95 Service Selection Page Setting Screen
WSG-401 User Manual
Page 89
89
Figure 3-96 Example-Service Selection Page
WSG-401 User Manual
Page 90

90
Successful Page
Figure 3-97 Successful Page Setting Screen
Figure 3-98 Example-Successful Page
WSG-401 User Manual
Page 91

91
Fail Page
This function allow service provider to customize the message for the fail page.
Figure 3-99 Fail Page Setting Screen
Figure 3-100 Example-Fail Page
Click Apply button to save the new settings.
Click Apply button, the success dialog box appears. Click on Back to return to Credit Card
Customization setting screen.
Figure 3-101 Success Dialog Box
WSG-401 User Manual
Page 92

92
3-2-10 Pass Through
please use this format such like
ter of the URL
This function allow administrator to set some special devices pass through the WSG-401 system.
Because some network devices might be constructed under the WSG-401. However these devices
needn’t be checked and authorized. The WSG-401 provides a pass through list and the administrator
can control which devices can be pass through with authentication.
Figure 3-102 Pass through Setting Screen
Item Default
Pass Through Disable Enables or disables the pass through function.
Destination URL/IP Address Pass Through
URL or Website Empty Enter the URL Page;
Description
“http://www.yahoo.com”. The maximum charac
Page is 200.
WSG-401 User Manual
Page 93

93
Item Default
pass
Start IP Address Empty Enter the start IP address of you wants pass through.
End IP Address Empty Enter the end IP address of you wants pass through.
Subscriber IP/MAC Address or LAN Device Pass Through
Start IP Address Empty Enter the start IP address of you wants pass through.
End IP Address Empty Enter the end IP address of you wants pass through.
IP Address Empty Enter the IP address of you wants pass through.
Subnet Mask Empty Enter the subnet mask of you wants pass through.
MAC Address Empty Enter the MAC address of you wants pass through.
Mask Empty Enter the subnet mask of you wants pass through.
Pass Through List Display the pass through Information of WSG-401.
No. - The index number of pass through address.
Active Disable Click on check box, active or inactive the pass through address.
Address List - Display the pass through address(s).
Type - Display the type of pass through address.
Delete Disable Select the check boxes and click ‘Delete’ to delete the
through address(s).
Click Add to List button to add a new entry.
Description
Click Apply button to save the new settings.
Click Delete All & Apply button to delete all entries.
Note: The priority of "pass through" is higher than "Filtering".
WSG-401 User Manual
Page 94

94
3-2-11 Filtering
to display when a
please use this format
character of the
Filtering allows the system administrator to have a list of restricted destinations, which is useful to block
specified Internet websites or Intranet areas.
Figure 3-103 Filtering Setting Screen
Item Default Description
Filtering Disable Enables or disables filtering function.
HTTP Message
website is
blocked
Restrict Destination
URL or Website Empty Enter the URL Page of you wants to filter;
Start IP Address Empty Enter the start IP address of you wants to filter.
End IP Address Empty Enter the end IP address of you wants to filter.
The Web
Site is
blocked by
System
Enter the http message.
such like “http://www.yahoo.com”. The maximum
URL Page is 200.
WSG-401 User Manual
Page 95

95
Item Default Description
filtering
IP Address Empty Enter the destination IP address of you wants to filter.
Subnet Mask Empty Enter the destination subnet mask.
No - The index number of filtering address.
Active Disable Click on check box, active or inactive the filtering address.
Address List - Display the filtering address(s).
Delete Disable Select the check boxes and click ‘Delete’ to delete the
Click Add to List button to add a new entry.
address(s).
Click Apply button to save the new settings.
Click Delete All & Apply button to delete all entries.
Note: The priority of "pass through" is higher than "Filtering".
WSG-401 User Manual
Page 96
96
3-2-12 Share
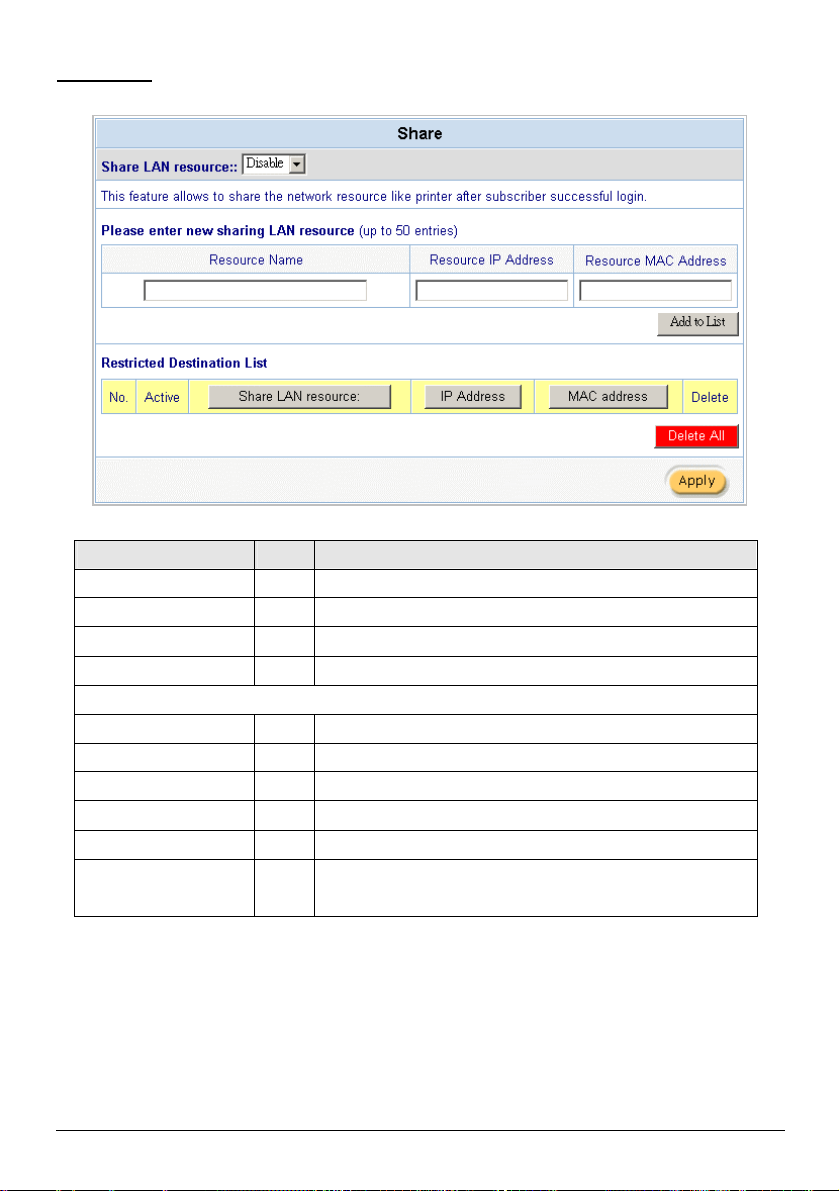
share
This feature allows sharing the network devices like printer after subscriber successful login.
Figure 3-104 Share Device Setting Screen
Item Default
Share LAN resource Disable Enables or disables share LAN resource function.
Resource Name Empty Enter the device name.
Resource IP Address Empty Enter the IP address of device.
Resource MAC Address Empty Enter the MAC address of device.
Share LAN resource List
No. - The index number of share LAN device.
Active Disable Click on check box, active or inactive the share LAN device.
Resource Name - Display the device name.
IP Address - Display the IP address of device.
MAC Address - Display the MAC address of device.
Delete Disable Select the check boxes and click ‘Delete’ to delete the
device(s).
Description
WSG-401 User Manual
Page 97

97
Note:
The input format can be
Link # is
1. You must use the “Search IP” method to search for a device on the network. Please follow steps
below to search your device.
F Click Start, and then click Search.
F Click Computers or People.
F Click “A computer on the network”.
F In Computer, type the IP address of the device you want to find. Click Search.
2. The function support only Unicast and IP Protocol.
Click Add to List button to add a new entry.
Click Apply button to save the new settings.
Click Delete All & Apply button to delete all entries.
3-2-13 Portal Page
This feature allows redirecting subscriber’s browser to a specified portal page after successful login.
Figure 3-105 Portal Page Setting Screen
Item Default
URL Link Empty Enter the URL Link page.
“http://www.yahoo.com”. The maximum character of the URL
200.
Description
Click Apply button to save the new settings.
Click Apply button, the success dialog box appears. Click on Back to return to Portal Page setting
screen.
Figure 3-106 Success Dialog Box
WSG-401 User Manual
Page 98

98
3-2-14 Advertisement
link
link every
This function allows the administrator to input ten different websites in
the table for advertisement. And these 10 websites will display to the
401
. The
The system allow service provider to input 10 URL links for advertisement link purpose.
Figure 3-107 Advertisement URL Link Setting Screen
Item Default Description
Frequency One Time Only One Time Only—One Time Only means to send the advertisement
once after the subscriber Login.
Every~Min(s)—The field means to send the advertisement
interval minutes. The value range is 1 to 60 (minutes).
Sequence Randomly Randomly—Display the advertisement page in the random order.
From 1 to 10 —Display the advertisement page in the order as setting.
URL Link
1~10
Empty
subscribers at random when the subscribers login in the WSG-
system. The input format can be “http://www.yahoo.com”
maximum character of the URL Link # is 200.
Click Apply button to save the new settings.
WSG-401 User Manual
Page 99
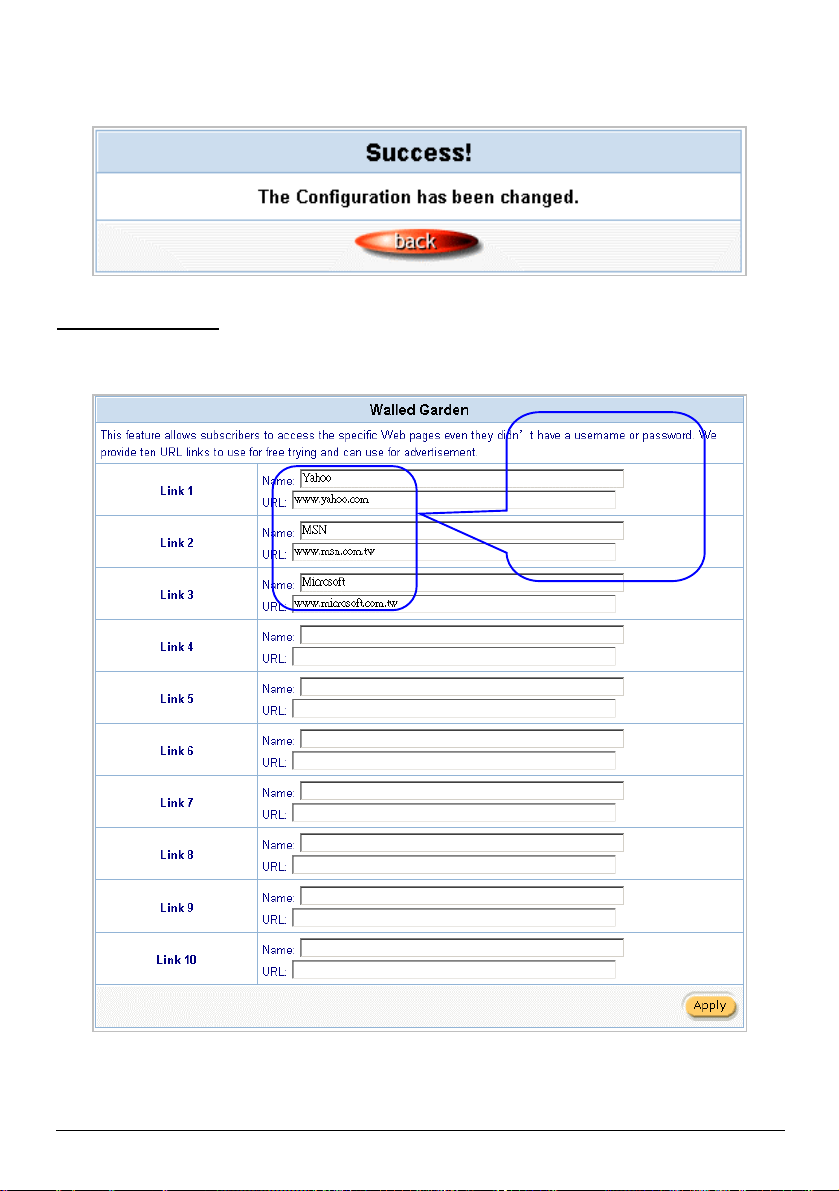
99
Click Apply button, the success dialog box appears. Click on Back to return to Advertisement URL Link
Yahoo
www.microsoft.com
setting screen.
Figure 3-108 Success Dialog Box
3-2-15 Walled Garden
We prepare ten URL links that allows subscriber to access the specific Web pages even they didn’t
have a username or password. It’s free trying and can use for advertisement.
www.yahoo.com
MSN
www.msn.com
Microsoft
WSG-401 User Manual
Figure 3-109 Walled Garden
Page 100

100
Figure 3-110 Login Page
The
character of the
Item Description
Link 1~10
Name The name is allowed user to set the prompt string in user customize login page.
maximum allowed characters length is 80.
URL 1~10 The input format can be “http://www.yahoo.com”. The maximum
Link# is 200.
Click Apply button, the success dialog box appears. Click on Back to return to Walled Garden setting
screen.
Figure 3-111 Success Dialog Box
WSG-401 User Manual
 Loading...