

Page 1

802.11g Wireless Broadband Router
WRT-415
User’s Manual
Version 1.0
Page 2

Copyright
Copyright 2007 by PLANET Technology Corp. All rights reserved. No part of this publication may
be reproduced, transmitted, transcribed, stored in a retrieval system, or translated into any language
or computer language, in any form or by any means, electronic, mechanical, magnetic, optical,
chemical, manual or otherwise, without the prior written permission of PLANET.
PLANET makes no representations or warranties, either expressed or implied, with respect to the
contents hereof and specifically disclaims any warranties, merchantability or fitness for any particular
purpose. Any software described in this manual is sold or licensed "as is". Should the programs
prove defective following their purchase, the buyer (and not this company, its distributor, or its dealer)
assumes the entire cost of all necessary servicing, repair, and any incidental or consequential
damages resulting from any defect in the software. Further, this company reserves the right to revise
this publication and to make changes from time to time in the contents hereof without obligation to
notify any person of such revision or changes..
All brand and product names mentioned in this manual are trademarks and/or registered trademarks
of their respective holders.
Federal Communication Commission Interference Statement
This equipment has been tested and found to comply with the limits for a Class B digital device,
pursuant to Part 15 of FCC Rules. These limits are designed to provide reasonable protection
against harmful interference in a residential installation. This equipment generates, uses, and can
radiate radio frequency energy and, if not installed and used in accordance with the instructions, may
cause harmful interference to radio communications. However, there is no guarantee that
interference will not occur in a particular installation. If this equipment does cause harmful
interference to radio or television reception, which can be determined by turning the equipment off and
on, the user is encouraged to try to correct the interference by one or more of the following measures:
1. Reorient or relocate the receiving antenna.
2. Increase the separation between the equipment and receiver.
3. Connect the equipment into an outlet on a circuit different from that to which the receiver is
connected.
4.
Consult the dealer or an experienced radio technician for help.
FCC Caution:
To assure continued compliance.(example-use only shielded interface cables when connecting to
computer or peripheral devices). Any changes or modifications not expressly approved by the party
responsible for compliance could void the user’s authority to operate the equipment.
This device complies with Part 15 of the FCC Rules. Operation is subject to the Following two
conditions: (1) This device may not cause harmful interference, and (2 ) this Device must accept any
interference received, including interference that may cause undesired operation.
Page 3

Federal Communication Commission (FCC) Radiation Exposure
Statement
This equipment complies with FCC radiation exposure set forth for an uncontrolled environment. In
order to avoid the possibility of exceeding the FCC radio frequency exposure limits, human proximity
to the antenna shall not be less than 20 cm(8 inches) during normal operation.
CE Mark Warning
This is a Class B product. In a domestic environment, this product may cause radio interference, in
which case the user may be required to take adequate measures.
Protection requirements for health and safety – Article 3.1a
Testing for electric safety according to EN 60950 has been conducted. These are considered relevant
and sufficient.
Protection requirements for electromagnetic compatibility – Article 3.1b
Testing for electromagnetic compatibility according to EN 301 489-1, EN 301 489-17 and EN 55024
has been conducted. These are considered relevant and sufficient.
Effective use of the radio spectrum – Article 3.2
Testing for radio test suites according to EN 300 328-2 has been conducted. These are considered
relevant and sufficient.
CE in which Countries where the product may be used freely:
Germany, UK, Italy, Spain, Belgium, Netherlands, Portugal, Greece, Ireland, Denmark, Luxembourg,
Austria, Finland, Sweden, Norway and Iceland.
France: except the channel 10 through 13, law prohibits the use of other channels
Safety
This equipment is designed with the utmost care for the safety of those who install and use it. However,
special attention must be paid to the dangers of electric shock and static electricity when working with
electrical equipment. All guidelines of this and of the computer manufacture must therefore be allowed
at all times to ensure the safe use of the equipment.
WEEE regulation
To avoid the potential effects on the environment and human health as a result of the
presence of hazardous substances in electrical and electronic equipment, end users of
electrical and electronic equipment should understand the meaning of the crossed-out
wheeled bin symbol. Do not dispose of WEEE as unsorted municipal waste and have to
collect such WEEE separately.
Revision
User’s Manual for PLANET Wireless Broadband Router
Model: WRT-415
Page 4

Rev: 1.0 (January. 2007)
Part No. EM-WRT415v2
Page 5

TABLE OF CONTENTS
CHAPTER 1 INTRODUCTION ........................................................................................................... 1
1.1 P
ACKAGE CONTENTS
1.2 S
YSTEM REQUIREMENTS
1.3 F
EATURES
1.4 S
PECIFICATION
1.5 W
IRELESS PERFORMANCE
CHAPTER 2 HARDWARE INSTALLATION .................................................................................... 4
2.1 H
ARDWARE CONNECTION
2.2 LED I
CHAPTER 3 CONFIGURE THROUGH WEB BROWSER ............................................................. 6
3.1 W
IZARD
3.2 WAN ............................................................................................................................................10
3.2.1 Connection Type................................................................................................................... 10
3.2.2 Dynamic DNS....................................................................................................................... 14
3.3 W
IRELESS
....................................................................................................................................... 2
NDICATORS
.......................................................................................................................................... 7
..................................................................................................................................... 15
...................................................................................................................... 1
................................................................................................................ 1
................................................................................................................................2
.............................................................................................................. 3
............................................................................................................... 4
............................................................................................................................4
3.3.1 Basic..................................................................................................................................... 15
3.3.2 Security ................................................................................................................................16
3.3.2.1 WEP ......................................................................................................................................... 16
3.3.2.2 WPA ......................................................................................................................................... 17
3.3.2.3 WPA2 ....................................................................................................................................... 18
3.3.3 Advanced..............................................................................................................................20
3.4 LAN ............................................................................................................................................. 21
3.4.1 Basic..................................................................................................................................... 21
3.4.2 DHCP................................................................................................................................... 22
3.5 A
CCESS CONTROL
3.5.1 Filters................................................................................................................................... 23
3.5.2 Virtual Server .......................................................................................................................28
3.5.3 Special AP............................................................................................................................ 29
3.5.4 DMZ .....................................................................................................................................30
3.5.5 Firewall Rule........................................................................................................................31
3.6 S
YSTEM
........................................................................................................................................ 32
3.6.1 Password..............................................................................................................................32
.........................................................................................................................23
3.6.2 Time...................................................................................................................................... 33
3.6.3 Device Information .............................................................................................................. 35
3.6.4 Log ....................................................................................................................................... 36
Page 6

3.6.5 Log Settings.......................................................................................................................... 37
3.6.6 Statistic................................................................................................................................. 38
3.6.7 Restart .................................................................................................................................. 39
3.6.8 Firmware.............................................................................................................................. 40
3.6.9 Configuration ....................................................................................................................... 41
3.6.10 UPnP..................................................................................................................................41
3.6.11 Ping Test.............................................................................................................................42
3.6.12 Remote Management .......................................................................................................... 43
APPENDIX A TCP/IP SETTINGS FOR PC......................................................................................44
W
INDOWS
W
INDOWS
W
INDOWS
95/98/ME..........................................................................................................................44
2000 .................................................................................................................................. 45
XP..................................................................................................................................... 46
Page 7

If any of the above items are missing, contact your supplier as soon as
Chapter 1 Introduction
The PLANET WRT-415 is an 802.11g wireless router that supports high-speed wireless networking for
home or SOHO users. The WRT-415 provides data rate up to 54 Mbps when used with other 802.11g
products. The 802.11g standard is backwards compatible with 802.11b products. There is no need to
change existing network to maintain connectivity. You may sacrifice some of 802.11g’s performance
when using 802.11b and 802.11g devices in the same WLAN, but you still can keep the ability to
communicate when deploying the 802.11g standard into your 802.11b network.
The WRT-415 supports the most advanced security features available today: WPA/WPA2. WPA (Wi-Fi
Protected Access) authorizes and identifies users based on a secret key that changes automatically at a
regular interval. WPA/WPA2 uses TKIP or AES to change the temporal key periodically. This insures
much greater security than the standard WEP security. (By contrast, the older WEP encryption required
the keys to be changed manually.)
For home users that will not incorporate a RADIUS server in their network, the security for the WRT-415
will still be much stronger than ever before. Utilizing the PSK (Pre Shared Key) mode of WPA, the
WRT-415 will obtain a new security key every time it connects to the 802.11g network. You only need to
enter your encryption information once in the configuration menu. Then you will automatically receive a
new key every time you connect, thus highly increasing the safety of your communications.
1.1 Package Contents
Make sure that you have the following items:
•
One WRT-415
•
One dipole antenna
•
One AC Power Adapter
•
One User’s Manual CD
•
One Quick Installation Guide
Note:
possible.
1.2 System Requirements
Before installation, please check the following requirements with your equipment.
•
Ethernet-based ADSL / Cable modem
•
Computers with Microsoft Windows, Macintosh, or Linux operating systems
equipped with an Ethernet adapter and a CD-ROM drive
•
Internet Explorer v6.0 or Netscape Navigator v6.0 and above
- 1 -
Page 8

1.3 Features
•
2.4GHz ISM band, unlicensed operation
•
Supports WPA/WPA2 (Wi-Fi Protected Access) for both 802.1x and
WPA/WPA2-PSK or AES
•
Dual-standard capability: 802.11g and 802.11b compliant
•
Supports DHCP server
•
Web Configuration provide a user friendly interface for the user to configure
through web browser
•
Supports UPnP (Universal Plug and Play)
•
Supports MAC / IP / Protocol Filter
•
Supports DDNS, virtual server and DMZ
•
Build-in 4-port switch
•
Provides Setup Wizard for the user to configure easily in the first time
1.4 Specification
Standards IEEE 802.3u 100BASE-TX Fast Ethernet
IEEE 802.11g; IEEE 802.11b
Protocol CSMA/CD
Radio Technology IEEE 802.11g Orthogonal Frequency Division Modulation
Data Transfer Rate 802.11b: 1, 2, 5.5, 11Mbps (auto sense)
802.11g: 6, 9, 12, 18, 24, 36, 48, 54Mbps @802.11g(auto sense)
Ethernet: 10Mbps (half duplex), 20Mbps (full-duplex)
Fast Ethernet: 100Mbps (half duplex), 200Mbps (full- duplex)
Topology Star
Receiver Sensitivity 54Mbps: Typical -70dBm @ 10% PER (Packet Error Rate)
11Mbps: Typical -85dBm @ 8% PER (Packet Error Rate)
TX Power 15dBm typically
Frequency Range 2412 ~ 2484 MHz ISM band
Modulation Schemes DBPSK/DQPSK/CCK/OFDM
Security
Channels 1 ~ 11 channels (FCC); 1 ~ 13 channels (ETSI);
Number of Ports LAN: 4 x 10/100Mbps Auto-MDIX Fast Ethernet port
64/128-bit WEP Encryption; WPA, WPA-PSK
1 ~ 14 channels (MKK)
WAN: 1 x 10/100Mbps Auto-MDIX Fast Ethernet port
DC inputs DC 7.5V 1A
Power Consumption 5W (Max)
Temperature
Humidity
Operating: 0° ~ 40° C, Storage: -10° ~ 70° C
Operating: 10% ~ 90%, Storage: 5% ~ 90%
- 2 -
Page 9

Dimensions
EMI:
147 x 110 x 30 mm (W x H x D) without Antenna
FCC Class B, CE Mark B
1.5 Wireless Performance
The following information will help you utilizing the wireless performance, and operating coverage of
WRT-415.
1. Site selection
To avoid interferences, please locate WRT-415 and wireless clients away from transformers,
microwave ovens, heavy-duty motors, refrigerators, fluorescent lights, and other industrial
equipments. Keep the number of walls, or ceilings between AP and clients as few as possible;
otherwise the signal strength may be seriously reduced. Place WRT-415 in open space or add
additional Access Point as needed to improve the coverage.
2. Environmental factors
The wireless network is easily affected by many environmental factors. Every environment is
unique with different obstacles, construction materials, weather, etc. It is hard to determine the
exact operating range of WRT-415 in a specific location without testing.
3. Antenna adjustment
The bundled antenna of WRT-415 is adjustable. Firstly install the antenna pointing straight up, then
smoothly adjust it if the radio signal strength is poor. But the signal reception is definitely weak in
some certain areas, such as location right down the antenna.
Moreover, the original antenna of WRT-415 can be replaced with other external antennas to extend
the coverage. Please check the specification of the antenna you want to use, and make sure it can
be used on WRT-415.
4. WLAN type
If WRT-415 is installed in an 802.11b and 802.11g mixed WLAN, its performance will reduced
significantly. Because every 802.11g OFDM packet needs to be preceded by an RTS-CTS or CTS
packet exchange that can be recognized by legacy 802.11b devices. This additional overhead
lowers the speed. If there are no 802.11b devices connected, or if connections to all 802.11b
devices are denied so that WRT-415 can operate in 11g-only mode, then its data rate should
actually 54Mbps.
- 3 -
Page 10

. Otherwise, the product may be
to default settings, press and hold the Reset button over 5
Chapter 2 Hardware Installation
Before you proceed with the installation, it is necessary that you have enough information about the
WRT-415.
2.1 Hardware Connection
1. Locate an optimum location for the WRT-415. The bes t place for your WRT-415 is usually at the
center of your wireless network, with line of sight to all of your mobile stations.
2. Connect the power adapter to the receptor at the rear panel of the WRT-415, and plug the other
end of the power adapter to a wall outlet or power strip. The Power LED will light up to indicate
proper operation.
3. Power off the ADSL / Cable modem first. Connect ADSL/Cable Modem to the WAN port on
WRT-415. Use the cable supplied with your modem. If no cable was supplied with your modem,
please use a RJ-45 Ethernet cable. After the Ethernet cable is securely connected, power on the
ADSL / Cable modem. The WAN LED will light up to indicate proper connection.
4. Use an Ethernet cable to connect one of the LAN ports on the WRT-415 and the computer you are
using to configure the router. The corresponding LAN LED will light up to indicate proper
connection. The LAN ports on the WRT-415 are Auto-MDI/MDI-X; thus, you can use a straight or
crossover Ethernet cable freely.
5. Adjust the antennas of WRT-415. Try to adjust them to a position that can best cover your wireless
network. The antenna’s position will enhance the receiving sensitivity.
Note: ONLY use the power adapter supplied with the WRT-415
damaged.
Note: If you want to reset WRT-415
seconds. And then wait for 10 seconds for WRT-415 restart.
2.2 LED Indicators
LED STATE MEANING
Green Device power on PWR
Off
Green or Off Device fail STATUS
Blinking Green Device is working
Green WAN link status is on WAN
Blinking Green
Device power off
WAN activity
Green WLAN link status is on WLAN
Blinking Green WLAN activity
LAN
Green Link is established 1
Blinking Green Packets are transmitting or receiving
Green Link is established
2
Blinking Green Packets are transmitting or receiving
- 4 -
Page 11

Green Link is established 3
Blinking Green Packets are transmitting or receiving
Green Link is established
4
Blinking Green Packets are transmitting or receiving
- 5 -
Page 12
Chapter 3 Configure through Web Browser
Web configuration provides a user-friendly graphical user interface (web pages) to manage your
WRT-415.
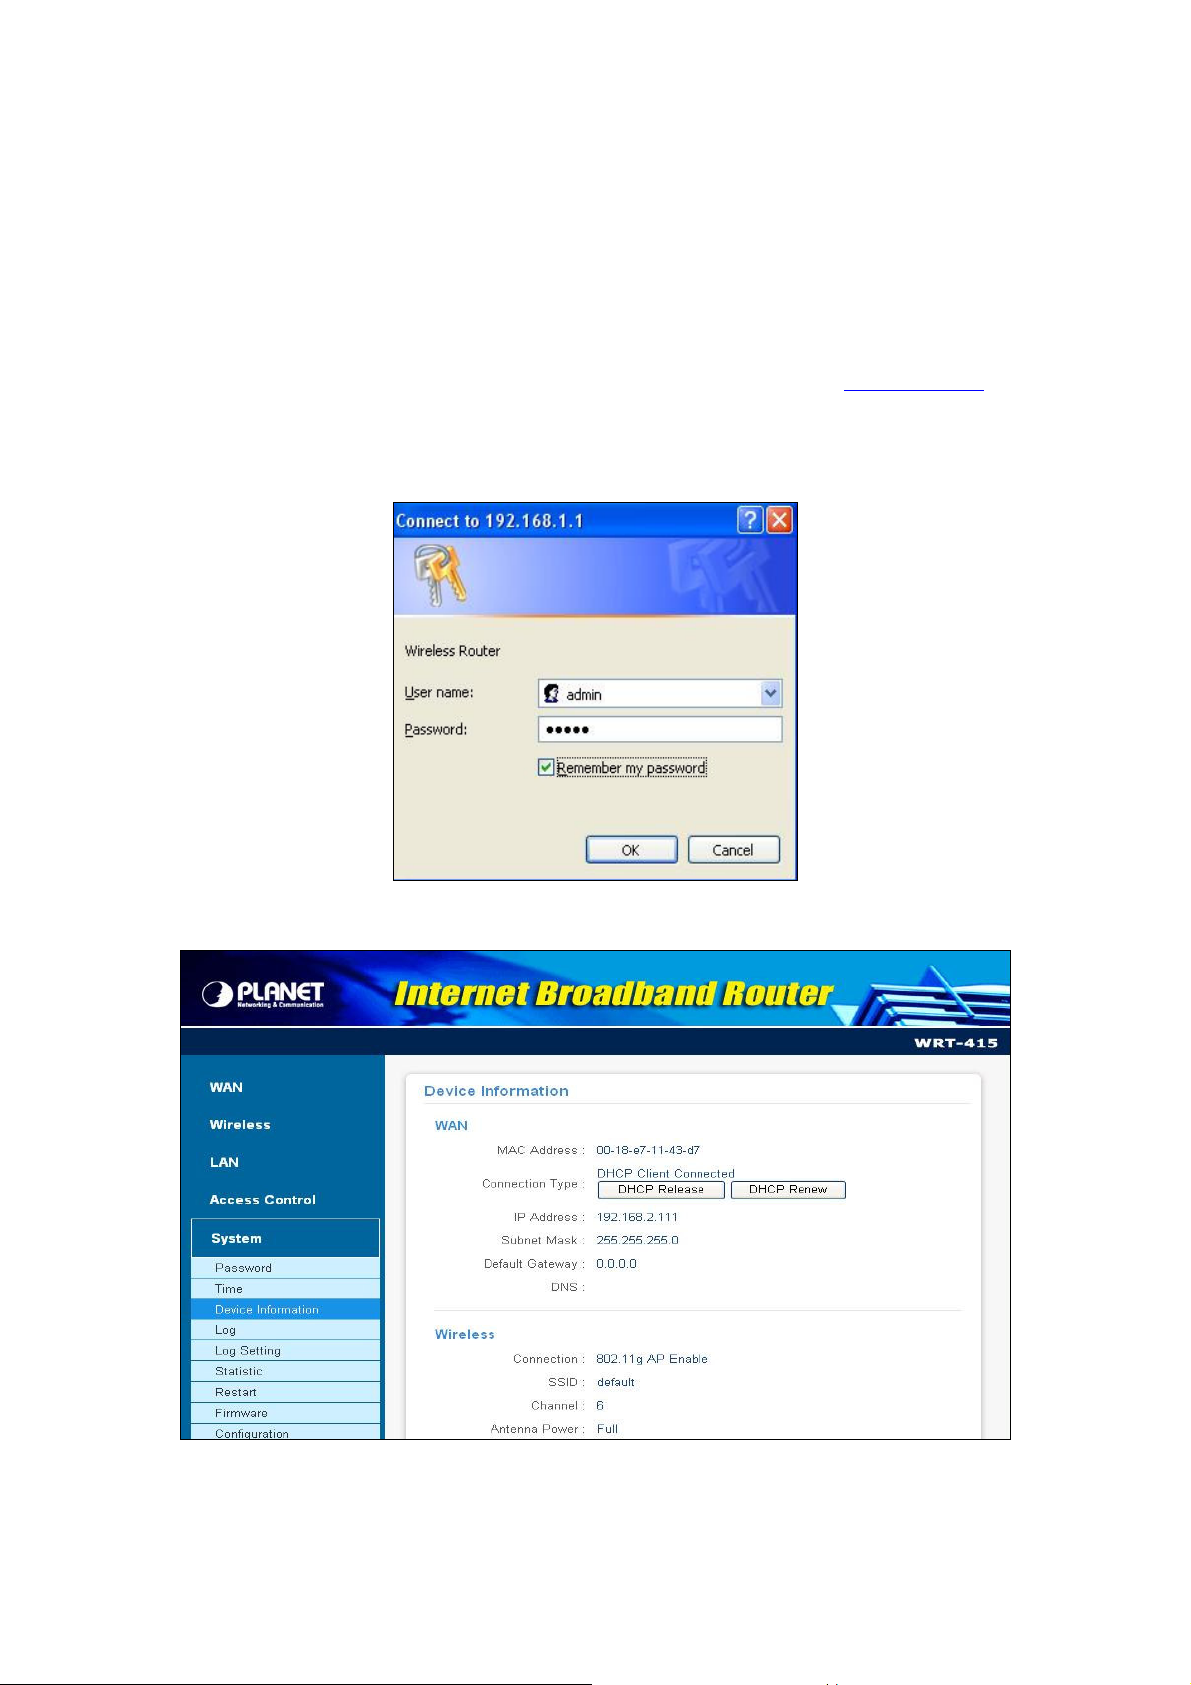
1. Open your web browser .
2. Enter the IP address of your WRT-415 in the address field (default IP address is http://192.168.1.1).
3. A User Name and Password dialog box will appear. Please enter your User Name and Password here.
Default User Name and Password are both “admin”. Click “OK”.
4. When the user name / password is correct, you will see the WRT-415 web page as below.
- 6 -
Page 13
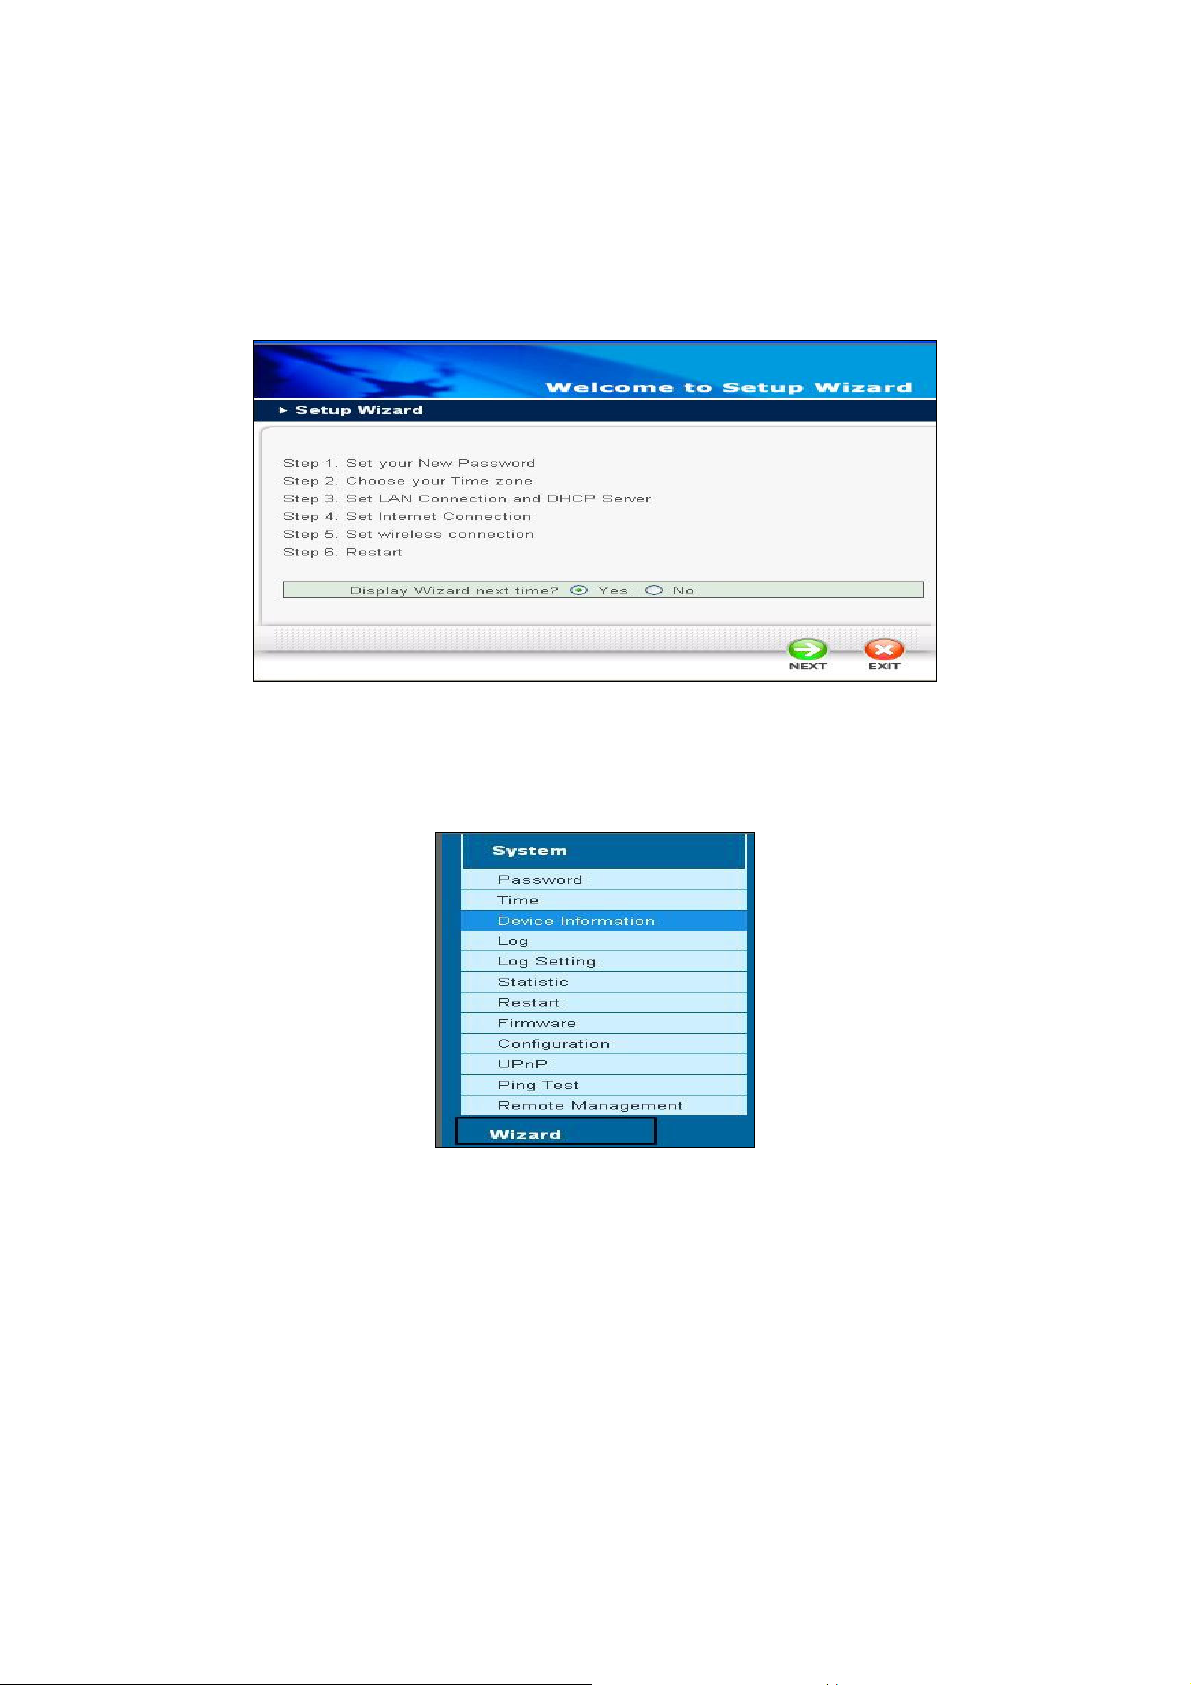
3.1 Wizard
When this is your first time to setup WRT-415, we will suggest you use the Wizard to complete the
configuration. The setup wizard enables you to configure the WRT-415 quickly and conveniently. Click
“Wizard” button, the window below will appear. Please click “Next>” and follow the steps to configure
WRT-415.
Click the Wizard. If you do not want to display wizard by itself next time, select “No” option from
“display wizard next time?” and click “update”. In the future, you can still have wizard appeared by
clicking “Wizard” button on left panel of WRT-415’s web page.
To configure WRT-415, please follow the steps below to complete the configuration. Click NEXT to
continue.
- 7 -
Page 14
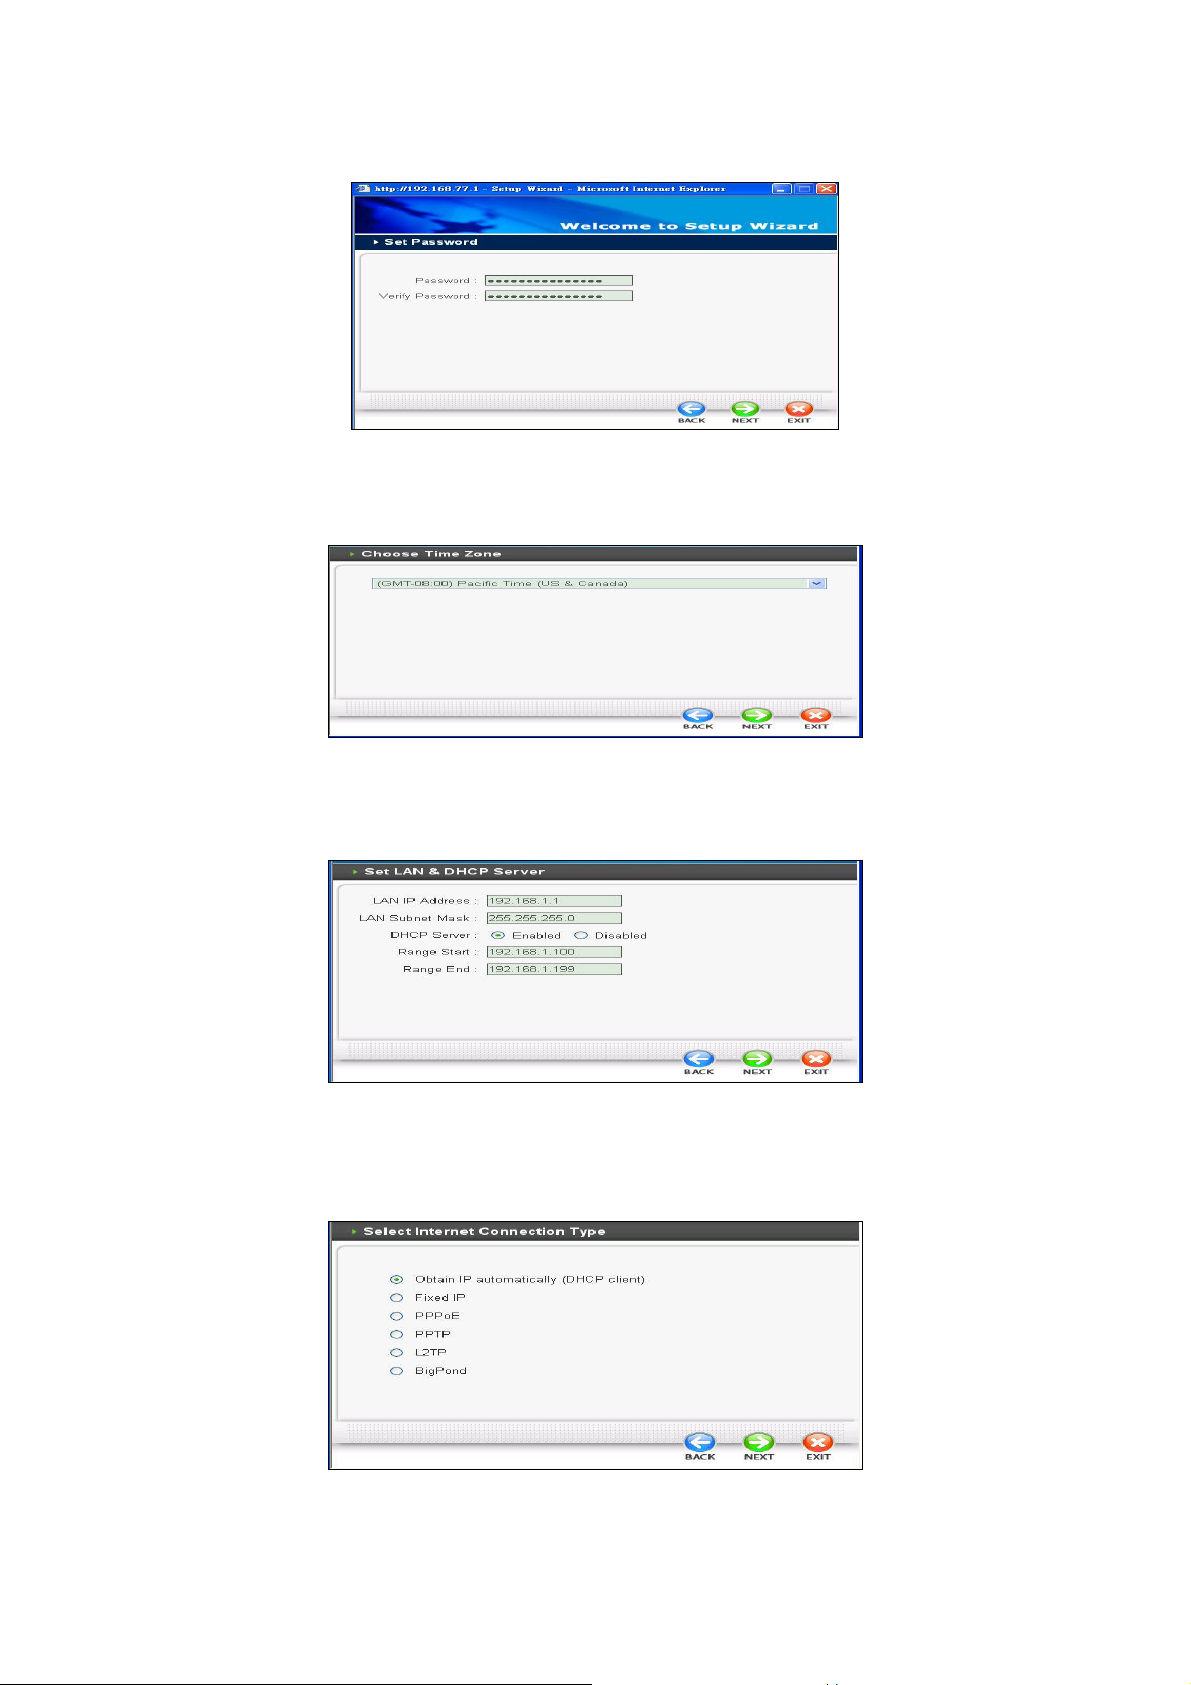
Step 1. Set your new password
The default password for administrator (login name is “admin”) is “admin”. You can change the
Password in this step. Click NEXT.
Step 2. Choose your time zone
Select the time zone that belongs to your location. Click NEXT.
Step 3. Set LAN connection and DHCP server
You can set the IP address, subnet mask and enable or disable DHCP server function. When DHCP
server is enabled, please ensure your LAN IP Address is on the same IP range of DHCP Server.
Click NEXT to continue.
Step 4. Set Internet connection
Please select your Internet connection type click NEXT .
- 8 -
Page 15
Refer to the information your ISP is provided to enter.
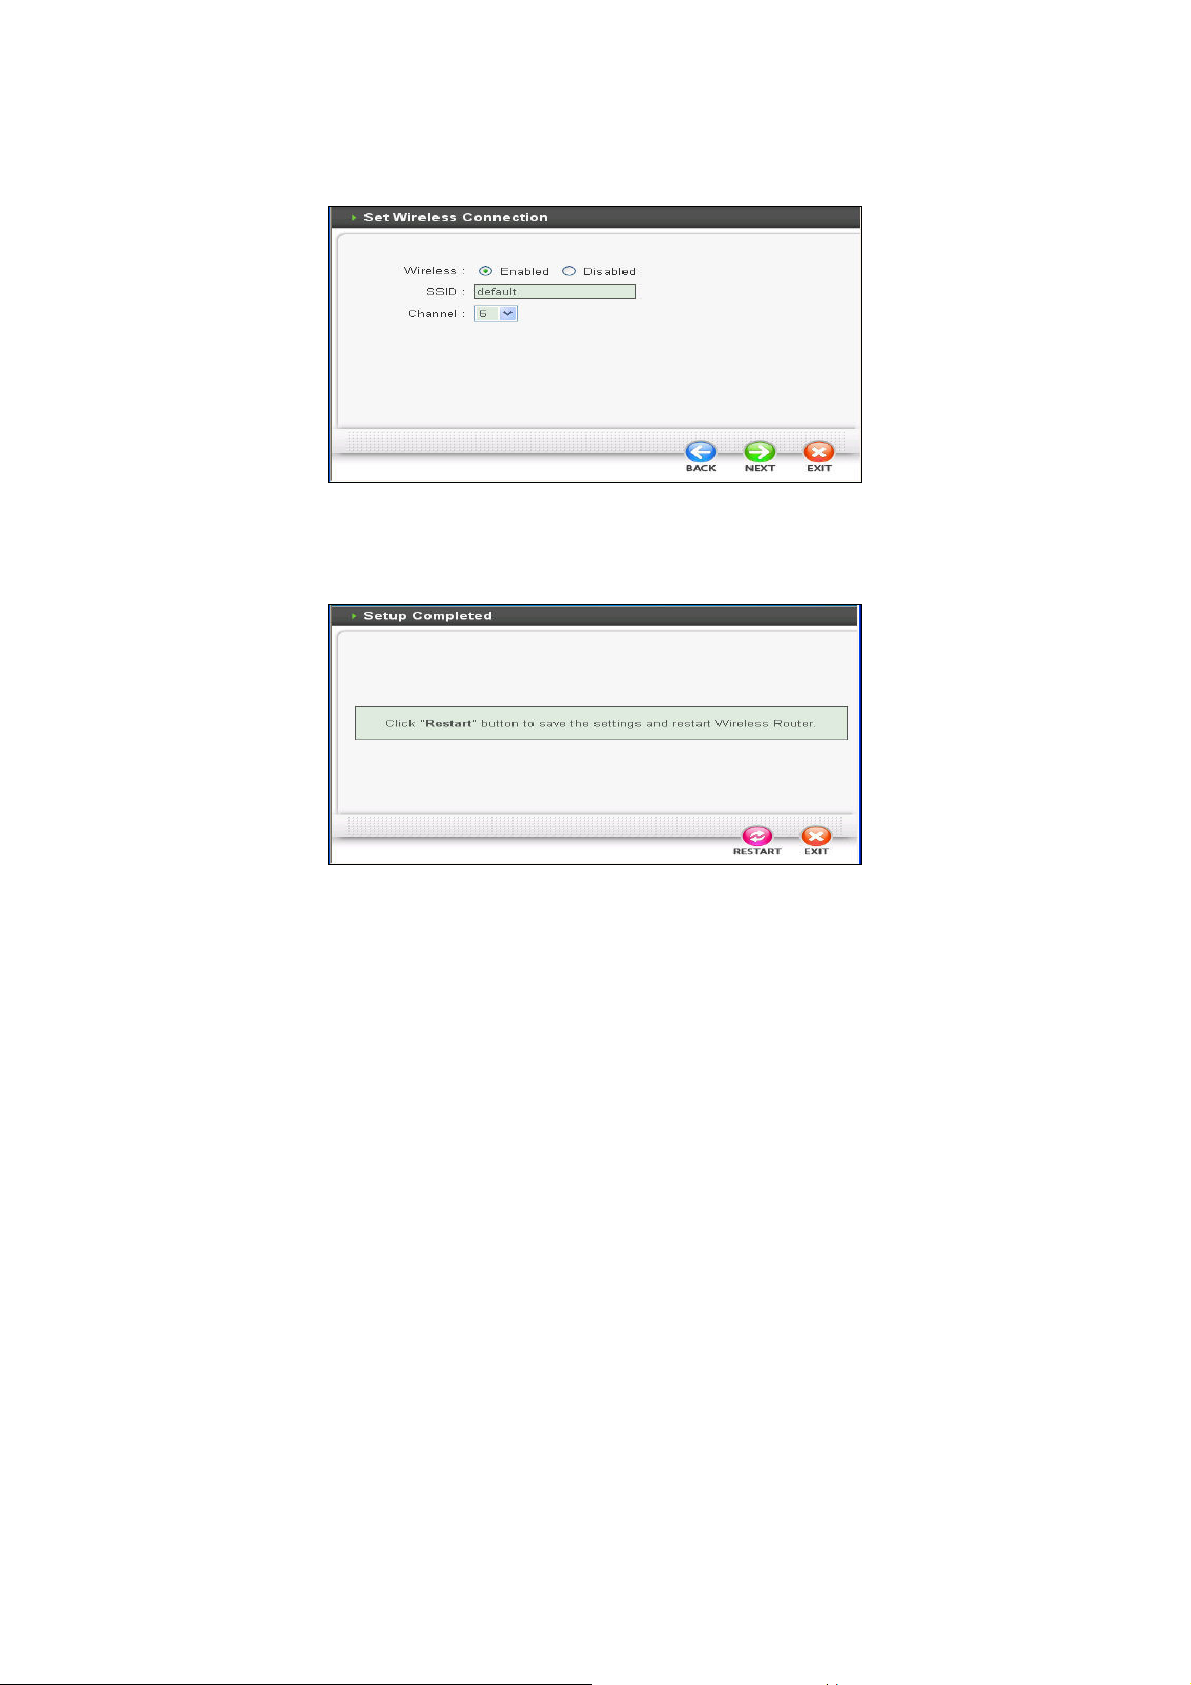
Step 5. Set wireless LAN connection
You can either enable or disable the wireless interface. If the Wireless LAN is enabled, you should
set a ESSID and Channel for the wireless client to access . Click “NEXT” to continue.
Step 6. Restart
Please click the “ RESTART ” button to save the settings and restart WRT-415. In the following web
page, please click “CLOSE” to close the Setup Wizard window.
- 9 -
Page 16
3.2 WAN
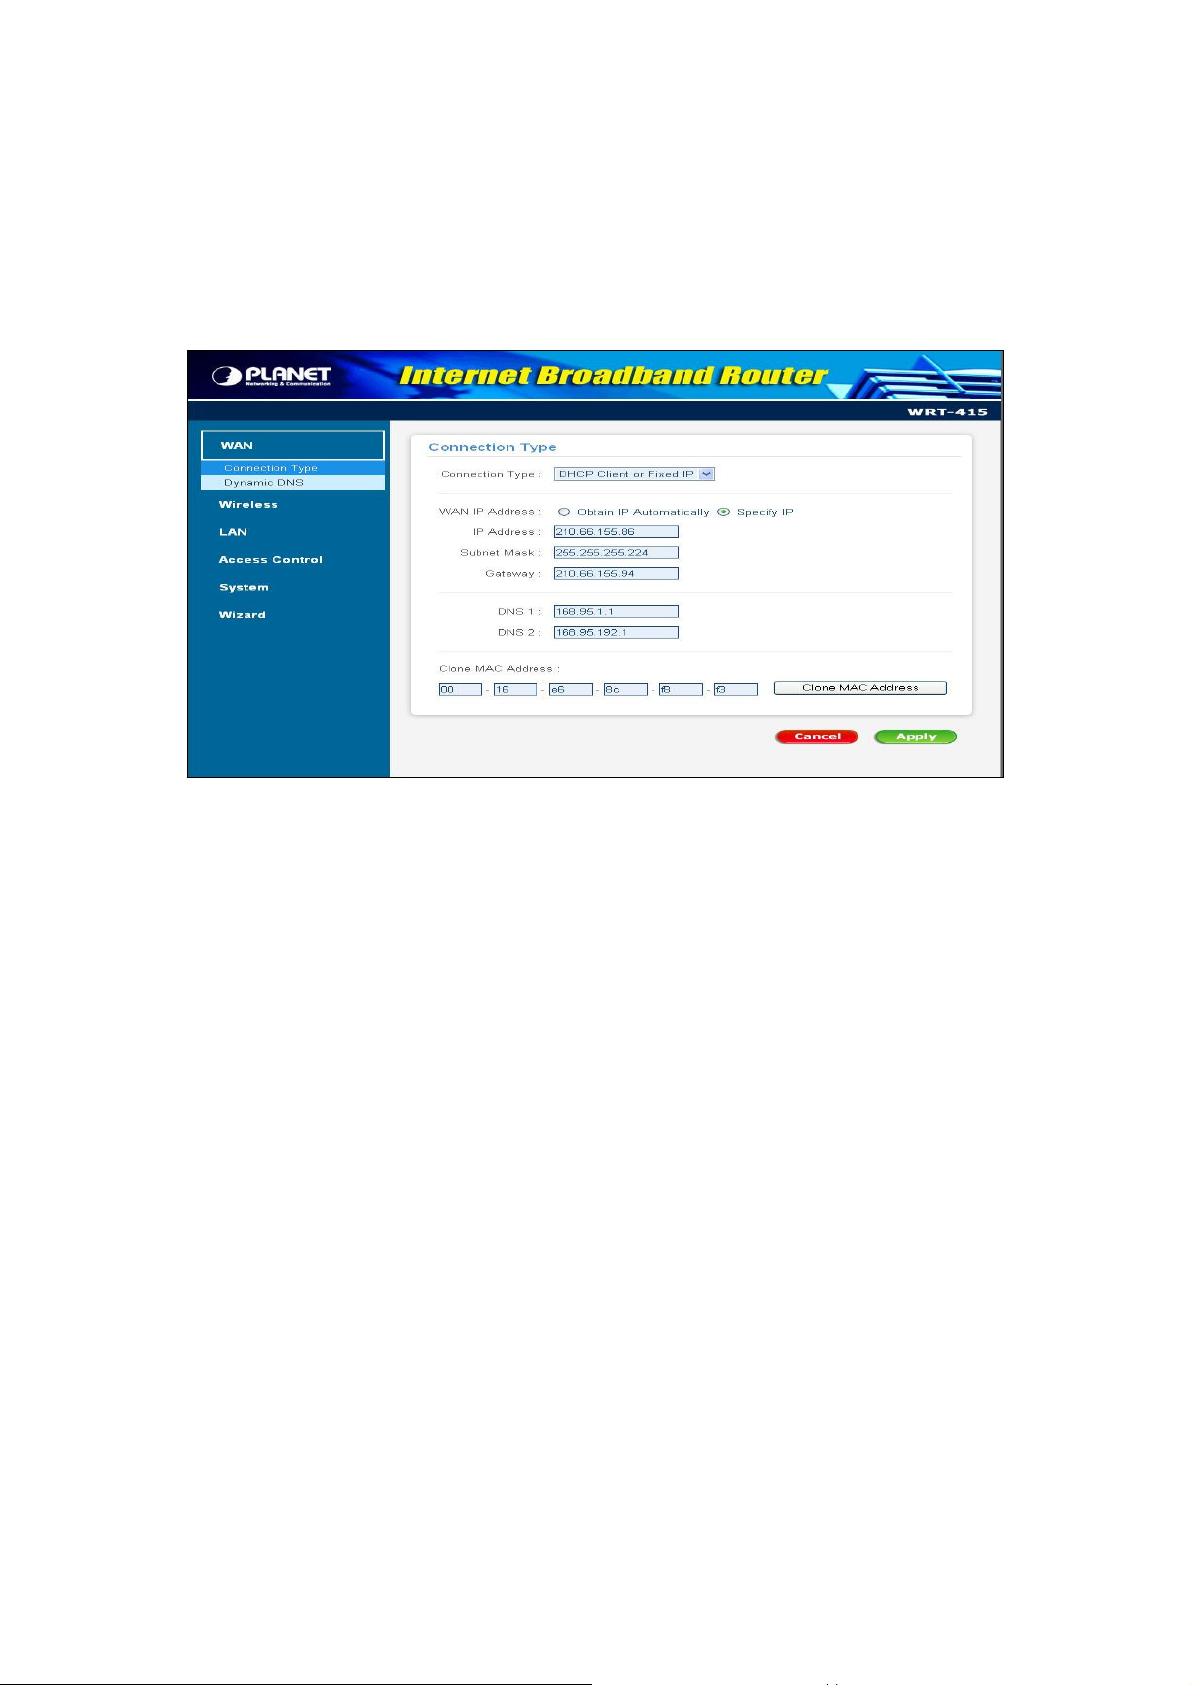
3.2.1 Connection Type
Please refer to your Internet connection method to select the Connection Type. And please configure
those settings per the information your ISP provides.
Connection Type: Select the connection type, DHCP client/Fixed IP, PPPoE, PPTP, or L2TP from the
drop-down list.
When using DHCP client/Fixed IP, enter the following information in the fields (some information are
provided by your ISP):
WAN IP: Select whether you want to specify an IP address manually, or want DHCP to obtain an IP
address automatically. When “Specify IP” is selected, type the IP address, subnet mask, and default
gateway in the fields. Your ISP will provide you with this information.
DNS 1 - 2 : Please type one DNS numbers into “DNS 1” fields. If your ISP has provide more DNS Server
information to you , please type the other DNS number to “DNS 2”.
Clone MAC Address: If required by your ISP, type the MAC address for the WRT-415 WAN interface in
this field. You can also copy the MAC address of your PC’s network card to the WRT-415 WAN
interface by clicking “Clone MAC address”.
- 10 -
Page 17

When using PPPoE, enter the following information in the fields (some information are provided by your
ISP):
WAN IP: Select whether you want the ISP to provide the IP address automatically, or whether you want
to assign a static IP address to the WRT-415 WAN interface. When “Specify IP” is selected, type the
PPPoE IP address in the field. Your ISP will provide you with this information.
DNS 1 / 2 : Please type one DNS numbers into “DNS 1” fields. If your ISP has provide more DNS Server
information to you , please type the other DNS number to “DNS 2”.
User Name: Type your PPPoE user name.
Password: Type your PPPoE password.
Connect on Demand: Enables or disables the connect on demand function, which enables WRT-415 to
initiate a connection with your ISP when an Internet request is made to the WRT-415. When enabled, the
WRT-415 automatically connects to the Internet when you open your browser.
Idle Time Out: Specify the time that will elapse before the WRT-415 times out of a connection.
MTU: Type the MTU value in the field.
- 11 -
Page 18

When using PPTP, enter the following information in the fields (some information are provided by your
ISP):
Dynamic IP / Static IP: Select the IP assignment method.
IP Address: Type the IP address which your ISP provides.
Subnet Mask: Type the Subnet Mask which your ISP provides.
Gateway: Type the IP address of Gateway which your ISP provides.
DNS: Type the IP address of DNS server which your ISP provides.
Server IP/Name: Type the IP address or name of server which offers Internet service. Your ISP will
provide you with this information.
PPTP Account: Type your PPTP account.
PPTP Password: Type your PPTP password.
PPTP Verify password: Confirm your PPTP password again.
Auto-reconnect: If this function is enabled, WRT-415 will try to rebuild Internet connection once the link
is down.
- 12 -
Page 19

When using L2TP, enter the following information in the fields (some information are provided by your
ISP):
Dynamic IP / Static IP: Select the IP assignment method.
IP Address: Type the IP address which your ISP provides.
Subnet Mask: Type the Subnet Mask which your ISP provides.
Gateway: Type the IP address of Gateway which your ISP provides.
DNS: Type the IP address of DNS server which your ISP provides.
Server IP/Name: Type the IP address or name of server which offers Internet service. Your ISP will
provide you with this information.
L2TP Account: Type your L2TP account.
L2TP Password: Type your L2TP password.
L2TP Verify password: Confirm your L2TP password again.
Auto-reconnect: If this function is enabled, WRT-415 will try to rebuild Internet connection once the link
is down.
- 13 -
Page 20

3.2.2 Dynamic DNS
You can configure WRT-415 to use DDNS service if you already have a registered DDNS account.
DDNS: You can enable or disable DDNS function here.
DDNS Server Address: WRT-415 supports 3 DDNS provider: DynDns.org, EasyDns.com, and
No-IP.com. Please select the one which you registered to.
Host Name: Enter the host name you registered to DDNS provider.
User Name: Enter the user name you registered to DDNS provider.
Password: Enter the password of your registered account.
- 14 -
Page 21

3.3 Wireless
3.3.1 Basic
This page allows you to enable or disable the wireless LAN function, enter a SSID, and set the channel
for wireless communications.
Wireless Radio: Enable or disable wireless LAN via the WRT-415.
SSID: Type an SSID in the field. The SSID of any wireless device must match the SSID typed here in
order for the wireless device to access the LAN and WAN via the WRT-415.
Channel: Select a work channel for wireless communications. The channel of any wireless device must
match the channel selected here in order for the wireless device to access the LAN and WAN via the
WRT-415.
Extended Range Mode: Enable and disable the wireless Extended Range enhancement.
SSID Broadcast: If disabled, no SSID is broadcast. If enabled, the SSID of WRT-415 will then be
broadcast to all wireless stations. Stations which have no SSID (or a "null" value) can then adopt the
correct SSID for connections to this router.
- 15 -
Page 22

3.3.2 Security
This screen allows you to set authentication types and the parameters for secure wireless
communications. Please “Enable” when you would like the security function works.
3.3.2.1 WEP
Authentication Type: Select the type from the listed options. If WEP is selected, the screen would
appear as above.
WEP Type: You can choose to use Open system or Shared key.
Mode: Select the key code you want to use for WEP Key, HEX or ASCII. When Hex is selected, you may
enter alphanumeric characters in the range of “A-F”, “a-f” and “0-9” in the WEP Key entry field.
Alternatively, you may enter digit hexadecimal values in the range of “a-z”, “A-Z” and “0-9”.
WEP Key: Select the level of encryption you want from the drop-down list. WRT-415 supports 64, and
128-bit encryption.
Key 1 ~ Key 4: There are 4 keys available, please ensure you have enter correct number for the key
values with different Key Length and coding (Hex or ASCII) as 64bit (10 Hex digit / 5 ASCII), 128bit (26
Hex digit / 13 ASCII) or 256bit (58 Hex digit / 29 ASCII), please select one of them and enter the key you
want to use. Click “Clear” to erase key values.
Note: 128bit WEP encryption will require more system resources than 64bit encryption. Use 64-bit
encryption for better performance.
- 16 -
Page 23

3.3.2.2 WPA
Cipher Type: WRT-415 supports two cipher types for WPA encryption: TKIP and AES. The wireless
stations must use the same cipher type to build the connection.
RADIUS Server 1: Enter the IP address, communicate port number, and shared secret key of your
primary RADIUS server.
RADIUS Server 2: Enter the IP address, communicate port number, and shared secret key of your
secondary RADIUS server.
Note: As soon as RADIUS authentication is enabled, all the wireless client stations that are
connected to the Router currently will be disconnected. The wireless clients must be
configured manually to authenticate themselves with the RADIUS server to be reconnected.
If WPA-PSK is selected, the screen appears as below. Please enter a hard-to-guess passphrase
(between 8 and 63 characters) in the field.
- 17 -
Page 24

3.3.2.3 WPA2
Cipher Type: WRT-415 supports two cipher types for WPA2 encryption: TKIP and AES. The wireless
stations must use the same cipher type to build the connection.
RADIUS Server 1: Enter the IP address, communicate port number, and shared secret key of your
- 18 -
Page 25
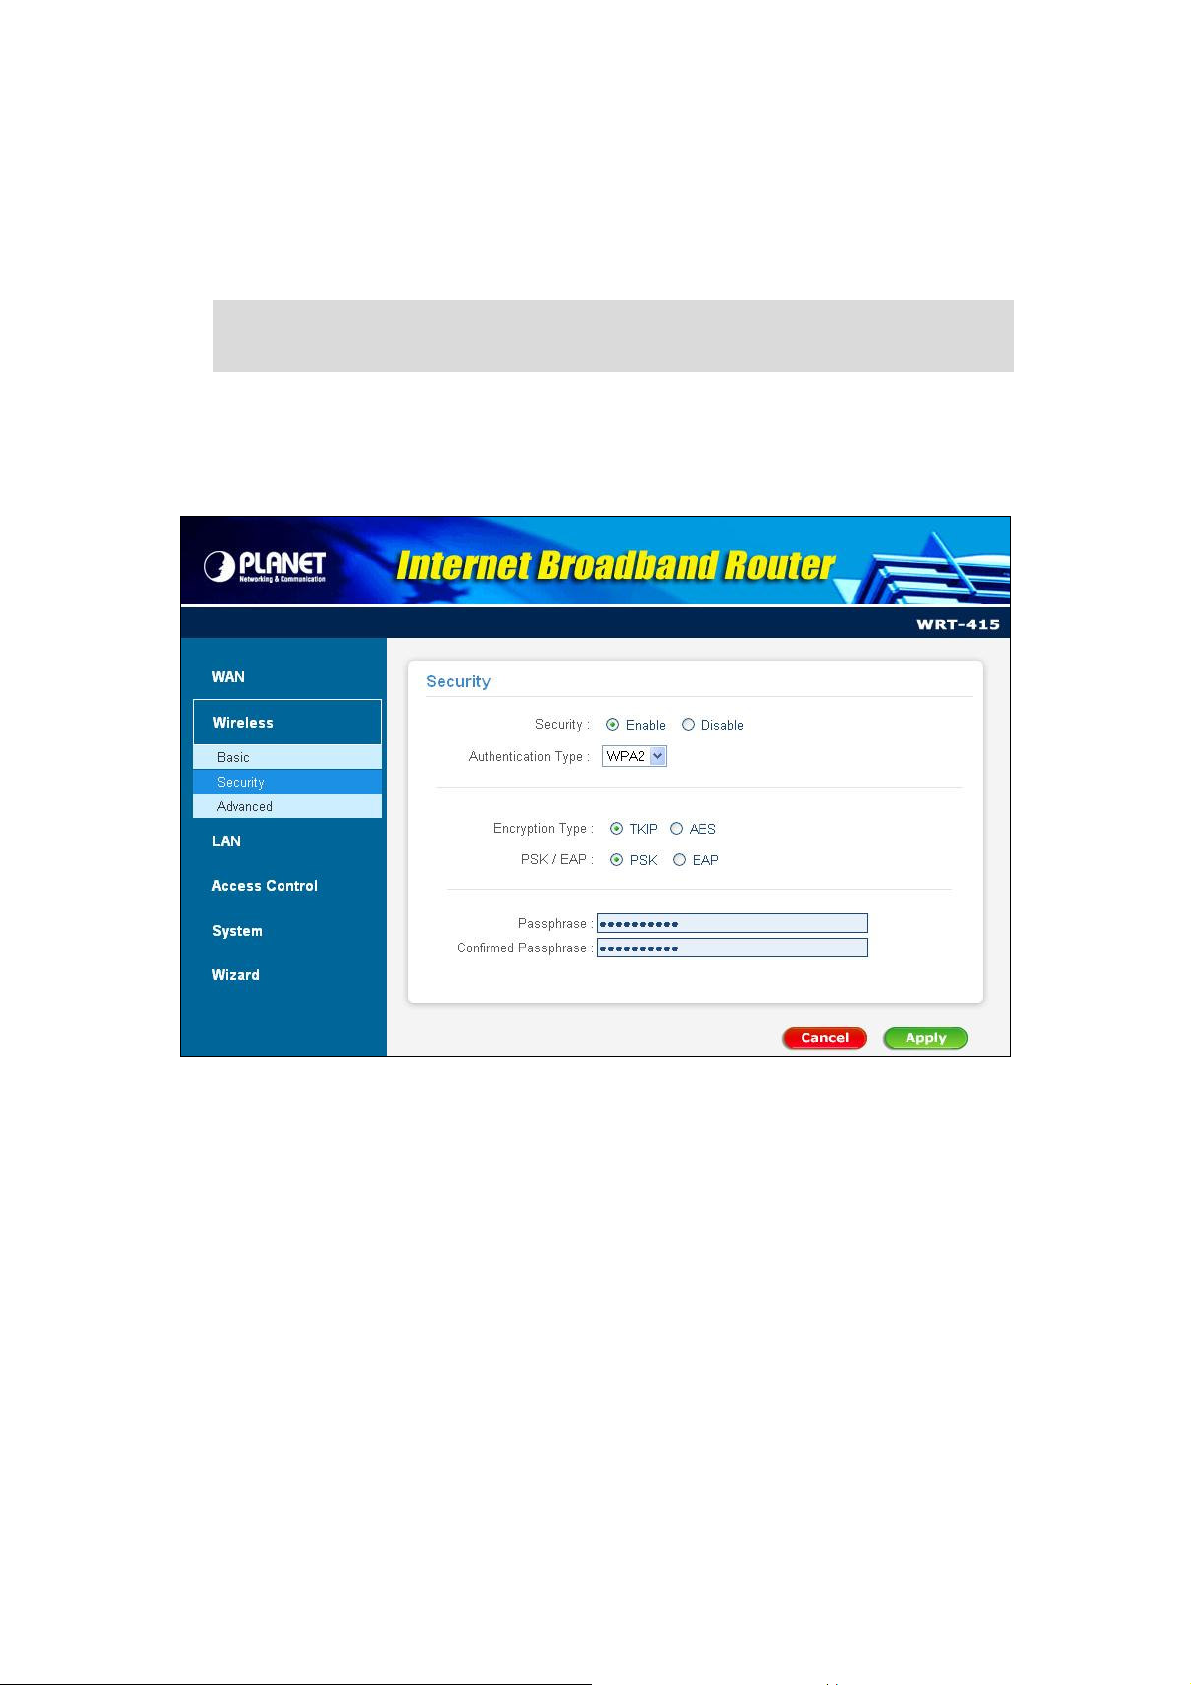
primary RADIUS server.
RADIUS Server 2: Enter the IP address, communicate port number, and shared secret key of your
secondary RADIUS server.
Note: As soon as RADIUS authentication is enabled, all the wireless client stations that are
connected to the Router currently will be disconnected. The wireless clients must be
configured manually to authenticate themselves with the RADIUS server to be reconnected.
If WPA2-PSK is selected, the screen appears as below. Please enter a hard-to-guess passphrase
(between 8 and 63 characters) in the field.
- 19 -
Page 26

3.3.3 Advanced
This screen enables you to configure advanced wireless functions.
Beacon Interval: Type the beacon interval in the field. You can specify a value from 1 to 1000. The
default beacon interval is 100.
RTS Threshold: Type the RTS (Request-To-Send) threshold in the field. This value stabilizes data flow.
If data flow is irregular, choose values between 256 and 2432 until data flow is normalized.
Fragmentation Threshold: Type the fragmentation threshold in the field. If packet transfer error rates
are high, choose values between 256 and 2346 until packet transfer rates are minimized. Please note
that setting the fragmentation threshold value may diminish system performance.
DTIM Interval: Type a DTIM (Delivery Traffic Indication Message) interval in the field. You can specify a
value between 1 and 255. The default value is 3.
TX Rates (MBps): Select one of the wireless communications transfer rates, based upon the speed of
wireless adapters connected to the WLAN.
Antenna Transmit Power(dB): Adjust the power of the antenna transmission by selecting from the drop
down list: full, half (-3dB), quarter (-6dB), eighth (-9dB) or min.
- 20 -
Page 27

3.4 LAN
3.4.1 Basic
This page leads to set LAN port properties, such as the host name, IP address, and subnet mask.
Host Name: Type the host name in the text box. The host name is required by some ISPs. The default
host name is "Wireless Router."
IP Address: This is the IP address of the router. The default IP address is 192.168.1.1.
Subnet Mask: Type the subnet mask for the router in the text box. The default subnet mask is
255.255.255.0.
- 21 -
Page 28

3.4.2 DHCP
You can configure WRT-415 DHCP server function in this screen. When configuration is completed,
please click “Apply” to save and restart WRT-415.
DHCP Server: Enables the DHCP server to allow the router to automatically assign IP addresses to
devices connecting to the WLAN or LAN. DHCP is enabled by default. All DHCP client computers are
listed in the table at the bottom of the page, providing the host name, IP address, and MAC address of
the client.
Lease Time: Select the proper expired duration of the IP leased by DHCP server.
Start IP: Type an IP address to serve as the start of the IP range that DHCP will use to assign IP
addresses to all LAN devices connected to the WRT-415.
End IP: Type an IP address to serve as the end of the IP range that DHCP will use to assign IP
addresses to all LAN devices connected to the WRT-415.
- 22 -
Page 29

3.5 Access Control
3.5.1 Filters
If MAC Filters is selected in the Filter Type field, the screen appears as below.
This screen enables you to allow and deny user access based upon the MAC filters you set.
Disabled MAC Filters: All users are allowed Internet access.
Only allow computers … : All users are denied Internet access except those users listed in MAC table.
Only deny computers … : All users are allowed Internet access except those users listed in MAC table.
MAC Table: Use this field to create a table to which Internet access is denied or allowed. The user
profiles are listed in the table below.
Note: When selecting items in the table at the bottom, click anywhere in the item. The line is
selected, and the fields automatically load the item's parameters, which you can edit.
Name: Type the name of the user.
MAC Address: Type the MAC address of the user's network adapter.
Add: Click to add the user to the table below.
Update: Click to update information for the user, if you have changed any of the fields.
Delete: Select a user from the table and click “Delete” to remove the user profile.
Clear: Click “Clear” to erase all fields and enter new information.
- 23 -
Page 30

If IP Filters is selected in the Filter Type field, the screen appears as below.
This page enables you to define a minimum and maximum IP address range filter; all IP addresses falling
in the range are not allowed Internet access. The IP filter profiles are listed in the table at the bottom of
the page.
Note: When selecting items in the table at the bottom, click anywhere in the item. The line is
selected, and the fields automatically load the item's parameters, which you can edit.
Enable: Click to enable or disable the IP address filter.
Range Start: Type the minimum address for the IP range. IP addresses falling between this value and
the Range End are not allowed to access the Internet.
Range End: Type the minimum address for the IP range. IP addresses falling between this value and the
Range Start are not allowed to access the Internet.
Add: Click to add the IP range to the table at the bottom of the screen.
Update: Click to update information for the range if you have selected a list item and have made
changes.
Delete: Select a list item and click “Delete” to remove the item from the list.
Clear: Click “Clear” to erase all fields and enter new information.
Select Domain Blocking, and the following screen appear.
- 24 -
Page 31

If URL Filters is selected in the Filter Type field, the screen appears as below.
You can block LAN users to access to some web sites by entering a full URL address or just keyword of
the web site.
Note: When selecting items in the table at the bottom, click anywhere in the item. The line is
selected, and the fields automatically load the item's parameters, which you can edit.
Fill in “URL / Keyword” and then click “Add”. You can enter the full URL address or the keyword of the
web site you want to block. If you find any type before adding it and want to retype again, just click it from
the Blocking list and the file will be delete.
Enable / Disable: Enable or Disable the URL blocking function of the WLAN Router.
Add: Click to add the specific URL to the URL blocking list.
Del: Selected a URL from the blocking list then click the Del button to remove the URL from the URL
Blocking list.
If Domain Filters is selected in the Filter Type field, the screen appears as below.
You could specify the domains that allow users to access or deny by clicking one of the two items.
- 25 -
Page 32

Also, add the specified domains in the text box.
Note: When selecting items in the table at the bottom, click anywhere in the item. The line is
selected, and the fields automatically load the item's parameters, which you can edit.
Disable: Disable the Domain Blocking function.
Allow: Allow users to access all domains except “Blocking Domains”.
Deny: Deny users to access all domains except “Permitted Domains”.
Blocked/Permitted Domains: List domains you will Blocked or Permitted.
Apply: Click to add domain to the Blocked/Permitted Domains list.
Del: Select a user from the table at the bottom of the list and click Del to remove the user profile.
If Protocol Filters is selected in the Filter Type field, the screen appears as below.
This page enables you to allow or deny access based upon a communications protocol list you create.
The protocol filter profiles are listed in the table at the bottom of the page.
- 26 -
Page 33

Note: When selecting items in the table at the bottom, click anywhere in the item. The line is
selected, and the fields automatically load the item's parameters, which you can edit.
Protocol Filter: Enables you to allow or deny Internet access to users based upon the communications
protocol of the origin.
Disable List: Select this option to disable Protocol Filter.
Enable List: All protocols in the list are not allowed to connect to the Internet via the LAN. (Create list
items in section under Add Protocol Filter.)
Edit Protocol Filter in List: Use this section to create a profile for the protocol you want to deny Internet
access to.
Enable: Click to enable or disable the protocol filter.
Name: Type a descriptive name for the protocol filter.
Protocol: Select the protocol (TCP, UDP or ICMP) you want to deny Internet access to from the
pull-down list.
Port Range: If you are creating a profile for ICMP, type a minimum and maximum port range in the two
fields.
Add: Click to add the protocol filter to the list at the bottom of the page.
Update: Click to update information for the protocol filter, if you have changed any of the fields.
This page
- 27 -
Page 34

Delete: Select a filter profile from the table at the bottom of the list and click “Delete” to remove the
profile.
New: Click “New” to erase all fields and enter new information.
3.5.2 Virtual Server
This screen enables you to create a virtual server via the WRT-415. If the WRT-415 is set as a virtual
server, remote users requesting Web or FTP services through the WAN are directed to local servers in
the LAN. The WRT-415 redirects the request via the protocol and port numbers to the correct LAN server.
The Virtual Sever profiles are listed in the table at the bottom of the page.
Enable: Click to enable or disable the virtual server.
Name: Type a descriptive name for the virtual server.
Protocol: Select the protocol (TCP or UDP) you want to use for the virtual server.
Private Port: Type the port number of the computer on the LAN that is being used to act as a virtual
server.
Public Port: Type the port number on the WAN that will be used to provide access to the virtual server.
LAN Server: Type the LAN IP address that will be assigned to the virtual server.
Add: Click to add the virtual server to the table at the bottom of the screen.
- 28 -
Page 35

Update: Click to update information for the virtual server if you have selected a list item and have made
changes.
Delete: Select a list item and click “Delete” to remove the item from the list.
Clear: Click “Clear” to erase all fields and enter new information.
3.5.3 Special AP
This screen allows you to specify special applications, such as games, that require multiple connections
that are inhibited by NAT.
The special applications profiles are listed in the table at the bottom of the page.
Enable: Click to enable or disable the application profile. When enabled, users will be able to connect to
the application via the WRT-415 WAN connection. Click Disabled on a profile to prevent users from
accessing the application on the WAN.
Name: Type a descriptive name for the application.
Trigger: Defines the outgoing communication that determines whether the user has legitimate access to
the application.
Protocol: Select the protocol (TCP, UDP or ICMP) that can be used to access the application.
- 29 -
Page 36

Port Range: Type the port range that can be used to access the application in the fields.
Incoming: Defines which incoming communications users are permitted to connect with.
Protocol: Select the protocol (TCP, UDP or ICMP) that can be used by the incoming communication.
Port: Type the port number that can be used for the incoming communication.
Add: Click to add the special application profile to the table at the bottom of the screen.
Update: Click to update information for the special application if you have selected a list item and have
made changes.
Delete: Select a list item and click “Delete” to remove the item from the list.
Clear: Click “Clear” to erase all fields and enter new information.
3.5.4 DMZ
This screen enables you to create a DMZ for those computers that cannot access Internet applications
properly through the WRT-415 and associated security settings.
Enable: Click to enable or disable the DMZ.
DMZ Host IP: Type a host IP address for the DMZ. The computer with this IP address acts as a DMZ
host with unlimited Internet access.
Apply: Click to save the settings.
- 30 -
Page 37

Note: Any clients added to the DMZ exposes the clients to security risks such as viruses and
unauthorized access.
3.5.5 Firewall Rule
This screen enables you to set up the firewall. The WRT-415 provides basic firewall functions, by filtering
all the packets that enter the WRT-415 using a set of rules. The rules are in an order sequence list: the
lower the rule number is, the higher the priority the rule has.
The rule profiles are listed in the table at the bottom of the page.
Enable: Click to enable or disable the firewall rule profile.
Name: Type a descriptive name for the firewall rule profile.
Action: Select whether to allow or deny packets that conform to the rule.
Inactive Timeout: Type the timeout period in seconds in this field. If the network is inactive for the
specified duration, the router refuses the incoming packet.
Source: Defines the source of the incoming packet that the rule is applied to.
Interface: Select which interface (WAN or LAN) the rule is applied to.
IP Range Start: Type the start IP address that the rule is applied to.
- 31 -
Page 38

IP Range End: Type the end IP address that the rule is applied to.
Destination: Defines the destination of the incoming packet that the rule is applied to.
Interface: Select which interface (WAN or LAN) the rule is applied to.
IP Range Start: Type the start IP address that the rule is applied to.
IP Range End: Type the end IP address that the rule is applied to.
Protocol: Select the protocol (TCP, UDP or ICMP) of the destination.
Port Range: Select the port range.
Add: Click to add the rule profile to the table at the bottom of the screen.
Update: Click to update information for the rule if you have selected a list item and changed.
Delete: Select a list item and click “Delete” to remove the item from the list.
New: Click “New” to erase all fields and enter new information.
Priority Up: Select a rule from the list and click “Priority Up” to increase the priority of the rule.
Priority Down: Select a rule from the list and click “Priority Down” to decrease the priority of the rule.
Update Priority: After increasing or decreasing the priority of a rule, click “Update Priority” to save the
changes.
3.6 System
3.6.1 Password
You can change the Administrator and User’s password in this screen. These passwords are used to gain
access to the router interface. When you login with user name “User”, you don’t have permission to
configure WRT-415.
- 32 -
Page 39

Administrator: Type the password the Administrator will use to login to the system. The password must
be typed again for confirmation.
User: Users can type a password to be used for logging in to the system. The password must be typed
again for confirmation.
3.6.2 Time
This screen enables you to set the time and date for the router's real time clock, select your time zone,
specify an NTP server, and enable or disable daylight saving.
- 33 -
Page 40

Local Time: Displays the local time and date.
Time Zone: Select your time zone from the pull-down list.
NTP Server: Type the NTP server IP address in the field to enable the WRT-415 to automatically
synchronize the time with Internet NTP server.
Set the Time: Select the date and time from the pull-down lists, and click “Set Time” to set the
WRT-415's internal clock to the correct date and time.
Daylight Saving: Enables you to enable or disable daylight saving time. When enabled, select the start
and end date for daylight saving time.
- 34 -
Page 41

3.6.3 Device Information
This screen enables you to view the router LAN, wireless LAN, and WAN configuration.
WAN: This field displays the WRT-415 WAN interface MAC address, DHCP client status, IP address,
subnet mask, default gateway and DNS. Click “DHCP Release” to release IP addresses get from ISP for
the WAN port. Click “DHCP Renew” to get a new IP addresses from ISP for the WAN port.
Wireless: Displays the WRT-415 wireless connection information, including the WRT-415 wireless
interface MAC address, SSID status, which channel is being used and whether WEP is enabled or not.
LAN: This field displays the WRT-415 LAN interface MAC address, IP address, subnet mask, and DHCP
server status. Click “DHCP Table” to view a list of client stations currently connected to the WRT-415
LAN interface.
- 35 -
Page 42

3.6.4 Log
This screen will show you a running log of system statistics, events and activities. The log displays up to
200 entries. Older entries are overwritten by new entries. You can save logs via the Log Settings option
-> “Send to”. The Log screen commands and information meaning are as follows
First Page: View the first page of the log message list.
Last Page: View the last page of the log message list.
Previous Page: View the page just before the current page.
Next Page: View the page just after the current page.
Clear Log: Delete the contents of the log and begin a new log.
Refresh: Renew log statistics.
Time: Displays the time and date that the log entry was created.
Message: Displays summary information about the log entry.
Source: Displays the source of the communication.
Destination: Displays the destination of the communication.
Note: Displays the IP address of the communication.
- 36 -
Page 43

3.6.5 Log Settings
This screen allows you to set WRT-415 logging parameters.
SMTP Server: Type the SMTP server address for the email that the log will be sent to in the next field.
Send to: Type an email address for the log to be sent to. Click “Email Log Now” to send the current log
immediately.
Syslog Server: Type the IP address of the Syslog Server if you want the WRT-415 to listen and receive
incoming SysLog messages.
Log Type: Select what items will be included in the log:
System Activity: Displays information related to WRT-415 operation.
Attacks: Displays information about any malicious activity on the network.
Dropped Packets: Displays information about packets that have not been transferred successfully.
Notice: Displays important notices by the system administrator.
- 37 -
Page 44

3.6.6 Statistic
This screen displays a table that shows the rate of packet transmission via the WRT-415 LAN, WLAN and
WAN ports (in bytes per second).
Click “Reset” to erase all statistics and begin logging statistics again.
- 38 -
Page 45

3.6.7 Restart
Click “Restart” to restart the system in the event the system is not performing correctly.
- 39 -
Page 46

3.6.8 Firmware
You can upgrade your WRT-415 with new firmware in this screen. Please follow these instructions:
1. Download the latest firmware from PLANET's website, and save it to your disk.
2. Click “Browse” and find out the location of the downloaded file.
3. Select the file and click “Upgrade” to update WRT-415 to the latest firmware.
Please follow the below instructions:
Download the latest firmware from the manufacturer's Web site, and save it to disk.
Click “Browse” and go to the location of the downloaded firmware file.
Select the file and click “Upgrade” to update the firmware to the latest release.
- 40 -
Page 47

3.6.9 Configuration
You can upgrade your WRT-415 with new firmware in this screen. Please follow these instructions:
1. Download the latest firmware from PLANET's website, and save it to your disk.
2. Click “Browse” and find out the location of the downloaded file.
3. Select the file and click “Upgrade” to update WRT-415 to the latest firmware.
3.6.10 UPnP
You can enable or disable your WRT-415 UPnP function
UPnP is more than just a simple extension of the Plug and Play peripheral model. It is designed to
support zero-configuration, "invisible" networking, and automatic discovery for a breadth of device
categories from a wide range of vendors.
With UPnP, a device can dynamically join a network, obtain an IP address, convey its capabilities, and
learn about the presence and capabilities of other devices-all automatically; truly enabling zero
configuration networks. Devices can subsequently communicate with each other directly; thereby further
enabling peer to peer networking.
.
- 41 -
Page 48

3.6.11 Ping Test
You can ping an IP address or host which is present on the Internet. Type the IP address or host name in
the field and click Ping. The results will be shown in short time.
- 42 -
Page 49

3.6.12 Remote Management
This screen enables you to set up remote management. Using remote management, the WRT-415 can
be configured through the WAN via a Web browser. A user name and password are required to perform
remote management.
HTTP: Enables you to set up HTTP access for remote management.
Enable: Click to enable or disable HTTP access for remote management.
Remote IP Range: Type the range of IP addresses that can be used for remote access.
Allows to Ping WAN Port: This function allows remote users to ping WRT-415 WAN port IP address.
Enable: Click to enable or disable WAN port pinged function.
Remote IP Range: Type the range of IP addresses that can ping from remote locations.
Gaming mode: If you are experiencing difficulties when playing online games or even certain
applications that use voice data, you may need to enable Gaming Mode for these applications to work
correctly. When not playing games or using voice applications, it is suggested to disable Gaming Mode.
- 43 -
Page 50

Appendix A TCP/IP Settings for PC
The network TCP/IP settings differ based on the computer’s operating system
(Win95/98/ME/NT/2000/XP) and are as follows.
Windows 95/98/ME
1. Click on the “Network neighborhood” icon found on the desktop.
2. Click the right mouse button and a context menu will be show.
3. Select “Properties” to enter the TCP/IP setting screen.
4. Select “Obtain an IP address automatically” on the “IP address” field.
5. Select “Disable DNS” in the “DNS” field.
- 44 -
Page 51

6. Select “None” for the “Gateway address” field.
Windows 2000
Double click on the “My computer” icon on the desktop. When “My computer” window opens, open the
“Control panel” and then open the “Network dialup connection” applet. Double click on the “Local area
network connection” icon. Select “Properties” to enter the TCP/IP setting window.
1. In the “Local area network status” window, click on “Properties.”
2. In the “Local area network connection” window, first select TCP/IP setting and then select
“Properties.”
3. Set both “IP address” and “DNS” to Automatic configuration.
- 45 -
Page 52

Windows XP
Point the cursor and click the right button on the “My Network Place” icon. Select “properties” to enter the
TCP/IP setting window.
1. Set “IP address” to “Obtain an IP address automatically.”
2. Set “DNS” to “Obtain DNS server address automatically.”
- 46 -
 Loading...