

Page 1
150Mbps 802.11n Wireless USB Adapter
WNL-U554M
Page 2

Copyright
Copyright 2013 by PLANET Technology Corp. All rights reserved. No part of this publication may be
reproduced, transmitted, transcribed, stored in a retrieval system, or translated into any language or
computer language, in any form or by any means, electronic, mechanical, magnetic, optical, chemical,
manual or otherwise, without the prior written permission of PLANET.
PLANET makes no representations or warranties, either expressed or implied, with respect to the
contents hereof and specifically disclaims any warranties, merchantability or fitness for any particular
purpose. Any software described in this manual is sold or licensed "as is". Should the programs prove
defective following their purchase, the buyer (and not PLANET, its distributor, or its dealer) assumes
the entire cost of all necessary servicing, repair, and any incidental or consequential damages
resulting from any defect in the software. Further, PLANET reserves the right to revise this publication
and to make changes from time to time in the contents hereof without obligation to notify any person of
such revision or changes.
All brand and product names mentioned in this manual are trademarks and/or registered trademarks
of their respective holders.
Federal Communication Commission Interference Statement
This equipment has been tested and found to comply with the limits for a Class B digital device,
pursuant to Part 15 of FCC Rules. These limits are designed to provide reasonable protection against
harmful interference in a residential installation. This equipment generates, uses, and can radiate radio
frequency energy and, if not installed and used in accordance with the instructions, may cause harmful
interference to radio communications. However, there is no guarantee that interference will not occur
in a particular installation. If this equipment does cause harmful interference to radio or television
reception, which can be determined by turning the equipment off and on, the user is encouraged to try
to correct the interference by one or more of the following measures:
1. Reorient or relocate the receiving antenna.
2. Increase the separation between the equipment and receiver.
3. Connect the equipment into an outlet on a circuit different from that to which the receiver is
connected.
4. Consult the dealer or an experienced radio technician for help.
FCC Caution
To assure continued compliance. (Example - use only shielded interface cables when connecting to
computer or peripheral devices). Any changes or modifications not expressly approved by the party
responsible for compliance could void the user’s authority to operate the equipment.
This device complies with Part 15 of the FCC Rules. Operation is subject to the Following two
conditions: (1) This device may not cause harmful interference, and (2) this Device must accept any
interference received, including interference that may cause undesired operation.
Federal Communication Commission (FCC) Radiation Exposure
Statement
This equipment complies with FCC radiation exposure set forth for an uncontrolled environment. In
order to avoid the possibility of exceeding the FCC radio frequency exposure limits, human proximity
to the antenna shall not be less than 20 cm (8 inches) during normal operation.
2
Page 3

CE mark Warning
This is a class B device, in a domestic environment; this product may cause radio interference, in
which case the user may be required to take adequate measures.
R&TTE Compliance Statement
This equipment complies with all the requirements of DIRECTIVE 1999/5/CE OF THE EUROPEAN
PARLIAMENT AND THE COUNCIL OF 9 March 1999 on radio equipment and telecommunication
terminal Equipment and the mutual recognition of their conformity (R&TTE). The R&TTE Directive
repeals and replaces in the directive 98/13/EEC (Telecommunications Terminal Equipment and
Satellite Earth Station Equipment) As of April 8, 2000.
Safety
This equipment is designed with the utmost care for the safety of those who install and use it. However,
special attention must be paid to the dangers of electric shock and static electricity when working with
electrical equipment. All guidelines of this and of the computer manufacture must therefore be allowed
at all times to ensure the safe use of the equipment.
EU Countries Intended for Use
The ETSI version of this device is intended for home and office use in Austria Belgium, Denmark,
Finland, and France (with Frequency channel restrictions). Germany, Greece, Ireland, Italy,
Luxembourg .The Netherlands, Portugal, Spain, Sweden and United Kingdom.
The ETSI version of this device is also authorized for use in EFTA member states Iceland,
Liechtenstein, Norway and Switzerland.
WEEE regulation
To avoid the potential effects on the environment and human health as a result of the
presence of hazardous substances in electrical and electronic equipment, end users of
electrical and electronic equipment should understand the meaning of the crossed-out
wheeled bin symbol. Do not dispose of WEEE as unsorted municipal waste and have to
collect such WEEE separately.
Revi
sion
User’s Manual for PLANET 150Mbps 802.11n Wireless USB Adapter
Model: WNL-U554M
Rev: EM-WNLU554M_v2.01 (January, 2013)
Part No. 2081-E23170-000
3
Page 4

CONTENTS
Chapter 1. PRODUCT INTRODUCTION ................................................................................................6
1.1 Package contents..................................................................................................................6
1.2 Product Description ...............................................................................................................6
1.3 Product Features................................................................................................................ 10
1.4 Hardware Description......................................................................................................... 10
1.5 Software Description .......................................................................................................... 10
1.5.1 Tray Icon ................................................................................................................ 10
1.5.2 Main Screen ............................................................................................................11
Chapter 2. INSTALLATION.................................................................................................................. 15
2.1 Microsoft Windows Driver Installation................................................................................. 15
2.2 MAC OS X 10.x Driver Installation ..................................................................................... 19
2.3 Linux Driver Installation ...................................................................................................... 25
Chapter 3. CONNECTING TO WIRELESS NETWORK ...................................................................... 26
3.1 PLANET 11n USB Wireless LAN Utility.............................................................................. 26
3.2 Windows Zero Configuration.............................................................................................. 28
3.2.1 Windows XP - Use Windows Zero Configure ........................................................ 28
3.2.2 Windows 7 - Use Windows 7 WLAN AutoConfig ................................................... 32
Chapter 4. PLANET USB WIRELESS LAN UTILITY.......................................................................... 35
4.1 Connection Profile Management........................................................................................ 35
4.1.1 Add a new profile ................................................................................................... 35
4.1.2 Remove an existing profile..................................................................................... 38
4.1.3 Edit an existing profile............................................................................................ 39
4.1.4 Set as the default profile ........................................................................................ 39
4.2 General Information, Status, and Network Statistics.......................................................... 40
4.2.1 General Information ............................................................................................... 40
4.2.2 Network Transmission Statistics ............................................................................ 41
4.2.3 About / Status......................................................................................................... 41
4.3 Advanced Settings.............................................................................................................. 42
4.4 Wi-Fi Protected Setup (WPS)............................................................................................. 43
4.4.1 Push Button Config (PBC) ..................................................................................... 44
4.4.2 PIN Input Config (PIN) ........................................................................................... 45
Chapter 5. SOFT ACCESS POINT MODE .......................................................................................... 48
5.1 Switch between Access Point Mode and Station Mode ..................................................... 49
5.1.1 Configure SSID and Channel................................................................................. 50
4
Page 5

5.1.2 Soft Access Point Security..................................................................................... 52
5.2 Advanced Settings.............................................................................................................. 54
5.3 Access Control List............................................................................................................. 55
5.4 Connected Devices ............................................................................................................ 56
5.5 About (AP Mode)................................................................................................................ 57
Appendix: Specifications................................................................................................................... 59
Appendix: Troubleshooting............................................................................................................... 61
Appendix: Glossary............................................................................................................................ 62
Appendix: FAQ.................................................................................................................................... 67
5
Page 6
Chapter 1. PRODUCT INTRODUCTION
1.1 Package contents
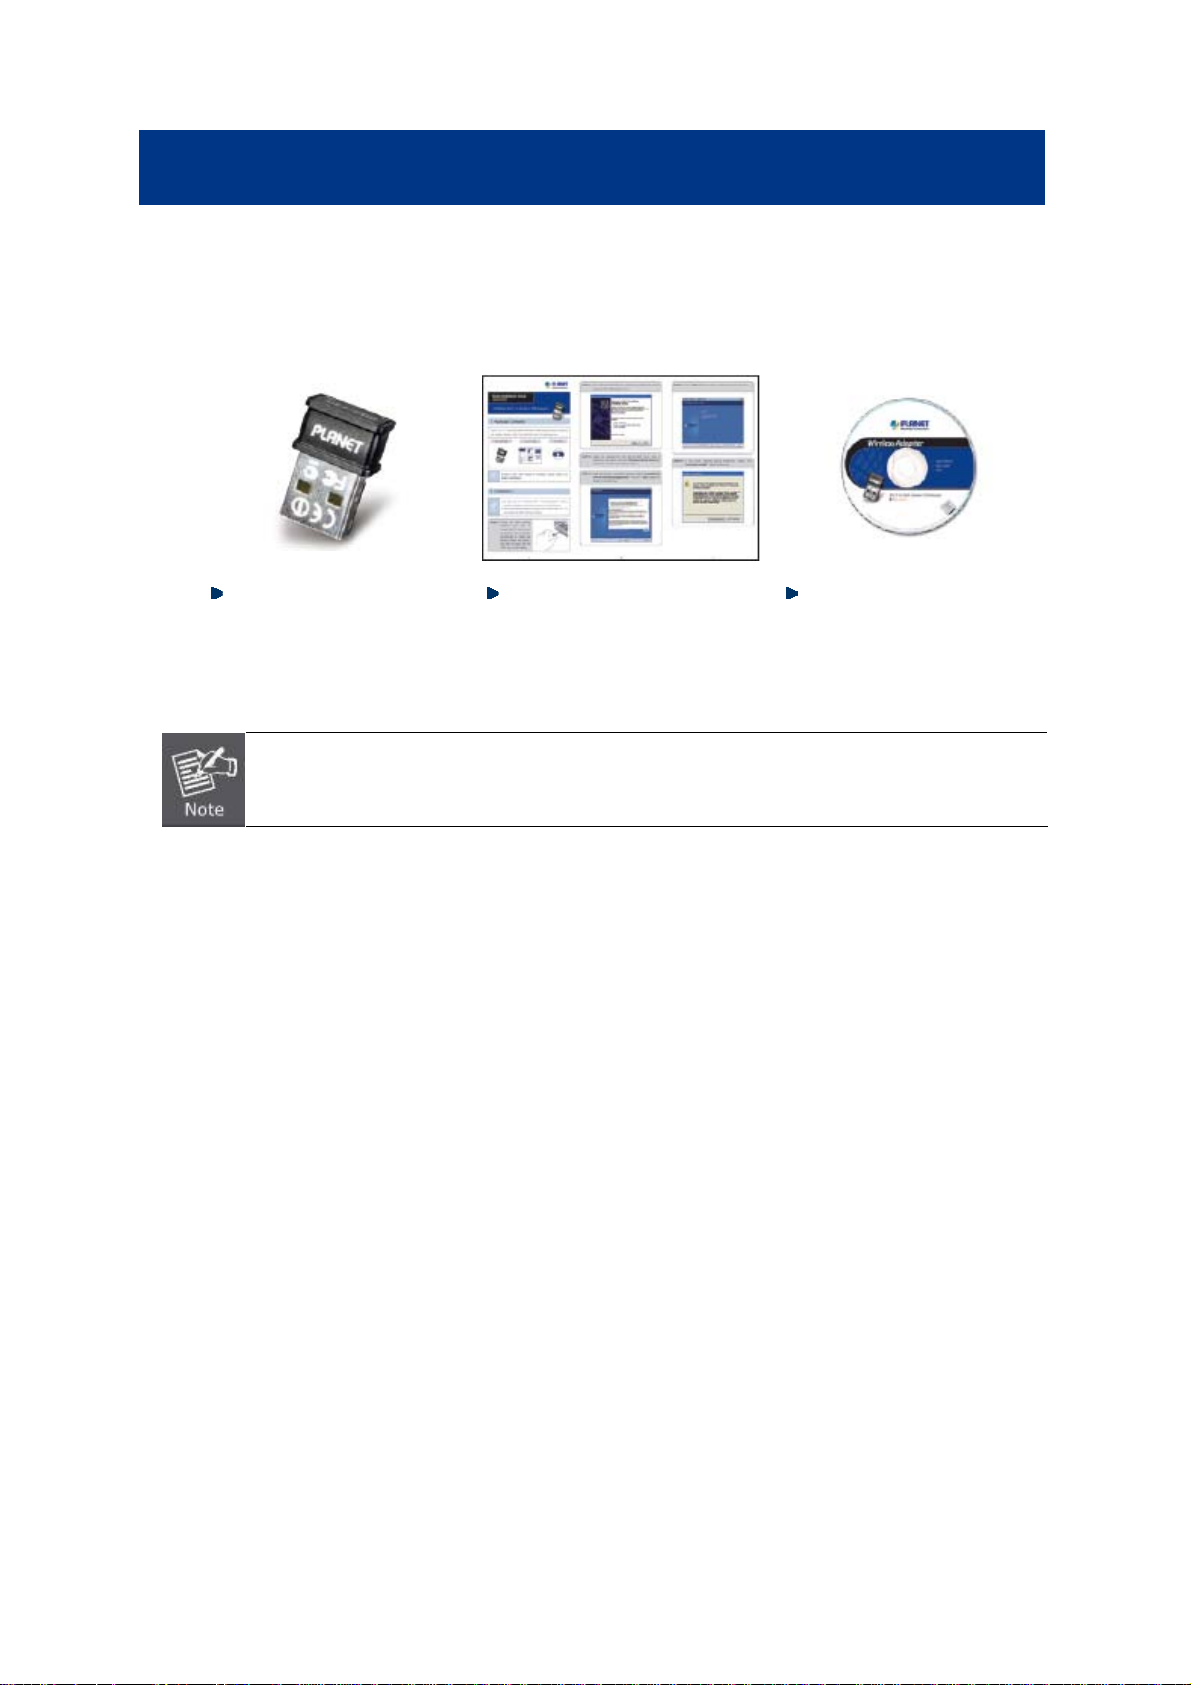
The following items should be contained in the package:
WNL-U554M(150Mbps
802.11n Wireless
Micro-Size USB adapter)
If there is any item missed or damaged, please contact the seller immediately.
Quick Installation Guide CD (includes
driver/utility/user’s
manual)
1.2 Product Description
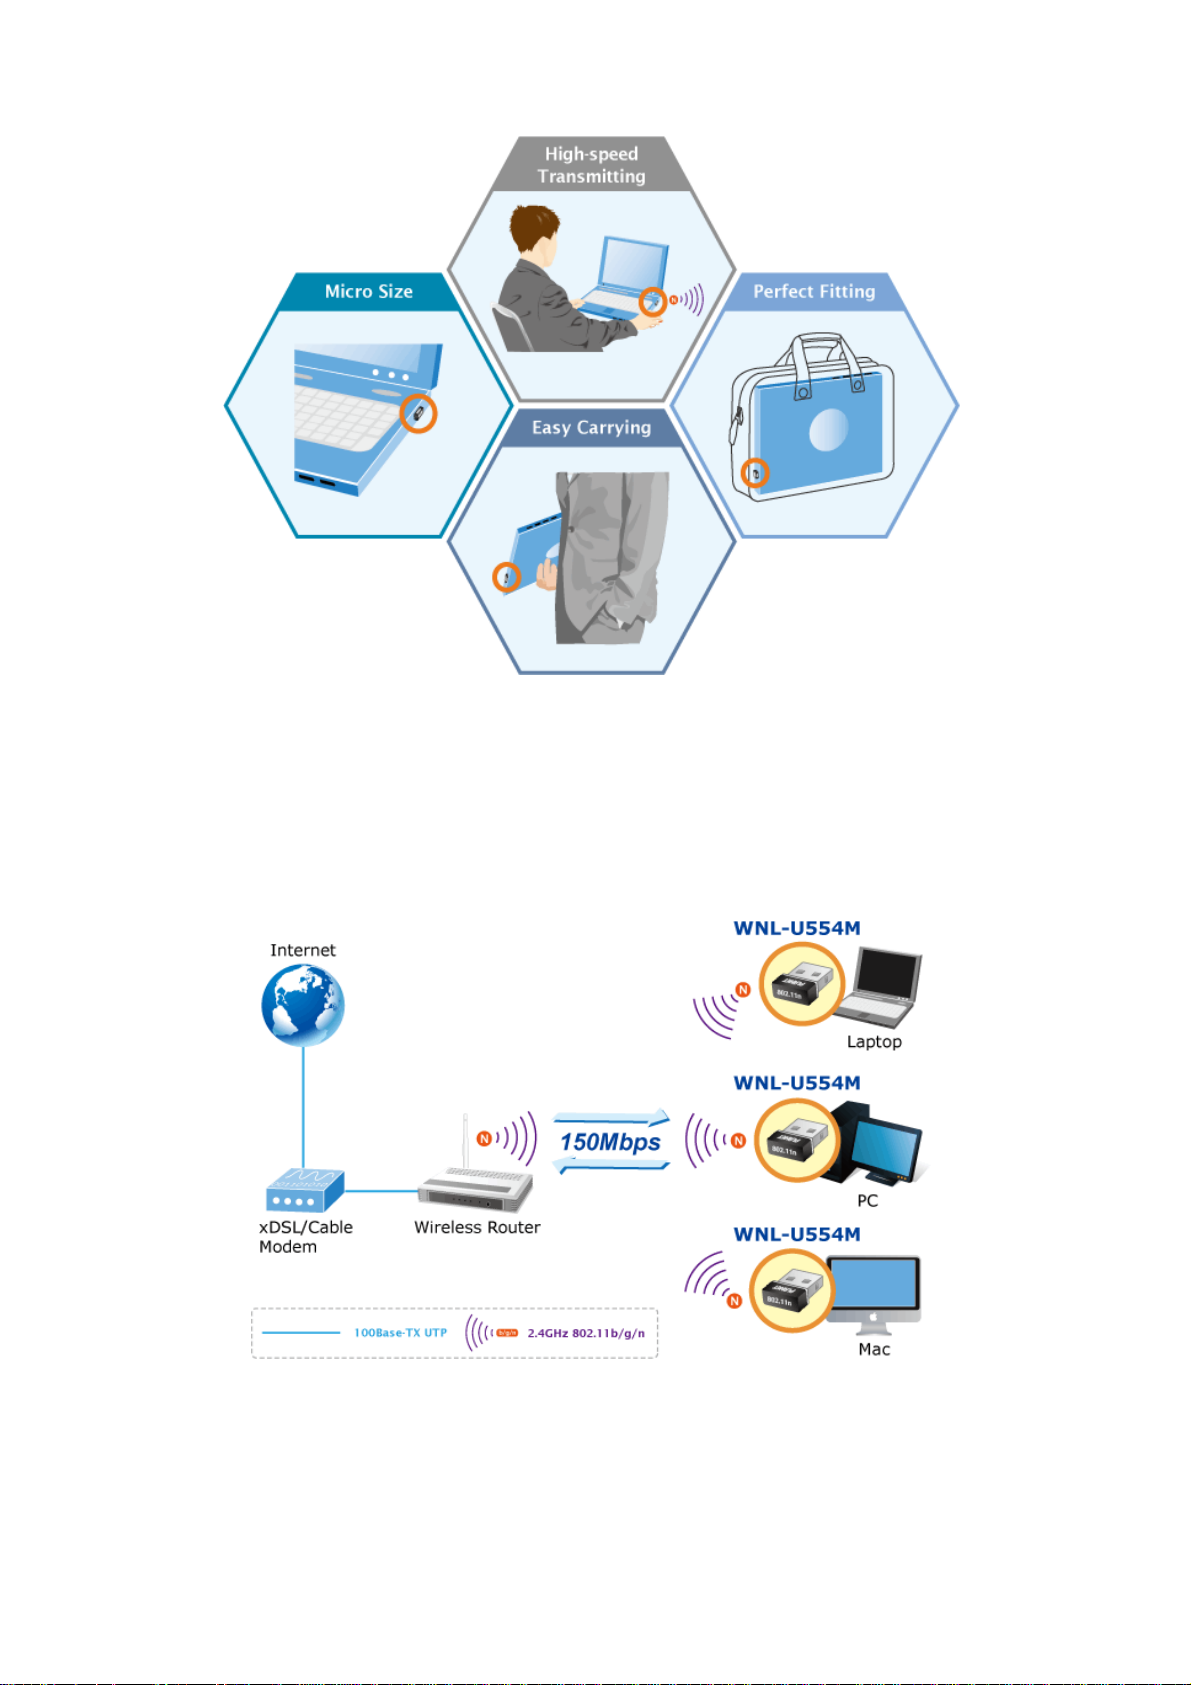
Ultra Mini Size Portable USB Adapter Boost 11n Performance
The PLANET WNL-U554M is specially designed for users who need high mobility and provides
150Mbps 802.11n high speed wireless transmission. The ultra mini size compact design of
WNL-U554M is convenient to carry for all mobile users. Users will not need to remove it from the
laptop anymore, no matter operating, moving, or even put the laptop back to the briefcase. It is just like
a part of the laptop or PC and hidden very well once it is plugged into USB port.
6
Page 7
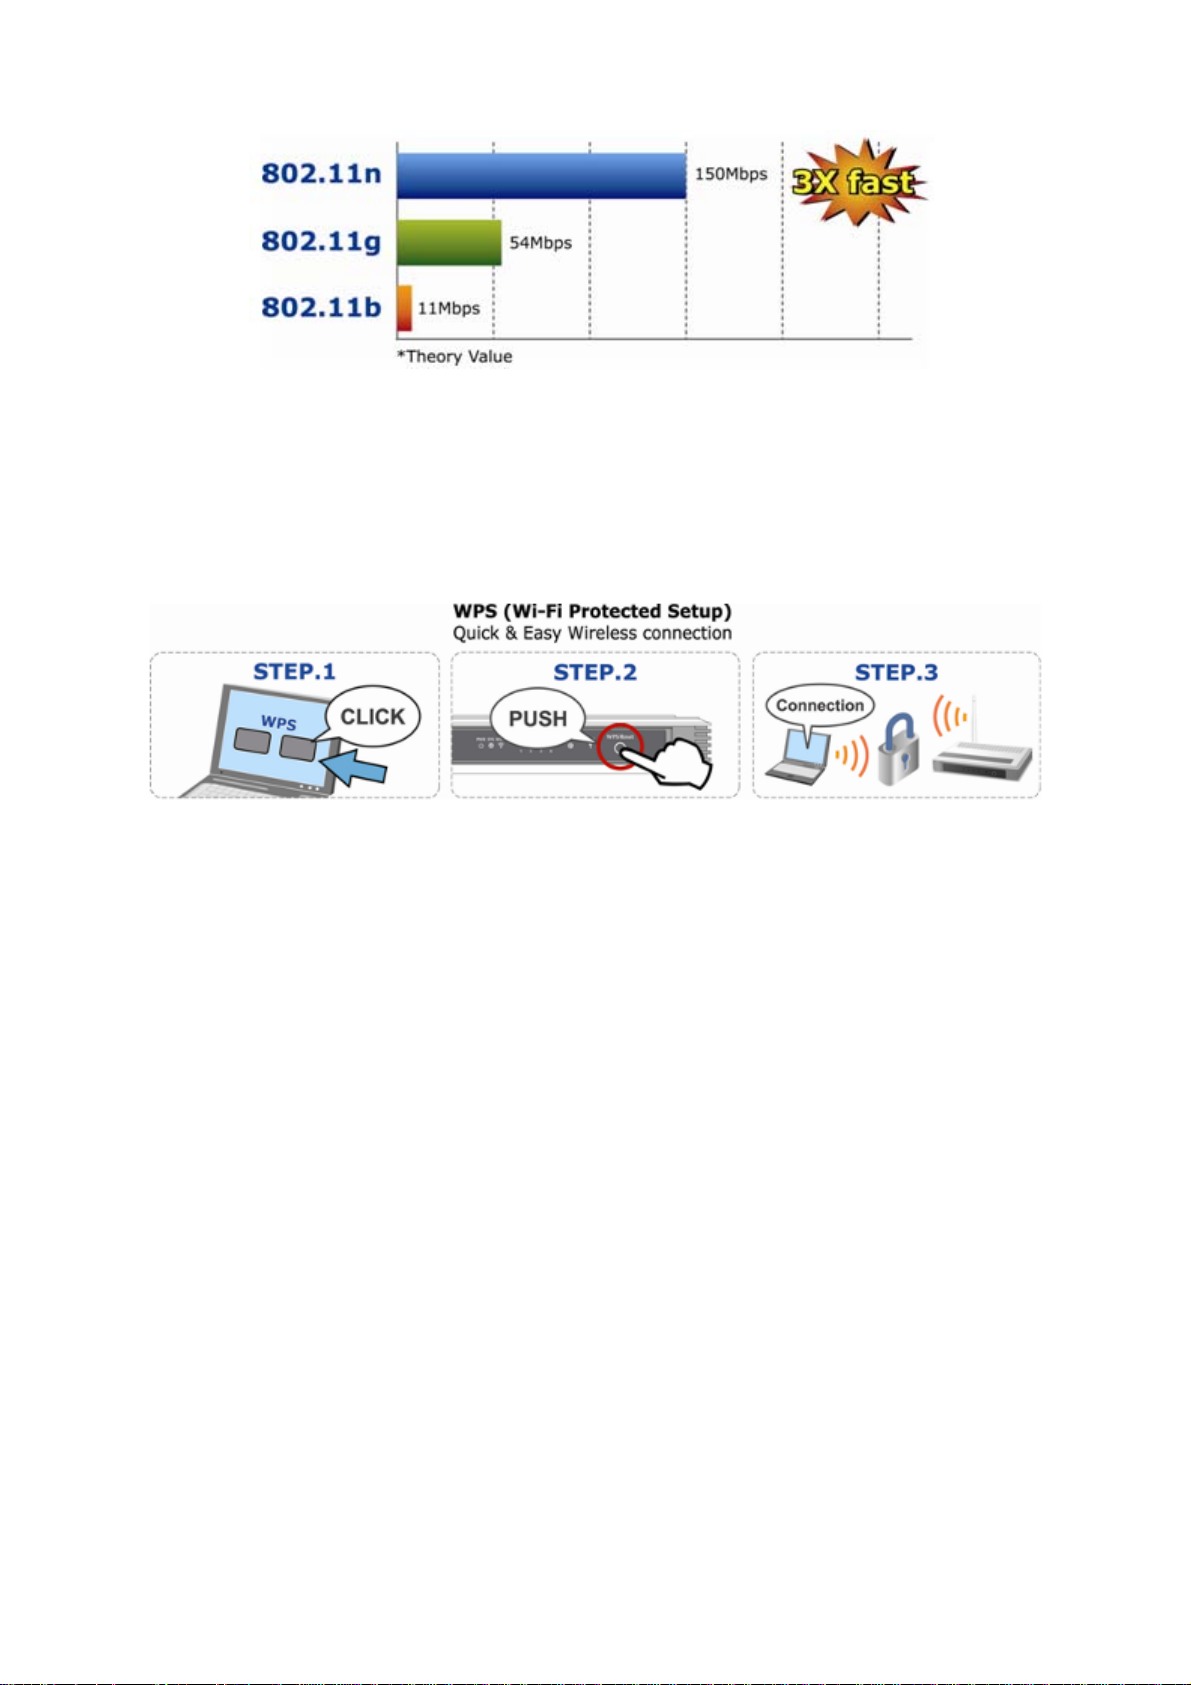
High Speed 802.11n Wireless Experience
The WNL-U554M offers a reliable and cost effective wireless extending solution. It adopts IEEE
802.11n technology and is backward compatible with IEEE 802.11b and 802.11g. The WNL-U554M
supports USB 2.0 interface that integrates with one transmit channel and one concurrent receive
channel to enable the speed up to 150Mbps for both data upload and download.
7
Page 8
Advanced Wireless Security
The WNL-U554M provides advanced security features including 64/128-bit WEP, WPA / WPA2 and
WPA-PSK / WPA2-PSK with TKIP/AES encryption. Furthermore, in order to simplify the security
configurations, WPS (Wi-Fi Protected Setup) function is included to offer a convenient and fast
connection method for users as well.
Multiple OS Compliant
The WNL-U554M supports most popular operating systems including Windows 2000, XP, Vista, Win7,
Linux, and MAC OS X. With high speed capability, users can have higher wireless transmission speed
anywhere and anytime.
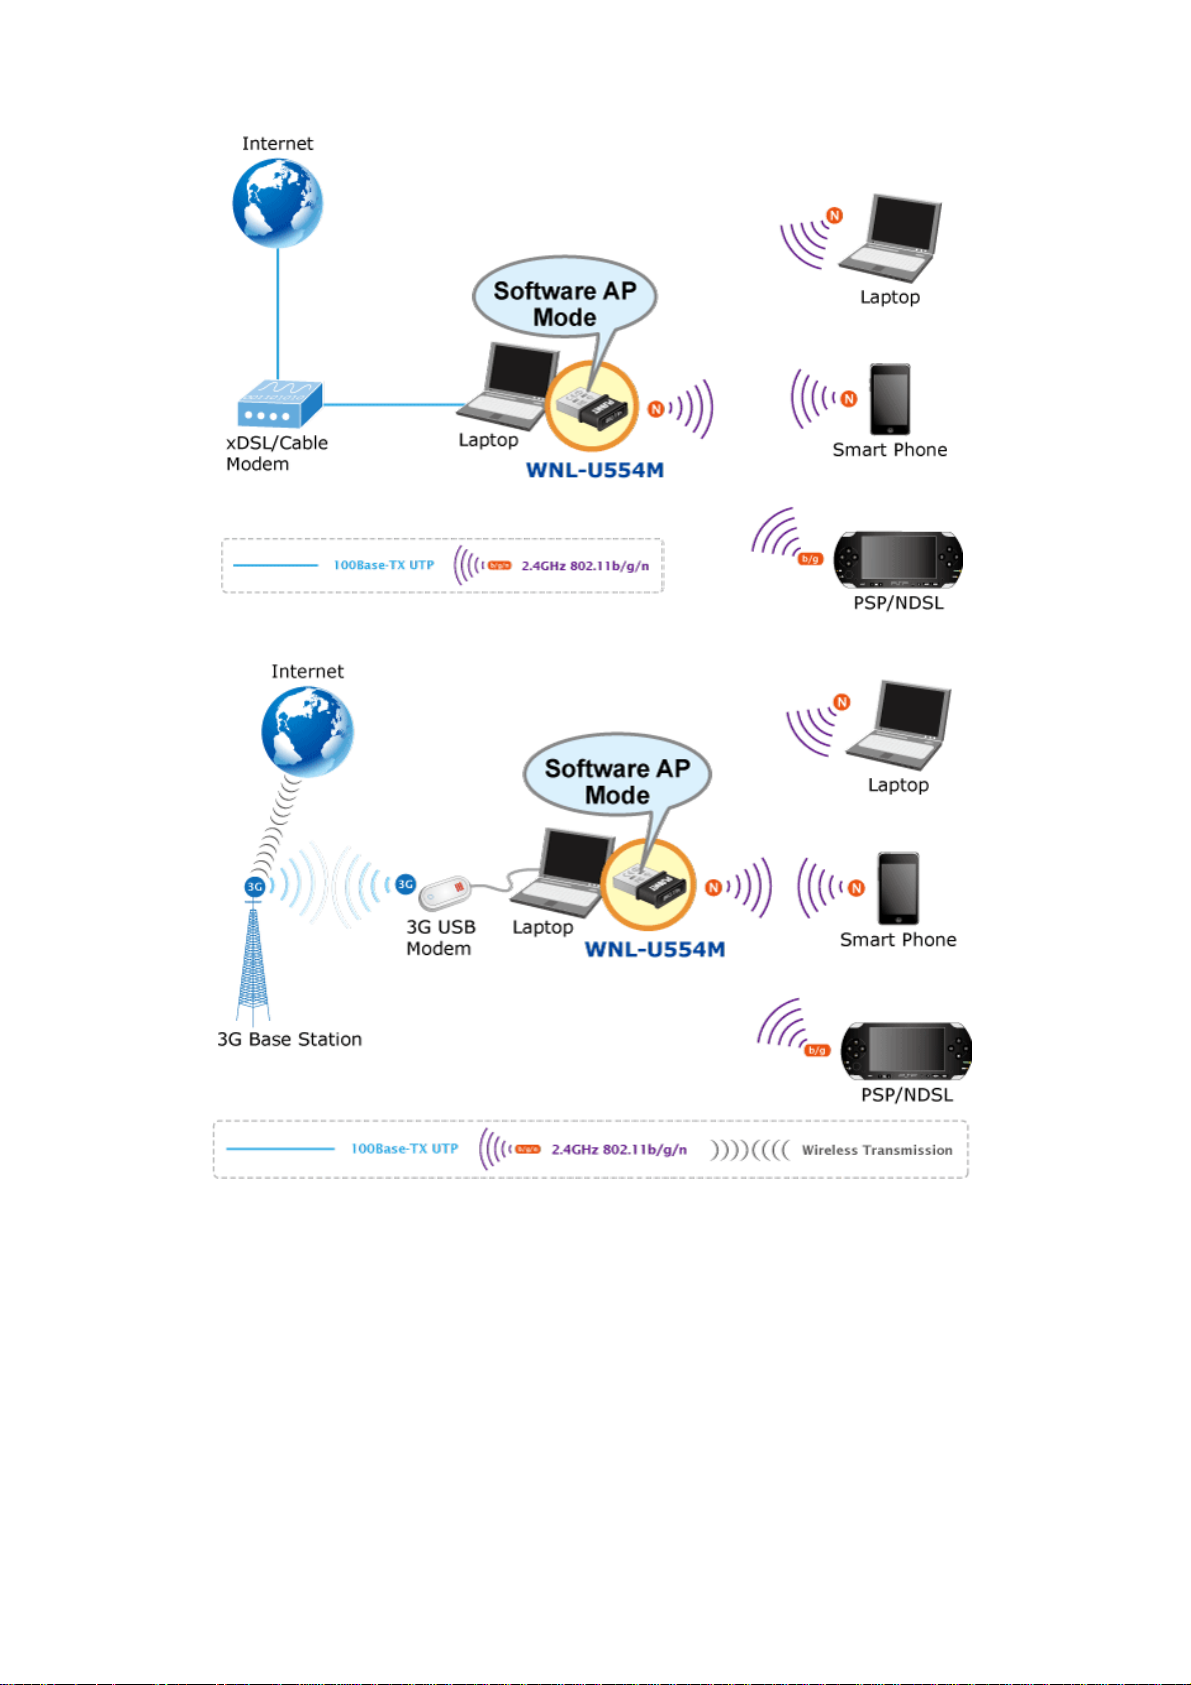
Software Access Point Function for Wireless Connection Sharing
More than just being an adapter for PC and laptop connecting to high speed wireless network, the
WNL-U554M can also become a wireless access point. By applying the USB Wireless LAN Utility
included in the package, users can switch the WNL-U554M operation mode between Station mode
and Access Point mode. When the WNL-U554M is in the Access Point mode, it turns to a Wi-Fi
Hotspot. The Wi-Fi supported devices such as iPhone / Android / Symbian / Windows Phone / iPod
Touch / iPad / NDS / PSP can connect to it and share the wireless access easily. Therefore, travelers
would then be worry free to connect to Internet wirelessly via the WNL-U554M when there is only
wired Internet available anywhere.
8
Page 9
9
Page 10

1.3 Product Features
2.4GHz ISM band, unlicensed operation
Compliant with IEEE 802.11b/g/n
Provides up to 150Mbps download and 150Mbps upload data rate
Wi-Fi Protected Setup (WPS) support
Supports WEP 64/128-bit, WPA / WPA2, WPA-PSK / WPA2-PSK (TKIP/AES encryption)
Supports Software AP mode
Supports Wireless QoS (WMM)
USB 2.0 attached interface
Compact-size Design
Supports most popular operating systems including Windows 2000, XP, Vista, Win 7, Linux,
and MAC OS X.
1.4 Hardware Description
Case Outlook
Front View Rear View Top View
1.5 Software Description
1.5.1 Tray Icon
Client Mode
Wireless connection is established, good signal reception.
Wireless connection is established, normal signal reception.
Wireless connection is established, weak signal reception.
Connection is not established yet..
Wireless network card is not detected.
10
Page 11

Wireless encryption is wrong.
AP Mode
Wireless connection is established, good signal reception.
Wireless connection is established, normal signal reception.
Wireless connection is established, weak signal reception.
Connection is not established yet.
Wireless network card is not detected.
Wireless encryption is wrong.
1.5.2 Main Screen
Client Mode
A. Click these buttons to open the following screens and access the Utility's features.
Use the Wi-Fi Direct screens to set up a Wi-Fi Direct connection, and to share media files
such as music or movies.
Use the Available Networks screen to find out about available wireless networks and their
network status, and to connect to a wireless network.
Use the Link Information screens to find detailed information on the status of your
wireless connection.
Use the Profile Settings screens to set up and use profiles to more quickly connect using
frequently used settings, and to set up wireless security.
Use the Advanced screens to select your region code, and to install WAPI certificates.
11
Page 12

Use the About screen to find version information for your Utility.
A
B. Use these buttons and icons to manage transmission and to find information about your
wireless connection.
Click this button to enable or disable wireless transmission.
Indicates the security status of your connection.
Indicates the quality of your wireless connection.
C. Use this screen to find information on wireless network settings.
SSID This shows the name of your wireless network.
Rate This shows the speed of your connection.
Channel
IP Address
Mask The subnet mask hides your IP address from outside your wireless network.
D. Lets you change the operation mode of the Utility.
Launch Config
Utility
Use Zero
Configuration as
Config Utility
Switch to Client +
AP Mode
Switch to AP
Mode
Exit
This is the channel assigned to your connection. Change this if interference is a
problem on your network.
This identifies the
address identifies a house on a street.
Select this option to display the Utility's main screen.
(Windows XP only) Select this option to use Windows to set up and manage your
network connection. Selection of this mode is not necessary in Windows Vista, 7
or higher, as you can use Windows and the Utility to manage the Adapter without
changing operating modes.
(Windows 7 and higher only) Select this option to let computers and devices
cted to the AP access the Internet (or another network to which the AP is
ne
con
nnected).
co
Select this option to use the Utility as an access point and to set up a wireless
network of your own.
Select this op
connections managed by the Utility will be disconnected.
dapter on your wireless network; much like a physical mailing
tion to close the main screen and exit the program. Any wireless
12
Page 13

AP Mode
A. Click these buttons to open the following screens and access the Utility's features.
Use the AP Setup screen to set up a secure wireless network.
Use the Advanced screen to configure advanced network settings.
Use the Access Control List screen to configure an access policy for your network based
on a client's MAC address.
Use the Connected Devices screen to find information on clients currently connected to
your network.
Use the About screen to find information on specifications for the Utility.
B. Use these buttons and icons to manage transmission and to find information about your
wireless connection.
Click the RF buttons to enable or disable wireless transmission.
Indicates the security status of your connection.
C. Use this screen to find information on wireless network settings.
SSID This shows the name of your wireless network.
Mode Indicates the mode and hence frequency supported by your wireless connection.
Channel The channel assigned to your connection. Default is 6, options are 1-12.
IP Address The IP address identifies your Adapter on your wireless network.
Mask The subnet mask hides your IP address from outside your wireless network.
Indicates AP Mode is enabled.
13
Page 14

D. Lets you change the operation mode of the Utility.
Open Utility Select this option to display the Utility's main screen.
Switch to Station
Mode
Exit
(Windows 7 and higher only) Select this option to let computers and devices
cted to the AP access the Internet (or another network to which the AP is
conne
nnected).
co
Select this option to close the main screen and exit the program. Any wireless
connections managed by the Utility will be disconnected.
14
Page 15
Chapter 2. INSTALLATION
2.1 Microsoft Windows Driver Installation
1. If you had ever installed other wireless adapters before, please uninstall the
existed drivers and utilities first.
2. The following installation is performed in Windows XP. The procedures in other
OS are similar.
Please follow the instructions below to install the USB Wireless Adapter:
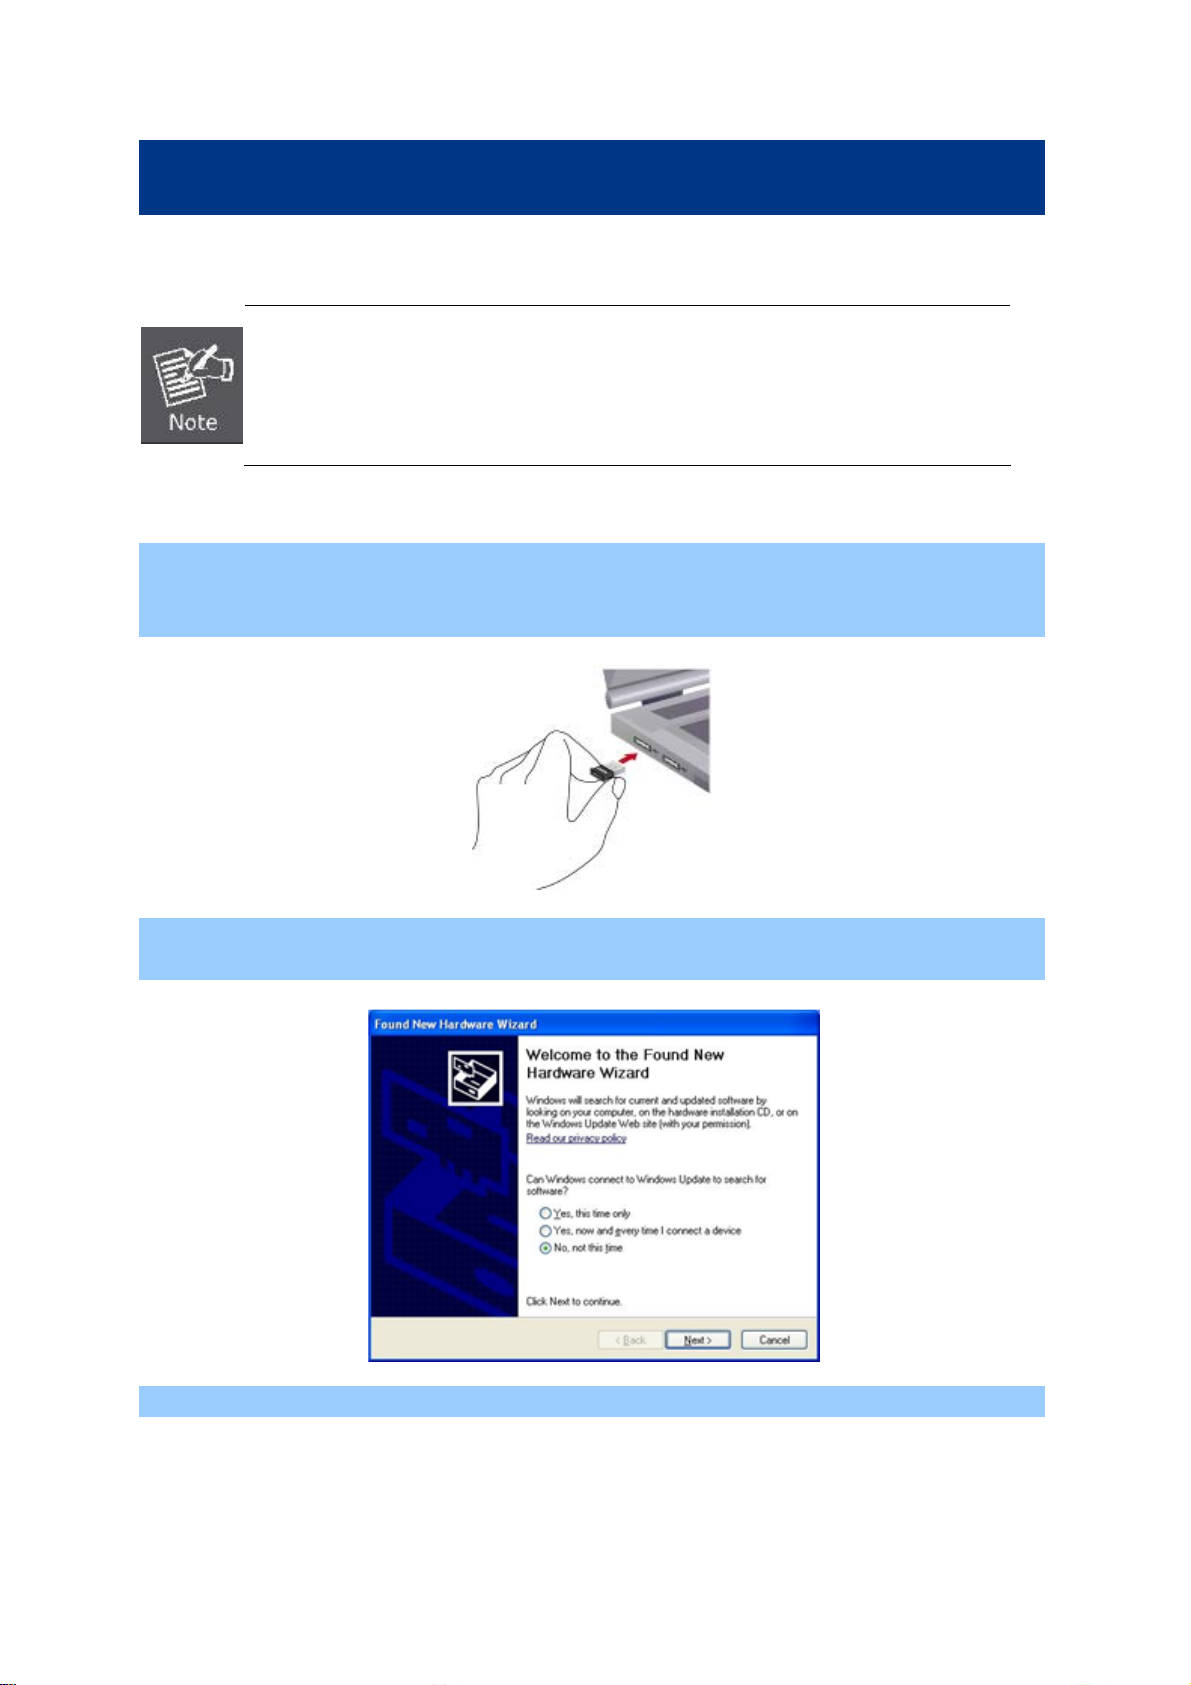
Step 1. Insert the USB wireless network card into an empty USB 2.0 port of your computer when
computer is switched on. Never use force to insert the card, if you feel it’s stuck, flip the card
over and try again.
Step 2. The system will find the new hardware and display the below message. Click “Cancel” to
skip.
Step 3. Insert the bundled CD into the CD-ROM drive.
15
Page 16
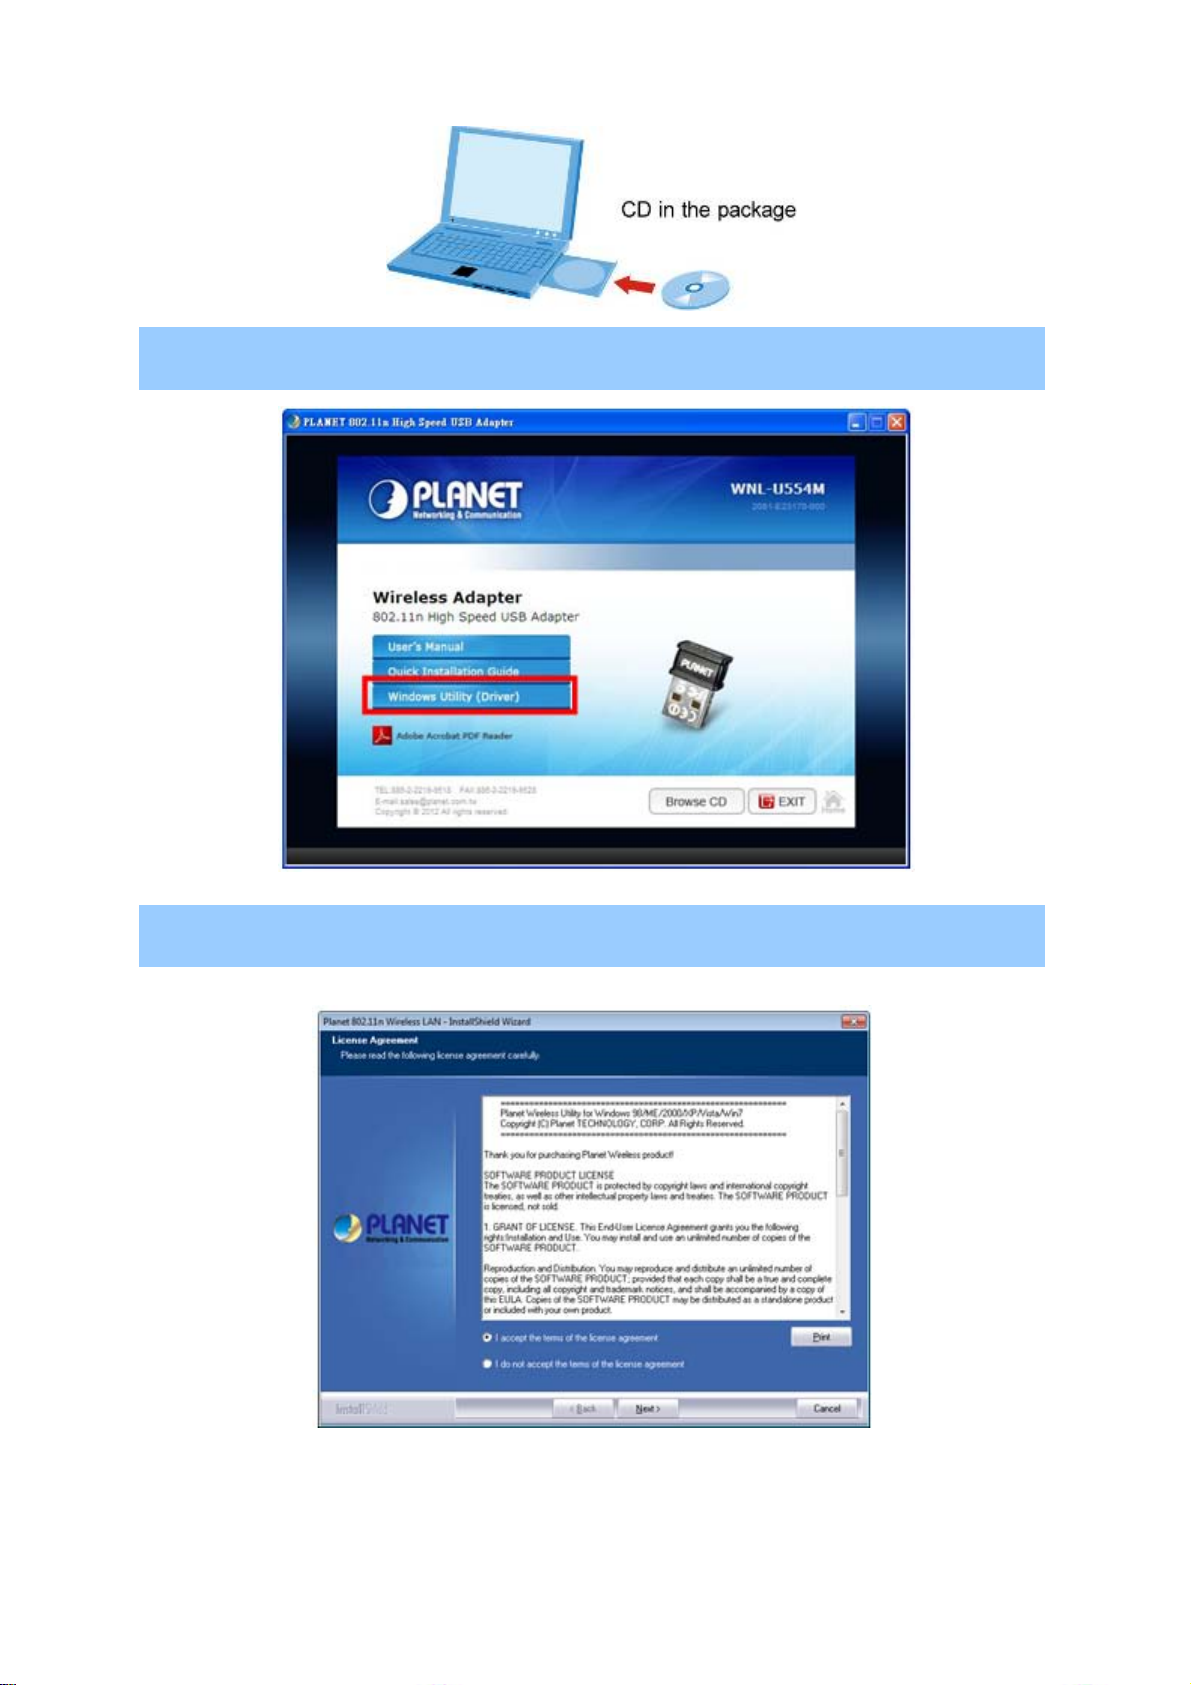
Step 4. Then a webpage will appear. Click the “Windows Utility” hyperlink to initiate the installing
wizard.
Step 5. Read the License Agreement carefully. Select “I accept the term of the license
agreement” and click “Next” button to accept it and continue.
16
Page 17
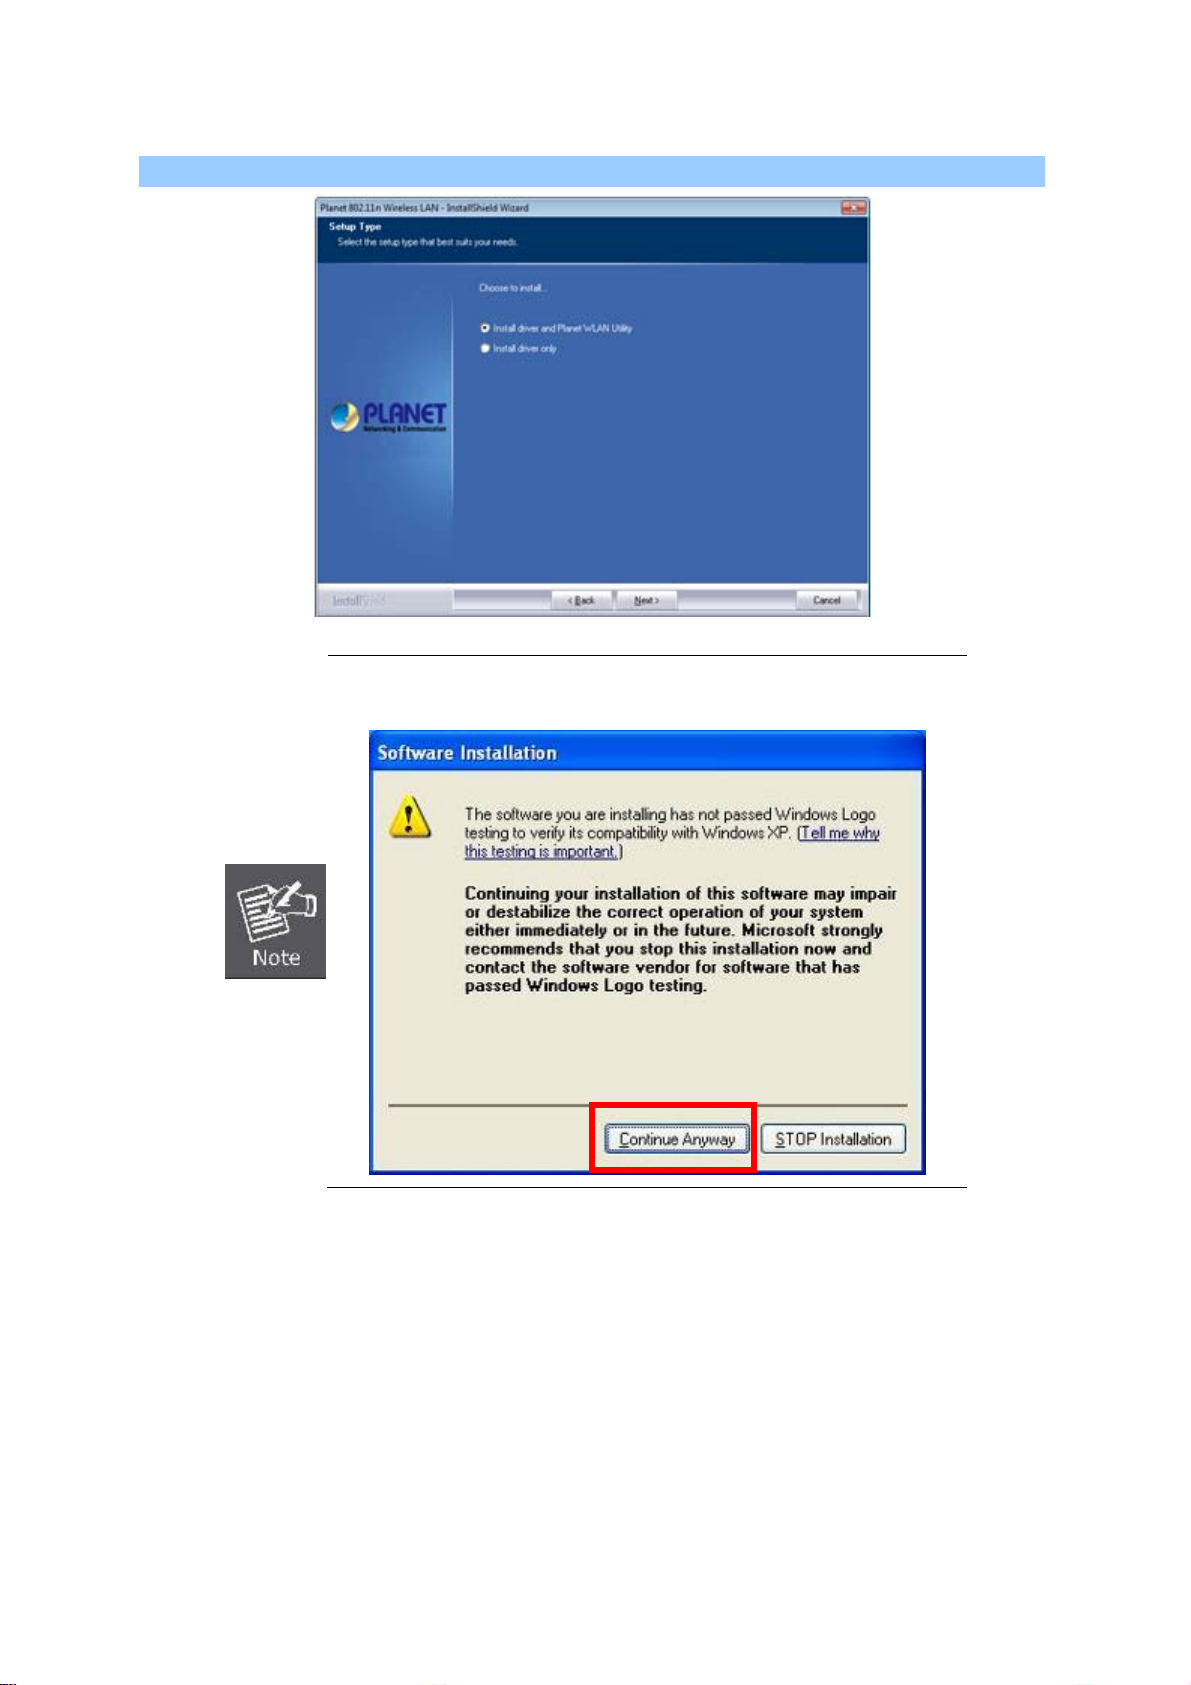
Step 6. Click “Next” button to start installing the driver and utility.
If the screen below appears during installation, please click “Continue
Anyway” button to continue.
17
Page 18
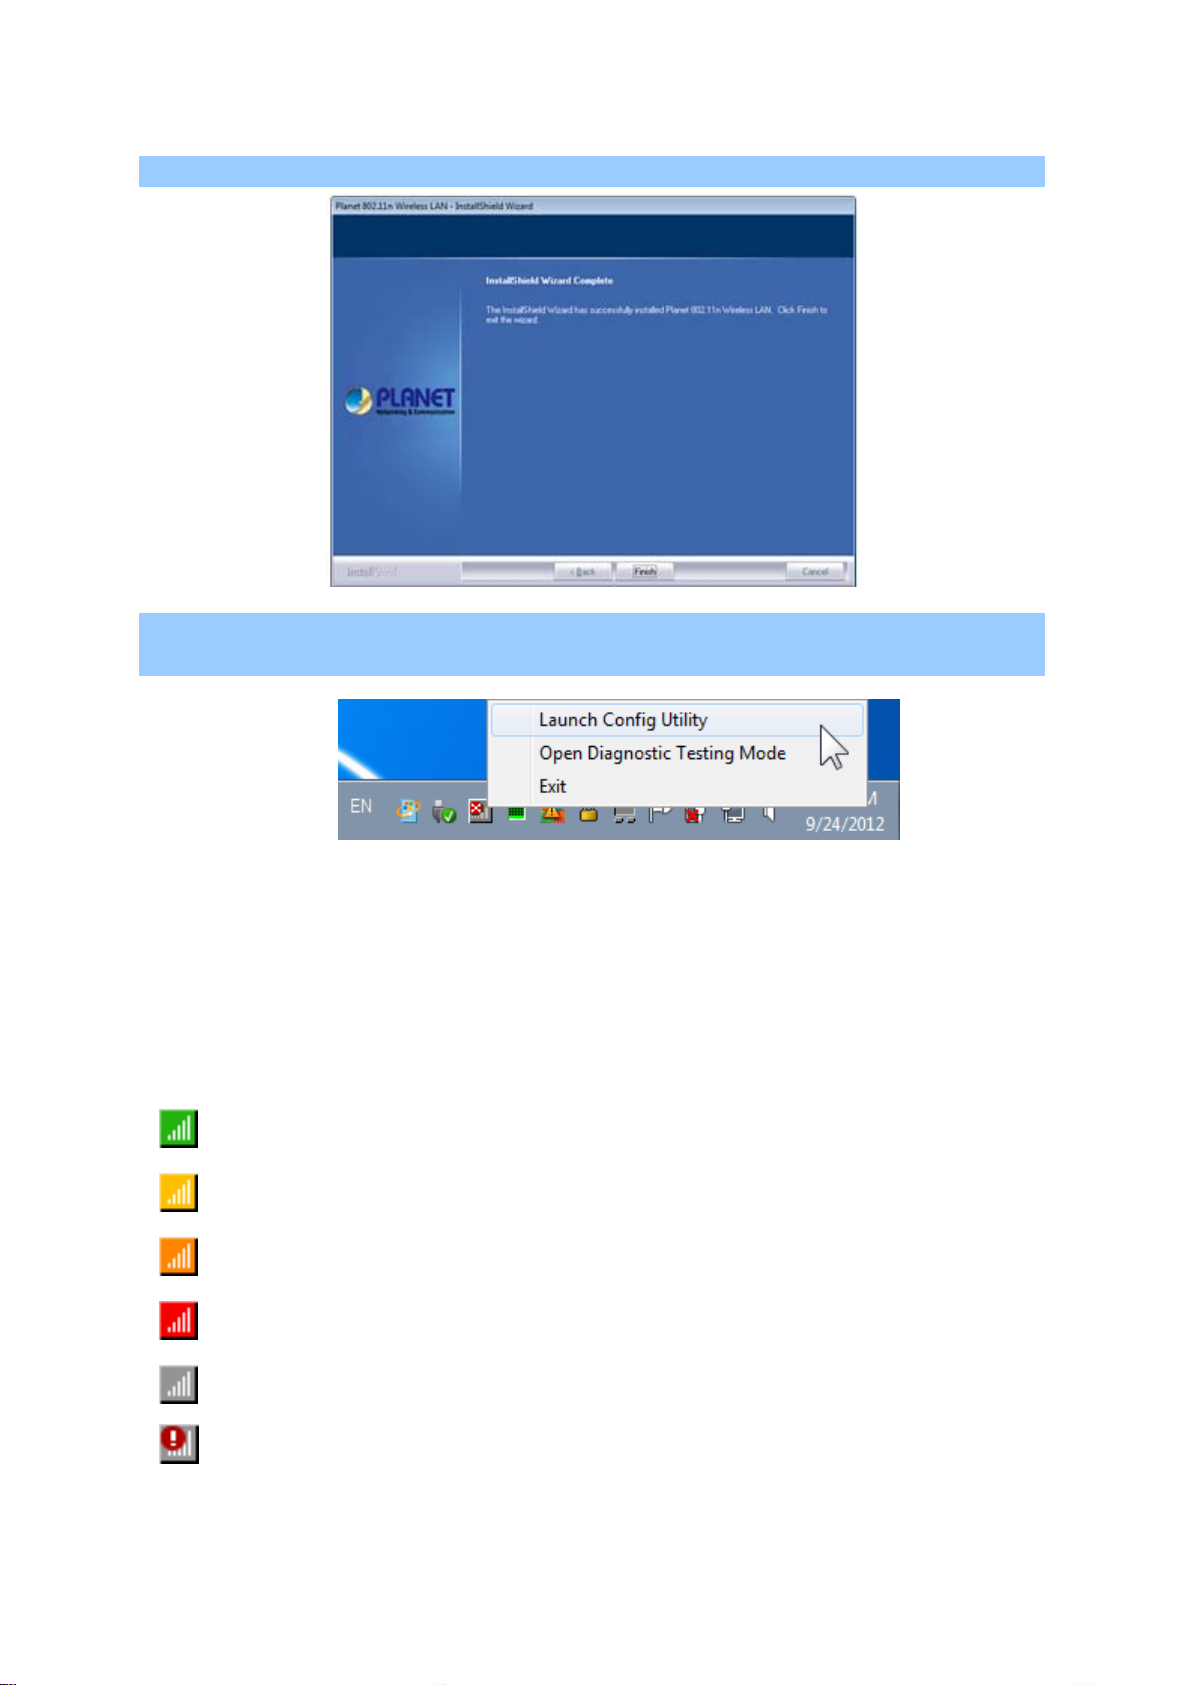
Step 7. Please click “Finish” to finish the installation.
Step 8. Execute the WNL-U554M utility, and then right-click the tray icon of WNL-U554M from the
system task bar. Select “Launch Config Utility” to start setting your wireless network.
After the driver of wireless adapter has been installed successfully, you’ll see another message pop-up
at lower-right corner of the screen. And there is also a new icon appeared on the system tray.
Left-click the new icon will launch PLANET 11n USB Wireless LAN Utility, and right-click the icon will
show the quick menu of configuration utility. This icon also uses different colors to show the status of
wireless connection:
Wireless connection is established, good signal reception.
Wireless connection is established, normal signal reception.
Wireless connection is established, weak signal reception.
Connection is not established yet..
Wireless network card is not detected.
18
Wireless encryption is wrong.
Page 19
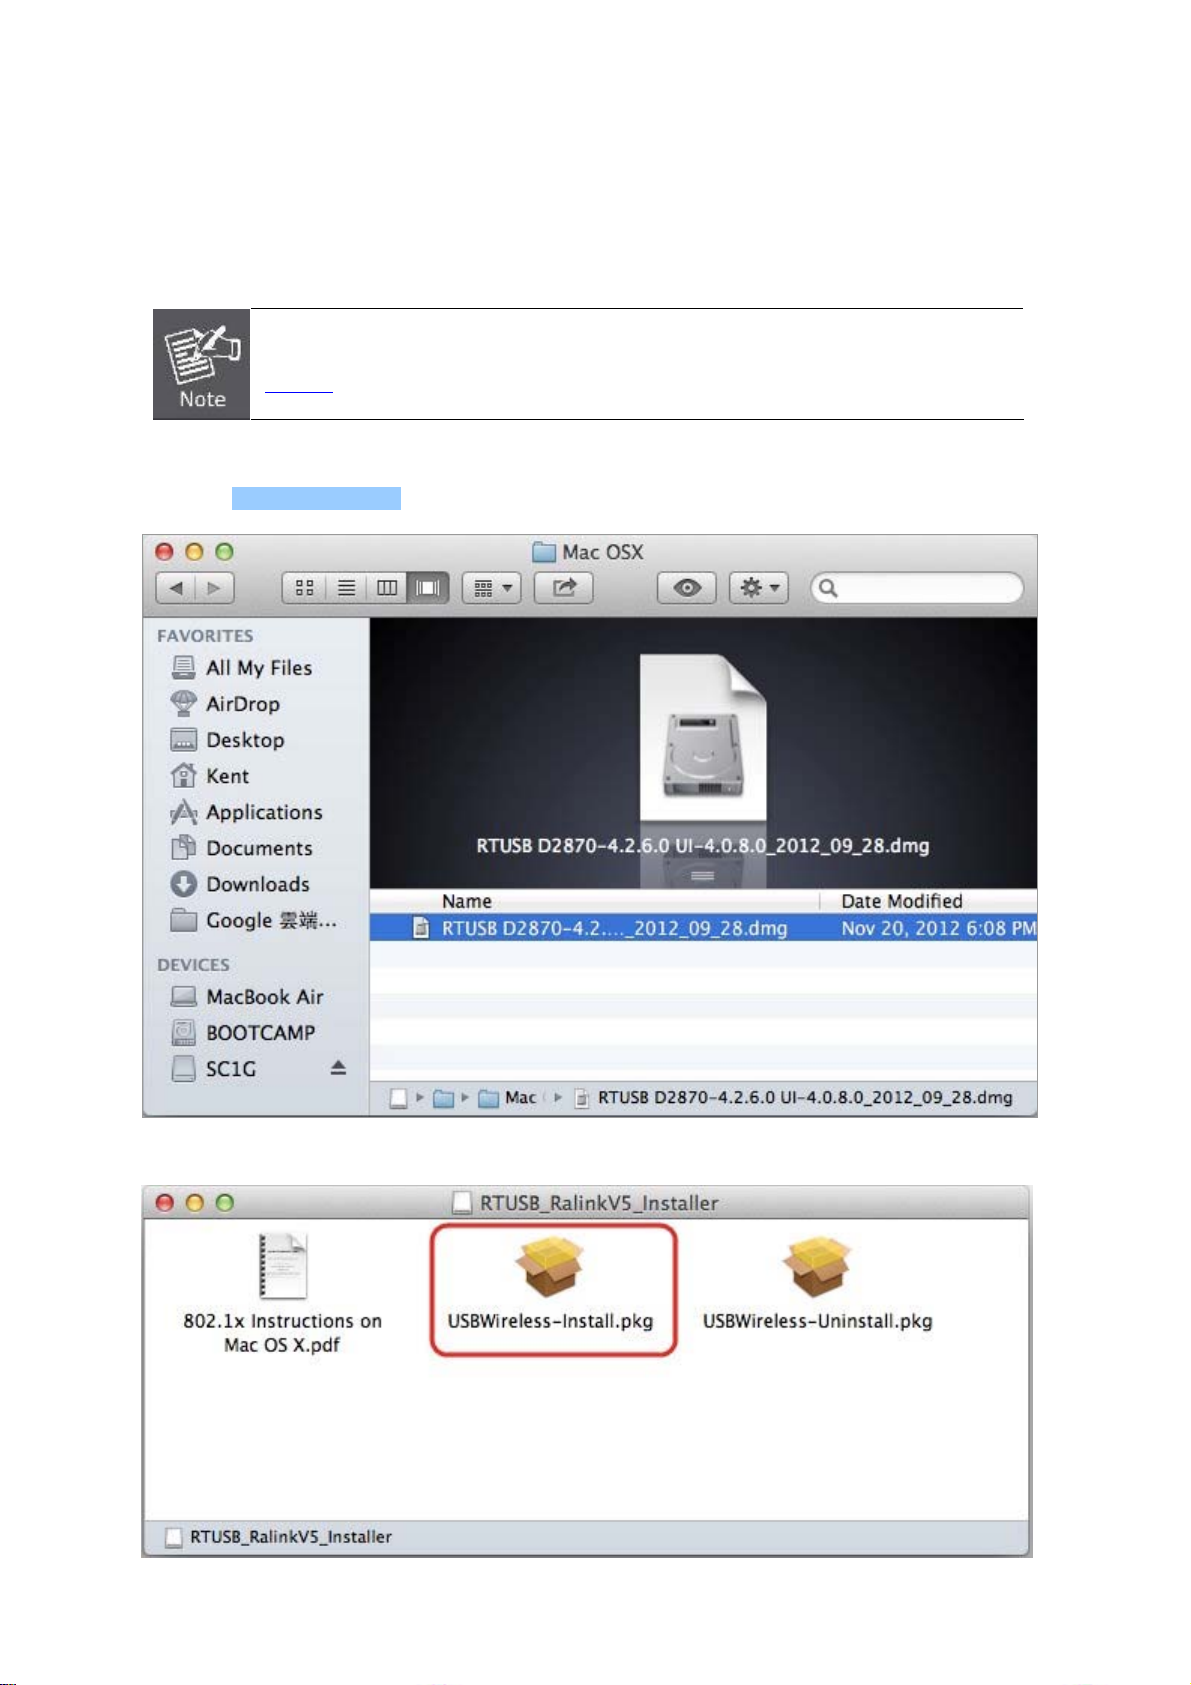
2.2 MAC OS X 10.x Driver Installation
The WNL-U554M supports MAC OS X 10.4 / 10.5 / 10.6 / 10.7. To install in MAC OS X operation
system, please follow the instructions below to install the USB Wireless Adapter:
Obtain the Mac driver from the bundled CD or download the official Mac driver from
this site
Step 1. Click the driver file.
.
19
Page 20
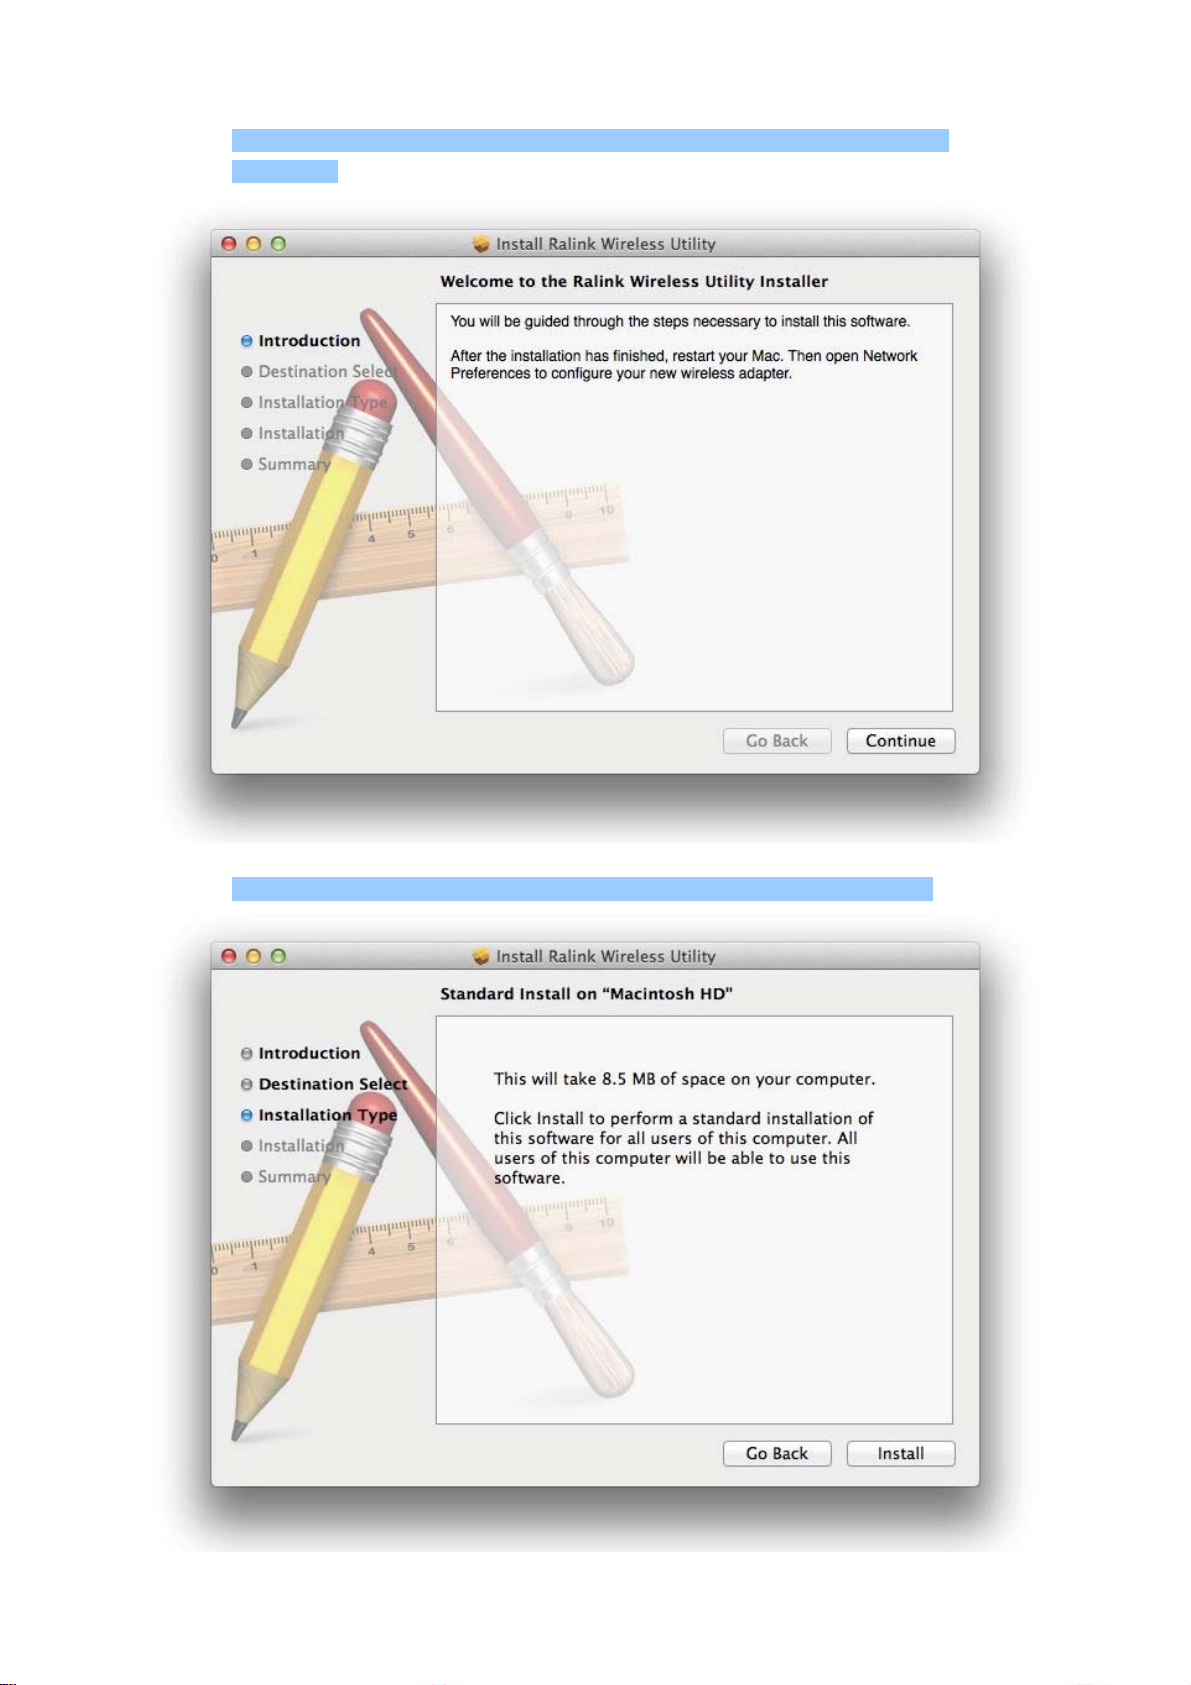
Step 2. It will pop up a window “Welcome to the Wireless Utility Installer”, please click
“Continue”.
tep 3. After read the important information, please click “Install” in the following steps.
S
20
Page 21
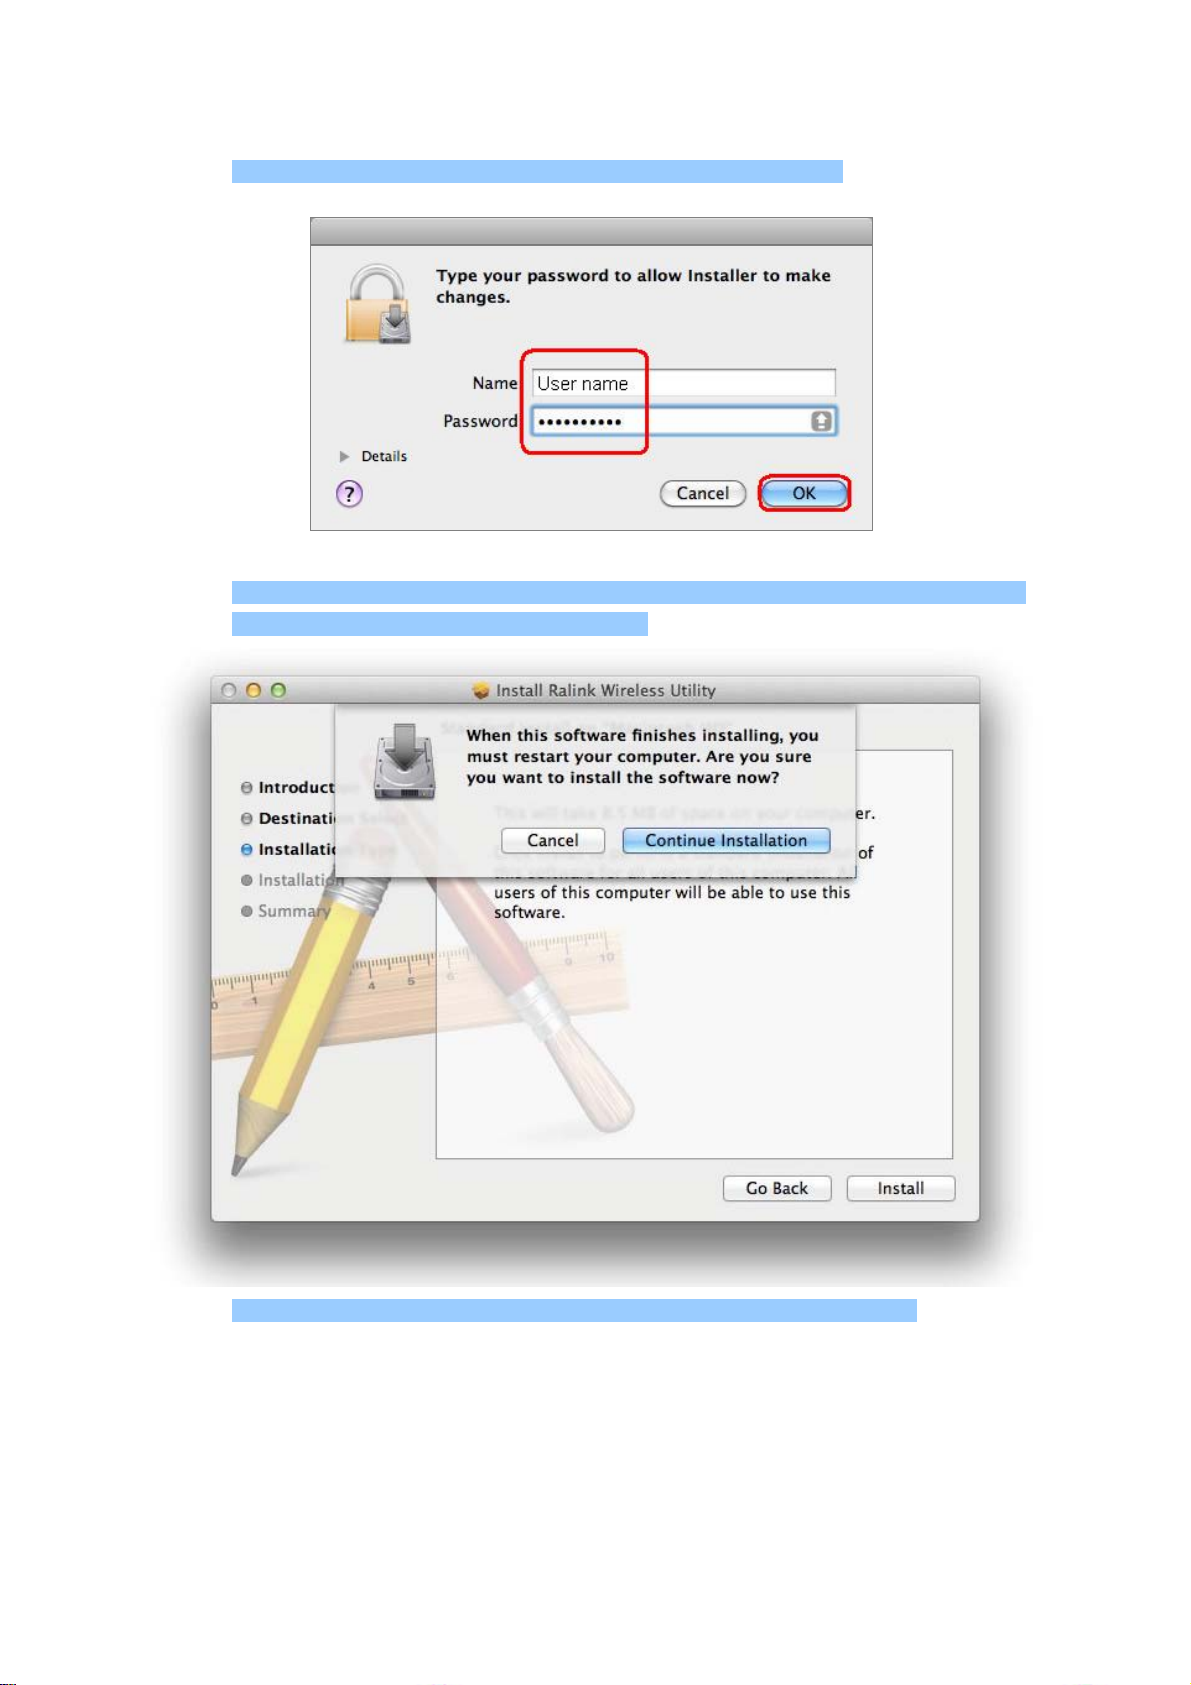
Step 4. Enter your Username and Password of the System. Then, click “OK”.
Step 5. The window pops up the notice to remind you that computer will restart while finishing the
installing. Please click “Continue Installation”.
Step 6. When the installation was successful, click “Restart” to restart your computer.
21
Page 22

Step 7. After restart the computer, plug the wireless adapter into the USB port on your computer.
Step 8. Right-Click on the Wireless Utility icon displayed in the Mac OS X system tray. Then, click
“Open Wireless Utility”. The Wireless Utility network connection menu will appear
22
Page 23

Step 9. Click “Site Survrty”. Choose the AP you would like to connect. Then, click “ADD
PROFILE”.
Step 10. Select the encryption type of the AP that you connected and fill in encryption key. Click “OK”,
and finish the installation and configuration of the wireless adapter!
Step 11. Click “Link Status” to check your wireless adapter is well connected to the target AP. It also
shows the Link Speed, Quality and Bandwidth information in this page.
23
Page 24

24
Page 25

2.3 Linux Driver Installation
The WNL-U554M supports following Linux platform:
Linux Kernel 2.6.18~2.6.38
Linux Kernel 3.0.8
Obtain the Linux driver from the bundled CD or download the official Linux driver
from this site
1. If the driver has been downloaded to your Downloads folder and is called
2011_0719_RT3070_RT3370_RT5370_RT5372_Linux_STA_V2.5.0.3_DPO.bz2. Open a terminal,
and type or paste the following:
sudo apt-get install linux-headers-$(uname -r) build-essential
cd Downloads
, and build the driver for the Linux OS that you are using.
tar -xjf 2011_0719_RT3070_RT3370_RT5370_RT5372_Linux_STA_V2.5.0.3_DPO
cd 2011_0719_RT3070_RT3370_RT5370_RT5372_Linux_STA_V2.5.0.3_DPO
sudo make && sudo make install
make clean
cd ..
rm -rf 2011_0719_RT3070_RT3370_RT5370_RT5372_Linux_STA_V2.5.0.3_DPO
2. Reboot, and hopefully your wireless connection will appear!
25
Page 26

Chapter 3. CONNECTING TO WIRELESS NETWORK
T
o use wireless network, you have to connect to a wireless a
11
PLANET
3.1 PLA
Please follo 11n USB
ireless LAN Utility.
W
Step 1. Left-click the icon located at lower-right corner of the screen, and PLANET Wireless Utility
S access points tep 2. Click “Available Network” icon. Please wait for a while, and all wireless
n USB Wireless LAN Utility
perating systemutility (comes with Windows o
NET 11n USB Wireless LAN Utility
the instructions below to connect the wireless access point via PLANETw
configuration menu will appear:
nearby which can be reached by the wireless adapter will be displayed here.
wireless access point you wish to connect does not appear here, you can click
If the
“Refresh” button to scan for wireless access points again; if the wireless access point you’re
looking for still not appear, try to move the computer closer to the access point.
(comes with network adapter), or Windows Zero Config
).
ccess point first. You can either use
Step 3. Click twice on the AP you would like to connect or click the “Connect” icon at the lower-right
corner of the window.
26
Page 27

150Mbps 802.11n Wireless USB Adapter
WNL-U554M
Step 4. If a password (Network Key) is required to access the wireless access point, please confirm
the Authentication and Encryption method first, and then key in the password in the “WPA
Preshared Key”.
Network security option (“Authentication” and “Encryption”) will be selected
automatically based on the security setting of the wireless access point you
selected. It’s not necessary to change these settings by your own self.
Step 5. Click “Right arrow” button, and you’ll see the connection has been added to the profile and
then you can connect to the wireless network successfully.
Step 6. Wireless adapter will attempt to connect to access point; this may require few seconds to
minutes. When the SSID and IP address are displayed in the main window, your computer is
connected to access point you selected. Click “Close” icon to close configuration window.
Page 28

If you connected to an access point but the connection was dropped soon,
please check security settings and re-check password spelling.
3.2 Windows Zero Configuration
Windows XP / Vista / 7 has a built-in wireless network configuration utility, called as “Windows Zero
Configuration” (WZC). You can also use WZC to configure your wireless network parameter:
Step 1. Right-click PLANET Wireless Utility icon, and click “Open Config Utility”.
To return to use PLANET wireless utility, click “Use RaConfig as
Configuration Utility”.
3.2.1 Windows XP - Use Windows Zero Configure
Step 2. Click “Start” button (should be located at the bottom-left corner of windows desktop), click
“Control Panel”, then click “Network and Internet Connections” in Control Panel.
28
Page 29

Step 3. Double click “Network Connections”.
29
Page 30

Step 4. Right-click “Wireless Network Connection” (it may have a number as suffix if you have
more than one wireless network adapter, please make sure you right-click the PLANET
Wireless LAN 802.11n USB Network Adapter), then select “View Available Wireless
Networks”.
Step 5. All wireless access points in proximity will be displayed here. If the access point you want to
use is not displayed here, please try to move your computer closer to the access point, or
you can click “Refresh network list” to rescan access points. Click the access point you
want to use if it’s shown, then click “Con nect”.
30
Page 31

Step 6. If the access point is protected by encryption, you have to input its Network key or
passphrase here. It must match the encryption setting on the access point. If the access
point you selected does not use encryption, you’ll not be prompted for network key or
passphrase.
Step 7. If you can see “Connected” message, the connection between your computer and wireless
access point you selected is successfully established.
31
Page 32

3.2.2 Windows 7 - Use Windows 7 WLAN AutoConfig
WL eless
AN AutoConfig service is built-in in Windows 7 that can be used to detect and connect to wir
netwo reless network connection tool is similar to wireless zero configuration tool in
rk. This built-in wi
indows XP.
W
Step 1: Right-Click on the network icon displayed in the system tray
Step 2: Highlight and select the wireless network (SSID) to connect.
(1) All wireless access points in proximity will be displayed here. If the access point you want
to use is not displayed here, please try to move your computer closer to the a cess point, c
or you can click “Refresh network list” to rescan access points.
(2) Click the access point you want to use if it’s shown, then click “Connect”.
If you will be connecting to this Wireless Router in the future, checking [Connect
automatically].
32
Page 33

Step 3: Enter the network security key of the wireless access point.
(1) The Connect to a Network box will appear
(2) Enter the security key
If the access point is protected by encryption, you have to input its Network key or
passphrase here. It must match the encryption setting on the access point.
(3) Click the [OK] button
Step 4: Check if “Connected” is displayed
33
Page 34

34
Page 35

Chapter 4. PLANET USB WIRELESS LAN UTILITY
4.1 Connection Profile Management
If you need to connect to different wireless access points at different time, like access point at home,
office, cyber-cafe, or public wireless service, you can save the connection parameters (encryption,
passphrase, security, etc.) as profiles for every access point, so you don’t have to input these
parameters every time when you want to connect to the specific wireless access point.
To manage profiles, right-click the PLANET wireless utility icon located at lower-right corner of the
screen, then click “Launch Config Utility”.
Click the “Profile Settings” button.
4.1.1 Add a new profile
You can setup the connection parameters for the specific wireless access point in advance. If you want
to create a new profile, click “Add” icon.
35
Page 36

You’ll be prompted to input connection parameters for the wireless access point you wish to connect:
Required parameters are as follows:
Object Description
Profile name
Network Name (SSID)
Infrastructure –
Connect to AP
Ad-Hoc – Connect to
other computers
Authentication
You can give a name to this profile, so you can remember its
purpose easily. It can be any phrase to help you remember.
The SSID (Service Set Identifier, i.e. access point’s name).
This field will be filled as the access point you selected when
SSID is not hidden and grayed out. If SSID is hidden, you
have to input correct SSID you yourself.
This operation mode requires the presence of an 802.11
Access Point. All communication is done via the Access Point
or Router.
Check this box if you wish to connect to another computer /
network device by ad-hoc method. When not accessing to
wireless access point, you have to check this box.
Select the authentication type from drop-down menu. This
setting must be identical with the setting of wireless access
point you with to connect.
Open – No authentication is needed among the wireless
rk.
netwo
36
Page 37

Shared – Only wireless devices using a shared key (WEP
Key identified) are allowed to connecting each other.
WPA – WPA provides a scheme of mutual authentication
using either IEEE 802.1x/Extensible Authentication Protocol
(EAP) authentication or pre-shared key (PSK) technology. It
provides a high level of assurance to enterprises, small
businesses and home users that data will remain protected
and that only authorized users may access their networks. For
enterprises that have already deployed IEEE 802.1x
authentication, WPA offers the advantage of leveraging
existing authentication databases and infrastructure.
WPA-PSK – It is a special mode designed for home and small
business users who do not have access to network
authentication servers. In this mode, known as Pre-Shared
Key, the user manually enters the starting password in their
access point or gateway, as well as in each wireless station in
the network. WPA-PSK takes over automatically from that
point, keeping unauthorized users that don't have the
matching password from joining the network, while encrypting
the data traveling between authorized devices.
WPA2 – Like WPA, WPA2 supports IEEE 802.1 x/EAP
authentications or PSK technology. It also incl des a new
vanced encryption mechanism using the Advanced
ad
Encryption S
user or gover
tandard (AES). AES is required to the corporate
nment users. The difference between WPA and
u
WPA2 is that WPA2 provides data encryption via the AES. In
contrast, WPA uses Temporal Key Integrity Protocol (TKIP).
WPA2-PSK – WPA2-PSK is also for home and small
business. The difference between WPA-PSK and WPA2-PSK
is that WPA2-PSK provides data encryption via the AES. In
contrast, WPA-PSK uses Temporal Key In
(TKIP).
.1x wireless authentication.
EAP Method / Tunnel
Authentication / Tunnel
ID
802.1X – 802
When select 802.1X, you have to select EAP method, Tunn
authentication, and Tunnel ID from dropdown menu
setting must be identical with your 802.1x authentication
server.
Encryption
None – Disable the encryption mode.
WEP – Enable the WEP Data Encryption. When the item is
selected,
37
you have to continue setting the WEP Encryption
tegrity Protocol
el
. This
Page 38

keys.
TKIP – TKIP (Temporal Key Integrity Protocol) changes the
temporal key every 10,000 packets (a packet is a kind of
message transmitted over a network.) This insures much
greater security than the standard WEP security.
AES – AES has been developed to ensure the highest degree
of security and authenticity for digital information and it is the
most advanced solution defined by IEEE 802.11i for the
security in the wireless network.
ote: All devices in the network should use the same
N
encryption method to ensure the communication.
Default Key (Key index)
Key Format
WEP Key
WPA Preshared Key
Show Password
Select WEP key index. For most of access points you can
select “1”, but please refer to the setting of the access point.
When the encryption type is “WEP”, it’s required to input a set
of “passphrase” to connect to wireless access point. Check
“ASCII” or “PASSPHRASE” depends on the security setting of
access point, and input it in the box; if you select
“PASSPHRASE” you also need to select the len
The passphrase must be identical with the setting of wireless
access point you with to connect.
The WEP keys are used to encrypt data transmitted in the
wireless network.
The WPA-PSK key can be from 8 to 64 characters and can be
letters or numbers. This same key must be used on all of the
wireless stations in the network.
inputted will be displayed as you type, but not replace your
input with asterisk.
gth of the key.
u Check this box and all passphrases or security keys yo
When all required parameters are s Right arrow” icon to create and save a new profile.
4.1.2 Remove an existing p
If you want to remove a profile no
existing profile you wish to remove, an
38
et, click “
rofile
lo
nger needed, click “Profile Settings” button, then select the
d click “Delete” icon.
Page 39

4.1.3 Edit an existing profi
If you have added a profile before nd now you wish to change the settings of the profile, you c
this function. Please select the prof e
selected profile will a iting them, you can click “Right arrow” icon to save changes, o
click “Cancel” to discard changes.
ppear. After ed r
le
, a an use
ile from the list first, then click “Edit” button. The contents of th
4.1.4 Set as the default profile
If you wish to use a specific profile as the default wireless connection, you can select the profile in the
list, and click “Active”. The selected profile will become default selection and PLANET wireless utility
will attempt to connect to the selected access point.
39
Page 40

, Status, and Network Statistics 4.2 General Information
The PLANET wireless utility provides the detailed information about the wireless connection you’re
using.
4.2.1 General Information
If you want to know the general information of the access point you’re connecting to, click “Link
Information” icon.
All general information like signal strength and link quality will be displayed here. The information is
very useful when you encounter some problems in connecting to access point.
40
Page 41

4.2.2 Network Transmission Statistics
To view the statistical data of wireless adapter, click “Statistics” icon, and the statistics of wireless
connection will be displayed:
All connection-related statistics is displayed here. You can click “Reset Counter” button to reset the
statistics of all items back to 0.
4.2.3 About / Status
If you want to know the status of your wireless network card, click “About” icon.
41
Page 42

4.3 Advanced Settings
This section is used to configure advanced settings including channel selection, wireless mode, and
certificate management.
42
Page 43

The descriptions of the function are listed as follow:
Object Description
Wireless Mode
Select Your
Country’s Region
Code
Apply
Display the wireless operation mode of the network card.
2.4 GHz: From the drop down list, select the appropriate code for
your region. If uncertain, leave this setting at its default value.
Click Apply to save your changes.
4.4 Wi-Fi Protected Setup (WPS)
Wi-Fi Protected Setup (WPS) is the latest wireless network technology which makes setting up
wireless network more quickly and easily. If you have WPS-supported wireless access point, and you
want to establish a secure connection to it, you don’t have to configure the wireless access point and
setup data encryption by your own self.
There are two kinds of WPS method supported, “PIN Input Config (PIN)” and “Push Button Config
(PBC)”. Please follow the instructions b
WPS-supported wireless access point and the PLANET wireless adapter.
elow to establish the secure connection between
Step 1. Right-click PLANET wireless utility icon, and click “Launch Config Utility”.
Step 2. Go to Profile List, and then click “WPS” icon.
Step 3. You can choose which WPS method to use, Push-Button Configuration( BC) or PIN / P
numeric code, and WPS-supported wireless access point must use the same method. See
the next two chapters for detailed instructions of each WPS method.
43
Page 44

4.4.1 Push Button Config (PBC)
This is the easiest way to establish secure connection by WPS, but if there’re more than one
WPS ed access poin utton config, please use PIN / numeric code instead.
-support t using Push-B
a. To PBC method, select “Push-Button Configuration(PBC)”. Click the right arrow to save
use the
your
settings.
b. Click “Start PBC”. At the same time (within 120 seconds) click the WPS button on the device to
which you are connecting.
Please activate WPS function of wireless access point now, and the secure connection between
wireless adapter and the WPS-supported access point will be established automatically.
c. Once connected, your WPS profile appears in the Profile List screen.
44
Page 45

4.4.2 PIN Input Config (PIN)
a. To use the PIN method, select “PIN / numeric code” and, in the “WPS AP List” field, select the
name of the network to which you connecting. Click the right arrow to save your settings.
b. You can use either the PIN provided by the Wireless Utility or the PIN provided by the device to
which you are connecting.
PIN provided by the Wireless Utility.
If the device to which you are connecting requires a PIN, in the '”Config Mode” field, from the
drop-down list, select “Enrollee”. Your PIN is displayed in the “Pin Code” field on your Utility. Then
in the corresponding WPS interface on the device, to which you are connecting, ente
its PIN entry field.
r your PIN in
45
Page 46

PIN provided by the device to which you connecting.
If the device to which you are connecting provides a PIN (e.g. on the device casing), in the
“Config Mode” field, select “Registrar”. In the “Pin Code” field, type the PIN provided by the
device to which you are connecting.
To optionally configure the connection name and security type on your WPS connection, click the
“WPS Profile” button. Otherwise leave settings at their default and click the right arrow to save
your settings.
If you click on the “WPS Profile” button, the following screen appears, allowing you to configure
the name of your network connection and security method. In “SSID” type a name for your WPS
connection, and select an Authentication and Encryption method.
In the “WPA Preshared Key” field, type a passphrase 8-63 characters long made up of characters
'0'-'9', 'a'-'z', 'A'-'Z', keyboard symbols and spaces. Click the right arrow to save your settings.
46
Page 47

c. For both PIN methods, the following screen displays. Click the Start PIN button. At the same time
(within 120 seconds) activate the corresponding WPS PIN connection function on the device to which
you are connecting.
d. Once connected, your WPS profile appears in the Profile List screen.
47
Page 48

Chapter 5. SOFT ACCESS POINT MODE
Excepting be a wireless client of other wireless access points, the PLANET wireless adapter can also
act as a wireless service provider. You can switch the operation mode of wireless adapter to “Access
Point” mode to simulate the function of a real wireless access point by software. And all other
computers and Wi-Fi supported devices can connect to your computer wirelessly, even share your
internet connection service.
Application: Software AP Mode with xDSL/Cable Internet Connection
Application: Software AP Mode with 3G/LTE Internet Connection
48
Page 49

5.1 Sw
The default operating mode of the wireless adapter is “Station Mode” (being a client of other wireless
acce
ss points).
Please follow the instructions below to switch to Access Point mode:
Step 1. Right-click PLANET wireless utility icon, and select “Switch to AP Mode”.
itch between Access Point Mode and Station Mode
It requires few seconds to switch mode.
After the mode switch is complete, the window of general information about software access point will
appear, includes SSID, IP address of the Soft AP and connected wireless clients.
Also the wireless LAN Utility icon in you system tray (lower-right corner) be changed to another icon.
Station mode icon.
Access Point icon.
49
Page 50

150Mbps 802.11n Wireless USB Adapter
WNL-U554M
5.1.1 Configure SSID and Channel
To configure software Access Point, click “Config” button, and the “Wireless Network Properties” will
be displayed.
a. The Network Settings Screen
Use the left and right arrows to navigate through the Setup screens.
Click the Stop button to cancel setting up your device.
Please note that Ad-Hoc mode is not available when the wireless adapter is in Acc
he setup options are listed below:
T
Object Description
SSID (Network
Name)
Hide SSID
Wireless Mode
Please input the SSID (the name used to identify this wireless
access point) here. Up to 32 numerical characters can be accepted
here, excepting space.
Select this optional setting to hide the name of your network from
unauthorized computers or devices.
Please select the wireless operating mode. The option is only
2.4GHz available if the wireless adapter only supported 2.4GHz.
ess Point mode.
Page 51

b. The Channel Settings Screen
The setup options are listed below:
Object Description
This indicates the 'Wireless Mode' selected in the previous Network
Settings screen. From the drop-down list, select the appropriate
2.4 G
Hz
code for your region. For more information on the c
for each region, see the Country Channel List.
Channel: Leave at its default value, o
Leave at its default value, or if interference is a problem on your
network, choose a channel which experiences less interference. If
Channel
you select Enable 40 MHz Bandwidth', choose a channel with
minima
channel.
Select this o
wireless connection. This function works by incorporating the
Enable 40 MHz
Bandwidth
bandwidth available on the four channels adjacent to your selected
channel. This option is o
computer or device connected to the AP does not support this
function, bandwidth is reduced to its d
hannels available
r
l interference on the four channels adjacent to your selected
ption to increase the bandwidth available for your
nly supported by IEEE 802.11n devices. If a
efault level.
51
Page 52

150Mbps 802.11n Wireless USB Adapter
WNL-U554M
5.1.2 Soft Access Point Security
To setup security options for Soft Access Point, configure “Wireless Network Security” as follows:
The set ut wireless security are listed below: up items abo
Object Description
Select the strongest security method supported by your network.
A ion
uthenticat
Encryption
ASCII / PASSPHRASE
Key Index
Network key / Confirm
network key
The authentication types are listed below:
Authentication Encryption Method Description
Method
WPA2-PSK
WPA-PSK
WPA-PSK/WPA2-PSK
Open
Options include Open, Shared, WPA-PSK, WPA2-PSK, o
WPA-PSK/WPA2-PSK.
Select the strongest encryption suppo
selected authentication method. Options for each authentication
method are as shown in the following table.
If the encryption method is WEP, check either “ASCII” or
“PASSPHRASE” box and input it in the box as WEP passphrase.
WEP key index (1-4). If you don’t know which one you Select
should use, select 1.
IF network authentication mode is WPA, please input WPA
passphrase in both box.
AES
TKIP
BOTH
(WPA2-PSK only)
WEP
r
rted by your network and the
WPA2-PSK is a faster, more recent
authentication standard than WPA-PSK.
AES is a stronger, more recent encryption
standard than TKIP.
Select the strongest security method
supported by your network. Options include
Open, Shared, WPA-PSK, WPA2-PSK, or
WPA-PSK/WPA2-PSK.
WEP is an older standard and is easily
decrypted. If using WEP select Open as the
authentication method for slightly stronger
Page 53

securit
y.
Shared
a. The WPA-PSK, WPA2-PSK or WPA-PSK/WPA2-PSK Security Screen
WPA-PSK Key: Type a
'A'-'Z', keybo
ard symbol
Group Rekey Interval: T e AP resets the group key. This key supports
wireless security on you
x 10 sec
onds: Sets the
period the group key is
x 1000 packets:Sets the
security key 8-63 characters long made up of characters '0'-'9', 'a'-'z',
s and spaces.
he interval after which th
r network. If uncertain, leave at its default value.
unit for the 'Group Key Interval' to 10 seconds. After the specified
reset.
unit for theGroup Key Interval to 1000 packets. After sending the
pac
kets the group key is reset. specified number of
b. curity Screen
The WEP Se
Default Tx Key: Options are 'Key 1' to 'Key 4'.
Key Format: Select character format fo
a r your
hex digits)' or 'ASCII(5 or 13 ASCII characters
WEP Key: Type a security passphrase accordi
ld.
fie
If you select a key format of 'Hex(10 or 2
security key 10 or 26 characters long made up of digits '0'-'9' and letters 'A'-'F'
53
Select one of these options.
security passphrase. Options are 'Hex(10 or 26
)'.
ng to the option you select in the Key Format
6 hex digits)', in the WEP Key field type a
Page 54

If you select a key format of 'ASCII(5 or 1 haracters)' in the WEP Key field, type
a security key 5 or 13 characters long made up of digits '0'-'9' and letters 'a'-'z' and 'A'-'Z'.
3 ASCII c
5.2 Advanced Settings
Click “Advanced” button to setup advanced settings of software access point. If you don’t know the
meanin
g and affects of these settings, please keep them as default.
The setup items are listed below:
Object Description
No forwarding among
wireless clients
Beacon Interval (ms)
Tx Power
Idle time (60 - 3600) (s)
Apply
If selected, this disables the forwarding of packets by the AP or router
of packets sent by wireless clients to other wireless clients in the
same network.
Default = 100 ms. The interval between beacon frames.
100%. The power of the transmitted signal as a percentage of
maximum power. Options include 100%, 75%, 50%, 25%, and Low.
Default = 300s. The maximum time a connected computer or device
can be idle before it is disconnected from the network
Click Apply to save your changes.
.
54
Page 55

5.3
you’re not going to open your computer and wireless resources to the public, you can use MAC
If
address filtering function to enforce y
address you defined by this function ca
Click “Access Control List” button and the following screens will be displayed.
Access Control List
our access control policy, so only wireless clients with MAC
n be connected to your software access point.
Th s are listed be
e setup item low:
Object Description
Option
s include Disable (default), Reject All, and Allow All.
Disable: Disables access control
Access Policy
55
address.
Reject All: All packets with a source MAC address matching those in
the access control list cannot access your network.
Allow All: All packets with a source MAC address matching those in
to your network based on MAC
Page 56

the access control list have access to your network.
MAC Address
Apply
Type a MAC address in hexadecimal format without additional
characters (e.g. colons or hyphens).
Adds the MAC address in the MAC Address field to the MAC address
control list.
Removes the
list.
Removes all MAC addresses from the MAC address control list.
Saves all changes made to the MAC address control list.
selected MAC address from the MAC address control
5.4 Connected Devices
If you want to see the list of all wireless clients connected to this access point, please follow the
following instructions:
Click “Connected Devices” button, and a list containing all connected wireless clients will appear:
56
Page 57

The information items are list ed below:
Object Description
MAC Address
Client ID
Power Saving Mode
Tx Rate (Mbits)
5.5 About (AP
The “About” screen provides you the information about version number of the configuration utility,
driver, and other important information about your wireless access point.
The unique hexadecimal manufacturer-assigned identifier of a device
connected t
An ID number assigned to each device on your AP's network, starting
at 2 w
power-saving.
Provides detailed information on factors affecting the dat
rate. IEEE 802.11n specific information includes the MCS (mod
and coding scheme) index value applied in a connection, the BW
(bandwidth), GI (guard interval), and the transmission rate of the
current co
o the this AP.
ith a maximum of 32.
nnection in megabits (Mbit).
Mode)
rts Indicates whether the connection with the associated device suppo
a transfer
ulation
The information items are listed below:
Object Description
Utility Version
Driver Version
DLL Version
Date
Date
57
Shows the version number of the Utility (different from the utility
version in station mode).
Shows the version number of this driver (the same as that in station
mode).
Displays the version number of the RaAPAPI.dll file, for use by
downstream developers.
Shows the date of release for the utility version shown.
Shows the date of release for the driver version shown.
Page 58

Date
Shows the date of release for the DLL version shown.
MAC Address
xadecimal identifier assigned to the Adapter. The unique he
58
Page 59

Appendix: Specifications
Product 150Mbps 802.11n Wireless Micro-size USB Adapter
Model WNL-U554M
Hardware Specification
Interface USB 2.0, Type-A
Antenna Type Internal Omni-directional Antenna
Antenna Gain 2dBi
Operation Voltage 5V DC, power input from USB port
Dimension 20 x 14.4 x 7mm
Weight 0.3g
Wireless Specification
Standards
Conformance
RF Modulation DBPSK,DQPSK,CCK, OFDM
Frequency Band 2.4-2.4835 GHz
Opt. Channel
Data Rate
Wireless Transmit
Power (EIRP)
Receiver Sensitivity
IEEE 802.11n standard compliant
IEEE 802.11b/g backwards compatible
America/ FCC: 2.414~2.462GHz (11 Channels)
Europe/ ETSI: 2.412~2.472GHz (13 Channels)
Japan/ TELEC: 2.412~2.484GHz (14 Channels)
802.11b: 11, 5.5, 2 and 1 Mbps with auto-rate fall back
802.11g: 54, 48, 36, 24, 18, 12, 9 and 6Mbps
802.11n (20MHz): up to 72Mbps
802.11n (40MHz): up to 150Mbp
≦20 dBm (EIRP)
135M: -68dBm@10% PER
108M: -68dBm@10% PER
54M: -68dBm@10% PER
11M: -85dBm@8% PER
6M: -87dBm@8% PER
1M: -90dBm@8% PER
Operating Mode Ad-Hoc / Infrastructure, Soft AP
WEP 64/128-bit
Encryption Security
Wireless Advanced
Management The utility included in the package or Windows XP Zero Configuration
59
WPA / WPA2 (TKIP/AES)
WPA-PSK / WPA2-PSK (TKIP/AES)
Supports 802.11e WMM (Wi-Fi Multimedia)
Supports Software/Hardware WPS (Wi-Fi Protected Setup)
Page 60

utility
Windows 2000/XP (x86/x64)
Operating systems
Linux Kernel 2.4 /2.6
Macintosh 10.4/10.5/10.6
Certification
Regulatory
Environment
Operating Temperature 0 - 40 Degree C
Humidity
10 - 90% (Non-Condensing)
WNL-U554M(150Mbps 802.11n W
Package Content
Quick Installati
CD
(includes driver/utility/user’s manual)
/ VISTA (x86/x64) / Win7 (x86/x64)
S CE, FCC, RoH
ireless Micro-Size USB adapter)
on Guide
60
Page 61

Appendix: Troubleshooting
Symptom :
Remedy :
Symptom : The L g. ED is always on not blinkin
Remedy :
Symptom :
Remedy :
Symptom :
Remedy :
The LED is off.
Make sure the PC Card is inserted properly. Otherwise contact your
vendor.
Make sure that you have installed the driver from attached CD.
Otherwise contact your vendor.
The LED is blinking but the PC Card icon does not appear in your icon
tray.
Make sure that you have installed the Utility from the attached CD.
The PC Card is linking, but can’t share files with others.
Make sure the file and printer sharing function is enabled.
You can enable the function by checking the icon of My Computer ->
Control Panel -> Network -> file and printer sharing -> I want to be
able to give others to access to my files.
Symptom :
Remedy :
Slow or poor performance under AP mode
Try to select another channel for the communicating group or move your
device closer to the Access Point.
61
Page 62

1. IEEE 802.11 Standard
Appendix: Glossary
The IEEE 802.1 Wi ttee, which is formulating a standard for the
industry.
1 reless LAN standards subcommi
2. Access Point
ternetworkin evice that seamlessly connect
An in g d nd wireless networks together.
3. Ad
Ad Hoc wireless LAN is a departmental scale for a branch or SOHO operation.
Hoc
An Ad Hoc wireless LAN is a group of computers, each with a WLAN adapter, connected as an
ende
indep ess
nt wirel LAN
pplicable at a
s wired a
4. BSSID
A sp LA S must be configured
ecific Ad Hoc N is called a Basic Service Se
with the same BSSID.
5. DHC
P
Dynamic Host Confi
dynamically to clients on the network. DHCP is used for Dynamic IP Addressing and requires a
dedi rv
cated DHCP se er on the network.
guration Protocol - a method in which IP addresses are assigned by server
t (BSS). Computers in a BS
6. Dire nce
ct Seque Spread Spectrum
This is the method the wireless cards use to transmit data over the frequency spectrum. The other
method is frequency hopping. Direct sequence spreads the data over one frequency range (channel)
while frequency hopping jumps from one narrow frequency band to another many times per second.
7. ESSID
An Infrastructure configuration could also support roaming capability for mobile workers. More than
one BSS can be configured as an Extended Service Set (ESS). Users within an ESS could roam
freely between BSSs while served as a continuous connection to the network wireless stations and
Access Points within an ESS must be configured with the same ESSID and the same radio channel.
8. Ethernet
Ethernet is a 10/100Mbps network that runs over dedicated home/office wiring. Users must be wired
to the network at all times to gain access.
9. Gateway
A gateway is a hardware and software device that connects two dissimilar systems, such as a LAN
and a mainframe. In Internet terminology, a gateway is another name for a router. Generally a
gateway is used as a funnel for all traffic to the Internet
62
Page 63

10. IEEE
Institute of Electrical and Electronics Engineers Infrastructure. An
is called an Infrastructure configuration. Infrastructure is applicable to enterprise scale for wireless
access to central database, or wirele
11
. ISM Band
The FCC
the so-called ISM (Industrial, Scientific and Medi
particular, is being m
2.4 GHz, in particular, is being made available of users around the globe.
12. Local A
A LAN is a group of computers, each equipped with the appropriate network adapter card connected
by cable/air, that share applicatio
wireless media, but a LAN does not use telephone services. It typically spans a single building or
campus.
13. Netwo
A network is a system of computers that is connected. Data, files, and messages can be transmitted
over this network. Netw
and their counterparts outside of the U.S. have set aside bandwidth for unlicensed use in
ade available (Industrial, Scientific and Medical) band. Spectrum in the vicinity of
rea Network (LAN)
rk
o
rks may be local or wide area networks.
ss
cal) band. Spectrum in the vicinity of 2.4 GHz, in
ns, data, and peripherals. All connections are made via cable or
integrate
d wireless and wired LAN
14. Protoc
A protocol is a standardized set of rules that specify how a conversation is to take place, including the
format, timing, sequencing and/ or error checking.
ol
15. SSID
A Network ID unique to a network. Only clients and
to communicate with ea
1
6. Static IP Addressing
A method
network a
assigned, a computer uses the same IP address every time it reboots and logs on to the network,
unless it is manually changed.
1
7. Temporal Key Integrity Protocol (TKIP)
The Tempora
standard for wirel
which is used to secure 802.11 wireless LANs. TKIP provides per-packet key mixing, a message
integrity check and a re-keying mechanism
of assigning IP addresses to clients on the network. In networks with Static IP address, the
dministrator manually assigns an IP address to each computer. Once a Static IP address is
l Key Integrity Protocol, pronounced tee-kip, is part of the IEEE 802.11i encryption
ch other. This string is case-sensitive.
ess LANs. TKIP is the next generation of WEP, the Wired Equivalency Protocol,
, thus fixing the flaws of WEP.
Access Points that share the same SSID are able
18. Transmis
TCP/IP is the protocol suite developed by the Advanced Research Projects Agency (ARPA). It is
widely used in corporate Internet works, because of its superior design for WANs. TCP governs how
packet is sequenced for transmission the network. The
63
sion Control Protocol / Internet Protocol (TCP/IP)
term “TCP/IP” is of
ten used generically to
Page 64

refer to the entire suite of related protocols.
1
9. Transmit / Receive
The wireless throughput in Bytes per seco
20. Wi-Fi Allian
The Wi-Fi Alliance is a nonprofit international association formed in 1999 to certify interoperability of
wireless Local Area Network products based on IEEE 802.11 specification. The goal of the Wi-Fi
Alliance’s members is to enhance the user experience through product interoperability. The
organization is formerly known as WECA.
ce
21. Wi-Fi Protected Access (WP
The Wi-Fi Alliance put together WPA as a data encryption method for 802.11 wireless LANs. WPA is
an industry-supported, pre-standard version of 802.11i utilizing the Temporal Key Integrity Protocol
(TKIP), which fixes the problems of WEP, including using dynamic keys.
nd averaged over two seconds.
A)
22. Wide Area Network (WAN)
A WAN consis
cabling. W
ts of multiple LANs that are tied together via telephone services and / or fiber optic
ANs may span a city, a state, a country, or even the world
23. Wired Equivalent Privacy (WEP)
Now widely recogni
transmission betwe
communicating devices. WEP’s problems are well-k
automated method for distributing the keys. WEP can be easily cracked in a couple of hours with
off-the-she
lf tools.
zed as flawed, WEP was a data encryption method used to protect the
en 802.11 wireless clients and APs. However, it used the same key among all
nown, including an insufficient key length and no
2
4. Wireless LAN (WLAN)
A wireless LAN does not use cable to transmit signals, but rather uses radio or infrared to transmit
ckets through the air. Radio
pa
transmission. Most wireless LANs use spread spectrum technology. It offers limited bandwidth,
usually under 11Mbps, and users share the bandwidth with other devices in the spectrum; however,
users can operate a spread spectrum device without licensing from the Federal Communications
Commission (FCC).
Frequency (RF) and infrared are the commonly used types of wireless
25. Fragment Threshold
The proposed protocol uses the frame fragmentation mechanism defined in IEEE 802.11 to achieve
parallel transmissions. A large data frame is fragmented into several fragments each of size equal to
fragment threshold. By tuning the fragment threshold value, we can get varying fragment sizes. The
determination of an efficient fragment threshold is an important issue in this scheme. If the fragment
threshold is small, the overlap part of the master and parallel transmission
This means the spatial reuse ratio of parallel transmissions is high. In contrast,
threshold, the overlap is small and the spatial reuse ratio is low. However high fragment threshold
leads to low fragment overhead. Hence there is a trade-off between spatial re-use and fragment
overhead. Fragment threshold is the maximum packet size used for fragmentation. Packets larger
than the size programmed in this field will be fragmented If you find that your corrupted packets or
s is larg
e.
with a large fragment
64
Page 65

asymmetric packet reception (all send packets, for example). You may want to try lowering your
fragmentation threshold. This will cause packets to be broken into smaller fragments. These small
fragmen
overhead, so you'll want to keep this value as close to the maximum value as possible.
ts, if corrupted, ca
n be resent faster than a larger fragment. Fragmentation increases
26. RTS(Request T
The RTS threshold is the packet size at which packet transmission is governed by the RTS/CTS
transaction. The IEEE802.11-1997 standard allows for short packets to be transmitted without
RTS/CTS transactions. Each station can have a different RTS threshold. RTS/CTS is used when the
data packet size exceeds the defined RTS threshold. With the CSMA/CA transmission mechanism,
the transmitting station sends out an RTS p
station to send back a CTS (Clear to Send) p
setting is useful for networks with many clie
be many more collisions. By lowering the RTS threshold, there may be fewer collisions, and
performance should improve. Basically, with a faster RTS threshold, the system can recover from
problems faster. RTS packets consume valuable bandwidth, however, s
will limit performance.
o Send) Threshold
acket to
nts. With many clients, and a high network load, there will
the receiving station, and waits for the receiving
acket before sending the actual packet data. This
o setting this value too low
27. Beacon Interval
In addition to data frames that carry information from higher layers
and cont
frame, provides the "heartbeat" of a wirele
communications in an orderly fashion. Bea
beacon transmissions. Before a station enters power save mode, the station needs the beacon
interval to know when to wake up to receive the beacon (and learn whether there are buffered frames
at the access point).
rol frames that support data transfer. The beacon frame, which is a type of management
ss LAN, enabling stations to establish and maintain
con Interval represents the amount of time between
, 802.11 includes management
2 e
8. Preamble Typ
There are two preamble types d
the decoder more time to proce
short preamble is designed to improve efficiency (for example, for VoIP systems). The difference
between the two is in the Synchronization field. The long preamble is 128 bits, and the short is 56
bits.
2
9. WPA2
It is the second generation of WPA. WPA2 is based on the final IEEE 802.11i amendment to the
standard.
802.11
3
0. Temporal Key Integrity Protocol (TKIP)
The Temporal Key Integrity Protocol, pronounced tee-kip, is part of the IEEE 802.11i encryption
standard for wireless LANs. TKIP is the next generation of WEP, the Wired Equivalency Protocol,
which is used to secure 802.11 wireless LANs. TKIP provides per-packet key mixing, a message
integrity check and a re-keying mechanism, thus fixing the flaws of WEP.
efined in IEEE 802.11 specification. A long preamble basically gives
ss the preamble. All 802.11 devices support a long preamble. The
65
Page 66

3
1. 802.1x Authentication
802.1x is a framework for authenticated MAC-level access control, defines Extensible Authentication
Protocol (EAP) over LANs (WAPOL). The standard encapsulates and leverages much of EAP, which
was defined for dial-up authentication with Point-to-Point Protocol in RFC 22
encapsulating EAP packets, the 802.1x stand
shared key information critical for wireless secu
ard also defines EAPOL messages that convey the
rity.
84. Beyond
3
2. Advanced Encryption Standard (AES)
Security issues are a major concern for wireless LANs, AES is the U.S. government’s
next-generation cryptography algorithm, which will replace DES and 3DES.
66
Page 67

Appendix: FAQ
1.
What is WMM?
Wi-Fi Multimedia (WMM), a group of features for wireless networks that improve the user
experience for audio, video and voice application
802.11e WLAN QoS draft standard. WMM adds prioritized capabilities to Wi-Fi networks and
optimizes their performance when multiple concurr
throughput requirements, compete for network resources. By using WMM, end-user satisfaction is
maintained in a wider variety of environments and traffic conditions. WMM makes it possible for
home network users and enterprise network managers to decide which
important and assign them a higher traffic priority.
2. What is WMM Power Save?
WMM Power Save is a set of features for Wi-Fi networks that increase the efficiency and flexibility
of data transmission in order to conserve power. WMM Power Save has been optimized for
mobile devices running latency-sensitive applications such as voice, audio, or video, but can
benefit any Wi-Fi device. WMM Power Save uses mechanisms included in the IEEE 802.11e
standard and is an enhancement of IEEE 802.11 legacy power saves. With WMM Power Save,
the same amount of data can be transmitted in a shorter time while allowing the Wi-Fi device to
remain longer in a low-power “dozing” state.
3. What is GI?
GI stands for Guard Interval. It’s a measure to protect wireless devices from cross- interference. If
there are two wireless devices using the same or near channel, and they are close enough, radio
interference will occur and reduce the radio resource usability.
4. What is STBC?
STBC stands for Space-Time Block Coding, which is a technique used to transfer multiple copies
of data by multiple antenna, to improve data transfer performance. By using multiple antennas,
not only data transfer rate is improved, but also the wireless stability.
s. WMM is based on a subset of the IEEE
ing applications, each with different latency and
data streams are most
67
Page 68

EC Declaration of Conformity
For the following equipment:
*Type of Product :
*Model Number : WNL-U554M
* Produced by:
Manufacturer‘s
Name : Planet T
Manufacturer‘s Address: 10F., No.96, Minquan Rd., Xindian Dist.,
New Taipei City 231, Taiwan (R.O.C.)
is herewith confirmed to comply with the requirements set out in the Council Directive on the
Approximation of the Laws of the Member States relating to
For the evaluation regarding the R&TTE the following standards were applied:
802.11n Micro Wireless USB Adapter
echnology Corp.
99/5/EC R&TTE.
EN 300 328 V1.7.1 (2006)
EN 301 489-1 V1.8.1 (2008)
EN 301 489-17 V2.1.1 (2009)
EN 62311 (2008)
EN 60950-1
(2006 + A11:2009 + A1:2010)
Responsible for marking this declarati o n i f the:
Manufacturer Authorized representative established within the EU
Authorized representative established within the EU (if applicable):
Company Name: Planet Technology Corp.
Company Address: 10F., No.96, Minquan Rd., Xindian Dist., New Taipei City 231, Taiwan
Person responsible for making this declaration
Name, Surname Kent Kang
Position / Title : Product M anager
(R.O.C.)
Taiwan 1th March., 2013
Place Date Legal Signature
PLANET TECHNOLOGY CORPORATION
e-mail: sales@planet.com.tw http://www.planet.com.tw
10F., No.96, Minquan Rd., Xindian Dist., New Taipei City, Taiwan, R.O.C. Tel:886-2-2219-9518 Fax:886-2-2219-9528
Page 69

English
Česky
Dansk
Deutsch
Eesti ke
Ελληνικ
Español
Français
Italiano
Latviski
EC Declaration of Conformity
Hereby, PLANE
declares that thi
is in compliance with the essential requirements
and other relevant provisions of Directive
1999/5/EC.
Společnost PLANET Technology Corporation,
tímto prohlašuje, že tato 802.11n Wireless USB
Adapter splňuje základní požadavky a další
příslušná ustanovení směrnice 1999/5/EC.
PLANET Technology Corporation, erklærer
herved, at følgende udstyr 802.11n Wireless USB
Adapter overholder de væsentlige krav og øvrige
relevante krav i direktiv 1999/5/EF
Hiermit erklärt PLANET Technology Corporation,
dass sich dieses Gerät 802.11n
Adapter in Übereinstimmung mi
grundlegenden Anforderungen und den anderen
relevanten
Vorschriften der Richtlinie 1999/5/EG befindet".
(BMWi)
Käesolevaga kinnitab PLANET Technology
eles
Corporation, et see 802.11n Wireless USB
Adapter vastab Euroopa Nõukogu direktiivi
1999/5/EC põhinõuetele ja muudele olulistele
tingimustele.
ΜΕ ΤΗΝ ΠΑΡΟΥΣΑ , PLANET Technology
ά
Corporation, ΔΗΛΩΝΕΙ ΟΤΙ ΑΥΤ Ο 802.11n
Wireless USB AdapterΣΥΜΜΟΡΦΩΝΕΤΑΙ ΠΡΟΣ
ΤΙΣ ΟΥΣ ΙΩΔ
ΣΧΕΤΙΚΕΣ
Por medio de la presente, PLANET Technology
Corporation, declara que 802.11n Wireless USB
Adapter cumple con los requisitos esenciales y
cualesquiera otras disposiciones aplicables o
exigibles de
la Directiva 1999/5/CE
Par la présente, PLANET Technology
Corporation, déclare que les appareils du 802.11n
Wireless USB Adapter sont conformes aux
exigences essentielles et aux autres dispositions
pertinentes de la directive 1999/5/CE
Con la presente , PLANET Technology
Corporation, dichiara che questo 802.11n
Wireless USB Adapter è conforme ai requisiti
essenziali ed alle altre disposizioni pertinenti
stabilite dalla direttiva
1999/5/CE.
Ar šo PLANET Technology Corporation,
apliecina, ka šī 802.11n Wireless USB Adapter
atbilst Direktīvas 1999/5/EK pamatprasībām un
citiem atbilstošiem noteikumiem.
T Technology Corporation,
s 802.11n Wireless USB Adapter
Wireless USB
t den
ΕΙ Σ ΑΠΑΙΤΗΣΕΙΣ ΚΑΙ ΤΙΣ ΛΟΙΠ ΕΣ
ΔΙΑΤΑΞΕΙΣ ΤΗΣ ΟΔΗΓΙΑΣ 1999/5/ΕΚ
Lietuviškai
Magyar
Malti
Nederlands
Polski
Português
Slovensky
Slovensko
Suomi
Svenska
Šiuo PLANET Technology Corporation,,
skelbia, kad 802.11n Wireless USB Adapter
tenkina visus svarbiausius 1999/5/E
direktyvos reikalavimus ir kitas svarbi
nuostatas.
A gyártó PLANET Technology Corporatio
kijelenti, hogy ez a 802.11n Wireless U
Adapter megfelel az 1999/5/EK irány
alapkövetelményeinek és a kapcsol
rendelkezéseknek.
Hawnhekk, PLANET Technology
Corporation, jiddikjara li dan 802.11n Wirele
USB Adapter jikkonforma mal-ħtiġijiet
essenzjali u ma provvedimenti oħrajn relevanti li
hemm fid-Dirrettiva 1999/5/EC
Hierbij verklaart , PLANET Technology
orporation, dat 802.11n Wireless USB Adapt
in overeenstemming is met de essentiële ei
en de andere relevante bepalingen van richt
1999/5/EG
Niniejszym firma PLANET Technology
Corporation, oświadcza, że 802.11n Wirele
High Power USB Adapter spełnia wszystkie
istotne wymogi i klauzule zawarte w
dokumencie „Directive 1999/5/EC”.
PLANET Technology Corporation, declara
que este 802.11n Wireless USB Adapter está
conforme com os requisitos essenciais e outras
disposições da Directiva 1999/5/CE.
Výrobca PLANET Technology Corporation,
týmto deklaruje, že táto 802.11n Wireless U
Adapter je v súlade so základnými
požiadavkami a ďalšími relevantnými predpismi
smernice 1999/5/EC.
PLANET Technology Corporation, s tem
potrjuje, da je ta 802.11n Wireless USB
Adapter skladen/a z osnovnimi zahtevami in
ustreznimi določili Direktive 1999/5/EC.
PLANET T
täten että 802.11n Wireless USB Adapter
tyyppinen laite on direktiivin 1999/5/EY
oleellisten vaatimusten ja sitä koskevien
direktiivin muiden ehtojen mukainen.
Härmed intygar, PLANET Technology
Corporation, att denna 802.11n Wireless USB
Adapter står i överensstämmelse med de
väsentliga egenskapskrav och övriga relevanta
bestämmelser som framgår av direktiv
1999/5/EG.
echnology Corporation, vakuuttaa
C
as
n,
SB
elv
ódó
ss
er
sen
lijn
ss
SB
 Loading...