

Planet WAP-4050 Manual Manual

802.11g Wireless LAN Travel Kit
WAP-4050
User’s Manual

Copyright
Copyrightã 2004 by PLANET Technology Corp. All rights reserved. No part of this publication may
be reproduced, transmitted, transcribed, stored in a retrieval system, or translated into any language
or computer language, in any form or by any means, electronic, mechanical, magnetic, optical,
chemical, manual or otherwise, without the prior written permission of PLANET.
PLANET makes no representations or warranties, either expressed or implied, with respect to the
contents hereof and specifically disclaims any warranties, merchantability or fitness for any particular
purpose. Any software described in this manual is sold or licensed "as is". Should the programs
prove defective following their purchase, the buyer (and not this company, its distributor, or its dealer)
assumes the entire cost of all necessary servicing, repair, and any incidental or consequential
damages resulting from any defect in the software. Further, this company reserves the right to revise
this publication and to make changes from time to time in the contents hereof without obligation to
notify any person of such revision or changes..
All brand and product names mentioned in this manual are trademarks and/or registered trademarks
of their respective holders.
Federal Communication Commission Interference Statement
This equipment has been tested and found to comply with the limits for a Class B digital device,
pursuant to Part 15 of FCC Rules. These limits are designed to provide reasonable protection
against harmful interference in a residential installation. This equipment generates, uses, and can
radiate radio frequency energy and, if not installed and used in accordance with the instructions, may
cause harmful interference to radio communications. However, there is no guarantee that
interference will not occur in a particular installation. If this equipment does cause harmful
interference to radio or television reception, which can be determined by turning the equipment off and
on, the user is encouraged to try to correct the interference by one or more of the following measures:
1. Reorient or relocate the receiving antenna.
2. Increase the separation between the equipment and receiver.
3. Connect the equipment into an outlet on a circuit different from that to which the receiver is
connected.
4. Consult the dealer or an experienced radio technician for help.
FCC Caution:
To assure continued compliance.(example-use only shielded interface cables when connecting to
computer or peripheral devices). Any changes or modifications not expressly approved by the party
responsible for compliance could void the user’s authority to operate the equipment.
This device complies with Part 15 of the FCC Rules. Operation is subject to the Following two
conditions: (1) This device may not cause harmful interference, and (2 ) this Device must accept any
interference received, including interference that may cause undesired operation.

Federal Communication Commission (FCC) Radiation Exposure
Statement
This equipment complies with FCC radiation exposure set forth for an uncontrolled environment. In
order to avoid the possibility of exceeding the FCC radio frequency exposure limits, human proximity
to the antenna shall not be less than 20 cm(8 inches) during normal operation.
R&TTE Compliance Statement
This equipment complies with all the requirements of DIRECTIVE 1999/5/CE OF THE EUROPEAN
PARLIAMENT AND THE COUNCIL OF 9 March 1999 on radio equipment and telecommunication
terminal Equipment and the mutual recognition of their conformity (R&TTE)
The R&TTE Directive repeals and replaces in the directive 98/13/EEC (Telecommunications Terminal
Equipment and Satellite Earth Station Equipment) As of April 8,2000.
Safety
This equipment is designed with the utmost care for the safety of those who install and use it. However,
special attention must be paid to the dangers of electric shock and static electricity when working with
electrical equipment. All guidelines of this and of the computer manufacture must therefore be allowed
at all times to ensure the safe use of the equipment.
Revision
User’s Manual for PLANET 802.11g Wireless LAN Travel Kit
Model: WAP-4050
Rev: 1.0 (September, 2004)
Part No. EM-WAP4050v1

TABLE OF CONTENTS
CHAPTER 1 INTRODUCTION..................................................................................................6
1.1 PACKAGE CONTENTS .........................................................................................................6
1.2 FEATURES .........................................................................................................................6
1.3 PHYSICAL FEATURES..........................................................................................................6
1.4 SPECIFICATION ..................................................................................................................8
1.5 WIRELESS PERFORMANCE .................................................................................................9
1.6 NETWORK SETUP...............................................................................................................9
1.6.1 AP Mode...................................................................................................................9
1.6.2 AP/Router Mode.....................................................................................................10
1.6.3 Client Mode............................................................................................................10
CHAPTER 2 INITIAL CONFIGURATION................................................................................11
2.1 SYSTEM REQUIREMENTS..................................................................................................11
2.2 PROCEDURES..................................................................................................................11
2.3 SYSTEM CONFIGURATION .................................................................................................12
2.3.1 Upgrade Firmware.................................................................................................14
2.3.2 Config File..............................................................................................................15
CHAPTER 3 CONFIGURING THE WIRELESS ACCESS POINT..........................................16
3.1 AP MODE ........................................................................................................................16
3.1.1 AP Setup................................................................................................................16
3.1.2 Wireless Security....................................................................................................17
3.1.3 Trusted Stations......................................................................................................19
3.2 AP/ROUTER MODE ..........................................................................................................20
3.2.1 AP/Router Setup....................................................................................................20
3.2.2 Wireless Security....................................................................................................23
3.2.3 Trusted Stations......................................................................................................23
3.2.4 Ethernet (WAN) Port Configuration........................................................................23
3.2.5 Ethernet (WAN) Port Status...................................................................................28
3.3 AP/ROUTER MODE - A DVANCED .......................................................................................35
3.3.1 Advanced Internet..................................................................................................35
3.3.2 Port Forwarding......................................................................................................36
3.3.3 DDNS.....................................................................................................................38
3.3.4 Network Diag..........................................................................................................40
3.3.5 Options...................................................................................................................41

3.3.6 PC Database..........................................................................................................41
3.3.7 Security..................................................................................................................42
3.4 CLIENT MODE ..................................................................................................................46
CHAPTER 4 TROUBLESHOOTING.......................................................................................51

Chapter 1 Introduction
If any of the above items are missing, contact your supplier as soon as
possible.
Thank you for purchasing WAP-4050.
As small as a box of poker cards, the WAP-4050 is not only a wireless access point but also a wireless
NAT router and Ethernet adapter. With these three most commonly used operating mode, WAP-4050
provides greater flexibility for a mobile user in various environments.
This manual guides you on how to install and properly use the WAP-4050 in order to take full advantage
of its features.
1.1 Package Contents
Make sure that you have the following items:
· 802.11g WLAN Pocket AP
· Power Adapter
· Quick Installation Guide
· User’s manual CD
· RJ-45 cable
· Travel bag
Note:
1.2 Features
• Wireless standard IEEE 802.11b/g compliant
• Pocket size wireless access point
• 3 operating modes selectable: AP, NAT Router, and AP Client
• Up to 54Mbps data rate
• Support WPA-PSK and 64/128-bit WEP encryption
• Support MAC Access Control in AP and AP/Router modes
• Support DDNS, DMZ, DHCP server, and virtual server in AP/Router mode
• Provide basic firewall features in AP/Router mode
• Support VPN pass through in AP/Router mode
• Driver free, plug ‘n play
1.3 Physical Features
Reset
Ethernet
Power Mode Selector
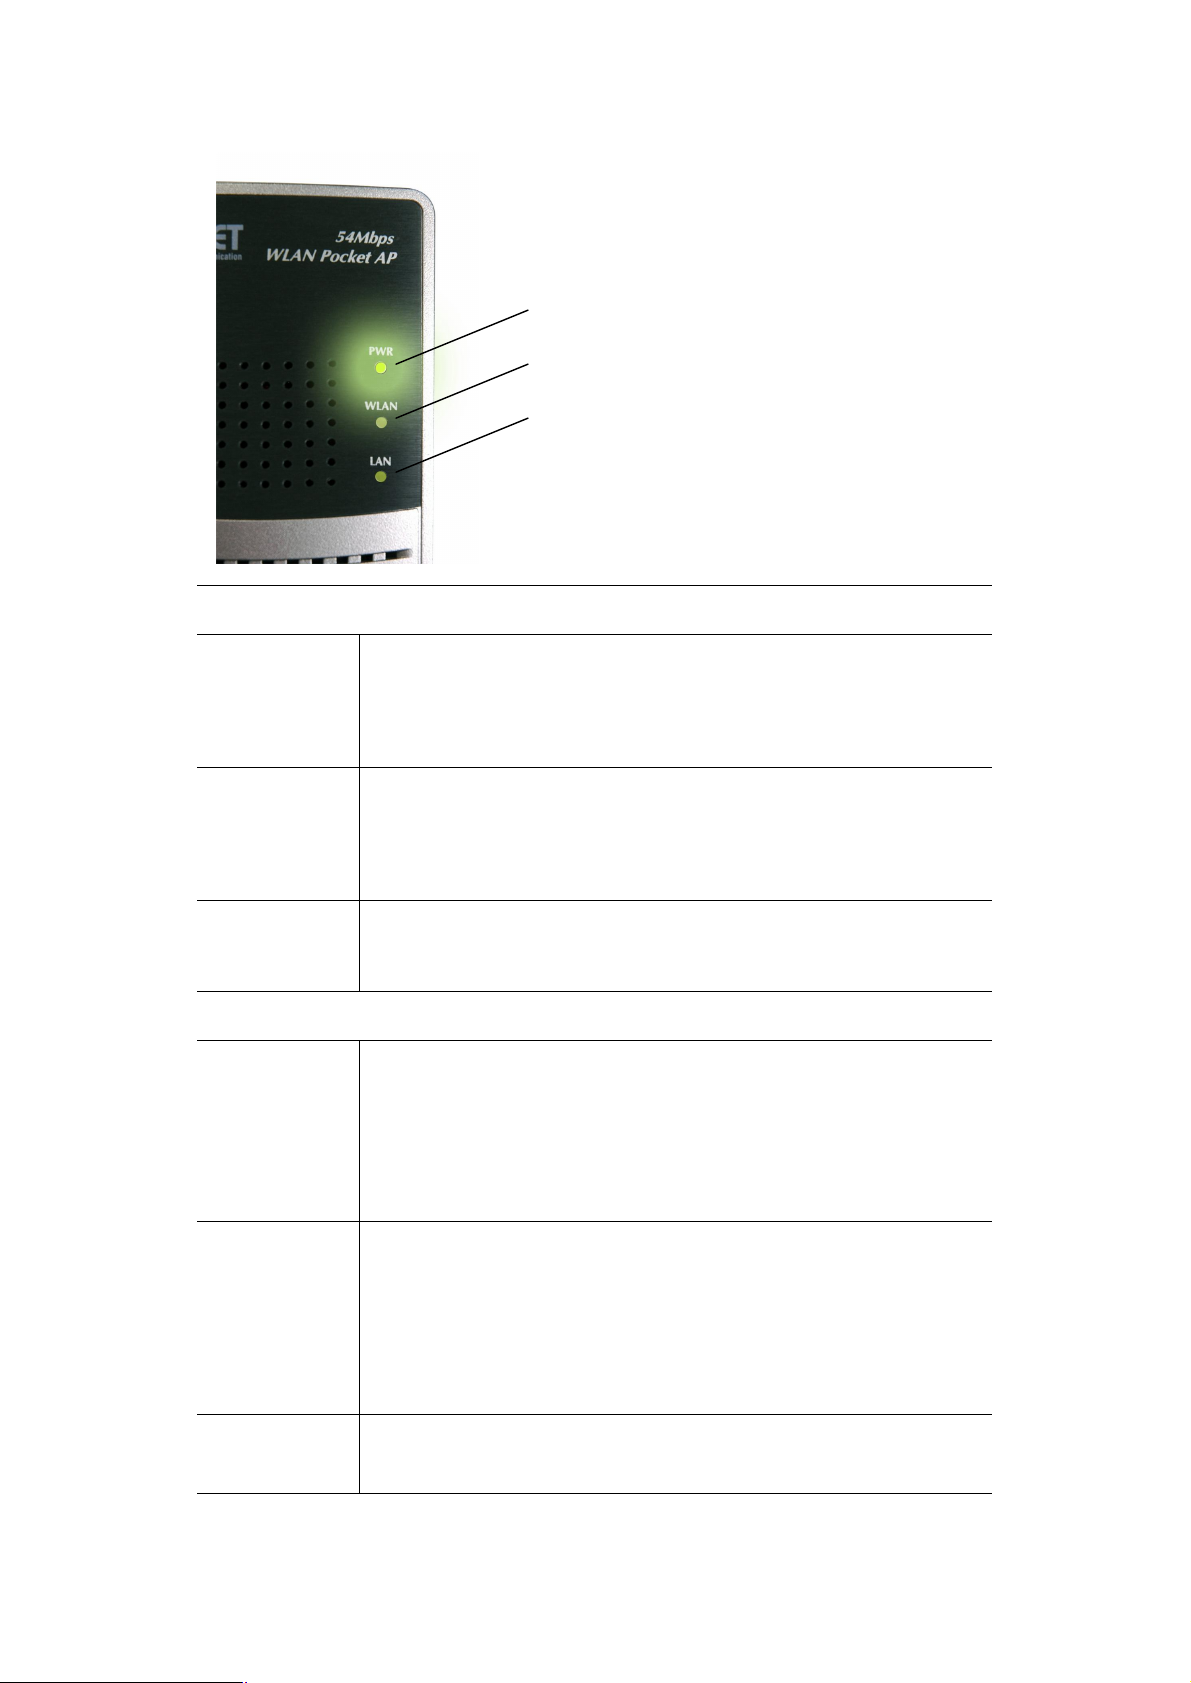
LED Indication
Power LED
Wireless LED
Ethernet LED
Ethernet LED
Wireless LED
Power LED
Physical Interface Description
Mode Selector This switch has 4 positions:
· On - Ethernet connection established.
· Off - No Ethernet connection.
· Flashing - Data being transferred.
· On - Wireless interface available.
· Off - Wireless interface unavailable.
· Flashing - Data being transferred.
· On - Power is available.
· Off - No power.
1 - AP Mode
2 - AP/Router Mode
3 - Config Mode
4 - Client Mode
Reset Button This button has 2 functions:
· Restart (reboot) - press & release.
· Set all settings to factory defaults - press & hold (for 8 seconds), then
release.
Note: This should not be done while connected or using the WAP-4050.
Ethernet Port Connect the 10/100BaseT Ethernet cable here.
· In AP mode or AP/Router mode, this is connected to the LAN or WAN.
- 7 -

· In Config mode, this should be directly connected to your PC.
· In Client mode, this is connected to the Ethernet port of a network
device.
Power Connect the supplied power adapter here.
1.4 Specification
Standard IEEE 802.11b, IEEE 802.11g
Signal Type DSSS (Direct Sequence Spread Spectrum)
Modulation BPSK / QPSK / CCK / OFDM
Port 10/100Base-TX (RJ-45) * 1
Antenna Internal antenna
Output Power 13dBm
11 Mbps (CCK): -72dBm
802.11b
Sensitivity
802.11g
Operating Mode AP, AP/Router, AP Client
64/128-bit WEP encryption
WPA-PSK
Security
Password Protect
MAC Filtering
5.5 Mbps (QPSK): - 76dBm
1, 2 Mbps (BPSK): - 80dBm
(typically @PER < 8% packet size 1024 and @25ºC + 5ºC)
54 Mbps: -70dBm
48 Mbps: - 70dBm
36 Mbps: -72dBm
24 Mbps: -72dBm
18 Mbps: -74dBm
12 Mbps: -76dBm
9 Mbps: -79dBm
6 Mbps: -80dBm
(typically @PER < 8% packet size 1024 and @25ºC + 5ºC)
SSID Broadcast Disable function
Frequency Band
Data Rate
2.4 GHz ~2.484GHz
802.11g Up to 54Mbps (6/ 9/ 12/ 18/ 24/ 36/ 48/ 54)
802.11b Up to 11Mbps (1/ 2/ 5.5/ 11)
- 8 -

1.5 Wireless Performance
The following information will help you utilizing the wireless performance, and operating coverage of
WAP-4050.
1. Site selection
To avoid interferences, please locate WAP-4050 and wireless clients away from transformers,
microwave ovens, heavy-duty motors, refrigerators, fluorescent lights, and other industrial
equipments. Keep the number of walls, or ceilings between AP and clients as few as possible;
otherwise the signal strength may be seriously reduced.
2. Environmental factors
The wireless network is easily affected by many environmental factors. Every environment is
unique with different obstacles, construction materials, weather, etc. It is hard to determine the
exact operating range of WAP-4050 in a specific location without testing.
3. WLAN type
If WAP-4050 is installed in an 802.11b and 802.11g mixed WLAN, its performance will reduced
significantly. Because every 802.11g OFDM packet needs to be preceded by an RTS-CTS or CTS
packet exchange that can be recognized by legacy 802.11b devices. This additional overhead
lowers the speed. If there are no 802.11b devices connected, or if connections to all 802.11b
devices are denied so that WAP-4050 can operate in 11g-only mode, then its data rate should
actually 54Mbps.
1.6 Network Setup
The WAP-4050 can be configured as an AP, AP/Router, or AP client. It is recommended to determine
your network settings before installing WAP-4050.
Note: While you can change modes at any time, please pay attention to the following points:
· Whenever the mode is changed, the WAP-4050 will restart. You need to wait for the restart to
be completed, which will take a few seconds. When the restart is completed, the Wireless LED will
be ON.
· After changing modes, any Wireless connections will be lost. On your PC, you need to select
the SSID (Wireless LAN) for the new mode in order to re-establish a Wireless connection to the
WAP-4050.
1.6.1 AP Mode
In AP mode, the WAP-4050 allows wireless clients to connect to LAN or WLAN.
- 9 -
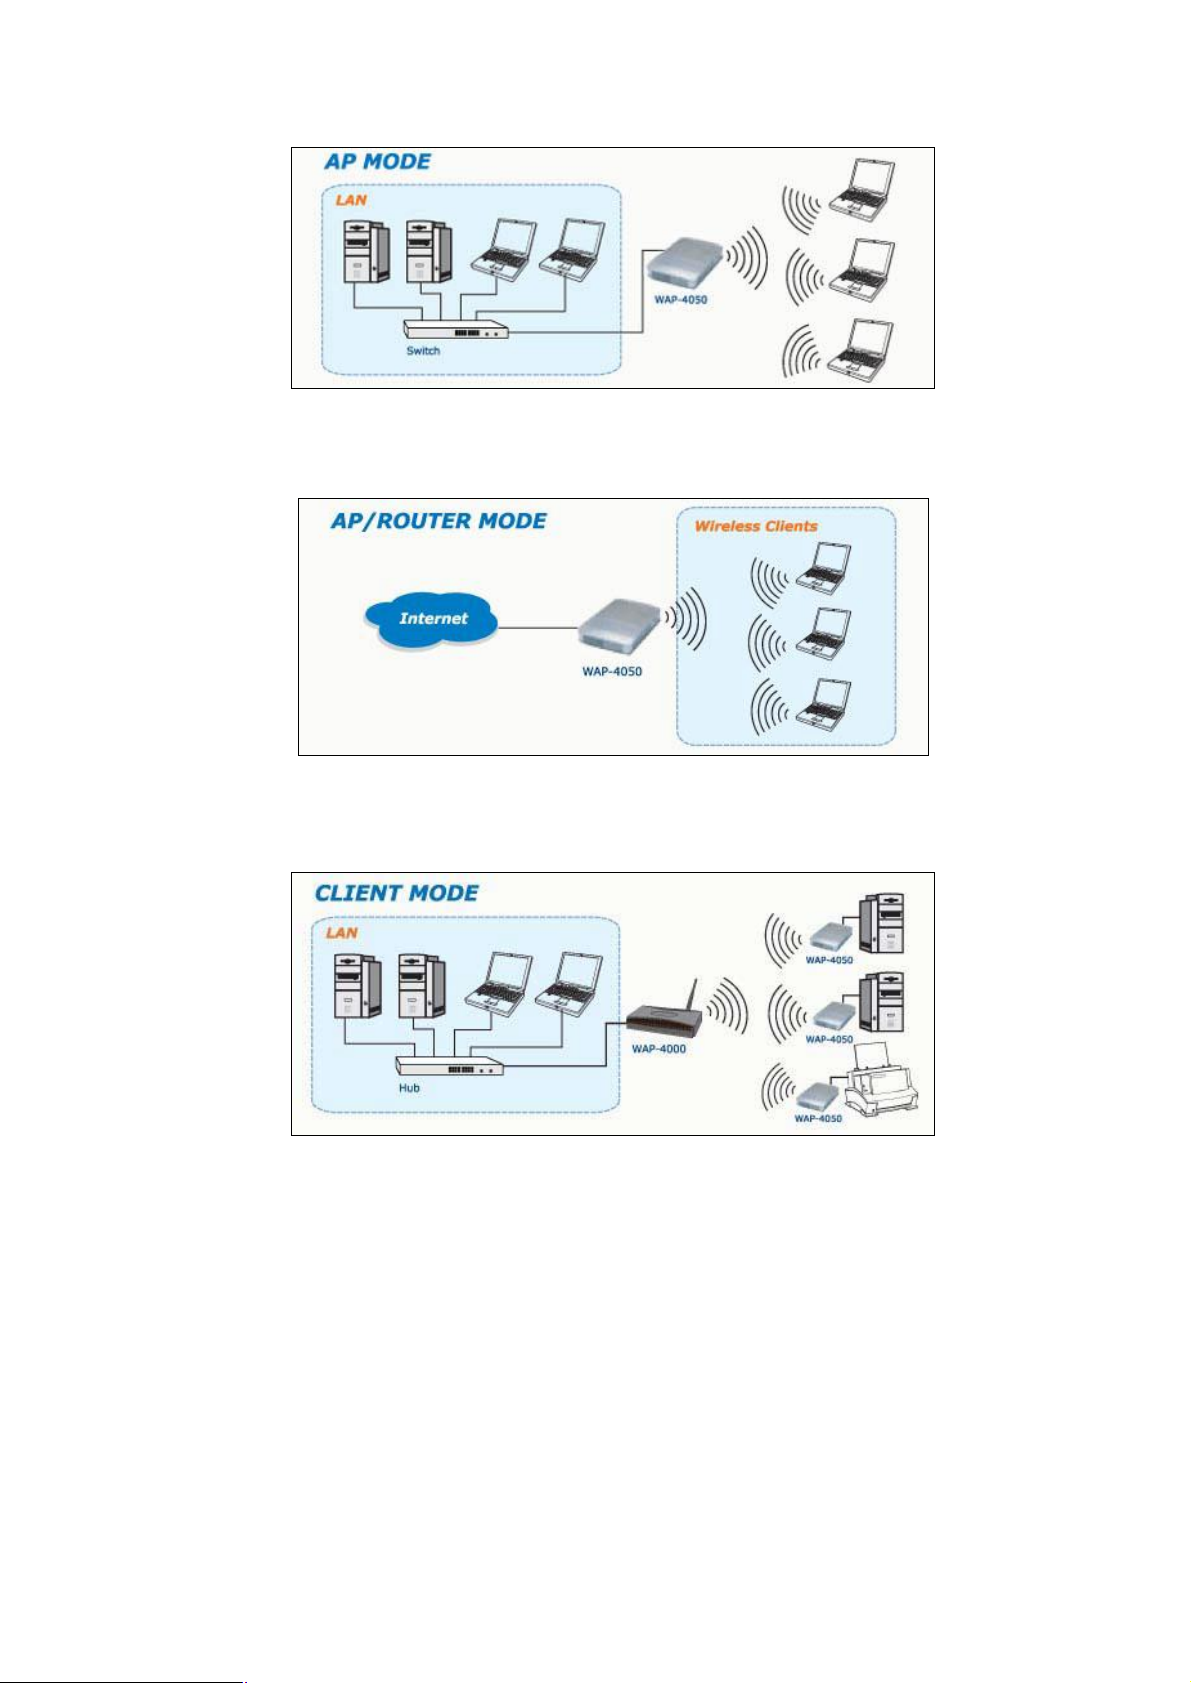
1.6.2 AP/Router Mode
In AP/Router mode, the WAP-4050 allows wireless clients to share a single Internet connection.
1.6.3 Client Mode
In Client mode, the WAP-4050 converts an Ethernet-ready device into a wireless device.
- 10 -

Chapter 2 Initial Configuration
2.1 System Requirements
Before installing WAP-4050, make sure that your system meets the following requirements:
· Network cable. Use a standard 10/100BaseT network (UTP) cable with RJ45 connectors.
· The administrative PC must be installed TCP/IP protocol, and configured as a DHCP client.
· To use the Wireless interface, your PC must be compliant with the IEEE802.11b or
IEEE802.11g specifications.
2.2 Procedures
1. Switch the mode selector to position 3 to enter Config mode.
2. Power up and wait for the Wireless LED to turn on. This indicates the WAP-4050 is ready.
Note: ONLY use the power adapter supplied with the WAP-4050. Otherwise, the product may be
damaged.
If you want to reset your WAP-4050 to default settings, press the Reset button for 8 seconds.
3. Establish a wired or wireless connection to the WAP-4050. It is strongly suggested to use wired
connection to configuration.
· Wired – directly connect a standard LAN cable from administrative PC to WAP-4050.
Please note there should be no hub or switch in between.
· Wireless – use the wireless adapter to connect the WLAN with SSID: default. Please also
check the MAC address of target AP to ensure you are associating to the correct AP.
4. Activate the web browser.
5. Enter “config.ap” in the “Location” or “Address” field. Or you can access the WAP-4050 by its
default IP address in Config mode, i.e. http://192.168.0.1.
Note: Either being activated by wired or wireless interface. If the administrative PC has active
wired and wireless interfaces at the same time, it may not be able to access WAP-4050
successfully.
6. By default, there is no username and password needed for the first time access. It is strongly
suggested to set admin login password for securing the management access.
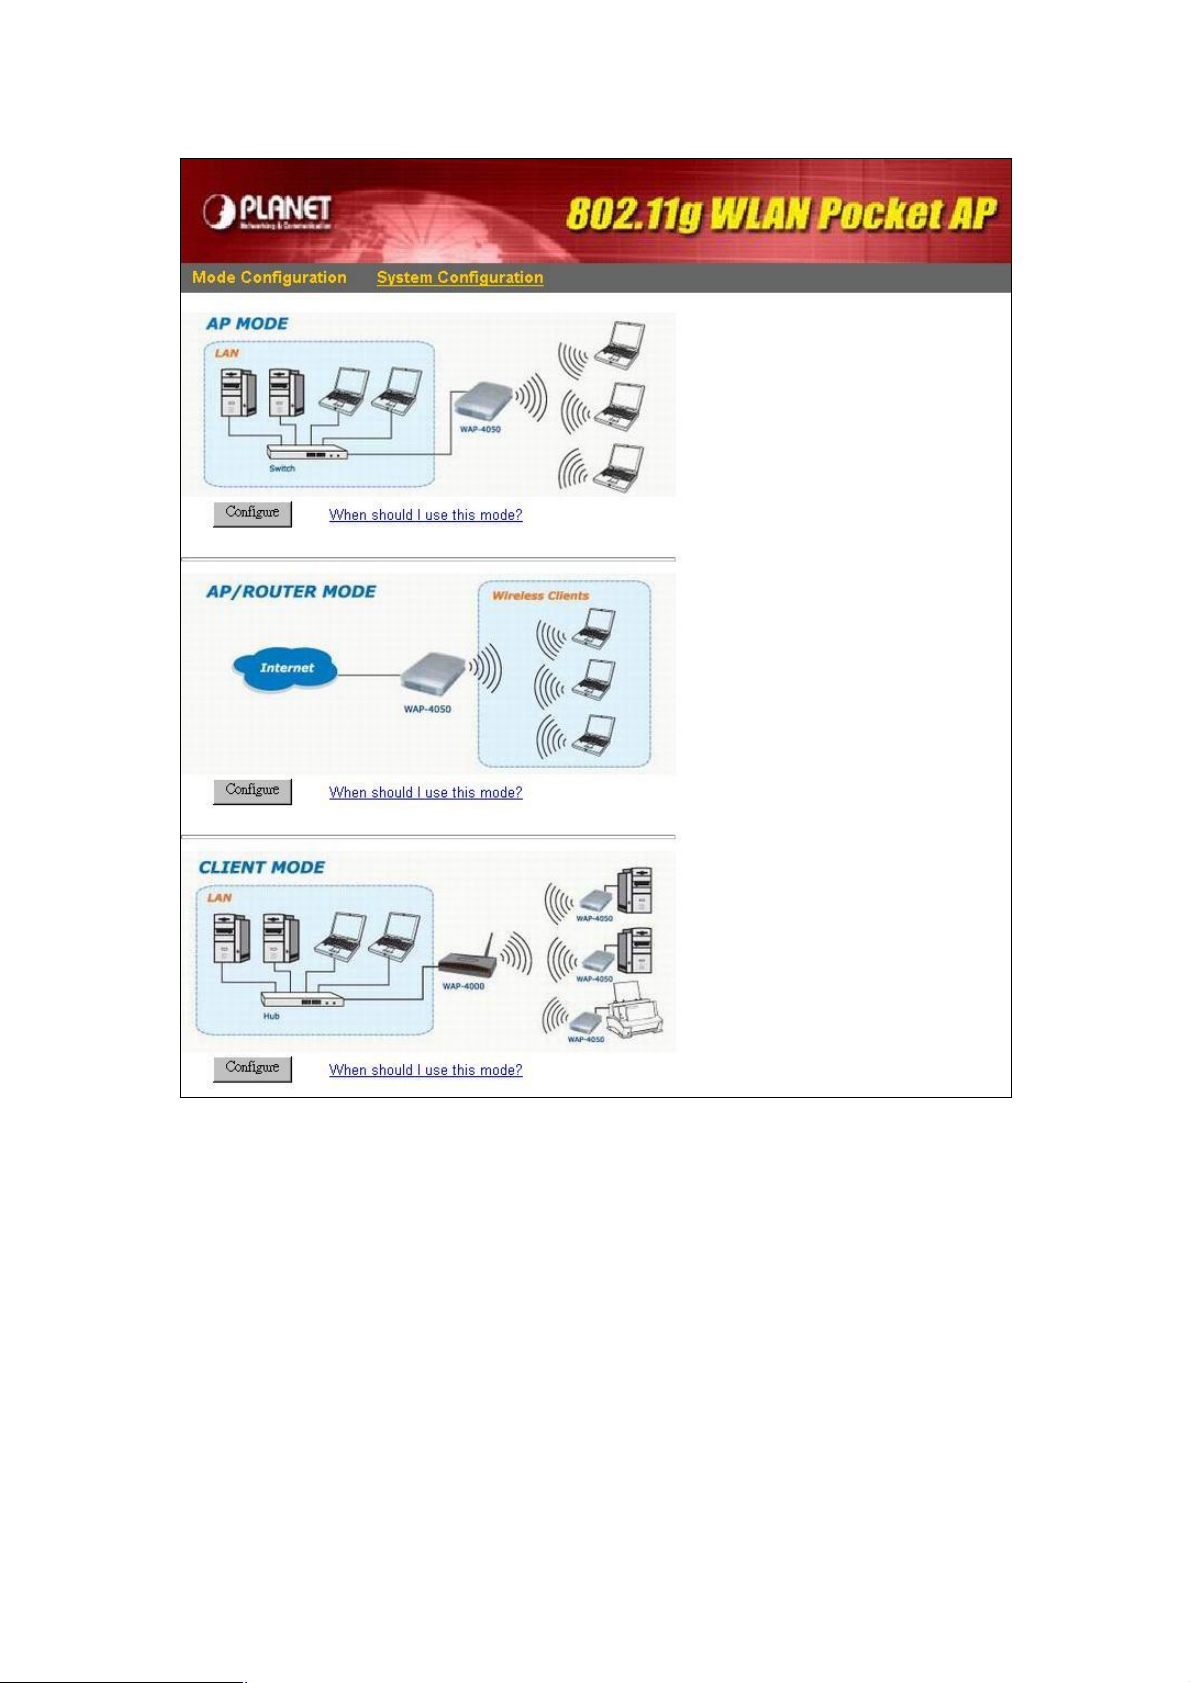
7. After successfully access the WAP-4050, you will see the Mode Configuration screen. As for the
detailed settings of each mode, please refer to following chapters.
- 11 -
2.3 System Configuration
The settings of System Configuration screen will apply to all modes.
- 12 -
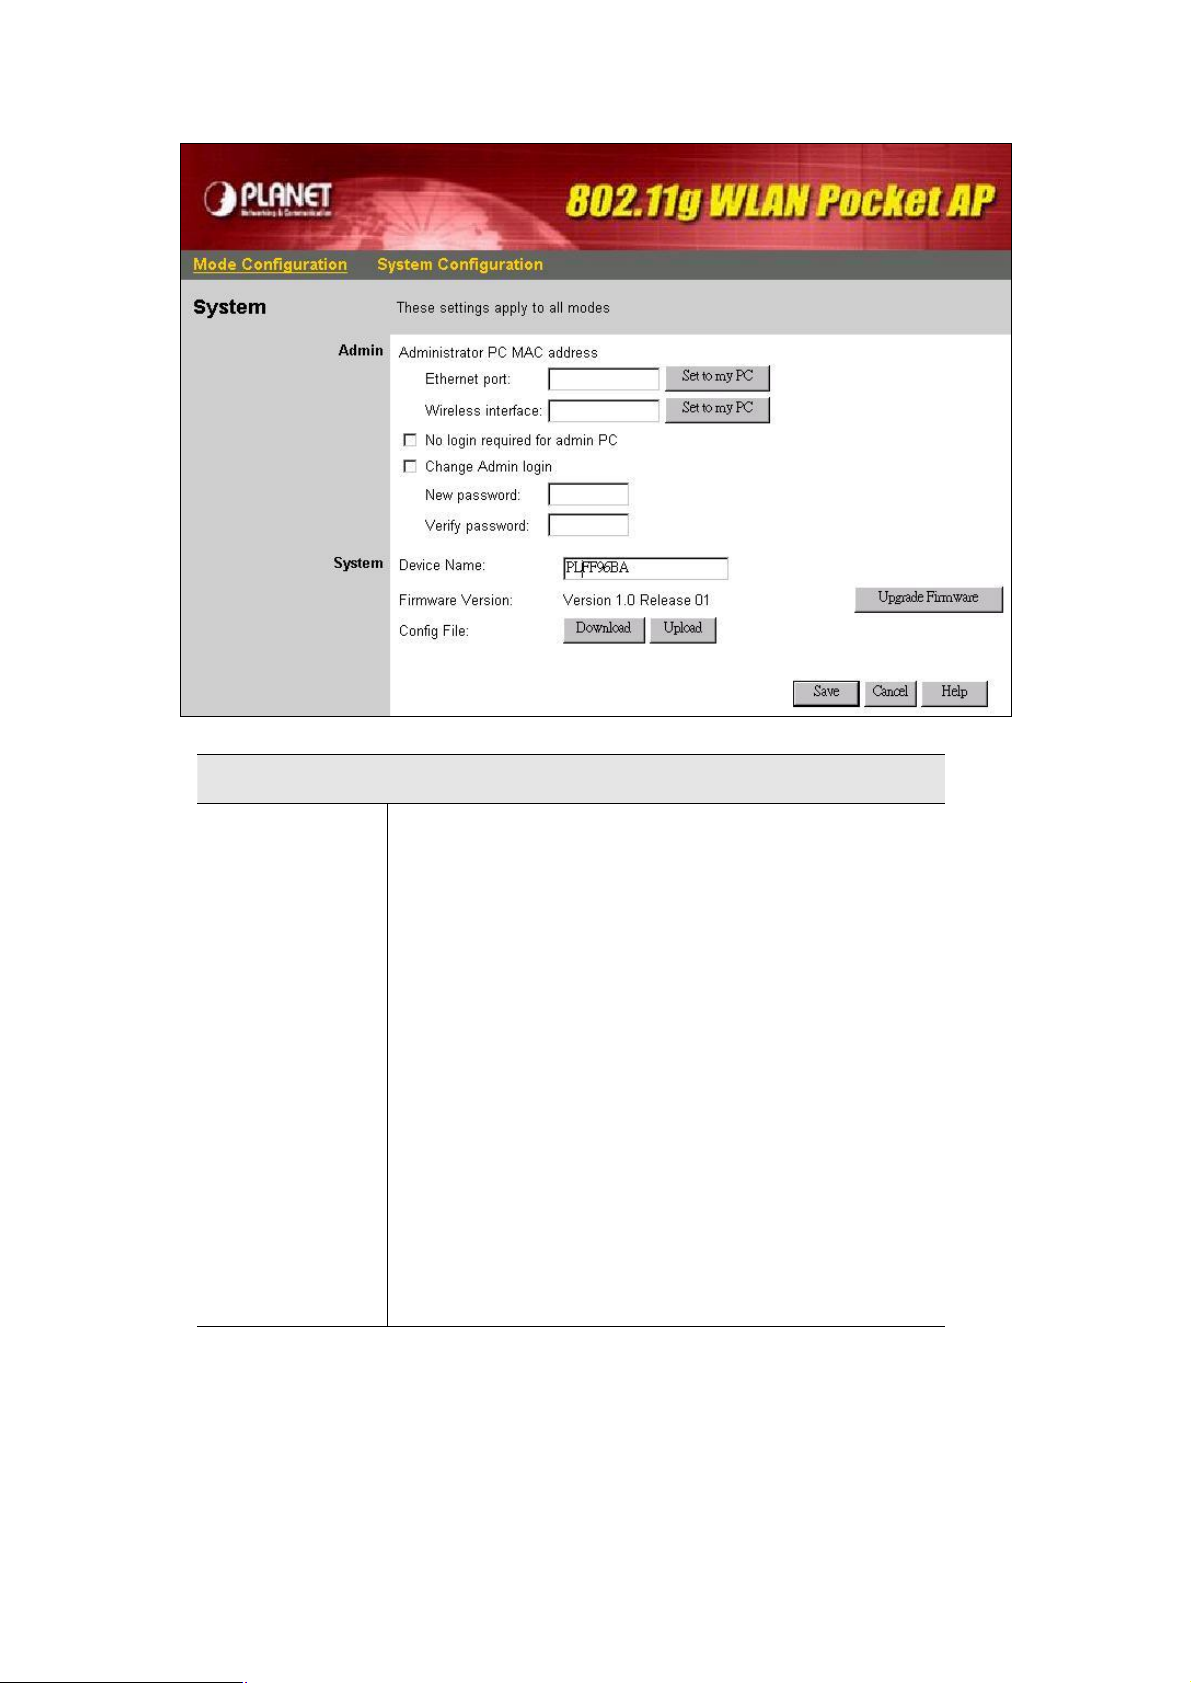
Admin
Administrator PC
MAC Address
This is used to identify your PC. If you normally use the same PC,
you should provide this information. The MAC address is also called
the "Physical Address". This address can be determined by
checking the Properties for the desired network interface, but the
provided Set to my PC buttons make this unnecessary.
· Ethernet Port - the MAC address of the 10/100BaseT Ethernet
Port on administrative PC.
· Wireless Interface - the MAC address of the wireless interface
on administrative PC.
· Set to my PC - only 1 of these buttons will work. If you have
connected via Wireless, click the button will insert your PC’s
wireless MAC address into the field provided. If you connected
via the wired Ethernet interface, click the button will insert your
PC’s Ethernet MAC address into the field provided.
- 13 -

No login required
If you check this, and provide the MAC address of administrative
for admin PC
Change Admin
login
New Password Enter the new password here.
Verify Password Re-enter the new password in this field, to ensure it is correct.
System
PC (see above), you will not be prompted for the password when
using the specified PC.
You should set a password for the admin login, using the password
fields below. This option is provided to allow you to set a password,
but avoid the inconvenience of being prompted for the password
whenever you wish to change the settings.
Check this box to change the current password, and then enter the
required password in the fields below. If this checkbox is enabled,
and the password fields left blank, then the password is cleared (set
to no password).
Note that if the password is set, you will be prompted for the user
name and password when you connect. You must use admin as the
user name.
Device Name The name of the WAP-4050. You can change this if you wish.
Firmware version This displays the current version of the firmware.
Click the Upgrade Firmware button if you wish to install a new
version of the firmware.
· You need to download the new firmware file first.
· Clicking the button will display the Upgrade Firmware screen.
See the following section for further details.
Config File This feature allows you to download (save) the current settings as a
file on your PC, upload (restore) a previously-saved config file. Click
the desired button:
· Download will prompt you for the location, on your PC, for the
configuration file.
· Upload will display the Config File screen. See below for
details.
2.3.1 Upgrade Firmware
To perform the firmware upgrade, please download the new firmware file to administrative PC first.
After clicking Upgrade Firmware button from System page, you will see the following screen.
- 14 -

1. Enter the password of the WAP-4050.
2. Use Browse button to specify the firmware file.
3. Click Start Upgrade button to perform the task.
Note: WAP-4050 is unavailable during the upgrade process, and must restart when the upgrade is
completed. Any connections to or through the WAP-4050 will be lost.
2.3.2 Config File
Restore Config The feature allows you to restore a pre-saved configuration file back to
the WAP-4050.
Click Browse to select the configuration file, then click Restore to
upload the configuration file.
WARNING: Uploading a configuration file will destroy (overwrite) ALL of
the existing settings.
Default Config Clicking the Restore Defaults button will reset the WAP-4050 to its
factory default settings.
WARNING: This will delete ALL of the existing settings.
- 15 -
Chapter 3 Configuring the Wireless Access Point
3.1 AP Mode
WAP-4050 is not allowed to be configured in AP mode. Configuration for AP mode must be performed
while in Config Mode.
Please follow the procedures described in section 2.2 to access the Mode Configuration screen and
click on the Configure button in AP Mode.
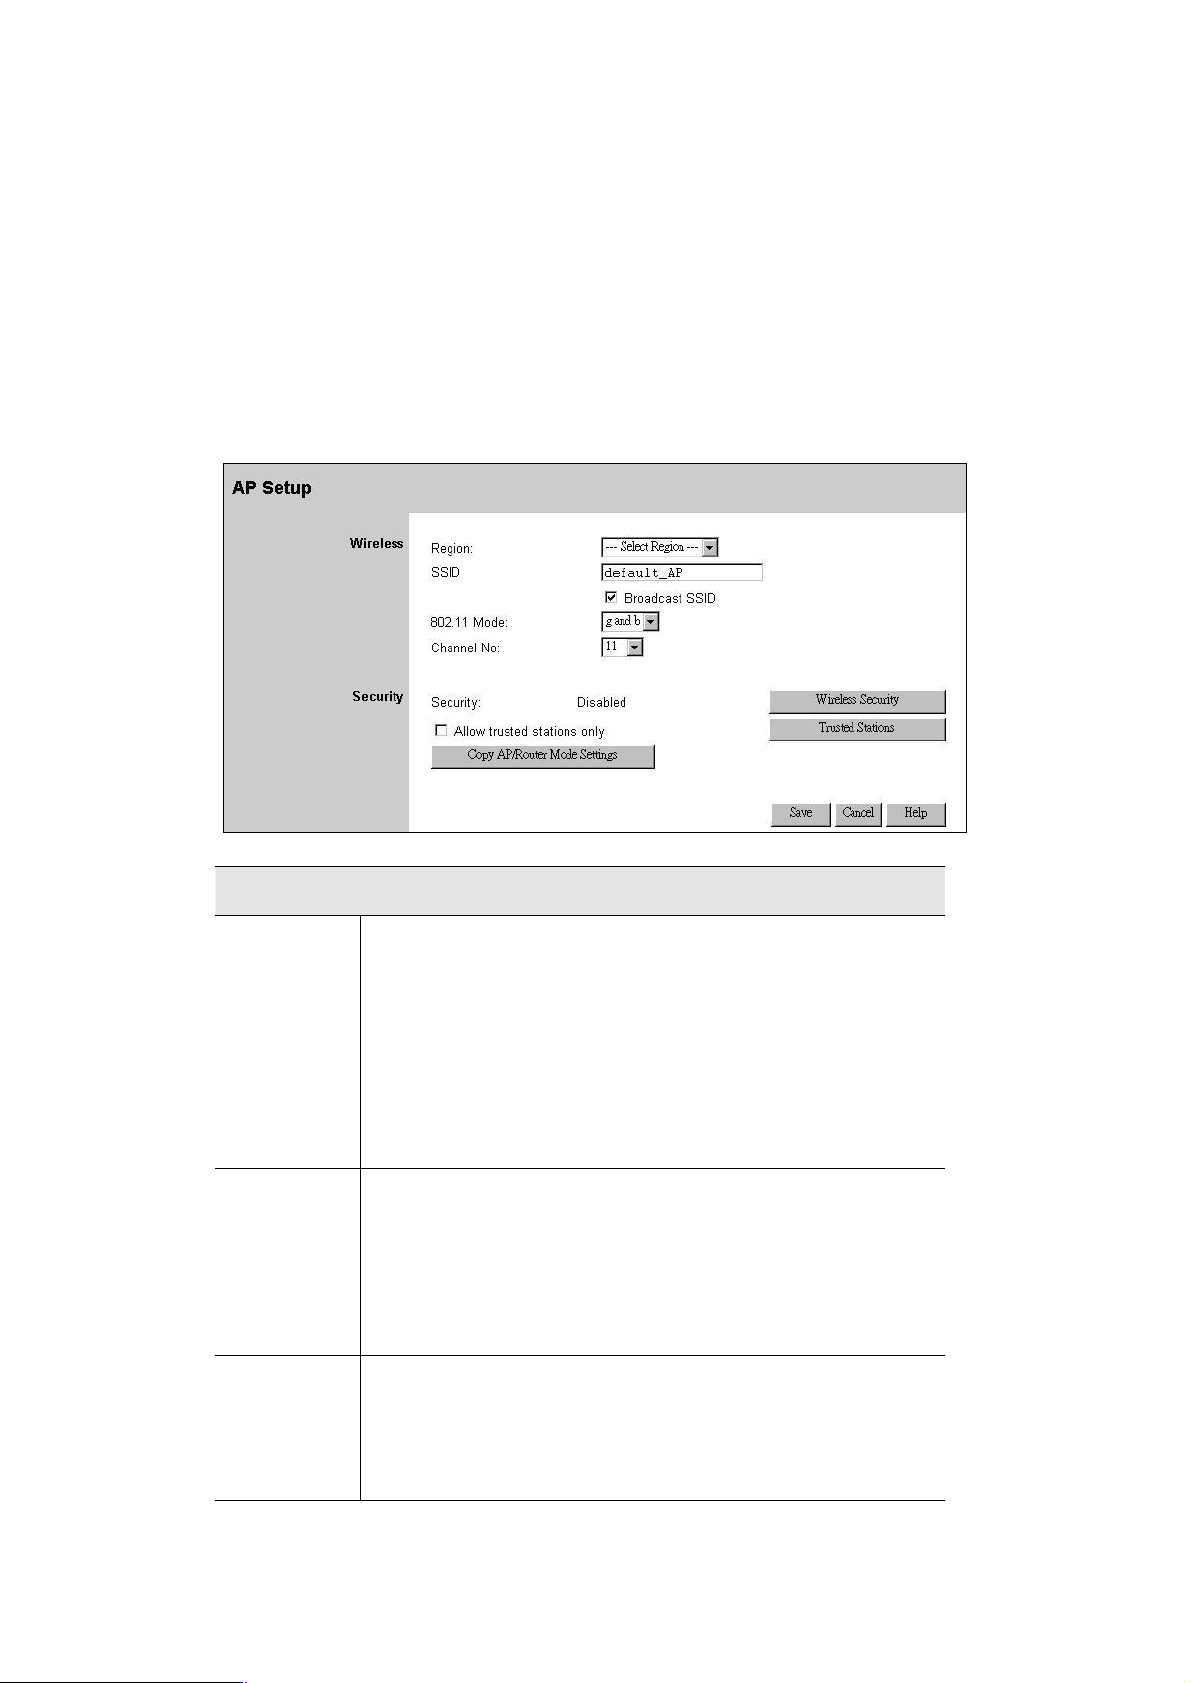
3.1.1 AP Setup
Wireless
Region Select your region from the drop-down list. This field displays the
region of operation for which the wireless interface is intended. It may
not be legal to operate the device in a region other than the region
shown here. If your country or region is not listed, please check with
your local government agency for more information on which channels
you are allowed to use, and select a region that allows those channels.
(The channel list changes according to the selected region.)
SSID This field allows you to set the SSID of WAP-4050 in AP mode. The
SSID is an identification string that differentiates from other WLANs.
AP Mode and AP/Router mode must use different SSIDs. Using the
same SSID for both modes would confuse Wireless clients. The default
value is default_AP.
Broadcast
Enable or disable a Service Set Identifier broadcast. When enabled,
SSID
the SSID of the WAP-4050 is sent to wireless enabled devices on the
area, thus may cause unauthorized user to connect your wireless
networks.
- 16 -
 Loading...