

Page 1

Business / Professional PoE IP Phone
VIP-350PT / VIP-550PT
User’s manual
Version 1.0.0
[1/168]
Page 2

Copyright
Copyright (C) 2007 PLANET Technology Corp. All rights reserved.
The products and programs described in this User’s Manual are licensed products of PLANET Technology, This
User’s Manual contains proprietary information protected by copyright, and this User’s Manual and all
accompanying hardware, software, and documentation are copyrighted.
No part of this User’s Manual may be copied, photocopied, reproduced, translated, or reduced to any electronic
medium or machine-readable form by any means by electronic or mechanical. Including photocopying, recording,
or information storage and retrieval systems, for any purpose other than the purchaser's personal use, and without
the prior express written permission of PLANET Technology.
Disclaimer
PLANET Technology does not warrant that the hardware will work properly in all environments and applications,
and makes no warranty and representation, either implied or expressed, with respect to the quality, performance,
merchantability, or fitness for a particular purpose.
PLANET has made every effort to ensure that this User’s Manual is accurate; PLANET disclaims liability for any
inaccuracies or omissions that may have occurred.
Information in this User’s Manual is subject to change without notice and does not represent a commitment on the
part of PLANET. PLANET assumes no responsibility for any inaccuracies that may be contained in this User’s
Manual. PLANET makes no commitment to update or keep current the information in this User’s Manual, and
reserves the right to make improvements to this User’s Manual and/or to the products described in this User’s
Manual, at any time without notice.
If you find information in this manual that is incorrect, misleading, or incomplete, we would appreciate your
comments and suggestions.
CE mark Warning
The is a class B device, In a domestic environment, this product may cause radio interference, in which case the
user may be required to take adequate measures.
WEEE Warning
To avoid the potential effects on the environment and human health as a result of the presence of
hazardous substances in electrical and electronic equipment, end users of electrical and electronic
equipment should understand the meaning of the crossed-out wheeled bin symbol. Do not dispose of
WEEE as unsorted municipal waste and have to collect such WEEE separately.
Trademarks
The PLANET logo is a trademark of PLANET Technology. This documentation may refer to numerous hardware
and software products by their trade names. In most, if not all cases, their respective companies claim these
designations as trademarks or registered trademarks.
Revision
User’s Manual for PLANET Business/Profreesional PoE IP Phone:
Model: VIP-350PT/VIP-550PT
Rev: 1.0 (2007, October)
Part No. EM-VIP350PT_550PTV1
[2/168]
Page 3

TABLE OF CONTENTS
Chapter 1 ....................................................................................................................................9
Introduction ................................................................................................................................9
Overview................................................................................................................................. 9
Package Content.................................................................................................................... 10
Physical Details..................................................................................................................... 11
Front View ........................................................................................................................ 11
Chapter 2 ..................................................................................................................................15
LCD Keypad Opearting & Configurations............................................................................... 15
Configurations for Address Book ......................................................................................... 15
Main Menu .......................................................................................................................15
Address Book ..................................................................................................................15
Find ...................................................................................................................................16
Find.【OK】 .................................................................................................................... 16
View Contact....................................................................................................................17
Edit Contact.Display.....................................................................................................18
Edit Contct.Protocol ..................................................................................................... 19
Edit Contact.Email-Like Address................................................................................. 19
Add ....................................................................................................................................20
Add Contact.Display ....................................................................................................21
Add Contact.Protocol ...................................................................................................21
Add Contact.Email-Like Address.................................................................................22
Del ..................................................................................................................................... 22
Clear .............................................................................................................................23
Address Book.【OK】 ...................................................................................................23
Speed Dials...................................................................................................................... 24
Call Screen ......................................................................................................................25
Favorite............................................................................................................................. 26
IMPP .................................................................................................................................28
State .............................................................................................................................. 28
IMPP. 【OK】 ............................................................................................................29
Add – Type & Address-of-Record ....................................................................... 33
Add - View Status ..................................................................................................34
Configurations Call History ..................................................................................................35
Missed/Dialed/Received Calls ......................................................................................36
View Record................................................................................................................. 36
Configurations Terminal Settings ......................................................................................... 37
[3/168]
Page 4

Password.......................................................................................................................... 38
Admin/User ..................................................................................................................39
Passward.Admin.【OK】 .....................................................................................39
Programable Keys ..........................................................................................................40
DTMF ...........................................................................................................................41
View DTMF ............................................................................................................. 42
Edit DTMF ...............................................................................................................43
Set Programmable Keys ............................................................................................... 43
Shortcut Menu ........................................................................................................ 44
Settings Date/Time................................................................................................................ 49
Zone ..................................................................................................................................50
FMT................................................................................................................................... 50
DST ................................................................................................................................... 51
DST Offset.................................................................................................................... 51
DST Start Date .............................................................................................................52
DST Start Date.Month...........................................................................................52
DST Start Date.Day...............................................................................................52
Set Date/Time 【OK】..................................................................................................53
Ringer ...............................................................................................................................54
Type Select ................................................................................................................... 55
Vol Adjustment ............................................................................................................55
Alert-Info........................................................................................................................... 55
Tag Settings ..................................................................................................................56
Ring Settings ................................................................................................................57
LCD Back-Light ............................................................................................................... 57
Alarm................................................................................................................................. 57
Regular Alarm ..............................................................................................................58
Time Settings.......................................................................................................... 58
Regularity Settings.................................................................................................59
Alarm Ringer....................................................................................................................59
Phone Lock ......................................................................................................................59
Call Forward .........................................................................................................................60
Target Number ................................................................................................................61
Call Forward.All Calls Forward ..................................................................................... 62
Call Forward.Busy Forward........................................................................................... 62
Call Forward.No Answer Forward................................................................................62
Preference..............................................................................................................................63
Call Waiting......................................................................................................................63
Dial Timeout.....................................................................................................................64
Hold Recall Timer ...........................................................................................................64
[4/168]
Page 5

Auto-Redial ...................................................................................................................... 65
Stop Criterion Settings .......................................................................................... 65
Retry Interval Settings...........................................................................................65
Totoal Duration Settings ....................................................................................... 66
Dial Plan ........................................................................................................................... 66
Inter-digit Timeout Settings .........................................................................................66
LAN Dial Settings ........................................................................................................ 67
Call Command Settings................................................................................................ 67
Dial Plan .......................................................................................................................73
Hot Line........................................................................................................................74
Message Alert.................................................................................................................. 75
Auto-Answer ....................................................................................................................76
Auto-Answer Control List............................................................................................ 76
Level......................................................................................................................... 77
AoR ..........................................................................................................................78
Unhold on Transfer......................................................................................................... 78
Conference Alert ............................................................................................................. 79
Default is enabled.................................................................................................... 79
Xfer on Exit Conf............................................................................................................. 79
Network................................................................................................................................. 80
Active Status....................................................................................................................81
General............................................................................................................................. 82
Mode.............................................................................................................................82
Static Settings ............................................................................................................... 82
PPPoE Settings ............................................................................................................. 83
User Name.............................................................................................................. 83
Password................................................................................................................. 83
Service Name .........................................................................................................84
DNS Server................................................................................................................... 84
Host Name ....................................................................................................................85
Time-to-Live.................................................................................................................85
RTP Settings.................................................................................................................... 85
Port Base....................................................................................................................... 85
Port Range ....................................................................................................................86
PTP IP ToS ...................................................................................................................86
Symmetric RTP Flow ...................................................................................................87
Network & Firewall.......................................................................................................... 88
STUN............................................................................................................................89
STUN Server ..........................................................................................................89
Diagnose NAT ........................................................................................................ 90
UDP Traversal ..............................................................................................................91
Static NAT IP ...............................................................................................................92
Dynamic NAT IP.......................................................................................................... 93
Diagnose UPnP............................................................................................................. 93
[5/168]
Page 6

SNMP................................................................................................................................94
VLAN................................................................................................................................. 96
VLAN ID...................................................................................................................... 97
VLAN CoS ................................................................................................................... 98
Chapter 3 ..................................................................................................................................99
Configuring SIP setting for IP Phone....................................................................................99
SIP Service ......................................................................................................................99
Transport.....................................................................................................................100
SIP Port....................................................................................................................... 100
Expires........................................................................................................................ 101
Rport ...........................................................................................................................101
Hold by RFC3261.......................................................................................................102
Signal IP ToS.............................................................................................................. 103
Session Timer ............................................................................................................. 104
Keep Alive Timer .......................................................................................................104
Expose SW Ver ..........................................................................................................105
SIP Timer T1 .............................................................................................................. 105
Service Domain............................................................................................................. 106
N-th Domain............................................................................................................... 107
Activation...............................................................................................................107
Authentication....................................................................................................... 108
Server Login .........................................................................................................108
Server Password.................................................................................................. 109
qop Support ..........................................................................................................109
Address-of-Record .....................................................................................................110
Proxy Server ............................................................................................................... 110
Mode ...................................................................................................................... 111
Default Proxy FQDN............................................................................................ 112
Transport ...............................................................................................................113
UDP Port ...............................................................................................................113
TCP Port................................................................................................................ 114
Registrar .....................................................................................................................114
Mode ...................................................................................................................... 114
Registrar FQDN ...................................................................................................115
Transport ...............................................................................................................116
UDP Port ...............................................................................................................116
TCP Port................................................................................................................ 117
Auto-Answer ..............................................................................................................117
Keep NAT Alive.........................................................................................................118
ENUM & E.164 .............................................................................................................. 118
ENUM DNS Suffix ....................................................................................................119
Min ENUM Length ....................................................................................................120
URI Format................................................................................................................. 120
Int’l Access Code .......................................................................................................121
Service............................................................................................................................122
MWI ...........................................................................................................................122
Voice Mailbox AoR ..............................................................................................124
[6/168]
Page 7

Unsolicited NOTIFY.............................................................................................125
Message......................................................................................................................... 125
Write Message ............................................................................................................126
Compose ...............................................................................................................126
Finish Writing........................................................................................................ 126
Send.......................................................................................................................127
Inbox...........................................................................................................................127
Read....................................................................................................................... 128
Outbox ........................................................................................................................ 132
Read....................................................................................................................... 133
Draft .......................................................................................................................136
SNTP................................................................................................................................... 138
Mode ............................................................................................................................... 138
Server .............................................................................................................................139
Protocol ..........................................................................................................................140
Server .............................................................................................................................140
Batch Default ................................................................................................................. 141
Terminal-Specific ..........................................................................................................142
Security........................................................................................................................... 143
Advanced ............................................................................................................................144
CODEC........................................................................................................................... 144
Preferences .................................................................................................................145
Packetization............................................................................................................... 145
Comfort Noise ............................................................................................................148
RFC2833 PT............................................................................................................... 148
DTMF Relay by INFO ...............................................................................................149
System Admin ...............................................................................................................149
System Status ...............................................................................................................151
Network Status ...........................................................................................................151
System Up Time .........................................................................................................152
Call Statistics ..............................................................................................................152
Lastest 50 Calls.................................................................................................... 152
Last 72 Hours/Accumulated ...............................................................................153
System Information....................................................................................................... 156
Version............................................................................................................................ 157
Log ..................................................................................................................................157
Log Component ..........................................................................................................157
Logger Type ...............................................................................................................159
Network Logger.......................................................................................................... 159
Appendix A Dial Plan .........................................................................................................160
Dial Plan Commands........................................................................................... 161
Dial Plan Rules..................................................................................................... 161
(In Rule) for Dial Plan Blocking.......................................................................... 161
[7/168]
Page 8

‘P’ Rule for Dial Prefix .........................................................................................162
‘R’ Rule for Enhanced Prefix.............................................................................. 162
‘A’ Rule for Suffix Appending ............................................................................. 163
‘C’ Rule for Call Blocking .................................................................................... 163
‘X’ Rule for Call Blocking and Call Forwarding Blocking ............................... 163
‘D’ Rule for Displaying Caller ID ........................................................................ 164
Appendix B Dial Plan Samples........................................................................................... 165
Example 1 .............................................................................................................165
Example 2 .............................................................................................................165
Example 3 .............................................................................................................166
Appendix C VIP-350PT Specifications ..............................................................................167
Appendix D VIP-550PT Specifications.............................................................................. 168
[8/168]
Page 9

Chapter 1
Introduction
1
Overview
Combining the cutting edge of Voice over IP and Internet telephony manufacturing experience,
PLANET now introduces the latest member of mainstream business series desktop IP phone family:
the VIP-350PT/550PT.
To bring the most satisfaction to customers, the VIP-350PT/550PT is the ideal choice for a business to
deploy by using IP PBX service. The standard features of the VIP-350PT/550PT include two-line, dual
10/100 switched Ethernet ports and integrated IEEE power over Ethernet (802.3af) circuitry for offering
a choice of powering and cabling options to help reduce cabling expenses and cord clutter.
To give most flexibility to users, the VIP-350PT/550PT platform contains a large graphic LCD with Back
light, 4/8 softkeys, 8 fixed function keys and a 5-position navigation key. The PLANET
VIP-350PT/550PT desktop phone is engineered to make Easy-to-install communications, cost-effective
to deploy, self-contained, service-integrated, intelligent phone features offering and powerful voice
processing power as possible. The VIP-350PT/550PT can effortlessly deliver toll voice quality
equivalent to the regular VoIP/IP PBX connections utilizing cutting-edge Quality of Service (QoS)
capabilities to encompassi IP-TOS/DiffServ, 802.1 p/q VLAN tagging, echo cancellation, comfort noise
generation (CNG) and voice compensation technology. Meanwhile, the dual Ethernet interfaces on the
IP phone allow users to install in an existing network location without interfering with connections of
desktop PC networks.
The VIP-350PT/550PT has streamlined wired IP telephone that provides additional features such as
built-in PPPoE/DHCP clients, password-protected machine management, call hold, forwarding, mute,
transfer, waiting, pickup, caller ID, peed-dial, 3-way conference, last number redial, incoming message
indicator, multiple call appearances and user-intuitive web administration system.
Besides, the VIP-350PT/550PT is the ideal solution for office use as well as installation for Internet
Telephony Service Provider (ITSP) from leading vendors. It's the delivery platform for IP voice services
that makes benefits from the VoIP technology in business class communications services.
There are models for VIP-350PT/550PT and there are:
VIP-350PT: Busniess PoE SIP IP Phone
VIP-550PT: Professional PoE SIP IP Phone
Benefits
• Full-Featured business SIP Desktop Phone
• Easy-to-read and configuration via large LCD screen
• Efficient installation and deployment of PLANET IP PBX solution for professional users
Product Features
• Integrated 802.3af Power over Ethernet support
• Easy-to-read large graphical LCD display
• Dual 10/100 switched Ethernet ports
• Two-line desktop phone for general professional users
[9/168]
Page 10

• Easy to configure and install
• Instant Message / Voice Mail Integration
• VLAN 802.1p/q / IP-TOS (IP Precedence) / DiffServ
• TFTP/HTTP for Auto Provisioning
• Full-duplex speakerphone / Dedicated RJ-9 headset port
• Reversible base stand / wall mount
VoIP Features
• SIP 2.0 (RFC3261) compliant
• Supports up to 3 service domains
• Interoperability with leading PLANET IP PBX platforms
• Voice codec support: G.711(A-Law, u-Law), G.723.1, G.729 A/B
• In-band, out-of-band DTMF Relay (RFC 2833) and SIP INFO
• Three-way conference / Caller ID / Speed Dial / Shared Line Appearance
• Call Hold / Mute / Pickup / Forward / Transfer / Waiting / Rejection / Screening
• Voice processing: VAD, CNG, AEC, Adaptive Jitter Buffer Management
Package Content
The contents of your product should contain the following items:
VoIP IP Phone
Power adapter
Quick Installation Guide
User’s Manual CD
Reversible base stand
[10/168]
Page 11
Physical Details
The following figure illustrates the front/rear panel of IP Phone.
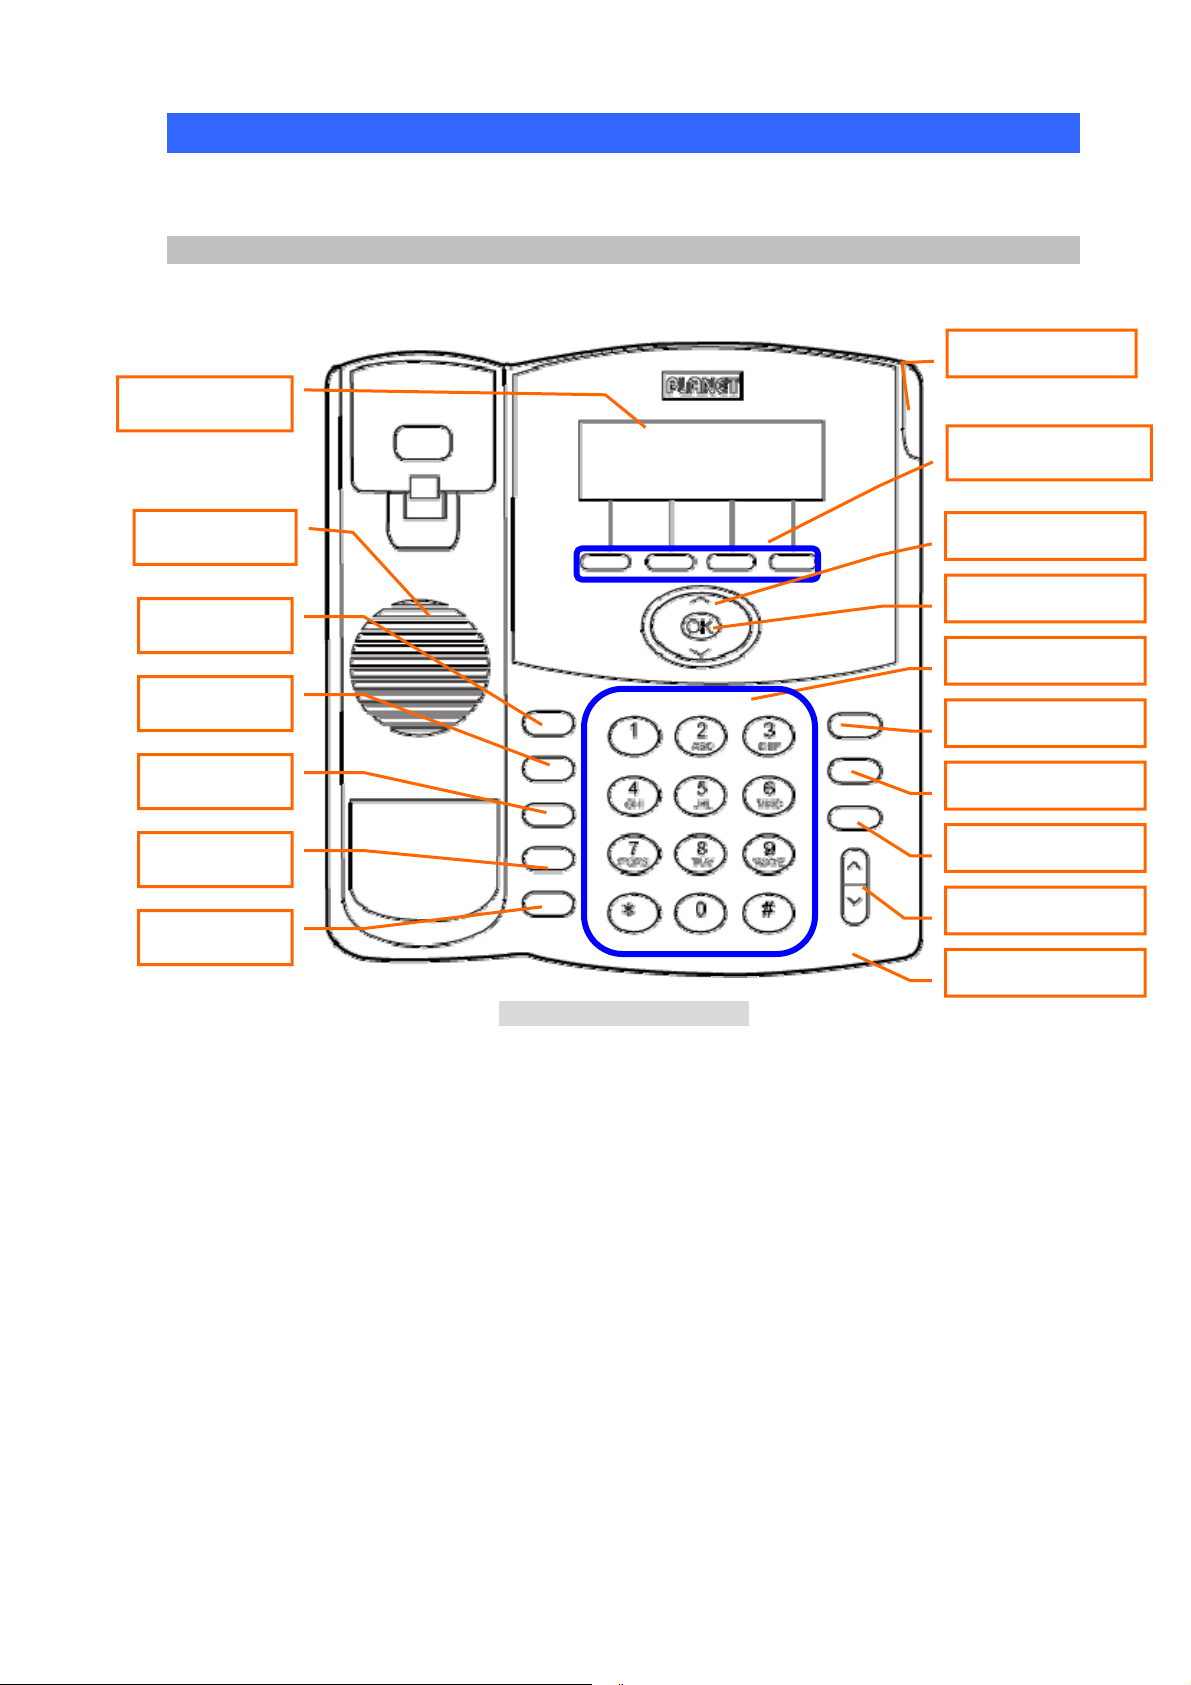
Front View
Ring Lamp
LCD Display
Soft-button
Speaker
Hold
Transfer
Redial
Speed Dial
Menu
Front Panel of VIP-350PT
Navigation Keys
Number Keypad
Mute
Hands-Free
Volume
Micro-Phone
OK
MWI
[11/168]
Page 12

LCD Display
Handset
Programmable
Keys (2x2)
Speaker
Hold
Transfer
Redial
Speed Dial
Menu
Front Panel of VIP-550PT
Ring Lamp
Context-Sensitive
Soft-button
Navigation Keys
Keypad
MWI
Mute
Hands-free
Volume
Micro-phone
OK
[12/168]
Page 13
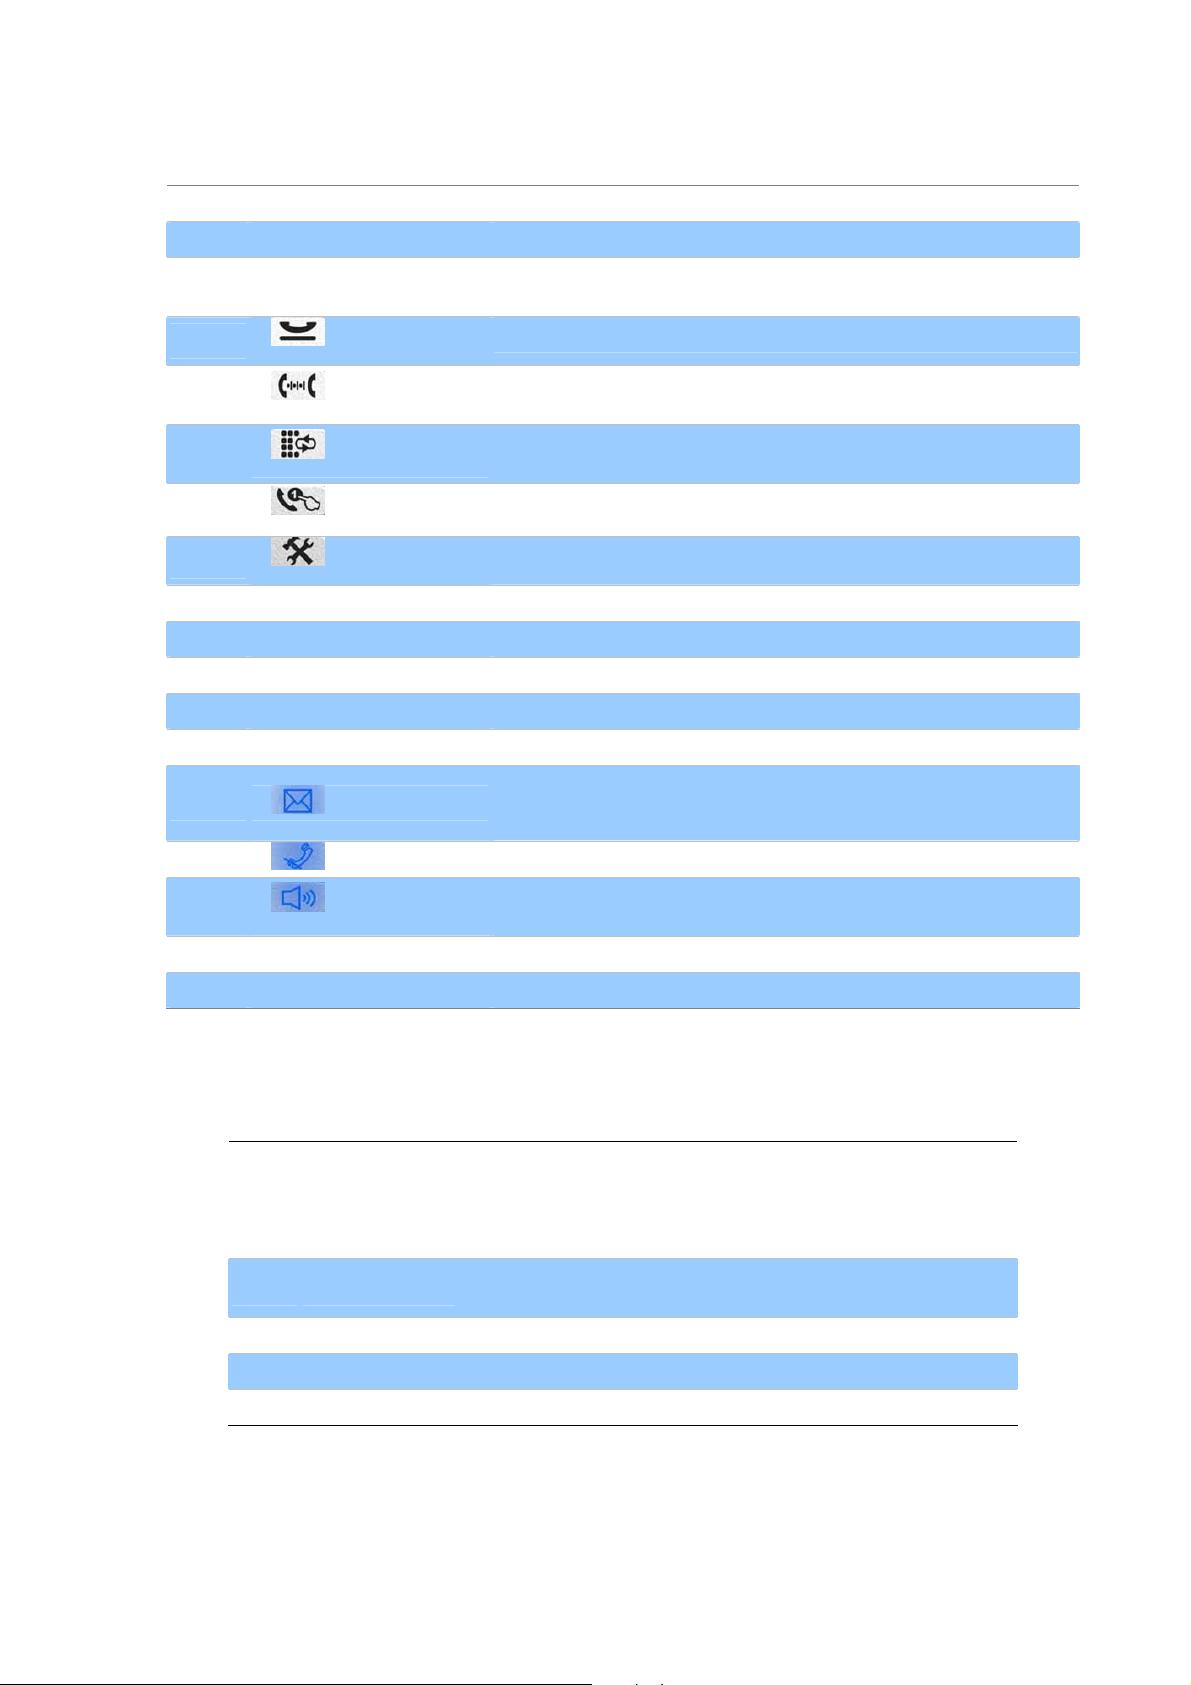
Keypad Description
1 LCD Display
2 Speaker
3 Programmable Keys
4
【 】:Hold
5
【
6
【 】:Redial
7
【
8
【 】:Menu
9 Ring Lamp
10 Soft-button
11 Navigation Keys
12 OK
13 Number Keypad
14
【 】:MWI
15
【
16
【 】:Hands-Free
】:TRANSFER
】:Speed Dial
】: Mute
Menu and all status shall be displayed for users.
To send out voice of device when usage hands-free.
User-defined programmable keys for easy feature access.
(Only VIP-550PT)
To hold the conversation.
To transfer an active call (incoming call answered or outgoing call
accepted) to another devices.
Press to dial the last dialed number when the IP Phone is
off-hooked.
To make a speed dial call by pressing.
To bring out the menu selection while IP Phone is in idle state.
The red light goes on-off when there is an incoming call.
To control context page and sip account switch function button.
To scroll menu item and phonebook.
To be used as confirm configuration or enter sub-menu.
Use to enter numbers, characters or special characters.
Press this button can enter the voicemail service.
Message Waiting Indication, MWI: Access to voice mail system
Press to mute sounds when at talk mode.
To switch between the usage of the handset and the speaker
devices.
17 Volume
18 Micro-Phone
Physical Interfaces
1 LAN
2 PC
3 Reset
4 12V DC
5 Handset Jack
Volume adjustment for ringer, headset, handset, speaker.
Receive voice of device when usage hands-free.
RJ-45 connector, for Internet access, connected directly to
Switch/Hub through straight CAT-5 cable.
The LAN interface also can be connected with 802.3af PoE
switch or converter for power supply.
RJ-45 connector, to maintain the existing network structure,
connected directly to the PC through straight CAT-5 cable.
Reset to the factory default setting.
12V DC Power input outlet.
RJ-22 connector, for telephone handset.
[13/168]
Page 14
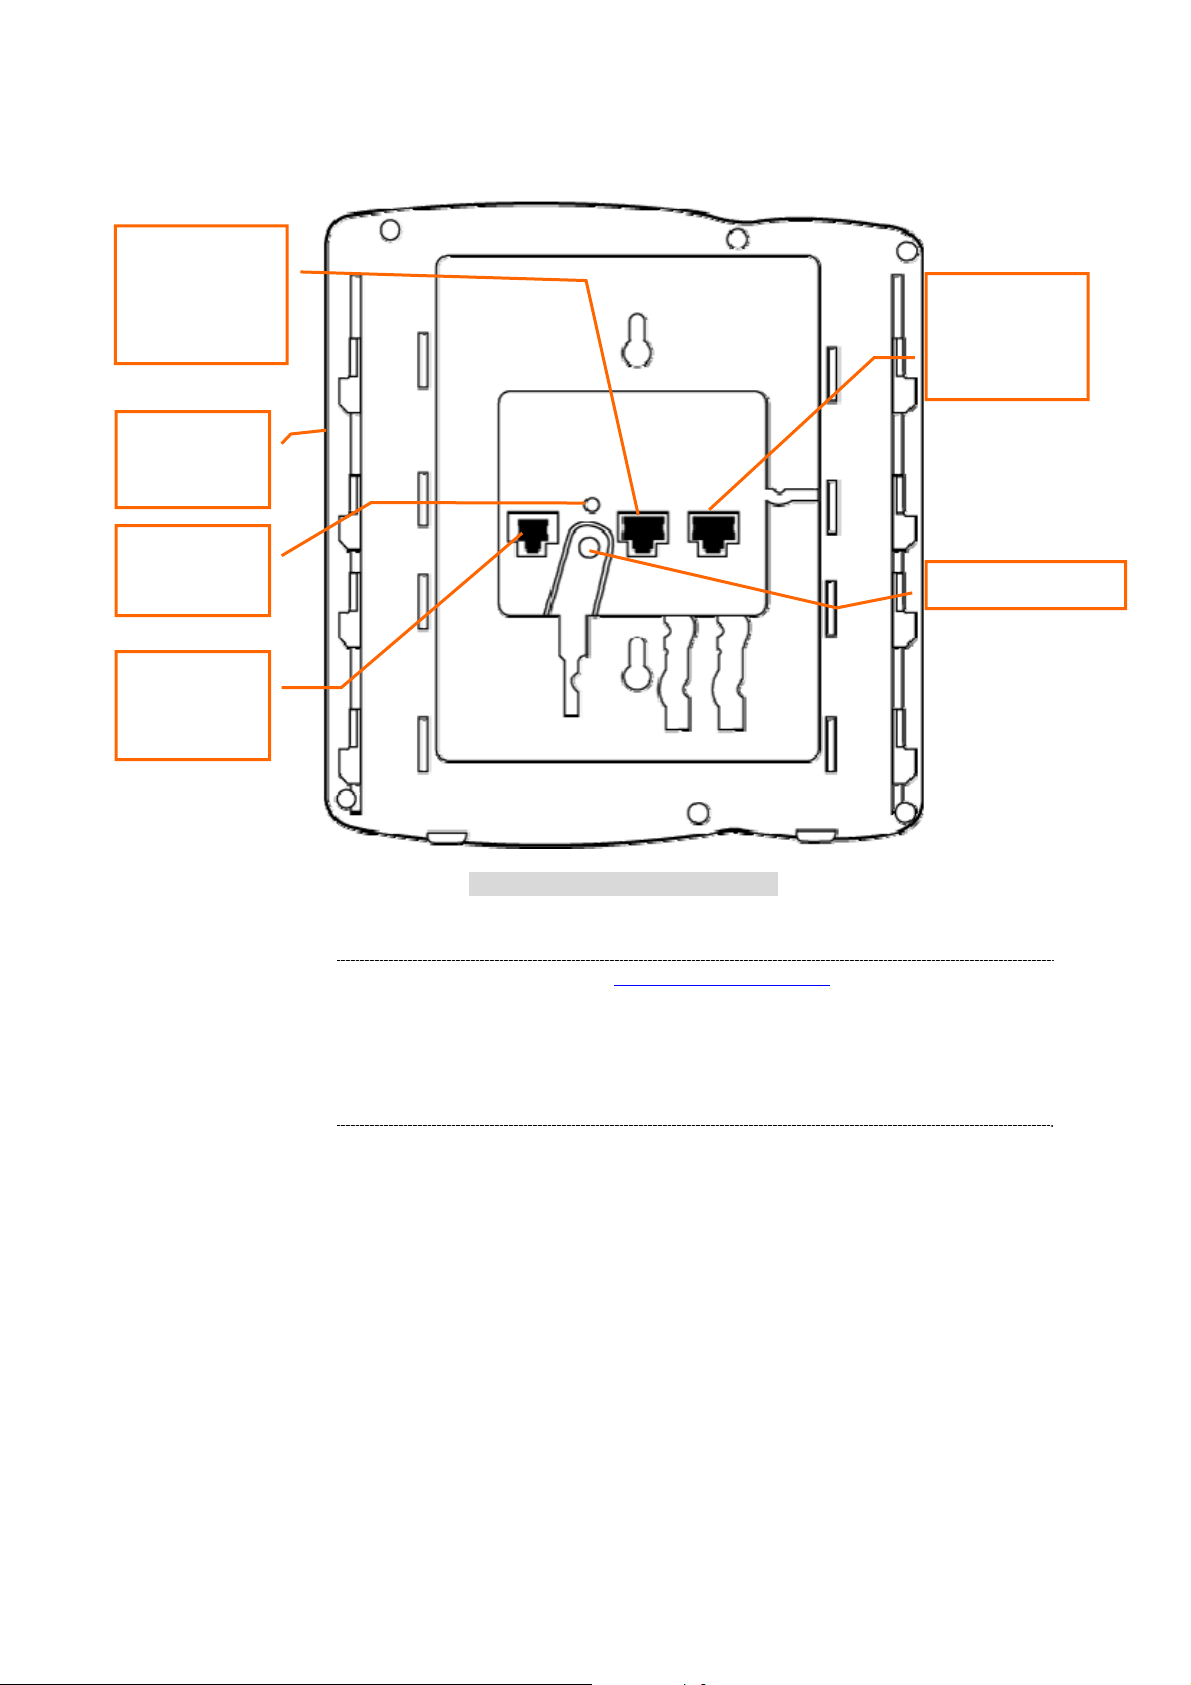
Rear view and panel descriptions
10/100 RJ-45
Ethernet Port
(To PCLAN)
Ear-Phone
Jack
Reset
Button
10/100 RJ-45
Ethernet Port
(To LAN)
Power Jack
Handset
(RJ-22)
ÍNote
Rear panel of VIP-350PT/550PT
1. Machine default IP is http://192.168.0.1. Press RESET button
on rear panel over 5 seconds will reset the VoIP Phone Adapter
to factory default value.
(Except speed dial and call forward settings)
2. For VIP-350PT/550PT, either PoE or AC adapter can be deployed
at one time
[14/168]
Page 15

Chapter 2
LCD Keypad Opearting & Configurations
Configurations for Address Book
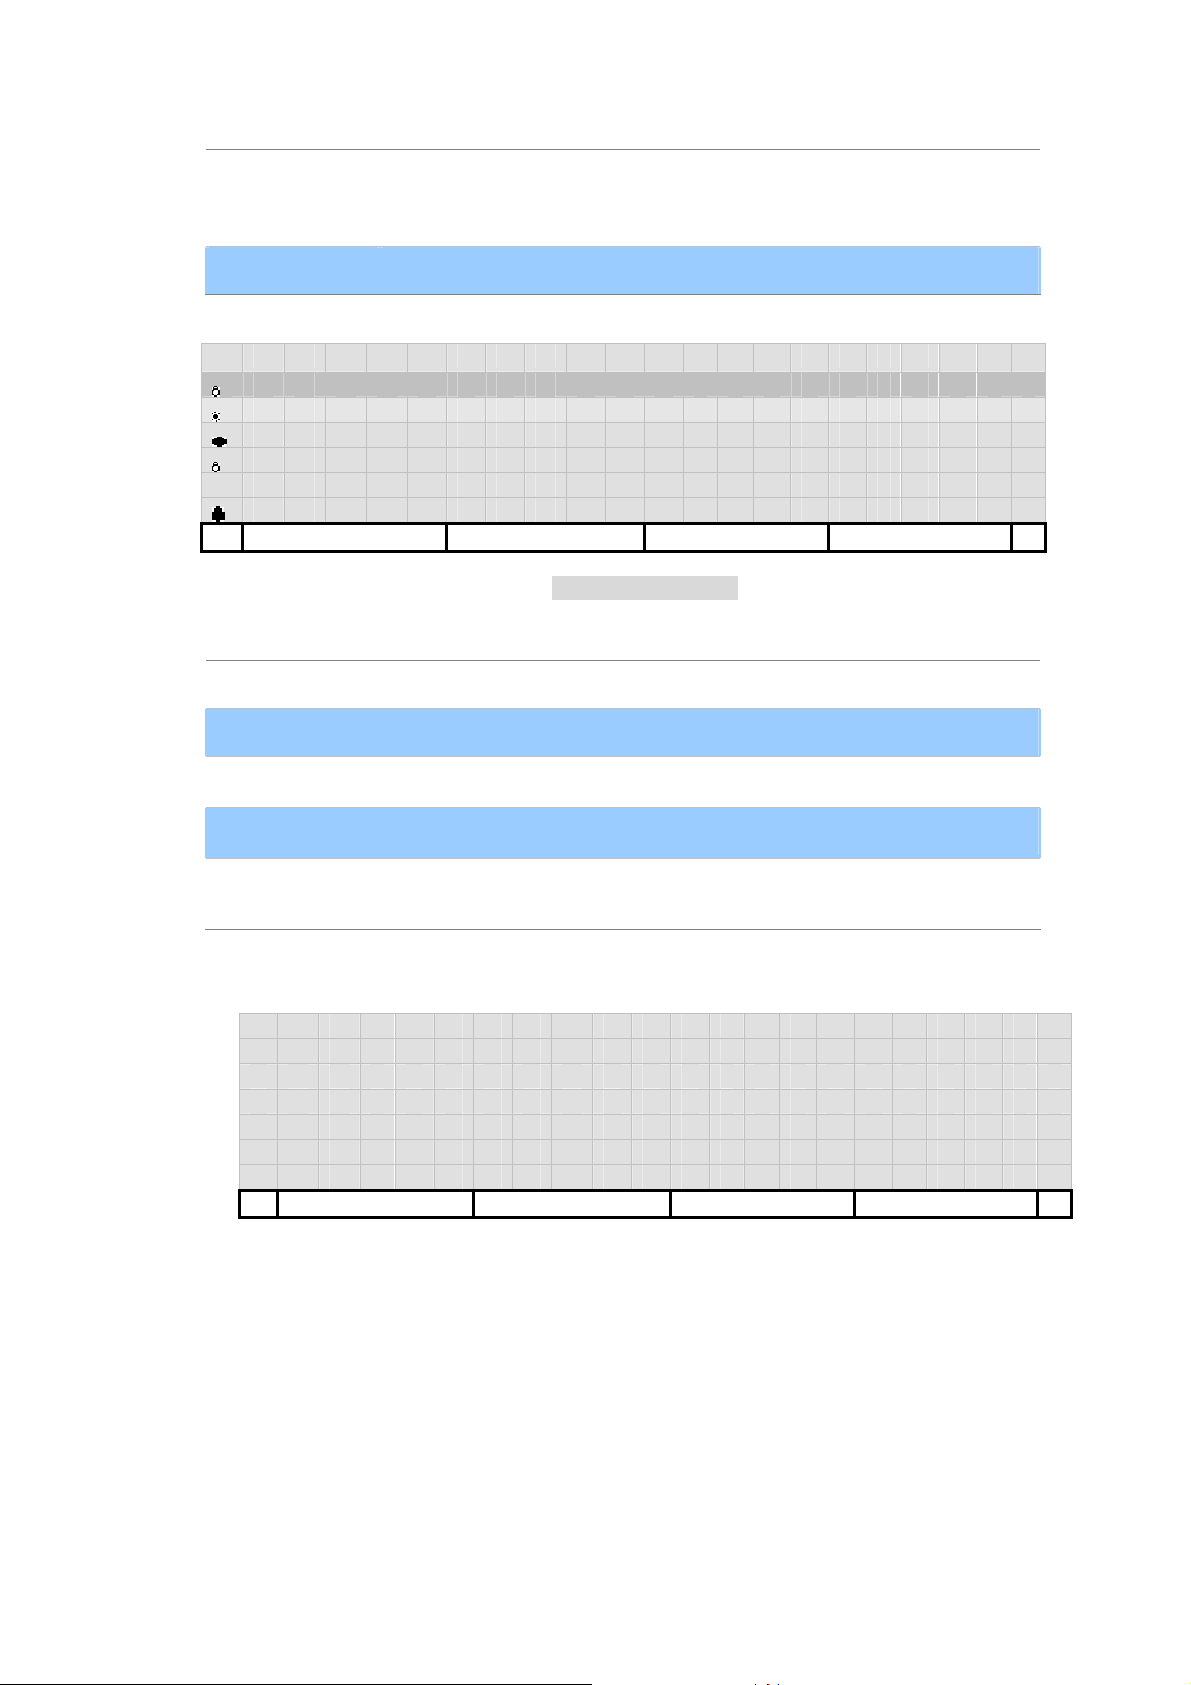
Main Menu
Main Menu keys Function Description
Menu
【↑】and【↓】
【OK】
Back
Soft-buttons
1 . A d d r e s s B o o k
2 . C a l l H i s t o r y
3 . T e r m i n a l S e t t i n g s
4 . C a l l F o r w a r d
5 . P r e f e r e n c e s
6 . N e t w o r k
7 . S I P S e t t i n g s
8 . S e r v i c e
9 . A d v a n c e d
Find Add Del Back
Enter or exit menu mode.
Navigate through menu items by up and down navigation keys.
Traverse into selected menu or return to previous menu if no specified
function.
To return previous menu page.
Context-sensitive menus.
2
Figure 1. IP Phone LCD Main Menu
Address Book
Address Book Keys Function Description
Add
Find
Del
【OK】
【↑】and【↓】
Add new contact onto address book
Search a contact in address book.
Delete contacts from address book.
Enter address-book sub-menu.
Navigate through menu items.
[15/168]
Page 16

1 . A d d r e s s B o o k
2 . C a l l H i s t o r y
3 . T e r m i n a l S e t t i n g s
4 . C a l L F o r w a r d
5 . P r e f e r e n c e s
6 . N e t w o r k
7 . S I P S e t t i n g s
8 . S e r v i c e
9 . A d v a n c e d
Find Add Del Back
Max size: 1,000 entries.
Figure 2. Main Menu
Find
Search for a specific entry on address book. The search criterion is a longest prefix match. If no
character is entered, then it will position on the 1
st
entry on address book
Keys Function Description
Del
[Abc..]/[123..]
[Clear]
[Back]
【OK】
【←】and【→】
Delete one character.
Toggle between digits and alphanumeric input, where [Abc..] indicates
cureent input method is alphanumeric and [123..] indicates digits input.
Clear all input.
Rturn previous page.
Start to search.
move cursor one position in edit mode.
S e a r c h N a m e :
M i c h a e l
Del Abc../123.. Clear Back
Figure 3. Name Search screen
Find.【OK】
Address Book List Format:
1. List all contacts in alphanumeric order.
2. First line is fixed (not scrollable) and also shows how many contacts in address book.
(VIP-550PT only)
3. Position at the best matched item.
4. User may use keypad to jump to the first contact prefixed with entered alphanumeric
character.
5. Alternatively, user may use navigation key 【↑】and【↓】to scroll contact list.
[16/168]
Page 17

y
y
6. Max size: 1,000
Keys Function Description
Dial to selected contact.
[Call]
Alternativel
by pressing
, You may lift the handset (offhook) or turn speaker on
【
SPK】 to make a call to selected contact as well.
[Del]
[Back]
【OK】
【↑】and【↓】
Delete current contact.
Reurn without any changes.
Edit selected contact.
Navigate through contacts list.
C o n t a c t s ( 1 4 3 )
M i c h a e l
M i k e
N i c k
P a t r i c k
P a u l
R i c h a r d
Call Del Back
Figure 4. Contact List
View Contact
Screen Field Description
It could consist of all ASCII letters except for left and right angle parentheses,
Display
Protocol
Address
‘<’ and ‘>’. You may enter the alias of your SIP AoR, phone number of this
port, or the display string of this AoR.
Currently, we support only sip and tel URI.
Note: protocol is case-sensitive!
The Email-like address of your SIP address-of-record, AoR, with the user part
and the domain part. For example, if your SIP AoR is “Handsome Boy
<sip:micheal@YourISP.com>”, please enter it as “micheal@YourISP.com”.
Keys Function Description
Dial to this contact.
[Call]
[Save]
[Back]
Alternativel
by pressing
Save changes and return
Return with previous page.
, You may lift the handset (offhook) or turn speaker on
【
SPK】 to make a call to selected contact as well.
【OK】
Edit selected field.
[17/168]
Page 18

【↑】and【↓】
Navigate through itmes.
D i s p l a y : M i c h a e l
P r o t o c o l : s i p
A d d r : 1 2 3 4 5 6 7 @ I S P . f o o . c
Call Save Back
Figure 5. View Contact Screen
Edit Contact.Display
Display consist of all ASCII letters except for left and right angle parentheses, ‘<’ and ‘>’. You may enter
the alias of your SIP AoR, phone number of this port, or the display string of this AoR.
Keys Function Description
[Del]
[Abc..]/[123..]
[Clear]
[Back]
【OK】
【←】and【→】
【↑】and【↓】
Delete on character.
Toggle between digits and alphanumeric input, where. [Abc..] indicates
current input method is alphanumeric and [123..] indicates digits input.
Clear all input.
Return without any changes.
Save changes and return.
move cursor one position in edit mode.
move cursor per line in edit mode.
D I s p l a y :
M I c h a e l
Del Abc../123.. Clear Back
Figure 6. Edit Contact Display
[18/168]
Page 19

y
Edit Contct.Protocol
Make IP Phone supports only sip and tel URI. Note: protocol is case-sensitive!
Keys Function Description
Dial to this contact.
[Call]
Alternativel
by pressing
, You may lift the handset (offhook) or turn speaker on
【
SPK】 to make a call to selected contact as well.
[tel]/[sip]
[Back]
Toggle between available protocols, including “sip” and “tel”. [tel] indicates
current protocol is “tel”, and so on.
Return to previous page.
D i s p l a y : M i c h a e l
P r o t o c o l : s i p
A d d r : 1 2 3 4 5 @ I S P . f o o . n e t
Call tel/sip Back
Figure 7. Edit Contact Protocol
Edit Contact.Email-Like Address
The Email-like address of your SIP address-of-record, AoR, with the user part and the domain part. For
example, if your SIP AoR is “Handsome Boy <sip:michael@YourISP.com>”, please enter it as
“michael@YourISP.com”.
Keys Function Description
[Del]
[Abc..]/[123..]
[Clear]
[Back]
【OK】
【←】and【→】
【↑】and【↓】
Delete one character.
Toggle between digits and alphanumeric input, where [Abc..] indicates
current input method is alphanumeric and [123..] indicates digits input.
Clear all input.
Return without any changes.
Save changes and return.
Move cursor one position in edit mode.
Move cusor per line in edit mode.
[19/168]
Page 20

E m a i l - L i k e A d d r e s s :
1 2 3 4 5 @ I S P . f o o . n e t
Del Abc../123.. Clear Back
Figure 8. Edit Contact EMail like Address
Add
Screen Field Description
It could consist of all ASCII letters except for left and right angle parentheses,
Display
‘<’ and ‘>’. You may enter the alias of your SIP AoR, phone number of this
port, or the display string of this AoR.
Protocol
Address
Currently, we support only sip and tel URI.
Note: protocol is case-sensitive!
The Email-like address of your SIP address-of-record, AoR, with the user part
and the domain part. For example, if your SIP AoR is “Handsome Boy
<sip:michael@YourISP.com>”, please enter it as “michael@YourISP.com”.
Keys Function Description
[Save]
[Back]
【OK】
【↑】and【↓】
Add contact into address book and return.
Return without any changes.
Edit selected field.
Navigate through itmes.
If reached max allowed entries, show
A d d r e s s - B o o k . A d d :
M a x E n t r y : 5 0 0 !
Back
Otherwise, show
D i s p l a y :
P r o t o c o l : s i p
A d d r :
Save Back
[20/168]
Page 21

Add Contact.Display
Display consist of all ASCII letters except for left and right angle parentheses, ‘<’ and ‘>’. You may enter
the alias of your SIP AoR, phone number of this port, or the display string of this AoR.
Keys Function Description
[Del]
[Abc..]/[123..]
[Clear]
[Back]
【OK】
【←】and【→】
【↑】and【↓】
Delete one character.
Toggle between digits and alphanumeric input, where. [Abc..] indicates
current input method is alphanumeric and [123..] indicates digits input.
Clear all input.
Return without any changes.
Save changes and return.
Move cursor one position in edit mode.
Move cursor per line in edit mode.
D i s p l a y :
M i c h a e l
Del Abc../123.. Clear Back
Figure 8. Contact Display screen
Add Contact.Protocol
Make IP Phone supports only sip and tel URI. Note: protocol is case-sensitive!
Keys Function Description
[Save]
[tel]/[sip]
[Back]
D i s p l a y : M i c h a e l
P r o t o c o l : s i p
A d d r : 1 2 3 4 5 6 7 @ I S P . f o o . c
Save tel/sip Back
Add contact only sip and return.
Toggle between available protocols, including “sip” and “tel” . [tel] indicates
current protocol is “tel”, and so on.
Return without any changes.
[21/168]
Page 22

Add Contact.Email-Like Address
The Email-like address of your SIP address-of-record, AoR, with the user part and the domain part. For
example, if your SIP AoR is “Handsome Boy <sip:michael@YourISP.com>”, please enter it as
“michael@YourISP.com”.
Keys Function Description
[Del]
[Abc..]/[123..]
[Clear]
[Back]
【OK】
【←】and【→】
【↑】and【↓】
Delete one character.
Toggle between digits alphanumeric input, where [Abc..] indicates current
input method is alphanumeric and [123..] indicates digits input.
Clear all input.
Return without any changes.
Save changes and return.
Move cursor one position in edit mode.
Move cursor per line in edit mode.
E m i l - L i k e A d d r e s s :
1 2 3 4 5 @ I S P . f o o . n e t
Del Abc../123.. Clear Back
Del
Keys Function Description
Dial to selected contact.
[Call]
[Del]
[Clear]
[Back]
【OK】
【↑】and【↓】
Alternatively, You may lift the handset (offhook) or turn speaker on
by pressing
Delete current contact.
Delete all contacts from address book.
Return without any changes.
Edit selected contact.
Navigate through contacts list.
Figure 9. Contact EMail Address
【
SPK】 to make a call to selected contact as well.
[22/168]
Page 23

C o n t a c t s ( 1 4 3 )
M c h a e l
M i k e
N i c k
P a t r i c k
P a u l
R i c h a r d
Call Del Clear Back
Figure 10. List address book
Clear
Soft-Keys Function Description
[Yes]
[No]
C l e a r a l l c o n t a c t s ?
Yes No
Clear all contacts from address book.
Return without any changes.
Figure 11. Clear Prompt
Address Book.【OK】
Keys Function Description
[Back]
【OK】
【↑】and【↓】
Retrun to previous page.
Enter sub-menu.
Navigate through menu items
.
1 . S p e e d D i a l
2 . C a l l S c r e e n
3 . F a v o r i t e
4 . I M P P
Back
Figure 12. Address Book Main menu
[23/168]
Page 24

y
Speed Dials
Speed Dials list format:
• Available entries: 0~19 (20 entries).
th
• User may use keypad to jump to specified entry, such as enter ‘9’ to jump to the 9
Keys Function Description
Dial to selected contact.
[Call]
Alternativel
by pressing
, You may lift the handset (offhook) or turn speaker on
【
SPK】 to make a call to selected contact as well.
entry.
[Del]
[Clear]
[Back]
【↑】and【↓】
【OK】
Remove selected speed dial mapping.
Remove all speed dial mapping.
Retrun to previous page.
Navigate through the list
Re-map selected entry.
.
0 . M i c h a e l
1 . M i k e
2 . N i c k
3 . P a t r i c k
4 . P a u l
5 . R i c h a r d
6 .
Call Del Clear Back
Figure 13. Speed Dial list
Speed Dial Contacts Book Keys Function Description
[Back]
【OK】
【↑】and【↓】
Retrun to previous page.
Re-map selected entry.
Navigate through the list.
C o n t a c t s ( 1 4 3 )
M i c h a e l
M i k e
N i c k
P a t r i c k
P a u l
R i c h a r d
Back
Figure 14. Address Book list
[24/168]
Page 25

y
Call Screen
Call Screen List format:
1. List all contacts in black lsit in alphanumeric order.
2. The First line is fixed (not scrollable), and shows how many contacts in black list.
(VIP-550PT only)
3. User may use keypad to jump to the first contact prefixed with the entered alphanumeric
character.
4. Alternatively, user may use navigation key 【↑】and【↓】to scroll contact list.
5. Max size: 100.
Keys Function Description
Dial to selected contact.
[Call]
Alternativel
by pressing
, You may lift the handset (offhook) or turn speaker on
【
SPK】 to make a call to selected contact as well.
[Unblk]
[Add]
Remove selected contact from black list and return (Unblock, revoke).
Add a contact from address book into black list.
C a l l S c r e e n ( 3 )
D e v l l W e a r i n g P r a d a
N i c k
S u a n
Call Unblk Add Back
If reached max allowed entries, show
B l a c k L i s t : :
M a x E n t r y : 1 0 0 !
Back
Black List Keys Function Description
[Black]
【OK】
【↑】and【↓】
Return without any changes
Check selected record (Read only).
Navigate through black list.
[25/168]
Page 26

Otherwise, show address book for user to pick a contact to add black list.
C o n t a c t s ( 1 4 3 )
M i c h a e l
M i k e
N i c k
P a t r i c k
P a u l
R i c h a r d
Back
Black Information Description
Last time-of-call
Attempts
[Black]
【↑】and【↓】
1 4 : 3 7 : 2 1 1 0 / 2 9 / 2 0 0 6
A t t e m p t s : 2 0 1
A o R : D e v i l W e a r i n g P r a d
a < s i p : b o s s @ I S P . f o o . c o m
>
Call Unblk Back
AoR
[Call]
This number is last time of caller.
Accumulated call attempts originated from this contact.
Address of record.
Dial to this contact.
Alternatively, You may lift the handset (offhook) or turn speaker on
by pressing 【SPK】 to make a call to selected contact as well.
Return without any changes.
Scroll line.
Figure 15. Caller information
Favorite
Configure favorite contacts for easy access during call-state, where you can activate favorite list by
pressing [DSS] keys.
Favorite List Format:
1. Listed in alphanumeric order.
2. Fixed the 1
(VIP-550PT only)
3. Max entries: 20.
[26/168]
st
line (not scrollable) and indicates entry counts on the first line, such as (11).
Page 27

y
y
Favorite Description
Dial to selected contact.
[Call]
Alternativel
by pressing
, You may lift the handset (offhook) or turn speaker on
【
SPK】 to make a call to selected contact as well.
[Add]
[Del]
[Back]
Add a new entry from address book into favoriate list.
Remove selected Favorite item.
Return without any changes.
F a v o r i t e ( 1 1 )
M i c h a e l
M i k e
N i c k
P a t r i c k
P a u l
R i c h a r d
Call Add Del Back
Figure 16. Favorite list
If max allowed entries is reached, show
F a v o r i t e L i s t
M a x E n t r y : 2 0 !
Back
Otherwise, show address book for user to pick a contact to add into favoriate list.
C o n t a c t s ( 1 4 3 )
M i c h a e l
M i k e
N i c k
P a t r i c k
P a u l
R i c h a r d
Back
Soft-Key Function Description
Dial to selected contact.
[Call]
[Del]
[Back]
【↑】and【↓】
Alternatively, You ma
【
by pressing
Remove selected Favorite item.
Return without any changes.
Scroll Line.
SPK】 to make a call to selected contact as well.
lift the handset (offhook) or turn speaker on
[27/168]
Page 28

Show SIP address-of-record (Read only).
M i c h a e l < s i p : 1 2 3 4 5 @ I S P .
f o o . n e t >
Call Del Back
IMPP
Soft-Key Function Description
[State]
[Back]
【OK】
【↑】and【↓】
Set terminal’s state.
Return previous page.
Enter sub-menu.
Scroll Line.
1 . S p e e d D i a l
2 . C a l l S c r e e n
3 . F a v o r i t e
4 . I M P P
State Back
Figure 17. IMPP main menu
State
Configure the Presence state of this terminal as per RFC4480 (Rich Presence Extension to the
Presence Information Data Format).
Soft-Key Function Description
[Back]
【OK】
Return without any changes.
On-Line
Away Presence state is open and user state is away.
Be Right
Busy
Presence state is open and user state is
<other>idle</other>
Presence state is open and user state is <other>Be Right
Back</other> or any of the following states:
dinner, meal, breakfast, worship such as.
Presence state is open and user state is busy or any of the
following states:
[28/168]
Page 29

meeting, performance, presentation, working, steering,
appointment.
On the Phone Presence state is open and user state is on-the-phone
Out to Lunch Presence state is open and user state is lunch
Of-Line Presence state is closed.
【↑】and【↓】
Navigate through menu items.
1 . O n - L i n e
2 . A w a y
3 . B e R i g h t B a c k
4 . B u s y
5 . O n t h e P h o n e
6 . O u t t o L u n c h
7 . O f f - L i n e
Back
Figure 18. IMMP Status lsit
IMPP. 【OK】
IMPP List Format:
1. Show all subscribed Presence, Busy Lamp Filed (BLF), and Shared-Line Appearance
(SLA) status.
2. Show display or user-part of the email-like address whenever possible and listed in
alphanumeric order.
3. The first line is fixed (not scrollable) and ndicates currently contacts on the first line, such
as (6).(VIP-550PT only)
4. Max enteries: 20.
5. For Presence, show
6. Busy Lamp Field (Dialog-Info)
SUBSCRIBE failed:
SUBSCRIBE ok but not received NOTIFY yet: No Symbol
Idle (terminated/no-dialogs):
Busy (confirmed/trying/preceeding):
Ringing (early):
7. Shared Line Appearance (Call-Info)
SUBSCRIBE failed:
SUBSCRIBE ok but not received NOTIFY yet: No Symbol
Idle:
alerting/held:
seized/progressing/active/held-private:
for “open” state (on-line) and show for “closed” state (off-line).
[29/168]
Page 30
(
Soft-Key Function Description
Dial to selected contact.
[Call]
Alternatively, You may lift the handset
【
by pressing
SPK】 to make a call to selected contact as well.
offhook) or turn speaker on
[Add]
Add a new contact into IMPP list.
I M P P ( 6 )
R i c h a r d
P a t r i c k ( r i n g i n g )
M a r i a ( a c t i v e )
J a s o n ( o n t h e p h o n e )
F o x ( U n k n o w n )
B i l l ( o f f l i n e )
Call Add Del Back
Figure 19. IMMP lsit
Soft-Key Function Description
[Del]
[Back]
【OK】
【↑】and【↓】
Remove selected contact from IMPP list
Return to previous page.
Review selected IMPP contact.
Scroll IMPP list.
【←】and【→】
Scroll columns on the selected line to view whole records. Scroll half of the
line width on each key press.
If max allowed entries is reached, show
I M P P . A d d :
M a x E n t r y : 2 0 !
Back
VIP-550PT supports the following specifications and integrated them as Instant Message and Presence
Protocol, IMPP, for rich server features integration:
• Busy Lamp fileld (BLF):
This feature is to monitor the status of a contact or a list of contacts, including early
(ringing)/confirmed (conversation)/terminated (idle) states. Refer to RFC3865 and
RFC4235 for detail. Besides, please refer to RFC2387 for Muptipart-Related MIME data
type and RFC4662 for “Event Notify for Resource List”.
[30/168]
Page 31

• SUBSCRIBE failed:
1. Failed to SUBSCRIBE to the dialog state of chosen contact!
2.
Symbol:
SUBSCRIBE ok but not received NOTIFY yet:
1. SUBSCRIBE to the dialog state of chosen contact succeeded but has not
been NOTIFY yet.
2. Symbol: None
Idle (terminated/no-dialogs):
1. SUBSCRIBE to the dialog state of chosen contact succeeded and in idle
mode.
2.
Symbol:
Busy (confirmed/trying/preceeding):
1. the SUBSCRIBEd contact number is busy.
o One of the dialogs of any dialog-info entity is in confirmed | trying |
proceeding state.
o User off-hook is in trying state.
2. Symbol:
Ringing (early):
1. the SUBSCRIBEd contact number is ringing.
o Not busy
o And one of the dialogs of dialog-info entity is in early state.
2.
Symbol:
• Presence:
Monitor the presence state (availability or reachability to take calls) of a contact or a list of
contacts. Refer to RFC3265 for SIP Event Notification, RFC3856 for Presence Event
Package and RFC3863/RFC2387/RFC4662 for “application/pidf+xml”/ ”MIME
Muptipart-Related” / “Event Notify for Resource List” data format in NOTIFY.
SUBSCRIBE failed:
1. Failed to SUBSCRIBE to the presence state of chosen contact!
2. Symbol:
SUBSCRIBE ok but not received NOTIFY yet:
1. SUBSCRIBE to the presence state of chosen contact succeeded but has not
been NOTIFY yet.
2. Symbol: None
On-Line (“open”):
1. At least one of the entities of the SUBSCRIBED presence contact is
available/on-line (NOTIFY status is “open”).
2. Symbol:
[31/168]
Page 32

Off-Line (“Closed”):
1. All entities of the SUBSCRIBED presence contact number are
unavailable/off-line (NOTIFY status is “closed”).
2. Symbol:
Note
Í
• Shared-Line Appearance (SLA):
This feature is for the endpoint and the service delivery platform to maintain consistent
“presentation” information, including
The relative order of call appearances on a line and the current state of the call
appearances.
Enables call control clients, attendant consoles, and other applications to maintain a
synchronized view of call appearance information.
Please refer to “BROADWORKS SIP ACCESS SIDE EXTENSIONS INTERFACE
SPECIFICATIONS” release 13.0 version 1 from BroadSoft Inc. for detailed implementation.
This terminal will be explicitly “unavailable” whenever:
• “Do-Not-Disturb”, DND, feature is enabled
• “All-Calls-Forward” is enabled,
• user explicitly off line by “Logout”
This terminal will respond a “closed” presence state if ever got Presence
SUBSCRIBE from other terminals. Otherwise, this terminal is “available” with
presence state “open” .
SUBSCRIBE failed:
1. SUBSCRIBE to the chosen shared line failed!
2. Symbol:
SUBSCRIBE ok but not received NOTIFY yet:
1. SUBSCRIBE to the dialog state of chosen contact succeeded but has not
been NOTIFY yet.
2. Symbol: None
Idle (terminated/no-dialogs):
1. this appearance of chosen shared line is idle
2. Symbol:
Busy (confirmed/trying/preceeding):
1. this appearance of chosen shared line is:
o Seized
o Progressing: making outbound calls.
o Active
o Held-private: be Held and only can be retrieved by the endpoint which
[32/168]
Page 33

held it involved in this call.
2. Symbol:
Ringing (early):
1. this appearance of chosen shared line is:
o Alerting: receiving an incoming call.
o Held: Holding the peer and can be retrieved other endpoints.
2. Symbol:
Call to this “Shared-Line Appearance” DSS key will:
1. Gain an empty channel 【A】/【B】 and perform line-seize SUBSCRIBE-NOTIFY
transaction before sending INVITE.
2. On receiving INVITE with Call-Info and “answer-after” parameter present, such as:
Call-Info: <sip:ProxyDNSorIP.com>;appearance-index=3;answer-after=0
Auto Answer this call if
• “answer-after” parameter is present in Call-Info header
• From Header is a recognized Shared-Line AoR
• appearance-index is configured
Mapping Rule
• answer-after=0: silent
• answer-after=1: imperious
• answer-after<3: urgent
• Others and present: normal
Add – Type & Address-of-Record
Key Function Description
[Back]
【OK】
【↑】and【↓】
Return Without any changes.
Pick selected item.
Navigate through the list.
1 . B u s y L a m p F i e l d , B L F
2 . P r e s e n c e
3 . S h a r e d - L i n e , S L A
Back
Figure 20. Type selecte lsit
[33/168]
Page 34

y
C o n t a c t s ( 1 4 3 )
M i c h a e l
M i k e
N i c k
P a t r i c k
P a u l
R i c h a r d
Back
Figure 21. List Address Book
Add - View Status
IMPP entry format:
2. Show IMPP type: Presence, SLA or BLF (Fixed, not scrollable)
3. Show each status in the list as:
o Status
o Full SIP address-of-record
4. Show aggregrated status and subscribed AoR on the last line.
5. For Presence, show
(off-line).
6. Busy Lamp Field (Dialog-Info)
SUBSCRIBE failed:
SUBSCRIBE ok but not received NOTIFY yet: No Symbol
Idle (terminated/no-dialogs):
Busy (confirmed/trying/preceeding):
Ringing (early):
7. Shared Line Appearance (Call-Info)
SUBSCRIBE failed:
SUBSCRIBE ok but not received NOTIFY yet: No Symbol
idle:
alerting/held:
seized/progressing/active/held-private:
Key Function Description
Dial to selected contact.
[Call]
Alternativel
by pressing
for “open” state (on-line) and show for “closed” state
, You may lift the handset (offhook) or turn speaker on
【
SPK】 to make a call to selected contact as well.
[IM]
[Renew]
[Back]
【OK】
【↑】and【↓】
Send instant Message to selected item.
Refresh status by re-SUBSCRIBE immediately.
Return Without any changes.
Review selected IMPP contact.
Scroll ines.
[34/168]
Page 35

Type: BLF,
P R e s e n c e
o P e n : s o h o < s o h o @ F o o . n e
c L o s e d : f r e d < 1 2 3 @ I S P . c
o P e n : R i c h a r d < r i c h a r d @
Call IM Renew Back
Show (Read only)
1. Type (BLF, SLA, Presence): Status
2. SIP address-of-record
B L F : R i n g i n g
M i c H a e l < s i p : 1 2 3 4 5 @ I S P .
Status Line:
Type+Status
f o o . n e t >
Call Back
Presence or SLA
Configurations Call History
Soft-Key Function Description
[Missed]
[Dialed]
[Recvd]
[Back]
1 . A d d r e s s B o o k
2 . C a l l H i s t o r y
3 . T e r m i n a l S e t t i n g s
4 . C a l l F o r w a r d
5 . P r e f e r e n c e s
6 . N e t w o r k
7 . S I P S e t t i n g s
8 . S e r v i c e
9 . A d v a n c e d
Missed Dialed Recvd Back
Show the lastest 20 20 missed calls.
Show the latest 20 dialed numbers.
Show the latest 20 received calls.
Return to previous page.
[35/168]
Page 36

y
Missed/Dialed/Received Calls
Missed Call list format:
• List all valid records with lastest call first.
By “latest”, it refers to time sequence rather than the recorded “time-of-call”; because
VIP-550PT has to synchronize its time with network time server by SNTP, such that an actually
“latest” call may recorded as early as 2007 if VIP-550PT fails to synchronize its time by either
SNTP or user manually configuration.
th
• User may use keypad to jump to specified entry, such as enter ‘9’ to jump to 9
Key Function Description
Dial to selected record.
[Call]
Alternativel
by pressing
, You may lift the handset (offhook) or turn speaker on
【
SPK】 to make a call to selected contact as well.
entry.
[Del]
[Clear]
[Back]
【OK】
【↑】and【↓】
Remove selected record.
Remove all records in this list.
Return to previous page.
Review selected record.
Navigate through the list.
1 . R i c h a r d
2 . H o r a c e
3 . M a r r y
4 . J i m
Call Del Clear Back
View Record
Key Function Description
[Call]
[Del]
[Back]
【OK】/ [Edit]
【↑】and【↓】
Dial to selected record.
Delete this record.
Return to previous page.
Edit address of record to save to address book.
Scroll Line.
[36/168]
Page 37

y
Show time-of- call and SIP address-of-record. (Read only)
1 4 : 3 7 : 2 1 1 0 / 2 9 / 2 0 0 6
M i C h a e l < s i p : 1 2 3 4 5 @ I S P .
f o O . n e t >
Call Del Edit Back
Key Function Description
Dial to selected record.
[Call]
[Save]
[To AB]
【OK】
Alternatively, You ma
【
by pressing
Save changes and return.
Save address-of-record into address book.
Edit selected item.
SPK】 to make a call to selected contact as well.
lift the handset (offhook) or turn speaker on
【↑】and【↓】
Navigate through items.
D i s p l a y : M i c h a e l
P R o t o c o l : s i p
A D d r : 1 2 3 4 5 @ I S P . f o o . n e t
Call Save To AB Back
Figure 22. Caller Record info
Configurations Terminal Settings
1 . A d d r e s s B o o k
2 . C a l l H i s t o r y
3 . T e r m i n a l S e t t i n g s
4 . C a l l F o r w a r d
5 . P r e f e r e n c e s
6 . N e t w o r k
7 . S I P S e t t i n g s
8 . S e r v i c e
9 . A d v a n c e d
Back
Figure 23. Main Menu
[37/168]
Page 38

Key Function Description
【↑】and【↓】
[Back]
【OK】
Return to pervious page.
Navigate through menu items.
Enter submenu.
1 . P a s s w o r d
2 . P r o g r a m m a b l e K e y s
3 . D a t e / T i m e
4 . R i n g e r
5 . A l e r t - I n f o
6 . L C D B a c k - L i g h t
7 . L a n g u a g e
8 . A l a r m
9 . P h o n e L o c k
Admin User Back
Password
Set the passwords to administrative and user-level account. These passwords will be needed while
unlocking the phone set (menu Lock), TELNET into the phone, logging in for web configuration,
downloading or upgrading image from network by TFTP?HTTP, and while network administrator tries to
remotely configure your phone set by flash update or rlogin.
Key Function Description
[Admin]
[User]
[Back]
【↑】and【↓】
Modify password to administrator’s account.
Modify password to user’s account.
Return to previous page.
Navigate through menu items.
1 . P a s s w o r d
2 . P r o g r a m m a b l e K e y s
3 . D a t e / T i m e
4 . R i n g e r
5 . A l e r t - I n f o
6 . L C D B r i g h t n e s s
7 . L a n g u a g e
8 . A l a r m
9 . P h o n e L o c k
Admin User Back
[38/168]
Page 39

Admin/User
Key Function Description
[Save]
[Back]
【OK】
【↑】and【↓】
Save changes and return.
Return without and changes.
Modified selected items.
Navigate through menu items.
Show 10 star signs, ‘*’, for security reasons.
O l D : * * * * * * * * * *
N e W : * * * * * * * * * *
R e T y p e : * * * * * * * * * *
Save Back
Passward.Admin.【OK】
Password consists of [0-9*#] only, and disply star sign, ‘*’, for security reasons.
The Default password is “null” (no password).
Key Function Description
[Del] Delete one character.
[Clear] Clear all input.
[Back] Return without any changes.
【OK】
【↑】and【↓】
Finish editing.
Move cursors.
O l D : * * *
N e W :
R e T y p e :
Del Clear Back
[39/168]
Page 40

Programable Keys
1 . P a s s w o r d
2 . P r o g r a m m a b l e K e y s
3 . D a t e / T i m e
4 . R i n g e r
5 . A l e r t - I n f o
6 . L C D B a c k - L i g h t
7 . L a n g u a g e
8 . A l a r m
9 . P h o n e L o c k
Back
Figure 24. Terminal Settings Menu
Key Function Description
[DTMF]
[Back]
【OK】
Configure predefined DTMF list for easy access to IVR system
Return to previous page.
Re-map selected programmable keys.
1 . I M P P
2 . R e g i s t e r
3 . D T M F
4 . F a v o r i t e L i s t
5 .
6 .
7 .
8 .
9
1 0 .
1 1 .
1 2 .
DTMF Back
Configure 12 programmable keys, and the very first 4 programmable key goes to 4 softkeys on the
top half of the LCD Panel.
√DND √AutoAnswer
√Register √DTMF Relay
a. Show ‘√’ to indicate activation status of “Auto-Answer”, “DND”, “DTMF Relay by INFO”;
and unmap of these features will turn off selected feature as well .
b. “Register”: Shoe ‘
and a ‘X’ symbol to indicate none of the active domains are registered. No symbols shown
if register to any of the active SIP service domains succeeded.
√’ to indicate successfully registered to all active SIP service domains
[40/168]
Page 41

c. Show display or user-part of its email-like address whenever possible for One-Touch Dial.
Besides, show Show
d. Otherwise promp to selected menu for further interaction.
The other 8 user-defined keys, excludng those NO-Function keys, will be shown during call state
whenver [DSS] is pressed.
for “One-Touch Dial”.
1 . A d d r e s s B o o k
2 . C a l l H i s t o r y
3
4
D T M F R e l a y b y I N F O
√
A u t o - A n s w e r
√
5 . D N D
6 . S I P D o m a i n S t a t u s
7 . F o r w a r d
Back
1. Show ‘√’ to indicate activation status of “Auto-Answer”, “DND”, “DTMF Relay by
INFO”; and unmap of these features will turn off selected feature as well .
2. “Register”: Show ‘√’ to indicate successfully registered to all active SIP service domains
and a ‘X’ symbol to indicate none of the active domains are registered. No symbols
shown if register to any of the active SIP service domains succeeded.
3. Show display or user-part of its email-like address whenever possible for One-Touch
Dial.
4. Besides, show Show
5. Otherwise promp to selected menu for further interaction.
for “One-Touch Dial”.
DTMF
Specify a sequence of DTMF keys to dial in pre-dial phase or to transmit after call setup. This is
shortcut to transmit a sequence of preconfigured DTMF keys, which aims to facilitate IVR system
interaction. For example, you may configure your personal ID or banking account, and just activate
corresponding DTMF entry to generate those pre-configured DTMF tones whenever appropriate (such
as inquired by tele-banking system). If a DTMF entry is activated during digit-collecting phase, then
those DTMF keys will be collected in a manner identical to those manually pressed by user.
Acceptable keys are [0-9 | * | # | p | ,], where ‘p’ and ‘,’ (comma) stands for one-second pause.
Depending on the configuration, such DTMF sequence may be transmitted to the peer either inbandly
or outbandly (rfc2833 or INFO). You may also configure it to use as server feature access code during
conversation, such as configuring it as “&76”, and it will send DTMF “&76” “as is” during conversation.
Key Function Description
[Dial]
[Add]
[Back]
Dial selected DTMF string.
Add new DTMF entry.
Return to previous page.
【OK】
【↑】and【↓】
Edit selected entry.
Scroll list.
[41/168]
Page 42

D T M F ( 3 )
C i t y B a n k A n t : 0 0 1 0 0 1 0
M a s t e r C a r d : 1 2 3 4 5 6 7 8 9
P I N : a b c d e f g h i j
Dial Add Del Back
DTMF List Format:
1. Show all DTMF entries in alphanumeric order by tags.
2. Fixed the 1
3. Max entries count: 10
st
line (not scrollable) and show entry count, such as (3). (VIP-550PT only)
If reached max allowed entries, show
D T M F . A d d :
M a x E n t r y : 1 0 !
Back
View DTMF
Key Function and items Description
Tag
DTMF
[Dial]
[Save]
【OK】
【↑】and【↓】
User-friendily display associated with this DTMF sequence numbers.
A sequence of DTMF keys to dial in pre-dial phase or to transmit after call
setup. Acceptable keys are [0-9 | * | # | p | ,], where ‘p’ and ‘,’ (comma)
stands for one-second pause. Depending on the configuration, such
DTMF sequence may be transmitted to the peer either inbandly or
outbandly (rfc2833 or INFO).
Dial selected DTMF string.
Save changes and reurn.
Edit selected entry.
Navigate through the list.
1 . T a g : C i t y B a n k A n t
2 . D T M F : 0 0 1 0 0 1 0 0 1 0 0 1 0 0 1
Dial Save Back
[42/168]
Page 43

Edit DTMF
Key Function and items Description
Tag
DTMF
[Del]
[Abc..]/[123..]
[Clear]
【OK】
[Black]
【←】and【→】
User-friendily display associated with this DTMF sequence numbers.
Specify a sequence of DTMF keys to dial in pre-dial phase or to transmit
after call setup. Acceptable keys are [0-9 | * | # | p | ,], where ‘p’ and ‘,’
(comma) stands for one-second pause. Depending on the configuration,
such DTMF sequence may be transmitted to the peer either inbandly or
outbandly (rfc2833 or INFO). You may also configure it to use as server
feature access code during conversation, such as configuring it as “&76”,
and it will send DTMF “&76” “as is” during conversation.
Delete one character.
Toggle between digits and alphanumeric input, where. [Abc..] indicates
current input method is alphanumeric and [123..] indicates digits input.
Clear all input.
Save changes and return.
Return without any changes.
move cursor one position in edit mode.
1 . T a g : C i t y B a n k A n t
2 . D T M F : 0 0 1 0 0 1 0 0 1 0 0 1 0 0 1
Del Abc../123.. Clear Back
Set Programmable Keys
Key Function Description
【OK】
[Back]
A d d r e s s B o o k
A u t o - A n s w e r
C a l l D e t a i l
C a l l H i s t o r y
C a l l R e t u r n
C h a n n e l I n f o
C O D E C
D o N o t D i s t u r b ( D N D )
D T M F L i s t
D T M F R e l a y b y I N F O
F a v o r i t e
Map programmable key to selected function and return.
Return without any changes.
[43/168]
Page 44

F o r w a r d
I M P P
L o g o u t
M e s s a g e
N e t w o r k S t a t u s
N o F u n c t i o n
O n e T o u c h D i a l
P a c k e t i z a t i o n
P h o n e L o c k
R e g i s t e r
R e j e c t
S I P D o m a i n S t a t u s
Back
Shortcut Menu
Auto-Answer (Auto Ans)
Auto-answering incoming calls on idle mode system-wide.
• Press this DSS to toggle auto-answer mode.
• Once enabled, it will show check symbol, ‘√’, along with this feature to indicate its current
status, and the phone will auto-answer all incoming calls arrive on idle mode.
• Unmap this DSS feature will NOT turn auto-answer off.
• This is a shortcut key to configure 『Preferences』=>”Auto-Answer”.
1 √ A u t o - A n s w e r
2 √ D T M F R e l a y b y I N F O
3 . D N D
4 √ R e g i s t e r
5 . S I P D o m a i n S t a t u s
6 . C a l l D e t a i l
7 . N e t w o r k I n f o
Back
Call History (CID)
Enter “2.Call History” / “Missed Call” menu directly if there are any unread missed call; otherwise
enter “Call History” menu directly.
Call Detail (CallDetail)
Show 10 call detail records of the latest connected and finished calls (either incoming or outgoing).
Those records (with their caller IDs, AoR, shown) are sorted by their finished time with latest
comes first. Besides, they are volatile in memory such that they will be clean up every time the
system reboots.
1 . M i c h a e l
2 . J a s o n
3 . F o x
4 . I n s u r a n c e A g e n t
5 . B r o k e r
Call
Back
[44/168]
Page 45

y
Key Function Description
Dial to selected item.
[Call]
Alternativel
by pressing
, You may lift the handset (offhook) or turn speaker on
【
SPK】 to make a call to selected contact as well.
[Back]
【↑】and【↓】
【OK】
Return to previous page.
Navigate through items / scroll Lines.
View record.
1 . F r o m
2 . T i m e o f C a l l
3 . D u r a t i o n : 2 3 : 1 0
4 . C O D E C : G . 7 2 3 . 1 - 5 . 3 k
5 . C o n t a c t
6 . U s e r A g e n t
Call
RTP Media
Back
[RTP] : show local and remote RTP session, with port in rtp/rtcp UDP port pair.
L o c a l R T P :
I P : 1 9 2 . 1 6 8 . 1 9 2 . 1 6 8
P o r t : 1 2 3 4 4 / 1 2 3 4 6
R e m o t e R T P :
I P : 1 0 . 0 . 2 4 . 3 3
P o r t : 8 0 0 0 / 8 0 0 1
Back
[Media] : Show media traffic information. The media-related information will be available only
when the call lasted for more than 20 seconds.
T x P a c k e T : 2 9
R x P a c k e T : 1 8 9 6
T x B y t e : 5 6 0 K B
R x B y t e : 3 4 4 5 K B
Back
From/To : SIP address-of-record of the peer.
M i c h a e l < s i p : 1 2 3 4 @ I S P . c
o m >
Call
Back
[45/168]
Page 46

Time of Call
1 4 : 1 2 : 3 4 1 2 / 1 6 / 2 0 0 6
Back
Duration: call active time (show mm:ss in-line)
CODEC: CODEC employed for the call (show in-line).
Contact: IP of the peer’s CPE.
M i c h a e l < s i p : 1 2 3 4 @ 1 9 2 . 1
6 8 . 1 . 3 3 >
Call
Back
User Agent: The phone tool used by the peer for this call.
I P S I P P h o n e / 2 . 2 3 . 8
Back
[Back]: return
Call Return (CallReturn)
Make a call back to the last incoming numbers (missed or received call). It differs from server
supported call return, such as “*69”, in that it will find the latest incoming calls from “Missed calls”
and “Received calls” then dial out the number.
Channel Info (A/B Info)
Show information of the current active calls on each channel. Those records (with their caller IDs,
AoR, shown) are volatile in memory such that they will be clean up every time the system reboots.
[A]/[B] : Toggle between channel A and B, with [A]/[B] indicate current channel.
C h a n n e l A
1 . F r o m
2 . C o n t a c t
3 . C O D E C : G . 7 2 3 . 1 - 5 . 3 k
4 . U s e r A g e n t
Call
RTP A/B Back
[46/168]
Page 47

Do Not Disturb (DND)
Toggle switch to enable or disable Do-Not-Disturb, DND, feature. Once enabled all incoming calls
will be forwarded unconditionally to the forwarded target number if applicable; otherwise, incoming
calls will be turned down as “486 Busy Here”. Unmap of this feature will cancel DND as well.
Show check symbol, ‘√’, along with this feature to indicate its current status once enabled.
1 √ A u t o A n s w e r
2 √ D T M F R e l a y b y I N F O
3 . D N D
4 √ R e g i s t e r
5 . S I P D o m a i n S t a t u s
6 . C a l l D e t a i l
7 . N e t w o r k I n f o
Back
DTMF List
Shortcut to invoke 『3.Terminal Settings』/ 『DTMF』 menu.
DTMF Relay by INFO (DTMF INFO)
This is a shortcut key to configure 『Advanced』/『CODEC』=>”DTMF Relay by INFO” directly. Once
enabled, all pressed DTMF keys (0-9*#&) during a call will be sent by SIP INFO method; otherwise
those DTMF keys will be transmitted by DTMF over RTP (either by RFC2833 or DTMF tone mixed
with voice stream).
Unmap of this key will not disable this feature. Show check symbol, ‘√’, along with this feature to
indicate its current status once enabled.
1 √ A u t o A n s w e r
2 √ D T M F R e l a y b y I N F O
3 . D N D
4 √ R e g i s T e r
5 . S I P D O m a i n S t a t u s
6 . C a l l D e t a i l
7 . N e t w o R k I n f o
Back
Favorite
Shortcut to invoke 『1.Address Book』/ 『Favor』 menu.
Forward
Forward incoming ringing calls on call arrival to preconfigured forwarding target number; otherwise
enter “4.Call Forward” menu. Although [Forward] will be one of the context-sensitive soft-buttons
on call-waiting, it may disappear if user does not process this incoming call before this context
changed, this programmable key can always be pressed at any time.
IMPP
Shortcut to invoke 『1.Address Book』/ 『IMPP』 menu.
Logout
Unregister all activated SIP address-of-records and cease regular auto-registration scheduling to
keep user off-line until 【Register】 feature is activated to be on-line again. Once logged out, it
appears to be in “closed” Presence state.
[47/168]
Page 48

After reboot the phone-set will clear this status and register to all activated SIP address-of-records
afte startup.
Message
Access to out-of-dialog instant messaging: on pressing, it will enter 『8.Service』/ 『Message』
/『Inbox』if there are any unread new messages; otherwise enter 『8.Service』/ 『Message』
menu.
Network Status (Network)
Shortcut to invoke 『9.Advanced』/ 『Network Status』 menu.
No Function (NOP)
No specific function for this key.
One-Touch Dial
Make an outbound call to the associated contact.
Show the display (or user-part of its email-like address) whenver possible. Besides, show
for “One-Touch Dial”.
Show
1
M i c h a e l
2 √ D T M F R e l a y b y I N F O
3 . D N D
4 √ R e g i s t e r
5 . S I P D o m a i n S t a t u s
6 . C a l l D e t a i l
7 . N e t w o r k I n f o
Back
Register
Register to all activated domains on-demand, and appear to be in “open” Presence State unless it
is in “DND”
1 √ A u t o A n s w e r
2 √ D T M F R e l a y b y I N F O
3 . D N D
4 . R e g i s t e r
5 . S I P D o m a i n S t a t u s
6 . C a l l D e t a i l
7 . N e t w o r k I n f o
Reject
Reject incoming ringing calls on arrival as “486 Busy”. Although [Busy] will be one of the
context-sensitive soft-buttons on call-waiting, it may disappear if user does not process this
incoming call before this context changed, this programmable key can always be pressed at any
time.
Back
[48/168]
Page 49

SIP Domain Status (SIP Realm)
Show a symbol preceding each active SIP service domain:
a. ‘√’ to indicate successfully registered to all active SIP service domains.
b. ‘x’ to indicate none of the active domains are registered.
c. No symbol to indicate registered to any of the active SIP service domain succeeded.
1 √ A u t o A n s w e r
2 √ D T M F R e l a y b y I N F O
3 . D N D
4 √ S I P D o m a i n S t a t u s
5 . R e j e c t
6 . C a l l D e t a i l
7 . N e t w o r k I n f o
Back
If pressed (activated), it will show registration status of each active SIP service domain.
1 √ I S P . f o o . n e t
2 x s i p . I S P . c o m
3 . I S P . p r i v a t e . b i z
Back
Show symbol preceding each active SIP service domain:
a. ‘√’ to indicate a register success state
b. ‘x’ to indicate a register failed state
c. ‘.’ To indicate a registering state.
The VIP-350PT / VIP-550PT serial IP Phone supports up to 3 SIP service domains, which this
terminal may register to; and you may circle active service domains by pressing [Realm]
soft-button while making outbound calls.
foo.biz
3 2 0 0
SIP.isp.com
foo.biz
Auto-locate
Settings Date/Time
IP Phone will synchronize its time by Simple Network Time Protocol, SNTP, with network time server
regularly if SNTP is enabled. To keep the time you manually set here, you must disable SNTP.
Key Function Description
[Zone]
[FMT]
[DST]
[Back]
【OK】
[49/168]
Set time-zone.
Set date/time display format.
Daylight Saving Time (DST) adjustment.
Return to previous page.
Adjust system date and time.
Page 50

1 . P a s s w o r d
2 . P r o g r a m m a b l e K e y s
3 . D a t e / T i m e
4 . R i n g e r
5 . A l e r t - I n f o
6 . L C D B a c k - L i g h t
7 . L a n g u a g e
8 . A l a r m
9 . P h o n e L o c k
Zone FMT DST Back
Zone
This terminal will synchronize its time by Simple Network Time Protocol, SNTP, with network time
server regularly if SNTP is enabled. Before setting the GMT time inquired from NTP server, it will
convert it into local time based on the time zone as well as daylight saving adjustment (see below).
To leave the current system date and time set from menu-“Date/Time” intact, you could either disable
SNTP from menu-”8.Service” / “SNTP”. The System default is GMT+00:00.
Key Function Description
[±]
【OK】
[Back]
【←】and【→】
[0-9]
±
Toggle between ‘+’ and ‘-‘.
Save changes and return.
Return without changes.
Navigate through fields.
enter values.
Press any key [0-9*#] to toggle between ‘+’ and ‘-‘.
T i m e Z o n e
G M T : ± 0 0 : 0 0
±
Back
FMT
Specify the date format for display purpose (such as time-of-call in records of call history).
MM: 2-digit month
DD: 2-digit day of month
YYYY: 4-digit year
[50/168]
Page 51

1 . M M / D D / Y Y Y Y
2 . D D / M M / Y Y Y Y
3 . Y Y Y Y / M M / D D
4 . Y Y Y Y / D D / M M
5 . Y Y Y Y - M M - D D
Back
DST
Daylight Saving Time (DST) adjustment.
1 . O f f s e t : + 2 : 0 0
2 . S t a r t D a t e
3 . S t o p D a t e
Back
DST Offset
Offset from this terminal’s time when DST is in effect. When DST is over, the specified offset is no
longer applied to this terminal’s time. Valid values are H:MM, -H:MM or +H:MM.
The System default is 0:00 to disable DST adjustment.
Key Function Description
[±]
【OK】
[Back]
【←】and【→】
[0-9]
D S T O f f s e t
O f f s e t : ± 0 : 0 0
Toggle between ‘+’ and ‘-‘.
Save changes and return.
Return without changes.
Navigate through fields.
enter values.
±
Back
[51/168]
Page 52

DST Start Date
M o n t h : A p r i l
D a y : S u n , L a s t W e e k
T i m e : 0 2 : 0 0
Back
DST Start Date.Month
J a n u a r y
F e b u r a r y
M a r c h
A p r i l
M a y
J u n e
J u l y
Back
DST Start Date.Day
[WoM]/[DoM]: Toggle between [Week-of-Moth] and [Day-of-Month].
1 . M o d e : D a y - o f - M o n t h
2 . D a y - o f - M o n t h
3 . W e e k - o f - M o n t h
WoM/DoM Back
DST Start Date.Day.Day-Of-Month
D a y - o f - M o n t h
[ 1 - 3 1 ] 1
Del Back
[52/168]
Page 53

DST Start Date.Day.Week-Of-Month
W e e k : L a s t W e e k
D a y - o f - W e e k : S u n
Back
Week
0 . L a s t W e e k
1 . 1 s t W e e k
2 . 2 n d W e e k
3 . 3 r d W e e k
4 . 4 t h W e e k
5 . 5 t h W e e k
6 . 6 t h W e e k
Back
Day-of-Week
0 . S u n
1 . M o n
2 . T u e
3 . W e d
4 . T h u
5 . F r i
6 . S a t
Back
DST Start Date.Time
Press 【OK】 to edit selected item
Time of day on which DST begins in HH:MM 24 hour’s format.
M o n t h : A p r i l
D a y : S u n , L a s t W e e k
T i m e : 0 2 : 0 0
Save Back
Set Date/Time 【OK】
Specify current date and time on this terminal. Enter the current date, where the time is in 24-hour
format and the date format depends on the “3.Date/Time” / “FMT” configuraiton.
Note: this terminal will synchronize its time by Simple Network Time Protocol, SNTP, with network time
server regularly if SNTP is enabled. To keep the time you manually set here, please disable SNTP from
menu-”SNTP mode” first.
[53/168]
Page 54

Key Function Description
[Save]
[Back]
[Back]
【←】and【→】
[0-9]
Save changes and return
Return without changes.
Return without changes.
Navigate through fields.
Enter values.
T o d a y
2 1 : 3 7 : 2 5 1 1 / 2 3 / 2 0 0 6
Save Back
Date / Time Setting Screen
Ringer
Specify the ring to play on call arrival.
Key Function Description
[Type]
[Vol]
[Back]
Configure ringer type.
Configure ringer volume.
Return to previous page.
1 . P a s s w o r d
2 . P r o g r a m m a b l e K e y s
3 . D a t e / T i m e
4 . R i n g e r
5 . A l e r t - I n f o
6 . L C D B a c k - L i g h t
7 . L a n g u a g e
8 . A l a r m
9 . P h o n e L o c k
Type Vol Back
Figure 25. Terminal Settings menu
[54/168]
Page 55

Type Select
【↑】and【↓】: Navigate (and play) through ringers.
1 . R i n g e r - 0
2 . R i n g e r - 1
3 . R i n g e r - 2
4 . R i n g e r - 3
5 . R i n g e r - 4
6 . R i n g e r - 5
7 . R i n g e r - 6
8 . R i n g e r - 7
9 . R i n g e r - 8
1 0 . R i n g e r - 9
Back
Vol Adjustment
Adjust volume real time by playing selected ring.
Use Volume Keys :【Up】and【Down】
navigation keys : 【↑】,【↓】,【←】and【→】to adjust volume.
R i n g e r V o l u m e :
< < < < < <
Back
Alert-Info
The IP Phone supports “Alert-Info” header in the first SIP INVITE message as per RFC3261,
“Alert-Info” header dictates the phone to use an alternative ringing tone, which is specific for that call.
The header should be in a format similar to
“Alert-Info: <http://MediaServer.ISP.com/Announce.pcmu>;AnyParameter=xxxx”
or
“Alert-Info: xxxx”, where “xxxxx” (case-insensitive) is the tone tag for one of the available ringing tones
(0~11). This is useful to distinguish calls, for example local calls from calls coming from PSTN. Besides,
this header is ignored for re-INVITE. If the specified tone is out of range, the current ringer is used.
From this page, user may re-map which tone should be played when “xxxx” tone tag is specified. For
example, if “Alert-Info: ringtone-0” is mapped to “Ringer7”, then “Ringer7” will be played whenever
“Alert-Info: ringtone-0” or “Alert-Info: <http://SIP.ISP.com/file.pcmu>;anyParameter=ringtone-0” is
specified in the initial INVITE.
Default is to map “ringtone-0” to Ringer0, “ringtone-1” to Ringer1, and so on.
[55/168]
Page 56

Key Function Description
[Tag]
[Ring]
[Back]
Configure the tag of selected alert-info.
Configure the ringer type of selected alert-info.
Return to previous page.
1 . i n - H i : R i n g e r - 1
2 . o u t - l o : R i n g e r - 4
3 . i n t r a - h i : R i n g e r - 3
4 . i n t r a - l o : R i n g e r - 2
5 . i n t l : R i n g e r - 9
6 .
7 .
Tag Ring Back
Tag Settings
Specif the tag to be compared to in “Alert-Info” header. This tag is case-insensitive and can appear
as header value or in any header parameter value.
Key Function Description
[Del]
[Abc..]/[123..]
[Clear]
[Back]
【OK】
【←】and【→】
Delete one character.
Toggle between digits and alphanumeric input, where [Abc..] indicates
current input method is alphanumeric and [123..] indicates digits input.
Clear all input.
Return without any changes.
Save changes and return.
Move cursor one position in edit mode.
T a g :
i n - H i
Del Abc../123.. Clear Back
Figure 26. Tag name settings
[56/168]
Page 57

Ring Settings
Specify which ring to play when a match is found in “Alert-Info” header.
Key Function Description
[Back]
【↑】and【↓】
【OK】
Return without changes
Navigate (and play) through ringers.
Save and return
Play selected ring real time.
1 . R i n g e r - 0
2 . R i n g e r - 1
3 . R i n g e r - 2
4 . R i n g e r - 3
5 . R i n g e r - 4
6 . R i n g e r - 5
7 . R i n g e r - 6
8 . R i n g e r - 7
9 . R i n g e r - 8
1 0 . R i n g e r - 9
Back
LCD Back-Light
Specify how long the LCD backlite stays on after going into idle state.
1 . O f f w h e n e v e r I d l e
2 . O f f a f t e r 1 0 S e c o n d s
3 . O f f a f t e r 3 0 S e c o n d s
4 . O f f a f t e r 1 M i n u t e
5 . O f f a f t e r 2 M i n u t e s
6 . O f f a f t e r 3 M i n u t e s
7 . O f f a f t e r 5 M i n u t e s
8 . O f f a f t e r 10 M i n u t e s
9 . A l w a y s O n
Back
Alarm
Set up temporary alarm and / or regular alarm.
On timer expiration (either alarm type), the phone will start ringing for 60 seconds with increasing
volume (stepping from the current speaker volume). Press any key after timer expiration will stop its
activation (ringing); otherwise, it will repeat the ringing process after 5 minutes ‘till any key is pressed or
it has been 30 minutes after its expiration.
[57/168]
Page 58

1 . O n e - t i m e A l a r m
2 . R e g u l a r A l a r m
3 . R i n g e r
Back
Regular Alarm
Configure a timer which triggers regularly.
[On]/[Off]: Toggle switch to enable or disable alarm. Show check symbol ‘√’ in-line if enabled!
1 . A c t i v a t e
2 . T i m e : 0 6 : 3 0
3 . R e g u l a r i t y
On/Off Back
Time Settings
Press 【OK】to edit the time of this regular alarm of when it triggers.
Key Function Description
[Back]
【←】and【→】
[0-9]
[Save]/【OK】
Return without changes
Navigate through fields in a item.
Please enter values.
Save and return.
1 √ A c t i v a t e
2 . T i m e : 0 6 : 3 0
3 . R e g u l a r i t y
Save Back
[58/168]
Page 59

Regularity Settings
Configure the regularity when the timer triggers.
[On]/[Off]: Toggle switch to enable or disable alarm on selected day. Show check symbol ‘That ’
in-line if enabled!
0 . S u n
1 √ M o n
2 . T u e
3 . W e d
4 √ T h u
5 . F r i
6 . S a t
Save On/Off Back
Alarm Ringer
Position on current values on entering.
1 . R i n g e r - 0
2 . R i n g e r - 1
3 . R i n g e r - 2
4 . R i n g e r - 3
5 . R i n g e r - 4
6 . R i n g e r - 5
7 . R i n g e r - 6
8 . R i n g e r - 7
9 . R i n g e r - 8
1 0 . R i n g e r - 9
Back
Phone Lock
Once locked in either Function Keys (security) mode or take call only mode, you need either user-level
or privileged password to unlock it.
U n l o ck pas s word:
Key Function Description
Off
Function
Keys
The terminal is not in security mode.
This terminal is locked on security level. In security mode, the following keys
will be protected (key press will be ignored):
• 4 programmable hard keys located on the upper half of LCD.
• Menu Key. 【Menu】
• Redial key: 【Redial】
• Message Waiting Indication: 【MWI】
• Context-sensitive soft-keys: [Call History], [Address Book] and [DSS]
keys.
[59/168]
Page 60

Lock the phone set such that no outbound calls could be made and the phone
Take Call Only
could not be configured either. That is, the phone would leave in “receive only”
mode (No dial tone could be heard).
[Back]
【OK】
【↑】and【↓】
1 . O f f
2 . F u n c t i o n K e y s
3 . T a k e C a l l O n l y
Back
Return without any changes.
Save changes and return.
Navigate through items.
Call Forward
Configure the target number to forward to while this phone is busy or not answered within a predefined
guarding interval. This forwarding number is also employed while the phone is engaged in Do Not
Disturb, DND, mode or while the user activate 【Forward】 feature on an incoming waiting call.
The system forwarding rules are checking Do Not Disturb mode first, then All Calls Forward, Busy
Forward, finally going to No Answer Forward while no-answer timer expires.
Show check symbol ‘√’ in-line if enabled!
1 . T a r g e t N u m b e r
2 . A l l C a l l s F o r w a r d
3 √ B u s y F o r w a r d
4 √ N o A n s w e r F o r w a r d
Back
[60/168]
Page 61

(
Target Number
This forwarding number is to forward incoming calls when the phone is busy or not answered within a
predefined guarding interval. It is also employed while the phone is engaged in Do Not Disturb, DND,
mode or while the user activates 【Forward】 feature on an incoming waiting call.
Key Function Description
Dial to target number if available.
[Call]
Alternatively, You may lift the handset
【
by pressing
SPK】 to make a call to selected contact as well.
offhook) or turn speaker on
[Reset]
Reset target number from address book.
M y A l t e r n a t i v e N o < s i p : 1 2
3 4 @ I S P . f o o . c o m >
Call Reset Del Back
Key Function Description
[Back] Return without any changes.
【OK】
【↑】and【↓】
[Del] Remove target number (no target number for call-forward).
Pick selected contact.
Navigate through the list.
[Back] Save changes and return.
【OK】
Return.
C o n t a c t s ( 1 4 3 )
M i c h a e l
M i k e
N i c k
P a t r i c k
P a u l
R i c h a r d
Back
[61/168]
Page 62

Call Forward.All Calls Forward
You can configure to unconditionally forward all incoming calls by enable the All Calls Forward feature.
Forwarded calls are logged in the Missed Calls. If this feature is enabled, LCD will show
“FWD:TargetAoR” to remind user that all incoming calls will be forwarded unconditionally thereafter.
Default is disabled.
[On] / [Off]: Toggle between enable and disable this feature. Show check symbol ‘√’ in-line if enabled!
1 . T a r g e t N u m b e r
2 . A l l C a l l s F o r w a r d
3 √ B u s y F o r w a r d
4 √ N o A n s w e r F o r w a r d
On/Off Back
Call Forward.Busy Forward
Configure to forward incoming waiting calls when the system is busy, on which time all lines are
occupied. Forwarded calls are logged in the Missed Calls.
Default is enabled
[On] / [Off]: Toggle between enable and disable this feature. Show check symbol ‘√’ in-line if enabled!
1 . T a r g e t N u m b e r
2 . A l l C a l l s F o r w a r d
3 √ B u s y F o r w a r d
4 √ N o A n s w e r F o r w a r d
On/Off Back
Call Forward.No Answer Forward
Configure to forward incoming waiting calls after ringing for a predefined interval. Forwarded calls are
logged in the Missed Calls. When No Answer Forward feature is enabled, the incoming calls will be
forwarded to the Target Number if the call has not been answered for a predefined time (see next
section); otherwise the phone will keep ringing indefinitely.
Default is enabled.
[On] / [Off]: Toggle between enable and disable this feature. Show check symbol ‘√’ in-line if enabled!
[Timer]: Configure the time to wait (ringing) before forwarding incoming calls as No Answer. Default is
30 seconds.
[62/168]
Page 63

1 . T a r g e t N u m b e r
2 . A l l C a l l s F o r w a r d
3 √ B u s y F o r w a r d
4 √ N o A n s w e r F o r w a r d
On/Off Timer Back
N o A n s w e r T i m e r
[ 1 0 - 6 0 ] ( s e c o n d )
3 0
Del Back
Figure 27. Timer Configuration
Preference
Set up personal call preferences.
Show check symbol ‘√’ in-line if enabled!
1 √ C a l l W a i t i n g
2 . D i a l T i m e o u t
3 . H o l d R e c a l l T i m e r
4 . A u t o - R e d i a l
5 . D i a l P l a n
6 √ M e s s a g e A l e r t
7 . A u t o - A n s w e r
8 . U n h o l d o n T r a n s f e r
9 √ C o n f e r e n c e A l e r t
1 0 . X f e r o n E x i t C o n f
Back
Figure 28. Preferences Main menu
Call Waiting
Call Waiting notifies the user, who is on an established call, that an additional external call has been
present and is “waiting to be answered.” The waiting call receives normal ringing until it is answered,
the incoming calling party abandons the call, or the ringing cycle timer expires, and the call is given
No-Answer-Forward treatment (if applicable).
When the user has engaged in a call, and some new incoming calls are waiting for answer, the phone
will play an auditable tone twice in 7 seconds to alert the user on active channel. You could change this
setting such that the phone will reply an incoming call a “486 Busy Here” while you are busy. Default is
enabled.
[On] / [Off]: Toggle between enable and disable this feature. Show check symbol ‘√’ in-line if enabled!
[63/168]
Page 64

1 √ C a l l W a i t i n g
2 . D i a l T i m e o u t
3 . H o l d R e c a l l T i m e r
4 . A u t o - R e d i a l
5 . D i a l P l a n
6 √ M e s s a g e A l e r t
7 . A u t o - A n s w e r
8 . U n h o l d o n T r a n s f e r
9 √ C o n f e r e n c e A l e r t
1 0 . X f e r o n E x i t C o n f
On/Off Back
Dial Timeout
Configure the dial timeout if no responses (any provisional responses such as “100 Trying” or “180
Ringing”) from the peer. If the timer expires before the peer starts ringing back, it will play disconnect
tone and prompt the user “Dial timeout”.
System default is 30 seconds.
[Del]: Delete one character
D i a l T i m e o u t
[ 1 0 - 6 0 0 ] ( s e c o n d )
3 0
Del Back
Hold Recall Timer
When some calls are put on hold, such as during a transfer procedure, the phone will play an auditable
tone regularly to alert the user on active channel. Default alerting interval is 60 seconds. Besides, the
phone will start ringing if the handset is placed on-hook and there is a call currently on hold.
The alerting process is as following:
1. User are in on-hook state:
• The phone will ring.
• The recall state continues ‘till user picks up the call. However, if user does not
answer the call within 1 minute, the call will be disconnected.
2. User are in off-hook state, either engaged in other calls or about to making calls:
• Play hold recall tone once to remind the user that some calls are in hold.
• Reset the hold recall timer for next time alarm.
[Del]: Delete one character
[64/168]
Page 65

H o l d R e c a l l I n t e r v a l
[ 1 0 - 6 0 0 ] ( s e c o n d )
6 0
Del Back
Auto-Redial
Once auto-redial is in progress, it will be automatically canceled if either the stop criterion is met or the
total activation duration is expired.
1 . S t o p C r i t e r i o n
2 . R e t r y I n t e r v a l
3 . T o t a l D u r a t i o n
Back
Stop Criterion Settings
Specify the circumstances to stop auto-redialing.
1. Stop on Ringing: only when the peer starts ringing back will auto-redialing stop (Default).
2. Stop on Connected: Only when the peer picks up will auto-redialing stop.
1 . S t o p o n R i n g i n g
2 . S t o p o n C o n n e c t e d
Back
Retry Interval Settings
Specify the gap (measured in seconds) between two successive re-dials to avoid overflowing the
networks with fast retries.
Default is 15 seconds
【←】and【→】: move cursor one position in edit mode.
R e d i a l I n t e r v a l
[ 1 - 2 5 5 ] ( s e c o n d )
1 5
Del Back
[65/168]
Page 66

Totoal Duration Settings
Specify the activation duration of this auto-redial feature once starts, measured in seconds. Once
the timer expires, the auto-redial feature will be canceled.
Default is 1800 seconds (30 minutes).
A c t i v e I n t e r v a l
[ 3 0 - 8 6 4 0 0 ] ( s e c o n d )
1 8 0 0
Del Back
Dial Plan
Show check symbol ‘√’ in-line if enabled!
1 . I n t e r - D i g i t T i m e o u t
2 √ L A N D i a l
3 . C a l l C o m m a n d
4 . D i a l P l a n
5 . H o t L i n e
Back
Inter-digit Timeout Settings
Configure the inter-digit timeout while dialing numbers in digit-collecting phase. Default is 4
seconds. If you dial the alphabets very often, such as URL, then you may increase the inter-digit
timeout to, say, 6 seconds. While making calls, the first digit timeout is 15 seconds, and the
inter-digit timeout after the first digit is defined here. The phone will dial out the collected digits on
timer expired. To speed up the dial process, press [Call] soft-button whenever finishing dial.
I n t e r - D i g i t T i m e o u t
[ 3 - 9 ] ( s e c o n d )
4
Del Back
[66/168]
Page 67

LAN Dial Settings
Configure whether a dial string starting with a star, ‘*’, key signals a LAN dial. For example, if your
IP is “192.168.3.10” and you want to make a direct IP call to another host (either a phone-set or a
PC) which IP is “192.168.3.20”, you may dial “*20” to make a call to it. To specify the UDP port, you
may dial “*20**9999” to call to “192.168.3.20:9999”.
Generally, to make LAN dial, you should use a star sign, ‘*’, as a dot, ‘.’; and double stars, “**”, as a
colon, ‘:’, to specify the UDP port the callee listens on. Besides, you may specify the last 1, 2 or 3
fields of the peer’s IP, plus additional port.
For example, suppose the terminal’s IP is 192.168.3.10.
z Example 1: to call “192.168.3.20:5060”, you may dial:
***192*168*3*20**5060 (where “**” as ‘:’ to specify UDP port)
***192*168*3*20 (default is call to UDP port 5060)
****20# (since the peer locates on the same subnet as you do, you could specify only
the last portion of its IP as shorthand to “192.168.3.20:5060”.
z Example 2: to call “888@192.168.4.90:5060
***888*192*168*4*90**5060 (where “**” as ‘:’ to specify UDP port)
***888*192*168*4*90 (default is call to UDP port 5060)
By default, this feature is enabled. You may want to disable LAN dial if it conflicts with some dial
numbers and/or you want to send those LAN dial strings “as is” (for example, “*123” may be
reserved by ISP for server feature access).
[On]/[Off]: Toggle between enable and disable this feature. Show check symbol ‘√’ in-line if
1 . I n t e r - D i g i t T i m e o u t
2 √ L A N D i a l
3 . C a l l C o m m a n d
4 . D i a l P l a n
5 . H o t L i n e
On/Off Back
Call Command Settings
Configure various call commands, such as Calling Line Identification Restriction (CLIR), or Calling
Line Identification Presentation (CLIP), on a per call basis. Alternative, you may change server
feature access code to fit your local regulation, such as change the “Call Return” access call from
“*69” to “#69”.
1 . M S A C :
2 . A n o n y m o u s C a l l : * 6 7
3 . C L I P : * 8 2
4 . M W I :
5 . S e r v e r H o l d :
6 . C a l l P i c k u p : * *
7 . F e a t u r e C o d e 0 :
8 . F e a t u r e C o d e 1 :
9 √ C o n f e r e n c e A l e r t
1 0 . X f e r o n E x i t C o n f
Back
[67/168]
Page 68

[Del]: Delete one character.
[Abc..]/[123..]: Toggle between digits and alphanumeric input, where. [Abc..] indicates current input
method is alphanumeric and [123..] indicates digits input.
[Clear]: Clear all input.
1 . M S A C :
2 . A n o n y m o u s C a l l : * 6 7
3 . C L I P : * 8 2
4 . M W I :
5 . S e r v e r H o l d :
6 . C a l l P i c k u p : * *
7 . F e a t u r e C o d e 0 :
8 . F e a t u r e C o d e 1 :
9 . F e a t u r e C o d e 2 :
Del Abc../123.. Clear Back
• Conference Server Access Code:
Whenever the [Conf] soft-key is pressed, IP Phone will try to initiate a 3-way local conferencing.
However, some ISP provide media server for server-side conference support as well. Thus, if you
want to send such access code to server, such as “*#”, instead of launch a local conference after
pressing [Conf] soft-key, you may define the access code here. If defined, this terminal will send
specified MSAC code as DTMF sequence by either inband or outband (rfc2833 or SIP INFO)
during conversation. Leave it blank for 3-way local conference on pressing [Conf] soft-key.
• CLIR: Calling Line Identification Restriction.
System default is to enable Calling Line Identification Presentation, CLIP, all the time. You may
enable the Call Line Identification Restriction, CLIR on a per-call basis by using the call command
dial string. To enable CLIR on a per-call basis requires that the dial string sequence (typically *67)
that users enter on their dial-pad prior to dialing the phone number match the specified CLIR string
defined in the call command. Whenever the prefix is detected in dial string, it will be stripped off
from the original dial string and send to proxy with CLIR enabled. The SIP INVITE message sent by
IP Phone would look like:
INVITE sip:3101@192.168.3.101 SIP/2.0
Via: SIP/2.0/UDP 192.168.3.253:5060;branch=abc7801
Via: SIP/2.0/UDP 192.168.3.51:5060
From: "Anonymous" <sip:Anonymous@192.168.3.51>;tag=22516
To: <sip:3101@192.168.2.101>
Call-ID: 1157628352@192.168.3.117
CSeq: 1 INVITE
Contact: "Anonymous" <sip:Anonymous@192.168.3.51:5060>
User-Agent: IP-Phone/2.0
Content-Length: 171
Content-Type: application/sdp
v=0
o=ipr000dc300051 0 0 IN IP4 192.168.3.5
System default activation code is “*67”.
• CLIP: Calling Line Identification Presentation.
System default is to enable Calling Line Identification Presentation, CLIP, all the time. You may
cancel CLIR by using the CLIP call command dial string.
To enable the Calling Line Identification Presentation, CLIR, on a per-call basis (to counter CLIR)
requires that the dial string sequence (typically *82) that users enter on their dial-pad prior to dialing
the phone number match the specified CLIP string defined in the call command. Whenever the
prefix is detected in dial string, it will be stripped off from the original dial string and send to proxy
with CLIP enabled.
System default activation code is “*82”.
[68/168]
Page 69

• MWI: Message Waiting Indication
Whenever the【MWI】 is pressed, The IP Phone will try to make a call to the SUBSCRIBEd MWI
account. However, some ISPs provide voice mailbox access by specific server feature access code.
Thus, if you want to send such server feature access code to server, such as “#”, you may define
the access code here. If defined, this terminal will make an outbound call to the defined code; for
example, if “#” is configured, it will call to “sip:#@ISP.com”. Leave it blank for terminal to call to the
SUBSCRIBEd MWI account.
• Server Hold
Whenever the【HOLD】 is pressed, The IP Phone will try to put the peer on hold by SIP re-INVITE,
and retrieve the peer by SIP re-INVITE if the 【HOLD】is pressed again. Besides, this terminal will
play music locally whenever it is put on hold by the peer. However, some ISP provide hold operation
as well as server generated music-on-hold stream through their servers. Thus, to integrate such
server/IP-PBX, you may re-define the operation of 【HOLD】. Once defined, such as “&”, the
terminal will generate the defined server hold access code as DTMF sequence by either inband or
outband (rfc2833 or SIP INFO) during conversation to invoke server hold features. Leave it blank for
terminal to perform HOLD/unHOLD operations by SIP re-INVITE locally.
• Call Pickup: Default is “**”. The IP Phone supports directed call pickup as well as group call
pickup.
Specify the group pickup code to pick up a ringing call of the same group (RFC4235-Dialog Event
Page, RFC4462-Event Notify for Resource List, RFC2387-Muptipart-Related MIME type, and
draft-ietf-sipping-service-examples-10.txt.
For example, if Bob and Peter are part of a work group at example.com that can pick up each
others calls. Alice calls Bob who does not answer. Peter wishes to pick up the call then he could
dial this specified “Call Pickup” code followed by Bob’s number, such as “**Bob”, where “**” is the
assumed “Call Pickup” code. Then Peter’s terminal will send a SUBSCRIBE to Bob to retrieve the
dialog information. Bill then generates an INVITE with a Replaces to Alice. Alice answers the
INVITE and sends a CANCEL to stop Bob's phone ringing. Note that the order of the
CANCEL/ACK sequence in message-9 through message 14 is not significant.
[69/168]
Page 70

# Message Content
INVITE sip:bob@192.168.3.101 SIP/2.0
Content-Length: 223
Content-Type: application/sdp
Via: SIP/2.0/UDP 192.168.3.57:5060;branch=z9hG4bK469312dfb
To: <sip:bob@ISP.com>
From: <sip:alice@ISP.com:5060>;tag=489c13a17
Supported: replaces, timer
Call-ID: 8dcb1544-78cd47b1-7de510c5-c0ab41b5@192.168.3.57
CSeq: 66526 INVITE
User-Agent: VIP-550PT/1.1.1
Max-Forwards: 70
Session-Expires: 1800
1
Contact: <sip:alice@192.168.3.57:5060>
v=0
o=iprD0E9015189 4553807 4553807 IN IP4 192.168.3.57
s=c=IN IP4 192.168.3.57
t=0 0
m=audio 8004 RTP/AVP 0 8 4 18 101
a=rtpmap:101 telephone-event/8000
a=ptime:20
a=fmtp:101 0-16
a=fmtp:4 ptime=30;bitrate=6.3
SIP/2.0 180 Ringing
Content-Length: 0
2
Server: IPR-720E/1.0.1
Via: SIP/2.0/UDP 192.168.3.57:5060;branch=z9hG4bK469312dfb
[70/168]
Page 71

To: <sip:bob@ISP.com>;IPDIAL=1;tag=46f66d0e
From: <sip:alice@IPS.com:5060>;tag=489c13a17
Call-ID: 8dcb1544-78cd47b1-7de510c5-c0ab41b5@192.168.3.57
CSeq: 66526 INVITE
Contact: <sip:bob@192.168.3.101:5060>
SUBSCRIBE sip:bob@192.168.3.101 SIP/2.0
Content-Length: 0
Date: Fri, 23 Jun 2006 16:00:49 GMT
Via: SIP/2.0/UDP 192.168.3.61:5060;branch=z9hG4bK41d57a19
To: <sip:bob@ISP.com>
From: <sip:peter@ISP.com>;tag=41c6a9c
Call-ID: 28c568f6-dc7fa18c-66e20de0-4c6b0c6d@192.168.3.61
3
Event: dialog
Supported: eventlist
CSeq: 40397 SUBSCRIBE
Expires: 30
User-Agent: ATA-740S/1.1.3
Max-Forwards: 70
Accept: multipart/related, application/rlmi+xml, application/dialog-info+xml
Contact: <sip:peter@192.168.3.61:5060>
SIP/2.0 200 OK
Content-Length: 0
Server: ATA-740S/1.1.3
Via: SIP/2.0/UDP 192.168.3.61:5060;branch=z9hG4bK41d57a19
4
To: <sip:bob@ISP.com>;tag=47251617
From: <sip:peter@ISP.com>;tag=41c6a9c
Call-ID: 28c568f6-dc7fa18c-66e20de0-4c6b0c6d@192.168.3.61
CSeq: 40397 SUBSCRIBE
Contact: <sip:bob@192.168.3.101:5060>
NOTIFY sip:peter@192.168.3.61:5060 SIP/2.0
Content-Length: 396
Content-Type: application/dialog-info+xml
Via: SIP/2.0/UDP 192.168.3.101:25320;branch=z9hG4bK4dae3c77
Subscription-State: terminated
To: <sip:perter@ISP.com>;tag=41c6a9c
From: <sip:bob@ISP.com>;tag=47251617
Call-ID: 28c568f6-dc7fa18c-66e20de0-4c6b0c6d@192.168.3.61
Event: dialog
CSeq: 2998 NOTIFY
User-Agent: IPR-720E/1.0.1
Max-Forwards: 70
Contact: <sip:peter@192.168.3.101:5060>
5
<?xml version="1.0"?>
<dialog-info xmlns="urn:ietf:params:xml:ns:dialog-info"
version="0 state="full"
entity="bob@ISP.com">
<dialog id="17f9388"
call-id="8dcb1544-78cd47b1-7de510c5-c0ab41b5@192.168.3.57"
local-tag="46f66d0e"
remote-tag="489c13a17"
direction="recipient" // [recipient | initiator]
remote-uri="alice@ISP.com"
remote-target="alice@192.168.3.57:5060">
<state>early</state> // [trying | early | confirmed | terminated]
</dialog>
</dialog-info>
SIP/2.0 200 OK
Content-Length: 0
Via: SIP/2.0/UDP 192.168.3.101:25320;branch=z9hG4bKdb0e6d
6
To: <sip:peter@ISP.com>;tag=41c6a9c
From: <sip:bob@ISP.com>;tag=47251617
Call-ID: 28c568f6-dc7fa18c-66e20de0-4c6b0c6d@192.168.3.61
[71/168]
Page 72

CSeq: 2998 NOTIFY
Server: ATA-740S/1.1.3
Contact: <sip:192.168.3.101:25320>
SUBSCRIBE sip:bob@192.168.3.101 SIP/2.0
Content-Length: 0
Date: Fri, 23 Jun 2006 16:00:49 GMT
Via: SIP/2.0/UDP 192.168.3.61:5060;branch=z9hG4bK41d57a19
To: <sip:bob@ISP.com>
From: <sip:peter@ISP.com>;tag=41c6a9c
Call-ID: 28c568f6-dc7fa18c-66e20de0-4c6b0c6d@192.168.3.61
7
Event: dialog
CSeq: 40398 SUBSCRIBE
Expires: 0
User-Agent: ATA-740S/1.1.3
Max-Forwards: 70
Accept: application/dialog-info+xml
Contact: <sip:peter@192.168.3.61:5060>
INVITE sip:alice@192.168.3.57 SIP/2.0
Content-Length: 286
Content-Type: application/sdp
Via: SIP/2.0/UDP 192.168.3.61:5060;rport;branch=z9hG4bKb815e3f
To: <sip:alice@ISP.com>
From: <sip:peter@ISP.com>;tag=dc8cec1
Supported: replaces,timer
Call-ID: 8b469d40-f7308b3c-fd61c470-772edb15@192.168.3.61
CSeq: 40372 INVITE
User-Agent: ATA-740S/1.1.3
Max-Forwards: 70
Session-Expires: 1800
Contact: <sip:peter@192.168.3.61:5060>
9
Replaces: d1084a888dcb1544-78cd47b1-7de510c5-c0ab41b5@192.168.3.57
to-tag=489c13a17;from-tag=46f66d0e;early-only
Require: replaces
v=0
o=iprDC3000361 11173553 11173553 IN IP4 192.168.3.61
s=c=IN IP4 192.168.3.61
t=0 0
m=audio 8000 RTP/AVP 0 8 18 4 101
a=rtpmap:101 telephone-event/8000
a=ptime:20
a=fmtp:101 0-16 a=fmtp:4 ptime=30;bitrate=6.3
SIP/2.0 200 OK
Server: VIP-550PT/1.1.1
Content-Length: 245
Content-Type: application/sdp
Via: SIP/2.0/UDP 192.168.3.61:5060;branch=z9hG4bKb815e3f
To: <sip:bob@ISP.com>;tag=50e14646
Supported: replaces,timer
From: <sip:peter@ISP.com>;tag=dc8cec1
Call-ID: 8b469d40-f7308b3c-fd61c470-772edb15@192.168.3.61
CSeq: 40372 INVITE
9
Session-Expires: 1800;refresher=uas
Contact: <sip:bob@192.168.3.57:5060>
v=0
o=iprD0E9015189 4553700 4553700 IN IP4 192.168.3.57
s=c=IN IP4 192.168.3.57
t=0 0
m=audio 8002 RTP/AVP 0 8 18 4 101
a=rtpmap:101 telephone-event/8000
;
[72/168]
Page 73

a=fmtp:101 0-16
a=ptime:20
a=fmtp:4 ptime=30;bitrate=6.3
CANCEL sip:bob@192.168.3.101 SIP/2.0
Content-Length: 223
Content-Type: application/sdp
Via: SIP/2.0/UDP 192.168.3.57:5060;branch=z9hG4bK469312dfb
To: <sip:bob@ISP.com>
11
From: <sip:alice@ISP.com:5060>;tag=489c13a17
Call-ID: 8dcb1544-78cd47b1-7de510c5-c0ab41b5@192.168.3.57
CSeq: 66526 INVITE
User-Agent: VIP-550PT/1.1.1
Max-Forwards: 70
Contact: <sip:alice@192.168.3.57:5060>
• Server Feature Access Codes.
Configure various feature access codes to activate server features, such as call return, voice
mailbox, etc. On making outbound calls, those feature access codes are sequentially checked
against. If the dial string matches any of the feature access code, the dial string will be dialed as “is”
to facilitate server feature access. For example, if you configure Server Feature Access Code-0 to
“*69”, then whenever you dial “*69”, The IP Phone will dial it as sip:*69@sipDomain.com
instead of translating it as LAN dials.
Besides, you may configure a prefix match by append a ‘v’ suffix to those feature access codes. For
example, if you configure “*#v”, then when you dial “*#1234”, the resultant dial string will be
rendered as “sip:*#1234@sipDomain.com”.
to server
ÍNote
Such server features replies on the SIP proxy server support.
Dial Plan
The programmable dial plan is designed for the service provider to customize the behavior of IP Phone
for collecting and sending dialed digits. The dial plan allows the terminal user to specify the events that
trigger the sending of dialed digits. These events include the following:
• The termination character has been entered.
• The specified dial string pattern has been accumulated.
• The specified number of dialed digits has been accumulated.
Dial Plan consists of alphanumeric string, and the maximum number of characters is 255.
System default dial plan is empty.
For example, "911 | [1_9]>#.r5" denotes that:
1. 911 => dial out immediately
2. [1_9]>#.r5
• [1_9]: Any digit from 1 to 9.
• (>#) press '#' to end dialing at any time.
• (.r5): 6 digits from [0-9,*#]
It will dial out immediately whenever a dial string starts with any digit form 1 to 9, and at most 6 digits
more has been collected (7 digits in total) or user press '#' to end dial.
Please refer to Appendix A – Dial Plan
for syntax.
[73/168]
Page 74

√
Key Function Description
[Del]
[Abc..]/[123..]
[Clear]
[Back]
【OK】
【←】and【→】
【↑】and【↓】
Delete one character.
Toggle between digits and alphanumeric input, where. [Abc..] indicates
current input method is alphanumeric and [123..] indicates digits input.
Clear all input.
Return without any changes.
Save changes and return.
Move cursor one position in edit mode.
Move cursor per line in edit mode.
D i a l P l a n :
. r 4
Del Abc../123.. Clear Back
Hot Line
Specify the number to dial out whenever the user hooks off.
For example, if you enable this feature, and fill in the number: “sip:888@ISP.com” or
“888@ISP.com” or “888”, then the terminal will dial to the specified number whenever user turns
on the speaker phone or hooks off without waiting for user input.
Soft-Key Function Description
[On]/[Off]
[AoR]
[Back]
1 . I n t e r - D i g i t T i m e o u t
2 √ L A N D i a l
3 . C a l l C o m m a n d
4 . D i a l P l a n
5 . H o t L i n e
On/Off AoR Back
Toggle between enable and disable this feature. Show check symbol ‘
in-line if enabled!
Specify the number to dial out whenever the user hooks off. For example,
if you enable this feature, and fill in the number: “sip:888@ISP.com” or
“888@ISP.com” or “888”, then the terminal will dial to the specified
number whenever user turns on the speaker phone or hooks off without
waiting for user input.
Return to previous page.
’
[74/168]
Page 75

Soft-Key Function Description
[Abc..]/[123..]
[Clear]
[Back]
【OK】
【←】and【→】
【↑】and【↓】
A d d r e s s - o f - R e c o r d :
Del Abc../123.. Clear Back
[Del]
Delete one character.
Toggle between digits and alphanumeric input, where. [Abc..] indicates
current input method is alphanumeric and [123..] indicates digits input.
Clear all input.
Return without any changes.
Save changes and return.
Move cursor one position in edit mode.
Move cursor per line in edit mode.
Message Alert
Configure whether the phone should play alerting tone on receiving and on sending messages. The
alerting tone serves to remind the user that new messages have been received or messages have
been sent successfully (failed).
Default is enabled.
[On] / [Off]: Toggle between enable and disable this feature. Show check symbol ‘√’ in-line if enabled!
1 √ C a l l W a i t i n g
2 . D i a l T i m e o u t
3 . H o l d R e c a l l T i m e r
4 . A u t o - R e d i a l
5 . D i a l P l a n
6 √ M e s s a g e A l e r t
7 . A u t o - A n s w e r
8 . U n h o l d o n T r a n s f e r
9 √ C o n f e r e n c e A l e r t
1 0 . X f e r o n E x i t C o n f
On/Off Back
[75/168]
Page 76

Auto-Answer
By “auto-answer”, the phone-set will play a distinguished auditable tone shortly (unless “Silent” is
specified), then answer the call by turning on speaker-phone (or headset if applicable) during idle
period. By idle, it either takes no call or is putting a call on hold. Otherwise, the incoming call will
proceed as normal incoming calls (play call-waiting tone to remind user of a call is waiting for answer).
[On] / [Off]: Toggle between enable and disable this feature. Show check symbol ‘√’ in-line if enabled!
1 . A u t o - A n s w e r A l l
2 . C o n t r o l L i s t
On/Off Back
Once “Auto-Answer All” is enabled, it will auto-answer all incoming calls on idle mode. By idle, it means
the phone-set is either engaging in no calls or putting a call on hold. It will play distinguished auditable
ring then turn on speaker-phone (or head-set if applicable) whenever an incoming call arrives.
Default is disabled
ÍNote
If this featured is mapped as a programmable DSS function key, pressing the
1.
mapped DSS key will toggle the auto-answer mode. Besides, unmap of this
DSS key will NOT turn off auto-answering.
If【DND】is on, Do-Not-Disturb feature wins; otherwise, for All-Calls-Forward
2.
and Auto-Answer features, All-Calls-Forward takes precedence.
The IP Phone supports server-side invoked auto-answer feature, please refer
3.
to “Auto Answer” on “User’s Manual” for detail.
The IP Phjone supports auto-answer based on called number as well. That is,
if you registered several SIP address-of-records, you could configure to
auto-answer calls arrived on specific SIP AoR(s). Please refer to “7.SIP
4.
Settings” / “Service Domain” / “Auto-Answer” for how to auto-answer incoming
calls arrived on specific accounts.
On idle, all incoming calls will check against the server-side invoked
auto-answer feature first, and then the global auto-answer feature, finally fall
5.
to the account-specific auto-answer feature.
Auto-Answer Control List
User controlled auto-answer list. Whenever an incoming call arrives, this terminal will check the SIP
address-of-record specified in the <From> header in the received INVITE message against
user-defined auto-answer control list. If a match exists, this incoming call will be auto-answered based
on their configured priority.
By “auto-answer”, the phone-set will play a distinguished auditable tone shortly (unless “Silent” is
specified), then answer the call by turning on speaker-phone (or headset if applicable) during idle
period. By idle, it either takes no call or is putting a call on hold. Otherwise, the incoming call will
proceed as normal incoming calls (play call-waiting tone to remind user of a call is waiting for answer).
[76/168]
Page 77

Soft-Key Function Description
[Level]
[AoR]
[Del]
[Back]
【↑】and【↓】
Modify anto-answer level.
Set address-of-record.
Remove this entry.
Return to previous page.
Move cursor per line in edit mode.
1 . E n t r y 1
2 . E n t r y 2
3 . E n t r y 3
4 . E n t r y 4
5 . E n t r y 5
Level AoR Back
Level
Auto-Answer Priority:
1. Normal
z Respond a “486 Busy Here” if all lines are occupied.
z Otherwise, auto-answer this incoming call.
2. Urgent
z Dropped an inactive call if all lines are occupied.
z Put any on-going calls to hold and auto-switch to an available line if not idle.
z auto-answer the newly arrived call.
3. Imperious
Identical to “Urgent” except that the phone-set will auto-answer this call even the
do-not-disturb (DND) or all-calls-forward feature has been activated.
4. Silent
Identical to “Imperious” except that no distinguished auditable tone will ever be played. This
is for supervised monitor/announce feature.
1 . N o r m a l
2 . U r g e n t
Back
[77/168]
Page 78

Incoming call processing rules (by precedence):
1. If “silent” or “Imperious” is specified, then auto-answer it. Besides, if “silent” is specified, then
no “distinguished auditable tone” will be played.
2. If the phone is engaged in do-not-disturb mode, then DND wins
3. Otherwise, if the phone has turned on unconditionally forward feature, then all incoming calls
are forwarded.
4. Check for auto-answer feature:
a. Check for server-side auto-answer feature.
b. Check for the global switch for auto-answer feature.
c. Match this call against all enabled service domains for auto-answering feature, if a
match is located, auto-answer it.
5. Otherwise, proceed as normal incoming calls.
AoR
Specify which caller (<From> header in the received INVITE SIP message) should be
auto-answered.
Soft-Key Function Description
[Del]
[Abc..]/[123..]
[Clear]
[Back]
【OK】
【←】and【→】
【↑】and【↓】
Delete one character.
Toggle between digits and alphanumeric input, where. [Abc..] indicates
current input method is alphanumeric and [123..] indicates digits input.
Clear all input.
Return without any changes.
Save changes and return.
Move cursor one position in edit mode.
Move cursor per line in edit mode.
A d d r e s s - o f - R e c o r d :
Del Abc../123.. Clear Back
Unhold on Transfer
Specify whether to unhold the transferee (as well as the transfer target in the case of attended transfer)
before issuing REFER to finish transfer.
Default is unchecked (recommended).
[78/168]
Page 79

[On] / [Off]: Toggle between enable and disable this feature. Show check symbol ‘√’ in-line if enabled!
1 √ C a l l W a i t i n g
2 . D i a l T i m e o u t
3 . H o l d R e c a l l T i m e r
4 . A u t o - R e d i a l
5 . D i a l P l a n
6 √ M e s s a g e A l e r t
7 . A u t o - A n s w e r
8 . U n h o l d o n T r a n s f e r
9 √ C o n f e r e n c e A l e r t
1 0 . X f e r o n E x i t C o n f
On/Off Back
Conference Alert
Specify whether to play alerting tone during an ad hoc 3-way conference.
Once enabled, terminal will regularly (every 60 seconds) play alerting tone during an ad hoc 3-way
local conference to all attendees to reminde them a conference is undergoing.
Default is enabled
[On] / [Off]: Toggle between enable and disable this feature. Show check symbol ‘√’ in-line if enabled!
1 √ C a l l W a i t i n g
2 . D i a l T i m e o u t
3 . H o l d R e c a l l T i m e r
4 . A u t o - R e d i a l
5 . D i a l P l a n
6 √ M e s s a g e A l e r t
7 . A u t o - A n s w e r
8 . U n h o l d o n T r a n s f e r
9 √ C o n f e r e n c e A l e r t
1 0 . X f e r o n E x i t C o n f
On/Off Back
Figure 29. Preferences Menu
Xfer on Exit Conf
The Phone supports ad hoc 3-way local conference. After setting up a conference, your terminal will
serve as a media mixer such that the other two parties can hear each other. However, when you hang
up, all parties in this conference will be disconnected because there is no media mixer.
Under some circumstances, you may want to keep the other two parties connected even after you exit
this conference. By enabling this feature, this terminal will carry out an attended transfer on exiting ad
hoc 3-way local conference. As a result, the other two parties may keep conversation without your
involvement.
[On] / [Off]: Toggle between enable and disable this feature. Show check symbol ‘√’ in-line if enabled!
[79/168]
Page 80

1 √ C a l l W a i t i n g
2 . D i a l T i m e o u t
3 . H o l d R e c a l l T i m e r
4 . A u t o - R e d i a l
5 . D i a l P l a n
6 √ M e s s a g e A l e r t
7 . A u t o - A n s w e r
8 . U n h o l d o n T r a n s f e r
9 √ C o n f e r e n c e A l e r t
1 0 . X f e r o n E x i t C o n f
On/Off Back
Figure 30. Preferences Menu
Network
Soft-Key Function Description
To ping the remote host for its availability or to verify the network
[Ping]
configuration of the phone. If no replies are received within a 5-second
timeout period, it will show “Host unreachable.”
[Del]
[Abc..]/[123..]
[Clear]
[Back]
【←】and【→】
【↑】and【↓】
【OK】
Delete one character.
Toggle between digits and alphanumeric input, where. [Abc..] indicates
current input method is alphanumeric and [123..] indicates digits input.
Clear all input.
Return without any changes.
Move cursor one position in edit mode.
Move cursor per line in edit mode.
Start to ping.
1 . A c t i v e S t a t u s
2 . G e n e r a l
3 . R T P S e t t i n g s
4 . N A T & F i r e w a l l
5 . S N M P
6 . V L A N
Ping Back
Figure 31. Netowrk Menu
[80/168]
Page 81

Enter the remote host to ping by sending ICMP echo request packets. You could use either a dotted IP
or a DNS name.
P i n g
l a r r y . g l o o . n e t
Del Abc../123.. Clear Back
P i n g
I C M P r e p l y f r o m l a r r y .
g l o o . n e t
Back
Active Status
Display currently active host IP, Ethernet MAC address and the active DNS IP (secondary DNS will be
shown if available), LAN and PC Ethernet link status in order. The phone will set MAC as it host name
in 12 hexadecimal characters.
I P : 1 9 2 . 1 6 8 . 3 . 2 0 0
M A C : 0 0 0 E C 3 1 2 3 4 5 6
D N S : 1 9 2 . 1 6 8 . 3 . 1
D N S : 1 9 2 . 1 6 8 . 3 . 2 5 4
L A N : 1 0 0 M , F u l l - D u p l e x
P C : : D o w n
Back
LAN and PC Ethernet link status are one of the following:
1. Down: not connected
2. Up: Ethernet jack connected
• 100M, Full: 100 MB, Full-Duplex (Usually connects to a 100-MB Ether-Switch).
• 100M, Half: 100 MB, Half-Duplex (Usually connects to a 100-MB Ethernet hub).
• 10M, Full: 10 MB, Full-Duplex (Usually connects to a 10-MB Ether-Switch).
• 10M, Half: 10 MB, Half-Duplex (Usually connects to a 10-MB Ethernet hub).
[81/168]
Page 82

General
1 . M o d e
2 . S t a t i c S e T t i n g s
3 . P P P o E S e t T i n g s
4 . D N S S e r v e R
5 . H o s t N a m e
6 . T i m e - t o - L I v e
Back
Figure 32. General Menu
Mode
Choose the protocol to configure host IP, gateway, network mask and / or domain name server.
Default is “DHCP”.
1 . D H C P
2 . S t a t i c A s S i g n
3 . P P P o E
Back
Figure 33. Mode select list
Static Settings
Static assign host IP, network mask and gateway IP.
Default IP is “192.168.000.001”
1 . H o s t I P
2 . N e t w o r k M a s k
3 . G a t e w a y I P
Back
Figure 34. Static IP Settings
H o s t I P :
1 9 2 . 1 6 8 . 0 0 3 . 2 0 0
Back
Figure 35. Enter IP Address
[82/168]
Page 83

You should enter "0.0.0.0" to disable gateway routing. That is, if you reside
ÍNote
on a LAN without gateway, you must set this to "0.0.0.0" rather than a
non-existent IP; otherwise the network packets may not be routed correctly
(which may result in no voice packets could be sent from this phone)! This
constrain applies to DHCP and PPPoE as well: DHCP and PPPoE server
should not designate a non-existent or invalid gateway.
PPPoE Settings
Point-to-Point Protocol over Ethernet (PPPoE) for xDSL dialup.
1 . U s e r N a m e
2 . P a s s w o r d
3 . S e r v i c e N a m e
Back
User Name
Name used by the phone for PPPoE authentication during dialup.
[Abc..]/[123..]: Toggle between digits and alphanumeric input, where. [Abc..] indicates current
input method is alphanumeric and [123..] indicates digits input.
L o g i n U s e r N a m e :
Del Abc../123.. Clear Back
Password
Password used by the phone for PPPoE authentication during dialup.
Initially show 10 ‘*’ signs but show clear text on user input because alphanumeric characters may
be needed.
P a s s w o r d :
1 2 3 4
Del Abc../123.. Clear Back
[83/168]
Page 84

Service Name
Some ISP require the use of service name.
[Abc..]/[123..]: Toggle between digits and alphanumeric input, where. [Abc..] indicates current
input method is alphanumeric and [123..] indicates digits input.
S e r v i c e N a m e :
Del Abc../123.. Clear Back
DNS Server
Configure to obtain domain name server by DHCP, or use the one statically assigned. The
configured DNS server will be activated if “Static DNS” is enabled.
Default is disable to utilize the DNS servers acquired by DHCP.
[On] / [Off]: Toggle between enable and disable this feature. Show check symbol ‘√’ in-line if enabled!
1 √ S t a t i c D N S
2 . P r i m a r y D N S
3 . S e c o n d a r y D N S
On/Off Back
Statically assign the primary domain name server IP.
Please enter "000.000.000.000" to disable this setting.
Generally, those IP(s) are invalid:
1. xxx.xxx.xxx.000 (this is LAN ID if network mask is 255.255.255.0)
2. xxx.xxx.xxx.255 (this is LAN broadcast IP if network mask is 255.255.255.0)
3. 255.255.255.255 (Broadcast IP)
4. 127.0.0.1 (localhost IP)
D N S S e r v e r :
1 9 2 . 1 6 8 . 0 0 3 . 2 5 4
Back
[84/168]
Page 85

Host Name
Set host name of this terminal which will be used on DHCP request for better network
administration as in
H O s t N a m e :
c p e 1
Del Abc../123.. Clear Back
Time-to-Live
Configure the TTL value of IP packet. The default value is 144. For RTP packets the TTL will use a
value higher than 127, and a value higher or equal to 75 for SIP signaling.
I P P a c k e t T T L
[ 7 5 - 2 5 5 ]
1 4 4
Del Back
RTP Settings
Show check symbol ‘√’ in-line if enabled!
1 . P o r t B a s e : 8 0 0 0
2 . P o r t R a n g e : 6
3 . R T P I P T o S : 0 x B 8
4 . R T C P I P T o S : 0 x 7 4
5 . S y m m e t r i c F l o w
Back
Figure 36. RTP Settings Menu
Port Base
Configure the starting Real-time Transport Protocol (RTP/RTCP) port for media transmission.
Conventionally, the RTP will use an even UDP port, and the RTCP will use a UDP port one higher
than that of RTP; such that the port base should be an even number and larger than 3000 to avoid
conflict. We suggest a base higher than 3000; however, it accepts a value between 2 and 65534 to
accommodate single line configuration.
Default is 8000
[85/168]
Page 86

R T P P o r t B a s e
[ 2 - 6 5 5 3 4 ]
8 0 0 0
Del Back
Port Range
Configure the number of ports which RTP will be used for media transport. It is an offset from the
pre-configured Base port. Each channel takes 2 ports, one for RTP and the other for RTCP
session. Conventionally, the RTP will use an even UDP port, and the RTCP will use a UDP port
one higher than that of RTP. As a result, the range specified here should be an even number and
at least doubles the lines equipped on the phone. For example, if the phone has two lines, then the
least port range requirement is 4. We suggest that a value that triples the lines should be more
suitable as a minimum requirement; however, it accepts a value between 2 and 100 to
accommodate single line configuration.
Default is 16
R T P P o r t R a n g e
[ 2 - 1 0 0 ]
1 6
Del Back
PTP IP ToS
Specify the IP type-of-service (ToS) bits of RTP packets transmitting voice streams.
The IP ToS bits consist eight bits:
7 (MSB) 6 5 4 3 2 1 0(LSB)
Precedence Delay Throughput Reliability Reserved (00)
Where MSB denotes “Most Significant Bit” and LSB denotes “Least Significant Bit”.
1. Bits 5-7 specify the precedence:
• 111 - Network Control
• 110 - Internetwork Control
• 101 - CRITIC/ECP (RTP default)
• 100 - Flash Override
• 011 - Flash (RTCP default)
• 010 – Immediate
• 001 – Priority
[86/168]
Page 87

• 000 - Routine (normal)
2. Bit 4: 0 = Normal Delay, 1 = Low Delay (RTP/RTCP default).
3. Bit 3: 0 = Normal Throughput, 1 = High Throughput (RTP default).
4. Bit 2: 0 = Normal Reliability, 1 = High Reliability (RTCP default).
5. Bit 0-1: Reserved for Future Use.
System default is 0xb8 (184 in decimal) for RTP and 0x74 (116 in decimal) for RTCP packets. Please
enter it in decimal.
I P T y p e - o f - S e r v i c e
[ 0 - 2 5 5 ]
1 8 4
Del Back
Symmetric RTP Flow
The IP Phone supports symmetric RTP flow for the cases where only one endpoint is behind a
NAT, and RTP packet flow will be possible in at least one direction. Since a client behind a NAT
can usually successfully send RTP packets to another client in the public Internet, in a symmetric
mode, RTP sent in the other direction could be sent to the address and port that RTP was
received from. As a result, even if you are behind a NAT and choose “Full Access” as your way
to traverse NAT, you could still reach another IP Phone on the public internet (since the peer
would adjust RTP flow accordingly).
Generally, if your terminal is behind a symmetric NAT, which cannot be traversed by STUN, or
your terminal is NATed, you should activate this feature. And the other party on the WAN (or
capable of traversing the NAT it currently behind without problem) should NOT enable this
feature.
Once “Symmetric RTP flow” is enabled, IP Phone will send its INVITE message stipulating its
desire for “Symmetric RTP flow” in SDP during call setup phase if the “UDP traversal” mode
configured in 『Main Menu』=>”6.Network” / ”NAT & firewall” / ”UDP Traversal” is either “Full
access” or “Enable STUN”. That is if you have configured “Static NAT map” as your way to
traverse NAT, it will not request the peer to enable symmetric RTP flow). The SDP sent by this
UAC would be:
o=SIP-Phone 28908445311 28908445311 IN IP4 192.168.3.51
s=t=0 0
c=IN IP4 192.168.3.51
m=audio 35000 RTP/AVP 4 18 0 8 101
a=rtpmap:101 telephone-event/8000
a=direction:active IN IP4
If the UAS supports this extension (which VIP-350PT/ VIP-550PT does), it will wait for RTP packets to
be received from the client behind the NAT before sending, the answer SDP will be:
v=0
o=SIP-Phone 28908445405 28908445405 IN IP4 192.168.3.101
s=t=0 0
[87/168]
Page 88

c=IN IP4 192.168.3.101
m=audio 35000 RTP/AVP 18
a=rtpmap:101 telephone-event/8000
a=direction:passive IN IP4
ÍNote
To m ak e symmetric RTP flow works, the UAS (which sends passive RTP flow) must locate on the
WAN. For IP Phone, it must comply with one of the following conditions:
• It resides on the public Internet and has public IP (Full-Access).
• It has configured to employ “2.Static NAT map” as its way to traverse its NAT from 『Main
Menu』=>”6.Network” / ”NAT & firewall” / ”UDP traversal”, and you have configured your
NAT to statically map the corresponding UDP ports (both SIP signaling and RTP ports) to your
phone.
• It is behind a NAT which can be traverse by STUN and you have configured your IP Phone to
employ STUN to traverse you NAT.
• It is behind a UPnP-capable NAT and you have configured your terminal to employ UPnP to
dynamically MAP your UPnP-aware NAT.
For backward compatibility with other SIP phones, system default is to disable
“Symmetric RTP flow”, thus the “a=direction” attribute will not appear in the
exchanged SDP.
[On] / [Off]: Toggle between enable and disable this feature. Show check symbol ‘√’ in-line if enabled!
1 . P o r t B a s e : 8 0 0 0
2 . P o r t R a n g e : 6
3 . R T P I P T o S : 0 x B 8
4 . R T C P I P T o S : 0 x 7 4
5 . S y m m e t r i c F l o w
On/Off Back
Network & Firewall
To properly configure your NAT traversal scheme, refer to “NAT Traversal” on “User’s Manual”.
1 . S T U N
2 . U D P T r a v e r s a l
3 . S t a t i c N A T I P
4 . D y n a m i c N A T I P
5 . D i a g n o s e U P n P
Back
[88/168]
Page 89

STUN
Simple Traversal of UDP through NATs (STUN) is a lightweight protocol that allows applications to
discover the presence and types of Network Address Translators (NATs) and firewalls between
them and the public Internet. It also provides the ability for applications to determine the public IP
addresses allocated to them by the NAT.
1 . S T U N S e r v e r
2 . D i a g n o s e N A T
Back
STUN Server
Configure the Simple Traversal of UDP through NAT protocol server. You may use a dotted IP or a
DNS name. If you fill in the DNS name, such as “isp.com”, IP Phone will try to locate the STUN
server of “isp.com” domain via DNS SRV query (_stun._udp.isp.com). If the STUN SRV record
query failed, the IP Phone will use the IP of “isp.com” as the default STUN server with UDP port
3478. Therefore, if the DNS returns more than one STUN SRV records, IP Phone will switch to the
secondary STUN server whenever it fails to reach the primary STUN server (STUN server
redundancy). Besides, IP Phone will switch between STUN servers only if it fails to reach the
primary STUN server for more than 30 seconds to avoid instability in switching back and forth.
Default is “larry.gloo.net”.
To use a different STUN server port other than the default UDP port 3478, please specify it in the format
like “STUN.isp.com:8888” or “172.16.0.1:8888”.
[Del]
[Abc..]/[123..]
[Clear]
[Back]
【OK】
【←】and【→】
【↑】and【↓】
Delete one character.
Toggle between digits and alphanumeric input, where. [Abc..] indicates
current input method is alphanumeric and [123..] indicates digits input.
Clear all input.
Return without any changes.
Save changes and return.
Move cursor one position in edit mode.
Move cursor per line in edit mode.
S T U N S e r v e r
l a r r y . g l o o . n e t
Del Abc../123.. Clear Back
[89/168]
Page 90

Diagnose NAT
Detect the NAT IP and the NAT type this UA is currently behind (8 possibilities).
The IP Phone will communicate with the STUN server (running outside the NAT, assigned in
“6.Network” / “Firewall & NAT” / “STUN Server”) to determine the type of NAT it is behind and
the diagnosis may take a quite while (roughly 10 seconds or so in a worse case). If the phone fails
to contact a STUN server, it will report it as “No STUN server is available”; otherwise, it will show
the IP of the NAT / firewall.
• Public internet (Neither NAT nor Firewall is involved)
• Firewall blocks UDP (Definitely, you cannot communicate with parties outside of your
LAN!).
ÍNote
This may also be a false alarm if the specifed STUN server is either down or
unreachable.
• Symmetric UDP Firewall (STUN may work!)
Firewall that allows UDP out and responses have to come back to the source of the
request (like a symmetric NAT, but no translation. We call this a symmetric UDP
Firewall).
• Full cone NAT (Enable STUN should suffice).
A full cone NAT is one where all requests from the same internal IP address and port
are mapped to the same external IP address and port. Furthermore, any external host
can send a packet to the internal host, by sending a packet to the mapped external
address.
• Restricted cone NAT (STUN may work!)
A restricted cone NAT is one where all requests from the same internal IP address and
port are mapped to the same external IP address and port. Unlike a full cone NAT, an
external host (with IP address X) can send a packet to the internal host only if the
internal host had previously sent a packet to IP address X.
• Port restricted cone NAT (STUN may work!)
A port restricted cone NAT is like a restricted cone NAT, but the restriction includes port
numbers. Specifically, an external host can send a packet, with source IP address X
and source port P, to the internal host only if the internal host had previously sent a
packet to IP address X and port P.
• Symmetric NAT
A symmetric NAT is one where all requests from the same internal IP address and port,
to a specific destination IP address and port, are mapped to the same external IP
address and port. If the same host sends a packet with the same source address and
port, but to a different destination, a different mapping is used. Furthermore, only the
external host that receives a packet can send a UDP packet back to the internal host.
• Non full cone NAT
If failed to identify the NAT type, it will show “Non Full cone NAT” (such as the one
bundled in Win2000).
[90/168]
Page 91

1. If failed to identify the NAT type, it will show “Non Full cone NAT” (such as the
Í
Note
one bundled in Win2000)
2. If the diagnosis is success, it will show the mapping of SIP signaling port on
NAT / Firewall as well
3. The red font indicates that the phone has problem traversion the NAT / Firewall
of that type, and the user should consider manually configure the port
mappings on NAT / Firewall
[Back]
【OK】
【↑】and【↓】
N A T T y p e :
S y M m e t r i c N A T ( 2 2 2 . 6 8 . 1
8 7 . 1 3 5 )
Back
Return without any changes.
Save changes and return.
Move cursor per line if there are too many lines to fit into one screen.
UDP Traversal
Choose “Full access” if the phone is not behind a NAT / Firewall or you are behind a SIP-aware
NAT. Otherwise, if you are behind a NAT / Firewall, choose “Static NAT map” whenever possible.
Besides, if the NAT / Firewall is either a Symmetric NAT or a Firewall that blocks UDP you must
choose “Static NAT map” as well. If the NAT/Firewall/Gateway/Router in your LAN is UPnP-aware
(Universal Plug and Play), you may turn on UPnP to dynamically open and close TCP/UDP ports
on these devices for SIP signaling and RTP media streaming; otherwise choose STUN, Simple
Traversal of UDP through NAT, as your last resort.
Generally, if your IP falls within the ranges: 10.0.0.0 to 10.255.255.255, 172.16.0.0 to
172.31.255.255, and 192.168.0.0 to 192.168.255.255, then you may have trouble making and
taking calls from the public WAN.
Default is Full access.
IP Phone supports symmetric RTP flow for the cases where only one endpoint is behind a NAT,
and RTP packet flow will be possible in at least one direction. Since a client behind a NAT can
usually successfully send RTP packets to another client in the public Internet, in a symmetric mode,
RTP sent in the other direction could be sent to the address and port that RTP was received from.
As a result, even if you are behind a NAT and choose “1.Full Access” as your way to traverse NAT,
you could still reach another IP Phone on the public internet (since the peer would adjust RTP flow
accordingly). Generally, if your terminal is behind a symmetric NAT, which cannot be traversed by
STUN, or your terminal is NATed, you should activate this feature. And the other party on the WAN
(or capable of traversing the NAT it currently behind without problem) should NOT enable this
feature.
[91/168]
Page 92

[Back]
【OK】
【↑】and【↓】
1 . F u l l A c c e s
2 . S t a t i c N A T M a p
3 . E n a b l e S T U N
4 . E n a b l e U P n P
Back
Return without any changes.
Save changes and return.
Move cursor per line if there are too many lines to fit into one screen.
Static NAT IP
Assign the static NAT IP to use by SIP signaling and RTP media stream. You could use either a
dotted IP or a DNS name. This field is valid if and only if you choose “Static NAT map” from the
“UDP traversal” configuration. You may detect your NAT IP by STUN from menu-“Diagnose NAT”
(please fill in only the IP, excluding the diagnosed SIP port).
Í
Note
[Del]
[Abc..]/[123..]
[Clear]
[Back]
1. You should also map the SIP signaling port, RTP port base and RTP port range
used for media stream from NAT to the phone to enable UDP traverse through
NAT / Firewall (if there are several phones reside under the same NAT, their SIP
and RTP ports must not be overlapped since they all share the same NAT
resource).
2. If your NAT uses dial-up modem or connects to the WAN via ADSL by PPPoE,
then the IP of your NAT may change whenever it re-dials up. Please synchronize
it if the NAT does not come with a fixed IP. Besides, you may detect your NAT IP
by STUN from menu- “Diagnose NAT” and re-configure the new NAT IP into
menu-“Static NAT IP”.
Delete one character.
Toggle between digits and alphanumeric input, where. [Abc..] indicates
current input method is alphanumeric and [123..] indicates digits input.
Clear all input.
Return without any changes.
【OK】
【←】and【→】
【↑】and【↓】
[92/168]
Save changes and return.
Move cursor one position in edit mode.
Move cursor per line if there are too many lines to fit into one screen.
Page 93

S t a t i c N A T I P
1 4 0 . 1 1 3 . 2 3 . 3
Del Abc../123.. Clear Back
Dynamic NAT IP
If your NAT uses dial-up modem or connect to the WAN via ADSL by PPPoE, then the IP of your
NAT may change whenever it re-dials up. If you choose “1.Notify on IP Change”, the phone will
notify you by sending an instant message into your inbox whenever it detects a mismatch between
the NAT you configured into menu-“Static NAT IP” and the one it auto-discovered by STUN. On the
contrary, if you choose “2.Auto-Update by STUN”, it would auto-refresh the NAT IP into
menu-“Static NAT IP” whenever it detects an inconsistency.
Default is “1.Notify on IP Change” and the detection interval is 20 minutes.
[Back]
【OK】
【↑】and【↓】
1 . N o t i f y o n I P C h a n g e
2 . A u t o - U p d a t e b y S T U N
Back
ÍNote
Return without any changes.
Save changes and return.
Move cursor per line if there are too many lines to fit into one screen.
Either option requires a viable STUN server has been configured into
menu-“STUN server”
Diagnose UPnP
Detect the external IP of UPnP-capable NAT/Gateway/Firewall devices (support either WAN IP
Connection and WAN PPP Connection). It will search for UPnP devices and show its external IP.
If such devices existed, this terminal will open UDP/TCP mapping on NAT device for media
streaming and SIP signaling by UPnP as necessary; Otherwise if there is no such devices co-exist
(or turn off UPnP explicitly), it may show “Not found UPnP device”. Consult to your LAN
administrator for further information.
ÍNote
[93/168]
The UPnP mode must have been enable before you can dignose UPnP device
on your LAN.
Page 94

[Back]
【OK】
【↑】and【↓】
Return without any changes.
Save changes and return.
Move cursor per line if there are too many lines to fit into one screen.
U P n P :
Back
SNMP
The IP Phone supports Simple Network Management Protocol (SNMP) v2 and Management
Information Base (MIB) v2 for SNMP Get/Set/Trap operation. It supports the following (RFC1213)
• “system” group : “sysObjectID” represents its model.
• “interface” group : Only Ethernet ports are included in the table. “ifAdminStatus” is effective. For
LAN port, “ifIndex is 1, and 255 for Ethernet WAN port.
• “IP” group
• “ICMP” group
• “TCP” group
• “UDP” group
• “SNMP” group.
Besides, it supports proprietary enterprise IAD MIB to Get /Set current configuration by SNMP as well,
including:
• Hardware type & version, software version
• MAC address of WAN/LAN
• Number of port (phone/Ethernet), Call-Channel 【A / B】status
• Real-time parameters, including gateway, DNS, SNMP, RTP, CODEC, etc.
• SIP settings, Registrar server, and Proxy server.
• Image upgrade and restart.
[Back]
【OK】
【↑】and【↓】
Return without any changes.
Edit selected item.
Navigate through menu items.
[94/168]
Page 95

1 . R e a d C o m m u n i t y
2 . W r i t e C o m m u n i t y
3 . T r a p C o m m u n i t y
4 . T r a p M a n a g e r
Back
1. Read Community: Set the “read community” for SNMP Get operation.
Default is “public” (case-sensitive).
2. Write Community: Set the “write community” for SNMP Set operation.
Default is “private” (case-sensitive).
Values set by SNMP Set Operation will not take effect immediately. In order to
Í
Note
facilitate multiple values set in a succession, IP Phone will not apply new values
set by SNMP till it returns to idel mode for more than 5 seconds. Besides, a
second new value application will not execute if the previous one was done within
5 seconds ago.
3. Trap Community: Specify the community name used by the SNMP manager to verify traps.
Default is “public” (case-sensitive).
4. Trap Manager : Specify the SNMP manager to which the SNMP trap sends.
You could use either a dotted IP or a DNS name to specify the SNMP agent. The IP Phone will
issue a trap to SNMP manager when:
• System startup
• System restart (by user/SNMP command/image upgrade)
• Call-Channel 【A / B】 Disabled
• Registrar Server availability.
The IP Phone is capable of reporting traps to two different SNMP managers. The
Í
Note
second trap manager (not a backup manager) could only be set via auto-provision
or by SNMP browser to set it. If both trap managers are available, The IP Phone
will report each trap to both of them.
[Del]
Delete one character.
[Abc..]/[123..]
[Back]
【OK】
【←】and【→】
【↑】and【↓】
[95/168]
Toggle between digits and alphanumeric input, where. [Abc..] indicates
current input method is alphanumeric and [123..] indicates digits input.
Return without any changes.
Edit selected item.
Move cursor one position in edit mode.
Move cursor per line in edit mode.
Page 96

R e a d C o m m u n i t y
p u b l i c
Del Abc../123.. Clear Back
VLAN
The IP Phone supports IEEE 802.1Q/802.1P/802.1D VLAN and IP class of service (differentiated
service in IP ToS bits). VLAN support will insert a 4-byte tag immediately after source address field in
the 802.3 Ethernet frame.
Destination
MAC
Address
(6-byte)
.
Once IEEE 802.1Q VLAN tagging is enabled, it will also map IP differentiated service set in ToS bits to
user priority field.
Source MAC
Address
(6-byte)
VLAN Protocol ID:0x8100 (16 bits) Priority (3 bits) CFI VLAN ID (12 bits)
VLAN
tag
(4 bytes)
LAN
Type
0x0800
(2-byte)
Data FCS
[On] / [Off]
[Back]
【OK】
【↑】and【↓】
Toggle between enable and disable this feature. Show check symbol ‘√’
in-linue if enable.
Return without any changes.
Edit selected item.
Navigate through items..
1 . A c t i v a t i o n
2 . V L A N I D : 4 0 9 4
3 . V L A N C o S : 6
On/Off Back
[96/168]
Page 97

VLAN ID
IEEE 802.1Q VLAN ID is 12-bit.
The following VLAN ID values are reserved:
VLAN ID Meaning / Usage
The null VLAN ID, indicating that the tag header contains only user_priority information,
0
no VLAN identifier is present in the frame. This VID value shall not be configured as a
PVID, configured in any Filtering Database entry, or used in any Management
operation.
1
0xFFF
If you disable VLAN tagging (disable menu-Activation), the VLAN ID will not take effect and be
displayed as “N/A” (not applicable).
The default PVID value used for classifying frames on ingress through a Bridge Port.
The PVID value can be changed by management on a per-Port basis
Reserved for implementation use. This VID value shall not be configured as a PVID,
configured in any Filtering Database entry, used in any Management operation, or
transmitted in a tag header.
[Del]
[Back]
【OK】
【←】and【→】
Delete one character.
Return without any changes.
Edit selected item.
Move cursor one position in edit mode.
V L A N I D
[ 1 - 4 0 9 4 ]
1
Del Back
[97/168]
Page 98

VLAN CoS
IEEE 802.1P VLAN User priority field, default is 6; where 0 is normal and 7 is the highest priority.
[Del]
[Back]
【OK】
【←】and【→】
V L A N C l a s s - o f - S e r v i c e
[ 0 - 7 ]
6
Del Back
Delete one character.
Return without any changes.
Edit selected item.
Move cursor one position in edit mode.
[98/168]
Page 99

Chapter 3
3
SIP Service Configurations
Configuring SIP setting for IP Phone
SIP is a request-response protocol, dealing with requests from clients and responses from servers.
Participants are identified by SIP URLs. Requests can be sent through any transport protocol. SIP
determines the end system to be used for the session, the communication media and media parameters,
and the called party's desire to engage in the communication. Once these are assured, SIP establishes
call parameters at either end of the communication, and handles call transfer and termination.
[Back]
【OK】
【←】and【→】
1 . S I P S e r v i c e
2 . S e r v i c e D o m a i n
3 . E N U M & E . 1 6 4
Back
Return without any changes.
Edit selected item.
Move cursor one position in edit mode.
SIP Service
Configure the SIP stack on the phone, including signaling port, transport protocol (TCP or UDP) to use
and the default registration expiration timeout (measured in seconds).
[Back]
【OK】
【↑】and【↓】
Show check symbol ‘√’ in-line if enabled!
1 . T r a n s p o r t : 3
2 . S I P P o r t : 5 0 6 0
3 . E x p i r e s : 1 8 0 0
4 √ r p o r t
5 . H o l d b y R F C 3 2 6 1
6 . S i g n a l I P T o S 0 x B 4
7 . S e s s i o n T i m e r 1 8 0 0
8 . K e e p A l i v e T i m e r
9 √ E x p o s e S W V e r
1 0 . S I P T i m e r T 1
Back
Return without any changes.
Edit selected item.
Navigate through items.
[99/168]
Page 100

Transport
By default, IP Phone supports both UDP and TCP for SIP signalling, and this setting prioritize
transportation protocols on making requests. UDP bears a higher priority. If you specify TCP only,
then IP Phone will try to make requests to the peers/servers by TCP, and fall back to UDP if the
peers/servers do not support TCP.
The default is UDP and TCP. Currently there is no TLS support.
[Back]
【OK】
【↑】and【↓】
Return without any changes.
Edit selected item.
Scroll menu items.
1 . U D P
2 . T C P
3 . U D P a n d T C P
Back
SIP Port
Note, to facilitate “Contact Dialing”, “IP Dialing” and “LAN Dialing”), where most users forget to
dial the SIP signaling port of the peer, and end in no responses if the peer doesn’t listen on the
standard UDP port 5060 for SIP signaling, the IP Phone will always listens on UDP-5060 for SIP
signaling in addition to the user configured SIP service port. That is, if you configure it to listen on
port 8888, it will listen on three ports (TCP-8888, UDP-8888 and UDP-5060). However, if UDP-5060
is overlapped with RTP ports for media session (see below menu-RTP settings); it will not listen on
UDP-5060 for SIP signaling to avoid conflict.
Specify both the TCP and UDP port for SIP signaling. Default is 5060.
[Del]
[Back]
【OK】
【←】and【→】
Delete one character.
Return without any changes.
Edit selected item.
Move cursor one position in edit mode.
S I P L i s t e n P o r t
[ 1 - 6 5 5 3 5 ]
5 0 6 0
Del Back
[100/168]
 Loading...