

Page 1

DECT VoIP Phone
VIP-321
Quick Installation Guide
Page 2

Overview
This quick installation guide describes the objectives; organization and
basic installation of the PLANET VIP-321 SIP DECT VoIP Phone, and
explains how to establish your rst voice over IP communication via
PLANET product. Also, this guide shows you how to nd additional
information on related products and services.
The VIP-321 integrate web-based graphical user interface that can
cover most congurations and machine status monitoring. Via standard,
web browser, you can congure and check machine status from
anywhere around the world.
Page 3

Table of Contents
Preparation before beginning administration on the VIP-321 ............... 5
Physical Interfaces ..................................................................... 5
Administration Interface ......................................................... 8
Web conguration access: ...................................................... 8
Network Interface quick congurations ........................................ 9
Installing Batteries into the Handset ..........................................10
Charging the Handset ...............................................................11
Voice communication samples .........................................................12
Peer to Peer (P2P) mode ...........................................................12
Intercom mode ........................................................................13
SIP Proxy mode .......................................................................14
Quick reference in CD-ROM guide ...................................................16
Page 4

Document Objectives
This guide provides physical installation, network congurations, and
Internet access establishment information for the PLANET DECT VoIP
Phone.
Document Organization
This guide is organized as follows:
1 Preparation before beginning administration on PLANET DECT VoIP
Phone
2 Administration interface
3 Network interface quick congurations
4 Internet access setup guide
Page 5
Preparation before beginning administration on
the VIP-321
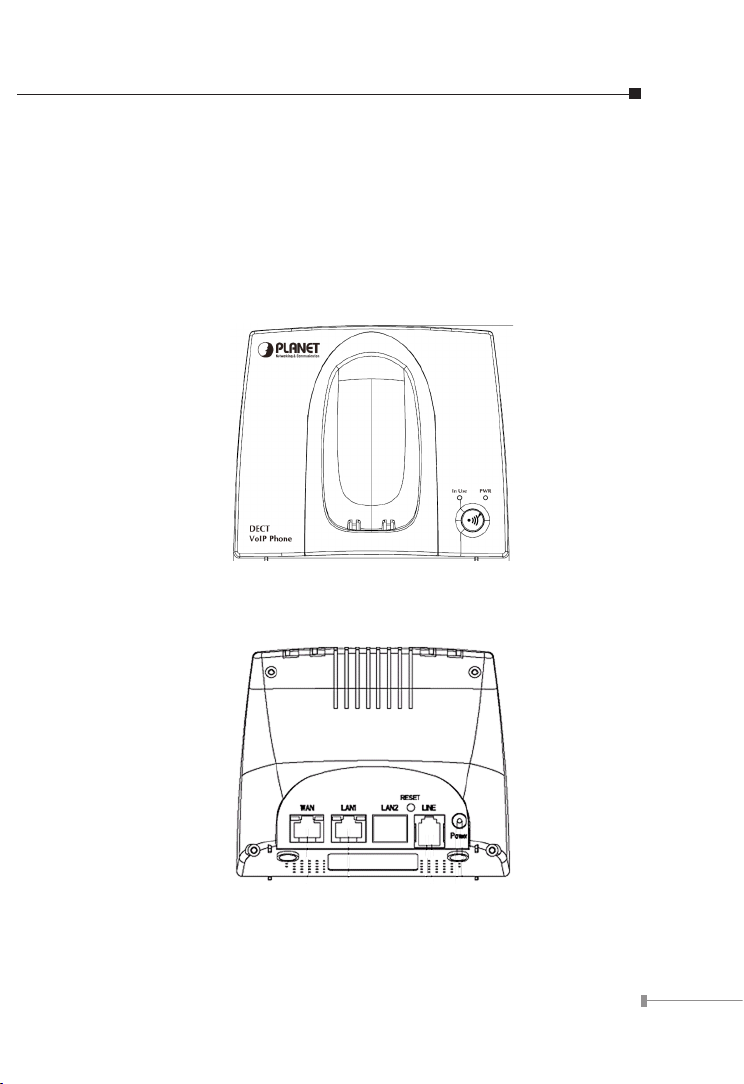
Physical Interfaces
VIP-321: DECT VoIP Phone (2 x RJ-45, 1 x RJ-11)
Front Panel of VIP-321
Rear Panel of VIP-321
5
Page 6

6
Physical Interfaces Description
Note
RJ-45 connector, to maintain the existing network structure,
WAN
LAN
RESET
LINE
6V DV
connected directly to the xDSL/Cable modem through
straight CAT-5 cable
RJ-45 connector, for Internet access, connected directly to
Switch/Hub, through straight CAT-5 cable.
Reset to the factory default setting
RJ-11 connector, connected directly to the PSTN analog line.
Press “**” to switch to PSTN mode.
6V DC Power input outlet.
• Machine default LAN IP is http://192.168.0.1. Press
RESET button and hold over 10 seconds will reset the
device to factory default value.
• If press RESET button 1~9 seconds only to enable the
device reset function.
Front panel LED and Button function:
Charge PIN
In Use LED
PWR LED
PAGE /
Registration
Button
Page 7

7
Top view LED function:
VoIP LED 1 / 2
LED and Button Description
LAN LED
WAN LED
In use LED
PWR LED
PAGE /
Registration
Button
Charging PIN
LAN LED
WAN LED
VoIP 1 / 2
An active LED indicates either Handset has been
hanged off or Incoming call is ongoing
A solid LED indicates PWR works normally
Press this button (1~9 seconds) to enable the
DECT PAGE function. Press and hold this button
over 10 seconds to enable DECT Registration
function.
To charge for DECT phone
Light : connection is active
Blink : data transmitting or receiving
Off : connection is not established
Light : connection is active
Blink : data transmitting or receiving
Off : connection is not established
Light : VoIP session has been established
Off : No VoIP session
Page 8

8
Administration Interface
Note
The VIP-321 provides GUI (Web based, Graphical User Interface) for
machine management and administration.
Web conguration access:
To start VIP-321 web conguration, you must have one of these web
browsers installed on computer for management
● Microsoft Internet Explorer 6.0 or higher with Java support
Default LAN IP address of DECT VoIP Phone is 192.168.0.1. You
may now open your web browser, and insert http://192.168.0.1 in
the address bar of your web browser to logon DECT VoIP Phone web
conguration page.
The VIP-321 will prompt for logon username/password, please enter:
root / null (not password) to continue machine administration.
In order to connect machine for administration, please
locate your PC in the same network segment (192.168.0.x)
of IP Phone. If you’re not familiar with TCP/IP, please refer
to related chapter on user’s manual CD or consult your
network administrator for proper network configurations.
Page 9

9
Network Interface quick congurations
Execute your web browser, and insert the WAN IP address (default:
172.16.0.1) of VIP-321 in the address bar. After logging on machine
with username / password (default: root / not password), browse to
“Network” -->“WAN settings” conguration menu:
Parameter Description
IP address
Mask
Default Gateway
WAN IP address of the VIP-321
Default: 172.16.0.1
WAN mask of the VIP-321
Default: 255.255.255.0
Gateway of the VIP-321
Default: 172.16.0.254
Page 10

10
Connection Type Description
Connection Type Data required.
Fixed IP
DHCP Client
PPPoE
After conrming the modication you’ve done. Please click on the
Submit button to apply settings and browse to “Save & Reboot”
menu to reboot the machine to make the settings effective.
The ISP will assign IP address, and related
information
In most circumstances, it is no need to
congure the DHCP settings.
The ISP will assign PPPoE username /
password for Internet access.
Save Change to Flash Memory
Most of the VIP-321 parameters will take effective after you modify,
but it is just temporary stored on RAM only, it will disappear after your
reboot or power off the DECT VoIP Phone, to save the parameters into
Flash ROM and let it take effective forever, please remember to press
the “Save & Reboot” button after you modify the parameters.
Installing Batteries into the Handset
You must install three AAA Ni/MH batteries (included in the package)
into the VIP-321 handset and charge them in the base for 15 hours or
more before you can use your new VIP-321 Cordless IP Telephone.
1. Slide the battery cover in the direction of the arrow.
2. Insert the new batteries, as indicated, matching the correct polarity
(+,-).
3. Replace the battery cover and slide it up until it snaps shut.
4. Put the Handset into the Base.
5. Connect the Base to the AC mains using the supplied AC adapter.
Page 11

11
6. Allow the batteries to charge for 15 hours or more before using the
Note
Handset to insure a proper rst time charge.
Charging the Handset
Before you use the Handset for the rst time,
you should fully charge the new batteries for 15
hours or more.
To charge the handset, simply place it on
the base; you will hear a conrmation beep
(charging beep) and the indicator the LED (Red)
battery is being re-charged.
When charging, the battery icon (Indicates battery
charge level) on the display
Page 12

12
Voice communication samples
Hint
There are several ways to make calls to desired destination in IP Phone.
In this section, we’ll lead you step by step to establish your rst voice
communication via keypad and web browsers operations.
Peer to Peer (P2P) mode
STEP 1: Assuming there are two VIP-321 in the network the WAN IP
address are 172.16.0.1 and 172.16.0.2
VIP-321-A
WAN IP address
(172.16.0.1)
VIP-321-B
WAN IP address
(172.16.0.2)
STEP 2: Press key from keypad of VIP-321-A and dial
“172*16*0*2”. Then the phone of VIP-321-B should ring.
You can do the same thing to the VIP-321-B.
● In default machine operation, the VIP-321 VoIP mode. If
you want to make a PSTN phone call, please press the
“**” key to switch to PSTN mode.
● If the IP address of the remote calling party is known,
you may directly make calls by preset number via its IP
address and end with a “#”.
● If the VIP-321 are installed behind a NAT/firewall/
IP sharing device, please make sure the NAT device
support SIP applications before making calls
Page 13

13
Intercom mode
If you connected more than one handset to a base (you can connect
up to 5 handsets to the same base), you can have a conversation
between two people using two different handsets.
DECT Phone are registering to the base already of the some VIP-321.
VIP-321
HS1
HS2
Test the scenario:
1. Please pick up the handset and press the Left key, the display shows
“INT->”.
2. Please press the number of the handset you want to contact (from 1
to 5). Then the called handset starts to ring.
3. If the called party can answer your call, it can press the
and start talking. You can see the number of the handset of your
called party and the icon in your LCD display.
4. At the end of the conversation press the
Standby mode.
key to return to
key
Page 14

14
SIP Proxy mode
Registration /
Authentication
IPX-2000 LAN IP address: 172.16.0.200
■ VIP-321-A
WAN IP address: 172.16.0.1
Line Number: 100
STEP 1: Log in IPX-2000 and create two testing accounts/password:
100 / 123 (for VIP-321-A), and 200 / 123 (for VIP-321-B)
for the voice calls.
WAN IP address: 172.16.0.2
Registration /
Authentication
■ VIP-321-B
Line Number: 200
Page 15

15
STEP 2: Please log in VIP-321-A via web browser, browse to the SIP
settings menu and select the Service Domain conguration
menu. In the setting page, please insert the account/
password information obtained from your service provider (in
this sample, we’re using PLANET IPX-2000 as the SIP Proxy
server for SIP account, call authentications), and then the
sample conguration screen is shown below:
STEP 3: Repeat the same conguration steps on VIP-321-B, and
check the machine registration status, make sure the
registrations are completed.
STEP 4: To verify the VoIP communication, please pick up the
telephone. Dial the destination number to make call between
SIP clients. For example, VIP-321-A (with number 100) with
keypad number 200 to VIP-321-B, or reversely makes calls
from SIP client (VIP-321-B) to the number 100 (VIP-321-A).
Page 16

Quick reference in CD-ROM guide
This guide is used to help you startup your DECT VoIP Phone settings.
It is also recommended to check the user manual CD-ROM for more
details like the “Web Setup”, and how to set the device back to default
value.
16
 Loading...