

Page 1

802.11b/g Smart Wi-Fi Phone
VIP-191
User’s manual
1
Page 2

Copyright
Copyright (C) 2007 PLANET Technology Corp. All rights reserved.
The products and programs described in this User’s Manual are licensed products of PLANET Technology, This
User’s Manual contains proprietary information protected by copyright, and this User’s Manual and all
accompanying hardware, software, and documentation are copyrighted.
No part of this User’s Manual may be copied, photocopied, reproduced, translated, or reduced to any electronic
medium or machine-readable form by any means by electronic or mechanical. Including photocopying, recording,
or information storage and retrieval systems, for any purpose other than the purchaser's personal use, and without
the prior express written permission of PLANET Technology.
Disclaimer
PLANET Technology does not warrant that the hardware will work properly in all environments and applications,
and makes no warranty and representation, either implied or expressed, with respect to the quality, performance,
merchantability, or fitness for a particular purpose.
PLANET has made every effort to ensure that this User’s Manual is accurate; PLANET disclaims liability for any
inaccuracies or omissions that may have occurred.
Information in this User’s Manual is subject to change without notice and does not represent a commitment on the
part of PLANET. PLANET assumes no responsibility for any inaccuracies that may be contained in this User’s
Manual. PLANET makes no commitment to update or keep current the information in this User’s Manual, and
reserves the right to make improvements to this User’s Manual and/or to the products described in this User’s
Manual, at any time without notice.
If you find information in this manual that is incorrect, misleading, or incomplete, we would appreciate your
comments and suggestions.
CE mark Warning
The is a class B device, In a domestic environment, this product may cause radio interference, in which case the
user may be required to take adequate measures.
WEEE Warning
To avoid the potential effects on the environment and human health as a result of the presence of
hazardous substances in electrical and electronic equipment, end users of electrical and electronic
equipment should understand the meaning of the crossed-out wheeled bin symbol. Do not dispose of
WEEE as unsorted municipal waste and have to collect such WEEE separately.
Trademarks
The PLANET logo is a trademark of PLANET Technology. This documentation may refer to numerous hardware
and software products by their trade names. In most, if not all cases, their respective companies claim these
designations as trademarks or registered trademarks.
2
Page 3

Revision
User’s Manual for PLANET Smart Wi-Fi Phone:
Model: VIP-191
Rev: 1.0 (2007, March)
Part No. EM-VIP191V1
3
Page 4

TABLE OF CONTENTS
Chapter 1................................................................................................ 9
Introduction............................................................................................ 9
Overview............................................................................................................................9
Package Content.............................................................................................................10
Physical Details...............................................................................................................10
Front view and keypad function:..............................................................................10
Rear view and keypad function:...............................................................................12
Side view and keypad function:................................................................................13
Normal Mode / Main Screen:...................................................................................14
Chapter 2 Preparations & Installation................................................ 17
Physical Installation Requirement................................................................................17
Access Poing Selection....................................................................................................19
IP Address Info .........................................................................................................21
Preferred AP List ......................................................................................................22
SIP Configuration.....................................................................................................23
Chapter 4.............................................................................................. 27
Basic Operations................................................................................. 27
Basic Operatoms (Make IP or SIP call)........................................................................27
Dial (Make PSTN Call)............................................................................................28
Disconnect Call ........................................................................................................28
Accept Incoming Call...............................................................................................29
Call Mute / Un-Mute................................................................................................29
Redial........................................................................................................................30
Speaker Phone ..........................................................................................................30
Missed Calls .............................................................................................................31
Call Waiting..............................................................................................................31
Call Hold ..................................................................................................................33
Call Transfer.............................................................................................................35
Chapter 5.............................................................................................. 37
Phone Settings..................................................................................... 37
Phone Settings.................................................................................................................37
Date Time Settings ...................................................................................................37
Volume Settings........................................................................................................38
Backlight Control .....................................................................................................39
System Properties.....................................................................................................39
SIP Codec Selection.................................................................................................40
Turn Off / On WiFi ...................................................................................................41
4
Page 5

Phone Lock...............................................................................................................42
Input / Change PIN.................................................................................42
Unlock Phone..........................................................................................42
Cancel Lock.............................................................................................43
Chapter 6.............................................................................................. 44
Applications......................................................................................... 44
Overview..........................................................................................................................44
Chapter 7.............................................................................................. 45
Video Conferencing............................................................................. 45
Video Conferencing........................................................................................................45
Make Video Conference Call ...................................................................................45
Disconnect Video Conference Call...........................................................................46
Accept Incoming Video Conference Call.................................................................46
Turn Off My Video Transmission.............................................................................47
Mute..........................................................................................................................47
Options .....................................................................................................................48
Home Monitor..........................................................................................................48
Chapter 8.............................................................................................. 49
Internet Explorer.................................................................................. 49
Internet Explorer............................................................................................................49
Web Browsing ..........................................................................................................49
Clear History ............................................................................................................52
Add folder.................................................................................................................52
Add Favorites ...........................................................................................................53
Favorites ...................................................................................................................54
Edit Favorites............................................................................................................54
Delete Favorites........................................................................................................55
Chapter 9.............................................................................................. 56
Windows Messenger........................................................................... 56
Windows Messenger.......................................................................................................56
Chapter 10............................................................................................ 59
Profile Settings .................................................................................... 59
Profile Settings................................................................................................................59
Change Profile..........................................................................................................59
Edit Profile................................................................................................................60
Call Forward.............................................................................................................62
Chapter 11 ............................................................................................ 64
Camera.................................................................................................. 64
Camera ............................................................................................................................64
Capture Image ..........................................................................................................64
5
Page 6

View Image...............................................................................................................64
Set Image as Wallpaper ............................................................................................65
Delete Image.............................................................................................................66
Rename Image..........................................................................................................67
Send Image to Storage Card.....................................................................................68
Send Image to Email ................................................................................................68
Chapter 12............................................................................................ 69
Email..................................................................................................... 69
Email................................................................................................................................69
Email Account Settings ............................................................................................69
Receive Email...........................................................................................................71
Read Email ...............................................................................................................72
Show Previous or Next Email ..................................................................................73
Send Email................................................................................................................73
Attachments..............................................................................................................75
Reply Email..............................................................................................................76
Delete Email.............................................................................................................76
Receive Email...........................................................................................................77
Chapter 13............................................................................................ 78
Contacts................................................................................................ 78
Contacts (Phone Book)...................................................................................................78
Add New Entry.........................................................................................................78
View Entry Details....................................................................................................80
Call from View Entry ...............................................................................................81
Edit Entry..................................................................................................................81
Delete Entry..............................................................................................................82
Search Entry .............................................................................................................83
Display by Category.................................................................................................84
Synchronization........................................................................................................84
Chapter 14............................................................................................ 85
Media Player......................................................................................... 85
Media Player...................................................................................................................85
Open URL ................................................................................................................86
Open File ..................................................................................................................87
Playlist......................................................................................................................87
Chapter 15............................................................................................ 90
File Explorer......................................................................................... 90
File Explorer ...................................................................................................................90
Chapter 16............................................................................................ 92
Accessories.......................................................................................... 92
6
Page 7

Accessories.......................................................................................................................92
Quick Dial ................................................................................................................92
Add Entry..................................................................................................92
Edit Entry..................................................................................................93
Delete Entry.............................................................................................93
Dial Number.............................................................................................93
Alarm........................................................................................................................94
Alarm Settings.........................................................................................94
Alarm Sound Setting ..............................................................................95
Infrared .....................................................................................................................96
Chapter 17............................................................................................ 98
Call History........................................................................................... 98
Call History.....................................................................................................................98
Placed Calls ..............................................................................................................98
Received Calls........................................................................................................100
Missed Calls ...........................................................................................................100
Blocked Calls..........................................................................................................100
Chapter 18.......................................................................................... 102
Calendar ............................................................................................. 102
Calendar........................................................................................................................102
Add New Entry.......................................................................................................102
Edit Entry................................................................................................................104
Delete Entry............................................................................................................105
Show another Date .................................................................................................105
Show T oday............................................................................................................106
Week V iew..............................................................................................................106
Month V iew............................................................................................................107
Synchronization......................................................................................................108
Appendix A......................................................................................... 109
Voice Communications.................................................................................................109
Peer To Peer (P2P) mode........................................................................................109
SIP Proxy mode...................................................................................................... 111
Appendix B..........................................................................................115
Wi-Fi Encryption & Authentication........................................................................... 115
No Encryption ........................................................................................................115
WEP (Wired Equivalent Privacy)...........................................................................115
WPA (Wifi Protected Access).................................................................................116
Personal Mode......................................................................................116
Enterprise Mode....................................................................................117
Appendix C......................................................................................... 120
7
Page 8

Certificates ....................................................................................................................120
View Certificates ....................................................................................................120
Import Certificates..................................................................................................121
Remove Certificates ...............................................................................................123
Appendix D......................................................................................... 124
Static IP address............................................................................................................124
Appendix E......................................................................................... 126
FAQ ................................................................................................................................126
Appendix F......................................................................................... 128
For Your Saftery ...........................................................................................................128
Appendix G......................................................................................... 130
VIP-191 Specifications .................................................................................................130
8
Page 9

1
Chapter 1
Introduction
Overview
Based on years of VoIP manufacturing experiences, PLANET Technology VoIP total solutions are
known for advanced implementation of standards based telephony with mass deployment capability.
Cost-effective, easy-to-install and simple-to-use, the portable WVoIP solution – 802.11b/g Smart Wi-Fi
Phone – VIP-191, a smart mobile phone that unleash your voice communications free from wire.
The VIP-191 smart Wi-Fi phone extends the convenience of wireless connection and provides the
user-friendly graphical LCD interface, 802.11b/g compatibility, and use with the power of Windows
Mobile system. It combines a smarter
and media player capabilities.
The VIP-191 is able to access your Internet Explorer and E-Mail, when connect wireless access point
around the world, and allow users can easily to use the MSN Talk/ Text messages service and call
anyone anywhere in the world, the VIP-191 is ideal for the daily routine communications, enterprises
and SOHO users to offer toll-quality voice communication services via the existing WLAN network or
Internet access.
Product Features
• Feature-rich mobile VoIP / MSN service in your daily life
• Cost effective, field proven compatibility, and stability
• Supports Mobile Internet Access and Email
• Windows Messenger / Media Player support
• Graphical display backlight LCD
• Up to 300K mega pixel camera
phone with wireless email and messaging, built-in web browser,
• Mini-SD expansion slot support
• Standby time 50 hours; talking time 3.5 hours
VoIP Features
• SIP 2.0 (RFC 3261), SDP (RFC 2327) compliant
• Voice codec support: G711, G.729
9
Page 10

• Built-in Contacts / Phone book
• Call logging / History support
• Caller ID display and Speed Dial support
• Call Hold / Transfer / Forward / Waiting
Package Content
The contents of your product should contain the following items:
Smart Wi-Fi Phone
Power adapter
Battery
USB cable
Earphone
Quick Installation Guide
User’s Manual CD
Physical Details
The following figure illustrates the front/rear panel of IP Phone.
Front view and keypad function:
Figure 1. Front view of VIP-191
10
Page 11

Keypad Description
1 LED
The LED denotes different conditions to show the following status:
Green: This indicates the battery is being re-charged, and the
phone is connected to an Access Point.
Red: This indicates the battery is being re-charged, and the phone
is
not connected to an Access Point.
Flashing green: This indicates the phone is connected to an
Access Point.
Flashing red: This indicates the phone is
Access Point.
2 Receiver
3 Camera
4 Up Key
5 Backward Key
6 Left / Tab Key
7 Down Key
8 Call Key
It can hear the sounds from here.
You can take a self-portrait by having the camera facing yourself,
or you can take a picture of others by rotating the camera to face
outward.
This key allows the user to navigate in an upward direction.
This key allows the user to navigate in a backward or left direction.
This key allows the user to select and choose the “soft key”
presented at the bottom left of the screen.
This key allows the user to navigate in a downward direction.
This key allows the user to make an outgoing call, and accept an
incoming call.
These keys are used to compose phone numbers, or create any
not connected to an
text input for applications. Pressing the digit keys will generate
characters in a round robin fashion, as shown in the following table:
9 Digit Keys
Key Output Key Output
1 1 @ : / \ _ - ? ! , . ; " ' () 7 p q r s 7
2 a b c 2 8 t u v 8
3 d e f 3 9 w x y z 9
4 g h i 4 0 0 space + & $ % ^ <> =
11
Page 12

Note: Pressing the # Key will toggle between lower and upper case.
This key corresponds to the Enter Key of a standard keyboard. It
10 OK Key
enables the user to select and confirm different menu selections or
data input.
5 j k l 5 * * .
6 m n o 6 # #
11 Forward Key
12 Right Key
End / Power
13
Key
14 Back Key
15 Home Key
This key allows the user to navigate in a forward or right direction.
This key allows the user to select and choose the “soft key”
presented at the bottom right of the screen.
This key serves as a power on/off switch for the phone, when it is
pressed for several seconds.
Just pressing on this button once will allow the user to hang up or
refuse a phone call, or close the current window.
Pressing this key will allow the user to navigate to the previous
page during Internet browsing or menu selection.
This key also serves as a backspace to correct any type mistakes.
Pressing this key will return to:
i) The default home page while browsing the Internet.
ii) The Main screen while not using the Int ernet Explore r.
Table 1. Front view description of VIP-191
Rear view and keypad function:
12
Page 13
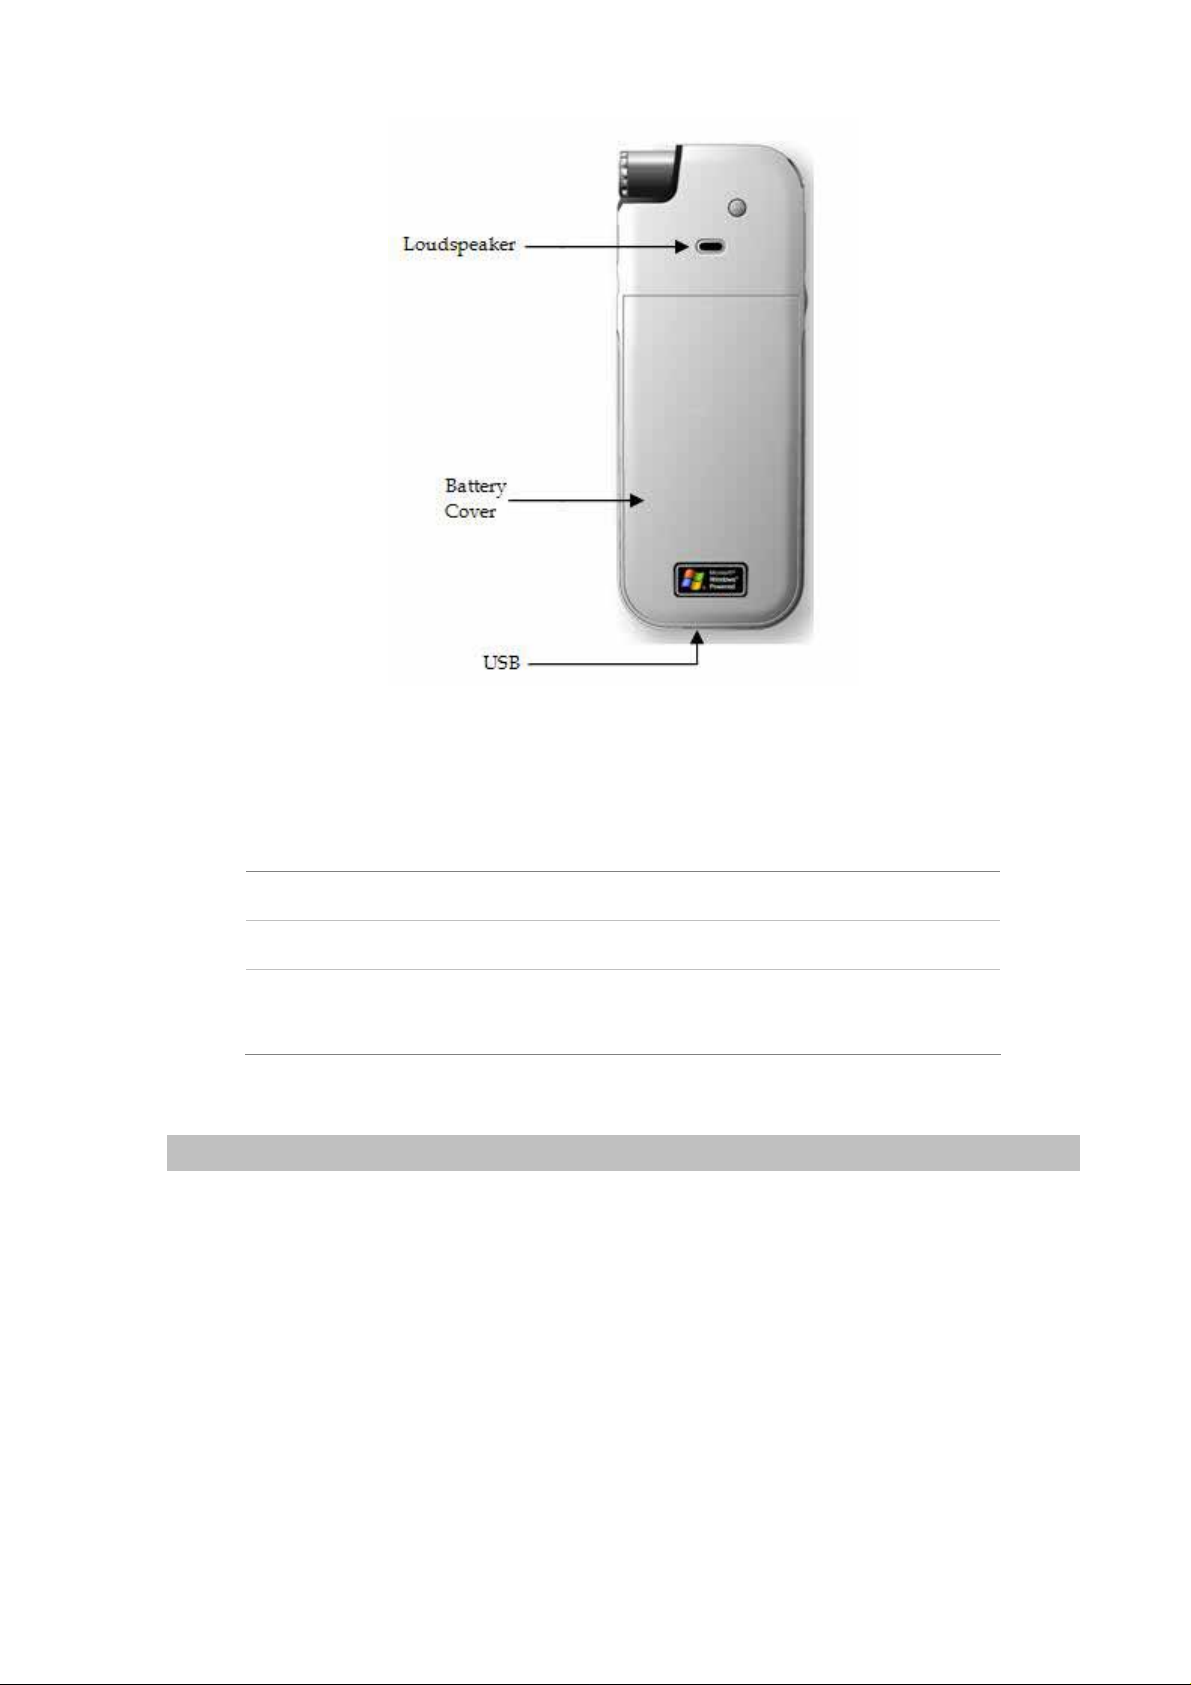
Keypad Description
Figure 2. Rear Panel of VIP-191
1 Loudspeaker
2 Battery Cover
3 USB
The sounds will sent out from here.
It can remove the battery cover to install/ un-install battery.
It can connect the USB adapter charge to charge, or
connect USB cable to carry out synchronization with PC.
Table 2. Rear view description of VIP-191
Side view and keypad function:
13
Page 14
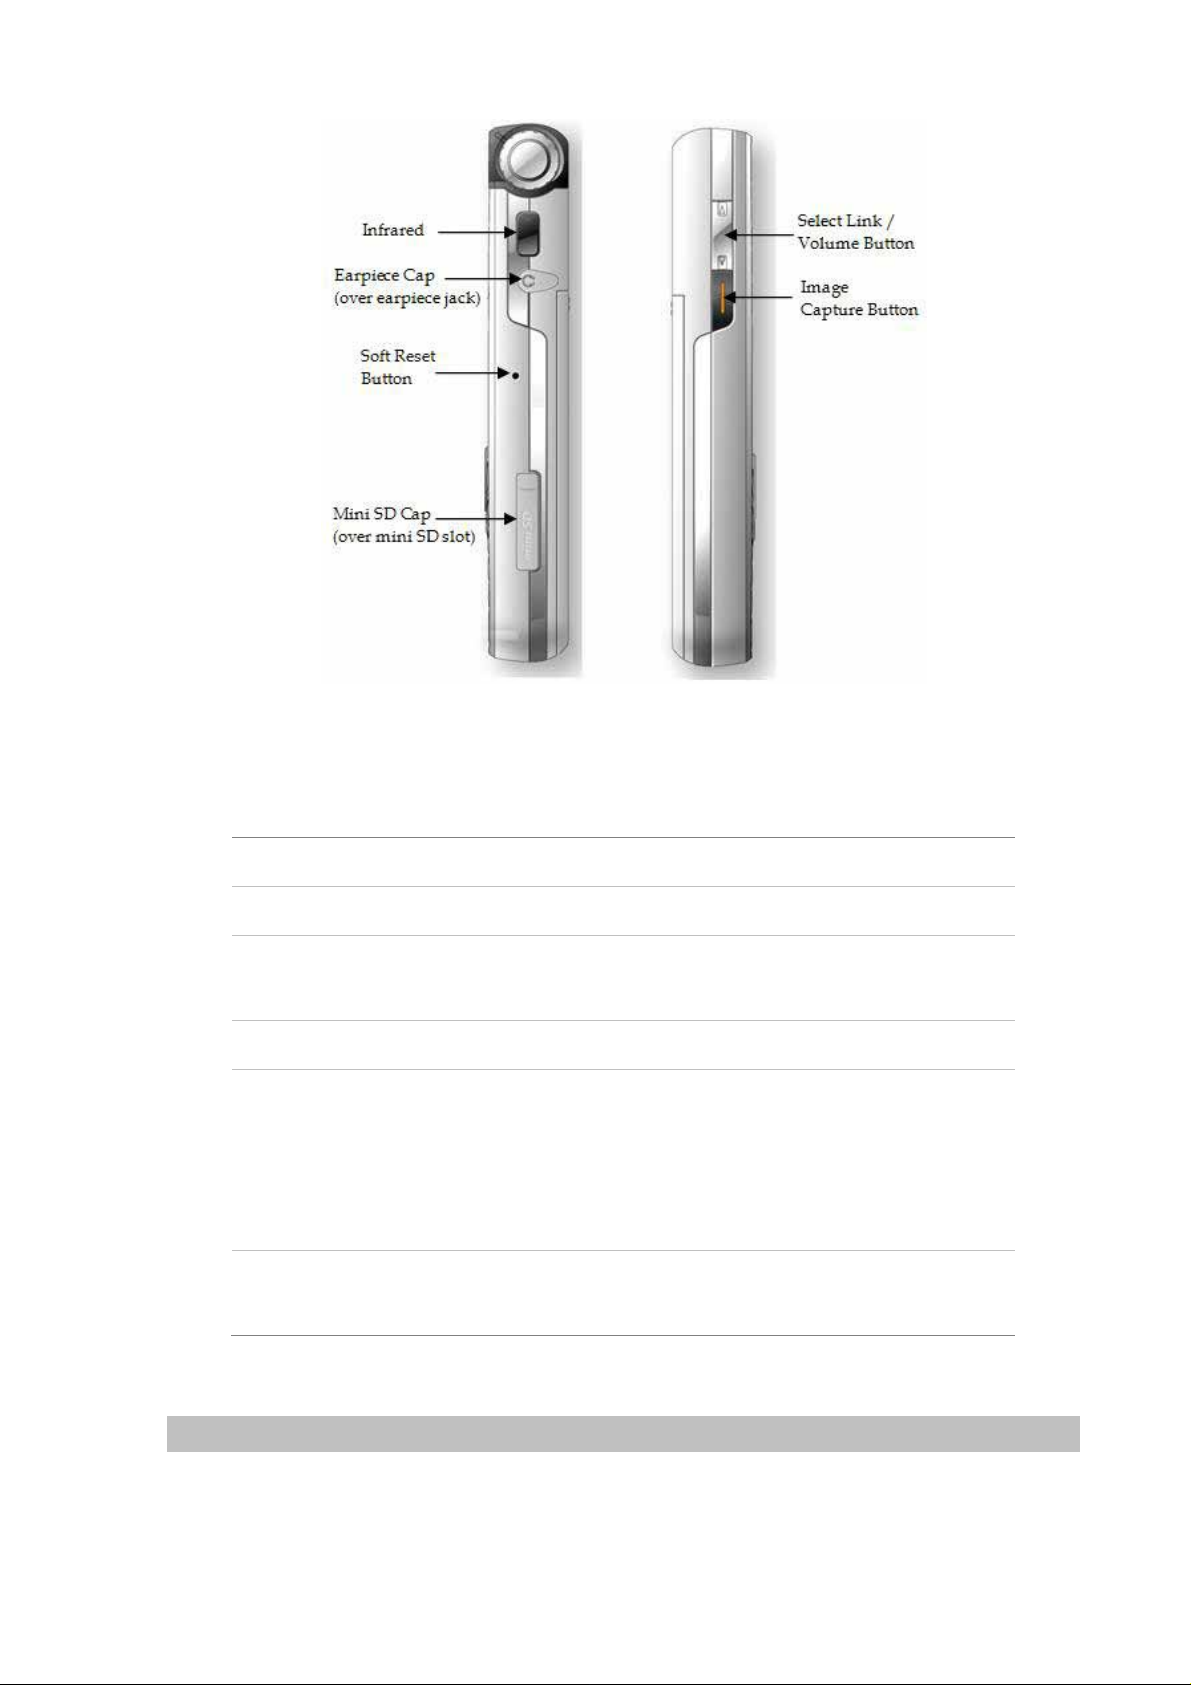
Keypad Description
Figure 3. Side Panel of VIP-191
1 Infrared
2 Earpiece Cap
Soft Reset
3
Button
4 Mini SD Cap
Select Link /
5
Volume Button
Image Capture
6
Button
It can deliver and receive the data by infrared device.
Removing this cap and it can plug the extend earpiece device.
Pressing the reset button to reboot the phone.
Removing this cap and it can install/ un-install the SD card.
Pressing this key will allow the user to set the focus on the
links on a web page. Pressing the OK Key while the focus is
on a link is equivalent to clicking on a link in Windows.
This key also allows user to adjust the volume during video
conferencing.
Pressing this key will allow the user to capture the image in
front while the camera application is running.
Table 3. Side view description of VIP-191
Normal Mode / Main Screen:
14
Page 15
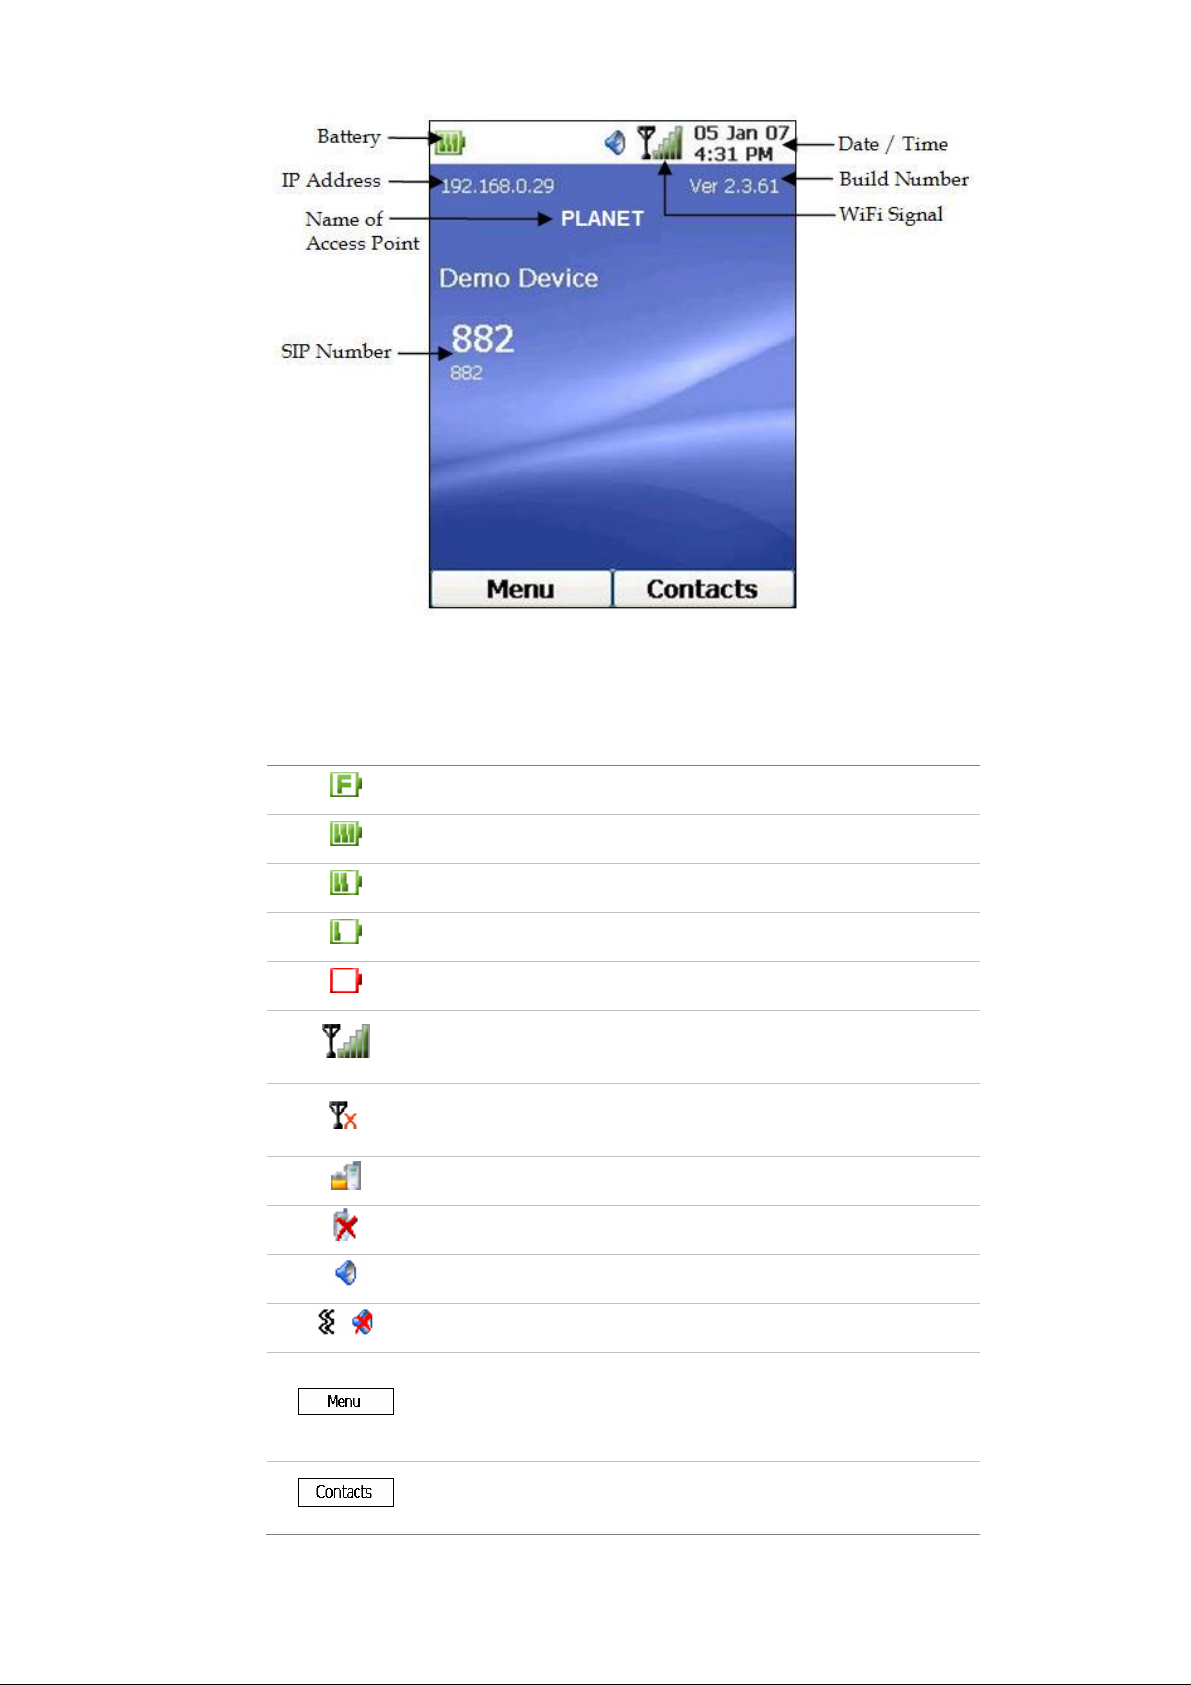
Symble Description
Figure 4. Main screen of VIP-191
This indicates the battery is fully charged.
This indicates the battery is 70% charged.
This indicates the battery is 50% charged.
This indicates the battery is 30% charged.
This indicates the battery is fully drained.
This indicates the WiFi signal strength after registration with
an AP. The stronger the signal, the more bars the icon has.
This indicates no network coverage, or the phone has been
disconnected from the Access Point.
This indicates phone lock has been activated.
This indicates there has been missed call(s).
This indicates ringer has been turned on.
This indicates vibration has been turned on, and ringer off.
This corresponds to the Left Button of the phone in the Main
Screen. Pressing on the Left Button will display the available
options to that screen.
This corresponds to the Right Button of the phone in the Main
Screen. Pressing on the Right Button will display the available
15
Page 16

options to that screen.
Table 4. Symble description
16
Page 17

Chapter 2
2
Preparations & Installation
Physical Installation Requirement
This chapter illustrates basic installation of Wi-Fi Phone
Administration Interface
PLANET Wi-Fi Phone only provides LCD keypad for machi ne management and administration.
Inserting the Battery
Before you can use the WiFi Phone, you have to insert the battery into the phone. Note that if you are
using the phone for the first time, the battery needs to be fully charged.
To insert the battery, carry out the following steps:
1. To open the phone, slide the phone cover towards the bottom of the phone.
2. Align the golden contacts of the battery with the corresponding connectors on the phone, and
push the opposite end of the battery until it snaps into place.
3. Close the phone cover by sliding it towards the top of the phone.
4. Press the red Power Key to turn on the phone.
Charging the Battery
On First Use:
1. Insert the battery, press the red Power Key and turn on the phone.
2. Connect the power cord to the USB slot located at the base of the phone.
3. Connect the charger to an AC wall outlet.
4. The battery can be fully charged within 3~4 hours. Then disconnect the charger first from the
phone and the AC outlet.
L Hint
If you are using the phone for the first time, the battery
needs to be fully charged before use.
On Subsequent Use:
On subsequent use, if the power level of the battery is low, the following orange text may be displayed
at boot up:
Low Battery….
17
Page 18

Please insert charger!
Figure 5. Low battery prompt
If you then insert the power adapter charging cable to the phone, the following orange text will be
displayed:
Charging………..
Figure 6. Battery charging prompt
After a period of 60-80 minutes, the battery should be fully charged.
In the event that the battery is totally drained out, the following recovery procedure will start the battery
charging function:
1. Remove the battery. Re-insert the battery and charging cable into the phone.
2. Wait for a short while, and the orange characters will show up indicating that the phone i s being
recharged. (Those orange letters will take a while to show up, though the phone starts being
re-charged the moment you plug in the charging cable.)
3. OS will boot up.
4. Save the cable inserted and the phone turned on until the battery is fully re-charged.
When Phone is Turned Off:
You can charge the phone when it is switched off. (Please refer to the section “Turning Of f The
Phone” on how to switch off the phone.) The following orange text will be displayed during charging:
Battery Charging Mode
Press Power On key once to start system.
Charging ………………. 60%
Figure 7. Battery charging status
Powering Up the Phone for the 1ST TIME:
1. To power up the phone, insert the battery, and press the red Power Key to turn on the phone.
2. When the phone is booted up, it will give a ring sound.
3. The phone will display the screen of the Normal mode. (Please refer to this as the Main Screen
from User’s Manual for more understandings.) At this point, all initialization is complete, and
you can start to operate the phone.
Rebooting the Phone:
The phone can be rebooted by carrying out 1 of the following steps:
1. Use an unfolded paperclip or a similar object without a sharp tip to press and release the soft
reset button, or
2. Remove the battery and the charging cable (if it is connected to the phone), and then re-insert
the battery.
18
Page 19
Chapter 3
3
Access Points & SIP Configuration
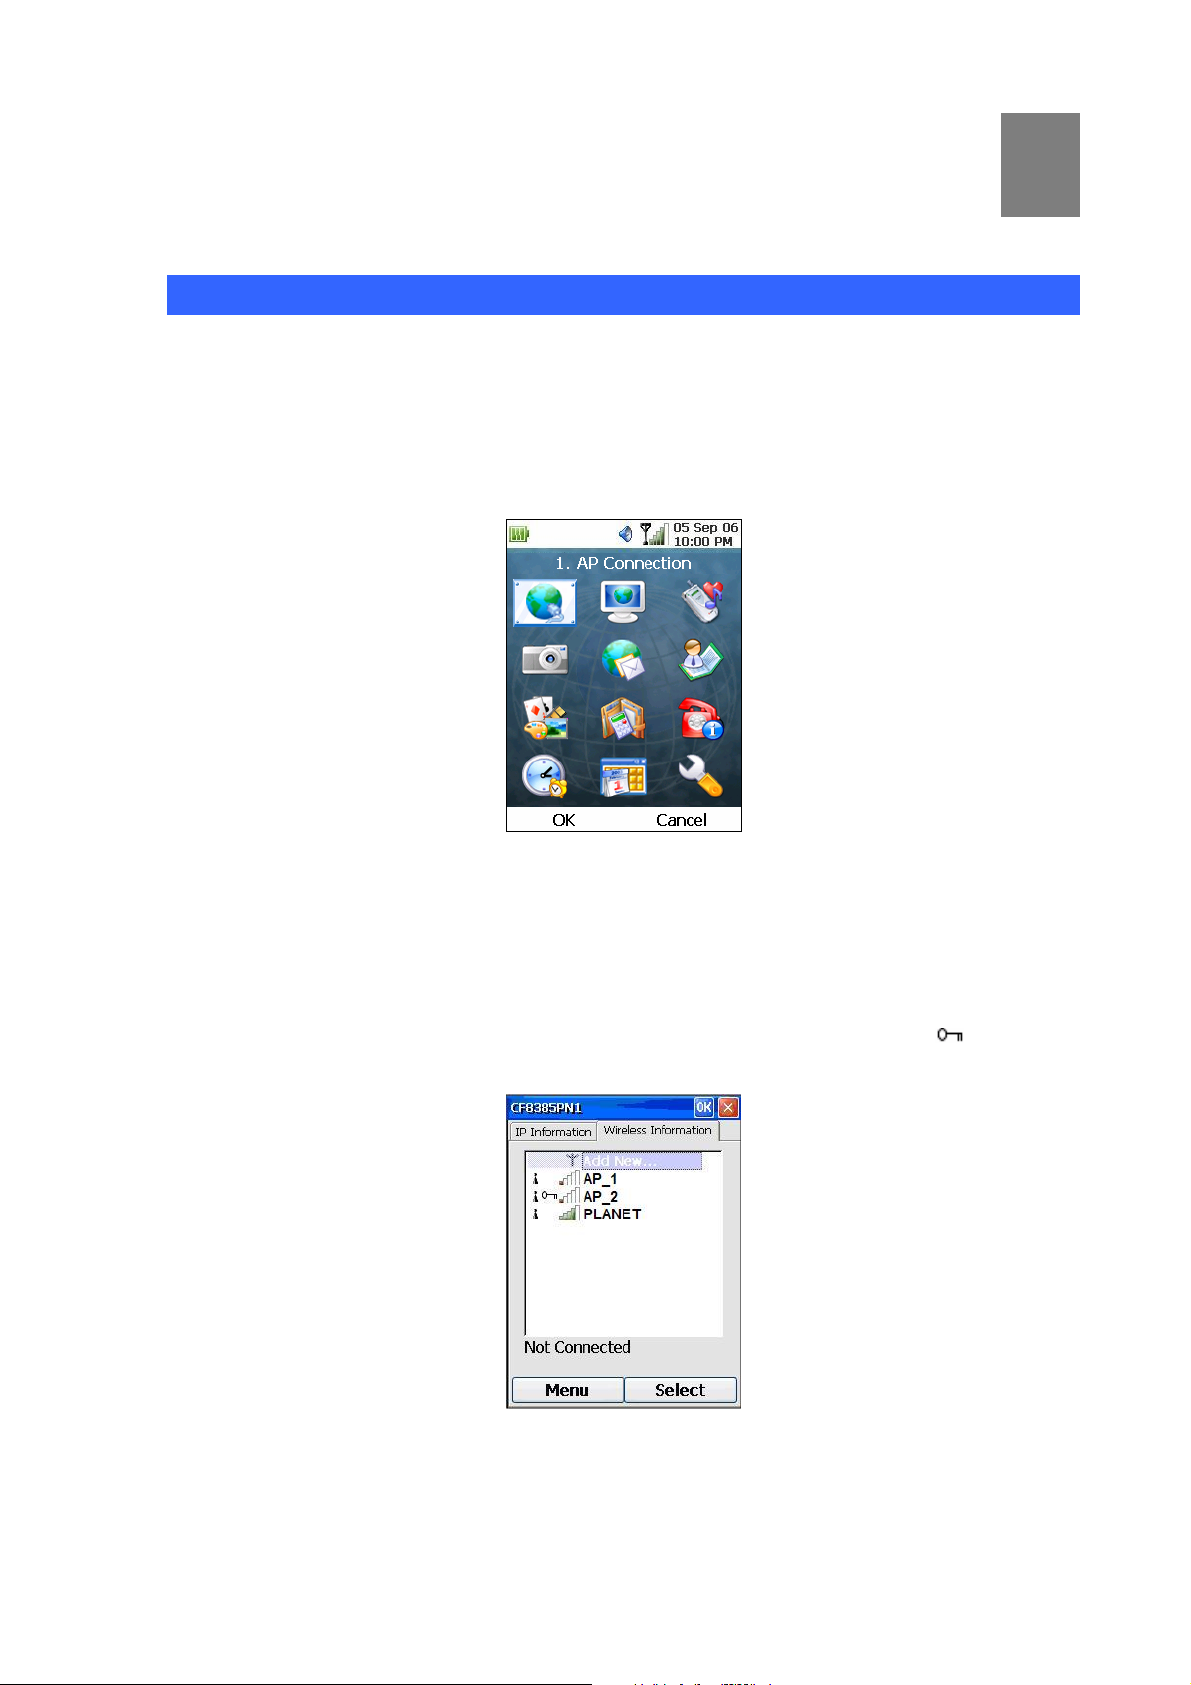
Access Poing Selection
To connect to the WiFi network, the phone has to connect to an Access Point (AP). To do so, carry out
the following steps:
1. From the Main Screen, press the Left Button (“Menu”) and select “1. AP Connection”, the
following screen should appear:
Figure 8. Main screen of VIP-191
2. Press the OK button (or the Left Key), and a screen showing the available APs and their
corresponding signal strength will appear. (The precise definition of the number that
corresponds to the signal level is called Signal To Noise Ratio, which indicates the noise level
of an AP. The higher the number , the less noi se the AP has.) Also, if there is a
of the signal bar, it indicates that the AP requires a network key.
Figure 9. Wireless information
icon in front
3. Press the Down Key to highlight the desired Access Point to be con nected.
19
Page 20
4. Once an AP is highlighted, press the Right (“Select”) key and the following screen of the AP
settings will appear:
Figure 10. AP setting
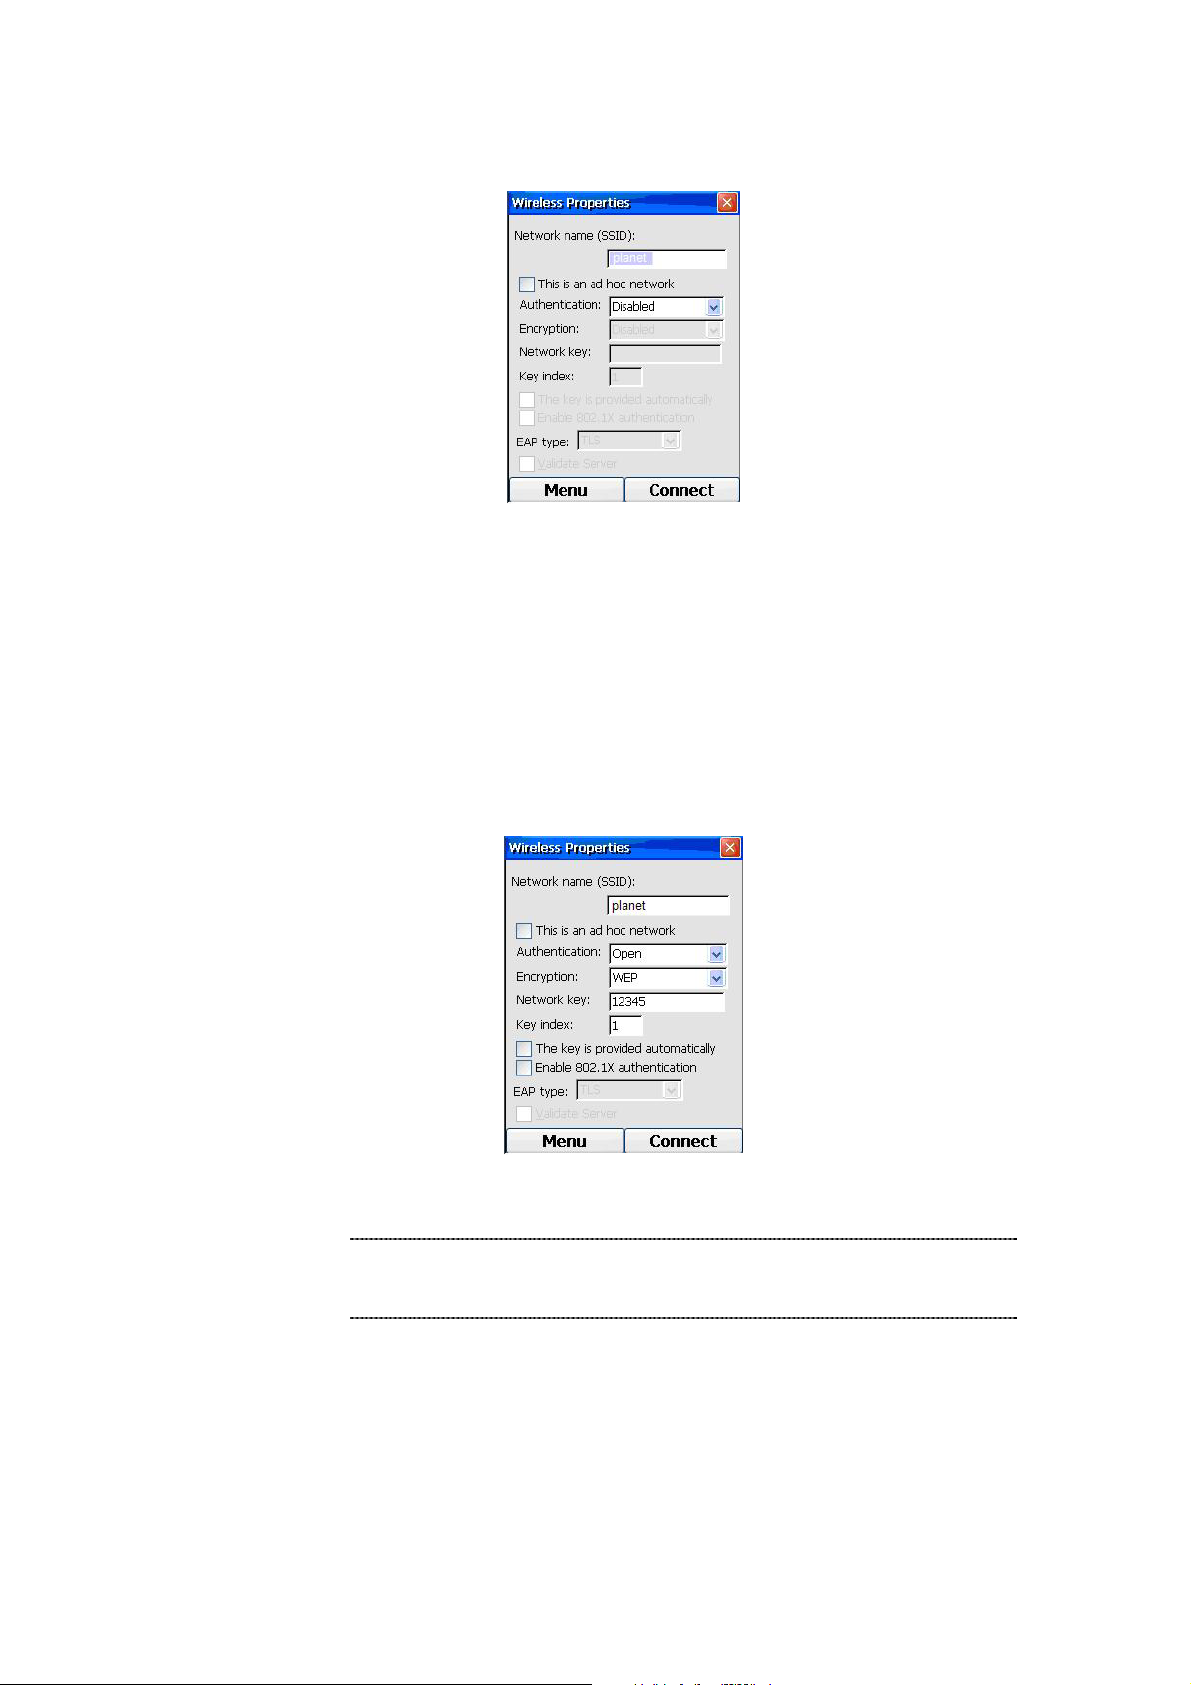
5. If the AP requires no encryption or authentication, you can just press the OK button. However , if
encryption or authentication is required, you can press on the Down Key to move to the
Authentication field, and use the Forward and Backward Keys to select the authentication
setting. Repeat the same procedure for the Encryption field. If the network key is
automatically provided, press the Down Key to move to the checkbox that says “The key is
provided automatically” and press on the OK Key to check the checkbox; otherwise, you have
to manually enter the key at the Network Key text box, as shown below:
Figure 11. AP setting - Encryption
L Hint
If both lower and upper case letters are needed in entering
the network key, pressing the # Key will toggle between lower
and upper case.
6. Pressing on the Right (“Connect”) key will have the phone tried to connect to the selected AP,
and the Status field will display status like “scanning”, “associating”, “associated”, etc.
7. If the connection is successful, the status should display “Connected to”, and the re will be a
blue ring on the antenna icon of the connected AP, as shown below:
20
Page 21
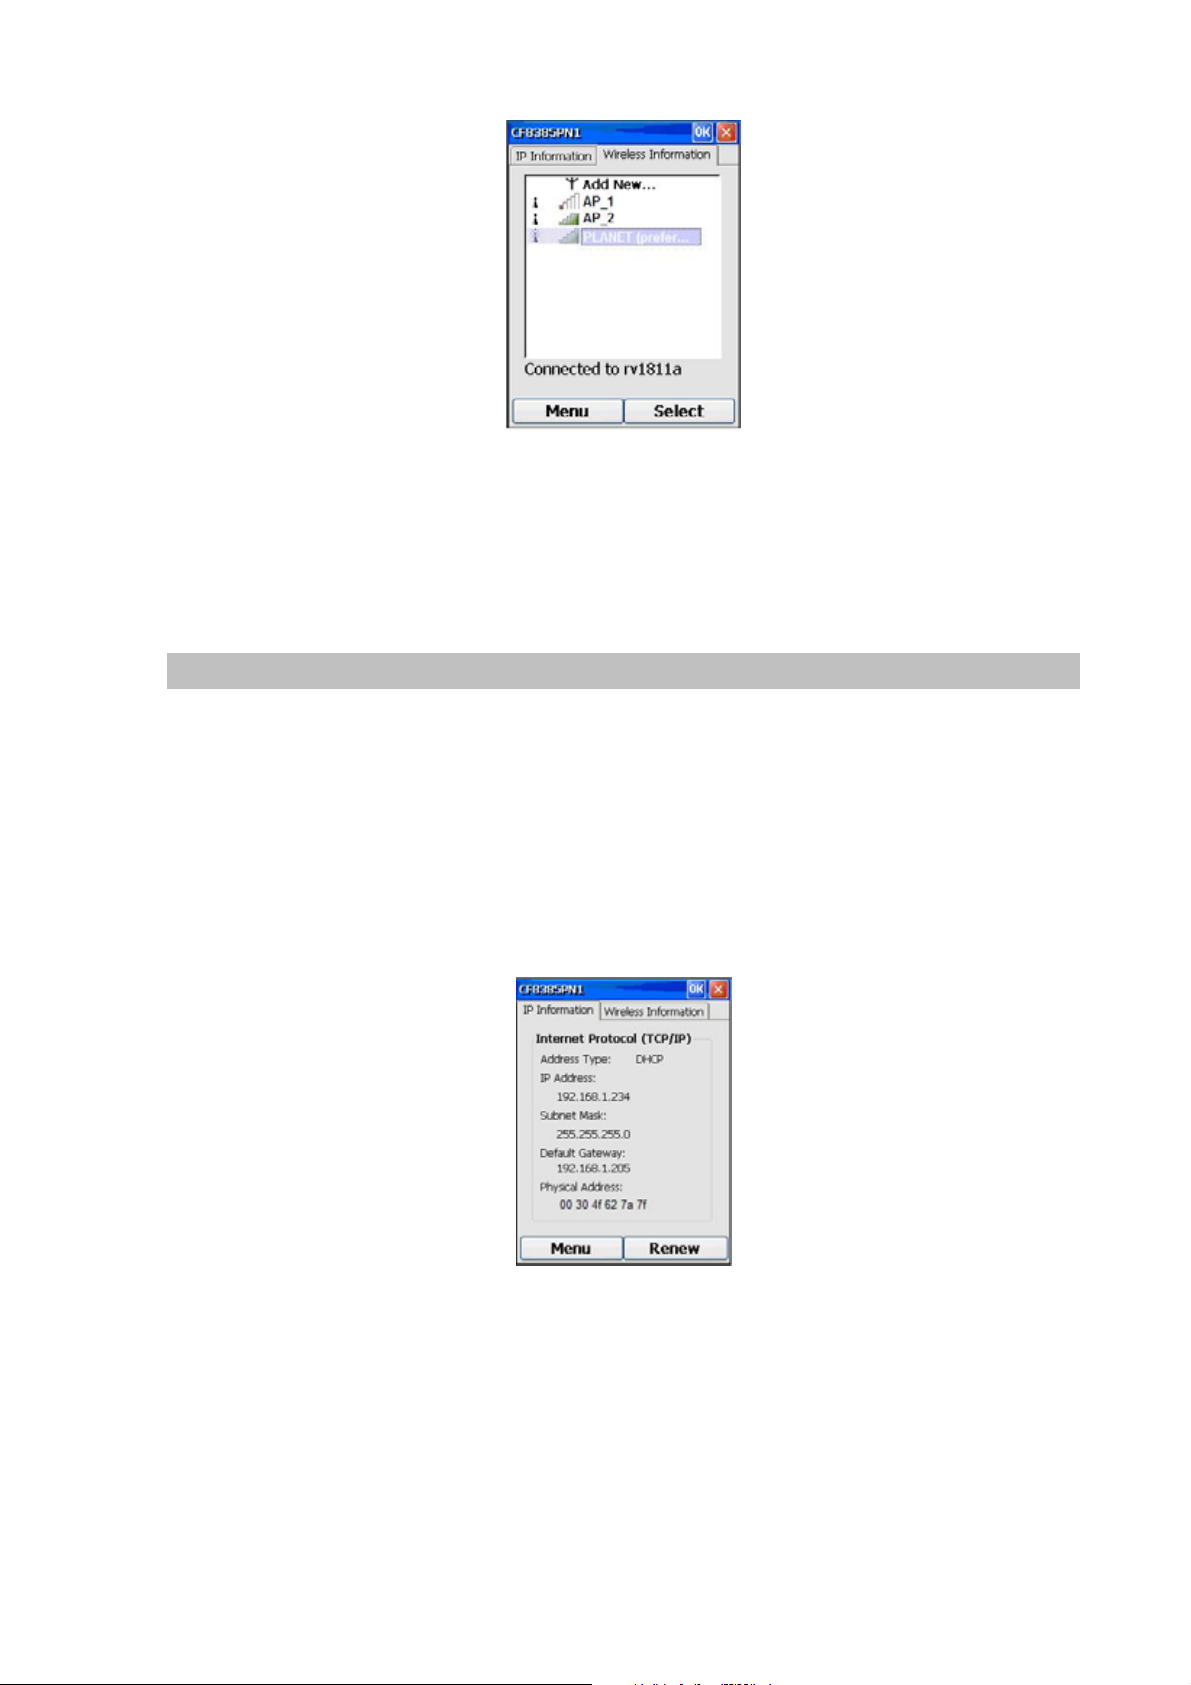
Figure 12. AP connection status
8. At this point, pressing the OK Key will bring the phone back to Normal Mode, displaying the
Main Screen with the newly obtained IP address on the top left corner and the middle of the
screen.
IP Address Info
When the phone is in Normal Mode, the screen should display the IP address on the top left corner of
the screen. (It will also be displayed in the middle of the screen, if the phone is not connected to a SIP
server).
Another way to display the IP address in a more detailed fashion is as follows:
1. Click the Left Key and select AP Connection.
2. Press the Left (“Menu”) Key and select “IP Info”.
3. A screen with more detailed IP information will then be displayed, as shown below:
Figure 13. IP information
4. Press the Right (“Renew”) Key will attempt to refresh the screen with a new IP address,
(though a new IP address may not be guaranteed.) The settings of IP Address, Subnet Mask,
and Default Gateway will temporarily be set to 0.0.0.0 and they will then be refreshed with the
new information.
21
Page 22
Preferred AP List
The phone keeps a list of APs that you have connected in the p ast. Whenever you power-on the phone,
it will try to connect to your last connected AP.
To view this list, from the Wireless Information screen, pressing the Right (“Options”) Key will pop up a
menu. Use the Up and Down Keys to highlight “Advanced” and press the OK Key. As a result, the
preferred networks screen will be displayed, as shown below:
Figure 14. Advanced wireless settings
This screen will show a list of APs you have connected in the past, with the latest one at the top.
The next time you turn on the phone, the phone will automatically connect to the APs in this list, st arting
with the one at the top. If connection to an AP is not successful, the phone will try to connect to the next
one on the list.
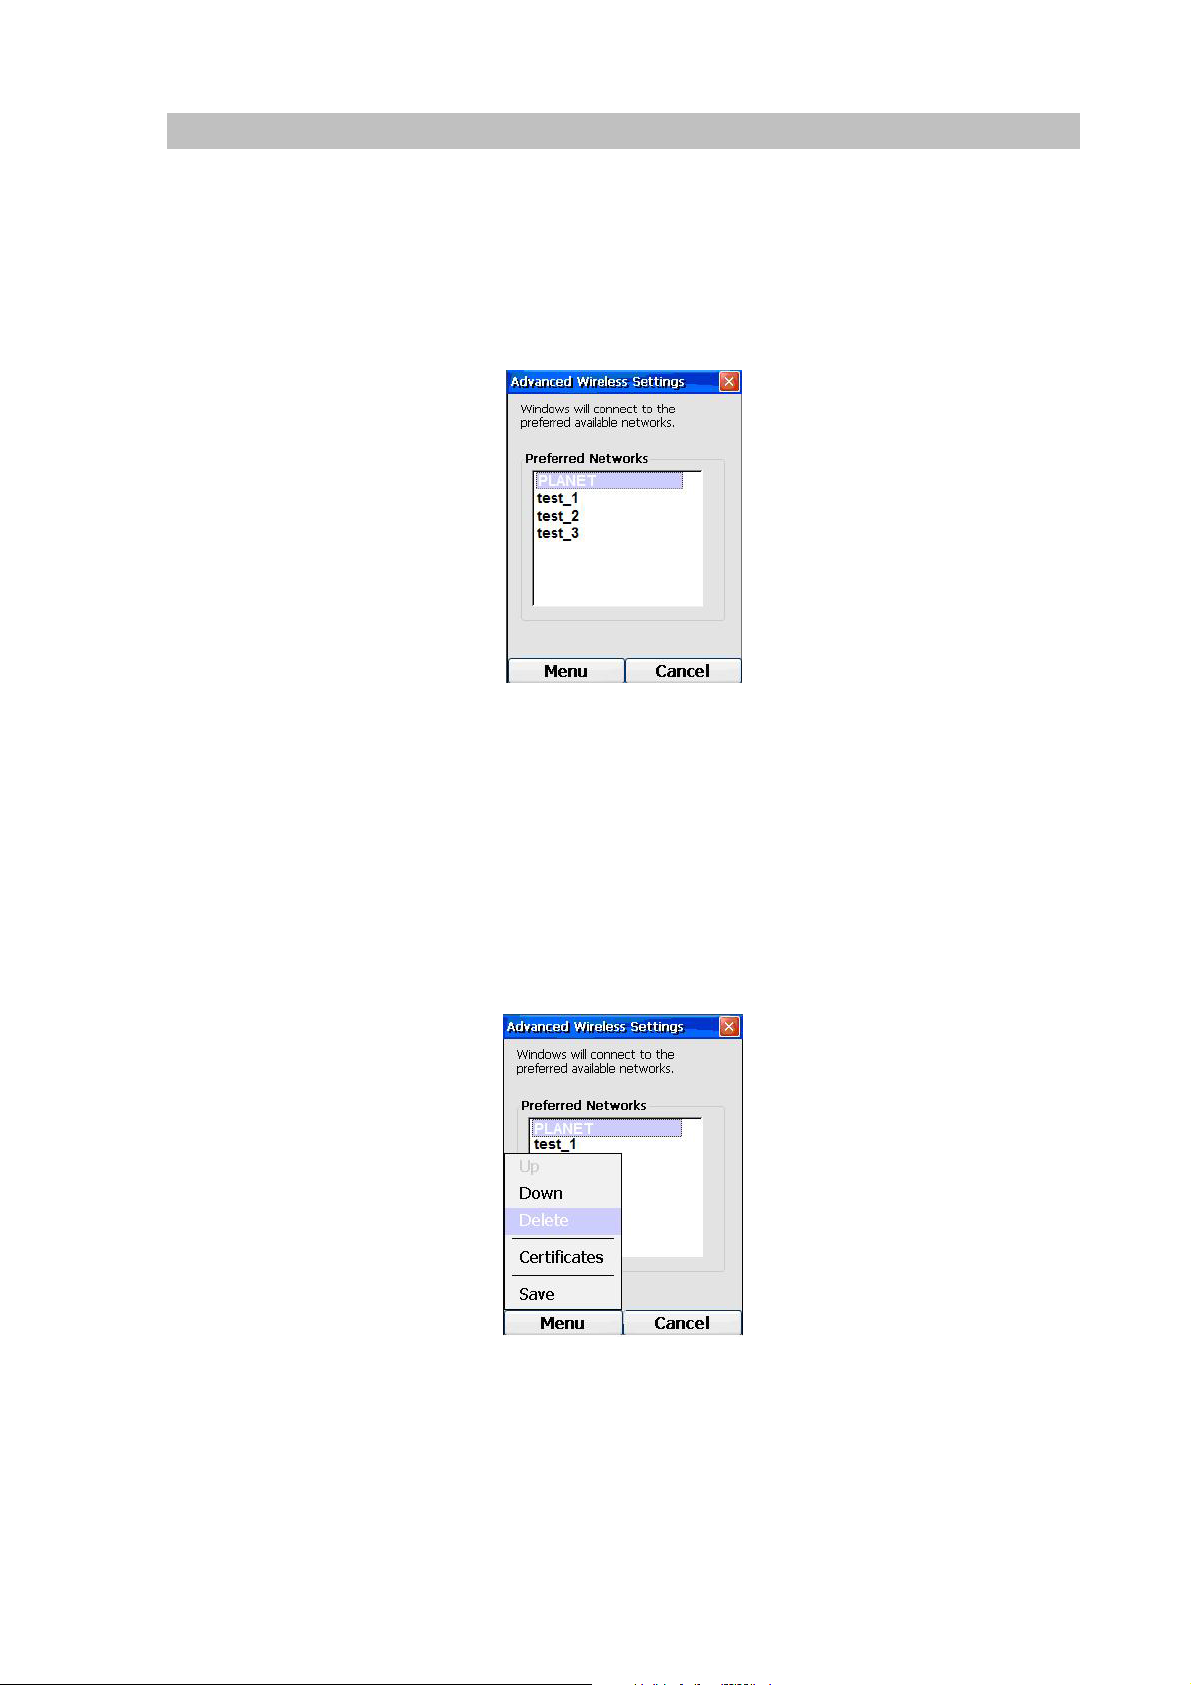
Pressing the Left (“Menu”) Key and selecting “Delete” will allow you to delete the highlighted AP from
the list, as shown below:
Figure 15. Advanced wireless settings - Delete
Pressing the Right (“Cancel”) Key will take you back to the Wireless Information screen without saving
the deletion; whereas pressing the Left (“Menu”) Key and selecting “Save” will confirm the deletion and
go back. If you delete the A P that you are currently connected to, the phone will try to connect to the
next AP on the list.
22
Page 23
Also, since the APs in the list are arrang ed in descen ding order of preference, moving an AP up on the
list will give a higher preference to that AP. To do so, carry out the following steps:
1. From the Advanced Wireless Settings screen, highlight the desired AP, press the Left (“Edit”)
Key and select “Up”.
2. This will move the AP up one slot in the list. Conversely, selecting “Down” will move the AP
down one slot.
3. Repeat steps 1 and 2 until the AP is placed at a desired slot in the list.
4. Pressing the Left (“Edit”) Key and selecting OK will confirm the changes and go back to the
Wireless Information screen. However, pressing the Right (“Cancel”) Key will also take you
back to the same screen without saving the changes.
L Note
If you move an AP from the top of the list, selecting “Save”
will have the phone tried to connect to the AP that is
currently on the top of the list.
SIP Configuration
To connect to a SIP server, you can carry out the following steps:
1. Make sure the Wi-FI Phone is connected to an AP.
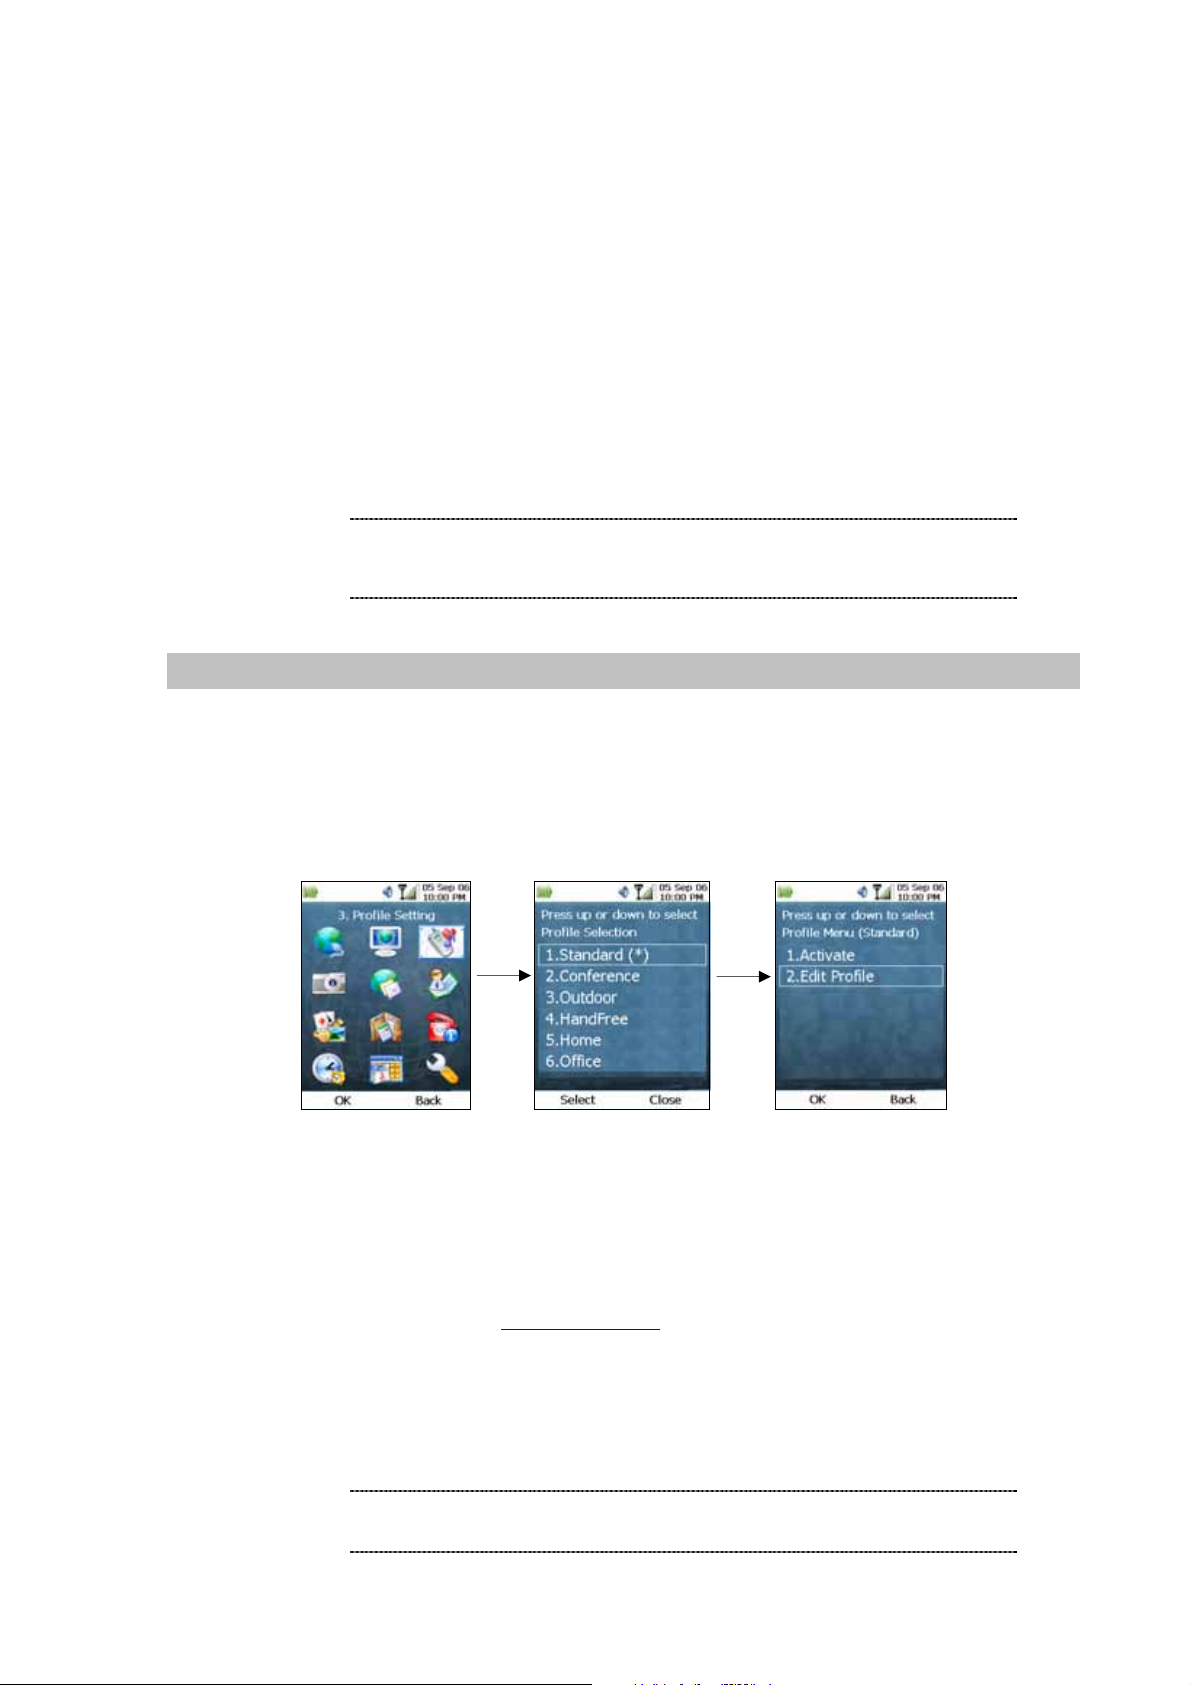
2. From the Main Screen, press the Left (“Menu”) Key and select “3. Profile Setting”. Select
“Standard”, press OK and select “Edit Profile” from the submenu, just as shown below:
Figure 16. Profile setting
3. Fill in the corresponding information. Usually the fields that need to be filled are: “My Phone
Number”, “SIP Server” (i.e. domain name or IP address of SIP server), “Account Name”, and
“Account Password”, and you can leave the other fields with the default values. An example:
L Hint
My Phone Number:
SIP Server: 192.168.1.1
Account Name: 882
Account Password: 123
The SIP standard requires you to include the “@” sign and
the SIP server domain in the My Phone Number field.
882@192.168.1.1
23
Page 24
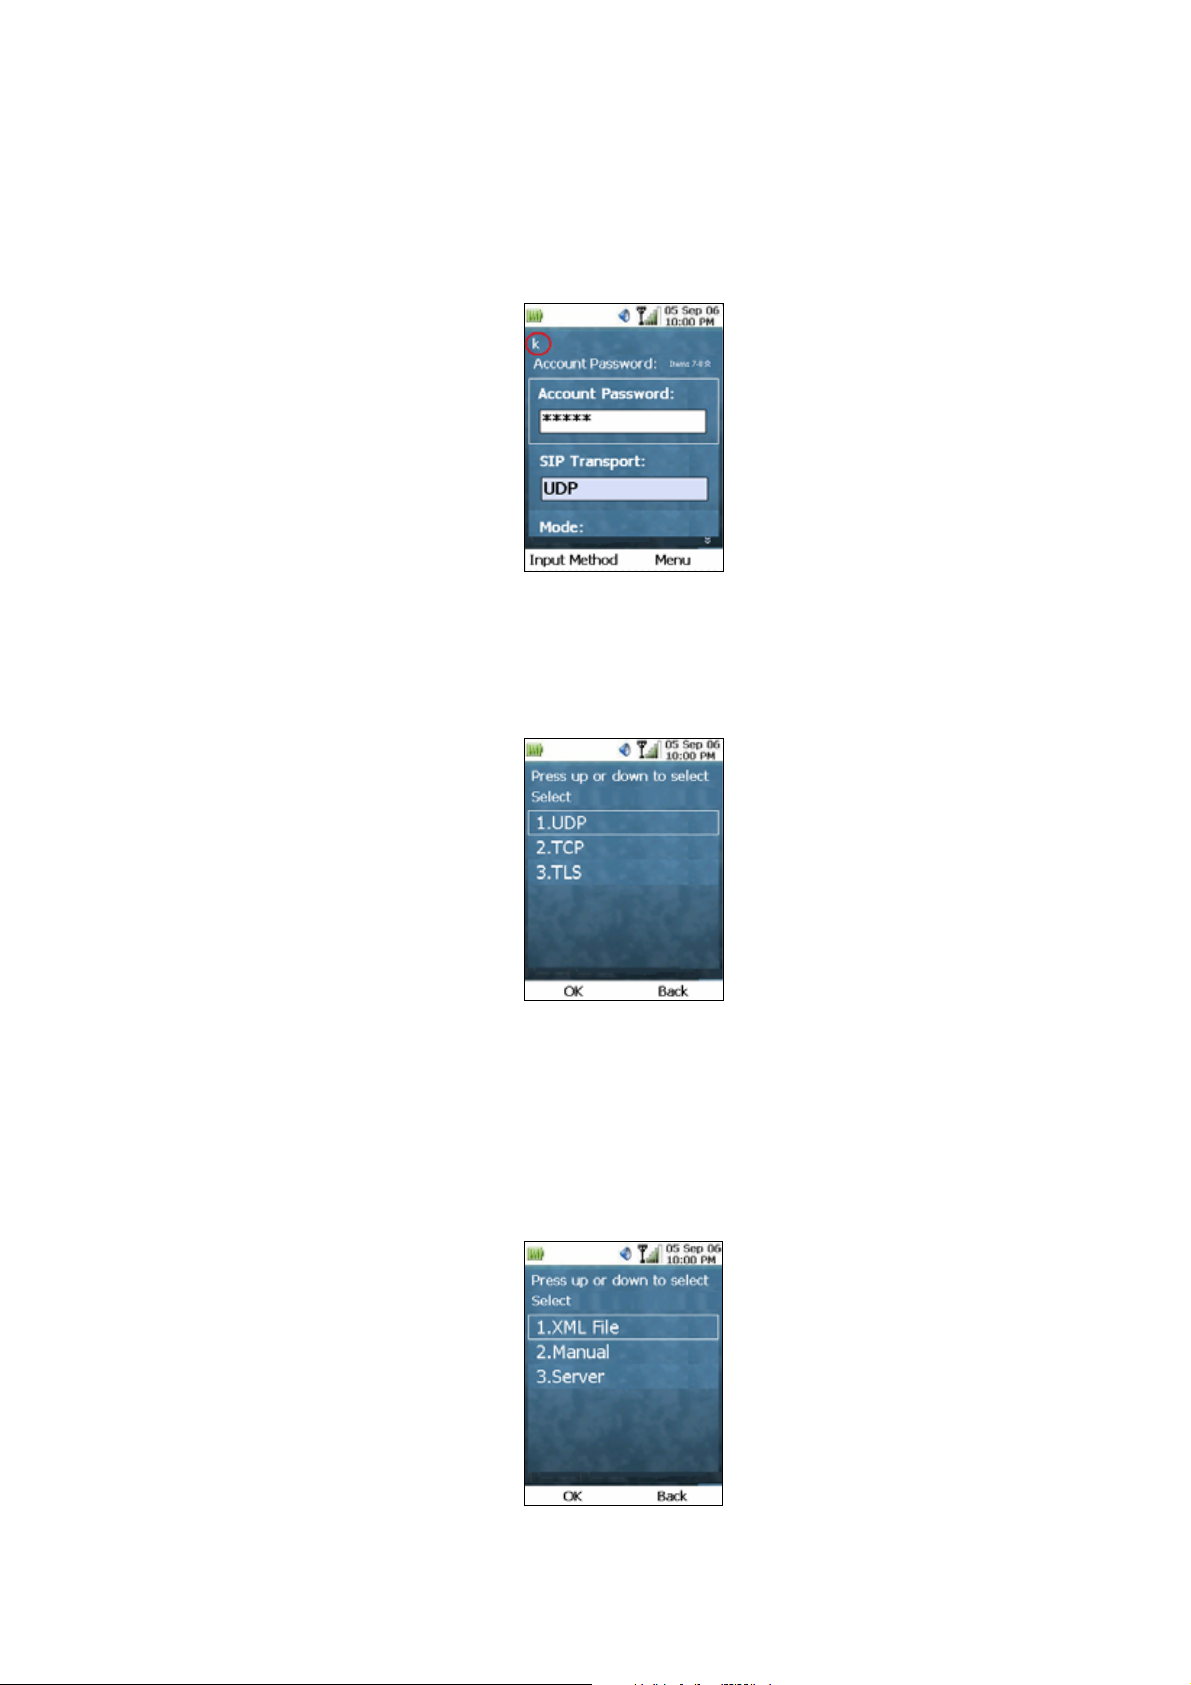
4. When filling in the Account Name and Account Password fields, pressing the Left Key (“Input
Method”) will allow you to switch among numeric, lower case or upper case input. Also, the
Account Password field is masked with asterisks, but pressing any key will display the
corresponding character on the top left corner of the screen, so that you are abl e to know which
character you are entering, as shown in the following diagram:
Figure 17. SIP account setting
5. For the “SIP Transport” field, pressing the Left Key will bring up the options for this field. The
options are shown in the following diagram:
Figure 18. SIP transport setting
6. Highlight the desired option by using the Up and Down Key, and then press the OK Key. This
will bring you back to the previous screen.
7. T o chan ge the default settings for the “Mode” field, press the Lef t Key to bring up the options for
this field, as shown below:
Figure 19. Mode setting
24
Page 25
(“Manual” means entering the information manually; “Server” means information will be
provided by the SIP server; “XML File” means inform ation can be derived from a XML file in the
phone.)
8. Highlight the desired option by using the Up and Down Key, and then press the OK Key. This
will bring you back to the previous screen.
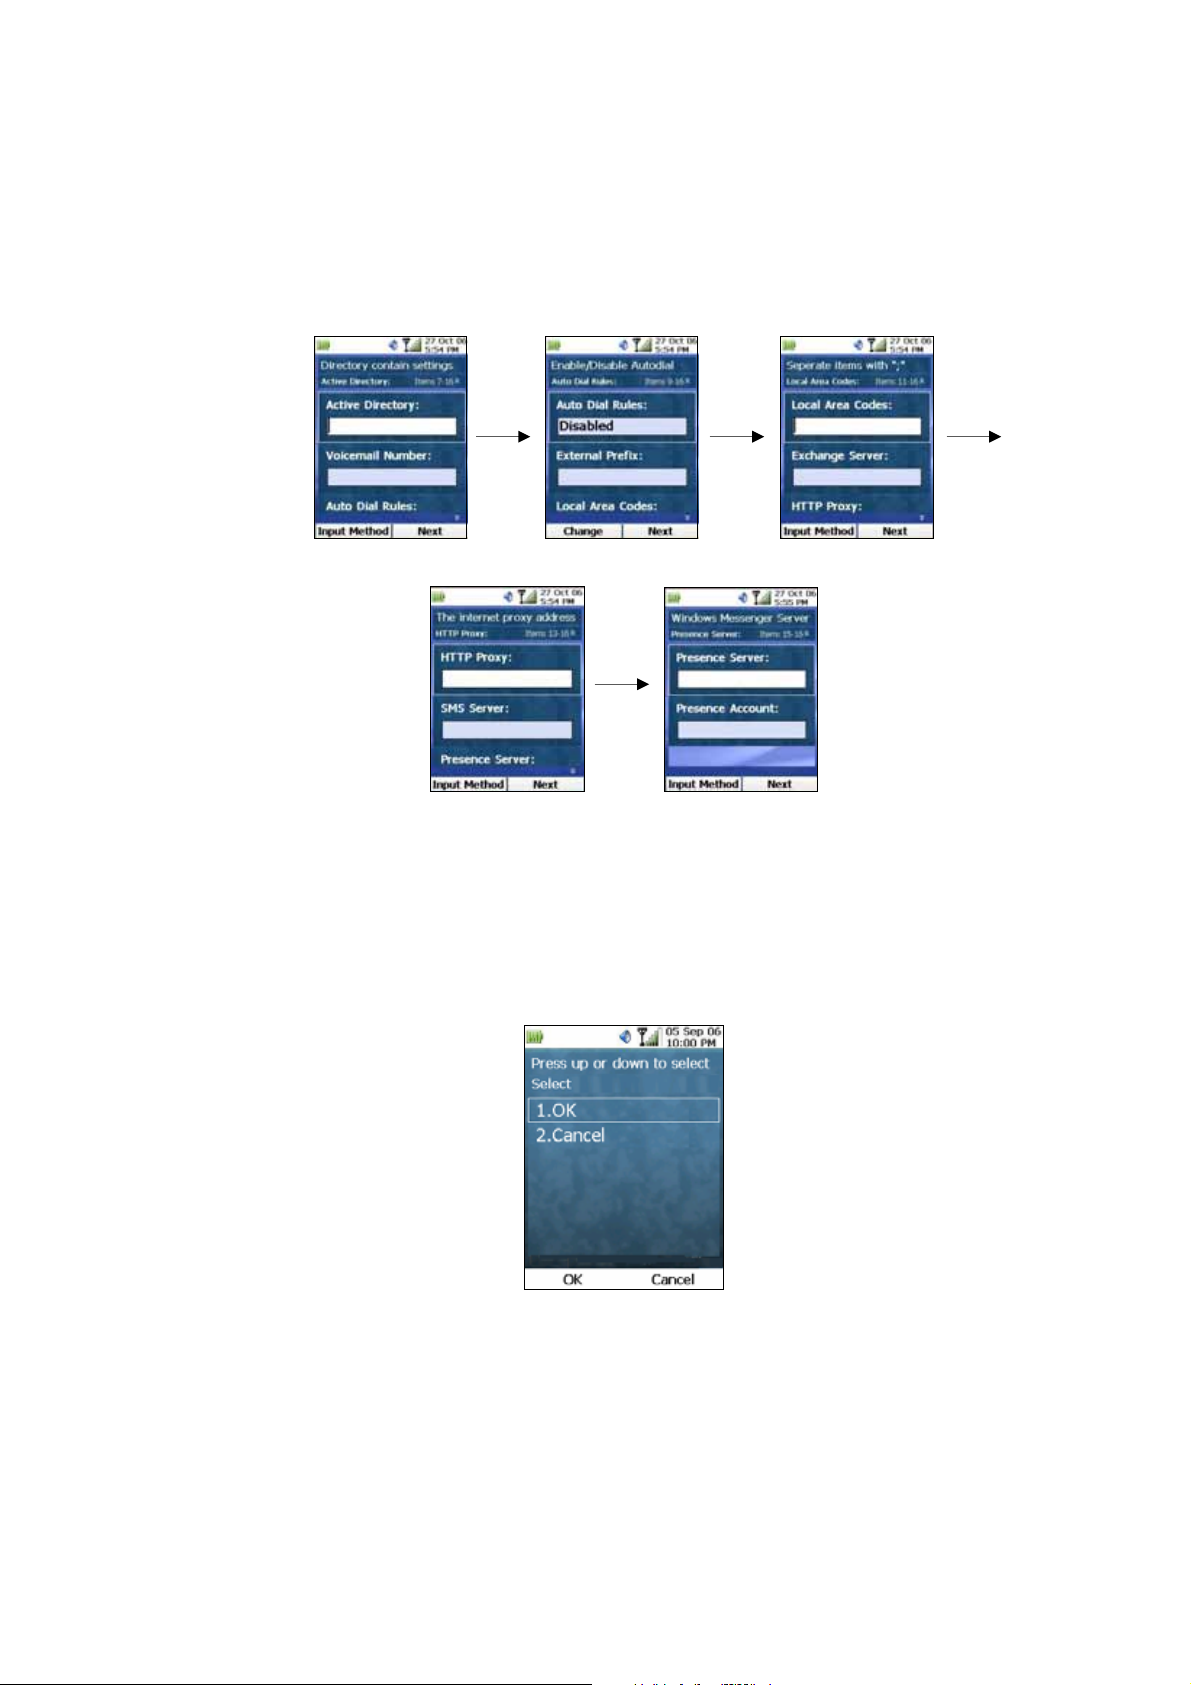
9. Press the Down Key to scroll down to the next pages, which are shown below:
Figure 20. The other settings
10. Fill in the rest of the fields or you can leave them empty.
11. At any point during filling out this information, pressing the Right Key (“Next”) will display the
following screen:
Figure 21. Confirm prompt
12. Press the Left (“OK”) key to save the information. Then press the Right (“Back”) Key to go back
up one level. Selecting “Activate” and pressing the Left Key will attempt to connect to the
specified SIP server, as shown below:
25
Page 26
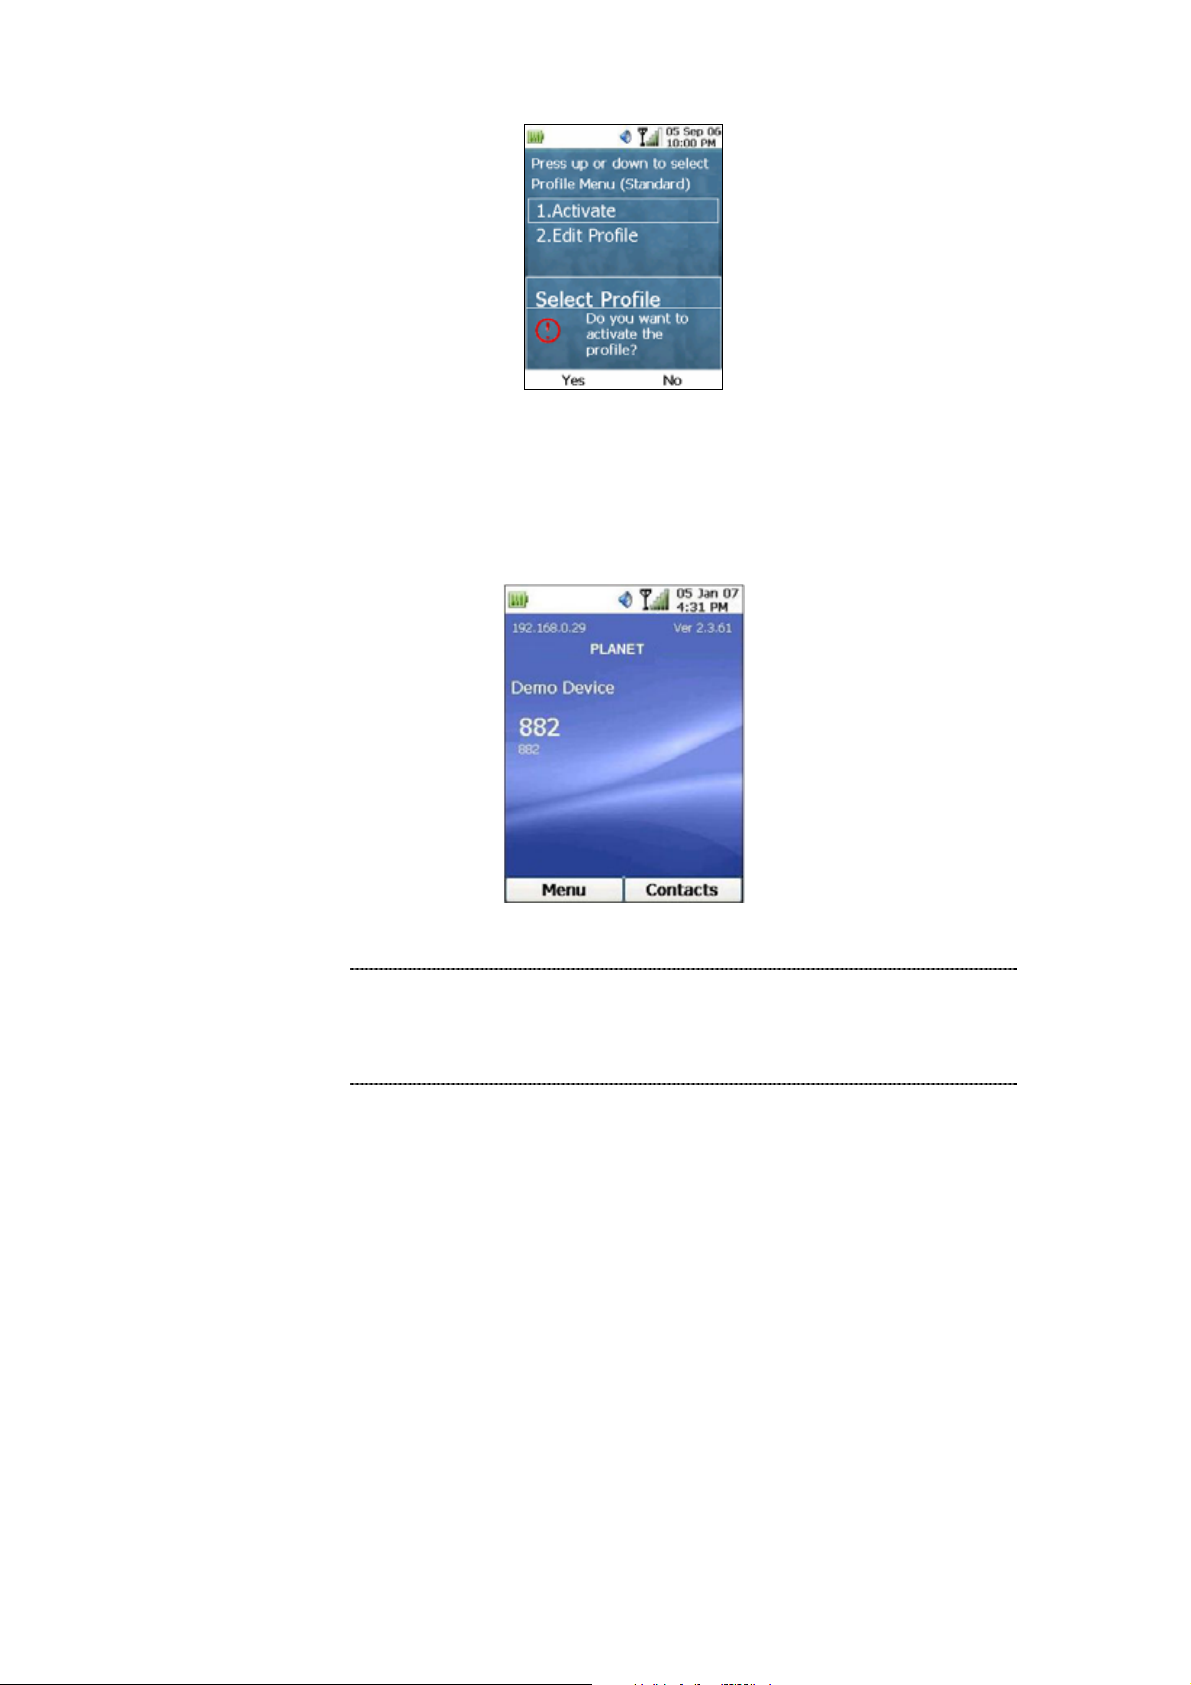
Figure 22. Activate profile prompt
13. If connection is successful, the number returned from the SIP server will be displayed on the
Main Screen (replacing the words “Windows CE”), just as shown below:
Figure 23. Main screen - with account number
L Hint
A SIP server is usually located at another network. In
other words, if there is a router between the phone and the
SIP server, you need to enable the uPnP feature in the
router.
26
Page 27
Chapter 4
Basic Operations
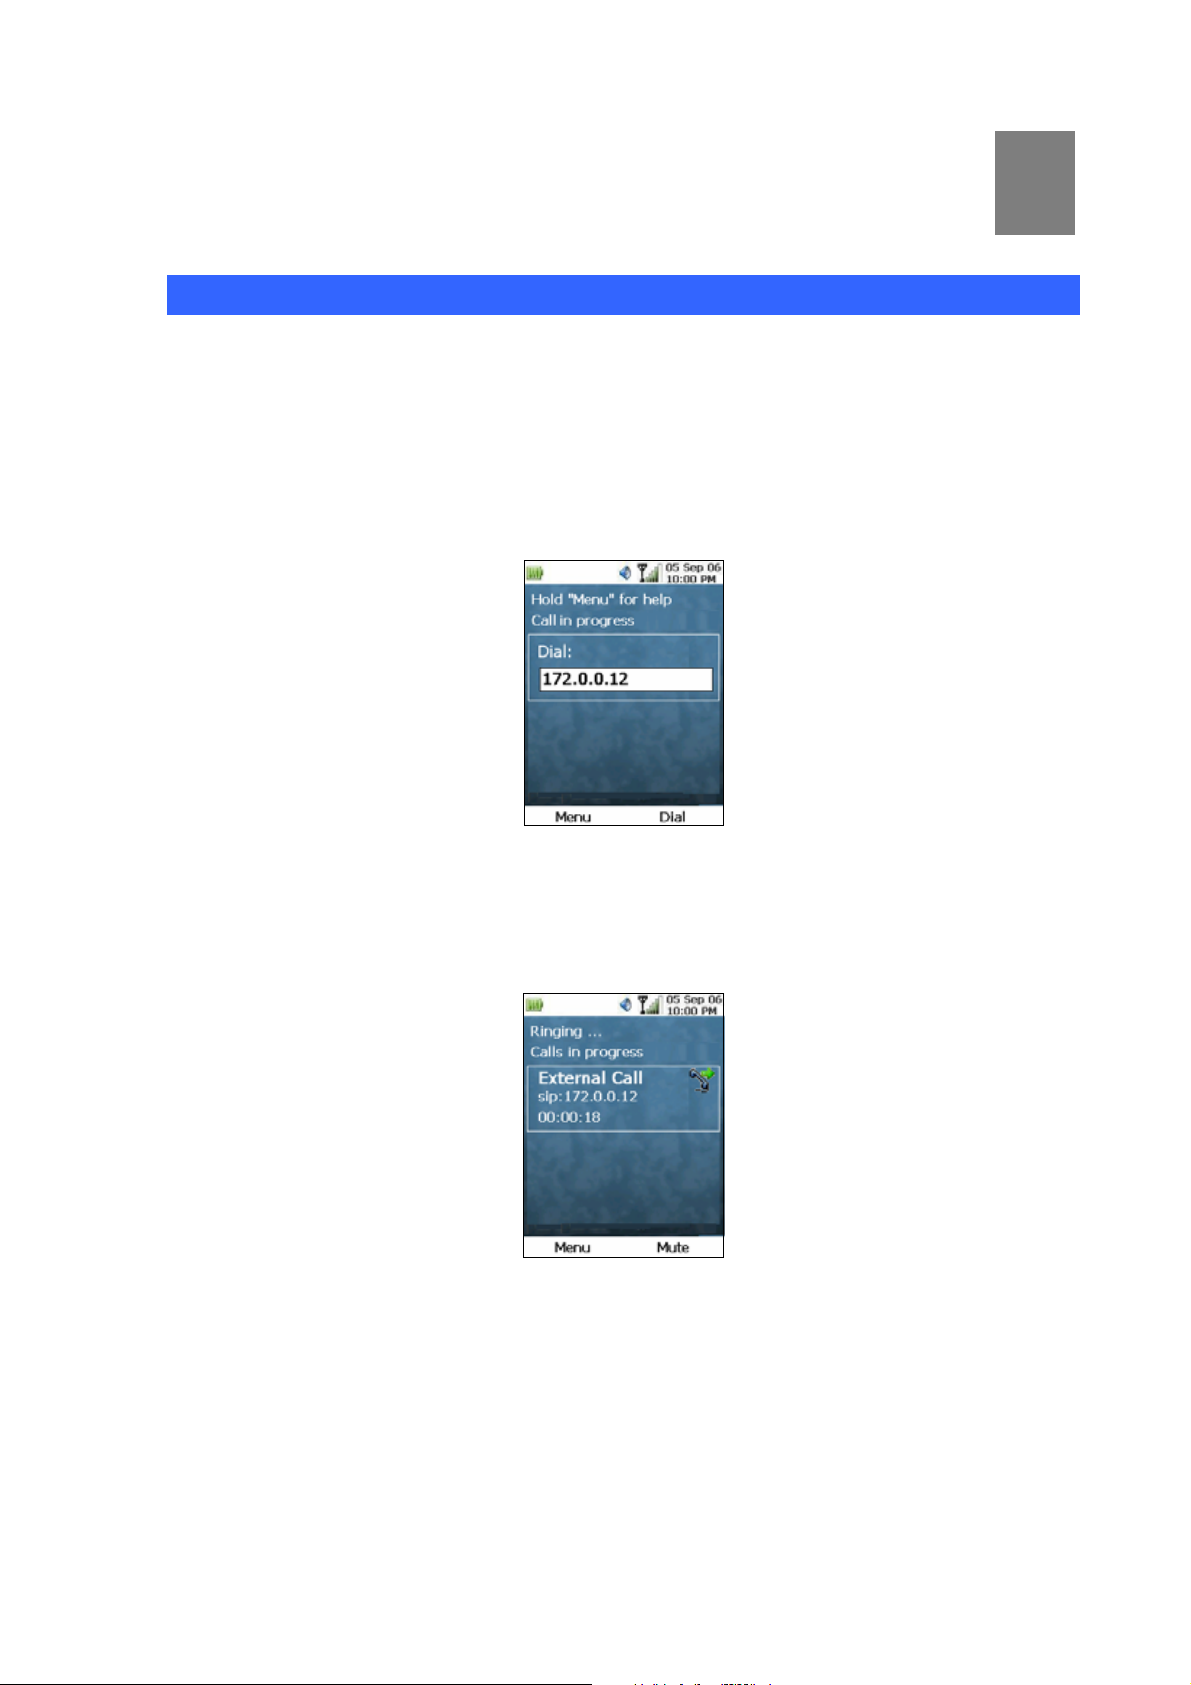
Basic Operatoms (Make IP or SIP call)
If the phone is connected to an AP with an IP address displayed on the Main Screen, the sequence of
events of making a call to another phone will take place as follows:
1. Press the Dial Key.
2. Enter the IP address or SIP number of th e other phone (as shown below). To enter the ‘.’ in the
IP address, press the ‘*’ Ke y twice.
4
Figure 24. Making a call - Entry the IP address
3. Press the Right Key (“Dial”) to dial out, and the status of the screen will be shown as “Ringing”,
as shown in the following diagram:
Figure 25. Making a call - Ringing
4. If the call is answered by the other party, the screen will display “Connected” on the status bar
together with the connection time, as shown in the following diagram:
27
Page 28
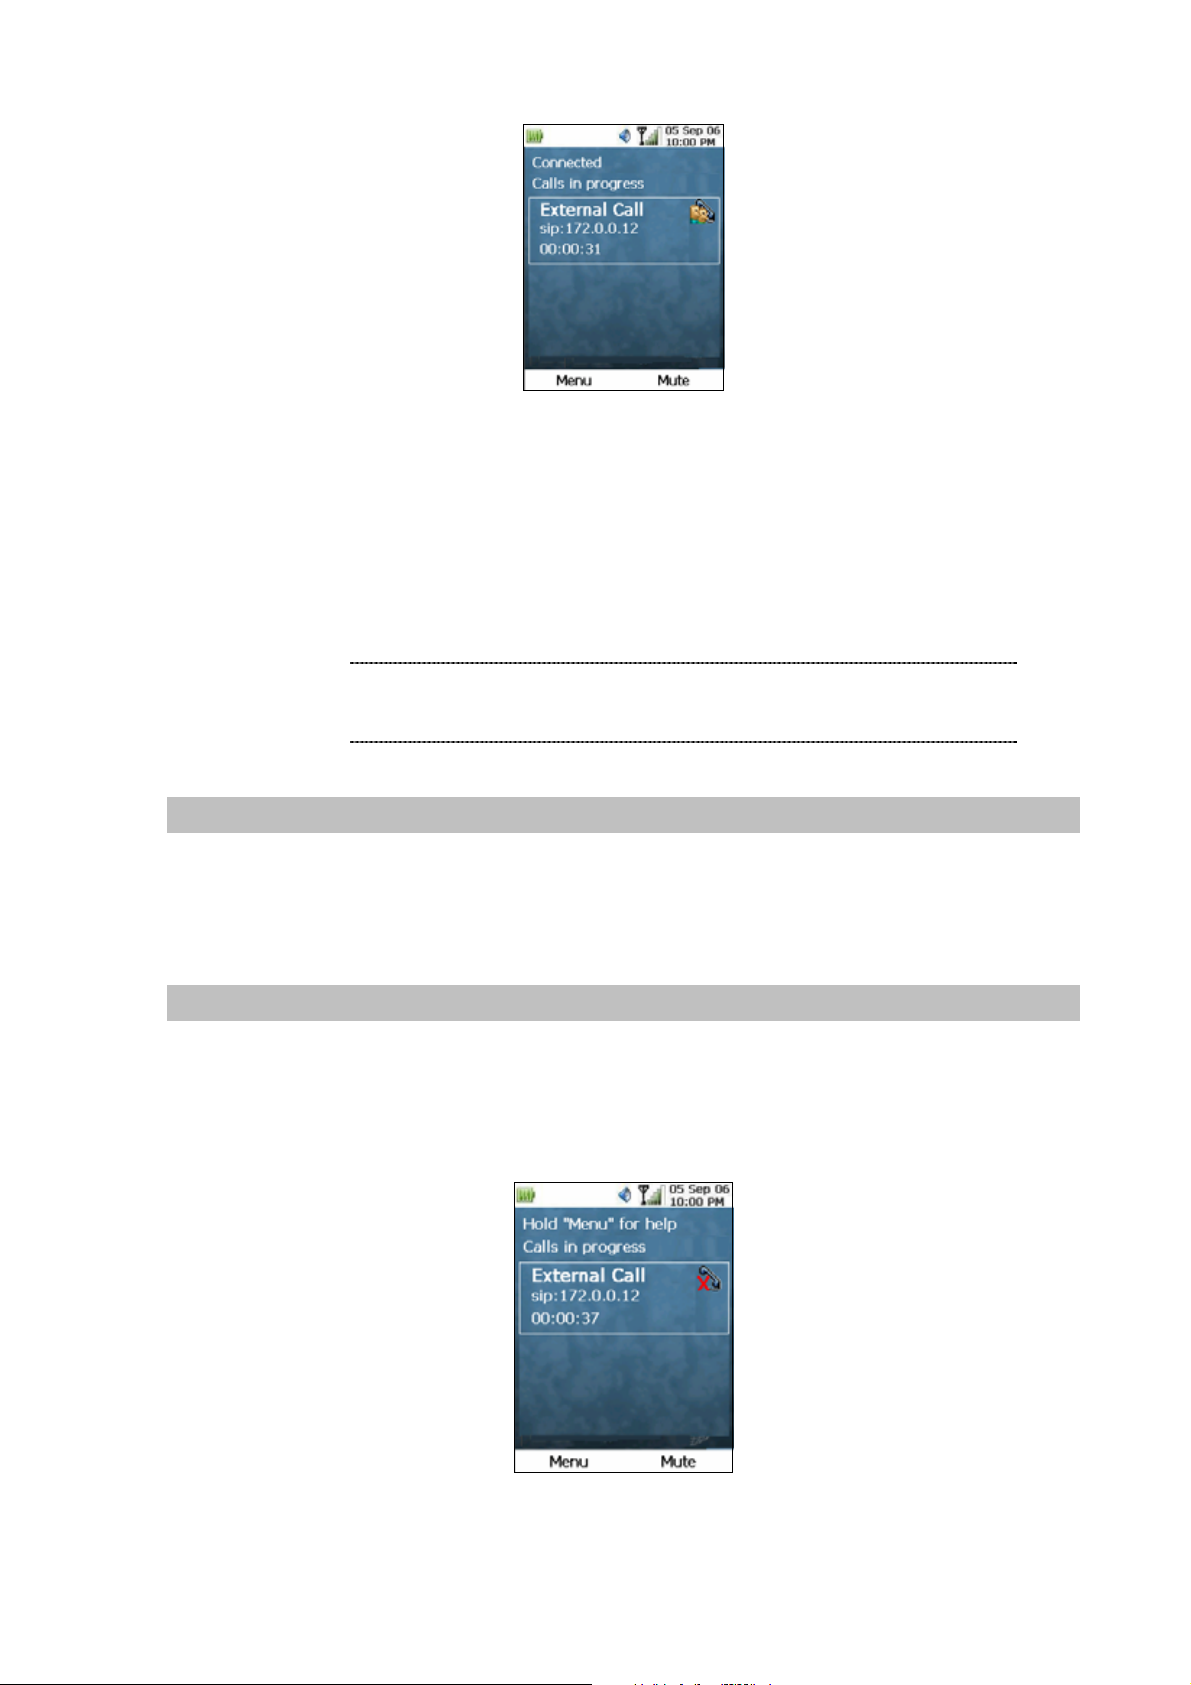
Figure 26. Making a call - Connected
5. To adjust the volume during the conversation, press the silver Volume Key on the side of the
phone.
6. At any time, the user can press the red End Key to hang up the call, and the phone will return to
the Main screen.
L Note
To escape from the dialing screen without dialing, just
press the End Key. This will take you back to the Main
screen.
Dial (Make PSTN Call)
If the phone is connected to a SIP server, making a PSTN call will be the same as making a
peer-to-peer IP call. The only difference is that the user will have to input a PSTN phone number
instead of an IP address.
Disconnect Call
To disconnect a call, the sequence of events will take place as follows:
1. Press the End Key.
2. Disconnected icon and last call duration will be displayed for a short while, as shown in the
following diagram:
Figure 27. Disconnect call
3. Phone returns back to the Main Screen.
28
Page 29
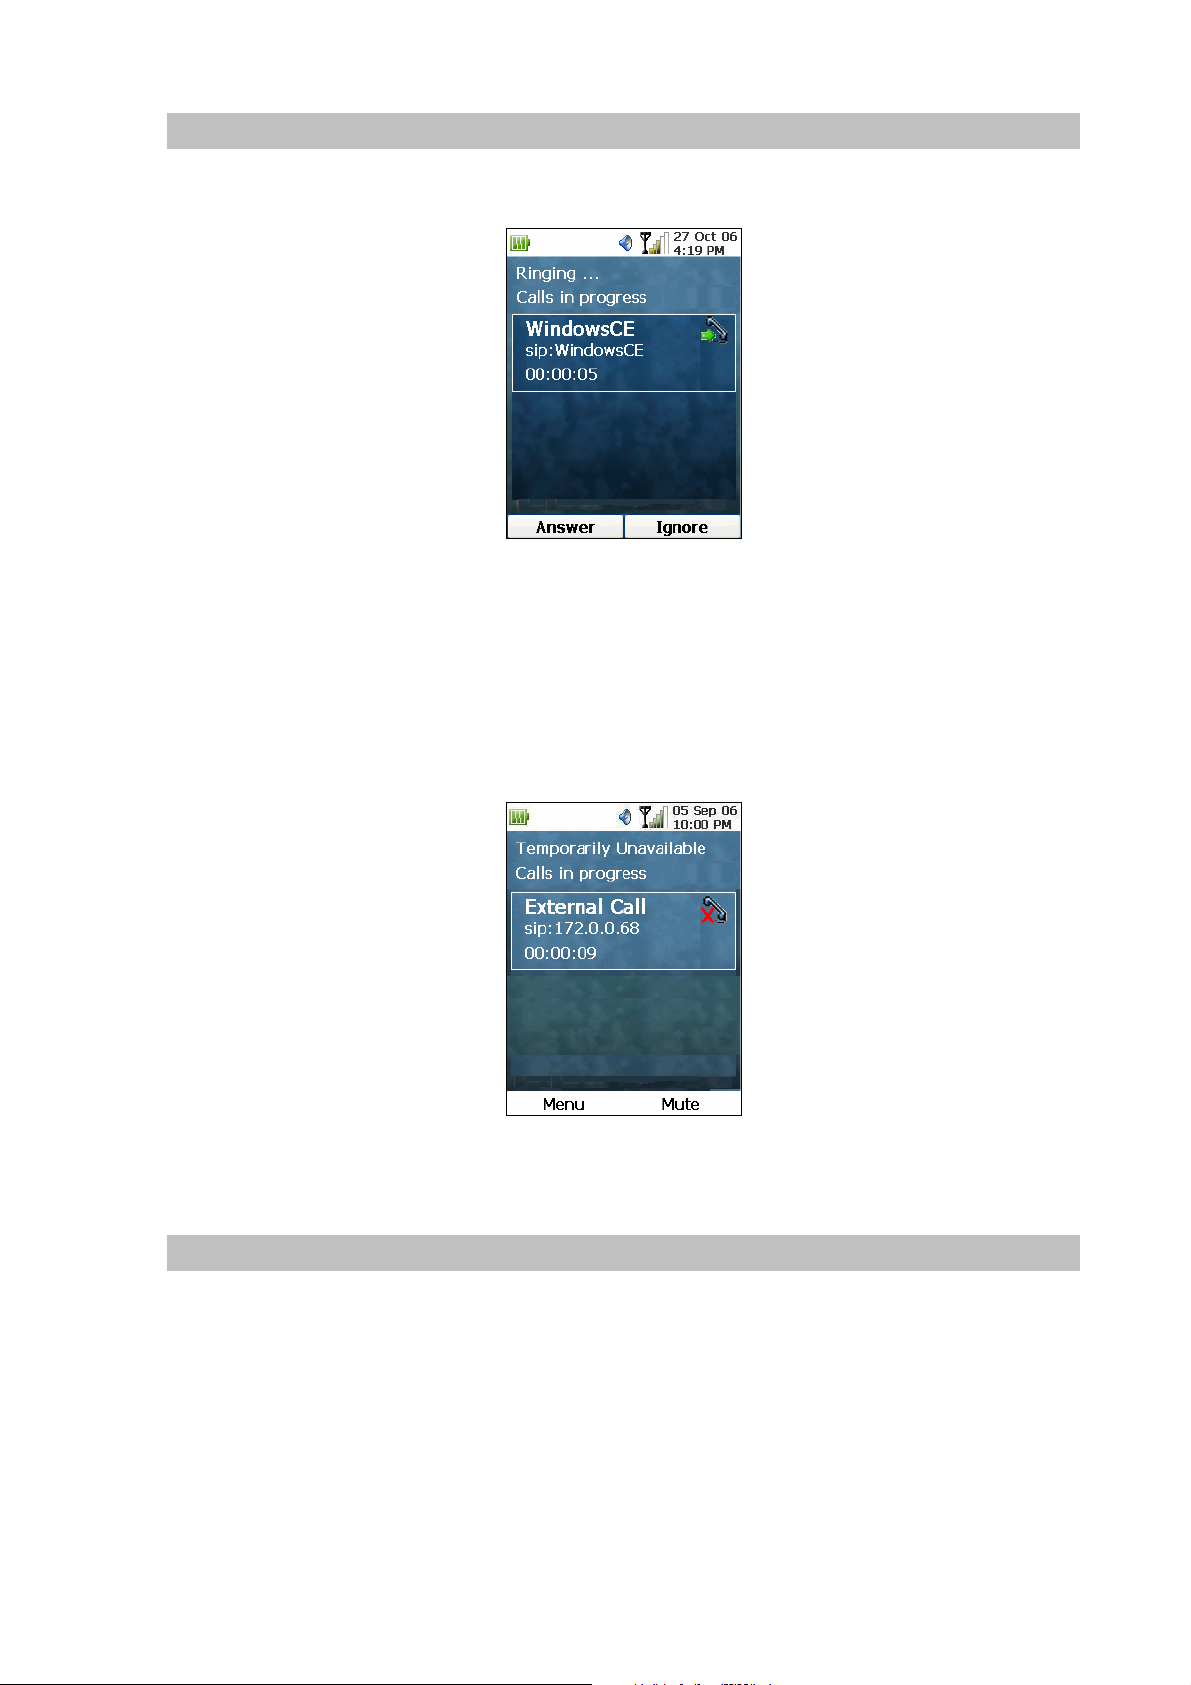
Accept Incoming Call
When there is an incoming call, the caller’s number or IP address will be displayed, as shown in the
following diagram:
Figure 28. Incoming call prompt
Pressing the Left Key (“Answer”) will accept the incoming call, and connection will be est ablished, and
the screen will display “Connected” on the status bar together with the connection time.
Pressing the Right Key (“Ignore”) will reject the incoming call and stop the phone from ringing. Also, if
the call is rejected, the screen of the caller will indicate that the other party is temporarily unavailable,
as shown in the following diagram:
Figure 29. Ignore the incoming call
Call Mute / Un-Mute
To mute a connected call, press the Right (“Mute”) Key. An additio nal icon will be displayed on the
screen, as shown below:
29
Page 30
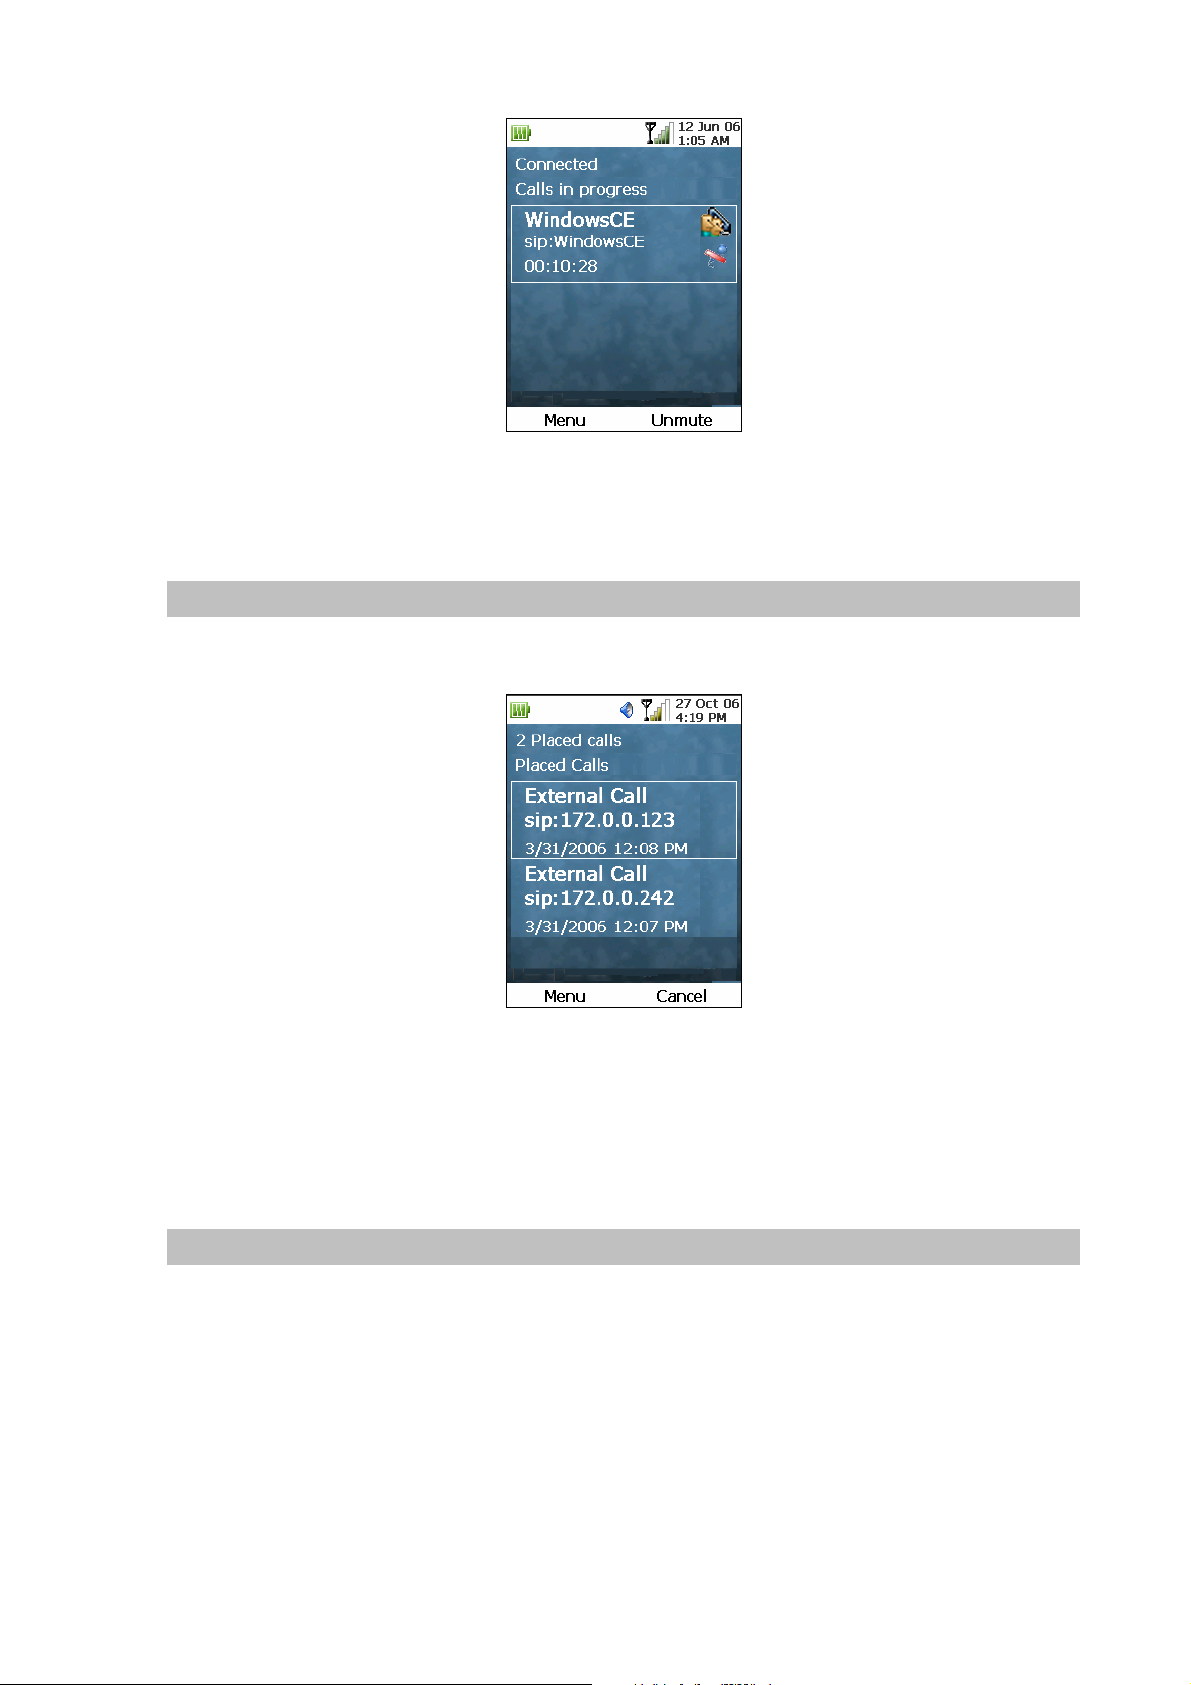
Figure 30. Call mute prompt
To cancel the muting, press the Right (“Unmute”) Key again.
Redial
To redial calls, press the Down Key at the Main or Dial screen. (You need to have the SIP information
filled in first.) The screen will display a list of previously made calls, as shown below:
Figure 31. Redial call prompt
You can use the Up or Down Key to select, and make the redial.
For further operations, please refer to the section “Placed Calls” of the “Call History” chapte r.
Speaker Phone
To turn on the speaker during a connected call, press the Left (“Menu”) Key, use the Up and Down Keys
to highlight the “Turn On Speaker” menu item and press the OK Key, as shown in the following diagram:
30
Page 31

Figure 32. Turn on speaker setting
To turn off the speaker, press the Left (“Menu”) Key, use the Up and Down Keys to select “Turn Off
Speaker” and press the OK Key, as shown below:
Figure 33. Turn off speaker setting
Missed Calls
If an incoming call hangs up before it is answered, the missed call icon will be displayed at the top of
the Main Screen, as shown below:
Figure 34. Missed calls prompt
To clear the missed call icon, view the missed calls by pressing the Left (“Menu”) Key at the Main
Screen, select “9. Call History”, then select “Missed Calls”. (Please refer to the “Call History” section for
further details.)
Call Waiting
This feature applies to both peer-to-peer and SIP calls (if the SIP server supports this feature).
Call waiting occurs when you are in a call and another call comes in. You will hear a beeping sound,
and your screen will be similar to the following, with the Connected Call icon on the first call and the
Incoming Call icon on the second call:
31
Page 32

Figure 35. Call waiting prompt – Connected call
Using the Up or Down Keys, you can select the new incoming call. Once you have set the focus on the
new call, notice that the status on top will change to “Ringing” and the Left and Right Keys to “Answer”
and “Ignore” respectively, as shown below:
Figure 36. Call waiting prompt – Incoming call
To keep the connection of the original call, press the Right (“Ignore”) Key to reject the new incoming call,
and the caller of the new call will hear a busy tone. Pressing the Left (“Answer”) Key will establish
connection with the new caller. This will put the first call on hold automatically, as shown below:
Figure 37. Answer the incoming call
If you want to switch back to the first call, use the Up or Down Keys to set the focus on the first call,
press the Left (“Menu”) Key and select the “Unhold” option. In this way, you will re-establish the
connection with the first call, while putting the second call on hold. Follow the same procedures if you
want to alternately switch between these 2 calls. Other operations with the second call will be the same
32
Page 33

as a regular call. For more details, please refer to the section “Dial (Make IP or SIP Call)”.
When you have finished with one of the calls, the other call will still be in Call Hold status. To resume
connection, use the Up or Down Keys to set the focus on the call. Press the Dial button, or you can
press the Left (“Menu”) key and select the “Un hold” option.
Call Hold
To hold a connected call, press the Left (“Menu”) Key, and use the Up and Down Keys to highlight the
“Hold” menu item, as shown in the following diagram:
Figure 38. Call hold setting
Press the OK Key, and the current call will be put on hold, as shown in the following screen:
Figure 39. Call hold prompt
The top of the screen will be displaying “Holding” and the telephone icon will have an excl amation mark,
indicating that the current call is being put on hold.
At this point, you can either un-hold the current call or call another number.
To un-hold the current call, press the Dial key. Alternatively, you can press the Left (“Menu”) Key, and
use the Up and Down Keys to highlight the “Unhold” menu item, as shown in the following screen:
33
Page 34

Figure 40. Call unhold setting
To call another number while the current call is put on hold:
1. Press the Up Key so that the “Dial” textbox is highlighted.
2. Enter the other number , as shown in the diagram below:
Figure 41. To call another number
rd
3. Press the Right (“Dial”) Key. When the 3
call is connected, the call duration will start counting
for the newly established call, while the telephone icon for the held call will still have an
exclamation mark. The display will be similar to the following diagram:
rd
Figure 42. 3
call prompt
34
Page 35

rd
4. When you are finished with the 3
call, you can return the original call by pressing the Left
(“Menu”) Key, and select “Unhold”.
Call Transfer
To transfer a connected call, press the Left (“Menu”) Key, and use the Up and Down Keys to highlight
the “Transfer” menu item, as shown in the following diagram:
Figure 43. Call transfer setting
Press the OK Key, and the current call will be put on hold. The following screen will be shown,
prompting you to enter the number to transfer the call to:
Figure 44. To transfer the call
Once you have entered the number you want to transfer the call to, press the OK Key. If that number is
not busy, the call will be transferred to that number (and the phone of that number will start ringing).
You will be released from the call, so the Call Transferred icon
will be displayed. It will then be
replaced by the Disconnected icon
. Last call duration will also be displayed for a short while on your
screen, before your phone returns to the Main screen.
Also, the other party that has been put on hold because of the transfer will see the following screen,
rd
once the call has been transferred to the 3
party:
35
Page 36

Figure 45. Call transfer prompt
His screen will show the Disconnected icon, indicating that his original conversation with you h as been
disconnected. At the same time, the call duration counter will start counting his talk time with the newly
established party.
36
Page 37

Chapter 5
Phone Settings
Phone Settings
When the phone is displaying the Main screen, pressing on the Left Key (“Menu”) and sele ct “# Phone
Settings” will display an interface to allow the user to adjust the different settings of the phone, as
shown in the following diagram:
Figure 46. Phone settings
5
Date Time Settings
Selecting “Date T ime” from the submenu of Phone Settings will display an interface to allow the user to
adjust the system date and time of the phone, as shown in the following diagram:
Figure 47. Date time setting
1. When the screen is first displayed, the focus in on the day of the month. Press the Volume
Down Key to jump to the next month, or the Volume Up Key to the previous month.
2. Once the desired month is selected, use the Up, Down, Backward and Forward Keys to select
the desired day.
3. Once the desired day is highlighted, press the OK Key to set the focus to the hour.
4. Use the Up and Down Keys to adjust the hour. Or you can manually input using the keypad.
37
Page 38

5. Press the Forward Key to set the focus to the minute.
6. Repeat step 4 and 5 for the minute, second, and am/pm.
7. To set the time zone, press the Left (“Menu”) Key, and select “TimeZone Setting”:
Figure 48. Time zone setting
8. Use the Up and Down Keys to adjust the desired time zone. Press the Left Key to select the
highlighted time zone, and the Right Key to go back to the previous screen.
9. Press the Left (“Menu”) Key and select “Apply”. Then press the Rig ht (“Exit”) Key to return to
the Main Screen with the new time and date settings.
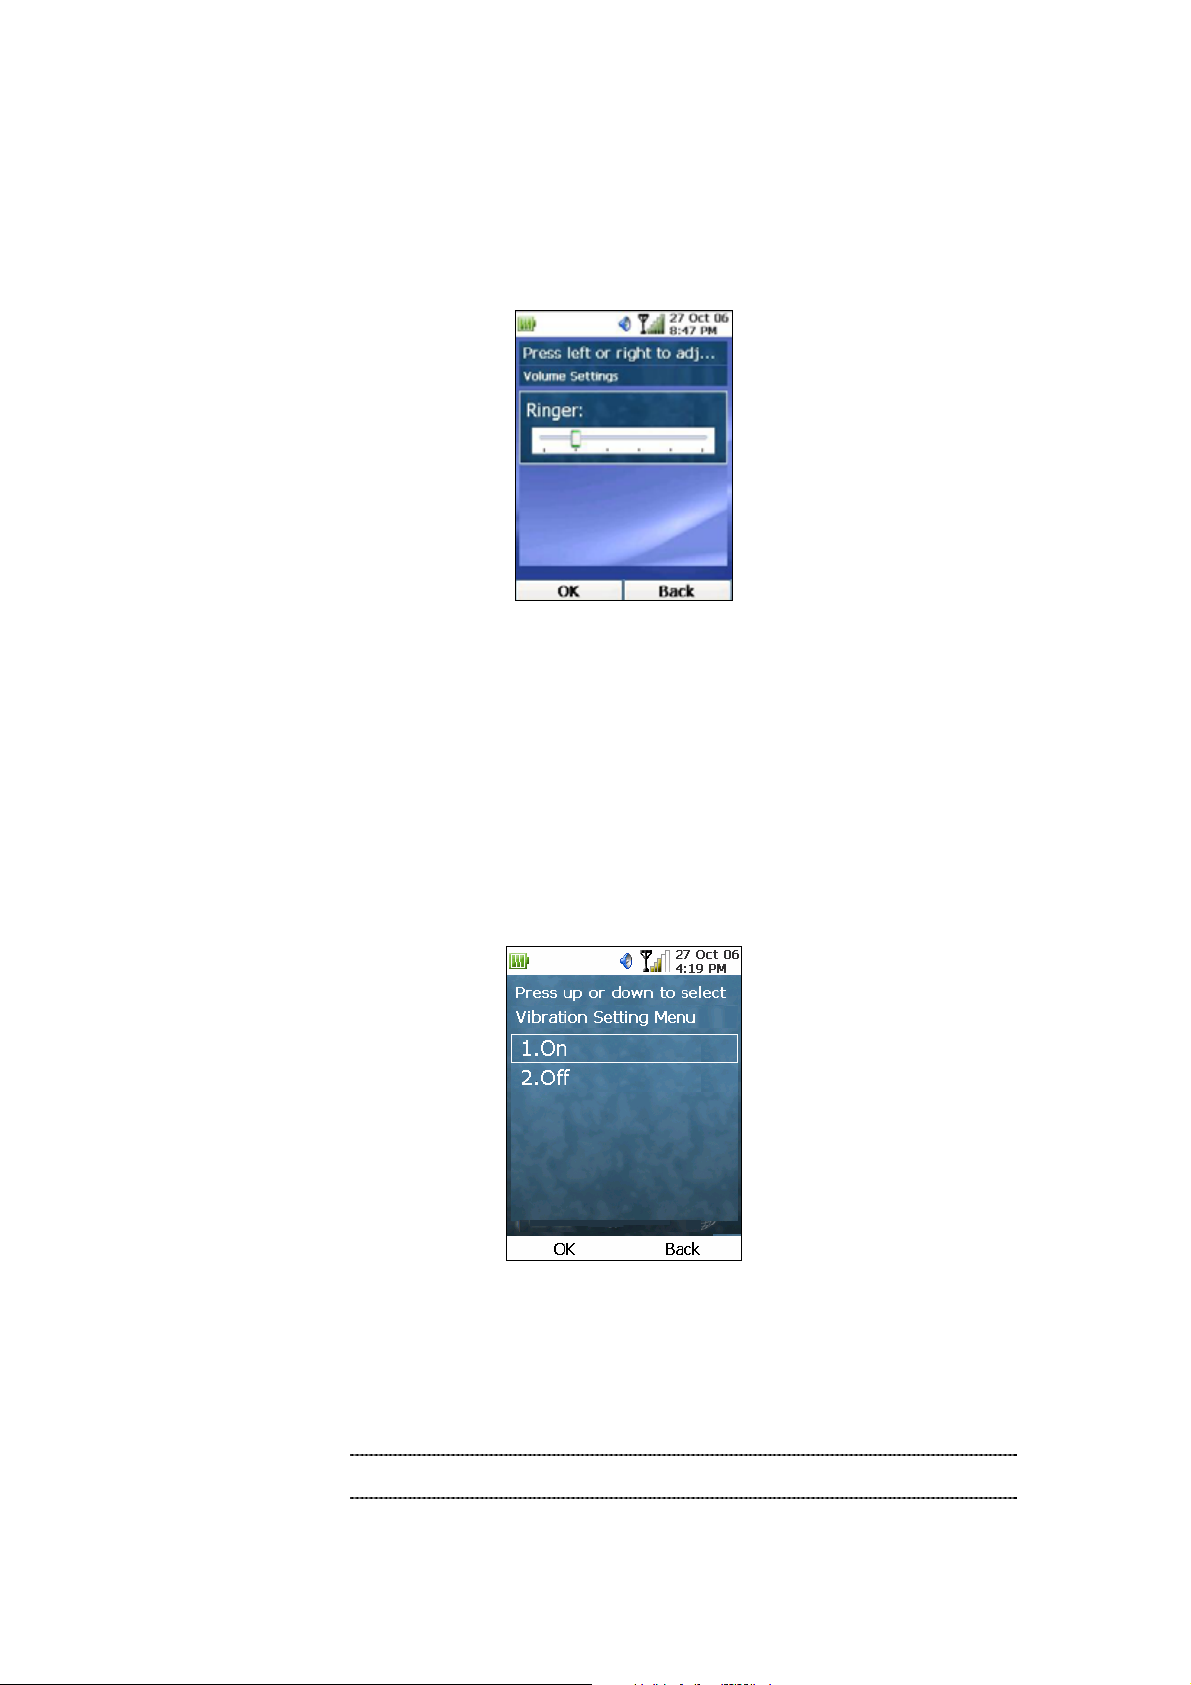
Volume Settings
Selecting “Vol ume” from the submenu of Phone Settings will display an interface to allow the user to
adjust the volume of the receiver, micro phone and loudspeaker of the phone, as shown in the following
diagram:
Figure 49. Volume setting
To adjust the volume level of Earpiece / Headphone, use the Up and Down keys to set the focus on
Earpiece / Headphone. Then use the Forward and Backward keys to adjust the volume level. Repeat
the same procedures for S pea ker, Ringtone and System sounds. Then press the Lef t (“Apply”) Key and
Right (“Close”) Key to save the settings. Alternatively, press the OK Key will have the same effect.
38
Page 39

Backlight Control
Selecting “Backlight” from the submenu of Phone Settings will display an interface to allow the user to
set the idle duration of the phone before switching off the backlight, as shown in the following diagram:
Figure 50. Backlight control
To adjust the idle duration, press the Down Key will display a list of durations: “never”, “15 sec”, “30 sec”,
“1 min”, “2 min” and “5 min”. Use the Up and Down keys to highlight and select. Press the Left (“Apply”)
Key and Right (“Close”) Key to save the settings. Alternatively, pressing the OK Key will have the same
effect.
System Properties
Selecting “System” from the submenu of Phone Settings will display an interface that shows th e type of
CPU and WiFi chip and available memory, as shown in the following diagram:
Figure 51. System properties setting
Also, if you press the Down Key to scroll down the page, the interface will display the memory allocated
for storage and applications, as shown in the following diagram:
39
Page 40

Figure 52. System properties setting - Continue
Pressing the Down Key to the fields “Device Name” and “Device Description” will allow you to change
the name and description of your device.
Press the Left (“Apply”) Key and Right (“Close”) Key to save the changes. Alternatively, pressing the
OK Key will have the same effect.
SIP Codec Selection
Selecting “SIP Codec” from the submenu of Phone Settings will display an interface that allows the user
to select his preferred audio codec, as shown in the following diagram:
Figure 53. SIP codec setting
Currently, you can choose from the following codecs: G.711 (default), G.729a, and GSM610. The type
of codec used in a SIP call will be determined by the type of codec specified by the caller. For example,
if your preferred codec is G.711, but the caller is using G.729a, the connection will be established using
the G.729a codec.
40
Page 41

Turn Off / On WiFi
If WiFi is not going to be used for a while, the user can choose to turn off the WiFi module in order to
reduce the power consumption. To turn off WiFi, highlight “Turn Off WiFi” from the submenu of Phone
Settings and press OK, as shown below:
Figure 54. Turn off WiFi setting
To end a connection to an AP, performing the same action will achieve such purpose.
To turn the WiFi module back on again, simply highlight “Turn On WiFi” from the submenu of Phone
Settings and press OK, as shown below:
Figure 55. Turn on WiFi setting
If the user tries to connect to an AP af ter he turns of f WiFi, he will be prompted to turn on WiFi again, as
shown in the following diagram:
L Note
Figure 56. Turn off WiFi prompt
If the phone cannot find, for 20 minutes, any AP to establish
a connection, WiFi will be turned off automatically to save
power.
41
Page 42
Phone Lock
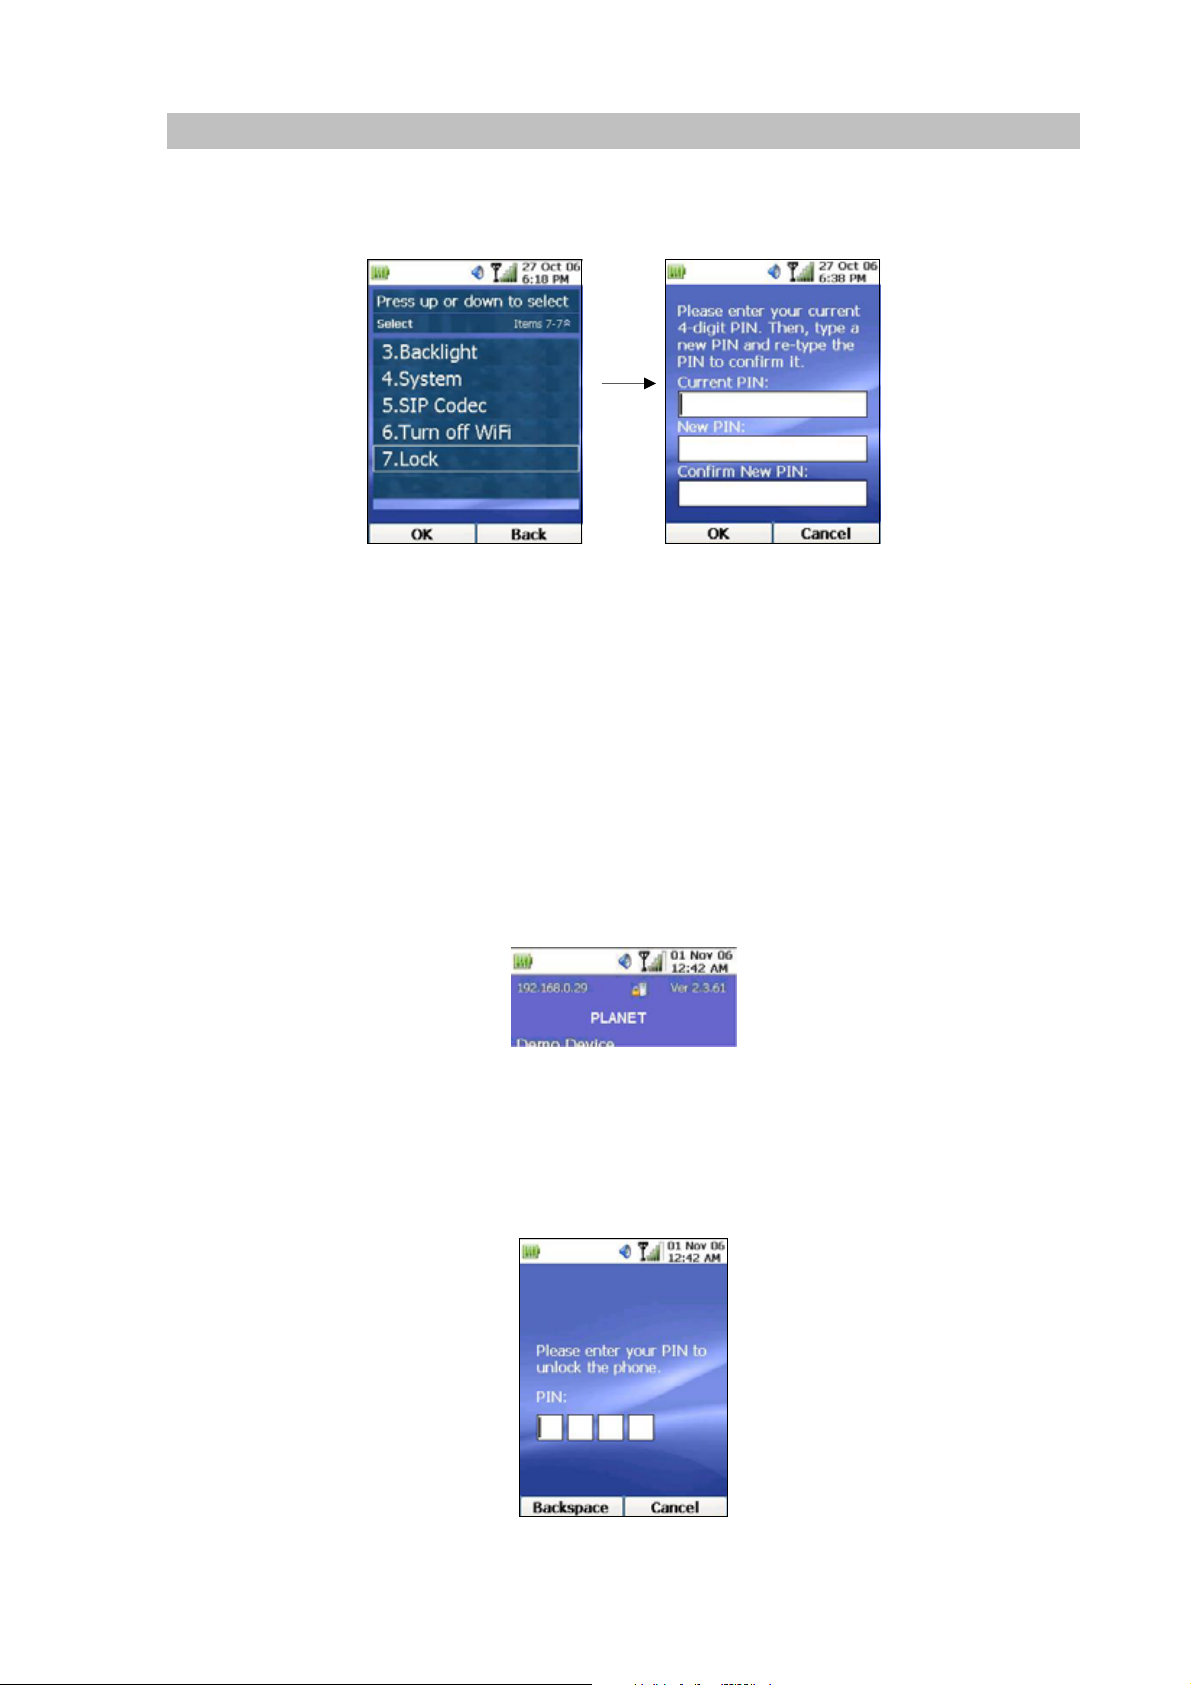
Selecting “Lock” from the submenu of Phone Settings will display an interface that allows the user to
set up a PIN for the first time, (or selecting “Change PIN” for any subsequent PIN change), as shown
below:
Figure 57. Lock setting
Input / Change PIN
When the phone lock is activated for the first time, the screen will prompt you to enter and reconfirm
your PIN number. Enter your PIN at the “Ne w PIN:” field. Press the Down Key to go to the “Confirm
New PIN:” field to re-enter the same PIN. Then press the OK Key to save PIN.
If you are changing your PIN, you need to first enter your current PIN before entering your new PIN.
Once you have activated the phone lock, a lock icon will appear at the top of the Main Screen, as
shown below:
Figure 58. Lock primpt
Unlock Phone
After you have entered and activated the PIN for your phone, subsequent key press will bring up the
following screen prompting you to enter PIN to unlock the phone:
Figure 59. Input PIN prompt
42
Page 43

Entering the PIN and pressing the OK Key will unlock the phone. If you enter an incorrect PIN, the
following screen will be displayed:
Figure 60. Incorrect PIN prompt
Pressing the Right Key (“OK”) will return to the previous screen so that you can e nter your PIN again to
unlock the phone.
If you leave your phone idle, the phone lock will be automatically turned on after a short period of time.
Cancel Lock
Selecting “Unlock” from the submenu of Phone Settings will allow you to cancel the phone lock.
43
Page 44
Chapter 6
Applications
Overview
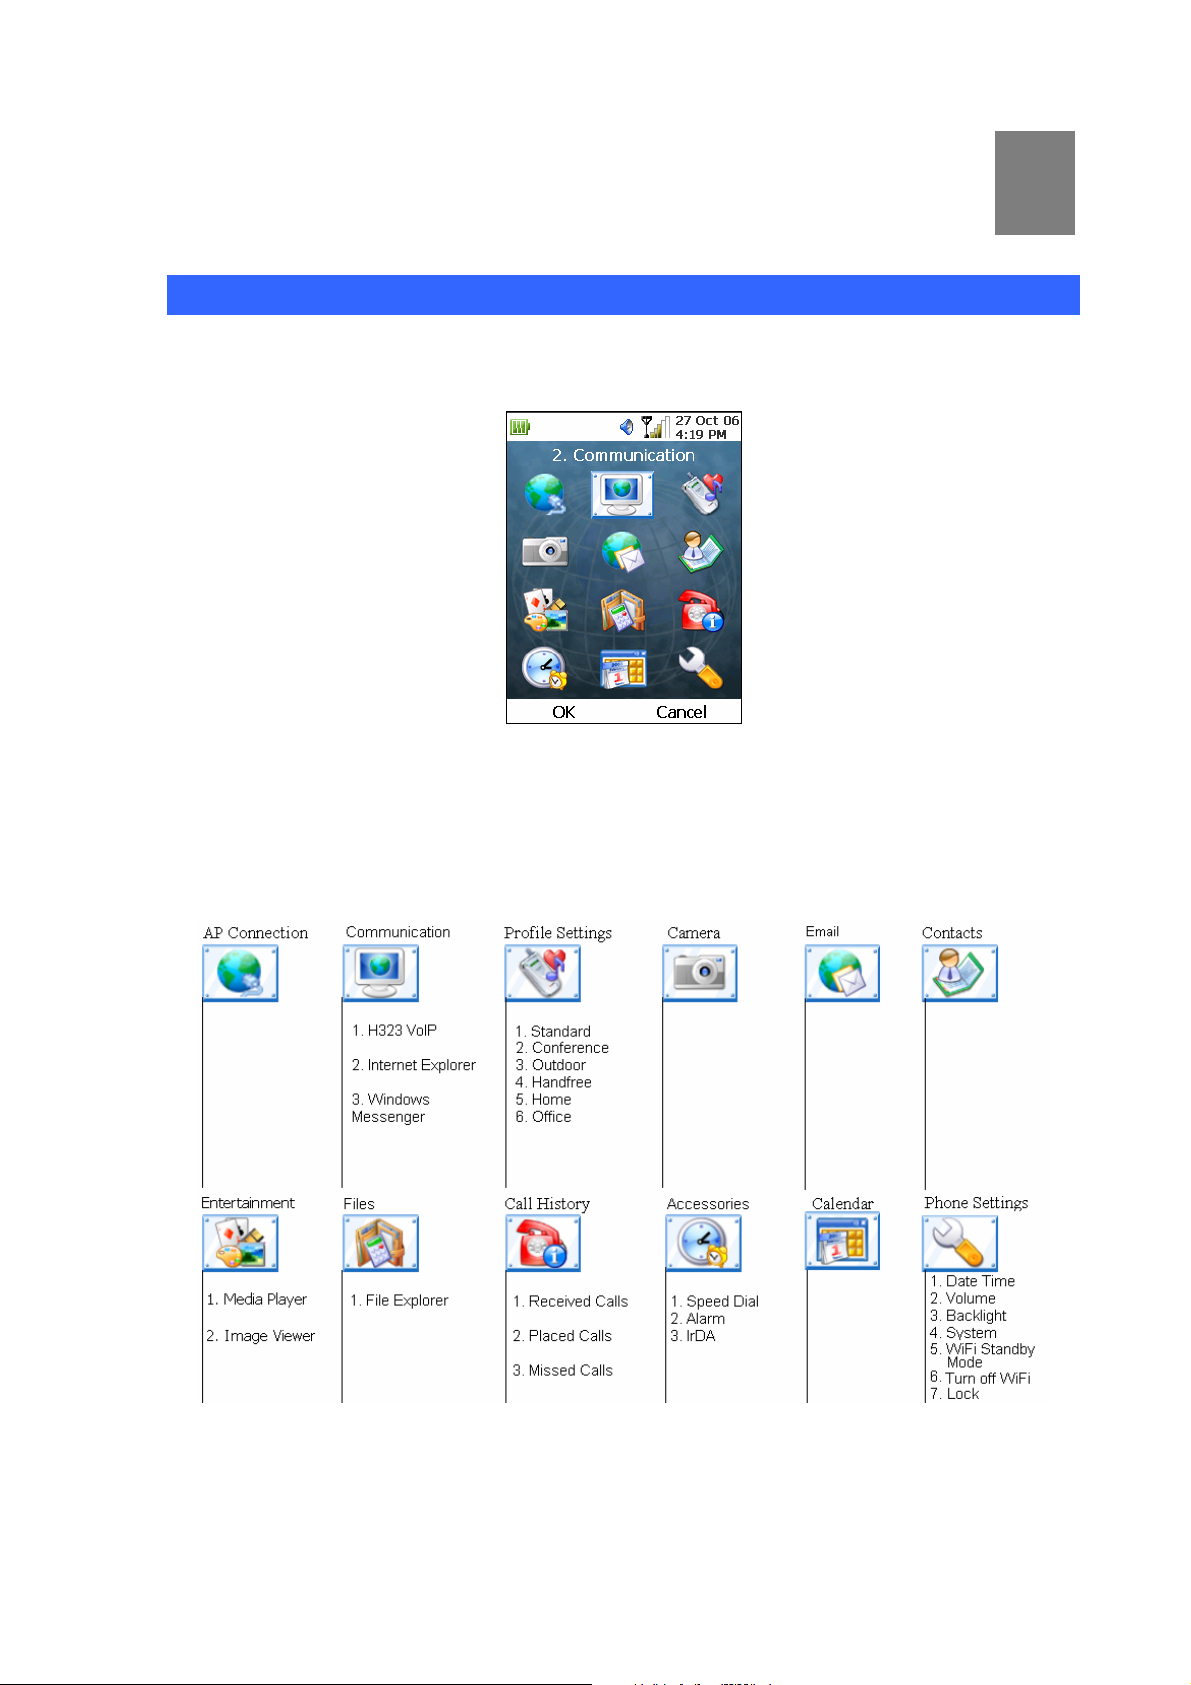
Pressing the Left Key in the Main Screen will allow the user to select different applications available
within the phone, as shown in the following diagram:
Figure 61. Main Menu setting
6
The applications include: Video Conferencing (H323 VoIP), Internet Explorer, Windows Messenger,
Profile Settings, Camera, Email, Contacts (Address Book), Media Player, Image Viewer, Lock (Phone
lock), File Explorer, Infrared, Call Hi story and Calendar.
Figure 62. Applications o utline
For applications (e.g. Internet Explorer) that require connection to Access Point, you will be prompted
to connect to an AP, if such connection has not been established.
44
Page 45
Chapter 7
Video Conferencing
Video Conferencing
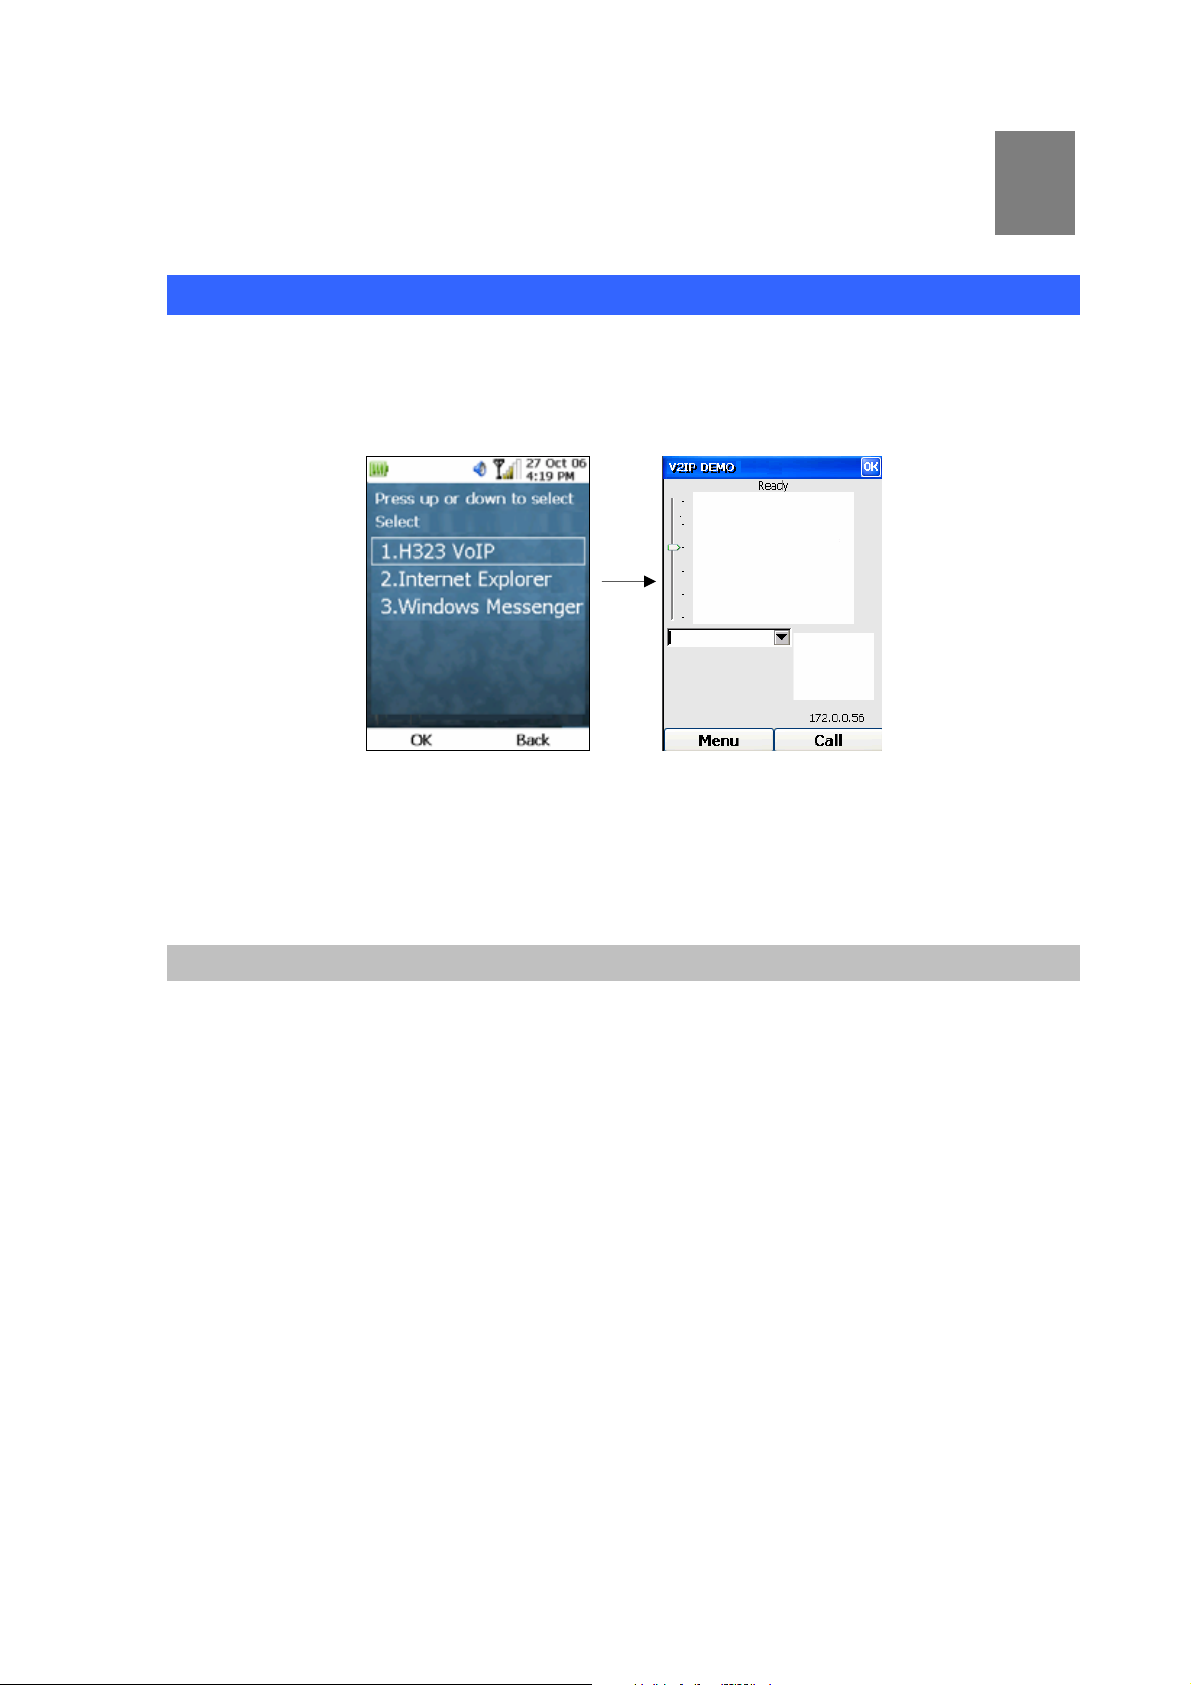
To launch the Video Conferencing application, press the Lef t Key (“Menu”) from the Main screen, select
“2. Communications”. Highlight “H323 VoIP” and press the OK Key. The following screen will be
displayed when the Video Conferencing application is launched:
Figure 63. Video conferencing setting
7
The Video Conferencing main screen will show your current IP address on the right corner of the
screen.
Make Video Conference Call
To start video conferencing, you have to enter the IP address of the other party in the text box with your
keypad. There are 2 ways to do this:
1. Manually enter the IP address. To enter the ‘.’ character, use the ‘#’ key, or press the ‘*’ key
twice.
2. Select from the list of previously called IP addresses by pressing the Down Key, highlighting
your desired IP address with the Up and Down Keys, and pressing OK Key to select.
Once you have finished entering the IP address, press the Right (“Call”) Key, as shown below:
45
Page 46

Figure 64. Entrying the IP address
The status on the top of the screen will change to “Dialing …” Once your call is an swered and
connection is established, the status bar will display “In call with Firstname Lastname [nnn.nnn.nnn.nnn ]
“ (where Firstname, Lastname and nnn.nnn.nnn.nnn are respectively the first and last name s a nd IP
address of the person you are calling). Also, the Rig ht Key will be ch anged to display “Hang-up”, as
shown below:
Figure 65. Video conference call status
To adjust the volume, press the upper or lower end of the silver Select Link / Volume Key located on the
left side of the phone.
Disconnect Video Conference Call
To hang up a video conferencing call, just press the Right (“Hang-up”) Key. The status displayed on the
top of the screen will change from “In call with …” to “hung up!” to “Ready” when it is ready to make /
accept another video conference call.
Accept Incoming Video Conference Call
When there is an incoming video conference call, the status displayed will change from “Ready” to
“Auto-accepting call from Firstname Lastname” (whe re Firstname and Lastname are respectively the
first and last names of the person who is calling you), as shown below:
46
Page 47

Figure 66. Video conference incoming call prompt
The current implementation will automatically accept the call for you. So eventually the status will
display “In call with …”
Turn Off My Video Transmission
This is equivalent to the mute function of a voice call. To turn off the transmission of video signal to the
recipient (but still be able to receive the video signal from him), press the Left (“Menu”) Key during a
video conferencing call, and select “Video On”. This will toggle off the sending of video signal to the
other party, which is also indicated by the signal blackout in the smaller video screen, as shown below:
Figure 67. Turn off my Video transmission setting
To toggle on the sending of video signal, simply repeat the same procedures by pressing the Left
(“Menu”) Key and select “Video On”.
Mute
To turn off the transmission of audio signal to the recipient, press the Left (“Menu”) Key during a video
conferencing call, and select “Mute”.
47
Page 48

Options
To view the supported audio codecs, press the Left (“Menu”) Key during a video conferencing call, and
select “Options”, as shown below:
Figure 68. Audio Codec setting
Home Monitor
If you are using the Video Conferencing application to monitor some stationery object, it is
recommended to have the backlight turned off after a cert ain period of time, in order to conserve battery
power. To do so, press the Left (“Menu”) Key during a video conferencing call, and select “Home
Monitor”, as shown below:
Figure 69. Home monitor setting
When the backlight is switched off, pressing any key will bring the backlight on again for another
duration. If you do not want the backlight to be switched off, just leave this option unchecked.
48
Page 49

Chapter 8
Internet Explorer
Internet Explorer
To launch the Internet Explorer, pre s s the Left Key (“Menu”) from the Main screen, select “2.
Communications”. Highlight “Internet Explorer” and press the OK Key. The following screen will be
displayed when Internet Explorer is launched:
Figure 70. Internet Explorer prompt
8
The title bar of the Internet Explorer will display the name of the web site, whereas the Right Key will
refresh the page, and the Left Key will display a list of options, as shown below:
Figure 71. Internet Explorer setting
Web Browsing
To visit a web site:
1. Press the Left Key and select the Address Bar option, and the following screen will be
displayed:
49
Page 50

Figure 72. Address bar option
2. You can select one of the URLs from the list of web addresses you have visited in the past (by
pressing the Down Key to highlight and OK Key to select), or you can type in the URL using the
keypad. To ease the process of manually entering the URL, prefixes such as “http://”, “www.”,
“.com”, etc. have been predefined. Pressing the Left (“Menu”) Key, highlighting the “Prefix”
menu item, and pressing the OK or Right Key will display the list of prefixes. Highlighting any
one of these prefixes and pressing OK will fill in the chosen prefix on to the address bar, as
shown below:
Also, you can input lower, upper case or numeric characters by selecting “abc”, “ABC” or “123”
respectively from the pop-up menu.
3. For example, if you enter “
Key, a screen similar to the following will be displayed:
Figure 73. Address bar setting
http://www.windowsmedia.com” and then press the Right Key or OK
50
Page 51

Figure 74. Browser screen
4. Using the Up and Down Keys will allow you to scroll up and down the screen.
5. To move down and select the links on the web page, press the lower part of the Select Link
Button, and vice versa. Please note that the focus (black dotted rectangle) will move as you
select different links, as shown by the red circle in the following diagram:
Figure 75. Web browser screen – Select link
6. To enlarge the screen, you can press the Left Key to pop up the menu, select “Zoom” and then
“Zoom In”, as shown below:
Figure 76. Zoom setting
7. In this way, the displayed web page will be enlarged. Conversely, to reduce the size of the web
page, select “Zoom” and “Zoom Out” to achieve the desired ef fect.
51
Page 52

8. To navigate between web pages, you can press the Lef t Key to pop up the menu, and highlight
“View”. Selecting “Back“ will take you back to the previous web page, whereas selecting
“Forward” will allow you to the move to the next web page.
9. Selecting links to multimedia files will also launch Windows Media Player to play the file, as
shown below:
Figure 77. Media player screen
Clear History
You can clear the list of previously visited URLs by pressing the Left (“Menu”) Key and select “Clear
History”, as shown below:
Figure 78. Clear history setting
Pressing the Left (“Clear”) Key will clear all the previously visited URLs or pressing the Right (“Back”)
Key will return to the previous screen without clearing.
Add folder
You can create folders of favorite web sites by pressing the Left Key to pop up the menu and selecting
“Add Folder”, which will then pop up a new screen, as shown below:
52
Page 53

Figure 79. Add folder setting
You can use the keypad to enter the new name of the folder you want to create. To correct any typo
mistake, press the Back Key . Pres sing the Left Key (“A dd”) will create the new folder and the screen will
return to the current web page. Pressing the Right Key (“Cancel”) will also allow you to return to the
current web page but with no folder created.
Add Favorites
This feature will only be enabled if you have created a folder of favorites (see previous section). If “Add
Favorites” is selected from the menu after a web page is loaded, a new screen will be displa yed for you
to add the current web site to your list of favorite web sites, as shown below:
Figure 80. Add favorites setting
When this screen is displayed, the field will already be filled with the default values. You can edit these
fields by using the Up and Down Keys to move to different fields on the screen. When the “Save to:”
field is highlighted, use the Forward and Backward Keys to choose to which folder you want to save the
URL of the web site.
Pressing the Left Key (“Add”) will save the information to the selected folder and return to the current
web page, whereas pressing the Right Key (“Cancel”) will also allow you to return to the current web
page but with no information saved.
53
Page 54

Favorites
This feature will only be enabled if you have created a folder of favorites (see “Add Folder” section). If
“Favorites” is selected from the pop-up menu after a web p age is loaded, a new screen will be
displayed for you to view and select from your list of favorite web sites, as shown below:
Figure 81.Favorites setting
You can select different folders by pressing the Forward and Backward Keys when the “Select Folder:”
field is highlighted. Then pressing the Down Key will take you to select from the list of URLs within this
folder. Pressing the Right Key (“Go”) will take you to that particular web site.
Pressing the Left Key (“Menu”) and then select “Back to Main” will return to the current web page.
Edit Favorites
To edit your list of favorite web sites, from the “Favorites” screen, use the Forward and Backward Keys
to select the desired folder. Then press the Down Key to select from the list of favorite web sites in this
folder. Once a URL is highlighted, press the Left Key (“Menu”) to display the pop-up menu and choose
“Edit” by pressing the OK Key when “Edit” is highlighted. This will take you to a screen where
information of the selected page can be edited, as shown below:
Figure 82.Edit favorites setting
Pressing the Left Key (“Confirm”) will save the changes and return to the Favorite screen. Pressing the
Right Key (“Cancel”) will also return to the Favorite screen, but with no changes saved.
54
Page 55

Delete Favorites
To delete from your folder of favorite web sites, from the “Favorites” screen, use the Forward and
Backward Keys to select the desired folder. Then press the Down Key to highlight the undesired URL.
Then press the Left Key (“Menu”) and select the “Delete” option. Another screen will pop up to prompt
you to confirm your action, as shown below:
Figure 83.Delete favorites setting
Pressing the Left Key (“Confirm”) will confirm the deletion and return to the Favorite screen. Pressing
the Right Key (“Cancel”) will also return to the Favorite screen, but with nothing deleted.
55
Page 56

Chapter 9
Windows Messenger
Windows Messenger
To launch the Windows Messenger, press the Left Key (“Menu”) from the Main screen, select “2.
Communications”. Highlight “Windows Messenger” and press the OK Key. The following screen will be
displayed when Windows Messenger is launched:
Figure 84.Windows Messenger
9
Pressing the Left (“Menu”) Key will display the menu options on the screen, as sho wn b elow:
Figure 85.Windows Messenger option
Use the Up and Down Key to move to the item that reads “Sign In As…” and press the OK Key. The
following screen would appear:
Figure 86.Sign in setting
56
Page 57

Use the Right (“Tab”) Key to set the focus to the checkbox that reads “.NET Messaging Service”.
Pressing on the 0 Key will allow you to check the checkbox. Pressing the OK button will display the
following screen, prompting you for your login id and password:
Figure 87. Sign in setting
You can enter your name and password with the keypad. By pressing the Right (“Tab”) Key, you ca n
jump from 1 field to another. To check the checkbox of remembering your name and password, press
the 0 Key when the focus is on the checkbox. Pressing the OK Key will sign you in. Once you are
signed in, a screen similar to the following will be displayed:
Figure 88.The signed in screen
From this screen, you can start instant messaging with your contacts, just as shown below:
Figure 89.Inserting messages
57
Page 58

To close the application, press the Left Key to display the menu options on the screen and select
“Close”, as shown below:
Figure 90.Menu option
If you ask Windows
®
Messenger to remember your username and password, the next time when you
run the application, you will be automatically signed in.
For further information on the functionality of Windows
®
Messenger, please refer to the various
documentation on the Microsoft web site (
http://www.microsoft.com).
58
Page 59

Chapter 10
Profile Settings
Profile Settings
To launch the Profile Settings, press the Left Key (“Menu”) from the Main screen, select “3. Profile
Setting”, and press the OK Key. The following screen will be displayed to allow the user to select
different profiles:
Figure 91.Profile main menu
10
The profile with the asterisk (*) at the end indicates the currently selected profile.
Change Profile
If you want to select another profile, use the Up or Down Key to highlight your desired profile and press
the Left (“Select”) Key. For example, if you want to select your Home profile, the following screen will be
displayed:
Figure 92.Profile setting
Pressing the Left or OK Key when “Activate” is highlighted will pop up a dialog box asking you to
confirm your action, as shown below:
59
Page 60

Figure 93.Profile setting - Activate
Pressing the Left (“Yes”) Key will take you back to the previous screen, where an asterisk (*) will be
displayed at the end of your newly selected profile.
Edit Profile
If you want to edit a profile, highlight the desired profile from the list of profiles and press the Left
(“Select”) Key. From the next screen, use the Up and Down Key to highlight “Edit Profile”, and a screen
similar to the following will be displayed:
Figure 94.Edit profile menu
If you want to edit the SIP settings within this profile, highlight “SIP Account” and press the Left (“Edit”)
Key. The SIP setting screen will then be displayed. For more information on SIP settings, please refe r
to the section “SIP Configuration”.
If you want to change the ringtone settings, highlight “Ringtone Setting” and press the Left (“Edit”) Key.
The next screen will show you the available ringtones. You can use the Up and Down Key to highlight a
ringtone and press the Left (“Play Sound”) Key to listen to it. Press the OK Key will choose the
highlighted ringtone to be the default ringtone for incoming calls.
Or you can transfer, by means of ActiveSync, your own ringtone in the form of a wav file to \User
Files\My Music of your phone, and select “Custom” in the Ringtone Setting screen. A screen will display
60
Page 61
all available wav files in this folder. Pressing the OK Key will choose the highlighted ringtone to be the
default ringtone for all incoming calls.
If you want to change the ringtone volume for this profile, highlight “Ringtone Volume” and press the
Left (“Edit”) Key. The following screen will be displayed:
Figure 95.Ringtone volume setting
Use the Forward or Backward Key to adjust the ringtone volume for this profile. Press the Left (“OK”)
Key when you are done.
The Edit Profile screen will also show you if vibration has been turned on for this profile. The status of
vibration is displayed in parentheses in the “Vibration” option. If you want to turn on / off the vibration
settings, highlight “Vibration” and press the Left (“Edit”) Key. The ne xt screen will allow you to turn the
vibration on or off, as shown below:
Figure 96.Vibration setting
Highlight the desired option and press the OK Key will take you back to the previous screen, with the
changes made to vibration shown.
L Note
61
Vibration is available only on selected models.
Page 62

Call Forward
If you want to set up call forwarding for a profile, select the “Call Forward” menu item from the Edit
Profile screen. A screen, allowing you to enter the other SIP number you want to forward to, will be
displayed:
Figure 97.Call forward setting
Enter the SIP number you want to forward to and press the Right Key to turn on the forwarding. If you
activate the profile, you should be able to see the forwarding reminder on the Main Screen, as shown
below:
Figure 98. Main screen with forwarding
When a call comes in, another message will also be displayed on the Main Screen, showing that the
incoming call has been forward, as shown below:
Figure 99. Forwarding prompt
To turn off the call forwarding, select the “Call Forward” menu item from the Edit Profile screen. The
62
Page 63

next screen will show you the number you are currently forwarding your calls to, similar to the following
A
screen:
Figure 100. Call forward setting
You can press the Left (“OK”) Key to return to the previous screen, or you can press the Right (“Turn
Off”) Key to turn off the call forwarding.
After you have pressed the Right Key to turn off the call forwarding, your screen will be similar to the
following screen:
Figure 101. Call forward setting - T urn off
At this point, you will have the options of carrying out any of the following actions:
1. Press the Right (“Cancel”) Key to return to the previous screen, and finish the cancellation of
call forwarding by again activating the profile, or
2. At the textbox, enter a new number to which you want to forward your calls, or
3. Press the Down Key to the list of numbers you have forwarded your calls to, and press the Left
(“Delete”) Key to delete the highlighted number.
L Note
ny changes made to the settings of a profile need to have
the profile activated again before the changes can be put
into effect.
63
Page 64

Chapter 11
Camera
Camera
To launch the Camera application, press the Left Key (“Menu”) from the Main screen, select “4.
Camera”, and press the OK Key. The following screen will be displayed when the Camera application is
launched:
Figure 102. Camera menu
11
You can take a self-portrait by having the camera facing yourself, or you can take a picture of others by
rotating the camera to face outward. The screen will display what is in front of the camera.
Capture Image
By pressing the Right Key (“Capture”), you can take a snapshot of what is displayed on the screen.
The current implementation will save the image in the \User Files\My Photos folder under the names
“IMG0001.jpg”, “IMG0002.jpg”, “IMG0003.jpg”, etc.
View Image
To view the images in your photo album, press the Left Key (“Menu”) and select “Album”. The Image
Viewer will be launched, as shown below:
Figure 103. Image viewer setting
64
Page 65

At the Image Viewer screen, use the Forward, Backward, Up and Down Keys to scroll and highlight the
desired image. Pressing the OK Key will then display the image on your screen, which will be similar to
the following screen:
Figure 104. Image viewer screen
Pressing the Right Key (“Back”) will allow you to return to the Album screen.
Set Image as Wallpaper
By default, the phone uses a blue wallpaper to display the words “Windows CE”. However, the
wallpaper can be changed by the following steps:
1. At the Image Viewer screen, use the Forward, Backward, Up and Down Keys to scroll and
highlight the desired image.
2. Press the Left Key (“Menu”) and select “Set as wallpaper”, as shown below:
Figure 105. Set as wallpaper setting
3. A confirmation message box will pop up . Press the OK Key on the Yes button to confirm setting
the particular picture as wallpaper.
4. Press the Home Key to return to the Main screen, and you can find the selected image has
been used as wallpaper for the phone, as shown below:
65
Page 66

Figure 106. Wallpaper screen
L Note
1. When viewing a particular photo, you can also set the photo
as wallpaper by pressing Menu, select “Set as wallpaper”,
and press OK on the pop-up confirmation box.
2. The default blue wallpaper will be used again if the photo
used as wallpaper is renamed or deleted.
Delete Image
You can discard any unwanted images by carrying out the following steps:
1. At the Image Viewer screen, use the Forward, Backward, Up and Down Keys to scroll and
highlight the image you want to delete.
2. Press the Left Key (“Menu”) and select “Delete”, as shown below:
Figure 107. Delete image setting
3. A pop-up win dow will be displayed, prompting you to confirm your action. You can use the
Backward and Forward Keys to choose “Yes” or “No”, as shown below:
66
Page 67

Figure 108. Delete image prompt
L Note
1. When viewing a particular photo, you can also delete the photo
by pressing Menu, select “Delete”, and press OK on the pop-up
confirmation box.
2. The default blue wallpaper will be used again if the photo
used as wallpaper is deleted.
Rename Image
The default file names of the images taken by the camera are in the format of “IMGnnnn.jpg” where
nnnn is just a sequence number. You can rename the file name of any images by carrying out the
following steps:
1. At the Image Viewer screen, use the Forward, Backward, Up and Down Keys to scroll and
highlight the image you want to rename.
2. Press the Left Key (“Menu”) and select “Rename”, as shown below:
Figure 109. Rename option
3. A pop-up window will then prompt you for the new file name, as shown below:
Figure 110. Rename setting
67
Page 68

4. You can press the Right Key to cancel the renaming, or enter the new file name using the
keypad.
5. Press the OK Key to rename the file.
L Note
1. When viewing a particular photo, you can also rename the photo
by pressing Menu, select “Rename”, and then enter the new
file name.
2. The default blue wallpaper will be used again if the photo
used as wallpaper is renamed.
Send Image to Storage Card
At the Image Viewer screen, you can send an image to the mini SD storage card by pressing the Left
(“Menu”) Key, select “Send to”, then select “Storage Card” and pres s the OK Key. Another screen will
be displayed. You can specify which folder to store the image by using the Forward, Backward, Up and
Down Keys to scroll and highlight the desired folder. This operation is illustrated below:
Figure 111. Send to storage card setting
Send Image to Email
At the Image Viewer screen, you can send an image to an email as attachment by pressing the Left
(“Menu”) Key , select “Send to”, then sele ct “Email” and press the OK Key. The Attachment screen of the
Email application will then be displayed. You can then press the Right Key (“Done”) to go to the screen
to fill out the recipient’s email address. The rest of the email operation will be described in the next
chapter.
After the email is sent, the phone will display the Image Viewer screen again.
68
Page 69

Chapter 12
To launch the Email application, press the Left Key (“Menu”) from the Main screen, select “5. Mail”, and
press the OK Key. The following screen will be displayed when the Email application is launched:
12
Figure 1120. Email menu
Email Account Settings
If you are using the email application for the first time, you need to enter your email account settings.
You can do so by pressing the Left (“Menu”) Key and use the Up and Down Keys to scroll and highlight
“Add Account ” and press the OK Key, and the following screen will be displayed:
Figure 113.Account setting - 1/3
This screen allows you to enter your email account setting. You can enter the account name with the
use of the keypad. Y ou can also use the Up and Down keys to jump from one field to another.
After you have filled in the Account name and Email address, pressing the Right Key (“Next”) will
display another screen shown in the following diagram:
69
Page 70

Figure 114. Account setting - 2/3
To set the Server type, press the Forward Key to trigger the dropdown box, and choose either POP3 or
IMAP4 with the Up or Down Keys.
An example of someone using a POP3 mail account from
www.yahoo.com, or an IMAP4 account from
www.fastmail.fm will be as follows:
Field Account1 Account2
Mail Server Address
Account Name
Incoming Mail Server
Outgoing Mail Server
www.yahoo.com www.fastmail.fm
xxx yyy
pop.mail.yahoo.com mail.messagingengine.com
smtp.mail.yahoo.com mail.messagingengine.com
Table 5. Mail account description
Pressing the Right (“Next”) Key after all this information is filled out will display another screen that
prompt you for your login name and password, as shown in the following diag ram:
Figure 115. Account setting - 3/3
If you want to add a signature to all outgoing email, you can press the Left (“Menu”) Key and select
“Advanced”, then “Signature”. A screen similar to the following will be displayed, allowing you to enter
your signature:
70
Page 71

Figure 116. Signature setting
Press the Right (“Done”) Key after you have filled in your signature.
If you need to view or change the port number for incoming or outgoing email, press the Left (“Menu”)
Key and select “Advanced”, then “Port number”. (Usually, the default incoming and outgoing port
numbers for POP3 are 110 and 25, and 143 and 25 for IMAP4). A screen similar to the following will be
displayed, allowing you to view or change the port numbers:
Figure 117. Server port setting
If you change the port numbers, pressing the Left (“Done”) Key will save the changes and t ake you
back to the previous screen (Account Setting 3/3).
Pressing the Right (“Done”) Key at the last screen of “Account Setting 3/3” will save all your settings
and the list of email accounts will be displayed.
Receive Email
After you have filled in all the setting information, the name of your email account will be displayed.
Highlight the account name you have just entered, and press the Right (“Select”) Key, just as shown
below:
71
Page 72

Figure 118. Account list
Press the Left (“Menu”) Key and from the menu select “Receive Mail”. The status at the bottom of the
screen should change from “connect…” to “Downloading email … ” to “Finished”, just as shown below:
Figure 119. Receive email
Read Email
After you have retrieved the headers of your email from your account, you can use the Up and Down
Keys to highlight the desired email header. Pressing the OK Key on the highlighted header will display
the header information of the email. Pressing the Left (“Read”) Key will allow you to read the content of
the email, just as shown below:
Figure 120. Read email
Pressing the Right (“Cancel”) Key at the email content screen will take you back to the header screen.
72
Page 73

Show Previous or Next Email
When you are reading the content of an email, you can move to the previous or next email by pressing
the Left (“Menu”) Key and select “Prev” or “Next” respectively for previous or next email.
Send Email
To send an email, press the Right (“New”) Key at the email header screen of your selected account,
and the following screen will be displayed:
Figure 121. Send email setting
In filling out the recipients’ email addresses in the “To:”, “cc:”, “bcc:” fields, you can either manually input
the email addresses or select from the email addresses in the Contact application by:
1. Press the Left (“Menu”) Key at this screen and select “Search Address”. In doing so, the
following screen will be displayed:
Figure 122. Search address
2. Use the Up and Down Keys to highlight your desired email address.
3. Press the Left (“Done”) Key and the selected email address will be automatically filled in on to
the field where the cursor is.
4. To have multiple recipients, repeat the steps 1-3, and the extra emai l address will be appended
to the list, with a comma separating it from the previous address, as shown below:
73
Page 74

Figure 123. Send email setting
After you have filled in the recipient’s email address and subject of the email, press the Right (“Done”)
Key will pop up another screen, allowing you to enter the content of the email, just as shown below:
Figure 124. Email contect
After you have finished typing the content of your email, you have the following options to deal with your
email:
1. Pressing the Left (“Menu”) Key and select “Save to Outbox”. In this way, you can save the
email to the outbox for further editing.
2. Pressing the Left (“Menu”) Key and select “Edit Destination”. In this way, you can go back to
edit the recipients’ email addresses and subject heading.
3. Pressing the Left (“Menu”) Key and select “Close”. In this way, you will be prompted to confirm
if you really want to cancel editing the current email.
4. Pressing the Right (“Send”) Key to send the email. You will then be prompted to confirm if you
want to send the email now or not. Pressing OK on “Yes” will send the email right away;
pressing OK on “No” will return you to the content screen.
5. To include an attachment by pressing the Left (“Menu”) Key and select “Attach”. See next
section for further details.
74
Page 75

Attachments
To include an attachment in your email, press the Left (“Menu”) Key at the Messa ge or Mail De stination
screen and select “Attach”. The following screen will be displayed, allowing you to sele ct the files to be
attached:
Figure 125. Insert attachment
Pressing the Down Key will allow you to highlight the desired folder. Pressing the OK Key on a
highlighted folder will then allow you to explore the files within. Once you have selected the file, press
the Left (“Add”) Key. The following screen will be displayed, showing the full path of the attachment:
Figure 126. Attachment file
Press the Right (“Done”) Key when you have finished attaching files. If you need to attach another file,
press the Left (“Menu”) Key and select “Add File”, repeating the above procedure. If you need to
remove an attachment, press the Left (“Menu”) Key and select “Remove File”. A dialog box will pop up,
asking you to confirm your action.
L Note
The current implementation will not allow attachment size that
exceeds 1MB.
75
Page 76
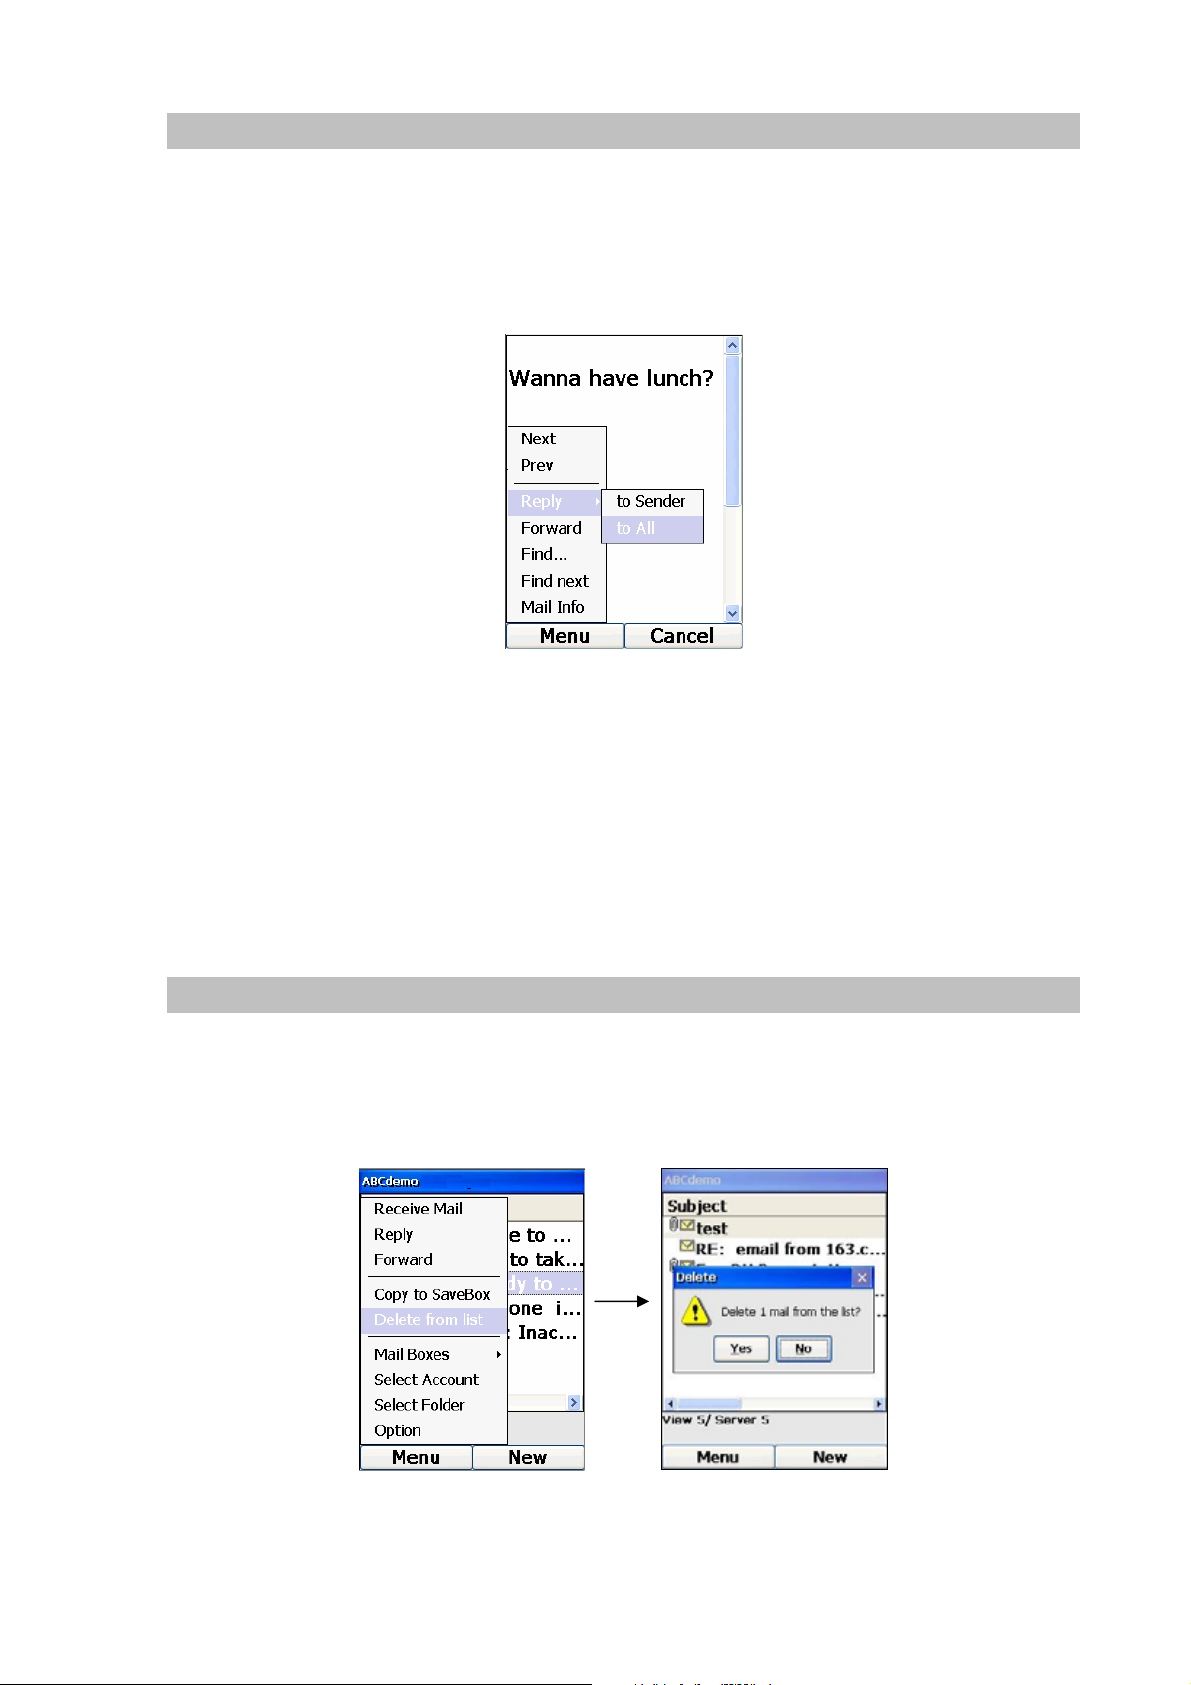
Reply Email
There are 2 ways to reply your email:
1. When you are reading the content of an email, you can reply by pressing the Left (“Menu”) Key
and select “Reply”. Select “to Sender” or “to All” to reply to the sender or to all the recipients of
the email respectively, just as shown below:
Figure 127. Reply email setting
2. When you are at the header screen, highlight one of the email headers, press the Left (“Menu”)
Key and select Reply.
Selecting these options will display another screen similar to that in composing a new email. The only
difference is that in replying, the email addresses are already filled in and the original message is also
included in the message content.
Delete Email
To delete an email from the phone, highlight one of the email headers at the header screen, press the
Left (“Menu”) Key and select “Delete from list”. Another screen will pop up, prompting you to confirm
your action, just as shown below:
Figure 128. Delete email setting
76
Page 77

Note: In the current implementation, even though you have deleted an email from the phone, the email
will still remain in the mail server.
Receive Email
To change the settings in receiving email, you can press the Left (“Menu”) Key at the main / Inbox
screen and select “Option”, and the following screens will be displayed for POP3 and IMAP4 accounts:
Figure 129. Receive email setting
You can specify to receive the entire message body (including attachment) of each email by using the
Down Key to set the focus on the label next to the checkbox and press the OK Key.
You can select to receive new messages only by using the Down Key to set the focus on the
corresponding label and checkbox and press the OK Key. Or if you want to re-download your entire
mailbox, remove this selection before you perform a Receive Mail action.
Also, in the POP3 settings screen, you can limit the number of lines you can receive in each email by
specifying a number in the textbox under the label “No. of lines to receive.”
After you have modified the settings, you can press the Left (“Don e”) Key to sa ve and return to the
Inbox screen, or you can cancel the changes made by pressing the Right (“Cancel”) Key.
To exit from the Email application, press the Left (“Menu”) Key, choose the “Select Account” option to
go back to the Account List screen. Then press the Left (“Menu”) Key, highlight the Exit option, and
press the OK Key.
77
Page 78

Chapter 13
Contacts
Contacts (Phone Book)
From the Main screen, to launch the Contacts application, press the Right (“Contacts”) Key, or press
the Left Key (“Menu”), select “6. Contacts”, and press the OK Key. The following screen will be
displayed when Contacts application is launched:
13
Figure 130. Phone book menu
Add New Entry
Pressing the Left Key (“Menu”) and selecting “New” will allow you to create a new entry in the phone
book by displaying a new screen. At any point in filling out the information of the new entry, you can
press the Left (Menu) button to select dif ferent input mode (su ch as number, lower case, or upper case),
or to save the entry. The New Entry screen is shown below:
78
Page 79

You can use the keypad to enter the necessary information into
all these fields. Pressing the Up and Down Keys will allow you
to scroll up and down these fields.
When you are at a field with a
sign at the end of the field,
this means pressing the OK Key when that particular field is
blank will display another smaller screen. For example, pressing
the OK Key at the “Work addr”, “Home addr”, or “Other addr”
field will pop up the following screen:
Figure 132. Addre s s fields
Pressing the OK Key at any of the fields in this pop up screen
will allow you to return to the New Entry screen.
Also for the “Ringtone” field, pressing the OK Key will pop up
the following screen for you to select the ringtone for this
Figure 131. New entry menu
person:
Figure 133. Ring tone setting
You can use the Up, Down, Forward and Backward Keys to
highlight the desired ring tone, and press the Left Key (“Select”)
to select that ring tone for this contact. This will then take you
back to the New Entry screen.
79
Page 80

Also, for the “Birthday” and “Anniversary” fields, pressing the OK Key will display the following screen
so that you can enter a date for these two fields:
Figure 134. Set date setting
You can use the Forward and Backward Keys to choose the fields to edit, and the Up and Down Keys
to increase or decrease the values for these fields. Pressing the Right Key will save the changes and
return to the New Entry screen.
Pressing the Right Key (“Save”) at the New Entry screen will save that entry, and the screen will return
to the Phone Book screen, showing the records in the phone book.
View Entry Details
To view the details of an entry, use the Up and Down Keys to highlight the particular contact. You can
either press the OK key , or pres s the Lef t Key (“Menu”) and sele ct the “Open” op tion. This will show the
details of an entry in the phone book, as shown below:
Figure 135. View entry details
Pressing the Left Key (“Back”) will return to the Phone Book screen.
80
Page 81

Call from View Entry
To call the number when you are at the View Entry screen, press the Right Key (“Call”), select the
desired number and press the OK Key, as shown below:
Figure 136. Call from view entry
The Calling screen will appear and the highlighted number will be dialed out.
Edit Entry
To edit an entry in the phone book, highlight that particular entry and press the Left Key (“Menu”) and
select Edit, as shown below in the following diagram:
Figure 137. Edit entry
This will open a page similar to that of Add New Entry, only with the existing information filled out in the
fields, and the page header would display “Edit Entry”.
81
Page 82

Delete Entry
To delete an entry in the phone book, highlight that p articular entry and pre ss the Lef t Key (“Menu ”) and
select Delete, as shown below in the following diagram:
Figure 138. Delete entry
This will pop up a dialog box prompting you to confirm your action, as shown below:
Figure 139. Delete entry prompt
You can use the Backward and Forward Key to set the focus on the Yes and No buttons. Pressing the
OK Key when the focus is on the Yes button will delete that particular entry, whereas pressing the OK
Key on the No button will allow you to return to the Phone Book screen.
82
Page 83

Search Entry
There are 2 ways to search for an entry. To do a quick search, press the first few characters of the
name that you are looking. These characters will be displayed in the “Name <Search>” text box. If there
is an entry that starts with the characters that you have typed in, that entry will be highlighted. For
example, typing the characters “te” will highlight the first match that starts “te”, as shown below:
Figure 140. Search entry
Otherwise, if no match can be found, the first entry will be highlighted.
Another way to search for more than 1 entries in the phone book is by pressing the Left Key (“Menu ”)
and selecting “Filter”. A new screen will be displayed, allowing you to enter the characters you want to
search for. When you press the Right (“Search”) Key, the application will search for the names that
contain the characters that you have typed in. For example, typing the characters “test” will display the
matches that have “test” in their names, as shown below:
Figure 141. Filter entry
If the entry cannot be found, a blank screen will be displayed.
Pressing the Right (“Category”) Key 4 times will take you back to the list of entries in the phone book.
83
Page 84

Display by Category
Pressing the Right Key (“Category”) will display the phone book according to the following selections:
• “All” – Displaying all the records.
• “Business” – Displaying only your business records in the phone book.
• “Personal” – Displaying only your personal records in the phone book.
• “PDA” – Displaying only those records that are stored in the handset (not SIM).
The selected category will also be displayed at the top right corner of the screen, as shown below:
Figure 142. Display by category
Synchronization
To synchronize the contacts with Microsoft Outlook in a PC with Microsoft ActiveSync installed, follow
the below guidelines to ensure proper synchronization:
1. Perform synchronization before modification is made to the records in PC.
2. Perform synchronization again after modification is made to the records in PC.
3. Do not switch off the phone in between these 2 synchronizations.
84
Page 85

Chapter 14
Media Player
Media Player
To launch Media Player, press the Left Key (“Menu”) from the Main screen, select “7. Entertainment”.
Then, select “2. Media Player” and press the OK Key. The following screen will be displayed when
Media Player is launched:
Figure 143. Media player screen
14
Pressing on the Left Key will display a menu of options on the screen, as shown below:
Figure 144. Media player option
Selecting “Play/Pause” will toggle between playing and pause playing the current file. Selecting
“Previous” will play the previous file, and “Next” will play the next file.
Selecting “Repeat”, “Shuffle”, “Mute” will corresponding repeat playing the file after it ends, pla y all files
in a shuffling manner, and turn off the volume of the current file. If any of these 3 options is selected,
you will see a “√” sign in front of those options, when you press the Left Key to display the menu optio ns,
indicating that those options are currently selected, as shown below in the following diagram:
85
Page 86

Figure 145. Repeat & mute setting
To unselect a setting, simply press the Left Key again to display the menu options and press t he OK
Key again on those selected options.
To adjust the volume, press the Left Key to display the menu options and select “Volume”. A volume bar
will be displayed on the below right corner of the screen for a short period of time, as shown below:
Figure 146. Volume setting
Pressing the Up and Down Keys will increase or reduce the volume level correspondingly. Also, during
any time of the playback, pressing these 2 keys will have the same effect on volume.
Open URL
If “Open URL” is selected from the menu, a new screen will be displayed for you to input the URL of the
media content, as shown below:
86
Page 87

Figure 147. Open URL setting
You can manually input the URL by using the keypad, or you can select one of the previously visited
URLs by pressing the Down Key to the list below. Pressing on the Right Key (“Go”) will start playing the
file from that particular URL, whereas pressing on the Right Key (“Menu”) will display the following
menu:
Figure 148. Clear history setting
Selecting “Clear History” will clear the list of previously visited URLs, and selecting “Back to Main” will
take you back to the Media Player screen.
Open File
If “Open File” is selected from the menu, a new screen will be displayed, listing all available media files
under the My Music, My Video and Storage Card folders. Pressing the Left (“Back”) Key will go back to
the previous screen, while pressing the Right (“Play”) Key will play the selected media file.
Playlist
If the Right Key (“Playlists”) is pressed, the screen will display two menu options, as shown in the
following diagram:
87
Page 88

Figure 149. Playlist setting
If Media Player is streaming from a URL, selecting “Add to Playlist” will add the URL of the cu rrent file to
the playlist. If it is not playing any media files, selecting this option will open another screen that will
allow you to select media files within the phone (the file location would be \User Files\My Music) to be
added to the playlist, just as shown in the following diagram:
Figure 150. Playlist option
Pressing the Left (“Add”) Key on a highlighted file will add it to the playlist with a confirmation pop-up
dialog similar to the following:
Figure 151. Playlist prompt
88
Page 89
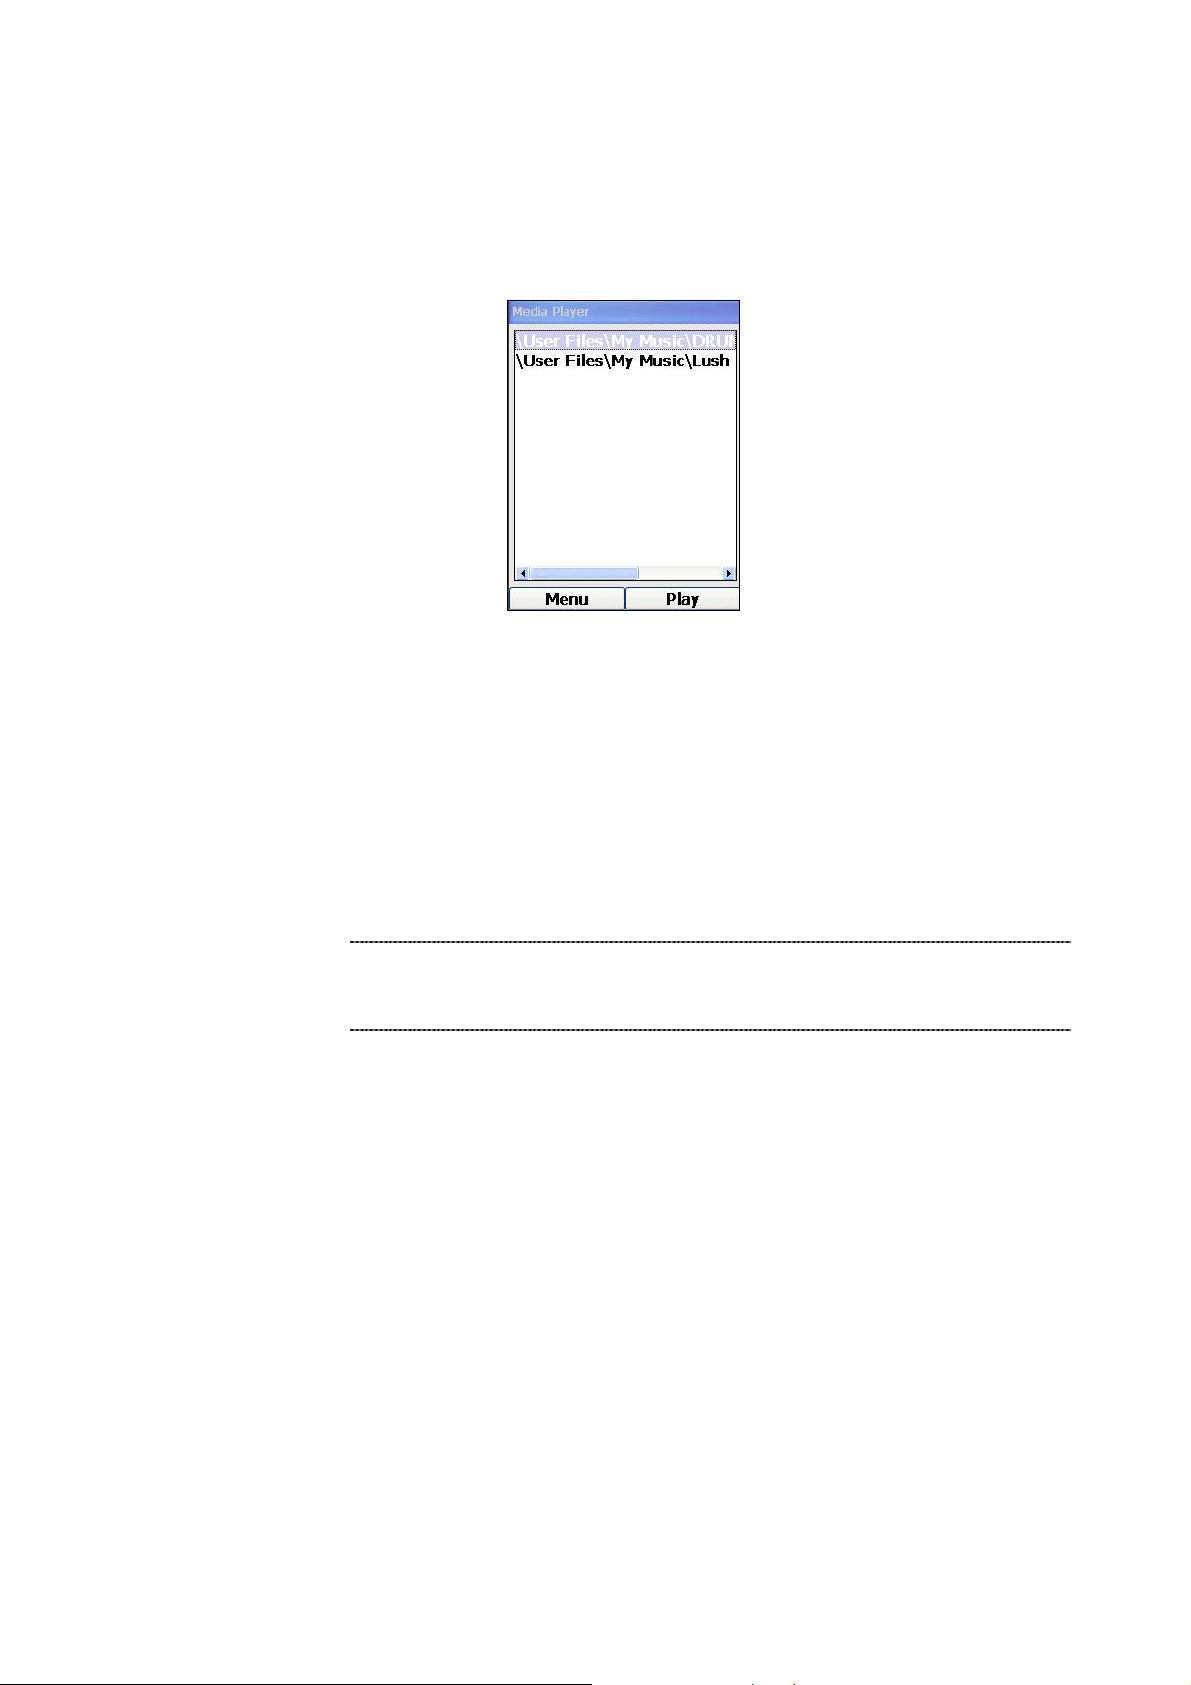
Pressing the Right Key (“Back”) will start playing the files in the playlist in the order of how you add
them to the playlist.
To display the files in the playlist, press on the Right (“Playlists”) key on the main screen of Media
Player, and select “playlist”. This will display the playlist screen, similar to the following diagram:
Figure 152. Playlist screen
Pressing on the Right Key (“Done”) will return to the main screen of Media Player, while pre s sing the
Left Key will display the following menu options:
• “Remove Media” – this will remove the highlighted file
• “Play Media” – this will play the highlighted file
• “Remove All Media” – this will remove all files
L Note
The current implementation will restore all settings to factory
default once the battery is removed and re-inserted. All
addition/deletion made to the playlist will not be kept.
89
Page 90

Chapter 15
File Explorer
File Explorer
To launch the File Explorer of Windows® CE, press the Left Key (“Menu”) from the Main screen, select
“8. Files”. Highlight “File Explorer” and press the OK Key. The following screen will be displayed when
File Explorer is launched:
Figure 153. File explorer screen
15
Pressing the Left (“Menu”) Key, following with the Backward and Forward Keys will allow you to
manipulate the menu items on the menu bar, as shown below:
Figure 154. File option
Highlighting a folder and pressing the OK Key will allow you to explore the content of the folder.
For further information on the functionality of File Explorer, please refer to the various documentation
on the Microsoft web site (
http://www.microsoft.com).
90
Page 91

A
L Note
1. Users are advised to make their changes (e.g. create new folders)
on /User Files. The current implementation will restore all
settings to factory default once the phone is switched off or
the battery is removed. Except for /User Files (and its
sub-folders), changes made in all other folders by File Explorer
will not be kept.
2. The files in the phone can also be browsed on a PC with Microsoft
ctiveSync installed. Connect the USB cable to the phone and
the PC, set up the ActiveSync partnership, and click on the
Explore button of ActiveSync. In this way, the files of the phone
can also be displayed. (Microsoft ActiveSync can be downloaded
at the Microsoft web site.)
3. Since the WLAN phone only uses the keypad for input, an
application using any other means of input may not be able to
run properly, even though it is transferred or loaded to the
phone with File Explorer.
91
Page 92

Chapter 16
Accessories
Accessories
Applications that are available under Accessories are: Quick Dial, Alarm, and Infrared.
Quick Dial
Quick Dial is an easy way to associate a number from 1 - 99 with a phone number, so that when that
number is pressed, the associated phone number will be dialed out. (Since the phone numbers to be
stored are usually SIP phone numbers, you need to have your SIP profile activated. Please refer to the
section “SIP Configuration” for details.)
Add Entry
To set up the numbers for quick dial, press the Left Key (“Menu”) from the Main screen, select “*.
Accessories”, highlight “Quick Dial” and press the OK Key. If you are setting up Quick Dial for the first
time, the phone will display the new entry screen. Fill in the name, phone number and the associated
quick dial number, a s shown in the exa mple below:
16
Figure 155. Quick dial – Add entry
Pressing the OK Key will save the entry with the following confirmation screen:
Figure 156. Quick dial – Add entry prompt
92
Page 93

Pressing OK Key will display the list of quick dial entries. And pressing the Home Key will take you back
to the Main Screen.
Edit Entry
To edit a quick dial entry, highlight the entry, press the Left (“Menu”) Key and select “Edit”, as shown
below:
Figure 157. Quick dial – Edit entry
This will open a page similar to that of New Entry, only with the existing information filled out in the fields.
After editing, pressing the OK Key will save the changes, whereas pressing the Right (“Cancel”) Key
will return to the list of quick dial numbers without saving the changes.
Delete Entry
To delete a quick dial entry, highlight the entry, press the Left (“Menu”) Key and select “Delete”.
Pressing the OK Key will display a pop-up message, asking you to confirm your action, as shown
below:
Figure 158. Quick dial – Delete entry
Pressing the Left (“Yes”) Key will confirm the deletion, whereas pressing the Right (“No”) Key will return
to the list of quick dial numbers without deleting the number.
Dial Number
To dial a number using quick dial at the Main screen, carry out the following steps:
93
Page 94

- If the quick dial number is single digit, just press and hold that digit, and the phone will dial out
that number associated with that digit.
nd
- If the quick dial number is double digit, just press the first digit, then press and hold the 2
digit,
and the phone will dial out that number.
When your phone is displaying the list of quick dial entries, you can also make a call to the highlighted
number by pressing the OK or Right (“Dial”) Key.
Alarm
To launch the Alarm appli c ation, press the Left Key (“Menu”) from the Main screen, select
“*. Accessories”. Hig hlight “Alarm” a nd press the OK Key.
Alarm Settings
To set the alarm time, select “Alarm Setting” from the sub-menu, as shown below:
Figure 159. Alarm setting
Use the Up, Down, Backward and Forward keys to specify the date of the alarm. Press the OK Key to
jump to set the alarm time. Use the Up and Down Keys to adjust the hour. Press the Backward and
Forward Keys to move to the minute or AM/PM field. Pressing the OK Key at any time will allow you to
jump between the date and time fields.
When you have finished adjusting the alarm time, press the Left (“Turn On”) Key to activate the alarm.
You should also see a bell icon right below the signal strength in the Main Screen, as shown below:
Figure 160. Alarm icon
When the alarm goes off, you should be able to see a pop-up reminder similar to the following:
94
Page 95

Figure 161. Alarm prompt
At this point, you can carry out 1 of the following actions:
- Press OK Key and dismiss the alarm
- Press the Down Key to set the focus on the Postpone button. Pressing the OK Key will
re-activate the alarm to go off in another 5 minutes.
- To postpone the alarm for an interval other than the default 5 minutes, press the Down Key to
set the focus on the “Postpone reminder for” dropdown box. Use the Forward or Backward
Keys to select other values. Press the OK Key again to set the focus back on the Postpone
button. Pressing the OK Key will re-activate the alarm to go off in the interval you just specify.
Alarm Sound Setting
To change the alarm sound, copy your desired sound file (in the form of a .wav file) to the /User
Files/My Music folder. Then select “Alarm Setting” from the sub-menu of the Alarm application. The
next screen will display all the sound files you have in that folder, as shown below:
Figure 162. Alarm soun d setting
Press the Up and Down Keys to select a sound. You can press the Left Key to hear the sound of the
selected file, or you can press the OK Key to choose the file to be the alarm sound. Pressing the Right
(“Back”) Key will return to the previous screen without making any selection.
Note: If you do not have any sound files in the /User Files/My Music folder, an error message will pop
up.
95
Page 96

Infrared
To launch the Infrared application, press the Left Key (“Menu”) from the Main screen, select
“*. Accessories”. Hig hlight “IrDA” and press the OK Key. The following scre en will be displayed when
the Infrared application is launched:
Figure 163. IrDA screen
Pressing the Left (“Search”) key will try to search for any device with infrared in the vicinity. When such
device is found, a screen similar to the following will be displayed:
Figure 164. IrDA search
Pressing the Up and Down Key will allow you to highlight the desired device. Pressing the Left
(“Connect”) or OK Key will start the connection to the device. When connection is established, a screen
similar to the following will be displayed:
Figure 165. IrDA conne ct screen
96
Page 97

After the connection is established, pressing the Lef t (“Send File”) Key will allow you to choose which
folder you want to send your file from, by displaying a screen similar to the following:
Figure 166. Choose folder
Pressing the Up and Down Key will allow you to highlight the desired folder. Pressi ng the Left
(“Connect”) or OK Key will open the highlighted folder and the content of the folder will be displayed,
just as shown below:
Figure 167. IrDA conne ct
Again, pressing the Up and Down Key will allow you to highlight the desired file. Pressing the Left
(“Send”) will start the file transfer via infrared. When the transfer is complete, a screen similar to the
following will be displayed showing that 100% of the transfer is complete:
Figure 168. IrDA transmi ssion
At this point, pressing the Right (“Return”) Key will take you back to the previous screen, where you can
further browse other folders for files to send, or quit the application.
97
Page 98

Chapter 17
Call History
Call History
To view history of calls made, received or missed, you need to have the SIP information filled in first.
Then press the Left Key (“Menu”) from the Main screen, select “9. Call History”, and press the OK Key.
The following screen will be displayed when the Call History application is launched:
17
Figure 169. Call history setting
Placed Calls
To view history of calls placed, highlight “Placed Calls” with the Up or Down Keys and press the OK Key,
and a screen similar to the following will be displayed:
Figure 170. Placed calls screen
Pressing the Right (“Cancel”) Key will return to the previous screen; whereas the Left (“Menu”) Key will
present with a menu of actions with which you can perform with the highlighted number, as shown
below:
98
Page 99

Figure 171. Placed calls menu
To delete a number from the list, highlight “Delete” and press the OK Key. You will be prompted to
confirm your action. Answer “yes”, and the number will then be deleted.
To delete all numbers from the list, highlight “Delete All” and press the OK Key. You will be prompted to
confirm your action. Answer “yes”, and all the numbers will then be deleted.
To dial a number from the list, highlight “Dial” and press the OK Key. A call will be made to this pa rticular
number.
To block a number from the list, highlight “Block” and press the OK Key. A screen similar to the following
will be displayed:
Figure 172. Block number prompt
Pressing the Left (“Yes”) Key will confirm the blocking, whereas the Right (“No”) Key will return to the
current screen. If you have blocked this caller, the next time he calls you, you will see a message on the
Main Screen, similar to the one below:
Figure 173. Block number screen
99
Page 100

To view the details of a number from the list of placed calls, highlight “Details” and press the OK Key.
A screen simi lar to the following, showing the date, time and number of the call will be displayed:
Figure 174. View call details
You can then press the Right Key (“Back”) to go back to the previous screen, or the Left Key (“Menu”)
to:
- Add the number to Speed Dial, or
- Dial this particular number.
Received Calls
To view history of calls received, highlight “Received Calls” with the Up or Down Keys at the Call History
screen and press the OK Key. A list of received calls will be presented on the screen.
The operations of the Left (“Menu”) Key and Right (“Cancel”) Key will be the same as those of Placed
Calls.
Missed Calls
To view history of calls missed, highlight “Missed Calls” with the Up or Down Keys at the Call History
screen and press the OK Key. A list of missed calls will be presented on the screen.
The operations of the Left (“Menu”) Key and Right (“Cancel”) Key will be the same as those of Placed
Calls.
Blocked Calls
To view the list of numbers blocked, highlight “Blocked Calls” with the Up or Down Keys at the Call
History screen and press the OK Key. A list of blocked numbers will be presented on the screen, as
shown below:
100
 Loading...