

Planet VIP-157, VIP-157S, VIP-156PE Quick Start Manual

Table of Contents
English:
Preparation before beginning administration on SIP Analog
Telephone Adapter ............................................................. 1-3
Voice communication samples ........................................... 1-10
Further Conguration ....................................................... 1-15
Português:
Preparativos antes de começar a administração do SIP ATA ... 2-2
Exemplos de conexões de voz ............................................2-8
Mais Congurações .......................................................... 2-11
Russian:
Подготовка к первому подключению ................................. 3-3
Настройка голосовой связи ............................................. 3-10
Дополнительная конфигурация ...................................... 3-13
Español:
Preparaciones previas a la administración del Adaptador de
Teléfono Analógico SIP ....................................................... 4-2
Ejemplos de comunicación de voz ....................................... 4-8
Conguración adicional ..................................................... 4-11
Polish:
Przygotowanie do zarządzania adapterem ATA. ..................... 5-3
Przykłady realizacji połączeń głosowych ............................... 5-9
Dalsza konguracja .......................................................... 5-12

English
VIP-156/VIP-157
SIP Analog Telephone Adapter
Quick Start Guide

Overview
This quick installation guide describes the objectives,
organization and basic installation of PLANET VIP-156/VIP157 VoIP Phone Adapter (also named as “ATA” in short), and
explains how to establish your rst voice over IP communication
via PLANET product. Also, this guide shows you how to nd
additional information on related products and services.
The related models are shown below:
VIP-156: SIP Analog Telephone Adapter
VIP-156PE: 802.3af PoE SIP Analog Telephone Adapter
VIP-157: 1 FXS/1 FXO SIP Analog Telephone Adapter
VIP-157S: 2-port FXS SIP Analog Telephone Adapter
The VIP-156/VIP-157 ATA series comes with a web-based
graphical user interface that can cover most congurations and
machine status monitoring. Via standard web browser, you can
congure and check machine status from anywhere around the
world.
1-1

Objectives
This guide provides physical installation, network congurations,
and Internet access establishment information for the ATA.
Organization
This guide is organized as follows:
• Preparation before beginning VIP-156/VIP-157 administration
• Administration interface
• Network interface quick congurations
• Internet access setup guide
1-2
Preparation before beginning administration
on SIP Analog Telephone Adapter
Physical Interfaces
RJ45 connector, to maintain the existing network
1 PC
2 LAN
3 12V DC 12V DC power
Note
Administration Interface
The ATA provides GUI (Web based, Graphical User Interface)
for machine management and keypad administration is also
available for simple conguration.
structure, is connected directly to the PC
through straight Cat5 cable.
RJ45 connector, for Internet access, is connected
directly to Switch/Hub through straight Cat5
cable.
1. Use proper AC adapter for the ATA; improper
power supply will damage device permanently.
2. For VIP-156PE, please connect IEEE 802.3af
standard compliant power injector to the LAN
interface for power resource. At the same time,
either PoE or AC adapter can be deployed at
one time.
Web conguration access:
To start ATA web conguration, you must have one of these web
browsers installed on computer for management:
• Microsoft Internet Explorer 4.01 or higher with Java support.
1-3
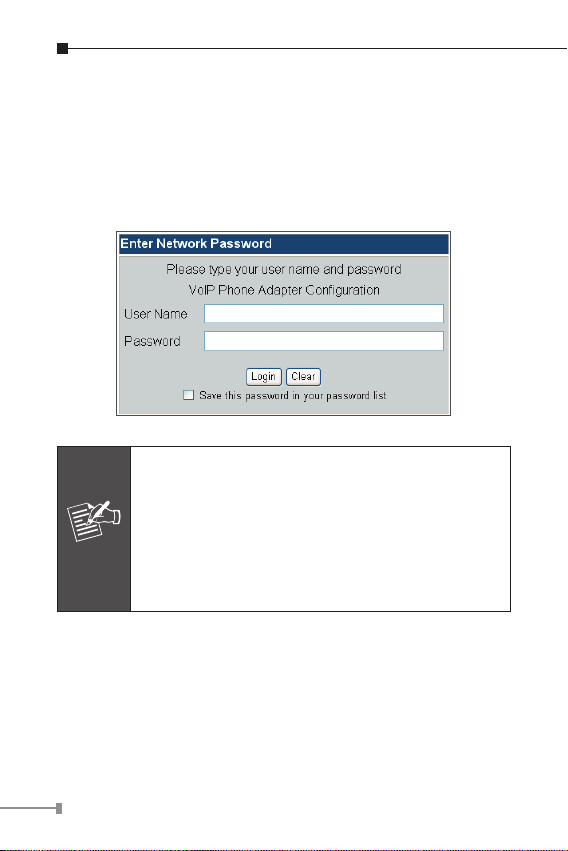
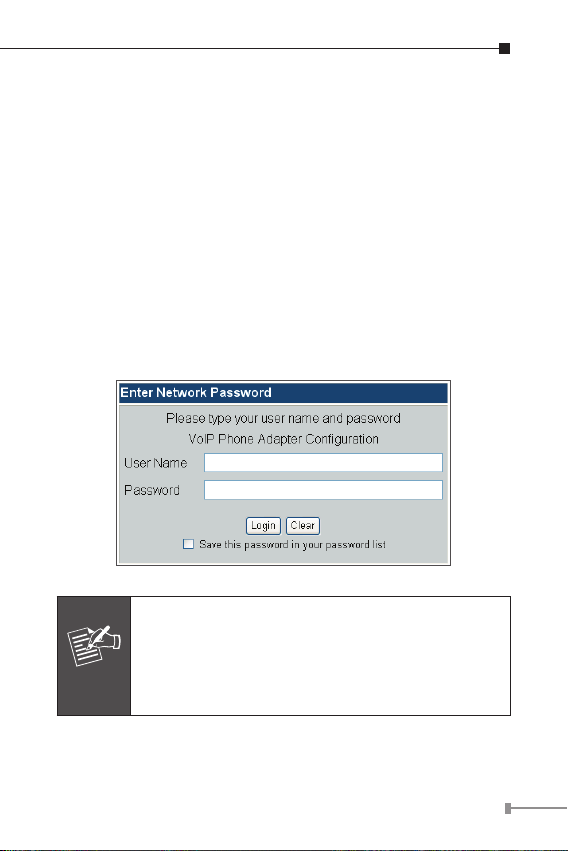
Default IP address of ATA is 192.168.0.1. Please execute web
Note
browser, and insert http://192.168.0.1 in the address bar of
your web browser to log on to the ATA web conguration page.
VIP-156/VIP-157 will prompt for logon username/password;
please enter: root/null (no password) to continue machine
administration.
In order to connect machine for administration,
please locate your PC in the same network
segment (192.168.0.x) of the ATA. If you’re
not familiar with TCP/IP, please refer to the
related chapter of the user’s manual or consult
your network administrator for proper network
configurations.
1-4
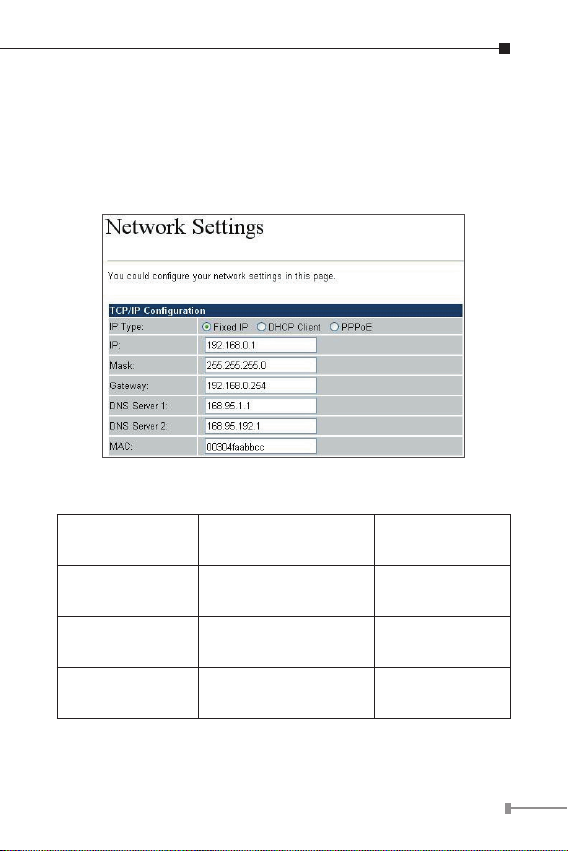
Network Interface quick congurations
Execute your web browser, and insert the IP address (default:
192.168.0.1) of VIP in the adddress bar. After logging on to
machine with username/password (default: root/no password),
browse “Network” “Network settings” conguration menu:
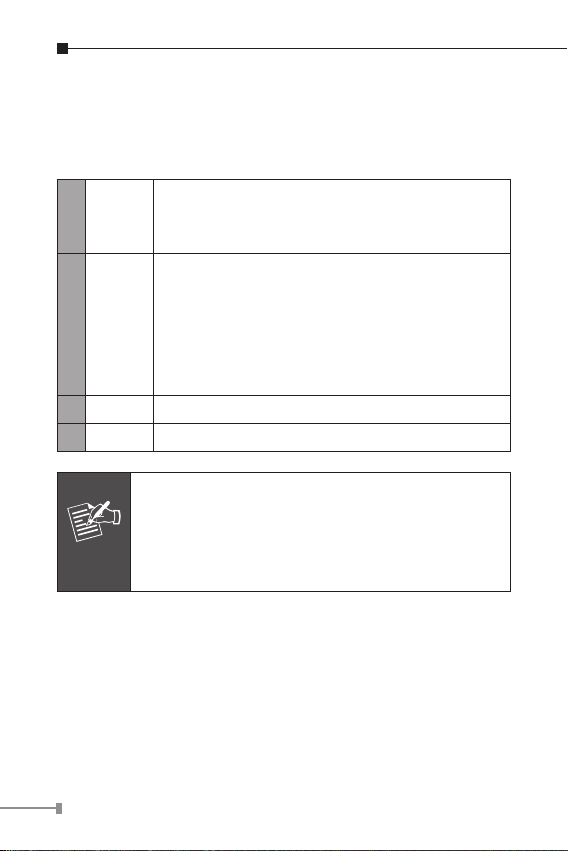
Parameter Description
IP address
Mask LAN mask of the ATA
Default Gateway Gateway of the ATA
DNS
LAN IP address of the
ATA
The Domain Name
Server IP address
Default:
192.168.0.1
Default:
255.255.255.0
Default:
192.168.0.254
Default:
168.95.192.1
1-5

Connection Type Data required.
Fixed IP
DHCP Client
PPPoE
After conrming the modication you’ve done, please click
on the Submit button to apply settings and browse “Save
& Reboot” menu to reboot machine to make the settings
effective.
The ISP will assign IP address, and
related information.
Under most circumstances, there’s no
need to congure the DHCP settings.
The ISP will assign PPPoE username /
password for Internet access.
Save Change to Flash Memory
Most of the modications on ATA will take effective after
modications, but they are just temporarily stored on RAM only.
They will disappear after your reboot or power off the VoIP
Phone Adapter. To save the parameters into Flash ROM and let
them take effective forever, please remember to press the Save
& Reboot button after you have modied the parameters.
Keypad Congurations
The ATA series supports telephone keypad congurations. Please
connect analog telephone set and refer to the following table for
machine network congurations.
1-6

Menu
Choice
#111#
#112xxx*
xxx*xxx*
xxx#
Machine
Operation
Set DHCP
Client
Set up
Static IP
Address
Parameter(s) Remarks:
None
Use the * key
when entering
a decimal point.
ATA will change
to DHCP Client
DHCP will be
disabled and
system will
change to the
Static IP type.
#113xxx*
xxx*xxx*
xxx#
#114xxx*
xxx*xxx*
xxx#
#115xxx*
xxx*xxx*
xxx#
#136#
#137#
#190# Unlock None
Set Network
Mask
Set Gateway
IP Address
Set Primary
DNS Server
Enable Auto-
cong mode
Disable
Auto-cong
mode
Use the * key
when entering
a decimal point.
Use the * key
when entering
a decimal point.
Use the * key
when entering
a decimal point.
None
None
Must set Static
IP rst.
Must set Static
IP rst.
Must set Static
IP rst.
For PLANET IPX2000 IP PBX
For PLANET IPX2000 IP PBX
Must unlock the
protect function
before setting up
network settings
via keypad.
1-7

#191# Lock None
#195# Reboot None
#198#
Factory
Reset
None
The system will
be locked and
can’t set up
network settings
via keypad.
The system
will reboot
automatically.
The system
will be reset to
factory default
value and reboot
automatically.
0*
The following keypad commands can be used to display the
network settings enabled on ATA via voice prompt.
To switch
PSTN mode
None VIP-157 only
1-8
IVR Menu
Hint
Choice
#120# Check IP Address
#121#
#122#
#123#
#124#
#125#
#128#
Machine
Operation
Check Network
Connection Type
Check the Phone
Number
Check Network
Mask
Check Gateway
IP Address
Check Primary
DNS Server
Setting
Check Firmware
Version
Remarks:
IVR will announce the
current IP address of the
ATA.
IVR will announce if
DHCP is enabled or
disabled.
IVR will announce the
current enabled VoIP
number.
IVR will announce the
current network mask of
the ATA.
IVR will announce the
current gateway IP
address of the ATA.
IVR will announce the
current setting in the
Primary DNS eld.
IVR will announce the
version of the rmware
running on the ATA.
Please contact your Internet service provider to
obtain the Internet access type, and select the
proper network settings in ATA to establish the
network connections.
1-9
Voice Communication Samples
There are several ways to make calls to desired destination in
ATA. In this section, we’ll guide you step by step to establishing
your rst voice communication via keypad and web browsers
operations.
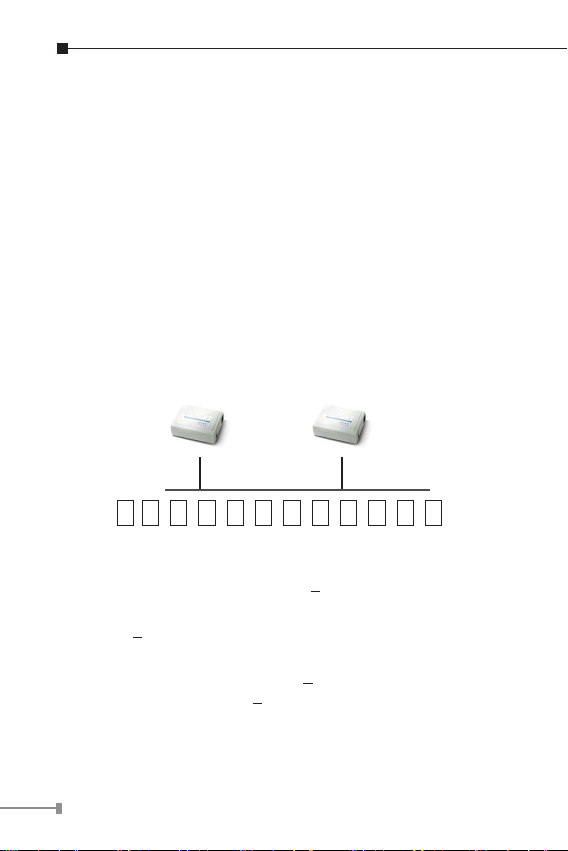
ATA to ATA Connection via IP Address
Assume there are two ATAs in the network; the IP addresses
are 192.168.0.1 and 192.168.0.2
Analog telephone sets are connected to the phone (RJ11) port
of ATAs, respectively
192.168.0.1 192.168.0.2
1 9 2 * 1 6 8 * 0 * 2 #
Operation Steps:
1. Pick up the telephone set on ATA A.
2. Press the keypad: 192*168*0*2# shall be able to connect to
the ATA B.
3. Then the phone in 192.168.0.2 should ring. Please repeat
the same dialing steps on ATA B to establish the rst voice
communication from ATA A
1-10
(Peer-to-Peer mode) VIP-157S Port 1 to Port 2
Communications
Supposing you have one VIP-157S that connects to two
telephones; just pick up phone 1 and dial “192*168*0*1**5062’’.
Phone 2 will ring.
Analog telephone sets are connected to the phone (RJ11) ports
of VIP-157S respectively
192.168.0.1
1 9 2 * 1 6 8 * 0 * 1 * * 5 0 6 2 #
10021001
Operation Steps:
a) Pick up the telephone set on VIP-157S port 1, and you
should be able to hear the dial-tone
b) Press the keypad: 192*168*0*1**5062# shall be able to
connect to the VIP-157S port 2
c) Then the telephone set in VIP-157S port 2 should ring.
Please repeat the same dialing steps on port 2 to establish
the rst voice communication from VIP-157S
1-11
Hint
● In default machine operation, the VIP-157 is in
VoIP mode. If you want to make a PSTN phone
call, press the “0*” key to switch to PSTN
mode.
● If the IP address of the remote calling party is
known, you may directly make calls via its IP
address and end with a “#”.
● If the ATAs are installed behind a NAT/
firewall/IP sharing device for Peer-to-Peer VoIP
application, please make sure the NAT device
supports SIP applications, and suitable settings
should be applied to the NAT device to enable
the SIP communications before making calls
● [VIP-157S] PLANET ATA series for connection
to remote ATA. Press the keypad in the
following sequence to connect to the remote
VIP-157S port 2:
[remote ATA IP address]**5062,
for example: 192*168*0*2**5062
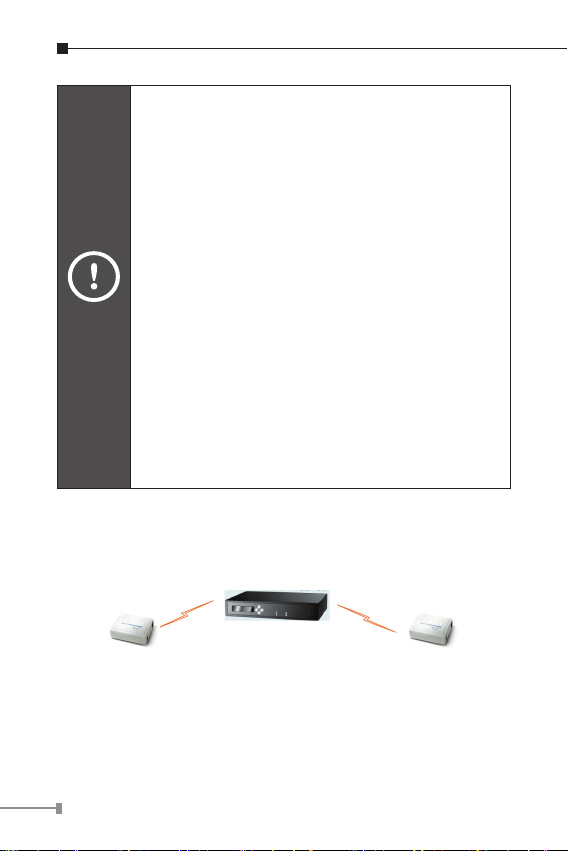
Voice Communication via SIP Proxy Server
■ VIP-156 IP Address:
192.168.0.1
Line Number: 1001
1-12
Registration /
Authentication
Registration /
Authentication
SIP Server IP Address:
192.168.0.50
■ VIP-156 IP Address:
192.168.0.2
Line Number: 2002
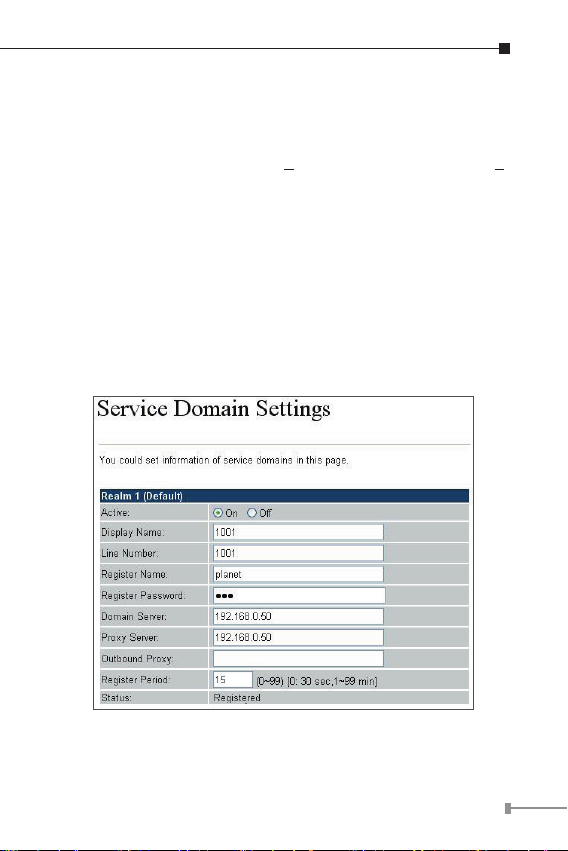
Device Congurations on the ATA:
STEP 1:
Log in to SIP proxy Server and create two testing accounts/
password: 1001/123 (for ATA A), and 1002/123 (for ATA B)
for the voice calls.
STEP 2:
Please log in to ATA via web browser, and browse the SIP
setting menu and select the Domain Service cong menu. On
the setting page, please insert the account/password information
obtained from your service provider (in this sample, we’re using
PLANET SIP-50 as the SIP Proxy server for SIP account, call
authentications), and then the sample conguration screen is
shown below:
1-13

STEP 3:
Repeat the same conguration steps on ATA B, and check the
machine registration status; make sure the registrations are
completed.
Test the Scenario:
To verify the VoIP communication, please
1. Pick up the telephone on ATA A.
2. Press the keypad: 2002 shall be able to connect to the ATA B.
3. Then the telephone set in ATA B should ring. Please repeat
the same dialing steps on ATA B to establish the rst voice
communication from ATA A.
1-14

Further Conguration
For detailed conguration, please check user’s manual:
http://www.planet.com.tw/en/support/download.
php?view=3&key=VIP-156#list
If you have any other question, please contact the dealer where
you purchased this product or you can contact PLANET directly
at the following email address: support_voip@planet.com.tw
1-15

VIP-156/VIP-157
Português
SIP Analog Telephone Adapter
Guia Rápido de Instalação

Avaliação
Este guia de instalação rápido descreve os objetivos;
organização e instalação básica do VIP-156/VIP-157, Adaptador
de Voz sobre IP para Telefone Analógico (usaremos o termo
ATA no manual), e explica como estabelecer sua primeira
comunicação em Voz sobre IP através deste produto da Planet.
Este guia também mostrará como achar informação adicional
sobre produtos e serviços relacionados.
O ATA, VIP-156/VIP-157 possui uma interface gráca WEB
que permite executar a maioria das congurações e o
monitoramento do status do equipamento. Através de um
navegador de Internet padrão você pode congurar e monitorar
o status do equipamento em qualquer lugar no mundo.
Objetivo deste Documento
Este guia trás informações sobre instalação física, congurações
de rede e acesso à Internet para o Adaptador de Telefone
Analógico - ATA.
Organização deste documento
Este guia está organizado como segue:
• Preparativos antes de começar a administração do VIP-156/
VIP-157
• A Interface de administração
• Conguração rápida da Interface de rede
• Guia de conguração de acesso à Internet
2-1
Preparativos antes de começar a
administração do SIP ATA
Interfaces Físicas
Uma porta RJ-45, para manter a estrutura de
1 PC
2 LAN
3 FXS Entrada RJ11 para aparelho telefônico analógico.
4 12V DC Entrada de energia 12V DC para fonte externa.
Not a
Interface de Administração
O ATA trás um GUI (Interface Gráca para Usuário) para
gerenciamento e administração. O teclado também pode ser
utilizado para congurações simples.
rede existente, para conexão ao PC através de
um cabo CAT-5 direto.
Uma porta RJ-45, para acesso à Internet, para
conexão ao Switch/Hub através de um cabo
CAT-5 direto.
A interface LAN também pode ser conectada
a um switch 802.3af PoE ou conversor de
fornecimento de energia (VIP-156PE)
1. Use somente a fonte AC que vem junto com o
ATA, de outra forma o equipamento pode ser
danificado.
2. Para VIP-156PE, tanto PoE como a fonte AC
podem ser usadas ao mesmo tempo.
2-2
Conguração de acesso à Interface WEB:
Para iniciar a conguração via WEB do ATA, você deve ter um
destes navegadores instalados em seu computador
• Netscape Communicator 4.03 ou mais recente
• Microsoft Internet Explorer 4.01 ou mais recente com suporte
a Java
O endereço IP padrão do ATA é 192.168.0.1. Você deve abrir
seu navegador e digitar http://192.168.0.1 na barra de
endereços.
Em seguida o VIP-156/VIP-156PE irá pedir o nome de usuário e
senha, coloque:
User Name: root / Senha: em branco (sem senha)
Para conectar-se ao equipamento, coloque seu
PC no mesmo segmento de rede (192.168.0.x)
do ATA. Se não estiver familiarizado com TCP/IP,
Not a
consulte o capitulo relativo no manual do usuário
ou consulte seu administrador de rede.
2-3
 Loading...