

Page 1

Users Manual of VIP-156/156PE/157S
-1-
VIP-156/VIP-156PE/VIP-157S
VoIP Analog Telephone Adapter
Page 2

Users Manual of VIP-156/156PE/157S
-2-
Copyright
Copyright© 2017 by PLANET Technology Corp. All rights reserved. No part of this publication may be
reproduced, transmitted, transcribed, stored in a retrieval system, or translated into any language or computer
language, in any form or by any means, electronic, mechanical, magnetic, optical, chemical, manual or
otherwise, without the prior written permission of PLANET.
PLANET makes no r epresentations or warranties , either expressed or im plied, with respect to t he contents
hereof and specif ically disclaims any warranties, merchantability or fitness f or any particular purpose. A ny
software described in this m anual is sold or licensed "as is". Should the programs prove defective follo wing
their purchase, the bu yer (and not this compan y, its distributor, or its dealer) ass umes the entire cost of all
necessary servicing, repair, and a ny incidental or consequential damages resulting from an y defect in the
software. Further, this company reserves the right to revise this publication and to make changes from time to
time in the contents hereof without obligation to notify any person of such revision or changes.
All brand and produc t names mentioned in this m anual ar e tradem arks and/or registered tradem arks of t heir
respective holders.
Disclaimer
PLANET Technology does not warrant that the hardware will work properly in all environments and
applications, and makes no warranty and representation, either implied or expressed, with respect to the
quality, performanc e, merchantability, or fitnes s for a particular pur pose. PLANET has made every effort to
ensure that this User’s Ma nual is accurat e; PL ANE T d iscla im s liab ilit y for any in accur acies or om iss ions that
may have occurred. Information in this User’s Manual is subject to change without notice and does not
represent a commitment on the part of PLANET. PLANET assumes no responsibility for any inaccuracies that
may be contained in this User’s Manual. PLANET makes no commitment to update or keep current the
information in this User ’s Manual, and reserv es the ri ght to make improvem ents to this Us er’s M anual a nd/or
to the products described in this User’s Manual, at any tim e without notice. If you find information in this
manual that is incorrect, misleading, or incomplete, we would appreciate your comments and suggestions.
Trademarks
The PLANET logo is a tr ademark of PLANET T echnology Corp. This docum entation ma y refer to num erous
hardware and software products by their trade names. In most, if not all cases, these designations are
claimed as trademarks or registered trademarks by their respective companies.
CE mark Warning
This is a class B device, in a domestic environment; this produc t m a y cause r adio i nterference, in which case
the user may be required to take adequate measures.
Page 3

Users Manual of VIP-156/156PE/157S
-3-
FCC Interference Statement
This equipment has been t ested and foun d to com ply with the lim its f or a Class B digit al device, pursua nt to
Part 15 of FCC Rules. These limits are designed to provide reasonable protection against harmful
interference in a r esidential installation. This eq uipment generates, uses, and can r adiate radio frequency
energy and, if not installed and used in accordanc e with the instructions , may cause harm ful interference to
radio communications. However, there is no guarantee that interference will not occur in a particular
installation. If this equipm ent does cause harm ful interference to radio or tel evision reception, whic h can be
determined by tur ning the equ ipment off and on, the user is encour aged to tr y to correc t the interf erence by
one or more of the following measures:
1. Reorient or relocate the receiving antenna.
2. Increase the separation between the equipment and rec eiv er.
3. Connect the equipment into an outlet on a circuit different from that to which the receiver is connected.
4. Consult the dealer or an experienced radio technician for help.
FCC Caution:
To assure continued com pliance (example-use only shie lded interface cab les when connecti ng to computer
or peripheral devices). Any changes or m odifications not expressly approved by the party responsible for
compliance could void the user’s authority to operate the equipment. This device complies with Part 15 of the
FCC Rules. Operation is subject to the Following two conditions: (1) This device may not cause harmful
interference, and (2) this Device must accept any interference received, including interference that may cause
undesired operation.
WEEE Caution
To avoid the potential ef fects on the environm ent and human health as a resu lt of the presence of
hazardous substances in electrical an d electronic e quipment, end users of electr ical and electro nic
equipment should understand the meaning of the crossed-out wheeled bin symbol. Do not dispose of
WEEE as unsorted municipal waste and have to collect such WEEE separately.
Safety
This equipment is designed with the utmost care for the safety of those who install and use it. However,
special attention must be paid to the dangers of electric shock and static electricity when working with
electrical equipm ent. All guidelines of this and of the com puter manuf acture must theref ore be allowed at a ll
times to ensure the safe use of the equipment.
Customer Service
For information on customer service and support for the Gigabit SSL VPN Security Router, please refer to the
following Website URL: http://www.planet.com.tw
Before contacting customer service, please take a moment to gather the following information:
Page 4

Users Manual of VIP-156/156PE/157S
-4-
VoIP Analog Telephone Adapter serial number and MAC address
Any error messages that displayed when the problem occurred
Any software running when the problem occurred
Steps you took to resolve the problem on your own
Revision
User’s Manual of PLANET VoIP Analog Telephone Adapter
Model: VIP-156/VIP-156PE/VIP-157S
Rev: 6.0 (October, 2017)
Page 5

Users Manual of VIP-156/156PE/157S
-5-
TABLE OF CONTENTS
Chapter 1. Introduction ...................................................................................................................... 7
1.1 Overview ........................................................................................................................... 7
1.2 Application...................................................................................................................... 11
1.3 Features .......................................................................................................................... 13
1.4 Package Contents .......................................................................................................... 14
1.5 Physical Details .............................................................................................................. 14
Chapter 2. Preparations & Installation ........................................................................................... 18
2.1 Physical Installation Requirements ............................................................................. 18
2.2 LAN IP Address Configuration via Web Configuration Interface .............................. 19
Chapter 3. Network Service Configurations .................................................................................. 23
3.1 Configuring and Monitori ng your ATA from Web Browser ....................................... 23
3.1.1 Overview of the web interface of ATA ...................................................................... 23
3.1.2 Manipulation of ATA via web browser ...................................................................... 23
Chapter 4. VoIP Telephone Adapter Configurations ..................................................................... 25
4.1 Status .............................................................................................................................. 25
4.2 Phone Book .................................................................................................................... 26
4.3 Call Service ..................................................................................................................... 28
4.4 SNTP setting ................................................................................................................... 30
4.5 Volume Setting ............................................................................................................... 30
4.6 Dial Plan Setting ............................................................................................................. 31
4.7 General ............................................................................................................................ 34
Chapter 5. Network ........................................................................................................................... 35
5.1 Network Setting .............................................................................................................. 35
5.2 DDNS Setting .................................................................................................................. 36
5.3 VLAN Setting .................................................................................................................. 36
5.4 VPN Setting..................................................................................................................... 37
5.5 IPv6 Setting..................................................................................................................... 38
Chapter 6. NAT Trans ....................................................................................................................... 39
6.1 Stun Setting .................................................................................................................... 39
6.2 PC Setting ....................................................................................................................... 39
6.3 DMZ and MAC Clone ...................................................................................................... 40
6.4 Virtual Server .................................................................................................................. 41
Chapter 7. SIP Setting ...................................................................................................................... 42
7.1 Service Domain Se tting ................................................................................................. 42
7.2 Codec Setting ................................................................................................................. 43
7.3 SIP Advance Setting ...................................................................................................... 44
Chapter 8. Advance Setting ............................................................................................................. 48
Page 6

Users Manual of VIP-156/156PE/157S
-6-
8.1 Status Log....................................................................................................................... 48
8.2 Auto Config..................................................................................................................... 49
8.3 Management -- Advanced Setting ................................................................................ 50
8.4 Tones ............................................................................................................................... 52
8.5 TR-069 ............................................................................................................................. 52
Chapter 9. Other Setting .................................................................................................................. 54
9.1 System Authority ........................................................................................................... 54
9.2 Firmware Upgrade ......................................................................................................... 54
9.3 Auto Update Setting ...................................................................................................... 55
9.4 Reset to defaul t .............................................................................................................. 57
9.5 Save and Reboot ............................................................................................................ 57
9.6 Logout ............................................................................................................................. 57
Appendix A Voice Communication Samples ................................................................................... 58
Case 1: ATA to ATA connection via IP address .................................................................... 58
Case 2: (Peer-to-Peer mode) VIP-157S Port 1 to Port 2 communications .......................... 58
Case 3: Call Forward Feature_Example 1 .............................................................................. 59
Case 4: Call Forward Feature_Example 2 .............................................................................. 60
Appendix B The method of operation guide .................................................................................... 62
Call Transfer .............................................................................................................................. 62
3-Way Conferencing ................................................................................................................. 62
Call Waiting ............................................................................................................................... 62
Switch the Realm (Registration Proxy Server) ...................................................................... 63
Auto Update Firmware Manually (Keypad) ............................................................................ 63
Appendix C VIP-156/VIP-156PE/ VIP-157S Specifi catio ns .............................................................. 64
Appendix D Planet DDNS Application .............................................................................................. 65
Configuring PLANET DDNS Steps: ......................................................................................... 65
Page 7

Users Manual of VIP-156/156PE/157S
-7-
CHAPTER 1. INTRODUCTION
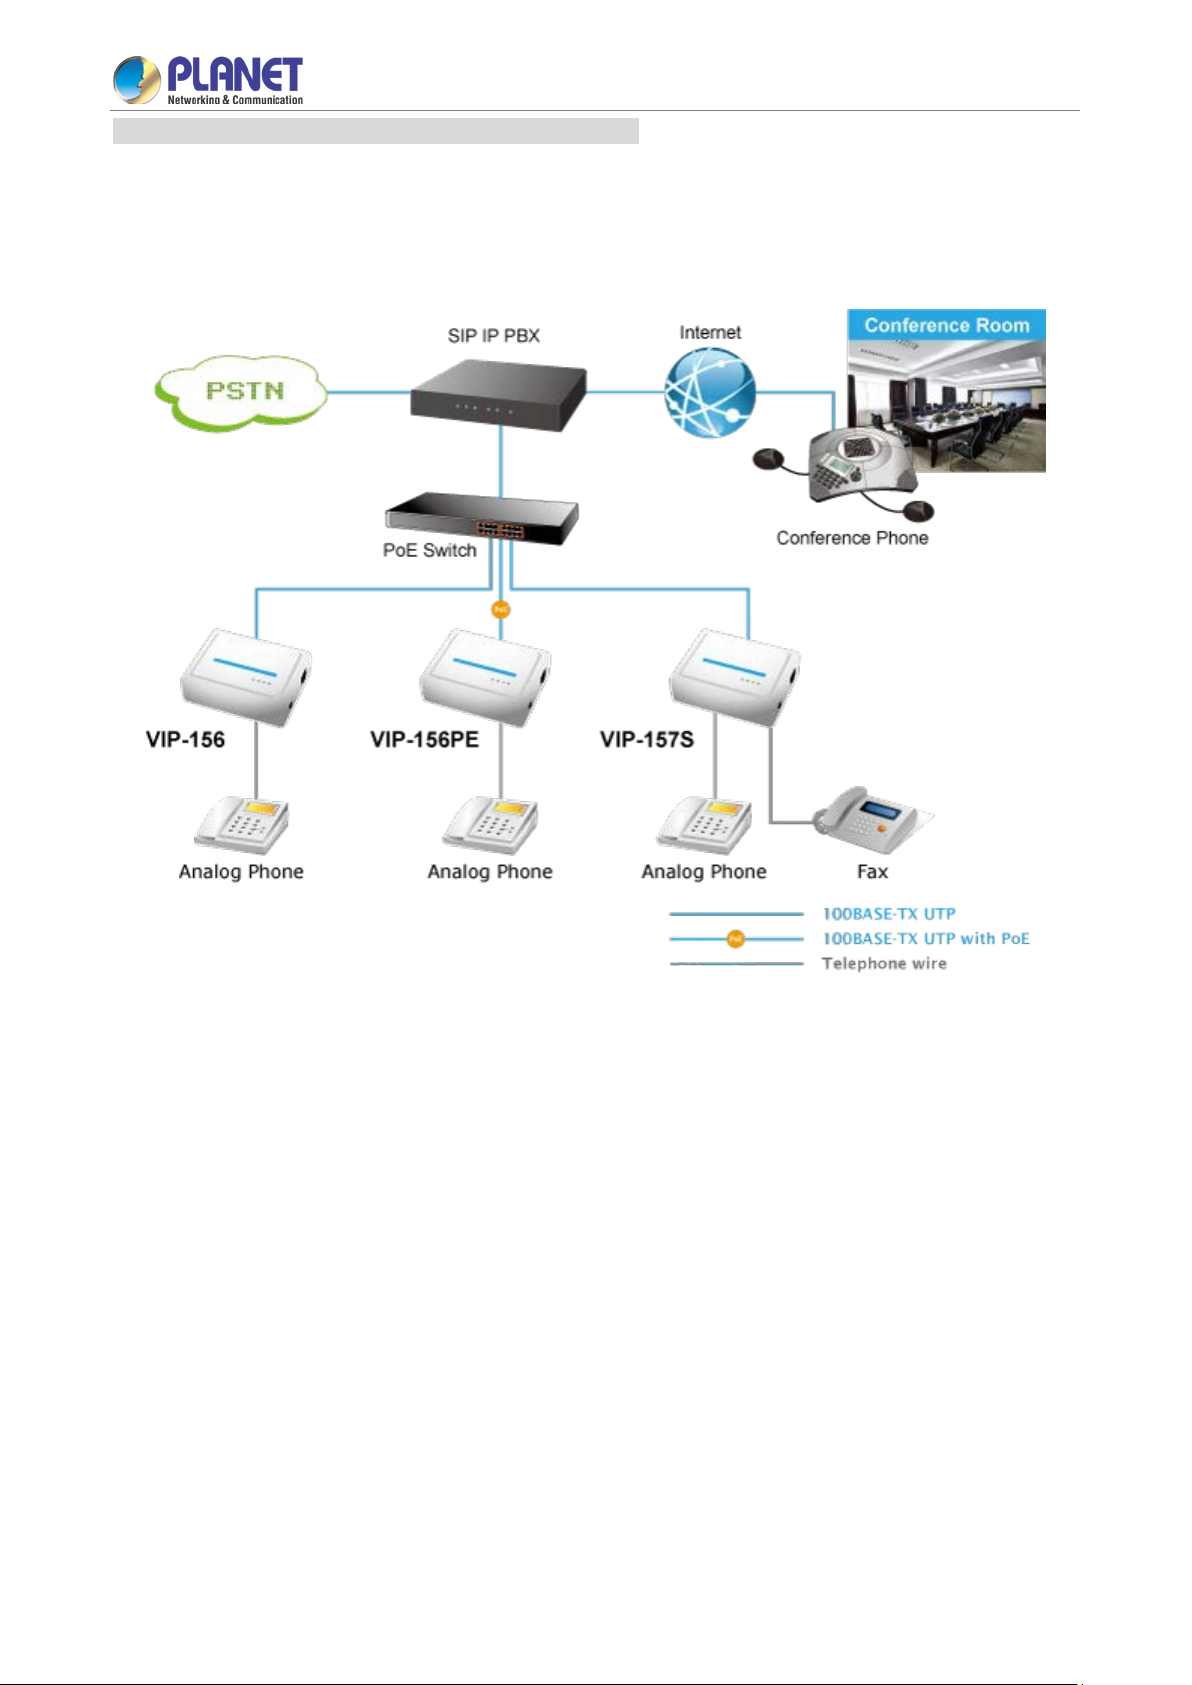
1.1 Overview
PLANET VoIP Adapter
PLANET VIP-156/VIP-156PE/VIP-157S, an easy-to-use-and-install Analog Telep hone Adapter , pr ovides the
same voice quality and reliability that users have come to expect from PLANET ATAs.
The VIP-156/VIP-156PE/VIP-157S is a 1-/2-port Analog Telephone Adapter which allows you to use your
existing analog phon es or fax mac hines to mak e calls using the int ernet. The VIP -156/VIP-156PE/VIP-157S
supports T.38 fax and works with most SIP-based internet service providers (ISPs). The
VIP-156/VIP-156PE/VIP-157S is a great choice for voice service providers because it is completely
customized auto-provisioning and auto-update. If you want to have the w orld's leading VoIP service, you
need to have the world's leading VoIP device!
Cost-effective, easy-to-install and simple-to-use, the VIP-156/VIP-156PE/VIP-157S converts standard
telephones to IP-based networks. With the 802.3af/at PoE integration (VIP-156PE only), the service
providers and enterprises can offer users traditional and enhanced the telephony communication services via
the existing broadband connection to the Internet or corporation network.
Professional Application
The VIP-156/VIP-156PE/VIP-157S inc ludes t wo Ether net i nterf aces for Internet (PP PoE, DHC P or Fixed I P),
or office LAN conn ection. Besides the IPv6, VPN (P PTP and L2TP), VLAN and PL ANET Easy Dynamic
Page 8
Users Manual of VIP-156/156PE/157S
-8-
DNS features, the VIP-156/VIP-156PE/VIP-157S is an intelligent lo w-density Voice over IP (VoIP) gateway
that enables carrier-class residential and business IP telephony services delivered over broadband or
high-speed Internet connections to two standard RJ11 telephones. The 10/100 LAN port allows internet
connectivity to be extended to a second device eliminating the need for a second Ethernet drop.
Calls from your VIP-156/VIP-156PE/VIP-157S to any other device on any VIP-156/VIP-156PE/VIP-157S
device anywhere in the world are always free! The VIP-156/VIP-156PE/VIP-157S allows you to use your
analog devices with any SIP trucking provider. Simply plug the Analog Telephone Adapter into your
broadband router and then plug your analog devices into the ATA. The VIP -156/VIP-156PE/VIP-157S also
can connect to your br oadband router and to another IP device such as a PC. The 2-port RJ45 r outer has
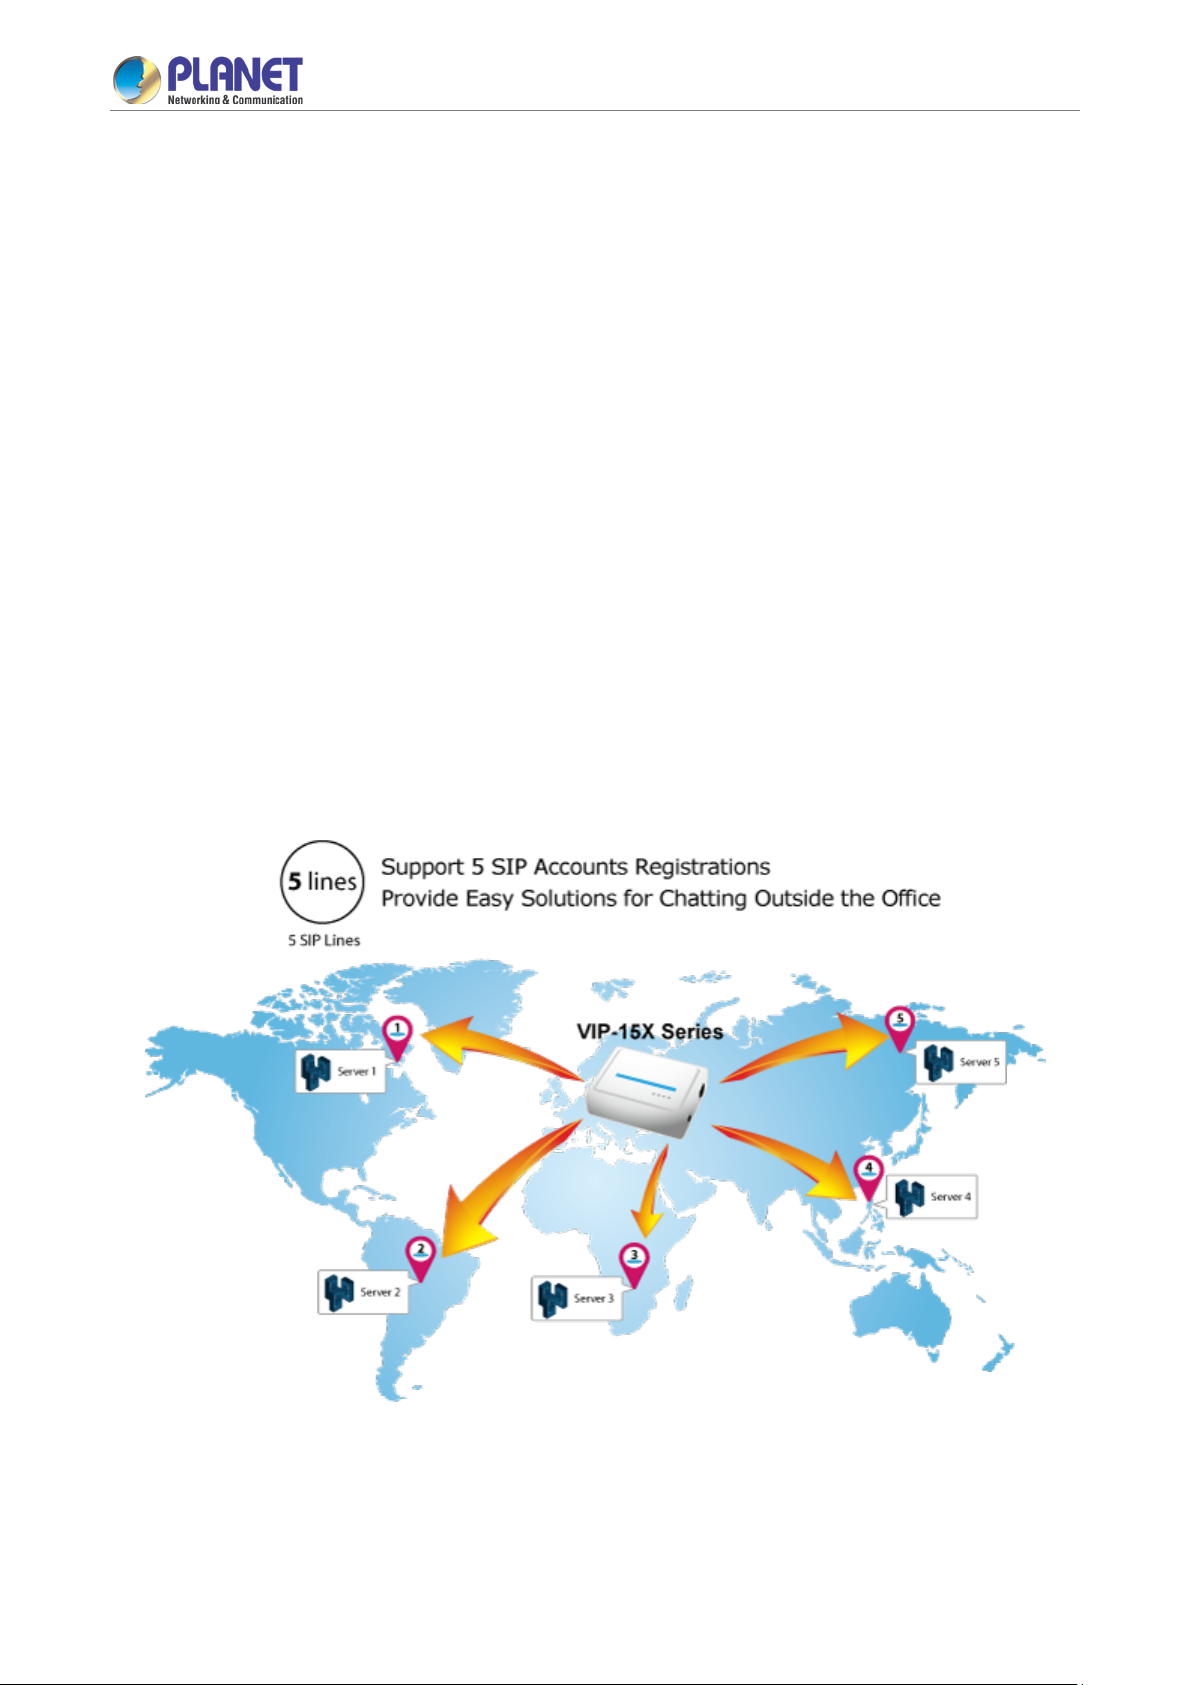
integrated QoS to ensure your voice traffic is prioritized above other types of traffic. It will support up to 5 VoIP
services or SIP accounts.
When used with a SIP service provider, you will enjoy value-added features such as message waiting
indication (MW I), hotline, three-way conf erencing, caller ID, call forward ( always, busy and no answer), call
waiting, Do Not Disturb (DND), dial plan and phone book. U sing a VI P-156PE with an analog ph on e as an I P
PBX telephone s ystem gives you a special feat ure at a consumer price; the VIP-156/VIP-156PE/VIP-157S
can be seamlessly integrated into the telephony network built by our IP PBX system series. The
VIP-156/VIP-156PE/VIP-157S a nd PLAN ET IP PBX Syst em (IPX-330/IPX-2100/IPX-2200/IPX-2500) are t he
ideal combination of your office daily communications.
Page 9
Users Manual of VIP-156/156PE/157S
-9-
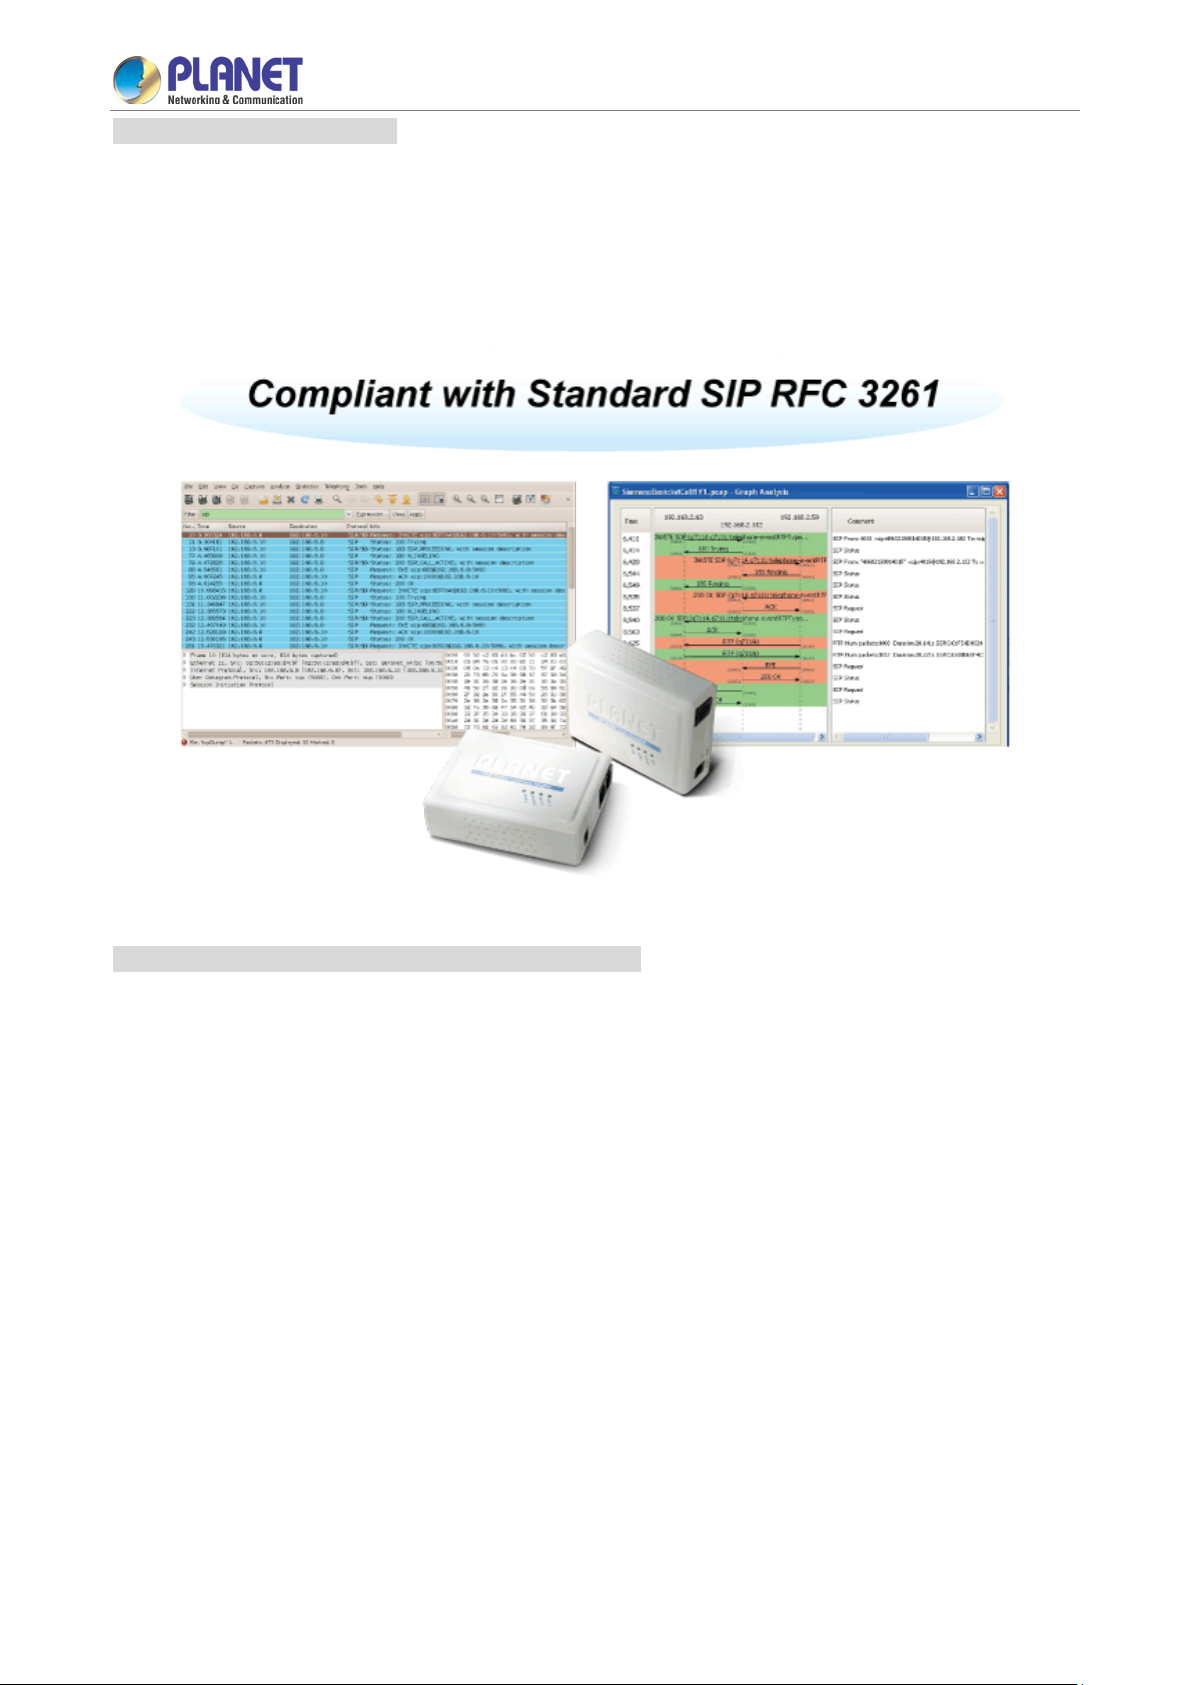
Compliant with IETFSIP 2.0
SIP service continues to gain popularity among businesses as the preferred protocol for enhancing
communication across IP networks. The VIP-156/VIP-156PE/VIP-157S supports Session Initiation Protocol
2.0 (RFC 3261), STUN and Outbound Proxy for easy integration with general voice over IP s ystem. The
VIP-156/VIP-156PE/VIP-157S is ab le to broadl y interoperate with equipm ent provide d by VoIP infr astructure
providers, thus enabling them to provide their customers with better voice over IP services.
Convenient Design Brings Quality Communication
Based on years of VoIP manuf acturing experiences, PLANET VoIP total solutions are k nown as advanced
implementation of standard-based telephony along with mass deployment capability.
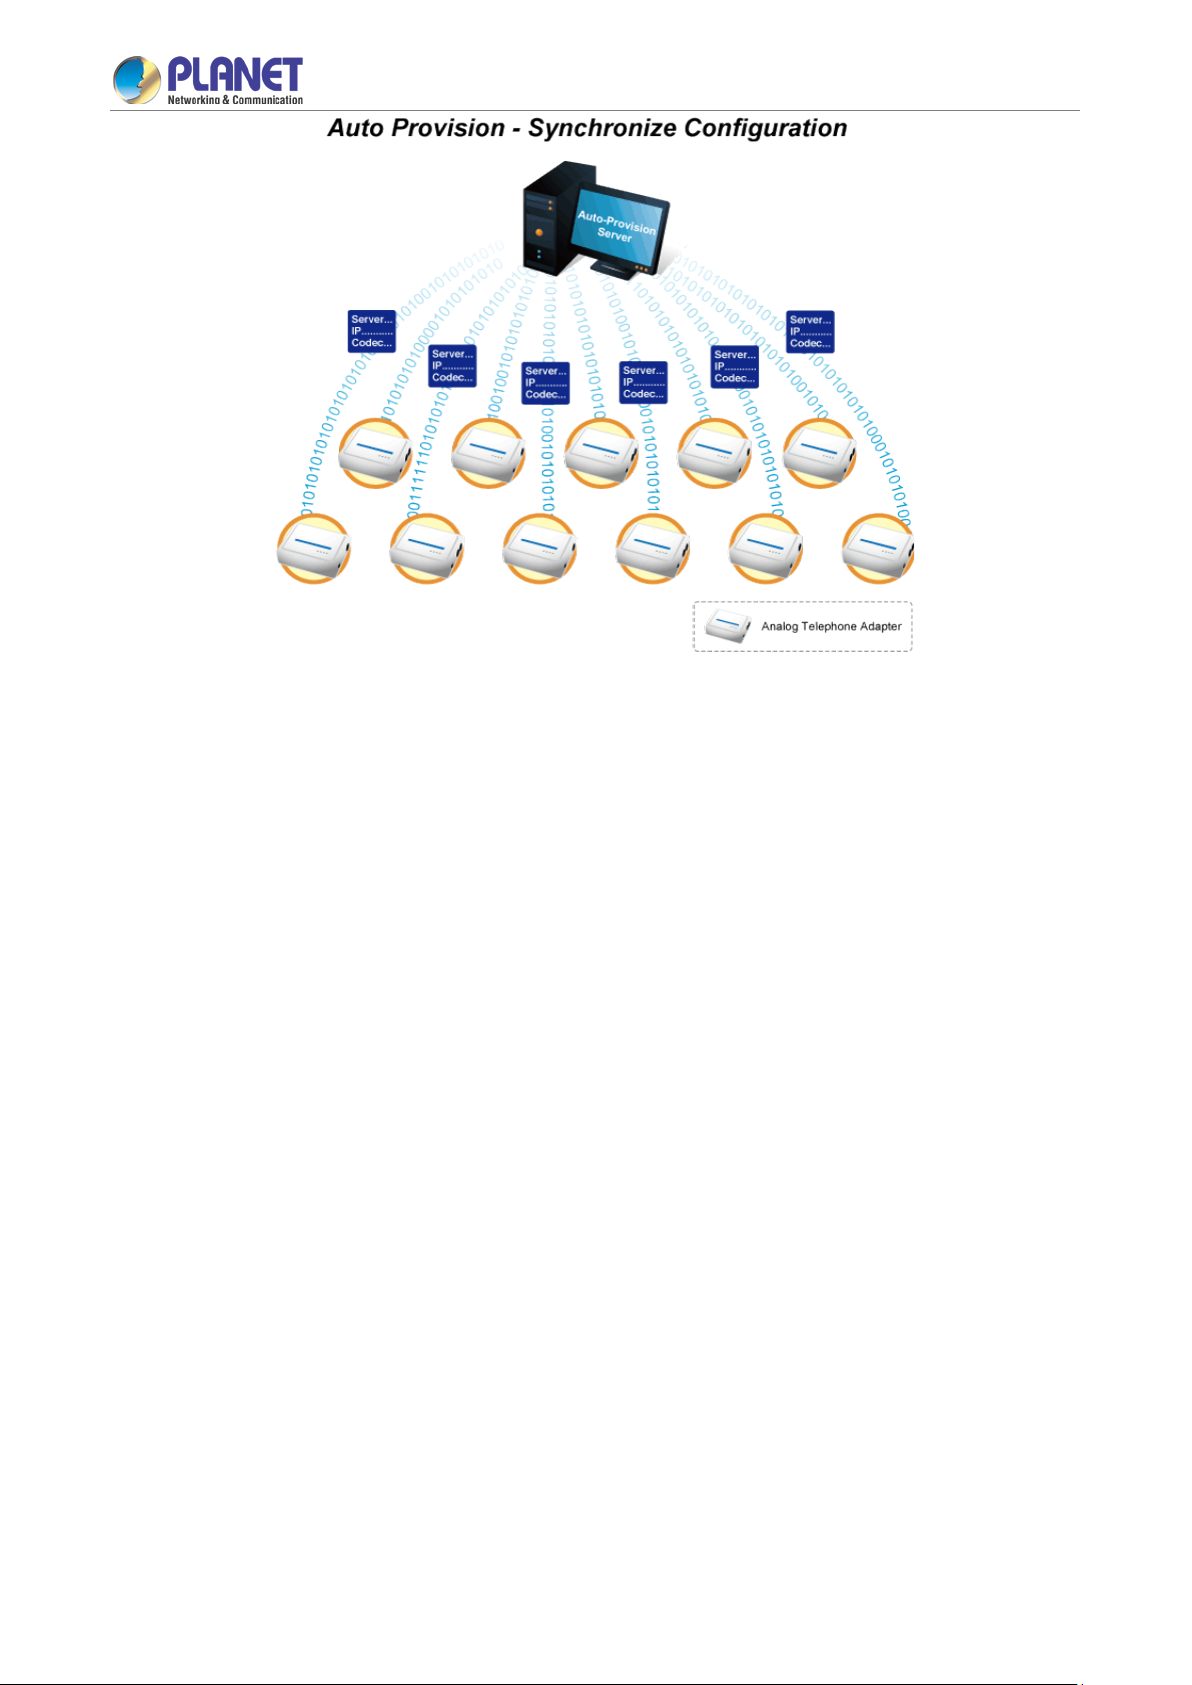
The VIP-156/VIP-156PE/VIP-157S is the lowest cost, fastest deployment ready ATA with auto-provision. The
ATA can be deployed d irectly to custom ers, redirecting autom atically to your pr ovisioning server or you can
use the TR069 ITSP portal for target profiles.
With the VIP-156/VIP-156PE/VIP-157S, enterprises are able to save the ins tallation cost and extend their
past investments in teleph ones, conference and spea kerphones. The VIP-156/VIP-156PE/VIP-157S can be
the bridge between the traditional analog systems and IP network with an extremely affordable investment.
Page 10
Users Manual of VIP-156/156PE/157S
-10-
Page 11
Users Manual of VIP-156/156PE/157S
-11-
1.2 Application
Enhanced, Full-Featured Analog Telephone Adapter
The VIP-156/VIP-156PE/VIP-157S is optimized for executive use for administrative assistants and those
working with bandwidth-intensive application on collocated PCs. Four programmable extension keys could be
configured as IP PBX features like, MWI, DND, Call Forward, Call Park and many others.
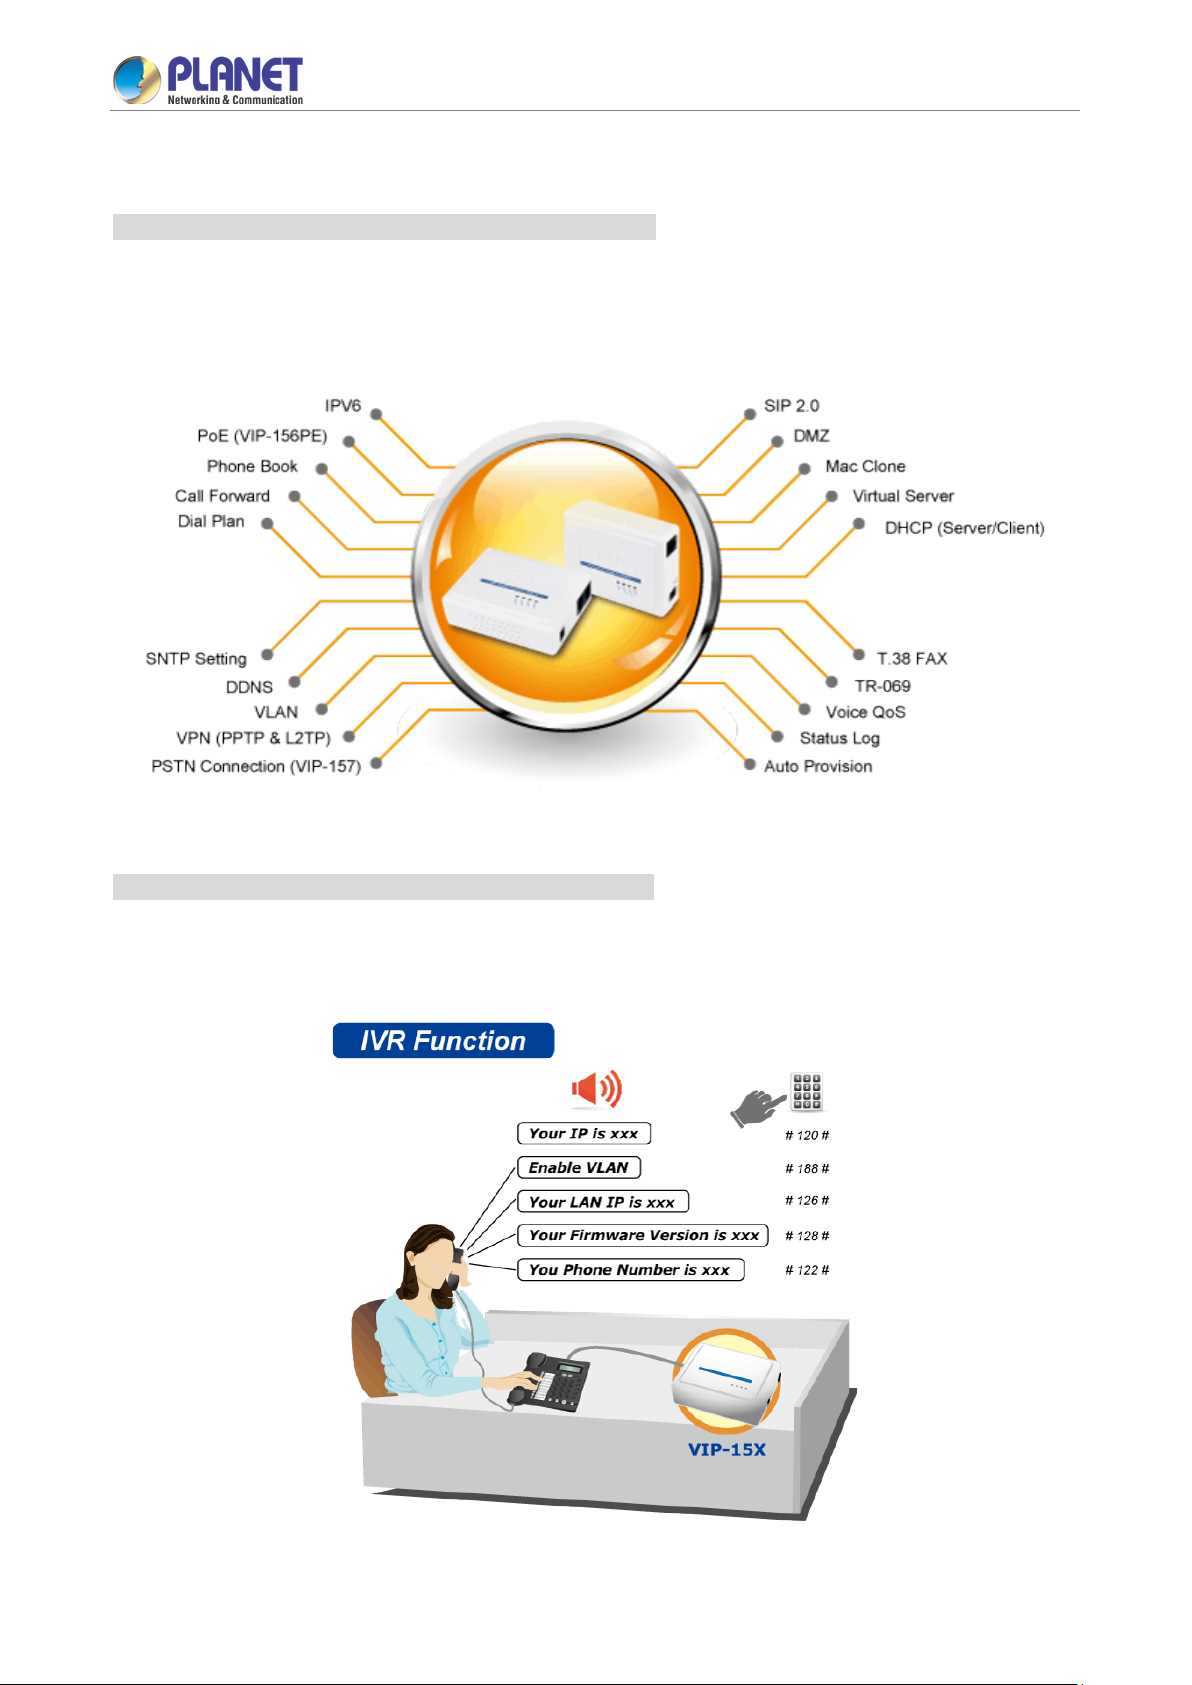
IVR Function to Easily Identify and Manage the AT A
Through the Interactiv e voice response (IVR) function, user can sim ply press so me function keys to sear ch
the device inform ation or program the ph one feature, e.g., #120 to chec k the LAN IP addres s, and #112 +
xxx*xxx*xxx*xxx# to assign the LAN IP address.
Page 12
Users Manual of VIP-156/156PE/157S
-12-
Enterprise IP Telephony Deployment of VIP-156PE
The VIP-156PE comes with exceptional audio quality and user-friendly features. The installation and
configuration of the IP phone are easier than those of the traditional phone system. Its low cost and
high-definition voice quality give you value for money. Based on standard SIP 2.0, it is compatible with all the
standard SIP-based servers.
Page 13

Users Manual of VIP-156/156PE/157S
-13-
1.3 Features
Product features
Feature-rich telephone service over home or office Internet/Intranet connection
Auto-provisioning features for flexible, ease-of-use IP PBX system integration
IEEE 802.3af/at Power over Ethernet compliant (VIP-156PE)
Up to 2 concurrent VoIP calls (VIP-157S)
Voice prompt for machine configurations
Quick Setup Wizard for easy configuration
Easy access with PLANET Dynamic DNS
Cost effective, field proven compatibility and stability
VoIP Feature
SIP 2.0 (RFC3261) compliant
Peer-to-Peer/SIP proxy calls
Voice codec support: G.711, G.723.1, G.729A/G.729B
T.38 fax transmission over IP network
Voice processing: Voice Active Detection, DT MF detection/generation, G.168 echo cancellation
(16mSec.), comfort noise generation,
In band and out-of-band DTMF support
Auto-provision (FTPP, HTTP, FTP)
Other Features
IPv6
VPN connection
Planet DDNS
VLAN
Local Phone book (download/upload)
QoS
IVR Function
802.3af PoE integration (VIP-156PE)
FXO integration (VIP-157)
Page 14

Users Manual of VIP-156/156PE/157S
-14-
1.4 Package Contents
The contents of your product should contain the following items:
VoIP Telephone Adapter
Power Adapter
Quick Installation Guide
RJ11 Cable x 1
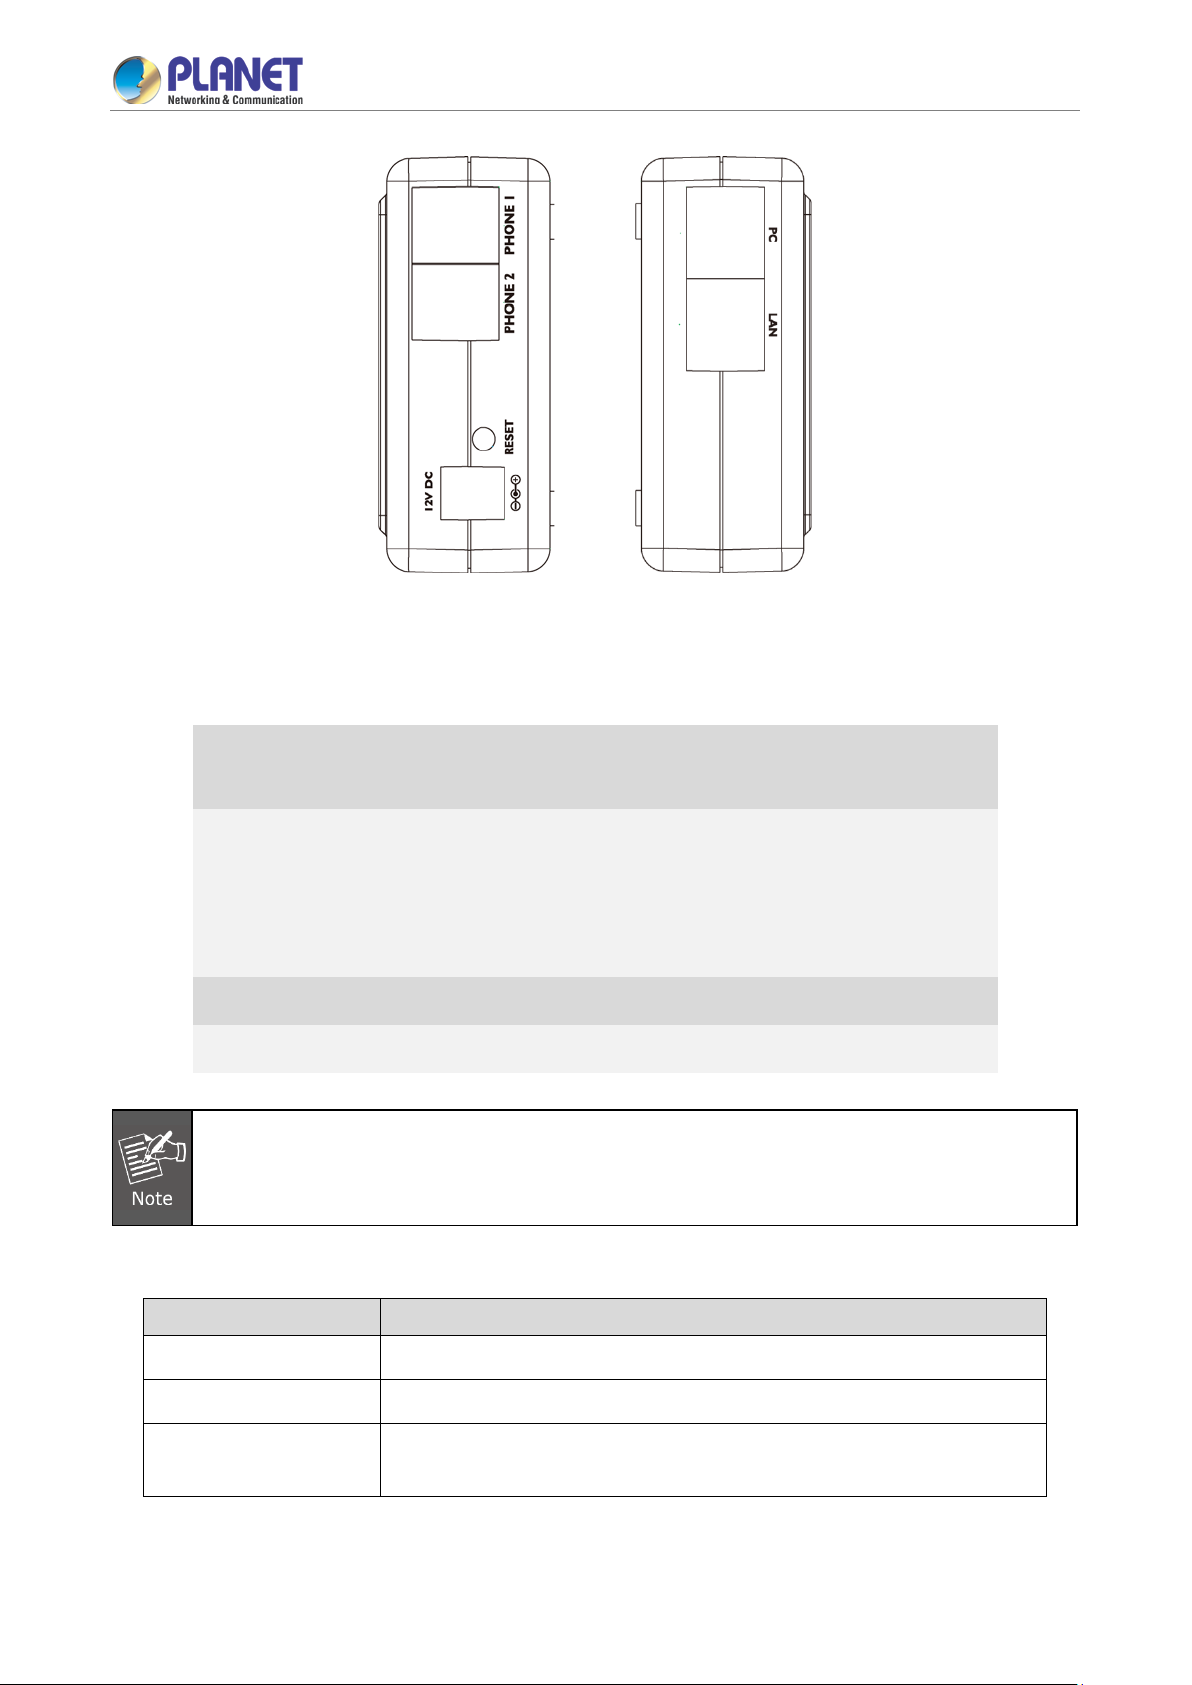
1.5 Physical Details
The following figure illustrates the front and rear panels of ATAs.
Respective models/descriptions are shown below:
VIP-156: SIP Analog Telephone Adapter
Front Panel of VIP-156
Left and Right Panels of VIP-156
Page 15

Users Manual of VIP-156/156PE/157S
-15-
VIP-156PE: 802.3af PoE SIP Analog Telephone Adapter
Front Panel of VIP-156PE
Left and Right Panels of VIP-156PE
VIP-157S: 2-port FXS SIP Analog Telephone Adapter
Front Panel of VIP-157S
Page 16
Users Manual of VIP-156/156PE/157S
-16-
is
interface also can be c onnected with 802.3 af PoE switch or
Left and Right Panels of VIP-157S
LED Display & Button
1 PC
2 LAN
3 12V DC
4 Reset
Machine default IP is http://192.168.0.1. Press the RESET button on the rear panel for over 5
seconds to reset the Vo IP Phone Adapter to fac tory default value. (Spe ed dial and call forwar d
settings are exceptional.)
RJ45 connector, to maintain the existing network structure,
connected directly to the PC through straight Cat5 cable.
RJ45 connector, for Int erne t acces s, c onnected d irect ly to Switch/Hub
through straight Cat5 cable.
The LAN
converter for power supply (VIP-156PE).
12V DC Power input outlet
Reset to the factory default setting
LED Display of VIP-156/VIP-156PE
LED Indicators Descriptions
PWR
STATUS
Power is supplied to the device.
The Status LED will flash when the machine is operational.
OFF: The device is connected to LAN at 10Mb/s.
LNK/ACT
ON: The device is connected to LAN at 100Mb/s.
Page 17

Users Manual of VIP-156/156PE/157S
-17-
LED Indicators Descriptions
OFF: The phone is idle.
RING
ON: The phone is in use (off hook).
Blinking: The phone is ringing.
LED Display of VIP-157/VIP-157S
LED Indicators Descriptions
STATUS
The Status LED will flash when the machine is operational.
OFF: The device is connected to LAN at 10Mb/s.
LNK/ACT
ON: The device is connected to LAN at 100Mb/s.
OFF: The phone is idle.
RING 1
ON: The phone is in use (off hook).
Blinking: The phone is ringing.
OFF: The phone is idle.
RING 2
ON: The phone is in use (off hook).
Blinking: The phone is ringing.
Page 18
Users Manual of VIP-156/156PE/157S
-18-
CHAPTER 2. PREPARATIONS & INSTALLATION
2.1 Physical Installation Requirements
This chapter illustrates basic installation of ATA Analog Phone Adapter (“ATA”).
• Network cables. Use standard 10/100BASE-TX netwo rk (UTP) cables with RJ45 connectors.
• TCP/IP protocol must be installed on all PCs.
For Internet Access, an Internet Access account with an ISP, and either of a DSL or cable modem
Administration interface
PLANET ATA provides GUI (Web-based graphical user interface) for machine management and
administration.
Web configuration access
To start ATA web configuration, you must have one of these web browsers installed on computer for
management
• Microsoft Internet Explorer 6.0.0 or higher with Java support
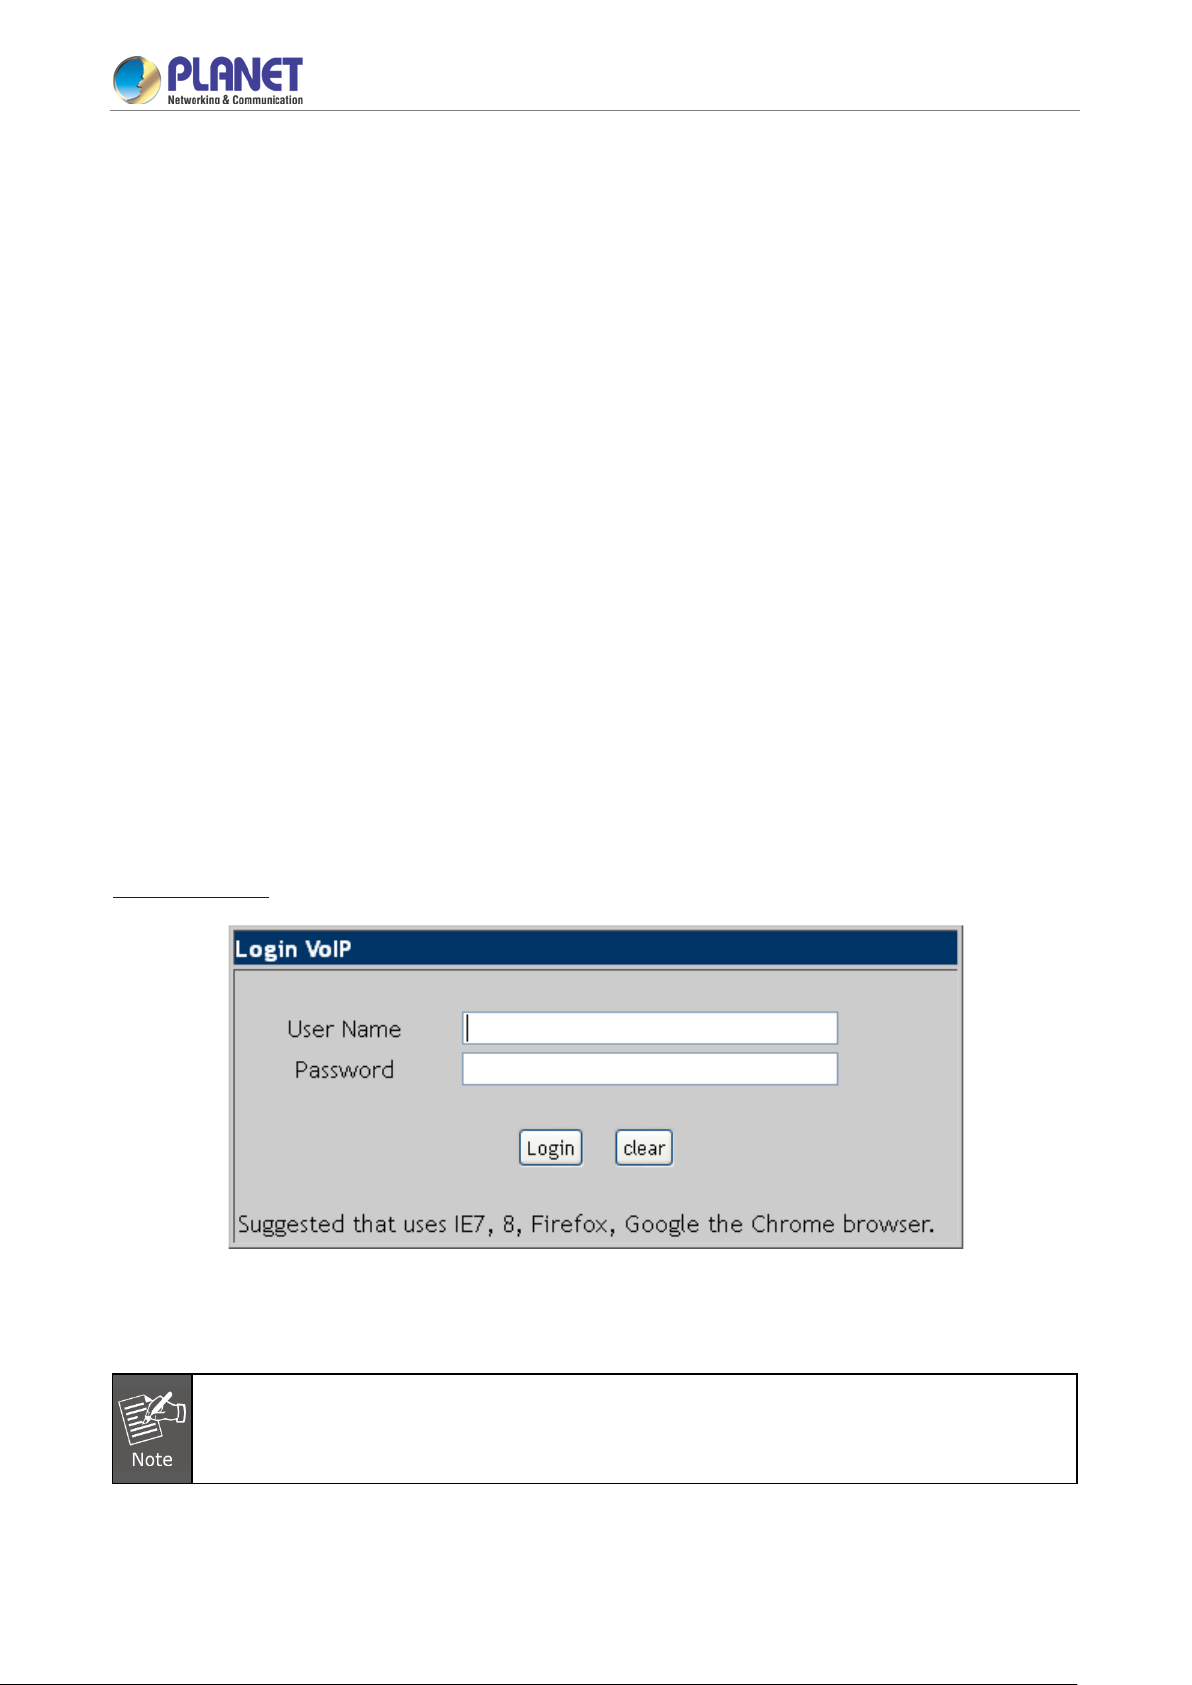
Default LAN interf ace IP address of AT A is 192.168.0.1. You m ay now open your web browser, and insert
http://192.168.0.1
ATA will prompt for logon u ser name/password. Please enter : root / null (no password) to continue machine
in the address bar of web browser to log on to the ATA web configuration page.
administration.
Please locate your PC in the same network segment (192.168.0.x) of ATA. If you’re not fam iliar
with TCP/IP, please refer to the related chapter on user’s manual CD or consult your network
administrator for proper network configurations.
Page 19
Users Manual of VIP-156/156PE/157S
-19-
ATA will change to
when entering a
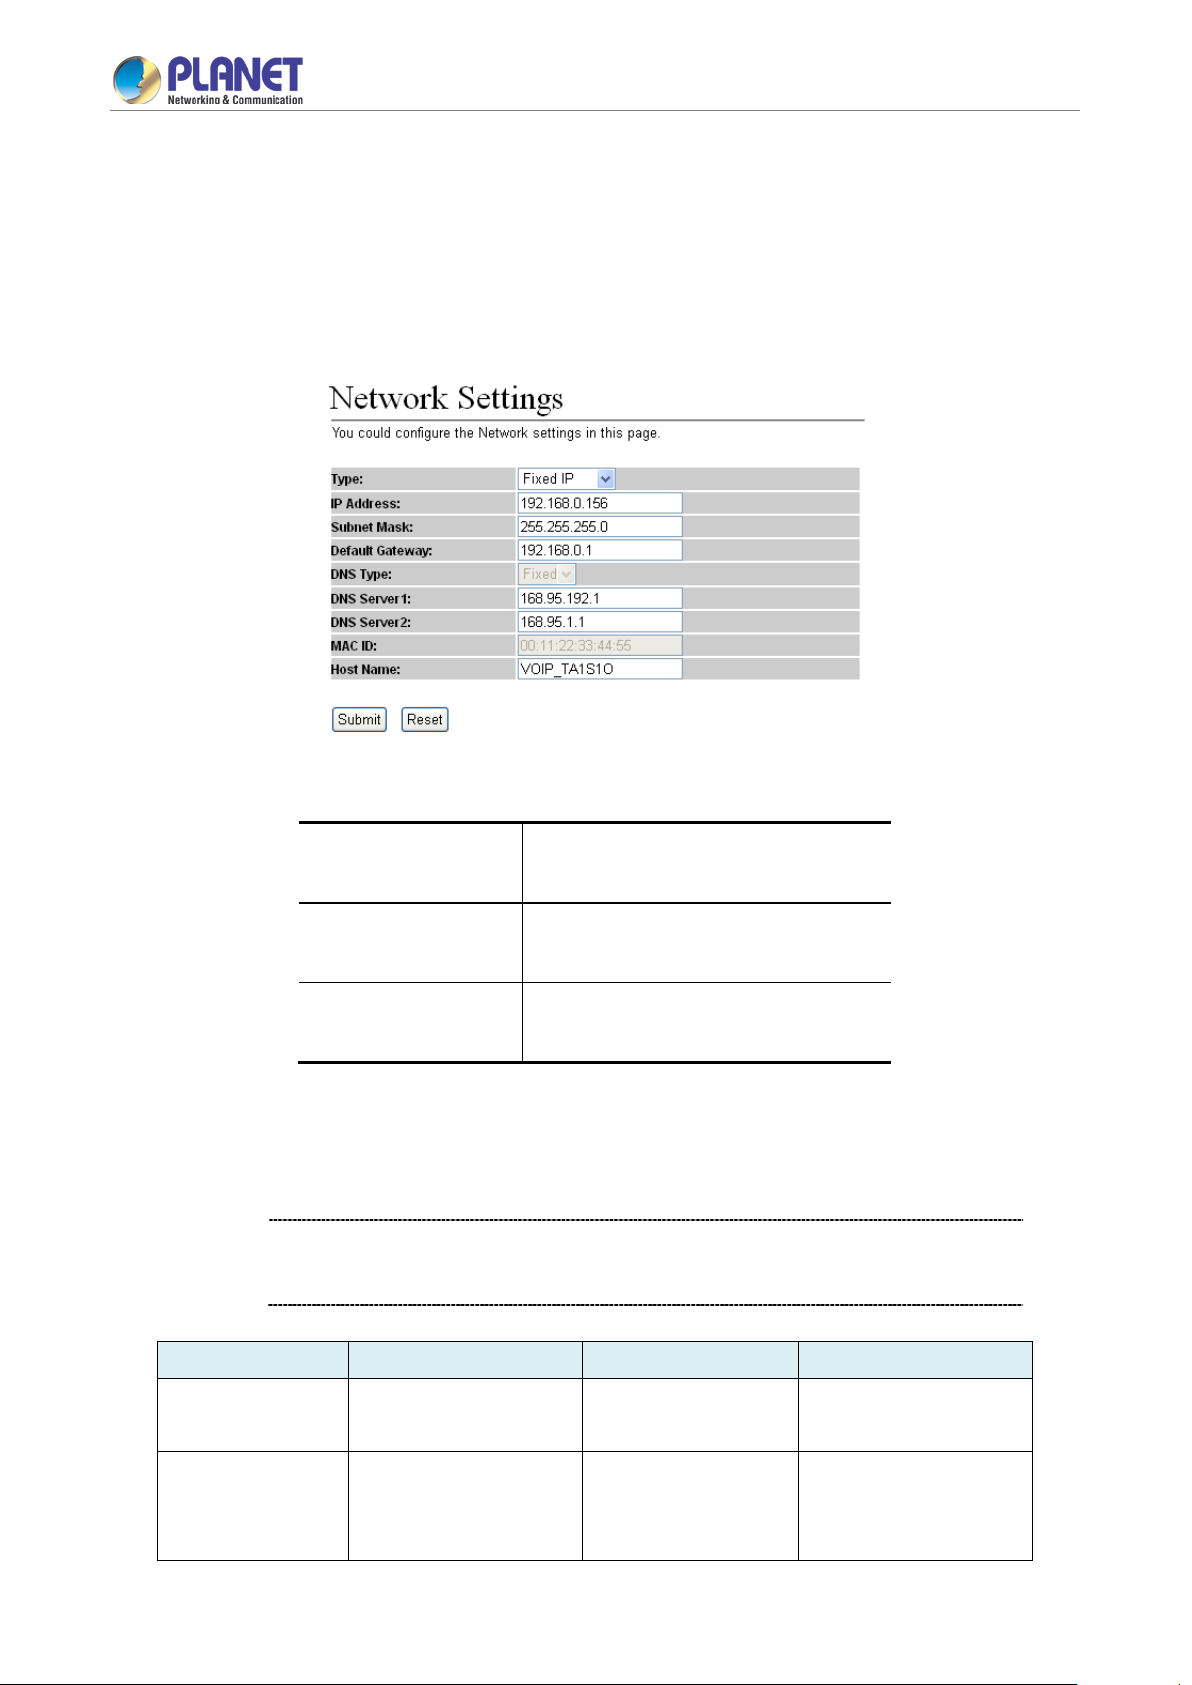
2.2 LAN IP address configuration via web configuration
interface
Execute your web browser, and inser t the IP address (defau lt: 192.16 8.0.1) of VIP in the addres s bar. Af ter
logging on to the machine with username and password (default: root and no password), browse “Network”
--> “Network Settings” configuration menu:
Parameter Description
IP Address LAN IP address of ATA
Default: 192.168.0.1
Subnet Mask LAN mask of ATA
Default: 255.255.255.0
Default Gateway Gateway of ATA
Default: 192.168.0.254
Network settings via Keypad commands
The ATA series phone adapters support te lephone k eypad conf igurations . Please conn ect analog t elephon e
set and refer to the following table for machine network configurations.
When you want to run the setup or the start function, you m ust unlock the protec t
Hint
function #190# before setting up network settings and ATA function via keypad.
IVR Menu Choice Machine Operation Parameter(s) Notes:
#111#
#112xxx*xxx*xxx*
xxx#
Set DHCP client None
Use the * (star) key
Setup Static IP Address
decimal point.
DHCP Client
DHCP will be disabled
and system will change
to the Static IP type.
Page 20

Users Manual of VIP-156/156PE/157S
-20-
when entering a
Set Gateway IP
when entering a
Set Primary DNS
when entering a
The system will be
network settings via
and reboot
0*
IVR Menu Choice Machine Operation Parameter(s) Notes:
#113xxx*xxx*xxx*
xxx#
#114xxx*xxx*xxx*
xxx#
#115xxx*xxx*xxx*
xxx#
#190#
#191#
Use the * (star) key
Set Network Mask
decimal point.
Use the * (star) key
Address
decimal point.
Use the * (star) key
Server
decimal point.
Unlock None
Lock None
Must set Static IP first.
Must set Static IP first.
Must set Static IP first.
Must unlock the protect
function before setting
up network settings and
ATA function via
keypad.
locked and can’t set up
keypad.
#195#
Reboot None
The system will reboot
automatically.
The system will be reset
#198#
Factory Reset None
to factory default value
automatically.
To switch PSTN mode None VIP-157 only
The following keypad commands can be used to display the network settings enabled on ATA via voice
prompt.
IVR Menu Choice
Machine Operation Notes:
IVR will announce the current PC-port
#120#
Check PC IP Address
IP address of the ATA.
IVR will announce if DHCP is enabled or
#121#
Check network connection type
disabled.
#122#
#123#
#124#
Check the Phone Number
IVR will announce current enab led VoIP
number.
IVR will announce the current network
Check Network Mask
mask of the ATA.
IVR will announce the current gateway
Check Gateway IP Address
IP address of the ATA.
Page 21

Users Manual of VIP-156/156PE/157S
-21-
Check Primary DNS Server
Law, 2:
Law, 3:
G.723.1, 4: G.729a, 5:
G.726 16K, 6: G.726
24K, 7: G.726 32K, 8:
Handset Gain from
You can set the Handset
gain to proper value,
Handset Volume from
Set Auto config TFTP
You can set the TFTP
Set Auto config FTP
You can set the FTP
Disable, 1: TFTP
configuration mode, 0:
Disable, 1: use TFTP
Server, 2: user FTP
IVR Menu Choice
Machine Operation Notes:
IVR will announce the curr ent setting in
#125#
Setting
the Primary DNS field.
IVR will announce the current LAN por t
#126#
Check LAN IP Address
IP address of the ATA.
IVR will announce the version of the
#128#
Check Firmware Version
firmware running on the ATA.
The following keypad commands can be used to set up the main function .
IVR Menu Choice Machine Operation Parameter(s) Notes:
#138#
#139#
#160#
#510#
#511#
#512#
Enable call waiting None Enable call waiting
Disable call waiting None Disable call waiting
Update firmware None Update firmware
Blind Tr ansfer ATA Blind Transfer
Attendant T rans fer ATA Attendant Transfer
3-way calling ATA 3-way calling
#514#
#130+[1~8]#
#131+[00~15]#
#132+[00~12]#
#135xxx*xxx*xxx*
xxx#
IP transfer to PSTN
Set Codec
Set Handset Gain
Set Handset Volume
TFTP Server IP Address
ATA transfer IP call to
PSTN side
1:G.711 uG.711 a-
G.726 40K,
0~15
0~12
Server IP Address
You can set the codec you
want to be the first priority.
default is 10
You can set the handset
volume to proper value;
default is 10
Server IP address
#136xxx*xxx*xxx*
xxx#
#137+[0~2]#
FTP Server IP Address
Auto config mode
Server IP Address
0:
mode, 2: FTP mode
Server IP address
You can set the auto
Server
Page 22

Users Manual of VIP-156/156PE/157S
-22-
nable forward to FXS
Eanble forward to FXS
IVR Menu Choice Machine Operation Parameter(s) Notes:
#145#
#146+Number#
#147+Number#
Forward function disable Disable forward function
E
Port
Enable forward to FXO
Port
Port
Eanble forward to FXO
Port
#116# Enable PPTP function None Enable PPTP function
#117# Disable PPTP function None Disable PPTP function
#118# Enable VLAN function None Enable VLAN function
#119# Disable VLAN function None Disable VLAN function
Please contact your Internet service provider to obtain the Internet access type,
Hint
and select the proper network settings in ATA to establish the network connections.
After confirming the modification you’ve done, please click on the Submit button to apply settings and browse
“Save & Reboot” menu to reboot the machine to make the settings effective.
Connection Type Data Required.
Fixed IP
DHCP client
PPPoE
In most circumsta nce s, it is no need to configure the DHCP settings.
The ISP will assign IP Address, and related information.
The ISP will assign PPPoE username/password for Internet access,
Please consult your ISP personnel to obtain proper PPPoE/IP address related
information, and input carefully.
Hint
If Internet connection c annot be es tabl ished, pl ease chec k the physica l connect ion
or contact the ISP service staff for support information.
Save Modification to Flash Memory
Most of the VoIP ro uter parameters will be effect ive after modifications, but it i s just temporarily stored on
RAM only. It will disappear after you reboot or power off the VoIP Phone Adapter. To save the parameters into
Flash ROM and let it be effective f orever, please remember to press the Save & Reboot butto n after you
modify the parameters.
Page 23

Users Manual of VIP-156/156PE/157S
-23-
CHAPTER 3. NETWORK SERVICE
CONFIGURATIONS
3.1 Configuring and monitoring your ATA from web browser
The ATA integrates a web-based graphical user interface that can cover most configurations an d machine
status monitoring. Via s tandard web browser, you can c onfigure and check machine status from anywhere
around the world.
3.1.1 Overview of the web interface of ATA
With web graphical user interface, you may have:
More comprehensive setting feels than traditional command line interface.
Input data fields, check boxes, and changing machine configuration settings
Machine running configuration
To start ATA web configuration, you must have one of these web browsers installed on computer for
management.
Microsoft Internet Explorer 6.0.0 or higher with Java support
3.1.2 Manipulation of ATA via web browser
Log on to ATA via web browser
After TCP/IP configurations on your PC, you may now open your web browser, and input http://192.168.0.1 to
log on to the Phone Adapter web configuration page.
Phone Adapter will prompt for logon username/password: root / null (no password)
ATA login page
When users log in to the web page, users can see the Phone Adapter system information like firmware
version, company, etc on this main page.
Page 24

Users Manual of VIP-156/156PE/157S
-24-
VoIP Phone Adapter main page
Page 25

Users Manual of VIP-156/156PE/157S
-25-
CHAPTER 4. VOIP TELEPHONE ADAP TER
CONFIGURATIONS
4.1 Status
Status shows all the system information like WAN/LAN IP address, system information, IPv6 connection
information, regist er st atus and VPN connection m es sage. ( Af ter you set up the VPN line, the status will start
to show.)
Page 26

Users Manual of VIP-156/156PE/157S
-26-
4.2 Phone Book
ATA can set up 140 r ecord s of Phone B ook . User c an dia l the Name records to m ake calls vi a Phone Book
feature.
Field Description
Phone Book Page
Phone
The default is Page 1. You can s elect Page 1 ~ Page 7 to look through
Phone Book records.
The record number is from 1 ~ 140; it can set up 140 records in total.
Page 27

Users Manual of VIP-156/156PE/157S
-27-
Field Description
Name
URL
Delete
Export csv
Upload
The name of Phone Book records; it only can input numerals character.
Fill in the outgoing number (Line Number) or IP address.
Clean this item’s data.
Save the phone book data as CSV file.
Upload the phone book file
If you need to a dd a ph one number to th e Ph one B ook list, you nee d t o inp ut the position, the name, and the
phone number (by URL type). When you finish a new phone list, just click the “Submit” button.
If you want to delete a phone number, you can select the phone number you want to delete and then click the
“Delete” button.
Press “Reset” to erase the data that you didn’t save.
For Example:
Example_1:
ATA has added the above phone num bers. User picks up the handset and dial “301” to mak e the P2P call
(301@192.168.1.2
).
Example_2:
User picks up the handset and dial “206” to make the Proxy call (17476433364).
Example_3:
User picks up the handset and dial “202” to make the P2P call (192.168.1.2:5062).
Page 28

Users Manual of VIP-156/156PE/157S
-28-
4.3 Call Service
[Call Forward]
This page defines Call Forward function. You can set up the phone number you want to forward on this page.
There are three types of Forward mode. You can choose All Forward, Busy Forward, and No Answer Forward
by clicking the icon.
All Forward:
All incoming call will forward to the number you choose. You can input the name and the phone number in the
URL field. If you select this function then all the incoming calls will direct forward to the speed dial number you
choose.
Busy Forward:
If you are on the phone the new incoming call will forward to the number you choose. You can input the name
and the phone number in the URL field.
No Answer Forward:
If you cannot ans wer the p hone, the incom ing cal l will f orward to the num ber you choose. You can input t he
name and the phone number in the URL f ield. Also you have to set t he Tim e Out time for system to start to
forward the call to the number you choose.
When you finish the setting, please click the Submit button.
Page 29

Users Manual of VIP-156/156PE/157S
-29-
[Hotline Type]
This page defines the Hot line setting on this page. When user picks up the handset, the device will call to the
specific number automatically.
Hotline Type:
Click Enable to carry the Hot line function out.
Hotline number:
The hot line number can input the IP address or registration number.
Delay time:
If you don’t dial for a period of time, it will automatically dial the hotline number.
[DND Type]
This page defines the DND Setting to keep the phone silent. You can choose Always Block or Block a period.
Always Block:
All incoming calls will be blocked until this feature is disabled.
Block Period:
Set a time period and th e phone will be block ed dur ing the t ime peri od. If the
“To” time, the Block time will from Day 1 to Day 2.
When you finish the setting, please click the Submit button.
“Fr om ” time is larger than the
[Alarm Type]
This page defines the Alarm setting on this page. It provides the alarm function, and it can set up the Alarm
Time to get the telephone rung every day.
Alarm Type:
The default is Off. If set up as On, the telephone will ring at a specific time.
Alarm Time:
It can set up the system prompt time within 24 hours.
Alarm Line:
Select the Line for alarm.(only for VIP-157S)
Page 30

Users Manual of VIP-156/156PE/157S
-30-
4.4 SNTP setting
This page defines the primary and second SNTP Server IP Address to get the date/time information. Also you
can base on your locati on to set the Time Zone, dep ending on how long you need to s ynchronize it again.
User can also use the “d aylight sa ving” to adjust the daylig ht tim e. W hen you finish the sett ing, please click
the Submit button.
4.5 Volume Setting
This page defines the Handset Volume, Ringer Volu me, and t he Ha ndset Gai n. W hen you f inish the settin g,
please click the Submit button.
Handset Volume is to set the volume you can hear from the handset.
Handset Gain is to set the volume sent out to the other side’s handset.
Volume Settings for VIP-156T/VIP-156PT
Page 31

Users Manual of VIP-156/156PE/157S
-31-
4.6 Dial Plan Setting
This page defines the Dial Plan Setting function. This function is to input the phone number by the keypad but
you don’t need to press “#”. After time out the system will dial directly.
Dial Plan Settings for VIP-156
Field Description
The rule of add or r eplace code -- If Disable is set, it will add the prefix
Drop Prefix
Prefix
Rule Rule
number prior to the ide ntification number. If Enable is set , it will replac e
the identification number.
The prefix number -- It only accepts the numeral and the max. length is 8.
The identification num ber -- I t can acc ept the num eral or s ymbol and t he
max. length is 40.
- Symbol: It only accepts the [+], [x]
- +: It means “or”. For exam ple, [123+456+334+5xx] even if [123 or
456 or 334 or 5xx]
- x: It is equal to 0~9. For exam ple, [5xx] even if the num ber begins
with 5.
Page 32

Users Manual of VIP-156/156PE/157S
-32-
Field Description
If the dialing number matches this field, it will d ial out and need no t have
to press the “#” key to end the dialing. It ac cepts the n umeral or s ymbol,
Dial Now Rule
and the max. length are 124.
Realm 1/2/3/4/5
These options can define the switching code for each Realm No.
Area Code
Inter Digit Time
Dialed number is sent out after dialing is stopped.
(Auto Dial Time)
If Yes is set, the system will stop receiving the dialed number when
receiving the [#] key. T he system also will determ ine the Auto Dial T ime,
Key as send #
It will carry out the c alling if ther e is no dialing after the Auto Dial T im e. If
No is set, the system will do according to the Auto Dial Time to determine
the end time.
Descriptions of example:
The starting number can’t be “0”. For exam ple, if the num ber
is “0xxxx”, the system will ignore this dial plan.
Example_1: Drop pref ix: Disable, Prefix: 002, Rule: 8613+8662
1. If the dialing num ber is “8613xxxxx”, it will matc h the rule [861 3], the n system will autom aticall y add the
prefix [002] in front of [8613].The real dialing number is [002+8613xxxxx].
2. If the dialing num ber is “8662xxxxx”, it will matc h the rule [866 2], the n system will autom aticall y add the
prefix [002] in front of [8662].The real dialing number is [002+8662xxxxx].
Example_2: Drop pref ix: Enable, Prefix: 006, Rule: 002+003+004+005+007+009
Page 33

Users Manual of VIP-156/156PE/157S
-33-
1. If the dialing number is “ 002+86xxxx”, it wil l match the rule [002], then system will autom atically replace
the prefix [002] to the prefix number [006].The real dialing number is [006+8613xxxxx].
2. If the dialing number is “ 003+77xxxx”, it wil l match the rule [003], then s ystem will automat ically replace
the prefix [003] to the prefix number [006]. The real dialing number is [006+77xxxx].
Example_3: Drop prefix: Disable, Prefix: 009, Rule: 12
1. If the dialing number is “ 12xxxxx”, it will match the r ul e [12], then system will aut omatically add the prefix
[009] in front of [12].The real dialing number is [009+12xxxxx].
Example_4: Drop pref ix: Disable, Prefix: 009, Rule: 53+35xx+21xx
1. If the dialing num ber prefix is [53789], i t will match th e rule [53], then s ystem will autom atically add the
prefix [007] in front of [53789].The real dialing number is [007+53789].
2. If the dialing num ber prefix is [ 3507], it wi ll match the rule [35xx], t hen system will autom atically add t he
prefix [007] in front of [3507].The real dialing number is [007+3507].
3. If the dialing num ber prefix is [ 2199], it w ill matc h the rule [21xx], t hen system will autom atically ad d the
prefix [007] in front of [2199].The real dialing number is [007+2199].
Example_5: Dial Now: *xx+#xx+11x+xxxxxx
1. If the dialing number matches with the rule of “*xx”, it will send out the dialing number directly. For
example, *00/ *01/ *02…*99.
2. If the dialing number matches with the rule of “#xx”, it will send out the dialing number directly. For
example, #00/ #01/ #02…#99.
3. If the dialing number matches with the rule of “11x”, it will send out the dialing number directly. For
example, 111/ 112/ 113…119.
4. If the dialing number m atches with the rule of 8 dig its, it will send out the dialing number directly. For
example, 12345678.
Page 34

Users Manual of VIP-156/156PE/157S
-34-
4.7 General
This page defines the volume, auto answer, caller ID, and call waiting caller ID (CID type II),
VIP-156
Field Description
Default is enable.
Call Waiting
Ring Timeout
Caller ID Scheme
CID Type II
When you are talking with other people , you can choose if you want to
hear the message when there is a new incoming call. If the call waiting
function is On, if there is a new incom ing call, you will hear the call
waiting message in your current call. If you set the function to Off, then
you will not hear any message.
Default is 60 (sec). After how long the s ystem will repl y the bus y (486
busy) message.
Set the caller ID m ode, it supports FSK Bellcore, DTFM, CID-Japan,
DTMF-Brazil, DTMF-Denmark.
FSK Bellcore: FSK caller ID mode.
DTMF: Before the first ring, it will send the DTMF caller ID data.
CID-Japan: Japan (Japan) caller ID mode
DTMF-Brazil: Brazil (Brazil) caller ID mode
DTMF-Denmark: Denmark (Denmark) caller ID mode
To enable the show caller ID function in call waiting.
When enabling this function, system will receive a new call in call
waiting. It will display the caller ID
Your phone must also support CID Type 2.
T.38 (Fax)
T.38 Pass-through
Codec
Enable/Disable T.38 Fax function.
Define the T.38 pass-through codec; it can support G.711 u-law/G.711
a-law.
Page 35

Users Manual of VIP-156/156PE/157S
-35-
CHAPTER 5. NETWORK
5.1 Network Setting
This page defines the LAN setting on this page.
Field Description
The default is Fixed IP, and it also provides DHCP Client and PPPoE
connection modes.
WAN Active
IP Address
Subnet Mask
Default Gateway
DNS Active
Primary DNS
Second DNS
MAC Address
Fixed IP: It could set up the IP address manually.
DHCP Client: It will acquire the IP address automatically.
PPPoE: It will use the PPPoE connection method
The IP address
The sub net address
The default gateway address
Static/Automatically, manually set up the DNS server or automatically
accept the DNS server.
The default is 168.95.192.1; it could set up the first DNS server address.
The default is 168.95.1.1; it could set up the second DNS server address.
The MAC of LAN port
System Name
PPPoE User Name
PPPoE Password
PPPoE Service name
PPPoE AC Name
The product model
The PPPoE connection account name. It could input numeral or
character; the maximum date length is 63.
The PPPoE connection account password. It could input numeral or
character; the maximum date length is 63.
PPPoE Service provider name
PPPoE AC name.
Page 36

Users Manual of VIP-156/156PE/157S
-36-
5.2 DDNS Setting
This page defines the DDNS setting on this page. You need to have the DDNS account and input the
information properly. You can have a DDNS account with a public IP address, then others can call you via the
DDNS account. But no w most of the VoIP app lications work with an SIP Proxy Server. When you finish the
setting, please click the Submit button.
(For better service, Planet provides Planet DDNS. You can apply your DDNS account on its web site
www.planetddns.com)
DDNS Settings for VIP-156/VIP-156PE/VIP-157S
5.3 VLAN Setting
This page defines the VLAN setting on this page. T his function needs to co-operate with net work devices
which have VLAN function . Also this page defines th e SIP and RTP port number on this page. Each ISP
provider will have a different SIP/RTP port setting. Please refer to the ISP to set up the port number correctly.
When you finish the setting, please click the Submit button.
Page 37

Users Manual of VIP-156/156PE/157S
-37-
Field Description
VLAN Activity
VID (802.1Q/TAG)
User Priority (802.1P)
Field Description
SIP VID
SIP User Priority (802.1P)
RTP VID
RTP User Priority (802.1P)
If On is set, it could receive VLAN messages.
Dispose VLAN ID is added as a T ag header af ter enabling the
VLAN function. The real ized v oice pac k ets trans fer is sim ilar to
that of VLAN. T he prere qui site is it m ust be the sam e as VL AN
of upper switch. The value range is 2~4094.
To set up the user priority.
Set the SIP VLAN ID; this is an independent function that
doesn’t need to enable [VLAN Pack ets : Enable].
Set up the SIP Priority.
Set the SIP RTP VID; this is an independent function that
doesn’t need to enable [VLAN Pack et s: Enable].
Set up the RTP Priority.
5.4 VPN Setting
This page defines the PPTP/L2TP setting on this page. You could set up the PP TP/L2TP Server connec tion
information. When you finish the setting, please click the Submit button.
Caution: VIP-156/VIP-157 series VPN can’t use the encryption or compression for VPN connection.
Page 38

Users Manual of VIP-156/156PE/157S
-38-
5.5 IPv6 Setting
This page defines the IPv6 setting on this page. You can program the IPv6 information.
Field Description
IPv6 Activity
IPv6 address
SubnetPrefix Length
Default Gateway
LAN IPv6 Address:
LAN IPv6 Link-Local Address
Autoconfiguration Type
Support three IPv6 types: Auto, Fixed IPv6, IPv6 in IPv4 Tunnel
Setting the WAN IPv6 address or display it (64 bits)
Default is 64
IPv6 gateway address ( 64 bits)
IPv6 LAN address (64 bits)
Link local address information.
It supports stateless or stateful (DHCP V6).
Page 39

Users Manual of VIP-156/156PE/157S
-39-
CHAPTER 6. NAT TRANS
6.1 Stun Setting
This page defines the STUN Enable/Disable and STUN Server IP address on this page. This function can
help your Phone Adapter work properly behind NAT. To change this setting, please follow your ISP
information. When you finish the setting, please click the Submit button.
6.2 PC Setting
This page defines the PC setting on this page.
Field Description
The default is Bridge mode, and it also provides NAT mode.
Bridge: W hen set as mode, the LAN and PC ports are in the same
Device Activity
PC IP address The IP address of PC port. (In the Birdge mode, the Default IP:
network segment.
NAT: The LAN and PC ports are in a different network segment, and PC
port could enable the DHCP Server function to allot the IP address.
Page 40

Users Manual of VIP-156/156PE/157S
-40-
Field Description
192.168.0.1
PC MAC Address
Enable DHCP Server
IP Address
Lease Time
The MAC of PC port
It will allot the IP address automatically when enable this function.
The range for DHCP IP address.
DHCP server lease time
6.3 DMZ and MAC Clone
This page defines the DMZ and MAC Clone setting on this page.
DMZ Activity: If set up as On, all of the packets (except SIP packets) will be sent to the specific IP address.
DMZ IP Address: The DMZ host IP address.
MAC Clone Activity: This page defines the MAC C lone Enable/Disable. This function will copy the MAC
address from N IC ( Net wor k Int er f ace C ard) which is placed in PC to LAN port of ATA. That is because s om e
ISPs will limit the MAC address for PPPoE dial-up connection.
Page 41

Users Manual of VIP-156/156PE/157S
-41-
6.4 Virtual Server
This page defines the Virt ual Server setting on th is page. You could defin e 24 virtual service inf ormation on
this page. When you finish the setting, please click the Submit button.
Field Description
Index
Activity
Protocol
Internal Port
External Port
Server IP
Delete
The serial number -- There are totally 12 records from Num 1 to 12.
The activity status -- The default is Dis able; this recor d will activate if
enable.
The TCP or UDP communication protocol.
For corresponding the inter nal port.
For corresponding the external port.
To input the Server IP address.
Delete this item
Page 42

Users Manual of VIP-156/156PE/157S
-42-
Note
CHAPTER 7. SIP SETTING
7.1 Service Domain Setting
In Service Dom ain function, you need to input the account and th e related inform ation on this p age. Please
refer to your ISP provider. You can register five SIP accounts in the ATA. You can dial the VoIP phone to your
friends via first enable SIP account and receive the phone from these five SIP accounts.
Field Description
Realm
Realm Activity
Display Name
Phone number
Authentication ID
Authentication Password
Domain Server
Proxy Server
Outbound Proxy
Which line you want to use.
First you need to click Active to enable the Service Domain, then you can
input the following items.
The serial number -- There are totally 24 records from Num 0 to 23.
The activate status -- The default is Disable; this record will activate if
enabled.
You need to input the Register Password obtained from your ISP.
You need to input the Register Name obtained from your ISP.
You need to input the Domain Server from your ISP.
You need to input the Proxy Server from your ISP.
You need to input the Outbound Proxy from your ISP. If your ISP does not
provide the information, then you can skip this item.
When system is enabled, it will frequently send the MWI message.
Subscribe to MWI
The starting number c an’t b e “0”. For example, if the number is
“0xxxx”, the system will ignore this dial plan.
Page 43

Users Manual of VIP-156/156PE/157S
-43-
You can see the Register Status on the Status page. If the item shows “Registered”, then your Phone Adapter
is registered to the ISP, and you can make a phone call directly.
If you have more than one SIP account, you can follow the steps below to register to the other ISP.
When you finish the setting, please click the Submit button.
7.2 Codec Setting
This page defines the Cod ec priorit y, RTP pack et length, and VAD f unction on this page. You need to follo w
the ISP suggestion to set up these items. When you finish the setting, please click the Submit button. Also on
this page, it defines the Codec ID. Sometimes two VoIP devices with different Codec IDs will cause the
interoperability issue. If you are ta lking with some people with some problems, you ma y ask the other one
what kind of Codec ID he uses, and then you can change your Codec ID. When you finish the setting, please
click the Submit button.
Page 44

Users Manual of VIP-156/156PE/157S
-44-
SIP Expire Time
Note
7.3 SIP Advance Setting
This page defines the Hold by RFC, Voice/SIP QoS and other settings on this page. To change these
settings, please follow your ISP information. When you finish the setting, please click the Submit button.
Field Description
SIP Expire Time
Type
To set up the registration interval time.
Default is General; register interval time setting. Provide items like
General (standard), 1/2, 2/3, 3/4, 4/5, 5/6, 6/7, 7/8, 8/9, 9/10.
Registered server needs to support this function.
Register time calculated
General: expiry time-[(expiry time/30)*6], when Expiry Time > 60 it w il l
start to work; if less than 60 seconds, it will decrease 5 seconds.
1/2: expiry time * 1/2.
Page 45

Users Manual of VIP-156/156PE/157S
-45-
SIP Register Retry
Note
Note
session timer
Note
SIP Port of
t be
RTP Port of
t be
disable, and to start up communication hold back
Field Description
2/3: expiry time * 2/3.
3/4: expiry time * 3/4.
4/5: expiry time * 4/5.
5/6: expiry time * 5/6.
6/7: expiry time * 6/7.
7/8: expiry time * 7/8.
8/9: expiry time * 8/9.
Timer
SIP session timer T1
SIP session timer T2
SIP
Timer B, F, H
9/10: expiry time * 9/10.
If SIP register fails, system will retry interval after this time.
Setting the maxim um retransm it interval for n on-INVIT E requests and
INVITE responses.
Registered server needs to support this function.
Setting the maxim um retransm it interval for n on-INVIT E requests and
INVITE responses.
Registered server needs to support this function.
Setting the maximum retransmit interv al for non-IN VITE requests and
INVITE responses.
Registered server needs to support this function.
Local
phone 1
Local
phone 1
Hold type
DTMF Mode
B: 64 * SIP T1; INVITE transaction timeout timer.
F: 64 * SIP T1; non-INVITE transaction timeout timer.
H: 64 * SIP T1, Wait time for ACK receipt.
Setting the phone 1 SIP start and end port. All the port can’
duplicated
Setting the phone 1 RTP start and end port. All the port can’
duplicated
The default is
function (RFC definition). Set enable to start up the Hold by RFC
function.
Defines the InBand, RFC2 833, SIP Info, RFC2833 + Inband, SIP Inf o
+ Inband on this page. T o change this set ting, please follow your ISP
information. When you finish the setting, please click the Submit
button.
Page 46

Users Manual of VIP-156/156PE/157S
-46-
Note
Voice QoS
Send Keep Alive
Note
Note
Note
Field Description
RPort
(Diff-Serv)
SIP QoS (Diff-Serv)
RTP Traffic Class
(IPv6)
SIP Traffic Class
(IPv6)
Use DNS SRV
To change this setti ng, please f ollow your IS P informatio n. When you
finish the setting, please click the Submit button.
Registered server needs to support this function.
The Voice QoS feature.
The SIP QoS feature.
The QoS setting is to set the voice packets’ priority. If you set the value
higher than 0, then the voice pac kets will get the h igher priorit y to the
Internet. But the QoS func tion still needs to cooperat e with the other
Internet devices.
IPv6 RTP traffic class
IPv6 SIP traffic class
The default is disab le, and use DNS SRV mode. Set enable to use
Packet
Keep Alive Period
Jitter Buffer
SIP Server Type
Use user = phone
(Register):
Use user = phone
DNS to SRV mode to search the host information.
Always transport the network packets to keep the NAT port
To set up the interval time for transporting packets.
To set up the size for jitter buffer packets.
Provides a different register server: General, Asterisk, BroadWorks,
Nortel, Xener, Vodtel, SKTelink, for different server systems will adjust
some system parameters
Registered server needs to support this function.
When sending the registered package, in package Header will add
the ”user=phone” message.
Registered server needs to support this function.
When sending the dialing package, in package Header will add
(Invite):
the ”user=phone” message.
Registered server needs to support this function.
Page 47

Users Manual of VIP-156/156PE/157S
-47-
hen sending the SIP package, in package Header will add
Note
Field Description
Send SIP PRACK to
Proxy:
W
the ”PRACK” message.
Registered server needs to support this function.
Only Accept Trusted
Certificates:
Only accept call fr om proxy; if s ystem receives the IP di aling, system
will refuse the call.
Page 48

Users Manual of VIP-156/156PE/157S
-48-
CHAPTER 8. ADVANCE SETTING
8.1 Status Log
Display and save systems running status message data. Press “Get Status Log” to back up the status log file.
Page 49

Users Manual of VIP-156/156PE/157S
-49-
8.2 Auto Config
This page defines the Auto Conf iguration (Auto Provis ion) setting. ATA suppor ts TFTP, FTP, HTT P and IP
PBX auto configuration f unction in total. In IP PBX Auto Configuration Setting , you need to check with your
service provider if they have provided this function.
Page 50

Users Manual of VIP-156/156PE/157S
-50-
Note
Management form
There are three billing types: Polarity Reversal, Tone_12K and
Note
8.3 Management -- Advanced Setting
This page defines the advanced functions. When you finish the setting, please click the Submit button.
Field Description
This function can disable echo when someone pings this device. It can
ICMP Not Echo
avoid hacker trying to attack the device
If this function is enabled, machine will to start the calling hidden
function, and it will not send the related Caller infor mation.
Anonymous Call
Registered server needs to support this function.
When [Enable] allow user login from WAN.
WAN
When [Enable] if system sets the function like [Subscribe to MWI,
Stop Feature Tone
forward, DND], when user picks up the phone, he will hear the rem ind
tone [Do Do Do]
Tone_16K.
Billing Signal
Registered server needs to support this function.
Page 51

Users Manual of VIP-156/156PE/157S
-51-
Disable, INFINET, AVS,
WALKERSUN1, WALKERSUN2, CSF1, CSF2, GX, VGX, RC4,
Note
Note
DHCP Gateway ARP
, General Debug, Call
PSTN Silence
General] [Auto Answer] function or
Generate Flash
Field Description
CPC Delay
CPC Duration
IP Dialing Format
Send Flash event
Encrypt Type
Encrypt Key
When receiving the d isconnected signal, m achine will cut the volt age
down to 0V after this time.
When starting to cut the voltage down to 0V, machine will continue this
state by this time.
Setting IP dialing format; when [Disable] can’t use IP dialing to make a
call.
There are two flash formats: DTMF Event and SIP Info.
There are seven encrypt formats:
VOS_R, VGCP.
Registered server needs to support this function.
Some encrypt types must enter the Encrypt Key
Registered server needs to support this function.
PPPoE Retry Period
Check Period
Syslog Server IP
Address
System Log
PSTN port Country
Timeout
PSTN CID forward
Signal for PSTN
If PPPoE dial-up connection fails, machine will retry the dial-up motion
after this time.
The period to check the DHCP gateway ARP.
There are seven Syslog types: Call Statistics
Statistics + Genera l Debug, SIP Debug , Call Statistics + SIP Debug,
General Debug + SIP Debug and All.
Machine could send the s ystem logs to the specific S yslog Server. It
can input the IP or Domain address
Set up the FXS Port Coutr y
Define the maximum silence tim e for FXO port. After the time, it will
disconnect the line.
It must work with [Phone –
[Phone – Caller Service] [Forward] function. When this function is
enabled, the caller ID from FXO can transfer to other devices.
FXO flash time defines to hold or hang up the phone
FXS Port Coutry
Select the FXO port local country
Flash Hook Time
Maximum flash time to detect the call on hold or hang up.
(Max)
Flash Hook Time
(Min)
Minimum flash time to detect the call on hold or hang up.
Page 52

Users Manual of VIP-156/156PE/157S
-52-
NET Bandwidth
069 is an
Field Description
Limit
Setting the limitation for LAN bandwidth
8.4 Tones
This page defines the Tone settings. This function can set up the related parameters of Dial Tone, Ring Back
Tone, Busy Tone, Error Tone and other Tones. When you finish the setting, please click the Submit button.
8.5 TR-069
On this page you can program the TR-069 setting.
A different TR-069 server may need to modify some different parameters.
What’s TR-069: Technical Repor t 069 (TR-069) is a custom er-premises equipm ent W AN
management protocol (CWMP) technical specification for remote management of end-user
Note
devices introduced by the broadband forum (formerly the DSL forum).TRintegrated framework equipped with safe auto-configuration. It also can take control of
other CPE functions.
Page 53

Users Manual of VIP-156/156PE/157S
-53-
Page 54

Users Manual of VIP-156/156PE/157S
-54-
CHAPTER 9. OTHER SETTINGS
9.1 System Authori ty
In System Authority, admin/System/User login password can be changed.
9.2 Firmware Upgrade
This page defines the SIP and RTP port number on this page. Each ISP provider will have different
SIP/RTPport settings. Please refer to the ISP to set up the port number correctly. When you finish the setting,
please click the Submit button.
If your updated file is xxxx.ROM, you must enter http://VIP-15X’s-IP
http://192.168.0.157/update.htm. to upload the ROM file and then update the system.
Address/update.htm e.g.
Page 55

Users Manual of VIP-156/156PE/157S
-55-
For technological consideration, we strongly suggest you refer to the following upgrade
methods for updating your device.
Note
After firmware is loaded, the unit will reboot, and default IP address of the customized
firmware: http://192.168.0.1
; login name/password: root/null (no password)
9.3 Auto Update Setting
The device can update new firmware with the gz or ds file format automatically by the Auto Upgrade function.
Field Descriptions
Type
TFTP Server
TFTP File Path
HTTP Server
HTTP File Path
FTP Server
There are TFTP/FTP and HTTP to provide the auto upgrade
function.
Input the TFTP Server address, and it could input the IP or Domain
Name form.
Set up the file path.
Input the HTTP Server address, and it could input the IP or Domain
Name form.
Set up the file path.
Input the FTP Server addr ess, and it could input th e IP or Domain
Name form.
FTP Username
FTP Password
FTP File Path
Check new firmware
The login username.
The login password
Set up the file path.
The device will do ac cording to the ways below to chec k the new
firmware.
– Power On (+ Scheduling): The machine will c heck the new
firmware when po wer on and following scheduled d ate and
time.
Page 56

Users Manual of VIP-156/156PE/157S
-56-
firmware update
can be
Field Descriptions
– Scheduling: The machine will follow the scheduled date and
time to check the new firmware.
Note
Scheduling (Date)
The machine will check the new firmware bet ween the time range
by random.
There are Notify only and Automatic ways to update.
– Notify only: If there are new firm ware, the AT A will send th e
“Beep” sound when picking up the handset to prompt you
Automatic Update
there is a new firmware.
–
Automatic: The device will carry out
automatically.
Firmware File Prefix
Next update time
It will check the information on model name.
It will show the next check date and time.
If the Check new firmware field is set to Power On, the machine will check the new firmware
according the scheduled time/date and power on. If there is a new firmware, it
upgraded. The machine won’t carry out firmware update automatically The machine will send
the prompt sounds when picking up the handset, and it needs to update firmware manually.
Page 57

Users Manual of VIP-156/156PE/157S
-57-
9.4 Reset to defa ult
In Default Setting, you can restore the Phone Adapter to factor y default on this p age. You can just clic k the
Restore button, then the Phone Adapter will restore to default and automatically restart again.
9.5 Save and Reboot
In Save & Reboot, you can save the changes you have done. If you want to u se new setting in the Phon e
Adapter, you have to click the Save button. After you click the Save button, the Phone Adapter will
automatically restart and the new setting will take effect.
9.6 Logout
Logging out the system will return you to the login page.
Page 58

Users Manual of VIP-156/156PE/157S
-58-
192.168.0.2
192.168.0.1
1001
1002
192.168.0.1
APPENDIX A VOICE COMM UNICATION SAMPLES
There are several ways to make calls to desired destination in ATA. In this section, we’ll lead you step by step
to establish your first voice communication via keypad and web browsers operations.
Case 1: ATA to ATA connection via IP address
Assume there are two ATAs in the network; the IP addresses are 192.168.0.1 and 192.168.0.2
Analog telephone sets are connected to the phone (RJ11) port of ATAs respectively
* 1 9 2 1 6 8 * 2 # * 0
Test the scenario:
1. Pick up the telephone set on ATA A.
2. Press the keypad: 192*168*0*2# and will be able to connect to the ATA B.
3. Then the phone in 192.168 .0.2 should ring. Please repeat t he same dialing s teps on AT A B to es tablish
the first voice communication from ATA A
Case 2: (Peer-to-Peer mode) VIP-157S Port 1 to Port 2
communications
Supposing one VIP-157S connects to two telephones, just pick up phone 1 and dial ‘192*168*0*1**5062’, and
phone 2 will ring.
Analog telephone sets are connected to the phone (RJ11) ports of VIP-157S respectively
1 9 2
* 1 6 8 * 1 * * 0 5 0 6 2 #
*
Page 59

Users Manual of VIP-156/156PE/157S
-59-
Test the scenario:
1. Pick up the telephone set on VIP-157S port 1, and you should be able to hear the dial-tone.
2. Press the keypad: 192*168*0*1**5062# and will be able to connect to the VIP-157S port 2.
3. Then the telephone s et in VIP-157S port 2 should ring. Pleas e r ep eat the same dialing ste ps on por t 2 t o
establish the first voice communication from VIP-157S.
If the IP address of the remote calling party is known, you may directly make calls via its IP
address and end with a “#”.
If the ATAs are installed behind a NAT /firewall/IP sharing device for P eer-to-Peer VoIP
application, please make sure the NAT device supports SIP applications, and suitable
settings should be applie d to the NAT device to enable the SIP comm unications before
making calls
[VIP-157S] in PLANET ATA s eries produc ts, to co nnect to rem ote AT A, press th e keypad
in the following sequence to connect to the remote VIP-157S port 2:
[remote ATA IP address]**5062, for example: 192*168*0*2**5062
Case 3: Call Forward Feature_Example 1
In the following samples, we’ll introduce the Call Forward Feature applications.
For this example, there are three VIP-156 registers to IPX-1980 and VIP-156_A has set Call Forward function
to VIP-156_B.
Machine configuration on the VIP-156:
Please log in to VIP-156_A via web browser and browse the Phone Settings menu and select the Call
service config menu. On the sett ing page, please enable the All Forward f unction and fill in the Forward
Type and Forward Number of VIP-156_B, then the sample configuration screen is shown below:
Page 60

Users Manual of VIP-156/156PE/157S
-60-
Test the scenario:
1. VIP-156_C picks up the telephone
2. Dial the number 1001 (VIP-156_A),
3. Because VIP-156_A has set up All Forward function to the number 2002 (VIP-156_B)
4. The number 2002 (VIP-156_B) will ring up; then it picks up the telepho ne and communication with the
number 3003 (VIP-156_C).
Case 4: Call Forward Feature_Example 2
For this example, there are three VIP-156 and connect with Peer to Peer mode. VIP-156_A has set Call
Forward function to VIP-156_B.
Machine configuration on the VIP-156:
Please log in to VIP-156_A via web browser and browse the Phone Settings menu and select the Call
service config menu. On the sett ing page, please enable the All Forward f unction and fill in the Forward
Type and Forward Number of VIP-156_B, and then the sample configuration screen is shown below:
Test the scenario:
1. VIP-156_C pick up the telephone
2. Dial the IP Address 192.168.0.1 (VIP-156_A)
3. Because VIP-156_A has set up All Forward function to the IP Address 192.168.0.2 (VIP-156_B)
Page 61

Users Manual of VIP-156/156PE/157S
-61-
4. The IP Address 192.168.0. 2 (VIP-156_ B) will rin g up; then it picks up the telephone and com munication
with the VIP-156_C
Page 62

Users Manual of VIP-156/156PE/157S
-62-
APPENDIX B THE METHOD OF OPERATION
GUIDE
In this section, we’ll introduce the steps of how to set up som e call features of the ATA. Please follow the
steps below to utilize those features.
Call Transfer
A. Blind Transfer
1. B called A and they are in the process of conversation.
2. A carries out the transfer function (Press the “transfer” button) to hold the conversation with B.
3. A presses “#510#” and hears the dial tone and then input the number of C (Followed by the “#” key).
4. C will ring up and A will get the busy tone for prompting to hang up
5. C picks up the handset and has conversation with B.
B. Attendant Transfer
1. B called A and they are in the process of conversation.
2. A carries out the transfer function to hold the conversation with B.
3. A presses “#511#” and hears the dial tone and then input the number of C (Followed by the “#” key).
4. C will ring up.
5. C picks up the handset and has conversation with A.
6. A hangs up and C has conversation with B.
3-Way Conferencing
1. A and B are in the process of conversation.
2. A wants to in vite C to join their conversation.
3. A presses “Transfer” or “Hold” button t o hold the con versation with B first and then press “#512#”
and hear the dial tone, and then input the number of C (plus the “#” key).
4. C will ring up and pick up the handset to have conversation with A.
5. A presses the “Transfer” button again, and they will enter the 3-way conference mode.
Call Waiting
1. A and B are in the process of conversation.
2. C called A and A will hear the prompt sounds.
Page 63

Users Manual of VIP-156/156PE/157S
-63-
3. A presses the “Hold” button to hold the conversation with B, and switch to have conversation with C.
Switch the Realm (Registration Proxy Server)
ATA can register to three different SIP Proxies at the same tim e. It can receive an y one of different SIP
accounts incoming c all, and it can switch t o anyone’s SIP acco unts for making calls through inputting the
switch code.
Realm switch code:
1*: Realm 1
2*: Realm 2
3*: Realm 3
4*: Realm 4
5*: Realm 5
For example, the default is realm 1, input the 2* (Followed by the # key) from keypad and hang up the
telephone set. It will switch to realm 2, and it can make the SIP calls via realm 2.
Auto Update firmware manually (Keypad)
If you pick up the handset of ATA, you will hear the “DoDoDo” prompt. If want to carry out the upgrade action,
please input ”#190#” to unlock the device first. Then input ”#160#” to upgrade the new firmware.
Page 64

Users Manual of VIP-156/156PE/157S
-64-
Product
SIP Analog Telepho ne Ada pter
Model
VIP-156
VIP-156PE
VIP-157S
Hardware
LAN
1 x 10/100Mbps RJ45 port (802.3af PoE for VIP-156PE)
PC
1 x 10/100Mbps RJ45 port
FXS (for telephone set
connection)
Protocols and Standard
Standard
SIP 2.0 (RFC3261)
Voice codec
G.711 u-law/a-law, G.723 (6.3k/5.3k), G.726, G.729
Fax support
T.38, G.711 pass-through
Voice activity detection (VAD)
Jitter buffer
SIP 2.0 (RFC-3261), IPv4/IPv6 TCP/IP, UDP/RTP/RTCP, HTTP, ICMP, ARP,
DNS, DHCP, NTP/SNTP, PPP, PPPoE, VLAN, VPN (PPTP & L2TP), TR069
Network and Configuration
Access Mode
Static IP, PPPoE, DHCP
Management
Web, keypad
Dimensions (W x D x H)
94 x 72 x 30 mm
Operating Environment
0~40 degrees C, 10~95% humidity
Power Requirements
12V DC
EMC/EMI
CE, FCC Class B
APPENDIX C VIP-156/VIP-156PE/VIP-157S
SPECIFICATIONS
1 x RJ11 2 x RJ11
Voice Standard
Protocols
Comfort noise generation (CNG)
Acoustic echo canceller (AEC)
G.165: Line echo canceller (LEC)
Page 65

Users Manual of VIP-156/156PE/157S
-65-
APPENDIX D PLANET DDNS APPLICATION
Configuring PLANET DDNS steps:
Step 1 Enable DDNS option through accessing web page of ATA device.
Step 2 Select DDNS server provided, and register an account if you have not used yet.
Let’s take dyndns.org as an example. Register an account at http://planetddns.com
 Loading...