

Page 1

Copyright
Copyright © 2003 by PLANET Technology Corp. All rights
reserved. No part of this publication may be reproduced,
transmitted, transcribed, stored in a retrieval system, or
translated into any language or computer language, in
any form or by any means, electronic, mechanical, magnetic, optical, chemical, manual or otherwise, without
the prior written permission of PLANET.
PLANET makes no representations or warranties, either
expressed or implied, with respect to the contents
hereof and specically disclaims any warranties, merchantability or tness for any particular purpose. Any
software described in this manual is sold or licensed “as
is”. Should the programs prove defective following their
purchase, the buyer (and not PLANET, its distributor,
or its dealer) assumes the entire cost of all necessary
servicing, repair, and any incidental or consequential
damages resulting from any defect in the software. Further, PLANET reserves the right to revise this publication
and to make changes from time to time in the contents
hereof without obligation to notify any person of such
revision or changes.
All brand and product names mentioned in this manual
are trademarks and/or registered trademarks of their
respective holders.
FCC Caution
To assure continued compliance. (example-use only
shielded interface cables when connecting to computer
or peripheral devices). Any changes or modications
not expressly approved by the party responsible for
compliance could void the user s authority to operate
the equipment.
This device complies with Part 15 of the FCC Rules. Operation is subject to the Following two conditions: ( 1 )
This device may not cause harmful interference, and (
2 ) this Device must accept any interference received,
including interference that may cause undesired operation.
CE Mark Warning
This is a Class B product. In a domestic environment,
this product may cause radio interference in which case
the user may be required to take adequate measures.
Page 2

Revision
User’s Manual for PLANET 2-Port/4-Port USB KVM
Switch
Model: KVM-U201 / KVM-U401
Rev: 1.0 (July, 2003)
Part No. EM-USBKVMv1
Page 3

Table of Contents
Chapter 1 Introduction 1
1.1 Features 1
1.2 Specification 3
1.3 Package Contents 4
1.4 System Requirment 4
1.5 MAC O.S. and Sun Micro Systems Keyboard
Mapping 4
Chapter 2 Installation Procedure 7
2.1 Windows 98/98SE User 7
2.2 Windows Me/XP/2000/Server 2003 User 9
2.3 DOS User 10
Chapter 3 Usage 11
Chapter 4 Hot-Key Operation 13
Chapter 5 Troubleshooting 15
Page 4

1
Chapter 1
Introduction
PLANET USB KVM Switches are designed to give you control of
multiple computers using just one keyboard, mouse and VGA
monitor. They provide more table and rack space in addition to
saving the cost of multiple keyboards, mice and monitors. Switch
between computers by just pressing a button on the panel or
predened hot key on connected keyboard. The USB KVM Switch
series are the perfect choice for home, ofce, server farm, or
testing site where there is a need to manage multiple computers
efciently and easily.
PLANET USB KVM Switches utilize advanced microprocessor
emulation to intelligently manage each KVM port. This allows
simultaneous boot-up of all the attached computers. Caps Lock,
Num Lock and Scroll Lock status can also be saved for each
computer. They support VGA, SVGA and MultiSync monitors up to
2048 x 1536 resolutions.
Furthermore, all the PCs that with a USB port can connect to the
USB KVM Switch and controlled by a PS/2 keyboard and mouse.
With build-in 2/4-port USB Hub, you can connect USB devices to
the USB hub and share to the PCs which connected to the USB
KVM Switch. With different switching mode, the USB hub can x to
one PC used or changed when you switch to next PC.
1.1 Features
2/4 ports USB KVM Switch
USB 1.1 Specification compliant
Support UHCI, OHCI USB interface
USB console and PS/2 console works with Win98/98SE/
Me/2000/XP/Server 2003, HP Unix, Linux, Sun Solaris,
MAC O.S 8.6 or later version
Auto boot all PCs or compatible, MACs and Sun Microsys-
tems simultaneously
USB KVM Switch is embedded with USB device ports for
computers to share different USB peripherals
Page 5

2
3
Manage multiple PCs, G3/G4 MACs, iMACs from one
PS/2 keyboard, PS/2 mouse and Monitor
Add PCs or Remove Connected PCs for Maintenance
without powering down the PC
Legacy Control: PS/2 Style Keyboard and PS/2 Style
Mouse control all PCs and real time switch PCs without
USB hub
Auto scan mode for monitoring all PCs
LED display for easy status monitoring
Use push button or hot key control for easy computer
selection
Plug & Play, no Windows software driver needed for PS/2
keyboard and PS/2 mouse operation
Buzzer sound for switching port confirmation
High VGA resolution 2048X1536 and High bandwidth
400MHz
Support VGA DDC, DDC2, DDC2B
Supports bus power or self power (need a power adapt-
er)
Independently access USB devices and select PC port
simultaneously
Page 6
3
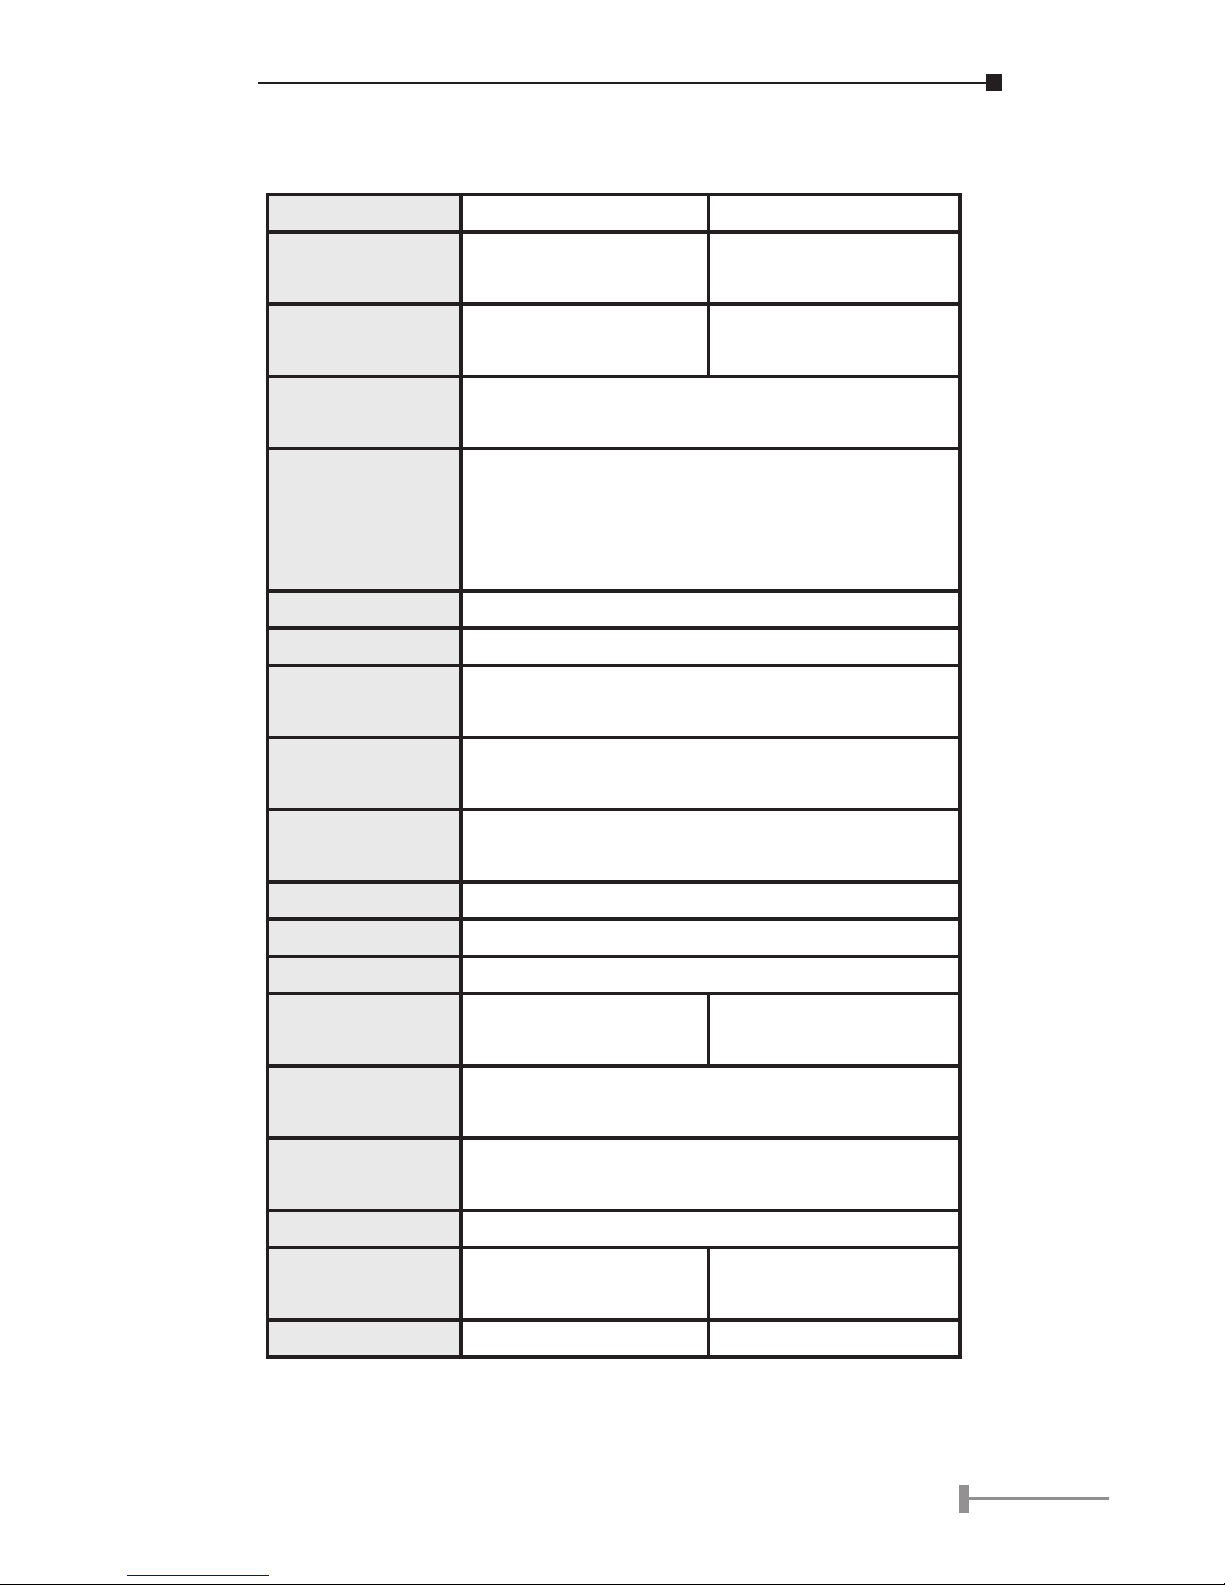
1.2 Specication
Model KVM-U201 KVM-U401
Computer Port
2 USB Type B ports
2 VGA ports
4 USB Type B ports
4 VGA ports
Console Port
2 USB type A ports
2 PS/2 ports
4 USB type A ports
2 PS/2 ports
Computer Port
Connector
USB Type B receptacle
VGA HDDB 15pin Female
Console Port
Connector
USB Type A receptacle
Keyboard: Mini DIN 6 pin Female
Mouse: Mini DIN 6 pin Female
Monitor: HDDB 15 pin Female
PC Selection Hot Key, Push Button
Scan Interval 5,10,20,30,40,50,60,70,80,90,100 sec.
Keyboard
Conversion
PS/2 to USB
Mouse Conver-
sion
PS/2 to USB
Video resolu-
tion
2048 x 1536
Bandwidth 400MHz
Housing Plastic
Power Type Bus Power
Power Adapter
(Optional)
DC 5V, 2A DC 5V, 2.5A
Operating
Temperature
0 ~ 50 Degree C
Storage Tem-
perature
-20 ~ 60 Degree C
Humidity 0 ~ 90% RH non-condensing
Dimension
(mm)
118 x 87 x 34 186 x 92 x 34
Weight (g) 175 295
Page 7
4
5
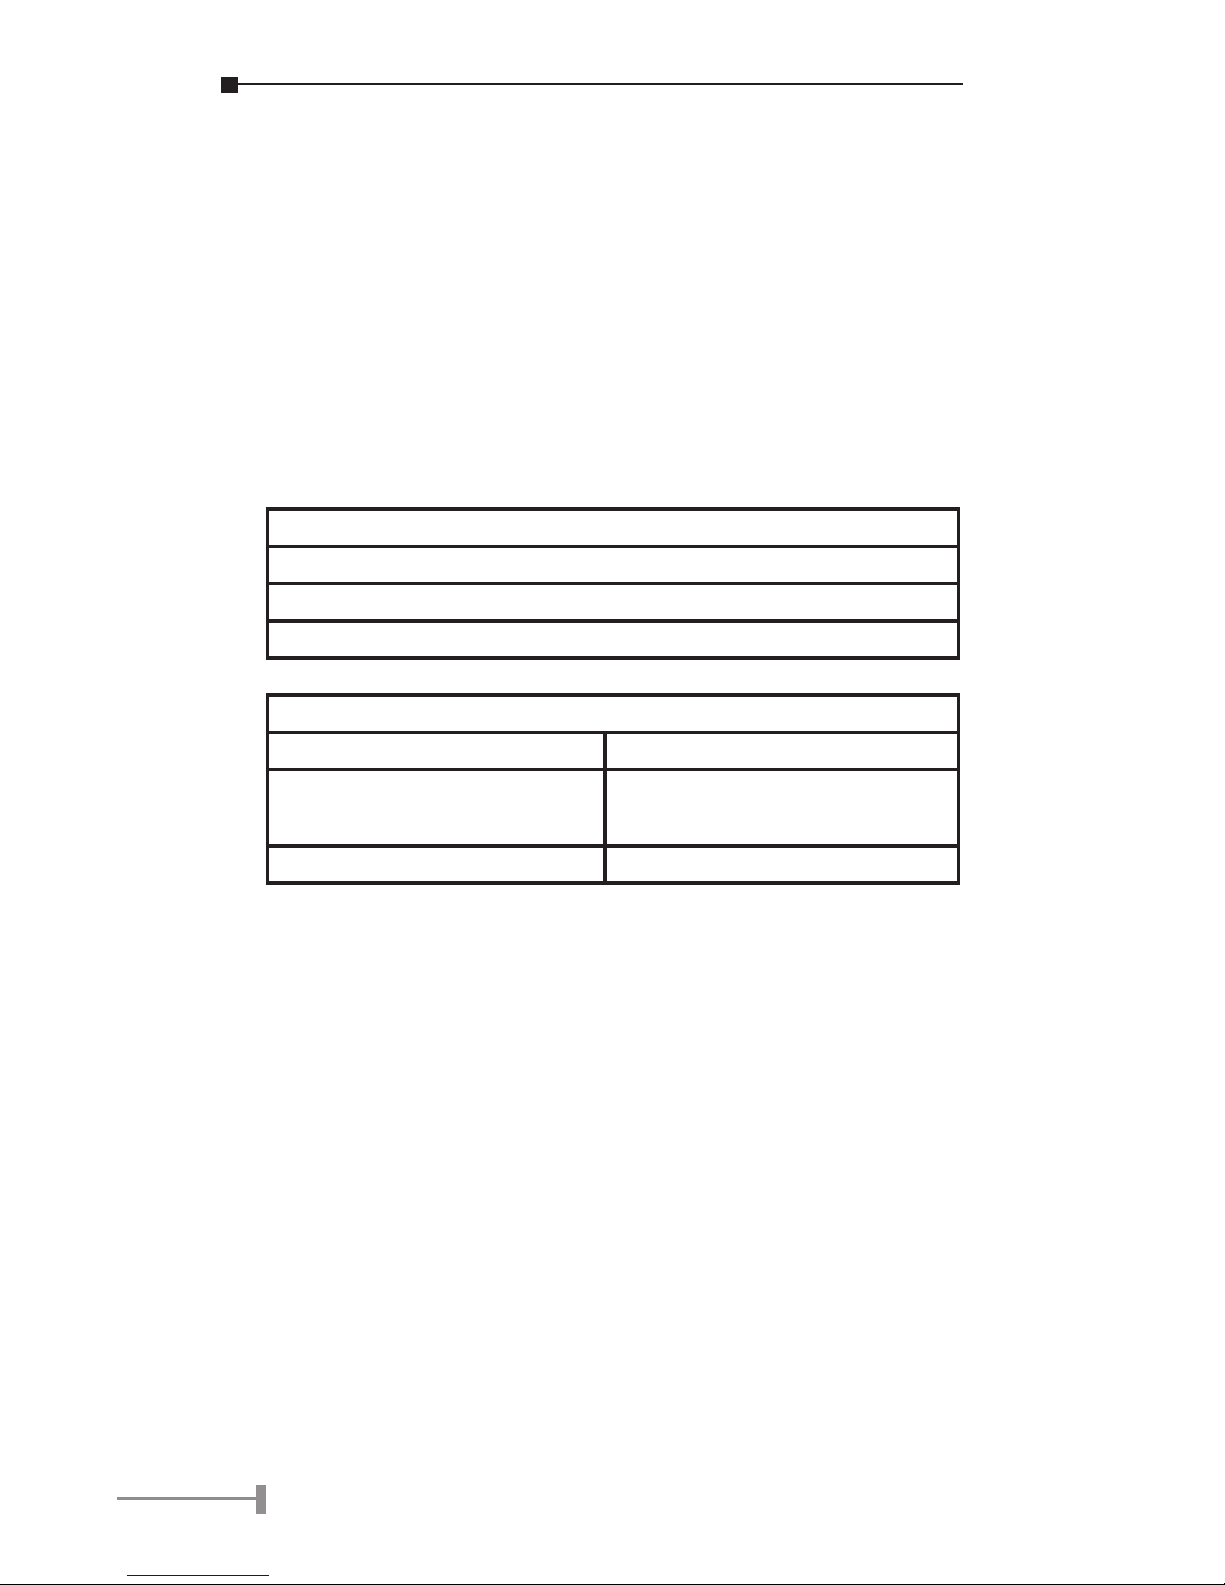
1.3 Package Contents
Before installation, please check the items of your package. The
package should include the following items:
KVM-U201 or KVM-U401 x 1
User’s Manual x 1
If any of the above items are missing, contact your supplier as
soon as possible.
1.4 System Requirment
Console side:
One VGA or the other VGA monitor
One PS/2 keyboard
One PS/2 mouse
Computers side:
KVM-U201 KVM-U401
Two HDDB 15 pin male to
male VGA cables
Four HDDB 15 pin male to
male VGA cables
Two USB A-B cables Four USB A-B cables
1.5 MAC O.S. and Sun Micro Systems
Keyboard Mapping
The following diagram indexes the Hot Key combination that
emulates Mac O.S. and Sun Micro keyboard commands. This
feature is only available on the PS/2 keyboard attached to the
KVM, and is not available on the USB keyboard.
Left Windows Key = L_Win
Page 8

5
Page 9

6
7
Page 10

7
Chapter 2
Installation Procedure
Before installation, please make sure all of peripherals and
computers have been turned off.
This installation example is for KVM-U401. The KVM-U201 has the
similar installation procedure.
2.1 Windows 98/98SE user
When you apply Windows 98/98SE to USB KVM Switch, please use
the following set up procedures:
Step 1:
1. Connecting USB A-B type cables to PC and USB KVM
switch. The type A connector of USB cable is for PC and
the other end of USB cable is for USB KVM Switch. And
connecting HDDB15 pin (Male to Male) cables to PC and
USB KVM switch.
2. VGA monitor’s cable is connected to console VGA port.
3. Connecting PS/2 keyboard to PC PS/2 keyboard port di-
rectly. Please do not connect PS/2 mouse to your PC and
PS/2 mouse & keyboard to USB KVM Switch.
Page 11

8
9
4. After PC boot up, if the PC is unable to get the mouse
during boot up system. The Window O.S. will show the
following message or similar things:
Windows did not detect a mouse attached to the com-
puter. You can safely attach a serial mouse now. To
attach a mouse to a PS/2 mouse port, you must first
turn the computer off.
□ Do not show this message in the future.
Please press keyboard “Tab” key, “Space” bar and “En-
ter” key to check the item “ Do not show this message
in the future.” and finishing booting Windows O.S.
5. It will mount USB HID (Human Interface Device) driver.
Using Keyboard Tab key, Left Arrow key, Right Arrow key
and Enter key to accomplish set up process.
6. To switch to the next PC port of USB KVM Switch.
7. Repeat item 4, 5 and 6 procedures to all of PCs.
8. Please turn off USB KVM Switch and use Windows key to
shut down your PCs.
Step 2:
1. Connect PS/2 keyboard and PS/2 mouse to USB KVM
Switch’s console port.
Page 12

9
2. Power on all of PCs.
2.2 Windows Me/XP/2000/Server 2003 user
When you apply Windows Me/XP/2000/Server 2003 to USB KVM
Switch, please use the following set up procedure:
1. Connecting USB A-B type cables to PC* and USB KVM
Switch. The type A connector of USB cable is for PC and
the other end of USB cable is for USB KVM Switch.
2. Connecting HDDB15 pin (Male to Male) cables to PC and
USB KVM Switch.
3. VGA monitor’s cable is connected to console VGA port.
4. Connecting keyboard and mouse to console PS/2 port.
5. Boot up all of PCs
6. If there have also SUN Microsystems on this USB KVM
Switch, please putting SUN Microsystems at 1st port of
this KVM switch and boot up SUN Microsystems again.
7. To add a power adapter to this KVM switch and power
on this switch first, then go the same boot up process
again.
*: MAC and Sun Micro Systems have the similar installa-
tion to mentioned-above PC installation process.
Page 13

10
11
2.3 DOS User
If the motherboard BIOS “USB Controller” and “USB Keyboard
Support” are disable and you apply USB KVM Switch to PC. The PC
will not work in DOS mode. Please connect PS/2 keyboard to the
PS/2 port of PC for enabling “USB Controller” and “USB Keyboard
Support” in BIOS.
Different motherboard BIOS has different set up procedure. Here
are some examples, which based on some kind of BIOS version,
below for the user reference.
A. AWARD BIOS: To press “Del” key immediately for a
couple of times when powering on PC and you will get
into BIOS set up mode à Select “Advanced” item à
USB Legacy support à Select “AUTO” à Save and quit
BIOS set up.
B. PHOENIX BIOS à To press “F2” after powering on PC
gets into BIOS set up mode à Select “Advanced” item à
Legacy USB support à Select “Enable” à Save and quit
BIOS set up.
C. AMI BIOS à To press “Del” key immediately for a couple
of times when powering on PC and you will get into
BIOS set up mode à Select “Chipset features setup”
à USB controller à all USB port USB KB/Mouse à
KEYB+MOUSE à Save and quit BIOS set up.
*: MAC and Sun Micro Systems has the similar installa-
tion like mentioned above PC installation process.
The console ports of USB KVM switch just support PS/2 keyboard
and PS/2 Mouse. So, please don’t use USB keyboard to the USB
KVM Switch to control it.
Note: When finishing to install the PC systems with this
USB KVM Switch, there is only one of the PCs can
get keyboard and mouse to work.
Page 14

11
Chapter 3
Usage
Push Button
USB KVM Switch provides one push button. You can select PC port
through it. Pressing the button in series to the destination port as
you want through all the ports.
Keyboard:
There is the connector which PS/2 keyboard can be applied to
this switch.
Mouse:
There is the connector which PS/2 mouse can be applied to this
switch.
Monitor:
There is the connector for connect your monitor to this switch.
LED Indication:
Two colors LED (Orange, Green) is applied to each PC port of USB
KVM Switch. Each PC port LED will show in different color light
based on USB hub is attached to the PC port or not.
1. If the console port and USB hub stay at the same PC
port, the PC port LED is lit in orange color.
2. If the console port and USB hub are located at different
PC ports, the PC port LED connected to the console port
will be lit in orange color and the other PC port con-
Page 15

12
13
nected to USB hub is lit in green color.
3. When you select one of PC ports and this PC is shut down
or this PC port is disconnected to the PC, the selected
port LED will flash in orange color.
USB Hub Power management:
If you prefer to running KVM-U401 as an USB bus power mode,
this switch draws the power from PC’s USB port.
1. If you use one or two USB hub ports, KVM-U401 is able
to supply enough power for one or two USB devices at-
tached to USB hub port.
2. If you use more than two USB hub ports, KVM-U401
needs minimum two PC’s USB ports power to go normal
operation. It means that there are two PCs which pow-
ered on always connected to this switch to guarantee
working condition and it need consume 500mA from
each of these two PC’s USB port.
3. If there is only one powered on PC connected to this
switch, the power is not enough for using more than two
USB HUB ports that built in KVM-U401.
There are two solutions as follows:
1. Please power on the other PC connected to this switch.
Every time, there are two PCs keeping at power on
mode. So, there are 1000mA power source for KVM-
U401 and 4 Port USB HUB ports. Each USB hub port
(Bus Power mode) can offer 100mA for the USB device.
2. To add one DC 5V, 2.5A power adapter to KVM-U401 or a
DC 5V, 2A power adapter to KVM-U201. The power jack
polarity is center positive.
Page 16

13
Chapter 4
Hot-Key Operation
PS/2 Keyboard user:
This application is for Win98/98SE/Me/2000/XP/Server 2003, HP
Unix, Linux, Sun Solaris, MAC O.S 8.6 or later version operation
systems.
To send commands to USB KVM Switch, the “SCROLL LOCK” key
must be pressed twice within 2 seconds. You will hear a beep
sound for conrmation. If you have not pressed any key-in hot
key mode within 2 seconds (It means to key in any key follows up
“Scroll Lock” “Scroll Lock” key), the keyboard will back to under
Operation System control state.
To select PC port without USB hub in PS/2 keyboard’s hot key:
To retrieve USB hub only in PS/2 keyboard’s hot key:
Beeper Function:
Note: The default Beeper function is ON and beeper is
only available for Scan Mode.
Page 17

14
15
Auto Scan Mode:
The scan interval is 5 Seconds, Power On Default. Auto scan mode
only works with at least two PCs powered on simultaneously.
Auto Scan (The scan interval is 10 ~ 100 Seconds)
Digital Number 1: 10 second 2: 20 second 3: 30 second 4: 40 second
5: 50 second 6: 60 second 7: 70 second 8: 80 second 9: 90 second
0: 100 second
Page 18

15
Chapter 5
Troubleshooting
Ensure that all cables are well seated. Label all of cables with the
number for each respective computer to avoid confusion.
IBM PC or Compatible:
ü When I connect WinNT PC to the USB KVM Switch,
WinNT can not detect the USB KVM Switch, what can I
do?
WinNT system doesn’t support USB function, so WinNT
can not detect the USB KVM Switch. And some of the
Win95 system are not support USB function also, if you
want to use Win95 system with USB KVM Switch, please
ensure the version is 95OSR2.1 or above. Then you can
use this Win95 PC to USB KVM Switch.
ü After switch the PC with USB keyboard Hot-Key, the key-
board is disappear. How can I get the keyboard back?
If you are use USB keyboard, this situation is normally.
When you use keyboard Hot-Key to switch PCs, the USB
Hub will not be switched at the same time. So the PC
which you switch to will not detect this USB keyboard. In
this time, you can use select button on USB KVM Switch
to switch again. When you use select button to switch,
the PC port and USB Hub will be switch to next PC at
the same time.
ü Why the keyboard or mouse not working or not compat-
ible with the PC?
Please make sure the keyboard or mouse works when
directly plug in to the computer. If the problem persists,
please try another keyboard or mouse.
ü WHY mouse doesn’t work in Auto Scan mode?
You can press any key on the keyboard or the front
Page 19

16
17
button on the face plate for returning standard mode
and then use the Keyboard or Mouse again. When KVM
switch is in Auto Scan mode, there are only VGA moni-
tor display and CPU alternately (but the USB hub is not
switched in auto scan mode). After you press any key,
the PC port will be selected at the same time, as you see
the current PC Screen.
ü Why the PC shows a screen to prompt me the PC cannot
detect the keyboard for work?
If you apply PS/2 keyboard to USB KVM Switch’s PS/2
port and are fail in booting PC on account of keyboard
error (There is a keyboard error message exists on the
screen), the PC BIOS (Basic Input Output System) need
be set (please see the hardware installation procedure)
or upgraded to new BIOS for accepting USB to PS/2
conversion. Normally, most of BIOS support, during PC
boots process, to recognize USB to PS/2 keyboard con-
version or USB keyboard.
ü Why my 4D mouse cannot work correctly with this USB
KVM Switch?
For 4D or 5D mouse user, it is recommended to be used
with a USB hub port of USB KVM Switch if the mouse
supported with USB type. Due to USB conversion stan-
dard does not define PS/2 to USB converter for 4D or
5D mouse, these extra user define key will lose function
when the users use the PS/2 port of USB KVM Switch.
ü How long of the VGA connect cable I can use?
The recommended VGA cable distance is 5 meters
maximum without ghosting and degradation. Normally,
the cable length is based on driver capacity of your VGA
card. If you need longer VGA cable, please use VGA ex-
tender to accomplish your applications.
ü Why I cannot use the USB devices which connect to the
USB hub on USB KVM Switch right away when I switch
Page 20

17
from one PC to another?
When you switch USB hub from one PC to another and
there are many USB devices are attached to the PC, it
will take about 5~10 seconds for all USB devices initial-
ization. So, to switch port will take more time than the
switching time of conventional PS/2 KVM Switch.
ü If I use the Japanese Windows with the USB KVM Switch,
how can I make my keyboard work correctly?
When you use Japanese Windows OS with 106 key
keyboard, there are some special keys like “¥” need
106 key driver (Microsoft native driver in OS CD-ROM).
Please follow procedures as below and click the mouse
to add new driver.
Win98/98SE/Me:
Control panel à Add new hardware à Next à Next à
Select “No, the device isn’t in the list” à Selectà”No, I
want to select the hardware from a list” à Select keyboard à Select standard keyboard à Select (日本語)
Japanese 106 key keyboard à Reboot PC
Win2000:
Control panel à System à Hardware à Device
manager à Keyboards à Standard keyboard à Click
mouse right key à Properties à Driver à Update
driver à Display a list of the known drivers à For this
device so that I can choose a specic driver à Standard keyboard à Standard (日本語)Japanese 106 key
keyboard à Reboot PC
WinXP:
Control panel à System à Hardware à Device
manager à Keyboards à Standard keyboard à Click
mouse right key à driver à Update driver à Install
from a list or specic location (advanced) à Don’t
search. I will choose the driver to install à Deselect
show compatible hardware à Standard keyboard à
Standard(日本語)Japanese 106 key keyboard à Reboot
PC
Page 21

18
SUN Microsystems:
If you apply PC USB keyboard to USB Hub ports and SUN
Microsystems are connected to this USB KVM Switch, there is
no SUN-to-PC keyboard mapping available. SUN-to-PC keyboard
mapping is only valid at PS/2 keyboard port of USB KVM switch.
For USB KVM Switch, few monitors might cause SUN Microsystems
fails in boot-up process, please power off all systems and console
monitor. You can go one of methods to solve this problem:
Putting SUN Microsystems at 1st port of this KVM Switch and boot
up SUN Microsystems again.
To add a power adapter to this KVM Switch and power on this
switch rst, then go the same boot up process again.
MAC Computer:
If you apply PC USB keyboard to one of USB HUB ports and MAC
computers are connected to this USB KVM Switch, there is no
MAC-to-PC keyboard mapping available. MAC-to-PC keyboard
mapping is only valid at PS/2 keyboard port of USB KVM Switch.
Page 22

Page 23

Part No.:EM_USBKVMv1
 Loading...