

Page 1

SMART COM PCMCIA
ENW-3501
Ethernet PC Card
Page 2

Trademarks
Copyright PLANET Technology Corp.
Contents subject to revision without prior notice.
PLANET is a registered trademark of PLANET Technology
Corp. All other trademarks belong to their respective owners.
FCC Warning
This equipment has been tested and found to comply with the
limits for a Class B digital device, pursuant to Part 15 of the FCC
Rules. These limits are designed to provide reasonable
protection against harmful interference in a residential
installation. This equipment generates, uses and can radiate
radio frequency energy and, if not installed and used in
accordance with the instructions, may cause harmful interference
to radio communications. However, there is no guarantee
that interference will not occur in a particular installation. If
this equipment does cause harmful interference to radio or
television reception, which can be determined by turning the
equipment off and on, the user is encouraged to try to correct the
interference by one or more of the following measures:
♦ Reoriented or relocate the receiving antenna.
♦ Increase the separation between the equipment and
receiver.
♦ Connect the equipment into an outlet on a circuit
different from that to which the receiver is connected.
♦ Consult the dealer or an experienced radio/TV
technician for help.
Shielded interface cables must be used in order to comply with
emission limits.
2
Page 3

Table Of Contents
INTRODUCTION....................................................... 5
What's New?........................................................... 5
Package contents .................................................... 5
General Description ................................................. 6
LED Indicators........................................................ 7
Summary of Features .............................................. 8
HARDWARE INSTALLATION...............................11
Step 1. Insert the Ethernet PC Card ..................11
Step 2. Attach the Media Coupler.....................12
Step 3. Connect to the Network Medium...........13
3a. The Network Medium is
Thin Coaxial Cable .......................13
3b. The Network Medium is
Unshielded Twisted-Pair (UTP) Cable 14
Step 4. Confirm Connection (Tx/On Indicator) .15
REMOVE ETHERNET PC CARD...........................17
Step 1. Disconnect the PSL Plug from the ENW-350117
Step 2. Eject the ENW-3501 from the Computer .......19
SOFTWARE INSTALLATION................................21
Page 4

Page 5

1. Introduction
What's New?
ENW-3501 Ethernet PC Card equipped with Just-In-Time-Interrupt
(JITI) on board remarkably boosts its performance and optimizes
CPU Utilization.
JITI is the A.I. enabled network interface card in the industry and the
best performance card in the market. With JITI, the improved ENW-
3501 Ethernet PC Card's performance is sure to benefit most users.
Package Contents
Open the shipping carton and carefully remove all items. In addition
to this user’s manual, a certain that you have:
q One ENW-3501 Ethernet Adapter
q One plastic storage bag for the PC card
q One media coupler
q Driver diskette
q One T-connector
In case of anything mismatch, damage, or missing, please contact
with your local dealer as soon as possible.
Page 6

General Description
The ENW-3501 Ethernet PC Card is a credit-card sized Ethernet
adapter for connecting a notebook PC to an IEEE 802.3 Ethernet
network and is designed to work with notebook or hand-held
computers that either comes with Socket Services and Card Services
or have Intel PC Card controller or compatible controller. The
notebook PC must be equipped with a PC Card slot. Inside its
compact package, the ENW-3501 holds the Ethernet controller,
network processing interface, RAM for the data buffer, a 68-pin PC
Card plug, and a 15-pin media adapter plug. It requires no preinstallation setup -- simply insert its 68-pin end (its big-connector
end) into the notebook computer's PC Card slot.
The ENW-3501 is supplied together with a media coupler suited to
your network cable media. The media coupler has a 15-pin
connector which plugs into the exposed end of the Ethernet PC card.
The other end of the media coupler has one or more connectors
suitable for connecting into to your network cable. The media coupler
features LED indicators for connection, data activity, and collision.
Important Note:
For ENW-3501 Ethernet PC Card, the ODI DOS driver, NDIS
DOS driver, and NDIS OS/2 driver are the only network
operating system drivers that support an On-Line Hot-Swap
function which allows the card to be removed and re-inserted
without reloading the driver or restarting your computer.
6
Introduction
Page 7

LED Indicators
The media couplers for ENW-3501 feature three LED indicators:
1. On/Tx Indicator
♦ Steady green indicates that the ENW-3501's connections
with the media coupler and the computer are good, and
that the ENW-3501 has been initialized by the system
software ("On" state).
♦ Flashing green indicates that the computer is
transmitting onto the network ("Transmission" state).
2. Ln/Rx Indicator
♦ Steady green indicates that a good linkage to the
network has been established. ("Linkage" state; this
indication valid only for UTP network medium).
♦ Flashing green indicates that the computer is receiving
data from the network ("Reception" state).
3. Col Indicator
♦ During transmission or reception, the Col indicator's
intermittent flashing yellow (data "Collision" state) is
normal; the network software automatically resolves
data collisions.
ENW-3501 Ethernet PC Card User’s Guide
7
Page 8

Summary of Features
The ENW-3501 Ethernet PC Card provides the following features:
♦ Complies with IEEE 802.3 Ethernet standards 10Base2
and 10BaseT
♦ Complies with PC Card 2.x JEIDA 4.x, PC Card 95
Standards
♦ Built-in JITI function ( Just-In-Time Interrupt )
♦ Built-in 32KB RAM data buffer
♦ Support Auto-detection of connected network media.
♦ Auto-Polarity for UTP cables.
♦ Capable of operation in either half duplex or full duplex
mode. Uses Auto Negotiation to automatically adjust
to network speed, and full-duplex operation. (BNC
media is capable of operation in half duplex mode
only.)
♦ No manual setup switches -- automatically con-figured
by softwareat
♦ Low power consumption
♦ Laser welded stainless stell case
♦ Media couplers for thin coaxial, UTP cable media
♦ Standard 15-pin Honda Connector for media coupler
8
Introduction
Page 9

♦ Supported software list
Novell Netware 3.x, 4.x ODI Driver
Novell NetWare client32 for DOS, Windows 3.x, Windows 95
IBM LAN Server
IBM PC LAN Support Program
IBM DOS LAN Services
DEC PathWorks 4.0, 5.0
Packet Driver
Artisoft LANtastic/A1
SCO Unix
AT&T Unix
Windows for Workgroup 3.11
Windows 95
Windows NT
Windows NT Advanced Server
Microsoft LAN Manger
Microsoft Client for DOS
NSCA
WINSOCK for Internet
NDIS Driver
PC/TCP
Sun PC-NFS
Banyan Vines
♦ Software support includes driver programs for NE-2000
adapter
♦ ENW-3501 comply with CE radiation standards EMI
EN50081-1, EN55022, EMS EN50082-1, IEC801-2(ESD),
IEC 801-3(RS), and IEC 801-4 (EFT)
ENW-3501 Ethernet PC Card User’s Guide
9
Page 10

Page 11
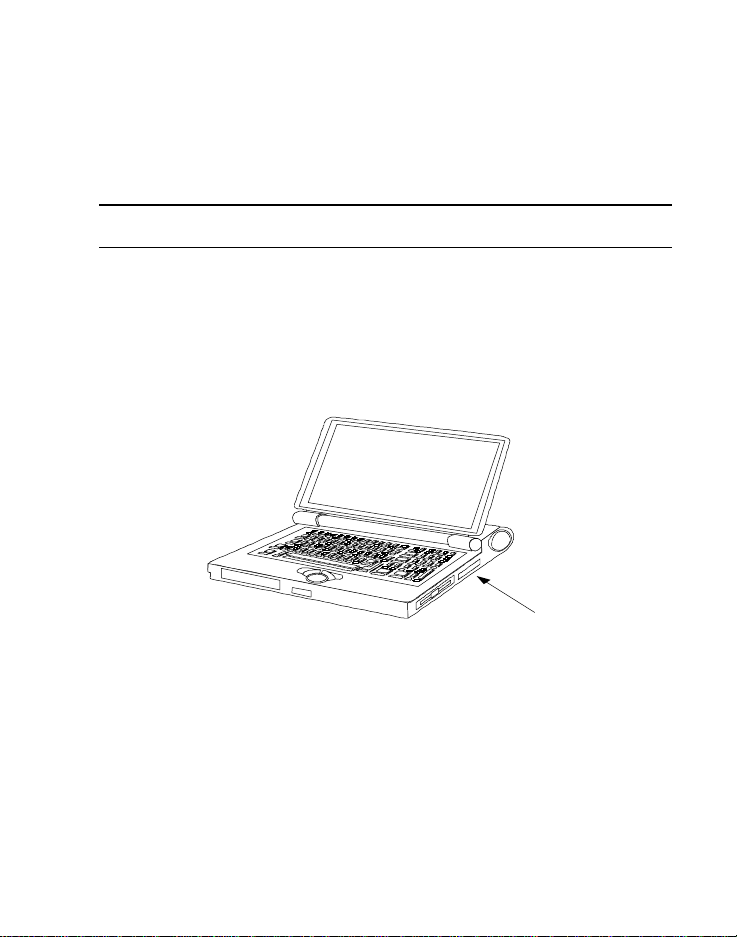
2. Hardware Installation
PC Card slo
t
Follow these four steps to install the ENW-3501 Ethernet PC card:
Step 1. Insert the Ethernet PC Card
Find/select an available Type II or Type III PC Card slot on your
notebook computer's side or rear panel. Holding the ENW-3501 with the
label facing up (the detail label with bar code facing down), insert its bigconnector end into the PC Card slot. Slide the ENW-3501 all the way
into the PC Card slot until it reaches a firm stop.
Page 12

Step 2. Attach the Media Coupler
The small-connector (Honda connector, PSL-plug receptacle) end of
the ENW-3501 remains accessible (approximately flush with the case
of the computer) when the ENW-3501 is properly seated in its PC
Card slot. The top side of the media coupler's PSL plug is labeled
with a small triangle molded into the plastic. Keeping the top
side of the PSL plug up, insert the plug into the ENW-3501's
receptacle until it is firmly seated.
Labeled sid e of
PSL plug f acing up
Me d ia coup ler
Inse rt the P S L Pl u g in t o t h e r e c epta c le o f E N W - 3501
NOTE:When the PSL plug is firmly seated, it is held in place by small
latching hooks at either end of the plug. To avoid damage when
removing the PSL plug from the ENW-3501, it is necessary to depress
the two small latch wings of the plug. See the following section,
"Remove Ethernet PC Card."
12
Hardware Installation
Page 13

Step 3. Connect to the Network Medium
Connecting Media Coupler to thin coaxial cabl
e
Connect the media coupler onto your network medium according to
subsection 3a or 3b depending on your network cable medium:
3a. The Network Medium is Thin Coaxial
Fasten the network cable connector directly onto the BNC receptacle
of the media coupler. If it is necessary to use a T-connector (one
is supplied), then any open BNC receptacle must be capped with a
50-ohm terminator (not supplied).
1
Cable
1
This medium is also known by a variety of other names, including BNC cable, 10Base2 cable, and
RG-58 cable.
ENW-3501 Ethernet PC Card User’s Guide
13
Page 14

3b.The Network Medium is Unshielded Twisted-Pair
(UTP)2 Cable
Make your network connection by running a UTP cable from the
10BASE-T hub to your media coupler. Simply plug one end of
the cable (RJ-45 connector) into an available hub port, and plug the
other end (RJ-45 connector) into the RJ-45 socket of your media
connector3.
Hub
Media Coupler
RJ-45 Connector
UTP cable
Using UTP cable to connect Media Coupler to hub
2
This is data-grade UTP cable, also known as 10BaseT cable.
3
ENW-3501 automatically detects a network cable connection to either connector.
14
Hardware Installation
Page 15

Step 4. Confirm Connection (Tx/On Indicator)
When the notebook computer's power is ON, and the Ethernet PC
card is recognized and enabled by the computer's system software, the
media coupler's Tx/On indicator glows steady green4.
If the Tx/On indicator remains dark, the most likely fault is poor
engagement of the 68-pin PC Card plug. Review the following
section titled "Remove the Ethernet PC Card," then remove the PC
Card from the notebook. Repeat the procedures of Step 1, "Insert
the Ethernet PC Card," taking care to ensure that the PC Card is
right side up and that it seats firmly in the correct socket of your
notebook. Repeat procedures of Steps 2 and 3 as necessary get the
steady green Tx/On confirmation.
4
You might need to wait a few seconds following notebook powerup, or following insertion of a PC
Card, for the software processing to be completed. The Tx/On indicator will remain dark until
the software processing is completed. See additional description in the "LED Indicators" section.
ENW-3501 Ethernet PC Card User’s Guide
15
Page 16

Page 17

3. Remove Ethernet PC Card
Follow these two steps to remove the Ethernet PC card:
Step 1. Disconnect the PSL Plug from the
ENW-3501
Unplug the media coupler from the ENW-3501 before ejecting the
ENW-3501 from the PC Card slot. The PSL plug is held in place
by small latching hooks at either end of the plug. To remove the
PSL plug from the ENW-3501, it is necessary to unlatch the hooks by
depressing the two small latch wings of the plug. Use thumb and
forefinger to squeeze the latch wings into the plug body and gently
pull the plug out of its receptacle.
Page 18

Depress clip wings while unplugging the PSL Plug
Do not pull the PSL plug without depressing clip wings
NOTE: Pulling the coupler plug out of its receptacle without depressing the
clip wings will cause damage to the plug.
18
Hardware Installation
Page 19

Step 2. Eject the ENW-3501 from the
Computer
Use the computer's PC Card Eject mechanism to unseat the ENW3501 from the computer's PC Card plug. The ENW-3501 will
then protrude from the PC Card slot, and you can easily remove the
ENW-3501 by gripping its protruding end and withdrawing it from
the PC Card receptacle.
ENW-3501 Ethernet PC Card User’s Guide
19
Page 20

Page 21

4. Software Installation
On account of the great variety of network environments in which the
ENW-3501 may be installed and used, and the frequency of revisions
in these network systems, the instructions for software installation are
given as README/text files on ENW-3501 driver program diskettes
supplied in your ENW-3501 package.
Required software is provided on a diskette labeled the ENW-3501
Series Ethernet PC Card Driver Program. The diskette contains
drivers for various NOSs (Network Operating Systems), and
README/text files which provide instructions for installing the
driver specific to your NOS. Please note it is strongly recommended
to run INSTALL.EXE in the DOS environment.
For normal software installation follow these steps:
1. Insert the ENW-3501 Series Ethernet PC Card Driver
Program diskette into the computer's diskette drive.
2. Issue the INSTALL command at the DOS command
prompt. If the diskette is drive A, for example, type:
> INSTALL and press Enter key.
Then main menu appears.
3. Highlight Release Notes then press Enter to view Release Notes.
It‘s optional to print out Release Notes. Find related
README/text file(s), then follow its instructions to install
ENW-3501 driver.
4. When the INSTALL run is completed, restart the computer.
Page 22

For further help, please contact the establishment from which you
purchased your ENW-3501.
22
Software Installation
Page 23

Page 24

EM3501
 Loading...