

Page 1
Owners Manual
Installation - Operation - Maintenance
Electric Counter Top Ovens
350 series
PM 351ED – PM 351ED-1 – PM 352ED – PM 352ED-1 – PM 352ED-2
PM 351ED-DW - PM 351ED-1DW - PM 352ED-DW - PM 352ED-1DW - PM 352ED-2DW
400 series
PM 401ED – PM 401ED-1 – PM 402ED – PM 402ED-1 – PM 402ED-2
PM 401ED-DW - PM 401ED-1DW - PM 402ED-DW - PM 402ED-1DW - PM 402ED-2DW
450 series
PM 451ED – PM 451ED-1 – PM 452ED – PM 452ED-1 – PM 452ED-2
PM 451ED-DW - PM 451ED-1DW - PM 452ED-DW - PM 452ED-1DW - PM 452ED-2DW
550 series
PM 551ED – PM 551ED-1 – PM 552ED – PM 552ED-1 – PM 552ED-2
APPROVALS approvals vary depending on market
ANSI/NSF 4
E326671
E326671
E335108
Owners Manual_PizzaMaster_Counter Top series_90028-EN-R1B
Page 2

PIZZAMASTER® – MANUFACTURER WARRANTY STATEMENT
2020-06-22 Page 1 (3)
I. Relationship to national law and purchase agreement
1. These PIZZAMASTER warranty conditions shall apply insofar as they do not conflict with the
prevailing national laws and regulations regarding warranty terms.
2. This PIZZAMASTER manufacturer’s warranty does not affect the rights the purchaser of a
PIZZAMASTER product has towards the vendor because of the purchase agreement made
between the two parties.
II. Warranty performance
1. Under the conditions of this warranty statement, PIZZAMASTER grants customers of a
PIZZAMASTER product:
a) A warranty of two (2) years for spare parts and one (1) year for labor cost for new products,
options, and accessories.
b) A warranty of one (1) year (spare parts and labor) on used products purchased from
PIZZAMASTER´s stock of demonstration models or similar stocks (unless otherwise explicitly
agreed in writing), starting from the date of product installation on customer premises. Proof
of the date of installation and the type of product are to be provided by the customer in the
form of a written confirmation or installation invoice from the dealer or sales partner.
c) A warranty of ninety (90) days for spare parts.
2. Should defects occur within this warranty period that are not excluded from warranty coverage
as per Section III, PIZZAMASTER shall, at its own discretion, remedy these defects free of charge
through repairs, replacement of defective parts or replacement of the product. Parts or products
replaced become the property of PIZZAMASTER.
3. This warranty is valid in all countries and can be claimed for products located in countries in
which authorized PIZZAMASTER partners provide warranty services in accordance with the
warranty conditions listed here.
4. The performance of warranty services does not result in the warranty period being extended or
restarted.
5. Warranty services other than the ones mentioned above shall not be granted.
III. Warranty terms
1. Defects must be made known to PIZZAMASTER in writing within thirty (30) days after they
become recognizable or the customer becomes aware of them. This is based on the date the
report is received by the customer´s local PIZZAMASTER service partner.
2. Warranty services are provided only if a copy of the vendor´s original invoice or cash receipt is
presented along with the product.
3. This warranty does not entitle the customer to free product inspections or maintenance. The
warranty also does not cover wear and tear resulting from customer use of the product, nor
defects in consumables and wearing parts that are to be attributed to normal usage or wear.
Consumables and wearing parts include lamps and seals. Glass damage is also excluded from the
warranty, as are defects arising due to calcification of the product.
The largest electric deck oven range in the world, 80 different sizes with over 1 000 combinations – Made by,
SVENSKA BAKEPARTNER AB
Customer Support: Tel: +46 33 230-025 | Fax: +4633 248-140 | E-mail: [email protected]
Websites: www.pizzamaster.com | HQ: Svenska Bakepartner AB, Ödegärdsgatan 5, SE 504 64 Borås Sweden
Page 3

PIZZAMASTER® – MANUFACTURER WARRANTY STATEMENT
2020-06-22 Page 2 (3)
4. This warranty also does not cover product damage occurring because of,
a. Improper usage of the product, using it for purposes other than its intended purpose, or
failure to observe the PIZZAMASTER operating and maintenance instructions and, insufficient
cleaning and, or maintenance.
b. Improper installation or usage of the product in a manner that does not comply with the
technical or safety requirements applicable in the country where the product is being used.
c. Repair attempts that are unprofessional, do not comply with PIZZAMASTER instructions, or
are made by unauthorized third parties.
d. Third-party influence or force majeure (such as fire or water damage)
e. Cleaning and maintenance products other than the ones recommended by PIZZAMASTER.
5. The warranty shall be considered void if replacement or wearing parts other than original
PIZZAMASTER parts are installed, or the device is repaired or opened by an unauthorized dealer,
an unauthorized service provider, or the customer themselves, regardless of whether the repairs
are performed professionally and according to instructions, and regardless of whether the
defects are the result of these repairs.
6. The warranty shall not apply if the PIZZAMASTER installation checklist and installation manual
are not followed, or if recommended maintenance and inspection cycles are not maintained. The
same applies to defects attributable to the usage environment, for example from using dirty,
corrosive water or electricity of incorrect current rating or voltage. All damage due to
overvoltage is excluded from the warranty.
7. Should PIZZAMASTER, upon inspection of the device, determine that the defect in question does
not entitle the customer to warranty claims, the costs of the PIZZAMASTER inspection are to be
borne by the customer.
8. PIZZAMASTER assumes no liability for transportation costs or risks.
IV. Non-transferability
This warranty guarantee is provided exclusively to the original customer of the vendor who procured
the products from PIZZAMASTER and is not transferable.
V. Limitation of liability
1. Pursuant to the conditions specified above, PIZZAMASTER undertakes only to maintain or replace
products.
2. The express terms of this warranty statement are in lieu of all other warranties, express or
implied, including, but not limited to, the implied warranties of merchantability and fitness for a
particular purpose, all of which are hereby excluded to the fullest extent permitted by law.
Notwithstanding anything else contained in this warranty statement, PIZZAMASTER shall in no
event be liable for loss of profits or contracts or other indirect or consequential loss or damage
(even if PIZZAMASTER has been advised of or should have foreseen, the possibility of such
damages) whether arising from negligence or any other cause of action arising out of the subject
matter of this warranty statement.
The largest electric deck oven range in the world, 80 different sizes with over 1 000 combinations – Made by,
SVENSKA BAKEPARTNER AB
Customer Support: Tel: +46 33 230-025 | Fax: +4633 248-140 | E-mail: [email protected]
Websites: www.pizzamaster.com | HQ: Svenska Bakepartner AB, Ödegärdsgatan 5, SE 504 64 Borås Sweden
Page 4

PIZZAMASTER® – MANUFACTURER WARRANTY STATEMENT
2020-06-22 Page 3 (3)
VI. Place of jurisdiction, place of performance
1. This warranty statement shall be governed by and construed and enforced in accordance with
the laws of Sweden.
2. Any dispute, controversy or claim arising out of or in connection with this warranty statement
shall be finally settled by arbitration administered by the Arbitration Institute of the Stockholm
Chamber of Commerce (the “SCC Institute”). The place of proceedings shall be Stockholm,
Sweden. The proceedings shall be conducted in the English language. The arbitral tribunal shall
be composed of a sole arbitrator.
VII. Final provisions
Should any part of this warranty statement be deemed invalid or inexecutable, it shall have no effect
on the validity of the rest of the warranty statement.
The largest electric deck oven range in the world, 80 different sizes with over 1 000 combinations – Made by,
SVENSKA BAKEPARTNER AB
Customer Support: Tel: +46 33 230-025 | Fax: +4633 248-140 | E-mail: [email protected]
Websites: www.pizzamaster.com | HQ: Svenska Bakepartner AB, Ödegärdsgatan 5, SE 504 64 Borås Sweden
Page 5

Index
Warranty and service ................................................................. 2
Index .......................................................................................... 3
Safety and Warnings ................................................................. 4
Installation ................................................................................. 5
Index
Electrical connection ................................................................. 6
Oven operation .......................................................................... 9
First-time start-up .................................................................... 13
Steam System ......................................................................... 14
Pizza Recipe / Oven Settings / Baking Guidelines .................. 16
Maintenance and Preventative Maintenance .......................... 18
Changing of oven lamp and door gasket ................................. 21
Trouble shooting ...................................................................... 22
Technical data .......................................................................... 23
EU-Declaration of conformity ................................................... 25
Notes ....................................................................................... 26
Attachment :
Electrical diagram
PizzaMaster®
3
Page 6
Safety and Warnings
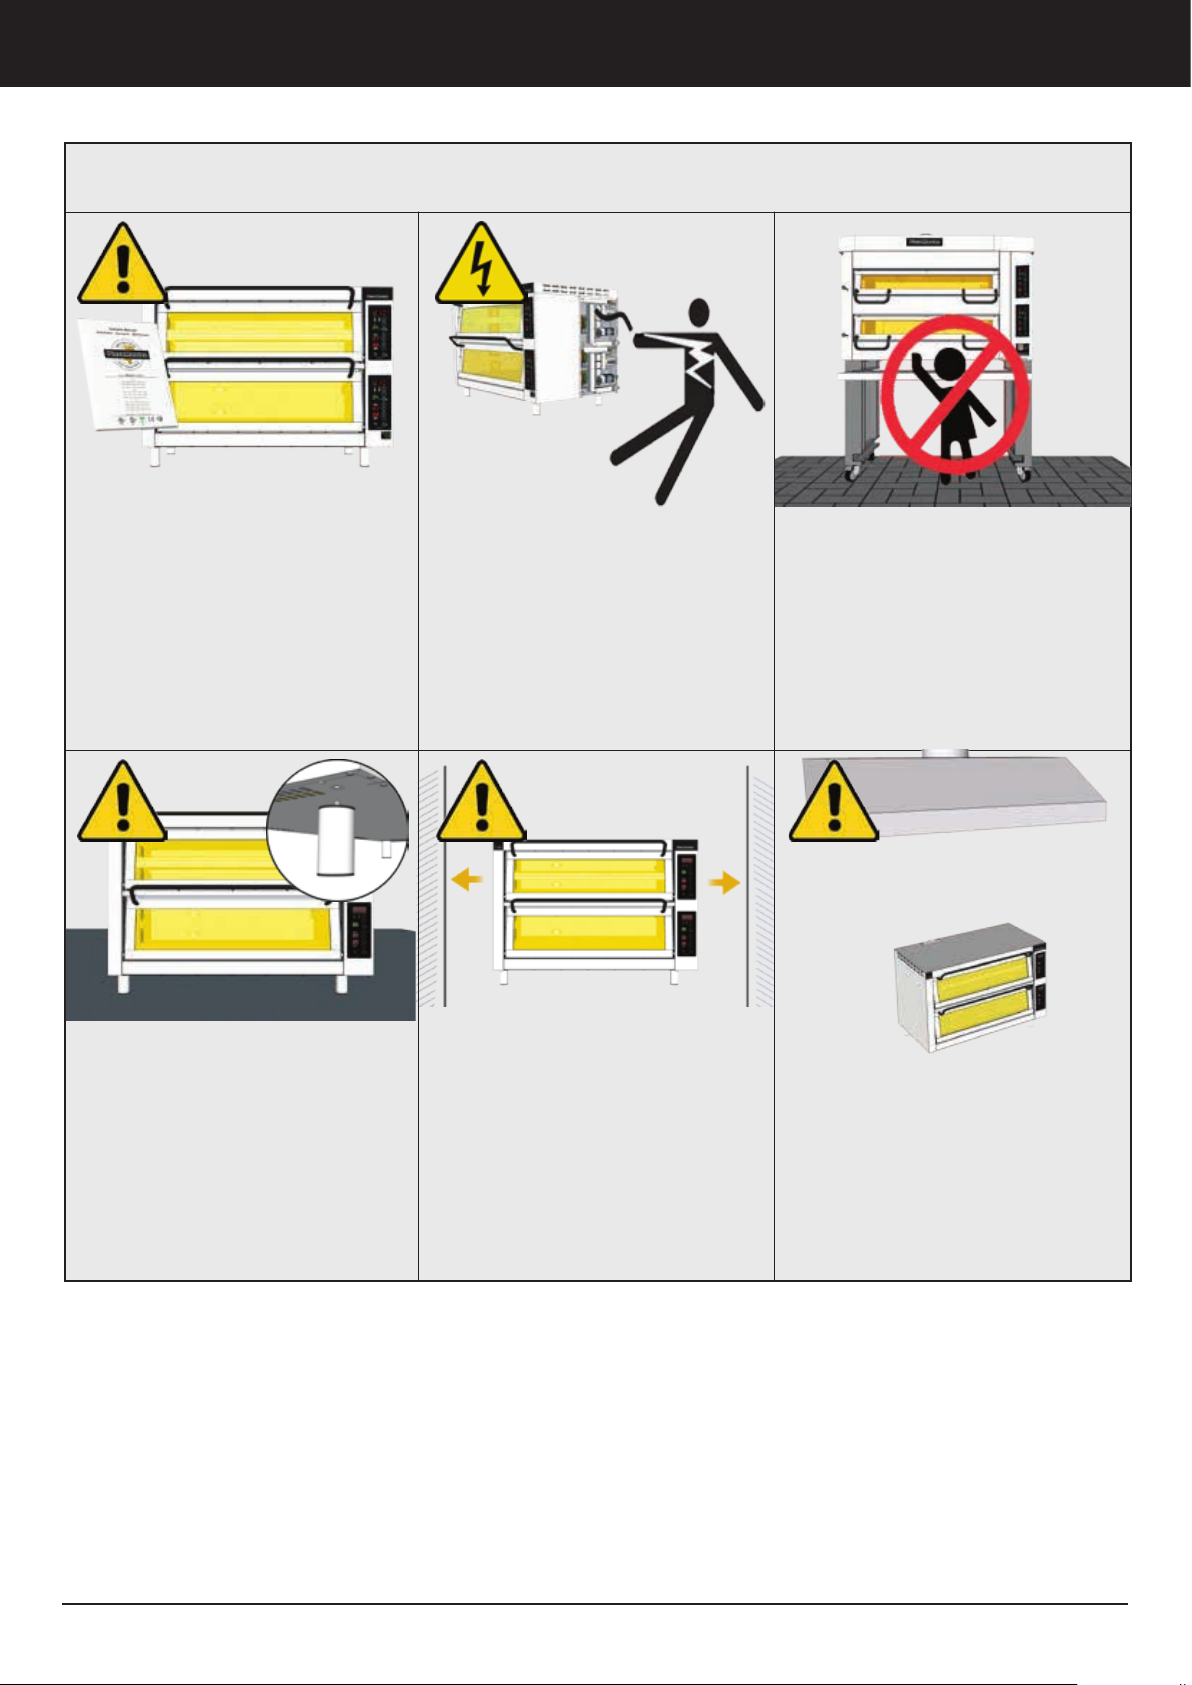
Safety Precautions and Warnings
To ensure safe operation, read
the following manual that contains
safety precautions and warnings
for your own safety
When positioning your oven, it is
important to consider the following
points:
It is important for the floor to be flat,
so that the oven is both horizontal
and stable.
High Risk of Electrocution!
Disconnect appliance from power
supply before opening.
To reduce the risk of electric shock,
DO NOT remove or open electrical
cover. Refer servicing to qualified
personnel.
For ventilation of the oven, a space
of at least 50 mm is needed between
the oven and any adjacent wall, on
all sides.
This appliances is not intended for
use by persons (including children)
with reduced physical, sensory or
mental capabilities, or lack of experience and knowledge, unless
they have been given supervisory
or instruction concerning use of the
appliance by a person responsible
for their safety.
The oven needs to be placed under
a ventilation hood or connected to a
local ventilation system as per local
local code and regulations
You MUST install the legs enclosed
with this appliance
4
PizzaMaster®
Page 7
Installation
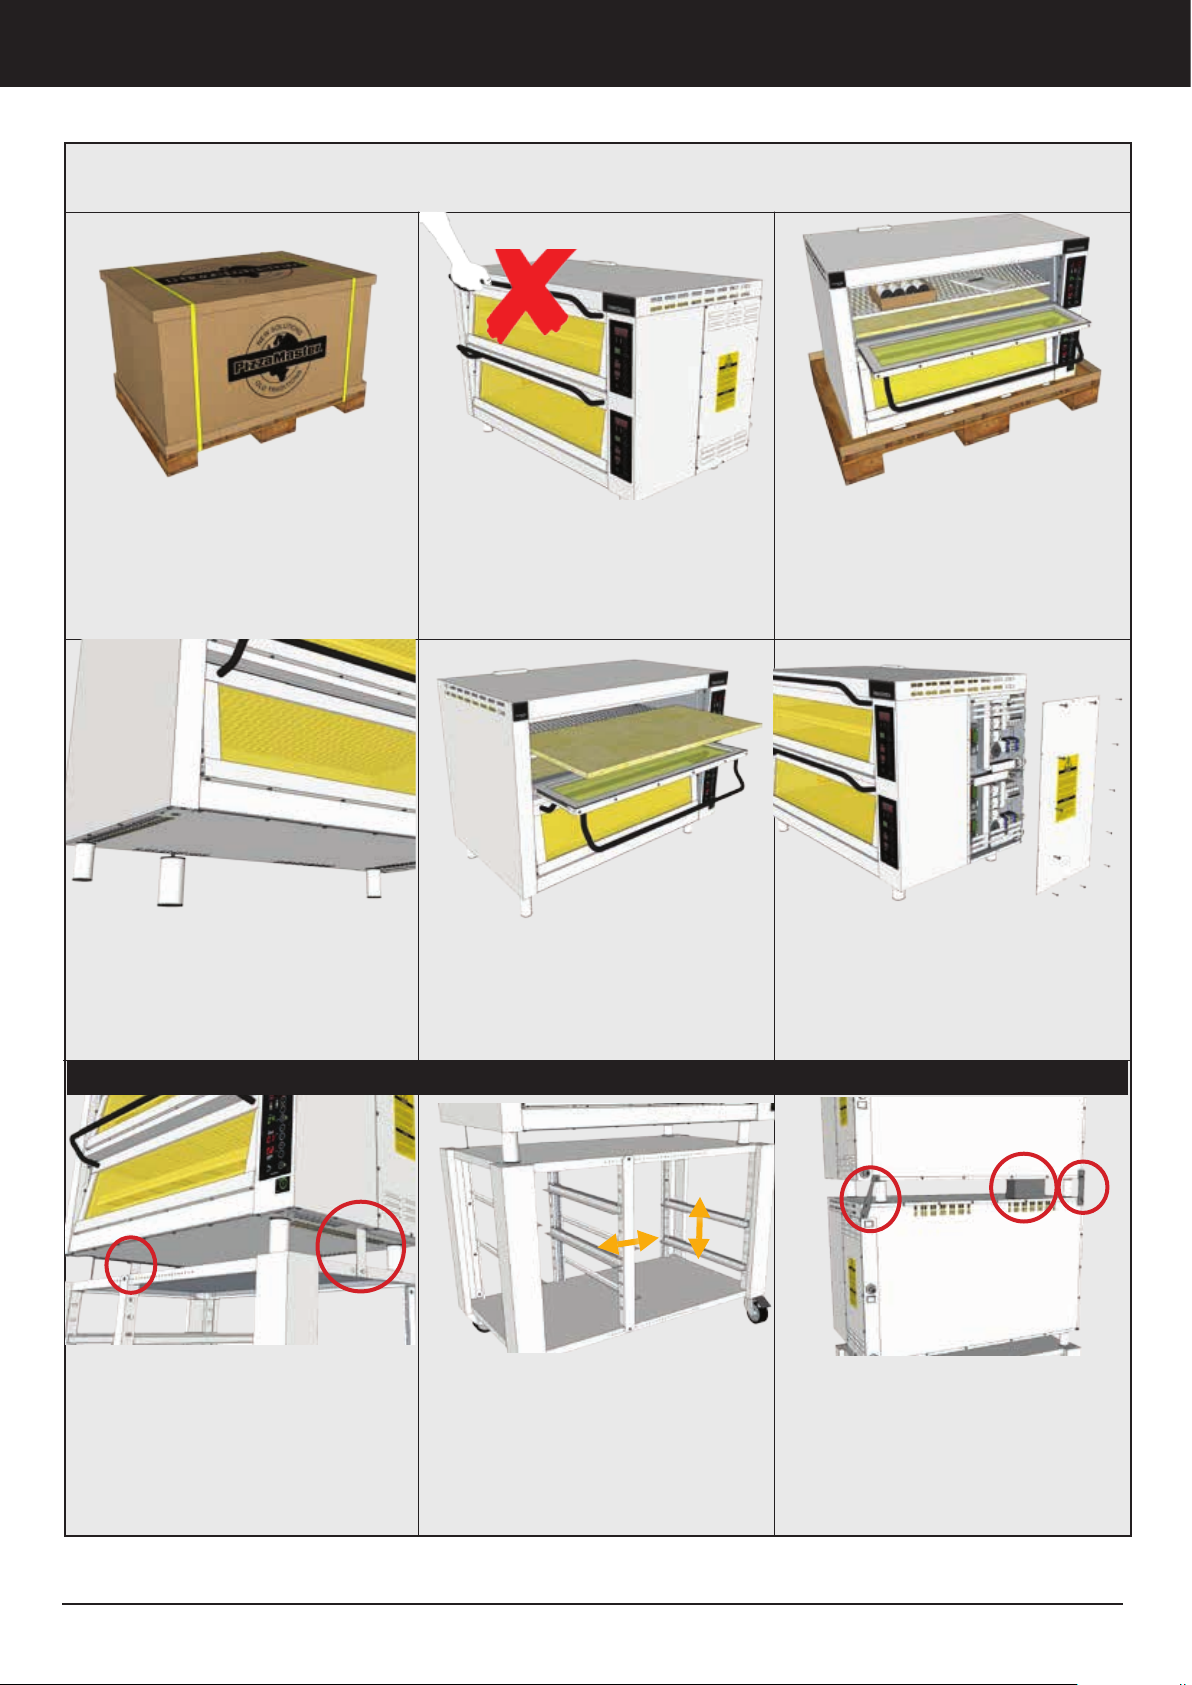
Installation
1. The oven is packed safely
and for easy transportation. Do
not drop it or allow hard knocks.
Cut the packing bands and
remove the top and side cardboards
4. Lift the oven carefully and place
the legs by screwing them to the
bottom.
You MUST install the legs enclosed
with this appliance
Accesories
2. DO NOT carry the oven by the door
handle
5. If your oven is equipped with
2 stones per chamber, carefully
remove the stone placed in the
bottom and place it over the middle
part of the chamber
3. Remove the legs and owners
manual from inside of the oven
chamber
6. If possible, position the oven
with easy access to the right
hand panel to facilitate the
electrical installation and future
services
Security Support Counter Top:
You must secure your oven with the
Support through the two Security
Support Holders in each side
Shelf Support System
Place the Shelf Support System
with the height and width most
suitable for your needs or trays size
PizzaMaster®
Ventilation Conduit
You can place one Conter Top
oven over other; for this you must
install the Ventilation Conduit
between the two ovens and the
ovens secure system holders
5
Page 8
Electrical connection
Electrical connection
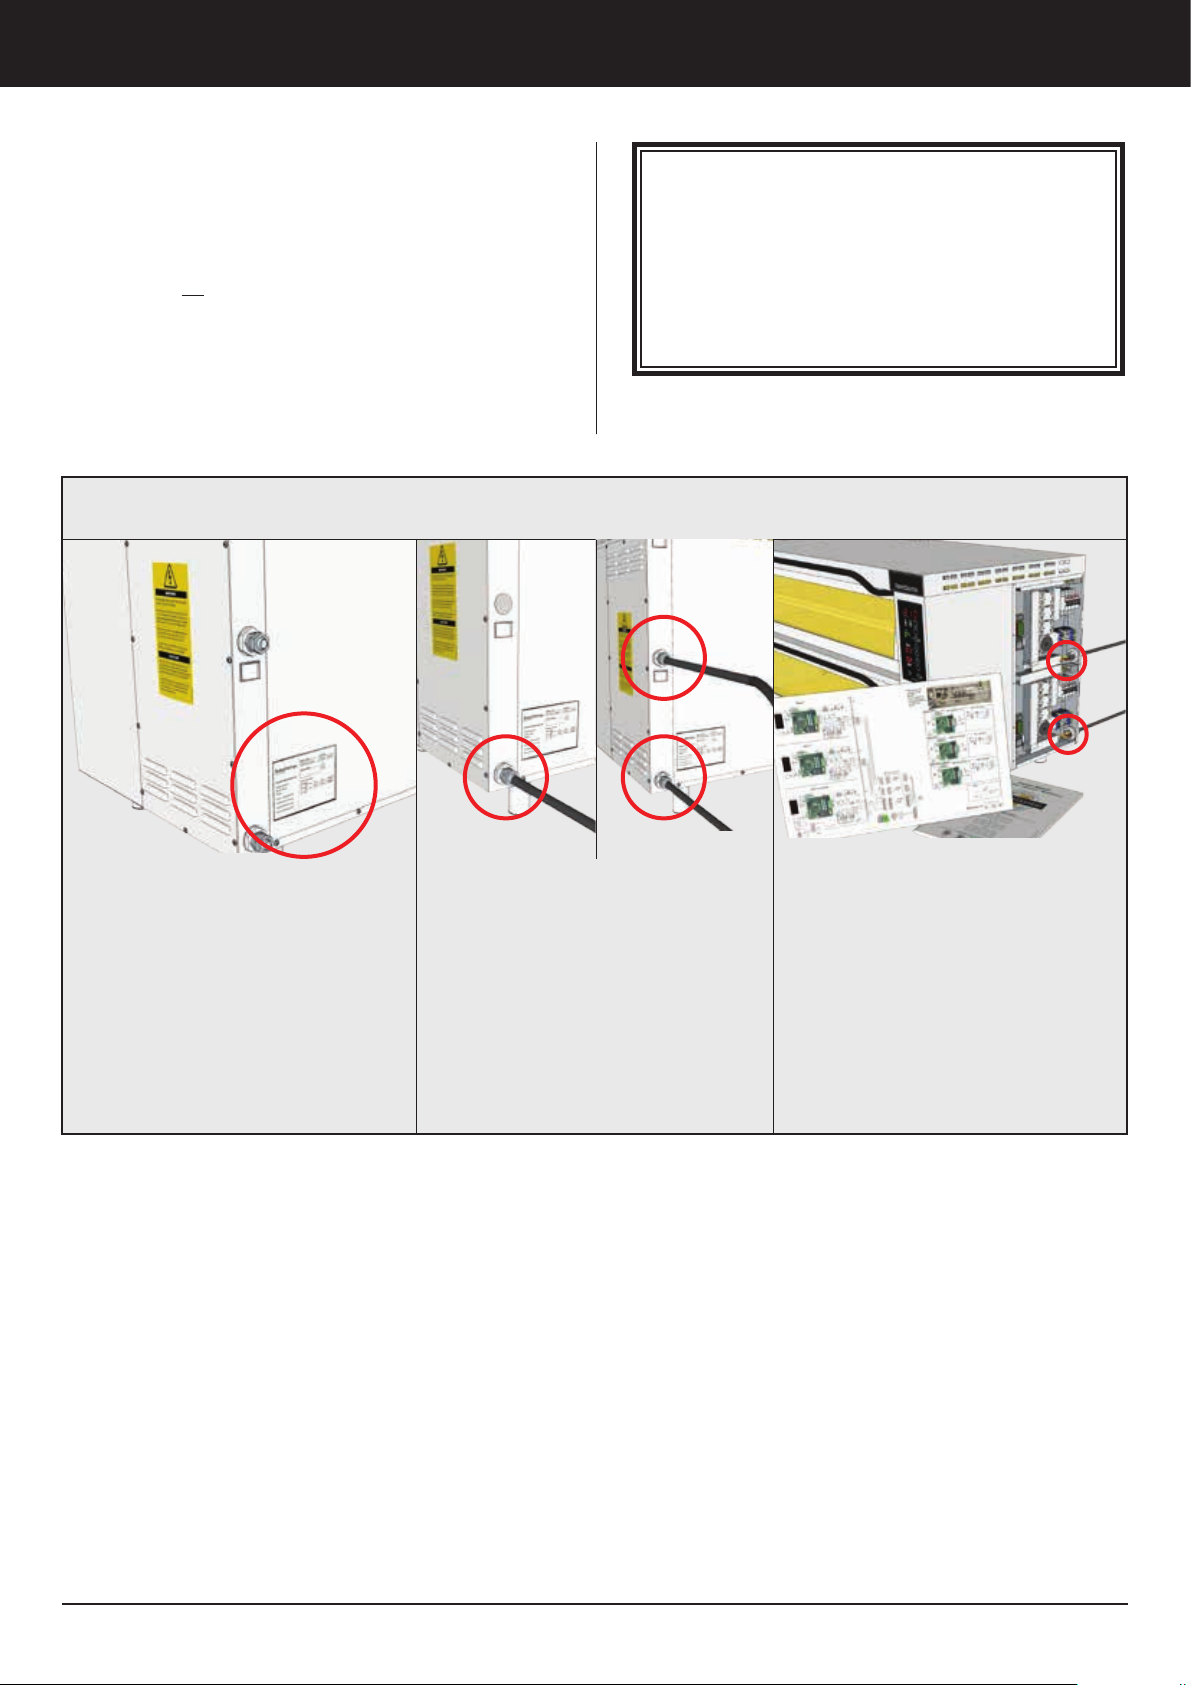
For connection and correct fuse rating, see the
oven rating plate, the table for fuse protection need
and the attached electrical diagram.
Important!
For reasons of safety and the validity of the warranty, all electrical work must be carried out by a
qualified electrician.
After reading all above information, follow instructions
below for correct electrical connection.
The earth potential equalizer screw has to be installed.
The earth potential equalizer screw is located on the
backside next to the connecting cable.
Electrical Connection
The oven must be connected via an external
main switch with min. 3 mm gape of at least 3
mm for each power supply cable.
1. Make sure electrical supply corresponds with that specified on the
oven rating plate
Remove the screws that secures the
right-hand side panel, and take off
the panel to access to the electrical
components.
2. The oven can be connected with
1 power supply per deck or 1 power
supply per oven, this depend of the
voltage and oven model.
3. For Cable connections or cable
replacement:
Open the righ hand panel. Following the appropriate electrical wiring
diagram confirming to the oven rating plate, connect the power supply
leads to the field terminal block.
Make sure all connections are tight,
then place back the right-hand side
panel.
6
PizzaMaster®
Page 9
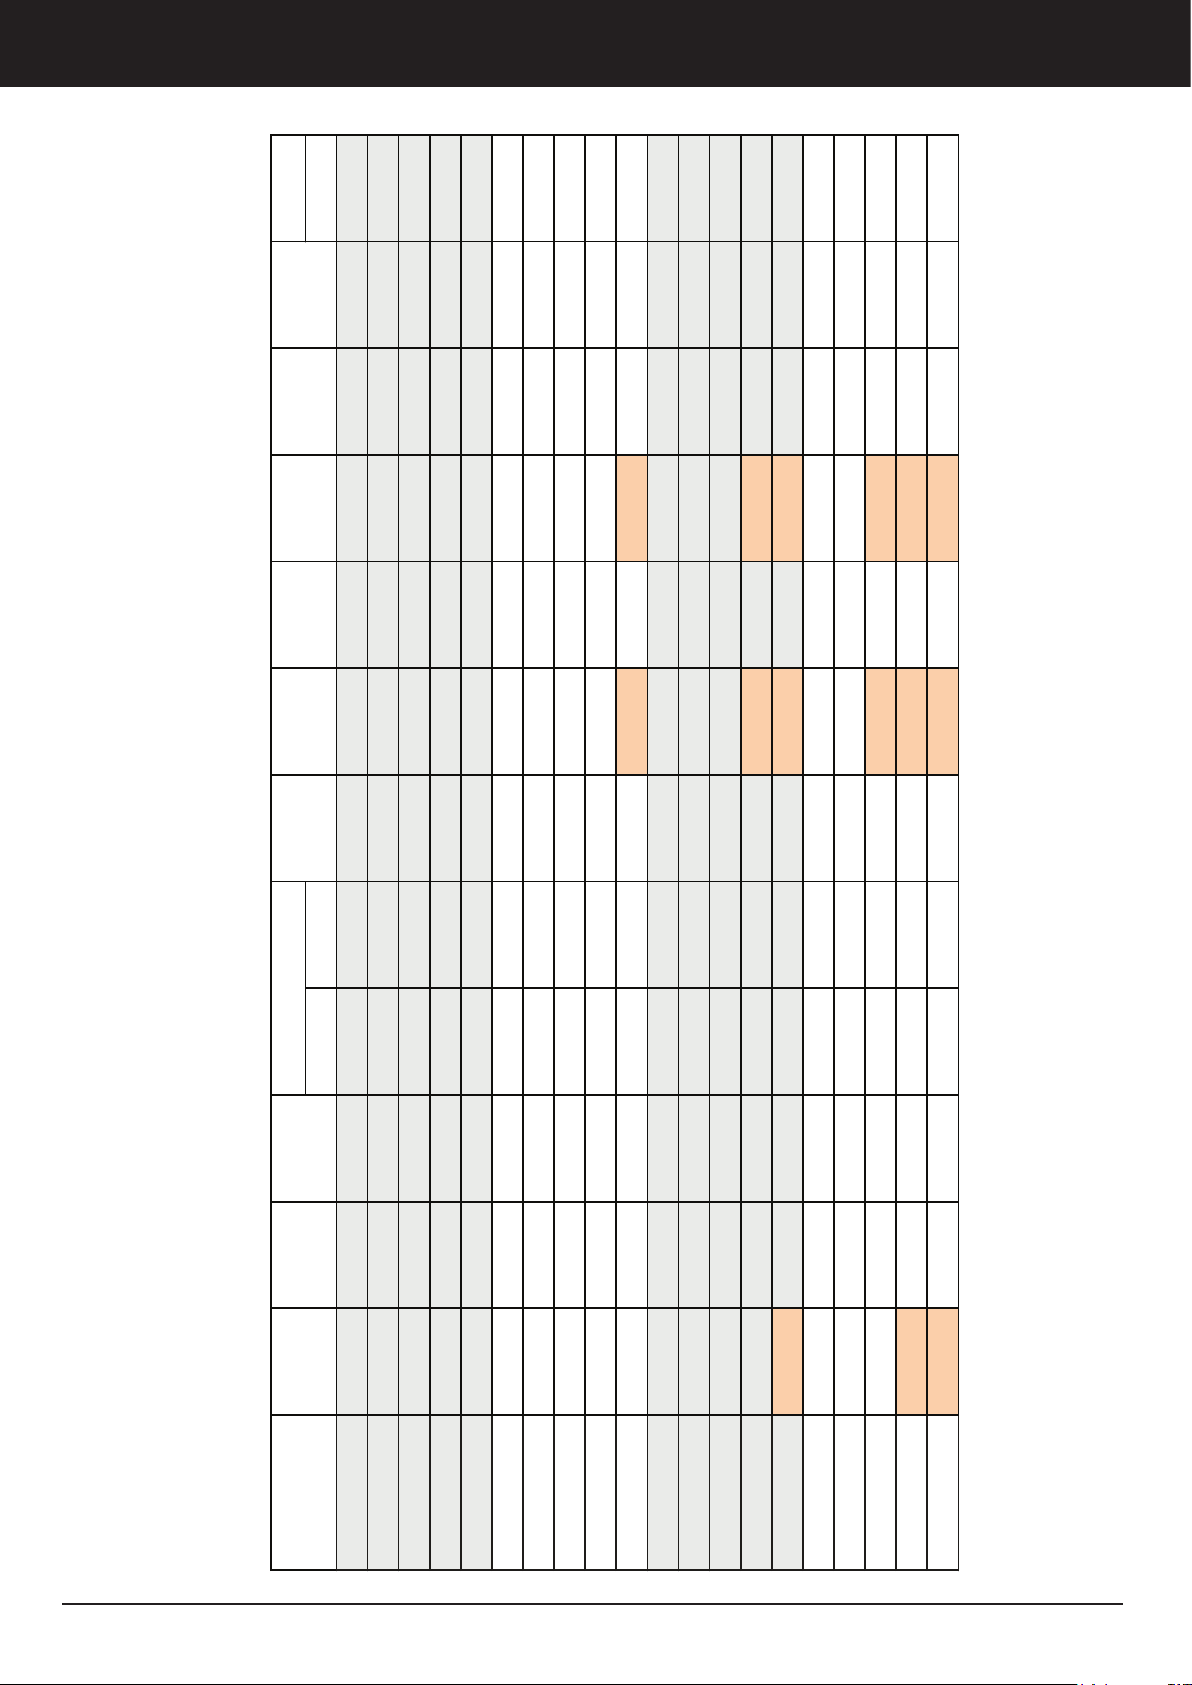
460V 3ph
Electrical connection
200V 3ph 208V 1ph 208V 3ph 240V 1ph 240V 3ph 400V 3ph
230V 3ph 400V 3ph + N (440-480)
230V 3ph / 400V 3ph + N
AMPS per phase and per OVEN
9.9 5.1 4.3 8.6 5.1 9.1 11.0 9.5 10.3 9.0 4.9 4.3
230V 1ph + N 400V 3ph + N 480V 3ph + N
14.7 5.1 4.3 8.6 5.1 9.1 16.3 9.5 15.3 9.0 4.9 4.3
19.8 10.3 8.5 13.0 10.3 13.9 21.9 14.4 20.7 13.6 7.5 6.5
24.6 10.3 8.5 17.2 10.3 18.3 27.2 19.0 25.7 17.9 9.9 8.6
29.4 10.3 8.5 17.2 10.3 18.3 32.3 19.0 30.7 17.9 9.9 8.6
13.4 6.9 5.7 11.6 6.9 12.7 14.8 12.8 14.0 12.4 6.8 5.9
19.9 6.9 5.7 11.6 6.9 12.7 22.0 12.8 20.8 12.4 6.8 5.9
26.8 13.7 11.4 17.6 13.7 18.7 29.6 19.4 27.9 18.3 10.1 8.8
33.3 13.7 11.4 23.2 13.7 24.7 36.8 25.6 34.8 24.2 13.3 11.6
39.8 13.7 11.4 23.2 13.7 24.7 – 25.6 – 24.2 13.3 11.6
15.9 8.1 6.8 13.8 8.1 14.7 17.6 15.2 16.6 14.4 7.9 6.9
23.7 8.1 6.8 13.8 8.1 14.7 26.2 15.2 24.7 14.4 7.9 6.9
31.8 16.3 13.5 20.8 16.3 22.1 35.2 23.0 33.2 21.7 12.0 10.4
39.6 16.3 13.5 27.6 16.3 29.3 – 30.5 – 28.8 15.8 13.8
– 16.3 13.5 27.6 16.3 29.3 – 30.5 – 28.8 15.8 13.8
19.3 9.8 8.2 16.7 9.8 17.8 21.3 18.5 20.1 17.4 9.6 8.4
28.8 9.8 8.2 16.7 9.8 17.8 31.8 18.5 30.0 17.4 9.6 8.4
38.6 19.7 16.3 25.2 19.7 26.8 – 27.9 – 26.3 14.5 12.6
– 19.7 16.3 33.4 19.7 35.5 – 37.0 – 34.9 19.2 16.7
– 19.7 16.3 33.4 19.7 35.5 – 37.0 – 34.9 19.2 16.7
CounterTop series - Standard width
Model
PM 352ED
PM 351ED-1
PM 351ED
PM 401ED
PM 352ED-2
PM 352ED-1
PM 451ED
PM 402ED-2
PM 402ED-1
PM 402ED
PM 401ED-1
PizzaMaster®
PM 452ED-1
PM 452ED
PM 451ED-1
PM 551ED-1
PM 551ED
PM 452ED-2
PM 552ED-2
PM 552ED-1
PM 552ED
7
Page 10
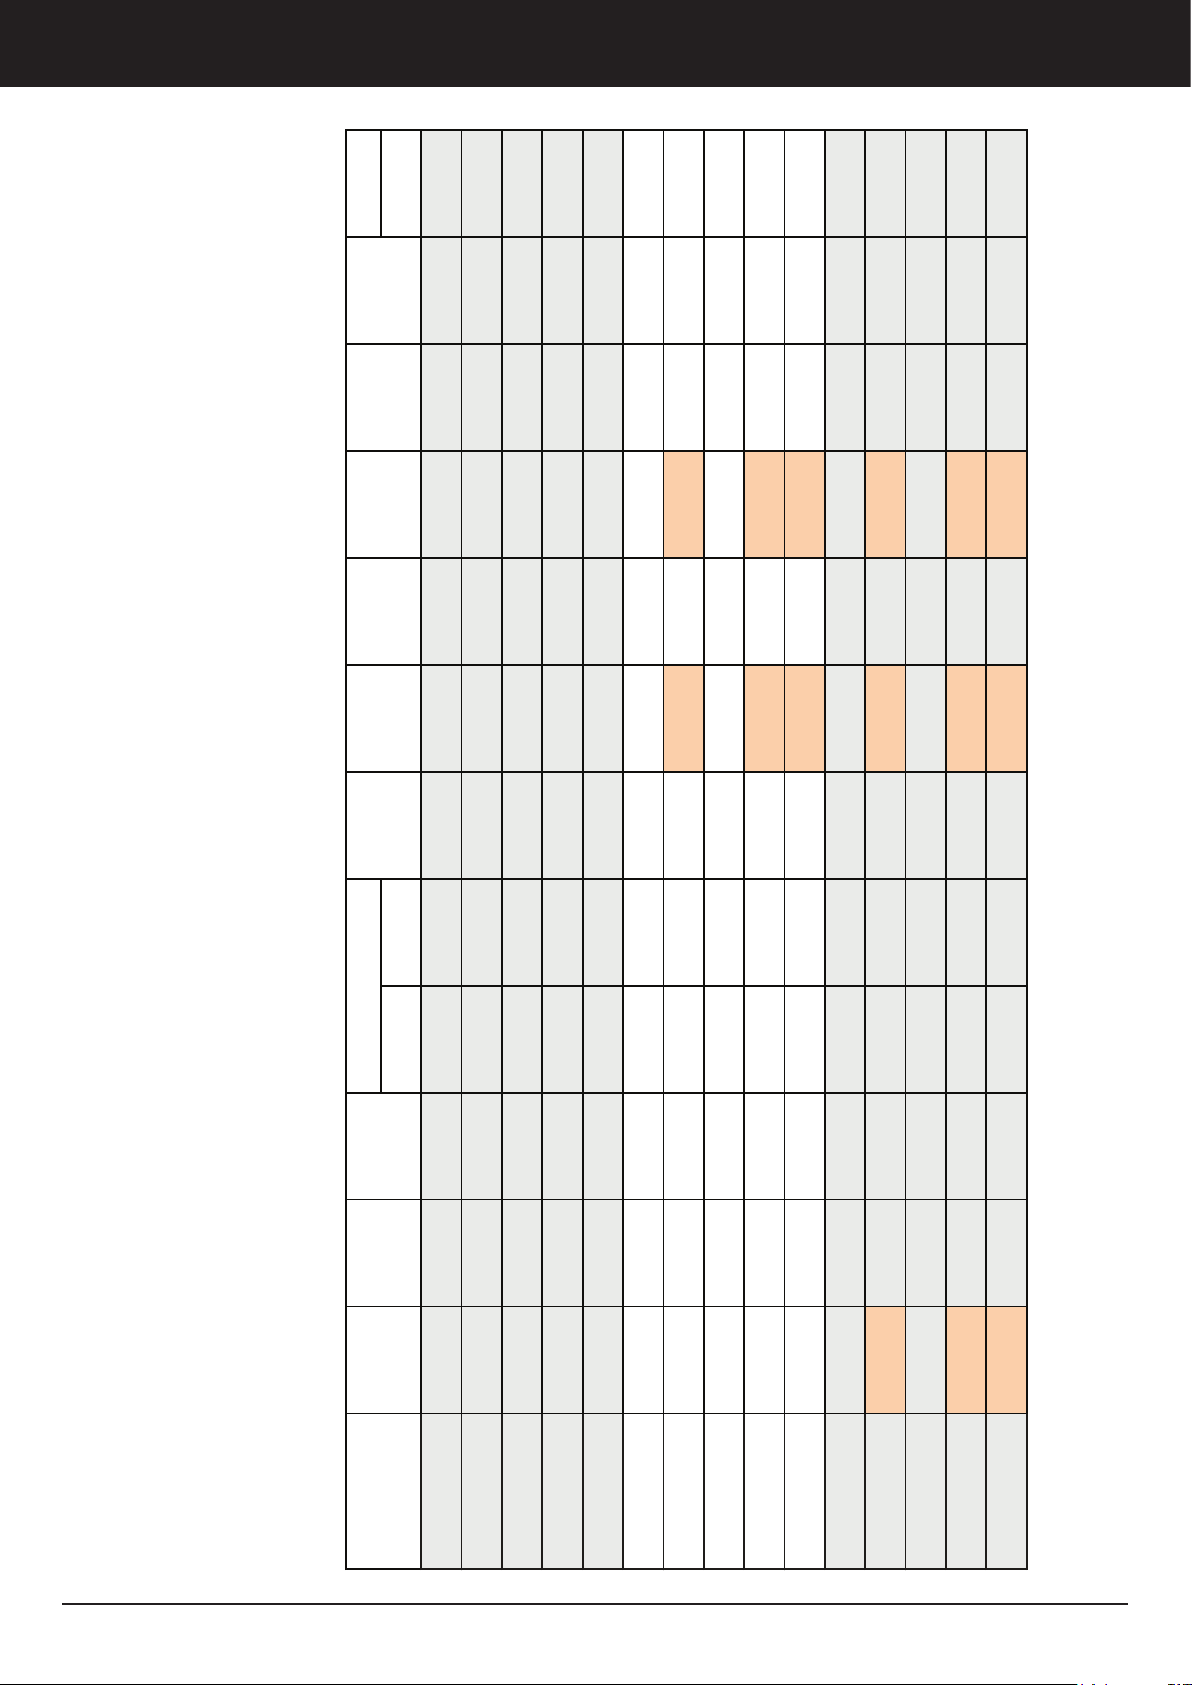
460V 3ph
200V 3ph 208V 1ph 208V 3ph 240V 1ph 240V 3ph 400V 3ph
230V 3ph 400V 3ph + N (440-480)
230V 3ph / 400V 3ph + N
39.5 13.4 11.1 22.9 13.4 24.3 – 25.3 – 23.9 13.2 11.4
29.4 + 28.7 19.8 16.5 17.2 + 16.6 19.8 18.3 + 17.6 32.5 + 31.7 19.0 + 18.3 30.7 + 29.9 17.9 + 17.3 19.4 16.9
26.4 13.0 10.8 17.2 13.0 18.3 29.2 19.1 27.6 18.0 9.9 8.6
26.8 + 26.1 19.6 16.2 17.5 + 16.9 19.6 18.7 + 18.0 29.6 + 28.8 19.4 + 18.7 27.9 + 27.2 18.3 + 17.7 19.5 16.9
29.0 9.9 8.2 16.9 9.9 17.9 32.1 18.7 30.3 17.6 9.7 8.4
AMPS per phase and per OVEN (models with 2 numbers require 2 separate electrical supplies)
19.5 9.6 7.9 12.7 9.6 13.5 21.6 14.1 20.3 13.3 7.3 6.4
230V 1ph + N 400V 3ph + N 480V 3ph + N
19.8 + 19.1 14.3 11.9 13.0 + 12.4 14.3 13.9 + 13.2 21.9 + 21.2 14.4 + 13.7 20.7 + 20.0 13.6 + 13.0 14.3 12.4
19.8 + 28.7 19.1 15.9 13.0 + 16.6 19.1 13.9 + 17.6 21.9 + 31.7 14.4 + 18.3 20.7 + 29.9 13.6 + 17.3 17.0 14.8
26.8 + 39.1 26.1 21.7 17.5 + 22.6 26.1 18.7 + 24.0 – 19.4 + 25.0 – 18.3 + 23.6 23.1 20.1
39.8 + 39.1 26.8 22.2 23.2 + 22.6 26.8 24.7 + 24.0 – 25.6 + 25.0 – 24.2 + 23.6 26.3 22.9
31.5 15.6 12.9 20.5 15.6 21.8 34.8 22.7 32.8 21.4 11.8 10.3
– 15.9 13.2 27.3 15.9 29.0 – 30.1 – 28.4 15.7 13.6
31.8 + 31.1 23.3 19.4 20.8 + 20.2 23.3 22.1 + 21.5 35.2 23.0 + 22.4 33.2 + 32.5 21.7 + 21.1 23.3 20.1
– 31.1 25.8 20.8 + 27.0 31.1 22.1 + 28.7 – 23.0 + 29.8 – 21.7 + 28.1 27.5 23.9
– 31.8 26.4 27.6 + 27.0 31.8 29.3 + 28.7 – 30.5 + 29.8 – 28.8 + 28.1 31.3 27.3
Model
PM 452ED-2DW
PM 452ED-1DW
PM 452ED-DW
PM 451ED-1DW
PM 451ED-DW
PM 402ED-2DW
PM 402ED-1DW
PM 402ED-DW
PM 401ED-1DW
PM 401ED-DW
PM 352ED-2DW
PM 352ED-1DW
PM 352ED-DW
PM 351ED-1DW
CounterTop series - Double width
8
PM 351ED-DW
PizzaMaster®
Page 11
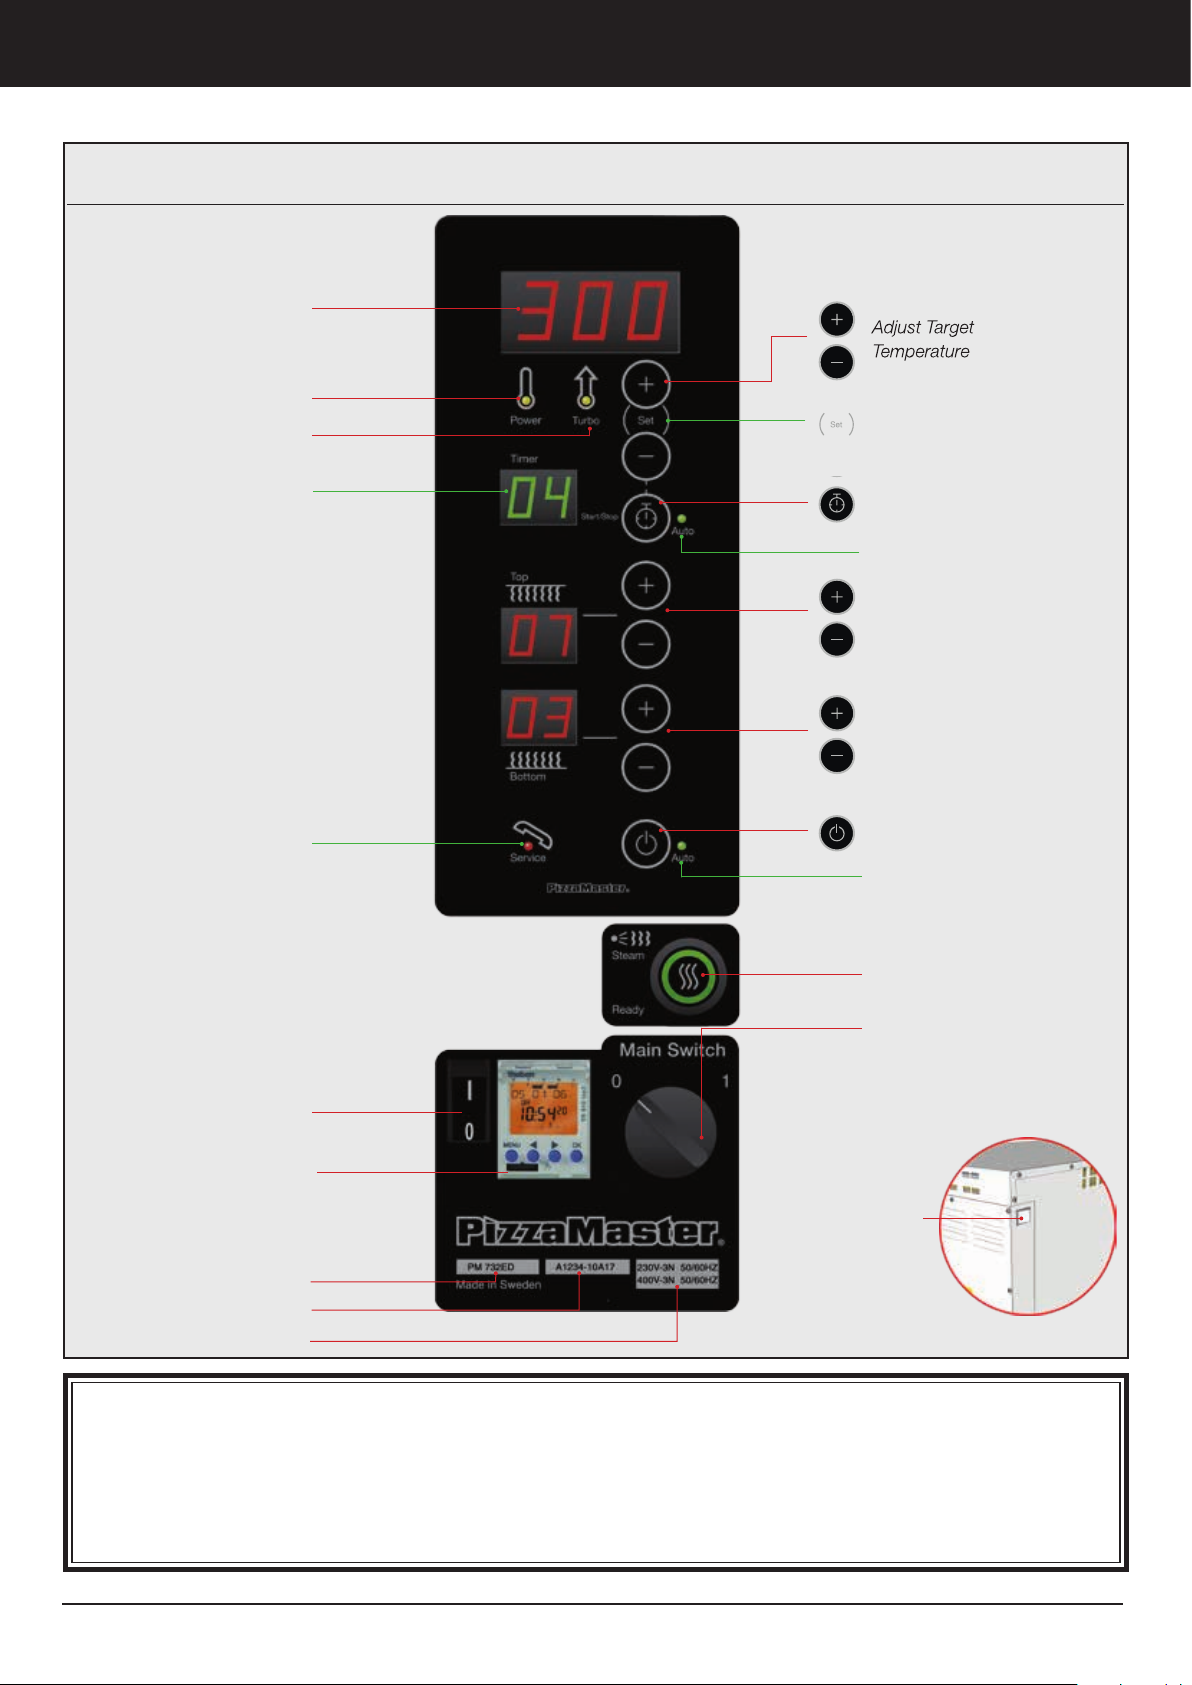
Target Temperature
Oven operation
Digital Control Panel
Power Light
Turbo Light
Timer Indicator
Service Light
UBC switch
(option)
Display Real
Time Temperature
Timer Button
Timer Auto Mode When Lit
Adjust Top Heat Intensity
from 0 to 10
Adjust Bottom Heat Intensity
from 0 to 10
Turn Deck ON/OFF
Auto Light
(7 days Timer Option)
Steam System (Option)
– Ready to use when lit
MAIN SWITCH:
Turn Oven ON/OFF
0= Off
1= ON
7-day clock timer
(option)
Model
Serial Number
Power Supply
Main Breaker
(Back righ side)
Power : A yellow lamp indicates that the heating element is on.
Turbo: The turbo-start function, engaged automatically at start up, brings the oven up to temperature very quickly.
When the desired temperature has been reached, the turbo-start shuts off automatically. A yellow lamp indicates
that the turbo is in operation.
Service: If the oven overheats, it is turned off automatically. A red light will show when the overheating cut-off has
been activated. The oven can be reset by turning off the main switch and turn it on again, when the temperature
have gone down below 390 °C / 734 °F (for standard model), 490 °C / 914 °F (for high temperature model).
PizzaMaster®
9
Page 12
Oven operation
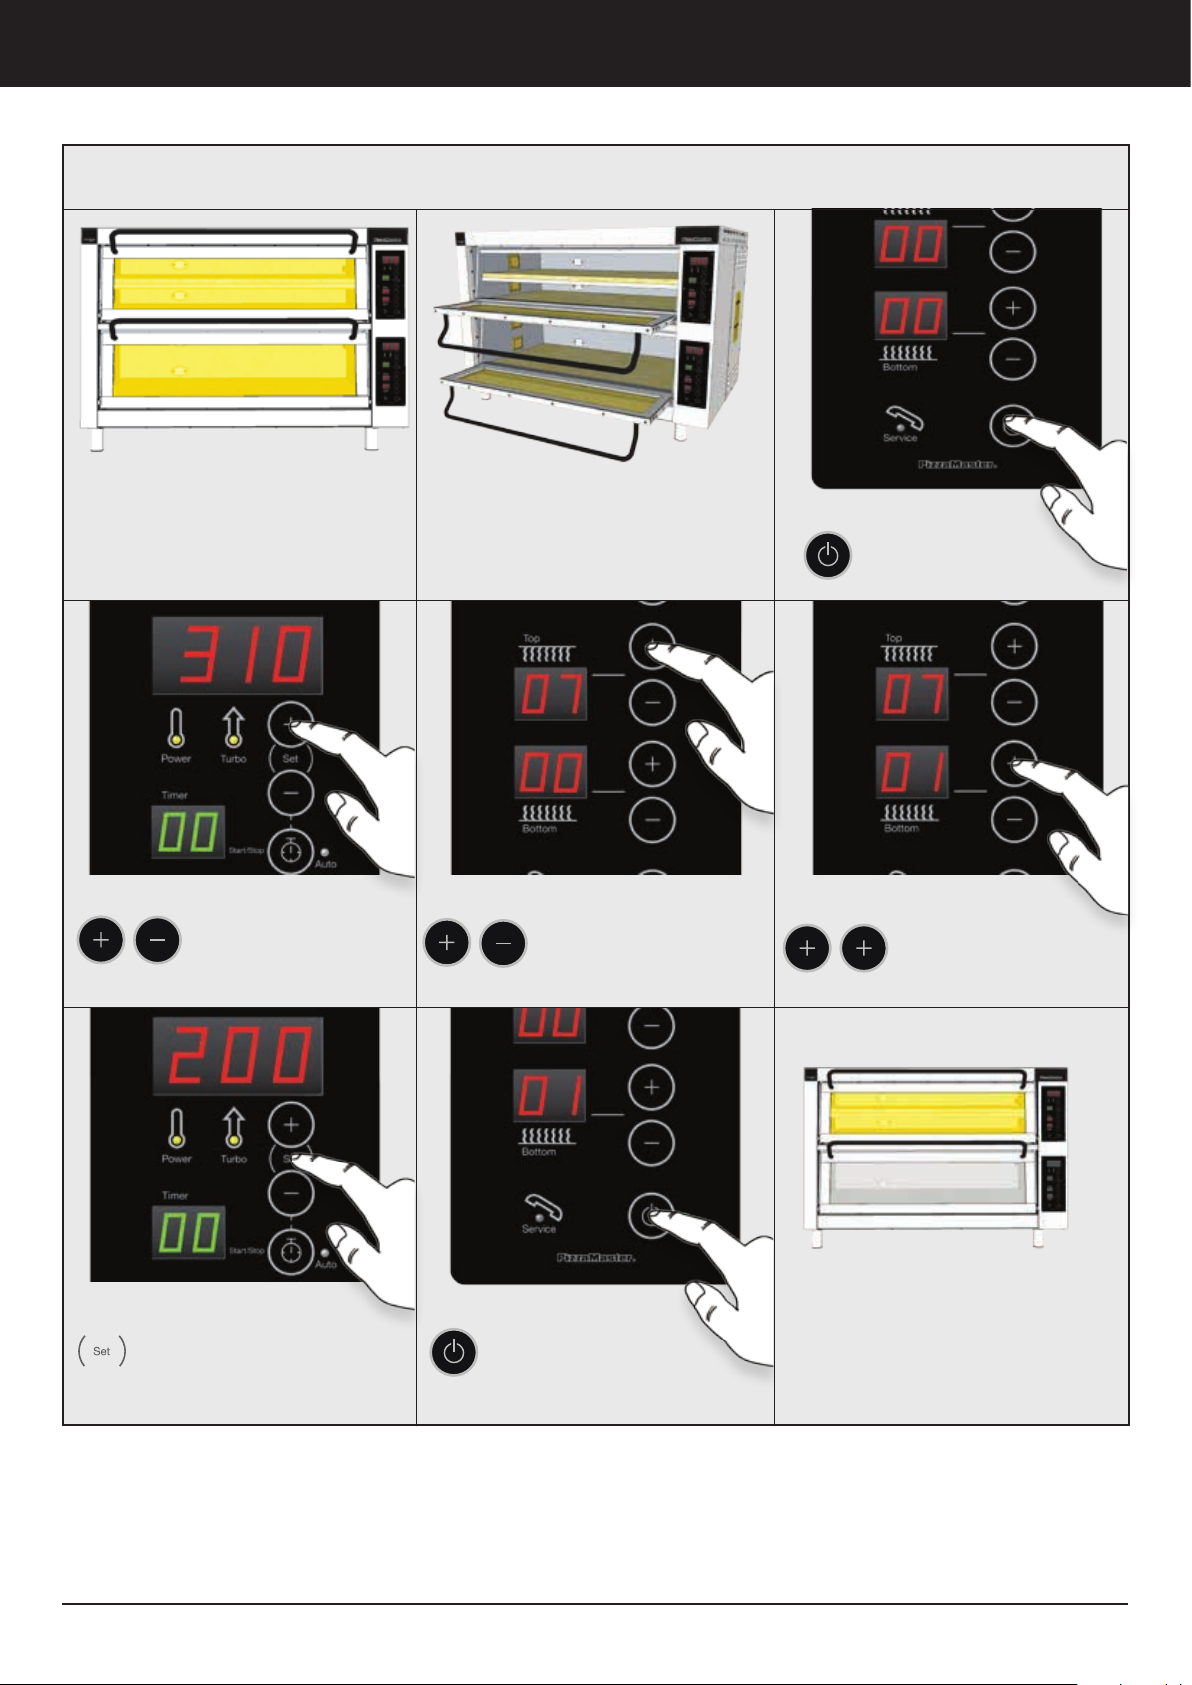
Operation Guide
Every deck has an independent
Control Panel.
3. Set Temperature
Press to adjust the
desired temperature.
Two Stones per deck
Ovens with 2 stones per deck, has only
one (1) Control panel for the whole deck.
4. Set Top Heat Zone
Press to adjust the TOP
heat intensity:
0 = Off / 10 = Maximum
2. Turn ON the deck
Press to turn
ON every deck.
5. Set Bottom Heat Zone
Press to adjust the
BOTTOM heat intensity:
0 = Off / 10 = Maximum
6. Real Time Temperature
Press and hold SET button to
display the deck actual
temperature at any time
10
7. Turn ”OFF” the deck
Press to turn OFF the
deck.
PizzaMaster®
You can Turn Off one of the
decks on the low work hours
Page 13
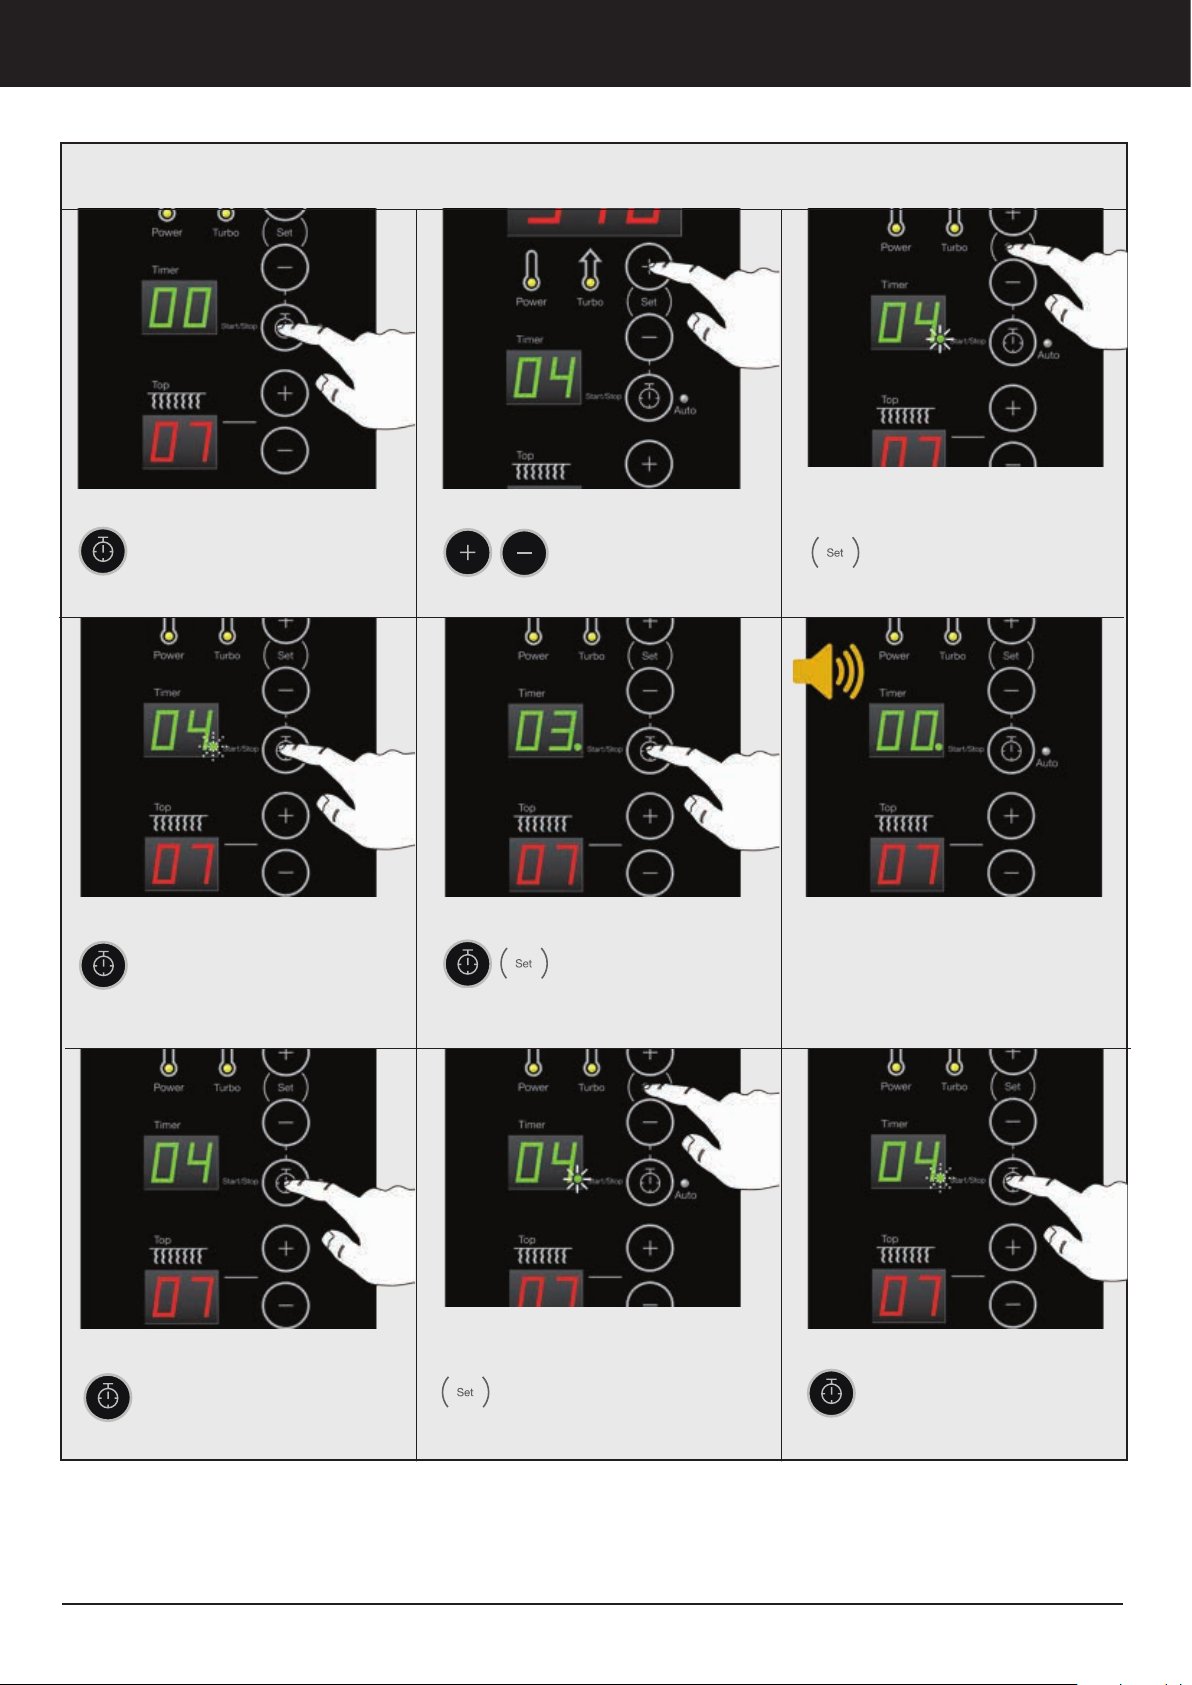
Individual Baking Times - Normal Mode
Oven operation
1. Turn ON Timer
Press Timer button
4. Start Timer
Press Timer button to
START timer. The green
light is flashing and remaining time is showed
2. Set Time
Press to adjust the
desire baking time
(minutes)
5. PAUSE / STOP
Press Timer to
PAUSE time. Press
Timer and SET to
STOP
3. Confirm
Press SET button to
confirm. A green indication light is turned on in
the timers display
6. Alarm
An alarm comes on when the
time has passed, count down
comes to 0 (zero)
7. Shutting Off the Alarm
Press Timer button to
Shut off the alarm
8. Finish
Press SET button to
finish. The green indication light is turned on in
the timers display
PizzaMaster®
9. Repeat the cycle
Press Timer button to
repeat the cycle. The
green indication light will
flash
11
Page 14
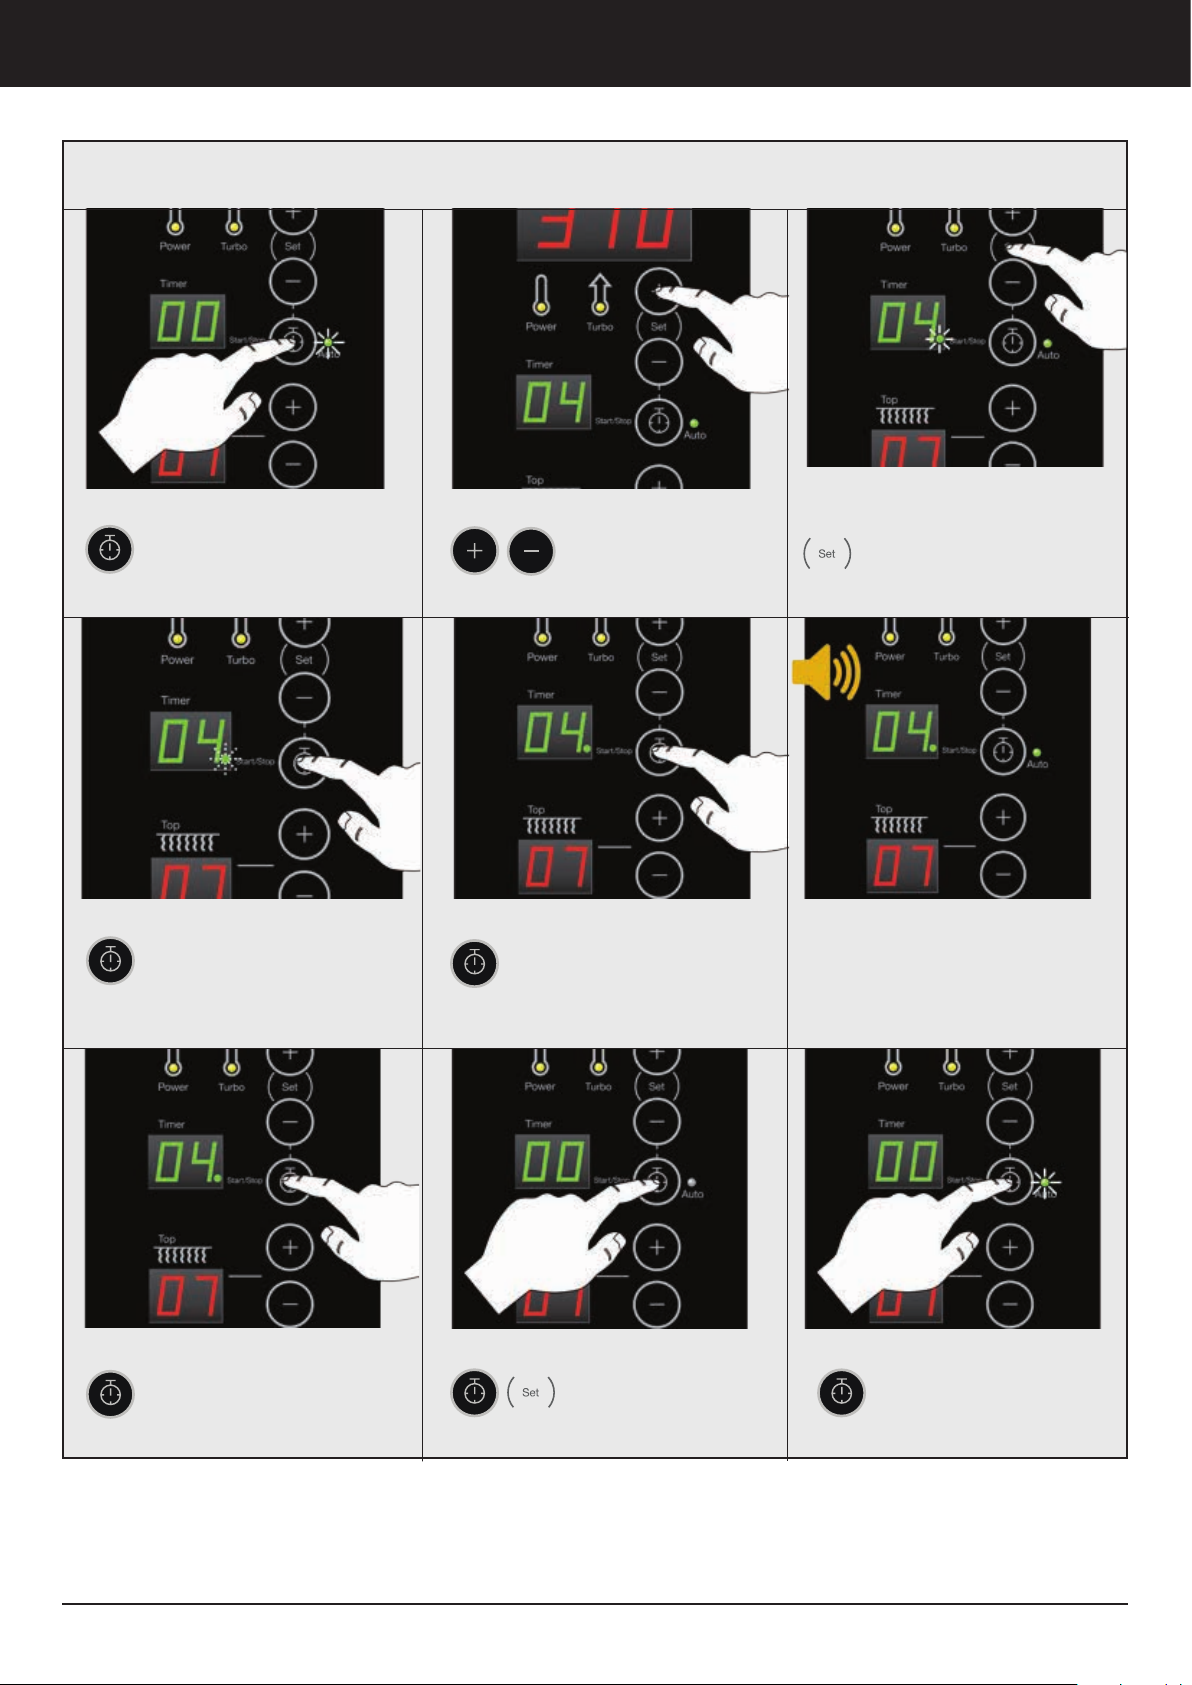
Oven operation
Common Baking Time - Auto Mode
1. Turn ON timer
Press and hold Timer
button until the green Auto
lamp is turned On
4. Start Timer
Press Timer button to
START timer. The green
light will flash
2. Set Time
Press to adjust the
desired baking time
(minutes)
5. Five (5) independent Alarms
Up to 5 independent
alarms can be activated.
Press Timer button for
each one of them
3. Confirm
Press SET button to
confirm. A green indication light is turned on in
the timers display
6. Alarm
After desired baking time, the
oven gives a 3 second alarm for
every preset time
6. New Alarm
You can add a new alarm as
soon as another alarm has
finished, press Timer to set
the new time
12
7. Turn ”OFF” Timer
Hold Timer until the
light goes off, and
press SET to turn
OFF the timer
PizzaMaster®
8. Repeat
To replay, press and
hold Timer button until
the green Auto lamp is
Turned On
Page 15
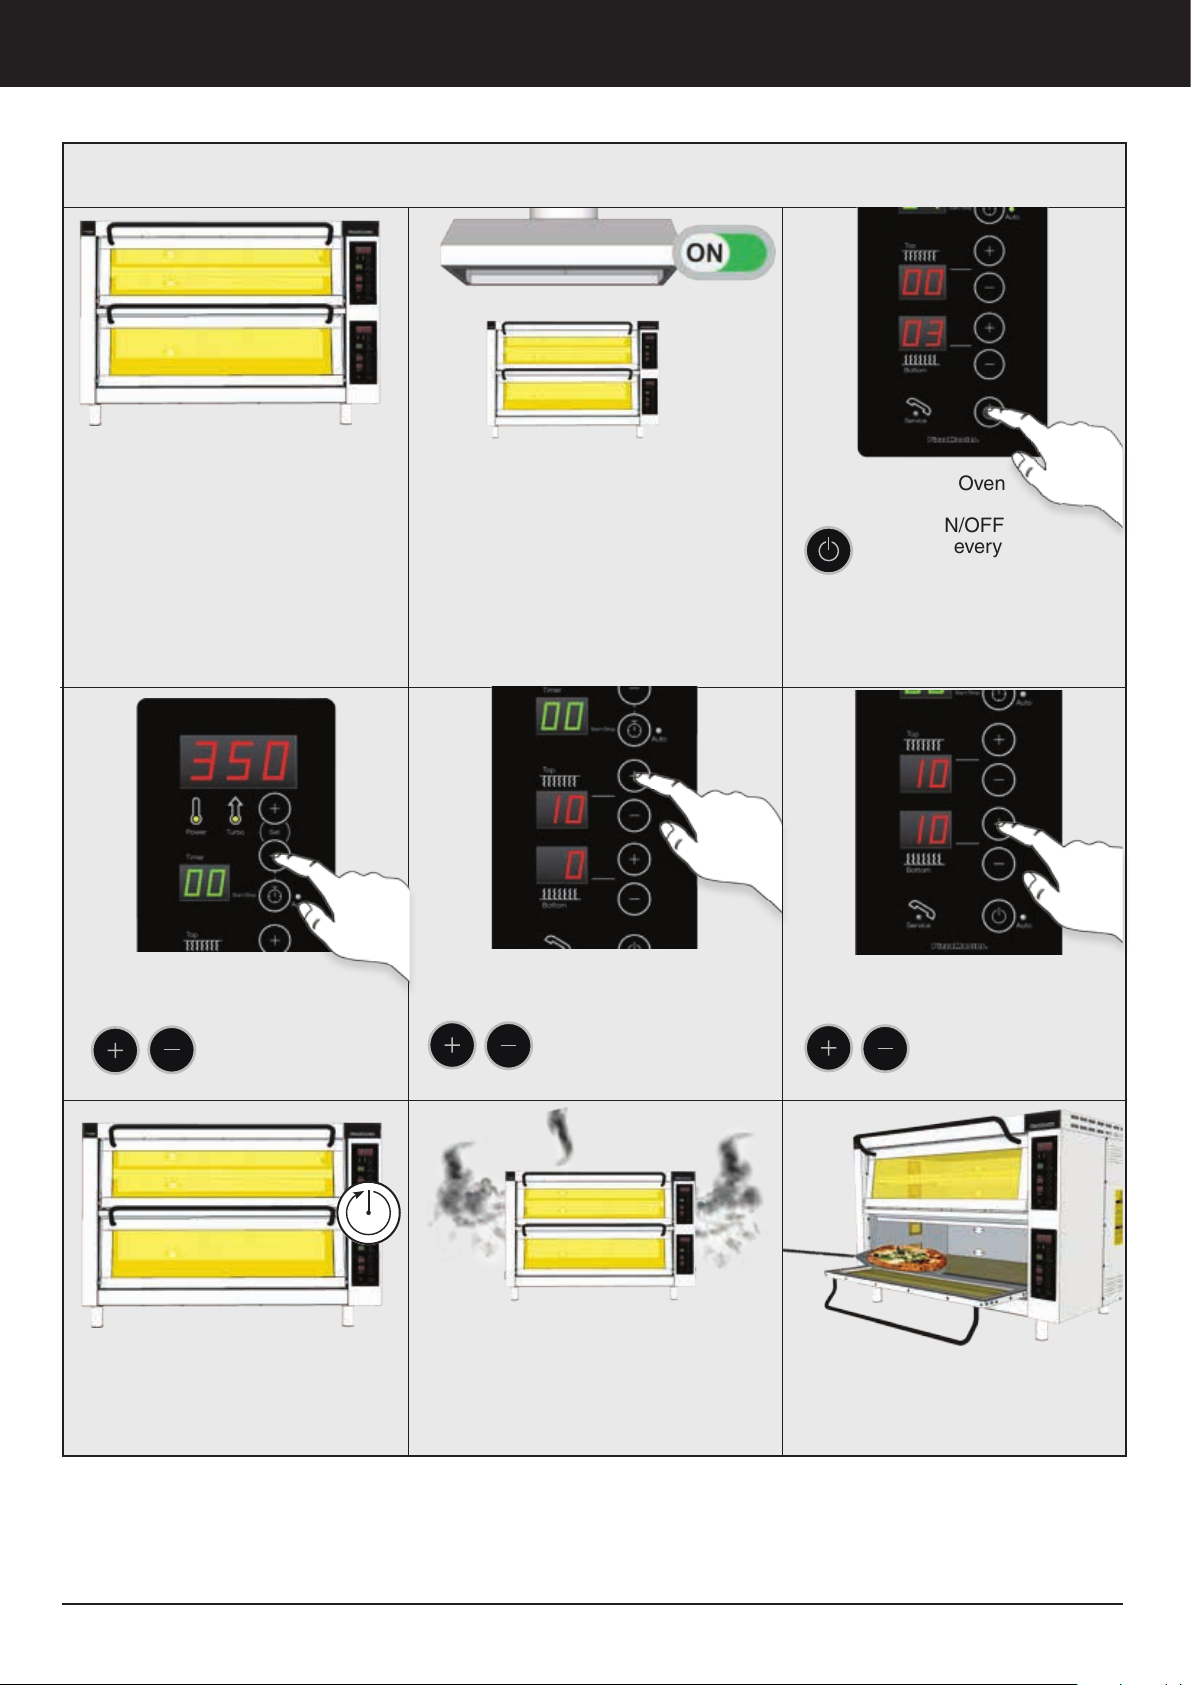
First-time start-up of oven
First-time start-up
1. Before putting the oven
into operation, it should be
switched on and brought up
to temperature to burn off any
remaining protective oil in the
oven chamber(s). During this
operation the oven will emit a
certain amount of smoke, which
is normal.
5. Set Temperature in 350°C
(662°F)
Press the buttons
to set the oven
350°C (662°F)
2. Make sure therefore that the
kitchen ventilation system is
switched on. If possible, open doors
and windows to allow the smoke to
escape more quickly. All decks can
be switched on simultaneously
6. Set Top Heat Zone
Press the button to
adjust the Top Heat
intensity to 10 in every
deck.
3. Turn ON every Oven
Deck
Press ON/OFF
button in every
deck to turn them
ON.
7. Set Bottom Heat Zone
Press the button to
adjust the Bottom
Heat intensity: to 10
in every deck.
4. When the oven reaches 300 C
(which takes about 20 minutes),
leave it switched on for 1 hour.
5. Let all the smoke go out from the
oven.
PizzaMaster®
Congratulations!
Now your oven is
ready to use!
13
Page 16
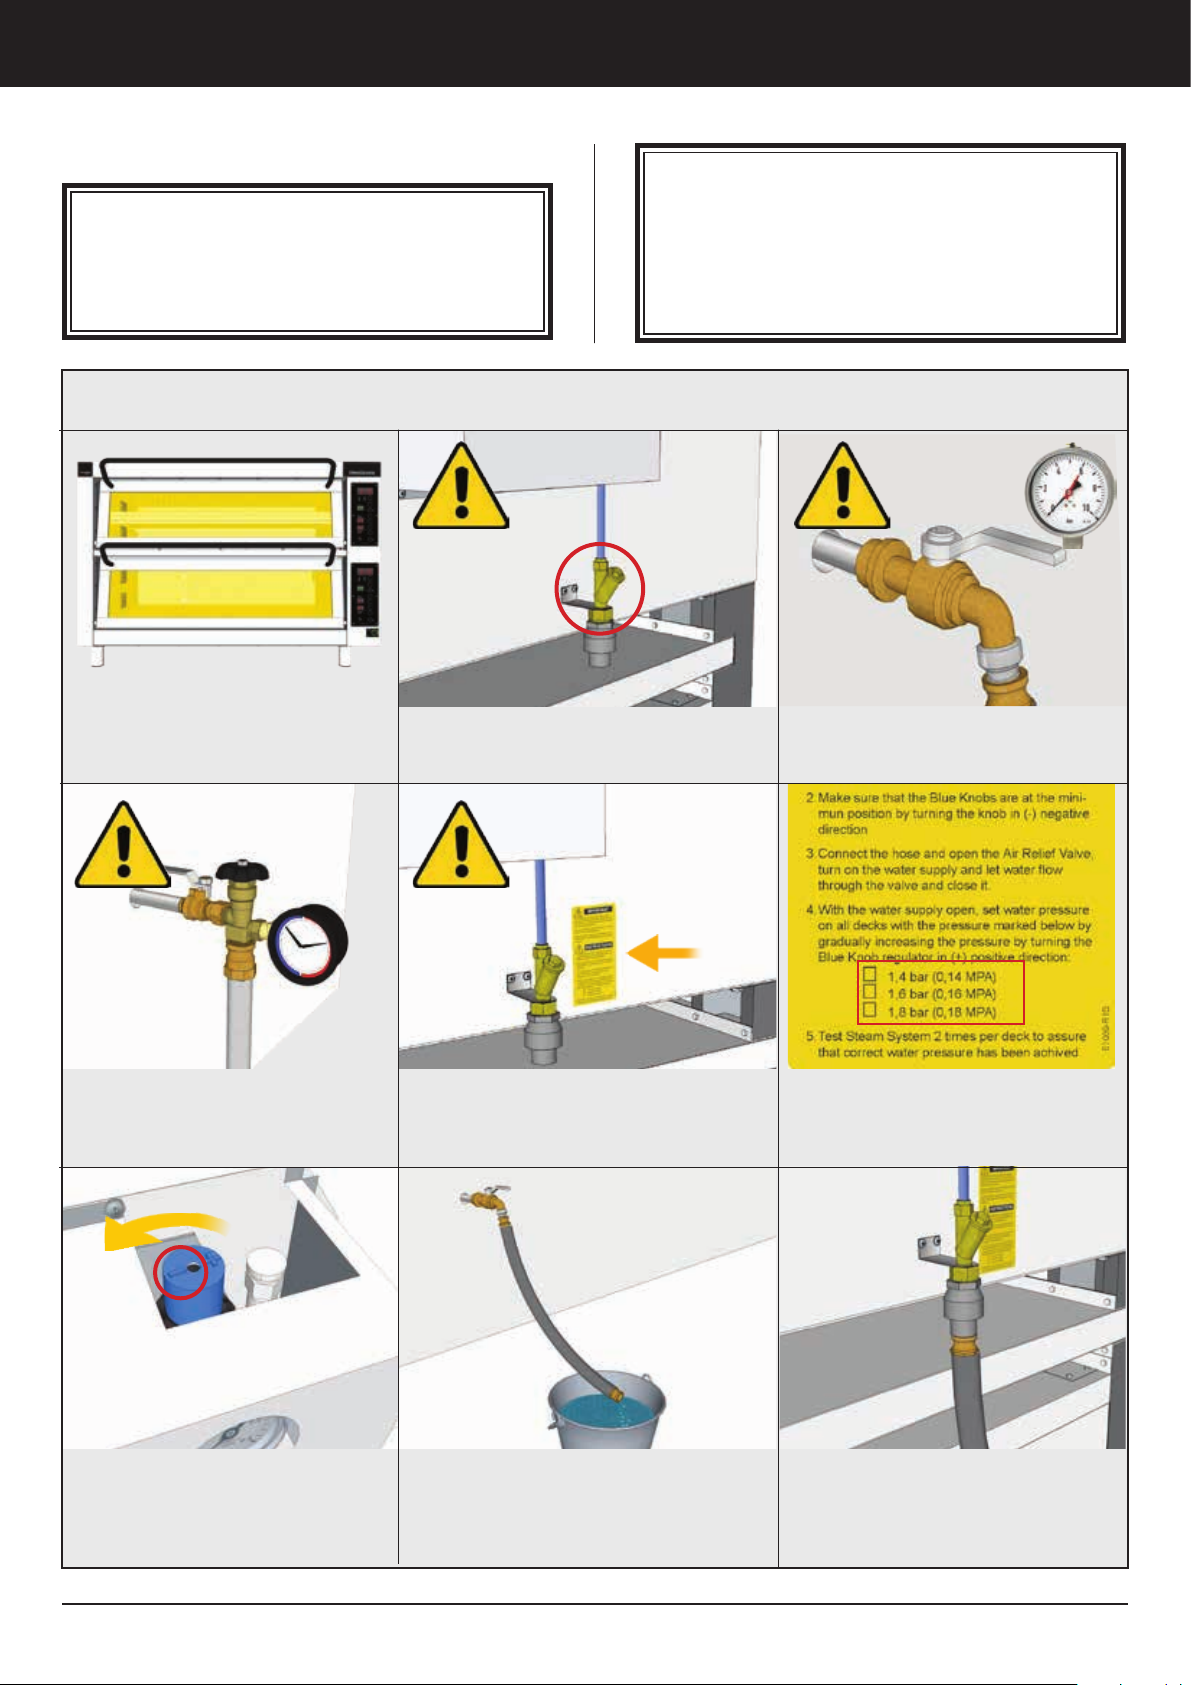
Steam System
Steam System Installation
Important!
• Particle filter must be installed on incoming
water line.
• Water softener is recommended to install on
incoming water line.
Steam System Installation
Important!
Guidelines for water quality:
• Magnesium, Mg (<30 mg/l)
• Calcium, Ca (20 – 100 mg/l)
• Hardness, dH (4,0 – 7,0 dH)
• pH at 20°C (7,5 – 8,5 pH)
• Alkalinity, HCO3 (>60 mg/l
Your oven can be equipped with
an optional Steam System in 1 or
more decks
If incoming water pressure is
above 6.0 bar (0.6 MPA) a Water
Pressure Reducing Valve must be
installed
This appliance must be installed with
a proper backflow protection system
by an authorized personnel
Read carefully the instructions on the
label attached to the steam system
Incoming water pressure must not
exceed 6.0 bar (0,6 MPA)
The label indicates the water pressure that the system needs to be
adjusted to
1. Make sure that the Blue Knobs
are at the minimum position by
turning the knob in (-) negative
direction
14
2. Open the water supply and let water run, this will clean the hose and
any other residue in the water system
before connecting the water supply
to the Steam System
PizzaMaster®
3. Connect the hose to the oven
Page 17
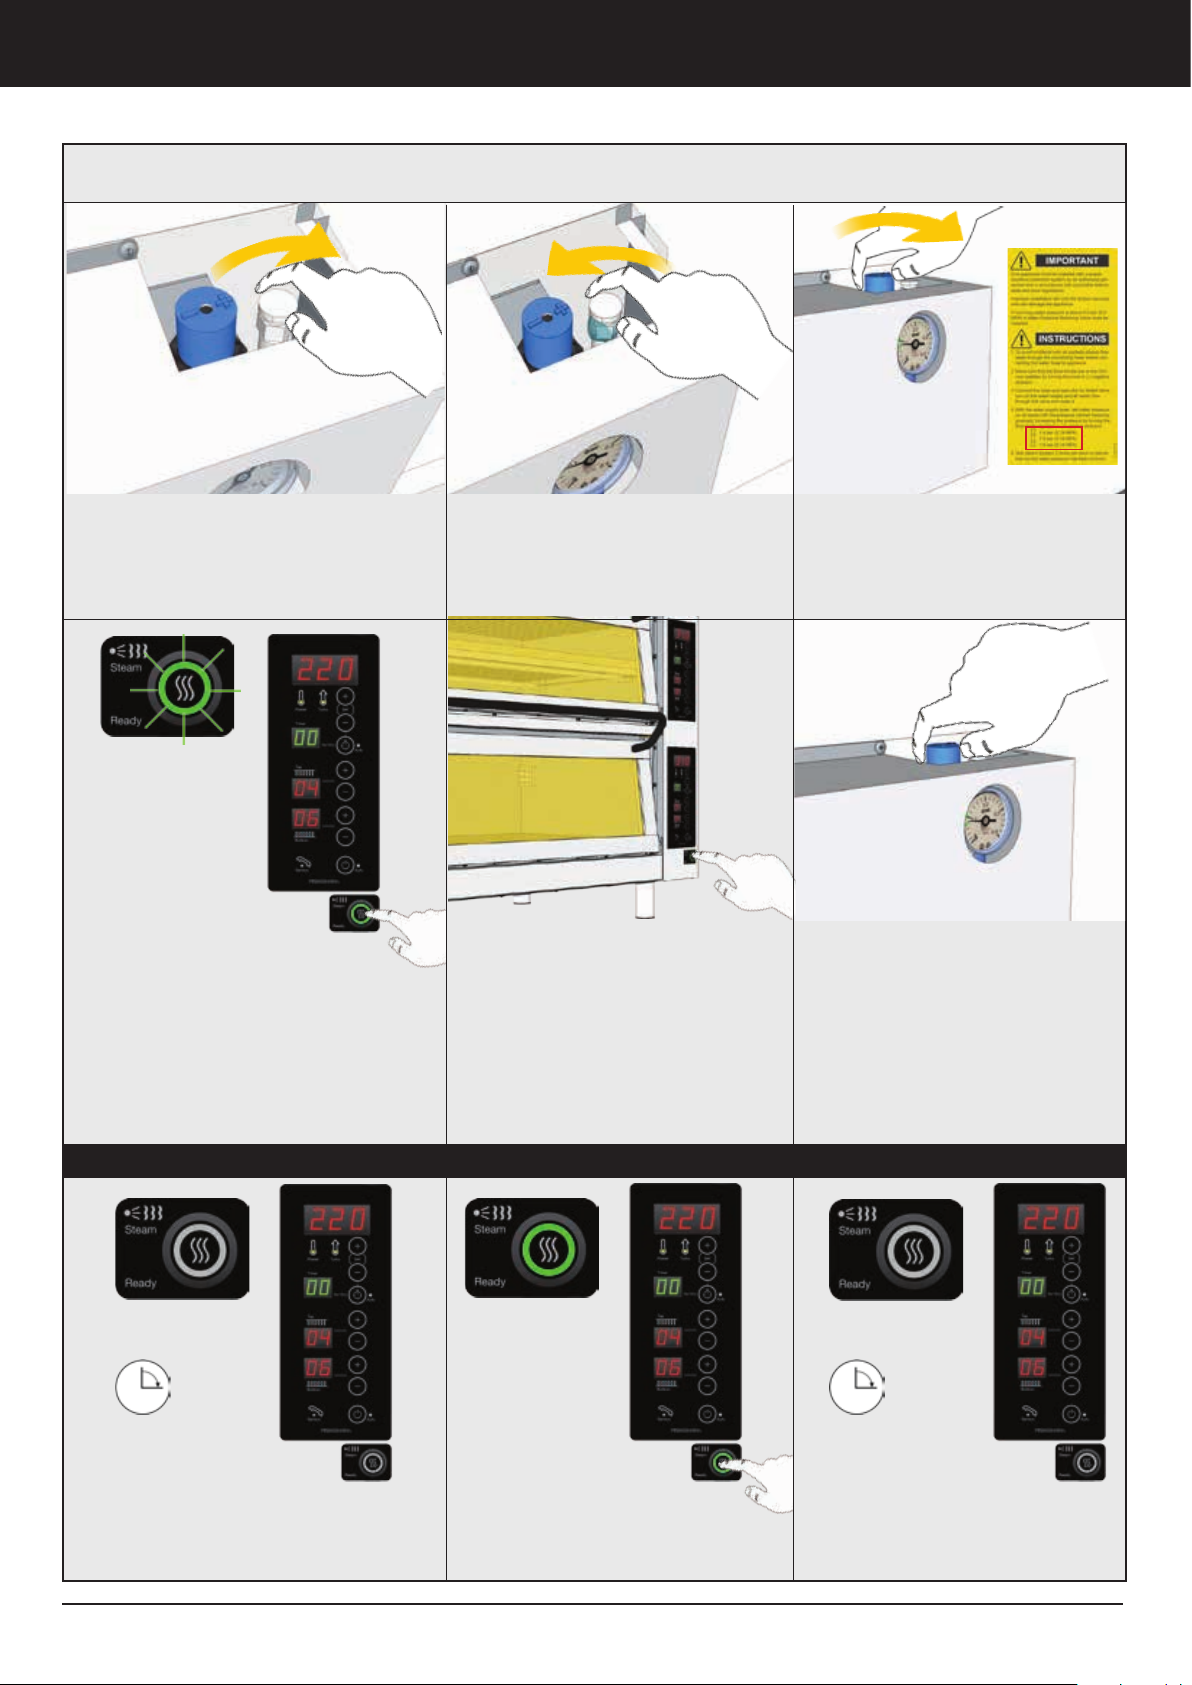
Steam System Installation and Use
Steam System
4. Open the Air Relief Valve
7. Turn ON the oven and set the
temperature to 220 C (428 F). The
Steam Button will light up to show
that the system is ready (15 minutes
after the oven has reached 200 C
(392 F))
5. Turn ON the water and let water
flow through the valve and then
close the Air Relief Valve
8. The Steam System needs 12
minutes to reload.
Test the Steam System 2 times
per deck to assure that correct
water pressure has been achieved
6. Set the water to the pressure
marked on the label by turning
slowly the Blue Knob regulator
in the (+) positive direction.
* Repeat for all decks
9. Adjust the Steam System if
necessary
Press the Steam Button to produce
steam inside the deck
Use
1. At first start when the oven reach
200 C (392 F), the steam system
takes 15 minutes to get ready
2. After the 15 minutes, the
Steam Button lights as a signal that
the system is ready to be use. Press
and release the button at anytime
PizzaMaster®
3. The button light turn off and
waits 12 minutes to get ready one
more time
15
Page 18

Pizza Recipe / Oven Settings / Baking Guidelines
Pizza Recipe and Baking Temperature
Pizza Dough Recipe
Flour (*bakers % = 100)
Always use a high quality flour (double zero (00) preferably an Italian brand as quality is higher and
more consistent)
Water (*bakers % = 65)
Salt (*bakers % = 3)
Yeast Fresh, (*bakers % = 1) or Dry (equivalent to fresh yeast as recommended by producer)
Required baking time (classic margarita pizza)
290 C / 554 F = 4min 10sec (change water to 50% change salt to 1.5%, add sugar with 1.5%, add oil with 3.5%)
310 C / 590 F = 3min 40sec (change water to 50% change salt to 1.5%, add sugar with 1.5%, add oil with 3.5%)
330 C / 626 F = 3min 20sec (change water to 55% change salt to 2%, add sugar with 1%, add oil with 3.5%)
350 C / 662 F = 2min 50sec (change water to 60% change salt to 2.5%, add sugar with 0.5%, add oil with 3.5%)
370 C / 698 F = 2min 30sec (baking at this temperature or higher we recommend our high temperature model)
400 C / 752 F = 2min 10sec
430 C / 806 F = 1min 50sec (at this temperature or higher the pizza “positively dry out” as most of the fluids vaporize)
460 C / 860 F = 90sec (5sec at this temperature or higher can make the difference between failure and success)
490 C / 914 F = 60sec
Oven Settings
Important!
- Never set the Top Heat lower than 3
Pizza baked direct on stone Pizza baked in Pan or on Grid
Temperature See above recipe Temperature See above recipe
Stones/door 1 2 Stones/door 1 2
Top 6-8 5-7 Top 3-5 5-7
Bottom 0-3 2-4 Bottom 6-10 2-4
Roast/Bake/Grill Food Bread
Temperature 180-220 C (355-430 F) Temperature Japanese/Asian bread 160-190 C (320-375 F)
Stones/door 1 2 European bread 200-240 C (390-465 F)
Top 5 5-7 Stones/door 1 2
Bottom 5 2-4 Top 4 not suitable
Bottom 6 not suitable
If you require further baking guidance contact your local PizzaMaster representative or PizzaMaster directly.
16
PizzaMaster®
Page 19

Pizza Recipe / Oven Settings / Baking Guidelines
Dough Preparation
Important!
Use cold water (this is important for having a uniform result) if using room temperature water the fermentation process starts and you will have less control over the fermentation.
1. Put water into mixer and thereafter dissolve the yeast in water. Put in salt and 75% of the flour.
2. Mix on lowest speed for 3min (depending on mixer the time can vary, the dough should be completely blended).
3. Start the mixer again on slowest speed.
4. After 5min start to add the remaining flour gradually.
5. Increase speed after 8min.
6. Stop mixing after 15min and let the dough rest for 20min.
7. Take out the dough from the mixer and put it on a floured surface and cut into balls (fro 33cm 310gr)
8. Place the dough balls in plastic boxes with airtight lids.
9. If the dough is wet it can be “sticky” put a little (very little) olive oil on the dough and your hands to make
dough handling easier.
10. Store cold for 2-3 days (for the very best result reshape doughballs every 24 hours)
Making the Pizza
1. Take out the dough from the fridge 90min before baking
2. If having a very light or wet dough it can be easier to use a wooden peel and/or open the pizza directly on
the peel.
3. For easier dought handling always use plastic tools when working with the dough.
4. Use as little flour as possible when “opening” the pizza dough and always shake off excess flour.
Recommendations
• Use only, for the tomato sause, canned whole tomatoes of good quality, remove all hard parts from the
tomatoes.
• Use buffalo mozzarella, dry the mozzarella as much as possible (tip is to put flaked sea salt on mozzarella
5-10min before use)
• Add extra virgin olive oil on pizza before putting it into oven for extra taste
• Do not use too much topping on pizza as this “kills” the dough
• Do not use wet toppings or topping with high water content on pizza as this can make the pizza soggy. Example is mushrooms or bell peppers, always roast simular toppings before so most of the water is removed.
• Topping can with benefit be placed on the pizza after taking it out from the oven.
• When taking the pizza out from the oven, place it a on grid or screen that is elevated at least 50mm/2in
as this lets the pizza “ventilate” (pizza is still baking after it is removed from oven and if placing it on a flat
surface it will condensate water and this will be sucked up into the crust making it soggier). Let the pizza
rest like this for 1-2min.
PizzaMaster®
17
Page 20
Maintenance and Preventative Maintenance
Warning!
DO NOT use any cleaning agents on the hearthstones
DO NOT use pressure washing equipment or a water hose to clean the oven
DO NOT use abrasive materials like steel wool or abrasive sponges to clean the oven door glass or the
under built cabinets glass doors
DO NOT clean the oven door glass until it’s cool enough to touch
DO NOT use any oven cleaners or detergents to clean the aluminum coated steel interior
DO NOT clean the oven when it is hot to avoid burning injuries
DO NOT clean ovens in Phantom Black or Royal Gold exterior with any abrasive cleaners inclusive of
PizzaMaster cleaning cloth for stainless steel surfaces
Preventive Maintenance
DO always install oven with required minimum clearance for easy maintenance
DO create a cleaning program and regularly clean the oven
DO routinely service the oven and only use original parts
DO contact your nearest PizzaMaster representative or PizzaMaster directly if maintenance or repairs
are necessary
Important!
It is possible to use conventional non toxic oven cleaners but for the best possible cleaning result we
always recommend PizzaMaster cleaning products
Environment friendly cleaning
PizzaMaster has developed a unique range of cleaning and maintenance products especially made for pizza and bakery
ovens. Using these products saves the environment at the same time as they are much easier to use than conventional
oven cleaning products and helps keep your oven new longer.
Product Art. No Suitable for
Oven brush Metal with scraper 50053-01 cleaning the ovens hearth stones
from soot and baking deposits
Oven brush Soft 50053-02 cleaning the ovens hearth stones
from soot and baking deposits
Cleaning cloth package 50341 removing burned soot from ovens stainless steel exterior
no more need for oven cleaners when removing hard burned soot or
deposits, this cloth cleans the ovens stainless steel exterior dry without
the use of any water or cleaning fluids.
Cleaning sponge package 50716 regular exterior cleaning and cleaning oven door glass
sponge with one side that is a regular sponge and the other side is a
scratchy but non abrasive side that makes the daily cleaning very easy
To order these products contact your nearest PizzaMaster representative or PizzaMaster directly
18
PizzaMaster®
Page 21
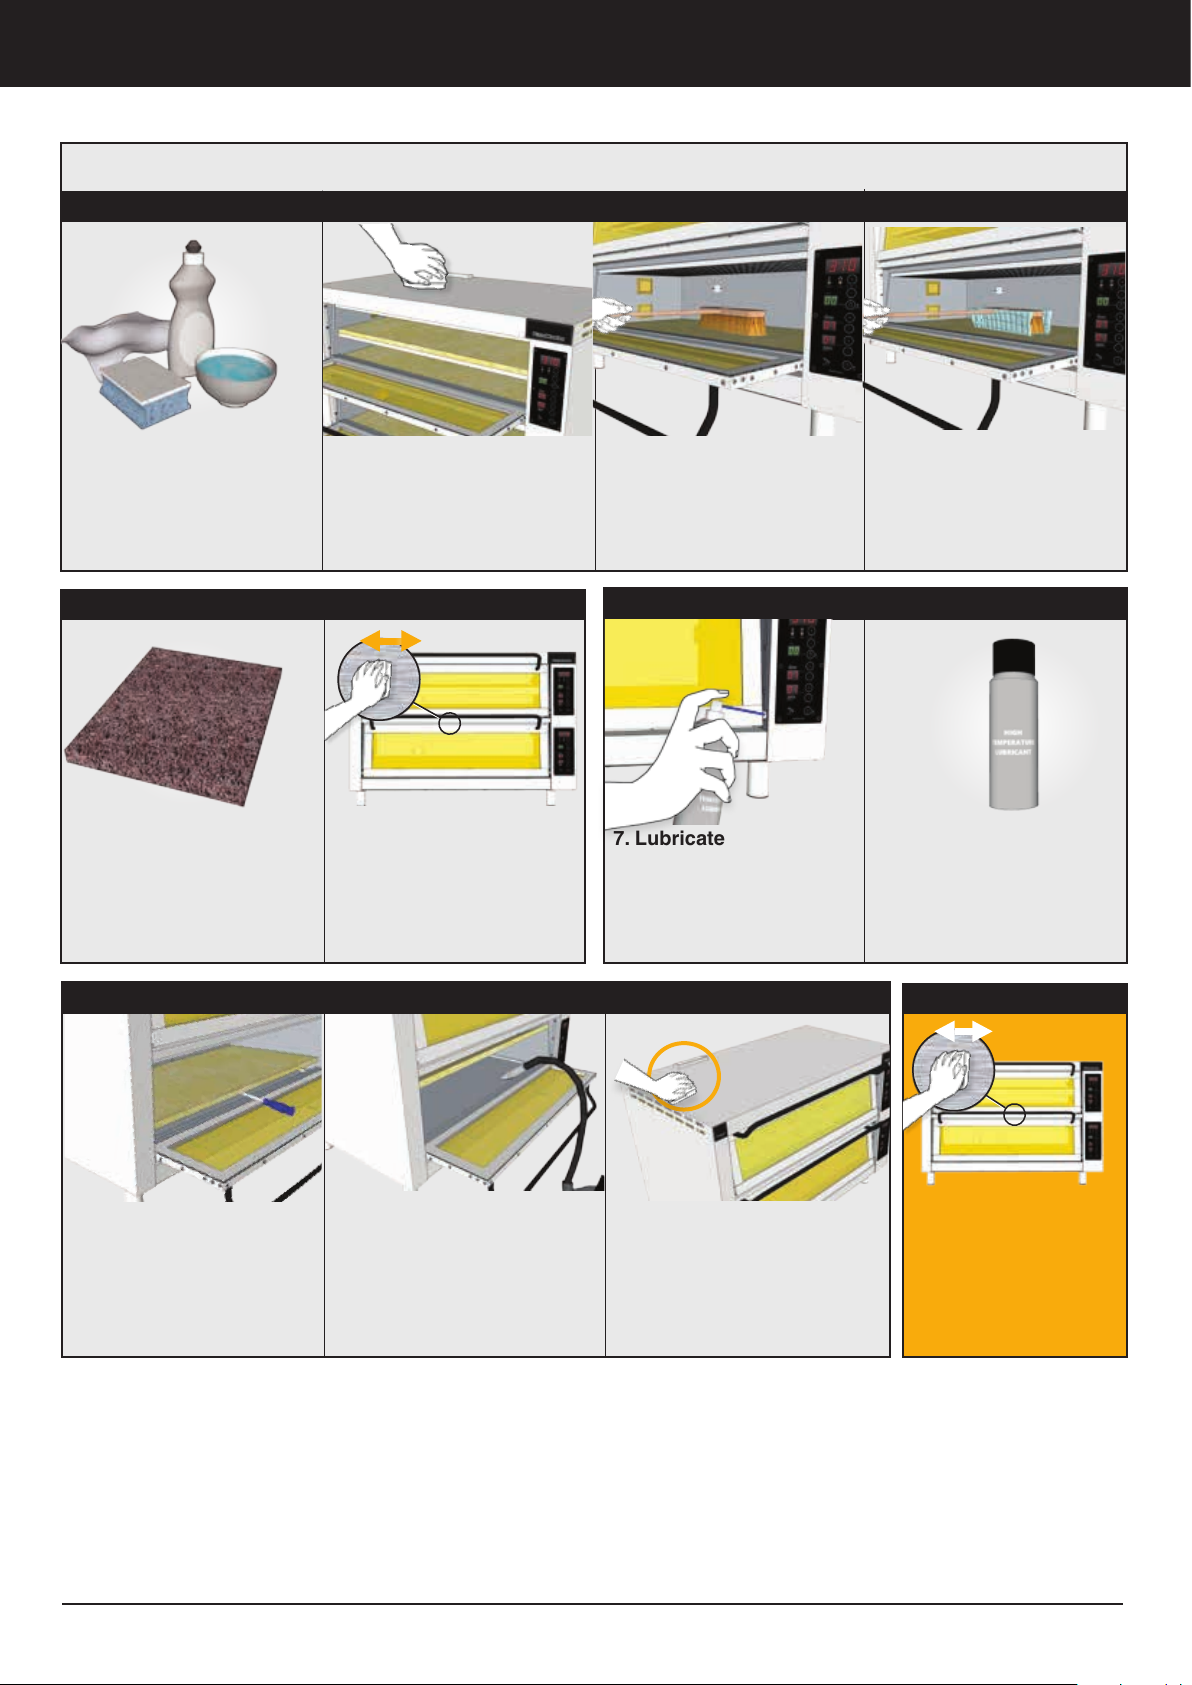
Daily
Maintenance and Preventative Maintenance
Cleaning and Maintenance
1. Prepare Solution
Damp a nonabrasive
sponge in a solution of
dish liquid and water.
Use a soft cloth to dry
Weekly Monthly
5. Use PizzaMaster
Cleaning Cloth
PizzaMaster Cleaning
cloth is special for stainless steel material.
Yearly
!
2. Clean Surfaces
Clean stainless Steel front
exterior, door handles, display, glass and shelves. Dry
with a soft cloth!
6. Clean Surfaces
Clean all the stainless steel
surfaces with the cloth,
always with grain direction.
Do NOT use over glass,
display, handles or labels!
3. Clean Stone
Brush and scrape out bake
deposit or soot regularly
during the day.
Use a metal and soft brush!
7. Lubricate
Lubricate all the door
bushings.
4. Brush Wrapped
It is possible to use a cloth
lightly damped with water
and wrapped around the
head of the brush.
8. Use High Temperature
Lubricant
Use a non-toxic high temperature lubricant.
Imporntant
9. Clean Oven Chamber
Wait until the oven is completely cold and remove
the stones; lift up the
stones using a flat screwdriver.
10. Vacuum Oven Chamber
Vacuum the chamber and
place back the stones exact
in the same position and
location.
PizzaMaster®
11. Ventilation Outlets
Clean soot and residues from
the front and back top ventilation outlets.
Always clean with
grain direction!
19
Page 22
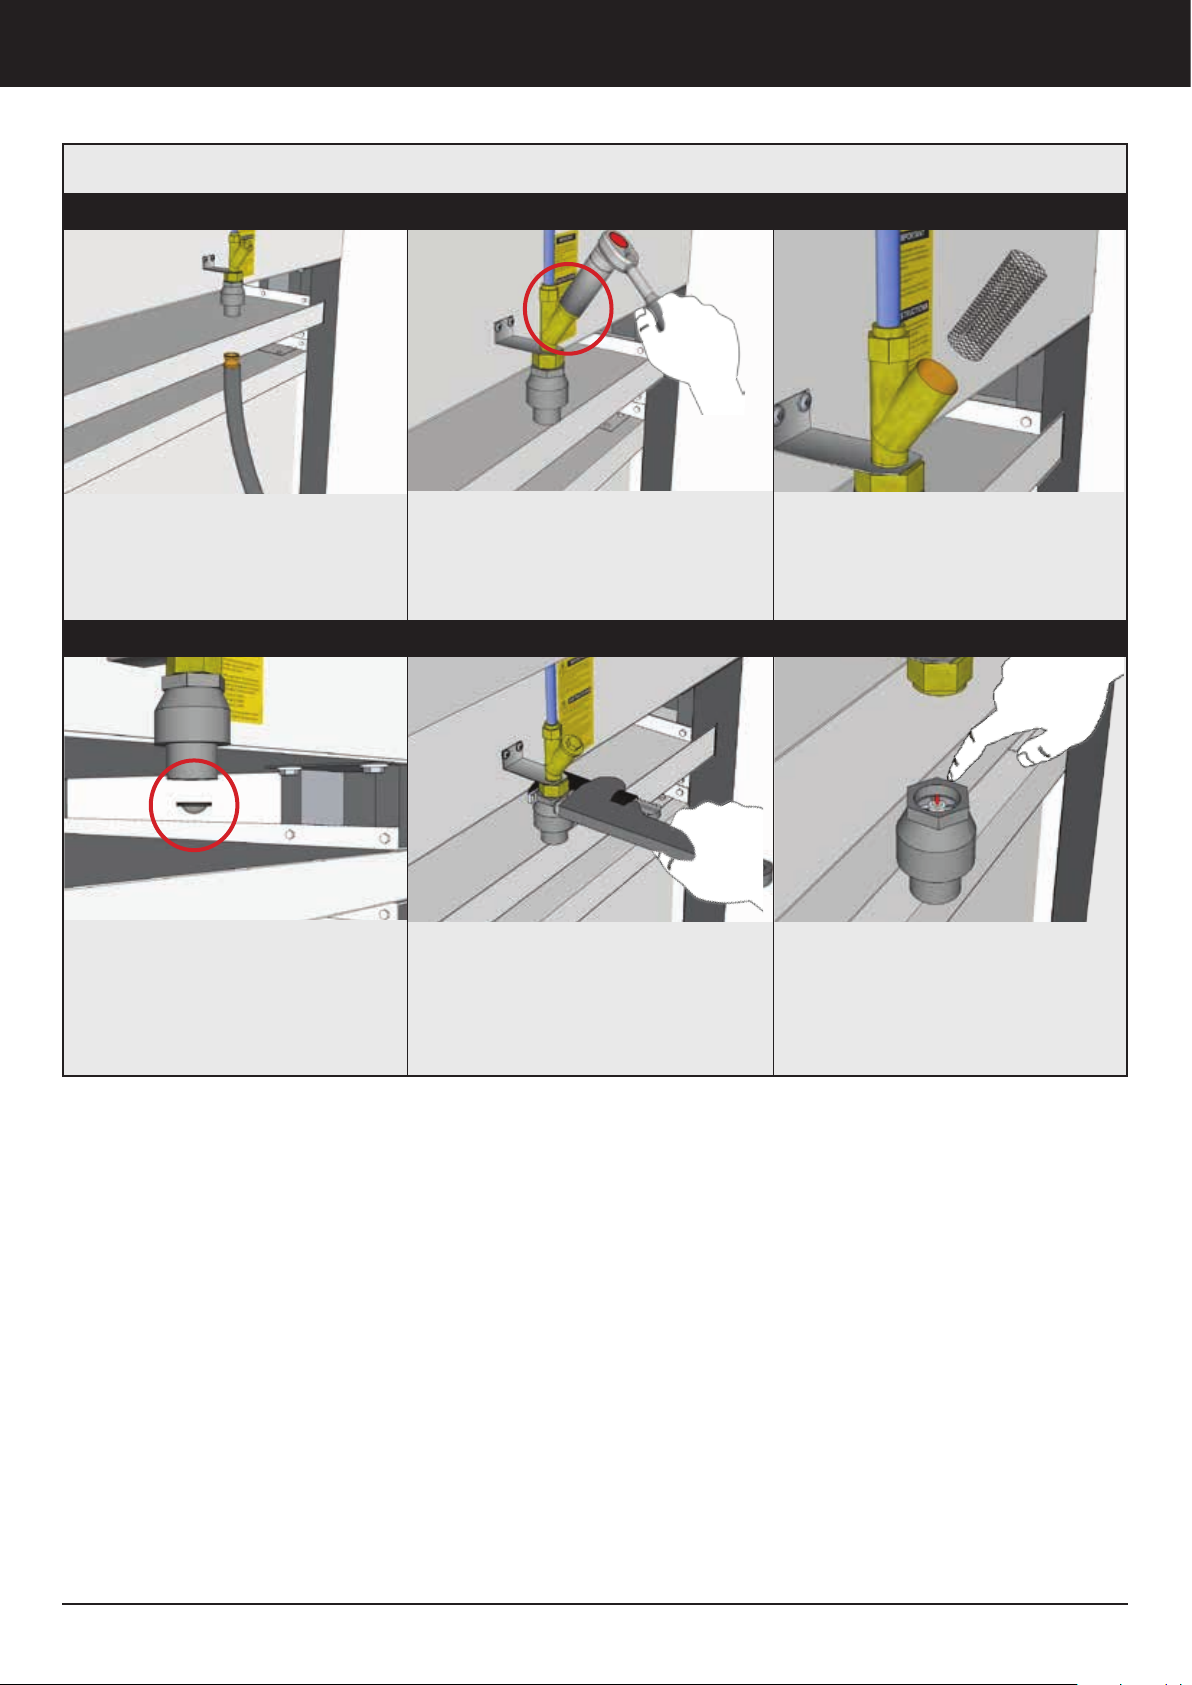
Maintenance and Preventative Maintenance
Steam System Cleaning and Maintanence
Cleaning
1. Turn off the water supply and
disconnect the hose from the
oven.
4. From the Water Block, take out
the filter and clean it
*Repeat the ”Installation steps”
before using the Steam System
2. Open the filter on the back flow
valve
Maintenance
1. RESET WATER BLOCK:
If a failure occurs causing a continuous water leak, the Water Block
will shut off.
Using a pipe wrench, remove the
Water Block Safety valve
3. Take out the filter and clean it
2. Press the red plunger to reset
the Water Block
*Repeat the ”Installation steps”
before using the Steam System
20
PizzaMaster®
Page 23
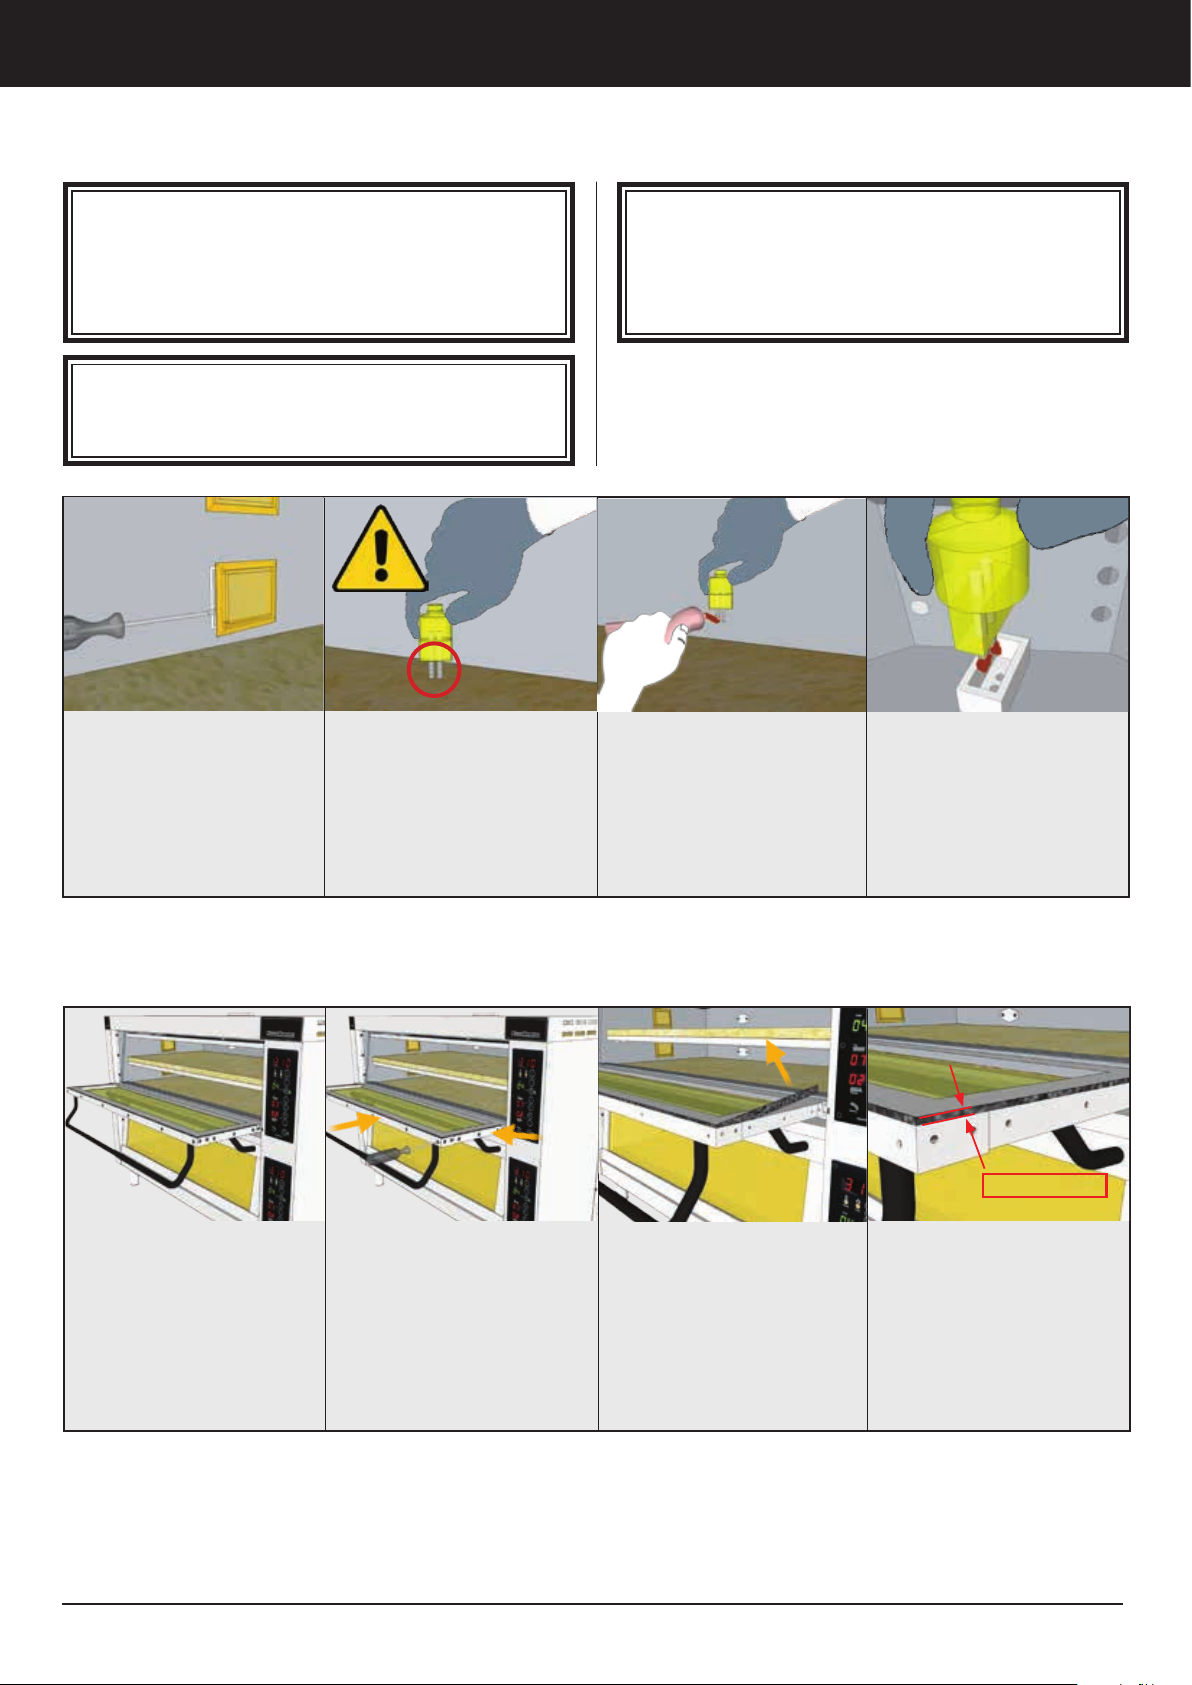
How to replace the oven lamps
Changing of oven lamp and door gasket
Important!
Never touch the oven lamp with your fingers, this
will result in severe shortage of the lamps lifetime,
use gloves, a piece of paper or a piece of fabric to
hold the lamp when replacing it.
Warning!
Never try to change the oven lamp when the oven is
hot, this can lead to severe burn injuries.
Carefully remove the
glass, you can use a flat
screwdriver
Hold the glass, do not allow the glass to fall on the
stone
Take out the defective lamp.
Make sure the old lamp has
the 2 pin legs like the new
lamp. If not part of the old
lamp can still be left in the
lamp socket, in this case it
is necessary to replace also
the lamp socket.
Important!
Never use other than original oven lamps supplied
from your PizzaMaster representative or directly from
PizzaMaster as this can damage the lamp transformer and the lamp socket.
Place a small amount of
copper paste on the new
lamp pins make sure not to
place any copper paste on
the lamp bulb.
Never touch the new lamp
directly with your fingers!
Place the new lamp into
the lamp socket. Never
touch the new lamp directly with your fingers.
Fit back the lamp glass.
How to remove door gasket for cleaning or replacement
Wait until the oven is at
room temperature.
Open the door.
For replacement of door
gasket it is necessary to use
a screwdriver with Phillips
Head.
Remove all screws, on both
left right hand and top side
of the oven door.
Remove the gasket.
Make sure that the old gasket is fully removed.
8mm / 0.3 in
Place the gasket in the
gap between the door
frame and the stainless
steel parts. Make sure
the gasket is left out with
8mm/0.3in.
Fasten gasket and stainless steel parts by attaching all screws.
PizzaMaster®
21
Page 24
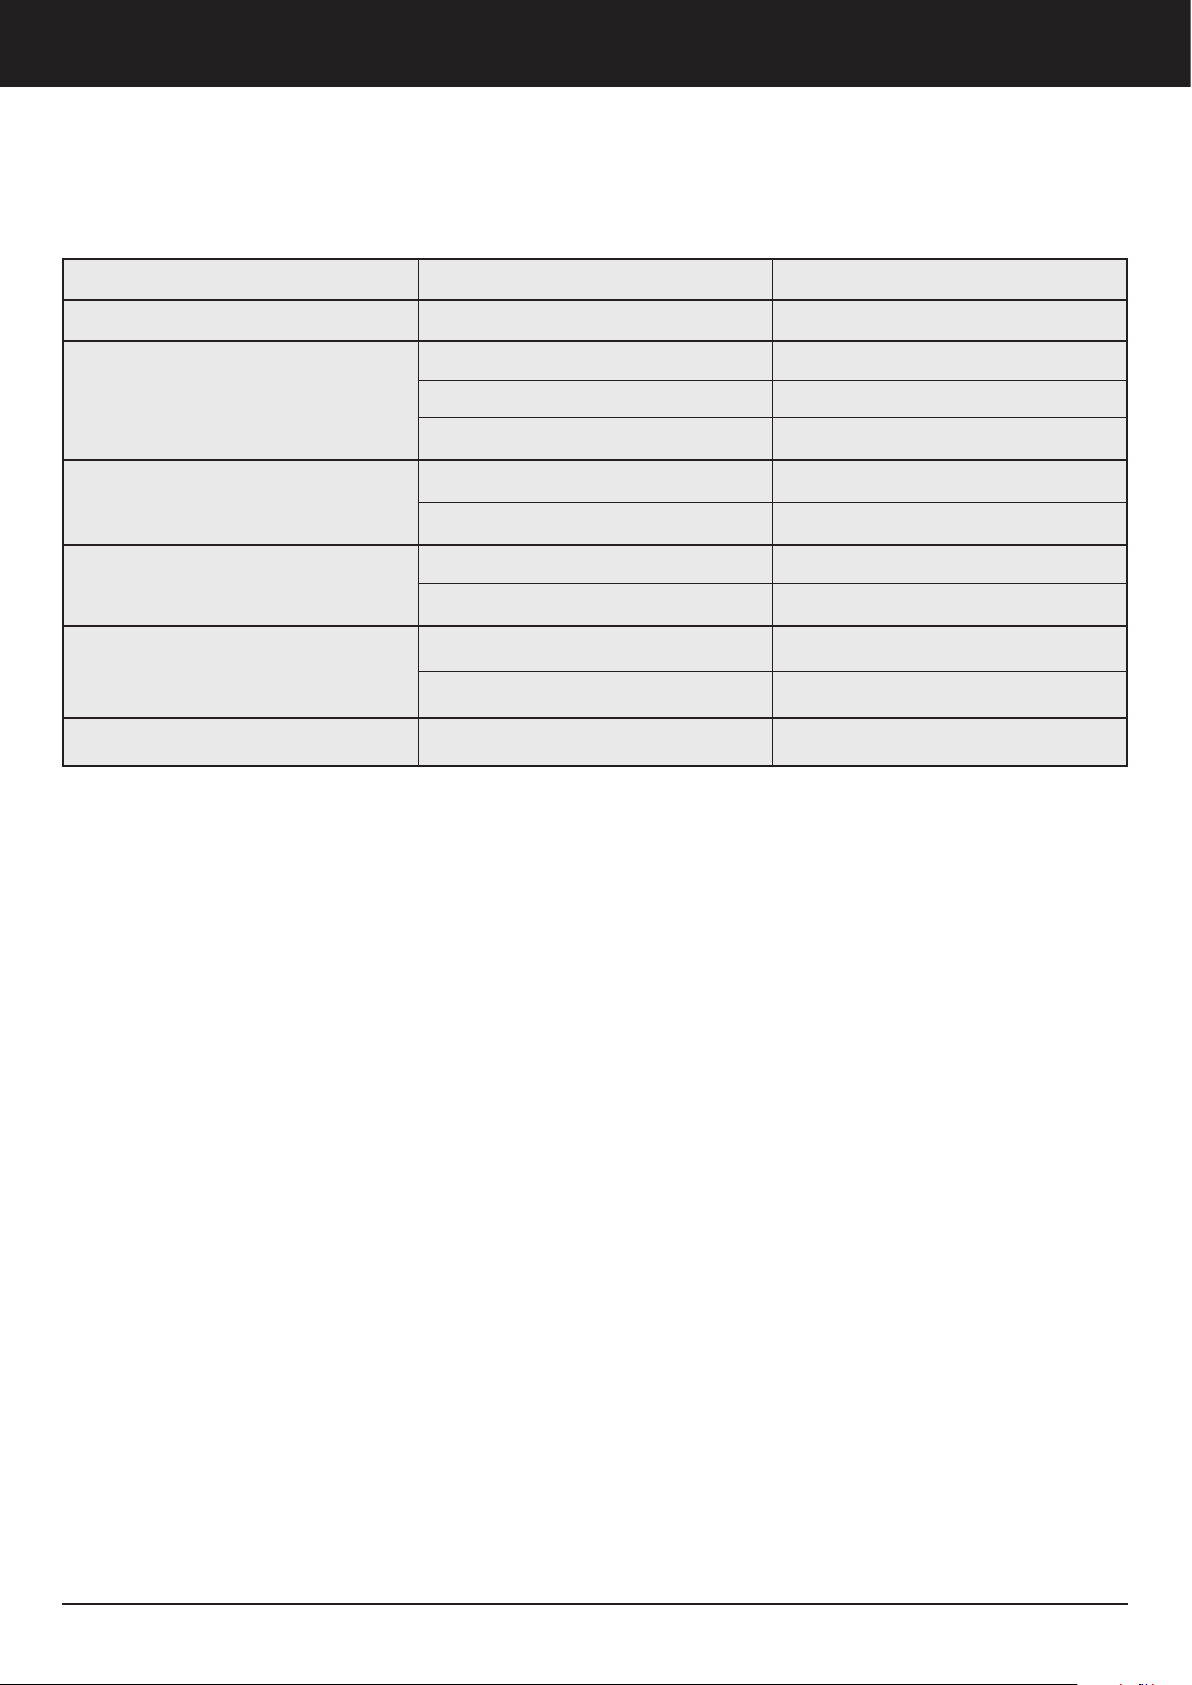
Trouble shooting
Trouble shooting
The table below will help to make baking easier, simplify adjustments of the oven and help in the event of problem. If
solution is not found please contact your nearest PizzaMaster® distributor or contact our service department.
SYMPTOM POSSIBLE CAUSE PROBABLE SOLUTION
The oven does not start Main fuse has blown/tripped Replace/reset main fuse
Main fuse has blown/tripped Replace/reset main fuse
Oven temperature falls too much or
recovery period is too long
The top of the pizza is too dark
The bottom of the pizza is too dark
A power relay is broken Replace power relay
Top settings are too low Increase settings for Top
Top settings are too high Decrease settings for Top
Too high baking temperature Decrease baking temperature
Bottom is set too high Decrease bottom
Too high baking temperature Decrease baking temperature
Both the top and bottomof the pizza is
too dark
Baking time is too long Baking temperature is too low Increase baking temperature
Too high baking temperature Decrease baking temperature
Too long baking time Decrease baking time
22
PizzaMaster®
Page 25
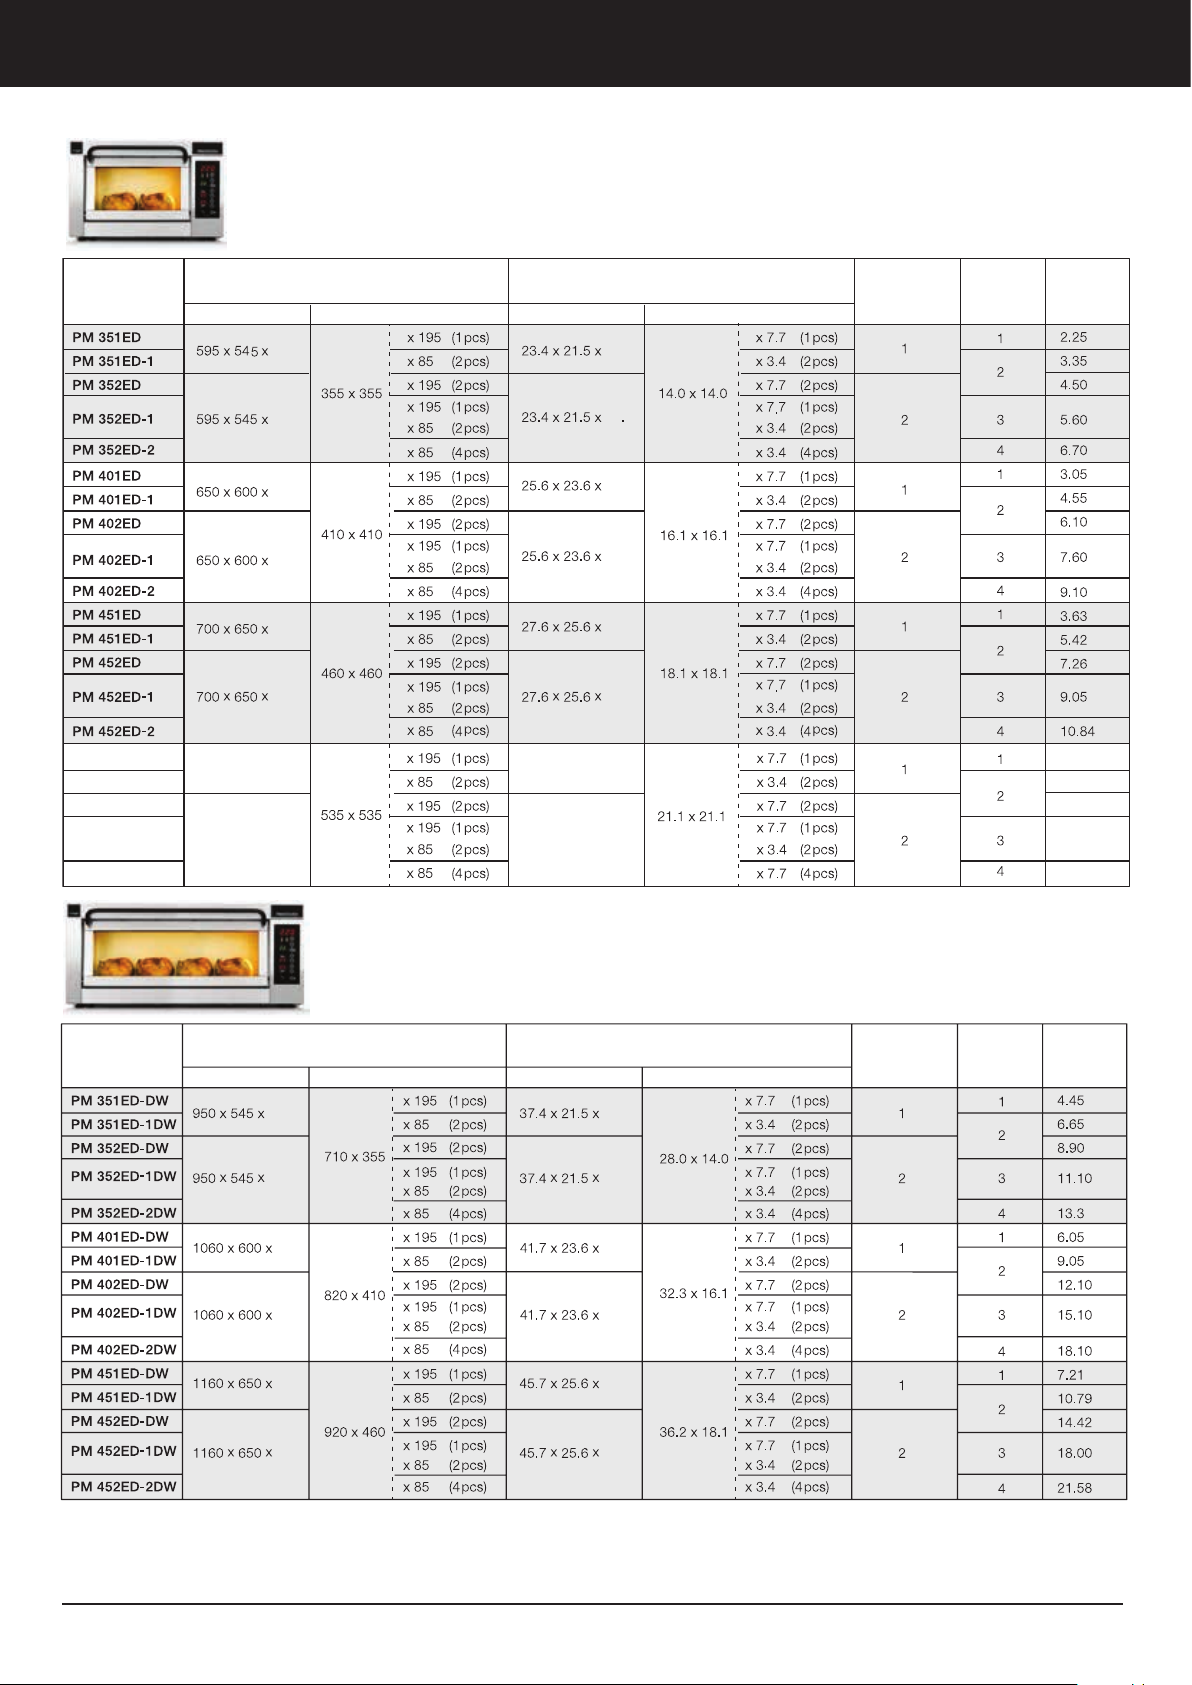
PizzaMaster® CounterTop series - Standard width
Technical data
Model
PM 551ED
PM 551ED-1
PM 552ED
PM 552ED-1
PM 552ED-2
Dimensions in millimetres
Width x Depth x Height
External Internal (per hearthstone)
500 19.7
800
500
800
500
800
775 x 725 x 500
775 x 725 x 800
Dimensions in inches
Width x Depth x Height
External
1) 1)
1) 1)
1)
30.5 x 28.5 x 19.7
30.5 x 28.5 x 31.5
1) 1)
Internal (per hearthstone)
31.5
19.7
31.5
19.7
31.5
Independent
chambers per
oven
1)
Hearthstones
per oven
Power
kW
4.41
5.59
8.77
10.95
13.13
® CounterTop series - Double width
Dimensions in inches
Width x Depth x Height
External
1)
1)
1)
Internal (per hearthstone)
19.7
31.5
19.7
31.5
19.7
31.5
1)
1)
1)
Independent
chambers per
oven
Hearthstones
per oven
Model
PizzaMaster
Dimensions in millimetres
Width x Depth x Height
External Internal (per hearthstone)
500
800
500
800
500
800
1) Model with 1 hearthstone in 1 deck and 2 hearthstone in 1 deck. As standard the oven s delivered with 1 hearthstone in the lower deck
and 2 hearthstone in the upper deck. Different configuration can be required
Power
kW
PizzaMaster®
23
Page 26
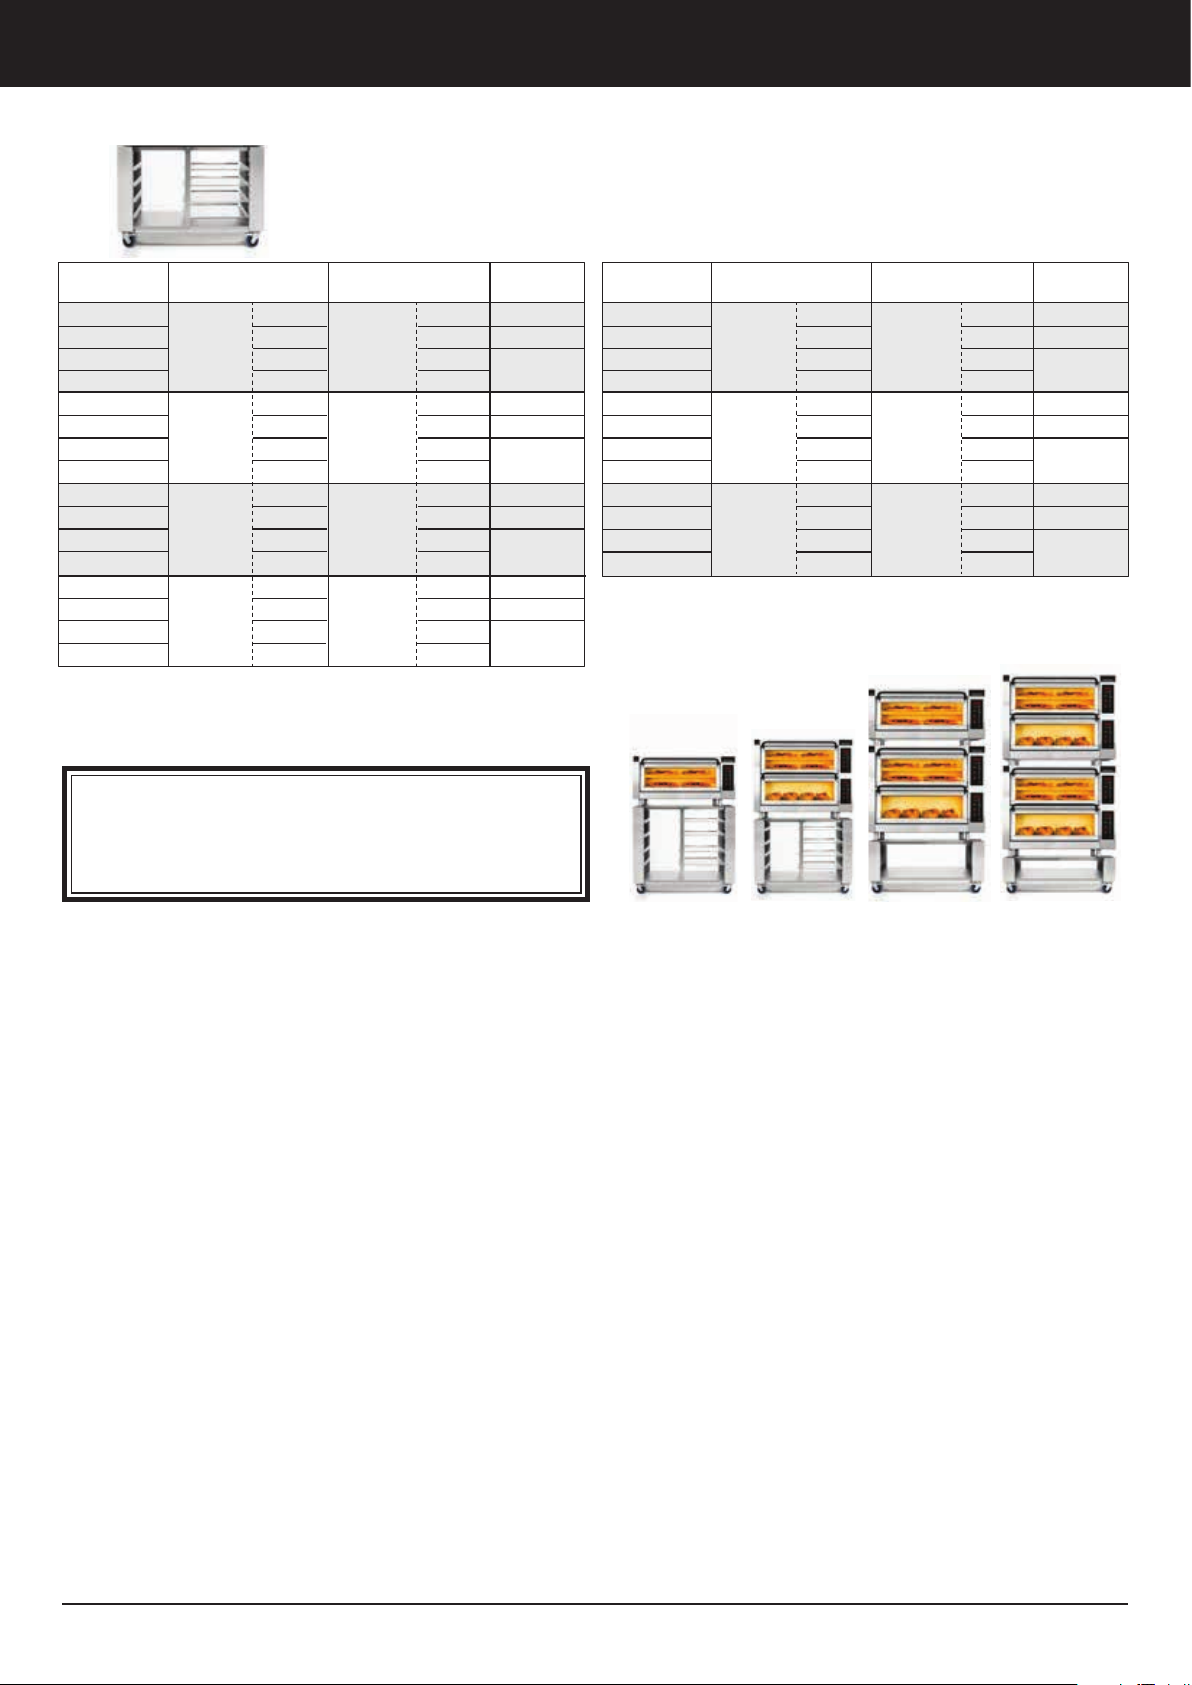
Technical data
Support Counter Top
Model
PM 351- S
PM 352- S
PM 353- S
PM 354- S
PM 401- S
PM 402- S
PM 403- S
PM 404- S
PM 451- S
PM 452- S
PM 453- S
PM 454- S
PM 551- S
PM 552- S
PM 553- S
PM 554- S
Dimensions in mm
Width x Depth x Height
x 900
595 x 598
650 x 598
700 x 648
775 x 723
x 750
x 450
x 300 x 11.8
x 900
x 750
x 450
x 300 x 11.8
x 900
x 750
x 450
x 300
x 900
x 750
x 450
x 300
Dimensions in inches
Width x Depth x Height
23.4 x 23.6
25.6 x 23.6
27.6 x 25.5
30.5 x 28.5
x 29.5
Shelf support
package
x 35.4 SP-1
SP-2
x 17.7
x 35.4
x 29.5
x 17.7
x 35.4
x 29.5
x 17.7
x 11.8
x 35.4
x 29.5
x 17.7
x 11.8
-
SP-1
SP-2
SP-1
SP-2
SP-1
SP-2
-
-
-
Important!
For complete oven technical information refer to
technical specification sheets for each individual oven
series
Model
PM 351DW- S
PM 352DW- S
PM 353DW- S
PM 354DW- S
PM 401DW- S
PM 402DW- S
PM 403DW- S
PM 404DW- S
PM 451DW- S
PM 452DW- S
PM 453DW- S
PM 454DW- S
Dimensions in mm
Width x Depth x Height
x 900
950 x 598
1 060 x 598
1 160 x 648
x 750
x 450
x 300 x 11.8
x 900
x 750
x 450
x 300 x 11.8
x 900
x 750
x 450
x 300
Dimensions in inches
Width x Depth x Height
x 35.4 SP-1DW
37.4 x 23.6
41.4 x 23.6
45.7 x 25.5
x 29.5
x 17.7
x 35.4
x 29.5
x 17.7
x 35.4
x 29.5
x 17.7
x 11.8
Shelf support
package
SP-2DW
-
SP-1DW
SP-2DW
-
SP-1DW
SP-2DW
-
24
PizzaMaster®
Page 27
EU-Declaration of conformity
EU-Declaration of conformity
Svenska BakePartner AB
declare under sole responsibility that the PizzaMaster oven
is approved and in conformity with,
Electromagnetic compatibility Directive 2004/108/EC,
and applicable supplements
Low voltage Directive 2006/95/EC, and applicable supplements
Counter Top Ovens
PM 351ED – PM 351ED-1 – PM 352ED – PM 352ED-1 – PM 352ED-2
PM 351ED-DW - PM 351ED-1DW - PM 352ED-DW - PM 352ED-1DW - PM 352ED-2DW
PM 401ED – PM 401ED-1 – PM 402ED – PM 402ED-1 – PM 402ED-2
PM 401ED-DW - PM 401ED-1DW - PM 402ED-DW - PM 402ED-1DW - PM 402ED-2DW
PM 451ED – PM 451ED-1 – PM 452ED – PM 452ED-1 – PM 452ED-2
PM 451ED-DW - PM 451ED-1DW - PM 452ED-DW - PM 452ED-1DW - PM 452ED-2DW
PM 551ED – PM 551ED-1 – PM 552ED – PM 552ED-1 – PM 552ED-2
...............................................................
Christer Andersson
Managing Director
Svenska BakePartner AB
Date
2014-04-01
PizzaMaster®
25
Page 28

Notes
26
PizzaMaster®
Page 29

Notes
PizzaMaster®
27
Page 30

L
U
E
W
S
O
T
I
O
N
S
N
We are always ready
to assist you!
O
L
D
T
R
A
D
I
T
I
S
N
O
PizzaMaster® Stone Hearth Deck Ovens are manufactured by Svenska BakePartner AB
Customer Support: Tel: +46 33 230-025 I Fax: +46 33 248-140 I E-mail: [email protected]
Website: www.pizzamaster.com or www.bakepartner.com I HQ: Svenska BakePartner AB, Odegardsgatan 5, SE 504 64 Boras Sweden
 Loading...