


PXT510WR04G

Wireless
Digital Picture Frame
User Guide / Livret Utilisateur
Manuale del Utilisator / Benutzerhandbuch
Guia do Utilizador / Guía del Usuario
2016-6
PXT510WR04G

Welcome
You have just acquired a Pix-Star
®
Wi-Fi Photo Frame and we thank you very much for
your trust in our product and solution.
This Digital Photo Frame is a totally new generation of product with wireless capabilities
and innovative features that we believe will delight you.
This product will allow you to easily share your best moments with friends and family in
just a few seconds wherever they are, at any moment. This product also includes the
traditional features of a Digital Photo Frame: it can display pictures and other media files
from USB memory sticks and compatible memory cards.
We hope you will enjoy using our product. Do not hesitate to send us your feedback and
suggestions by emailing us at info@pix-star.com.
Notice: This user guide has been simplified to enable you to understand the basic features
of this frame. Nevertheless these explanations may not be exhaustive due to constant
improvements made to our products. Therefore, we recommend that you check our
website at www.pix-star.com and the knowledge base where you can find regularly
updated information. You can also email us your questions at info@pix-star.com.
REGISTRATION
To register your Pix-Star Online now, simply go to www.pix-star.com, and click on "I want
to choose an email address for my Pix-Star!" will be able to instantly send/receive pictures
to/from your friends and relatives!
Enjoy your Pix-Star
®

Recommendations of Use and Safety Warnings
Do not install your Digital Picture Frame close to a water source (minimum 1.50 m away
from a water source) or in a humid environment (such as bathroom, laundry, kitchen).
Warning: To reduce the risk of electrical shock, do not remove the cover or back. To
prevent fire or electrical shock, do not expose the device to rain, water or moisture.
This product has been designed to work inside a room or a house and cannot be used
outside. Avoid using the product in a dusty environment.
This product must be used in temperatures between 10 °C and 35 °C.
Only use this product with the power adapter that was provided with the product. Using
any other adapter will void your warranty.
Do not place this product on an unstable desk or table. Never place heavy or sharp objects
on the LCD panel of the device.
This product is not suitable for use by a child.
Protect the power cord from being walked on or pinched particularly at plugs, receptacles
and the point where the cord attaches to the device.
The CE mark indicates that the product is in compliance with the main requirements of
the European parliament and council directive 2002/96/EC for telecommunications
terminals, user health and safety and for electromagnetic disturbance.
This terminal has been designed for private, indoor use (CPE customer premises
equipment) within the European Union. It has been tested according to the technical
dispositions for radio equipment (EN 300328). The manufacturer therefore declines all
responsibility in case of non-compliance with the current regulations in the country of
installation.
If you suspect there is any problem with the device, the remote control or the power
adapter please contact us immediately at: support@pix-star.com. We will supply a
replacement part, if needed, free of charge. For your safety, DO NOT ATTEMPT to
repair the device or the adapter by yourself.
The declaration of conformity and the warranty are accessible upon request by
sending an email to support@pix-star.com.
Always keep a back up of your pictures!
The warranty does not cover damage caused by incorrect use of this product as well as
memory devices.
When using earphones for private listening with this product, in order to protect your
ears from hearing damage, always turn the volume down before plugging the
earphones into the device and limit the amount of time your listen through earphones
at high volume. Excessive exposure to loud sounds can cause hearing damage.

1. Overview of the device
CAUTION
In cases of inappropriate handling the batteries might explode.
Do not attempt to recharge, disassemble or burn them.
Play/pause when in slideshow mode
To enter a sub-menu in menu mode
To confirm the selection
Move left in the menu mode
Move to previous picture in slideshow mode
Move right in the menu mode
Move to next picture in the slideshow mode
Move up in the menu mode
Move down in the menu mode
Share: Open the user interface to send/share pictures
Inbox: Open the inbox to view pictures received by email
Switch On/Off the LCD (Standby mode)
To move back to previous menu in menu mode
To quit the slideshow when slideshow is playing
Display slide show menu bar (when slideshow is playing)
Display main menu
Box contains:
- 1 x remote control
- 1 x user manual
- 1 x Pix-Star photo frame
- 1 x power adapter AC 100/220V
Note:
Insert the batteries in the remote control prior to using it. Batteries
are to be inserted at the back of the remote control.
Always point the remote control toward the remote sensor located
on the right side of the screen.
ATTENTION: batteries can NOT be recharged!
2. Installation and Power On
First, plug the AC adapter at the back of the device, then plug the AC adapter to a power
outlet/socket.
To turn on the device, move the switch button located on back/bottom side of the device
next to the AC adapter plug. After a few seconds, the screen should display a logo.
Wait for about 20 seconds for the device to be ready for use.
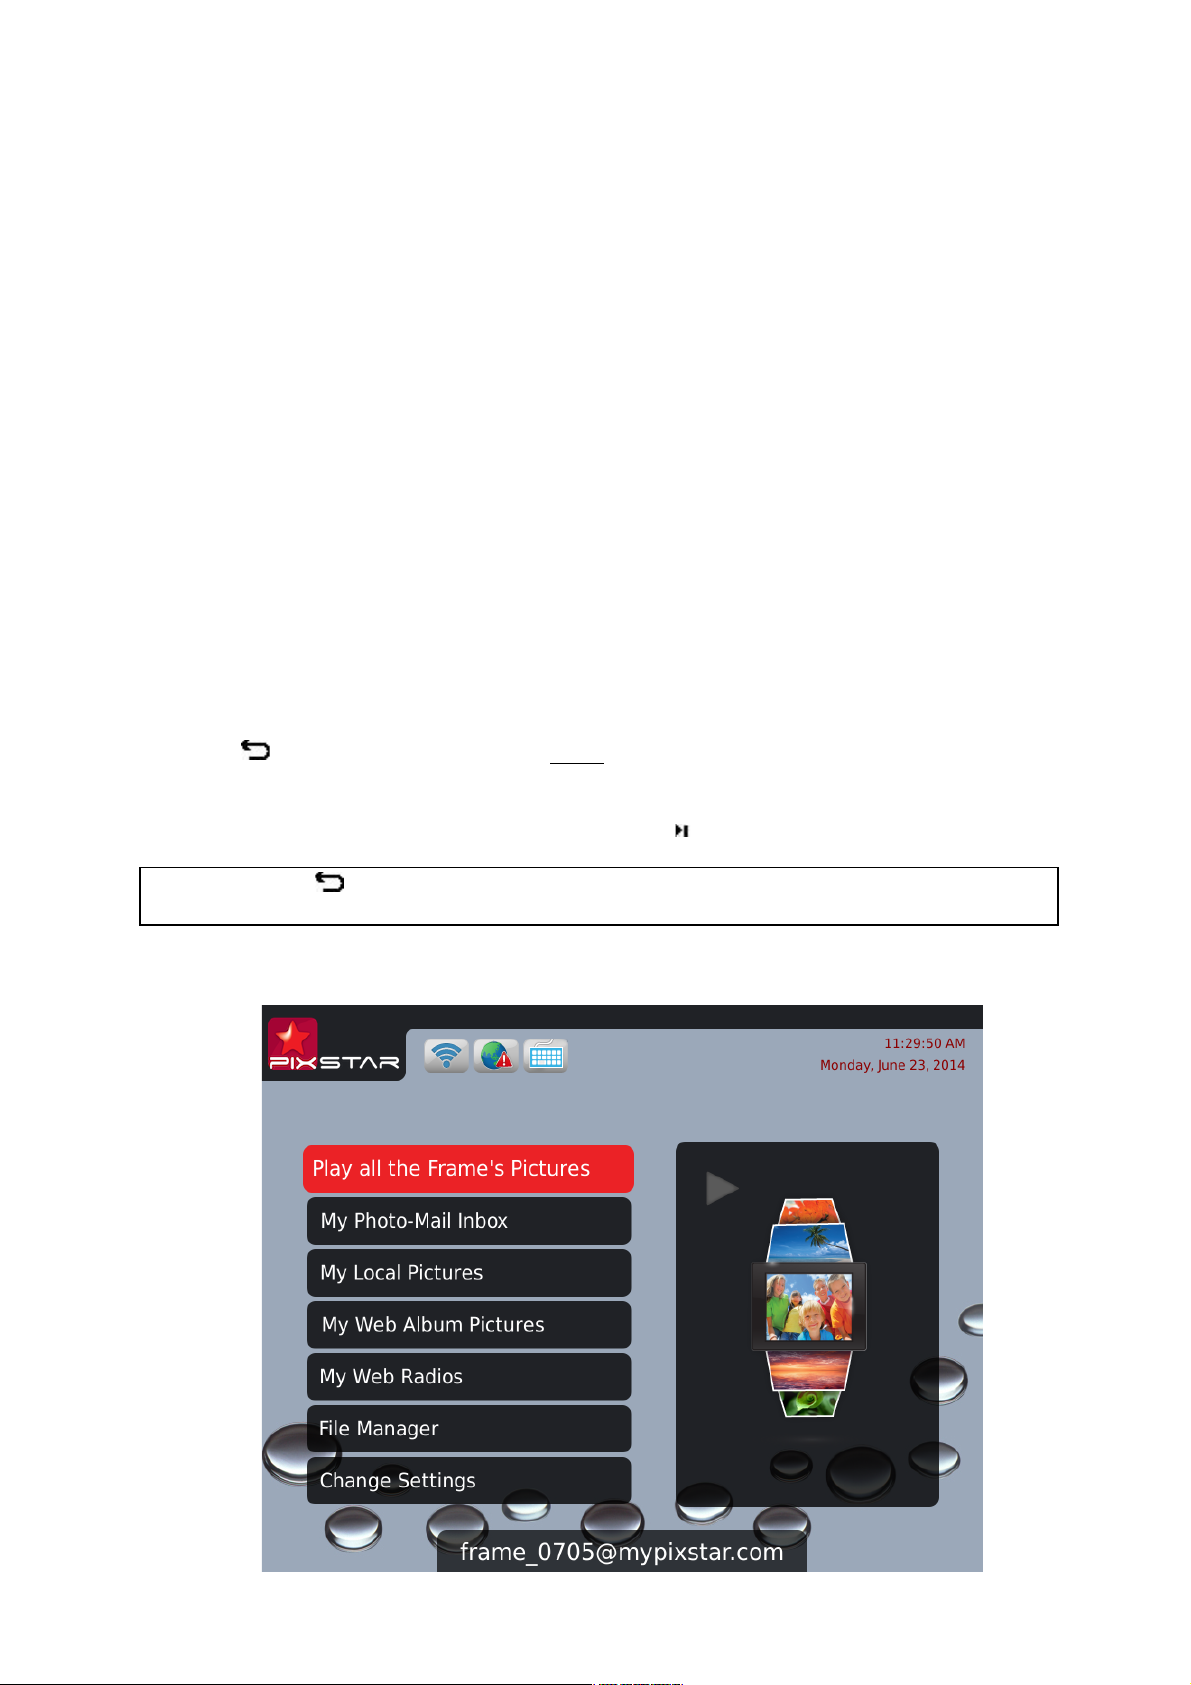
3. Introduction to the Main User Interface
After you power on the device and wait for approximately 20 seconds your Pix-Star will
display the main menu.
You can navigate the menus using the remote control or the buttons located behind the
device on the right side.
When the slide show is playing, to quit the slide show and go back to the main menu press
the Back button or the Menu button twice.
When the main menu is displayed on the Pix-star’s screen, select the menu you want to
enter using the UP and DOWN buttons then press the / OK button to enter it.
Note: The Back button on the remote control allows you to go back to the previous
menu (upper level menu)

Play all the Frame’s Pictures
Play a slide show of all the frame’s picture.
My Photo-Mail Inbox
Display the Photo-Mails you’ve received
My local Pictures
-
My Pix-Star
®
frame (Inbox)
-
USB
-
SD card
-
My Network Devices
-
My photo RSS feeds
Display the photos of your friends sent by
email, from SD card, a USB stick, a network
device (DLNA server) or photo RSS feed.
My Web Album Pictures
Manage web albums displayed on your frame
via the www.pix-star.com web site.
Web albums will only be displayed after being
linked on the web site.
Weather forecasts are accessible from this
menu
My Radios, Games & Reminders
Display a selection of web radio from all over
the world
Browse your audio files from an SD card or a
USB device.
Excercise your brain with “games for the
brain”.
Schedule reminders and alarms.
File Manager
Manage files saved on your device’s local
memory, copy from SD card or USB source.
Change Settings
-
Language
- Date & Time
- Auto On/Off
- Slide-Show
- Photo-Mail
- Wi-Fi
- About
- Factory Reset
Configure the language of the user interface
Configure the date and time
Configure the device’s automatic sleep mode
Configure all the slide show settings
Configure Photo-Mail reception mode
Connect to your wireless network
Information related to the device
Reset the device to factory settings

4. Wi-Fi and Internet Setup
4.1 Connect the device to a Wi-Fi wireless network
Each unit has a dedicated email address, which makes it possible for the device to receive
pictures directly from the Internet. To receive pictures, the device must be connected to
the Internet through a Wi-Fi gateway.
Here is how to connect your photo frame to a local Wi-Fi network:
1. Access the Main Menu (If you are playing a slideshow, press slowly the button Menu
2 times to come back to the Main Menu)
2. Scroll to CHANGE SETTINGS and press " " to enter it
3. Scroll to Wi-Fi and press " ". The device will automatically start a scanning
process to discover available wireless networks.
4. Using the UP and DOWN keys to navigate the interface and select the Wi-Fi
network you want to connect to.
5. Press the button to connect to the selected network.
If the network has its security enabled, the device will automatically pop up a window
where you can enter the security key. All other parameters are AUTOMATICALLY
configured by your Pix-Star.
After you enter the security key in the interface using the virtual keyboard, press
CONFIRM then press JOIN, it will start the Wi-Fi connection process.
Note 1: A DHCP server must be running on your network in order to automatically assign
an IP address to your device. Most personal Wi-Fi networks run a DHCP server.
Note 2: Connection to Public Hotspots or to a network that requires an authentication
with user name and password through a web page (HTML) are NOT supported by this
product (there is no browser in the device). If you use a router with a “guest” access that
uses this web page authentication mode please connect to the “main” access instead.
 Loading...