

Page 1

Supervisor Guide
SV 50220, Rev. B
December 1995
Page 2

TRADEMARKS
Mail Center 2000™, PARAGON™, SoftKey™, Weigh on the Way™, W-O-W™,
Para-Text™, Data Trail™ and Postage by Phone
®
ZIP Code
and ZIP+4® are registered trademarks of the U.S. Postal Service.
®
are trademarks of Pitney Bowes Inc.
FCC Compliance - PARAGON™ Mail Processor
"Note: This equipment has been tested and found to comply with the limits for a Class A digital
device, pursuant to Part 15 of FCC Rules. These limits are designed to provide reasonable protection
against harmful interference when the equipment is operated in a commercial environment. This
equipment generates, uses, and can radiate radio frequency energy and, if not installed and used in
accordance with the instruction manual, may cause harmful interference to radio communications.
Operation of this equipment in a residential area is likely to cause harmful interference in which case
the user will be required to correct the interference at his own expense."
"Shielded cables must be used with this unit to insure compliance with the Class A limits."
FCC Compliance - E100 Series Postage Meter
"NOTE: This equipment has been tested and found to comply with the limits for a Class B digital
device, pursuant to Part 15 of the FCC Rules. These limits are designed to provide reasonable
protection against harmful interference in a residential installation. This equipment generates, uses
and can radiate radio frequency energy and, if not installed and used in accordance with the instructions, may cause harmful interference to radio communications. However, there is no guarantee that
interference will not occur in a particular installation. If this equipment does cause harmful interference to radio or television reception, which can be determined by turning the equipment off and on,
the user is encouraged to try to correct the interference by one or more of the following measures:
-- Reorient or relocate the receiving antenna.
-- Increase the separation between the equipment and receiver.
-- Connect the equipment into an outlet on a circuit different from that to which
the receiver is connected.
-- Consult the dealer or an experienced radio/TV technician for help."
Canadian DOC Compliance
"This digital apparatus does not exceed the Class A limits for radio noise emissions from digital
apparatus set out in the Radio Interference Regulations of the Canadian Department of Communications.
Le présent appareil numérique n'emet pas de bruits radioélectriques depassant les limites applicables
aux appareils numériques de la class A prescrites dans le Règlement sur le brouillage radioélectrique
édicté par le ministère des Communications du Canada."
Page 3

Contents
Overview
Introduction ---------------------------------------------------------------Supervisory Functions ---------------------------------------------------- 1-1
Site Setup
Overview ------------------------------------------------------------------Modify Site Setup --------------------------------------------------------- 2-2
Set Up Operator IDs ------------------------------------------------------ 2-6
Change Operator Info ------------------------------------------------- 2-7
Add Operator----------------------------------------------------------- 2-7
Remove Operator------------------------------------------------------ 2-7
Set Default Class or Acct./Class ---------------------------------------- 2-8
Set Up Preferred Classes ------------------------------------------------- 2-9
Contents
1-1
2-1
Job Presets
Overview -------------------------------------------------------------------
3-1
Saving a Job Preset-------------------------------------------------------- 3-2
Removing a Job Preset --------------------------------------------------- 3-2
Choosing a Job Preset ---------------------------------------------------- 3-3
Job Preset Configuration Table------------------------------------------ 3-3
Troubleshooting. ------------------------------------------------------------- 4-1
Power Up Failure---------------------------------------------------------- 4-1
Troubleshooting Tables -------------------------------------------------- 4-2
Calling for Service ---------------------------------------------------- 4-2
Control Panel Checklist ---------------------------------------------- 4-3
Mail Flow and Paper Handling -------------------------------------- 4-4
Postage Meter ---------------------------------------------------------- 4-5
Postage Printing ------------------------------------------------------- 4-6
Power-on and System Initialization--------------------------------- 4-7
Tape Generation ------------------------------------------------------- 4-8
Weigh-on-the-Weigh
TM
----------------------------------------------------4-8
Glossary . ------------------------------------------------------------------------ 5-1
Options. -------------------------------------------------------------------------- 6-1
Appendix: Operator Skills List ------------------------------------------ A-1
iii
Page 4

Overview
Introduction
This guide shows you how to configure the Mail Center 2000™ PARAGON™ Mail Processor to meet the needs of your mailroom. Before configuring your system, you must familiarize yourself with the operation of the
PARAGON™ by reading the PARAGON ™ Operating Guide (SV50219)
supplied with the system.
After you have read the PARAGON™ Operating Guide, use this
PARAGON ™ Supervisor Guide as a hands-on guide for understanding
how to perform the various configuration procedures.
You may also use this binder to hold the guides for the options you have
purchased with your PARAGON™. Place the guides after section 6,
"Options".
Overview • 1
Supervisory Functions
Because you have a Supervisor level access, you can access the specific
functions which allow you to configure the system. An assigned ID ensures
that no one else can enter the system to configure it.
There are two ways in which you can configure the system. First, you "set up"
the system in a general sense, assigning operator ID's, configuring for scales,
printers, Postage By Phone
section of this guide explains how to do this.
After you perform the Site Setup functions, you may want to create and save
sets of parameters (account ID, class, sealer mode, postage value, etc.), called
"Job Presets", which meet the individual requirements for various runs of
mail. The Job Presets section of this guide explains how to do this.
Note that you may save your Site Setups onto a disk (for later use), but not
your Job Presets. Instructions for saving and restoring your Site Setups are
included in section 8 of the PARAGON Operating Guide.
In addition to configuring the system, you need to be familiar with solutions to
problems that may occur while operating the system. The Troubleshooting
section guides you to a solution for your problem.
®
, setting meter parameters, etc. The Site Setup
Note: Labels, keys and screen titles are printed here as they are in the
PARAGON™ Operating Guide. SoftKey™ labels are placed in single quotes
(for example, 'Change Account'), keyboard keys are placed in angle brackets
(for example, <ENTER>) and screen titles are capitalized (for example, MAIL
RUN).
1-1
Page 5
Site Setup
Site Setup Selections
To set up the PARAGONTM to meet your specific mailing demands, access the
MAIL RUN screen, then select 'Site Setup'.
The SITE SETUP SCREEN displays the five selections listed below. For a
description of the selections and procedures, turn to the appropriate section on
one of the following pages.
• 'Modify Site Setup'
• 'Set Up Accounting' (If accounting is installed, see the Data Trail
• 'Set Up Operator IDs' (if you have chosen to require operator log-ons
• 'Set Default Class' or 'Set Default Acct./Class' (if accounting is
Site Setup • 2
Accounting Operating Guide for selections and procedures.)
through the 'Modify Site Setup' screens)
installed)
• 'Set Up Preferred Classes'
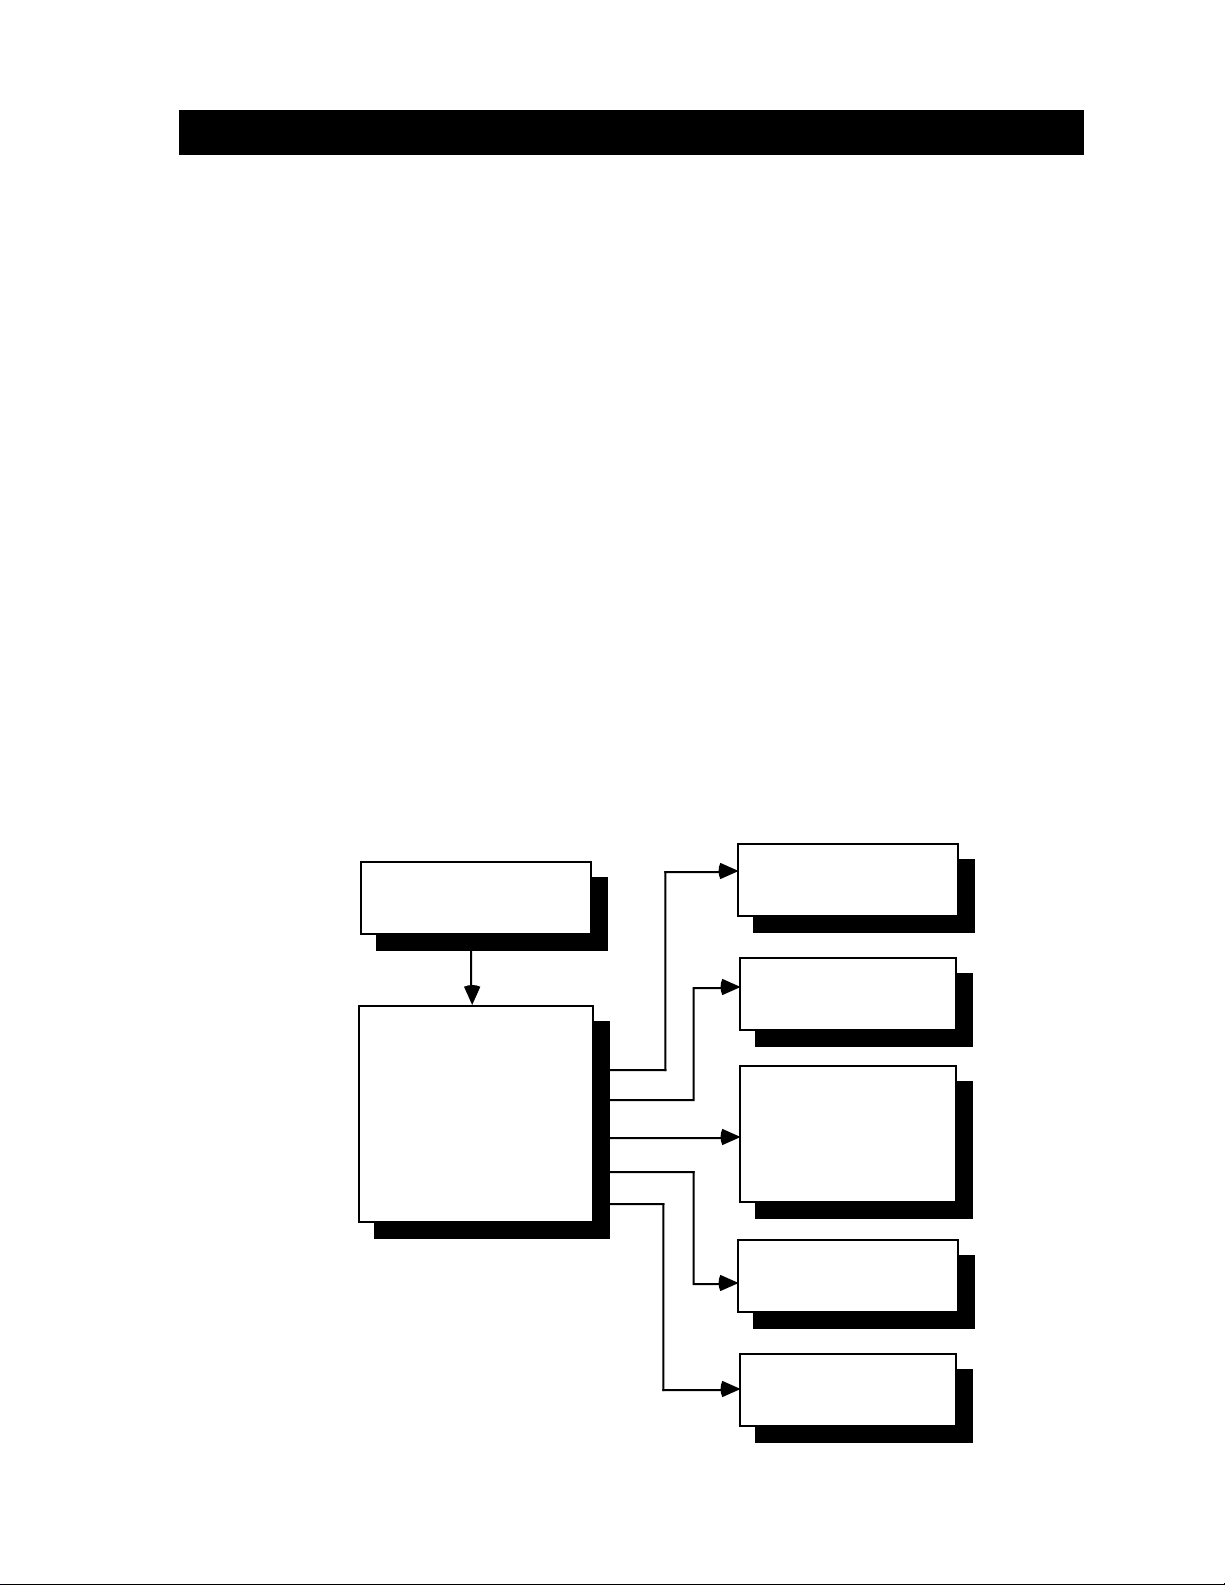
The flowchart below shows the sequence of screens and SoftKeysTM used to
make your selection.
MAIL RUN
'Site Setup'
SITE SETUP
'Modify Site Setup'
'Set Up Accounting'
'Set Up Operator IDs'
'Set Default Acct./Class'
'Set Up Preferred Classes'
View or modify the
system parameters
Set up or modify
accounting parameters
Enable/Disable
Operator IDs
If enabled, you can add
or delete operators and
modify operator info
Specify a default
account and/or class
Specify nine commonly
used carrier/class
combinations
2-1
Page 6

Site Setup • 2
Until ID's have been assigned and enabled (see"Set Up Operator IDs") any
user can access all functions, including "Modify Site Setup". After Operator
IDs are assigned and enabled, the screen prompts you for the Supervisor ID.
See the PARAGON
your Diagnostics/Utilities disk.
Modify Site Setup
Use the 'Modify Site Setup' selection to set the system parameters listed below.
After you select 'Modify Site Setup', the screens used to set the parameters
come up in the order listed below.
Each of the following screens offers you choices. You press the desired
SoftKeyTM or, if the system prompts you for data, enter the data using the
keyboard. If you press the wrong key or choose the wrong option, you may fix
it. The changes you make or options you choose do not become effective until
you press <ENTER>. After you press <ENTER>, the change is made effective
and the next screen appears.
TM
Operating Guide to save or restore a site setup using
Time
When this screen displays, you can enter the time (HH:MM). After entering
the time, the screen prompts you to select AM or PM.
Scale Configuration
The Scale Configuration screen presents three modes you must set if you have
an external scale, A300, A305, or Carrier Management System. Select to end
or not end the transaction, have a long or short trip timeout, and to obey or not
obey the disable meter mode, according to which device you have.
SELECTION End Transaction
Mode
DEVICE
A300, A305 DON'T END
TRANSACTION
All Carrier
Management Systems
Scales DON'T END
END TRANSACTION SHORT Not Applicable
TRANSACTION
Trip Timeout Disable Meter Mode
LONG OBEYor DON'T OBEY
(Recommend "OBEY",
but set to your
requirement.)
LONG DON'T OBEY
2-2
Page 7

Site Setup • 2
Printer Configuration
You need to let the system know the type of printer attached to it: None, 80
column or 132 column. If you select 'NONE', the 'View Reports' selection
displays on the MAIL RUN screen; otherwise, the 'Print/Cancel Reports'
selection displays on the MAIL RUN screen.
Manual Postage-by-Phone
®
When this screen displays, you can change the default reset value and the
Postage by Phone
Auto Postage-by-Phone
®
account number.
®
If you have Auto Postage-by-Phone®, when this screen displays you can
change the account number, change the dialing prefix, and choose pulse or
tone dialing.
USPS Intra-BMC Range
When this screen displays, you can change the range of a valid ZIP Code for
your United States Postal Service (USPS) Intra-BMC (Bulk Mailing Center)
area. The codes are initially set up at installation by the Pitney Bowes Customer Service Representative to the codes in effect at that time. If the ZIP
Codes for your Intra-BMC area change, you need to add or delete codes as
required.
ZIP Code ranges are entered as the first three digits of the codes, lowest code
to highest code (for example, 080-087). Leading zeros must be entered. For a
single ZIP Code, enter the three digits twice to complete the range entry (for
example, 127-127).
NOTES
For these changes to become effective, the system power must be turned off
and on again after the completion of site setup.
After selecting any class containing "Inter" and entering a ZIP Code in your
Intra-BMC area, "Inter" automatically changes to "Intra" in the "Class" field.
UPS Intra-state Range
When this screen displays, you can change the range of a valid ZIP Code for
your United Parcel Service (UPS) Intra-state area. In addition, because UPS
Intra-state rates may have a delayed approval/effective date in certain states,
you must enter the proper "Intra-state Code" to assure that the appropriate
rates are applied. The codes are initially set up at installation by the Pitney
Bowes Customer Service Representative to the codes in effect at that time. If
2-3
Page 8

Site Setup • 2
the ZIP Codes for your Intra-state area change, you need to add or delete
codes as required. Also, when UPS rate changes occur, you receive update
rate disks with information on any change to the Intra-state Code.
ZIP Code ranges are entered as the first three digits of the codes, lowest code
to highest code (for example, 080-087). Leading zeros must be entered. For a
single ZIP Code, enter the three digits twice to complete the range entry (for
example, 127-127). The "Intra-state Code" tells the rate manager which UPS
Intra-state rate table to use (0=use latest rates, 1=use previous rates, 2=use
rates two revisions back, etc.).
For these changes to become effective, the system power must be turned off
and on again after the completion of site setup.
After selecting any class containing "Inter" and entering a ZIP Code in your
Intra-state area, "Inter" automatically changes to "Intra" in the "Class" field.
Station ID
The Station ID is used to identify a specific Mail Processor when used as part
of an accounting system. When this screen displays, you can enter a station ID
of one or two digits (0 thru 99). The Station ID initially defaults to a 0.
NOTES
Timeout
A timeout closes the transaction (if accounting is used) and logs off the current operator (if operator log on is enabled). A timeout occurs when there has
been no system activity for a duration greater than the timeout interval.
When this screen displays, you can enable/disable the system timeout. If
enabled, set a timeout value between 0 and 1440 minutes. The timeout is
disabled if the value is set to zero. The timeout interval initially defaults to
three minutes.
Ad definition
When this screen displays, you can enter a definition (up to 20 alphanumeric
characters) for ads B, C and D installed in your postage meter. These definitions appear whenever 'View Ads' is selected. Ad "A" is always a blank.
Inscription definition
When this screen displays, you can enter a definition (up to 20 alphanumeric
characters) for inscriptions B, C and D installed in your postage meter. These
definitions appear whenever 'View Inscriptions' is selected. Inscription "A" is
always a blank.
2-4
Page 9

Site Setup • 2
Low postage warning
When this screen displays, you can enter a low postage warning value.
This value can be any value between zero and the maximum value the
meter is capable of storing. Whenever the amount of postage in the meter
is equal to or below the low postage warning value, a warning message is
displayed on the screen and the postage left field is shown in reverse video
as a reminder to add postage to your meter.
Postage upper limit
When this screen displays, you can enter a postage upper limit. The value
entered sets a cap on how much postage can be spent at one time. If during
an operation, the postage value requested exceeds the postage upper limit,
an error is displayed and the meter postage value is left unchanged.
Dollar unlock limit
When this screen displays, you can enter a dollar unlock limit. This is a
double check to ensure that an operator does not enter too high a postage
value by accident. If during an operation, the postage value equals or
exceeds the dollar unlock limit, the operator is required to confirm that the
postage is correct.
Meter codes
When this screen displays, you can enter a code (up to four alphanumeric
characters) for meter installation, meter removal and meter lock/unlock.
The codes initially default to "3336".
Meter activity log enable/disable
When this screen displays, you can enable or disable the meter activity
log. The meter activity log maintains a history of the meters which have
been installed in the system.
Meter date rollover time
When this screen displays, you can enter the time of day you want the
meter imprint date to change to the next day's date. After entering the time,
you are prompted for AM or PM.
2-5
Page 10

Site Setup • 2
Transaction log printing enable/disable
When this screen displays, you can select whether the user must print the
transaction log before clearing it. If you choose "Yes", the system will stop
processing when the transaction log is full and prompt the user to clear the log
or to print and clear the log. If you choose "No", the system will print and
clear the log without giving the user the option to print or not print.
Set Up Operator IDs
When first delivered, the software assumes anyone using the system is a
Supervisor and has access to all of the functions. In order to restrict the access
to these functions to certain classes of users, you must enable operator IDs and
assign access levels.
With operator IDs enabled, you can limit the functions that individuals are
allowed to access by assigning one of three access levels: Operator, Key
Operator or Supervisor.
The Supervisor has the highest access level, followed by the Key Operator
and Operator (the lowest access level). A user at a higher access level may
perform all the functions available to a user at a lower access level. Thus, on
only the Supervisor can perform the functions in this Supervisor Guide. The
Paragon
TM
Operating Guide indicates which parts of the operation are avail-
able to the Operator and which are available to the Key Operator.
Since each system must have at least one assigned Supervisor, operator
number 1
always has a Supervisor access level. The Supervisor ID code is set
to "9999" when installed but may be changed at anytime.
When you enable operator IDs operators must enter their ID in order to use
the system. You may have up to twenty operator IDs.
When first selected, the Operator ID enable/disable screen displays. If Opera-
tor IDs are disabled, pressing <ENTER> will return you to the SITE SETUP
screen. If Operator IDs are enabled, pressing <ENTER> displays the OPERATOR ID SETUP screen with the list of operators. The following selections are
then available:
• 'Change Operator Info'
• 'Add Operator' (if less than 20 operators are defined)
2-6
• 'Remove Operator' (if there is at least one operator other than #1)
You cannot delete or change the access level (always a Supervisor) of operator #1.
You can, however, change the Name and ID. Operator #1 shall initially default as
follows: ID: 9999, Name: SUPERVISOR, and Access Level: Supervisor.
Page 11

Site Setup • 2
Change Operator Info
Use the following procedure to view or change an operator's information.
TM
1. Press the 'Change Operator Info' SoftKey
. The screen prompts you for an
operator number.
2. Enter the desired number (1 thru 20) and press <ENTER>. The screen
displays the current settings and SoftKeys
TM
which allow you to change the
operator name, ID, and access level. If your system has two languages
installed, you are also able to change the language used.
3. Verify all information and make any desired changes. When you are satisfied with the information, press the <ENTER> key to save the data and
return to the OPERATOR ID SETUP screen which displays the list of
operators.
Add Operator
Use the following procedure to add an operator.
TM
1. Press the 'Add Operator' SoftKey
. The screen prompts you for the opera-
tor name.
2. Enter up to 20 alphanumeric characters and press <ENTER>. The screen
prompts you for the operator ID (password).
3. Enter up to 8 alphanumeric characters and press <ENTER>. This is the code
the new operator will use to log on to the system. The screen now displays
'Operator', 'Key Operator' and 'Supervisor' access level selections.
4. Press the SoftKeyTM for the access level to be assigned to this operator (the
default is Operator), and then press the <ENTER> key. The screen displays
the current settings and SoftKeysTM which allow you to change the operator
name, ID, and access level. If your system has two languages installed, you
are also able to change the language used.
5. Verify all the information and make any desired changes. When you are
satisfied with the information, press the <ENTER> key to save the data and
return to the OPERATOR ID SETUP screen which displays the list of
operators.
Remove Operator
Use the following procedure to remove an operator.
1. Press the 'Remove Operator' SoftKey
TM
. You are prompted for the operator
number.
2. Enter the operator number (1 thru 20) and press <ENTER>. The screen
2-7
Page 12

Site Setup • 2
prompts you to confirm that you want to remove the operator.
3. Press 'Yes' to remove the operator from the system or 'No' to leave the
operator on the system. The OPERATOR ID SETUP screen with the list of
operators displays.
Set Default Class or Set Default Acct./Class
The 'Set Default Acct./Class' selection allows you to specify the account ID
(if accounting is enabled and at least one account is defined) and class type (if
accounting is enabled or rating is used) displayed on the MAIL RUN screen
when a new transaction is started. If only rating is available, the SoftKey
label is 'Set Default Class'. There are three choices for the default account and
class type: None, Previous, or Specific.
If "None" is selected, the operator is required to enter an Account ID or class
when each new transaction is begun.
If "Previous" is selected, the Account ID or class for the new transaction
automatically defaults to the Account ID or class used for the previous transaction.
TM
If "Specific" is selected, the Account ID or class for the new transaction
automatically defaults to the default Account ID or class.
Perform the following procedure to specify the Default Acct./Class:
1. With the DEFAULT ACCOUNT screen displayed, press the desired
SoftKey
TM
to select the default account type: "None", "Previous" or
"Specific".
2. a) If 'Set Default Account to NONE' or 'Use Last Account Selected' is
selected, "None" or "Previous" displays on the screen.
b) If 'Use Specific Account' is selected, you are prompted for the account
ID. Enter the ID and press <ENTER>. The ID displays on the screen.
3. When you are satisfied with the default account selection, press <ENTER>.
The DEFAULT CLASS screen displays.
4. With the DEFAULT CLASS screen displayed, press the desired SoftKey
TM
to select the default class type: "None", "Previous" or "Specific''.
5. a) If 'Set Default Class to NONE' or 'Use Last Class Selected' is selected,
"None" or "Previous" displays on the screen.
TM
b) If 'Use Specific Class' is selected, SoftKeys
displays to allow you to
select a carrier and class. Select the desired carrier and class. The class
then displays on the screen.
2-8
6. When you are satisfied with the default class selection, press <ENTER>.
The SITE SETUP screen displays.
Page 13

Set Up Preferred Classes
This selection allows you to specify/modify nine of your most commonlyused carrier/class combinations ("Preferred Nine"). The Preferred Nine (if
they have been defined) appear first when the 'Change Class' selection (on the
MAIL RUN screen) is made, followed by all other carrier/classes.
Use the following procedure to specify/modify preferred classes:
1. With the SITE SETUP screen displayed, press 'Set Up Preferred Classes'.
The Preferred Classes list displays.
2. Press the 'Modify Preferred Class List' SoftKey
for the Preferred Class number to modify.
3. Enter the number and press <ENTER>. The screen prompts you to choose a
carrier.
4. Press the SoftKey
choose a class.
5. Press the SoftKey
Preferred Classes list.
Site Setup • 2
TM
. The screen prompts you
TM
for the desired carrier. The screen prompts you to
TM
for the desired class. The system returns you to the
6. When you are finished making entries, press the <ENTER> key to return to
the SITE SETUP screen. Otherwise, repeat steps 1-5 until you are finished.
2-9
Page 14

Job Presets
Overview
Using Job Presets you can save specified values for recall at a later time. For
example, if once a week you must run a batch of mail for a specified account/
class, you can set the system to do the job and then you can save this set of
values as a Job Preset. Then, any time you must run the same job, you need
only press the <JOB PRESETS> key and select that Preset to automatically
configure the system for that job.
You can save up to nine Job Presets. The system is automatically set to Job
Preset 1 on power-up or logon (if Operator IDs are used).
You choose values for the following when you make a Job Preset.
Job Presets • 3
• Account ID, if accounting is enabled
• Class, if accounting or rating is enabled
• Feeder Mode (Auto or Single)
• Sealer Mode (Flaps Open/Sealed, Flaps Open/Closed, Seal Only
or Off)
• Sealer wetness setting
• W-O-W
• W-O-W
TM
Mode (On or Off)
TM
weight limit setting
• Date Mode (full date, month/year, no date)
• Date Advance
• Inscription selection (A, B, C or D)
• Ad selection (A, B, C or D)
• Postage value
• Tape Type selection (Wet, Dry or Adhesive)
• Machine speed
• Meter print position
• Ink density setting
• Stacker "Auto" mode (automatically set if a Power Stacker is installed)
• Dark Mail Setting
• Power Stacker Speed
3-1
Page 15

Job Presets • 3
To save the current system state as a Job Preset, remove a Job Preset from the
list, or choose (recalling) a Job Preset, follow the instructions below. These
procedures are available if you are signed in as a supervisor or if Operator IDs
are not used. Note that Key Operators and Operators cannot create Presets, but
they can select Presets which have been saved by a supervisor.
Saving a Job Preset
Use the following procedure to save a Job Preset:
1. Set the system to the desired settings. Be sure all of the items listed on the
previous page are set to the desired selection.
2. With the MAIL RUN screen displayed, press the <JOB PRESETS> key.
The PRESETS screen displays.
3. Press the 'Save Preset' SoftKey
of the Job Preset to use.
4. Enter the number and press <ENTER>. The screen prompts for a name.
TM
. The screen prompts you for the number
5. Enter the name and press <ENTER> to save the state of the system under
that name and number. The PRESETS screen displays.
6. Make another selection or press <BACKTRACK> to return to the MAIL
RUN screen.
Removing a Job Preset
Use the following procedure to remove a Job Preset. (Job Preset 1 can be
modified but not deleted.)
1. With the MAIL RUN screen displayed, press the <JOB PRESETS> key.
The PRESETS screen displays.
2. Press the 'Remove Preset' SoftKey
number of the Job Preset to remove.
3. Enter the number and press <ENTER>. The name of the entered Job Preset
is changed to "Undefined". The PRESETS screen displays.
4. Make another selection or press <BACKTRACK> to return to the MAIL
RUN screen.
TM
. The screen prompts you for the
3-2
Page 16

Choosing a Job Preset
Use the following procedure to choose (recall) a Job Preset.
1. With the MAIL RUN screen displayed, press the <JOB PRESETS> key.
The PRESETS screen displays.
2. Enter the number (1 thru 9) of the desired Preset or press the 'Choose
Preset' SoftKey
TM
. If you entered the number, go to step 4; otherwise, go to
step 3.
3. The screen prompts for the number of the Job Preset to choose. Enter the
desired number.
4. Press <ENTER>. The system is set to the Job Preset and the MAIL RUN
screen displays. If all the conditions of the Job Preset cannot be satisfied,
the system sets up what it can and then displays the PRESET RECALL
ERROR(S) screen with a list of the conditions it could not satisfy.
Job Preset Configuration Table
You can use the table on the following page to store the name and values of
the different items for your Job Presets. You should make copies of the following page, complete the required information for each Job Preset, and place
it in a location close to the system.
Job Presets • 3
Remember that whenever the system is powered up it uses the values in Job
Preset 1 to set up the system.
3-3
Page 17

Job Presets • 3
MACHINE IDENTIFICATION:
Item Job Preset Settings
Job Preset # 12345
Preset Name
Account ID
Class
Feeder Mode
Sealer Mode
Sealer Wetness
W-O-W Mode
W-O-W Weight Limit
Date Mode
Date Advance
Inscription
Ad
Postage Value
Tape Type
Machine Speed
Print Position
Ink Density
Power Stacker
(if installed) Auto Auto Auto Auto Auto
Dark Mail
Stacker Speed
Item Job Preset Settings
Job Preset # 6789
Preset Name
Account ID
Class
Feeder Mode
Sealer Mode
Sealer Wetness
W-O-W Mode
W-O-W Weight Limit
Date Mode
Date Advance
Inscription
Ad
Postage Value
Tape Type
Machine Speed
Print Position
Ink Density
Power Stacker
(if installed)
Dark Mail
Stacker Speed
Auto Auto Auto Auto Auto
3-4
Page 18

Troubleshooting
This section contains information you can use in the analysis of problems that
may occur while operating the system.
Power Up Failure
If a failure occurs during the power up sequence after activating the system
display, the POWER UP screen lists the error code(s). You must press any
key to continue operation. The error code format is XXXX/XXXX, where X
is an alphanumeric character. You can use the first four characters of the error
code to determine the area of the machine causing the failure.
0XXX Motor Control or Sensor Controller
1XXX Postage Meter
2XXX Weigh-on-the-Way™
3XXX Accounting software fault
4XXX Mail Processor software fault
5XXX Mail Processor peripheral
6XXX Mail Processor diagnostics
7XXX Disc access error
8XXX MCS communications
9XXX Mail Processor Operating system
DXXX Disk controller/media error
EXXX I/O expansion devices
FXXX Mail Processor software utility
Troubleshooting • 4
Error Code Related area
If the system powers up with the SITE SETUP screen displayed, the battery
for nonvolatile memory has gone bad or something has caused the loss of the
contents of memory. Call Your Pitney Bowes Customer Service Representative.
To use the machine until service arrives, you have to perform a limited site
setup. Enter only the date and time, and press the 'Use Current Settings'
SoftKey
TM
when prompted. This allows you to run mail and tapes until service
arrives.
IMPORTANT: All the accounting information, preferred
nine class list, job presets, and operator IDs you previously
set up are not available.
4-1
Page 19

Troubleshooting • 4
Troubleshooting Tables
The tables on the following pages help you to determine and correct problems in the
indicated areas of the machine. The tables are presented in the following order:
• Control Panel Checklist
• Mail Flow and Paper Handling
• Postage Meter
• Postage Printing
• Power-on and System Initialization
• Tape Generation
• Weigh-on-the-Way™ (W-O-W™)
Calling for Service
Follow the steps in the table to correct your problem. If you still have a problem,
please call Pitney Bowes Customer Service.
4-2
Page 20

Troubleshooting • 4
Control Panel Checklist
Problem Indication Possible Cause Action
Meter Display is not
illuminated - associated keys
are inactive
Machine Status Display is not
illuminated - associated keys
are inactive
System Display is blank 1. Contrast all the way
JOB PRESETS key not
functioning
1. Operator log on screen is
displayed.
2. Machine in "Seal Only". 2. Place the sealer in
3. Nonmeterable rating
class selected.
4. System in diagnostic or
site setup mode.
5. Meter is locked. 5. Unlock the meter.
6. Meter is not installed. 6. Install a meter.
1. Operator log on screen is
displayed.
2. System in diagnostic or
site setup mode.
3. Meter is not installed. 3. Install a meter.
down.
1. Not on MAIL RUN screen. 1. Press <BACKTRACK> to
1. Log on to the system.
another mode.
3. Select a meterable class.
4. Leave diagnostic or site
setup mode.
1. Log on to the system.
2. Leave diagnostic or site
setup mode.
1. Adjust the contrast
control.
go to the MAIL RUN screen.
MAKE TAPES or SINGLE TAPE
key not functioning
POSTAGE or +/= key not
functioning
+DAY key not functioning 1. A portion of date ducked. 1. Press the TODAY key to
START key not functioning 1. Not on MAIL RUN screen. 1. Press <BACKTRACK> to
NEW BATCH key not
functioning
1. Not on MAIL RUN screen. 1. Press <BACKTRACK> to
go to the MAIL RUN screen.
1. Not on MAIL RUN or
TAPE PROCESSING screen.
2. Meter display is not
illuminated.
1. Not on MAIL RUN screen. 1. Press <BACKTRACK> to
1. Go to MAIL RUN or TAPE
PROCESSING screen.
2. Check actions for "Meter
Display is not illuminated"
at top of table.
display the entire date, then
press the +DAY key.
go to the MAIL RUN screen.
go to the MAIL RUN screen.
4-3
Page 21

Troubleshooting • 4
Mail Flow and Paper Handling
Problem Indication Possible Faults Action
System will not start - mail on deck,
‘start’ button pressed
Poor feeding/nudging 1. Mail stack too heavy/too
Double / Stream Feeds 1. Dirty feed deck sensors. 1. Clean all deck sensors with
Envelope flaps not sealing 1. Flaps not stripping properly
Mail jams at stripper blade 1. Flap too deep for stripper to
1. Mail deck sensors dirty. 1. Clean mail deck sensors
with damp cloth.
1. Refer to Operating Guide
high.
2. Mail too thick/too wide. 2. Refer to Operating Guide
- Square flaps.
- Thick inserts.
2. No E-Z Seal® in tank
handle.
2. Only tips of envelopes
sealed.
3. Pre-sealed mail run in
wrong sealer mode.
for stack height and weight
limits.
for stack width and thickness
limits.
a damp cloth.
1a. Run envelopes with flaps
opened.
1b. Slow machine speed.
2. Refill water bottle.
1. Run mail with flaps opened.
2. Sealed mail must be well
sealed on leading edge or will
jam on stripper blade.
3. Select "Open/Sealed" or
"Sealer Off" mode.
4-4
Page 22

Troubleshooting • 4
Postage Meter
Problem Indication Possible Faults Action
Meter won’t latch into
printer
Meter won’t initialize 1. Various Meter fatal
Meter won’t ‘install’ in
system
Meter won’t set postage value 1. Meter internal motor
1. Shutter carriers not
correctly positioned
2. Lead seal on E101 meter
causing interference.
errors - reported on
display.
2. Various Dater fatal
errors - reported on
display.
1. Didn't begin installation. 1. Repeat the "Installing the
2. Started, but didn't
complete installation.
3. Message "Meter not
properly seated" is
displayed.
fatal move error.
2. Value requested exceeds
Postage upper limit.
3. Value requested exceeds
Dollar unlock value.
4. System not in idle. 4. Return to MAIL RUN
1. Power down and turn on
the system again.
2. Reposition seal corectly
and reseat meter.
1. Power down and turn on
the system again.
2. Power down and turn on
the system again.
Meter"procedure in Section
3 of the Operating Guide.
2. Try the "Removing the
Meter" procedure in
Section 3 of the Operating
Guide.
3. Press down on front of
meter to ensure seating.
1. Power down and turn on
the system again.
2. Enter new value or
change Postage upper limit
3. Re-enter value and press
enter key twice.
screen to enter postage.
Meter won’t enable for print 1. Communications error -
reported on display.
2. Meter out of funds reported on display.
Can’t remove meter from
system
1. Load /Latch mechanism
failure - reported on
display.
2. System power failure. 2. Use meter removal tool
1. Repeat operation, if
trouble continues to occur
call Pitney Bowes.
2. Reset meter instructions are in the
Operating Guide and under
the meter keyboard cover.
1. Use meter removal tool
to manually remove meter.
to manually remove meter.
4-5
Page 23

Troubleshooting • 4
Postage Printing
Problem Indication Possible Faults Action
Poor print registration 1. Dirty letter deck sensors. 1. Clean deck sensors in front
of printer.
Prints too light 1. Inking level set too low. 1. Increase the inking level
using the "Changing the Ink
Density " procedure in section
3 of the Operating Guide.
Prints too dark 1. Inking level set too high. 1. Decrease the inking level
using the "Changing the Ink
Density" procedure in section
3 of the Operating Guide
2. Vent cover not removed
from new ink bottle.
No Print - envelope ejected 1. "Seal Only" mode set 1. Set Sealer to another mode.
2. W-O-WTM mode overweight mail-piece.
3. Out of ink. 3. Replace ink bottle.
2. Remove vent cover from ink
bottle.
2. Refer to Operating Guide
for mail-piece weight limits.
Bars printed in postage value 1. Meter dropped rectifiers -
meter fatal error.
Wrong date printed 1. Wrong date set on meter
indicator.
Wrong ad printed 1. Ad titles stored in system
memory do not agree with ads
mounted in meter.
2. Meter ad block out of sync
with system display.
Wrong postal inscription printed 1. Inscription titles stored in
system memory do not agree
with inscriptions mounted in
meter.
2. Meter Inscription Block out
of sync with system display.
1. Power down and turn on the
system again.
1. Press TODAY key to set
current system date.
1. Update ad titles to agree
with the ads mounted in the
meter using the Modify Site
Setup procedure.
2 Power down and turn on the
system again.
1. Update inscription titles to
agree with the inscriptions
mounted in the meter using
the "Modify Site Setup"
procedure.
2. Power down and re-initialize
the system.
4-6
Page 24

Troubleshooting • 4
No Date printed 1. Date ducked
1. Press DATE ON/OFF key
Postage Printing (cont'd)
Problem Indication Possible Faults Action
.
to select proper date mode.
No Ad printed when requested 1. Selected ad location in
meter is empty.
No Inscription printed when
requested
1. Selected inscription
location in meter is empty.
Power-on and System Initialization
Problem Indication Possible Faults Action
System does not power-up
- No initialization
- No control panel
indicators
System powers up but does
not begin initialization.
- No system LCD display
- System indicators
blinking
1. No power to system. 1a. Check that the line cord
1. System power-on
diagnostics failure.
1. Insert proper ad in
meter ad block.
1. Insert proper
inscription in meter
Inscription block.
is plugged into an outlet.
1b. Check that the power
switch is ON.
1c. Call Pitney Bowes for
service.
1. Refer to "Power Up
Failure" in this section.
System powers up but does
not complete initialization.
- Error code on display
System completes
initialization but error code
on system display.
System completes
initialization but warning on
the system display
1. Various fatal
initialization failures - as
indicated on system display.
1. Non-fatal problem
exists. System disables the
indicated function and
displays error.
1. Supply related warning
- Low ink warning.
- Low water warning.
- Out of tape.
1. Call Pitney Bowes for
service.
1a. Recycle the power.
1b. Call Pitney Bowes for
service.
1. Refill indicated supply as
required.
4-7
Page 25

Troubleshooting • 4
Tape Generation
Problem Indication Possible Faults Action
Tape won’t feed off roll 1. Mechanical problem with
tape holder.
2. Jammed tape still in tape
path.
Tape spools off roll 1. Mechanical problem with
tape holder.
2. Clutch broken. 2. Call Pitney Bowes service.
Tape jams in gangplank 1. Jammed tape still in tape
path.
2. Tape not exiting into cutter
assembly.
Tape cutter jams 1. Tape jammed in cutter. 1. Clear tape jam.
Tape carriage movement failure 1. Tape jammed between end
of gangplank and cutter
preventing gangplank
movement.
Tape moistener does not fill 1. Float stuck. 1. Remove and clean tank to
2. Water tube off at moistener
unit.
1. Raise and reseat tape
holder.
2. Check tape path for
obstructions.
1. Raise and reseat tape
holder.
1. Check tape path for
obstructions.
2. Check cutter entrance for
obstructions.
1. Raise tape holder and pull
tape back out of gangplank to
clear jam.
free float.
2. Connect water tube.
Larger tape generated than
expected
Problem Indication Possible Faults Action
W-O-WTM gives wrong weight 1. W-O-WTM out of calibration.
W-O-WTM gives incorrect Postage
value
1. Ad or inscription selected
but not installed in meter.
Weigh on the WayTM
2. Envelope weight poorly
distributed
- Heavy insert on one side of
mail-piece.
- loose or stacked inserts
that can shift easily.
1. Old / Wrong Rate Table
loaded.
2. Wrong class or fees
applied.
3. W-O-WTM out of calibration.
1. Select position "A" for both
ad and inscription.
1. Call Pitney Bowes service.
2. W-O-W will not handle
small, heavy inserts which
grossly distort center of mass weigh these on a platform.
1. Check current revision of
Rate PROMs installed update as required.
2. Check selected class and
attached fees
3. Call Pitney Bowes service.
4-8
4-8
Page 26

Glossary
Glossary • 5
This section gives a brief description of the terms used with the mail processor.
Access Level One of three levels (Operator, Key Operator or
Supervisor) to which features are assigned to
restrict access.
Account A grouping established by a company as a means of
organizing and managing related postal activities,
for example, all mail sent by the Sales Department
would be kept together in such an "Account".
Account ID A company-generated number which IDentifies a
particular account, for example, the Account ID for
the Sales Department may be S100. An Account
ID can consist of an account number and subaccount number, for example, S100-123 where
S100 is the account number and 123 is the
subaccount number.
Ad A feature on the meter which allows printing of a
customer-designed graphic. Up to three ad plates
can be inserted in the meter.
Alphanumeric For the purposes of this document, the term in-
cludes any character which can be entered through
the keyboard, including special characters and
spaces.
Bar Code Wand A hand-held scanner used to read bar code symbols
into the mail processor.
Carrier A company which transports and delivers letters and
packages (United States Postal Service (USPS) or
United Parcel Service (UPS), etc.).
Class A particular type of service or handling for
mail-pieces or parcels.
Date Ducking The inhibiting of the printing of part or all of the
date of the meter imprint.
Dollar Unlock Limit A postage value limit associated with setting the
meter. If an attempt is made to set the meter to a
postage value greater than or equal to the Dollar
Unlock Limit, an additional confirmation is
required from the user before the operation is
completed.
5-1
Page 27

Glossary • 5
Fee A premium paid in return for special carrier
Inscription A graphical or textual mark placed near the meter
Job Preset A "snapshot" of the system configuration. The
Key Operator A user who has access to more features than an
Locked Account An account not currently active (restricted from
services.
imprint which relates to a particular type of mail
service and which is required by the U.S. Postal
Service. Examples include "ZIP+4" and
"ZIP+4 Barcode" inscriptions. Up to three inscrip
tion plates can be inserted in the meter.
system allows nine Job Presets to be saved and
retrieved.
operator and to less features than a supervisor.
use) which may be activated, modified and/or
deleted.
Operator A user with the lowest access level, that is, one
who can access the fewest number of features.
Platform A weighing device used with the mail processor.
Rating class Postal authority or carrier-defined types of service.
Rating classes are provided to the system via the
rating module.
Scale A weighing and rating device which can operate
independently of the mail processor.
SoftKeys
TM
The six keys on the left side of the system display.
The labels and functions of these keys change
depending on the operation being performed.
Subaccount An accounting record which is grouped with other
records under a master account.
Supervisor A user with the highest customer access level.
Surcharge A premium over and above the nominal postage
which is charged to an account when mail for that
account is processed. Note that surcharges can be
negative (rebates).
5-2
Transaction Data about mail and tapes processed (as part of the
same batch) and charged to a given Account ID and
class.
Page 28

Options
Options • 6
In this section, place the operating guides for each option you purchase for
use with your PARAGON™ Mail Processor. Each operating guide contains a
description and procedure (if applicable) for using the specified option.
Data Trail™ Accounting System
Report Printer Interface
Postage by Phone® Auto Meter Resetting Modem
Second Weighing Platform Interface
MMS Interface
Barcode Wand with Interface
Flats Feeder Option
Laser Scanner
Echoplex Interface
6-1
Page 29

Appendix • A
ParagonTM Operator Training Skills List
Listed below are the skills taught to operators in the Paragon™ training class. If you need to
train a new operator, cover all the features below in the order listed. Each operator should be
trained to acknowledge, understand and perform these skills.
1. Operator can locate & identify the following:
Feeder/Sealer Unit (UF30)
[] Mixed mail feeder [] Jetspray™ sealer
[] Tape exit bin [] Serial number & product code
[] Disk drive [] Power Switch
Base Unit (UBF1, UBF0)
[] Para-Text™ control panel [] Present Impression™ meter
[] W-O-W™ [] Serial number & product code
[] Seal ski adjustment
Stacker Unit
[] Drop stacker [] Power stacker
Keypad
[] Numeric entry [] Alpha (letter) entry
[] Postage value entry [] Additional fees entry (+/= key)
[] Start / stop keys [] Backtrack key
[] New batch key [] Make tapes key
[] Job presets key [] Enter key
[] Clear key
Machine Status Display
[] Feeder modes [] Sealing modes & usage
[] W-O-W™ modes [] Stacker modes ( power stacker
only)
[] Tape types and modes [] Jam indicators
[] Water level indicators [] Add water indicator
[] Add ink indicator [] Add tape indicators
Meter Display
[] Postage value [] Date
[] Ad & inscription
System Display
[] Screen title [] Information block
[] Instruction block [] SoftKeys™ & SoftKey™ labels
A-1
Page 30

Appendix • A
2. Operator is able to perform the following:
Basic Set-up
[] Plug in the system to a grounded outlet
[] Turn on system
[] Log on system (if required)
[] Batch Set-up
[] Selecting Account (if installed)
[] Class
[] Fees (use of auto-oversize fee)
[] Set-up meter
[] Enter postage value [] Advance date
[] Duck (OMIT) date [] Select ad & inscription
[] Select feeder mode [] Select sealer mode
[] Select stacker mode [] Select W-O-W
[] Adjust machine settings
[] Machine speed [] Ink density
[] Sealer wetness [] Imprint position
[] WOW weight limit
[] Load mail
[] Mixed sealed & unsealed mail [] Large flap envelopes
[] Mixed size & thickness
TM
mode
Processing Mail
[] Start Batch
[] Stop & Re-start
[] End Batch
[] Make Tapes
[] Single Tapes
[] Multiple Tapes
[] Install supplies
[] Fill E-Z Seal
™ bottle
[] Install new tape roll
[] Ink - remember to remove vent seal
Present Impression™ Postage Meter
[] Install meter [] Lock & unlock meter
[] Remove meter
[] Emergency removal (hand crank)
[] Normal removal
[] Re-set meter
[] Meter receipts
[] Manual meter (Post office reset)
[] Postage-by-Phone
®
meter
[] Through Paragon™ keyboard
[] Through meter keyboard
®
[] Via Postage-by-Phone
modem (If installed)
[] Installing advertisements & inscriptions
A-2
Page 31

Machine Maintenance & Error Correction
[] Daily maintenance
[] Cleaning mail deck sensors
[] Cleaning flap array
[] Clearing Jams
[] Mail jams
[] Tape Jams
[] Calling for service
[] Error codes
3. Supervisor Level Functions
Site Set-up
[] Change system time (standard vs. daylight savings time)
[] Station ID [] Set low postage warning
[] Set system time-out [] Define Ads & Inscriptions
[] Set postage upper limit [] Set dollar lock
[] Set operator IDs
[] Operator ID
[] Access Level
[] Remove operators
[] Preferred classes
[] Set meter date roll-over time
[] Default class & account
[] Intra-state Zip Code ranges (If applicable)
[] Intra- BMC Zip Code ranges (If applicable)
[] Saving & restoring site setup
Appendix • A
Data Trail Accounting
[] No. of Accounts purchased & Acct/Class/Fee combinations
[] Account Template
[] Creating and Deleting Accounts
[] Typical Account [] Basic Account
[] Assigning Speed Codes
[] Use of Bar code
[] Normal Mode [] Account only mode
[] Clearing Data
[] Transaction Log [] Period 1 & 2
[] Accounting Reports
[] Standard Reports [] Report Macros
MMS Interfaced Accounting
[] Setup
[] Station ID [] Account length
[] Job ID & Job type [] Transaction Receipt
[] Surcharge setup
A-3
Page 32

Appendix • A
Defining Job Presets
[] Saving a job preset
[] Using job presets
[] Removing job presets
Customer Diagnostics & Utilities
[] Testing system
[] System event log
[] Meter avtivity log
[] System configuration
System Reports
[] Class / fee list
[] Meter activity report
[] Operator ID list
[] System set-up
Options (As Required)
[] Using 15 lb platform [] Using 100 lb platform
[] Report printer [] Barcode wand / Laser scanner
[] Postage By Phone
®
modem [] Flats feeder kit
I acknowledge the ability to perform the above listed skills.
_____________________________ Paragon™ Operator
Signature
A-4
 Loading...