

Page 1
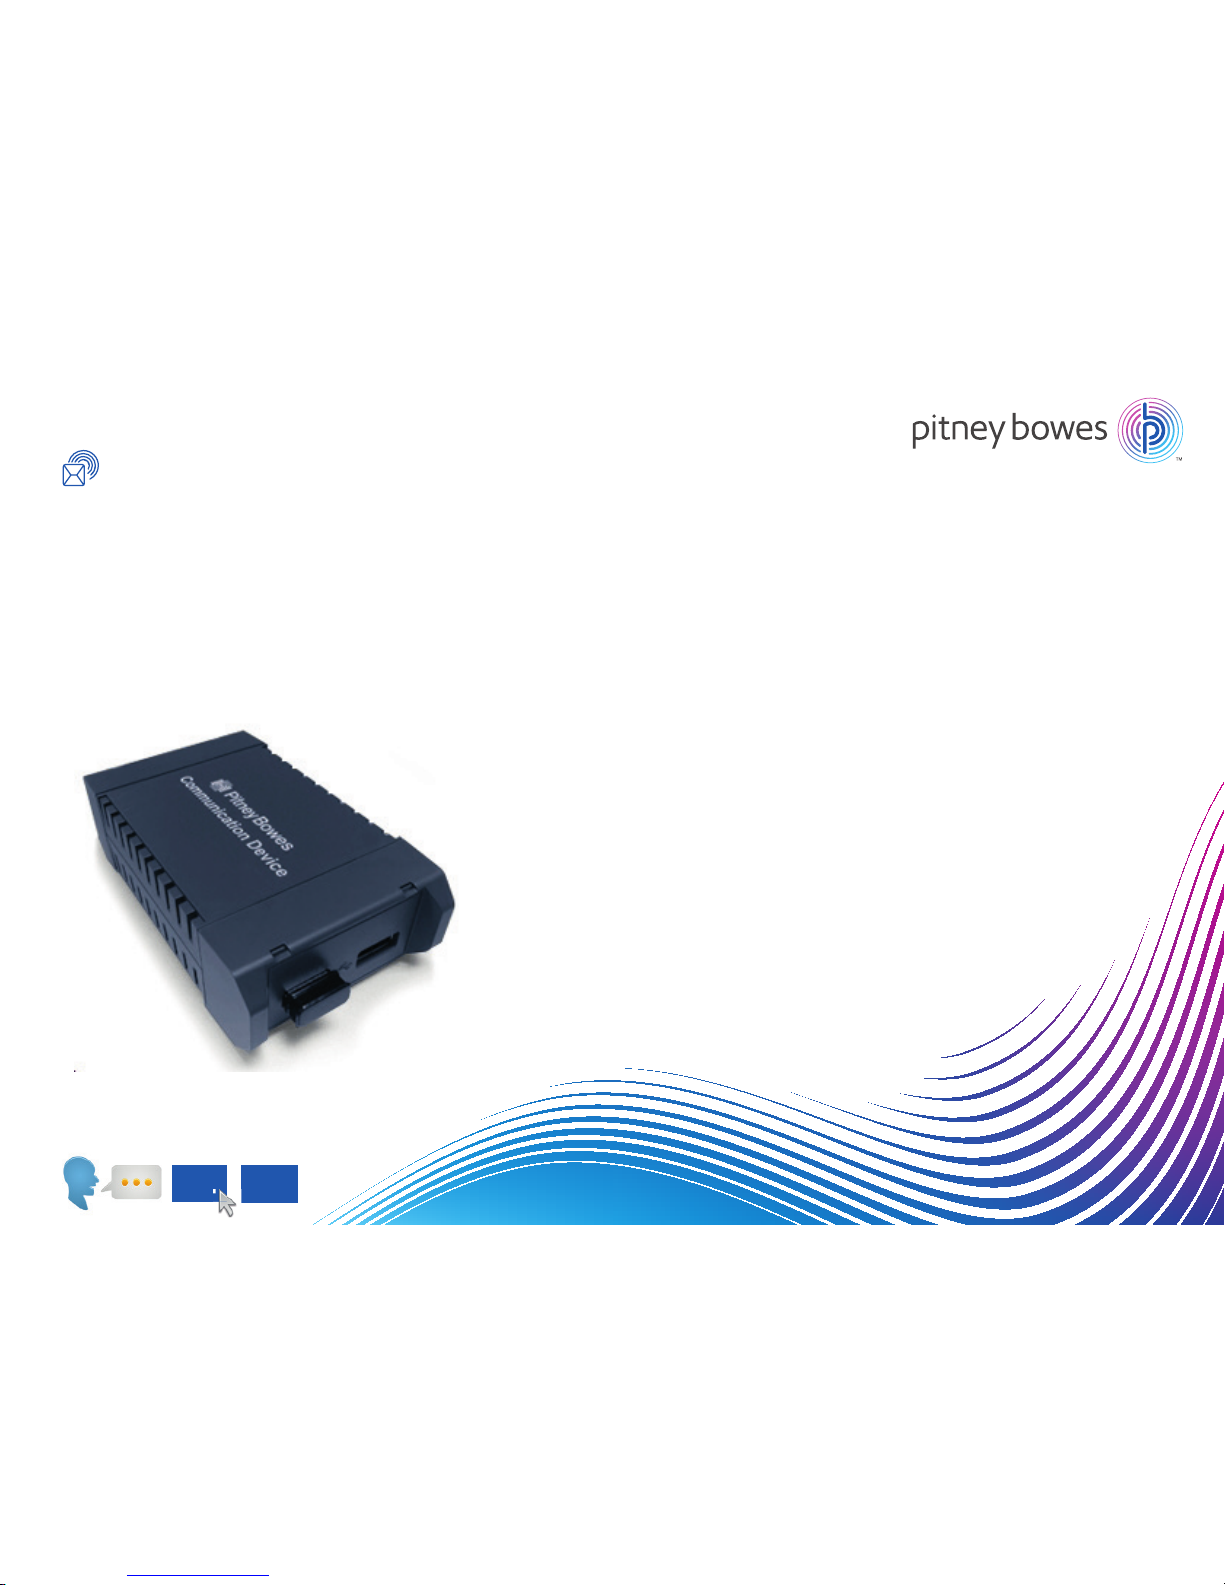
Advanced Setup Guide
DM50/55/60 Series Communication Device
EN NODE
Shipping & Mailing
Franking Machines
Page 2

SDC2035C Communication Device Advanced Setup Guide
Contents
INSTALLATION
• Setting up a wired network connection
Introduction
1. Connect the Communication Device
2. Download and run the Setup Software
3. Continue with Franking Machine Installation
• Setting up a wireless (Wi-Fi) network connection
Introduction
Before setting up the Communication Device for wireless operation
1. Connect the Communication Device
2. Download and run the Setup Software
3. Restart the Communication Device
4. Continue with Franking Machine Installation
• Wi-Fi Protected Setup
Introduction
Before setting up the Communication Device for Wi-Fi Protected
operation
1. Prepare the Communication Device
2. WPS Setup Procedure
3. Continue with Franking Machine Installation
REFERENCE
Connectivity Requirements
File extensions and URLs that the network/fi rewall needs to allow
Ports and protocols needed by Constant Connection
Resetting the Communication Device to its factory defaults
Troubleshooting
EN
<< Return to Contents
Click on any of the subjects in the contents list to jump
straight to that section.
Page 3
SDC2035C Communication Device Advanced Setup Guide
Setting up a wired network connection
EN
<< Return to Contents
LAN connection (Router,
Hub, Wall socket)
Network Cable
Communication
Device
Introduction
Your Communication Device is supplied configured to connect as a plug-and-play
device if your network meets the following criteria:
• uses DHCP
• is open to HTTP and HTTPS trac
• does NOT use a proxy server
If your network meets these criteria, just follow the printed instructions supplied in
the DM50/DM55/DM60 series Installation Guide supplied with your machine.
This section is needed only if your network requires special settings to operate
properly, such as static IPs and proxy server settings. These settings will need
to be added to the Communication Device. You may need the help of your IT
specialist/network administrator to do this.
Follow the instructions exactly in the sequence that follows.
• If you are installing your Franking Machine and have just taken the
Communication Device out of its box, it will be in the factory default state
and you can continue with the steps that follow. If the Communication Device
has been configured and used before, first reset it as described here before
proceeding.
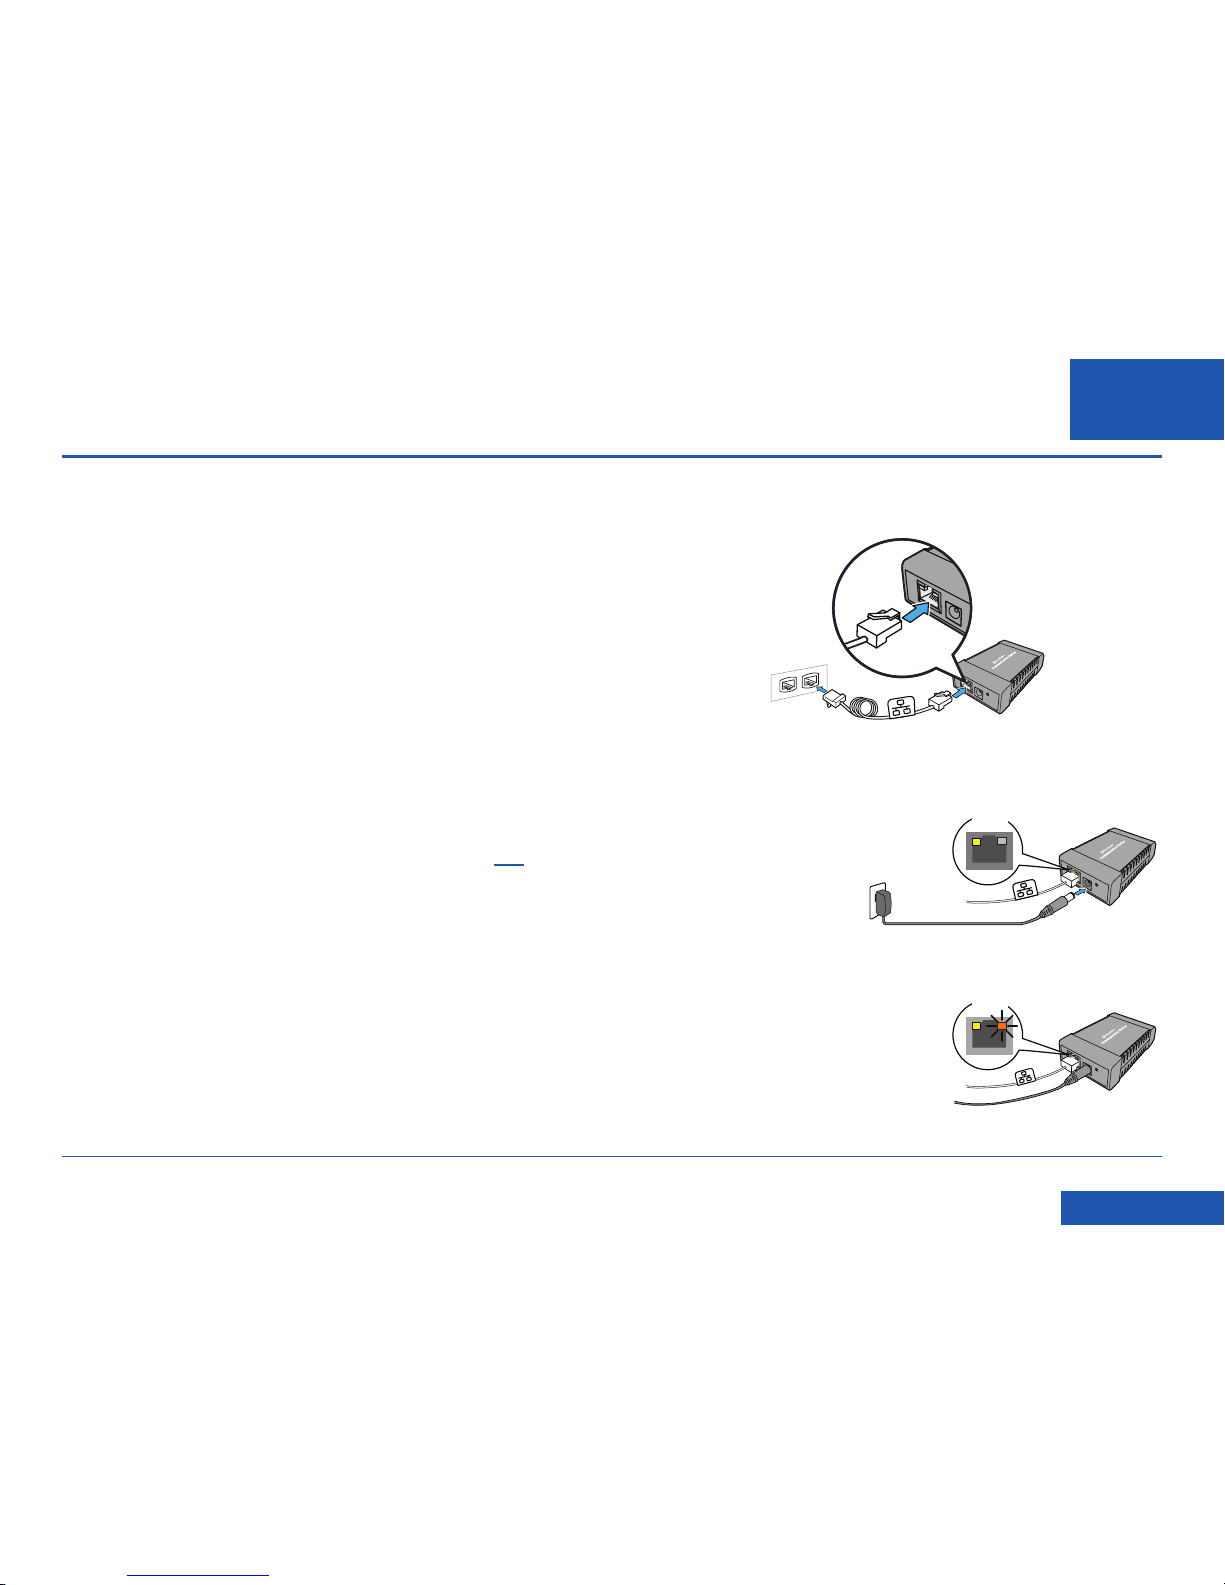
1. Connect the Communication Device
a. Connect the Communication Device to your network as shown.
b. Plug the AC power adapter into
the Communication Device and
a power outlet. The left LED is lit
yellow when it is on.
c. After a short time, check that the
right LED is blinking orange and/
or green.
LEDs
LEDs
AC Power Adapter
Page 4
SDC2035C Communication Device Advanced Setup Guide
Setting up a wired network connection (continued)
EN
<< Return to Contents
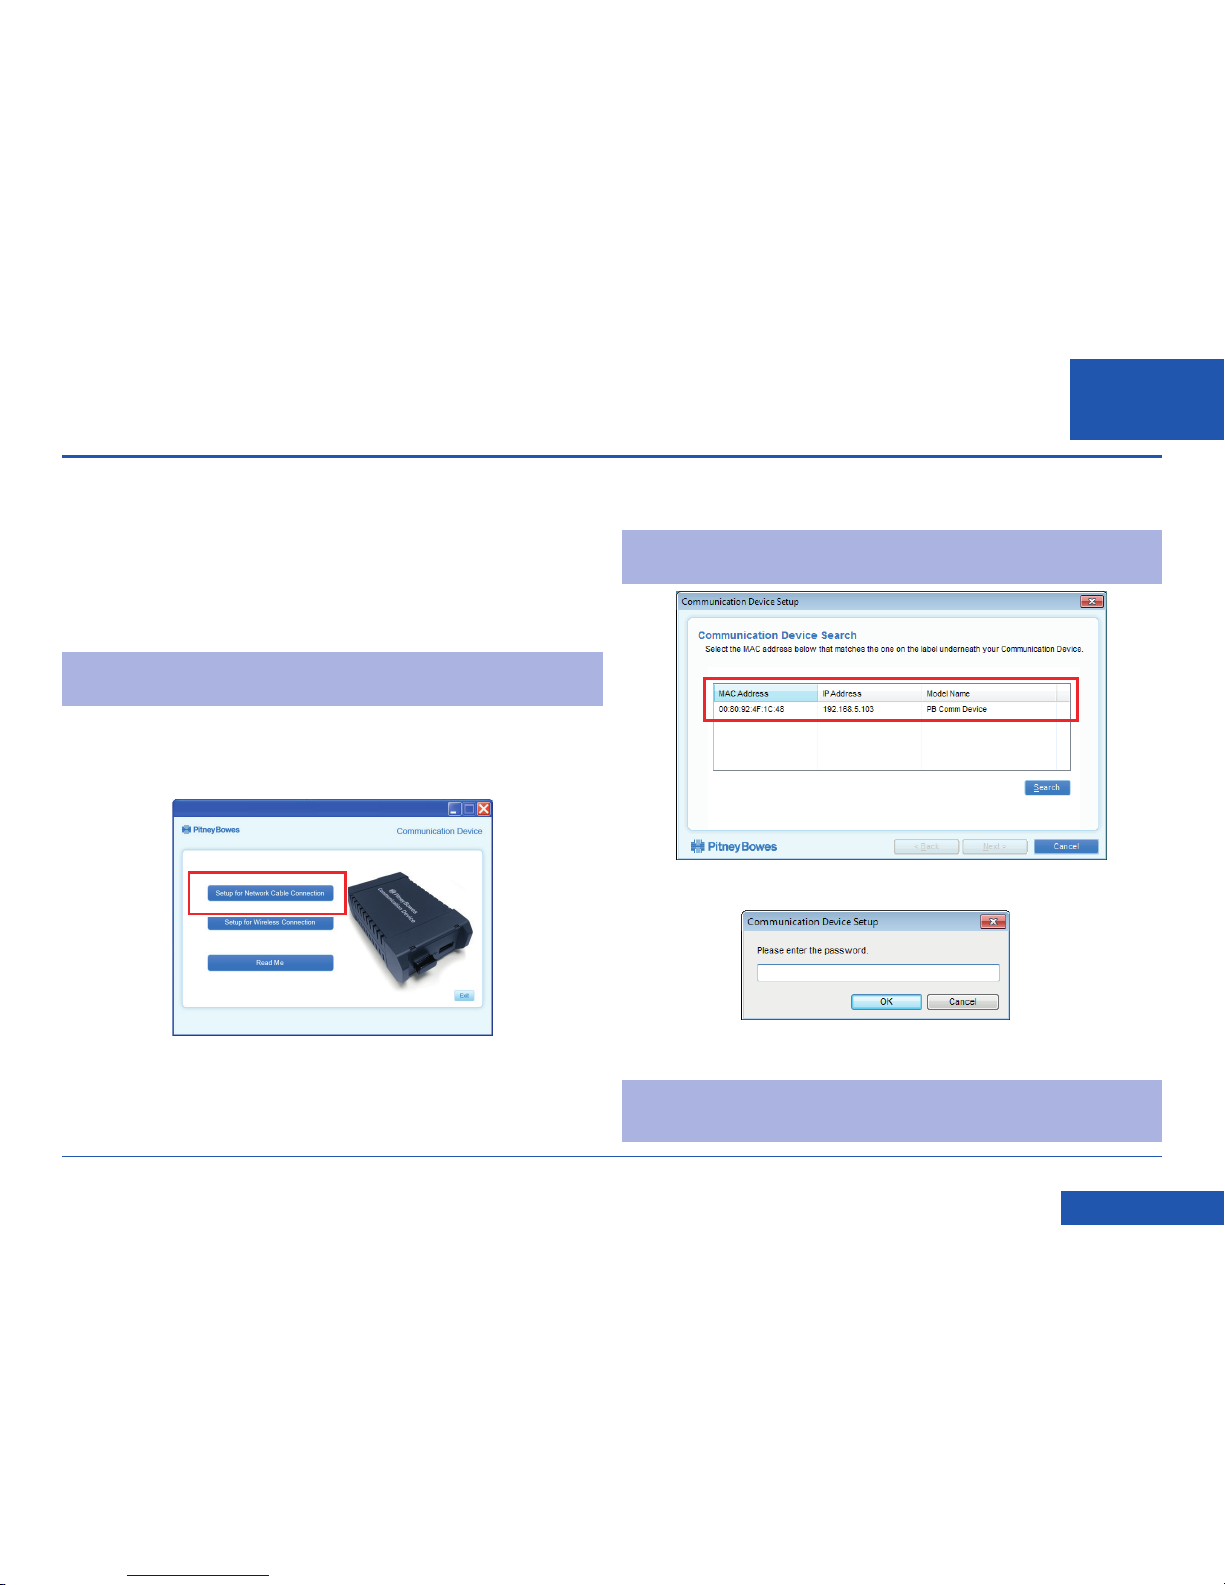
e. The setup software will search for devices on your network and display a list of
the devices found. Highlight the device you are setting up and click Next.
Note: If multiple devices are listed, choose the MAC Address that matches the
‘E/A’ number on the base of your Communication Device.
f. Enter the device password MnDqr7 and click OK.
g. Follow the setup wizard and enter the appropriate special settings.
Note: Your network firewall will also need to be open to certain ports, protocols,
domains and file extensions. Details are given in the Reference section of
this guide.
2. Download and run the Setup Software
a. Use a computer that is connected to the same network or router as the
Communication Device. Download the setup software to your computer by
going to:
PC: pitneybowes.com/UK/DM60wifipc
Mac: pitneybowes.eu/DM60mac
Click the button for your type of computer.
Note: If a firewall message appears, click the button that allows the download to
proceed.
b. Save the software “pbSmartLAN” to your computer, then open and run it.
c. Click the Setup for Network Cable Connection button.
d. Read and accept the User License Agreement.
Page 5
SDC2035C Communication Device Advanced Setup Guide
Setting up a wired network connection (continued)
EN
<< Return to Contents
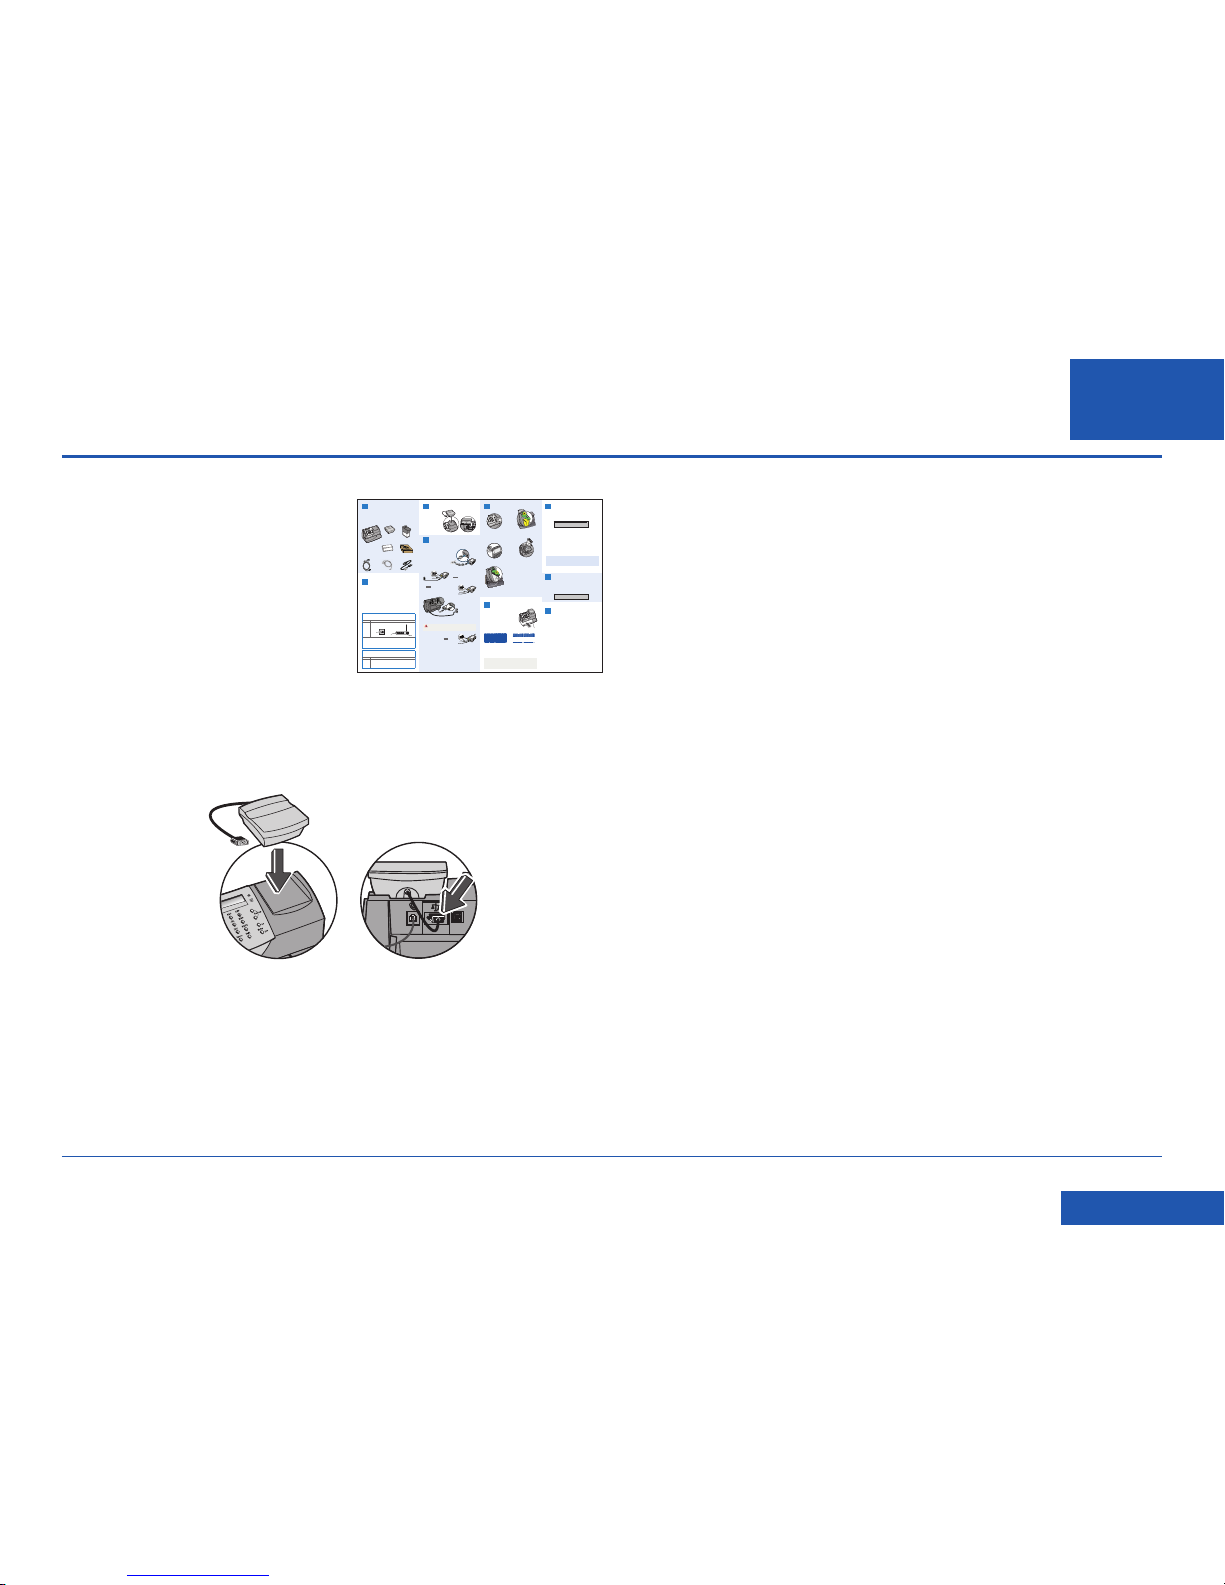
3. Continue with Franking Machine Installation
Once your Communication Device is
confi gured using the setup software, your
Franking Machine should be displaying
“Add ink cartridge” or “Select Language”.
You can now continue with the Franking
Machine installation as described in the
printed Installation Guide supplied with the
machine.
a. Before proceeding, make sure that the Scale has been fi tted as described in the
printed Installation Guide.
b. Now continue from “Install the Ink Cartridge” or “Select Language” (as
appropriate) in the printed Installation Guide to complete installation. Once
installation is complete, see the reverse of the Guide for useful information and
tips on using your Franking Machine.
AC Adapter
LEDs
3. Connect to the outside world
Follow the relevant section below for the connection method you‘ve chosen:
Option 1 - LAN (network) connection
4.1 Connect the Communication Device
to your network as shown.
6. Carry out a test print
When prompted, insert a spare envelope or tape/
label strip for a test print. Insert the item into the
franking machine from the front, making sure it
is pushed up to the right registration wall. The
franking machine automatically begins printing.
Do not remove the item until the printing has
finished.
Review the quality of the test print.
Good quality – press Enter/Yes.
Poor quality – press No, the franking machine goes through another set-up cycle
and when complete you should try the test print again.
8. Check for updates
Your franking machine now automatically checks and installs any new software,
including any new Envelope Messages associated with your account. The display
shows the status of the update.
Once complete, the Home Screen displays and your franking machine is ready to
be used.
7. Add postage funds
You need to add funds to your franking machine before you can use it.
Connect to Pitney Bowes Data Centre
The franking machine automatically connects with the Data Centre and, after a
s
hort delay, displays your account balance:
Adding funds
You now need to add postage to your franking machine.
• Press Enter/Yes - an amount of £50 will be suggested. To accept this amount,
press Enter/Yes or press Clear/Back to change it.
• If you pressed Clear/Back you will be prompted to enter a new amount. Enter the
amount and then press Enter/yes. This new refill amount must be in increments
of £10.
• Confirm the amount to add by pressing Enter/yes again.
• The franking machine communicates with the Data Centre to add postage and
co
nfirms when complete. Press Enter/yes.
• T
he display asks if you would like a receipt. Press Enter/Yes and print an
envelope or label as you did for the test print at step 6.
9. Frank an envelope
Let’s now create your first piece of franked mail...
• Place your item of mail on the scale and the display will show the cost, weight,
class and date.
• If you want to change the Class, press the Class button and scroll
to highlight the Class you wish to use and then press Enter/yes.
• Envelope Messaging prints alongside your frank. To select your preferred
Envelope Message, press the down Review ▼ key until ‘Ad’ displays, then press
Enter/yes. Scroll to the required Envelope Message using the Review ▼▲ keys,
then press Enter/yes. (To ensure your Envelope Message prints automatically in
future, see Pre-setting Options, overleaf).
• Insert the item of mail into the franking machine exactly as you did at step 6 to
create your first piece of franked mail.
Problems?
• Can’t see the personalised Envelope Message you ordered? See Envelope
Messaging overleaf.
•
Want to pre-set the franking machine to automatically print your preferred Envelope
Mess
age? See Pre-setting Options overleaf.
• Want to learn more about using you new franking machine? See Using your
franking machine overleaf.
Prepaid: £xxxxx.xx
0.00 0 g
postal class date
IMPORTANT
Once you have printed the receipt, check the Postage by Phone account number
on the receipt and ensure it matches the account number on the dispatch note
received with the franking machine. If the numbers do NOT match, do not go any
further with this installation and contact Pitney Bowes on 08444 992992.
IMPORTANT
It is very important that the print from your franking machine is of a good
quality. If you do not have a good quality print, Royal Mail may refuse or be
unable to read the information automatically, this might result in a delay in
delivering your post.
Right Registration Wall
5 . Install the ink cartridge
1
2
3
4
5
6
7
8
9
C
0
.
Sperren
Versandarten
Zählerstände
Einstellungen
Eingabe
blättern vor/zurück
Nein
Ja
*#_
ABC
DEF
GHI
JKLMNO
PQRS
TUV
WXYZ
zurück
Leertaste
Eingabe
1
2
3
4
5
6
7
8
9
C
0
.
Lock
Class
Funds
Options
Enter
Review
no
yes
*#_
ABC
DEF
GHI
JKLMNO
PQRS
TUV
WXYZ
Clear/Back
Space
Shift
PitneyBowes
2. Decide where to site your
system and how to connect it
Please DO NOT connect power until instructed.
Your franking machine has to connect to the Pitney Bowes Data Centre to add
postage funds, get software updates, and carry out the required Postal Authority
inspections.
Choose which of the two connection methods described in the table below best
suits your needs. Consider the requirements and ensure that there is a suitable
network socket or internet enabled PC within reach of the supplied cables. You
must also ensure that the franking machine has a constant power supply and you
have space around it to work. When you have decided, continue with step 3.
If you cannot meet the requirements of either connection method, refer to
Troubleshooting overleaf.
5.2 When prompted, lift the top cover
and press the unlock symbol on the
cartridge latch. Remove and discard
the yellow packaging material.
5.3 Open the packaging for the ink
cartridge and take off the protective
tape from the bottom.
5.6 Close the top cover and press Enter/
yes. When you see ‘IMPORTANT – is
the ink cartridge installed?’ displayed,
press Enter/yes again.
The franking machine will now go
through a set-up cycle which takes up
to 2 minutes.
1 Open the box and unpack
Here’s a diagram and explanation of the items you should find in your box, if
a
nything is missing give us a call on 08444 992992. Depending on how you install
your franking machine, you might not need all of t
hese items.
If you have any problems during this installation, refer to ‘Troubleshooting’
overleaf.
Franking Machine Scale Ink Cartridge
Postage Meter
Labels
USB Cable
Network Cable Power Cord
Communication
Device
1 5 7
8
9
2
6
5.1 When the display shows ‘Add ink
cartridge’, press Enter/yes.
5.4 Insert the ink cartridge. Insert the
base of the cartridge first before
pushing the top back.
5.5 Press the ink cartridge latch down
until it clicks and holds the cartridge
in place.
Good print - no broken lines in the
centre of the test print
Bad print - broken lines in the centre
of the test print
Communication Device
For Pitney Bowes Digital Mailing System
BEST - LAN (Network) Connection
You can use a suitably configured network connection (LAN) that gives access to the
internet. Pitney Bowes highly recommends LAN connection.
Benefits Requirements
Fast.
Always
connected.
Saves
phone call
costs.
A standard (RJ45) network connection on your router (as found in a normal
domestic wired setup) or an active network wall socket.
The technical stuff...
The connection must use DHCP (automatic configuration), be open to all HTTP, HTTPS
and FTP traffic and must NOT be using a PROXY server.
If you’re unsure about the requirements for LAN connection or if you wish to connect
using Wi-Fi, our online Communication Device Advanced Setup Guide can help.
Go to www.europe.pb.com/docs and enter the code 10936 to download the guide.
GOOD - PCMC Connection (Internet connection via your PC)
If you have a PC with an internet connection nearby, you can install the free Pitney Bowes
PC Meter Connect™ (PCMC) software and use the PC’s internet connection.
Benefits Requirements
Fast.
Saves
phone call
costs.
Requires a PC with an active internet connection to be nearby and turned
on.
The PC must run Windows XP, Vista or 7 and have Pitney Bowes PCMC
software installed.
PCMC is not available for Mac.
3. Fit the Scale
Remove all shipping
tape from the machine.
Position the scale on
t
he franking machine
a
nd plug in the scale
connector as shown in
these diagrams. Tighten
the connector screws.
3
WARNING: Always plug the equipment into a properly grounded wall
outlet. The socket outlet should be near the equipment and should be easily
accessible. Use the mains lead supplied with your equipment.
LAN connection (Router,
Hub, Wall socket)
Communication
Device
Network Cable
LEDs
LEDs
4
4.2 Plug the AC adapter into the
Communication Device and a
power outlet. The left LED is lit
yellow when it is on.
4.3 After 45 seconds, the right LED will blink
orange .
If the right LED lights orange continuously
(not blinking), follow Communication Device
Troubleshooting 1 overleaf.
4.4 Connnect the Franking
Machine to the
Communication Device
using the supplied USB
cable.
4.5 Connnect the Franking Machine to a power outlet using the cord supplied. The
Franking Machine displays its startup screens and you will hear noises as the
Franking Machine initialises.
4.6 About 10 seconds after it initialises, the Franking
Machine will display ‘Meter connected to internet
- Press Enter’. Also, the right LED changes from
blinking orange to blinking green .
Press Enter/Yes to continue with step 5.
If the right LED stays orange (either blinking
or continuous), follow Communication Device
Troubleshooting 2 overleaf.
Option 2 - PCMC Connection (Internet connection via your PC)
Before you connect your franking machine to your PC, you need to install our
FREE PC Meter Connect™ software. To do this, you must have administrator rights
on your PC which may require you to contact your IT department. Please note that
the software is not Mac compatible.
To install, visit www.europe.pb.com/PCMeterConnect/setup.exe and choose the
‘Run’ option. Select ‘English (United Kingdom)’ as your installation language and
follow the on-screen instructions. This process installs the software and tests
your franking machine connection. When complete, you are asked to return to this
guide to complete the franking machine installation.
USB Cable
Power
Cord
Page 6
SDC2035C Communication Device Advanced Setup Guide
EN
<< Return to Contents
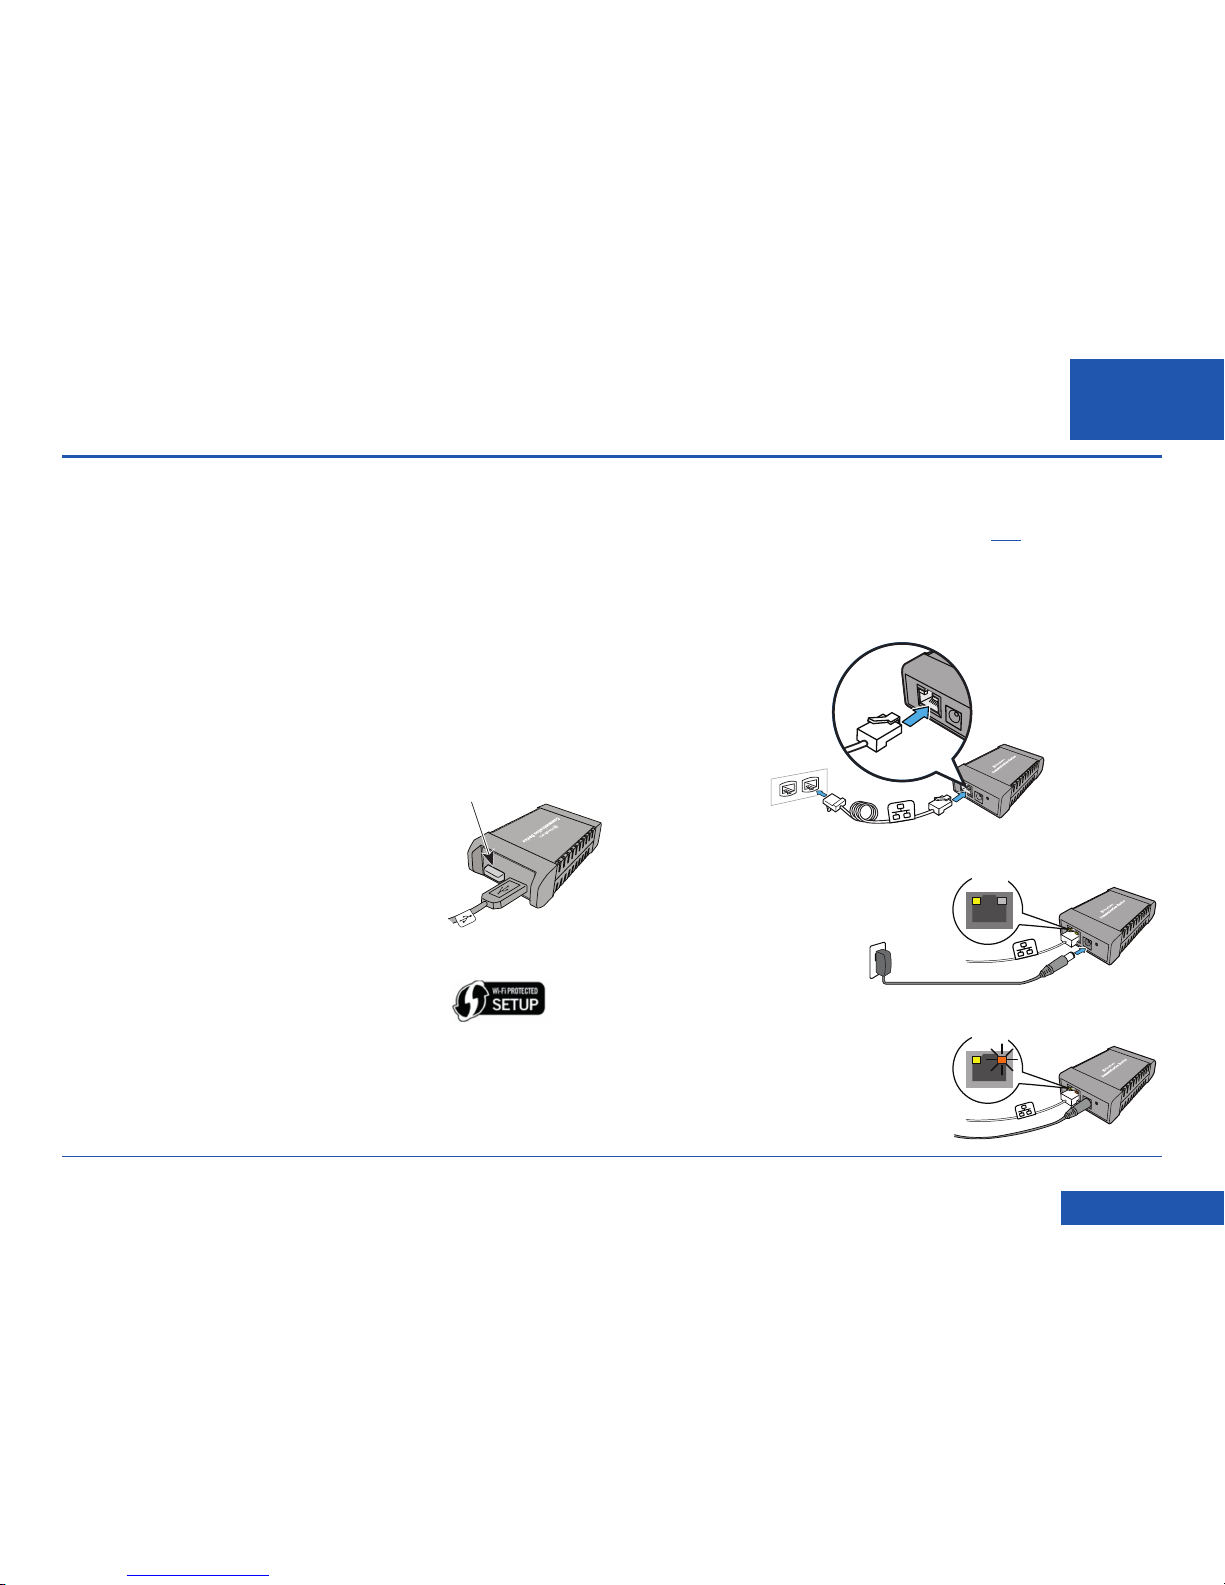
1. Connect the Communication Device
a. Connect the Communication Device to your network as shown.
b. Plug the AC power adapter into
the Communication Device and
a power outlet. The left LED is lit
yellow when it is on.
c. After a short time, check that the
right LED is blinking orange and/
or green.
Setting up a wireless (Wi-Fi) network connection
Introduction
The Communication Device can be setup for wireless usage, enabling you to move
your Franking Machine to any location that is within the range of a wireless access
point on your network.
You should have a working knowledge of your wireless network in order to
complete the setup successfully. Follow the steps below. If at any point you are not
certain how to proceed, consult with your IT specialist/network administrator.
Before setting up the Communication Device for wireless operation:
• Have the name (i.e., SSID) and password (i.e., key) available for your wireless
network/router. The SSID may be printed on the bottom of your wireless router.
• Find out if any special settings are necessary to install a new device on your
wireless network, such as static IPs, proxy servers or non-standard wireless
network settings.
• Ensure the Wireless USB Plug-in is installed in one of the USB ports in the
Communication Device (see illustration).
• Be sure a wireless access point (transmitter) is
close enough to the location of your Franking
Machine to have good signal strength.
• Determine if your network supports Wi-Fi
Protected Setup.
You can do this by checking your router documentation or looking on the router
to see if it has a button labelled “WPS” or the symbol
If it supports WPS, you may choose to follow the instructions “Wi-Fi Protected
Setup” later in this guide instead of performing the standard Wi-Fi setup
instructions on the following pages.
USB Plug-in
• If you are installing your Franking Machine and have just taken the
Communication Device out of its box, it will be in the factory default state and
you can continue with the steps below. If the Communication Device has been
confi gured and used before, fi rst reset it as described here before proceeding.
LAN connection (Router,
Hub, Wall socket)
Network Cable
Communication
Device
LEDs
AC Power Adapter
LEDs
Page 7
SDC2035C Communication Device Advanced Setup Guide
EN
<< Return to Contents
Setting up a wireless (Wi-Fi) network connection (continued)
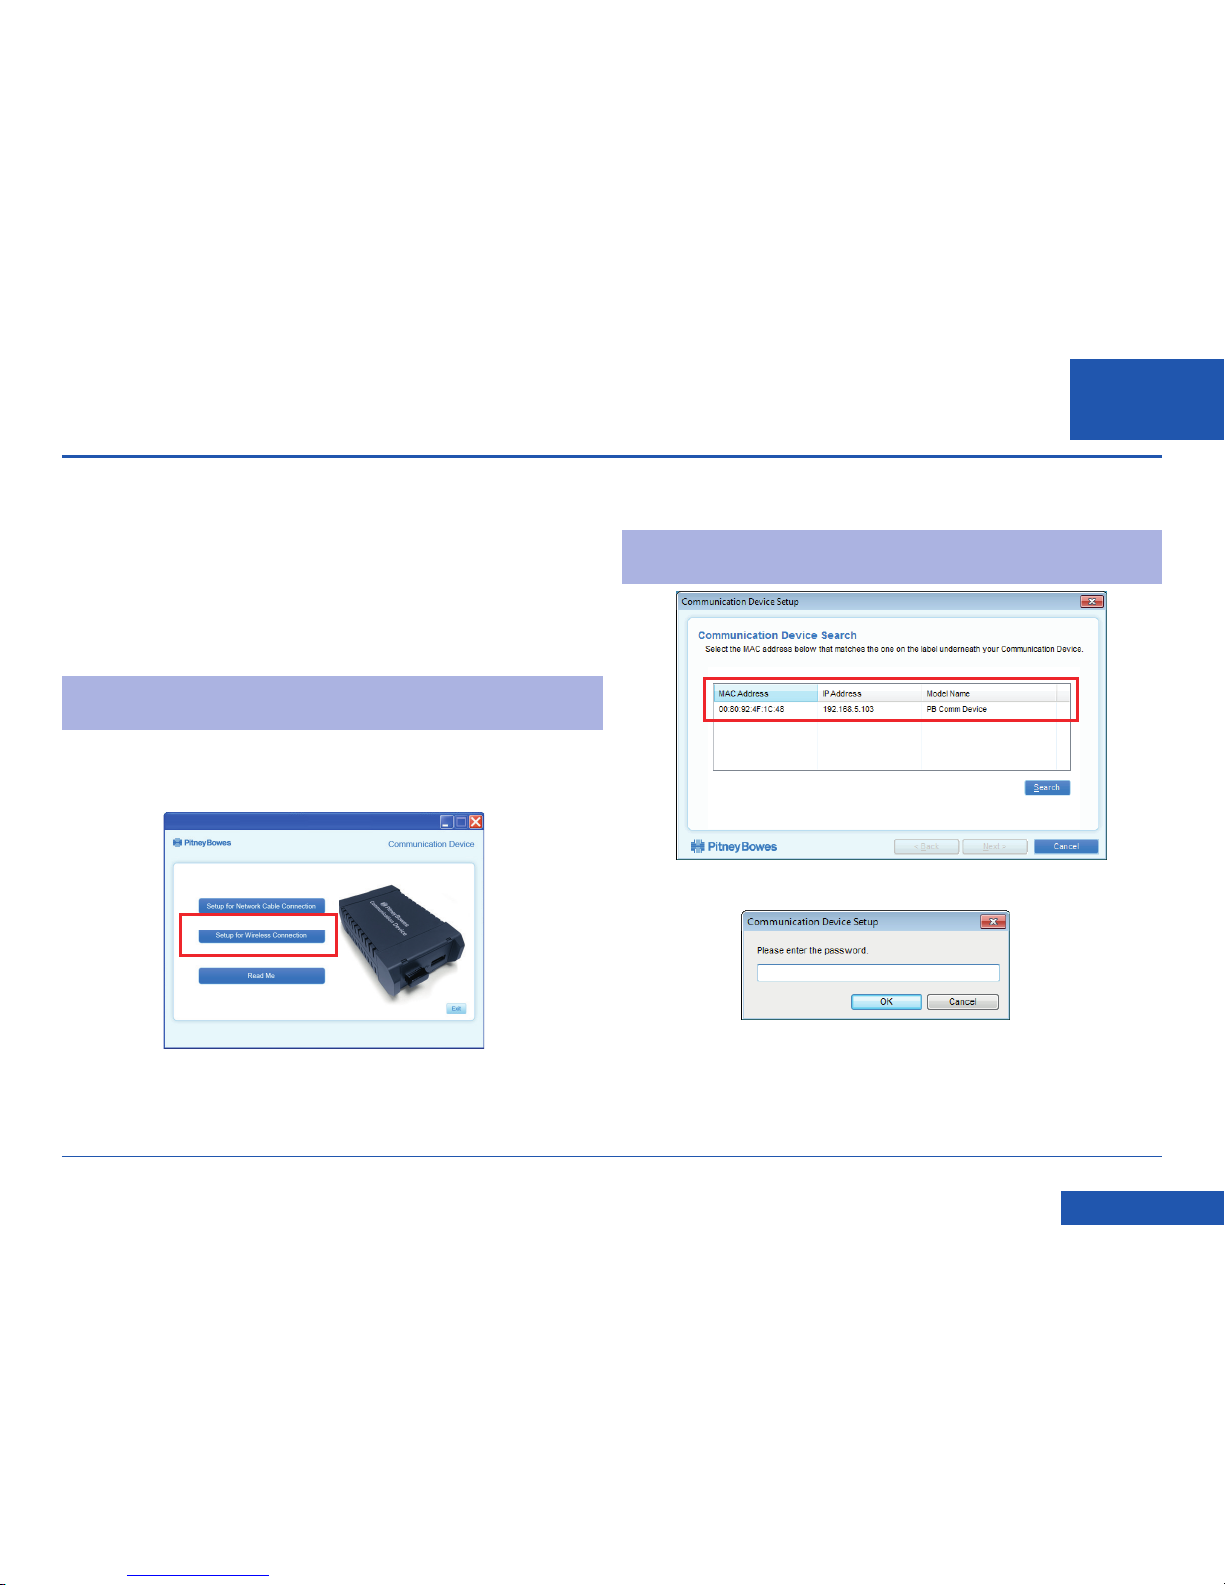
2. Download and run the Setup Software
a. Use a computer that is connected to the same network or router as the
Communication Device. Download the setup software to your computer by
going to:
PC: pitneybowes.com/UK/DM60wifipc
Mac: pitneybowes.eu/DM60mac
Click the button for your type of computer.
Note: If a firewall message appears, click the button that allows the download to
proceed.
b. Save the software “pbSmartLAN” to your computer, then open and run it.
c. Click the Setup for Wireless Connection button.
d. Read and accept the User License Agreement.
e. The setup software will search for devices on your network and display a list of
the devices found. Highlight the device you are setting up and click Next.
Note: If multiple devices are listed, choose the MAC Address that matches the
‘E/A’ number on the base of your Communication Device.
f. Enter the device password MnDqr7 and click OK.
Page 8
SDC2035C Communication Device Advanced Setup Guide
EN
<< Return to Contents
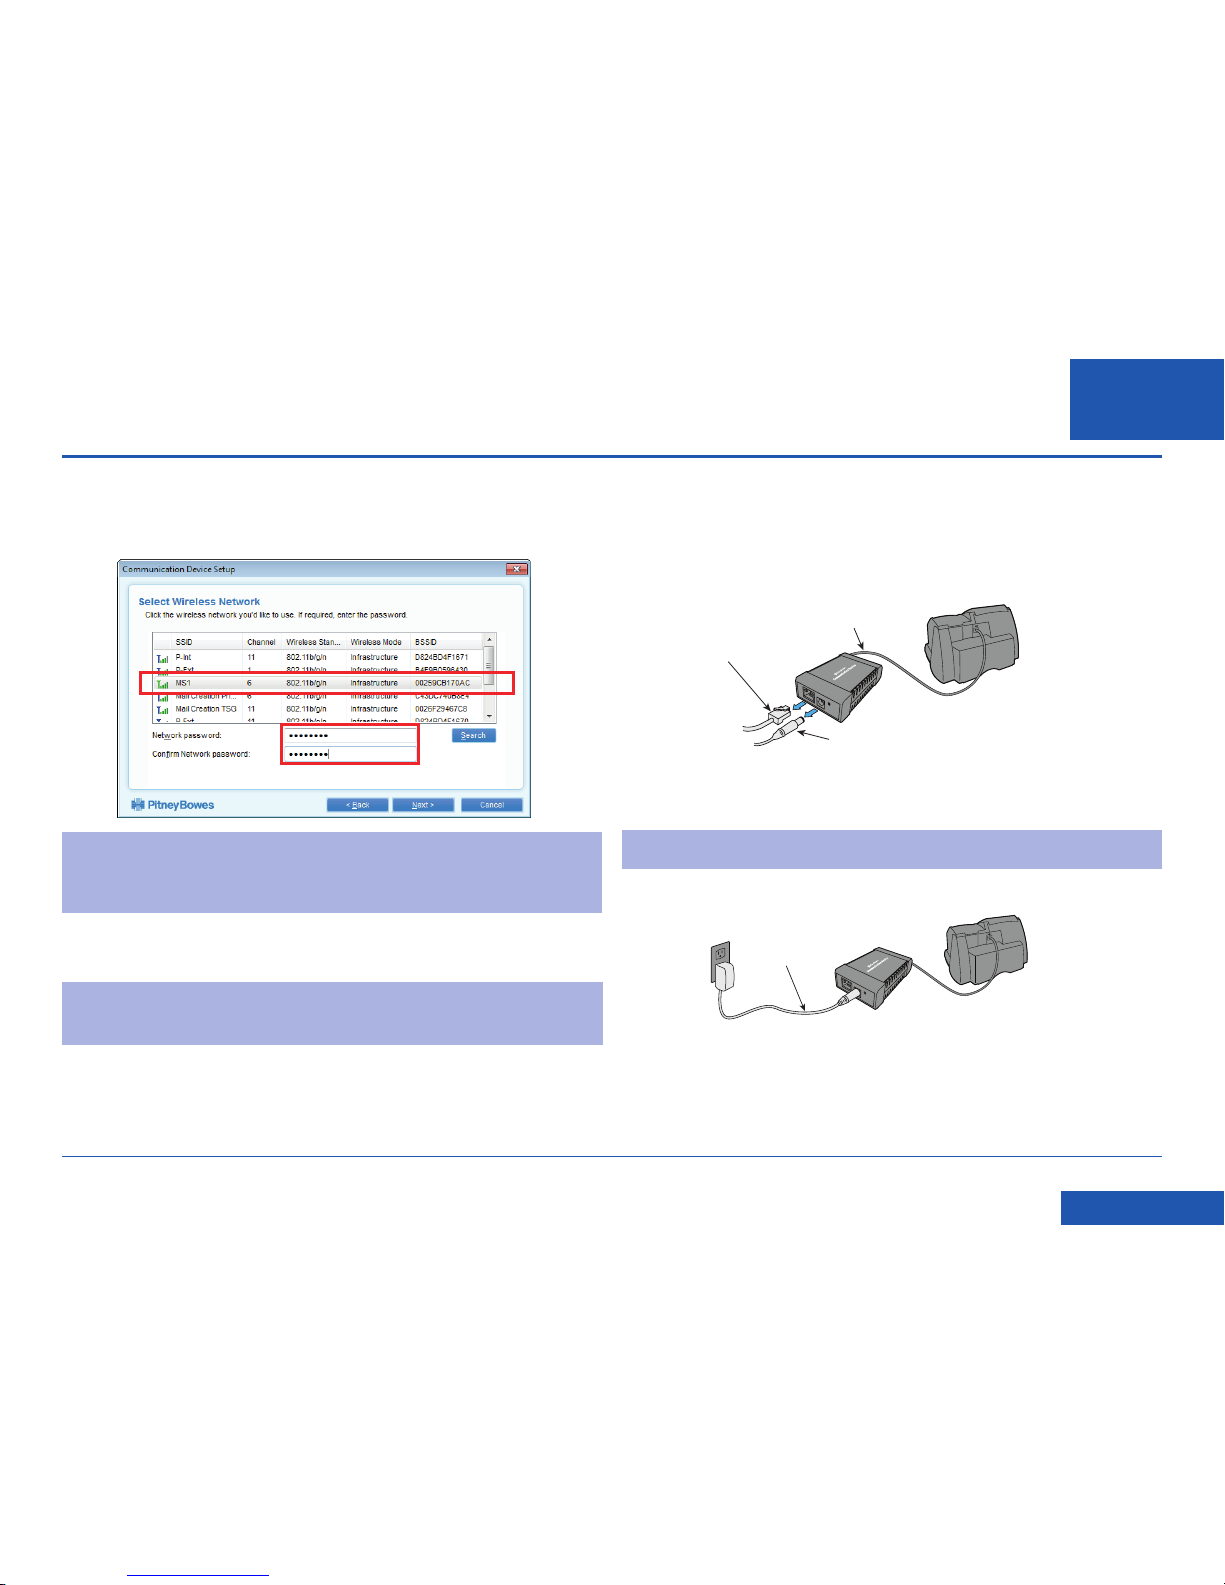
3. Restart the Communication Device
a. Disconnect the Network Cable and AC power adapter from the Communication
Device.
Ensure that the Franking Machine and Communication Device are connected
with the USB cable.
b. Reconnect power to the Communication Device.
Note: Do not reconnect the Network Cable.
USB Cable to
Franking Machine
Network Cable
g. Select the SSID (name) for your wireless network. If you do not see your network
listed, click Search.
If required, enter and re-enter the password (key) for the selected wireless
network and click Next.
Note: If the wireless network you use does not broadcast its name, the name
will not appear on this list. To enter this information, scroll down and select
Other Network. Then click Next, and enter the settings for your wireless
network manually.
h. Follow the setup wizard and enter the appropriate special settings.
Note: Your network fi rewall will also need to be open to certain ports, protocols,
domains and fi le extensions. Details are given in the Reference section of
this guide.
AC Power Adapter
Setting up a wireless (Wi-Fi) network connection (continued)
AC Power Adapter
Page 9
SDC2035C Communication Device Advanced Setup Guide
EN
<< Return to Contents
Setting up a wireless (Wi-Fi) network connection (continued)
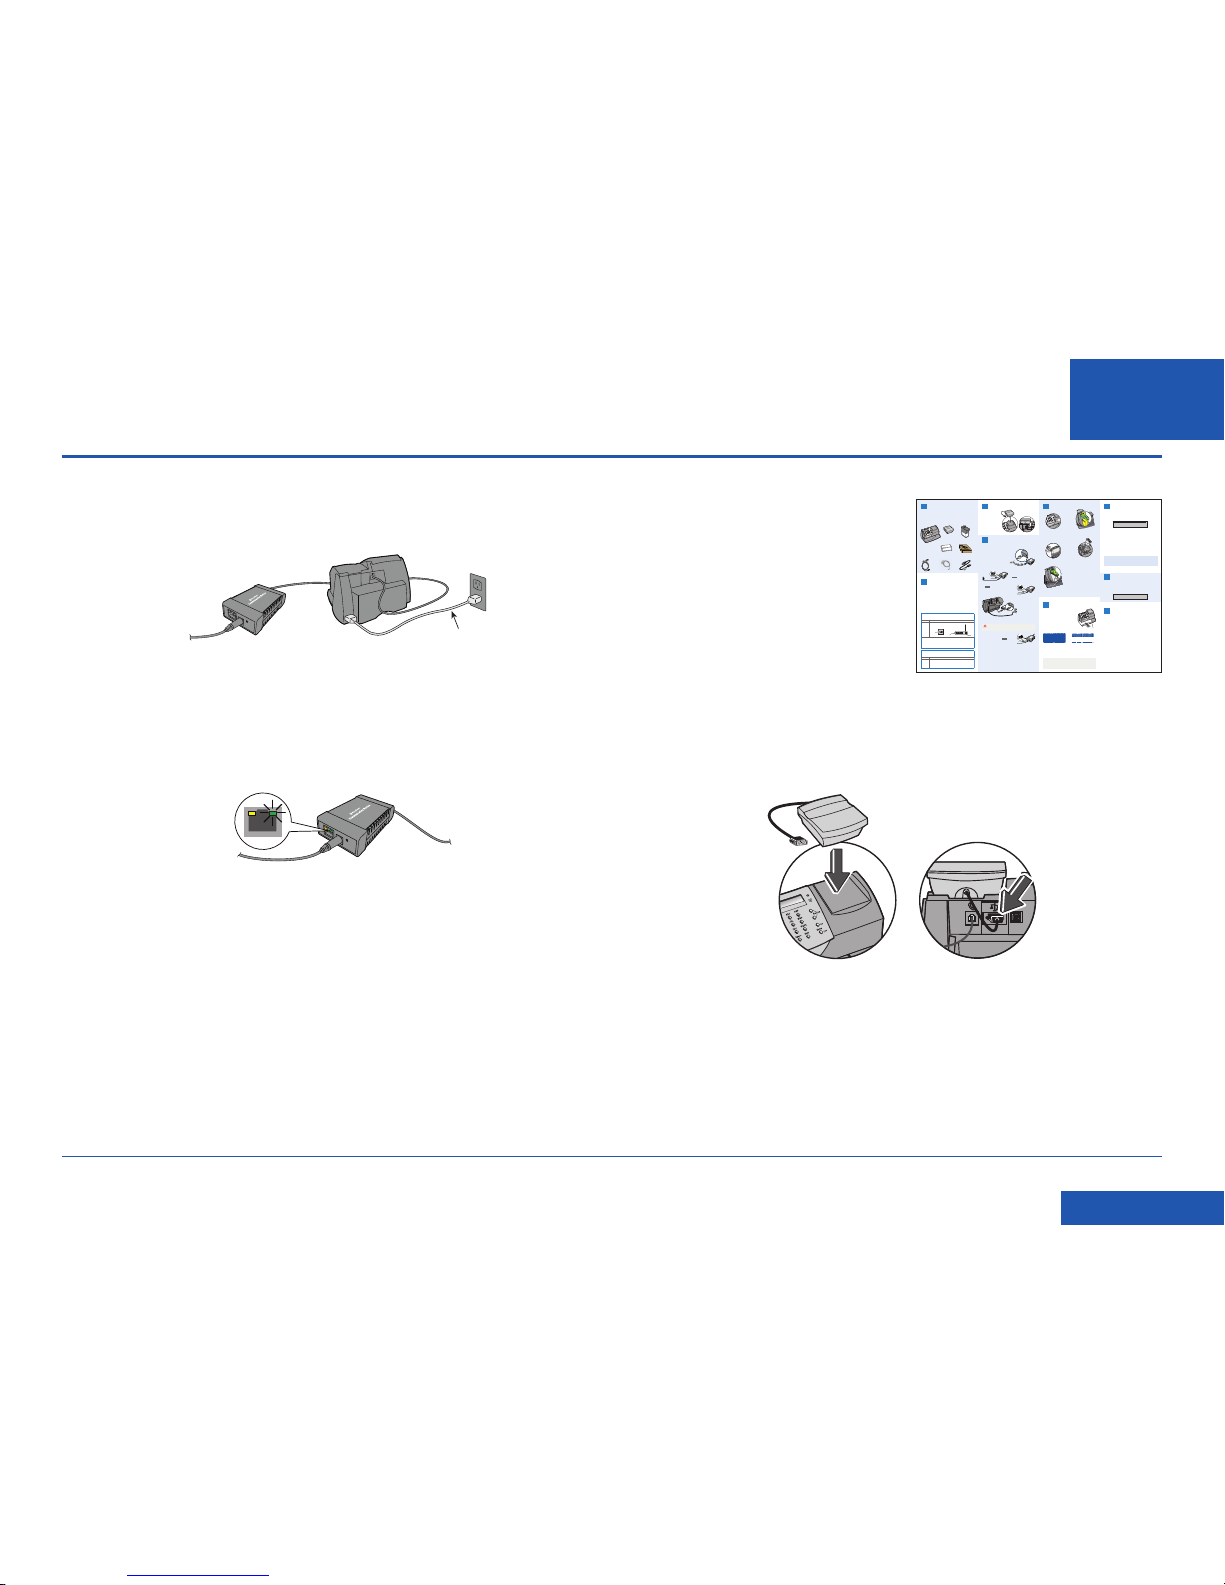
3. Restart the Communication Device (continued)
c. Connect power to the Franking Machine. If your Franking Machine is already
installed, the power may already be connected.
d. After 60 seconds, check that the right LED on the Communication Device is
blinking green.
Power Cable
4. Continue with Franking Machine Installation
Once your Communication Device is
confi gured using the setup software, your
Franking Machine should be displaying
“Add ink cartridge” or “Select Language”.
You can now continue with the Franking
Machine installation as described in the
printed Installation Guide supplied with the
machine.
a. Before proceeding, make sure that the Scale has been fi tted as described in the
printed Installation Guide.
b. Now continue from “Install the Ink Cartridge” or “Select Language” (as
appropriate) in the printed Installation Guide to complete installation. Once
installation is complete, see the reverse of the Guide for useful information and
tips on using your Franking Machine.
AC Adapter
LEDs
3. Connect to the outside world
Follow the relevant section below for the connection method you‘ve chosen:
Option 1 - LAN (network) connection
4.1 Connect the Communication Device
to your network as shown.
6. Carry out a test print
When prompted, insert a spare envelope or tape/
label strip for a test print. Insert the item into the
franking machine from the front, making sure it
is pushed up to the right registration wall. The
franking machine automatically begins printing.
Do not remove the item until the printing has
finished.
Review the quality of the test print.
Good quality – press Enter/Yes.
Poor quality – press No, the franking machine goes through another set-up cycle
and when complete you should try the test print again.
8. Check for updates
Your franking machine now automatically checks and installs any new software,
including any new Envelope Messages associated with your account. The display
shows the status of the update.
Once complete, the Home Screen displays and your franking machine is ready to
be used.
7. Add postage funds
You need to add funds to your franking machine before you can use it.
Connect to Pitney Bowes Data Centre
The franking machine automatically connects with the Data Centre and, after a
short
delay, displays your account balance:
Adding funds
You now need to add postage to your franking machine.
• Press Enter/Yes - an amount of £50 will be suggested. To accept this amount,
press Enter/Yes or press Clear/Back to change it.
• If you pressed Clear/Back you will be prompted to enter a new amount. Enter the
amount and then press Enter/yes. This new refill amount must be in increments
of £10.
• Confirm the amount to add by pressing Enter/yes again.
• The franking machine communicates with the Data Centre to add postage and
confirms when
complete. Press Enter/yes.
• The display
asks if you would like a receipt. Press Enter/Yes and print an
envelope or label as you did for the test print at step 6.
9. Frank an envelope
Let’s now create your first piece of franked mail...
• Place your item of mail on the scale and the display will show the cost, weight,
class and date.
• If you want to change the Class, press the Class button and scroll
to highlight the Class you wish to use and then press Enter/yes.
• Envelope Messaging prints alongside your frank. To select your preferred
Envelope Message, press the down Review ▼ key until ‘Ad’ displays, then press
Enter/yes. Scroll to the required Envelope Message using the Review ▼▲ keys,
then press Enter/yes. (To ensure your Envelope Message prints automatically in
future, see Pre-setting Options, overleaf).
• Insert the item of mail into the franking machine exactly as you did at step 6 to
create your first piece of franked mail.
Problems?
• Can’t see the personalised Envelope Message you ordered? See Envelope
Messaging overleaf.
•
Want to pre-set the franking machine to automatically print your preferred Envelope
Me
ssage? See Pre-setting Options overleaf.
• Want to learn more about using you new franking machine? See Using your
franking machine overleaf.
Prepaid: £xxxxx.xx
0.00 0 g
postal class date
IMPORTANT
Once you have printed the receipt, check the Postage by Phone account number
on the receipt and ensure it matches the account number on the dispatch note
received with the franking machine. If the numbers do NOT match, do not go any
further with this installation and contact Pitney Bowes on 08444 992992.
IMPORTANT
It is very important that the print from your franking machine is of a good
quality. If you do not have a good quality print, Royal Mail may refuse or be
unable to read the information automatically, this might result in a delay in
delivering your post.
Right Registration Wall
5 . Install the ink cartridge
1
2
3
4
5
6
7
8
9
C
0
.
Sperren
Versandarten
Zählerstände
Einstellungen
Eingabe
blättern vor/zurück
Nein
Ja
*#_
ABC
DEF
GHI
JKLMNO
PQRS
TUV
WXYZ
zurück
Leertaste
Eingabe
1
2
3
4
5
6
7
8
9
C
0
.
Lock
Class
Funds
Options
Enter
Review
no
yes
*#_
ABC
DEF
GHI
JKLMNO
PQRS
TUV
WXYZ
Clear/Back
Space
Shift
PitneyBowes
2. Decide where to site your
system and how to connect it
Please DO NOT connect power until instructed.
Your franking machine has to connect to the Pitney Bowes Data Centre to add
postage funds, get software updates, and carry out the required Postal Authority
inspections.
Choose which of the two connection methods described in the table below best
suits your needs. Consider the requirements and ensure that there is a suitable
network socket or internet enabled PC within reach of the supplied cables. You
must also ensure that the franking machine has a constant power supply and you
have space around it to work. When you have decided, continue with step 3.
If you cannot meet the requirements of either connection method, refer to
Troubleshooting overleaf.
5.2 When prompted, lift the top cover
and press the unlock symbol on the
cartridge latch. Remove and discard
the yellow packaging material.
5.3 Open the packaging for the ink
cartridge and take off the protective
tape from the bottom.
5.6 Close the top cover and press Enter/
yes. When you see ‘IMPORTANT – is
the ink cartridge installed?’ displayed,
press Enter/yes again.
The franking machine will now go
through a set-up cycle which takes up
to 2 minutes.
1 Open the box and unpack
Here’s a diagram and explanation of the items you should find in your box, if
a
nything is missing give us a call on 08444 992992. Depending on how you install
your franking machine, you might not need all of thes
e items.
If you have any problems during this installation, refer to ‘Troubleshooting’
overleaf.
Franking Machine Scale Ink Cartridge
Postage Meter
Labels
USB Cable
Network Cable Power Cord
Communication
Device
1 5 7
8
9
2
6
5.1 When the display shows ‘Add ink
cartridge’, press Enter/yes.
5.4 Insert the ink cartridge. Insert the
base of the cartridge first before
pushing the top back.
5.5 Press the ink cartridge latch down
until it clicks and holds the cartridge
in place.
Good print - no broken lines in the
centre of the test print
Bad print - broken lines in the centre
of the test print
Communication Device
For Pitney Bowes Digital Mailing System
BEST - LAN (Network) Connection
You can use a suitably configured network connection (LAN) that gives access to the
internet. Pitney Bowes highly recommends LAN connection.
Benefits Requirements
Fast.
Always
connected.
Saves
phone call
costs.
A standard (RJ45) network connection on your router (as found in a normal
domestic wired setup) or an active network wall socket.
The technical stuff...
The connection must use DHCP (automatic configuration), be open to all HTTP, HTTPS
and FTP traffic and must NOT be using a PROXY server.
If you’re unsure about the requirements for LAN connection or if you wish to connect
using Wi-Fi, our online Communication Device Advanced Setup Guide can help.
Go to www.europe.pb.com/docs and enter the code 10936 to download the guide.
GOOD - PCMC Connection (Internet connection via your PC)
If you have a PC with an internet connection nearby, you can install the free Pitney Bowes
PC Meter Connect™ (PCMC) software and use the PC’s internet connection.
Benefits Requirements
Fast.
Saves
phone call
costs.
Requires a PC with an active internet connection to be nearby and turned
on.
The PC must run Windows XP, Vista or 7 and have Pitney Bowes PCMC
software installed.
PCMC is not available for Mac.
3. Fit the Scale
Remove all shipping
tape from the machine.
Position the scale on
the franking mach
ine
a
nd plug in the scale
connector as shown in
these diagrams. Tighten
the connector screws.
3
WARNING: Always plug the equipment into a properly grounded wall
outlet. The socket outlet should be near the equipment and should be easily
accessible. Use the mains lead supplied with your equipment.
LAN connection (Router,
Hub, Wall socket)
Communication
Device
Network Cable
LEDs
LEDs
4
4.2 Plug the AC adapter into the
Communication Device and a
power outlet. The left LED is lit
yellow when it is on.
4.3 After 45 seconds, the right LED will blink
orange .
If the right LED lights orange continuously
(not blinking), follow Communication Device
Troubleshooting 1 overleaf.
4.4 Connnect the Franking
Machine to the
Communication Device
using the supplied USB
cable.
4.5 Connnect the Franking Machine to a power outlet using the cord supplied. The
Franking Machine displays its startup screens and you will hear noises as the
Franking Machine initialises.
4.6 About 10 seconds after it initialises, the Franking
Machine will display ‘Meter connected to internet
- Press Enter’. Also, the right LED changes from
blinking orange to blinking green .
Press Enter/Yes to continue with step 5.
If the right LED stays orange (either blinking
or continuous), follow Communication Device
Troubleshooting 2 overleaf.
Option 2 - PCMC Connection (Internet connection via your PC)
Before you connect your franking machine to your PC, you need to install our
FREE PC Meter Connect™ software. To do this, you must have administrator rights
on your PC which may require you to contact your IT department. Please note that
the software is not Mac compatible.
To install, visit www.europe.pb.com/PCMeterConnect/setup.exe and choose the
‘Run’ option. Select ‘English (United Kingdom)’ as your installation language and
follow the on-screen instructions. This process installs the software and tests
your franking machine connection. When complete, you are asked to return to this
guide to complete the franking machine installation.
USB Cable
Power
Cord
Page 10
SDC2035C Communication Device Advanced Setup Guide
EN
<< Return to Contents
Wi-Fi Protected Setup
Introduction
The Communication Device can be setup for wireless usage, enabling you to move
your Franking Machine to any location that is within the range of a wireless access
point on your network.
If your network/router supports Wi-Fi Protected Setup (WPS), you may choose to
follow these instructions instead of performing the standard Wi-Fi setup instructions
described previously in this guide. WPS is a method used to set up wireless
communication among devices without having to manually enter long passphrases.
You can determine if your router supports Wi-Fi Protected Setup by checking your
router documentation or looking on the router to see if it has a button labelled
“WPS” or the symbol
Before setting up the Communication Device for Wi-Fi Protected
operation:
• Make sure that your router is set to one of the following: WPA-PSK/WPA2-PSK or
[AES]/WPA2-PSK [TKIP]. WEP or “None” cannot be used.
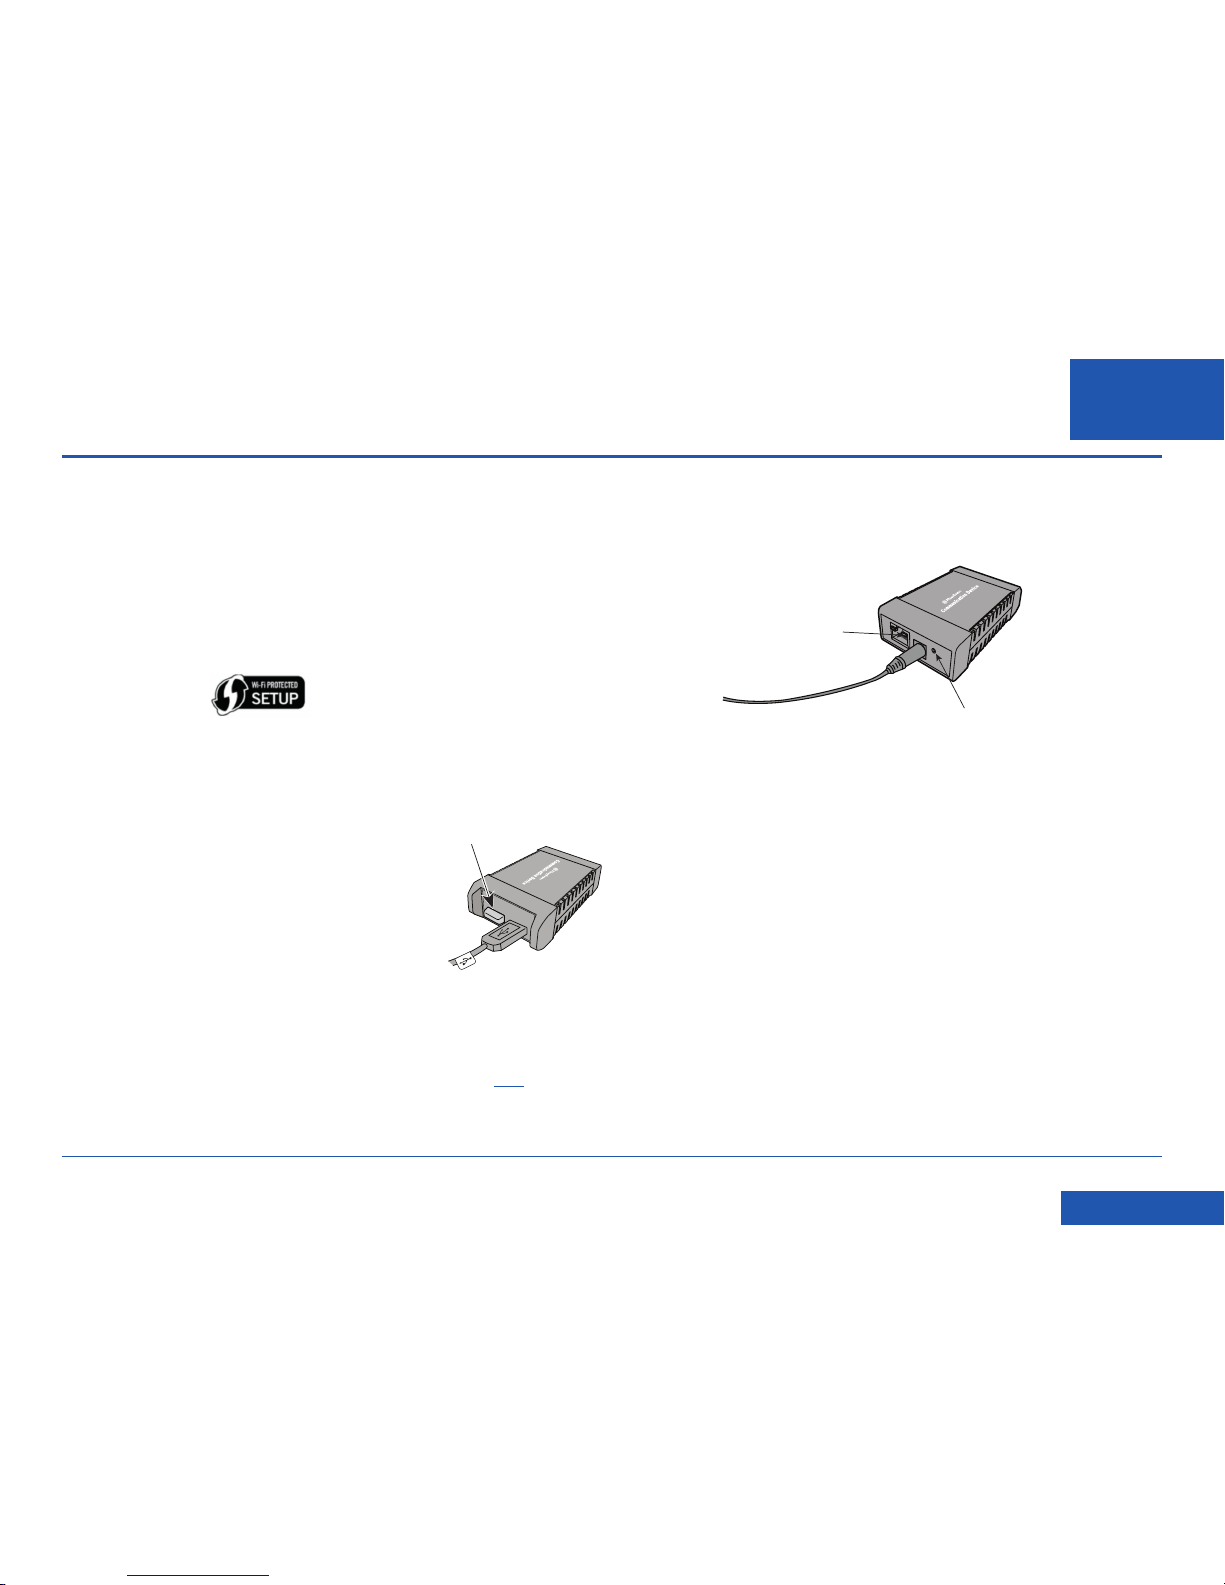
• Ensure the Wireless USB Plug-in is installed in one
of the USB ports in the Communication Device
(see illustration).
• Be sure a wireless access point (transmitter) is close enough to the location of
your Franking Machine to have good signal strength.
• If you are installing your Franking Machine and have just taken the
Communication Device out of its box, it will be in the factory default state
and you can continue with the steps that follow. If the Communication Device
has been confi gured and used before, fi rst reset it as described here before
proceeding.
1. Prepare the Communication Device
a. Connect the AC power adapter to the Communication Device.
b. Wait about 30 seconds for the Orange LED to light, then press the Reset Button.
When the LED lights green, release the button.
c. Wait another 45 seconds for the Communication Device to complete its startup
routine. When the LED is blinking in a regular pattern (typically Orange, Green,
Orange, Green, Pause), continue with step 2 below.
2. WPS Setup Procedure
a. Put your wireless router into its WPS state (refer to its operation guide).
b. Press and hold down the Reset Button on the Communication Device for 15
seconds, then release the button. The LED fl ashes rapidly.
c. The random fl ashing continues for about a minute. When the LED stops fl ashing
rapidly, unplug the AC power adapter from the Communication Device and then
connect it again.
d. Wait another 45 seconds for the Communication Device to complete its startup
routine.
If the LED blinks orange only (if not connected to the Franking Machine) or
blinks green only (if connected to the Franking Machine), you have successfully
set up the Communication Device to run wirelessly.
If the rapid fl ashing lasts more than a minute then WPS has failed. Repeat Steps
1 and 2 on this page again.
e. Connect the Franking Machine and Communication Device using the supplied
USB cable.
Reset Button
LED
Wireless USB Plug-in
Page 11
SDC2035C Communication Device Advanced Setup Guide
EN
<< Return to Contents
Wi-Fi Protected Setup (continued)
3. Continue with Franking Machine Installation
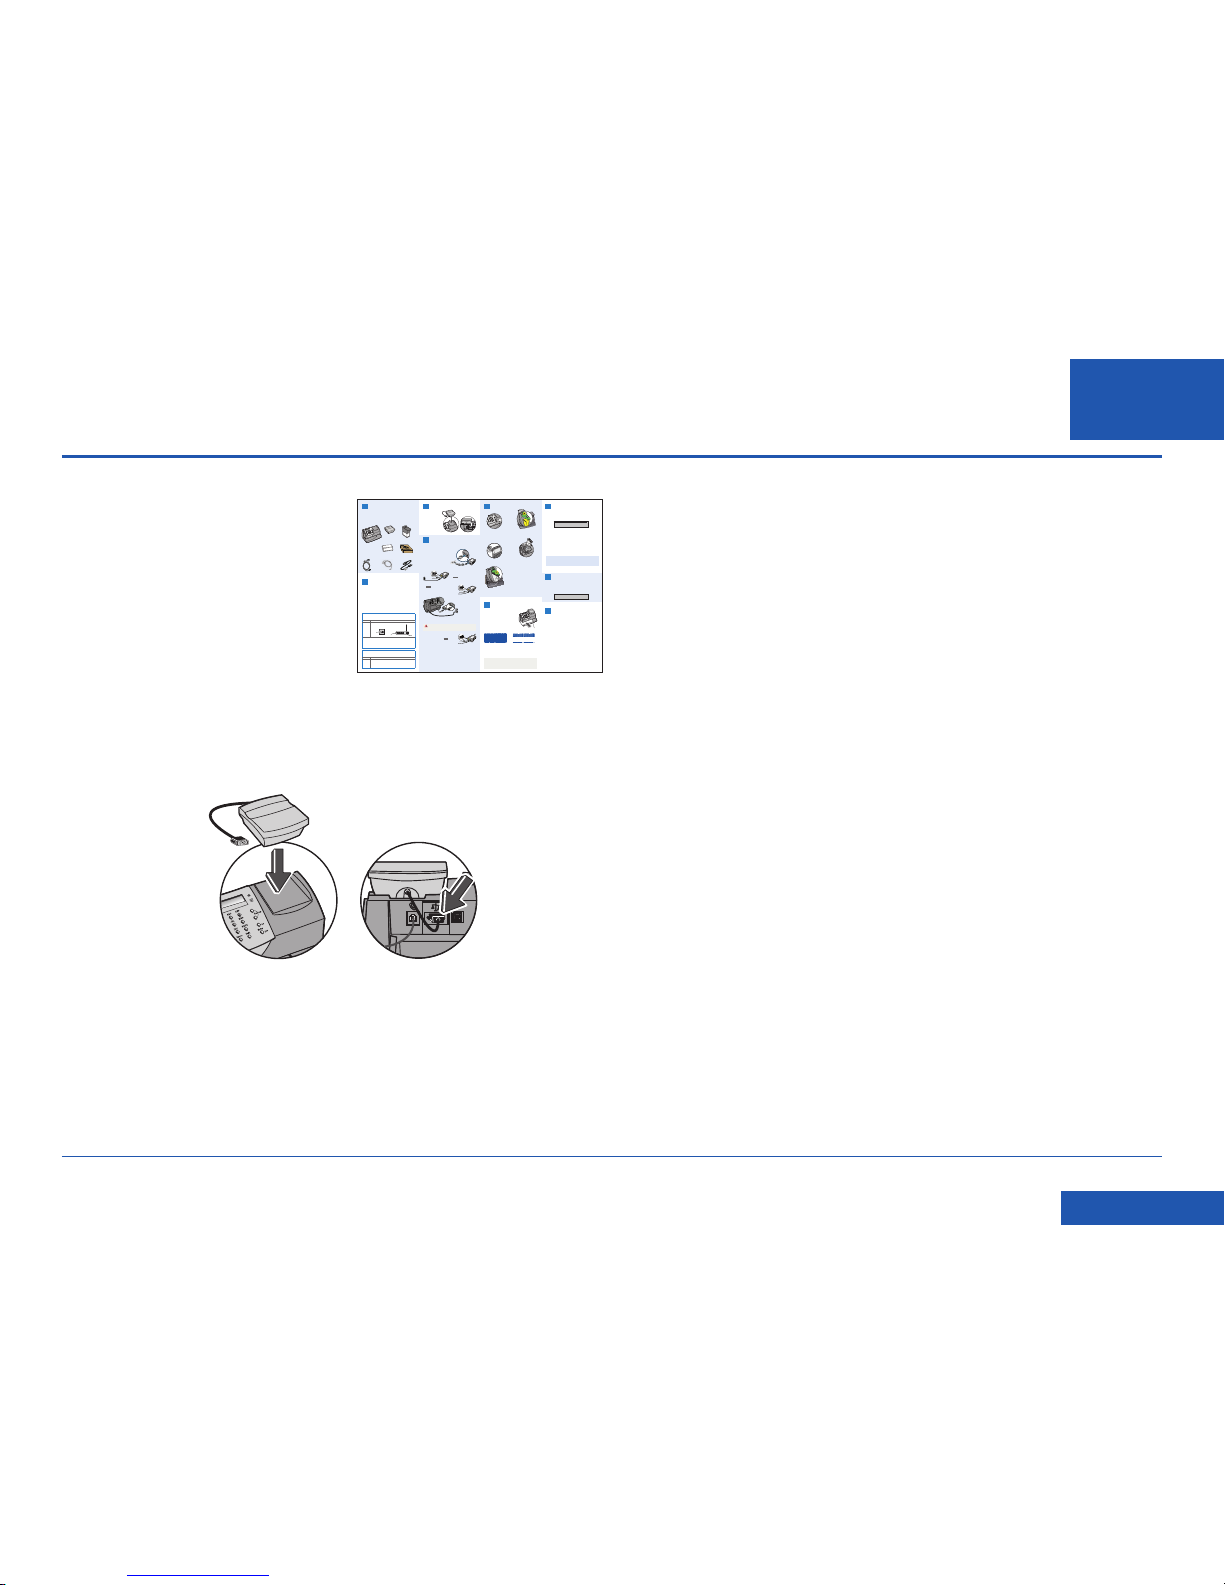
Once your Communication Device is
confi gured using WPS, your Franking
Machine should be displaying “Add ink
cartridge” or “Select Language”. You can
now continue with the Franking Machine
installation as described in the printed
Installation Guide supplied with the
machine.
a. Before proceeding, make sure that the Scale has been fi tted as described in the
printed Installation Guide.
b. Now continue from “Install the Ink Cartridge” or “Select Language” (as
appropriate) in the printed Installation Guide to complete installation. Once
installation is complete, see the reverse of the Guide for useful information and
tips on using your Franking Machine.
AC Adapter
LEDs
3. Connect to the outside world
Follow the relevant section below for the connection method you‘ve chosen:
Option 1 - LAN (network) connection
4.1 Connect the Communication Device
to your network as shown.
6. Carry out a test print
When prompted, insert a spare envelope or tape/
label strip for a test print. Insert the item into the
franking machine from the front, making sure it
is pushed up to the right registration wall. The
franking machine automatically begins printing.
Do not remove the item until the printing has
finished.
Review the quality of the test print.
Good quality – press Enter/Yes.
Poor quality – press No, the franking machine goes through another set-up cycle
and when complete you should try the test print again.
8. Check for updates
Your franking machine now automatically checks and installs any new software,
including any new Envelope Messages associated with your account. The display
shows the status of the update.
Once complete, the Home Screen displays and your franking machine is ready to
be used.
7. Add postage funds
You need to add funds to your franking machine before you can use it.
Connect to Pitney Bowes Data Centre
The franking machine automatically connects with the Data Centre and, after a
s
hort delay, displays your account balance:
Adding funds
You now need to add postage to your franking machine.
• Press Enter/Yes - an amount of £50 will be suggested. To accept this amount,
press Enter/Yes or press Clear/Back to change it.
• If you pressed Clear/Back you will be prompted to enter a new amount. Enter the
amount and then press Enter/yes. This new refill amount must be in increments
of £10.
• Confirm the amount to add by pressing Enter/yes again.
• The franking machine communicates with the Data Centre to add postage and
co
nfirms when complete. Press Enter/yes.
• T
he display asks if you would like a receipt. Press Enter/Yes and print an
envelope or label as you did for the test print at step 6.
9. Frank an envelope
Let’s now create your first piece of franked mail...
• Place your item of mail on the scale and the display will show the cost, weight,
class and date.
• If you want to change the Class, press the Class button and scroll
to highlight the Class you wish to use and then press Enter/yes.
• Envelope Messaging prints alongside your frank. To select your preferred
Envelope Message, press the down Review ▼ key until ‘Ad’ displays, then press
Enter/yes. Scroll to the required Envelope Message using the Review ▼▲ keys,
then press Enter/yes. (To ensure your Envelope Message prints automatically in
future, see Pre-setting Options, overleaf).
• Insert the item of mail into the franking machine exactly as you did at step 6 to
create your first piece of franked mail.
Problems?
• Can’t see the personalised Envelope Message you ordered? See Envelope
Messaging overleaf.
•
Want to pre-set the franking machine to automatically print your preferred Envelope
Mess
age? See Pre-setting Options overleaf.
• Want to learn more about using you new franking machine? See Using your
franking machine overleaf.
Prepaid: £xxxxx.xx
0.00 0 g
postal class date
IMPORTANT
Once you have printed the receipt, check the Postage by Phone account number
on the receipt and ensure it matches the account number on the dispatch note
received with the franking machine. If the numbers do NOT match, do not go any
further with this installation and contact Pitney Bowes on 08444 992992.
IMPORTANT
It is very important that the print from your franking machine is of a good
quality. If you do not have a good quality print, Royal Mail may refuse or be
unable to read the information automatically, this might result in a delay in
delivering your post.
Right Registration Wall
5 . Install the ink cartridge
1
2
3
4
5
6
7
8
9
C
0
.
Sperren
Versandarten
Zählerstände
Einstellungen
Eingabe
blättern vor/zurück
Nein
Ja
*#_
ABC
DEF
GHI
JKLMNO
PQRS
TUV
WXYZ
zurück
Leertaste
Eingabe
1
2
3
4
5
6
7
8
9
C
0
.
Lock
Class
Funds
Options
Enter
Review
no
yes
*#_
ABC
DEF
GHI
JKLMNO
PQRS
TUV
WXYZ
Clear/Back
Space
Shift
PitneyBowes
2. Decide where to site your
system and how to connect it
Please DO NOT connect power until instructed.
Your franking machine has to connect to the Pitney Bowes Data Centre to add
postage funds, get software updates, and carry out the required Postal Authority
inspections.
Choose which of the two connection methods described in the table below best
suits your needs. Consider the requirements and ensure that there is a suitable
network socket or internet enabled PC within reach of the supplied cables. You
must also ensure that the franking machine has a constant power supply and you
have space around it to work. When you have decided, continue with step 3.
If you cannot meet the requirements of either connection method, refer to
Troubleshooting overleaf.
5.2 When prompted, lift the top cover
and press the unlock symbol on the
cartridge latch. Remove and discard
the yellow packaging material.
5.3 Open the packaging for the ink
cartridge and take off the protective
tape from the bottom.
5.6 Close the top cover and press Enter/
yes. When you see ‘IMPORTANT – is
the ink cartridge installed?’ displayed,
press Enter/yes again.
The franking machine will now go
through a set-up cycle which takes up
to 2 minutes.
1 Open the box and unpack
Here’s a diagram and explanation of the items you should find in your box, if
a
nything is missing give us a call on 08444 992992. Depending on how you install
your franking machine, you might not need all of t
hese items.
If you have any problems during this installation, refer to ‘Troubleshooting’
overleaf.
Franking Machine Scale Ink Cartridge
Postage Meter
Labels
USB Cable
Network Cable Power Cord
Communication
Device
1 5 7
8
9
2
6
5.1 When the display shows ‘Add ink
cartridge’, press Enter/yes.
5.4 Insert the ink cartridge. Insert the
base of the cartridge first before
pushing the top back.
5.5 Press the ink cartridge latch down
until it clicks and holds the cartridge
in place.
Good print - no broken lines in the
centre of the test print
Bad print - broken lines in the centre
of the test print
Communication Device
For Pitney Bowes Digital Mailing System
BEST - LAN (Network) Connection
You can use a suitably configured network connection (LAN) that gives access to the
internet. Pitney Bowes highly recommends LAN connection.
Benefits Requirements
Fast.
Always
connected.
Saves
phone call
costs.
A standard (RJ45) network connection on your router (as found in a normal
domestic wired setup) or an active network wall socket.
The technical stuff...
The connection must use DHCP (automatic configuration), be open to all HTTP, HTTPS
and FTP traffic and must NOT be using a PROXY server.
If you’re unsure about the requirements for LAN connection or if you wish to connect
using Wi-Fi, our online Communication Device Advanced Setup Guide can help.
Go to www.europe.pb.com/docs and enter the code 10936 to download the guide.
GOOD - PCMC Connection (Internet connection via your PC)
If you have a PC with an internet connection nearby, you can install the free Pitney Bowes
PC Meter Connect™ (PCMC) software and use the PC’s internet connection.
Benefits Requirements
Fast.
Saves
phone call
costs.
Requires a PC with an active internet connection to be nearby and turned
on.
The PC must run Windows XP, Vista or 7 and have Pitney Bowes PCMC
software installed.
PCMC is not available for Mac.
3. Fit the Scale
Remove all shipping
tape from the machine.
Position the scale on
t
he franking machine
a
nd plug in the scale
connector as shown in
these diagrams. Tighten
the connector screws.
3
WARNING: Always plug the equipment into a properly grounded wall
outlet. The socket outlet should be near the equipment and should be easily
accessible. Use the mains lead supplied with your equipment.
LAN connection (Router,
Hub, Wall socket)
Communication
Device
Network Cable
LEDs
LEDs
4
4.2 Plug the AC adapter into the
Communication Device and a
power outlet. The left LED is lit
yellow when it is on.
4.3 After 45 seconds, the right LED will blink
orange .
If the right LED lights orange continuously
(not blinking), follow Communication Device
Troubleshooting 1 overleaf.
4.4 Connnect the Franking
Machine to the
Communication Device
using the supplied USB
cable.
4.5 Connnect the Franking Machine to a power outlet using the cord supplied. The
Franking Machine displays its startup screens and you will hear noises as the
Franking Machine initialises.
4.6 About 10 seconds after it initialises, the Franking
Machine will display ‘Meter connected to internet
- Press Enter’. Also, the right LED changes from
blinking orange to blinking green .
Press Enter/Yes to continue with step 5.
If the right LED stays orange (either blinking
or continuous), follow Communication Device
Troubleshooting 2 overleaf.
Option 2 - PCMC Connection (Internet connection via your PC)
Before you connect your franking machine to your PC, you need to install our
FREE PC Meter Connect™ software. To do this, you must have administrator rights
on your PC which may require you to contact your IT department. Please note that
the software is not Mac compatible.
To install, visit www.europe.pb.com/PCMeterConnect/setup.exe and choose the
‘Run’ option. Select ‘English (United Kingdom)’ as your installation language and
follow the on-screen instructions. This process installs the software and tests
your franking machine connection. When complete, you are asked to return to this
guide to complete the franking machine installation.
USB Cable
Power
Cord
Page 12
SDC2035C Communication Device Advanced Setup Guide
EN
<< Return to Contents
Reference - File extensions and URLs that the
network/firewall needs to allow
Reference - Ports and protocols
needed by the Connectivity Device
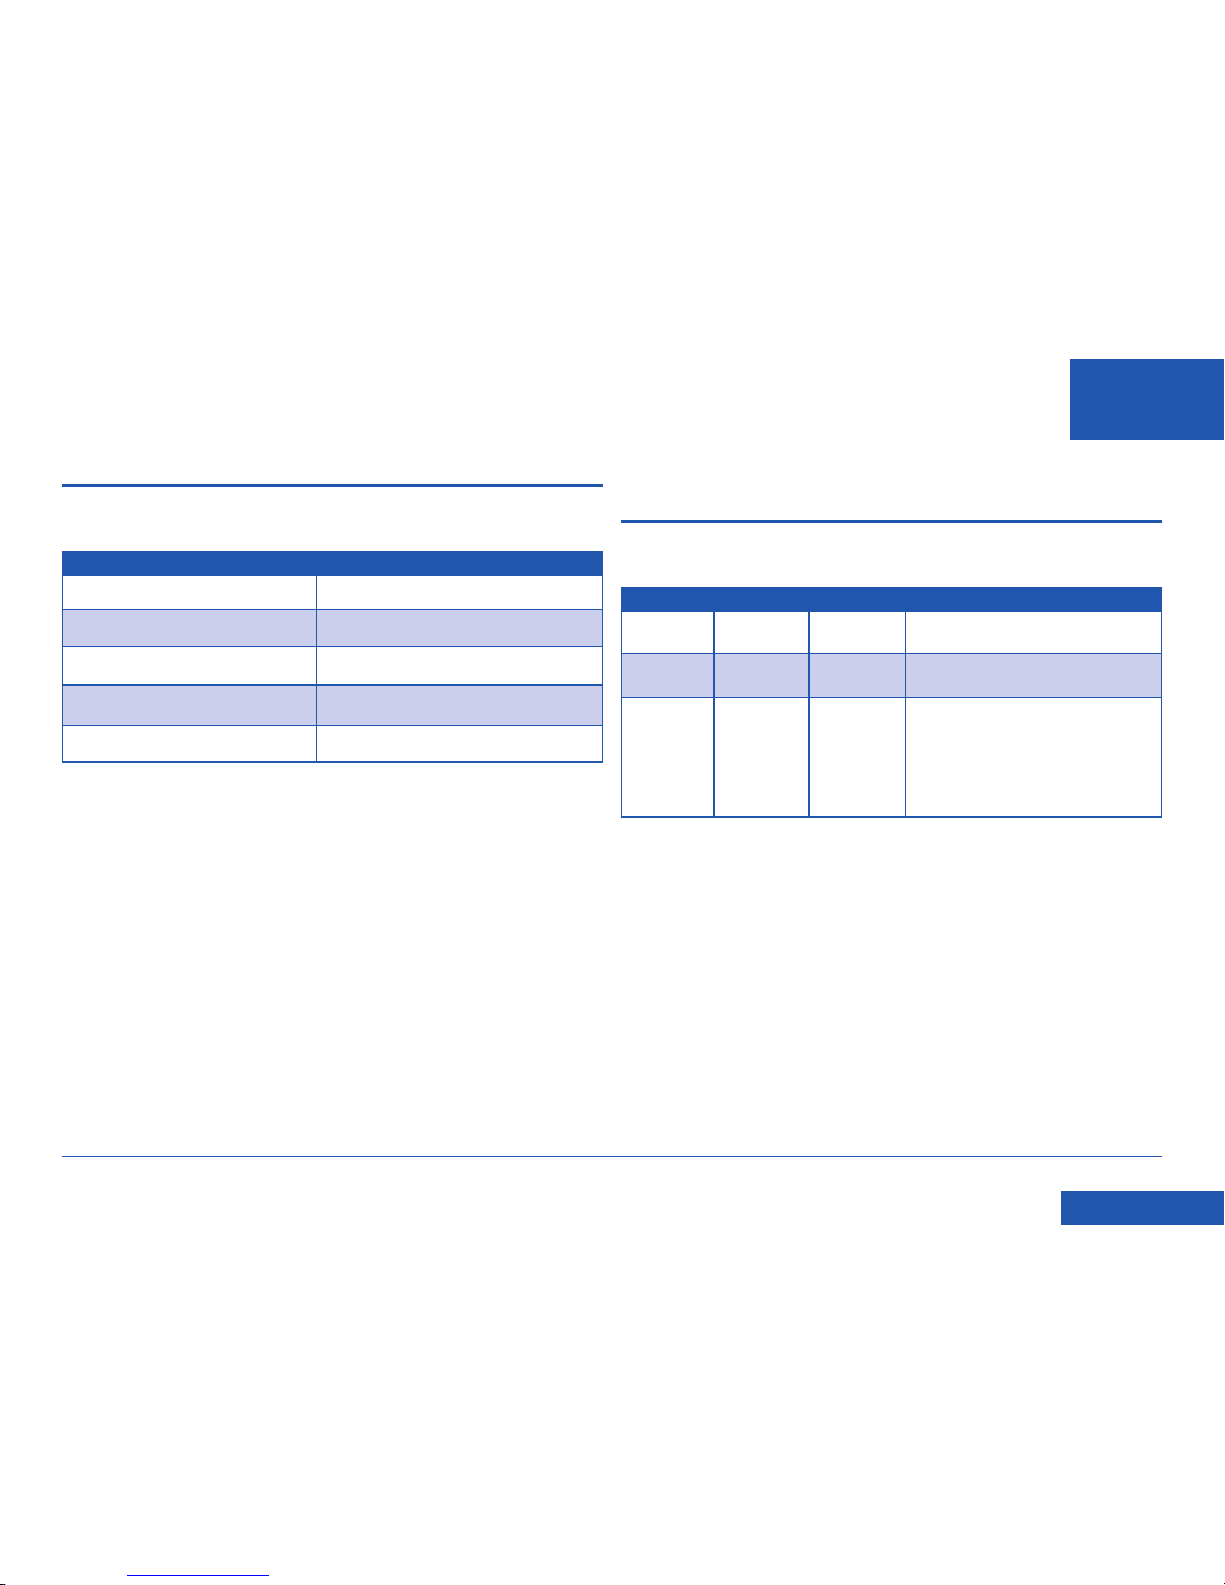
The Connectivity Device uses the following file extensions that must be allowed
through your network and firewall:
Type Extension
DEC .dcz
EMD .zmd
Graphics .gar
Rate Manager .rmz
CCD .bin
The domain pb.com must also be accessible through your network and firewall:
NOTE: URLs accessed by your franking machine may contain pb.com anywhere
within the URL. Firewalls must therefore be set to allow trac to any URL containing
pb.com.
Your firewall may need to be configured using “wildcards”, for example *pb.com*
The Connectivity Device uses the following ports and protocols that must be allowed
through your network and firewall:
Type Protocol Port Function
DNS UDP 53 Postage by Phone and Web Services
HTTP TCP 80 Postage by Phone and Web Services
HTTPS TCP 443 Postage by Phone
Software and Rates Updates, Graphic
uploads.
Firewall must be set to Active mode
and to allow ephemeral ports.
Page 13
SDC2035C Communication Device Advanced Setup Guide
EN
<< Return to Contents
Resetting the Communication Device to its factory defaults
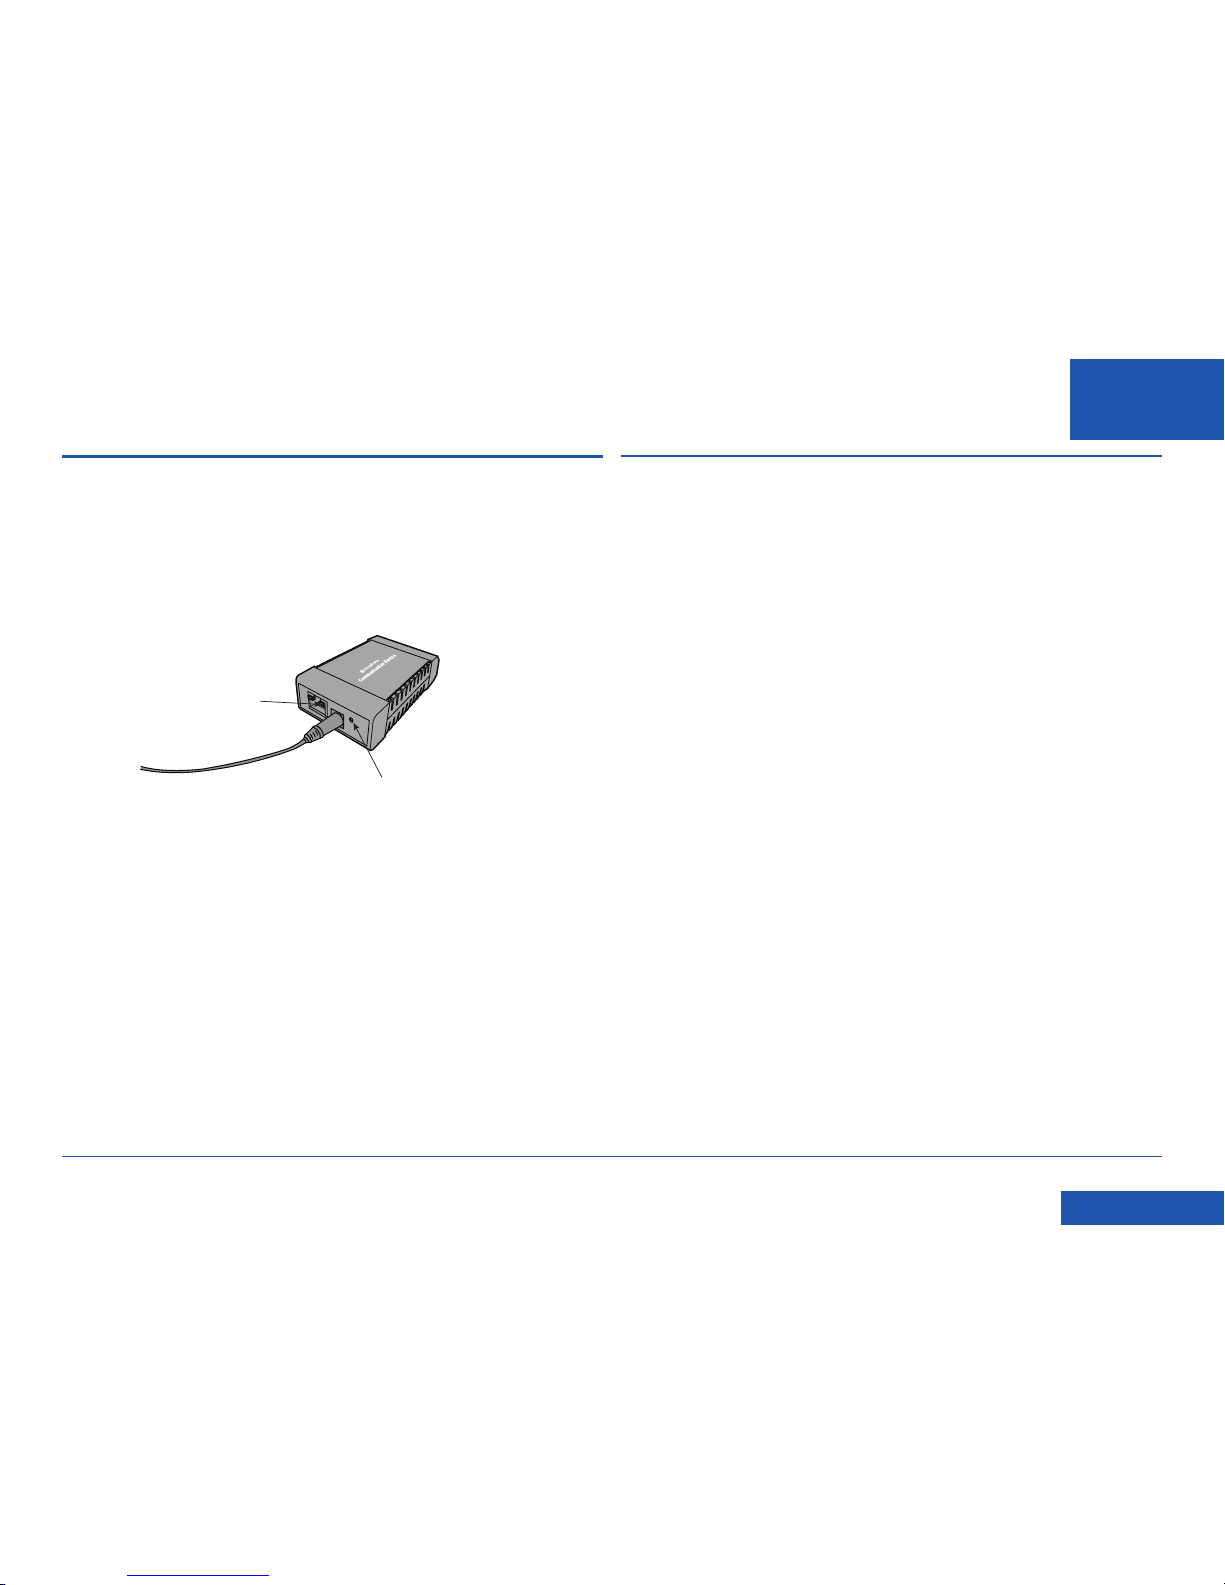
To reset the Communication Device to its default settings, you will need a small
pointed object, such as a pen, to access the reset button.
a. Disconnect the network cable from the Communication Device.
b. Press and hold the reset button. Apply power to the Communication Device.
c. When the LED lights continuous green (about 2 seconds), immediately release
the reset button.
d. The green LED will go out and the orange LED will come on, indicating the
Communication Device has reset.
If the LEDs start blinking, then the Communication Device is not reset. Repeat
the process from Step a above.
e. Disconnect the AC power adapter.
Reset Button
LED
Reference - Resetting the Device Reference - Troubleshooting
My Franking Machine will not connect to the Pitney Bowes Data
Centre
• Check that other PC/Mac’s on the network can access the internet. If they
cannot, there is a connection problem not associated with the Communication
Device.
• If you are connecting via Wi-Fi and your wireless network requires you
to change your password at set intervals, this could be the problem The
Communication Device password might have expired. Reset the Communication
Device as described earlier in this guide and set it up again as described in
‘Setting up a Wireless Connection’.
Page 14

SDC2035C Konstante Verbindung (LAN Verbindung) Anleitung
Inhalt
Installation
• Einrichtung eines drahtgebundenen Netzwerks
Einführung
1. Schließen Sie das Kommunikationsgerät an
2. Laden Sie die Setup-Software herunter und starten Sie sie.
3. Fahren Sie mit der Installation der Frankiermaschine fort
• Einrichtung einer drahtlosen (Wi-Fi) Netzwerkverbindung
Einführung
Bevor Sie das Kommunikationsgerät für den drahtlosen Betrieb
einrichten:
1. Schließen Sie das Kommunikationsgerät an
2. Laden Sie die Setup-Software herunter und starten Sie sie.
3. Starten Sie das Kommunikationsgerät erneut
4. Fahren Sie mit der Installation der Frankiermaschine for
• Wi-Fi Geschützte Einrichtung
Einleitung
Bevor Sie das Kommunikationsgerät für den Wi-Fi geschützten Betrieb
einrichten
1. Einrichten des Kommunikationsgeräts
2. WPS Einrichtungsverfahren
3. Fahren Sie mit der Installation der Frankiermaschine fort
HINWEISE
Verbindungsvoraussetzungen
Dateierweiterungen und URLs für das Netzwerk/die Firewall zulassen
Anschlüsse und Protokolle werden von der konstanten Verbindung
genutzt
Setzen Sie das Kommunikationsgerät auf Werkseinstellung zurück.
Fehlerbehebung
DE
<< Zurück zum Inhalt
Klicken sie auf ein Thema in der Liste um direkt zu dem
Kapitel zu gelangen.
Page 15
SDC2035C Konstante Verbindung (LAN Verbindung) Anleitung
Einrichtung eines drahtgebundenen Netzwerks
DE
<< Zurück zum Inhalt
LAN-Verbindung (Router,
Hub, Steckdose)
Netzwerk-Kabel
Kommunikation
Gerät
Einführung
Ihr Kommunikationsgerät wird in der Konfiguration geliefert, dass es als Plug-undPlay-Gerät angeschlossen werden kann, wenn Ihr Netzwerk die folgenden Kriterien
erfüllt:
• HTTPS und HTTPS Trac
• KEINEN Proxy-Server verwendet
Wenn Ihr Netzwerk diese Kriterien erfüllt, befolgen Sie die Anleitungen in
Papierform, die in der Installationsanleitung der DM60-Serie mit Ihrer Maschine
geliefert wurden.
Dieser Abschnitt wird nur benötigt, wenn Ihr Netzwerk besondere Einstellungen
erforderlich macht, wie eine statische IP und Proxyservereinstellungen. Diese
Einstellungen werden dem Kommunikationsgerät hinzugefügt. Möglicherweise
benötigen Sie die Hilfe Ihres IT-Spezialisten/Netzwerkadministrators, um dies
durchzuführen.
Folgen Sie den Anweisungen in genau der Reihenfolge, wie beschrieben:
• Wenn Sie Ihre Frankiermaschine installieren und das Kommunikationsgerät
gerade aus der Verpackung genommen haben, befindet es sich in
Werkseinstellung und Sie können mit folgenden Schritten fortfahren. Wenn das
Kommunikationsgerät vorher konfiguriert und verwendet wurde, setzen Sie es
gemäß der Beschreibung hier zurück, bevor Sie fortfahren.
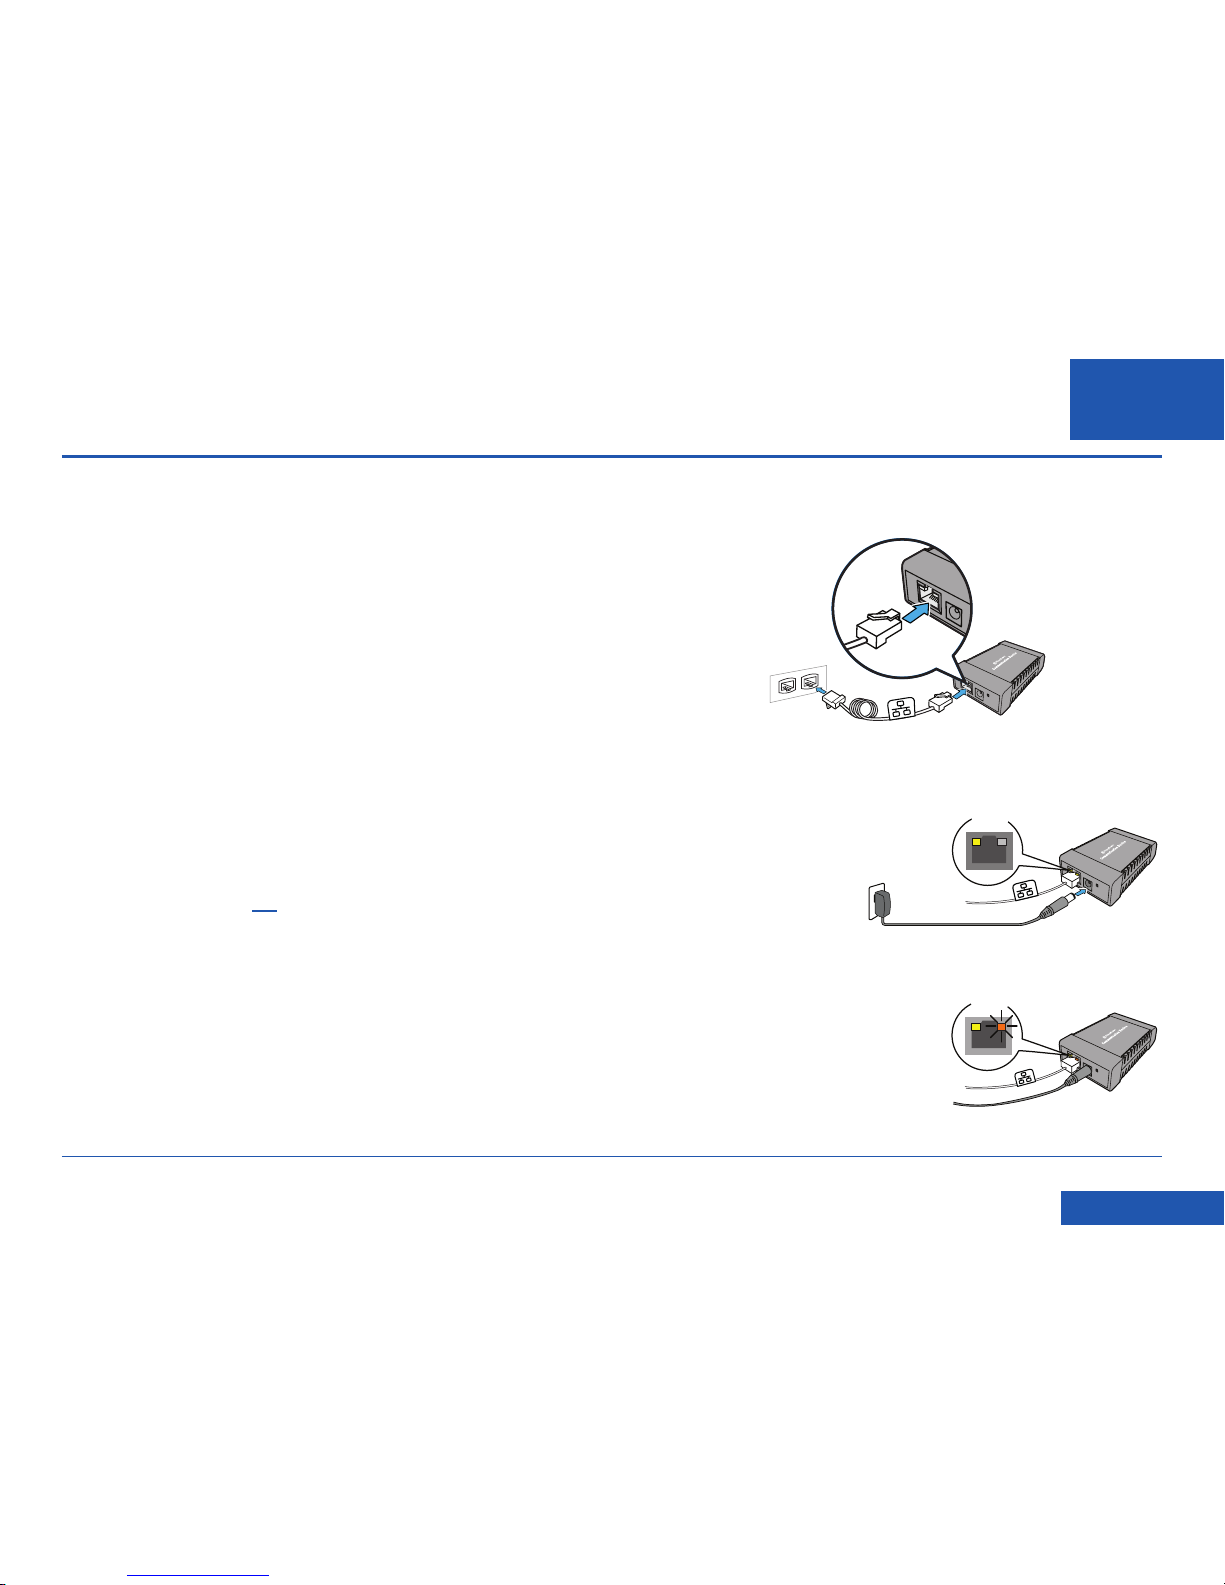
1. Schließen Sie das Kommunikationsgerät an
a. Schließen Sie das Kommunikationsgerät, wie abgebildet, an Ihr Netzwerk an.
b. Stecken Sie das AC-Netzteil in das
Kommunikationsgerät und eine
Steckdose. Die linke LED leuchtet
gelb, wenn das Gerät an ist.
c. Prüfen Sie nach kurzer Zeit, dass
die rechte LED orange und/oder
grün blinkt.
LEDs
LEDs
AC Power Adapter
Page 16
SDC2035C Konstante Verbindung (LAN Verbindung) Anleitung
Einrichtung eines drahtgebundenen Netzwerks (Fortsetzung)
DE
<< Zurück zum Inhalt
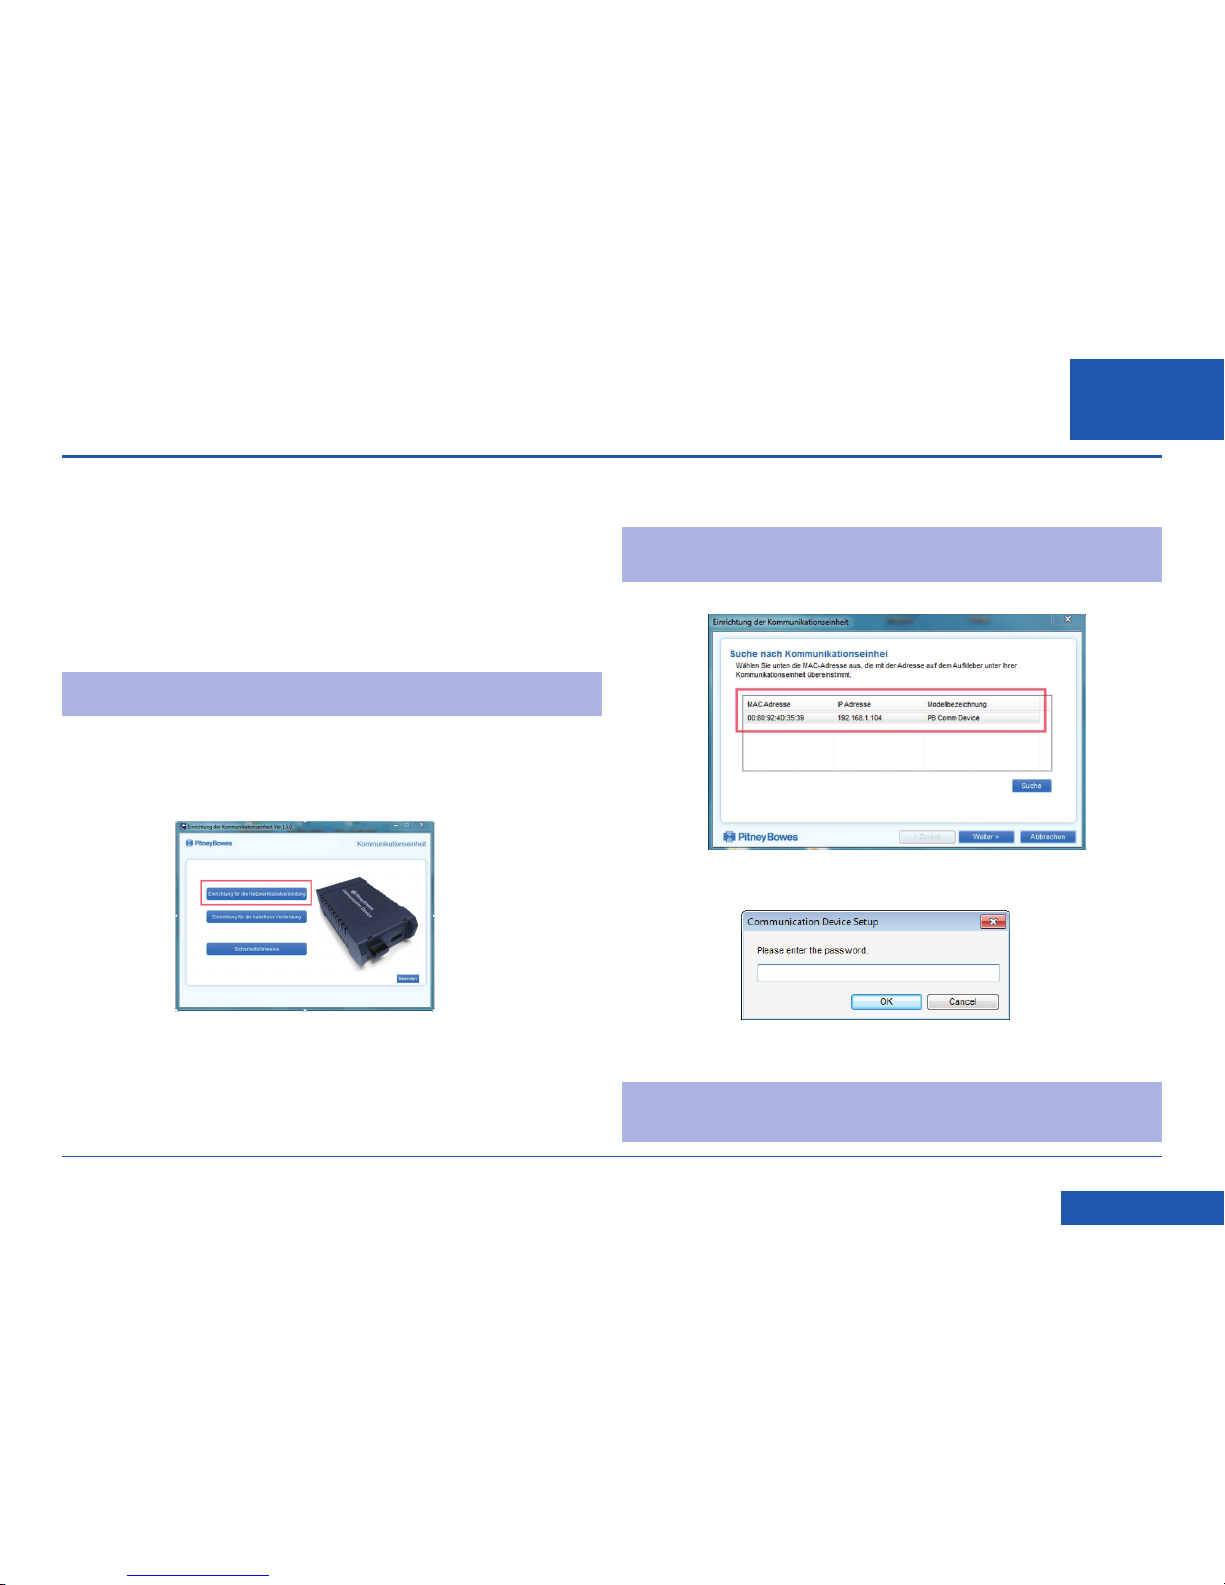
e. Die Konfigurationssoftware sucht nach Geräten in Ihrem Netzwerk und zeigt
eine Liste der gefundenen Geräte. Markieren Sie das Gerät, dass konfiguriert
werden soll und wählen Sie Weiter.
Anmerkung: wenn mehrer Geräte angezeigt werden, wählen Sie die MAC
Adresse, die mit Ihrem Gerät übereinstimmt. ‘E/A’ Nummer steht auf
der Rückseite des Kommunikationsgeräts.
f. Geben Sie das Passwort MnDqr7 ein und wählen OK.
g. Folgen Sie Einrichtungsassistenten und geben Sie die entsprechenden
besonderen Einstellungen ein.
Hinweis: Ihre Netzwerk muss für bestimmte Ports, Protokolle, Domains und
Dateierweiterungen oen sein. Einzelheiten dazu finden Sie im Abschnitt
Referenzen in dieser Anleitung.
2. Laden Sie die Setup-Software herunter und starten Sie sie.
a. Verwenden Sie einen Computer, der an dasselbe Netzwerk oder denselben
Router wie das Kommunikationsgerät angeschlossen ist. Laden Sie die
Einrichtungssoftware auf Ihren Computer herunter, gehen Sie hierzu auf die
Seite:
PC: pitneybowes.com/DE/DM60wifipc
Mac: pitneybowes.eu/DM60mac
Klicken Sie auf die Schaltfläche für den Typ Ihres Computers.
Hinweis: Wenn eine Firewall-Meldung erscheint, klicken Sie auf die Schaltfläche,
um das Herunterladen zuzulassen, um fortzufahren.
b. Speichern Sie die Software “pbSmartLAN” auf Ihrem Computer, dann önen und
starten Sie sie.
c. Klicken Sie auf die Schaltfläche Drahtgebundene Netzwerkverbindung .
d. Bitte lesen Sie die Software-Lizensvereinbarung und akzeptieren Sie diese.
Page 17
SDC2035C Konstante Verbindung (LAN Verbindung) Anleitung
Einrichtung eines drahtgebundenen Netzwerks (Fortsetzung)
DE
<< Zurück zum Inhalt
3. Fahren Sie mit der Installation der Frankiermaschine fort
Sobald Ihr Kommunikationsgerät mit der
Setup-Software konfi guriert ist, sollte
Ihre Frankiermaschine "Tintenkartusche
einsetzen" oder "Sprache auswählen"
anzeigen. Sie kann nun mit der Installation
der Frankiermaschine gemäß der
Installationsanleitung in Papierform
fortfahren, die mit der Maschine geliefert
wurde.
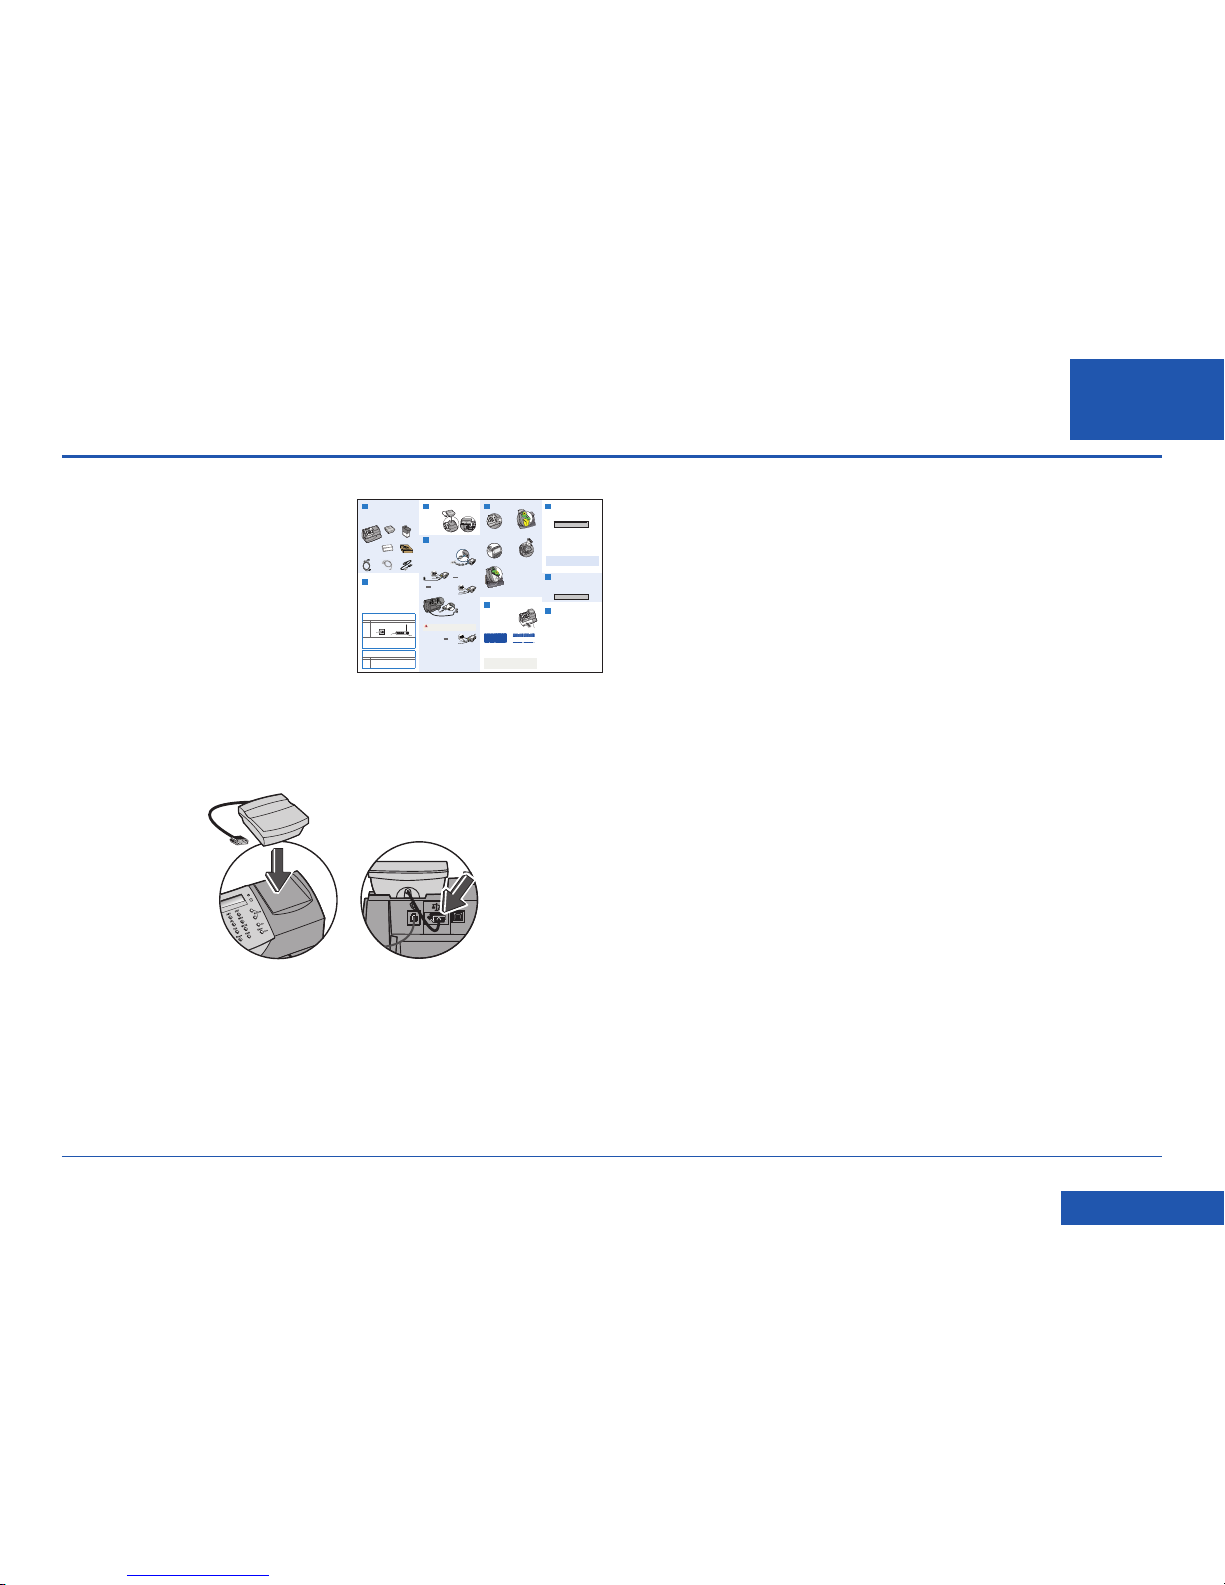
a. Bevor Sie fortfahren, stellen Sie sicher, dass die Waage wie in der gedruckten
Installationsanleitung beschrieben angeschlossen wurde.
b. Fahren Sie nun mit “Die Tintenkartusche installieren” oder “Sprache
auswählen” (je nachdem) in der gedruckten Installationsanleitung fort, um
die Installation abzuschließen. Sobald die Installation abgeschossen ist, lesen
Sie die Anleitung auf der Rückseite für hilfreiche Informationen und Tipps zur
Verwendung der Frankiermaschine.
AC Adapter
LEDs
3. Connect to the outside world
Follow the relevant section below for the connection method you‘ve chosen:
Option 1 - LAN (network) connection
4.1 Connect the Communication Device
to your network as shown.
6. Carry out a test print
When prompted, insert a spare envelope or tape/
label strip for a test print. Insert the item into the
franking machine from the front, making sure it
is pushed up to the right registration wall. The
franking machine automatically begins printing.
Do not remove the item until the printing has
finished.
Review the quality of the test print.
Good quality – press Enter/Yes.
Poor quality – press No, the franking machine goes through another set-up cycle
and when complete you should try the test print again.
8. Check for updates
Your franking machine now automatically checks and installs any new software,
including any new Envelope Messages associated with your account. The display
shows the status of the update.
Once complete, the Home Screen displays and your franking machine is ready to
be used.
7. Add postage funds
You need to add funds to your franking machine before you can use it.
Connect to Pitney Bowes Data Centre
The franking machine automatically connects with the Data Centre and, after a
s
hort delay, displays your account balance:
Adding funds
You now need to add postage to your franking machine.
• Press Enter/Yes - an amount of £50 will be suggested. To accept this amount,
press Enter/Yes or press Clear/Back to change it.
• If you pressed Clear/Back you will be prompted to enter a new amount. Enter the
amount and then press Enter/yes. This new refill amount must be in increments
of £10.
• Confirm the amount to add by pressing Enter/yes again.
• The franking machine communicates with the Data Centre to add postage and
co
nfirms when complete. Press Enter/yes.
• T
he display asks if you would like a receipt. Press Enter/Yes and print an
envelope or label as you did for the test print at step 6.
9. Frank an envelope
Let’s now create your first piece of franked mail...
• Place your item of mail on the scale and the display will show the cost, weight,
class and date.
• If you want to change the Class, press the Class button and scroll
to highlight the Class you wish to use and then press Enter/yes.
• Envelope Messaging prints alongside your frank. To select your preferred
Envelope Message, press the down Review ▼ key until ‘Ad’ displays, then press
Enter/yes. Scroll to the required Envelope Message using the Review ▼▲ keys,
then press Enter/yes. (To ensure your Envelope Message prints automatically in
future, see Pre-setting Options, overleaf).
• Insert the item of mail into the franking machine exactly as you did at step 6 to
create your first piece of franked mail.
Problems?
• Can’t see the personalised Envelope Message you ordered? See Envelope
Messaging overleaf.
•
Want to pre-set the franking machine to automatically print your preferred Envelope
Mess
age? See Pre-setting Options overleaf.
• Want to learn more about using you new franking machine? See Using your
franking machine overleaf.
Prepaid: £xxxxx.xx
0.00 0 g
postal class date
IMPORTANT
Once you have printed the receipt, check the Postage by Phone account number
on the receipt and ensure it matches the account number on the dispatch note
received with the franking machine. If the numbers do NOT match, do not go any
further with this installation and contact Pitney Bowes on 08444 992992.
IMPORTANT
It is very important that the print from your franking machine is of a good
quality. If you do not have a good quality print, Royal Mail may refuse or be
unable to read the information automatically, this might result in a delay in
delivering your post.
Right Registration Wall
5 . Install the ink cartridge
1
2
3
4
5
6
7
8
9
C
0
.
Sperren
Versandarten
Zählerstände
Einstellungen
Eingabe
blättern vor/zurück
Nein
Ja
*#_
ABC
DEF
GHI
JKLMNO
PQRS
TUV
WXYZ
zurück
Leertaste
Eingabe
1
2
3
4
5
6
7
8
9
C
0
.
Lock
Class
Funds
Options
Enter
Review
no
yes
*#_
ABC
DEF
GHI
JKLMNO
PQRS
TUV
WXYZ
Clear/Back
Space
Shift
PitneyBowes
2. Decide where to site your
system and how to connect it
Please DO NOT connect power until instructed.
Your franking machine has to connect to the Pitney Bowes Data Centre to add
postage funds, get software updates, and carry out the required Postal Authority
inspections.
Choose which of the two connection methods described in the table below best
suits your needs. Consider the requirements and ensure that there is a suitable
network socket or internet enabled PC within reach of the supplied cables. You
must also ensure that the franking machine has a constant power supply and you
have space around it to work. When you have decided, continue with step 3.
If you cannot meet the requirements of either connection method, refer to
Troubleshooting overleaf.
5.2 When prompted, lift the top cover
and press the unlock symbol on the
cartridge latch. Remove and discard
the yellow packaging material.
5.3 Open the packaging for the ink
cartridge and take off the protective
tape from the bottom.
5.6 Close the top cover and press Enter/
yes. When you see ‘IMPORTANT – is
the ink cartridge installed?’ displayed,
press Enter/yes again.
The franking machine will now go
through a set-up cycle which takes up
to 2 minutes.
1 Open the box and unpack
Here’s a diagram and explanation of the items you should find in your box, if
a
nything is missing give us a call on 08444 992992. Depending on how you install
your franking machine, you might not need all of t
hese items.
If you have any problems during this installation, refer to ‘Troubleshooting’
overleaf.
Franking Machine Scale Ink Cartridge
Postage Meter
Labels
USB Cable
Network Cable Power Cord
Communication
Device
1 5 7
8
9
2
6
5.1 When the display shows ‘Add ink
cartridge’, press Enter/yes.
5.4 Insert the ink cartridge. Insert the
base of the cartridge first before
pushing the top back.
5.5 Press the ink cartridge latch down
until it clicks and holds the cartridge
in place.
Good print - no broken lines in the
centre of the test print
Bad print - broken lines in the centre
of the test print
Communication Device
For Pitney Bowes Digital Mailing System
BEST - LAN (Network) Connection
You can use a suitably configured network connection (LAN) that gives access to the
internet. Pitney Bowes highly recommends LAN connection.
Benefits Requirements
Fast.
Always
connected.
Saves
phone call
costs.
A standard (RJ45) network connection on your router (as found in a normal
domestic wired setup) or an active network wall socket.
The technical stuff...
The connection must use DHCP (automatic configuration), be open to all HTTP, HTTPS
and FTP traffic and must NOT be using a PROXY server.
If you’re unsure about the requirements for LAN connection or if you wish to connect
using Wi-Fi, our online Communication Device Advanced Setup Guide can help.
Go to www.europe.pb.com/docs and enter the code 10936 to download the guide.
GOOD - PCMC Connection (Internet connection via your PC)
If you have a PC with an internet connection nearby, you can install the free Pitney Bowes
PC Meter Connect™ (PCMC) software and use the PC’s internet connection.
Benefits Requirements
Fast.
Saves
phone call
costs.
Requires a PC with an active internet connection to be nearby and turned
on.
The PC must run Windows XP, Vista or 7 and have Pitney Bowes PCMC
software installed.
PCMC is not available for Mac.
3. Fit the Scale
Remove all shipping
tape from the machine.
Position the scale on
t
he franking machine
a
nd plug in the scale
connector as shown in
these diagrams. Tighten
the connector screws.
3
WARNING: Always plug the equipment into a properly grounded wall
outlet. The socket outlet should be near the equipment and should be easily
accessible. Use the mains lead supplied with your equipment.
LAN connection (Router,
Hub, Wall socket)
Communication
Device
Network Cable
LEDs
LEDs
4
4.2 Plug the AC adapter into the
Communication Device and a
power outlet. The left LED is lit
yellow when it is on.
4.3 After 45 seconds, the right LED will blink
orange .
If the right LED lights orange continuously
(not blinking), follow Communication Device
Troubleshooting 1 overleaf.
4.4 Connnect the Franking
Machine to the
Communication Device
using the supplied USB
cable.
4.5 Connnect the Franking Machine to a power outlet using the cord supplied. The
Franking Machine displays its startup screens and you will hear noises as the
Franking Machine initialises.
4.6 About 10 seconds after it initialises, the Franking
Machine will display ‘Meter connected to internet
- Press Enter’. Also, the right LED changes from
blinking orange to blinking green .
Press Enter/Yes to continue with step 5.
If the right LED stays orange (either blinking
or continuous), follow Communication Device
Troubleshooting 2 overleaf.
Option 2 - PCMC Connection (Internet connection via your PC)
Before you connect your franking machine to your PC, you need to install our
FREE PC Meter Connect™ software. To do this, you must have administrator rights
on your PC which may require you to contact your IT department. Please note that
the software is not Mac compatible.
To install, visit www.europe.pb.com/PCMeterConnect/setup.exe and choose the
‘Run’ option. Select ‘English (United Kingdom)’ as your installation language and
follow the on-screen instructions. This process installs the software and tests
your franking machine connection. When complete, you are asked to return to this
guide to complete the franking machine installation.
USB Cable
Power
Cord
Page 18
SDC2035C Konstante Verbindung (LAN Verbindung) Anleitung
DE
<< Zurück zum Inhalt
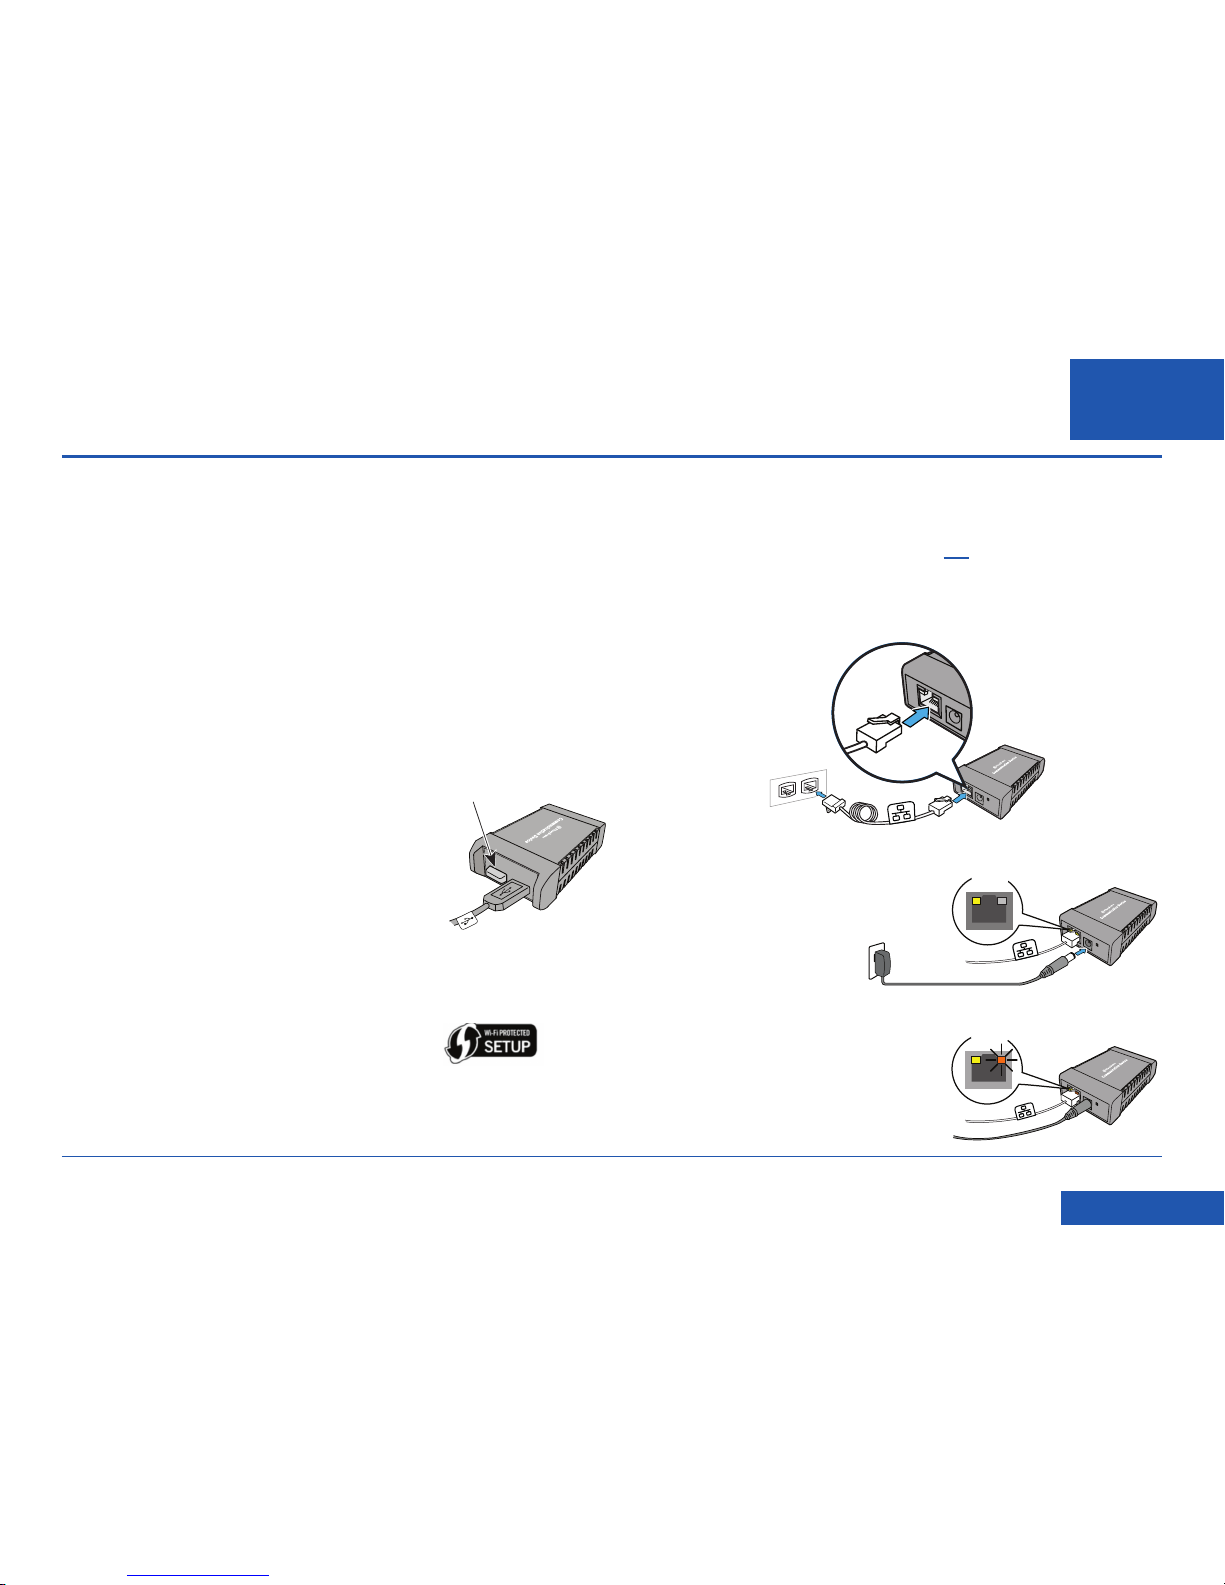
1. Schließen Sie das Kommunikationsgerät an
a. Schließen Sie das Kommunikationsgerät, wie abgebildet, an Ihr Netzwerk an.
b. Stecken Sie das AC-Netzteil in das
Kommunikationsgerät und eine
Steckdose. Die linke LED leuchtet
gelb, wenn das Gerät an ist.
c. Prüfen Sie nach kurzer Zeit, dass
die rechte LED orange und/oder
grün blinkt.
Einrichtung einer drahtlosen (Wi-Fi) Netzwerkverbindung
EINLEITUNG
Das Kommunikationsgerät kann für die drahtlose Verwendung eingestellt werden,
dies ermöglicht Ihnen, die Frankiermaschine an jedem Ort innerhalb des drahtlosen
Bereichs Ihres Netzwerks zu verwenden.
Sie sollten gute Kenntnisse über Ihr drahtloses Netzwerk haben, um die Einrichtung
erfolgreich abzuschließen. Folgen Sie den unten angegebenen Schritten.
Wenn Sie sich an einem Punkt nicht sicher sind, bitten Sie Ihren IT Spezialisten/
Netzwerkadministratorum Hilfe.
Bevor Sie das Kommunikationsgerät für den drahtlosen Betrieb
einrichten:
• Halten Sie den Namen (z.B. SSID) und das Passwort (z.B., Schlüssel) für Ihr
drahtloses Netzwerk/Ihren Router zur Verfügung. Das SSID kann unten auf
Ihrem Router aufgedruckt sein.
• Finden Sie heraus, ob besondere Einstellungen notwendig sind, um ein neues
Gerät in Ihrem drahtlosen Netzwerk zu installieren,
wie statische IPs, Proxy-Server oder nicht
standardmäßige drahtlose Netzwerkeinstellungen.
• Stellen Sie sicher, dass der Drahtlos-USB-Stecker
in einem der USB-Ports im Kommunikationsgerät
installiert ist (siehe Abbildung).
• Stellen Sie sicher, dass der drahtlose Zugangspunkt
(Sender) in der Nähe der Frankiermaschine steht,
so dass eine gute Signalstärke vorhanden ist.
• Stellen Sie fest, ob Ihr Netzwerk die Wi-Fi geschützte Einrichtung unterstützt.
Sie können dies feststellen, indem Sie in der Dokumentation des Routers
nachlesen oder nachsehen, ob der Router über das WPS-Symbol verfügt
Wenn WPS unterstützt wird, können Sie den Anweisungen “Wi-Fi geschützte
Einrichtung" weiter unten in dieser Anleitung folgen, anstatt den Standard Wi-Fi
Einrichtungsanweisungen auf den folgenden Seiten.
USB Plug-in
• Wenn Sie Ihre Frankiermaschine installieren und das Kommunikationsgerät
gerade aus der Verpackung genommen haben, befi ndet es sich in
Werkseinstellung und Sie können mit den unten angegebenen Schritten
fortfahren. Wenn das Kommunikationsgerät vorher konfi guriert und verwendet
wurde, setzen Sie es gemäß der Beschreibung hier zurück, bevor Sie fortfahren.
LAN-Verbindung (Router,
Hub, Steckdose)
Netzwerk-Kabel
Kommunikation
Gerät
LEDs
AC Power Adapter
LEDs
Page 19
SDC2035C Konstante Verbindung (LAN Verbindung) Anleitung
DE
<< Zurück zum Inhalt
Einrichtung einer drahtlosen (Wi-Fi) Netzwerkverbindung (Fortsetzung)
2. Laden Sie die Setup-Software herunter und starten Sie sie.
a. Verwenden Sie einen Computer, der an dasselbe Netzwerk oder denselben
Router wie das Kommunikationsgerät angeschlossen ist. Laden Sie die
Einrichtungssoftware auf Ihren Computer herunter, gehen Sie hierzu auf die
Seite:
PC: pitneybowes.com/DE/DM60wifpc
Mac: pitneybowes.eu/DM60mac
Klicken Sie auf die Schaltfläche für den Typ Ihres Computers.
Hinweis: Wenn eine Firewall-Meldung erscheint, klicken Sie auf die Schaltfläche,
um das Herunterladen zuzulassen, um fortzufahren.
b. Speichern Sie die Software “pbSmartLAN” auf Ihrem Computer, dann önen und
starten Sie sie.
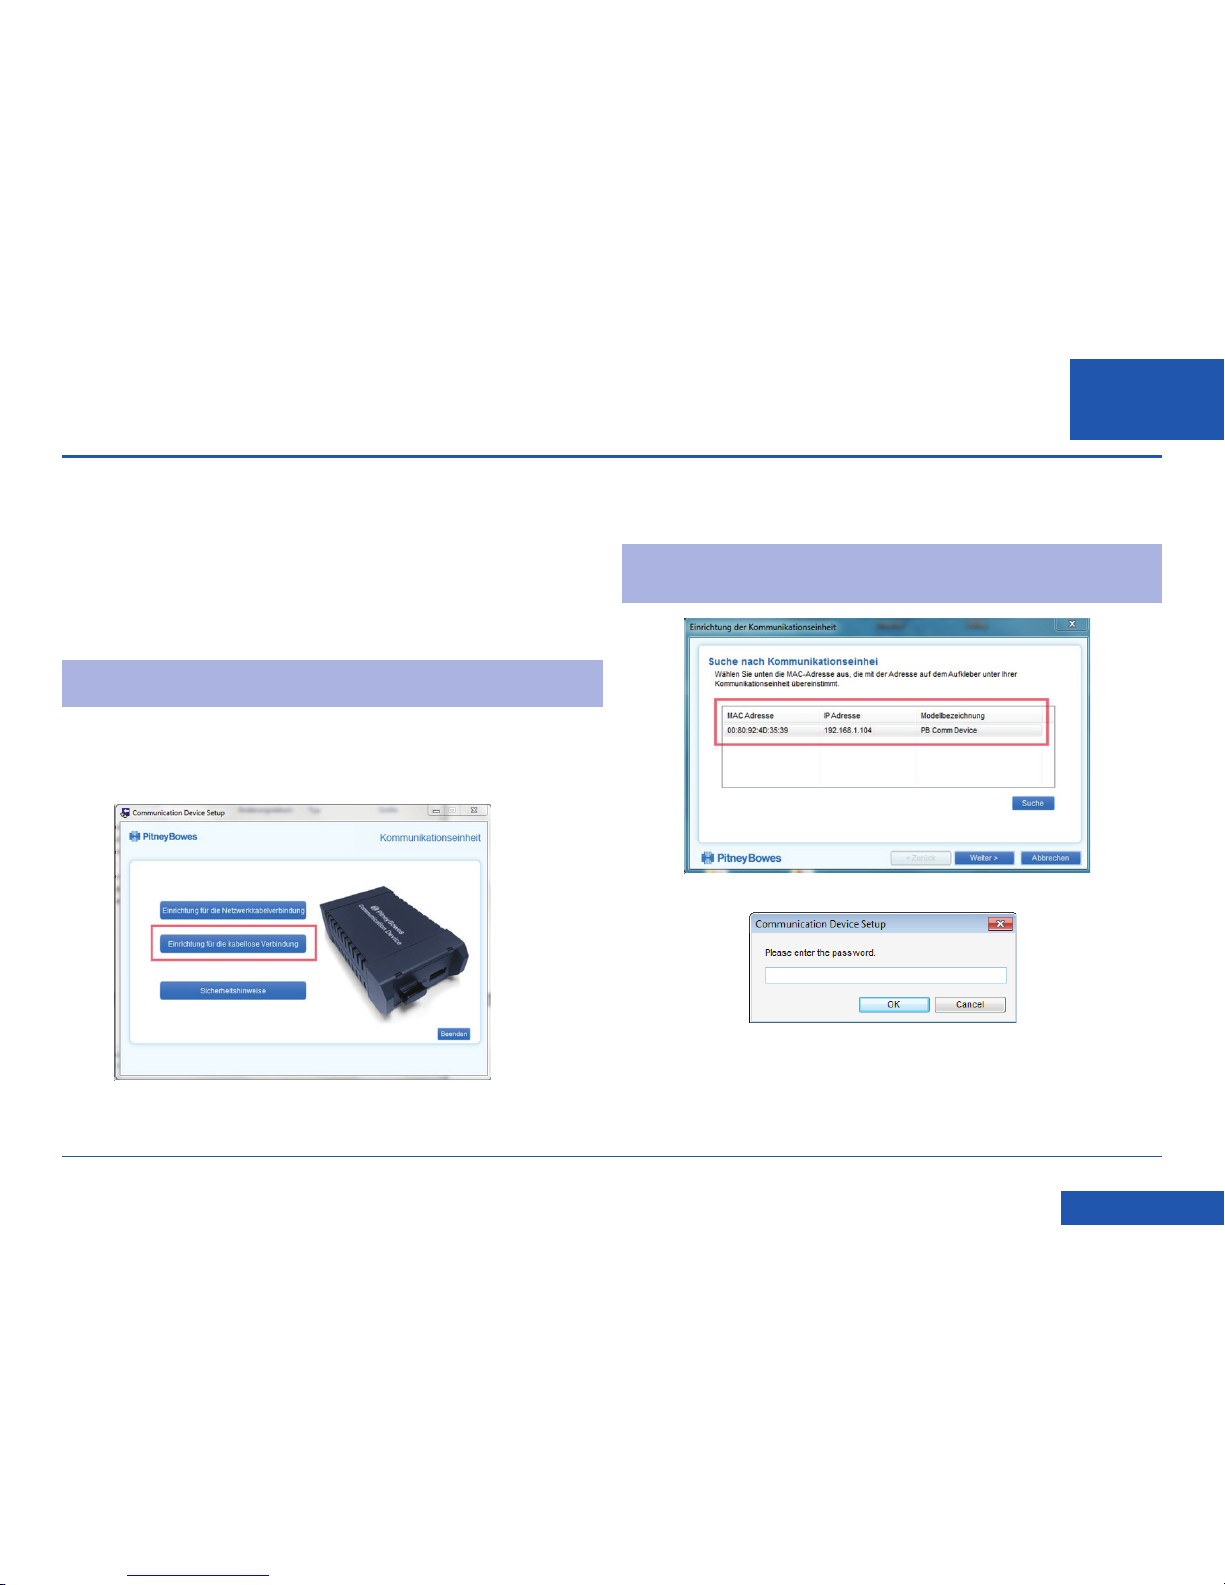
c. Klicken Sie auf die Schaltfläche Kabellos Netzwerkverbindung .
d. Bitte lesen Sie die Software-Lizensvereinbarung und akzeptieren Sie diese.
e. Die Konfigurationssoftware sucht nach Geräten in Ihrem Netzwerk und zeigt
eine Liste der gefundenen Geräte. Markieren Sie das Gerät, dass konfiguriert
werden soll und wählen Sie Weiter.
Anmerkung: wenn mehrer Geräte angezeigt werden, wählen Sie die MAC
Adresse, die mit Ihrem Gerät übereinstimmt. ‘E/A’ Nummer steht auf
der Rückseite des Kommunikationsgeräts.
f. Geben Sie das Passwort MnDqr7 ein und wählen OK.
Page 20
SDC2035C Konstante Verbindung (LAN Verbindung) Anleitung
DE
<< Zurück zum Inhalt
3. Starten Sie das Kommunikationsgerät erneut
a. Trennen Sie das Netzwerkkabel und das AC-Netzteil vom Kommunikationsgerät.
Stellen Sie sicher, dass die Frankiermaschine und das Kommunikationsgerät über
das USB-Kabel angeschlossen sind.
b. Schließen Sie das Kommunikationsgerät wieder an die Stromversorgung an.
Hinweis: Schließen Sie nicht das Netzwerkkabel an.
USB-Kabel zu
Frankiermaschine
Netzwerk-Kabel
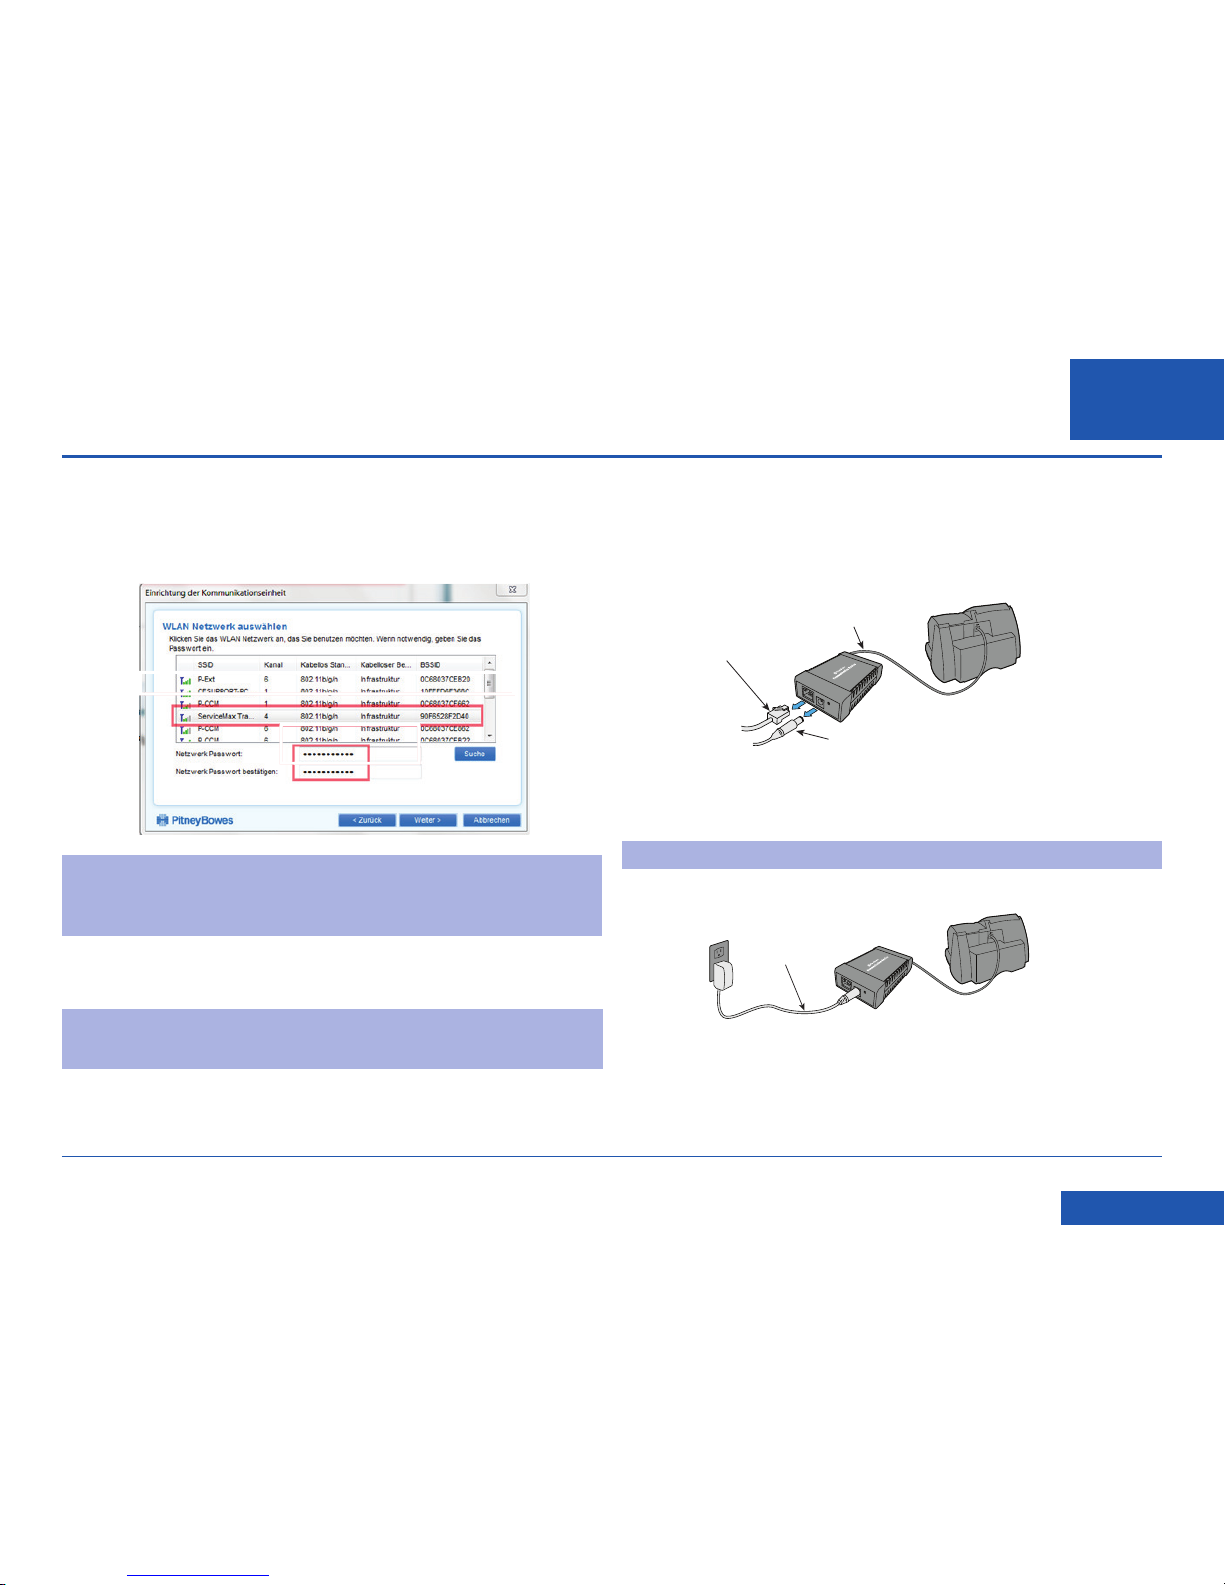
g. Wählen Sie die SSID (Name) für Ihr drahtloses Netzwerk aus. Wenn es nicht
angezeigt wird, klicken Sie auf Suche.
Wenn erforderlich, geben Sie das Passwort (Schlüssel) für das ausgewählte
Netzwerk aus, bestätigen Sie es und klicken Sie dann auf Weiter.
Hinweis: Wenn das drahtlose Netzwerk, das Sie verwenden, seinen Namen
nicht sendet, erscheint der Name nicht in dieser Liste Um diese Informationen
einzugeben, scrollen Sie hinunter und wählen Sie Anderes Netzwerkaus. Klicken
Sie dann auf Weiter, geben Sie die Einstellungen für Ihr drahtlosesNetzwerk ein.
h. Folgen Sie Einrichtungsassistenten und geben Sie die entsprechenden
besonderen Einstellungen ein.
Hinweis: Ihre Netzwerk muss für bestimmte Ports, Protokolle, Domains und
Dateierweiterungen o en sein. Einzelheiten dazu fi nden Sie im Abschnitt
Referenzen in dieser Anleitung.
AC Power Adapter
Einrichtung einer drahtlosen (Wi-Fi) Netzwerkverbindung (Fortsetzung)
AC Power Adapter
Page 21
SDC2035C Konstante Verbindung (LAN Verbindung) Anleitung
DE
<< Zurück zum Inhalt
Einrichtung einer drahtlosen (Wi-Fi) Netzwerkverbindung (Fortsetzung)
3. Das Kommunikationsgerät neu starten (Fortsetzung)
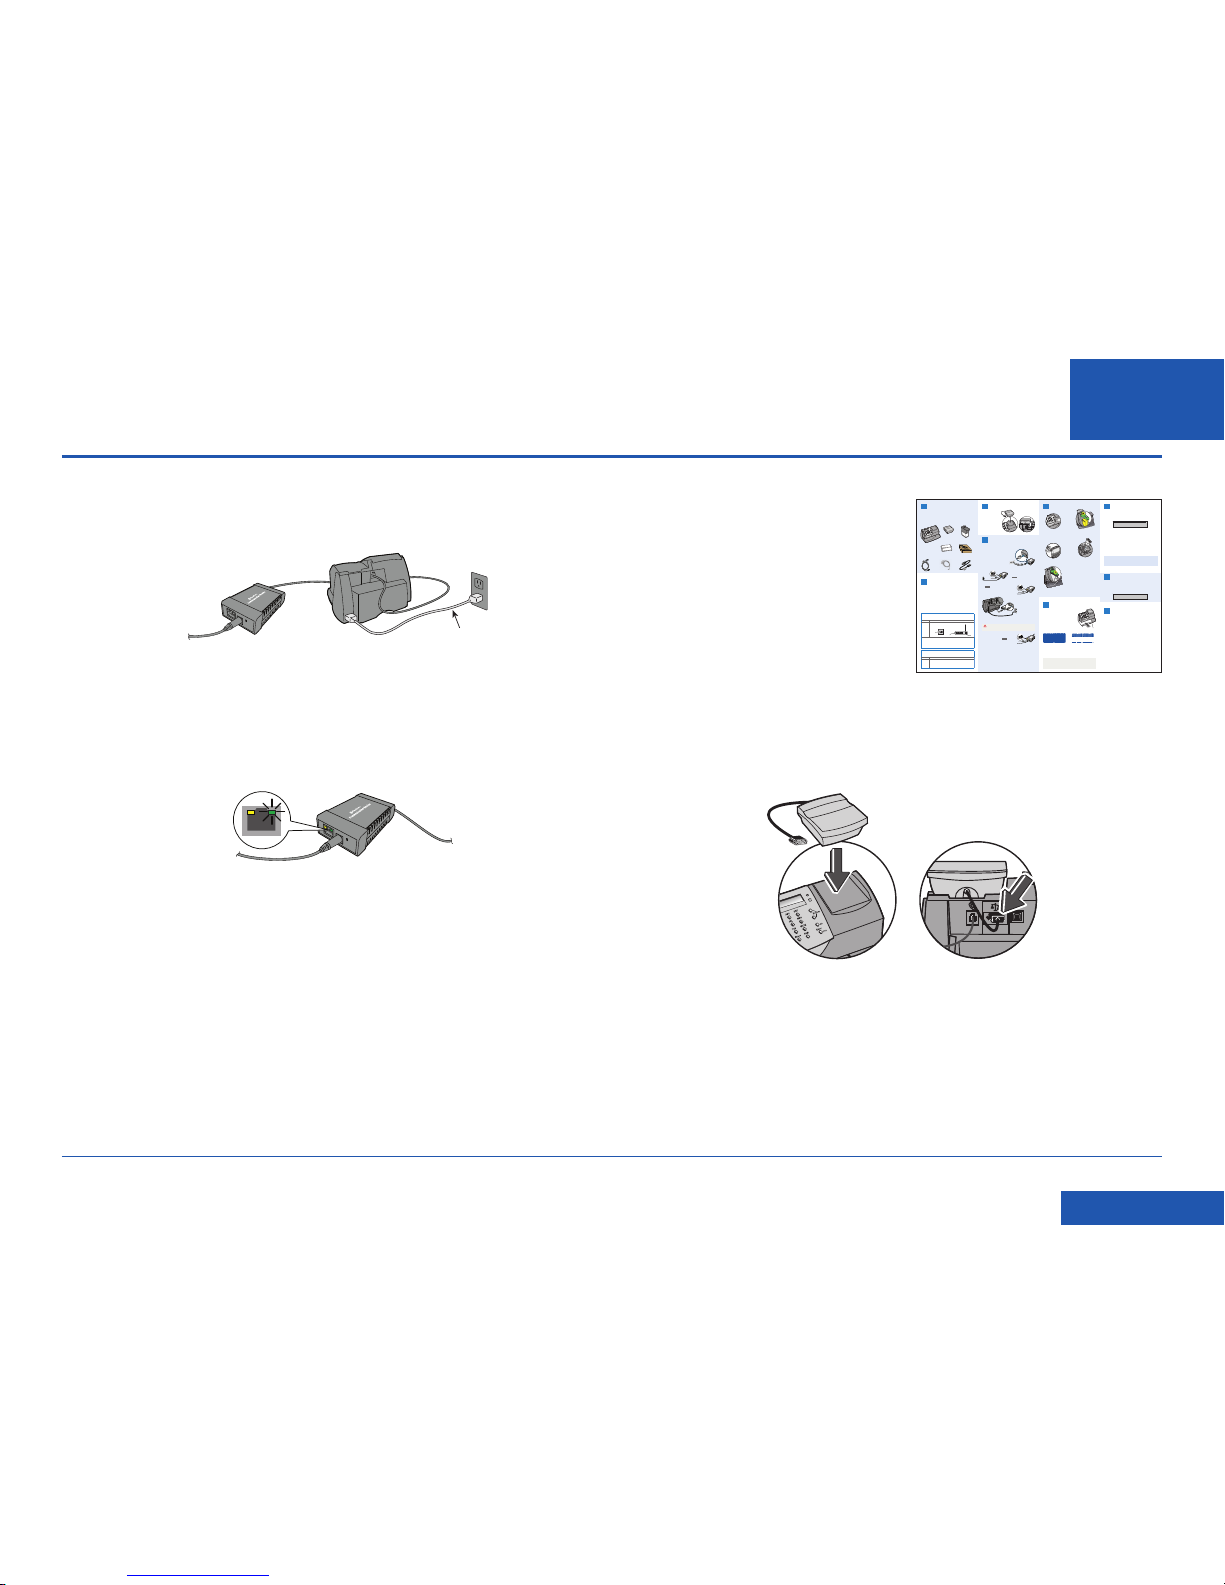
c. Schließen Sie die Frankiermaschine an die Stromversorgung an. Wenn Ihre
Frankiermaschine bereits installiert ist, könnte die Stromversorgung bereits
angeschlossen sein.
d. Nach 60 Sekunden prüfen, ob die rechte LED des Kommunikationsgeräts
grünblinkt
Stromkabel
4. Fahren Sie mit der Installation der Frankiermaschine fort
Sobald Ihr Kommunikationsgerät mit der
Setup-Software konfi guriert ist, sollte
Ihre Frankiermaschine "Tintenkartusche
einsetzen" oder "Sprache auswählen"
anzeigen. Sie kann nun mit der Installation
der Frankiermaschine gemäß der
Installationsanleitung in Papierform
fortfahren, die mit der Maschine geliefert
wurde.
a. Bevor Sie fortfahren, stellen Sie sicher, dass die Waage wie in der gedruckten
Installationsanleitung beschrieben angeschlossen wurde.
b. Fahren Sie nun mit “Die Tintenkartusche installieren” oder “Sprache
auswählen” (je nachdem) in der gedruckten Installationsanleitung fort, um
die Installation abzuschließen. Sobald die Installation abgeschossen ist, lesen
Sie die Anleitung auf der Rückseite für hilfreiche Informationen und Tipps zur
Verwendung der Frankiermaschine.
AC Adapter
LEDs
3. Connect to the outside world
Follow the relevant section below for the connection method you‘ve chosen:
Option 1 - LAN (network) connection
4.1 Connect the Communication Device
to your network as shown.
6. Carry out a test print
When prompted, insert a spare envelope or tape/
label strip for a test print. Insert the item into the
franking machine from the front, making sure it
is pushed up to the right registration wall. The
franking machine automatically begins printing.
Do not remove the item until the printing has
finished.
Review the quality of the test print.
Good quality – press Enter/Yes.
Poor quality – press No, the franking machine goes through another set-up cycle
and when complete you should try the test print again.
8. Check for updates
Your franking machine now automatically checks and installs any new software,
including any new Envelope Messages associated with your account. The display
shows the status of the update.
Once complete, the Home Screen displays and your franking machine is ready to
be used.
7. Add postage funds
You need to add funds to your franking machine before you can use it.
Connect to Pitney Bowes Data Centre
The franking machine automatically connects with the Data Centre and, after a
short
delay, displays your account balance:
Adding funds
You now need to add postage to your franking machine.
• Press Enter/Yes - an amount of £50 will be suggested. To accept this amount,
press Enter/Yes or press Clear/Back to change it.
• If you pressed Clear/Back you will be prompted to enter a new amount. Enter the
amount and then press Enter/yes. This new refill amount must be in increments
of £10.
• Confirm the amount to add by pressing Enter/yes again.
• The franking machine communicates with the Data Centre to add postage and
confirms when
complete. Press Enter/yes.
• The display
asks if you would like a receipt. Press Enter/Yes and print an
envelope or label as you did for the test print at step 6.
9. Frank an envelope
Let’s now create your first piece of franked mail...
• Place your item of mail on the scale and the display will show the cost, weight,
class and date.
• If you want to change the Class, press the Class button and scroll
to highlight the Class you wish to use and then press Enter/yes.
• Envelope Messaging prints alongside your frank. To select your preferred
Envelope Message, press the down Review ▼ key until ‘Ad’ displays, then press
Enter/yes. Scroll to the required Envelope Message using the Review ▼▲ keys,
then press Enter/yes. (To ensure your Envelope Message prints automatically in
future, see Pre-setting Options, overleaf).
• Insert the item of mail into the franking machine exactly as you did at step 6 to
create your first piece of franked mail.
Problems?
• Can’t see the personalised Envelope Message you ordered? See Envelope
Messaging overleaf.
•
Want to pre-set the franking machine to automatically print your preferred Envelope
Me
ssage? See Pre-setting Options overleaf.
• Want to learn more about using you new franking machine? See Using your
franking machine overleaf.
Prepaid: £xxxxx.xx
0.00 0 g
postal class date
IMPORTANT
Once you have printed the receipt, check the Postage by Phone account number
on the receipt and ensure it matches the account number on the dispatch note
received with the franking machine. If the numbers do NOT match, do not go any
further with this installation and contact Pitney Bowes on 08444 992992.
IMPORTANT
It is very important that the print from your franking machine is of a good
quality. If you do not have a good quality print, Royal Mail may refuse or be
unable to read the information automatically, this might result in a delay in
delivering your post.
Right Registration Wall
5 . Install the ink cartridge
1
2
3
4
5
6
7
8
9
C
0
.
Sperren
Versandarten
Zählerstände
Einstellungen
Eingabe
blättern vor/zurück
Nein
Ja
*#_
ABC
DEF
GHI
JKLMNO
PQRS
TUV
WXYZ
zurück
Leertaste
Eingabe
1
2
3
4
5
6
7
8
9
C
0
.
Lock
Class
Funds
Options
Enter
Review
no
yes
*#_
ABC
DEF
GHI
JKLMNO
PQRS
TUV
WXYZ
Clear/Back
Space
Shift
PitneyBowes
2. Decide where to site your
system and how to connect it
Please DO NOT connect power until instructed.
Your franking machine has to connect to the Pitney Bowes Data Centre to add
postage funds, get software updates, and carry out the required Postal Authority
inspections.
Choose which of the two connection methods described in the table below best
suits your needs. Consider the requirements and ensure that there is a suitable
network socket or internet enabled PC within reach of the supplied cables. You
must also ensure that the franking machine has a constant power supply and you
have space around it to work. When you have decided, continue with step 3.
If you cannot meet the requirements of either connection method, refer to
Troubleshooting overleaf.
5.2 When prompted, lift the top cover
and press the unlock symbol on the
cartridge latch. Remove and discard
the yellow packaging material.
5.3 Open the packaging for the ink
cartridge and take off the protective
tape from the bottom.
5.6 Close the top cover and press Enter/
yes. When you see ‘IMPORTANT – is
the ink cartridge installed?’ displayed,
press Enter/yes again.
The franking machine will now go
through a set-up cycle which takes up
to 2 minutes.
1 Open the box and unpack
Here’s a diagram and explanation of the items you should find in your box, if
a
nything is missing give us a call on 08444 992992. Depending on how you install
your franking machine, you might not need all of thes
e items.
If you have any problems during this installation, refer to ‘Troubleshooting’
overleaf.
Franking Machine Scale Ink Cartridge
Postage Meter
Labels
USB Cable
Network Cable Power Cord
Communication
Device
1 5 7
8
9
2
6
5.1 When the display shows ‘Add ink
cartridge’, press Enter/yes.
5.4 Insert the ink cartridge. Insert the
base of the cartridge first before
pushing the top back.
5.5 Press the ink cartridge latch down
until it clicks and holds the cartridge
in place.
Good print - no broken lines in the
centre of the test print
Bad print - broken lines in the centre
of the test print
Communication Device
For Pitney Bowes Digital Mailing System
BEST - LAN (Network) Connection
You can use a suitably configured network connection (LAN) that gives access to the
internet. Pitney Bowes highly recommends LAN connection.
Benefits Requirements
Fast.
Always
connected.
Saves
phone call
costs.
A standard (RJ45) network connection on your router (as found in a normal
domestic wired setup) or an active network wall socket.
The technical stuff...
The connection must use DHCP (automatic configuration), be open to all HTTP, HTTPS
and FTP traffic and must NOT be using a PROXY server.
If you’re unsure about the requirements for LAN connection or if you wish to connect
using Wi-Fi, our online Communication Device Advanced Setup Guide can help.
Go to www.europe.pb.com/docs and enter the code 10936 to download the guide.
GOOD - PCMC Connection (Internet connection via your PC)
If you have a PC with an internet connection nearby, you can install the free Pitney Bowes
PC Meter Connect™ (PCMC) software and use the PC’s internet connection.
Benefits Requirements
Fast.
Saves
phone call
costs.
Requires a PC with an active internet connection to be nearby and turned
on.
The PC must run Windows XP, Vista or 7 and have Pitney Bowes PCMC
software installed.
PCMC is not available for Mac.
3. Fit the Scale
Remove all shipping
tape from the machine.
Position the scale on
the franking mach
ine
a
nd plug in the scale
connector as shown in
these diagrams. Tighten
the connector screws.
3
WARNING: Always plug the equipment into a properly grounded wall
outlet. The socket outlet should be near the equipment and should be easily
accessible. Use the mains lead supplied with your equipment.
LAN connection (Router,
Hub, Wall socket)
Communication
Device
Network Cable
LEDs
LEDs
4
4.2 Plug the AC adapter into the
Communication Device and a
power outlet. The left LED is lit
yellow when it is on.
4.3 After 45 seconds, the right LED will blink
orange .
If the right LED lights orange continuously
(not blinking), follow Communication Device
Troubleshooting 1 overleaf.
4.4 Connnect the Franking
Machine to the
Communication Device
using the supplied USB
cable.
4.5 Connnect the Franking Machine to a power outlet using the cord supplied. The
Franking Machine displays its startup screens and you will hear noises as the
Franking Machine initialises.
4.6 About 10 seconds after it initialises, the Franking
Machine will display ‘Meter connected to internet
- Press Enter’. Also, the right LED changes from
blinking orange to blinking green .
Press Enter/Yes to continue with step 5.
If the right LED stays orange (either blinking
or continuous), follow Communication Device
Troubleshooting 2 overleaf.
Option 2 - PCMC Connection (Internet connection via your PC)
Before you connect your franking machine to your PC, you need to install our
FREE PC Meter Connect™ software. To do this, you must have administrator rights
on your PC which may require you to contact your IT department. Please note that
the software is not Mac compatible.
To install, visit www.europe.pb.com/PCMeterConnect/setup.exe and choose the
‘Run’ option. Select ‘English (United Kingdom)’ as your installation language and
follow the on-screen instructions. This process installs the software and tests
your franking machine connection. When complete, you are asked to return to this
guide to complete the franking machine installation.
USB Cable
Power
Cord
Page 22
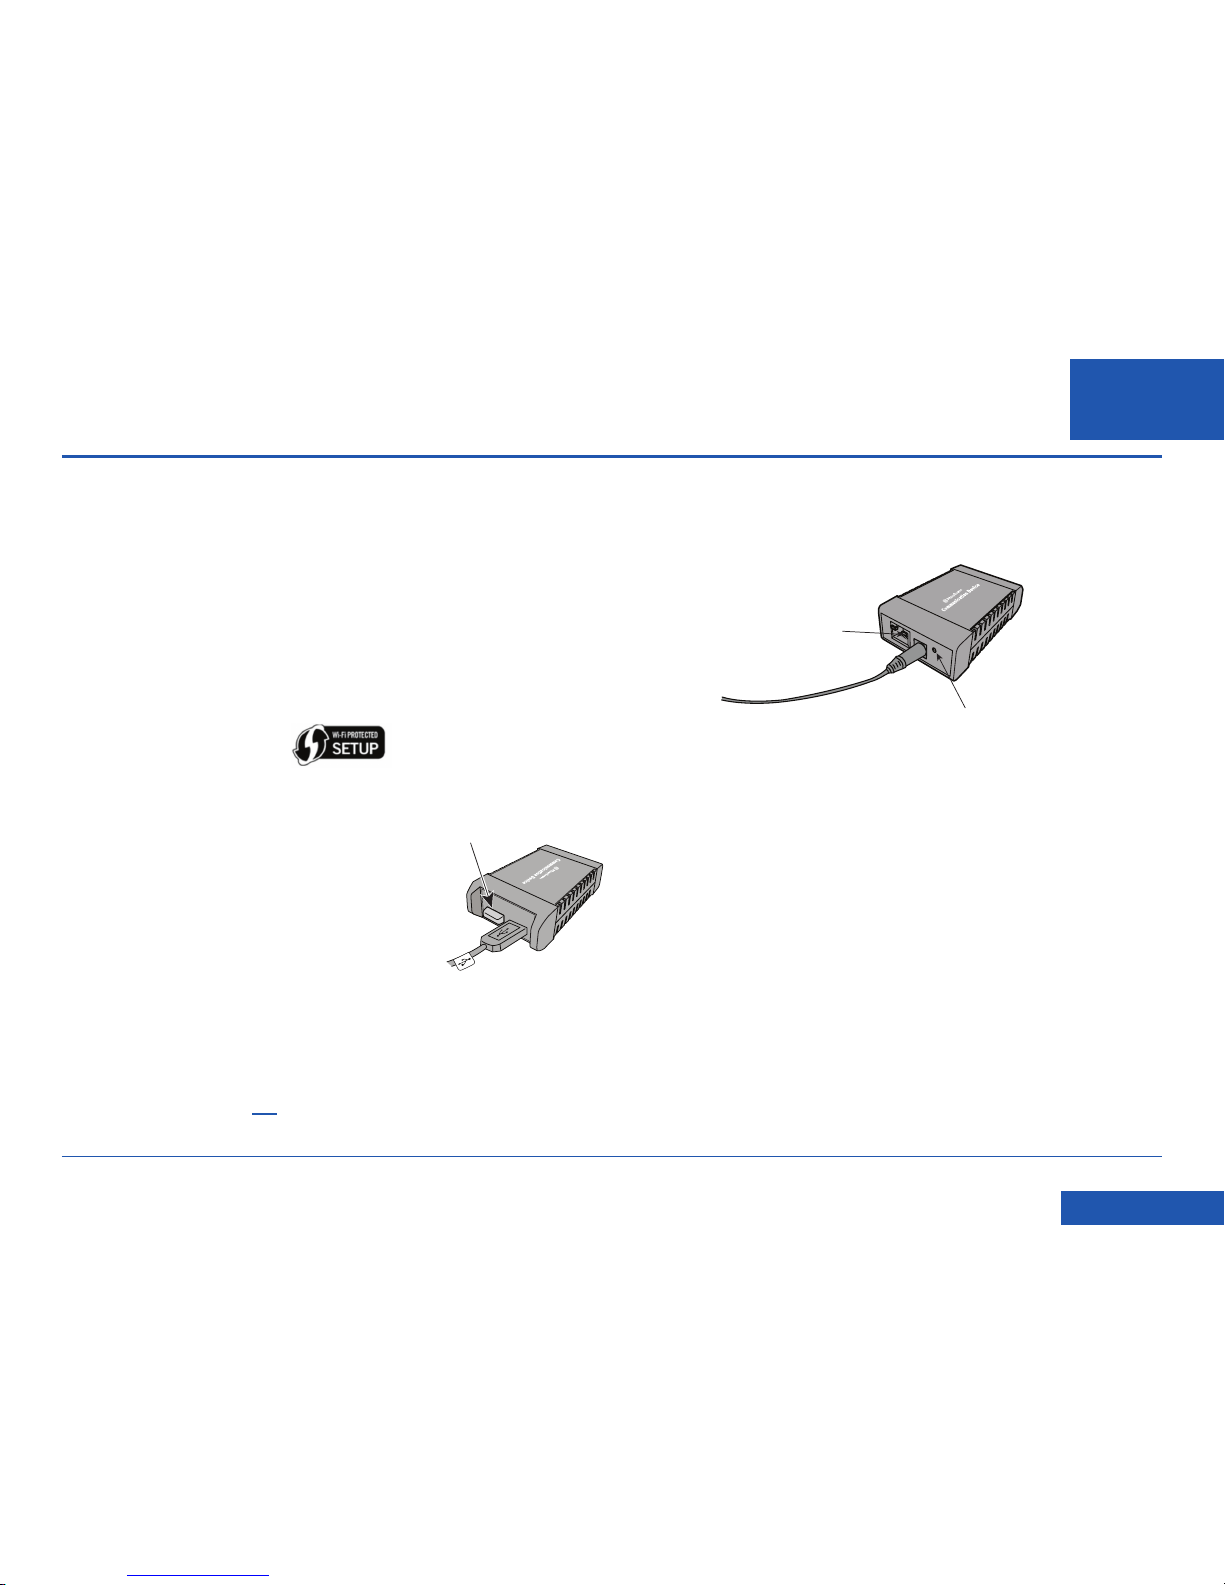
SDC2035C Konstante Verbindung (LAN Verbindung) Anleitung
DE
<< Zurück zum Inhalt
Wi-Fi Geschützte Einrichtung
Einführung
Das Kommunikationsgerät kann für die drahtlose Verwendung eingestellt werden,
dies ermöglicht Ihnen, die Frankiermaschine an jedem Ort innerhalb des drahtlosen
Bereichs Ihres Netzwerks zu verwenden.
Wenn Ihr Netzwerk/Router die Wi-Fi geschützte Einrichtung (WPS)
unterstützt, können Sie diesen Anweisungen folgen, anstatt die StandardWi-Fi-Einrichtungsanweisungen zu verwenden, die oben in dieser Anleitung
beschrieben wurden. WPS ist eine Methode, die verwendet wird, um die drahtlose
Kommunikation zwischen Geräten zu ermöglichen, ohne lange Kennwörter
einzugeben.
Sie können feststellen, ob Ihr Router die Wi-Fi geschützte Einrichtung unterstützt,
indem Sie in der Dokumentation des Routers nachlesen oder nachsehen, ob der
Router über eine Taste mit der Kennzeichnung "WPS" oder mit dem entsprechenden
Symbol verfügt
Bevor Sie das Kommunikationsgerät für den Wi-Fi geschützten
Betrieb einrichten:
• Stellen Sie sicher dass der Router in einer der
folgenden Einstellungen eingerichtet ist: WPAPSK/WPA2-PSK oder [AES]/WPA2-PSK [TKIP].
WEP oder “Keine” kann nicht verwendet werden.
• Stellen Sie sicher, dass der Drahtlos-USB-Stecker
in einem der USB-Ports im Kommunikationsgerät
installiert ist (siehe Abbildung).
• Stellen Sie sicher, dass der drahtlose
Zugangspunkt (Sender) in der Nähe der Frankiermaschine steht, so dass eine
gute Signalstärke vorhanden ist.
• Wenn Sie Ihre Frankiermaschine installieren und das Kommunikationsgerät
gerade aus der Verpackung genommen haben, befi ndet es sich in
Werkseinstellung und Sie können mit folgenden Schritten fortfahren. Wenn das
Kommunikationsgerät vorher konfi guriert und verwendet wurde, setzen Sie es
gemäß der Beschreibung hier zurück, bevor Sie fortfahren.
1. Einrichten des Kommunikationsgeräts
a. Schließen Sie das AC-Netzteil an das Kommunikationsgerät an.
b. Warten Sie ungefähr 30 Sekunden, bis die orange LED leuchtet, drücken Sie
dann die Taste Reset. Wenn die LED grün leuchtet, lassen Sie die Taste los.
c. Warten Sie weitere 45 Sekunden, bis das Kommunikationsgerät seine Start-
Routine abgeschlossen hat. Wenn die LED regelmäßig blinkt, (normalerweise
orange, grün, orange, grün, Pause), fahren Sie mit Schritt 2, wie unten
beschrieben, fort.
2. WPS Einrichtungsverfahren
a. Bringen Sie Ihren Routern in den Zustand WPS (lesen Sie hierfür in der
Betriebsanleitung nach).
b. Halten Sie die Taste auf dem Kommunikationsgerät 15 Sekunden gedrückt,
lassen Sie sie dann wieder los. Die LED blinkt schnell.
c. Das Blinken dauert ungefähr eine Minute. Wenn die LED nicht mehr schnell
blinkt, trennen Sie das AC-Netzteil vom Kommunikationsgerät und schließen Sie
es wieder an.
d. Warten Sie weitere 45 Sekunden, bis das Kommunikationsgerät seine Start-
Routine abgeschlossen hat.
Wenn die LED orange blinkt (nur bei nicht angeschlossener Frankiermaschine)
oder wenn sie grün blinkt (nur bei angeschlossener Frankiermaschine) haben Sie
das Kommunikationsgerät erfolgreich eingerichtet, sodass es drahtlos betrieben
werden kann.
Wenn das schnelle Blinken länger als eine Minute anhält, ist das WPS
fehlgeschlagen. Wiederholen Sie die Schritte 1 und 2 auf dieser Seite.
e. Schließen Sie die Frankiermaschine und das Kommunikationsgerät über das
mitgelieferte USB-Kabel an.
Resettaste
LED
Wireless USB Plug-in
Page 23
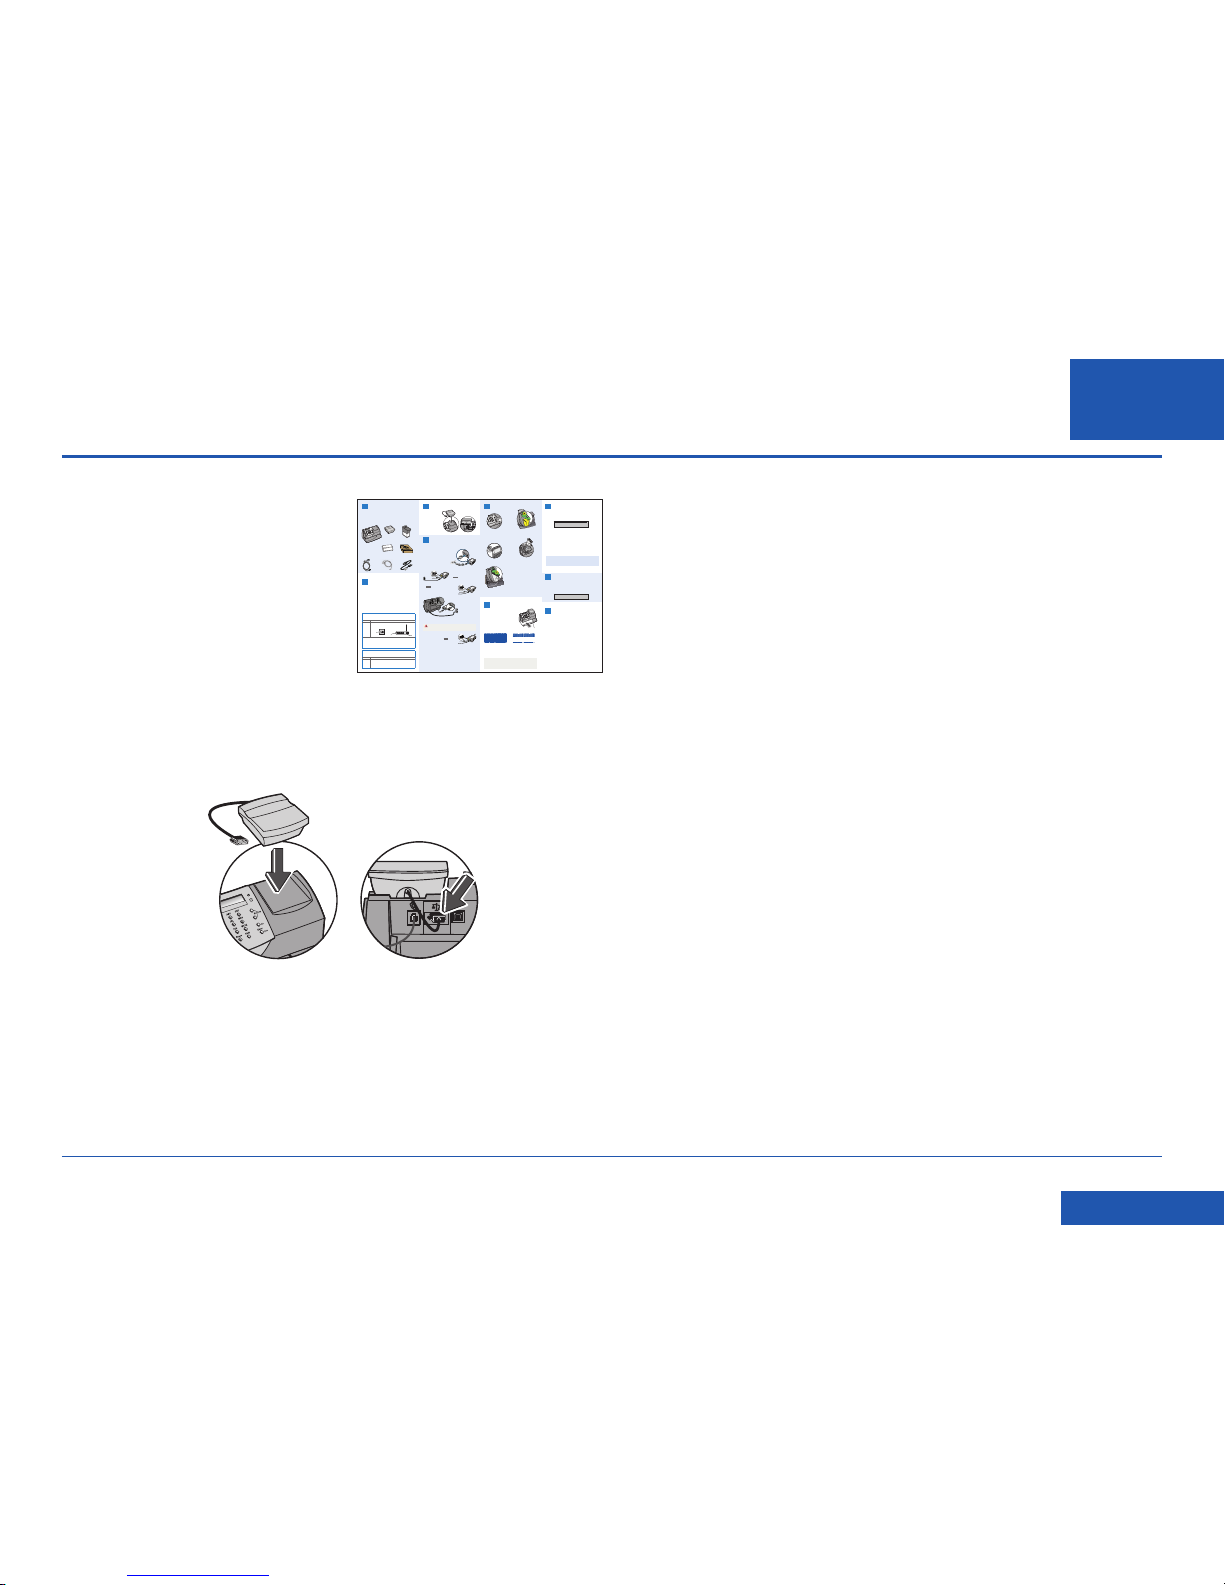
SDC2035C Konstante Verbindung (LAN Verbindung) Anleitung
DE
<< Zurück zum Inhalt
Wi-Fi Geschützte Einrichtung (Fortsetzung)
3. Fahren Sie mit der Installation der Frankiermaschine fort
Sobald Ihr Kommunikationsgerät
mit WPS konfi guriert ist, sollte Ihre
Frankiermaschine "Tintenkartusche
einsetzen" oder "Sprache auswählen"
anzeigen. Sie kann nun mit der Installation
der Frankiermaschine gemäß der
Installationsanleitung in Papierform
fortfahren, die mit der Maschine geliefert
wurde.
a. Bevor Sie fortfahren, stellen Sie sicher, dass die Waage wie in der gedruckten
Installationsanleitung beschrieben angeschlossen wurde.
b. Fahren Sie nun mit “Die Tintenkartusche installieren” oder “Sprache
auswählen” (je nachdem) in der gedruckten Installationsanleitung fort, um
die Installation abzuschließen. Sobald die Installation abgeschossen ist, lesen
Sie die Anleitung auf der Rückseite für hilfreiche Informationen und Tipps zur
Verwendung der Frankiermaschine.
AC Adapter
LEDs
3. Connect to the outside world
Follow the relevant section below for the connection method you‘ve chosen:
Option 1 - LAN (network) connection
4.1 Connect the Communication Device
to your network as shown.
6. Carry out a test print
When prompted, insert a spare envelope or tape/
label strip for a test print. Insert the item into the
franking machine from the front, making sure it
is pushed up to the right registration wall. The
franking machine automatically begins printing.
Do not remove the item until the printing has
finished.
Review the quality of the test print.
Good quality – press Enter/Yes.
Poor quality – press No, the franking machine goes through another set-up cycle
and when complete you should try the test print again.
8. Check for updates
Your franking machine now automatically checks and installs any new software,
including any new Envelope Messages associated with your account. The display
shows the status of the update.
Once complete, the Home Screen displays and your franking machine is ready to
be used.
7. Add postage funds
You need to add funds to your franking machine before you can use it.
Connect to Pitney Bowes Data Centre
The franking machine automatically connects with the Data Centre and, after a
s
hort delay, displays your account balance:
Adding funds
You now need to add postage to your franking machine.
• Press Enter/Yes - an amount of £50 will be suggested. To accept this amount,
press Enter/Yes or press Clear/Back to change it.
• If you pressed Clear/Back you will be prompted to enter a new amount. Enter the
amount and then press Enter/yes. This new refill amount must be in increments
of £10.
• Confirm the amount to add by pressing Enter/yes again.
• The franking machine communicates with the Data Centre to add postage and
co
nfirms when complete. Press Enter/yes.
• T
he display asks if you would like a receipt. Press Enter/Yes and print an
envelope or label as you did for the test print at step 6.
9. Frank an envelope
Let’s now create your first piece of franked mail...
• Place your item of mail on the scale and the display will show the cost, weight,
class and date.
• If you want to change the Class, press the Class button and scroll
to highlight the Class you wish to use and then press Enter/yes.
• Envelope Messaging prints alongside your frank. To select your preferred
Envelope Message, press the down Review ▼ key until ‘Ad’ displays, then press
Enter/yes. Scroll to the required Envelope Message using the Review ▼▲ keys,
then press Enter/yes. (To ensure your Envelope Message prints automatically in
future, see Pre-setting Options, overleaf).
• Insert the item of mail into the franking machine exactly as you did at step 6 to
create your first piece of franked mail.
Problems?
• Can’t see the personalised Envelope Message you ordered? See Envelope
Messaging overleaf.
•
Want to pre-set the franking machine to automatically print your preferred Envelope
Mess
age? See Pre-setting Options overleaf.
• Want to learn more about using you new franking machine? See Using your
franking machine overleaf.
Prepaid: £xxxxx.xx
0.00 0 g
postal class date
IMPORTANT
Once you have printed the receipt, check the Postage by Phone account number
on the receipt and ensure it matches the account number on the dispatch note
received with the franking machine. If the numbers do NOT match, do not go any
further with this installation and contact Pitney Bowes on 08444 992992.
IMPORTANT
It is very important that the print from your franking machine is of a good
quality. If you do not have a good quality print, Royal Mail may refuse or be
unable to read the information automatically, this might result in a delay in
delivering your post.
Right Registration Wall
5 . Install the ink cartridge
1
2
3
4
5
6
7
8
9
C
0
.
Sperren
Versandarten
Zählerstände
Einstellungen
Eingabe
blättern vor/zurück
Nein
Ja
*#_
ABC
DEF
GHI
JKLMNO
PQRS
TUV
WXYZ
zurück
Leertaste
Eingabe
1
2
3
4
5
6
7
8
9
C
0
.
Lock
Class
Funds
Options
Enter
Review
no
yes
*#_
ABC
DEF
GHI
JKLMNO
PQRS
TUV
WXYZ
Clear/Back
Space
Shift
PitneyBowes
2. Decide where to site your
system and how to connect it
Please DO NOT connect power until instructed.
Your franking machine has to connect to the Pitney Bowes Data Centre to add
postage funds, get software updates, and carry out the required Postal Authority
inspections.
Choose which of the two connection methods described in the table below best
suits your needs. Consider the requirements and ensure that there is a suitable
network socket or internet enabled PC within reach of the supplied cables. You
must also ensure that the franking machine has a constant power supply and you
have space around it to work. When you have decided, continue with step 3.
If you cannot meet the requirements of either connection method, refer to
Troubleshooting overleaf.
5.2 When prompted, lift the top cover
and press the unlock symbol on the
cartridge latch. Remove and discard
the yellow packaging material.
5.3 Open the packaging for the ink
cartridge and take off the protective
tape from the bottom.
5.6 Close the top cover and press Enter/
yes. When you see ‘IMPORTANT – is
the ink cartridge installed?’ displayed,
press Enter/yes again.
The franking machine will now go
through a set-up cycle which takes up
to 2 minutes.
1 Open the box and unpack
Here’s a diagram and explanation of the items you should find in your box, if
a
nything is missing give us a call on 08444 992992. Depending on how you install
your franking machine, you might not need all of t
hese items.
If you have any problems during this installation, refer to ‘Troubleshooting’
overleaf.
Franking Machine Scale Ink Cartridge
Postage Meter
Labels
USB Cable
Network Cable Power Cord
Communication
Device
1 5 7
8
9
2
6
5.1 When the display shows ‘Add ink
cartridge’, press Enter/yes.
5.4 Insert the ink cartridge. Insert the
base of the cartridge first before
pushing the top back.
5.5 Press the ink cartridge latch down
until it clicks and holds the cartridge
in place.
Good print - no broken lines in the
centre of the test print
Bad print - broken lines in the centre
of the test print
Communication Device
For Pitney Bowes Digital Mailing System
BEST - LAN (Network) Connection
You can use a suitably configured network connection (LAN) that gives access to the
internet. Pitney Bowes highly recommends LAN connection.
Benefits Requirements
Fast.
Always
connected.
Saves
phone call
costs.
A standard (RJ45) network connection on your router (as found in a normal
domestic wired setup) or an active network wall socket.
The technical stuff...
The connection must use DHCP (automatic configuration), be open to all HTTP, HTTPS
and FTP traffic and must NOT be using a PROXY server.
If you’re unsure about the requirements for LAN connection or if you wish to connect
using Wi-Fi, our online Communication Device Advanced Setup Guide can help.
Go to www.europe.pb.com/docs and enter the code 10936 to download the guide.
GOOD - PCMC Connection (Internet connection via your PC)
If you have a PC with an internet connection nearby, you can install the free Pitney Bowes
PC Meter Connect™ (PCMC) software and use the PC’s internet connection.
Benefits Requirements
Fast.
Saves
phone call
costs.
Requires a PC with an active internet connection to be nearby and turned
on.
The PC must run Windows XP, Vista or 7 and have Pitney Bowes PCMC
software installed.
PCMC is not available for Mac.
3. Fit the Scale
Remove all shipping
tape from the machine.
Position the scale on
t
he franking machine
a
nd plug in the scale
connector as shown in
these diagrams. Tighten
the connector screws.
3
WARNING: Always plug the equipment into a properly grounded wall
outlet. The socket outlet should be near the equipment and should be easily
accessible. Use the mains lead supplied with your equipment.
LAN connection (Router,
Hub, Wall socket)
Communication
Device
Network Cable
LEDs
LEDs
4
4.2 Plug the AC adapter into the
Communication Device and a
power outlet. The left LED is lit
yellow when it is on.
4.3 After 45 seconds, the right LED will blink
orange .
If the right LED lights orange continuously
(not blinking), follow Communication Device
Troubleshooting 1 overleaf.
4.4 Connnect the Franking
Machine to the
Communication Device
using the supplied USB
cable.
4.5 Connnect the Franking Machine to a power outlet using the cord supplied. The
Franking Machine displays its startup screens and you will hear noises as the
Franking Machine initialises.
4.6 About 10 seconds after it initialises, the Franking
Machine will display ‘Meter connected to internet
- Press Enter’. Also, the right LED changes from
blinking orange to blinking green .
Press Enter/Yes to continue with step 5.
If the right LED stays orange (either blinking
or continuous), follow Communication Device
Troubleshooting 2 overleaf.
Option 2 - PCMC Connection (Internet connection via your PC)
Before you connect your franking machine to your PC, you need to install our
FREE PC Meter Connect™ software. To do this, you must have administrator rights
on your PC which may require you to contact your IT department. Please note that
the software is not Mac compatible.
To install, visit www.europe.pb.com/PCMeterConnect/setup.exe and choose the
‘Run’ option. Select ‘English (United Kingdom)’ as your installation language and
follow the on-screen instructions. This process installs the software and tests
your franking machine connection. When complete, you are asked to return to this
guide to complete the franking machine installation.
USB Cable
Power
Cord
Page 24
SDC2035C Konstante Verbindung (LAN Verbindung) Anleitung
DE
<< Zurück zum Inhalt
Referenz - Dateierweiterungen und URLs für
das Netzwerk/die Firewall
Referenz - Ports und Potokolle die
vom Kommunikationsgerät genutzt
werden
Das Kommunikationsgerät nutzt folgende Dateierweiterungen, welche von Ihrem
Netzwerk und den Firewall-Einstellungen zugelassen werden müssen:
Typ Erweiterung
DEC .dcz
EMD .zmd
Grafiken .gar
Gebührenmanager .rmz
CCD bin
Unter anderem muss der Zugri auf die Domain pb.com über Ihr Netzwerk / Firewall
gewährleistet sein:
Hinweis: URLs, auf die von Ihrem Pitney Bowes-System zugegrien wird, können
die oben angegebenen Zeichenfolge innerhalb der URL enthalten. Beispiel: pb.com.
Firewalls müssen daher so eingestellt werden, dass Sie Trac zu jeder URL zulässt,
die die oben genannten Domains enthalten.
Ihre Firewall muss möglicherweise für die Verwendung von "Wildcards" konfiguriert
werden, wie beispielsweise *pb.com*
Das Kommunikationsgerät nutzt folgende Dateierweiterungen, welche von Ihrem
Netzwerk und den Firewall-Einstellungen zugelassen werden müssen:
Typ Protokoll Port Funktion
HTTPS TCP 443 Portophon
Software und Gebühren-Updates,
Grafiken hochladen.
Firewall muß auf Modus aktiv gesetzt
sein und temporäre Ports zulassen.
Page 25
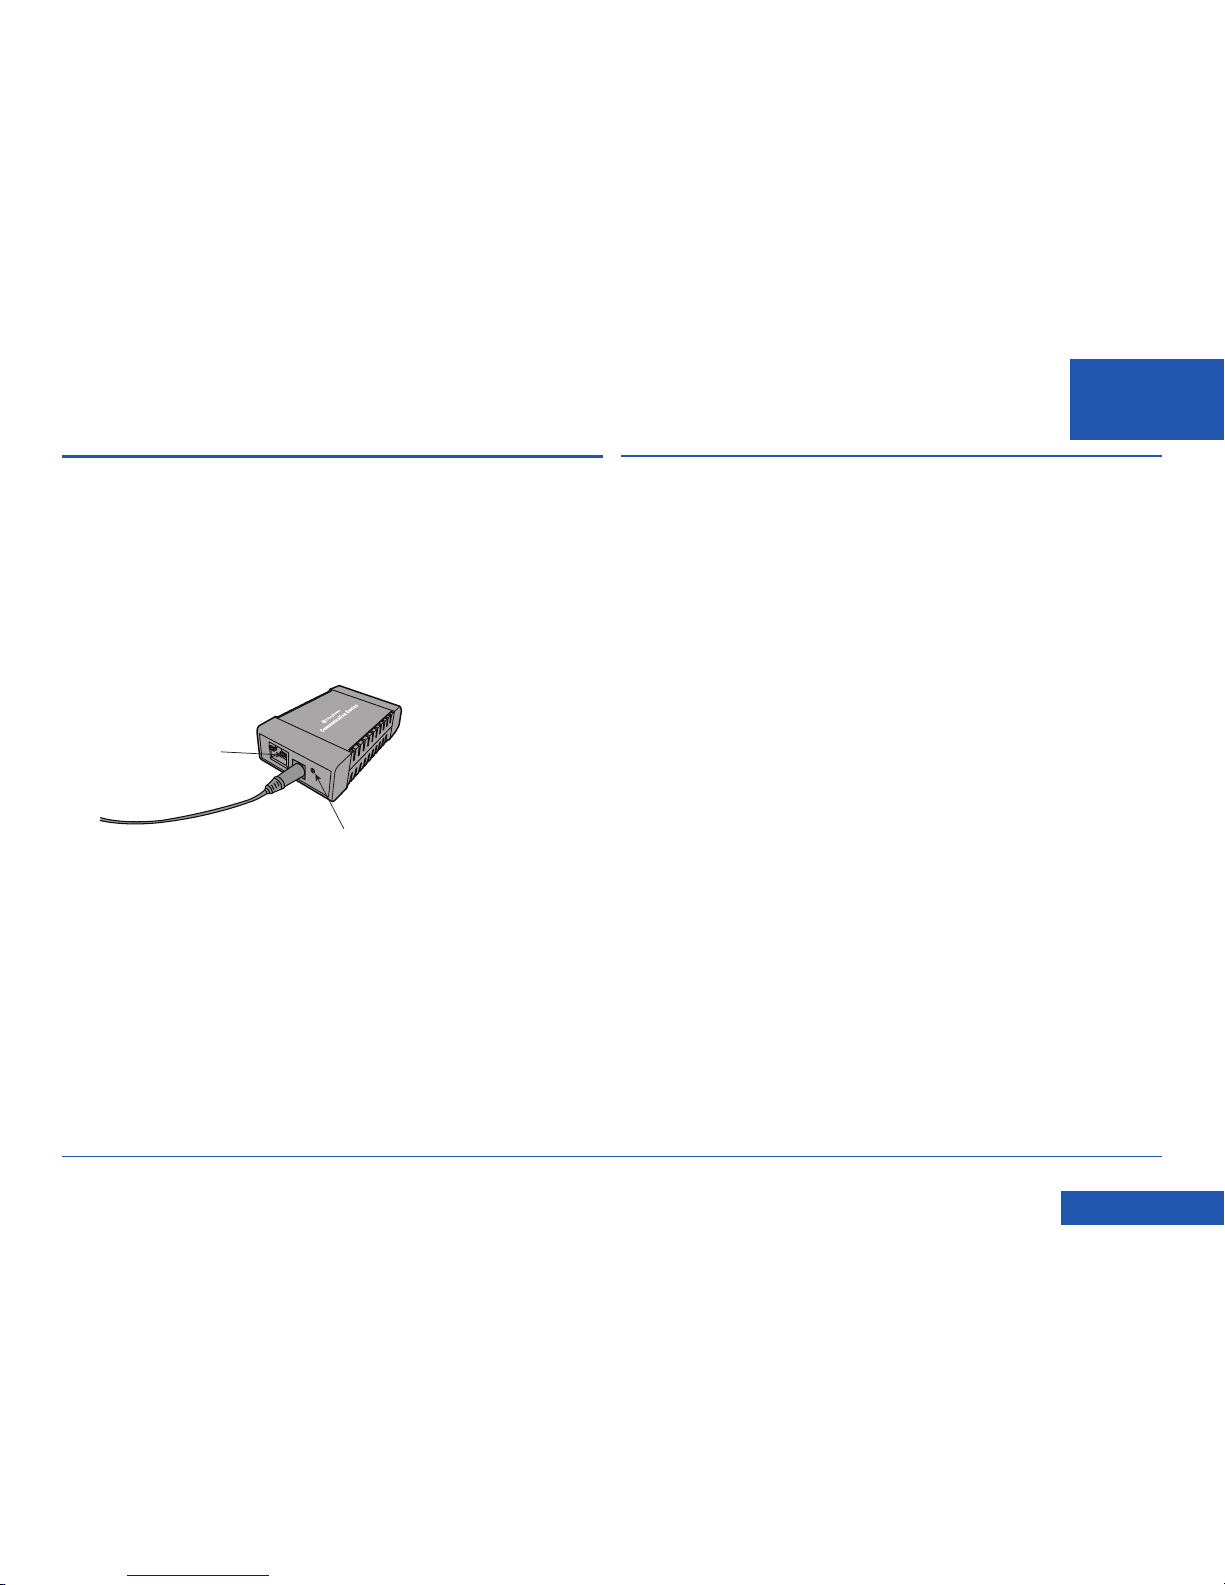
SDC2035C Konstante Verbindung (LAN Verbindung) Anleitung
DE
<< Zurück zum Inhalt
Setzen Sie das Kommunikationsgerät auf Werkseinstellung zurück.
Um das Kommunikationsgerät auf Werkseinstellungen zurückzusetzen, benötigen
Sie einen kleinen spitzen Gegenstand, wie einen Stift, um die Reset-Taste zu
betätigen.
a. Trennen Sie das Netzwerkkabel und das AC-Netzteil vom Kommunikationsgerät.
b. Drücken und halten Sie die Resettaste. Schließen Sie das Kommunikationsgerät
wieder an die Stromversorgung an.
c. Wenn die LED dauerhaft grün leuchtet (mehr wie 2 Sekunden), lassen Sie die
Taste unverzüglich los.
d. Die grüne LED geht aus und die orange LED geht an, dies zeigt, dass das
Kommunikationsgerät zurück gesetzt wurde.
Wenn die LED zu blinken beginnt ist das Kommunikationsgerät nicht
zurückgesetzt. Wiederholen Sie den Schritt wie oben beschrieben.
e. Trennen Sie das AC-Netzteil vom Kommunikationsgerät
Resettaste
LED
Referenz - Rücksetzen des Kommunikationsgerätes
Referenz - Problembehebung
Meine Frankiermaschine verbindet sich nicht mit dem Pitney Bowes
Daten Zentrum
• Prüfen Sie, ob andere PC´s/Mac´s im Netzwerk zugri auf das Internet haben.
Wenn diese auch keinen Internetzugri haben, gibt es ein Verbindungsproblem,
dass nichts mit dem Kommunikationsgerät zu tun hat.
• Wenn Sie das Kommunikationsgerät über Wi-Fi mit Ihrem Netzwerk
verbinden und das verwendete Passwort in Ihrem Wireless Netzwerk in
regelmäßigen Abständen geändert werden muss, kann dies dazu führen,
dass das im Kommunikationsgerät verwendete Passwort abgelaufen ist.
Setzen das Kommunikationsgerät wie vorher beschrieben zurück und
konfigurieren das Gerät neu, wie im Kapitel "Einrichtung einer dratlosen (Wi-Fi)
Netzwerkverbindungen" beschrieben.
Page 26
For Service or Supplies:
PB Form SDC2035C (9-16)
© Pitney Bowes Limited, 2016
This book may not be reproduced in whole or in part in any fashion or stored in a retrieval system of any type or
transmitted by any means, electronically or mechanically, without the express, written permission of Pitney Bowes.
We have made every reasonable eort to assure the accuracy and usefulness of this guide, however we cannot
assume responsibility for errors or omissions or liability for the misuse or misapplication of our products.
*SDC2035C*
 Loading...