

Page 1
PostPerfectTM Postage Meter
B700, B702
Setup and Operator Guide
US English Version
Page 2

FCC Notice
This equipment has been tested and found to comply with the limits for a Class B
digital device, pursuant to part 15 of the FCC rules. These limits are designed to
provide reasonable protection against unwanted interference when the equipment
is operated in a residential environment. This equipment generates, uses, and can
radiate radio frequency energy and, if not installed and used in accordance with the
instruction manual, may cause unwanted interference to radio communications. Operation of this equipment with other, non-complying equipment is discouraged. If this
equipment noes cause interference to radio or television reception, which you can
determine by turning the equipment off and on, you may be able to correct the problem by taking one or more of the following measures:
– Reorient or relocate the receiving antenna
– Increase the distance between the equipment and the receiver
– Connect the equipment to an outlet that's on a circuit different from the one the
receiver is on.
Use only a shielded interface cable with this equipment to insure compliance with the
Class B limits.
SV60941 Rev. B 5/04 ©2004 Pitney Bowes Inc.
All rights reserved. This book may not be reproduced in whole or in part in any fash-
ion or stored in a retrieval system of any type or transmitted by any means, electronically or mechanically, without the express, written permission of Pitney Bowes.
We have made every reasonable effort to ensure the accuracy and usefulness of this
manual; however, we cannot assume responsibility for errors or omissions or liability
for the misuse or misapplication of our products.
Due to our continuing program of product improvement, equipment and material
specifications as well as performance features are subject to change without notice.
Your postage meter may not have some of the features described in this book.
Post Perfect, E-Z Seal, PB Supply Line and Postage By Phone are trademarks or
registered trademarks of Pitney Bowes Inc.
Page 3

Page 4

Table of
C
Chapter 1—Introduction
About Your Meter ........................................................................ 1-2
About this Book ........................................................................... 1-3
The Quick Reference Guide ......................................................1-4
Specifications .............................................................................. 1-4
Equipment ............................................................................. 1-4
Material ................................................................................. 1-4
Meter Settings ....................................................................... 1-5
Glossary ...................................................................................... 1-5
Safety Notes ............................................................................... 1-7
Chapter 2—Getting Acquainted
The B700/B702 ........................................................................... 2-2
Controls, Indicators and Machine Features, Front ................ 2-2
Controls, Indicators and Machine Features, Rear ................ 2-3
B700/B702 Keypad (User Mode) ................................................ 2-4
Keypad Template (Setup Mode) ...........................................2-6
ontents
Chapter 3—Using the Meter
Turning the Meter On .................................................................. 3-2
Before You Apply Power ....................................................... 3-2
Applying Power ..................................................................... 3-2
Warning Prompts .................................................................. 3-2
Adjusting the Stacker .................................................................. 3-3
Checking Postage Funds Available ............................................3-3
Checking the Date ...................................................................... 3-3
Advancing the Date ....................................................................3-3
Omitting the Date ........................................................................ 3-4
Selecting an Ad Slogan ..............................................................3-4
Selecting an Inscription (B700 Only) ..........................................3-5
Selecting an Account (B700 Only) .............................................. 3-5
iiiSV60941 Rev. B
Page 5

Table of Contents
Checking and Clearing the Batch Register ................................. 3-6
Standard Operation (B702 and B700 With No
Accounting) ........................................................................... 3-6
Printing a Register Report ..........................................................3-7
Printing a Register Report (B702 and B700 With or
Without Accounting) .............................................................. 3-7
Printing Account Reports (B700 Only) ........................................ 3-8
If You Have Departmental Accounting .................................. 3-8
Printing an Account Report ................................................... 3-8
Printing Postage Using the Default Value ................................... 3-9
Changing the Postage Value ....................................................3-10
Printing Postage Using the Memory Keys (B700 Only) ........... 3-11
Chapter 4—Setting Up the Meter
Using the Keyboard Setup Template .......................................... 4-3
Entering Setup ............................................................................ 4-3
Entering Alpha Characters .................................................... 4-3
Entering Numeric Characters ............................................... 4-3
Navigating the Menus ................................................................. 4-4
Setting Up Options ...................................................................... 4-4
Menu 1: Change Language ....................................................... 4-7
Menus 3, 4, 5 and 6: Set Memory Keys (B700 Only) ................4-7
Menu 7: Set Daylight Saving Time .............................................4-9
Menu 8: Select Default Advertisement .......................................4-9
Menu 9: Set Default Inscription (B700 Only) ...........................4-10
Menu 10: Set Account Default (B700 Only) ............................. 4-10
Menu 11: Set Low Funds Warning ........................................... 4-11
Menu 12: Set Postage Default Value ....................................... 4-12
Menu 13: Set Timeout Length .................................................4-13
Menu 14: Activate Features (B700 Only) ................................. 4-14
Menu 15: Print Setup Report (B700 Only) ............................... 4-15
Menu 16: Print Account Report (B700 Only) ...........................4-16
iv SV60941 Rev. B
Page 6

Menu 17: Clear All Accounts (B700 Only) ................................ 4-17
Menu 18: Move Clock Ahead ................................................... 4-18
Menu 19: Move Clock Back ..................................................... 4-18
Menu 20: Create Account (B700 Only) .................................... 4-19
Menu 21: Delete Account (B700 Only) .................................... 4-20
Menu 22: Change Account Names (B700 Only) ...................... 4-21
Menu 23: Change Supervisor Password (B700 Only) ............. 4-22
Menu 24: Enable Password (B700 Only) ................................ 4-22
Menu 25: Enable Accounting (B700 Only) ............................... 4-23
Menu 26: Set Time of Date Change ........................................ 4-24
Menu 27: Set the Default Refill Amount ................................... 4-25
Menu 28: Set Printer Connection (B700 Only) ........................4-25
Menu 29: Set Up EIU (DataLink) (B700 Only) ......................... 4-26
Chapter 5—Refilling the Meter
Obtaining the Current Meter Access Code ................................. 5-2
Obtaining the Refill Combination ................................................ 5-3
Refilling Your Meter on the Internet ...................................... 5-3
Refilling Your Meter on the Phone ........................................5-4
Entering Your Refill Amount into the Meter ................................. 5-5
Payment Options ........................................................................ 5-5
Purchase Power ................................................................... 5-5
Reserve Account ................................................................... 5-6
United States Postal Service ................................................ 5-8
Performing an Inspection on Your Meter ..................................5-10
Obtaining the Current Meter Access Code ......................... 5-10
Performing the Inspection ................................................... 5-11
Entering Your Combination in the Meter ............................. 5-11
Table of Contents
Chapter 6—Replacing the Ribbon
Removing the Used Ribbon Cassette ......................................... 6-2
Installing the New Cassette ........................................................ 6-4
vSV60941 Rev. B
Page 7

Table of Contents
Chapter 7—Troubleshooting
Error and Warning Messages ..................................................... 7-2
Fault Messages ..........................................................................7-2
If You Need Service .................................................................... 7-2
Chapter 8—Supplies and Options
Advertising Slogan Cartridge ...................................................... 8-2
Using the Slogan Cartridge ................................................... 8-2
Moistener (B700 Only) ............................................................... 8-3
Attaching the Moistener ........................................................ 8-3
Filling Moistener .................................................................... 8-4
Using the Moistener .............................................................. 8-4
Bypassing the Moistener ...................................................... 8-5
Maintaining the Moistener ..................................................... 8-5
DataLink (Electronic Interface Unit) (B700 Only) ....................... 8-6
Ordering Supplies and Options ................................................... 8-6
Appendix A
Meter Inscriptions .......................................................................A-2
vi SV60941 Rev. B
Page 8

1 • Introduction
This chapter lists the key features of your postage
meter, tells you what's in this book, and pre sents
important safety information.
About Your Meter ..............................................1-2
About this Book ................................................1-3
The Quick Reference Guide ............................. 1-4
Specifications ...................................................1-4
Glossary ...........................................................1-5
Safety Notes .....................................................1-7
1-1SV60941 Rev. B
Page 9

1 • Introduction
About Your Meter
The B700/B702 is a compact, programmable postage meter
that combines simplicity of operation with user-changeable
features that let you tailor its operation to your own unique
requirements. The meter is supplied pre-programmed, so
you can start processing mail right away using its factory settings. You can change some of these settings at the push of
a button; or, if you wish, you can easily program the meter
with your own settings.
The meter's advanced features include:
• Sleek, compact design
• An easy-to-use, multi-purpose keypad
• 11-character operator display
• Self-prompting setup menus
• Automatic date advance
• Daily piece count printing
• Keyboard-selectable ads
• Keyboard-selectable inscriptions (B700 only)
• Easy addition of advertising slogans by means of a removable slogan cartridge
• Easy addition of inscriptions via download (B700 only)
• Easy, convenient funds refill via Postage By Phone
®
• Digital printing technology eliminates dies, ink rollers and
ink
• Sharp 8 dot/mm printing resolution for clear, crisp meter
imprints
• Optional accounting feature tracks postage spent by department name. This feature supports up to 10 accounts
(B700 only).
• Password protection provides an added measure of security by limiting access to key meter functions to authorized personnel
• Communications port for an optional Pitney Bowes electronic scale or other peripheral devices (B700 only)
1-2 SV60941 Rev. B
Page 10

Introduction • 1
• Report printing: the meter generates and prints a register
summary, setup summary, and Postage By Phone® summary. The B700 also generates and prints a setup summary.
About this Book
The Introduction lists the important features of your meter,
provides material and equipment specifications and a brief
glossary of terms. It also includes important notes about using your meter safely.
Getting Acquainted explains the purpose and shows the location of each control and machine feature. Please read this
section carefully. It provides a foundation for the instructions
given in later sections of this book.
Using the Meter explains how to process mail. The operations covered here are the ones you'll use most often.
Setting Up the Meter provides step-by-step instructions for
customizing meter operation to suit your own needs.
Refilling the Meter explains how to add postage funds to
your meter using Pitney Bowes' convenient Postage By
Phone® service.
Replacing the Ribbon provides instructions for removing
and replacing the ribbon cassette.
Troubleshooting explains the error and warning messages
that might appear on the meter's display during the course of
operation.
Options/Supplies describes the optional ad slogan cartridge
and explains how to use it. In addition, optional equipment
specific to the B700 model is featured. Items include a moistener to assist envelope sealing and Datalink (Electronic Interface KUnit or EIU) that expands account capacity from 10
to 100 accounts and connects the meter to external devices
such as a Pitney Bowes electronic scale, modem, serial
printer or personal computer.
This chapter also lists the supplies available for your meter
and explains how to order them.
1-3SV60941 Rev. B
Page 11
1 • Introduction
The Quick Reference Guide
Specifications
Don't like reading
manuals? Try the
Quick Reference
Guide supplied with
your meter. It's located in the ribbon
compartment just
above the cassette.
It contains condensed
instructions for most of the topics covered in this book.
Equipment
Size: 11.75"L x 9.75"W x 7"H in. (30 cm x 25 cm x 18 cm)
Weight: 17.6 lbs. (8 kg), approximate
Power Requirements: 120 VAC, 60 Hz, 3A
Operating Temperature: 40°F (4°C) to 109°F (43°C)
Average Throughput: 30 envelopes per minute maximum.
Actual throughput will vary, depending on the material used
and the skill of the operator.
Ribbon Life: 1,200 impressions maximum; this will vary, depending on the number of ads printed.
Material
Minimum Size: 3" x 3" (76 mm x 76 mm)
Maximum Size: 10" x 13.5" (250 x 340 mm)
Minimum Thickness: 0.007" (0.2 mm)
Maximum Thickness: .24 in. (6 mm)
IMPORTANT! For best results, make sure that your material
(envelopes, postcards) conforms fully to these specifi cations. We
do not recommend textured or rough-surfaced papers because
they may cause poor print quality. Mail that presents an uneven
surface to the print mechanism may also cause poor print quality. (Tapping mail contents to the top right envelope corner may
help.) Use tape sheets to apply postage to rough surfaced or
oversize mailpieces.
1-4 SV60941 Rev. B
Page 12
Introduction • 1
Meter Settings
Maximum Imprint: $99.999 (B700) or $9.999 (B702)
Reset Type: Postage By Phone
Piece Count: Up to 8 digits (non-resettable)
Postage Used Register: 10 digits
Postage Unused Register: 8 digits
®
Meter
Serial
Number
Date
Glossary
Ad
Slogan
Origin
ZIP
Code
Typical Indicia
Inscription
For Post
Office
Use
City, StatePostal
Some of the words used in this manual may be new to you.
This little glossary explains what they mean.
Account
(B700 Only)
A department or other entity to which postage is charged. The B700 meter allows you
to select from up to 10 accounts. You may
identify accounts by a unique name when
you set your meter up. Accounting is an
optional feature on the B700.
Ascending
Register
The total amount of postage used since the
meter was placed in service.
($ Used)
1-5SV60941 Rev. B
Page 13

1 • Introduction
Glossary
(continued)
Batch
Register
A part of the meter's memory that stores
the total postage spent and the number of
mailpieces processed. If your meter has
the optional departmental accounting feature, it stores this data in memory for each
account. You can clear the contents of the
batch register if you want.
Default A value or setting the meter automatically
returns to after a set period of time. As delivered, your meter has factory-set defaults.
You may change these if you wish.
Descending
Register
($ Available)
The postage funds available for use. The
imprint produced by the postage meter as
shown in the figure on page 1-5. The word
“indicia” means “postal markings.” The
markings may include:
An Ad Slogan: This is an optional part of
the indicia that lets you convey your own
special message to the mail recipient. You
may choose from a great variety of standard and custom ads available from the PB
™
Supply Line
. Ads are supplied in a plug-in
slogan cartridge. (See Chapter 8).
A Postal Inscription: (B700 only) This in-
formation appears next to the indicia or ad
slogan and complies with postal regulations
concerning the class of delivery or service.
An endorsement is similar to an inscription,
but appears in the area normally reserved
for the ad slogan because of space requirements. Inscriptions are available from the
™
PB Supply Line
The Date
The City/State
The Meter's Serial Number
Origin ZIP Code
Information for Post Office Use
(See Chapter 8).
1-6 SV60941 Rev. B
Page 14

Introduction • 1
Refill The process of adding postage funds to
your meter using the Pitney Bowes Postage By Phone
“resetting” the meter.
Setup The process of customizing the meter to
best suit your own needs.
Timeout A period of time, measured from the last
key press or meter trip, after which the meter automatically returns to its default settings. You can set timeout length when you
set the meter up.
Trip The process of dispensing and account-
ing for postage. The meter is said to “trip”
when it senses the envelope and starts
printing.
®
Service. Sometimes called
Safety Notes
Please follow these common-sense precautions whenever
you use your meter:
• Plug the meter into a properly grounded wall outlet. This
reduces the risk of shock and equipment damage in
the event of a short circuit. DO NOT remove the power
cord's ground pin and DO NOT use a ground adapter.
• The power cord wall plug is the primary means of dis-
connecting the meter from the AC supply. The meter is
on whenever it is plugged into a live receptacle, even
though the key switch and operator display may be off.
• Place the meter close to an easily accessible wall outlet.
Avoid using wall outlets controlled by wall switches or
shared by other equipment.
• Make sure the area in front of the wall outlet into which
the meter is plugged is free from obstruction.
• DO NOT route the power cord over sharp edges or trap it
between pieces of furniture. Make sure there is no strain
on the power cord.
1-7SV60941 Rev. B
Page 15

1 • Introduction
Safety Notes
(continued)
• To reduce the risk of fire or electrical shock, DO NOT
attempt to remove covers or disassemble the meter.
The cabinet encloses hazardous parts. If the meter was
dropped or otherwise damaged, report such damage to
your Pitney Bowes Customer Service Representative.
• Keep fingers, long hair, jewelry and loose clothing away
from moving parts at all times.
• Read all instructions before you attempt to operate the
meter.
• Use the equipment only for its intended purpose.
• Printhead temperature can reach 103° F (43° C), making
it warm to the touch.
• Always follow the specific occupational safety and health
standards prescribed for your workplace.
• Switch the meter OFF when you change the ribbon cassette.
1-8 SV60941 Rev. B
Page 16

2 •
G
d
This chapter lists the controls, indicators and machine features of your meter.
The B700/B702 ................................................2-2
Controls, Indicators and
Machine Features, Front View ....................2-2
Controls, Indicators and
Machine Features, Rear View .................... 2-3
B700/B702 Keypad (User Mode) .....................2-4
Keypad Template (Setup Mode) .................2-6
etting Acquainte
2-1SV60941 Rev. B
Page 17
2 • Getting Acquainted
The B700/B702
Controls, Indicators and Machine Features, Front View
5
4
6
3
7
2
9
8
1
1. Moistener (Optional)—Moistens and helps to seal an envelope as you guide it
onto the meter. (B700 only)
2. Feed Deck—Supports your envelope, post card or tape sheet as it passes
through the indicia printer. Place your envelope or tape sheet face up on this
deck. Push it up against the rear wall to align it and move it to the right, up to the
trip mark (item 9).
3. Rear Wall—Serves as an alignment guide for your envelope.
4. Access Door—The ribbon cassette and Quick Reference Guide are behind this
door. Open the door from the right.
5. Ad Slogan Cartridge Well—The optional ad slogan cartridge goes here.
6. Operator Display—This 11-character display shows the current status of the
meter, normally displaying the default postage value. You can choose to display
the postage used and postage available, the date and the ad. The B700 displays the current account and inscription as well. The display also prompts you
through the entire setup routine.
7. Keypad—Enter your postage amount or commands here. See pages 2-3 and 24 for a description of each button's function.
2-2 SV60941 Rev. B
Page 18
Getting Acquainted • 2
8. Stacker—Completed mailpieces are stacked here.
9. Trip Mark—When feeding an envelope, make sure you guide it up against the
rear wall (item 3). Then guide it to the right until its lead edge touches this mark;
the meter senses the envelope, prints the postage amount and conveys the
piece into the stacker.
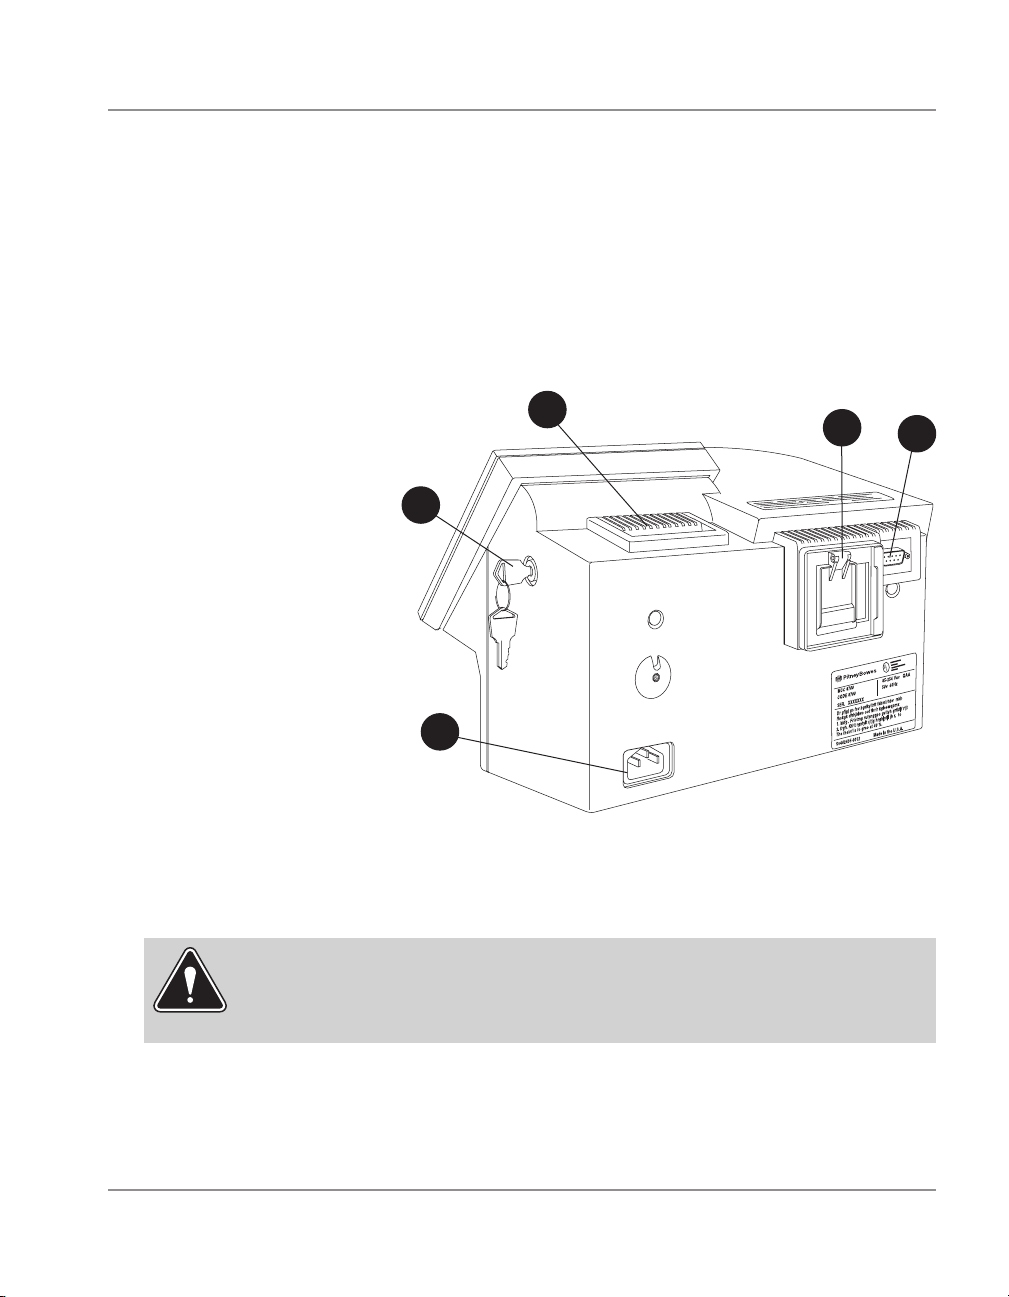
Controls, Indicators and Machine Features, Rear View
1. Ad Slogan Car-
tridge Well—Ad-
ditional ads (and
inscriptions for
B700) are available
by plugging the
optional ad slogan
cartridge in here.
2. Lock—Prevents
unauthorized use of
your meter. Insert
the key and turn it
to the right to unlock
the meter. Always
keep the key in a
safe place. The meter has no ON/OFF
switch.
3. Power Cord Connector—Connect the power cord here and plug the other end
into a 120 VAC, 60 Hz grounded wall outlet.
WARNING! Don't use an ungrounded outlet or a ground adapter. Adapters
may not ground the equipment properly. In the event of a short circuit, a
faulty ground could damage the meter and result in a possible shock hazard
to the user.
2
3
1
4
5
4 . Security Door—The USPS Seal is located here. The door is for use by Postal
only. (Some meters may not have a security door.)
5. Communications Port—Allows your meter to communicate with a Pitney Bowes
electronic scale or other devices. (Not active in the B702)
2-3SV60941 Rev. B
Page 19
2 • Getting Acquainted
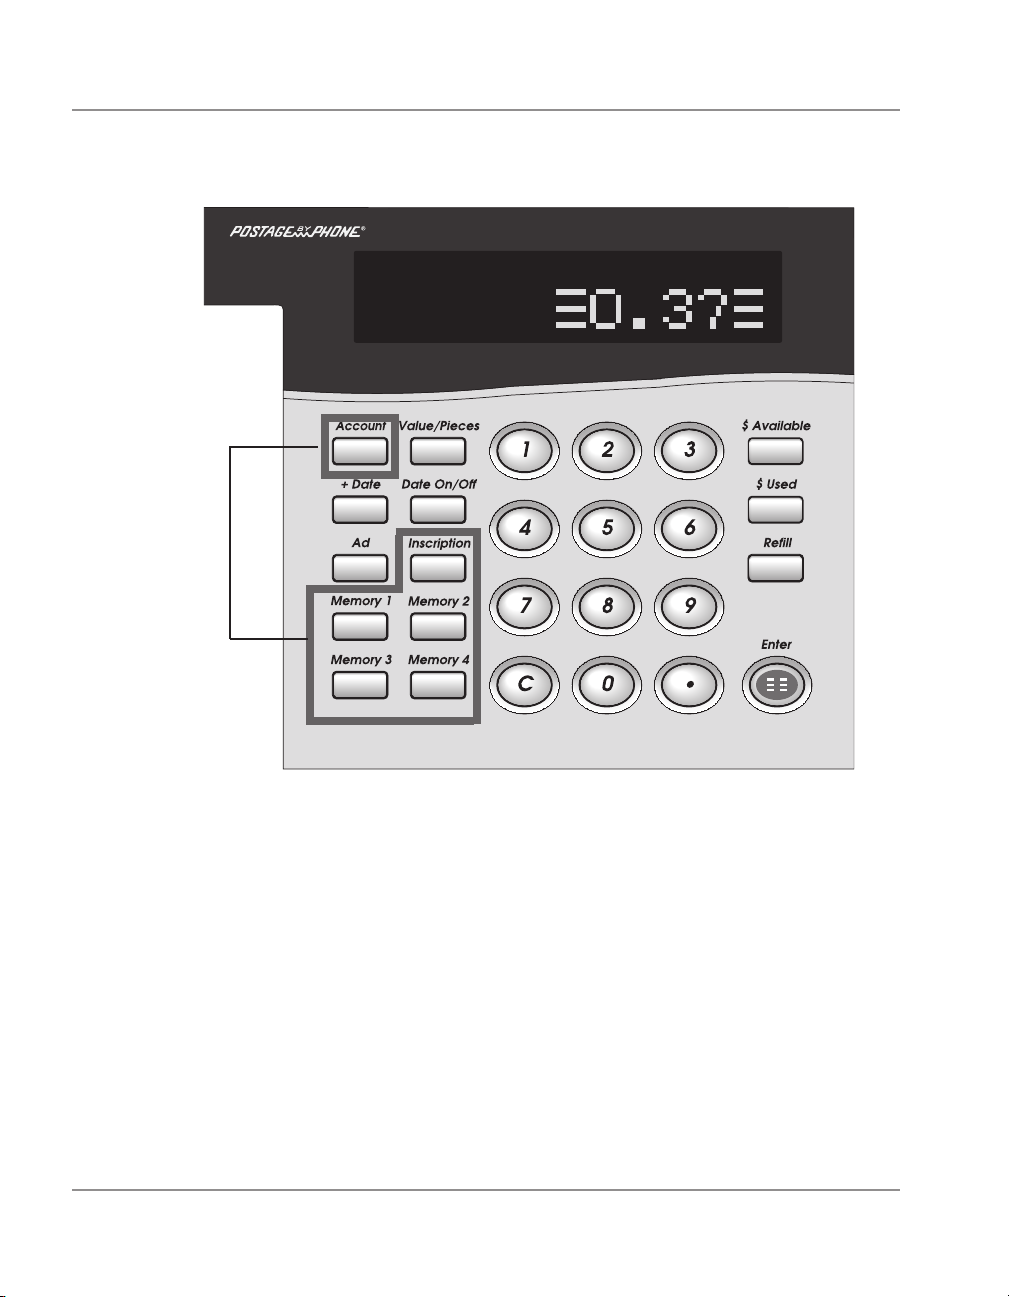
B700/B702 Keypad (User Mode)
B700 Only
Your meter has two modes of operation: user, for routine, day-to-day operations; and
setup, which lets you customize the meter to suit your own needs. The keyboard
functions differently, depending on which mode you're in.
In the User Mode, the keys function as follows
• Account (B700 Only)—Accounting is an optional feature) Press to see the cur-
rent account number or change accounts.
• Value/Pieces—Displays the contents of the batch register, that is, the total post-
age spent since the batch register was last cleared. Press this button again to
see the total number of mailpieces (batch count) processed.
If your B700 is equipped with the optional accounting feature, you can view the
total postage applied to and the number of pieces processed for any account.
2-4 SV60941 Rev. B
Page 20

Getting Acquainted • 2
• + Date—Press to see the date that will be printed as a part of the meter imprint.
This is usually the current date. You can also advance the date up to a maximum
of 30 days from the current date.
• Date On/Off—Allows you to print the date, omit the date or omit (“duck”) the day.
• Ad—Press to see the name of the ad that will print when the meter is tripped.
Press the key repeatedly to select different ads.
• Inscription (B700 only)—Press to see the current inscription or change the in-
scription.
• Memory Keys 1, 2 , 3 and 4 (B700 only)—Press to select a pre-programmed
meter configuration. A “configuration” specifies a postage amount, ad slogan
number and inscription number. You program the memory keys using the B700's
setup menus.
• Numeric Keys (0-9)—Use these to enter a numeric value for a postage amount
or to select a particular menu choice.
• Clear (C)—Press to clear an entry. You may also use this key along with the
Value/Pieces key to reset the batch count registers to zero.
• Decimal (.)—Press to enter a decimal point. You have the option of entering the
decimal point manually or letting the meter enter it for you. You must always type
a decimal point first when you enter a fractional value such as 15.8¢ (enter this
value as .158).
• $ Available—Press to display the total amount of postage funds remaining.
• $ Used—Press to display the total amount of postage the meter has dispensed
since it was placed in service.
• Refill—Press to begin the process of refilling the meter using the Pitney Bowes
Postage By Phone
• Enter—Press to accept a selection.
®
service.
2-5SV60941 Rev. B
Page 21
2 • Getting Acquainted
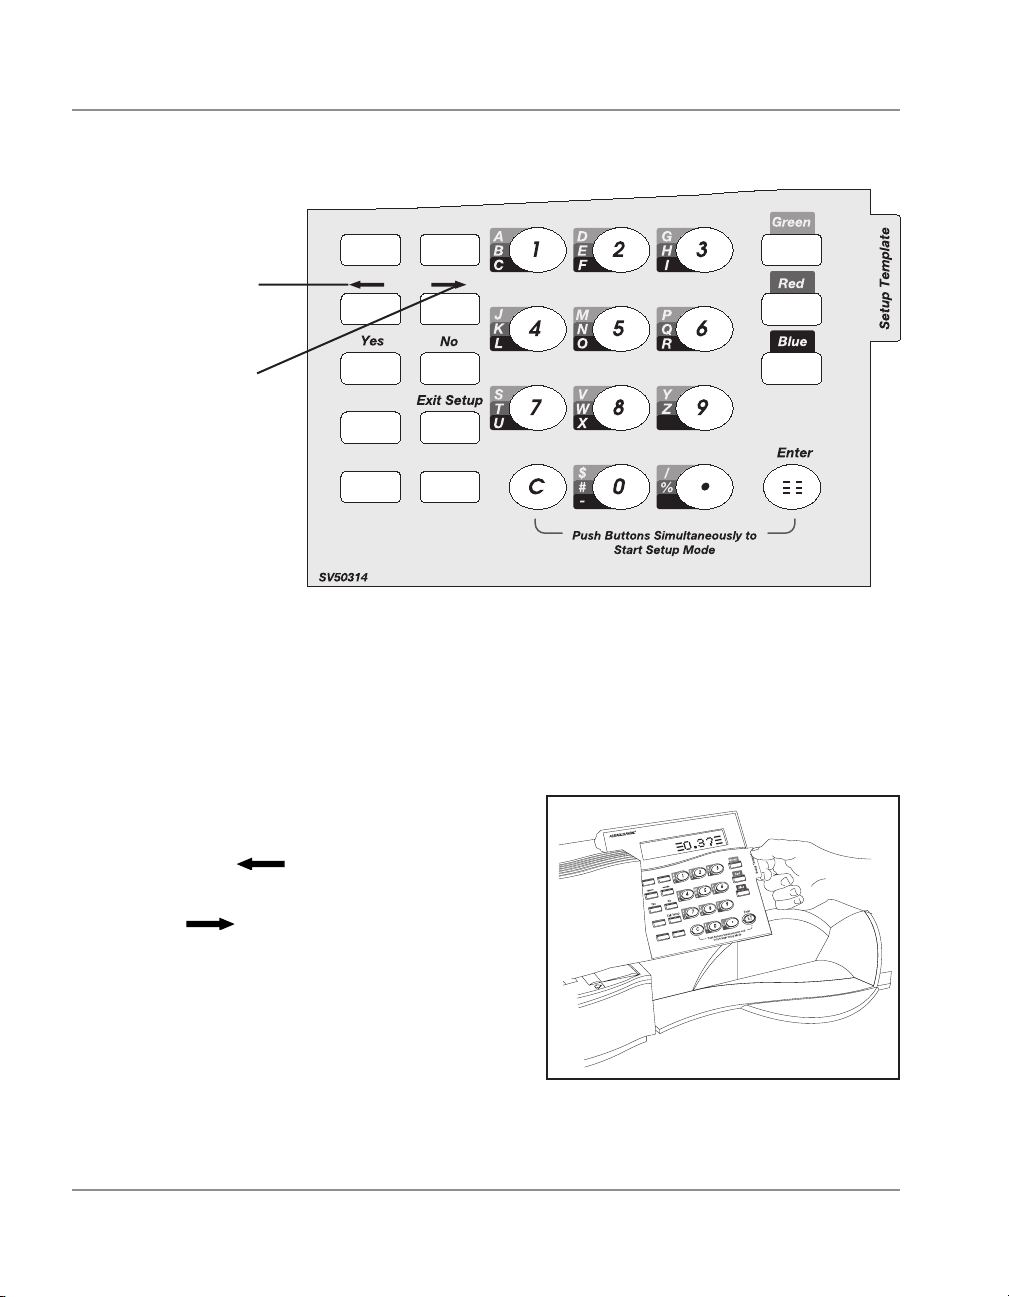
Keypad Template (Setup Mode)
Backspace
Space
Use the Setup Mode to tailor meter operation to your own exact needs. To get into
the Setup Mode, place the keypad template on the keypad as shown (below, right).
You'll find the template in a pocket on the inside rear cover of this book. Press the
C (Clear) and Enter keys at the same time. (B700 only-If your meter's password
feature is on, the display will ask you to enter your password. See Chapter 4 for complete instructions.)
In the Setup Mode the keys function as
follows:
• Backspace (
rightmost character displayed.
• Space (
characters.
• Yes—Press to accept the setup menu
choice.
• No—Press to reject the setup menu
choice.
)—Press to erase the
)—Press for a space between
Place Template on Keypad (Store
template in pocket located on the
inside rear cover for future use)
2-6 SV60941 Rev. B
Page 22

Getting Acquainted • 2
• Green, Red, Blue—Use to enter alpha characters (letters). Press the appropriate
color and numeric keys at the same time to get an alpha character. For example:
- Green and 1 for A;
- Red and 8 for W;
- Blue and 5 for O.
• Exit Setup—Press to leave the setup mode.
• Clear—Press to remove an entry.
• Enter—Press to accept an entry.
2-7SV60941 Rev. B
Page 23

Page 24

3 • Using the Mete
r
This chapter explains how to use your postage
meter.
Turning the Meter On .......................................3-2
Adjusting the Stacker .......................................3-3
Checking Postage Funds Available ..................3-3
Checking the Date ............................................3-3
Advancing the Date ..........................................3-3
Omitting the Date .............................................3-4
Selecting an Ad Slogan ....................................3-4
Selecting an Inscription (B700 Only) ................3-5
Selecting an Account (B700 Only) ....................3-5
Checking and Clearing the Batch Register ......3-6
Printing a Register Report ................................3-7
Printing Account Reports (B700 Only) ..............3-8
Printing Postage Using the Default Value .........3-9
Changing the Postage Value ..........................3-10
Printing Postage Using the Memory
Keys (B700 Only) ...........................................3-11
3-1SV60941 Rev. B
Page 25
3 • Using the Meter
Turning the Meter On
Before You Apply Power
• Make sure the meter is plugged into a properly grounded
receptacle.
• If your're using an optional advertising slogan cartridge,
make sure it's in place (Chapter 8).
• Check that the stacker is in position (see instructions below).
• Make sure the ribbon cassette is properly loaded (Chapter 6).
• If you’re using a Pitney Bowes electronic scale with your
meter, make sure it’s connected properly. Follow the instructions supplied with the scale. (B700 only)
®
• Add E-Z Seal
to the optional moistener if necessary.
Follow the instructions supplied with your moistener.
(B700 only)
The instructions that follow assume the meter is set up the
way you want. If not, go to Chapter 4 for step-by-step setup
instructions.
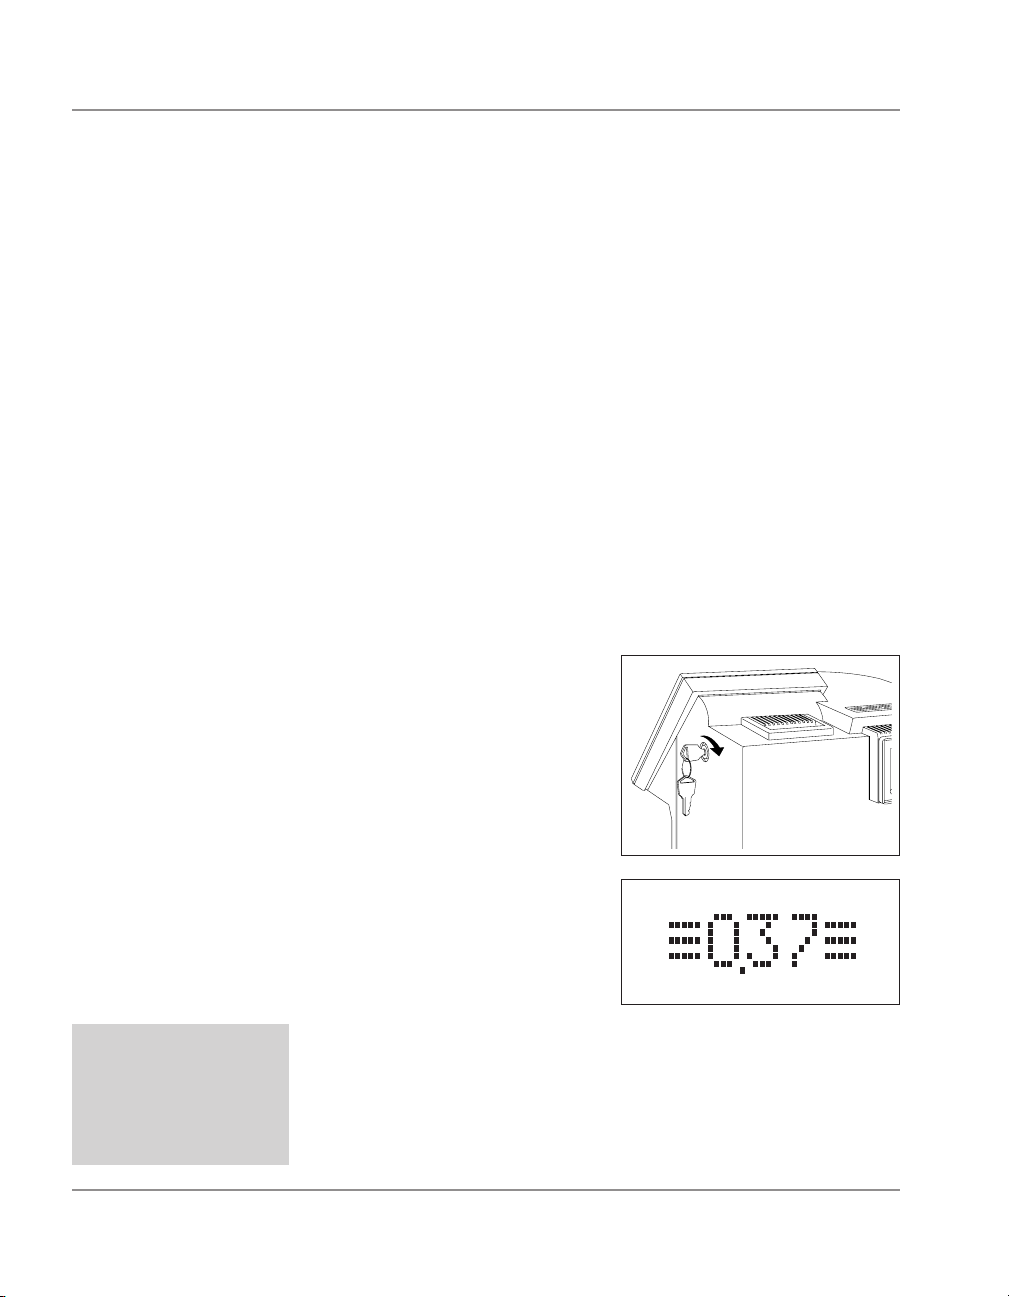
Applying Power
Insert the key and turn it
clockwise. After you turn it on,
the meter performs a self test
for several seconds and operates the envelope transport
mechanism.
If the self test is OK, the meter
shows the default postage
value in the operator display
as shown at the right (your default value may be different).
HINT: If postage funds
are low, it's a good
idea to refi ll your meter. See Chapter 5 for
instructions.
3-2 SV60941 Rev. B
Warning Prompts
If postage funds are low, the operator display flashes “Low
Funds” or “Insuf Funds” alternately with the postage value
selected. If any other message appears on the display, see
pages 7-2 and 7-3 of this guide for an explanation.
Page 26

Using the Meter • 3
Adjusting the Stacker
Checking Postage Funds Available
Checking the Date
Slide the stacker into position up against the meter
as shown. This position is
good for envelopes up to
#10. If you're running longer envelopes, move the
stacker to the right as necessary to accommodate
them.
1. Press $ Available to display the postage funds on hand.
2. Press $ Used to display the amount of postage already
used.
3. Press C (Clear) to return to the default postage display.
Press +Date to check the date. The display shows the date
exactly as it will be printed. Any omitted parts of the date appear as dashes. (See Omitting the Date below.)
Advancing the Date
1. To advance the date, press the +Date key again. This
advances the date by one day. Each time you press the
+Date key, the date advances by one more day. You can
advance the date of submission up to 30 days. If you
attempt to advance the date more than this, the meter
prompts: “30 Days Max” after you press Enter and returns to the current date setting.
You can also advance the date by keying in a num-
ber—from 1 to 30—and pressing Enter while the meter
is in the date setting mode. For example, if you press 6
and Enter, the date advances by six days and the display
returns to the postage amount .
2. To return to the current date, press the C key while the
meter is in the date mode and press Enter. The display
returns to the postage amount.
3-3SV60941 Rev. B
Page 27

3 • Using the Meter
Omitting the Date
Selecting an Ad Slogan
HINT: Ad slogans are
optional. See Chapter
8 for details. When
you select a slogan, it
may take a little time to
load. This is normal.
1. Press the Date On/Off key to see the current selection:
“Date On;” Date Off;” or “No Day.” Pressing the Date On/
Off key toggles (switches) among these three selections:
• “Date On” means the complete date is printed as part
of the indicia.
• “Date Off” means the date is not printed.
• “No Day” means the month and year are printed, but
not the day.
2. Select one of the three choices. Press Enter to confirm
your selection.
3. When you press +Date, the display shows the date exactly as it will print. Any omitted parts of the date appear
as dashes.
1. Press Ad to see the current ad selection. The display
shows the name of the ad slogan. “NONE” means no ad
slogan is selected.
2. To change the selection, press the Ad key repeatedly
until you see the name of the ad slogan you want. Press
Enter to accept the slogan. The display then returns to
the postage amount.
Shortcut: When the meter is in the ad mode you can
choose an ad slogan by typing its number on the numeric
keypad and pressing Enter. You'll find the ad number
on the slogan cartridge label. If the ad isn't available, the
meter displays “No Ad.”
NOTE: The ad you want may be in an ad slogan cartridge you
haven’t loaded. See Chapter 8 for loading instructions. Press C
(Clear) to return to the default postage display without changing
the ad or to clear an error.
3-4 SV60941 Rev. B
Page 28

Using the Meter • 3
Selecting an
Inscription
(B700 Only)
HINT: Inscriptions are
optional. If no inscriptions are enabled, the
meter will prompt “No
Inscrpts” when you
press the Inscription
key.
Selecting an
Account
(B700 Only)
HINT: Departmental accounting is an
optional feature. If your
meter is not equipped
with it, the display
prompts “Accounting
Disabled” when you
press the Account key.
1. Press the Inscription key to see the name of the current
inscription. If the display shows “NONE,” no inscription is
selected.
2. To change the inscription, press the Inscription key
repeatedly until you see the name of the inscription you
want. Press Enter to accept the inscription. The display
then returns to the postage amount.
Shortcut: When the meter is in the inscription mode you
can choose an inscription by pressing its number on the
keypad and pressing Enter. If you enter a wrong number,
the meter displays “No Inscript.”
Press C (Clear) at any time to return to the default post-
age display without changing the inscription or to clear
an error.
1. Press Account to display the name of the current ac-
count.
2. If you want to change the account to which postage is
charged, press the Account key repeatedly until you
see the account name you want. Press Enter to accept
the account. The display will return to the default postage amount and show the account ID number. (If the
account is password protected, the meter prompts you to
enter a password. Type in the password—up to four digits—and press Enter.)
Shortcut: When the meter is in the account mode (that is,
displaying an account), you can choose an account by
pressing its number on the keypad and pressing Enter.
If you select a number the meter doesn’t recognize, the
meter displays the message “No Accnt.”
Press $ Avail then Enter at any time during the process
to go back to the default postage display without changing the account.
3-5SV60941 Rev. B
Page 29

3 • Using the Meter
Checking and Clearing the Batch Register
The meter's batch register stores the total postage value
expended and the number of mail pieces processed since it
waslast cleared. You can display this information and clear
it—return the register to zero—if you want. The procedure for
doing so depends on whether your meter is equipped with
the optional departmental accounting feature.
Standard Operation (B702 and B700 With No Accounting)
1. Press the Value/Pieces key once. The display shows the
total postage ($) spent.
2. Press the Value/Pieces key again to see the total number of mail pieces processed.
3. To clear the batch register (return it to zero), press the
Value/Pieces key and, while holding it, press C. The display prompts “Cleared.”
CAUTION! Be sure you really want to clear the
register. Once you've done so, you can't restore its
contents. If you want a record of the batch register before you clear it, print a register report as
explained on the next page.
3-6 SV60941 Rev. B
Page 30

Using the Meter • 3
Printing a Register Report
Printing a Register Report (B702 and B700 With or Without Accounting)
1. Press the $ Available key. The display shows the post-
age amount currently available.
2. Place a spare envelope or index card on the deck, as
though you were about to print postage. Guide the envelope up against the rear wall and slide it to the right until
its lead edge is aligned with the trip mark on the deck.
(See the figure in Printing Postage Using the Default
Value.)
3. The display prompts: “Reg Report Press Enter.”
4. Press Enter; the meter prompts “Printing...”
5. The meter will print a register report like that shown be-
low. When printing is done, press Enter to return to the
postage value display and resume processing mail.
REGISTER REPORT
MAR 17 95
ASCENDING REGISTER
DESCENDING REGISTER
CONTROL SUM
METER PIECE COUNT
BATCH COUNT
BATCH AMOUNT
AAA PB2000002
05:18P
$14.878
$99985.122
$100000.000
19
18
$14.878
3-7SV60941 Rev. B
Page 31

3 • Using the Meter
Printing Account Reports (B700 Only)
If You Have Departmental Accounting
1. Press the Account key repeatedly until you see the account you want to check. Press Enter to confirm your
selection.
2. Press the Value/Pieces key once. The display shows the
total postage ($) charged to the account since the register was last cleared. Press the Value/Pieces key again
to see the total number of mail pieces processed for the
account since the register was last cleared.
3. To clear an account's batch register (return it to zero),
press the Value/Pieces key and, while holding it, press
C. The display prompts “Cleared.”
Printing an Account Report
1. Press the Account key repeatedly until you see the account you want to check. Press Enter to confirm your
selection. Press the Value/Pieces key once.
2. Place a spare envelope in the transport, as though you
were about to print postage. The display prompts: “Acct
Report Press Enter.”
3. Press Enter; the meter prompts “Printing...”
4. The meter will print a summary report like that shown
below. When printing is done, press Enter to display the
postage value and resume processing mail.
SINGLE ACCOUNT REPORT
MAR 17 95
ACCOUNT NUMBER
ACCOUNT NAME
BATCH COUNT
BATCH AMOUNT
3-8 SV60941 Rev. B
AAA PB2000002
05:45P
1
MFG ENG
10
$3.038
Page 32

Using the Meter • 3
Printing Postage
Using the Default
Value
The default postage value is set at the factory or by you
while the meter is in the setup mode. (This value is often that
for first class mail weighing up to one ounce). This value appears in the display after you turn the meter on and the self
test is completed. The default value also displays automatically after the meter has been inactive for a period of time.
The meter is ready to use
when the default value is
shown bracketed by three
bars. See the figure at right.
1. Select the account to which you want to charge postage
(B700 only, if your B700 is equipped with the optional accounting feature).
2. (B700 only) Select the advertising slogan and/or the in-
scription you want to use .
3. To print postage using the default value, place your ma-
terial (envelope, post card or tape sheet) on the transport
face up and push it against the rear wall (1). Slide it to
the right up to the trip mark (2) and let go as the meter
takes the mailpiece. See the figures below.
2
1
3-9SV60941 Rev. B
Page 33

3 • Using the Meter
Printing Postage
Using the Default
Value (continued)
4. When the meter senses the envelope, it conveys it
through the print area and into the stacker. If your meter
is equipped with the optional moistener, follow the instructions in Chapter 8 of this manual.
5. If no change in postage value is necessary, you can insert the next envelope as soon as the previous one enters the stacker.
Changing the Postage Value
3-10 SV60941 Rev. B
1. Use the number keys to enter the postage amount you
want. You can enter the decimal point (.) manually, or let
the meter do it for you. For example, to set a value of 64
cents: press the 6, 4 and Enter keys; or press the deci-
mal (.), 6, 4 and Enter keys. In either case the result is
.64. If you want to print a fractional value, always press
the decimal point first. To enter 15.8¢, press the decimal
point (.), the 1, 5, 8 and Enter keys. The meter displays
this value as “0.158”.
The same principle applies if you enter a value of one
dollar or more; you can enter the decimal point yourself,
or let the meter do it for you. As an example, to set a
value of $1.40: press the 1, 4, 0 and Enter keys; or press
the 1, (.), 4 and 0 keys, then Enter. The result is 1.40.
Page 34

Using the Meter • 3
Changing the
Postage Value
(continued)
2. If you make a mistake or change your mind, press C to
clear the entry. The display shows “_”. Enter the amount
you want.
3. If the display shows “Insuf Funds,” the postage amount
you selected is more than the funds available in the meter. In this case, you may want to refill the meter. See
Chapter 5 for instructions. You may also select a smaller
amount of postage and continue processing mail.
4. If the display shows “High Value” alternately with the
postage amount selected, the meter is warning you the
postage value is more than the high limit specified in the
user setup mode. If you want to accept the high value,
press Enter.
5. The meter is ready to
use when the postage
value you selected is
shown bracketed by
three bars. Process
your mail as explained earlier. The display returns to the
default value after the meter has been inactive for a certain period of time.
Printing Postage
Using the
Memory Keys
(B700 Only)
HINT: The ad slogan
and inscription called
up by the memory key
remain selected even
if you enter a different postage value. To
clear this, wait until the
meter times out or turn
it off, then on.
You can also select a preset postage value by pressing one
of the four memory keys—Memory 1, Memory 2, Memory
3, Memory 4. The factory defaults for these keys are:
• Memory 1—First Class Letter, 1 oz.
• Memory 2—First Class Letter, 2 oz.
• Memory 3—Express Mail
• Memory 4—Priority Mail
When the preset value appears in the display bracketed by
three bars, the meter is ready. Process mail as described
earlier.
NOTE: You can program each memory key to store a specifi c
postage value, advertising slogan and inscription. See the setup
instructions in Chapter 4.
3-11SV60941 Rev. B
Page 35

Page 36

4 • Setting Up the Meter
This chapter explains how to set up the menu options available on your postage meter.
Using the Keyboard Setup Template ................4-3
Entering Setup .................................................. 4-3
Navigating the Menus ....................................... 4-4
Setting Up Options ...........................................4-4
Menu 1:Change Language ...............................4-7
Menus 3, 4, 5 and 6: Set Memory Keys
(B700 Only) .....................................................4-7
Menu 7: Set Daylight Saving Time ..................4-9
Menu 8: Select DefaultAdvertisement .............4-9
Menu 9: Set Default Inscription
(B700 Only) ....................................................4-10
Menu 10: Set Account Default
(B700 Only) ....................................................4-10
Menu 11: Set Low FundsWarning ................. 4-11
Menu 12: Set Postage Default Value .............4-12
Menu 13: Set Timeout Length .......................4-13
Menu 14: Activate Features (B700 Only) ......4-14
4-1SV60941 Rev. B
Page 37

4 • Setting Up the Meter
Menu 15: Print Setup Report (B700 Only) ..... 4-15
Menu 16: Print Account Report
(B700 Only) ....................................................4-16
Menu 17: Clear All Accounts (B700 Only) .....4-17
Menu 18: Move Clock Ahead ........................4-18
Menu 19: Move Clock Back ........................... 4-18
Menu 20: Create Account (B700 Only) ..........4-19
Menu 22: Change Account Names
(B700 Only) ....................................................4-21
Menu 23: Change Supervisor Password
(B700 Only) ....................................................4-22
Menu 24: Enable Password (B700 Only) ......4-22
Menu 25: Enable Accounting (B700 Only) ....4-23
Menu 26: Set Time of Date Change .............. 4-24
Menu 27: Set the Default Refill Amount ........4-25
Menu 28: Set Printer Connection
(B700 Only) ....................................................4-25
Menu 29: Set Up EIU (DataLink)
(B700 Only) ....................................................4-26
4-2SV60941 Rev. B
Page 38

Setting Up the Meter • 4
Using the Keyboard Setup Template
Entering Setup
When the meter enters the Setup Mode, the keys are automatically redefined so you can enter alphabetical as well as
numeric characters and perform other functions easily. You’ll
find a setup template in the pocket on the inside rear cover
of this guide. Place it over the keypad as shown. It shows
you exactly how each key functions in the Setup Mode. You’ll
be able to customize
a number of meter
features to meet
your exact needs.
The table on the following two pages
lists all of these features.
Entering Alpha Characters
To enter an alpha character, press the appropriate function
key (Red, Blue or Green) and the appropriate number key.
For example,
• To enter A, press Green and 1
• To enter W, press Red and 8
You can press the keys at the same time, or one after the
other (color key first, number key second).
Entering Numeric Characters
Enter numbers
just as you normally would; just
press the key.
The setup mode
doesn’t affect the
operation of the
number keys.
4-3SV60941 Rev. B
Page 39

4 • Setting Up the Meter
Navigating the Menus
Your meter offers two methods for using the setup menus
and you can freely combine them:
• Self-Prompting Menus—If you choose this method, the
meter leads you through the entire setup menu. The display asks you a series of yes/no questions and instructs
you to enter a value or text as required.
• Direct Selection (Shortcut Keys)—Use the number
keys to select the number of the menu you want and
press Enter. Menu numbers are shown in the flowcharts
that follow and the detailed instructions for each setup
procedure are arranged by menu number. You can get to
any menu choice with no more than three keystrokes.
B700 Only
NOTE: Some menu choices described in this guide may not be
available because they’re associated with optional features that
haven’t been enabled. For example, if you don’t have departmental accounting, the setup menu items associated with it are
not active. The meter’s display will show “Not Avail” when you
enter an account-related menu ID while in the Setup Mode.
B702 Only
NOTE: Some menu options, notably 3,4,5,6,14 and 28 are available, but are not used with B702 meters. Ignore them! Setting up
these options will not have an effect on meter operation.
Setting Up Options
4-4 SV60941 Rev. B
With the meter in the default display mode, press the C and
Enter keys at the same time. If the password feature is on,
the meter prompts you to enter your password (up to four
digits). Type it and press Enter to get into the Setup Mode.
Press Exit Setup to leave the Setup Mode at any time.
Page 40

Setup Up Options (continued)
Setting Up the Meter • 4
Menu
ID Prompt Function
1 Change
Language?
B700 Only 3 Set Memory 1
Key?
B700 Only 4 Set Memory 2
Key?
B700 Only 6 Set Memory 3
Key?
B700 Only 6 Set Memory 4
Key?
7 Set Daylite
Saving Time?
8 Set Advert
Default?
B700 Only 9 Set Inscript
Default?
B700 Only 10 Set Account
Default?
11 Set Low Funds
Warn?
12 Set Postage
Default?
13 Set Timeout
Length?
Go To
Page
Selects the language shown in the meter's
display.
Programs a postage job that's displayed
when you press the memory key. A memory
key can store a postage value, ad slogan,
and inscription.
As above. 4-7
As above. 4-7
As above. 4-7
Selects daylite savig or standard time. 4-9
Selects the default advertisment. 4-9
Selects the default inscription (if inscriptions
are enabled).
Selects the default account
(optional feature).
Selects the descending register amount
that triggers the low funds warning.
Sets the default postage value. 4-12
Sets the timeout period, i.e., that amount of
time the meter waits following an inactive
period before it returns to default display.
4-7
4-7
4-10
4-10
4-11
4-13
B700 Only 14 Activate
Features?
Turns the following features on or off:
slogan port, Electronic Interace Unit and
inscriptions. You must have an activation
code from PB Supply Line
tions.
SM
for inscrip-
4-14
4-5SV60941 Rev. B
Page 41

4 • Setting Up the Meter
Setup Up Options (continued)
Menu
ID Prompt Function
B700 Only 15 Print Setup
Report?
B700 Only 16 Print Acct
Report?
B700 Only 17 Clear All
Accounts?
18 Move Ahead
Clock?
19 Move Back
Clock?
B700 Only 20 Create
Account?
B700 Only 21 Delete
Account?
B700 Only 22 Change Acct
Names?
B700 Only 23 Super Pswd
Change?
B700 Only 24 Password
Enable?
B700 Only 25 Enable
Accounting?
26 Set Time
of Date
Change?
27 Set Refill
Default?
B700 Only 28 Set Printer
Connection?
B700 Only 29 Setup EIU? This menu item is available only if your me-
Prints a report listing the setup parameters
you've chosen (requires serial printer).
Prints a report listing all the accounts
you’ve defined.
Clears the contents of all accounts in a
single operation.
Sets the meter’s internal clock forward by
an amount you specify. Use this feature to
correct clock drift.
Same as above, but moves the clock back. 4-18
Create Sets up an account (optional feature).
Removes an account (optional feature). 4-20
Changes account names (optional feature). 4-21
Changes supervisor password. 4-22
Enables password protection. 4-22
Enables accounting (optional feature). 4-23
Sets the time at which the meter advances
the date.
Sets a default refill amount that your meter
displays when you add postage.
Selects printer connection.This menu item
is not available if meter has optional EIU.
ter has optional EIU (DataLink).Use it to set
up the EIU.
Go To
Page
4-15
4-16
4-17
4-18
4-19
4-24
4-25
4-25
4-26
4-6 SV60941 Rev. B
Page 42

Setting Up the Meter • 4
Menu 1: Change Language
Menus 3, 4, 5 and
6: Set Memory
Keys
(B700 Only)
This menu lets you change the language displayed by your
meter. The number of languages from which you can choose
depends on what model meter you have.
1. The display prompts “Change Language?”
2. Press Yes.
3. The meter prompts “Amr English?”
4. Press Yes to accept the language; press No to see the
next language in the list. When you see the language you
want, press Yes. The meter advances to the next item on
the setup menu.
You can also select a language by entering its number. For
example, if Amr English is 1 and Spanish is 2, select Spanish, by typing 2 and pressing Enter. If you enter a number
the meter can't accept, it displays “Error,” leaves the current
language choice unchanged and returns to the setup menu.
This menu option allows you to assign a certain setup to a
memory key. The setup choices you assign include postage
value, advertising slogan number, and inscription number.
The meter recalls these settings whenever you press the appropriate memory key.
IMPORTANT! Ad slogans and inscriptions are options which you
can purchase at the time of your initial order, or afterwards from
the PB Supply Line™ as explained in Chapter 8.
The meter can have one “resident” ad slogan and up to four additional slogans loaded via a slogan cartridge. The meter will not
“see” additional slogans unless the slogan cartridge is loaded as
described in Chapter 8.
4-7SV60941 Rev. B
Page 43

4 • Setting Up the Meter
Menus 3, 4, 5 and
6: Set Memory
Keys
(B700 Only)
(continued)
1. The display prompts “Set Memory N Key?”
NOTE: N is the number of the Memory Key.
2. Press Yes.
3. The display prompts: “Enter Amnt” and shows current
setting.
4. Key in the postage value you want and press Enter.
5. The display prompts: “Enter Ad” and shows current setting.
6. Key in the ad number you want and press Enter. (Ad
numbers range from 0 to 5. 0=no ad. If the ad number is
not available, the meter prompts “No Ad” and returns to
the “Set Memory N Key?” prompt.) If you do not want an
ad, key in 0 (zero) and press Enter.
7. The display prompts: “Enter Inscr” and shows current
setting.
8. Key in the inscription number you want and press Enter.
If you don’t want an inscription, key in 0 (zero) and En-
ter.
NOTE: The Appendix contains a list of inscription codes.
If the inscription is not available, the display shows “No
Inscript” briefl y and returns to the “Set Memory N Key?”
prompt.
9. The display prompts “Mem N Set” (where N is the number of the memory key) and moves on to the next item of
the setup menu.
4-8 SV60941 Rev. B
Page 44

Setting Up the Meter • 4
Menu 7: Set Daylight Saving Time
Menu 8: Select Default Advertisement
This menu lets you turn daylight saving time on or off.
1. The display prompts “Set Daylite Saving Time?”
2. Press Yes.
3. The meter prompts: “Set Daylite Saving On [Off]?”
4. Press Yes or No as appropriate to respond to the prompt.
5. The meter prompts “Daylite Time is On [Off],” depending
on your answer in step 2.
6. The meter prompts “Now XX:XX a(p) Press Enter” where
XX:XX is the time.
7. Press Enter to accept the setting. The meter advances to
the next item on the setup menu.
The meter automatically selects the default ad when you first
turn it on and after it has been inactive for a certain period of
time. You can change the default as follows:
1. The display prompts “Set Advert Default?”
2. Press Yes.
3. The display prompts “Enter Ad Number.”
4. Use the number keys to key in the number of the ad you
want to use as the default.
NOTE: You’ll fi nd ad numbers printed on your slogan cartridge (see Chapter 8 for more information.) “Valid” numbers
may range from 0 to 5. Zero (0) means no ad is selected. If
the number you enter isn't valid, the meter briefl y displays
“No Ad,” leaves the current default ad unchanged, and returns to the “Set Advert Default?” prompt.
5. The meter displays the ad number and ad name or
“NONE” if you keyed in zero (0).
6. Press Enter.
7. The meter prompts “Ad Set” and goes to the next item in
the setup menu.
4-9SV60941 Rev. B
Page 45

4 • Setting Up the Meter
Menu 9:
Set Default
Inscription
(B700 Only)
Menu 10:
Set Account
Default
(B700 Only)
NOTE: This menu
item is not available
when the password
feature—Menu Item
24—is enabled.
The default inscription is automatically selected when you
first turn the meter on and after it has been inactive for a period of time. You can change the default as follows:
1. The display prompts “Set Inscrpt Default?”
2. Press Yes.
3. The display prompts “Enter Insc Number.”
4. Key in the code number of the default inscription using
the number keys and press Enter. (If the number you enter isn't valid—the inscription isn't available—the meter
displays “No Inscript” for one second and returns to the
“Set Inscrpt Default” prompt.
NOTE: Inscriptions are options purchased at the time of
your initial order or afterwards from the PB Supply Line™.
See the Appendix for a list of available inscriptions and their
code numbers.
5. The display prompts “Inscrpt Set” and the meter goes to
the next item in the setup menu.
The meter selects the default account automatically when
you first turn it on and after it's been inactive for a while. You
can change the default account as follows:
1. The display prompts “Set Account Default?”
2. Press Yes.
3. The display shows the current default account name.
4. Press No repeatedly to cycle through the available account names or key in the account ID number and press
Enter. (Account ID numbers range from 1 to 10. If you
have the optional Electronic Interface Unit [“Datalink”],
they range from 1 to 100.)
NOTE: If the meter can't accept the number you enter, it will
prompt “Error” and return you to the “Set Account Default?”
prompt.
5. When you’ve selected the account name you want, press
Enter.
6. The meter prompts “Account Set” and moves to the next
item in the setup menu.
4-10 SV60941 Rev. B
Page 46

Setting Up the Meter • 4
Menu 11: Set Low Funds Warning
The meter warns you when the descending register ($ Available) reaches a certain default value. You can set a different
amount as follows.
1. The display prompts “Set Low Funds Warn?”
2. Press Yes.
3. The display prompts “Enter Amnt” and shows the current
value.
4. Key in the low funds amount using the number keys and
press Enter. You must enter the decimal point. For example, press the 5, 0, (.) and Enter keys for a low funds
warning amount of $50.
5. The display prompts “Amount Set” and the meter ad-
vances to the next item in the setup menu.
NOTE: If you enter a value the meter can't accept, it
prompts “Value Error,” leaves the original default value unchanged and returns to the “Set Low Funds Warn?” prompt.
If you make a mistake while entering the new value, or decide not to change it, press C (Clear), then Enter. The low
funds amount will not change and the meter returns to the
“Set Low Funds Warn” prompt.
4-11SV60941 Rev. B
Page 47

4 • Setting Up the Meter
Menu 12: Set Postage Default Value
Your meter displays the default postage value when you first
turn it on and when it has been inactive for a period of time.
Think of the default as a standard value the meter always
returns to. The factory-set default is the current rate for first
class postage for mailpieces weighing up to one ounce. You
can change this setting as follows:
1. The display prompts "Set Postage Default?”
2. Press Yes.
3. The display prompts: “Enter Amnt” and shows the current
value.
4. Key in the default value using the number keys and
press Enter. You can key in the decimal point or let the
meter do it for you. For example, press 3, 2, and Enter to
enter $0.32.
5. The display prompts “Amount Set” and the meter advances to the next item in the setup menu.
NOTE: If you enter a value the meter can't accept, it
prompts “Error,” leaves the current default value unchanged
and returns to the “Set Postage Default?” prompt.
If you make a mistake while entering the new value, or
decide not to change it, press Clear, then Enter. The default postage amount remains unchanged and the meter
returns to the “Set Postage Default” prompt.
4-12 SV60941 Rev. B
Page 48

Setting Up the Meter • 4
Menu 13: Set Timeout Length
The timeout length is the amount of time in minutes the meter waits following an inactive period before it returns to the
default display. To change the timeout value:
1. The display prompts “Set Timeout Length?”
2. Press Yes.
3. The display prompts “Enter Time” and shows current
timeout setting.
4. Key in the timeout value in minutes using the number
keys and press Enter. The timeout value can range from
0 to 1,440 minutes (24 hours). For example, press 1, 0
and Enter to enter a timeout value of ten minutes. If you
want to disable the timeout feature, enter 0 (zero).
5. The display prompts “Timeout Set” and advances to the
next item in the setup menu.
NOTE: If you enter a timeout value the meter can't accept (you
chose a number outside of the minimum and maximum limits),
the display shows “Error” and returns you to the “Set Timeout
Length?” prompt.
4-13SV60941 Rev. B
Page 49

4 • Setting Up the Meter
Menu 14:
Activate Features
(B700 Only)
Use this option to enable (turn on) or disable (turn off) certain
optional meter features. These include additional inscriptions.
You need a special code number to activate these features.
The PB Supply Line™ will give it to you when you place your
order.
1. The display prompts "Activate Features?”
2. Press Yes.
3. The display prompts “Enter Code.”
4. Key in the code for the feature you want to enable or disable; press Enter.
NOTE: If you enter a bad code number (wrong number of
digits or the code doesn't match any of the features in the
meter), the meter displays “Error” and returns to the “Enter
Code” prompt.
5. The display prompts “Enabled” or “Disabled,” depending
on the code you entered.
6. The display prompts “Enter Code.” To enable or disable
another feature, repeat steps 4 and 5. To return to the
main setup menu, press Enter.
4-14 SV60941 Rev. B
Page 50

Setting Up the Meter • 4
Menu 15:
Print Setup
Report
(B700 Only)
Use this menu option to print a report summarizing the setup
options you've chosen.
NOTE: This menu option is not available unless you select
a printer connection. Follow the instructions given for Menu
28—Set Printer Connection (page 4-25). Your meter must be
connected to a serial printer either directly or through the optional Electronic Interface Unit in order to print this report. Make sure
your printer is ON, set to ON LINE and loaded with paper before
you print.
1. The display prompts “Print Setup Report?"
2. Press Yes.
3. The display prompts “Printing...”
4. Your serial printer produces a report similar to that shown
below.
NOTE: If no printer is connected, or there is a communications problem, the meter prompts “Error” and advances to
the next item of the setup menu.
5. When the report is finished, the meter advances to the
next item of the setup menu.
SETUP REPORT AAA 20000002
MAR 17 95
ASCENDING REGISTER 10000.00$
DESCENDING REGISTER 1000.00$
CONTROL SUM 11000.00$
METER PIECE COUNT 500
BATCH COUNT 500
BATCH AMOUNT 1000.00$
INSCRIPTION LIST........................................................................
INS ID INS NAME
19 First Class
29 Nonprofit Org
18 Carrier Presort
31 Nonprofit ZIP+4
*************************************************************************
Sample Setup Report
4-15SV60941 Rev. B
Page 51

4 • Setting Up the Meter
Menu 16:
Print Account
Report
(B700 Only)
Use this option to print a report summarizing the contents of
all the accounts defined for the meter.
1. The display prompts “Print Accnt Report?”
2. Press Yes. (If you press No, the meter goes to the next
item in the setup menu.)
3. The display prompts “Insert Form.”
4. Place a spare envelope or index card on the meter’s
deck, up against the rear wall and slide it to the right.
5. The display says “Printing...” and the meter prints the
first page of the report.
6. If the report is complete, the meter takes you to the next
item in the setup menu. If a second page is needed, the
display prompts “Insert Form” again. In this case, repeat
steps 4 and 5.
MULTI-ACCOUNT REPORT
MAR 17 95 AAA PB2000002
05:14P
No Pieces Postage No Pieces Postage
01 270 $89.10 06 540 $178.20
02 4 $11.84 07 0 $0.00
03 0 $0.00 08 0 $0.00
04 683 $437.12 09 683 $437.12
05 0 $0.00 10 0 $0.00
Typical Multi-Account Report
IMPORTANT! If your meter is equipped with the optional Dat-
aLink, also known as an Electronic Interface Unit (EIU), it can
assign postage charges to up to 100 unique departmental accounts. This application requires a serial printer to produce the
multi-account report. Please refer to the instructions furnished
with your DataLink.
4-16 SV60941 Rev. B
Page 52

Setting Up the Meter • 4
Menu 17:
Clear All
Accounts
(B700 Only)
Use this menu choice to clear the contents of all accounts in
a single operation.
CAUTION! Make certain you really want to clear all
account registers. Once you do so, you can't undo the
operation.
1. The display prompts “Clear All Accounts?”
2. Press Yes.
3. The display prompts: “To Confirm Press Yes.”
4. Press Yes to clear all accounts. The display will blank out
for a short time and then show “Cleared” for one second.
The meter then takes you to the next item in the setup
menu.
5. If you press No—or any other key—while the confirma-
tion prompt is showing, accounts are not cleared and the
meter advances to the next item in the setup menu.
6. If you’d like to clear a single account, see page 3-8, If
You Have Departmental Accounting, for instructions.
4-17SV60941 Rev. B
Page 53

4 • Setting Up the Meter
Menu 18: Move Clock Ahead
and
Menu 19: Move Clock Back
Use these menus to adjust the meter's clock.
1. The display prompts “Move Ahead Clock?” or “Move
Back Clock?” depending on the menu you're in.
2. Press Yes.
3. The display prompts “Now XX:XXa(p) Press Enter”
where XX:XX is the current time displayed by the meter's internal clock. For example:
Now 11:34p
Press Enter
4. Press Enter.
5. The display prompts: “Enter Mins To Advance” or “Enter
Mins To Set Back,” depending on which menu you're in.
6. Key in the number of minutes you want to either advance or set back the clock. You can adjust the clock up
or down by a maximum of 120 minutes. If you enter a
value the meter can't accept, the display prompts “Error,”
leaves the time unchanged and lets you start over.
NOTE: Once you’ve moved the clock ahead or back, you no
longer have the full adjustment range of 120 minutes. The
range is reduced by previous adjustments. For example, if
you set the clock back by 30 minutes, the adjustment range
remaining is 90 minutes (120-30=90).
7. Press Enter.
8. The meter prompts “Now XX-XXa(p) Press Enter” again.
If the setting is OK, press Enter. The meter automatically
goes to the next item in the setup menu. If you want to
change the setting, press C (Clear) to return to the menu
prompt.
4-18 SV60941 Rev. B
Page 54

Setting Up the Meter • 4
Menu 20:
Create Account
(B700 Only)
In order to use this option:
• Your meter must have the optional accounting feature;
• Accounting must be enabled—see Menu 25 for instruc-
tions;
• You must first delete an account or accounts before you
can create one—see the instructions for Menu 21 on the
following page. The reason for this is that when you first
enable the accounting feature, the meter creates 10 accounts named “1” through “10”. You cannot have more
than 10 accounts unless your meter is equipped with the
optional Electronic Interface Unit (DataLink), in which
case you can have up to 100. Therefore you must delete
one or more accounts before you can create one.
1. The meter prompts “Create Account?"
2. Press Yes.
3. The display prompts “ Enter Acct Name.”
4. Key in an account name. It can be up to 11 characters
long. To backspace, press the left arrow key ←. To type
a space, press the right arrow key (or the blue key, then
the decimal point key).
5. Press Enter. Skip steps 6 and 7 if the password feature
is not enabled.
6. If the password feature is enabled, the meter prompts
“Enter Acct Password.”
7. Key in a password for the account. You can use numbers
only and are limited to four. Press Enter.
8. The meter prompts "Account Defined” for a few seconds
and then “Enter Account Name.” You can create another
account or press No to go to the next menu item.
4-19SV60941 Rev. B
Page 55

4 • Setting Up the Meter
Menu 21:
Delete Account
(B700 Only)
To delete an account:
1. The meter prompts “Delete Account?
2. Press Yes.
3. To scroll through the account names, press the No key
repeatedly. To select the account to delete, press Yes.
(You can also select an account by keying in its ID number and pressing Enter.)
4. The meter prompts “Delete?” and shows the account
name.
5. Press Yes to delete the account. Press No if you
changed your mind.
6. If you pressed Yes the meter prompts “Deleted” and advances to the next menu item.
7. If you pressed No the meter prompts “Delete Account?”
Press No to advance to the next menu item.
Menu 22:
4-20 SV60941 Rev. B
Page 56

Setting Up the Meter • 4
Menu 22:
Change Account
Names
(B700 Only)
In order to use this option:
• Your meter must have the optional accounting feature;
• Accounting must be enabled—see Menu 25 for instruc-
tions.
To change an account name:
1. The meter prompts “Change Acct Names?"
2. Press Yes.
3. The display shows the current account name.
4. You can:
• Type in the account ID number you want to change;
press Enter.
• Or press No repeatedly to scroll through the account names.
5. Press Yes to select the account name you want to
change.
6. The meter prompts “Name?” and shows the account
name.
7. Key in an account name. It can be up to 11 characters
long. To backspace, press the left arrow ← key. To type
a space, press the right arrow key (or the blue key then
the decimal point key).
8. Press Enter. Ignore steps 9 through 12 if the password
feature is not on.
9. If the password feature is enabled, the meter prompts:
“PSWD” and displays the current password.
10. To leave the password as is, press Enter.
11. To change the password, type in a new one for the account. You can use numbers only and cannot enter
more than four.
12. Press Enter.
13. The meter prompts “Changed” and returns to the
“Change Acct Names?” prompt. Press No if you want to
go on to the next menu item.
4-21SV60941 Rev. B
Page 57

4 • Setting Up the Meter
Menu 23:
Change
Supervisor
Password
(B700 Only)
Menu 24:
Enable Password
(B700 Only)
To change the supervisor password:
1. The meter prompts “Super Pswd Change?"
2. Press Yes.
3. The meter prompts "Enter Super Password.”
4. Key in the new password. You may use numbers only
and cannot enter more than four.
5. Press Enter.
6. The meter prompts “Changed” and advances to the next
menu item.
Password protection is a feature that offers an additional
measure of security by limiting access to certain meter operations to authorized personnel only.
IMPORTANT! Password protection is available only when the
meter’s accounting feature is activated and in use.
To use this feature:
1. The meter prompts “Password Enable?"
2. Press Yes.
3. The meter prompts "To Enable Press YES.”
4. Press Yes.
5. The meter prompts “Enter Super Password.”
6. Key in the supervisor's password. You may use numbers
only and you may not enter more than four. If the meter
can’t accept the password, it prompts “Error” and returns
to the “Password Enable?” prompt.
7. Press Enter.
8. The meter prompts “Enabled” and goes to the next menu
item.
NOTE: With password protection enabled, you must enter the
supervisor password to get into the meter's setup mode.
4-22 SV60941 Rev. B
Page 58

Setting Up the Meter • 4
Menu 25:
Enable
Accounting
(B700 Only)
Accounting is an optional feature that let's you charge postage to a particular account. When you enable this feature,
the meter creates 10 accounts and automatically assigns the
names “1” to “10” to them. If passwords are used, turn them
on after enabling accounting and setting up accounts (See
page 4-22). Once you enable the accounts feature you can
change account names, delete accounts, create accounts
and assign password protection to them. To enable this feature:
1. The meter prompts “Enable Accounting?"
2. Press Yes.
3. The meter prompts "To Enable Press YES.”
4. Press Yes.
5. The meter prompts “Enabled.”
NOTE: With accounting enabled, the meter will ask for an
account name when you turn it on (if you’ve set up a default
account, the display will show the account ID number). You can
disable accounting by pressing No when the display prompts “To
Enable Press Yes.” When you disable accounting, the meter will
save your account names and any account data that has accumulated. These will appear when you enable accounting again.
4-23SV60941 Rev. B
Page 59

4 • Setting Up the Meter
Menu 26: Set Time of Date Change
This menu choice lets you change the time at which the meter advances the date. This is usually set to occur at 12:00
A.M.
1. The meter prompts “Set Time of Date Change.”
2. Press Yes.
3. The meter prompts "Now 12:00a Press Enter.” (This is
the current setting.)
4. Press Enter.
5. The meter prompts “Enter Hour.”
6. Type in the hour you want using the number keys on
the keyboard. You can type an hour from 1 to 12. Press
Enter. If you enter an invalid number, the meter will display “Error” and return to the “Set Time of Day” prompt.
If you make a mistake while entering a number, press C
to clear it. The meter prompts “—.” Enter the value you
want.
7. The meter prompts “Enter Min.”
8. Type in the minutes you want. You can type numbers
ranging from 00 to 59. Press Enter. If you enter an invalid number, the meter will display “Error” and return to
the “Set Time of Day” prompt.
9. Meter prompts “AM?”
10. Press Yes for AM; No for PM.
11. Meter prompts “Now XX:XXa(p) Press Enter” again
where XX:XXa(p) is the new time for the date change. If
the setting is OK, press Enter. The meter will automati-
cally go to the next item on the setup menu.
4-24 SV60941 Rev. B
Page 60

Setting Up the Meter • 4
Menu 27: Set the Default Refill Amount
Menu 28:
Set Printer
Connection
(B700 Only)
This menu choice lets you set the default refill amount shown
by the meter when you add postage using Pitney Bowes
Postage By Phone
1. The meter prompts “Set Refill Default.”
2. Press Yes.
3. The meter prompts "Enter Amnt” and shows the current
refill value.
4. Key in the new refill amount. You don’t have to type the
decimal point.
5. Press Enter.
6. The meter prompts “Amount Set” and advances to the
next menu item.
Your meter is equipped with a communications port that allows you to connect it to a serial printer or a Pitney Bowes
Electronic Scale. The printer can produce the reports listed
below:
• Setup Report
• Multi-Account Report (available only when your meter is
equipped with the optional Electronic Interface Unit (DataLink); this option expands departmental accounting to
100 accounts).
• Service Report (can be accessed and printed only by
Pitney Bowes Service Personnel).
Menu Option 28 lets you specify the type of printer connection.
®
service.
IMPORTANT! If your meter is equipped with the optional Electronic Interface Unit (DataLink), this menu option is not available.
4-25SV60941 Rev. B
Page 61

4 • Setting Up the Meter
Menu 28:
Set Printer
Connection
(B700 Only)
(continued)
Menu 29:
Set Up EIU
(DataLink)
(B700 Only)
1. The meter prompts “Set Printer Connection?”
2. Press Yes.
3. Press No repeatedly to cycle through the available options:
• None?— Select this option if your meter is connect-
ed to a Pitney Bowes Electronic Scale.
• Direct?— Select this option if your meter is connect-
ed to a serial printer.
4. When you’ve selected the option you want, press Yes or
Enter to confirm it. The meter prompts “Connection Set”
and advances to the next menu item.
This setup option is available only if an Electronic Interface
Unit is connected to your meter. The EIU or “DataLink” is an
expansion module that allows your postage meter to communicate with other devices such as a Pitney Bowes electronic scale. It also offers support for up to 100 departmental
accounts.
1. The meter prompts “Set Up EIU?”
2. Press Yes.
3. Follow the instructions furnished with your EIU (Pitney
Bowes Publication SV50394).
4-26 SV60941 Rev. B
Page 62

5 • Refilling Your Meter
This chapter contains the information you'll need
to obtain postage funds for your B700/B702 meter
without leaving your office. All you need is a phone
or internet access and a few minutes of your time.
Obtaining the Current Meter Access Code ....... 5-2
Obtaining the Refill Combination ...................... 5-3
Entering Your Refill Amount into the Meter .......5-5
Payment Options ..............................................5-5
Performing an Inspection on Your Meter ........5-10
5-1SV60941 Rev. B
Page 63

5 • Refilling Your Meter
Obtaining the Current Meter Access Code
To obtain your meter’s current access code:
1. Press the Refill button. Your default reset amount will
display.
2. Press the Enter button if you wish to refill for the amount
shown, OR enter a new amount, and then press the En-
ter button to confirm.
3. Insert a spare envelope or index card as a form (this will
run through the machine) OR press the Enter button
again.
Depending on the action you take, your current access
code will either display or will print on the envelope or
index card you ran through the machine.
NOTE: Your access code changes as you use postage, so be
sure to obtain the current access code each time you refi ll your
meter.
5-2 SV60941 Rev. B
Page 64

Refilling Your Meter • 5
Obtaining the Refill Combination
NOTE: You can refi ll you meter either on the internet or on the
phone.
Refilling Your Meter on the Internet
In order to refill your meter on the internet, you will need your
User ID, password, meter serial number, and current access
code from Obtaining the Current Meter Access Code, on
page 5-2.
1. Go to www.postagebyphone.com.
2. Enter your User ID and password. Click Login.
3. On the "Transactions" page:
a. Click on Refill Your Meter.
b. Enter your 7-digit meter serial number. If prompted,
click Continue.
4. On the "Refill Meter" page:
a. Enter the current meter access code.
b. Enter the Refill Amount you wish to add to your me-
ter.
c. Click Continue.
5. On the "Verify Your Choices" page:
• Click Refill Meter if all information is correct, OR
• Click Re-enter Amount to change the dollar amount.
Your Setting Combination displays on the "Meter Refill Confirmed" page. You can now go to your meter and follow the
steps in Entering Your Refill Amount into the Meter on page
5-5.
5-3SV60941 Rev. B
Page 65

5 • Refilling Your Meter
Obtaining
the Refill
Combination
(continued)
Refilling Your Meter on the Phone
In order to refill your meter on the phone, you will need your
account number, meter serial number, and current access
code from Obtaining the Current Meter Access Code, on
page 5-2.
1. Dial 1-800-243-7800 (available 24 hours/day, 7 days/
week).
®
2. Key in your 8-digit Postage By Phone
followed by the # key.
3. Select option 1 to add postage to your meter.
4. If prompted, key in your 7-digit meter serial number followed by the # key.
5. Key in the current meter access code followed by the #
key.
6. Key in the dollar amount you wish to add to your meter,
in whole dollars only followed by the # key (for example:
to add $200 key 200#).
7. The system will verify the amount – if correct, press the #
key again.
8. The phone system will give you a 6-digit refill combination for this request; write this number down.
You can now end your call and follow the steps in Entering
Your Refill Amount into the Meter on page 5-5.
account number
NOTE: If at any time during this process you have a question,
press “0” for an agent (available M-F, 8am-8pm, EST).
5-4 SV60941 Rev. B
Page 66

Refilling Your Meter • 5
Entering Your Refill Amount into the Meter
Payment Options
If you have printed a form:
• Your display should read "Enter Combo".
• Key in the 6-digit setting number and press the Enter
button. Your display will read "Refill OK" and the postage
available.
If you have not printed a form:
• Your meter should be displaying your current access
code. Press Enter. The display will read "Enter Combo."
• Key in the 6-digit setting number and press the Enter
button. Your display will read "Refill OK" and the postage
available.
Purchase Power
As a Purchase Power or Postal Privilege customer, you can
order postage now and pay later when you get your bill.
When you receive your invoice, simply write a check payable
to Purchase Power or Postal Privilege (Please be sure your
11-digit account number is referenced) and send it with your
invoice stub to:
®
Regular Mail Address:
Purchase Power/Postal Privilege
P.O. Box 856042
Louisville, KY 40285-6042
Overnight Mail Address:
Purchase Power/Postal Privilege
5101 Interchange Way
Louisville, KY 40229
5-5SV60941 Rev. B
Page 67

5 • Refilling Your Meter
Payment Options
(continued)
Reserve Account
Today, when you send a postage check in advance, you receive no added value. At Pitney Bowes, we believe important
customers like you deserve more. By sending your pre-payment checks to Reserve Account, you’ll earn FREE POSTAGE based on your average daily account balance. This is
the smartest way to make postage payments earn money for
you!
• Schedule Electronic Payments – We’ve added a new
payment-scheduling feature to make funding your Postage By Phone
up online at www.postagebyphone.com, you can fund
your account by scheduling postage payments weekly,
monthly, or once your account balance reaches a specified level.
• ACH Credit instructions for your Reserve Account
– If you send an ACH Credit, your funds will be posted
to your account within 2 business days by 6:00 pm Eastern Time. Use the following information to send an ACH
Credit:
®
Reserve Account even easier! By signing
Remit To: Reserve Account C/O
Pitney Bowes Bank
Routing Number: 1240-8462-7
Credit to Account Number: Your 8-Digit Postage By
®
Phone
Account #
Company Name: Your Company Name
• Acceptable ACH Credit formats: CTX, CCD/CCD+,
PPD/PPD+
5-6 SV60941 Rev. B
Page 68

Refilling Your Meter • 5
Payment Options
(continued)
• Bank-to-Bank Wiring instructions for your Reserve
Account – If you send a Bank or Federal Wire by 1:00
pm Eastern Time, your account is updated the same day
by 6:00 pm Eastern Time. Use the following information
to send a Wire:
Destination Bank: National City Bank
Kentucky
Routing Number: 083000056
City, State: Louisville, KY
FDN (Beneficiary): Pitney Bowes Bank, Inc.
Reserve Account
AC (Account Number): 754401126
OBI (Other Information): Your 8-Digit Postage By
®
Phone
Account #
Company Name: Your Company Name
If you choose to mail your deposit, make your checks payable to Reserve Account and write your 8-digit Postage By
®
Phone
account number on the check. Include a deposit slip
with every payment. These slips are located on the bottom
of your Postage By Phone® statement or can be ordered online at www.postagebyphone.com. Allow 5 business days for
Regular Mail or 2 business days for Overnight Mail and send
deposits to:
Regular Mail Address:
Reserve Account
P.O. Box 856056
Louisville, KY 40285-6056
Overnight Mail Address:
Reserve Account
5101 Interchange Way
Louisville, KY 40229
5-7SV60941 Rev. B
Page 69

5 • Refilling Your Meter
Payment Options
(continued)
United States Postal Service
• ACH Debit (EFT) – If you would like to be one of our
ACH debit customers, please apply online at
www.postagebyphone.com and click on Pay For Post-
age.
• Bank-to-Bank Wiring or ACH Credit – If you send a
Bank or Federal Wire by 1:00 pm Eastern Time, your
account is updated the same day. If you send an ACH
Credit, your funds will be posted to your account within 2
business days by 6:00 pm Eastern Time. Use the following information to send a Wire or an ACH Credit:
Citibank
CMRS/Pitney Bowes Postage By Phone
Account # 4067-8633
Routing Transit #021000089
Detail Payment Field: XXXXXXXX
- Acceptable ACH Credit formats: CTX, CCD/CCD+,
PPD/PPD+
®
- (X’s are your 8-digit Postage By Phone
number)
account
If you choose to mail your deposit to the United States Postal
Service, make your check payable to United States Postal
Service, and write your 8-digit Postage By Phone
®
account
number on the check.
Include a deposit slip coupon with every payment (these
coupons will be provided and replenished automatically by
the Postal Service).
5-8 SV60941 Rev. B
Page 70

Refilling Your Meter • 5
Mail your deposit to one of the Lockbox addresses reflected
below (the most efficient location in terms of mail service will
be reflected on your deposit slip coupons).
Regular Mail Addresses - (Allow 5 business days)
CMRS-PB
P.O. Box 7247-0166
Philadelphia, PA 19170-0166
CMRS-PB
P.O. Box 0566
Carol Stream, IL 60132-0566
CMRS-PB
P.O. Box 894766
Los Angeles, CA 90189-4766
5-9SV60941 Rev. B
Page 71

5 • Refilling Your Meter
Performing an Inspection on Your Meter
Postal regulations require a meter holder to contact the manufacturer periodically to add postage or perform an inspection. If you do not add postage within a 90-day period, your
meter will begin flashing “Insp. Due” but will still allow you to
run postage.
If you do not add postage or perform an inspection within
the next 30 days, your meter will flash “Insp. Req.” and stop
printing postage.
You can satisfy this requirement by calling our automated
system at 1-800-243-7800 and adding postage or if you do
not need postage, by performing an inspection. Below are
the steps to perform an inspection:
Obtaining the Current Meter Access Code
To obtain your meter’s current access code:
1. Press the Refill button. Your default reset amount will
display.
2. Press the number 5 and then press Enter.
3. Press the Enter button again.
4. Your current access code displays. Write this number
down.
5. Press the Enter button again.
5-10 SV60941 Rev. B
Page 72

Refilling Your Meter • 5
Performing
an Inspection
on Your Meter
(continued)
Performing the Inspection
In order to perform your meter inspection, you will need your
account number, meter serial number, and access code from
the steps above.
1. Dial 1-800-243-7800.
®
2. Key in your 8-digit Postage By Phone
followed by the # key.
3. Select option 4 to perform a meter inspection.
4. If prompted, key in your 7-digit meter serial number fol-
lowed by the # key.
5. Key in the current meter access code followed by the #
key.
The voice response system will respond with a 4-digit combination. You can now end your call.
account number
Entering Your Combination in the Meter
Your meter should be displaying “Enter Combo”. Key in the
4-digit combination issued in the steps above and press the
Enter button.
Your meter will display "Refill OK" and the postage will be
available.
5-11SV60941 Rev. B
Page 73

Page 74

6 • Replacing the Ribbon
This chapter contains the procedure to remove
and replace the ribbon cassette in your postage
meter.
Removing the Used Ribbon Cassette ..............6-2
Installing the New Cassette .............................. 6-4
6-1SV60941 Rev. B
Page 75

6 • Replacing the Ribbon
Removing the Used Ribbon Cassette
The meter's display shows “Low Ribbon” when the supply
is about to run out. You can still print postage when you see
this warning. If you see “Ribbon Out,” replace the cassette
immediately.
IMPORTANT! If you attempt to use an exhausted ribbon cassette, you may pay for postage without getting a valid meter
imprint.
1. Turn the key counterclockwise to switch the meter OFF.
U
L
2. Open the cassette compartment door.
6-2 SV60941 Rev. B
Page 76
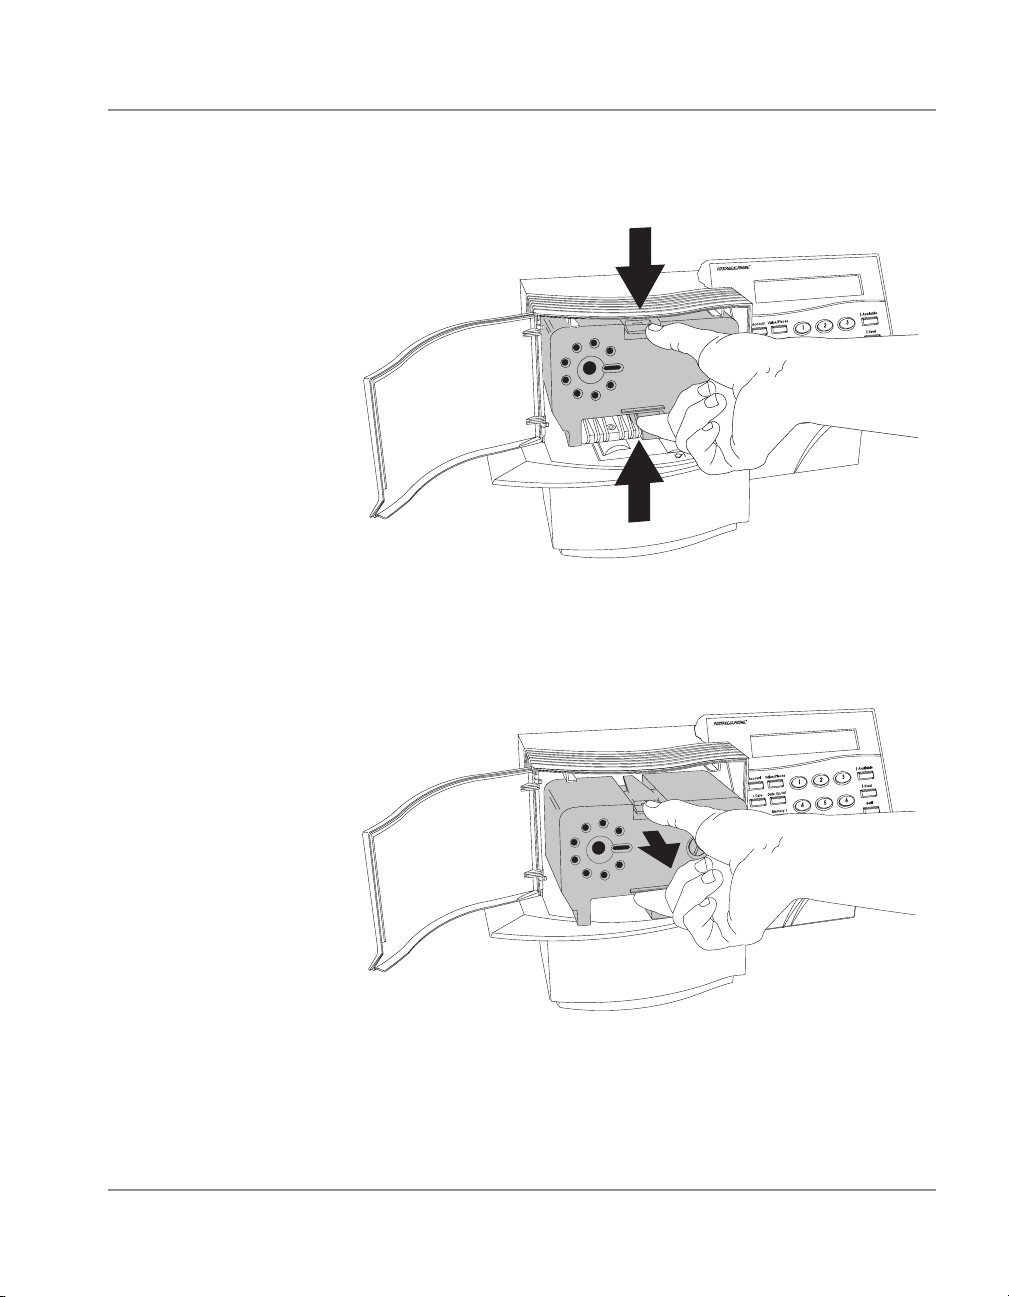
Replacing the Ribbon • 6
Removing the
Used Ribbon
Cassette
(continued)
3. Squeeze the locking tab as shown to disengage the cas-
sette.
4. Pull the cassette straight out and discard it.
6-3SV60941 Rev. B
Page 77

6 • Replacing the Ribbon
Installing the New Cassette
1. Unwrap the new
cassette and pull the
shipping tab from its
back.
2. If necessary, turn
the winder slightly
counterclockwise to
take up any slack in
the ribbon.
3. Hold the new cassette with the ribbon side down and the
opening (print head cutout) aligned with the printhead.
Rest the cassette on the deck. Align the locating tab on
the right side of the cassette with the groove in the cassette compartment. See the figure below.
6-4 SV60941 Rev. B
Page 78

Replacing the Ribbon • 6
Installing the
New Cassette
(continued)
4. Push the cassette back into the ribbon compartment as
far as it will go. Firmly press on the upper part of the cassette near the locking tab to snap it into position.
IMPORTANT! Make sure the cassette snaps into place for
proper operation.
5. Close the cassette compartment door.
6. Switch the meter ON and resume normal operation.
CAUTION! The printhead needs no maintenance.
Please don't touch it with your fi ngers or any object;
you could damage it.
6-5SV60941 Rev. B
Page 79

Page 80

7 • Troubleshootin
g
This chapter lists provides you with defi nitions of
error and warning message you may receive on
your postage meter.
Error and Warning Messages ........................... 7-2
Fault Messages ................................................7-2
If You Need Service ..........................................7-2
7-1SV60941 Rev. B
Page 81

7 • Troubleshooting
Error and
Warning
Messages
Fault Messages
The table on the following pages lists error and warning messages you might see while using your meter. An error message alerts you to a fault which, until you correct it, prevents
the meter from tripping. A warning message alerts you to a
condition that needs attention, but doesn't prevent meter tripping.
NOTE: Whenever the postage amount displayed is bracketed
by three wings, as shown below, the meter is ready to print postage. If the amount is bracketed by one set of wings, you can't
process mail until you fi x the fault.
Meter is ready to print postage.
Meter not ready. It won't trip until you
respond to the error or warning message.
If the meter senses a fault it can't correct, it displays the
message “FATAL NN” where NN is a code that represents
the type of fault. When this display appears, you won't be
able to enter many keyboard commands and the meter won't
trip.
You may be able to correct the problem by turning the meter
off for a few seconds, and turning it back on. If this doesn't
correct the problem, please write down the error code and
call for service.
If You Need Service
7-2 SV60941 Rev. B
Pitney Bowes provides service from most of the major cities of the United States through a nationwide, computerized
dispatching network. Should you have questions about your
postage meter or require assistance with your particular application, visit our web site:
www.pitneyworks.com/metersupport or call 1-800-522-0020.
Page 82

Troubleshooting • 7
Error and Warning Messages
Bad PrintHd
The meter has detected a printhead problem. Call for service.
Check EIU (B700 Only)
There is a communication problem between your meter and the EIU (DataLink). Unplug
the power cord for 30 seconds, then plug it in to restart the meter. If this fails to correct the
problem, call for service.
Clear Jam
The mailpiece has jammed on the feed deck. To clear the jam, turn the meter off, then on.
This causes the transport to release the envelope. Carefully pull the envelope out to the
Left to avoid damaging the ribbon.
Date Change
Normal. Occurs at midnight (unless you specified another time) when the meter automatically advances the date.
Date Error
Check the date.
Error
You entered an “illegal” value, that is, a value the meter can't accept.
Fatal 09
The meter displays this message after nine consecutive, unsuccessful attempts to refill it.
You cannot refill the meter at this point. Please call for service.
Fatal NN
The meter has a fault which prevents it from operating. "NN" is a code that indicates the
nature of the fault to Pitney Bowes Service personnel. You may be able to recover the meter from a Fatal 14 fault by turning it off, waiting a few seconds, then turning it on. If the meter fails to display the default postage amount after you do this, write down the error code
and please call for service.
High Value
The postage value you selected is greater than the high value limit set for your meter. This
is a warning only; you can accept the value and process the mailpiece by pressing Enter.
7-3SV60941 Rev. B
Page 83

7 • Troubleshooting
Error and Warning Messages
Inspect Due
The meter is alerting you that a postal inspection is due which you will need to perform. Call
the Postage By Phone® Data Center at 1-800-243-7800 (1-800-243-2300 in Alaska and
Hawaii). When you hear the recording, press 0 and the asterisk (*) key for assistance. You
may still use your meter after you see this message. If you fail to have the meter inspected,
you will see the “Inspection Req” prompt. At this point, the meter is locked out, preventing
you from using it until the inspection is completed.
Inspect Req
This message alerts you that the meter requires a mandatory inspection. The meter is
locked out: you cannot print postage. Call the Postage By Phone® Data Center using the
numbers above for help.
Insuf Funds
The postage value selected is more than the funds currently available in the meter. You can
select a lesser amount of postage. You should also refill the meter at this time (Chapter 5).
Low Funds
The descending register ($ Available) has reached the low funds warning amount. You
should refill the meter at this point. See the instructions in Chapter 5. You may continue using the meter until you see the “Insuf Fund” message.
Low Ribbon
The ribbon supply is nearly exhausted. About 80% of the supply is gone at this point. Make
sure you have a new cassette on hand. You can continue using your meter until you see
the Ribbon Out error message.
Need Accnt (B700 Only)
If your meter has the optional accounting feature enabled, you must enter a valid departmental account to which postage is charged. If you fail to do so, you'll see this message.
Enter the account using the Account key (Chapter 3) and then select the postage value
you want.
No Inscript (B700 Only)
The selected inscription is not available; inscriptions have not been enabled. See Chapter 4
for instructions on activating features.
7-4 SV60941 Rev. B
Page 84

Troubleshooting • 7
Error and Warning Messages
No Ribbon
The ribbon is exhausted, broken or no ribbon cassette is loaded. Replace the ribbon cassette (Chapter 6), close the cassette door and press Enter.
Please Wait
Printhead temperature is out of range. Wait until it warms up.
Press Enter to Restart
Press Enter to restart the meter.
Remove Mail
The mailpiece did not complete its path through the print area. Carefully remove the mailpiece from the transport and reinsert it.
Ribbon Out
The ribbon supply is critically low; you must press Enter after each mailpiece is processed.
Replace the ribbon cassette immediately (Chapter 6).
No Ad
The selected slogan is not available. See Chapter 8 for instructions on loading ad slogan
cartridges.
Value Error
You entered an "illegal" value, that is, a value the meter can't accept.
7-5SV60941 Rev. B
Page 85

Page 86

8 • Supplies and Options
This chapter lists the various supplies and options
available with your postage meter.
Advertising Slogan Cartridge ............................ 8-2
Moistener (B700 Only) .....................................8-3
DataLink (Electronic Interface Unit)
(B700 Only) ......................................................8-6
Ordering Supplies and Options ........................8-6
8-1SV60941 Rev. B
Page 87

8 • Supplies and Options
Advertising Slogan Cartridge
The advertising slogan cartridge is a versatile plug-in
option that contains up to
four customer ads. A wide
variety of standard ads is
available direct from the PB
TM
Supply Line
as explained
later in this chapter. You
can also order customized
ads to turn your unused envelope space into a highly
visible, hard-working promotional tool. (B700 only–The
slogan cartridge may also
contain additional postal inscriptions.)
Using the Slogan Cartridge
1. Hold the slogan cartridge
as shown—with the label
facing the front of the
meter—and gently push
it into the cartridge well
as far as it will go.
2. A slogan cartridge holds
up to four ads. The cartridge label shows a
picture of each ad identified by number (figure
above).
1.
2.
3.
4.
.
8-2 SV60941 Rev. B
Page 88

Supplies and Options • 8
Advertising
Slogan Cartridge
(continued)
Moistener
(B700 Only)
3. To select an ad, press the Ad key repeatedly until you
see the ad name you want. Press Enter to confirm your
selection. The meter's display then shows the postal
amount.
When the meter is in the Ad Mode, you can also choose
an ad by typing its number on the meter's keypad
and pressing Enter. If an ad isn't available, the meter
prompts “No Ad.”
NOTE: Ads are not available for use if you remove the slogan cartridge from its well
The moistener is an option designed to moisten and help
seal envelopes as they feed into the postage meter. The instructions below tell you how to attach, fill, use and maintain
your moistener.
Attaching the Moistener
1. Place the moistener assembly
to the left of the
meter as shown at
the right.
2. Slide the moistener to the right up
against the meter.
Align the pieshaped back wall
of the moistener
with the smaller
pie-shaped wall of
the meter. These
areas are shaded
in the accompanying figure.
3. When the blue lock lever snaps up level with the meter
deck, the moistener is fully locked into position.
8-3SV60941 Rev. B
Page 89

8 • Supplies and Options
Moistener
(B700 Only)
(continued)
NOTE: You can use
tap water in the moistener. But we strongly
recommend that, for
best results, you use
E-Z Seal® instead. It
prolongs the life of the
moistener brush and
reduces maintenance
requirements.
Filling Moistener
1. Pour E-Z Seal® solution into the fill hole of
the moistener brush
assembly.
2. Fill until the solution
level reaches the top
of the sight glass. DO
NOT overfill.
Sight Glass
Using the Moistener
1. Select the postage
value you want, just as
you normally would.
2. Open the envelope flap
and feed it under the
moistener brush assembly as shown.
3. Guide the envelope up
against the rear wall
and to the right until its
lead edge reaches the
trip mark on the meter's
deck.
4. The meter will then convey the envelope through the
printer and into the stacker.
5. To fully seal some flaps, you may have to compress the
mailpiece by hand after metering.
8-4 SV60941 Rev. B
Page 90

Supplies and Options • 8
Moistener
(B700 Only)
(continued)
Bypassing the Moistener
Keep the envelope flap closed as you feed it over the moistener brush (that is, on top of the brush). See figure below,
right.
BYPASSUSE
Maintaining the Moistener
1. Using E-Z Seal® will
reduce the amount of
maintenance required.
See page 8-6 for ordering instructions.
2. Periodically remove
the wick assembly and
wipe excess envelope
glue off the deck with a
damp sponge or paper
towel.
3. To remove the wick
assembly, lift it straight
up and out of the
moistener as shown in
the accompanying illustration.
4. If the wick gets dirty, replace the entire wick assembly
with a new one. Remove it as described in step 3 above;
install the new one as shown. Make sure the new wick
assembly is all the way down against the deck.
8-5SV60941 Rev. B
Page 91

8 • Supplies and Options
DataLink
(Electronic
Interface Unit)
(B700 Only)
Ordering Supplies and Options
The DataLink (Electronic Interface Unit or EIU) is an expansion module that's permanently mounted to the back of your
postage meter. It increases account capacity from 10 to 100
and provides three communications ports, allowing you to
connect your meter to a variety of external devices. These
include a Pitney
Bowes Electronic
Scale, a modem
for one-button
postage refill, and
an IBM-compatible
personal computer
U
or serial printer.
L
Complete operating instructions are
furnished with your
DataLink.
For options and supplies, visit our web site: www.pb.com
Go to My Account Access and select Supplies Online.
TM
Select B700 Post Perfect
You may also call the PB Supply Line™
.
at 1-800-243-7824.
B700 and B702 Item
Ribbon Cassette 767-0
Postage Tape Sheets 612-7
Standard or Custom Advertising Slogans Call PB Supply
B700 Only Item
E-Z Seal
Wick Assembly 621-7
Postal Inscriptions See Appendix
8-6 SV60941 Rev. B
®
Sealing Solution (pint)
Line
601-0
TM
Page 92

A
pp
x
This appendix lists the postal inscriptions available
for your postage meter.
Meter Inscriptions ............................................ A-2
endi
A-1SV60941 Rev. B
Page 93

Appendix
Meter Inscriptions
The table below lists the postal inscriptions available for your
meter. Use the order number when you place your order with
™
the PB Supply Line
; use the inscription code number to
select the inscription after it's been activated. See page 8-4
for ordering instructions and page 4-14 for activation instructions.
Available Inscriptions
Order
Number
049-7 10 Additional Presort Postage Paid
063-7 11 Bound Printed Matter
057-7 12 Bound Printed Matter Bulk Rate
079-7 13 Bulk Rate
073-7 14 Bulk Rate 5-Digit ZIP+4
069-7 15 Bulk Rate Carrier Route Presort
071-7 16 Bulk Rate ZIP+4
077-7 17 Bulk Rate ZIP+4 Barcoded
013-7 18 Carrier Route Presort
026-7 19 First Class
070-7 20 First Class Carrier Route Presort
017-7 21 First Class Mail Enclosed
075-7 22 First Class ZIP+4 Barcoded
038-7 23 First Class ZIP+4 Presort
102-7 24 Fourth Class Bulk Rate
105-7 25 Fourth Class DBMC
099-7 26 International Priority Mail
054-7 27 Library Rate
074-7 28 Nonprofit 5-digit ZIP+4
080-7 29 Nonprofit Org
014-7,
068-7
Code
Number
30 Nonprofit Org Carrier Route Presort
Inscription
A-2 SV60941 Rev. B
Page 94

Available Inscriptions
Appendix
Order
Number
072-7 31 Nonprofit ZIP+4
076-7 32 Nonprofit ZIP+4 Barcoded
042-7 33 Par Avion/Air Mail
101-7 34 Pound Rate Paid Via Permit
067-7 35 Presorted First Class
104-7 36 Presorted First Class ZIP+4
093-7 37 Presorted Priority Mail
010-7 38 Presorted Special Fourth Class Rate
098-7 39 Printed Matter
011-7 40 Printed Matter Books
103-7 41 Printed Matter Catalogs
018-7 42 Printed Matter Par Avion
050-7 43 Printed Matter Second Class
052-7 44 Printed Matter Sheet Music
060-7 45 Priority Mail
061-7 46 Small Packet
096-7 47 Special Fourth Class Rate
078-7 48 Third Class
097-7 49 US International Air Mail Postage Paid/
065-7 50 ZIP+4
066-7 51 ZIP+4 Presort
Code
Number
Inscription
Barcoded
Par Avion
A-3SV60941 Rev. B
Page 95

Page 96

1 Elmcroft Road
Stamford, Connecticut 06926-0700
www.pb.com
For Service or Supplies
Web Site: www.pb.com
Customer Support: 1-800-522-0020
Product Name: B700, B702
Model Number: B700, B702
PB Form SV60941 Rev. B 05/04
© 2004 Pitney Bowes Inc.
All Rights Reserved
Printed in the USA
Printed on recyclable paper
*sv60941Revb*
 Loading...