

Page 1
Mailing Systems
PostPerfect
B700 Postage Meter
Quick Start Installation Instructions
™
READ ME FIRST!
Before you do anything else, read this
booklet. It explains how to install your
meter, how to put postage in it and
how to select and print postage.
Page 2

IMPORTANT SAFETY NOTES
• Plug the meter into a properly grounded wall outlet. This reduces the risk of shock and
equipment damage in the event of a short circuit. DO NOT remove the power cord's
ground pin and DO NOT use a ground adapter.
• The power cord wall plug is the primary means of disconnecting the meter from the AC
supply. The meter is on whenever it is plugged into a live receptacle, even though the
key switch and operator display may be off.
• Place the meter close to an easily accessible wall outlet. Avoid using wall outlets controlled by wall switches or shared by other equipment.
• Make sure the area in front of the wall outlet into which the meter is plugged is free
from obstruction.
• DO NOT route the power cord over sharp edges or trap it between pieces of furniture.
Make sure there is no strain on the power cord.
• To reduce the risk of fire or electrical shock, DO NOT attempt to remove covers or
disassemble the meter. The cabinet encloses hazardous parts. If the meter was dropped
or otherwise damaged, report such damage to your Pitney Bowes Customer Service
Representative.
• Keep fingers, long hair, jewelry and loose clothing away from moving parts at all times.
• Read all instructions before you attempt to operate the meter.
• Use the equipment only for its intended purpose.
• Printhead temperature can reach 103° F (43° C), making it warm to the touch.
• Always follow the specific occupational safety and health standards prescribed for your
workplace.
• Switch the meter OFF when you change the ribbon cassette.
Second Edition, July, 1995
©1995 Pitney Bowes Inc.
All rights reserved. This book may not be reproduced in whole or in part in any fashion or stored in a retrieval
system of any type or transmitted by any means, electronically or mechanically, without the express, written
permission of Pitney Bowes.
POSTAGE BY PHONE is a registered trademark of Pitney Bowes. PB SUPPLY LINE is a service mark of Pitney Bowes.
Printed on recycled paper
Page 3
B700 Installation Instructions
1. Unpack Shipping Carton and Check Contents
Remove the meter carrying case and all packing material. Carefully remove the shipping tape
from the cassette compartment access door. D on ’ t thr ow any packing material away until you ’ re
sure you have all the items listed below.
✓ Setup and Operating Guide
✓ Quick Reference Guide
✓ Quality Card
✓ Meter Carrying Case
✓ Postage Meter
✓ Stacker Assembly
✓ Keys (2)
✓ Power Cord
✓ Ribbon Cassette
✓ Supply Kit
✓ Postal Documents
✓ POSTAGE BY PHONE
tion about your POSTAGE BY PHONE account. You’ll need
to refer to it when you put postage in your meter.)
®
Letter (this has important informa-
If anything is missing, please call the number given on page 7 of this booklet. See the figure
below for a brief introduction to your new meter.
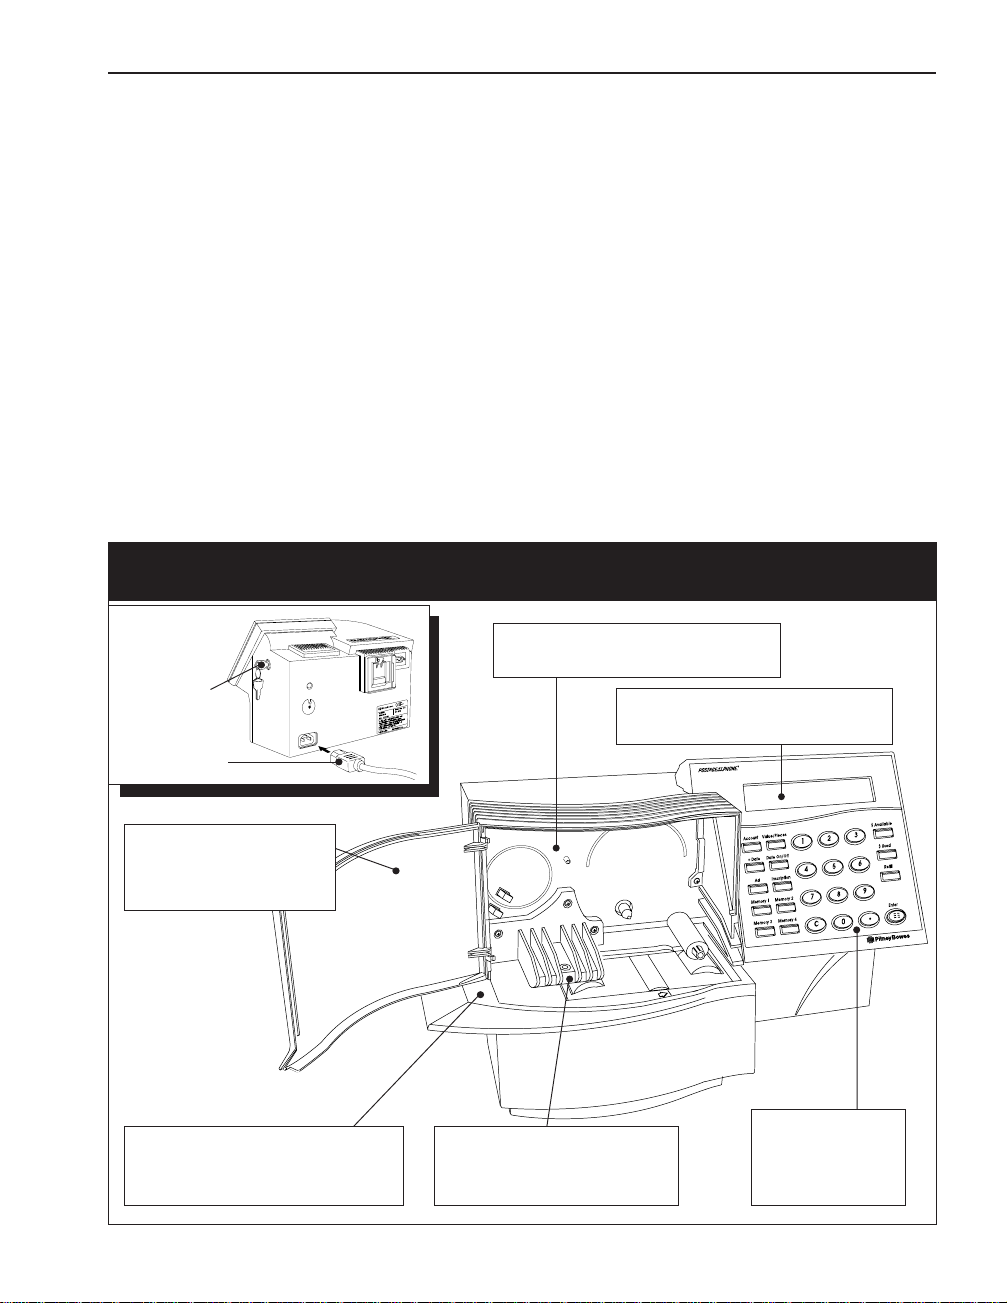
A Quick Tour of Your New Meter
Lock—Turn
clockwise
to turn
meter ON
Power Cord
U
L
Cassette Compartment—You’ll
load the ribbon cassette here
Operator Display—shows you
the current status of the meter
Access Door—Open to
install ribbon
cassette
Feed Deck—Supports your
envelope or tape sheet as it
passes through print area
Printhead—Applies meter
impression to your
envelopes and tape sheets
Keypad—Enter
your postage
amount or
commands here.
Page 1
Page 4

B700 Installation Instructions
2. Connect the Power Cord
Remove the meter from its carrying case and place
it on your work surface, close to a properly grounded
120 VAC wall outlet. Choose a convenient location—one where you have enough room to establish an efficient work flow.
a. Connect the power cord to the receptacle at the
back of the meter as shown.
b. Connect the power cord to a properly grounded
120 VAC wall outlet.
WARNING: Always plug the
meter into a properly grounded wall outlet. This reduces the risk of shock and
equipment damage in the event of a short circuit. DO NOT remove the power
cord’s ground pin and DO NOT use a ground adapter. Read the safety notes
printed on the inside front cover of this booklet.
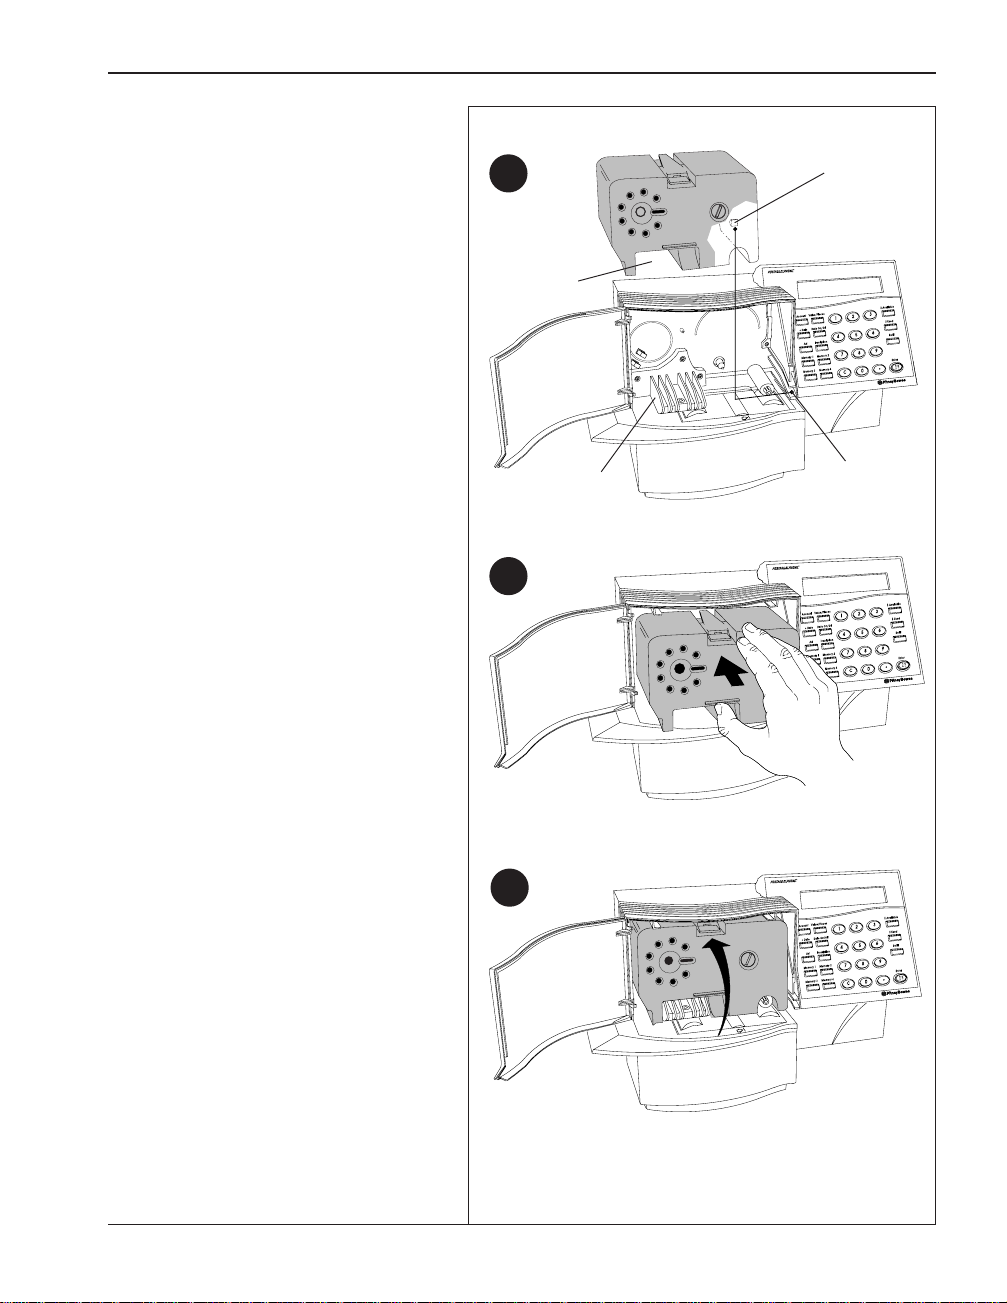
3. Install the Ribbon
U
L
a. Unpack the ribbon cassette and
remove the shipping tab. If necessary, turn the winder counterclockwise to remove any slack
from the ribbon.
b. Open the cassette door.
A
B
Page 2
Page 5
B700 Installation Instructions
c. Hold the cassette with the rib-
bon side down and the cutout
aligned with the printhead.
Align the locating tab on the
right side of the cassette with the
groove in the cassette compartment.
d. Rest the cassette on the deck and
push it back into the ribbon
compartment as far as it will go.
C
Printhead
Cutout
B
Printhead
D
Locating
Tab
Groove
e. Press in on the top of the cassette
near the locking tab to snap it in
position.
Close the cassette compartment
door. This completes ribbon
loading.
E
Page 3
Page 6

B700 Installation Instructions
4. Unlock the Meter
a. The lock is on the right side of the meter
as seen from the front.
b. Insert the key in the lock.
c. Turn the key to the right (clockwise) to
unlock the meter.
After you turn it on, the meter performs
a self test for several seconds and you'll
hear it run briefly.
d. The meter displays “Insuf Funds.”
Now you're ready to put postage into
your meter for the first time. You need:
✓ Your Pitney Bowes POSTAGE BY PHONE
received from Pitney Bowes contains this number. Write it down in the space
provided in the gray box on page 6 of these instructions.
✓ To telephone the POSTAGE BY PHONE D ata Center to get a combination num-
ber as explained in the instructions that follow . The Data Center is open from 8:00
A.M. to 8:00 P.M. Eastern Time, Monday through Friday, and 8:00 A.M. to 3:00
P.M., Eastern Time, Saturday. It is closed on Sundays and certain holidays.
®
Account Number. The letter you
U
L
5. Put Postage in the Meter
At the Meter—
a. Press Refill.
b. The display prompts “Enter
Amnt” alternating with the default re-
fill amount ($200).
c. To accept the default amount, pr ess
ter and go to step e. To enter your own
refill amount, go to step d.
d. Use the number keys to type in the post-
age amount you want. Note that:
• You must enter
amounts. You can enter $50, $100,
$340 and so on. You can’t enter
amounts like $72.50.
Page 4
whole dollar
En-
Enter AmntEnter Amnt
Enter Amnt
Enter AmntEnter Amnt
Page 7

B700 Installation Instructions
• If you enter a value the meter can’t accept, the display prompts “Value Error.”’
• You don't have to type the decimal point; the meter enters it automatically. For
example, type in $500 as follows:
5
00
• If you make a mistake or change your mind, use the
amount. The display shows “-”. Type in the correct amount.
e. Press
Enter.
f. The meter display prompts:
“Insert Form.”
g. Place a spare envelope or
piece of stiff paper (such as
an index card) on the transport. Insert it from the left
and guide it up against the
rear wall (1); then slide it to
Insert Envelope
from Left
2
the right (2) up to the trip
mark as shown and release it.
The display prompts “Printing...” and the meter prints
a refill report similar to this:
REFILL REPORT
03 / 07 / 95
C (Clear ) key to delete the refill
1
Trip Mark
20000003
10:48a
PHONE NUMBER
SERIAL NUMBER
ACCESS CODE
REFILL AMOUNT
COMBINATION
Sample Refill Report (Your Report Will Look Different)
1-800-243-7800
20000003
90000000
$500.00
At the Phone—
Have your POSTAGE BY PHONE® account number and your refill report at hand when you
call; the Pitney Bowes POSTAGE BY PHONE Data Center will ask you for some of the
information on your refill report. If you need help during the transaction, press the telephone
keys shown on the next page.
Page 5
Page 8

B700 Installation Instructions
7
to hear the last message repeat
*
0
to speak to a customer assistance representative
*
4
to end the call
*
NOTE: Should you have problems, a Customer Assistance Representative will intercept your
call after three errors. In the instructions that follow, make sure to press the asterisk or
pound keys as indicated.
#
What You Hear What You Do
a. F rom a touchtone phone, call the POST-
AGE BY PHONE
b. Data Center: “Pitney Bowes POSTAGE
BY PHONE. Please enter your Request
Code.”
c. Data Center: “P ostage reset request. Please
enter your 8-digit account number.”
®
Data Center.
Continental States: 1-800-243-7800
Alaska or Hawaii: 1-800-243-2300
At the telephone, press 5 5 5, followed
by the # (pound) key.
Write your POSTAGE BY PHONE account number here:
At the telephone, enter your 8-digit POSTAGE BY PHONE account number, followed
by the # key.
*
d. Data Center: “Enter 7-digit meter num-
ber.”
e. Data Center: “Enter meter access code.”
f. Data Center: “Enter reset dollar amount.”
g. Data Center: “Reset is ___________dol-
lars. Please enter pound sign if OK; otherwise reenter dollars.”
Page 6
At the phone enter your meter's serial
number (from refill report) followed by
the # key.
At the phone enter the meter access code
(from refill report) followed by the # key .
At the phone enter the postage reset dollar amount (from refill report) followed
by the # key.
At the phone press the # key if the reset
dollar amount is OK; if not, enter the correct amount followed by the # key.
Page 9

B700 Installation Instructions
h. Data Center: “The setting/combination
number is __________.”
i. Data Center: “Please enter request code.”
Write this number in the space provided
on your refill report.
At the telephone press 7 followed by the
* (asterisk) to hear the setting/combination number again.
j. Data Center: “Setting number is:______
__________.”
k. Data Center: “Please enter request code.”
Make sure the setting/combo number you
wrote in step h is correct.
Press 4 and * to end the call.
Completing the Refill at Your Meter
a. The meter prompts: “Enter Combo.”
b. Use the meter's number keys to type the setting/combination number the Data Center
gave you in step h above. P ress Enter.
c. If the refill is successful, the display briefly shows “R efill OK” and then “$A vail= XXX.XX”
where XXX.XX is the postage amount now available. (If the refill amount you asked for
was $50.00 or less, the meter displays “Low Funds.” This is normal. As delivered, your
meter is set to show this warning when the postage available reaches or falls below $50.00.)
d. If the refill was not successful, the display will show “Failed” for two seconds and then
“Insuf Funds.” If this happens, or should you have other problems with your meter after
following the steps in this installation guide, please call:
Direct Distribution Assistance
1-800-562-8237
The Direct Distribution Help Line is available Monday through Friday between the hours of
8:00 A.M. and 8:00 P.M., Eastern Standard Time.
Congratulations! Your meter is now installed, filled with postage and ready to go to work for you. The instructions on the
next two pages tell you how to process mail. If your meter is
equipped with the optional Electronic Interface (DataLink) feature, follow the setup and operating instructions furnished with
it. See page 11 of this booklet.
Page 7
Page 10

B700 Installation Instructions
6. Install the Stacker
Slide the stacker up against the
right side of the meter and position it as shown. The stacker sits
next to the meter. It's not physically connected to it. In this position, the stacker can handle envelopes up to #10. If you're using
longer envelopes, move the stacker
to the right to accommodate
them.
7. Make a Test Imprint
a. The display normally shows the default postage amount
shown at the right. This is usually the rate for first class
letter mail weighing up to one ounce.
b. At the keyboard type a
c. The display now shows zero as the postage value. The
meter is ready to use when the amount you entered is
bracketed by three bars as shown.
d. Place a sample
envelope on the
feed deck
up and push it
face
against the rear
wall of the meter
(1).
e. Slide the enve-
lope to the right
(2) until its lead
edge touches the
trip mark on the
feed deck.
f. The meter will
sense the pres-
ence of the envelope, convey it through the print area and into the stacker. The meter
impression should look similar—but not necessarily identical—to that shown in the
figure at the top of the next page.
0 (zero) and then Enter.
Insert Envelope
from Left
2
1
Push Envelope up
to Mark on Deck
Page 8
Page 11

B700 Installation Instructions
8. Printing Postage
a. If you want to accept the default value displayed by the meter, press Enter and go
to step d. To enter a different postage value, go to step b.
b. Use the number keys to type in the postage value you want. For example, to key in
64¢, press:
6
You don’t have to type a decimal point. The meter automatically adds it.
c. Press
d. Place your envelope on the transport
e. The meter senses the presence of your envelope, then conveys it into the print area
f. You can insert the next envelope as soon as the previous one enters the stacker.
9. Place the Quick Reference Guide in the Meter
The Quick Reference Guide included with your documentation
package provides brief step-by-step
instructions for the procedures you’ll
use most often. Place the guide in
the cassette compartment as shown
in the accompanying figure.
Enter to confirm the postage value. The three bars on either side of the postage
display tell you the meter is ready to print postage as shown below.
face up and push it against the rear wall of the
meter. Slide the envelope to the right until its lead edge touches the trip mark on the
feed deck. See the figure at the bottom of the previous page.
and out to the stacker.
4
Quick
Reference
Guide
Page 9
Page 12

B700 Installation Instructions
10. For More Information
Your meter is designed to streamline your mail processing and accounting procedures. A
comprehensive user’s guide is packed with it. Please take a few minutes to go through the
manual; it explains everything you need to know to take full advantage of the many useful
features built in to your meter.
11. Optional Features
Pitney Bowes offers several options designed to enhance the operation and expand the
capabilities of your postage meter. These include:
❑ A moistener—moistens and help seals envelopes as they feed through the meter.
❑ Advertising slogan cartridge—lets you select additional meter ads and inscriptions. Pitney
Bowes offers a wide range of standard meter ads to turn your unused envelope space into
a hard-working promotional tool. You can also order custom ads to personalize and add
impact to your mailings.
❑ An Electronic Interface Unit (DataLink)—expands account capacity to 100 and provides
communication ports for connection to a Pitney Bowes electronic scale, a PC or serial
printer, and a modem for one-button postage refill. See facing page.
Pitney Bowes also offers a full complement of supplies for your meter, including:
❑ Replacement Ribbon Cassettes
❑ Postage Tape Sheets
❑ E-Z
For more information, or to place an order, call the:
®
Seal Sealing Solution
12. Help Us Serve You Better
Please take a moment or two to fill out the Quality Card included with your documentation
package and print a register report on it as follows:
a. Press the
b. Place the Quality Card on the meter’s feed deck, as though you were about to print postage.
Guide the card up against the rear wall and to the right, up to the trip mark.
c. The display prompts “Reg Report Press Enter.” Press
report on your quality card.
d. Drop the card in the mail. Thank you.
Page 10
Value/Pieces key.
Enter. The meter prints a register
Page 13

B700 Installation Instructions
Does the back of your meter look like this?
U
L
If so, it’s equipped with an expansion DataLink module, also known as an Electronic Interface Unit.
It’s easy to set up and use and greatly enhances the capabilities of your meter as described on the
previous page. It comes with a modem and its own set of step-by-step installation and user
instructions (Pitney Bowes Publication SV 50394). Please read and follow the instructions carefully
and you’ll be rewarded with an exceptional set of performance features.
Page 11
Page 14

One Elmcroft Road
Stamford, Connecticut 06926-0700
PB Form SV 50359 Rev. A 7/95 ©1995 Pitney Bowes Inc. All rights reserved. Printed in USA
 Loading...