

Page 1
B700, B702 Quick Install Guide
Read Me First!
Your new system has been
designed to let you set it
up on your own, so you can
begin processing mail in just
a short time.
Carefully following the
sequence of steps presented
in this guide will result in
a successful installation.
US English Version
Page 2

IMPORTANT SAFETY NOTES
• Plug the meter into a properly grounded wall outlet. This reduces the risk of
shock and equipment damage in the event of a short circuit. DO NOT remove the
power cord’s ground pin and DO NOT use a ground adapter.
• The power cord wall plug is the primary means of disconnecting the meter from
the AC supply. The meter is on whenever it is plugged into a live receptacle, even
though the key switch and operator display may be off.
• Place the meter close to an easily accessible wall outlet. Avoid using wall outlets
controlled by wall switches or shared by other equipment.
• Make sure the area in front of the wall outlet into which the meter is plugged is
free from obstruction.
• DO NOT route the power cord over sharp edges or trap it between pieces of furniture. Make sure there is no strain on the power cord.
• To reduce the risk of fire or electrical shock, DO NOT attempt to remove covers
or disassemble the meter. The cabinet encloses hazardous parts. If the meter
was dropped or otherwise damaged, report such damage to your Pitney Bowes
Customer Service Representative.
• Keep fingers, long hair, jewelry and loose clothing away from moving parts at all
times.
• Read all instructions before you attempt to operate the meter.
• Use the equipment only for its intended purpose.
• Printhead temperature can reach 103°F (43°C), making it warm to the touch.
• Always follow the specific occupational safety and health standards prescribed
for your workplace.
• Switch the meter OFF when you change the ribbon cassette.
SV60943 Revision B
Second Edition, May 2004
©2004 Pitney Bowes Inc.
All rights reserved. This book may not be reproduced in whole or in part in any fash-
ion or stored in a retrieval system of any type or transmitted by any means, electronically or mechanically, without the express, written permission of Pitney Bowes.
Postage By Phone, PB Supply Line and E-Z Seal are registered trademarks of Pitney Bowes.
Page 3

Page 4
B700/B702 Quick Install Guide
1. Unpack Shipping Carton and Check Contents
Remove the meter and all packing material from the shipping carton. Carefully remove the shipping tape from the cassette compartment access door. Don’t throw any
packing material away until you’re sure you have all the items listed below.
• Setup and Operating Guide • Ribbon Cassette
• Quick Reference Guide • Supply Kit
• Quality Card • Postal Documents
®
• Postage Meter • Postage By Phone
• Stacker Assembly
• Keys (2)
• Power Cord
This has important information about your
Postage By Phone
to refer to it when you put postage in your
meter.
If anything is missing, please call the number given on page 8 of this booklet. See
the figure below for a brief introduction to your new meter.
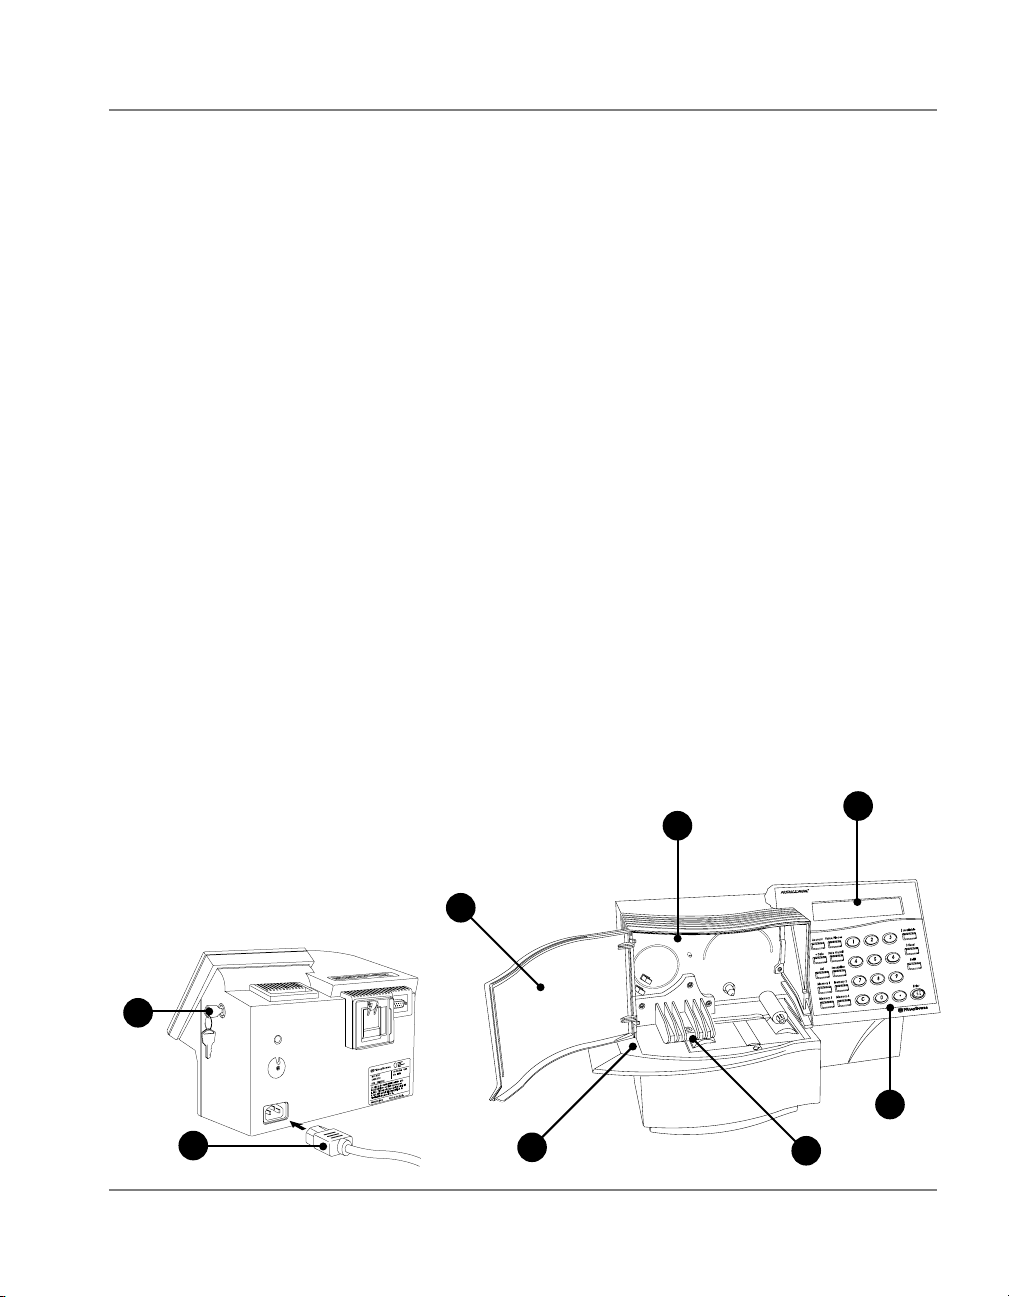
A Quick Tour of Your New Meter
a. Cassette Compartment—You'll load the ribbon cassette here.
b. Operator Display—Shows you the current status of the meter.
c. Keypad—Enter your postage amount or commands here.
d. Printhead—Applies meter impression to your envelopes.
e. Feed Deck—Support your envelope or tape sheet as it passes through print
area.
f. Access Door—Open to install ribbon cassette.
g. Lock—Turn clockwise to turn meter ON.
h. Power Cord.
f
Letter
®
account. You’ll need
a
b
g
U
L
c
h
e
d
3SV60943 Rev. B
Page 5
B700/B702 Quick Install Guide
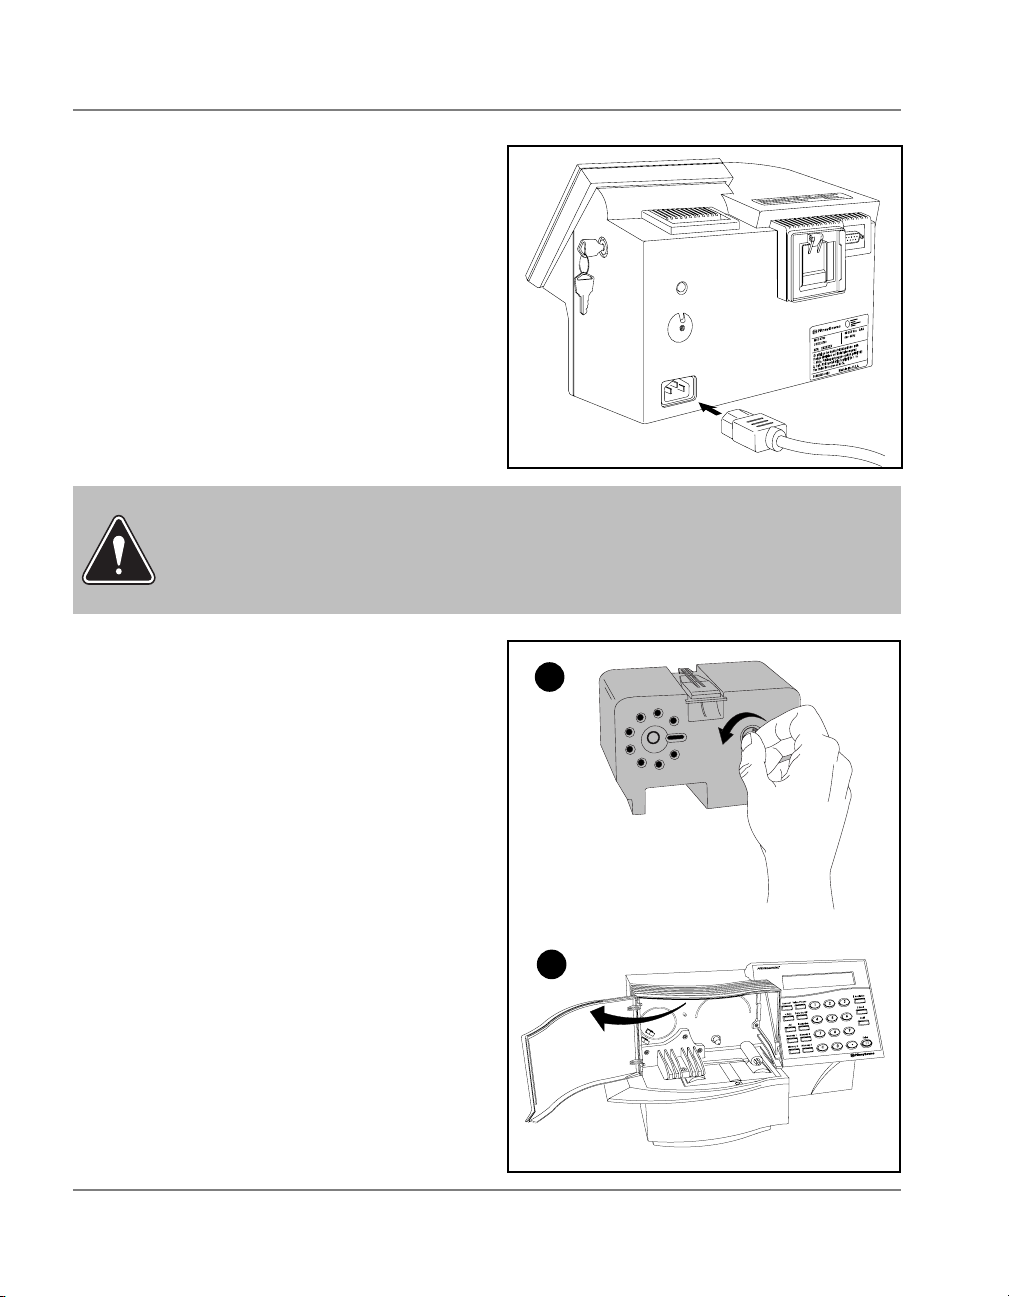
2. Connect the Power Cord
Remove the meter from the shipping
carton and place it on your work surface,
close to a properly grounded 120 VAC
wall outlet. Choose a convenient location—one where you have enough room
to establish an efficient work flow.
a. Connect the power cord to the re-
ceptacle at the back of the meter as
shown.
b. Connect the power cord to a properly
grounded 120 VAC wall outlet.
WARNING! Always plug the meter into a properly grounded wall outlet. This
reduces the risk of shock and equipment damage in the event of a short circuit.
DO NOT remove the power cord’s ground pin and DO NOT use a ground adapter.
Read the safety notes printed on the inside front cover of this booklet.
3. Install the Ribbon
a. Unpack the ribbon cassette and re-
move the shipping tab. If necessary,
turn the winder counterclockwise to
remove any slack from the ribbon.
U
L
a
b. Open the cassette door.
4 SV60943 Rev. B
b
Page 6
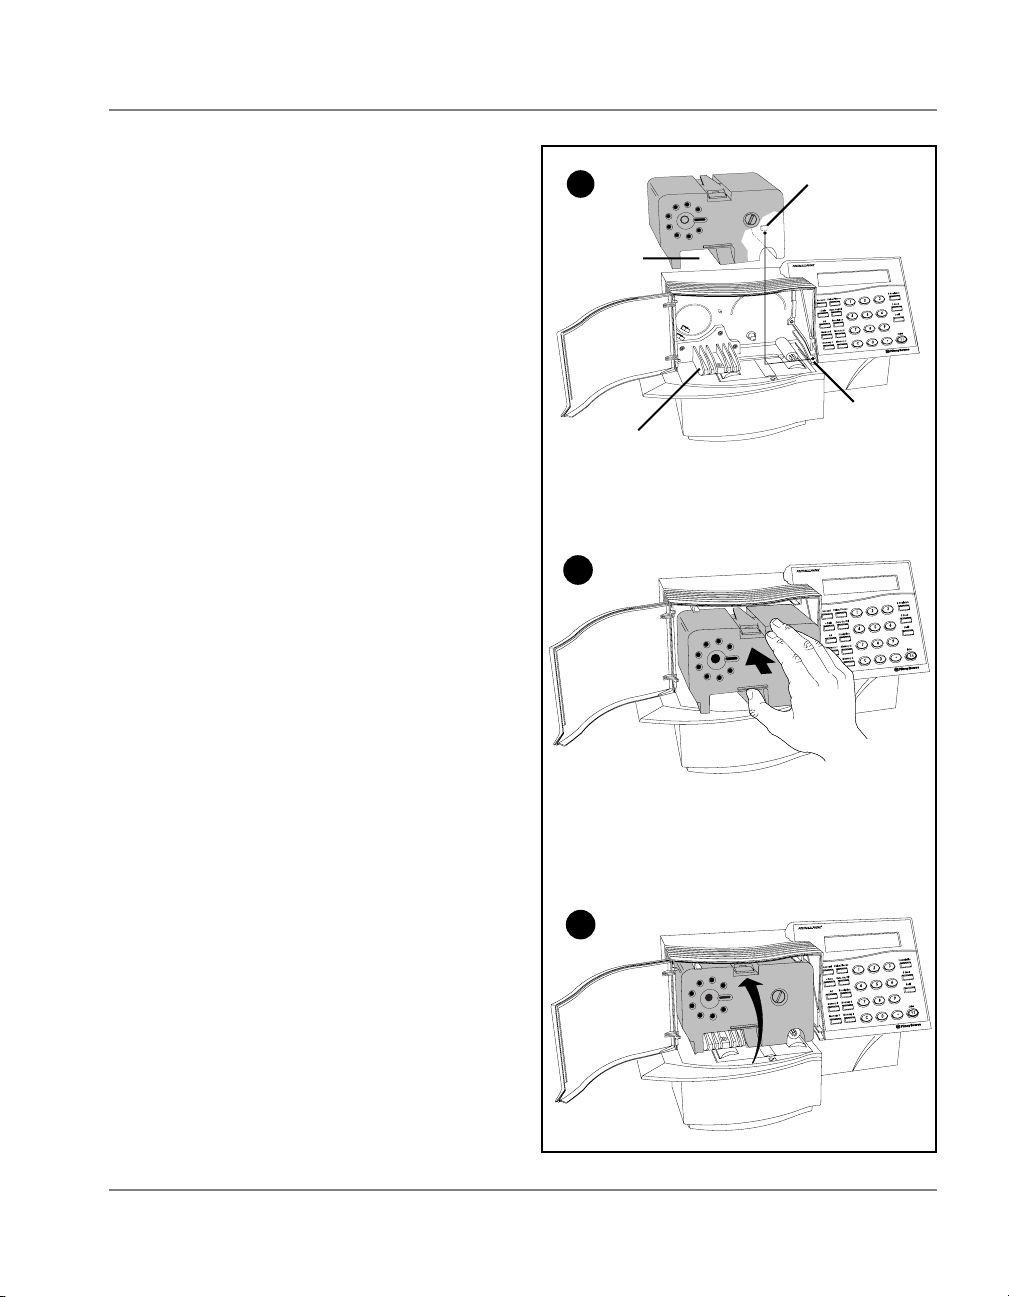
B700/B702 Quick Install Guide
c. Hold the cassette with the ribbon side
down and the cutout aligned with the
printhead. Align the locating tab on
the right side of the cassette with the
groove in the cassette compartment.
d. Rest the cassette on the deck and
push it back into the ribbon compartment as far as it will go.
c
Printhead
cutout
Printhead
d
Locating tab
Groove
cutout
e. Press in on the top of the cassette
near the locking tab to snap it in position.
Close the cassette compartment door.
This completes ribbon loading.
e
5SV60943 Rev. B
Page 7

B700/B702 Quick Install Guide
4. Unlock the Meter
Follow the steps below to unlock the meter.
a. The lock is on the right side of the meter
as seen from the front.
b. Insert the key in the lock.
c. Turn the key to the right (clockwise) to
unlock the meter.
After you turn it on, the meter performs
a self test for several seconds and you’ll
hear it run briefly.
d. The meter displays “Insuf Funds.” Now
you’re ready to put postage into your meter for the first time. You need:
• Your Pitney Bowes Postage By
Phone
you received from Pitney Bowes contains this number.
• To obtain a combination number as
explained in the instructions that follow.
®
Account Number. The letter
B700 Postage Meter
U
L
U
L
B702 Postage Meter
6 SV60943 Rev. B
Page 8

B700/B702 Quick Install Guide
5. Refilling Your Meter
Obtaining the Current Meter Access Code
To obtain your meter’s current access code:
a. Press the Refill button. Your default reset amount will display.
b. Press the Enter button if you wish to refill for the amount shown, OR enter a new
amount, and then press the Enter button to confirm.
c. Insert a spare envelope or index card as a form (this will run through the ma-
chine) OR press the Enter button again.
Depending on the action you took in step c, your current access code will either display or will print on the envelope or index card you ran through the machine.
NOTE: Your access code changes as you use postage, so be sure to obtain the current access code each time you refi ll your meter.
Obtaining the Refill Combination
NOTE: You can refi ll your meter either on the internet or on the phone.
Refilling Your Meter on the Internet
In order to refill your meter on the internet, you will need your User ID, password,
meter serial number, and current access code from Step 1: Obtaining the Current
Meter Access Code, above.
a. Go to www.postagebyphone.com.
b. Enter your User ID and password. Click Login.
c. On the "Transactions" page:
i. Click on Refill Your Meter.
ii. Enter your 7-digit meter serial number. If prompted, click Continue.
d. On the "Refill Meter" page:
i. Enter the current meter access code.
ii. Enter the Refill Amount you wish to add to your meter.
iii. Click Continue.
e. On the "Verify Your Choices" page:
• Click Refill Meter if all information is correct, OR
• Click Re-enter Amount to change the dollar amount.
Your Setting Combination displays on the "Meter Refill Confirmed" page. You can
now go to your meter and follow the steps in Entering Your Refill Amount into the Me-
ter on page 8.
7SV60943 Rev. B
Page 9

B700/B702 Quick Install Guide
Obtaining the Refill Combination (continued)
Refilling Your Meter on the Phone
In order to refill your meter on the phone, you will need your account number, meter
serial number, and current access code from Obtaining the Current Meter Access
Code, on page 7.
a. Dial 1-800-243-7800 (available 24 hours/day, 7 days/week).
®
b. Key in your 8-digit Postage By Phone
c. Select option 1 to add postage to your meter.
d. If prompted, key in your 7-digit meter serial number followed by the # key.
e. Key in the current meter access code followed by the # key.
f. Key in the dollar amount you wish to add to your meter, in whole dollars only fol-
lowed by the # key ( for example: to add $200 key 200#).
g. The computer will verify the amount – if correct, press the # key again.
h. The phone system will give you a 6-digit refill combination for this request; write
this number down.
You can now end your call and follow the steps below in Entering Your Refill Amount
into the Meter.
NOTE: If at any time during this process you have a question, press “0” for an agent (available M-F, 8am-8pm, EST).
account number followed by the # key.
Entering Your Refill Amount into the Meter
If you have printed a form:
• Your display should read "Enter Combo".
• Key in the 6-digit setting number and press the Enter button. Your display will
read "Refill OK" and the postage available.
If you have not printed a form:
• Your meter should be displaying your current access code. Press Enter. The display will read "Enter Combo".
• Key in the 6-digit setting number and press the Enter button. Your display will
read "Refill OK" and the postage available.
8 SV60943 Rev. B
Page 10

B700/B702 Quick Install Guide
Payment Options
Purchase Power®
As a Purchase Power or Postal Privilege customer, you can order postage now and
pay later when you get your bill. When you receive your invoice, simply write a check
payable to Purchase Power or Postal Privilege. Please be sure your 11-digit account
number is referenced and send it with your invoice stub to:
Regular Mail Address: Overnight Mail Address:
Purchase Power/Postal Privilege Purchase Power/Postal Privilege
P.O. Box 856042 5101 Interchange Way
Louisville, KY 40285-6042 Louisville, KY 40229
Reserve Account
Today, when you send a postage check in advance, you receive no added value. At
Pitney Bowes, we believe important customers like you deserve more. By sending
your pre-payment checks to Reserve Account, you’ll earn FREE POSTAGE based on
your average daily account balance. This is the smartest way to make postage payments earn money for you!
• Schedule Electronic Payments – We’ve added a new payment-scheduling
feature to make funding your Postage By Phone Reserve Account even easier!
By signing up online at www.postagebyphone.com, you can fund your account
by scheduling postage payments weekly, monthly, or once your account balance
reaches a specified level.
• ACH Credit instructions for your Reserve Account – If you send an ACH
Credit, your funds will be posted to your account within 2 business days by 6:00
p.m. Eastern Time. Use the following information to send an ACH Credit:
Remit To: Reserve Account C/O Pitney Bowes Bank
Routing Number: 1240-8462-7
Credit to Account Number: Your 8-Digit Postage By Phone Account #
Company Name: Your Company Name
Acceptable ACH Credit formats: CTX, CCD/CCD+, PPD/PPD+
9SV60943 Rev. B
Page 11

B700/B702 Quick Install Guide
Payment Options (continued)
Reserve Account
• Bank-to-Bank Wiring instructions for your Reserve Account – If you send
a Bank or Federal Wire by 1:00 p.m. Eastern Time, your account is updated the
same day by 6:00 p.m. Eastern Time. Use the following information to send a
Wire:
Destination Bank: National City Bank Kentucky
Routing Number: 083000056
City, State: Louisville, KY
FDN (Beneficiary): Pitney Bowes Bank, Inc. Reserve Account
AC (Account Number): 754401126
OBI (Other Information): Your 8-Digit Postage By Phone Account #
If you choose to mail your deposit, make your checks payable to Reserve Account
and write your 8-digit Postage By Phone® account number on the check. Include a
deposit slip with every payment. These slips are located on the bottom of your Postage By Phone® statement or can be ordered online at www.postagebyphone.com.
Allow 5 business days for Regular Mail or 2 business days for Overnight Mail and
send deposits to:
Regular Mail Address: Overnight Mail Address:
Reserve Account Reserve Account
P.O. Box 856056 5101 Interchange Way
Louisville, KY 40285-6056 Louisville, KY 40229
10 SV60943 Rev. B
Page 12

B700/B702 Quick Install Guide
Payment Options (continued)
United States Postal Service
• ACH Debit (EFT) – If you would like to be one of our ACH debit customers,
please apply online at www.postagebyphone.com and click on Pay For Postage.
• Bank-to-Bank Wiring or ACH Credit – If you send a Bank or Federal Wire by
1:00 p.m. Eastern Time, your account is updated the same day. If you send an
ACH Credit, your funds will be posted to your account within 2 business days by
6:00 p.m. Eastern Time. Use the following information to send a Wire or an ACH
Credit:
Citibank
CMRS/Pitney Bowes Postage By Phone®
Account # 4067-8633
Routing Transit #021000089
Detail Payment Field: XXXXXXXX
(X’s are your 8-digit Postage By Phone® account number)
Acceptable ACH Credit formats: CTX, CCD/CCD+, PPD/PPD+
If you choose to mail your deposit to the United States Postal Service, make your
check payable to United States Postal Service, and write your 8-digit Postage By
Phone® account number on the check.
Include a deposit slip coupon with every payment (these coupons will be provided
and replenished automatically by the Postal Service).
Mail your deposit to one of the Lockbox addresses reflected below (the most efficient
location in terms of mail service will be reflected on your deposit slip coupons).
Regular Mail Addresses: (Allow 5 business days)
CMRS-PB CMRS-PB CMRS-PB
P.O. Box 7247-0166 P.O. Box 0566 P.O. Box 894766
Philadelphia, PA 19170-0166 Carol Stream, IL 60132-0566 Los Angeles, CA 90189-4766
11SV60943 Rev. B
Page 13

B700/B702 Quick Install Guide
Performing an Inspection on Your Meter
Postal regulations require a meter holder to contact the manufacturer periodically to
add postage or perform an inspection. If you do not add postage within a 90-day period, your meter will begin flashing “Insp. Due” but will still allow you to run postage.
If you do not add postage or perform an inspection within the next 30 days, your meter will flash “Insp. Req.” and will stop printing postage.
You can satisfy this requirement by calling our automated system at 1-800-243-7800
and adding postage or if you do not need postage, by performing an inspection. Follow the steps below to perform an inspection.
Obtaining the Current Meter Access Code
To obtain your meter’s current access code:
a. Press the Refill button. Your default reset amount will display.
b. Press the number 5 and then press Enter.
c. Press the Enter button again.
d. Your current access code displays. Write this number down.
e. Press the Enter button again.
Performing the Inspection
In order to perform your meter inspection, you will need your account number, meter
serial number, and access code from the steps above.
a. Dial 1-800-243-7800.
®
b. Key in your 8-digit Postage By Phone
account number followed by the # key.
c. Select option 4 to perform a meter inspection.
d. If prompted, key in your 7-digit meter serial number followed by the # key.
e. Key in the current meter access code followed by the # key.
The voice response system will respond with a 4-digit combination. You can now end
your call.
Entering Your Combination in the Meter
Your meter should be displaying “Enter Combo”. Key in the 4-digit combination issued in the steps above and press the Enter button.
Your meter will display "Refill OK" and the postage will be available.
12 SV60943 Rev. B
Page 14

B700/B702 Quick Install Guide
6. Install the Stacker
Slide the stacker up against the right side of
the meter and position it as shown. The stacker sits next to the meter. It’s not physically
connected to it. In this position, the stacker
can handle envelopes up to #10. If you’re using longer envelopes, move the stacker to the
right to accommodate them.
7. Make a Test Imprint
Follow the steps below to make a test imprint.
a. The display normally shows the default
postage amount shown at the right. This
is usually the rate for first class letter mail
weighing up to one ounce.
b. At the keyboard type a 0 (zero) and then
Enter.
c. The display now shows zero as the post-
age value. The meter is ready to use
when the amount you entered is bracketed by three bars as shown.
d. Place a sample envelope on the feed
deck face up and push it against the rear
wall of the meter (1).
e. Slide the envelope to the right (2) until its
lead edge touches the trip mark on the
feed deck.
f. The meter will sense the presence of the
envelope, convey it through the print area
and into the stacker. The meter impression should look similar—but not necessarily identical—to that shown in the figure
at right.
Default Postage Amount
Zero Postage Value
2
1
Push envelope up to
mark on deck
13SV60943 Rev. B
Page 15

B700/B702 Quick Install Guide
8. Printing Postage
Follow the steps below to print postage.
a. If you want to accept the default value displayed by the meter, press Enter and
go to step d. To enter a different postage value, go to step b.
b. Use the number keys to type in the postage value you want. For example, to key
in 64¢, press:
6
You don’t have to type a decimal point. The meter automatically adds it.
c. Press Enter to confirm the postage value. The three bars on either side of the
postage display tell you the meter is ready to print postage as shown below.
d. Place your envelope on the transport face up and push it against the rear wall of
the meter. Slide the envelope to the right until its lead edge touches the trip mark
on the feed deck. See the figure at the bottom of the previous page.
e. The meter senses the presence of your envelope, then conveys it into the print
area and out to the stacker.
f. You can insert the next envelope as soon as the previous one enters the stacker.
4
9. Place the Quick Reference Guide in the Meter
The Quick Reference Guide included with
your documentation package provides brief
step-by-step instructions for the procedures
you’ll use most often. Place the guide in the
cassette compartment as shown in the accompanying figure.
Quick Reference Guide
14 SV60943 Rev. B
Page 16

B700/B702 Quick Install Guide
10. For More Information
Your meter is designed to streamline your mail processing and accounting procedures. A comprehensive user’s guide is packed with it. Please take a few minutes to
go through the manual; it explains everything you need to know to take full advantage of the many useful features built in to your meter.
11. Optional Features
Pitney Bowes offers several options designed to enhance the operation and expand
the capabilities of your postage meter. These include:
• Advertising slogan cartridge—Lets you select additional meter ads and inscriptions. Pitney Bowes offers a wide range of standard meter ads to turn your
unused envelope space into a hard-working promotional tool. You can also order
custom ads to personalize and add impact to your mailings.
• A moistener (B700 Only)—Moistens and help seals envelopes as they feed
through the meter.
• An Electronic Interface Unit (DataLink) (B700 Only)—Expands account capacity to 100 and provides communication ports for connection to a Pitney Bowes
electronic scale, a PC or serial printer, and a modem for one-button postage refill.
See facing page.
12. Meter Supplies
Pitney Bowes also offers a full complement of supplies for your meter, including:
• Replacement Ribbon Cassettes
• Postage Tape Sheets
®
• E-Z
For more information, or to place an order, call the PB Supply Line
7824.
Seal Sealing Solution (B700 Only)
™
at 1-800-243-
15SV60943 Rev. B
Page 17

B700/B702 Quick Install Guide
13. Help Us Serve You Better
Please take a moment or two to fill out the Quality Card included with your documentation package and print a register report on it as follows:
a. Press the Value/Pieces key.
b. Place the Quality Card on the meter’s feed deck, as though you were about to
print postage. Guide the card up against the rear wall and to the right, up to the
trip mark.
c. The display prompts “Reg Report Press Enter.” Press Enter. The meter prints a
register report on your quality card.
d. Drop the card in the mail. Thank you.
Does the back of your meter look like this? (B700 Only)
U
L
If so, it’s equipped with an expansion DataLink module, also known as an Electronic
Interface Unit. It’s easy to set up and use and greatly enhances the capabilities
of your meter as described on the previous page. It comes with a modem and its
own set of step-by-step installation and user instructions (Pitney Bowes Publication
SV50394). Please read and follow the instructions carefully and you’ll be rewarded
with an exceptional set of performance features.
16 SV60943 Rev. B
Page 18

1 Elmcroft Road
Stamford, Connecticut 06926-0700
www.pb.com
For Service or Supplies
Web Site: www.pb.com
Customer Support: 1-800-522-0020
Product Name: B700, B702
Model Number: B700, B702
PB Form SV60943 Rev. B 05/04
© 2004 Pitney Bowes Inc.
All Rights Reserved
Printed in the USA
Printed on recyclable paper
*sv60943RevB*
 Loading...