

Page 1

AddressRight®+
Course Manual
Page 2
AddressRight®+ Introduction
AddressRight®+, the answer to your address management
needs, is the only tool you will need to help you correct, manage and update your mailing lists. And with the Letter Presort
Carrier option, it will help save you money as well.
As an owner of the AddressRight
®
+ program you are being sent
regular up-to-the-minute version of the Canada Post Database
along with program updates on a regular basis.
It is imperative that you make it a regular habit of installing the
updates on time. To open AddressRight
®
+ double click on the
AddressRight®+ icon on your desktop. Depending on how you
have set up your AddressRight®+ Program, you may be asked
for a password to complete opening the program.
AddressRight®+ Course Manual
Manuel de cours - AddressRightMD+ Page 1
Hint: Use your [Alt] key with the underlined letter to access a menu item.
i.e. use [Alt] [S] to open the Setup menu
How do I...?
Start AddressRight®+
How do I...?
Change passwords
Set up my mailer information
Set up my data file directories
What do I…?
Do with the maintenance CD’s
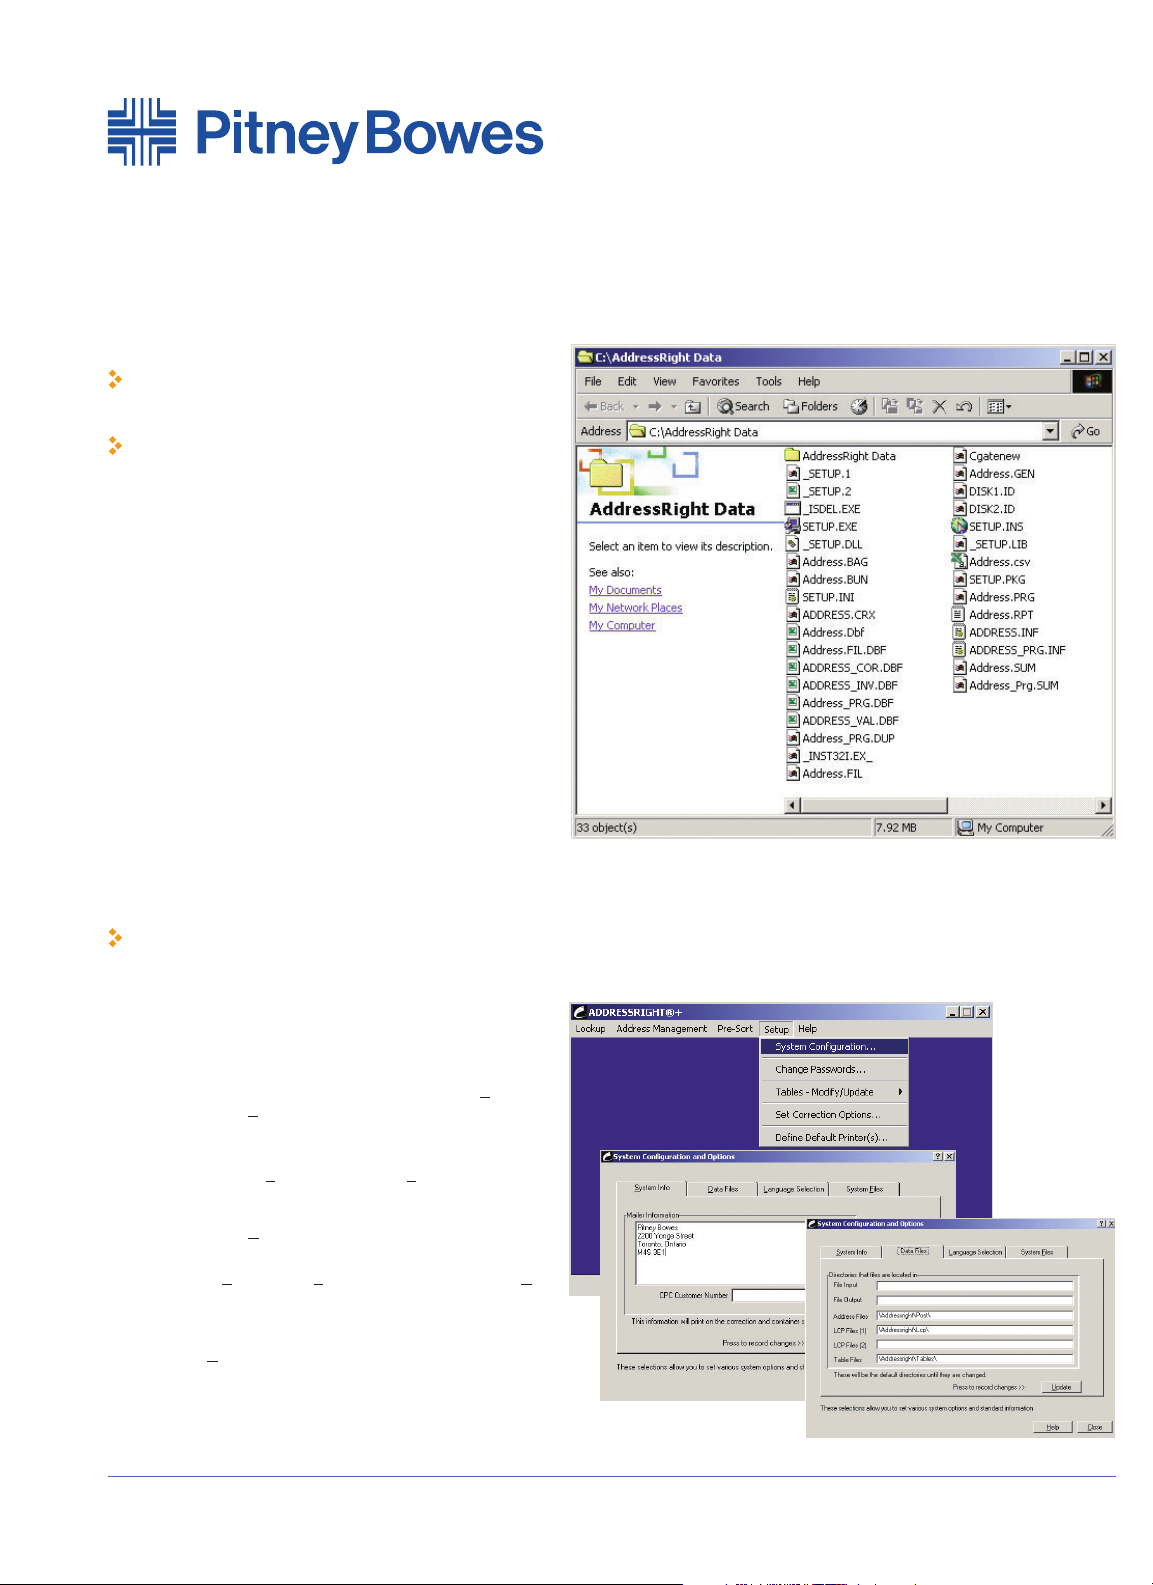
System Configuration
Passwords: To access the Passwords section select Change
Password from the Setup menu. You can have up to 16 user
passwords. The Master Password allows you to enable disable
passwords.
Mailer Info: From the S
etup menu, select System
Configuration. the System Info tab holds the information for
Mailer Address and CP Customer Nr. Key in the appropriate
address and select U
pdate to record changes.
Data Files: To update the directories that AddressRight
®
+ access-
es to, select the S
etup menu, System Configuration and the Data
Files tab. Here you can alter the directories for such things as
Input/Output files, Letter Carrier Presort files, and table modifications. The directories can be local or on a network. Upon completion, press U
pdate to record changes.
Page 3
How do I...?
Look up addresses by Postal Code,
City or Street Name
Interpret the search results
AddressRight®+ Course Manual Page 2
Interpreting the Search
The addresses in the filtered search appear in the large display
screen. On the left hand side is a code that indicates the type of
address record. They can be interpreted as follows:
1 = Street address
2 = Street Address served by route service
3 = PO Box
4 = Rural Route
5 = General Delivery
The Postal Code and Address Information appears in the middle columns
with the DMC codes indicating the letter carrier route number on the
right hand side. The DMC Codes can be interpreted as follows:
A = Letter Carrier Route
B = Apartment/Residential Building
E = Business building
G = LVR business building (Large Volume Receiver)
H = Rural Route
J = General Delivery
K = PO Box
M = LVR PO Box
T = Suburban Service
X = Mobile Route
Z = Retired Postal Code
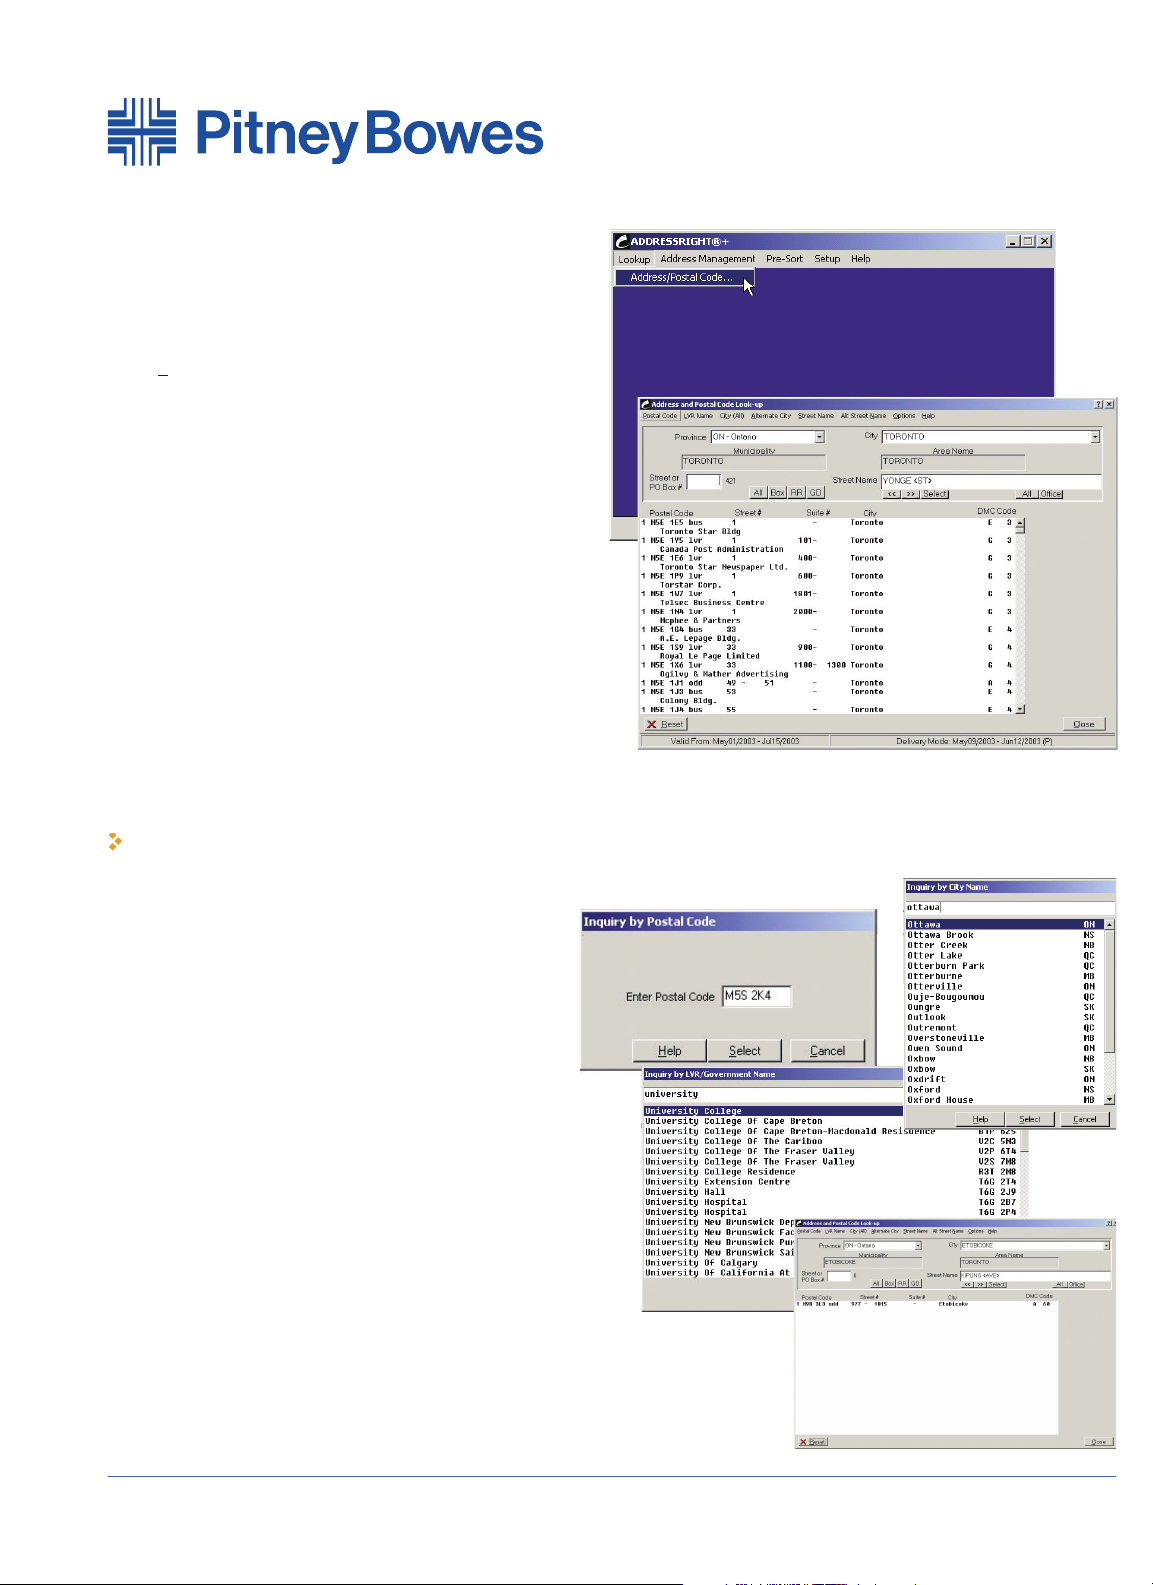
Use the menu bar on the Lookup
Program to access searches for
Postal Code, LVR, City, Street
Names, and even Alternative
Cities andStreet Names
Lookup
The Lookup Program gives you an up-to-date ability to do Address
Problem Determination and to look up addresses based on the city,
postal code or street name information.
Select A
ddress/Postal Code from the Lookup Menu on
AddressRight
®
+ and you will open up the Lookup Program.
Validation Dates: To ensure you are working on the most recent version of Lookup, check the bottom left hand corner of the Lookup
screen for va lid dates of the address database. You should receive
your updates every month.
Filtering/Narrowing the Search:
Province – key/ select the 2 -digit province abbreviation from the
province drop down menu
City – key/select the city from the drop down city menu
Street Name – key/select the street name in the Street Name
fieldALL or OFFICE Buttons: All displays all street names in selected city;
Office displays post office locations:
BOX, RR, GD Buttons: Box narrows the list t PO Box entries; RR narrows list to Rural Route entries; GD narrows the list to General
Delivery entries.
Street or PO Box Number: Once the information for the street has
been displayed, enter the Street or PO Box Number in this field to
narrow the search even more.
Page 4

For an ASCII Fixed Length file you must
highlight each component (Name, address
line one/two, city, province, postal code, etc.)
including all the dots and then click on the
appropriate button on the left to insert the
field length information.
AddressRight®+ Course Manual Page 3
Address Management
The Address Management component of the AddressRight®+ program
is all you will ever need to properly manage your address files.
It is important to note that your address files (which are created in
another application such as Dbase, Excel, Word, Access, etc.) MUST
be either:
• A fixed length ASCII file where each field has the same number of
characters in each record and the length of each record has the same
number of characters or
• A DBF (Database File) which is a standard rd format compatible
with a wide range of database programs (I.e., Dbase, Access, etc.)
Note: if the file is not in this format, select M
erge/Convert from the
Address Management menu to convert it to fixed length ASCII
Setting Parameters
1. From the Address Management Menu, select Set Parameters
2. Select the maintenance Icon
3. Select C
reate New and then View File. At this point you will need to
retrieve your Address File from the appropriate directory.
4. You will need to set the parameters for all the fields (at a minimum
the required fields which are highlighted with a *). To do so, Select
the field on the right from the display screen then click on the
appropriate button on the left. It will insert the field length.
5. You can check the file by using t he arrow keys to scroll through
your database.
6. Upon completion select A
ccept and then name it and Update.
Page 5

From Normal Tab you can make the following selections :
Type of Process: If you choose to update the Input File, it will make
corrections and reformat addresses in the currently selected file. If you
choose to create an Output file it will create three files with the extensions .VAL for Valid, .COR for corrected and .INV for invalid addresses.
In order to print results by these categories you should select Create
Output Files.
Address Formatting: Select UPPER CASE or Upper and Lower Case to
format your file. AddressRight
®
+ accesses appropriate tables to determine proper words, acronyms and names such as MacDonald that may
require special upper and lower case formatting.
Street Type/Direction: Select how you want to correct or reformat your
street names (I.e., Rd or Road) French Accents: You may add French
accents to all fields that have been defined in the parameters, which
includes the name fields. Once you have chosen this option you may
also, under Advanced Options, determine which addresses should be
accented and formatted in the French addressing style.
Unit Information: This determines how you want the apartment or unit
number to appear in the address. (i.e., 12 -123 Main Street or 123 Main
Street Apt 12)
Replace Postal Code: In the case of a conflict between the street name
and the postal code the option YES will give more weight to the street
name and change the postal code to match the street address.
Change or Add LVR Names: (Large Volume Receiver): Cana da Post
assigns a unique postal code to large companies and organizations. In
this case the name of the company is maintained in the database. By
choosing to add the LVR name you will then be asked which field to
insert the name into. This option may help standardize company
names and/or assist in subsequently purging duplicate companies
from your file.
Correct Street #’s: If the street name is valid but the street number
does not exist on that street the sys tem will use the postal code to find
the address if you have selected YES. NOTE: It is recommended that
you DO NOT USE THIS OPTION as there is a chance that the street
number and postal code are both wrong.
Postal Code Format: Depending on the format of your Address File,
use this option to insert a space to the Postal Code.
Street Guard: If the street name is spelled wrong the system will use
the postal code to find the correct name. Providing the street number
also matches the postal code the street name will then be corrected. In
most cases this will be the proper correction. Howev er, in some cases
the street name is incorrect AND the postal code is incorrect but by
chance it matches the street number range .
Address Lines: In this field, you can determine how many address lines
you may require. In most cases the a ddress information is l ocated on
address lines one and two. However, in some cases it may span three
lines – in this case, Name Three may also be defined as possibly containing address information.
Format Valids: Valid addresses may optionally be reformatted to match
the criteria that you have selected. By default all corrected addresses
are automatically reformatted.
Address Correction
Once you have set the parameters for your Address File, the next step would be to put it through the A
ddress Correction process found on
the Address Management menu. You will be asked which file you are working with at which point you must select it from the appropriate
directory and choose corresponding parameters.
AddressRight®+ Course Manual Page 4
How do I...?
Format my Address file for Upper or Upper
and Lower Case
Work with 3 street address lines
Page 6

Address Correction (cont’d)
On the Advanced Option, it is recommended that you accept the
defaults in most cases. Here is an explanation of each option:
City from Postal Code: By selecting YES, the city and province names
will be ignored and only the postal code is used for correction . This
should only be used in extreme cases when the city name is always
wrong or the province is always missing. Otherwise, accept the
default of NO.
Line Wrap: This option is used when two or more lines of the
address have been defined and the address information is too long to
fit on one line. This information will than be split into two lines.
Alternate City: In some cases an address may have a city name that
is not the official name but is an acceptable alternate name – that
city name will be retained. If you se lect OFF, the city name will be
changed to the official name.
Parsed Output: This will format the address in the address lines one
and two and parse the output into User Field Two. This formats the
address information into separate fields for the Suite#, Street#,
Street Name, Type and Direction. It also separates the information
for P.O. Box, Rural Routes and General Delivery addresses. The
exact fo rmatting information is contained in a file PARSE.DOC in the
Address Right
®
+ directory. [Note: In order for this option to be active
you must have defined at least 64 characters in User Field Two.]
Override Rural Postal Codes: When activated the system will check
for an EXACT match on the city and province fields. If it is rural, the
postal code will be added without verifying the address information.
Quebec Only or All Addresses: Determines whether or not to add
accents to Quebec addresses only or all.
Language Code: If you have defined at least one character in User
Field One, this option will be active. If you are using this option enter
the character that refers to the address being a French address.
Output Format: Determines whether output format for French
accent should be ANSI (Windows) or OEM (PC8 DOS).
On the Mailer Info tab you can place the name and address that will
print on the Address Accuracy Statement. If this information is
blank, you may set up a common name and address under the Setup
options on the main AddressRight
®
+ menu.
Upon completion press the Proceed button at the bottom right hand
corner. You will see the Correction Manual Processing screen that
will allow you to check the Status Code of individual addresses. You
can view as many as you like or select the Automatic button to generate the Address Correction and Statement of Accuracy Report.
AddressRight®+ Course Manual Page 5
Page 7

Address Correction (cont’d)
Address Files – Print: For printing reports directly to any attached
printer or to a file. You will need to determine a file name that will
contain the results and the type of report to be printed. You may also
select the range of records you would like printed. The final option
you will need to determine is whether you will be printing in
Windows (ANSI) or OEM (DOS PC8) format for French accent.
Address Files – Edit: To edit a file once the parameters have been se
t, select Address Files – E
dit from the Address Management menu. If
you print the invalid file and then use the Lookup Program to resolve
the addresses, you may then use this program to enter the changes.
This option allows you to correct a single address.
Merge/Convert Files: This option allows you to merge number of different files. Files can be converted from La bel Print Formatted
(which is typically a word processor file containing labels separated
by blank line), and Comma or Tab Delim ited to fixed length ASCII. If
your file is already a DBF or ASCII format you can re -sort your file
based on the chosen file, keycode it or run Nth selection, add extra
fields etc.
Purge Duplicates: This option found under A
ddress Management
allows you to purge duplicates from a s elected file or purge by
removing records occurring in one file from the second file. The
purge will be done through a comparison of the Postal Code and
Name and/or Address fields of your choice that have defined parameters. You will have the choice of Exact Match or a Sound Alike
Match. Both options will remove key words, punctuation and spaces
before making the comparison. The difference is one will do an exact
match the other will use a phonetic based matching method.
Genderize: Genderize will analyze a file and determine whether a
particular name is male, female or neutral (common to both sexes)
or unknown. You will be required to identify the field which has the
first name in it; determine whether the first name field stands alone
or needs to be parsed from the last name field. The last step is to
enter the res ult of the search for each sex and the target field for
this information.
Accessing/Updating Table
Information
Address Management and Correction constantly refer to tables in
the AddressRight
®
+ program. These tables include: French Accents,
Upper and Lower Case, Last Names (Mac type names), Purge
Keywords, and Gender (First Name). All tables are extremely extensive and in most cases should suffice; however, there may be occasion to add or modify the tables. . The table files can be found in the
\AddressRight\Tables directory and are as follows:
French Accent: SS -FRN.TBL
Upper and Lower Case: SS -CASE.TBL
Mac Type: SS -LAST.TBL
Purge Keywords: SS -PURGE.TBL
Gender: SS -GEND.TBL
These tables can be accessed from: S
etup: Tables—Modify/Update
AddressRight®+ Course Manual Page 6
How do I...?
Print my accuracy reports
Update the tables that Address
Correction refers to
Page 8

Letter Carrier Presort (LCP)
If you have the Letter Carrier Presort function as part of your
AddressRight®+ package, you will need to get familiar with the
Presort Queue. The queue may be sorted and displayed by Queue #,
File Description, Run Date and Job Description and can hold up to
999 different presorted files. The entries in the presort correspond to
the files LCP-01, LCP -02, etc., in the program directory. These files
hold all the presort information with pointers to the actual date file.
DO NOT modify or replace the data file after the presort or the pointers in these files will be incorrect. If you have modified the data file
after the presort has been run a warning message will appear when
you do subs equent processing.
Presort Options:
Sort Type: Default selection is LCP – Letter Carrier Presort which
sorts by postal station and assigns a letter carrier route number to
each mail piece. The other option is NDG – National Distribution
Guide typically used only in rare cases.
Mail Type: Lettermail must have a contract with Canada Post. It
requires high d ensity where the minimum bundle size is 5.
Publications Mail must have a publication registration number from
Canada Post with a minimum bundle size of 6. Admail is advertising
type mail which must have a permit number and a minimum bundle
size of 8. Admail Parcels requires a special co ntract rate for oversize mail and has a minimum bundle size of 3. Bookmail requires a
special co ntract rate for books.
Piece Weight/Piece Size: Enter weight of each mail piece in grams
as well as size : Standard or Oversized.
Residue Office: A residue bag or container will be made up when
there is an insufficient volume of mail to send directly to a postal insta
llation. The Residue Office identifies where this mail should be sent.
You will also need to determine the Maximum Bundle Size, C ontain-
er Type and Container Maximum. The first four lines of the Name
and Address field and the CPC Customer # will print on the
Container/Bag and Bundle Summary report. The Processing Date is
typically today’s date and does not affect any calculations while the
Drop Date is also for reference purposes only and is typically the
anticipated date of delivery to Canada Post. Make sure that you are
using an appropriate LCP file to sort.
You can determine the Output File Type by clicking on the
Input/Output tab on the Presort Options Screen and making the
appropriate selection. You’ll ha ve to have Bag and Bundle and DMC
Code fields predefined in your file’s parameter layout, if you wish to
create a DBF output file from your DBF address file. The Bundle
Sequence determines forward or reverse sequence for printing
depending on the type of printer being used. You will need to determine the file name(s) for the Output or accept the defaults. Your final
option is to Code Only which means no presort is done and the file
will be split into valid and invalid postal code records.
AddressRight®+ Course Manual Page 7
Page 9

Letter Carrier Presort (cont’d)
The Bag and Bundle Report can be accessed and printed
any time through the C
ontainer/Bag and Bundle Summary
from the Letter Carrier Presort menu. You will need to
determine Report Type, whether you are printing to a
Printer or File and the range of container to print on the
summary.
Container/Bag Labels through the L
etter Carrier Presort
menu will print Standard Canada Post approved Bag and
Container La bels. You will need to determine the Report
Type, whether you are printing to a printer or file and the
range of container. Publication Name will be printed but
only applies for publication mail.
Bundle Labels – an asterisk (*) will print beside the bundle
on the Container/Bag and Bundle Summary if the bundle
requires a label. The number of bundle labels that will be
printed are displayed as well.
To create a file to be printed in another department or location, utilize the Address Labels/Output File from the Letter
Carrier Presort menu.
The Output Option would be to Print labels to file as
opposed to printer. You will need to specify the starting
container/bag and bundle and the ending container.
To set up the format for printing labels access the Set
Param Parameters – Label Format from the P
re-Sort
menu. You can store up to 999 ferent label formats to save
you time in the future. After naming the format, using the
legend on the left, design the format of the label by keying
in the appropriate field number for each line. You can have
up to 3 fields per line with a total of 9 lines to work from.
Other format options include Lines per Inch, Lines per
Label, Label Width, Top Margin and Number of Labels
Across along with starting position for each label.
Address Labels/Output Files: This option will allow you to
print your address labels along with Bag/Bundle codes and
DMC audit codes from a sorted file to printer (either ink-jet,
laser or dot -matrix) or to file for future printing. However,
a label format must be set up prior to using this option.
Print Labels from an Unsorted File is an option to print
labels from files which cannot or do not have to be sorted
(e.g. international data bases)
Hint: Need Help? AddressRight®+ is fully equipped with
an amazing help facility. Simply use the H
elp button
from any screen or select the Help menu from the
AddressRight
®
+ main screen.
AddressRight®+ Course Manual Page 8
 Loading...