

Pitney Bowes 5300 User Manual

PCL Print Driver
TWAIN Scanner Driver

Trademark and Copyrights
• The Pitney Bowes logo and all Pitney Bowes product names contained herein are trademarks of Pitney
Bowes Inc.
• Microsoft®, Windows®, Windows® 3.1, Windows® 95, Windows® 98, Windows® Me, Windows NT® 4.0,
Windows® 2000, Windows® XP and Windows ServerTM 2003 are registered trademarks of the Microsoft
Corporation.
• PCL is a registered trademark of the Hewlett Packard Company.
All other products referenced are trademarks or registered trademarks of their respective companies.

Contents
Chapter 1
Local printer setup ........................................................................................1-1
System requirements..................................................................................................1-2
Drivers .........................................................................................................................1-3
Installation ..............................................................................................................1-3
Printer driver ..........................................................................................................1-3
Scanner driver .........................................................................................................1-3
Summary of installation procedure ...........................................................................1-4
Installing the driver ...................................................................................................1-5
Installing the driver ................................................................................................1-5
Windows Server 2003 / Windows XP .....................................................................1-6
Windows 2000 professional ....................................................................................1-8
Windows 98/Me .....................................................................................................1-10
Installing both PCL6 and PCL5e .........................................................................1-12
Deleting a driver .......................................................................................................1-20
Chapter 2
Network printer setup ..................................................................................2-1
System requirements..................................................................................................2-2
Summary of the installation procedure .....................................................................2-3
Cable connection .........................................................................................................2-4
Setting the IP address ................................................................................................2-5
Installing the driver ...................................................................................................2-6
Installing the driver ................................................................................................2-6
Configuring the network printer port ....................................................................2-7
Activating an optional device .................................................................................2-9
Deleting the driver ...................................................................................................2-10
For Windows Server 2003 and Windows XP ........................................................2-10
For Windows 2000 Professional ...........................................................................2-10
For Windows 95/98 and Windows Me ..................................................................2-10
Chapter 3
Various printing ..............................................................................................3-1
Configuring printer driver settings ...........................................................................3-2
Open the printer properties ...................................................................................3-2
Paper tab .................................................................................................................3-3
Page Layout tab ......................................................................................................3-5
Quality tab ..............................................................................................................3-8
Device Option tab..................................................................................................3-10
Using the bypass tray ...............................................................................................3-11
Loading paper into the bypass tray .....................................................................3-11
Various printing ........................................................................................................3-14
Combine printing ..................................................................................................3-14
Duplex printing .....................................................................................................3-16
Booklet printing ....................................................................................................3-18
Printing on custom size paper ..............................................................................3-20
Printing water marks ...........................................................................................3-24
Printing on specified size paper ...........................................................................3-27
Cancelling a print job ...............................................................................................3-29
Job cancel using Windows ....................................................................................3-29
Job cancel from the machine ................................................................................3-29

Chapter 4
Using the TWAIN Scanner ............................................................................4-1
Scanning a document .................................................................................................4-2
Scanning a document ..............................................................................................4-2
Chapter 5
Troubleshooting .............................................................................................. 5-1
Installing the local print driver .................................................................................5-2
Installing the network print driver ...........................................................................5-3
PC printing ..................................................................................................................5-4
Error Messages .......................................................................................................5-4
PC printing errors ...................................................................................................5-5
Specifications ................................................................................................. A-1
Printer ....................................................................................................................A-2
Scanner ................................................................................................................... A-4

Chapter 1 Local printer setup
System requirements .......................................................... 1-2
Drivers ................................................................................... 1-3
Installation ........................................................................................... 1-3
Printer driver ....................................................................................... 1-3
Scanner driver ...................................................................................... 1-3
Summary of installation procedure ................................ 1-4
Installing the driver............................................................ 1-5
Installing the driver ............................................................................. 1-5
Windows Server 2003 / Windows XP .................................................. 1-6
Windows 2000 professional ................................................................. 1-8
Windows 98/Me .................................................................................. 1-10
Installing both PCL6 and PCL5e ...................................................... 1-12
Deleting a driver ................................................................ 1-20
For Windows Server 2003 and Windows XP ..................................... 1-20
For Windows 2000 Professional......................................................... 1-20
For Windows 98 and Windows Me .................................................... 1-20

1-2
System requirements
The following operating environment is required to use the printer /scanner drivers.
Item Requirements
Type
Operating System
CPU and Memory
Disk space
Interface
CD-ROM
IBM’s PC-AT compatible machine loaded with one of the
following operating systems.
• Windows Server 2003
• Windows XP Professional / Home Edition
• Windows 2000 Professional
• Windows Me
• Windows 98 SE
Operation with Windows 98/Me upgraded from
*
Windows 95/3.1 cannot be guaranteed.
Not compatible with command prompt of MS-
*
DOS and Windows and DOS prompt.
Not compatible with Windows 3.1/95/NT 4.0
*
Depends on the operating system
10 MB for driver install
USB 2.0 (full speed)
CD-ROM drive
NOTE: A USB cable is required to connect your machine to your PC.
(It is not included in this kit.)

Drivers
Installation
• Install the drivers before connecting USB to PC.
• If installing using Windows Server 2003 /Windows XP /Windows 2000, you
need to log on as an administrator or a group of administrators.
• Do not attach/detach the USB cable in the following conditions:
·Before Windows gets ready after switching on PC
·While installing the printer driver
·While printing
Printer driver
The supplied CD-ROM has 2 types of printer drivers, PCL5e and PCL6. For maximum performance we recommend installing the PCL6 driver.
* If you want to keep compatibility with your old PCL printer, use PCL5e.
Scanner driver
To use your machine as a scanner, Pitney Bowes 5300 scanner driver should be
installed on your PC.
1-3

1-4
See page 1-5.
1
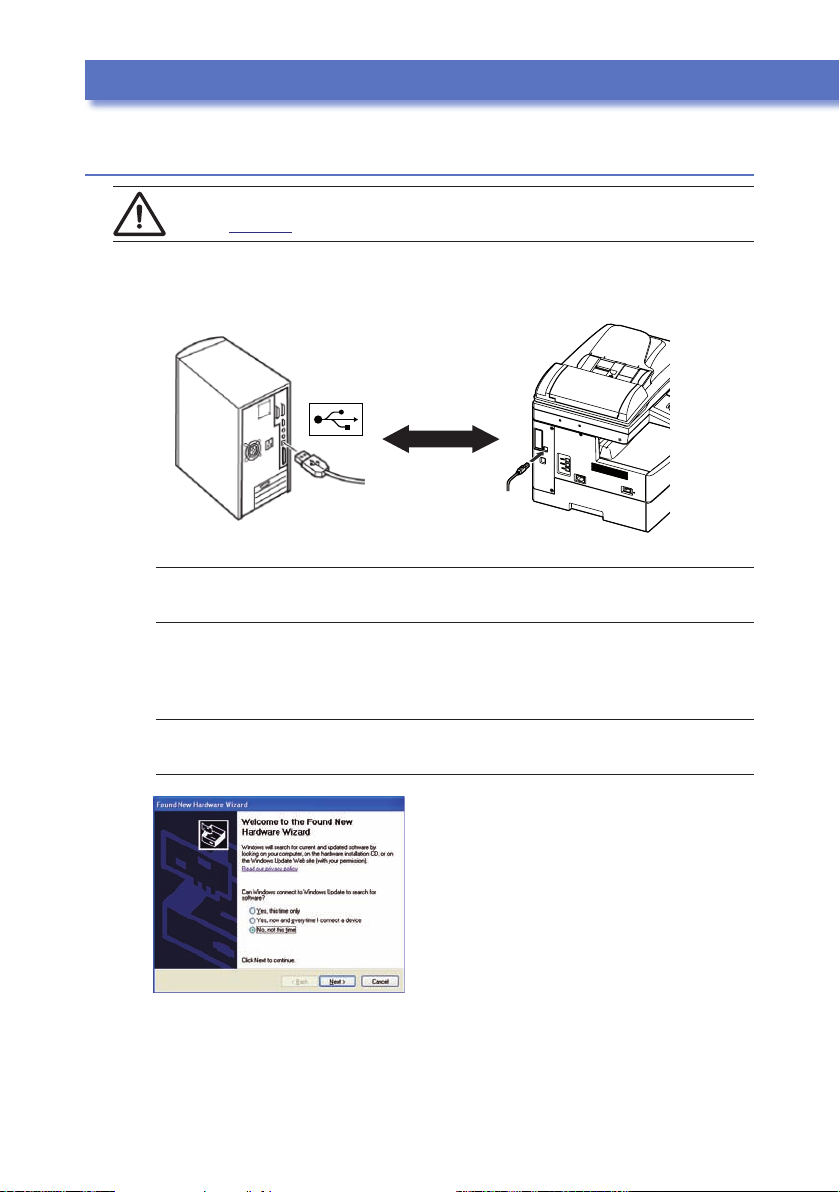
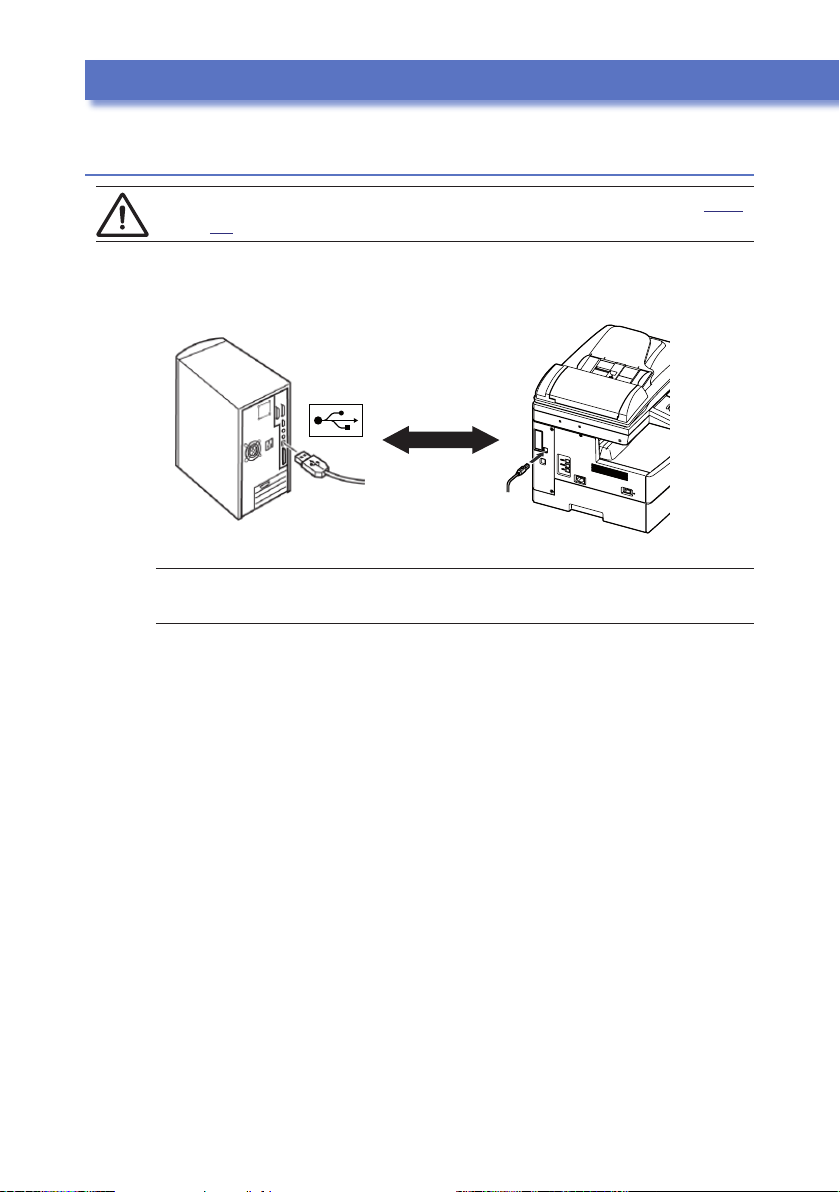
After installing the driver,
connect your machine to the PC using the USB cable.
2
See page 1-6.
See page 1-8.
See page 1-10.
For Windows Server 2003/ Windows XP
For Windows 2000
For Windows 98/Me
Install the driver
Do not connect USB to PC before installing the driver.
Follow the instructions that appear on your screen to complete
the installation.
Summary of installation procedure
* For applicable environment, refer to “System requirements” on page 1-2.
* If using under a network environment with an optional network interface,
refer to “Network Printer Setup” on page 2-1.
NOTE: If installing both PCL6 and PCL5e, refer to page 1-12.

Installing the driver
Installing the driver
Do NOT connect the USB cable before installing
the driver
1 Turn on your PC and insert the supplied CD into your CD-ROM.
The driver installation window will appear automatically.
If not, run the “setup.exe” from the root directory of the CD.
2 Click [Next] to start the installation.
3 After reading and accepting the License Agreement click [Yes].
Otherwise, click [No] to cancel the installation.
4 Select your machine and click [Next].
5 Select “Local” and click [Next].
6 Click [Next].
7 Select the driver you want to install and click [Next].
NOTE: Both PCL6 and PCL5e drivers cannot be installed simultaneously.
If you want to install both drivers, install one driver first and then
install the second using the “Add Printer Wizard”. (See page 1-12.)
8 Follow the instructions that appears on your screen until you can click
[Finish].
For Windows Server 2003 / Windows XP users, go to page 1-6.
For Windows 2000 professional users, go to page 1-8.
For Windows 98/Me users, go to page 1-10.
1-5
1-6
Connect
Installing the driver
Windows Server 2003 / Windows XP
NOTE: Make sure that you followed installation steps 1 to 8 described on
page 1-5.
9 Plug the USB cable to your machine and then connect it to your com-
puter.
NOTE: Be sure to use a shielded USB cable. Use of an unshielded cable may
result in radio interference.
10 Turn your machine on.
11 The “Found New Hardware Wizard” will appear.
NOTE: When Service Pack 2 (SP2) is installed, the following message
appears. Select “No not this time” and click [Next].

Installing the driverInstalling the driver
12 Select “Install from a list or specific location (Advanced)” and click
[Next].
13 Select “Include this location in the search:” and clear any other choices.
Click [Browse] to navigate your hard disk: C:\PitneyBowes_5300\PCL.
Then click [OK].
14 Click [Next].
If the “Windows Logo testing” dialog box appears, click [Continue Anyway] to install the driver.
15 Click [Finish].
16 The “Found New Hardware Wizard” appears again. Repeat same proce-
dures from steps 12 to 15.
The driver installation is complete.
Activating an optional device
If an optional device has been installed on your machine, you must open the driver
and activate it.
To activate the optional device:
1 Click [Start] g [Printer and Faxes].
In Windows XP Home Edition, click [Start] g [Control Panel] g [Print-
ers and Other Hardware] g [Printers and Faxes].
2 Right click the Pitney Bowes 5300 PCL printer icon, then click [Printing
Preferences…].
3 Click the “Device Option” tab.
4 Select an optional device installed to your machine.
5 Click [OK] and close the printing preferences.
1-7
1-8
Connect
Installing the driver
Windows 2000 professional
NOTE: Make sure that you followed installation steps 1 to 8 described on page
1-5.
9 Plug the USB cable to your machine and then connect it to your com-
puter.
NOTE: Be sure to use a shielded USB cable. Use of an unshielded cable may
result in radio interference.
10 Turn your machine on.
11 The “Found New Hardware Wizard” will appear. Click [Next].
12 Select “Search for a suitable driver for my device (recommended)” and
click [Next].
The “Locate Driver Files” dialog box appears.
13 Select “Specify a location” and clear any other choices, then click [Next].
14 Click [Browse] to navigate your hard disk: C:\PitneyBowes_5300\PCL.
Then click [OK].
15 Click [Next].
If the “Digital Signature Not Found” dialog box appear, click [Yes] to
install the driver.
16 Follow the instructions that appear on your screen until you can click
[Finish].
17 The “Found New Hardware Wizard” appears again. Repeat same proce-
dures from steps 11 to 16. This will complete the installation.
The driver installation is complete.

Installing the driverInstalling the driver
Activating an optional device
If an optional device has been installed on your machine, you must open the driver
and activate it.
To activate the optional device:
1 Click [Start] g [Settings] g [Printer].
2 Right click the Pitney Bowes 5300 PCL printer icon, then click [Printing
Preferences…].
3 Click the “Device Option” tab.
4 Select an optional device installed to your machine.
5 Click [OK] and close the printing preferences.
1-9

1-10
Connect
Installing the driver
Windows 98/Me
NOTE: Make sure that you followed installation steps 1 to 8 described on page
1-5.
9 Plug the USB cable to your machine and then connect it to your com-
puter.
NOTE: Be sure to use a shielded USB cable. Use of an unshielded cable may
result in radio interference.
10 Turn your machine on.
11 The “Add New Hardware Wizard” will appear.
Select “Specify the location of the driver” and click [Next].
12 Select “Specify a location” and clear any other choices. Click [Browse] to
navigate your hard disk: C:\PitneyBowes_5300\PCL.
Then click [OK].
13 Follow the instructions that appear on the screen until you can click
[Finish].
14 The “Add New Hardware Wizard” appears again, repeat same proce-
dures from steps 12 to 13.
NOTE: Repeat steps 12 through 13 three more times until the installation
has completely finished. This will complete the installation.
The driver installation is complete.
If an optional device has been installed on your machine, you must open the driver
and activate it. See “Activating the optional second paper cassette” on next page for
instructions on how do this.

Installing the driverInstalling the driver
Activating an optional device
If an optional device has been installed to your machine, you must enter the driver
and activate it.
To activate the optional device:
1 Click [Start] g [Settings] g [Printer].
2 Right click the Pitney Bowes 5300 PCL printer icon, then click [Proper-
ties].
3 Click “Device Option” tab.
4 Select an optional device installed to your machine.
5 Click [OK] and close the printing preferences.
1-11

1-12
Installing the driver
Installing both PCL6 and PCL5e
If you want to install both drivers connecting with USB interface, install one driver
first and then install the second using the “Add Printer Wizard”.
Windows Server 2003, Windows XP
1 Click [Start] g [Printers and Faxes].
In Windows XP Home Edition, click [Start]
ers and Other Hardware] g [Printers and Faxes].
2 Select “Add Printer” from File menu to start the “Add New Printer Wiz-
ard”.
3 Select “Local printer attached to this computer” and clear the check box
for “Automatically detect and install my plug and play printer”, then
click [Next].
4 Select the USB port for printer and click [Next].
5 Click [Have Disk].
6 Insert the supplied PCL printer driver CD into your CD-ROM drive,
then click [Browse].
7 Browse to the following location on the CD depending on your choice,
and then click [OK].
In case of installing PCL6 driver:
Windows XP, “Driver\5300\winxp\pcl6”
Windows Server 2003, “Driver\5300\win2003\pcl6”
In case of installing PCL5e driver:
Windows XP, “Driver\5300\winxp\pcl5e”
Windfows Server 2003, “Driver\5300\win2003\pcl5e”
8 Follow the instructions that appear on the screen until you can click
[Finish].
g [Control Panel] g [Print-
NOTE: When the Windows Logo testing window appears, click [Continue
Anyway].
9 After installation finishes, the printer icon can be found on the “Printers
and Fax” screen.

Installing the driverInstalling the driver
Windows 2000
1 Click [Start] g [Settings] g [Printers].
2 Double-click [Add Printer].
3 Click [Next].
4 Select “Local printer” and clear the check box for “Automatically detect
and install my Plug and Play printer”, then click [Next].
5 Select the USB port for printer and click [Next].
6 Click [Have Disk].
7 Insert the supplied PCL printer driver CD into your CD-ROM drive,
then click [Browse].
8 Browse to the following location on the CD depending on your choice,
and then click [OK].
In case of installing PCL6 driver:
“Driver\5300\win2000\pcl6”
In case of installing PCL5e driver:
“Driver\5300\win2000\pcl5e”
9 Follow the instructions that appear on the screen until you can click
[Finish].
NOTE: When the Digital Signature Not Found window appears, click [Yes].
10 After installation finishes, the printer icon can be found on the “Print-
ers” screen.
1-13

1-14
Installing the driver
Windows 98/Me
1 Click [Start] g [Settings] g [Printers].
2 Double-click [Add Printer].
3 Click [Next].
4 Select “Local Printer” and click [Next].
5 Click [Have Disk].
6 Insert the supplied PCL printer driver CD into your CD-ROM drive,
then click [Browse].
7 Browse to the following location on the CD depending on your choice,
and then click [OK].
In case of installing PCL6 driver:
“Driver\5300\win9x_me\pcl6”
In case of installing PCL5e driver:
“Driver\5300\win9x_me\pcl5e”
8 Click [Next].
9 Select the USB port for printer and click [Next].
10 Follow the instructions that appear on the screen until you can click
[Finish].
Installing the driverInstalling the driver
When “Found New Hardware Wizard” does not appear on
Windows Server 2003 and Windows XP
1 Confirm that your machine is connected to the computer with the USB
cable.
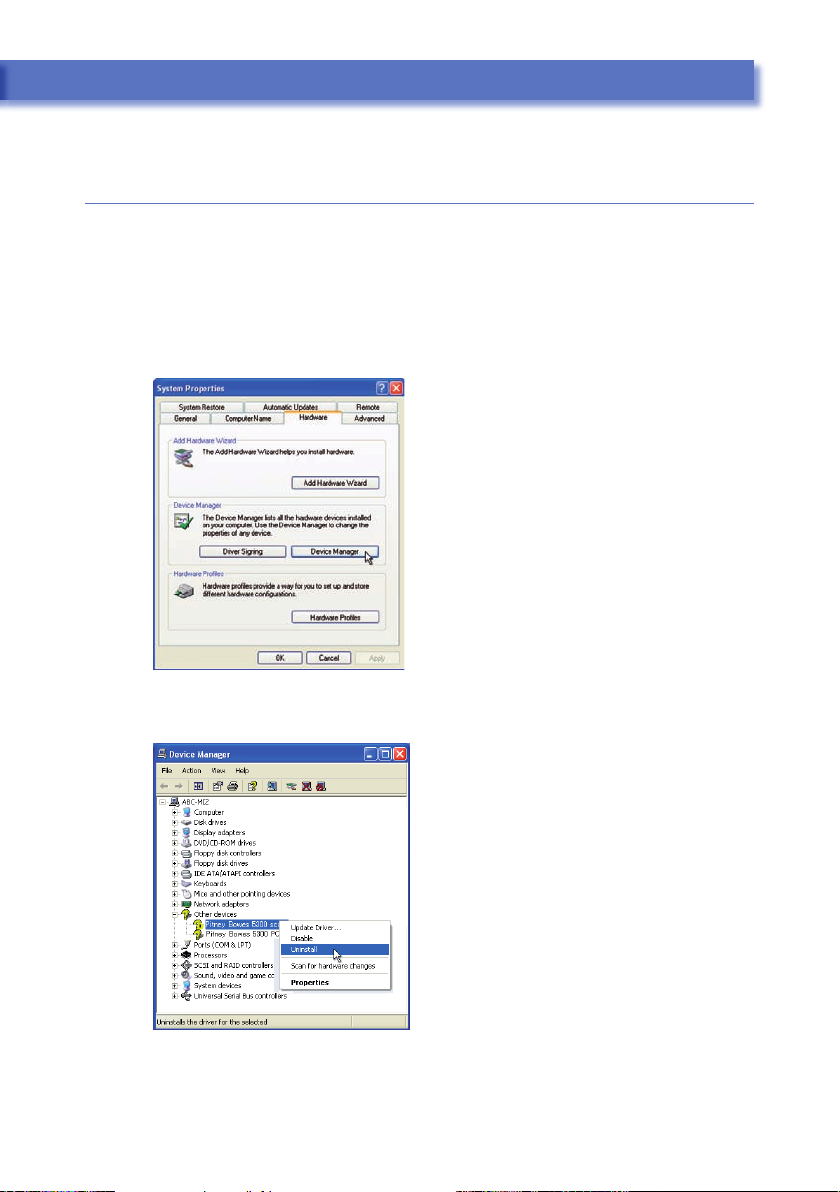
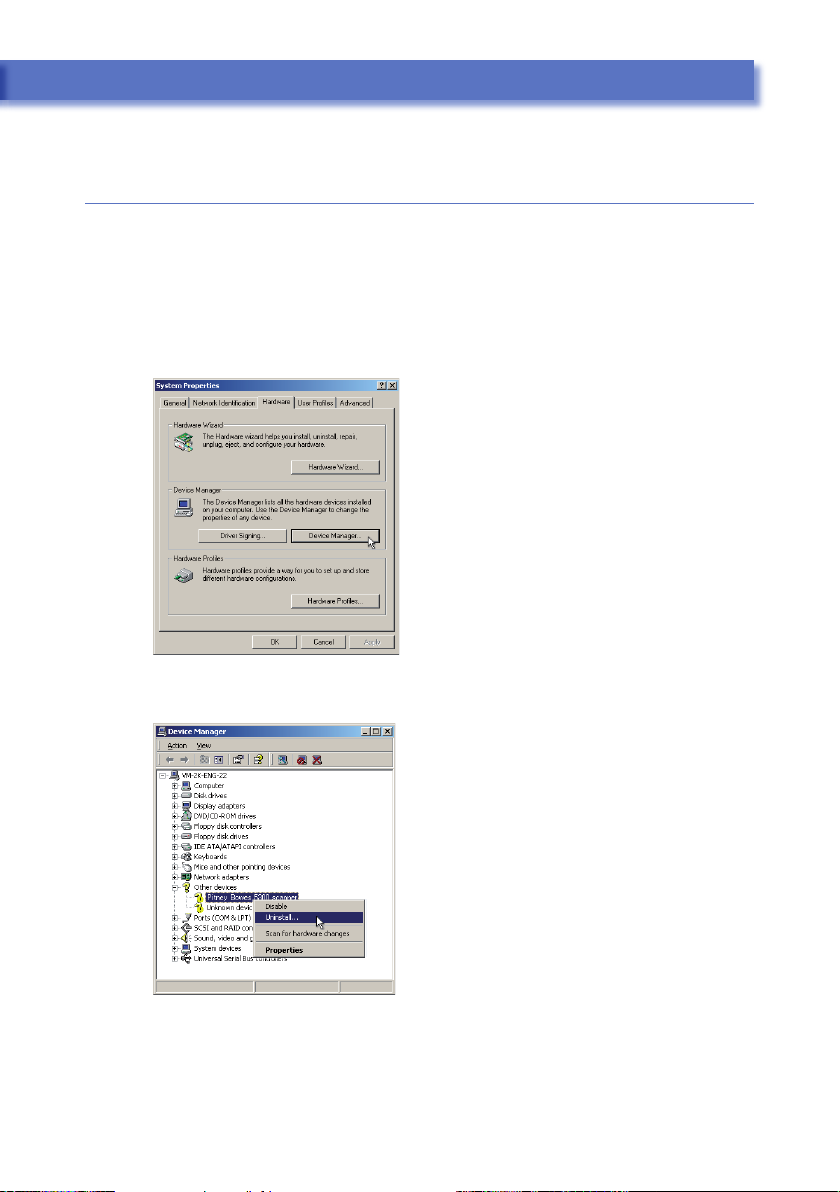
2 Click [Start], then right-click [My computer].
3 Click [Properties] to open the “System Properties” window.
4 Select the “Hardware” tab, then click [Device Manager].
5 Right-click the Pitney Bowes 5300 device displayed under the “Other
devices”. Then click [Uninstall].
1-15
1-16
Installing the driver
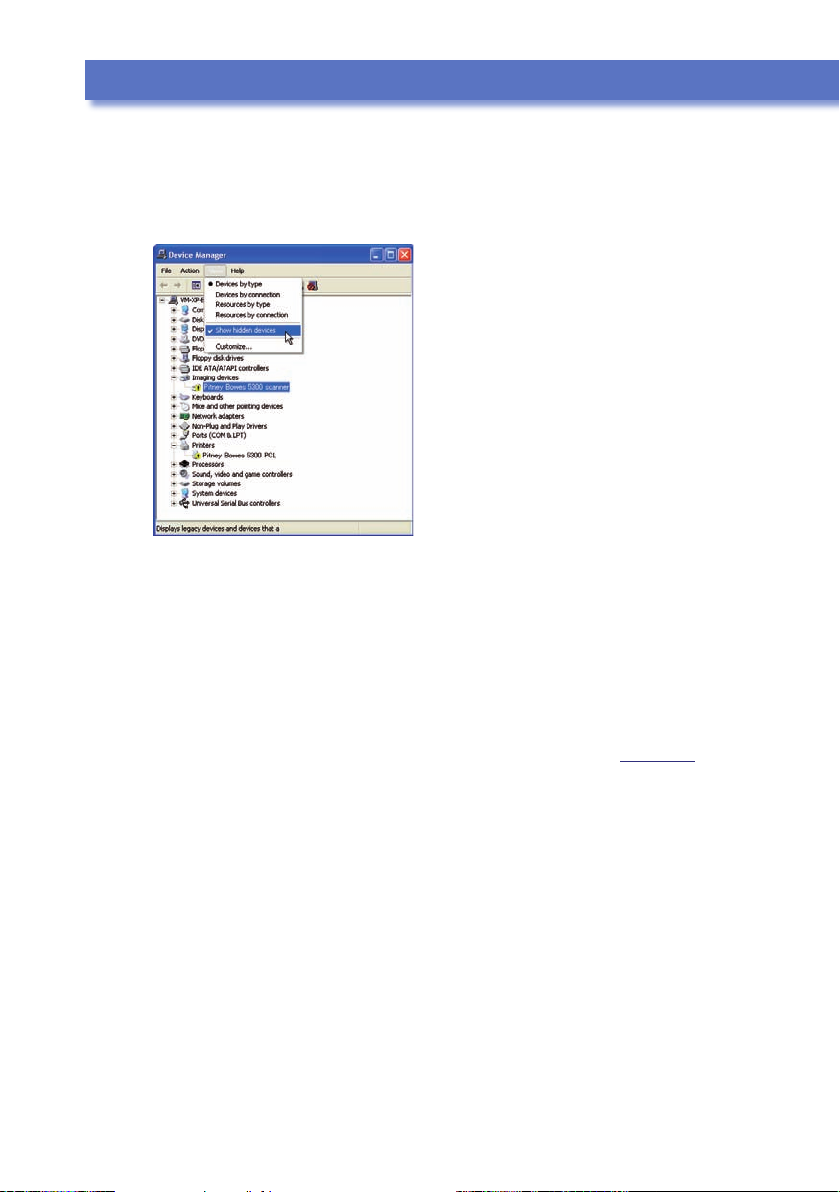
If the “Other devices” is not displayed, click “Shown hidden devices”
from the “View” menu. The Pitney Bowes 5300 device will be shown
under “Imaging devices” and “Printers”. Right-click them and click
[Uninstall].
6 In the confirmation dialog box, click [OK] to uninstall the Pitney Bowes
device.
7 Repeat steps 5 to 6 to uninstall the Pitney Bowes 5300 scanner and
Pitney Bowes 5300 printer.
8 Click [OK] to close the “System Properties” window.
9 Unplug the USB cable and restart your computer.
10 Refer to the “Summary of the installation procedure” on page 1-4 for
proper installation.
Installing the driverInstalling the driver
When “Found New Hardware Wizard” does not appear on
Windows 2000
1 Confirm that your machine is connected to the computer with the USB
cable.
2 Click [Start] g [Settings] g [Control Panel].
3 Double-click [System] to open the “System Properties” window.
4 Select the “Hardware” tab, then click [Device Manager].
5 Right-click the Pitney Bowes 5300 device displayed under the “Other
devices”. Then click [Uninstall].
1-17

1-18
Installing the driver
If the “Other devices” is not displayed, click “Shown hidden devices”
from the “View” menu. The Pitney Bowes 5300 device will be shown
under “Imaging devices” and “Printers”. Right-click them and click
[Uninstall].
6 In the “Confirm Device Removal” dialog box, click [OK] to uninstall the
Pitney Bowes 5300.
7 Repeat steps 5 to 6 to uninstall the Pitney Bowes 5300 scanner and
Pitney Bowes 5300 printer. Pitney Bowes 5300 printer may be displayed
as “Unknown device”.
8 Click [OK] to close the “System Properties” window.
9 Unplug the USB cable and restart your computer.
10 Refer to the “Summary of the installation procedure” on page 1-4 for
proper installation.

Installing the driverInstalling the driver
When “Add New Hardware Wizard” does not appear on
Windows 98/Me
1 Confirm that your machine is connected to the computer with the USB
cable.
2 Click [Start] g [Settings] g [Control Panel].
3 Double-click [System] to open the “System Properties” window.
4 Select the “Device Manager” tab.
5 Right-click the Pitney Bowes 5300 device which will be displayed under
the “Other devices”, and then click [Remove].
NOTE: It may be displayed as “Unknown device”.
6 In the confirm dialog box, click [OK] to uninstall the Pitney Bowes 5300
device.
7 Repeat steps 5 to 6 to uninstall the Pitney Bowes 5300 scanner and
Pitney Bowes 5300 printer.
8 Click [OK] to close the “System Properties” window.
9 Unplug the USB cable and restart your computer.
10 Refer to the “Summary of the installation procedure” on page 1-4 for
proper installation.
1-19

Deleting a driver
NOTE: If deleting a driver from Windows Server 2003, Windows XP or 2000, you
need to log on with user account authorized as PC administrator.
For Windows Server 2003 and Windows XP
1 Select [Start], [Control Panel], [Add or Remove Programs] and the
[Change or Remove Programs] icon.
2 Select “Pitney Bowes PCL Printer Driver for 4300/5300” and click the
[Change/Remove] button.
3 Follow the instructions appears on your screen.
For Windows 2000 Professional
1 Select [Start], [Settings], [Control Panel] and [Add/Remove Programs]
and [Change or Remove Programs] icon.
2 Select “Pitney Bowes PCL Printer Driver for 4300/5300” and click the
[Change/Remove] button.
3 Follow the instructions appears on your screen.
For Windows 98 and Windows Me
1 Select [Start], [Settings], [Control Panel], [Add/Remove Programs] and
the [Install/Uninstall] tab.
2 Select “Pitney Bowes PCL Printer Driver for 4300/5300” and click the
[Add/Remove] button.
3 Follow the instructions appears on your screen.
1-20
 Loading...