

Page 1

Pitney Bowes 3400
RS-232C
Interface
Operator’s Guide
RS-232C for PB 3400.qxd 12/16/99 6:51 PM Page 1
Page 2

Table of contents
Introduction . . . . . . . . . . . . . . . . . . . . . . . . . . . . . . . . . . . . . . . . . .1
Unpacking . . . . . . . . . . . . . . . . . . . . . . . . . . . . . . . . . . . . . . . .1
RS-232C interface cable . . . . . . . . . . . . . . . . . . . . . . . . . . . . . .2
Setting up . . . . . . . . . . . . . . . . . . . . . . . . . . . . . . . . . . . . . . . . .3
Operation . . . . . . . . . . . . . . . . . . . . . . . . . . . . . . . . . . . . . . . . . . . .5
Setting your fax machine . . . . . . . . . . . . . . . . . . . . . . . . . . . . .5
Requirements for your computer . . . . . . . . . . . . . . . . . . . . . .5
Making the RS-232C settings . . . . . . . . . . . . . . . . . . . . . . . .6
Initializing your machine . . . . . . . . . . . . . . . . . . . . . . . . . . .7
Using your fax’s new PC connection . . . . . . . . . . . . . . . . . . . . .7
Scanning from your fax to your computer . . . . . . . . . . . . . . .7
Printing from your computer to your fax . . . . . . . . . . . . . . . .8
Sending/receiving faxes with your computer . . . . . . . . . . . . .9
Installation . . . . . . . . . . . . . . . . . . . . . . . . . . . . . . . . . . . . . . . . . . .11
Reference . . . . . . . . . . . . . . . . . . . . . . . . . . . . . . . . . . . . . . . . . .A-1
“AT” commands . . . . . . . . . . . . . . . . . . . . . . . . . . . . . . . . .A-1
Copyright © 1999 by Pitney Bowes; all rights reserved.
Pitney Bowes and the Pitney Bowes logo are trademarks of Pitney Bowes. Bitware is a trademark
of Cheyenne Software, Inc., a division of Computer Associates International, Inc. WinFax is a
trademark of Symantec Corporation. Windows and Windows 95 are registered trademarks of
Microsoft Corporation. HydraFax is a trademark of Wordcraft International Ltd.
i
RS-232C for PB 3400.qxd 12/16/99 6:51 PM Page i
Page 3
Introduction
Important: The optional RS-232C interface must be installed by
your Pitney Bowes representative.
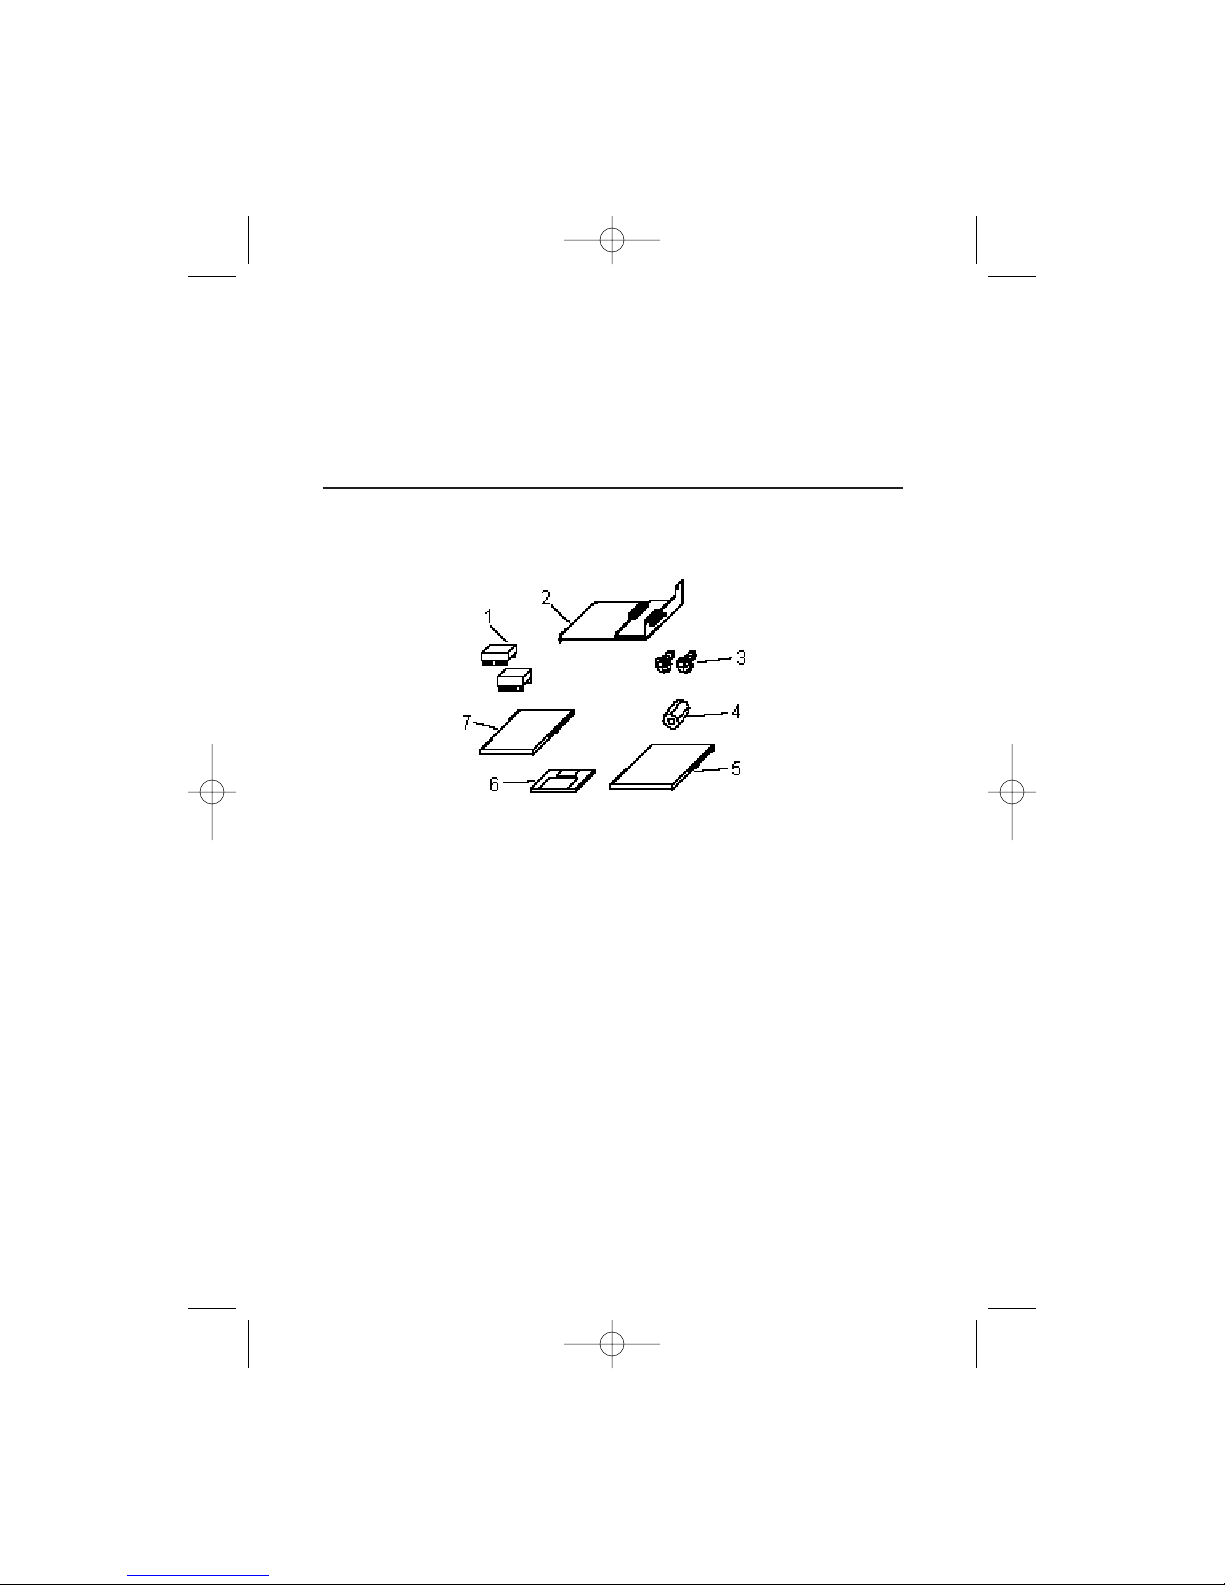
Unpacking
Included in the packaging:
1. Two RS-232C upgrade ROMs
Note: If your fax machine’s model does not require these ROMs,
these will not be included in the packaging.
2. RS-232C printed circuit board (PCB) assembly
3. Two screws
4. Ferrite core
5. RS-232C instructions (this manual)
6. Software diskette
7. Software operating instructions
To connect between your fax machine and your computer, you will
need an RS-232C interface cable (see next page).
1
RS-232C for PB 3400.qxd 12/16/99 6:51 PM Page 1
Page 4
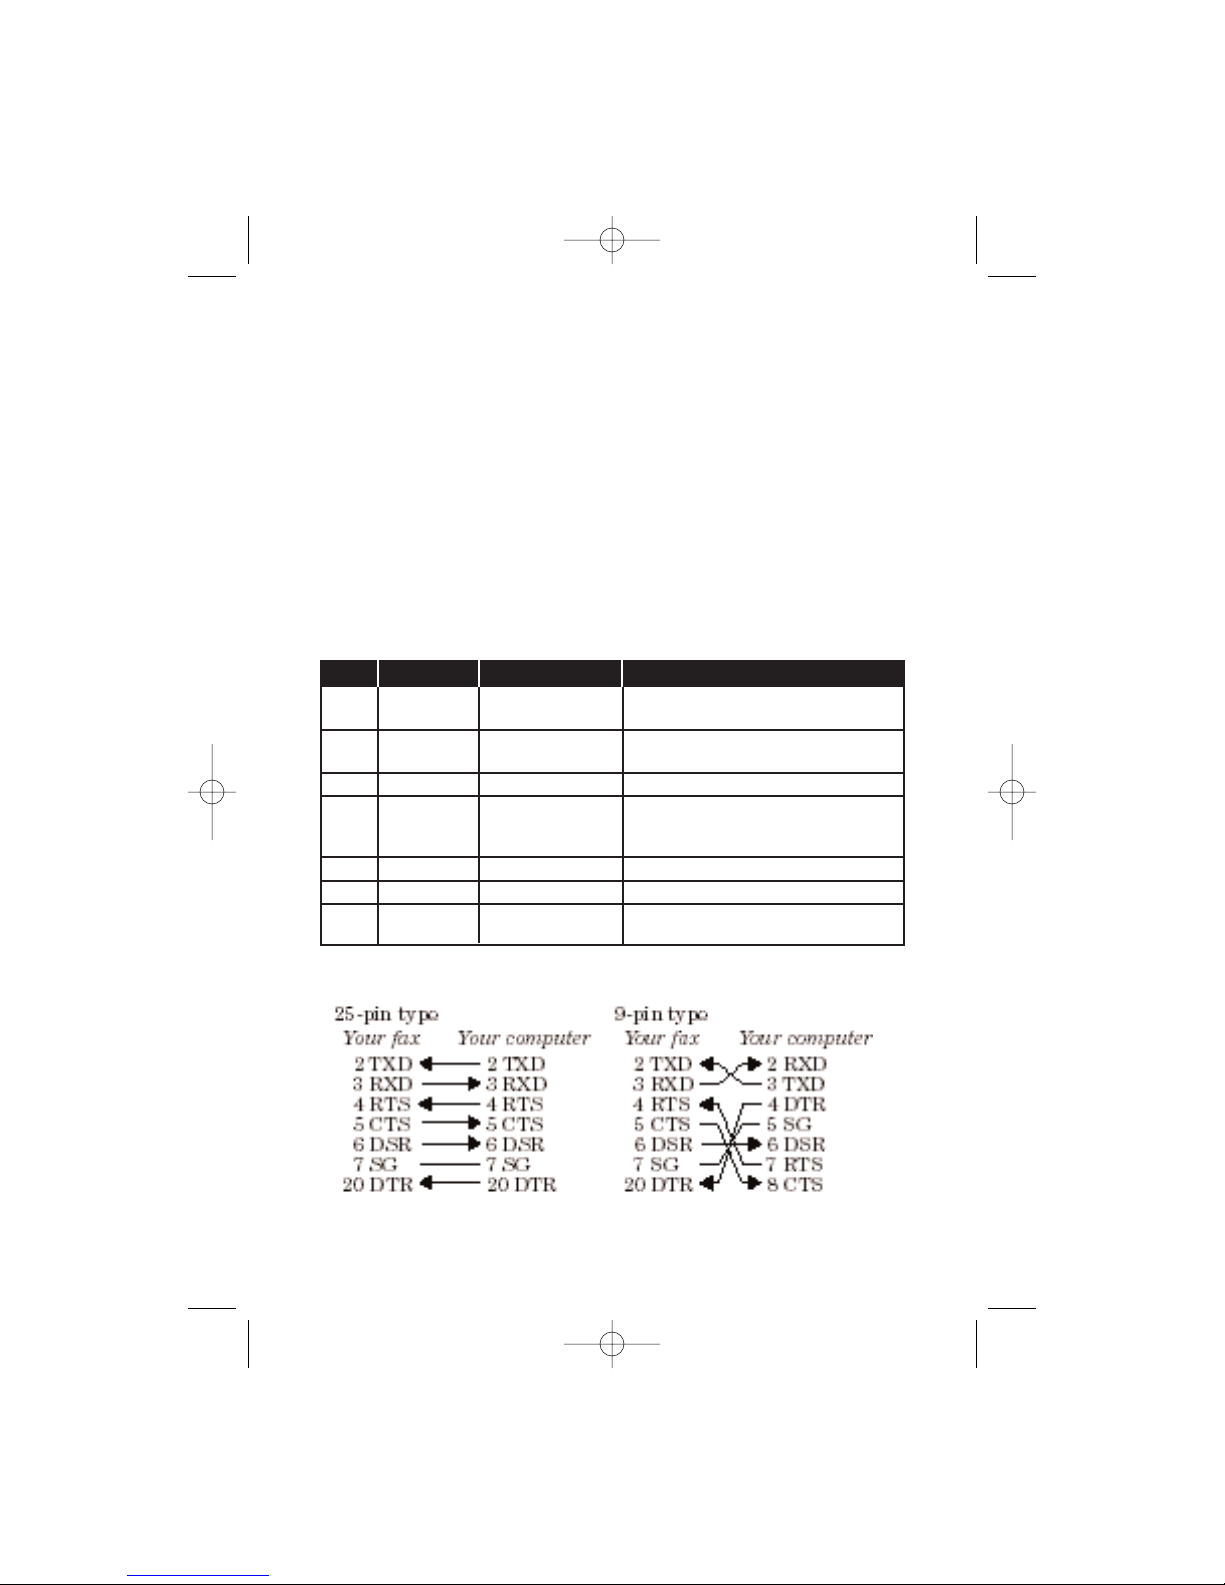
RS-232C interface cable
The RS-232C port on your newly installed RS-232C interface has a
DB-25 (standard 25-pin serial) female receptacle which accepts a
male DB-25 cable plug. Your computer’s port may have either a DB-
25 or DB-9 (9-pin) receptacle.
If necessary, see the chart below for detailed information on the pin
assignment for your fax machine’s RS232C port.
Note:For more information on your computer’s serial interface port,
see your computer’s operating instructions.
Pin assignment
Pin No. Signal code Signal name Contents
2 TXD Transmitted data
Data signal sent from computer
to your fax.
3 RXD Received data
The data sent to computer by
your fax.
4 RTS Request to send Signal for request to send data.
Data Enable signal for data
5 CTS Clear to send transmission from your fax to
your computer.
6 DSR DCE ready Tur ning on always.
7 SG Signal ground Ground for signal.
20 DTR DTE ready
Data Terminal Enable - ready
to communicate
Signal direction
2
RS-232C for PB 3400.qxd 12/16/99 6:51 PM Page 2
Page 5
3
Setting up
After your Pitney Bowes representative has installed the RS-232C
interface on your fax, follow the steps below to complete your
machine’s setup. (Your representative may perform these for you as
part of the installation.)
1. Attach the ferrite core to your RS-232C interface cable.
2. Connect one end of the RS-232C cable to the RS-232C port on
your fax machine.
3. Connect the other end of the RS-232C cable to your computer’s
RS-232C port.
Note: If you don’t know where your computer’s RS-232C port is,
check the computer’s operating instructions.
RS-232C for PB 3400.qxd 12/16/99 6:51 PM Page 3
Page 6

(This page intentionally blank.)
4
RS-232C for PB 3400.qxd 12/16/99 6:51 PM Page 4
Page 7

Operation
Your fax machine isn’t only a fax —it can also be an image scanner
for your computer.
Setting your fax machine
Requirements for your computer
To use your fax’s RS-232C interface, you must first properly install
fax software on your computer.
Pitney Bowes has tested this interface with the following software
titles:
• BitWareTMVer. 3.30
• BitWareTMPlus Ver. 4.0
• HydraFaxTMVer. 3.5 (34) [U. S. and Canada]
• WinFax PROTMVer. 4 for Windows 3.1and Ver.7 for Windows 95
• LaserFaxTMVer. 3.5 [Except North America]
Note:While this RS-232C interface should work with most fax soft-
ware, there may be some fax packages with which it may not
work. If you experience trouble, please confirm that you are following all instructions correctly and in the right order. If you
still have trouble, please contact the manufacturer of your fax
software package.
Note:Before continuing with these instructions, you must first install
fax software on your computer.
5
RS-232C for PB 3400.qxd 12/16/99 6:51 PM Page 5
Page 8

Making the RS-232C settings
Note:You must make the following settings every time you change
your fax software.
Note:The parameters for the following settings should be listed in
your fax software. If you choose the wrong RS-232C parameters, the fax machine cannot communicate with your computer.
1. 3400: Press /PROGRAM, R, 2, ENTER.
The LCD shows the fax’s RS-232C transmission speed (baud
rate) in bps (bits per second):
Note: This setting is just for the RS-232C port. It does not
change the speed at which your machine sends faxes.
2. Press
or
/PROGRAM to choose the appropriate baud rate
for your computer and software. The settings are: Variable; or
600, 1200, 2400, 4800, 9600 or 19200 bps. When you see the set-
ting you want, press ENTER.
Note: If using one of the following Pitney Bowes-tested pack-
ages, select Variable:
•BitWare
TM
Ver. 3.30
•BitWareTMPlus Ver. 4.0
•WinFax PROTMVer. 4 for Windows 3.1and Ver.7
for Windows 95
3. Press
or
/PROGRAM to choose the data parity. Choose
between None, Odd, or Even. Then press ENTER.
Parity: None
Program/Enter
Baud Rate: Variable
Program/Enter
6
RS-232C for PB 3400.qxd 12/16/99 6:51 PM Page 6
Page 9

4. Press
or
/PROGRAM to toggle the stop bit between 1 bit or
2 bit. When you see the setting you want, press ENTER.
5. Press or /PROGRAM to toggle the data length between 7
bit or 8 bit. When you see the setting you want, press ENTER.
Initializing your machine
1. Make sure your fax is connected to your computer (see page 3).
2. Computer: Make sure that your fax software is running and in
receive mode.
Note: If necessary, consult your fax software’s instructions.
3. Fax machine:
3400: Press /PROGRAM, R, 3, ENTER.
It will take a few moments to initialize the settings.
Using your fax’s new PC connection
Scanning from your fax to your computer
You can store logos, signatures, line art or even photographs onto
your computer by using the fax machine to scan to your computer:
1. Make sure your fax is connected to your computer (see page 3).
2. Fax machine: Insert the document. Adjust resolution and con-
trast if necessary.
PC-FAX Connection
Data Length: 8 bit
Program/Enter
Stop Bit: 1 bit
Program/Enter
7
RS-232C for PB 3400.qxd 12/16/99 6:51 PM Page 7
Page 10

3. Computer: Instruct your fax software to receive.
Note: If necessary, consult your fax software’s instructions.
4. Fax machine:
3400: Press /PROGRAM, R, 1, ENTER.
Your fax software will now “receive” the fax (including the TTI, if
you’ve set one) onto your computer. To cancel the scanning operation
while it’s in progress, just press STOP. (To cancel the command after
scanning the document, consult your software’s operating instructions.)
Printing from your computer to your fax
With the RS-232C interface installed, you can now print documents
from your computer to your fax.
1. Make sure your fax is connected to your computer (see page 3).
2. Computer: Use your application — for example, a word-processing program — to send the document to your fax software, just
as if you were actually going to fax the document.
3. Fax machine: Make sure that you have stored your subscriber
ID (your fax number) on your machine.
Note: Please consult your fax machine’s operating instructions
for more on how to enter the subscriber ID.
4. Computer: When the fax software asks for a fax number to
which to send the document, enter your subscriber ID.
5. Computer: Instruct your fax software to transmit. The fax
machine will begin to print.
PC-FAX Scan
A4 Memory 99%
8
RS-232C for PB 3400.qxd 12/16/99 6:51 PM Page 8
Page 11

Sending/receiving faxes with your computer
You can receive documents from another fax onto your computer, as
well as transmit documents from your computer to other faxes. As
with scanning, the exact procedure for sending/receiving will vary
depending upon your computer’s fax software.
Note:Consult your software’s operating instructions for more details.
1. Make sure your fax is connected to your computer (see page 3).
2. Computer: Instruct your fax software to send or receive.
The fax machine will begin either transmitting or receiving.
9
RS-232C for PB 3400.qxd 12/16/99 6:51 PM Page 9
Page 12

Installation
Note:The optional RS-232C interface must be installed by your
Pitney Bowes representative.
1. Turn off your fax machine and your computer.
2. Remove the document hopper and document tray.
3. Remove the four mounting screws holding the rear cover in
place. Then remove the rear cover.
10
RS-232C for PB 3400.qxd 12/16/99 6:51 PM Page 10
Page 13

4. Remove the mounting screws holding
the option cover in place. Then remove
the option cover.
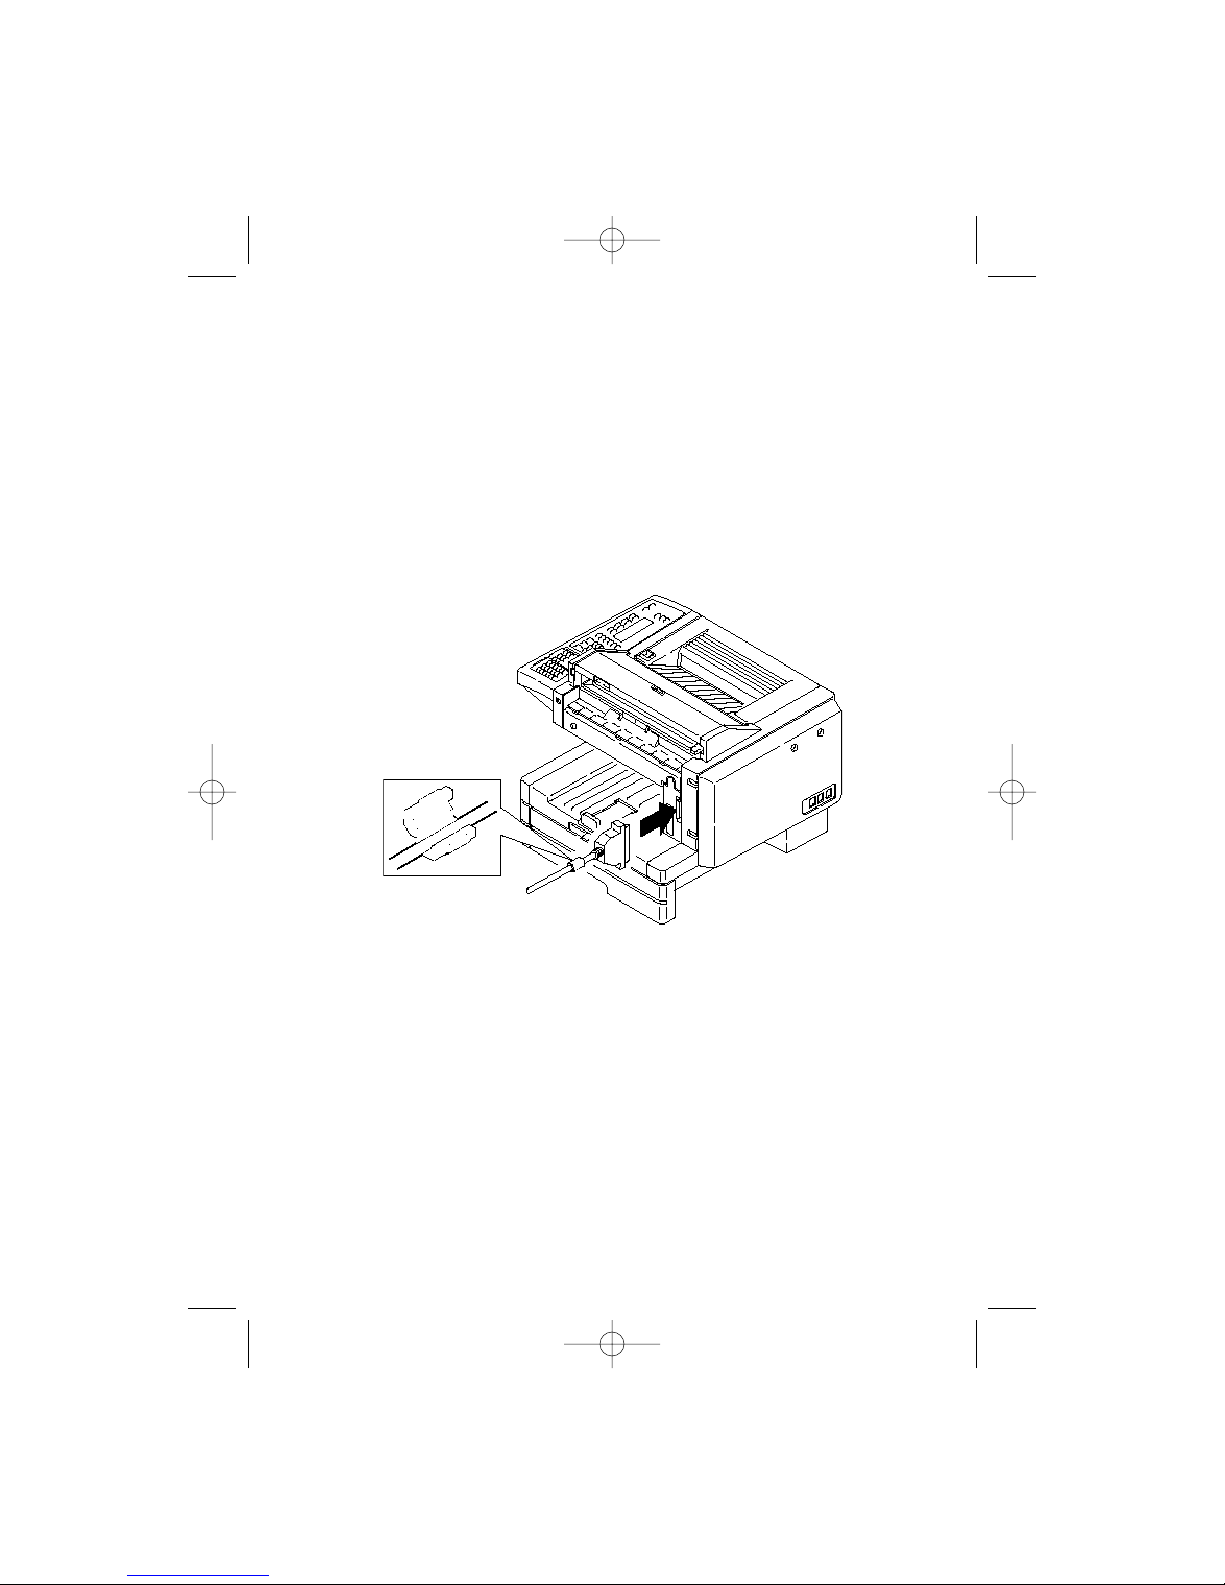
5. Use pliers to gently punch out the rectangular connector space located in the upper
right corner of the option cover.
6. Insert the RS-232C PCB assembly
into the slot until the connector is
firmly seated. Then use the two
mounting screws to attach the
assembly.
7. Re-attach the rear cover using
the four mounting screws.
8. Re-attach the option cover using
its mounting screw.
9. Attach the ferrite core to your
RS-232C cable.
11
RS-232C for PB 3400.qxd 12/16/99 6:51 PM Page 11
Page 14

10. Connect one end of the RS-232C interface cable to the RS-232C
interface port on your fax machine.
Note: Please see page 2 for more details on the
RS-232C cable.
11. Connect the other end of the RS-232C cable to your computer’s
RS-232C port.
Note: If you don’t know where the computer’s RS-232C port is,
check the computer’s operating instructions.
12
RS-232C for PB 3400.qxd 12/16/99 6:51 PM Page 12
Page 15

“AT” commands
Note:This is a list of standard “AT” modem commands. For more
information, please consult your fax software’s instructions.
Command Parameter Description Default value
A none Call answer
D 0 - 9, *,# Dial number
P Pulse dial
T Tone dial
, Pause
E 0 Not echo command character E0
1 Echo command character
H 0 On Hook (Disconnect line)
1 Off Hook (Connect line)
M 0 Monitor speaker is always off M1
1 Monitor speaker is on until carrier is
detected
2 Monitor speaker is always on
P none Set pulse dial mode
T none Set tone dial mode
V 0 Short formed response code V1
1 Long formed response code
Z none Reset modem
&F none Initialize to factory setting
\Q 1 XON/XOFF flow control \Q2
2 RS/CS flow control
+FCLASS? none Indicate current service class
+FCLASS=? none Indicate ser vice class capability
+FCLASS=n none Set ser vice class
+FRH=n none Receive HDLC frame (n=3:300 bps)
+FLO=n none XON/XOFF flow control (n=1) +FLO=2
none RS/CS flow control (n=2)
+FRM=n none Facsimile receive message
(14400/12000/9600/7200/4800/
2400 bps)
+FRS=n none Detect silence for n x 10ms
+FTH=n none Transmit HDLC frame (n=3:300 bps)
+FTM=n none Facsimile transmit message
(14400/12000/9600/7200/4800/
2400bps)
+FTS=n none Wait for n x 10ms
A-1
RS-232C for PB 3400.qxd 12/16/99 6:51 PM Page 13
Page 16

100 Oakview Drive
Trumbull, CT 06611
phone: 800-290-7860
fax: 800-446-0760
www.pitneybowes.com
FX30067
RS-232C for PB 3400.qxd 12/16/99 6:51 PM Page 14
 Loading...