

Page 1

Table of contents
Page
Introduction . . . . . . . . . . . . . . . . . . . . . . . . . . . . . . . . . . . . . . . . . . . . . .ii
System requirements . . . . . . . . . . . . . . . . . . . . . . . . . . . . . . . . . . . .ii
General precautions . . . . . . . . . . . . . . . . . . . . . . . . . . . . . . . . . . . . .ii
If problems arise . . . . . . . . . . . . . . . . . . . . . . . . . . . . . . . . . . . . . . .ii
Getting started . . . . . . . . . . . . . . . . . . . . . . . . . . . . . . . . . . . . . . . . . . . .1
Connecting to your computer . . . . . . . . . . . . . . . . . . . . . . . . . . . . . .2
Installing the Fax Printer type 3 software . . . . . . . . . . . . . . . . . . . .3
Installing to Windows 95/98 . . . . . . . . . . . . . . . . . . . . . . . . . . . . .3
Installing to Windows 3.1 . . . . . . . . . . . . . . . . . . . . . . . . . . . . . . .4
Setting up the printer environment . . . . . . . . . . . . . . . . . . . . . . . . . . . .5
Setting up the printer environment . . . . . . . . . . . . . . . . . . . . . . . . .6
Setting the paper size for the multipurpose tray . . . . . . . . . . . . . .12
Using the Print Manager . . . . . . . . . . . . . . . . . . . . . . . . . . . . . . . . . . .15
The status on your computer and printer . . . . . . . . . . . . . . . . . . .16
1. Your System . . . . . . . . . . . . . . . . . . . . . . . . . . . . . . . . . . . . . . .16
2 Communication . . . . . . . . . . . . . . . . . . . . . . . . . . . . . . . . . . . .18
3.Your Printer . . . . . . . . . . . . . . . . . . . . . . . . . . . . . . . . . . . . . . .20
4. Your Print JOB . . . . . . . . . . . . . . . . . . . . . . . . . . . . . . . . . . . .22
Using the 3400 P
RINTER OPTION on a Network . . . . . . . . . . . . . . . . . . .24
Connection via network adapter . . . . . . . . . . . . . . . . . . . . . . . . .24
Connection through printer server PC . . . . . . . . . . . . . . . . . . . .25
Print status monitor . . . . . . . . . . . . . . . . . . . . . . . . . . . . . . . . . .25
Just in case . . . . . . . . . . . . . . . . . . . . . . . . . . . . . . . . . . . . . . . . . . . . .26
Uninstalling the Fax Printer type 3 driver software . . . . . . . . . . .27
If running Windows 98 or Windows 95: . . . . . . . . . . . . . . . . . . . .27
If running Windows 3.x: . . . . . . . . . . . . . . . . . . . . . . . . . . . . . . .27
Resetting your fax machine . . . . . . . . . . . . . . . . . . . . . . . . . . . . . .27
Error messages . . . . . . . . . . . . . . . . . . . . . . . . . . . . . . . . . . . . . . . .28
Dealer Installation . . . . . . . . . . . . . . . . . . . . . . . . . . . . . . . . . . . . . . .A-1
Unpacking . . . . . . . . . . . . . . . . . . . . . . . . . . . . . . . . . . . . . . . . . . .A-1
Attaching the 3400 PRINTER OPTION . . . . . . . . . . . . . . . . . . . . . . .A-1
Copyright © 1999 Pitney Bowes; all rights reserved.
i
WP-300 for PB 3400.qxd 12/16/99 6:54 PM Page i
Page 2

Introduction
Thank you for purchasing the Pitney Bowes 3400 P
RINTEROPTION
. The 3400
P
RINTEROPTION
is a printer control module which is attached to your Pitney
Bowes fax machine. It allows your fax machine to be used as a PC printer.
System requirements
To use the Fax Printer type 3 driver software, you need the following
hardware and software:
•
IBM®-compatible personal computer with an i486™ or higher processor
•
At least 5 MB of free disk space and one 3.5-inch floppy disk drive
with 1.44 MB capacity
•
Windows®98, Windows®95 or Windows®3.1
•
Microsoft®MS-DOS®operating system version 5.0 or later
•
At least 8 MB random-access memory (RAM) for Windows®3.1
•
At least 16 MB random-access memory (RAM) for Windows®98/95
•
Bi-directional parallel interface cable
General precautions
•
To avoid serious injury, never disassemble the machine. Exposed
power points inside the machine can cause electrical shock if you
touch them.
•
During thunderstorms, disconnect the plug from the power outlet.
•
Before you attach or remove the AC power cord from the power outlet,
make sure that your hands are dry.
•
Keep liquid cleaners away from the metal on your machine.
If problems arise
In the event repairs are ever needed on your fax machine, contact Pitney
Bowes. For information, contact the Pitney Bowes Diagnostic Center at
800-243-5556 (from the U.S. only).
Microsoft, MS, Windows, Windows 3.1, Windows 95 and Windows 98 are registered trademarks of
Microsoft Corporation. IBM is a registered trademark of International Business Machines Corporation.
Centronics is a registered trademark of GENICOM Corporation. Screen shots reprinted by permission
from Microsoft Corporation.
ii
WP-300 for PB 3400.qxd 12/16/99 6:54 PM Page ii
Page 3

Getting started
Connecting to your computer . . . . . . . . . . . .2
Installing the Fax Printer type 3 software .3
Installing to Windows 95/98 . . . . . . . . . .3
Installing to Windows 3.1 . . . . . . . . . . . .4
1
WP-300 for PB 3400.qxd 12/16/99 6:54 PM Page 1
Page 4
Connecting to your computer
Your authorized Pitney Bowes representative should install the 3400
PRINTER OPTION printer controller module to your machine. Do not per-
form this installation yourself.
Once the 3400 PRINTER OPTION module is installed on your machine, follow the steps below to complete the setup. (Your representative may also
perform these steps for you as part of the installation.)
With the 3400 PRINTER OPTION installation, a Centronics®parallel interface port will be added to your fax machine.
1.
Turn off both your fax machine and computer.
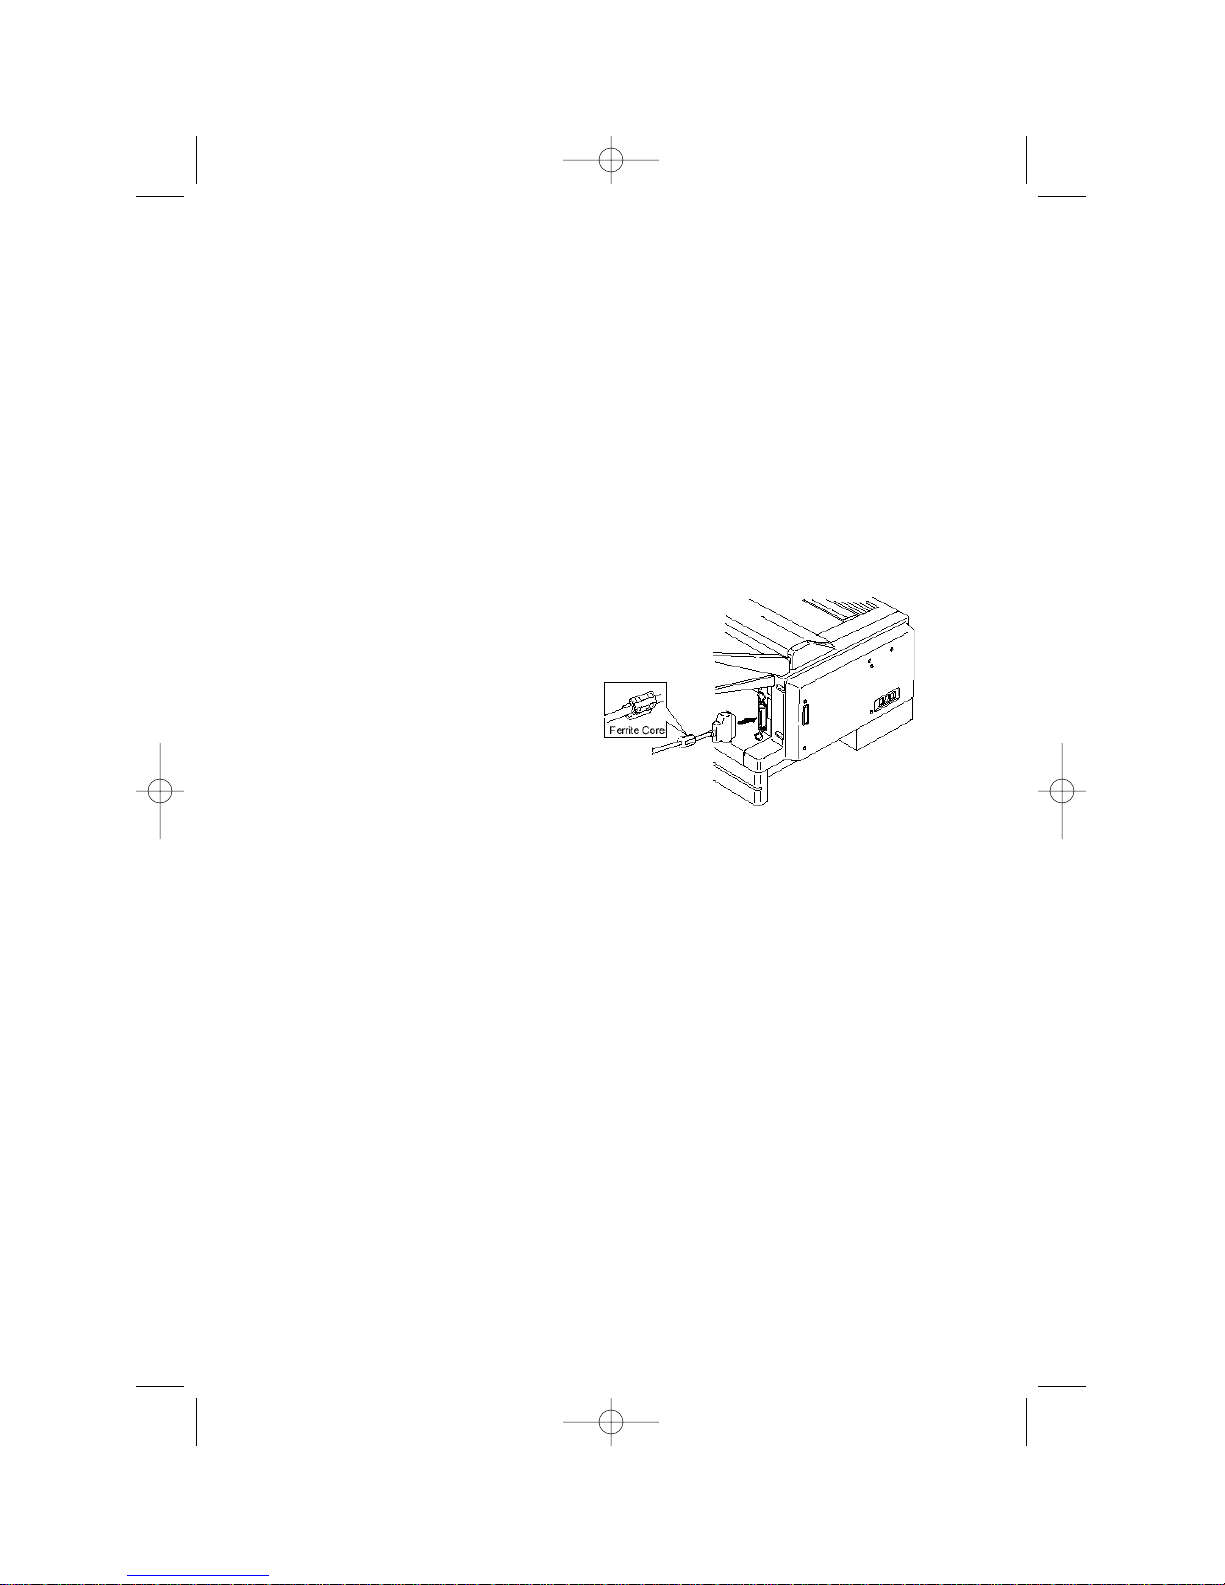
2.
Connect the bi-directional
parallel interface cable to
the 3400 PRINTER OPTION’s
port.
Note: If your cable does not
have a ferrite core
already fitted, install
the ferrite core
included in the
3400 P
RINTER
OPTION’s packaging.
3.
Snap the port’s wire clips
onto the interface cable.
4.
Connect the other end of the bi-directional parallel interface cable
to your computer’s parallel port.
Note: Please see your computer’s operating instructions if you need
help with this step.
2
WP-300 for PB 3400.qxd 12/16/99 6:54 PM Page 2
Page 5

Installing the Fax Printer type 3 software
Important: Before you install the Fax Printer type 3 driver, make sure
that your computer meets the requirements described in
the Introduction (see page ii).
Installing to Windows 95/98
Plug & play installation — Windows 98
Connect the 3400 PRINTER OPTION to your computer using the parallel
interface cable. After Windows 98 reboots, it detects your 3400 PRINTER
OPTION and shows the message that new hardware was found. It then
compiles a driver database and the Add New Hardware Wizard appears.
1.
Click Next. The Wizard asks what you want to do.
2.
Select Display list of all drivers in a… and click Next.
3.
Click Have Disk...
4.
Insert the floppy diskette labeled Fax Printer type 3 driver for
Windows 95/98. Then click OK.
5.
Click Next, Next and then Finish.The Fax Printer type 3 driver
installation program will start. Follow the instructions that appear.
Plug & play installation — Windows 95
Connect the 3400 PRINTER OPTION to your computer using the parallel
interface cable. When Windows 95 reboots, it detects your 3400 PRINTER
OPTION and prompts you to install the drivers. Follow the instructions
that appear on your screen.
Manual installation — both Windows 98 and Windows 95
Use this procedure if you reinstall the Fax Printer type 3 driver or if the
plug & play feature doesn’t work.
1.
After Windows restarts, insert the Fax Printer type 3 driver
diskette for Windows 95/98 into your floppy disk drive.
2.
Go to Start > Settings > Printers, then double-click on Add
printer. The Add Printer Wizard appears.
3.
Click Next to begin installation.
3
WP-300 for PB 3400.qxd 12/16/99 6:54 PM Page 3
Page 6

4.
If you are prompted to select local or network, click Local printer
and then click Next.
5.
Click Have Disk... Type A:\ (where A:\ is the letter of your floppy
disk drive) and then click OK.
6.
Click Next to continue and follow the instructions that appear.
Note: If you are prompted to keep or replace existing files, replace
existing files.
7.
Once installation is complete, restart your computer for changes to
take effect.
8.
When you finish, the icon for the Fax Printer type 3 appears in the
Printers folder, and the Fax Printer type 3 Print Manager button
appears on the taskbar.
Note: To see a list of documents printing you must use the
Fax Printer type 3 Print Manager (see page 15).
Installing to Windows 3.1
1.
If not already running, start Windows 3.1.
2.
Insert the Fax Printer type 3 driver disk for Windows 3.1.
3.
Click the File menu in the Program Manager, then click Run.
4.
Type A:\setup31.exe (where A:\ is the letter of your floppy disk
drive), and click OK.
5.
The Fax Printer type 3 driver installation program will start.
Follow the instructions that appear on your screen.
6.
Once installation is finished, restart your computer for changes to
take effect.
7.
When you finish, the Fax Printer type 3 Print Manager icon will
appear at the lower edge of your screen.
4
WP-300 for PB 3400.qxd 12/16/99 6:54 PM Page 4
Page 7

Setting up the
printer environment
Setting up the printer environment . . . . . .6
Paper source . . . . . . . . . . . . . . . . . . . . . .7
Resolution . . . . . . . . . . . . . . . . . . . . . . . .7
Paper size . . . . . . . . . . . . . . . . . . . . . . . .8
Detail setting . . . . . . . . . . . . . . . . . . . . .9
Orientation . . . . . . . . . . . . . . . . . . . . . . .9
Copy . . . . . . . . . . . . . . . . . . . . . . . . . . .10
Hi-speed TT font process . . . . . . . . . . .10
Option . . . . . . . . . . . . . . . . . . . . . . . . . .10
Wide-screen . . . . . . . . . . . . . . . . . . . . . .11
Setting the paper size
for the multipurpose tray . . . . . . . . . . . . .12
5
WP-300 for PB 3400.qxd 12/16/99 6:54 PM Page 5
Page 8
Setting up the printer environment
You can customize the printer to fit your needs.
First, make the Fax Printer type 3 Properties window appear by following the
steps below.
Windows 98/95:
1.
Click on Start > Settings, then click on Printers.
2.
Use the right mouse button to click your Fax Printer type 3.
Then select Properties from the drop-down menu.
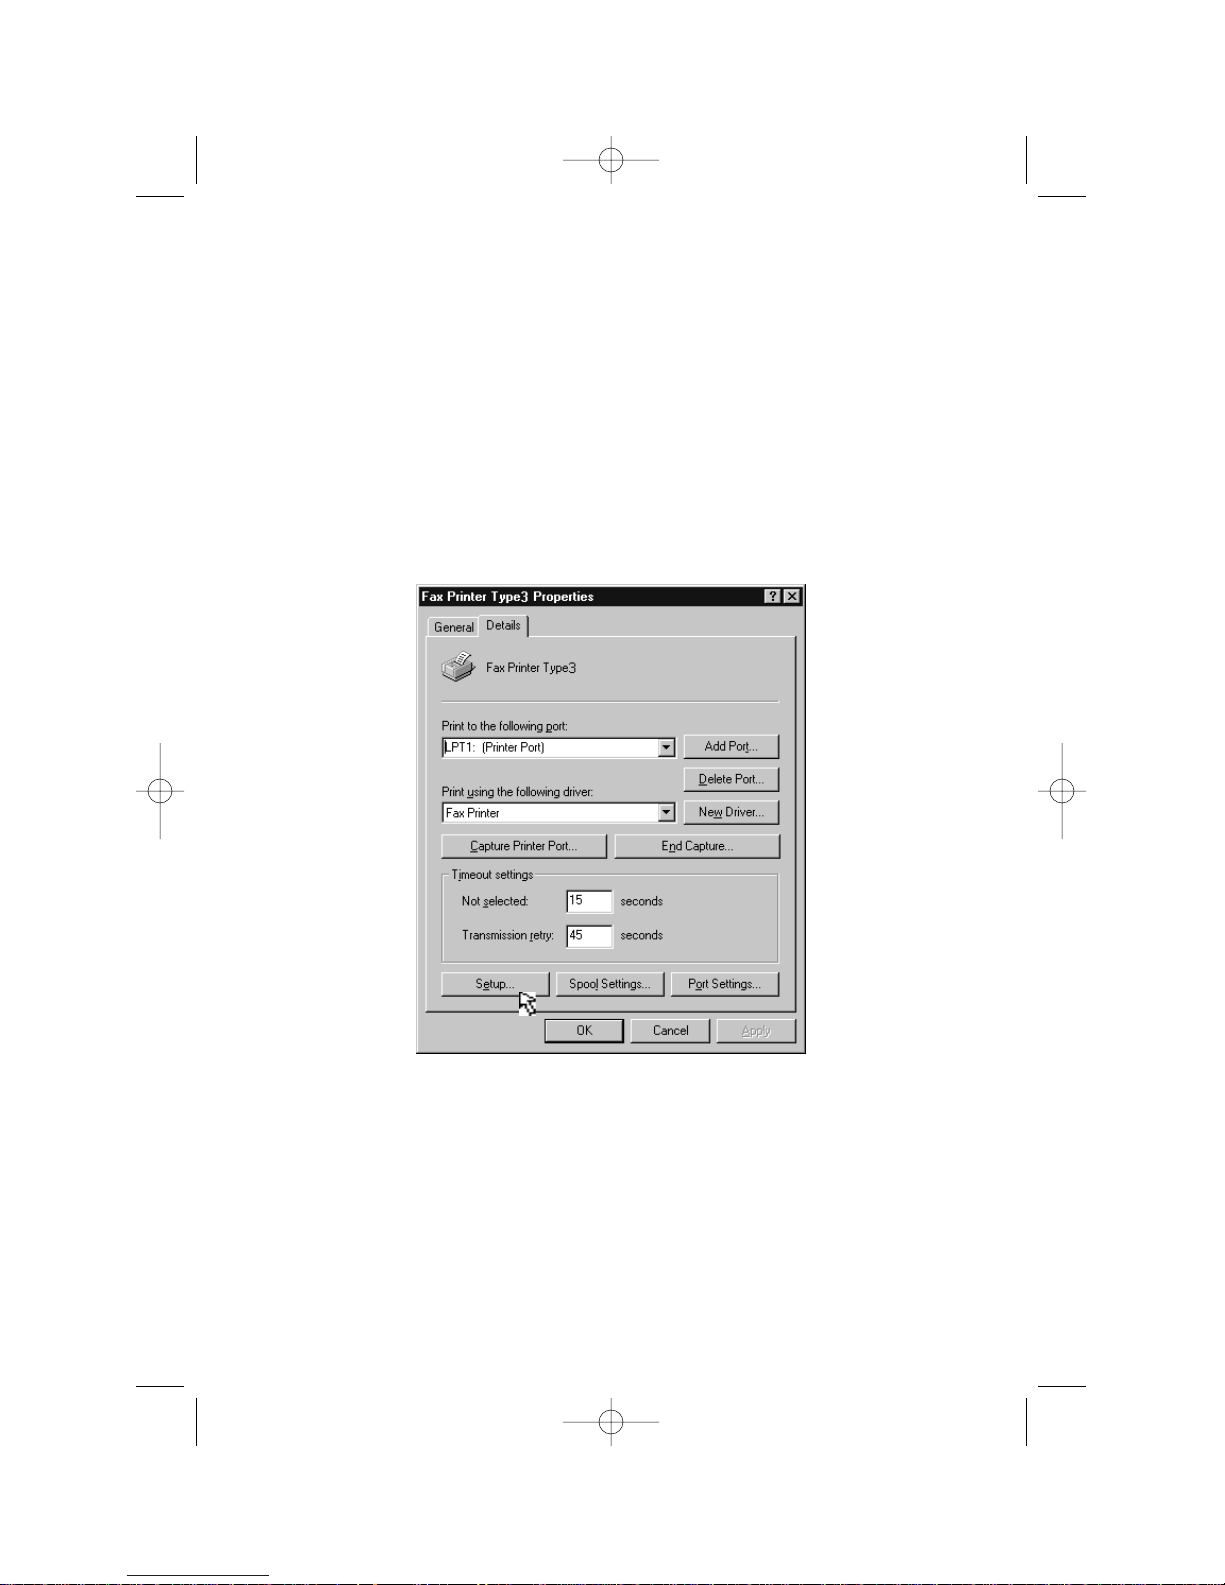
3.
Click the Details tab, and then click Setup… (see below).
Windows 3.1:
1.
Double-click the Main icon in the Program Manager window.
2.
Double-click the Control Panel icon in the Main group window.
3.
Then double-click the Printers icon in the Control Panel window,
and then click Set-up.
6
WP-300 for PB 3400.qxd 12/16/99 6:54 PM Page 6
Page 9
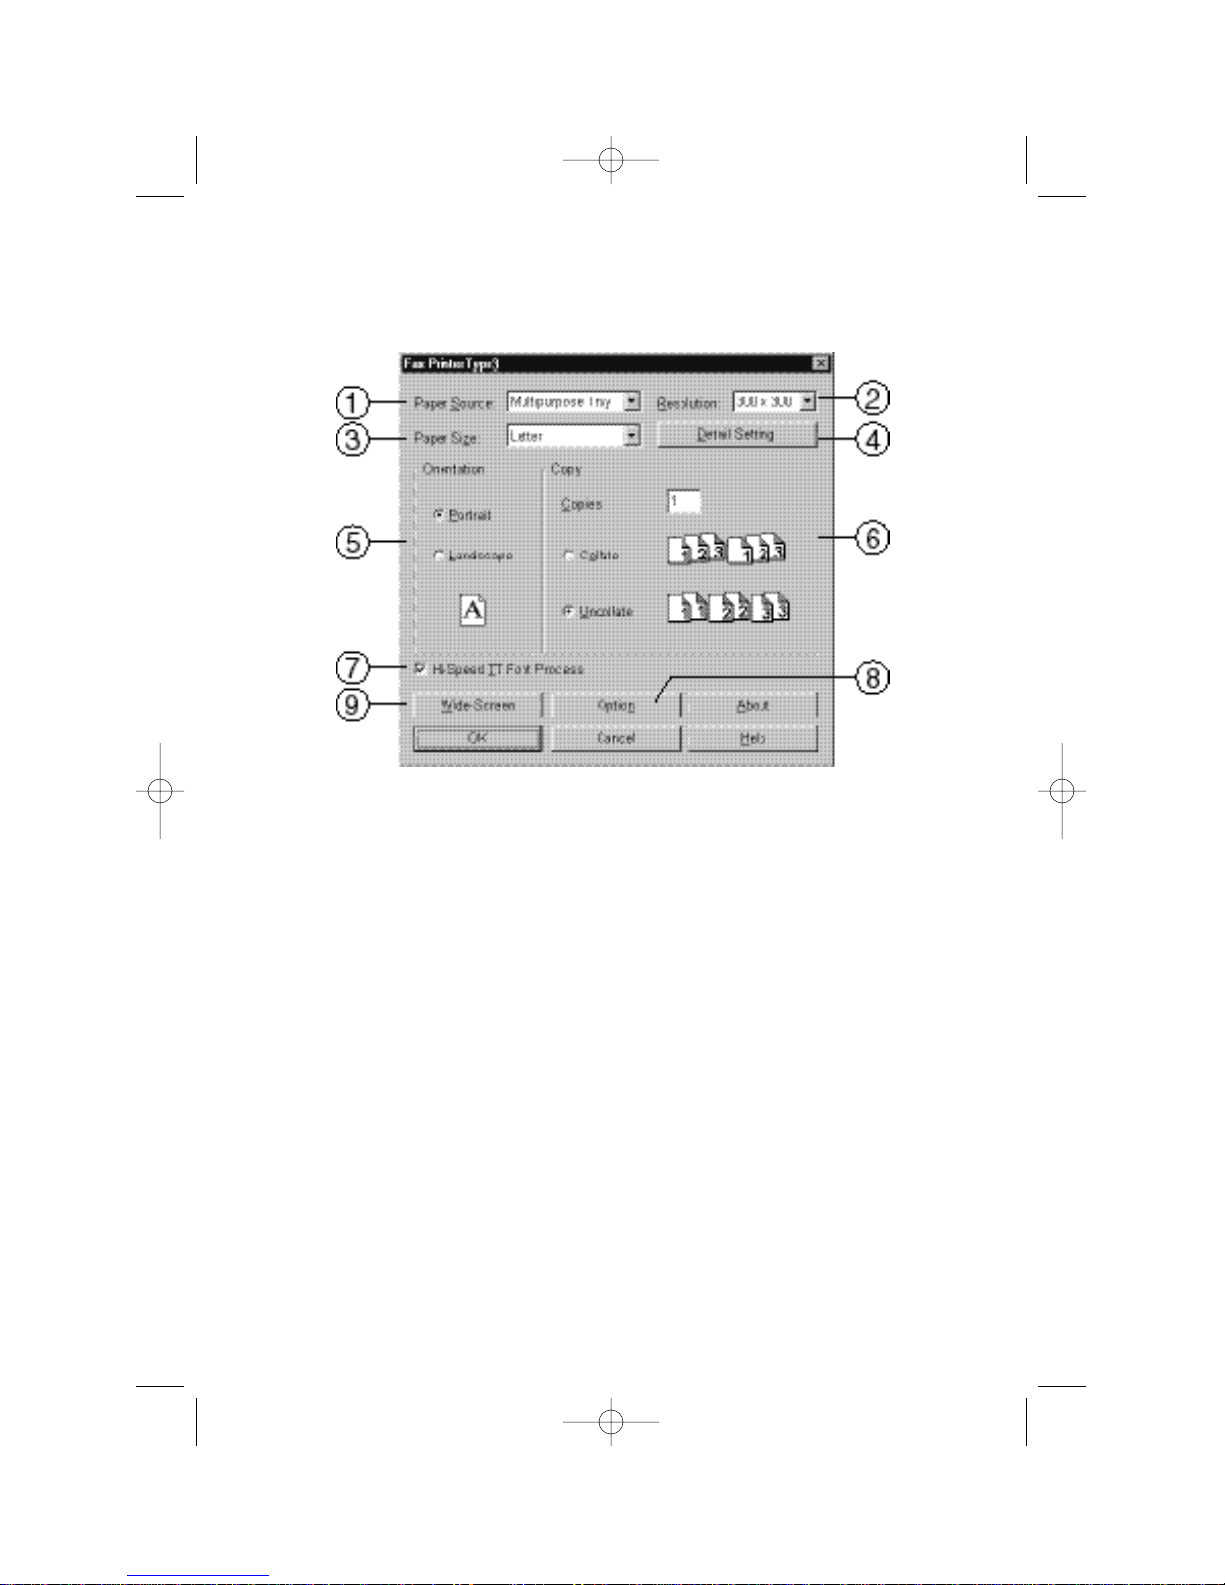
4.
The following Fax Printer type 3 window (or a similar one) will
appear.
Now, you can set the following:
Click Help if you need assistance while you’re in the Printer Settings
window:
1 Paper Source
Selects the default paper supply source. You may choose from
either the multipurpose tray or the paper cassettes.
The Auto setting chooses the right paper supply source automatically, based on the paper size settings you have made for each
source.
2 Resolution
Sets the default printing resolution to either 300 or 600 dpi.
7
WP-300 for PB 3400.qxd 12/16/99 6:54 PM Page 7
Page 10
3 Paper Size
Selects the paper size. Select from among nine paper sizes:
Note: Do not use any paper which has been creased, wrinkled or
has absorbed any moisture.
Standard paper:
Inches Millimeters
Legal 8.5 ˘ 14 216 ˘ 356
Letter 8.5 ˘ 11 216 ˘ 279
F4 8.3 ˘ 13 210 ˘ 330
A4 8.3 ˘ 11.7 210 ˘ 297
Executive 7.25 ˘ 10.5 184 ˘ 267
Special paper:
Inches Millimeters
DL 4.3 ˘ 8.7 110 ˘ 220
COM 10 4.125 ˘ 9.5 105 ˘ 241
Post Card 3.9 ˘ 5.8 100 ˘ 148
Monarch 3.875 ˘ 7.5 98 ˘ 190
Envelopes:
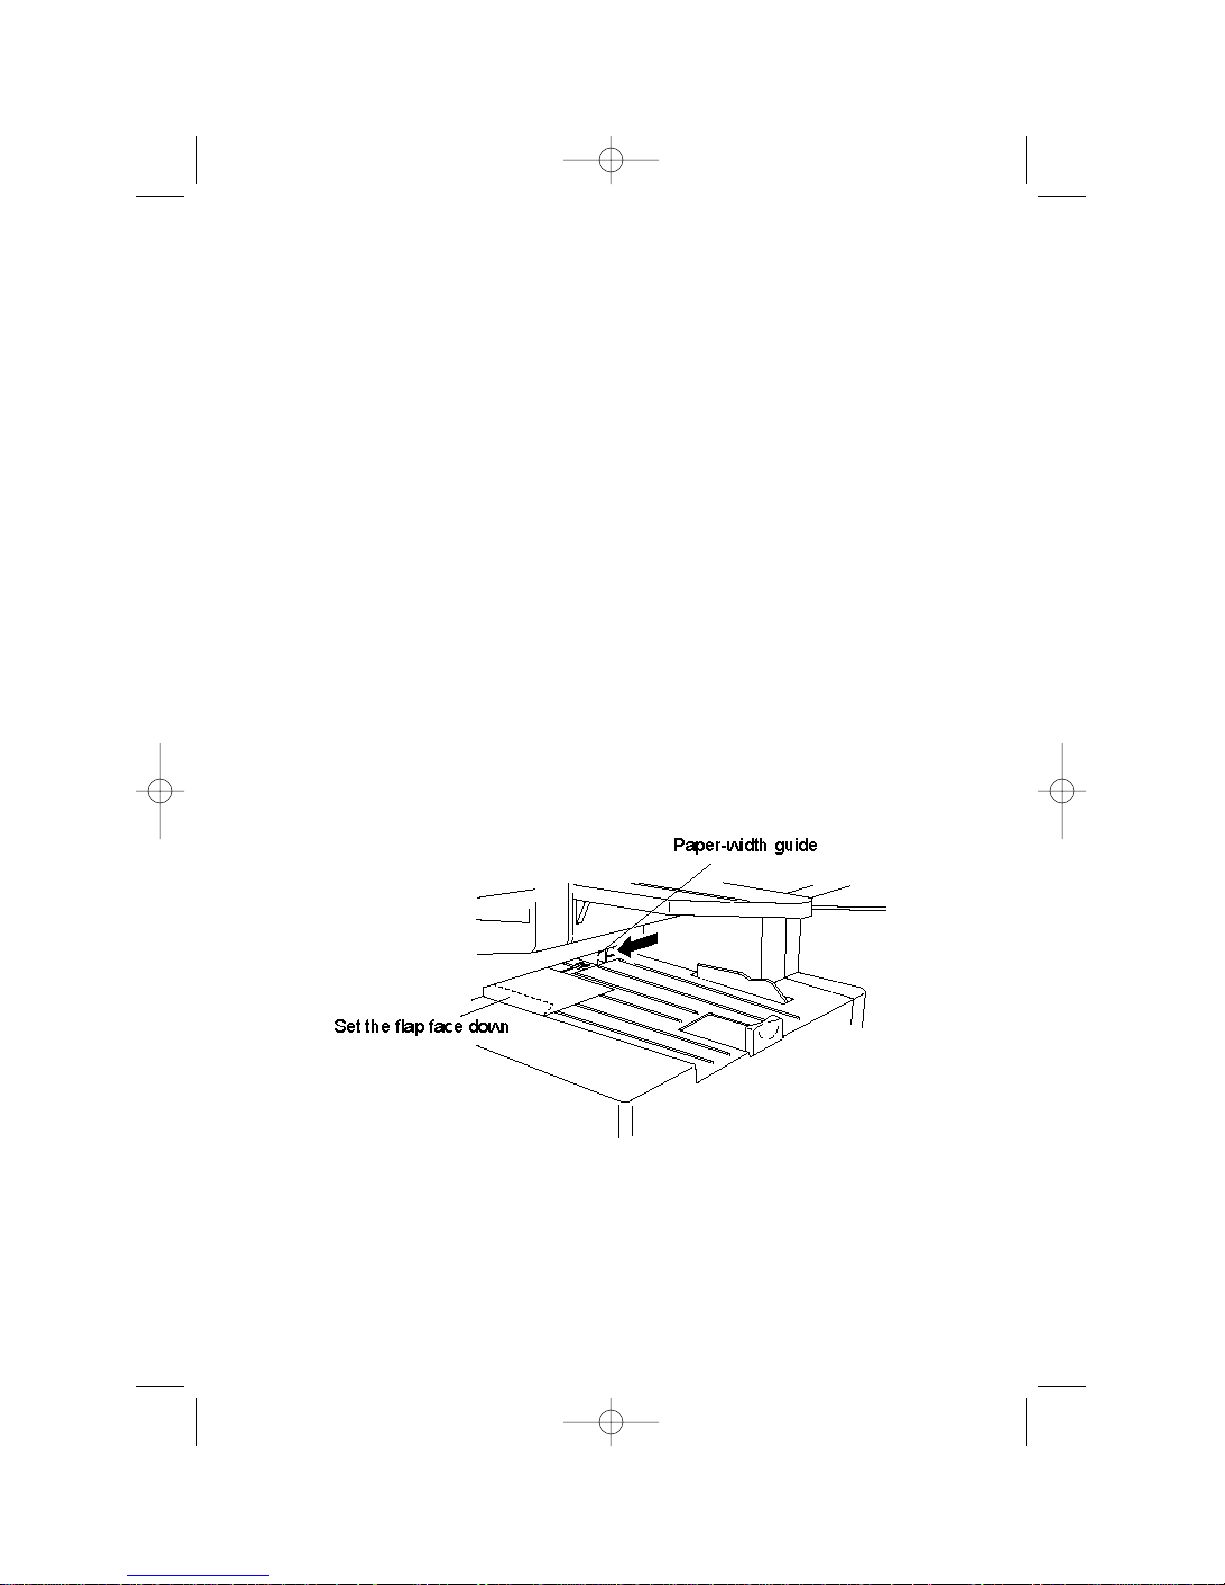
Your fax machine’s multipurpose tray can hold up to 10 envelopes.
To use envelopes, insert the envelope face down, with the envelope
flap toward the front of the machine, as pictured below.
Note: Although the envelope passes through the printer at high
temperatures (392°F, or 200°C, for about one second) and
pressure in the fuser unit, the glue on the envelope should
not burn, melt, or be affected in any way.
8
WP-300 for PB 3400.qxd 12/16/99 6:54 PM Page 8
Page 11
Transparencies:
• When using transparencies, you must change the “OHP Mode” to On
(see page 11).
•
As with any other paper, make sure the transparency is the correct length for your fax’s current paper setting.
•
If using paper-backed transparency film with a strip along the
edge, remove the strip before loading the transparency.
•
Although a transparency passes through the printer at high
temperatures (392°F, or 200°C, for about one second) and pressure in the fuser unit, the transparency should not melt or curl
excessively.
Important: If you use a different paper size than the one selected in
this setting, the machine won’t print. (See also page 12.)
Important: In your computer application (such as a word processing or
spreadsheet program), set the paper size for your document
to be the same as the one set here.
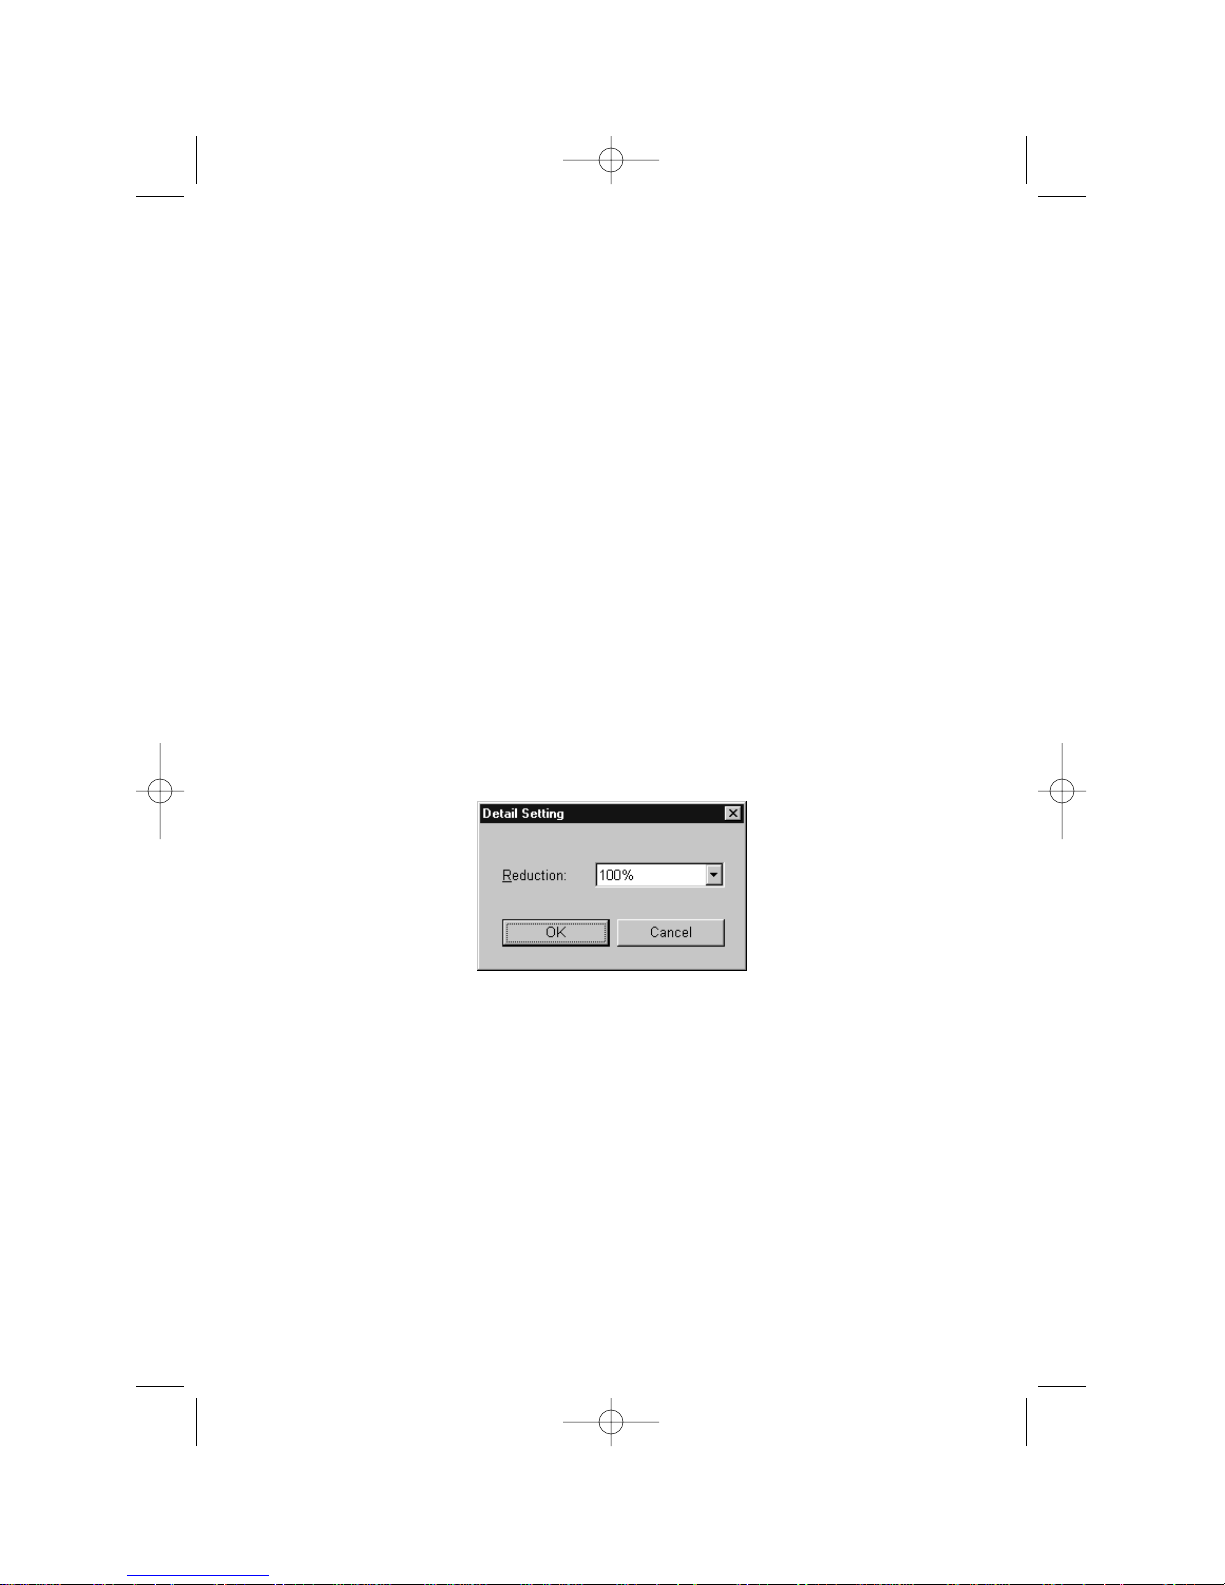
4 Detail Setting
If you want to reduce the size of your document when you print it,
click Detail Setting… to open the Detail Setting window.
Your reduction rate choices are 81% and 70%. However, this setting
is not available if a paper size other than A4-sized is in your fax
machine.
Note: While selecting reduction print, the paper size window shows
only the paper size, either B4->A4 or A3-> A4, for the reduction print you select. If you want to select another paper size,
select the 100% reduction rate in the details setting.
5 Orientation
Determines how the document is positioned on the page, either
portrait (tall) or landscape (wide).
9
WP-300 for PB 3400.qxd 12/16/99 6:54 PM Page 9
Page 12

6 Copy
Selects the number of copies printed for each page. You can select
up to 99 copies. Also, sets whether the machine will collate the
printed copies.
Important: Set this to be the same as your computer application
(such as a word processing or spreadsheet program).
7 Hi-speed TT (True Type) Font Process
Usually, this mode must be set to
ON, indicated by a check mark in
the box.
Note: If the document doesn’t print with the correct font, turn this
mode off to try to correct the problem.
8 Option
You can set other printing functions by clicking Option… from the
Printer Settings box, which brings up this dialog box:
Dither:
Sets the quality of grayscale (halftone) printing to coarse, fine or
line art.
10
WP-300 for PB 3400.qxd 12/16/99 6:54 PM Page 10
Page 13

Print Density:
Sets the print density, or the darkness of the printing. You may
choose from: Dark, A Little Dark, Normal, A Little Light, Light or
Very Light.
OHP Mode:
You must set to “ON” only when using transparencies film (OHP
film) in your fax machine. Otherwise, this setting must be set to
“OFF”. See page 9 for more information about using transparencies.
9 Wide-Screen
To see more settings on your monitor at one time, click WideScreen. To return to the standard screen view, click
Standard-Screen.
Now that you are familiar with the driver settings, review the following
pages for information on your fax machine settings, which will prepare
it for printing PC documents.
11
WP-300 for PB 3400.qxd 12/16/99 6:54 PM Page 11
Page 14

Setting the paper size for the
multipurpose tray
Your fax machine’s multipurpose tray can hold nine different sizes of
paper for your fax machine when the machine is equipped with the
3400 PRINTER OPTION upgrade. All you have to do is tell your fax
machine which size the tray is using.
Important: On your fax machine’s display, a paper size with “P” as the
last character — for example, A4_P — works only when
you’re using your fax machine as a PC printer. Such a size
is not a valid setting for standalone (non-computer) fax
receiving and copying.
Important: If you use a different paper size from the one set in the fol-
lowing steps, the machine won’t print.
Important: In your computer application (such as a word processing or
spreadsheet program), be sure to set the paper size for your
document to the same as this setting.
1.
Press PROGRAM, J, 0, 4, ENTER. The LCD shows the tray’s current
setting:
2.
Press PROGRAM until the paper size you want appears. In this
example, we’ve chosen A4_P.
3.
Press ENTER to save the setting.
Paper Size: A4_P
Program/Enter
Paper Size: Letter
Program/Enter
12
WP-300 for PB 3400.qxd 12/16/99 6:54 PM Page 12
Page 15

4.
Then adjust the multipurpose tray for the width of the paper you
plan to load by sliding the paper-width guide to the appropriate
slot.
13
WP-300 for PB 3400.qxd 12/16/99 6:54 PM Page 13
Page 16

(This page intentionally blank.)
14
WP-300 for PB 3400.qxd 12/16/99 6:54 PM Page 14
Page 17

Using the Print Manager
Status on your computer and printer . . . .16
Your System . . . . . . . . . . . . . . . . . . . . .16
Communication . . . . . . . . . . . . . . . . . .18
Your Printer . . . . . . . . . . . . . . . . . . . . .20
Your Print JOB . . . . . . . . . . . . . . . . . . .22
15
WP-300 for PB 3400.qxd 12/16/99 6:54 PM Page 15
Page 18

The status on your computer and printer
The Fax Printer type 3 Print Manager window shows the status and the
settings for the computer and printer.
Windows 95: Click the Fax Printer type 3 Print Manager button on
the taskbar to open the Fax Printer type 3 Print
Manager.
Windows 3.1: Double-click the Fax Printer type 3 Print Manager icon
at the lower edge of your screen.
1.Your System
The Your System box shows the current status
for the PC connected to your fax machine:
The PC is working properly.
An error has occurred on the PC.
The Print Manager has paused.
The printing data is being processed.
The image data is being transferred to the FaxPrinter type3.
The Print Manager is making settings on the FaxPrinter type3.
16
WP-300 for PB 3400.qxd 12/16/99 6:54 PM Page 16
Page 19

Click Option to open the System Option window. You can
make settings in the Control Option box and/or Error
Message Option box.
1. Control Option
For the Control Option box, your choices include:
• Background Printing
This lets you use the PC while the fax prints “in the background,” but
the printing speed is slower.
You can also prioritize print jobs. Choose between High, Medium and
Low priority. The higher the priority, the harder the PC will work to
finish the print job. But setting print jobs as priority will also allow
you to do less work on the PC while the priority job is printing.
• Use Spooler (Jam Recovery)
With this function activated, the Fax Printer type 3 Print Manager
spools the print data onto the PC hard drive. When you print multiple
pages, we suggest you make sure this function is activated, for higher
performance. That way, if a paper jam occurs during printing, you can
remove the jammed paper and resume the print job from where the
jam occurred.
• Always Watch Printer Status
If this is activated, the Print Manager monitors the printer status at
all times. If it is off, the Print Manager monitors the printer status
only when printing.
Note:Activating this feature may slow other PC work, particularly on
slower PCs and/or on Windows 3.x.
17
WP-300 for PB 3400.qxd 12/16/99 6:54 PM Page 17
Page 20

2. Error Message Option
For the Error Message Option, your choices include:
• Picture Mode
Error messages appear as an illustration and error statement. (See
page 27.)
• Dialog Box Mode
Error messages appear as an icon and error statement. (See page 27.)
• Sound Out
A beep sounds when an error occurs.
Disable Fax Printer type 3 Print Manager
When the error message “The printer is not responding” appears, and
the printer cable is connected correctly, click this box (a check mark
appears) to print your document.
Note:When this box is checked, the Fax Printer type 3 print manager will
not display the Fax Printer type 3 status.
2 Communication
The Communication box displays the status
between your computer and your fax. The icon
shows the status of the communication link
between the PC and fax (including the connecting cable):
The link is working fine.
The computer and the fax cannot communicate with each
other.
Either the printer cable is not connected or the fax is turned
off.
The fax is not responding.
If there is a problem, click this to open the Error Message
box.
18
WP-300 for PB 3400.qxd 12/16/99 6:54 PM Page 18
Page 21

You can monitor and, if necessary, change the status of the
link between your computer and fax by clicking Option.
You’ll see:
1. Current Status
This uses an icon to show the current PC/fax status.
If an error occurs, click Advice for more information of an error.
2. Status Change
You can change the communication status between your PC and fax.
When you click Connect, the Print Manager monitors printer status.
Note:When you print, you do not need to click this because the Print
Manager automatically connects to the printer.
When you click Disconnect, this disconnects the bi-directional communication between your computer and fax.
Note:Clicking this when you’re not printing will provide a slight
improvement in your PC’s processing speed.
Tuning
If necessary, click + (plus) or – (minus) to optimize communication
between your PC and fax. The Fax Printer type 3 driver software checks
whether the fax can receive data sent at high speed from your PC, and
then adjusts internal parameters (as necessary) to send data to the fax
at optimum speed.
Note:If using an IBM PS/2, please do not make either of the following set-
tings here: 5 or F.
19
WP-300 for PB 3400.qxd 12/16/99 6:54 PM Page 19
Page 22

3.Your Printer
The Your Printer box shows messages about
your Fax Printer type 3’s status.
The Fax Printer type 3 is working normally.
An error has occurred in the Fax Printer type 3.
The Fax Printer type 3 is warming up.
The Fax Printer type 3 is printing.
The Fax Printer type 3 is in its power-save mode.
If there is a problem, you can click Advice to open the
Error Message box.
Click the Option button to see the current status and perform certain printer operations.
20
WP-300 for PB 3400.qxd 12/16/99 6:54 PM Page 20
Page 23

1. Current Status
In the Current Status box, you will see an icon which shows the
Fax Printer type 3’s current status as a PC printer.
2. Printer Operation box
In the Printer Operation box, you can select three printer operations:
Reset: Click this button to reset your 3400 PRINTER OPTION.
Note: Use this button if the error message “The printer is
not responding” or “Data Transfer Error” appears and
if you cannot clear the errors. If your fax machine
hangs up while printing, reset your fax machine (see
“Resetting your fax machine,” page 26).
Self test: You may print a test pattern on your fax machine. Select
either pattern A (a checkerboard pattern) or pattern B (a
grid pattern).
Status: This shows the basic printing status, RAM size and any
errors your fax has encountered during the current printing
operation.
21
WP-300 for PB 3400.qxd 12/16/99 6:54 PM Page 21
Page 24

4.Your Print JOB
The Your Print JOB box shows the queue of documents either printing
or waiting to be printed.
Pausing and resuming printing
To pause the printing of a specific document, select the document and
click Pause.
To resume printing a specific document, select the document and click
Resume.
22
WP-300 for PB 3400.qxd 12/16/99 6:54 PM Page 22
Page 25

Canceling the printing
You can cancel the printing of a document by deleting it from the queue
(the box called Your Print JOB).
In the list of documents, select the documents you want to cancel, and
then click Delete. A dialog box appears, prompting you to confirm the
deletion.
23
WP-300 for PB 3400.qxd 12/16/99 6:54 PM Page 23
Page 26

Using the 3400 PRINTER
OPTION on a Network
Pitney Bowes's 3400 P
RINTEROPTION
can be used on peer-to-peer networks
operating Windows 98, Windows 95 and Windows 3.1 client PCs. The 3400
P
RINTEROPTION
can be used on client/server networks operating with
Windows 98, Windows 95 and Windows 3.1 clients, with Novell Netware,
Windows NT,Windows 98 or Windows 95 on the server. The 3400 P
RINTER
O
PTION
does not currently support Windows NT clients.
Connection via network adapter
When connecting the 3400 P
RINTEROPTION
and Pitney Bowes fax to a network
via a direct network connection, select a compatible network adapter and set
the network adapter for the operating system in use. Refer to the installation
instructions for your network adapter for information on this setting.
Pitney Bowes has tested the 3400 P
RINTEROPTION
with the following network
adapters:
• AXIS 540+ Network Print Server
• AXIS 5400 Network Print Server
Connect your Pitney Bowes fax machine to the network adapter using a short
extension cable available from a computer supply store. Plugging the network
adapter directly into the 3400 P
RINTEROPTION
's parallel port may cover or
obstruct the modular connector on some network adapters.
24
WP-300 for PB 3400.qxd 12/16/99 6:54 PM Page 24
Page 27

25
WP-300 for PB 3400.qxd 12/16/99 6:54 PM Page 25
Page 28

Connection through printer server PC
When equipped with a 3400 P
RINTEROPTION
, your fax machine can also be
made available to network users by connecting it to the network through a
printer server PC. In this arrangement, the Pitney Bowes fax machine with
3400 P
RINTEROPTION
is connected to the printer server PC with a bi-directional parallel printer cable. The printer server PC is connected to the network
through a network interface card inside the PC.
In this arrangement, the printer server PC must be powered on, operating and
logged onto the network for the Pitney Bowes fax to be available for use as a
printer.
Print status monitor
When the 3400 P
RINTEROPTION
and attached Pitney Bowes fax are used in a
network environment, use the Windows Print Manager to show the status of
print jobs. Pitney Bowes's Fax Printer Type 3 Print Manager does not work in
network installations.
26
WP-300 for PB 3400.qxd 12/16/99 6:54 PM Page 26
Page 29

Just in case
Uninstalling the Fax Printer type 3
driver software . . . . . . . . . . . . . . . . . . . . .27
Resetting your fax machine . . . . . . . . . . .27
Error messages . . . . . . . . . . . . . . . . . . . . .28
27
WP-300 for PB 3400.qxd 12/16/99 6:54 PM Page 27
Page 30

Uninstalling the Fax Printer type 3 driver
software
If it becomes necessary to remove the Fax Printer type 3 software from
your PC, follow these steps.
If running Windows 98 or Windows 95:
1.
Close the Fax Printer type 3 Print Manager.
2.
Click on Start>Programs>Fax Printer type 3, then click
Fax Printer type 3 Uninstaller.The Fax Printer type 3
Uninstaller dialog box will appear.
3.
Follow the instructions that appear on the screen.
4.
When finished uninstalling, restart your computer.
If running Windows 3.x:
1.
Close the Fax Printer type 3 Print Manager.
2.
In Program manager, open the Fax Printer type 3 Print Manager.
Double-click the Fax Printer type 3 Uninstaller icon in the
Fax Printer type 3 window. The Fax Printer type 3 Uninstaller dialog box will appear.
3.
Follow the instructions that appear on the screen.
4.
When finished uninstalling, restart your computer.
Resetting your fax machine
If your fax machine does not respond when you try to print, reset it.
1.
Press PROGRAM, Q, ENTER. The LCD shows:
2.
To reset your fax machine, press ENTER.
Note: If you want to cancel this operation, press
STOP.
Reset Printer Opt.
Check Enter/Stop
28
WP-300 for PB 3400.qxd 12/16/99 6:54 PM Page 28
Page 31

Error messages
If a printer error occurs, an error icon will appear on the
Communication box or Your Printer box in the Fax Printer type 3
Manager window. Also, the Error Message box appears.
Note:You can select whether the error message appears in picture mode
or dialog box mode, as shown below. See “Error Message Option”
(page 18).
Picture mode
Dialog box mode
In the Fax Printer type 3 Print Manager window, an icon indicating the
nature of the error appears in either the Communication box or the
Your Printer box.
If you need assistance understanding the error icon, click the Advice
button to open the Error Message box.
Click to show the fax’s current PC printer status (see page
21).
Click Help if you need assistance. The Help window will
appear.
Click OK to close the error message box.
Note:Some errors will allow printing to continue. However, some errors
stop printing and require you to print again.
29
WP-300 for PB 3400.qxd 12/16/99 6:54 PM Page 29
Page 32

(This page intentionally blank.)
A-1
WP-300 for PB 3400.qxd 12/16/99 6:54 PM Page A-1
Page 33

Installation
Unpacking
Included in the 3400 PRINTER OPTION packaging:
1. Printer Control PCB
2. Bracket
3. Three screws
4. Connection cable
5. Ferrite core
6. FaxPrinter driver disks
7. Operating instructions
(this book)
Save the module and packing materials for reshipment.
Attaching the 3400 PRINTER OPTION
Note: Turn off the fax machine before proceeding with the following steps.
1. Attach the bracket to the
printer control PCB using
the screws included in this
package.
2. Remove the document hopper.
3. Remove the four mounting screws holding the rear cover in place,
then remove the rear cover.
A-2
WP-300 for PB 3400.qxd 12/16/99 6:54 PM Page A-2
Page 34

4. Disconnect the three connectors on the NCU PCB.
5. Remove the mounting
screw and release the two
tabs holding the NCU PCB
in place. Then remove the
NCU PCB.
6. Remove the option cover.
7. Remove the three mounting screws holding the
main control PCB in place.
Then move the main control PCB. (It is not
necessary to disconnect the
connectors on the main
control PCB.)
8. Plug the connection cable
into the CN2 connector on
the printer control PCB.
9. Insert the printer control
PCB into its slot, while
passing the other end of
the connection cable
through the hole on the
rear frame as shown.
Then use a screw to attach the bracket.
A-3
WP-300 for PB 3400.qxd 12/16/99 6:54 PM Page A-3
Page 35

10. Re-attach the main control
PCB using its three mounting screws.
11. Re-attach the NCU PCB
and re-connect the three
connectors to the NCU
PCB.
12. Plug the connection cable
into the P5 connector on
the main control PCB.
13. Use pliers to gently punch
out the perforated panel on
the cover, as shown.
14. Re-attach the option cover using a screw.
15. Re-attach the rear cover using four screws.
16. Connect the bi-directional parallel interface cable to the printer
interface port of the 3400 P
RINTER OPTION.
Note: If the parallel interface cable does not have a ferrite core
already fitted, install the ferrite core included in the 3400
P
RINTER OPTION’s carton box.
17. Snap the port’s wire clips onto the interface cable.
18. Connect the other end of the bi-directional parallel interface cable
to the computer’s parallel port.
A-4
WP-300 for PB 3400.qxd 12/16/99 6:54 PM Page A-4
Page 36

(This page intentionally blank.)
A-5
WP-300 for PB 3400.qxd 12/16/99 6:54 PM Page A-5
 Loading...