

Page 1
Return to OPG Menu
Quick Ref. Guide
Page 2

Recycling
Pitney Bowes is concerned about issues that affect our environment.
Properly handled, all parts from our Imaging Cartridges can be recycled in some way
rather than taking up additional space in our country’s landfills.
To make this easier, Pitney Bowes has set up a program to provide trouble-free recycling
for the 1630 Imaging Cartridges in the U.S. Enclosed with each Imaging Cartridge is a
prepaid postage return label and a strip of adhesive tape. Simply pack the used Cartridge
in the same box that contained its replacement. Seal the box with the tape, apply the
return label and mail back to us with your regular mail. You may want to keep a copy of
the label in the event you misplace the original. As long as it is a clear copy, the Post
Office will honor the copied label.
A recycling program is currently under review in the U.K.
In Canada, a Purolator slip is enclosed with each cartridge. Attach the slip to the box and
call the Purolator telephone number indicated on the slip for pick up of a used Cartridge.
Year 2000 Compliance
To ensure proper and uninterrupted operation of our equipment into the next century, the
“Year 2000 Compliance” of all Pitney Bowes, Inc. products is defined as meeting the
following criteria: Whether a product provides tw o- or four-digit representation of years
for operator display, reports and external communication interfaces, all date processing
functions of the product (e.g., data comparisons, sorts, calculations, leap year
calculations, etc.) will operate correctly across the year 2000 boundary.
Page 3

Table of Contents
INTRODUCTION ............................................................................1-1
1
1
2
2
Using This Manual ............................................................................ 1-1
Finding Information ................................................................... 1-1
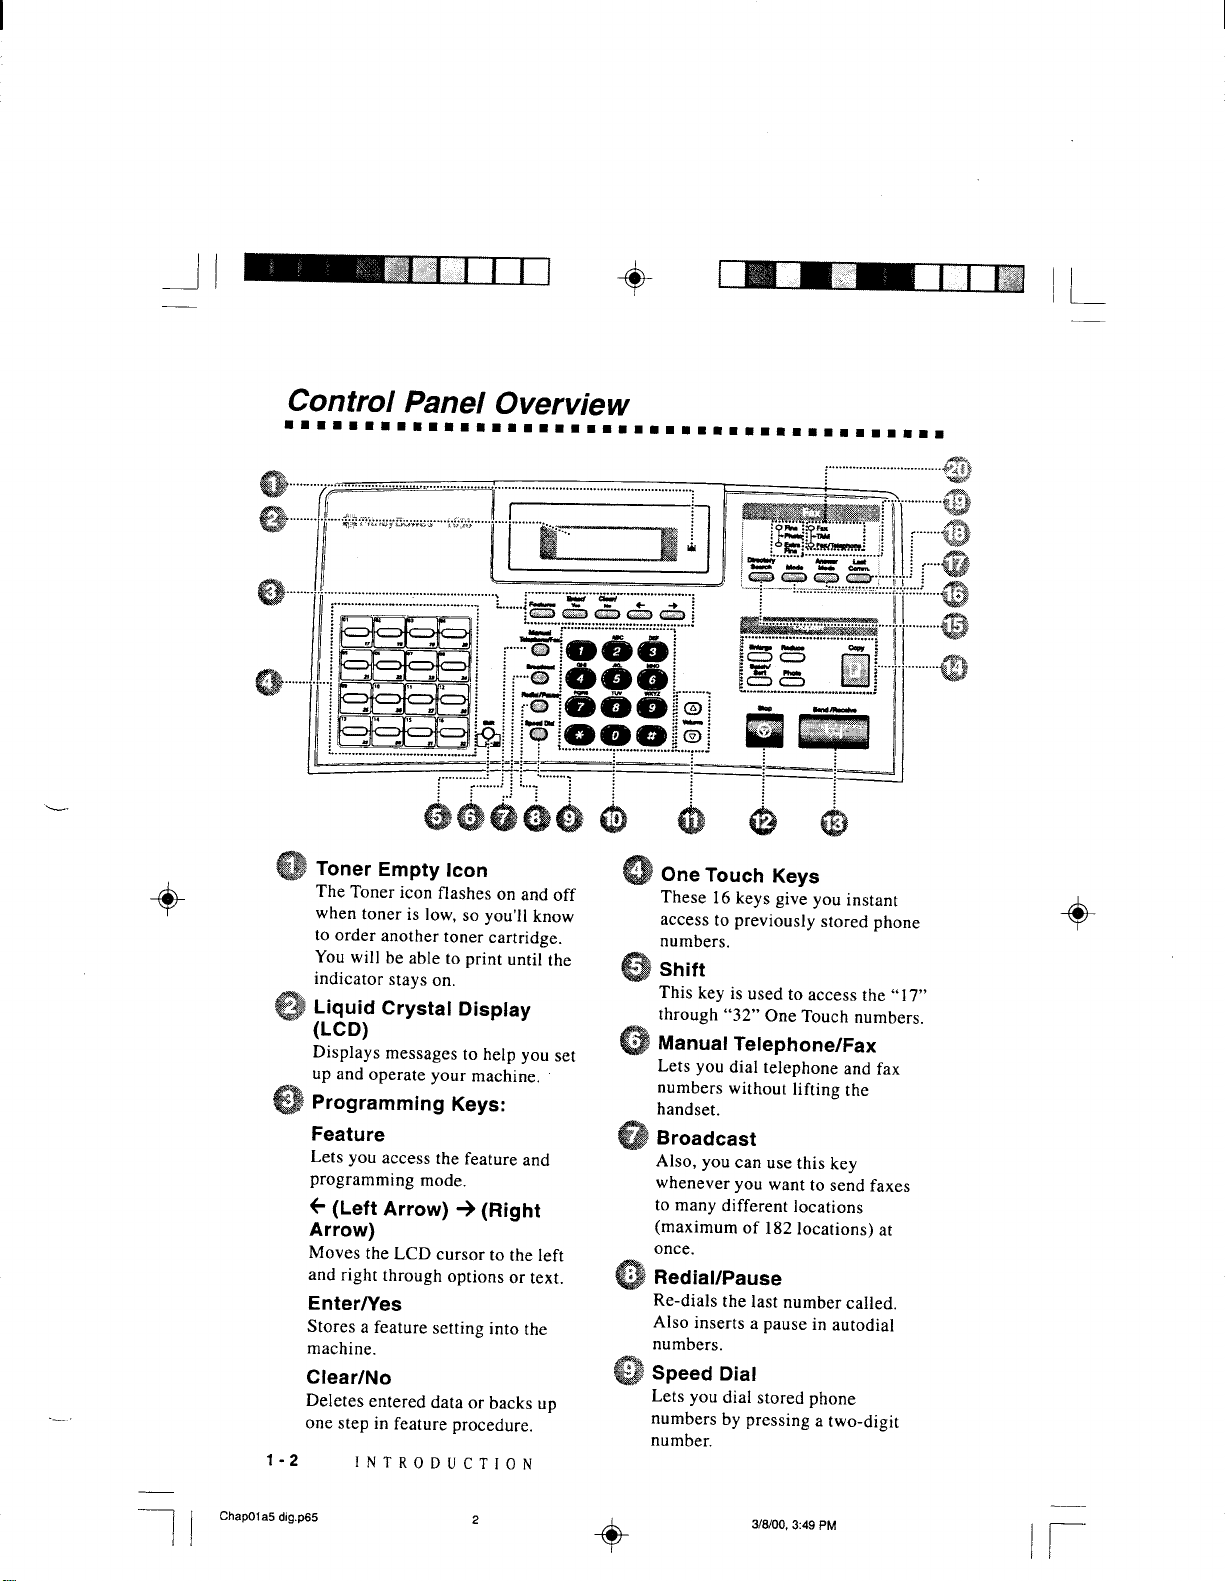
Control Panel Overview ...................................................................1-2
About Y our Machine......................................................................... 1-4
Fax Tones and Handshake ..........................................................1-4
ECM (Error Correction Mode) ................................................... 1-4
ASSEMBL Y AND CONNECTIONS............................................... 2-1
Packing List .......................................................................................2-1
Choosing a Location ......................................................................... 2-2
Assembly............................................................................................ 2-3
Installing the Drum Unit Assembly (with Toner Cartridge) ....... 2-3
Attach the Trays ......................................................................... 2-4
Manual Feed Slot ....................................................................... 2-4
Paper ..................................................................................................2-5
Acceptable Paper........................................................................ 2-5
Paper Capacity of Paper Cassette ...............................................2-5
Paper Specification for the Cassette ........................................... 2-6
Manual Feed Slot ................................................................. 2-6
Loading Paper in Multi-purpose Paper Cassette.........................2-7
Connections ....................................................................................... 2-8
Connecting the Machine............................................................. 2-8
Connecting an External Telephone ............................................. 2-9
Connecting an External TAM (Telephone Answering Machine) 2-9
Sequence .............................................................................. 2-9
Connections.......................................................................... 2-9
Recording Outgoing Message (OGM) ............................... 2-10
Special Line Considerations .....................................................2-11
Roll Over Phone Lines .......................................................2-11
Two-Line Phone System .................................................... 2-11
Conver ting Telephone Wall Outlets.................................... 2-11
Installing Machine, External Two-Line TAM,
and Two-Line Telephone ................................................. 2-12
Multi-Line Connections (PBX) ................................................ 2-13
If you are installing the machine to work with a PBX: ...... 2-13
Custom Features on a Single Line............................................ 2-13
33
ON-SCREEN PROGRAMMING.................................................... 3-1
User-Friendly Programming............................................................ 3-1
Feature Mode .............................................................................3-1
Feature Selection Table .............................................................. 3-2
TABLE OF CONTENTS
i
Page 4

4
4
5
5
SYSTEM SETUP .............................................................................. 4-1
Getting Started.................................................................................. 4-1
Setting Dialing Mode (Tone/Pulse) ............................................ 4-1
Setting Date and Time ................................................................ 4-1
Setting Machine ID .................................................................... 4-2
Entering T ext ........................................................................4-2
Inserting spaces .................................................................... 4-3
Making corrections............................................................... 4-3
Repeating letters ................................................................... 4-3
Special characters and symbols ............................................ 4-3
Setting Beep Volume .................................................................. 4-4
Choosing the Handset Volume ....................................................4-4
Setting Handset Volume ....................................................... 4-5
Setting the Speaker Volume ........................................................ 4-5
Setting the Ring Volume ............................................................. 4-5
Memory Storage ......................................................................... 4-5
Sleep Timer ................................................................................ 4-6
Delayed Send.............................................................................. 4-6
Local Language .......................................................................... 4-6
RX SETTINGS.................................................................................. 5-1
Basic Receiving Operations.............................................................. 5-1
Select Answer Mode................................................................... 5-1
Setting Ring Count .....................................................................5-2
Setting F/T Ring Time................................................................ 5-2
EXT .TEL.RX ............................................................................. 5-3
Turning on Cassette #2............................................................... 5-3
Printing a Reduced Incoming Document.................................... 5-4
Recommended Reductions ................................................... 5-4
Setting Paper Size....................................................................... 5-5
Setting Cassette Usage ............................................................... 5-5
Setting the Print Density ............................................................. 5-6
Save Toner .................................................................................. 5-6
Advanced Receiving Operations ...................................................... 5-7
Operation from External T elephones.................................... 5-7
For Fax/Telephone Mode Only ............................................. 5-7
Changing Remote Codes ...................................................... 5-7
Printing a Fax in Memory .......................................................... 5-8
Polling ........................................................................................5-8
Setting Up Polling Receive .................................................. 5-9
Setting Up Sequential Polling Receive ................................ 5-9
Canceling a Scheduled Job....................................................... 5-10
Unique Ringing ........................................................................ 5-11
Registering your Unique Ring Pattern ............................... 5-12
Caller ID................................................................................... 5-13
Viewing Caller ID List ....................................................... 5-13
Clearing a Caller ID Stored in Memory ............................. 5-14
Printing Caller ID List........................................................ 5-14
ii
TABLE OF CONTENTS
Page 5

6
6
TX SETTINGS.................................................................................. 6-1
Before You Begin ............................................................................... 6-1
Sending Faxes with Multiple Settings ........................................6-2
Manual Transmission ................................................................. 6-2
Automatic Transmission............................................................. 6-2
Manual and Automatic Fax Redial ............................................. 6-2
Dual Access ................................................................................ 6-3
Real Time Transmission ............................................................. 6-3
Checking the Jobs Status ............................................................ 6-4
Canceling Jobs in Memory......................................................... 6-4
Basic Sending Operations................................................................. 6-5
Composing Electronic Cover Sheet............................................ 6-5
Composing Your Own Comments ........................................ 6-6
Cover Sheet for Next Fax Only ............................................ 6-6
Always Send Cover Sheet ....................................................6-7
Using a Printed Cover Sheet ................................................ 6-7
Contrast ...................................................................................... 6-8
Mode .......................................................................................... 6-8
Canceling a Job While Scanning the Document......................... 6-8
Advanced Sending Operations......................................................... 6-9
Overseas Mode........................................................................... 6-9
Voice Request ............................................................................. 6-9
Print Sample Call Back Message .............................................6-10
Delayed Send ........................................................................... 6-10
Delayed Batch Transmission.............................................. 6-11
Broadcasting............................................................................. 6-11
Multiple Mode Transmission.................................................... 6-12
Setting Up Polling Transmit..................................................... 6-13
Interrupting Delayed Send and Polling Transmit Jobs.............. 6-13
7
7
8
8
SETUP DIALER SETTINGS ..........................................................7-1
Storing Numbers for Easy Dialing................................................... 7-1
Storing One Touch Dial Numbers .............................................. 7-1
Storing Speed Dial Numbers ...................................................... 7-2
Setting Up Groups for Broadcasting .......................................... 7-3
Changing One Touch and Speed Dial Numbers ......................... 7-4
TELEPHONE OPERATIONS......................................................... 8-1
Dialing Options ................................................................................. 8-1
Manual Dialing........................................................................... 8-1
One T ouch Dialing ..................................................................... 8-1
Speed Dialing .............................................................................8-2
Dialing Access Codes and Credit Card Numbers....................... 8-2
Pause .......................................................................................... 8-3
Fax Redial .................................................................................. 8-3
T one/Pulse.................................................................................. 8-3
Searching Telephone Index ........................................................ 8-3
TABLE OF CONTENTS
iii
Page 6

9
9
10
10
11
11
REMOTE FAX OPTIONS............................................................... 9-1
Fax Forwarding/P aging.................................................................... 9-1
Programming a Fax Forwarding Number................................... 9-1
Programming Paging Number.................................................... 9-2
Setting Remote Rtrv ......................................................................... 9-2
Changing R R Passcode.................................................................... 9-3
Remote Retrieval............................................................................... 9-3
Using R R Passcode ................................................................... 9-3
Remote Commands .................................................................... 9-4
Retrieving Jobs Report ...............................................................9-5
Retrieving Fax Messages............................................................ 9-5
Changing Fax Forwarding Number Remotely............................ 9-6
PRINTING REPORTS................................................................... 10-1
Settings and Activity ....................................................................... 10-1
To Print a Report ...................................................................... 10-1
Transmission Verification Job Status Rpt................................. 10-2
Journal Interval......................................................................... 10-2
MAKING COPIES ......................................................................... 11-1
Using Your Machine as a Copier ................................................... 11-1
Copy Contrast (Temporary Setting) ......................................... 11-1
Making a Single Copy.............................................................. 11-1
Making Multiple Copies........................................................... 11-2
Stacking Multiple Copies ......................................................... 11-2
Sorting Multiple Copies ........................................................... 11-2
If You Get a Memory Full Message.......................................... 11-2
Reducing and Enlarging Copies ............................................... 11-3
Copying a Photograph .............................................................. 11-3
12
12
13
13
iv
SETTING UP FAX MACHINE AND PC TO WORK
TOGETHER............................................................................... 12-1
Using Fax Machine with Your PC ................................................. 12-1
Before You Install Printer Driver .................................................. 12-1
Computer Requirements........................................................... 12-1
Connecting Fax Machine to PC With Bundled Parallel Cable ... 12-2
Installing Printer Driver................................................................. 12-3
If you are using Windows NT
If you are using Windows
If you are using Windows
FOR DOS USERS ........................................................................... 13-1
How to Use Fax machine with Your DOS Application
Software................................................................................ 13-1
TABLE OF CONTENTS
®
W o rkstation Version 4.0: ........ 12-3
®
3.1 or 3.11:.................................... 12-5
®
95, 98: ...........................................12-6
Page 7

14
14
15
15
16
16
USING FAX MACHINE AS A PRINTER .................................... 14-1
Special Printing Features ............................................................... 14-1
Windows
Popular Printer Emulation Support .......................................... 14-1
Bi-directional Parallel Interface ...............................................14-1
Enhanced Memory Management.............................................. 14-1
Printing From Your PC .................................................................. 14-2
Multi-purpose Paper Cassette................................................... 14-2
Two-Sided Printing (Manual Duplexing) ................................. 14-2
Front Output Bin ...................................................................... 14-3
Manual Feed Slot ..................................................................... 14-3
Simultaneous Printing/Faxing ....................................................... 14-6
Choosing Acceptable Paper ...................................................... 14-6
Printing the Internal Font List .................................................. 14-7
Printing the Print Configuration List ........................................14-7
Restoring Factory Default Settings .......................................... 14-7
Printing PC Data in Hexadecimal............................................. 14-7
OPTIONAL ACCESSORIES ........................................................ 15-1
Additional Memory for Faxing ...................................................... 15-1
Paper Cassette #2 (Option)............................................................. 15-2
IMPORTANT INFORMA TION.................................................... 16-1
Standard Telephone and FCC Notices (For 120V Models Only). 16-1
These notices are in effect on models sold and used in the United
Federal Communications Commission (FCC) Declaration of
E
NERGY STAR
Laser Safety (For 110-120V Models Only).............................. 16-3
®
Printing ...................................................................14-1
Loading One Sheet of Paper............................................... 14-4
Loading More than One Sheet of Paper ............................. 14-4
Printing on Thicker Paper and Card Stock .........................14-5
States only ............................................................................ 16-1
Pitney Bowes Diagnostic Center ........................................ 16-2
Conformity (For USA Only) ................................................ 16-2
Industry Canada Compliance Statement (For Canada Only) 16-3
Important Safety Instructions .............................................16-4
Compilation and Publication Notice .................................. 16-6
Trademarks......................................................................... 16-6
®
Compliance Statement ...................................... 16-3
17
17
TROUBLESHOOTING AND ROUTINE MAINTENANCE ..... 17-1
Troubleshooting............................................................................... 17-1
Error Messages......................................................................... 17-1
Document Jam.......................................................................... 17-4
Printer Jam ...............................................................................17-4
Paper is Jammed in the Multi-purpose Paper Cassette ....... 17-5
Paper is Jammed near the Drum Unit................................. 17-5
Paper is Jammed in the Fuser Unit ..................................... 17-5
TABLE OF CONTENTS
v
Page 8

If You Are Having Difficulty with Your Machine .................... 17-6
Difficulties Setting up the Software (For Windows
®
3.1x Users) 17-13
Graphics or Text Is Missing in the Printout............................ 17-13
Bi-Directional Parallel Ports (nibble and byte modes)............ 17-13
Machine Connect Failure or Bi-Directional Communication
Error ................................................................................... 17-13
EPSON ActionLaser 1100 / 1400:.......................................... 17-14
HP LaserJet series II, IID, IIP, IIP+, III, IIID or IIIP:............. 17-14
HP LaserJet 4 Plus: .......................................................... 17-15
NEC SuperScript 610/660:............................................... 17-15
Lexmark WinWriter 200: ................................................. 17-15
Packing and Shipping the Machine ............................................. 17-17
Routine Maintenance.................................................................... 17-19
Cleaning the Document Scanner ............................................ 17-19
Cleaning the Printer................................................................ 17-19
Cleaning the Drum Unit ......................................................... 17-20
Replacing the Toner Cartridge................................................ 17-21
Toner Empty Indicator ..................................................... 17-22
Replacing the Toner Cartridge................................................ 17-22
Replacing the Drum Unit .......................................................17-24
SPECIFICATIONS ...........................................................................S-1
Fax Specif ications ...................................................................... S-1
Printer Specifications..................................................................S-2
Electrical and Environment ........................................................S-3
Parallel Interface Specifications ................................................. S-3
Resident Fonts ............................................................................ S-4
Symbol Sets/Character Sets .................................................S-4
vi
GLOSSARY...................................................................................... G-1
SUPPL Y ORDERING ..................................................................... H-1
INDEX ................................................................................................I-1
TABLE OF CONTENTS
Page 9
Page 10
Page 11
Page 12
Page 13
2
2
Assembly and Connections
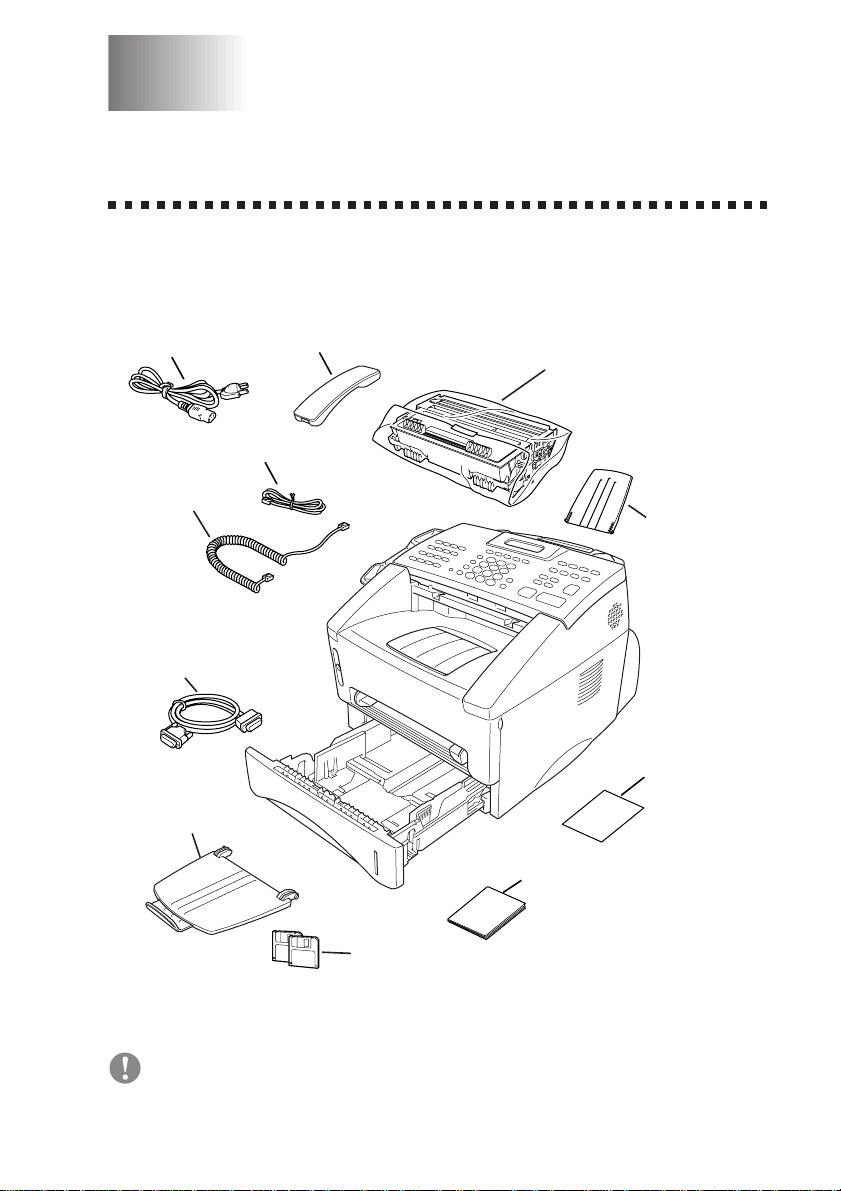
Packing List
Make sure you have the following items:
Power Cord
Telephone Wire Cord
Handset
Curled
Cord
IEEE-1284 Compliant
Bi-directioned Cable
Document Tra y
with Extension
Telephone Handset
Drum Unit Assembly
Document
Support
Quick Reference
Card
Operating Guide
Floppy Disks
Whenever you transport the machine, use the packing materials that came
with your machine.
ASSEMBLY AND CONNECTIONS
2 - 1
Page 14
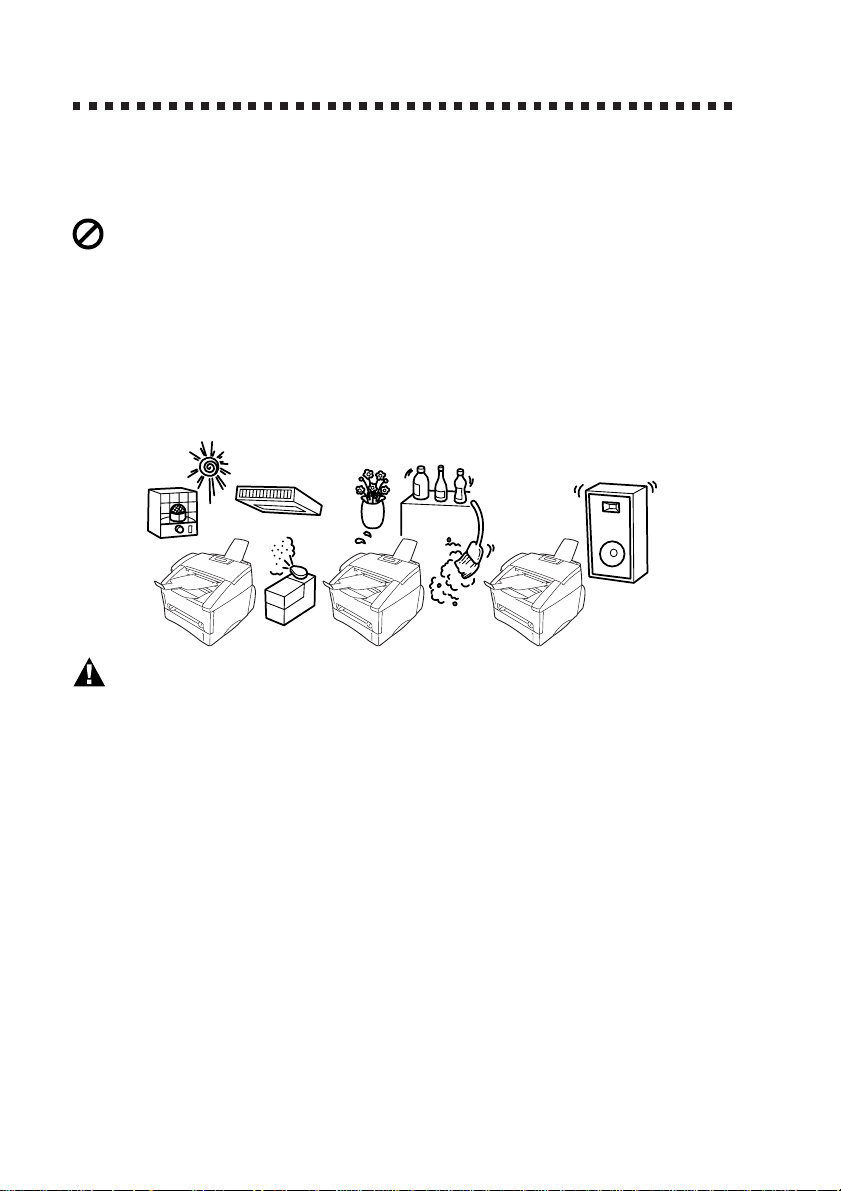
Choosing a Location
Place your machine on a flat, stable surface, such as a desk. Select a place
that is free of vibration and shocks. Locate the machine near a telephone
jack and a standard, grounded power outlet.
Avoid placing your machine in a high-traffic area. Do not place near
heaters, air conditioners, water, chemicals or refrigerators. Do not expose
the machine to direct sunlight, excessive heat, moisture or dust. Make
sure nothing blocks the flow of air from the fan on the sides of the
machine. Do not connect your machine to electrical outlets controlled by
wall switches or automatic timers. Disruption of power can wipe out
information in the unit’s memory. Do not connect your machine to
electrical outlets on the same circuit as large appliances or other
equipment that might disrupt the power supply. Avoid interference
sources, such as speakers or the base units of cordless phones.
NO !
WARNING
n
Never install telephone wiring during a lightning storm.
n
We recommend that this product be used with a surge protection device to
protect the product against lightning storms.
n
Never install a telephone jack in a wet location unless the jack is
specifically designed for a wet location.
n
Never touch telephone wires or terminals that are not insulated unless the
telephone line has been disconnected at the network interface.
n
Use caution when installing or modifying telephone lines.
n
Avoid using a telephone (other than a cordless type) during an electrical
storm. There may be a remote risk of electric shock from lightning.
n
Do not use the telephone to report a gas leak in the vicinity of the leak.
n
For PLUGGABLE EQUIPMENT, the socket-outlet should be installed
near the equipment and should be easily accessible.
n
To reduce the risk of shock or fire, use only a No. 26 AWG or larger
telecommunications line cord.
NO !
NO !
2 - 2
ASSEMBLY AND CONNECTIONS
Page 15
Assembly
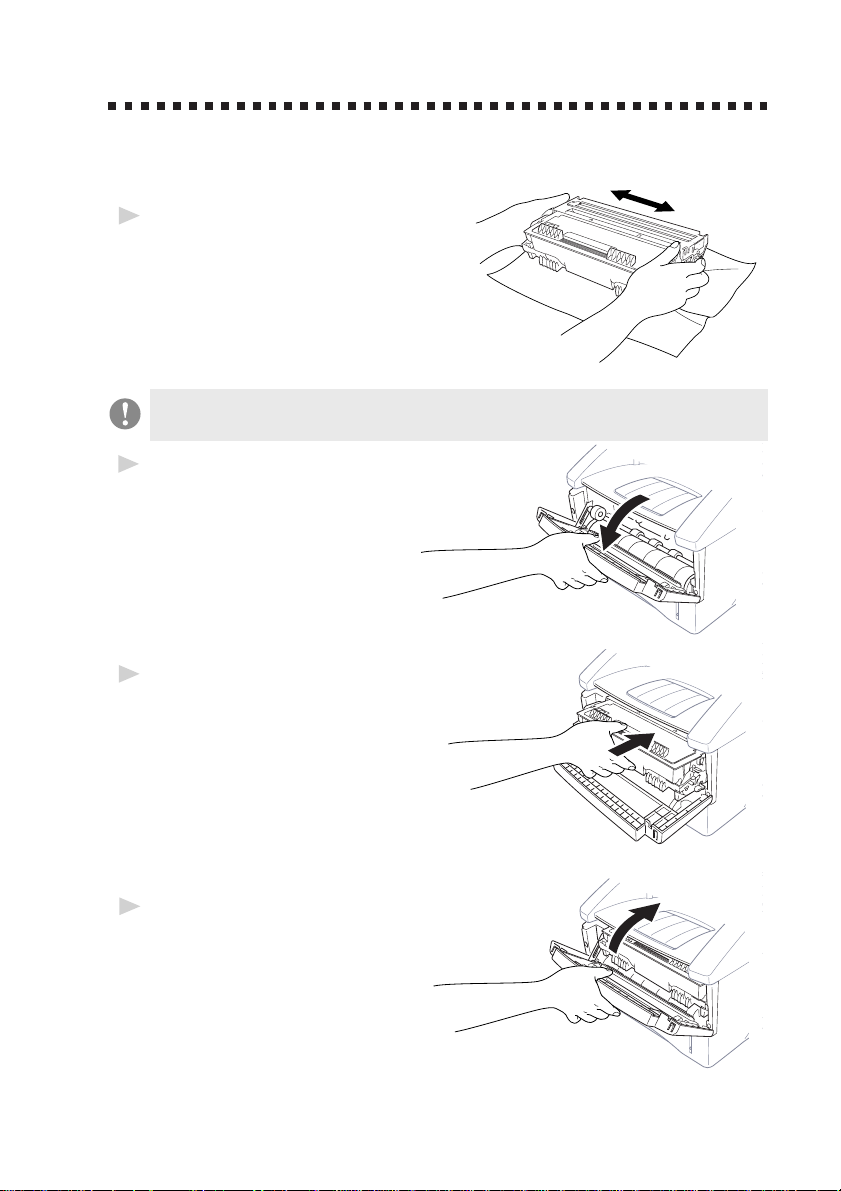
Installing the Drum Unit Assembly
(with T oner Cartridge)
Unpack the drum unit assembly,
1
including the toner cartridge, and
gently rock it from side to side
five or six times to distribute the
toner evenly inside the cartridge.
To prevent damage to the drum, do not expose it to light for
longer than a few minutes.
Open the front cover of the
2
machine.
Insert the drum unit assembly
3
into the machine.
Close the front cover.
4
ASSEMBLY AND CONNECTIONS
2 - 3
Page 16

Attach the Trays
Attach the document
1
support and document
tray with extension,
and unfold the
extension, which holds
documents in place.
Document Tray
with Extension
Unfold the Front Output Bin
2
Extension, which holds printed
pages in place.
Document
Support
Front
Output Bin
Extension
Manual Feed Slot
The manual feed slot is above the multi-purpose paper cassette. Load paper
or envelopes one at a time. You do not have to remove paper from the paper
cassette.
To print or copy on labels, transparencies, card stock or thicker paper:
Manual
Feed
Slot
2 - 4
ASSEMBLY AND CONNECTIONS
Page 17

Paper
Acceptable Paper
Paper Type Paper Size
Multi-purpose cut sheet Letter, Legal, A4, A5, ISO B5, Executive, A6,
Paper Cassette #1: 2.75–8.5 x 4.57–14 inches (70–216 x 116–356 mm)
Manual Feed Slot: cut sheet Letter, Legal, A4, A5, B5 (JIS/ISO), Executive, A6
2.75–8.5 x 4.57–14 inches (70–216 x 116–356 mm)
envelopes COM-10, Monarch, C5, DL
post cards 2.75–8.5 x 4.57–14 inches (70–216 x 116–356 mm)
organizer Day-Timer® J, K, L
2.75–8.5 x 4.57–14 inches (70–216 x 116–356 mm)
labels and 2.75–8.5 x 4.57–14 inches (70–216 x 116–356 mm)
transparencies
Paper Capacity of Paper Cassette
Multi-purpose Max. paper height is 1.06 inches (27 mm)
Paper Cassette #1: (use the guides) or approx. 250 sheets of
20 lb. (75 g/m2) Letter/A4 paper,
10 transparencies.
Front Output Bin: Approx. 150 sheets of 20 lb. (75 g/m
Letter/A4 paper
2
)
ASSEMBLY AND CONNECTIONS
2 - 5
Page 18

Paper Specification for the Cassette
Cut Sheet
Basis Weight: 17 to 28 lb.
(64 to 105 g/m
2
)
Caliper: 0.003 to 0.005 inches.
(0.08 to 0.13 mm)
Moisture Content: 4% to 6% by weight
Manual Feed Slot
Cut Sheet Envelopes
Basis Weight: 17 to 42 lb. 20 to 24 lb.
(64 to 158 g/m
2
) (75 to 90 g/m2)
Caliper: 0.003 to 0.008 inches. 0.003 to 0.005 inches.
(0.08 to 0.2 mm) (0.084 to 0.14 mm)
Moisture Content: 4% to 6% by weight 4% to 6% by weight
Fax messages can be received on only Letter, Legal and A4 size paper.
If you use legal or A4, change the Paper Size setting:
Features
, 1, 2, 6.)
(
2 - 6
ASSEMBLY AND CONNECTIONS
Page 19
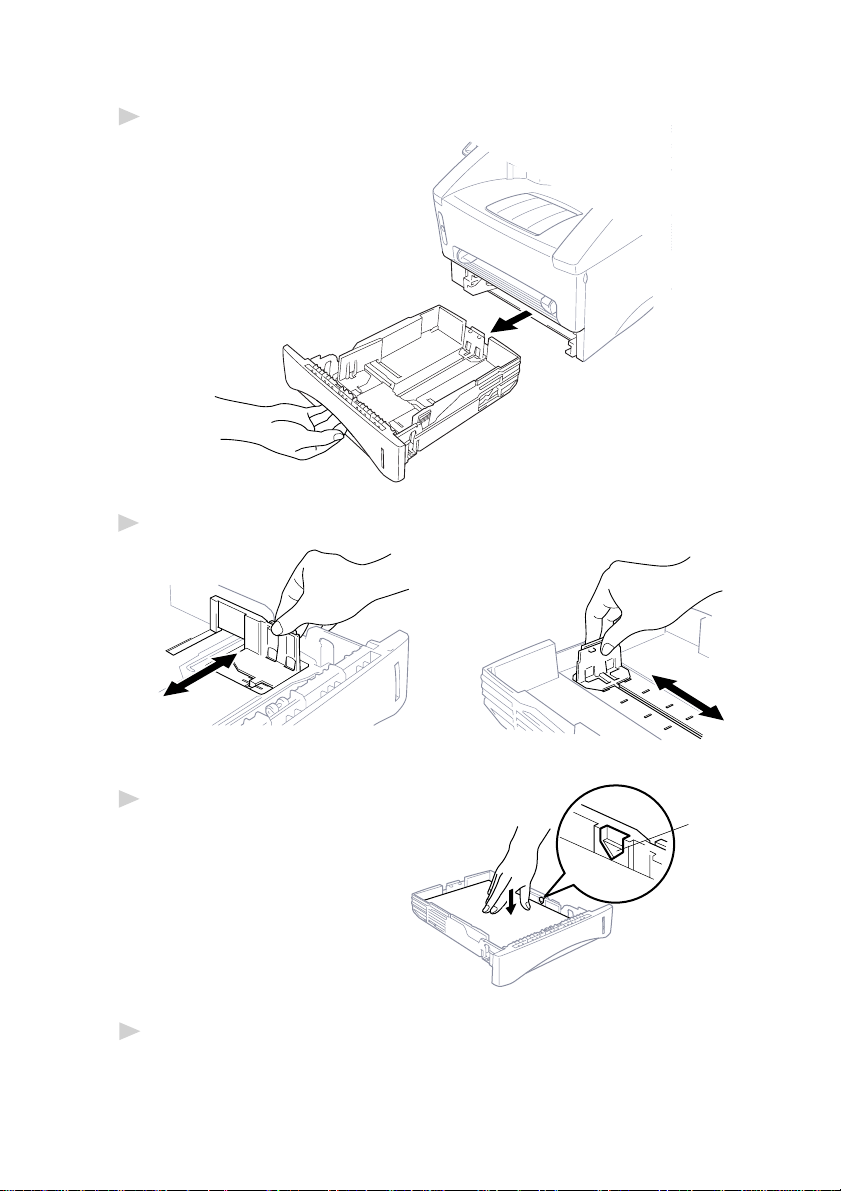
Loading Paper in Multi-purpose Paper Cassette
Pull the paper cassette completely out of the machine.
1
Slide the paper width and length adjusters for the paper size you want.
2
Fan the paper well. Load paper
3
in the paper cassette. Press
down on the paper to flatten
it in all four corners, keeping
the paper level below the
guide. The cassette can
hold up to 250 sheets of
20 lb (75g/m
Slide the paper cassette into the machine until it locks into place.
4
2
) paper.
ASSEMBLY AND CONNECTIONS
Maximum
Paper
Height
Guide
2 - 7
Page 20
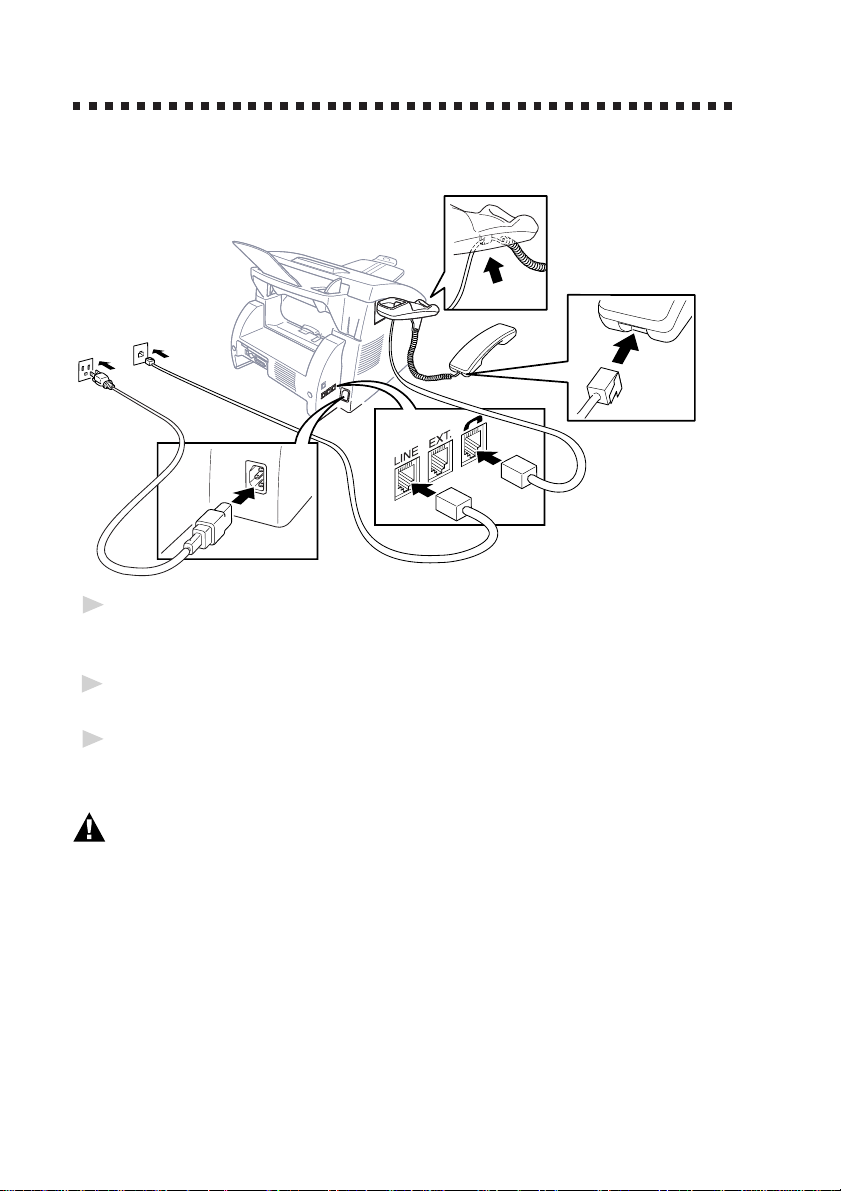
Connections
Connecting the Machine
Connect the handset, power cord, and telephone line.
Connecting the Handset
1
Connect the curled handset cord to the bottom of the handset and the left
side of the machine.
Connect the Power Cord
2
When you connect the power, the screen will illuminate.
Connect the telephone line.
3
Connect one end of the telephone line cord to the jack labeled LINE on
the left side of the machine. Connect the other end to a modular wall jack.
WARNING
n
This machine must be grounded using a three-prong plug.
n
Since the machine is grounded through the power outlet, you can protect
yourself from potentially hazardous electrical conditions on the telephone line
by keeping the power to your machine on when you connect it to a telephone
line. When you want to move your machine, protect yourself by disconnecting
the telephone line first, and then the power cord.
n
Lightning and power surges can damage this product! We recommend that
you use a quality surge protection device on the AC power line as well as
on the telephone line, or unplug the lines during a lightning storm.
n
Do not touch the rollers at the paper exit.
2 - 8
ASSEMBLY AND CONNECTIONS
Page 21

Connecting an External Telephone
Your machine is equipped with a handset that you can use as a regular
phone. However, you can also connect a separate telephone (or telephone
answering device) directly to your machine.
Connect the modular plug on the telephone’s line cord to the jack labeled
EXT. on the left side of the machine.
Whenever this phone (or TAM) is in use, the screen displays EXT. TEL IN
USE, and, if the machine handset is lifted, an alarm sounds. To disconnect
the call on the external phone and switch to the machine, press
Manual Telephone/Fax
.
Connecting an External TAM
(Telephone Answering Machine)
Sequence
You might choose to connect an answering system. When you have an
external TAM on the same telephone line as the machine, the TAM
answers all calls. The machine “listens” for fax calling (CNG) tones. If it
hears them, the machine takes over the call and receives the fax. If it
doesn’t hear CNG tones, the machine lets the TAM continue playing your
outgoing message so your caller can leave you a voice message.
The TAM must answer within four rings (the recommended setting is two
rings). The machine cannot hear CNG tones until the TAM has answered
the call, and with four rings there are only 8–10 seconds of CNG tones
left for the fax “handshake.” Make sure you carefully follow the
instructions in this manual for recording your outgoing message. We do
not recommend using the toll saver feature on your external answering
machine if it exceeds 4 rings.
Connections
The external TAM must be plugged into the left side of the mac hine in the
jack labeled EXT. Your machine cannot work properly if you plug the
TAM into a wall jack.
If You Subscribe to your Telephone Company’s Unique Ring Service:
You may connect an external TAM to a separate wall jack only if you
subscribe to your telephone company’s Unique Ring service, have
registered the unique ring pattern on your machine, use that number as a
fax number and set your machine’s Answer mode to MANUAL.
If You Do NOT Subscribe to Unique Ring Service:
You must plug your TAM into the EXT. jack of your machine. If your
TAM is plugged into a wall jack, both your machine and the TAM will try
to control the phone line. (See illustration on page 2-10.)
ASSEMBLY AND CONNECTIONS
2 - 9
Page 22
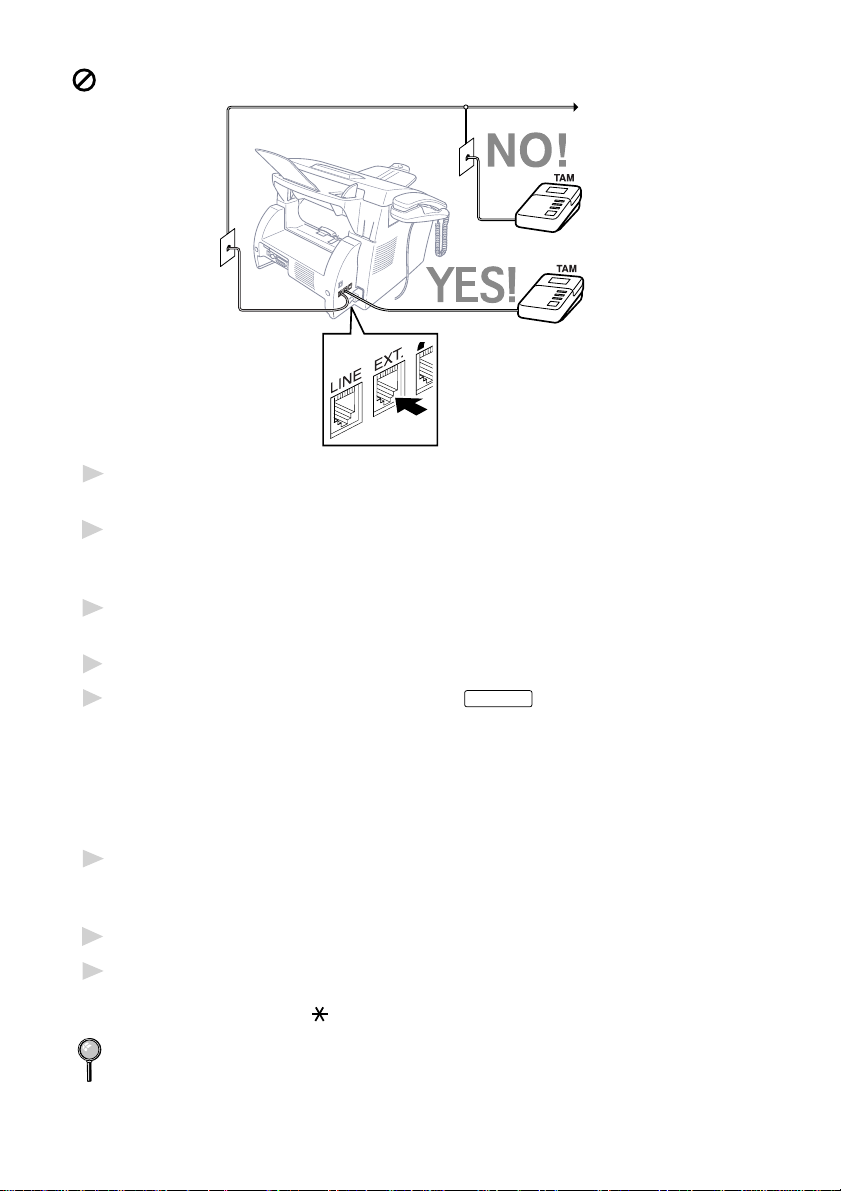
Do not connect a TAM elsewhere on the same phone line.
Plug the telephone line cord from the wall jack into the left side of the
1
machine, in the jack labeled LINE.
Plug the telephone line cord from your TAM into the left side of the
2
machine, in the jack labeled EXT. (Make sure this cord is connected to the
TAM at the TAM’s telephone line jack, and not its telephone set jack.)
Set your external TAM to four rings or less. (The machine’s Ring Count
3
setting does not apply).
Record the outgoing message. (See below.)
4
Set the Answer Mode to TAM by pressing
5
Fax/Telephone lights are on.
Answer Mode
until both Fax and
Recording Outgoing Message (OGM)
Timing is important in recording this message. The message sets up the
ways to handle both manual and automatic fax reception.
Record 5 seconds of silence at the beginning of your message. (This
1
allows your machine time to listen for the fax CNG tones of automatic
transmissions before they stop.)
Limit your speaking to 20 seconds. (See EXT.TEL.RX, page 5-3.)
2
End your 20-second message by giving your Fax Receive Code for people
3
sending manual faxes. For example: “After the beep, leave a message or
send a fax by pressing
We recommend beginning your OGM with an initial 5-second silence
because the machine cannot hear fax tones over a resonant or loud voice.
You may try omitting this pause, but if your machine has trouble
receiving, then you must rerecord the OGM to include it.
2 - 10
ASSEMBLY AND CONNECTIONS
5 1 and Start.”
Page 23

Special Line Considerations
Roll Over Phone Lines
A roll over phone system is a group of two or more separate telephone
lines that pass incoming calls to each other if they are busy. The calls are
usually passed down or “rolled over” to the next available phone line in a
preset order.
Your machine can work in a roll over system as long as it is the last
number in the sequence, so the call cannot roll away. Do not put the
machine on any of the other numbers; when the other lines are busy and a
second fax call is received, the fax call would be transferred to a line that
does not have a fax machine. Your machine will work best on a dedicated
line.
Two-Line Phone System
A two-line phone system is nothing more than two separate phone
numbers on the same wall outlet. The two phone numbers can be on
separate jacks (RJ11) or combined into one jack (RJ14). Your machine
must be plugged into an RJ11 jack. RJ11 and RJ14 jacks may be equal in
size and appearance and both may contain four wires (black, red, green,
yellow). To test the type of jack, plug in a two-line phone and see if it can
access both lines. If it can, you must separate the line for your machine.
Converting T elephone Wall Outlets
There are three ways to convert to an RJ11 receptacle. The first two ways
may require assistance from the telephone company. You can change the
wall outlets from one RJ14 jack to two RJ11 jacks. Or, you can have an
RJ11 wall outlet installed and slave or jump one of the phone numbers to
it.
The third way is the easiest: Buy a triplex adapter. You can plug a triplex
adapter into an RJ14 outlet. It separates the wires into two separate RJ11
jacks (Line 1, Line 2) and a third RJ14 jack (Lines 1 and 2). If your
machine is on Line 1, plug the machine into L1 of the triplex adapter. If
your machine is on Line 2, plug it into L2 of the triplex adapter.
Triplex Adapter
RJ14
RJ11
ASSEMBLY AND CONNECTIONS
RJ14
2 - 11
Page 24
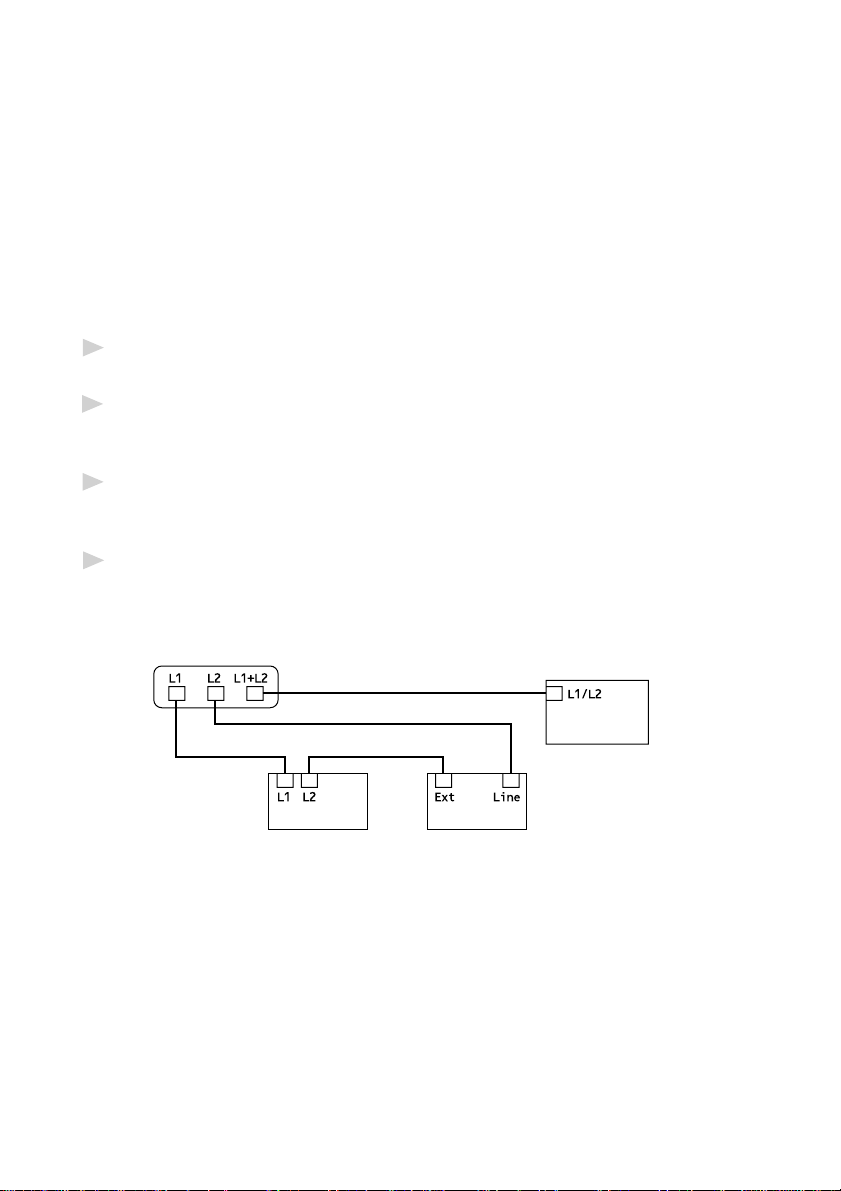
Installing Machine, External Tw o-Line TAM,
and Two-Line Telephone
When you are installing an external two-line telephone answering
machine (TAM) and a two-line telephone, your machine must be isolated
on one line at both the wall jack and at the TAM. The most common
connection is to put the machine on Line 2, which is our assumption in the
following steps. The back of the two-line TAM must have two telephone
jacks: one labeled L1 or L1/L2, and the other labeled L2. You will need at
least three telephone line cords, the one that came with your machine and
two for your external two-line TAM. You will need a fourth line cord if you
add a two-line telephone.
Place the two-line TAM and the two-line telephone next to your
1
machine.
Plug one end of the telephone line cord for your fax machine into the L2
2
jack of the triplex adapter. Plug the other end into the LINE jack on the
left side of the machine.
Plug one end of the first telephone line cord for your TAM into the L1 jack
3
of the triplex adapter. Plug the other end into the L1 or L1/L2 jack of the
two-line TAM.
Plug one end of the second telephone line cord for your TAM into the L2
4
jack of the two-line TAM. Plug the other end into the EXT. jack on the left
side of the machine.
Triplex Adapter
Two Line
External TAM
FAX
Two Line Phone
You can keep two-line telephones on other wall outlets as always. There
are two ways to add a two-line telephone to the machine’s wall outlet. You
can plug the telephone line cord from the two-line telephone into the
L1+L2 jack of the triplex adapter. Or, you can plug the two-line telephone
into the TEL jack of the two-line TAM.
2 - 12
ASSEMBLY AND CONNECTIONS
Page 25

Multi-Line Connections (PBX)
Most offices use a central telephone system. While it is often relatively
simple to connect the machine to a key system or a PBX (Private Branch
Exchange), we suggest that you contact the company that installed your
telephone system and ask them to connect the machine for you. It is
advisable to have a separate line for the machine. You can then leave the
machine in FAX mode to receive faxes any time of day or night.
If the machine is to be connected to a multi-line system, ask your installer
to connect the unit to the last line on the system. This prevents the unit
from being activated each time a telephone call is received.
As with all fax units, this machine must be connected to a two wire
system. If your line has more than two wires, proper connection of the
machine cannot be made.
If you are installing the machine to work with a PBX:
It is not guaranteed that the unit will operate correctly under all
1
circumstances with a PBX. Any cases of difficulty should be reported first
to the company that handles your PBX.
If all incoming calls will be answered by a switchboard operator, it is
2
recommended that the Answer Mode be set to MANUAL. All incoming
calls should initially be regarded as telephone calls.
The machine may be used with either pulse or tone dialing telephone
3
service.
Custom Features on a Single Line
To learn how custom features may affect your faxing operations, please
see the Troubleshooting and Routine Maintenance chapter, page 17-1.
ASSEMBLY AND CONNECTIONS
2 - 13
Page 26

2 - 14
ASSEMBLY AND CONNECTIONS
Page 27
3
3
On-Screen Programming
User-Friendly Programming
We have designed your machine with on-screen programming. Userfriendly programming helps you take full advantage of all the features
your machine has to offer. (See Using This Manual, page 1-1.)
Since your fax programming is done on the LCD, we created step-by-step
on-screen prompts to help you program your machine. All you need to do
is follow the prompts as they guide you through the feature menu
selections and programming options and settings.
Feature Mode
You can access the feature mode by pressing
Feature mode, your machine displays a list of main menu options which
scroll on the display automatically; select one menu option by pressing
Enter/Yes
when it appears. The display then scrolls the options within that
menu.
You can scroll more quickly by pressing
and see all options, in the opposite order.)
Enter/Yes
Before you press
pad, you can correct a mistake. Use
incorrect characters.
When you finish a feature, the screen displays ACCEPTED.
If you want to exit the Feature Mode, press
after entering information in a field using the dial
Features
. When you enter the
. (Use to scroll backward
to back up and then type over the
Stop
.
ON-SCREEN PROGRAMMING
3 - 1
Page 28

Feature Selection Table
If you have a basic understanding of how to program your machine, you
can perform most of the programming settings without this manual. To
help you understand the feature selections, options, and settings that are
found in your fax programs, use the Feature Selection Table below.
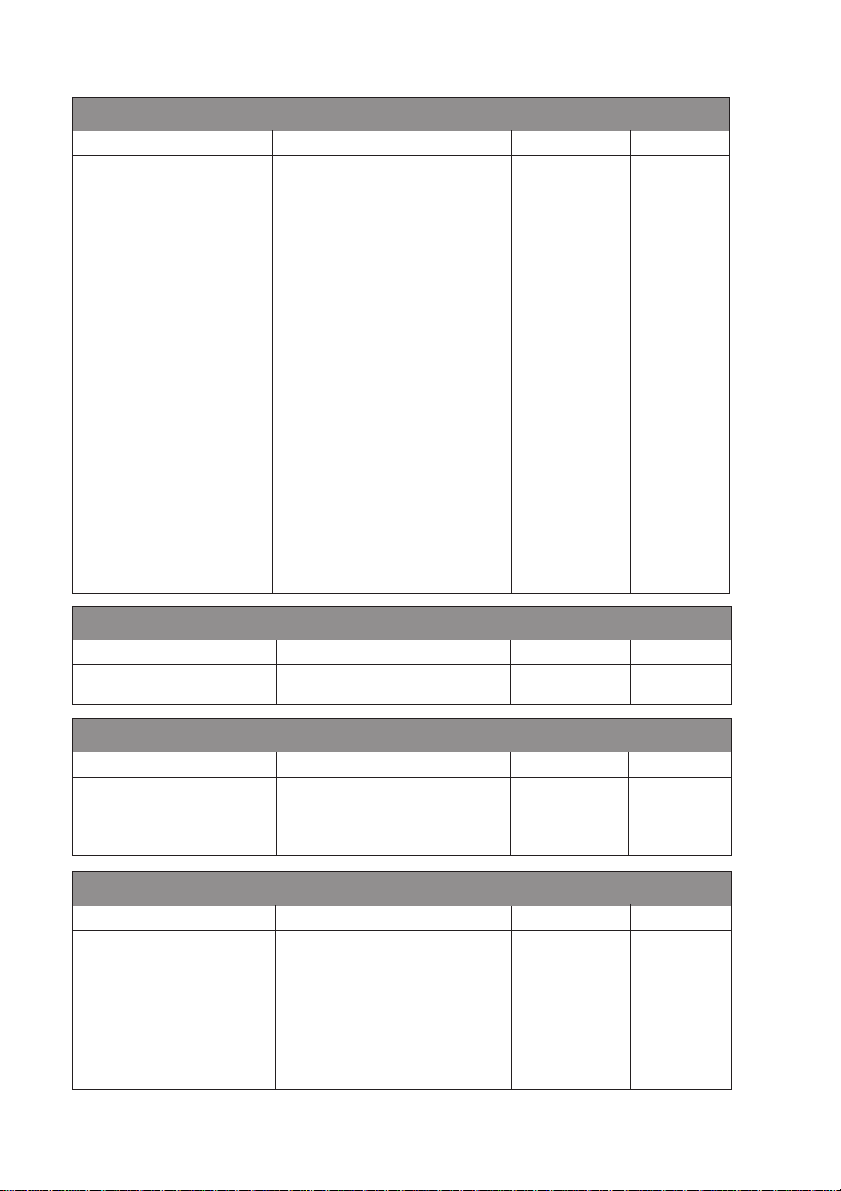
1. Fax Features
1. SYSTEM SETUP
Feature Description Factory Set Page
1. TONE/PULSE Selects dialing mode. TONE 4-1
2. DATE/TIME Enter date and time for LCD — 4-1
display and heading on
transmissions.
3. MACHINE ID Program name, fax number and — 4-2
telephone number to appear on
each transmitted page.
4. BEEP VOL. Adjust volume level of beeper. LOW 4-4
5. SLEEP TIMER Conserve power 00 MIN 4-6
6. DELAYED SEND Sets the time of day for delayed 00:00 4-6
faxes. You can accept it or enter
another time.
7.
HANDSET VOLUME
8. CASSETTE #2 Turn CASSETTE #2 ON if you OFF 5-3
0. LANGUAGE Changes the local language to ENGLISH
For the hearing-impaired, you can OFF 4-5
set the volume to the
VOL AMPLIFY:ON setting on a
temporary or permanent basis.
purchased the optional Cassette
#2.
French.
3 - 2
ON-SCREEN PROGRAMMING
Page 29

1. Fax Features (CONTINUED)
2. RX SETTINGS
Features Description Factory Set Page
1. RING COUNT Number of rings before machine 04 5-2
answers in FAX or FAX/TEL mode.
2. F/T RING TIME Sets the time for “double ring” in 20 SEC 5-2
FAX/TEL mode.
3. EXT .TEL.RX Receive fax messages without O N 5-3
pressing the Start key.
4. REMOTE CODE Enter code to activate or deactivate ON (
machine from a remote location.
5. RX REDUCE Reduces size of image. AUTO 5-4
If the optional cassette #2 is
attached, you can select the
reduction ratio for each cassette.
6. PAPER Selects size of paper for fax — 5-5
receiving.
If the optional cassette #2 is
attached, you can select the
size of paper for each cassette
and choose the cassette you wish
to use first.
7. PRINT DENSITY Make prints darker or lighter. — 5-6
8. POLL RX Turns Polling Receive ON or OFF. OFF 5-9
9. SAVE TONER Increases life of toner cartridge. OFF 5-6
51, #51) 5 -7
ON-SCREEN PROGRAMMING
3 - 3
Page 30
1. Fax Features (CONTINUED)
3. TX SETTINGS
Feature Description Factory Set Page
1. COVER SHEET Automatically sends the cover OFF 6-6, 7
page you programmed.
2. COVER MESSAGE Program customized message for — 6-6
fax cover sheet.
3. CONTRAST Change lightness or darkness of a AUTO 6-8
fax you are sending.
4. MODE Allows you to change resolutions STANDARD 6-12
page by page.
5. OVERSEAS MODE Adjusts for sometimes difficult O FF 6-9
overseas transmissions.
6. VOICE REQ. You can send a fax, then speak. OFF 6-9
7. DELAYED SEND Send documents later. — 6-10
8. POLL Turns Polling Transmission ON OFF 6-13
(or OFF).
9. TX FROM ADF Next Fax Only/ON/OFF OFF 6-3
0. BATCH TX Sends all delayed faxes that are OFF 6-11
to the same fax number and at the
same time as one transmission.
4. VIEW/DEL. JOBS
Feature Description Factory Set Page
Canceling a job in memory Cancel a delayed fax or polling job. — 5-10, 6-4
5. PRIORITY JOB
Feature Description Factory Set Page
Interrupting a polling Send a fax now, even if you have — 6-13
or transmit job the machine set to send a fax later ,
or if you have it set for Polling.
6. DIALER SETTING
Feature Description Factory Set Page
1. ONE TOUCH KEYS Dial numbers stored in memory — 7-1
by pressing only one key.
2. SPEED DIAL Dial numbers stored in memory — 7-2
by pressing only three keys.
3. SETUP GROUPS Set up a Group number for — 7-3
broadcasting.
3 - 4
ON-SCREEN PROGRAMMING
Page 31

1. Fax Features (CONTINUED)
7. PRINT REPORTS
Feature Description Factory Set Page
1. JOB STATUS RPT INC 10-1
2. JOURNAL Print lists and reports INTERVAL:OFF 10-1
3. DIALER DIR. of activity. — 10-1
4. ALPHA DIR. (Details in Chapter 10) — 10-1
5. MACH. SETTINGS — 10-1
6. JOBS REPORT — 10-1
8. REMOTE FAX OPT
Feature Description Factory Set Page
1. F AX FWD/PAGE Set machine to forward fax OFF 9-1, 2
messages
—OR—call your pager.
2. REMOTE RTRV Store incoming faxes in memory OFF 9-2
for remote retrieval.
3. RR PASSCODE Set code for retrieving faxes. 159
4. PRINT F AX Print incoming faxes stored in — 5 - 8
the memory.
9-3
0. MISCELLANEOUS
Feature Description Factory Set Page
1. UNIQUE RING Use with telephone company’s OFF 5-12
distinctive ringing service to
register the ring pattern on the
machine.
2. CALLER ID View or print a list of the last 30 — 5-13, 14
Caller IDs stored in memory.
3. COPY CONTRAST You can make copies darker or — 11-1
lighter.
ON-SCREEN PROGRAMMING
3 - 5
Page 32

2. Printer Features
1. PRINT OPTIONS
Feature Description Factory Set Page
1. INTERNAL FONT You can print resident fonts to — 14-7
check and confirm font types
2. CONFIGURA TION Printer settings and status are — 14-7
listed here.
2. RESET PRINTER
Feature Description Factory Set Page
1. FACTORY SET You can restore the printer back — 14-7
to the factory default settings.
2. HEX DUMP MODE If you set HEX DUMP MODE, — 14-7
all the PC data is printed in
hexadecimal.
3 - 6
ON-SCREEN PROGRAMMING
Page 33

4
4
System Setup
Getting Started
Setting Dialing Mode (Tone/Pulse)
Your machine comes set to accommodate tone (multi-frequency) dialing
service. If you have pulse (rotary) dialing service, you need to change the
dialing mode.
Features
Press
1
Use or to select dialing mode
2
and press
Press
3
Setting Date and Time
Your machine displays the date and time, and prints it on every fax you send.
In the event of a power failure, you may have to reset the date and time.
All other settings remain unaffected.
Stop
to exit.
, 1, 1, 1.
Enter/Yes
.
DIALING:TONE?
SELECT <- -> & SET
DIALING:PULSE?
SELECT <- -> & SET
Features
Press
1
Enter the last two digits of the year and
2
press
Enter two digits for the month and press
3
(For example, enter 09 for
September, or 10 for October).
Enter two digits for the day and press
4
(For example, 06).
Enter the time in 24-hour format and press
5
Enter/Yes
PM).
Press
6
The screen now displays the date and time you set, and displays it
whenever the machine is standing by.
, 1, 1, 2.
Enter/Yes
.
Enter/Yes
. (For example, enter 15:25 for 3:25
Stop
.
YEAR:XX
ENTER & SET
Enter/Yes
.
MONTH:XX
ENTER & SET
.
DAY:XX
ENTER & SET
TIME:XX:XX
ENTER & SET
SYSTEM SETUP
4 - 1
Page 34

Setting Machine ID
You can store your name, fax number, and telephone number to be printed
on all fax pages you send. See Composing Electronic Cover Sheet, page
6-5.
Features
Press
1
Enter your fax number (up to 20
2
digits) and press
You must enter a fax number
to proceed.
Enter your telephone number (up
3
to 20 digits) and press
If your telephone number and fax
number are the same, enter the
same number again.
The number appears on Cover
sheets and Call Back Messages.
Use the dial pad to enter your name
4
(up to 20 characters) and press
(See Entering Text.)
Press
5
The screen returns to the date and time.
If your Machine ID has already been programmed, the screen prompts “1”
to make a change, or “2” to exit without changing.
Stop
.
, 1, 1, 3.
Enter/Yes
.
Enter/Yes
.
Enter/Yes
FAX:
ENTER & SET
TEL:
ENTER & SET
NAME:
.
ENTER & SET
Entering Te xt
When you are setting certain features, such as the Machine ID, you may
need to enter text into the machine. Most keys on the dial pad have three
or four letters printed above them. The keys for 0, # and
don’t have
printed letters because they are used for special characters.
By pressing the appropriate number on the dial pad the correct number of
times, you can access the character you want.
Key once twice three times four times five times
AB C2A
DE F 3D
GH I 4G
JK L5J
MN O 6M
PQ RS7
TU V8T
WX Y Z 9
4 - 2
2
3
4
5
6
7
8
9
SYSTEM SETUP
Page 35

Inserting spaces
If you want to enter a blank space, press once between numbers and
twice between characters.
Making corrections
If you entered a letter incorrectly and want to change it, press to move
the cursor after the last correct letter. Then press
Clear/No
; all letters above
and to the right of the cursor are deleted. Re-enter the correct text and/or
digits. Also, you can back up and type over incorrect letters.
Repeating letters
If you need to enter a character assigned to the same key as the previous
character, press
to move the cursor to the right.
Special characters and symbols
Press for (space) ! “ # $ % & ’ ( ) * + , - . /
Press # for : ; < = > ? @ [ ] ^ _
Press Ø for É À È Ê Î Ç Ë Ö 0
NOTICE
The Telephone Consumer Protection Act of 1991 makes it unlawful
for any person to use a computer or electronic device to send any
message via a telephone fax machine unless such messages clearly
contain, in a margin at the top or bottom of each transmitted page, or
on the first page of the transmission, the date and time it is sent and
an identification of the business or other entity or other individual
sending the message and the telephone number of the sending
machines or such business, other entity or individual.
In order to program this information into your fax machine, you
should complete the steps described on pages 4-1 and 4-2.
The telephone number you enter is used only for Call Back Message and
Cover Sheet features.
SYSTEM SETUP
4 - 3
Page 36

Setting Beep Volume
You can set the beep volume to LOW, HIGH or OFF. The default setting is
LOW. When the beep volume is set to LOW or HIGH, the machine beeps
every time you press a key or make an error, and at the end of fax sending
or receiving.
Features
Press
1
Press or to select your setting and press
2
Press
3
Stop
to exit.
, 1, 1, 4.
Enter/Yes
.
Choosing the Handset Volume
Before you begin to use the machine, you must decide if you need to set
the handset volume to AMPLIFY:ON for a user who is hearing-impaired.
The AMPLIFY:ON volume level complies with FCC standards.
AMPLIFY VOL: OFF
This default setting is appropriate if none of the users are hearingimpaired. During a conversation, users can press Volume
control panel to adjust the volume to LOW or HIGH. When the handset is
replaced, the handset volume will remain until you change it again.
AMPLIFY VOL: ON—TEMPORARY
This setting is appropriate if some of the users are hearing-impaired.
During a conversation, users can press Volume
or on the control
panel to adjust the volume to LOW, HIGH or AMPLIFY. When the
handset is replaced, the handset volume returns to the default setting of
LOW.
or on the
AMPLIFY VOL:ON—PERMANENT
Choose AMPLIFY VOL:ON—PERMANENT if all of the users are
hearing-impaired. During a conversation, users can press Volume
on the control panel to adjust the volume to LOW, HIGH or AMPLIFY.
When the handset is replaced, the handset volume returns to the default
setting of AMPLIFY.
When you press Volume or on the control panel to adjust the
volume, the display shows the setting you are choosing. Each key press
changes the volume to the next setting.
WARNING
It is important that you do not choose PERMANENT unless all the
users are hearing-impaired. Otherwise, the default setting of AMPLIFY
may damage the hearing of some users.
4 - 4
SYSTEM SETUP
or
Page 37

Setting Handset Volume
Please carefully read “Choosing the Handset Volume,” page 4-4 before
you do the following steps:
Features
Press
1
If none of the users are
2
hearing-impaired, press or
, 1, 1, 7.
AMPLIFY VOL:ON?
SELECT <- -> & SET
to select AMPLIFY VOL:OFF?
and press
Enter/Yes
, then go to Step 4
—OR—
If some or all of the users
are hearing-impaired, select
Enter/Yes
AMPLIFY VOL:ON? and press
If all the users are hearing-impaired,
3
press or to select PERMANENT?
and press
Enter/Yes
.
PERMANENT?
SELECT <- -> & SET
—OR—
If only some of the
users are hearing-impaired, select
TEMPORARY? and press
Stop
4
Press
to exit.
Enter/Yes
.
TEMPORARY?
SELECT <- -> & SET
Setting the Speaker Volume
You can adjust the speaker volume when your machine is on
Manual Telephone/Fax
.
Press Volume
or to adjust the volume level. The display shows the
setting you are choosing. Each key press changes the volume to the next
setting. The new setting will remain until you change it again.
Setting the Ring Volume
You can adjust the ring volume when your machine is idle. You can turn
the ring OFF or you can select a ring volume level.
Press Volume
or to adjust the volume level. With each key press, the
machine rings as you hear the current setting and the display shows the
setting you are choosing. Each key press changes the volume to the next
setting. The new setting will remain until you change it again.
Memory Storage
In the event of a power failure, all settings in the SYSTEM SETUP, RX
SETTINGS, DIALER SETTINGS and REMOTE FAX OPTIONS, plus the
COVER SHEET and COVER MESSAGE (from TX SETTINGS) features
are stored permanently. You may have to reset the date and time.
SYSTEM SETUP
4 - 5
Page 38

Sleep Timer
Setting the Sleep Timer reduces power consumption while the machine is
idle. You can choose how long the machine is idle (from 00 to 99
minutes) before it drops into sleep mode. The timer automatically resets
when the machine receives a fax, or makes a copy. The default setting is 0
minutes.
Features
Press
1
Use the Dial pad to enter the amount of time the machine is idle before it
2
drops into sleep mode (00 to 99 minutes) and press
Press
3
Stop
to exit.
, 1, 1, 5.
Enter/Yes
.
Delayed Send
You can set up the time of day that delayed faxes will be sent. This time
will be displayed for acceptance or you can override it in Delayed Send.
(See Delayed Send, page 6-10.)
Features
Press
1
Enter the time (in 24-hour format)
2
that you want delayed faxes to be
sent and press
Press
3
Stop
to exit.
, 1, 1, 6.
Enter/Yes
.
SET TIME=12:34
ENTER & SET
SET TIME=17:00
ENTER & SET
Local Language
You can change the local language from English to French.
Features
Press
1
Press or to select FRENCH or ENGLISH.
2
Press
3
4 - 6
, 1, 1, 0.
Stop
to exit.
SYSTEM SETUP
Page 39

5
5
RX Settings
Basic Receiving Operations
Select Answer Mode
There are four different answer modes for your machine. You may choose
the mode that best suits your needs by pressing the Mode button
repeatedly until you have changed the FAX and FAX/TEL lights to the
setting you want to use.
NOTE: The lighted indicators mean
lit.
Mode
1. MANUAL
(manual
receive)
2.Fax
(automatic
receive)
3. Fax/
Telephone*
(fax and
telephone)
4. TAM
(External
Telephone
Answering
Machine)
Light
Fax
TAM
Fax/
Telephone
Fax
TAM
Fax/
Telephone
Fax
TAM
Fax/
Telephone
Fax
TAM
Fax/
Telephone
How it works
You control the phone
line and must answer
every call yourself.
The machine
automatically answers
every call as a fax.
Machine controls the
line and automatically
answers every call. If
the call is a fax it will
receive the fax. If the
call is not a fax it will
ring (double ring) for
you to pick up the call.
The external TAM
automatically answers
every call. Voice
messages are stored on
the external TAM. Fax
messages are printed.
= not selected = is selected and
When to use it
Use this mode when you
are using a computer
modem on the same line or
if you receive very few fax
messages. You can also use
this mode with Unique
Ringing.
For dedicated fax lines.
You cannot receive a voice
call but you can call out.
You cannot have an
answering machine on the
same line, even if it is on a
separate jack on the same
line. You cannot use the
telephone company’s Voice
Mail in this mode.
Use this mode if you have
an answering machine on
your phone line.
*In Fax/Telephone mode you must set the Ring Count and F/T Ring Time. If
you have extension phones on the line, set the Ring Count to 4 rings.
RECEIVE SETTINGS
5 - 1
Page 40

Setting Ring Count
The Ring Count setting determines the number of times the machine rings
before it answers. If you have extension phones on the same line as the
machine, keep the Ring Count default setting of 4. (See EXT.TEL.RX
page 5-3 and Operation from External or Extension Telephones and For
FAX/TEL Mode Only, page 5-7.)
Features
Press
1
Press or to select Ring Delay and press
2
Press or to select how many times the line rings before the
3
machine answers (00 – 04) and press
, 1, 2, 1.
Enter/Yes
Enter/Yes
.
.
(If you select 00, the line doesn’t ring at all.)
Stop
4
Press
to exit.
Setting F/T Ring Time
You must determine how long the machine will notify you with its special
double ring when you have a voice call. This ringing happens after the
initial ringing from the phone company. Only the machine rings, for 20,
30, 40 or 70 seconds; no other phones on the same line ring the special
double ring. However, you can also answer the call on any extension
phone on the same phone number as the machine.
Features
Press
1
Press or to select how long
2
the machine will ring to alert you
that you have a voice call and press
Press
3
Now, when a call comes in and the machine is set to Fax/Telephone Mode,
all phones on this line will ring the number of times you selected in
Ring Count.
Stop
to exit.
, 1, 2, 2.
Enter/Yes
.
RING TIME:20 SEC
SELECT <- -> & SET
You can let the machine pick up and detect if it’s a fax or voice call.
If it’s a fax call, the machine prints the fax. If it’s a voice call, the machine
signals you with a double ring for the length of time you selected in
F/T Ring Time.
Even if the caller hangs up during the double ringing, the machine
continues ringing for the set time.
5 - 2
RECEIVE SETTINGS
Page 41

EXT.TEL.RX
When you use this feature, you don’t have to press
answer a fax call and hear calling beeps. Just hold the handset and wait a
few seconds. When you see RECEIVING on the fax screen or when you
hear “chirps” through the handset of an extension phone connected to
another wall jack, just replace the handset, and your machine does the
rest. Selecting ON allows the machine to receive fax calls automatically,
even if you lift the handset of an extension or external phone. Selecting
SEMI lets the machine receive the call only if you’ve answered it at the
machine. Selecting OFF means you’ll have to activate the machine
yourself, by pressing
Send/Receive
—OR—by pressing 5 1 if you are not
at the machine.
If you’ve set this feature to ON, but your machine doesn’t automatically
connect a fax call when you lift an external or extension phone handset,
press the Fax Receive code
Send/Receive
press
. (See Operation from External or Extension Telephones and
5 1. At the machine, lift the handset and
For Fax/Telephone Mode Only, page 5-7.)
If you send faxes from a computer on the same phone line and your
machine intercepts them, set EXT.TEL.RX to OFF.
Features
Press
1
Use or to select ON, SEMI or OFF and press
2
Press
3
Stop
to exit.
, 1, 2, 3.
Send/Receive
Enter/Yes
when you
.
Turning on Cassette #2
When CASSETTE #2 is set to ON, you can set paper size, reduction
setting and the cassette usage. (See Printing a Reduced Incoming
Document, page 5-4 and Setting Paper Size, page 5-5.)
Features
Press
1
Press or to select ON (or OFF) and press
2
Press
3
Stop
to exit.
, 1, 1, 8.
Enter/Yes
.
RECEIVE SETTINGS
5 - 3
Page 42

Printing a Reduced Incoming Document
You can always reduce the size of an incoming fax to a fixed percentage,
regardless of the size of the paper (up to legal) in your machine. If you
choose AUTO, your machine chooses the level of reduction for you.
If you purchased and attached the optional Cassette #2 you can select the
reduction ratio for each cassette.
Features
Press
1
If you have the optional Cassette #2,
2
press
CASSETTE #2 and press
Use or to select the reduction
3
ratio you want (AUTO, 93%, 87% or 75%)
and press
Choose 100% if you don't want a reduction.
Press
4
Recommended Reductions
If your paper is letter size (8.5" x 11"), and the incoming fax is
If your paper is A4 (8.2" x 11.6"), and the incoming fax is
If your paper is legal size (8.5" x 14"), and the incoming fax is
, 1, 2, 5.
or to select CASSETTE #1 or
Enter/Yes
.
Enter/Yes
.
Stop
to exit.
letter size, select 93%
A4 size, select 87%
legal size, select 75%.
letter size, select 100%
A4 size, select 93%
letter and A4 size, select 100%
legal size, select 93%.
5.RX REDUCE
5 - 4
RECEIVE SETTINGS
Page 43

Setting Paper Size
You can use three sizes of paper for printing your faxes: letter, legal and
A4. When you change the size of paper you have loaded in the machine,
you will need to change the setting for paper size, so your machine will
know how to fit the incoming fax on the page. You can also select the
level of page reduction to fit on the paper in your machine.
If you purchased and attached the optional Cassette #2 you can select the
paper size for each cassette.
Features
Press
1
If you have the optional Cassette #2,
2
press or to select CASSETTE #1
or CASSETTE #2 and press
Press or to select LETTER,
3
LEGAL or A4 (for the cassette
you selected in Step 2) and press
, 1, 2, 6.
Enter/Yes
Enter/Yes
6.PAPER
CASSETTE #2
SELECT <- -> & SET
.
.
Press 1 to change the RX reduction setting
4
—OR—
2
Press
Press or to select AUTO, 100%,
5
93%, 87% or 75% and press
Press
6
to go to Step 6.
Stop
to exit.
Enter/Yes
.
CHANGE REDUCTION
1.YES 2.NO
Setting Cassette Usage
The default setting of AUTO allows your machine to choose Cassette #2 if
paper is out in Cassette #1 or if incoming faxes will fit best on the paper
in Cassette #2. Choose CASSETTE#1 ONLY or CASSETTE#2 ONLY if
you want to keep special paper in the other cassette and control when it is
used.
Features
Press
1
Press or to select CASSETTE USAGE and press
2
Press or to select AUTO, CASSETTE#1 ONLY or CASSETTE#2
3
ONLY and press
Press
4
Stop
to exit.
, 1, 2, 6.
Enter/Yes
Enter/Yes
.
.
RECEIVE SETTINGS
5 - 5
Page 44

Setting the Print Density
You can adjust print density, making your printed documents darker or
lighter.
Features
Press
1
Press to make print lighter, or to make print darker.
2
Press
3
Stop
to exit.
, 1, 2, 7.
Save Toner
You can conserve toner using this feature. When you set Save Toner to
ON, print appears somewhat lighter. The default setting is OFF.
Features
Press
1
Press or to turn ON (or OFF) and press
2
Press
3
Stop
to exit.
, 1, 2, 9.
Enter/Yes
.
5 - 6
RECEIVE SETTINGS
Page 45

Advanced Receiving Operations
Operation from External Telephones
If you answer a fax call on an external phone in the EXT. jack, you can
make your machine take over by using the Fax Receive Code. When you
press the Fax Receive Code
(See Setting Ring Count, page 5-2 and EXT.TEL.RX, page 5-3.)
If the machine answers a voice call and double-rings for you to take over,
use the Telephone Answer Code
phone.
If you answer a call, and no one is on the line, assume you’re receiving a
fax. At the machine’s phone, press
phone, press
5 1 and wait for the phone to be disconnected (the
screen displays RECEIVING) before you hang up. (Your caller will have
to press
Send/Receive
to send the fax.)
For Fax/Telephone Mode Only
When the machine is in Fax/Telephone mode, it will use the F/T Ring
Time (double-ringing) to alert you to pick up a voice call. If you’re at the
machine, you can lift the handset to answer.
If you’re at an extension phone, you’ll need to lift the handset during the
F/T Ring Time and press
on the line, or if someone wants to send you a fax, send the call back to
the machine by pressing
5 1, the machine starts to receive a fax.
5 1 to take the call at an extension
Send/Receive
, then hang up. At an external
5 1 between the double rings. If no one is
5 1.
Changing Remote Codes
Remote Codes might not work with some telephone systems. The preset
Fax Receive Code is
5 1. The preset Telephone Answer Code is
5 1.
If you are always disconnected when accessing your external TAM
remotely, try changing the Fax Receive Code from
5 1 to
and the Telephone Answer Code from 5 1 to 9 9 9.
RECEIVE SETTINGS
5 - 7
Page 46

Features
Press
1
Press or to select ON
2
(or OFF) and press
If you want to, enter a new
3
Fax Receive Code, and press
If you want to, enter a new
4
Telephone Answer Code, and press
Press
5
Stop
to exit.
, 1, 2, 4.
Enter/Yes
.
Enter/Yes
.
Enter/Yes
REMOTE ACT.:ON?
SELECT <- -> & SET
FAX RECEIVE:*51
ENTER & SET
TEL ANSWER:#51
ENTER & SET
.
Printing a Fax in Memory
If you have Remote Rtrv ON for remote retrieval you can still print a fax
in the memory. (See Setting Remote Rtrv, page 9-2.)
Features
Press
1
Press
2
After printing is finished, press
3
, 1, 8, 4.
Send/Receive
.
Stop
to exit.
Polling
Polling is the process of retrieving faxes from another fax machine. You
can use your machine to “poll” other machines, or you can have someone
poll your machine.
All parties involved in polling need to set up their fax machines to
accommodate polling. When someone polls your machine to receive a
fax, they pay for the call; if you poll someone’s fax machine to receive a
fax, you pay for the call.
Some fax machines do not respond to the polling function.
5 - 8
RECEIVE SETTINGS
Page 47

Setting Up Polling Receive
Polling Receive is when you call another fax machine to receive a fax
from it. (See Canceling a Scheduled Job, page 5-10.)
Features
Press
1
Press or to choose ON (or OFF)
2
and press
Enter the fax number you are polling.
3
, 1, 2, 8.
Enter/Yes
.
POLL RX:OFF?
SELECT <- -> & SET
ENTER FAX NO.
PRESS START KEY
4
Press
. The screen displays DIALING.
Send/Receive
Setting Up Sequential Polling Receive
Your machine can request documents from several fax units in a single
operation. Afterward, a Sequential Polling Report will be printed. (See
Canceling a Scheduled Job, page 5-10.)
Features
Press
1
Press or to select
2
Polling ON (or OFF) and press
Specify the destination fax machines you
3
wish to poll, using One Touch, Speed Dial,
, 1, 2, 8.
Enter/Yes
.
POLL RX:OFF?
SELECT <- -> & SET
ENTER FAX NO.
PRESS START KEY
a Group or the dial pad. You must press
Broadcast
between each location.
Send/Receive
Press
4
Your machine will
.
DIALING #XX
poll each number or group member
in turn for a document.
RECEIVE SETTINGS
5 - 9
Page 48

Canceling a Scheduled Job
You can cancel tasks you’ve scheduled, such as Delayed Send or Polling
Transmit.
1
Press
Features
, 1, 4.
4.VIEW/DEL.JOBS
Any waiting jobs will appear on the
display. If no jobs are waiting, the
screen displays NO JOB WAITING.
If you have more than two jobs waiting, use or to select the job you
2
want to cancel and press
Enter/Yes
.
—OR—
If you have only one job waiting, go to Step 3.
Press 1 to cancel—OR—Press 2 to exit without canceling.
3
To cancel another job, return to Step 2.
4
Press
to exit.
Stop
You can check which jobs are waiting in memory by following Steps 1 and
2 above.
5 - 10
RECEIVE SETTINGS
Page 49

Unique Ringing
This machine feature lets you use the Unique Ring subscriber service
offered by some telephone companies, which allows you to hav e several
telephone numbers on one phone line. Each phone number has its own
Unique Ring pattern, so you’ll know which phone n umber is ring ing . This is
one way you can have a separate phone number for your machine.
Your machine has a Unique Ring feature, allowing you to dedicate one
phone number just for receiving faxes. You’ll need to follow the directions
below to “register” the new Unique Ring pattern, that was assigned by the
Telephone Company, so your machine can recognize its incoming calls.
You can change or cancel the Unique Ring pattern at any time. You can
switch it off temporarily, then turn it back on. When you get a new fax
number, be sure to reset this feature.
You can register only one Unique Ring pattern with the machine. Some
ringing patterns cannot be registered.
n
The machine will answer only calls to its registered number.
n
You will not hear the first two rings of all incoming calls on the machine.
n
To have your TAM answer only the main number, the machine must be in
Manual Mode.
n
In Fax/Telephone or Fax mode, the machine will answer all numbers on
the phone line.
RECEIVE SETTINGS
5 - 11
Page 50

Registering your Unique Ring Pattern
If you are not sure which ring pattern you have, call your telephone
company. Then assign that pattern in the steps below.
Set the machine to MANUAL mode.
1
Features
2
Press
, 1, 0, 1.
The screen displays the current setting of this feature.
Press or to select Mode.
3
Enter/Yes
Press
4
Press or to select the prestored ring pattern you want to assign and
5
press
when the screen displays UNIQUE RING:SET?
Enter/Yes
. (You will hear each pattern as you scroll through the four
patterns. Be sure to choose the pattern assigned by the Telephone
Company.)
Ring
6
Press
Stop
to exit.
Pattern
Rings
1
long - long
2
short - long - short
3
short - short - long
4
very long (normal pattern)
Once you’ve registered the Unique Ring pattern in your machine, you can
turn this feature on or off. To change the setting, follow steps 1 to 4
above, selecting ON (or OFF).
After you’re sure you’ve set up Unique Ring properly and it is working,
you can reconnect a TAM or have Voice Mail turned back on.
5 - 12
RECEIVE SETTINGS
Page 51

Caller ID
The Caller ID feature of this machine lets you use the Caller ID subscriber
service offered by many local phone companies. This service provides
you, by means of the screen display, the name or telephone number of
your caller as the line rings. (See Printing Caller ID List, page 5-14.)
After a few rings, the screen displays the telephone number of your caller
(or name, if available). Once you pick up the handset, the Caller ID
information disappears from the screen, but the call information remains
stored in the Caller ID memory.
n
You will see the first 16 characters of the number or name.
n
OUT OF AREA display means call originates outside your Caller ID
service area.
n
PRIVATE CALL display means the caller has intentionally blocked
transmission of information.
n
CALL PICKUP display remains on the screen when no Caller ID
information was transmitted.
If both the name and number are received, the screen displays only the
name. You can print a list of Caller ID information received by your
machine.
Caller ID service varies with different carriers. Call your local phone
company to determine the kind of service available in your area.
Viewing Caller ID List
Caller ID memory stores information for up to thirty calls; when the
thirty-first call comes in, information about the first call is erased. You
can scroll through Caller ID information to review those calls made to
your machine.
Features
Press
1
Press or to select DISPLAY #? and press
2
, 1, 0, 2.
Enter/Yes
.
If the name was not received, it will not be displayed.
Press or to scroll through the Caller ID memory to select the Caller
3
ID you want to view and press
Enter/Yes
.
The next screen shows the caller’s telephone number and the date and time
of the call.
Press or to return to the Caller ID listing—OR—Press
4
RECEIVE SETTINGS
Stop
to exit.
5 - 13
Page 52

Clearing a Caller ID Stored in Memory
Clear/No
For effective use of the memory, it is recommended that you clear the
Caller ID stored in memory by pressing
when the display shows the
number or name.
Printing Caller ID List
Features
Press
1
Press or to select PRINT REPORT? and press
2
Press
3
, 1, 0, 2.
Send/Receive
.
Enter/Yes
.
5 - 14
RECEIVE SETTINGS
Page 53

6
6
TX Settings
Before You Begin
n
Documents must be between 5.8 and 8.5 inches wide, and 3.9 and 14.1
inches long. Your machine can scan an image only 8.15 inches wide,
regardless of how wide the paper is.
n
Make sure you insert documents face down, top edge first.
n
Adjust the paper guides
to fit the width of your
document.
n
The ADF (automatic document feeder) can hold up to 30 pages, feeding
each one individually through the machine. Use standard (17 lb–24 lb)
paper when using the ADF. If you’re using heavier paper, feed each sheet
individually to prevent paper jams.
n
The ADF can hold up to 50 pages if you stagger the pages and meet the
following conditions:
Temperature: 68°F – 86°F (20°C – 30°C)
Humidity: 50% – 70%
Paper: Xerox 4200 (20LB/LTR),
Fan the paper, then stagger
the pages in the document
feeder as shown below:
DO NOT use curled, wrinkled, folded or ripped paper, or paper with
staples, paper clips, paste or tape attached. DO NOT use cardboard,
newspaper or fabric.
n
Make sure documents written in ink are completely dry.
n
Mode
Press
document you’re sending. (See Resolution, page 6-8.)
(before you send the fax) to select the resolution for the
TX SETTINGS
6 - 1
Page 54

Sending Faxes with Multiple Settings
When you send a fax you can choose any
combination of the available settings: add
a coversheet and select a comment; set the
contrast or resolution; send using overseas
mode, call reservation or delayed send,
polling transmission or real time transmission. After each function is
accepted, the display will ask if you want to enter other settings:
1
Press
SETTINGS menu—OR—
Press
if you want to select additional settings. The display returns to the TX
2
if you are finished choosing settings, and go to the next step.
ACCEPTED
OTHER SETTINGS?
1.YES 2.NO
Manual T ransmission
Manual transmission lets you hear the dial tone, ringing and fax receiving
tones before sending the fax.
Insert the document face down in the feeder.
1
Pick up the handset and listen for a dial tone—OR—
2
3
4
5
Manual Telephone/Fax
Press
Enter the fax number you want to call (you can enter the digits using the dial
pad, or you can enter a One Touch or Speed Dial number or you can call from
the Tel-index).
(See One Touch Dialing, page 8-1.)
When you hear the fax tone, press
If you’re using the handset, hang up.
and listen for a dial tone.
Send/Receive
.
Automatic T ransmission
This is the easiest way to send a fax. IMPORTANT: Do not pick up the
handset, or press
Insert the document face down in the feeder.
1
Enter the fax number using One Touch, Speed Dial, Tel-index or the dial pad.
2
(See Speed Dialing, page 8-2.)
Send/Receive
Press
3
Manual Telephone/Fax
.
.
Manual and Automatic Fax Redial
If you’re sending a fax manually and the line is busy, after you disconnect the
call press
If you’re sending a fax automatically and the line is busy, the machine will
redial automatically, up to three times at 5 minute intervals.
6 - 2
Redial/Pause
TX SETTINGS
to retry the number.
Page 55

Dual Access
You can scan up to 50 documents into the fax memory, even while the
machine is receiving or sending another fax (from memory). You can set
temporary settings for each fax you're scanning, except Timer and Polling.
If you try to scan in and store a 51st fax, the machine will send it
immediately, without storing it in memory.
If you get a MEMORY FULL message while scanning the first page of a
Stop
fax, press
while scanning in a subsequent page, you'll have the option to press
Send/Receive
operation.
Make sure the document feeder is empty.
1
Place the document in the feeder.
2
Enter the fax number.
3
Send/Receive
Press
4
displays the job number (#XX) of the fax and how much memory is
available. Then the machine starts dialing. You can immediately repeat
steps 1 through 4 for the next fax.
Your machine normally operates in Dual Access mode. However, you can
override Dual Access by using Real Time Transmission.
The number of documents you can scan into memory varies with the data
they contain.
to cancel scanning. If you get a MEMORY FULL message
to transmit the pages scanned so far, or to press
Stop
to cancel the
. The machine starts scanning the document and the screen
Real Time T ransmission
When Memory is full, the machine cannot continue to scan documents
into memory before sending. However, you can turn on TX FROM ADF;
place the documents in the feeder and enter the fax number. As soon as
the phone line is free, the machine starts dialing and sending the fax.
Place the document in the feeder.
1
Features
Press
2
To change the default setting,
3
press
and press
For the next fax transmission only,
press
NEXT FAX ONLY and press
For the next fax only, press or to
4
select ON (or OFF) and press
, 1, 3, 9.
or to select ON (or OFF)
Enter/Yes
. Go to Step 5—OR—
or to select
Enter/Yes
Enter/Yes
9.TX FROM ADF
.
TX FROM ADF:ON?
.
SELECT <- -> & SET
TX SETTINGS
6 - 3
Page 56

Press 1 if you want to select additional settings. The display returns to the
5
TX SETTINGS menu—OR—Press
2
if you are finished choosing settings
and go to Step 6.
Enter fax number and press
6
Send/Receive
.
Checking the Jobs Status
Check which jobs are still waiting in memory to be sent. (If no jobs are
waiting, the screen displays NO JOB WAITING.) (See Canceling a Job in
Memory on this page.)
Features
Press
1
If you have multiple jobs waiting, use or to scroll through the list.
2
Press
3
Stop
to exit.
, 1, 4.
Canceling Jobs in Memory
You can cancel tasks you’ve scheduled, such as Delayed Send, Polling
Receive, Polling Transmit or faxes in memory waiting to be sent. If no
jobs are waiting, the screen displays NO JOB WAITING.
1
Press
, 1, 4.
Features
Any waiting jobs appear on the display.
If you have more than two jobs
2
waiting, use
or to select the
job you want to cancel and press
—OR—
If you have only one job waiting,
go to step 3.
Press 1 to cancel—OR—Press 2 to
3
exit without canceling.
To cancel another job, return to step 2.
Stop
4
Press
to exit.
Enter/Yes
4.VIEW/DEL.JOBS
.
#02 SALES REPORT
1.CLEAR 2.EXIT
6 - 4
TX SETTINGS
Page 57

Basic Sending Operations
Composing Electronic Cover Sheet
The cover sheet is generated at the receiving party’s machine. Your cover
sheet includes the name stored in the One Touch or Speed Dial memory. If
you’re dialing manually, the name is left blank. (See One Touch and Speed
Dialing, pages 8-1, 8-2.)
The cover sheet indicates your Machine ID, and the number of pages
you’re sending. If you have Cover Sheet Setup set to ON, the number of
Features
pages remains blank. (
2.)
You can select a comment to include on your cover sheet.
Instead of using one of the comments above, you can enter up to two
customized messages, each 27 characters long. Use the chart on page 4-2
to help enter characters. (See Composing Your Own Comments,
page 6-6.)
1 3 1.) (See Setting Machine ID, page 4-
1.COMMENT OFF
2.PLEASE CALL
3.URGENT
4.CONFIDENTIAL
5.(USER DEFINED)
6.(USER DEFINED)
Most of the TX SETTINGS features are temporary settings that allow you
to make adjustments for each document you send. However, so you can set
up your cover sheet and cover sheet comments in advance, the Cover Sheet
Setup and Cover Sheet Message features change the default settings.
TX SETTINGS
6 - 5
Page 58

Composing Your Own Comments
Enter/Yes
You can set up two custom comments.
Features
Press
1
Use or to choose position 5 or 6
2
for your customized comment and press
Use the dial pad to enter your
3
customized comment and press
, 1, 3, 2.
Enter/Yes
.
.
ACCEPTED
(See Entering Text, page 4-2.)
Press 1 if you want to select additional
4
settings. The display returns to the
TX SETTINGS menu—OR—Press
2
to exit.
OTHER SETTINGS?
1.YES 2.NO
Cover Sheet for Next Fax Only
Make sure the Machine ID is set up. (See page 4-2.) This feature does not
work without the Machine ID.
You can set the fax to send a cover sheet with a particular document. This
cover sheet will include the number of pages in your document.
Insert the document in the feeder.
1
Features
Press
2
When the screen displays NEXT FAX ONLY?, press
3
Press or to select ON (or OFF) and press
4
Press or to select one of the standard or custom comments and
5
press
Enter/Yes
, 1, 3, 1.
.
Enter/Yes
Enter/Yes
.
.
Enter two digits to indicate the number of pages you are sending and
6
7
Enter/Yes
press
(Enter
press
.
0 0
to leave the number of pages blank.) If you make a mistake,
to back up and reenter the number of pages.
Press 1 if you want to select additional settings. The display returns to
2
the TX SETTINGS menu—OR—Press
if you are finished choosing
settings, and go to step 8.
Enter the fax number you’re calling.
8
Send/Receive
9
6 - 6
Press
TX SETTINGS
.
Page 59

Always Send Cover Sheet
Enter/Yes
Make sure Machine ID is set up. This feature does not work without the
Machine ID. (See Setting Machine ID, page 4-2.)
You can set the machine to send a cover sheet whenever you send a fax.
The number of pages in your fax is not included when you use this setting.
Features
Press
1
Press or to select
2
COVER SHEET: ON? and press
If you selected ON, press or to
3
select one of the standard or custom
comments and press
Press 1 if you want to select additional settings. The display returns to
4
the TX SETTINGS menu—OR—Press
, 1, 3, 1.
Enter/Yes
COVER SHEET:OFF?
.
SELECT <- -> & SET
COVER SHEET:ON?
SELECT <- -> & SET
.
2
to exit if you are finished
choosing settings.
Using a Printed Cover Sheet
If you prefer using a printed cover sheet that you can write on, you can
print the sample page and attach it to your fax.
Features
Press
1
Press or to select PRINT SAMPLE? and press
2
Press
3
, 1, 3, 1.
Send/Receive
. Your machine prints a copy of your cover page.
Enter/Yes
.
TO:
FROM:
FAX#:
TEL#:
COMMENT:
- - -
COVER SHEET
- - -
PAGE[S] TO FOLLOW
- - -
- - -
TX SETTINGS
6 - 7
Page 60

Contrast
If your document is very light or very dark, you might want to set the
contrast. Use S.LIGHT to send a very light document. Use S.DARK to
send a very dark document.
Insert the document, face down, in the feeder.
1
Features
Press
2
Use or to select AUTO, S.LIGHT or S.DARK and press
3
Press 1 if you want to select additional settings.The display returns to the
4
TX SETTINGS menu.—OR—Press
, 1, 3, 3.
2
if you are finished choosing
Enter/Yes
settings, and go to step 5.
Enter a fax number and press
5
Send/Receive
to send a fax.
Mode
When you have a document in the feeder, you can use the
Mode
change the default setting. Press
continuously until you see the lights
change to the setting you want. For standard, turn Fine & Extra Fine
lights off. For Photo, turn them both on. (See Multiple Resolution
Transmission, page 6-12.)
Standard—Suitable for most typed documents.
Fine—Good for small print; transmits a little slower than standard
resolution.
Extra Fine—Good for small print or artwork; transmits slower than fine
resolution.
Photo—Use when document has varying shades of gray; slowest
transmission time.
Mode
key to
.
Canceling a Job While Scanning the Document
You can cancel a job while you are scanning it into memory by pressing
6 - 8
Stop
. Eject the document by pressing
TX SETTINGS
Stop
again.
Page 61

Advanced Sending Operations
Overseas Mode
After you send a fax using this feature, the feature turns itself off.
Insert document.
1
Features
Press
2
For the MFC, press
Press or to select ON (or OFF) and press
3
Press 1 if you want to select additional settings. The display returns to
4
the TX SETTINGS menu—OR—Press
settings and go to step 5.
Enter the fax number you’re calling.
5
Press
6
, 1, 3, 5.
Features
, 1, 3, 5.
2
Send/Receive
.
Voice Request
You can send a fax and let the other party know that you want to have a
conversation after the fax transmission is complete. The other fax machine
will ring as if it were receiving a telephone call; if the other party picks up
the handset, your machine will ring. Lift the handset to speak.
If the other party does not answer the Voice Request and the Call Back
Message feature is set to ON, your machine leaves a message to call you.
Insert the document in the feeder.
1
Features
Press
2
Press or to select
3
VOICE REQUEST:ON? (or OFF) and
press
The screen displays the current
setting for Call Back Message.
Press or to select ON (or OFF) and
4
press
Press 1 if you want to select additional settings. The display returns to
5
the TX SETTINGS menu—OR—Press
settings, and go to step 6.
, 1, 3, 6.
Enter/Yes
.
Enter/Yes
.
2
5.OVERSEAS MODE
Enter/Yes
.
if you are finished choosing
VOICE REQ.:OFF
SELECT <- -> & SET
VOICE REQ.:ON
SELECT <- -> & SET
CALL BACK:OFF?
SELECT <- -> & SET
CALL BACK:ON?
SELECT <- -> & SET
if you are finished choosing
Enter the fax number.
6
Send/Receive
Press
7
If you’ve set V oice Request to O N , pick u p your handset if the machine rings.
8
.
TX SETTINGS
6 - 9
Page 62

You cannot use auto redial with Voice Request. You cannot use Voice
Request with Delayed Send or with Polling. You must register your
Machine ID to set Call Back Message to ON.
Print Sample Call Back Message
Features
Press
1
Press or to select PRINT SAMPLE? and press
2
Press
3
, 1, 3, 6.
Send/Receive
.
Enter/Yes
.
Delayed Send
During the day you can store up to 50 documents into memory for delayed
sending. Transmission of these documents will begin at the time of day you
enter in Step 3. If you have set up in the Delayed Send feature, page 4-6,
you can accept it in Step 3 or enter another time for this fax.
Insert the document in the feeder.
1
Features
Press
2
Accept the displayed time or enter another time for this fax and press
3
Enter/Yes
Press 1 to leave the originals waiting in
4
the document feeder—OR—Press 2 to scan
the document into memory.
(See Interrupting Delayed Send and Polling Transmit Jobs, page 6-13.)
, 1, 3, 7.
.
1.DOC 2.MEMORY
Press 1 if you want to select additional settings. The display returns to
5
the TX SETTINGS menu—OR—Press
2
if you are finished choosing
settings and go to step 5.
The screen will prompt you to
enter the fax number.
Enter the fax number.
6
Send/Receive
7
Press
. The machine will wait to send the fax at the time you set
ENTER FAX NO.
PRESS START KEY
up.
Features
, 1, 1, 6.)
(
The number of documents you can scan into memory varies with the data
they contain.
6 - 10
TX SETTINGS
Page 63

Delayed Batch Transmission
Before sending the delayed faxes, your machine will economize by sorting
all the documents in memory by destination and scheduled time. All
delayed faxes scheduled at the same time to the same fax number will be
sent as one transmission.
Features
Press
1
Press or to select ON (or OFF)
2
and press
Press
3
Stop
to exit.
, 1, 3, 0.
Enter/Yes
.
BATCH TX:ON?
SELECT <- -> & SET
Broadcasting
Broadcasting is automatically sending the same fax message to multiple
Broadcast
fax numbers. Using the
locations, up to 100 Speed Dial locations, and up to 50 manually dialed
numbers (maximum of 182 locations if you did not use up any locations
for Groups, access codes or credit card numbers). However, available
memory will vary with the types of jobs in memory and the number of
locations used for broadcasting. If you broadcast to more than the
maximum locations available, you will not be able to set up transmissions
using dual access and the timer. (See Setting Up Groups for Broadcasting,
page 7-3.)
Although the easiest way to broadcast is to press Group keys, you can
include One Touch, Speed Dial, and manually, dialed numbers in the same
broadcast. Y ou must press
Alpha Directory to help you choose the numbers easily.
key, you can include Groups, One Touch
Broadcast
between each of these locations. Use the
After the broadcast is completed, a Broadcast Report will be printed
automatically to let you know the results.
n
To stop the broadcasting in progress, press
Stop
. The LCD display asks if
you want to cancel all locations or the location that is being sent.
Enter the long dialing sequence numbers as you normally would, but keep
in mind that each key counts as one location, so the number of locations
you can call become limited.
n
If the line is busy or for some other reasons a connection could not be
made while broadcasting, the machine will redial the number
automatically.
n
If the memory is full, press
Stop
to abort the job or press
Send/Receive
the portion that is in the memory (if more than one page has been
scanned).
TX SETTINGS
to send
6 - 11
Page 64

Insert the document into the feeder.
1
Enter a number using One Touch, Speed Dial, Group number, Tel-index or
2
the dial pad. Example: Group number
Broadcast
Press
3
Enter the next number. Example: Speed Dial
4
Press
5
Enter the next fax number.
6
Broadcast
.
.
Example: Manual dialing, using the dial pad.
7
Press
.
Send/Receive
Your machine will read the document into memory and then start sending
faxes to all the numbers you entered.
Multiple Mode Transmission
Use this feature to select separate mode settings for each page of the fax
you’re sending. This could be useful if you’re sending a fax with photos
and letters, or some pages with small print and others with normal print.
Mode settings return to STANDARD after the fax is sent.
(See Resolution, page 6-8.)
Insert the document in the feeder.
1
Features
Press
2
Use or to select resolution for page 1 and press
3
Repeat Step 3 for subsequent pages.
4
Press
5
Press 1 if you want to select additional settings. The display returns to
6
the TX SETTINGS menu—OR—Press
settings and go to Step 7.
Enter the fax number you’re calling.
7
Press
8
If you want to copy a document using multiple resolutions, press
step 7.
, 1, 3, 4.
Stop
when you’re finished.
Send/Receive
.
Enter/Yes
.
2
if you are finished choosing
Copy
in
6 - 12
TX SETTINGS
Page 65

Setting Up Polling Transmit
Polling Transmit is when you set up your machine to wait with a document
so another fax machine can retrieve it. (See Interrupting Delayed Send and
Polling Transmit Jobs on this page.)
Place the document to be retrieved in the feeder.
1
Features
Press
2
Press or to choose
3
POLL TX:ON? and press
Press 1 to select DOC if you want your
4
machine to scan the printed document at
the time it is polled—OR—Press
Press 1 if you want to select additional settings. The display returns to
5
the TX SETTINGS menu—OR—Press
settings and go to step 6.
Press
6
If you pressed 1 in Step 4, the printed document remains in the document
feeder until your machine is polled. However, you can “interrupt” it to
send another fax.
, 1, 3, 8.
Send/Receive
.
Enter/Yes
.
POLL:OFF?
SELECT <- -> & SET
1.DOC 2.MEMORY
2
to select MEMORY.
2
if you are finished choosing
Interrupting Delayed Send and Polling Transmit
Jobs
You can send a fax or make a copy now, even if you have the machine set
to send documents from the feeder later. However, you cannot use
automatic redial or the Feature mode. (See Delayed Send, page 6-10 and
Setting Up Polling Transmit on this page.)
Features
Press
1
Wait 2 seconds, then remove the documents that are waiting in the
2
feeder.
Place the “new” document you want to
3
send now in the feeder.
Enter the new fax number for the documents you want to send now.
4
Press
5
After the transmission is finished, place the “old” documents back into the
6
feeder.
To restore the Delayed Send and/or Polling.
7
Press
, 1, 5.
Send/Receive
Features
.
, 1, 5.
INSERT DOCUMENT
TX SETTINGS
6 - 13
Page 66

6 - 14
TX SETTINGS
Page 67

7
7
Setup Dialer Settings
Storing Numbers for Easy Dialing
You can set up your machine to do three types of easy dialing: One Touch,
Speed Dial, and Groups for Broadcasting of faxes.
Storing One Touch Dial Numbers
You can store 32 fax/phone numbers that you can dial by pressing one key
Send/Receive
(and
store names with these numbers. When you press a One Touch dial
location, the screen displays the name or number as the call is dialed.
(See One Touch Dialing, page 8-1.)
One Touch keys are not the dial pad keys. They are the 16 keys (numbers
01–32) located to the left of the dial pad.
Features
Press
1
Press the One Touch key where you want to store a number.
2
The screen displays the location you selected.
Enter a number (up to 20 digits) and press
3
(See Changing One Touch and Speed Dial Numbers, page 7-4.)
If you want to enter a pause in the dialing
sequence (for example, to access an outside
line), press
Pressing
and a dash appears on the screen.
Use the dial pad to enter the name (up to 15 characters) and press
4
You can use the chart on page 4-2 to help you enter letters—OR— Press
Enter/Yes
to store the number without a name.
or to select the type you want and press
5
FAX a fax only number
TEL a tele phone (voice) number
FAX/TEL both fax and telephone (voice) number
Return to Step 2 to store another One-Touch number—OR—Press
6
exit.
). To access numbers 17 to 32, hold down
, 1, 6, 1.
Enter/Yes
Redial/Pause
Redial/Pause
as you’re entering digits.
enters a 3.5 second pause when the number is dialed,
NAME:
ENTER & SET
Enter/Yes
Shift
. You also can
.
.
Enter/Yes
Stop
to
.
SETUP DIALER SETTINGS
7 - 1
Page 68

If you need to store a pause longer than 3.5 seconds, press
Redial/Pause
more times.
Even if you lose electrical power, numbers stored in memory will not be
lost.
Storing Speed Dial Numbers
You can store Speed Dial numbers, so you can dial by pressing only three
keys (and
electrical power, numbers stored in memory will not be lost. (See Speed
Dialing, page 8-2.)
Press
1
Use the dial pad to enter a two-digit location
2
(00–99) and press
Enter the number (up to 20 digits) and
3
press
Use the dial pad to enter the name
4
(up to 15 characters) and press
You can use the chart on page 4-2 to help
you enter letters—OR—Press
the number without a name.
or to select the type of number
5
and press
Return to Step 2 to store another Speed Dial number—OR—Press
6
exit.
Send/Receive
Features
Enter/Yes
). There are 100 Speed Dial locations. Even if you lose
, 1, 6, 2.
Enter/Yes
.
.
Enter/Yes
.
Enter/Yes
to store
FAX a fax number
TEL a telephone (voice) number
FAX/TEL both fax and telephone number
Enter/Yes
.
SPEED-DIAL? #
ENTER & SET
#05:
ENTER & SET
NAME:
ENTER & SET
two or
Stop
to
Even if you lose electrical power, numbers stored in memory will not be
lost.
7 - 2
SETUP DIALER SETTINGS
Page 69

Setting Up Groups for Broadcasting
Groups allow you to send the same fax message to many fax numbers by
pressing only one One Touch Group key (and
to store each fax number as a One Touch or Speed Dial number. Then, you
can combine them into a Group. Each Group uses up A One Touch key.
Finally, you can have up to six small Groups, or you can assign up to 131
numbers to one large Group.
You can include up to 31 One Touch keys, and up to 100 Speed Dial
numbers. If you broadcast to more than the maximum locations available,
you will be unable to set up transmissions using Dual Access and the Timer.
(See Storing One Touch Dial Numbers, page 7-1 and Storing Speed Dial
Numbers, page 7-2.)
Features
Press
1
Select a One Touch key where you
2
, 1, 6, 3.
wish to store the Group number.
(For example, press One Touch
02
for Group 1.)
key
Use the dial pad to enter the Group number
3
and press
(For example, press
To include One Touch or Speed Dial
4
Enter/Yes
.
1
for Group 1.)
numbers in the Group, enter them as
if you were dialing. For example, for
One Touch key
05
. For Speed Dial location 09,
key
Speed Dial
press
dial pad. The display shows
When you’re finished adding numbers,
5
press
Enter/Yes
05
, press One Touch
, then press 0, 9 on the
05, #09.
.
Send/Receive
). First, you’ll need
SELECT ONE TOUCH
SETUP GROUP:GR
ENTER & SET
GR1:*O5#O9
ENTER & SET
Use the dial pad and the chart on page 4-2
6
to enter a name for the group and press
Enter/Yes
. (For example, NEW CLIENTS)
Stop
7
Press
to exit.
NAME:
ENTER & SET
You can print a list of all One Touch and Speed Dial numbers.
(See Chapter 10, Printing Reports.)
If you lose electrical power, numbers stored in memory will not be lost.
(See Broadcasting, page 6-11.)
SETUP DIALER SETTINGS
7 - 3
Page 70

Changing One Touch and Speed Dial Numbers
Clear/No
If you try to store a One Touch or Speed Dial number in a location where a
number is already stored, the screen displays the current name stored
there, then prompts you to either
*01: PITNEY BOWES
1.CHANGE 2.EXIT
Press 1 to change the number, or press 2 to exit without changing it.
1
Enter a new number and press
2
n
If you want to erase the number, press
left of the digits.
n
If you want to change a digit, use or to position the cursor under
the digit you want to change, then type over it.
Follow the directions from Step 4 for Storing One Touch Numbers or
3
Storing Speed Dial Numbers.
Enter/Yes
.
when the cursor is to the
7 - 4
SETUP DIALER SETTINGS
Page 71

8
8
Telephone Operations
Dialing Options
You can send faxes or make telephone calls by dialing manually or by
using Directory Search, One Touch or Speed Dial memory.
Manual Dialing
Manual dialing is simply pressing all of the digits of the phone number.
Pick up the handset—OR—Press
1
When you hear a dial tone, dial the call using the dial pad.
2
If you pressed
3
other party answers. (The speaker works only one way; the other party
won’t be able to hear you unless you pick up the handset.)
To hang up, replace the handset.
4
Manual Telephone/Fax
Manual Telephone/Fax
to dial the call, pick up the handset when the
.
One T ouch Dialing
Pick up the handset—OR—Press
1
When you hear a dial tone, press the One Touch key of the location you
2
want to call. (See Storing One Touch Dial Numbers, page 7-1.)
If you pressed
3
other party answers. (The speaker works only one way; the other party
won’t be able to hear you unless you pickup the handset.)
To hang up, replace the handset.
4
If you try to use a One Touch key with no number stored in it, you’ll hear
a warning sound, and screen will display NOT REGISTERED. The
display will return to normal after 2 seconds.
If you are sending a fax, press
If you picked up the handset, press
machine answers with fax tones.
Manual Telephone/Fax
Manual Telephone/Fax
to dial the call, pick up the handset when the
Send/Receive
after pressing the One Touch key.
Send/Receive
.
when the receiving fax
TELEPHONE OPERATIONS
8 - 1
Page 72

Speed Dialing
Pick up the handset—OR—Press
1
Manual Telephone/Fax
.
(See Storing Speed Dial Numbers, page 7-2.)
When you hear a dial tone, press
2
Speed Dial
, then press the two-digit
Speed Dial number.
If you pressed
3
Manual Telephone/Fax
to dial the call, pick up the handset when the
other party answers. (The speaker works only one way; the other party
won’t be able to hear you unless you pickup the handset.)
To hang up, replace the handset.
4
If you are sending a fax, press
number. If you picked up the handset, press
Send/Receive
after pressing the Speed Dial
Send/Receive
when the receiving
fax machine answers with fax tones.
Dialing Access Codes and Credit Card Numbers
Sometimes you may want to choose from among several long distance
carriers when you make a call. Rates may vary depending upon the time
and destination. To take advantage of low rates, you can store the access
codes or long-distance carriers as One Touch and Speed Dial numbers. You
can store these long dialing sequences by dividing them and setting them up
separately in any combination. You can even include manual dialing using
the dial pad. The combined number will be dialed in the order you entered
it, as soon as you press
page
7-1.)
Send/Receive
. (See Storing One Touch Dial Numbers,
For example:
03
You store “555” on One Touch key
If you press One Touch
03, 02
and
and “7000” on One Touch key 02.
Send/Receive
you can dial “555-7000”. To
temporarily change a number, you can substitute part of the number with
manual dialing using the dial pad. For example, to change the number to
555-7001 you could press One Touch
03
and press 7, 0, 0, 1 using the
dialing pad.
Pause after dialing Speed Dial numbers for the name to be displayed
before you enter the next portion of the dialing sequence.
8 - 2
TELEPHONE OPERATIONS
Page 73

Pause
Redial/Pause
Press
dialing overseas, you can press
increase the length of the pause.
to insert a 3.5 second pause between numbers. If you are
Redial/Pause
as many times as needed to
Fax Redial
If you’re sending a fax manually and the line is busy, press
retry the number.
If you’re sending a fax automatically and the line is busy, the machine
will redial automatically up to three times at 5 minute intervals.
Redial/Pause
Tone/Pulse
If you have pulse dialing service, but need to send tone signals
(for telephone banking, for example), follow the directions below. If you
have touch tone service, you do not need this feature to send tone signals.
Lift the handset.
1
Press . Digits dialed after will send tone signals.
2
When you hang up, the machine returns to pulse dialing service.
3
Searching Directory
You can search for names you have stored in One Touch and Speed Dial
memories. Names are stored alphabetically. (See Storing One Touch Dial
Numbers, page 7-1 and Storing Speed Dial Numbers, page 7- 2.)
to
Directory Search
Press
1
Press or to search the memory.
2
When the screen displays the name you want to call, pick up the handset
3
or press
Press
4
If you pressed
5
other party answers. (The speaker works only one way; the other party
won’t be able to hear you unless you pickup the handset.)
When the call is over, hang up.
6
Manual Telephone/Fax
Send/Receive
, then enter the first letter of the name you’re looking for.
.
to begin dialing.
Manual Telephone/Fax
to dial the call, pick up the handset when the
TELEPHONE OPERATIONS
8 - 3
Page 74

8 - 4
TELEPHONE OPERATIONS
Page 75

9
9
Remote Fax Options
Fax Forwarding/Paging
You cannot use Paging and Fax Forwarding at the same time.
You cannot use Paging and Fax Forwarding when “Remote Rtrv” is set to
OFF.
Programming a Fax Forwarding Number
When Fax Forwarding is set to ON, your machine stores the received fax
in memory, then dials the fax number you’ve programmed, and forwards
the fax message.
Features
Press
1
Press or until the screen displays
2
and press
Enter the forwarding number (up to
3
20 digits) and press
Press
4
Stop
to exit.
, 1, 8, 1.
Enter/Yes
.
Enter/Yes
FAX FORWARD?
SELECT <- -> & SET
.
FWD#:
ENTER & SET
REMOTE FAX OPTIONS
9 - 1
Page 76

Programming Paging Number
When Paging is selected, your machine dials the pager number you’ve
programmed, and dials your Personal Identification Number (PIN) when
connected, to activate your pager and let you know you have a fax
message in the memory.
Features
Press
1
Press or until the screen displays
2
and press
Enter your pager phone number (up to 20
3
digits) followed by and press
, 1, 8, 1.
Enter/Yes
.
Enter/Yes
PAGING?
SELECT <- -> & SET
PAG#:
ENTER & SET
.
Do not include the area code if it is the same as that of your machine.
1
8
0 0
For example,
If your pager requires a PIN, enter the PIN, press , press
4
your fax number, then press
1
For example,
2 3 4 5
5 5 512 3 4
and press
Redial/Pause
1
—OR—If you do not need a PIN, press
1
Enter/Yes
8
0 0
.
5 212 8 4 6
then press
For example,
Press
5
Stop
to exit.
and press
Redial/Pause
.
Enter/Yes
8
0 0
5 212 8 4 6
Redial/Pause
Redial/Pause
.
, enter the fax number,
.
You cannot change a Paging number or PIN remotely.
Setting Remote Rtrv
, enter
.
If you set Remote Rtrv to ON, you will be able to retrieve fax messages
from another location, using Fax Forwarding, Paging, or Remote Retrieval
functions. The screen will indicate when you have a fax stored in
memory. (See Remote Retrieval, page 9-3.)
Features
Press
1
Press or to select ON (or OFF) and
2
press
Press
3
Enter/Yes
Stop
to exit.
, 1, 8, 2.
.
REMOTE RTRV:OFF?
SELECT & SET
If there are faxes in memory when you turn Remote Rtrv to OFF, the
screen prompts you to erase any faxes in memory.
1
If you press
Remote Rtrv is turned off. If you press 2,
, all fax data is erased and
ERASE ALL FAX?
1.YES 2.NO
data is not erased, and Remote Rtrv remains on.
9 - 2
REMOTE FAX OPTIONS
Page 77

Changing R R Passcode
Enter your R R Passcode when the machine picks up your call, so you can
access features remotely. The passcode is preset to 1 5 9
change this. The
Features
Press
1
Enter a three-digit number from 000 to 999 and press
2
(Do not use the same digits that appear in your Fax Receive Code or
T elephone Answer Code.)
Press
3
Stop
to exit.
, 1, 8, 3.
cannot be changed.
, but you can
Enter/Yes
.
Remote Retrieval
You can call your machine from any fax machine using touch tone and use
a R R Passcode and other button presses to retrieve fax messages. Cut out
the R R Passcode on the last page and keep it in your wallet as an aid.
Using R R Passcode
Dial your fax number from a fax machine using touch tone.
1
(See Changing R R Passcode on this page.)
When your machine answers and beeps, immediately enter your R R
2
Passcode (1 5 9
).
Your machine signals the kinds of messages received:
3
1 long beep — Fax message(s)
No long beeps — No messages
Your machine then prompts you with two short beeps to enter a command.
4
If you wait longer than 30 seconds to enter a command, your machine
hangs up. If you enter an invalid command, your machine beeps three
times.
Press 9 0 to reset your machine when you’re finished.
5
Hang up.
6
If your machine is set to Manual mode, you can access your machine by
waiting about 2 minutes, then entering the R R Passcode within 30
seconds.
REMOTE FAX OPTIONS
9 - 3
Page 78

Remote Commands
Follow the commands below to access features remotely. When you call
your machine and enter your Remote Retrieval Passcode (1 5 9
system will signal you with two short beeps to enter a remote command.
), the
Remote Commands
95 Changing Fax Forwarding/
Paging setting
1 OFF
2 Fax Forwarding
3 Paging
4 FAX FWD No.
6 Remote Rtrv ON
7 Remote Rtrv OFF
96 Retrieve a fax
1 Jobs Report
2 Retrieve all faxes
3 Erase fax from
the memory
97 Check the receiving status
1 Fax
Operation Details
If you hear one long beep, the change is
accepted. If you hear three short beeps, you
cannot change it because the conditions have
not been met. (Example: registering paging
number). You can register your fax
forwarding number by using 4. FAX FWD
NO (see page 9-6). Once you have registered
the number, your machine will change
automatically to FAX FWD:ON mode. Then
retrieve a Jobs Report by entering 961 (see
page 9-6) to make sure that the Fax
Forwarding number you registered is correct
on the List.
You can set REMOTE RTRV to ON or OFF.
Enter the number of a remote fax machine to
receive the Jobs Report List or stored fax
message(s). (See page 9-5.)
If you hear one long beep, you can erase fax
message(s) from the memory.
You can check whether your machine has
received any fax message(s). If yes, you will
hear one long beep. If no, you will hear three
short beeps.
98 Change Answer Mode
1 TAM
2 Fax/Telephone
3 Fax
90 Exit
9 - 4
REMOTE FAX OPTIONS
If you hear one long beep, you can change the
Answer Mode. If you hear three short beeps,
you cannot change it.
After a long beep, y ou can e xit rem ote retriev al.
Page 79

Retrieving Jobs Report
You can retrieve the Jobs Report from a remote fax machine to see if you
have any fax messages.
Dial your fax number.
1
When you hear the beep, immediately enter your R R Passcode
2
1
5 9 ).
(
When you hear two short beeps, use the dial pad to press 9 6 1.
3
Using the dial pad, enter the number of the remote fax machine (up to 20
4
digits) where you want the Jobs Report forwarded, and then press
You cannot use and as dial n umbers. However, if you want to store
a pause, press
After you hear your machine beep, hang up and wait.
5
Your machine calls the remote fax machine. The remote fax machine
prints the Jobs Report.
.
Retrieving Fax Messages
Dial your fax number.
1
When you hear the beep, immediately enter your R R Passcode
2
1
5 9 ).
(
As soon as you hear two short beeps, use the dial pad to press 9 6 2.
3
Using the dial pad, enter the number (up to 20 digits) of the remote fax
4
machine where you want your fax messages forwarded, and then press
.
.
You cannot use and as dial numbers. However, if you want to store
a pause, press
After you hear your machine beep, hang up and wait.
5
Your machine calls the remote fax machine. The remote fax machine
prints your fax messages.
.
REMOTE FAX OPTIONS
9 - 5
Page 80

Changing Fax Forwarding Number Remotely
You can change the default setting of your fax forwarding number from a
remote fax machine.
Dial your fax number.
1
When you hear the beep, immediately enter your R R Passcode
2
1
5 9 ).
(
When you hear two short beeps, enter 9 5 4.
3
Enter the new telephone number of the remote fax machine (up to 20
4
digits) where you want your fax messages forwarded, and then
press
You cannot use and as dial numbers. However, if you want to store
a pause, press
To retrieve the Jobs Report, when you hear two short beeps, use the dial
5
pad to press
Use the dial pad to enter the number of the remote fax machine (up to 20
6
digits), and then press
After you hear your machine beep, hang up and wait.
7
Your machine calls the remote fax machine. The remote fax machine
prints the Jobs Report showing the new forwarding number.
Check the forwarding number.
8
If the forwarding number is incorrect, return to Step 1 and reset it.
.
9 6
.
1.
.
9 - 6
REMOTE FAX OPTIONS
Page 81

10
10
Printing Reports
Settings and Activity
You can print the following lists and reports:
1.JOB STATUS RPT
2.JOURNAL
3.DIALER DIR.
4.ALPHA DIR.
5.MACH.SETTINGS
6.JOBS REPORT
Choose if you would like a
Job Status Report printed after every fax
you send.
Journal lists information about the last
50 incoming and outgoing faxes.
TX means Transmit; RX means Receive.
Lists names and numbers stored in One
Touch and Speed Dial memory, in
numerical order.
DIALER DIR. list (above),
alphabetically.
Lists settings for SYSTEM SETUP,
RX SETTINGS, TX SETTINGS,
PRINT REPORTS, REMOTE FAX OPT
and MISCELLANEOUS.
Lists summary information and amount
of occupied memory.
To Print a Report
Features
Press
1
Enter the number of the report you want to print.
2
For example, press
, 1, 7.
4
to print the ALPHA DIR.
For the Journal, also press or to select PRINT REPORT?
and press
Press
3
Press
4
Enter/Yes
Send/Receive
Stop
.
to exit.
.
PRINTING REPORTS
10 - 1
Page 82

Transmission Verification Job Status Rpt.
You can use the Job Status Rpt. as proof that you sent a fax. This report
lists the time and date of transmission, and whether the transmission was
successful.
When the feature is OFF, the report is printed automatically only if an
error occurred during transmission. If the report indicates NG (poor line
condition), send the document again. If the report indicates you should
check the readability of certain pages, resend those pages.
If you typically send multiple faxes to the same destinations, you may need
a reminder to identify each fax transmission. You can select OFF+IMAGE
or ON+IMAGE to print a portion of the first page of the fax message on
the report.
Features
Press
1
Press or to select INC, INC+IMAGE, ON or ON+IMAGE and press
2
Enter/Yes
.
Press
3
Stop
to exit.
, 1, 7, 1.
When the machine is idle, you can print the Transmission Verification
Report by pressing
Last Comm.
when you wish to confirm if the last
transmission was successful or not.
Journal Interval
You can set the machine to print the Journal at specific intervals
(6, 12, 24 hours, 2, 4 or 7 days). If you set the interval to OFF, you can
print the report by following the steps in the previous section.
Features
Press
1
Press or to display INTERVAL?
2
and press
Press or to choose your setting and press
3
, 1, 7, 2.
Enter/Yes
.
INTERVAL?
Enter/Yes
.
(If you choose 7 days, the screen prompts you to choose a day at which to
begin the 7-day countdown.)
Enter the time to begin printing, in 24-hour format and press
4
Enter/Yes
(For example: enter 19:45 for 7:45 PM.)
Stop
5
10 - 2
Press
to exit.
PRINTING REPORTS
.
Page 83

11
11
Making Copies
Using Your Machine as a Copier
You can use your machine as a copy
machine, making up to 99 copies at
a time. The machine can stack the
copies or collate (sort) them.
The printable area of your machine
begins at approximately one-sixth
inch (4mm) from the edge of the paper.
1/6" (4mm)
1/6" (4mm)
Copy Contrast (Temporary Setting)
If a document is in the feeder, you can adjust copy contrast, to make
copies darker or lighter.
Features
Press
1
Press to make a copy lighter, or to
2
make a copy darker and press
Press
3
Press
4
Stop
Copy
to exit.
.
, 1, 0, 3.
Enter/Yes
3.COPY CONTRAST
.
Making a Single Copy
The default resolution for a single copy is Standard, which you can use for
documents containing both text and photographs. You can also select
S. Fine and Photo, as needed.
Insert document face down in the feeder.
1
Copy
Press
2
Do NOT pull on the paper while copying is in progress.
, then wait five seconds—OR—Press
Copy
again.
Not
Printable
area
MAKING COPIES
11 - 1
Page 84

Making Multiple Copies
There are two ways to make multiple copies on your machine. You can
choose whether the copies will be STACKED (all copies of page 1, then
all copies of page 2, etc.), or SORTED (collated). The default resolution
for multiple copies is Standard.
Stacking Multiple Copies
Insert document face-down in the feeder.
1
Batch/Sort
Press
2
Use the dial pad to enter the number of copies you want (up to 99).
3
Wait five seconds—OR—Press
4
twice.
Copy
again.
Sorting Multiple Copies
Sorting uses more memory then stacking. (See If You Get a Memory Full
Message on this page.)
Insert document face-down in the feeder.
1
Batch/Sort
Press
2
Use the dial pad to enter the number of copies you want (up to 99).
3
Wait five seconds—OR—Press
4
.
Copy
.
If You Get a Memory Full Message
If the memory becomes full while your
scanning a document to be copied the
screen displays
Batch/Sort
If you selected
or STACK after pressing
FULL message while you are scanning the first page, press
the job and make a single copy. If you selected
FULL message appears while scanning subsequent pages, press
copy the portion that is in memory—OR—press
the copy job using less memory, select STACKED copies.
MEMORY FULL P.01
PRESS STOP KEY
Copy
and get a MEMORY
Stop
to cancel
Batch/Sort
and the MEMORY
Stop
to cancel. To restart
Copy
to
11 - 2
MAKING COPIES
Page 85

Reducing and Enlarging Copies
AUTO sets the machine to calculate automatically the reduction ratio that
fits the size of your paper. MANUAL allows you to enter a ratio from 50%
to 200% in 1% increments.
Insert document face-down in the feeder.
1
Enlarge
Press
2
Press or to select AUTO, 200%, 150%, 125%, 120%, 100%, 93%,
3
or
Reduce
.
87%, 75%, 50% or MANUAL. (Enlargement or reduction ratios appear).
Copy
Press
4
Use the dial pad to enter the number of copies you want (up to 99).
5
Wait five seconds—OR—P ress
6
.
Copy
again.
Copying a Photograph
You can copy a photograph by pressing
Insert the photo(s) face-down in the feeder.
1
Photo
Press
2
Use the dial pad to enter the number of copies you want (up to 99).
3
Wait five seconds—OR—P ress
4
.
Copy
Photo
again.
, without pressing
Mode
.
MAKING COPIES
11 - 3
Page 86

11 - 4
MAKING COPIES
Page 87

Setting Up Fax Machine
12
12
Using Fax Machine with Your PC
Before you can print from W indows® on your PC, you must first follo w the
steps in this chapter to connect the machine to your computer and to install
the printer driver from the bundled Floppy Disks.
Before You Install Printer Driver
Computer Requirements
The following are the minimum computer requirements you need to set up
and operate as a printer. Use only a shielded interface cable that is IEEE1284 compliant, and that is less than 6 feet (1.8 meters) long.
CPU 80486/66MHz or higher (Windows
RAM 8MB or greater for Windows
and PC to Work Together
®
3.1x or 95)
®
Pentium 75 or Higher (Windows
®
NT
Workstation Version 4.0)
8MB or greater for Windows
(16MB recommended)
16MB or greater for Windows
Workstation Version 4.0 (32MB recommended)
98 or Windows
®
3.1x
®
95
®
98 or Windows NT
®
Hard Disk Drive 10MB Available Disk Space
®
Operating System Windows
4.0, DOS environment compatible with your
Windows
SETUP FAX MACHINE WITH PC
3.1x, 95/98 or NT® Workstation Version
®
version
12 - 1
Page 88

Connecting Fax Machine to PC
With Bundled Parallel Cable
You must connect the Fax machine to your PC with the included
bi-directional IEEE-1284 compliant parallel cable.
Make sure to unplug the machine’s power cord from the electrical outlet
1
before connecting the parallel interface cable.
Also, make sure the PC is turned off and unplugged from the electrical
power before you connect the interface cable.
Connect the parallel interface cable to the parallel interface port of the
2
machine and secure the connection with the wire clips.
Connect the interface
3
cable to the printer port of
the PC and secure
with the two screws.
For the location of your
computer’s parallel printer
port, see the User’s Guide
for your PC.
Before plugging in your PC and turning it on, plug in the electrical cord of
4
the machine.
If you are using Windows® 95, after you connect machine to PC. You may
see “New Hardware Found Pitney Bowes 1630” during startup.
®
You can select “Do not install a driver (Windows
again).” and click OK, so Windows
®
will not display this dialog box
will not prompt you
again.
—OR—
If you see “Update Device Driver Wizard”, click Next to bypass the
Windows
If you are using Windows
®
Plug and Play Printer Driver screens, followed by Finish.
®
98, you may see the “Add New Hardware
Wizard” during startup, follow the instructions from the installer, then
click Next. Click Finish when it appears on the screen.
12 - 2
SETUP FAX MACHINE WITH PC
Page 89

Installing Printer Driver
If you are using Windows NT® W orkstation Version
4.0:
Click the Start button in the Taskbar.
1
Select Settings, then Printers.
2
Double-click on the Add Printer wizard.
3
The Add Printer Wizard window appears:
SETUP FAX MACHINE WITH PC
12 - 3
Page 90

Select My Computer and click the Next button.
4
Select the Port you will use (we recommend LPT1), and click the Next
5
button.
12 - 4
SETUP FAX MACHINE WITH PC
Page 91

Click the Have Disk button.
6
The Install From Disk window appears:
Insert the floppy disk for the printer driver into drive A, and click the OK
7
button.
Follow the screen prompts to complete the installation.
If you are using Windows® 3.1 or 3.11:
Insert the floppy disk for the printer driver into drive A.
1
From the Program Manager, click on File, then Run.
2
Enter A:\SETUP .
3
SETUP FAX MACHINE WITH PC
12 - 5
Page 92

If you are using Windows® 95, 98:
Click the Start button in the Task bar.
1
Select Settings, then Printers.
2
Double-click on the Add Printer wizard.
3
Click the Next button.
4
12 - 6
SETUP FAX MACHINE WITH PC
Page 93

Select Local printer and click the Next button.
5
Click the Have Disk button.
6
The Install From Disk windows appears.
Insert the floppy disk for the printer driver into drive A, and click the OK
7
button.
Follow the screen prompts to complete the installation.
SETUP FAX MACHINE WITH PC
12 - 7
Page 94

12 - 8
SETUP FAX MACHINE WITH PC
Page 95

13
For DOS Users
13
How to Use Fax machine with Your DOS
Application Software
Before working with your application software that runs on DOS, check
that the machine’s name appears in the printer selection of your
application software. If the machine is not listed, you must install the
printer driver that corresponds to HP LaserJet IIP’s emulations.
The following table shows combinations of printer drivers and emulation
mode. To get the most out of this machine, you should install an HP
printer driver in your application software.
Printer driver supported in Emulation mode to be selected with
your application software the remote printer console program
HP LaserJet IIP™ HP LaserJet IIP emulation mode
HP LaserJet II™ Auto emulation selection
n
The best or recommended printer driver is indicated in bold.
n
Be sure to choose the proper printer driver in your application software.
n
Be sure the printing resolution is set to 300 dpi in your DOS application
software.
FOR DOS USERS
13 - 1
Page 96

13 - 2
FOR DOS USERS
Page 97

Using Fax Machine
14
14
Special Printing Features
Windows® Printing
The dedicated printer driver for Microsoft® Windows® 3.1x, 95/98 and
Windows NT
supplied with your machine. You can install them easily into your
Windows
unique compression mode to enhance printing speed in Windows
applications, and allows you to set various printer settings, including
economy printing mode and custom paper size.
Popular Printer Emulation Support
The machine supports HP LaserJet IIP printer emulation mode. If you use
DOS application software, or Windows
LaserJet IIP emulation mode for printer operations.
Bi-directional Parallel Interface
The machine’s parallel interface enables it to send memory and printer
setup information to the computer.
as a Printer
®
Workstation Version 4.0 are available on the diskettes
®
system using our installer program. The driver supports our
®
3.0 or earlier, you can use HP
®
Enhanced Memory Management
The machine has its own Data Compression Technology, which
automatically compresses graphic data and downloads font data
efficiently into the machine’s memory. With the machine’s standard
memory, you can avoid memory errors and print most full-page, 600 dpi
graphic and text data, including larger fonts.
USING FAX MACHINE AS A PRINTER
14 - 1
Page 98

Printing From Your PC
Multi-purpose Paper Cassette
The machine’s multi-purpose paper cassette can be adjusted to feed many
sizes of paper: letter, legal, A4, B5 and A5 plain paper. When the
machine receives print data from your computer, it loads paper from the
paper cassette.
n
Select the print command from your PC.
Your PC sends a print command and data to the machine. The machine
displays the date and time and RECEIVING DATA. If there are more
pages, the machine begins to print the next page automatically. When
printing is finished, it returns to online status.
You may select the proper paper source, paper size, and page orientation
in your application software.
If your application software does not support your custom paper size,
select the next larger paper size. Then adjust the print area by changing
the right and left margins in your application software. (See Acceptable
Paper, page 2-5.)
Use the manual feed slot for labels, transparencies, card stock, thicker
paper or envelopes.
Two-Sided Printing (Manual Duplexing)
The supplied printer drivers for Windows® 3.1x, 95/98 and Windows NT
Workstation Version 4.0 enable manual duplex printing. (For more
information, see the Help screen for the printer driver.)
Please select LPT1 on the printer driver.
The machine prints all the
even-numbered pages on one
side of the paper first.
Then, the Windows
instructs you (with a pop-up
message) to reinsert the paper.
Before reinserting the paper,
straighten it well, or you may
get a paper jam. Very thin or
very thick paper is not recommended.
14 - 2
USING FAX MACHINE AS A PRINTER
®
driver
®
Page 99

Caution
When you use manual duplexing, it is possible that a paper jam may occur
or the print quality might not be satisfactory. (See Paper is Jammed in the
Multi-purpose Paper Cassette, page 17-6.)
Front Output Bin
The machine ejects paper with printed surfaces face down into the output
bin in the front of the machine. Unfold the output bin extension to support
the printed pages.
To prevent the possibility of
transparencies smudging as they
stack in the output bin, remove
each transparency after it exits.
Manual Feed Slot
Your machine has a manual feed
slot above the paper cassette.
You can load envelopes and
special print media one at a time
into this slot. You do not have to
remove paper from the paper cassette.
(For information about
acceptable paper, see page 2-6.)
Use the manual feed slot to print
or copy on labels, transparencies,
card stock, thicker paper or envelopes.
USING FAX MACHINE AS A PRINTER
14 - 3
Page 100

Loading One Sheet of Paper
You do not have to choose Manual Feed in the Setup dialog box of your
printer driver. Insert the sheet of paper for Portrait (vertical) or
Landscape (horizontal), with the side you wish to print on face up in the
manual feed slot.
Align the paper at the center of the manual feed slot and insert it all the
1
way.
Adjust the paper guides
2
to the width of the paper.
Loading More than One Sheet of Paper
Open the Setup dialog box of the Windows® printer driver and select
1
Manual Feed in the Paper Source section. Follow Steps 1 and 2 above to
load the first page. The machine starts printing automatically.
After the first page is printed, the screen
2
displays:
MANUAL FEED
Insert the next sheet of paper to resume printing.
Repeat Steps 1 and 2 until you have finished printing.
3
If you do not select Manual Feed, and insert a page in the manual feed
slot, the machine will load the first page from the manual feed slot and
subsequent pages from the paper cassette.
Manual
Feed
Slot
14 - 4
USING FAX MACHINE AS A PRINTER
 Loading...