

Page 1

STEREO CD CASSETTE DECK RECEIVER
REPRODUCTOR DE DISCOS
COMPACTOS/PLATINA/RECEPTOR ESTEREO
XR-A790
XR-A390
SPEAKER SYSTEM
SISTEMA DE ALTAVOCES
S-A790VLR
S-A390
Operating Instructions
Manual de instrucciones
Page 2
WARNING: TO PREVENT FIRE OR SHOCK
HAZARD, DO NOT EXPOSE THIS APPLIANCE TO RAIN
OR MOISTURE.
Energy-saving design
This system is designed to use 1 W of electricity when
power is switched to Standby.
IMPORTANT
CAUTION
RISK OF ELECTRIC SHOCK
DO NOT OPEN
The lightning flash with arrowhead symbol, within an
equilateral triangle, is intended to alert the user to the
presence of uninsulated "dangerous voltage" within
the product's enclosure that may be of sufficient
magnitude to constitute a risk of electric shock to
persons.
Note: This equipment has been tested and found to comply with the limits for a Class B digital device, pursuant to Part 15 of the
FCC Rules. These limits are designed to provide reasonable protection against harmful interference in a residential installation.
This equipment generates, uses, and can radiate radio frequency energy and, if not installed and used in accordance with the
instructions, may cause harmful interference to radio communications. However, there is no guarantee that interference will not
occur in a particular installation. If this equipment does cause harmful interference to radio or television reception, which can be
determined by turning the equipment off and on, the user is encouraged to try to correct the interference by one or more of the
following measures:
— Reorient or relocate the receiving antenna.
— Increase the separation between the equipment and receiver.
— Connect the equipment into an outlet on a circuit different from that to which the receiver is connected.
— Consult the dealer or an experienced radio/TV technician for help.
Information to User
Alteration or modifications carried out without appropriate authorization may invalidate the user’s right to operate the
equipment.
CAUTION:
TO PREVENT THE RISK OF ELECTRIC SHOCK, DO
NOT REMOVE COVER (OR BACK). NO USERSERVICEABLE PARTS INSIDE. REFER SERVICING
TO QUALIFIED SERVICE PERSONNEL.
The exclamation point within an equilateral triangle is
intended to alert the user to the presence of important
operating and maintenance (servicing) instructions in
the literature accompanying the appliance.
CAUTION
• Use of controls or adjustments or performance of procedures other than those specified herein may result in hazardous
radiation exposure.
• The use of optical instruments with this product will increase eye hazard.
Thank you for buying this Pioneer product.
Please read through these operating instructions so you will
know how to operate your model properly. After you have
finished reading the instructions, put them away in a safe place
THE STANDBY/ON BUTTON IS SECONDARY
CONNECTED AND THEREFORE DOES NOT SEPARATE
THE UNIT FROM MAINS POWER IN STANDBY POSITION.
for future reference.
In some countries or regions, the shape of the power plug and
power outlet may sometimes differ from that shown in the
explanatory drawings. However, the method of connecting and
operating the unit is the same.
CAUTION
This product contains a laser diode of higher class than 1.
To ensure continued safety, do not remove any covers or
attempt to gain access to the inside of the product.
Refer all servicing to qualified personnel.
The following caution label appears on your unit.
Location: rear of the unit
LINE VOLTAGE SELECTOR SWITCH
Mains voltages in Saudi Arabia are 127 V and 220 V only.
The line voltage selector switch is located on the rear panel
of this receiver. Check that it is set properly before plugging
the power cord into the outlet. If the voltage is not properly
set or if you move to an area where the voltage requirements differ, adjust the selector switch as follows:
1. Disconnect the power cord.
2. Use a medium-size screwdriver.
3. Insert the screwdriver into the groove on the voltage
selector, and adjust so that the tip of the arrow points to
the voltage value of your area.
VOLTAGE
SELECTOR
CLASS 1
LASER PRODUCT
Ventilation
When installing this unit, make sure to leave space around the
unit for ventilation to improve heat radiation (at least 30 cm at top,
15 cm at rear, and 15 cm at each side). If not enough space is
provided between the unit and walls or other equipment, heat
will build up inside, interfering with performance or causing
malfunctions.
En
This product is for general household purposes. Any failure
due to use for other than household purposes (such as
long-term use for business purposes in a restaurant or use
in a car or ship) which requires repair will be charged for
even during the warranty period.
240V 220–
230V
110–
127V
Page 3
警告:
為防止火災或觸電事故,請不要讓機器暴露在雨
中或潮濕的環境裡。
節能設計
本機處於待機模式時的設計耗電量為1 W 。
承蒙惠顧日本先鋒公司產品,甚表示感謝。
務請通讀本使用說明書,以便您掌握如何正確地使用此機器。
當您讀完本說明書後,請把它妥善保存好,以備今後查用。
在某些國家地區,電源插頭和插座的形狀可能與中文插圖所示
的形狀有所差異。但是,本機的聯接和操作方法是相同的。
注意
本產品內裝有高於 1 級(class 1)的鐳射二極管。為確保
持續的安全,請勿拆卸任何蓋子或試圖接觸產品內部。
全部維修事宜請委托有資格的人員進行。
機器上面貼有如下注意標籤。
位置:機器背面
CLASS 1
LASER PRODUCT
通 風
ADVERTENCIA: PARA EVITAR INCENDIOS Y
DESCARGAS ELECTRICAS, NO EXPONGA ESTE
APARATO A LA LLUVIA NI A LA HUMEDAD.
Diseño con ahorro de energía
Este sistema está diseñado para utilizar 1 W de electricidad cuando el tocadiscos está en el modo de espera.
Gracias por la adquisición de este producto Pioneer.
Para saber cómo utilizar correctamente su modelo, lea
cuidadosamente este manual de instrucciones. Después de
haber finalizado su lectura, guárdelo en un lugar seguro para
futuras referencias.
En algunos países o regiones, la forma de la clavija de alimentación
y de la toma de corriente pueden ser diferentes a la indicada en
las ilustraciones explicatorias, sin embargo el método de conexión
y operación de la unidad es idéntico.
PRECAUCION
Este aparato contiene un diodo láser de clase superior a 1.
Para mantener la seguridad apropiada, no saque ninguna
cubierta ni intente acceder al interior del aparato.
Lleve siempre el aparato a un centro con personal de servicio
técnico cualificado.
En su la unidad aparecerá la etiqueta de precaución siguiente.
Ubicación: parte posterior de la unidad.
CLASS 1
LASER PRODUCT
在安裝本機時,請在機器周圍留下足夠空間以保証通風,使熱
量散發出去(應保證頂部空間不小於30cm﹔背部空間不小於15 cm﹔
左右側面空間不小於15 cm)。如果在機器和牆壁以及其他裝置之間
不能保留足夠的空隙,熱量就會在內部積蓄,從而影響機器運作或
造成異常。
因電源開關 (STANDBY/ON) 是二次聯接的,因此,請勿在預
備狀態下將本機與主電源分開。
線路電壓選擇開關
沙烏地阿拉伯的主電壓只使用 127 V 和 220 V 。
線路電壓選擇開關位於本裝置的背面板上。在將電源插頭插入
牆裝電源插座之前,請確認它是否正確設定。如果電壓沒有正確設
定,或搬遷到電壓需求不同的地方,請按如下要領調詳本選擇開
關:
1. 拔除電源插頭。
2. 使用中型螺絲刀。
3. 將螺絲刀插入電壓選擇開關上的槽中,然後進行調詳以使箭頭
尖端指向當地電壓值。
VOLTAGE
SELECTOR
240V 220–
本產品只適宜一般家庭用途。如果是由於應用在其他非家庭用
途(如做為商業用途而長期使用於餐廳中,或者使用於汽車或
船中)而導致發生故障並需要修理,在保用期間必須承擔修理
費用。
230V
110–
127V
Ventilación
Cuando se instala esta unidad, asegúrese de dejar espacio
alrededor de la unidad para proporcionar ventilación y mejorar así
la radiación del calor (por lo menos 30 cm en la parte superior, 15
cm en la parte trasera y 15 cm de cada lado). Si no hay suficiente
espacio entre la unidad y las paredes u otro equipo, se acumulará
calor en el interior, interfiriendo con el rendimiento o causando
fallas de funcionamiento.
EL INTERRUPTOR DE ENCENDIDO/EN (STANDBY/ON)
ESPERA ESTÁ CONECTADO EN SECUNDARIO Y POR LO
TANTO NO DESCONECTA AL APARATO DE LA RED
CUANDO ESTE EN LA POSICION DE ESPERA (STANDBY).
INTERRUPTOR SELECTOR DE VOLTAJE DE LINEA
Las tensiones de la red en Arabia Saudí son de 127 V y
220 V solamente.
El interruptor selector de voltaje de línea se ubica en el
panel trasero del reproductor. Verifique que se encuentra
ajustado adecuadamente antes de enchufar el cable de
alimentación al tomacorriente. Si el voltaje no se ajusta
adecuadamente o si va una área en donde los
requerimientos de voltaje son diferentes, ajuste el
interruptor selector de la manera siguiente:
1. Desconecte el cable de la alimentación.
2. Utilice un destornillador de tamaño medio.
3. Inserte el destornillador en la ranura del conmutador
selector de tensión y
mueva el
conmutador de
forma que la punta
de la flecha señale
hacia la tensión
ustilizada en su área.
Este producto es para tareas domésticas generales.
Cualquiera avería debida a otra utilización que tareas
domésticas (tales como el uso a largo plazo para motivos
de negocios en un restaurante o el uso en un coche o un
barco) y que necesita una reparación hará que cobrarla
incluso durante el período de garantía.
VOLTAGE
SELECTOR
240V 220–
230V
110–
127V
ChH/Sp
Page 4

Before You Start1
Contents
1 Before You Start
Checking what’s in the box ............................................... 4
Using this manual............................................................. 4
Putting the batteries in the remote ................................... 5
Using the remote control ................................................. 5
Finding a suitable location................................................ 5
Avoiding condensation problems ................................... 5
Moving the system unit..................................................... 5
Discs compatible with this system ..................................... 5
2 Connecting Up
The rear panel ............................................................... 10
Connecting the speakers ................................................ 10
Connecting the front speakers ..................................... 10
Connecting the Super Woofer speakers ....................... 12
Connecting the rear speakers ...................................... 12
Placing the speakers .................................................... 12
Connecting the radio antennas........................................ 14
Connecting external antennas .......................................16
Connecting auxiliary components .................................. 16
Connecting the power.....................................................16
3 Controls & Displays
Front panel .....................................................................18
Display .......................................................................... 20
Remote control .............................................................. 22
4 Getting Started
Switching on and setting the clock ................................. 24
Playing CDs ................................................................... 26
Summary of playback controls for CDs ........................ 28
Changing discs ............................................................... 28
Tuning in stations ........................................................... 30
Improving poor FM reception ...................................... 30
Playing cassette tapes..................................................... 30
Resetting the tape counter........................................... 34
Relay play.................................................................... 34
5 More CD Features
Programming a playlist ................................................... 36
Using repeat play ........................................................... 36
Using random play ......................................................... 38
6 More Tuner Features
Saving stations for quick recall ....................................... 40
Listening to station presets .......................................... 40
Changing the frequency step .......................................... 40
7 Recording Cassette Tapes
Making tape recordings.................................................. 42
Automatically recording CDs ....................................... 44
Copying tapes ............................................................. 46
Improving AM tape recordings ..................................... 46
8 Singing Karaoke
Singing karaoke ............................................................. 48
9 Using Sound Effects
Using the sound morph .................................................. 50
Using preset effects ....................................................... 50
Audio preset mode ...................................................... 50
Surround preset mode................................................. 50
Changing sound presets using the remote .................... 50
Using individual sound effects ........................................ 52
Equalizer mode ........................................................... 52
Zoom Surround mode ................................................. 52
P.Bass mode ................................................................ 52
Changing sound effects using the remote..................... 52
Saving your own settings ................................................ 54
Changing the sound display............................................ 54
Muting the sound ........................................................... 54
10Using the Timer
Setting the wake-up timer .............................................. 56
Setting the sleep timer ................................................... 58
Setting the record timer ................................................. 58
Canceling the timer ....................................................... 60
11 Additional Information
Taking care of your system ............................................. 62
Disc lens cleaner.......................................................... 62
Taking care of your discs ................................................ 62
Storing discs................................................................ 62
Discs to avoid .............................................................. 64
Using cassette tapes ....................................................... 64
Tapes you should avoid ................................................ 64
Protecting your recordings .......................................... 64
Troubleshooting............................................................. 66
Specifications ................................................................ 69
Switching the demo mode on/off ....................... back cover
Checking what’s in the box
Thank you for buying this Pioneer product. Before starting to set
up your new stereo system, please check that you received the
following supplied accessories:
• Operating instructions
• Remote control unit
• Power cord x1 (x2 (Latin American model only))
• FM antenna
• AM loop antenna
• Power plug adapter (Latin American model only)
• Speaker cord (S-A790VLR only)— red/black speaker cords
(x2), blue/black speaker cords (x2)
Using this manual
This manual is for the XR-A790 and XR-A390 Stereo CD Cassette
Deck Receiver. It is split into three sections: setting up (chapters 1
and 2); using the system (chapters 3 to 10), and additional
information (chapter 11). This last chapter contains care
information for the unit, discs and tapes, a troubleshooting
section, and specifications.
4
En
Page 5
Before You Start
1
Putting the batteries in the
remote
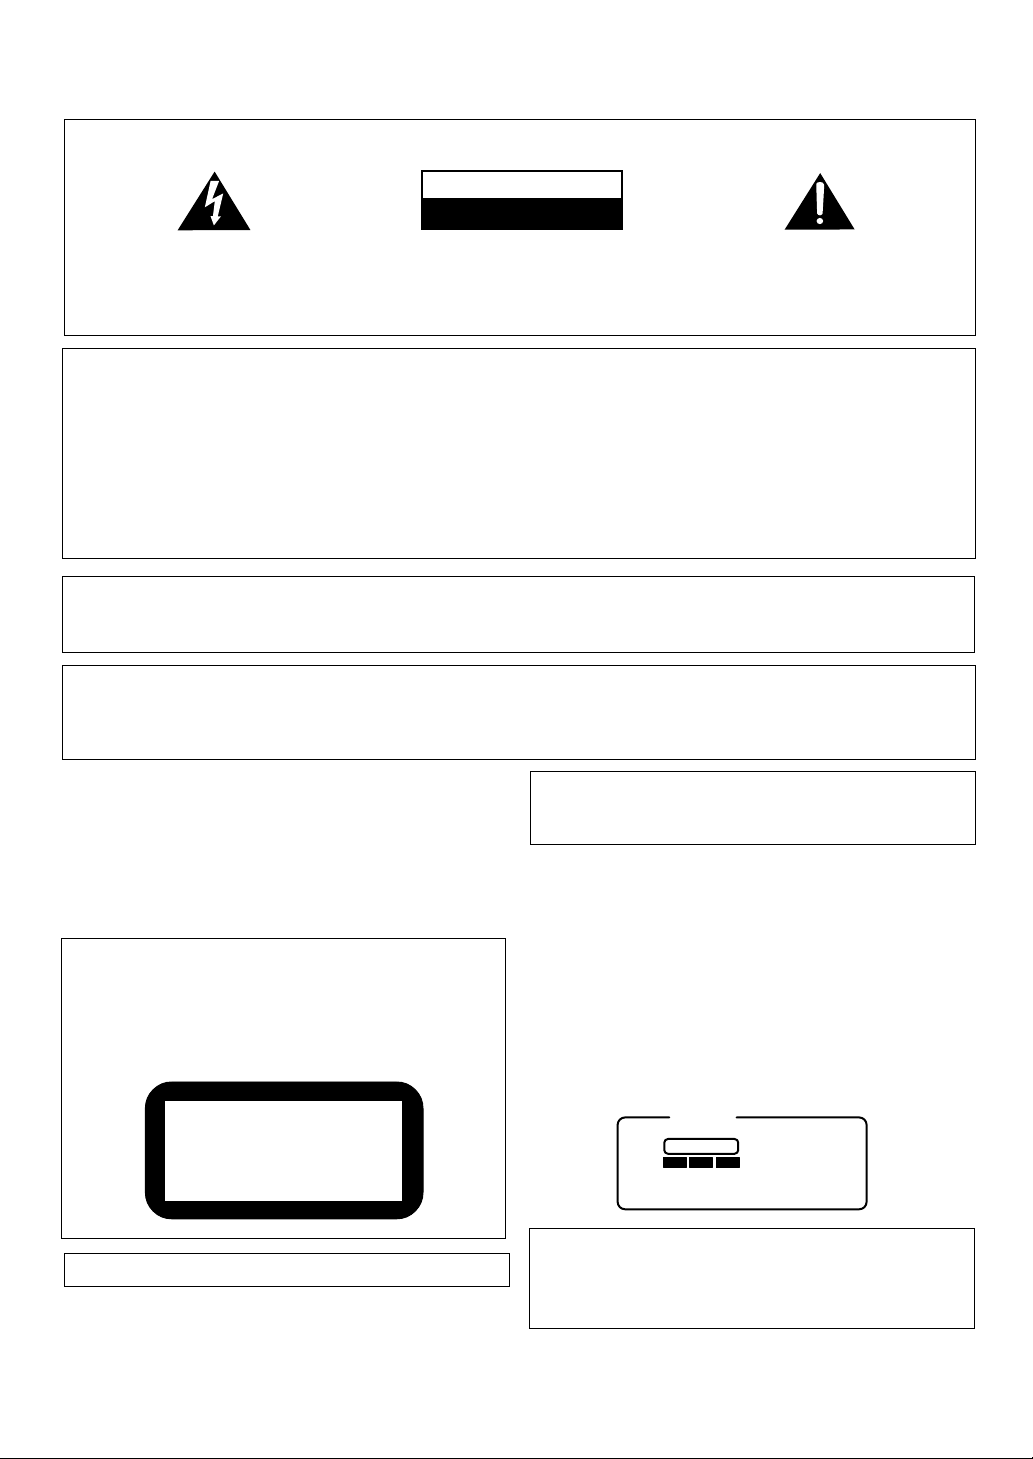
1 Open the battery compartment
cover on the back of the remote
control unit.
2 Load the two AA/R6P batteries
into the battery compartment
following the indications (ª, ·)
inside the compartment.
3 Close the cover.
Caution!
• Remove the batteries if the remote is
not going to be used for a month or
more.
• Remove dead batteries promptly—
they can leak and damage the unit.
1
2
3
Using the remote control
Keep in mind the following when using the remote control unit:
• Make sure that there are no obstacles in between the remote
and the remote sensor on the unit.
• Use within the operating range and angle, as shown in the
diagram. (A)
• Remote operation may
become unreliable if
strong sunlight or
fluorescent light is
shining on the
unit’s remote
sensor.
• Remote controllers for different devices can interfere with each
other. Avoid using remotes for other equipment located nearby
this unit.
• Replace the batteries when you notice a fall off in the
operating range of the remote.
(A)
Finding a suitable location
We want you to enjoy using your new stereo system for years to
come, so please bear in mind the following points when choosing
a suitable location for the system components and speakers:
Do...
✔ Use in a well-ventilated room.
✔ Place on a solid, flat, level surface, such as a table, shelf or
stereo rack.
Don’t...
✗ Use in a place exposed to high temperatures or humidity,
including near radiators and other heat-generating appliances.
✗ Place on a window sill or other place where any of the
components or speakers will be exposed to direct sunlight.
✗ Use in an excessively dusty or damp environment.
✗ Place directly on top of any appliance which becomes hot in
use.
✗ Use near a television or monitor as you may experience
interference—especially if the television uses an indoor
antenna.
✗ Use in a kitchen or other room where the unit may be exposed
to smoke or steam.
✗ Place on an unstable surface, or one that is not large enough
to support all four of the unit’s feet, or the whole footprint of
each speaker.
✗ Block the cooling fan on the rear of the unit. Don’t cover the
unit with cloth, or use on thick carpet, etc.
✗ Put objects on top of the speakers.
Avoiding condensation problems
Condensation may form inside the unit if it is brought into a
warm room from outside, or if the temperature of the room rises
quickly. Although the condensation won’t damage the unit, it may
temporarily impair its performance. For this reason you should
leave it to adjust to the warmer temperature for about an hour
before switching on and using.
Moving the system unit
If you need to move the system unit, first switch it off and unplug
from the wall outlet. Never lift or move the unit during playback—discs rotate at a high speed and may be damaged.
Discs compatible with this
system
Any disc that displays one of the following logos should play in
this system. Other formats, including DVD, Video CD, CD-R, CDRW,
CD-ROM, SACD and Photo CD will not play.
12cm or 8cm discs.
5
En
Page 6

1
開始操作之前
目錄
1 開始操作之前
檢查包裝的內容 ................................... 6
本說明書使用方法 ................................. 6
遙控器內裝入電池 ................................. 7
遙控器使用方法 ................................... 7
找出合適的位置 ................................... 7
避免冷凝問題 .................................... 7
移動系統組件 ..................................... 7
適合於本系統的碟片 ............................... 7
2聯接
背面板 .......................................... 1 1
揚聲器聯接方法 .................................. 1 1
正面揚聲器聯接方法 ............................. 1 1
超低音揚聲器聯接方法 ........................... 1 3
背面揚聲器聯接方法 ............................. 1 3
揚聲器安放方法 ................................. 1 3
無線電天線聯接方法 .............................. 1 5
外接天線聯接方法 ............................... 1 7
輔助組件聯接方法 ................................ 1 7
電源聯接方法 .................................... 1 7
3 控制器和顯示器
前面板 .......................................... 1 9
顯示器 .......................................... 2 1
遙控器 .......................................... 2 3
4 開始操作
電源打開方法和時鐘設定方法 ...................... 2 5
CD 碟片播放方法 ................................. 2 7
CD 碟片用播放控制器概要 ....................... 2 9
換碟片 .......................................... 2 9
電台調入方法 .................................... 3 1
欠佳的調頻接收改進方法 ......................... 3 1
卡帶播放方法 .................................... 3 1
磁帶計數器復原方法 ............................. 3 5
接力播放 ....................................... 3 5
5 CD 碟片更多的功能
播放一覽表的編程 ................................ 3 7
重複播放使用方法 ................................ 3 7
隨機播放使用方法 ................................ 3 9
6 調諧器更多的功能
為快速重呼叫進行電台記憶 ........................ 4 1
電台預調收聽方法 ............................... 4 1
頻率步進改變方法 ................................ 4 1
7 進行卡帶錄音
進行卡帶錄音 .................................... 4 3
CD 碟片的自動錄音 ............................. 4 5
磁帶拷貝方法 ................................... 4 7
調幅廣播的磁帶錄音改進方法 ..................... 4 7
8 卡拉 O K 演唱方法
卡拉 O K 演唱方法 ................................ 49
9 音響效果使用方法
音響改變功能使用方法 ............................ 5 1
6
ChH
預置效果使用方法 ................................ 5 1
音頻預置模式 ................................... 51
環繞聲預置模式 ................................. 51
使用遙控器來改變音響預置 ....................... 51
各音響效果使用方法 .............................. 53
均衡器模式 ..................................... 53
變焦距環繞聲模式 ............................... 53
無源低音模式 ................................... 53
使用遙控器來改變音響效果 ....................... 53
自己的設定記憶方法 .............................. 55
音響顯示改變方法 ................................ 55
消音 ............................................ 55
10 定時器使用方法
喚醒定時器設定方法 .............................. 5 7
睡眠定時器設定方法 .............................. 5 9
錄音定時器設定方法 .............................. 5 9
定時器取消方法 .................................. 6 1
11附加情報
系統維護方法 .................................... 6 3
碟片拾音透鏡清潔器 ............................. 6 3
碟片維護方法 .................................... 6 3
碟片保存方法 ................................... 6 3
應避免使用的碟片 ............................... 6 5
卡帶使用方法 .................................... 6 5
應避免使用的磁帶 ............................... 6 5
保護錄音內容 ................................... 6 5
故障檢修 ........................................ 6 7
規格 ............................................ 7 0
通∕斷示範模式 ................................ 封底
檢查包裝的內容
謝謝購買先鋒公司產品。在開始裝配新的立體聲系統之
前,請確認下列附件齊全:
• 使用說明書
• 遙控器
• 電源線 ×1(×2 僅適用於拉美型號)
• 調頻天線
• 調幅環形天線
• 電源插頭適配器(僅適用於拉美型號)
• 揚聲器導線(僅適用於 S-A790VLR 型)-紅色∕黑
色揚聲器導線(×2),藍色∕黑色揚聲器導線(×2)
本說明書使用方法
本說明書為 XR-A790 型和 XR-A390 型立體聲 CD 卡式座
接收機用。分為 3 個部分:設置(第 1 和 2 章);系統
使用方法(第 3 ∼ 10 章)和附加情報(第 11 章)。該
最後一章包括有關本機、碟片和磁帶的注意情報、故障
檢修和規格各節。
Page 7
開始操作之前
1
遙控器內裝入電池
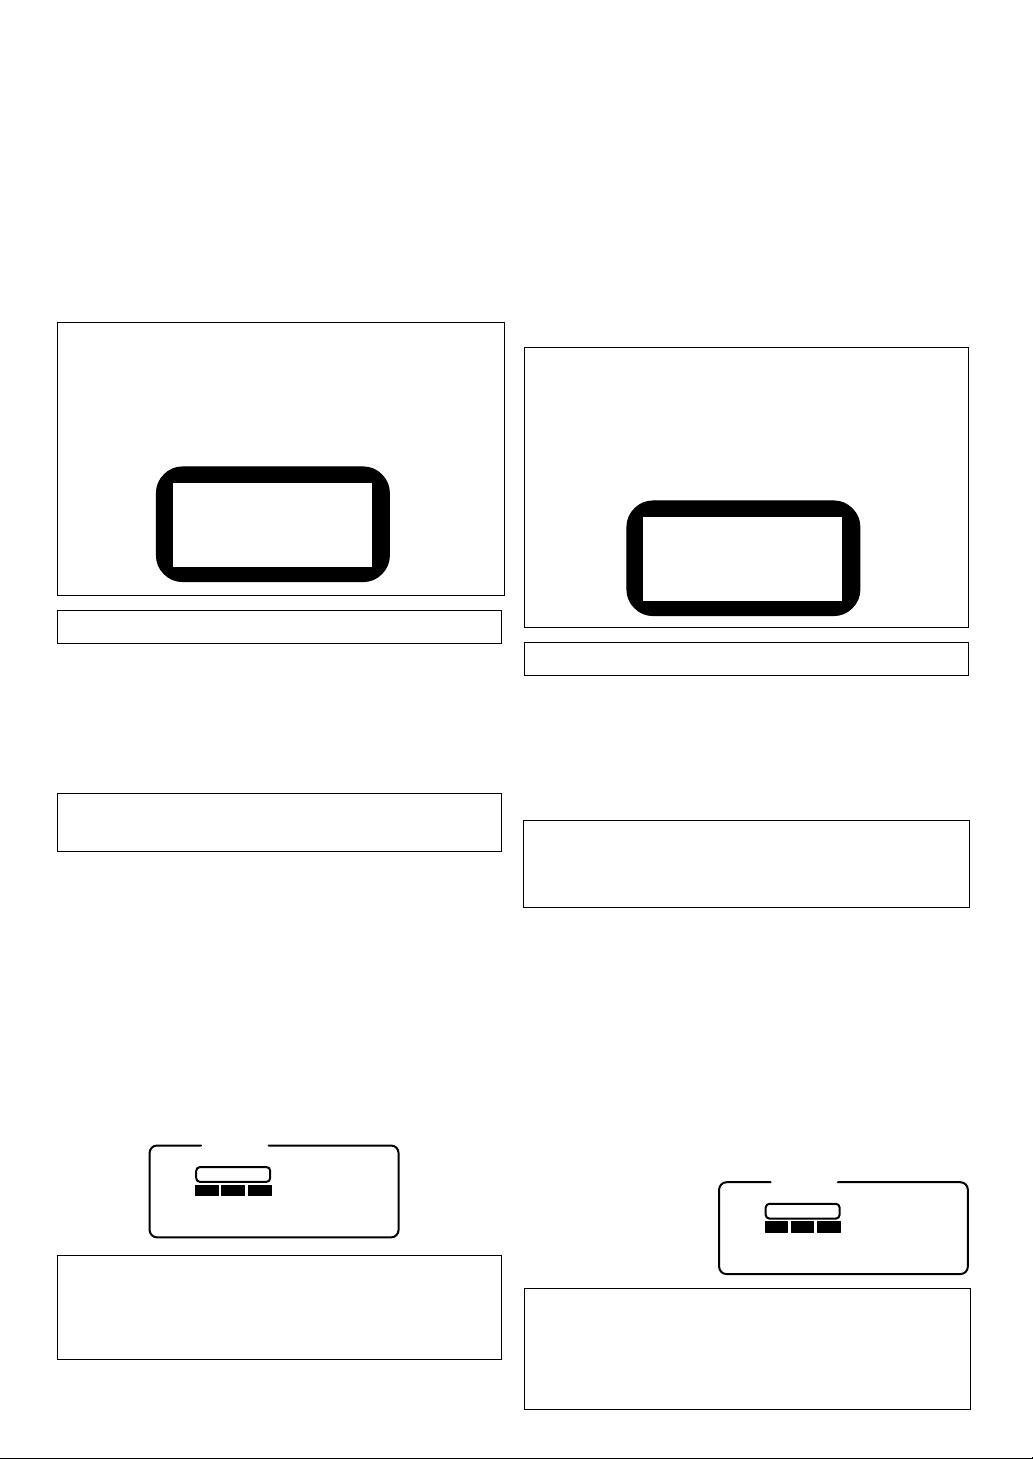
1 打開位於遙控器背面上的電池室
蓋。
2 按照電池室內的指示(ª,·)
將 2 節 AA/R6P 型乾電池裝入電
池室內。
3 關閉電池室蓋。
注意!
• 如果遙控器不使用一個月以
上,請取出電池。
• 耗盡的電池應立即取出,否
則可能會洩漏而損傷裝置。
1
2
3
遙控器使用方法
當使用遙控器時,應牢記下列事項:
• 確認遙控器與主機上遙控感應器之間沒有阻礙物。
• 如圖所示,在操作範圍和角度內使用。(A)
• 如果強烈的陽光或螢光燈光線照射到本機的遙控感
應器,遙控器的動作可能變為不可靠。
• 用於不同設備的遙控器可
能互相干擾,避免對位
於本機附近的其他裝
置使用遙控器。
• 當注意到遙控器
的操作範圍變
小時,需更換
電池。
(A)
找出合適的位置
本公司希望您長年愛用您新的立體聲系統,因此為本系
統組合設備和揚聲器選擇合適的位置時,應注意下列要
點:
要:
✔ 在通風良好的室內使用。
✔ 安放在結實、平坦的表面,如桌子、擱架或立體聲
設備架上。
不要:
✗ 在曝露於高溫或高濕的場所,包括散熱器及其他產
生熱的機器附近使用。
✗ 安放在將被陽光直射的窗台板或其他任何組件或揚
聲器上面。
✗ 在過度污髒或潮濕的環境使用。
✗ 直接安放在使用中變熱的任何裝置上面。
✗ 在電視機或監視器附近使用,否則可能會經驗干
擾,特別是電視機使用室內天線時。
✗ 在裝置可能曝露於煙或蒸汽的廚房或其他房間使
用。
✗ 安放在不穩定的表面,或尺寸不足於支撐裝置全部4
個腳或每一個揚聲器全部腳印的表面。
✗ 阻塞位於裝置背面上的冷卻風扇;用布罩上,或放
在厚地毯上使用。
✗ 將物品安放在揚聲器上面。
避免冷凝問題
如果裝置從室外搬進溫暖的房間,或室溫急劇上昇,裝
置內側可能形成冷凝。儘管冷凝不會損傷裝置,然而可
能會暫時減弱其性能。為此理由,在打開電源並使用之
前擱置裝置約一小時,以使其調整到更暖的溫度。
移動系統組件
如果需要移動本系統組件,首先關掉電源,然後從牆壁
輸出插座拔除電源線。播放中,切忌提起或移動本機,
因為碟片以高速旋轉而可能導致損壞。
適合於本系統的碟片
任何具有下列標識之一的碟片能夠在本系統中播放。其
他制式,包括 D V D 、 Video CD 、CD-RW 、CDROM 、 SACD 和 Photo CD 不能在本系統中播放。
(12 cm 或 8 cm 碟片。)
ChH
7
Page 8

Antes de comenzar1
Índice
1 Antes de comenzar
Verificación de los contenidos .......................................... 8
Cómo usar este manual .................................................... 8
Cómo colocar las baterías en el mando a distancia ........... 9
Cómo usar el mando a distancia ....................................... 9
Cómo encontrar una ubicación adecuada ......................... 9
Prevención de problemas de condensación .................... 9
Cómo trasladar el sistema ................................................ 9
Discos compatibles con este sistema ................................ 9
2 Cómo realizar conexiones
El panel posterior ........................................................... 11
Cómo conectar los altavoces ........................................... 11
Cómo conectar los altavoces frontales .......................... 11
Conexión de los súper altavoces de subgraves .............. 13
Cómo conectar los altavoces posteriores ..................... 13
Cómo ubicar los altavoces ........................................... 13
Cómo conectar las antenas de radio ............................... 15
Cómo conectar antenas externas .................................. 17
Cómo conectar componentes auxiliares .......................... 17
Cómo conectarse a la red eléctrica..................................17
3 Controles y visualizaciones
Panel frontal .................................................................. 19
Pantalla de visualización ................................................. 21
Mando a distancia .......................................................... 23
4 Cómo empezar
Cómo encender y configurar el reloj............................... 25
Cómo reproducir discos compactos ............................... 27
Resumen de los controles de reproducción de discos
compactos .................................................................. 29
Cómo cambiar discos ..................................................... 29
Cómo sintonizar emisoras de radio................................. 31
Cómo mejorar una recepción en FM débil .................... 31
Cómo reproducir cintas ................................................. 33
Cómo reconfigurar el contador .................................... 35
Reproducción por relé................................................. 35
5 Otras características de los discos compactos
Cómo programar una lista de reproducción.................... 37
Cómo usar la reproducción repetida .............................. 37
Cómo usar la reproducción aleatoria .............................. 39
6 Otras características del sintonizador
Cómo almacenar emisoras para su rápida sintonización .. 41
Cómo escuchar las presintonías ................................... 41
Cómo cambiar los pasos de frecuencia ........................... 41
7 Cómo grabar cintas
Cómo grabar cintas ........................................................ 43
Grabación automática de discos compactos ................. 45
Cómo copiar cintas ..................................................... 47
Cómo mejorar grabaciones de AM en cintas ................. 47
8 Karaoke
Karaoke ......................................................................... 49
9 Uso de los efectos de sonido
Cómo usar el cambio de sonido ..................................... 51
Cómo usar los efectos preconfigurados .......................... 51
Modo de preconfiguración Audio................................. 51
Modo de preconfiguración Surround ........................... 51
Cambio de preconfiguraciones de sonido con el mando a
distancia ..................................................................... 51
Cómo usar efectos individuales de sonido ...................... 53
Modo Equalizer ........................................................... 53
Modo Zoom Surround................................................. 53
Modo P.Bass ................................................................ 53
Cambiar efectos de sonido con el mando a distancia ... 53
Cómo almacenar sus propias configuraciones ................. 55
Cambio de la pantalla de sonido .................................... 55
Cómo silenciar el sonido ................................................ 55
10 Cómo usar el temporizador
Cómo configurar el temporizador del despertador ......... 57
Cómo configurar el temporizador de apagado................ 59
Cómo configurar el temporizador de grabación .............. 59
Cómo cancelar el temporizador ..................................... 61
11 Información adicional
Cómo cuidar su sistema ................................................. 63
Limpiador de la lente de discos.................................... 63
Cómo cuidar sus discos .................................................. 63
Cómo almacenar discos ............................................... 63
Discos a evitar ............................................................. 65
Cómo usar las cintas ...................................................... 65
Cintas a evitar ............................................................. 65
Cómo proteger sus grabaciones ................................... 65
Solución de problemas................................................... 68
Especificaciones ............................................................. 71
Cómo activar/desactivar el modo de
demostración.............................................. Contraportada
Verificación de los contenidos
Le agradecemos la compra de este producto Pioneer. Antes de
comenzar a configurar su nuevo sistema estéreo, le rogamos
verificar que ha recibido los siguientes accesorios suministrados:
• Instrucciones de operación
• Mando a distancia
• Cable de alimentación
• Antena FM
• AM Antena de cuadro AM
• Cable de alimentación (x2 (Modelo americano latino
solamente))
• Adaptador de conversión de enchufe del cable de alimentación
(Modelo americano latino solamente)
• Cables de altavoz (sólo el S-A790VLR) –
Cables de altavoz rojo/negro (x2), cables de altavoz azul/
negro (x2)
Cómo usar este manual
Este manual está diseñado para el sistema estéreo reproductor de
CDs/doble platina/radio XR-A790 y XR-A390. Se divide en tres
secciones: configuración (capítulos 1 y 2), uso del sistema
(capítulos 3 al 10) e información adicional (capítulo 11). El
último capítulo contiene información sobre el cuidado del
sistema, como también sobre discos y cintas, una sección de
resolución de problemas y las especificaciones.
8
Sp
Page 9

Antes de comenzar
1
Cómo colocar las pilas en el
mando a distancia
1 Abra la tapa del compartimento
de las pilas en la parte posterior
del mando a distancia.
2 Cargue las pilas suministradas en
el compartimento de las pilas
siguiendo las instrucciones (ª,
·) que verá en su interior.
3 Cierre la tapa.
¡Precaución!
• Saque las pilas si no va a usar el
mando a distancia durante un mes o
más.
• Saque las pilas gastadas
inmediatamente. Puede sufrir fugas
y dañar la unidad.
1
2
3
Cómo usar el mando a
distancia
Tenga en cuenta las siguientes indicaciones al usar el mando a
distancia:
• Asegúrese de que no haya
obstáculos entre el mando
distancia y el sensor del
mando a distancia de
la unidad.
•Úselo dentro de la
distancia y ángulo
de operación, como se muestra en la ilustración. (A)
• La operación a distancia puede no funcionar si se refleja la luz
solar intensa o la luz fluorescente sobre el sensor del mando a
distancia.
• Los mandos a distancia de diferentes aparatos pueden
interferir entre sí. Evite usar mandos a distancia de otros
equipos situados cerca de esta unidad.
• Recambie las pilas cuando observe una disminución en la
distancia de operación del mando a distancia.
(A)
Cómo encontrar una
ubicación adecuada
Queremos que disfrute el uso de su nuevo sistema estéreo durante
muchos años y por este motivo le rogamos que tenga en cuenta
los siguientes puntos al elegir una ubicación adecuada para los
altavoces y componentes del sistema:
Sí...
✔ Use una sala con suficiente ventilación.
✔ Coloque sobre una superficie sólida, plana y nivelada como
una mesa, estantería o mueble para aparatos de alta fidelidad.
No...
✗ Use en un lugar expuesto a altas temperaturas o humedad,
incluyendo cerca de radiadores u otros electrodomésticos
generadores de calor.
✗ Coloque sobre la repisa de una ventana ni en otro lugar en
donde el sistema se verá expuesto a la luz solar directa.
✗ Use en un ambiente excesivamente polvoriento ni húmedo.
✗ Coloque directamente encima de cualquier aparato que se
recaliente con el uso.
✗ Use cerca del televisor ni del monitor puesto que puede sufrir
interferencias, especialmente si el televisor usa una antena
interna.
✗ Use en la cocina ni en otra sala en donde el sistema se pueda
ver expuesto a humo o vapor.
✗ Coloque sobre una superficie inestable o que no tenga el
tamaño suficiente para mantener las cuatro patas de la
unidad o el área completa de cada altavoz.
✗ Bloquee el ventilador de la parte posterior de la unidad. No
cubra con un paño ni use sobre una carpeta gruesa, etc.
✗ Ponga objetos encima de los altavoces.
Prevención de problemas de
condensación
Puede formarse condensación dentro del sistema si se traslada a
una sala más caliente desde el exterior, o si la temperatura de la
sala sube rápidamente. Aunque la condensación no dañará al
sistema, puede deteriorar temporalmente su funcionamiento. Por
esta razón, debe dejar pasar una hora aproximadamente para
permitir su adaptación a la temperatura más elevada antes de
encenderlo y usarlo.
Cómo trasladar el sistema
Si necesita trasladar el sistema, apáguelo primero y desenchúfelo
de la toma de corriente de la pared. Nunca levante ni mueva la
unidad mientras esté en reproducción. El disco gira a alta
velocidad y puede dañarse.
Discos compatibles con este
sistema
Cualquier disco que tenga uno de los siguiente logotipos debería
funcionar con el sistema. Otros formatos, incluyendo DVDs, discos
compactos de vídeo, CD-RW, CD-ROM, SACD y Photo CD no
funcionarán play.
(Discos de 12cm o 8cm)
9
Sp
Page 10
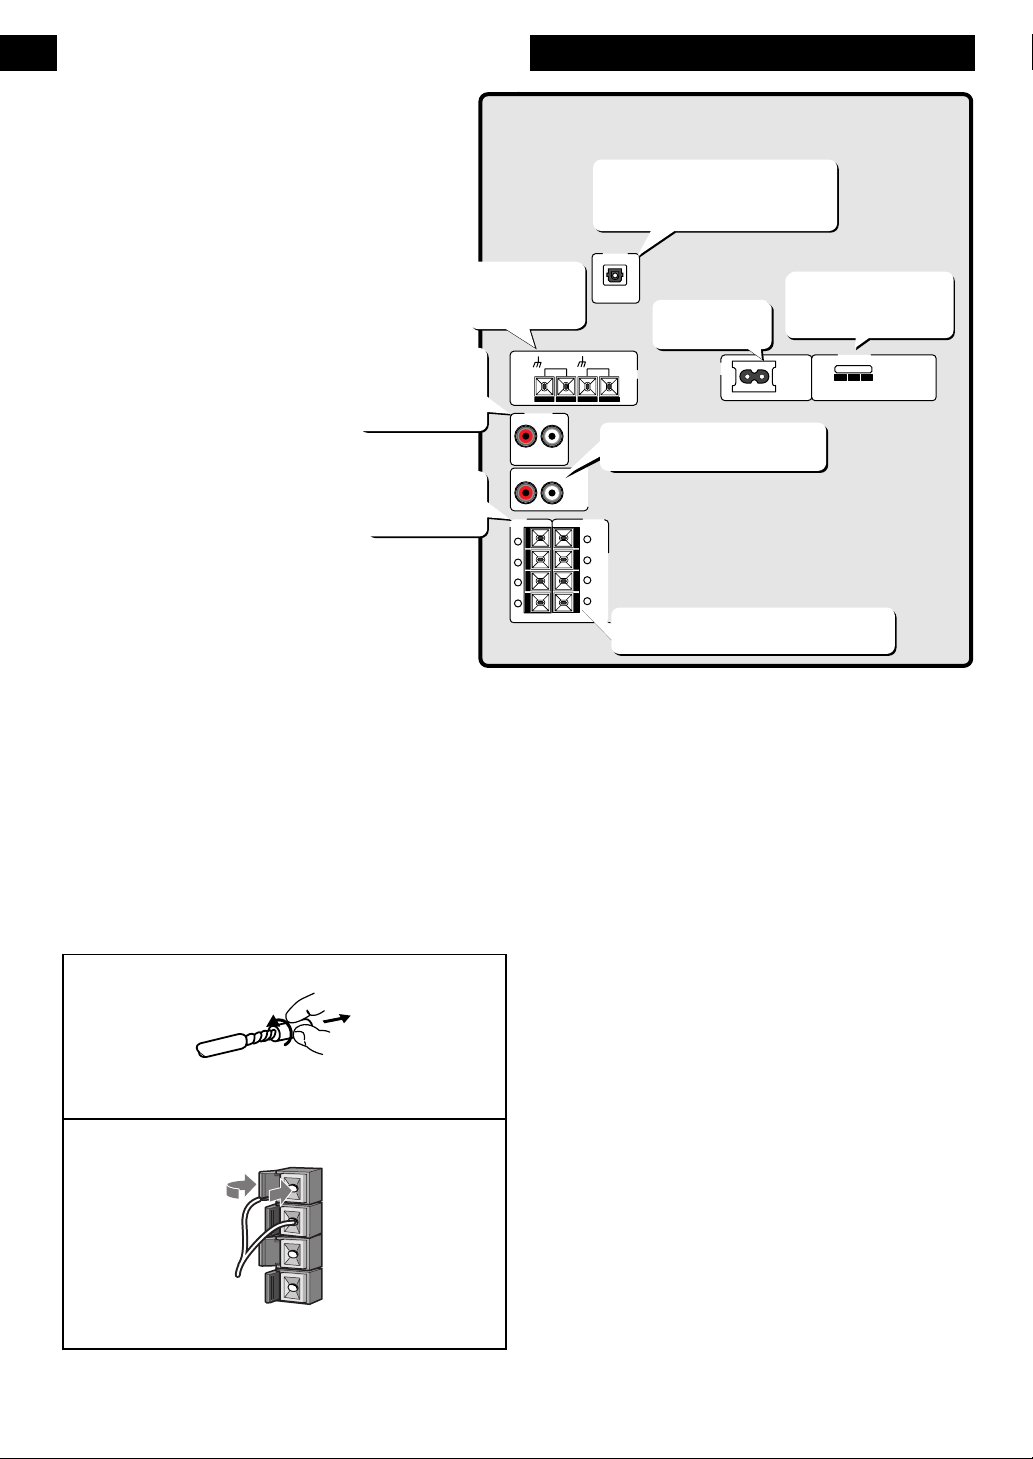
The rear panel
The illustration on this page shows the XR-A790. Not all
features are available on the XR-A390.
Important: Before making or changing any rear panel
connections, make sure that all the components are
switched off and unplugged from the power supply.
Connect to the
analog inputs
of an external
recorder here
Connect the
front speakers
here
Connecting Up2
Connect the
AM and FM
antennas here
AM
LOOP
ANTENNA
AUX IN
R
L
R
L
FRONT
SPEAKERS
+
L
-
-
R
+
Connect an external AV amp or
digital recorder here
(XR-A790 only)
OPTICAL
DIGITAL OUT
Connect to a
power outlet
FM
UNBAL
75Ω
ANTENNA
AC
INLET
Connect the rear speakers here
(XR-A790 only)
REAR
SPEAKERS
SUPER
WOOFER
+
L
-
-
R
+
Connect Super Woofer speakers here
(XR-A790 only)
Select the voltage
compatible with your
AC power supply
VOLTAGE
SELECTOR
240V 220 –
110–
230V
127V
Connecting the speakers
XR-A790: This system is supplied with four speakers: two main
front speakers; two Super Woofer speakers.
XR-A390: This system is supplied with two front speakers.
Connecting the front speakers
Use the supplied red and black speaker cords to connect the front
speakers to the main unit. (The S-A390 speakers come with
speaker cord already attached; you only need to connect them to
1
2
the main unit.) To get the best sound from the system, it’s
important that you connect the two strands of speaker cord for
each speaker to the correct speaker terminal. The terminals and
cords are color-coded to help you match them up.
Note: Make sure that the bare speaker cords cannot touch each
other, or come into contact with other metal parts once the unit is
switched on.
To connect a speaker cord to a terminal:
1 Pull off the protective covers on the end of each cord,
then twist the exposed wire strands together.
2 Push the tab to open, then insert the twisted wire fully
into the terminal.
3 Snap shut the tab to secure the speaker cord.
10
En
Page 11

聯接
Cómo realizar conexiones
2
背面板
本頁上的圖解表示XR-A790型時的情況。不是全部功能
可以在 XR-A390 型上獲得。
重要事項:在進行或
改變背面板的任何聯
接之前,確保全部組
件的電源被關掉,並
從電源插座拔除電源
線。
FRONT
SPEAKERS
+
L
R
+
ANTENNA
AUX IN
R
R
-
-
OPTICAL
DIGITAL OUT
FM
AM
UNBAL
LOOP
75Ω
ANTENNA
L
L
REAR
SPEAKERS
SUPER
WOOFER
+
L
-
-
R
+
El panel posterior
La ilustración de esta página muestra el XR-A790. No todas las
características están disponibles en el XR-A390.
Importante: Antes de
realizar o cambiar cualquier
conexión del panel posterior,
asegúrese de que todos los
componentes estén apagados
y desenchufados del
suministro eléctrico.
VOLTAGE
AC
INLET
SELECTOR
240V 220 –
110–
230V
127V
揚聲器聯接方法
XR-A790 型:本系統有 4 個揚聲器供應:2 個主正面揚
聲器;2 個超低音揚聲器。
XR-A390 型:本系統有 2 個正面揚聲器供應。
正面揚聲器聯接方法
使用配備的紅色和黑色揚聲器導線來將正面揚聲器聯接
到主機。(S-A390型揚聲器已裝備有揚聲器導線;只需
將它們聯接到主機上。)為了從本系統獲得最佳聲音,
關鍵在於將各揚聲器用兩條揚聲器導線聯接到正確的揚
聲器端子。端子和導線具備顏色代碼,有助於使它們相
匹配。
注意:一旦打開了本機電源,確保裸露的揚聲器導線不
至於相互接觸,或接觸其他金屬零件。
將揚聲器導線聯接到端子:
1 取掉各導線尾端的包覆層,然後將露出的導線股擰絞在
一起。
2 按壓翼片來打開,然後將擰絞的導線全面插入端子中。
3 閉合翼片來固定揚聲器導線。
Cómo conectar los altavoces
XR-A790: Este sistema se suministra con cuatro altavoces: dos
altavoces delanteros principales, y dos súper altavoces de subgraves.
XR-A390: Este sistema se suministra con dos altavoces
delanteros.
Cómo conectar los altavoces
frontales
Use los cables rojo y negro suministrados para conectar los
altavoces frontales a la unidad principal. (Los altavoces S-A390 se
sirven con los cables de altavoz ya conectados; usted sólo tendrá
que conectarlos a la unidad principal.) Para obtener el mejor
sonido del sistema, es importante que conecte las dos trenzas del
cable del altavoz de cada altavoz al terminal del altavoz correcto.
Los terminales y los cables están codificados por color para
ayudarle a hacerlos coincidir.
Nota: Asegúrese de que no se tocan los cables de los altavoces
entre sí si están pelados, ni que tampoco entran en contacto con
otras piezas metálicas una vez encendida la unidad.
Para conectar un cable del altavoz a un terminal:
1 Extraiga las cubiertas protectoras del extremo de cada
cable, y retuerza los conductores expuestos para
trenzarlos.
2 Empuje la lengüeta que desea abrir y, a continuación,
inserte completamente el cable torcido en el terminal.
3 Cierre la lengüeta soltándola para fijar el cable de
altavoz.
11
ChH/Sp
Page 12

Connecting Up2
Connecting the Super Woofer
speakers
XR-A790 only: Use the supplied blue and black speaker
cords to connect the Super Woofer speakers to the main unit. Like
the front speakers above, it’s important that you connect the two
strands of speaker cord for each speaker to the correct speaker
terminal.
Connect the Super Woofer speaker cords in the same way as the
front speakers above.
Note: Make sure that the bare speaker wires cannot touch each
other, or come into contact with other metal parts once the unit is
switched on.
Connecting the rear speakers
XR-A790 only: The rear speakers connect to the main unit
by RCA/phono-type plugs. Simply plug each speaker into the
corresponding jack on the rear panel. Use only speakers with a
nominal impedance of between 16 Ω or more.
To mount the rear speakers on a wall:
• Use the hole located on the rear panel of the speaker to mount
it on a wall. Make sure that the speakers are mounted securely
to prevent accidents.
• Check that the wall is strong enough to hang the speakers on.
Pioneer disclaims any responsibility for damage due to falling
speakers and other accidents caused by inappropriate strength
of the wall or improper installation.
• No screws or other fittings are supplied to mount the speakers
on the wall.
12
En
Speaker Caution!
Do not connect any of the supplied speakers to any other
amplifier. This may result in malfunction or fire.
If you wish to connect speakers other than the ones supplied with
this system, use only speakers with a nominal impedance of
between 12–16 Ω with the XR-A790, and between 6–16 Ω with
the XR-A390. Refer to the instructions that came with your
speakers if you are unsure of their impedance before connecting
them and switching on.
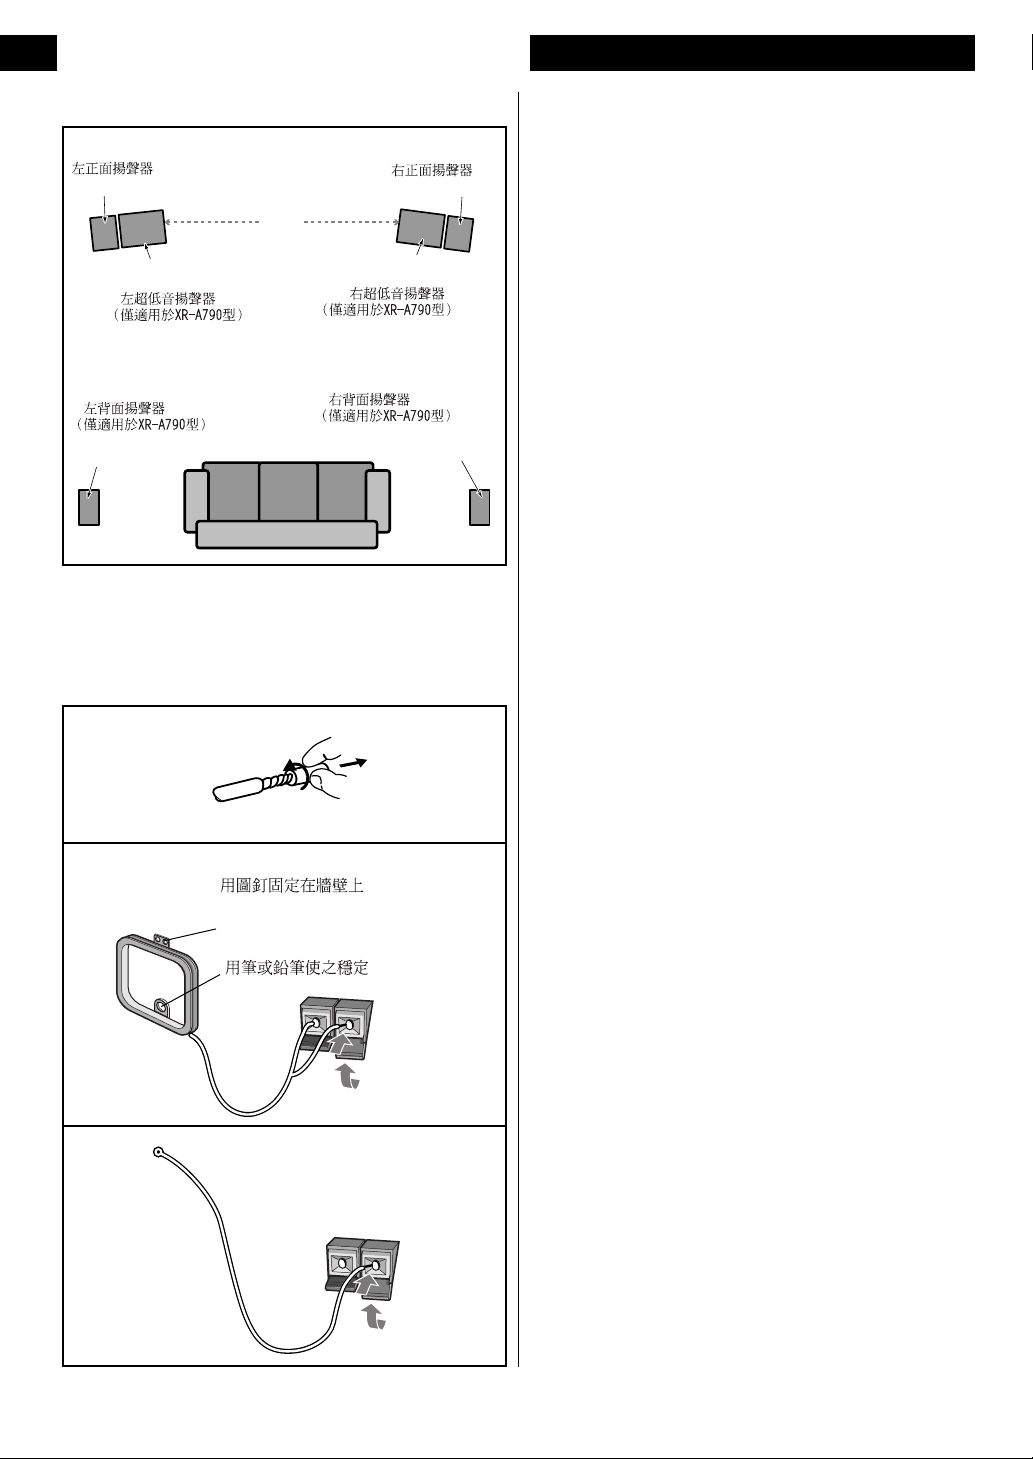
Placing the speakers
Where you put your speakers in the room has a big effect on the
quality of the sound. The following guidelines and the diagram
below should help you to get the best sound from your system.
Page 13

聯接
Cómo realizar conexiones
2
超低音揚聲器聯接方法
僅適用於XR-A790型:使用配備的藍色和黑色揚聲器導
線來將超低音揚聲器聯接到主機。與上述正面揚聲器一
樣,關鍵在於將各揚聲器用兩條揚聲器導線聯接到正確
的揚聲器端子。
按與上述正面揚聲器相同的方法來聯接超低音揚聲器導
線。
注意:一旦打開了本機電源,確保裸露的揚聲器導線不
至於相互接觸,或接觸其他金屬零件。
背面揚聲器聯接方法
僅適用於XR-A790型:使用RCA/phono-type插頭來將背
面聲揚聲器聯接到主機。只需將各揚聲器插入背面板上
相應的插孔。只能使用標稱阻抗在16 Ω或以上的揚聲
器。
要將背面揚聲器安裝在牆壁上時:
• 要將背面揚聲器系統安裝在牆壁上時,使用位於揚
聲器背面板上的孔。為防止事故,確保揚聲器被牢
固安裝。
• 確認牆壁強度足於掛物件於其上面。對於由於牆壁
強度不相稱或不正確的安裝而造成的揚聲器落下及
其他事故為原因的損壞,先鋒公司拒絕承擔任何責
任。
• 沒有供應在將揚聲器安裝在牆壁上時使用的螺絲或
其他安裝配件。
揚聲器注意事項!
請勿將任何配備的揚聲器聯接到任何其他放大器。否則
可能會導致故障或失火。
如果希望將配備之外的揚聲器聯接到本系統,對 X RA790 型只能使用標稱阻抗在 12 ∼ 16 Ω 的揚聲器,對
XR-A390 型只能使用 6 ∼ 16 Ω 的揚聲器。如果在聯接
揚聲器並打開電源之前不確知他們的阻抗,請見所使用
揚聲器附上的使用說明書。
揚聲器安放方法
揚聲器要安放在對音質的影響大的地方。下列指南和下
圖將有助於從您的系統獲得最佳的音響。
Conexión de los súper altavoces de
subgraves
Sólo el XR-A790: Emplee los cables de altavoz azules y
negros suministrados para conectar los súper altavoces de
subgraves a la unidad principal. Al igual que los altavoces
delanteros antes mencionados, es importante que conecte los dos
cables de altavoz de cada altavoz al terminal correcto del altavoz.
Conecte los cables de altavoz de los súper altavoces de subgraves
del mismo modo que los altavoces delanteros.
Nota: Asegúrese de que los cables de altavoz desforrados no se
toquen entre sí, ni que se pongan en contacto con otras partes
metálicas después de haber conectado la alimentación del
aparato.
Cómo conectar los altavoces
posteriores
Sólo XR-A790: Los altavoces posteriores se conectan a la
unidad principal con fonoconectores/RCA. Simplemente enchufe
cada altavoz en la toma correspondiente del panel posterior.
Emplee solamente altavoces con una impedancia nominal de 16
Ω o más.
Para colgar los altavoces posteriores en la pared:
• Use el orificio ubicado en el panel posterior del altavoz para
colgarlo en la pared. Asegúrese de que estén colgados
adecuadamente para evitar accidentes.
• Verifique que la pared sea lo suficientemente resistente para
colgar los altavoces. Pioneer declina toda responsabilidad en
lo que respecta a daños en altavoces que se hayan caído u
otros accidentes ocasionados al tener insuficiente fuerza la
pared o una instalación inadecuada.
• No se proporcionan tornillos u otros accesorios para colgar los
altavoces en la pared.
¡Precaución con los altavoces!
No conecte los altavoces suministrados a cualquier otro
amplificador. Ello puede ocasionar un mal funcionamiento o un
incendio.
Si desea conectar unos altavoces que no son los suministrados a
este sistema, emplee sólo altavoces con una impedancia nominal
que esté entre 12 a 16 Ω para el XR-A790, y entre 6 y 16 Ω para
el XR-A390. Consulte las instrucciones que acompañan sus
altavoces si no está seguro de su impedancia antes de conectarlos
y activarlos.
Cómo ubicar los altavoces
El lugar que elija para colocar los altavoces en la sala tiene un
efecto importante en el sonido. Las siguientes pautas e ilustración
deberían ayudarle a obtener el mejor resultado de su sistema.
13
ChH/Sp
Page 14
Connecting Up2
(A) • Ideally, speakers should be at about ear-level when you’re
listening to them. Putting the speakers on the floor, or
Left front
Frontal izquierdo
2-3 m
Right front
Frontal derecho
mounting them very high on a wall is not recommended.
• For the best stereo effect, place the front speakers
2–3 meters apart.
• The rear speakers should not be further away from your
Left Super Woofer
(XR-A790 only)
Súper altavoz de
graves izquierdo
(Sólo XR-A790)
Left rear (XR-A790 only)
Right Super Woofer
(XR-A790 only)
Súper altavoz de
graves derecho
(Sólo XR-A790)
Right rear (XR-A790 only)
listening position than the front speakers. (A)
Important:
S-A390: The supplied speakers are not magnetically shielded,
so should not be placed near to a TV or monitor.
S-A790VLR: The front, Super Woofer speakers supplied with
this system are magnetically shielded. However, placing them
Posterior izquierdo
(Sólo XR-A790)
Posterior derecho
(Sólo XR-A790)
extremely close to a television may result in color distortion on
the screen. If this happens, move the speakers a little further away
and switch off the television for 15–30 minutes.
Connecting the radio
antennas
Connecting the supplied antennas will allow you to listen to both
AM and FM radio broadcasts. If you find that reception quality is
poor, an outdoor antenna should give you better sound quality—
1
2
4
Attach to a wall with tacks
Cuelgue en la pared con
plastelina adherente
Stabilize with pen/pencil
Estabilice con una pluma/lápiz
see the Connecting external antennas on page 16 for more on
how to do this.
Before making or changing antenna connections, make sure that
the power is switched off and the unit disconnected from the wall
power outlet.
1 Pull off the protective shields of both AM antenna
wires.
2 Push open the tabs, then insert one wire fully into each
terminal.
3 Snap shut the tabs to secure the AM antenna wires.
Place the AM antenna on a flat surface and point in the direction
giving the best reception. If necessary, stabilize with a pen or
pencil through the hole near the base. Avoid placing near
computers, television sets or other electrical appliances and do not
let it come into contact with metal objects.
It’s also possible to fix the AM antenna to a wall using two small
screws or pins through the two holes at the top of the loop. Before
fixing, make sure that the reception is satisfactory.
14
En
Page 15

聯接
Cómo realizar conexiones
2
• 欣賞時,揚聲器最好位於大致與耳朵相同高度的地
方。不建議將揚聲器安放在地板上,或安裝在牆壁
上極高的地方。
• 為最佳立體聲效果,正面揚聲器要放開 2 ∼ 3 m 。
• 背面揚聲器的安放位置不應比正面揚聲器從欣賞位
置的距離更遠。(A)
重要事項:
S-A390型:配備的揚聲器沒有被磁屏蔽,因此不應靠近
電視機或監視器安放。
S-A790VLR型:本系統配備的正面、超低音揚聲器被磁
屏蔽。但是,極端靠近電視機安放它們可能會導致屏幕
上彩色失真。遇此情況時,稍微移動揚聲器並關掉電視
機15∼30分鐘。
無線電天線聯接方法
聯接配備的天線即可收聽調幅和調頻無線電廣播。如果
發現到接收質量欠佳,室外天線將會提供更佳的音質。
有關本操作的詳情,見第17 頁
說明。
進行或改變天線聯接之前,必須關掉電源並從牆壁電源
插座拔除本機電源線。
1 剝去調幅天線的保護層。
2 按壓並打開翼片,然後將各導線全面插入各端子中。
3 閉合翼片來固定調幅天線導線。
調幅天線安放在平坦的表面並使其指向提供最佳接收的
方向。如果必要,使筆或鉛筆穿通靠近底部的孔中來使
其穩定。避免靠近電腦、電視機或其他電器安放,也不
要讓它與金屬物件接觸。
使用2支小螺絲釘或圖釘穿通位於環頂部的兩個孔亦可
將調幅天線固定在牆壁上。固定之前,確保接收令人滿
意。
“外接天線聯接方法”
• Idealmente, los altavoces deberían estar a la altura de sus
oídos al escucharlos. No es recomendable ponerlos en el suelo
o colgarlos muy altos en la pared.
• Para obtener el mejor efecto estéreo, separe ambos altavoces
frontales entre 2 a 3 m.
• Los altavoces surround no deberían estar a una distancia
mayor de su posición de audición que la de los altavoces
frontales. (A)
Importante:
S-A390: Los altavoces suministrados no están protegidos
contra campos magnéticos por lo que no deberían colocarse cerca
de un televisor o un monitor.
S-A790VLR: Los altavoces delanteros, los súper altavoces de
subgraves suministrados con este sistema están magnéticamente
protegidos. Sin embargo, si se ponen demasiado cerca de un
televisor pueden causar distorsión del color en la pantalla. Si así
sucede, separe un poco más los altavoces del televisor de 15 a 30
minutos.
的
Cómo conectar las antenas de
radio
La conexión de las antenas suministradas le permitirá escuchar
emisiones en AM y FM. Si considera que la calidad de recepción es
débil, una antena externa podría mejorar la calidad del sonido.
Consulte la sección Cómo conectar antenas externas en la
página 16 si necesita más información al respecto.
Antes de realizar o cambiar las conexiones de las antenas,
asegúrese de que el suministro eléctrico está apagado y de que la
unidad está desconectada de la toma de corriente de la pared.
1 Estire de la vaina protectora de ambos cables de la
antena AM para quitarla.
2 Empuje para abrir las lengüetas y, a continuación,
inserte completamente un cable en cada terminal.
3 Cierre las lengüetas soltándolas para fijar los cables de
la antena de AM.
Coloque la antena AM sobre una superficie plana y apúntela
hacia la dirección que le proporcione la mejor recepción. De ser
necesario, estabilice con una pluma o lápiz a través del orificio
cerca de la base. Evite colocarla cerca de ordenadores, televisores
u otros electrodomésticos y no permite que entre en contacto con
objetos metálicos.
También es posible colocar la antena AM con dos tornillos o
clavijas pequeñas a través de los dos orificios de la parte superior
del cuadro. Antes de proceder, asegúrese de que la recepción es
satisfactoria.
15
ChH/Sp
Page 16

Connecting Up2
(A)
Outdoor antenna
Antena externa
Indoor antenna (5–6 m vinyl-coated wire)
Antena interna
(fio isolado a vinil de 5-6 metros)
AM
LOOP
ANTENNA
Ground
Puesta a tierra
(B)
ANTENNA
FM
(C)
AM
LOOP
ANTENNA
UNBAL
75Ω coaxial cable
75Ω
Cable coaxial de 75 Ω
Ω
MD player, etc.
M D 播放機等
Reproductor de minidiscos, etc.
AUX IN
R
L
Stereo audio cord
立體聲音頻導線
Cable de audio estéreo
(D)
MD recorder, etc.
M D 錄音機等
Reproductor de minidiscos, etc.
4 Connect the FM wire antenna in the same way as the
AM loop antenna.
For best results, extend the FM antenna fully and fix to a wall or
door frame. Don’t drape loosely or leave coiled up.
The supplied FM antenna is a simple means of receiving FM
stations; using a dedicated, outdoor FM antenna will usually give
you better reception and sound quality. See Connecting external
antennas below for connection details.
Note: The signal earth (H) is designed to reduce noise that
occurs when an antenna is connected. It is not an electrical safety
earth.
Connecting external antennas
External AM antenna (A)
Use 5–6 meters of vinyl-insulated wire and set up either indoors
or outdoors. Leave the AM loop antenna connected.
External FM antenna (B)
Use 75 Ω coaxial cable to hook up an external FM antenna.
Connecting auxiliary
components
This system has a set of stereo analog inputs for connecting an
external MD player, etc. The XR-A790 model also has an optical
digital output for use with a CD-R or MD recorder.
Use the AUX IN jacks to connect an MD player, etc. to this system.
(C)
Use an optical digital cord to connect a digital recorder or AV
PLAY
OUT
L
amplifier using the OPTICAL OUT. (D)
Connecting the power
R
Models in some regions of the world have a VOLTAGE SELEC-
TOR switch, located to the right of the AC INLET. If necessary,
change the voltage setting to match the mains power supply in
your country or region.
After making sure that everything is connected properly, plug in
the power cord to the AC INLET, and the other end to a mains
power outlet.
Congratulations! You’re done setting up.
16
En
OPTICAL
DIGITAL OUT
Optical digital audio cord
光學數碼音頻導線
Cable de audio digital óptico
OPTICAL
IN
Page 17

聯接
Cómo realizar conexiones
2
4 按與調幅環形天線相同的做法聯接調頻導線天線。
為最佳結果,完全伸展調頻天線並固定在牆壁或門框
上。請勿讓它鬆弛懸掛或成為螺旋狀。
使用配備的調頻天線是一種簡單的調頻電台接收方法。
使用專用的室外調頻天線一般會提供更佳的接收和音
質。有關聯接的詳情,見下面的
法”
。
注意:信號接地(H)設計成為降低聯接有天線時產生
的噪音。並不是電氣安全接地。
“外接天線聯接方
外接天線聯接方法
外接調幅天線(A)
使用5∼6 m 長聚乙稀絕緣導線設置室內或室外天線。
調幅環形天線保持聯接。
外接調頻天線(B)
使用 75 Ω 同軸電纜來設置外接調頻天線。
輔助組件聯接方法
本系統具備一組用於聯接外接 M D 播放機等的立體聲
類比輸入插孔。XR-A790型還具備光學數碼輸出插孔,
可與 CD-R 或 MD 錄音機一起使用。
使用 AUX IN 插孔來將 MD 播放機等聯接到本系統。
(C )
使用光學數碼導線來聯接數碼錄音機,或使用
OPTICAL OUT 插孔來聯接 A V 放大器。(D)
電源聯接方法
供應世界一些地區的機型具備 VOLTAGE SELECTOR
開關,位於 AC INLET 插孔的右邊。如果必要,改變電
壓設定,以便匹配貴國或貴地區的主電源。
確認全部聯接正確進行後,將電源線插入 AC INLET 插
孔,另一端插入主電源輸出插座。
這樣,裝配便完成了!
4 Conecte la antena de cable de FM del mismo modo
que la antena de cuadro de AM.
Para obtener los mejores resultados, extienda la antena de FM
totalmente y cuélguela a una pared o al marco de una puerta. No
la acople descuidadamente ni la deje enrollada.
La antena de FM que se suministra con el sistema es únicament
eun medio de recibir emisoras de FM. Si utiliza una antena de FM
exterior, obtendrá una mejor recepción y una mayor calidad de
sonido. Consulte la sección Cómo conectar antenas externa a
continuación si necesita más detalles sobre la conexión.
Nota: La señal de toma a tierra (H) está diseñada para reducir
el ruidos que puede ocurrir cuando se conecta una antena. No se
trata de una toma a tierra de seguridad contra descargas
eléctricas.
Cómo conectar antenas externas
Antena AM externa (A)
Use un cable con revestimiento de vinilo de 5-6m e instale ya sea
en el interior o exterior. Deje la antena de cuadro AM conectada.
Antena FM externa (B)
Emplee un cable coaxial de 75 Ω para conectar una antena de
FM exterior.
Cómo conectar componentes
auxiliares
El sistema tiene un grupo de entradas analógicas estéreo para
conectar un reproductor de minidiscos externo, etc. El modelo
XR-A790 también tiene una salida digital óptica para usar con
una grabadora de CD-R o de minidiscos.
Use las tomas AUX IN para conectar un reproductor de
minidiscos, etc. al sistema. (C)
Use el cable digital óptico para conectar una grabadora digital o
un amplificador AV usando la toma OPTICAL OUT. (D)
Cómo conectarse a la red
eléctrica
Los modelos de ciertos destinos tienen un selector de tensión
(VOLTAGE SELECTOR), situado a la derecha de la toma de
alimentación AC INLET. Si es necesario, cambie el ajuste de la
tensión para que corresponda con la tensión de la alimentación
de su país o región.
Después de asegurarse de que todo esté conectado
adecuadamente, enchufe el cable de alimentación a AC INLET, y
el otro extremo a una toma de corriente de la red.
¡Felicitaciones! Ha completado la instalación.
17
ChH/Sp
Page 18
3 Controls & Displays
model: XR-A790
型號:XR-A790
modelo: XR-A790
STANDBY/ON
29
DISC-1
28
27
26
25
24
23
22
DISC-2
OPEN/CLOSE DISC CHANGE
TIMER STANDBY
TUNER/BAND
C
D
AUX
4
23 5
DISC-3
AUDIO
EQUALIZER
ZOOM SURROUND
R
EC
/ ST
O
P
NR ON / OFF
MAN MIC SUB
20
21 17 161819
TAPE /
AUDIO
MODE
ASES / COPY
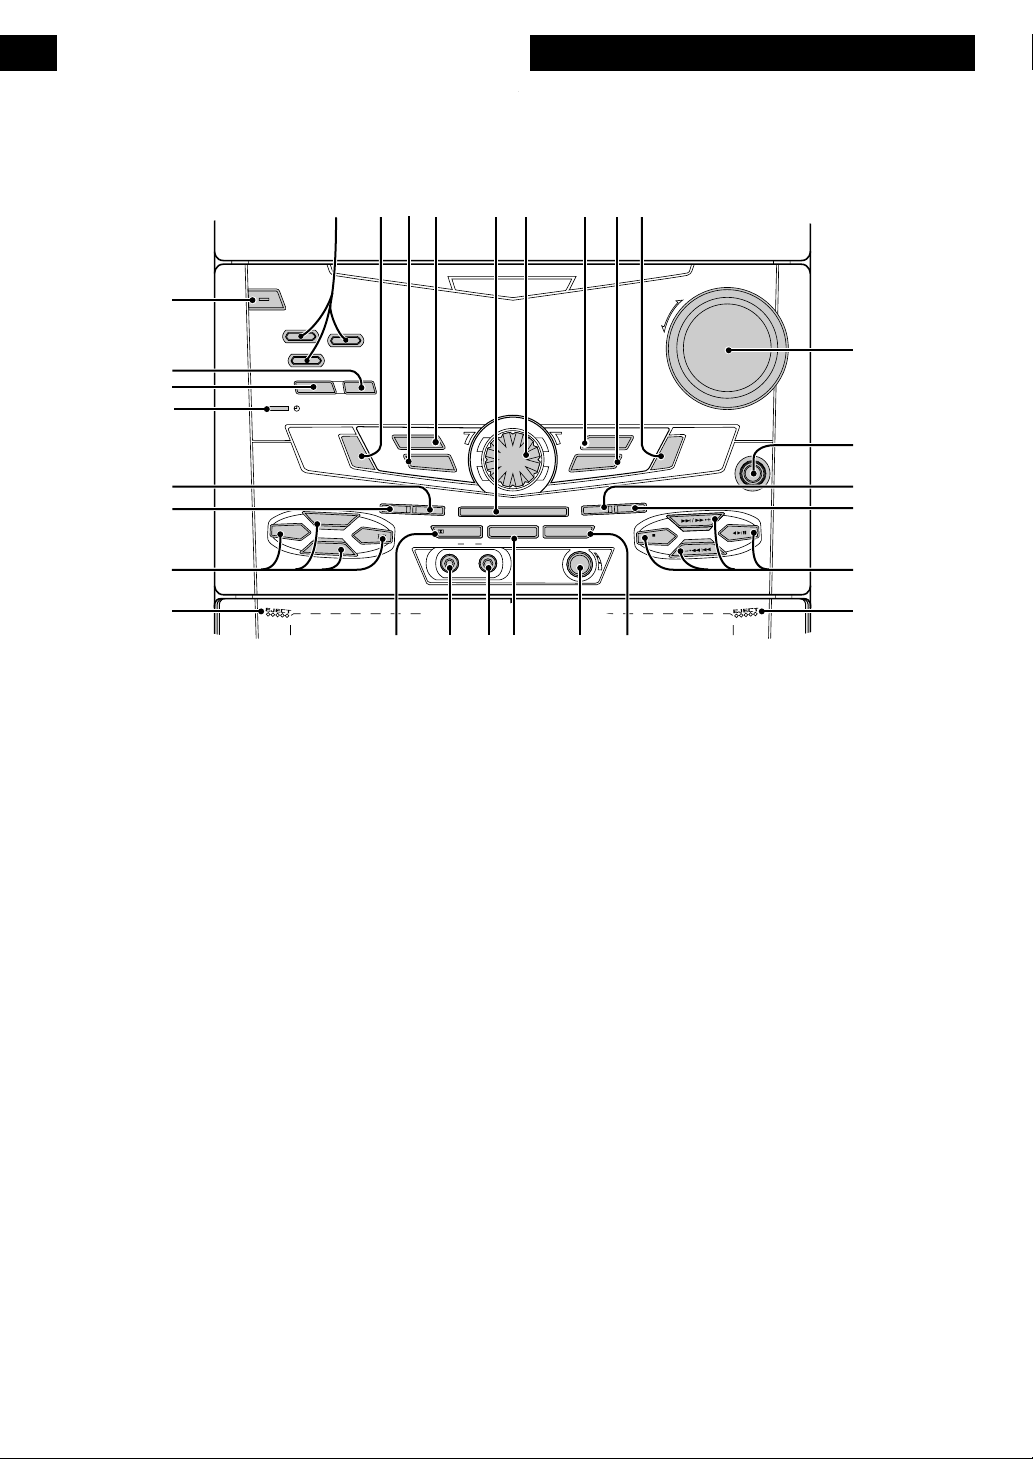
Front panel
The illustration on this page shows the XR-A790. Not all features
are available on the XR-A390.
78196
VOLUME
UP
DOWN
SET
REPEAT
SURROUND
FREG/STATION
MIC LEVEL
P.BASS ( DEMO )
DISPLAY MODE
MONO
SURROUND
MODE
PHONES
J
AD
CK
ER / CLO
TIM
ST.MEMORY
10
11
12
13
14
15
1 DISC-1/2/3 (page 28)
2 AUDIO MODE (page 50)
3 ZOOM SURROUND (page 52)
4 EQUALIZER (page 52)
5 SET—Use to enter timer/clock settings, or user sound settings.
6 JOG dial—Use to morph between sound settings, and when
setting the clock or timer.
7 P.BASS (DEMO) (page 52, back cover)
8 DISPLAY MODE (page 24, 54)
9 SURROUND MODE (page 50)
10 VOLUME UP/DOWN—Use to adjust the overall volume.
11 PHONES jack (Headphones)—Plug in a pair of head-
phones to this jack.
12 MONO (page 30)
13 TIMER / CLOCK ADJ (page 24, 56, 60)
14 Playback/tuning controls
7 ST. MEMORY (page 40)
¢ ⁄¡ ·+ (page 26, 30, 40)
–·1 ⁄4 (page 26, 30, 40)
26 (page 24, 26, 32)
15 EJECT (tape II)—Press to open the cassette door of deck II.
16 FREQ / STATION (page 40)
17 MIC LEVEL (page 48)
18 REPEAT (page 36)
19 MIC SUB (page 48)
20 MIC MAIN (page 48)
21 XR-A790 : 2 NR* ON/OFF (page 32, 42)
XR-A390 : RANDOM (page 38)
22 EJECT (tape I)—Press to open the cassette door of deck I.
23 Function select buttons
CD (page 24)
TUNER BAND (page 24, 30)
AUX (page 24)
TAPE I/II (page 24)
24 ASES / COPY (page 44, 46)
25 REC / STOP (page 44, 46)
26 TIMER STANDBY indicator (page 60)
27 OPEN/CLOSE (page 24, 26, 28)
28 DISC CHANGE (page 28)
29 STANDBY/ON and standby indicator—Press to switch the
unit between standby and on. Indicator lights in standby.
* Manufactured under licence from Dolby Laboratories.
“Dolby” and the double-D symbol are trademarks of
Dolby Laboratories.
18
En
Page 19

控制器和顯示器
Controles y visualizaciones
3
前面板
本頁上的圖解和說明表示XR-A790型時的情況。不是全部功能
可以在 XR-A390 型上獲得。
1 碟片 1/2/3 按鈕 (DISC-1/2/3) (見第 29 頁)
2 音頻模式按鈕 (AUDIO MODE) (見第 51 頁)
3 變焦距環繞聲按鈕 (ZOOM SURROUND) (見第 53 頁)
4 均衡器按鈕 (EQUALIZER) (見第 53 頁)
5 設置按鈕 (SET)-用以輸入定時器∕時鐘設定值,或用戶音響
設定。
6 緩動旋鈕 (JOG)-用以在音響設定之間,以及在設定時鐘或定
時器時進行改變。
7 無源低音 (示範) 按鈕 (P.BASS(DEMO)) (見第53頁和封底)
8 顯示模式按鈕 (DISPLAY MODE) (見第 25 , 55 頁)
9 環繞聲模式按鈕 (SURROUND MODE) (見第 51 頁)
10
音量增大 / 減小旋鈕 (VOLUME UP/DOWN)-用以調節總的音量。
11 耳機 (頭戴耳機) 插孔 (PHONES)-頭戴耳機插入本插孔。
12 單聲道按鈕 (MONO) (見第 31 頁)
13 定時器 / 時鐘調節按鈕 (TIMER/CLOCK ADJ) (見第 25,57,
61 頁)
14 播放 /調諧控制器:
電台記憶按鈕 (7 ST.MEMORY) (見第 41 頁)
¢/¡•+按鈕 (見第 27 ,31, 41 頁)
-•1/4 按鈕 (見第27,31,41頁)
2
6 按鈕 (見第25,27,33頁)
15
取盒按鈕 (EJECT) (卡式座II)-按下以打開卡式座II的卡帶艙門。
16 頻率 / 電台按鈕 (FREQ/STATION) (見第 41 頁)
17 麥克風電平調節旋鈕 (MIC LEVEL) (見第 49頁)
18 重複按鈕 (REPEAT) (見第 37 頁)
19 副麥克風插孔 (MIC SUB) (見第49頁)
20 主麥克風插孔 (MIC MAIN) (見第49頁)
21 XR-A790型:杜比降噪通∕斷按鈕 (2 NR* ON/OFF)(見第33,
43 頁)
XR-A390 型:隨機按鈕 (RANDOM) (見第 39 頁)
22
取盒按鈕 (EJECT) (卡式座I)-按下以打開卡式座I的卡帶艙門。
23 功能選擇按鈕:
CD 碟片按鈕 (CD) (見第 25 頁)
調諧器波段按鈕 (TUNER BAND) (見第 25 , 31 頁)
輔助按鈕 (AUX) (見第25頁)
卡式座I/II按鈕 (TAPE I/II) (見第25頁)
24 自動同步編輯 (ASES)/ 拷貝按鈕 (ASES/COPY) (見第 45 ,
47 頁)
25 錄音 / 停止按鈕 (REC/STOP) (見第 47 , 45 頁)
26 定時器待機指示燈 (TIMER STANDBY) (見第61 頁)
27 打開 / 關閉按鈕 (OPEN/CLOSE) (見第 25 , 27 , 29 頁)
28 換碟按鈕 (DISC CHANGE) (見第 29 頁)
29 待機 / 電源打開按鈕 (STANDBY/ON) 及待機指示燈-按下以
使本機在待機和打開電源之間進行切換。在待機模式,指示燈
發亮。
*
經杜比實驗室授權生產。
“杜比”、“Dolby”和雙 D 標志是杜比實驗室的商標。
Panel frontal
La ilustración de esta página muestra el XR-A790. No todas
las características se encuentran en el XR-A390.
1 DISC-1/2/3 (página 29)
2 AUDIO MODE (página 51)
3 ZOOM SURROUND (página 53)
4 EQUALIZER (página 53)
5 SET—Use para introducir las configuraciones del
temporizador/reloj o las configuraciones de sonido del usuario.
6 Selector JOG—Use para cambiar entre las configuraciones de
sonido y al configurar el reloj o temporizador.
7 P.BASS (DEMO) (página 53, Contraportada)
8 DISPLAY MODE (página 25, 55)
9 SURROUND MODE (página 51)
10 VOLUME UP/DOWN—Use para ajustar el volumen total.
11 Toma PHONES (Auriculares)—Conecte un par de
auriculares a esta toma.
12 MONO (página 31)
13 TIMER / CLOCK ADJ (página 25, 57, 61)
14 Controles de reproducción/sintonización
7 ST. MEMORY (página 41)
¢ ⁄¡ ·+ (página 27, 31, 41)
–·1 ⁄4 (página 27, 31, 41)
2
6 (página 25, 27, 31)
15 EJECT (cinta II)—Pulse para abrir la puerta de la cinta de la
platina II.
16 FREQ / STATION (página 41)
17 MIC LEVEL (página 49)
18 REPEAT (página 37)
19 MIC SUB (página 49)
20 MIC MAIN (página 49)
21 XR-A790 : 2 NR* ON/OFF (página 33, 43)
XR-A390 : RANDOM (página 39)
22 EJECT (cinta I)—Pulse para abrir la puerta de la cinta de la
platina I.
23 Teclas de selección de función
CD (página 25)
TUNER BAND (página 25, 31)
AUX (página 25)
TAPE I/II (página 25)
24 ASES / COPY (página 45, 47)
25 REC / STOP (página 45, 47)
26 Indicador TIMER STANDBY (página 61)
27 OPEN/CLOSE (página 25, 27, 29)
28 DISC CHANGE (página 29)
29 STANDBY/ON e indicador de espera—Presiónelo para
cambiar el estado del aparato entre el estado de espera y la
conexión de la alimentación. El indicador queda encendido.
* Fabricado bajo licencia de Dolby Laborotaries. “Dolby” y
el símbolo de la doble-D son marcas de Dolby Laboratories.
19
ChH/Sp
Page 20

3 Controls & Displays
Display
The illustration on this page shows the XR-A790. Not all features
are available on the XR-A390.
171816
123
15 14 13 12 10
4
5
6
11
1 Character display
2 Lights when the sleep timer has been set.
3 Lights when either the record timer or the wake up timer has
been set.
4 Lights during broadcast station reception.
5 Lights when the tuner is set to mono FM mode.
6 Lights when in beat cut 2 mode. (XR-A790 model only)
7 Lights when a CD is playing.
8 Lights when the system is in CD mode.
9 2 and 3 – Indicates the current tape play/record direction.
or – Indicates the current tape deck, I or II.
10
Lights when Dolby Noise Reduction is switched on. (XR-A790
model only)
11 – Lights when in the karaoke mode.
L R – Indicates which channels of the karaoke track you’re
hearing.
12 Lights when the tuner is receiving a stereo FM broadcast in auto
stereo mode.
13 Lights when recording to tape.
14 Lights during automatic recording of a CD.
15 Highlights during repeat play mode.
16 Highlights during program playback mode.
17 Highlights during random playback mode.
18 Sound morphing / Sound level display
7
9 8
20
En
Page 21
控制器和顯示器
Controles y visualizaciones
3
顯示器
本頁上的圖解和說明表示XR-A790型時的情況。不是全
部功能可以在 XR-A390 型上獲得。
1 字符顯示器
2 設置了睡眠定時器時發亮。
3 設置了錄音定時器或喚醒定時器時發亮。
4 接收廣播電台期間發亮。
5 調諧器被設定成單聲道調頻模式時發亮。
6 拍頻截止 2 模式時發亮。(僅適用於 XR-A790 型)
7 播放 C D 碟片時發亮。
8 本系統處於 C D 模式時發亮。
9 2 和 3 -指示現在的磁帶播放∕錄音方向。
或 -指示現在的卡式座, I或II。
10 接通杜比降噪功能時發亮。(僅適用於 XR-A790 型)
11
-處於卡拉 O K 模式時發亮。
LR -指示正在聽取的是卡拉 OK 磁跡的哪一個聲道。
12 調諧器以自動立體聲模式接收立體聲調頻廣播時發
亮。
13 對磁帶進行錄音時發亮。
14 進行 CD 碟片的自動錄音期間發亮。
15 重複播放模式時輝亮。
16 程式播放模式時輝亮。
17 隨機播放模式時輝亮。
18 聲音改變∕聲級顯示。
Pantalla de visualización
La ilustración de esta página muestra el XR-A790. No todas las
características se encuentran en el XR-A390.
1 Pantalla de visualización de caracteres
2 Se ilumina una vez configurado el temporizador de apagado.
3 Se ilumina una vez configurado el temporizador de grabación o
el temporizador del despertador.
4 Se enciende cuando el sintonizador está recibiendo una difusión.
5 Se ilumina cuando el temporizador es configurado en el modo
monoaural en FM.
6 Se enciende cuando se ha establecido el modo de supresión de
batido 2. (Sólo en el modelo XR-A790)
7 Se ilumina cuando se está reproduciendo un disco compacto.
8 Se ilumina cuando el sistema está en el modo de discos
compactos.
9 2 y 3 – Indican la dirección de reproducción/grabación de la
cinta actual.
o – Indican la platina de cintas actual, I ó II.s
10 Se ilumina cuando Dolby Noise Reduction está activado. (Sólo
en el modelo XR-A790)
11 – Se ilumina en el modo de karaoke.
L R – Indica qué canales de la pista de karaoke está
escuchando.
12 Se ilumina cuando el sintonizador recibe una emisión FM
estéreo en el modo estéreo automático.
13 Se ilumina cuando se graba una cinta.
14 Se ilumina durante la grabación automática de un disco
compacto.
15 Se ilumina durante el modo de reproducción repetida.
16 Se ilumina durante el modo de reproducción programada.
17 Se ilumina durante el modo de reproducción aleatoria.
18 Visualización gráfica del sonido/nivel del sonido
21
ChH/Sp
Page 22
3 Controls & Displays
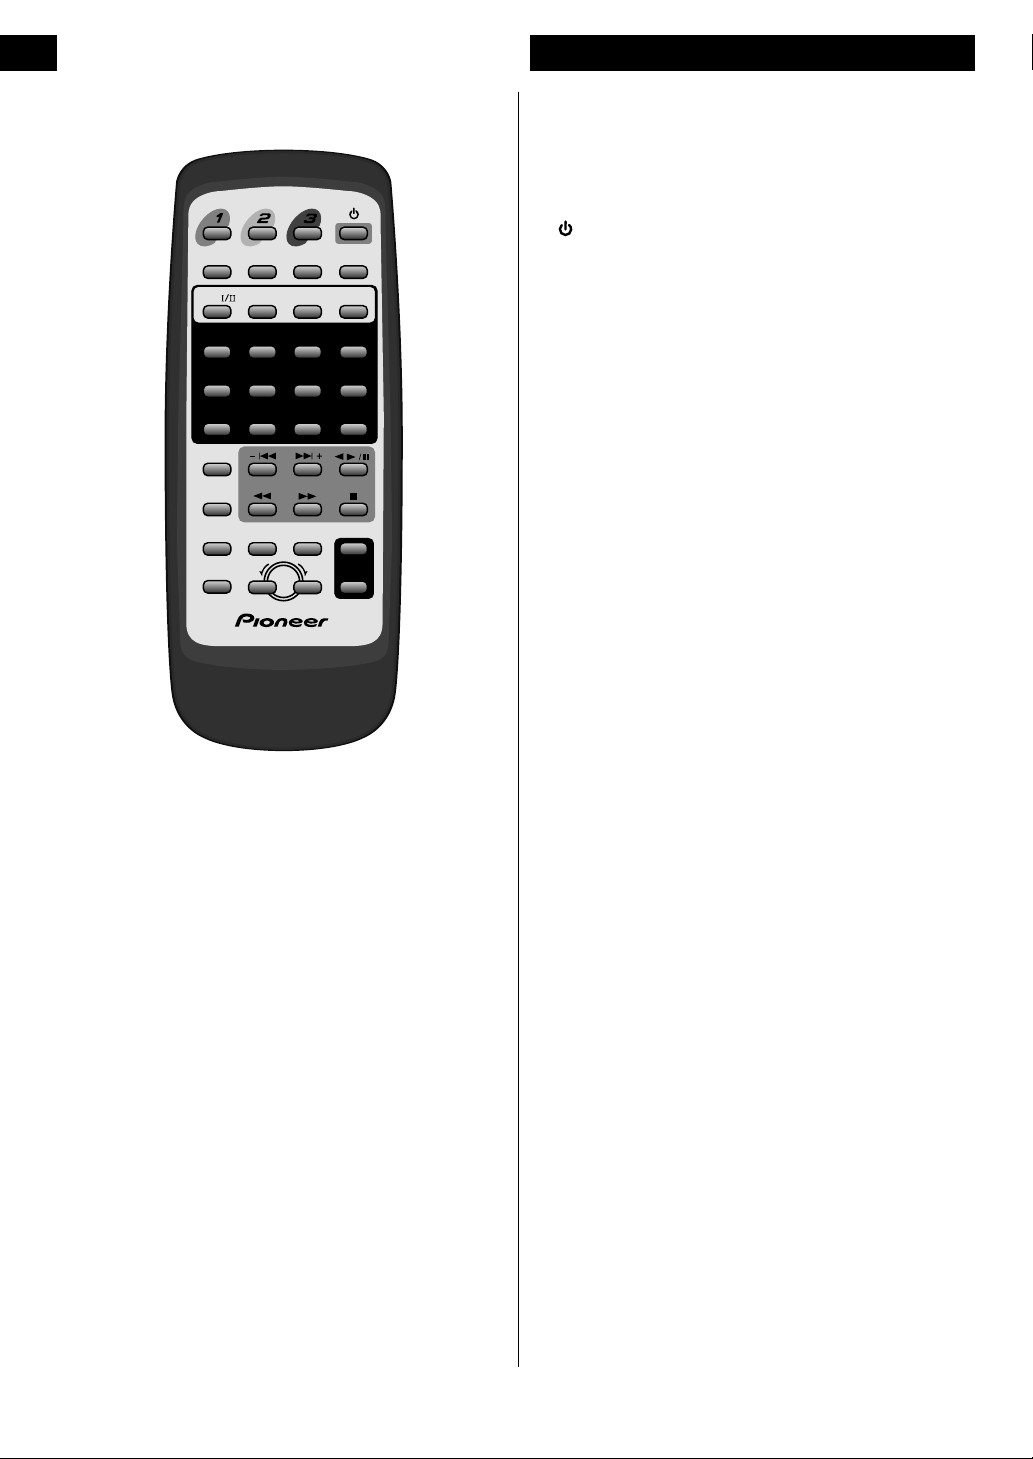
Remote control
To learn about the function of a particular button, look up the
name of the button in the following alphabetical list (buttons
DISC DISC DISC
marked with symbols appear first).
OPEN/CLOSE
DISC CHANGE
SLEEP
TAPE
TUNER/BAND
AUX CD
123
456>10
MONO REPEAT
789
KARAOKE
MUTE
AUDIO/
SURROUND
SHIFT
MORPHING
JOG
RANDOM
DISPLAY
PROGRAM
CLEAR
10/0
+
VOLUME
–
Press to switch the system on or into standby.
7 (Stop)
2
6 (Play/pause/reverse)
1 (Reverse scan/fast rewind/radio tuning)
¡
(Forward scan/fast forward/radio tuning)
– 4 (Reverse track skip/music search/preset station select)
¢ +
(Forward track skip/music search/preset station select)
>10
Use to select numbers over 10 (press this button, then input the
number using the other number buttons).
10/0
Use as zero or 10 when entering numbers (for track numbers and
station presets).
1–9
Number buttons (for track numbers and station presets).
A AUDIO/SURROUND (page 50)
AUX (page 24)
C CD (page 24)
CLEAR (page 36)
Press to clear the most recently programmed track.
D DISC-1/2/3 (page 28)
DISC CHANGE (page 28)
DISPLAY (page 24, 54)
JJOG
Use to morph between sound settings, and when setting the clock
or timer.
K KARAOKE (page 48)
M MONO (SHIFT & 7) (page 30)
MORPHING (page 52)
MUTE (page 54)
O OPEN/CLOSE (page 24, 28)
P PROGRAM (page 36)
R RANDOM (SHIFT & 9) (page 38)
REPEAT (SHIFT & 8) (page 36)
S SHIFT
Use to access secondary functions on the remote control.
SLEEP (page 58)
T TAPE I/II (page 24)
TUNER/BAND (page 24, 30)
V VOLUME +/–
Use to adjust the overall volume level.
22
En
Page 23

控制器和顯示器
Controles y visualizaciones
3
遙控器
要弄清楚特定按鈕的功能時,請查閱下列字母一覽表中
的按鈕名稱(標記有符號的按鈕首先出現)。
按鈕
按下以打開本系統電源或進入待機模式。
7(停止)按鈕
26按鈕(播放∕暫停∕反向)
1 按鈕(反向掃描∕快倒∕無線電廣播調諧)
¡ 按鈕(正向掃描∕快進∕無線電廣播調諧)
- 4 按鈕(反向磁跡跳躍∕音樂搜索∕預調電台選
擇)
¢ +按鈕(正向磁跡跳躍∕音樂搜索∕預調電台選
擇)
>10 按鈕
用以選擇大於 10 的數字(按下本按鈕,然後用其他數
字按鈕輸入數字)。
10/0 按鈕
輸入數字(用於磁跡號碼和電台預調)時當作0或10 使
用。
1∼9按鈕
數字按鈕(用於磁跡號碼和電台預調)。
A 音頻∕環繞聲按鈕(AUDIO/SURROUND) (見第 51 頁)
輔助按鈕(AUX)(見第 25 頁)
C CD 碟片按鈕(見第 25 頁)
清除按鈕(CLEAR)(見第 37 頁)
按下以清除最近所編程的磁跡。
D 碟片 1/2/3 按鈕(DISC-1/2/3)(見第 29 頁)
換碟按鈕(DISC CHANGE)(見第 2 9 頁)
顯示按鈕(DISPLAY)(見第 25 , 55 頁)
J 緩動按鈕(J OG)
用以在音響設定之間,和設定時鐘或定時器時進行變
化。
K 卡拉OK 按鈕(KARAOKE)(見第 49 頁)
M 單聲道按鈕(MONO)(SHIFT 和7)(見第 31 頁)
變化按鈕(MORPHING)(見第 5 3 頁)
靜音按鈕(MUTE)(見第 5 5 頁)
O 打開∕關閉按鈕(OPEN/CLOSE)(見第 25 , 29 頁)
P 程式按鈕(PROGRAM)(見第 37 頁)
R 隨機按鈕(RANDOM)(SHIFT 和9)(見第 39 頁)
重複按鈕(REPEAT)(SHIFT 和 8)(見第 37 頁)
S 移動按鈕(SHIFT)
用以進入遙控器上的第二功能。
睡眠按鈕(SLEEP)(見第 59 頁)
T 卡式座 I∕II 按鈕(TAPE I/II)(見第 25頁)
調諧器∕波段按鈕(TUNER/BAND)(見第 25 , 31 頁)
V 音量增大∕減小按鈕(VOLUME +/ -)
用以調節總的聲級。
Mando a distancia
Para aprender la función de una tecla en particular del mando a
distancia, consulte el nombre de la función en la siguiente lista
ordenada alfabéticamente (las teclas marcadas con símbolos
encabezan la lista).
Pulse para encender el sistema o dejarlo en el modo de standby.
7 (Detener)
2
6 (Reproducción/pausa/hacia atrás)
1 (Escaneo hacia atrás/rebobinado rápido/sintonización de la
radio)
¡ (Escaneo hacia delante/avance rápido/sintonización de la
radio)
– 4 (Salto de pistas/búsqueda de música hacia atrás/
selección de emisoras preajustadas)
¢ + (Salto de pistas/búsqueda de música hacia delante/
selección de emisoras preajustadas)
>10
Use para seleccionar números mayores a 10 (pulse esta tecla y, a
continuación, introduzca el número usando las otras teclas
numeradas).
10 / 0
Use como 0 ó 10 al introducir números (para números de pistas
y presintonías).
1–9
Teclas numeradas (para números de pistas y presintonías).
A AUDIO/SURROUND (página 51)
AUX (página 25)
C CD (página 25)
CLEAR (página 37)
Presiónelo para cancelar la última pista programada.
D DISC-1/2/3 (página 29)
DISC CHANGE (página 29)
DISPLAY (página 25, 55)
JJOG
Use para cambiar entre las configuraciones de sonido y la
configuración del reloj o temporizador.
K KARAOKE (página 49)
M MONO (SHIFT & 7) (página 31)
MORPHING (página 31)
MUTE (página 55)
O OPEN/CLOSE (página 25, 29)
P PROGRAM (página 37)
R RANDOM (SHIFT & 9) (página 39)
REPEAT (SHIFT & 8) (página 37)
S SHIFT
Use para acceder funciones secundarias del mando a distancia.
SLEEP (página 59)
T TAPE I/II (página 25)
TUNER/BAND (página 25, 31)
V VOLUME +/–
Use para ajustar el nivel del volumen total.
23
ChH/Sp
Page 24

4 Getting Started
Switching on and setting the
clock
OPEN/CLOSE
TAPE
TUNER/BAND
AUX CD
DISPLAY
JOG
You should now have your system installed with everything
connected up and plugged in. After switching on, the first thing to
do is to set the clock. This only needs to be done once (unless all
power to the unit is cut) and will enable you to use the timer
features.
Use the front panel controls to do this.
1 Press STANDBY/ON
• Pressing again switches the unit back into standby mode.
2 Press TIMER/CLOCK ADJ.
3 Turn the JOG dial until CLK ADJ (clock adjust) appears
in the display.
If this is the first time you’ve switched on the unit, CLK ADJ
should already be displayed.
4 Press SET.
5 Turn the JOG dial to select 12 or 24 hour clock
format.
This setting affects the clock and timer setting displays. Choose the
format you prefer.
TIMER/CLOCK ADJ
DISPLAY MODE
STANDBY/ON
JOG
OPEN/CLOSE
SET
Function select buttons
功能選擇按鈕
Teclas de selección de función
6 Press SET.
7 Use the JOG dial to set the hour.
8 Press SET.
9 Use the JOG dial to set the minute.
10
Press SET to finish.
• Press DISPLAY MODE (front panel) or DISPLAY (remote)
anytime to show the current time. The display will revert to its
previous state after about five seconds.
Tip
There are a number of buttons other than STANDBY/ON which
will switch the unit on. Pressing any of the function select buttons
(CD, TUNER/BAND, TAPE I/II, AUX) when the unit is in
standby mode will turn the unit on and switch to that function.
Pressing the disc tray OPEN/CLOSE button will also switch the
power on and select the CD function.
If you press CD with a disc loaded, the disc will also start playing.
Likewise, if there is a tape loaded and you press TAPE I/II, the
tape will begin playing.
Pressing 26 will switch on the power and start playing the
last selected function.
24
En
23/8
Page 25

開始操作
Cómo empezar
4
電源打開方法和時鐘設定方
法
必須進行全部聯接和插入作業來完成系統安裝。打開電
源後,首先要做的是時鐘的設定。本設定只需進行一次
(除非本機電源被關掉),即可使用定時器的功能。
本操作使用前面板控制器進行。
1 按下STANDBY/ON 按鈕。
• 再次按下則使本機回到待機模式。
2 按下TIMER/CLOCK ADJ 按鈕。
3 旋轉 JOG 旋鈕直至 CLK ADJ(時鐘調解)出現於顯示
器中。
如果這是本機第一次打開電源, CLK ADJ 應已被顯
示。
4 按下 SET 按鈕。
5 旋轉 JOG 旋鈕來選擇 12 或 24 小時制時鐘。
本設定影響時鐘和定時器設置顯示。選擇喜歡的顯示方
式。
6 按下 SET 按鈕。
7 使用 JOG 旋鈕來設定小時。
8 按下 SET 按鈕。
9 使用 JOG 旋鈕來設定分鐘。
10 按下 SET 按鈕來結束操作。
• 隨時按下 DISPLAY MODE 按鈕(前面板)或
DISPLAY 按鈕(遙控器)以表示現在時間。約 5 秒
鐘後,顯示器將恢復其原先的狀態。
提示
STANDBY/ON 按鈕以外,還有許多能夠打開裝置電源
的按鈕。在本機處於待機模式時按下任何功能選擇按鈕
(CD , TUNER/BAND , TAPE I/II , AUX),將會打
開本機電源而切換到該功能。
按下碟片托盤 OPEN/CLOSE 按鈕也將會打開電源並選
擇 C D 功能。
如果在裝入碟片的狀態按下 CD 按鈕,碟片將開始播
放。同樣,如果裝入磁帶並按下TAPE I/II按鈕,磁帶
將開始播放。
按下
2
6按鈕將會打開電源並開始進行最後所選擇功
能的播放。
Cómo encender y configurar
el reloj
Debería ahora tener su sistema instalado con todo conectado y
enchufado. Después de encender el sistema, lo primero que se
debe hacer es configurar el reloj. Este paso sólo se realiza una vez
(a menos que se corte el suministro eléctrico hacia la unidad) y le
permitirá usar las funciones del temporizador.
Use los controles del panel frontal para realizarlo.
1 Pulse STANDBY/ON.
• Una nueva pulsación regresa la unidad al modo de standby.
2 Pulse TIMER/CLOCK ADJ.
3 Gire el selector JOG hasta visualizar CLK ADJ (ajuste
del reloj) en pantalla.
Si esta es la primera vez que enciende la unidad, CLK ADJ
debería ya visualizarse en pantalla.
4 Pulse SET.
5 Gire el selector JOG para seleccionar el formato del
reloj en 12 ó 24 horas.
Esta configuración afecta a las pantallas de configuración del
temporizador y el reloj. Escoja el formato que prefiera.
6 Pulse SET.
7 Use el selector JOG para configurar la hora.
8 Pulse SET.
9 Use el selector JOG para configurar los minutos.
10
Pulse SET para finalizar.
• Pulse DISPLAY MODE (panel frontal) o DISPLAY (mando a
distancia) en cualquier momento para visualizar la hora
actual. La pantalla regresará a su estado anterior después de
aproximadamente cinco segundos.
Consejo
Hay otros botones, aparte del STANDBY/ON, que también
conectan la alimentación de la unidad. Al presionar cualquiera
de los botones de ajuste de función
/II,
AUX
)
I
cuando el aparato está en el modo de espera, se
conecta la alimentación de la unidad y se cambiará a la función
seleccionada. La pulsación de la tecla OPEN/CLOSE de la
bandeja del disco también encenderá el sistema y seleccionará la
función de discos compactos.
Si pulsa CD estando un disco cargado, el disco también iniciará
su reproducción. Del mismo modo, si hay una cinta cargada y
pulsa TAPE I/II, la cinta iniciará su reproducción.
La pulsación de 26 encenderá el sistema e iniciará la
reproducción de la última función seleccionada.
(CD,
TUNER/BAND, TAPE
25
ChH/Sp
Page 26

4 Getting Started
Playing CDs
1 Press OPEN/CLOSE.
The disc tray ejects. Place a CD, with the label face up, into disc 1’s
disc guide in the disc tray. Make sure that it’s seated properly.
OPEN/CLOSE
+
Note: Do not use an adapter when playing 8cm CD singles. The
disc tray has guides for both 12 cm and 8cm discs.
2 Press 26.
The disc tray closes and playback starts.
3 Use the VOLUME buttons to adjust the volume (or the
front panel VOLUME UP/DOWN).
On the remote, press and hold for continuous adjustment. The
display indicates the current volume as you adjust it.
4 To pause playback, press 26.
To resume playback, press again.
VOLUME UP/DOWN
OPEN/CLOSE
VOLUME
–
5 To scan backward or forward, press and hold 1 or
¡.
On the front panel, these buttons are marked –·1/4 and
¢/¡·+.
Release the button to resume normal playback.
6 To skip back or forward to another track, press – 4
or ¢ +.
On the front panel, these buttons are marked –·1/4 and
¢/¡·+.
Pressing ¢ + once skips to the start of the next track on the
disc. Further presses take you to subsequent tracks.
Pressing – 4 once takes you to the beginning of the current
track. Further presses skip to the start of previous tracks.
You can use – 4 and ¢ + while the disc is paused, too.
The track number changes while the disc remains paused.
7 To stop playback, press 7.
26
En
Page 27

開始操作
Cómo empezar
4
CD 碟片播放方法
1 按下OPEN/CLOSE 按鈕。
碟片托盤開啟。使標籤面朝上將 CD 碟片裝入碟片托盤
中碟片 1 的碟片導向槽。確認碟片正確座落。
注意:當播放單曲目 8cm CD 碟片時,請勿使用適配
器。碟片托盤具備 12cm 和 8cm 碟片用導槽。
2 按下 26按鈕。
碟片托盤關閉,播放開始。
3 使用VOLUME 按鈕來調解音量(或前面板 V OLUME
UP/DOWN 旋鈕)。
在遙控器上,按住本按鈕來繼續進行調節。顯示器便指
示所調節的現在音量。
4 要暫停播放時,按下 26按鈕。
要恢復播放時,再次按下 26按鈕。
5 要反向或正向掃描時,按住 1 或 ¡ 按鈕。
在前面板上,這些按鈕標記為-·1/4和 ¢/¡·
+。
解除本按鈕來恢復標準播放。
6 要反向或正向跳躍到其他磁跡時,按下-4或¢+
按鈕。
在前面板上,這些按鈕標記為-·1/4和 ¢/¡·
+。
按下¢+按鈕一次則跳躍到碟片上下一磁跡的開頭。
繼續按下時,跳躍到下面的磁跡。
按下-4按鈕一次則跳躍到播放中磁跡的開頭。繼續
按下時,跳躍到前面磁跡的開頭。
在碟片暫停期間,也可以使用-4和¢+按鈕。在
碟片保持暫停期間,磁跡號碼變化。
7 要停止播放時,按下 7 按鈕。
Cómo reproducir discos
compactos
1 Pulse OPEN/CLOSE.
Saldrá la bandeja de discos. Ponga un disco CD con la etiqueta
arriba, en la guía para el primer disco de la bandeja de discos.
Asegúrese de que quede asentado correctamente.
Nota: No use un adaptador al reproducir discos compactos
sencillos de 8cm. La bandeja de discos tiene guías para discos de
12cm y 8cm.
2 Pulse 26.
La bandeja de discos se cierra y se inicia la reproducción.
3 Emplee los botones VOLUME para ajustar el volumen
(o VOLUME UP/DOWN del panel frontal).
En el mando a distancia, pulse y mantenga pulsada para un
ajuste continuo. La pantalla indica el volumen actual mientras
Vd. lo ajusta.
4 Para poner la reproducción en pausa, pulse 26.
Para reiniciar la reproducción, pulse nuevamente.
5 Para escanear hacia atrás o hacia delante, pulse y
mantenga pulsada 1 o ¡.
Estas teclas están marcadas en el panel frontal como –·1/
4 y ¢/¡·+.
Suelte la tecla para reiniciar la reproducción normal.
6 Para saltar hacia atrás o hacia delante a otra pista,
pulse – 4 o ¢ +.
Estas teclas están marcadas en el panel frontal como –·1/
4 y ¢/¡·+.
La pulsación de ¢ + una vez le permite saltar al inicio de la
pista siguiente del disco. Pulsaciones adicionales lo llevan a las
pistas siguientes.
La pulsación de – 4 una vez le permite ir al inicio de la pista
actual. Pulsaciones adicionales le permiten saltar al inicio de las
pistas anteriores.
También puede usar – 4 y ¢ + mientras el disco está en
pausa. El número de pista cambia mientras el disco permanece
en pausa.
7 Para detener la reproducción, pulse 7.
27
ChH/Sp
Page 28

4 Getting Started
Summary of playback controls for
CDs
DISC DISC DISC
OPEN/CLOSE DISC CHANGE
123
456
MONO REPEAT RANDOM
789
>
10
10/0
Below is a summary what remote control buttons do what when
you’re playing a CD.
Button What it does
2
6 Starts/restarts playback; pauses a disc that’s playing.
7 Stops playback.
1 Press & hold for fast reverse scanning.
¡ Press & hold for fast forward scanning .
– 4 Skips to the start of the current track. Press repeatedly to
skip to previous tracks.
¢ + Skips to the next track.
DISC-1/2/3
DISC CHANGE
Numbers
10 / 0 Use as 10 or 0 when selecting tracks.
>10 Selects tracks 10 and over. (For example, for 24, press >10 ,
Starts playback from the selected track number.
2 , 4.)
Changing discs
The disc tray has space for up to three discs.
• To start playing the next disc loaded, press
DISC CHANGE.
You can do this while the system is playing a disc.
• To playback a disc directly, use one of the three
DISC-1/2/3 buttons.
You can do this while the system is playing a disc, or when it’s
stopped.
• To rotate the disc tray when it’s open, press
DISC CHANGE.
This gives you access to all the discs loaded.
• To load/change discs during playback, press OPEN/
CLOSE.
The disc tray opens giving you access to the two discs not currently
playing.
28
En
OPEN/CLOSE
Page 29

開始操作
Cómo empezar
4
CD 碟片用播放控制器概要
播放 CD 碟片時,各遙控器按鈕所起的作用概要如下。
按鈕 作用
26 開始∕重新開始播放;暫停播放中的碟片。
7 停止播放。
1 按住以進行快速反向掃描。
¡ 按住以進行快速正向掃描。
- 4 跳躍到現在磁跡的開頭。反複按下來跳躍到
前一個磁跡。
¢ + 跳躍到下一磁跡。
數字 從所選擇的磁跡號碼開始播放。
10/0 選擇磁跡時,當作 10 或 0 按鈕使用。
>10 選擇 10 及以上的磁跡。(例如,對 24 ,按
下 >10 , 2 , 4 按鈕。)
Resumen de los controles de
reproducción de discos compactos
A continuación, listamos un resumen de las funciones de las
teclas del mando a distancia cuando reproduce un disco
compacto.
Tecla Qué hace
2
6 Inicia/reinicia la reproducción. Pone en pausa un disco
que está en reproducción
7 Detiene la reproducción
1 Pulse y mantenga pulsada para un escaneo rápido hacia
delante.
¡ Pulse y mantenga pulsada para un escaneo rápido hacia
delante.
–
4 Salta al principio de la pista actual. Presiónelo
repetidamente para saltar a pistas anteriores.
¢
+
Números
10 / 0 Use como 10 ó 0 al seleccionar pistas.
Salta a la pista siguiente.
Inicia la reproducción del número de pista seleccionado.
換碟片
碟片托盤有最多可以擱放三張碟片的空間。
• 要開始播放下一張所裝入碟片時,按下 DISC CHANGE
按鈕。
本操作可以在系統播放碟片期間進行。
• 要直接播放一張碟片時,使用三個DISC-1/2/3按鈕中
的一個。
本操作可以在系統播放碟片期間,或系統停止時進行。
• 要在碟片托盤打開時旋轉碟片托盤時,按下 DISC
CHANGE 按鈕。
這樣可以讓您存取全部裝入的碟片。
• 要在播放中裝入∕更換碟片時,按下 OPEN/CLOSE 按
鈕。
碟片托盤開啟,可以讓您存取不是播放中的兩張碟片。
>10 Selecciona la pista 10 y mayores. (Por ejemplo, para 24,
pulse >10 , 2 , 4.)
Cómo cambiar discos
La bandeja de discos tiene espacio para hasta tres discos.
• Para iniciar la reproducción del siguiente disco
cargado, pulse DISC CHANGE.
Puede hacerlo mientras el sistema reproduce un disco.
• Para reproducir un disco directamente, emplee uno de
los tres botones DISC-1/2/3.
Puede hacerlo miestras el sistema reproduce un disco o cuando
está detenido.
• Para hacer girar la bandeja de discos cuando está
abierta, pulse DISC CHANGE.
Ello le permite el acceso a todos los discos cargados.
• Para cargar/cambiar discos durante la reproducción,
pulse OPEN/CLOSE.
La bandeja de discos se abre permitiéndole el acceso a los dos
discos que actualmente no están en reproducción.
29
ChH/Sp
Page 30

4 Getting Started
Tuning in stations
The tuner can receive both FM and AM broadcasts, and lets you
memorize your favorite stations so you don’t have to manually
tune in every time you want to listen.
1 Press TUNER/BAND to switch to tuner mode.
Press repeatedly to switch between FM and AM.
2 Tune to a station.
There are three tuning modes—step, auto, and high-speed:
Step tuning: Press 1 or ¡ repeatedly to step through
the frequency in either direction (front panel:
–·1 /4 and ¢ /¡·+ )
Auto tuning: Press and hold 1 or ¡ until the frequency
display starts to move, then release. The tuner will stop on the
next station it finds. Repeat to search for other stations.
High-speed tuning: Press and hold 1 or ¡ until the
frequency display starts to move rapidly. Keep the button held
down until you reach the frequency you want. If necessary, fine
tune the frequency using the step tuning method.
When you’re tuned into a station, the tuned indicator ( )
lights in the display.
MONO
7
SHIFT
TUNER/BAND
TUNER BAND
MONO
If the station is FM stereo, the stereo indicator ( ) lights.
Improving poor FM reception
If you’re listening to an FM station in stereo but the reception is
weak, you can improve the sound quality by switching to mono:
1 Press MONO (SHIFT & 7 on the remote).
The mono indicator ( ) lights when the tuner is in mono
reception mode. Press again to switch back to auto-stereo mode
(the indicator lights when receiving a stereo broadcast).
Playing cassette tapes
This unit has two tape decks; one exclusively for playback, the
other for both recording and playback. Other features include
auto-reverse, relay play, Dolby B Noise Reduction (XR-A790 only)
and auto tape select.
• Auto-reverse lets you play or record a tape without physically
taking it out and turning it over (tape deck II only).
• Using relay play, you can listen to two complete tapes back-toback for up to 3 hours of continuous music.
30
En
Page 31

開始操作
Cómo empezar
4
電台調入方法
調諧器能夠接收調頻和調幅廣播,並讓您記憶喜歡的電
台,因此每次希望收聽時不需要手動進行調諧。
1 按下TUNER/BAND 按鈕來切換到調諧器模式。
反複按下來在調頻(F M)和調幅(AM)波段之間進
行切換。
2 調入一個電台。
有 3 種調諧模式:步進、自動和高速。
步進調諧:反複按下1或¡按鈕來在頻率波段內向
任何一個方向步進(前面板:-·1/4 和¢/¡·
+按鈕)。
自動調諧:按住 1 或 ¡ 按鈕直至頻率顯示開始變
動,然後解除。調諧器將在所找出的下一個電台上停
止。反複本操作來搜索其他電台。
高速調諧:按住1 或¡按鈕直至頻率顯示開始快速
變動。保持按住本按鈕直至到達希望的頻率。如果需
要,使用步進調諧方法進行頻率精細調諧。
當調入一個電台時,調入指示燈(
起。
如果電台為調頻立體聲,立體聲指示燈(
欠佳的調頻接收改進方法
如果收聽立體聲但接收微弱的一個調頻電台,通過切換
為單聲道可以改進音質:
1 按下MONO(遙控器上的 SHIFT 和7)按鈕。
當調諧器處於單聲道接收模式時,單聲道指示燈( )
亮起。再次按下來切換並回到自動立體聲模式(當接收
到立體聲廣播時,
指示燈亮起)。
)在顯示器中亮
)亮起。
Cómo sintonizar emisoras de
radio
El sintonizador puede recibir emisiones en AM y FM y le permite
memorizar sus emisoras preferidas de modo que no tiene que
sintonizarlas manualmente cada vez que desea escucharlas.
1 Pulse TUNER/BAND para cambiar al modo del
sintonizador.
Pulse repetidamente para cambiar entre AM y FM.
2 Sintonice una emisora.
Existen tres modos de sintonización: en pasos, automática y a alta
velocidad:
Sintonización en pasos: Pulse 1 o ¡ epetidamente
para pasar por la frecuencia en cualquiera dirección (panel
frontal: –·1 /4 y ¢ /¡·+ )
Sintonización automática: Pulse y mantenga pulsada
1 o ¡ hasta que la pantalla de frecuencia comienza a
moverse y, a continuación, suelte. El sintonizador se detendrá en
la emisora siguiente que encuentre. Repita para buscar otras
emisoras.
Sintonización a alta velocidad: Pulse y mantenga
pulsada 1 o ¡ hasta que la pantalla de frecuencia
comienza a moverse rápidamente. Mantenga la tecla pulsada
hasta encontrar la frecuencia que desea. En caso de necesidad,
sintonice con precisión la frecuencia usando el método de
sintonización en pasos.
Una vez que haya sintonizado una emisora, el indicador
sintonizado ( ) se ilumina en la pantalla y muestra la
potencia de la señal.
Si la emisora es en FM estéreo, el indicador de estéreo ( ) se
iluminará.
卡帶播放方法
本機裝備2個卡式座:一個為播放專用,一個為錄音和
播放用。其他功能包括自動反向、接力播放、杜比B降
噪(僅適用於 XR-A790 型)和自動磁帶選擇等。
• 自動反向讓您可不需進行任何操作取出並翻過來磁
帶以進行一個磁帶的播放或錄音(僅適用於卡式座
II)。
• 使用接力播放功能時,可以欣賞兩個完整的磁帶反
複播放最多 3 個小時。
Cómo mejorar una recepción de FM
débil
Si está escuchando una emisora en FM estéreo pero su recepción
es débil, puede mejorar la calidad del sonido al cambiarlo al
modo monoaural:
1 Pulse MONO (SHIFT & 7 en el mando a distancia).
El indicador del modo monoaural ( ) se ilumina cuando el
sintonizador está en el modo de recepción monoaural. Pulse
nuevamente para regresar al modo de estéreo automático (el
indicador se ilumina cuando recibe una emisión en estéreo).
31
ChH/Sp
Page 32

4 Getting Started
• Dolby B NR reduces tape hiss on tapes recorded using Dolby B
NR (which includes almost all commercially recorded tapes).
• Auto tape select means that the deck automatically detects the
type of tape you’re playing/recording—normal (Type I), or
high-position/CrO2 (Type II) (Type I only if you’re using the
XR-A390)—so there’s no need to check the tape type and
TAPE
switch manually.
1 Press TAPE I/II to switch to tape mode.
If two tapes are already loaded, press repeatedly to switch between
tape decks I and II.
If there’s only one tape loaded, the player automatically selects
that deck.
2 Press EJECT on the front panel to open one of the
cassette doors.
Remember: Both decks can play tapes, but only deck II
records.
3 Load a cassette tape then push the cassette door shut.
Use a tape that’s already recorded on so you can hear something
in the following steps.
(XR-A790 only)
(僅適用於 XR-A790 型)
(Sólo XR-A790)
2 NR ON/OFF
TAPE I/II
4 XR-A790 only: Press 2 NR ON/OFF to switch Dolby
NR on/off as required.
If the tape you loaded was recorded with Dolby NR on, then for the
best playback you should switch Dolby NR on.
5 Press 26 to start playback.
The side of the tape you’ll hear is whichever is forward-facing
when you load it. This is the ‘forward’ (3) direction, while the
other side is ‘reverse’ (2). The forward indicator is shown in the
display.
6 To play the other side of the tape, press 26 (XR-
A390: tape deck II only).
Each time you press 26 during playback, the other side of
the tape starts playing. Pressing 26 when the tape is stopped
starts playback on the side it was playing previously.
The current tape direction is indicated in the display.
7 To skip back or forward a track on the tape, press
– 4 or ¢ +.
On the front panel, press –·1 /4 or ¢ /¡·+ (the
tape should be playing when you do this).
¢ + searches for the next blank space between tracks on the
side currently playing (in other words, to the start of the next
track), then resumes playback.
32
En
EJECT
Page 33

開始操作
Cómo empezar
4
• 杜比 B 降噪功能降低使用杜比 B 降噪系統來錄音的
磁帶(包括幾乎全部市上可購買的磁帶)上的磁帶嘶
聲。
• 自動磁帶選擇意味卡式座自動檢測播放錄音中磁
帶的類型,即普通型(Type I),或High-position/
CrO
2 型(Type II)(如果使用 XR-A390 型,僅適用
Type I 型磁帶),因此並不需要手動確認磁帶類型
並進行切換。
1 按下TAPE I/II按鈕來切換成磁帶模式。
如果已裝入有兩個磁帶,反複按下來在卡式座I和II之
間進行切換。
如果只有一個磁帶裝入,播放機自動選擇該卡式座。
2 按下位於前面板上的 EJECT 按鈕來打開一個卡帶艙
門。
應牢記:兩個卡式座均能播放磁帶,但只有卡式座II能
夠進行錄音。
3 裝入卡帶,然後按卡帶艙門來關閉。
使用已錄好的磁帶即可在下列步驟聽到聲音。
4 僅適用於 XR-A790 型:按下 2 NR ON/OFF 按鈕以視需
進行杜比降噪通∕斷的切換。
如果所裝入的卡帶使用杜比降噪功能進行錄音,那麼,
要獲得最佳播放也需要接通杜比降噪功能。
5 按下 26按鈕來開始播放。
將會聽到的磁帶面為裝入時朝正向的一面。這一面為
‘正向’(3),而另一面為‘反向’(2)。正向指示燈
被顯示於顯示器中。
6 要播放磁帶的其他一面時,按下 26按鈕(XR-A390
型:僅適用於卡式座 II)。
播放中每次按下26按鈕時,磁帶的其他一面開始播
放。磁帶停止時按下26按鈕時,開始播放前一個播
放的一面。
現在的磁帶方向被顯示於顯示器中。
7 要反向或正向跳躍磁帶上的磁跡時,按下-4和¢
+按鈕。
在前面板上,按下- ·1/4 或¢/¡· +按鈕(進
行此操作時磁帶應被播放)。
¢+按鈕搜索磁帶播放中一面上的磁跡之間下一個空
白空間(換句話說,到下一磁軌的開頭),然後恢復播
放。
Cómo reproducir cintas
Esta unidad tiene dos platinas de cintas: una exclusivamente para
la reproducción y la otra para la grabación y la reproducción.
Otras características incluyen la autoinversión, la reproducción
por relé, el Dolby B Noise Reduction (XR-A790 sólo) y la selección
automática de la cinta.
• La autoinversión le permite reproducir o grabar una cinta sin
tener que sacarla y darle vuelta físicamente.
• Al usar la reproducción por relé, puede escuchar dos cintas
completas de principio a fin durante hasta 3 horas de música
continua.
• El Dolby B NR reduce el silbido de las cintas grabadas con
Dolby B NR (usado en casi todas las cintas grabadas
disponibles comercialmente).
• La selección automática de la cinta significa que la platina
detecta automáticamente si el tipo de cinta que está en
reproducción/grabación es normal (Tipo I) o de alta
posición/CrO2 (Tipo II) (Tipo I sólo si usa el XR-A380). Así, no
hay necesidad de verificar el tipo de cinta y realizar cambios
manualmente.
1 Pulse TAPE I/II para cambiar al modo de cinta.
Si ya hay insertadas dos cintas, pulse repetidamente para cambiar
entre las platinas I y II.
Si sólo hay un disco cargado, el reproductor selecciona
automáticamente esa platina.
2 Pulse EJECT en el panel frontal para abrir una de las
puertas de la cinta.
Recuerde: Ambas platinas pueden reproducir cintas, pero sólo
la platina II graba.
3 Cargue una cinta y, a continuación, cierre la puerta de
la cinta.
¡Use una cinta que ya esté grabada para poder escuchar algo al
ejecutar los pasos siguientes!
4 Sólo XR-A790: Pulse 2 NR ON/OFF para activar/
desactivar Dolby NR según sea necesario.
Si la cinta que ha cargado está grabada con Dolby NR, debería
activar Dolby NR para obtener la mejor reproducción.
5 Pulse 26 para iniciar la reproducción.
La cara de la cinta que escuchará es aquella que tenga su cara
hacia fuera al cargarse. Ésta es la dirección ‘hacia delante’ (3) y
el otro lado es ‘hacia atrás’ (2). El indicador hacia delante se
visualizará en pantalla.
6 Para reproducir la otra cara de la cinta, pulse 26.
(XR-A390: sólo la platina II)
Cada vez que pulse 26 durante la reproducción, la otra cara
de la cinta inicia su reproducción. La pulsación de 26
cuando la cinta está detenida, inicia la reproducción de la cara
que estaba anteriormente en reproducción.
La dirección actual de la cinta se indica en pantalla.
33
ChH/Sp
Page 34

4 Getting Started
– 4 searches for the previous blank space between tracks on
the side currently playing (in other words, to the start of the
current track), then resumes playback.
By pressing – 4 or ¢ + more than once, the player will
skip several tracks at once (to a maximum of 15). For example,
press ¢ + twice to skip forward two tracks.
Note: Track search is unlikely to work reliably in the following
cases:
• if the space between tracks is less than about 4 seconds.
• if the recording is particularly noisy so the spaces are not
recognized.
• if the recording contains frequent silences, such as a language
study tape.
• if the recording contains sections of very quiet material, such
as some classical music recordings.
8 To stop playback, press 7.
9 To fast wind the tape, press 1 or ¡.
On the front panel, press –·1 /4 or ¢ /¡·+ (the
tape should be stopped when you do this).
1 rewinds the tape, regardless of the tape direction at the time.
¡ forward-winds the tape.
Resetting the tape counter
The tape counter indicates the current location of the tape. The
counter increases when the tape is travelling forwards and
decreases when it’s travelling in reverse (playing or fast winding).
The tape counter returns to zero automatically when you eject a
tape. To reset it manually:
• Press 7 while the tape is stopped.
The counter returns to 0000.
Relay play
XR-A790: Both tape decks are auto-reverse and will play a tape
repeatedly until you press 7 or the tape has played eight times all
the way through. If two tapes are loaded, each will be played
alternately (for a maximum of eight times through each tape).
XR-A390: Deck I plays only in the 3 (forward) direction. Deck II
is auto-reverse and will play a tape repeatedly until you press 7 or
the tape has played eight times all the way through. If two tapes
are loaded, then the tape in deck II will play repeatedly.
34
En
Page 35

開始操作
Cómo empezar
4
-4按鈕搜索磁帶播放中一面上的磁跡之間的前面空
白空間(換句話說,到播放中磁跡的開頭),然後恢復
播放。
通過按下-4和¢+按鈕一次以上,播放機將一次
跳躍幾個(最多 15 個)磁跡。例如,按下 ¢ +按鈕
兩次來正向跳躍兩個磁跡。
注意:在下列情況,磁跡搜索的動作很可能不會可靠:
• 如果磁跡之間的空間小於約 4 秒鐘。
• 如果錄音特別有噪音,而無法識別空間。
• 如果錄音包含頻繁的無聲部分,如語言學習磁帶。
• 如果錄音包含極寂靜的材料,如一些古典音樂錄
音。
8 要停止播放時,按下 7 按鈕。
9 要快進磁帶時,按下 1 或 ¡ 按鈕。
在前面板上,按下- ·1/4 或¢/¡· +按鈕(進
行此操作時磁帶應停止)。
不管此時的磁帶方向,1 按鈕將倒繞磁帶。¡按鈕
將前捲磁帶。
磁帶計數器復原方法
磁帶計數器指示磁帶現在的位置。磁帶正向走動時計數
器數字增大,反向走動時減小(播放或快進)。當排出
磁帶時,磁帶計數器自動回到零。要手動復原時:
• 在磁帶停止中按下 7 按鈕。
計數器回到 0000 。
7 Para saltar hacia atrás o hacia delante una pista en una
cinta, pulse – 4 o ¢ +.
En el panel frontal, pulse –·1 /4 o ¢ /¡·+ (la
cinta debe estar en reproducción para ejecutarlo).
¢ + busca el espacio en blanco siguiente entre las pistas de la
cara actualmente en reproducción (es decir, al inicio de la pista
siguiente) y, a continuación, reinicia la reproducción.
– 4 busca el espacio en blanco anterior entre las pistas de la
cara actualmente en reproducción (es decir, al inicio de la pista
actual) y, a continuación, reinicia la reproducción.
Al pulsar – 4 o ¢ + más de una vez, el reproductor saltará
varias pistas a la vez (hasta un máximo de 15). Por ejemplo,
pulse ¢ + dos veces para saltar hacia adelante dos pistas.
Nota: Es poco probable que la búsqueda de pistas funcione
adecuadamente en los siguientes casos:
• si el espacio entre las pistas es menor a aproximadamente 4
segundos
• si la grabación es particularmente ruidosa de modo que no se
reconozcan los espacios
• si la grabación tiene silencios frecuentes como, por ejemplo,
una cinta de curso de idiomas.
• si la grabación tiene secciones de audio muy bajas como, por
ejemplo, grabaciones de música clásica
8 Para detener la reproducción, pulse 7.
9 Para bobinar rápidamente la cinta, pulse 1 o ¡.
En el panel frontal, pulse –·1 /4 o ¢ /¡·+
(debe detener la cinta para ejecutarlo).
1 rebobina la cinta, independientemente de la dirección de la
cinta actualmente. ¡ hace el avance rápido de la cinta.
接力播放
XR-A790型:兩個卡式座自動反向並反複播放磁帶,直
至按下7 按鈕或磁帶從頭到尾播放8次為止。如果裝入
有兩盤磁帶,分別將被交替地播放(各磁帶從頭到尾最
多播放 8 次)。
XR-A390 型:卡式座 I 只在 3(正向)方向進行播放。
卡式座 II 會自動反向,將反複播放磁帶,直至按下 7
按鈕或磁帶從頭到尾播放8次為止。如果裝入有兩盤磁
帶,卡式座 II 中的磁帶將被反複播放。
Cómo reconfigurar el contador
El contador indica el punto actual en el que se encuentra la cinta.
El contador aumenta cuando la cinta gira hacia delante y
disminuye cuando gira hacia atrás (en reproducción o al
bobinarse rápidamente hacia delante). El contador regresa a cero
automáticamente cuando se expulsa una cinta. Para ponerlo a
cero manualmente:
• Pulse 7 cuando la cinta está detenida.
El contador regresa a 0000.
Reproducción por relé
XR-A790: Ambas platinas de cinta son de autoinversión y
reproducirán una cinta repetidamente hasta que pulse 7 o hasta
haber reproducido una cintaocho veces de principio a fin. Si hay
dos cintas cargadas, cada cinta se reproducirá alternadamente
(por un máximo de ocho veces cada cinta).
XR-A380: La platina I reproduce sólo en la dirección 3 (avance). La
platina II tiene inversión automática y reproduce repetidamente una
cinta hasta que usted presiona 7 o hasta que la cinta se haya
reproducido por completo ocho veces. Si se han insertado dos cintas,
la cinta de la platina II se reproducirá repetidamente.
35
ChH/Sp
Page 36

5
DISC DISC DISC
123
456
MONO REPEAT RANDOM
789
SHIFT
PROGRAM
CLEAR
>
10
10/0
More CD Features
Programming a playlist
Programming a playlist means telling the player which tracks,
and in what order, you want to play. You can program a sequence
of up to 32 tracks to play from any of the discs loaded in the disc
changer. Tracks can appear more than once in the playlist, or can
be left out entirely.
1 Press PROGRAM.
2 Use the DISC-1/2/3 buttons to select the disc.
3 Enter a track number.
For example, to enter track 6, press 6. To enter track 14, press
>10, 1, 4.
To clear an entry, press CLEAR.
4 Repeat steps 2 and 3 to add more items to the
playlist.
2
5 Press
Notes:
• To delete the most recently programmed track, press CLEAR.
• To delete the whole playlist, make sure that playback is
6 to start playing the playlist.
stopped, then press 7. The playlist is also cleared if you open
the disc tray.
DISC-1/2/3
Using repeat play
You can set the player to repeat individual tracks on CDs, a whole
disc, or all the discs loaded in the player.
You can use the repeat together with the programming mode to
repeat the tracks in the playlist (see Programming a playlist for
how to program a playlist).
REPEAT
1 Press REPEAT (SHIFT & 8) during playback to select a
repeat mode.
On the front panel, press REPEAT.
Each press switches the repeat mode:
• Repeat one Track
• Repeat All
• Repeat off
In program play mode:
• Repeat one Track
• Program Repeat
• Repeat off
36
En
Page 37

CD 碟片更多的功能
Otras características de los discos compactos
5
播放一覽表的編程
播放一覽表的編程意味告訴播放機您希望播放的是哪一
個磁跡,按甚麼樣的順序播放。可以進行最多 32 磁跡
的順序編程,以便從裝入換碟機內的任何碟片進行播
放。磁跡能夠在播放一覽表中出現一次以上,或能夠完
全省略。
1 按下PROGRAM 按鈕。
2 使用 DISC-1/2/3 按鈕來選擇碟片。
3 輸入一個磁跡號碼。
例如,要輸入磁跡 6 時,按下 6 按鈕。要輸入磁跡 14
時,按下 >10 , 1 , 4 按鈕。
要清除一個輸入時,按下 CLEAR 按鈕。
4 反複步驟 2 和 3 來在播放一覽表上追加更多的項目。
5 按下 26按鈕來開始播放一覽表的播放。
注意:
• 要刪除最近所編程的磁跡時,按下 CLEAR 按鈕。
• 要刪除整個播放一覽表時,確保播放停止,然後按
下 7 按鈕。如果打開了碟片托盤,亦可清除播放一
覽表。
重複播放使用方法
可以設定播放機以便重複播放裝入播放機中的個別的
CD 、整個碟片,或裝入播放機中的全部碟片。
與編程模式一起,可以使用重複功能以便重複播放一覽
表中的磁跡(有關播放一覽表的編程,見“
的編程
”)。
1 播放中按下 REPEAT(SHIFT 和 8)按鈕來選擇一個重
複模式。
在前面板上,按下 REPEAT 按鈕。
每次按下會切換重複模式如下:
• 重複一個磁跡
• 重複全部
• 重複斷開
在程式播放模式:
• 重複一個磁跡
• 程式重複
• 重複斷開
播放一覽表
Cómo programar una lista de
reproducción
La programación de una lista de reproducción significa indicarle
al reproductor qué pistas y en qué orden desea reproducirlas.
Puede programar una secuencia de hasta 32 pistas para
reproducir de cualquiera de los discos cargados en el cambiador
de discos. En la lista de reproducción las pistas pueden aparecer
más de una vez o bien eliminarlas completamente.
1 Pulse PROGRAM.
2 Use las teclas DISC-1/2/3 para seleccionar el disco.
3 Introduzca un número de pista.
Por ejemplo, para introducir la pista 6, pulse 6. Para introducir
la pista 14, pulse >10, 1, 4.
Para borrar una entrada, pulse CLEAR.
4 Repita los pasos 2 y 3 para añadir más ítems a la lista
de reproducción.
2
5 Pulse
reproducción.
Notas:
• Para borrar la última pista programada, presione CLEAR.
• Para borrar la lista de reproducción, asegúrese de que la
6 para iniciar la reproducción de la lista de
reproducción esté parada, y luego presione 7. La lista de
reproducción también se borrará si abre la bandeja de discos.
Cómo usar la reproducción
repetida
Puede configurar el reproductor para repetir pistas individuales de
discos compactos, un disco completo, o todos los discos cargados en
el reproductor.
Puede usar el modo de repetición junto con el modo de
programación para repetir las pistas en la lista de programación
(consulte Cómo programar una lista de reproducción si necesita
más información sobre cómo programar una lista de reproducción).
1 Pulse REPEAT (SHIFT & 8) durante la reproducción
para seleccionar un modo de repetición.
En el panel frontal, presione REPEAT.
Cada pulsación cambia el modo de repetición:
• Repetir una pista
• Repitir todo
• Cancelar la repetición
En el modo de reproducción programada:
• Repetir una pista
• Repetición de la programación
• Cancela la repetición
37
ChH/Sp
Page 38

5
SHIFT
RANDOM
9
More CD Features
Using random play
Use the random play function to play tracks on the CDs loaded in
a random order.
• To start random playback, press RANDOM (SHIFT & 9).
XR-A390 only: On the front panel, press RANDOM.
• To stop the disc and cancel random playback, press 7.
Note: During random play, the – 4 and ¢ + buttons
function a little differently to normal: – 4 returns to the
beginning of the current track. You can’t go back further than
this. ¢ + selects another track at random from those
remaining.
(XR-A390 only)
(僅適用於 XR-A390 型)
(Sólo XR-A390)
RANDOM
38
En
Page 39

CD 碟片更多的功能
Otras características de los discos compactos
5
隨機播放使用方法
使用隨機播放功能來以隨機的順序播放所裝入 CD 碟片
上的磁跡。
• 要開始隨機播放時,按下 RANDOM(SHIFT 和 9)按鈕。
僅適用於 XR-A390 型:在前面板上,按下 RANDOM 按
鈕。
• 要停止碟片並取消隨機播放時,按下 7 按鈕。
注意:隨機播放中,-4和¢+按鈕起與正常稍微
不同的功能:-4按鈕回到播放中磁跡的開頭。不能
比這進一步反向。¢+按鈕從那些所剩下的磁跡隨機
地選擇其他磁跡。
Cómo usar la reproducción
aleatoria
Use la función de reproducción aleatoria para reproducir
aleatoriamente pistas de los discos compactos que haya cargado.
• Para iniciar la reproducción aleatoria, presione
RANDOM (SHIFT y 9).
XR-A390 solamente: En el panel frontal, presione RANDOM.
• Para detener el disco y cancelar la reproducción
aleatoria, pulse 7.
Nota: Durante la reproducción aleatoria, las teclas – 4 y
¢ + no funcionan exactamente igual a lo normal: – 4
regresa al inicio de la pista actual. No puede ir más allá de este
punto. ¢ + selecciona otra pista aleatoriamente entre las que
queden.
39
ChH/Sp
Page 40

6 More Tuner Features
Saving stations for quick recall
You can save up to 24 station presets so that you always have easy
access to your favorite stations without having to tune in
manually each time.
If the unit is unplugged from the power supply completely, saved
stations will remain for several days, after which you’ll have to
TUNER/BAND
123
456
MONO REPEAT RANDOM
789
>
10
10/0
save them again.
Note: The following instructions assume that you are already
familiar with tuning into radio stations—see page 30 for detailed
tuning instructions.
Use the front panel controls to do this.
1 Tune into a radio station on either the AM or FM band.
2 Press 7 ST. MEMORY.
The station preset number starts blinking.
3 Use –·1/4 or ¢/¡·+ to select a station preset
number.
There are 24 preset locations; each can store one station preset.
4 Press 7 ST.MEMORY again to save the station preset.
TUNER/BAND
FREQ/STATION
Listening to station presets
1 Press TUNER/BAND to switch to tuner mode.
2 If you’re using the front panel controls, press FREQ/
STATION to switch station mode.
This switches the tuner to the preset station mode. If you’re using
the remote, there’s no need for this step.
3 Use the – 4 and ¢ + buttons to select a station
preset.
If you’re using the front panel controls, use
–·1/4 or ¢/¡·+.
If you’re using the remote, you can also use the number buttons
to select a station preset directly. For example, to select station
preset 6, press 6; to select 24, press >10, 2, 4.
Changing the frequency step
As its default setting, the tuner jumps in steps of 50 kHz and 9 kHz
when tuning in FM and AM stations respectively. If you find that
this is unsuitable in your area (if you can’t tune into stations
successfully), you can change the frequency steps to 100 kHz for
FM and 10 kHz for AM. Here’s how to switch the setting:
1 Switch the power into standby.
2 Press and hold FREQ/STATION (front panel only) for
about three seconds.
40
En
Page 41

調諧器更多的功能
Otras características del sintonizador
6
為快速重呼叫進行電台記憶
最多可以儲存 24 個電台預調以便不需每次手動精細調
諧而經常能夠簡易接入喜歡的電台。
如果裝置從電源完全拔除,所記憶的電台將被保持幾
天,這以後將需要重新記憶它們。
注意:下列指示假定您已經熟悉廣播電台的調諧。有關
詳細的調諧指示,見第 31 頁。
使用前面板控制器來進行本操作。
1 調入一個調幅或調頻波段的廣播電台。
2 按下 7 ST.MEMORY 按鈕。
電台預調號碼開始閃爍。
3 使用-·1/4或¢/¡·+按鈕來選擇一個電台預
調號碼。
有 24 個預調位置;分別可以儲存一個電台預調。
4 再次按下 7 ST.MEMORY 按鈕來記憶電台預調。
電台預調收聽方法
1 按下TUNER/BAND 按鈕來切換成調諧器模式。
2 如果使用前面板控制器,按下 FREQ/STATION 按鈕。
這會使調諧器切換成預調電台模式。如果使用的是遙控
器,不需進行本步驟。
3 使用- 4 和 ¢ +按鈕來選擇一個電台預調。
如果使用的是前面板控制器,使用- · 1 / 4 或
¢/¡·+按鈕。
如果正在使用遙控器,亦可使用數字按鈕來直接選擇一
個電台預調。例如,要選擇電台預調 6 時,按下 6 按
鈕;要選擇 24 時,按下 >10 , 2 , 4 按鈕。
頻率步進改變方法
作為其工廠初期設定,調諧器在調入調頻和調幅電台時
分別以50kHz 和 9kHz 步進跳動。如果發現到該步進
不適宜於本地(如果不能成功地調入電台),對調頻可
以將頻率步進改變為 100kHz ,對調幅可以改變為
10kHz 。設定的切換方法如下:
1 將電源切換為待機模式。
2 按住 FREQ/STATION 按鈕(僅適用於前面板)約 3 秒
鐘。
Cómo almacenar emisoras para su
rápida sintonización
Puede almacenar hasta 24 presintonías de modo que siempre
tenga un acceso fácil a sus emisoras favoritas sin tener que
sintonizarlas manualmente cada vez.
Si la unidad está desenchufada completamente de la red eléctrica,
las emisoras almacenadas permanecerán durante varios días,
después de los cuales deberá almacenarlas nuevamente.
Nota: Las instrucciones siguientes suponen que Vd. ya sabe
cómo sintonizar emisoras. Consulte la página 31 si necesita más
detalles al respecto.
Use los controles del panel frontal para realizarlo.
1 Sintonice una emisora ya sea en la banda AM o FM .
2 Pulse 7.
Si está usando los controles del panel frontal, pulse 7
ST.MEMORY.
La pantalla de frecuencia comenzará a parpadear.
3 Use –·1/4 o ¢/¡·+ para seleccionar un
número de presintonía.
Existen 24 memorias libres para presintonías y cada una puede
almacenar una presintonía.
4 Pulse 7 nuevamente para almacenar la presintonía.
Si está usando los controles del panel frontal, pulse 7
ST.MEMORY.
Cómo escuchar las presintonías
1 Pulse TUNER/BAND para cambiar al modo del
sintonizador.
2 Si está usando los controles del panel frontal, pulse
FREQ/STATION.
Esto hará que el sintonizador cambie al modo de presintonía. Si
está usando el mando a distancia, no necesita este primer paso.
3 Use las teclas – 4 y ¢ + para seleccionar una
presintonía.
Si está usando los controles del panel frontal, use
–·1/4 o ¢/¡·+.
Si está usando el mando a distancia, puede también usar las
teclas numeradas para seleccionar directamente la presintonía.
Por ejemplo, para seleccionar la presintonía 6, pulse 6; para
seleccionar la 24, pulse >10, 2, 4.
Cómo cambiar los pasos de
frecuencia
En su configuración por defecto, el sintonizador salta en pasos de
50kHz y 9kHz al sintonizar emisoras de FM y AM respectivamente.
Si considera que esto es inapropiado en su área (si es difícil
sintonizar las emisoras bien), puede cambiar los pasos de
sintonización a 100kHz para FM y a 10kHz para AM. A
continuación indicamos las instrucciones:
1 Ponga el sistema en modo de standby.
2 Pulse y mantenga pulsada FREQ/STATION (sólo panel
frontal) durante aproximadamente tres segundos.
41
ChH/Sp
Page 42

7
Recording Cassette Tapes
Making tape recordings
You can make tape recordings from the radio, CDs, or from an
external component connected to the auxiliary inputs. If you're
recording from CD it’s more convenient to use the ASES mode—
see Automatically recording CDs on page 44.
Once recording has started, you can’t switch to another component until recording has stopped. So, for example, you can’t
switch over to the tuner while you’re recording a CD.
Unlike some tape decks, there’s no need to set recording levels; the
deck sets the level automatically. When recording, the volume,
and other sound settings have no effect on the recording. This
means that you can record something with the volume turned
right down, if you want.
Before recording, check that the cassette erase-protect tabs have
not been broken, and that the tape is either a Type I (normal
position) or Type II (high position/CrO2) (Type I only if you’re
using the XR-A390). You can’t record on Type IV (metal) tapes
using this deck.
If you’re recording from the start of a tape, it’s a good idea to wind
the tape on a little so that you don’t accidently start recording over
the leader tape. You can either do this by hand, or load the tape
into the deck and play the tape for 5–6 seconds.
2 NR ON/OFF
(XR-A790 only)
(僅適用於 XR-A790 型)
(Sólo XR-A790)
1 Load a cassette into tape deck II.
Remember: You can only record using deck II.
In order to follow these instructions more easily, load the cassette
with side A facing front.
2 Check the recording direction.
If you start recording in the 3 direction, both sides of the tape
will be recorded (unless the erase protect tab for side B is
missing). If you switch sides and start recording in the 2
direction, then recording will start from side B and stop when the
end of the tape is reached.
If you need to change the direction, press 26 twice, then 7.
3 XR-A790 only: Turn Dolby NR on or off as required.
Using Dolby NR improves the sound quality of tape recordings
that are going to be played on Dolby NR equipped players. If the
tape is not going to be played on a Dolby NR equipped player (or
if you’re not sure), you should leave Dolby NR off.
42
En
Page 43

進行卡帶錄音
Cómo grabar cintas
7
進行卡帶錄音
可以從無線電廣播、 CD 碟片,或者從聯接到輔助輸入
插孔的外接組件進行磁帶錄音。如果從 CD 碟片進行錄
音,使用 ASES 模式進行更為方便,見第 45 頁
片的自動錄音”
一旦錄音開始,不能切換到其他組件,直至錄音停止。
例如,在進行 C D 碟片的錄音期間,不能切換到調諧
器。
不像一些卡式座,本機不需要設定錄音電平,卡式座會
自動設定電平。進行錄音時,音量及其他音響設定不影
響錄音。這意味,如果希望,不需徹底降低音量也能夠
進行一些錄音。
錄音之前,確認卡帶防誤抹片沒有被挖除,而磁帶為
Type I 型(普通磁帶)或 Type II 型(high position/
CrO
2 磁帶)(如果使用 XR-A390 型,僅適用 Type I 型磁
帶)。使用本機不能在 Type IV 型(金屬)磁帶上進行
錄音。
如果從磁帶開頭進行錄音,磁帶最好捲繞一點,以免無
意中在引導帶上進行錄音。可以用手,或在卡式座上裝
入磁帶並讓磁帶走動約 5 ∼ 6 秒鐘來進行此操作。
1 在卡式座 II 中裝入卡帶。
應記住:只能使用卡式座II 來進行錄音。
為進一步容易遵循下列指示,使 A 面朝正面裝入卡
帶。
2 確認錄音方向。
如果以3方向開始錄音,磁帶兩面將被錄音(除非B面
用防誤抹片被挖除)。如果切換磁帶面並以2 方向開始
錄音,那麼,錄音將從B面開始並在到達帶尾時停止。
如果需要改變方向,按下26按鈕兩次,然後按下7
按鈕。
3 僅適用於XR-A790型:視需接通或斷開杜比降噪功能。
使用杜比降噪功能會改進準備在裝備杜比降噪系統的播
放機進行播放的磁帶錄音音質。
如果不在裝備杜比降噪系統的播放機播放時(或沒有
確信時),杜比降噪功能應保持在斷開位置。
。
“CD 碟
Cómo grabar cintas
Puede grabar cintas de radio CDs, de un componente externo
conectado a las salidas auxiliares. Si está grabando de un disco
compacto, es más conveniente usar el modo ASES. Consulte
Grabación automática de discos compactos CDs en la página
44.
Una vez que la grabación ha comenzado, no puede cambiar a
otro componente hasta que la grabación se detenga. Entonces,
por ejemplo, no puede cambiar al sintonizador mientras graba un
disco compacto.
A diferencia de otras platinas de cintas, no es necesario configurar
niveles de grabación, la platina configura el nivel correcto
automáticamente. Al grabar, el volumen y otras configuraciones
de sonido no tienen efecto alguno en la grabación. Esto significa
que puede grabar con el volumen en su nivel más bajo, si lo
desea.
Antes de grabar, verifique que la lengüeta de antigrabación de la
cinta no esté quebrada y que la cinta es del Tipo I(posición
normal) o del Tipo II (posición alta/CrO2) (Tipo I sólo si usa el
XR-A390). No puede grabar en cintas Tipo IV (metálicas) en esta
platina.
Si está grabando desde el inicio de una cinta, es recomendable
bobinarla un poco para no iniciar la grabación accidentalmente
sobre el segmento inicial en blanco. Puede hacerlo ya sea a mano
o cargar la cinta en la platina y reproducirla durante 5 – 6
segundos
1 Cargue la cinta en la platina de cintas II.
Recuerde: Sólo puede grabar en la platina II.
Para seguir estas instrucciones más fácilmente, cargue la cinta
con la cara A hacia delante.
2 Verifique la dirección de la grabación.
Si inicia la grabación en la dirección 3 ambas caras de la cinta
se grabarán (a menos que falte la lengüeta de antigrabación de la
cara B). Si cambia los lados y comienza la grabación en la
dirección 2 la grabación se iniciará en la cara B y se detendrá al
llegar al final de la cinta.
Si necesita cambiar la dirección, pulse 26 dos veces y, a
continuación 7.
3 Sólo XR-A790: Active/desactive Dolby NR según sea
necesario.
El uso de Dolby NR mejora la calidad del sonido de grabaciones
en cintas que van a ser reproducidas en reproductores equipados
con Dolby NR. Si la cinta no va a ser reproducida en un
reproductor equipado con Dolby NR (o si no está seguro), debería
desactivar Dolby NR.
43
ChH/Sp
Page 44

7
DISC DISC DISC
Recording Cassette Tapes
4 Select the function you plan to record.
For example, press TUNER/BAND to record from the radio. If
you’ve selected a CD or tape, make sure that it’s stopped.
5 Prepare the source for recording.
For example, tune in the radio station.
TUNER/BAND
DISC-1/2/3
TUNER BAND
(XR-A790 only)
(僅適用於 XR-A790 型)
(Sólo XR-A790)
2 NR ON/OFF
6 Press REC/STOP (front panel only).
The deck starts recording.
7 Start the source playing (if necessary).
8 When you’re ready to stop recording, press REC/STOP
again.
Automatically recording CDs
Auto Synchro Editing System (ASES for short) makes recording
one or more CDs automatic. It also makes sure that a CD track
isn’t spread over two sides of a tape.
If the tape runs out midway through a CD track, the same track is
automatically recorded from the beginning again on the other
side.
1 Prepare tape deck II for recording.
Load a blank cassette and wind on past the leader. XR-A790 only:
Switch Dolby NR on or off as required.
Recording starts in the 3 direction, so take care over which way
you load the tape.
2 Load the CD(s) you want to record.
3 Press the DISC-1/2/3 button of the first CD you want
to record, then press 7.
The CD should now be selected, but not playing.
If you want to record the tracks in a different order, use the
program play feature—see page 36 for how to do this.
4 Press ASES/COPY to start recording.
After the first CD has finished, recording of the next CD loaded
starts. Recording finishes automatically when either all the discs
have been recorded, or the tape ends (whichever comes first).
44
En
5 If you want to stop recording before the end of the
CD, press 7.
Note: ASES may not work correctly if the first side of the tape
finishes at the same time as a CD track ends. If this happens, stop
the recording then resume on the other side without ASES.
ASES/COPY
REC/STOP
Page 45

進行卡帶錄音
Cómo grabar cintas
7
4 選擇準備進行錄音的功能。
例如,按下 TUNER/BAND 按鈕來從廣播進行錄音。如
果選擇了 C D 碟片或磁帶,確認它停止。
5 準備用於錄音的音源。
例如,調入廣播電台。
6 按下REC/STOP 按鈕(僅適用於前面板)。
卡式座開始錄音。
7 開始音源的播放(如果需要)。
8 要準備停止錄音時,再次按下 REC/STOP 按鈕。
CD 碟片的自動錄音
自動同步編輯系統(簡寫為 ASES)自動進行一張或以
上碟片的錄音。也要確認 CD 磁跡不能向磁帶兩面進行
錄音。
如果磁帶在 CD 磁跡的中途結束走動,同一磁跡從頭開
始再次被自動錄在磁帶另外一面上。
1 準備用於錄音的卡式座II。
裝入空白磁帶,繞過引導帶。僅適用於
視需接通或斷開杜比降噪功能。
錄音以 3 方向開始,因此要注意方向裝入磁帶。
2 裝入希望錄音的 CD 碟片。
3 按下希望進行錄音的第一張 CD碟片的DISC-1/2/3按鈕
來進行錄音,然後按下 7 按鈕。
這時 C D 碟片應被選擇,但不被播放。
如果希望以一個不同的順序進行錄音,使用程式播放功
能,操作方法見第 37 頁。
4 按下ASES/COPY 按鈕來開始錄音。
第一張 CD 碟片結束後,所裝入的下一張 CD 碟片開始
錄音。在全部碟片結束錄音時,或磁帶停止走動時(以
先到者為準),錄音停止。
5 如果希望在結束 CD 碟片之前停止錄音,按下 7 按鈕。
注意:如果磁帶的第一面與 CD 碟片的終端同時結束,
ASES可能不會正確動作。遇此情況時,停止錄音,然後
在另外一面上不使用 ASES 功能恢復錄音。
XR-A790 型:
4 Seleccione la función que desea grabar.
Por ejemplo, pulse TUNER/BAND para grabar de la radio.
5 Prepare la fuente para la grabación.
Por ejemplo, sintonice una emisora.
6 Pulse REC/STOP (sólo panel frontal).
La platina inicia la grabación.
7 Inicie la reproducción de la fuente (si es necesario).
8 Para finalizar la grabación, pulse REC/STOP
nuevamente.
Grabación automática de discos
compactos
El sistema de edición autosincronizada (ASES, abreviado) graba
de uno o más discos compactos automáticamente. También
verifica que una pista del disco compacto no quede separada en
dos lados de la cinta.
Si la cinta se termina en la mitad de una pista del disco
compacto, la misma pista se grabará automáticamente de nuevo
desde el inicio del otro lado.
1 Prepare la platina de cintas II para la grabación.
Cargue una cinta virgen y bobine hasta pasar el segmento inicial
en blanco. Sólo XR-A790: Active/desactive Dolby NR según sea
necesario.
Las grabaciones se inician en la dirección 3 verifique la
dirección para cargar la cinta.
2 Cargue el(los) disco(s) compacto(s) que desea grabar.
3 Pulse la tecla DISC-1/2/3 del primer disco compacto
que desea grabar y, a continuación, pulse 7.
Se debe ahora seleccionar el disco compacto pero no para su
reproducción.
Si desea grabar las pistas en un orden diferente, use la función de
reproducción programada. Consulte la página 37 si necesita más
información al respecto.
4 Pulse ASES/COPY para iniciar la reproducción.
Una vez que haya terminado el primer disco compacto, se inicia
la grabación del siguiente disco compacto cargado. La grabación
siempre se detiene después que el disco en la bandeja 3 termine su
reproducción (por lo tanto, si comienza en la bandeja 3, sólo
grabará el disco 3).
5 Si desea detener la grabación antes del término del
disco compacto, pulse 7.
Nota: ASES puede no funcionar correctamente si la primera
cara de la cinta termina al mismo tiempo que una pista del disco
compacto. Si esto ocurre, detenga la grabación y, a continuación,
reiníciela en la otra cara sin ASES.
45
ChH/Sp
Page 46

7
TAPE
Recording Cassette Tapes
Copying tapes
Here’s how to copy a tape from deck I to deck II.
1 Press TAPE I/II.
2 Load the source tape into deck I.
Recording starts in the 3 direction, so take care over which way
you load the tape.
3 Prepare tape deck II for recording.
Load a blank cassette and wind on past the leader.
XR-A790 only: Switch Dolby NR on or off as required—for best
results, switch on if the tape you’re recording was recorded using
Dolby NR.
Note: It’s not possible to switch Dolby NR on and off
independently for each deck.
4 Press ASES/COPY to start recording.
Recording starts in the 3 direction and continues onto the other
side, unless the erase-protect tab is broken on the cassette in deck
II.
5 If you want to stop recording before the end of the
tape is reached, press 7.
ASES/COPY
TAPE I/II
Improving AM tape recordings
• XR-A790 model only.
Recording AM broadcasts on cassette tape can result in noisy
recordings. If you experience this, change the beat cut function:
1 Switch the system into standby.
2 Press REC/STOP for about 3 seconds.
Release when the display reads B.CUT 2.
Note: Switch beat cut 1 again by following the same procedure
(the display reads B.CUT 1).
REC/STOP
46
En
Page 47

進行卡帶錄音
Cómo grabar cintas
7
磁帶拷貝方法
從卡式座I向卡式座 II 進行拷貝的方法如下:
1 按下TAPE I/II按鈕。
2 在卡式座 I中裝入音源磁帶。
錄音以 3 方向開始,因此要注意方向裝入磁帶。
3 準備用於錄音的卡式座II。
裝入空白磁帶,並繞過引導帶。
僅適用於XR-A790型:視需接通或斷開杜比降噪功能。
為最佳結果,如果已錄音磁帶使用杜比降噪功能進行錄
音,最好接通杜比降噪功能。
注意:各卡式座不能獨立地接通或斷開杜比降噪功能。
4 按下ASES/COPY 按鈕來開始錄音。
錄音以 3 方向開始並繼續到另外一面,除非卡式座 II
中的卡帶防誤抹片被挖除。
5 如果希望在磁帶到達尾端之前停止錄音,按下7按鈕。
調幅廣播的磁帶錄音改進方法
• 僅適用於 XR-A790 型。
在卡帶上進行調幅廣播的錄音可能會造成噪音多的錄
音。如果發現到此情況,可改變拍頻截止功能:
1 將系統切換成待機模式。
2 按下REC/STOP按鈕約 3 秒鐘。
顯示器顯示 B.CUT 2 時解除。
注意:通過進行相同的步驟來再次斷開拍頻截止1功能
(顯示器表示 B.CUT 1)。
Cómo copiar cintas
A continuación, las instrucciones para copiar cintas desde la
platina I a la II.
1 Pulse TAPE I/II.
2 Cargue la cinta fuente en la platina I.
Las grabaciones se inician en la dirección 3 verifique la
dirección para cargar la cinta.
3 Prepare la platina de cintas II para la grabación.
Cargue una cinta virgen y bobine hasta pasar el segmento inicial
en blanco.
Sólo XR-A790: Active/desactive Dolby NR segúns sea necesario.
Para obtener mejores resultados active si la cinta que está
grabando fue grabada con Dolby NR.
Nota: No es posible activar/desactivar independientemente
Dolby NR para cada platina.
4 Pulse ASES/COPY para iniciar la reproducción.
La grabación se inicia en la dirección 3 y continúa en la otra
cara a menos que la lengüeta de antigrabación de la cinta en la
platina II esté rota.
5 Si desea detener la grabación antes del término de la
cinta, pulse 7.
Cómo mejorar grabaciones de AM en
cintas
• Sólo modelo XR-A790.
La grabación de emisiones de AM en cintas puede resultar
ruidosa. Si léste es el caso, cambie a la función del filtro
antiinterferencias:
1 Cambie el sistema al modo de standby.
2 Pulse REC/STOP durante aproximadamente 3
segundos.
Suelte cuando se visualiza B.CUT 2 en pantalla.
Nota: Cambie de nuevo la supresión de batido 1 siguiendo el
mismo procedimiento (el visualizador muestra B.CUT 1).
47
ChH/Sp
Page 48

8 Singing Karaoke
Singing karaoke
Using the karaoke features you can plug in up to two microphones and mix the sound of your own voice (or two people’s
voices) with a backing track. The backing track can be anything
you like, from a song on the radio, to a dedicated karaoke CD.
1 Set MIC LEVEL to minimum.
2 Plug in the microphone(s).
• If the microphone has an on/off switch, make sure it’s on.
• If you’re using just one microphone, plug it into the
MIC MAIN input.
KARAOKE
3 Load a karaoke backing disc or tape.
You can also use the radio or a component connected to the
auxiliary inputs as source material for a backing track.
• If you’re using a disc, make sure that you’ve selected the
correct disc to play.
• If you want to play from a track other than the first, select the
track now.
4 To change the mix, press KARAOKE.
Pressing repeatedly switches between these modes:
• KARAOKE (voice cancel) – Takes out the vocals in the
backing track.
• L CH – Plays the left channel only.
• R CH – Plays the right channel only.
• L+R CH – Normal stereo playback.
• OFF (stereo) – Normal stereo playback.
5 Play the backing track.
6 Adjust the MIC LEVEL to get the sound you want.
If when you turn the MIC LEVEL up you get a loud whistling
from the speakers, move the microphone(s) so that it points away
from the speakers.
48
En
MIC MAIN
MIC SUB
7 Sing!
Note:
• Depending on the microphone level, the sound of the disc may
distort. If this happens, turn down the volume.
• You must turn the audio preset effect (see page 50) to FLAT to
use any of the karaoke features.
MIC LEVEL
Page 49

卡拉 O K 演唱方法
Karaoke
8
卡拉 O K 演唱方法
使用卡拉 OK 功能,即可插入 2 支麥克風並將自己的聲
音(或兩個人的聲音)與背景伴奏曲目混合在一起。背
景伴奏曲目可以是喜歡的任意東西,即從來自廣播的樂
曲到播放音樂時在屏幕上顯示歌詞的專用 C D 卡拉 OK
碟片。
1 將 MIC LEVEL 調節旋鈕設定成最低位置。
2 插入麥克風。
• 如果麥克風具備電源打開∕關掉開關,必須打開
它。
• 如果只使用 1 支麥克風,將它插入 MIC MAIN 輸入
插孔。
3 裝入卡拉 OK 背景伴奏碟片或磁帶。
亦可使用廣播或聯接到輔助輸入插孔的組件作為背景伴
奏用音源材料。
• 如果使用碟片,確保選擇了正確的碟片進行播放。
• 如果希望從第一曲以外的曲目播放,這時進行曲目
選擇。
4 要改變混合時,按下 KARAOKE 按鈕。
反複按下以在下列模式之間進行切換:
• KARAOKE(聲音取消)-斷開背景磁跡中的聲樂。
• L CH -僅播放左聲道。
• R CH -僅播放右聲道。
• L + R CH -正常的立體聲播放。
• OFF(立體聲)-正常的立體聲播放。
5 播放背景伴奏曲目。
6 調節 MIC LEVEL 調節旋鈕來獲得希望的聲音。
如果在增大 MIC LEVEL 調節旋鈕的設定時從揚聲器聽
到大的嘯叫聲,移動麥克風以使其遠離揚聲器。
7 演唱!
注意:
• 根據麥克風的電平,碟片的聲音可能會失真。遇此
情況時,降低音量。
• 必須把音響預置效果(參見第 51 頁)轉到FLAT才能
使用任意一項卡拉 ok 功能。
Karaoke
Para usar la función de karaoke, puede conectar hasta dos
micrófonos y mezclar el sonido de su propia voz (o la de dos
personas) con una pista de fondo. La pista de fondo puede ser
cualquier cosa que desee, desde una canción de la radio hasta un
disco compacto especializado de karaoke.
1 Ponga el MIC LEVEL al mínimo.
2 Conecte el(los) micrófono(s).
• Si el micrófono tiene un interruptor de activación/
desactivación, asegúrese de que esté activado.
• Si sólo usa un micrófono, conéctelo a la entrada MIC MAIN.
3 Cargue un disco o cinta de fondo de karaoke.
También puede usar la radio o un componente conectado a las
entradas auxiliares como material fuente para la pista de fondo.
• Si está usando un disco, asegúrese de haber seleccionado el
disco correcto a reproducir.
• Si desea reproducir una pista diferente a la primera, seleccione
la pista ahora.
4 Para cambiar la mezcla, pulse KARAOKE
La pulsación repetida permite cambios entre estos modos:
• KARAOKE (cancelación de la voz) – Quita las voces de la
pista de fondo.
• L CH – Reproduce sólo el canal izquierdo.
• R CH – Reproduce sólo el canal derecho.
• L+R CH – Reproducción normal en estéreo.
• OFF – Reproducción normal en estéreo.
5 Reproduzca la pista de fondo.
6 Ajuste el MIC LEVEL para obtener el sonido que desea.
Si sube el MIC LEVEL se obtiene un silbido alto de los hablantes,
aleje el(los) micrófono(s) de ellos.
7 ¡Cante!
Nota:
• Dependiendo del nivel del micrófono, el sonido del disco
puede distorsionarse. Si sucediera esto, baje el volumen.
• Debe poner el efecto de preajuste de audio (véase la página
51) en FLAT para poder utilizar cualquiera de las
características del karaoke.
49
ChH/Sp
Page 50

9 Using Sound Effects
Using the sound morph
This system gives you many different ways to change the character
of the music you’re listening to. The Sound Morphing feature lets
you ‘morph’ between the various sound presets, giving you the
freedom to shape the sound as you like. There are also a number
of user presets, so when you have a sound you want to keep, you
can save it for instant recall.
Using preset effects
There are two sets of effect presets, called Audio mode and
Surround mode.
Audio preset mode
AUDIO/
SURROUND
JOG
1 Press AUDIO MODE (front panel only) to switch
between presets.
Alternatively, press AUDIO MODE once then turn the JOG dial
to morph from one preset to the next.
• STUDIO – recording studio sound
• CLUB – the live sound of a small club
• HALL – a rich, expansive concert hall sound
• A.USER1–3 – three settings for you to store your own
settings (see page 54)
• ALL FLAT – the original sound with no effects
The JOG dial lights in green when in Audio preset mode.
SURROUND MODE
AUDIO MODE
JOG
Surround preset mode
1 Press SURROUND MODE (front panel only) to switch
between presets.
Alternatively, press SURROUND MODE once then turn the JOG
dial to morph from one preset to the next.
• ACTION – dramatic, powerful sound
• DRAMA – emphasized dialog
• MUSICAL – wide, spacious sound
• S.USER1–3 – three settings for you to store your own
settings (see page 54)
• ALL FLAT – the original sound with no effects
The JOG dial lights in orange when in Surround preset mode.
Changing sound presets using the
remote
1 Press AUDIO/SURROUND to switch between Audio
mode and Surround mode.
2 Use the JOG buttons to change the sound.
50
En
Page 51

音響效果使用方法
Uso de los efectos de sonido
9
音響改變功能使用方法
本系統提供許多改變要欣賞音樂的特性的不同方法。音
響改變功能可供在各種音響預置之間進行‘改變’,提
供您任意加工音響的自由。還有一些用戶預置,因此當
您有希望保存的音響,可以進行記憶以便瞬時進行重呼
叫。
預置效果使用方法
有兩套效果預置,即音頻模式和環繞聲模式。
音頻預置模式
1 按下 AUDIO MODE 按鈕(僅適用於前面板)來在預置
之間進行切換。
另一個方法是,按下 AUDIO MODE 按鈕一次,然後旋
轉 JOG 旋鈕來從一個預置向下一個預置進行改變。
• STUDIO -錄製播音室音響
• CLUB -小俱樂部的實況節目音響
• HALL -豐潤,擴展的音樂廳音響
• A.USER1-3 -三個設定,可用以儲存自己的設定
(見第 55 頁)
• ALL FLAT -不受影響的原始的音響
處於音頻預置模式時, JOG 旋鈕以綠色亮起。
環繞聲預置模式
1 按下SURROUND MODE 按鈕(僅適用於前面板)來
在預置之間進行切換。
另一個方法是,按下 SURROUND MODE 按鈕一次,
然後旋轉 JOG 旋鈕來從一個預置向下一個預置進行改
變。
• ACTION -驚人的,強勁的音響
• DRAMA -被強調的對話
• MUSICAL -寬廣,寬敞的音響
• S.USER1-3 -三個設定,可用以儲存自己的設定
(見第 55 頁)
• ALL FLAT -不受影響的原始的音響
處於環繞聲預置模式時, JOG 旋鈕以橙色亮起。
使用遙控器來改變音響預置
Cómo usar el cambio de
sonido
Este sistema ofrece diferentes posibilidades acústicas para la
música. La función de cambio de sonido le permite ‘cambiar’
entre preconfiguraciones de sonido, dándole la libertad de ajustar
el sonido a su gusto. Existen también diversas preconfiguraciones
de usuario de modo que cuando tiene un sonido que desea
mantener, puede almacenarlo para su inmediata recuperación.
Cómo usar los efectos
preconfigurados
Existen dos grupos de efectos preconfigurados denominados modo
Audio y modo Surround.
Modo de preconfiguración Audio
1 Pulse AUDIO MODE (sólo panel frontal) para cambiar
entre las preconfiguraciones.
Alternativamente, pulse AUDIO MODE una vez y, a
continuación, gire el selector JOG para cambiar de una
preconfiguración a la próxima.
• STUDIO – sonido de estudio de grabación
• CLUB – sonido en vivo de un club pequeño
• HALL – sonido de sala de concierto expansivo y rico
• A.USER1–3 – tres configuraciones para que las almacene
como propias (consulte página 54)
• ALL FLAT – el sonido original, sin efectos
El selector JOG se ilumina en verde en el modo Audio.
Modo de preconfiguración Surround
1 Pulse SURROUND MODE (sólo panel frontal) para
cambiar entre las preconfiguraciones.
Alternativamente, pulse SURROUND MODE una vez y, a
continuación, gire el selector JOG para cambiar de una
preconfiguración a la siguiente.
• ACTION – sonido potente y dramático
• DRAMA – diálogo enfatizado
• MUSICAL – sonido espacioso y amplio
• S.USER1–3 – tres configuraciones para que las almacene
cómo suyas propias (consulte página 54)
• ALL FLAT – el sonido original, sin efectos
El selector JOG se ilumina en verde en el modo de Surround.
1 按下AUDIO/SURROUND 按鈕來在音頻模式與環繞聲
模式之間進行切換。
2 使用 JOG 按鈕來改變音響。
Cambio de las preconfiguraciones de
sonido con el mando a distancia
1 Pulse AUDIO/SURROUND para cambiar entre el
modo Audio y el Surround.
2 Use las teclas JOG para cambiar el sonido.
51
ChH/Sp
Page 52

9 Using Sound Effects
Using individual sound effects
There are three individual sets of sound effect presets; Equalizer,
Zoom Surround and P.Bass.
Equalizer mode
Use the Equalizer mode to emphasize or de-emphasize the bass,
middle or treble sounds.
1 Press EQUALIZER (front panel) to switch between
presets,
Alternatively, press EQUALIZER once then turn the JOG to morph
from one preset to the next.
• FLAT – the original sound with no effects
• TECHNO – emphasized highs for electronic music
MORPHING
• HIP HOP – deep bass for heavy beats
• SOUL – brings out the vocal frequencies in the mix
• ROCK – strong mid frequencies for driving guitar sounds
Zoom Surround mode
Zoom Surround alters the apparent location of the speakers; either
closer together or further apart than they actually are.
EQUALIZER
JOG
P.BASS (DEMO)
ZOOM SURROUND
1 Press ZOOM SURROUND (front panel only) to switch
between presets.
Alternatively, press ZOOM SURROUND once then turn the JOG
dial to morph from one preset to the next.
• OFF – the original sound with no effects
• NEAR +1 – +5 – five different ‘close’ settings
• FAR +1 – +5 – five different ‘wide’ settings
P.Bass mode
Switch on P.Bass for deep, extended bass.
1 Press P.BASS (front panel) to switch between presets.
Alternatively, press P.BASS once then turn the JOG to morph
from one preset to the next.
• OFF – the original sound with no effects
• MID – boosts lower-mid frequencies
• WIDE – accentuates bass and lower-mid frequencies
• LOW – boosts low bass only
Changing sound effects using the
remote
1 Press MORPHING to switch between the room and
sound effect modes:
52
En
Page 53

音響效果使用方法
Uso de los efectos de sonido
9
各音響效果使用方法
有三套音響效果預置:均衡器,變焦距和無源低音模
式。
均衡器模式
使用均衡器模式來強調或削弱低音、中音或高音。
1 按下 EQUALIZER 按鈕(前面板)來在預置之間進行切
換。
另一個方法是,按下 EQUALIZER 按鈕一次,然後旋轉
JOG 旋鈕來從一個預置向下一個預置進行改變。
• FLAT -不受影響的原始的音響
• TECHNO -用於電子音樂的強調高音的音響
• HIP HOP -用於強烈拍節音樂的深沉的低音
• SOUL -使混合中的聲樂頻率突出
• ROCK -用於激動的吉他音響的強烈的中頻
變焦距環繞聲模式
變焦距環繞聲改變揚聲器的視在位置;比實際或是靠
近,或是遠離。
1 按下ZOOM SURROUND 按鈕(僅適用於前面板)來
在預置之間進行切換。
另一個方法是,按下 ZOOM SURROUND 按鈕一次,
然後旋轉 JOG 旋鈕來從一個預置向下一個預置進行改
變。
• OFF -不受影響的原始的音響
• NEAR +1 ∼+5 - 5 種不同的‘靠近’設定
• FAR + 1 ∼+ 5 - 5 種不同的‘寬闊’設定
無源低音模式
接通無源低音模式,可用於深沉,擴展的低音。
1 按下 P.BASS 按鈕(前面板)來在預置之間進行切換。
另一個方法是,按下 P.BASS 按鈕一次,然後旋轉
JOG 旋鈕來從一個預置向下一個預置進行改變。
• OFF -不受影響的原始的音響
• MID -增強中低頻率
• WIDE -加重低音和中低頻率
• LOW -只增強低音
使用遙控器來改變音響效果
1 按下MORPHING 按鈕來在室內與環繞聲模式之間進行
切換:
Cómo usar efectos
individuales de sonido
Existen tres grupos individuales de preconfiguraciones de efectos
de sonido: Equilizer, Zoom Surround y P.Bass.
Modo Equalizer
Use el modo Equalizer para enfatizar o desenfatizar los sonidos
graves, medios y agudos.
1 Pulse EQUALIZER (panel frontal) para cambiar entre
las preconfiguraciones.
Alternativamente, pulse EQUALIZER una vez y, a continuación,
gire el selector JOG para cambiar de una preconfiguración a la
próxima.
• FLAT – el sonido original, sin efectos
• TECHNO – altos enfatizados para música electrónica
• HIP HOP – graves profundos para compases pesados
• SOUL – enfatiza las frecuencias vocales de la mezcla
• ROCK – frecuencias medias potentes para sonidos
dominantes de guitarra
Modo Zoom Surround
El Zoom Surround altera la aparente colocación de los altavoces
ya sea más cerca o apartados de lo que realmente están.
1 Pulse ZOOM SURROUND (sólo panel frontal) para
cambiar entre las preconfiguraciones.
Alternativamente, pulse ZOOM SURROUND una vez y, a
continuación, gire el selector JOG para cambiar de una
preconfiguración a la próxima.
• OFF – el sonido original, sin efectos
• NEAR +1 – +5 – cinco diferentes configuraciones
‘cercanas’.
• FAR +1 – +5 – cinco diferentes configuraciones ‘lejanas’.
Modo P.Bass
Active P.Bass para graves más profundos y extendidos.
1 Pulse P.BASS (sólo panel frontal) para cambiar entre
las preconfiguraciones.
Alternativamente, pulse P.BASS una vez y, a continuación, gire el
selector JOG para cambiar de una preconfiguración a la próxima.
• OFF – el sonido original, sin efectos
• MID – aumenta las frecuencias medias bajas
• WIDE – acentúa las frecuencias graves y medias bajas
• LOW – aumenta sólo los graves bajos
Cambiar efectos de sonido con el
mando a distancia
1 Pulse MORPHING para cambiar entre los modos de
efecto de sala y de sonido:
53
ChH/Sp
Page 54

9 Using Sound Effects
• AUDIO/SURROUND mode
• EQUALIZER
• ZOOM SURROUND
• P.BASS
2 Use the JOG buttons to change the sound.
Saving your own settings
You can save up to six different combinations of Equalizer, Zoom
Surround, and P.Bass settings: three as Audio presets; three as
Surround presets.
Note: If the unit is unplugged from the power supply, settings
MUTE
will remain intact for several days, after which they are lost.
DISPLAY
JOG
VOLUME UP/DOWN
DISPLAY MODE
JOG
1 Press AUDIO MODE or SURROUND MODE (front
panel) to select the preset mode.
2 Adjust the Equalizer, Zoom Surround and P.Bass to
your liking.
3 Press and hold the SET button for about three
seconds.
One of the user settings blinks in the display.
4 Use the JOG dial to select a preset number.
5 Press the SET again to save the settings.
Changing the sound display
You can choose between six different sound level displays.
1 Press DISPLAY until the front panel display shows DISP.
If you’re using the front panel controls, press DISPLAY MODE.
2 Use the JOG dial/buttons to cycle through the six
different display types.
Stop on one you like.
Muting the sound
Use this function to temporarily mute all sound from the
speakers.
54
En
• Press MUTE (remote only) to mute the sound.
• Press again to restore the sound or adjust VOLUME
UP/DOWN.
AUDIO MODE
SET
SURROUND MODE
Page 55

音響效果使用方法
Uso de los efectos de sonido
9
• 音頻∕環繞聲(AUDIO/SURROUND)模式
• 均衡器(EQUALIZER)模式
• 變焦距環繞聲(ZOOM SURROUND)模式
• 無源低音(P.BASS)模式
2 使用 JOG 按鈕來改變音響。
自己的設定記憶方法
可以記憶最多6個均衡器、變焦距和無源低音設定不同
的組合:3 個為音頻預置模式, 3 個為環繞聲預置模
式。
注意:如果本機從電源插座被拔除,設定將被原封不動
地保持下來數天,以後將消失。
1 按下AUDIO MODE 或SURROUND MODE 按鈕(前
面板)來選擇預置模式。
2 視需調節均衡器,變焦距和無源低音模式。
3 按住 SE T 按鈕約 3 秒鐘。
一個用戶設定會在顯示器中閃爍。
4 使用 JO G 旋鈕來選擇一個預置號碼。
5 再次按下 SET 按鈕來記憶該設定。
音響顯示改變方法
可以在 6 種不同的音響水平之間進行選擇。
1 按下DISPLAY 按鈕直至前面板顯示器表示 DISP 。
如果在使用前面板控制器,按下 DISPLAY MODE 按
鈕。
2 使用 JOG 旋鈕∕按鈕來使 6 種不同的顯示類型循環。
在希望的一個上停止。
消音
使用本功能來暫時使來自揚聲器的聲音靜噪。
• 按下MUTE 按鈕(僅適用於遙控器)來使聲音靜噪。
• 再次按下來恢復原來聲音或調節 VOLUME UP/DOWN
旋鈕。
• AUDIO/SURROUND
• EQUALIZER
• ZOOM SURROUND
• P.BASS
2 Use las teclas JOG para cambiar el sonido.
Cómo almacenar sus propias
configuraciones
Podrá memorizar hasta seis combinaciones distintas de ajustes de
Equalizer, Zoom Surround, y P.Bass: tres como preajustes de Audio
y tres como preajustes del tipo Surround.
Nota: Si la unidad se desenchufa de la red, las configuraciones
permanecerán intactas varios días, trás los cuales se perderán.
1 Presione AUDIO MODE o SURROUND MODE (panel
frontal) para seleccionar un modo de preajuste.
2 Ajuste el Equalizer, Zoom Surround y P.Bass a su gusto.
3 Pulse y mantenga pulsada la tecla SET durante
aproximadamente tres segundos.
Una de las configuraciones de usuario parpadeará en la pantalla.
4 Emplee el mando JOG para seleccionar un número de
preajuste.
5 Pulse la tecla SET nuevamente para almacenar las
configuraciones.
Cambio de la pantalla de
sonido
Podrá elegir ente seis distintas visualizaciones del nivel del sonido.
1
Presione DISPLAY hasta que el visualizador de la unidad
principal muestre DISP.
Si emplea los controles del panel frontal, presione DISPLAY
.
MODE
2 Use el selector/teclas JOG para desplazarse entre los
seis diferentes tipos de pantallas.
Deténgase en la que desea.
Cómo silenciar el sonido
Use esta función para silenciar temporalmente el sonido completo
de los altavoces.
• Pulse MUTE (sólo mando a distancia) para silenciar el
sonido.
• Presiónelo de nuevo para reponer el sonido o ajuste el
sonido con VOLUME UP/DOWN.
55
ChH/Sp
Page 56

10
TAPE
TUNER/BAND
JOG
AUX CD
Using the Timer
Setting the wake-up timer
The clock must be set to the correct time for the wake-up timer to
work properly.
Use the wake-up timer to set a time for the system to switch on
and start playing your choice of source. The wake-up timer
remains active (so the system will switch on everyday at the time
you set), until you reset it.
Note: Also, you cannot set both the wake-up and the record
timer.
Use the front panel controls to set the timer:
1 Select the source you want to wake up to.
For example, press TUNER/BAND to select the radio as your
source.
2 Prepare the source.
For example, tune in the radio station.
If you’ve selected a CD or tape, make sure that it’s stopped.
3 Set the volume.
4 Press TIMER/CLOCK ADJ.
5 Turn the JOG dial until the display shows TIMER, then
press SET.
6 Set the switch-on time.
Use the JOG dial to set the hour, then press SET. Set the minute
in the same way, pressing SET when you’re done.
STANDBY/ON
JOG
TIMER/CLOCK ADJ
SET
Function select buttons
功能選擇按鈕
Teclas de selección de función
7 Set the switch-off time.
Use the JOG dial to set the hour, then press SET. Set the minute in
the same way, pressing SET when you’re done.
The switch-on and switch-off times are confirmed in the display
after pressing SET this last time.
8 Switch the system into standby mode.
9 Press TIMER/CLOCK ADJ.
10
Turn the JOG dial until the display shows WAKE UP,
then press SET.
The timer standby indicator ( ) lights in the display and wake
up timer setup is complete!
Note: There is no way to edit the timer settings once made. If
you make a mistake, work through the rest of the settings, then
start over.
56
En
Page 57

定時器使用方法
Cómo usar el temporizador
10
喚醒定時器設定方法
為使喚醒定時器正確動作,時鐘必須設定成正確的時
間。
使用喚醒定時器來為打開本系統電源以及開始播放所選
擇的音源設定時間。喚醒定時器保持有效(系統將在每
天所設定的時間接通電源),直至重新設定它。
注意:不能設定喚醒定時器和錄音定時器兩者。
使用前面板控制器來設定定時器。
1 選擇希望用以喚醒的音源。
例如,按下 TUNER/BAND 來選擇無線電廣播作為音
源。
2 準備音源。
例如,調入廣播電台。
如果選擇了 C D 碟片或磁帶,確認它停止。
3 設定音量。
4 按下TIMER/CLOCK ADJ 按鈕。
5 旋轉 JOG 旋鈕直至顯示器表示 TIMER ,然後按下 SET
按鈕。
6 設定電源打開時間。
使用 JOG 旋鈕來設定小時,然後按下 SET 按鈕。按同
樣的方法設定分鐘,結束時按下 SET 按鈕。
7 設定電源關掉時間。
使用 JOG 旋鈕來設定小時,然後按下 SET 按鈕。按同
樣的方法設定分鐘,結束時按下 SET 按鈕。
最後按下 SET 按鈕後可以在顯示器中確認電源打開和
電源關掉時間。
8 將本系統切換成待機模式。
9 按下TIMER/CLOCK ADJ 按鈕。
10 旋轉 J OG 旋鈕直至顯示器表示 WAKE UP ,然後按下
SET 按鈕。
定時器待機指示燈(
定時器的設定完成。
注意:一旦作好定時器設定,沒有方法進行刪除。如果
有誤操作,作好剩下的設定,然後重新進行設定。
)在顯示器中發亮。這樣,喚醒
Cómo configurar el temporizador
del despertador
El reloj debe estar configurado con la hora correcta para que el
temporizador del despertador funcione adecuadamente.
Use el temporizador del despertador para programar una hora de
encendido del sistema en la que se iniciará la reproducción de la
fuente que haya elegido. El temporizador del despertador
permanece activo (el sistema se encenderá cada día a la hora
programada) hasta que lo reconfigure.
Nota: No puede configurar el temporizador del despertador junto
con el de grabación.
Use los controles del panel frontal para configurar el
temporizador:
1 Seleccione la fuente que desea usar para despertarse.
Por ejemplo, pulse TUNER/BAND para seleccionar la radio
como fuente.
2 Prepare la fuente.
Por ejemplo, sintonice la emisora de radio.
Si ha seleccionado un disco compacto o una cinta, asegúrese de
que esté detenida.
3 Configure el volumen.
4 Pulse TIMER/CLOCK ADJ.
5 Gire el selector JOG hasta visualizar TIMER en pantalla
y, a continuación, pulse SET.
6 Configure la hora de encendido.
Use el selector JOG para configurar la hora y, a continuación,
pulse SET. Configure los minutos en la misma forma pulsando
SET al terminar.
7 Configure la hora de apagado.
Use el selector JOG para seleccionar la hora y, a continuación,
pulse SET. Configure los minutos de la misma forma pulsando
SET al terminar.
Las horas de encendido y apagado son confirmadas en pantalla
después de pulsar SET esta última vez.
8 Ponga el sistema en modo de standby.
9 Pulse TIMER/CLOCK ADJ.
10
Gire el selector JOG hasta visualizar WAKE UP en
pantalla y, a continuación , pulse SET.
El indicador de reserva (standby) del temporizador ( ) se
enciende en el visualizador y se completa la configuración del
temporizador del despertador.
Nota: No existe ninguna forma de editar las configuraciones del
temporizador una vez ya hechas. Si comete un error, vaya a las
configuraciones restantes y, a continuación, comience
nuevamente.
57
ChH/Sp
Page 58

10
SLEEP
TUNER/BAND
Using the Timer
Setting the sleep timer
The sleep timer switches off the system after a specified time so
you can fall asleep without worrying about it.
Note: If you set the sleep timer while either the wake-up or
record timer is active, the earlier switch off time takes priority.
1 Press SLEEP to select a switch-off time.
Press repeatedly to switch between:
• AUTO SLEEP – system switches off after the current source
has finished playing (you can’t set this if you’re listening to
the radio, or playing a CD in repeat play mode).
• SLEEP 90 – system switches off after 90 minutes
• SLEEP 60 – system switches off after an hour
• SLEEP 30 – system switches off after 30 minutes
• SLEEP 0 – cancels the sleep timer
The display dims when the sleep timer is set.
2 To check how much time is left, press SLEEP.
The remaining time is displayed momentarily (don’t press SLEEP
again while the time is displayed or you’ll change the sleep timer
to a different setting).
2 NR ON/OFF
Setting the record timer
The clock must be set to the correct time for the record timer to
work properly.
You can set the timer to record something off the radio. For
example, you might want to record a program that is broadcast
while you’re at work. During the actual recording, the volume is
automatically set to minimum. After the recording has finished,
the record timer is canceled.
Note: Also, you cannot set both the wake-up and the record
timer. Use the front panel controls to set the timer:
1 Set up the tape deck.
Load a tape into deck II and wind on past the leader tape. XRA790 only: Switch Dolby NR on/off as required.
2 Press TUNER/BAND to select the tuner.
3 Tune in the station you want to record.
See page 30 for more detailed instructions on tuning.
58
En
TUNER BAND
Page 59

定時器使用方法
Cómo usar el temporizador
10
睡眠定時器設定方法
規定的時間後,睡眠定時器關掉本系統電源,因此不需
擔心它可以入睡。
注意:如果在喚醒定時器或錄音定時器起作用期間設定
了睡眠定時器,早一些時間設定的電源關掉時間優先。
1 按下 SLEEP 按鈕來選擇電源關掉時間。
反複按下來在下列設定之間進行切換:
• AUTO SLEEP -在現在的音源結束播放後關掉系統
電源(如果在收聽廣播,或以重複播放模式播放 CD
碟片,不能進行本設定)。
• SLEEP 90 -系統在 90 分鐘後關掉電源。
• SLEEP 60 -系統在 1 小時後關掉電源。
• SLEEP 30 -系統在 30 分鐘後關掉電源。
• SLEEP 0 -取消睡眠定時器。
當設定了睡眠定時器時,顯示器變黯淡。
2 要確認剩下多少時間時,按下 SLEEP 按鈕。
剩餘時間被短暫地顯示(在時間被顯示或將睡眠定時
器改變為不同的設定期間,請勿再次按下 SLEEP 按
鈕)。
錄音定時器設定方法
為使錄音定時器正確動作,時鐘必須設定成正確的時
間。
可以設定定時器來錄製廣播的某節目。例如,您可能希
望錄製您在工作期間廣播的節目。在實際錄音中,音量
被自動設定成最小音量。錄音結束後,錄音定時器被取
消。
注意:不能設定喚醒定時器和錄音定時器兩者。使用前
面板控制器來設定定時器。
1 設定卡式座。
在卡式座 I I 中裝入磁帶並使引導帶繞過。僅適用於
XR-A790 型:視需通∕斷杜比靜噪功能。
2 按下TUNER/BAND 按鈕來選擇調諧器。
3 調入希望錄音的電台。
有關調諧更詳細的說明,見第 31 頁。
Cómo configurar el temporizador
de apagado
El temporizador de apagado apaga el sistema transcurrido un
período específico de tiempo, de tal forma que puede quedarse
dormido sin preocuparse.
Nota: Si configura el temporizador de apagado mientras el
temporizador del despertador o el de grabación están activos, la
primera hora de apagado será la prioritaria.
1 Pulse SLEEP para seleccionar una hora de apagado.
Pulse repetidamente para cambiar entre:
• AUTO SLEEP – el sistema se apaga después de que la
fuente actual haya finalizado su reproducción (no puede
configurar esta opción si está escuchando la radio, o
reproduciendo un disco compacto en el modo de reproducción
repetida).
• SLEEP 90 – el sistema se apaga después de 90 minutos
• SLEEP 60 – el sistema se apaga después de una hora
• SLEEP 30 – el sistema se apaga después de 30 minutos
• SLEEP 0 – cancela el temporizador de apagado
2 Para verificar cuanto tiempo queda, pulse SLEEP.
El tiempo restante se visualiza brevemente en pantalla (no pulse
SLEEP nuevamente mientras la hora está en pantalla o cambiará
el temporizador de apagado a una configuración diferente).
Cómo configurar el temporizador
de grabación
El reloj debe estar configurado en la hora correcta para que el
temporizador de grabación funcione adecuadamente.
Puede configurar el temporizador para grabar de la radio. Por
ejemplo, tal vez desee grabar un programa que se emite cuando
está en el trabajo. Durante la grabación real, el volumen baja
automáticamente al mínimo. Después de finalizada la grabación,
se cancela el temporizador de grabación.
Nota: No puede configurar el temporizador del despertador
junto con el de grabación. Use los controles del panel frontal para
configurar el temporizador:
1 Configure la platina de cintas.
Cargue una cinta en la platina II y bobine hasta pasar el
segmento inicial en blanco. Sólo XR-A790: active/desactive Dolby
NR según sea necesario.
2 Pulse TUNER/BAND para seleccionar el sintonizador.
3 Sintonice la emisora que desea grabar.
Consulte la página 31 si necesita instrucciones más detalladas
sobre la sintonización.
59
ChH/Sp
Page 60

10
Using the Timer
4 Press TIMER/CLOCK ADJ.
5 Turn the JOG dial until the display shows TIMER, then
press SET.
6 Set the record start time.
Use the JOG dial to set the hour, then press SET. Set the minute in
the same way, pressing SET when you’re done.
7 Set the record end time.
Use the JOG dial to set the hour, then press SET. Set the minute
in the same way, pressing SET when you’re done.
The switch-on and switch-off times are confirmed in the display
after pressing SET this last time.
8 Switch the system into standby mode.
9 Press TIMER/CLOCK ADJ.
10
Turn the JOG dial until the display shows REC, then
press SET.
The record timer indicator ( and REC) lights in the display and
JOG
record timer setup is complete!
Note: There is no way to edit the timer settings once made. If
you make a mistake, work through the rest of the settings, then
start over.
JOG
TIMER/CLOCK ADJ
Canceling the timer
Here’s how to cancel the wake-up or record timer (whichever has
been set):
1 In standby mode, press TIMER/CLOCK ADJ.
2 Turn the JOG dial until the display shows OFF, then
press SET.
SET
60
En
Page 61

定時器使用方法
Cómo usar el temporizador
10
4 按下TIMER/CLOCK ADJ 按鈕。
5 旋轉 JOG 旋鈕直至顯示器表示 TIMER ,然後按下 SET
按鈕。
6 設定錄音開始時間。
使用 JOG 旋鈕來設定小時,然後按下 SET 按鈕。按同
樣的方法設定分鐘,結束時按下 SET 按鈕。
7 設定錄音結束時間。
使用 JOG 旋鈕來設定小時,然後按下 SET 按鈕。按同
樣的方法設定分鐘,結束時按下 SET 按鈕。
最後按下 SET 按鈕後可以在顯示器中確認電源打開和
電源關掉時間。
8 將本系統切換成待機模式。
9 按下TIMER/CLOCK ADJ 按鈕。
10 旋轉 JOG 旋鈕直至顯示器表示 REC ,然後按下 SET 按
鈕。
錄音定時器指示燈(
樣錄音定時器的設定完成。
注意:一旦作好定時器設定,沒有方法進行刪除。如果
有誤操作,作好剩下的設定,然後重新進行設定。
和 REC)在顯示器中亮起,這
定時器取消方法
下面說明喚醒定時器或錄音定時器取消方法(無論哪一
個有設定時):
1 在待機模式,按下 TIMER/CLOCK ADJ 按鈕。
2 旋轉 JOG 旋鈕直至顯示器表示 OFF ,然後按下 SET 按
鈕。
4 Pulse TIMER/CLOCK ADJ.
5 Gire el selector JOG hasta visualizar TIMER en pantalla
y, a continuación, pulse SET.
6 Configure la hora de inicio de la grabación.
Use el selector JOG para configurar la hora y, a continuación,
pulse SET. Configure los minutos en la misma forma pulsando
SET al terminar.
7 Configure la hora de finalización de la grabación.
Use el selector JOG para programar la hora y, a continuación,
pulse SET. Configure los minutos de la misma forma pulsando
SET al terminar.
Las horas de encendido y apagado son confirmadas en pantalla
después de pulsar SET esta última vez.
8 Ponga el sistema en modo de standby.
9 Pulse TIMER/CLOCK ADJ.
10
Gire el selector JOG hasta visualizar REC en pantalla y,
a continuación, pulse SET.
El indicador del temporizador de grabación ( y REC) se
ilumina en la pantalla y ¡la configuración del temporizador de
grabación está completa!
Nota: No existe ninguna forma de editar las configuraciones del
temporizador una vez ya hechas. Si comete un error, vaya a las
configuraciones restantes y, a continuación, comience
nuevamente.
Cómo cancelar el temporizador
A continuación, le indicamos las instrucciones para cancelar el
temporizador del despertador y de grabación (el que haya
configurado):
1 En modo de standby, pulse TIMER/CLOCK ADJ.
2 Gire el selector JOG hasta visualizar OFF en pantalla y,
a continuación, pulse SET.
61
ChH/Sp
Page 62

Additional Information11
Taking care of your system
To clean this unit, wipe with a soft, dry cloth. For stubborn dirt,
wet a soft cloth with a mild detergent solution made by diluting
one part detergent to 5 or 6 parts water, wring well, then wipe off
the dirt. Use a dry cloth to wipe the surface dry. Do not use volatile
liquids such as benzene or thinner which may damage the
surfaces.
Disc lens cleaner
The disc pickup lens should not become dirty in normal use, but if
for some reason it should malfunction due to dirt or dust, consult
your nearest Pioneer authorized service center. Although lens
cleaners for CD players are commercially available, we do not
recommend using them since some may damage the lens.
(A)
(B)
(C)
Taking care of your discs
When holding discs, take care not to leave fingerprints, dirt or
scratches on the disc surface. Hold the disc by its edge or by the
center hole and edge. Damaged or dirty discs can affect playback
performance. Take care also not to scratch the label side of the
disc. Although not as fragile as the recorded side, scratches can
still result in a disc becoming unusable. (A)
Should a disc become marked with fingerprints, dust, etc., clean
using a soft, dry cloth, wiping the disc lightly from the center to
the outside edge as shown left. If necessary, use a cloth soaked in
alcohol, or a commercially available CD cleaning kit to clean a
disc more thoroughly. Never use benzine, thinner or other
cleaning agents, including products designed for cleaning vinyl
records.
• Wipe lightly from the center of the disc using straight
strokes. (B)
• Don’t wipe the disc surface using circular strokes. (C)
Storing discs
Although CDs are more durable than vinyl records, you should
still take care to handle and store discs correctly. When you’re not
using a disc, return it to its case and store upright. Avoid leaving
discs in excessively cold, humid, or hot environments (including
under direct sunlight).
62
En
Page 63

附加情報
11Información adicional
系統維護方法
要清潔本機時,用一軟乾布擦拭。對於頑固的污垢,軟
布蘸濕 1 份洗滌劑用 5 或 6 份水稀釋而成的軟性洗滌劑
溶液,充分擰絞,然後擦除污垢。使用乾布擦乾表面。
請勿使用可能會損傷表面的揮發性液體,如苯和天拿
水。
碟片拾音透鏡清潔器
在正常使用中,碟片拾音透鏡不應變污,但是如果由於
一些理由萬一因為塵埃而造成故障,請與貴地就近的先
鋒公司認可的維修中心商量。儘管市上可購買 CD 播放
機用透鏡清潔器,由於一些商品可能會損傷透鏡,我們
不建議使用它們。
碟片維護方法
拿碟片時,小心不要讓指紋、污垢或擦痕留在碟片表面
上。拿碟片邊緣,或中心孔和邊緣。
損傷或污垢的碟片可能會影響播放性能。還應注意不要
刮傷碟片標籤面。儘管不像錄音面那樣易於損傷,但是
擦痕仍然可能會造成碟片無法使用。(A)
萬一碟片上留下指紋、污垢等,如左圖所示,使用一軟
乾布清潔,從中心向外側邊緣輕輕擦拭。如果需要,使
用布蘸濕酒精,或市上可購買的 CD 清潔工具來進一步
全面清潔碟片。切忌使用石油精、天拿水或其他清潔
劑,包括設計成用於清潔聚乙烯唱片的產品。
• 以直線動作從碟片中心輕輕擦拭。(B)
• 請勿以圓形動作擦拭碟片表面。(C)
碟片保存方法
儘管 CD 碟片比聚乙稀唱片更為結實,但是仍然需要小
心拿持並正確加以保管。當不使用碟片時,放回其盒中
並豎直保管。避免將碟片擱置在過度寒冷、潮濕,或高
溫的環境中(包括直射陽光之下)。
Cómo cuidar su sistema
Para limpiar esta unidad, use un paño suave y seco. Para
suciedad rebelde, humedezca un paño suave con una solución
detergente suave diluyendo una parte del detergente en 5 ó 6
partes de agua, enjuáguela a conciencia y elimine la suciedad.
Use un paño seco para secar la superficie. No use líquidos volátiles
como la bencina o diluyentes que pudieran dañar las superficies.
Limpiador de la lente de discos
La lente de lectura de discos compactos no debería ensuciarse si se
utiliza con normalidad pero si, por alguna razón, empieza a
funcionar mal por culpa de la suciedad o del polvo, consulte con
su servicio Pioneer autorizado más cercano. Aunque hay
disponibles en el comercio productos para limpiar reproductores
de discos compactos, no recomendamos su uso ya que algunos
podrían dañar dicha lente.
Cómo cuidar sus discos
Cuando manipule discos compactos, tenga cuidado de no dejar
huellas dactilares así como de no ensuciar ni rayar la superficie
del disco. Sostenga el disco por los bordes o por el orificio central y
el borde. La reproducción de discos dañados o sucios se puede ver
afectada en sus resultados. Así mismo, tenga cuidado de no rayar
el lateral de la etiqueta del disco. Aunque no sea tan frágil como
el lateral grabado, un disco rayado puede resultar inutilizable.
(A)
Si se ha ensuciado un disco con huellas dactilares, polvo, etc.,
límpielo con cuidado desde el centro al borde exterior como se
muestra a la izquierda. En caso necesario, utilice un pañuelo
mojado en alcohol o un equipo comercializado de limpieza de
discos compactos para que la limpieza del disco sea más
completa. No utilice nunca bencina, disolventes u otros agentes
limpiadores, lo que incluye los productos diseñados para la
limpieza de los discos de vinilo.
• Limpie suavemente desde el centro del disco
realizando movimientos en línea recta. (B)
• No limpie la superficie del disco realizando
movimientos circulares. (C)
Cómo almacenar discos
Aunque los discos compactos sean más duraderos que los discos
de vinilo, deberá cuidar la correcta manipulación y
almacenamiento de los mismos. Cuando no esté usando un disco,
guárdelo en su funda y almacénelo en vertical. Evite guardar los
discos en un entorno demasiado frío, húmedo o caliente (lo que
incluye la luz directa del sol).
63
ChH/Sp
Page 64

(A)
(B)
(C)
Additional Information11
Don’t glue paper or put stickers on discs, or write on them using a
pencil, ball-point pen or other sharp-tipped writing instrument.
(A)
Discs to avoid
Discs spin at high speed inside the player during playback. If you
can see that a disc is cracked, chipped, warped, or otherwise
damaged, don’t risk using it—you could end up damaging the
unit.
This system is designed for use with conventional, fully circular
CDs only. Use of shaped discs is not recommended. Pioneer
disclaims all liability arising in connection with the use of shaped
discs. (B)
Using cassette tapes
The tape of a cassette is quite easily damaged and loose tape can
jam in the tape deck mechanism. If the tape has become
unwound, use a pen or pencil to wind it back on to the spool. (C)
When not using cassettes, always store in the case. Store cassettes
away from magnetic fields, excessive heat, humidity, dust or oil.
Before recording on a tape, wind the tape on past the leader tape
(about the first 3 or 4 seconds of each side).
(D)
(E)
Erase-protect tab (For side A)
Lengüeta de antigrabación
(para la cara A)
Erase-protect tab (For side B)
Lengüeta de antigrabación
(para la cara B)
Tape-type hole
Tapes you should avoid
Since tapes longer than 90 minutes are so thin, they are more
susceptible to jamming in the tape deck mechanism and other
trouble such as irregular winding. Avoid using cassette tapes
longer than 90 minutes.
Protecting your recordings
You can protect an important recording against accidental erasure
by breaking the erase-protect tab(s) with a small screwdriver. (D)
If you want to re-record on an erase-protected cassette, cover the
space left by the broken tab with self-adhesive tape. (E)
Note (XR-A790 only): If you’re using Type II (High/CrO2)
tapes, make sure you don’t also cover the tape-type detection
holes.
64
En
Orificio de tipo de cinta
Page 65

附加情報
11Información adicional
請勿在碟片表面上張貼紙張或背面有黏膠的標籤,或使
用鉛筆、原子筆或其他尖銳的書寫用具在其上面書寫。
(A)
應避免使用的碟片
播放中,碟片在播放機內高速旋轉。如果發現到碟片有
裂紋、碎裂、翹曲或其他損傷,請勿冒使用它的危險。
否則會以損傷裝置而告終。
本系統設計成只能使用普通的,全圓形的 CD 碟片。本
機不建議使用異形碟片。先鋒公司拒絕承擔全部與使用
異形碟片有關而產生的責任。(B)
卡帶使用方法
卡帶極其容易損傷,而鬆弛的磁帶可能會卡住卡式座機
構中。如果磁帶沒有被捲繞,使用筆或鉛筆來使磁帶捲
回捲軸上。(C)
不使用卡帶時,必須保管在盒中。遠離磁場、過度的
熱、濕氣、灰塵來保管卡帶。
在磁帶上進行錄音之前,捲繞磁帶以使引導帶(每一面
起初約 3 或 4 秒鐘)部分通過。
應避免使用的磁帶
由於長度大於 90 分鐘的磁帶極薄,更易於造成磁帶卡
住卡式座機構中,以及產生如異常捲繞等故障。避免使
用長度大於 90 分鐘的磁帶。
保護錄音內容
通過使用小型螺絲刀來挖除防誤抹片,即可保護重要的
錄音內容免遭無意中抹掉。(D)
如果希望在經過防誤抹處理的卡帶上重新進行錄音,用
自黏膠帶封住挖除防誤抹片後留下的開口。(E)
注意(僅適用於XR-A790型):如果使用Type II(High/
CrO
2)型磁帶,注意不要封住磁帶類型檢測孔。
No pegue papeles o etiquetas a los discos, no escriba en ellos
usando un lápiz, un bolígrafo de punta redonda o cualquier otro
instrumento afilado. (A)
Discos a evitar
Durante su reproducción, los discos compactos giran a gran
velocidad en el reproductor. Si observa que un disco está rajado,
picado, deformado o dañado de cualquier forma, no se arriesgue a
utilizarlo en el reproductor de discos compactos ya que podría
dañar su sistema
Este sistema está diseñado para funcionar sólo con discos
convencionales totalmente circulares. Se desaconseja el uso de
discos compactos de formas irregulares. Pioneer declina toda
responsabilidad en lo que respecta al uso de discos compactos de
forma irregular. (B)
Cómo usar las cintas
Las cintas de un casete se dañan con facilidad y una cinta suelta
se puede atascar en el mecanismo de la platina de cintas. Si la
cinta está desbobinada, use un bolígrafo o un lápiz para
bobinarla en nuevamente en el carrete. (C)
Cuando no esté usando una cinta, guárdela siempre en su funda.
Guarde las cintas lejos de campos magnéticos, calor excesivo,
humedad, polvo o aceite. Antes de grabar en una cinta, bobine la
cinta hasta pasar el segmento inicial en blanco
(aproximadamente los primeros 3 ó 4 segundos de cada cara).
Cintas a evitar
Puesto que las cintas de más de 90 minutos son bastante finas,
son más susceptibles a atascarse en el mecanismo de la platina de
cintas y de ocasionar otros problemas como, por ejemplo, un
bobinado irregular. Evite las cintas de más de 90 minutos.
Cómo proteger sus grabaciones
Puede proteger una grabación importante contra borrados
accidentales quebrando la(s) lengüeta(s) de antigrabación con
un desatornillador pequeño. (D)
Si desea regrabar en un casete sin la lengüeta de antigrabación,
cubra el espacio dejado por la lengüeta rota con una cinta
adhesiva. (E)
Nota (Sólo el XR-A790): Si está usando cintas del Tipo II
(alta /CrO2), asegúrese de no tapar también los orificios de
detección del tipo de cinta.
65
ChH/Sp
Page 66

11 Additional Information
Troubleshooting
Incorrect operation is often mistaken for trouble or malfunction.
If you think that there is something wrong with this component,
check the points below. Sometimes the trouble may lie in another
component. Inspect the other components and electrical
appliances being used. If the trouble cannot be rectified after
checking the items below, ask your nearest Pioneer authorized
service center or your dealer to carry out repair work.
Playback is not possible.
• Check that the disc with the label side face up.
No audio, or audio is distorted.
• Check that the disc is not paused. Press 26 to restart
playback.
CD playback
• Check that the disc is clean and in good condition (pages
62, 64).
Auto tuning does not pick up some stations.
• Auto tuning will only detect radio stations with a good
signal. For more sensitive tuning, connect an outdoor
antenna (see page 16).
Noisy radio reception.
• If the radio signal is weak, an outdoor antenna will usually
give better results than the supplied indoor types (see
page 16).
• Other electrical equipment, such as TVs, fluorescent
lamps and motors can cause interference. Try switching
off or moving the nearby equipment, or moving the
antenna(s).
Tuner
• Check that the antennas are connected properly. For FM,
make sure that the antenna is fully extended and
positioned to give the best reception (see page 14). For
AM, make sure that the loop antenna is pointing in the
best direction (see page 14).
• The tuning interval may be incorrect for your country or
region. Try switching the tuning interval (see page 40).
Sound is mono only.
• Check that the tuner is not in FM mono mode (see page
30)
Tape deck door will not open.
• If the power cord was disconnected during playback or
recording, the door will not open—plug the power cord
back in and switch power on.
Cannot record.
• Check that the cassette still has its erase-protect tabs
intact, or that they are covered with self-adhesive tape,
etc. (see page 64)
Sound is muffled or previous recording is still
audible underneath the new one.
• The tape heads may be dirty. Clean the tape heads using
a head-cleaning cassette or cleaning kit.
• Check that you’re using a Type I (normal) or Type II
(high/CrO
(Type I (normal) only if you’re using the XR-A390).
Tape Deck
• XR-A790 only: If the recording was made with Dolby NR
switched off, check that Dolby NR is also switched off
during playback.
2) tape. Do not use Type IV (metal) tapes
Sound is unnaturally bright.
• XR-A790 only: If the recording was made with Dolby NR
switched on, check that Dolby NR is also switched on
during playback.
Music search does not work.
• The spaces between songs may be too short for music
search to work. (see page 34)
• Make sure that the tape is playing when using music
search—it will not work if the tape is stopped.
The remote control doesn't seem to work.
• Make sure that you are using the remote within its
operating range (see page 5).
• Try replacing the batteries (see page 5).
Other
Timer doesn't work.
• Check that the time has been set. (page 24)
Note: Static electricity or other external influences may cause
malfunctioning of this unit. In this case, unplug the power cord
and then plug back in. This will usually reset the unit for proper
operation. If this does not correct the problem, please consult your
nearest Pioneer service center.
66
En
Page 67

Xx1 11
附加情報
故障檢修
不正常的動作往往被誤認為故障和功能失常。如果您發
現到機器有毛病,請檢查下列要點。
一些問題可能是由於其他組件而造成的。請檢查一下所
使用的其他組件和電器。即使進行了下列檢查,如果仍
然不能得到校正,請委託就近的先鋒公司認可的維修中
心進行修理工作。
不能播放。
• 檢查碟片標籤面是否朝上。
沒有聲音,或聲音失真。
C D 碟片播放
• 檢查碟片是否暫停。按下26 按鈕來重新開始播放。
• 檢查碟片是否清潔,處於良好的狀態(見第63,65頁)。
自動調諧不能接收一些電台。
• 自動調諧只能檢測具有良好信號的廣播電台。對於更靈敏
的調諧,聯接室外天線(見第 17 頁)。
廣播接收帶有噪音。
• 如果廣播信號微弱,室外天線一般將會提供比附件室內型
天線更為良好的結果(見第 17 頁)。
• 其他電器,如電視機、螢光燈和馬達可能會造成干擾。試
圖關掉附近電器的電源,或移動它們,或移動天線。
• 檢查天線是否正確聯接。對於調頻(FM),確保天線全
調諧器
面伸展並指向提供最佳接收的方向(見第 15 頁)。對於
調幅(AM),確保環形天線指向最佳方向(見第15 頁)。
• 對貴國或貴地區,調諧間隔可能不正確。試圖切換調諧間
隔(見第 41 頁)。
聲音只能以單聲道聽到。
• 檢查調諧器是否沒有設定成調頻單聲道模式(見第 3 1
頁)。
卡式座卡帶艙門不會開啟。
• 如果在播放或錄音期間電源線被拔除,卡帶艙門將不會開
啟,重新插入電源線並打開電源。
無法錄音。
• 檢查卡帶是否仍舊帶有防誤抹片,或卡帶防誤抹片開口被
自黏膠帶等封住(見第 65 頁)。
聲音被壓住或新的錄音下面的原先的錄音仍然能夠聽
到。
• 磁頭可能污髒。使用磁頭清潔卡帶或清潔工具進行清潔。
• 檢查是否使用 Type I(普通)型或Type II(high/CrO2)
型磁帶。請勿使用Type IV(金屬)型磁帶(使用XR-A390
型時,只能使用 Type I(普通)型磁帶)。
卡式座
• 僅適用於XR-A790型:如果錄音以斷開杜比降噪功能進行
錄音,播放中檢查杜比降噪功能是否也被斷開。
聲音不自然地響亮。
• 僅適用於 XR-A790 型:如果錄音以接通杜比降噪功能進
行,播放中檢查杜比降噪功能是否也接通。
音樂搜索不起作用。
• 對於音樂搜索功能起作用,樂曲之間的空間可能太短
(見第 35 頁)。
• 使用音樂搜索時,確保磁帶被播放。如果磁帶停止,它將
不會起作用。
遙控器似乎不起作用。
• 確保在其操作範圍內使用遙控器(見第 7 頁)。
• 試圖更換電池(見第 7 頁)。
其他
定時器不起作用。
• 檢查時間有無設定。(見第 25 頁)
注意:靜電或其他外部影響可能會造成本機故障。遇此
情況時,拔除電源線並重新插入。這樣一般將會使本機
復原,進行正確的動作。如果這樣仍不能解決問題,請
與貴地就近的先鋒公司維修中心商量。
67
ChH
Page 68

11 Información adicional
Solución de problemas
El uso incorrecto se puede confundir a veces con un problema o
con un mal funcionamiento. Si cree que hay un problema con
este componente, compruebe los puntos que indicamos a
continuación. A veces el problema se encuentra en otro
componente. Compruebe los demás componentes y aparatos
eléctricos utilizados. En caso de que no haya podido rectificar los
problemas tras haber comprobado los siguientes puntos, consulte
con el servicio Pioneer autorizado más cercano para proceder a su
reparación.
La reproducción no es posible.
• Verifique que el disco esté cargado con la cara de la
etiqueta hacia arriba.
No hay audio o el audio está distorsionado
• Verifique que el disco no esté en pausa. Pulse 26 para
reiniciar la reproducción.
• Verifique que el disco esté limpio y en buenas
Reproducción de
condiciones. (páginas 63, 65).
La sintonización automática no detecta algunas
emisoras
• La sintonización automática sólo detectará emisoras de
radio con una buena señal. Para una sintonización más
sensitiva, conecte una antena externa (consulte página
17).
Recepción distorsionada de la emisora
• Si la señal de la emisora es débil, una antena externa le
dará, generalmente, mejores resultados que los tipos de
antenas internas suministradas (consulte la página 17).
• Otros aparatos eléctricos como, por ejemplo, televisores,
lámparas fluorescentes, y motores pueden ocasionar
interferencias. Intente apagar o desplazar el equipo que
está cerca o bien mover la(s) antena(s).
• Verifique que las antenas estén conectadas
adecuadamente. Para la sintonización de FM, asegúrese
Sintonizador
de que la antena esté totalmente extendida y en posición
para proporcionar la mejor recepción (consulte la páginas
15, 17). Para la sintonización de AM, asegúrese de que la
antena de cuadro apunta hacia la mejor dirección
(páginas 15, 17)
• El intervalo de sintonización puede ser el incorrecto para
su país o región. Intente cambiar el intervalo de
sintonización (consulte página 41).
El sonido es sólo en modo monoaural
• Verifique que el sintonizador no esté en el modo
monoaural de FM (consulte página 31)
La puerta de la platina de cintas no se abre
• Si se ha desenchufado el cable de la alimentación durante
la reproducción o grabación, la puerta no se abrirá.
Enchufe el cable de la alimentación y conecte la
alimentación.
No puede grabar
• Verifique que la cinta aún tenga las lengüetas de
antigrabación intactas o bien, que estén cubiertas con
cinta adhesiva, etc (consulte página 65)
El sonido es apagado o grabaciones anteriores
aún son audibles bajo la nueva
• Los cabezales de lectura de la cinta pueden estar sucios.
Límpielos con una cinta de limpieza o un producto de
limpieza para cabezales.
• Verifique que esté usando una cinta del Tipo I (normal) o
del Tipo II (alta/C
(metálicas.
• Sólo XR-A790: Si la grabación fue realizada sin el Dolby
NR, verifique que el Dolby NR esté también desactivado
Platina de cintas
durante su reproducción.
rO2). No use cintas del Tipo IV
El sonido es artificialmente nítido
• Sólo XR-A790:Si la grabación fue realizada con el Dolby
NR, verifique que el Dolby NR esté también activado
durante su reproducción.
La búsqueda de música no funciona
• Los espacios entre las canciones pueden ser muy breves
para que la búsqueda de música funcione. (consulte
página 35)
• Asegúrese de que la cinta esté en reproducción cuando
use la búsqueda de música, no funcionará si la cinta está
detenida.
El mando a distancia parece no funcionar
• Asegúrese de usar el mando a distancia dentro de su
distancia de operación (consulte página 8).
• Intente reemplazar las baterías (consulte página 9).
Otros
El temporizador no funciona
• Verifique que la hora esté configurada (página 25)
Nota: La electricidad estática u otras influencias externas
pueden ocasionar un mal funcionamiento de esta unidad. En este
caso, desenchufe el cable de alimentación y vuelva a enchufarlo.
Esto generalmente reconfigurará la unidad para su operación
adecuada. Si ello no corrige el problema, le rogamos consultar al
servicio Pioneer más cercano.
68
Sp
Page 69

Additional Information
11
Specifications
Amplifier section
Continuous Power Output [FRONT]
RMS (1 kHz, T.H.D. 10%, 6 Ω)
XR-A790 ........................................................ 140 W + 140 W
XR-A390 ....................................................... 100 W + 100 W
Peak Music Power Output
XR-A790 ..................................................................... 3500 W
XR-A390 ..................................................................... 2500 W
CD section
Type ....................................... Compact disc digital audio system
Wow and Flutter ......................................... Limit of measurement
(±0.001 % W.PEAK) or less (EIAJ)
Cassette deck section
Systems ................................................. 4 track, 2-channel stereo
Heads .............................................. Recording/playback head x 1
Playback head x 1
Erase head x 1
Motor ..............................................................DC servo motor x 1
Tape types
XR-A790 ............................................... TYPE I (Normal) tape
TYPE II (HIGH/CrO2) tape
XR-A390 ............................................... TYPE I (Normal) tape
FM tuner section
Frequency Range ....................................... 87.5 MHz to 108 MHz
Antenna input .................................................... 75 Ω unbalanced
AM tuner section
Frequency Range
With 9 kHz step ................................... 531 kHz to 1,602 kHz
With 10 kHz step ................................ 530 kHz to 1,700 kHz
Antenna input .......................................................... Loop antenna
Miscellaneous
Power Requirements
......... AC 110-127 V/220-230 V/240 V (switchable), 50/60 Hz
Power Consumption
XR-A790 (Latin American model) ............................... 700 W
XR-A390 (Latin American model) ................................420 W
XR-A790 (Other models) ............................................ 800 W
XR-A390 (Other models) ............................................ 480 W
Power Consumption in Standby mode ................................... 1 W
Dimensions ............................. 270 (W) x 320 (H) x 339 (D) mm
Weight (without package)
XR-A790 ........................................................................ 8.8 kg
XR-A390 ........................................................................ 8.3 kg
Speaker system (S-A790VLR)
(Super Woofer x 2, Front Speaker x 2)
Enclosure
Super Woofer ................................ Bass-reflex bookshelf type
(magnetically shielded)
Front Speaker .............................. Closed-box bookshelf type
(magnetically shielded)
System
Super Woofer .......................................... 20 cm 1-way system
Front Speaker ......................................... 10 cm 2-way system
Loudspeakers
Super Woofer
Woofer..................................................... 20 cm cone type
Front Speakers
Mid-range ................................................ 10 cm cone type
Tweeter ................................................... 5.2 cm cone type
Nominal Impedance (total) ..................................................... 6Ω
Frequency Response (total) .............................. 38 Hz to 20 kHz
Maximum power (total) ...................................................... 140 W
Dimensions
Super Woofer .................... 230 (W) x 320 (H) x 281 (D) mm
Front Speakers .................. 145 (W) x 320 (H) x 235 (D) mm
Weight
Super Woofer ................................................................. 4.7 kg
Front Speakers ............................................................... 2.4 kg
Speaker system (S-A390)
Enclosure ............................................ Bass-reflex bookshelf type
System ........................................................... 16 cm 3-way system
Loudspeakers
Woofer .......................................................... 16 cm cone type
Mid-range.....................................................5.2 cm cone type
Tweeter.................................................... 2.0 cm ceramic type
Nominal Impedance ................................................................ 6 Ω
Frequency Response .......................................... 40 Hz to 20 kHz
Maximum power ..................................................................100 W
Dimensions ............................. 230 (W) x 331 (H) x 249 (D) mm
Weight.................................................................................. 3.4 kg
Accessories
Operating instructions................................................................ 1
Remote control unit .................................................................... 1
Power Cord (Latin American model) .......................................... 2
Power Cord (Other models) ....................................................... 1
Power plug adapter (Latin American model only) ...................... 1
FM antenna .................................................................................. 1
AM loop antenna ......................................................................... 1
Speaker Cord (S-A790VLR only)
Red/black speaker cords....................................................... 2
Blue/black speaker cords...................................................... 2
POWER-CORD CAUTION
Handle the power cord by the plug. Do not pull out the plug by
tugging the cord and never touch the power cord when your
hands are wet as this could cause a short circuit or electric shock.
Do not place the unit, a piece of furniture, etc., on the power cord,
or pinch the cord. Never make a knot in the cord or tie it with other
cords. The power cords should be routed such that they are not
likely to be stepped on. A damaged power cord can cause a fire
or give you an electrical shock. Check the power cord once in a
while. When you find it damaged, ask your nearest PIONEER
authorized service center or your dealer for a replacement.
Note:
Specifications and design subject to possible modification without
notice, due to improvements.
Published by Pioneer Corporation.
Copyright © 2001 Pioneer Corporation.
All rights reserved.
69
En
Page 70

11
附加情報
規格
放大器部
連續功率輸出〔正面〕
RMS(1 kHz , T.H.D. 10%, 6Ω)
XR-A790 型 .......................... 140 W + 140 W
XR-A390 型 .......................... 100 W + 100 W
峰值音樂功率輸出
XR-A790 型 ................................. 3500 W
XR-A390 型 ................................. 2500 W
CD 碟片部
型式 ........................... 鐳射唱喋數碼音頻系統
抖晃率 ..................................... 測量極限
(±0.001 % W.PEAK)或以下(EIAJ)
卡式座部
系統 ............................ 4 磁跡,雙聲道立體聲
磁頭 .............................. 錄音∕放音磁頭 × 1
放音磁頭 × 1
抹音磁頭 × 1
馬達 ................................ 直流伺服馬達 × 1
磁帶類型
XR-A790 型 ..................... TYPE I(普通)磁帶
TYPE II(HIGH/CrO2)磁帶
XR-A390 型 ..................... TYPE I(普通)磁帶
重量(不計包裝)
XR-A790 型 ................................. 8.8 kg
XR-A390 型 ................................. 8.3 kg
揚聲器系統(S-A790VLR 型)
(超低音揚聲器 × 2 ,正面揚聲器 × 2)
機箱
超低音揚聲器 ............ 低音反射式書架型(磁屏蔽)
正面揚聲器 .................. 密閉式書架型(磁屏蔽)
系統
超低音揚聲器 ....................... 20 cm 單路系統
正面揚聲器 ......................... 10 cm 雙路系統
喇叭
超低音揚聲器
低音喇叭 .......................... 20 cm 圓錐形
正面揚聲器
中音喇叭 .......................... 10 cm 圓錐形
高音喇叭 ......................... 5.2 cm 圓錐形
標稱阻抗(總計)................................ 6 Ω
頻率響應(總計)....................... 38 Hz ∼ 20kHz
最大功率(總計)............................... 140 W
尺寸
超低音揚聲器 ... 230(寬)× 320(高)× 281(深)mm
正面揚聲器 ..... 145(寬)× 320(高)× 235(深)mm
重量
超低音揚聲器 ............................... 4.7 kg
正面揚聲器 ................................. 2.4 kg
調頻調諧器部
頻率範圍 ........................ 87.5 MHz∼108 MHz
天線輸入 ................................. 75 Ω 不平衡
調幅調諧器部
頻率範圍
使用 9 kHz 步進 ................ 531 kHz ∼ 1,602 kHz
使用 10 kHz 步進 ............... 530 kHz ∼ 1,700 kHz
天線輸入 ................................... 環形天線
其他
功率需求 ........... AC 110 ∼ 127 V/220 ∼ 230 V/240 V
(可切換), 50/60 Hz
功率消耗
XR-A790 型(僅適用於拉美型號)............... 700 W
XR-A390 型(僅適用於拉美型號)............... 420 W
XR-A790 型(其他機型)........................ 800 W
XR-A390 型(其他機型)........................ 480 W
待機模式中的功率消耗 ............................ 1 W
尺寸 .............. 270(寬)× 320(高)× 339(深)mm
使用電源線的注意點
用插頭拔、插電源線。不要只拿住電線來拔出插頭。絕對不
要用濕手觸碰電源線,否則會引起短路或觸電。不要使機器、
家具等放在電源線上或壓住電源線。絕對不要使電源線打結或
用其他電線捆住它。要將電源線安放在踩不到的地方。用損傷
的電源線可能會引起失火或觸電,因此要經常檢查電源線。如
當發現有損傷時,請就近通知 PIONEER 指定的維修服務中心或
經銷店加以更換。
70
ChH
揚聲器系統(S-A390 型)
機箱 ............................... 低音反射式書架型
系統 ................................. 16 cm 三路系統
喇叭
低音喇叭 ............................. 16 cm 圓錐形
中音喇叭 ............................ 5.2 cm 圓錐形
高音喇叭 ............................ 2.0 cm 陶瓷型
標稱阻抗 ....................................... 6 Ω
頻率響應 .............................. 40 Hz ∼ 20kHz
最大功率 ..................................... 100 W
尺寸 ............. 230(寬)× 331(高)× 249(深)mm
重量 ......................................... 3.4 kg
附件
使用說明書 ........................................ 1
遙控器 ............................................ 1
電源線(僅適用於拉美型號)......................... 2
電源線(其他機型)..................................1
調頻天線 .......................................... 1
調幅環形天線 ...................................... 1
電源插頭適配器(僅適用於拉美型號)................. 1
揚聲器導線(僅適用於 S-A790VLR 型)
紅色∕黑色揚聲器導線 ............................ 2
藍色∕黑色揚聲器導線 ........................... 2
注意:
為改進起見,規格和設計可能會有變更,恕不另行通知。
日本先鋒公司出版
版權 © 2001 日本先鋒公司
版權所有
Page 71

Información adicional
11
Especificaciones
Sección del amplificador
Potencia de salida continua [DELANTERO]
RMS (1 kHz, D.A.T. 10%, 6 Ω)
XR-A790 ........................................................ 140 W + 140 W
XR-A390 ....................................................... 100 W + 100 W
Salida de potencia musical pico
XR-A790 ..................................................................... 3500 W
XR-A390 .................................................................... 2500 W
Sección de discos compactos
Tipo ..................... Sistema de audio digital de discos compactos
Fluctuación y trémolo .................................... Límite de medición
(±0.001 % W.PEAK) o menos (EIAJ)
Sección de la platina de cintas
Sistemas ..............................................Estéreo 4 pistas, 2 canales
Cabezales ...................... Cabezal de reproducción/grabación x 1
Cabezal de reproducción x 1
Cabezal de borrado x 1
Motor ............................................................. Motor servo CC x 1
Tipos de cintas
XR-A790 .............................................. Cinta TIPO I (normal)
Cinta TIPO II (ALTA/CrO2)
XR-A390 .............................................. Cinta TIPO I (normal)
Sección del sintonizador de FM
Gama de frecuencia..................................... 87,5 MHz a 108 MHz
Entrada de la antena ......................................... 75 Ω, asimétricas
Sección del sintonizador de AM
Gama de frecuencia
En pasos de 9kHz ................................. 531 kHz a 1.602 kHz
En pasos de 10kHz ............................... 530 kHz a 1.700 kHz
Entrada de la antena ........................................ Antena de cuadro
Misceláneos
Potencia requerida
.... CA 110-127 V/220-230 V/240 V (seleccionable), 50/60 Hz
Consumo
XR-A790 (Modelo americano latino solamente) ....... 700 W
XR-A390 (Modelo americano latino solamente) ........420 W
XR-A790 (El otro modelo) .......................................... 800 W
XR-A390 (El otro modelo) .......................................... 480 W
Consumo en modo standby.................................................... 1 W
Dimensiones ....................... 270 (An) x 320 (Al) x 339 (Prf) mm
Peso (sin embalaje)
XR-A790 ........................................................................ 8.8 kg
XR-A390 ........................................................................ 8.3 kg
PRECAUCIONES CONCERNIENTES A LA MANIPULACION
DEL CABLE DE ALIMENTACION
Tome el cable de alimentación por la clavija. No extraiga la clavija
tirando del cable. Nunca toque el cable de alimentación cuando
sus manos estén mojadas, ya que esto podría causar cortocircuitos
o descargas eléctricas. No coloque la unidad, algún mueble, etc.,
sobre el cable de alimentación. Asegúrese de no hacer nudos en
el cable ni de unirlo a otros cables. Los cables de alimentación
deberán ser dispuestos de tal forma que la probabilidad de que
sean pisados sea mínima. Una cable de alimentación dañado
podrá causar incendios o descargas eléctricas. Revise el cable de
alimentación está dañado, solicite el reemplazo del mismo al
centro de servicio autorizado PIONEER más cercano, o a su
distribuidor.
Sistema del altavoz (S-A790VLR)
(Súper altavoces de subgraves x 2, Altavoces
delanteros x 2)
Caja acústica
Súper altavoz de graves ...... Tipo estante de reflejo de graves
Altavoz delantero.......................Tipo estante de caja cerrada
Sistema
Súper altavoz de graves ................ Sistema de 1 vía de 20 cm
Altavoz delantero......................... Sistema de 2 vías de 10 cm
Altavoces
Súper altavoz de graves
Altavoz de graves .............................. Tipo cono de 20 cm
Altavoces delanteros
Gamas medias .................................... Tipo cono de 10 cm
Agudos ............................................. Tipo cono de 5,2 cm
Impedancia nominal (total) .................................................... 6 Ω
Respuesta en frecuencia (total)........................... 38 Hz a 20 kHz
Potencia máxima (total) ...................................................... 140 W
Dimensiones
Súper altavoz de graves.. 230 (An) x 320 (Al) x 281 (Prf) mm
Altavoces delanteros .... 145 (An) x 320 (Al) x 235 (Prf) mm
Peso
Súper altavoz de graves ................................................. 4,7 kg
Altavoces delanteros ..................................................... 2,4 kg
(magnéticamente protegido)
(magnéticamente protegido)
Sistema del altavoz (S-A390)
Caja acústica ...................... Tipo estantería con reflejos de bajos
Sistema ............................................... Sistema de 3 vías de 16cm
Altavoces
Altavoz de graves .....................................Tipo cono de 16 cm
Gamas medias ........................................ Tipo cono de 5,2 cm
Agudos ............................................. Tipo cerámica de 2,0 cm
Impedancia nominal ................................................................ 6 Ω
Respuesta en frecuencia ...................................... 40 Hz a 20 kHz
Potencia máxima.................................................................. 100 W
Dimensiones ........................ 230 (An) x 331(Al) x 249 (Prf) mm
Peso...................................................................................... 3,4 kg
Accesorios
Instrucciones de operación ........................................................ 1
Mando a distancia ....................................................................... 1
Cable de alimentación (Modelo americano latino solamente) ... 2
Cable de alimentación (El otro modelo) ................................... 1
Antena FM ................................................................................... 1
Antena de cuadro AM ................................................................. 1
Adaptador de conversión de enchufe del cable de alimentación
(Modelo americano latino solamente)....................................... 1
Cable de altavoz (sólo el S-A780VLR)
Cables de altavoz rojos/negros ............................................ 2
Cables de altavoz azules/negros ........................................... 2
Nota:
El diseño y las especificaciones están sujetas a cambios sin aviso
previo para realizar mejoras.
Publicado por Pioneer Corporation.
Copyright © 2001 Pioneer Corporation.
Todos los derechos reservados.
71
Sp
Page 72

Switching the demo mode on/off
When you first plug in this system the display shows a demo sequence. The demo will also start if the system is on but idle for more than 5
minutes. The demo will stop if you press any button on the main unit or the remote.
• To switch the demo mode off completely, press and hold P.BASS (DEMO) (front panel only) for 3 seconds while the demo is in
progress.
• To switch the demo mode on, press and hold P.BASS (DEMO) for 3 seconds while the system is in standby.
通∕斷示範模式
當第一次打開本系統電源時,顯示器將顯示示範程序。如果本系統電源被打開但閒置5分鐘以上,示範模式也將開
始。如果按下主機或遙控器上的任何按鈕,示範將停止。
• 要完全斷開示範模式時,在示範模式進行期間按住前面板上的 P.BASS(DEMO)按鈕 3 秒鐘。
• 要接通示範模式時,在本系統處於待機模式期間按住 P.BASS(DEMO)按鈕 3 秒鐘。
Cómo activar/desactivar el modo de demostración
Cuando enchufa el sistema por primera vez, la pantalla muestra una secuencia de demostración. Cuando el modo de demostración esté
activado, la secuencia de demostración se iniciará cuando la unidad esté libre durante más de 5 minutos. La demostración se detendrá si
pulsa cualquier tecla en la unidad principal o en el mando a distancia.
• Para desactivar completamente el modo de demostración, pulse y mantenga pulsada P.BASS (DEMO) (sólo panel frontal)
durante 3 segundos mientras se efectúa la demostración.
• Para activar el modo de demostración, pulse y mantenga pulsada P.BASS (DEMO) durante 3 segundos mientras el sistema
está en el modo de standby (modo de espera).
PIONEER CORPORATION
PIONEER ELECTRONICS [USA] INC.
PIONEER ELECTRONICS OF CANADA, INC.
PIONEER EUROPE NV
PIONEER ELECTRONICS AUSTRALIA PTY. LTD.
PIONEER ELECTRONICS DE MEXICO S.A. DE C.V.
Haven 1087, Keetberglaan 1, B-9120 Melsele, Belgium TEL: 03/570.05.11
4-1, Meguro 1-Chome, Meguro-ku, Tokyo 153-8654, Japan
P.O. BOX 1540, Long Beach, California 90801-1540, U.S.A.
300 Allstate Parkway, Markham, Ontario L3R OP2, Canada
Published by Pioneer Corporation.
Copyright © 2001 Pioneer Corporation.
All rights reserved.
178-184 Boundary Road, Braeside, Victoria 3195, Australia, TEL: [03] 9586-6300
San Lorenzo 1009 3er Piso Desp. 302 Col. Del Valle Mexico D.F. C.P. 03100
TEL: 5-688-52-90
Printed in <XRE3048-A><00E00ZF0S00>
 Loading...