

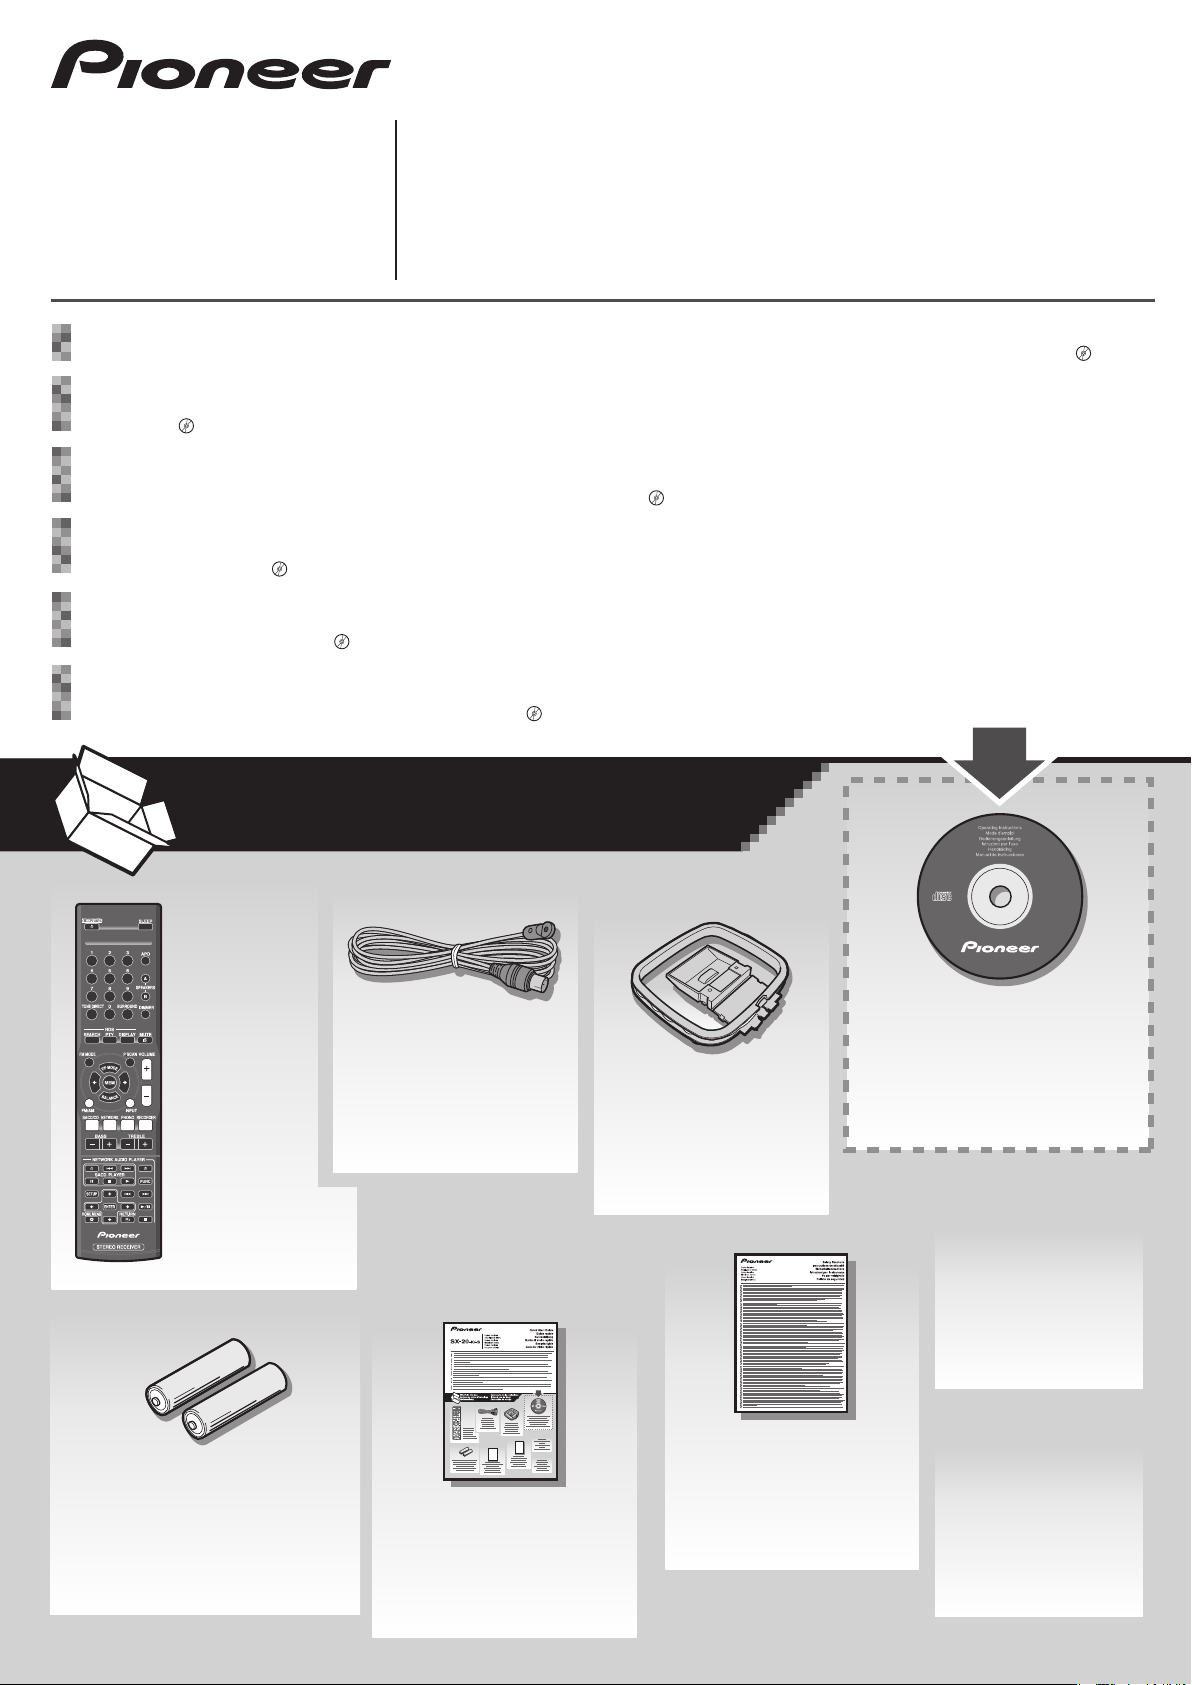
What’s in the box
Contenu du carton d’emballage
Lieferumfang
Quick Start Guide
Stereo Receiver
Ampli-tuner stéréo
SX-20-K/-S
Stereo Receiver
Ricevitore Stereo
Guida di avvio rapido
Stereo Receiver
Receptor estéreo
Thank you for buying this Pioneer product. This Quick Start Guide includes instructions for basic connections and operations to allow simple
use of the receiver. For detailed descriptions of the receiver, see the “Operating Instructions” provided on the included CD-ROM ( ).
Merci pour l’achat de ce produit Pioneer. Ce guide rapide contient les instructions relatives aux raccordements et opérations de base
permettant une utilisation simple de ce récepteur. Pour des descriptions plus détaillées du récepteur, référez-vous au “Mode d’emploi” sur
le CD-ROM ( ) fourni.
Vielen Dank, dass Sie sich für dieses Pioneer-Produkt entschieden haben. Die Kurzanleitung enthält Anweisungen für grundlegende
Verbindungen und Bedienvorgänge, um eine einfache Bedienung des Receivers zu ermöglichen. Detaillierte Beschreibungen des Receivers
finden Sie in der „Bedienungsanleitung“ auf der mitgelieferten CD-ROM ( ).
Vi ringraziamo per avere acquistato questo prodotto Pioneer. Questa Guida di avvio rapido comprende istruzioni per i collegamenti
fondamentali e per le operazioni essenziali di questo ricevitore. Per una descrizione dettagliata del ricevitore, vedere le “Istruzioni per l’uso”
contenute nel CD-ROM ( ) accluso.
Hartelijk dank voor de aanschaf van dit Pioneer product. In deze snelstartgids vindt u de instructies voor de basisaansluitingen en de
basisbediening voor een eenvoudig gebruik van de receiver. Voor meer gedetailleerde informatie wordt u verwezen naar de “Handleiding”
die op de bijgeleverde CD-ROM ( ) staat.
Muchas gracias por haber adquirido este producto de Pioneer. Esta Guía de inicio rápido incluye instrucciones para hacer las conexiones y
operaciones básicas que le permitirán hacer un uso sencillo del receptor. Para conocer una descripción detallada del receptor, consulte el
“Manual de instrucciones” suministrado con el CD-ROM ( ) incluido.
Guía de inicio rápido
Guide rapide
Kurzanleitung
Snelstartgids
What’s in the box
What’s in the box
Contenu du carton d’emballage
Contenu du carton d’emballage
Lieferumfang
Lieferumfang
FM wire antenna
Antenne laire FM
UKW-Drahtantenne
Antenna FM a lo
FM-draadantenne
Remote Control
Télécommande
Fernbedienung
Telecomando
Afstandsbediening
Mando a distancia
Antena de hilos de FM
Contenuto della confezione
Inhoud van de doos
Contenido de la caja
AM loop antenna
Antenne cadre AM
MW-Rahmenantenne
Antenna AM a telaio
AM-raamantenne
Antena de cuadro de AM
SX-20-K/-S
CD-ROM (Operating instructions)
CD-ROM (Mode d’emploi)
CD-ROM (Bedienungsanleitung)
CD-ROM (Istruzioni per l’uso)
CD-ROM (Handleiding)
CD-ROM (Manual de instrucciones)
Power cord
Cordon d’alimentation
Netzkabel
Cavo di alimentazione
Netsnoer
Cable de alimentación
AAA size IEC R03 dry cell batteries x2
Piles à anode sèche AAA IEC R03 x 2
AAA/IEC/R03 Trockenbatterien x2
Pile a secco AAA IEC R03 x2
AAA/IEC/R03 drogecelbatterijen x2
Pilas secas AAA, IEC R03 x 2
These quick start guide
Le présent Guide de démarrage
Diese Kurzanleitung
Guida per l’avvio rapido
Deze Quick Start-gids
Esta guía de inicio rápido
Safety Brochure
Instructions de sécurité
Sicherheitsbroschüre
Istruzioni per la sicurezza
Folder veiligheid
Folleto de seguridad
Warranty card
Carte de garantie
Garantiekarte
Documento di garanzia
Garantiebewijs
Tarjeta de garantía
English
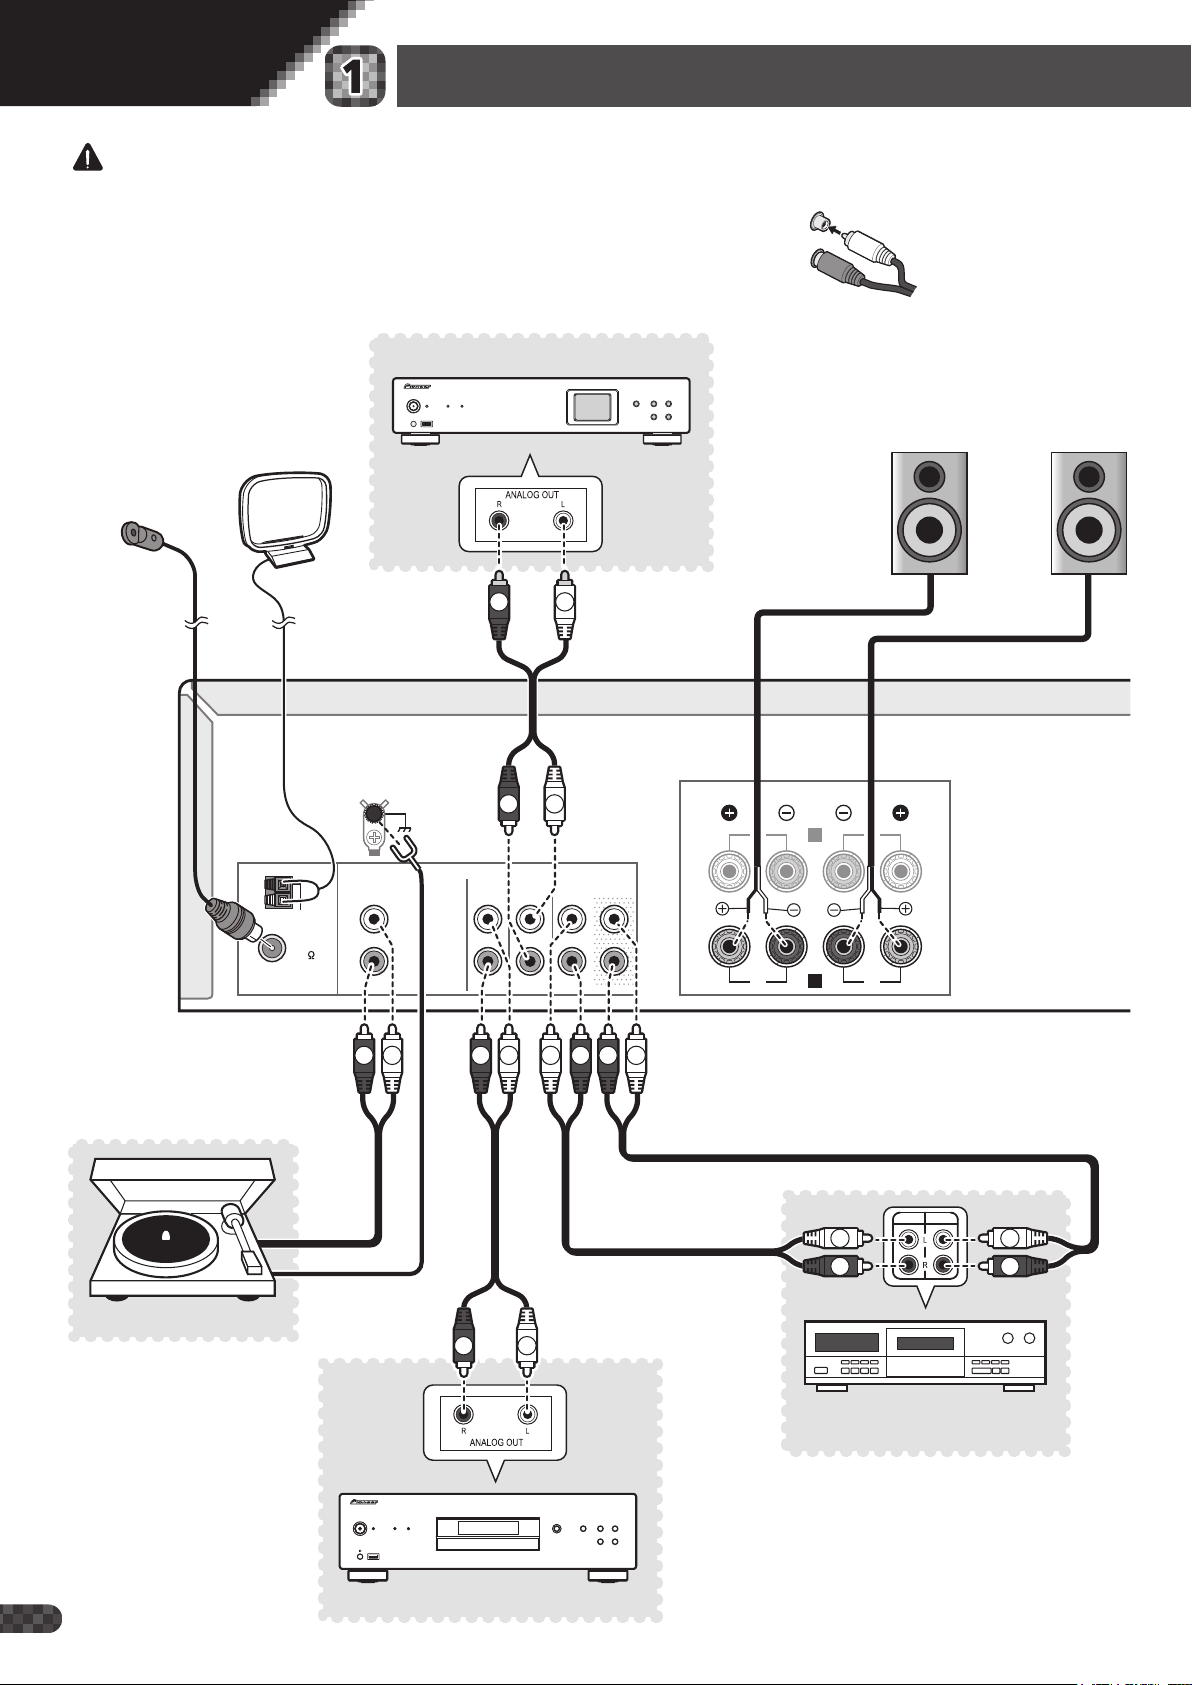
Connecting up
CAUTION
•Before making or changing the connections, switch off the power and
disconnect the power cord from the AC outlet.
•Connect the power cord after all the connections between devices have
been completed.
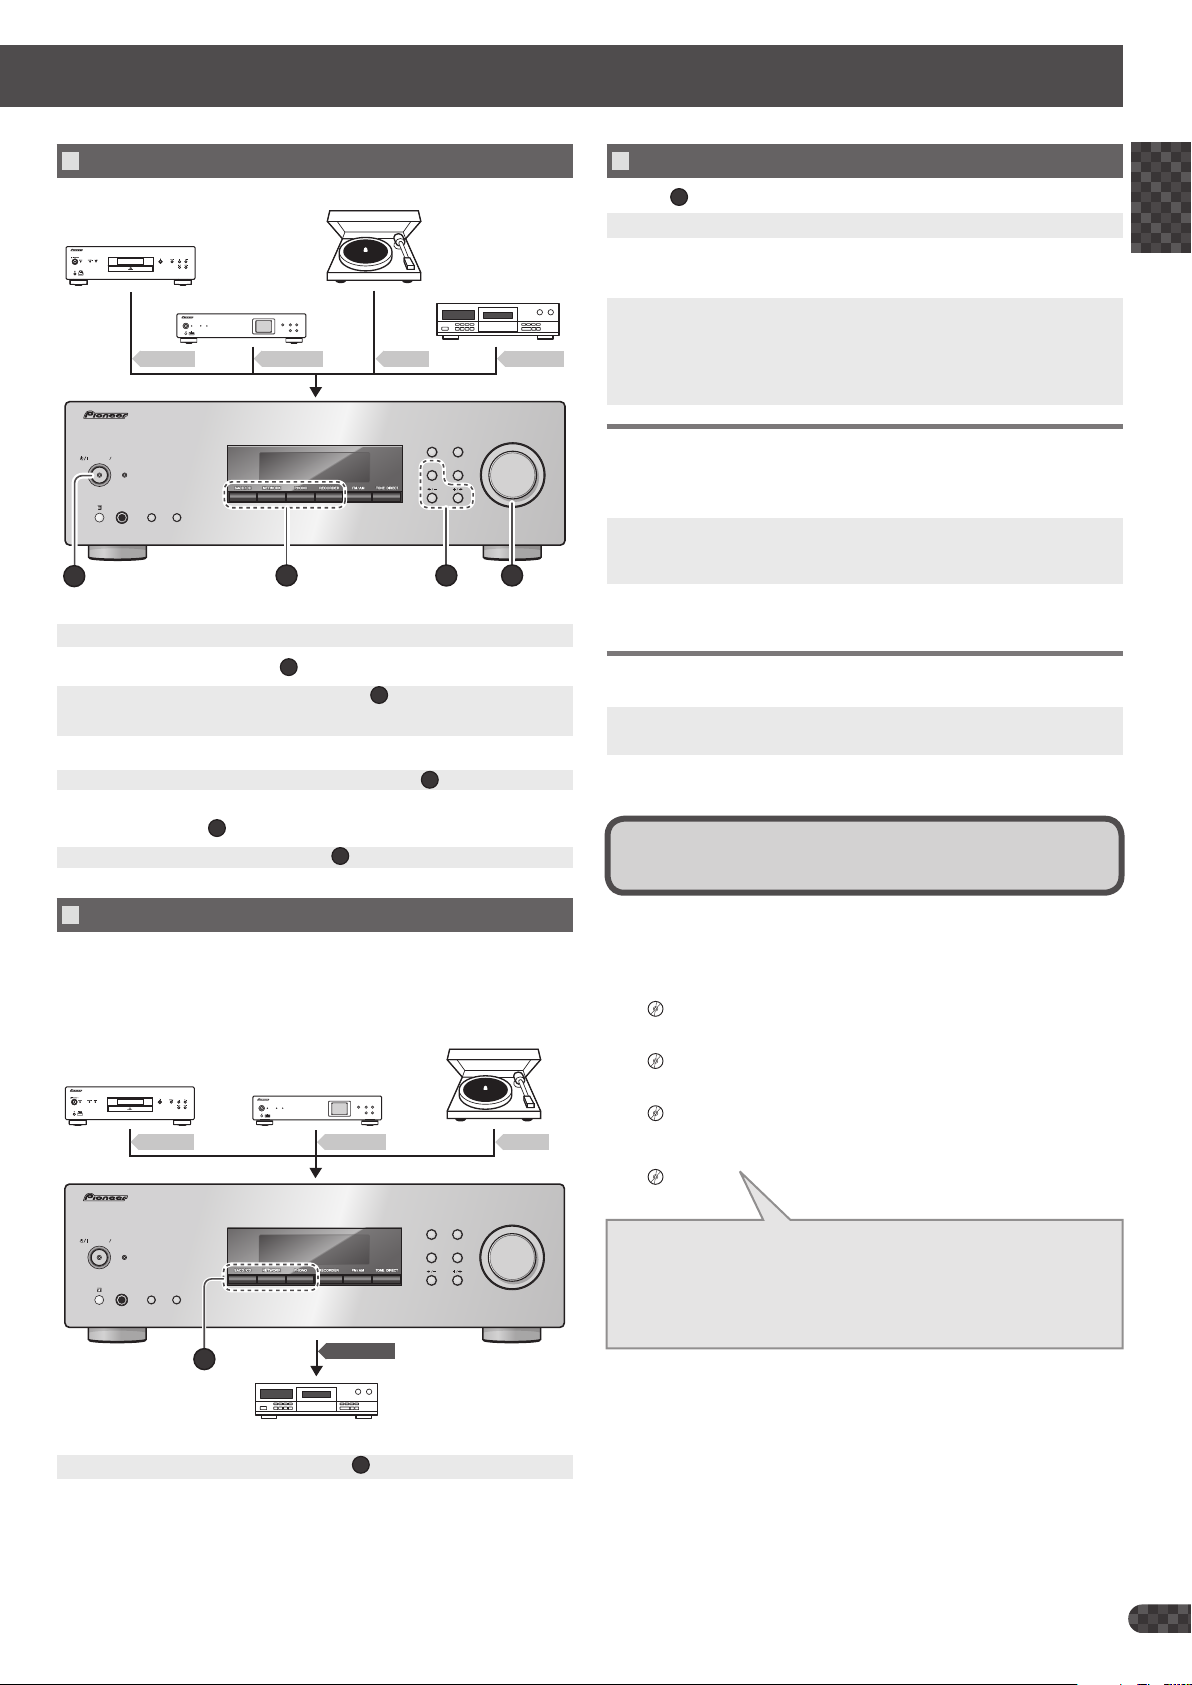
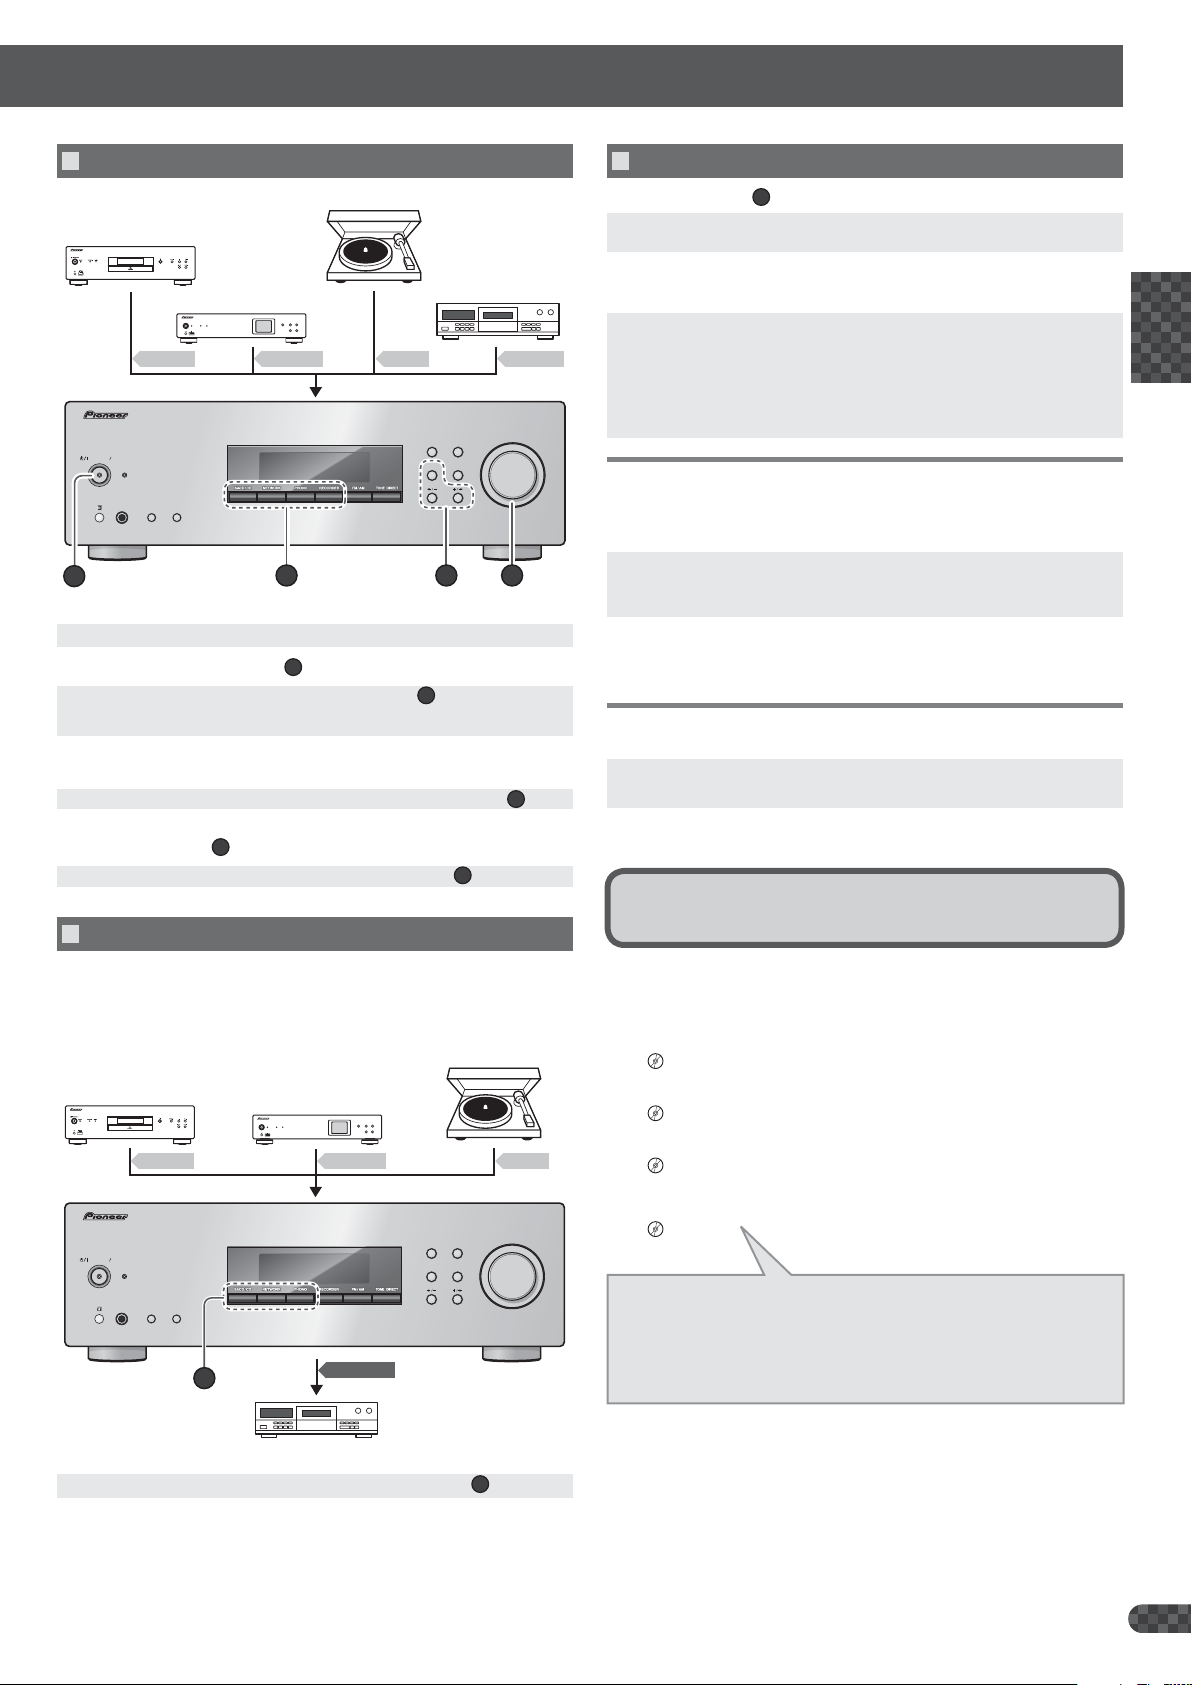
Network audio player
AM loop antenna
FM wire antenna
R
Using audio cables
Connect the white plug to the left (L) jack, and the red plug to the right (R)
jack. Be sure to insert the plugs fully into the jacks.
L
R
Left (Wihte)
Right (Red)
Right speaker Left speaker
L
Turntable
AM LOOP
FM UNBAL
75
ANTENNA
PHONO (MM
IN
L
R
L
R
SIGNAL
GND
)
SACD/CD
R
R
R
NETWORK
L
L
L
RECORDER
INININ
L
R
OUT
R
SPEAKERS
RL
B
RL
A
L
RECPLAY
L
R
L
R
CD recorder or
Cassette deck
SACD/CD player
2
En
Connecting up (continued)
VENTILATION CAUTION
When installing this unit, make sure to leave space around the unit for
ventilation to improve heat radiation (at least 40 cm at top, 10 cm at rear,
and 20 cm at each side).
WARNING
Slots and openings in the cabinet are provided for ventilation to ensure
reliable operation of the product, and to protect it from overheating. To
prevent fire hazard, the openings should never be blocked or covered with
items (such as newspapers, table-cloths, curtains) or by operating the
equipment on thick carpet or a bed.
D3-4-2-1-7b*_A1_En
STANDBY
ON
STANDBY
PHONES
A
SPEAKERS
B
STEREO RECEIVER
S
X
20
MEMORY
TUNE
VOLUME
/
PRESET
TONE
BALANCE
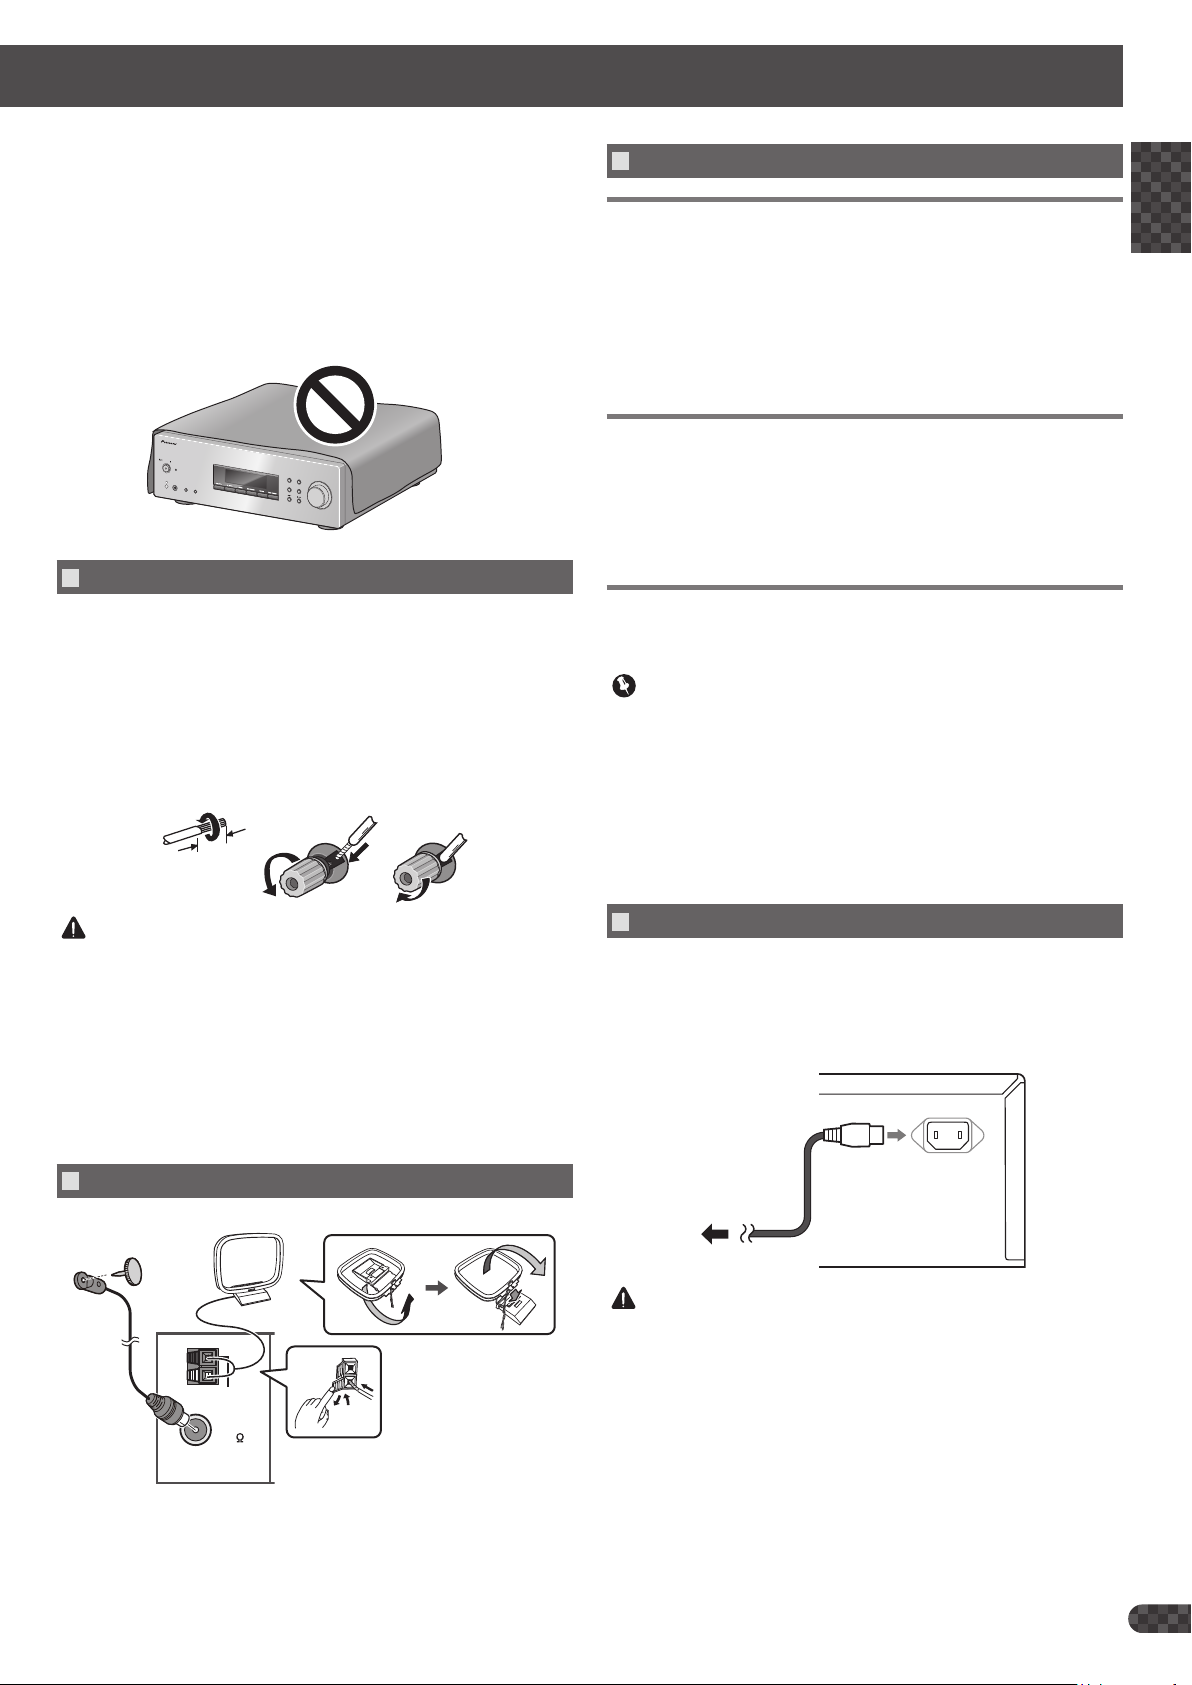
Connecting the speakers
Make sure you connect the speaker on the right to the right (R) terminal
and the speaker on the left to the left (L) terminal. Also make sure the
positive and negative (+/–) terminals on the receiver match those on the
speakers.
Twist the cable cores.
1
Loosen the nut on the SPEAKERS terminal, and insert the speaker
2
cable into the exposed hole in the terminal shaft.
Retighten the terminal nut.
3
12 3
10 mm
Connecting your equipment
Connecting the playback components
Connect the audio outputs of your SACD player (or CD player) to the
1
SACD/CD IN jacks on this receiver.
Connect the audio outputs of your network audio player to the
2
NETWORK IN jacks on this receiver.
•You may connect other audio components furnished with analog audio
output jacks. If you wish to connect a portable audio player or other
component furnished with mini-plug output jacks (or headphone jacks),
use of a commercially available conversion plug will be necessary.
Connecting the cassette deck
Connect the audio outputs of your cassette deck (or other recorder)
to the RECORDER IN jacks on this receiver. Then connect the audio
inputs on the cassette deck to the RECORDER OUT jacks on this
receiver.
This will allow you to make recordings from the components connected to
this receiver.
Connecting a turntable
Connect the audio outputs of your turntable to the PHONO IN jacks
on this receiver.
Important
SIGNAL GND
•The
connecting the unit to components such as an analog turntable.
•Do not connect the
than a turntable; also, do not connect to a turntable equipped with
built-in equalizer. An excessively high sound output may be produced,
resulting in damage to your speakers or other devices.
•The unit’s
turntables equipped with MM (moving-magnet) type cartridges.
Turntables equipped with MC (moving-coil) cartridges cannot be used.
terminal is provided to reduce noise when
PHONO (MM)
PHONO (MM)
terminals are designed to be used with
terminals to any component other
English
Français
Deutsch
Italiano
Nederlands
Español
CAUTION
When using only one set of speaker terminals (SPEAKERS A or
•
SPEAKERS B), the speaker used should have a nominal impedance
between 4 Ω and 16 Ω. When using both sets of terminals, the
connected speakers should have nominal impedance between 8
and 16 Ω. Consult the instructions accompanying your speakers
Ω
for details regarding the impedance value.
•These speaker terminals carry
HAZARDOUS live voltage
. To prevent
the risk of electric shock when connecting or disconnecting the
speaker cables, disconnect the power cord before touching any
uninsulated parts.
Connecting the FM and AM antennas
Connect FM wire antenna and the the AM loop antennaas shown below.
AM LOOP
FM UNBAL
75
ANTENNA
Plugging the receiver
Only plug in after you have connected all your components to this receiver,
including the speakers.
Plug the supplied power cord into the AC IN socket on the back of
1
the receiver.
Plug the other end into a power outlet.
2
AC IN
To power outlet
CAUTION
•Handle the power cord by the plug part. Do not pull out the plug by
tugging the cord, and never touch the power cord when your hands are
wet, as this could cause a short circuit or electric shock. Do not place
the unit, a piece of furniture, or other object on the power cord or pinch
the cord in any other way. Never make a knot in the cord or tie it with
other cables. The power cords should be routed so that they are not
likely to be stepped on. A damaged power cord can cause a fire or give
you an electric shock. Check the power cord once in a while. If you find
it damaged, ask your nearest Pioneer authorized independent service
company for a replacement.
3
En
Before you start Operation
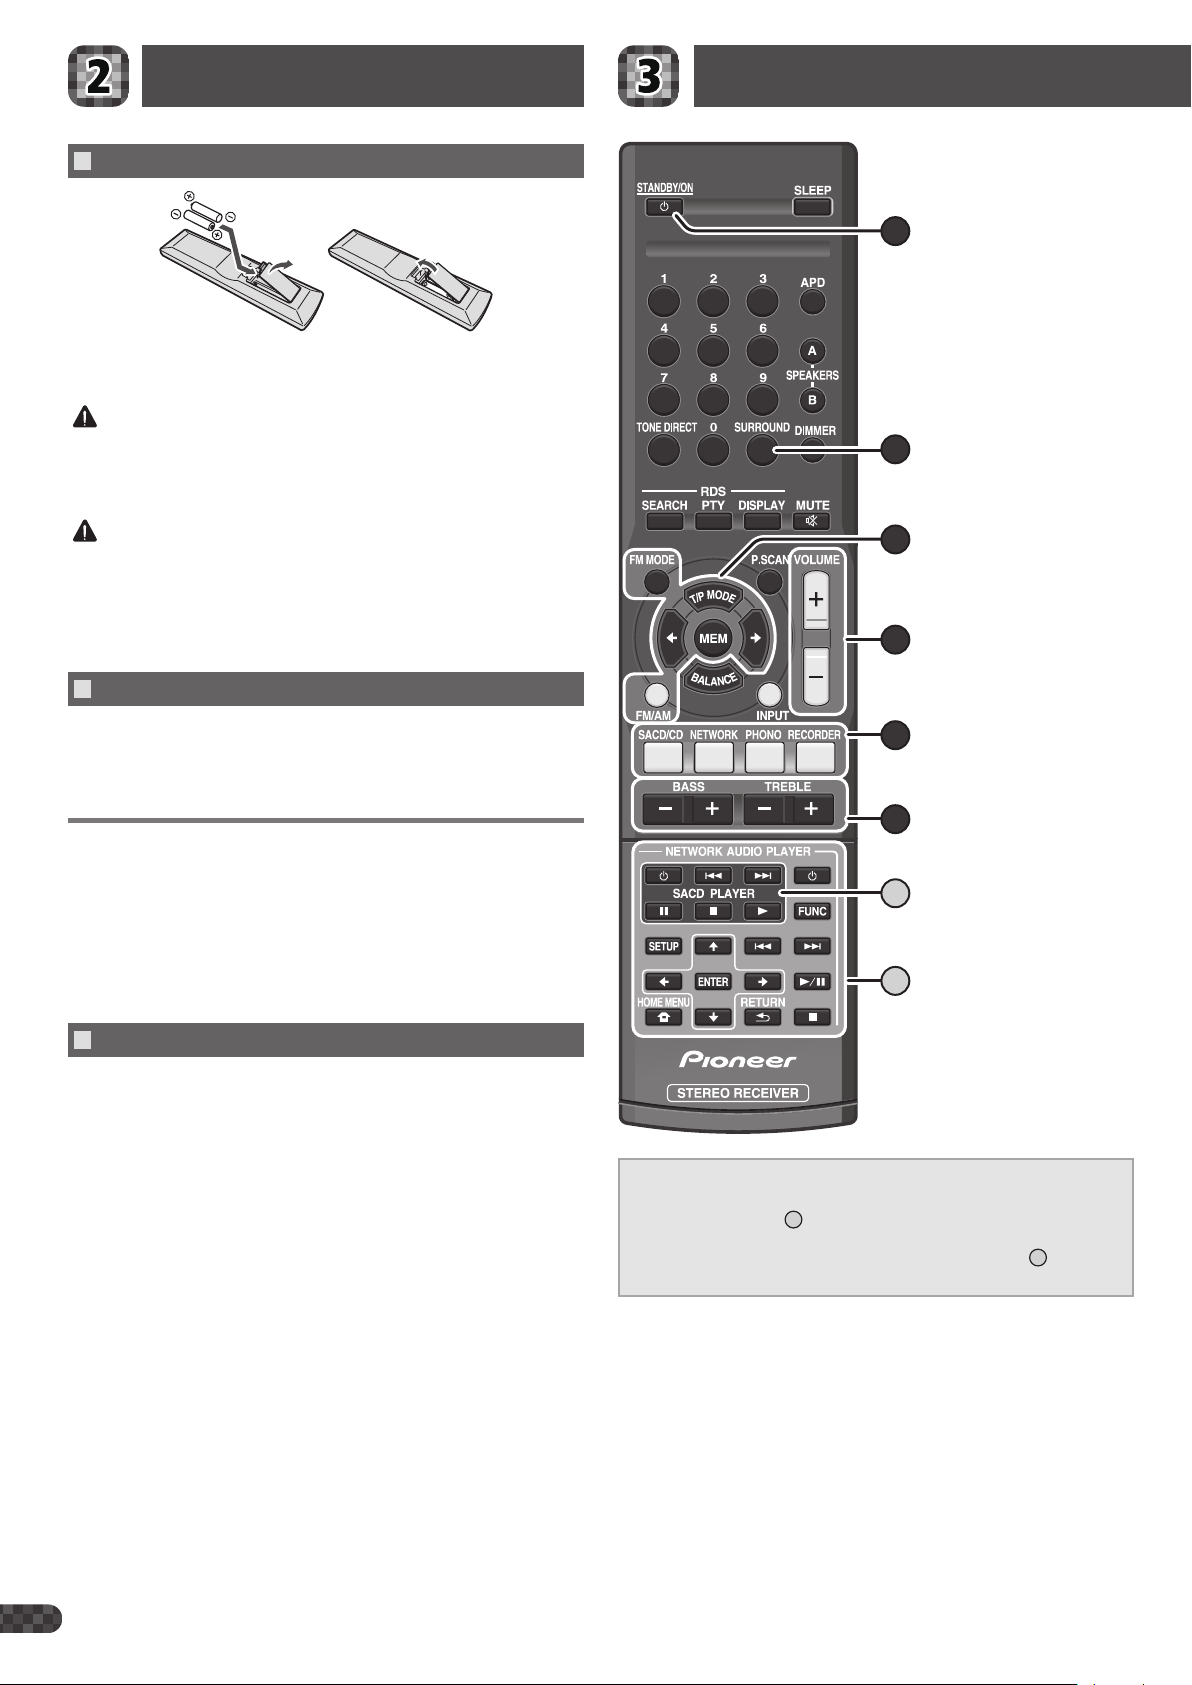
Loading the batteries
The batteries included with the unit have been provided to allow you check
product operation and may not last long. We recommend using alkaline
batteries that have a longer life.
WARNING
•Do not use or store batteries in direct sunlight or other excessively hot
place, such as inside a car or near a heater. This can cause batteries
to leak, overheat, explode or catch fire. It can also reduce the life or
performance of batteries.
CAUTION
•When inserting the batteries, make sure not to damage the springs on
the battery’s terminals.
•When disposing of used batteries, please comply with governmental
regulations or environmental public institution’s rules that apply in your
country/area.
To turn the power on
A
Switches the receiver between
standby and on.
E
Switches between the various
surround modes.
F
Use to listening to the FM/AM radio.
C
Use to set the listening volume.
Press STANDBY/ON button on the remote control or /I
STANDBY/ON button on the front panel.
•If the unit is in the standby mode, press
remote control.
STANDBY/ON
button on the
Set the power to Standby
Press STANDBY/ON button on the remote control.
The next time you wish to turn on the power, press
button on the remote control.
•If the front panel’s
will be turned off. In this case, if the power is off, pressing the remote
control’s
the power again, press the front panel’s
STANDBY/ON
/I STANDBY/ON
button will not turn on the power. To turn on
button is pressed, the power
STANDBY/ON
/I STANDBY/ON
button.
Canceling the Auto Power Down
When this receiver is not used over a period of several hours, it will power
down automatically. The automatic power-off timer is set to six hours
under factory settings, and the timing can be changed or the power-off
function switched off altogether.
Press APD repeatedly to select "OFF".
You can select 2, 4 or 6 hours, or OFF (if no automatic shutoff is desired).
B
Press to select an input source.
D
Use to adjust Bass or Treble.
b
Use to control Pioneer SACD/CD
players.
a
Use to control Pioneer network
audio players.
Controls for other Pioneer components
When the
NETWORK
Pioneer network audio players. Likewise, when the
pressed to switch the unit’s input to
can be used to operate certain other Pioneer SACD/CD players.
NETWORK
input, the “
button is pressed to switch the unit’s input to
a
” buttons can be used to operate certain other
SACD/CD
SACD/CD
input, the “
button is
b
” buttons
4
En
Operation (continued)
Playback
Turntable
SACD/CD player
CD recorder or
Network audio player
/I STANDBY/ON
STANDBY
PURE AUDIO Hi-Bit 32
iPod/USB
5V 2.1A
N-50
NETWORK AUDIO PLAYER
FUNCTION
SACD/CD NETWORK PHONO
STANDBY ON
STANDBY
PHONES
SPEAKERS
B
A
A CB D
Turn on the power of the playback component.
1
Turn power ON to the unit. (A)
2
Select the source you want to playback. (B)
3
Select the playback component.
Start playback of the component you selected in step 1.
4
Adjust playback volume with VOLUME control. (C)
5
Adjust the tone to your preference using the TONE (BASS and
6
TREBLE) controls. (
Select a surround mode you want. (E)
7
D
)
Cassette deck
TUNE / PRESET
MEMORY
BALANCE
TONE
RECORDER
STEREO RECEIVER
VOLUME
Listening to the radio
English
Use the “F” buttons to listening to the FM/AM radio.
Press FM/AM repeatedly to select the band (FM or AM).
1
Press T/P MODE to change to tuning mode.
2
PRESET
indicator goes off.
Press
3
•Press and hold
to tune to a station.
for about a second. The receiver will start
Français
searching for the next station.
When FM stereo broadcasts are poor because of weak broadcast signals,
FM MODE
SX-20
press
to select the
FM MONO
mode to reduce the noise.
Deutsch
Saving station presets
If you often listen to a particular radio station, it’s convenient to have the
receiver store the frequency for easy recall whenever you want to listen to
that station.
Press MEM while receiving a signal from the station you want to
1
store.
The display shows
Press
2
PRESET
, then a blinking
MEM
and station preset.
to select the station preset you want, then press MEM.
Italiano
The preset number stop blinking and the receiver stores the station.
Listening to station presets
Nederlands
You will need to have some presets stored to do this.
Press T/P MODE to change to preset mode.
1
PRESET
indicator lights up.
2
Press
to select the station preset you want.
Español
To enjoy the many functions of the unit
to the fullest extent
Making an audio recording
You can make an audio recording from any audio source connected to the
receiver.
•The sound volume and tone settings made on this unit will not be
reflected in the audio output.
Turntable
SACD/CD player
SACD/CD NETWORK PHONO
STANDBY ON
STANDBY
PHONES
SPEAKERS
B
A
Select the source you want to record. (B)
1
Start recording, then start playback of the source component.
2
Network audio player
/I STANDBY/ON
STANDBY
PURE AUDIO Hi-Bit 32
iPod/USB
5V 2.1A
B
N-50
NETWORK AUDIO PLAYER
FUNCTION
RECORDER
TUNE / PRESET
MEMORY
BALANCE
TONE
CD recorder or
Cassette deck
STEREO RECEIVER
SX-20
VOLUME
Load the CD-ROM into your computer and download the PDF
manual from the menu screen to read.
Functions
Listening to RDS broadcasts
•
page 10
Adjusting the sound volume balance
•
page 11
Using Tone Direct
•
page 11
Troubleshooting
page 13
The front panel display does not appear.
The front panel display will not appear when the Tone Direct mode is
ON, or when the DIMMER is set to OFF.
If you not wish for the display to disappear, use
DIMMER
button to change the setting.
TONE DIRECT
button or
© 2012 PIONEER CORPORATION.
All rights reserved.
5
En
Français
Raccordement
ATTENTION
•Avant d’effectuer ou de modifier les raccordements, mettez l’appareil
hors tension et débranchez le cordon d’alimentation de la prise secteur.
•Connectez le cordon d’alimentation après avoir effectué toutes les
connexions entre les appareils.
Lecteur audio réseau
Antenne cadre AM
Antenne à fil FM
R
Utilisation de câbles audio
Connectez la fiche blanche à la prise gauche (L) et la fiche rouge à la
prise droite (R). Assurez-vous de bien brancher les fiches dans les prises.
Gauche (Blanche)
Droite (Rouge)
Enceinte de
droite
L
Enceinte de
gauche
Platine
AM LOOP
FM UNBAL
75
ANTENNA
PHONO (MM
IN
L
R
L
R
SIGNAL
GND
)
SACD/CD
R
R
R
NETWORK
L
L
L
RECORDER
INININ
L
R
OUT
R
SPEAKERS
RL
B
RL
A
L
RECPLAY
L
R
L
R
Enregistreur CD ou
à bande
Lecteur SACD/CD
2
Fr

Raccordement (suite)
PRÉCAUTION DE VENTILATION
Lors de l’installation de l’appareil, veillez à laisser un espace suffisant
autour de ses parois de manière à améliorer la dissipation de chaleur (au
moins 40 cm sur le dessus, 10 cm à l’arrière et 20 cm de chaque côté).
AVERTISSEMENT
Les fentes et ouvertures du coffret sont prévues pour la ventilation, pour
assurer un fonctionnement stable de l’appareil et pour éviter sa
surchauffe. Pour éviter les risques d’incendie, ne bouchez jamais les
ouvertures et ne les recouvrez pas d’objets, tels que journaux, nappes ou
rideaux, et n’utilisez pas l’appareil posé sur un tapis épais ou un lit.
D3-4-2-1-7b*_A1_Fr
STANDBY
ON
STANDBY
PHONES
A
SPEAKERS
B
STEREO RECEIVER
SX
20
MEMORY
TUNE
VOLUME
/
PRESET
TONE
BALANCE
Raccordement des enceintes
Assurez-vous de raccorder l’enceinte de droite à la borne de droite (R)
et l’enceinte de gauche à la borne de gauche (L). Vérifiez aussi que les
bornes positive et négative (+/–) sur l’ampli-tuner correspondent à celles
des enceintes.
Entortillez l’âme des câbles.
1
Desserrez l’écrou sur la borne SPEAKERS et introduisez le câble de
2
l’enceinte dans le trou exposé dans la borne.
Resserrez l’écrou de la borne.
3
12 3
10 mm
Branchement de votre équipement
Branchement des composants de lecture
Branchez les sorties audio de votre lecteur SACD (ou lecteur CD) aux
1
prises SACD/CD IN de cet ampli-tuner.
Raccordez les sorties audio de votre lecteur audio en réseau aux
2
prises NETWORK IN de cet ampli-tuner.
•Vous pouvez brancher d’autres composants audio équipés de prises
de sortie audio analogiques. Si vous voulez brancher un lecteur audio
portable, ou d’autres composants équipés de prises mini-fiche de
sortie (ou prises casque), utilisez un adaptateur disponible dans le
commerce.
Branchement de la platine cassette
Branchez les sorties audio de votre platine cassette (ou autre
enregistreur) aux prises RECORDER IN de cet ampli-tuner. Raccordez
ensuite les entrées audio de la platine cassette aux prises
RECORDER OUT de cet ampli-tuner.
Cela vous permettra d’effectuer des enregistrements à partir des
composants raccordés à cet ampli-tuner.
Branchement d’une platine
Raccordez les sorties audio de votre platine aux prises PHONO IN de
cet ampli-tuner.
Important
•La borne
connexion de l’unité aux composants, tels que la platine analogique.
•Ne pas connecter les bornes
qu’une platine ; ne pas connecter non plus une platine doté d’un
égalisateur intégré. Un son émis trop fort peut se produire, ce qui
endommagerait les enceintes ou les autres appareils.
•Les bornes de l’unité
avec des platines dotées de cartouches de type MM (à aimant mobile).
Ne pas utiliser les platines dotées de cartouches MC (à bobine mobile).
SIGNAL GND
est fournie pour réduire le bruit lors de la
PHONO (MM)
PHONO (MM)
à un autre composant
ont été conçues pour être utilisées
English
Français
Deutsch
Italiano
Nederlands
Español
ATTENTION
Lorsque vous utilisez uniquement un jeu de bornes de l’enceinte
•
(SPEAKERS A ou SPEAKERS B), l’enceinte utilisée doit disposer
d’une impédance nominale comprise entre 4 Ω et 16 Ω. Lorsque
vous utilisez des jeux de bornes, les enceintes connectées doivent
disposer d’une impédance nominale entre 8 Ω et 16 Ω. Pour de
plus amples informations sur la valeur de l’impédance, consultez
les instructions jointes aux enceintes.
•Les bornes des haut-parleurs sont sous une
DANGEREUSE
. Pour éviter tout risque de décharge électrique lors du
tension ACTIVE
branchement et du débranchement des câbles d’enceinte, débranchez
le cordon d’alimentation avant de toucher des parties non isolées.
Branchement d’antennes FM et AM
Raccordez l’antenne câblée FM et l’antenne en boucle AMcomme
indiqué ci-dessous.
AM LOOP
FM UNBAL
75
ANTENNA
Branchement de l’ampli-tuner
Ne brancher l’appareil qu’fois tous vos composants connectés à
l’ampli-tuner, y compris les enceintes.
Branchez le cordon d’alimentation dans la prise AC IN située à l’arrière
1
de l’ampli-tuner.
Branchez l’autre extrémité dans la prise secteur.
2
AC IN
Vers la sortie
alimentation
ATTENTION
•Manipulez le cordon d’alimentation par la prise. Ne tirez pas la prise
en aggripant le cordon et ne touchez jamais le cordon avec les mains
mouillées, cela pourrait entraîner un court-circuit ou une électrocution.
Ne placez pas l’appareil, un meuble ou tout autre objet sur le cordon
d’alimentation. Ne le pincez d’aucune façon. Ne faites jamais un noeud
dans le cordon, ne le nouer pas avec d’autres câbles. Les cordons d’alimentation doivent être disposés de façon à ne pas marcher dessus.
Un cordon d’alimentation endommagé peut entraîner un incendie ou
provoquer une électrocution. Vérifiez régulièrement le cordon d’alimentation. S’il est endommagé, faites appel à l’agence de réparation
indépendante agréée Pioneer la plus proche pour le remplacer.
3
Fr

Préparatifs Fonctionnement
Chargement des piles
Les piles incluses avec l’unité ont été fournies pour permettre de contrôler
le fonctionnement du produit et ne dureront pas longtemps. Nous
recommandons d’utiliser des piles alcalines disposant d’une durée de vie
plus longue.
AVERTISSEMENT
•N’utilisez ni ne conservez les piles sous la lumière directe du soleil
ou dans un endroit excessivement chaud, comme une voiture ou à
proximité d’un appareil de chauffage. Les piles risqueraient de fuir, de
surchauffer, d’exploser ou de s’enflammer. Leur durée de vie ou leur
performance pourrait également être réduite.
ATTENTION
•Lorsque vous placez les piles, prenez soin de ne pas endommager les
ressorts des bornes des piles .
•Lorsque vous jetez des piles usées, veuillez vous conformer aux normes
gouvernementales ou à la réglementation des institutions publiques
environnementales en vigueur dans votre pays ou région.
A
Cette touche permet d’allumer
l’ampli-tuner et de le mettre en
veille.
E
Passer d’un mode surround à un
autre.
F
Utilisez les boutons pour écouter la
radio FM/AM.
C
Permet de régler le volume d’écoute.
Mise sous tension
Appuyez sur le bouton STANDBY/ON de la télécommande ou sur le
bouton /I STANDBY/ON du panneau avant.
•Si l’unité est en mode de veille, appuyez sur le bouton
de la télécommande.
STANDBY/ON
Réglage de la puissance sur la mise en veille
Appuyez sur le bouton STANDBY/ON de la télécommande.
La prochaine fois que vous remettrez sous tension, appuyez sur le bouton
STANDBY/ON
•Si vous appuyez sur le bouton
l’appareil se met hors tension. Dans ce cas, si l’alimentation est
coupée, vous ne pourrez pas remettre sous tension en appuyant sur
le bouton
tension, appuyez sur le bouton
de la télécommande.
STANDBY/ON
de la télécommande. Pour remettre sous
/I STANDBY/ON
/I STANDBY/ON
du panneau avant,
du panneau avant.
Annulation de la mise hors tension automatique
Lorsque cet ampli-tuner n’est pas utilisé pendant plusieurs heures, il se
met automatiquement hors tension. Le minuteur de mise hors tension
automatique est réglé par défaut sur six heures. Il est possible de modifier
cette durée ou de désactiver complètement la fonction de mise hors
tension.
Appuyez plusieurs fois sur APD pour sélectionner "OFF".
Vous pouvez sélectionner 2, 4 ou 6 heures, ou OFF (si vous ne souhaitez
aucune désactivation automatique).
Commandes des autres composants Pioneer
Lorsque vous appuyez sur le bouton
de l’appareil sur
commander certains autres lecteurs audio Pioneer en réseau. De la
même façon, lorsque vous appuyez sur le bouton
l’entrée de l’appareil sur
“
B
Appuyez sur l’une de ces touches
pour sélectionner une source
d’entrée.
D
Permet de régler les basses ou les
aigus.
b
Permet de contrôler les lecteurs
SACD/CD Pioneer.
a
Permet de contrôler les lecteurs
Pioneer audio en réseau.
NETWORK
b
” pour commander certains autres lecteurs SACD/CD Pioneer.
SACD/CD
NETWORK
, vous pouvez utiliser les boutons “
, vous pouvez utiliser les boutons
pour mettre l’entrée
SACD/CD
pour mettre
a
” pour
4
Fr
Fonctionnement (suite)
Lecture
Platine
Lecteur SACD/CD
Enregistreur CD ou
MEMORY
à bande
RECORDER
STEREO RECEIVER
VOLUME
TUNE / PRESET
BALANCE
TONE
Lecteur audio réseau
/I STANDBY/ON
STANDBY
PURE AUDIO Hi-Bit 32
iPod/USB
5V 2.1A
N-50
NETWORK AUDIO PLAYER
FUNCTION
SACD/CD NETWORK PHONO
STANDBY ON
STANDBY
PHONES
SPEAKERS
B
A
A CB D
Mettez sous tension le composant de lecture.
1
Mettez l’unité sous tension. (A)
2
Sélectionnez la source que vous souhaitez lire. (B)
3
Sélectionnez le composant de lecture.
Débutez la lecture du composant que vous avez sélectionné dans
4
l’étape 1.
Réglez le volume de la lecture avec la commande VOLUME. (C)
5
Ajustez la tonalité à votre convenance à l’aide des commandes TONE
6
(BASS et TREBLE). (
Sélectionnez le mode surround que vous souhaitez. (E)
7
D
)
Réalisation d’un enregistrement audio
Vous pouvez faire un enregistrement audio à partir de n’importe quelle
source audio raccordée à l’ampli-tuner.
•Le réglage du volume et de la tonalité effectué sur cet appareil n’intervient pas sur la sortie audio.
Platine
Lecteur SACD/CD
SACD/CD NETWORK PHONO
Lecteur audio réseau
/I STANDBY/ON
STANDBY
PURE AUDIO Hi-Bit 32
iPod/USB
5V 2.1A
NETWORK AUDIO PLAYER
FUNCTION
N-50
Écoute de la radio
English
Utilisez les boutons “F” pour écouter la radio FM/AM.
Appuyez à plusieurs reprises sur FM/AM pour sélectionner la bande
1
(FM ou AM).
3
L’indicateur
Appuyez sur
PRESET
•Restez appuyé sur
s’éteint.
pour régler une station.
pendant environ une seconde. L’ampli-tuner
Français
Appuyez sur T/P MODE pour passer au mode sélection.
2
va lancer la recherche de la prochaine station.
Lorsque les diffusions stéréo FM sont faibles, en raison de signaux faibles
SX-20
de diffusion, appuyez sur
réduire le bruit.
FM MODE
pour choisir le mode
FM MONO
et
Deutsch
Enregistrement des stations préréglées
Si vous écoutez souvent une station en particulier, il est utile de la
mémoriser sur l’ampli-tuner afin de faciliter son rappel lorsque vous le
souhaitez.
Appuyez sur MEM lorsque vous réceptionnez un signal d’une station
1
Italiano
à enregistrer.
L’indicateur
Appuyez sur
2
préréglée souhaitée, puis appuyez sur MEM.
L’indicateur
MEM
clignote.
dans les 5 secondes pour sélectionner la station
MEM
cesse de clignoter et l’ampli-tuner mémorise la station.
Nederlands
Écoute de stations préréglées
Pour faire cela, vous devez avoir des stations préréglées en mémoire.
Appuyez sur T/P MODE pour passer au mode présélection.
1
L’indicateur
Appuyez sur
2
PRESET
s’allume.
pour sélectionner la station préréglée souhaitée.
Español
Pour profiter au maximum de toutes
les fonctions de l’appareil
Chargez le CD-ROM dans votre ordinateur et téléchargez et lisez le
manuel PDF dans l’écran menu.
Fonctions
Écoute des diffusions RDS
•
page 10
Réglage de la balance du volume audio
•
page 11
Utilisation du mode Tone Direct
•
page 11
TUNE / PRESET
STANDBY ON
STANDBY
PHONES
SPEAKERS
B
A
B
RECORDER
MEMORY
BALANCE
TONE
Enregistreur CD ou
à bande
Sélectionnez la source que vous souhaitez enregistrer. (B)
1
Commencez l’enregistrement, puis commencez la lecture du
2
composant source.
STEREO RECEIVER
VOLUME
SX-20
Guide de dépannage
page 13
L’affichage du panneau avant n’apparaît pas.
L’affichage du panneau avant n’apparaît pas lors le mode Tone direct est
activé (ON) ou lorsque DIMMER est désactivé (OFF).
Si vous ne voulez pas faire disparaître l’affichage, utilisez le bouton
TONE DIRECT
ou
DIMMER
pour modifier le paramètre.
© 2012 PIONEER CORPORATION.
Tous droits de reproduction et de
traduction réservés.
5
Fr

Deutsch
Anschlüsse
VORSICHT
•Bevor Sie Anschlüsse vornehmen oder abtrennen, schalten Sie das
Gerät aus und ziehen Siz das Netzkabel aus der Netzsteckdose.
•Schließen Sie erst dann das Netzteil an, wenn sämtliche Verbindungen
zwischen den Geräten hergestellt wurden.
Netzwerk-Audioplayer
MW-Rahmenantenne
UKW-Drahtantenne
R
Audiokabel verwenden
Schließen Sie den weißen Stecker an die linke Buchse (L), den roten
Stecker an die rechte Buchse (R) an. Stecken Sie die Stecker bis zum
Anschlag ein.
Links (weiß)
Rechts (rot)
Rechter
Lautsprecher
L
Linker
Lautsprecher
Plattenspieler
AM LOOP
FM UNBAL
75
ANTENNA
PHONO (MM
IN
L
R
L
R
SIGNAL
GND
)
SACD/CD
R
R
R
NETWORK
L
L
L
RECORDER
INININ
L
R
OUT
R
SPEAKERS
RL
B
RL
A
L
RECPLAY
L
R
L
R
CD-Recorder oder
Kassettendeck
SACD/CD-Player
2
De

Anschlüsse (Fortsetzung)
VORSICHTSHINWEIS ZUR BELÜFTUNG
Bei der Aufstellung dieses Gerätes muss für einen ausreichenden
Freiraum gesorgt werden, um eine einwandfreie Wärmeabfuhr zu
gewährleisten (mindestens 40 cm oberhalb des Gerätes, 10 cm hinter
dem Gerät und jeweils 20 cm an der Seite des Gerätes).
WARNUNG
Im Gerätegehäuse sind Ventilationsschlitze und andere Öffnungen
vorgesehen, die dazu dienen, eine Überhitzung des Gerätes zu verhindern
und einen zuverlässigen Betrieb zu gewährleisten. Um Brandgefahr
auszuschließen, dürfen diese Öffnungen auf keinen Fall blockiert oder mit
Gegenständen (z.B. Zeitungen, Tischdecken und Gardinen) abgedeckt
werden, und das Gerät darf beim Betrieb nicht auf einem dicken Teppich
oder Bett aufgestellt sein.
STANDBY
ON
STANDBY
PHONES
STEREO RECEIVER
S
X
20
MEMORY
TUNE
VOLUME
/
PRESET
A
SPEAKERS
B
TONE
BALANCE
D3-4-2-1-7b*_A1_De
Lautsprecher anschließen
Sorgen Sie dafür, dass der rechte Lautsprecher mit dem rechten
Anschluss (R), der linke Lautsprecher mit dem linken Anschluss (L)
verbunden wird. Achten Sie auch darauf, dass die positiven und negativen
Anschlüsse am Empfänger (+/–) mit den richtigen Anschlüssen an den
Lautsprechern verbunden werden.
Verdrillen Sie die Seele (den Kern aus Metalladern) des Kabels.
1
Lösen Sie die Klemmmutter am SPEAKERS-Anschluss, führen Sie das
2
Lautsprecherkabel in die nun sichtbare Öffnung am Anschluss.
Ziehen Sie die Klemmmutter wieder an.
3
12 3
10 mm
Geräte anschließen
Wiedergabegeräte anschließen
Schließen Sie die Audioausgänge Ihres SACD-Players (oder
1
CD-Players) an die SACD/CD IN-Anschlüsse des Empfängers an.
Verbinden Sie die Audioausgänge Ihres Netzwerk-Audioplayers mit
2
den NETWORK IN-Anschlüssen des Empfängers.
•Sie können auch weitere Audiokomponenten mit analogen Ausgängen
anschließen. Falls Sie einen tragbaren Audioplayer oder ein anderes
Gerät mit Mini-Klinkenbuchsen anschließen möchten, nutzen Sie dazu
einen handelsüblichen Adapterstecker.
Kassettendeck anschließen
Schließen Sie die Audioausgänge des Kassettendecks (oder eines
anderen Aufnahmegerätes) an die RECORDER IN-Anschlüsse
des Empfängers an. Verbinden Sie dann die Audioeingänge des
Kassettendecks mit den RECORDER OUT-Anschlüssen am Empfänger.
Dadurch können Sie Aufnahmen von den an den Empfänger
angeschlossenen Geräten vornehmen.
Plattenspieler anschließen
Verbinden Sie die Audioausgänge Ihres Plattenspielers mit den
PHONO IN-Anschlüssen des Empfängers.
Wichtig
SIGNAL GND
•Der
an Komponenten wie analoge Plattenspieler angeschlossen wird.
•Schließen Sie die
Plattenspieler an; schließen Sie keine Plattenspieler mit integriertem
Equalizer an. Andernfalls kann es zu extrem lauter, verzerrter
Tonausgabe kommen, die Lautsprecher und andere Geräte
beschädigen kann.
PHONO (MM)
•Die
mit MM-Tonabnehmern (MM steht für Moving Magnet) vorgesehen.
Plattenspieler mit MC-Tonabnehmern (MC steht für Moving Coil)
können nicht angeschlossen werden.
-Anschluss reduziert Störgeräusche, wenn das Gerät
PHONO (MM)
-Anschlüsse ausschließlich an
-Anschlüsse sind zum Anschluss von Plattenspielern
English
Français
Deutsch
Italiano
Nederlands
Español
VORSICHT
Wenn Sie nur einen Satz Lautsprecherbuchsen (SPEAKERS A
•
oder SPEAKERS B) verwenden, sollten die Lautsprecher eine
Nennimpedanz zwischen 4 Ω und 16 Ω aufweisen. Wenn
Sie beide Lautsprecheranschlusspaare nutzen, sollten die
angeschlossenen Lautsprecher eine Nennimpedanz zwischen 8 Ω
und 16 Ω aufweisen. Hinweise zur Impedanz finden Sie in der mit
den Lautsprechern gelieferten Dokumentation.
•An den Lautsprecherklemmen dieses Gerätes liegt eine potentiell
GEFÄHRLICHE Spannung
an. Zur Vermeidung von Stromschlaggefahr
ist unbedingt darauf zu achten, den Netzstecker beim Anschließen und
Abtrennen der Lautsprecherkabel von der Netzsteckdose zu trennen,
bevor irgendwelche nicht isolierten Teile berührt werden.
MW- und UKW-Antennen anschließen
Schließen Sie die MW-Rahmenantenne und die UKW-Drahtantenne wie
nachstehend dargestellt an.
AM LOOP
FM UNBAL
75
ANTENNA
Empfänger an die Stromversorgung anschließen
Verbinden Sie das Gerät erst dann mit der Stromversorgung, nachdem
sämtliche Komponenten einschließlich Lautsprechern angeschlossen
wurden.
Schließen Sie das mitgelieferte Netzkabel an den AC IN-Anschluss an
1
der Rückwand des Gerätes an.
Stecken Sie den Netzstecker in eine Steckdose.
2
AC IN
Zur Steckdose
VORSICHT
•Fassen Sie das Netzkabeln nur am Stecker. Ziehen Sie den Stecker
nicht am Kabel aus der Steckdose, berühren Sie das Netzkabel
niemals mit feuchten oder gar nassen Händen – andernfalls kann es
zu Kurzschlüssen oder Stromschlägen kommen. Stellen Sie nichts
auf dem Netzkabel ab, achten Sie darauf, dass das Kabel nicht
eingeklemmt werden kann. Verknoten Sie das Netzkabel niemals,
binden Sie es nicht mit anderen Kabeln zusammen. Netzkabel
sollten so verlegt werden, dass nicht darauf getreten werden
kann. Beschädigte Netzkabel können Brände oder Stromschläge
verursachen. Überprüfen Sie das Netzkabel von Zeit zu Zeit. Falls
Sie Beschädigungen feststellen sollten, bitten Sie den autorisierten
Pioneer-Kundendienst in Ihrer Nähe um Ersatz.
3
De

Bevor Sie beginnen Bedienung
Batterien einlegen
Die mit dem Gerät gelieferten Batterien dienen in erster Linie zur
Überprüfung, ob das Gerät richtig funktioniert; dürften daher auch nicht
übermäßig lange halten. Wir empfehlen Alkalibatterien, die deutlich
länger durchhalten.
WARNUNG
•Vermeiden Sie Gebrauch und Lagerung von Batterien unter direkter
Sonneneinstrahlung oder an einem anderen sehr heißen Ort, z. B. im
Inneren eines Fahrzeugs oder in der Nähe eines Heizkörpers. Dadurch
können die Batterien auslaufen, sich überhitzen, explodieren oder
in Brand geraten. Auch kann dies die Lebensdauer der Batterien
verringern.
VORSICHT
•Achten Sie beim Einlegen der Batterien darauf, die Federn an den
Batteriekontakten nicht zu beschädigen.
•Bei der Entsorgung von verbrauchten Batterien sind die einschlägigen
gesetzlichen Vorschriften und Umweltschutzbestimmungen strikt
einzuhalten.
A
Schaltet den Empfänger zwischen
Bereitschaft und regulärem Betrieb
um.
E
Schaltet zwischen
unterschiedlichen Surround-Modi
um.
F
Zum Radiohören (MW oder UKW).
C
Zum Einstellen der Lautstärke.
Einschalten
Drücken Sie die Taste STANDBY/ON an der Fernbedienung oder die
Taste /I STANDBY/ON an der Frontblende.
•Falls sich das Gerät im Bereitschaftsmodus befindet, drücken Sie die
Fernbedienungstaste
STANDBY/ON
.
Bereitschaftsmodus einstellen
Drücken Sie die Taste STANDBY/ON an der Fernbedienung.
Zum nächsten Einschalten drücken Sie die Fernbedienungstaste
STANDBY/ON
•Wenn die Taste
schaltet sich das Gerät aus. In diesem Fall lässt sich das Gerät nicht
mehr mit der Fernbedienungstaste
Zum Einschalten drücken Sie bitte die Taste
Frontblende.
.
/l STANDBY/ON
an der Frontblende gedrückt wird,
STANDBY/ON
einschalten.
/l STANDBY/ON
an der
Auto-Abschaltung außer Kraft setzen
Falls Sie den Empfänger mehrere Stunden lang nicht benutzen, schaltet
sich automatisch ab. Die automatische Abschaltung ist ab Werk auf
6 Stunden eingestellt; diese Zeitspanne können Sie ändern oder die
automatische Abschaltung komplett außer Kraft setzen.
Drücken Sie APD, um „OFF“ auszuwählen.
Sie können 2, 4 oder 6 Stunden oder OFF auswählen (wenn kein
automatisches Abschalten gewünscht wird).
B
Zum Auswählen der gewünschten
Eingangsquelle.
D
Zum Anpassen der Bass- und
Höhenwiedergabe.
b
Zum Steuern eines Pioneer-SACD/
CD-Players.
a
Zum Steuern eines PioneerNetzwerk-Audioplayers.
Andere Pioneer-Komponenten steuern
Wenn der Eingang des Gerätes mit der
umgestellt ist, können Sie mit den Tasten
Netzwerk-Audioplayer steuern. Auf ähnliche Weise können Sie mit der
SACD/CD
andere Pioneer-SACD/CD-Player mit den Tasten
-Taste zum
SACD/CD
NETWORK
-Eingang umschalten und bestimmte
-Taste auf
a
bestimmte andere Pioneer-
b
bedienen.
NETWORK
4
De

Bedienung (Fortsetzung)
Wiedergabe
Plattenspieler
SACD/CD-Player
CD-Recorder oder
Netzwerk-Audioplayer
/I STANDBY/ON
STANDBY
PURE AUDIO Hi-Bit 32
iPod/USB
5V 2.1A
N-50
NETWORK AUDIO PLAYER
FUNCTION
SACD/CD NETWORK PHONO
STANDBY ON
STANDBY
PHONES
SPEAKERS
B
A
A CB D
Schalten Sie das Wiedergabegerät ein.
1
Schalten Sie das Gerät EIN. (A)
2
Wählen Sie die gewünschte Wiedergabequelle. (B)
3
Wählen Sie die gewünschte Wiedergabekomponente aus.
Starten Sie die Wiedergabe des in Schritt 1 gewählten Geräts.
4
Stellen Sie die Wiedergabelautstärke mit dem VOLUME-Regler ein. (C)
5
Passen Sie den Klang mit den TONE(BASS und TREBLE)-Reglern an
6
Ihrenpersönlichen Geschmack an. (
Wählen Sie den gewünschten Surround-Modus aus. (E)
7
D
)
Kassettendeck
TUNE / PRESET
MEMORY
BALANCE
TONE
RECORDER
STEREO RECEIVER
VOLUME
Radio hören
English
Drücken Sie zum MW- oder UKW-Empfang die Tasten F.
Drücken Sie FM/AM wiederholt, um den Frequenzbereich (UKW oder
1
MW) zu wählen.
Drücken Sie T/P MODE, um in den Abstimmungsmodus zu wechseln.
2
PRESET
Die
Zum Abstimmen eines Senders drücken Sie
3
•Halten Sie
-Anzeige erlischt.
etwa eine Sekunde lang gedrückt. Der Empfänger
.
Français
sucht nach dem nächsten Sender.
Falls es bei UKW-Stereosendungen zu Störungen wegen geringer Signal-
SX-20
stärke kommt, schalten Sie zur Reduktion der Störungen mit der Taste
FM MODE
in den
FM MONO
-Modus um.
Deutsch
Speichern von Voreinstellungen für Sender
Wenn Sie häufig einen bestimmten Sender hören, sollten Sie den
Empfänger die Frequenz speichern lassen, damit Sie diesen Sender
einfach abrufen können, wenn Sie ihn hören wollen.
Drücken Sie MEM, wenn der Sender eingestellt ist, den Sie speichern
1
Italiano
möchten.
MEM
Die
Wählen Sie innerhalb 5 Sekunden mit
2
Speicherplatz, drücken Sie dann MEM.
Die
-Anzeige blinkt.
den gewünschten
MEM
-Anzeige hört auf zu blinken und der Empfänger speichert den
Nederlands
Sender.
Voreingestellte Sender anhören
Dazu müssen Sie zunächst Sender gespeichert haben.
Drücken Sie T/P MODE, um in den Voreinstellungsmodus zu wech-
1
seln.
PRESET
Die
Wählen Sie mit
2
-Anzeige leuchtet.
den gewünschten, gespeicherten Sender.
Español
Audioaufnahmen
Sie können eine Audioaufnahme von jeder an den Empfänger
angeschlossenen Audioquelle vornehmen.
•Die Aufnahme wird nicht von den Lautstärke- und Klangeinstellungen
des Gerätes beeinflusst.
Plattenspieler
SACD/CD-Player
SACD/CD NETWORK PHONO
STANDBY ON
STANDBY
PHONES
SPEAKERS
A
Wählen Sie die gewünschte Aufnahmequelle. (B)
1
Starten Sie die Aufnahme und dann die Wiedergabe des
2
Quellengeräts.
Netzwerk-Audioplayer
B
B
N-50
/I STANDBY/ON
STANDBY
PURE AUDIO Hi-Bit 32
iPod/USB
5V 2.1A
NETWORK AUDIO PLAYER
FUNCTION
STEREO RECEIVER
VOLUME
TUNE / PRESET
MEMORY
BALANCE
TONE
RECORDER
CD-Recorder oder
Kassettendeck
Damit Sie sämtliche Funktionen des
Gerätes voll und ganz genießen können:
Legen Sie die CD in das optische Laufwerk Ihres Computers
ein, wählen Sie anschließend die PDF-Anleitung aus dem
Bildschirmmenü.
Funktionen
RDS-Sendungen hören
•
Seite 10
Lautstärkebalance einstellen
•
Seite 11
SX-20
Tone Direct verwenden
•
Seite 11
Fehlerbehandlung
Seite 13
Das Frontdisplay leuchtet nicht auf.
Das Frontdisplay leuchtet nicht, wenn Tone Direct eingeschaltet oder
DIMMER auf OFF eingestellt ist.
Falls das Display nicht abgeschaltet werden soll, können Sie die
Einstellung mit den Tasten
ändern.
TONE DIRECT
oder
DIMMER
entsprechend
© 2012 PIONEER CORPORATION.
Alle Rechte vorbehalten.
5
De

Italiano
Collegamento
ATTENZIONE
•Prima di effettuare o modificare i collegamenti, spegnere l’unità e
scollegare il cavo di alimentazione dalla presa di corrente CA.
•Collegare il cavo di alimentazione dopo avere collegato tutti i dispositivi.
Lettore audio di rete
Antenna AM a telaio
Antenna lineare FM
R
Uso dei cavi audio
Collegare la spina bianca al jack sinistro (L) e la spina rossa al jack destro
(R). Assicurarsi di inserire completamente le spine nei jack.
Sinistra (bianco)
Destra (rosso)
Altoparlante
destro
L
Altoparlante
sinistro
Giradischi
AM LOOP
FM UNBAL
75
ANTENNA
PHONO (MM
IN
L
R
L
R
SIGNAL
GND
)
SACD/CD
R
R
R
NETWORK
L
L
L
RECORDER
INININ
L
R
OUT
R
SPEAKERS
RL
B
RL
A
L
RECPLAY
L
R
L
R
Registratore CD o
piastra audiocassette
Lettore SACD/CD
2
It

Collegamento (segue)
AVVERTENZA PER LA VENTILAZIONE
Installare l’apparecchio avendo cura di lasciare un certo spazio
all’intorno dello stesso per consentire una adeguata circolazione dell’aria
e migliorare la dispersione del calore (almeno 40 cm sulla parte
superiore, 10 cm sul retro, e 20 cm su ciascuno dei lati).
ATTENZIONE
L’apparecchio è dotato di un certo numero di fessure e di aperture per la
ventilazione, allo scopo di garantirne un funzionamento affidabile, e per
proteggerlo dal surriscaldamento. Per prevenire possibili pericoli di incendi le
aperture non devono mai venire bloccate o coperte con oggetti vari (quali
giornali, tovaglie, tende o tendaggi, ecc.), e l’apparecchio non deve essere
utilizzato appoggiandolo su tappeti spessi o sul letto.
STANDBY
ON
STANDBY
PHONES
A
SPEAKERS
B
STEREO RECEIVER
SX
20
MEMORY
TUNE
VOLUME
/
PRESET
TONE
BALANCE
D3-4-2-1-7b*_A1_It
Collegamento degli altoparlanti
Assicurarsi di collegare l’altoparlante destro al terminale destro (R) e
quello sinistro al terminale sinistro (L). Assicurarsi inoltre che i terminali
positivo e negativo (+/–) del ricevitore corrispondano a quelli degli
altoparlanti.
Avvolgere i fili del cavo.
1
Allentare il dado del terminale SPEAKERS e inserire il cavo nel foro
2
esposto presente nell'asta del terminale.
Serrare di nuovo il dado del terminale.
3
12 3
10 mm
Collegamento dell’apparecchio
Collegamento dei componenti di riproduzione
Collegare le uscite audio del lettore SACD (o del lettore CD) ai jack
1
SACD/CD IN del ricevitore.
Collegare le uscite audio del lettore audio di rete ai jack NETWORK IN
2
del ricevitore.
•È possibile collegare altri componenti audio forniti ai jack delle uscite
audio analogiche. Se si desidera collegare un lettore audio portatile
o altri componenti forniti con delle mini prese jack di uscita (o i jack
delle cuffie), sarà necessario fare ricorso a un adattatore normalmente
reperibile in commercio.
Collegamento della piastra audiocassette
Collegare le uscite audio della piastra audiocassette (o di un altro
registratore) ai jack RECORDER IN del ricevitore. Collegare quindi gli
ingressi audio della piastra audiocassette ai jack RECORDER OUT del
ricevitore.
Ciò consentirà di effettuare delle registrazioni dai componenti collegati
al ricevitore.
Collegamento di un giradischi
Collegare le uscite audio del giradischi ai jack PHONO IN del
ricevitore.
Importante
•Per ridurre i disturbi quando l’unità è collegata a componenti come un
giradischi analogico viene fornito il terminale
•Non collegare i terminali
PHONO (MM)
giradischi; inoltre, non collegare giradischi dotati di equalizzatore
integrato. Potrebbe essere prodotta un’uscita audio di volume
eccessivamente elevato, provocando danni agli altoparlanti o ad altri
dispositivi.
•I terminali
PHONO (MM)
dell’unità sono progettati per essere usati
con giradischi dotati di cartucce di tipo MM (a magnete mobile).
Non possono essere usati giradischi dotati di cartucce MC (a bobina
mobile).
SIGNAL GND
.
a componenti diversi dai
English
Français
Deutsch
Italiano
Nederlands
Español
ATTENZIONE
Quando si usa solo una serie di terminali per gli altoparlanti
•
(SPEAKERS A o SPEAKERS B), l’altoparlante in uso deve avere
un’impedenza nominale compresa tra 4 Ω e 16 Ω. Quando si
usano entrambe le serie di terminali, gli altoparlanti collegati
devono avere un’impedenza nominale compresa tra 8 Ω e 16 Ω.
Per informazioni dettagliate sui valori di impedenza consultare le
istruzioni fornite
•I terminali degli altoparlanti sono sotto tensione, alla stessa
PERICOLOSA tensione
della corrente di rete. Per prevenire il rischio
di scosse elettriche quando si collegano o disconnettono i cavi degli
altoparlanti, staccare il cavo di alimentazione prima di toccare qualsiasi
parte non isolata.
Collegamento delle antenne FM e AM
Collegare l’antenna a telaio AMe l’antenna lineare FM come mostrato di
seguito.
AM LOOP
FM UNBAL
75
ANTENNA
Collegamento del ricevitore
Effettuare il collegamento soltanto dopo aver collegato tutti i componenti,
compresi gli altoparlanti, al ricevitore.
Collegare il cavo di alimentazione fornito in dotazione alla presa
1
AC IN posizionata sul retro del ricevitore.
Collegare l’altra estremità a una presa.
2
AC IN
Alla presa
ATTENZIONE
•Maneggiare il cavo di alimentazione reggendolo per la spina. Non
estrarre la spina tirando il cavo di alimentazione e non toccare mai
il cavo di alimentazione con le mani bagnate in quanto ciò potrebbe
provocare cortocircuiti o folgorazioni. Non posizionare l’unità, mobili
o altri oggetti sopra il cavo di alimentazione e non schiacciarlo in
nessun altro modo. Non annodare mai il cavo e non collegarlo ad
altri cavi. Il percorso dei cavi di alimentazione dovrà essere tale che
sia improbabile inciamparvi. Un cavo di alimentazione danneggiato
potrebbe provocare incendi o folgorazioni. Controllare di tanto in tanto
il cavo di alimentazione. Se si riscontrano danneggiamenti chiederne
la sostituzione al più vicino centro assistenza indipendente autorizzato
Pioneer.
3
It

Prima di iniziare Funzionamento
Caricamento delle batterie
Le batterie in dotazione con l’unità sono state fornite per permettere
di controllare il funzionamento del prodotto e potrebbero non durare a
lungo. Per una maggiore durata di utilizzo si raccomanda di usare batterie
alcaline.
AVVERTENZA
•Non usare né conservare le batterie alla luce diretta del sole o in luoghi
eccessivamente caldi, ad esempio all’interno di un’automobile o in
prossimità di un calorifero. Le batterie potrebbero perdere liquido,
surriscaldarsi, esplodere o prendere fuoco. Anche la durata e le
prestazioni delle batterie potrebbero risultare ridotte.
ATTENZIONE
•Quando si inseriscono le batterie, prestare attenzione a non
danneggiare le molle dei terminali .
•Per lo smaltimento delle batterie usate osservare le leggi statali o le
regolamentazioni in materia di ambiente emesse dagli enti pubblici in
vigore nel proprio paese/regione.
A
Accende il ricevitore o lo pone in
standby.
E
Passa da una delle numerose
modalità surround a un’altra.
F
Per l’ascolto delle trasmissioni
radiofoniche FM/AM.
C
Per impostare il volume di ascolto.
Accensione
Premere il tasto STANDBY/ON sul telecomando o il pulsante
/I STANDBY/ON sul pannello frontale.
•Se l’unità è in modalità di standby, premere il tasto
sul telecomando.
STANDBY/ON
Impostazione della modalità di standby
Premere il tasto STANDBY/ON sul telecomando.
Per riaccendere l’unità, premere il tasto
telecomando.
•Se il pulsante
l’alimentazione sarà disattivata. In questo caso, se l’unità è spenta,
premendo il tasto
si accenderà. Per riaccendere l’unità, premere il pulsante
STANDBY/ON
/I STANDBY/ON
STANDBY/ON
sul pannello frontale.
STANDBY/ON
del pannello frontale è premuto,
del telecomando l’unità non
sul
/I
Annullamento dello spegnimento automatico
Se il ricevitore non viene usato per diverse ore, si spegnerà
automaticamente. Il timer per lo spegnimento automatico per
impostazione predefinita di fabbrica è tarato su sei ore; è possibile
modificare l’intervallo di tempo oppure disattivare del tutto la funzione di
spegnimento.
Premere ripetutamente APD per selezionare "OFF".
È possibile selezionare 2, 4 o 6 ore oppure OFF (se non si desidera che
avvenga lo spegnimento automatico).
B
Premere questo tasto per
selezionare una sorgente di
ingresso.
D
Utilizzare per regolare il livello dei
bassi (Bass o Treble).
b
Usare per gestire i lettori SACD/CD
Pioneer.
a
Usare per regolare i lettori audio di
rete Pioneer.
Comandi per altri componenti Pioneer
Quando viene premuto il pulsante
dell’unità su
mettere in funzione altri lettori audio di rete Pioneer. Parimenti, quando
viene premuto il pulsante
tà su
funzione altri lettori SACD/CD Pioneer.
NETWORK
SACD/CD
, i pulsanti “
SACD/CD
, i pulsanti “
NETWORK
a
per commutare l’ingresso dell’uni-
b
” possono essere utilizzati per mettere in
per commutare l’ingresso
” possono essere utilizzati per
4
It

Funzionamento (segue)
Riproduzione
Giradischi
Lettore SACD/CD
Registratore CD o
piastra
Lettore audio di rete
/I STANDBY/ON
STANDBY
PURE AUDIO Hi-Bit 32
iPod/USB
5V 2.1A
N-50
NETWORK AUDIO PLAYER
FUNCTION
SACD/CD NETWORK PHONO
STANDBY ON
STANDBY
PHONES
SPEAKERS
B
A
A CB D
Accendere il componente di riproduzione.
1
Accendere l’unità. (A)
2
Selezionare la sorgente che si desidera riprodurre. (B)
3
Selezionare il componente di riproduzione.
Avviare la riproduzione del componente selezionato nel punto 1.
4
Regolare il volume di riproduzione usando il comando VOLUME. (C)
5
Regolare le preferenze in materia di tono usando i comandi TONE
6
(BASS e TREBLE). (
Selezionare la modalità di surround desiderata. (E)
7
D
)
audiocassette
TUNE / PRESET
MEMORY
BALANCE
TONE
RECORDER
STEREO RECEIVER
VOLUME
Ascolto della radio
English
Per l’ascolto delle trasmissioni radiofoniche FM/AM, fare ricorso ai
F
”.
PRESET
si spegne.
per sintonizzarsi su una stazione.
per circa un secondo. Il ricevitore
Français
pulsanti “
Premere ripetutamente FM/AM per selezionare la banda di frequenza
1
(FM o AM).
Premere T/P MODE per passare alla modalità di sintonizzazione.
2
La spia
Premere
3
•Premere e tenere premuto
inizierà a cercare la stazione successiva.
SX-20
Quando l’audio delle trasmissioni FM stereo è scadente a causa di un
segnale di trasmissione debole, premere
modalità
FM MONO
in modo da ridurre i disturbi.
FM MODE
per selezionare la
Deutsch
Salvataggio delle stazioni preimpostate
Se si ascolta spesso una stazione radio specifica, è comodo memorizzarla
sul ricevitore per accedervi rapidamente quando si desidera ascoltarla.
Mentre si riceve un segnale da una stazione che si desidera
1
Italiano
memorizzare, premere MEM.
MEM
La spia
Premere
2
preimpostata desiderata, poi premere MEM.
La spia
lampeggia.
entro cinque secondi per selezionare la stazione
MEM
smette di lampeggiare e la stazione viene memorizzata sul
Nederlands
ricevitore.
Ascolto delle stazioni preimpostate
Per questa operazione è necessario aver memorizzato alcune stazioni
preimpostate.
Premere T/P MODE per passare alla modalità preimpostata.
1
PRESET
La spia
Premere
2
si accende.
per selezionare la stazione preimpostata desiderata.
Español
Effettuazione di una registrazione audio
È possibile effettuare una registrazione audio da qualsiasi sorgente
collegata al ricevitore.
•Il volume dell’audio e le impostazioni di tono dell’unità non saranno
riflessi nell’uscita audio.
Giradischi
Lettore SACD/CD
SACD/CD NETWORK PHONO
STANDBY ON
STANDBY
PHONES
SPEAKERS
B
A
Selezionare la sorgente che si desidera registrare. (B)
1
Avviare la registrazione, quindi avviare la riproduzione della
2
sorgente.
Lettore audio di rete
/I STANDBY/ON
STANDBY
PURE AUDIO Hi-Bit 32
iPod/USB
5V 2.1A
B
N-50
NETWORK AUDIO PLAYER
FUNCTION
RECORDER
Registratore CD o
piastra audiocassette
MEMORY
STEREO RECEIVER
VOLUME
TUNE / PRESET
BALANCE
TONE
Apprezzamento al massimo grado delle
numerose funzioni dell’unità
Inserire il CD-ROM nel computer e scaricare il manuale in formato
PDF dalla schermata del menu per poterlo leggere.
Funzioni
Ascolto delle trasmissioni in RDS
•
pagina 10
Regolazione del bilanciamento del volume audio
•
pagina 11
Utilizzo della funzionalità di ascolto diretto (Tone Direct)
SX-20
•
pagina 11
Risoluzione dei problemi
pagina 13
Il display del pannello frontale non viene visualizzato.
Il display del pannello frontale non verrà visualizzato quando si attiverà
la modalità di ascolto diretto (Tone Direct) o quando il DIMMER sarà
impostato su OFF.
Se non si desidera la scomparsa del display, modificare l’impostazione
con i pulsanti
TONE DIRECT
DIMMER
o
.
© 2012 PIONEER CORPORATION.
Tutti i diritti riservati.
5
It

Nederlands
Aansluitingen
LET OP
•Voordat u aansluitingen maakt of wijzigt, moet u dit toestel uitschakelen
en de stekker van het netsnoer uit het stopcontact trekken.
•Sluit de voedingskabel aan nadat alle aansluitingen tussen apparaten
zijn voltooid.
Netwerkaudiospeler
AM-raamantenne
FM-draadantenne
R
Audiokabels gebruiken
Sluit de witte stekker aan op de linkeraansluiting (L) en de rode op de
rechteraansluiting (R). Zorg dat u de stekkers volledig in de aansluitingen
stopt.
Links (wit)
Rechts (rood)
Rechterluidspreker Linkerluidspreker
L
Platenspeler
AM LOOP
FM UNBAL
75
ANTENNA
PHONO (MM
IN
L
R
L
R
SIGNAL
GND
)
SACD/CD
R
R
R
NETWORK
L
L
L
RECORDER
INININ
L
R
OUT
R
SPEAKERS
RL
B
RL
A
L
RECPLAY
L
R
L
R
CD-recorder of
cassettedeck
SACD/CD-speler
2
Nl

Aansluitingen (vervolg)
BELANGRIJKE INFORMATIE BETREFFENDE DE VENTILATIE
Let er bij het installeren van het apparaat op dat er voldoende vrije ruimte
rondom het apparaat is om een goede doorstroming van lucht te
waarborgen (tenminste 40 cm boven, 10 cm achter en 20 cm aan de
zijkanten van het apparaat).
WAARSCHUWING
De gleuven en openingen in de behuizing van het apparaat zijn aangebracht
voor de ventilatie, zodat een betrouwbare werking van het apparaat wordt
verkregen en oververhitting wordt voorkomen. Om brand te voorkomen, moet
u ervoor zorgen dat deze openingen nooit geblokkeerd worden of dat ze
afgedekt worden door voorwerpen (kranten, tafelkleed, gordijn e.d.) of door
gebruik van het apparaat op een dik tapijt of een bed.
STANDBY
ON
STANDBY
PHONES
A
SPEAKERS
B
STEREO RECEIVER
SX
20
MEMORY
TUNE
VOLUME
/
PRESET
TONE
BALANCE
D3-4-2-1-7b*_A1_Nl
De luidsprekers aansluiten
Verzeker u ervan dat u de luidspreker rechts (R) op de rechteraansluiting
en de luidspreker links op de linkeraansluiting (L) aansluit. De positieve en
negatieve (+/–) aansluitingen op de ontvanger moeten overeenkomen met
die van de luidsprekers.
Draai de kabelkernen.
1
Maak de moer los op de SPEAKERS-aansluiting en stop de
2
luidsprekerkabel in de opening in de aansluitingsas.
Maak de moer van de aansluiting opnieuw vast.
3
12 3
10 mm
LET OP
Wanneer u slechts één set luidsprekeraansluitingen gebruikt
•
(SPEAKERS A of SPEAKERS B), moet de gebruikte luidspreker
een nominale impedantie hebben tussen 4 Ω en 16 Ω. Wanneer
u beide sets aansluitingen gebruikt, moeten de aangesloten
luidsprekers een nominale impedantie hebben van 8 Ω tot 16 Ω.
Raadpleeg de instructies die bij uw luidsprekers zijn geleverd
voor meer informatie over de impedantiewaarde.
•Op deze luidsprekeraansluitingen staat een
Om een elektrische schok te voorkomen bij het aansluiten en losmaken
van de luidsprekerkabels, moet u de stekker uit het stopcontact halen
voordat u niet geïsoleerde onderdelen aanraakt.
GEVAARLIJKE spanning
.
De apparatuur aansluiten
De weergavecomponenten aansluiten
Sluit de audio-uitgangen van uw SACD-speler (of CD-speler) aan op
1
de SACD/CD IN-stekkers op deze ontvanger.
Sluit de audio-uitgangen van uw netwerkaudiospeler aan op de
2
NETWORK IN-stekkers op deze ontvanger.
•U kunt andere componenten aansluiten die zijn geleverd met
analoge audio-uitgangen. Als u een draagbare audiospeler of een
andere component die is voorzien van mini-stekkeruitgangen (of
hoofdtelefoonstekkers) wilt aansluiten, moet u een in de handel
beschikbare adapterstekker gebruiken.
De cassettedeck aansluiten
Sluit de audio-uitgangen van uw cassettedeck (of een andere
recorder) aan op de RECORDER IN-stekkers op deze ontvanger.
Sluit vervolgens de audioingangen van de cassettedeck aan op de
RECORDER OUT-stekker op deze ontvanger.
Dit stelt u in staat om opnames te maken van de apparatuur die is
aangesloten op deze ontvanger.
Een platenspeler aansluiten
Sluit de audio-uitgangen van uw platenspeler aan op de
PHONO IN-stekkers op deze ontvanger.
Belangrijk
SIGNAL GND
•De
wanneer u het apparaat aansluit op componenten, zoals een analoge
platenspeler.
PHONO (MM)
•Sluit de
aan dan op een platenspeler. Voer ook geen aansluitingen uit op een
platenspeler die is uitgerust met een ingebouwde equalizer. Er kan een
extreem hoog geluid worden weergegeven waardoor uw luidsprekers of
andere apparaten kunnen schade oplopen.
PHONO (MM)
•De
worden gebruikt met platenspelers die zijn uitgerust met cartridges van
het MM-type (moving-magnet). De platenspelers die zijn uitgerust met
MC-cartridges (moving-coil), kunnen niet worden gebruikt.
-aansluiting is voorzien om het lawaai te verminderen
-aansluitingen op een andere component
-aansluitingen van het apparaat zijn ontworpen om te
De ontvanger aansluiten
Stop de stekker pas in het stopcontact nadat u alle componenten,
inclusief de luidsprekers, op deze ontvanger hebt aangesloten.
Sluit de bijgeleverde voedingskabel aan op de AC IN-aansluiting op
1
het achterpaneel van de ontvanger.
Sluit het andere uiteinde aan op een stopcontact.
2
AC IN
English
Français
Deutsch
Italiano
Nederlands
Español
De FM- en AM-antennes aansluiten
Sluit de FM-draadantenne en de AM-raamantenneaan zoals hieronder
weergegeven.
AM LOOP
FM UNBAL
75
ANTENNA
Naar stopcontact
LET OP
•Neem de kabel vast bij de stekker. Trek de stekker niet uit door aan de
kabel te trekken en raak de voedingskabel niet aan wanneer u handen
nat zijn omdat dit een kortsluiting of elektrische schok kan veroorzaken.
Plaats het apparaat, een meubelstuk of een andere object niet op de
voedingskabel of knel de kabel niet vast. Maak nooit een knoop in de
kabel of bindt deze niet vast met andere kabels. De voedingskabels
moeten zo worden gelegd, dat u er niet op kunt trappen. Een
beschadigde voedingskabel kan brand veroorzaken of u een elektrische
schok geven. Controleer de voedingskabel af en toe. Als u merkt dat de
kabel beschadigd is, dient u contact op te nemen met een door Pioneer
erkende, onafhankelijke onderhoudsdienst voor het vervangen.
3
Nl

Voordat u begint Bediening
De batterijen plaatsen
De batterijen bij het apparaat zijn geleverd zodat u het gebruik van het
product kunt controleren. Ze zullen mogelijk niet lang werken. Wij raden u
aan alkalinebatterijen te gebruiken die een langere levensduur hebben.
WAARSCHUWING
•Gebruik of bewaar batterijen niet in direct zonlicht of op een hete
plaats, zoals in de auto of bij een kachel. Hierdoor kunnen batterijen
gaan lekken, oververhit raken, exploderen of in brand vliegen.
Bovendien reduceert dit de levensduur of prestatie van de batterijen.
LET OP
•Wanneer u de batterijen plaatst, moet u ervoor zorgen dat u de veren
op de -terminals van de batterijen niet beschadigt.
•Bij het weggooien van gebruikte batterijen moet u de milieuwetten en
andere openbare reglementeringen naleven die in uw land of streek
van toepassing zijn.
De voeding inschakelen
A
Schakelt de ontvanger tussen standby en aan.
E
Schakelt tussen de verschillende
surroundmodi.
F
Gebruiken om te luisteren naar de
FM/AM-radio.
C
Gebruik deze knop om het volume
te regelen.
Druk op de knop STANDBY/ON op de afstandsbediening of op de
knop /I STANDBY/ON op het voorpaneel.
•Als het apparaat in stand-bymodus is, drukt u op de knop
STANDBY/ON
van de afstandsbediening.
Stel de voeding in op stand-by
Druk op de knop STANDBY/ON op de afstandsbediening.
Wanneer u de voeding de volgende keer wilt inschakelen, drukt u op de
STANDBY/ON
knop
•Als u op het voorpaneel op de knop
voeding uitgeschakeld. Als de voeding is uitgeschakeld en u in dit geval
op de
voeding niet ingeschakeld. Druk op de
voorpaneel om de voeding opnieuw in te schakelen.
STANDBY/ON
van de afstandsbediening.
/I STANDBY/ON
-knop op de afstandsbediening drukt, wordt de
/I STANDBY/ON
drukt, wordt de
-knop op het
Auto uitschakelen annuleren
Wanneer deze ontvanger gedurende meerdere uren niet wordt gebruikt,
wordt deze automatisch uitgeschakeld. De timer voor het automatisch
uitschakelen is in de fabrieksinstellingen ingesteld op zes uur. De timing
kan worden gewijzigd of de uitschakelfunctie kan volledig worden
uitgeschakeld.
Druk herhaaldelijk op APD om "OFF" te selecteren.
U kunt 2, 4 of 6 uur of OFF selecteren (als er geen automatische
uitschakeling nodig is).
B
Indrukken om een input te
selecteren.
D
Gebruiken voor het aanpassen van
de lage of hoge tonen.
b
Gebruiken om de Pioneer SACD/
CD-spelers te bedienen.
a
Gebruiken om de Pioneer
netwerkaudiospelers te bedienen.
Bedieningen voor andere Pioneer-componenten.
Wanneer u op de knop
paraat te schakelen naar de
a
“
” worden gebruikt voor het bedienen van bepaalde andere Pioneernetwerkaudiospelers. Hetzelfde geldt wanneer u op de knop
drukt om de ingang van het apparaat te schakelen naar de
gang, kunnen de knoppen “
bepaalde andere SACD/CD-spelers van Pioneer.
NETWORK
drukt om de ingang van het ap-
NETWORK
b
” worden gebruikt voor het bedienen van
-ingang, kunnen de knoppen
SACD/CD
SACD/CD
-in-
4
Nl

Bediening (vervolg)
Afspelen
Platenspeler
SACD/CD-speler
CD-recorder of
Netwerkaudiospeler
/I STANDBY/ON
STANDBY
PURE AUDIO Hi-Bit 32
iPod/USB
5V 2.1A
N-50
NETWORK AUDIO PLAYER
FUNCTION
SACD/CD NETWORK PHONO
STANDBY ON
STANDBY
PHONES
SPEAKERS
B
A
A CB D
Schakel de stroom van de weergaveapparatuur uit.
1
Schakel de voeding van het toestel IN. (A)
2
Selecteer de bron die u wenst weer te geven. (B)
3
Selecteer de weergavecomponent.
Start de weergave van het apparaat dat u heeft geselecteerd in stap 1.
4
Pas het weergavevolume aan met de VOLUME-bediening. (C)
5
Regel de toon volgens uw voorkeur met de TONE-bedieningselemen-
6
ten (BASS en TREBLE). (
Selecteer de gewenste surroundmodus. (E)
7
D
)
cassettedeck
TUNE / PRESET
MEMORY
BALANCE
TONE
RECORDER
STEREO RECEIVER
VOLUME
SX-20
Luisteren naar de radio
Gebruik de knoppen “F” om te luisteren naar de FM/AM-radio.
Druk herhaaldelijk op FM/AM om de band (FM of AM) te selecteren.
1
Druk op T/P MODE om te schakelen naar de tuningmodus.
2
PRESET
De
Druk op
3
•Houd
-indicator dooft.
om af te stemmen op een station.
ongeveer een seconde ingedrukt. De ontvanger starten het
zoeken naar het volgende station.
Wanneer FM stereo-uitzendingen slecht zijn vanwege zwakke zendsignalen, drukt u op de
FM MODE
drukt u op de
FM MONO
te verminderen.
Vooraf ingestelde stations opslaan
Als u vaak luistert naar een specifiek radiostation, is het handig om de
ontvanger de frequentie te laten opslaan zodat u deze gemakkelijk
opnieuw kunt oproepen wanneer u luistert naar dat station.
Druk op MEM tijdens het ontvangen van een signaal van het station
1
dat u wilt opslaan.
MEM
De
-indicator knippert.
Binnen 5 seconden drukt u op
2
om het gewenste vooraf
ingestelde station te selecteren. Druk vervolgens op MEM.
MEM
De
-indicator stopt met knipperen en de ontvanger slaat het station
op.
Luisteren naar vooraf ingestelde stations
U hebt hiervoor enkele opgeslagen voorinstellingen nodig.
Druk op T/P MODE om te schakelen naar de vooraf ingestelde
1
modus.
PRESET
De
Druk op
2
selecteren.
-indicator licht op.
om het gewenste, vooraf ingestelde station te
English
Français
-modus om de ruis
Deutsch
Italiano
Nederlands
Español
Een audioopname maken
U kunt audio opnemen dat afkomstig is van iedere willekeurige bron die is
aangesloten op de ontvanger.
•De instellingen voor het volume en de toon op dit apparaat, worden niet
weergegeven in de audio-uitvoer.
Platenspeler
SACD/CD-speler
SACD/CD NETWORK PHONO
STANDBY ON
STANDBY
PHONES
SPEAKERS
B
A
Selecteer de bron waar u van wenst op te nemen. (B)
1
Start de opname en start daarna de weergave van de
2
bronapparatuur.
Netwerkaudiospeler
/I STANDBY/ON
STANDBY
PURE AUDIO Hi-Bit 32
iPod/USB
5V 2.1A
B
N-50
NETWORK AUDIO PLAYER
FUNCTION
RECORDER
TUNE / PRESET
MEMORY
BALANCE
TONE
CD-recorder of
cassettedeck
STEREO RECEIVER
VOLUME
SX-20
Om optimaal de profiteren van de
talrijke functies van het apparaat
Laad de cd-rom in uw computer en download de PDF-handleiding
van het menuscherm om deze te lezen.
Functies
Luisteren naar RDS-uitzendingen
•
pagina 10
De volumebalans aanpassen
•
pagina 11
Tone Direct gebruiken
•
pagina 11
Problemen oplossen
pagina 13
Het display op het voorpaneel verschijnt niet.
Het display op het voorpaneel verschijnt niet wanneer de modus Tone
Direct ON is, of wanneer de DIMMER is ingesteld op OFF.
Als u niet wilt dat het display verdwijnt, gebruikt u de knop
TONE DIRECT
DIMMER
of
om de instelling te wijzigen.
© 2012 PIONEER CORPORATION.
Alle rechten voorbehouden.
5
Nl

Español
Conexión
PRECAUCIÓN
•Antes de hacer o cambiar las conexiones, apague la unidad y
desenchufe el cable de alimentación de la toma de CA.
•Conecte el cable de alimentación después de que todas las conexiones
entre los dispositivos se hayan completado.
Reproductor de audio de red
Antena de cuadro
de AM
Antena de cable
de FM
R
Utilización de cables de audio
Conecte el enchufe de color blanco en el conector izquierdo (L) y el
enchufe de color rojo en el conector derecho (R). Asegúrese de insertar
los enchufes completamente en los conectores.
Izquierdo (blanco)
Derecho (rojo)
Altavoz
derecho
L
Altavoz
izquierdo
Giradiscos
AM LOOP
FM UNBAL
75
ANTENNA
PHONO (MM
IN
L
R
L
R
SIGNAL
GND
)
SACD/CD
R
R
R
NETWORK
L
L
L
RECORDER
INININ
L
R
OUT
R
SPEAKERS
RL
B
RL
A
L
RECPLAY
L
R
L
R
Grabadora de CD o
pletina de casete
Reproductor de SACD/CD
2
Es

Conexión (continuación)
PRECAUCIÓN PARA LA VENTILACIÓN
Cuando instale este aparato, asegúrese de dejar espacio en torno al
mismo para la ventilación con el fin de mejorar la disipación de calor (por
lo menos 40 cm encima, 10 cm detrás, y 20 cm en cada lado).
ADVERTENCIA
Las ranuras y aberturas de la caja del aparato sirven para su ventilación
para poder asegurar un funcionamiento fiable del aparato y para
protegerlo contra sobrecalentamiento. Para evitar el peligro de incendio,
las aberturas nunca deberán taparse ni cubrirse con nada (como por
ejemplo, periódicos, manteles, cortinas) ni ponerse en funcionamiento el
aparato sobre una alfombra gruesas o una cama.
STANDBY
ON
STANDBY
PHONES
A
SPEAKERS
B
STEREO RECEIVER
SX
20
MEMORY
TUNE
VOLUME
/
PRESET
TONE
BALANCE
D3-4-2-1-7b*_A1_Es
Conexión de los altavoces
Asegúrese de conectar el altavoz de la derecha al terminal derecho (R) y
el altavoz de la izquierda al terminal izquierdo (L). Asegúrese también de
que los terminales positivo y negativo (+/–) del receptor coinciden con los
de los altavoces.
Retuerza los núcleos de los cables.
1
Afloje la tuerca del terminal SPEAKERS e inserte el cable del altavoz
2
en el orificio visible en el eje de dicho terminal.
Vuelva a apretar la tuerca del terminal.
3
12 3
10 mm
PRECAUCIÓN
Cuando utilice solo un conjunto de terminales de los altavoces
•
(SPEAKERS A o SPEAKERS B), el altavoz utilizado debe tener
una impedancia nominal de entre 4 Ω y 16 Ω. Cuando utilice
ambos juegos de terminales, los altavoces conectados deben
tener una impedancia nominal de entre 8 Ω y 16 Ω. Consulte
las instrucciones que acompañan a los altavoces para obtener
detalles relacionados con el valor de impedancia.
•Por estos terminales de altavoz circula
PELIGROSA
. Para evitar el peligro de descargas eléctricas al conectar o
desconectar los cables de altavoz, desenchufe el cable de alimentación
antes de tocar las partes de los cables que no están aisladas.
tensión ACTIVA que es
Conexión de su equipo
Conexión de los componentes de reproducción
Conecte las salidas de audio del reproductor SACD (o del reproductor
1
de CD) a las tomas SACD/CD IN de este receptor.
Conecte las salidas de audio del reproductor de audio de red a las
2
tomas NETWORK IN de este receptor.
•Puede conectar otros componentes de audio que cuenten con tomas
de salida de audio analógico. Si desea conectar un reproductor de
audio portátil u otro componente equipado con tomas de salida
de mini-clavija (o tomas de auriculares), será necesario utilizar un
adaptador, que puede adquirir en cualquier tienda especializada.
Conexión de la pletina de casete
Conecte las salidas de audio de la pletina de casete (o de
otra grabadora) a las tomas RECORDER IN de este receptor. A
continuación, conecte las entradas de audio de la pletina de casete a
las tomas RECORDER OUT de este receptor.
De esta forma podrá realizar grabaciones desde los componentes
conectados a este receptor.
Conexión de un giradiscos
Conecte las salidas de audio del giradiscos a las tomas PHONO IN de
este receptor.
Importante
•El terminal
la unidad se conecta componentes como giradiscos analógicos.
•No conecte los terminales
que no sea un giradiscos; asimismo, no conecte con giradiscos que
tenga un ecualizador integrado. Se puede producir una salida de
sonido excesivamente alta, lo que puede dañar los altavoces u otros
dispositivos.
•Los terminales
utilizarse con pletinas equipadas con cartuchos de tipo MM (imán
móvil). Las pletinas con cartuchos de tipo MC (bobina móvil) no se
pueden utilizar.
SIGNAL GND
PHONO (MM)
se proporciona para reducir el ruido cuando
PHONO (MM)
a ningún componente
de la unidad están diseñados para
Enchufar el receptor
Enchufe el receptor solamente después de haber conectado todos los
componentes a dicho receptor, incluidos los altavoces.
Enchufe el cable de alimentación proporcionado a la toma AC IN
1
situada en el panel posterior del receptor.
Enchufe el otro extremo a la toma de corriente eléctrica.
2
AC IN
English
Français
Deutsch
Italiano
Nederlands
Español
Conexión de las antenas de FM y AM
Conecte la antena de cable de FM y la antena de cuadro de AM tal y como
se muestra a continuación.
AM LOOP
FM UNBAL
75
ANTENNA
A la toma de
corriente eléctrica
PRECAUCIÓN
•Manipule el cable de alimentación por la parte del enchufe. No extraiga
el enchufe tirando del cable y nunca toque el cable de alimentación
con las manos mojadas, ya que se podría producir un cortocircuito o
descargas eléctricas. No coloque la unidad, un mueble u otro objeto
sobre el cable de alimentación ni atrape cable de ninguna otra forma.
Nunca haga un nudo en el cable de alimentación ni lo ate con otros
cables. Los cables de alimentación se deben colocar de forma existan
pocas posibilidades de pisarlos. Un cable de alimentación dañado
puede provocar un incendio o descargas eléctricas. Compruebe el
cable de alimentación de vez en cuando. Si observa que está dañado,
solicite un recambio a su compañía de servicio independiente
autorizada de Pioneer.
3
Es

Antes de comenzar Funcionamiento
Cargar las pilas
Las pilas incluidas con la unidad se proporcionan para que pueda
comprobar el funcionamiento del producto y es posible que no duren
mucho. Es recomendable utilizar pilas alcalinas que tengan una mayor
duración.
ADVERTENCIA
•No utilice o almacene las pilas bajo la luz solar directa o en otros
lugares excesivamente calientes, como el interior de un coche o
cerca de un calefactor. Esto puede ocasionar que las pilas goteen, se
sobrecalienten, exploten o se incendien. También se puede reducir la
vida o el rendimiento de las mismas.
PRECAUCIÓN
•Cuando inserte las pilas, asegúrese de no dañar los muelles de los
terminales de las mismas.
•Cuando elimine pilas usadas, asegúrese de cumplir los requisitos de
los reglamentos gubernamentales y las normas de los organismos
públicos de medioambiente que correspondan a su país o zona.
A
Alterna el receptor entre modo de
espera y encendido.
E
Alterna entre los diferentes modos
envolventes.
F
Utilícelo para escuchar la radio de
FM/AM.
C
Utilícelo para ajustar el volumen de
escucha.
Para encender la alimentación
Pulse el botón STANDBY/ON del mando a distancia o el botón
/I STANDBY/ON del panel delantero.
•Si la unidad se encuentra en el modo de espera, pulse el botón
STANDBY/ON
del mando a distancia.
Establecer la alimentación en el modo de espera
Pulse el botón STANDBY/ON del mando a distancia.
La próxima vez que desee encender la unidad, pulse el botón
STANDBY/ON
•Si presiona el botón
se apagará. En este caso, si la unidad está apagada, no se encenderá
al presionar el botón
encender de nuevo la alimentación, presione el botón
del panel delantero.
del mando a distancia.
/I STANDBY/ON
STANDBY/ON
del panel delantero, la unidad
del mando a distancia. Para
/I STANDBY/ON
Cancelación del apagado automático
Si este receptor no se utiliza durante un período de varias horas, se
apagará automáticamente. La configuración de fábrica del temporizador
de apagado automático tiene un tiempo establecido de seis horas. Dicha
configuración se puede cambiar. Asimismo, esta función se puede
desactivar completamente.
Pulse APD para seleccionar "OFF".
Puede seleccionar 2, 4 o 6 horas, u OFF (si no se desea utilizar el apagado
automático).
B
Púlselos para seleccionar una
fuente de entrada.
D
Utilícelos para ajustar los graves y
agudos.
b
Utilícelos para controlar
reproductores de SACD/CD de
Pioneer.
a
Controles para otros componentes de Pioneer
Cuando se pulsa el botón
unidad a la entrada
para utilizar otros reproductores de audio de red de Pioneer. Del mismo
modo, cuando se pulsa el botón
la unidad a la entrada
para utilizar otros reproductores de SACD/CD de Pioneer.
NETWORK
NETWORK
SACD/CD
Utilícelos para controlar
reproductores de audio de red de
Pioneer.
para cambiar la entrada de la
, los botones “
SACD/CD
, los botones “
a
” se pueden emplear
para cambiar la entrada de
b
” se pueden emplear
4
Es

Funcionamiento (continuación)
Reproducción
FUNCTION
NETWORK AUDIO PLAYER
N-50
Giradiscos
Grabadora de CD o
pletina de casete
RECORDER
STEREO RECEIVER
VOLUME
TUNE / PRESET
MEMORY
BALANCE
TONE
SX-20
Reproductor de
SACD/CD
Reproductor de
audio de red
/I STANDBY/ON
STANDBY
PURE AUDIO Hi-Bit 32
iPod/USB
5V 2.1A
SACD/CD NETWORK PHONO
STANDBY ON
STANDBY
PHONES
SPEAKERS
B
A
A CB D
Apague el componente de reproducción.
1
ENCIENDA la unidad. (A)
2
Seleccione la fuente que desea reproducir. (B)
3
Seleccione el componente de reproducción.
Inicie la reproducción del componente seleccionado en el paso 1.
4
Ajuste el volumen de reproducción con el control VOLUME. (C)
5
Ajuste el tono conforme a sus preferencias utilizando los controles de
6
TONE (BASS y TREBLE). (
Seleccione el modo envolvente que desee. (E)
7
D
)
Realizar una grabación de audio
Puede realizar una grabación de audio desde cualquier fuente de audio
conectada al receptor.
•La configuración del volumen de sonido y de los tonos realizada en
esta unidad no se reflejará en la salida de audio.
Giradiscos
Reproductor de
SACD/CD
SACD/CD NETWORK PHONO
Reproductor de
audio de red
/I STANDBY/ON
STANDBY
PURE AUDIO Hi-Bit 32
iPod/USB
5V 2.1A
N-50
NETWORK AUDIO PLAYER
FUNCTION
Escuchar la radio
Utilice los botones “F” para escuchar la radio de FM/AM.
Pulse FM/AM repetidamente para seleccionar la banda (FM o AM).
1
Pulse T/P MODE para cambiar al modo de sintonización.
2
El indicador
Pulse
3
•Mantenga pulsado
PRESET
se apagará.
para sintonizar una emisora.
durante aproximadamente un segundo. El
receptor iniciará la búsqueda de la siguiente emisora.
Cuando las emisiones estéreo de FM tengan mala calidad debido a que
las señales de emisión tienen poca intensidad, pulse
seleccionar el modo
FM MONO
para reducir el ruido.
FM MODE
Guardado de presintonías
Si escucha a menudo una emisora de radio concreta, es conveniente
hacer que el receptor memorice la frecuencia para seleccionar de manera
fácil la emisora siempre que desee escucharla.
Pulse MEM mientras recibe una señal de la emisora que desee alma-
1
cenar.
El indicador
En los 5 segundos siguientes, pulse
2
MEM
parpadeará.
para seleccionar la
presintonía que desee y, a continuación, pulse MEM.
El indicador
MEM
dejará de parpadear y el receptor guardará la emisora.
Escuchar presintonías
Es necesario que haya almacenado previamente algunas presintonías.
Pulse T/P MODE para cambiar al modo de presintonización.
1
El indicador
Pulse
2
PRESET
se encenderá.
para seleccionar la presintonía que desee.
Para disfrutar de las numerosas
funciones de la unidad al máximo
Cargue el CD-ROM en el equipo y descargue el manual en formato
PDF desde la pantalla de menús para leerlo.
Funciones
Escuchar emisiones RDS
•
página 10
Ajuste del balance del volumen del sonido
•
página 11
Uso del tono directo
•
página 11
English
Français
para
Deutsch
Italiano
Nederlands
Español
STEREO RECEIVER
VOLUME
TUNE / PRESET
STANDBY ON
STANDBY
PHONES
SPEAKERS
B
A
B
Seleccione la fuente que desea grabar. (B)
1
Inicie la grabación y, a continuación, la reproducción del componente
2
RECORDER
MEMORY
BALANCE
TONE
Grabadora de CD o
pletina de casete
fuente.
SX-20
Resolución de problemas
página 13
La pantalla del panel delantero no aparece.
La pantalla del panel delantero no aparecerá cuando el modo de tono
directo está ACTIVADO o cuando DIMMER está DESACTIVADO.
Si no desea que la información desaparezca, utilice el botón
TONE DIRECT
o el botón
DIMMER
para cambiar la configuración.
© 2012 PIONEER CORPORATION.
Todos los derechos reservados.
5
Es

6
Es

English
Français
Deutsch
Italiano
Nederlands
Español
7
Es

Discover the benefits of registering your product online at http://www.pioneer.co.uk (or http://www.pioneer.eu).
Découvrez les nombreux avantages offerts en enregistrant votre produit en ligne maintenant sur http://www.pioneer.fr
(ou http://www.pioneer.eu).
Bitte nutzen Sie die Möglichkeit zur Registrierung Ihres Produktes unter http://www.pioneer.de
(oder http://www.pioneer.eu)
Registra il tuo prodotto su http://www.pioneer.it (o http://www.pioneer.eu) e scopri subito quali vantaggi puoi ottenere!
Ontdek nu de voordelen van online registratie! Registreer uw Pioneer product via
http://www.pioneer.nl - http://www.pioneer.be (of http://www.pioneer.eu).
Registre su producto en http://www.pioneer.es (o en http://www.pioneer.eu)
Descubra los beneficios de registrarse on-line:
PIONEER CORPORATION
1-1, Shin-ogura, Saiwai-ku, Kawasaki-shi, Kanagawa 212-0031, Japan
PIONEER ELECTRONICS (USA) INC.
P.O. BOX 1540, Long Beach, California 90801-1540, U.S.A. TEL: (800) 421-1404
PIONEER ELECTRONICS OF CANADA, INC.
340 Ferrier Street, Unit 2, Markham, Ontario L3R 2Z5, Canada TEL: 1-877-283-5901, 905-479-4411
PIONEER EUROPE NV
Haven 1087, Keetberglaan 1, B-9120 Melsele, Belgium TEL: 03/570.05.11
PIONEER ELECTRONICS ASIACENTRE PTE. LTD.
253 Alexandra Road, #04-01, Singapore 159936 TEL: 65-6472-7555
PIONEER ELECTRONICS AUSTRALIA PTY. LTD.
5 Arco Lane, Heatherton, Victoria, 3202, Australia, TEL: (03) 9586-6300
PIONEER ELECTRONICS DE MEXICO S.A. DE C.V.
Blvd.Manuel Avila Camacho 138 10 piso Col.Lomas de Chapultepec, Mexico, D.F. 11000 TEL: 55-9178-4270
K002_B3_En
Printed in China / Imprimé en Chine
© 2012 PIONEER CORPORATION.
All rights reserved.
© 2012 PIONEER CORPORATION.
Tous droits de reproduction et de traduction réservés.
<5707-00000-745-0S>
 Loading...