

Page 1

User's Guide (for WEB)
GPS cycle computer
SGX-CA600
Using the Alert Notication Function
Using the Strava Live Segment Function
Using the Live Partner Function
Linking with External Services
Frequently Asked Questions
Introduction
Initial Setup
Basic Operations
Training
Analyzing Log Data
Navigation
Pedaling Monitor
Bike and Sensor Settings
Advanced Settings
Appendix
English
Page 2

Contents
Introduction ........................6
• Checking Accessories ................ 6
• Part Names and Functions ......... 7
– Front view ................................ 7
– Back view ................................ 9
• Name of Each Screen ................ 9
– Meter screen ........................... 9
– Main menu screen ................. 10
• Button Operation in Each Screen
and Screen Hierarchy ...............11
– [←]/[→] buttons, [Conrm] but-
ton, [Menu] button ..................11
– [Lap] button and [Power]/
[Logging] button ................... 12
– Screen hierarchy ................... 13
• Viewing the Meter Screen ........ 13
– Page set ................................ 14
• Installation ............................... 15
– Installing the device ............... 15
– Removing the device ............. 19
– Installing sensors................... 19
• Charging .................................. 20
– Charging the device .............. 20
– Checking the battery level ..... 22
• Turning Power On/Off .............. 24
– Turning power on ................... 24
– Turning power off ................... 26
– Turning power off automatically
if no operation is performed
within a set time ..................... 27
– Switching to Sleep Mode ....... 30
– Switching to the sleep state
automatically if no operation is
performed within a set time.... 31
Initial Setup ......................36
• Performing the Initial Setup by
Operating the Device ............... 37
• Conguring the Settings in the
App .......................................... 40
• Conguring the Settings on the
Device ...................................... 41
– User Settings ......................... 41
– Bike Settings ......................... 41
– Sensor Settings ..................... 41
– Wi-Fi Settings ........................ 41
– Page Settings ........................ 41
– Map Download ...................... 41
Basic Operations .............42
• Operating the Meter Screen ..... 42
– Viewing Pages ....................... 42
– Changing the Page ................ 43
– Enlarging the Display of a Data
Field ...................................... 44
– Changing the Display Type of a
Data Field .............................. 47
– Displaying the Status ............. 49
• Operating the Main Menu
Screen ..................................... 50
– Viewing the Status Bar .......... 52
• Operation in the Spin Screen ... 52
• Operation in the Text Input
Screen ..................................... 53
• Performing Logging ................. 55
– Setting the Logging Interval ... 57
– Pausing and Resuming Logging
Automatically ......................... 60
– Notifying when Forget to Start
Logging ................................. 64
2
Page 3

• Uploading Log Data ................. 68
– About Cyclo-Sphere .............. 68
– Uploading via Wi-Fi ............... 69
– Uploading Using a PC ........... 80
– Uploading via Cyclo-Sphere
Control App ........................... 81
Training .............................84
• Training Overview .................... 84
– Clarifying the Areas You Wish to
Strengthen ............................. 84
– Types of Training Menus ....... 85
– Laps ...................................... 87
– Laying out an Appropriate
Display for a Lap.................... 87
– Auto Lap Function ................. 87
• Using Training Assistance ........ 87
– Creating a Training Menu of
Training Assistance ............... 88
– Downloading the Training Menu
of Training Assistance ........... 88
– Creating a Training Menu ...... 88
– Connecting the Device via
Wi-Fi ...................................... 89
– Importing a Training Menu ..... 89
– Selecting an Imported Training
Menu ..................................... 91
• Starting/Ending a Training
Menu ........................................ 95
– Forcibly Ending a Training Menu
Part Way Through ................. 97
– Deleting a Training Menu ....... 99
• Using a Link Menu ................. 102
• Using an Original Menu.......... 106
– Selecting an Original Menu
– Editing an Original Menu ..... 109
– Creating an Original Menu .... 111
• Measuring Your FTP ...............114
• Performing Training Based on
Your MMP Data ...................... 121
... 106
– Types of Threshold Training
– Setting the MMP .................. 122
• Automatically Switching to the
Screen That Matches the Training
Menu ...................................... 134
• Setting the Countdown Timer
... 121
... 135
Using the Alert Notication
Function .........................138
• Conguring the Basic Settings of
Alerts ..................................... 138
– Setting the Message and
Sound .................................. 138
– Power, Heart Rate, and
Cadence .............................. 139
• Using the Auto Target Alert
Function ................................. 142
• Using the Intensity Alert
Function ................................. 145
Using the Strava Live
Segment Function ..........149
• About Strava Live Segment ... 149
• Transferring a Strava Live
Segment ................................ 149
• Using a Strava Live Segment
While Riding ........................... 150
– Riding to the Start Point of One
of the Segments .................. 152
– Riding to the End Point of the
Segment .............................. 153
• Disabling the Live Segment
Function ................................. 153
• Automatically Switching to
the Screen That Matches the
Segment ................................ 155
• Using the Segment Alert
Function ................................. 157
3
Page 4

Using the Live Partner
Function .........................159
• Coach and Partner Conguration
Patterns ................................. 159
– Coach and Partner
Communication Distance .... 159
– Adding a Partner ................. 160
– Adding a Coach ................... 165
– Deleting a Partner or Coach
– Viewing the Partner Screen
– Option Settings of the Live
Partner Function .................. 179
... 172
... 175
Analyzing Log Data ........182
• Displaying Log Data ............... 182
• Editing Log Data .................... 185
– Editing the Date and Time of
Log Data .............................. 185
– Deleting Log Data ................ 188
• Performing Analysis Using Cyclo-
Sphere ................................... 190
– Cyclo-Sphere Analysis App (for
iPhone) ................................ 190
– Smartphone Version of the
Cyclo-Sphere Website ......... 190
– PC Version of the Cyclo-Sphere
Website ............................... 190
• Performing Analysis Using
Strava .................................... 190
• Performing Analysis Using
TrainingPeaks ........................ 191
Navigation ......................193
• Transferring Courses ............. 193
– Ride with GPS Setup ........... 193
– Strava Setup........................ 193
– Transferring from a Smartphone
App ...................................... 193
– Transferring Course Files Using
a PC .................................... 193
• Selecting a Course ................. 194
– Selecting from the Transfer
Folder .................................. 194
– Selecting from past Log
Data..................................... 197
– Checking a Course .............. 200
• Navigation Settings ................ 205
• Starting and Stopping
Navigation .............................. 206
• Simulation .............................. 208
– Smart Trainer Setting .......... 208
– Starting and Stopping .......... 209
– Simulation Player .................211
• Map Download ....................... 213
– Checking Map Information ... 216
Pedaling Monitor ............219
• Initial Setup ............................ 219
– Connecting .......................... 219
– Conguring the Settings Using
Cyclo-Sphere Control App ... 222
– Conguring the Settings on the
Device ................................. 222
– Auto Zero Point Calibration
– Torque Assistance ............... 241
– Sprint Detection ................... 244
• Zero Point Calibration ............ 247
... 238
Bike and Sensor
Settings ..........................252
• Changing the Bike .................. 252
• Connecting Sensors............... 254
– Adding a Sensor .................. 255
– Checking the Settings of Added
Sensors ............................... 259
• ANT+ Power Transmission
Function Settings ................... 263
• Bluetooth Power Transmission
Function Settings ................... 265
4
Page 5

• Di2 Remote Switch Setting .... 268
• Speed Priority Level Settings
• GPS Setup ............................. 273
• Display Settings ..................... 275
• Speaker Settings ................... 277
• Bike Distance and Time
Settings .................................. 279
... 270
Advanced Settings.........284
• Setting Data Fields ................. 284
– Layout Pattern List .............. 286
– Data Field Setting Details .... 288
• User Settings ..........................3 11
• System Settings ..................... 314
– Performing Initialization ....... 317
– Making a Backup ................. 317
– Performing Restoration ....... 318
– Updating the Firmware ........ 318
• Device Settings ...................... 319
• Wi-Fi Settings ........................ 322
• Bluetooth Setting ................... 325
Linking with External
Services ..........................328
• Strava .................................... 328
• Ride with GPS........................ 328
• TrainingPeaks™ .................... 328
• ZWIFT .................................... 328
• Smartphone Notication
Function ................................. 328
• A-GPS Function ..................... 329
Frequently Asked
Questions .......................330
• Q: How can I return the language
setting to English?.................. 330
• Q: The vectors of the pedaling
graph are not displayed. Is there a
problem with the display?....... 330
• Q: Error 13 occurred during zero
calibration. What does this error
mean? .................................... 330
• Q: The operation buttons have
become completely inoperable.
Why? ..................................... 330
• Q: How do I upload log data?
• Q: Can you tell me how the time is
set? ........................................ 331
... 330
Appendix ........................332
• Cautions Regarding Care,
Storage, and Disposal ............ 332
– About Care and Storage ...... 332
– About Disposing of the
Device ................................. 332
– Replacing the Lithium-Ion
Battery ................................. 332
– Cautions When Recycling ... 332
• Warranty and After-Sales
Service ................................... 334
5
Page 6
Introduction
Checking Accessories
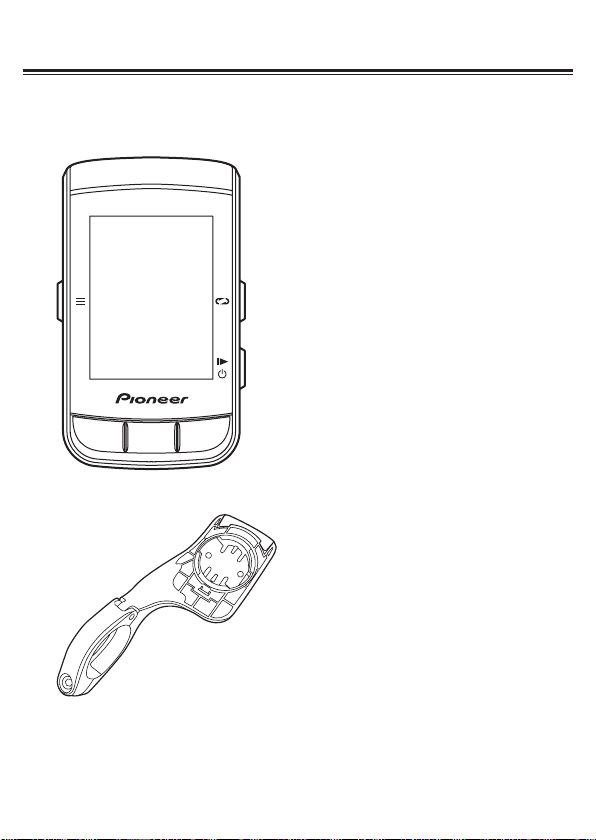
This product contains the following parts.
! Main unit
! Bracket
6
Page 7
! USB cable
①
⑤
②④
⑥
③
! Strap
! Safety Precautions
! Warranty Card
Part Names and Functions
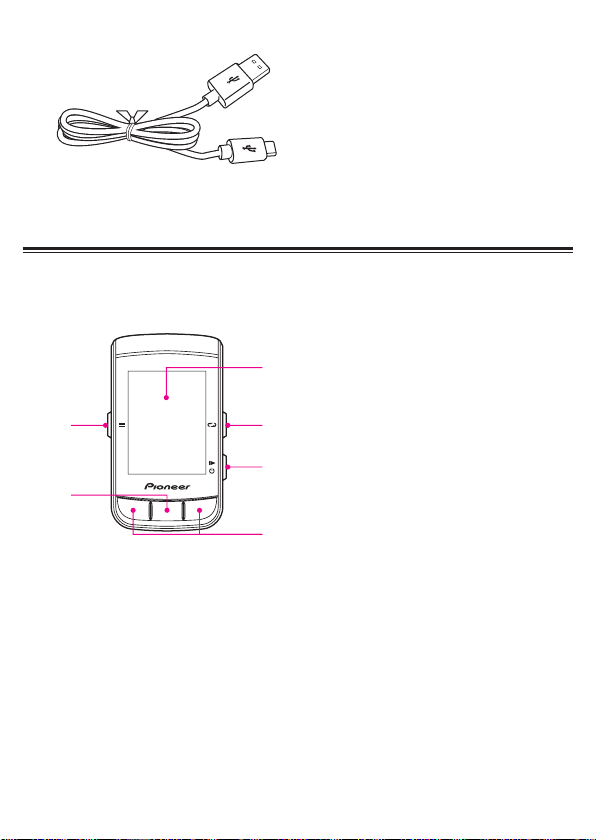
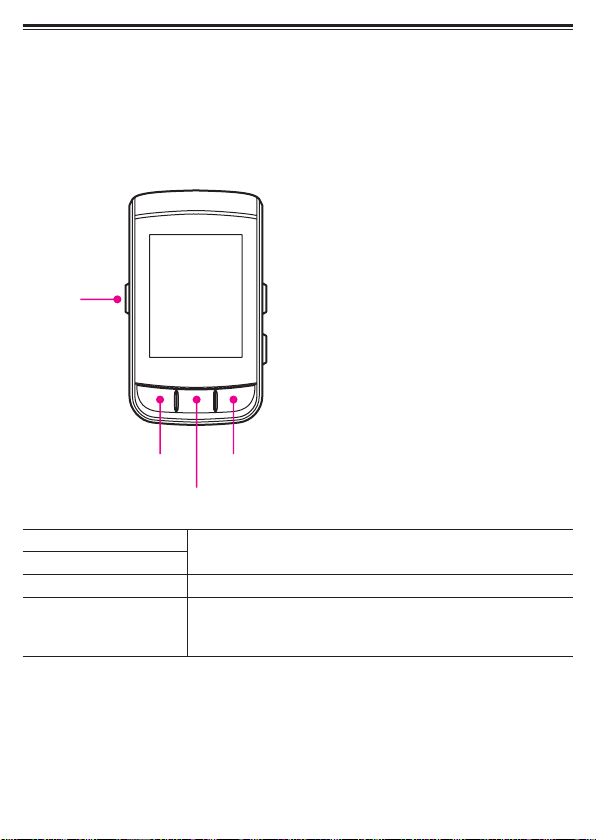
■Front view
1 Display
2 [Lap] button
Press this button during logging to record a lap.
Press and hold this button for 2 seconds or more while logging is
stopped to switch to the screen to save the log data.
Performing Logging
3 [Power]/[Logging] button
Press and hold this button for 2 seconds or more when the power of the
device is off to turn the power on.
Press and hold this button for 2 seconds or more when the device is
running to display the power off/sleep conrmation screen.
Press this button to start or stop logging.
7
Page 8

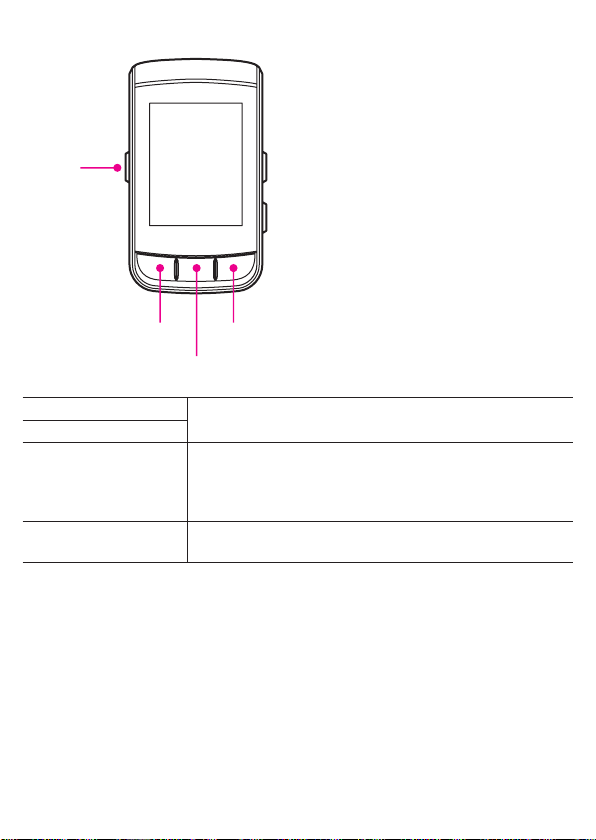
4 [Menu] button
Press this button to display the main menu screen.
! Press this button when the main menu screen is displayed to return to
the previous screen.
! Press this button when a data eld is displayed enlarged to return to the
meter screen.
! Press and hold this button for 2 seconds or more while the main menu
screen is displayed to close the main menu.
5 [←]/[→] buttons
Used to perform operations such as changing the page and selecting
an item.
6 [Conrm]/[Enlarge] buttons
Press this button when the main menu screen is displayed to conrm an
item.
Press this button when the meter screen is displayed to display the data
eld at the top left enlarged.
However, large data elds such as the course display are enlarged rst
because they are given priority.
When this button is pressed during enlarged display, the next data eld
is displayed enlarged.
After 5 seconds of enlarged display, the display returns to the meter
screen automatically.
Caution
! When the capture function is enabled, the function to save the logging
data by pressing and holding the [Lap] button while logging is stopped
will not work.
8
Page 9
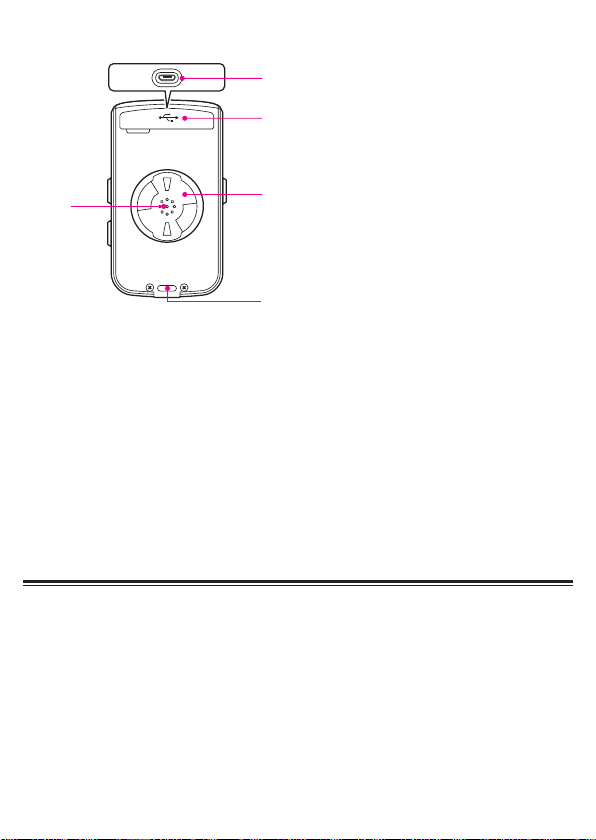
■Back view
②
①
⑤
③
④
1 USB connector cover
Securely close the USB connector cover when not charging the device
or connecting to your PC.
2 USB connector
Connect the USB cable to charge the device or transfer data to your
PC.
3 Speaker
Outputs a buzzer sound when there is an alert or button operation.
4 Air pressure sensor
Do not block this sensor or the device will not operate properly.
5 Bracket installation slot
Use the bracket installation slot to attach the device on the bracket xed
to the bike.
Name of Each Screen
■Meter screen
This is the main screen of the device for displaying the trip data of your bike.
When you turn on the device, the meter screen is displayed rst.
Operating the Meter Screen
9
Page 10
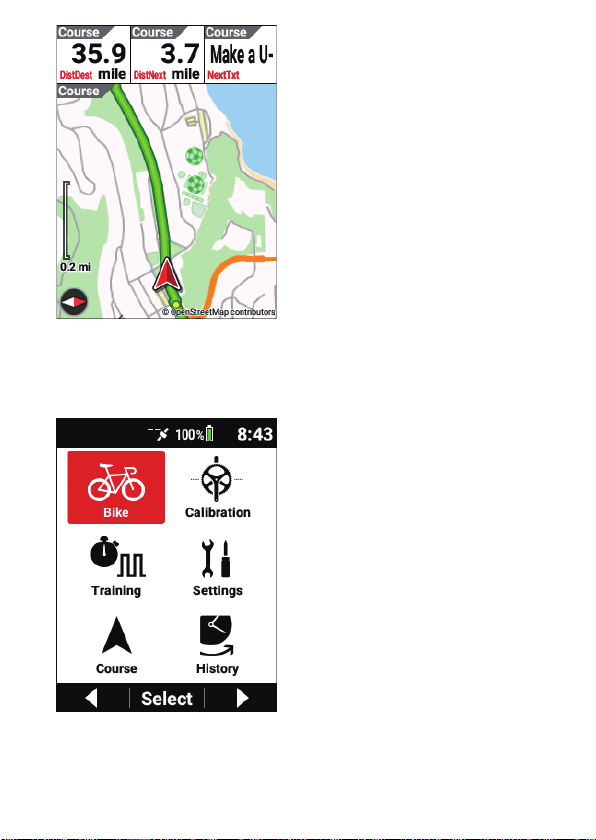
■Main menu screen
This is the main screen of the device for displaying various menus.
Operating the Main Menu Screen
10
Page 11
Button Operation in Each Screen and
④
③
Screen Hierarchy
■[←]/[→] buttons, [Conrm] button, [Menu] button
The functions of the main unit buttons differ depending on the displayed screen
Operation in the menu screen
① [←] button
② [→] button
③ [Conrm] button
④ [Menu] button
①
②
Selects an item or value.
Conrms an item or value.
Returns to the previous screen.
Pressing and holding this button returns to the meter
screen.
11
Page 12
Operation in the meter screen
④
③
①
① [←] button
② [→] button
③ [Conrm] button
④ [Menu] button
②
Changes the page.
Enlarges or switches the data eld.
Press and hold to display the status screen.
Press and hold during enlarged display to display the
data eld of the settings screen.
Press this button during enlarged display to return to the
meter screen.
■[Lap] button and [Power]/[Logging] button
The [Lap] button and [Power]/[Logging] button can be operated in any screen.
12
Page 13
①
②
When logging: Records the lap.
① [Lap] button
When logging is stopped: Press and hold to save the
logging data.
When power is off: Press and hold to turn on the power.
② [Power]/[Logging]
button
When power is on: Starts/stops/resumes logging.
Press and hold to turn off the power or switch to the sleep
state.
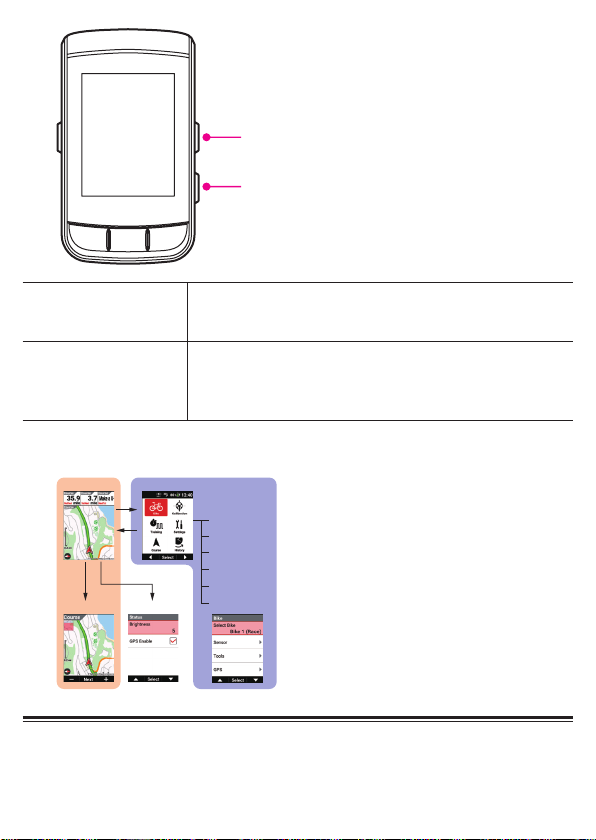
■Screen hierarchy
Meter Screen Main Menu Screen
Bike Screen
Calibration Scren
Training Screen
Settings Screen
Course Screen
Enlarged Display Status Screen
History Screen
Viewing the Meter Screen
The meter screen consists of data elds to display various measurement data and
pages to lay out and display the data elds.
13
Page 14

①
②
① Data eld
PageSet1
The data to be displayed can be customized.
■Changing the Display Type of a Data Field
The number of data elds to display on a page and the
② Page
layout can be customized.
Setting Data Fields
■Page set
A combination of multiple pages is called a page set.
Multiple page sets can be registered and accessed.
Setting Data Fields
Page1
PageSet2
Page1 Page2
Page3Page2
Page3
14
Page 15
Note
! For details on the meter screen, refer to the following.
Operating the Meter Screen
Installation
■Installing the device
Mount the device to your bike.
Caution
! When mounting the device, make sure your bike is in a stable position to
prevent it from falling.
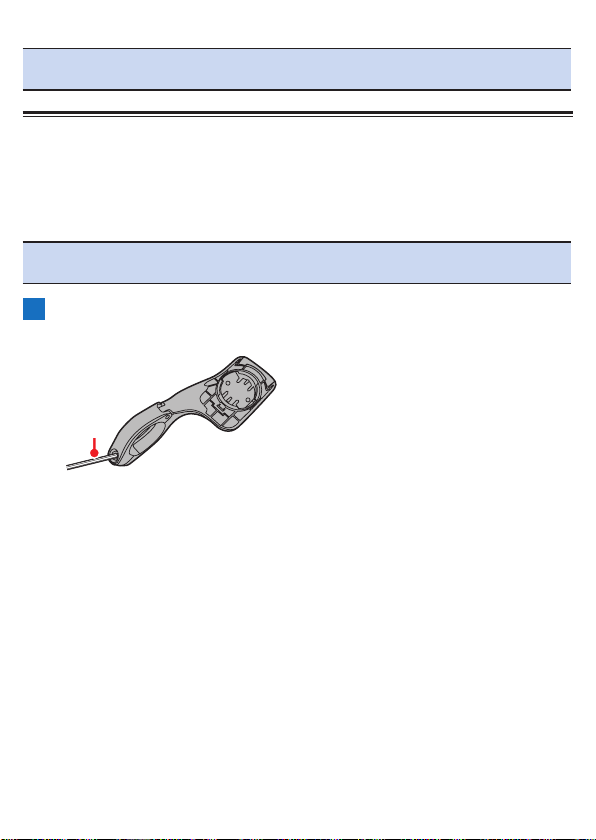
1
Remove the bolt from the bracket.
Remove the bolt from the bracket using a 3 mm hex wrench.
1
1 Hex wrench
Be careful not to lose the removed bolt.
15
Page 16
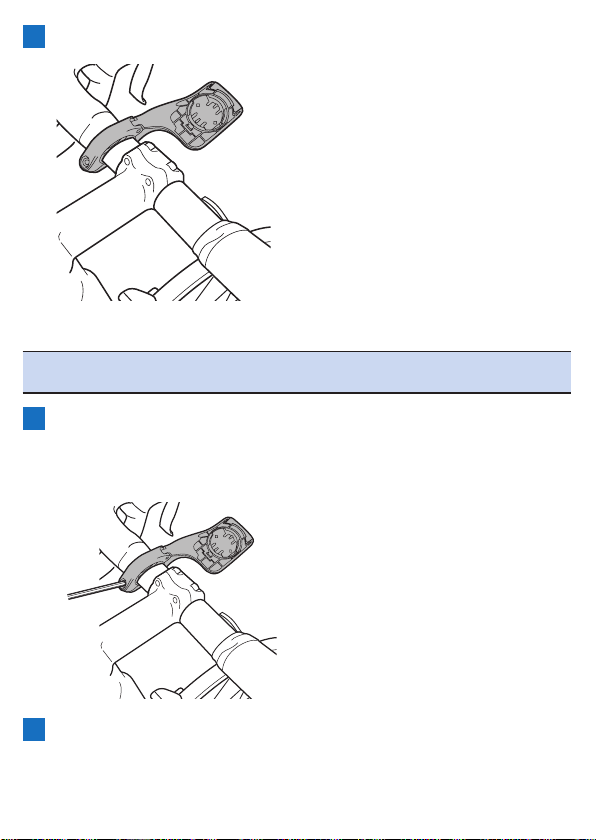
2
Mount the bracket on the handlebar of your bike.
Caution
! Be careful not to pinch your nger when mounting the bracket on the
bike.
3
Secure the bracket with the bolt.
Apply an anti-seize compound like grease to the bolt.
Adjust the bracket horizontally from the stem, insert the bolt into the hole
and tighten lightly.
4
Attach the strap to the device.
Lace the strap through the strap holes of the device.
16
Page 17
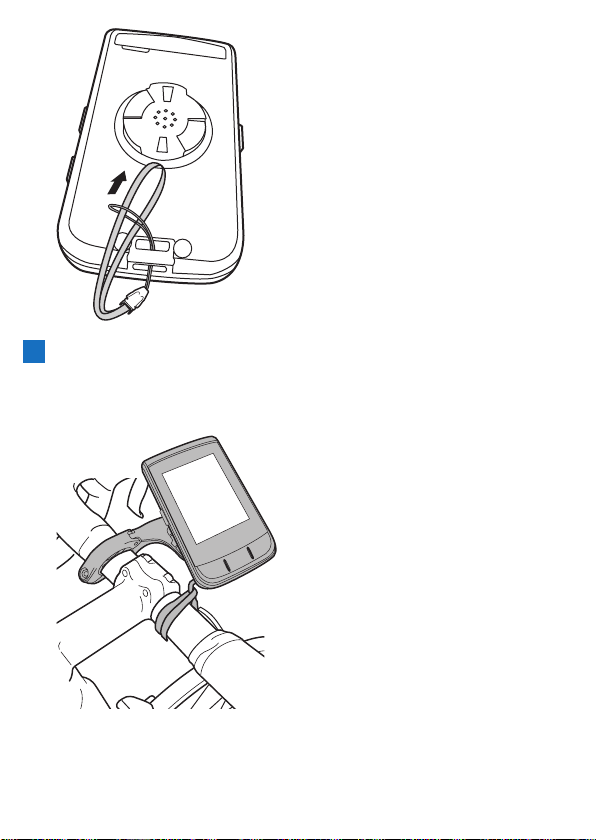
5
Attach the device to the bracket.
Fasten the strap to the handlebars, orient the device as shown in the
gure, and align the bracket installation slot on the back of the device
with the groove in the bracket.
Turn the device clockwise until the device and bracket are securely xed
together.
17
Page 18
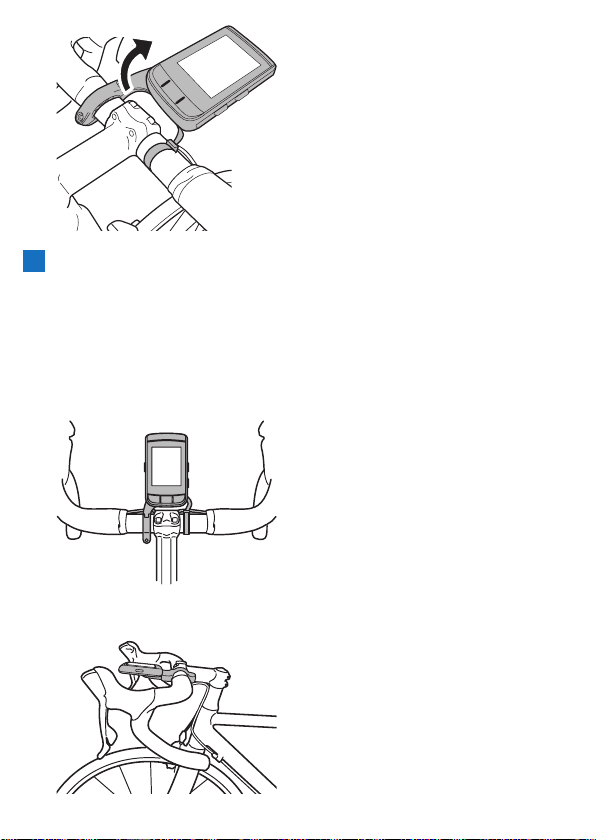
6
Adjust the angle of the device and then secure the bracket.
If the device is not in the center of the handlebars or horizontal to the
stem, loosen the bracket bolt and adjust it.
After adjusting the angle, secure the bracket by tightening the bolt that
you tightened lightly.
Use a tool that can measure the torque to tighten the bolt.
Tightening torque: 0.6 N·m
Front view
Side view
18
Page 19
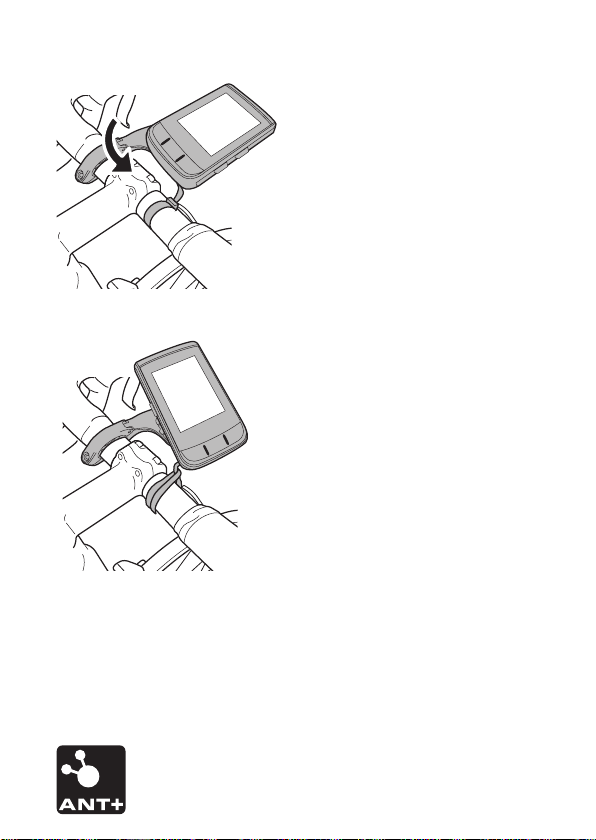
■Removing the device
Remove the device by performing the installation procedure in reverse.
■Installing sensors
This device is compatible with ANT+™ sensors mounted on your bike.
Refer to the user's manual of your ANT+ sensors for mounting instructions.
After mounting a sensor, perform pairing with the device.
For details, refer to "
This product is ANT+™ certied.
Visit http://www.thisisant.com/directory/ for a list of compatible products and apps.
Connecting Sensors
."
19
Page 20
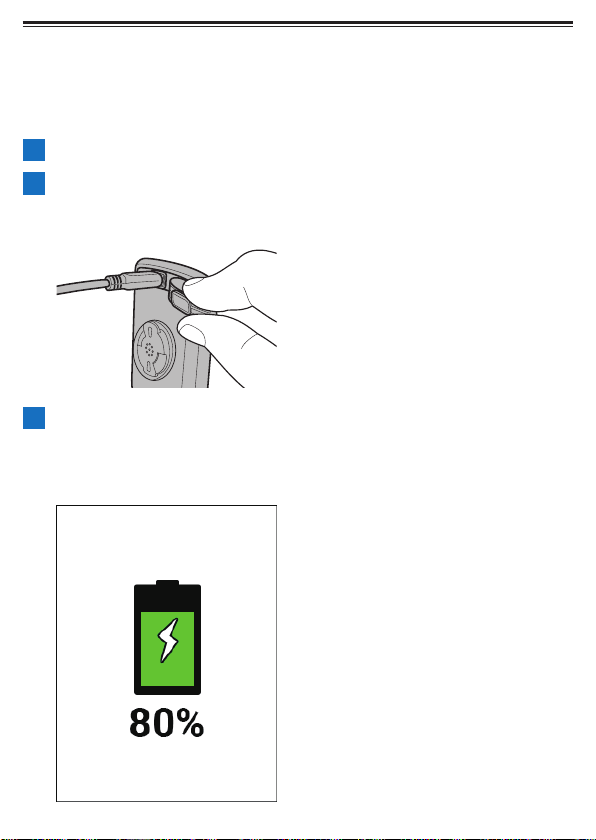
Charging
The internal battery of the device is not charged at the time of purchase.
Charge the device using the provided USB cable before using it.
■Charging the device
1
Open the USB connector cover.
2
Connect the provided USB cable to the USB connector of
the device.
3
Turn your PC on and connect the USB cable to an open USB
port on your PC.
The device starts charging.
! When the device is off
20
Page 21

! When the device is on
Press and hold the [Power] button for 2 seconds or more to turn the
power on or off during charging.
The charging time is shorter if the power is turned off.
Charging icons
Charging
Fully charged
Note
! The device takes about 4 hours to fully charge (when the power is off or
normal charging).
! When the device is turned off, the screen turns dark after 5 seconds. To
check the charge state and battery level, press the [Power] button.
21
Page 22

! For safety reasons, the device will not charge in an environment outside
the charging temperature range (0°C to 45°C).
If the internal temperature of the device is too high, charging may not be
possible even when the ambient temperature is within range.
In this case, turn off the device, allow time to cool down and recharge.
! Connect the provided USB cable directly to a USB port of your PC.
If the device is connected via a USB hub, charging may not be possible
due to insufcient capacity.
Make sure that the USB output of your PC is compatible with 5 V/500 mA.
! Do not unplug the USB cable, shut down the PC or put it to sleep, sus-
pend the power supply to the USB, etc. during access between the
device and PC as there is a risk of corrupting data in the device.
4
Unplug the USB cable from the USB port.
Once data transfer or charging is complete, disconnect the USB cable
from the PC rst, and then from the device.
5
Close the USB connector cover.
Securely close the USB connector cover.
If the cover is not securely closed, waterproof performance may be
impaired.
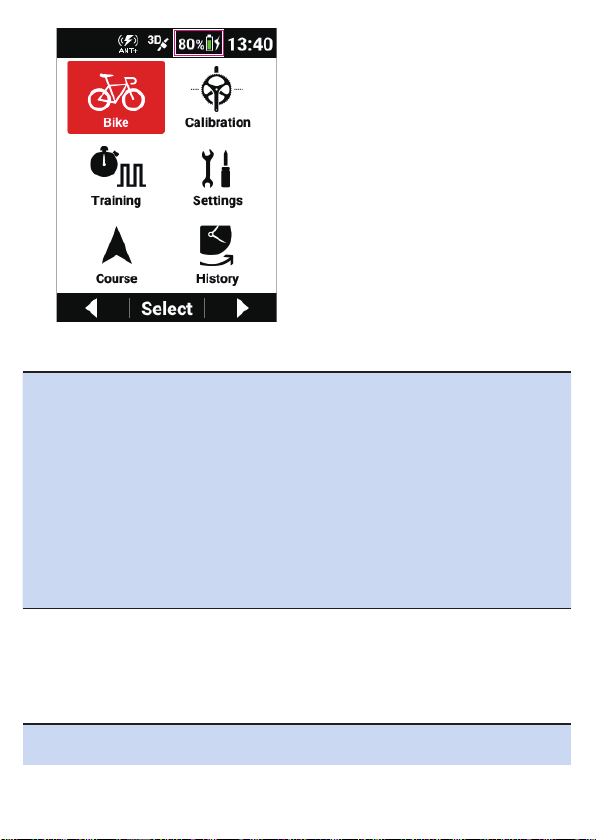
■Checking the battery level
You can check the battery level from the battery level icon displayed on the status
bar of the main menu screen.
22
Page 23
Note
! When the battery level becomes low, the "Battery Level Decreasing"
message appears.
If the battery level is allowed to become even lower, the device will shut
down automatically.
! Battery power consumption can be reduced by using combination of the
power saving mode, auto power off, and auto sleep.
Low Energy Mode
Auto Power Off
Auto Sleep
! You can also check the battery level on the device settings screen. An
estimate of the remaining possible operating time is also displayed.
Device Settings
Estimate of possible operating time
This device can be used for approximately 12 hours with a fully charged battery.
(In case of screen brightness 3)
Note
! The possible operating time may become shorter depending on the oper-
ating conditions.
23
Page 24

! If the possible operating time after charging is abnormally short, the bat-
tery may need to be replaced.
For details, please visit our website.
http://www.pioneerelectronics.com
http://www.pioneerelectronics.ca
www.pioneer-car.eu
Turning Power On/Off
■Turning power on
1
Press and hold the [Power] button for 2 seconds or more.
An opening message appears and then the meter screen is displayed
automatically.
24
Page 25
25
Page 26

■Turning power off
1
Press and hold the [Power] button for 2 seconds or more.
2
Press the [Conrm] button.
A shutdown message will appear and the power turns off.
26
Page 27
■Turning power off automatically if no operation is
performed within a set time
You can set the device to turn off automatically if no operation is performed within
a set time.
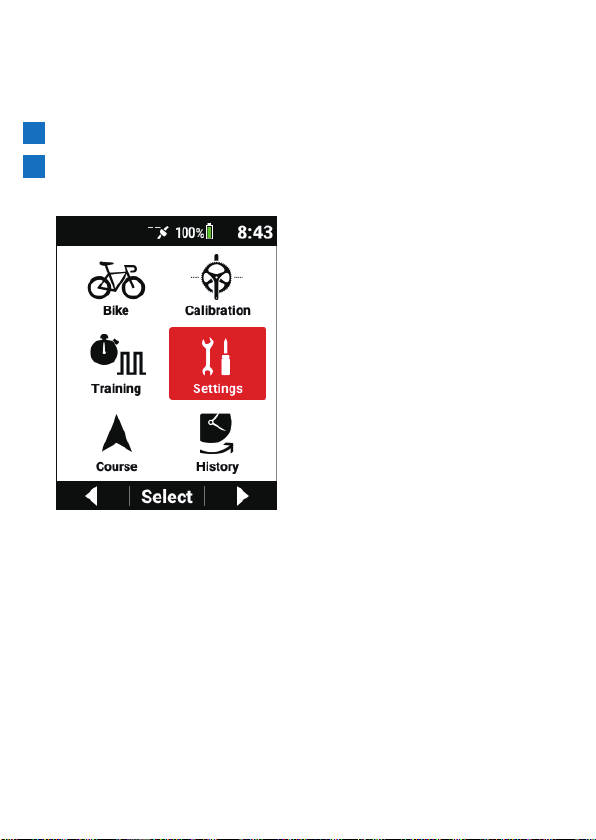
1
Press the [Menu] button.
2
Use the [←]/[→] buttons to select [Settings] and then press
the [Conrm] button.
27
Page 28
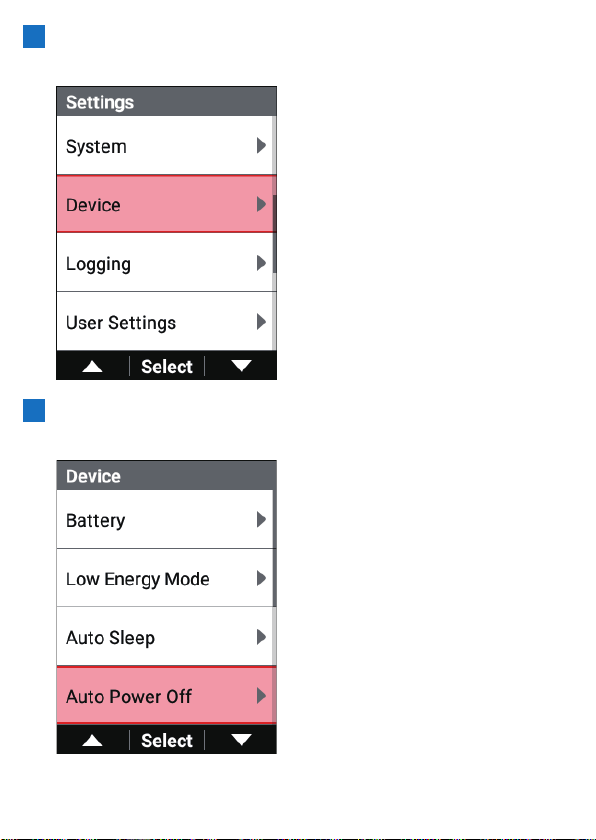
3
Use the [←]/[→] buttons to select [Device] and then press
the [Conrm] button.
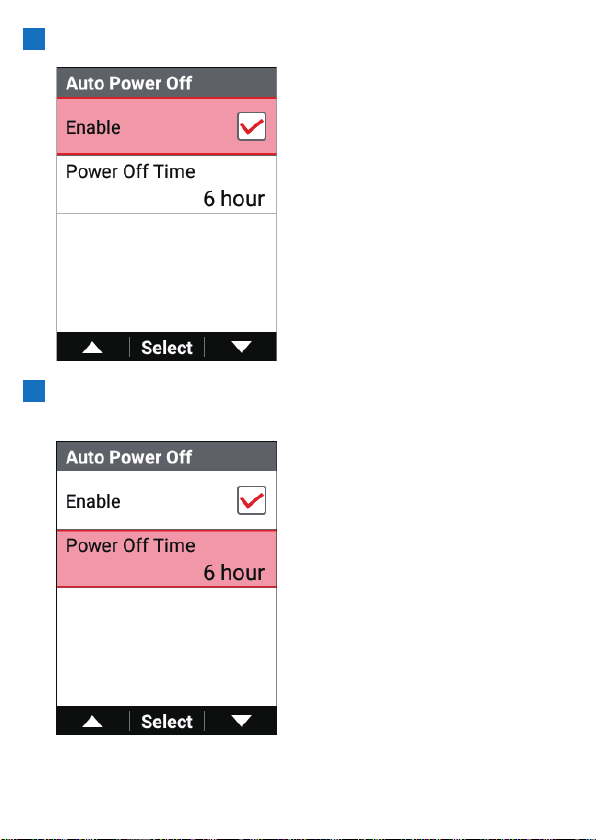
4
Use the [←]/[→] buttons to select [Auto Power Off] and then
press the [Conrm] button.
28
Page 29
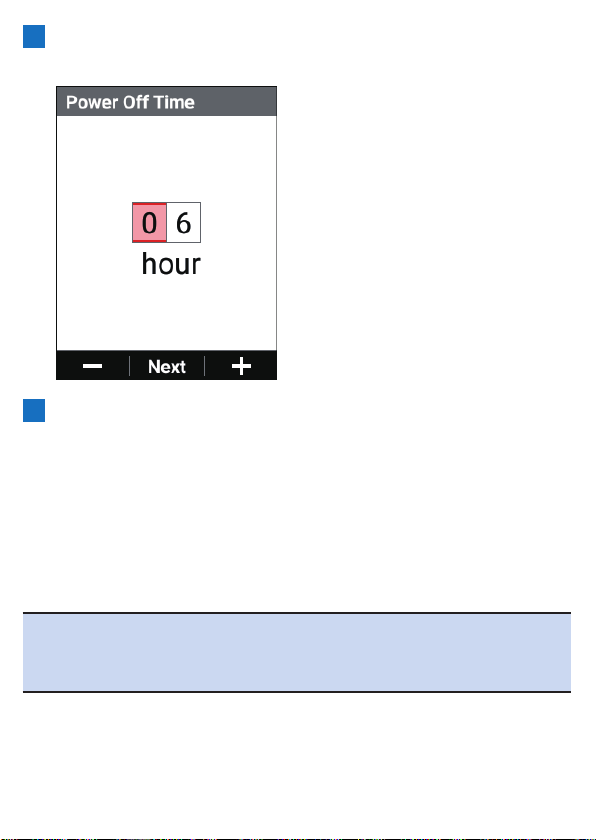
5
Press the [Conrm] button to select the [Enable] check box.
6
Use the [←]/[→] buttons to select [Power Off Time] and then
press the [Conrm] button.
29
Page 30
7
Press the [←]/[→] buttons and [Conrm] button to set the
time to wait until turning the power off.
8
Press the [Conrm] button.
■Switching to Sleep Mode
When the device is switched to the sleep state, the screen turns off to minimize
battery consumption.
You can return to the power-on state immediately by pressing any button other than
the[←]/[→] buttons.
Use this feature when, for example, you take a lunch or other break or when your
bike is standing by for the transition from swimming to cycling during a triathlon.
Note
! If a Pedaling Monitor, Power Meter, or Smart Trainer in the Sensor List of
the currently selected bike are enabled, apply over 5 watts of power or
produce a cadence value of 30rpm or more to recover from sleep mode
automatically.
30
Page 31

1
Press and hold the [Power] button for 2 seconds or more.
2
Press the [←] button.
A message is displayed and the device switches to sleep state.
■Switching to the sleep state automatically if no
operation is performed within a set time
You can set the device to switch to the sleep state automatically if no operation is
performed within a set time.
31
Page 32

This is set to [30 min] by default.
1
Press the [Menu] button.
2
Use the [←]/[→] buttons to select [Settings] and then press
the [Conrm] button.
32
Page 33

3
Use the [←]/[→] buttons to select [Device] and then press
the [Conrm] button.
4
Use the [←]/[→] buttons to select [Auto Sleep] and then
press the [Conrm] button.
33
Page 34

5
Press the [Conrm] button to select the [Enable] check box.
6
Use the [←]/[→] buttons to select [Auto Sleep Time] and
then press the [Conrm] button.
34
Page 35

7
Press the [←]/[→] buttons and [Conrm] button to set the
time to wait until switching to the sleep state.
8
Press the [Conrm] button.
Note
! Sleep state will not engage during logging even if no operation continues.
35
Page 36

Initial Setup
When you turn the device on for the rst time after purchase, the
initial setup screen is displayed.
First, a QR code is displayed prompting you to go to the download site for the Cyclo-Sphere Control App, which is an app for
smartphones.
The initial setup can also be performed by installing the CycloSphere Control App on your iPhone or Android device and then performing the initial setup in the app.
In this case, the initial setup procedure on this device will not be necessary because the meter screen will be displayed when synchroni-
zation with the device is conrmed.
To perform the initial setup by operating the device, press the [→]
button to go to the next screen.
There are a total of three pages in the initial setup (language setting
→ date and time setting → unit system setting).
Note
! To change the language of the screen displaying the QR code, press the
[←] button and select the language.
36
Page 37

Performing the Initial Setup by Operating
the Device
Set the desired display language for the device.
The following languages can be selected.
English/日本語/Français/Español/繁體中文/Nederlands/Deutsch/Italiano
The language is set to [English] by default.
1
Press the [Conrm] button.
37
Page 38

2
Use the [←]/[→] buttons to select a language and then
press the [Conrm] button.
The selected language is conrmed.
Press the [→] button to go to the next screen.
3
Press the [Conrm] button.
38
Page 39

The following items can be set.
Setting item Description
Time Zone Select a time zone.
Date Enter the date.
Time
24-Hour Format Check the box to display time in 24-hour format.
Date Format Select the date format.
Note
! The date and time settings are updated automatically when a GPS signal
is received before logging starts and after log data is saved.
! If the time zone setting is incorrect, the time may be off by the time zone
amount after a GPS automatic update even when the time has been set.
! If logging is started in the factory default state, the "The Date & Time are
incorrect." message will be displayed.
If logging is started while the date is incorrect, you can change the date
and time in the history after the log data is saved.
! The format selected for the date format is reected in the date indications
of data elds and in the setting for your date of birth.
It is not reected in the le name of the log data.
4
Press the [Menu] button.
The initial setup (2/3) screen reappears.
Press the [→] button to go to the next screen.
Enter the time. Enter the time in 24-hour format for the
time setting regardless of whether or not the [24-Hour
Format] check box is selected.
39
Page 40

5
Press the [Conrm] button.
The following items can be set.
Setting item Description
km, kg, ℃
mi/ft, lb, ℉
This is set to [mi/ft, lb, ℉] by default.
6
Press the [→] button.
The initial setup completion message appears. To complete the initial
setup, press the [Conrm] button. The device starts and the meter
screen appears.
To redo the initial setup, press the [←] button.
Set the unit system indications to kilometers, kilograms,
and Celsius.
Set the unit system indications to miles/feet, pounds, and
Fahrenheit.
Conguring the Settings in the App
Conguration of the settings is simpler if you use the Cyclo-Sphere Control App,
which is an app for smartphones.
The settings can be automatically synchronized with the device.
For details, refer to the following website.
https://cyclo-sphere.com/app/
40
Page 41

Conguring the Settings on the Device
The settings can also be congured from the main menu of the device without
using the Cyclo-Sphere Control App, which is an app for smartphones.
We recommend conguring the following settings before using the device.
■User Settings
Register basic information such as your user name and sex, information related to
your power level and heart rate, and other information.
User Settings
■Bike Settings
Register information related to each of your bikes.
Bike and Sensor Settings
■Sensor Settings
Congure various settings related to sensors.
Bike and Sensor Settings
■Wi-Fi Settings
Congure settings related to Wi-Fi such as switching the Wi-Fi connection and
adding an access point.
Wi-Fi Settings
■Page Settings
The page layout and display items can be customized to match your preference.
Setting Data Fields
■Map Download
Download map data to the device.
Download map data to the device.
41
Page 42

Basic Operations
This section describes how to view and use the meter screen which
is the main screen of the device and how to perform logging to
record information such as the elapsed time, various sensor information, and GPS position information.
Operating the Meter Screen
The meter screen is the main screen of the device for displaying trip data.
When you turn on the device, the meter screen is displayed rst.
Note
! To display the meter screen from the main menu screen, press the
[Menu] button.
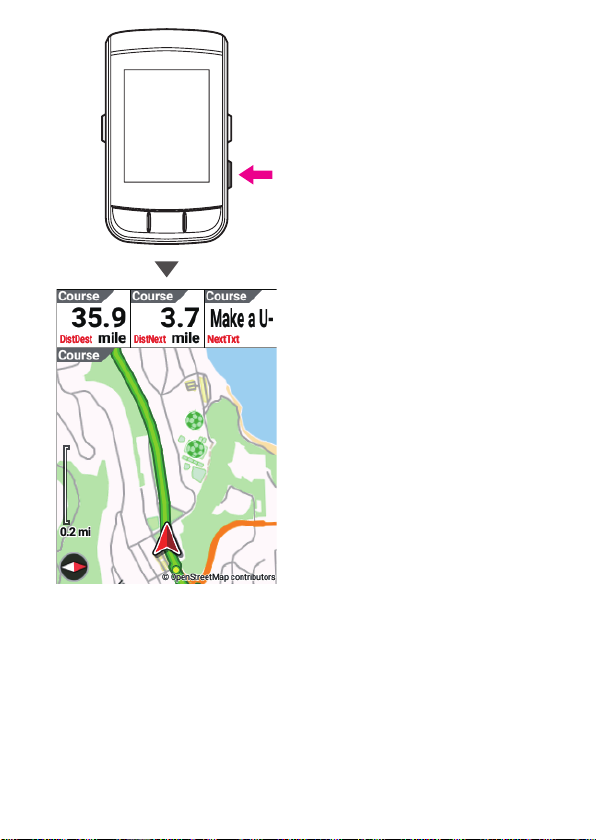
■Viewing Pages
The meter screen consists of multiple pages and data elds.
Various information is displayed on the pages on a data eld basis.
! Data eld
A data eld shows the label, sub-label, unit and other details of the dis-
played information.
42
Page 43

The content to display in a data eld can be selected from the data
Example: Numerical type
③
categories of graph parts and numerical value parts depending on the
size of the data eld.
Furthermore, customization is possible depending on the data type and
display type.
①
②
1 Label
2 Unit
3 Sub-label
! Page
A screen on which data elds are placed.
The number of data elds to display and the layout on each page can
be edited as desired to match the purpose of use.
Setting Data Fields
■Changing the Page
Change the page to display.
1
Press the [←]/[→] buttons.
Each press changes the page.
43
Page 44

■Enlarging the Display of a Data Field
Enlarge the display of a data eld displayed on a page.
1
Press the [Conrm] button.
The data eld is displayed enlarged.
44
Page 45

When you display a data eld enlarged, a thumbnail of the layout will be
displayed at the top left for the rst 2 seconds. The place focused in red
is the data eld currently displayed enlarged.
When the [Conrm] button is pressed during enlarged display, enlarged
display continues and the next data eld is displayed.
45
Page 46

Pressing the [Conrm]/[Enlarge] button when the last data eld is displayed ends the zoom feature and returns the screen to normal display.
If no operation is performed, normal display returns after approximately
5 seconds.
46
Page 47

■Changing the Display Type of a Data Field
You can change the category, unit, type, and other settings for the data displayed
in a data eld.
1
Press the [Conrm] button.
The data eld is displayed enlarged.
47
Page 48

2
Press the [Conrm] button until the data eld for which you
wish to change the display type appears and then press and
hold the [Conrm] button.
Use the [←]/[→] buttons to select the desired display type and then
press the [Conrm] button.
48
Page 49

When the settings are nished, press the [Menu] button to return to the
meter screen.
■Displaying the Status
In the status display, you can set the screen brightness and GPS settings.
The sensor connection status is displayed below these settings.
1
Press and hold the [Conrm] button for 2 seconds or more.
The status screen appears.
49
Page 50

Operating the Main Menu Screen
You can congure various settings of the device in the main menu screen..
1
Press the [Menu] button.
2
Use the [←]/[→] buttons to select a main menu item and
then press the [Conrm] button.
50
Page 51

The settings screen for the selected main menu item appears.
Select the bike to be used and congure various settings for the bike. For details, refer to "
Settings
."
Zero point calibration of pedaling monitor sensor or
ANT+power meter is performed. For details, refer to
"
Zero Point Calibration
Congure settings and perform operations related to
training such as creating a training menu and starting
training. For details, refer to "
Congure various settings related to Wi-Fi, CycloSphere, and the device. For details, refer to "
Settings
."
Congure settings and perform operations related to
courses such as selecting a course and downloading a
map. For details, refer to "
"
Selecting a Course
".
Transferring Courses
".
Training
Bike and Sensor
."
Advanced
," and
Analyze and edit past log data records. For details, refer
to "
Analyzing Log Data
"
51
Page 52

■Viewing the Status Bar
You can check the statuses of the device from the icons displayed on the status bar
at the top of the main menu screen.
1 Logging status
2 Sprint detection status
3 ANT+/Bluetooth® power transmission status
"ANT +" when ANT + power transmission is enabled, "BT" when
Bluetooth power transmission is enabled, "ANT + BT" when both are
enabled is displayed.
4 GPS reception status
5 Battery status
6 Current time
Operation in the Spin Screen
A screen for selecting the current value from predetermined items such as dates is
called a spin screen.
52
Page 53

(Example: Date setting screen)
Each press of the [←]/[→] buttons changes the value of the selected item, and
each press of the [Conrm] button changes the selected item.
Operation in the Text Input Screen
Text input operation on the device is performed by rst selecting the character type
in the type selection screen and then entering text by selecting the desired text in
the displayed text input screen.
53
Page 54

1
Use the [←]/[→] buttons to select the character type and
then press the [Conrm] button.
(Example: Bike name input screen)
A: Displays the alphabet letter list screen (uppercase).
a: Displays the alphabet letter list screen (lowercase).
1: Displays the number list screen.
@: Displays the symbol and other character list screen.
SP: Enters a space.
BS: Deletes one character at a time.
<: Moves the text input cursor position to the left.
>: Moves the text input cursor position to the right.
[Set]: Saves the entered text and ends text input.
54
Page 55

2
[Stop][Stop]
[Start]
Use the [←]/[→] buttons to select text and then press the
[Conrm] button.
(Example: When selecting character type "A")
Aa1@: Saves the entered text and returns to the type selection screen.
[Set]: Saves the entered text and ends text input.
Note
! If you press the [Menu] button in the type selection screen, the entered
text is discarded (returns to the state before input) and text input ends.
! If you press the [Menu] button in the text input screen, the entered text is
saved and the type selection screen reappears.
Performing Logging
Recording information such as the elapsed time, various sensor information, and
GPS position information is called "logging."
Lap1 Lap2 Lap3 Lap3 Lap4 Lap5
Workout
[Start]
[Lap]
[Lap]
[Lap]
Timer
Resetting
( )
[Lap]
(2 sec.)
[Lap]
1
Press the [Logging] button.
[Logging Started] is displayed and logging starts.
55
Page 56

2
Press the [Logging] button during logging.
Logging stops and the save conrmation message appears.
If you press the [Conrm] button, the log data is saved and the meter
screen reappears.
If you press the [←] button, the message closes and the meter screen
reappears while logging remains in the stopped state.
When you wish to start logging, press the [Logging] button again.
56
Page 57

If you press the [→] button, the log data deletion conrmation message
appears.
If you press the [Conrm] button, the log data is deleted and the meter
screen reappears.
Note
! You can also save the log data by pressing and holding the [Lap] button
for 2 seconds or more in the logging stopped state.
! When the capture function is enabled, the function to save the logging
data by pressing and holding the [Lap] button while logging is stopped
will not work.
■Setting the Logging Interval
The device saves the various data during logging at a set interval.
Select from [Auto], [1 sec]*, [3 sec], [5 sec], and [10 sec] for the setting.
If the interval is set to [Auto], the logging interval becomes shorter when the riding
speed of the bike increases and longer when the riding speed decreases.
*: Factory default setting
Note
! The maximum le size for log data that can be analyzed in Cyclo-Sphere
is 16 MB.
The le size for one hour of log data is approximately 1 MB.
The size differs depending on the sensors connected and settings.
! When performing logging for a long time such as on a long ride or when
randonneuring, we recommend setting this to [3 sec] or [Auto].
1
Press the [Menu] button.
57
Page 58

2
Use the [←]/[→] buttons to select [Settings] and then press
the [Conrm] button.
3
Use the [←]/[→] buttons to select [Logging] and then press
the [Conrm] button.
58
Page 59

4
Use the [←]/[→] buttons to select [Logging Interval] and
then press the [Conrm] button.
5
Use the [←]/[→] buttons to select the desired setting and
then press the [Conrm] button.
59
Page 60

6
Press the [Menu] button.
Setting nishes.
■Pausing and Resuming Logging Automatically
You can use the Auto Pause/Resume function to pause/resume logging automatically when a certain speed is reached during logging.
For example, if you wish to automatically pause logging when the ride speed
decreases to 3 km/h* or slower and resume logging when the ride speed becomes
faster than 3 km/h, enable [Auto Pause/Resume] and set [Trigger Threshold] to 3.0.
*: Factory default setting
Setting the Auto Pause function
1
Press the [Menu] button.
2
Use the [←]/[→] buttons to select [Settings] and then press
the [Conrm] button.
60
Page 61

3
Use the [←]/[→] buttons to select [Logging] and then press
the [Conrm] button.
4
Use the [←]/[→] buttons to select [Auto Pause/Resume] and
then press the [Conrm] button.
61
Page 62

5
Use the [←]/[→] buttons to select [Enable] and then press
the [Conrm] button.
The "Enable" check box is selected and the Auto Pause/Resume function turns on.
To turn it off, press the [Conrm] button again to clear the check box.
62
Page 63

6
Use the [←]/[→] buttons to select [Trigger Threshold] and
then press the [Conrm] button.
7
Use the [←]/[→] buttons to set the speed at which the Auto
Pause function works and then press the [Conrm] button.
63
Page 64

8
Press the [Menu] button.
Setting nishes.
Note
! The Auto Pause function may not work properly when using GPS speed
while using rollers or when there is no speed sensor.
■Notifying when Forget to Start Logging
You can use the Reminder function to display a message if you start a ride without
starting logging.
Set the operation interval of the Reminder function as desired.
Select from [10 sec], [30 sec], and [1 min]* for the setting.
*: Factory default setting
Note
! The Reminder function reminds you not only before logging starts but
also when you resume a ride from the logging stopped state.
! The Reminder function determines you are riding by one of the values of
speed, cadence, or power.
It may not operate depending on the GPS Speed setting, or the condi-
tions of the sensor connection or GPS reception.
1
Press the [Menu] button.
64
Page 65

2
Use the [←]/[→] buttons to select [Settings] and then press
the [Conrm] button.
3
Use the [←]/[→] buttons to select [Logging] and then press
the [Conrm] button.
65
Page 66

4
Use the [←]/[→] buttons to select [Reminder] and then
press the [Conrm] button.
5
Use the [←]/[→] buttons to select [Enable] and then press
the [Conrm] button.
The "Enable" check box is selected and the Reminder function turns on.
66
Page 67

To turn it off, press the [Conrm] button again to clear the check box.
6
Use the [←]/[→] buttons to select [Reminder Interval] and
then press the [Conrm] button.
7
Use the [←]/[→] buttons to select the operation interval of
the Reminder function and then press the [Conrm] button.
67
Page 68

8
Press the [Menu] button.
Setting nishes.
Uploading Log Data
You can upload the log data stored in the built-in ash memory of the device to the
Cyclo-Sphere analysis service for analysis.
There are the following three ways to upload log data.
! Uploaded via Wi-Fi from the device
■Uploading via Wi-Fi
! Upload using a PC
■Uploading Using a PC
! Upload via the Cyclo-Sphere Control App
■Uploading via Cyclo-Sphere Control App
■About Cyclo-Sphere
This is a free web service to upload the log data of the device and then perform
detailed data analysis.
The service can be accessed with a web browser or dedicated application.
Recommended web browsers
Windows
! Google Chrome
! Mozilla Firefox
Macintosh
! Google Chrome
! Mozilla Firefox
! Apple Safari
Recommended web browsers for the page designed for
smartphones
iPhone 7/iPhone 7 Plus
! Safari
Application for iPhone
Cyclo-Sphere Analysis App
68
Page 69

■Uploading via Wi-Fi
Creating a Cyclo-Sphere account
Register from the following URL.
cyclo-sphere.com
Setting Your Cyclo-Sphere Account
Set the user account of Cyclo-Sphere for uploading the log data via Wi-Fi.
If you are using Google etc for the account, congure the account settings from the
Cyclo-Sphere Control App on your iPhone or Android device.
Only account settings using an e-mail address can be set on the device.
1
Press the [Menu] button.
2
Use the [←]/[→] buttons to select [Settings] and then press
the [Conrm] button.
69
Page 70

3
Use the [←]/[→] buttons to select [Cyclo-Sphere] and then
press the [Conrm] button.
4
Use the [←]/[→] buttons to select [Account] and then press
the [Conrm] button.
70
Page 71

5
Use the [←]/[→] buttons to select [Email Address] and then
press the [Conrm] button.
6
Use the [←]/[→]/[Conrm] buttons to enter an e-mail
address.
71
Page 72

Select the "Set" key on the keyboard and then press the [Conrm] button
to return to the previous screen.
Operation in the Text Input Screen
7
Use the [←]/[→] buttons to select [Password] and then
press the [Conrm] button.
8
Use the [←]/[→]/[Conrm] buttons to enter a password.
Select the "Set" key on the keyboard and then press the [Conrm] button
to return to the previous screen.
Operation in the Text Input Screen
9
Use the [←]/[→] buttons to select [Login] and then press the
[Conrm] button.
If login is successful, your user name is displayed and the logout button
is displayed.
To change the user, press the logout button.
If Wi-Fi setup has not been performed, the screen changes to the Wi-Fi
setup screen after you press the login button.
When the setup is complete, log in.
10
Press the [Menu] button.
Setting nishes.
72
Page 73

Uploading
There are three ways to upload log data.
! Data selection (upload manually)
! Differential upload (uploaded all log data that is different from the
already uploaded log data)
! Auto upload (uploaded automatically)
After setting up Wi-Fi, perform either "
"
Uploading the log data automatically
Wi-Fi Settings
Uploading the log data manually
Select the log data to upload to Cyclo-Sphere from the list of log data and
then upload the log data.
1
Press the [Menu] button.
2
Use the [←]/[→] buttons to select [Settings] and then press
Uploading the log data manually
."
" or
the [Conrm] button.
73
Page 74

3
Use the [←]/[→] buttons to select [Cyclo-Sphere] and then
press the [Conrm] button.
4
Use the [←]/[→] buttons to select [Manual Upload] and then
press the [Conrm] button.
74
Page 75

5
Use the [←]/[→] buttons to select the log data you wish to
upload and then press the [Conrm] button.
Repeat step 5 to add check marks for all the log data you wish to upload.
6
Use the [←]/[→] buttons to select [Upload] and then press
the [Conrm] button.
75
Page 76

A connection is established via Wi-Fi automatically and uploading starts.
When uploading is complete, the Wi-Fi connection is disconnected.
"Wi-Fi" is displayed for log data that has been uploaded.
Note
! If you transfer log data to your iPhone or Android device when uploading
log data via the Cyclo-Sphere Control App, "Bluetooth" is displayed.
! Both "Wi-Fi" and "Bluetooth" may be displayed.
Uploading only the log data that is different from the already uploaded
log data
Upload all log data that has not been uploaded to Cyclo-Sphere.
1
Press the [Menu] button.
2
Use the [←]/[→] buttons to select [Settings] and then press
the [Conrm] button.
76
Page 77

3
Use the [←]/[→] buttons to select [Cyclo-Sphere] and then
press the [Conrm] button.
4
Use the [←]/[→] buttons to select [Difference Upload] and
then press the [Conrm] button.
77
Page 78

A connection is established via Wi-Fi automatically and uploading starts.
When uploading is complete, the Wi-Fi connection is disconnected.
Uploading the log data automatically
The device can automatically establish a Wi-Fi connection and upload the log
data to Cyclo-Sphere when logging stops and the log data is saved.
If there is log data that has not been uploaded to Cyclo-Sphere before logging starts or after the log data is saved, the device periodically checks for a
Wi-Fi connection, and if a connection can be established, it uploads the log
data to Cyclo-Sphere in the background.
1
Press the [Menu] button.
2
Use the [←]/[→] buttons to select [Settings] and then press
the [Conrm] button.
78
Page 79

3
Use the [←]/[→] buttons to select [Cyclo-Sphere] and then
press the [Conrm] button.
4
Use the [←]/[→] buttons to select [Auto Upload] and then
press the [Conrm] button.
The check box is selected and auto upload is enabled.
79
Page 80

■Uploading Using a PC
Creating a Cyclo-Sphere account
Register from the following URL.
cyclo-sphere.com
Uploading
There is the following way to upload log data using a PC.
Note
! When uploading with the Cyclo-Sphere upload button, we recommend
backing up your log data to a PC.
Perform the upload after performing the operation described in “Backing
up log data to a PC.”
Backing up log data to a PC
Transfer the log data in the built-in ash memory of the device to your PC.
1
Turn on the device and connect the device to your PC with
the provided USB cable after the device has started up
completely.
The device is recognized as an MTP device on the PC.
The mode will be charging mode if you connect the USB cable while the
power of the device is off.
For details on connecting the device and PC, refer to "
device
."
Note
! For MTP connection with Macintosh, please refer to the following URL for
example.
https://www.android.com/letransfer/
■Charging the
2
Select the log data you wish to back up and save it in any
location on the PC.
The log data is stored in the "/CA600/Internal storage/Pioneer/Log"
folder.
The le name of the log data is the date and hour that the log started.
Example: LOG_2019_01_01_08_20.db
80
Page 81

(Pioneer)
LOG_2019_01_01_08_20.db
LOG_2019_01_01_09_20.db
(Log)
Uploading with the Cyclo-Sphere upload button
1
Log in to Cyclo-Sphere and then press the "Upload" button
at the top of the workout screen.
An upload pop-up appears.
2
Press the [ファイル選択] button in the pop-up and then
select the le name to upload.
The selected le name appears in the pop-up.
3
Press the [Upload] button.
Analysis of the log data starts. (Analysis may take a while due to server
congestion.)
You can check the analysis state if you leave the pop-up displayed. If
you closed the pop-up, the analysis state is displayed at the top right of
the workout list window.
You can check the progress by placing the mouse over it.
When the indication at the top right disappears, analysis is complete and
the data has been added to the workout list.
For details, refer to the following website.
→ https://cyclo-sphere.com/help/howtouse/
help_howtouse_menubar_upload
■Uploading via Cyclo-Sphere Control App
Creating a Cyclo-Sphere account
Register from the following URL.
cyclo-sphere.com
81
Page 82

Uploading
1
Install theCyclo-Sphere Control App on your iPhone or
Android device.
https://cyclo-sphere.com/app/
2
Link the Cyclo-Sphere Control App and your device.
Operate the Cyclo-Sphere Control App to display your device from [Add
a new device] and then congure the link setting.
3
Select the following in order in the Cyclo-Sphere Control
App.
[SGX-CA600] > [Log Data upload settings]
4
Tap [Upload via smartphone] in the Cyclo-Sphere Control
App.
5
Check that authentication is complete for [Cyclo-Sphere
Account Setting] in the Cyclo-Sphere Control App.
If authentication is not complete, congure the account settings.
Note
! If there is log data that has not been transfered via Wi-Fi before the start
of logging or after the saving of log data while the device and CycloSphere Control App are linked, the log data is transferred to the CycloSphere Control App via Bluetooth automatically.
! Transferred log data is transferred from the Cyclo-Sphere Control Appto
Cyclo-Sphere automatically using the phone line or Wi-Fi connection.
! To turn off automatic transfer from the Cyclo-Sphere Control App using
the phone line in order to limit transfer to when there is a Wi-Fi connection, turn on the following setting.
[Others] > [Cyclo-Sphere Control Setting] > [Limit data communication
such as le transmission via Wi-Fi.]
! Automatic transfer to Cyclo-Sphere may not be possible depending on
the line connection status of the smartphone.
! It takes approximately 3 minutes per MB when transferring from the
device to the Cyclo-Sphere Control App.
When there is about 5 hours of log data, it will take approximately 15
minutes for transfer to complete.
82
Page 83

! If the device establishes a Wi-Fi connection while transferring log data
from the device to the Cyclo-Sphere Control App, the log data will begin
to be transferred via Wi-Fi if the auto upload function is enabled.
! If log data was uploaded via the Cyclo-Sphere Control App, "Bluetooth" is
displayed below the log data name on the log data selection screen.
! If log data was uploaded via Wi-Fi, "Wi-Fi" is displayed below the log data
name on the log data selection screen.
! Both "Wi-Fi" and "Bluetooth" may be displayed.
83
Page 84

Training
Training Overview
The goals for road bike training differ depending on the person.
You can more objectively monitor and analyze your rides if you use a cyclocomputer for your regular training because a cyclocomputer is an effective training aid.
■Clarifying the Areas You Wish to Strengthen
Riders who wish to enjoy cycling and long rides
For those who have just begun riding a road bike, the most important goal is to rst
ride at a constant speed so that you can get used to riding your road bike.
Have you ever thought the following during regular cycling?
! Both riding alone and riding with other people are fun, but riding with
other people is more tiring than I expected and I do not want to be a
burden on other people.
! I normally ride hard but there are situations where I can not keep up
with other people. I want to get faster.
The best thing to do is to plan training that will help you overcome these issues.
Riders who wish to do well in road races
The key is to clarify the areas you wish to strengthen in consideration of the races
you participate in, establish your goals, and then create a training menu.
Training that simply punishes your body will not necessary make you faster.
If anything, training that is too hard may have the opposite effect.
When you select training methods suitable for the areas you wish to strengthen, it
is important to objectively monitor and analyze your rides.
84
Page 85

Have you ever thought the following during regular training?
! I train according to a plan created to meet my goal, but I cannot seem to
achieve my target placement.
! I am often disappointed because I cannot get the desired result and
demonstrate my ability in competitions due to insufcient preparation.
The best thing to do is to plan training that will help you overcome these issues.
■Types of Training Menus
Basically, you can use the following ve methods to handle your training menus on
the device.
Link menu
Send a training menu (workout) created in the TrainingPeaks service using the
Cyclo-Sphere Control App on your iPhone or Android device, and import and link it
on your device.
Training assistance
You can use the Wi-Fi function of the device to download the training menus you
created using the Cyclo-Sphere Analysis App or the smartphone version of the
Cyclo-Sphere website.
Original menu
This is a simple training menu that can be created and edited on the device.
85
Page 86

FTP 20-minute test
This is a training menu in which you ride for 20 minutes and measure your func-
tional threshold power (FTP).
MMP challenge
This is a training menu based on your mean maximal power (MMP) data.
You can customize the target FTP and target power for the FTP 20-minute test and
MMP challenge training menus.
86
Page 87

■Laps
TrainingStart TrainingStop
Training to ride at an average speed and training to gain explosive sprint power
work on different areas and thus require different training methods.
Even within one training menu, there is a separator for every time spent, for example, warming up, riding focusing on cadence, riding focusing on pedaling, and
cooling down, and these separators are called "laps."
Furthermore, the segment between one separator and another is called an
"interval."
A lap is used for the separator between training, and for the separator of intervals
within training.
A lap is the end point of the previous interval, as well as the start point of the next
interval.
Accurate analysis of each interval segment can be performed later by correctly
separating the collected data by lap.
Lap1 Lap2 Lap3
WarmUp CoolDownCadencefocus Pedalingfocus
If not separated by lap...
Data that has been averaged overall is collected so analysis cannot be performed
properly later.
It is difcult to know during training from where the ride method needs to be
changed.
■Laying out an Appropriate Display for a Lap
The device allows you to select which numerical values to show on the display.
This enables arbitrarily setting the value you wish to monitor the most during that
training, as well as the other values you think are important.
For details, refer to "
Setting Data Fields
."
■Auto Lap Function
The Auto Lap function operates only during logging. It does not operate when logging is stopped, during auto pause, and while a training menu is in progress.
Using Training Assistance
A training menu created using the training assistance of the Cyclo-Sphere Analysis
App (for iPhone) can be imported into the device.
87
Page 88

You can also use the training assistance from the smartphone version of the CycloSphere website by using an iPhone or Android device.
The procedure is roughly as follows.
■Creating a Training Menu of Training Assistance
! Create a training menu in the Cyclo-Sphere Analysis App.
! Create a training menu using the smartphone version of the Cyclo-
Sphere website.
■Downloading the Training Menu of Training
Assistance
! Download the training menu via Wi-Fi using the device.
■Creating a Training Menu
This section describes how to create a training menu using the training assistance
of the Cyclo-Sphere Analysis App (for iPhone).
For a training menu created using training assistance, the laps are added automatically to the appropriate positions, and the page settings are switched automatically
to the layout recommended for the training details.
This saves you the trouble of having to manually press laps and select pages.
(You can also manually operate laps and change pages.)
Cyclo-Sphere Analysis App comes with 28 types of training menus. The following
describes an example of creating "B7: Interval Training Using a Power Meter".
1
Install the Cyclo-Sphere Analysis App (for iPhone).
If this your rst time to use Cyclo-Sphere, register as a user and create
an account.
2
Log in to the Cyclo-Sphere Analysis App (for iPhone).
3
Tap [More] > [Training Assist].
After a while, a list of the training menus of the training assistance
appears.
4
Tap [Power Training] > [B7: Interval Training Using a Power
Meter].
After a while, an explanation of the details of this training appears.
5
Carefully read the details and then tap [Training Menu].
An explanation of the training menu is displayed, and the parameters
required when creating the training menu are displayed.
88
Page 89

6
Set the necessary parameters and tap [Training Menu
Creation].
A message appears to notify you that the training menu has been
created.
7
Tap [OK].
■Connecting the Device via Wi-Fi
For how to connect the device via Wi-Fi, refer to the following.
Wi-Fi Settings
■Importing a Training Menu
This section describes how to import a training menu created in the Cyclo-Sphere
Analysis App to the device so that you can display it as a training menu on the
device.
Note
! Congure the account settings in advance.
Creating a Cyclo-Sphere account
1
Press the [Menu] button.
2
Use the [←]/[→] buttons to select [Settings] and then press
the [Conrm] button.
89
Page 90

3
Use the [←]/[→] buttons to select [Cyclo-Sphere] and then
press the [Conrm] button.
4
Check that the check box is selected for [Training Menu
Sync].
90
Page 91

If the check box is not selected, use the [←]/[→] buttons to select
[Training Menu Sync] and then press the [Conrm] button.
5
Use the [←]/[→] buttons to select [Sync Now] and then
press the [Conrm] button.
Wait until the synchronization nishes.
6
When the synchronization nishes, press the [Menu] button
to return to the main menu screen.
■Selecting an Imported Training Menu
1
Press the [Menu] button.
91
Page 92

2
Use the [←]/[→] buttons to select [Training] and then press
the [Conrm] button.
3
Use the [←]/[→] buttons to select [Training Menu] and then
press the [Conrm] button.
92
Page 93

The name of the currently selected training menu is displayed in the
[Training Menu] item.
4
Use the [←]/[→] buttons to select [Training Assist] and then
press the [Conrm] button.
5
Use the [←]/[→] buttons to select the training item you wish
to use and then press the [Conrm] button.
93
Page 94

6
Check the training details and then press the [Conrm]
button.
The name of the selected training menu is displayed in the [Training
Menu] item.
94
Page 95

Starting/Ending a Training Menu
1
Press the [Menu] button.
2
Use the [←]/[→] buttons to select [Training] and then press
the [Conrm] button.
95
Page 96

3
Use the [←]/[→] buttons to select [Training Start] and then
press the [Conrm] button.
The training menu start message appears.
If you press the [Conrm] button, the meter screen reappears and the
training menu starts.
Start training in accordance with the instructions on the screen.
Note
! If logging is already started, the training menu will be separated by laps
and the rst interval segment will start.
If logging is not started, logging will start simultaneously with the start of
the training menu.
! If you press the [Logging] button, the training menu pauses.
Press the [Logging] button again to resume the training menu.
4
Start training in accordance with the instructions on the
screen.
The instructions for the rst interval segment are displayed. When it
becomes time for the next interval segment, the instructions for that
segment are displayed.
96
Page 97

This process is repeated. When all of the interval segments are nished,
the training menu ends automatically and the nished message appears
on the screen.
Note
! Pressing the [Lap] button skips to the next the training menu.
If the training menu is separated by laps, the next interval segment will
start.
5
Press the [Logging] button.
Logging stops and the save conrmation message appears.
If you press the [Conrm] button, the log data is saved and the screen
displayed before you started logging reappears.
If you press the [←] button, the message closes and the previous screen
reappears while logging remains in the stopped state. When you wish to
restart logging, press the [Logging] button again.
If you press the [→] button, the log data deletion conrmation message
appears.
If you press the [Conrm] button, the log data is deleted and the screen
displayed before you started logging reappears.
Note
! You can also save the log data by pressing and holding the [Lap] button
for 2 seconds or more in the logging stopped state.
! When the capture function is enabled, the function to save the logging
data by pressing and holding the [Lap] button while logging is stopped
will not work.
! Auto Lap does not operate while a training menu is in progress.
! If a different training menu is selected while a training menu is in prog-
ress, the training menu set before the selection ends and the newly set
training menu is selected.
■Forcibly Ending a Training Menu Part Way
Through
You can forcibly end a training menu part way through.
1
Press the [Menu] button.
97
Page 98

2
Use the [←]/[→] buttons to select [Training] and then press
the [Conrm] button.
3
Use the [←]/[→] buttons to select [Training Stop] and then
press the [Conrm] button.
98
Page 99

Note
! Since the log data will continue to be acquired even after the training
menu ends, press the [Logging] button to stop logging and then check
the save conrmation message and save the log data.
■Deleting a Training Menu
You can delete a training menu that was imported to the device or a training menu
that was created on the device.
Note
! You can delete only the training menus that were created from [Linked
Menu], [Training Assist], and [Original Menu].
1
Press the [Menu] button.
2
Use the [←]/[→] buttons to select [Training] and then press
the [Conrm] button.
99
Page 100

3
Use the [←]/[→] buttons to select [Training Menu] and then
press the [Conrm] button.
4
Use the [←]/[→] buttons to select the training item you wish
to delete and then press the [Conrm] button.
100
 Loading...