

Page 1
S-DJ50X
T
S-DJ50X-W
S-DJ60X
S-DJ80X
English
Français Deutsch Italiano
ACTIVE REFERENCE MONITOR
MONITEUR DE RÉFÉRENCE ACTIF
AKTIVER REFERENZMONITOR
REFERENCE MONITOR ATTIVO
ACTIEVE REFERENTIEMONITOR
MONITOR ACTIVO DE REFERENCIA
MONITOR ATIVO DE REFERÊNCIA
АКТИВНЫЙ СТУДИЙНЫЙ МОНИТОР
Nederlands Español
http://pioneerdj.com/support/
he Pioneer DJ support site shown above offers FAQs, information on software and various other types of
information and services to allow you to use your product in greater comfort.
Le site de support DJ de Pioneer indiqué ci-dessus propose une FAQ, des informations sur le logiciel et divers
types d’informations et de services qui permettent une utilisation plus confortable de ce produit.
Die oben gezeigte Pioneer DJ-Support-Website enthält häufig gestellte Fragen, Informationen über Software
und andere wichtige Informationen und Dienste, die Ihnen helfen, Ihr Produkt optimal zu verwenden.
Il sito di supporto DJ Pioneer indicato qui sopra offre una sezione FAQ, informazioni sul software ed
informazioni e servizi di vario tipo, per permettere un uso più confortevole dei nostri prodotti.
De bovengenoemde Pioneer DJ ondersteuningswebsite biedt een overzicht van de vaak gestelde vragen,
informatie over software en allerlei andere soorten informatie en diensten die u in staat stellen dit product met
meer gemak te gebruiken.
El sitio de asistencia Pioneer DJ mostrado arriba ofrece las preguntas frecuentes, información del software y
varios otros tipos de información y servicios que le permitirán usar su producto con mayor confort.
O site de suporte da Pioneer DJ mostrado acima oferece FAQs, informações sobre o software e outros tipos
de informações e serviços para permitir utilizar o produto com um maior conforto.
На указанном выше сайте поддержки Pioneer DJ содержатся раздел часто задаваемых вопросов,
информация по программному обеспечению, а также различные другие типы информации и услуг,
позволяющие использовать ваше изделие более лучшим образом.
Operating Instructions
Mode d’emploi
Bedienungsanleitung
Istruzioni per l’uso
Handleiding
Manual de instrucciones
Manual de instruções
Инструкции по эксплуатации
Português Русский
Page 2
Thank you for buying this Pioneer product.
Please read through these operating instructions so you will know how to operate your model properly. After you have finished reading the
instructions, put them away in a safe place for future reference.
CAUTION
TO PREVENT THE RISK OF ELECTRIC SHOCK, DO NOT
REMOVE COVER (OR BACK). NO USER-SERVICEABLE
PARTS INSIDE. REFER SERVICING TO QUALIFIED
SERVICE PERSONNEL.
D3-4-2-1-1_B1_En
This product is for general household purposes. Any
failure due to use for other than household purposes
(such as long-term use for business purposes in a
restaurant or use in a car or ship) and which requires
repair will be charged for even during the warranty
period.
WARNING
K041_A1_En
This equipment is not waterproof. To prevent a fire or
shock hazard, do not place any container filled with
liquid near this equipment (such as a vase or flower
pot) or expose it to dripping, splashing, rain or
moisture.
D3-4-2-1-3_A1_En
POWER-CORD CAUTION
Handle the power cord by the plug. Do not pull out the
plug by tugging the cord and never touch the power
cord when your hands are wet as this could cause a
short circuit or electric shock. Do not place the unit, a
piece of furniture, etc., on the power cord, or pinch the
WARNING
To prevent a fire hazard, do not place any naked flame
sources (such as a lighted candle) on the equipment.
D3-4-2-1-7a_A1_En
cord. Never make a knot in the cord or tie it with other
cords. The power cords should be routed such that they
are not likely to be stepped on. A damaged power cord
can cause a fire or give you an electrical shock. Check
the power cord once in a while. When you find it
Operating Environment
Operating environment temperature and humidity:
+5 °C to +35 °C (+41 °F to +95 °F); less than 85 %RH
(cooling vents not blocked)
Do not install this unit in a poorly ventilated area, or in
locations exposed to high humidity or direct sunlight (or
strong artificial light)
D3-4-2-1-7c*_A1_En
damaged, ask your nearest PIONEER authorized
service center or your dealer for a replacement.
S002*_A1_En
WARNING
This product equipped with a three-wire grounding
(earthed) plug - a plug that has a third (grounding) pin.
This plug only fits a grounding-type power outlet. If you
are unable to insert the plug into an outlet, contact a
licensed electrician to replace the outlet with a properly
CAUTION
POWER
The
switch on this unit will not completely
shut off all power from the AC outlet. Since the power
grounded one. Do not defeat the safety purpose of the
grounding plug.
D3-4-2-1-6_A1_En
cord serves as the main disconnect device for the
unit, you will need to unplug it from the AC outlet to
shut down all power. Therefore, make sure the unit
has been installed so that the power cord can be
easily unplugged from the AC outlet in case of an
accident. To avoid fire hazard, the power cord should
VENTILATION CAUTION
When installing this unit, make sure to leave space
around the unit for ventilation to improve heat radiation
(at least 30 cm at top, 30 cm at rear, and 30 cm at each
side).
also be unplugged from the AC outlet when left
unused for a long period of time (for example, when
on vacation).
D3-4-2-2-2a*_A1_En
WARNING
Slots and openings in the cabinet are provided for
ventilation to ensure reliable operation of the product,
and to protect it from overheating. To prevent fire
hazard, the openings should never be blocked or
For Finland customers
Laite on liitettävä suojamaadoituskoskettimilla
varustettuun pistorasiaan
For Norway customers
covered with items (such as newspapers, table-cloths,
curtains) or by operating the equipment on thick carpet
or a bed.
D3-4-2-1-7b*_A1_En
Apparatet må tilkoples jordet stikkontakt
For Sweden customers
Apparaten skall anslutas till jordat uttag
D3-4-2-1-6b_A1_En
Do not attach these speakers to the wall or ceiling, as
they may cause injury in the event of a fall.
En
2
SGK007*_A1_En
Page 3
If you want to dispose this product, do not mix it with general household waste. There is a separate collection system for used
P
designated collection facilities or to a retailer (if you purchase a similar new one).
Fo
By doing so you will ensure that your disposed product undergoes the necessar
negative effects on the environment and human health
K058b_A1_En
electronic products in accordance with legislation that requires proper treatment, recovery and recycling.
rivate households in the member states of the EU, in Switzerland and Norway may return their used electronic products free of charge to
r countries not mentioned above, please contact your local authorities for the correct method of disposal.
y treatment, recovery and recycling and thus prevent potential
.
Introduction
Main Features
English
Diffuser on the waveguide improves sound directivity and
provides spacious sound.
Aramid fiber woofer cone is light and extremely rigid, which
provides the best bass response.
Grooves on the bass-reflex duct improve the airflow and provide
loss-less bass performance.
Confirm All Accessories
Power cord (1)
Operating Instructions (this document)
Warranty card
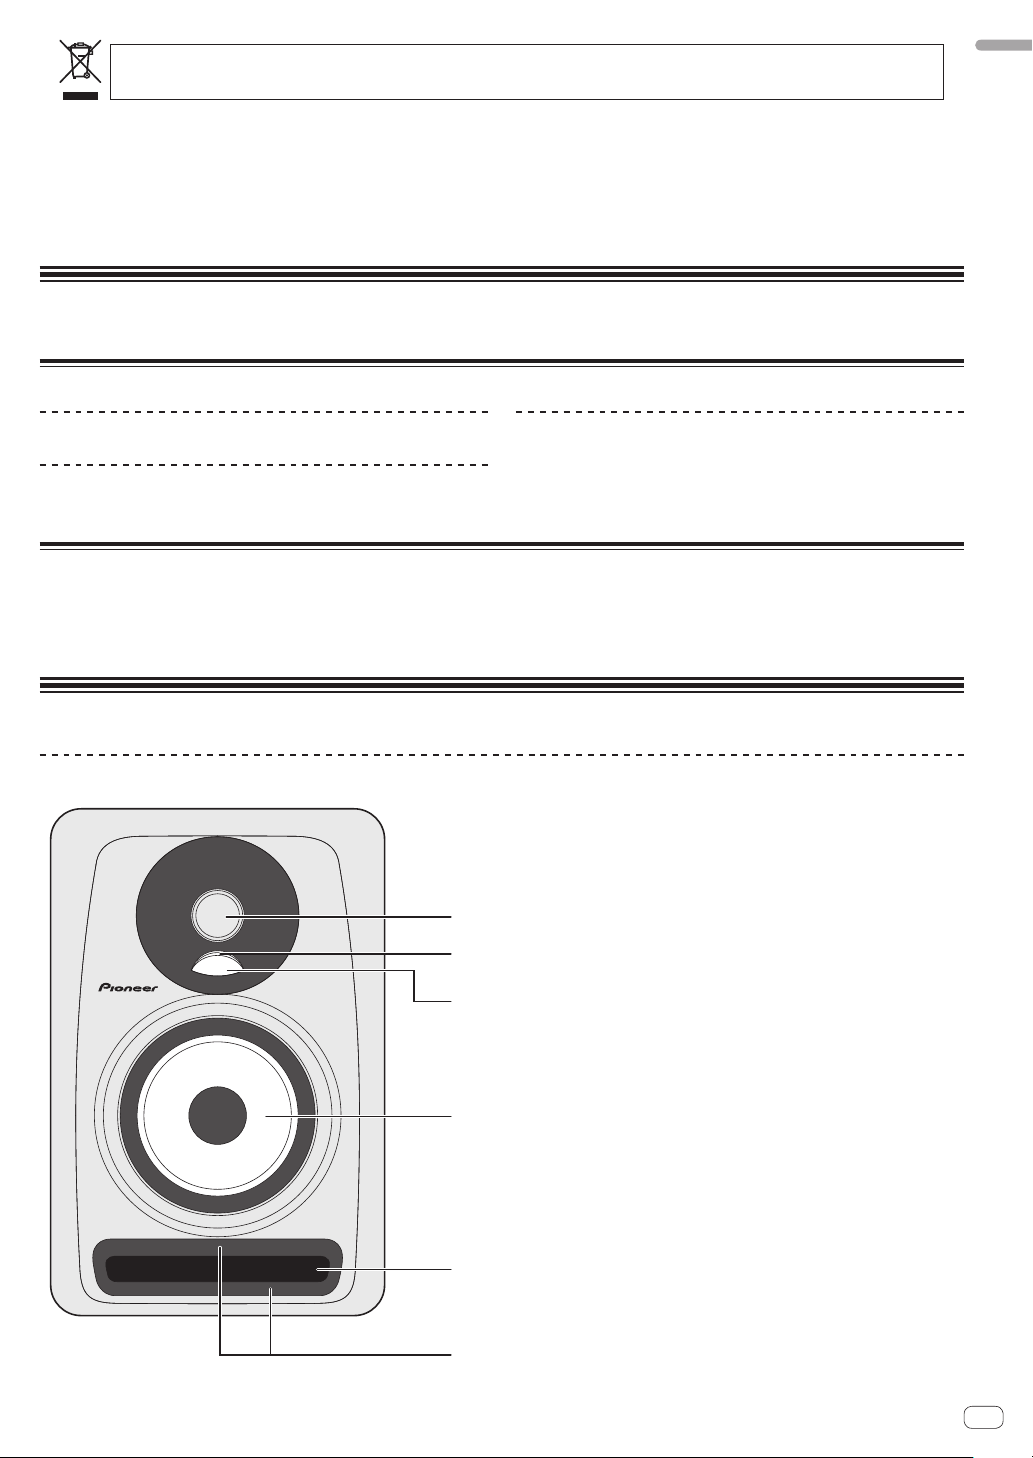
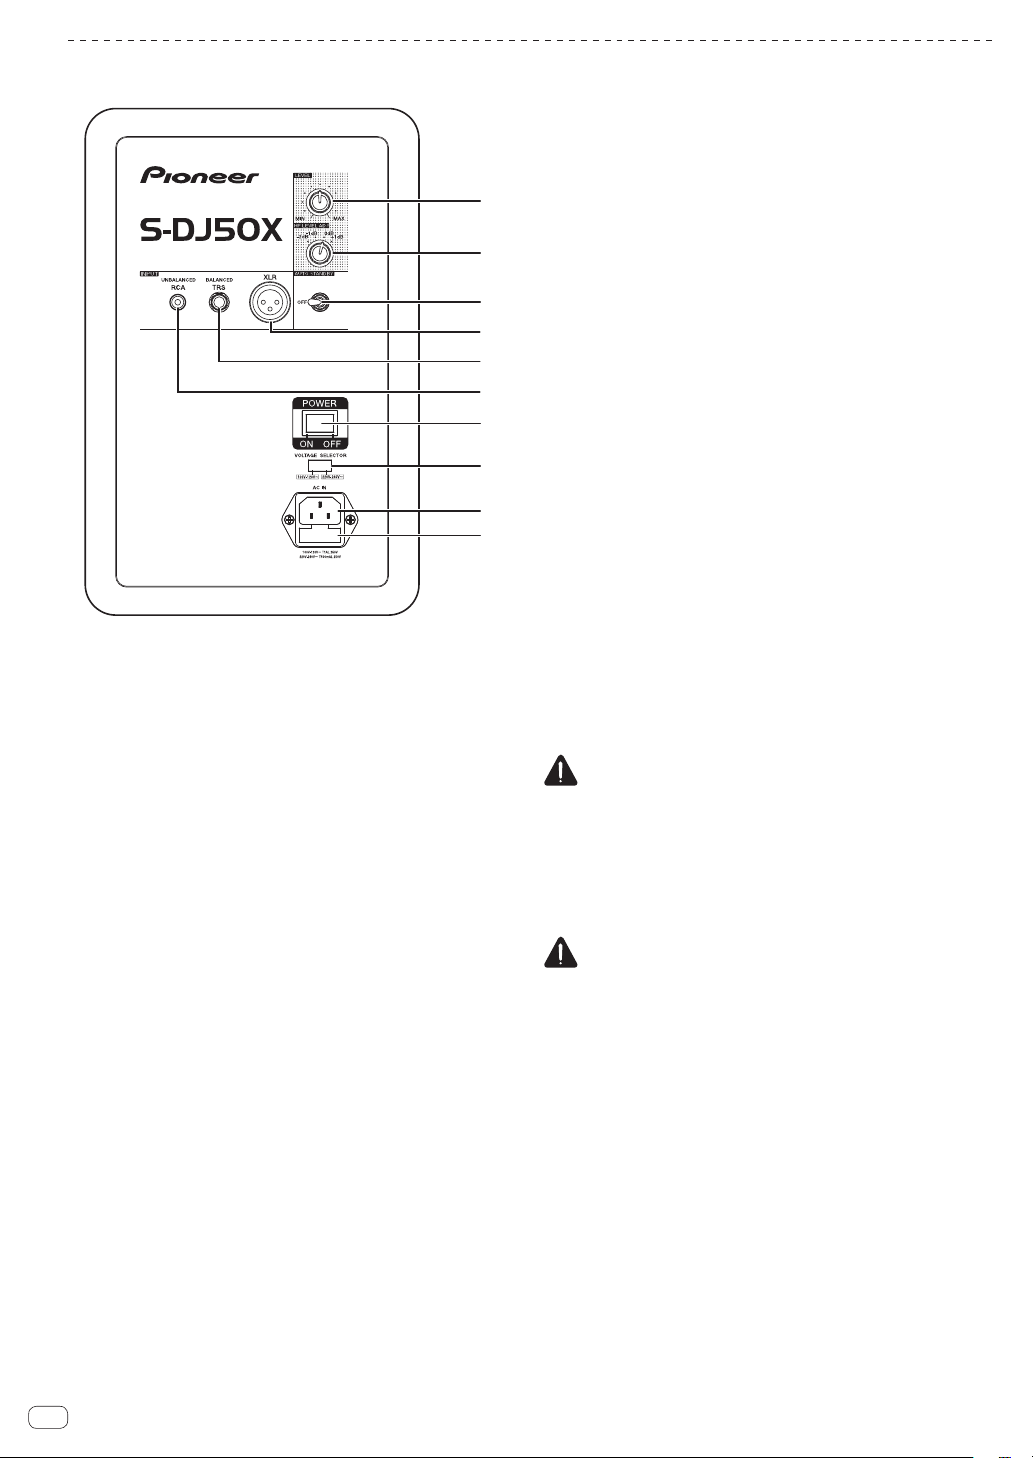
Names and Functions of Parts
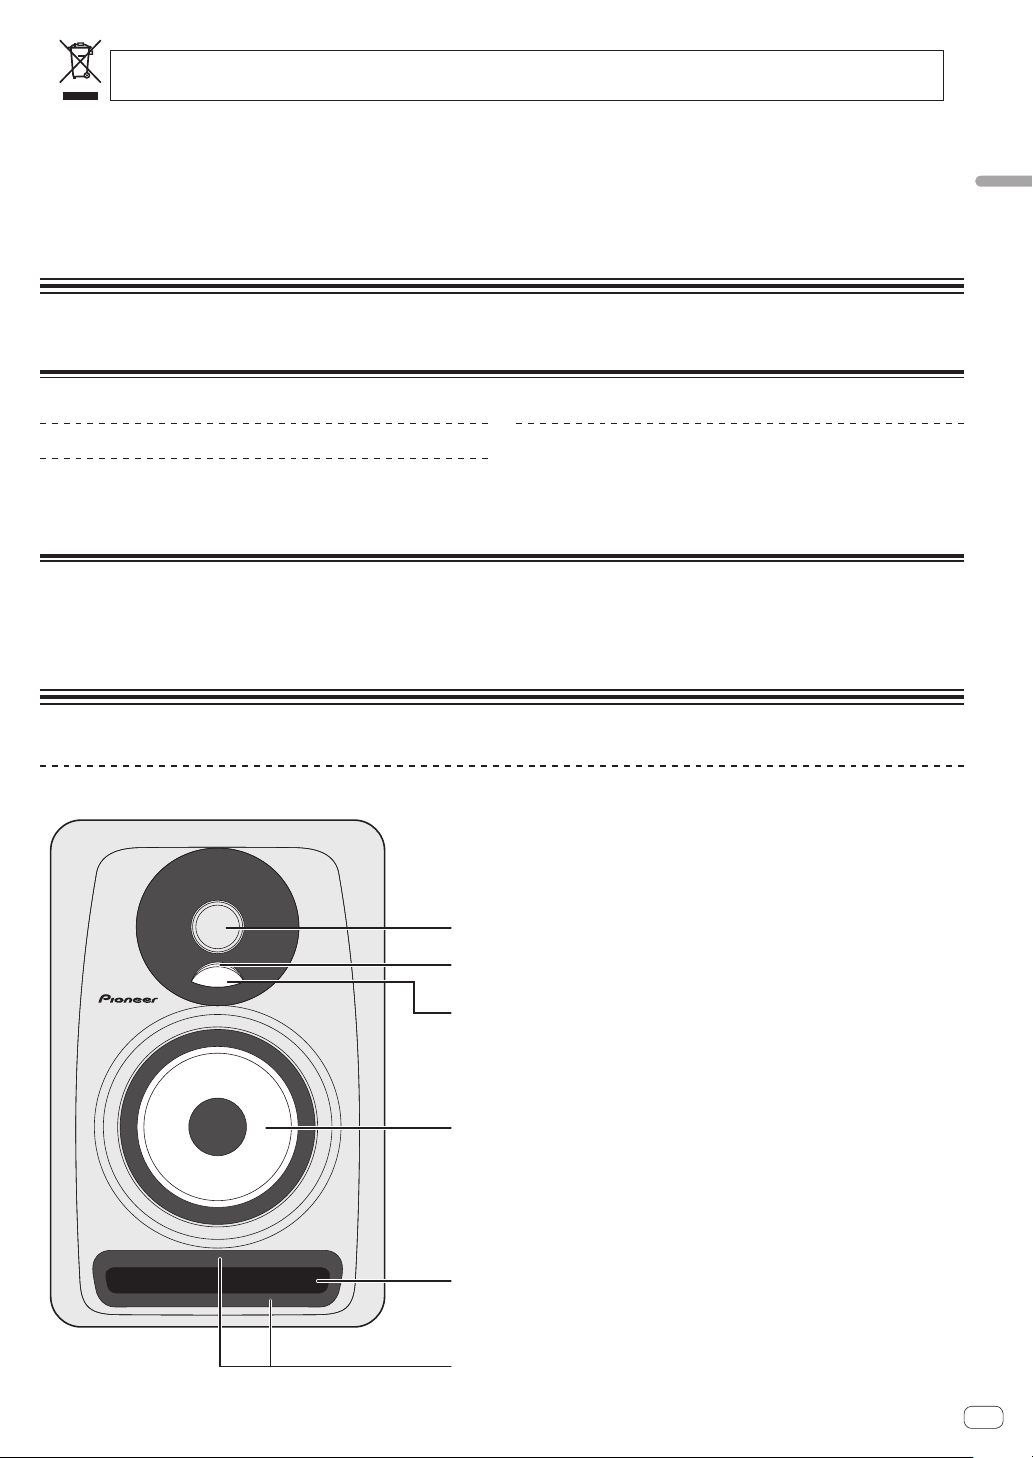
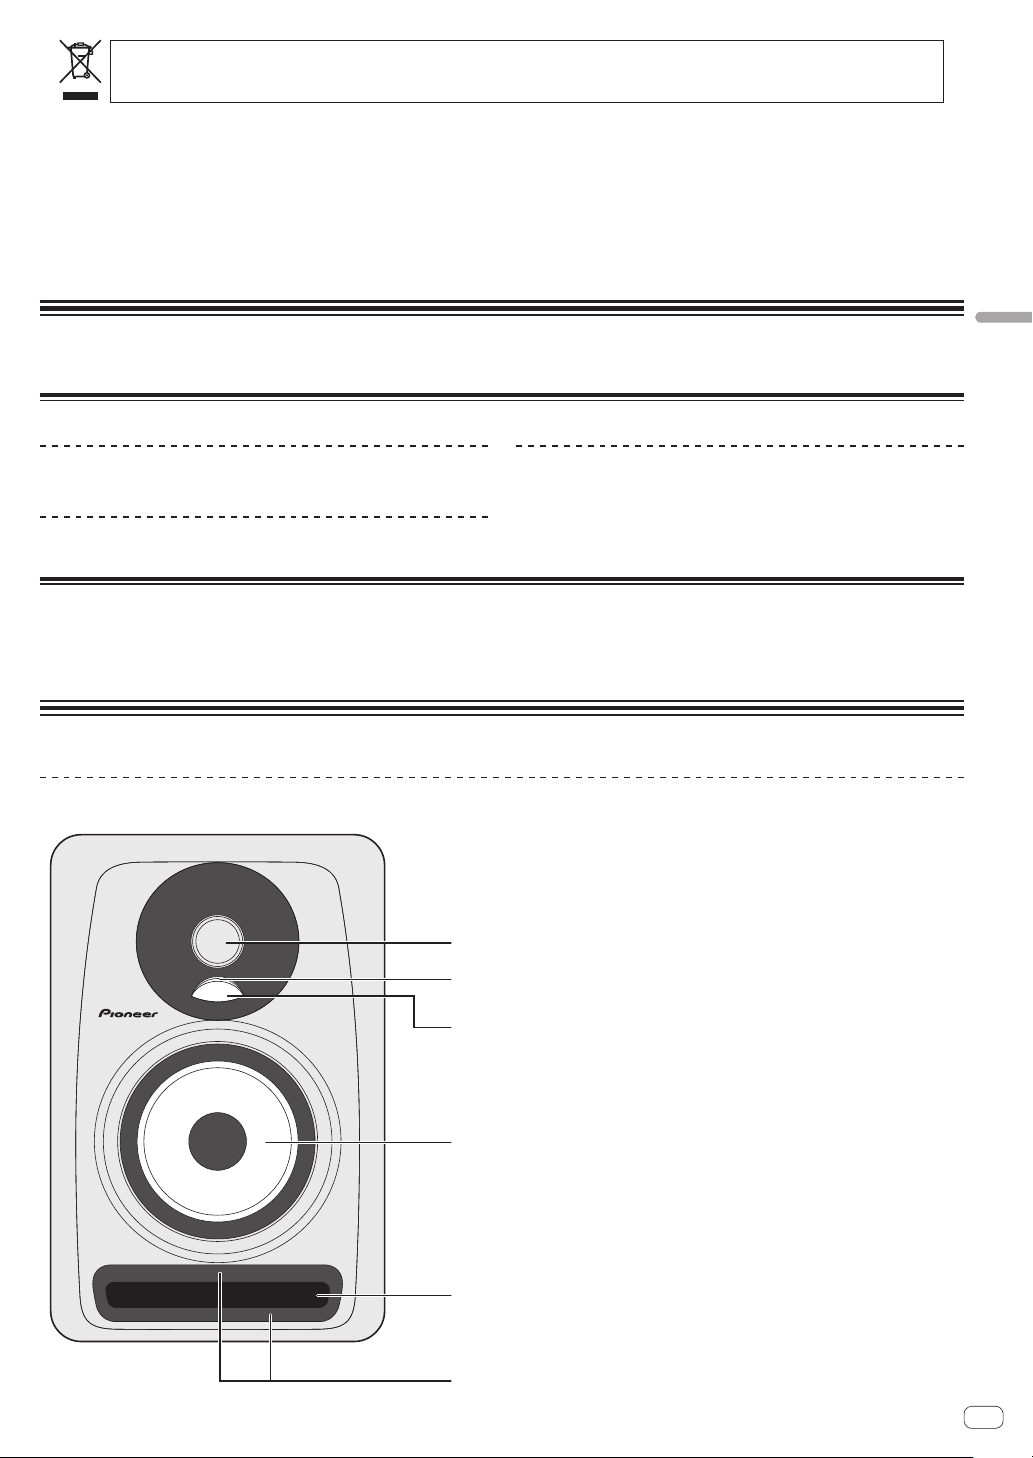
Front Panel Facilities
1-inch high-resolution soft dome tweeter
1
Illumination (POWER indicator)
2
Lights up according to whether the power is on or off. The
indicator does not light up when the speakers are in standby
1
2
3
4
mode.
Diffuser
3
Improves the directionality and diffusion of high-frequency
sounds.
Aramid fiber woofer
4
Light and extremely rigid cones provides the best bass
response.
Bass-reflex duct
5
Groove
6
Regulates the flow of air in the bass-reflex duct to enable
powerful low-frequency sounds with little loss in sound.
5
6
En
3
Page 4
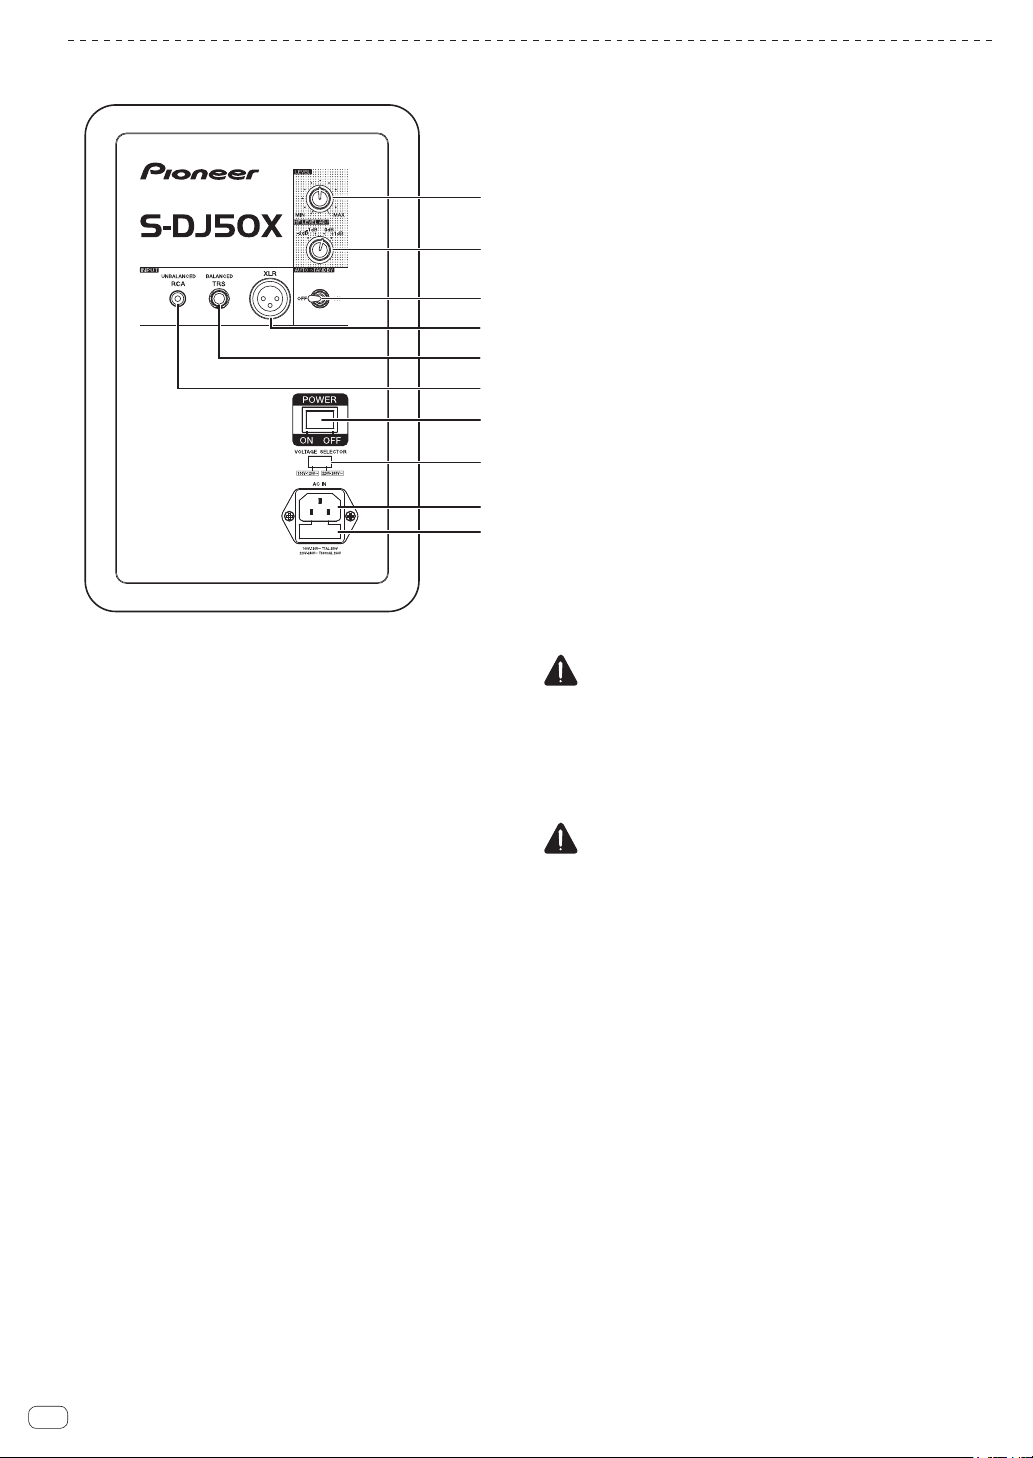
Rear Panel Facilities
* The S-DJ50X is shown in the illustration.
1
2
3
4
5
6
7
8
9
a
LEVEL dial
1
Use to adjust the sound level (volume).
HF LEVEL ADJ dial
2
Use to adjust high-frequency sounds.
You can select from –2 dB, –1 dB, 0 dB, and 1 dB.
AUTO STANDBY switch
3
Use to turn the auto standby function on or off.
When the auto standby function is turned on, the speakers
automatically enter standby mode if no input signal is
received for a certain period of time (approximately 25
minutes) and power consumption can be reduced. When
an input signal is received while the speakers are in standby
mode, the speakers will automatically resume from standby
mode.
•The illumination (POWER indicator) on the front panel turns
off when the speakers enter standby mode.
•When the input signal is weaker than a certain level, the
speakers may not automatically resume from standby
mode. In such cases, turn off the [
to use the speakers.
•To force the speakers to resume from standby mode, turn off
POWER
the [
on after a few seconds.
XLR INPUT connector
4
XLR type balanced input connector. The connector’s pin array
is as follows: No. 1 Ground, No. 2 Hot, and No. 3 Cold.
TRS INPUT jack
5
Balanced-input phone jack.
CAUTION
Do not connect to both the XLR INPUT connector and the TRS
INPUT jack at the same time.
RCA INPUT jack
6
RCA pin-type unbalanced input jacks.
POWER switch
7
Use to turn the power on and off.
CAUTION
Before turning on the power, make sure to check that the
VOLTAGE SELECTOR
[
for the country or region where the speakers will be used. If
VOLTAGE SELECTOR
the [
a Pioneer service center and request that the set voltage be
changed and the fuse be replaced. At the time of shipment, a
fuse with the appropriate voltage setting is set in the product.
When it becomes necessary to change the voltage setting, the
fuse must be replaced.
VOLTAGE SELECTOR switch
8
This switch is used to select the appropriate voltage settings
for the country/region of use. It is not to be used by the
customer directly.
AC IN
9
Connect the accessory power cord here and to an AC
power outlet. Do not plug in the power cord until all other
connections have been completed. Use only the furnished
accessory power cord.
Fuse holder
a
] switch on the rear panel once, and turn it back
] switch is set to the appropriate voltage
] switch is not correctly set, contact
AUTO STANDBY
] switch
En
4
Page 5
Installation and Connections
How to Install
English
A speaker’s playback sound is delicately influenced by
conditions in the listening room. To produce optimum listening
conditions, take due consideration of the conditions of your
installation location before beginning actual installation.
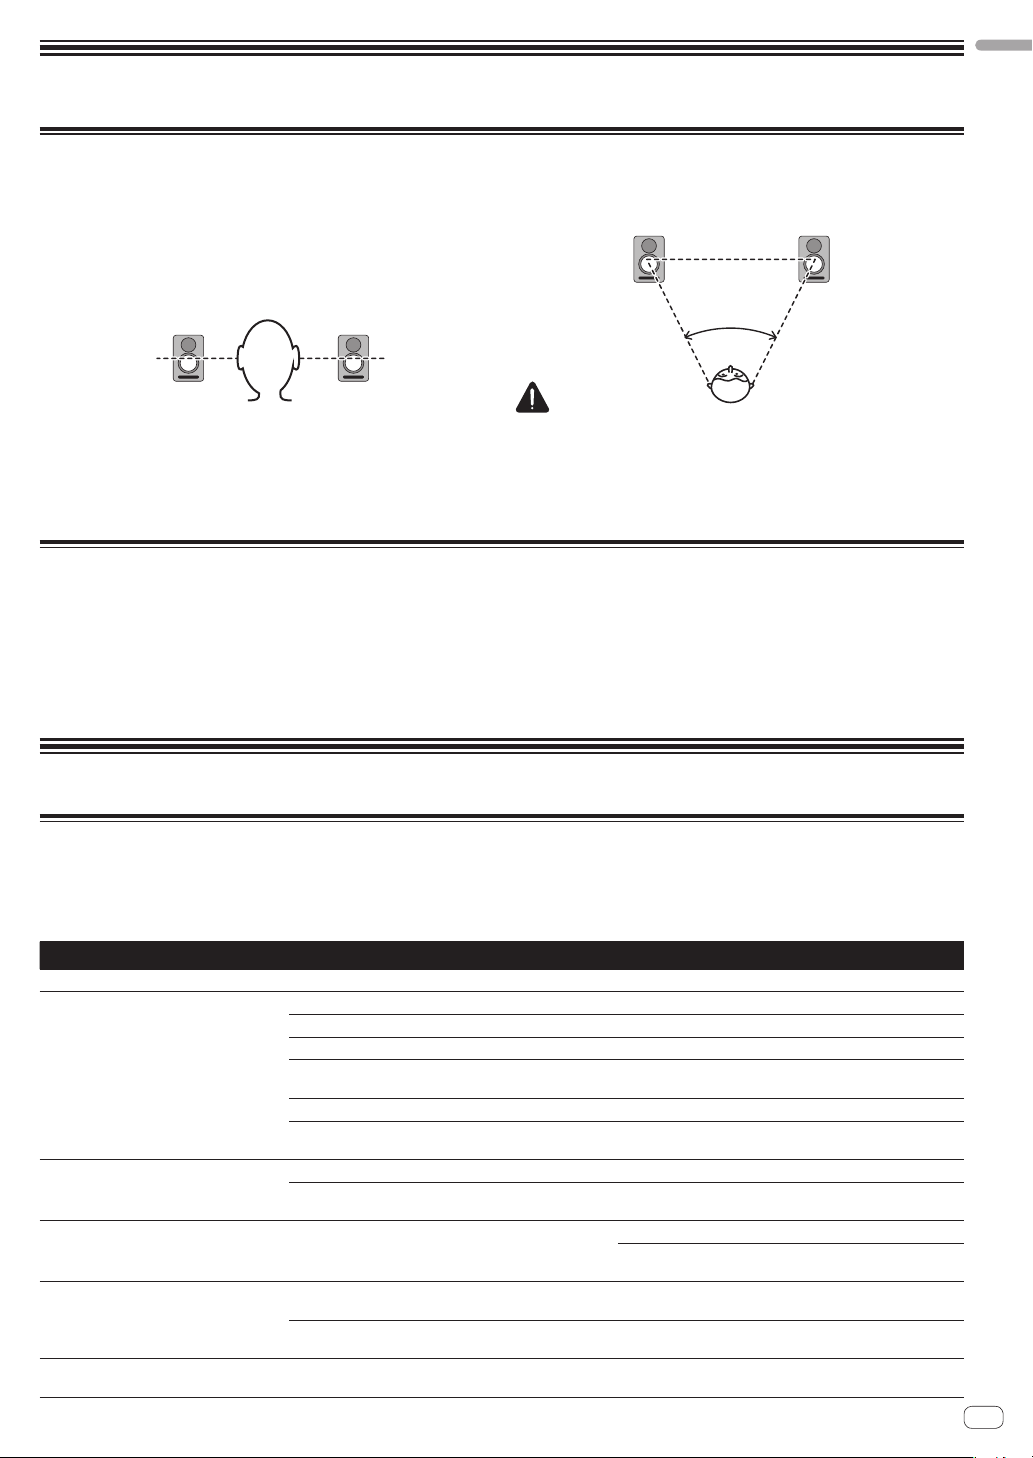
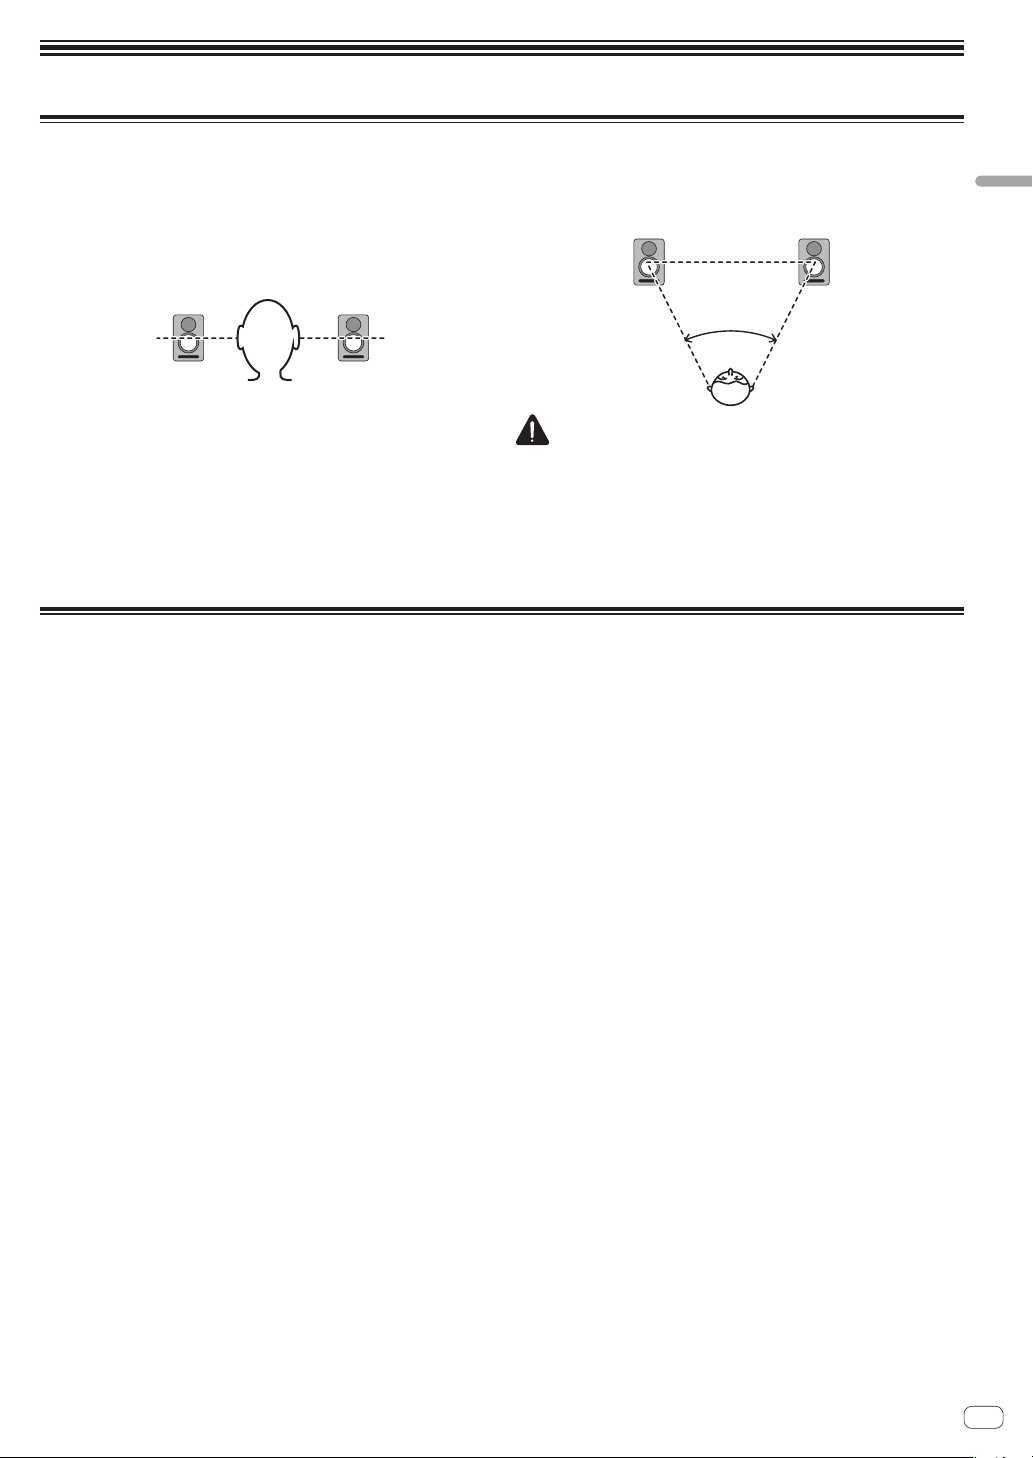
Place the speakers at ear level.
For a natural stereo effect, the right and left speakers should
be installed in symmetrical and equidistant positions from the
listening position.
Connections
When making or changing connections, always turn off the
power and disconnect the power cord from its outlet.
Also, be sure to read the operating instructions for the other
components to which you are connecting these speakers.
Do not plug in the power cord until all other connections have
been completed.
Use only the furnished accessory power cord.
Speakers should ideally be located at 30 ° angles from the
listening position (together forming a total 60 ° angle), and
rotated inward to face the listening position.
50 °~ 60 °
CAUTION
To promote proper cooling, please assure that sufficient space
is preserved between the speakers and nearby walls or other
components (minimum 30 cm or more above, behind, and to
right and left sides of each speaker). Leaving insufficient space
between the speaker and walls or other components may lead to
rising interior temperatures, leading to malfunction or damage.
• DonotconnecttoboththeXLRINPUTconnectorandtheTRS
INPUT jack at the same time.
• Makesuretosetthesoundlevelatanappropriatelevelas
the input signals to the XLR INPUT connector (or TRS INPUT
jack) and RCA INPUT jack will be mixed together, affecting the
sound level.
Additional Information
Troubleshooting
If you think you are experiencing a malfunction with this unit, check the following items. Also check other devices connected to the
unit. If the problem persists, consult your dealer for service.
On occasion, the unit may fail to operate properly due to static electricity or other external conditions. In this event, disconnect the
power cord and wait for five minutes or more, then reconnect the power cord and check for proper operation.
Symptom Items to Check Remedy
No power Is power cord connected properly? Connect power cord to outlet.
No sound from connected audio
devices, or sound is very small.
Illumination (POWER indicator)
remains turned off.
Speakers do not resume (turn on) from
standby mode.
Sound is distorted. Is the sound level set properly? Slowly turn the [
Feedback (continuous howling sound) Is the sound volume set properly? Slowly turn the [
Has connected audio device been set properly? Set device’s external input and sound volume properly.
Is connection cable connected properly? Connect cables properly.
Are connectors or plugs dirty? Clean connectors and plugs before connecting.
Is the sound volume set properly? Turn the [
Is the power turned on? Turn on the [
Is the auto standby function on? Turn off the [
Is the power turned on? Turn on the [
Is the auto standby function on? Turn off the [
Is the level of the input signal low? Increase the level of the input signal.
Is the output level of the connected audio device set
properly?
LEVEL
turn up the volume.
wait a few seconds, and then turn it back on.
wait a few seconds, and then turn it back on.
Turn off the [
auto standby function.
counterclockwise and turn down the volume.
Adjust the output level of the connected audio device
properly.
counterclockwise and turn down the volume.
] dial on the rear panel clockwise and
POWER
] switch on the rear panel.
POWER
] switch on the rear panel once,
POWER
] switch on the rear panel.
POWER
] switch on the rear panel once,
AUTO STANDBY
LEVEL
LEVEL
] switch to turn off the
] dial on the rear panel
] dial on the rear panel
En
5
Page 6
Trademarks
Pioneer is a registered trademark of PIONEER CORPORATION.
Other listed company names and a product name are the registered trademark of the companies or trademarks.
Specifications
S-DJ50X/S-DJ50X-W S-DJ60X S-DJ80X
Type Bi-amp 2-way active speaker
Amplifier
LF amp 30 W 50 W 70 W
HF amp 15 W 20 W 20 W
Input connectors (balanced input) XLR × 1, TRS (1/4 inch Phone) × 1
Input connectors (unbalanced input) RCA × 1
Impedance 10kΩ
Speaker
Enclosure Bass reflex
Enclosure material MDF
Woofer (LF driver) 13 cm cone 15 cm cone 20 cm cone
Tweeter (HF driver) 2.5 cm soft dome
Playback response 50 Hz to 20 kHz 45 Hz to 20 kHz 40 Hz to 20 kHz
Power unit/other
Supported voltages 100 V to 120 V (50 Hz to 60 Hz) / 220 V to 240 V (50 Hz to 60 Hz) conversion
Power consumption 100 W 140 W 160 W
Power consumption during standby
mode
External dimensions W × H × D 197 mm × 301 mm × 262 mm 228 mm × 342 mm × 295 mm 276 mm × 401 mm × 315 mm
Weight 6.5 kg 8.5 kg 11.8 kg
Specifications and design subject to possible modification without notice, due to improvements.
© 2013 PIONEER CORPORATION. All rights reserved.
0.5 W or less
En
6
Page 7

Page 8
Nous vous remercions d’avoir acheté ce produit Pioneer.
Veuillez lire attentivement ce mode d’emploi de manière à pouvoir utiliser votre modèle correctement. Après avoir lu ces
explications,conservez-les en lieu sûr pour éventuellement les consulter plus tard.
ATTENTION
POUR ÉVITER TOUT RISQUE D’ÉLECTROCUTION, NE
PAS ENLEVER LE COUVERCLE (NI LE PANNEAU
ARRIÈRE). AUCUNE PIÈCE RÉPARABLE PAR
L’UTILISATEUR NE SE TROUVE À L’INTÉRIEUR.
CONFIER TOUT ENTRETIEN À UN PERSONNEL
QUALIFIÉ UNIQUEMENT.
D3-4-2-1-1_B1_Fr
AVERTISSEMENT
Cet appareil n’est pas étanche. Pour éviter les risques
d’incendie et de décharge électrique, ne placez près de
lui un récipient rempli d’eau, tel qu’un vase ou un pot
de fleurs, et ne l’exposez pas à des gouttes d’eau, des
éclaboussures, de la pluie ou de l’humidité.
D3-4-2-1-3_A1_Fr
AVERTISSEMENT
Pour éviter les risques d’incendie, ne placez aucune
flamme nue (telle qu’une bougie allumée) sur
l’appareil.
D3-4-2-1-7a_A1_Fr
PRÉCAUTION DE VENTILATION
Lors de l’installation de l’appareil, veillez à laisser un
espace suffisant autour de ses parois de manière à
améliorer la dissipation de chaleur (au moins 30 cm sur
le dessus, 30 cm à l’arrière et 30 cm de chaque côté).
AVERTISSEMENT
Les fentes et ouvertures du coffret sont prévues pour la
ventilation, pour assurer un fonctionnement stable de
l’appareil et pour éviter sa surchauffe. Pour éviter les
risques d’incendie, ne bouchez jamais les ouvertures et
ne les recouvrez pas d’objets, tels que journaux, nappes
ou rideaux, et n’utilisez pas l’appareil posé sur un tapis
épais ou un lit.
D3-4-2-1-7b*_A1_Fr
Milieu de fonctionnement
Température et humidité du milieu de fonctionnement :
De +5 °C à +35 °C (de +41 °F à +95 °F) ; Humidité
relative inférieure à 85 % (orifices de ventilation non
obstrués)
N’installez pas l’appareil dans un endroit mal ventilé ou
un lieu soumis à une forte humidité ou en plein soleil
(ou à une forte lumière artificielle).
D3-4-2-1-7c*_A1_Fr
ATTENTION
L’interrupteur
POWER
de cet appareil ne coupe pas
complètement celui-ci de sa prise secteur. Comme le
cordon d’alimentation fait office de dispositif de
déconnexion du secteur, il devra être débranché au
niveau de la prise secteur pour que l’appareil soit
complètement hors tension. Par conséquent, veillez à
installer l’appareil de telle manière que son cordon
d’alimentation puisse être facilement débranché de
la prise secteur en cas d’accident. Pour éviter tout
risque d’incendie, le cordon d’alimentation sera
débranché au niveau de la prise secteur si vous
prévoyez une période prolongée de non utilisation
(par exemple avant un départ en vacances).
D3-4-2-2-2a*_A1_Fr
Ce produit est destiné à une utilisation domestique
générale. Toute panne due à une utilisation autre qu'à
des fins privées (comme une utilisation à des fins
commerciales dans un restaurant, dans un autocar
ou sur un bateau) et qui nécessite une réparation
sera aux frais du client, même pendant la période de
garantie.
K041_A1_Fr
Ne fixez pas ces enceintes sur une paroi ou au
plafond car leur chute pourrait causer des blessures.
SGK007*_A1_Fr
NOTE IMPORTANTE SUR LE CABLE
D’ALIMENTATION
Tenir le câble d’alimentation par la fiche. Ne pas
débrancher la prise en tirant sur le câble et ne pas
toucher le câble avec les mains mouillées. Cela risque
de provoquer un court-circuit ou un choc électrique. Ne
pas poser l’appareil ou un meuble sur le câble. Ne pas
pincer le câble. Ne pas faire de noeud avec le câble ou
l’attacher à d’autres câbles. Les câbles d’alimentation
doivent être posés de façon à ne pas être écrasés. Un
câble abîmé peut provoquer un risque d’incendie ou un
choc électrique. Vérifier le câble d’alimentation de
temps en temps. Contacter le service après-vente
PIONEER le plus proche ou le revendeur pour un
remplacement.
S002*_A1_Fr
AVERTISSEMENT
Cet appareil est muni d’une fiche de mise à la terre
(masse) à trois fils. Comme la fiche présente une
troisième broche (de terre), elle ne peut se brancher
que sur une prise de courant, prévue pour une mise à
la terre. Si vous n’arrivez pas à insérer la fiche dans la
prise de courant, contactez un électricien qualifié pour
faire remplacer la prise par une qui soit mise à la terre.
N’annulez pas la fonction de sécurité que procure cette
fiche de mise à la terre.
Fr
2
D3-4-2-1-6_A1_Fr
Page 9
Si vous souhaitez vous débarrasser de cet appareil, ne le mettez pas à la poubelle avec vos ordures ménagères. Il existe un système de
Les habitants des états membres de l’UE, de Suisse et de No
centres de collecte agréés ou à un détaillant (si vous rachetez un appareil similaire neuf).
Dans les pays qui ne sont pas mentionnés ci-dessus, veuillez contacter les autorités locales pour savoir comment vous pouvez vo
de vos appareils.
V
les impacts néfastes possibles sur l’environnement et la santé humaine
K058b_A1_Fr
collecte séparé pour les appareils électroniques usagés, qui doivent être récupérés, traités et recyclés conformément à la législation.
rvège peuvent retourner gratuitement leurs appareils électroniques usagés aux
us débarrasser
ous garantirez ainsi que les appareils dont vous vous débarrassez sont correctement récupérés, traités et recyclés et préviendrez de cette façon
.
Introduction
Caractéristiques principales
Français
Design optimisant la directivité et la spatialité du son.
Cône fibre d’aramide léger et extrêmement rigide afin d’offrir une
réponse optimale des basses.
Rainures sur la gaine bass-reflex améliorant la circulation de l’air
et permettant de réduire la perte de performances en matière de
reproduction des basses.
Confirmation de tous les accessoires
Cordon d’alimentation (1)
Moded’emploi(cedocument)
Carte de garantie
Nom et fonctions des éléments
Éléments du panneau avant
Haut-parleur d’aigus à dôme souple haute
1
résolution de 1 pouce
Éclairage (indicateur POWER)
2
S’allume suivant si l’appareil est sous tension ou hors
1
2
3
4
tension. L’indicateur se s’allume pas lorsque les enceintes
sont en mode Veille.
Diffuseur
3
Améliore la directivité et la diffusion des sons de haute
fréquence.
Haut-parleur de graves en fibres d’aramide
4
Cône léger et extrêmement rigide afin d’offrir une réponse
optimale des basses.
Gaine bass-reflex
5
Évent
6
Régule la circulation de l’air dans la gaine bass-reflex afin
d’émettre des sons de basse fréquence plus puissants avec
très peu de perte sonore.
5
6
Fr
3
Page 10

Éléments du panneau arrière
* L’illustration représente le S-DJ50X.
1
2
3
4
5
6
7
8
9
a
Molette LEVEL
1
Permet de régler le niveau sonore (volume).
Molette HF LEVEL ADJ
2
Permet de régler les sons de haute fréquence.
Vous pouvez sélectionner entre –2 dB, –1 dB, 0 dB et 1 dB.
Commutateur AUTO STANDBY
3
Permet d’activer ou de désactiver la fonction de veille
automatique.
Lorsque la fonction de veille automatique est activée, les
enceintes passent automatiquement en mode Veille si
aucun signal d’entrée n’est reçu pendant un certain temps
(environ 25 minutes) afin de réduire la consommation
électrique. Lorsqu’un signal d’entrée est reçu alors que
les enceintes sont en mode Veille, les enceintes quitteront
automatiquement le mode Veille.
•L’éclairage (indicateur POWER) sur le panneau avant
s’éteint lorsque les enceintes sont en mode Veille.
•Si la puissance du signal d’entrée est en dessous un certain
niveau, les enceintes ne quitteront pas automatiquement
le mode Veille. Dans ce cas, désactivez le commutateur
AUTO STANDBY
[
•Pour forcer les enceintes à quitter le mode Veille, désactivez
le commutateur [
réactivez-le après quelques secondes.
Connecteur XLR INPUT
4
Connecteur d’entrée symétrique de type XLR. L’agencement
desbrochesduconnecteurestcommesuit:N°1Masse,N°2
Point chaud et N° 3 Point froid.
Jack TRS INPUT
5
Prise casque d’entrée symétrique.
ATTENTION
Ne connectez pas simultanément au connecteur XLR INPUT et
au jack TRS INPUT.
Jack RCA INPUT
6
Prises d’entrée asymétrique de type à broche RCA.
Commutateur POWER
7
Permet de mettre sous tension ou hors tension.
ATTENTION
Avant de mettre l’appareil sous tension, vérifiez que le
commutateur [
appropriée au pays ou à la région où les enceintes sont
utilisées. Si le commutateur [
correctement réglé, contactez un service d’entretien agréé par
Pioneer et demandez à changer la tension réglée et à remplacer
le fusible. Un fusible ayant un réglage de tension appropriée
est installé dans le produit au moment de l’expédition. S’il est
nécessaire de changer le réglage de la tension, le fusible doit être
remplacé.
Commutateur VOLTAGE SELECTOR
8
Ce commutateur est utilisé pour sélectionner les réglages
de la tension appropriée en fonction du pays/de la région
d’utilisation. Il ne doit pas être utilisé directement par le
client.
AC IN
9
Branchez le cordon d’alimentation fourni comme accessoire
ici et sur une prise secteur. Ne branchez pas le cordon
d’alimentation avant que toutes les autres connexions
ne soient terminées. Utilisez uniquement le cordon
d’alimentation fourni comme accessoire.
Porte-fusible
a
] pour utiliser les enceintes.
POWER
] sur le panneau arrière, puis
VOLTAGE SELECTOR
VOLTAGE SELECTOR
] est réglé sur la tension
] n’est pas
Fr
4
Page 11
Installation et connexions
Méthode d’installation
Les sons reproduits par les enceintes sont influencés
délicatement par les conditions du local d’écoute. Pour
bénéficier d’un environnement d’écoute optimal, réfléchissez
bien aux conditions de l’emplacement avant de commencer
l’installation proprement dite.
Installez les haut-parleurs à hauteur des oreilles.
Pour obtenir un effet stéréo naturel, les enceintes gauche
et droite doivent être installées à des points symétriques et
équidistants de la position d’écoute.
Connexions
Avant d’effectuer ou de changer les connexions,
coupez toujours l’alimentation et débranchez le cordon
d’alimentation au niveau de la prise du secteur.
Veillez également à lire les explications relatives aux autres
composants auxquels ces enceintes seront raccordées.
Ne branchez pas le cordon d’alimentation avant que toutes
les autres connexions ne soient terminées.
Idéalement parlant, les enceintes doivent être placées à un
angle de 30 ° par rapport à la position d’écoute (formant
ensemble un angle de 60 °) et orientées vers l’intérieur et la
position d’écoute.
ATTENTION
Pour garantir un refroidissement adéquat, laissez suffisamment
d’espace entre les enceintes et les parois adjacentes ou d’autres
composants (au moins 30 cm au-dessus, derrière et sur les
deux côtés de chaque enceinte). Un espace insuffisant entre les
enceintes et les parois ou les autres composants peut provoquer
une hausse de la température interne, ce qui entraînerait un
mauvais fonctionnement, voire des dégâts.
Utilisez uniquement le cordon d’alimentation fourni comme
accessoire.
Ne connectez pas simultanément au connecteur XLR INPUT
et au jack TRS INPUT.
Assurez-vous que le niveau sonore est réglé sur un niveau
approprié car les signaux d’entrée vers le connecteur XLR
INPUT (ou le jack TRS INPUT) et le jack RCA INPUT seront
entrelacés, affectant le niveau sonore.
Français
50 °~ 60 °
Fr
5
Page 12

Informations complémentaires
Guide de dépannage
En présence d’une défaillance apparente de cet appareil, vérifiez les points suivants. Examinez aussi les autres composants
raccordés à cet appareil. Si le problème subsiste, consultez votre revendeur pour les réparations éventuelles.
Dans certains cas, il arrive que l’appareil ne fonctionne pas correctement à cause de l’électricité statique ou d’autres
circonstances externes. Dans ce cas, débranchez le cordon d’alimentation et attendez au moins 5 minutes, puis rebranchez le
cordon et vérifiez si l’appareil fonctionne correctement.
Symptôme Points à vérifier Solution
Pas d’alimentation Le cordon d’alimentation est-il correctement
Aucun son, ou seulement un son très
faible, ne provient des appareils audio
raccordés.
L’éclairage (indicateur POWER) reste
éteint.
Les enceintes ne quittent pas le mode
Veille (elles ne se rallument pas).
Le son est distordu. Le volume sonore est-il réglé correctement ? Tournez lentement la molette [
Rétroaction sonore (sifflement
continu)
branché ?
L’appareil audio raccordé est-il réglé correctement ? Réglez correctement l’entrée externe et le volume
Le câble de connexion est-il correctement branché ? Branchez correctement les câbles.
Les connecteurs ou les fiches sont-ils sales ? Nettoyez les connecteurs et les fiches avant leur
Le volume sonore est-il correctement réglé ? Tournez la molette [
L’appareil est-il sous tension ? Activez le commutateur [
La fonction de veille automatique est-elle activée ? Désactivez le commutateur [
L’appareil est-il sous tension ? Activez le commutateur [
La fonction de veille automatique est-elle activée ? Désactivez le commutateur [
Le niveau du signal d’entrée est-il faible ? Augmentez le niveau du signal d’entrée.
Le niveau de sortie de l’appareil audio raccordé est-il
correctement réglé ?
Le volume sonore est-il correctement réglé ? Tournez lentement la molette [
Branchez le cordon d’alimentation sur une prise
secteur.
sonore de l’appareil.
branchement.
le sens des aiguilles d’une montre et augmentez le
volume.
arrière.
arrière, attendez quelques secondes, puis réactivez-le.
arrière.
arrière, attendez quelques secondes, puis réactivez-le.
Désactivez le commutateur [
désactiver la fonction de veille automatique.
arrière dans le sens inverse des aiguilles d’une montre
et baissez le volume.
Ajustez correctement le niveau de sortie de l’appareil
audio raccordé.
arrière dans le sens inverse des aiguilles d’une montre
et baissez le volume.
LEVEL
] sur le panneau arrière dans
POWER
] sur le panneau
POWER
] sur le panneau
POWER
] sur le panneau
POWER
] sur le panneau
AUTO STANDBY
LEVEL
] sur le panneau
LEVEL
] sur le panneau
] pour
Fr
6
Page 13
Marques commerciales
Pioneer est une marque déposée de PIONEER CORPORATION.
Les autres noms de sociétés et noms de produits listés sont des marques commerciales déposées ou marques commerciales de leur
propriétaire respectif.
Caractéristiques techniques
S-DJ50X/S-DJ50X-W S-DJ60X S-DJ80X
Type Enceinte active bi-ampli 2 voies
Amplificateur
Amplificateur BF 30 W 50 W 70 W
Amplificateur HF 15 W 20 W 20 W
Connecteurs d’entrée
(entrée symétrique)
Connecteurs d’entrée
(entrée asymétrique)
Impédance 10kΩ
Enceinte
Caisson Bass-reflex
Matériauducaisson MDF
Haut-parleur de graves
(pilote de basse fréquence)
Haut-parleur d’aigus
(pilote de haute fréquence)
Réponse en lecture de 50 Hz à 20 kHz de 45 Hz à 20 kHz de 40 Hz à 20 kHz
Bloc d’alimentation / autres
Tensions prises en charge Conversion 100 V à 120 V (50 Hz à 60 Hz) / 220 V à 240 V (50 Hz à 60 Hz)
Consommation électrique 100 W 140 W 160 W
Consommation électrique en mode
Veille
Dimensions extérieures L × H × P 197 mm × 301 mm × 262 mm 228 mm × 342 mm × 295 mm 276 mm × 401 mm × 315 mm
Poids 6,5 kg 8,5 kg 11,8 kg
Les caractéristiques et la présentation peuvent être modifiées sans avis à fin d’amélioration.
© 2013 PIONEER CORPORATION. Tous droits de reproduction et de traduction réservés.
XLR × 1, TRS (casque 1/4 pouce) × 1
RCA × 1
Cône de 13 cm Cône de 15 cm Cône de 20 cm
Dôme souple de 2,5 cm
0,5 W max.
Français
Fr
7
Page 14
Wir danken Ihnen dafür, dass Sie sich für dieses Produkt von Pioneer entschieden haben.
Bitte lesen Sie diese Bedienungsanleitung vor der Inbetriebnahme aufmerksam durch, damit Sie die optimale Leistung von
diesem Produkt erzielen können. Bitte bewahren Sie diese Anleitung anschließend für spätere Bezugnahme griffbereit auf.
ACHTUNG
UM SICH NICHT DER GEFAHR EINES ELEKTRISCHEN
SCHLAGES AUSZUSETZEN, DÜRFEN SIE NICHT DEN
DECKEL (ODER DIE RÜCKSEITE) ENTFERNEN. IM
GERÄTEINNEREN BEFINDEN SICH KEINE VOM
BENUTZER REPARIERBAREN TEILE. ÜBERLASSEN
SIE REPARATUREN DEM QUALIFIZIERTEN
KUNDENDIENST.
D3-4-2-1-1_B1_De
WARNUNG
Dieses Gerät ist nicht wasserdicht. Zur Vermeidung der
Gefahr von Brand und Stromschlag keine Behälter mit
Flüssigkeiten (z.B. Blumenvasen und -töpfe) in die
Nähe des Gerätes bringen und dieses vor Tropfwasser,
Spritzwasser, Regen und Nässe schützen.
D3-4-2-1-3_A1_De
WARNUNG
Keine Quellen offener Flammen (z.B. eine brennende
Kerze) auf dieses Gerät stellen.
D3-4-2-1-7a_A1_De
VORSICHTSHINWEIS ZUR BELÜFTUNG
Bei der Aufstellung dieses Gerätes muss für einen
ausreichenden Freiraum gesorgt werden, um eine
einwandfreie Wärmeabfuhr zu gewährleisten
(mindestens 30 cm oberhalb des Gerätes, 30 cm hinter
dem Gerät und jeweils 30 cm an der Seite des Gerätes).
WARNUNG
Im Gerätegehäuse sind Ventilationsschlitze und andere
Öffnungen vorgesehen, die dazu dienen, eine
Überhitzung des Gerätes zu verhindern und einen
zuverlässigen Betrieb zu gewährleisten. Um
Brandgefahr auszuschließen, dürfen diese Öffnungen
auf keinen Fall blockiert oder mit Gegenständen (z.B.
Zeitungen, Tischdecken und Gardinen) abgedeckt
werden, und das Gerät darf beim Betrieb nicht auf
einem dicken Teppich oder Bett aufgestellt sein.
D3-4-2-1-7b*_A1_De
WARNUNG
Das Netzkabel dieses Gerätes ist mit einem dreipoligen
(einschließlich Erdungsstift) Netzstecker ausgestattet,
der ausschließlich für den Anschluss an eine (geerdete)
Schuko-Steckdose vorgesehen ist. Falls der Netzstecker
aufgrund einer abweichenden Ausführung nicht an die
Netzsteckdose angeschlossen werden kann, muss ein
Elektriker mit der Installation einer vorschriftsmäßigen
Netzsteckdose beauftragt werden. Beim Erdungsstift
handelt es sich um eine Sicherheitsvorrichtung, die auf
keinen Fall umgangen oder außer Kraft gesetzt werden
darf.
D3-4-2-1-6_A1_De
Betriebsumgebung
Betriebstemperatur und Betriebsluftfeuchtigkeit:
+5 °C bis +35 °C, 85 % rel. Feuchte max.
(Ventilationsschlitze nicht blockiert)
Eine Aufstellung dieses Gerät an einem unzureichend
belüfteten, sehr feuchten oder heißen Ort ist zu
vermeiden, und das Gerät darf weder direkter
Sonneneinstrahlung noch starken Kunstlichtquellen
ausgesetzt werden.
D3-4-2-1-7c*_A1_De
ACHTUNG
Der POWER-Schalter dieses Gerätes trennt das Gerät
nicht vollständig vom Stromnetz. Um das Gerät
vollständig vom Netz zu trennen, muss der
Netzstecker aus der Netzsteckdose gezogen werden.
Daher sollte das Gerät so aufgestellt werden, dass
stets ein unbehinderter Zugang zur Netzsteckdose
gewährleistet ist, damit der Netzstecker in einer
Notsituation sofort abgezogen werden kann. Um
Brandgefahr auszuschließen, sollte der Netzstecker
vor einem längeren Nichtgebrauch des Gerätes,
beispielsweise während des Urlaubs, grundsätzlich
von der Netzsteckdose getrennt werden.
D3-4-2-2-2a*_A1_De
Dieses Gerät ist für den Heimgebrauch vorgesehen.
Falls bei Einsatz zu einem anderem Zweck (z.B.
Langzeitgebrauch zu gewerblichen Zwecken in einem
Restaurant oder Betrieb in einem Fahrzeug bzw.
Schiff) eine Funktionsstörung auftritt, die eine
Reparatur des Gerätes erforderlich macht, werden
die Reparaturkosten dem Kunden selbst dann in
Rechnung gestellt, wenn die Garantiefrist noch nicht
abgelaufen ist.
K041_A1_De
Diese Lautsprecher dürfen auf keinen Fall an einer
Wand oder Decke montiert werden, da sie
Verletzungen verursachen können, wenn sie
herunterfallen.
SGK007*_A1_De
VORSICHT MIT DEM NETZKABEL
Fassen Sie das Netzkabel immer am Stecker. Ziehen Sie
nicht am Kabel selbst, und fassen Sie das Netzkabel
niemals mit nassen Händen an, da dies einen
Kurzschluss oder elektrischen Schlag verursachen
kann. Stellen Sie nicht das Gerät, Möbelstücke o.ä. auf
das Netzkabel; sehen Sie auch zu, dass es nicht
eingeklemmt wird. Machen Sie niemals einen Knoten
in das Netzkabel, und binden Sie es nicht mit anderen
Kabeln. Das Netzkabel sollte so gelegt werden, dass
niemand darauf tritt. Ein beschädigtes Netzkabel kann
einen Brand oder elektrischen Schlag verursachen.
Prüfen Sie das Netzkabel von Zeit zu Zeit. Sollte es
beschädigt sein, wenden Sie sich an Ihre nächste
autorisierte PIONEER-Kundendienststelle oder Ihren
Händler, um es zu ersetzen.
S002*_A1_De
De
2
Page 15
Mischen Sie dieses Produkt, wenn Sie es entsorgen wollen, nicht mit gewöhnlichen Haushaltsabfällen. Es gibt ein getrenntes
P
vorgesehenen Sammeleinrichtungen
kaufen).
Bitte wenden Sie sich in den Ländern
Ko
Auf diese
unter
K058b_A1_De
Sammelsystem für gebrauchte elektronische Produkte, über das die richtige Behandlung, Rückgewinnung und Wiederverwertung
gemäß der bestehenden Gesetzgebung gewährleistet wird.
rivathaushalte in den Mitgliedsstaaten der EU, in der Schweiz und in Norwegen können ihre gebrauchten elektronischen Produkte an
kostenfrei zurückgeben oder aber an einen Händler zurückgeben (wenn sie ein ähnliches neues Produkt
mmunalverwaltung.
Weise stellen Sie sicher, dass das zu entsorgende Produkt der notwendigen Behandlung, Rückgewinnung und Wiederverwertung
zogen wird, und so mögliche negative Einflüsse auf die Umwelt und die menschliche Gesundheit vermieden werden.
, die oben nicht aufgeführt sind, hinsichtlich der korrekten Verfahrensweise der Entsorgung an die örtliche
Einleitung
Hauptmerkmale
Dem Hornvorsatz (Wave Guide) wurde ein konvex geformter
Diffusor hinzugefügt, womit die Richtcharakteristik von
Hochfrequenztönen sowie die Klangdiffusion verbessert wird.
Die Subwoofermembran aus Aramidfaser ist sehr leicht und
äußerst robust und liefert die beste Basswiedergabe.
Die Öffnung am Bassreflexrohr reguliert den Luftstrom und
unterstützt die Erzeugung eines kraftvollen Basstons mit sehr
geringem Verlust.
Überprüfen des mitgelieferten Zubehörs
Netzkabel (1)
Bedienungsanleitung (dieses Dokument)
Garantiekarte
Bezeichnung und Funktion der Teile
Deutsch
Elemente der Frontplatte
1
2
3
4
5
6
Hochauflösender 1-Zoll-Weichkalottenhochtöner
1
Beleuchtung (POWER-Anzeige)
2
Leuchtet, je nach dem, ob das Gerät eingeschaltet ist. Die
Anzeige leuchtet nicht, wenn sich der Lautsprecher im
Standby-Modusbefindet.
Diffusor
3
Verbessert die Richtcharakteristik und die Klangdiffusion von
Hochfrequenztönen.
Aramidfaser-Subwoofer
4
DieseleichtenundäußerstrobustenMembranenlieferndie
beste Basswiedergabe.
Bassreflexrohr
5
Öffnung
6
Reguliert den Luftstrom im Bassreflexrohr, um einen
kraftvollen Basston mit sehr geringem Klangverlust zu
erzeugen.
De
3
Page 16
Elemente der Rückseite
*DieAbbildungzeigtdasModellS-DJ50X.
1
2
3
4
5
6
7
8
9
a
LEVEL-Regler
1
MitdiesemReglerwirdderKlangpegel(Lautstärke)
eingestellt.
HF LEVEL ADJ-Regler
2
MitdiesemReglerwerdendieHochfrequenztöneeingestellt.
Sie können zwischen –2 dB, –1 dB, 0 dB, und 1 dB wählen.
AUTO STANDBY-Schalter
3
MitdiesemSchalterwirddieautomatischeStandby-Funktion
ein- oder ausgeschaltet.
Wenn die automatische Standby-Funktion aktiviert ist,
schalten sich die Lautsprecher automatisch in den
Standby-Modus,wennfüreinenbestimmtenZeitraum
(ca.25Minuten)keinEingangssignalanliegt.Damitkann
der Energieverbrauch reduziert werden. Damit kann der
Energieverbrauch reduziert werden. Wenn die Lautsprecher
imStandby-ModuseinEingangssignalempfangen,setzensie
automatisch ihren normalen Betrieb fort.
•Die Beleuchtung (POWER-Anzeige) an der Frontplatte
erlischt,wenndieLautsprecherindenStandby-Modus
wechseln.
•Wenn das Eingangssignal einen bestimmten Pegel
unterschreitet, wechseln die Lautsprecher eventuell nicht
automatischvomStandby-ModusindennormalenBetrieb
zurück. Deaktivieren Sie in diesem Fall den [
Schalter, um die Lautsprecher verwenden zu können.
•Um zu erzwingen, dass die Lautsprecher aus dem Standby-
ModusindennormalenBetriebzurückkehren,schalten
Sie den [
einigen Sekunden wieder ein.
XLR INPUT-Anschluss
4
Bei diesem Anschluss handelt es sich um einen
symmetrischen XLR-Eingang. Die Pinbelegung ist
folgendermaßen:Nr.1Masse,Nr.2PlussignalundNr.3
Minussignal.
TRS INPUT-Buchse
5
Bei dieser Klinkenbuchse handelt es sich um eine
symmetrische Eingangsbuchse.
VORSICHT
Schließen Sie nicht gleichzeitig den XLR INPUT-Anschluss und
die TRS INPUT-Buchse an.
RCA INPUT-Buchse
6
Bei dieser Cinchbuchse handelt es sich um eine
unsymmetrische Eingangsbuchse.
POWER-Schalter
7
MitdiesemSchalterwirddasGerätein-bzw.ausgeschaltet.
VORSICHT
Bevor Sie die Stromversorgung einschalten, ist unbedingt
darauf zu achten, dass der [
auf die entsprechende Spannung für das Land oder die Region
eingestellt ist, wo der Lautsprecher verwendet werden soll. Wenn
VOLTAGE SELECTOR
der [
ist, wenden Sie sich an den Pioneer-Kundendienst und fordern
ein Ändern der eingestellten Spannung und den Austausch
der Sicherung an. Bei Auslieferung ist das Produkt mit einer
Sicherung mit der entsprechenden Spannungseinstellung
ausgestattet. Wenn die Spannungseinstellung geändert werden
muss, ist ebenfalls ein Austauschen der Sicherung erforderlich.
VOLTAGE SELECTOR-Schalter
8
Dieser Schalter dient zum Auswählen der geeigneten
Spannungseinstellung für das Land/die Region, wo das Gerät
verwendet werden soll. Er ist nicht für eine Bedienung durch
den Kunden vorgesehen.
AC IN
9
Verbinden Sie das Netzkabel mit dieser Buchse und
schließen Sie das andere Ende an eine Steckdose an.
Verbinden Sie das Netzkabel erst, nachdem alle anderen
Anschlüsse vorgenommen wurden. Verwenden Sie
ausschließlich das mitgelieferte Netzkabel.
Sicherungshalter
a
POWER
]-Schalter an der Rückseite aus und nach
VOLTAGE SELECTOR
]-Schalter nicht richtig eingestellt
AUTO STANDBY
]-Schalter
]-
De
4
Page 17

Installation und Anschlüsse
Installationsverfahren
Der Wiedergabeklang eines Lautsprechers wird durch die
akustischen Verhältnisse im Hörraum beeinflusst. Bitte
berücksichtigen Sie vor Beginn der Installation sorgfältig
die Bedingungen am Aufstellungsort, um eine optimale
Hörumgebung zu kreieren.
Stellen Sie die Lautsprecher auf Ohrenhöhe auf.
Idealerweise sollten die Lautsprecher jeweils in einem Winkel
von 30 ° zur Hörposition aufgestellt werden (so dass sie einen
Winkel von 60 ° zueinander bilden) und so nach innen gedreht
werden, dass sie direkt auf die Hörposition weisen.
Um einen natürlich wirkenden Stereoeffekt zu erzielen,
sollten der rechte und der linke Lautsprecher an einer
symmetrischen Position jeweils im gleichen Abstand von der
Hörposition aufgestellt werden.
Anschlüsse
Achten Sie unbedingt darauf, die Stromzufuhr auszuschalten
und den Netzstecker von der Netzsteckdose zu trennen, bevor
Anschlüsse hergestellt oder verändert werden.
Bitte achten Sie auch stets darauf, in den
Bedienungsanleitungen der anderen Komponenten
nachzuschlagen, an die diese Lautsprecher angeschlossen
werden.
Verbinden Sie das Netzkabel erst, nachdem alle anderen
Anschlüsse vorgenommen wurden.
50 °~ 60 °
VORSICHT
Um eine einwandfreie Wärmeabfuhr zu gewährleisten, sollte
ein ausreichender Abstand zwischen den Lautsprechern und
Wänden oder anderen Komponenten eingehalten werden
(mindestens jeweils 30 cm oberhalb und hinter jedem
Lautsprecher sowie auf beiden Seiten). Falls die Lautsprecher zu
nah nebeneinander, an einer Wand oder anderen Komponenten
aufgestellt werden, führt dies möglicherweise zu einem
Anstieg der Innentemperatur, der eine Funktionsstörung oder
Beschädigung zur Folge haben kann.
Verwenden Sie ausschließlich das mitgelieferte Netzkabel.
Schließen Sie nicht gleichzeitig den XLR INPUT-Anschluss
und die TRS INPUT-Buchse an.
Stellen Sie die Lautstärke auf einen geeigneten Pegel, da
die Eingangssignale für den XLR INPUT-Anschluss (oder die
TRS INPUT-Buchse) und die RCA INPUT-Buchse gemischt
werden und die Lautstärke beeinflussen.
Deutsch
De
5
Page 18

Zusätzliche Informationen
Störungsbeseitigung
Wenn Sie vermuten, dass eine Funktionsstörung dieses Gerätes vorliegt, überprüfen Sie bitte zunächst die Hinweise in der
nachstehenden Tabelle. Überprüfen Sie auch die anderen angeschlossenen Geräte. Falls sich die Störung nicht beseitigen lässt,
wenden Sie sich bitte zwecks Reparatur des Gerätes an Ihren Fachhändler.
In seltenen Fällen kann es vorkommen, dass das Gerät aufgrund der Einwirkung von statischer Elektrizität oder einer anderen
externen Ursache nicht mehr einwandfrei arbeitet. In einem solchen Fall trennen Sie den Netzstecker von der Netzsteckdose,
wartenSieca.fünfMinutenlang,schließenSiedasNetzkabeldannerneutanundüberprüfenSie,obdernormaleBetriebszustand
des Gerätes wiederhergestellt worden ist.
Störung Prüfpunkte Abhilfemaßnahme
Kein Strom Ist das Netzkabel einwandfrei angeschlossen? Schließen Sie das Netzkabel an eine Netzsteckdose an.
Kein Ton von angeschlossenen
Audiogeräten, oder die Lautstärke ist
extrem niedrig.
Die Beleuchtung (POWER-Anzeige)
bleibt ausgeschaltet.
Die Lautsprecher wechseln nicht
ausdemStandby-Modusinden
Betriebsmodus (schalten sich nicht ein).
Der Klang ist verzerrt. Ist der Klangpegel richtig eingestellt? Drehen Sie den [
Rückkopplung (kontinuierlicher
Heulton)
Ist das Audiogerät richtig eingestellt worden? Stellen Sie den externen Eingang und die Lautstärke
Ist das Verbindungskabel richtig angeschlossen? Schließen Sie die Kabel richtig an.
Sind die Buchsen oder Stecker verschmutzt? Reinigen Sie die Buchsen und Stecker, bevor Sie die
Ist die Lautstärke richtig eingestellt? Drehen Sie den [
Ist die Stromzufuhr eingeschaltet? Schalten Sie den [
Ist die automatische Standby-Funktion aktiviert? Schalten Sie den [
Ist die Stromzufuhr eingeschaltet? Schalten Sie den [
Ist die automatische Standby-Funktion aktiviert? Schalten Sie den [
Ist der Pegel des Eingangssignals zu niedrig? Erhöhen Sie den Pegel des Eingangssignals.
Ist der Ausgangspegel des angeschlossenen
Audiogerätes richtig eingestellt?
Ist die Lautstärke richtig eingestellt? Drehen Sie den [
des Audiogerätes richtig ein.
Anschlüsse herstellen.
Uhrzeigersinn und erhöhen Sie die Lautstärke.
ein.
aus und nach einigen Sekunden wieder ein.
ein.
aus und nach einigen Sekunden wieder ein.
Schalten Sie den [
die automatische Standby-Funktion zu deaktivieren.
langsam entgegen dem Uhrzeigersinn und reduzieren
Sie die Lautstärke.
Stellen Sie den Ausgangspegel des angeschlossenen
Audiogerätes richtig ein.
langsam entgegen dem Uhrzeigersinn und reduzieren
Sie die Lautstärke.
LEVEL
]-Regler an der Rückseite im
POWER
]-Schalter an der Rückseite
POWER
]-Schalter an der Rückseite
POWER
]-Schalter an der Rückseite
POWER
]-Schalter an der Rückseite
AUTO STANDBY
LEVEL
]-Regler an der Rückseite
LEVEL
]-Regler an der Rückseite
]-Schalter aus, um
De
6
Page 19

Warenzeichen
PioneeristeineingetragenesMarkenzeichenderPIONEERCORPORATION.
Andere hier aufgelistete Firmen- und Produktnamen sind eingetragene Warenzeichen der jeweiligen Firmen oder Warenzeichen.
Technische Daten
S-DJ50X/S-DJ50X-W S-DJ60X S-DJ80X
Ausführung Zweiverstärker-,2-Wege-Lautsprecher
Verstärker
NF-Verstärker 30 W 50 W 70 W
HF-Verstärker 15 W 20 W 20 W
Eingangsbuchsen
(symmetrischer Eingang)
Eingangsbuchsen
(unsymmetrischer Eingang)
Impedanz 10kΩ
Lautsprecher
Gehäuse Bassreflex
Gehäusematerial MDF
Subwoofer (NF-Treiber) 13cm-Membran 15cm-Membran 20cm-Membran
Hochtöner (HF-Treiber) 2,5 cm-Weichkalotte
Frequenzgang 50 Hz bis 20 kHz 45 Hz bis 20 kHz 40 Hz bis 20 kHz
Netzteil/Sonstiges
Unterstützte Spannungen 100 V bis 120 V (50 Hz bis 60 Hz) / 220 V bis 240 V (50 Hz bis 60 Hz) Umschaltung
Leistungsaufnahme 100 W 140 W 160 W
Leistungsaufnahme im Standby-
Modus
Außenabmessungen B × H × T 197 mm × 301 mm × 262 mm 228 mm × 342 mm × 295 mm 276 mm × 401 mm × 315 mm
Gewicht 6,5 kg 8,5 kg 11,8 kg
Die technischen Daten und das Design können sich aufgrund von Verbesserungen ohne Ankündigung ändern.
© 2013 PIONEER CORPORATION. Alle Rechte vorbehalten.
XLR×1,TRS(1/4-Zoll-Klinkenbuchse)×1
Cinch × 1
0,5 W oder weniger
Deutsch
De
7
Page 20

Vi ringraziamo per avere acquistato questo prodotto Pioneer.
Prima di usare il prodotto, leggere questo istruzioni per l’uso in modo da saperlo utilizzare correttamente. Finito di leggerle,
conservarle in un luogo sicuro per poterle riutilizzare in futuro.
ATTENZIONE
PER EVITARE IL RISCHIO DI SCOSSE ELETTRICHE,
NON RIMUOVERE IL COPERCHIO (O IL RETRO). NON
CI SONO PARTI INTERNE LA CUI MANUTENZIONE
POSSA ESSERE EFFETTUATA DALL’UTENTE. IN CASO
DI NECESSITÀ, RIVOLGERSI ESCLUSIVAMENTE A
PERSONALE DI SERVIZIO QUALIFICATO.
D3-4-2-1-1_B2_It
ATTENZIONE
Questo apparecchio non è impermeabile. Per prevenire
pericoli di incendi o folgorazioni, non posizionare nelle
vicinanze di questo apparecchio contenitori pieni di
liquidi (quali vasi da fiori, o simili), e non esporre
l’apparecchio a sgocciolii, schizzi, pioggia o umidità.
D3-4-2-1-3_A1_It
ATTENZIONE
Per evitare il pericolo di incendi, non posizionare
sull’apparecchio dispositivi con fiamme vive (ad
esempio una candela accesa, o simili).
D3-4-2-1-7a_A1_It
AVVERTENZA PER LA VENTILAZIONE
Installare l’apparecchio avendo cura di lasciare un
certo spazio all’intorno dello stesso per consentire una
adeguata circolazione dell’aria e migliorare la
dispersione del calore (almeno 30 cm sulla parte
superiore, 30 cm sul retro, e 30 cm su ciascuno dei lati).
ATTENZIONE
L’apparecchio è dotato di un certo numero di fessure e
di aperture per la ventilazione, allo scopo di garantirne
un funzionamento affidabile, e per proteggerlo dal
surriscaldamento. Per prevenire possibili pericoli di
incendi le aperture non devono mai venire bloccate o
coperte con oggetti vari (quali giornali, tovaglie, tende o
tendaggi, ecc.), e l’apparecchio non deve essere
utilizzato appoggiandolo su tappeti spessi o sul letto.
AVVERTENZA
L’interruttore principale (
POWER
non stacca completamente il flusso di corrente
elettrica dalla presa di corrente alternata di rete. Dal
momento che il cavo di alimentazione costituisce
l’unico dispositivo di distacco dell’apparecchio dalla
sorgente di alimentazione, il cavo stesso deve essere
staccato dalla presa di corrente alternata di rete per
sospendere completamente qualsiasi flusso di
corrente. Verificare quindi che l’apparecchio sia stato
installato in modo da poter procedere con facilità al
distacco del cavo di alimentazione dalla presa di
corrente, in caso di necessità. Per prevenire pericoli
di incendi, inoltre, il cavo di alimentazione deve
essere staccato dalla presa di corrente alternata di
rete se si pensa di non utilizzare l’apparecchio per
periodi di tempo relativamente lunghi (ad esempio,
durante una vacanza).
D3-4-2-1-7b*_A1_It
) dell’apparecchio
D3-4-2-2-2a*_A1_It
Condizioni ambientali di funzionamento
Gamma ideale della temperatura ed umidità
dell’ambiente di funzionamento:
da +5 °C a +35 °C, umidità relativa inferiore all‘85 %
(fessure di ventilazione non bloccate)
Non installare l’apparecchio in luoghi poco ventilati, o
in luoghi esposti ad alte umidità o alla diretta luce del
sole (o a sorgenti di luce artificiale molto forti).
D3-4-2-1-7c*_A1_It
ATTENZIONE
Questo apparecchio è dotato di una spina con messa a
terra, cioè di una spina con un terzo spinotto (per la
messa a terra). Questo tipo di spine si inserisce
solamente in prese di corrente dello stesso tipo, cioè
con attacco per messa a terra. Se non si riesce ad
inserire la spina nella presa di corrente di casa,
rivolgersi ad un elettricista qualificato per far sostituire
la presa alla parete con una dotata di attacco per la
messa a terra. Non annullare la scopo di sicurezza della
spina con messa a terra.
D3-4-2-1-6_A1_It
Questo prodotto è destinato esclusivamente all'uso
domestico. Eventuali disfunzioni dovute ad usi diversi
(quali uso prolungato a scopi commerciali, in
ristoranti, o uso in auto o su navi) e che richiedano
particolari riparazioni, saranno a carico dell'utente,
anche se nel corso del periodo di garanzia.
K041_A1_It
Non applicare questi diffusori ad un muro o ad un
soffitto, dato che una eventuale caduta potrebbe
causare ferimenti.
SGK007*_A1_It
AVVERTIMENTO RIGUARDANTE IL FILO DI
ALIMENTAZIONE
Prendete sempre il filo di alimentazione per la spina.
Non tiratelo mai agendo per il filo stesso e non toccate
mai il filo con le mani bagnati, perchè questo potrebbe
causare cortocircuiti o scosse elettriche. Non collocate
l’unità, oppure dei mobili sopra il filo di alimentazione e
controllate che lo stesso non sia premuto. Non
annodate mai il filo di alimentazione nè collegatelo con
altri fili. I fili di alimentazione devono essere collocati in
tal modo che non saranno calpestati. Un filo di
alimentazione danneggiato potrebbe causare incendi o
scosse elettriche. Controllate il filo di alimentazione
regolarmente. Quando localizzate un eventuale danno,
rivolgetevi al più vicino centro assistenza autorizzato
della PIONEER oppure al vostro rivenditore per la
sostituzione del filo di alimentazione.
S002*_A1_It
It
2
Page 21

Se si vuole eliminare questo prodotto, non gettarlo insieme ai rifiuti domestici. Esiste un sistema di raccolta differenziata in conformità
I privati cittadini dei paesi membri dell’UE, di Svizzera e No
se
Pe
In questo modo
potenzialmente negativi sull’ambiente e sulla vita dell’uom
K058b_A1_It
alle leggi che richiedono appositi trattamenti, recupero e riciclo.
rvizi di raccolta o a un rivenditore (se si desidera acquistarne uno simile).
r i paesi non citati qui sopra, si prega di prendere contatto con le autorità locali per il corretto metodo di smaltimento.
, si è sicuri che il proprio prodotto eliminato subirà il trattamento, il recupero e il riciclo necessari per prevenire gli effetti
rvegia, possono restituire senza alcun costo i loro prodotti elettronici usati ad appositi
o.
Introduzione
Caratteristiche principali
Il diffusore a guida d’onda migliora la direzionalità del suono e
garantisce un campo sonoro ampio.
Il cono in fibra aramidica è leggero ma molto rigido, per garantire
la resa migliore dei bassi.
Le scanalature sul condotto del bass-reflex migliorano il flusso
d’aria e garantiscono prestazioni ideali senza perdita delle
frequenze basse.
Controllo degli accessori in dotazione
Cavo di alimentazione (1)
Istruzioni per l’uso (questo documento)
Scheda di garanzia
Nome e funzione delle varie parti
Caratteristiche del pannello anteriore
Tweeter a cupola morbida da 1” ad alta risoluzione
1
Illuminazione (indicatore POWER)
2
Si illumina a seconda che l’unità sia accesa o spenta.
L’indicatore non si illumina quando i diffusori sono in
1
2
3
4
modalità standby.
Diffusore
3
Miglioraladirezionalitàeladiffusionedellealtefrequenze.
Woofer in fibra aramidica
4
I coni leggeri ed estremamente rigidi garantiscono una resa
migliore dei bassi.
Condotto del bass-reflex
5
Raccordo del reflex
6
Regola il flusso dell’aria nel condotto del bass-reflex
consentendo di ottenere bassi potenti senza perdite sonore
significative.
Italiano
5
6
It
3
Page 22

Caratteristiche del pannello posteriore
1
2
3
4
5
6
7
8
9
a
* L’illustrazione rappresenta il modello S-DJ50X.
Manopola LEVEL
1
Consente di controllare il livello (volume) audio.
Manopola HF LEVEL ADJ
2
Consente di regolare le alte frequenze.
È possibile selezionare un livello tra –2 dB, –1 dB, 0 dB e 1 dB.
Interruttore AUTO STANDBY
3
Consente di attivare o disattivare la funzione auto standby.
Quando la funzione auto standby è attiva, i diffusori entrano
automaticamente in modalità standby se non viene ricevuto
nessun segnale per un certo periodo di tempo (circa 25
minuti) riducendo il consumo energetico. Se i diffusori
ricevono un segnale mentre sono in modalità standby,
usciranno automaticamente dalla modalità standby.
•Quando i diffusori entrano in modalità standby,
l’illuminazione (indicatore POWER) del pannello anteriore si
spegne.
•Se il segnale risulta inferiore ad un determinato livello, i
diffusori potrebbero non uscire automaticamente dalla
modalità standby. In questo caso, spegnere l’interruttore
AUTO STANDBY
[
•Per forzare i diffusori ad uscire dalla modalità standby,
spegnere l’interruttore [
quindi riaccenderlo dopo qualche secondo.
Connettore XLR INPUT
4
Connettore di ingresso bilanciato di tipo XLR. La distribuzione
dei piedini del connettore è la seguente: N. 1, terra, N. 2, sotto
tensione, e N. 3, non sotto tensione.
Presa TRS INPUT
5
Spinotto fono di ingresso bilanciato.
ATTENZIONE
Non collegare il connettore XLR INPUT e la Presa TRS INPUT allo
stesso tempo.
Presa RCA INPUT
6
Presa di ingresso sbilanciata RCA a spillo.
Interruttore POWER
7
Consente di accendere o spegnere questa unità.
ATTENZIONE
Prima di accendere l’unità, verificare che l’interruttore
VOLTAGE SELECTOR
[
per il paese o la regione dove si utilizzeranno i diffusori. Se
l’interruttore [
impostato, contattare il Centro assistenza Pioneer richiedendo
l’impostazione corretta della tensione e la sostituzione del
fusibile. Al momento della spedizione, un fusibile della
tensione appropriata è installato nel prodotto. Il fusibile deve
essere sostituito nel caso in cui sia necessario modificare
l’impostazione della tensione.
Interruttore VOLTAGE SELECTOR
8
Questo interruttore consente di selezionare la tensione
appropriata per il paese/regione di utilizzo del prodotto. Non
deve essere utilizzato direttamente dall’utente.
AC IN
9
Collegare il cavo di alimentazione in dotazione qui e ad
una presa di corrente alternata. Non collegare il cavo di
alimentazione prima di aver completato i collegamenti. Usare
solo il cavo di alimentazione in dotazione.
Alloggiamento fusibile
a
VOLTAGE SELECTOR
] per utilizzare i diffusori.
POWER
] sul pannello posteriore,
] sia impostato sulla tensione appropriata
] non è correttamente
It
4
Page 23

Installazione e collegamenti
Come installare l’unità
La riproduzione di un diffusore viene influenzata dalle condizioni
presenti nella stanza di ascolto. Per ottenere condizioni di
ascolto ottimali, tenere in considerazione le caratteristiche di
ambiente prima di iniziare l’installazione.
Posizionare i diffusori a livello degli orecchi.
Per ottenere un effetto stereo naturale, installare i diffusori di
sinistra e destra in posizioni simmetriche ed equidistanti dalla
posizione di ascolto.
Collegamenti
Prima di fare o modificare i collegamenti, spegnere sempre
questa unità e scollegarne il cavo di alimentazione dalla presa
di corrente alternata.
Non mancare inoltre di leggere le istruzioni per l’uso degli
altri componenti da collegare a questi diffusori.
Non collegare il cavo di alimentazione prima di aver
completato i collegamenti.
I diffusori dovrebbero trovarsi a 30 ° dalla posizione di ascolto,
formando insieme un angolo di 60 °, ed essere diretti verso la
posizione di ascolto stessa.
50 °~ 60 °
ATTENZIONE
Per facilitare il raffreddamento, controllare che ci sia spazio
sufficiente fra i diffusori e le pareti vicine o altri componenti
(almeno 30 cm sopra, dietro e sui due lati di ciascun diffusore).
Lasciando spazio insufficiente fra i diffusori ed i muri o altri
componenti si possono causare surriscaldamenti, e quindi
malfunzionamenti o guasti.
Usare solo il cavo di alimentazione in dotazione.
Non collegare il connettore XLR INPUT e la Presa TRS INPUT
allo stesso tempo.
Assicurarsi di impostare un livello sonoro appropriato, in
quanto i segnali in entrata al connettore XLR INPUT (o al
Presa TRS INPUT) e al connettore di ingresso RCA possono
mescolarsi influenzando il livello sonoro.
Italiano
It
5
Page 24

Informazioni supplementari
Diagnostica
Se si ritiene che questa unità non funzioni bene, controllare quanto segue. Controllare anche gli altri dispositivi collegati a questa
unità. Se il problema persiste, consultare il vostro negoziante di fiducia.
In altre occasioni, questa unità potrebbe non funzionare a dovere a causa di elettricità statica o altri fattori. In tal caso, scollegare
il cavo di alimentazione ed attendere cinque minuti o più, poi ricollegare il cavo e controllare che l’unità funzioni a dovere.
Problema Controlli da fare Rimedio
L’unità non si accende. Il cavo di alimentazione è collegato bene? Collegare il cavo di alimentazione ad una presa di
Nessun suono dai dispositivi collegati,
o il volume è molto basso.
L’illuminazione (indicatore POWER)
rimane disattivata.
I diffusori non escono dalla modalità
standby (non si attivano).
Il suono è distorto. Il livello audio è corretto? Ruotare lentamente la leva [
Feedback (un sibilo continuo) Il livello audio è corretto? Ruotare lentamente la leva [
Il dispositivo audio collegato è bene installato? Impostare correttamente l’ingresso esterno e il volume
Il cavo di collegamento è collegato correttamente? Collegare correttamente i cavi.
I connettori o gli spinotti sono sporchi?
Il livello audio è corretto? Ruotare la leva [
Il sistema è acceso? Accendere l’interruttore [
La funzione auto standby è attivata? Spegnere l’interruttore [
Il sistema è acceso? Accendere l’interruttore [
La funzione auto standby è attivata? Spegnere l’interruttore [
Il livello del segnale in ingresso è basso? Aumentare il livello del segnale in ingresso.
Il livello di uscita del dispositivo audio esterno è
corretto?
corrente.
di uscita del dispositivo.
Pulire i connettori e gli spinotti prima di procedere con i
collegamenti.
orario e abbassare il volume.
posteriore.
posteriore, attendere alcuni secondi, quindi accenderlo
di nuovo.
posteriore.
posteriore, attendere alcuni secondi, quindi accenderlo
di nuovo.
Spegnere l’interruttore [
disattivare la funzione auto standby.
posteriore in senso antiorario e abbassare il volume.
Regolare il livello di uscita del dispositivo audio
collegato.
posteriore in senso antiorario e abbassare il volume.
LEVEL
] del pannello posteriore in senso
POWER
] del pannello
POWER
] del pannello
POWER
] del pannello
POWER
] del pannello
AUTO STANDBY
LEVEL
] del pannello
LEVEL
] del pannello
] per
It
6
Page 25

Marchi di fabbrica
Pioneer è un marchio di fabbrica depositato della PIONEER CORPORATION.
Tutti gli altri nomi di società e nomi di prodotti sono marchi registrati o marchi dei rispettivi proprietari.
Dati tecnici
S-DJ50X/S-DJ50X-W S-DJ60X S-DJ80X
Tipo Diffusore attivo a 2 vie bi-amp
Amplificatore
Amplificatore LF 30 W 50 W 70 W
Amplificatore HF 15 W 20 W 20 W
Connettori d’ingresso
(ingresso bilanciato)
Connettori d’ingresso
(ingresso sbilanciato)
Impedenza 10kΩ
Diffusore
Cassa Bass reflex
Materialecassa MDF
Woofer (driver LF) Cono da 13 cm Cono da 15 cm Cono da 20 cm
Tweeter (driver HF) Cupola morbida da 2,5 cm
Risposta in frequenza Da 50 Hz a 20 kHz Da 45 Hz a 20 kHz Da 40 Hz a 20 kHz
Unità di potenza/altro
Tensioni supportate Conversione 100 V a 120 V (50 Hz a 60 Hz) / 220 V a 240 V (50 Hz a 60 Hz)
Consumo 100 W 140 W 160 W
Consumo durante modalità standby 0,5 W o meno
Dimensioni esterne L × A × P 197 mm × 301 mm × 262 mm 228 mm × 342 mm × 295 mm 276 mm × 401 mm × 315 mm
Peso 6,5 kg 8,5 kg 11,8 kg
Caratteristiche tecniche e design sono soggetti a modifiche senza preavviso a causa di migliorie.
© 2013 PIONEER CORPORATION. Tutti i diritti riservati.
XLR × 1, TRS (fono da 1/4”) × 1
RCA × 1
Italiano
It
7
Page 26

Hartelijk dank voor de aanschaf van dit Pioneer product.
Lees de handleiding aandachtig door zodat u volledig op de hoogte bent van de bediening en werking. Bewaar de handleiding
op een veilige plaats voor eventuele naslag in de toekomst.
LET OP
OM HET GEVAAR VOOR EEN ELEKTRISCHE SHOCK TE
VOORKOMEN, DEKSEL (OF RUG) NIET
VERWIJDEREN. AAN DE BINNENZIJDE BEVINDEN
ZICH GEEN ELEMENTEN DIE DOOR DE GEBRUIKER
KUNNEN BEDIEND WORDEN. ENKEL DOOR
GEKWALIFICEERD PERSONEEL TE BEDIENEN.
D3-4-2-1-1_B2_Nl
WAARSCHUWING
Dit apparaat is niet waterdicht. Om brand of een
elektrische schok te voorkomen, mag u geen voorwerp
dat vloeistof bevat in de buurt van het apparaat zetten
(bijvoorbeeld een bloemenvaas) of het apparaat op
andere wijze blootstellen aan waterdruppels,
opspattend water, regen of vocht.
D3-4-2-1-3_A1_Nl
WAARSCHUWING
Om brand te voorkomen, mag u geen open vuur (zoals
een brandende kaars) op de apparatuur zetten.
D3-4-2-1-7a_A1_Nl
BELANGRIJKE INFORMATIE BETREFFENDE
DE VENTILATIE
Let er bij het installeren van het apparaat op dat er
voldoende vrije ruimte rondom het apparaat is om een
goede doorstroming van lucht te waarborgen
(tenminste 30 cm boven, 30 cm achter en 30 cm aan de
zijkanten van het apparaat).
WAARSCHUWING
De gleuven en openingen in de behuizing van het
apparaat zijn aangebracht voor de ventilatie, zodat een
betrouwbare werking van het apparaat wordt verkregen
en oververhitting wordt voorkomen. Om brand te
voorkomen, moet u ervoor zorgen dat deze openingen
nooit geblokkeerd worden of dat ze afgedekt worden
door voorwerpen (kranten, tafelkleed, gordijn e.d.) of
door gebruik van het apparaat op een dik tapijt of een
bed.
LET OP
De
POWER
schakelaar van dit apparaat koppelt het
apparaat niet volledig los van het lichtnet. Aangezien
er na het uitschakelen van het apparaat nog een
kleine hoeveelheid stroom blijft lopen, moet u de
stekker uit het stopcontact halen om het apparaat
volledig van het lichtnet los te koppelen. Plaats het
apparaat zodanig dat de stekker in een noodgeval
gemakkelijk uit het stopcontact kan worden gehaald.
Om brand te voorkomen, moet u de stekker uit het
stopcontact halen wanneer u het apparaat langere
tijd niet denkt te gebruiken (bijv. wanneer u op
vakantie gaat).
D3-4-2-1-7b*_A1_Nl
D3-4-2-2-2a*_A1_Nl
Gebruiksomgeving
Temperatuur en vochtigheidsgraad op de plaats van
gebruik:
+5 °C tot +35 °C, minder dan 85 % RH
(ventilatieopeningen niet afgedekt)
Zet het apparaat niet op een slecht geventileerde plaats
en stel het apparaat ook niet bloot aan hoge
vochtigheid of direct zonlicht (of sterke kunstmatige
verlichting).
D3-4-2-1-7c*_A1_Nl
WAARSCHUWING
Dit apparaat is uitgerust met een drie-draden (geaarde)
stekker – de stekker heeft dus een derde pen (aardpen).
Deze stekker past alleen in een geaard stopcontact. Als
u de stekker niet in het stopcontact kunt steken, moet u
contact opnemen met een bevoegde elektricien om het
stopcontact te laten vervangen door een geaard
stopcontact. Verwijder nooit de aardbeveiliging van de
stekker.
D3-4-2-1-6_A1_Nl
Dit apparaat is bestemd voor normaal huishoudelijk
gebruik. Indien het apparaat voor andere doeleinden
of op andere plaatsen wordt gebruikt (bijvoorbeeld
langdurig gebruik in een restaurant voor zakelijke
doeleinden, of gebruik in een auto of boot) en als
gevolg hiervan defect zou raken, zullen de reparaties
in rekening gebracht worden, ook als het apparaat
nog in de garantieperiode is.
K041_A1_Nl
Bevestig deze luidsprekers niet aan de muur of het
plafond, want als de luidsprekers vallen kunnen ze
letsel veroorzaken.
SGK007*_A1_Nl
WAARSCHUWING NETSNOER
Pak het netsnoer beet bij de stekker. Trek de stekker er
niet uit door aan het snoer te trekken en trek nooit aan
het netsnoer met natte handen aangezien dit
kortsluiting of een elektrische schok tot gevolg kan
hebben. Plaats geen toestel, meubelstuk o.i.d. op het
netsnoer, en klem het niet vast. Maak er nooit een
knoop in en en verbind het evenmin met andere
snoeren. De netsnoeren dienen zo te worden geleid dat
er niet per ongeluk iemand op gaat staan. Een
beschadigd netsnoer kan brand of een elektrische
schok veroorzaken. Kontroleer het netsnoer af en toe.
Wanneer u de indruk krijgt dat het beschadigd is, dient
u bij uw dichtstbijzijnde erkende PIONEER
onderhoudscentrum of uw dealer een nieuw snoer te
kopen.
S002*_A1_Nl
Nl
2
Page 27

Deponeer dit product niet bij het gewone huishoudelijk afval wanneer u het wilt verwijderen. Er bestaat een speciaal wettelijk
In de lidstaten van de EU, Zwitserland en Noor
bestemde ve
Indien u zich in een ander dan bovengenoemd land bevindt kunt u contact opnemen met de plaatselijke overheid voor informatie ov
ve
Zodoende zorgt u er
cycleerd en het
niet schadelijk is voor de gezondheid en het milieu.
voorgeschreven verzamelsysteem voor de juiste behandeling, het opnieuw bruikbaar maken en de recycling van gebruikte
elektronische producten.
rzamelplaatsen of een verkooppunt (indien u aldaar een gelijkwaardig nieuw product koopt) inleveren.
rwijdering van het product.
voor dat het verwijderde product op de juiste wijze wordt behandeld, opnieuw bruikbaar wordt gemaakt, t gere
Inleiding
Hoofdkenmerken
wegen kunnen particulieren hun gebruikte elektronische producten gratis bij de daarvoor
er de juiste
K058b_A1_Nl
De directionaliteit van hoogfrequente tonen en de geluidsdiffusie
werden verbeterd door een convexe diffusor op de golfpijp te
plaatsen.
De conus van aramidevezel is licht en bijzonder stijf en levert
daardoor een uitstekende basrespons.
De gleuf in het basreflectiekanaal regelt de luchtstroom en zorgt
voor krachtige lage tonen met weinig geluidsverlies.
Controleer alle accessoires
Stroomsnoer (1)
Handleiding (dit document)
Garantiekaart
Benaming en functie van de onderdelen
Voorzieningen op het voorpaneel
Zachtekoepeltweeter van 1 inch met hoge resolutie
1
Verlichting (POWER-aanduiding)
2
Deze licht op afhankelijk of de stroom is in- of uitgeschakeld.
De aanduiding licht niet op wanneer de luidsprekers in de
1
2
3
4
ruststand zijn.
Diffusor
3
Deze verbetert de directionaliteit en de diffusie van hoge
tonen.
Woofer van aramidevezel
4
De lichte en bijzonder stijve conus levert een uitstekende
basrespons.
Basreflectiekanaal
5
Gleuf
6
Deze regelt de luchtstroom in het basreflectiekanaal en zorgt
voor krachtige lage tonen met zeer weinig geluidsverlies.
Nederlands
5
6
Nl
3
Page 28

Voorzieningen op het achterpaneel
* In de afbeelding wordt de S-DJ50X getoond.
1
2
3
4
5
6
7
8
9
a
LEVEL-knop
1
Gebruik deze regelaar om de geluidssterkte (het volume) in te
stellen.
HF LEVEL ADJ-knop
2
Gebruik deze regelaar om geluid met hoge frequenties aan te
passen.
U kunt –2 dB, –1 dB, 0 dB en 1 dB selecteren.
AUTO STANDBY-schakelaar
3
Metdezeschakelaarzetudeautomatischestand-byfunctie
aan of uit.
Als de automatische stand-byfunctie is ingeschakeld,
schakelen de luidsprekers automatisch over naar de
energiezuinige ruststand (stand-by) als gedurende een
bepaalde tijd (ongeveer 25 minuten) geen signaal wordt
ontvangen. Als in de ruststand een signaal wordt ontvangen,
worden de luidsprekers automatisch uit de ruststand
geactiveerd.
•De verlichting (POWER-aanduiding) op het voorpaneel
dooft wanneer de luidsprekers overschakelen naar de
ruststand.
•Als het ingangssignaal zwakker is dan een bepaald
niveau, worden de luidsprekers mogelijk niet automatisch
geactiveerduitderuststand.Zetindatgevalde[
STANDBY
•Als u de luidsprekers geforceerd wilt activeren uit
de ruststand, zet u de [
achterpaneel een keer uit en na enkele seconden weer aan.
XLR INPUT-aansluiting
4
XLR-type, gebalanceerde ingangsaansluiting. De
penopstelling van de aansluiting is als volgt: Nr. 1 Aarde, Nr.
2 Spanning en Nr. 3 Geen spanning.
TRS INPUT-aansluiting
5
Gebalanceerde ingang, klinkstekkerbus.
LET OP
MaakniettweeaansluitingentegelijkopdeXLRINPUT-
aansluiting en de TRS INPUT-aansluiting.
RCA INPUT-aansluiting
6
RCA-tulpstekkertype, ongebalanceerde
ingangsaansluitingen.
POWER-schakelaar
7
Gebruik deze schakelaar om de stroom in en uit te schakelen.
LET OP
Controleer voordat u de stroom inschakelt of de [
SELECTOR
voor het land waarin de luidsprekers worden gebruikt. Als de
VOLTAGE SELECTOR
[
moet u contact opnemen met een onderhoudscentrum van
Pioneer. Vraag om aanpassing van de spanningsinstelling en
vervanging van de zekering. Bij de levering is in het product een
zekering voor de juiste spanning geïnstalleerd. Als de spanning
wordt gewijzigd, moet de zekering worden vervangen.
VOLTAGE SELECTOR-schakelaar
8
Deze schakelaar wordt gebruikt om de geschikte spanning in
te stellen voor het land van gebruik. U mag deze schakelaar
niet zelf gebruiken.
AC IN
9
Sluit hierop het bijgeleverde stroomsnoer aan en steek dan
de stekker in een stopcontact. Sluit het stroomsnoer pas aan
nadat alle andere aansluitingen zijn voltooid. Gebruik alleen
het bijgeleverde stroomsnoer.
Zekeringhouder
a
]-schakelaar uit om de luidsprekers te gebruiken.
POWER
]-schakelaar op het
]-schakelaar is ingesteld op de juiste spanning
]-schakelaar niet correct is ingesteld,
AUTO
VOLTAGE
Nl
4
Page 29
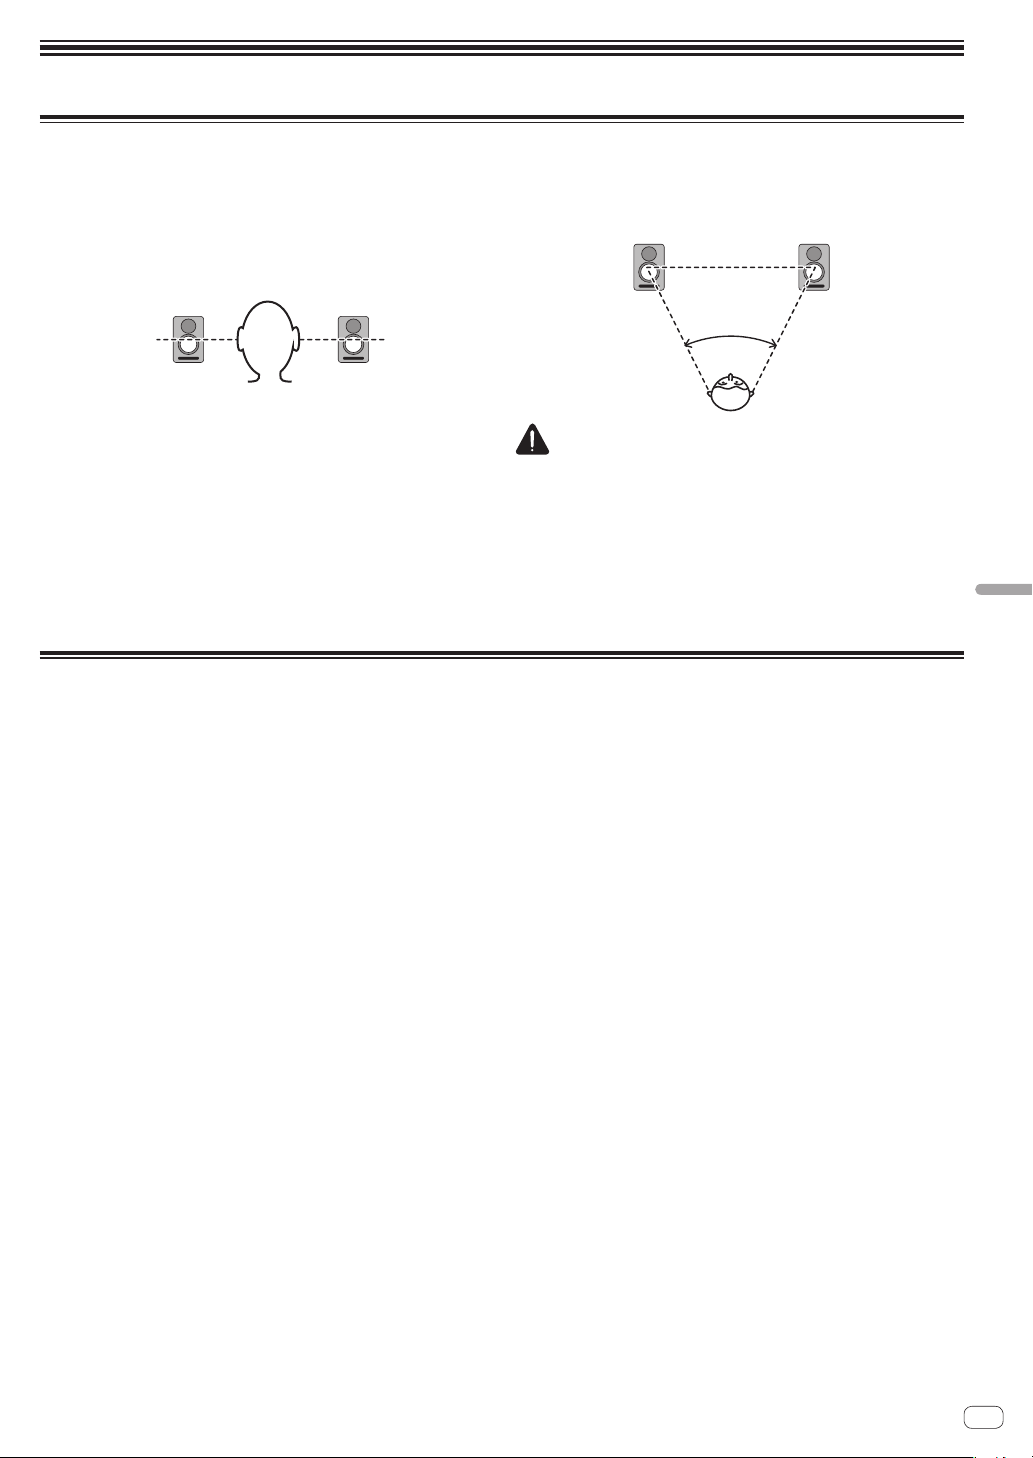
Installatie en aansluitingen
Installatiewijze
Het weergavegeluid van luidsprekers wordt beïnvloed door
de omstandigheden in de luisterruimte. Om een optimale
luisteromgeving te creëren, moet u terdege rekening houden
met de omstandigheden op de installatieplaats voordat u met de
feitelijke installatie begint.
Plaats de luidsprekers op oorniveau.
Voor een natuurlijk stereo-effect moeten de linker en de
rechter luidspreker symmetrisch en op gelijke afstand van de
luisterplaats worden opgesteld.
In het ideale geval moeten de luidsprekers onder een hoek van
30 ° graden ten opzichte van de luisterplaats worden opgesteld
(ze vormen samen een hoek van 60 ° graden) en naar binnen
gedraaid worden naar de luisterplaats toe.
LET OP
Voor een goede koeling moet u ervoor zorgen dat er voldoende
ruimte is tussen de luidsprekers en eventuele muren of andere
componenten in de buurt (er moet minimaal 30 cm vrije ruimte
zijn boven, achter, en rechts en links van elke luidspreker).
Wanneer er onvoldoende ruimte is tussen de luidspreker en
de muur of andere componenten, kan de temperatuur in het
inwendige te hoog oplopen met een defect of beschadiging tot
gevolg.
50 °~ 60 °
Nederlands
Aansluitingen
Schakel de stroom uit en haal de stekker uit het stopcontact
voordat u begint met het maken of wijzigen van de
aansluitingen.
Lees ook de handleiding van de andere apparatuur waarop
deze luidsprekers worden aangesloten.
Sluit het stroomsnoer pas aan nadat alle andere
aansluitingen zijn voltooid.
Gebruik alleen het bijgeleverde stroomsnoer.
MaakniettweeaansluitingentegelijkopdeXLRINPUT-
aansluiting en de TRS INPUT-aansluiting.
Stel de geluidssterkte correct in omdat de ingangssignalen
naar de XLR INPUT-aansluiting (of TRS INPUT-aansluiting)
en de RCA INPUT-aansluiting gemengd worden en de
geluidssterkte daardoor beïnvloed wordt.
Nl
5
Page 30

Aanvullende informatie
Problemen oplossen
Als u denkt dat het apparaat niet juist functioneert, kunt u de volgende punten controleren. Controleer ook de apparatuur waarop
dit apparaat is aangesloten. Neem contact op met uw dealer voor reparatie als het probleem blijft bestaan.
Soms is het mogelijk dat het apparaat niet juist functioneert als gevolg van statische elektriciteit of andere externe invloeden.
Haal in dat geval de stekker uit het stopcontact, wacht vijf minuten of langer, steek daarna weer de stekker in het stopcontact, en
controleer vervolgens of het apparaat juist werkt.
Symptoom Controlepunten Maatregel
Geen stroom Is het stroomsnoer juist aangesloten? Sluit het stroomsnoer op een stopcontact aan.
Het geluid van de aangesloten
geluidsapparaten wordt niet
weergegeven of het geluid is erg zacht.
De verlichting (POWER-aanduiding)
blijft uitgeschakeld.
De luidsprekers herstellen zich niet
(worden niet ingeschakeld) uit de
ruststand.
Het geluid is vervormd. Is het geluidsniveau juist ingesteld? Draai de [
Terugkoppeling (continu hoog
zoemgeluid)
Zijndejuisteinstellingengemaaktophet
aangesloten apparaat?
Is de verbindingskabel juist aangesloten? Sluit alle kabels correct aan.
Zijndeaansluitingenofdestekkersvuil?
Is het geluidsniveau juist ingesteld? Draai de [
Is de stroom ingeschakeld? Zetde[
Is de automatische stand-byfunctie ingeschakeld? Zetde[
Is de stroom ingeschakeld? Zetde[
Is de automatische stand-byfunctie ingeschakeld? Zetde[
Is het ingangssignaal zwak? Verhoog het niveau van het ingangssignaal.
Is het uitgangsniveau van het aangesloten
geluidsapparaat juist ingesteld?
Is het geluidsniveau juist ingesteld? Draai de [
Stel de externe ingang van het betreffende apparaat en
de geluidssterkte juist in.
Maakdeaansluitingenendestekkersschoonvoordatuze
gebruikt.
LEVEL
en zet het volume hoger.
wacht enkele seconden, en zet hem weer aan.
wacht enkele seconden, en zet hem weer aan.
Schakel de automatische stand-byfunctie uit met de
AUTO STANDBY
[
linksom en zet het volume lager.
Stel het uitgangsniveau van het aangesloten
geluidsapparaat correct in.
linksom en zet het volume lager.
]-knop op het achterpaneel rechtsom
POWER
]-schakelaar op het achterpaneel aan.
POWER
]-schakelaar op het achterpaneel uit,
POWER
]-schakelaar op het achterpaneel aan.
POWER
]-schakelaar op het achterpaneel uit,
]-schakelaar.
LEVEL
]-knop op het achterpaneel langzaam
LEVEL
]-knop op het achterpaneel langzaam
Nl
6
Page 31

Handelsmerken
Pioneer is een gedeponeerd handelsmerk van PIONEER CORPORATION.
Andere namen van bedrijven en producten zijn gedeponeerde handelsmerken of handelsmerken van de betreffende bedrijven.
Technische gegevens
S-DJ50X/S-DJ50X-W S-DJ60X S-DJ80X
Type Actieve tweewegluidspreker met biversterker
Versterker
LF-versterker 30 W 50 W 70 W
HF-versterker 15 W 20 W 20 W
Ingangsaansluitingen
(gebalanceerde ingang)
Ingangsaansluitingen
(niet-gebalanceerde ingang)
Impedantie 10kΩ
Luidspreker
Behuizing Basreflex
Materiaalbehuizing MDF
Woofer (LF-sturing) 13 cm conus 15 cm conus 20 cm conus
Tweeter (HF-sturing) 2,5 cm zachte koepel
Weergavekarakteristiek 50 Hz tot 20 kHz 45 Hz tot 20 kHz 40 Hz tot 20 kHz
Voedingseenheid/overige
Bruikbare spanning 100 V tot 120 V (50 Hz tot 60 Hz) / 220 V tot 240 V (50 Hz tot 60 Hz) conversie
Stroomverbruik 100 W 140 W 160 W
Stroomverbruik in ruststand 0,5 W of minder
Buitenafmetingen W × H × D 197 mm × 301 mm × 262 mm 228 mm × 342 mm × 295 mm 276 mm × 401 mm × 315 mm
Gewicht 6,5 kg 8,5 kg 11,8 kg
Wijzigingen in ontwerp en technische gegevens voorbehouden, zonder voorafgaande kennisgeving.
© 2013 PIONEER CORPORATION. Alle rechten voorbehouden.
XLR × 1, TRS (1/4-inch klinkstekkerbus) × 1
RCA × 1
Nederlands
Nl
7
Page 32

Muchas gracias por la adquisición de este producto Pioneer.
Lea todo este manual de instrucciones para aprender a operar correctamente su modelo. Después de haber leído las instrucciones, guarde el manual en un lugar seguro para poderlo consultar en el futuro.
PRECAUCIÓN
PARA PREVENIR EL PELIGRO DE CHOQUE ELÉCTRICO
NO REMOVER LA TAPA NI LAS PARTES DENTRO NO
UTILIZADAS, LLAMAR UNA PERSONA CUALIFICADA.
D3-4-2-1-1_B2_Es
ADVERTENCIA
Este aparato no es impermeable. Para evitar el riesgo
de incendio y de descargas eléctricas, no ponga ningún
recipiente lleno de líquido (como pueda ser un vaso o
un florero) cerca del aparato ni lo exponga a goteo,
salpicaduras, lluvia o humedad.
D3-4-2-1-3_A1_Es
ADVERTENCIA
Para evitar el peligro de incendio, no ponga nada con
fuego encendido (como pueda ser una vela) encima del
aparato.
D3-4-2-1-7a_A1_Es
PRECAUCIÓN PARA LA VENTILACIÓN
Cuando instale este aparato, asegúrese de dejar
espacio en torno al mismo para la ventilación con el fin
de mejorar la disipación de calor (por lo menos 30 cm
encima, 30 cm detrás, y 30 cm en cada lado).
ADVERTENCIA
Las ranuras y aberturas de la caja del aparato sirven
para su ventilación para poder asegurar un
funcionamiento fiable del aparato y para protegerlo
contra sobrecalentamiento. Para evitar el peligro de
incendio, las aberturas nunca deberán taparse ni
cubrirse con nada (como por ejemplo, periódicos,
manteles, cortinas) ni ponerse en funcionamiento el
aparato sobre una alfombra gruesas o una cama.
D3-4-2-1-7b*_A1_Es
Entorno de funcionamiento
Temperatura y humedad del entorno de funcionamiento
+5 °C a +35 °C; menos del 85 % de humedad relativa
(rejillas de refrigeración no obstruidas)
No instale este aparato en un lugar mal ventilado, ni en
lugares expuestos a alta humedad o a la luz directa del
sol (o de otra luz artificial potente).
D3-4-2-1-7c*_A1_Es
ADVERTENCIA
Este producto está provisto de una clavija de tres
conductores con toma de tierra (puesta a tierra) cuya
tercera patilla es la de toma de tierra. Esta clavija sólo
se adapta en una toma de corriente del tipo de toma de
tierra. Si no puede insertar la clavija en la toma de
corriente, llame a un electricista profesional para que le
reemplace la toma de corriente por otra con toma de
tierra que sea adecuada. No elimine el dispositivo de
seguridad de la clavija con toma de tierra.
D3-4-2-1-6_A1_Es
PRECAUCIÓN
El interruptor de la alimentación
POWER
de este
aparato no corta por completo toda la alimentación
de la toma de corriente de CA. Puesto que el cable de
alimentación hace las funciones de dispositivo de
desconexión de la corriente para el aparato, para
desconectar toda la alimentación del aparato deberá
desenchufar el cable de la toma de corriente de CA.
Por lo tanto, asegúrese de instalar el aparato de
modo que el cable de alimentación pueda
desenchufarse con facilidad de la toma de corriente
de CA en caso de un accidente. Para evitar correr el
peligro de incendio, el cable de alimentación también
deberá desenchufarse de la toma de corriente de CA
cuando no se tenga la intención de utilizarlo durante
mucho tiempo seguido (por ejemplo, antes de irse de
vacaciones).
D3-4-2-2-2a*_A1_Es
Este producto es para tareas domésticas generales.
Cualquiera avería debida a otra utilización que tareas
domésticas (tales como el uso a largo plazo para
motivos de negocios en un restaurante o el uso en un
coche o un barco) y que necesita una reparación
hará que cobrarla incluso durante el período de
garantía.
K041_A1_Es
No fije estos altavoces a una pared ni al techo, ya que
podrían caerse y ocasionar lesiones.
SGK007*_A1_Es
PRECAUCIONES CONCERNIENTES A LA
MANIPULACIÓN DEL CABLE DE
ALIMENTACIÓN
Tome el cable de alimentación por la clavija. No
extraiga la clavija tirando del cable. Nunca toque el
cable de alimentación cuando sus manos estén
mojadas, ya que esto podría causar cortocircuitos o
descargas eléctricas. No coloque la unidad, algún
mueble, etc., sobre el cable de alimentación.
Asegúrese de no hacer nudos en el cable ni de unirlo a
otros cables. Los cables de alimentación deberán ser
dispuestos de tal forma que la probabilidad de que
sean pisados sea mínima. Una cable de alimentación
dañado podrá causar incendios o descargas eléctricas.
Revise el cable de alimentación está dañado, solicite el
reemplazo del mismo al centro de servicio autorizado
PIONEER más cercano, o a su distribuidor.
S002*_A1_Es
Es
2
Page 33

Si desea deshacerse de este producto, no lo mezcle con los residuos generales de su hogar. De conformidad con la legislación
Las viviendas privadas en los estados miembros de la UE, en Suiza y Noruega pueden devolver gratuitamente sus productos electr
en las instalaciones de recolección previstas o bien en las instalaciones de minoristas (si adquieren un producto similar nuevo
En el caso de los países que no se han mencionado en el párrafo anterio
método de eliminación correct
Al actuar siguiendo estas instrucciones, se asegurará de que el producto de desecho se somete a los procesos de tratamient
reciclaje necesarios, con lo que se previenen los efectos negativos potenciales para el entorno y la salud humana.
K058b_A1_Es
vigente, existe un sistema de recogida distinto para los productos electrónicos que requieren un procedimiento adecuado de
tratamiento, recuperación y reciclado.
o.
Introducción
Características principales
ónicos usados
).
r, póngase en contacto con sus autoridades locales a fin de conocer el
o, recuperación y
El difusor en la guía de ondas mejora la directividad del sonido y
proporciona un sonido espacioso.
El cono de fibra aramida es ligero y extremadamente rígido y
proporciona la mejor respuesta de los graves.
Las ranuras en el conducto bass-reflex mejora el flujo de aire y
proporciona potencia de graves sin pérdidas.
Confirmación de todos los accesorios
Cable de alimentación (1)
Manualdeinstrucciones(estedocumento)
Tarjeta de garantía
Nomenclatura y funciones de las partes
Elementos del panel frontal
Altavoz de agudos de domo blando de 1 pulgada y
1
1
2
3
4
alta resolución
Iluminación (indicador POWER)
2
Se enciende dependiendo de si la unidad está encendida o
apagada. El indicador no se enciende si los altavoces están
en el modo de espera.
Difusor
3
Mejoraladireccionabilidadyladifusióndelossonidosdealta
frecuencia.
Altavoz de graves de fibra de aramida
4
Los conos ligeros y extremadamente rígidos proporcionan la
mejor respuesta de graves.
Conducto bass-reflex
5
Ranura
6
Regula el flujo de aire en el conducto bass-reflex para permitir
sonidos potentes de frecuencia baja y con pérdidas muy
reducidas de sonido.
Español
5
6
Es
3
Page 34

Elementos del panel trasero
* En la ilustración se muestra el S-DJ50X.
1
2
3
4
5
6
7
8
9
a
Control LEVEL
1
Se emplea para ajustar el nivel del sonido (el volumen).
Control HF LEVEL ADJ
2
Se emplea para ajustar el sonido de las altas frecuencias.
Se puede seleccionar entre –2 dB, –1 dB, 0 dB y 1 dB.
Interruptor AUTO STANDBY
3
Se emplea para activar o desactivar la función de espera
automática.
Si la función de espera automática está activada, los
altavoces entran automáticamente en el modo de espera
si no se recibe ninguna señal de entrada durante un cierto
período de tiempo (aproximadamente 25 minutos) y se
puede reducir así el consumo eléctrico. Si se recibe una
señal de entrada mientras los altavoces se encuentran en
el modo de espera, estos reanudarán automáticamente su
funcionamiento desde el modo de espera.
•La iluminación (indicador POWER) en el panel frontal se
apaga cuando los altavoces están en el modo de espera.
•Si la señal de entrada es más débil que un cierto nivel, los
altavoces pueden no poder reanudarse automáticamente
del modo de espera. En tales casos, apague el interruptor
AUTO STANDBY
[
•Para forzar los altavoces a que se reanuden del modo de
espera, apague el interruptor [
una vez y vuelva a encenderlo en unos pocos segundos.
Conector XLR INPUT
4
Conector de entrada equilibrada del tipo XLR. La disposición
delaspatillasdelconectoreslasiguiente:N.º1Masa,N.º2
Activo y N.º 3 Retorno.
Toma TRS INPUT
5
Toma de auriculares de entrada equilibrada.
PRECAUCIÓN
No conecte al mismo tiempo el conector XLR INPUT y la toma
TRS INPUT.
Toma RCA INPUT
6
Tomas de entrada desequilibrada del tipo de contactos RCA.
Interruptor POWER
7
Se emplea para conectar y desconectar la alimentación
principal.
PRECAUCIÓN
Antes de conectar la alimentación, asegúrese de que el
interruptor [
apropiado para el país o región donde se proponga utilizar
los altavoces. Si el interruptor [
ajustado correctamente, póngase en contacto con el centro de
servicio y solicite cambiar el voltaje ajustado y sustituir el fusible.
En el momento del envío hay un fusible montado con el voltaje
adecuado en el producto. Si resulta necesario cambiar el ajuste
del voltaje, se deberá sustituir el fusible.
Interruptor VOLTAGE SELECTOR
8
Este interruptor se utiliza para seleccionar los ajustes del
voltaje apropiado para el país/región de uso. No está diseñado
para el uso directo por el usuario.
AC IN
9
Enchufe el cable de alimentación accesorio aquí y a una toma
de corriente de CA. No enchufe el cable de alimentación
hasta haber completado todas las demás conexiones. Emplee
solo el cable de alimentación accesorio suministrado.
Portafusibles
a
VOLTAGE SELECTOR
] para poder utilizar los altavoces.
POWER
] en el panel trasero
] esté ajustado en el voltaje
VOLTAGE SELECTOR
] no está
Es
4
Page 35

Instalación y conexiones
Modo de instalación
El sonido de reproducción de un altavoz queda ligeramente
afectado por las condiciones de la sala de audición. Para
producir las mejores condiciones para la audición, tenga
debidamente en cuenta las condiciones del lugar de instalación
antes de comenzar la instalación.
Coloque los altavoces al nivel de los oídos.
Para obtener un efecto estéreo natural, los altavoces derecho
e izquierdo deben instalarse simétricamente y en posiciones
equidistantes de la posición de audición.
Conexiones
Cuando desee realizar o cambiar conexiones, desconecte
antes la alimentación y desenchufe el cable de alimentación
de la toma de corriente.
Lea también sin falta los manuales de instrucciones de los
otros componentes a los que se proponga conectar estos
altavoces.
No enchufe el cable de alimentación hasta haber completado
todas las demás conexiones.
Para conseguir el enfriamiento adecuado, asegúrese de dejar
espacio suficiente entre los altavoces y las paredes circundantes
u otros componentes (un mínimo de 30 cm o más por encima,
detrás y por los lados derecho e izquierdo de cada altavoz). Si
no se deja espacio suficiente entre el altavoz y las paredes o los
otros componentes, la temperatura del interior puede subir más
de la cuenta y ser causa de mal funcionamiento o de averías.
Idealmente, los altavoces deben situarse en ángulos de 30 ° de
la posición de audición (formando en su conjunto un ángulo
total de 60 °), y deben girarse hacia adentro para orientarlos
hacia la posición de audición.
50 °~ 60 °
PRECAUCIÓN
Emplee solo el cable de alimentación accesorio
suministrado.
No conecte al mismo tiempo el conector XLR INPUT y la toma
TRS INPUT.
Asegúrese de ajustar el nivel de sonido a un nivel adecuado,
ya que las señales de entrada en el conector XLR INPUT (o la
toma TRS INPUT) y la toma RCA INPUT se mezclarán, lo que
afectará al nivel de sonido.
Español
Es
5
Page 36

Información adicional
Solución de problemas
Si usted cree que hay algo que no funciona como es debido en esta unidad, revise los puntos siguientes. Compruebe también los
otros dispositivos conectados a la unidad. Si el problema persiste, solicite el servicio técnico a su distribuidor.
Es posible que alguna vez la unidad no pueda funcionar correctamente debido a la electricidad estática o a otras condiciones
externas. En tales casos, desenchufe el cable de alimentación y espere cinco o más minutos y luego vuelva a enchufarlo y
compruebe si la unidad funciona correctamente.
Síntoma Puntos de comprobación Solución
No se conecta la alimentación ¿Está correctamente enchufado el cable de
No sale el sonido de los dispositivos de
audio conectados o el sonido es muy
bajo.
La iluminación (indicador POWER)
permanece apagada.
Los altavoces no se reanudan (se
encienden) del modo de espera.
El sonido sale distorsionado. ¿Está ajustado el volumen del sonido a un nivel
Realimentación acústica (sonido de
aullido continuo)
alimentación?
¿El dispositivo de audio conectado se ha ajustado
correctamente?
¿Está bien conectado el cable de conexión? Conecte correctamente los cables.
¿Están sucios los conectores o las clavijas? Limpie los conectores y las clavijas antes de la
¿Está bien ajustado el volumen del sonido? Gire hacia la derecha el control [
¿Está conectada la alimentación? Encienda el interruptor [
¿Está activada la función de espera automática? Apague el interruptor [
¿Está conectada la alimentación? Encienda el interruptor [
¿Está activada la función de espera automática? Apague el interruptor [
¿Es bajo el nivel de la señal de entrada? Incremente el nivel de la señal de entrada.
adecuado?
¿Está correctamente ajustado el nivel de salida del
dispositivo de audio conectado?
¿Está bien ajustado el volumen del sonido? Gire lentamente hacia la izquierda el control [
Enchufe el cable de alimentación a la toma de corriente.
Ajuste correctamente la entrada externa y el volumen
del sonido del dispositivo.
conexión.
trasero y sube el volumen.
vez, espere algunos segundos y vuelva a encenderlo.
vez, espere algunos segundos y vuelva a encenderlo.
Apague el interruptor [
desactivar la función de espera automática.
Gire lentamente hacia la izquierda el control [
del panel trasero y baje el volumen.
Ajuste correctamente el nivel de salida del dispositivo
de audio conectado.
del panel trasero y baje el volumen.
POWER
POWER
AUTO STANDBY
LEVEL
] del panel
POWER
] en el panel trasero.
] en el panel trasero una
POWER
] en el panel trasero.
] en el panel trasero una
] para
LEVEL
LEVEL
]
]
Es
6
Page 37

Marcas comerciales
Pioneer es una marca registrada de PIONEER CORPORATION.
Los demás nombres listados de empresas y de un producto son marcas comerciales registradas de las empresas o marcas
comerciales.
Especificaciones
S-DJ50X/S-DJ50X-W S-DJ60X S-DJ80X
Tipo Altavoz activo de 2 vías de dos amplificadores
Amplificador
Amplificador de baja frecuencia 30 W 50 W 70 W
Amplificador de alta frecuencia 15 W 20 W 20 W
Conectores de entrada
(entrada equilibrada)
Conectores de entrada
(entrada desequilibrada)
Impedancia 10kΩ
Altavoz
Caja acústica Reflejo de graves
Materialdelacajaacústica MDF
Altavoz de graves
(controlador de baja frecuencia)
Altavoz de agudos
(controlador de alta frecuencia)
Respuesta de reproducción 50 Hz a 20 kHz 45 Hz a 20 kHz 40 Hz a 20 kHz
Unidad de alimentación/otra
Voltajes admitidos Conversión de 100 V a 120 V (50 Hz a 60 Hz) / 220 V a 240 V (50 Hz a 60 Hz)
Consumo eléctrico 100 W 140 W 160 W
Consumo eléctrico durante el modo de
espera
Dimensiones externas An × Al × Pr 197 mm × 301 mm × 262 mm 228 mm × 342 mm × 295 mm 276 mm × 401 mm × 315 mm
Peso 6,5 kg 8,5 kg 11,8 kg
Las especificaciones y el diseño están sujetos a posibles modificaciones sin previo aviso debido a mejoras.
© 2013 PIONEER CORPORATION. Todos los derechos reservados.
XLR × 1, TRS (auriculares de 1/4 de pulgada) × 1
RCA × 1
Cono de 13 cm Cono de 15 cm Cono de 20 cm
Domo blando de 2,5 cm
0,5 W o menos
Español
Es
7
Page 38

Obrigado por adquirir este produto da Pioneer.
Leia atentamente estas instruções de funcionamento de modo a saber como utilizar correctamente o seu modelo. Após terminar de ler as
instruções, coloque-as num local seguro para futura referência.
CUIDADO
PARA PREVENIR O PERIGO DE CHOQUE ELÉCTRICO,
NÃO REMOVA A COBERTURA (NEM A PARTE POSTERIOR). NÃO EXISTEM NO INTERIOR PEÇAS REPARÁVEIS PELO UTILIZADOR. A MANUTENÇÃO DEVE SER
EFECTUADA POR PESSOAL ESPECIALIZADO.
D3-4-2-1-1_B1_Pt
AVISO
Para prevenir o perigo de incêndio, não coloque fontes
de chamas nuas (tais como uma vela acesa) sobre o
aparelho.
D3-4-2-1-7a_A1_Pt
CUIDADO
O botão POWER do aparelho não o desliga
completamente da energia fornecida pela tomada
CA. Uma vez que o cabo de alimentação serve como
o principal dispositivo de desconexão, será
necessário desligá-lo da tomada para desligar toda a
alimentação. Por isso, verifique se a unidade foi
instalada de forma que o cabo de alimentação possa
ser facilmente desligado da tomada AC, em caso de
acidente. Para prevenir o risco de incêndio, deverá
desligar igualmente o cabo de alimentação de
energia da tomada CA quando o aparelho não for
utilizado durante um período prolongado (por
CUIDADOS COM A VENTILAÇÃO
Quando instalar esta unidade, certifique-se de que
exemplo, durante um período de férias).
D3-4-2-2-2a*_A1_Pt
deixa espaço em torno da unidade para ventilação de
modo a melhorar a radiação térmica (pelo menos 30
cm na parte superior, 30 cm na parte posterior e 30 cm
em cada um dos lados).
AVISO
As ranhuras e as aberturas da caixa destinam-se a
ventilação, para garantir o funcionamento fiável do
Este produto destina-se a utilização doméstica geral.
A reparação de qualquer avaria devida a utilizações
fora desse âmbito (como, por exemplo, utilização
prolongada num restaurante, para efeitos comerciais,
ou utilização num automóvel ou num barco) será
cobrada, ainda que dentro da garantia.
K041_A1_Pt
produto e para evitar o seu sobreaquecimento.
Para evitar riscos de incêndio, as aberturas nunca
devem ser bloqueadas ou cobertas com coisas (como
jornais, toalhas de mesa, cortinas) ou através do
funcionamento do equipamento em cima de um tapete
Não fixe estas colunas em paredes ou no tecto, pois
podem causar ferimentos em caso de queda.
SGK007_A1_Pt
grosso ou uma cama.
D3-4-2-1-7b*_A1_Pt
Ambiente de funcionamento
Temperatura e humidade do ambiente de
funcionamento:
+5 °C a +35 °C; humidade relativa inferior a 85 %
(respiradouros de refrigeração não bloqueados)
Não instale o aparelho num espaço insuficientemente
arejado ou em locais expostos a uma humidade
elevada ou a luz solar directa (ou a iluminação artificial
intensa).
D3-4-2-1-7c*_A1_Pt
AVISO
Este produto está equipado com uma de ficha ligação à
terra de três fios - um ficha que possui um terceiro pino
AVISO SOBRE O CABO DE ALIMENTAÇÃO
Manuseie o cabo de alimentação através da ficha. Não
retire a ficha puxando o cabo e nunca toque no cabo
de alimentação com as mãos húmidas, pois pode
provocar um curto-circuito ou choque eléctrico. Não
coloque a unidade, um móvel, etc., sobre o cabo de
alimentação nem trilhe o cabo. Nunca faça um nó no
cabo nem o amarre a outros cabos. Os cabos de
alimentação devem ser encaminhados de modo a não
serem pisados. Um cabo de alimentação danificado
pode provocar um incêndio ou um choque eléctrico.
Verifique periodicamente o cabo de alimentação.
Quando estiver danificado, solicite um cabo de
alimentação de substituição junto do seu revendedor
ou centro de assistência autorizado PIONEER.
S002*_A1_Pt
(ligação à terra). Esta ficha apenas encaixa numa
tomada do tipo de ligação de terra. Se não conseguir
inserir a ficha numa tomada, contacte com um
electricista qualificado para substituir a tomada por
uma com ligação à terra. Não descure os
procedimentos de segurança dos cabos de ligação à
terra.
D3-4-2-1-6_A1_Pt
AVISO
Este aparelho não é à prova de água. Para prevenir o
perigo de incêndio ou choque eléctrico, não coloque
perto dele recipientes contendo líquidos (tais como
uma jarra ou um vaso de flores) nem o exponha a
pingos, salpicos, chuva ou humidade.
Pt
2
D3-4-2-1-3_A1_Pt
Page 39

Os consumidores dos Estados-membros da UE, da Suíça e da Noruega podem entregar equipamentos electrónicos fora de uso em
determinadas instalações de recolha ou a um retalhista (se adquirirem um equipamento novo similar).
Nos países não mencionados acima, informe-se sobre o método de eliminação correcto junto das autoridades locais
Ao fazê-lo estará a garantir que o produto que já não tem utilidade para si é submetido a processos de tratamento
adequados, evitando
K058b_A1_Pt
Se quiser eliminar este produto, não o misture com resíduos domésticos gerais. Existe um sistema de recolha separado para produtos
electrónicos usados de acordo com a legislação que requer tratamento, recuperação e reciclagem adequados.
-se assim potenciais efeitos negativos para o ambiente e a saúde humana.
Introdução
Características principais
.
, recuperação e reciclagem
O difusor existente no guia de onda aumenta a direcionalidade
do som tornando-o mais abrangente.
O cone de woofer em fibra de aramida é leve e extremamente
rígido, o que permite que ofereça a melhor resposta de graves.
As ranhuras da conduta refletora de graves melhoram o fluxo de
ar e permitem obter um desempenho de graves sem perdas.
Confirmar todos os acessórios
Cabo de alimentação (1)
Manualdeinstruções(estedocumento)
Cartão da garantia
Nomes e funções dos componentes
Componentes do painel frontal
Tweeter de alta resolução de 1 polegada com
1
1
2
3
4
cúpula macia
Iluminação (indicador POWER)
2
Acende-se consoante a alimentação esteja ou não ligada. O
indicador não se acende quando as colunas estão no modo
de espera.
Difusor
3
Melhoraodireccionamentoeadifusãodesonsdealta
frequência.
Woofer em fibra de aramida
4
Cones leves e extremamente rígidos oferecem a melhor
resposta de graves.
Conduta refletora de graves
5
Abertura
6
Regula o fluxo de ar na conduta refletora de graves para
possibilitar sons potentes de baixa frequência com pouca
perda de som.
Português
5
6
Pt
3
Page 40

Componentes do painel posterior
* A ilustração refere-se ao modelo S-DJ50X.
1
2
3
4
5
6
7
8
9
a
Botão LEVEL
1
Utilize este botão para ajustar o nível de som (volume).
Botão HF LEVEL ADJ
2
Utilize este botão para ajustar sons de alta frequência.
Pode seleccionar –2 dB, –1 dB, 0 dB e 1 dB.
Interruptor AUTO STANDBY
3
Utilize este interruptor para activar ou desactivar a função de
espera automática.
Quando a função de espera automática está activada, as
colunas entram automaticamente no modo de espera se não
for recebido um sinal de entrada durante um determinado
período de tempo (cerca de 25 minutos) e é possível reduzir
o consumo de energia. Quando for recebido um sinal de
entrada com as colunas no modo de espera, as colunas saem
automaticamente do modo de espera.
•A iluminação (indicador POWER) no painel frontal apaga-se
quando as colunas entram no modo de espera.
•Se o sinal de entrada for inferior a um determinado nível,
as colunas podem não sair automaticamente do modo
de espera. Nesse caso, desligue o interruptor [
STANDBY
•Para forçar as colunas a saírem do modo de espera,
desligue o interruptor [
e volte a ligá-lo após alguns segundos.
Conector XLR INPUT
4
Conector de entrada equilibrada de tipo XLR. O conector tem
o seguinte conjunto de pinos: N.º 1 Terra, N.º 2 Quente e N.º
3 Frio.
Tomada TRS INPUT
5
Tomada de auscultadores de entrada equilibrada.
ATENÇÃO
Não faça uma ligação ao conector XLR INPUT e à tomada TRS
INPUT ao mesmo tempo.
Tomada RCA INPUT
6
Tomada de entrada não equilibrada de pino RCA.
Interruptor POWER
7
Utilize este interruptor para ligar e desligar a alimentação.
ATENÇÃO
Antes de ligar a alimentação, verifique se o interruptor
VOLTAGE SELECTOR
[
ao país ou à região onde pretende utilizar as colunas. Se
o interruptor [
correctamente, contacte um centro de assistência técnica da
Pioneer e solicite a alteração da tensão definida e a substituição
do fusível. Aquando do envio, é colocado no produto um fusível
com a definição de tensão adequada. Se for necessário alterar a
definição de tensão, o fusível terá de ser substituído.
Interruptor VOLTAGE SELECTOR
8
Esteinterruptoréutilizadoparaseleccionarasdefinições
de tensão adequadas ao país/região em que se utilizam as
colunas. Não deve ser utilizado directamente pelo cliente.
AC IN
9
Ligue o cabo de alimentação fornecido a esta entrada e a uma
tomada eléctrica de CA. Não ligue o cabo de alimentação até
todasasoutrasligaçõesficaremconcluídas.Utilizeapenaso
cabo de alimentação fornecido.
Suporte de fusível
a
] para utilizar as colunas.
POWER
] está definido para a tensão adequada
VOLTAGE SELECTOR
] no painel posterior uma vez
] não estiver definido
AUTO
Pt
4
Page 41

Instalação e ligações
Como instalar
O som reproduzido por uma coluna é delicadamente
influenciadopelascondiçõesdocompartimentoemquese
fazaaudição.Paraobtercondiçõesideaisdeaudição,tenha
emconsideraçãoascondiçõesdolocaldeinstalaçãoantesde
proceder à instalação propriamente dita.
Coloque as colunas ao nível dos ouvidos.
Para obter um efeito de estéreo natural, deve instalar a
colunaesquerdaeacolunadireitaemposiçõessimétricase
equidistantes em relação à posição de audição.
Ligações
Quandopretenderefectuaroualterarligações,desligue
sempre a alimentação e desligue o cabo de alimentação da
tomada eléctrica.
Alémdisso,leiaosmanuaisdeinstruçõesdoscomponentes
aos quais pretende ligar as colunas.
Nãoligueocabodealimentaçãoatétodasasoutrasligações
ficarem concluídas.
Idealmente, as colunas devem ser colocadas em ângulos de 30 °
em relação à posição de audição (formando em conjunto um
ângulo total de 60 °) e devem ser rodadas para dentro de modo a
ficarem de frente para a posição de audição.
50 °~ 60 °
ATENÇÃO
Para possibilitar um arrefecimento adequado, certifique-se
de que existe espaço suficiente entre as colunas e as paredes
próximas ou outros componentes (no mínimo, 30 cm ou mais
em cima, atrás e dos lados direito e esquerdo de cada coluna).
Deixar espaço insuficiente entre a coluna e as paredes ou outros
componentes pode originar um aumento das temperaturas
interiores, o que pode causar avarias ou danos.
Utilize apenas o cabo de alimentação fornecido.
Não faça uma ligação ao conector XLR INPUT e à tomada TRS
INPUT ao mesmo tempo.
Certifique-se de que define o nível de som para um nível
adequado, uma vez que os sinais emitidos para o conector XLR
INPUT (ou tomada TRS INPUT) e para a tomada RCA INPUT
serão misturados, o que afecta o nível de som.
Pt
Português
5
Page 42

Informação adicional
Resolução de problemas
Se achar que algo não está a funcionar bem na unidade, verifique os itens que se seguem. Verifique também os outros dispositivos
ligados à unidade. Se o problema persistir, contacte o revendedor para obter assistência técnica.
Ocasionalmente,aunidadepodenãofuncionarcorrectamentedevidoaelectricidadeestáticaououtrascondiçõesexternas.
Se isso acontecer, desligue o cabo de alimentação, aguarde cinco minutos ou mais, ligue novamente o cabo de alimentação e
verifique se a unidade está funcionar correctamente.
Sintoma Itens a verificar Solução
Sem alimentação O cabo de alimentação está ligado correctamente? Ligue o cabo de alimentação à tomada eléctrica.
Não sai som dos dispositivos de áudio
ligados ou o som está muito baixo.
A iluminação (indicador POWER)
permanece desligada.
As colunas não saem do modo de
espera (não ligam).
O som está distorcido. O nível de som está definido correctamente? Rode lentamente o botão [
Feedback (som estridente contínuo) O volume de som está definido correctamente? Rode lentamente o botão [
O dispositivo de áudio ligado foi definido
correctamente?
O cabo de ligação está ligado correctamente? Ligue os cabos correctamente.
Os conectores ou as fichas estão sujos? Limpe os conectores e as fichas antes de fazer as
O volume de som está definido correctamente? Rode o botão [
A alimentação está ligada? Ligue o interruptor [
A função de espera automática está activada? Desligue o interruptor [
A alimentação está ligada? Ligue o interruptor [
A função de espera automática está activada? Desligue o interruptor [
O nível do sinal de entrada está baixo? Aumente o nível do sinal de entrada.
O nível de saída do dispositivo de áudio ligado está
definido correctamente?
Defina a entrada externa e o volume de som do
dispositivo correctamente.
ligações.
dos ponteiros do relógio e aumente o volume.
uma vez, aguarde alguns segundos e volte a ligar o
interruptor.
uma vez, aguarde alguns segundos e volte a ligar o
interruptor.
Desligue o interruptor [
desactivar a função de espera automática.
no sentido contrário ao dos ponteiros do relógio e baixe
o volume.
Ajuste o nível de saída do dispositivo de áudio ligado
correctamente.
no sentido contrário ao dos ponteiros do relógio e baixe
o volume.
LEVEL
] no painel posterior no sentido
POWER
] no painel posterior.
POWER
] no painel posterior
POWER
] no painel posterior.
POWER
] no painel posterior
AUTO STANDBY
LEVEL
] no painel posterior
LEVEL
] no painel posterior
] para
Pt
6
Page 43

Marcas comerciais
Pioneer é uma marca comercial registada da PIONEER CORPORATION.
Outros nomes de empresas mencionados e o nome de um produto são marcas registadas das empresas ou marcas comerciais.
Especificações
S-DJ50X/S-DJ50X-W S-DJ60X S-DJ80X
Tipo Coluna activa de 2 vias com bi-amplificação
Amplificador
Amplificador LF 30 W 50 W 70 W
Amplificador HF 15 W 20 W 20 W
Conectores de entrada
(entrada equilibrada)
Conectores de entrada
(entrada não equilibrada)
Impedância 10kΩ
Coluna
Caixa Reflexo de graves
Materialdacaixa MDF
Woofer (condutor LF) Cone de 13 cm Cone de 15 cm Cone de 20 cm
Tweeter (condutor HF) Cúpula macia de 2,5 cm
Resposta de reprodução 50 Hz a 20 kHz 45 Hz a 20 kHz 40 Hz a 20 kHz
Unidade de alimentação/outras
Tensõessuportadas
Consumo de energia 100 W 140 W 160 W
Consumo de energia durante o
modo de espera
DimensõesexternasL×A×P 197 mm × 301 mm × 262 mm 228 mm × 342 mm × 295 mm 276 mm × 401 mm × 315 mm
Peso 6,5 kg 8,5 kg 11,8 kg
Asespecificaçõeseodesignestãosujeitosapossíveismodificaçõessemavisoprévio,devidoamelhoramentos.
© 2013 PIONEER CORPORATION. Todos os direitos reservados.
XLR × 1, TRS (Auscultadores 1/4 pol.) × 1
RCA × 1
onversão em 100 V a 120 V (50 Hz a 60 Hz) / 220 V a 240 V (50 Hz a 60 Hz)
C
0,5 W ou menos
Pt
Português
7
Page 44

Благодарим вас за покупку изделия компании Pioneer.
жалуйста, ознакомьтесь с настоящей инструкцией по эксплуатации, чтобы узнать, как правильно обращаться с приобретенной вами
По
моделью. После того, как вы закончите ознакомление с инструкцией, сохраните ее в надежном месте для обращения к ней в будущем.
ВНИМАНИЕ
ВО ИЗБЕЖАНИЕ ПОРАЖЕНИЯ ЭЛЕКТРИЧЕСКИМ
ТОКОМ НЕ СНИМАЙТЕ КРЫШКУ (ИЛИ ЗАДНЮЮ
СТЕНКУ). ВНУТРИ НЕ СОДЕРЖАТСЯ ДЕАТЛИ,
ПРЕДНАЗНАЧЕННЫЕ ДЛЯ РЕМОНТА
ПОЛЬЗОВАТЕЛЕМ. ДЛЯ ОБСЛУЖИВАНИЯ
ОБРАТИТЕСЬ К КВАЛИФИЦИРОВАННОМУ
СОТРУДНИКУ СЕРВИСНОЙ СЛУЖБЫ.
D3-4-2-1-1_B1_Ru
ПРЕДУПРЕЖДЕНИЕ
Данное оборудование не является
водонепроницаемым. Во избежание пожара или
поражения электрическим током не помещайте
рядом с оборудованием емкости с жидкостями
(например, вазы, цветочные горшки) и не
допускайте попадания на него капель, брызг, дождя
или влаги.
D3-4-2-1-3_A1_Ru
ПРЕДУПРЕЖДЕНИЕ
Во избежание пожара не приближайте к
оборудованию источники открытого огня
(например, зажженные свечи).
D3-4-2-1-7a_A1_Ru
ОБЯЗАТЕЛЬНАЯ ВЕНТИЛЯЦИЯ
При установке устройства обеспечьте достаточное
пространство для вентиляции во избежание
повышения температуры внутри устройства (не
менее 30 см сверху, 30 см сзади и по 30 см слева и
справа).
ПРЕДУПРЕЖДЕНИЕ
Данное изделие оснащено трехконтактной вилкой с
заземляющим контактом. Эта вилка подходит
только к электророзетке, оборудованной
заземлением. Если вилку не удается вставить в
розетку, обратитесь к электрику для установки
розетки соответствующего типа. Защитную
функцию вилки с заземляющим контактом следует
использовать обязательно.
D3-4-2-1-6_A1_Ru
ВНИМАНИЕ
Выключатель POWER данного устройства не
полностью отключает его от электросети. Чтобы
полностью отключить питание устройства,
вытащите вилку кабеля питания из
электророзетки. Поэтому устройство следует
устанавливать так, чтобы вилку кабеля питания
можно было легко вытащить из розетки в
чрезвычайных обстоятельствах. Во избежание
пожара следует извлекать вилку кабеля питания
из розетки, если устройство не будет
использоваться в течение долгого времени
(например, если вы уезжаете в отпуск).
D3-4-2-2-2a*_A1_Ru
ПРЕДУПРЕЖДЕНИЕ
В корпусе устройства имеются щели и отверстия
для вентиляции, обеспечивающие надежную
работу изделия и защищающие его от перегрева.
Во избежание пожара эти отверстия ни в коем
случае не следует закрывать или заслонять
другими предметами (газетами, скатертями и
шторами) или устанавливать оборудование на
толстом ковре или постели.
D3-4-2-1-7b*_A1_Ru
Условия эксплуатации
Изделие эксплуатируется при следующих
температуре и влажности:
+5 °C до +35 °C; влажность менее 85 % (не
заслоняйте охлаждающие вентиляторы)
Не устанавливайте изделие в плохо
проветриваемом помещении или в месте с высокой
влажностью, открытом для прямого солнечного
света (или сильного искусственного света).
D3-4-2-1-7c*_A1_Ru
K041_A1_Ru
Не закрепляйте эти колонки на стене или
потолке, так как в случае их падения они могут
причинить травмы.
SGK007*_A1_Ru
МЕРЫ ПРЕДОСТОРОЖНОСТИ ПРИ
ОБРАЩЕНИИ С СЕТЕВЫМ ШНУРОМ
Держите сетевой шнур за вилку. Не вытаскивайте
вилку, взявшись за шнур, и никогда не касайтесь
сетевого шнура, если Ваши руки влажные, так как
это может привести к короткому замыканию или
поражению электрическим током. Не ставьте
аппарат, предметы мебели и т.д. на сетевой шнур,
не зажимайте его. Не завязывайте узлов на шнуре
и не связывайте его с другими шнурами. Сетевые
шнуры должны лежать так, чтобы на них нельзя
было наступить. Поврежденный сетевой шнур
может стать причиной возникновения пожара или
поразить Вас электрическим током. Время от
времени проверяйте сетевой шнур. В случае
обнаружения повреждения обратитесь за заменой
в ближайший официальный сервисный центр
фирмы PIONEER или к Вашему дилеру.
S002*_A1_Ru
Ru
2
Page 45

Если вы желаете утилизировать данное изделие, не выбрасывайте его вместе с обычным бытовым мусором. Существует
Чacтные к
в
В странах, не пере
учр
Пост
пере
отдельная система сбора использованных электронных изделий в соответствии с законодательством, которая предполагает
соответствующее обращение, возврат и переработку.
лиенты-в странах-членах ЕС, в Швейцарии и Норвегии могут бесплатно возвращать использованные электронные изделия
соответствующие пункты сбора или дилеру (при покупке сходного нового изделия).
численных выше, для получения информации о правильных способах утилизации обращайтесь в cooтветcтвующие
еждения.
упая таким образом, вы можете быть уверены в том, что утилизируемый продукт будет соответствующим образом обработан,
дан в соответствующий пункт и переработан без возможных негативных последствий для окружающей среды и здоровья людей.
Введение
Основные функциональные возможности
K058b_A1_Ru
Диффузор в волноводе улучшает диаграмму
направленности и обеспечивает объемный звук.
Конус низкочастотного громкоговорителя из арамидного
волокна обладает низким весом и высокой жесткостью, что
обеспечивает качественное низкочастотное звучание.
Рифленая поверхность порта фазоинвертора выравнивает
движение воздуха и обеспечивает воспроизведение низких
частот без потерь.
Проверка комплектности прилагаемых принадлежностей
Силовой кабель (1)
Инструкция по эксплуатации (данный документ)
Гарантийный талон
Название и функции частей
Элементы на фронтальной панели
1-дюймовый мягкий купольный
1
высокочастотный громкоговоритель высокого
1
2
3
4
разрешения
Подсветка (индикатор POWER)
2
Загорается при включении питания. Индикатор не горит,
если колонка находится в режиме ожидания.
Диффузор
3
Улучшает направленность и распространение звука
высокой частоты.
Низкочастотный громкоговоритель из
4
арамидного волокна
Легкие и очень жесткие конусы обеспечивают
качественное низкочастотное звучание.
Порт фазоинвертора
5
Канал
6
Регулирует поток воздуха в порту фазоинвертора и
обеспечивает мощное басовое звучание при низких
звуковых потерях.
Русский
5
6
Ru
3
Page 46

Элементы на задней панели
* На иллюстрации показана модель S-DJ50X.
1
2
3
4
5
6
7
8
9
a
Поворотный регулятор LEVEL
1
Используется для регулировки уровня звука (громкости).
Поворотный регулятор HF LEVEL ADJ
2
Используется для настройки высоких частот.
Можно выбрать –2 дБ, –1 дБ, 0 дБ или 1 дБ.
Переключатель AUTO STANDBY
3
Используется для включения и выключения функции
автоматического перехода в режим ожидания.
Когда функция автоматического перехода в режим
ожидания включена, колонка автоматически
переходит в режим ожидания, если входной сигнал
отсутствует в течение определенного периода времени
(приблизительно 25 минут), за счет чего снижается
потребление электроэнергии. Если поступает входной
сигнал, когда колонка находится в режиме ожидания,
колонка автоматически выходит из режима ожидания.
Когда колонка переходит в режиме ожидания,
•
подсветка (индикатор POWER) на фронтальной панели
гаснет.
Если уровень входного сигнала находится ниже
•
определенного уровня, колонка может не выходить
из режима ожидания автоматически. В таких случаях
переведите переключатель [AUTO STANDBY] в
выключенное положение, чтобы использовать колонку.
Чтобы принудительно вывести колонку из режима
•
ожидания, выключите переключатель [POWER] на
задней панели, а спустя несколько секунд снова
включите.
Разъем XLR INPUT
4
Симметричный входной разъем XLR. Контакты разъема:
№ 1 Заземление, № 2 Плюс, № 3 Минус.
Гнездо TRS INPUT
5
Симметричный входной разъем для подключения
наушников.
ВНИМАНИЕ
Не используйте одновременно разъем XLR INPUT и гнездо
TRS INPUT.
Гнездо RCA INPUT
6
Несимметричные штырьковые входные разъемы RCA.
Переключатель POWER
7
Используется для включения и отключения питания.
ВНИМАНИЕ
Перед включением питания убедитесь, что переключатель
[VOLTAGE SELECTOR] установлен в положение,
соответствующее напряжению, применяемому в стране
или регионе использования колонки. Если переключатель
[VOLTAGE SELECTOR] установлен неправильно,
обратитесь в сервисный центр компании Pioneer с просьбой
изменить установленное напряжение и заменить плавкий
предохранитель. При отправке с завода-изготовителя в
изделии установлен предохранитель с соответствующим
установленным напряжением.В случае необходимости
изменения установленного напряжения плавкий
предохранитель следует заменить.
Переключатель VOLTAGE SELECTOR
8
Этот переключатель используется для выбора
установленного напряжения для страны/
региона использования. Он не предназначен для
непосредственного использования клиентом.
Разъем AC IN
9
Подсоедините силовой кабель к этому разъему и к
розетке сети переменного тока. Не подсоединяйте
силовой кабель до тех пор, пока не будут выполнены
все остальные соединения. Используйте только силовой
кабель, входящий в комплект поставки.
Держатель плавкого предохранителя
a
Ru
4
Page 47

Установка и подключение
Правила установки
Условия в помещении прослушивания оказывают тонкое
влияние на звучание воспроизводимых колонками звуков.
Для достижения оптимальных условий прослушивания,
перед тем как приступить к установке, обратите
надлежащее внимание на условия в месте установки.
Устанавливайте колонки на уровне ушей.
Для получения естественного стереофонического
эффекта левая и правая колонки должны быть
установлены симметрично на одинаковом расстоянии от
слушателя.
Соединения
При выполнении или изменении соединений всегда
выключайте питание и отсоединяйте силовой кабель от
сетевой розетки.
Также обязательно читайте инструкции по эксплуатации
других компонентов, к которым подключаются эти
колонки.
Не подсоединяйте силовой кабель до тех пор, пока не
будут выполнены все остальные соединения.
В идеальном случае колонки должны располагаться под
углом 30 ° по отношению к слушателю (образуя между
собой угол 60 °) и быть обращены в сторону слушателя.
ВНИМАНИЕ
В целях обеспечения надлежащего охлаждения, пожалуйста,
оставляйте достаточное пространство между колонками и
ближайшими стенами или другими компонентами (минимум
30 см или больше сверху, сзади, справа и слева каждой
колонки). Недостаточное свободное пространство между
колонкой и стенами или другими компонентами может
привести к повышению температуры внутри корпуса и
вызывать неполадки или повреждения.
Используйте только силовой кабель, входящий в
комплект поставки.
Не используйте одновременно разъем XLR INPUT и
гнездо TRS INPUT.
Обязательно устанавливайте необходимый уровень
звука, поскольку входные сигналы, которые подаются
к разъему XLR INPUT (или гнезду TRS INPUT) и гнезду
RCA INPUT, смешиваются, что влияет на уровень звука.
50 °~ 60 °
Ru
Русский
5
Page 48

Дополнительная информация
Поиск и устранение неполадок
Если вы полагаете, что столкнулись с неполадкой в работе данного устройства, выполните проверку по следующим
пунктам. Также проверьте другое оборудование, подключенное к данному устройству. Если проблему не удается
устранить, обратитесь за консультацией и обслуживанием к вашему дилеру.
Иногда устройство может не работать надлежащим образом из-за статического электричества или других внешних
условий. В подобных случаях отсоедините силовой кабель и подождите пять или более минут, а затем снова
подсоедините силовой кабель и проверьте корректность работы устройства.
Неполадка Пункты проверки Устранение
Отсутствует питание Правильно ли подсоединен силовой кабель? Подсоедините силовой кабель к сетевой розетке.
Не воспроизводится звук с
подключенных аудиоустройств, или
звук слишком тихий.
Подсветка (индикатор POWER)
остается выключенным.
Колонка не выходит из режима
ожидания (не включается).
Звук искажен. Правильно ли установлен уровень звука? Медленно поверните поворотный регулятор
Обратная связь (непрерывное
«завывание»)
Правильно ли настроено подключенное
аудиоустройство?
Правильно ли подсоединен соединительный
кабель?
Не загрязнены ли разъемы или штекеры? Очистите разъемы и штекеры перед
Правильно ли установлен уровень громкости? Поверните поворотный регулятор [LEVEL] на
Включено ли питание? Включите переключатель [POWER] на задней
Включена ли функция автоматического
перехода в режим ожидания?
Включено ли питание? Включите переключатель [POWER] на задней
Включена ли функция автоматического
перехода в режим ожидания?
Уровень входного сигнала слишком низок? Увеличьте уровень входного сигнала.
Правильно ли установлен уровень выходного
сигнала подключенного аудиоустройства?
Правильно ли установлен уровень громкости? Медленно поверните поворотный регулятор
Правильно выберите источник сигнала и
установите уровень громкости.
Правильно подсоедините кабели.
подсоединением.
задней панели по часовой стрелке и увеличить
громкость.
панели.
Выключите переключатель [POWER] на задней
панели, подождите несколько секунд, а затем
снова включите.
панели.
Выключите переключатель [POWER] на задней
панели, подождите несколько секунд, а затем
снова включите.
Переведите переключатель [AUTO STANDBY]
в выключенное положение, чтобы выключить
функцию автоматического перехода в режим
ожидания.
[LEVEL] на задней панели против часовой стрелки
и уменьшите громкость.
Отрегулируйте уровень выходного сигнала
подключенного аудиоустройства.
[LEVEL] на задней панели против часовой стрелки
и уменьшите громкость.
Ru
6
Page 49

Товарные знаки
Pioneer является зарегистрированной торговой маркой PIONEER CORPORATION.
Другие используемые названия компаний и изделий являются зарегистрированными товарными знаками компаний или
товарными знаками.
Технические характеристики
S-DJ50X/S-DJ50X-W S-DJ60X S-DJ80X
Тип 2-полосной активный громкоговоритель с системой двухканального усиления
Усилитель
Усилитель низкой частоты 30 Вт 50 Вт 70 Вт
Усилитель высокой частоты 15 Вт 20 Вт 20 Вт
Входные разъемы
(симметричный вход)
Входные разъемы
(несимметричный вход)
Импеданс 10 кОм
Колонка
Корпус фазоинверторный
Материал корпуса древесно-волокнистая плита средней плотности
Низкочастотный
громкоговоритель
(низкочастотная головка)
Высокочастотный
громкоговоритель
(высокочастотная головка)
Частотная характеристика
воспроизведения
Блок питания/прочее
Поддерживаемые уровни
напряжения
Потребляемая мощность 100 Вт 140 Вт 160 Вт
Потребляемая мощность в
режиме ожидания
Габаритные размеры Ш × В × Г 197 мм × 301 мм × 262 мм 228 мм × 342 мм × 295 мм 276 мм × 401 мм × 315 мм
Масса 6,5 кг 8,5 кг 11,8 кг
В связи с постоянным совершенствованием изделия его технические характеристики и конструкция могут изменяться без предварительного
уведомления.
© PIONEER CORPORATION, 2013. Все права защищены.
XLR × 1, TRS (1/4 дюйма для наушников) × 1
RCA × 1
13-см конус 15-см конус 20-см конус
2,5-см тканевый купол
от 50 Гц до 20 кГц от 45 Гц до 20 кГц от 40 Гц до 20 кГц
преобразование от 100 В до 120 В (от 50 Гц до 60 Гц) / от 220 В до 240 В (от 50 Гц до 60 Гц)
не более 0,5 Вткг
Ru
Русский
7
Page 50

Page 51

Page 52

Примечание:
В соответствии со статьей 5 Закона Российской Федерации “О защите прав потребителя” и Указанием
Правительства Российской Федерации № 720 от 16 июня 1997 года корпорация Pioneer Europe NV
устанавливает условие на следующую продолжительность срока службы официально поставляемых на
Российский рынок товаров.
Аудио и видеооборудование: 7 лет
Переносное аудиооборудование: 6 лет
Другое оборудование (наушники, микрофон и т.д.): 5 лет
Автомобильная электроника: 6 лет
D3-7-10-6_A1_Ru
Дату изготовления оборудования можно определить по серийному номеру, который содержит информацию о
месяце и годе производства.
Серийный номер
12 цифр
2 цифры
10 цифр
P1 P2
Дата изготовления оборудования
P1 - Год изготовления
Год 2001A2002B2003C2004D2005E2006F2007G2008H2009I2010
Символ
Год
2011K2012L2013M2014N2015O2016P2017Q2018R2019S2020
Символ
P2 - Месяц изготовления
Месяц 1
Символ
A
2
B
3
C
4
D
5
E
6
F
7
G
8
H
Tous droits de reproduction et de traduction réservés.
9
10
I
© 2013 PIONEER CORPORATION.
© 2013 PIONEER CORPORATION.
J
J
T
11
All rights reserved.
K
D3-7-10-7_A1_Ru
12
L
PIONEER CORPORATION
1-1, Shin-ogura, Saiwai-ku, Kawasaki-shi, Kanagawa 212-0031, Japan
Корпорация Пайонир
1-1, Син-Огура, Сайвай-ку, г. Кавасаки, префектура Канагава, 212-0031, Япония
Импортер: ООО "ПИОНЕР РУС"
125040, Россия, г. Москва, ул. Правды, д.26 Тел.: +7(495) 956-89-01
PIONEER EUROPE NV
Haven 1087, Keetberglaan 1, B-9120 Melsele, Belgium TEL: 03/570.05.11
K002_PSV_SY
Сделано в Китае
Printed in China / Imprimé en Chine
<DRB1689-A>
 Loading...