


ACTIVE REFERENCE MONITOR
MONITEUR DE RÉFÉRENCE ACTIF
MONITOR ACTIVO DE REFERENCIA
S-DJ50X
S-DJ50X-W
S-DJ60X
S-DJ80X
English
Français Español
http://pioneerdj.com/support/
The Pioneer DJ support site shown above offers FAQs, information on software and various other types of
information and services to allow you to use your product in greater comfort.
Le site de support DJ de Pioneer indiqué ci-dessus propose une FAQ, des informations sur le logiciel et divers
types d’informations et de services qui permettent une utilisation plus confortable de ce produit.
El sitio de asistencia Pioneer DJ mostrado arriba ofrece las preguntas frecuentes, información del software y
varios otros tipos de información y servicios que le permitirán usar su producto con mayor confort.
Operating Instructions
Mode d’emploi
Manual de instrucciones

Thank you for buying this Pioneer product.
NOTE:
This equipment has been tested and found to comply with the limits for a Class B digital device, pursuant to Part 15
of the FCC Rules. These limits are designed to provide reasonable protection against harmful interference in a
residential installation. This equipment generates, uses, and can radiate radio frequency energy and, if not installed
and used in accordance with the instructions, may cause harmful interference to radio communications. However,
there is no guarantee that interference will not occur in a particular installation. If this equipment does cause
harmful interference to radio or television reception, which can be determined by turning the equipment off and on,
the user is encouraged to try to correct the interference by one or more of the following measures:
— Reorient or relocate the receiving antenna.
— Increase the separation between the equipment and receiver.
— Connect the equipment into an outlet on a circuit different from that to which the receiver is connected.
— Consult the dealer or an experienced radio/TV technician for help.
D8-10-1-2_A1_En
Information to User
Alterations or modifications carried out without
appropriate authorization may invalidate the user’s
right to operate the equipment.
D8-10-2_A1_En
This product is for general household purposes. Any
failure due to use for other than household purposes
(such as long-term use for business purposes in a
restaurant or use in a car or ship) and which requires
repair will be charged for even during the warranty
period.
K041_A1_En
Operating Environment
Operating environment temperature and humidity:
+5 °C to +35 °C (+41 °F to +95 °F); less than 85 %RH
(cooling vents not blocked)
Do not install this unit in a poorly ventilated area, or in
locations exposed to high humidity or direct sunlight (or
strong artificial light)
D3-4-2-1-7c*_A1_En
WARNING: Handling the cord on this product or
cords associated with accessories sold with the
product may expose you to chemicals listed on
proposition 65 known to the State of California and
other governmental entities to cause cancer and
birth defect or other reproductive harm.
D36-P5_B1_En
POWER-CORD CAUTION
Handle the power cord by the plug. Do not pull out the
plug by tugging the cord and never touch the power
cord when your hands are wet as this could cause a
short circuit or electric shock. Do not place the unit, a
piece of furniture, etc., on the power cord, or pinch the
cord. Never make a knot in the cord or tie it with other
cords. The power cords should be routed such that they
are not likely to be stepped on. A damaged power cord
can cause a fire or give you an electrical shock. Check
the power cord once in a while. When you find it
damaged, ask your nearest PIONEER authorized
service center or your dealer for a replacement.
S002*_A1_En
IMPORTANT NOTICE
THE MODEL NUMBER AND SERIAL NUMBER OF
THIS EQUIPMENT ARE ON THE REAR OR BOTTOM.
RECORD THESE NUMBERS ON PAGE 11 FOR
FUTURE REFERENCE.
D36-AP9-3*_A1_En
The Safety of Your Ears is in Your Hands
Get the most out of your equipment by playing it at a
safe level – a level that lets the sound come through
clearly without annoying blaring or distortion and, most
importantly, without affecting your sensitive hearing.
Sound can be deceiving. Over time, your hearing
“comfort level” adapts to higher volumes of sound, so
what sounds “normal” can actually be loud and
harmful to your hearing. Guard against this by setting
your equipment at a safe level BEFORE your hearing
adapts.
ESTABLISH A SAFE LEVEL:
• Set your volume control at a low setting.
• Slowly increase the sound until you can hear it
comfortably and clearly, without distortion.
• Once you have established a comfortable sound
level, set the dial and leave it there.
BE SURE TO OBSERVE THE FOLLOWING
GUIDELINES:
• Do not turn up the volume so high that you can’t
hear what’s around you.
• Use caution or temporarily discontinue use in
potentially hazardous situations.
• Do not use headphones while operating a motorized
vehicle; the use of headphones may create a traffic
hazard and is illegal in many areas.
S001a_A1_En
Please read through these operating instructions so you will know how to operate your model properly. After you have finished reading the
instructions, put them away in a safe place for future reference.
IMPORTANT
The lightning flash with arrowhead symbol,
within an equilateral triangle, is intended to
alert the user to the presence of uninsulated
“dangerous voltage” within the product’s
enclosure that may be of sufficient
magnitude to constitute a risk of electric
shock to persons.
CAUTION:
TO PREVENT THE RISK OF ELECTRIC
SHOCK, DO NOT REMOVE COVER (OR
BACK). NO USER-SERVICEABLE PARTS
INSIDE. REFER SERVICING TO QUALIFIED
SERVICE PERSONNEL.
CAUTION
RISK OF ELECTRIC SHOCK
DO NOT OPEN
The exclamation point within an equilateral
triangle is intended to alert the user to the
presence of important operating and
maintenance (servicing) instructions in the
literature accompanying the appliance.
D3-4-2-1-1b_A1_En
Read these instructions.
1)
Keep these instructions.
2)
Heed all warnings.
3)
Follow all instructions.
4)
Do not use this apparatus near water.
5)
Clean only with dry cloth.
6)
Do not block any ventilation openings. Install in
7)
accordance with the manufacturer’s
instructions.
Do not install near any heat sources such as
8)
radiators, heat registers, stoves, or other
apparatus (including amplifiers) that produce
heat.
Do not defeat the safety purpose of the polarized
9)
or grounding-type plug. A polarized plug has two
blades with one wider than the other. A
grounding type plug has two blades and a third
grounding prong. The wide blade or the third
prong are provided for your safety. If the provided
plug does not fit into your outlet, consult an
electrician for replacement of the obsolete outlet.
Protect the power cord from being walked on or
10)
pinched particularly at plugs, convenience
receptacles, and the point where they exit from
the apparatus.
WARNING
This equipment is not waterproof. To prevent a fire or
shock hazard, do not place any container filled with
liquid near this equipment (such as a vase or flower
pot) or expose it to dripping, splashing, rain or
moisture.
WARNING
To prevent a fire hazard, do not place any naked flame
sources (such as a lighted candle) on the equipment.
D3-4-2-1-3_A1_En
D3-4-2-1-7a_A1_En
11)
Only use attachments/accessories specified by
the manufacturer.
12)
Use only with the cart, stand, tripod, bracket, or
table specified by the manufacturer, or sold with
the apparatus. When a cart is used, use caution
when moving the cart/apparatus combination to
avoid injury from tip-over.
13)
Unplug this apparatus during lightning storms
or when unused for long periods of time.
14)
Refer all servicing to qualified service personnel.
Servicing is required when the apparatus has
been damaged in any way, such as power-supply
cord or plug is damaged, liquid has been spilled
or objects have fallen into the apparatus, the
apparatus has been exposed to rain or moisture,
does not operate normally, or has been dropped.
D3-7-13-69_En
VENTILATION CAUTION
When installing this unit, make sure to leave space
around the unit for ventilation to improve heat radiation
(at least 30 cm at top, 30 cm at rear, and 30 cm at each
side).
WARNING
Slots and openings in the cabinet are provided for
ventilation to ensure reliable operation of the product,
and to protect it from overheating. To prevent fire
hazard, the openings should never be blocked or
covered with items (such as newspapers, table-cloths,
curtains) or by operating the equipment on thick carpet
or a bed.
D3-4-2-1-7b*_A1_En
En
2
NOTE:
This equipment has been tested and found to comply with the limits for a Class B digital device, pursuant to Part 15
of the FCC Rules. These limits are designed to provide reasonable protection against harmful interference in a
residential installation. This equipment generates, uses, and can radiate radio frequency energy and, if not installed
and used in accordance with the instructions, may cause harmful interference to radio communications. However,
there is no guarantee that interference will not occur in a particular installation. If this equipment does cause
harmful interference to radio or television reception, which can be determined by turning the equipment off and on,
the user is encouraged to try to correct the interference by one or more of the following measures:
— Reorient or relocate the receiving antenna.
— Increase the separation between the equipment and receiver.
— Connect the equipment into an outlet on a circuit different from that to which the receiver is connected.
— Consult the dealer or an experienced radio/TV technician for help.
D8-10-1-2_A1_En
English
Operating Environment
Operating environment temperature and humidity:
+5 °C to +35 °C (+41 °F to +95 °F); less than 85 %RH
(cooling vents not blocked)
Do not install this unit in a poorly ventilated area, or in
locations exposed to high humidity or direct sunlight (or
strong artificial light)
D3-4-2-1-7c*_A1_En
Information to User
Alterations or modifications carried out without
appropriate authorization may invalidate the user’s
right to operate the equipment.
D8-10-2_A1_En
This product is for general household purposes. Any
failure due to use for other than household purposes
(such as long-term use for business purposes in a
restaurant or use in a car or ship) and which requires
repair will be charged for even during the warranty
period.
K041_A1_En
IMPORTANT NOTICE
THE MODEL NUMBER AND SERIAL NUMBER OF
THIS EQUIPMENT ARE ON THE REAR OR BOTTOM.
RECORD THESE NUMBERS ON PAGE 11 FOR
FUTURE REFERENCE.
D36-AP9-3*_A1_En
POWER-CORD CAUTION
Handle the power cord by the plug. Do not pull out the
plug by tugging the cord and never touch the power
cord when your hands are wet as this could cause a
short circuit or electric shock. Do not place the unit, a
piece of furniture, etc., on the power cord, or pinch the
cord. Never make a knot in the cord or tie it with other
cords. The power cords should be routed such that they
are not likely to be stepped on. A damaged power cord
can cause a fire or give you an electrical shock. Check
the power cord once in a while. When you find it
damaged, ask your nearest PIONEER authorized
service center or your dealer for a replacement.
S002*_A1_En
The Safety of Your Ears is in Your Hands
Get the most out of your equipment by playing it at a
safe level – a level that lets the sound come through
clearly without annoying blaring or distortion and, most
importantly, without affecting your sensitive hearing.
Sound can be deceiving. Over time, your hearing
“comfort level” adapts to higher volumes of sound, so
what sounds “normal” can actually be loud and
harmful to your hearing. Guard against this by setting
your equipment at a safe level BEFORE your hearing
adapts.
ESTABLISH A SAFE LEVEL:
• Set your volume control at a low setting.
• Slowly increase the sound until you can hear it
comfortably and clearly, without distortion.
• Once you have established a comfortable sound
level, set the dial and leave it there.
WARNING: Handling the cord on this product or
cords associated with accessories sold with the
product may expose you to chemicals listed on
proposition 65 known to the State of California and
other governmental entities to cause cancer and
birth defect or other reproductive harm.
D36-P5_B1_En
BE SURE TO OBSERVE THE FOLLOWING
GUIDELINES:
• Do not turn up the volume so high that you can’t
hear what’s around you.
• Use caution or temporarily discontinue use in
potentially hazardous situations.
• Do not use headphones while operating a motorized
vehicle; the use of headphones may create a traffic
hazard and is illegal in many areas.
S001a_A1_En
En
3

FEDERAL COMMUNICATIONS COMMISSION DECLARATION OF CONFORMITY
AFTER-SALES SERVICE FOR PIONEER PRODUCTS
Please contact the dealer or distributor from where you purchased the
product for its after-sales service (including warranty conditions) or any
other information. In case the necessary information is not available,
please contact the Pioneer’s subsidiaries (regional service headquarters)
listed below:
PLEASE DO NOT SHIP YOUR PRODUCT TO THE COMPANIES at the
addresses listed below for repair without advance contact, for these
companies are not repair locations.
AMERICA
PIONEER ELECTRONICS (USA) INC.
P. O. BOX 1760, LONG BEACH, CA 90801-1760, U.S.A.
EUROPE
PIONEER EUROPE NV
EUROPEAN SERVICE DIVISION
HAVEN 1087, KEETBERGLAAN 1, B-9120 MELSELE, BELGIUM
ASEAN
PIONEER ELECTRONICS ASIACENTRE PTE. LTD.
SERVICE DEPARTMENT
253, ALEXANDRA ROAD #04-01 SINGAPORE 159936
JAPAN AND OTHERS
PIONEER CORPORATION (HEAD OFFICE)
CUSTOMER SUPPORT CENTER
1-1, SHIN-OGURA, SAIWAI-KU, KAWASAKI-SHI, KANAGAWA
212-0031, JAPAN
S016_C1_En
This device complies with part 15 of the FCC Rules. Operation is subject to the following two conditions: (1) This
device may not cause harmful interference, and (2) this device must accept any interference received, including
interference that may cause undesired operation.
Product Name: ACTIVE REFERENCE MONITOR
Model Number: S-DJ50X/S-DJ50X-W/S-DJ60X/S-DJ80X
Responsible Party Name: PIONEER ELECTRONICS (USA) INC.
SERVICE SUPPORT DIVISION
Address: 1925 E. DOMINGUEZ ST. LONG BEACH, CA 90810-1003, U.S.A.
Phone: 1-800-421-1404
URL: http://www.pioneerelectronics.com
D8-10-4*_C1_En
CAUTION
The
POWER
shut off all power from the AC outlet. Since the power
cord serves as the main disconnect device for the
unit, you will need to unplug it from the AC outlet to
shut down all power. Therefore, make sure the unit
has been installed so that the power cord can be
easily unplugged from the AC outlet in case of an
accident. To avoid fire hazard, the power cord should
also be unplugged from the AC outlet when left
unused for a long period of time (for example, when
on vacation).
Do not attach these speakers to the wall or ceiling, as
they may cause injury in the event of a fall.
switch on this unit will not completely
CAUTION
These servicing instructions are for use by qualified
service personnel only. To reduce the risk of electric
shock, do not perform any servicing other than that
contained in the operating instructions unless you
are qualified to do so.
D3-4-2-2-2a*_A1_En
SGK007*_A1_En
WARNING
This product equipped with a three-wire grounding
(earthed) plug - a plug that has a third (grounding) pin.
This plug only fits a grounding-type power outlet. If you
are unable to insert the plug into an outlet, contact a
licensed electrician to replace the outlet with a properly
grounded one. Do not defeat the safety purpose of the
grounding plug.
D3-7-13-70_A1_En
D3-4-2-1-6_A1_En
En
4
AFTER-SALES SERVICE FOR PIONEER PRODUCTS
Please contact the dealer or distributor from where you purchased the
product for its after-sales service (including warranty conditions) or any
other information. In case the necessary information is not available,
please contact the Pioneer’s subsidiaries (regional service headquarters)
listed below:
PLEASE DO NOT SHIP YOUR PRODUCT TO THE COMPANIES at the
addresses listed below for repair without advance contact, for these
companies are not repair locations.
AMERICA
PIONEER ELECTRONICS (USA) INC.
P. O. BOX 1760, LONG BEACH, CA 90801-1760, U.S.A.
EUROPE
PIONEER EUROPE NV
EUROPEAN SERVICE DIVISION
HAVEN 1087, KEETBERGLAAN 1, B-9120 MELSELE, BELGIUM
ASEAN
PIONEER ELECTRONICS ASIACENTRE PTE. LTD.
SERVICE DEPARTMENT
253, ALEXANDRA ROAD #04-01 SINGAPORE 159936
English
JAPAN AND OTHERS
PIONEER CORPORATION (HEAD OFFICE)
CUSTOMER SUPPORT CENTER
1-1, SHIN-OGURA, SAIWAI-KU, KAWASAKI-SHI, KANAGAWA
212-0031, JAPAN
S016_C1_En
En
5
Introduction
Main Features
Diffuser on the waveguide improves sound directivity and
provides spacious sound.
Aramid fiber woofer cone is light and extremely rigid, which
provides the best bass response.
Grooves on the bass-reflex duct improve the airflow and provide
loss-less bass performance.
Confirm All Accessories
Power cord (1)
Operating Instructions (this document)
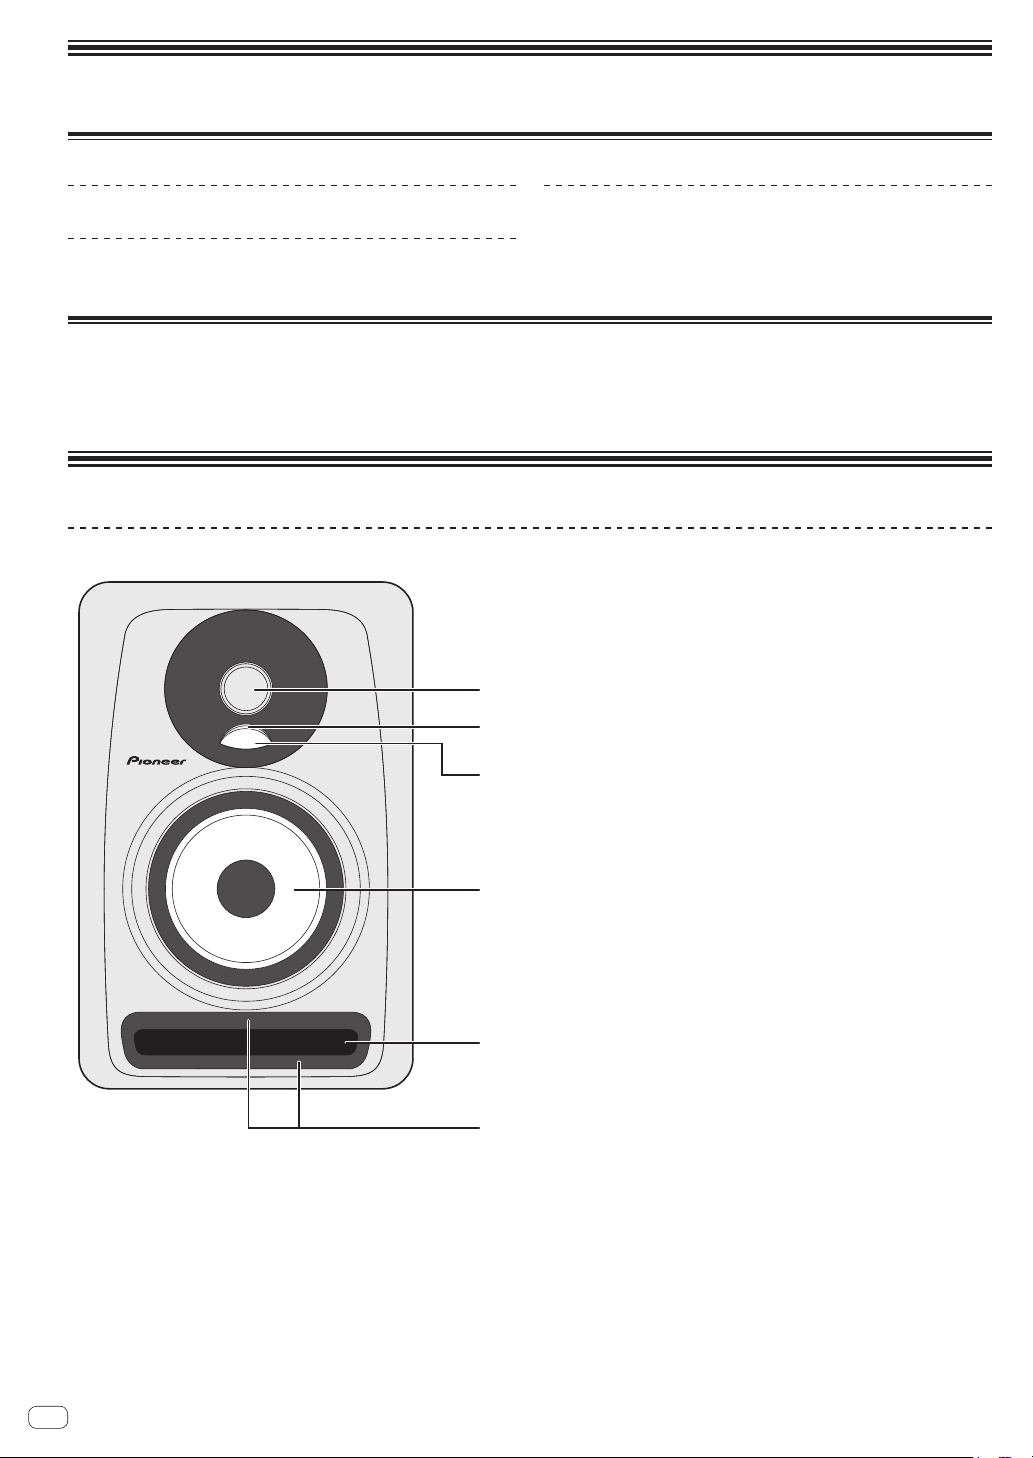
Names and Functions of Parts
Front Panel Facilities
1-inch high-resolution soft dome tweeter
1
Illumination (POWER indicator)
2
Lights up according to whether the power is on or off. The
indicator does not light up when the speakers are in standby
1
2
3
4
mode.
Diffuser
3
Improves the directionality and diffusion of high-frequency
sounds.
Aramid fiber woofer
4
Light and extremely rigid cone provides the best bass
response.
Bass-reflex duct
5
Groove
6
Regulates the flow of air in the bass-reflex duct to enable
powerful low-frequency sounds with little loss in sound.
5
6
En
6
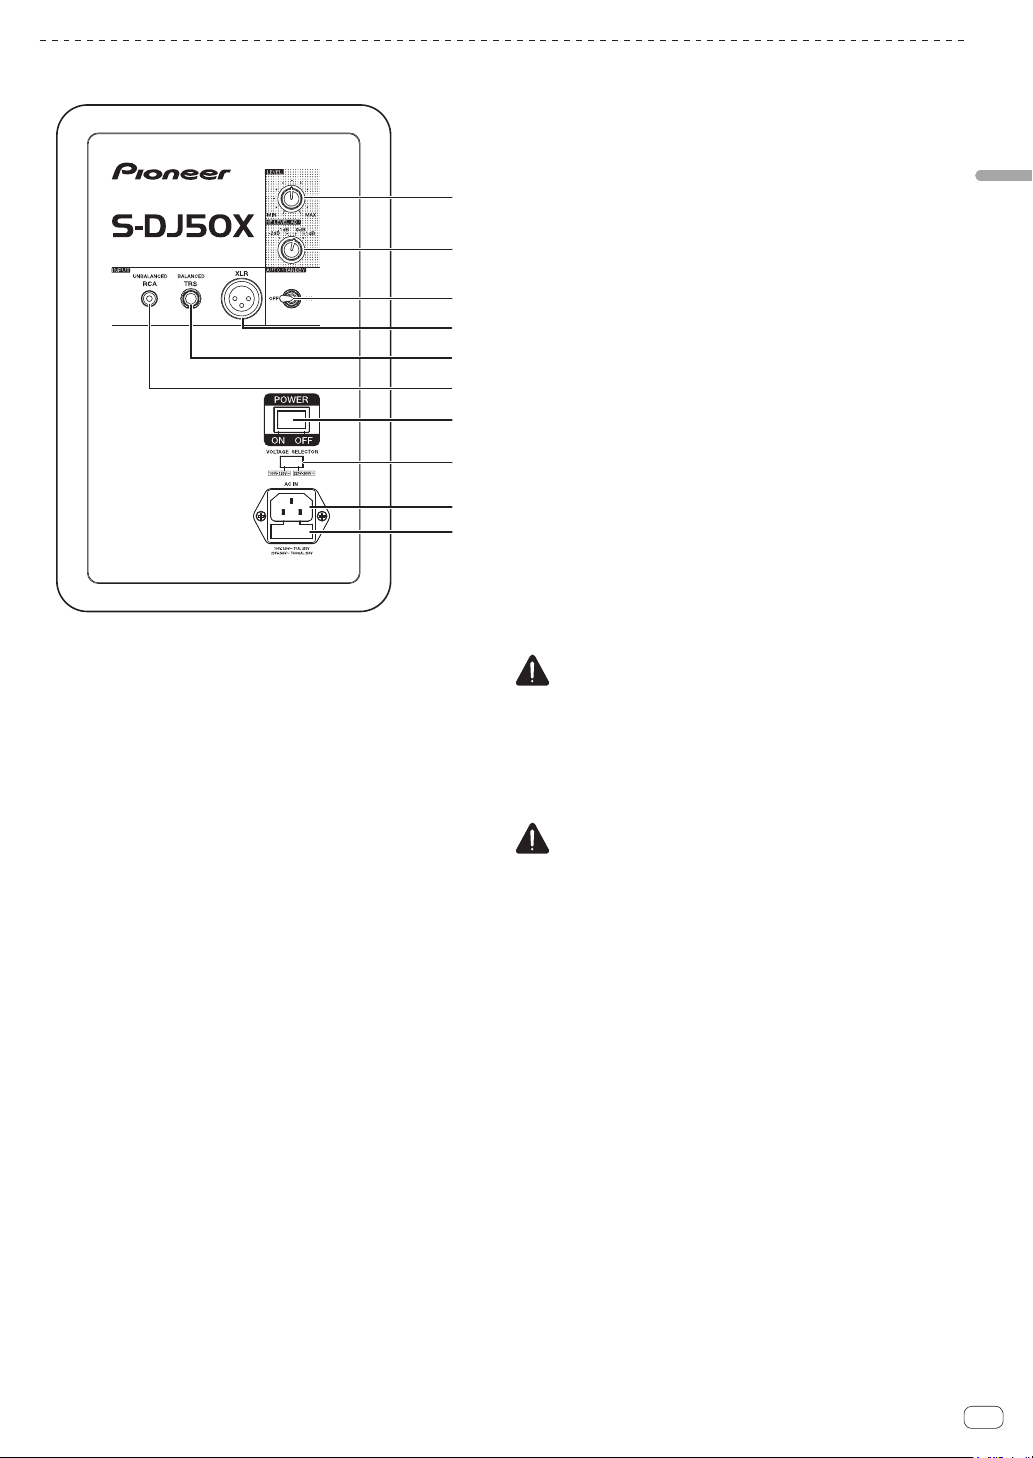
Rear Panel Facilities
* The S-DJ50X is shown in the illustration.
1
2
3
4
5
6
7
8
9
a
LEVEL dial
1
Use to adjust the sound level (volume).
HF LEVEL ADJ dial
2
Use to adjust high-frequency sounds.
You can select from –2 dB, –1 dB, 0 dB, and 1 dB.
AUTO STANDBY switch
3
Use to turn the auto standby function on or off.
When the auto standby function is turned on, the speakers
automatically enter standby mode if no input signal is
received for a certain period of time (approximately 25
minutes) and power consumption can be reduced. When
an input signal is received while the speakers are in standby
mode, the speakers will automatically resume from standby
mode.
•The illumination (POWER indicator) on the front panel turns
off when the speakers enter standby mode.
•When the input signal is weaker than a certain level, the
speakers may not automatically resume from standby
mode. In such cases, turn off the [
to use the speakers.
•To force the speakers to resume from standby mode, turn off
POWER
the [
on after a few seconds.
XLR INPUT connector
4
XLR type balanced input connector. The connector’s pin array
is as follows: No. 1 Ground, No. 2 Hot, and No. 3 Cold.
TRS INPUT jack
5
Balanced-input phone jack.
CAUTION
Do not connect to both the XLR INPUT connector and the TRS
INPUT jack at the same time.
RCA INPUT jack
6
RCA pin-type unbalanced input jacks.
POWER switch
7
Use to turn the power on and off.
CAUTION
Before turning on the power, make sure to check that the
VOLTAGE SELECTOR
[
for the country or region where the speakers will be used. If
VOLTAGE SELECTOR
the [
a Pioneer service center and request that the set voltage be
changed and the fuse be replaced. At the time of shipment, a
fuse with the appropriate voltage setting is set in the product.
When it becomes necessary to change the voltage setting, the
fuse must be replaced.
VOLTAGE SELECTOR switch
8
This switch is used to select the appropriate voltage settings
for the country/region of use. It is not to be used by the
customer directly.
AC IN
9
Connect the accessory power cord here and to an AC
power outlet. Do not plug in the power cord until all other
connections have been completed. Use only the furnished
accessory power cord.
Fuse holder
a
] switch on the rear panel once, and turn it back
] switch is set to the appropriate voltage
] switch is not correctly set, contact
AUTO STANDBY
] switch
English
En
7
Installation and Connections
How to Install
A speaker’s playback sound is delicately influenced by
conditions in the listening room. To produce optimum listening
conditions, take due consideration of the conditions of your
installation location before beginning actual installation.
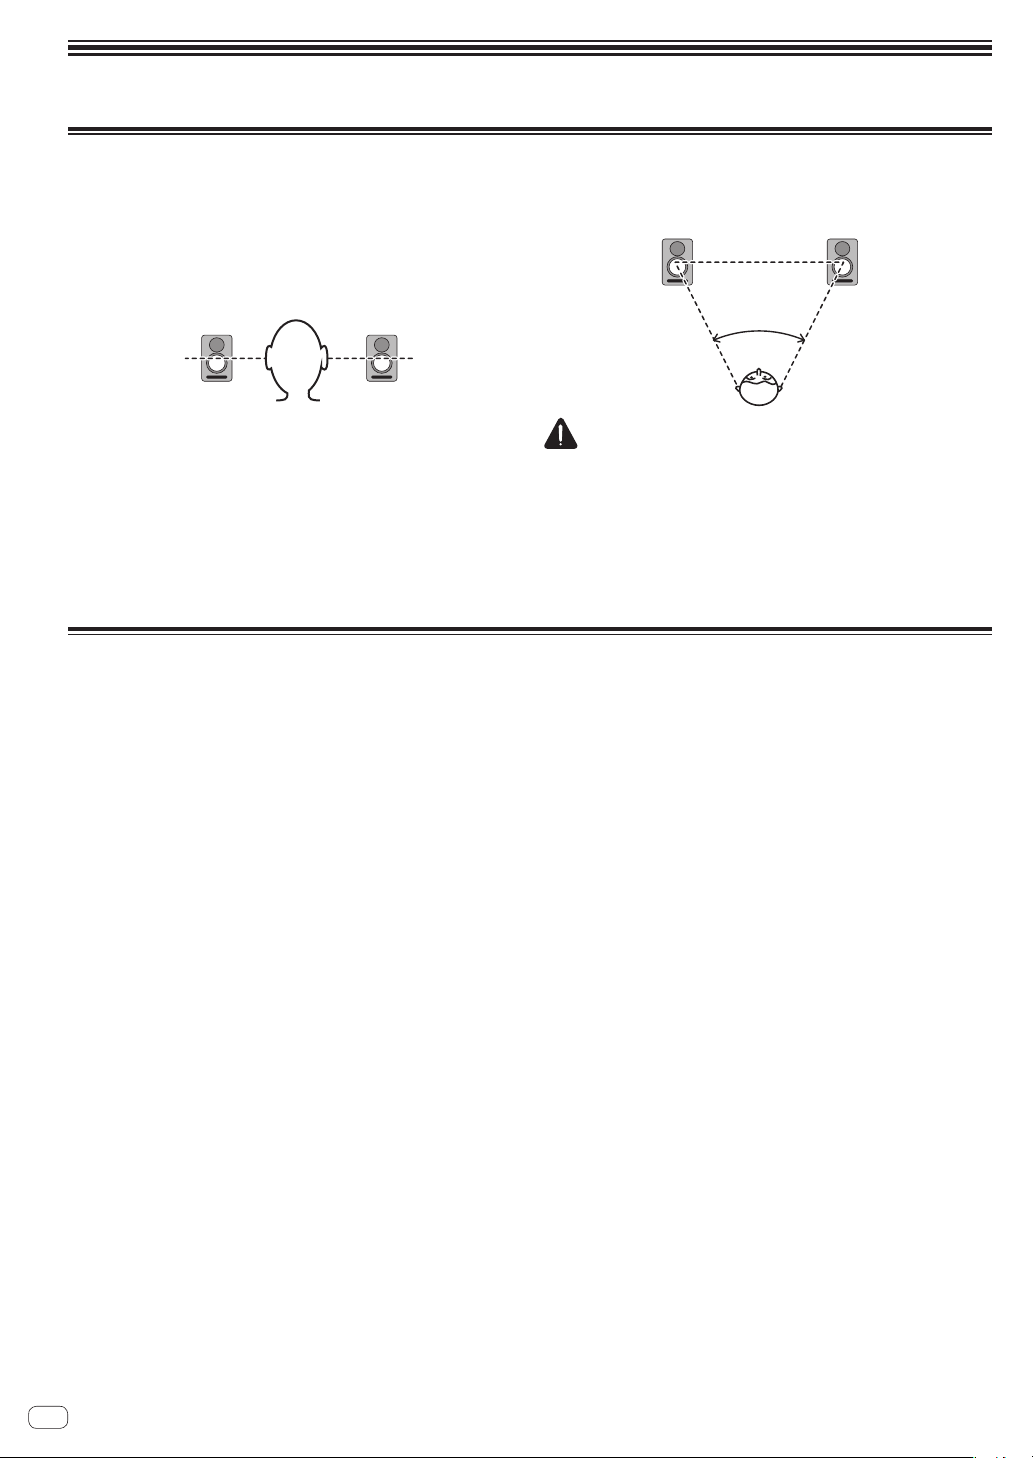
Place the speakers at ear level.
For a natural stereo effect, the right and left speakers should
be installed in symmetrical and equidistant positions from the
listening position.
Connections
When making or changing connections, always turn off the
power and disconnect the power cord from its outlet.
Also, be sure to read the operating instructions for the other
components to which you are connecting these speakers.
Do not plug in the power cord until all other connections have
been completed.
Use only the furnished accessory power cord.
Speakers should ideally be located at 30 ° angles from the
listening position (together forming a total 60 ° angle), and
rotated inward to face the listening position.
50 °~ 60 °
CAUTION
To promote proper cooling, please assure that sufficient space
is preserved between the speakers and nearby walls or other
components (minimum 30 cm (11.9 in.) or more above, behind,
and to right and left sides of each speaker). Leaving insufficient
space between the speaker and walls or other components may
lead to rising interior temperatures, leading to malfunction or
damage.
• DonotconnecttoboththeXLRINPUTconnectorandtheTRS
INPUT jack at the same time.
• Makesuretosetthesoundlevelatanappropriatelevelas
the input signals to the XLR INPUT connector (or TRS INPUT
jack) and RCA INPUT jack will be mixed together, affecting the
sound level.
En
8

Additional Information
Troubleshooting
If you think you are experiencing a malfunction with this unit, check the following items. Also check other devices connected to the
unit. If the problem persists, consult your dealer for service.
On occasion, the unit may fail to operate properly due to static electricity or other external conditions. In this event, disconnect the
power cord and wait for five minutes or more, then reconnect the power cord and check for proper operation.
Symptom Items to Check Remedy
No power Is power cord connected properly? Connect power cord to outlet.
No sound from connected audio
devices, or sound is very small.
Illumination (POWER indicator)
remains turned off.
Speakers do not resume (turn on) from
standby mode.
Sound is distorted. Is the sound level set properly? Slowly turn the [
Feedback (continuous howling sound) Is the sound volume set properly? Slowly turn the [
Has connected audio device been set properly? Set device’s external input and sound volume properly.
Is connection cable connected properly? Connect cables properly.
Are connectors or plugs dirty? Clean connectors and plugs before connecting.
Is the sound volume set properly? Turn the [
Is the power turned on? Turn on the [
Is the auto standby function on? Turn off the [
Is the power turned on? Turn on the [
Is the auto standby function on? Turn off the [
Is the level of the input signal low? Increase the level of the input signal.
Is the output level of the connected audio device set
properly?
LEVEL
turn up the volume.
wait a few seconds, and then turn it back on.
wait a few seconds, and then turn it back on.
Turn off the [
auto standby function.
counterclockwise and turn down the volume.
Adjust the output level of the connected audio device
properly.
counterclockwise and turn down the volume.
] dial on the rear panel clockwise and
POWER
] switch on the rear panel.
POWER
] switch on the rear panel once,
POWER
] switch on the rear panel.
POWER
] switch on the rear panel once,
AUTO STANDBY
LEVEL
LEVEL
] switch to turn off the
] dial on the rear panel
] dial on the rear panel
English
En
9

Trademarks
Pioneer is a registered trademark of PIONEER CORPORATION.
Other listed company names and a product name are the registered trademark of the companies or trademarks.
Specifications
S-DJ50X/S-DJ50X-W S-DJ60X S-DJ80X
Type Bi-amp 2-way active speaker
Amplifier
LF amp 30 W 50 W 70 W
HF amp 15 W 20 W 20 W
Input connectors (balanced input) XLR × 1, TRS (1/4 inch Phone) × 1
Input connectors (unbalanced input) RCA × 1
Impedance 10kΩ
Speaker
Enclosure Bass reflex
Enclosure material MDF
Woofer (LF driver) 13 cm (5 in.) cone 15 cm (6 in.) cone 20 cm (8 in.) cone
Tweeter (HF driver) 2.5 cm (1 in.) soft dome
Playback response 50 Hz to 20 kHz 45 Hz to 20 kHz 40 Hz to 20 kHz
Power unit/other
Supported voltages 100 V to 120 V (50 Hz to 60 Hz) / 220 V to 240 V (50 Hz to 60 Hz) conversion
Power consumption 100 W 140 W 160 W
Power consumption during standby
mode
External dimensions W × H × D
Weight 6.5 kg (14.3 lb.) 8.5 kg (18.7 lb.) 11.8 kg (26.0 lb.)
Specifications and design subject to possible modification without notice, due to improvements.
© 2013 PIONEER CORPORATION. All rights reserved.
0.5 W or less
197 mm (77.6 in.) × 301 mm
(118.5 in.) × 262 mm (103.1 in.)
228 mm (89.8 in.) × 342 mm
(134.6 in.) × 295 mm (116.1 in.)
276 mm (108.7 in.) × 401 mm
(157.9 in.) × 315 mm (124.0 in.)
10
En

UCP0212
PIONEER ELECTRONICS (USA) INC.
WARRANTY VALID ONLY IN THE U.S.A. AND CANADA
WARRANTY
Pioneer Electronics (USA) Inc. (PUSA) warrants that products distributed by PUSA in the U.S.A. and Canada that fail to function properly under normal use due to a manufacturing
defect when installed and operated according to the owner’s manual enclosed with the unit will be repaired or replaced with a unit of comparable value, at the option of PUSA,
without charge to you for parts or actual repair work. Parts supplied under this warranty may be new or rebuilt at the option of PUSA.
THIS LIMITED WARRANTY APPLIES TO THE ORIGINAL OR ANY SUBSEQUENT OWNER OF THIS PIONEER PRODUCT DURING THE WARRANTY PERIOD PROVIDED THE
PRODUCT WAS PURCHASED FROM AN AUTHORIZED PIONEER DISTRIBUTOR/DEALER IN THE U.S.A. OR CANADA. YO U WILL BE REQUIRED TO PROVIDE A SALES
RECEIPT OR OTHER VALID PROOF OF PURCHASE SHOWING THE DATE OF ORIGINAL PURCHASE OR, IF RENTED, YOUR RENTAL CONTRACT SHOWING THE PLACE
AND DATE OF FIRST RENTAL. IN THE EVENT SERVICE IS REQUIRED, THE PRODUCT MUST BE DELIVERED WITHIN THE WARRANTY PERIOD, TRANSPORTATION
PREPAID, ONLY FROM WITHIN THE U.S.A. AS EXPLAINED IN THIS DOCUMENT. YOU WILL BE RESPONSIBLE FOR REMOVAL AND INSTALLATION OF THE PRODUCT .
PUSA WILL PAY TO RETURN THE REPAIRED OR REPLACEMENT PRODUCT TO YOU WITHIN THE U.S.A.
PRODUCT WARRANTY PERIOD
DJ Audio and Video ................................................................................................................................................................................... 1 Year 1 Year
The warranty period for retail customers who rent the product commences upon the date product is first put into use (a) during the rental period or (b) retail sale, whichever occurs first.
WHAT IS NOT COVERED
IF THIS PRODUCT WAS PURCHASED FROM AN UNAUTHORIZED DISTRIBUTOR, THERE ARE NO WARRANTIES, EXPRESS OR IMPLIED, INCLUDING THE IMPLIED WARRANTY
OF MERCHANTABILITY AND THE IMPLIED WARRANTY OF FITNESS FOR A PARTICULAR PURPOSE AND THIS PRODUCT IS SOLD STRICTLY “AS IS” AND “WITH ALL FAULTS".
PIONEER SHALL NOT BE LIABLE FOR ANY CONSEQUENTIAL AND/OR INCIDENTAL DAMAGES.
THIS WARRANTY DOES NOT APPLY IF THE PRODUCT HAS BEEN SUBJECTED TO POWER IN EXCESS OF ITS PUBLISHED POWER RATING.
THIS WARRANTY DOES NOT COVER THE CABINET OR ANY APPEARANCE ITEM, USER ATTA CHED ANTENNA, ANY DAMAGE TO RECORDS OR RECORDING TA PES OR DISCS, ANY
DAMAGE TO THE PRODUCT RESULTING FROM ALTERATIONS, MODIFICA
LIGHTNING OR TO POWER SURGES, SUBSEQUENT DAMAGE FROM LEAKING, DAMAGE FROM INOPERATIVE BATTERIES, OR THE USE OF BATTERIES NOT CONFORMING TO THOSE
SPECIFIED IN THE OWNER’S MANUAL.
THIS WARRANTY DOES NOT COVER THE COST OF PARTS OR LABOR WHICH WOULD BE OTHERWISE PROVIDED WITHOUT CHARGE UNDER THIS WARRANTY OBTAINED FROM
ANY SOURCE OTHER THAN A PIONEER AUTHORIZED SERVICE COMPANY OR OTHER DESIGNATED LOCATION. THIS WARRANTY DOES NOT COVER DEFECTS OR DAMAGE CAUSED
BY THE USE OF UNAUTHORIZED PARTS OR LABOR OR FROM IMPROPER MAINTENANCE.
ALTERED, DEFACED, OR REMOVED SERIAL NUMBERS VOID THIS ENTIRE WARRANTY
NO OTHER WARRANTIES
PIONEER LIMITS ITS OBLIGATIONS UNDER ANY IMPLIED WARRANTIES INCLUDING, BUT NOT LIMITED TO, THE IMPLIED WARRANTIES OF MERCHANTABILITY AND
FITNESS FOR A PARTICULAR PURPOSE, TO A PERIOD NOT TO EXCEED THE WARRANTY PERIOD. NO WARRANTIES SHALL APPLY AFTER THE WARRANTY PERIOD.
SOME STATES DO NOT ALLOW LIMITATIONS ON HOW LONG AN IMPLIED WARRANTY LASTS AND SOME STATES DO NOT ALLOW THE EX CLUSIONS OR LIMITATIONS
OF INCIDENTAL OR CONSEQUENTIAL DAMAGES, SO THE ABOVE LIMITATIONS OR EXCLUSIONS MAY NOT APPLY TO YOU. THIS WARRANTY GIVES YOU SPECIFIC LEGAL
RIGHTS AND YOU MAY HAVE OTHER RIGHTS WHICH MAY VA RY FROM STATE TO STATE.
TO OBTAIN SERVICE
PUSA has appointed a number of Authorized Service Companies throughout the U.S.A. and Canada should your product require service. To receive warranty service you
need to present your sales receipt or, if rented, your rental contract showing place and date of original owner’s transaction. If shipping the unit you will need to package it
carefully and send it, transportation prepaid by a traceable, insured method, to an Authorized Service Company. Package the product
prevent damage in transit. The original container is ideal for this purpose. Include your name, address and telephone number where you can be reached during business
hours.
On all complaints and concerns in the U.S.A. and Canada call Customer Support at 1-800-872-4159.
LIMITED WARRANTY
Parts Labor
TIONS NOT AUTHORIZED IN WRITING BY PIONEER, ACCIDENT, MISUSE OR ABUSE, DAMAGE DUE TO
using adequate padding material to
English
For hook-up and operation of your unit or to locate an
Authorized Service Company, please call or write:
DISPUTE RESOLUTION
Following our response to any initial request to Customer Support, should a dispute arise between you and Pioneer, Pioneer makes available its Complaint Resolution Program
to resolve the dispute. The Complaint Resolution Program is available to you without charge. Yo u are required to use the Complaint Resolution Program before you exercise
any rights under, or seek any remedies, created by Title I of the Magnuson-Moss Warranty-Federal Trade Commission Improvement Act, 15 U.S.C. 2301 et seq.
To use the Complaint Resolution Program call 1-800-872-4159 and explain to the customer service representative the problem you are experiencing, steps you have taken
to have the product repaired during the warranty period and the name of the authorized Distributor/Dealer from whom the Pioneer product was purchased. After the complaint
has been explained to the representative, a resolution number will be issued. Within 40 days of receiving your complaint, Pioneer will investigate the dispute and will either:
(1) respond to your complaint in writing informing you what action Pioneer will take, and in what time period, to resolve the dispute; or (2) respond to your complaint in writing
informing you why it will not take any action.
CUSTOMER SUPPORT
PIONEER ELECTRONICS (USA) INC.
LONG BEACH, CALIFORNIA 90801
P.O. BOX 1720
1-800-872-4159
http://www.pioneerelectronics.com
RECORD THE PLACE AND DATE OF PURCHASE FOR FUTURE REFERENCE
Model No. ____________________________________________ Serial No. _________________________________________ Purchase Date ______________________
Purchased From ____________________________________________________________________________________________________________________________
KEEP THIS INFORMATION AND YOUR SALES RECEIPT IN A SAFE PLACE
_
En
11

Nous vous remercions d’avoir acheté ce produit Pioneer.
NOTE IMPORTANTE SUR LE CABLE
D’ALIMENTATION
Tenir le câble d’alimentation par la fiche. Ne pas
débrancher la prise en tirant sur le câble et ne pas
toucher le câble avec les mains mouillées. Cela risque
de provoquer un court-circuit ou un choc électrique. Ne
pas poser l’appareil ou un meuble sur le câble. Ne pas
pincer le câble. Ne pas faire de noeud avec le câble ou
l’attacher à d’autres câbles. Les câbles d’alimentation
doivent être posés de façon à ne pas être écrasés. Un
câble abîmé peut provoquer un risque d’incendie ou un
choc électrique. Vérifier le câble d’alimentation de
temps en temps. Contacter le service après-vente
PIONEER le plus proche ou le revendeur pour un
remplacement.
S002*_A1_Fr
REMARQUE IMPORTANTE
LE NUMÉRO DE MODÈLE ET LE NUMÉRO DE SÉRIE
SE TROUVENT À L’ARRIÈRE OU SUR LE FOND DE
CET APPAREIL. NOTEZ CES NUMÉROS À LA PAGE 9
POUR VOUS Y RÉFÉRER ULTÉRIEUREMENT.
D36-AP9-3*_A1_Fr
La protection de votre ouïe est entre vos
mains
Pour assurer le rendement optimal de votre matériel
et – plus important encore – la protection de votre ouïe,
réglez le volume à un niveau raisonnable. Pour ne pas
altérer votre sens de la perception, le son doit être clair
mais ne produire aucun vacarme et être exempt de
toute distorsion. Votre ouïe peut vous jouer des tours.
Avec le temps, votre système auditif peut en effet
s’adapter à des volumes supérieurs, et ce qui vous
semble un « niveau de confort normal » pourrait au
contraire être excessif et contribuer à endommager
votre ouïe de façon permanente. Le réglage de votre
matériel à un volume sécuritaire AVANT que votre ouïe
s’adapte vous permettra de mieux vous protéger.
CHOISISSEZ UN VOLUME SÉCURITAIRE:
• Réglez d’abord le volume à un niveau inférieur.
• Montez progressivement le volume jusqu’à un niveau
d’écoute confortable ; le son doit être clair et exempt
de distorsions.
• Une fois que le son est à un niveau confortable, ne
touchez plus au bouton du volume.
N’OUBLIEZ PAS DE RESPECTER LES
DIRECTIVES SUIVANTES:
• Lorsque vous montez le volume, assurez-vous de
pouvoir quand même entendre ce qui se passe
autour de vous.
• Faites très attention ou cessez temporairement
l’utilisation dans les situations pouvant s’avérer
dangereuses.
• N’utilisez pas des écouteurs ou un casque d’écoute
lorsque vous opérez un véhicule motorisé ; une telle
utilisation peut créer des dangers sur la route et est
illégale à de nombreux endroits.
S001a_A1_Fr
ATTENTION
Ces instructions de maintenance doivent être
utilisées uniquement par du personnel d’entretien
qualifié. Afin de réduire les risques de choc
électrique, n’effectuez aucun entretien vous-même
autre que ce qui est indiqué dans les instructions
d’utilisation, sauf si vous êtes qualifié à le faire.
D3-7-13-70_A1_Fr
Veuillez lire attentivement ce mode d’emploi de manière à pouvoir utiliser votre modèle correctement. Après avoir lu ces
explications,conservez-les en lieu sûr pour éventuellement les consulter plus tard.
IMPORTANT
Ce symbole de l’éclair, placé dans un
triangle équilatéral, a pour but d’attirer
l’attention de l’utilisateur sur la présence, à
l’intérieur du coffret de l’appareil, de
“tensions dangereuses” non isolées d’une
grandeur suffisante pour représenter un
risque d’électrocution pour les êtres
humains.
ATTENTION :
POUR ÉVITER TOUT RISQUE
D’ÉLECTROCUTION, NE PAS ENLEVER LE
COUVERCLE (NI LE PANNEAU ARRIÈRE).
AUCUNE PIÈCE RÉPARABLE PAR
L’UTILISATEUR NE SE TROUVE À
L’INTÉRIEUR. CONFIER TOUT ENTRETIEN À
UN PERSONNEL QUALIFIÉ UNIQUEMENT.
AVERTISSEMENT
Cet appareil n’est pas étanche. Pour éviter les risques
d’incendie et de décharge électrique, ne placez près de
lui un récipient rempli d’eau, tel qu’un vase ou un pot
de fleurs, et ne l’exposez pas à des gouttes d’eau, des
éclaboussures, de la pluie ou de l’humidité.
AVERTISSEMENT
Pour éviter les risques d’incendie, ne placez aucune
flamme nue (telle qu’une bougie allumée) sur
l’appareil.
PRÉCAUTION DE VENTILATION
Lors de l’installation de l’appareil, veillez à laisser un
espace suffisant autour de ses parois de manière à
améliorer la dissipation de chaleur (au moins 30 cm sur
le dessus, 30 cm à l’arrière et 30 cm de chaque côté).
AVERTISSEMENT
Les fentes et ouvertures du coffret sont prévues pour la
ventilation, pour assurer un fonctionnement stable de
l’appareil et pour éviter sa surchauffe. Pour éviter les
risques d’incendie, ne bouchez jamais les ouvertures et
ne les recouvrez pas d’objets, tels que journaux, nappes
ou rideaux, et n’utilisez pas l’appareil posé sur un tapis
épais ou un lit.
D3-4-2-1-7b*_A1_Fr
Milieu de fonctionnement
Température et humidité du milieu de fonctionnement :
De +5 °C à +35 °C (de +41 °F à +95 °F) ; Humidité
relative inférieure à 85 % (orifices de ventilation non
obstrués)
N’installez pas l’appareil dans un endroit mal ventilé ou
un lieu soumis à une forte humidité ou en plein soleil
(ou à une forte lumière artificielle).
D3-4-2-1-7c*_A1_Fr
ATTENTION
DANGER D´ELECTROCUTION
NE PAS OUVRIR
D3-4-2-1-3_A1_Fr
D3-4-2-1-7a_A1_Fr
Ce point d’exclamation, placé dans un
triangle équilatéral, a pour but d’attirer
l’attention de l’utilisateur sur la présence,
dans les documents qui accompagnent
l’appareil, d’explications importantes du
point de vue de l’exploitation ou de
l’entretien.
D3-4-2-1-1b_A1_Fr
AVERTISSEMENT
Cet appareil est muni d’une fiche de mise à la terre
(masse) à trois fils. Comme la fiche présente une
troisième broche (de terre), elle ne peut se brancher
que sur une prise de courant, prévue pour une mise à
la terre. Si vous n’arrivez pas à insérer la fiche dans la
prise de courant, contactez un électricien qualifié pour
faire remplacer la prise par une qui soit mise à la terre.
N’annulez pas la fonction de sécurité que procure cette
fiche de mise à la terre.
D3-4-2-1-6_A1_Fr
ATTENTION
L’interrupteur
complètement celui-ci de sa prise secteur. Comme le
cordon d’alimentation fait office de dispositif de
déconnexion du secteur, il devra être débranché au
niveau de la prise secteur pour que l’appareil soit
complètement hors tension. Par conséquent, veillez à
installer l’appareil de telle manière que son cordon
d’alimentation puisse être facilement débranché de
la prise secteur en cas d’accident. Pour éviter tout
risque d’incendie, le cordon d’alimentation sera
débranché au niveau de la prise secteur si vous
prévoyez une période prolongée de non utilisation
(par exemple avant un départ en vacances).
Ce produit est destiné à une utilisation domestique
générale. Toute panne due à une utilisation autre qu'à
des fins privées (comme une utilisation à des fins
commerciales dans un restaurant, dans un autocar
ou sur un bateau) et qui nécessite une réparation
sera aux frais du client, même pendant la période de
garantie.
Ne fixez pas ces enceintes sur une paroi ou au
plafond car leur chute pourrait causer des blessures.
POWER
de cet appareil ne coupe pas
D3-4-2-2-2a*_A1_Fr
K041_A1_Fr
SGK007*_A1_Fr
Fr
2

REMARQUE IMPORTANTE
LE NUMÉRO DE MODÈLE ET LE NUMÉRO DE SÉRIE
SE TROUVENT À L’ARRIÈRE OU SUR LE FOND DE
CET APPAREIL. NOTEZ CES NUMÉROS À LA PAGE 9
POUR VOUS Y RÉFÉRER ULTÉRIEUREMENT.
D36-AP9-3*_A1_Fr
ATTENTION
Ces instructions de maintenance doivent être
utilisées uniquement par du personnel d’entretien
qualifié. Afin de réduire les risques de choc
électrique, n’effectuez aucun entretien vous-même
autre que ce qui est indiqué dans les instructions
d’utilisation, sauf si vous êtes qualifié à le faire.
D3-7-13-70_A1_Fr
NOTE IMPORTANTE SUR LE CABLE
D’ALIMENTATION
Tenir le câble d’alimentation par la fiche. Ne pas
débrancher la prise en tirant sur le câble et ne pas
toucher le câble avec les mains mouillées. Cela risque
de provoquer un court-circuit ou un choc électrique. Ne
pas poser l’appareil ou un meuble sur le câble. Ne pas
pincer le câble. Ne pas faire de noeud avec le câble ou
l’attacher à d’autres câbles. Les câbles d’alimentation
doivent être posés de façon à ne pas être écrasés. Un
câble abîmé peut provoquer un risque d’incendie ou un
choc électrique. Vérifier le câble d’alimentation de
temps en temps. Contacter le service après-vente
PIONEER le plus proche ou le revendeur pour un
remplacement.
S002*_A1_Fr
La protection de votre ouïe est entre vos
mains
Pour assurer le rendement optimal de votre matériel
et – plus important encore – la protection de votre ouïe,
réglez le volume à un niveau raisonnable. Pour ne pas
altérer votre sens de la perception, le son doit être clair
mais ne produire aucun vacarme et être exempt de
toute distorsion. Votre ouïe peut vous jouer des tours.
Avec le temps, votre système auditif peut en effet
s’adapter à des volumes supérieurs, et ce qui vous
semble un « niveau de confort normal » pourrait au
contraire être excessif et contribuer à endommager
votre ouïe de façon permanente. Le réglage de votre
matériel à un volume sécuritaire AVANT que votre ouïe
s’adapte vous permettra de mieux vous protéger.
CHOISISSEZ UN VOLUME SÉCURITAIRE:
• Réglez d’abord le volume à un niveau inférieur.
• Montez progressivement le volume jusqu’à un niveau
d’écoute confortable ; le son doit être clair et exempt
de distorsions.
• Une fois que le son est à un niveau confortable, ne
touchez plus au bouton du volume.
N’OUBLIEZ PAS DE RESPECTER LES
DIRECTIVES SUIVANTES:
• Lorsque vous montez le volume, assurez-vous de
pouvoir quand même entendre ce qui se passe
autour de vous.
• Faites très attention ou cessez temporairement
l’utilisation dans les situations pouvant s’avérer
dangereuses.
• N’utilisez pas des écouteurs ou un casque d’écoute
lorsque vous opérez un véhicule motorisé ; une telle
utilisation peut créer des dangers sur la route et est
illégale à de nombreux endroits.
S001a_A1_Fr
Français
Fr
3

Introduction
Caractéristiques principales
Design optimisant la directivité et la spatialité du son.
Cône fibre d’aramide léger et extrêmement rigide afin d’offrir une
réponse optimale des basses.
Rainures sur la gaine bass-reflex améliorant la circulation de l’air
et permettant de réduire la perte de performances en matière de
reproduction des basses.
Confirmation de tous les accessoires
Cordon d’alimentation (1)
Moded’emploi(cedocument)
Nom et fonctions des éléments
Éléments du panneau avant
Haut-parleur d’aigus à dôme souple haute
1
résolution de 1 pouce
Éclairage (indicateur POWER)
2
S’allume suivant si l’appareil est sous tension ou hors
1
2
3
4
tension. L’indicateur se s’allume pas lorsque les enceintes
sont en mode Veille.
Diffuseur
3
Améliore la directivité et la diffusion des sons de haute
fréquence.
Haut-parleur de graves en fibres d’aramide
4
Cône léger et extrêmement rigide afin d’offrir une réponse
optimale des basses.
Gaine bass-reflex
5
Évent
6
Régule la circulation de l’air dans la gaine bass-reflex afin
d’émettre des sons de basse fréquence plus puissants avec
très peu de perte sonore.
5
6
Fr
4

Éléments du panneau arrière
* L’illustration représente le S-DJ50X.
1
2
3
4
5
6
7
8
9
a
Molette LEVEL
1
Permet de régler le niveau sonore (volume).
Molette HF LEVEL ADJ
2
Permet de régler les sons de haute fréquence.
Vous pouvez sélectionner entre –2 dB, –1 dB, 0 dB et 1 dB.
Commutateur AUTO STANDBY
3
Permet d’activer ou de désactiver la fonction de veille
automatique.
Lorsque la fonction de veille automatique est activée, les
enceintes passent automatiquement en mode Veille si
aucun signal d’entrée n’est reçu pendant un certain temps
(environ 25 minutes) afin de réduire la consommation
électrique. Lorsqu’un signal d’entrée est reçu alors que
les enceintes sont en mode Veille, les enceintes quitteront
automatiquement le mode Veille.
•L’éclairage (indicateur POWER) sur le panneau avant
s’éteint lorsque les enceintes sont en mode Veille.
•Si la puissance du signal d’entrée est en dessous un certain
niveau, les enceintes ne quitteront pas automatiquement
le mode Veille. Dans ce cas, désactivez le commutateur
AUTO STANDBY
[
•Pour forcer les enceintes à quitter le mode Veille, désactivez
le commutateur [
réactivez-le après quelques secondes.
Connecteur XLR INPUT
4
Connecteur d’entrée symétrique de type XLR. L’agencement
desbrochesduconnecteurestcommesuit:N°1Masse,N°2
Point chaud et N° 3 Point froid.
Jack TRS INPUT
5
Prise casque d’entrée symétrique.
ATTENTION
Ne connectez pas simultanément au connecteur XLR INPUT et
au jack TRS INPUT.
Jack RCA INPUT
6
Prises d’entrée asymétrique de type à broche RCA.
Commutateur POWER
7
Permet de mettre sous tension ou hors tension.
ATTENTION
Avant de mettre l’appareil sous tension, vérifiez que le
commutateur [
appropriée au pays ou à la région où les enceintes sont
utilisées. Si le commutateur [
correctement réglé, contactez un service d’entretien agréé par
Pioneer et demandez à changer la tension réglée et à remplacer
le fusible. Un fusible ayant un réglage de tension appropriée
est installé dans le produit au moment de l’expédition. S’il est
nécessaire de changer le réglage de la tension, le fusible doit être
remplacé.
Commutateur VOLTAGE SELECTOR
8
Ce commutateur est utilisé pour sélectionner les réglages
de la tension appropriée en fonction du pays/de la région
d’utilisation. Il ne doit pas être utilisé directement par le
client.
AC IN
9
Branchez le cordon d’alimentation fourni comme accessoire
ici et sur une prise secteur. Ne branchez pas le cordon
d’alimentation avant que toutes les autres connexions
ne soient terminées. Utilisez uniquement le cordon
d’alimentation fourni comme accessoire.
Porte-fusible
a
] pour utiliser les enceintes.
POWER
] sur le panneau arrière, puis
VOLTAGE SELECTOR
VOLTAGE SELECTOR
] est réglé sur la tension
] n’est pas
Français
Fr
5

Installation et connexions
Méthode d’installation
Les sons reproduits par les enceintes sont influencés
délicatement par les conditions du local d’écoute. Pour
bénéficier d’un environnement d’écoute optimal, réfléchissez
bien aux conditions de l’emplacement avant de commencer
l’installation proprement dite.
Installez les haut-parleurs à hauteur des oreilles.
Pour obtenir un effet stéréo naturel, les enceintes gauche
et droite doivent être installées à des points symétriques et
équidistants de la position d’écoute.
Connexions
Avant d’effectuer ou de changer les connexions,
coupez toujours l’alimentation et débranchez le cordon
d’alimentation au niveau de la prise du secteur.
Veillez également à lire les explications relatives aux autres
composants auxquels ces enceintes seront raccordées.
Ne branchez pas le cordon d’alimentation avant que toutes
les autres connexions ne soient terminées.
Idéalement parlant, les enceintes doivent être placées à un
angle de 30 ° par rapport à la position d’écoute (formant
ensemble un angle de 60 °) et orientées vers l’intérieur et la
position d’écoute.
ATTENTION
Pour garantir un refroidissement adéquat, laissez suffisamment
d’espace entre les enceintes et les parois adjacentes ou d’autres
composants (au moins 30 cm au-dessus, derrière et sur les
deux côtés de chaque enceinte). Un espace insuffisant entre les
enceintes et les parois ou les autres composants peut provoquer
une hausse de la température interne, ce qui entraînerait un
mauvais fonctionnement, voire des dégâts.
Utilisez uniquement le cordon d’alimentation fourni comme
accessoire.
Ne connectez pas simultanément au connecteur XLR INPUT
et au jack TRS INPUT.
Assurez-vous que le niveau sonore est réglé sur un niveau
approprié car les signaux d’entrée vers le connecteur XLR
INPUT (ou le jack TRS INPUT) et le jack RCA INPUT seront
entrelacés, affectant le niveau sonore.
50 °~ 60 °
Fr
6

Informations complémentaires
Guide de dépannage
En présence d’une défaillance apparente de cet appareil, vérifiez les points suivants. Examinez aussi les autres composants
raccordés à cet appareil. Si le problème subsiste, consultez votre revendeur pour les réparations éventuelles.
Dans certains cas, il arrive que l’appareil ne fonctionne pas correctement à cause de l’électricité statique ou d’autres
circonstances externes. Dans ce cas, débranchez le cordon d’alimentation et attendez au moins 5 minutes, puis rebranchez le
cordon et vérifiez si l’appareil fonctionne correctement.
Symptôme Points à vérifier Solution
Pas d’alimentation Le cordon d’alimentation est-il correctement
Aucun son, ou seulement un son très
faible, ne provient des appareils audio
raccordés.
L’éclairage (indicateur POWER) reste
éteint.
Les enceintes ne quittent pas le mode
Veille (elles ne se rallument pas).
Le son est distordu. Le volume sonore est-il réglé correctement ? Tournez lentement la molette [
Rétroaction sonore (sifflement
continu)
branché ?
L’appareil audio raccordé est-il réglé correctement ? Réglez correctement l’entrée externe et le volume
Le câble de connexion est-il correctement branché ? Branchez correctement les câbles.
Les connecteurs ou les fiches sont-ils sales ? Nettoyez les connecteurs et les fiches avant leur
Le volume sonore est-il correctement réglé ? Tournez la molette [
L’appareil est-il sous tension ? Activez le commutateur [
La fonction de veille automatique est-elle activée ? Désactivez le commutateur [
L’appareil est-il sous tension ? Activez le commutateur [
La fonction de veille automatique est-elle activée ? Désactivez le commutateur [
Le niveau du signal d’entrée est-il faible ? Augmentez le niveau du signal d’entrée.
Le niveau de sortie de l’appareil audio raccordé est-il
correctement réglé ?
Le volume sonore est-il correctement réglé ? Tournez lentement la molette [
Branchez le cordon d’alimentation sur une prise
secteur.
sonore de l’appareil.
branchement.
le sens des aiguilles d’une montre et augmentez le
volume.
arrière.
arrière, attendez quelques secondes, puis réactivez-le.
arrière.
arrière, attendez quelques secondes, puis réactivez-le.
Désactivez le commutateur [
désactiver la fonction de veille automatique.
arrière dans le sens inverse des aiguilles d’une montre
et baissez le volume.
Ajustez correctement le niveau de sortie de l’appareil
audio raccordé.
arrière dans le sens inverse des aiguilles d’une montre
et baissez le volume.
LEVEL
] sur le panneau arrière dans
POWER
] sur le panneau
POWER
] sur le panneau
POWER
] sur le panneau
POWER
] sur le panneau
AUTO STANDBY
LEVEL
] sur le panneau
LEVEL
] sur le panneau
Français
] pour
Fr
7

Marques commerciales
Pioneer est une marque déposée de PIONEER CORPORATION.
Les autres noms de sociétés et noms de produits listés sont des marques commerciales déposées ou marques commerciales de leur
propriétaire respectif.
Caractéristiques techniques
S-DJ50X/S-DJ50X-W S-DJ60X S-DJ80X
Type Enceinte active bi-ampli 2 voies
Amplificateur
Amplificateur BF 30 W 50 W 70 W
Amplificateur HF 15 W 20 W 20 W
Connecteurs d’entrée
(entrée symétrique)
Connecteurs d’entrée
(entrée asymétrique)
Impédance 10kΩ
Enceinte
Caisson Bass-reflex
Matériauducaisson MDF
Haut-parleur de graves
(pilote de basse fréquence)
Haut-parleur d’aigus
(pilote de haute fréquence)
Réponse en lecture de 50 Hz à 20 kHz de 45 Hz à 20 kHz de 40 Hz à 20 kHz
Bloc d’alimentation / autres
Tensions prises en charge Conversion 100 V à 120 V (50 Hz à 60 Hz) / 220 V à 240 V (50 Hz à 60 Hz)
Consommation électrique 100 W 140 W 160 W
Consommation électrique en mode
Veille
Dimensions extérieures L × H × P 197 mm × 301 mm × 262 mm 228 mm × 342 mm × 295 mm 276 mm × 401 mm × 315 mm
Poids 6,5 kg 8,5 kg 11,8 kg
Les caractéristiques et la présentation peuvent être modifiées sans avis à fin d’amélioration.
© 2013 PIONEER CORPORATION. Tous droits de reproduction et de traduction réservés.
XLR × 1, TRS (casque 1/4 pouce) × 1
RCA × 1
Cône de 13 cm Cône de 15 cm Cône de 20 cm
Dôme souple de 2,5 cm
0,5 W max.
Fr
8

UCP0212
PIONEER ELECTRONICS (USA) INC.
GARANTIE
Pioneer Electronics (USA) Inc. (PUSA) garantie que les produits distribués par PUSA aux États-Unis ou au Canada qui, bien qu’étant installés et utilisés conformément au Manuel
de l’utilisateur fourni avec le produit, ne fonctionneraient pas correctement dans le cadre d’une utilisation normale en raison d’un défaut de fabrication seront réparés ou remplacés
par un produit de valeur équivalente, au choix de PUSA, sans frais à votre charge pour les pièces et/ou la main d’œuvre de réparation. Les pièces incluses en vertu de la présente
garantie peuvent être neuves ou remises à neuf, au choix de PUSA.
LA PRÉSENTE GARANTIE LIMITÉE S’APPLIQUE AU PROPRIÉTAIRE ORIGINAL AINSI QU’À TOUT PROPRIÉTAIRE SUCCESSIF DE CE PRODUIT PIONEER PENDANT LA
PÉRIODE DE GARANTIE À CONDITION QUE LE PRODUIT AIT ÉTÉ ACHETÉ AUPRÈS D’UN DISTRIBUTEUR/DÉTA ILLANT PIONEER AGRÉÉ AUX ÉTATS-UNIS OU AU CANADA.
VOUS DEVREZ FOURNIR UN RELEVÉ DE CAISSE OU UNE AUTRE PREUVE D’AC HAT VALIDE INDIQUANT LA DATE DE L’ACHAT INITIAL OU, SI VOUS LOUEZ LE
PRODUIT, VOTRE CONTRAT DE LOCATION INDIQUANT L’ENDROIT ET LA DATE DE LA PREMIÈRE LOCATION. EN CAS DE BESOIN DE RÉPARATION, LE PRODUIT
DOIT ÊTRE RENVOYÉ ET LIVRÉ AU COURS DE LA PÉRIODE DE GARANTIE, FRAIS DE PORT PAYÉS ET UNIQUEMENT DEPUIS L’INTÉRIEUR DES ÉTATS-UNIS. COMME
EXPLIQUÉ DANS LE PRÉSENT DOCUMENT. VOUS ÊTES RESPONSABLE DU DÉMONTAGE ET DE L’INSTALLATION DU PRODUIT. PUSA PREND À SA CHARGE LES
FRAIS D’EXPÉDITION DU PRODUIT RÉPARÉ OU REMPLACÉ JUSQU’À VOTRE ADRESSE À L’INTÉRIEUR DES ÉTATS-UNIS.
PÉRIODE DE GARANTIE DES PRODUITS
DJ Audio et Vidéo ............................................................................................................................................................................... 1 an 1 an
La période de garantie pour les clients qui louent le produit commence le jour où le produit est utilisé pour la première fois (a) pendant la période de location ou (b) après la
vente au détail, selon ce qui se produit en premier.
ÉLÉMENTS NON COUVERTS PAR LA GARANTIE
UN PRODUIT ACHETÉ CHEZ UN DISTRIBUTEUR NON AUTORISÉ N’EST COUVERT PAR AUCUNE GARANTIE EXPRESSE OU IMPLICITE, Y COMPRIS QUELQUE GARANTIE
IMPLICITE DE QUALITÉ MARCHANDE OU D’ADAPTATION À UN USAGE PA RTICULIER QUE CE SOIT. DE PLUS, CE PRODUIT EST STRICTEMENT VENDU « TEL QUEL » ET
« AVEC TOUS SES DÉFAUTS ÉVENTUELS ».
PIONEER NE PEUT PAS ÊTRE TENU RESPONSABLE DES DOMMAGES INDIRECTS ET/OU ACCESSOIRES ÉVENTUELS.
LA PRÉSENTE GARANTIE NE S’APPLIQUE PA S SI LE PRODUIT A ÉTÉ SOUMIS À UNE PUISSANCE NOMINALE EXCÉDANT LA PUISSANCE INDIQUÉE DANS LES
SPÉCIFICATIONS FOURNIES.
LA PRÉSENTE GARANTIE NE COUVRE PAS LE BOÎTIER OU LES ÉLÉMENTS ESTHÉTIQUES, LES ANTENNES INSTALLÉES PAR L’UTILISAT EUR, LES DOMMAGES AUX DISQUES
OU AUX RUBANS OU DISQUES D’ENREGISTREMENT, LES DOMMAGES AU PRODUIT DÉCOULANT D’UNE RETOUCHE, D’UNE MODIFICATION NON AUTORISÉE PAR ÉCRIT
PAR PIONEER, D’UN ACCIDENT, D’UN USAGE INAPPROPRIÉ OU D’UN USAGE ABUSIF, LES DOMMAGES PRODUITS PAR LA FOUDRE OU LA SURTENSION, LES DOMMAGES
SUBSÉQUENTS DÉCOULANT DE FUITES, LES DOMMAGES DÉCOULANT DE PILES DÉFECTUEUSES OU DE L’UTILISAT ION DE PILES NON CONFORMES À CELLES QUI SONT
SPÉCIFIÉES DANS LE MANUEL DE L’UTILISATEUR.
LA PRÉSENTE GARANTIE NE COUVRE PAS LE COÛT DES PIÈCES OU DE LA MAIN-D’OEUVRE QUI SERAIENT AUTREMENT OFFERTES SANS FRAIS EN VERTU DE LA
PRÉSENTE GARANTIE, SI ELLES SONT OBTENUES AUPRÈS D’UNE SOURCE AUTRE QU’UNE SOCIÉTÉ DE SERVICE OU AUTRE AUTORISÉE OU DÉSIGNÉE PAR PIONEER.
LA PRÉSENTE GARANTIE NE COUVRE PAS LES DÉFECTUOSITÉS OU LES DOMMAGES
OU D’UN ENTRETIEN INADÉQUAT.
LES NUMÉROS DE SÉRIE MODIFIÉS, OBLITÉRÉS OU ENLEVÉS ANNULENT LA PRÉSENTE GARANTIE DANS SA TOTALITÉ.
EXCLUSION DE TOUTE AUTRE GARANTIE
PIONEER LIMITE SES OBLIGATIONS EN VERTU DE TOUTE GARANTIE IMPLICITE QUE CE SOIT, Y COMPRIS ENTRE AUTRES LES GARANTIES IMPLICITES DE QUALITÉ
MARCHANDE OU D’ADAPTATION À UN USAGE PARTICULIER, À UNE PÉRIODE N’EXCÉDANT PAS LA PÉRIODE DE GARANTIE. AUCUNE GARANTIE NE S’APPLIQUE APRÈS LA
PÉRIODE DE GARANTIE. CERTAINS ÉTATS NE PERMETTENT PAS LA LIMITATION DE LA DURÉE D’UNE GARANTIE IMPLICITE, ET CERTAINS NE PERMETTENT PAS L’EXCLUSION
OU LA LIMITATION DES DOMMAGES CONSÉCUTIFS OU INDIRECTS. LES LIMITATIONS ET EXCLUSIONS ÉTABLIES CI-DESSUS PEUVENT DONC NE PAS S’APPLIQUER À VOUS.
LA PRÉSENTE GARANTIE VOUS DONNE DES DROITS LÉGAUX SPÉCIFIQUES. VOUS POUVEZ JOUIR D’AUTRES DROITS, QUI PEUVENT VARIER D’UN ÉTAT À L’AUTRE.
SERVICE APRÈS-VENTE
PUSA a autorisé un certain nombre de sociétés de service après-vente agréées à travers les États-Unis et le Canada pour le cas où votre produit
aurait besoin d’être réparé. Pour profiter d’un tel service en vertu de la garantie, vous devez présenter votre ticket de caisse ou, si vous louez
le produit, votre contrat de location indiquant l’endroit et la date de la transaction par le premier propriétaire. Si vous expédiez le produit, vous
devez l’emballer soigneusement et l’envoyer à une société de service autorisée, en port prépayé et selon une méthode de transport incluant un
suivi et une assurance. Emballez le produit au moyen de matériaux de rembourrage appropriés pour éviter tout dommage
L’emballage d’origine est idéal pour cela. Indiquez votre nom, votre adresse et un numéro de téléphone où nous pouvons vous joindre pendant les heures de bureau.
Pour toute réclamation et/ou question à l’intérieur des États-Unis ou du Canada, appelez le Service Consommateurs au 1-800-872-4159.
GARANTIE VALABLE UNIQUEMENT AUX ÉTATS-UNIS ET AU CANADA
GARANTIE LIMITÉE
Pièces Main-d’oeuvre
CAUSÉS PAR L’UTILISAT ION D’UNE MAIN-D’OEUVRE OU DE PIÈCES NON AUTORISÉES, ET/
pendant le transport.
Français
Pour toute question concernant la mise en service ou l’utilisation de votre produit,
ou pour trouver une société de service autorisée, appelez ou écrivez à :
RÉSOLUTION DES LITIGES
Si un litige se produit entre vous et Pioneer après la réponse à une demande initiale faite au Service Consommateurs, vous pouvez avoir recours au Programme de résolution des
plaintes de Pioneer pour résoudre le litige. Le Programme de résolution des plaintes vous est offert gratuitement. Vous devez avoir recours au Programme de résolution des plaintes
avant de vous prévaloir de vos droits ou de chercher réparation en vertu du Ti tre I de la loi Magnuson-Moss Warranty-Federal Trade Commission Improvement Act, 15 U.S.C. 2301 et seq.
Pour utiliser le Programme de résolution des plaintes, appelez le 1-800-872-4159 et expliquez au représentant du Service Consommateurs
le problème que vous rencontrez ainsi que les démarches que vous avez eff ectuées pour faire réparer le produit pendant la pério de
de garantie, puis communiquez-lui le nom du distributeur /détaillant autorisé auprès d uquel vous avez acheté le produit Pioneer.
Une fois que votre plainte a été expliquée au représentant, un numéro de résolution vous sera communiqué. Pioneer étudiera votre plainte et, dans un délai de quarante (40) jours
après la réception de votre plainte, (1) répondra à votre plainte par écrit pour vous aviser des démarches qui seront entreprises pour résoudre le conflit, et indiquera combien de
temps ces démarches prendront ; ou (2) répondra à votre plainte par écrit pour vous indiquer les raisons pour lesquelles aucune démarche ne sera entreprise.
CUSTOMER SUPPORT
PIONEER ELECTRONICS (USA) INC.
P.O. BOX 1720
LONG BEACH, CALIFORNIA 90801
1-800-872-4159
http://www.pioneerelectronics.com
NOTEZ ET CONSERVER LE LIEU ET LA DATE D’ACHAT POUR RÉFÉRENCE ULTÉRIEURE
N° de modèle : _______________________________________ N° de Série : ________________________________________________________________________
Date d’achat : ________________________________________ Nom du distributeur/détaillant ___________________________________________________________
PRENEZ SOIN DE CONSERVER CES INFORMATIONS ET VOTRE REÇU D’ACHAT EN LIEU SÛR POUR RÉFÉRENCE ULTÉRIEURE
Fr
9

Muchas gracias por la adquisición de este producto Pioneer.
PRECAUCIONES CONCERNIENTES A LA
MANIPULACIÓN DEL CABLE DE
ALIMENTACIÓN
Tome el cable de alimentación por la clavija. No
extraiga la clavija tirando del cable. Nunca toque el
cable de alimentación cuando sus manos estén
mojadas, ya que esto podría causar cortocircuitos o
descargas eléctricas. No coloque la unidad, algún
mueble, etc., sobre el cable de alimentación.
Asegúrese de no hacer nudos en el cable ni de unirlo a
otros cables. Los cables de alimentación deberán ser
dispuestos de tal forma que la probabilidad de que
sean pisados sea mínima. Una cable de alimentación
dañado podrá causar incendios o descargas eléctricas.
Revise el cable de alimentación está dañado, solicite el
reemplazo del mismo al centro de servicio autorizado
PIONEER más cercano, o a su distribuidor.
S002*_A1_Es
PRECAUCIÓN
Estas instrucciones de servicio son para el uso
exclusivo por personal de servicio cualificado. Para
reducir el riesgo de descargas eléctricas, no realice
ninguna reparación distinta a las indicadas en las
instrucciones sobre el funcionamiento, a no ser que
usted esté cualificado para ello.
D3-7-13-70_A1_Es
Lea todo este manual de instrucciones para aprender a operar correctamente su modelo. Después de haber leído las instrucciones, guarde el manual en un lugar seguro para poderlo consultar en el futuro.
IMPORTANTE
La luz intermitente con el símbolo de punta
de flecha dentro un triángulo equilátero.
Está convenido para avisar el usuario de la
presencia de “voltaje peligrosa” no aislada
dentro el producto que podría constituir un
peligro de choque eléctrico para las
personas.
PRECAUCIÓN
PARA PREVENIR EL PELIGRO DE CHOQUE
ELÉCTRICO NO REMOVER LA TAPA NI LAS
PARTES DENTRO NO UTILIZADAS,
LLAMAR UNA PERSONA CUALIFICADA.
CAUTION
RISK OF ELECTRIC SHOCK
DO NOT OPEN
El punto exclamativo dentro un triángulo
equilátero convenido para avisar el usuário
de la presencia de importantes
instrucciones sobre el funcionamiento y la
manutención en la libreta que acompaña el
aparato.
D3-4-2-1-1b_A2_Es
ADVERTENCIA
Este aparato no es impermeable. Para evitar el riesgo
de incendio y de descargas eléctricas, no ponga ningún
recipiente lleno de líquido (como pueda ser un vaso o
un florero) cerca del aparato ni lo exponga a goteo,
salpicaduras, lluvia o humedad.
ADVERTENCIA
Para evitar el peligro de incendio, no ponga nada con
fuego encendido (como pueda ser una vela) encima del
aparato.
D3-4-2-1-3_A1_Es
D3-4-2-1-7a_A1_Es
PRECAUCIÓN PARA LA VENTILACIÓN
Cuando instale este aparato, asegúrese de dejar
espacio en torno al mismo para la ventilación con el fin
de mejorar la disipación de calor (por lo menos 30 cm
encima, 30 cm detrás, y 30 cm en cada lado).
ADVERTENCIA
Las ranuras y aberturas de la caja del aparato sirven
para su ventilación para poder asegurar un
funcionamiento fiable del aparato y para protegerlo
contra sobrecalentamiento. Para evitar el peligro de
incendio, las aberturas nunca deberán taparse ni
cubrirse con nada (como por ejemplo, periódicos,
manteles, cortinas) ni ponerse en funcionamiento el
aparato sobre una alfombra gruesas o una cama.
D3-4-2-1-7b*_A1_Es
ADVERTENCIA
Este producto está provisto de una clavija de tres
conductores con toma de tierra (puesta a tierra) cuya
tercera patilla es la de toma de tierra. Esta clavija sólo
se adapta en una toma de corriente del tipo de toma de
tierra. Si no puede insertar la clavija en la toma de
corriente, llame a un electricista profesional para que le
reemplace la toma de corriente por otra con toma de
tierra que sea adecuada. No elimine el dispositivo de
seguridad de la clavija con toma de tierra.
PRECAUCIÓN
El interruptor de la alimentación
POWER
aparato no corta por completo toda la alimentación
de la toma de corriente de CA. Puesto que el cable de
alimentación hace las funciones de dispositivo de
desconexión de la corriente para el aparato, para
desconectar toda la alimentación del aparato deberá
desenchufar el cable de la toma de corriente de CA.
Por lo tanto, asegúrese de instalar el aparato de
modo que el cable de alimentación pueda
desenchufarse con facilidad de la toma de corriente
de CA en caso de un accidente. Para evitar correr el
peligro de incendio, el cable de alimentación también
deberá desenchufarse de la toma de corriente de CA
cuando no se tenga la intención de utilizarlo durante
mucho tiempo seguido (por ejemplo, antes de irse de
vacaciones).
D3-4-2-1-6_A1_Es
de este
D3-4-2-2-2a*_A1_Es
Entorno de funcionamiento
Temperatura y humedad del entorno de funcionamiento
+5 °C a +35 °C; menos del 85 % de humedad relativa
(rejillas de refrigeración no obstruidas)
No instale este aparato en un lugar mal ventilado, ni en
lugares expuestos a alta humedad o a la luz directa del
sol (o de otra luz artificial potente).
Es
2
D3-4-2-1-7c*_A1_Es
Este producto es para tareas domésticas generales.
Cualquiera avería debida a otra utilización que tareas
domésticas (tales como el uso a largo plazo para
motivos de negocios en un restaurante o el uso en un
coche o un barco) y que necesita una reparación
hará que cobrarla incluso durante el período de
garantía.
K041_A1_Es
No fije estos altavoces a una pared ni al techo, ya que
podrían caerse y ocasionar lesiones.
SGK007*_A1_Es

PRECAUCIÓN
Estas instrucciones de servicio son para el uso
exclusivo por personal de servicio cualificado. Para
reducir el riesgo de descargas eléctricas, no realice
ninguna reparación distinta a las indicadas en las
instrucciones sobre el funcionamiento, a no ser que
usted esté cualificado para ello.
D3-7-13-70_A1_Es
PRECAUCIONES CONCERNIENTES A LA
MANIPULACIÓN DEL CABLE DE
ALIMENTACIÓN
Tome el cable de alimentación por la clavija. No
extraiga la clavija tirando del cable. Nunca toque el
cable de alimentación cuando sus manos estén
mojadas, ya que esto podría causar cortocircuitos o
descargas eléctricas. No coloque la unidad, algún
mueble, etc., sobre el cable de alimentación.
Asegúrese de no hacer nudos en el cable ni de unirlo a
otros cables. Los cables de alimentación deberán ser
dispuestos de tal forma que la probabilidad de que
sean pisados sea mínima. Una cable de alimentación
dañado podrá causar incendios o descargas eléctricas.
Revise el cable de alimentación está dañado, solicite el
reemplazo del mismo al centro de servicio autorizado
PIONEER más cercano, o a su distribuidor.
S002*_A1_Es
Español
Es
3

Introducción
Características principales
El difusor en la guía de ondas mejora la directividad del sonido y
proporciona un sonido espacioso.
El cono de fibra aramida es ligero y extremadamente rígido y
proporciona la mejor respuesta de los graves.
Las ranuras en el conducto bass-reflex mejora el flujo de aire y
proporciona potencia de graves sin pérdidas.
Confirmación de todos los accesorios
Cable de alimentación (1)
Manualdeinstrucciones(estedocumento)
Nomenclatura y funciones de las partes
Elementos del panel frontal
Altavoz de agudos de domo blando de 1 pulgada y
1
1
2
3
4
alta resolución
Iluminación (indicador POWER)
2
Se enciende dependiendo de si la unidad está encendida o
apagada. El indicador no se enciende si los altavoces están
en el modo de espera.
Difusor
3
Mejoraladireccionabilidadyladifusióndelossonidosdealta
frecuencia.
Altavoz de graves de fibra de aramida
4
Los conos ligeros y extremadamente rígidos proporcionan la
mejor respuesta de graves.
Conducto bass-reflex
5
Ranura
6
Regula el flujo de aire en el conducto bass-reflex para permitir
sonidos potentes de frecuencia baja y con pérdidas muy
reducidas de sonido.
5
6
Es
4

Elementos del panel trasero
* En la ilustración se muestra el S-DJ50X.
1
2
3
4
5
6
7
8
9
a
Control LEVEL
1
Se emplea para ajustar el nivel del sonido (el volumen).
Control HF LEVEL ADJ
2
Se emplea para ajustar el sonido de las altas frecuencias.
Se puede seleccionar entre –2 dB, –1 dB, 0 dB y 1 dB.
Interruptor AUTO STANDBY
3
Se emplea para activar o desactivar la función de espera
automática.
Si la función de espera automática está activada, los
altavoces entran automáticamente en el modo de espera
si no se recibe ninguna señal de entrada durante un cierto
período de tiempo (aproximadamente 25 minutos) y se
puede reducir así el consumo eléctrico. Si se recibe una
señal de entrada mientras los altavoces se encuentran en
el modo de espera, estos reanudarán automáticamente su
funcionamiento desde el modo de espera.
•La iluminación (indicador POWER) en el panel frontal se
apaga cuando los altavoces están en el modo de espera.
•Si la señal de entrada es más débil que un cierto nivel, los
altavoces pueden no poder reanudarse automáticamente
del modo de espera. En tales casos, apague el interruptor
AUTO STANDBY
[
•Para forzar los altavoces a que se reanuden del modo de
espera, apague el interruptor [
una vez y vuelva a encenderlo en unos pocos segundos.
Conector XLR INPUT
4
Conector de entrada equilibrada del tipo XLR. La disposición
delaspatillasdelconectoreslasiguiente:N.º1Masa,N.º2
Activo y N.º 3 Retorno.
Toma TRS INPUT
5
Toma de auriculares de entrada equilibrada.
PRECAUCIÓN
No conecte al mismo tiempo el conector XLR INPUT y la toma
TRS INPUT.
Toma RCA INPUT
6
Tomas de entrada desequilibrada del tipo de contactos RCA.
Interruptor POWER
7
Se emplea para conectar y desconectar la alimentación
principal.
PRECAUCIÓN
Antes de conectar la alimentación, asegúrese de que el
interruptor [
apropiado para el país o región donde se proponga utilizar
los altavoces. Si el interruptor [
ajustado correctamente, póngase en contacto con el centro de
servicio y solicite cambiar el voltaje ajustado y sustituir el fusible.
En el momento del envío hay un fusible montado con el voltaje
adecuado en el producto. Si resulta necesario cambiar el ajuste
del voltaje, se deberá sustituir el fusible.
Interruptor VOLTAGE SELECTOR
8
Este interruptor se utiliza para seleccionar los ajustes del
voltaje apropiado para el país/región de uso. No está diseñado
para el uso directo por el usuario.
AC IN
9
Enchufe el cable de alimentación accesorio aquí y a una toma
de corriente de CA. No enchufe el cable de alimentación
hasta haber completado todas las demás conexiones. Emplee
solo el cable de alimentación accesorio suministrado.
Portafusibles
a
VOLTAGE SELECTOR
] para poder utilizar los altavoces.
POWER
] en el panel trasero
] esté ajustado en el voltaje
VOLTAGE SELECTOR
] no está
Español
Es
5

Instalación y conexiones
Modo de instalación
El sonido de reproducción de un altavoz queda ligeramente
afectado por las condiciones de la sala de audición. Para
producir las mejores condiciones para la audición, tenga
debidamente en cuenta las condiciones del lugar de instalación
antes de comenzar la instalación.
Coloque los altavoces al nivel de los oídos.
Para obtener un efecto estéreo natural, los altavoces derecho
e izquierdo deben instalarse simétricamente y en posiciones
equidistantes de la posición de audición.
Conexiones
Cuando desee realizar o cambiar conexiones, desconecte
antes la alimentación y desenchufe el cable de alimentación
de la toma de corriente.
Lea también sin falta los manuales de instrucciones de los
otros componentes a los que se proponga conectar estos
altavoces.
No enchufe el cable de alimentación hasta haber completado
todas las demás conexiones.
Para conseguir el enfriamiento adecuado, asegúrese de dejar
espacio suficiente entre los altavoces y las paredes circundantes
u otros componentes (un mínimo de 30 cm o más por encima,
detrás y por los lados derecho e izquierdo de cada altavoz). Si
no se deja espacio suficiente entre el altavoz y las paredes o los
otros componentes, la temperatura del interior puede subir más
de la cuenta y ser causa de mal funcionamiento o de averías.
Idealmente, los altavoces deben situarse en ángulos de 30 ° de
la posición de audición (formando en su conjunto un ángulo
total de 60 °), y deben girarse hacia adentro para orientarlos
hacia la posición de audición.
50 °~ 60 °
PRECAUCIÓN
Emplee solo el cable de alimentación accesorio
suministrado.
No conecte al mismo tiempo el conector XLR INPUT y la toma
TRS INPUT.
Asegúrese de ajustar el nivel de sonido a un nivel adecuado,
ya que las señales de entrada en el conector XLR INPUT (o la
toma TRS INPUT) y la toma RCA INPUT se mezclarán, lo que
afectará al nivel de sonido.
Es
6

Información adicional
Solución de problemas
Si usted cree que hay algo que no funciona como es debido en esta unidad, revise los puntos siguientes. Compruebe también los
otros dispositivos conectados a la unidad. Si el problema persiste, solicite el servicio técnico a su distribuidor.
Es posible que alguna vez la unidad no pueda funcionar correctamente debido a la electricidad estática o a otras condiciones
externas. En tales casos, desenchufe el cable de alimentación y espere cinco o más minutos y luego vuelva a enchufarlo y
compruebe si la unidad funciona correctamente.
Síntoma Puntos de comprobación Solución
No se conecta la alimentación ¿Está correctamente enchufado el cable de
No sale el sonido de los dispositivos de
audio conectados o el sonido es muy
bajo.
La iluminación (indicador POWER)
permanece apagada.
Los altavoces no se reanudan (se
encienden) del modo de espera.
El sonido sale distorsionado. ¿Está ajustado el volumen del sonido a un nivel
Realimentación acústica (sonido de
aullido continuo)
alimentación?
¿El dispositivo de audio conectado se ha ajustado
correctamente?
¿Está bien conectado el cable de conexión? Conecte correctamente los cables.
¿Están sucios los conectores o las clavijas? Limpie los conectores y las clavijas antes de la
¿Está bien ajustado el volumen del sonido? Gire hacia la derecha el control [
¿Está conectada la alimentación? Encienda el interruptor [
¿Está activada la función de espera automática? Apague el interruptor [
¿Está conectada la alimentación? Encienda el interruptor [
¿Está activada la función de espera automática? Apague el interruptor [
¿Es bajo el nivel de la señal de entrada? Incremente el nivel de la señal de entrada.
adecuado?
¿Está correctamente ajustado el nivel de salida del
dispositivo de audio conectado?
¿Está bien ajustado el volumen del sonido? Gire lentamente hacia la izquierda el control [
Enchufe el cable de alimentación a la toma de corriente.
Ajuste correctamente la entrada externa y el volumen
del sonido del dispositivo.
conexión.
trasero y sube el volumen.
vez, espere algunos segundos y vuelva a encenderlo.
vez, espere algunos segundos y vuelva a encenderlo.
Apague el interruptor [
desactivar la función de espera automática.
Gire lentamente hacia la izquierda el control [
del panel trasero y baje el volumen.
Ajuste correctamente el nivel de salida del dispositivo
de audio conectado.
del panel trasero y baje el volumen.
POWER
POWER
AUTO STANDBY
LEVEL
] del panel
POWER
] en el panel trasero.
] en el panel trasero una
POWER
] en el panel trasero.
] en el panel trasero una
] para
LEVEL
LEVEL
Español
]
]
Es
7

Marcas comerciales
Pioneer es una marca registrada de PIONEER CORPORATION.
Los demás nombres listados de empresas y de un producto son marcas comerciales registradas de las empresas o marcas
comerciales.
Especificaciones
S-DJ50X/S-DJ50X-W S-DJ60X S-DJ80X
Tipo Altavoz activo de 2 vías de dos amplificadores
Amplificador
Amplificador de baja frecuencia 30 W 50 W 70 W
Amplificador de alta frecuencia 15 W 20 W 20 W
Conectores de entrada
(entrada equilibrada)
Conectores de entrada
(entrada desequilibrada)
Impedancia 10kΩ
Altavoz
Caja acústica Reflejo de graves
Materialdelacajaacústica MDF
Altavoz de graves
(controlador de baja frecuencia)
Altavoz de agudos
(controlador de alta frecuencia)
Respuesta de reproducción 50 Hz a 20 kHz 45 Hz a 20 kHz 40 Hz a 20 kHz
Unidad de alimentación/otra
Voltajes admitidos Conversión de 100 V a 120 V (50 Hz a 60 Hz) / 220 V a 240 V (50 Hz a 60 Hz)
Consumo eléctrico 100 W 140 W 160 W
Consumo eléctrico durante el modo de
espera
Dimensiones externas An × Al × Pr 197 mm × 301 mm × 262 mm 228 mm × 342 mm × 295 mm 276 mm × 401 mm × 315 mm
Peso 6,5 kg 8,5 kg 11,8 kg
Las especificaciones y el diseño están sujetos a posibles modificaciones sin previo aviso debido a mejoras.
© 2013 PIONEER CORPORATION. Todos los derechos reservados.
XLR × 1, TRS (auriculares de 1/4 de pulgada) × 1
RCA × 1
Cono de 13 cm Cono de 15 cm Cono de 20 cm
Domo blando de 2,5 cm
0,5 W o menos
Es
8


To register your product, find the nearest authorized service location, to purchase replacement parts, operating
instructions, or accessories, please go to one of following URLs :
Pour enregistrer votre produit, trouver le service après-vente agréé le plus proche et pour acheter des pièces de
rechange, des modes d’emploi ou des accessoires, reportez-vous aux URL suivantes :
Para registrar su producto, encuentre el centro de servicio autorizado más cercano; para adquirir piezas de
recambio, manuales de instrucciones o accesorios, visite uno de los URL siguientes :
In the USA & Canada/Aux Etats-Unis & Canada
/En los EE.UU. & Canadá
http://www.pioneerelectronics.com S018_B1_EnFrEs_PSV
PIONEER CORPORATION
1-1, Shin-ogura, Saiwai-ku, Kawasaki-shi, Kanagawa 212-0031, Japan
PIONEER ELECTRONICS (USA) INC.
P. O. BOX 1720, Long Beach, California 90801-1720, U.S.A. TEL: (800) 421-1404
K002_PSV_CU
Imprimé en Chine
© 2013 PIONEER CORPORATION.
All rights reserved.
© 2013 PIONEER CORPORATION.
Tous droits de reproduction et de traduction réservés.
<DRB1690-A>Printed in China
 Loading...