

Page 1

SBX-B70D
Network Speaker Base
Operating Instructions
Page 2

Operating Environment
Operating environment temperature and humidity:
+5 °C to +35 °C (+41 °F to +95 °F); less than 85 %RH
(cooling vents not blocked)
Do not install this unit in a poorly ventilated area, or in
locations exposed to high humidity or direct sunlight (or
strong artificial light)
D3-4-2-1-7c*_A1_En
WARNING
This equipment is not waterproof. To prevent a fire or
shock hazard, do not place any container filled with
liquid near this equipment (such as a vase or flower pot)
or expose it to dripping, splashing, rain or moisture.
D3-4-2-1-3_A1_En
CAUTION
TO PREVENT THE RISK OF ELECTRIC SHOCK, DO NOT
REMOVE COVER (OR BACK). NO USER-SERVICEABLE
PARTS INSIDE. REFER SERVICING TO QUALIFIED
SERVICE PERSONNEL.
D3-4-2-1-1_B1_En
CAUTION
The /l switch on this unit will not completely shut
off all power from the AC outlet. Since the power cord
serves as the main disconnect device for the unit,
you will need to unplug it from the AC outlet to shut
down all power. Therefore, make sure the unit has
been installed so that the power cord can be easily
unplugged from the AC outlet in case of an accident.
To avoid fire hazard, the power cord should also be
unplugged from the AC outlet when left unused for a
long period of time (for example, when on vacation).
D3-4-2-2-2a*_A1_En
This product is for general household purposes. Any
failure due to use for other than household purposes
(such as long-term use for business purposes in a
restaurant or use in a car or ship) and which requires
repair will be charged for even during the warranty
period.
K041_A1_En
WARNING
To prevent a fire hazard, do not place any naked flame
sources (such as a lighted candle) on the equipment.
D3-4-2-1-7a_A1_En
POWER-CORD CAUTION
Handle the power cord by the plug. Do not pull out the
plug by tugging the cord and never touch the power
cord when your hands are wet as this could cause a
short circuit or electric shock. Do not place the unit, a
piece of furniture, etc., on the power cord, or pinch the
cord. Never make a knot in the cord or tie it with other
cords. The power cords should be routed such that they
are not likely to be stepped on. A damaged power cord
can cause a fire or give you an electrical shock. Check
the power cord once in a while. When you find it
damaged, ask your nearest PIONEER authorized
service center or your dealer for a replacement.
S002*_A1_En
VENTILATION CAUTION
WARNING
Slots and openings in the cabinet are provided for
ventilation to ensure reliable operation of the product,
and to protect it from overheating. To prevent fire
hazard, the openings should never be blocked or
covered with items (such as newspapers, table-cloths,
curtains) or by operating the equipment on thick carpet
or a bed.
D3-4-2-1-7b*_A1_En
When installing the unit, leave space of at least 10 cm
at the sides and rear.
Furthermore, to facilitate good heat dissipation, make
sure there is a little distance between the other devices.
When installing the unit in a rack or the like, leave
space of at least 10 cm at the top, rear, and sides.
Internal heat buildup may cause a fire.
WARNING
Store small parts out of the reach of children and
infants. If accidentally swallowed, contact a doctor
immediately.
D41-6-4_A1_En
Page 3

Information for users on collection and disposal of old equipment and used batteries
These symbols on the products, packaging, and/or accompanying documents mean
that used electrical and electronic products and batteries should not be mixed with
general household waste.
For proper treatment, recovery and recycling of old products and used batteries,
please take them to applicable collection points in accordance with your national
legislation.
By disposing of these products and batteries correctly, you will help to save valuable
resources and prevent any potential negative effects on human health and the
environment which could otherwise arise from inappropriate waste handling.
For more information about collection and recycling of old products and batteries,
please contact your local municipality, your waste disposal service or the point of sale
where you purchased the items.
These symbols are only valid in the European Union.
For countries outside the European Union:
If you wish to discard these items, please contact your local authorities or dealer and
ask for the correct method of disposal.
K058a_A1_En
Symbol examples
for batteries
Symbol for
equipment
Pb
Radio wave caution
This unit uses a 2.4 GHz radio wave frequency, which is
a band used by other wireless systems (Microwave
ovens and Cordless phones, etc.). In this event noise
appears in your television image, there is the possibility
this unit (including products supported by this unit) is
causing signal interference with the antenna input
connector of your television, video, satellite tuner, etc. In
this event, increase the distance between the antenna
input connector and this unit (including products
supported by this unit).
• Pioneer is not responsible for any malfunction of the
compatible Pioneer product due to communication
error/malfunctions associated with your network
connection and/or your connected equipment. Please
contact your Internet service provider or network
device manufacturer.
• A separate contract with/payment to an Internet
service provider is required to use the Internet.
Page 4

Thank you for buying this product.
Please read through these operating instructions so that you will know how to operate your model properly. After you
have finished reading the instructions, put them in a safe place for future reference.
Contents
01 Before you start
Supplied accessories . . . . . . . . . . . . . . . . . . . . . . . . . . . 6
Loading the batteries . . . . . . . . . . . . . . . . . . . . . . . . . . . 6
Operating range of remote control . . . . . . . . . . . . . . . . 6
02 Part names and functions
Rear panel . . . . . . . . . . . . . . . . . . . . . . . . . . . . . . . . . . . . 7
Remote control . . . . . . . . . . . . . . . . . . . . . . . . . . . . . . . . 8
Front panel . . . . . . . . . . . . . . . . . . . . . . . . . . . . . . . . . . . . 9
03 Installing and connecting the unit
Installing the unit . . . . . . . . . . . . . . . . . . . . . . . . . . . . . 10
04 Getting started
To turn the power on . . . . . . . . . . . . . . . . . . . . . . . . . . . 14
Setting the clock . . . . . . . . . . . . . . . . . . . . . . . . . . . . . . 14
General control . . . . . . . . . . . . . . . . . . . . . . . . . . . . . . . 14
Input function. . . . . . . . . . . . . . . . . . . . . . . . . . . . . . . . . . 14
Display brightness control . . . . . . . . . . . . . . . . . . . . . . . 14
Volume auto setting. . . . . . . . . . . . . . . . . . . . . . . . . . . . . 14
Volume control. . . . . . . . . . . . . . . . . . . . . . . . . . . . . . . . . 14
Subwoofer volume control . . . . . . . . . . . . . . . . . . . . . . . 14
Muting. . . . . . . . . . . . . . . . . . . . . . . . . . . . . . . . . . . . . . . . 14
Sound controls . . . . . . . . . . . . . . . . . . . . . . . . . . . . . . . 15
Surround mode . . . . . . . . . . . . . . . . . . . . . . . . . . . . . . . . 15
ALC (Auto Level Control) mode . . . . . . . . . . . . . . . . . . . 15
Emphasizes low range (P.BASS) . . . . . . . . . . . . . . . . . . 15
Bass/treble control . . . . . . . . . . . . . . . . . . . . . . . . . . . . . 15
Setting the wake-up timer . . . . . . . . . . . . . . . . . . . . . . . 15
Calling the wake-up timer . . . . . . . . . . . . . . . . . . . . . . . . 16
Cancelling the wake-up timer. . . . . . . . . . . . . . . . . . . . . 16
Using the wake-up timer. . . . . . . . . . . . . . . . . . . . . . . . . 16
Using the sleep timer . . . . . . . . . . . . . . . . . . . . . . . . . . 16
05 Basic operation
Outputting the sound of a device connected to
the unit . . . . . . . . . . . . . . . . . . . . . . . . . . . . . . . . . . . . . . 17
Linking power for the unit and a TV . . . . . . . . . . . . . . . 17
06 iPod/iPhone playback
Confirming what iPod/iPhone models are
supported . . . . . . . . . . . . . . . . . . . . . . . . . . . . . . . . . . . . 18
07 USB playback
Playing USB storage devices . . . . . . . . . . . . . . . . . . . . 19
Repeat play. . . . . . . . . . . . . . . . . . . . . . . . . . . . . . . . . . . . 19
Random play . . . . . . . . . . . . . . . . . . . . . . . . . . . . . . . . . . 19
Switch the display contents . . . . . . . . . . . . . . . . . . . . . . 19
08 Connect network
Setting with a special application (Start-up Navi) . . . 20
Setting network connection . . . . . . . . . . . . . . . . . . . . . 21
A: Connecting with a LAN cable (wired LAN) . . . . . . . . 22
B: Setting this unit with iOS equipment
(iOS version 5.0 or later) . . . . . . . . . . . . . . . . . . . . . . . . . 23
C: Perform this unit's settings using the iOS equipment
(iOS version 7.1 or later) . . . . . . . . . . . . . . . . . . . . . . . . . 24
D: WPS connection settings. . . . . . . . . . . . . . . . . . . . . . 25
4
E: Setting the wireless LAN setting for this unit from
the web browser of a computer that supports a
wired LAN connection. . . . . . . . . . . . . . . . . . . . . . . . . . . 26
F: Setting the wireless LAN setting for this unit from
the web browser of a computer that supports a
wireless LAN connection . . . . . . . . . . . . . . . . . . . . . . . . 27
G: Directly connecting this unit with a smart phone by
wireless (Wireless Direct). . . . . . . . . . . . . . . . . . . . . . . . 28
Checking the Network Information . . . . . . . . . . . . . . . 29
09 Listening to Spotify audio streaming
playback
About the Spotify audio streaming playback
function . . . . . . . . . . . . . . . . . . . . . . . . . . . . . . . . . . . . . 30
Installing ControlApp . . . . . . . . . . . . . . . . . . . . . . . . . . 31
Using ControlApp . . . . . . . . . . . . . . . . . . . . . . . . . . . . . 31
10 Music server
Introduction . . . . . . . . . . . . . . . . . . . . . . . . . . . . . . . . . . 32
Playing music on Music server . . . . . . . . . . . . . . . . . . . 32
About playable DLNA network devices . . . . . . . . . . . . . 32
Playing back your favorite songs . . . . . . . . . . . . . . . . . . 32
11 AirPlay
Using AirPlay on iPod touch, iPhone, iPad and
iTunes . . . . . . . . . . . . . . . . . . . . . . . . . . . . . . . . . . . . . . . 33
Playing audio files stored on computers or other
components . . . . . . . . . . . . . . . . . . . . . . . . . . . . . . . . . . 33
Connecting to the LAN network. . . . . . . . . . . . . . . . . . . 33
Using AirPlay to enjoy music . . . . . . . . . . . . . . . . . . . . 33
Operating AirPlay from an iPod/iPhone/iPad. . . . . . . . 33
12 Using the tuner
Listening to the radio broadcasts . . . . . . . . . . . . . . . . 35
Tuning. . . . . . . . . . . . . . . . . . . . . . . . . . . . . . . . . . . . . . . . 35
Saving station presets. . . . . . . . . . . . . . . . . . . . . . . . . . . 35
To recall a memorized station . . . . . . . . . . . . . . . . . . . . 36
To scan the preset stations. . . . . . . . . . . . . . . . . . . . . . . 36
To erase entire preset memory. . . . . . . . . . . . . . . . . . . . 36
Listening to the DAB+ . . . . . . . . . . . . . . . . . . . . . . . . . 36
About DAB+ (Digital Audio Broadcasting) . . . . . . . . . 36
Auto Scan. . . . . . . . . . . . . . . . . . . . . . . . . . . . . . . . . . . . . 36
Selecting a station in the station list . . . . . . . . . . . . . . . 36
Manual tune. . . . . . . . . . . . . . . . . . . . . . . . . . . . . . . . . . . 37
Changing the information display . . . . . . . . . . . . . . . . . 37
Memorising a station . . . . . . . . . . . . . . . . . . . . . . . . . . . 37
DAB Frequency table (BAND III) . . . . . . . . . . . . . . . . . . 37
Using the Radio Data System (RDS) . . . . . . . . . . . . . . 38
An introduction to RDS. . . . . . . . . . . . . . . . . . . . . . . . . . 38
Searching for RDS programs. . . . . . . . . . . . . . . . . . . . . 38
Information provided by RDS . . . . . . . . . . . . . . . . . . . . . 38
Using the Auto Station Program Memory (ASPM). . . . 39
Notes for RDS operation. . . . . . . . . . . . . . . . . . . . . . . . . 39
Page 5

Bluetooth
13
Music playback using Bluetooth wireless technology .40
Remote control operation . . . . . . . . . . . . . . . . . . . . . . .40
Pairing with the unit (Initial registration) . . . . . . . . . . . 40
Listen to music on the unit from a Bluetooth
capable device . . . . . . . . . . . . . . . . . . . . . . . . . . . . . . . . 41
BT STANDBY . . . . . . . . . . . . . . . . . . . . . . . . . . . . . . . . . . 41
Switch the BT AUDIO function on or off. . . . . . . . . . . . 41
® Audio playback
14 PHASE CONTROL technology
No PHASE CONTROL technology . . . . . . . . . . . . . . . . . 42
With PHASE CONTROL technology . . . . . . . . . . . . . . . 42
15 Home menu
Automatically switch power to standby mode
(Auto Power Off) . . . . . . . . . . . . . . . . . . . . . . . . . . . . . . .43
Setting Network Standby mode . . . . . . . . . . . . . . . . . . . 43
Check network settings . . . . . . . . . . . . . . . . . . . . . . . . .43
Check software version . . . . . . . . . . . . . . . . . . . . . . . . . 43
Software Update . . . . . . . . . . . . . . . . . . . . . . . . . . . . . . . 43
Firmware Update using Web browser . . . . . . . . . . . . .44
16 Setting the remote to control other
components
Recall signal from the remote control of another
device to the remote control of this unit . . . . . . . . . . . .46
Delete a preset code . . . . . . . . . . . . . . . . . . . . . . . . . . . . 46
Reset all preset codes . . . . . . . . . . . . . . . . . . . . . . . . . .46
Control of other devices . . . . . . . . . . . . . . . . . . . . . . . . .47
17 Troubleshooting and other
information
Troubleshooting . . . . . . . . . . . . . . . . . . . . . . . . . . . . . . .48
About network playback . . . . . . . . . . . . . . . . . . . . . . . . . 53
Windows Media Player . . . . . . . . . . . . . . . . . . . . . . . . . . 53
DLNA . . . . . . . . . . . . . . . . . . . . . . . . . . . . . . . . . . . . . . . . 53
Content playable over a network . . . . . . . . . . . . . . . . . . 53
Disclaimer for Third Party Content . . . . . . . . . . . . . . . . 53
About playback behavior over a network . . . . . . . . . . . 53
Authorizing this unit . . . . . . . . . . . . . . . . . . . . . . . . . . . . 54
aacPlus . . . . . . . . . . . . . . . . . . . . . . . . . . . . . . . . . . . . . . 54
FLAC . . . . . . . . . . . . . . . . . . . . . . . . . . . . . . . . . . . . . . . . . 54
Radio wave caution. . . . . . . . . . . . . . . . . . . . . . . . . . . . . 55
Scope of operation . . . . . . . . . . . . . . . . . . . . . . . . . . . . . 55
Radio wave reflections . . . . . . . . . . . . . . . . . . . . . . . . . . 55
Precautions regarding connections to products
supported by this unit. . . . . . . . . . . . . . . . . . . . . . . . . . . 55
Supported audio file formats . . . . . . . . . . . . . . . . . . . . . 56
About Wi-Fi® . . . . . . . . . . . . . . . . . . . . . . . . . . . . . . . . . .58
About iPod/iPhone/iPad . . . . . . . . . . . . . . . . . . . . . . . .58
Apple Lossless Audio Codec . . . . . . . . . . . . . . . . . . . . .58
Dolby Digital. . . . . . . . . . . . . . . . . . . . . . . . . . . . . . . . . . .58
DTS . . . . . . . . . . . . . . . . . . . . . . . . . . . . . . . . . . . . . . . . . .58
About Spotify . . . . . . . . . . . . . . . . . . . . . . . . . . . . . . . . . .58
Specifications . . . . . . . . . . . . . . . . . . . . . . . . . . . . . . . . .59
18 Preset code list
TV . . . . . . . . . . . . . . . . . . . . . . . . . . . . . . . . . . . . . . . . . . .60
DVD . . . . . . . . . . . . . . . . . . . . . . . . . . . . . . . . . . . . . . . . .63
BD . . . . . . . . . . . . . . . . . . . . . . . . . . . . . . . . . . . . . . . . . .64
5
Page 6
Before you start01
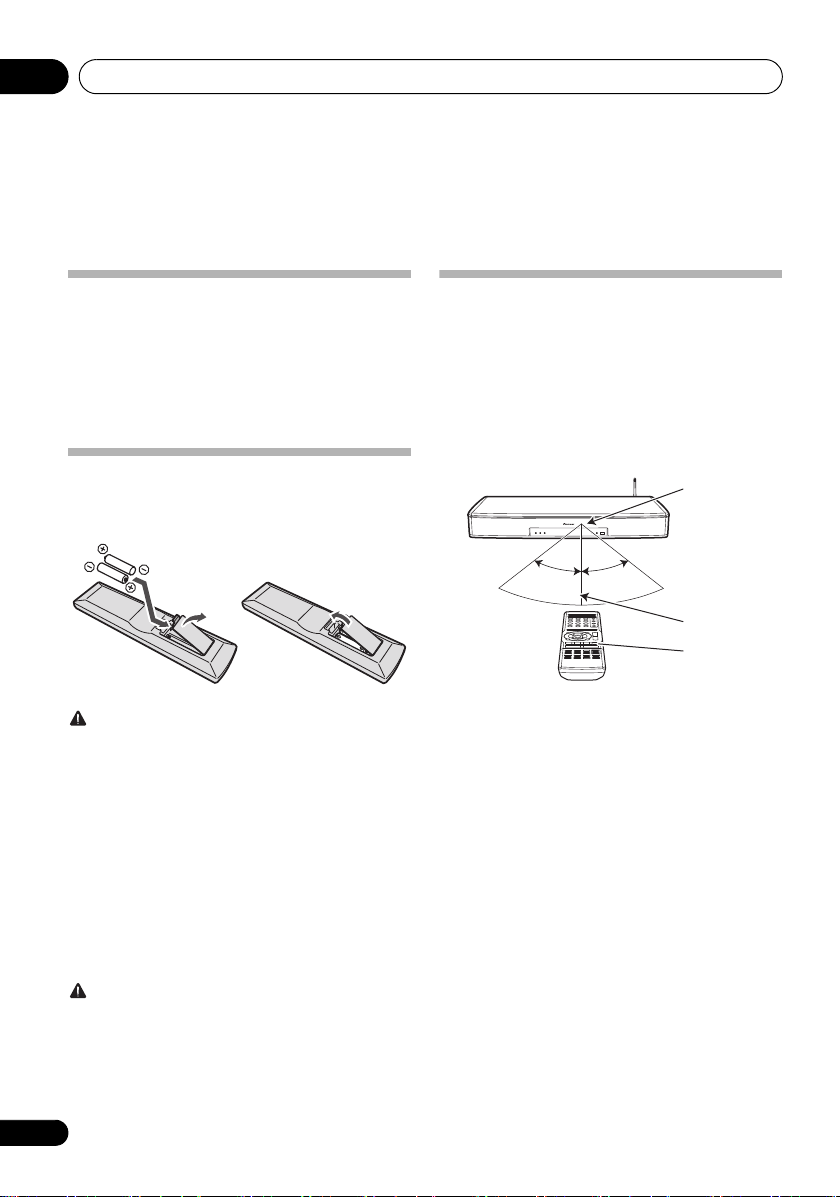
30°30°
Remote control
sensor
7 m
Remote control
Chapter 1:
Before you start
Supplied accessories
• Remote control x 1
• AAA size IEC R03 dry cell batteries x 2
• Optical digital audio cable x 1 (1.5 m)
•Power cord
• DAB/FM wire antenna
• Warranty
• Operating Instructions (this manual)
Loading the batteries
The batteries included with the unit are to check initial
operations; they may not last over a long period. We
recommend using alkaline batteries that have a longer life.
CAUTION
• Incorrect use of batteries may result in such hazards as
leakage and bursting. Observe the following
precautions:
– Never use new and old batteries together.
– Insert the plus and minus sides of the batteries
properly according to the marks in the battery case.
– Batteries with the same shape may have different
voltages. Do not use different batteries together.
– When disposing of used the batteries, please comply
with governmental regulations or environmental
public institution’s rules that apply in your country/
area.
– When inserting the batteries, make sure not to
damage the springs on the battery’s (–) terminals. This
can cause batteries to leak or overheat.
WARNING
• Do not use or store batteries in direct sunlight or other
excessively hot place, such as inside a car or near a
heater. This can cause batteries to leak, overheat,
explode or catch fire. It can also reduce the life or
performance of batteries.
6
Operating range of remote control
The remote control may not work properly if:
• There are obstacles between the remote control and the
unit’s remote sensor.
• Direct sunlight or fluorescent light is shining onto the
remote sensor.
• The unit is located near a device that is emitting infrared
rays.
• The unit is operated simultaneously with another
infrared remote control unit.
Page 7
Part names and functions 02
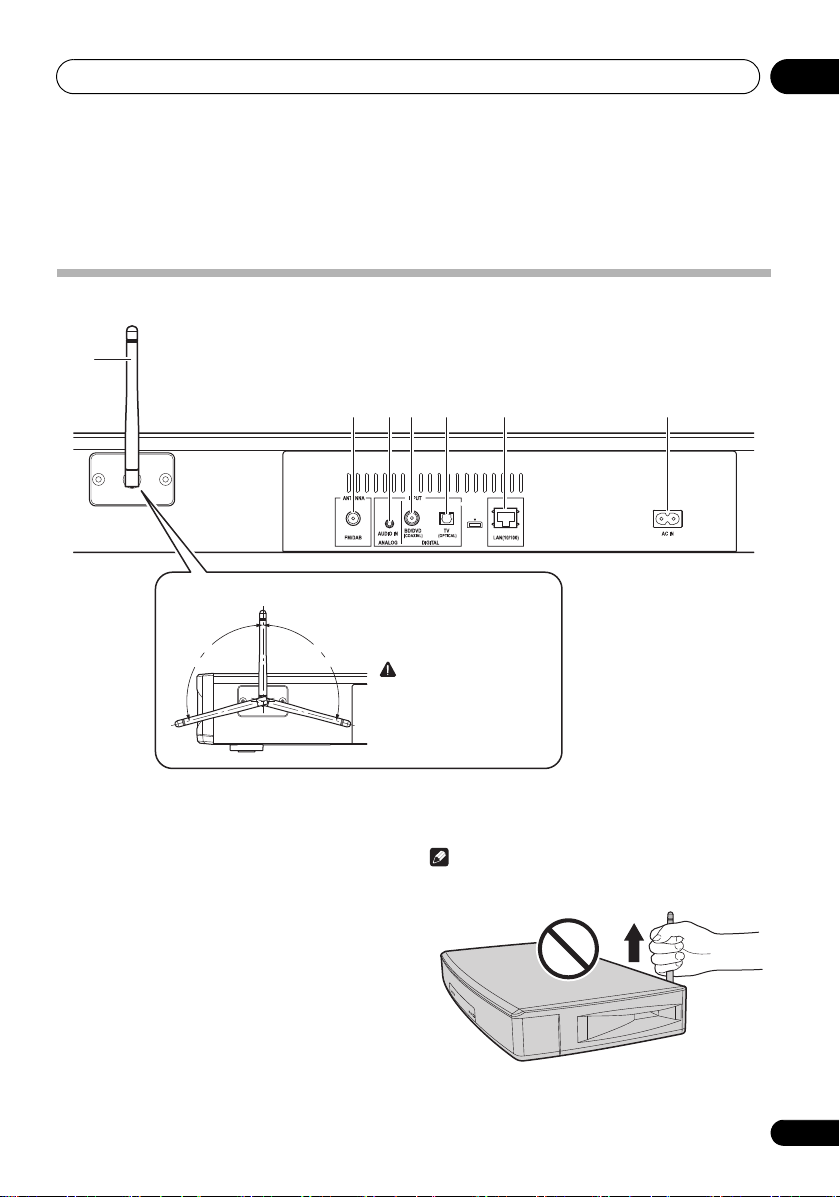
Movable range of the wireless LAN antenna
105°
CAUTION
• Do not move the antenna
beyond the movable range.
Doing so may damage the
antenna.
105°
Do not lift this device by holding the wireless LAN
antenna, since damage or personal injury may result.
Chapter 2:
Part names and functions
Rear panel
7
1 2 3 4 56
1 DAB/FM antenna socket
Connect provided DAB/FM wire antenna here (page 11).
2 Analog audio input terminal
(3.5-mm stereo mini jack)
Connect a TV, portable audio player, or other device with an
analog audio output (page 11).
3 Coaxial digital audio input terminal
Connect a BD or DVD player or other device with a coaxial
digital audio output (page 11).
4 Optical digital audio input terminal
Connect a TV or other device with an optical digital audio
output (page 11).
5 LAN (10/100) connector
Connect this unit to the router using a LAN cable (page 12).
6 AC IN terminal
Be sure to connect this last.
7
Wireless
Receives signals from wireless devices.
Note
• This is not an DAB/FM antenna.
LAN antenna
7
Page 8
Part names and functions02
1
2
3
4
5
6g
7
8
9
a
b
c
d
h
f
i
j
k
l
e
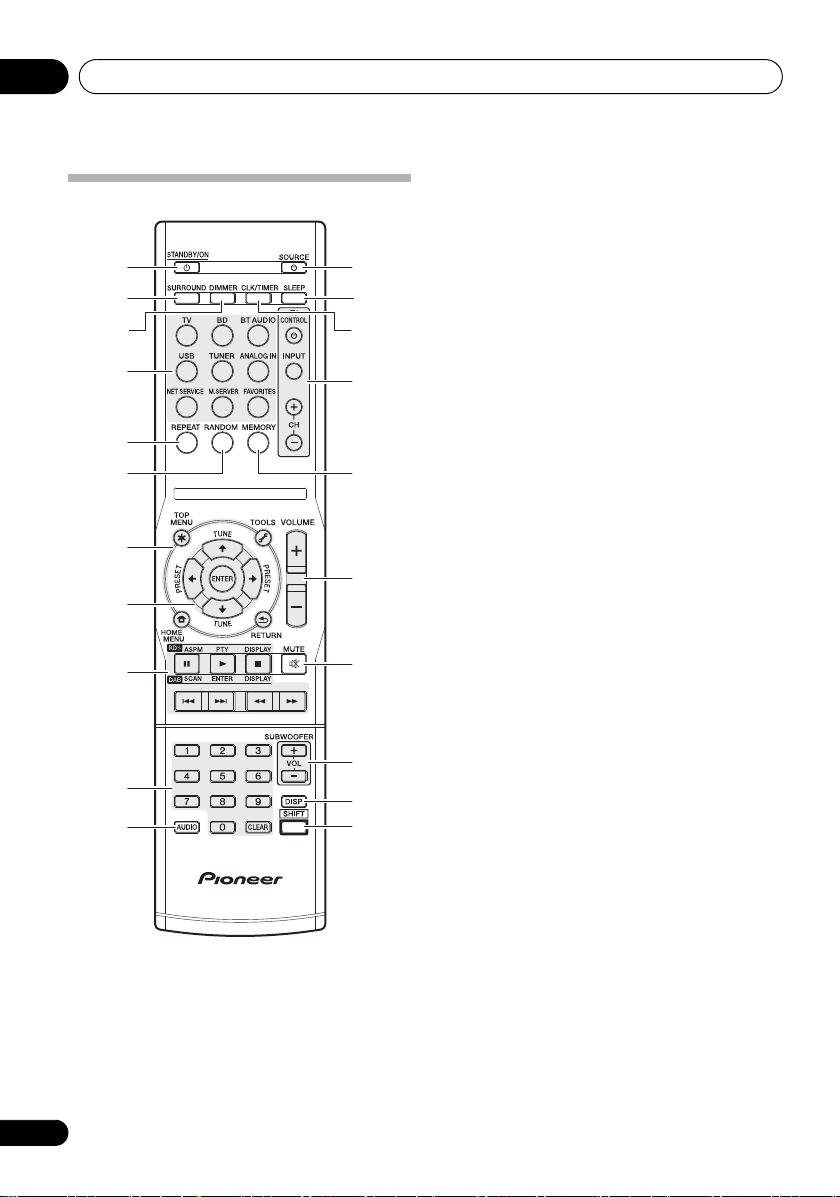
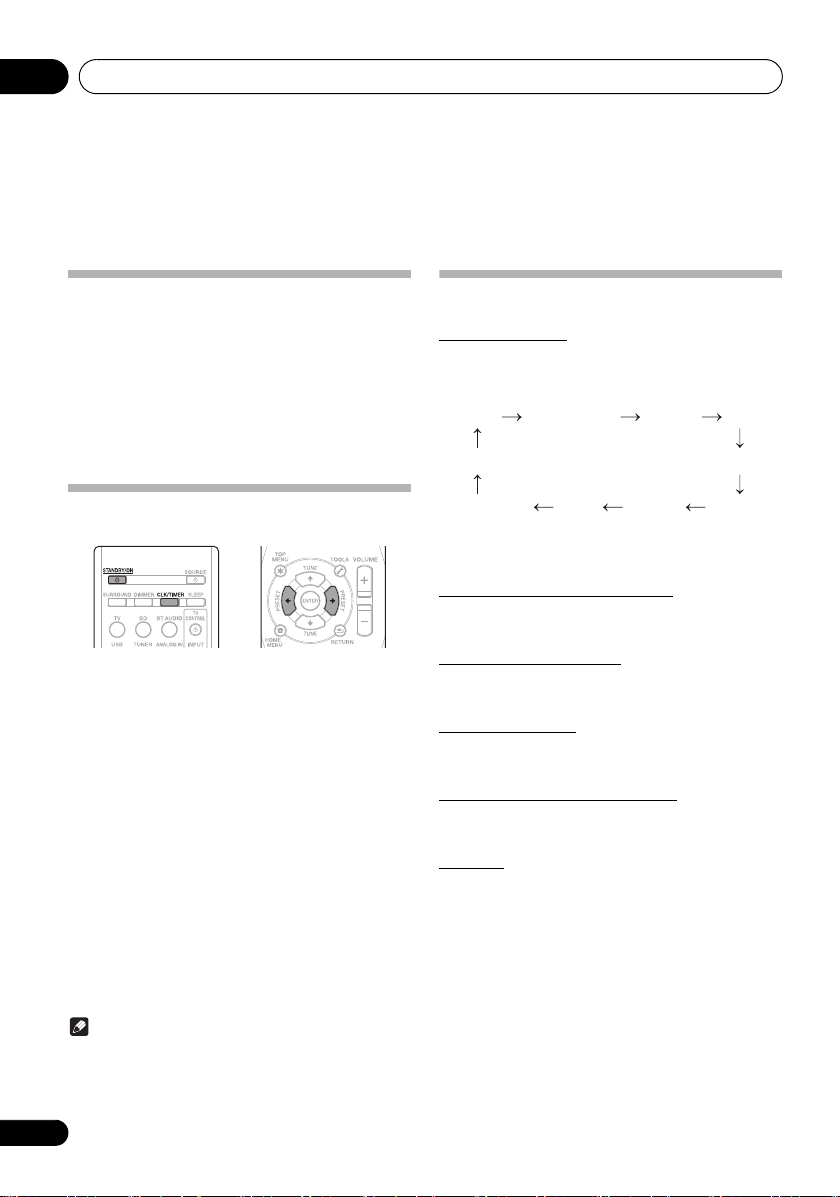
1 STANDBY/ON
Remote control
Turns the power of the unit on/off (standby mode) (page 14).
2
Switches surround mode (page 15).
3
Changes the brightness of the indicators on the front panel of
the unit in four steps (page 14).
4 Input selection buttons
Switches the input of the unit (page 14).
5
Press to change the repeat play setting.
6
Randomize order of track playback.
7 Source control buttons
8/// (
ENTER
Use the arrow buttons when setting up your surround sound
system. Also used to control BD/DVD menus/options.
Use TUNE / can be used to find radio frequencies and
PRESET /can be used to select preset radio stations
(page 35).
9 Source device operation buttons
Operates other devices or each input (TUNER, etc.).
• See page 38 for details on RDS.
• See page 36 for details on DAB.
10 Number buttons
Use the number buttons to directly select a radio frequency or
the tracks on a BD/DVD, etc.
11
Switch the tuner between STEREO/MONO (page 35).
12
Turn the power of a TV or BD/DVD player connected to the
unit on/off (page 46).
13
Press to change the amount of time before the unit switches
into standby (10 min, 20 min, 30 min, 60 min, 90 min, 120 min,
150 min, 180 min, OFF). You can check the remaining sleep
time at any time by pressing SLEEP once.
SURROUND
DIMMER
REPEAT
RANDOM
TOP MENU
Displays the disc “top” menu of a BD/DVD.
HOME MENU
Display the Home Menu and perform various settings for
the unit.
TOOLS
Use to set sound quality.
RETURN
Go back one operation.
TUNE /, PRESET /
AUDIO
SOURCE
SLEEP
),
8
Page 9
Part names and functions 02
1 2 3 6
7 8
45
9 ba
14
CLK/TIMER
Use to set the clock and wake-up timer functions (pages 14
and 15).
15
TV CONTROL
These buttons can be used to control TVs (page 46).
Use to turn on/off the power of the TV.
buttons
INPUT
Use to select the TV input signal.
CH +/–
Use to select channels.
16
MEMORY
Use when presetting the stations for registration (pages 35
and 37).
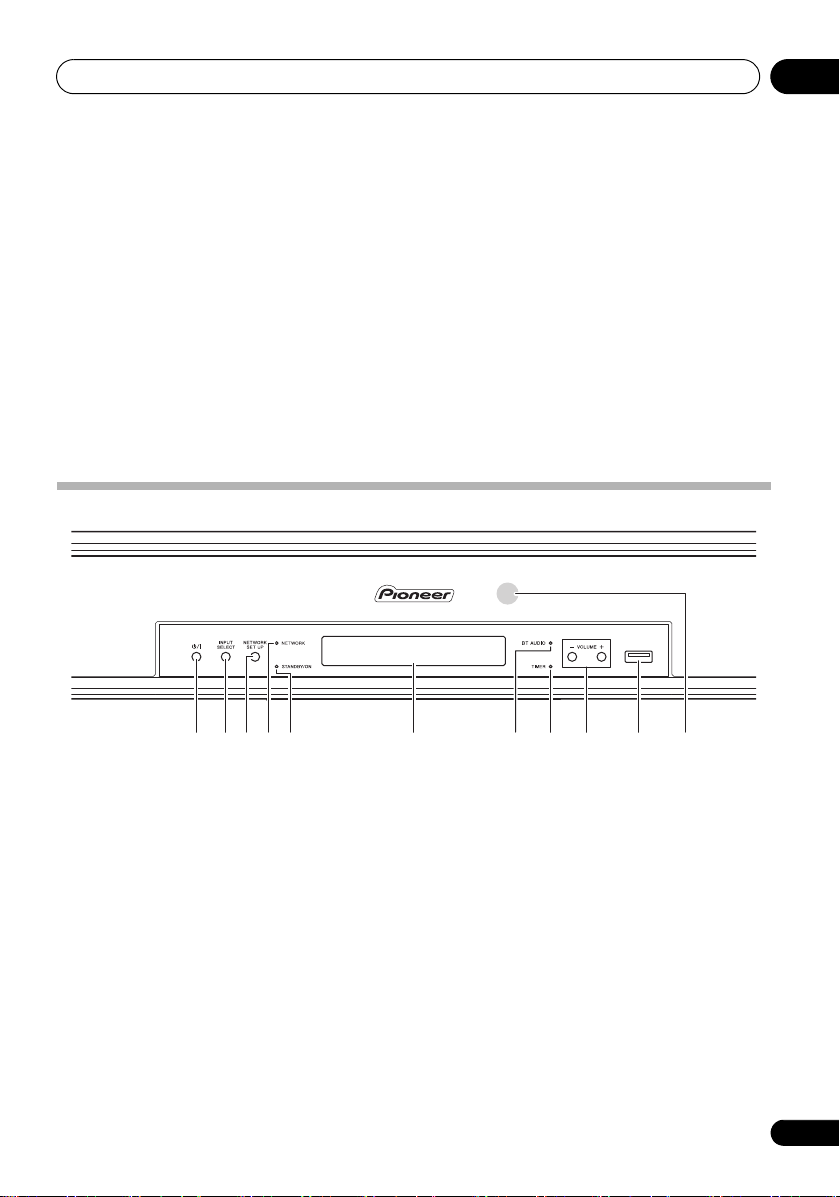
Front panel
17
VOLUME
Adjusts the overall volume including the subwoofer volume
(page 14).
18
MUTE
Temporarily mutes the sound. Press again to restore the
original volume (page 14).
19
SUBWOOFER VOL
Adjusts the subwoofer (bass sound) volume.
20
DISP
Each press switches the information displayed on the display.
Information for each source is displayed.
21
SHIFT
Af ter s witc hing to TV or BD play er in put, you c an pr ess t he TV
or BD button and the SHIFT button together to control the TV
or BD/DVD player (page 46).
1 /I
Turns the power of the unit on/off (standby mode) (page 14).
2
INPUT SELECT
Switches the input (page 14).
3
NETWORK SET UP
Use for network functions and other settings.
4
NETWORK
When the network status changes, this indicator lights. The
indicator’s color changes as noted below.
Lit white: good connection
Flashes red: connection failure
5
STANDBY/ON
Lit when the power is on. The indicator’s color changes as
noted below.
Lit blue: power on
Lit red: network standby
Off: standby
indicator
indicator
6Display
BT AUDIO
7
Lit to display the status of connection with a Bluetooth
capable device. The indicator’s color changes as noted below.
Lit white: connected to a Bluetooth capable device
Flashes white: pairing mode
Off: not connected to a Bluetooth capable device, or not in
pairing mode
8
TIMER
Lit red: wake-up timer is set (power off)
Off: wake-up time is not set, or power is on
9VOLUME +/–
Adjusts the volume (page 14).
10
USB
Use to connect your USB mass storage device or Apple iPod/
iPhone as an audio source (page 19).
11 Remote control sensor
Receives the signals from the remote control.
indicator
indicator
terminal
9
Page 10
Installing and connecting the unit03
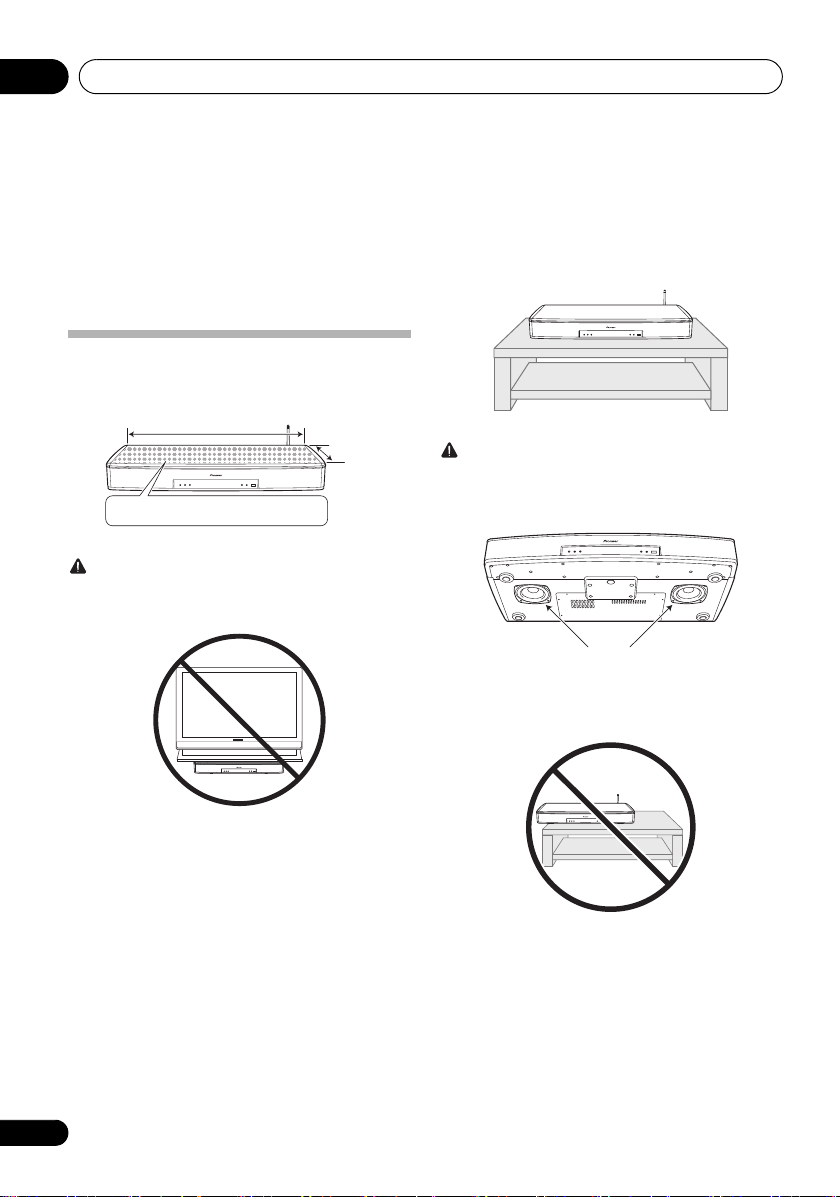
Dotted range : Possible placement area
660 mm
310 mm
Subwoofer
Chapter 3:
Installing and connecting the unit
Before connecting the unit or changing the connections, be
sure to turn off the power and disconnect the po wer cord from
the outlet. Also, make sure you have finished connecting all
cables before connecting the power cord to the wall outlet.
Installing the unit
If you are placing the unit directly under a TV, only place a TV
of 40 kg or less within the allowable placement area.
CAUTION
• Do not place a TV stand on top that is larger than the
possible placement area.
1 Place the unit.
CAUTION
• There are subwoofers located on the bottom of the unit.
Make sure that there is nothing between the unit and the
surface it is being placed on it.
• Do not install the unit in an unstable place such as on an
unsteady stand or tilted surface. The unit may fall or tip
over, resulting in injury.
• The unit is not magnetically shielded and so should be
used away from a cathode ray tube (CRT) TV or monitor.
Also, do not place devices that are easily influenced by
magnetism (magnetic cards, watches, video tapes, etc.)
near the unit.
• Do not attach this unit to the wall or ceiling. It may fall off
and cause injury.
10
• Place the unit so that it does not extend out over the TV
rack, shelf etc.
Page 11
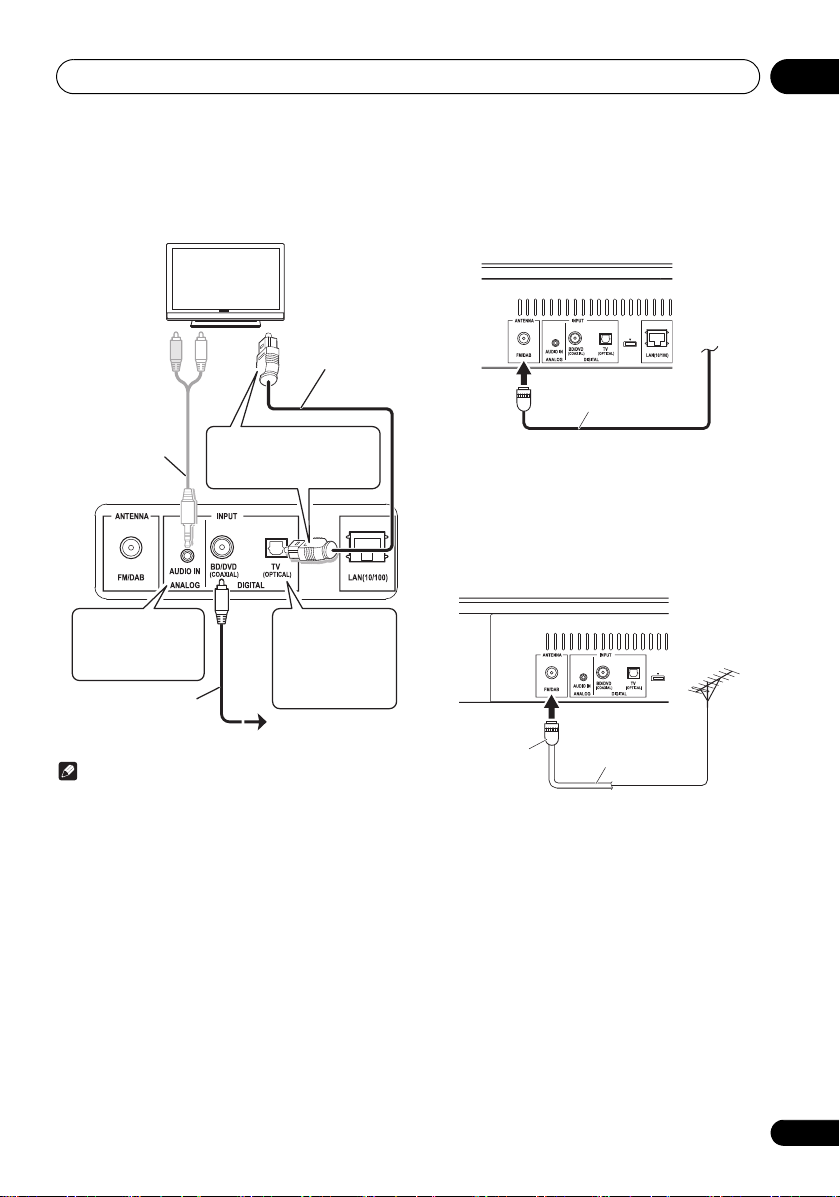
Installing and connecting the unit 03
Optical digital
audio cable
(included)
Analog cable
(commercially
available)
Remove the protection cap at
the end and then connect the
cable while paying attention to
the orientation of the connector.
If you will not use the
cable for your TV
connection, you can
use it to connect
another audio device.
If your TV does not
have a digital
terminal, connect it to
the analog terminal.
Digital audio pin cable
(commercially available)
BD/DVD
DAB/FM wire antenna
(included)
75 coaxial cable
One-touch PAL
connector
2 Wire the unit.
In order to make the wiring process as easy as possible,
complete all wiring prior to placing the TV on top of the unit.
Connecting antenna
Connect the DAB/FM wire antenna into the DAB/FM antenna
socket.
For best results, extend the DAB/FM antenna fully and fix to a
wall or door frame. Don’t drape loosely or leave coiled up.
Using external antennas
To improve DAB/FM reception and sound quality
Use a PAL connector (not supplied) to connect an external
DAB/FM antenna.
Note
• Some connected devices (TV and set top box etc.) have
settings for the digital audio output. For details, see the
operating instructions for the specific playback device.
• Digital audio input (COAXIAL, OPTICAL) supports input
signals with sampling frequencies of 32 kHz, 44.1 kHz,
48 kHz, 88.2 kHz, and 96 kHz.
11
Page 12
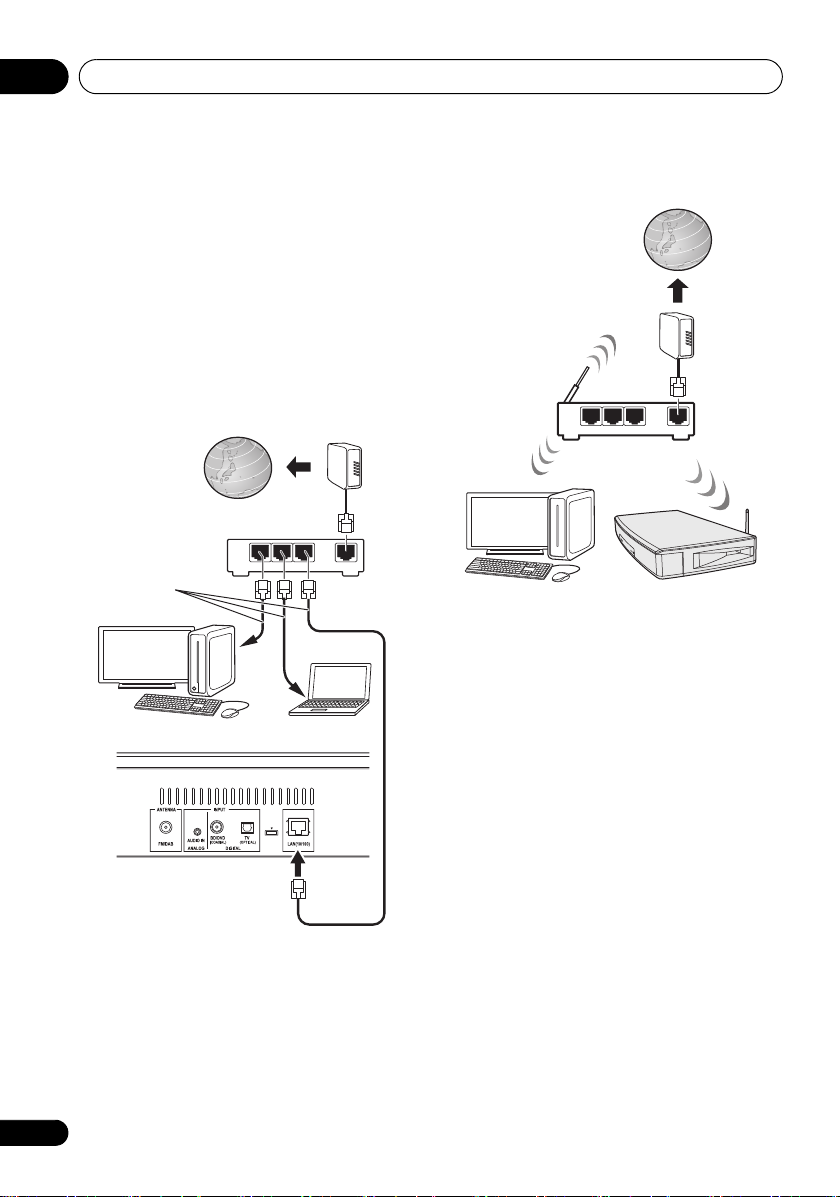
Installing and connecting the unit03
Internet
Modem
Router
Computer 1
Computer 2
LAN cable
(commercially
available)
Internet
Modem
Router
Computer
This unit
Connecting to the network through the LAN
interface or WLAN antenna
By connecting this unit to the network via the LAN interface,
you can play back audio files stored on components on the
network, including your computer, and listen to Internet
Radio stations.
Connect the LAN terminal on this unit to the LAN terminal on
your router (with or without the built-in DHCP server function)
with a straight LAN cable (CAT 5 or higher). Also wireless
connection to the network is possible.
Turn on the DHCP server function of your router. If your router
does not have a built-in DHCP server function, you have to set
up the network manually. For details, see page 21.
Connecting using LAN cable
LAN
321
WAN
Connecting using wireless LAN
LAN
321
WAN
3 Place the TV on top of the unit, and then
wire the TV and other devices.
To enable hearing of the TV audio with the unit, connect the
supplied optical digital audio cable.
For a TV that only has an analog audio output terminal,
connect the audio output of the TV and the analog terminal of
the unit with a commercially available audio cable.
12
Page 13
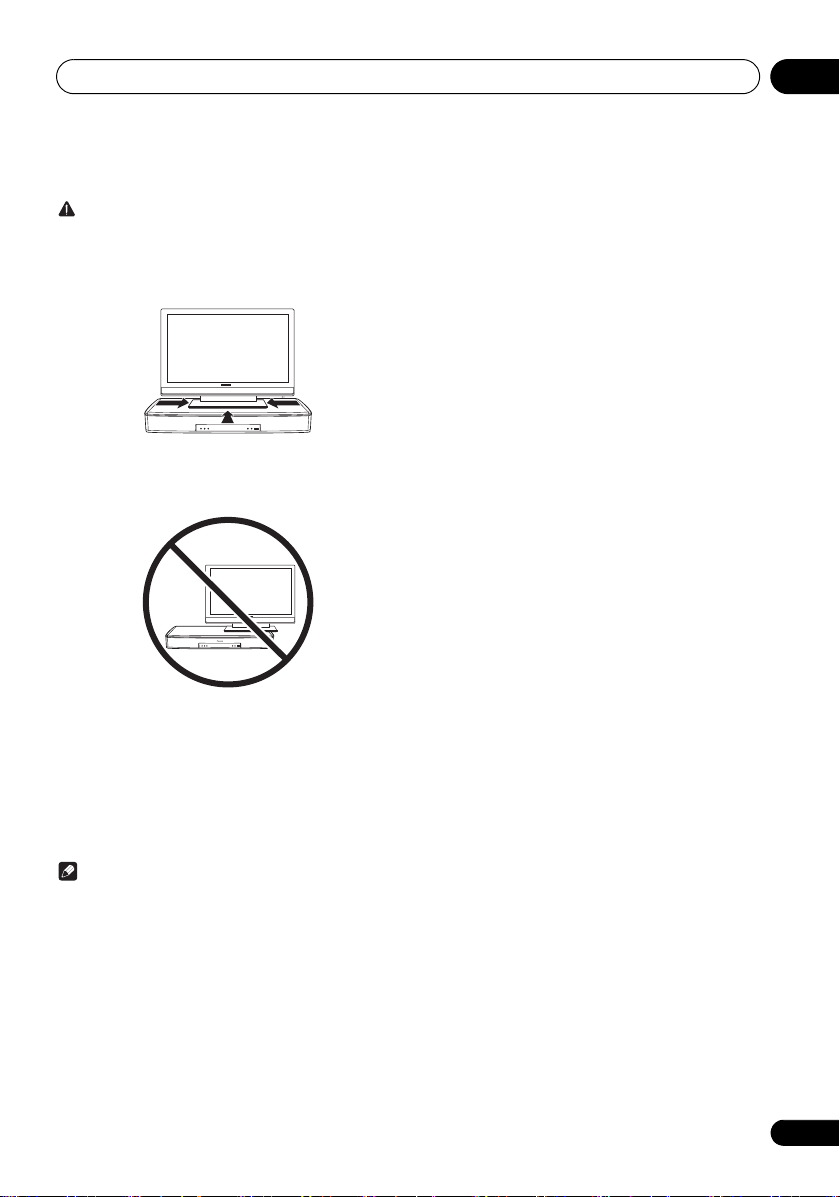
Installing and connecting the unit 03
4 Place the TV in its final position.
CAUTION
• Pioneer is not responsible for any accidents or damage
that result from improper installation/mounting,
incorrect use, modification, disaster, etc.
• Place the TV in the center of the unit.
• Place the TV so that its stand does not stick out over the
unit.
• Refer to the operating instructions for your TV for
methods to prevent the TV from tipping over or falling. Do
not attach any parts intended to prevent the TV from
tipping over or falling (such as belts etc.) to this unit.
Doing so may cause damage to the unit, or result in fire
or electric shock. Doing so may also mean the TV can tip
over or fall, and being damaged or causing injury.
5 Connect the power cord.
Note
• Some TVs have settings for digital audio output. For
details, see the operating instructions for your TV.
• Set audio output from the built-in speakers of the TV to
OFF. If this cannot be set, set the TV volume to the
minimum level.
13
Page 14
Getting started04
TV(OPT) BD/DVD(COAX) Analog In DAB
FM
BT AUDIO
USB/iPodSpotify
Music Server
Favorites
Chapter 4:
Getting started
To turn the power on
Press the STANDBY/ON on the remote control or the /I
on the main unit to turn the power on.
About startup time:
About 30 seconds are required between turning on the power
and being able to use the network function. The time required
for startup can be reduced by setting the network standby
mode to on (page 43).
After use:
Press the STANDBY/ON to enter the power stand-by mode.
Setting the clock
1 Press
2 Press
“CLOCK” is shown on the main display.
3 Press
4 Press
5 Press
ENTER.
6 Press
ENTER to confirm.
7 Press
To confirm the time display:
Press the CLK/TIMER. The time display will appear for about
10 seconds.
To readjust the clock:
Perform “Setting the clock” from step 1.
STANDBY/ON
CLK/TIMER
ENTER
.
/
to set the day, then press ENTER.
/
to set the hour, then press
/
to set the minute, then press
ENTER
.
Note
• When power supply is restored after unit is plugged in
again or after a power failure, reset the clock.
to turn the power on.
on the remote control.
General control
Input function
When the INPUT SELECT on main unit is pressed, the current
function will change to different mode. Press the INPUT
SELECT repeatedly to select desired function.
Input can also be switched by pressing input selection
buttons on the remote control.
Display brightness control
Press DIMMER to dims the display brightness. The
brightness can be controlled in four steps.
Volume auto setting
If you turn off and on the main unit with the volume set to 31
or higher, the volume starts at 30.
Volume control
Press the VOLUME –/+ on the unit or press VOLUME +/– on
the remote control to increase or decrease the volume.
Subwoofer volume control
Press SUBWOOFER VOL +/– on the remote control to
increase or decrease the volume of the subwoofer.
Muting
The volume is muted temporarily when pressing the MUTE on
the remote control. Press again to restore the volume.
14
Page 15
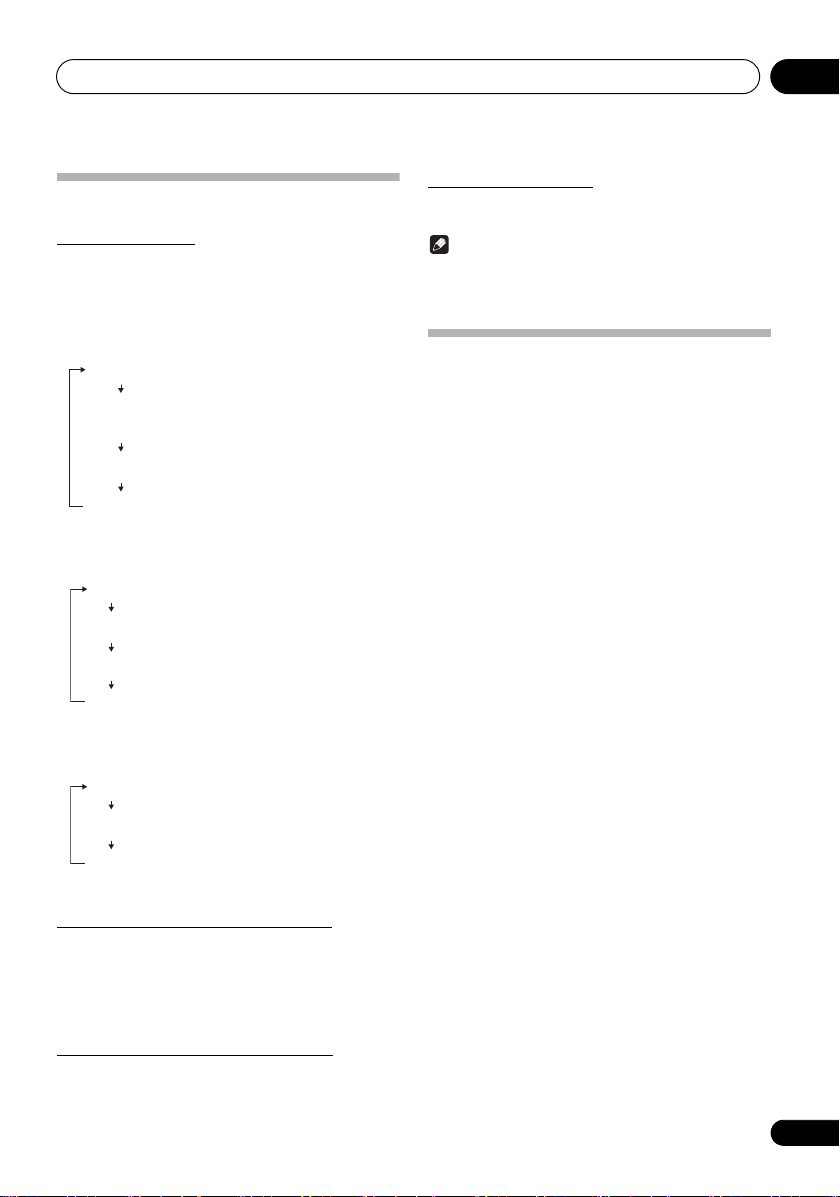
Getting started 04
AUTO
SURROUND
The unit automatically detects the audio
signal that is being played back and
selects the method of playback best suited
to it, such as multi-channel or stereo.
Allows the radio or vocal sounds to be
heard clearly.
DIALOGUE
State in which all other modes are off.
STANDARD
Allows sound that can be enjoyed even
when using low volume at night.
NIGHT
DIRECT
Playback true to the source, with no
modifications performed on the input signal.
Allows the radio or vocal sounds to be
heard clearly.
DIALOGUE
Allows for the optimal playback of music.
MUSIC
Allows sound that can be enjoyed even
when using low volume at night.
NIGHT
MUSIC Allows for the optimal playback of music.
Allows the radio or vocal sounds to be
heard clearly.
DIALOGUE
Allows sound that can be enjoyed even
when using low volume at night.
NIGHT
Sound controls
Surround mode
When SURROUND is pressed on the remote control the
current mode setting will be displayed. To change to a
different mode, press the SURROUND repeatedly until the
desired sound mode appears. The modes that can be selected
differ depending on the input.
TV, BD, Analog In
AirPlay
USB/iPod, BT AUDIO, Music Server, DMR,
Favorites, Spotify, TUNER (FM, DAB)
ALC (Auto Level Control) mode
The unit will automatically level any differences in volume
between multiple music sources on a portable digital audio
player etc. and then play them back in stereo. When the
power is first turned on, ALC mode is set to OFF. In order to
turn ALC mode ON, press TOOLS on the remote control and
then use /// to select on.
Emphasizes low range (P.BASS)
When the power is first turned on, P.BASS mode is set to OFF.
In order to turn P.BASS mode ON, press TOOLS on the
remote control and then use /// to select on.
Bass/treble control
Press TOOLS on the remote control and then use ///
to make adjustments.
Note
• Adjustments can be made between the range of –5 and
+5.
• BASS/TREBLE can operate alongside P.BASS.
Setting the wake-up timer
Used to change the existing timer setting, or to set a new
timer.
1 Press
2 Press and hold
3 Press
then press ENTER.
4 Press
press ENTER.
5 Press
source, then press
6 Press
press ENTER.
7 Press
ENTER.
8 Press
ENTER.
9 Adjust the volume press
press ENTER.
10 Press
standby mode.
STANDBY/ON
/
to select “
ONCE – Works once only at a preset time.
DAILY – Works at the preset time on a preset day.
/
to select “
/
to select the timer playback
• DAB, FM, USB/iPod and Spotify can be selected as the
playback source.
/
to select the timer day, then
/
to set the hour, then press
/
to set the minute, then press
• Set the time to finish as in steps 7 and 8 above.
STANDBY/ON
•The TIMER indicator lights up.
to turn the power on.
CLK/TIMER
.
ONCE
TIMER SET
ENTER
.
VOLUME +/–
to enter the power
” or “
DAILY
”, then
, then
”,
15
Page 16

Getting started04
Calling the wake-up timer
An existing timer setting can be reused.
1 Follow steps 1 to 3 in “Setting the wake-up
timer”.
/
2 Press
ENTER
press
to select “
.
Cancelling the wake-up timer
Turn off the timer setting.
1 Follow steps 1 to 3 in “Setting the wake-up
timer”.
/
2 Press
to select “
press ENTER.
Using the wake-up timer
1 Press
off.
2 At the wake-up time, this unit will turn on
automatically and play the selected input
function.
STANDBY/ON
Note
• If at the wake-up time an iPod/iPhone is not connected
to the unit, the unit will be turned on but will not play
back the track.
• When setting the timer set at least one minute between
the start and end time.
TIMER ON
TIMER OFF
”, then
”, then
to turn the power
Using the sleep timer
The sleep timer switches off the unit after a specified time so
you can fall asleep without worrying about it.
1 Press
time.
Choose between 10 min, 20 min, 30 min, 60 min, 90 min, 120
min, 150 min, 180 min or OFF. The newly set value displays for
3 seconds, and then the setting is completed.
16
SLEEP
repeatedly to select a switch off
Note
• The sleep timer can be set by pressing SLEEP while the
remaining time is displayed.
Page 17

Basic operation 05
Chapter 5:
Basic operation
Outputting the sound of a device
connected to the unit
The following describes the procedure up until listening to the
sound of a device connected to the unit.
1 Turn on the power of the connected device.
2 Press
3 Press
button on the remote control.
Switch to the input you wish to play and then start playback
on the connected device.
4 Press the
To temporarily mute the sound, press the MUTE. Press the
button again or adjust the volume to cancel mute.
STANDBY/ON
INPUT SELECT
VOLUME
Note
• When the unit is connected to a TV, set the volume to the
minimum level or mute the sound. Also, if the TV speaker
sound can be turned off in the settings menu of the TV,
set it to OFF.
to turn the power on.
or an input selection
to adjust the volume.
Linking power for the unit and a TV
If a TV is connected to the unit’s optical digital audio input
terminal and the Wake Up TV function is turned ON, then the
power for the unit will come on when the TV is turned on, and
the unit will switch to Optical In.
1 Press
2 Press
press
3 Press
press
HOME MENU
/
ENTER
.
/
ENTER
.
.
to select “
to select “ON” or “
Wake Up TV
OFF
”, then
”, then
17
Page 18

iPod/iPhone playback06
Chapter 6:
iPod/iPhone playback
Merely by connecting your iPod/iPhone to this unit, you can
enjoy high-quality sound from your iPod/iPhone. Playback
setting for iPod/iPhone music can be performed from this
unit or the iPod/iPhone itself.
Confirming what iPod/iPhone
models are supported
The iPod/iPhone playable on this unit are shown below.
iPod/iPhone USB terminal
iPhone 6 Plus/6/5s/5c/5/4s/4/3GS
iPod touch 5G/4G
iPod nano 7G/6G/5G/4G
Note
• Pioneer does not guarantee that this unit plays iPod/
iPhone models other than the ones specified.
• Some functions may be restricted depending on the
model or software version.
• iPod/iPhone is licensed for reproduction of noncopyrighted materials or materials the user is legally
permitted to reproduce.
• Features such as the equalizer cannot be controlled
using this system, and we recommend switching the
equalizer off before connecting.
• Pioneer cannot under any circumstances accept
responsibility for any direct or indirect loss arising from
any inconvenience or loss of recorded material resulting
from iPod/iPhone failure.
• For detailed instructions on using the iPod/iPhone,
please refer to the manual supplied with the iPod/
iPhone.
• This system has been developed and tested for the
software version of iPod/iPhone indicated on the website
of Pioneer (http://pioneer.jp/homeav/support/ios/eu/).
• Installing software versions other than indicated on the
website of Pioneer to your iPod/iPhone may result in
incompatibility with this system.
• This unit cannot be used to record tuner or other content
on an iPod/iPhone.
• If an iPod/iPhone is connected to the unit, the unit will
automatically begin charging it.
18
Page 19
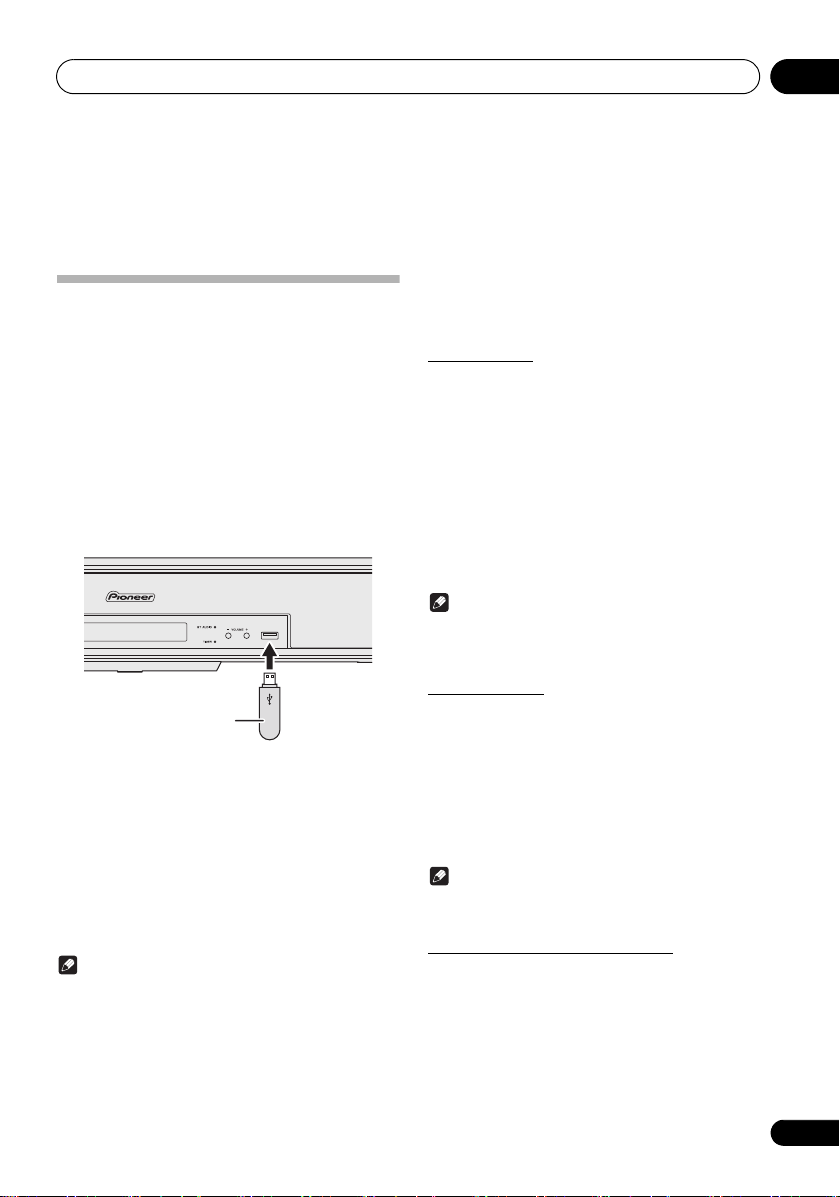
USB playback 07
USB storage device
(commercially available)
Chapter 7:
USB playback
• Auto power off can be switched to ON/OFF (page 43).
Playing USB storage devices
It is possible to listen to two-channel audio using the USB
interface on the side of this unit.
• Pioneer does not guarantee that any file recorded on a
USB storage device will play or that power will be
supplied to a USB storage device. Also note that Pioneer
will accept no responsibility whatsoever for loss of files
on USB storage devices caused by connection to this
unit.
1 Press
“USB/iPod” is shown on the main display.
2 Connect the USB storage device.
USB
as the input source.
• This unit does not support a USB hub.
• Installing the ControlApp to your mobile device and then
connecting it to this unit will allow for more convenient
control (page 31).
Repeat play
Repeat play can play one track, all tracks or a programmed
sequence continuously.
To repeat one track:
Press REPEAT repeatedly until “REPEAT ONE” appears. Press
ENTER.
To repeat all tracks:
Press REPEAT repeatedly until “REPEAT ALL” appears. Press
ENTER.
To cancel repeat play:
Press REPEAT repeatedly until “REPEAT OFF” appears. Press
ENTER.
Note
• After performing repeat play, be sure to press .
Otherwise, the file of USB storage device will play
continuously.
3 When recognition is completed, the root
directory folder/file name will be shown on the
display.
/
4 Press
ENTER
Select a folder and the folders/files inside it will be displayed.
Select a file and playback will start.
to select a folder/file, then press
.
5 Disconnect USB storage device from the
terminal.
Note
• USB flash drive that supports USB 2.0 can be used.
• This unit may not recognize a USB storage device, play
files or supply power to a USB storage device. For
details, see When a USB storage device is connected on
page 49.
• When a USB storage device is not playing and no
operations have been performed for more than 20
minutes, the unit will automatically power off.
USB
Random play
The file of USB storage device can be played in random order
automatically.
To random play all tracks:
Press RANDOM repeatedly until “RANDOM ON” appears.
Press ENTER.
To cancel random play:
Press RANDOM repeatedly until “RANDOM OFF” appears.
Press ENTER.
Note
• In random play, the unit will select and play tracks
automatically. (You cannot select the order of the tracks.)
Switch the display contents
The unit can display the information recorded in the USB
storage device.
1 Press
The information recorded in the USB storage device will be
displayed on the unit’s display
DISP
.
19
Page 20
Connect network08
Chapter 8:
Connect network
Setting with a special application (Start-up Navi)
If you have a smart phone or tablet, once you download and start the special application, the settings can be done according to
the instructions by the application.
• If you have an iPhone or iPod touch
Please search for “Start-up Navi” app in the App Store.
• If you have an Android device
Please search for “Start-up Navi” app in Google Play.
20
Page 21
Connect network 08
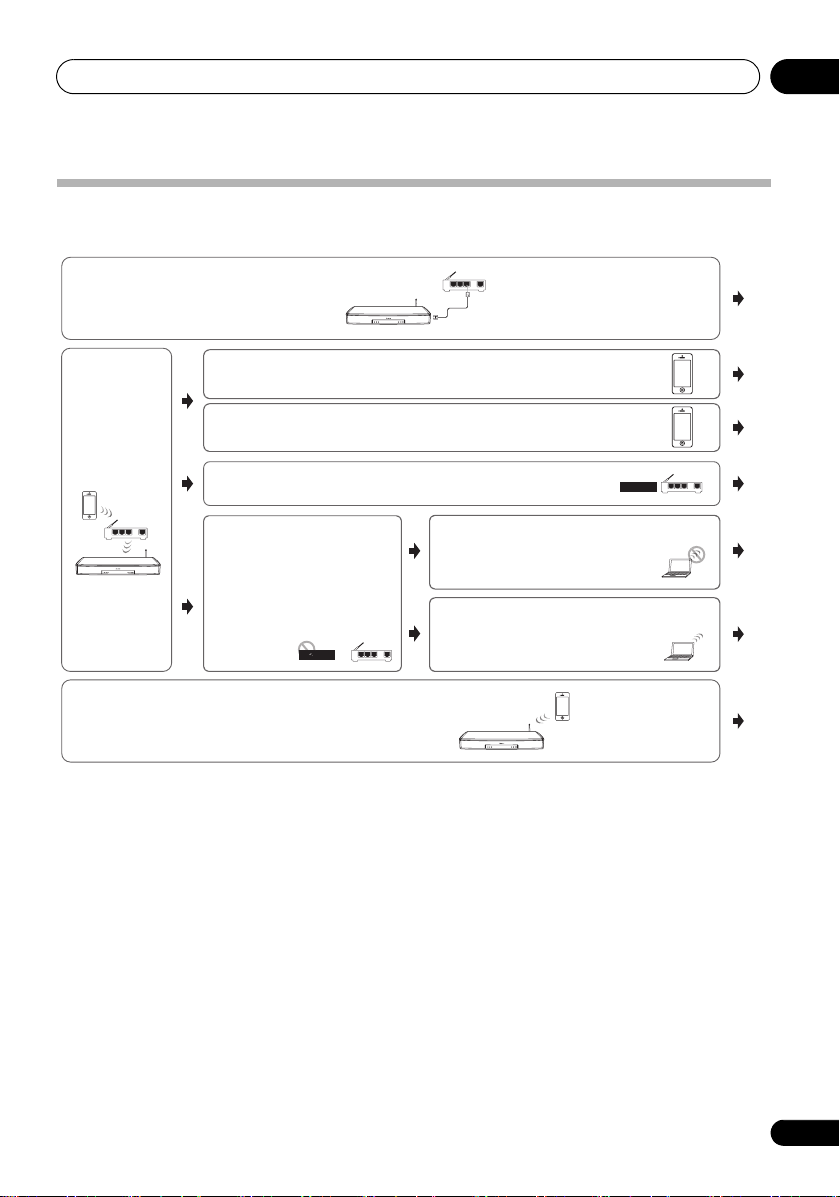
WAN
321
LAN
Connecting
this unit and
router with a
wireless LAN
WAN
321
LAN
WPS-PBC
Connecting a router without
a WPS-PBC function with this
unit
WAN
321
LAN
WPS-PBC
Connecting a router with a WPS-PBC function with this unit
WAN
321
LAN
Connecting this unit and
router with a wired LAN
If you do not have a router
Directly connecting your smart phone to this unit
(Wireless Direct)
D
F
C
B
A
G
E
Connecting the router with this unit with your iPhone or iPod touch
(iOS version 7.1 or later)
The wireless LAN settings for iPhone or iPod touch can be applied to this unit.
Connecting the router with this unit with your iPhone or iPod touch
(iOS version 5.0 or later)
The wireless LAN settings for iPhone or iPod touch can be applied to this unit.
Directly connect this unit with your
computer or smart phone.
Configure the settings of this unit
via a Web browser from a computer
or smart phone.
Your computer or smart phone has
a wireless LAN function
There is no wireless LAN function
on your computer or smart phone
(wired LAN only)
WPS
Setting network connection
This part explains the connection settings for all networks.
• When connection method B, C, D, E, or F is selected, check that the LAN cable is not connected to this unit.
• Warning when connecting a wireless LAN router with this unit
SSID is compatible only with single-byte alphanumerical characters and some symbols such as the underbar. If characters
other than these are used, change the SSID before executing network settings. Refer to the user’s manual for your router
for information on SSID.
When setting this unit by A-G, first show the settings screen using the following procedures.
1 Select the setting you want to adjust.
If you are doing this for the first time, you may want to adjust these settings under the home menu in order:
• Network INFO – The setting status of the following network-related items can be checked (page 29).
• Network Type Set – Select the network connection method.
21
Page 22

Connect network08
http://169.254.1.1
A: Connecting with a LAN cable (wired
LAN)
Simply connect the LAN cable. Network settings are
unnecessary.
• When wireless LAN is set once, the following procedures
1 through 3 must be executed.
1 Select “
MENU
2Use
3 Press
A-1: Wired connection to a router with DHCP
server
1 Confirm that this unit is powered off.
2 Use a LAN cable to connect this unit and
your router.
3 Press
Wait for about 30 to 40 seconds.
4 When the power is fully turned on, the
NETWORK indicator will light white.
A-2: Setting this unit from the web browser of
a computer that supports a wired LAN
connection
• Only when connected to a network without a DHCP
• IP Address
• Subnet Mask
• Default Gateway
• Primary DNS Server/Secondary DNS Server
Network Type Set
” from the
HOME
.
/
to select “
ENTER
STANDBY/ON
server function, the following network settings are
necessary. Check the setting value with the provider or
network administrator in advance when executing the
settings. Also refer to the user’s manual for network
equipment.
The IP address to be entered must be defined within the
following ranges. If the IP address defined is beyond the
following ranges, you cannot play back audio files stored
on components on the network or listen to Internet radio
stations.
Class A: 10.0.0.1 to 10.255.255.254
Class B: 172.16.0.1 to 172.31.255.254
Class C: 192.168.0.1 to 192.168.255.254
In case an xDSL modem or a terminal adapter is directly
connected to this unit, enter the subnet mask provided
by your ISP on paper. In most cases, enter 255.255.255.0.
In case a gateway (router) is connected to this unit, enter
the corresponding IP address.
In case there is only one DNS server address provided by
your ISP on paper, enter it in the “Primary DNS Server”
field. In case there are more than two DNS server
addresses, enter “Secondary DNS Server” in the other
DNS server address field.
Wired
”.
.
.
• Proxy Hostname/Proxy Port
This setting is required when you connect this unit to the
Internet via a proxy server. Enter the IP address of your
proxy server in the “Proxy Hostname” field. Also, enter
the port number of your proxy server in the “Proxy Port”
field.
1 Turn off power to the unit.
If a LAN cable is connected to the unit, disconnect the LAN
cable from the unit.
2 Use a LAN cable to connect the unit to the
computer.
3Press
Wait for about 30 to 40 seconds.
STANDBY/ON
.
4 Wait for the NETWORK indicator to change
from flashing to steadily lighted red.
This may require up to 90 seconds or so.
5 When the NETWORK indicator lights red,
start your computer’s Web browser, and access
the URL noted below to make settings for this
unit.
The Web Control menu will appear.
22
Page 23

Connect network 08
6 From the menu on the left, select “Network
Configuration”.
If you wish to change the Friendly Name, select “Friendly
Name” from the menu and change the name before selecting
“Network Configuration”.
7 Perform the following settings on the
“Network Configuration”.
• Network Type: Wired
•DHCP: OFF
8 Enter the IP Address, Subnet Mask, Default
Gateway, Primary DNS Server and Secondary
DNS Server.
OFF
9 Select “
” or “ON” for the Enable Proxy
Server setting to deactivate or activate the
proxy server.
In case you select “OFF”, proceed with Step 12. In case you
select “ON”, on the other hand, proceed with Step 10.
10 Enter the address of your proxy server or the
domain name.
11 Enter the port number of your proxy server.
12 When settings are completed, click on
“Apply”.
The unit will automatically power down.
13 Confirm that the power is switched on for
the router.
If using a wired LAN, connect the unit and the router using a
LAN cable. If using a wireless LAN, disconnect the LAN cable
from the unit.
14 Press
When the power is completely on, the NETWORK indicator
will light white, indicating that settings are completed.
STANDBY/ON
.
B: Setting this unit with iOS equipment
(iOS version 5.0 or later)
The Wi-Fi settings of your iPod/iPhone (equipment with iOS
version 5.0 or later) can be applied to this unit.
• The iOS equipment and router must be connected
through Wi-Fi.
• Check that the LAN cable is not connected to this unit.
• When wired LAN is set once, the following procedures 1
through 3 must be executed.
1Select “
MENU
2Use
3 Press
The home menu will be disabled for about 60 seconds. After
60 seconds, execute the following operation.
Network Type Set
.
/
to select “
ENTER
.
” from the
Wireless
HOME
”.
23
Page 24

Connect network08
Share Wi-Fi Settings?
Ignore
4 Unlock the iPod/iPhone.
Check that the Wi-Fi operation mark is shown on the screen
of the iOS equipment.
5 Connect the iOS equipment to the iPod/
iPhone terminal on the front panel.
6 Press
7 Tap [
The Wi-Fi settings of your iPod/iPhone is applied to this unit.
NETWORK SET UP
Allow
] on iPod/iPhone.
on the front panel.
C: Perform this unit's settings using
the iOS equipment (iOS version 7.1 or
later)
The Wi-Fi settings of your iPod/iPhone (equipment with iOS
version 7.1 or later) can be applied to this unit.
• The iOS equipment and router must be connected
through Wi-Fi.
• Check that the LAN cable is not connected to this unit.
• When wired LAN is set once, the following procedures 1
through 3 must be executed.
1 Select “
MENU
2Use
3 Press
The home menu will be disabled for about 60 seconds. After
60 seconds, execute the following operation.
4 Unlock the iPod/iPhone.
Check that the Wi-Fi operation mark is shown on the screen
of the iOS equipment.
5 Press
the front panel together for 3 seconds.
6 The unit will enter WAC mode.
WAC (Wireless Accessory Configuration) mode is a mode
that allows you to set the network settings by operating this
unit as a Wi-Fi access point.
Network Type Set
.
/
to select “
ENTER
.
NETWORK SET UP
” from the
Wireless
and
”.
VOLUME –
HOME
on
7 Operate the screen of the iPhone or iPod
touch.
• Check that the Wi-Fi mark is displayed on the screen of
the iPhone or iPod touch.
If the mark is not displayed, activate Wi-Fi, and connect
the iPhone or iPod touch to a wireless LAN router.
• Select the settings.
• Select [Wi-Fi].
• In [Set new AIRPLAY speaker], select Friendly Name (iOS
7) or SSID (iOS 6 or older).
XXXXXX
XXXXXX
SBX-B70D *****
24
Page 25

Connect network 08
*****
XXXXXX
XXXXXX
SBX-B70D *****
XXXXXX
SBX-B70D ***** ...
XXXXXX
• Select [Next].
• Wait until the processing is complete.
• Select [Complete].
• Even when using a Mac OS, if “Set new AIRPLAY
speaker” is displayed on the “Wi-Fi” setting screen then
it may be possible to perform settings using the controls
described above.
D: WPS connection settings
WPS is an abbreviation for “Wi-Fi Protected Setup”. This is a
standard stipulated by the Wi-Fi Alliance, and connection to
WPS compatible equipment and security settings can be
performed using simple operations.
This unit is compatible with PBC (push button) method.
• PBC (Push-button method) – Connection settings are
automatically done by simply pressing the WPS button
on wireless LAN equipment that is WPS-compatible.
Follow the instructions shown on the screen of this unit.
This setting method is available when there is a WPS
button on the wireless LAN equipment which is WPScompatible, and is the easiest method for connection
settings.
• Check that your router is compatible with PBC.
• Check that the LAN cable is not connected to this unit.
• When wired LAN is set once, the following procedures 1
through 3 must be executed.
1Select “
MENU
2Use
3 Press
The home menu will be disabled for about 60 seconds. After
60 seconds, execute the following operation.
4 Press
on the front panel together for 3 seconds.
The NETWORK indicator will flash blue.
5 Press your router’s WPS button within 2
minutes.
Please refer to your router’s user manual for details on router
operation.
6 Network connection settings will be
performed automatically.
Once settings are completed the NETWORK indicator will
change from flashing blue to remaining lit white.
Network Type Set
.
/
to select “
ENTER
.
NETWORK SET UP
” from the
Wireless
and
HOME
”.
INPUT SELECT
Note
• This screen is iOS 7.1. When software other than iOS 7.1
is installed on an iPhone or iPod touch, the operation for
the iPhone or iPod touch may change.
25
Page 26

Connect network08
http://169.254.1.1
E: Setting the wireless LAN setting for
this unit from the web browser of a
computer that supports a wired LAN
connection
• When wireless LAN is set once, the following procedures
1 through 3 must be executed.
1 Select “
MENU
2Use
3 Press
The home menu will be disabled for about 60 seconds. After
60 seconds, execute the following operation.
4 Turn off power to the unit.
If a LAN cable is connected to the unit, disconnect the LAN
cable from the unit.
5 Use a LAN cable to connect the unit to the
computer.
6 Press
Wait for about 30 to 40 seconds.
7 Wait for the NETWORK indicator to change
from flashing to steadily lighted red.
This may require up to 90 seconds or so.
Network Type Set
.
/
to select “
ENTER
.
STANDBY/ON
Wired
.
” from the
”.
HOME
8 When the NETWORK indicator lights red,
start your computer’s Web browser, and access
the URL noted below to make settings for this
unit.
The Web Control menu will appear.
9 From the menu on the left, select “Network
Configuration”.
If you wish to change the Friendly Name, select “Friendly
Name” from the menu and change the name before selecting
“Network Configuration”.
26
Page 27

Connect network 08
10 On the “Network Configuration”, input the
router's SSID, then select the “Security” item set
on the router.
11 If a password is requested, input it here.
OFF
12 Select “
” or “ON” for the Enable Proxy
Server setting to deactivate or activate the
proxy server.
In case you select “OFF”, proceed with Step 15. In case you
select “ON”, on the other hand, proceed with Step 13.
13 Enter the address of your proxy server or the
domain name.
14 Enter the port number of your proxy server.
15 Select the DHCP setting you want.
If you are asked to input a fixed IP address, perform settings
after turning DHCP OFF. For details, see A: Connecting with a
LAN cable (wired LAN) on page 22.
16 When settings are completed, click on
“Apply”.
The unit will automatically power down.
17 Disconnect the LAN cable from the unit and
confirm that the router’s power is ON.
If you intend to use the unit in a wired configuration, use a
LAN cable to connect the unit to the router.
18 Press
When the power is completely on, the NETWORK indicator
will light white, indicating that settings are completed.
STANDBY/ON
.
F: Setting the wireless LAN setting for
this unit from the web browser of a
computer that supports a wireless LAN
connection
To set with this method, your computer must be compatible
with wireless LAN functions.
Network settings are performed on the browser on your
computer.
• Check that the LAN cable is not connected to this unit.
• When wired LAN is set once, the following procedures 1
through 3 must be executed.
1Select “
MENU
2Use
3 Press
The home menu will be disabled for about 60 seconds. After
60 seconds, execute the following operation.
4 Press
the front panel together for 3 seconds.
5 The unit will enter WAC mode.
Network Type Set
.
/
to select “
ENTER
.
NETWORK SET UP
” from the
Wireless
and
HOME
”.
VOLUME –
on
27
Page 28

Connect network08
000001
000002
000003
XX.XX
:xxxxxx
http://192.168.1.1
6 Select [
Pioneer Setup
] (this unit) from the
list of wireless LAN connections on your
computer.
[Pioneer Setup:xxxxxxxx] will be shown in the SSID field.
“xxxxxxxx” represents a number unique to each product.
• For your computer, iPhone, tablet computer, or wireless
equipment, refer to the respective user's manual.
• Because this connection is not encrypted, there is a
slight security risk.
• Operation verification has been done for this setting with
OS X v 10.7, Safari 5.1.
7 Start the Web browser.
Access the following URL, and start setting this unit. The Web
Control menu will be shown.
G: Directly connecting this unit with a
smart phone by wireless (Wireless
Direct)
• When wired LAN is set once, the following procedures 1
through 3 must be executed.
1Select “
MENU
2Use
3 Press
The home menu will be disabled for about 60 seconds. After
60 seconds, execute the following operation.
4 Press
for 3 seconds.
The NETWORK indicator will turn blue and “W DIRECT ON”
will be displayed on the display. Wait for about 10 to 20
seconds.
5 Once the NETWORK indicator turns blue,
select “Wireless Direct N: xxxxxx” under “Wi-Fi
Network Settings” on your computer, iPhone,
tablet or other wireless device.
• N: Value from 0 to 9
• “xxxxxx” represents the identification number of a unit.
Connection is now complete. (The NETWORK indicator will
remain on in blue)
Network Type Set
” from the
HOME
.
/
to select “
ENTER
NETWORK SET UP
The initial value is 0. Will increase in sequence 1, 2, 3...
each time that Wireless Direct is executed.
Depending on the device you are using, there may not be
room to display all of the text. For details on operation of
your computer, iPhone, tablet or other wireless device,
please see the respective user manual.
Wireless
”.
.
on the front panel
8 Click IP, Proxy Setting.
9 Setup the network settings manually and
then press Apply.
SSID items are generally shown automatically, but if they are
not shown follow the procedures again and redo the settings.
This unit will restart and the settings will be applied to this
unit.
28
Page 29

Connect network 08
Checking the Network Information
The setting status of the following network-related items can
be checked.
• Signal Strength – Check the strength of the wireless
signal.
• IP Address – Check the IP address of this unit.
• MAC Address – Check the MAC address of this unit.
• Network Type – Check the network connection status
(Wired/Wireless).
• SSID – Check the SSID during wireless connection.
• DHCP – Check whether DHCP is being used (ON), or
isn’t being used (OFF).
• Default Gateway – If a gateway (router) is connected to
this player, enter the corresponding IP address.
The status of these items can be checked from the
HOME MENU
1 Display “
MENU, then press ENTER.
2Use
check, then press
Note
• Use the following steps to check your IPv6 Address.
– Enter “http://(the unit’s IP address)” into your web
browser’s address bar.
– Select “Network Setup” from your web browser.
– The Link Local IPv6 Address will be displayed.
under "
Network INFO
Network INFO
/
to display the item you wish to
ENTER
” from the HOME
.
".
29
Page 30

Listening to Spotify audio streaming playback09
Chapter 9:
Listening to Spotify audio streaming
playback
In order to use the Spotify audio stream
About the Spotify audio streaming
playback function
Spotify is a music streaming distribution service managed
and operated by Spotify Ltd. and distributing music over the
Internet.
Spotify audio streams can be enjoyed using this unit and your
smartphone or other mobile digital device.
Preparations (1) Installing the Spotify
application on mobile digital devices and
registering a Spotify Premium account
Note
• The Spotify application must be installed on mobile
digital devices and you must have registered a Spotify
Premium account (for a charge) in order to use the
Spotify audio stream playback function on this unit. For
registration procedures and other Spotify services, see
the Spotify website.
http://www.spotify.com/
http://www.spotify.com/connect/
• For information on the countries and regions where
Spotify services can be used, see the website below.
http://www.spotify.com/
• Spotify functions may be changed without notice. An
Internet connection is required on the mobile digital
device in order to use the Spotify application. Using the
mobile telephone line for the Internet connection tends
to lead to high packet communication charges, so we
recommend subscribing to a fixed packet rate plan. For
details, contact your mobile telephone operator.
Preparations (2) Connecting this unit to the
network
• Connect this unit to the network and also to the Internet
(page 12).
• Connect the mobile digital device by Wi-Fi to the wireless
LAN router of the same network as the one to which this
unit is connected. For instructions on connecting, see
the operating instructions of the mobile digital device
and the wireless LAN router.
playback function from the Spotify
application
To use the Spotify audio stream playback function, select this
unit on the Spotify application. When Spotify audio streaming
starts, this unit’s input automatically switches to Spotify.
CAUTION
• Even if you are away from home, if you start Spotify audio
streaming to play music on your mobile digital device
and this unit is selected, the sound will be output from
this unit. Depending on the volume level, the output may
be loud, so be sure to check the audio output selection
carefully before starting audio streaming. In addition, if
you accidentally select this unit and play the sound on it,
switch the audio output selection to the mobile digital
device.
Note
• A separate contract with/payment to an Internet service
provider is required to use the Spotify audio stream
playback function.
• This unit’s name is displayed as the playback device on
the Spotify application. Also, this unit’s name can be
changed at Friendly Name in the network settings.
• When this unit is selected with the Spotify application,
the account information is registered on this unit as well.
When disposing of this unit, reset this unit’s settings in
order to delete the account information registered on
this unit. For instructions on resetting, see this unit’s
operating instructions.
Using This Device With Spotify Connect
Spotify lets you listen to millions of songs – the artists you
love, the latest hits and discoveries just for you.
If you are a Spotify user, you can control this device using your
Spotify app.
Step 1. Connect your device to the same wifi network as your
phone, tablet or PC running the Spotify app.
Step 2. Open the Spotify app, and play any song.
Step 3. Tap the song image in the bottom left of the screen.
Step 4. Tap the Connect icon .
Step 5. Pick your device from the list.
For information on how to set up and use Spotify Connect
please visit
www.spotify.com/connect
Licenses
The Spotify Software is subject to third party licenses found
here: www.spotify.com/connect/third-party-licenses.
30
Page 31

Listening to Spotify audio streaming playback 09
Wired/Wireless
Wireless
Installing ControlApp
The Pioneer application ControlApp must be installed on your
mobile device. For more information about your operating
environment, access the appropriate Website as noted below.
If using an iPhone or iPod touch
You can obtain from “App Store”.
If using an Android device
You can obtain from “Google Play”.
Using ControlApp
If using ControlApp for the first time, follow these procedures
to start the application.
1 Connect this unit to the network you
normally use.
2 Connect your mobile device to the same
network.
Confirm that ControlApp is installed on your mobile device.
3 Turn on the power to this unit.
4 Start ControlApp on your mobile device.
5 Tap the “Download”.
When download is completed, the CONTROL screen will be
displayed.
Download
31
Page 32

Music server10
Chapter 10:
Music server
Installation of the Pioneer Control Application (ControlApp) is
required in order to use all of the Music server functions.
Consult the following website:
When using iPhone/iPod touch
http://pioneer.jp/support/soft/iapp_controlapp/en.html
When using Android
http://pioneer.jp/support/soft/aapp_controlapp/en.html
For details, Installing ControlApp (page 31) and Using
ControlApp (page 31).
This unit can play audio files stored on computers or other
components on a Local Area Network (LAN).
Introduction
This unit allows you to listen to audio files on a computer or
other component connected to the unit via LAN interface.
This chapter describes the setup and playback procedures
required to enjoy these features. It is advisory that you also
refer to the operation manual supplied with your network
component.
Note
• Photo or video files cannot be played back.
Playing music on Music server
1 Connect this unit and your mobile device to
a network.
The Music server function cannot be used when using a
wireless Direct connection.
2 Start ControlApp.
3 Tap the Music Server.
The servers on the network will be displayed.
4 Tap the server you want to playback from,
and then select the track to playback from the
server.
Audio playback will begin.
Note
• If no play back and no operation has done for 20 minutes
or more, the unit turns off automatically.
• Auto power off can be switched to ON/OFF (page 43).
About playable DLNA network devices
This unit allows you to play music on media servers
connected on an identical Local Area Network (LAN) as the
unit. This unit allows you to play files stored on the following
devices:
• PCs running Microsoft Windows Vista with Windows
Media Player 11 installed
• PCs running Microsoft Windows 7 with Windows Media
Player 12 installed
• DLNA-compatible digital media servers (on computers
or other components)
Files stored in a computer or DMS (Digital Media Server) as
described above can be played via command from an external
Digital Media Controller (DMC). Devices controlled by this
DMC to play files are called DMRs (Digital Media Renderers).
This unit supports this DMR function.
When this unit is selected as a DMR and DMS playback is
begun, the unit’s input automatically switches to DMR. When
in the DMR mode, such operations as playing and stopping
files can be performed from the external controller. Volume
adjustment and the muting control are also possible.
Important
• You cannot access a computer on a network while you
are logged onto a domain that is configured in a
Windows network environment. Instead of logging onto
the domain, log onto the local machine.
• There are cases where the time elapsed may not be
correctly displayed.
Note
• Depending on the external controller being used,
playback may be interrupted when the volume is
adjusted from the controller. In this case, adjust the
volume from the unit or remote control.
Playing back your favorite songs
Up to 64 favorite tracks on the media server can be registered
in Favorites function. Note that only the audio files stored on
components on the network can be registered.
Registering and deleting audio files in and from
Favorites
1 Use the ControlApp to select Music Server
input.
2 Use the ControlApp to select the track that
you wish to register, and then tap the green star
mark .
The selected song is registered in Favorites.
Note
• On the ControlApp’s Favorites List Screen, long press
the track that you wish to delete, and then tap the white
star mark when it appears.
32
Page 33

AirPlay 11
Chapter 11:
AirPlay
Operating AirPlay from an iPod/iPhone/
Using AirPlay on iPod touch,
iPhone, iPad and iTunes
AirPlay works with iPhone, iPad and iPod touch with iOS 4.3.3
or later, and Mac and PC with iTunes 10.2.2 or later.
To use AirPlay, select your unit on your iPod touch, iPhone,
iPad or in iTunes and start playback. For more information,
see the Apple website (http://www.apple.com).
• Adjustment of the unit’s volume from iPod touch,
iPhone, iPad or iTunes.
• / (play/pause), (prev), and (next) track, and
random/repeat from the remote control of the unit. The
display will not show the Play Status, Repeat, or random
icons.
Playing audio files stored on
computers or other components
iPad
1 Set the iPhone, iPod touch or iPad to music
playback mode.
Confirm that the Wi-Fi operation mark is displayed.
Connecting to the LAN network
Be sure to connect computer or other components to the
network using the LAN interface before you use this function.
For details on the connections, see Connecting to the network
through the LAN interface or WLAN antenna on page 12
Using AirPlay to enjoy music
1 Confirm that the iPod touch, iPhone, iPad,
iTunes and this unit are connected to the same
wired or wireless network.
2 Play music on iPod touch, iPhone, iPad or
iTunes.
3 During playback, tap the AirPlay icon ( )
displayed on the iPod touch, iPhone, iPad or
iTunes.
4 Select this unit’s name (“Friendly Name”)
from the available device list.
Note
• Turn the iPhone, iPod touch or iPad Wi-Fi on, and
connect to the wireless LAN router.
Refer to the user manual of the device you are using for
details on how to connect it.
2 Swipe (slide) your finger upward from the
bottom of the screen.
33
Page 34

AirPlay11
SBX-B70D
*****
HM82
*****
3 Tap (touch) AirPlay.
4 Once the name of this unit is displayed,
select it.
Note
• “*****” is the lower three bytes of the MAC address.
5 Select a track and play it.
Swipe (slide) and hide display of the Control Center.
Playback will begin through this unit.
Note
• If an AirPlay password has been set, you may be required
to input the password when starting AirPlay.
You may set an AirPlay password in the following ways.
– AirPlay password on the Web Control screen
34
Page 35

Using the tuner 12
Chapter 12:
Using the tuner
Listening to the radio broadcasts
The following steps show you how to tune in to FM radio
broadcasts using the automatic (search) and manual (step)
tuning functions. Once you are tuned to a station you can
memorize the frequency for recall later. See Saving station
presets below for more on how to do this.
Tuning
1 Press the
the power on.
2 Press
SELECT
input.
3 Press
tune in to the desired station.
Automatic tuning:
Press and hold TUNE /, scanning will start automatically
and the tuner will stop at the first receivable broadcast
station.
Manual tuning:
Press the TUNE / repeatedly to tune in to the desired
station.
Note
• When radio interference occurs, automatic tuning may
stop automatically at that point.
• Automatic tuning will skip weak signal stations.
• To stop the automatic tuning, press .
To receive an FM stereo transmission:
•Press AUDIO to select stereo mode and “AUTO” will be
displayed.
STANDBY/ON
TUNER
on the remote control or
to turn
INPUT
repeatedly on the main unit to select FM
TUNE /
on the remote control to
Improving poor FM reception:
1 Press
This will change the tuner from stereo to mono and usually
improve the reception.
AUDIO
repeatedly to select MONO.
Saving station presets
If you often listen to a particular radio station, it’s convenient
to have the unit store the frequency for easy recall whenever
you want to listen to that station (Preset tuning). This saves
the effort of manually tuning in each time. This unit can
memorize up to 30 stations.
1 Tune to a station you want to memorize.
See Tuning for more on this.
2 Press
The preset number will flash.
3 Press
channel number.
4 Press
memory.
If the preset number has changed from flashing to lighting,
before the station is memorized, repeat the operation from
step 2.
MEMORY
PRESET /
MEMORY
• Repeat steps 1 to 4 to set other stations, or to change a
preset station. When a new station is stored in the
memory, the station previously memorized for that
preset channel number will be erased.
Note
• The backup function protects the memorized stations for
a few hours should there be a power failure or the AC
power cord become disconnected.
.
to select the preset
to store that station in
35
Page 36

Using the tuner12
DAB + SIGNAL
MULTIPLEX
(ENSEMBLE)
SERVICES
SERVICES
COMPONENTS
(STATIONS)
To recall a memorized station
1 Press
station.
PRESET /
to select the desired
To scan the preset stations
The stations saved in the memory can be scanned
automatically. (Preset memory scan)
1 Press and hold
The preset number will appear and the programmed stations
will be tuned in sequentially, for 5 seconds each.
2 Press
PRESET /
PRESET /
.
again when the desired
station is located.
To erase entire preset memory
1 Press
2 Press
appears.
TUNER
on the remote control.
CLEAR
until “
Note
• All stations will be erased.
MEMORY CLEAR
”
Listening to the DAB+
About DAB+ (Digital Audio
Broadcasting)
Digital Audio Broadcasting is a digital transmission system
where audio signals are converted to digital signals for
broadcasting. DAB+ is broadcast as a group of data called
multiplex (ensemble) which may contain one or more stations
(services). Each station contains a primary service and there
may be one or more secondary services. This allows several
programmes or services to be transmitted on a single
frequency.
Auto Scan
When turned on for the first time, the unit scans radio
stations automatically to create a station list. You can make
the auto scan again when you move the unit to other areas or
add multiplex channels to the station list.
1Press
SELECT
DAB
TUNER
on the remote control or
repeatedly on the main unit to select
input.
INPUT
2 Press DAB SCAN on the remote control for
more than 3 seconds.
Auto Scan scanning begins.
After the scan:
The stations will be stored in alphanumeric order and the first
station on the list will be selected and you will hear it through
the speakers.
• To listen to other stations, see Selecting a station in the
station list below.
Note
• If no station is found, “NO SIG” appears.
• Up to 100 appears for total received stations.
Selecting a station in the station list
Once a DAB+ station is received, you can select stations in
the station list.
1 Press the
display.
2 Whilst receiving a DAB+ station, press the
TUNE /
TUNER
until “DAB” appears on the
to select the desired station.
36
3 Within 10 seconds, press the
DAB ENTER
the remote control to tune into the desired
station.
on
Page 37

Using the tuner 12
Manual tune
You can manually store stations which Auto Scan cannot
find. If reception is poor, you can adjust the sensitivity.
Manual tune is only available after Auto tune. Perform Auto
Scan first.
1 Press the
TUNER
until “DAB” appears on the
display.
2 Press the
DAB SCAN
3 Within 10 seconds, press the
once.
TUNE /
to
select the DAB+ frequency.
4 Within 10 seconds, press the
• If the level is too low, move the aerial or unit to improve
reception.
DAB ENTER
.
Changing the information display
You can switch DAB+ display information.
Press the DAB DISPLAY button.
Each time the button is pressed, the information display
changes in the following order.
When “NO SIG” appears, the DAB DISPLAY button does not
allow you to change the display.
[Station Name]
Station name is displayed. (set by default)
[Scrolling text]
Information scrolls across the display when sent from the
station.
[Programme type]
A description of the type of content being broadcast by the
station.
[Multiplex name]
The name of the multiplex (ensemble) which provides the
current service.
[Frequency]
The DAB+ frequency for the station.
[Stereo mode]
Display stereo mode.
[Transfer speed]
The data transfer speed.
[Signal quality]
The signal quality is displayed as a number (0 - 100).
[85-100: Good, 70-84: Fair, 0-69: Poor]
Memorising a station
You can store 10 DAB stations in memory and recall them at
the push of a button. (Preset tuning)
1 Tune to the desired DAB station.
2 Press the MEMORY.
The preset number will flash.
3 Within 10 seconds, press the
PRESET /
to select the preset channel number.
Store the stations in memory, in order, starting with preset
channel 1.
4 Within 10 seconds, press the
store that station in memory.
If the preset number indicators disappear before the station is
memorised, repeat the operation from step 2.
MEMORY
to
5 Repeat steps 1 - 4 to set other stations, or to
change a preset station.
When a new station is stored in the memory, the station
previously memorised for that preset channel number will be
erased.
DAB Frequency table (BAND III)
Frequency Label Frequency Label
174.928 MHz 5A 208.064 MHz 9D
176.640 MHz 5B 209.936 MHz 10A
178.352 MHz 5C 211.648 MHz 10B
180.064 MHz 5D 213.360 MHz 10C
181.936 MHz 6A 215.072 MHz 10D
183.648 MHz 6B 216.928 MHz 11A
185.360 MHz 6C 218.640 MHz 11B
187.072 MHz 6D 220.352 MHz 11C
188.928 MHz 7A 222.064 MHz 11D
190.640 MHz 7B 223.936 MHz 12A
192.352 MHz 7C 225.648 MHz 12B
194.064 MHz 7D 227.360 MHz 12C
195.936 MHz 8A 229.072 MHz 12D
197.648 MHz 8B 230.784 MHz 13A
199.360 MHz 8C 232.496 MHz 13B
201.072 MHz 8D 234.208 MHz 13C
202.928 MHz 9A 235.776 MHz 13D
204.640 MHz 9B 237.488 MHz 13E
206.352 MHz 9C 239.200 MHz 13F
37
Page 38

Using the tuner12
Station name (PS) Program type (PTY)
Frequency Radio text (RT)
Using the Radio Data System (RDS)
An introduction to RDS
Radio Data System (RDS) is a system used by most FM radio
stations to provide listeners with various kinds of
information—the name of the station and the kind of show
they’re broadcasting, for example.
One feature of RDS is that you can search by type of program.
For example, you can search for a station that’s broadcasting
a show with the program type, JAZZ.
You can search the following program types:
News – News
Current Affairs – Current
Affairs
Information – General
Information
Sport – Sport
Education – Educational
Drama – Radio plays, etc.
Cultures – National or regional
culture, theater, etc.
Science – Science and
technology
Varied Speech – Usually talkbased material, such as quiz
shows or interviews.
Pop Music – Pop music
Rock Music – Rock music
Easy Listening – Easy
listening
Light Classics M – ‘Light’
classical music
Serious Classics – ‘Serious’
classical music
Other Music – Music not
fitting above categories
Whether & Metr – Weather
reports
Finance – Stock market
reports, commerce, trading,
etc.
Searching for RDS programs
You can search a program type listed above.
1 Press
2 Press RDS
“SELECT” will appear for about 6 seconds.
3 Press
want to hear.
Each time the button is pressed, the program type will appear.
If the button is held down, the program type will appear
continuously.
TUNER
PTY
/
to select the program type you
Children’s Progs – Programs
for children
Social Affairs – Social affairs
Religion – Programs
concerning religion
Phone In – Public expressing
their views by Phone
Travel & Touring – Holidaytype travel rather than traffic
announcements
Leisure & Hobby – Leisure
interests and hobbies
Jazz Music – Jazz
Country Music – Country
music
National Music – Popular
music in a language other than
English
Oldies Music – Popular music
from the ‘50s and’ 60s
Folk Music – Folk music
Documentary – Documentary
Alarm Test – Broadcasting
when testing emergency
broadcast equipment or the
unit.
Alarm – Alarm
on the remote control.
on the remote control.
4 While the selected program type is
PTY
displayed (within 6 seconds), press RDS
again.
After the selected program type has been lit for 2 seconds,
“SEARCH” will appear, and the search operation will start.
Note
• If the display has stopped flashing, start again from step
2. If the unit finds a desired program type, the
corresponding channel number will be lit for about 8
seconds, and then the station name will be displayed.
• If you want to listen to the same program type of another
station, press the RDS PTY while the channel number or
station name is flashing. The unit will look for the next
station.
• If no station can be found, “NOT FOUND” will appear for
4 seconds.
Information provided by RDS
Each time the RDS DISPLAY is pressed, the display will
switch as follows:
When tuning in to a station other than an RDS station or to an
RDS station which sends weak signal, the display will change
in the following order:
No RDS
FM 98.80 MHz
38
Page 39

Using the tuner 12
Using the Auto Station Program
Memory (ASPM)
While in the ASPM operation mode, the tuner will
automatically search for new RDS stations. Up to 30 stations
can be stored.
If you have already stored some stations in memory, the
number of new stations you can store will be less.
1 Press
2 Press and hold down RDS ASPM on the
remote control.
Scan will be performed while “ASPM” is flashing (87.5 MHz to
108 MHz).
After scanning, the number of stations stored in memory will
be displayed for 4 seconds, and then “END” will appear for 4
seconds.
To stop the ASPM operation before it is
complete:
Press while it is scanning for stations. The stations which
are already stored in memory will be kept there.
TUNER
on the remote control.
Note
• If the same station is broadcasting on different
frequencies, the strongest frequency will be stored in
memory.
• Any station which has the same frequency as the one
stored in memory will not be stored.
• If 30 stations have already been stored in memory, the
scan will be aborted. If you want to redo the ASPM
operation, erase the preset memory.
• If no station have been stored in memory, “END” will
appear for about 4 seconds.
• If the RDS signals are very weak, station names may not
be stored in memory.
• The same station name can be stored in different
channels.
• In a certain area or during certain time periods, the
station names may temporarily be different.
Notes for radio text:
• The first 8 characters of the radio text will appear and
then they will scroll across the display.
• If you tune in to an RDS station which is not
broadcasting any radio text, “No RT” will be displayed
when you switch to the radio text position.
• While radio text data is received or when the text
contents change, “RT” will be displayed.
Notes for RDS operation
If any of the following events occur, it does
not mean that the unit is faulty:
• “PS”, “No PS” and a station name appear alternately,
and properly.
• If a particular station is not broadcasting properly or a
station is conducting tests, the RDS reception function
may not work properly.
• When you receive an RDS station whose signal is too
weak, information like the station name may not be
displayed.
• “No PS”, “No PTY” or “No RT” will flash for about 5
seconds, and then the frequency will be displayed.
39
Page 40

13
Bluetooth wireless technology
enabled device:
Cell phone
Bluetooth wireless technology
enabled device:
Digital music player
Device not equipped with Bluetooth
wireless technology:
Digital music player
+
Bluetooth
®
audio transmitter
(commercially available)
Music data
Bluetooth
® Audio playback
Chapter 13:
Bluetooth® Audio playback
Music playback using
Bluetooth
technology
The unit is capable of playing back music stored on Bluetooth
capable devices (cell phones, digital music players etc.)
wirelessly. You can also use a Bluetooth audio transmitter
(sold separately) to enjoy music from devices that do not have
Bluetooth functionality. Please refer to the user’s manual for
your Bluetooth capable device for more details.
Note
•The Bluetooth
trademarks owned by Bluetooth SIG, Inc. and any use of
such marks by PIONEER CORPORATION is under
license. Other trademarks and trade names are those of
their respective owners.
•The Bluetooth wireless technology enabled device must
support A2DP profiles.
• Pioneer does not guarantee proper connection and
operation of this unit with all Bluetooth wireless
technology enabled devices.
• Meta information (e.g. title/artist etc.) display cannot be
guaranteed for all Bluetooth wireless technology
enabled devices.
®
word mark and logos are registered
wireless
Remote control operation
The remote control supplied with this unit allows you to play
and stop media, and perform other operations.
Note
•The Bluetooth wireless technology enabled device must
support AVRCP profiles.
• Remote control operations cannot be guaranteed for all
Bluetooth wireless technology enabled devices.
Pairing with the unit (Initial registration)
In order for the unit to playback music stored on a Bluetooth
capable device, pairing must first be performed. Pairing
should be performed when first using the unit with the
Bluetooth capable device, or when the pairing data on the
device has been erased for any reason.
Pairing is a step required to allow communication using
Bluetooth wireless technology to be carried out.
• Pairing is only performed the first time that you use the
unit and the Bluetooth capable device together.
• In order to allow communication using Bluetooth
wireless technology to take place, pairing must be
performed on both the unit and the Bluetooth capable
device.
• After pressing the BT AUDIO and switching to BT
AUDIO input, perform the pairing procedure on the
Bluetooth capable device. If pairing has been performed
correctly, you will not need to perform the pairing
procedures for the unit as shown below.
Please refer to the user’s manual for your Bluetooth capable
device for more details.
1
Press the STANDBY/ON and turn the
power to the unit on.
2 Press the
The unit switches to BT AUDIO and “PAIRING” will be
displayed.
3 Turn on the power to the Bluetooth capable
device that you wish to pair with, and perform
pairing procedure on it.
Pairing will start.
•Place the Bluetooth capable device close to the unit.
• Please refer to the user’s manual for your Bluetooth
capable device for details on when pairing can be
performed and the procedures required for pairing.
• When PIN code entry is requested, enter “0000.” (This
unit does not accept any PIN code setting other than
“0000.”)
BT AUDIO
.
40
Page 41

Bluetooth
® Audio playback
13
4 Confirm on the Bluetooth capable device
that pairing has been completed.
If pairing with the Bluetooth capable device has been
completed correctly, the name of the Bluetooth capable
device will be displayed on the front panel of the unit. (Only
single-byte alphanumeric characters can be displayed. Any
character that cannot be displayed will be indicated by a “”.)
On BT CONNECT LED display
Pairing condition LED display
Pairing standby Slow flashing
Pairing completed Lit up
Listen to music on the unit from a
Bluetooth
1 Press the
The unit will switch to BT AUDIO input.
2A Bluetooth connection will be created
between the Bluetooth capable device and the
unit.
Procedures for connecting to the unit should be performed
from the Bluetooth capable device.
• Please refer to the user’s manual for your Bluetooth
capable device for details of the connection procedures.
3 Playback music from the Bluetooth capable
device.
BT STANDBY
• The following can be done when the unit is on standby
with the BT STANDBY switched ON.
• By selecting a Bluetooth capable device that already has
a connection history (pairing has already been
conducted) with this unit, this unit will automatically
turn on with the BT AUDIO function.
BT STANDBY settings
1 Press
2 Press
then press
3 Press
capable device
BT AUDIO
HOME MENU
/
to select “
ENTER
/
to select “ON”, then press
.
.
Network Standby
.
”,
ENTER
Connection while in BT STANDBY mode with
Bluetooth capable device
When connection history (pairing has already been
conducted) with a Bluetooth capable device exists for the unit
during BT STANDBY, the unit can receive a connection
request directly from the connection history.
The unit will start using the BT AUDIO function, and connect
with a Bluetooth capable device.
Even devices that have already been paired with this unit will
not connect during BT STANDBY in the following cases.
In such cases, delete pairing history from the Bluetooth
wireless technology device and perform pairing again.
• Up to 8 pairing history can be recorded with this unit. If
connecting to a Bluetooth wireless technology device
over 8 units, the oldest pairing history will be deleted.
• If the settings are reset to the factory setting, all pairing
history will be deleted.
Switch the BT AUDIO function on or off
If you wi sh t o sw it ch t he B T AU DI O fu nc tio n be tw een on o r of f,
then perform the following settings.
The factory setting is ON.
1 Press
VOLUME –
three seconds.
2 Press
ON
“
control.
3 Wait 60 seconds until “
disappears.
Once “BT Setting” disappears then settings are complete.
.
INPUT SELECT
on the front panel and
at the same time and hold them for
/
” or “
on the remote control to select
OFF
”, then press
ENTER
BT Setting
on the remote
”
41
Page 42

PHASE CONTROL technology14
Front speaker
Subwoofer
Timing is
delayed, and
sounds cancel
each other out
Sound
source
Listening
position
Front speaker
Subwoofer
Original sound
tone can be
heard
Sound
source
Listening
position
Chapter 14:
PHASE CONTROL technology
PHASE CONTROL technology is used with this unit.
During multi-channel playback in a typical home theater, the
LFE (Low Frequency Effects) signals and low-pitched
components contained in various channels are routed to the
subwoofer or other optimum speaker. However, in principle,
this routing process results in a frequency where the phase is
shifted (group delay), leading to problems where the lowfrequency sounds only arrive delayed or low-pitched sounds
cancel each other out due to interference with other
channels. The PHASE CONTROL technology in the unit is
used to recreate powerful low-pitched sounds that are faithful
to the original sounds.
The phase indicates the time relationship between two sound
waves. Two sounds waves are said to be "in phase" if their
peaks match up with each other, and the phases are said to
be "out of phase" if their peaks do not match up.
When the PHASE CONTROL technology is used, it can
provide the following effects when the sound source is played
back.
No PHASE CONTROL technology
Note
•The PHASE CONTROL technology is always activated.
Phase Control technology is a trademark assigned to
products that provide matching of the phase characteristics
from recording to playback based on the PHASE CONTROL
technology concept developed by PIONEER.
• Rhythm is out of phase and unclear
• Poor quality of low-pitched sounds
• Musical instruments have an unrealistic sound
With PHASE CONTROL technology
•Clear rhythm
• Low-pitched sounds keep their quality
• Musical instruments have a realistic sound
42
Page 43

Home menu 15
Chapter 15:
Home menu
The HOME MENU button on the remote control can be used
to perform a variety of settings for the unit.
Automatically switch power to
standby mode (Auto Power Off)
The unit can be set to automatically change to standby mode
if it does not receive any signal or control input for 20 minutes.
The factory setting is ON.
1 Press
The currently selected input will be displayed on the display.
2 Press
then press
3 Press
press
HOME MENU
/
ENTER
/
ENTER
.
.
to select “
Auto Power Down
.
to select “ON“ or “
OFF
“, then
Setting Network Standby mode
When Network Standby mode is ON, the start up sequence
for the unit will be shortened. Furthermore, if AirPlay, DLNA
or BT AUDIO playback is started while the unit is in this mode
then power to the unit will automatically come on.
When set to Network Standby mode, power consumption
during Standby will be increased when compared to normal
Standby mode.
The factory setting is ON.
1 Press
2 Press
then press
3 Press
press
HOME MENU
/
ENTER
/
ENTER
.
.
to select “
Network Standby
.
to select “ON“ or “
OFF
“, then
Check network settings
Check the status of current network settings.
1 Press
2 Press
press
3 Press
check, then press ENTER.
HOME MENU
/
ENTER
.
/
.
to select “
Network INFO
”, then
to select the item you wish to
Check software version
Can check the current software version.
1 Press
2 Press
then press
To go back one step, press HOME MENU or RETURN.
HOME MENU
/
to select “
ENTER
.
.
Software Version
Software Update
Use this procedure to update the unit’s software and check
”,
the version. There are two ways to update: via the Internet and
via a USB memory device.
Updating via the Internet is performed by accessing the file
server from the unit and downloading the file.
This procedure is only possible if the unit is connected to the
Internet.
Updating via a USB memory device is performed by
downloading the update file from a computer, reading this file
onto a USB memory device then inserting this USB memory
device into the USB port on the unit’s front panel. With this
procedure, the USB memory device containing the update file
must first be inserted into the USB port on the unit’s front
panel.
• If an update file is provided on the Pioneer website,
download it onto your computer. When downloading an
update file from the Pioneer website onto your
computer, the file will be in ZIP format. Unzip the ZIP file
before saving it on the USB memory device. If there are
”,
any old downloaded files or downloaded files for other
models on the USB memory device, delete them.
http://www.pioneerelectronics.com
• If an update file does not exist in the Pioneer’s website,
updating the software for the unit is not necessary.
Important
• DO NOT unplug the power cord during updating.
• When updating via the Internet, do not disconnect the
LAN cable. When updating via a USB memory device, do
not disconnect the USB memory device.
• If updating is interrupted before it is completed, start
updating over from the beginning.
• The unit’s settings may be reset when the software is
updated. Information on the models for which the
settings are reset is provided on the Pioneer website.
Check the website before updating.
”,
43
Page 44

Home menu15
a
b
SBX-B70D
*****
SBX-B70D
*****
1 Press
2 Press
then press
3Use
ENTER
HOME MENU
/
to select “Software Update“,
ENTER
/
to select update method and press
.
• Update via Internet - The unit checks whether
updatable software is available via the Internet.
• Update via USB Memory - The unit checks whether the
USB memory device inserted into the USB port on the
unit’s front panel contains updatable software.
“Accessing” is displayed and the update file is checked.
Wait a while.
.
.
4 Check on the screen whether or not an
update file was found.
If “New version found.” is displayed, the update file has
been found. The version number and updating time are
displayed.
If “This is the latest version. There is no need to update.”
is displayed, no update file has been found.
5 If you wish to update, use
OK
“ and then press ENTER.
“
The updating screen appears and updating is performed.
• The power turns off automatically once updating is
completed.
/
to select
Firmware Update using Web
browser
You can update this unit’s firmware via Web browser.
Download the latest firmware at Pioneer website.
1 Be sure this unit and your computer are
connected to the same wired or wireless
network.
2 Launch Web browser on your computer.
3 Display the Network Setup menu.
For Safari
Press Bookmark icon ( ). Click Bonjour list (a), and then
select this unit’s name (“Friendly Name”) (b) in Bookmark.
If Bonjour list is not displayed, access the IP address “http://
(the unit’s IP address)” from Safari.
Note
• The displayed name will change depending on the
product being used.
SBX-B70D ***** will be displayed. (“*****” is the lower
three bytes of the MAC address.)
Other than Safari
Enter “http://(the receiver’s IP address)” into your web
browser’s address bar.
Note
• Confirm the unit’s IP address as follows:
1. Press HOME MENU.
2. Select Network INFO.
3. Confirm the IP field.
44
Page 45

Home menu 15
SBX-B70D ******
a
b
4 Click Network Setup Firmware Update.
5 Press Start.
The firmware update prepare screen is displayed. If the
screen does not switch automatically, click Click here.
7 The firmware upload status screen is
displayed. Press Ok.
“The upload process finished successfully.” will be shown
when the update is completed.
After the update is complete, the power will turn off
automatically.
6 Browse the latest firmware on your
computer (a) and then press Upload (b).
The confirmation screen is displayed. If you continue the
firmware update, press Yes. Once the firmware update
process starts, you can’t stop it. Wait until the file is uploaded
(about one minute may be required depending on your LAN
connection environment).
45
Page 46

Setting the remote to control other components16
Chapter 16:
Setting the remote to control
other components
Recall signal from the remote
control of another device to the
remote control of this unit
The remote control supplied with this unit is registered with
preset codes for multiple AV devices (including products of
other brands).
For a list of preset codes for all other devices that can be
controlled see Preset code list on page 60. For the functions
assigned to each button see Control of other devices on
page 47.
1 Hold down
BD
.
or
2 Use the number buttons (0-9) to enter the 4
digit code that corresponds to the device that
you wish to control.
3 Hold down
BD
.
or
Press SOURCE. If the power to the desired device can be
turned on/off then it means you have entered the correct
code.
Note
• Even if the settings appear to have been performed
correctly, there are multiple codes in which the
functions of only certain buttons differ. Confirm that you
can operate the device as desired.
SHIFT
and then press either TV
SHIFT
and then press either TV
Delete a preset code
1 Hold down
or
BD
.
2 Use the number buttons (0-9) to enter 9999.
3Press
SHIFT
SHIFT
and then press either TV
and
CLEAR
.
Reset all preset codes
This will reset all remote control settings, and return it to
original factory settings.
Factory preset codes
TV: 0305
BD: 2255
1 Hold down
2 Use the number buttons (0-9) to enter
12358079.
3Press
ENTER
SHIFT
and then press
and
CLEAR
ENTER
.
.
46
Page 47

Setting the remote to control other components 16
Control of other devices
• Performing the following controls via remote control requires that you first register the remote control code of the device
that you wish to control. For more details see Recall signal from the remote control of another device to the remote control of
this unit on page 46.
• Before starting control press either the TV or BD button to switch the remote control to control mode for the intended
device. See the operating instructions for each device for more details on its specific functions.
1 Hold down
Unless SHIFT is pressed, the remote control will remain in control of this unit only. Furthermore, certain functions of this unit
can still be used even when the control mode has been switched.
Button TV BD
STANDBY/ON POWER ON/OFF (this unit)* POWER ON/OFF (this unit)*
SOURCE POWER ON/OFF (TV) POWER ON/OFF (BD)
TOP MENU Previous screen TOP MENU
/ TUNE +
TOOLS GUIDE TOOLS
VOL + VOL +* VOL +*
/PRESET –
ENTER ENTER ENTER
/PRESET +
HOME MENU HOME MENU HOME MENU
/ TUNE –
RETURN RETURN RETURN
VOL – VOL –* VOL –*
(PAUSE) — (PAUSE)
PLAY —PLAY
/ (STOP) — /(STOP)
MUTE ——
—
—
—
—
Number buttons Select channel Input numbers
SUBWOOFER VOL + SUBWOOFER VOL +* SUBWOOFER VOL +*
SUBWOOFER VOL – SUBWOOFER VOL –* SUBWOOFER VOL –*
DISPLAY DISPLAY DISPLAY
AUDIO AUDIO AUDIO
CLEAR 10 CLEAR
SHIFT Switch remote control mode Switch remote control mode
* Still controls this unit even when the remote control mode has been switched.
SHIFT
and then press the control buttons on the remote control.
47
Page 48

Troubleshooting and other information17
Chapter 17:
Troubleshooting and other information
Troubleshooting
Incorrect operations are often mistaken for trouble and malfunctions. If you think that there is something wrong with this
component, check the points below. Sometimes the trouble may lie in another component. Investigate the other components
and electrical appliances being used. If the trouble cannot be rectified even after exercising the checks listed below, ask your
nearest Pioneer authorized service center or your dealer to carry out repair work.
General problem
Problem Check Remedy
Settings you have made have
been cleared.
Difference in volume
between input devices.
This unit cannot be operated
with the remote control.
Folder or file names are not
recognized.
The unit turns off
automatically.
Was the power cord unplugged? When power cord is unplugged, the settings you have made is
This is not a problem with this unit. The volume may sound differentl y depending on the input source
Are you operating from far away? Operate within 7 m, 30º of the remote sensor on the front panel
Is the remote control sensor exposed
to direct sunlight or strong artificial
light from a fluorescent bulb, etc.?
Are the batteries dead? Replace the batteries (page 6).
Have you exceeded the maximum
number of folder or file names t his
unit can recognize?
cleared. Please set the clock again. If you do not want to clear the
settings, do not unplug the power cord.
and recording format.
(page 6).
The remote control signals may not be received properly if the
remote control sensor is exposed to direct sunlight or strong
artificial light from a fluorescent bulb, etc.
Up to 255 folders can be recognized on one disc. Up to 999 files can
be recognized within one folder. Depending on the folder structure,
however, this unit may not be able to recognize certain folders or
files.
If no play back and no operation has done for 20 minutes or more,
the unit turns off automatically.
Auto power off can be switched to ON/
OFF
(page 43).
48
Page 49

Troubleshooting and other information 17
When a USB storage device is connected
Problem Check Remedy
USB storage device is not
recognized.
File cannot be played. Is the file copyright-protected (by
Folder or file names are not
displayed or are not properly
displayed.
Folder or file names are not
displayed in alphabetical
order.
Much time is required to
recognize the USB storage
device.
Power is not supplied to the
USB storage device.
Is the USB storage device properly
connected?
Is the USB storage device connected
via a USB hub?
Is the USB storage device supported
by this unit?
This is not a problem with this unit. Turn the power off then back on.
DRM)?
This is not a problem with this unit. Files stored on a computer cannot be played.
Do the folder or file names contain
more than 30 characters?
This is not a problem with this unit. The order in which the folder and file names are displayed depends
What is the USB storage devices
capacity?
AUTH ERR
Is
panel display? No power is supplied if
the power consumption is too high.
displayed on the front
Connect the device securely (all the way in).
This unit does not support USB hubs. Connect the USB storage
device directly.
This unit only supports USB mass storage class devices.
This unit supports portabl e flash memory and digital audio
playback devices.
Only the FAT16 and FAT32 file systems are supported. Other file
systems (exFAT, NTFS, HFS etc.) are not supported.
USB flash drive that supports USB 2.0 can be used.
This device does not support the use of external hard disc drives.
Some USB storage devices may not be recognized properly.
Copyright-protected files cannot be played.
It may not be possible to play some files.
The maximum number of characters displayable for the folder and
file names is 30.
on the order in which the folders or files were recorded on the USB
storage device.
Some time may be required to load the data when large capacity
USB storage devices are connected (this could take several
minutes).
Turn the power off then back on.
Turn the power off, then disconnect and reconnect the USB storage
device.
Press
INPUT
USB mode.
to switch to the other mode, then switch again to the
When an iPod/iPhone is connected
Problem Remedy
Can’t operate the iPod/iPhone by the remote control. Make sure the iPod/iPhone is connected correctly (refer to
Can’t operate the iPod/iPhone. Make sure the iPod/iPhone is connected correctly (refer to
iPhone playback
iPhone playback
If the iPod/iPhone is experiencing a hangup, try resetting the iPod/
iPhone, and reconnect it to the unit.
on page 18).
on page 18).
iPod/
iPod/
49
Page 50

Troubleshooting and other information17
Network
Problem Check Remedy
Cannot access to the
network.
Cannot access to the
component or c omputer
connected via network.
Playback does not start. The component is currently
The computer or Internet
Radio is not properly
operated.
The audio files stored on
components on the network,
such as a computer, cannot
be played back.
The LAN cable is not firmly
connected.
The router is not switched on. Switch on the router.
Is the network type correctly set up? If set to Auto, the network connection is switched to wired or
Internet security software is currently
installed in the connected
component.
The audio component on the network
which has been switched off is
switched on.
The component connected to the
network is not properly set.
There are no playable audio files on
the component connected to the
network.
disconnected from this unit or the
power supply.
The corresponding IP address is not
properly set.
The IP address is being automati cally
configured.
Windows Media Player 11 or
Windows Media Player 12 is not
currently installed on your PC.
Audio files were recorded in formats
other than MP3, WAV (LPCM only),
MPEG-4 AAC, FLAC, WMA, AIFF, and
ALAC.
Audio files recorded in MPEG-4 AAC
or FLAC are being played back on
Windows Media Player 11 or
Windows Med ia Playe r 12.
The component connected to the
network is not properly operated.
The component connected to the
network does not permit file sharing.
The folder stored on the component
connected to the network has been
deleted or damaged.
Network connections could be
restricted due to the computer’s
network settings, security settings,
etc.
Firmly connect the LAN cable (page 12).
wireless depending on whether the unit is connected to a LAN
cable when the power is turned
There are cases where a component with Internet security software
installed cannot be accessed.
Switch on the audio component on the network before switching on
this unit.
If the client is automatically authorized, you need to enter the
corresponding information again. Check whether the connectio n
status is set to “Do not authorize”.
Check the audio files stored on the component connected to the
network.
Check whether the component is properly connected to this unit or
the power supply.
Switch on the built-in DHCP server function of your router, or set up
the network manually according to your network environment
(page 21).
The automatic configuration process takes time. Please wait.
Install Windows Media Player 11 or Windows Media Player 12 on
your PC (page 32).
Play back audio files recorded in MP3, WAV (LPCM only), MPEG-4
AAC, FLAC, WMA, AIFF, or ALAC. Note that some audio files
recorded in these formats may not be played back on this unit.
Audio files recorded in MPEG-4 AAC or FLAC cannot be played
back on Windows Media Player 11 or Windows Media Player 12. Try
using another server. Refer to the operation manual supplied with
your server.
Check whether the component is affected by special
circumstances or is in the sleep mode. Try rebooting the
component if necessary.
Try changing the settings for the component connected to the
network.
Check the folder stored on the component connected to the
network.
Check the computer’s network settings, security settings, etc.
ON
.
50
Page 51

Troubleshooting and other information 17
Problem Check Remedy
Cannot access Windows
Media Player 11 or Windows
Media Player 12.
Audio playback is
undesirably stopped or
disturbed.
Cannot listen to Internet
Radio s tations.
In case of Windows Media Player 11:
You are currently logged onto the
domain through your PC with
Windows XP or Windows Vista
installed.
In case of Windows Media Player 12:
You are currently logged onto the
domain through your PC with
Windows 7 installed.
The audio file currently being played
back was not recorded in a format
playable on this unit.
The LAN cable is currently
disconnected.
There is heavy traffic on the network
with the Internet being accessed on
the same network.
When in the DMR mode, depending
on the external controller being used,
playback may be interrupted when a
volume operation is performed from
the controller.
There is a connection routed through
a wireless LAN on the same network.
The firewall settings for components
on the network are currently in
operation.
You are currently disconnected from
the Internet.
The broadcasts from an Internet
Radio station are stopped or
interrupted.
Instead of logging onto the domain, log onto the local machine.
Check whether the audio file was recorded in a format supported by
this unit.
Check whether the folder has been damaged or corrupted.
Even audio files listed as playable on this unit may sometimes not
be played back or displayed (page 56).
Connect the LAN cable properly (page 12).
Use 100BASE-TX to access the components on the network.
In this case, adjust the volume from the unit or remote control.
There may be a shortage of bandwidth on the 2.4 GHz band used by
the wireless LAN. Make wired L AN connections not routed through
a wireless LAN.
Install away from any devices emitting electromagnetic waves on
the 2.4 GHz band (microwave ovens, game consoles, etc.). If this
does not solve the problem, stop using other devices that emit
electromagnetic waves.
Check the firewall settings for components on the network.
Check the connection settings for components on the network, and
consult with your network ser vice provider if necessary (page 12).
Some Internet Radio stations on the list of Internet Radio stations
for this unit (page 53) may occasionally not be available for
listening.
51
Page 52

Troubleshooting and other information17
Wireless LAN
Problem Check Remedy
Network cannot be accessed
via wireless LAN.
Doesn’t play properly when
using the Wireless Direct
function.
Set to network standby mode,
but during standby AirPlay
and DMR do not work.
After turning on the power,
the
NETWORK
flashes blue.
indicator
Is the LAN cable connected to the
unit?
Is the Network type set to Wired? In the Network configuration screen in the Web browser, set
This unit and base unit (wireless LAN
router, etc.) are too far apart or there
is an obstacle between them.
There is a microwave oven or other
device generating electromagnetic
waves near the wireless LAN
environment.
Multiple wireless devices are
connected to the wireless LAN router.
Wireless LAN connections cannot be
established between the unit and
base unit (wireless LAN router, etc.).
The IP address settings of the unit
does not match the settings of the
wireless LAN router, etc.
The access point is set to conceal the
SSID.
The access point’s security settings
use WEP 152-bit length code key or
shared key authentication.
Are you using Connecting to a router
without WPS-PBC function or
Wireless Direct?
Have you removed the power cord? If you remove and then reinsert the power cord, network standby
Be sure the LAN cable is not connected to the unit, and then the
unit
OFF
Network type to Auto.
Improve the wireless LAN environment by moving the unit and base
unit closer together, etc.
Use the system in a place away from microwave ovens or others
device generating electromagnetic waves.
Avoid using devices generati ng electromagnetic waves as much as
possible when using the system with the wireless LAN.
When connecting multiple wireless devices, their IP addresses
must be changed.
The unit must be set in order to establish wireless LAN
connections. See
Check the IP address settings of the unit (including the DHCP
setting).
If the unit’s DHCP setting is on, turn the unit’s power off, then turn
the power back on.
Check that the IP address of the unit matches the settings of the
wireless LAN router, etc.
If the unit’s DHCP setting is off, set an IP address matching the
network of the base unit (wireless LAN router, etc.).
For example, if the wireless LAN router’s IP address is
“192.168.1.1”, set the unit’s IP address to “192.168.1.XXX” (*1), the
subnet mask to “255.255.255.0”, the gateway and DNS to
“192.168.1.1”.
(*1) Set the “XXX” in “192.168.1.XXX” to a number between 2 and
248 that is not assigned to other devices.
In this case, the SSID may not be displayed on the access point list
screen. If not, set the SSID, etc., by making the wireless LAN
settings on the unit manually.
The unit does not support WEP 152-bit length code key or shared
key authentication.
The Wireless Direct function may not operate properly depending
on the condition of signal reception and the wireless LAN device
connected. In such cases, bring the wireless devices closer
together and in other ways improve the conditions for wireless LAN
reception.
If you turn the power
router without WPS-PBC function or Wireless Direct, network
standby mode will be temporari ly turned
turned ON again, the network standby mode settings will be
restored.
will be temporarily turned
the network standby mode settings will be restored.
If you removed the power cord while connecting to a router with
WPS-PBC function, the settings may remain in effect when the
power is next tuned back on. Turn the power
back ON again.
and ON again.
Connecting using wireless LAN
OFF
immediately after using Connecting to a
OFF
on page 12.
OFF
. Once the power is
. Once the power is turned ON again,
OFF
, and then turn it
52
Page 53

Troubleshooting and other information 17
About network playback
The network playback function such as Internet Radio or
Music Server of this unit uses the following technologies:
Windows Media Player
See Windows Media Player 11/Windows Media Player 12 on
page 32 for more on this.
DLNA
DLNA CERTIFIEDTM Audio Player
The Digital Living Network Alliance (DLNA) is a cross-industry
organization of consumer electronics, computing industry
and mobile device companies. Digital Living provides
consumers with easy sharing of digital media through a wired
or wireless network in the home.
The DLNA certification logo makes it easy to find products
that comply with the DLNA Interoperability Guidelines. This
unit complies with DLNA Interoperability Guidelines v1.5.
When a computer running DLNA server software or other
DLNA compatible device is connected to this player, some
setting changes of software or other devices may be required.
Please refer to the operating instructions for the software or
device for more information.
TM
DLNA
, the DLNA Logo and DLNA CERTIFIEDTM are
trademarks, service marks, or certification marks of the Digital
Living Network Alliance.
Content playable over a network
• Even when encoded in a compatible format, some files
may not play correctly.
• Movie or Photo files cannot be played back.
• There are cases where you cannot listen to an Internet
Radio station even if the station can be selected from a
list of radio stations.
• Some functions may not be supported depending on the
server type or version used.
• Supported file formats vary by server. As such, files not
supported by your server are not displayed on this unit.
For more information check with the manufacturer of
your server.
Disclaimer for Third Party Content
Access to content provided by third parties requires a high
speed internet connection and may also require account
registration and a paid subscription.
Third party content services may be changed, suspended,
interrupted, or discontinued at any time without notice, and
Pioneer disclaims any liability in connection with such
occurrences.
Pioneer does not represent or warrant that content services
will continue to be provided or available for a particular period
of time, and any such warranty, express or implied, is
disclaimed.
About playback behavior over a
network
• Playback may stall when the computer is switched off or
any media files stored on it are deleted while playing
content.
• If there are problems within the network environment
(heavy network traffic, etc.) content may not be displayed
or played properly (playback may be interrupted or
stalled). For best performance, a 100BASE-TX connectio n
between player and computer is recommended.
• If several clients are playing simultaneously, as the case
may be, playback is interrupted or stalled.
• Depending on the security software installed on a
connected computer and the setting of such software,
network connection may be blocked.
Pioneer is not responsible for any malfunction of the player
and/or the Music Server features due to communication
error/malfunctions associated with your network connection
and/or your computer, or other connected equipment. Please
contact your computer manufacturer or Internet service
provider.
Windows Media is either a registered trademark or trademark of
Microsoft Corporation in the United States and/or other
countries.
This product includes technology owned by Microsoft
Corporation and cannot be used or distributed without a license
from Microsoft Licensing, Inc.
®
Microsoft
Windows
and WindowsNT
trademarks of Microsoft Corporation in the United States and/
or other countries.
, Windows®7, Windows Vista®, Windows®XP,
®
2000, Windows®Millennium Edition, Windows®98,
®
are either registered trademarks or
53
Page 54

Troubleshooting and other information17
Authorizing this unit
In order to be able to play with Music Server, this unit must be
authorized. This happens automatically when the unit makes
a connection over the network to the computer. If not, please
authorize this unit manually on the computer.
The authorization (or permission) method for access varies
depending on the type of server currently being connected.
For more information on authorizing this unit, refer to the
instruction manual of your server.
aacPlus
The AAC decoder uses aacPlus developed by Coding
Technologies
(www.codingtechnologies.com).
FLAC
FLAC Decoder
Copyright © 2000, 2001, 2002, 2003, 2004, 2005, 2006, 2007,
2008, 2009 Josh Coalson
Redistribution and use in source and binary forms, with or
without modification, are permitted provided that the
following conditions are met:
• Redistributions of source code must retain the above
copyright notice, this list of conditions and the following
disclaimer.
• Redistributions in binary form must reproduce the above
copyright notice, this list of conditions and the following
disclaimer in the documentation and/or other materials
provided with the distribution.
• Neither the name of the Xiph.org
Foundation nor the names of its contributors may be
used to endorse or promote products derived from this
software without specific prior written permission.
THIS SOFTWARE IS PROVIDED BY THE COPYRIGHT
HOLDERS AND CONTRIBUTORS “AS IS” AND ANY EXPRESS
OR IMPLIED WARRANTIES, INCLUDING, BUT NOT LIMITED
TO, THE IMPLIED WARRANTIES OF MERCHANTABILITY
AND FITNESS FOR A PARTICULAR PURPOSE ARE
DISCLAIMED. IN NO EVENT SHALL THE FOUNDATION OR
CONTRIBUTORS BE LIABLE FOR ANY DIRECT, INDIRECT,
INCIDENTAL, SPECIAL, EXEMPLARY, OR CONSEQUENTIAL
DAMAGES (INCLUDING, BUT NOT LIMITED TO,
PROCUREMENT OF SUBSTITUTE GOODS OR SERVICES;
LOSS OF USE, DATA, OR PROFITS; OR BUSINESS
INTERRUPTION) HOWEVER CAUSED AND ON ANY THEORY
OF LIABILITY, WHETHER IN CONTRACT, STRICT LIABILITY,
OR TORT (INCLUDING NEGLIGENCE OR OTHERWISE)
ARISING IN ANY WAY OUT OF THE USE OF THIS SOFTWARE,
EVEN IF ADVISED OF THE POSSIBILITY OF SUCH DAMAGE.
54
Page 55

Troubleshooting and other information 17
Radio wave caution
This unit uses a 2.4 GHz radio wave frequency, which is a
band used by other wireless systems (see list below). To
prevent noise or interrupted communication, do not use this
unit nearby such devices, or make sure these devices are
switched off during use.
• Cordless phones
• Cordless facsimiles
•Microwave ovens
• Wireless LAN devices (IEEE802.11b/g)
• Wireless AV equipment
• Wireless controllers for game systems
• Microwave-based health aids
•Some baby monitors
Other, less common, equipment that may operate on the
same frequency:
• Anti-theft systems
• Amateur radio stations (HAM)
• Warehouse logistic management systems
• Discrimination systems for train or emergency vehicles
Note
• In the event noise appears in your television image, there
is the possibility that a
enabled device or this unit (including products supported
by this unit) are causing signal interference with the
antenna input connector of your television, video,
satellite tuner, etc. In this event, increase the distance
between the antenna input connector and the
wireless technology enabled device or t his unit (including
products supported by this unit).
• If there is something obstructing the path between this
unit (including devices supported by this unit) and the
device equipped with
(such as a metal door, concrete wall, or insulation
containing tinfoil), you may need to change the location
of your system to prevent signal noise and interruptions.
Bluetooth
Bluetooth
wireless technology
Bluetooth
wireless technology
Scope of operation
Use of this unit is limited to home use. (Transmission
distances may be reduced depending on communication
environment).
In the following locations, poor condition or inability to receive
radio waves may cause the audio to be interrupted or stopped:
• In reinforced concrete buildings or steel framed or ironframed buildings.
• Near large metallic furniture.
• In a crowd of people or near a building or obstacle.
• In a location exposed to the magnetic field, static
electricity or radio wave interference from radio
communication equipment using the same frequency
band (2.4 GHz) as this unit, such as a 2.4 GHz wireless
LAN device (IEEE802.11b/g) or microwave oven.
• If you live in a heavily populated residential area
(apartment, townhouse, etc.) and if your neighbor's
microwave is placed near your system, you may
experience radio wave interference. If this occurs, move
your unit to a different place. When the microwave is not
in use, there will be no radio wave interference.
Radio wave reflections
The radio waves received by this unit include the radio wave
coming directly from the device equipped with Bluetooth
wireless technology (direct wave) and waves coming from
various directions due to reflections by walls, furniture and
building (reflected waves). The reflected waves (due to
obstacles and reflecting objects) further produce a variety of
reflected waves as well as variation in reception condition
depending on locations. If the audio cannot be received
properly due to this phenomenon, try moving the location of
the device equipped with Bluetooth wireless technology a
little. Also note that audio may be interrupted due to the
reflected waves when a person crosses or approaches the
space between this unit and the device equipped with
Bluetooth wireless technology.
Precautions regarding connections to
products supported by this unit
• Complete connections for all devices supported by this
unit, including all audio cords and power cables before
connecting them to this unit.
• After completing connections to this unit, check the
audio and power cables to confirm that they not twisted
together.
• When disconnecting this unit, confirm that you have
sufficient working space in the surrounding area.
• When changing connections of audio or other cables for
products supported by this unit, confirm that you have
sufficient working space in the surrounding area.
55
Page 56

Troubleshooting and other information17
Supported audio file formats
This unit supports the following file formats. Note that some file formats are not available for playback although they are listed
as playable file formats. Also, the compatibility of file formats varies depending on the type of server. Check with your server to
ensure the compatibility of file formats supported by your server.
• If an attempt is made to play files with unsupported formats, the sound may be intermittent or be accompanied by noise. In
such cases, confirm that the file format is compatible with this unit.
• Internet Radio playback may be affected by the Internet communications environment, and in this case playback may not be
possible even with the file formats listed here.
• For WAV, FLAC, AIFF and Apple Lossless files, if music files with the same format, sampling frequency, quantization bitrate
and channel are queued up sequentially, gapless playback will be possible.
- If the format has been changed on the server (transcode), gapless playback will not be possible.
- Gapless playback is not possible in DMR mode.
Music files
Category
MP3
<a>
WAV .wav LPCM
WMA .wma
AAC
Apple Lossless
Extension
.mp3 MPEG-1 Audio Layer-3
.m4a
.aac
.3gp
.3g2
.m4a
.mp4
Stream
WMA 2/7/8/9
<c>
MPEG-4 AAC LC
MPEG-4 HE AAC
Apple Lossless
Sampling frequency 32 kHz, 44.1 kHz, 48 kHz
Quantization bitrate 16 bit
Channel 2 ch
Bitrate 8 kbps to 320 kbps
VBR/CBR Supported/Supported
Sampling frequency
<b>
Quantization bitrate 16 bit, 24 bit
Channel
Sampling frequency
Quantization bitrate 16 bit
Channel 2 ch
Bitrate 5 kbps to 320 kbps
VBR/CBR Supported/Supported
Sampling frequency 32 kHz, 44.1 kHz, 48 kHz
Quantization bitrate 16 bit
Channel 2 ch
Bitrate 16 kbps to 320 kbps
VBR/CBR Supported/Supported
Sampling frequency 32 kHz, 44.1 kHz, 48 kHz,
Quantization bitrate 16 bit, 24 bit
Channel 2 ch
32 kHz, 44.1 kHz, 48 kHz,
88.2 kHz, 96 kHz, 176.4 kHz,
192 kHz
2ch
32 kHz, 44.1 kHz, 48 kHz
88.2 kHz, 96 kHz, 176.4 kHz,
192 kHz
56
Page 57

Troubleshooting and other information 17
Category
FLAC
<d>
AIFF
a “MPEG Layer-3 audio decoding technol ogy licensed from Fraunhofer IIS and Thomson multimedia.”
b 32 kHz, 176.4 kHz and 192 kHz support 2-channel audio sources only.
c Files encoded using Windows Media Codec 9 may be playable but some parts of the specification are not supported; specifically, Pro,
Lossless, Voice.
d Uncompressed FLAC files are not supported. Pioneer does not guarantee playback.
Extension
.flac FLAC
.aiff
.aif
Stream
.aiff
.aif
Sampling frequency
<b>
Quantization bitrate 16 bit, 24 bit
Channel
Sampling frequency 32 kHz, 44.1 kHz, 48 kHz,
Quantization bitrate 16 bit, 24 bit
Channel
32 kHz, 44.1 kHz, 48 kHz,
88.2 kHz, 96 kHz, 176.4 kHz,
192 kHz
2ch
88.2 kHz, 96 kHz, 176.4 kHz,
192 kHz
2ch
57
Page 58

Troubleshooting and other information17
About Wi-Fi®
The Wi-Fi CERTIFIED Logo is a certification mark of the Wi-Fi
Alliance.
About iPod/iPhone/iPad
AirPlay works with iPhone, iPad and iPod touch with iOS 4.3.3
or later, and Mac and PC with iTunes 10.2.2 or later.
USB works with iPhone 6, iPhone 6 Plus, iPhone 5, iPhone 5s,
iPhone 5c, iPhone 4s, iPhone 4, iPhone 3GS, iPod touch (4th
through 5th generation) and iPod nano (4th through 7th
generation).
“Made for iPod” and “Made for iPhone” mean that an
electronic accessory has been designed to connect
specifically to iPod or iPhone, respectively, and has been
certified by the developer to meet Apple performance
standards. Apple is not responsible for the operation of this
device or its compliance with safety and regulatory standards.
Please note that the use of this accessory with iPod, iPhone,
or iPad may affect wireless performance.
Apple, AirPlay, iPad, iPhone, iPod, iPod nano and iPod touch,
iTunes, Safari, Bonjour and Mac are trademarks of Apple Inc.,
registered in the U.S. and other countries.
The AirPlay logo is a trademark of Apple Inc.
App Store is a service mark of Apple Inc.
Dolby Digital
Manufactured under license from Dolby Laboratories. Dolby
and the double-D symbol are trademarks of Dolby
Laboratories.
Please see the Dolby Laboratories website for more details.
DTS
For DTS patents, see http://patents.dts.com. Manufactured
under license from DTS Licensing Limited. DTS, the Symbol,
& DTS and the Symbol together are registered trademarks,
and DTS Digital Surround is a trademark of DTS, Inc. © DTS,
Inc. All Rights Reserved.
About Spotify
Spotify Connect
Spotify is a digital music-streaming service that gives you
access to millions of songs instantly. This device is ready for
Spotify Connect, which lets you play music on your audio
system, using the Spotify app as a remote. For service
availability in your country check www.spotify.com.
Apple Lossless Audio Codec
Copyright © 2011 Apple Inc. All rights reserved.
Licensed under the Apache License, Version 2.0. You may
obtain a copy of the License at
http://www.apache.org/licenses/LICENSE-2.0.
58
Page 59

Troubleshooting and other information 17
• Accessories
Specifications
• Amplifier section
RMS Power Output
Front (stereo) . . . . . . 40 W + 40 W (1 kHz, 30 %, T.H.D., 4 )
Subwoofer (1+2) . . . 40 W + 40 W (1 kHz, 30 %, T.H.D., 4 )
• Tuner section
Frequency Range (FM). . . . . . . . . . . . . . 87.5 MHz to 108 MHz
Frequency Range (DAB) . . . . . . 174.928 MHz to 239.200 MHz
Antenna Input (DAB/FM). . . . . . . . . . . . . . . .75 unbalanced
•Network
WLAN standards . . . . . . . . . . . . . . . . . . . . . . . . 802.11 a/b/g/n
Frequency band . . . . .2.4 GHz band (2.412 GHz to 2.472 GHz)
5 GHz band (5.180 GHz to 5.240 GHz)
• Bluetooth
Version . . . . . . . . . . . . . . . .Bluetooth Specification 2.1 + EDR
Output . . . . . . . . . . . . . . . . . . . Bluetooth Specification Class 2
Estimated line-of-sight transmission distance*
. . . . . . . . . . . . . . . . . . . . . . . . . . . . . . . . . . . . . . . . . .About 10 m
Frequency range. . . . . . . . . . . . . . . . . . . . . . . . . . . . . . . 2.4 GHz
Modulation
. . . . . . . . . . . . FH-SS (Frequency Hopping Spread Spectrum)
Supported Bluetooth profiles. . . . . . . . . . . . . . . A2DP, AVRCP
Supported Codec . . . . . . . . . . . . SBC (Subband Codec), AAC
* The line-of-sight transmission distance is an estimate.
Actual transmission distances supported may differ
depending on surrounding conditions.
• Speaker
Playback frequency range . . . . . . . . . . . . . . . . 40 Hz to 20 kHz
Front
Type . . . . . . . . . . . . . . . . . . . . . . . . . . . . . . . . . . Closed box type
Speakers . . . . . . . . . . . . . . . . . . . . 4 cm x 7 cm (cone type) x 4
Subwoofer
Type . . . . . . . . . . . . . . . . . . . . . . . . . . . . . . . . . . Bass reflex type
Speakers . . . . . . . . . . . . . . . . . . . . . . . . . 10 cm (cone type) x 2
• Miscellaneous
USB terminal . . . . . . . . . . . . . . . . . . . . . . . . . . . . . . . . . 5 V, 1 A
Power source . . . . . . . . . . . . . AC 220 V to 240 V, 50 Hz/60 Hz
Power consumption
Power on . . . . . . . . . . . . . . . . . . . . . . . . . . . . . . . . . . . . . 53 W
In standby . . . . . . . . . . . . . . . . . . . . . . . . . . . . . .0.5 W or less
In standby (Wake Up TV on) . . . . . . . . . . . . . . . . . . . . .0.5 W
In standby (Network standby on) . . . . . . . . . . . . . . . . . . 3 W
In standby (Network standby on, wireless LAN
connected) . . . . . . . . . . . . . . . . . . . . . . . . . . . . . . . . . . . . 3 W
In standby (Network standby on, Wake Up TV on) . . . . 3 W
In standby (Network standby on, wireless LAN
connected, Wake Up TV on) . . . . . . . . . . . . . . . . . . . . . . 3 W
Dimensions. . . . . . . . 700 mm (W) x 94 mm (H) x 350 mm (D)
Weight (without package) . . . . . . . . . . . . . . . . . . . . . . . . 8.5 kg
Channel 1 to Channel 13
Channel 36 to Channel 48
(not including the antenna)
Remote control. . . . . . . . . . . . . . . . . . . . . . . . . . . . . . . . . . . . . .1
AAA size IEC R03 dry cell batteries . . . . . . . . . . . . . . . . . . . . .2
Optical digital audio cable (1.5 m) . . . . . . . . . . . . . . . . . . . . . .1
DAB/FM wire antenna . . . . . . . . . . . . . . . . . . . . . . . . . . . . . . . .1
Power cord
Warranty card
Operating instructions (this document)
Note
• Specifications and the design are subject to possible
modifications without notice, due to improvements.
• iOS is a trademark on which Cisco holds the trademark
right in the US and certain other countries.
• Android and Google Play are trademarks of Google Inc.
59
Page 60

Preset code list18
Chapter 18:
Preset code list
Presetting the following manufacturer codes to the remote control for this unit will allow this unit’s remote control to control
other devices.
Key: Manufacturer / Code
TV
Pioneer 0113, 0233, 0252,
0275, 0291, 0295, 0296, 0305
A.R. Systems 0155
Acme 0141
Acura 0142, 0154
ADC 0140
Admiral 0138, 0139, 0140,
0145, 0146
Adyson 0141, 0228, 0229
Agashi 0228, 0229
Agazi 0140
Aiko 0141, 0142, 0154, 0155,
0228, 0229
Aim 0155
Aiwa 0199
Akai 0142, 0143, 0149, 0152,
0154, 0155, 0228, 0229
Akiba 0143, 0155
Akura 0140, 0143, 0154, 0155
Alaron 0228
Alba 0125, 0141, 0142, 0143,
0147, 0150, 0152, 0154, 0155,
0190, 0193, 0203, 0228
Alcyon 0132
Allorgan 0229
Allstar 0149, 0155
AMOi 0224
Amplivision 0125, 0141,
0156, 0229
Amstrad 0140, 0142, 0143,
0154, 0155
Anam 0142
Anglo 0142, 0154
Anitech 0132, 0140, 0142,
0154, 0155
Ansonic 0125, 0133, 0142,
0144, 0154, 0155
Arcam 0228, 0229
Arcam Delta 0141
Aristona 0149, 0152, 0155
Arthur Martin 0156
ASA 0138, 0146
Asberg 0132, 0149, 0155
Astra 0142
Asuka 0140, 0141, 0143, 0228,
0229
Atlantic 0141, 0149, 0152,
0155, 0228
Atori 0142, 0154
Auchan 0156
Audiosonic 0125, 0141, 0142,
0143, 0149, 0152, 0155, 0229
AudioTon 0125, 0141, 0229
Ausind 0132
Autovox 0132, 0138, 0140,
0141, 0229
Awa 0228, 0229
Baird 0229
Bang & Olufsen 0138,
Basic Line
0154, 0155, 0229
Bastide 0141, 0229
Baur 0152, 0155
Bazin 0229
Beko 0125, 0150, 0155, 0175
Benq 0219
Beon 0149, 0152, 0155
Best 0125
Bestar 0125, 0149, 0155
Binatone 0141, 0229
Blue Sky 0143, 0155
Blue Star 0151
Boots 0141, 0229
BPL 0151, 0155
Brandt 0148, 0153, 0157, 0159
Brinkmann 0155
Brionvega 0138, 0149, 0152,
0155
Britannia 0141, 0228, 0229
Bruns 0138
BTC 0143
Bush 0142, 0143, 0145, 0147,
0149, 0151, 0152, 0154, 0155,
0180, 0193, 0229
Capsonic 0140
Carena 0155
Carrefour 0147
Cascade 0142, 0154, 0155
0142, 0143, 0149,
0230
Casio 0221
Cathay 0149, 0152, 0155
CCE 0229
Centurion 0149, 0152, 0155
Century 0138
CGE 0125, 0132
Cimline 0142, 0154
City 0142, 0154
Clarivox 0152
Clatronic 0125, 0132, 0140,
0141, 0142, 0143, 0149, 0150,
0154, 0155, 0229
CMS 0228
CMS Hightec 0229
Concorde 0142, 0154
Condor 0125, 0141, 0149,
0150, 0154, 0155, 0228
Contec 0141, 0142, 0147,
0154, 0228
Continental Edison 0148
Cosmel 0142, 0154
Crosley 0132, 0138
Crown 0125, 0132, 0142,
0149, 0150, 0152, 0154, 0155
CS Electronics 0141, 0143,
0228
CTC Clatronic 0144
Cybertron 0143
oo 0128, 0141, 0142,
Daew
0149, 0154, 0155, 0169, 0179,
0206, 0228, 0229
Dainichi 0143, 0228
Dansai 0140, 0149, 0152,
0155, 0228, 0229
Dantax 0125, 0152
Dawa 0155
Daytron 0142, 0154
De Graaf 0145
Decca 0141, 0149, 0152, 0155,
0229
Denver 0213, 0218
Desmet 0149, 0152, 0155
Diamant 0155
Diamond 0228
Dixi 0142, 0149, 0152, 0154,
0155, 0229
DTS 0142, 0154
Dual 0141, 0155, 0229
Dual-Tec 0141, 0142
Dumont 0138, 0141, 0144,
0229
Dux 0152
Dynatron 0149, 0152, 0155
Elbe 0125, 0133, 0155, 0229
Elcit 0138
Electa 0151
ELECTRO TECH 0142
Elin 0141, 0149, 0152, 0154,
0155, 0228
Elite 0143, 0149, 0155
Elman 0144
Elta 0142, 0154, 0228
Emerson 0125, 0138, 0155
Epson 0216
Erres 0149, 0152, 0155
ESC 0229
Etron 0142
Eurofeel 0229, 0140
Euroline 0152
Euroman 0125, 0140, 0141,
0149, 0155, 0228, 0229
Europhon 0141, 0144, 0149,
0155, 0228, 0229
Expert 0156
Exquisit 0155
Fenner 0142, 0154
Ferguson 0148, 0152, 0153,
0157
Fidelity 0141, 0145, 0155,
0228
Filsai 0229
Finlandia 0145
Finlux 0132, 0138, 0141, 0144,
0149, 0152, 0155, 0229
Firstline 0141, 0142, 0149,
0154, 0155, 0228, 0229
Fisher 0125,
0150, 0229
0138, 0141,
0147,
60
Page 61

Preset code list 18
Flint 0149, 0155
Formenti 0132, 0138, 0139,
0141, 0152, 0228
Formenti/Phoenix 0228
Fortress 0138, 0139
Fraba 0125, 0155
Friac 0125
Frontech 0140, 0142, 0145,
0146, 0154, 0229
Fujitsu 0229
Fujitsu General 0229
Funai 0140
Galaxi 0155, 0150
Galaxis 0125, 0155
GBC 0142, 0147, 0154
Geant Casino 0156
GEC 0141, 0146, 0149, 0152,
0155, 0229
Geloso 0142, 0145, 0154
General Technic 0142, 0154
Genexxa 0143, 0146, 0149,
0155
Giant 0229
GoldHand 0228
Goldline 0155
Goldstar 0125, 0141, 0142,
0145, 0149, 0152, 0154, 0155,
0228, 0229
Goodmans 0140, 0142, 0147,
0149, 0152, 0154, 0155, 0222,
0229
Gorenje 0125, 0150
GPM 0143
Graetz 0146
Granada 0132, 0141, 0145,
0147, 0149, 0152, 0155, 0156,
0229
Grandin 0142, 0143, 0151,
0152
Gronic 0229
Grundig 0124, 0125, 0132,
0155, 0162
Halifax 0140, 0141, 0228,
0229
Hampton 0141, 0228, 0229
Hanseatic 0125, 0133, 0141,
0142, 0147, 0149, 0152, 0154,
0155, 0229
Hantarex 0142, 0154, 0155
Hantor 0155
Harwood 0154, 0155
HCM 0140, 0141, 0142, 0151,
0154, 0155, 0229
Hema 0154, 0229
Higashi 0228
HiLine 0155
Hinari 0142, 0143, 0147, 0149,
0152, 0154, 0155
Hisawa 0143, 0151, 0156
Hitachi 0137, 0141, 0145,
0146, 0147, 0155, 0191, 0226,
0229
Hornyphon 0149, 0155
Hoshai 0143
Huanyu 0141,
Hygashi 0141, 0228, 0229
Hyper
0229
Hypson 0140, 0141, 0149,
0151, 0152, 0155, 0156, 0229
Iberia 0155
ICE 0140, 0141, 0142, 0143,
0149, 0154, 0155, 0228, 0229
ICeS 0228
Imperial 0125, 0132, 0146,
0149, 0150, 0155
Indiana 0149, 0152, 0155
Ingelen 0146
Ingersol 0142, 0154
Inno Hit 0132, 0141, 0142,
0143, 0149, 0152, 0154, 0155,
0229
Innovation 0140, 0142
Interactive 0125
Interbuy 0142, 0154
Interfunk 0125, 0138, 0146,
0149, 0152, 0155
International 0228
Intervision 0125, 0140, 0141,
0144, 0155, 0229
Irradio 0132, 0142, 0143,
0149, 0152, 0154, 0155
Isukai 0143, 0155
ITC 0141, 0229
ITS 0143, 0149, 0151, 0155,
0228
ITT 0142, 0146
ITV 0142, 0152, 0155
JVC 0134, 0135, 0147, 0149,
0192
Kaisui 0141, 0142, 0143, 0151,
0154, 0155, 0228, 0229
Kamosonic 0141
Kamp 0141, 0228
Kapsch 0146
Karcher 0125, 0141, 0142,
0152, 0155
Kawasho 0228
Kendo 0125, 0144, 0145, 0155
KIC 0229
0228
0141, 0142, 0154, 0228,
Kingsley 0141, 0228
Kneissel 0125, 0133, 0155
Kolster 0149, 0155
Konka 0143
Korpel 0149, 0152, 0155
Korting 0125, 0138
Kosmos 0155
Koyoda 0142
KTV 0141, 0229
Kyoto 0228, 0229
Lasat 0125
Lenco 0142,
Lenoir 0141, 0142,
Leyco 0140, 0149, 0152, 0155
LG 0125, 0136, 0141, 0142,
0145, 0149, 0152, 0154, 0155,
0186, 0189, 0196, 0220, 0228,
0229
LG/GoldStar 0129
Liesenk 0152
Liesenkotter 0155
Life 0140, 0142
Lifetec 0140, 0142, 0154, 0155
Lloyds 0154
Loewe 0125, 0133, 0155,
0166, 0167
Loewe Opta 0138, 0149, 0152
Luma 0145, 0152, 0154, 0155
Lumatron 0145, 0149, 0152,
0155, 0229
Lux May 0149
Luxor 0141, 0145, 0229
M Electronic 0141, 0142,
0146, 0148, 0149, 0152
Magnadyne 0138, 0144, 0152
Magnafon 0132, 0141, 0144,
0228
Magnum 0140, 0142
Mandor 0140
Manesth 0140, 0141, 0149,
0152, 0155, 0229
Marantz 0149, 0152, 0155
Marelli 0138
Mark 0149, 0152, 0154, 0155,
0228, 0229
Masuda 0229
Matsui 0141, 0142, 0145,
0147, 0149, 0152, 0154, 0155,
0229
Mediator 0149, 0152, 0155
Medion 0140, 0142, 0155
M-Electronic 0154, 0155,
0228, 0229
Melvox 0156
Memorex 0142, 0154
0154
0154
Memphis 0142, 0154
Mercury 0154, 0155
Metz 0138, 0299, 0300, 0301,
0302
Micromaxx 0140, 0142
Microstar 0140, 0142
Minerva 0132
Minoka 0149, 0155
Mitsubishi 0138, 0147, 0149,
0155, 0200
Mivar 0125, 0132, 0133, 0141,
0228, 0229
Motion 0132
MTC 0125, 0228
Multi System 0152
Multitech 0125, 0141, 0142,
0144, 0145, 0147, 0152, 0154,
0155, 0228, 0229
Murphy 0141, 0228
Naonis 0145
NEC 0147, 02
Neckermann 0125, 0138,
0141,
0155, 0229
NEI 0149, 0152, 0155
Neufunk 0154, 0155
New Tech 0142, 0149, 0154,
0155, 0229
New World 0143
Nicamagic 0141, 0228
Nikkai 0140, 0141, 0143, 0149,
0152, 0154, 0155, 0228, 0229
Nobliko 0132, 0141, 0144,
0228
Nokia 0146
Nordic 0229
Nordmende 0138, 0146,
0148, 0149
Nordvision 0152
Novatronic 0155
Oceanic 0146, 0156
Okano 0125, 0150, 0155
ONCEAS 0141
Opera 0155
Orbit 0149, 0155
Orion 0142, 0149, 0152, 0154,
0155, 0194
Orline 0155
Osaki 0140, 0141, 0143, 0155,
0229
Oso 0143
Otto Versand 0139, 0141,
0147, 0149, 0151, 0152, 0155,
0229
Pael 0141, 0228
29
0145, 0149, 0150, 0152,
61
Page 62

Preset code list18
Palladium 0125, 0141, 0150,
0155, 0229
Palsonic 0229
Panama 0140, 0141, 0142,
0154, 0155, 0228, 0229
Panasonic 0123, 0146, 0155,
0158, 0164, 0214, 0217
Panavision 0155
Pathe Cinema 0125, 0133,
0141, 0156, 0228
Pausa 0142, 0154
Perdio 0155, 0228
Perfekt 0155
Philco 0125, 0132, 0138, 0155
Philharmonic 0141, 0229
Philips 0115, 0117, 0138,
0141, 0149, 0152, 0155, 0160,
0163, 0165, 0170, 0171, 0173,
0174, 0182, 0183, 0195, 0196,
0202, 0205, 0212, 0215
Phoenix 0125, 0138, 0149,
0152, 0155, 0228
Phonola 0138, 0149, 0152,
0155, 0228
Plantron 0140, 0149, 0154,
0155
Playsonic 0229
Poppy 0142, 0154
Prandoni-Prince 0132, 0145
Precision 0141, 0229
Prima 0142, 0146, 0154
Profex 0142, 0154
Profi-Tronic 0149, 0155
Proline 0149, 0155
Prosonic 0125, 0141, 0152,
0155, 0228, 0229, 0232
Protech 0140, 0141, 0142,
0144, 0149, 0152, 0229
Provision 0152, 0155
Pye 0149, 0152, 0155, 0198
Pymi 0142, 0154
Quandra Vision 0156
Quelle 0140, 0141, 0149,
0152, 0155, 0229
Questa 0147
Radialva 0155
Radio Shack 0155
Radiola 0149, 0152, 0155,
0229
Radiomarelli 0138, 0155
Radiotone 0125, 0149, 0154,
0155
Rank 0147
Recor 0155
Redstar 0155
Reflex 0155
Revox 0125, 0149, 0152, 0155
Rex 0140, 0145, 0146
RFT 0125, 0133, 0138
Rhapsody 0228
R-Line 0149, 0152, 0155
0140, 0142, 0143,
Roadstar
0154
Robotron 0138
Ro
wa 0228, 0229
Royal Lux 0125
RTF 0138
Saba 0138, 0146, 0148, 0153,
0157, 0159
Saisho 0140, 0141, 0142,
0154, 0229
Salora 0145, 0146
Sambers 0132, 0144
Samsung 0119, 0120, 0125,
0140, 0141, 0142, 0149, 0150,
0152, 0154, 0155, 0177, 0178,
0181, 0204, 0208, 0228, 0229
Sandra 0141, 0228, 0229
Sansui 0149, 0155
Sanyo 0125, 0133, 0141, 0147,
0154, 0187, 0228, 0229
SBR 0152, 0155
SCHAUB LORENTZ 0146
Schneider 0141, 0143, 0149,
0152, 0155, 0190, 0229
SEG 0140, 0141, 0144, 0147,
0152, 0154, 0155, 0190, 0228,
0229
SEI 0155
SEI-Sinudyne 0138, 0144,
0146
Seleco 0145, 0146, 0147
Sencora 0142, 0154
Sentra 0154
Serino 0228
Sharp 0130, 0131, 0139, 0147,
0184, 0207
Siarem 0138, 0144, 0155
Sierra 0149, 0155
Siesta 0125
Silva 0228
Silver 0147
Singer 0138, 0144, 0156
Sinudyne 0138, 0144, 0152,
0155
Skantic 0146
Solavox 0146
Sonitron 0125, 0229
Sonoko 0140, 0141, 0142,
0149, 0152, 0154, 0155, 0229
Sonolor 0146, 0156
Sontec 0125, 0149, 0152, 0155
Sony 0116, 0118, 0142, 0147,
0161, 0168, 0172, 0185, 0188,
0197, 0201, 0211, 0225, 0227
Sound & Vision 0143, 0144
Soundwave 0149, 0152, 0155
Standard 0141, 0142, 0143,
0149, 0154, 0155, 0229
Starlight 0152
Starlite 0154, 0155
Stenway 0151
Stern 0145, 0146
to 0154, 0155
Stra
Stylandia
0229
Sunkai 0142
Sunstar 0154, 0155
Sunwood 0142, 0149, 0154,
0155
Superla 0141, 0228, 0229
SuperTech 0154, 0155, 0228
Supra 0142, 0154
Susumu 0143
Sutron 0142, 0154
Sydney 0141, 0228, 0229
Sysline 0152
Sytong 0228
Tandy 0139, 0141, 0143, 0146,
0229
Tashiko 0144, 0145, 0147,
0228, 0229
Tatung 0141, 0149, 0152,
0155, 0229
TCM 0140, 0142
Teac 0155, 0229
Tec 0141, 0142, 0154, 0229
TEDELEX 0229
Teleavia 0148
Telecor 0155, 0229
Telefunken 0148, 0149, 0155,
0157
Telegazi 0155
Telemeister 0155
Telesonic 0155
Telestar 0155
Teletech 0142, 0152, 0154,
0155
Teleton 0141, 0229
Televideon 0228
Televiso 0156
Tensai 0142, 0143, 0149, 0154,
0155, 0229
Tesmet 0149
Tevion 0140, 0142
Texet 0141, 0154, 0228, 0229
Thomson 0121, 0122, 0141,
0148, 0149, 0153, 0155, 0157,
0159, 0210
Thorn 0152, 0155
Tokai 0149, 0155, 0229
Tokyo 0141, 0228
Tomashi 0151
Toshiba 0126, 0127, 0147,
0176, 0209, 0229
Towada 0146, 0229
Trakton 0229
Trans Continens 0155, 0229
Transtec 0228
Trident 0229
Triumph 0155
Vestel 0145, 0146, 0149, 0150,
0152, 0155, 0229
Vexa 0142, 0152, 0154, 0155
Victor 0147, 0149
VIDEOLOGIC 0228
Videologique 0141, 0143,
0228, 0229
VideoSystem 0149, 0155
Videotechnic 0228, 0229
Viewsonic 0223
Visiola 0141, 0228
Vision 0149, 0155, 0229
Vortec 0149, 0152, 0155
0132, 0138, 0145,
Voxson
0146, 0149, 0155
Waltham 0141, 0155, 0229
Watson
0149, 0152, 0155
Watt Radio 0141, 0144, 0228
Wega 0138, 0147, 0155
Wegavox 0154
Weltblick 0149, 0152, 0155,
0229
White Westinghouse 0141,
0144, 0152, 0155, 0228
Xrypton 0155
Yamishi 0155, 0229
Yokan 0155
Yoko 0125, 0140, 0141, 0142,
0143, 0149, 0152, 0154, 0155,
0228, 0229
Yorx 0143
Zanussi 0145, 0229
62
Page 63

Preset code list 18
DVD
If operations are not possible using the preset codes below, you may be able to conduct operations with the preset codes for the
BD.
Pioneer 2014
AEG 2188
Aiwa 2149
Akai 2096
Akura 2186
Alba 2122, 2133, 2143
Amitech 2188
AMW 2189
Awa 2189
Bang & Olufsen 2191
Bellagio 2189
Best Buy 2185
Brainwave 2188
Brandt 2112, 2139
Bush 2122, 2143, 2177, 2184
Cambridge Audio 2180
CAT 2182, 2183
Centrum 2183
CGV 2180, 2188
Cinetec 2189
Clatronic 2184
Coby 2190
Conia 2177
Continental Edison 2189
Crown 2188
C-Tech 2181
CyberHome 2103, 2132
Daenyx 2189
Daewoo 2130, 2154, 2188,
2189
Daewoo International 2189
Dalton 2187
Dansai 2179, 2188
Daytek 2105, 2128, 2189
Dayton 2189
DEC 2184
Decca 2188
Denon 2161, 2163
Denver 2164, 2184, 2186,
2190
Denzel 2178
Diamond 2180, 2181
DK Digital 2129
Dmtech 2095
Dual 2178
DVX 2181
Easy Home 2185
Eclipse 2180
Electrohome 2188
Elin 2188
Elta 2142, 2188
Enzer 2178
Finlux 2180, 2188
Gericom 2145
Global Solutions 2181
Global Sphere 2181
Goodmans 2122, 2165, 2184
Graetz 2178
Grundig 2148
Grunkel 2188
H&B 2184
Haaz 2180,
HiMAX 2185
Hitachi 2110, 2178,
Innovation 2097
JVC 2119, 2136, 2152
Kansai 2190
Kennex 2188
Kenwood 2146
KeyPlug 2188
Kiiro 2188
Kingavon 2184
Kiss 2178
Koda 2184
KXD 2185
Lawson 2181
Lecson 2179
Lenco 2184, 2188
LG 2111, 2115, 2135, 2138,
2160, 2171
Life 2097
Lifetec 2097
Limit 2181
Loewe 2151
LogicLab 2181
Magnavox 2184
Majestic 2190
Marantz 2157
Marquant 2188
Matsui 2139
Mecotek 2188
Medion 2097
MiCO 2180
2181
2185
Micromaxx 2097
Microstar 2097
Minoka 2188
Mizuda 2184, 2185
Monyka 2178
Mustek 2101
Mx Onda 2180
Naiko 2188
Neufunk 2178
Nevir 2188
NU-TEC 2177
Onkyo 2167
Optim 2179
Optimus 2099
Orava 2184
Orbit 2189
Orion 2156
P&B 2184
Pacific 2181
Panasonic 2113,
2127, 2131,
Philips 2100, 2106, 2117,
2118, 2126, 2134, 2157
Pointer 2188
Portland 2188
Powerpoint 2189
Prosonic 2190
Provision 2184
Raite 2178
RedStar 2186, 2188, 2190
Reoc 2181
Roadstar 2116, 2184
Ronin 2189
Rowa 2177
Rownsonic 2183
Saba 2112, 2139
Sabaki 2181
Saivod 2188
Samsung 2110, 2137, 2158,
2173, 2176
Sansui 2180, 2181, 2188
Sanyo 2140, 2166
ScanMagic 2101
Schaub Lorenz 2188
Schneider 2095
Scientific Labs 2181
2114, 2121,
2170
Scott 2120, 2187
SEG 2116, 2178, 2181, 2189
Sharp 2097, 2141, 2174
Sigmatek 2185
Silva 2186
Singer 2180, 2181
Skymaster 2153, 2181
Skyworth 2186
Slim Art 2188
SM Electronic 2181
Sony 2104, 2108, 2123, 2124,
2125, 2150, 2175
Soundmaster 2181
Soundmax 2181
Spectra 2189
Standard 2181
Star Cluster 2181
Starmedia 2184
Sunkai 2188
Supervision 2181
Synn 2181
Tatung 2130, 2188
TCM 2097
Teac 2162, 2177, 2181
Tec 2186
Technika 2188
Telefunken 2183
88
Tensai 21
Tevion 2097, 2181,
Thomson 2098, 2112, 2155,
2159
Tokai 2178, 2186
Toshiba 2102, 2156, 2168,
2169, 2172
TRANScontinents 2189
Trio 2188
TruVision 2185
Wharfedale 2180, 2181
Xbox 2098
Xlogic 2181, 2188
XMS 2188
Yamada 2189
Yamaha 2106
Yamakawa 2178, 2189
Yukai 2101, 2147
2187
63
Page 64

Preset code list18
BD
If operations are not possible using the preset codes below, you may be able to conduct operations with the preset codes for the
DVD.
Pioneer 2034, 2192, 2255,
2258, 2259, 2260, 2281
Denon 2310, 2311, 2312
Hitachi 2307, 2308, 2309
JVC 2290, 2291, 2293, 2294,
2295, 2296
LG 2286, 2287
Marantz 2302, 2303
Mitsubishi 2300, 2301
Onkyo 2289
Panasonic 2277, 2278, 2279
Philips 2280
Samsung 2282
Sharp 2304, 2305, 2306
Sony 2283, 2284, 2285, 2292
Toshiba 2288, 2262
Yamaha 2297, 2298, 2299
64
Page 65

Page 66

Declaration of Conformity with regard to the R&TTE Directive 1999/5/EC
Manufacturer:
PIONEER HOME ELECTRONICS
CORPORATION
1-1, Shin-ogura, Saiwai-ku,
Kawasaki-shi, Kanagawa
212-0031, Japan
English:
Hereby, Pioneer, declares that this
SBX-B70D is in compliance with the
essential requirements and other
relevant provisions of Directive
1999/5/EC.
Suomi:
Pioneer vakuuttaa täten että SBX-B70D
tyyppinen laite on direktiivin 1999/5/EY
oleellisten vaatimusten ja sitä
koskevien direktiivin muiden ehtojen
mukainen.
Nederlands:
Hierbij verklaart Pioneer dat het toestel
SBX-B70D in overeenstemming is met
de essentiële eisen en de andere
relevante bepalingen van richtlijn
1999/5/EG
EU Representative’s:
Pioneer Europe NV
Haven 1087, Keetberglaan 1,
9120 Melsele, Belgium
http://www.pioneer.eu
Indoor use only
Dansk:
Undertegnede Pioneer erklærer herved,
at følgende udstyr SBX-B70D
overholder de væsentlige krav og øvrige
relevante krav i direktiv 1999/5/EF
Deutsch:
Hiermit erklärt Pioneer, dass sich
dieses SBX-B70D in Übereinstimmung
mit den grundlegenden Anforderungen
und den anderen relevanten
Vorschriften der Richtlinie 1999/5/EG
befindet". (BMWi)
Ελληνικά:
ΜΕ ΤΗΝ ΠΑΡΟΥΣΑ Pioneer ΔΗΛΩΝΕΙ
ΟΤΙ SBX-B70D ΣΥΜΜΟΡΦΩΝΕΤΑΙ
ΠΡΟΣ ΤΙΣ ΟΥΣΙΩΔΕΙΣ ΑΠΑΙΤΗΣΕΙΣ
ΚΑΙ ΤΙΣ ΛΟΙΠΕΣ ΣΧΕΤΙΚΕΣ ΔΙΑΤΑΞΕΙΣ
ΤΗΣ ΟΔΗΓΙΑΣ 1999/5/ΕΚ
Français:
Par la présente Pioneer déclare que
l’appareil SBX-B70D est conforme aux
exigences essentielles et aux autres
dispositions pertinentes de la directive
1999/5/CE
Svenska:
Härmed intygar Pioneer att denna
SBX-B70D står I överensstämmelse
med de väsentliga egenskapskrav och
övriga relevanta bestämmelser som
framgår av direktiv 1999/5/EG.
Italiano:
Con la presente Pioneer dichiara che
questo SBX-B70D è conforme ai
requisiti essenziali ed alle altre
disposizioni pertinenti stabilite dalla
direttiva 1999/5/CE.
Español:
Por medio de la presente Pioneer
declara que el SBX-B70D cumple con
los requisitos esenciales y cualesquiera
otras disposiciones aplicables o
exigibles de la Directiva 1999/5/CE
Page 67

Português:
Pioneer declara que este SBX-B70D
está conforme com os requisitos
essenciais e outras disposições da
Directiva 1999/5/CE.
Pioneer tímto prohlašuje, že tento
SBX-B70D je ve shodě se základními
požadavky a dalšími příslušnými
ustanoveními směrnice 1999/5/ES
Eesti:
Käesolevaga kinnitab Pioneer seadme
SBX-B70D vastavust direktiivi
1999/5/EÜ põhinõuetele ja nimetatud
direktiivist tulenevatele teistele
asjakohastele sätetele.
Magyar:
Alulírott, Pioneer nyilatkozom, hogy a
SBX-B70D megfelel a vonatkozó
alapvetõ követelményeknek és az
1999/5/EC irányelv egyéb elõírásainak.
Ar šo Pioneer deklarē, ka SBX-B70D
atbilst Direktīvas 1999/5/EK būtiskajām
prasībām un citiem ar to saistītajiem
noteikumiem.
Šiuo Pioneer deklaruoja, kad šis
SBX-B70D atitinka esminius
reikalavimus ir kitas 1999/5/EB
Direktyvos nuostatas.
Malti:
Hawnhekk, Pioneer jiddikjara li dan
SBX-B70D jikkonforma mal-ħtiġijiet
essenzjali u ma provvedimenti oħrajn
relevanti li hemm fid-Dirrettiva
1999/5/EC
Pioneer izjavlja, da je ta SBX-B70D v
skladu z bistvenimi zahtevami in
ostalimi relevantnimi določili direktive
1999/5/ES.
Prin prezenta, Pioneer declara ca acest
SBX-B70D este in conformitate cu
cerintele esentiale si alte prevederi ale
Directivei 1999/5/EU.
Polski:
Niniejszym Pioneer oświadcza, że
SBX-B70D jest zgodny z zasadniczymi
wymogami oraz pozostałymi
stosownymi postanowieniami Dyrektywy
1999/5/EC
Norsk:
Pioneer erklærer herved at utstyret
SBX-B70D er i samsvar med de
grunnleggende krav og øvrige relevante
krav i direktiv 1999/5/EF.
Pioneer týmto vyhlasuje, že SBX-B70D
spĺňa základné požiadavky a všetky
príslušné ustanovenia Smernice
1999/5/ES.
R-TTE-24L_C1_En
Íslenska:
Hér með lýsir Pioneer yfir því að
SBX-B70D er í samræmi við grunnkröfur og aðrar kröfur, sem gerðar eru í
tilskipun 1999/5/EC
С настоящето, Pioneer декларира, че
този SBX-B70D отговаря на
основните изисквания и други
съответни постановления на
Директива 1999/5/EC.
Hrvatski:
Ovime tvrtka Pioneer izjavljuje da je
ovaj SBX-B70D u skladu osnovnim
zahtjevima i ostalim odredbama
Direktive 1999/5/EC.
Page 68

Printed in China
© 2015 PIONEER HOME ELECTRONICS CORPORATION.
All rights reserved.
http://www.pioneer.co.uk
http://www.pioneer.eu
<YOM200167-0003>
PIONEER HOME ELECTRONICS CORPORATION
1-1, Shin-ogura, Saiwai-ku, Kawasaki-shi, Kanagawa 212-0031, Japan
PIONEER ELECTRONICS (USA) INC.
P.O. BOX 1540, Long Beach, California 90801-1540, U.S.A. TEL: (800) 421-1404
PIONEER ELECTRONICS OF CANADA, INC.
340 Ferrier Street, Unit 2, Markham, Ontario L3R 2Z5, Canada TEL: 1-877-283-5901, 905-479-4411
PIONEER EUROPE NV
Haven 1087, Keetberglaan 1, B-9120 Melsele, Belgium TEL: 03/570.05.11
PIONEER ELECTRONICS ASIACENTRE PTE. LTD.
253 Alexandra Road, #04-01, Singapore 159936 TEL: 65-6472-7555
PIONEER ELECTRONICS AUSTRALIA PTY. LTD.
5 Arco Lane, Heatherton, Victoria, 3202, Australia, TEL: (03) 9586-6300
PIONEER ELECTRONICS DE MEXICO S.A. DE C.V.
Blvd.Manuel Avila Camacho 138 10 piso Col.Lomas de Chapultepec, Mexico, D.F. 11000 TEL: 55-9178-4270
K002_B3_En
YOM200167-0003
 Loading...