

Page 1
En
1
Page 2

Thank you for buying this Pioneer product.
Please read through these operating instructions so you will know how to operate your model properly. After you have finished reading the
instructions, put them away in a safe place for future reference.
Cleaning the speaker cabinet
Before you start
• The nominal impedance of this speaker system is 6 Ω.
Connect the speaker system to an amplifier with a load
impedance ranging from 6 Ω to 16 Ω (a model with “6 Ω to
16 Ω” displayed on the speaker output terminals).
In order to prevent damage to the speaker system resulting
from input overload, please observe the following precautions:
• Do not supply power to the speaker system in excess of the
maximum permissible input.
• When using a graphic equalizer to emphasize loud sounds
in the high-frequency range, do not use excessive amplifier
volume.
• Do not try to force a low-powered amplifier to produce loud
volumes of sound (the amplifier’s harmonic distortion will
be increased, and you may damage the speaker).
Caution: installation
• Do not attach these speakers to the wall or ceiling. They may
fall off and cause injury.
• Do not install your speakers overhead on the ceiling or wall. If
improperly attached, the speaker grille can fall and cause
damage or personal injury.
• Switch off and unplug your AV equipment and consult the
instructions when connecting up components. Make sure you
use the correct connecting cables.
• The grille is affixed with magnets. The grille may fall if force is
applied to the grille in a horizontal direction. When cleaning
the speaker, remove the grille first.
Caution: in use
• Do not place the speaker on an unstable surface. It could
present a hazard if it falls, as well as damaging the equipment.
• Do not use the speaker to output distorted sound for long
periods of times. This can result in a fire hazard.
• Do not sit or stand on the speaker, or let children play on the
speaker.
• Do not put large or heavy objects on top of the speaker.
• Do not place magnetic objects such as screwdrivers or iron
parts near the tweeter or midrange. Since the speakers use
strong magnets, the objects may be attracted, causing injury
or damaging the diaphragm.
For U.S. model
With normal use, wiping with a dry cloth should be sufficient to
keep the cabinet clean. If necessary, clean with a cloth dipped in
a neutral cleanser diluted five or six times with water, and wrung
out well. Do not use furniture wax or cleansers.
Never use thinners, benzine, insecticide sprays or other chemicals
on or near this unit since these will corrode the surfaces.
Cleaning the glossy finish of the speaker system
S-81C-K only
• If you use a dusty or hard cloth or if you rub the screen hard,
the finish of the product will be scratched.
• If you clean the surface of the speaker system with a wet cloth,
water droplets on the surface may enter into the product,
resulting in malfunction.
• When cleaning the finish of the speaker system, gently wipe it
with a dry soft cloth; the supplied cleaning cloth.
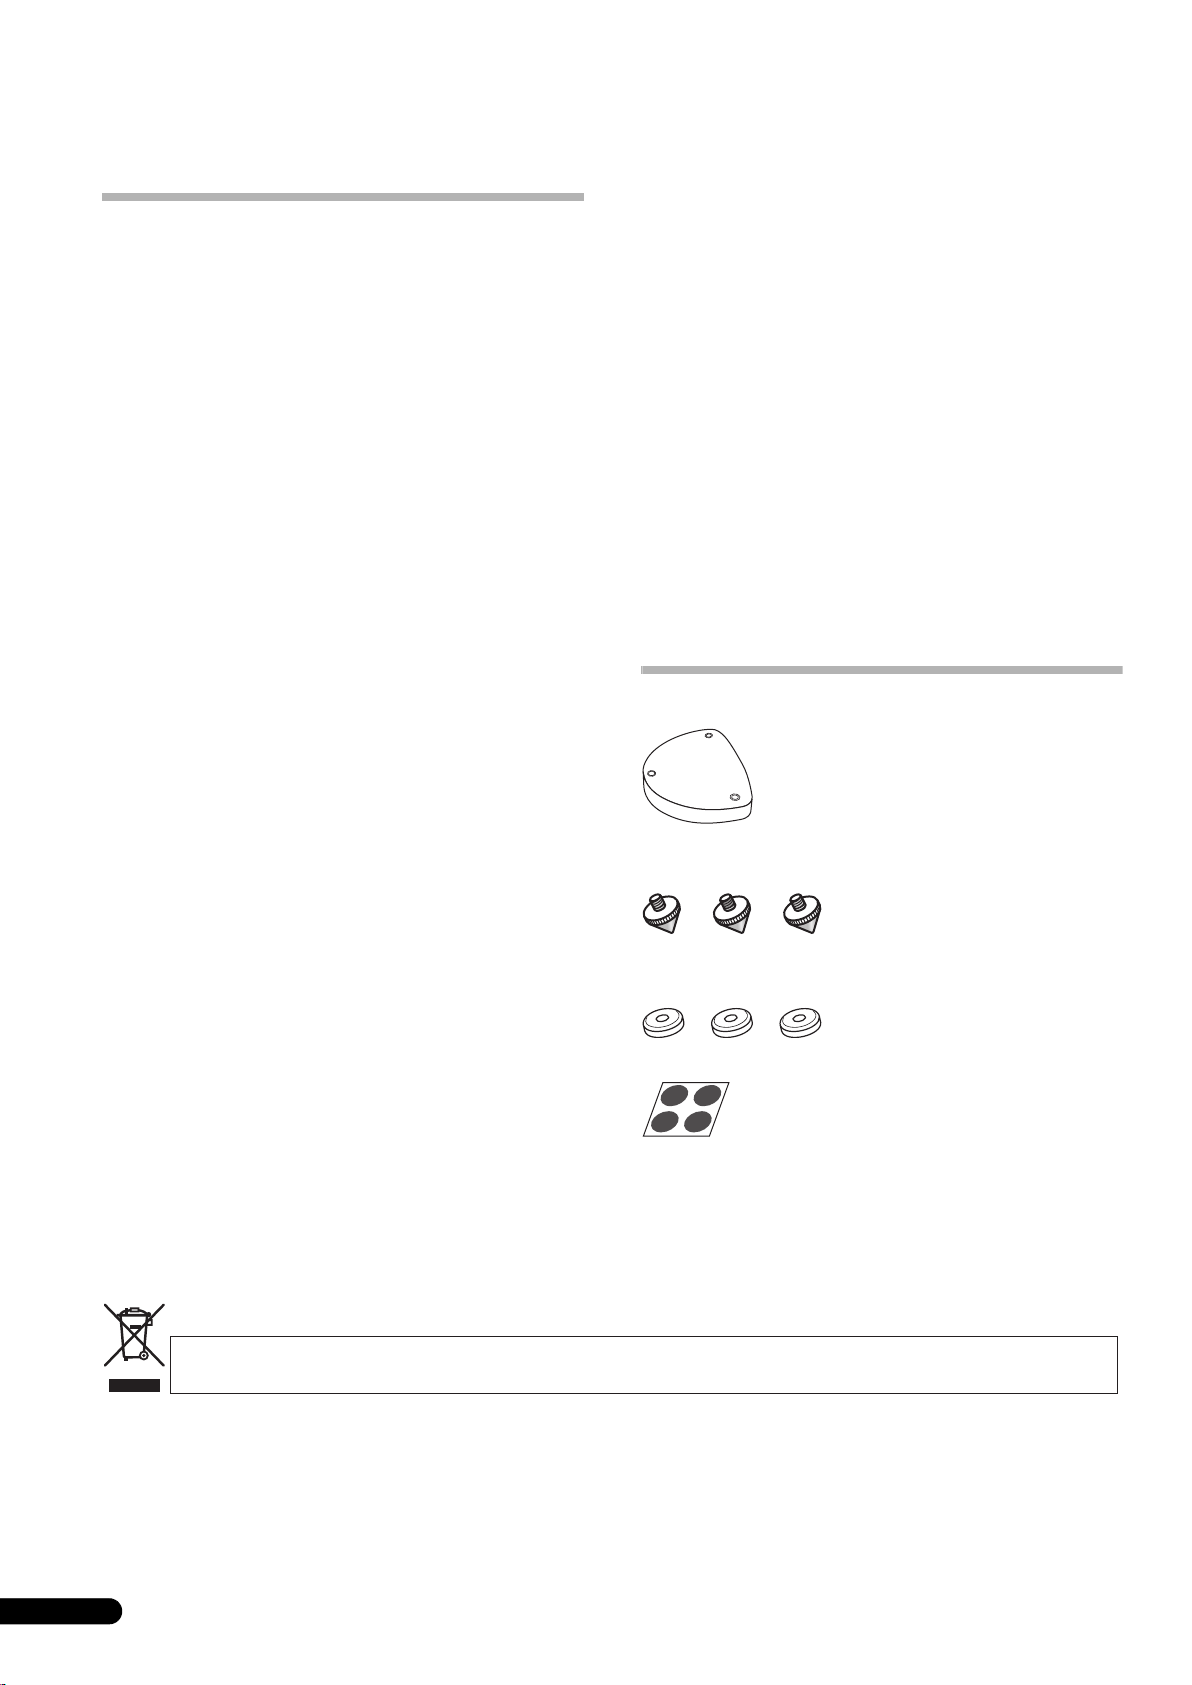
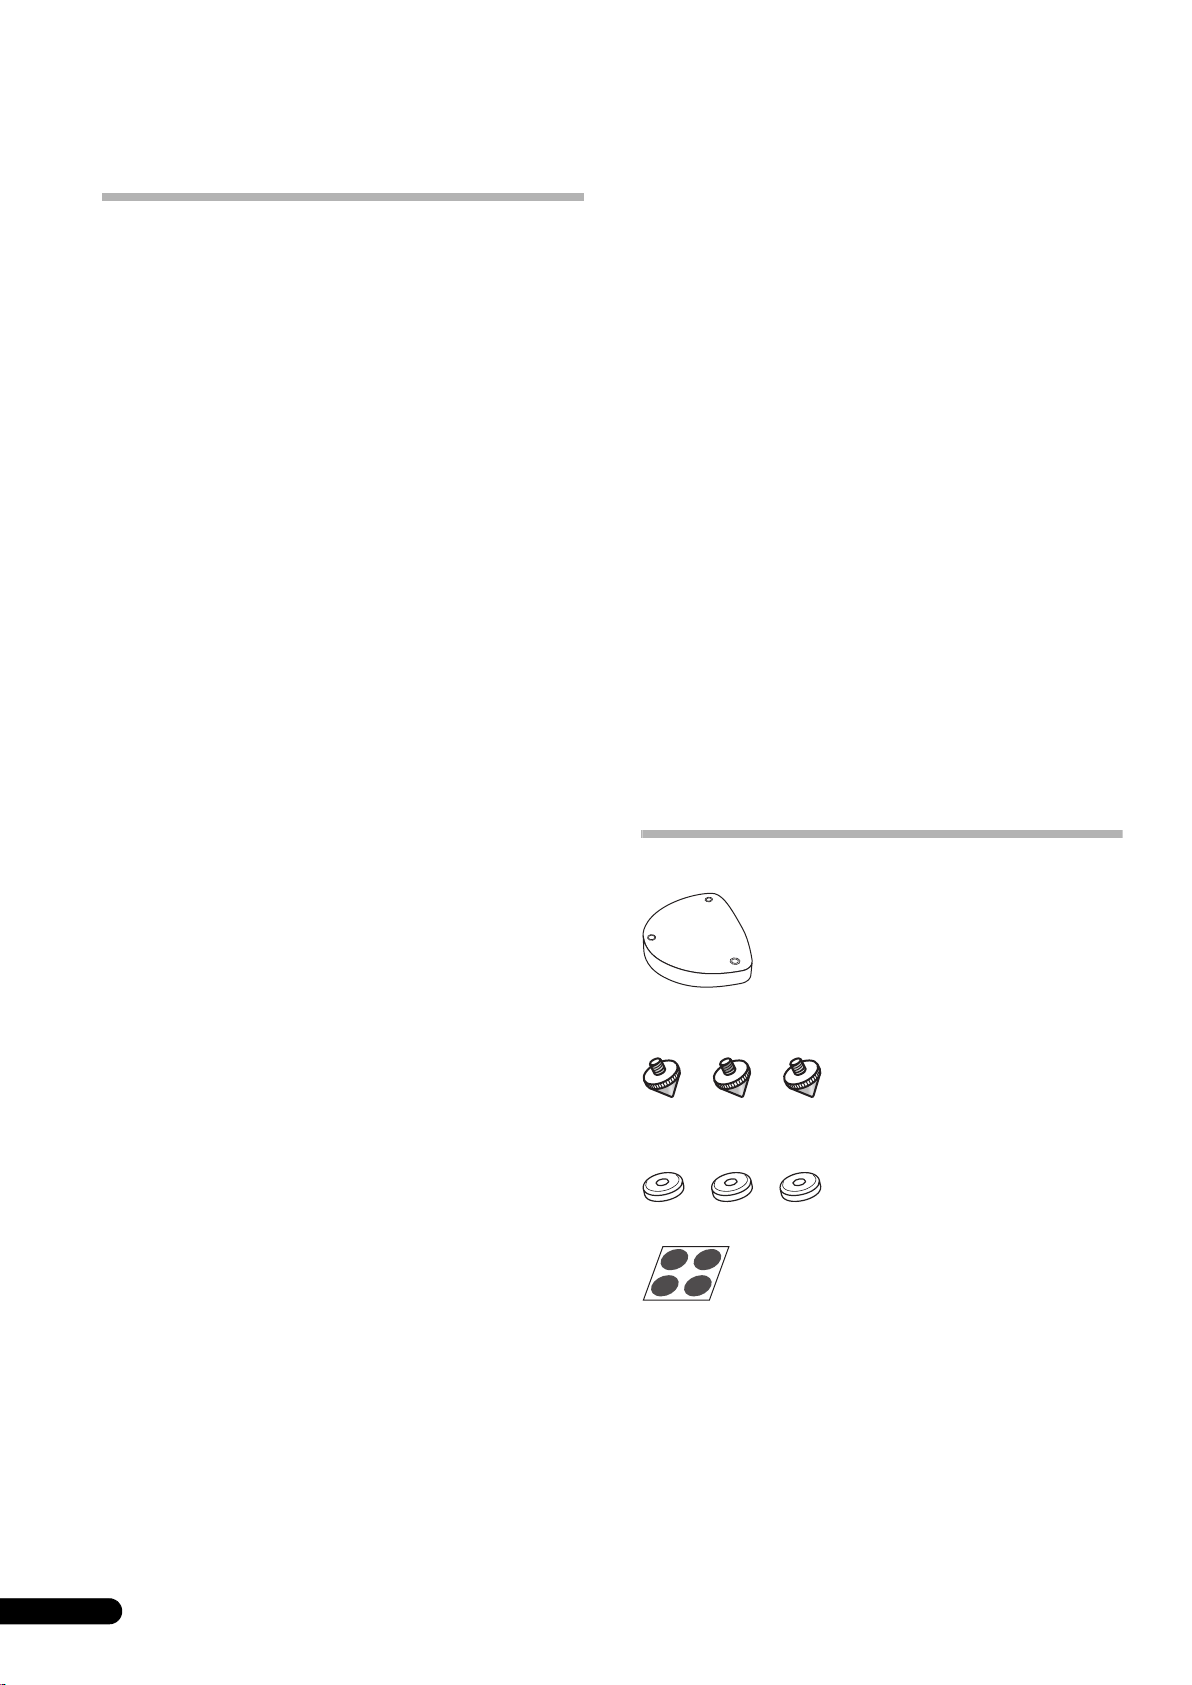
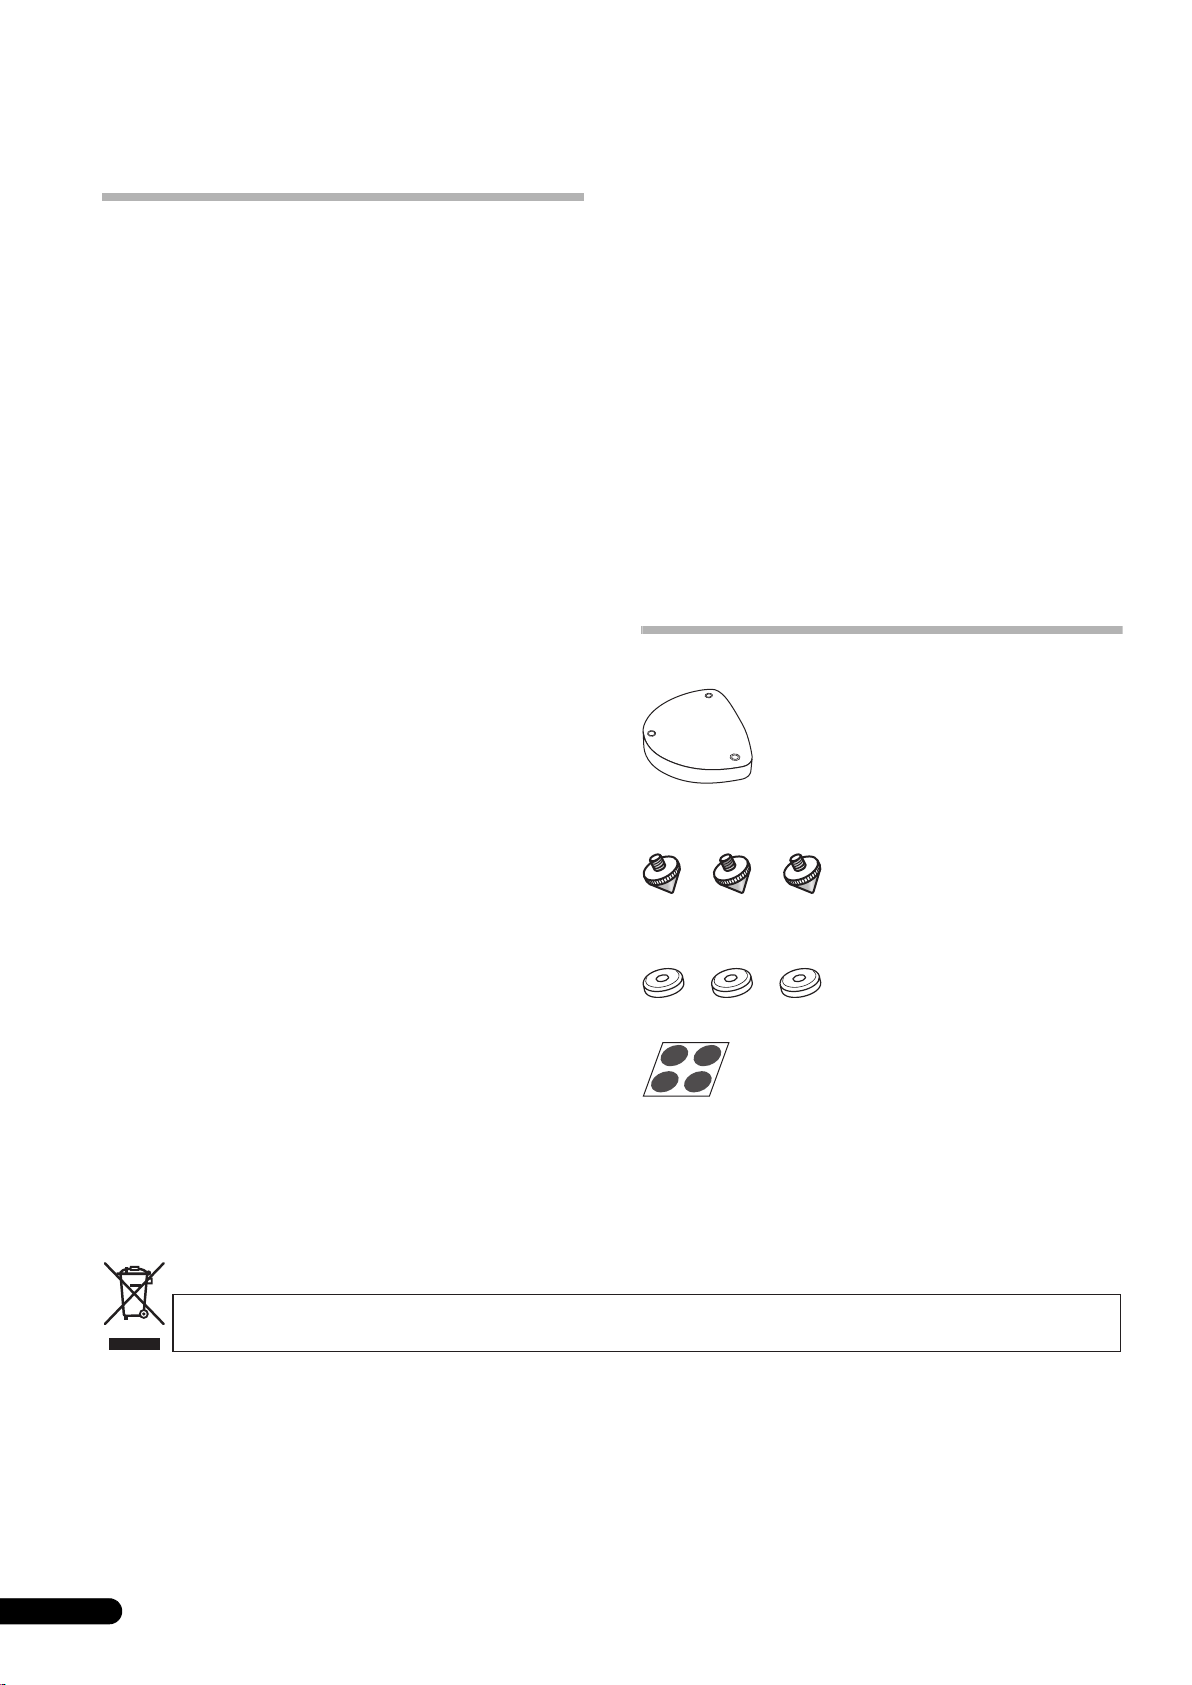
What’s in the box
Speaker base x 1
Spikes x 3
Spike bases x 3
Non-skid pads x 4
Grille x 1
Cleaning cloth (for S-81C-K only) x 1
Operating instructions
WARNING:
cords associated with accessories sold with the
product will expose you to chemicals listed on
proposition 65 known to the State of California and
other governmental entities to cause cancer and
birth defect or other reproductive harm.
Wash hands after handling
Handling the cord on this product or
D36-P4_A_En
For European model
If you want to dispose this product, do not mix it with general household waste. There is a separate collection system for used
electronic products in accordance with legislation that requires proper treatment, recovery and recycling.
Private households in the member states of the EU, in Switzerland and Norway may return their used electronic products free of charge to
designated collection facilities or to a retailer (if you purchase a similar new one).
For countries not mentioned above, please contact your local authorities for the correct method of disposal.
By doing so you will ensure that your disposed product undergoes the necessary treatment, recovery and recycling and thus prevent potential
negative effects on the environment and human health.
2
En
K058_A_En
Page 3
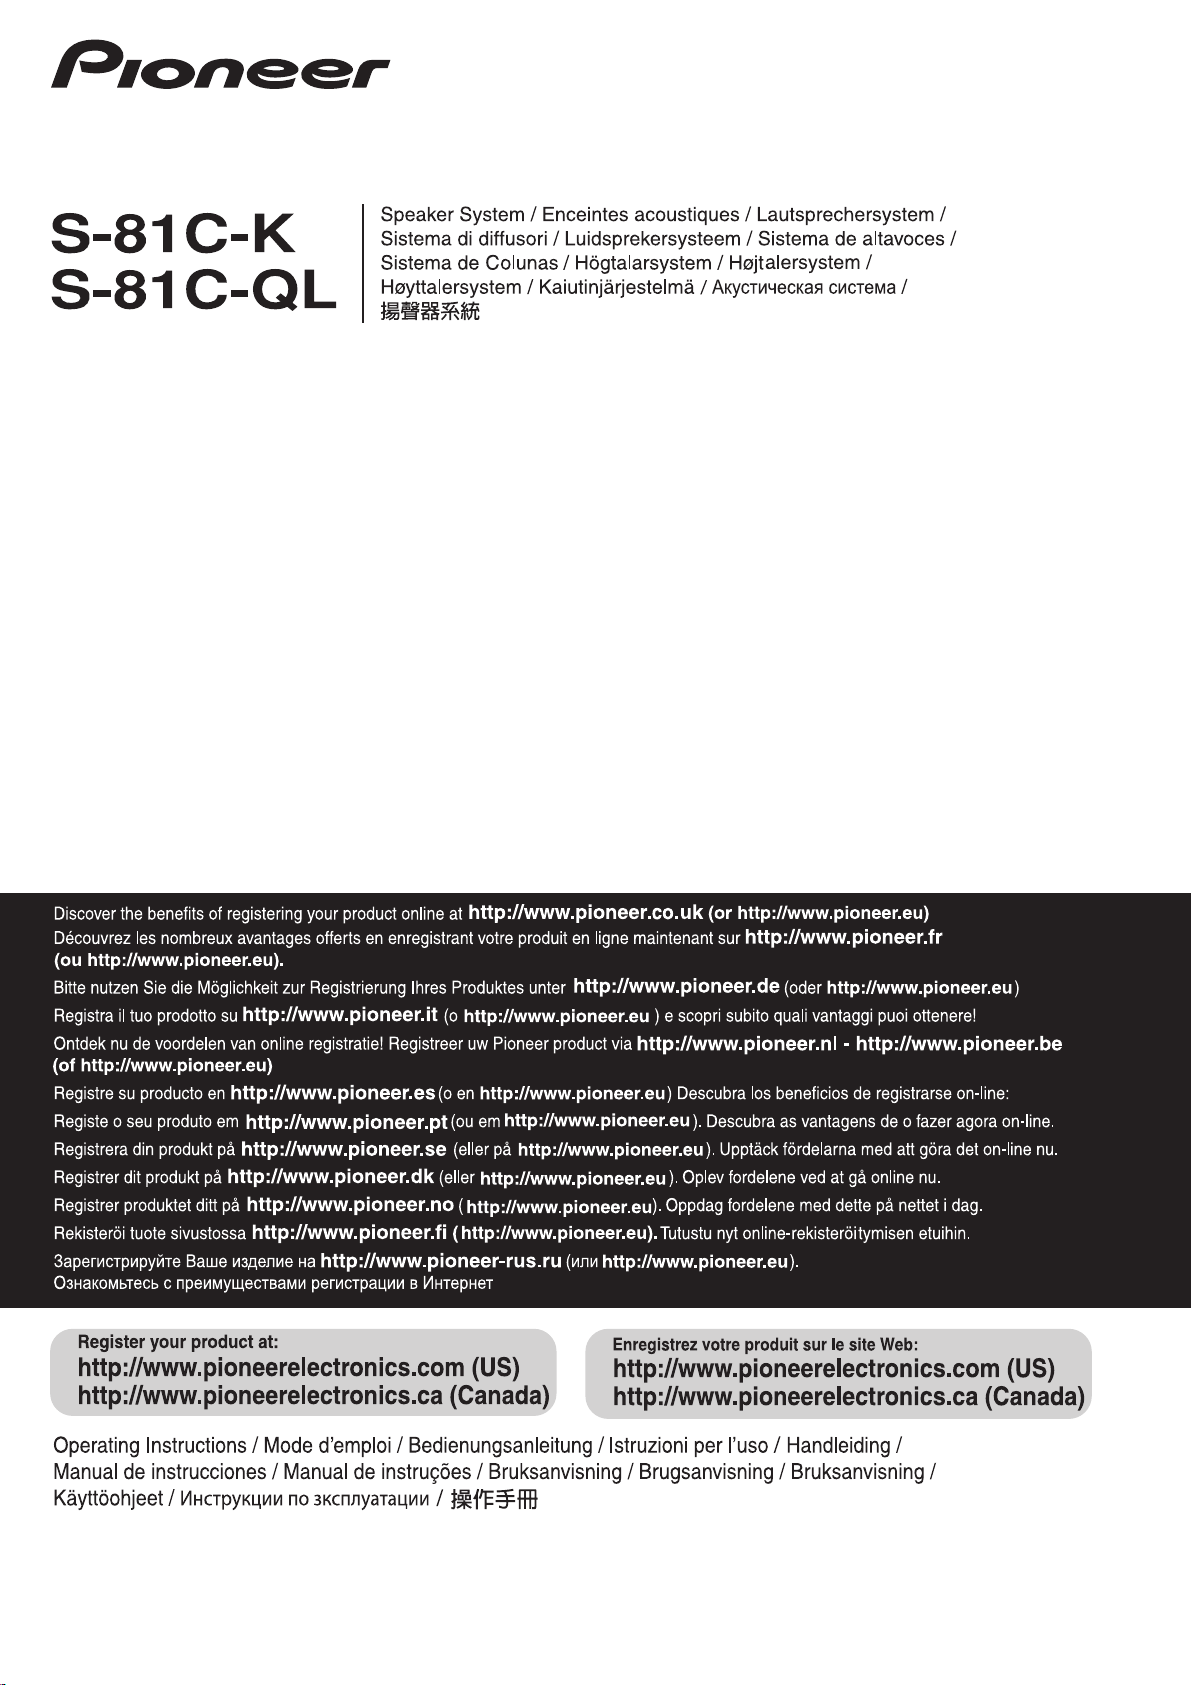
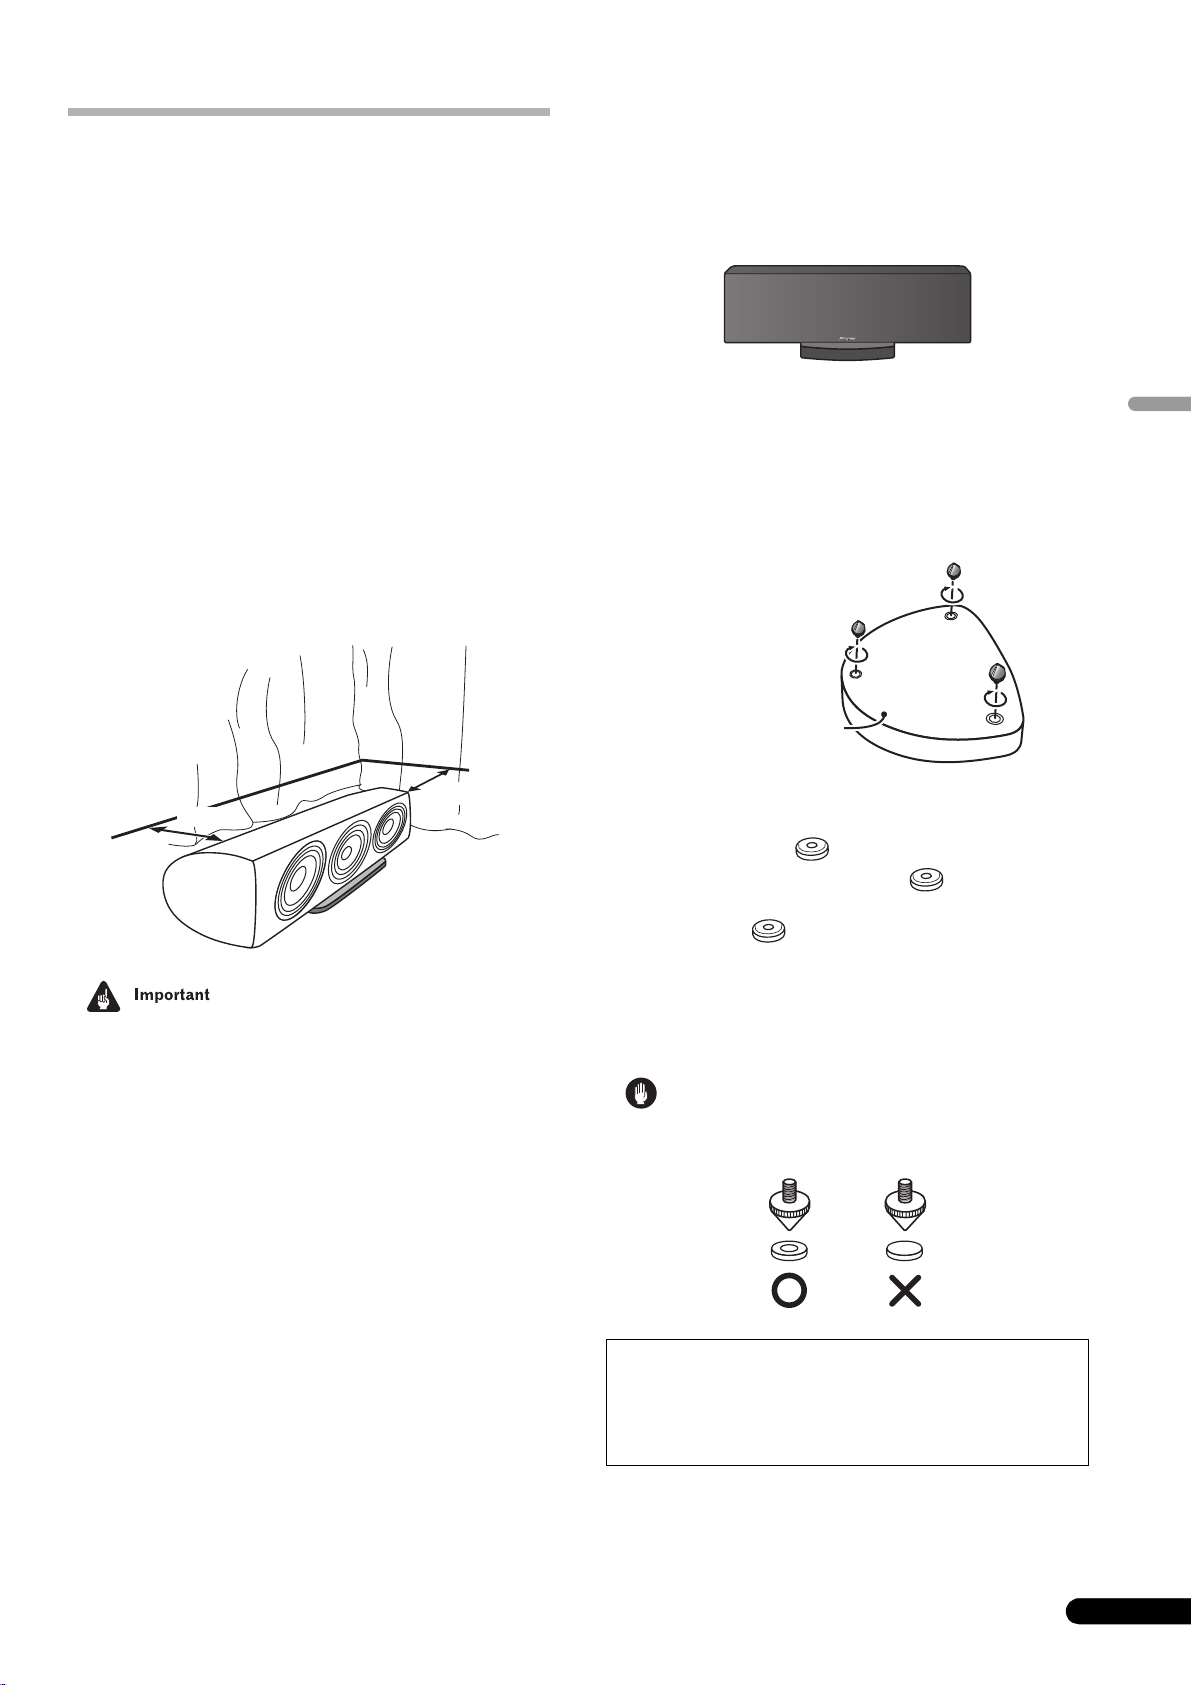
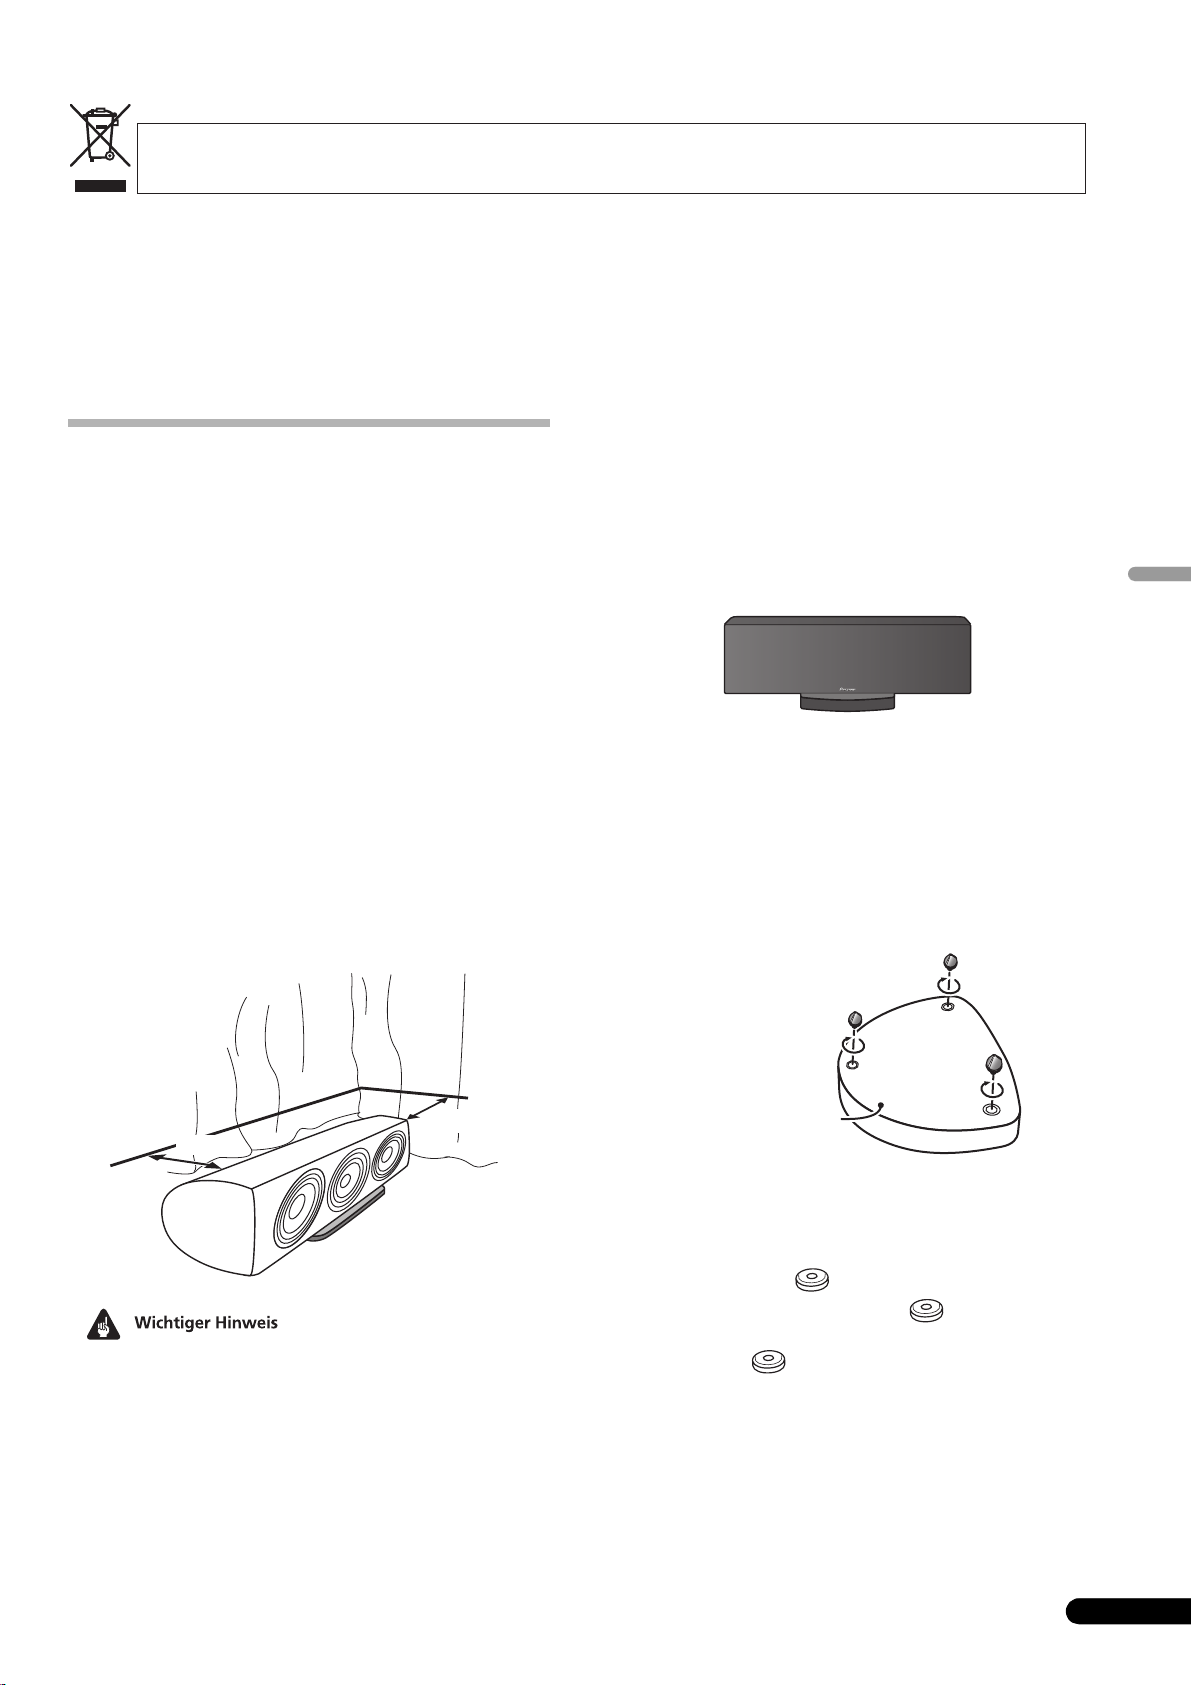
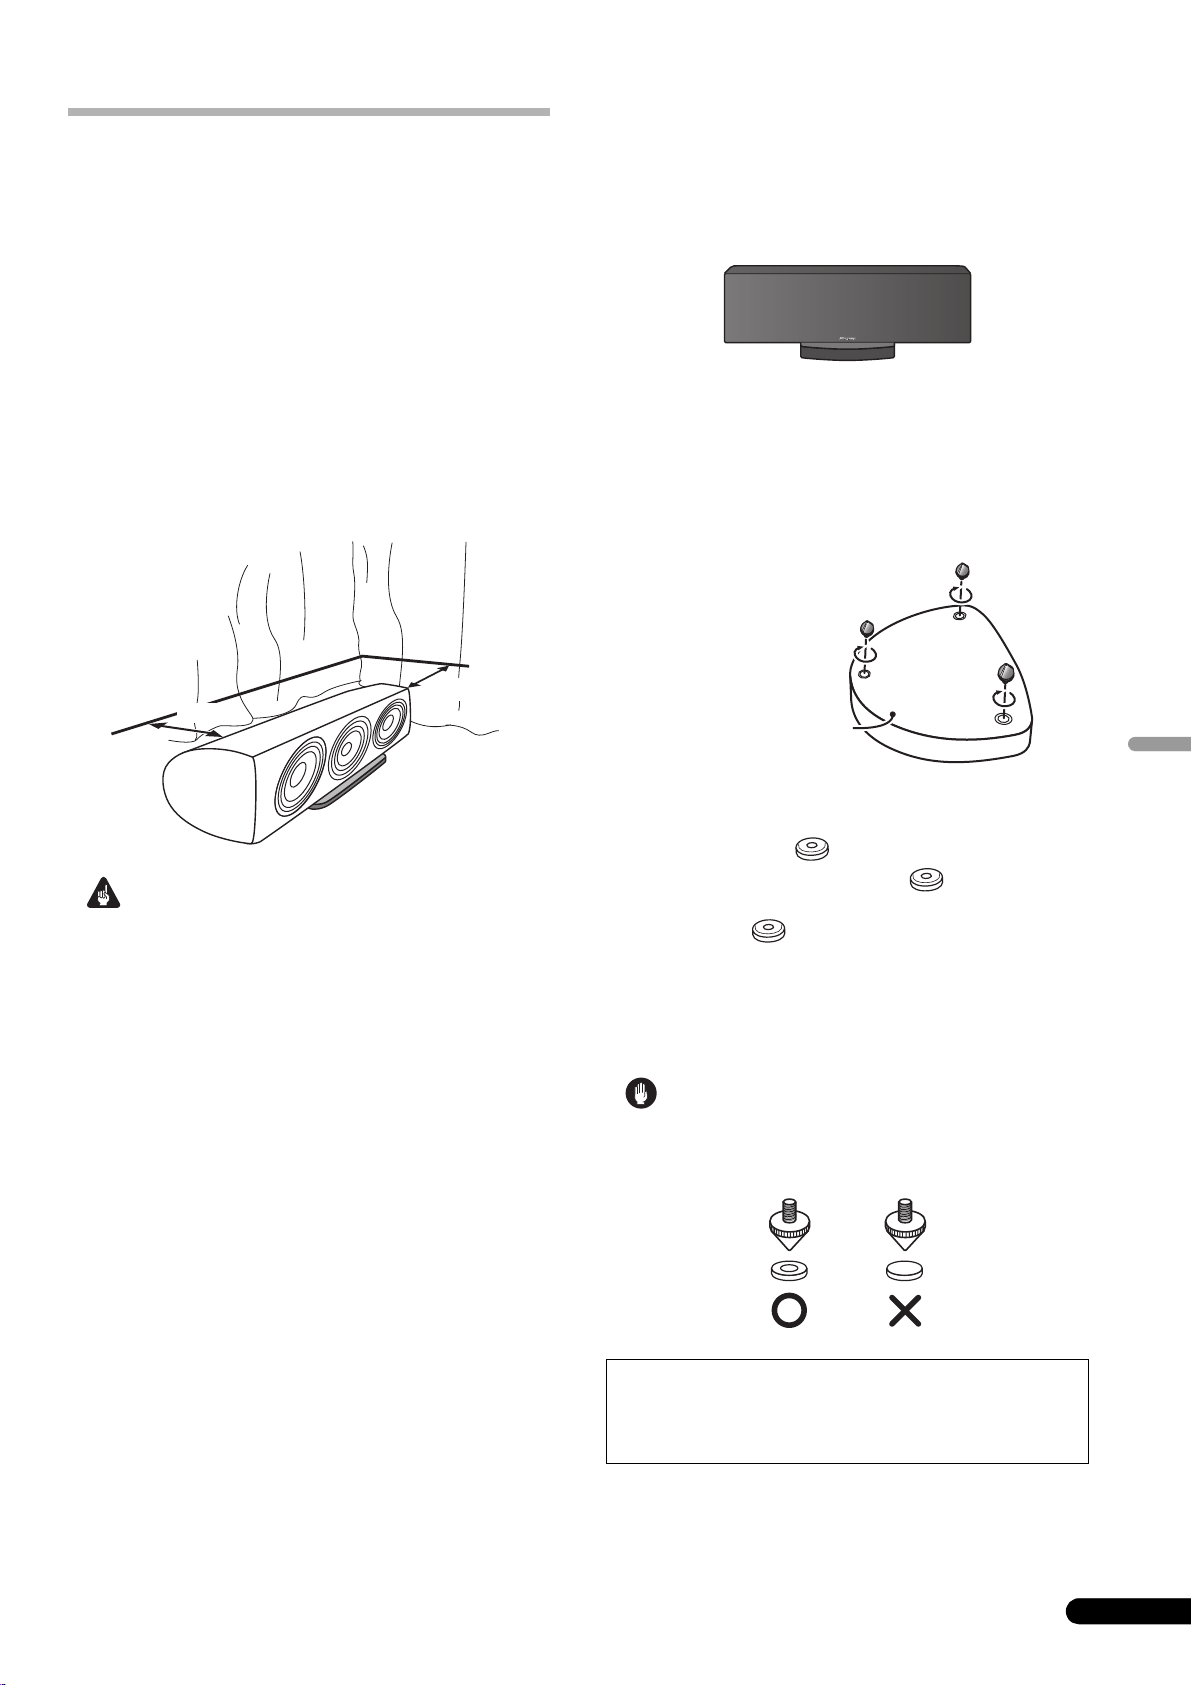
How to install
Speaker base bottom
Choosing where to place the speaker systems
• Sounds played through speaker systems are easily affected in
subtle ways by the conditions in the listening space.
• For best sound, choose a solid floor upon which to place the
speakers, and position the speakers as shown below. The level
of low sounds can be adjusted by moving the speakers closer
to or further from the wall. Adjust the speakers so that they are
equidistant from their respective side walls to assure balanced
sound.
• If the room has a lot of reverberation, we recommend hanging
heavy fabric on the walls, and/or putting a carpet on the floor
to damp the sound. For best results, cover walls completely.
• This speaker is a bookshelf-type speaker which will give best
performance when placed on a solid, level surface off the floor.
Placing the speaker directly on the floor will result in boomy,
undefined sound.
Using the speaker base
Included with this speaker system is a speaker base for better
sound, stability and safety. Place the speaker on the base as
shown below.
Use the furnished spikes or non-skid pads when installing the
speaker on the speaker base.
English
When using the spikes
This speaker system includes spikes that you can use to isolate
the speaker from the floor. Use the supplied spike bases to avoid
scratching the floor or other surface where the speaker is placed.
1 Twist the spikes into the threaded metal inserts
embedded in the bottom of the speaker base.
50 cm
11
(19
/
16 in.)
• Pioneer assumes no liability whatsoever for damages
resulting from assembly, improper mounting, insufficient
reinforcement, misuse of the product, acts of nature, etc.
S-81C-QL only
• The cabinet uses sliced veneer made of natural wood. Do not
place the speaker where it will be in direct sunlight, and avoid
positioning it near heaters and air conditioners. Doing so may
cause warping and discoloration of the speaker cabinet and
damage to the speaker.
20 cm
7
(7
/
8 in.)
2 Set the spike bases in the positions where the points of
the three spikes will strike when the speaker is set down.
3 Set the speaker base on the spike bases and check to
confirm the speaker base does not rock.
4 Set the speaker on the speaker base and check to confirm
the speaker does not rock
• Always use the spike bases as shown, with the indented
surface facing up to receive the spike point.
If you do not use the spike bases when placing the
speakers, the spikes may cause damage to the floor. If
you plan on using the spikes we highly recommend to
use the spike bases.
3
En
Page 4
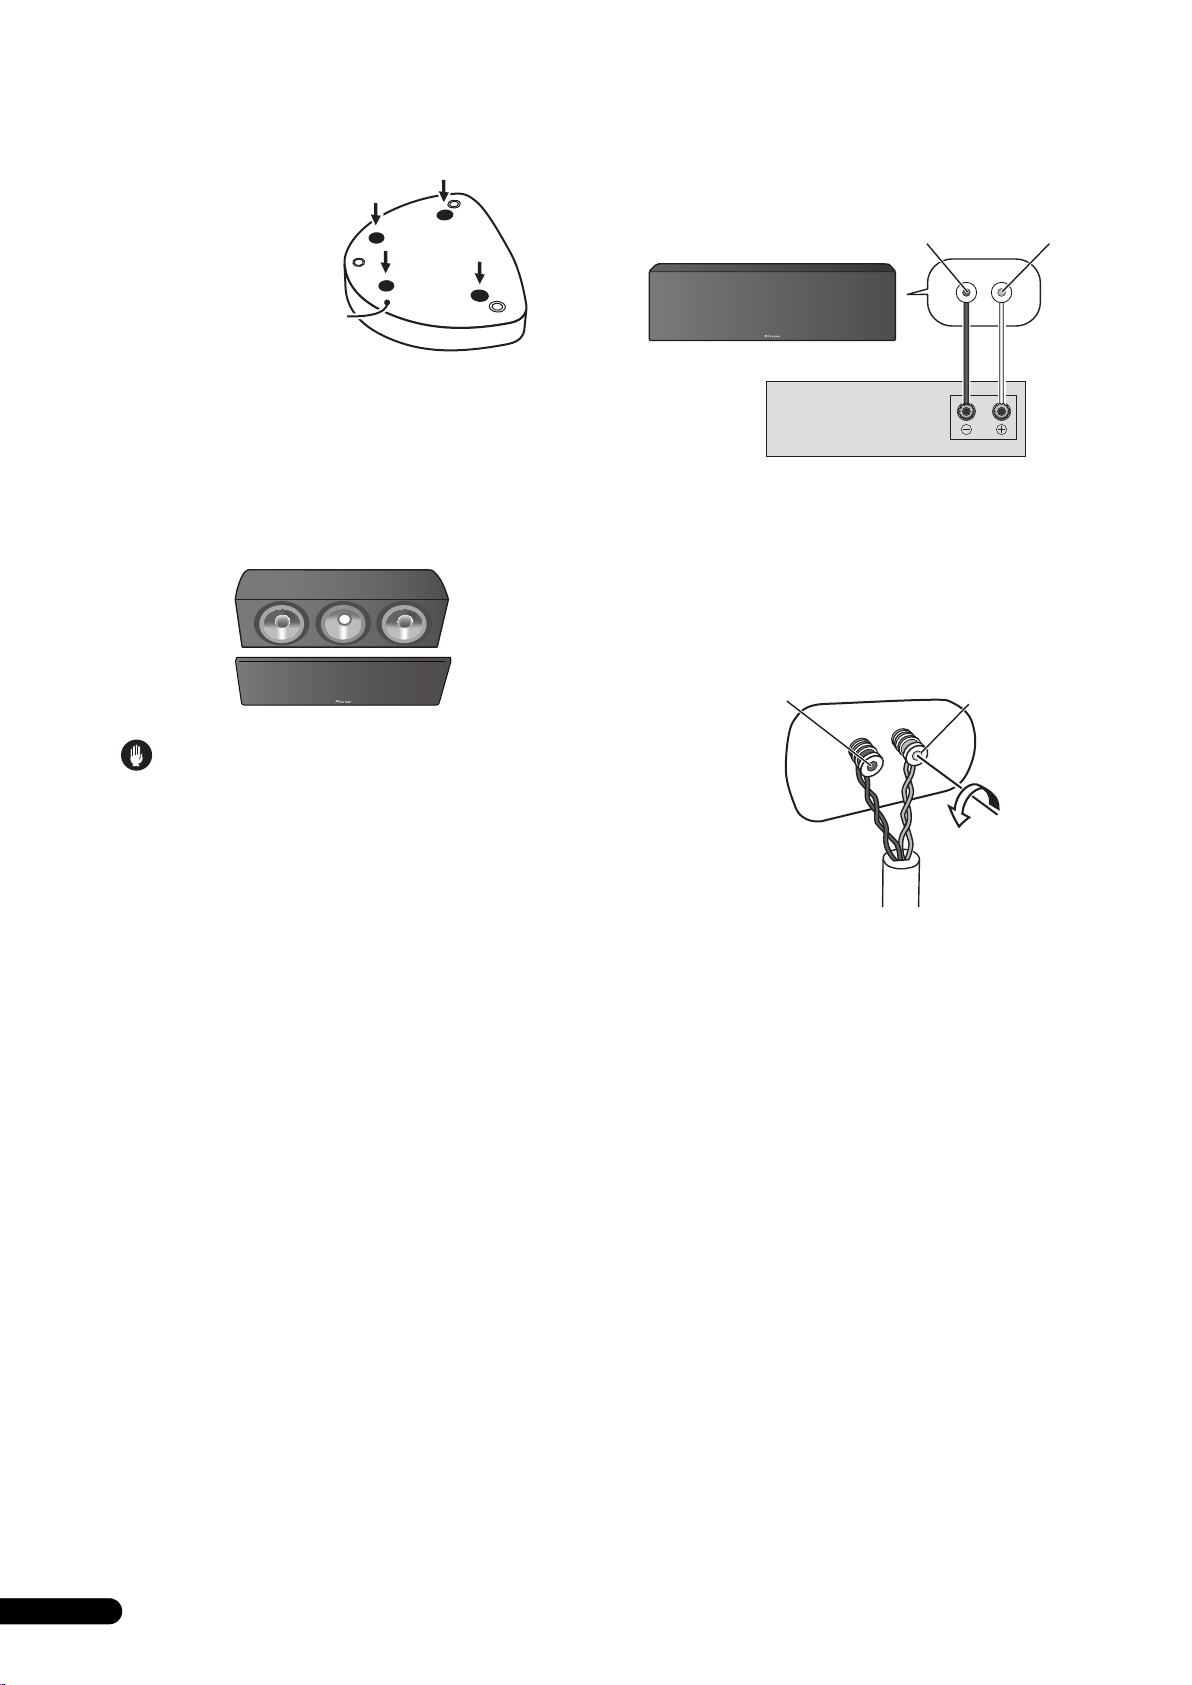
When using the non-skid pads
Speaker base bottom
T
To assure stable installation, affix the non-skid pads to the bottom
surface of the speaker base.
Connections
This speaker does not include speaker cables used for connecting
to an amplifier.
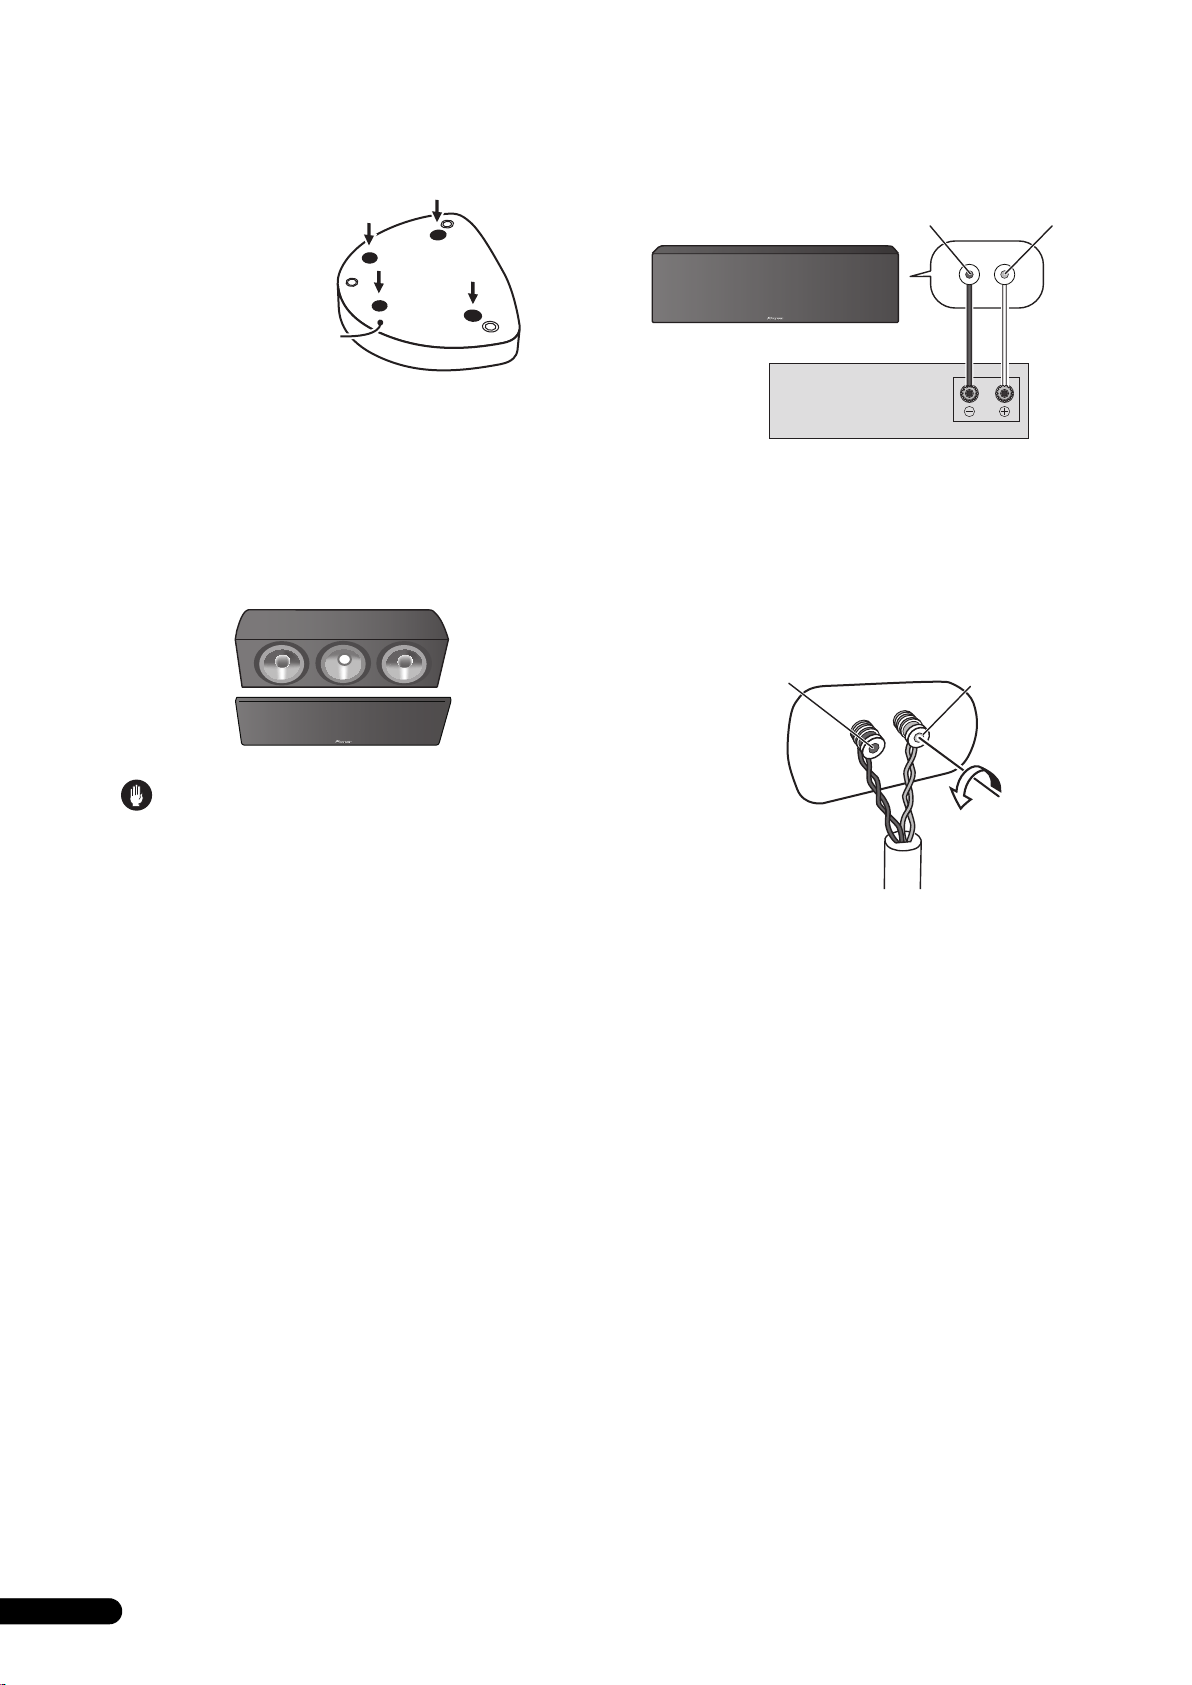
Attaching/removing the grille
This speaker system comes with grille which may be attached and
removed by:
1 To attach the grille, align the grille with the speaker body
and press gently.
2 To remove the grille, hold the grille with both hands near
the middle and pull gently toward you to separate the grille
from the speaker.
Black
terminal
Amplifier (rear)
Speaker (rear):
Input panel
(−)
SPEAKERS
OUTPUT
CENTER
Red
terminal
(+)
Connecting the cables
1 Switch off the power to your amplifier.
2 Connect the speaker cables to the input terminals on the
back of the speaker. For input terminal polarity, red is
positive (+) and black is negative (–).
Loosen the knobs on the input terminals and insert the speaker
cable wires into each of the terminal post holes, then tighten the
knobs.
Black terminal
(−)
Red terminal
(+)
• Magnets are used for holding the grille in place. Do not place
the grilles near devices that may be susceptible to magnetic
influence (CRT televisions, etc.).
3 Connect the other ends of the cables to the amp's
speaker
output terminals (for more details, refer to your amp
instruction manual).
• You can also connect the speaker’s terminals with a banana
plug. When using a banana plug, be sure to remove the cap at
the tip of the input terminal.
• After connecting the plugs, pull lightly on the cables to make
sure that the ends of the cables are securely connected to the
terminals. Poor connections can create noise and
interruptions in the sound.
• If the cables’ wires happen to be pushed out of the terminals,
allowing the wires to come into contact with each other, it
places an excessive additional load on the amp. This may
cause the amp to stop functioning, and may even damage the
amp.
• When using a set of speakers connected to an amplifier, you
won’t be able to obtain the normal stereo effect if the polarity
(+, –) of one of the speakers (left or right) is reversed.
CAUTION
hese speaker terminals carry HAZARDOUS LIVE
voltage. To prevent the risk of electric shock when
connecting or disconnecting the speaker cables,
disconnect the power cord before touching any
uninsulated parts.
D3-4-2-2-3_A_En
4
En
Page 5
Specifications
S001_En
Selecting fine audio equipment such as the unit
you’ve just purchased is only the start of your
musical enjoyment. Now it’s time to consider how
you can maximize the fun and excitement your
equipment offers. This manufacturer and the
Electronic Industries Association’s Consumer
Electronics Group want you to get the most out of
your equipment by playing it at a safe level. One that
lets the sound come through loud and clear without
annoying blaring or distortion-and, most importantly,
without affecting your sensitive hearing.
Sound can be deceiving. Over time your hearing
“comfort level” adapts to higher volumes of sound.
So what sounds “normal” can actually be loud and
harmful to your hearing. Guard against this by
setting your equipment at a safe level BEFORE your
hearing adapts.
To establish a safe level:
• Start your volume control at a low setting.
• Slowly increase the sound until you can hear it
comfortably and clearly, and without distortion.
Once you have established a comfortable sound
level:
• Set the dial and leave it there.
Taking a minute to do this now will help to prevent
hearing damage or loss in the future. After all, we
want you listening for a lifetime.
We Want You Listening For A Lifetime
Used wisely, your new sound equipment will
provide a lifetime of fun and enjoyment. Since
hearing damage from loud noise is often
undetectable until it is too late, this manufacturer
and the Electronic Industries Association’s
Consumer Electronics Group recommend you avoid
prolonged exposure to excessive noise. This list of
sound levels is included for your protection.
Decibel
Level Example
30 Quiet library, soft whispers
40
Living room, refrigerator, bedroom away from traffic
50 Light traffic, normal conversation, quiet office
60 Air conditioner at 20 feet, sewing machine
70 Vacuum cleaner, hair dryer, noisy restaurant
80
Average city traffic, garbage disposals, alarm clock
at two feet.
THE FOLLOWING NOISES CAN BE DANGEROUS
UNDER CONSTANT EXPOSURE
90
Subway, motorcycle, truck traffic, lawn mower
100 Garbage truck, chain saw, pneumatic drill
120 Rock band concert in front of speakers,
thunderclap
140 Gunshot blast, jet plane
180 Rocket launching pad
Information courtesy of the Deafness Research Foundation.
For U.S. model
Enclosure. . . . . . . . . . . . . . . . . . . . . . . . . . . . Bass-reflex bookshelf type
Configuration . . . . . . . . . . . . . . . . . . . . . . . . . . . . . . . . . . . . . . . . . .3-way
Woofer . . . . . . . . . . . . . . . . . . . . . . . . . . . . . .13 cm (5
Mid/Tweeter . . . . Coaxial unit: 13 cm (5
Impedance. . . . . . . . . . . . . . . . . . . . . . . . . . . . . . . . . . . . . . . . . . . . . . 6
Frequency response . . . . . . . . . . . . . . . . . . . . . . . . . . . . 40 Hz to 50 kHz
Sensitivity. . . . . . . . . . . . . . . . . . . . . . . . . . . . . . . . . . . . . 85.5 dB (2.83 V)
Maximum input power . . . . . . . . . . . . . . . . . . . . . . . . . . . . . . . . . . 130 W
Crossover frequency. . . . . . . . . . . . . . . . . . . . . . . . . . . . . . 370 Hz/3 kHz
Exterior dimensions . . . . . . . 560 (W) mm x 190 (H) mm x 280 (D) mm
*Height (including speaker stand): 211.5 mm
Weight . . . . . . . . . . . . . . . . . . . . . . . . . . . . . . . . . . 14.5 kg (31 lbs 16 oz.)
1
22
/16 (W) in. x 7 4/8 (H) in. x 11 1/
1
/8 in.) cone/2.5 cm (1 in.) dome
Supplied accessories
Speaker base. . . . . . . . . . . . . . . . . . . . . . . . . . . . . . . . . . . . . . . . . . . . . . 1
Spikes. . . . . . . . . . . . . . . . . . . . . . . . . . . . . . . . . . . . . . . . . . . . . . . . . . . . 3
Spike bases . . . . . . . . . . . . . . . . . . . . . . . . . . . . . . . . . . . . . . . . . . . . . . . 3
Non-skid pads . . . . . . . . . . . . . . . . . . . . . . . . . . . . . . . . . . . . . . . . . . . . . 4
Grille. . . . . . . . . . . . . . . . . . . . . . . . . . . . . . . . . . . . . . . . . . . . . . . . . . . . . 1
Cleaning cloth (S-81C-K only) . . . . . . . . . . . . . . . . . . . . . . . . . . . . . . . . 1
Operating instructions
1
/8 in.) cone x 2
(D) in.
16
3
/ 8
/8 (H) in.
Specifications and design subject to possible modification
without notice, due to improvements.
Ω
is a trademark placed on a product with Pioneer’s Phase
Control technology. This technology enables high-grade sound
reproduction through each component by improving overall
phase matching.
Published by Pioneer Corporation.
Copyright © 2008 Pioneer Corporation.
All rights reserved.
English
5
En
Page 6
Nous vous remercions d’avoir acheté ce produit Pioneer.
Veuillez lire attentivement ce mode d’emploi de manière à pouvoir utiliser votre modèle correctement. Après avoir lu ces explications,
conservez-les en lieu sûr pour éventuellement les consulter plus tard.
Nettoyage du coffret de l’enceinte
Avant de commencer
• L’impédance nominale de ces enceintes acoustiques est de
6 Ω. Raccordez ces enceintes à un amplificateur dont
l’impédance de charge va de 6 Ω à 16 Ω (un modèle pour
lequel “6 Ω to 16 Ω” est indiqué sur les bornes de sortie de
haut-parleurs).
Pour éviter d’endommager les enceintes par une surcharge à
l’entrée, observez les précautions suivantes :
• Ne fournissez pas aux enceintes acoustiques une
puissance électrique dépassant l’entrée maximale
autorisée.
• Si vous utilisez un égaliseur graphique pour accentuer les
sons dans la plage des hautes fréquences, n’élevez pas trop
le volume de l’amplificateur.
• N’essayez pas de pousser un amplificateur de faible
puissance à produire un volume sonore élevé, car la
distorsion harmonique de l’amplificateur en serait
accentuée et vous pourriez endommager les haut-parleurs.
Précautions à l’installation
• Ne fixez pas les enceintes sur une paroi ou au plafond, car
elles pourraient tomber et provoquer des blessures.
• N’installez pas les enceintes en hauteur, au plafond ou sur
une paroi. Si elle est mal installée, la grille des haut-parleurs
pourrait tomber et provoquer des dégâts, voire des blessures
à des personnes.
• Mettez votre système audiovisuel hors tension et débranchezle, puis consultez le mode d’emploi avant de brancher des
composants. Prenez soin d’utiliser correctement les cordons
de raccordement.
• La grille est immobilisée au moyen d’aimants. La grille
pourrait tomber si vous y appliquez une force dans le sens
horizontal. Pour nettoyer l’enceinte, déposez d’abord sa grille.
Normalement, il suffira de frottez le coffret de ces enceintes avec
un linge sec pour maintenir leur propreté. Au besoin, trempez un
linge dans un détergent neutre allongé de cinq à six fois son
volume d’eau et essorez bien le linge avant de l’utiliser pour frotter
le coffret. N’utilisez pas de cire ou de détergent pour mobilier.
N’employez jamais de diluant, benzine, insecticide en atomiseur
ou autre produit chimique sur les coffrets ou à proximité, car cela
endommagerait leurs surfaces.
Nettoyage de la finition brillante de l’enceinte
S-81C-K seulement
• Vous risquez de griffer la finition du produit si vous utilisez un
chiffon poussiéreux ou rugueux ou si vous frottez fortement.
• Si vous nettoyez la surface de l’enceinte avec un chiffon
humide, des goutelettes d’eau risquent d’y pénétrer et de
provoquer un mauvais fonctionnement.
• Lors du nettoyage de la finition de l’enceinte, frottez
délicatement au moyen d’un linge doux et sec ou du chiffon
de nettoyage fourni.
Contenu de l’emballage
Base d’enceinte x 1
Précautions à l’emploi
• Ne placez pas l’enceinte sur une surface instable, car en
tombant, elle pourrait entraîner des blessures et être
endommagée.
• N’utilisez pas les enceintes pour produire des sons distordus
pendant une longue période, car ceci pourrait provoquer un
incendie.
• Ne montez pas et ne vous asseyez pas sur les enceintes et ne
laissez pas des enfants jouer sur celles-ci.
• Ne posez pas d’objets lourds ou volumineux sur le dessus des
enceintes.
• Ne placez pas d’objets magnétiques tels que des tournevis ou
des pièces en fer près du tweeter ou du médium. Comme ces
haut-parleurs utilisent des aimants puissants, ces objets
pourraient être attirés, provoquant des dégâts aux hautparleurs ou endommageant leur diaphragme.
Si vous souhaitez vous débarrasser de cet appareil, ne le mettez pas à la poubelle avec vos ordures ménagères. Il existe un système de
collecte séparé pour les appareils électroniques usagés, qui doivent être récupérés, traités et recyclés conformément à la législation.
Les habitants des états membres de l’UE, de Suisse et de Norvège peuvent retourner gratuitement leurs appareils électroniques usagés aux
centres de collecte agréés ou à un détaillant (si vous rachetez un appareil similaire neuf).
Dans les pays qui ne sont pas mentionnés ci-dessus, veuillez contacter les autorités locales pour savoir comment vous pouvez vous débarrasser
de vos appareils.
Vous garantirez ainsi que les appareils dont vous vous débarrassez sont correctement récupérés, traités et recyclés et préviendrez de cette façon
les impacts néfastes possibles sur l’environnement et la santé humaine.
Pointes de découplage x 3
Bases pour pointes de découplage x 3
Coussinets antidérapants x 4
Grille x 1
Chiffon de nettoyage (pour S-81C-K seulement) x 1
Mode d’emploi
K058_A_Fr
2
Fr
Page 7
Méthode d’installation
50 cm
20 cm
Choix d’un emplacement pour les enceintes
acoustiques
• Les sons reproduits par les enceintes acoustiques sont
facilement affectés de manière subtile par les conditions du
local d’écoute.
• Pour obtenir un son optimal, choisissez un plancher solide
pour disposer les enceintes et positionnez-les comme indiqué
ci-après. Le niveau des sons graves peut être ajusté en
rapprochant ou éloignant les enceintes par rapport aux parois.
Afin d’obtenir un son équilibré, ajustez les enceintes de sorte
qu’elles soient équidistantes de leur mur respectif.
• Si la pièce à tendance à réverbérer les sons, nous conseillons
de suspendre des tentures aux murs et/ou de placer un tapis
sur le plancher afin d’amortir les sons. Pour obtenir les
meilleurs résultats possibles, couvrez complètement les
murs.
• Cette enceinte est du type bibliothèque et elle déploiera donc
ses meilleures performances lorsqu’elle sera placée sur une
surface solide et plate, séparée du plancher. Le fait de placer
l’enceinte directement sur le plancher provoquera un son
ronflant et mal défini.
Utilisation de la base d’enceinte fournie
Un socle d’enceinte est fourni avec cette enceinte pour améliorer
le son, la stabilité et la sécurité. Placez l’enceinte sur le socle
comme illustré ci-dessous.
Utilisez les pointes de découplage ou les coussinets
antidérapants fournis si vous installez directement l’enceinte sur
le socle d’enceinte.
A l’emploi des pointes de découplage
Cette enceinte fait appel à des pointes de découplage, permettant
d’isoler l’enceinte par rapport au plancher. Utilisez les bases des
pointes de découplage pour éviter de griffer le plancher ou la
surface sur laquelle l’enceinte est placée.
1 Insérez les pointes dans les encastrements métalliques
filetés, prévus sur le fond de l’enceinte.
Français
• Pioneer n’assume aucune responsabilité en cas de dégâts
causés par un assemblage et un montage inadéquats, un
renforcement insuffisant, une erreur d’utilisation, des
catastrophes naturelles, etc.
S-81C-QL seulement
• Le coffret utilise un placage de bois naturel. N’installez pas les
enceintes en plein soleil et évitez de les placer près d’appareils
de chauffage ou de climatiseurs, car ceci pourrait gondoler et
décolorer le coffret des enceintes et endommager leurs hautparleurs.
Fond de la base d’enceinte
2 Fixez les bases des trois pointes aux positions ou elles
feront contact lorsque l’enceinte sera posée à plat.
3 Posez l’enceinte sur les bases des pointes de découplage
et assurez-vous que le socle de l’enceinte est stable.
4 Posez l’enceinte sur la base des pointes de découplage et
assurez-vous que l’enceinte est stable.
Attention
• Utilisez toujours les bases de pointe de découplage comme
illustré, de sorte que le creux puisse recevoir la pointe.
Si vous n’utilisez pas de bases pour pointes de
découplage à l’installation des enceintes, les pointes
risquent d’âbimer le plancher. Si vous prévoyez
d’employer les pointes de découplage, nous
conseillons vivement d’utiliser leurs bases.
3
Fr
Page 8
A l’emploi des coussinets antidérapants
Pour garantir une installation stable, fixez les coussinets
antidérapants sur la surface inférieure de chaque socle
d’enceinte.
Connexions
Les câbles d’enceintes, nécessaires pour le branchement à un
ampli, ne sont pas fournis avec cette enceinte acoustique.
Fond de la base d’enceinte
Fixation et dépose de la grille
Cette enceinte est fournie avec une grille qui peut être fixée et
déposée en procédant comme suit :
1 Pour fixer la grille, alignez celle-ci avec le corps de
l’enceinte et appuyez-y doucement.
2 Pour retirer la grille, tenez-la des deux mains près du
milieu et tirez doucement vers vous pour séparer la grille et
l’enceinte.
Borne
noire (–)
Amplificateur (arrière)
SPEAKERS
OUTPUT
Enceinte (arrière) :
Panneau d’entrée
CENTER
Borne
rouge (+)
Câblage
1 Mettez l’amplificateur hors tension.
2 Branchez les câbles d’enceinte sur les bornes d’entrée à
l’arrière de l’enceinte. En ce qui concerne les polarités des
bornes, la rouge est positive (+) et la noire est négative (–).
Desserrez les boutons des bornes d’entrée et insérez les fils du
câble d’enceinte dans chaque orifice des bornes, puis serrez les
boutons.
Borne noire (–)
Borne rouge (+)
Attention
• Des aimants servent à maintenir la grille en place. Ne placez
pas les grilles près de dispositifs pouvant être influencés par
le magnétisme (écran de téléviseur, etc.).
3 Raccordez l’autre bout des câbles sur les bornes de sortie
d’enceinte de l’amplificateur (pour plus d’informations,
consultez le mode d’emploi de votre amplificateur).
• Vous pouvez également utiliser une fiche banane pour cette
connexion. Dans ce cas, vous devrez d’abord déposer le
capuchon présent sur le bouton de la borne d’entrée.
• Après avoir branché les câbles sur les bornes, tirez
légèrement sur ceux-ci pour vous assurer que leur extrémité
est parfaitement immobilisée sur les bornes. De mauvaises
connexions sont la source de parasites, voire d’interruption
des sons.
• Si les fils des câbles ressortent des bornes et s’ils entrent en
contact mutuellement, l’amplificateur subira une charge
additionnelle, ce qui peut l’obliger à s’arrêter, voire
l’endommager.
• A l’emploi d’un jeu d’enceintes raccordé à un amplificateur, si
la polarité d’une des enceintes acoustiques (+, –) est inversée,
vous n’obtiendrez pas un effet stéréophonique normal.
ATTENTION
Les bornes des haut-parleurs sont sous une tension
ACTIVE DANGEREUSE. Pour éviter tout risque de
décharge électrique lors du branchement et du
débranchement des câbles de haut-parleur, débranchez
le cordon d’alimentation avant de toucher des parties
non isolées.
D3-4-2-2-3_A_Fr
4
Fr
Page 9
Fiche technique
Coffret . . . . . . . . . . . . . . . . . . . . . . . . . . Type bibliothèque, basse reflex
Configuration . . . . . . . . . . . . . . . . . . . . . . . . . . . . . . . . . . . . . . . . .3 voies
Woofer . . . . . . . . . . . . . . . . . . . . . . . . . . . . . . . . . . .Cône de 13 cm x 2
Médium/Tweeter . . . . Unité coaxiale : Cône de 13 cm/Dome de 2,5 cm
Impédance . . . . . . . . . . . . . . . . . . . . . . . . . . . . . . . . . . . . . . . . . . . . . 6
Réponse de fréquence . . . . . . . . . . . . . . . . . . . . . . . . De 40 Hz à 50 kHz
Sensibilité . . . . . . . . . . . . . . . . . . . . . . . . . . . . . . . . . . . . 85,5 dB (2,83 V)
Puissance d’entrée maximum. . . . . . . . . . . . . . . . . . . . . . . . . . . . 130 W
Fréquence de recouvrement . . . . . . . . . . . . . . . . . . . . . . . 370 Hz/3 kHz
Dimensions extérieures . . . . . 560 (L) mm x 190 (H) mm x 280 mm (P)
*Hauteur (socle d’enceinte compris) : 211,5 mm
Poids . . . . . . . . . . . . . . . . . . . . . . . . . . . . . . . . . . . . . . . . . . . . . . . 14,5 kg
Accessoires fournis
Base d’enceinte . . . . . . . . . . . . . . . . . . . . . . . . . . . . . . . . . . . . . . . . . . . 1
Pointes de découplage. . . . . . . . . . . . . . . . . . . . . . . . . . . . . . . . . . . . . . 3
Bases pour pointes de découplage. . . . . . . . . . . . . . . . . . . . . . . . . . . . 3
Coussinets antidérapants . . . . . . . . . . . . . . . . . . . . . . . . . . . . . . . . . . . 4
Grille . . . . . . . . . . . . . . . . . . . . . . . . . . . . . . . . . . . . . . . . . . . . . . . . . . . . 1
Chiffon de nettoyage (pour S-81C-K seulement) . . . . . . . . . . . . . . . . . 1
Mode d’emploi
Remarque
Spécifications et design sous réserve de modifications sans
préavis en raison d’améliorations éventuelles.
Ω
est une marque de commerce, appliquée sur un appareil
doté de la technologie “Phase Control” de Pioneer. Cette
technologie autorise une reproduction sonore de haut niveau par
chaque composant grâce à une amélioration de la
synchronisation d’ensemble des phases.
Publication de Pioneer Corporation.
Tous droits de reproduction et de traduction réservés.
© 2008 Pioneer Corporation.
Français
5
Fr
Page 10
Wir danken Ihnen dafür, dass Sie sich für dieses Produkt von Pioneer entschieden haben.
Bitte lesen Sie diese Bedienungsanleitung vor der Inbetriebnahme aufmerksam durch, damit Sie die optimale Leistung von diesem Produkt
erzielen können. Bitte bewahren Sie diese Anleitung anschließend für spätere Bezugnahme griffbereit auf.
Reinigen des Lautsprechergehäuses
Vor der Inbetriebnahme
• Die Nennimpedanz dieses Lautsprechersystems beträgt 6 Ω.
Schließen Sie dieses Lautsprechersystem ausschließlich an
einen Verstärker mit einer Lastimpedanz von 6 Ω bis 16 Ω an
(die Lautsprecherklemmen des Verstärkers müssen mit der
Beschriftung „6 Ω to 16 Ω“ gekennzeichnet sein).
Um eine Beschädigung des Lautsprechersystems durch ein
zu starkes Eingangssignal zu vermeiden, sind die folgenden
Vorsichtshinweise sorgfältig zu beachten:
• Die zulässige Belastbarkeit (Eingangspegel) dieses
Lautsprechersystems darf auf keinen Fall überschritten
werden.
• Wenn ein Grafik-Equalizer verwendet wird, um den hohen
Frequenzbereich anzuheben, darf die Lautstärke am
Verstärker nicht auf einen übermäßig hohen Pegel
eingestellt werden.
• Versuchen Sie auf keinen Fall, einen sehr hohen
Lautstärkepegel von einem Verstärker mit niedriger
Ausgangsleistung zu erzielen (dies führt zu einer Erhöhung
des Klirrfaktors des Verstärkers und kann eine
Beschädigung des Lautsprechers verursachen).
Vorsichtshinweise zur Aufstellung
• Montieren Sie diesen Lautsprecher nicht an einer Wand oder
der Decke. Anderenfalls besteht die Gefahr, dass er
herunterfällt und Verletzungen verursacht.
• Dieser Lautsprecher darf nicht oberhalb des Kopfniveaus an
der Decke oder an einer Wand befestigt werden. Bei
unsachgemäßer Befestigung besteht die Gefahr, dass die
Frontverkleidung herunterfällt und Verletzungen oder eine
Beschädigung verursacht.
• Schalten Sie die AV-Anlage aus, und ziehen Sie alle
Netzstecker ab, bevor Sie die Anschlüsse unter Bezugnahme
auf die Bedienungsanleitungen der einzelnen Komponenten
herstellen. Achten Sie unbedingt darauf, die richtigen
Anschlusskabel zu verwenden.
• Die Frontverkleidung ist mit Magneten am
Lautsprechergehäuse gesichert. Wenn in horizontaler
Richtung Kraft auf die Frontverkleidung ausgeübt wird, kann
sie herunterfallen. Entfernen Sie die Frontverkleidung, bevor
Sie den Lautsprecher reinigen.
Unter normalen Bedingungen lassen sich Staub, Fingerabdrücke
und leichte Verschmutzungen durch Abreiben des
Lautsprechergehäuses mit einem trockenen Tuch entfernen. Falls
hartnäckige Schmutzflecken an den Außenflächen vorhanden
sind, tauchen Sie einen sauberen Lappen in eine Lösung aus 5–6
Teilen eines neutralen Haushaltsreinigers und 1 Teil Wasser,
wringen Sie ihn gründlich aus, und wischen Sie die
Schmutzflecken dann ab. Benutzen Sie dazu keine
Möbelpolituren oder -reinigungsmittel.
Verwenden Sie auf keinen Fall Farbverdünner, Leichtbenzin,
Insektizide oder andere Chemikalien zur Reinigung des Gehäuses
oder in der Nähe dieses Lautsprechers, da derartige Mittel das
Oberflächenfinish anlösen.
Reinigen des Hochglanzfinish des
Lautsprechersystems
Nur Modell S-81C-K
• Durch den Gebrauch eines staubigen oder harten Tuchs oder
starke Druckausübung beim Abreiben kann das
Oberflächenfinish zerkratzt werden.
• Wenn ein nasses Tuch zur Reinigung der Außenflächen
verwendet wird, können Wassertröpfchen in das Innere des
Lautsprechers eindringen und eine Funktionsstörung
verursachen.
• Reiben Sie nach dem Reinigen des Oberflächenfinish mit
einem trockenen, weichen Tuch nach; verwenden Sie dazu
das mitgelieferte Reinigungstuch.
Mitgeliefertes Zubehör
Lautsprecher-Trägerplatte x 1
Vorsichtshinweise zum Betrieb
• Stellen Sie den Lautsprecher auf einer stabilen Unterlage auf.
Anderenfalls besteht die Gefahr, dass der Lautsprecher
umkippt und Verletzungen oder eine Beschädigung
verursacht.
• Verwenden Sie den Lautsprecher auf keinen Fall zur
Wiedergabe von verzerrtem Klang über längere Zeiträume
hinweg. Anderenfalls besteht die Gefahr eines
Brandausbruchs.
• Bitte sorgen Sie dafür, dass sich Personen nicht auf den
Lautsprecher setzen oder sich darauf stellen, und dass Kinder
nicht auf dem Lautsprecher spielen.
• Stellen Sie keine großen oder schweren Gegenstände auf den
Lautsprecher.
• Bringen Sie keine magnetischen Gegenstände, z.B.
aufmagnetisierte Schraubendreher oder Eisenteile, in die
Nähe des Hochtöners oder Mitteltöners. Da diese
Lautsprecher starke Magneten enthalten, könnten derartige
Gegenstände angezogen werden und Verletzungen
verursachen oder die Lautsprechermembran beschädigen.
2
Ge
Stabilisator x 3
Untersetzer für Stabilisatoren x 3
Rutschfestes Kissen x 4
Frontverkleidung x 1
Reinigungstuch (nur Modell S-81C-K) x 1
Bedienungsanleitung
Page 11
Installationsverfahren
K058_A_Ge
Mischen Sie dieses Produkt, wenn Sie es entsorgen wollen, nicht mit gewöhnlichen Haushaltsabfällen. Es gibt ein getrenntes
Sammelsystem für gebrauchte elektronische Produkte, über das die richtige Behandlung, Rückgewinnung und Wiederverwertung
gemäß der bestehenden Gesetzgebung gewährleistet wird.
Privathaushalte in den Mitgliedsstaaten der EU, in der Schweiz und in Norwegen können ihre gebrauchten elektronischen Produkte an
vorgesehenen Sammeleinrichtungen kostenfrei zurückgeben oder aber an einen Händler zurückgeben (wenn sie ein ähnliches neues Produkt
kaufen).
Bitte wenden Sie sich in den Ländern, die oben nicht aufgeführt sind, hinsichtlich der korrekten Verfahrensweise der Entsorgung an die örtliche
Kommunalverwaltung.
Auf diese Weise stellen Sie sicher, dass das zu entsorgende Produkt der notwendigen Behandlung, Rückgewinnung und Wiederverwertung
unterzogen wird, und so mögliche negative Einflüsse auf die Umwelt und die menschliche Gesundheit vermieden werden.
50 cm
20 cm
Wahl des Aufstellungsortes
• Die akustischen Verhältnisse im Hörraum üben einen starken
Einfluss auf die Art der Schallabstrahlung von Lautsprechern
aus.
• Um die optimale Klangqualität zu erhalten, sollten die
Lautsprecher möglichst auf einem soliden Fußboden
aufgestellt und wie in der nachstehenden Abbildung gezeigt
platziert werden. Der Basspegel kann justiert werden, indem
der Abstand zwischen Lautsprecher und Wand verringert oder
erhöht wird. Stellen Sie die Lautsprecher jeweils im gleichen
Abstand von der seitlichen Wand auf, um einen gut
ausgewogenen Klang zu erzielen.
• Wenn der Hörraum einen starken Nachhall aufweist,
empfiehlt es sich, die Wände mit schwerem Stoff zu behängen
und/oder einen Teppich auf den Boden zu legen, um den
Schall zu dämpfen. Die besten Ergebnisse werden erzielt,
wenn die Wände vollständig abgedeckt werden.
• Bei diesem Lautsprecher handelt es sich um eine Regalbox;
die beste Leistung wird bei Aufstellung auf einer stabilen,
waagerechten Unterlage oberhalb des Fußbodens erzielt. Bei
direkter Aufstellung auf dem Boden wird ein dröhnender,
undefinierter Klang erzeugt.
Verwendung der Lautsprecher-Trägerplatte
Zum Lieferumfang dieses Lautsprechersystems gehört eine
Lautsprecher-Trägerplatte, die für eine Verbesserung der
Klangqualität, Stabilität und Sicherheit sorgt. Stellen Sie den
Lautsprecher wie in der nachstehenden Abbildung gezeigt auf die
Lautsprecher-Trägerplatte.
Verwenden Sie die mitgelieferten Stabilisatoren oder rutschfesten
Kissen, wenn der Lautsprecher auf der Lautsprecher-Trägerplatte
aufgestellt werden soll.
Verwendung der Stabilisatoren
Die Stabilisatoren im Lieferumfang dieses Lautsprechersystems
ermöglichen es, den Lautsprecher vom Boden zu isolieren.
Verwenden Sie die mitgelieferten Untersetzer für die
Stabilisatoren, um ein Zerkratzen des Bodens bzw. der Unterlage
am Aufstellungsort zu verhindern.
1 Drehen Sie die Stabilisatoren in die mit einem Gewinde
versehenen Metalleinsätze in der Bodenplatte des
Lautsprechers ein.
Deutsch
Lautsprecher-Trägerplatte
Unterseite der
2 Platzieren Sie die Untersetzer für die Stabilisatoren an
den Positionen, an denen sich die Spitzen der drei
Stabilisatoren befinden werden, wenn der Lautsprecher
aufgestellt wird.
• Pioneer lehnt jegliche Haftung für Schäden ab, die durch
Fehler bei Zusammenbau oder Aufstellung, eine
unzureichende Verstärkung, zweckentfremdeten Gebrauch
oder höhere Gewalt entstehen.
Nur Modell S-81C-QL
• Beim Gehäuse wird ein Messerfurnier aus Naturholz
verwendet. Stellen Sie den Lautsprecher weder an einem Ort,
an dem er direkter Sonneneinstrahlung ausgesetzt ist, noch in
der Nähe von Heizkörpern oder einer Klimaanlage auf.
Anderenfalls besteht die Gefahr, dass sich das
3 Stellen Sie die Lautsprecher-Trägerplatte auf die
Untersetzer der Stabilisatoren, und vergewissern Sie sich,
dass die Trägerplatte nicht wackelt.
4 Stellen Sie den Lautsprecher auf die LautsprecherTrägerplatte, und vergewissern Sie sich, dass er nicht
wackelt.
Lautsprechergehäuse verzieht oder verfärbt und der
Lautsprecher beschädigt wird.
3
Ge
Page 12
Vorsichtshinweise
• Platzieren Sie die Untersetzer wie in unten gezeigt so, dass die
Seite mit der Vertiefung nach oben weist und den Spitze des
Stabilisators aufnimmt.
Anschlüsse
Lautsprecherkabel für den Anschluss an einen Verstärker
gehören nicht zum Lieferumfang dieses Lautsprechers.
Lautsprecher
schwarze
Klemme (–)
(Rückwand):
Klemmenfeld
rote
Klemme (+)
Wenn die Untersetzer nicht verwendet werden, können
die Spitzen der Stabilisatoren den Fußboden bzw. die
Unterlage am Aufstellungsort des Lautsprechers
zerkratzen. Der Gebrauch der Untersetzer in
Verbindung mit den Stabilisatoren wird daher
empfohlen.
Verwendung der rutschfesten Kissen
Befestigen Sie die rutschfesten Kissen an der Unterseite der
Lautsprecher-Trägerplatte, um ein Verrutschen zu verhindern.
Unterseite der
Lautsprecher-Trägerplatte
Anbringen/Entfernen der Frontverkleidung
Die Frontverkleidung dieses Lautsprechersystems kann wie folgt
angebracht und abgenommen werden:
1 Zum Anbringen richten Sie die Frontverkleidung auf das
Lautsprechergehäuse aus, und drücken Sie dann sacht
darauf.
2 Zum Abnehmen der Frontverkleidung ergreifen Sie etwa
in der Mitte jeder Seite mit beiden Händen, und ziehen Sie
sie sacht nach vorn, um die Frontverkleidung vom
Lautsprechergehäuse zu trennen.
Vorsichtshinweise
• Die Frontverkleidung wird durch Magneten in Arbeitsstellung
gesichert. Halten Sie die Frontverkleidungen von Geräten fern,
die für magnetische Einstreuungen empfindlich sind
(Kathodenstrahlröhren-Fernsehgeräte usw.).
Verstärker (Rückwand)
SPEAKERS
OUTPUT
CENTER
Anschließen der Kabel
1 Schalten Sie den Verstärker aus.
2 Schließen Sie die Lautsprecherkabel an die
Eingangsklemmen an der Rückwand jedes Lautsprechers an.
Die roten Klemmen sind positiv (+), die schwarzen Klemmen
negativ (–) gepolt.
Lösen Sie Knöpfe der Eingangsklemmen, führen Sie die Drähte
der Lautsprecherkabel in die Löcher in den Polbolzen ein, und
ziehen Sie dann die Knöpfe wieder an.
schwarze Klemme (–)
3 Schließen Sie das andere Ende jedes Lautsprecherkabels
an die Lautsprecherausgangsklemmen des Verstärkers an
(Einzelheiten hierzu finden Sie in der Bedienungsanleitung
Ihres Verstärkers).
• Bananenstecker können ebenfalls für den Anschluss an den
Lautsprecherklemmen verwendet werden. In einem solchen
Fall müssen die Kappenknöpfe vorher von den Polbolzen
entfernt werden.
• Ziehen Sie nach dem Herstellen der Anschlüsse sacht an
jedem Lautsprecherkabel, um sicherzustellen, dass die
Drähte fest in den Klemmen sitzen. Lose Anschlüsse können
Rauschen und Tonaussetzer verursachen.
• Falls die blanken Leiter von zwei Lautsprecherkabeln so weit
aus den Klemmen hervorstehen, dass sie sich gegenseitig
berühren, kann dies eine Überlastung des Verstärkers
verursachen. In einem solchen Fall stellt der Verstärker
möglicherweise den Betrieb ein, und es kann sogar zu einer
Beschädigung des Verstärkers kommen.
• Falls einer der beiden Lautsprecher eines Lautsprecherpaars
versehentlich mit vertauschter Polarität (+, –)an einen
Verstärker angeschlossen wird, kann der normale Stereoeffekt
nicht erzielt werden.
rote Klemme (+)
4
Ge
ACHTUNG
An den Lautsprecherklemmen dieses Gerätes liegt eine
potentiell GEFÄHRLICHE Spannung an. Zur
Vermeidung von Stromschlaggefahr ist unbedingt
darauf zu achten, den Netzstecker beim Anschließen
und Abtrennen der Lautsprecherkabel von der
Netzsteckdose zu trennen, bevor irgendwelche nicht
isolierten Teile berührt werden.
D3-4-2-2-3_A_Ge
Page 13

Technische Daten
Gehäuse. . . . . . . . . . . . . . . . . . . . . . . . . . . Bassreflex-Regalausführung
Aufbau . . . . . . . . . . . . . . . . . . . . . . . . . . . . . . . . . . . . . . . 3-Wege-System
Tieftöner. . . . . . . . . . . . . . . . . . . . . . . . . . . . . . . . . . . 13-cm-Konus x 2
Mitteltöner/Hochtöner . . . Koaxialeinheit: 13-cm-Konus/2,5-cm-Kalotte
Impedanz . . . . . . . . . . . . . . . . . . . . . . . . . . . . . . . . . . . . . . . . . . . . . . 6
Frequenzgang . . . . . . . . . . . . . . . . . . . . . . . . . . . . . . . . 40 Hz bis 50 kHz
Empfindlichkeit . . . . . . . . . . . . . . . . . . . . . . . . . . . . . . . . 85,5 dB (2,83 V)
Maximale Belastbarkeit . . . . . . . . . . . . . . . . . . . . . . . . . . . . . . . . . 130 W
Übernahmefrequenz. . . . . . . . . . . . . . . . . . . . . . . . . . . . . . 370 Hz/3 kHz
Außenabmessungen . . . . . . . 560 (B) mm x 190 (H) mm x 280 (T) mm
*Höhe (einschließlich Lautsprecherständer): 211,5 mm
Masse. . . . . . . . . . . . . . . . . . . . . . . . . . . . . . . . . . . . . . . . . . . . . . . 14,5 kg
Hinweis
Änderungen der technischen Daten und äußeren Aufmachung
bleiben im Sinne der ständigen Produktverbesserung jederzeit
vorbehalten.
Ω
ist eine Marke, mit der Geräte gekennzeichnet sind, die
mit Pioneers Phase Control-Technologie ausgestattet sind. Diese
Technologie gewährleistet eine hochwertige Klangreproduktion
des betreffenden Gerätes durch eine Verbesserung der
Gesamtphasenanpassung.
Mitgeliefertes Zubehör
Lautsprecher-Trägerplatte . . . . . . . . . . . . . . . . . . . . . . . . . . . . . . . . . . . 1
Stabilisatoren . . . . . . . . . . . . . . . . . . . . . . . . . . . . . . . . . . . . . . . . . . . . . 3
Untersetzer für Stabilisatoren . . . . . . . . . . . . . . . . . . . . . . . . . . . . . . . . 3
Rutschfeste Kissen. . . . . . . . . . . . . . . . . . . . . . . . . . . . . . . . . . . . . . . . . 4
Frontverkleidung . . . . . . . . . . . . . . . . . . . . . . . . . . . . . . . . . . . . . . . . . . 1
Reinigungstuch (nur Modell S-81C-K) . . . . . . . . . . . . . . . . . . . . . . . . . 1
Bedienungsanleitung
Urheberrechtlich geschützt © 2008 Pioneer Corporation.
Veröffentlicht von Pioneer Corporation.
Alle Rechte vorbehalten.
Deutsch
Ge
5
Page 14
Vi ringraziamo per avere acquistato questo prodotto Pioneer.
Prima di usare il prodotto, leggere questo manuale d’istruzioni in modo da saperlo utilizzare correttamente. Finito di leggerle, conservarle
in un luogo sicuro per poterle riutilizzare in futuro.
Pulizia del cabinet dei diffusori
Prima di cominciare
• L’impedenza nominale di questo diffusore è 6 Ω. Collegare il
diffusore ad un amplificatore dotato di un’impedenza di carico
che vada da 6 Ω a 16 Ω (un modello che porti sui terminali di
collegamento dei diffusori l’indicazione “6 Ω to 16 Ω”).
Per evitare danni al diffusore dovuti al sovraccarico di segnale
in ingresso, osservare le seguenti norme:
• Non alimentare il diffusore con potenza oltre il massimo
concesso.
• Se si usa un equalizzatore grafico per enfatizzare forti suoni
di alta frequenza, non usare volumi eccessivi
dell’amplificatore.
• Non tentare di forzare un amplificatore di bassa potenza a
produrre alti volumi. La distorsione armonica
dell’amplificatore aumenterebbe e potreste danneggiare il
diffusore.
Attenzione: installazione
• Non installare questi diffusori su di un muro o parete. Essi
possono cadere e causare ferite.
• Non installare i diffusori in alto su di un soffitto o su di una
parete. Se male installati, la griglia potrebbe cadere e causare
danni o ferite.
• Prima di fare collegamenti, spegnere i propri componenti AV,
scollegarli e consultarne i manuali. Controllare di avere usato
i cavi di collegamento corretti.
• La griglia è tenuta ferma da magneti. La griglia potrebbe
cadere se viene fatta forza su di essa in senso orizzontale. Per
pulire il diffusore, togliere prima la griglia.
Normalmente per mantenere pulito il diffusore dovrebbe bastare
un panno morbido ed asciutto. Se necessario, passarlo con un
panno inumidito con un detergente neutro diluito cinque o sei
volte con acqua, quindi strizzarlo bene. Non usare cere o pulenti
per mobilia.
Non usare mai diluenti, benzina, spray insetticidi o altre sostanze
chimiche su o vicino a quest’unità, dato che essi ne corrodono la
superficie.
Pulizia delle finiture lucide del diffusore
Solo S-81C-K
• Se si usa un panno polveroso o duro per pulire lo schermo, le
finiture del prodotto possono riportare graffi.
• Se si pulisce la superficie del diffusore con un panno
inumidito in esso può entrare dell’umidità, danneggiandolo.
• Per pulire le finiture del diffusore, passarlo con cautela con un
panno asciutto; usare possibilmente quello in dotazione.
Contenuto della confezione
Base del diffusore x 1
Attenzione: in uso
• Non installare il diffusore su superfici poco stabili. Esso in
caso di caduta può causare incidenti e danneggiarsi.
• Non fare emettere al diffusore suono distorto per lunghi
periodi. Questo può provocare incendi.
• Non sedere o appoggiarsi al diffusore, e non lasciare che i
bambini ci giochino.
• Non posare oggetti grandi o pesanti sul diffusore.
• Non posare oggetti che producono campi magnetici, ad
esempio cacciaviti o pezzi di metallo, vicino al tweeter o al
midrange. Dato che i diffusori incorporano forti magneti,
questi oggetti possono venirne attratti, causando ferite o
danneggiando il diaframma.
Se si vuole eliminare questo prodotto, non gettarlo insieme ai rifiuti domestici. Esiste un sistema di raccolta differenziata in conformità
alle leggi che richiedono appositi trattamenti, recupero e riciclo.
I privati cittadini dei paesi membri dell’UE, di Svizzera e Norvegia, possono restituire senza alcun costo i loro prodotti elettronici usati ad appositi
servizi di raccolta o a un rivenditore (se si desidera acquistarne uno simile).
Per i paesi non citati qui sopra, si prega di prendere contatto con le autorità locali per il corretto metodo di smaltimento.
Punte x 3
Basi delle punte x 3
Cuscinetti antiscivolamento x 4
Griglia x 1
Panno per la pulizia (solo S-81C-K) x 1
Istruzioni per l’uso
In questo modo, si è sicuri che il proprio prodotto eliminato subirà il trattamento, il recupero e il riciclo necessari per prevenire gli effetti
potenzialmente negativi sull’ambiente e sulla vita dell’uomo.
2
It
K058_A_It
Page 15
Norme di installazione
50 cm
20 cm
Importante
Scelta della posizione di installazione dei diffusori
• I suoni riprodotti dal diffusore vengono facilmente influenzati
dalle condizioni dell’ambiente di ascolto.
• Per ottenere il suono migliore possibile, scegliere un
pavimento solido sul quale appoggiare i diffusori e posizionarli
nel modo visto di seguito. Il livello dei bassi può venire regolato
avvicinando o allontanando i diffusori dalle pareti. Regolare i
diffusori in modo che siano equidistanti dalle rispettive pareti
in modo che il suono sia bilanciato.
• Se la stanza ha molto riverbero, si raccomandano tendaggi
pesanti sulle pareti e/o tappeti sul pavimento per smorzarlo.
Per ottenere risultati ottimali, coprire del tutto le pareti.
• Questo diffusore è del tipo da scaffale e dà le sue massime
prestazioni se appoggiato su di una superficie solida ed in
piano. Posando il diffusore direttamente sul pavimento si avrà
un suono rimbombante e poco definito.
Uso della base del diffusore
Per migliorare il suono, la stabilità e la sicurezza del diffusore, ad
esso è in dotazione una base. Posare il diffusore sulla sua base nel
modo indicato di seguito.
Per installare i diffusori direttamente sul pavimento, usare le
punte o i cuscinetti antiscivolamento in dotazione sulla base del
diffusore.
Se si usano le punte
Questo sistema di diffusori include punte utilizzabili per isolare il
diffusore dal pavimento. Usare le basi delle punte in dotazione per
evitare graffi al pavimento o alla superficie di installazione del
diffusore.
1 Girare le punte avvitandole negli inserti filettati del
fondo del diffusore.
• Pioneer non si assume alcuna responsabilità per danni
risultanti da una scorretta messa in posa, un insufficiente
rinforzo, un uso scorretto del prodotto, catastrofi naturali, ecc.
Solo S-81C-QL
• Il cabinet è composto di impiallacciato di vero legno. Non
mettere il diffusore dove sarà esposto a luce solare diretta ed
evitare di installarlo vicino a caloriferi e climatizzatori. Esso
potrebbe altrimenti deformarsi e scolorirsi, danneggiandosi
anche gravemente.
Fondo della base dei diffusori
Italiano
2 Mettere le basi delle punte nelle posizioni dove le tre
punte toccano quando il diffusore viene messo in posizione.
3 Mettere la base del diffusore sulle basi delle punte e
controllare la base del diffusore che non oscilli.
4 Mettere il diffusore sulla base del diffusore e controllare
che il diffusore non oscilli.
Attenzione
• Usare le basi dei diffusori sempre nel modo mostrato, con la
superficie indentata rivolta in alto in modo da ricevere la cima
della punta.
Se non si usano le basi delle punte nell’installare i
diffusori, queste possono causare danni al pavimento.
Raccomandiamo caldamente l’uso delle basi delle
punte a chi intende usare le punte.
3
It
Page 16
Se si usano i cuscinetti antiscivolamento
Per assicurarsi la stabilità del pezzo, fissare i cuscinetti
antiscivolamento al fondo della base del diffusore.
Fondo della base dei diffusori
Collegamenti
Questo diffusore non include cavi per diffusori usati per il
collegamento con un amplificatore.
Diffusore (retro):
Terminale
nero (−)
Pannello
d’ingresso
Terminale
rosso (+)
Applicazione e rimozione della griglia
Questo diffusore possiede una griglia di installabile e rimovibile
nel modo seguente:
1 Per applicare la griglia, allinearla al diffusore e premere
piano.
2 Per rimuovere la griglia, tenerla con ambedue le mani al
centro e tirare piano verso di sé separandola dal diffusore.
Attenzione
• La griglia è tenuta in posizione da magneti. Non posare la
griglia vicino a dispositivi sensibili ai campi magnetici
(televisori a raggi catodici, ecc.).
Amplificatore (retro)
SPEAKERS
OUTPUT
CENTER
Collegamento dei cavi
1 Spegnere l’amplificatore.
2 Collegare i cavi dei diffusori ai terminali di ingresso sul
retro del diffusore. Il terminale dei diffusori positivo (+) è
rosso, quello negativo (–) nero.
Allentare le manopole dei terminali di ingresso ed inserire i fili dei
diffusori in ciascun foro dei terminali, quindi stringere le
manopole.
Terminale nero (−)
3 Collegare le estremità dei cavi ai terminali di uscita
diffusori
dell’amplificatore. Per maggiori dettagli, consultare
il manuale del proprio amplificatore.
• Potete anche collegare i terminali dei diffusori con uno
spinotto a banana. Se si usa uno spinotto a banana, togliere
sempre il cappuccio in cima al terminale di ingresso.
• Dopo aver rimesso a posto i tappi, tirare leggermente i cavi per
controllare che siano ben collegati ai rispettivi terminali.
Collegamenti scadenti possono causare rumore ed
interruzioni del suono.
• Se i conduttori dei cavi fuoriescono dai terminali ed entrano in
contatto l’uno con l’altro, il carico posto sull’amplificatore è
eccessivo. Questo può impedirne il funzionamento o
addirittura danneggiarlo.
• Se si usano dei diffusori collegati ad un amplificatore, non si
otterrà un normale effetto stereo se la polarità (+, –) di uno dei
diffusori (destro o sinistro) viene invertita.
Terminale rosso (+)
dei
AVVERTENZA
I terminali degli altoparlanti sono sotto tensione, alla
stessa PERICOLOSA tensione della corrente di rete.
Per prevenire rischi di folgorazioni nel corso delle
operazioni di collegamento o di distacco dei cavi degli
altoparlanti, staccare il cavo di alimentazione principale
prima di toccare qualsiasi parte non isolata.
4
It
D3-4-2-2-3_A_It
Page 17
Dati tecnici
Cassa . . . . . . . . . . . . . . . . . . . . . . . . . . . . . . Tipo bass-reflex da scaffale
Configurazione . . . . . . . . . . . . . . . . . . . . . . . . . . . . . . . . . . . . . . . . a 3 vie
Woofer . . . . . . . . . . . . . . . . . . . . . . . . . . . . . . . . . . . .coni da 13 cm x 2
Medi/tweeter . . . . . . . Unità coassiale: cono da 13 cm/cupola da 2,5 cm
Impedenza nominale . . . . . . . . . . . . . . . . . . . . . . . . . . . . . . . . . . . . . 6
Risposta in frequenza. . . . . . . . . . . . . . . . . . . . . . . . . Da 40 Hz a 50 kHz
Sensibilità . . . . . . . . . . . . . . . . . . . . . . . . . . . . . . . . . . . . 85,5 dB (2,83 V)
Potenza in ingresso massima . . . . . . . . . . . . . . . . . . . . . . . . . . . . 130 W
Frequenza di incrocio . . . . . . . . . . . . . . . . . . . . . . . . . . . . . 370 Hz/3 kHz
Dimensioni esterne . . . . . . . . 560 (L) mm x 190 (A) mm x 280 (P) mm
* Altezza (compresa la base per diffusori): 211,5 mm
Peso . . . . . . . . . . . . . . . . . . . . . . . . . . . . . . . . . . . . . . . . . . . . . . . . 14,5 kg
Accessori in dotazione
Base del diffusorie . . . . . . . . . . . . . . . . . . . . . . . . . . . . . . . . . . . . . . . . . 1
Punte . . . . . . . . . . . . . . . . . . . . . . . . . . . . . . . . . . . . . . . . . . . . . . . . . . . . 3
Basi delle punte . . . . . . . . . . . . . . . . . . . . . . . . . . . . . . . . . . . . . . . . . . . 3
Cuscinetti antiscivolamento . . . . . . . . . . . . . . . . . . . . . . . . . . . . . . . . . 4
Griglia . . . . . . . . . . . . . . . . . . . . . . . . . . . . . . . . . . . . . . . . . . . . . . . . . . . 1
Panno per la pulizia (solo S-81C-K). . . . . . . . . . . . . . . . . . . . . . . . . . . . 1
Istruzioni per l’uso
Nota
I dati tecnici ed il design sono soggetti a modifiche senza
preavviso a causa di migliorie.
Ω
è un marchio di fabbrica messo sul prodotto che utilizza
la tecnologia Phase Control di Pioneer. Questa tecnologia
permette una riproduzione audio di alta qualità attraverso i vari
componenti regolandone la fase.
Pubblicato da Pioneer Corporation.
Copyright © 2008 Pioneer Corporation.
Tutti i diritti riservati.
Italiano
5
It
Page 18

Hartelijk dank voor de aanschaf van dit Pioneer product.
Lees de handleiding aandachtig door zodat u volledig op de hoogte bent van de bediening en werking. Bewaar de handleiding op een veilige
plaats voor eventuele naslag in de toekomst.
Schoonmaken van de luidsprekerbehuizing
Voordat u begint
• De nominale impedantie van deze luidsprekers is 6 Ω. Sluit de
luidsprekers op een versterker aan met een
belastingsimpedantie tussen 6 Ω en 16 Ω (een model met het
opschrift “6 Ω to 16 Ω” op de luidsprekeruitgangsaansluitingen).
Om beschadiging van de luidsprekers als gevolg van
overbelasting te voorkomen, dient u de volgende punten in
acht te nemen:
• De stroomtoevoer naar de luidsprekers mag het maximaal
toelaatbare ingangsvermogen niet overschrijden.
• Bij gebruik van een grafische equalizer voor het versterken
van de hoge tonen, mag het volume van de versterker niet te
hoog worden ingesteld.
• Probeer niet om een versterker met laag vermogen geluid
met overmatig hoog volume te laten weergeven (de
harmonische vervorming van de versterker zal toenemen,
wat kan resulteren in beschadiging van de luidspreker).
Let op: opstelling
• Bevestig de luidsprekers niet aan een muur of het plafond. De
luidsprekers kunnen vallen en letsel veroorzaken.
• Monteer de luidsprekers niet boven u aan het plafond of aan
een muur. Als de luidspreker verkeerd is bevestigd, kan het
luidsprekerfront vallen met beschadiging of letsel tot gevolg.
• Schakel de AV-apparatuur uit, haal de stekker uit het
stopcontact en raadpleeg de handleidingen voordat u begint
met het aansluiten van apparatuur. Zorg dat u de juiste
aansluitkabels gebruikt.
• Het front is met magneten aan de luidspreker bevestigd. Het
front kan vallen als in horizontale richting tegen het front
wordt gedrukt. Verwijder het front voordat u de luidspreker
schoonmaakt.
Bij normaal gebruik is het voldoende als u de luidspreker af en toe
met een droge doek afveegt. Voor het verwijderen van hardnekkig
vuil kunt u de doek bevochtigen met een neutraal
reinigingsmiddel dat vijf- of zesmaal verdund is met water. Wring
de doek goed uit voordat u begint. Gebruik geen meubelwas of
sterke reinigingsmiddelen.
Gebruik nooit witte spiritus, benzine, insecticidenspray of andere
chemische middelen op of in de buurt van de luidsprekers, want
deze kunnen de afwerking aantasten.
Schoonmaken van de glanzende afwerking van de
luidspreker
Alleen voor de S-81C-K
• Als u een vuile of harde doek gebruikt of als u erg hard over de
afwerking wrijft, kunnen er krassen op de afwerking komen.
• Als u de buitenkant van de luidspreker met een natte doek
schoonmaakt, kunnen er waterdruppeltjes in het inwendige
terechtkomen, wat kan resulteren in een defect.
• Wanneer u de afwerking van de luidspreker wilt
schoonmaken, kunt u deze met een droge, zachte doek
afvegen, zoals de bijgeleverde reinigingsdoek.
Inhoud van de doos
Luidsprekervoet x 1
Let op: gebruik
• Zet de luidspreker niet op een onstabiele ondergrond. De
luidspreker kan gevaar opleveren wanneer deze omvalt of de
apparatuur kan beschadigd worden.
• Laat de luidspreker niet gedurende langere tijd vervormd
geluid weergeven. Dit kan resulteren in brand.
• Ga niet op de luidspreker zitten of staan en laat ook niet
kinderen op de luidspreker spelen.
• Zet geen grote of zware voorwerpen op de luidspreker.
• Leg geen voorwerpen die door magneten worden
aangetrokken, zoals schroevendraaiers of ijzeren voorwerpen,
in de buurt van de tweeter of midrange. Aangezien er sterke
magneten in de luidsprekers zijn, kunnen de voorwerpen
worden aangetrokken met persoonlijk letsel of beschadiging
van het membraan tot gevolg.
Deponeer dit product niet bij het gewone huishoudelijk afval wanneer u het wilt verwijderen. Er bestaat een speciaal wettelijk
voorgeschreven verzamelsysteem voor de juiste behandeling, het opnieuw bruikbaar maken en de recycling van gebruikte
elektronische producten.
In de lidstaten van de EU, Zwitserland en Noorwegen kunnen particulieren hun gebruikte elektronische producten gratis bij de daarvoor
bestemde verzamelplaatsen of een verkooppunt (indien u aldaar een gelijkwaardig nieuw product koopt) inleveren.
Indien u zich in een ander dan bovengenoemd land bevindt kunt u contact opnemen met de plaatselijke overheid voor informatie over de juiste
verwijdering van het product.
Pennen x 3
Penvoetjes x 3
Antislipkussentjes x 4
Front x 1
Reinigingsdoek (alleen voor de S-81C-K) x 1
Handleiding
Zodoende zorgt u ervoor dat het verwijderde product op de juiste wijze wordt behandeld, opnieuw bruikbaar wordt gemaakt, t gerecycleerd en het
niet schadelijk is voor de gezondheid en het milieu.
2
Du
K058_A_Du
Page 19

Installatie
50 cm
20 cm
Belangrijk
Kiezen van een plaats voor de luidsprekers
• De geluiden die via de luidsprekers worden weergegeven,
worden op verscheidene manieren beïnvloed door de
omstandigheden in de luisterruimte.
• Voor een optimale geluidsweergave dient u de luidsprekers op
een stevige ondergrond te zetten en in de hieronder
afgebeelde positie. Het niveau van de lage geluiden kan
aangepast worden door de luidsprekers dichter of verder van
de mu ur t e zett en . Pl aats d e l uid sprek er s zo dat de ze op g el ijk e
afstand van de zijmuren staan om een gebalanceerde
weergave te verkrijgen.
• Als er veel nagalm in de kamer is, raden wij u aan dikke kleden
aan de wanden te hangen en/of een vloerkleed op de grond te
leggen om het geluid te absorberen. Voor een optimaal
resultaat moet u de wanden volledig bedekken.
• Deze luidspreker is een boekenplanktype luidspreker die de
beste prestaties levert wanneer ze op een stevig en horizontaal
oppervlak wordt geplaatst, dat op enige afstand is van de vloer.
Als u de luidspreker direct op de vloer zet, resulteert dit in een
dreuned en niet goed gedefinieerd geluid.
Gebruik van de luidsprekervoet
Bij deze luidspreker wordt een luidsprekervoet geleverd voor een
optimaal geluid, stabiliteit en veiligheid. Plaats de luidspreker op
de voet zoals hieronder is aangegeven.
Gebruik de bijgeleverde pennen of antislipkussentjes wanneer de
luidspreker op de luidsprekervoet wordt gezet.
Wanneer de pennen worden gebruikt
Bij deze luidspreker worden pennen geleverd die u kunt gebruiken
om de luidspreker even boven de vloer te plaatsen. Gebruik de
bijgeleverde penvoetjes om te voorkomen dat er krassen komen
op de vloer of de andere ondergrond waarop de luidspreker wordt
gezet.
1 Draai de pennen in de metalen schroefdraadgaten die in
de onderkant van de luidspreker zijn.
• Pioneer kan niet aansprakelijk worden gesteld voor
beschadigingen als gevolg van een foutieve montage of
bevestiging, onvoldoende versteviging, verkeerd gebruik van
het product, natuurrampen enz.
Alleen voor de S-81C-QL
• De behuizing is gemaakt van gesneden fineer dat vervaardigd
is van natuurlijk hout. Zet de luidsprekers niet in de zon en
houd deze ook uit de buurt van verwarmingselementen en
airco’s. Dit om kromtrekken en verkleuring van de behuizing
en andere beschadigingen van de luidsprekers te voorkomen.
Onderkant van
luidsprekervoet
2 Leg de penvoetjes op de plaatsen waar de uiteinden van
de drie pennen terechtkomen wanneer de luidspreker wordt
neergezet.
Nederlands
3 Plaats de luidsprekervoet op de penvoetjes en controleer
of de luidsprekervoet niet schommelt.
4 Plaats de luidspreker op de luidsprekervoet en controleer
of de luidspreker niet schommelt.
Let op
• Gebruik de penvoetjes altijd op de afgebeelde wijze, met de
holle kant naar de penpunt gekeerd.
Als u de penvoetjes niet gebruikt bij de opstelling van
de luidsprekers, kunnen de pennen de vloer
beschadigen. Wij raden u aan de penvoetjes altijd te
gebruiken als u de pennen aanbrengt.
3
Du
Page 20

Wanneer de antislipkussentjes worden gebruikt
Voor een stabiele opstelling dient u de antislipkussentjes op de
onderkant van de luidsprekervoet aan te brengen.
Onderkant van
luidsprekervoet
Aansluitingen
Bij deze luidsprekers worden geen luidsprekerkabels geleverd
voor aansluiting op een versterker.
Luidspreke r
Zwarte
aansluiting (–)
(achterkant):
Ingangspaneel
Rode
aansluiting (+)
Bevestigen/verwijderen van het front
Bij deze luidspreker wordt een front geleverd dat u als volgt kunt
bevestigen en verwijderen:
1 Om het front te bevestigen, lijnt u het front uit met de
luidspreker en drukt het dan voorzichtig vast.
2 Om het front te verwijderen, pakt u dit met beide handen
in het midden vast en trekt het dan voorzichtig naar u toe om
het los te maken van de luidspreker.
Let op
• Het front wordt met magneten op de plaats gehouden. Houd
het front uit de buurt van apparatuur die gevoelig is voor
magnetische velden (CRT-televisies enz.).
Versterker (achterkant)
SPEAKERS
OUTPUT
CENTER
Aansluiten van de kabels
1 Schakel de versterker uit.
2 Sluit de luidsprekerkabels op de ingangsaansluitingen
aan de achterkant van de luidspreker aan. De polariteit van
de ingangsaansluitingen is rood voor positief (+) en zwart
voor negatief (–).
Draai de knopjes op de ingangsaansluitingen los en steek de
draden van de luidsprekerkabels in de aansluitingen, waarna u de
knopjes weer vastdraait.
Zwarte aansluiting (–)
3 Sluit het andere uiteinde van de kabels aan op de
luidspreker-uitgangsaansluitingen van de versterker
(raadpleeg de handleiding van de versterker voor verdere
informatie).
• U kunt ook een luidsprekerkabel met banaanstekker
gebruiken. Vergeet bij gebruik van een banaanstekker niet om
het kapje op het puntje van de ingangsaansluiting te
verwijderen.
• Nadat u de stekkers in de aansluitbussen hebt gestoken, trekt
u lichtjes aan de kabels om te controleren of de stekkers stevig
vastzitten. Een slecht contact kan resulteren in storingen of
onderbrekingen in het geluid.
• Als de draden uit de aansluitingen steken en met elkaar in
contact komen, zal dit een extra belasting voor de versterker
betekenen. Het is mogelijk dat de versterker dan niet meer
werkt en deze kan zelfs worden beschadigd.
• Als een luidsprekerpaar met de versterker is verbonden, maar
een van de luidsprekers (links of rechts) met omgekeerde
polariteit (+, –) is aangesloten, zal er geen normaal stereoeffect worden verkregen.
Rode aansluiting (+)
4
Du
LET OP
Op deze luidsprekeraansluitingen staat een
GEVAARLIJKE spanning. Om een elektrische schok te
voorkomen bij het aansluiten en losmaken van de
luidsprekerkabels, moet u de stekker uit het
stopcontact halen voordat u niet geïsoleerde
onderdelen aanraakt.
D3-4-2-2-3_A_Du
Page 21

Technische gegevens
Behuizing. . . . . . . . . . . . . . . . . . . . . . . . . . . Basreflex, boekenplanktype
Luidsprekersysteem . . . . . . . . . . . . . . . . . . . . . . . . . . . . . 3-wegsysteem
Woofer . . . . . . . . . . . . . . . . . . . . . . . . . . . . . . . . . . . . .13 cm conus x 2
Midrange/tweeter. . . . . . Coaxiale eenheid: 13 cm conus/2,5 cm koepel
Impedantie. . . . . . . . . . . . . . . . . . . . . . . . . . . . . . . . . . . . . . . . . . . . . . 6
Frequentiebereik . . . . . . . . . . . . . . . . . . . . . . . . . . . . . . . 40 Hz tot 50 kHz
Gevoeligheid . . . . . . . . . . . . . . . . . . . . . . . . . . . . . . . . . . 85,5 dB (2,83 V)
Maximaal ingangsvermogen . . . . . . . . . . . . . . . . . . . . . . . . . . . . . 130 W
Wisselfrequentie. . . . . . . . . . . . . . . . . . . . . . . . . . . . . . . . . 370 Hz/3 kHz
Buitenafmetingen. . . . . . . . . .560 (B) mm x 190 (H) mm x 280 (D) mm
*Hoogte (inclusief luidsprekerstandaard): 211,5 mm
Gewicht . . . . . . . . . . . . . . . . . . . . . . . . . . . . . . . . . . . . . . . . . . . . . 14,5 kg
Bijgeleverde accessoires
Luidsprekervoet. . . . . . . . . . . . . . . . . . . . . . . . . . . . . . . . . . . . . . . . . . . . 1
Pennen. . . . . . . . . . . . . . . . . . . . . . . . . . . . . . . . . . . . . . . . . . . . . . . . . . . 3
Penvoetjes . . . . . . . . . . . . . . . . . . . . . . . . . . . . . . . . . . . . . . . . . . . . . . . . 3
Antislipkussentjes. . . . . . . . . . . . . . . . . . . . . . . . . . . . . . . . . . . . . . . . . . 4
Front . . . . . . . . . . . . . . . . . . . . . . . . . . . . . . . . . . . . . . . . . . . . . . . . . . . . 1
Reinigingsdoek (alleen voor de S-81C-K) . . . . . . . . . . . . . . . . . . . . . . . 1
Handleiding
Opmerking
Wijzigingen in ontwerp en technische gegevens voorbehouden,
zonder voorafgaande kennisgeving.
Ω
is een handelsmerk dat op een product staat dat is
uitgerust met Pioneer’s Phase Control technologie. Met deze
technologie is een hoogwaardige geluidsweergave via elke
component mogelijk door verbetering van de totale faseaanpassing.
Uitgegeven door Pioneer Corporation.
Copyright © 2008 Pioneer Corporation.
Alle rechten voorbehouden.
Nederlands
Du
5
Page 22

Muchas gracias por la adquisición de este producto Pioneer.
Lea todo este manual de instrucciones para aprender a operar correctamente su modelo. Después de haber leído las instrucciones, guarde
el manual en un lugar seguro para poderlo consultar en el futuro.
Limpieza de la caja acústica
Antes de comenzar
• La impedancia nominal de este sistema de altavoces es de 6Ω.
Conecte el sistema de altavoces a un amplificador que tenga
una impedancia de carga de 6
inscrito “6
del amplificador).
Para evitar daños en el sistema de altavoces debido a una
sobrecarga de entrada, tenga presente las precauciones
siguientes:
• No aplique potencia al sistema de altavoces si excede la
entrada máxima permisible.
• Cuando emplee un ecualizador gráfico para acentuar los
sonidos altos de la gama de agudos, no aplique un volumen
excesivo del amplificador.
• No trate de forzar a un amplificador de poca potencia para
que produzca altos volúmenes de sonido (se incrementaría
la distorsión armónica del amplificador, y podría dañarse el
altavoz).
Precaución: instalación
• No monte los altavoces en la pared ni en el techo. Podrían
caerse y ocasionar heridas.
• No instale los altavoces en una posición elevada ni en la
pared. La rejilla de altavoz, si se monta incorrectamente,
puede caerse y ocasionar daños o heridas personales.
• Desconecte la alimentación y desenchufe su equipo
audiovisual y consulte las instrucciones antes de conectar
componentes. Asegúrese de emplear unos cables de
conexión adecuados.
• La rejilla se fija con imágenes. La rejilla podría caerse si se
aplica fuerza a la rejilla en la dirección horizontal. Cuando
limpie el altavoz, quite primero la rejilla.
Ω
to 16Ω” en los terminales de salida de altavoces
Ω
a 16 Ω (un modelo que tenga
En condiciones normales de utilización, emplee un paño seco
para frotar la superficie y mantener limpias las cajas acústicas. Si
es necesario, límpielas con un paño humedecido en un
detergente neutro diluido en cinco o seis partes de agua, y
enjuáguelo bien. No emplee cera para muebles ni detergentes.
No utilice nunca, ni en la unidad como cerca de ella, disolventes,
bencina, pulverizadores de insecticida u otros productos
químicos, ya que estos productos podrían corroer la superficie.
Limpieza del acabado brillante del sistema de
altavoces
Sólo el S-81C-K
• Si emplea un paño sucio o áspero o si frota la rejilla con
fuerza, pueden producirse rayadas en el acabado del
producto.
• Si limpia la superficie del sistema de altavoces con un paño
humedecido, las gotas de agua de la superficie pueden entrar
al interior del producto y ocasionar mal funcionamiento.
• Cuando limpie el acabado del sistema de altavoces, frote con
cuidado con un paño suave y seco; el paño de limpieza
suministrado.
Contenido de la caja
Base de altavoz x 1
Precaución: durante la utilización
• No ponga el altavoz sobre una superficie inestable. Correría el
peligro de caídas, pudiendo ocasionar heridas y daños en el
equipo.
• No emplee el altavoz para emitir sonido distorsionado durante
largos períodos de tiempo. Correría el peligro de incendios.
• No se suba ni se siente encima del altavoz, y no permita que
los niños jueguen sobre el altavoz.
• No ponga objetos grandes ni pesados sobre el altavoz.
• No ponga objetos magnéticos, como puedan ser
destornilladores, ni piezas de hierro cerca del altavoz de
agudos ni del de sonidos medios. Puesto que los altavoces
emplean imanes potentes, pueden atraer los objetos
metálicos, pudiendo ocasionar heridas o daños en el
diafragma.
Si desea deshacerse de este producto, no lo mezcle con los residuos generales de su hogar. De conformidad con la legislación
vigente, existe un sistema de recogida distinto para los productos electrónicos que requieren un procedimiento adecuado de
tratamiento, recuperación y reciclado.
Las viviendas privadas en los estados miembros de la UE, en Suiza y Noruega pueden devolver gratuitamente sus productos electrónicos usados
en las instalaciones de recolección previstas o bien en las instalaciones de minoristas (si adquieren un producto similar nuevo).
En el caso de los países que no se han mencionado en el párrafo anterior, póngase en contacto con sus autoridades locales a fin de conocer el
método de eliminación correcto.
Pies de punta x 3
Bases de pies de punta x 3
Pastillas antideslizantes x 4
Rejilla x 1
Paño de limpieza (sólo para el S-81C-K) x 1
Manual de instrucciones
Al actuar siguiendo estas instrucciones, se asegurará de que el producto de desecho se somete a los procesos de tratamiento, recuperación y
reciclaje necesarios, con lo que se previenen los efectos negativos potenciales para el entorno y la salud humana.
2
Sp
K058_A_Sp
Page 23

Modo de instalación
50 cm
20 cm
Importante
Selección del lugar de colocación de los sistemas de
altavoces
• Los sonidos reproducidos por los sistemas de altavoces
quedan fácilmente afectados de formas sutiles por las
condiciones del lugar de audición.
• Para obtener el mejor sonido, seleccione un piso sólido para
colocar los altavoces, y sitúe los altavoces como se muestra a
continuación. El nivel de los sonidos bajos puede ajustarse
acercando o alejando los altavoces de la pared. Ajuste los
altavoces de modo que queden equidistantes de sus paredes
laterales respectivas para poder obtener un sonido
equilibrado.
• Si la habitación tiene mucha reverberación, le recomendamos
que cuelgue tela gruesa en las paredes, y/o que ponga una
alfombra en el piso para amortiguar el sonido. Para obtener
los mejores resultados, cubra las paredes por completo.
• Este altavoz es del tipo estante, y ofrece su mejor rendimiento
cuando se ponen sobre una superficie sólida y nivelada
apartada del piso. Si se pone el altavoz directamente sobre el
piso se producirá un sonido con retumbo y sin definición.
Empleo de la base de altavoz
Con este sistema de altavoces se incluye una base de altavoz para
mejorar el sonido, la estabilidad y la seguridad. Monte el altavoz
sobre la base como se muestra a continuación.
Emplee los pies de punta o las pastillas antideslizantes
suministrados cuando desee instalar el altavoz sobre la base de
altavoz.
Cuando utilice los pies de punta
Este sistema de altavoces incluye pies de punta que usted podrá
utilizar para aislar del piso el altavoz. Emplee las bases de los
pernos para evitar rayadas en el piso o en otras superficies.
1 Gire los pies de punta para introducirlos en las piezas
metálicas roscadas empotradas en la parte inferior del
altavoz.
• Pioneer no se hace responsable por ningún tipo de daño
debido al montaje y a la instalación inadecuados, al refuerzo
insuficiente, a la utilización indebida del producto, a desastres
naturales, etc.
Sólo el S-81C-QL
• La caja está hecha de tiras enchapadas de madera natural. No
ponga los altavoces en un lugar donde puedan quedar bajo la
luz directa del sol, y tampoco cerca de estufas o
acondicionadores de aire. Podría producirse deformación y
decoloración de la caja acústica y podrían dañarse los
altavoces.
Parte inferior de la
base del altavoz
2 Pongas las bases de los pies de punta en los puntos de los
tres pies de punta golpeándolas al dejar apoyado el altavoz
sobre su base.
3 Coloque la base de altavoz sobre las bases de los pies de
punta y confirme que la base de altavoz no se mueva.
4 Coloque el altavoz sobre la bases de altavoz y confirme
que el altavoz no se mueva.
Precaución
• Emplee siempre las bases de los pies de punta, con la
superficie dentada arriba como punto de entrada de los pies
de punta.
Español
Si no emplea las bases de los pies de punta para colocar
los altavoces, es posible que los pies de punta causen
daños en el piso. Le recomendamos que emplee las
bases de los pies de punta si se propone utilizar los pies
de punta.
3
Sp
Page 24

Cuando se empleen las pastillas antideslizantes
Para asegurar una instalación estable, fije las pastillas
antideslizantes a la superficie inferior de la base de altavoz.
Conexiones
Este altavoz no se suministra con los cables de altavoz utilizados
para la conexión a un amplificador.
Parte inferior de la
base del altavoz
Colocación/extracción de la rejilla
Este sistema de altavoces se sirve con una rejilla que pueden
colocarse y extraerse de la forma siguiente:
1 Para colocar la rejilla, alinéela con el cuerpo del altavoz y
empújela con cuidado.
2 Para extraer la rejilla, tómela con las dos manos cerca de
la parte intermedia y tire con cuidado hacia usted para
separar la rejilla del altavoz.
Precaución
Terminal
negro (–)
Amplificador (trasero)
SPEAKERS
OUTPUT
Altavoz (trasero):
Panel de entrada
CENTER
Terminal
rojo (+)
Conexión de los cables
1 Desconecte la alimentación del amplificador.
2 Conecte los cables de altavoz a los terminales de entrada
de la parte posterior del altavoz. En cuanto a la polaridad de
los terminales, el rojo es positivo (+) y el negro es negativo (–).
Afloje los bornes de los terminales de entrada e inserte los cables
de altavoz en cada uno de los orificios de los terminales, y luego
apriete los bornes.
Terminal negro (–)
Terminal rojo (+)
• Para retener la rejilla en su posición se emplean imanes. No
ponga las rejillas cerca de dispositivos que puedan ser
susceptibles a la influencia magnética (televisores de TRC,
etc.).
3 Conecte el otro extremo del cable a los terminales de
salida de
altavoz en el amplificador, en el canal asignado a al
altavoz y manteniendo la polaridad (para más detalles al
respecto, consulte el manual de instrucciones del
amplificador).
• También podrá conectar los terminales del altavoz con una
clavija de punta cónica. Cuando emplee una clavija de punta
cónica, no se olvide de quitar la tapa de la punta del terminal
de entrada.
• Después de haber efectuado la conexión tire ligeramente del
cable para asegurar la seguridad y solidez de la conexión. Las
conexiones defectuosas pueden ocasionar ruido e
interrupción del sonido.
• Si los hilos de los cables salen de los terminales y entran en
contacto entre sí, el amplificador recibirá una carga adicional
excesiva. Esto puede hacer que el amplificador deje de
funcionar y incluso pueda dañarse.
• Cuando emplee un juego de altavoces conectados a un
amplificador, no podrá obtener el efecto estéreo normal si se
ha invertido la polaridad (+, –) de uno de los altavoces
(izquierdo o derecho).
PRECAUCIÓN
Por estos terminales de altavoz circula tensión ACTIVA
que es PELIGROSA. Para evitar el peligro de descargas
eléctricas al conectar o desconectar los cables de
altavoz, desenchufe el cable de alimentación antes de
tocar las partes de los cables que no están aisladas.
D3-4-2-2-3_A_Sp
4
Sp
Page 25

Especificaciones
Caja . . . . . . . . . . . . . . . . . . . . . . . . . . . . . . . .Bass-réflex para estantería
Configuración . . . . . . . . . . . . . . . . . . . . . . . . . . . . . . . . . . . . . . . . . .3 vías
Altavoz de graves . . . . . . . . . . . . . . . . . . . . . . . . . . Cono de 13 cm x 2
Altavoz de medios/agudos
. . . . . . . . . . . . . . . . . . . . . Unidad coaxial: Cono de 13 cm/domo de 2,5 cm
Impedancia . . . . . . . . . . . . . . . . . . . . . . . . . . . . . . . . . . . . . . . . . . . . . 6
Respuesta en frecuencia . . . . . . . . . . . . . . . . . . . . . . . . . 40 Hz a 50 kHz
Sensibilidad. . . . . . . . . . . . . . . . . . . . . . . . . . . . . . . . . . . 85,5 dB (2,83 V)
Potencia de entrada máxima. . . . . . . . . . . . . . . . . . . . . . . . . . . . . 130 W
Frecuencia de cruce. . . . . . . . . . . . . . . . . . . . . . . . . . . . . . 370 Hz/3 kHz
Dimensiones exteriores
. . . . . . . . . . . . . . . . . . . . . . 560 (An) mm x 190 (Al) mm x 280 (Prf) mm
*Altura (incluyendo el soporte de altavoz): 211,5 mm
Peso . . . . . . . . . . . . . . . . . . . . . . . . . . . . . . . . . . . . . . . . . . . . . . . . 14,5 kg
Accesorios suministrados
Base de altavoz . . . . . . . . . . . . . . . . . . . . . . . . . . . . . . . . . . . . . . . . . . . . 1
Pies de punta . . . . . . . . . . . . . . . . . . . . . . . . . . . . . . . . . . . . . . . . . . . . . 3
Bases de pies de punta . . . . . . . . . . . . . . . . . . . . . . . . . . . . . . . . . . . . . 3
Pastillas antideslizantes. . . . . . . . . . . . . . . . . . . . . . . . . . . . . . . . . . . . . 4
Rejilla . . . . . . . . . . . . . . . . . . . . . . . . . . . . . . . . . . . . . . . . . . . . . . . . . . . 1
Paño de limpieza (sólo el S-81C-K) . . . . . . . . . . . . . . . . . . . . . . . . . . . . 1
Manual de instrucciones
Nota
Especificaciones y diseño sujetos a posibles cambios sin previo
aviso debido a mejoras del producto.
Ω
es una marca comercial que llevan los productos que
incorporan la tecnología de control de fase de Pioneer. Esta
tecnología permite la reproducción del sonido de alta calidad a
través de cada componente mediante la mejora de la
correspondencia de fase general.
Publicado por Pioneer Corporation.
Copyright © 2008 Pioneer Corporation.
Todos los derechos reservados.
Sp
Español
5
Page 26

Obrigado por ter adquirido este produto Pioneer.
Leia por favor estas instruções de utilização na sua totalidade para ficar a saber como operar adequadamente o seu aparelho. Depois de
terminar a leitura destas instruções, guarde-as num local seguro para referência futura.
Limpeza da caixa das colunas
Antes de começar
• A impedância nominal deste sistema de colunas é de 6 Ω.
Ligue o sistema de colunas a um amplificador com uma
impedância de carga entre 6 Ω e 16 Ω (um modelo com a
indicação “6 Ω to 16 Ω” afixada nos terminais de saída para as
colunas).
De modo a prevenir danos nas colunas resultantes de
sobrecarga na entrada, observe por favor as seguintes
precauções:
• Não forneça potência ao sistema de colunas para além da
entrada máxima permitida.
• Quando utilizar um equalizador gráfico para dar ênfase a
sons altos na faixa das altas frequências, não utilize um
volume de amplificação excessivo.
• Não force um amplificador de baixa potência a produzir
altos volumes de som (a distorção harmónica do
amplificador aumentará, além de poder danificar a coluna).
Precaução: instalação
• Não fixe estas colunas à parede ou ao tecto. Podem cair,
causando ferimentos.
• Não instale as as suas colunas sobre a cabeça, na parede ou
notecto. Se mal fixadas, a grelha das colunas pode cair,
causando danos e ferimentos.
• Desligue da tomada o seu equipamento audio-visual e
consulte o manual de instruções quando ligar os
componentes entre si. Certifique-se que utiliza os cabos de
ligação adequados.
• A grelha é fixada com magnetos. A grelha pode cair se sobre
esta for aplicada for aplicada força na horizontal. Retire a
grelha quando limpar a coluna.
Em condições de utilização normais, a passagem com um pano
seco é suficiente para manter a caixa limpa. Se necessário limpe
com um pano embebido num detergente neutro diluído cinco ou
seis vezes em água, e torcido bem. Não utilize cera ou detergentes
para mobília.
Não utilize nunca diluentes, benzina, sprays insecticidas ou outro
produto químico neste ou próximo deste aparelho, pois tal
corroerá as superfícies.
Limpeza do acabamento brilhante do sistema de
colunas
S-81C-K apenas
• Se utilizar um pano áspero ou se esfregar a superfície com
força o acabamento do produto ficará riscado.
• Se limpar a superfície do sistema de colunas com um pano
húmido, os pingos de água na superfície podem penetrar no
produto, causando mau funcionamento.
• Quando limpar o acabamento do sistema de colunas, passe
suavemente um pano macio e seco, o pano de limpeza
fornecido.
O que encontra na caixa
Base de coluna x 1
Precaução: utilização
• Não coloque a coluna numa superfície instável. Pode tornarse perigosa em caso de queda, para além de danificar o
equipamento.
• Não utilize a coluna para produzir som distorcido durante
longos períodos de tempo. Tal pode resultar em incêndio.
• Não se sente nem se ponha em pé em cima das colunas. Não
deixe as crianças brincar com as colunas.
• Não coloque objectos grandes ou pesados sobre as colunas.
• Não coloque objectos magnéticos tais como chaves de
parafusos ou peças de ferro perto do tweeeter ou dos médios.
As colunas utilizam fortes magnetes, podendo atrair objectos,
causando ferimentos ou danificando o diafragma.
Se quiser deitar fora este produto, não o misture com o lixo comum. De acordo com a legislação, existe um sistema de recolha
separado para os equipamentos electrónicos fora de uso, que requerem tratamento, recuperação e reciclagem apropriados.
Os consumidores dos Estados-membros da UE, da Suíça e da Noruega podem entregar equipamentos electrónicos fora de uso em
determinadas instalações de recolha ou a um retalhista (se adquirirem um equipamento novo similar).
Nos países não mencionados acima, informe-se sobre o método de eliminação correcto junto das autoridades locais.
Espigões x 3
Bases para espigão x 3
Almofadas anti-derrapantes x 4
Grelha x 1
Pano de limpeza (para S-81C-K apenas) x 1
Manual de instruções
Ao fazê-lo estará a garantir que o produto que já não tem utilidade para si é submetido a processos de tratamento, recuperação e reciclagem
adequados, evitando-se assim potenciais efeitos negativos para o ambiente e a saúde humana.
2
Po
K058_A_Po
Page 27

Como instalar
50 cm
20 cm
Importante
Escolha do local onde colocar os sistemas de colunas
• Os sons produzidos através do sistema de colunas são
facilmente afectados, de modo subtil, pelas condições do
espaço de audição.
• Para uma melhor audição, escolha uma superfície sólida para
a colocação das colunas, e posicione as colunas tal como
apresentado abaixo. O nível dos baixos pode ser ajustado
aproximando ou afastando as colunas da parede. Ajuste as
colunas de modo a que fiquem equidistantes das paredes
laterais, de modo a assegurar um som equlibrado.
• Se o quarto tiver muita reverberação, recomendamos
pendurar tecidos fortes nas paredes, e/ou colocar uma
carpete no chão para absorver o som. Para os melhores
resultados, cubra as paredes completamente.
• Esta coluna é uma coluna tipo prateleira que apresenta o seu
melhor desempenho quando colocada sobre uma superfície
sólida e de nível, afastada do chão. A colocação da coluna
directamente sobre o solo resulta num som de estrondo,
indefinido.
Utilização da base da coluna
Incluída neste sistema de colunas está uma base de coluna para
obter o melhor som, estabilidade e segurança. Coloque a coluna
sobre a base, tal como indicado abaixo.
Quando instalar a coluna sobre a base da coluna, utilize os
espigões ou as bases anti-derrapantes fornecidas.
Quando utilizar os espigões
Este sistema de colunas inclui espigões que podem ser utilizados
para isolar a coluna do chão. Utilize as bases dos espigões para
evitar riscar o chão ou a superfície sobre a qual a coluna for
colocada.
1 Aparafuse os espigões nos furos metal roscados, abertos
na base das colunas.
• A Pioneer não assume qualquer responsabilidade sobre
danos resultants da montagem, fixação deficiente, reforço
insuficiente, má utilização do produto, actos da natureza, etc.
S-81C-QL apenas
• A caixa da coluna usa um folheado de madeira natural. Não
coloque as colunas sob luz solar directa. Evite colocá-las perto
de aquecedores ou ar condicionados. Tal pode empenar ou
descolorar as caixas das colunas, ou danificar as colunas.
Parte debaixo da base
da coluna
2 Coloque as bases dos espigões nas posições onde as
pontas dos três espigões apontam quando a coluna estiver
na sua posição.
3 Coloque a base da coluna sobre as bases dos espigões e
confirme que a base da coluna não abana.
4 Coloque a coluna sobre a base da coluna e verifique que
esta não abana.
Precaução
• Utilize sempre as bases dos espigões como mostrado, com a
superfície pretendida voltada para cima, de modo receber a
ponta do espigão.
Português
Não utilize as bases dos espigões quando instalar as
colunas, pois os espigões podem danificar o chão. Se
tencionar utilizar os espigões, aconselhamos
vivamente a utilização das bases dos espigões.
3
Po
Page 28

Quando utilizar as bases anti-derrapantes
Para assegurar uma instalação estável, afixe as bases antiderrapantes na superfície debaixo da base da coluna.
Ligações
Esta coluna não inclui cabos de coluna para ligar a um
amplificador.
Coluna
(parte de trás):
Terminal
preto (–)
Painel de
entrada
Terminal
encarnado (+)
Parte debaixo da base
da coluna
Fixação/Remoção da grelha
Este sistema de colunas está equipado com uma grelha, que pode
ser fixada ou retirada do seguinte modo:
1 Para fixar a grelha, alinhe a grelha com o corpo a coluna
e pressione ligeiramente.
2 Para retirar a grelha, segure-a com ambas as mãos perto
do centro e puxe-a suavemente para si, de modo a separar a
grelha da coluna.
Precaução
• A grelha é fixada com magnetos. Não coloque a grelha perto
de aparelhos sensíveis a influência magnética (televisores de
tubo de raios catódicos, etc.).
Amplificador
(anterior)
SPEAKERS
OUTPUT
CENTER
Ligação dos cabos
1 Desligue a alimentação do seu amplificador.
2 Ligue os cabos da coluna aos terminais de entrada na
parte anterior da coluna. No que diz respeito à polaridade de
entrada, o encarnado é positivo (+) e o preto é negativo (–).
Afrouxe as porcas nos terminais de entrada e insira os cabos em
cada um dos oríficios do poste do terminal. Aperte depois as
porcas.
Terminal preto (–)
Terminal encarnado (+)
3 Ligue as outras extremidades dos cabos aos terminais de
saída para colunas, no amplificador (para mais detalhes,
consulte o manual de utilizador do seu amplificador).
• Pode também ligar os terminais da coluna utilizando uma
ficha banana. Quando utilizar uma ficha banana, certifique-se
de retirar a tampa na extremidade do terminal de entrada.
• Depois de ligar as fichas, puxe os cabos levemente para se
certificar que as extremidades destes se encontram ligadas
firmemente aos terminais. Ligações deficientes podem criar
ruído e interrupção no som.
• Se os fios dos cabos sairem dos terminais e entrarem em
contacto um com o outro, induzirão uma carga excessiva no
amplificador. Tal pode fazer com que o amplificador deixe de
funcionar, podendo mesmo danificar o amplificador.
• Quando utilizar o conjunto de colunas ligadas a um
amplificador, não conseguirá obter o efeito estereofónico
usual se a polaridade (+, –) de uma das colunas (esquerda ou
direita) estiver invertida.
CUIDADO
Estes terminais de coluna estão sob voltagem
PERIGOSA. Para evitar o risco de choque eléctrico ao
ligar ou desligar os cabos de coluna, desligue o cabo
de alimentação de energia antes de tocar em quaisquer
componentes não isolados.
D3-4-2-2-3_A_Po
4
Po
Page 29

Especificações
Caixa . . . . . . . . . . . . . . . . . . . . . . . . . . Tipo prateleira, reflexo de baixos
Configuração. . . . . . . . . . . . . . . . . . . . . . . . . . . . . . . . . . . . . . . . . . .3 vias
Altifalante de graves (Woofer). . . . . . . . . . . . . . . . . . .13 cm cone x 2
Médios/Tweeter . . . . . Unidade coaxial: cone 13 cm/abobadado 2,5 cm
Impedância . . . . . . . . . . . . . . . . . . . . . . . . . . . . . . . . . . . . . . . . . . . . . 6
Resposta em frequência . . . . . . . . . . . . . . . . . . . . . . . . . 40 Hz a 50 kHz
Sensibilidade. . . . . . . . . . . . . . . . . . . . . . . . . . . . . . . . . . 85,5 dB (2,83 V)
Potência máxima de entrada. . . . . . . . . . . . . . . . . . . . . . . . . . . . . 130 W
Frequência de crossover . . . . . . . . . . . . . . . . . . . . . . . . . . . 370Hz/3 kHz
Dimensões exteriores. . . . . . . 560 (L) mm x 190 (A) mm x 280 (P) mm
*Altura (incluindo o suporte da coluna): 211,5 mm
Peso . . . . . . . . . . . . . . . . . . . . . . . . . . . . . . . . . . . . . . . . . . . . . . . . 14,5 kg
Acessórios fornecidos
Base de coluna . . . . . . . . . . . . . . . . . . . . . . . . . . . . . . . . . . . . . . . . . . . . 1
Espigões . . . . . . . . . . . . . . . . . . . . . . . . . . . . . . . . . . . . . . . . . . . . . . . . . 3
Bases de espigões . . . . . . . . . . . . . . . . . . . . . . . . . . . . . . . . . . . . . . . . . 3
almofadas anti-derrapante. . . . . . . . . . . . . . . . . . . . . . . . . . . . . . . . . . . 4
Grelha . . . . . . . . . . . . . . . . . . . . . . . . . . . . . . . . . . . . . . . . . . . . . . . . . . . 1
Pano de limpeza (para S-81C-K apenas) . . . . . . . . . . . . . . . . . . . . . . . 1
Manual de instruções
Nota
Especificações e concepção sujeitas a possíveis modificações
sem aviso prévio, devido a melhoramentos.
Ω
é um marca registada colocada num produto com
tecnologia Controlo de Fase Pioneer. Esta tecnologia permite uma
reprodução sonora de alto grau através de cada componente,
melhorando o emparelhamento geral de fases.
Publicado por Pioneer Corporation.
“Copyright” © 2008 Pioneer Corporation.
Todos os direitos reservados.
Português
5
Po
Page 30

Gratulerar till ditt inköp av denna Pioneer-produkt.
Läs noggrant igenom denna bruksanvisning, så att du vet hur du skall hantera högtalaren på rätt sätt. När du har läst igenom
bruksanvisningen, skall du förvara den på en säker plats för framtida bruk.
Rengöring av högtalarhöljet
Innan du startar
• Denna högtalares nominella impedans är 6 Ω. Anslut
högtalaren till en förstärkare med en belastningsimpedans i
omfånget från 6 Ω till 16 Ω (en modell där “6 Ω to 16 Ω” visas
intill högtalarutgången).
För att förhindra att högtalarsystemet skadas på grund av
överbelastad inmatning, skall du följa följande
säkerhetsföreskrifter:
• Mata inte uteffekt till högtalaren som överskrider den
maximalt tillåtna ingången.
• När du använder en grafisk equalizer för att betona kraftiga
diskantljud, skall du inte använda för hög ljudnivå för
förstärkaren.
• Försök inte att tvinga en lågeffektsförstärkare att mata ut
kraftiga ljudnivåer (förstärkarens harmoniska distorsion
ökas och du kan skada högtalaren).
Observera: Installation
• Sätt inte fast dessa högtalare på väggen eller i taket. De kan
falla ned och orsaka personskador.
• Montera inte högtalarna högt i taket eller på väggen. Om de
sätts fast på fel sätt, kan högtalargrillen falla ned och orsaka
materiella skador eller personskador.
• Stäng av och lossa din AV-utrustning från elnätet samt se i
bruksanvisningarna vid anslutning av apparater. Kontrollera
att du använder korrekta anslutningskablar.
• Grillen sitter fast med magneter. Grillen kan falla ned om den
utsätts för tryck i vågrät riktning. Vid rengöring av högtalaren
skall du först ta bort grillen.
Vid normal användning bör det räcka med att torka av med en torr
duk för att hålla höljet rent. Om så erfordras, kan du rengöra med
en duk som har doppats i ett neutralt rengöringsmedel som har
spätts ut fem eller sex gånger med vatten och vridits ur ordentligt.
Använd inte möbelvax eller kraftiga rengöringsmedel.
Använd aldrig thinner, bensen, insektssprayer eller andra
kemikalier på eller nära högtalaren, därför att sådana kommer att
korrodera ytorna.
Rengöring av högtalarsystemets glansiga yta
Endast S-81C-K
• Om du använder en dammig eller hård duk, eller om du
gnuggar hårt, kan högtalarsystemets finish repas.
• Om du rengör högtalarsystemets yta med en våt duk kan
vattendroppar tränga in, så att systemet inte längre fungerar.
• Vid rengöring av högtalarsystemets finish skall du torka av det
varsamt med en torr och mjuk duk, alltså den medföljande
rengöringsduken.
Detta finns i kartongen
Högtalarstöd x 1
Observera vid användning
• Ställ inte högtalaren på en ostadig yta. Den kan utgöra en fara
om den tippar över och detta kan också skada utrustningen.
• Använd inte högtalaren för utmatning av förvrängt ljud under
långa tidsperioder. Detta kan leda till fara för brand.
• Du får inte sitta eller stå på högtalaren och inte låta barn leka
på den.
• Placera inte stora eller tunga föremål ovanpå högtalaren.
• Lägg inte magnetiska föremål som till exempel skruvmejslar
eller delar av stål nära diskantelementet eller mellanregistret.
På grund av att högtalarna använder kraftiga magneter, kan
de dra till sig sådana föremål, vilket kan orsaka personskador
eller kan skada membranet.
Denna produkt får inte kastas tillsammans med vanligt hushållsavfall. Uttjänta elektronikprodukter skall enligt lag samlas in separat
för särskild hantering och återvinning.
I EU:s medlemsländer samt Schweiz och Norge får privata hushåll kostnadsfritt lämna in uttjänt elektronik på särskilda insamlingsställen och
återvinningscentraler eller hos en återförsäljare (vid köp av liknande produkt).
I övriga länder skall lokala myndigheter kontaktas för information om korrekt avfallshantering.
Spetsar x 3
Spetsdynor x 3
Glidskyddsdynor x 4
Grill x 1
Rengöringsduk (endast för S-81C-K) x 1
Bruksanvisning
Härigenom kommer den kasserade produkten att samlas in, behandlas och återvinnas på det sätt som krävs för att minska negativ påverkan på
miljö och människors hälsa.
2
Sw
K058_A_Sw
Page 31

Installation
50 cm
20 cm
Viktigt
Val av högtalarsystemets placering
• Ljud som spelas genom högtalarna påverkas lätt av subtila
vägar på grund av förhållandena i lyssningsrummet.
• För att få bästa tänkbara ljud skall du välja ett stabilt golv för
att ställa upp högtalarna och placera dem på det sätt som
bilden nedan visar. Nivån för basljuden kan justeras genom att
du ställer högtalarna närmare eller längre bort från väggen.
Ställ högtalarna så att de står lika långt från sidoväggarna för
att få ett balanserat ljud.
• Om rummet har mycket återklanger rekommenderar vi att du
hänger tunga gardiner på väggarna och/eller lägger en matta
på golvet för att dämpa ljudet. För att få bästa tänkbara ljud
skall du täcka väggarna helt.
• Denna högtalare är avsedd att användas i en bokhylla och ger
bästa ljudåtergivning när den placeras på ett solitt och jämnt
underlag ovanför golvnivå. På golvet ger högtalaren ett
dånande och odefinierat ljud.
Användning av högtalarstödet
Högtalarsystemet levereras med ett högtalarstöd för bättre
ljudåtergivning, stabilitet och säkerhet. Placera högtalaren på
stödet som visas här nedan.
Använd de medföljande spetsarna eller glidskyddsdynorna när
högtalaren ska placeras på högtalarstödet.
Svenska
När spetsarna används
Spetsarna som medföljer högtalaren kan användas for att isolera
högtalaren från golvet. Använd de medföljande spetsdynorna för
att undvika att repa golv eller andra underlag som högtalarna
placeras på.
1 Vrid in spetsarna i de nedsänkta gängade
metallinsatserna på högtalarens undersida.
• Pioneer tar inte på sig något som helst ansvar för skador som
uppstår på grund av ihopsättning, felaktig montering,
otillräcklig förstärkning, felaktig användning av stativet,
naturkatastrofer, etc.
Endast S-81C-QL
• Högtalarhöljet har skivad faner gjort av naturträ. Placera inte
högtalaren, där den kan utsättas för direkt solljus och undvik
att placera den nära värmeelement och luftkonditionerare.
Detta kan leda till att högtalarens hölje blir skevt och
missfärgat samt att högtalarelementen skadas.
Högtalarens bottenplatta
2 Sätt spetsdynorna på de platser där de tre spetsarnas
ända kommer att hamna när högtalaren ställs ned.
3 Ställ högtalarstödet på spetsdynorna och kontrollera att
högtalarstödet står stadigt.
4 Ställ högtalaren på högtalarstödet och kontrollera att
högtalaren står stadigt.
Observera
• Använd alltid spetsdynorna såsom bilden visar, med den
försänkta ytan vänd uppåt för mottagning av spetsens vassa
ända.
Om du inte använder spetsdynorna vid uppställningen
av högtalarna, kan spetsarna skada golvet. Om du
tänker använda spetsarna, rekommenderar vi att du
också använder spetsdynorna.
3
Sw
Page 32

Användning av glidskyddsdynor
Sätt fast glidskyddsdynorna på undersidan av högtalarstödet för
att tillförsäkra en stabil installation.
Högtalarens bottenplatta
Anslutningar
Till denna högtalare medföljer inga högtalarkablar för anslutning
till en förstärkare.
Högtalare
Svart
terminal (–)
(baksida):
Ingångspanel
Röd
terminal (+)
Fastsättning/borttagning av grillen
Högtalarsystemet har grillar som kan sättas dit och tas bort:
1 För att sätta fast grillen skall du passa in den mot
högtalarkroppen och trycka in försiktigt.
2 För att avlägsna grillen från högtalaren, fatta med båda
händerna i grillens mitt och drag den varsamt mot dig.
Observera
• Grillen hålles fast av magneter. Placera inte grillarna i
närheten av apparater som är känsliga för magnetism som
tex. CRT TV-apparater.
Förstärkare (baksidan)
SPEAKERS
OUTPUT
CENTER
Anslutning av kablarna
1 Stäng av strömmen till förstärkaren.
2 Anslut högtalarkablarna till ingången på högtalarens
baksida. Den röda ingångens polaritet är positiv (+) och den
svarta är negativ (–).
Lösgör knopparna på ingångarna och anslut högtalarkablarna till
var sitt hål på terminalerna och dra fast knopparna.
Svart terminal (–)
3 Anslut de andra ändarna av kablarna till förstärkarens
högtalarutgångar (för ytterligare upplysningar hänvisas till
förstärkarens bruksanvisning).
• Du kan också ansluta till högtalarterminalerna med en
banankontakt. Vid användning av en banankontakt skall du
komma ihåg att ta bort kåpan vid spetsen av ingången.
• Efter anslutningarna skall du dra lätt i kablarna för att
kontrollera att kabeländarna sitter fast ordentligt i
terminalerna. Slarviga anslutningar kan leda till störningar
och ljudavbrott.
• Om kablarnas kärntrådar lossnar från terminalerna, så att
kärntrådarna kommer i beröring med varandra, skapar det en
för hög belastning på förstärkaren. Detta kan göra att
förstärkaren slutar att fungera och förstärkaren kan till och
med skadas.
• Om du använder ett högtalarpar anslutet till en förstärkare,
kommer du inte att få normal stereoeffekt om polariteten (
för en av högtalarna (vänster eller höger) har förväxlats.
Röd terminal (+)
+, –
)
4
Sw
VIKTIGT
Dessa högtalarkontakter är strömförande och
innehåller FARLIG SPÄNNING. För att minska risken för
elektrisk stöt när du ansluter eller drar ur
högtalarsladdarna ska nätkabeln dras ur innan någon
oisolerad del vidrörs.
D3-4-2-2-3_A_Sw
Page 33

Specifikationer
Hölje. . . . . . . . . . . . . . . . . . . . . . . . . . . . . . . . Bokhylletyp med basreflex
Utformning . . . . . . . . . . . . . . . . . . . . . . . . . . . . . . . . . . . . . . . . . . . 3-vägs
Woofer-element . . . . . . . . . . . . . . . . . . . . . . . . . . . . . . .13 cm kon x 2
Mellanregister/Diskantelement
. . . . . . . . . . . . . . . . . . . . . . . . . . . . . Koaxialenhet: 13 cm kon/2,5 cm dome
Impedans . . . . . . . . . . . . . . . . . . . . . . . . . . . . . . . . . . . . . . . . . . . . . . 6
Frekvensomfång . . . . . . . . . . . . . . . . . . . . . . . . . . . . . . . 40 Hz till 50 kHz
Känslighet . . . . . . . . . . . . . . . . . . . . . . . . . . . . . . . . . . . . 85,5 dB (2,83 V)
Maximal ineffekt . . . . . . . . . . . . . . . . . . . . . . . . . . . . . . . . . . . . . . . 130 W
Brytfrekvens. . . . . . . . . . . . . . . . . . . . . . . . . . . . . . . . . . . . . 370 Hz/3 kHz
Yttermått . . . . . . . . . . . . . . . . .560 (B) mm x 190 (H) mm x 280 (D) mm
* Höjd (inklusive högtalarstödet): 211,5 mm
Vikt . . . . . . . . . . . . . . . . . . . . . . . . . . . . . . . . . . . . . . . . . . . . . . . . . 14,5 kg
Medföljande tillbehör
Högtalarstöd . . . . . . . . . . . . . . . . . . . . . . . . . . . . . . . . . . . . . . . . . . . . . . 1
Spetsar. . . . . . . . . . . . . . . . . . . . . . . . . . . . . . . . . . . . . . . . . . . . . . . . . . . 3
Spetsdynor. . . . . . . . . . . . . . . . . . . . . . . . . . . . . . . . . . . . . . . . . . . . . . . . 3
Glidskyddsdynor . . . . . . . . . . . . . . . . . . . . . . . . . . . . . . . . . . . . . . . . . . . 4
Grill. . . . . . . . . . . . . . . . . . . . . . . . . . . . . . . . . . . . . . . . . . . . . . . . . . . . . . 1
Rengöringsduk (endast för S-81C-K). . . . . . . . . . . . . . . . . . . . . . . . . . . 1
Bruksanvisning
Anmärkning
Tekniska data och utförande kan, i förbättringssyfte, ändras utan
föregående meddelande.
Ω
är ett varumärke som finns på en produkt med Pioneers
Phase Control-teknologi. Denna teknologi möjliggör högklassig
Svenska
ljudåtergivning från varje komponent genom en förbättrad total
fasanpassning.
Utgiven av Pioneer Corporation.
Copyright © 2008 Pioneer Corporation.
Kopiering förbjuden.
Sw
5
Page 34

Tak for købet af dette produkt fra Pioneer.
Gennemlæs venligst denne brugsanvisning grundigt, så du ved, hvordan du skal anvende din model på korrekt vis. Gem brugsvejledningen
på et sikkert sted, når du er færdig med at læse den, så du senere kan konsultere den.
Rengøring af højttalerkabinettet
Inden du begynder
• Dette højttalersystems nominelle impedans er 6 Ω. Slut
højttalersystemet til en forstærker med en
belastningsimpedans fra 6 Ω til 16 Ω (en model med “6 Ω to
16 Ω” vist på højttalerudgangsterminalerne).
Iagttag venligst de følgende sikkerhedsforskrifter, således at
skade på højttalersystemet på grund af
indgangsoverbelastning undgås:
• Strømforsyningen til højttalersystemet må ikke overstige
den højeste tilladte indgang.
• Anvend ikke en for kraftig forstærkerlydstyrke, når du
anvender en grafisk equalizer til at fremhæve kraftig lyd i det
højfrekvente område.
• Tving ikke en forstærker med svag strømforsyning til at
producere en kraftig lyd (forstærkerens harmoniske
forvrængning vil blive øget, hvorved højttaleren kan lide
skade).
Forsigtig: installation
• Monter ikke disse højttalere på væggen eller loftet. De kan
falde ned og være årsag til tilskadekomst.
• Monter ikke højttalerne i højden i loftet eller på væggen. Hvis
de monteres forkert, kan højttalergitteret falde ned og være
årsag til materiel skade og personskade.
• Sluk for og tag dit AV-udstyr ud af forbindelse og gå frem efter
anvisningerne, når du tilslutter apparaterne. Sørg for at
anvende de rigtige tilslutningskabler.
• Gitteret er monteret med magneter. Gitteret kan falde af, hvis
det udsættes for magt i vandret retning. Tag gitteret af først,
når højttaleren skal rengøres.
Ved normal brug bør aftørring med en tør klud være tilstrækkeligt
til at holde kabinettet rent. Om nødvendigt rengøres med en klud,
som er dyppet i et neutralt rengøringsmiddel, som er fortyndet fem
eller seks gange med vand og derefter vredet godt op. Anvend ikke
møbelpolitur eller rensemidler.
Anvend aldrig fortynder, rensebenzin, insektspray eller andre
kemikalier på eller i nærheden af denne enhed, da disse midler vil
ødelægge overfladerne.
Rengøring af højttalersystemets blanke overflade
Kun S-81C-K
• Hvis der anvendes en hård klud eller hvis du gnider skærmen
hårdt, vil pruduktets overflade blive ridset.
• Hvis du rengører højttalersystemets overflade med en våd
klud, kan små dråber på overfladen komme ind i produktet,
hvilket kan resultere i fejlfunktion.
• Når du rengører højttalersystemets overflade, skal du tørre
den forsigtigt af med en tør, blød klud, dvs. den medfølgende
renseklud.
Kassen indeholder
Højttalerfod x 1
Forsigtig: ibrug
• Anbring ikke højttaleren på en ustabil flade. Den kan i så fald
udgøre en fare, hvis den vælter, og desuden øve skade på
udstyret.
• Anvend ikke højttaleren til at frembringe forvrænget lyd i et
længere tidsrum. Dette kan resultere i fare for brand.
• Lad være med at sidde eller stå på højttaleren og lad ikke børn
lege på højttaleren.
• Anbring ikke store og tunge genstande oven på højttaleren.
• Anbring ikke magnetiske genstande, som for eksempel en
skruetrækker eller jerndele i nærheden af diskant- eller
mellemtonehøjttaleren. Eftersom højttalerne betjener sig af
kraftige magneter, kan genstandene blive tiltrukket, med
personskade eller skade på membranen som resultat.
EU’s
Pigge x 3
Pigfødder x 3
Skridsikre puder x 4
Gitter x 1
Renseklud (kun til S-81C-K) x 1
Brugsanvisning
2
Da
K058_Da
Page 35

Installationsanvisninger
50 cm
20 cm
Vigtigt
Valg af installationssted for højttalersystemet
• Lyd fra højttalersystemet påvirkes nemt på en umærkelig
måde af forholdene på lyttestedet.
• Den bedste lyd opnås ved at man stiller højttalerne på et solidt
gulv og placerer dem som vist herunder. Niveauet af baslyd
kan reguleres ved at man flytter højttalerne nærmere til eller
længere fra væggen. Indstil højttalerne, så de er i samme
afstand fra deres respektive sidevægge, således at en
balanceret lyd garanteres.
• Hvis der er meget efterklang i rummet, anbefaler vi at du
hænger noget tungt stof på væggene og/eller lægger et tæppe
på gulvet for at dæmpe lyden. Det bedste resultat opnås ved at
man dækker væggene helt.
• Denne højttaler er af bogreol-typen, som vil yde dens bedste,
hvis den anbringes på en solid, plan flade og ikke på gulvet.
Anbringelse af højttaleren direkte på gulvet, vil resultere i en
buldrende, udefineret lyd.
Anvendelse af højttalerfoden
Med dette højttalersystem følger en højttalerfod, som giver bedre
lyd, stabilitetet og sikkerhed. Anbring højttaleren på foden som
vist herunder.
Anvend de medfølgende pigge eller skridsikre plader, hvis du
anbringer højttaleren på højttalerfoden.
Hvis piggene anvendes
Dette højttalersystem inkluderer pigge, som kan anvendes til at
isolere højttaleren fra gulvet. Anvend de medfølgende pigplader
for at undgå at ridse gulvet eller andre overflader, hvor højttaleren
anbringes.
1 Drej piggene ind i de gevindskårne metalindsatser, som
er indlejret i højttalerens underside.
Dansk
• Pioneer påtager sig intet ansvar for skader, som er et resultat
af samling, fejlagtig montering, utilstrækkelig forstærkning,
misbrug af produktet, naturrelaterede påvirkninger og
lignende.
Kun S-81C-QL
• Kabinettet betjener sig af en krydsfinerplade, som er lavet af
naturligt træ. Anbring ikke højttaleren på et sted, hvor den vil
blive udsat for direkte sol, og undgå at anbringe den i
nærheden af varmeapparater og klima-anlæg. Dette kan føre
til skævhed i og misfarvning af højttalerkabinettet og øve
skade på højttaleren.
Højttaler fod underside
2 Sæt pigfødderne i de stillinger, hvor piggenes spidser vil
ramme, når højttaleren sættes ned.
3 Anbring højttalerfoden på pigfødderne og kontroller for
at bekræfte, at højttalerfoden ikke rokker.
4 Anbring højttaleren på højttalerfoden og kontroller for
at bekræfte, at højttaleren ikke rokker.
Forsigtig
• Benyt altid pigfødderne som vist, med den indskårne flade
vendende opad til modtagning af pigspidsen.
Hvis du ikke anvender pigfødderne, når højttalerne
anbringes, kan piggene øve skade på gulvet. Hvis du
agter at anvende de pigge, anbefaler vi stærkt
anvendelse af pigfødderne.
3
Da
Page 36

Når skridsikre plader anvendes
For at sikre en stabil installation, skal de skridsikre plader sættes
på undersiden af hver højttalerfod.
Tilslutninger
Denne højttaler inkluderer ikke højttalerkabler, som anvendes til
tilslutning af en forstærker.
Højttaler fod underside
Påsætning/aftagning af gitteret
Dette højttalersystem er udstyret med et gitter, som kan sættes på
og tages af på følgende måde:
1 Gitteret sættes på ved at man sætter det ud for
højttaleren og trykker det forsigtigt på.
2 Gitteret tages af ved at du tager fat i det med begge
hænder nær midten og forsigtigt trækker det mod dig for at
skille gitteret fra højttaleren.
Forsigtig
Sort
terminal (–)
Forstærker (bag)
Højttaler (bag):
Indgangspanel
SPEAKERS
OUTPUT
CENTER
Rød
terminal (+)
Tilslutning af kablerne
1 Sluk for forstærkeren.
2 Sæt højttalerkablerne i indgangsterminalerne på
bagsiden af højttaleren. Med hensyn til
indgangsterminalernes polaritet er rød positiv (+) og sort
negativ (–).
Løsn knapperne på indgangsterminalerne og sæt
højttalerkabeltrådene ind i hver terminalklemmeåbning.
Sort terminal (–)
Rød terminal (+)
• Der anvendes magneter til at holde gitteret på plads. Anbring
ikke gitteret nær anordninger, der kan blive påvirket af
magnetisme (CTR-fjernsyn etc.).
3 Sæt den anden ende af kablerne i udgangsterminalerne
på forstærkerens
højttaler udgangsterminaler (vi henviser til
brugsanvisningen for din forstærker angående yderligere
detaljer).
• Du kan også anvende bananstik til denne tilslutning. Hvis du
ønsker at gøre dette, skal du først tage hætterne af
indgangsterminalerne.
• Træk let i kablerne, når du har sat stikkene i, for at sikre dig, at
kabelenderne er sat ordentligt i terminalerne. Mangelfuld
tilslutning kan frembringe støj i og afbrydelser af lyden.
• Hvis kabeltrådene skulle falde ud af terminalerne, således at
der er risiko for at de kan komme i kontakt med hinanden, vil
forstærkeren blive udsat for en ekstra stor belastning. Dette
kan bevirke, at forstærkeren holder op med at fungere og kan
endog medføre skade på forstærkeren.
• Hvis du anvender et sæt højttalere, som er sluttet til en
forstærker, vil du ikke kunne opnå den normale stereovirkning,
hvis polariteten af (+, –) en af højttalerne (venstre eller højre)
er i modfase.
ADVARSEL
Disse højtalerterminaler leder FARLIG
STRØMFØRENDE spænding. For at forhindre risikoen
for elektrisk stød, når højtalerkablerne tilsluttes eller
kobles fra, trækkes strømkablet ud af stikdåsen, før der
røres ved uisolerede dele.
D3-4-2-2-3_A_Da
4
Da
Page 37

Tekniske specifikationer
Kabinet. . . . . . . . . . . . . . . . . . . . . . . . . . . . . . . . Basrefleks, bogreol-type
Konfiguration . . . . . . . . . . . . . . . . . . . . . . . . . . . . . . . . . . . . . . . . . .3-vejs
Bashøjttaler. . . . . . . . . . . . . . . . . . . . . . . . . 13 cm keglemembran x 2
Mellemtone/Diskanthøjttaler
. . . . . . . . . . . . . . . . . Koaksial enhed: 13 cm keglemembran/2,5 cm dome
Impedans . . . . . . . . . . . . . . . . . . . . . . . . . . . . . . . . . . . . . . . . . . . . . . 6
Frekvensgang . . . . . . . . . . . . . . . . . . . . . . . . . . . . . . . . . 40 Hz til 50 kHz
Følsomhed. . . . . . . . . . . . . . . . . . . . . . . . . . . . . . . . . . . . 85,5 dB (2,83 V)
Maks. indgangseffekt . . . . . . . . . . . . . . . . . . . . . . . . . . . . . . . . . . . 130 W
Delefrekvens . . . . . . . . . . . . . . . . . . . . . . . . . . . . . . . . . . . . 370 Hz/3 kHz
Udvendige mål . . . . . . . . . . . . 560 (B) mm x 190 (H) mm x 280 (D) mm
*Højde (inklusive højttalerstativ): 211,5 mm
Vægt. . . . . . . . . . . . . . . . . . . . . . . . . . . . . . . . . . . . . . . . . . . . . . . . 14,5 kg
Medfølgende tilbehør
Højttalerfod . . . . . . . . . . . . . . . . . . . . . . . . . . . . . . . . . . . . . . . . . . . . . . . 1
Pigge . . . . . . . . . . . . . . . . . . . . . . . . . . . . . . . . . . . . . . . . . . . . . . . . . . . . 3
Pigfødder . . . . . . . . . . . . . . . . . . . . . . . . . . . . . . . . . . . . . . . . . . . . . . . . . 3
Skridsikre puder . . . . . . . . . . . . . . . . . . . . . . . . . . . . . . . . . . . . . . . . . . . 4
Gitter . . . . . . . . . . . . . . . . . . . . . . . . . . . . . . . . . . . . . . . . . . . . . . . . . . . . 1
Renseklud (kun til S-81C-K) . . . . . . . . . . . . . . . . . . . . . . . . . . . . . . . . . . 1
Brugsanvisning
Bemærk
Tekniske specifikationer og design kan ændres uden varsel på
grund af forbedringer.
Ω
er et varemærke for et produkt med Pioneers fasekontrolteknologi. Denne teknologi muliggør højkvalitets lydgengivelse via
hver enkelt komponent ved forbedring af den generelle
faseoverensstemmelse.
Published by Pioneer Corporation.
Copyright © 2008 Pioneer Corporation.
Alle rettigheder forbeholdes.
Dansk
Da
5
Page 38

Vi takker for innkjøpet av dette Pioneer-produktet.
Vennligst les igjennom denne brukerveiledningen slik at du blir godt fortrolig med riktig betjening av denne modellen. Etter å ha nøye
gjennomlest brukerveiledningen bør den oppbevares på et trygt sted for fremtidig konsultasjon.
Rengjøring av høyttalerkabinettet
Før du går i gang
• Den nominelle impedansen for høyttalersystemet er 6 Ω.
Koble høyttalersystemet til en forsterker som har en
belastningsimpedanse på mellom 6 Ω og 16 Ω (modeller med
“6 Ω to 16 Ω” avmerket på forsterkerens utgangsterminaler).
For å unngå skade på høyttalerne pga. overbelastning bør du
vennligst iaktta følgende forholdsregler:
• Ikke belast høyttalersystemet i overkant av det som er
spesifisert som maksimal ytelse.
• Ved bruk av en grafisk equalizer for å forsterke lydbildet i
høyfrekvensområdet må det ikke benyttes et overdrevent
høyt volumnivå med forsterkeren.
• Forsøk aldri å trekke høye volumnivåer fra en forsterker med
lav yteevne (forsterkerens harmoniske forvrengning vil øke
og kan dermed påføre skade på høyttaleren).
Forsiktig: Installasjon
• Ikke fest disse høyttalerne til vegger eller tak. De kan falle ned
og dermed påføre personskader.
• Ikke monter høyttalerne høyt opp i et tak eller på en vegg. Hvis
de festes uforsvarlig kan de falle ned og dermed påføre skade
på person eller utstyr.
• Slå av og frakoble alt stereoutstyr og følg brukerveiledningene
når komponenter skal tilkobles. Pass på å bruke egnede kabler
for tilkoblingene.
• Grillen er festet med magneter. Grillen kan falle av hvis den
skyves på i horisontal retning. Ta først av grillen før du rengjør
høyttaleren.
Ved normal bruk er det tilstrekkelig å rengjøre kabinettet ved å
tørke det av med en tørr klut. Om nødvendig kan det tørkes av med
en klut dyppet i et nøytralt rensemiddel som har blitt uttynnet fem
til seks ganger med vann og deretter vridd godt opp. Unngå bruk
av møbelvoks og skuremidler.
Bruk aldri tynningsmidler, bensin, insektspray eller andre
kjemikalier på eller i nærheten av enhetene da disse kan tære på
overflatene.
Rengjøring av høyttalersystemets blanke
overflater.
Kun modell S-81C-K
• Hvis du anvender en støvete eller stiv klut, eller hvis du gnir
hardt på flaten, risikerer du at det oppstår riper på produktet.
• Hvis du rengjør høyttalersystemets overflater med en våt klut,
kan vanndråper som blir igjen på overflaten trenge inn i
enhetene og føre til funksjonssvikt.
• Bruk den medfølgende pussefillen eller en tilsvarende tørr og
myk klut når du rengjør høyttalersystemets overflater.
Eskens innhold
Forsiktig: Ved bruk
• Ikke plasser høyttalerne på ustabile flater. Risiko for
personskade oppstår hvis de velter, så vel som at utstyret kan
skades.
• Ikke benytt høyttalerne til avspilling av forvrengte lyder i lengre
tid. Dette medfører risiko for brann.
• Ikke sitt eller stå på høyttalerne eller la barn leke oppå
høyttalerne.
• Ikke plasser store eller tunge gjenstander oppå høyttalerne.
• Ikke legg magnetiske gjenstander som f.eks. skrutrekkere eller
deler som inneholder jern i nærheten av tweeter- eller
mellomtoneelementene. Høyttalerelementene benytter
kraftige magneter, slik at gjenstander kan tiltrekkes og
dermed forårsake personskader eller skade på membranene.
pluss
Høyttalerfot x 1
Spike x 3
Spiketabletter x 3
Anti-glifelt x 4
Grill x 1
Pussefille (kun modell S-81C-K) x 1
Bruksanvisning
2
No
K058_No
Page 39

Installering
50 cm
20 cm
Viktig
Valg av høyttalersystemets plassering
• Lyd som avspilles via et høyttalersystem kan lett bli påvirket på
diverse måter av forholdene i rommet hvor lyttingen pågår.
• For å oppnå best mulig lyd bør du velge å plassere høyttalerne
på et solid gulv og stille de som anvist nedenfor.
Bassregisterets nivå kan justeres ved å flytte høyttalerne i
kortere eller lengre avstand fra veggen. Juster høyttalerne slik
at de står i samme avstand fra sine respektive vegger slik at du
oppnår et balansert lydbilde.
• Hvis rommet har mye gjenklang anbefales det å henge et tykt
tøystykke på veggene og/eller plassere et teppe på gulvet for å
dempe lyden. Best resultat oppnås ved å dekke veggene
fullstendig.
• Disse høyttalerne er beregnet for bokhyller og vil gi best ytelse
når de plasseres på en solid, jevn flate i avstand fra gulvet.
Plassering av høyttalerne direkte på gulvflater vil som regel
resultere i drønnende lyd som mangler definisjon.
Bruk av høyttalerfoten
En høyttalerfot følger med dette høyttalersystemet for bedre lyd,
stabilitet og inkludert med dette høyttalersystemet er Plasser
høyttaleren oppå foten som vist nedenfor.
Bruk medfølgende spikes eller anti-gliflatene når du monterer
høyttalerne på høyttalerfoten.
Ved bruk av spikes
Dette høyttalersystemet er utstyrt med spikes som kan brukes til å
skille høyttalerne fra gulvet. Bruk de medfølgende spiketablettene
for å unngå at gulvet eller andre flater hvor høyttalerne plasseres,
blir ripet opp.
1 Skru hver spike inn i metallgjengene som er innfelt i
høyttalerbunnen.
Norsk
• Pioneer påtar seg ikke ansvar for skader som eventuelt
oppstår ved sammenstilling, feil montering, utilstrekkelige
forsterkninger, feil bruk av produktet, naturkatastrofer eller
lignende.
Kun modell S-81C-QL
• Høyttalerkabinettet er laget med finert, naturlig treverk. Ikke
plasser høyttalerne på steder hvor de kan utsettes for direkte
sollys og unngå plassering i nærheten av varmeapparater eller
klimaanlegg. Slike påkjenninger kan forårsake at
høyttalerkabinettet vrir seg, avfarges eller at
høyttalerelementene tar skade.
Høyttalerfotens underside
2 Legg spiketablettene på egnede steder slik at
spikespissene treffes når høyttaleren settes ned.
3 Plasser høyttalerfoten på spiketablettene og sjekk for å
forsikre deg om at høyttaleren ikke vakler.
4 Legg høyttaleren oppå høyttalerfoten og sjekk for å
forsikre deg om at høyttaleren ikke vakler.
Forsiktig
• Bruk alltid spiketablettene som anvist slik at den innfelte flaten
vender opp for mottak av spikespissen.
Spikes kan påføre skade på gulvet hvis du unnlater å
bruke spiketablettene ved plassering av høyttalerne.
Hvis du ønsker på bruke spikes anbefaler vi at du tar i
bruk spiketablettene.
3
No
Page 40

Ved bruk av anti-glifelt
For å sikre en stabil oppstilling bør du feste anti-glifeltene på
undersiden av hver høyttalerfot.
Høyttalerfotens underside
Tilkoblinger
Høyttalerkabler for tilkobling til en forsterker følger ikke med dette
høyttalersystemet.
Høyttaler
Sort
terminal (–)
(bakside):
Inngangspanel
Rød
terminal (+)
Montering/fjerning av grillen
Med høyttalersystemet følger det med griller som kan monteres
eller fjernes på følgende måte:
1 Monter grillen ved å stille den mot høyttaleren og gi den
et lett trykk.
2 Ta tak med begge hender nær midten av grillen og trekk
den forsiktig mot deg slik at den skilles fra høyttaleren.
Forsiktig
• Magneter har blitt brukt for å holde grillen på plass. Ikke
plasser en grill i nærheten av apparater som kan påvirkes av
magnetisme (CRT-skjermer osv.).
Forsterker (bakpanel)
SPEAKERS
OUTPUT
CENTER
Tilkobling av kablene
1 Skru av forsterkerens strøm.
2 Koble høyttalerkablene til inngangsterminalene på hver
høyttalers bakside. Inngangsterminalenes polaritet: rød er
positiv (+) og sort er negativ (–).
Løsne knotten på hver inngangsterminal og skyv kabeltrådene inn
i hver av terminalstolpenes hull og stram deretter til knottene.
Sort terminal (–)
3 Koble kabelens andre ender til forsterkerens
utganger (se forsterkerens brukerveiledning for en mer
detaljert forklaring).
• Du kan også bruke bananplugger for denne tilkoblingen.
Terminalkapslene må først fjernes fra inngangsterminalen når
du bruker av bananplugger.
• Etter at pluggene har blitt tilkoblet bør du dra lett i kablene for
å bekrefte at de er godt nok festet til terminalene. Dårlige
tilkoblinger er ofte årsak til støy og brudd på lyden.
• Dersom det skulle forekomme at kabeltrådene skyves ut av en
terminal kan de komme i kontakt med hverandre, noe som kan
føre til at forsterkeren overbelastes. Dette kan medføre at
forsterkeren slutter å fungere og til og med påføre skade på
forsterkeren.
• Ved bruk av høyttalere som har blitt koblet til en forsterker, vil
du ikke oppnå normal stereoeffekt dersom polariteten (+, –) på
en av høyttalerne (høyre eller venstre) har blitt reversert.
Rød terminal (+)
speaker-
4
No
ADVARSEL
Disse høyttalerkontaktene leder LIVSFARLIG strøm.
Dra ut strømledningen før du kobler til eller fra
høyttalerledningene og før du berører noen uisolerte
deler, dette for å unngå fare for elektrisk støt.
D3-4-2-2-3_A_No
Page 41

Spesifikasjoner
Kammer. . . . . . . . . . . . . . . . . . . . . . . Bassrefleks beregnet for bokhylle
Konfigurasjon . . . . . . . . . . . . . . . . . . . . . . . . . . . . . . . . . . . . . . . . . .3-veis
Woofer . . . . . . . . . . . . . . . . . . . . . . . . . . . . . . . . . . . . . .13 cm cone x 2
Mellomtone/Tweeter . . . . . . . Koaksial enhet: 13 cm cone/2,5 cm dome
Impedanse . . . . . . . . . . . . . . . . . . . . . . . . . . . . . . . . . . . . . . . . . . . . 6
Frekvensrespons . . . . . . . . . . . . . . . . . . . . . . . . . . . . . . . 40 Hz til 50 kHz
Sensitivitet. . . . . . . . . . . . . . . . . . . . . . . . . . . . . . . . . . . . 85,5 dB (2,83 V)
Maksimal inngangeffekt. . . . . . . . . . . . . . . . . . . . . . . . . . . . . . . . . 130 W
Crossover-frekvens . . . . . . . . . . . . . . . . . . . . . . . . . . . . . . . 370 Hz/3 kHz
Utvendige dimensjoner . . . . . 560 (B) mm x 190 (H) mm x 280 (D) mm
*Høyde (inkl. høyttalerstativ): 211,5 mm
Vekt. . . . . . . . . . . . . . . . . . . . . . . . . . . . . . . . . . . . . . . . . . . . . . . . . 14,5 kg
Medfølgende utstyr
Høyttalerfot . . . . . . . . . . . . . . . . . . . . . . . . . . . . . . . . . . . . . . . . . . . . . . . 1
Spike . . . . . . . . . . . . . . . . . . . . . . . . . . . . . . . . . . . . . . . . . . . . . . . . . . . . 3
Spiketabletter . . . . . . . . . . . . . . . . . . . . . . . . . . . . . . . . . . . . . . . . . . . . . 3
Anti-glifelt . . . . . . . . . . . . . . . . . . . . . . . . . . . . . . . . . . . . . . . . . . . . . . . . 4
Grill. . . . . . . . . . . . . . . . . . . . . . . . . . . . . . . . . . . . . . . . . . . . . . . . . . . . . . 1
Pussefille (kun modell S-81C-K) . . . . . . . . . . . . . . . . . . . . . . . . . . . . . . 1
Bruksanvisning
Merk
Spesifikasjoner og utforming kan bli endret uten forutgående
varsel grunnet produktutbedringer.
Ω
er et varemerke som finnes på produkter som inneholder
Pioneers fasekontrollteknologi (Phase Control). Denne
teknologien muliggjør lydgjengivelse gjennom hver komponent
ved å forbedre helhetlig fasetilpasning.
Utgitt av Pioneer Corporation.
Opphavsrett © 2008 Pioneer Corporation.
Alle rettigheter reservert.
Norsk
No
5
Page 42

Kiitämme tämän Pioneer-laitteen hankinnasta.
Pyydämme lukemaan nämä käyttöohjeet huolellisesti, jotta mallin käyttötoimet tulevat tutuiksi. Kun ohjeet on luettu, pane ne säilöön
johonkin varmaan paikkaan, josta ne tarvittaessa löytyvät.
Kaiuttimen pintojen puhdistaminen
Ennen kuin aloitat
• Tämän kaiutinjärjestelmän nimellisimpedanssi on 6 Ω. Liitä
kaiutinjärjestelmä vahvistimeen, jonka kuormitusimpedanssi
on 6 Ω–16 Ω (malli, jossa “6 Ω to 16 Ω” näkyy kaiuttimen
lähtöliittimissä).
Jotta kaiutin ei pääse vahingoittumaan tulon ylikuormasta
johtuen, pyydämme noudattamaan seuraavia ohjeita:
• Älä syötä virtaa kaiutinjärjestelmään yli suurimman sallitun
tulon.
• Kun graafista taajuuskorjainta käytetään korkeataajuisen
alan äänekkäiden äänien korostamiseen, älä käytä liian
suurta äänenvoimakkuutta vahvistimessa.
• Älä pakota matalatehoista vahvistinta antamaan kovaa
ääntä (vahvistimen harmoninen särö suurenee ja kaiuttimet
saattavat vahingoittua).
Huomautus: asennus
• Älä kiinnitä näitä kaiuttimia seinälle tai kattoon. Kaiuttimet
saattavat pudota ja aiheuttaa vammoja.
• Älä asenna kaiuttimia istuma-asennon päälle kattoon tai
seinälle. Väärin kiinnitetty kaiuttimen verkko saattaa pudota ja
aiheuttaa vahinkoja tai henkilövammoja.
• Kun liität laitteita, katkaise AV-laitteesta virta, irrota
verkkojohto ja katso ohjeita. Varmista, että käytät oikeita
liitäntäjohtoja.
• Verkko on kiinnitetty magneetein. Verkko saattaa pudota, jos
siihen kohdistetaan voima vaakasuunnassa. Kun puhdistat
kaiuttimen, ota ensin verkko pois.
Tavallisessa käytössä pintojen pyyhkimen kuivalla kankaalla riittää
kaiuttimien puhtaana pitämiseen. Jos tarpeen, pyyhi liinalla, joka
on kastettu viisi- tai kuusikertaiseksi vedellä laimennettuun
neutraaliin pesuaineliuokseen ja väännetty kuivaksi. Älä käytä
huonekaluvahoja tai puhdistimia.
Älä koskaan käytä tinneriä, bensiiniä, hyönteismyrkkyjä tai muita
kemikaaleja laitteelle tai sen läheisyydessä, sillä tällaiset aineet
syövyttävät sen pintaa.
Kaiutinjärjestelmän kiiltävän pinnan
puhdistaminen
Vain S-81C-K
• Jos käytetään pölyistä tai kovaa kangasta tai jos pintaa
hangataan voimakkaasti, pintaan tulee naarmuja.
• Jos kaiutinjärjestelmän pinnat puhdistetaan märällä
kankaalla, vesipisaroita saattaa päästä pinnalta laitteen
sisään, jolloin se menee epäkuntoon.
• Kun puhdistat kaiutinjärjestelmän pintoja, pyyhi ne varovasti
kuivalla, pehmeällä , varusteisiin kuuluvalla
puhdistuskankaalla.
Mitä pakkaukseen kuuluu
Huomautus: käytössä
• Älä aseta kaiutinta epävakaalle pinnalle. Pudotessaan kaiutin
saattaa aiheuttaa vahinkoja ja mennä rikki.
• Älä käytä kaiutinta säröisen äänen toistoon pitkän aikaa. Tämä
saattaa aiheuttaa tulipalovaaran.
• Älä istu äläkä seiso kaiuttimen päällä äläkä anna lasten leikkiä
sen kanssa.
• Älä aseta suuria tai painavia esineitä kaiuttimen päälle.
• Älä aseta magneettisia esineitä kuten ruuviavaimia tai
rautaosia diskantti- tai keskikaiuttimen läheisyyteen. Koska
kaiuttimissa on voimakkaat magneetit, ne saattavat vetää
esineitä puoleensa ja aiheuttaa vahinkoja tai vahingoittaa
kalvoa.
Kaiuttimen alusta x 1
Nastat x 3
Nastapohjat x 3
Liukuestolevyt x 4
Verkko x 1
Puhdistuskangas (vain mallille S-81C-K) x 1
Käyttöohjeet
K058_Fi
2
Fi
Page 43

Asennus
50 cm
20 cm
Tärkeää
Kaiuttimien paikan valinta
• Kuuntelupaikan äänet vaikuttavat helposti kaiutinjärjestelmän
kautta toistuvaan ääneen.
• Jotta ääni toistuisi parhaalla mahdollisella tavalla, aseta
kaiuttimet vakaalle lattiapinnalle ja sijoita ne alla kuvatulla
tavalla. Matalien äänten tasoa voidaan säätää siirtämällä
kaiuttimet lähemmäs tai kauemmas seinästä. Säädä
kaiuttimet niin, että ne ovat samalla etäisyydellä
seinäpinnoista, jotta ääni olisi tasapainossa.
• Jos huoneessa on paljon jälkikaiuntaa, suosittelemme
raskaan kankaan ripustamista seinille ja/tai maton
asettamista lattialle, jotta ääni vaimenee. Peitä seinät
kokonaan, jotta tulos olisi paras mahdollinen.
• Tämä kaiutin on kirjahyllytyyppinen kaiutin, joka toimii
parhaiten asennettuna tukevalle, tasaiselle pinnalle pois
lattialta. Kaiuttimen asentaminen suoraan lattialle antaa
samean ja epäselkeän äänen.
Käyttämällä kaiutinalustaa
Tämän kaiutinjärjestelmän varusteisiin kuuluu kaiuttimen alusta,
jotta saadaan parempi ääni ja jotta käyttö olisi vakaata ja
turvallista. Aseta kaiutin alustalle alla kuvatulla tavalla.
Käytä varusteisiin kuuluvia nastoja tai liukuestolevyjä, kun kaiutin
asennetaan kaiuttimen alustalle.
Kun käytetään nastoja
Tässä kaiutinjärjestelmässä on nastat, joita käyttämällä kaiutin
voidaan eristää lattiasta. Käytä varusteisiin kuuluvia nastapohjia,
jotta lattia tai muu pinta, jolle kaiutin asetetaan, ei naarmuunnu.
1 Kierrä nastat kierteitettyihin metalliasentimiin, jotka
ovat kaiuttimen pohjassa.
Kaiuttimen alustan pohja
• Pioneer ei ota minkäänlaista vastuuta vahingoista, jotka ovat
seurausta sijoittamisesta, virheellisestä asennuksesta,
riittämättömästä vahvuuden voimistamisesta, laitteen
virheellisestä käytöstä, luonnonmullistuksista jne.
Vain S-81C-QL
• Kotelon pinnassa on luonnonpusta valmistettu kiiltopinta. Älä
sijoita kaiutinta sellaiseen paikkaan, johon aurinko paistaa
suoraan ja vältä lämmittimen ja ilmastointilaitteen
läheisyydessä olevia paikkoja. Tällaisissa paikoissa
kaiuttimien pinta saattaa vääristyä, väri lähteä ja kaiuttimet
saattavat vahingoittua.
2 Aseta nastapohjat niin, että kolmen nastan kärjet osuvat
kohdalleen asetettaessa kaiutin alas.
3 Aseta kaiuttimen alusta nastapohjille ja varmista, että
kaiuttimen alusta ei heilu.
4 Aseta kaiutin nastapohjille ja varmista, että kaiutin ei
heilu.
Huomautus
• Käytä aina nastapohjia näytetyllä tavalla oikea puoli ylöspäin
nastan kärjen vastaanottamista varten.
Jos nastapohjia ei käytetä kaiuttimien asennuksessa,
nastat saattavat vahingoittaa lattiaa. Jos nastoja
aiotaan käyttää, suosittelemme nastapohjien
käyttämistä.
Suomi
3
Fi
Page 44

Kun käytetään liukuestolevyjä
Jotta asennuksesta tulee vakaa, kiinnitä liukuestolevyt kaiuttimen
alustan pohjaan.
Liitännät
Tämän kaiuttimen varusteisiin ei kuulu kaiutinjohtoja
vahvistimeen tapahtuvaa liittämistä varten.
Kaiuttimen alustan pohja
Verkon kiinnittämien/irrottaminen
Tässä kaiutinjärjestelmässä on verkko, joka voidaan kiinnittää ja
irrottaa seuraavalla tavalla:
1 Verkko kiinnitetään asettamalla se kaiuttimen runkoon ja
painamalla kevyesti.
2 Ota verkko pois tarttumalla siitä kiinni molemmin käsin
keskeltä ja vetämällä varovasti itseesi päin niin, että verkko
irtoaa kaiuttimesta.
Huomautus
Vahvistin (taka)
Musta
liitin (–)
SPEAKERS
OUTPUT
Kaiutin (taka):
Tulopaneeli
CENTER
Punainen
liitin (+)
Johtojen liittäminen
1 Katkaise virta vahvistimesta.
2 Liitä kaiutinjohdot kaiuttimen takana oleviin
tuloliittimiin. Tuloliittimen napaisuus: punainen on
positiivinen (+) ja musta negatiivinen (–).
Löysennä tuloliittimien nupit, aseta kaiutinkaapelijohtimet
kumpaankin liitinaukkoon ja kiristä lopuksi nupit.
Musta liitin (–)
Punainen liitin (+)
• Magneetit pitävät verkkoa paikallaan. Älä aseta verkkoja
sellaisten esineiden lähelle, jotka ovat alttiita magneettiselle
vaikutukselle (CRT-televisiot jne.).
3 Liitä johtojen toinen pää vahvistimen
kaiuttimen
lähtöliittimiin (katso tarkemmat tiedot vahvistimen
käyttöohjeista).
• Kaiutinliittimet voidaan liittää myös banaanipistokkeella. Kun
käytät banaanipistokkeita, ota pois tuloliittimen päässä oleva
suojus.
• Kun pistokkeet on liitetty, varmista johdoista kevyesti
vetämällä, että johtojen päät on kiinnitetty lujasti liittimiin.
Huonot liitännät aiheuttavat kohinaa ja katkoja ääneen.
• Jos johtojen säikeet työntyvät ulos liittimistä ja säikeet
pääsevät koskettamaan toisiaan, vahvistimeen kohdistuu
ylimääräinen kuorma. Tämä saattaa aiheuttaa sen, että
vahvistin lakkaa toimimasta ja vahingoittuu.
• Kun käytetään vahvistimeen liitettyjä kaiutinpareja, normaalia
stereotehostetta ei saada, jos yhden kaiuttimen (vasemman
tai oikean) napaisuus (+, –) on päinvastainen.
VAROTOIMET
Kaiutinpäätteet ovat HENGENVAARALLISIA, kun virta
on päällä. Estä sähköiskun vaara irrottamalla
sähköjohto, ennen kuin kosketat eristämättömiä osia
kaiutinkaapeleita kytkettäessä tai irrotettaessa.
D3-4-2-2-3_A_Fi
4
Fi
Page 45

Tekniset tiedot
Kotelo. . . . . . . . . . . . . . . . . . . . . . . . . . . . .Bassorefleksi, kirjahyllytyyppi
Rakenne. . . . . . . . . . . . . . . . . . . . . . . . . . . . . . . . . . . . . . . . . . . . .3-teinen
Bassokaiutin . . . . . . . . . . . . . . . . . . . . . . . . . . . . . . . . 13 cm kartio x 2
Keskiala/Diskantti
. . . . . . . . . . . . . . . . . . . . Koaksiaalinen yksikkö: 13 cm kartio/2,5 cm kalotti
Impedanssi . . . . . . . . . . . . . . . . . . . . . . . . . . . . . . . . . . . . . . . . . . . . . 6
Taajuusvaste . . . . . . . . . . . . . . . . . . . . . . . . . . . . . . . . . . . 40 Hz – 50 kHz
Herkkyys. . . . . . . . . . . . . . . . . . . . . . . . . . . . . . . . . . . . . . 85,5 dB (2,83 V)
Suurin tuloteho . . . . . . . . . . . . . . . . . . . . . . . . . . . . . . . . . . . . . . . . 130 W
Jakosuodatintaajuus . . . . . . . . . . . . . . . . . . . . . . . . . . . . . . 370 Hz/3kHz
Ulkoiset mitat . . . . . . . . . . . . . 560 (L) mm x 190 (K) mm x 280 (S) mm
*Korkeus (kaiutinteline mukaan luettuna): 211,5 mm
Paino . . . . . . . . . . . . . . . . . . . . . . . . . . . . . . . . . . . . . . . . . . . . . . . 14,5 kg
Vakiovarusteet
Kaiuttimen alusta . . . . . . . . . . . . . . . . . . . . . . . . . . . . . . . . . . . . . . . . . . 1
Nastat. . . . . . . . . . . . . . . . . . . . . . . . . . . . . . . . . . . . . . . . . . . . . . . . . . . . 3
Nastapohjat. . . . . . . . . . . . . . . . . . . . . . . . . . . . . . . . . . . . . . . . . . . . . . . 3
Liukuestolevyt . . . . . . . . . . . . . . . . . . . . . . . . . . . . . . . . . . . . . . . . . . . . . 4
Verkko . . . . . . . . . . . . . . . . . . . . . . . . . . . . . . . . . . . . . . . . . . . . . . . . . . . 1
Puhdistuskangas (vain mallille S-81C-K) . . . . . . . . . . . . . . . . . . . . . . . 1
Käyttöohjeet
Huom
Parannusten vuoksi pidätämme oikeuden muuttaa teknisiä
ominaisuuksia ja ulkoasua ilman erillistä ilmoitusta.
Ω
on Pioneerin vaihesäätötekniikalla varustettuihin
tuotteisiin merkitty tavaramerkki. Tämä teknologia mahdollistaa
korkealaatuisen äänentoiston kustakin osasta parantamalla
kokonaisvaiheen sopivuutta.
Julkaisija : Pioneer Corporation.
Copyright-oikeudet © 2008 : Pioneer Corporation.
Kaikki oikeudet pidätetään.
Suomi
5
Fi
Page 46

Благодарим вас за покупку изделия компании Pioneer.
Пожалуйста, ознакомьтесь с настоящей инструкцией по эксплуатации, чтобы узнать, как правильно обращаться с приобретенной вами
моделью. После того, как вы закончите ознакомление с инструкцией, сохраните ее в надежном месте для обращения к ней в будущем.
Чистка корпуса динамика
Перед началом эксплуатации
• Номинальное полное сопротивление данной акустической
системы составляет 6 Ω. Подсоединяйте акустическую
систему только к усилителям с полным сопротивлением
нагрузки в пределах от 6 Ω до 16 Ω (модели, на выходных
контактах на динамик которых указано “6 Ω to 16 Ω”).
В целях предотвращения повреждения акустической системы
в результате входной перегрузки, пожалуйста, соблюдайте
следующие меры предосторожности:
• Не допускайте подачу на акусти
мощность которых превышает значение максимально
допустимой мощности на входе.
• При использовании графического эквалайзера для
выделения звучания громких звуков в высокочастотном
диапазоне, не устанавливайте на усилителе чрезмерно
высокий уровень громкости.
• Не перегружайте маломощный усилитель, пытаясь
повысить уровень громкости звучания (гармоническое
искажение усилителя увеличится и это мо
динамик).
Внима
ние: установка
• Не закрепляйте эти динамики на стене или потолке. Они могут
упасть и причинить травму.
• Не устанавливайте динамики над головой на потолке или на
стене. При неправильном или ненадежном креплении решетка
динамика может упасть, что может стать причиной
повреждения оборудования или травм.
• При подсоединении компонентов, выключайте и отсое
ваше аудио-/видеооборудование из розетки, читайте и
соблюдайте все инструкции. Убедитесь в том, что вы
используете правильные соединительные кабели.
• Решетка прикреплена с помощью магнитов. Решетка может
упасть в случае приложения к ней силы в горизонтальном
направлении. Перед выполнением чистки динамика, сначала
снимите решетку.
ческую систему сиг
жет повредить
налов,
дин
яйте
В обычных условиях эксплуатации достаточно периодически
протирать корпус сухой тканью, чтобы поддерживать корпус в
чистоте. При необходимости, протирайте тканью, смоченной
нейтральным моющим средством, разбавленным в пяти или шести
частях воды, и хорошо выжатой. Не пользуйтесь воском или
моющими средствами для мебели.
Никогда не пользуйтесь растворителями, бензином,
инсектицидными распылителями или другими химическими
в
еществами на или ряд
вызовет коррозию поверхности.
ом с данным устройством, поскольку это
Чистка глянцевой поверхности акустической
системы
Только для S-81C-K
• Использование пыльной или жесткой ткани, либо приложение
слишком большой силы при протирании поверхности может
привести к появлению на лакокрасочном покрытии изделия
царапин.
• Чистка поверхности акустической системы влажной ткани ью
может привести к проникновению капель воды на поверхности
внутрь изделия, что может привести к неполадкам в работе.
• При выполнении чистки л
акустической системы осторожно протирайте его сухой
мягкой тканью, прилагаемой в комплекте поставки
протирочной материей.
акокрасочн
ого покрытия
Комплект поставки
Основание динамика x 1
Внимание: во время эксплуатации
• Не размещайте динам
Падение динамика может создавать опасности для людей, а
также стать причиной повреждения оборудования.
• Не допускайте вывод через динамик искаженного звука в
течение длительного периода времени. Это может создавать
опасность возгорания и пожара.
• Не садитесь и не вставайте на динамик, а также не позволяйте
детям игр
• Не помещайте
• Не помещайте рядом с высокочастотным или
среднечастотным динамиком магнитные или металлические
предметы, например, отвертку. Поскольку в динамиках
используются сильные магниты, они могут притягивать такие
объекты, что может причинить травмы или повредить
мембрану.
ать на динамике.
ик на н
еустойчивой поверхности.
на динамик большие или тяжелые предметы.
Шипы x 3
Основания шипов x 3
Предохранительные нескользкие подкладки x 4
Решетка х 1
Протирочная материя (только для S-81C-K) x 1
Инструкции по эксплуатации
2
Ru
Page 47

Правила установки
Если вы желаете утилизировать данное изделие, не выбрасывайте его вместе с обычным бытовым мусором. Существует
отдельная система сбора использованных электронных изделий в соответствии с законодательством, которая
предполагает соответствующее обращение, возврат и переработку.
Чacтные клиенты-в странах-членах ЕС, в Швейцарии и Норвегии могут бесплатно возвращать использованные электронные
изделия в соответствующие пункты сбора или дилеру (при покупке сходного нового изделия).
В странах, не перечисленных выше, для получения информации о правильных способах утилизации обращайтесь в
cooтветcтвующие учреждения.
Поступая таким образом, вы можете быть уверены в том, что утилизируемый продукт будет соответствующим образом обработан,
передан в соответствующий пункт и переработан без возможных негативных последствий для окружающей среды и здоровья
людей.
K058_A_Ru
50 см
20 см
Важно
Выбор места для размещения акустических систем
• Условия в помещении прослушивания оказывают тонкое
воздействие на качество звуков, воспроизводимых через
акустические системы.
• Для достижения лучшего качества звучания выберите место на
твердом и прочном полу и расположите динамики, как это
показано на рисунке внизу. Уровень низкочастотных звуков
можно отрегулировать, передвигая динамики ближе или
дальше от стены. Настройте динамики таким образом, что
они были расположе
соответствующей стороны, чтобы обеспечить
сбалансированное звучание.
• Если в комнате наблюдается значительный эффект
реверберации, рекомендуется повесить плотную материю на
стены и/или постелить на пол ковер для приглушения звука.
Для достижения лучших результатов полностью закройте
стены материей.
• Данный динамик представляют собой «ди
тип
а», который проявляет свои наилучшие эксплуатационные
качества при размещении на твердой и ровной поверхности
над полом. Размещение динамика непосредственно на полу
усилит реверберацию, что приведет к гулкому, неясному
звучанию.
ны на одинаковом расстоянии от стены с
намик полочного
Использование основания динамика
В комплект поставки акустической системы включено основание
динамика, позволяющее повысить качество звучания,
устойчивость и безопасность. Поставьте динамик на основание
динамика, как это показано на рисунке внизу.
При установке динамика на основание динамика используйте
прилагаемые шипы или предохранительные нескользкие
подкладки.
бы
При использовании шипов
В комплект поставки данной акустической системы входят шипы,
которые можно использовать для изоляции динамика от пола.
Пользуйтесь прилагаемыми основаниями шипов для
предотвращения появления царапин на полу или другой
поверхности в месте установки динамика.
1 Вверните шипы в резьбовые металлические вставки,
предусмотренные в днище динамика.
Pyccкий
Днище основания динамика
2 Расположите основания шипов в позициях, в
которые по
динамика.
3 Поставьте основание динамика на основания шипов
и убедитесь в том, что основание динамика не качается.
• Компания Pioneer не несет ответственность по возмещению
каких-либо убытков, понесенных в результате сборки,
неправильного монтажа, недостаточного крепления,
неправильной эк
Только для S-81C-QL
• В корпусе используется фанера из натуральной древесины. Не
размещайте динамик в местах, подверженных воздействию
прямых лучей солнечного света, а также избегайте мест вблизи
нагревателей и кондиционеров воздуха. Несоблюдение этого
правила может привести к деформации и обесцвечиванию
корпуса динамика или повреждению динамика.
сплуатации изделия,
явлений природы и т. д.
4 Поставьте динамик на основание динамика и
убедитесь в том, что динамик не качается.
падут концы трех шипов при ус
тановке
3
Ru
Page 48

Внимание
• Всегда используйте основания шипов, как это показано на
рисунке, с выемкой под шип, обращенной вверх.
Соединения
К данному динамику не прилагаются кабели динамика,
используемые для подсоединения к усилителю.
Динамик (сзади):
Черный контактный
разъем (–)
Панель входных
контактов
Красный
контактный
разъем (+)
Если при установке динамиков основания шипов не
используются, то шипы могут повредить пол. При
использовании шипов рекомендуется использовать
основания шипов.
При использовании предохранительных нескользких
подкладок
Для обеспечения устойчивости установки прикрепите к днищу
каждого основания динамика предохранительные нескользкие
подкладки.
Днище основания динамика
Установка/снятие решетки
Данная акустическая система поставляется с решеткой динамика,
которую можно снять, выполнив следующую операцию:
1 Чтобы установить решетку, выровняйте решетку на
корпусе динамика и осторожно нажмите на нее.
2 Для того чтобы снять решетку, возьмитесь за
решетку обеими руками в центре решетки и отсоедините
решетку от динамика, осторожно потянув ее на себя.
Внимание
• Для удержани
я решетки на месте
размещайте решетки возле устройств, которые могут быть
чувствительными к магнитному воздействию (ЭЛТтелевизоры и т. п.).
используются магниты. Не
Усилитель
(задняя панель)
SPEAKERS
OUTPUT
CENTER
Подключение кабелей
1 Выключите питание усилителя.
2 Подсоедините кабели динамика к входным
контактным разъемам на задней панели динамика.
Полярность входных контактных разъемов
обозначается следующим образом: красный —
положительный (+), черный — отрицательный (–).
Ослабьте головки на входных контактных разъемах и вставьте
жилы кабелей динамиков в отверстия в контактных клеммах,
затем затяните головки.
Черный контактный
разъем (–)
3 Подсоедините другие концы кабелей к выходным
ко
нтак
тным разъемам усилителя (за подробным
описанием обращайтесь к инструкциям по эксплуатации
вашего усилителя).
• Для подсоединения к контактным разъемам динамика вы
также можете использовать вилку штекерного («бананового»)
типа. При использовании вилки штекерного типа необходимо
удалить головки с входных контактных разъемов.
• После подсоединения штепселей, слегка потяните за кабели,
чтобы убедиться в том, что конц
ы кабелей надежно
закреплены в контактных разъемах. Плохой контакт может
стать причиной возникновения шумов и пропадания звука.
• Если провода кабелей будут случайно выдернуты из
контактных разъемов и войдут в контакт между собой, это
вызовет чрезмерную дополнительную нагрузку на усилитель.
Это может стать причиной сбоев в работе и даже полом
усилител
я.
• Когда вы пользуетесь комплектом динамиков,
подсоединенных к усилителю, вы не сможете получить
нормальный эффект стереофонического звучания, если
полярность (+, –) подключения одного из динамиков (левого
или правого) изменена на обратную.
Красный контактный
разъем (+)
ки
4
Ru
ВНИМАНИЕ
Если система ВКЛЮЧЕНА, прикосновение к
контактам громкоговорителей ОПАСНО. Во
избежание опасности поражения электрическим
током при подключении или отключении кабелей
громкоговорителей отсоединяйте кабель питания,
прежде чем прикасаться к любым
неизолированным деталям.
D3-4-2-2-3_A_Ru
Page 49

Технические характеристики
Корпус. . . . . . . . . . . . . . . . . . . . . Полочного типа, с отражателем басов
Конфигурация . . . . . . . . . . . . . . . . . . . . . . . . . . . . . . . . . . . . . . . 3 полосы
Низкочастотный динамик . . . . . . . . . . . . . . . . . . . . . . .13-см конус x 2
Средне/высокочастотный динамик
. . . . . . . . . . . . . . . . . . . . . Коаксиальная головка: 13-см конус/2,5-см купол
Сопротивление . . . . . . . . . . . . . . . . . . . . . . . . . . . . . . . . . . . . . . . . . . 6
Частотная характеристика. . . . . . . . . . . . . . . . . . . . . . от 40 Гц до 50 кГц
Чувствительность. . . . . . . . . . . . . . . . . . . . . . . . . . . . . . . 85,5 дБ (2,83 В)
Максимальная входная мощность . . . . . . . . . . . . . . . . . . . . . . . . . 130 Вт
Частота разделения . . . . . . . . . . . . . . . . . . . . . . . . . . . . . . . .370 Гц/3 кГц
Габаритные размеры . . . . . . . . . .560 (Ш) мм x 190 (В) мм x 280 (Г) мм
*Высота (включая стойку под динамик): 211,5 мм
Вес . . . . . . . . . . . . . . . . . . . . . . . . . . . . . . . . . . . . . . . . . . . . . . . . . . . 14,5 кг
Замечание
Технические характеристики и конструкция могут меняться без
предварительного уведомления, в связи с вносимыми
усовершенствованиями.
Ω
является товарным знаком, наносимым на продукты, в
которых применяется технология регулировки фазы Pioneer Phase
Control. Данная технология позволяет получать
высококачественное звучание воспроизводимых каждым
компонентом звуков посредством повышения точности настройки
уровня фазировки.
Поставляемые в комплекте принадлежности
Основание динамика . . . . . . . . . . . . . . . . . . . . . . . . . . . . . . . . . . . . . . . . .1
Шипы . . . . . . . . . . . . . . . . . . . . . . . . . . . . . . . . . . . . . . . . . . . . . . . . . . . . .3
Основания шипов. . . . . . . . . . . . . . . . . . . . . . . . . . . . . . . . . . . . . . . . . . . .3
Предохранительные нескользкие подкладки . . . . . . . . . . . . . . . . . . . . . 4
Решетка . . . . . . . . . . . . . . . . . . . . . . . . . . . . . . . . . . . . . . . . . . . . . . . . . . .1
Протирочная материя (только для S-81C-K). . . . . . . . . . . . . . . . . . . . . . 1
Инструкции по эксплуатации
Издано Pioneer Corporation.
© Pioneer Corporation, 2008.
Все права защищены.
Pyccкий
Ru
5
Page 50

感謝您購買本台先鋒產品。
徹底閱讀本操作手冊,以便正確地操作您的產品。 在您閱讀完後,請將手冊置於安全的地方以備未來參考。
揚聲器機箱的維護
開始之前
• 本揚聲器系統標稱阻抗 6 Ω。 請將揚聲器系統連接到負載阻抗
為 6 Ω 至 16 Ω (揚聲器輸出端子標有 “6 Ω to 16 Ω"的型
號)範圍內的擴大機。
為防止輸入超載致使揚聲器系統受損壞,請遵守下列所示使
用前的注意事項:
• 請勿對揚聲器提供超出輸入最大容許量的電源。
• 為強調高頻率的大音響而使用圖形等化器時,請勿過度使
用擴大機的音量。
• 請試一下勿使低音頻的擴大機輸出大音量的噪音 (由于擴
大機諧波失真而加大音量有可能破壞揚聲器)。
注意:安裝
• 請勿將揚聲器安置在牆壁或天花板上。 落下時有可能帶來傷
害。
• 請勿將揚聲器安置在頭上的天花板或牆壁上。 安裝不正確
時,揚聲器護網有可能落下而損壞或帶來人體的傷害。
• 連接組件時,請關掉 AV 設備並把插銷拔下來。 請參考操作手
冊,務必確認清楚正確的連接電纜。
• 護網上裝有磁鐵。 如果朝水平方向對護網用力,護網可能會
掉落。 清潔揚聲器時,請先取下護網。
平常使用時,只用乾布擦拭就能充分保持機箱的乾淨。 必要時請
用五倍或六倍的水加入中性洗衣劑液,然後用充分擰乾水的擦布
擦拭。 請勿用家具用的打蠟或清潔劑。
由於表面會受到侵蝕,在本裝置上或附近請絕對勿使用稀釋劑、
揮發油、殺虫劑或其他化學藥品。
清潔揚聲器系統的光亮表面
僅適用於
• 如果使用有灰塵或硬質的布,或用力按顯示幕,產品的表面
• 如果使用溼布清潔揚聲器表面,沾在表面上的水滴可能會進
• 清潔揚聲器系統的表面時,請用乾軟布 (隨附的清潔布)輕
S-81C-K
會遭到刮傷。
入本產品內,導致本產品故障。
輕擦拭它。
包裝箱中的內容
注意:在使用時
• 請勿將揚聲器放置在不穩定的平面台。 這樣掉下來時,會受
害或使裝置設備損壞。
• 使用本揚聲器請勿長時間輸出失真的音響,這會帶來火災的
危險。
• 請勿坐在或站在揚聲器上面或讓小孩子在揚聲器的上面遊
玩。
• 請勿在揚聲器上放置大型物或重量大的物件。
• 請勿在高頻或中頻揚聲器附近放置螺絲刀或鐵製部件等帶磁
性的物件。由於揚聲器採用強力磁鐵,以致於吸引物件、損
壞護網或可能帶來傷害。
揚聲器基座 x 1
長螺釘 x 3
長螺釘底座 x 3
防滑墊 x 4
護網 x 1
清潔布 (僅適用於 S-81C-K) x 1
操作手冊
2
ChH
Page 51

如何安裝
選擇安置揚聲器系統的地方
• 透過揚聲器播放的聲音會受到聆聽空間情況的微妙影響。
• 為了得到最好的音效,請選擇將揚聲器放置在實心地板上,
並依照如下所示的位置擺放揚聲器。 將揚聲器朝向離牆壁更
近或更遠的位置移動可以調整低音位準調整揚聲器。使揚聲
器與周遭的牆壁保持等距以確保聲音的平衡。
• 如果房間有很嚴重的迴響情況,建議您在牆壁上懸掛厚的織
品,並且/或在地板上放置地毯以減輕迴響。 若要得到最好
的效果,請將牆壁完全覆蓋。
• 此揚聲器是書架式揚聲器,放在地板以外的實心水平表面上
才能發揮最佳效能。 將揚聲器直接放在地板上會產生因低音
過強造成模糊的轟隆聲。
使用揚聲器基座
此揚聲器系統附有一個揚聲器基座,可讓揚聲器有更好的聲音、
更穩定且更安全。 如下所示,請將揚聲器放在底座上。
將揚聲器直接安裝在揚聲器基座上時,請使用隨附的螺釘或防滑
墊。
使用長螺釘時
本揚聲器系統附有您可以用來隔開地板與揚聲器的螺釘。 使用隨
附的螺釘底座以避免刮傷放置揚聲器所在的地板或其他表面。
1 將長螺釘擰入埋置揚聲器基座底部的螺紋金屬墊片。
50 cm
• 日本先鋒公司對於部件的組裝,錯誤設置、加強不夠充分、
誤用以及由自然行為所引起的故障,不負責一切損害的賠償
責任。
僅適用於
• 揚聲器機箱使用天然木做成的飾板片。 請勿把揚聲器放在陽
光直接照射得到的地方,同時避免放置於電熱器和空調機的
附近。 這樣說不定會引起揚聲器機箱變形和變色以及損壞到
揚聲器。
S-81C-QL
20 cm
ඵᖑᏣஆ৵ۼഌ
2 將長螺釘底座放在放置於揚聲器時要插入三支長螺釘的位
置。
3 將揚聲器基座放在長螺釘底座上,並確認揚聲器基座不搖
擺。
4 將揚聲器放在揚聲器基座上,並確認揚聲器不搖擺。
ݨཏ
• 請務必使用如圖所示的長螺釘底座,使凹陷表面朝上以承受
長螺釘尖端。
中國語
若放下揚聲器時不使用長螺釘底座,長螺釘可能會傷害到
地板。如果您想使用長螺釘,我們大力推薦您使用長螺釘
底座。
3
ChH
Page 52

使用防滑墊片時
確認安裝穩定,將防滑墊片放在揚聲器基座的底面。
ඵᖑᏣஆ৵ۼഌ
護網的裝卸
此揚聲器系統裝備有護網,可以依照下述方法進行裝卸:
1 若要裝上護網,請將護網對齊揚聲器本體,然後輕輕按下護
網。
2 若要取下護網,請用雙手握住靠近中央的位置,然後輕輕朝
您自己的方向拉,將護網從揚聲器上取下。
連接
此揚聲器並不含有用於連接擴大機的揚聲器電纜。
ඵᖑᏣ
ᒰяᆓ
ඵᖑᏣȞഌȟ;
ᒰΤݗ
ϜЗ
༄Քᆓφ
ᘘτᐡȞഌȟ
電纜的連接
1 關閉擴大機的電源。
2 連接揚聲器接線於揚聲器背面的輸入端。 輸入端子的極性是
紅色為正極 (+),而黑色為負極 (-)。
鬆開輸入端子上的旋鈕並將揚聲器連接線插入每個端子柱孔中,
然後鎖緊旋鈕。
༄Քᆓφ
Քᆓφ
(+)
Քᆓφ
(+)
ݨཏ
• 磁鐵是用於將護網保持在定位。 請勿將護網放在靠近易受磁
性影響 (CRT 電視機等)的裝置的位置。
3 將電纜的另一端連接於擴大機的
揚聲器輸出端子上 (詳細請
參照擴大機的操作手冊)。
• 您也可用一個香蕉插頭來連接揚聲器的端子。 使用香蕉插頭
時,請務必取下輸入端子的端蓋。
• 當連接插座後,請輕拉一下電纜的短部與端子確認是否確實
的連接好。 不良的連接,將導致噪音與聲音的中斷。
• 如果電纜的接線時有脫落,使接線互相接觸導致擴大機的過
度負荷,這樣可能造成擴大機停止工作或損壞。
• 使用連接於擴大機的揚聲器套接時,揚聲器 (左置或右置)
的正負極 (+,–)連接錯誤的話,將無法得到正確的立體聲
效果。
ݨཏ
ඵᖑᏣᆓφழԥԥড়ޠႬᔇȄഀ௦ܗϹᘟႬྜጤȂ࣐ᗘ
ռដႬϟᓏȂ፝Ӷ௦ដӉեґ๙ጣഌϸࠊӒႬྜϹ
ᘟȄ
D3-4-2-2-3_A_ChH
4
ChH
Page 53

規格
機殼 . . . . . . . . . . . . . . . . . . . . . . . . . . . . . . . . . . . . . . 低音反射書架型
配置 . . . . . . . . . . . . . . . . . . . . . . . . . . . . . . . . . . . . . . . . . . . . . . . 3 路
低音揚聲器 . . . . . . . . . . . . . . . . . . . . . . . . . . . . . . . 13 cm 錐形 x 2
中音/高音揚聲器 . . . . . . . . 同軸裝置: 13 cm 錐形 /2.5 cm 球頂型
電阻 . . . . . . . . . . . . . . . . . . . . . . . . . . . . . . . . . . . . . . . . . . . . . . . 6
頻率響應. . . . . . . . . . . . . . . . . . . . . . . . . . . . . . . . . . 40 Hz 至 50 kHz
靈敏度 . . . . . . . . . . . . . . . . . . . . . . . . . . . . . . . . . . . 85.5 dB (2.83 V)
最大輸入功率 . . . . . . . . . . . . . . . . . . . . . . . . . . . . . . . . . . . . . . 130 W
交越頻率. . . . . . . . . . . . . . . . . . . . . . . . . . . . . . . . . . . . 370 Hz/3 kHz
外形尺寸. . . . . . . .560 mm (寬) x 190 mm (高) x 280 mm (深)
* 高度 (包括揚聲器基座): 211.5 mm
重量 . . . . . . . . . . . . . . . . . . . . . . . . . . . . . . . . . . . . . . . . . . . . 14.5 kg
附件
揚聲器基座 . . . . . . . . . . . . . . . . . . . . . . . . . . . . . . . . . . . . . . . . . . . . 1
長螺釘 . . . . . . . . . . . . . . . . . . . . . . . . . . . . . . . . . . . . . . . . . . . . . . . 3
長螺釘底座 . . . . . . . . . . . . . . . . . . . . . . . . . . . . . . . . . . . . . . . . . . . . 3
防滑墊 . . . . . . . . . . . . . . . . . . . . . . . . . . . . . . . . . . . . . . . . . . . . . . . 4
護網 . . . . . . . . . . . . . . . . . . . . . . . . . . . . . . . . . . . . . . . . . . . . . . . . . 1
清潔布 (僅適用於 S-81C-K). . . . . . . . . . . . . . . . . . . . . . . . . . . . . . 1
操作手冊
Ω
ݨ
規格及設計有因產品改善而有所變更,恕不另行通知。
是根據日本先鋒公司開發的相控制的技術概念。 這是通
過從錄音到播放改善階段匹配特性的產品所授予的商標。
日本先鋒公司出版。
版權 © 2008 日本先鋒公司。
版權所有。
ChH
中國語
5
Page 54

6
ChH
Page 55

ChH
中國語
7
Page 56

 Loading...