

Page 1

PRV-LX1
Importing Menu Backgrounds
Importing Edit Decision Lists
Importing Using a Network
Version 1.1 created January 9, 2004
Table of Contents
1.0 IMPORT A MENU BACKGROUND FROM CD/DVD........................................................2
1.1 SELECT A MENU TYPE (BACKGROUND) ..........................................................................................2
1.2 SELECT A SOURCE ........................................................................................................................3
1.3 SELECT THE SOURCE FILE.............................................................................................................3
2.0 IMPORT AN EDIT DECISION LIST (EDL) FROM CD/DVD..............................................4
2.1 SELECT AN EDL............................................................................................................................4
2.2 SELECT THE SOURCE FILE.............................................................................................................5
3.0 IMPORT USING A NETWORK CONNECTION ................................................................6
3.1 ACTIVATE THE NETWORK OPTION ON THE PRV-LX1.......................................................................6
3.2 DHCP OR MANUAL OPTION...........................................................................................................6
3.3 CONNECT VIA FTP.........................................................................................................................7
3.4 TROUBLESHOOTING.......................................................................................................................9
Page 2
1.0 IMPORT A MENU BACKGROUND FROM CD/DVD
Menu background graphic files (.BMP or .JPG) can be imported to the LX1 HDD from CD/DVD discs or
transferred via FTP (Network connection). The background images are stored in the recorder’s me nu
library and can be accessed via the Function Menu (see below). Being as a user can delete menu
graphic files from the HDD it is recommended that the user keep backup copies of these files.
GUI NAVIGATION NOTE: The user can navigate the LX1 GUI with the front panel
keys, with a USB keyboard or with a USB mouse. When using the front panel or
keyboard to select an option, highlight the GUI menu item and press the ENTER
key on the front panel or the keyboard. When using a mouse to select an
option, double-click on the GUI menu item. An orange box appears next to the
GUI menu item when it is selected.
1.1 Select a Menu Type (Background)
PRV-LX1 Import Menu/EDL
Follow the steps below to import a menu background.
1) Insert a CD-ROM or DVD-ROM disc containing your custom menu backgrounds into
Drive 1 (DVD1).
• The PRV-LX1 only accepts JPEG or Bitmap files.
• Menu background file names may not contain spaces.
Ex: Logo Screen.jpg should be imported as LogoScreen.jpg or Logo-Screen.jpg
2) Press the Function button on the PRV-LX1’s front panel to access the main menu.
3) Select Copy/Import/Bkup under the APP section.
4) Select Menu Import to display the Import submenu.
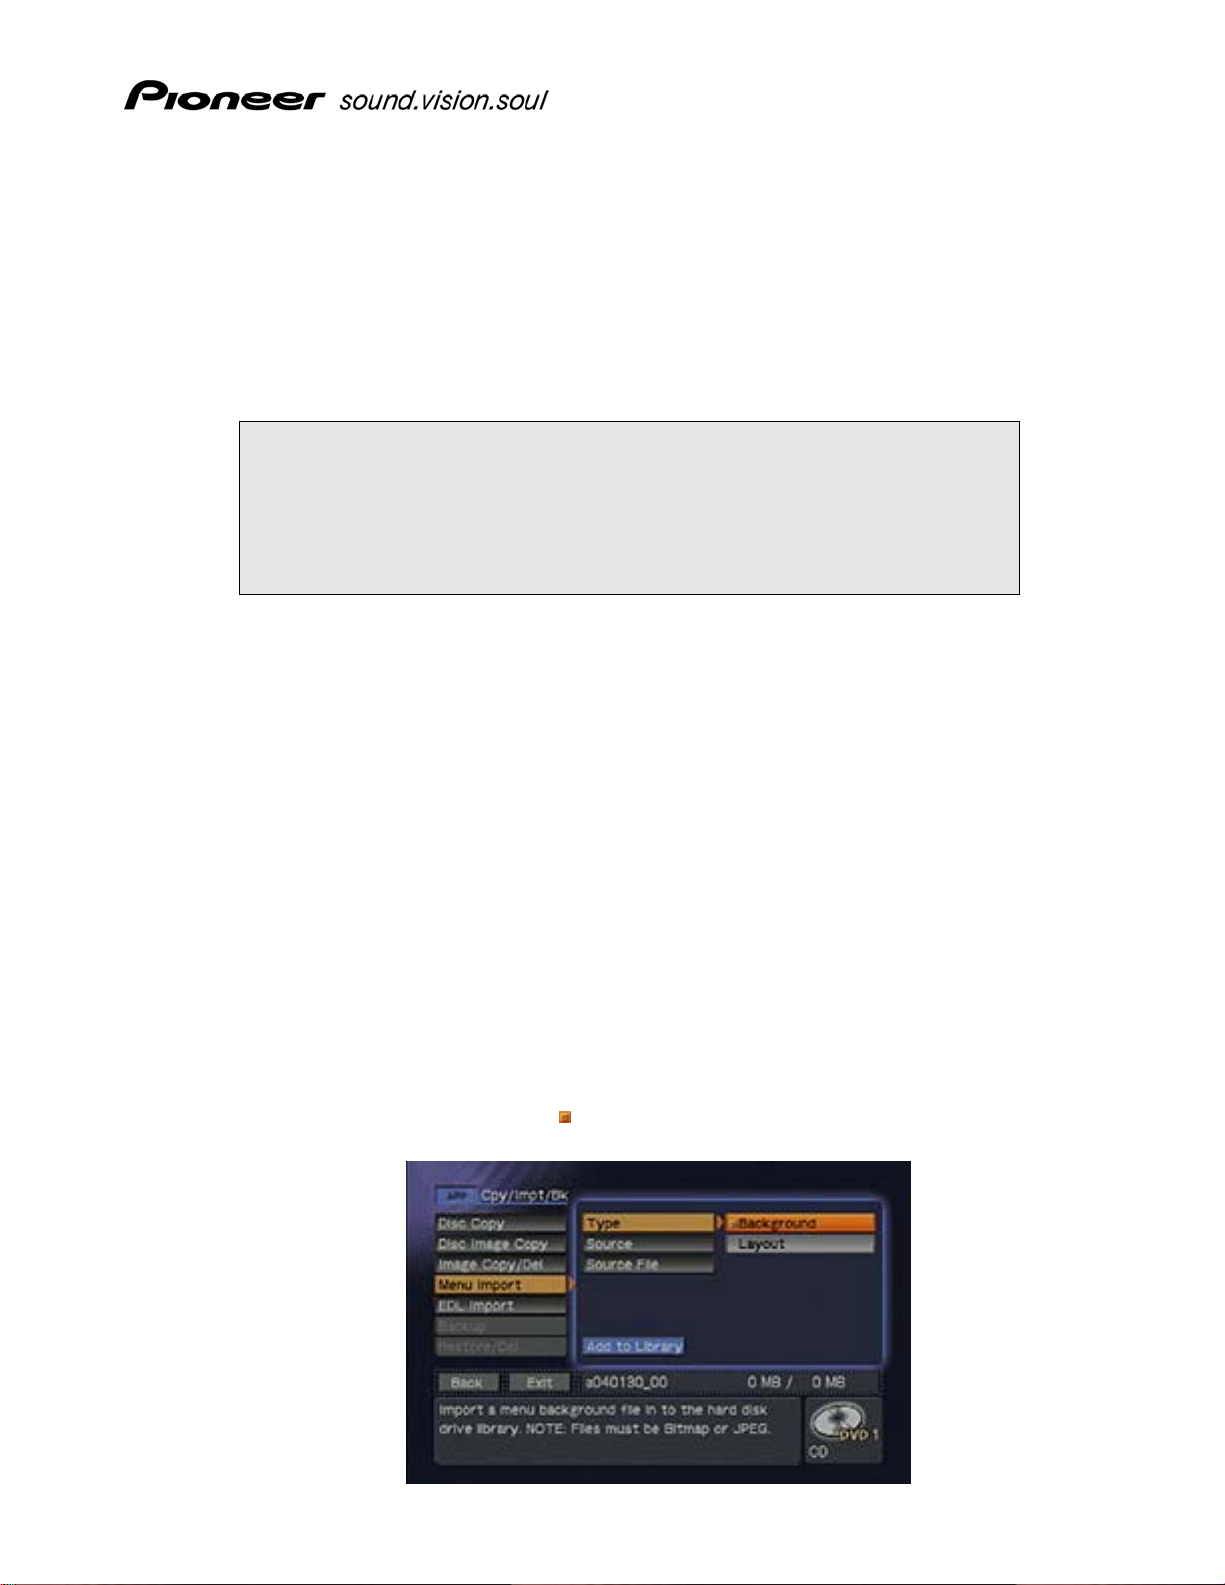
5) Select Type to display the menu type choices.
6) Select Background to select a menu type.
7) Verify that an orange box (
Example: Background is selected as the Menu Type.
) appears next to Background.
Page 2 of 10
Page 3

PRV-LX1 Import Menu/EDL
1.2 Select a Source
The following steps direct the PRV-LX1 where to find the menu background graphic files (DVD1,
DVD2 or Import Directory on the HDD).
1) Select Source to display the source device options.
2) Select the drive that contains the data disc (DVD1) to select it as the source device.
The Import directory is used for network connection using FTP (see section 3.0).
3) Verify that an orange box (
Example: Drive 1 (DVD1) is selected.
Note: When selecting drive DVD1 or DVD2 as the [Source] to import menu backgrounds or EDL
files, insert the disc first then select the drive. The unit refreshes the [Source File] data when the
drive is selected. Selecting the drive then inserting the disc defeats the Source refresh.
1.3 Select the Source File
Follow the steps below to select a menu background graphic file to import.
1) Select Source File to display the available menu background files.
A user can choose to import ALL menu background files or select individual files from
that source.
) appears next to DVD1.
2) Select ALL or select an individual file name to import the menu background file(s).
3) Verify that an orange box (
Example: The desired menu background is selected.
) appears next to ALL or next to the individual file to import.
Page 3 of 10
Page 4

4) Select Add to Library to highlight the button.
5) Select Add-to-Library again to activate the button.
A dialog box appears, “Are You Sure…”
6) Select Import to add the menu background to the HDD library.
7) Repeat step 2 through step 6 to import another individual file.
2.0 IMPORT AN EDIT DECISION LIST (EDL) FROM CD/DVD
Edit Decision List (.EDL) files can be imported into the LX1 HDD from CD/DVD discs or transferred via
FTP (Network connection). EDL files are stored in the recorder’s EDL library and can be accessed via
the Function Menu (see below). Being as a user can delete EDL files from the HDD it is recommended
that the user keep backup copies of these files.
GUI NAVIGATION NOTE: The user can navigate the LX1 GUI with the front panel
keys, with a USB keyboard or with a USB mouse. When using the front panel or
keyboard to select an option, highlight the GUI menu item and press the ENTER
key on the front panel or the keyboard. When using a mouse to select an
option, double-click on the GUI menu item. An orange box appears next to the
GUI menu item when it is selected.
PRV-LX1 Import Menu/EDL
2.1 Select an EDL
Follow the steps below to import an EDL.
1) Insert a CD-ROM or DVD-ROM disc containing your customized EDL file(s) into Drive 1
(DVD1).
EDL file names may not contain spaces.
Ex: Weekly Loop.edl should be imported as WeeklyLoop.edl or Weekly-Loop.edl
2) Select the Function button on the PRV-LX1’s front panel to access the main menu.
3) Select Copy/Import/Bkup under the APP section.
4) Select EDL Import to activate the EDL Import submenu.
5) Select Source to display the source device options.
6) Select the drive that contains the data disc (DVD1) to select it as the source device.
The Import directory is used for network connections using FTP (see section 3. 0).
Page 4 of 10
Page 5

PRV-LX1 Import Menu/EDL
7) Verify that an orange box (
Example: DVD1 is selected as the target drive.
Note: When selecting drive DVD1 or DVD2 as the [Source] to import menu background or EDL
files, insert the disc first then select the drive. The unit refreshes the [Source File] data when the
drive is selected. Selecting the drive then inserting the disc defeats the Source refresh.
2.2 Select the Source File
Follow the steps below to select an EDL to import.
) appears next to DVD1.
1) Select Source File to display the available EDL files.
The user can choose to import ALL EDL files or select individual files from that source.
2) Select ALL or select an individual file name to import the EDL file(s).
3) Verify that an orange box (
Example: The desired EDL is selected.
) appears next to ALL or next to the EDL file to import.
4) Select Add to Library to highlight the button.
5) Select Add-to-Library again to activate the button.
A dialog box appears, “Are You Sure…”
6) Select Import to add the EDL to the EDL Library.
7) Repeat step 2 through step 6 to import another individual file.
Page 5 of 10
Page 6

3.0 IMPORT USING A NETWORK CONNECTION
Menu Background Graphic files and EDL files can be transferred to the LX1 via FTP when it is connected
to a network via the ethernet connector on the rear panel of the unit. Any FTP software can be used. For
this example
to connect the PRV-LX1 to a network and to transfer files to the PRV-LX1 via FTP.
3.1 Activate the Network Option on the PRV-LX1
Internet Explorer version 6.0 is used. The instructions below provide step-by-step directions
Follow the steps below to turn ON the network option.
1) Connect the PRV-LX1 to a network using either a straight cable connected to a hub or a
cross cable.
2) Select the Function button on the PRV-LX1’s front panel to access the main menu.
3) Select System under the SETUP section.
4) Select Network (far left column) to display the Network submenu.
PRV-LX1 Import Menu/EDL
5) Select Network (middle column) to display the options.
6) Select ON to activate.
7) Verify that an orange box (
Example: Network set to ON Example: Network Selections
3.2 DHCP or Manual Option
There are two network options to choose from, DHCP and Manual. DHCP automatically seeks a
free IP address available on the network and assigns it to the PRV-LX1. Manual mode requires
the user to type in the IP address, Subnet Mask, and Gateway parameters, which can be obtained
from your network administrator. Follow the steps below to select which network protocol to use.
) appears next to ON.
Note: If DHCP is selected but no DHCP server exists, the PRV-LX1 takes additional time to start up after the
power is turned ON. If this option is not being used, set DHCP to OFF.
Follow the directions below to set the network connection.
1) Select DHCP/Manual from the Network submenu.
2) Select DHCP to activate this option.
Page 6 of 10
Page 7

PRV-LX1 Import Menu/EDL
3) Verify that an orange box (
Example: DHCP is selected.
) appears next to DHCP.
4) Write down the IP address automatically assigned, it is needed in the following section.
The IP address may not auto-refresh. If the IP address assigned to the PRV-LX1 fails to
appear, follow the directions below to refresh the IP address:
1. Select the Back button located at the bottom of the menu.
2. Select System under the SETUP section.
3. Select Network (far left column) to access the Network submenu.
Note: If the IP address still fails to appear, verify that the network cables are securely connected
and that there is an active Network connection. Repeat steps 1-3 to attempt connection.
3.3 Connect via FTP
The following steps are to be completed from a computer with an active Network connection.
Verify that both the computer and the PRV-LX1 are connected to the Network via a hub or a
crossover cable.
1) Launch
2) Enter the PRV-LX1’s IP address into the browser window:
Note: Your IP address will be different from the address used in this example. Refer to section 3.1
to obtain the IP address for your PRV-LX1.
Internet Explorer (Must be version 6.0 or higher).
ftp://172.018.004.124
Page 7 of 10
Page 8

PRV-LX1 Import Menu/EDL
3) Press Enter on the keyboard to display the Login As dialog box.
It may take up to one minute to establish the FTP connection.
4) Type in the user name and password.
Both the user name and password are case sensitive.
User Name: PRVUser
Password: prv-lx1
5) Click on the Login button.
The EDL, Menu, and other folders appear in the browser window.
6) Copy your file(s) into the appropriate folder(s).
• Menu background graphic (.BMP or .JPG) files are copied into the menu folder
• EDL (.edl) files are copied into the EDL folder
Copying files into folders on the PRV-LX1 is the same as copying files on a computer. You may
use either the copy/paste option or the drag-and-drop method to copy files.
Once the files are copied into the folders, they still need to be placed in the appropriate areas on
the HDD. An imported file resides in the Import directory until it is moved to a library. To move
an imported file, please refer to Section 1.0 for a menu background file or Section 2.0 for an EDL
file.
Page 8 of 10
Page 9

PRV-LX1 Import Menu/EDL
3.4 Troubleshooting
If you are unable to connect to the PRV-LX1 using the previous method, follow the steps below:
1) Select Tools in Internet Explorer.
2) Select Internet Options under the Tools submenu.
3) Select the Advanced tab.
4) Place a checkmark in the Enable folder view for FTP sites box.
5) Select OK to activate this option.
Page 9 of 10
Page 10

PRV-LX1 Import Menu/EDL
6) Type the following into the browser window:
ftp://PRVUser:prv-lx1@172.018.004.124
Your IP address will be different from the address used in this example. Refer to section 3.1
to obtain the IP address for your PRV-LX1.
7) Press Enter on the keyboard.
The EDL, Menu and other folders appear in the browser window.
If you still are unable to connect, try dropping the leading zeros in the IP address.
Example: IP address
012.120.032.051 becomes 12.120.32.51.
Page 10 of 10
 Loading...