

PLASMA DISPLAY SYSTEM
PRO-1110HD
PRO-910HD
Register Your Product on
www.pioneerelectronics.com
Operating Instructions
PDP-ELITE-Eng (Cover) 9/9/03, 11:421
1)
Read these instructions.
2)
Keep these instructions.
3)
Heed all warnings.
4)
Follow all instructions.
5)
Do not use this apparatus near water.
6)
Clean only with dry cloth.
7)
Do not block any ventilation openings. Install in
accordance with the manufacturer’s instructions.
8)
Do not install near any heat sources such as
radiators, heat registers, stoves, or other apparatus
(including amplifiers) that produce heat.
9)
Do not defeat the safety purpose of the polarized
or grounding-type plug. A polarized plug has two
blades with one wider than the other. A grounding
type plug has two blades and a third grounding
prong. The wide blade or the third prong are
provided for your safety. If the provided plug does
not fit into your outlet, consult an electrician for
replacement of the obsolete outlet.
10)
Protect the power cord from being walked on or
pinched particularly at plugs, convenience
receptacles, and the point where they exit from the
apparatus.
11)
Only use attachments/accessories specified by the
manufacturer.
12)
Use only with the cart, stand, tripod, bracket, or
table specified by the manufacturer, or sold with
the apparatus. When a cart is used, use caution
when moving the cart/apparatus combination to
avoid injury from tip-over.
13)
Unplug this apparatus during lightning storms or
when unused for long periods of time.
14)
Refer all servicing to qualified service personnel.
Servicing is required when the apparatus has been
damaged in any way, such as power-supply cord or
plug is damaged, liquid has been spilled or objects
have fallen into the apparatus, the apparatus has
been exposed to rain or moisture, does not operate
normally, or has been dropped.
WARNING: THE APPARATUS IS NOT WATER-
PROOFS, TO PREVENT FIRE OR SHOCK HAZARD, DO
NOT EXPOSE THIS APPLIANCE TO RAIN OR MOISTURE AND DO NOT PUT ANY WATER SOURCE NEAR
THIS APPARATUS, SUCH AS VASE, FLOWER POT,
COSMETICS CONTAINER AND MEDICINE BOTTLE
ETC.
AVERTISSEMENT: CET APPAREIL N’EST PAS
ÉTANCHE. POUR ÉVITER TOUT RISQUE D’INCENDIE
OU TOUTE SECOUSSE ÉLECTRIQUE, NE L’EXPOSEZ
PAS À LA PLUIE NI À L’HUMIDITÉ, NE LE PLACEZ
PAS À PROXIMITÉ D’UN POINT D’EAU NI D’UN VASE,
D’UN FLACON DE COSMÉTIQUE OU DE
MÉDICAMENT, ETC.
Note to CATV system installer.
This reminder is provided to call the CATV system installer’s attention to Article 820-40 of the NEC that provides
guidelines for proper grounding and, in particular, specifies that the cable ground–shall be connected to the
grounding system of the building, as close to the point of cable entry as practical.
PDP-ELITE-Eng (02-03) 9/9/03, 16:322
WARNING: Handling the cord on this product or
cords associated with accessories sold with the product will expose you to lead, a chemical known to the
State of California and other governmental entities to
cause cancer and birth defects or other reproductive
harm. Wash hands after handling.
NOTE: This equipment has been tested and found to
comply with the limits for a class B digital device, pursuant to Part 15 of the FCC Rules. These limits are
designed to provide reasonable protection against
harmful interference in a residential installation. This
equipment generates, uses, and can radiate radio frequency energy and, if not installed and used in accordance with the instructions, may cause harmful interference to radio communications. However, there is
no guarantee that interference will not occur in a particular installation. If this equipment does cause harmful interference to radio or television reception, which
can be determined by turning the equipment off and
on, the user is encouraged to try to correct the interference by one or more of the following measures:
— Reorient or relocate the receiving antenna.
— Increase the separation between the equipment and
receiver.
— Connect the equipment into an outlet on a circuit
different from that to which the receiver is connected.
— Consult the dealer or an experienced radio/TV tech-
nician for help.
Information to User
Alteration or modifications carried out without appropriate authorization may invalidate the user’s right to
operate the equipment.
[For Canadian model]
This Class B digital apparatus complies with Canadian
ICES-003.
[Pour le modèle destiné au Canada]
Cet appareil numérique de la classe B est conforme
à la norme canadienne ICES-003.
CAUTION:
This product satisfies FCC regulations when shielded
cables and connectors are used to connect the unit to
other equipment. To prevent electromagnetic interference with electric appliances such as radios and televisions, use shielded cables and connectors for connections.
FEDERAL COMMUNICATIONS COMMISSION
DECLARATION OF CONFORMITY
This device complies with part 15 of the FCC Rules. Operation is subject to the following two conditions: (1)
This device may not cause harmful interference, and
(2) this device must accept any interference received,
including interference that may cause undesired operation.
Product Name: Plasma Display System
(Plasma Display)
(Media Receiver)
Model Number: PRO-1110HD PRO-910HD
(PRO-504PU) (PRO-434PU)
(PRO-R04U) (PRO-R04U)
Product Category: Class B Personal Computers & Peripherals
Responsible Party Name: PIONEER ELECTRONICS
(USA), INC., Customer Support Div.
Address: P.O. BOX 1760, LONG BEACH, CA., 90801-1760
U.S.A.
Phone: (800) 421-1625
For Business Customer URL
http://www.PioneerUSA.com
IMPORTANT NOTICE: The serial number for this
equipment is located on the rear panel. Please write
this serial number on your enclosed warranty card and
keep it in a secure area. This is for your security.
DO NOT PLACE THIS PRODUCT ON AN UNSTABLE
CART, STAND, TRIPOD, BRACKET, OR TABLE. THE
PRODUCT MAY FALL, CAUSING SERIOUS PERSONAL
INJURY AND SERIOUS DAMAGE TO THE PRODUCT.
USE ONLY WITH A CART, STAND, TRIPOD, BRACKET,
OR TABLE RECOMMENDED BY THE MANUFACTURER,
OR SOLD WITH THE PRODUCT. FOLLOW THE
MANUFACTURE’S INSTRUCTIONS WHEN INSTALLING
THE PRODUCT AND USE MOUNTING ACCESSORIES
RECOMMENDED BY THE MANUFACTURER.
A PRODUCT AND CART COMBINATION SHOULD BE
MOVED WITH THE CARE. QUICK STOPS, EXCESSIVE
FORCE, AND UNEVEN SURFACES MAY CAUSE THE
PRODUCT AND CART COMBINATION TO OVERTURN.
PDP-ELITE-Eng (02-03) 9/9/03, 16:323
NE DÉPOSEZ PAS L’APPAREIL SUR UNE TABLE, UN
CHARIOT, UN SUPPORT, UN TRÉPIED, UNE CONSOLE
INSTABLES. CET APPAREIL POURRAIT TOMBER,
PROVOQUANT DES BLESSURES GRAVES OU DES
DOMMAGES PHYSIQUES IMPORTANTS. UTILISEZ
UNIQUEMENT UN CHARIOT, UN SUPPORT, UN
TRÉPIED, UNE CONSOLE OU UNE TABLE CONSEILLÉS
PAR LE FABRICANT OU VENDUS AVEC L’APPAREIL.
RESPECTEZ LES INSTRUCTIONS DU FABRICANT
POUR TOUT CE QUI CONCERNE L’INSTALLATION DE
L’ APPAREIL ET L’EMPLOI DES ACCESSOIRES DE
MONTAGE QU’IL CONSEILLE.
L’ ENSEMBLE QUE FORME UN APPAREIL ET LE
CHARIOT À L’AIDE DUQUEL ON LE DÉPLACE, DOIT
ÊTRE MANŒUVRÉ AVEC PRÉCAUTION. LES ARRÊTS
BRUSQUES, LES POUSSÉES EXCESSIVES ET LES
IRRÉGULARITÉS DU PLANCHER, PEUVENT
PROVOQUER LE BASCULEMENT DU CHARIOT ET LA
CHUTE DE L’APPAREIL.

Contents
Thank you for buying this Pioneer product.
Please read through these operating instructions so you will know how to operate your model properly. After you
have finished reading the instructions, put them away in a safe place for future reference.
In some countries or regions, the shape of the power plug and power outlet may sometimes differ from that shown
in the explanatory drawings. However the method of connecting and operating the unit is the same.
01 Important User Guidance Information
02 Safety Precautions
03 Operational Precautions
04 Features
05 Supplied Accessories
Plasma Display ................................................................... 12
Media Receiver .................................................................... 12
06 Part Names
Plasma Display ................................................................... 13
Media Receiver .................................................................... 14
Remote control unit ............................................................ 16
07 Preparation
Allowed operation range of the remote control unit ....... 17
Installing the Plasma Display ............................................ 17
Installing the Media receiver ............................................. 18
Installing the Media Receiver vertically ...................... 19
Setting the system .............................................................. 20
Routing cables .................................................................... 21
Using the remote control unit ........................................... 22
Cautions regarding the remote control unit .............. 22
Inserting batteries ......................................................... 22
Cautions regarding batteries ....................................... 23
Cable connections for watching conventional TV
channels .............................................................................. 24
Connecting a VHF/UHF antenna ................................. 24
Connecting a Cable Converter .................................... 24
Connecting a VHF/UHF antenna and Cable
Converter ....................................................................... 25
Switching between tuner A and B .............................. 25
Cable connections for watching digital TV channels ...... 26
Connecting a VHF/UHF antenna ................................. 26
Connecting for cable TV ...............................................26
Connecting the power cord ............................................... 27
08 Basic Operations
Turning on the power .......................................................... 28
Turning off the power .......................................................... 29
Watching conventional TV channels ................................. 30
Selecting the antenna .................................................. 30
Changing channels ...................................................... 30
Changing the volume and sound ................................ 31
Setting MTS/SAP mode ............................................... 32
Watching digital TV channels ............................................ 34
Selecting the digital TV input ....................................... 34
Changing channels ...................................................... 34
Changing the volume and sound ................................ 35
Changing the language................................................ 35
4
En
Viewing DTV banners ................................................... 36
Using the multiscreen functions ....................................... 36
Splitting the screen ...................................................... 36
Freezing images ............................................................ 37
09 Basic Adjustment Settings
Using the menu .................................................................. 38
AV mode menus ............................................................ 38
PC mode menus ........................................................... 39
Menu operation keys .................................................... 40
Setting up conventional TV channels ............................... 41
Using Auto Channel Preset ......................................... 41
Setting for skipping unwanted channels .................... 42
Setting your favorite channels ..................................... 43
Setting up digital TV channels ........................................... 44
Using Auto Channel Preset ......................................... 44
Setting for skipping unwanted channels .................... 45
Checking signal strength ............................................. 45
Language setting ................................................................ 46
Clock setting ........................................................................ 46
AV Selection ........................................................................ 47
Picture adjustments ........................................................... 48
PureCinema .................................................................. 49
Color temperature ........................................................ 50
MPEG NR ....................................................................... 51
DNR ............................................................................... 51
CTI .................................................................................. 52
DRE ................................................................................ 52
Color Management ....................................................... 53
Sound adjustments ............................................................ 53
FOCUS ........................................................................... 54
Front Surround .............................................................. 54
Power Control ...................................................................... 55
Power Control for AV source........................................ 55
Power Control for PC source ....................................... 56
10 Electronic Program Guide (EPG)
(for DTV Only)
EPG display format ............................................................. 57
Using the EPG ..................................................................... 58
Presetting TV programs using the EPG ............................ 59
Using auto channel select ........................................... 59
Recording TV programs using a D-VHS recorder ...... 60
Recording TV programs via a VCR controller ............. 61
Setting the timer manually ................................................ 62
Priority rules for overlapped presettings ........................... 63
Changing/ canceling TV program presettings ................. 64
Using the EPG ...............................................................64
Using the menu ............................................................ 64
PDP-ELITE-Eng (04-05) 9/9/03, 11:434

Contents
11 Enjoying through External Equipment
Watching a DVD image ...................................................... 65
Connecting a DVD player ............................................. 65
Displaying a DVD image .............................................. 65
Watching a VCR image ...................................................... 66
Connecting a VCR ........................................................ 66
Displaying a VCR image ............................................... 66
Enjoying a game console or watching
camcorder images .............................................................. 67
Connecting a game console or camcorder ................ 67
Displaying an image of the game console or
camcorder ..................................................................... 67
Recording digital TV programs using a VCR or DVD
recorder ............................................................................... 68
Connecting a recorder ................................................. 68
Connecting other audio equipment .................................. 69
Connecting an AV receiver .......................................... 69
Switching the optical audio signal type ...................... 69
Watching a D-VHS image................................................... 70
What is i.LINK? .............................................................. 70
Which i.LINK devices are connectable? ..................... 70
What can be recorded through i.LINK? ...................... 70
Connecting D-VHS recorders ...................................... 70
Displaying a D-VHS image ........................................... 72
Useful and important notification ............................... 72
Setting up for controlling a D-VHS recorder .............. 73
Operating the control panel screen ............................ 74
Editing the i.LINK list .................................................... 74
Setting up for i.LINK standby....................................... 76
Watching an image from a personal computer ............... 77
Connecting a personal computer ............................... 77
Displaying an image from a personal computer ....... 77
Connecting a VCR controller ............................................. 78
The lists of controllable recording
equipment manufactures ............................................ 79
Connecting control cords .................................................. 80
About SR+ .................................................................... 80
Closed caption for digital TV channels ............................. 87
Activating the closed caption ...................................... 87
Selecting the type of conventional closed captions
(for digital TV channels) ............................................... 87
Selecting digital closed captions ................................ 88
Selecting digital closed caption parameters ............. 88
Parental Control (setting the V-CHIP level)....................... 90
Activating the Parental Control ................................... 90
Setting the voluntary moving rating
system (MPAA) ............................................................. 91
Blocking Not Rated (NR) TV programs ....................... 91
Setting the TV Parental Guidelines (TV Guidelines) ... 92
Canadian rating systems ............................................. 92
Setting Canadian English ratings ............................... 93
Setting Canadian French ratings ................................ 93
Temporarily deactivating the V-CHIP Block ................ 94
Reactivating the V-CHIP Block .................................... 94
Programming a password (AV mode only) ....................... 95
Setting and changing the password ........................... 95
Resetting the password ............................................... 96
13 Useful Features
Learning function of the remote control unit ................... 97
Using the learning function ......................................... 97
Presetting manufacture codes .................................... 98
Manufacture codes ...................................................... 99
Using the remote control unit to control
other devices ..................................................................... 100
Receiver control buttons ............................................ 100
Cable control buttons ................................................. 101
SAT control buttons .................................................... 102
VCR control buttons ................................................... 103
DVD/DVR control buttons .......................................... 104
14 Appendix
Troubleshooting ................................................................ 106
Computer compatibility chart .......................................... 107
Specifications .................................................................... 108
12 Useful Adjustment Settings
Adjusting image positions (AV mode only) ...................... 81
Adjusting image positions and clock automatically
(PC mode only) .................................................................... 81
Adjusting image positions and clock manually
(PC mode only) .................................................................... 82
Selecting a screen size ....................................................... 83
Changing the brightness at both sides of the screen
(Side Mask) .......................................................................... 84
Sleep Timer .......................................................................... 85
Closed caption for conventional TV channels .................. 86
Activating the closed caption ...................................... 86
Selecting the type of closed captions ......................... 86
PDP-ELITE-Eng (04-05) 9/9/03, 11:435
5
En

01 Important User Guidance Information
In order to obtain maximum enjoyment from this
Pioneer PureVision PRO-1110HD/PRO-910HD Plasma
Display System, please first read this information
carefully.
With the Pioneer PureVision PRO-1110HD/PRO-910HD,
you can be assured of a high quality Plasma Display
System with long-life and high reliability. To achieve
images of exceptional quality, this Pioneer Plasma
Display System incorporates state-of-the-art design and
construction, as well as very precise and highly
advanced technology.
Over the course of its lifetime, the luminosity of the
Pioneer PRO-1110HD/PRO-910HD Plasma Display
System will diminish very slowly, such as with all
phosphor-based screens (for example, a traditional
tube-type television). To enjoy beautiful and bright
images on your Pioneer Plasma Display System for
many years to come, please carefully read and follow
the usage guidelines below.
Usage guidelines
All phosphor-based screens (including conventional
tube-type televisions) can be affected by displaying
static images for a prolonged period. Plasma Display
Systems are no exception to this rule. After-image and
permanent effects on the screen can be avoided by
taking some basic precautions. By following the recommendations listed below, you can ensure longer and
satisfactory results from your plasma:
• Whenever possible, avoid frequently displaying the
same image or virtually still moving pictures (e.g.
closed-captioned images or video game images
which have static portions).
• Avoid viewing the On Screen Display for extended
periods, from a DVD player, VCR, and all other
components.
• Do not leave the same picture freeze-framed or
paused continuously over a long period of time, when
using the still picture mode from a TV, VCR, DVD
player or any other component.
•Images which have both very bright areas and very
dark areas side by side should not be displayed for a
prolonged period of time.
• When playing a game, the “GAME” mode setting
within “AV Selection” is strongly recommended.
However, please limit its use to less than 2 hours at a
time.
•After playing a game, or displaying a PC image or any
still image, it is best to view a normal moving picture
in the “WIDE” or “FULL” screen setting for over 3
times longer than the previous still/moving image.
•After using the Plasma Display System, always
switch the display to “STANDBY” mode.
Installation guidelines
The Pioneer PureVision PRO-1110HD/PRO-910HD
Plasma Display System incorporates a very thin design.
To ensure safety, please take the proper measures to
mount or install the Plasma Display, in order to prevent
the unit from tipping over in the event of vibration or
accidental movement.
This product should be installed by using only parts
and accessories designed by PIONEER. Use of
accessories other than the PIONEER stand or
installation bracket may result in instability, and could
cause injury. For custom installation, please consult the
dealer where the unit was purchased. To ensure correct
installation, experienced and qualified experts must
install the unit. PIONEER will not be held responsible
for accident or damage caused by the use of parts and
accessories manufactured by other companies.
To avoid malfunction and overheating when installing,
make sure that the vents on the main unit are not
blocked. To ensure proper heat emission:
•Distance the unit slightly from other equipment,
walls, etc. For the minimum space required around
the unit, see pages 17 and 18.
• Do not fit the unit inside narrow spaces where
ventilation is poor.
• Do not cover with a cloth, etc.
•Clean the vents on the sides and rear of the unit to
remove dust build-up by using a vacuum cleaner set
to its lowest suction setting.
• Do not place the product on a carpet or blanket.
• Do not leave the product tilted over except the case of
vertical installation of the Media Receiver.
• Do not reverse the product.
Using the unit without proper ventilation may cause the
internal temperature to rise, and could result in
possible malfunction. When the surrounding or internal
temperature exceeds a certain degree, the display will
automatically power off in order to cool the internal
electronics and prevent a hazardous occurrence.
Malfunction can be caused by many factors:
inappropriate installation site, improper assembly/
installation/mounting, improper operation of or
modifications made to this product. However, PIONEER
cannot be held responsible for accidents or
malfunction caused by the above.
Typical effects and characteristics of a phosphor-based
matrix display such as permanent residual images
upon the phosphors of the panel and the existence of a
minute number of inactive light cells in the screen are
not covered by local warranties.
6
En
PDP-ELITE-Eng (06-12) 9/9/03, 11:436

Panel sticking and after-image lag
•Displaying the same images such as still images for
a long time may cause after-image lagging. This may
occur in the following two cases.
1. After-image lagging due to remaining electric
load
When image patterns with very high peak luminance
are displayed more than 1 minute, after-image lagging
may occur due to the remaining electric load. The afterimages remaining on the screen will disappear when
moving images are displayed. The time for the afterimages to disappear depends on the luminance of the
still images and the time they had been displayed.
2. After-image (lag image) due to burning
Avoid displaying the same image on the Plasma
Display continuously over a long period of time. If the
same image is displayed continuously for several
hours, or for shorter periods of time over several days, a
permanent after-image may remain on the screen due
to burning of the fluorescent materials. Such images
may become less noticeable if moving images are later
displayed, but they will not disappear completely.
• The Energy save function can be set to help prevent
damage from screen burning (see page 55).
01Important User Guidance Information
About operations through i.LINK
PIONEER shall not always assure normal video/audio
recording or playback when a D-VHS is operated
through i.LINK.
PDP-ELITE-Eng (06-12) 9/9/03, 16:337
7
En

02
Safety Precautions
Electricity is used to perform many useful functions, but it
can also cause personal injuries and property damage if
improperly handled. This product has been engineered and
manufactured with the highest priority on safety. However,
improper use can result in electric shock and/or fire. In order
to prevent potential danger, please observe the following
instructions when installing, operating and cleaning the
product. To ensure your safety and prolong the service life of
your product, please read the following precautions carefully
before using the product.
1. Read instructions—All operating instructions must be
read and understood before the product is operated.
2. Keep this manual in a safe place—These safety and
operating instructions must be kept in a safe place for
future reference.
3. Observe warnings—All warnings on the product and in
the instructions must be observed closely.
4. Follow instructions—All operating instructions must be
followed.
5. Cleaning—Unplug the power cord from the AC outlet
before cleaning the product. Use a damp cloth to clean
the product. Do not use liquid cleaners or aerosol cleaners.
6. Attachments—Do not use attachments not recommended by the manufacturer. Use of inadequate attachments can result in accidents.
7. Water and moisture—Do not use the product near water,
such as bathtub, washbasin, kitchen sink and laundry
tub, swimming pool and in a wet basement.
8. Stand—Do not place the product on an unstable cart,
stand, tripod or table. Placing the product on an unstable
base can cause the product to fall, resulting in serious
personal injuries as well as damage to the product. Use
only a cart, stand, tripod, bracket or table recommended
by the manufacturer or sold with the product. When
mounting the product on a wall, be sure to follow the
manufacturer’s instructions. Use only the mounting
hardware recommended by the manufacturer.
9. When relocating the product placed on a cart, it must be
moved with utmost care. Sudden stops, excessive force
and nueven floor surface can cause the product to fall
from the cart.
10. Ventilation—The vents and other openings in the cabinet
are designed for ventilation. Do not cover or block these
vents and openings since insufficient ventilation can
cause overheating and/or shorten the life of the product.
Do not place the product on a bed, sofa, rug or other
similar surface, since they can block ventilation openings.
This product is not designed for built-in installation; do
not place the product in an enclosed place such as a
bookcase or rack, unless proper ventilation is provided or
the manufacturer’s instructions are followed.
11. Power source—This product must operate on a power
source specified on the specification label. If you are not
sure of the type of power supply used in your home,
consult your dealer or local power company.
12. Power cord protection—The power cords must be routed
properly to prevent people from stepping on them or
8
En
objects from resting on them. Check the cords at the
plugs and product.
13. The plasma Display used in this product is made of glass.
Therefore, it can break when the product is dropped or
applied with impact. Be careful not to be injured by
broken glass pieces in case the plasma Display breaks.
14. Overloading—Do not overload AC outlets or extension
cords. Overloading can cause fire or electric shock.
15. Entering of objects and liquids—Never insert an object
into the product through vents or openings. High voltage
flows in the product, and inserting an object can cause
electric shock and/or short internal parts. For the same
reason, do not spill water or liquid on the product.
16. Servicing—Do not attempt to service the product yourself.
Removing covers can expose you to high voltage and
other dangerous conditions. Request a qualified service
person to perform servicing.
17. Repair—If any of the following conditions occurs, unplug
the power cord from the AC outlet, and request a qualified
service person to perform repairs.
a. When the power cord or plug is damaged.
b. When a liquid was spilled on the product or when
objects have fallen into the product.
c. When the product has been exposed to rain or water.
d. When the product does not operate properly as
described in the operating instructions.
Do not touch the controls other than those described
in the operating instructions. Improper adjustment of
controls not described in the instructions can cause
damage, which often requires extensive adjustment
work by a qualified technician.
e. When the product has been dropped or damaged.
f. When the product displays an abnormal condition. Any
noticeable abnormality in the product indicates that
the product needs servicing.
18. Replacement parts—In case the product needs replacement parts, make sure that the service person uses
replacement parts specified by the manufacturer, or those
with the same characteristics and performance as the
original parts. Use of unauthorized parts can result in fire,
electric shock and/or other danger.
19. Safety checks—Upon completion of service or repair
work, request the service technician to perform safety
checks to ensure that the product is in proper operating
condition.
20. Wall or ceiling mounting—When mounting the product
on a wall or ceiling, be sure to install the product
according to the method recommended by the manufacturer.
21. Heat sources—Keep the product away from heat sources
such as radiators, heaters, stoves and other heat- generating products (including amplifiers).
22. Unplug the power cord from the AC outlet before installing the speakers.
23. Never expose the screen of the Plasma Display to a strong
impact, for example, by hitting it. The screen may be
broken, resulting in fire or personal injury.
24. Do not expose the Plasma Display to direct sunlight for a
long period of time. The optical characteristics of the front
protection panel changes, resulting in discoloration or
warp.
25. The Plasma Display weighs about 38 kg (83.8 lbs.) for the
PRO-504PU and about 30.5 kg (67.3 lbs.) for the PRO434PU. Because it has small depth and is unstable,
unpack, carry, and install the product with one more
person at least and use the handles.
PDP-ELITE-Eng (06-12) 9/9/03, 11:438
Safety Precautions
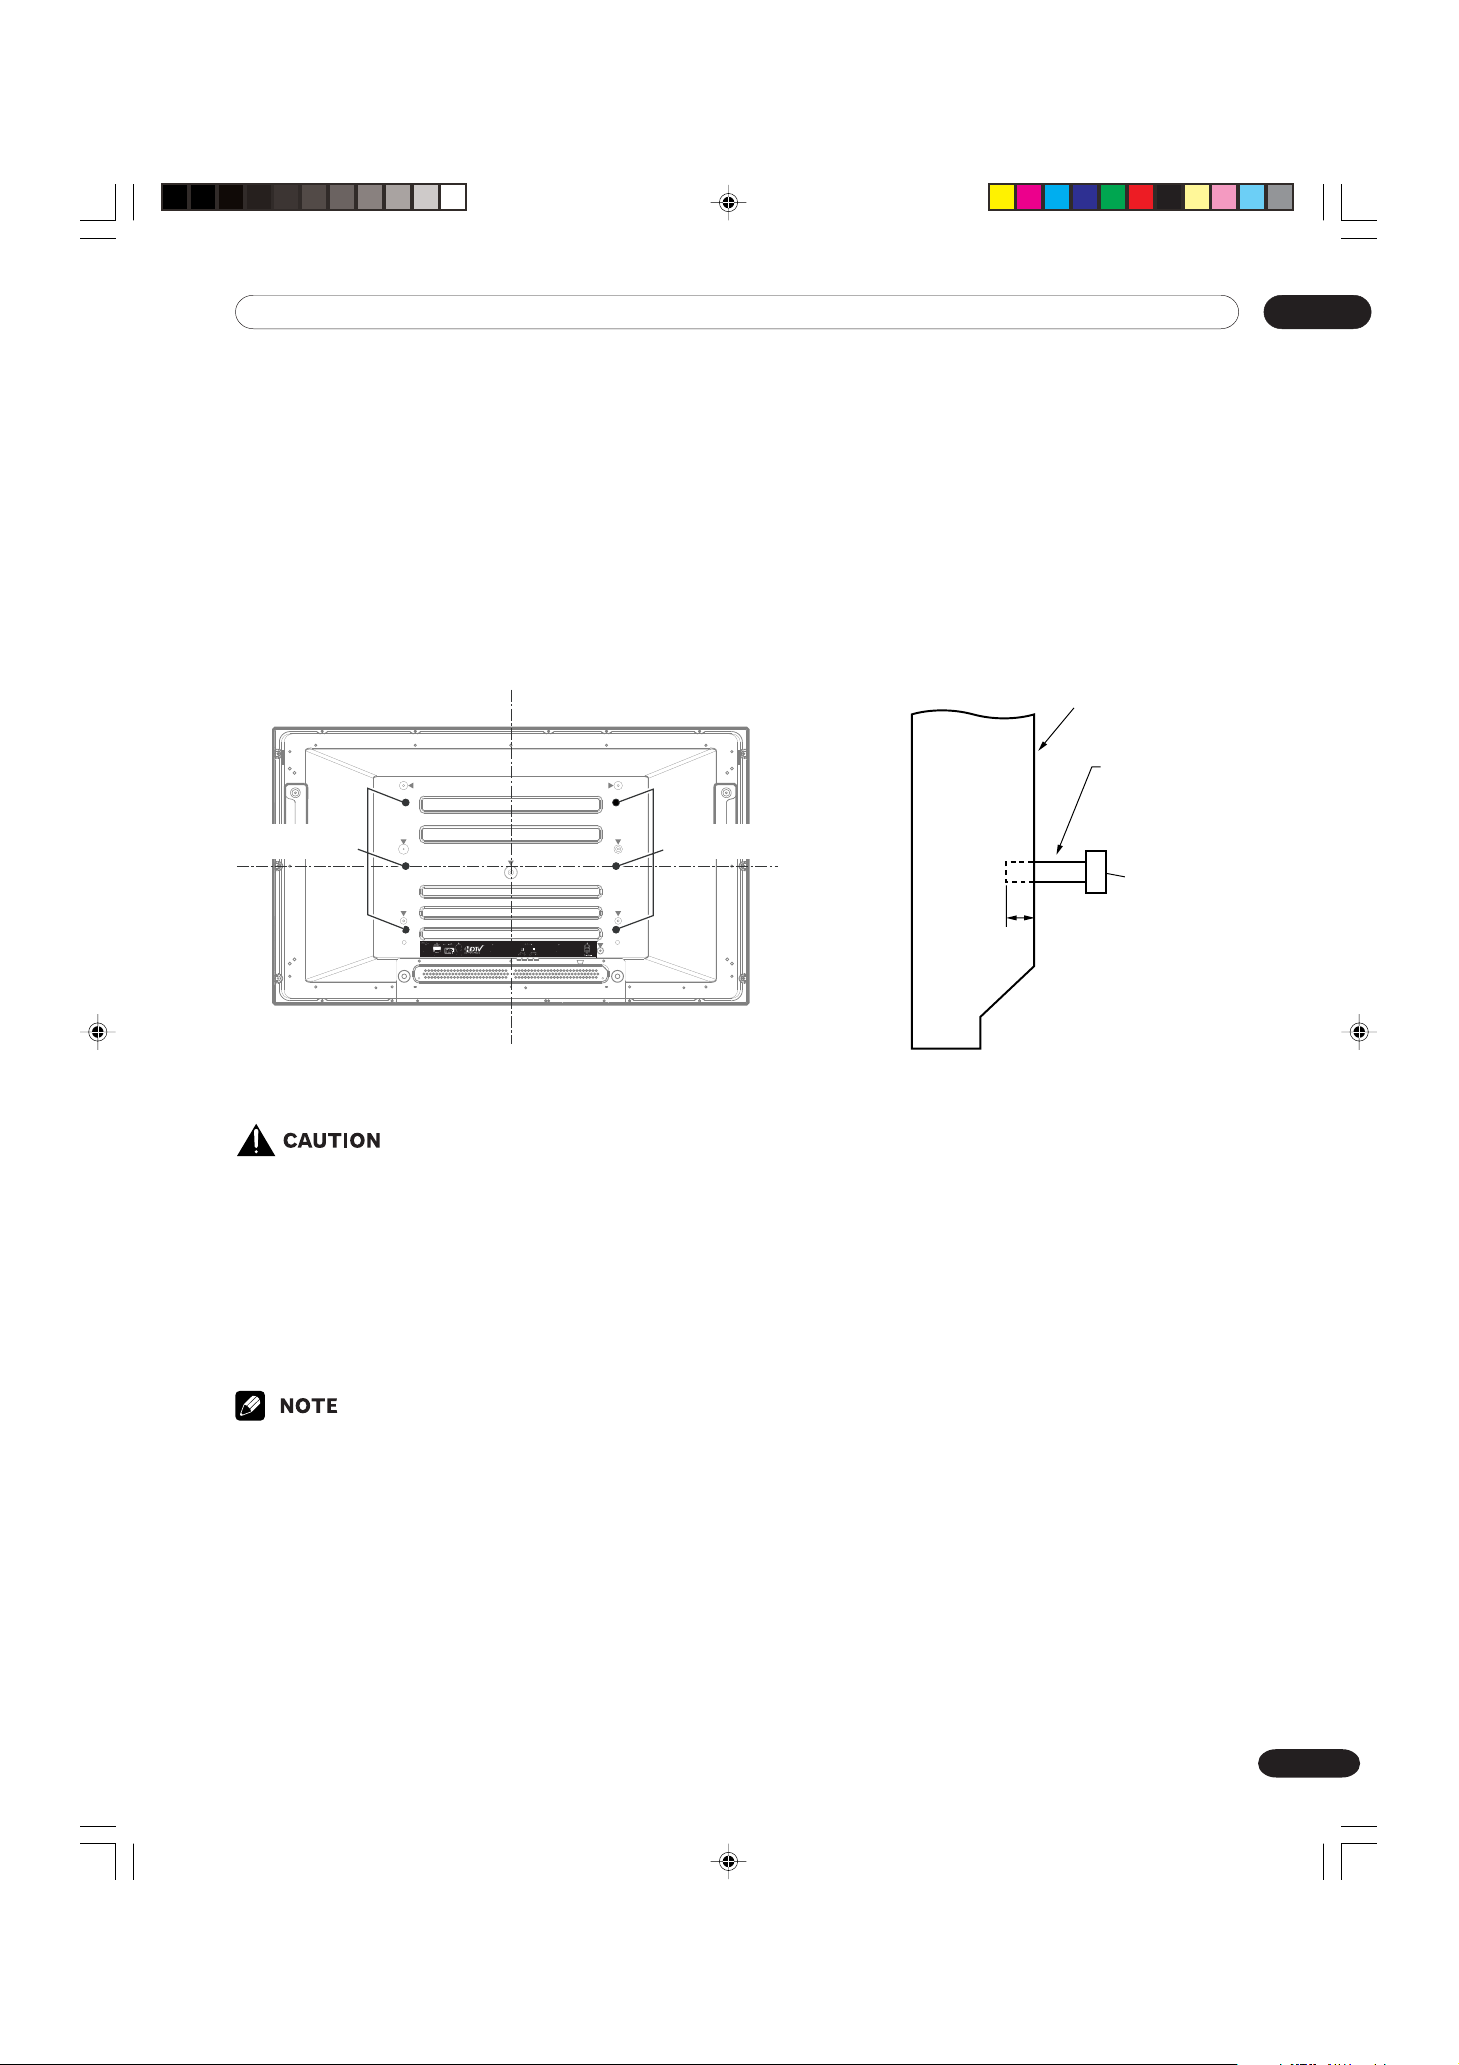
Installation Precautions
Observe the following precautions when installing with any items such as the optional stand.
When using the optional stand, brackets, or equivalent items
• Ask your dealer to perform the installation.
• Be sure to use the supplied bolts.
•For details, see the instruction manual that comes with the optional stand (or equivalent items).
When using other items
• Consult your dealer.
• The following six mounting holes can be used for the installation:
02
Rear view
Mounting hole Mounting hole
Median line
Side view
Plasma
Display
Median line
Mounting surface
Mounting
bracket (or
equivalent item)
M8 screw
12 to 18 mm
(0.5 to 0.7 inches)
• Be sure to use four or more mounting holes symmetrical to the vertical and horizontal median lines.
• Use M8 screws, which go 12 to 18 mm (0.5 to 0.7 inches) in depth from the mounting surface of the Plasma
Display. See the side view above.
• Be careful not to block the ventilation opening at the rear of the Plasma Display.
• Be sure to install the Plasma Displayed on a flat surface because it contains glass.
• The screw holes other than the above are to be used only for the specified products. Never use them for
mounting non-specified products.
• Do not mount or remove the Plasma Display to or from the stand, with speakers attached.
• It is strongly recommended to use the optional PIONEER mounting products.
•PIONEER shall not be liable for any personal injury or product damage that results from the use of mounting
items other than the optional PIONEER products.
PDP-ELITE-Eng (06-12) 9/9/03, 11:439
9
En

03
Operational Precautions
PIONEER bears no responsibility for any damages
arising from incorrect use of the product by you or other
people, malfunctions when in use, other product related
problems, and use of the product except in cases where
the company must be liable.
Plasma Display protection function
When still images (such as photos and computer
images) stay on the screen for an extended period of
time, the screen will be slightly dimmed. This is because the protection function of the Plasma Display
automatically adjusts the brightness to protect the
screen when detecting still images; so this does not
designate malfunction. The screen is dimmed when a
still image is detected for about three minutes.
Infrared rays
The Plasma Display releases infrared rays because of
its characteristics. Depending on how the Plasma
Display is in use, the remote controls of nearby equipment may be adversely affected or wireless headphones
using infrared rays are interfered by noise. If this is the
case, place that equipment at a location where its
remote control sensor is not affected.
Radio interference
While this product meets the required specifications, it
emits a small amount of noise. If you place such
equipment as an AM radio, personal computer, and
VCR close to this product, that equipment may be
interfered. If this happens, place that equipment far
enough from this product.
Condensation
• Condensation may take place on the surface or inside
of the product when the product is rapidly moved
from a cold place to a warm place or just after a
heater is switched on in winter morning, for example.
When condensation takes place, do not switch on the
product and wait until condensation disappears.
Using the product with condensation may result in
malfunction.
Cleaning the screen
• When cleaning the screen of this product, gently
wipe it with a dry soft cloth; the supplied cleaning
cloth or other similar cloths (e.g., cotton and flannel).
If you use a hard cloth or rub the screen hard, the
surface of the screen will be scratched.
• If you clean the surface of the screen with a wet
cloth, water droplets on the surface may enter into
the product, resulting in malfunction.
Cleaning the cabinet
• The cabinet of this product is mostly composed of
plastic. Do not use chemicals such as benzine or
thinner to clean the cabinet. Using these chemicals
may result in quality deterioration or coating removal.
• Do not expose the product to volatile gas or fluid
such as pesticide. Do not make the product contact
with rubber or vinyl products for a long period of time.
The effect of plasticizer in the plastic may result in
quality deterioration or coating removal.
• If you clean the surface of the cabinet with a wet
cloth, water droplets on the surface may enter into
the product, resulting in malfunction.
Fan motor noise
When ambient temperature of the Media Receiver
becomes high, the rotation speed of the cooling fan
motor increases. This may make you feel that the fan
motor is noisy at such an occasion.
Do not attach such items as labels and tape to the
product.
• This may result in the discoloration or scratch of the
cabinet.
When not using the product for a long period of
time
• If you do not use the product for a long period of time,
the functions of the product may be adversely affected. Switch on and run the product occasionally.
Handles at the rear of the Plasma Display
• Do not remove the handles from the rear of the
Plasma Display.
• When moving the Plasma Display, ask another
person for help and use the handles attached to the
rear of the Plasma Display. Do not move the Plasma
Display by holding only a single handle. Use the
handles as shown.
• Do not use the handles to hang the product when
installing or carrying the product, for example. Do not
use the handles for the purpose of preventing the
product from tilting over.
10
En
PDP-ELITE-Eng (06-12) 9/9/03, 11:4310

Features
• Built-in Digital Television (DTV) Tuner
• EPG for DTV programs
• New WIDE XGA Plasma Panel
PRO-1110HD: 1280 x 768 (H x V) pixels
PRO-910HD: 1024 x 768 (H x V) pixels
• PureCinema
•TruBass, FOCUS, and SRS sound systems
• Dual TV Tuner
• Multi-screen display (2-screen/picture-in-picture)
• Still image function
• 4-Language On Screen Display
•4-Video Input and PC (XGA) Input
•3-Component Video Input
04
• 2-i.LINK interface
•Parental Control System (V-CHIP)
•Power-Saving Design
PDP-ELITE-Eng (06-12) 9/9/03, 11:4311
11
En
05
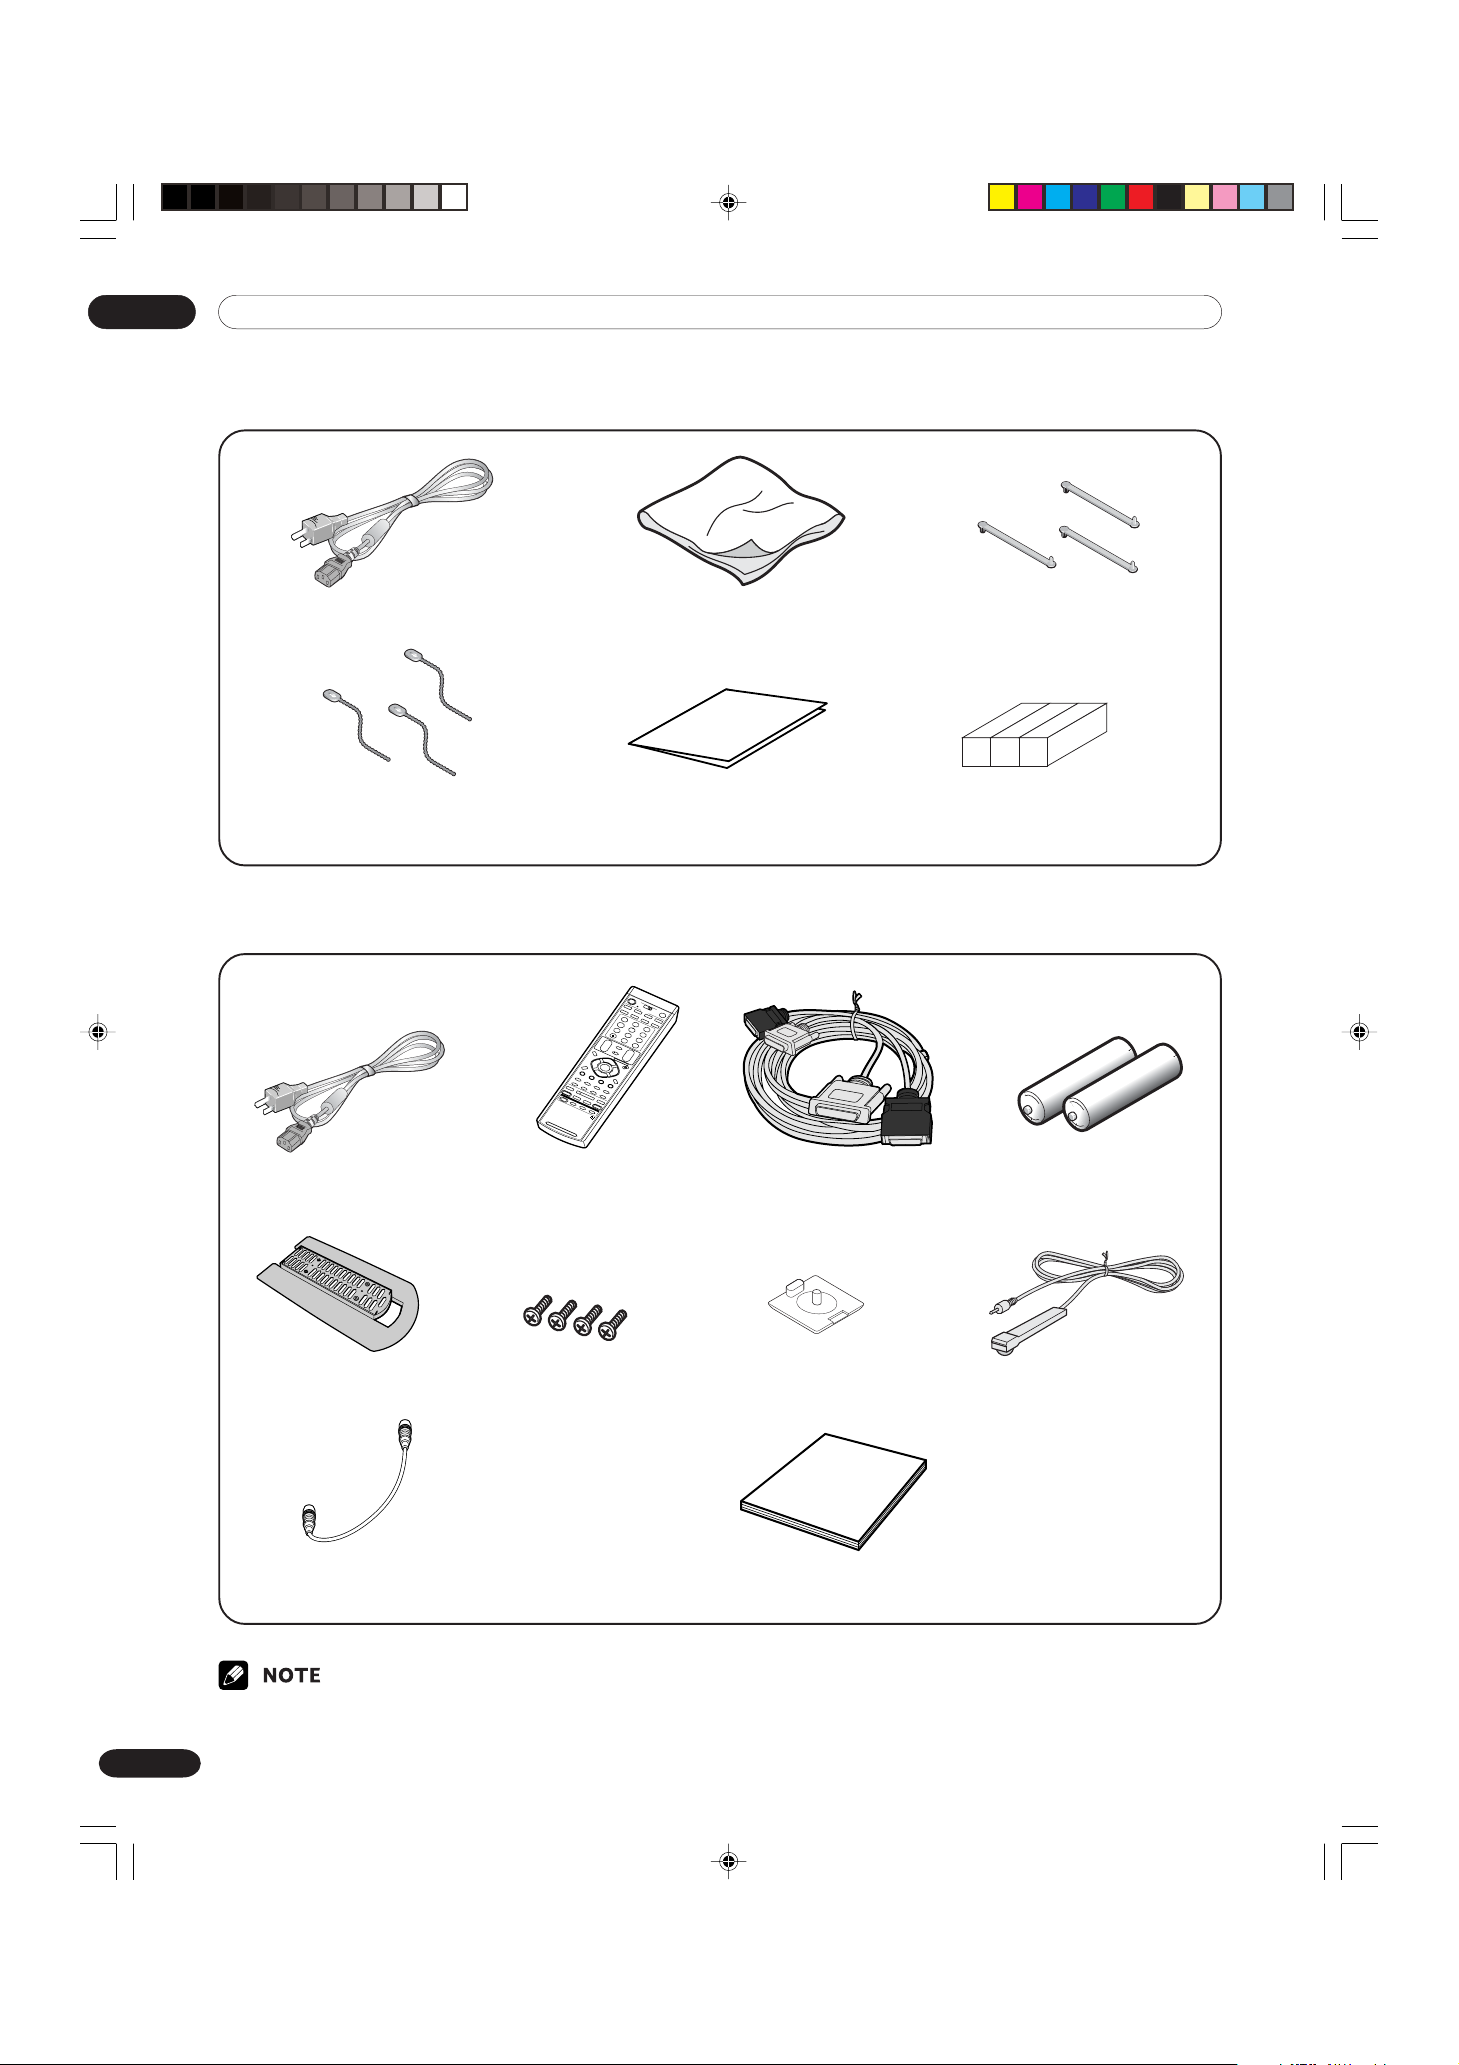
Supplied Accessories
Plasma Display
Power cord (2 m/6.6 feet)
Bead band x 3 Warranty card Speaker cushion x 3
Media Receiver
Power cord (2 m/6.6 feet)
Remote control unit
Cleaning cloth Speed clamp x 3
(Use when installing the optional speakers at
the bottom of the Plasma Display.)
System cable (3 m/9.8 feet) AA size battery x 2
(Alkaline battery)
Stand Screw x 4
(for stand)
Coaxial cable (0.15 m/0.49 feet) x 1
(Already set at the rear of the Media Receiver)
•Always use the power cord supplied with the Plasma
Display and the one supplied with the Media Receiver
12
En
PDP-ELITE-Eng (06-12) 9/9/03, 11:4312
for each respective unit.
Screw hole cap x 4 VCR controller x 1
(1.8 m/5.9 feet)
Operating instruction
Plasma Display
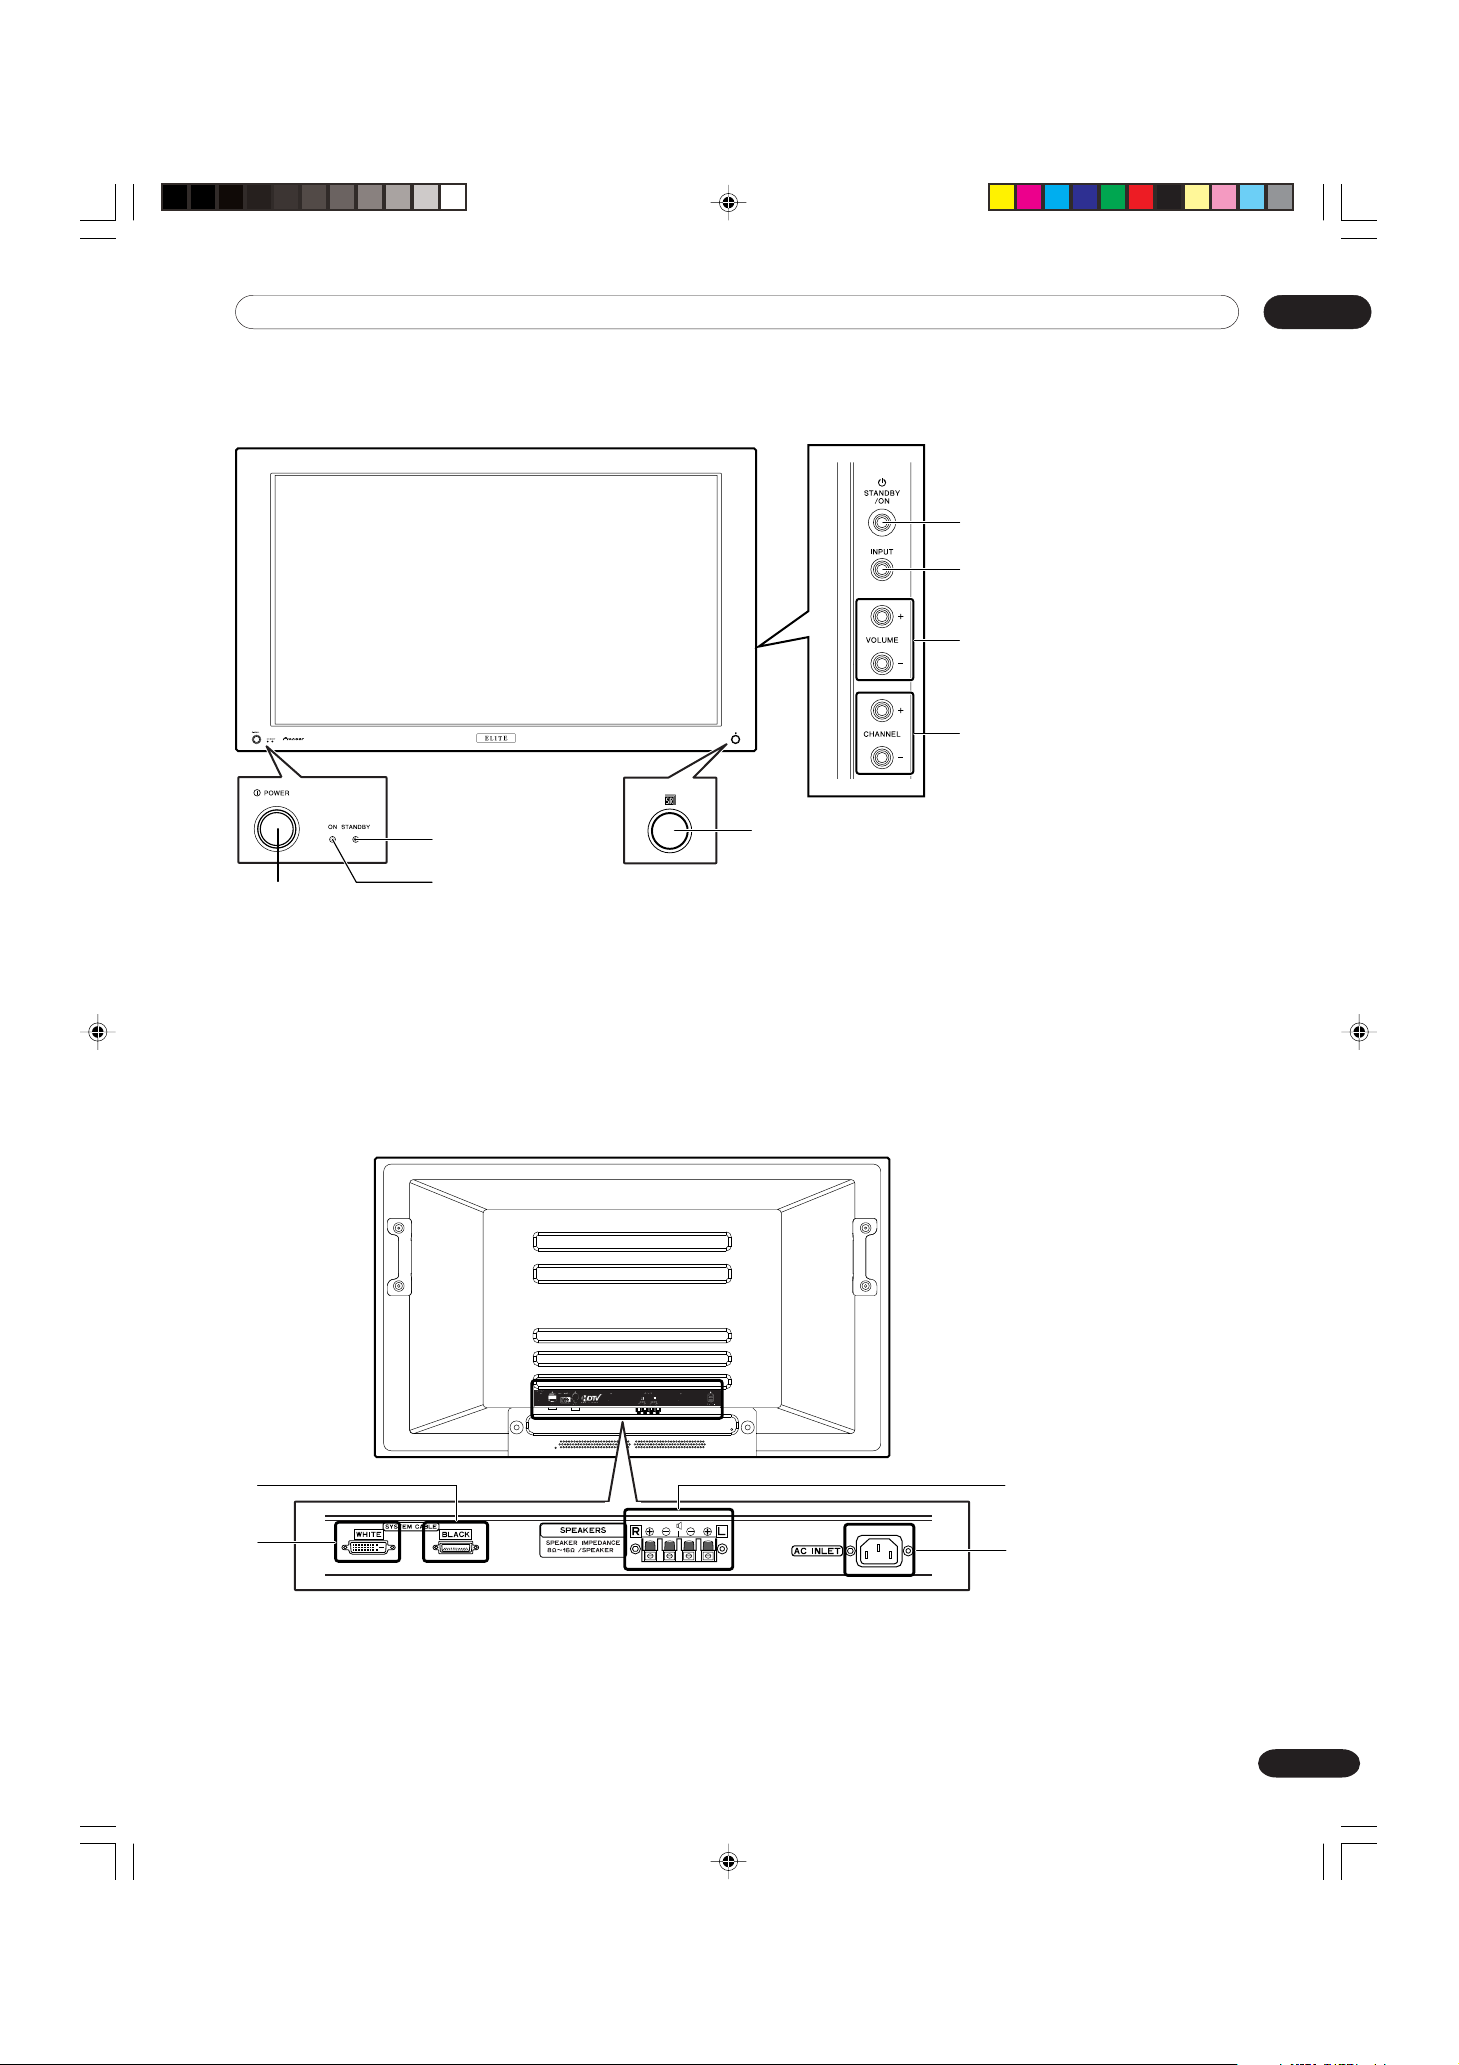
Front view
06Part Names
(right view)
5
6
7
8
2
1
3
1 POWER button
2 STANDBY indicator
3 POWER ON indicator
4 Remote control sensor
Rear view
4
5 STANDBY/ON button
6 INPUT button
7 VOLUME +/– buttons
8 CHANNEL +/– buttons
9
0
9 SYSTEM CABLE terminal (BLACK)
0 SYSTEM CABLE terminal (WHITE)
PDP-ELITE-Eng (13-16) 9/9/03, 11:4313
-
=
The terminals have faced downward.
- SPEAKER (right/left) terminals
= AC INLET terminal
13
En
06 Part Names
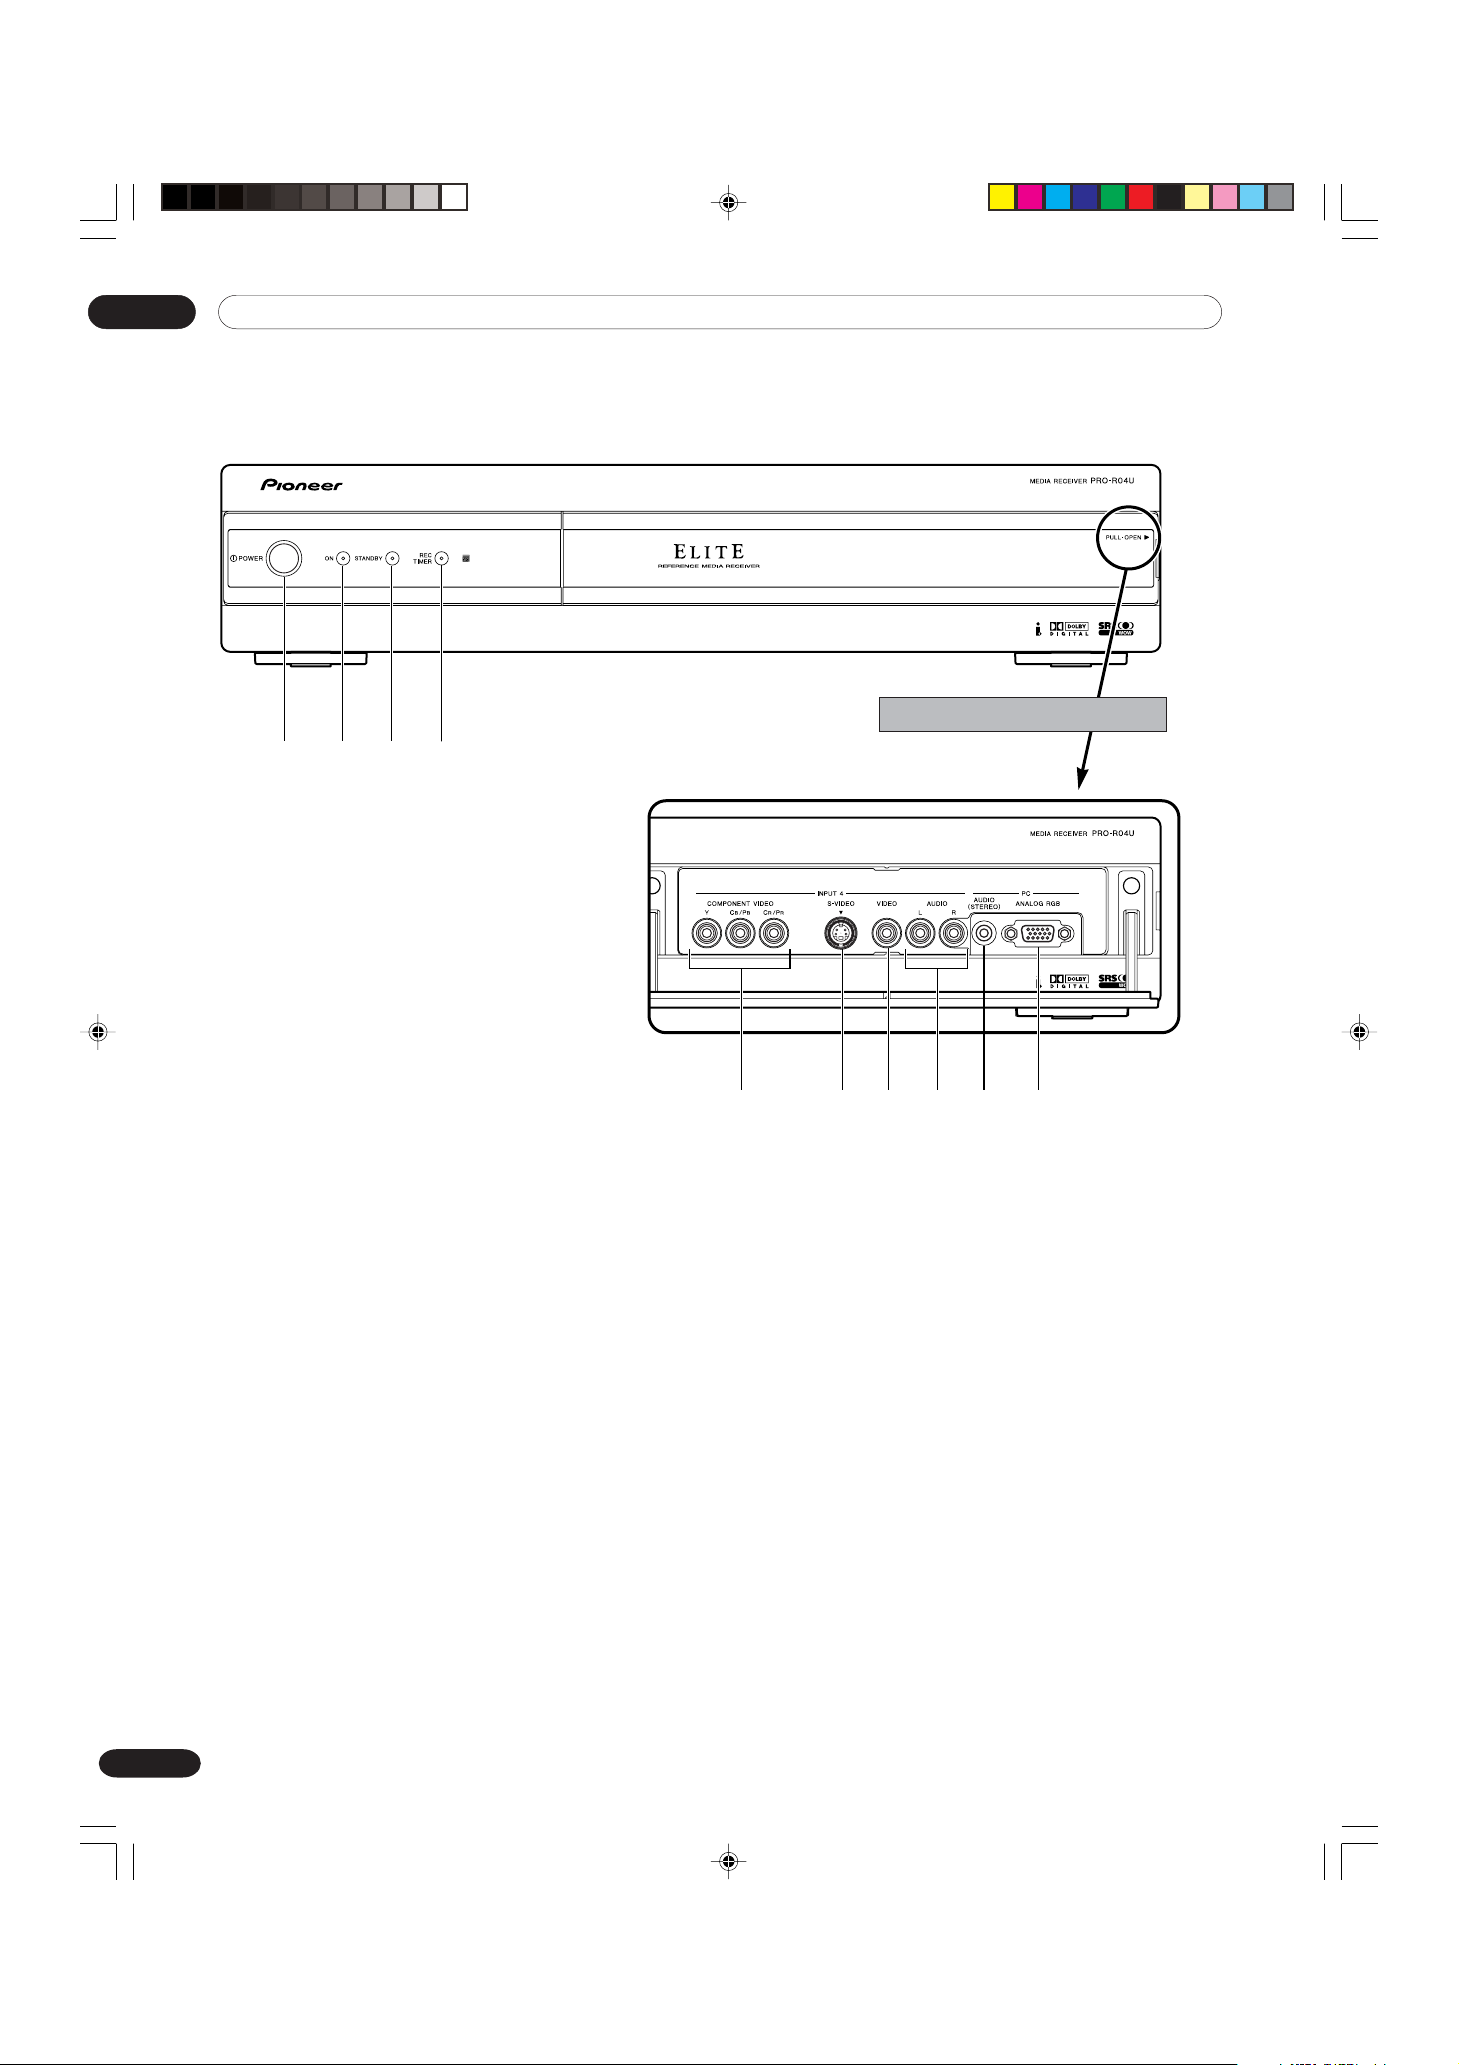
Media Receiver
Front view
1 2 3 4
Pull this section to open the door.
1 POWER button
2 POWER ON indicator
3 STANDBY indicator
4 REC TIMER indicator
5 INPUT 4 COMPONENT VIDEO terminals
(Y, CB/PB, CR/PR)
6 INPUT 4 terminal (S-VIDEO)
7 INPUT 4 terminal (VIDEO)
8 INPUT 4 terminals (AUDIO)
9 PC INPUT terminal (AUDIO)
0 PC INPUT terminal (ANALOG RGB)
6 789 05
14
En
PDP-ELITE-Eng (13-16) 9/9/03, 11:4314
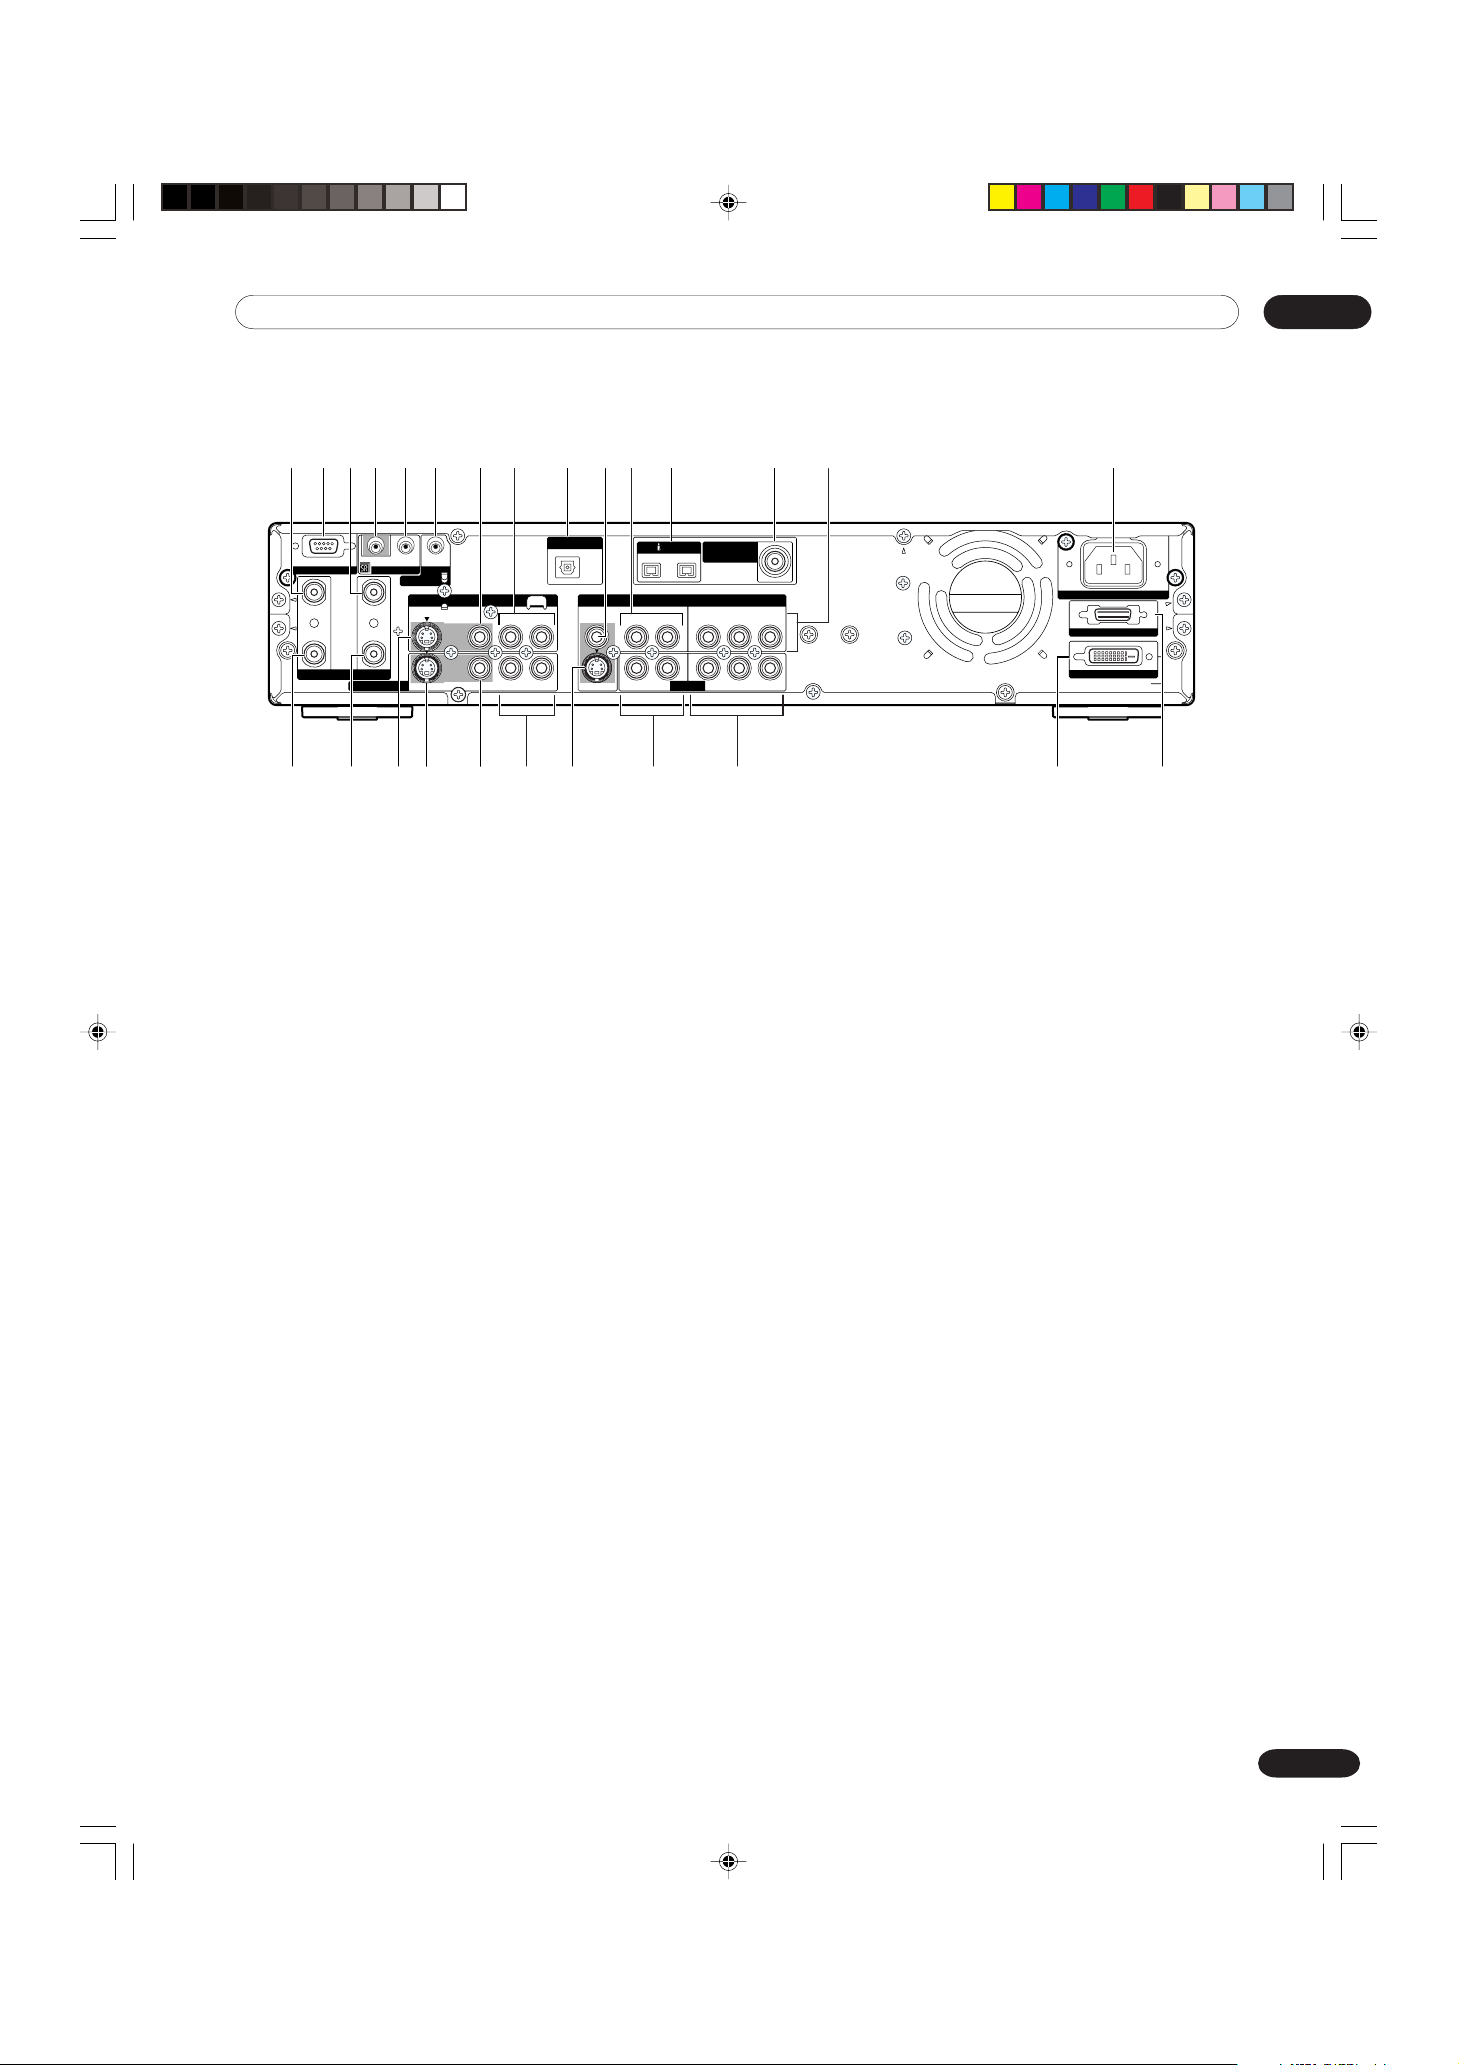
Rear view
06Part Names
231 456
DIGITAL OUT
SERVICE ONLY
IN
OUT
A ANTENNA/CABLE B
MONITOR OUT
IN
OUT
CONTROL
VCR
CONTROL
IN
OUT
INPUT 2
S-VIDEO
VIDEO
VIDEO
S-VIDEO S-VIDEO
OPTICAL
R-AUDIO-L R-AUDIO-L Y
R-AUDIO-L R-AUDIO-L Y
VIDEO
1 Antenna A input terminal
2 RS-232C terminal (used in the factory
setup)
3 Antenna B input terminal
4 Control input terminal
5 Control output terminal
S400
(TS)
INPUT 1
COMPONENT VIDEO
INPUT 3
@08-9=~!7
DTV-ANTENNA
IN
AC INLET
CB/P
B
CR/P
R
C
B/PB
CR/P
R
BLACK
WHITE
SYSTEM CABLE
+¡#$%^&*( ) _
! INPUT 1 COMPONENT VIDEO terminals
(Y, CB/PB, CR/PR)
@ AC INLET terminal
# Antenna A output terminal
$ Antenna B output terminal
% INPUT 2 terminal (S-VIDEO)
6 VCR control terminal
7 INPUT 2 terminal (VIDEO)
8 INPUT 2 terminals (AUDIO)
9 DIGITAL AUDIO output terminal
(OPTICAL)
0 INPUT 1 terminal (VIDEO)
- INPUT 1 terminals (AUDIO)
= i.LINK terminals
~ DTV Antenna input terminal
^ MONITOR OUT terminal (S-VIDEO)
& MONITOR OUT terminal (VIDEO)
* MONITOR OUT terminals (AUDIO)
( INPUT 1 terminal (S-VIDEO)
) INPUT 3 terminals (AUDIO)
_ INPUT 3 COMPONENT VIDEO terminals
(Y, CB/PB, CR/PR)
+ SYSTEM CABLE terminal (WHITE)
¡ SYSTEM CABLE terminal (BLACK)
PDP-ELITE-Eng (13-16) 9/9/03, 11:4315
15
En
06 Part Names
Remote control unit
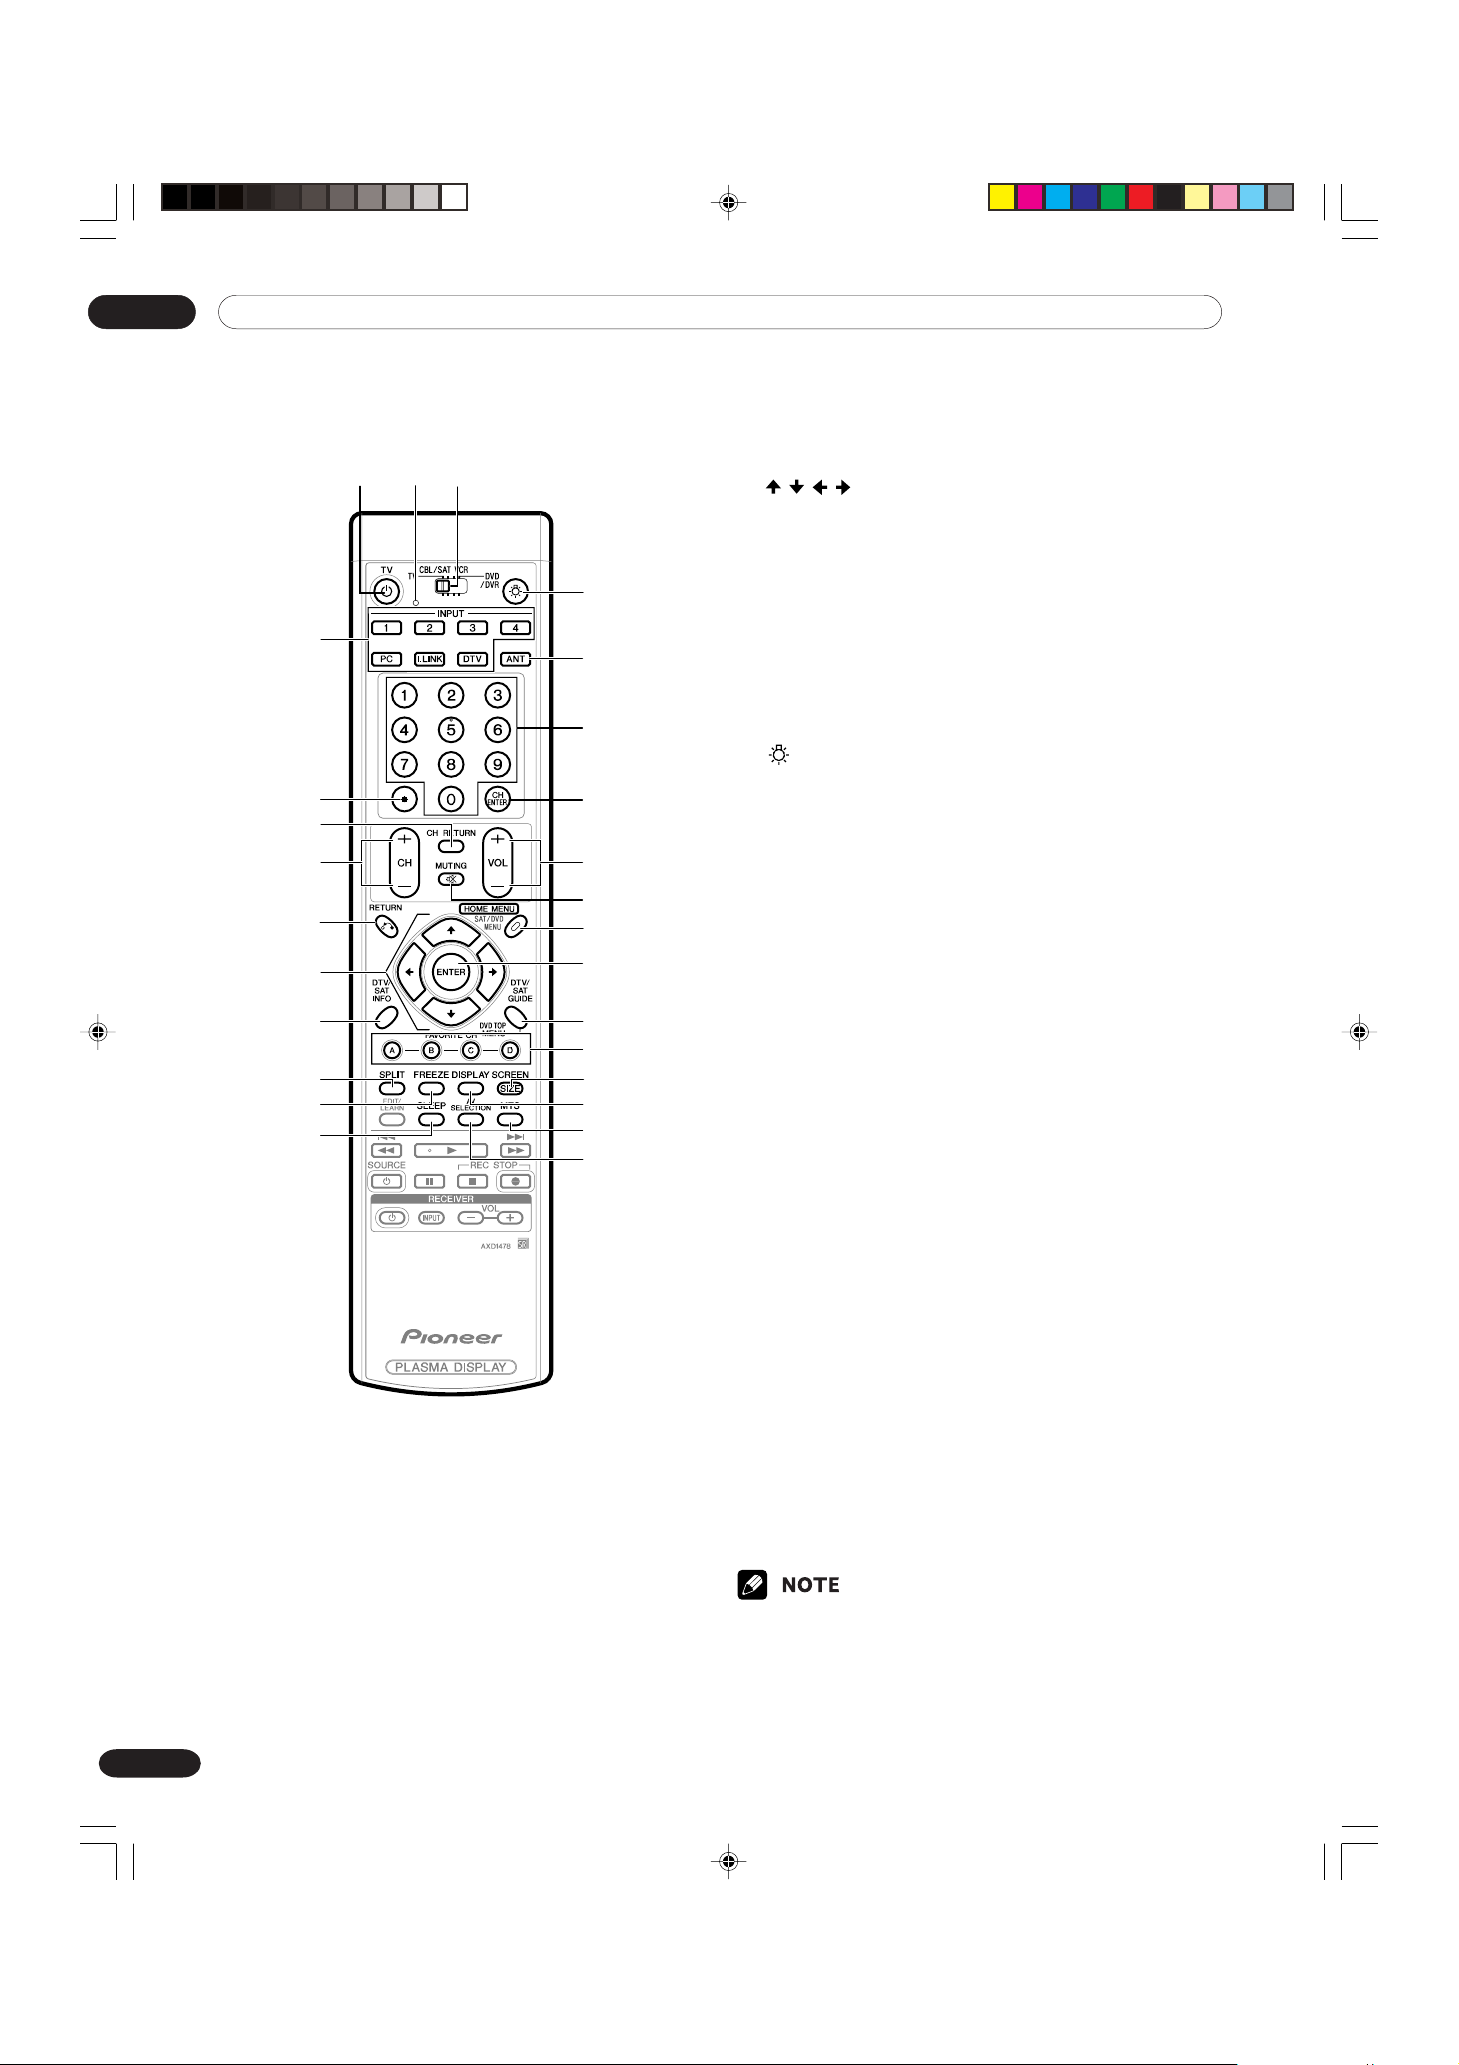
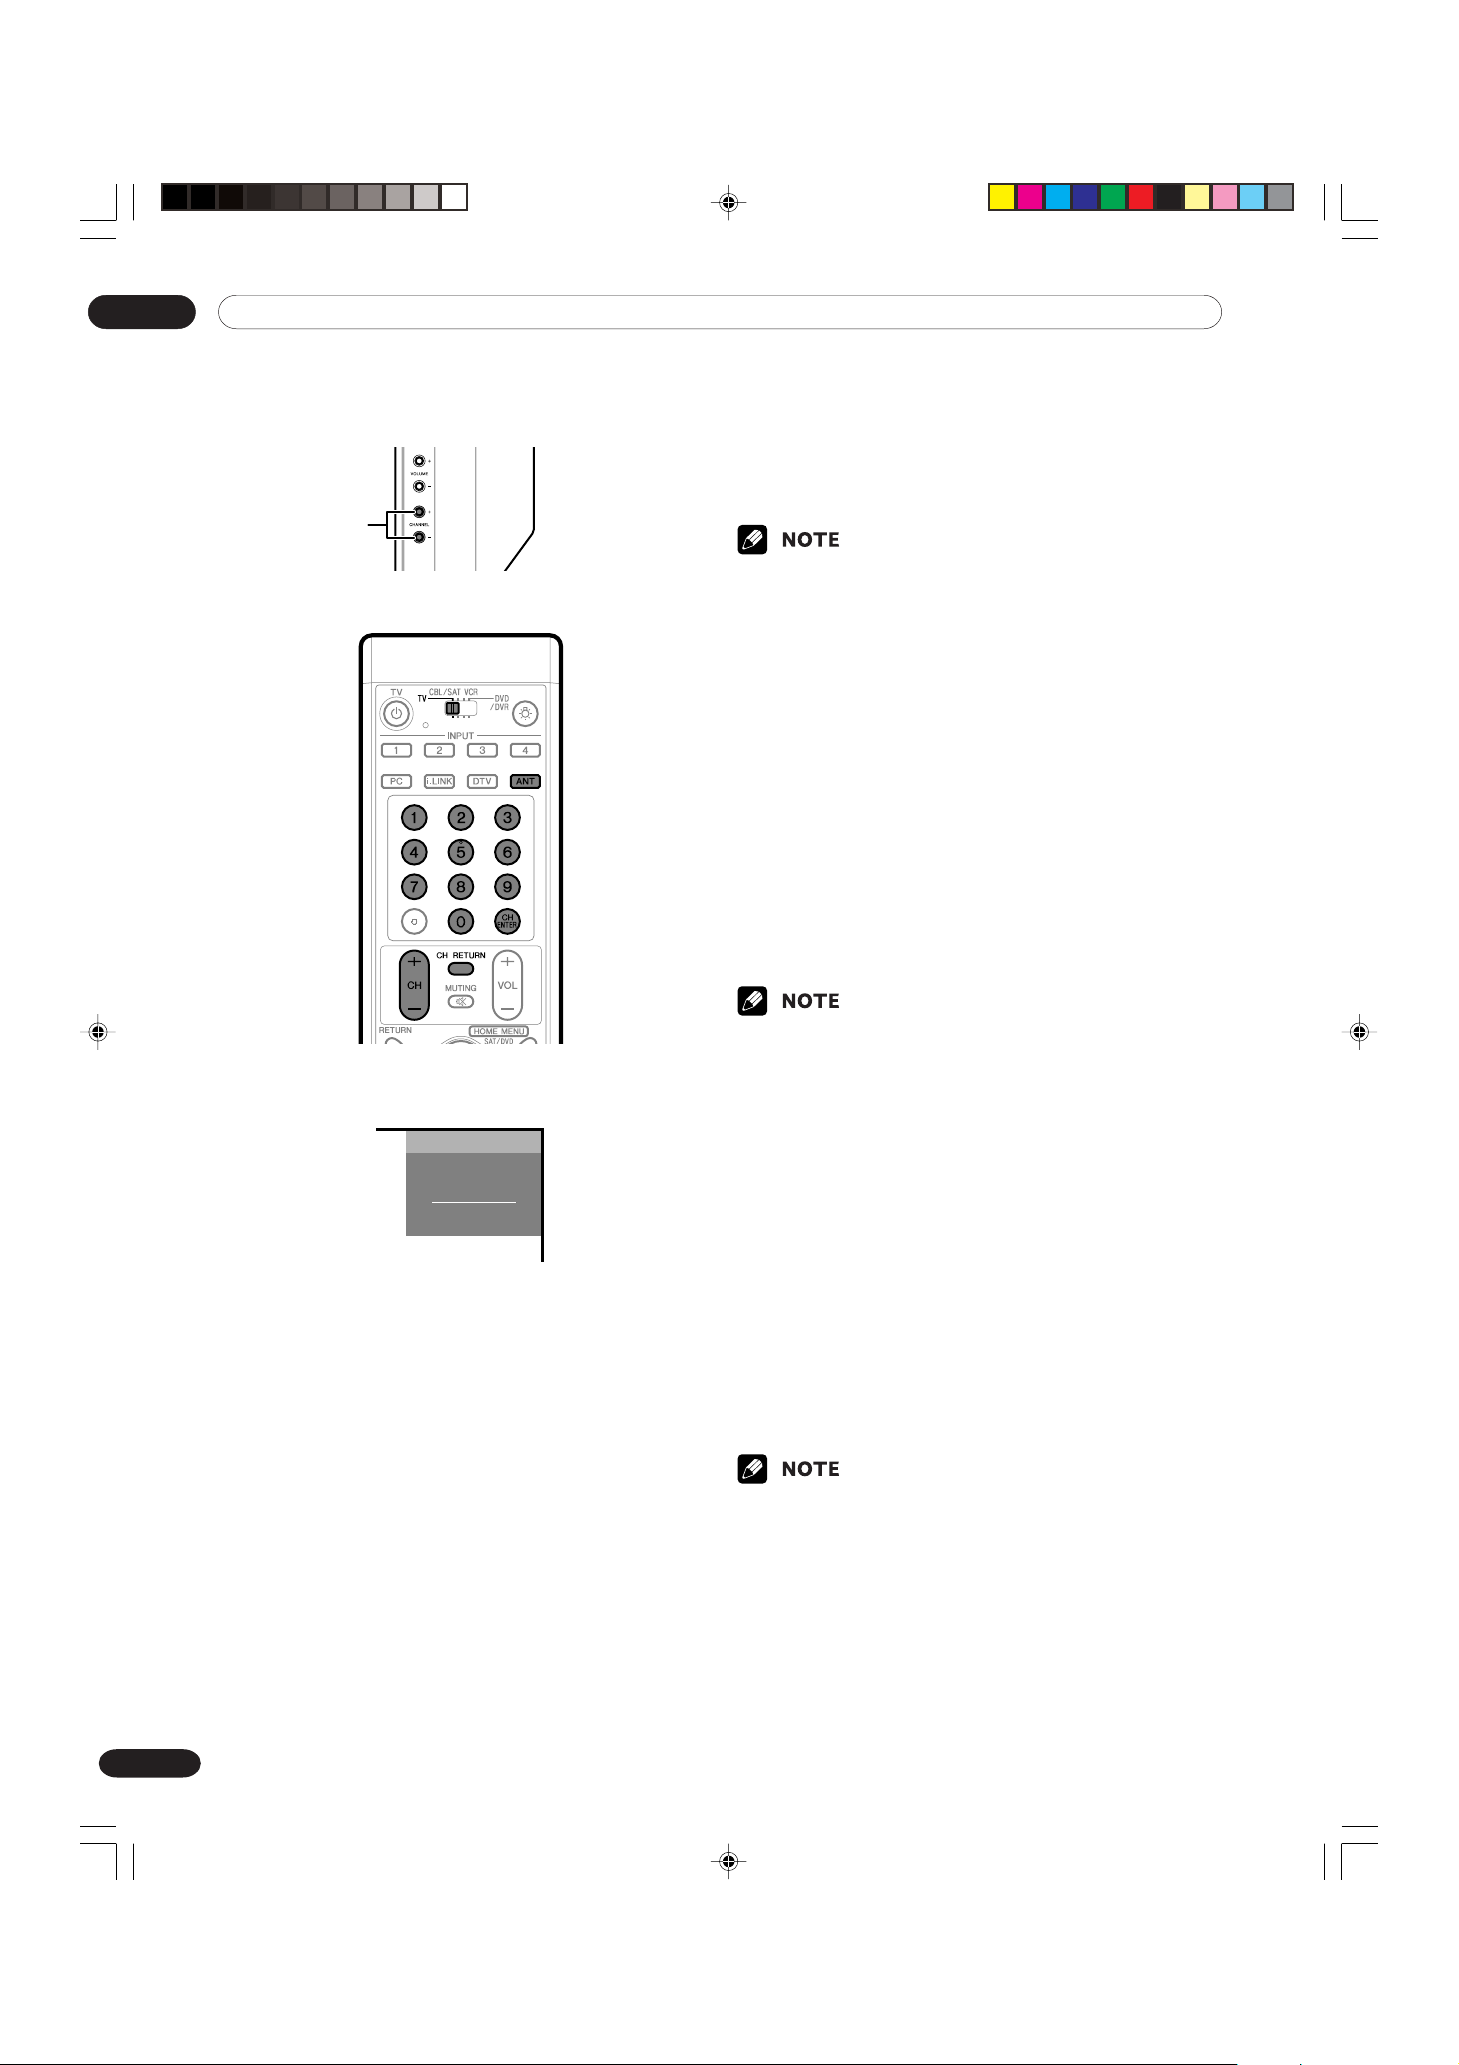
Mode switch (with
12
3
4
5
6
7
8
9
0
=
With the mode switch set to TV
1 TV a: Turns on the power to the Plasma
Display or places it into standby mode.
2 Transmission confirmation LED
3 INPUT: Selects an input source of the
Plasma Display. (DTV, i.LINK, INPUT 1, INPUT 2, INPUT 3, INPUT 4, PC)
4 •(dot): Enters a dot.
5 CH RETURN: Returns to the previous chan-
16
En
nel.
“TV” selected)
~
!
@
#
$
%
^
&
*
(
)
_
+
¡
6 CH +/–: Selects the channel.
7 RETURN: Returns to the previous menu
screen.
8
/ / / : Selects a desired item on the menu
screen.
9 DTV INFO: Shows more information on DTV
programs.
0 SPLIT: Switches the screen mode among 2-
screen, picture-in-picture, and single-screen.
- FREEZE: Freezes a frame from a moving
image. Press again to cancel the function.
= SLEEP: Sets the sleep timer.
~
: When pressed, all buttons on the remote
control unit will light. The lighting will
turn off if no operations are performed
within about 5 seconds. This button is
used for performing operations in dark
places.
! ANT: Selects the antenna (A, B). See pages
24 to 26 for details.
@ 0 – 9: Sets the channel.
# CH ENTER: Executes a channel number.
$ VOL
% e MUTING: Mutes the sound.
^ HOME MENU: Displays the menu screen.
& ENTER: Executes a command.
* DTV GUIDE: Displays the DTV Electronic
( FAVORITE CH (A, B, C, D):
) SCREEN SIZE: Selects the screen size.
_ DISPLAY: Displays the channel information.
+ MTS: Selects the MTS/SAP.
¡ AV SELECTION: Selects audio and video
• When using the remote control unit, point it at the
Plasma Display.
• See pages 97 to 105 for operating buttons not listed
on this page.
+/–: Sets the volume.
Program Guide (EPG).
Selects any of the four preset channels. See
page 43 for details to set the FAVORITE CH.
While watching, you can toggle the set channels by pressing A, B, C and D.
settings. (AV mode: STANDARD, DYNAMIC,
MOVIE, GAME, USER. PC mode: STANDARD,
USER.)
PDP-ELITE-Eng (13-16) 9/9/03, 11:4316
07Preparation
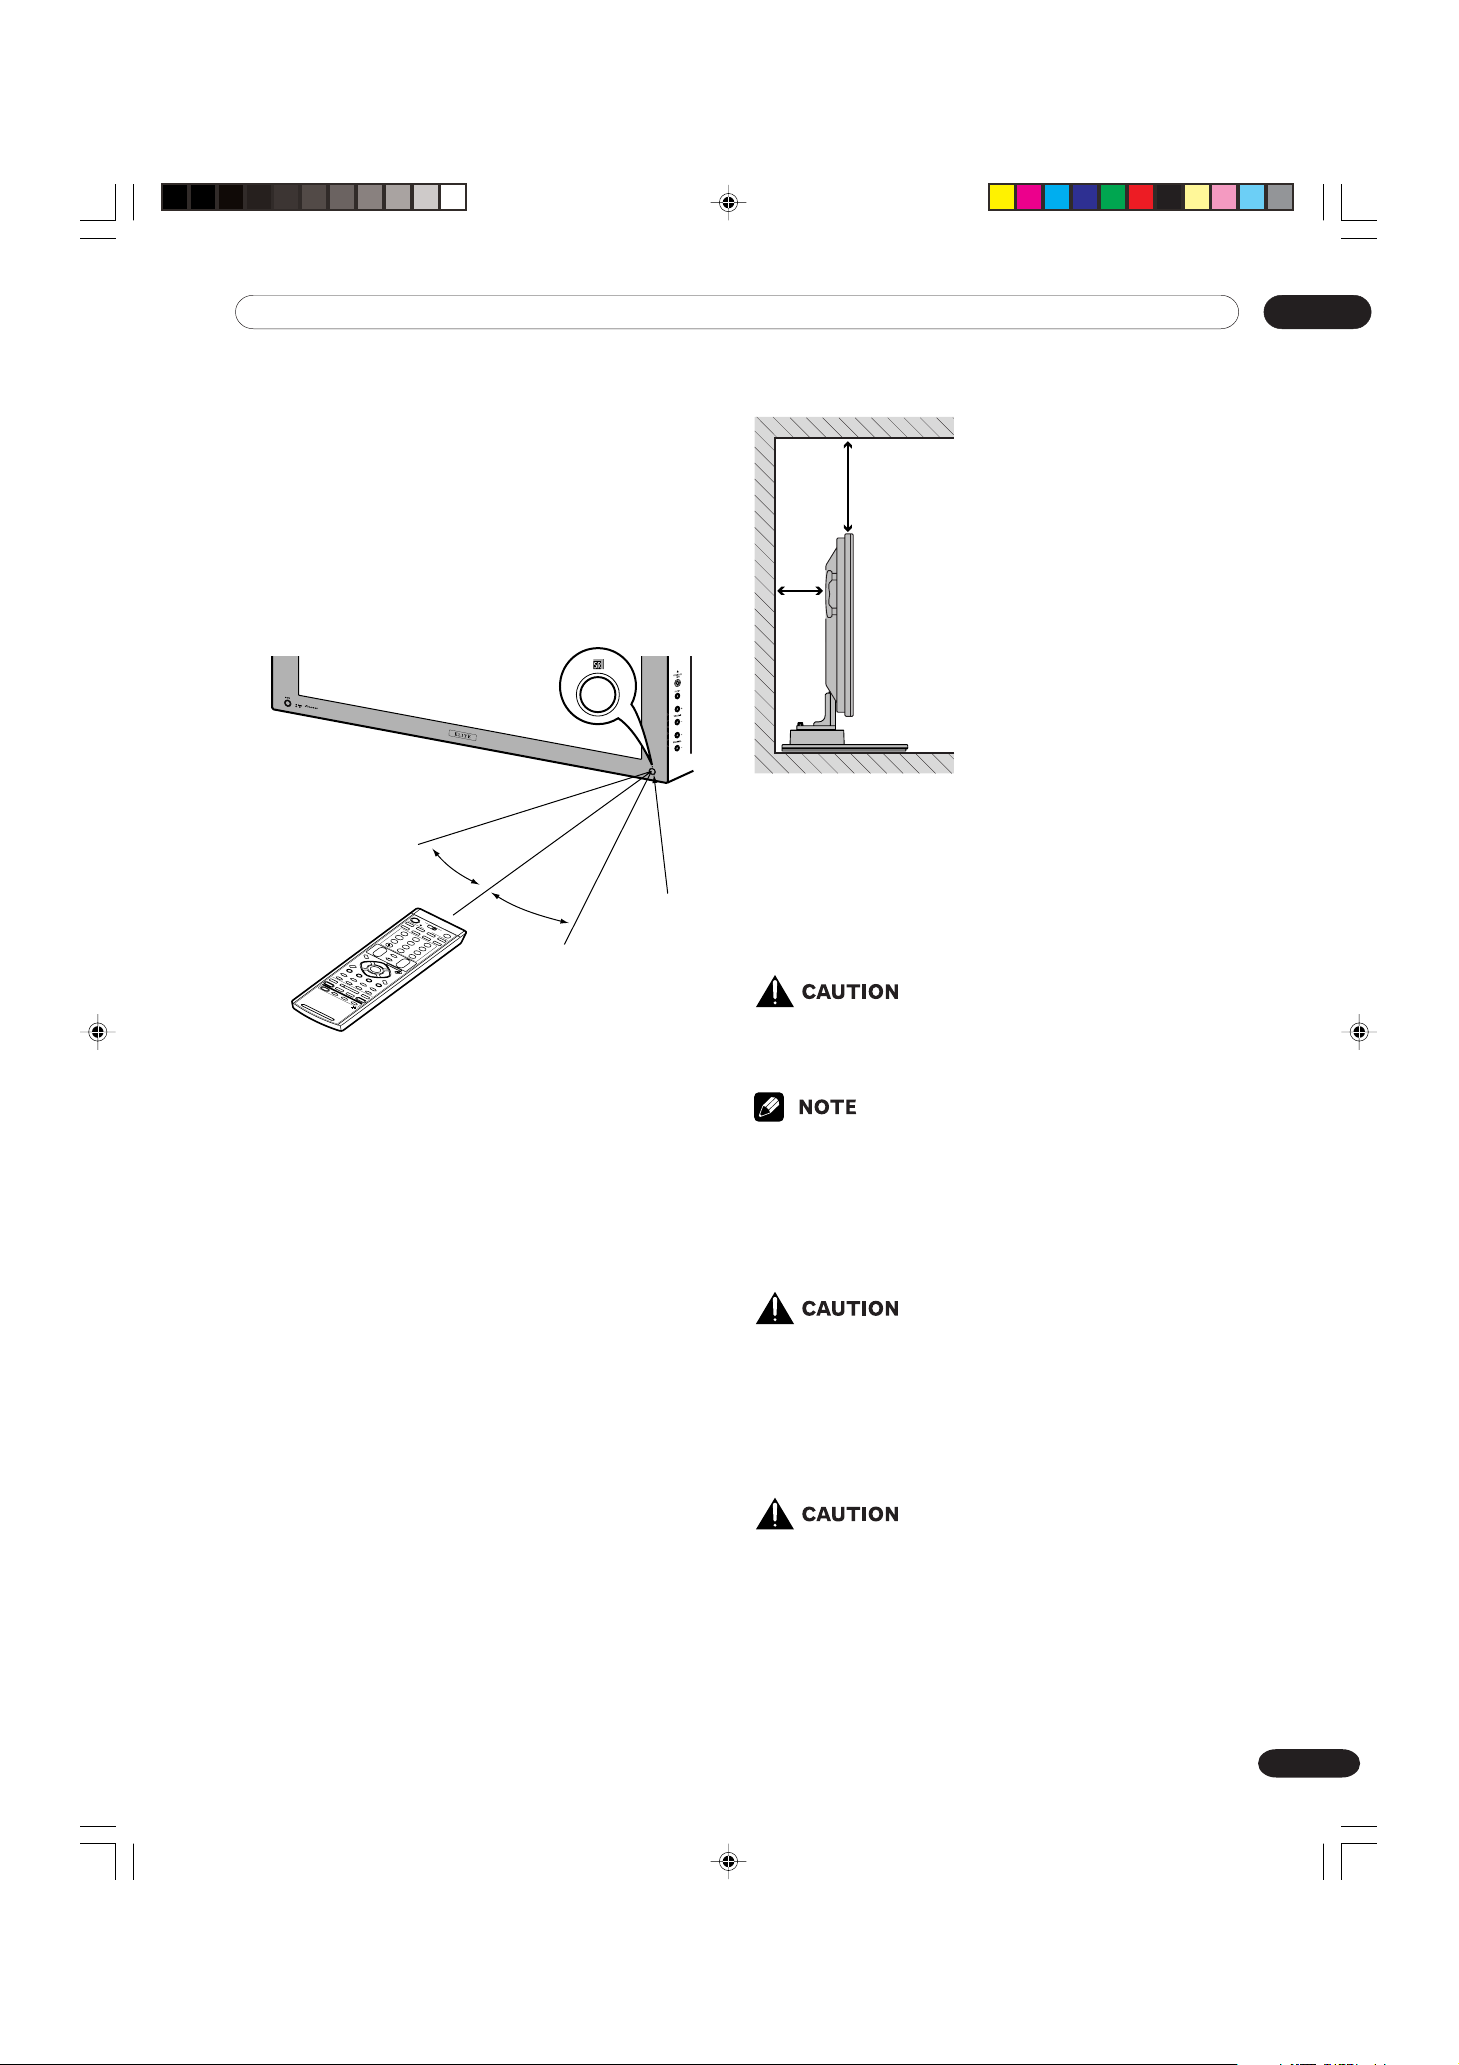
Allowed operation range of the remote
control unit
Operate the remote control unit while pointing it toward
the remote control sensor (t) located at the bottom
right of the front panel of the Plasma Display. The
distance from the remote control sensor must be within
7 m (276 inches) and the angle relative to the sensor
must be within 30 degrees in the right, left, upward, or
downward direction.
30º
7 m (276 inches)
30º
Remote
control
sensor
Installing the Plasma Display
Over 50 cm (19 11/16 inches)
Over 10 cm
(3 15/
16
inches )
Locating
• Avoid direct sunlight. Maintain adequate ventilation.
• The length of the system cable used to connect the
Plasma Display and the Media Receiver is about 3 m
(118 inches).
• Because the Plasma Display is heavy, be sure to have
someone help you when moving it.
When the remote control unit does not function properly
• When any obstacle exists between the remote control
unit and the remote control sensor, the remote
control unit may not function.
• As the batteries become empty, the remote control
unit can function within a shorter distance from the
remote control sensor. Replace the batteries with new
ones early enough.
• The Plasma Display emits very weak infrared rays
from its screen. If you place such equipment operated through infrared remote control as a VCR
nearby, that equipment may not receive commands
from its remote control unit properly or entirely. If this
is the case, place that equipment at a location far
enough from the Plasma Display.
• Depending on the installation environment, infrared
rays from the Plasma Display may not allow this
system to properly receive commands from the
remote control unit or may shorten allowable distances between the remote control unit and the
remote control sensor. The strength of infrared rays
emitted from the screen differs, depending on images
displayed on the screen.
• If you place anything on the top of the Media Receiver
it will not receive enough ventilation and will not
operate properly.
•Allow enough space around the upper and back parts
when installing to ensure ventilation around the
backside.
Using the optional PIONEER stand
•For details on installation, refer to the instruction
manual provided with the stand.
• This product may be used only with model PDK-TS04
stand, use with other stands may result in instability
causing possible injury.
Using the optional PIONEER speakers
•For details on installation, refer to the instruction
manual provided with the speaker.
Operating Environment
Operating environment temperature and humidity:
+0°C to +40°C (+32°F to +104°F); less than 85% RH
(cooling vents not blocked)
Avoid installing at the following locations:
• Under direct exposure to sunlight
• Under strong artificial light
•In high humidity
•Poorly ventilated
17
En
PDP-ELITE-Eng (17-27) 9/9/03, 11:4417
07 Preparation
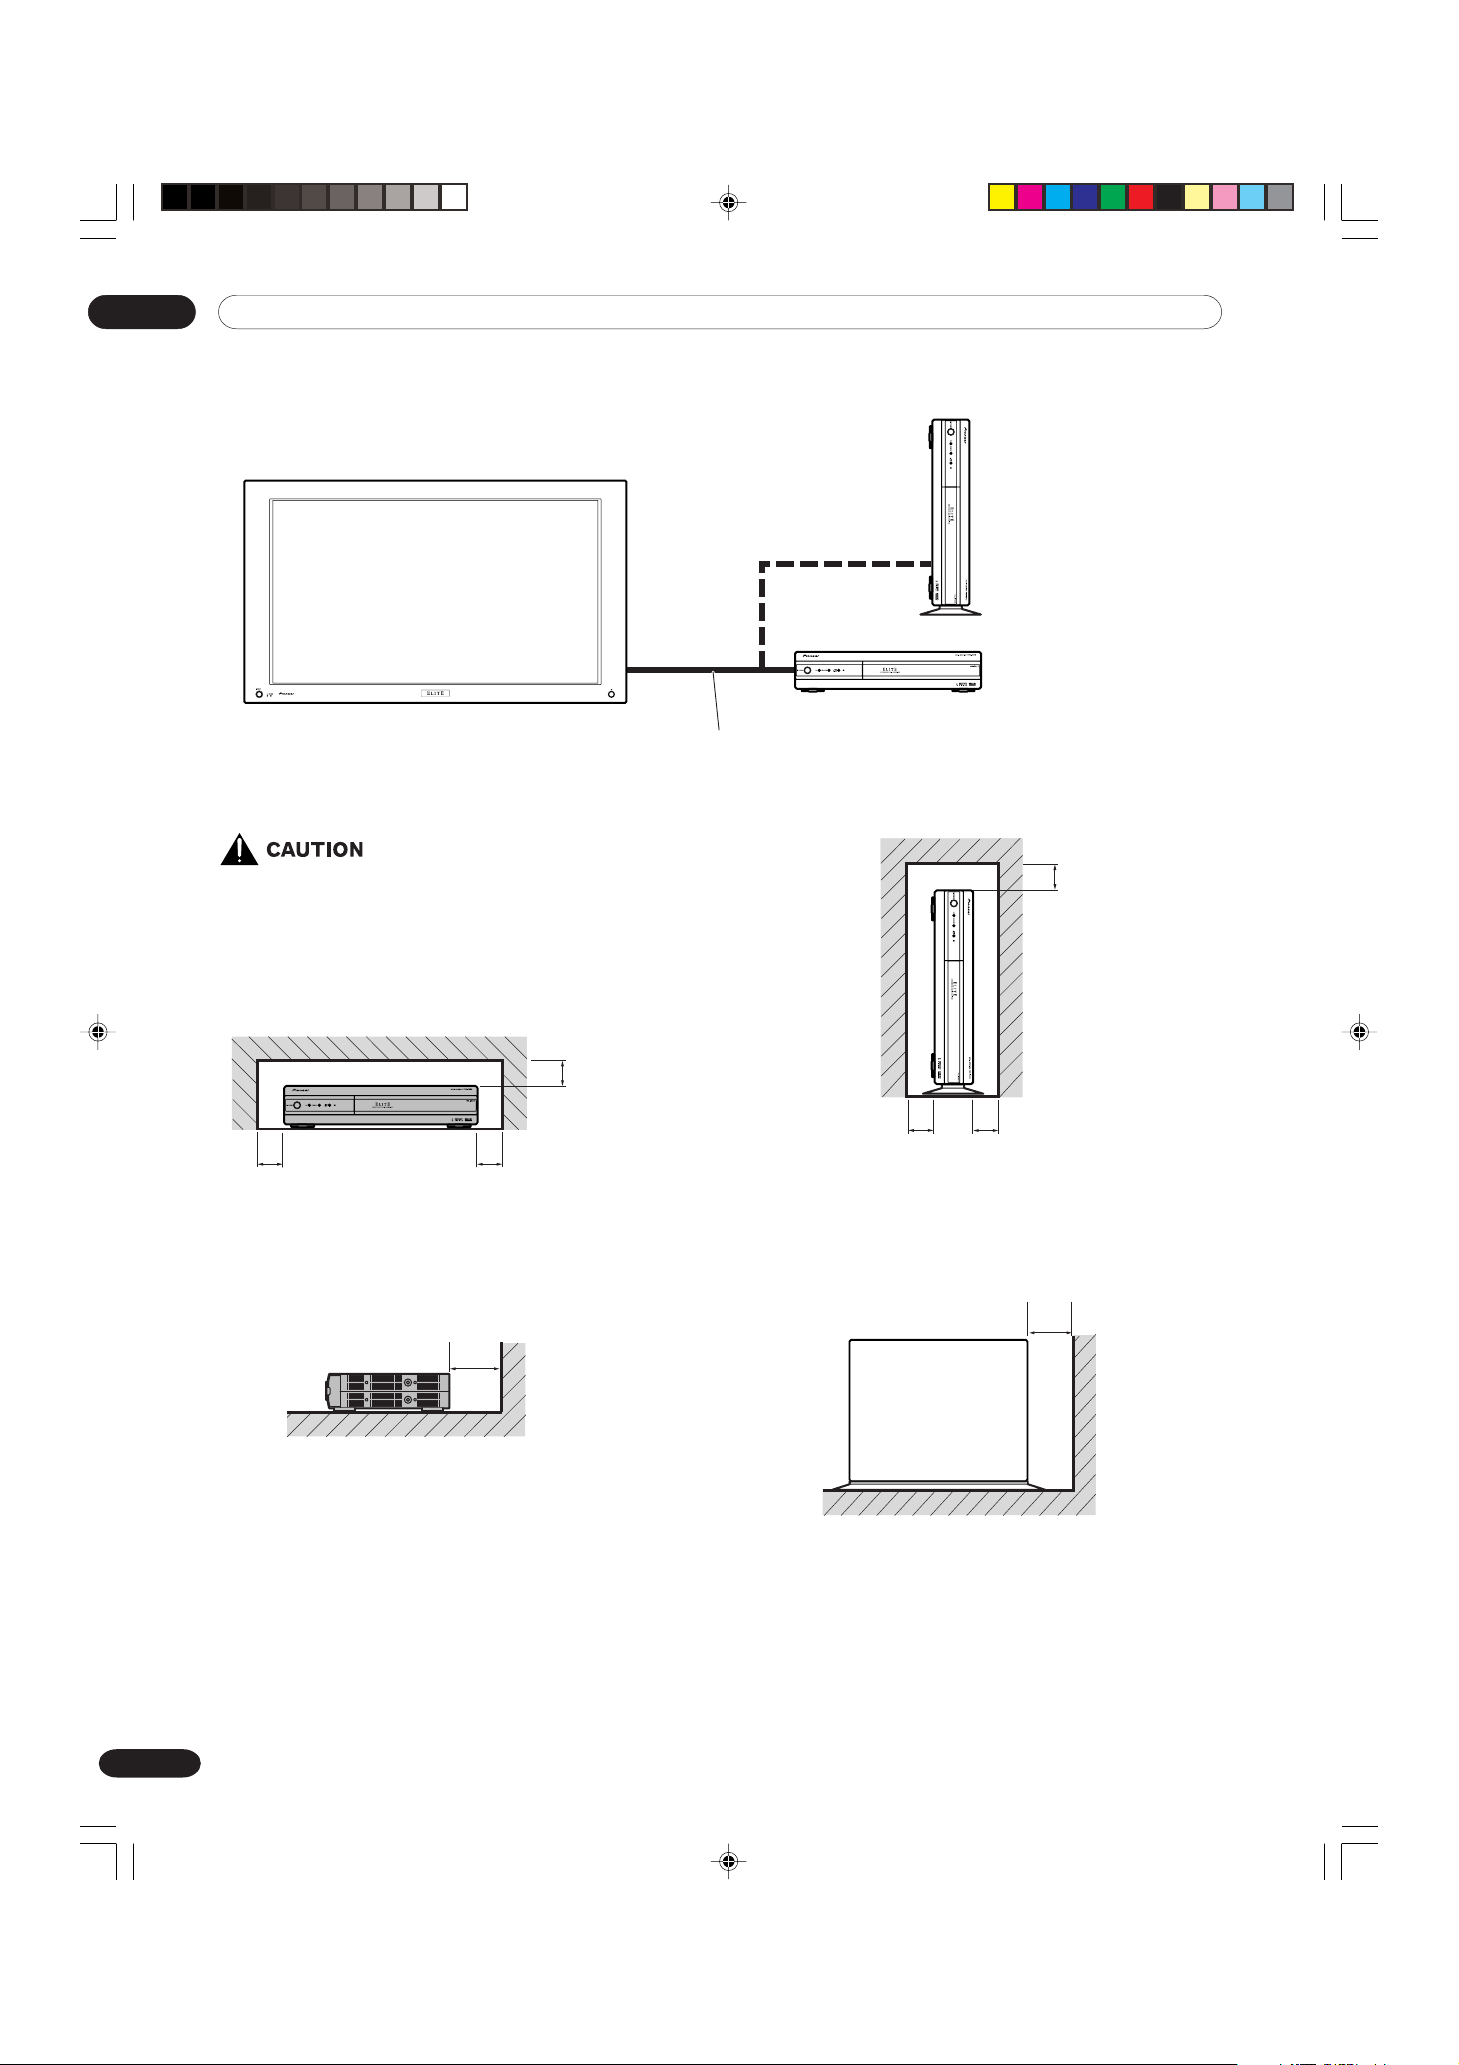
Installing the Media receiver
Plasma Display
Media Receiver
(vertical installation)
(horizontal installation)
System cable (approx. 3 meters/9.8
• Do not place a VCR or any other device on top of
the Media Receiver.
• When installing, allow enough space on the
sides and above the Media Receiver.
• Do not block the side cooling vents or the rear
ventilation fan opening of the Media Receiver.
Over 5 cm
inches)
(2
Over 5 cm
(2 inches)
Over 10 cm
15
(3
/16 inches)
feet)
Over 5 cm
(2 inches)
Over 5 cm
inches)
(2
Over 10 cm
(3
Over 5 cm
(2
inches)
15
/16 inches)
18
En
PDP-ELITE-Eng (17-27) 9/9/03, 11:4418
07Preparation
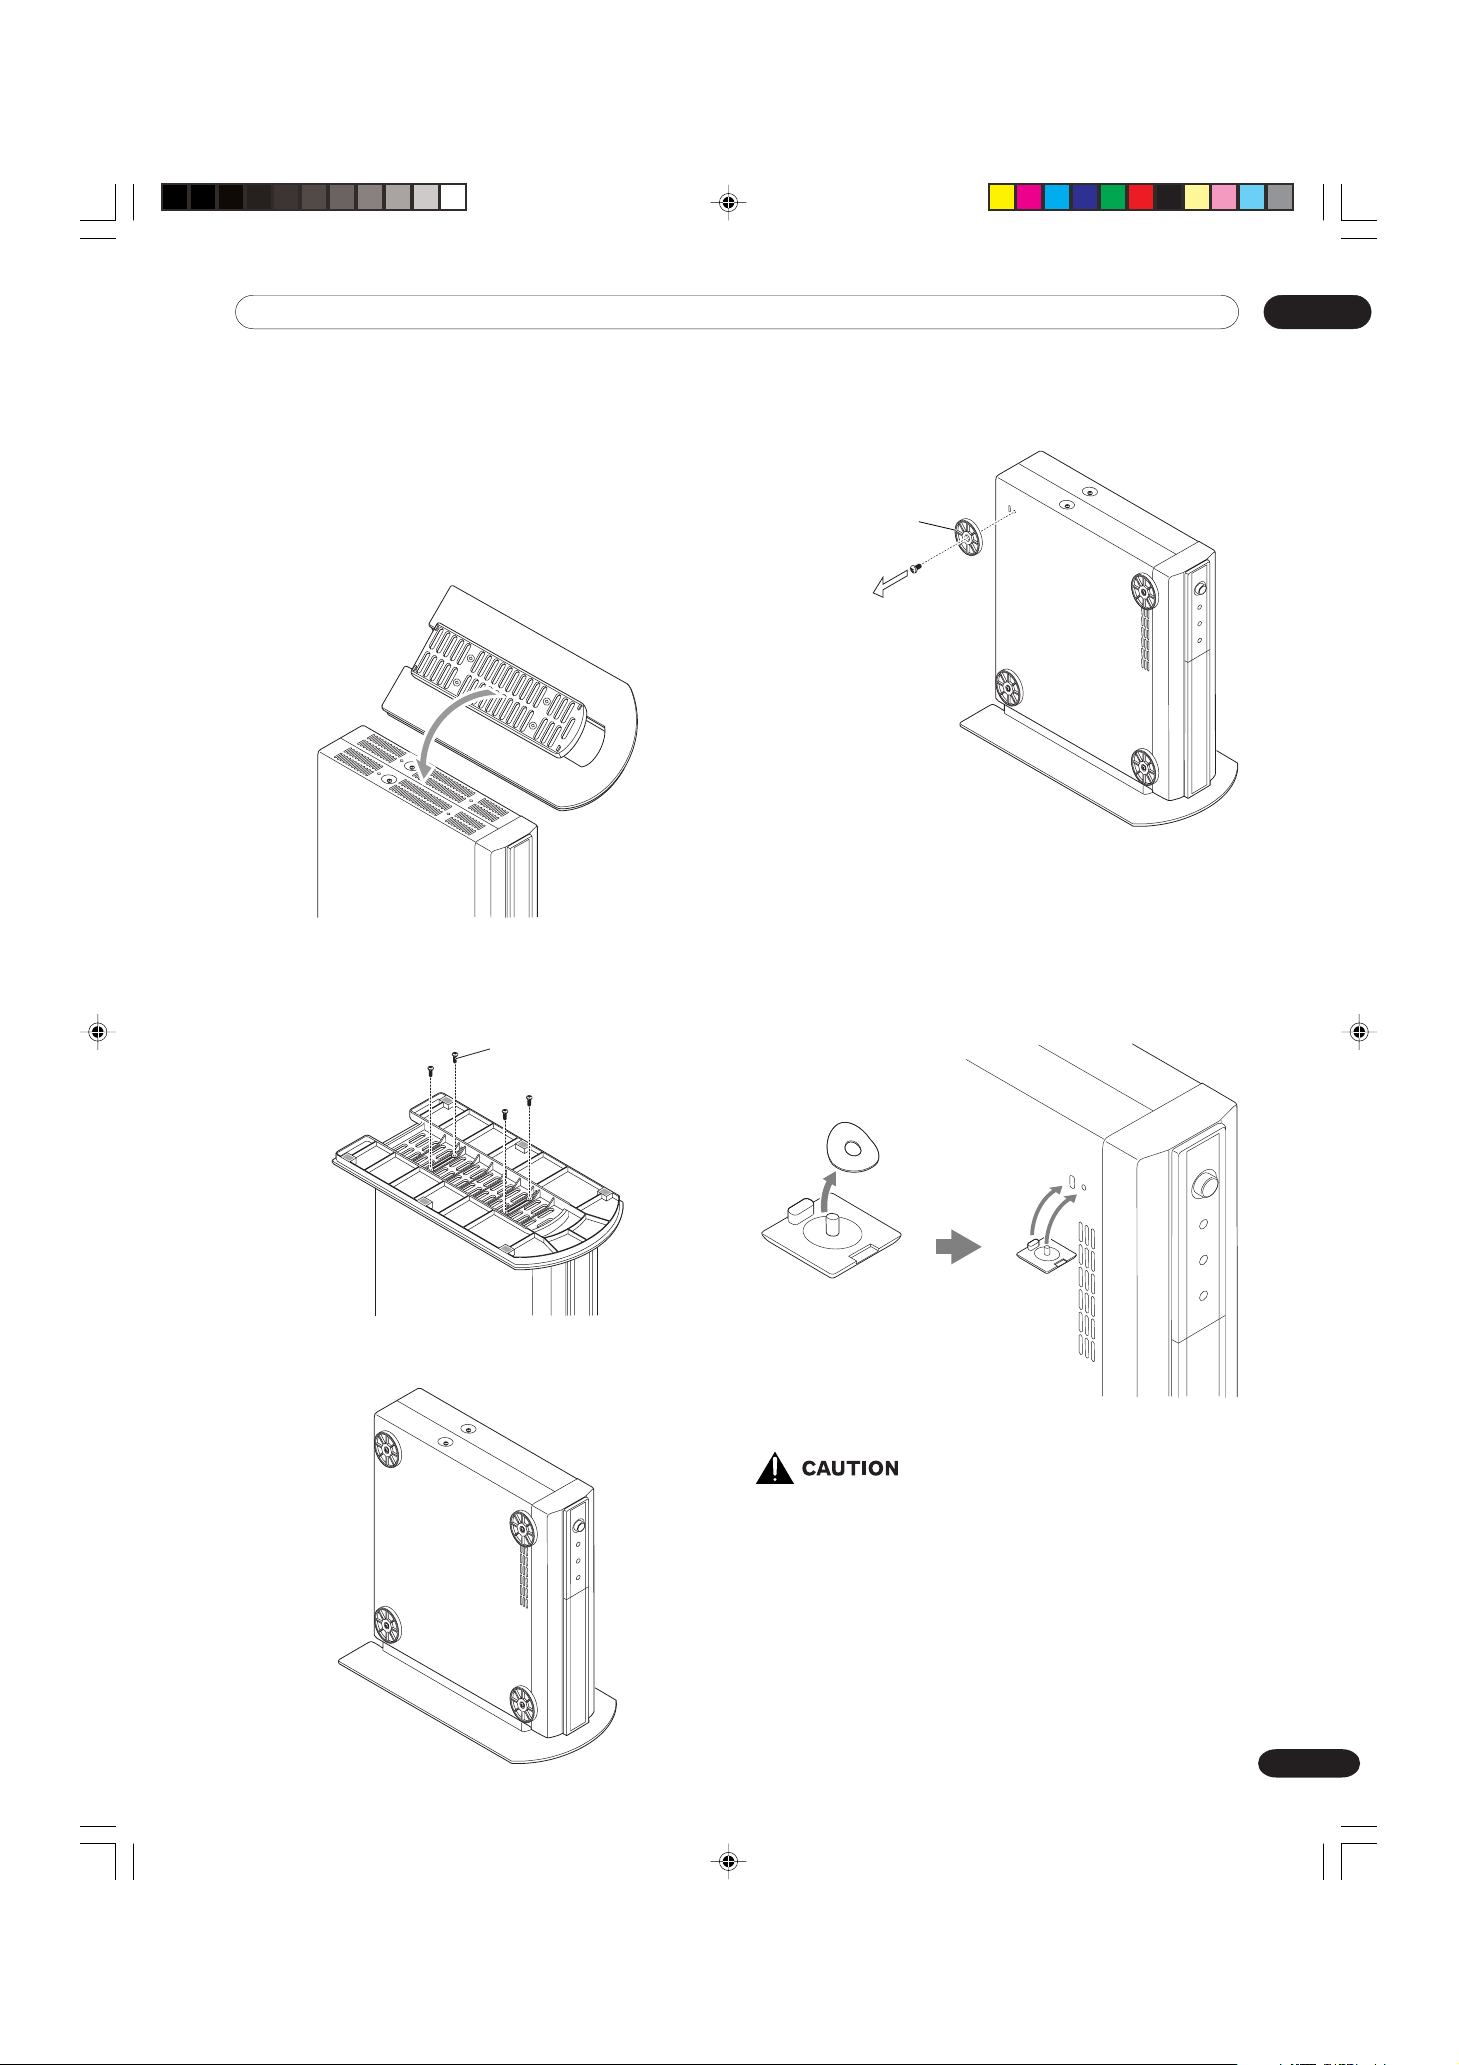
Installing the Media Receiver vertically
You can use the accompanying stand to install the
Media Receiver vertically.
Installing the Media Receiver vertically
Insert the vertical installation stand into the side of the
Media Receiver.
Right side
You can remove the shock absorbing pads.
Shock absorbing pad
Keep the shock absorbing pads and screws. They are
required when you place the Media Receiver in the
horizontal position.
Secure the vertical installation stand with
screws.
Vertical installation stand
screws
Plug the screw holes using the caps provided.
Remove the separation sheet.
Align with the
hole and attach.
Screw hole cap
• When you have installed the Media Receiver
vertically, always use the accompanying stand.
If you place the unit directly on the floor the
cooling vents will be blocked which will result in
mechanical failure.
PDP-ELITE-Eng (17-27) 9/9/03, 11:4419
19
En
07 Preparation
Setting the system
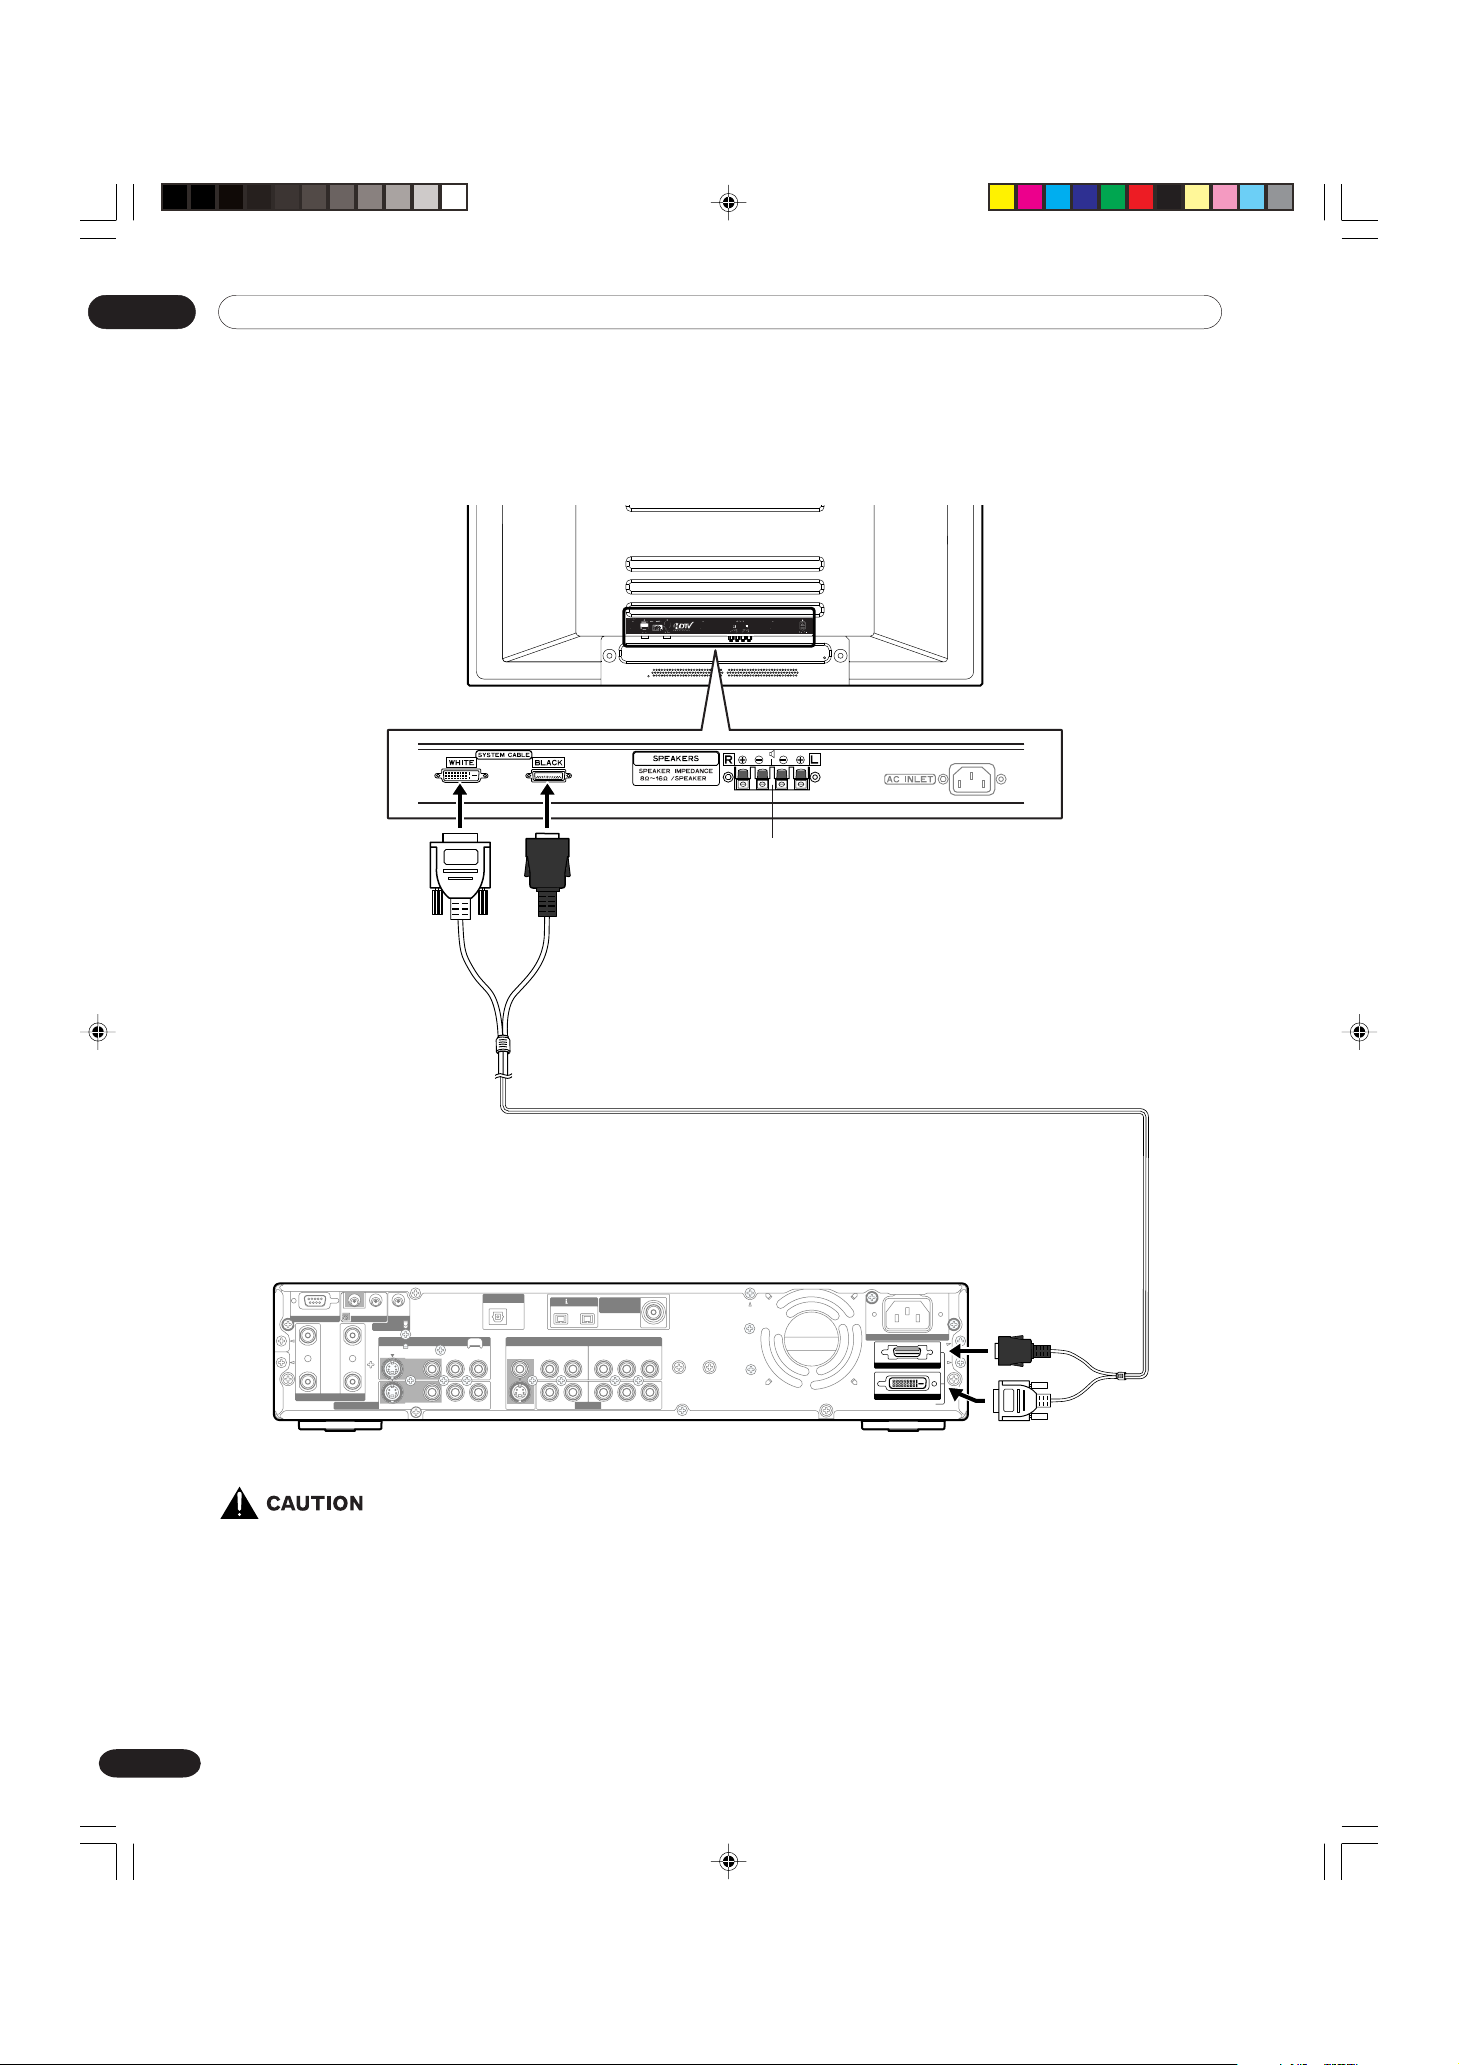
Connecting the system cable to the Plasma Display
Plasma Display (rear view)
(WHITE) (BLACK)
For details on optional PIONEER
speaker installation, refer to the
speaker instruction manual
provided.
Connecting the system cable to the Media Receiver
Media Receiver (rear view)
SERVICE ONLY
IN
OUT
A ANTENNA/CABLE B
OUT
IN
CONTROL
VCR
CONTROL
IN
OUT
MONITOR OUT
INPUT 2
S-VIDEO
VIDEO VIDEO
VIDEO
S-VIDEO S-VIDEO
DIGITAL OUT
OPTICAL
R-AUDIO-L R-AUDIO-L Y
R-AUDIO-L R-AUDIO-L Y
(TS)
S400
INPUT 1
INPUT 3
DTV-ANTENNA
IN
COMPONENT VIDEO
CB/P
B
C
B/PB
CR/P
R
CR/P
R
System cable
AC INLET
BLACK
WHITE
SYSTEM CABLE
(BLACK)
(WHITE)
• THESE SPEAKER TERMINALS CAN BE UNDER HAZARDOUS VOLTAGE WHEN YOU CONNECT OR
DISCONNECT THE SPEAKER CABLES. TO PREVENT THE RISK OF ELECTRIC SHOCK, DO NOT
TOUCH UNINSULATED PARTS BEFORE DISCONNECTING THE POWER CORD.
20
En
PDP-ELITE-Eng (17-27) 9/9/03, 11:4420

Routing cables
Speed clamps and bead bands are included with this system for bunching cables. Once properly bunched, follow
the steps below to route the cables.
07Preparation
When the speakers are installed on the sides
Speaker cable Speed clamps
Cable binders (supplied
with the stand)*
Attaching speed clamps to the main unit
Attach the speed clamps using the 4 holes marked with
below, depending on your routing system.
(rear view)
Speaker cable
Attaching and removing speed clamps
Insert 1 into an appropriate hole on the rear of the
Plasma Display and snap 2 into the back of 1 to lock
the clamp.
Speed clamps are designed to be difficult to undo once
in place. Please attach them carefully.
Use pliers to twist the clamp 90°, pulling outward. The
clamp may deteriorate over time and become damaged
if removed.
When the speakers are installed at the bottom
Speaker cable Speaker cable
Cable binders (supplied
with the stand)*
2
1
* Cable binder
Using the cable binders supplied with the stand, put the
speaker and system cables together so that the cables are
invisible from the front. At that time be careful not to apply
any force to the connection sections of the cables.
21
En
PDP-ELITE-Eng (17-27) 9/9/03, 11:4421
07 Preparation
Using the remote control unit
Use the remote control unit by pointing it towards the
remote sensor window. Objects between the remote
control unit and sensor window may prevent proper
operation.
Cautions regarding the remote control
unit
• Do not expose the remote control unit to shock. In
addition, do not expose the remote control unit to
liquids, and do not place in an area with high humidity.
• Do not install or place the remote control unit under
direct sunlight. The heat may cause deformation of
the unit.
• The remote control unit may not work properly if the
remote sensor window of the Plasma Display is under
direct sunlight or strong lighting. In such case,
change the angle of the lighting or Plasma Display
set, or operate the remote control unit closer to the
remote sensor window.
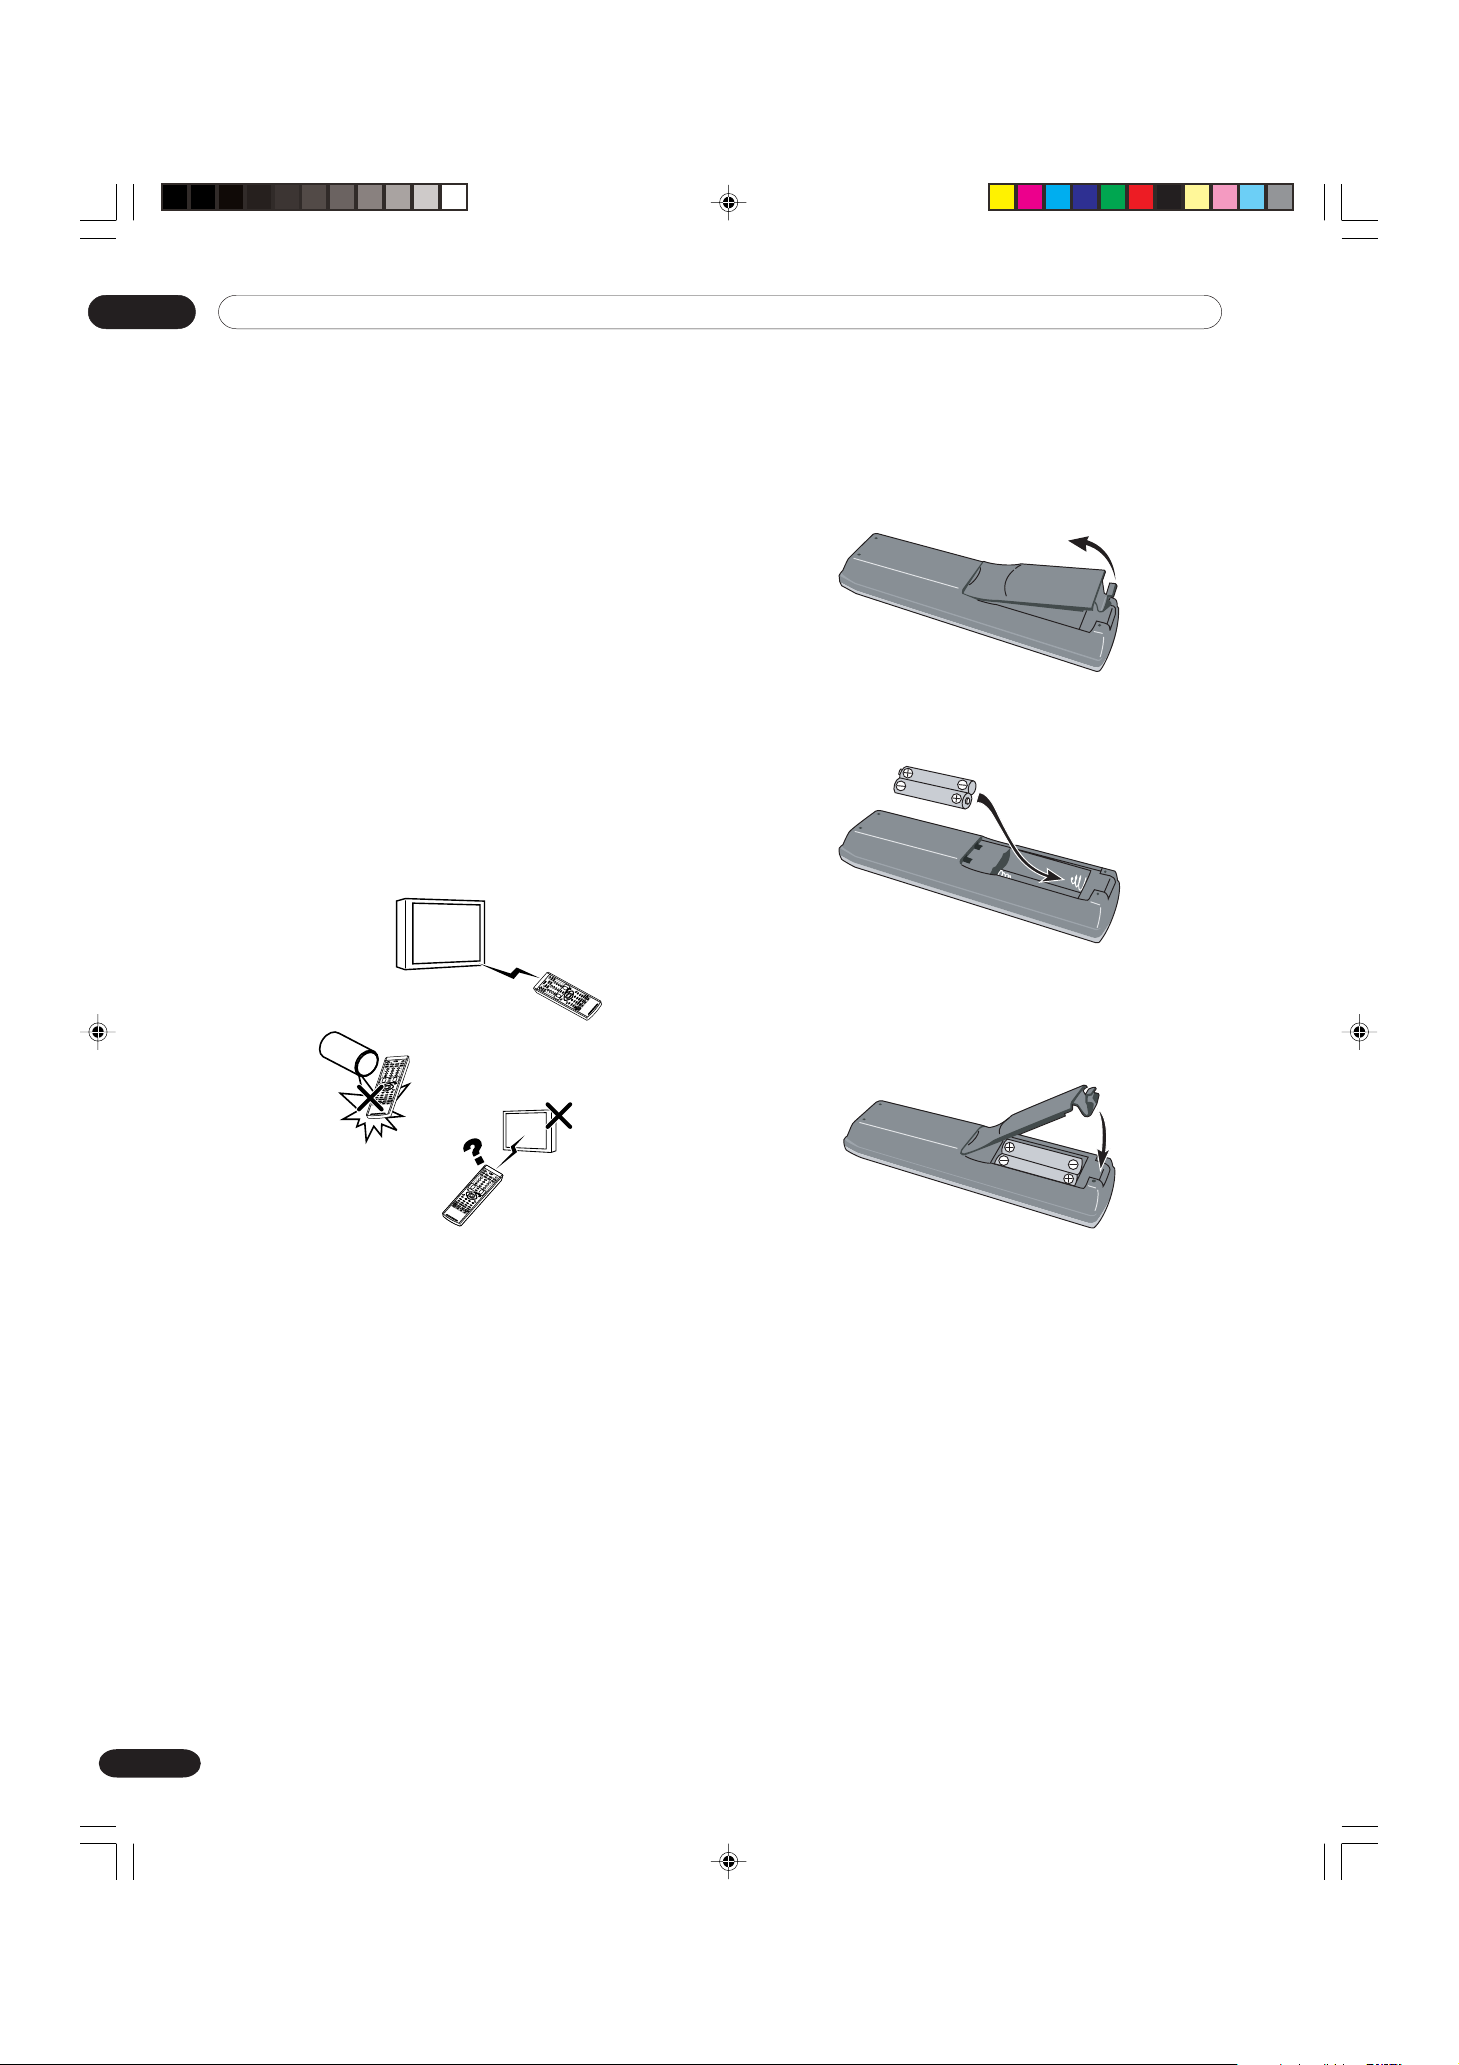
Inserting batteries
If the remote control unit fails to operate Plasma
Display System functions, replace the batteries in the
remote control unit.
1
Open the battery cover.
2
Insert the two AA size batteries supplied with the
product.
•Place batteries with their terminals corresponding
to the (+) and (–) indicators in the battery compartment.
3
Close the battery cover.
22
En
PDP-ELITE-Eng (17-27) 9/9/03, 11:4422

Cautions regarding batteries
Improper use of batteries can result in chemical
leakage or explosion. Be sure to follow the instructions
below.
• Do not use manganese batteries. When you replace
the batteries, use alkaline ones.
•Place the batteries with their terminals corresponding to the (+) and (–) indicators.
• Do not mix batteries of different types. Different types
of batteries have different characteristics.
• Do not mix old and new batteries. Mixing old and new
batteries can shorten the life of new batteries or
cause chemical leakage in old batteries.
• Remove batteries as soon as they have worn out.
Chemicals that leak from batteries can cause a rash.
If you find any chemical leakage, wipe thoroughly
with a cloth.
• The batteries supplied with this product may have a
shorter life expectancy due to storage conditions.
• If you will not use the remote control unit for an
extended period of time, remove the batteries from it.
07Preparation
• WHEN DISPOSING OF USED BATTERIES, BE
SURE TO COMPLY WITH GOVERNMENT
REGULATIONS AND ENVIRONMENTAL PROTECTION GUIDELINES THAT APPLY IN YOUR
COUNTRY OR AREA.
PDP-ELITE-Eng (17-27) 9/9/03, 11:4423
23
En
07 Preparation
Cable connections for watching conventional TV channels
In order to watch conventional TV channels, connect coaxial cables as shown below. To enjoy a clearer picture, use
an outdoor antenna. If your outdoor antenna uses a 75-ohm coaxial cable with an F-type connector, plug it into the
antenna terminal at the rear of the Media Receiver.
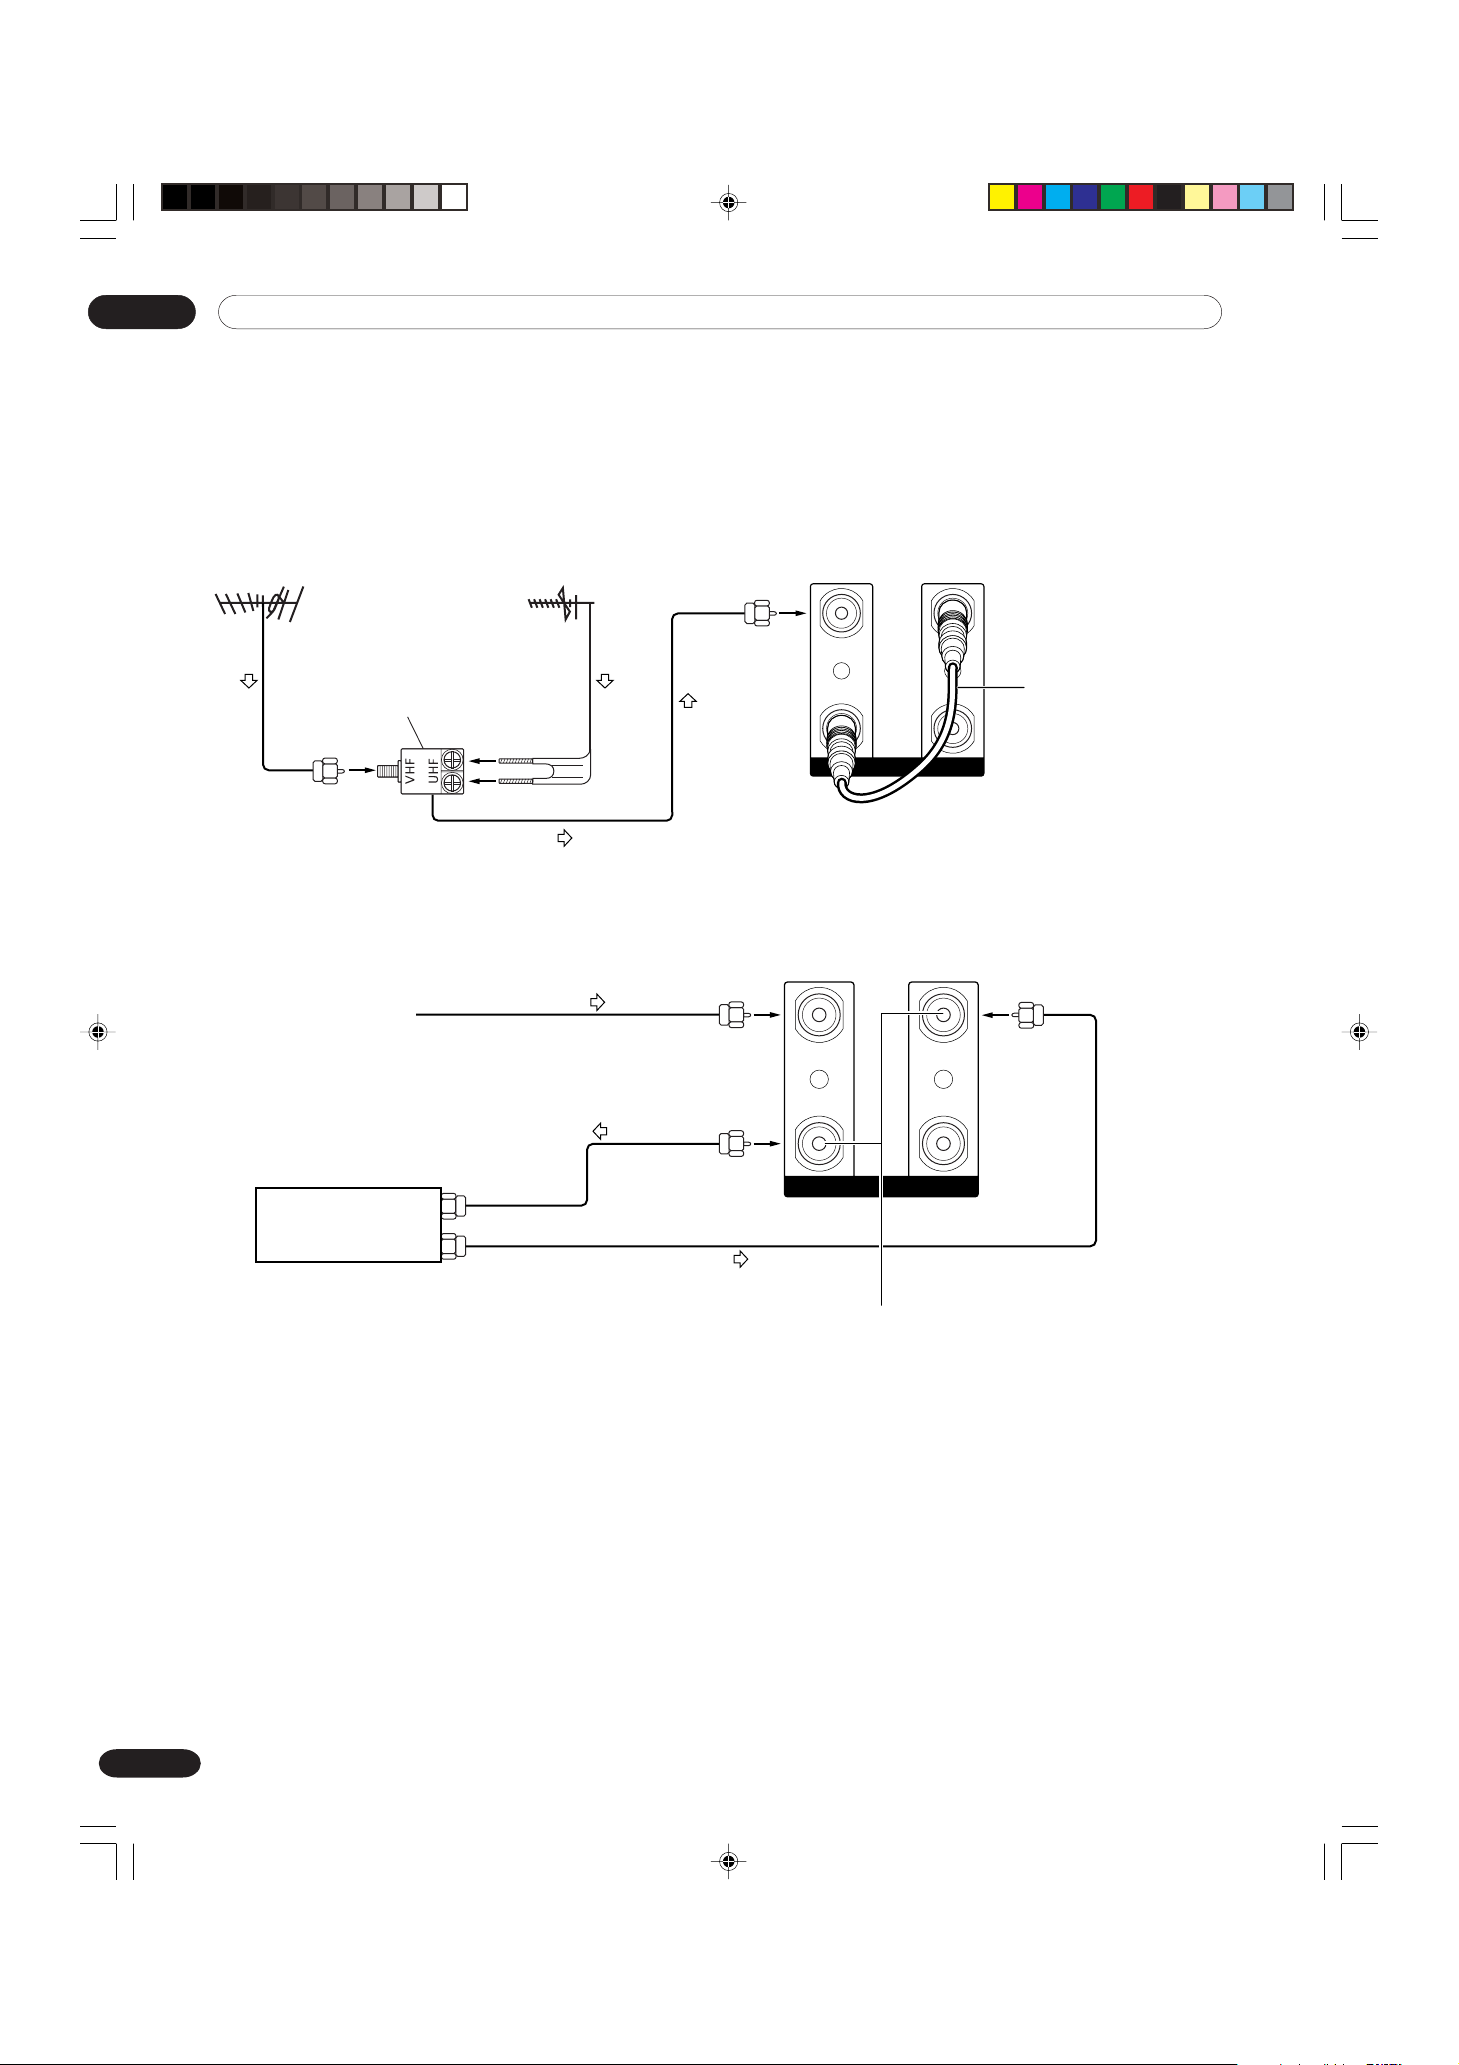
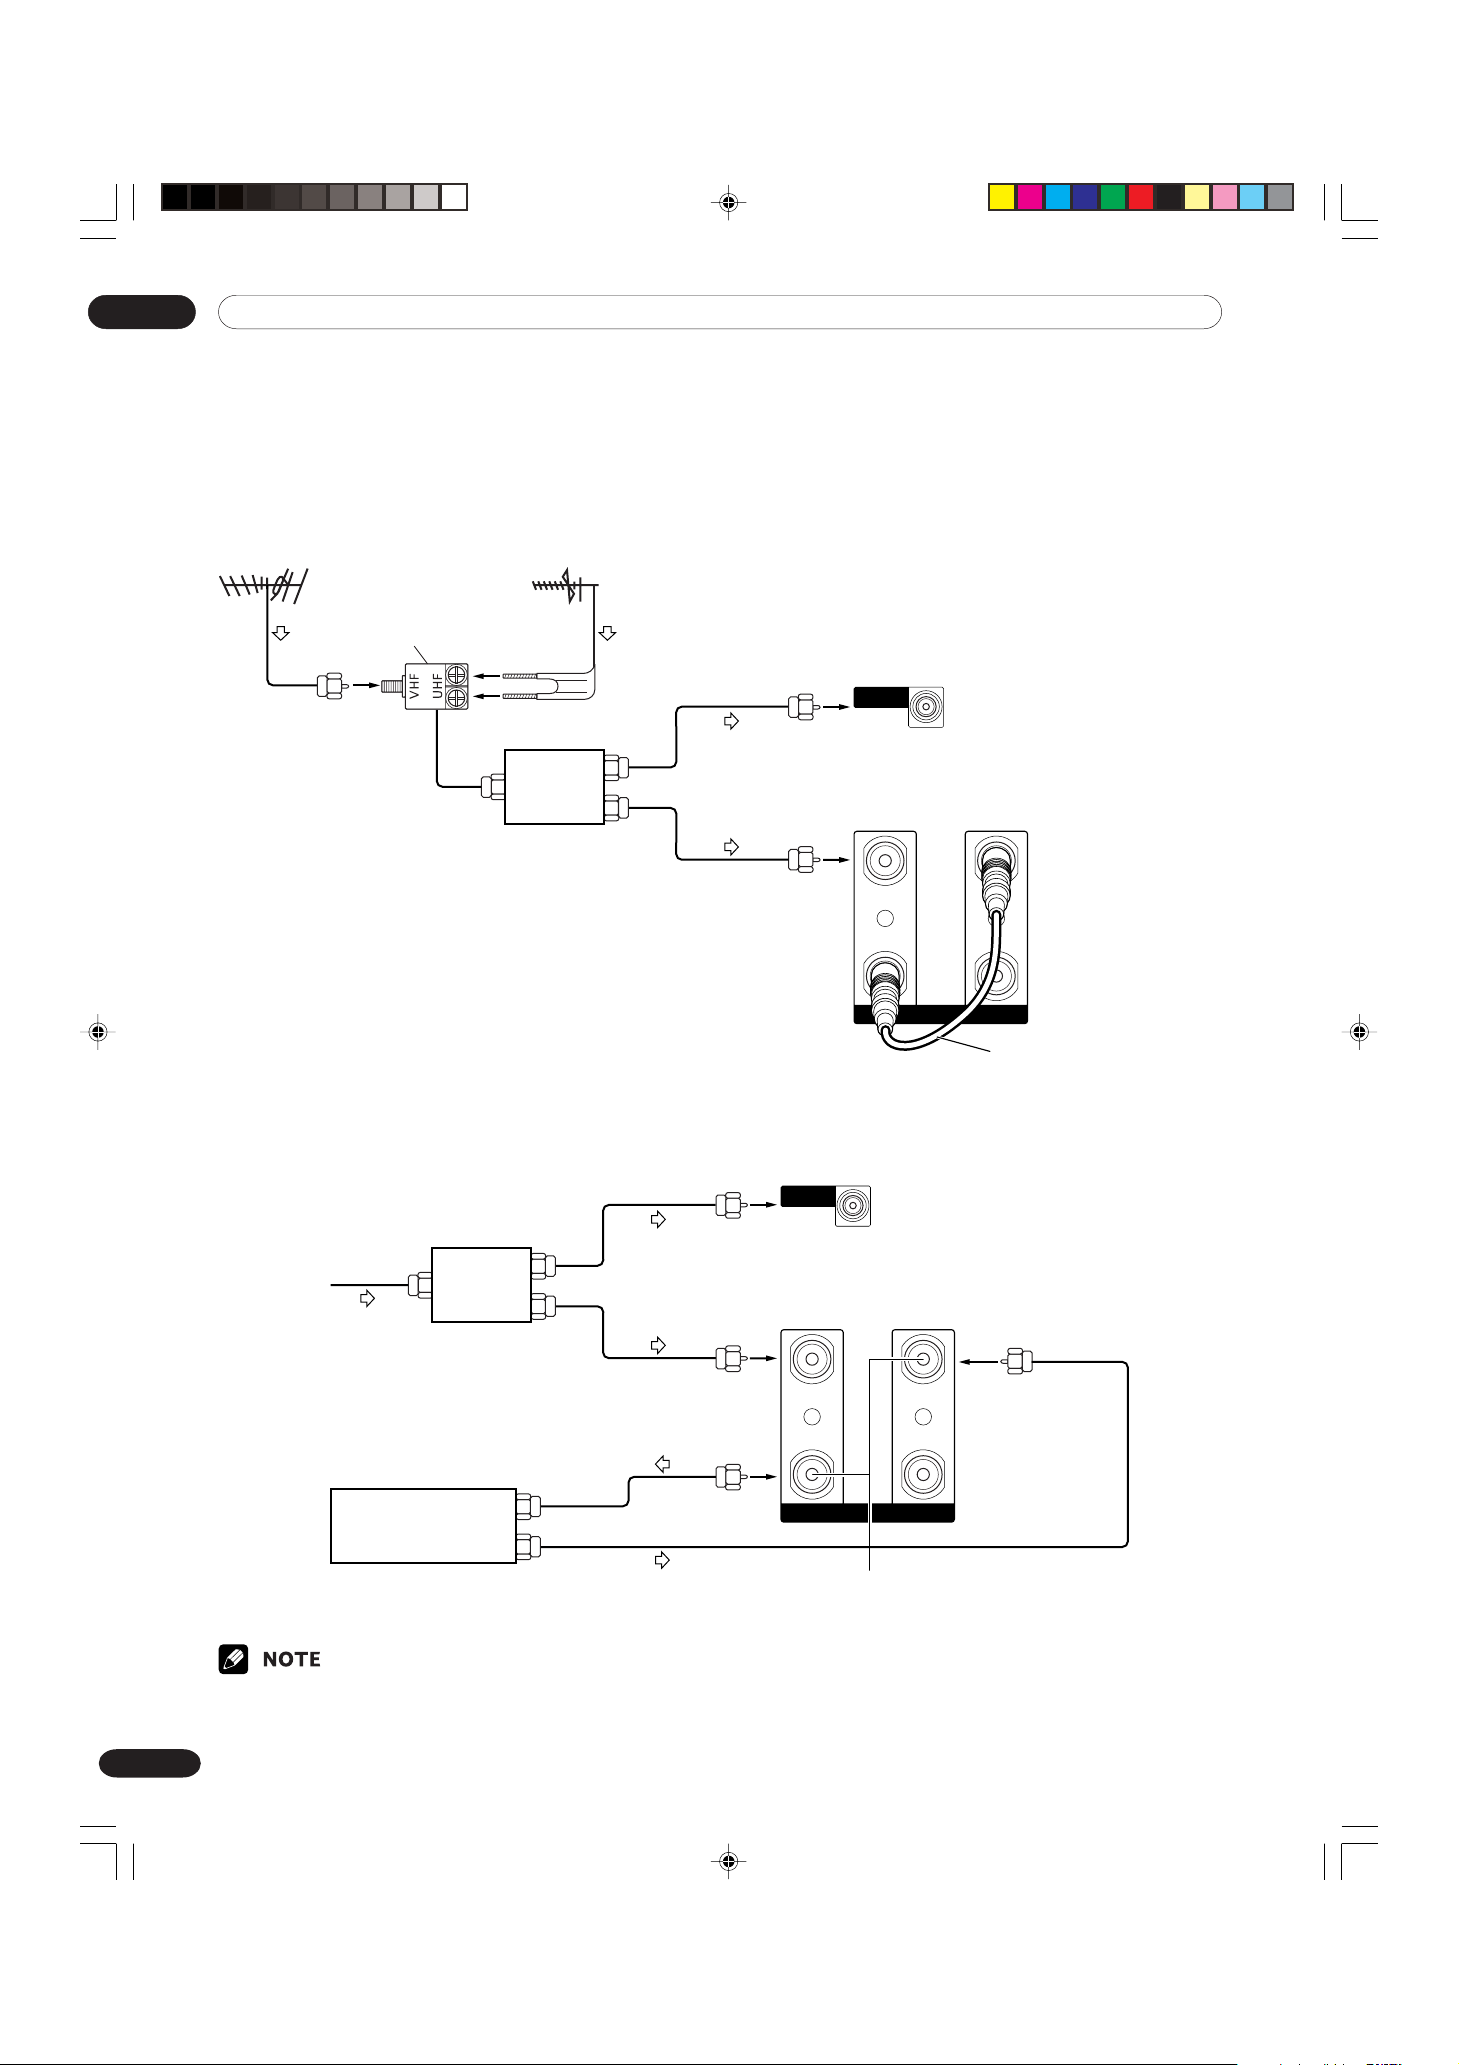
Connecting a VHF/UHF antenna
VHF antenna
UHF antenna
U/V mixer
Connecting a Cable Converter
Cable TV
Media Receiver (rear)
IN
OUT
A ANTENNA/CABLE B
IN
OUT
Media Receiver (rear)
IN
OUT
IN
OUT
The coaxial cable is
already connected at
the time of purchase.
24
En
A ANTENNA/CABLE B
Cable Converter
When making the above connections, first
remove the coaxial cable attached before
shipment.
PDP-ELITE-Eng (17-27) 9/9/03, 11:4424
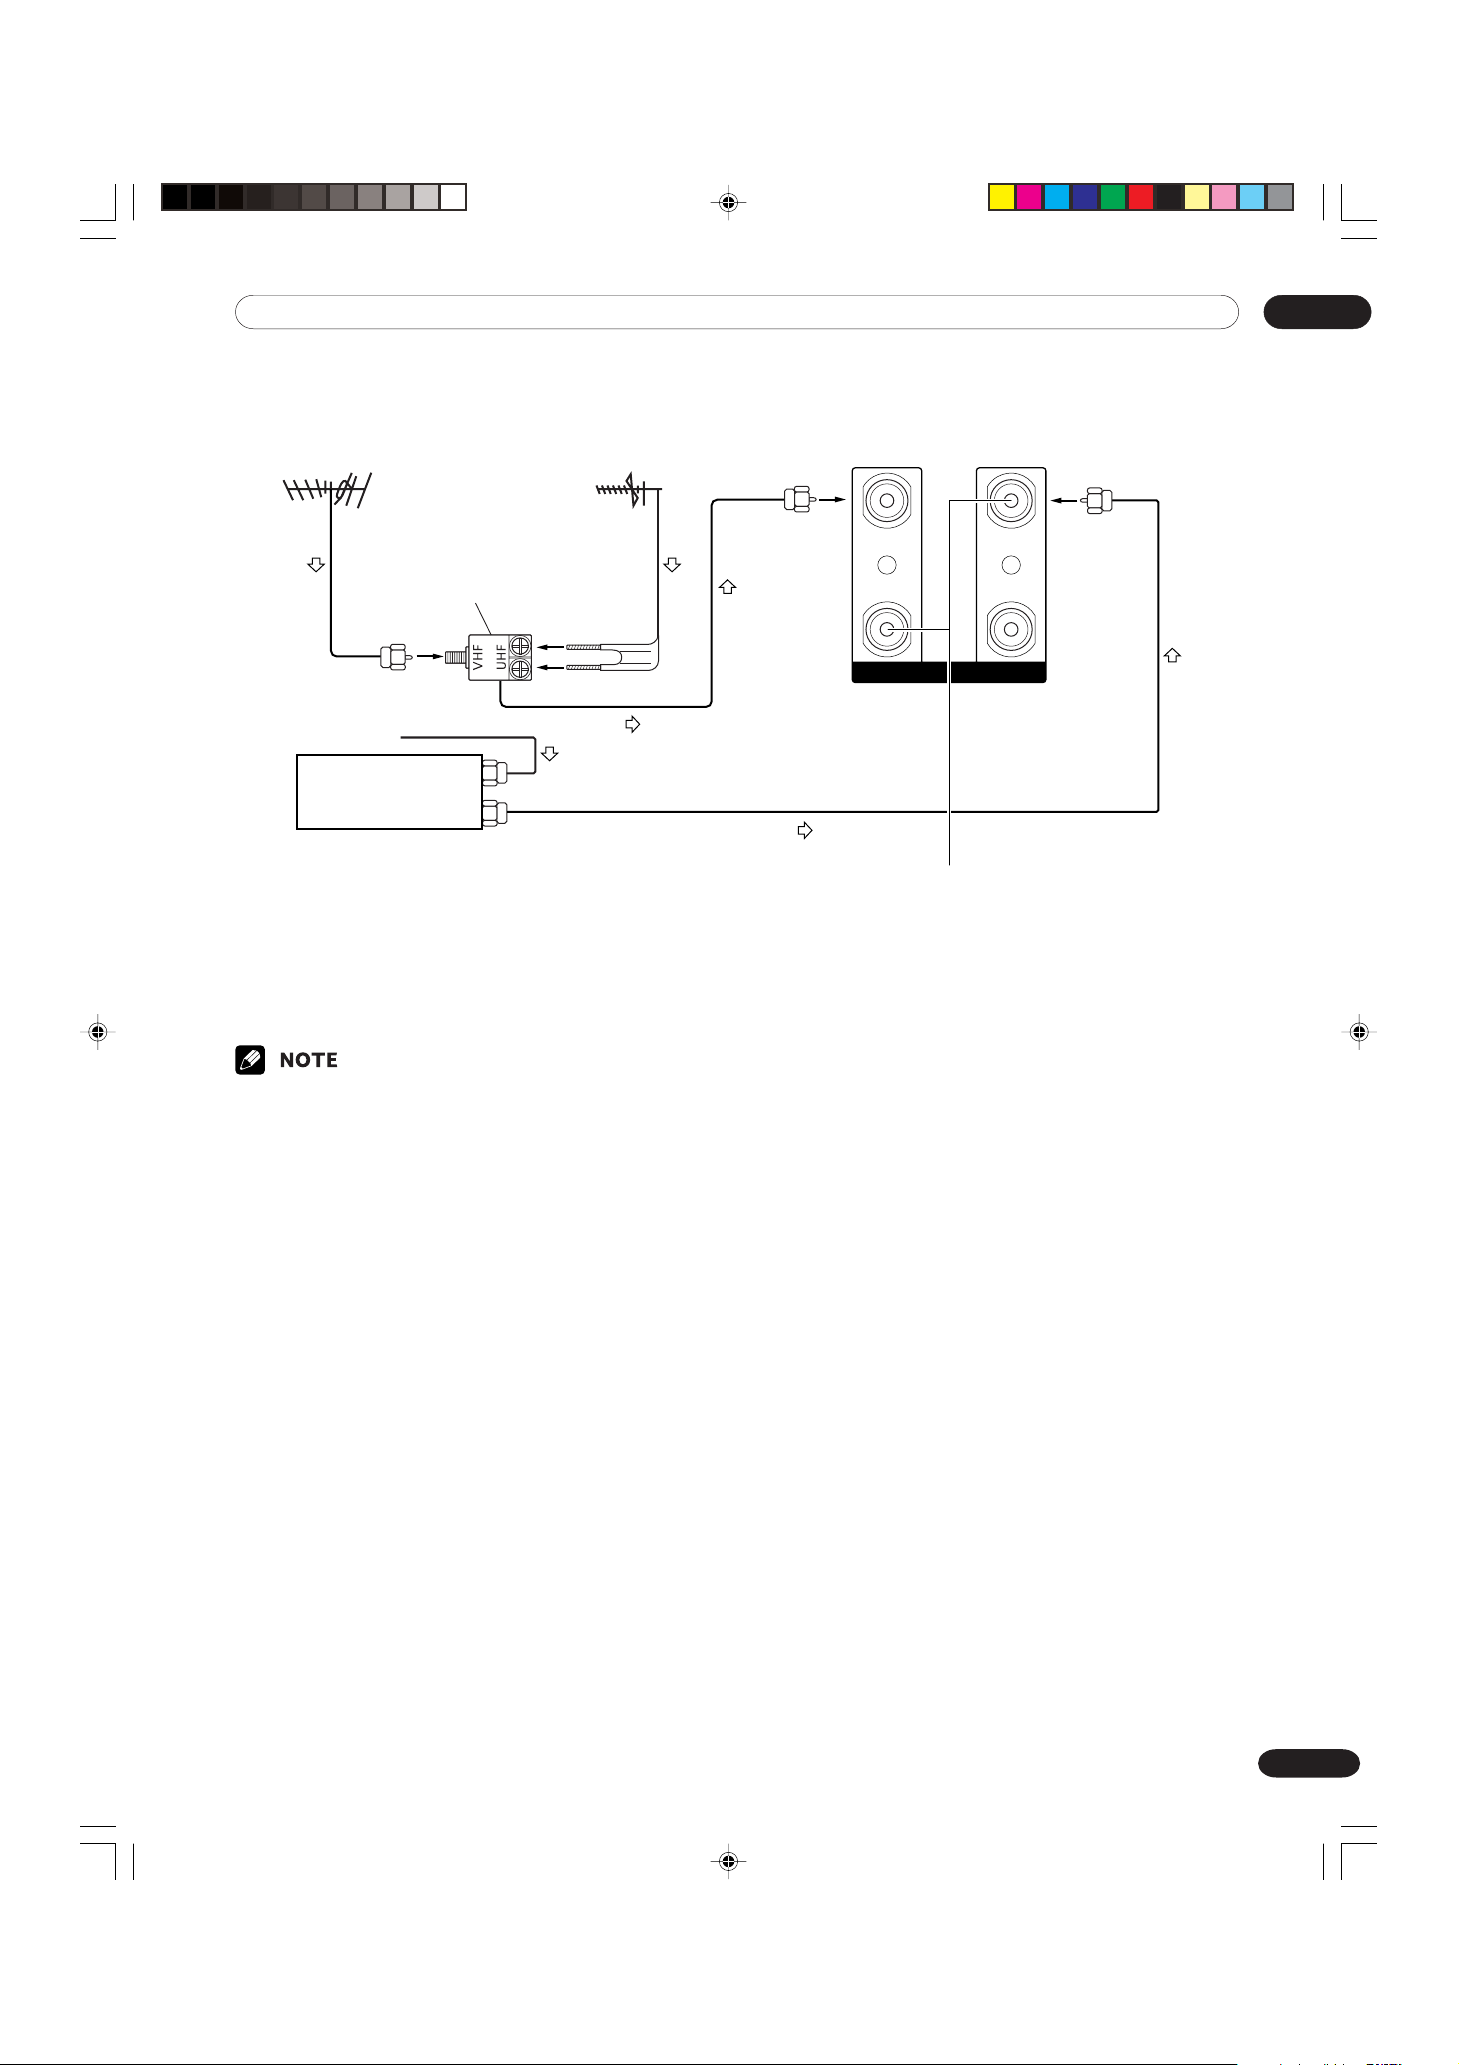
Connecting a VHF/UHF antenna and Cable Converter
07Preparation
VHF antenna UHF antenna
U/V mixer
Cable TV
Cable Converter
Media Receiver (rear)
IN
OUT
A ANTENNA/CABLE B
When making the above connections, first
remove the coaxial cable attached before
shipment.
IN
OUT
• Be sure to connect the antenna or the Cable
Converter as shown above. Signal reception may
fail if not properly connected.
• Be sure that the Cable Converter output signal is
assigned to the ANTENNA/CABLE B input on the
Media Receiver.
• How to change channels when the Cable Converter
output signal is connected to the ANTENNA/CABLE
B input on the Media Receiver.
• Press ANT on the remote control unit to switch to
ANTENNA/CABLE B.
• You can view an image right after selecting the
output channel on the Cable Converter.
Switching between antenna A and B
To watch broadcasts via the two antennas, you can
select it by pressing ANT on the remote control unit.
• While watching a broadcast, press ANT to view the
image received from the other antenna.
•Pressing ANT while viewing in Dual Screen mode
(TV image and video image) with TV selected will
display the TV image of the other antenna.
•Pressing ANT while viewing Dual Screen with two TV
images displayed will not have any effect.
•Pressing ANT while viewing Dual Screen with two
video images displayed will switch the selected
screen to a TV image.
25
En
PDP-ELITE-Eng (17-27) 9/9/03, 11:4425
07 Preparation
Cable connections for watching digital TV channels
In order to watch digital TV channels, connect coaxial cables as shown below. To enjoy a clearer picture, use an
outdoor antenna. If your outdoor uses a 75-ohm coaxial cable with an F-type connector, plug it into the antenna
terminal at the rear of the Media Receiver.
Connecting a VHF/UHF antenna
VHF antenna UHF antenna
U/V mixer
Splitter
Media Receiver (rear)
DTV-ANTENNA
IN
Digital tuner
Connecting for cable TV
Cable TV
Splitter
IN
OUT
A ANTENNA/CABLE B
Media Receiver (rear)
DTV-ANTENNA
IN
Digital tuner
IN
OUT
IN
OUT
IN
Analog tuner
OUT
The coaxial cable is
already connected at
the time of purchase.
Analog tuner
Cable Converter
• Be sure to connect coaxial cables as shown above.
Signal reception may fail if not properly connected.
26
En
PDP-ELITE-Eng (17-27) 9/9/03, 11:4426
A ANTENNA/CABLE B
When making the above connections, first
remove the coaxial cable attached before
shipment.
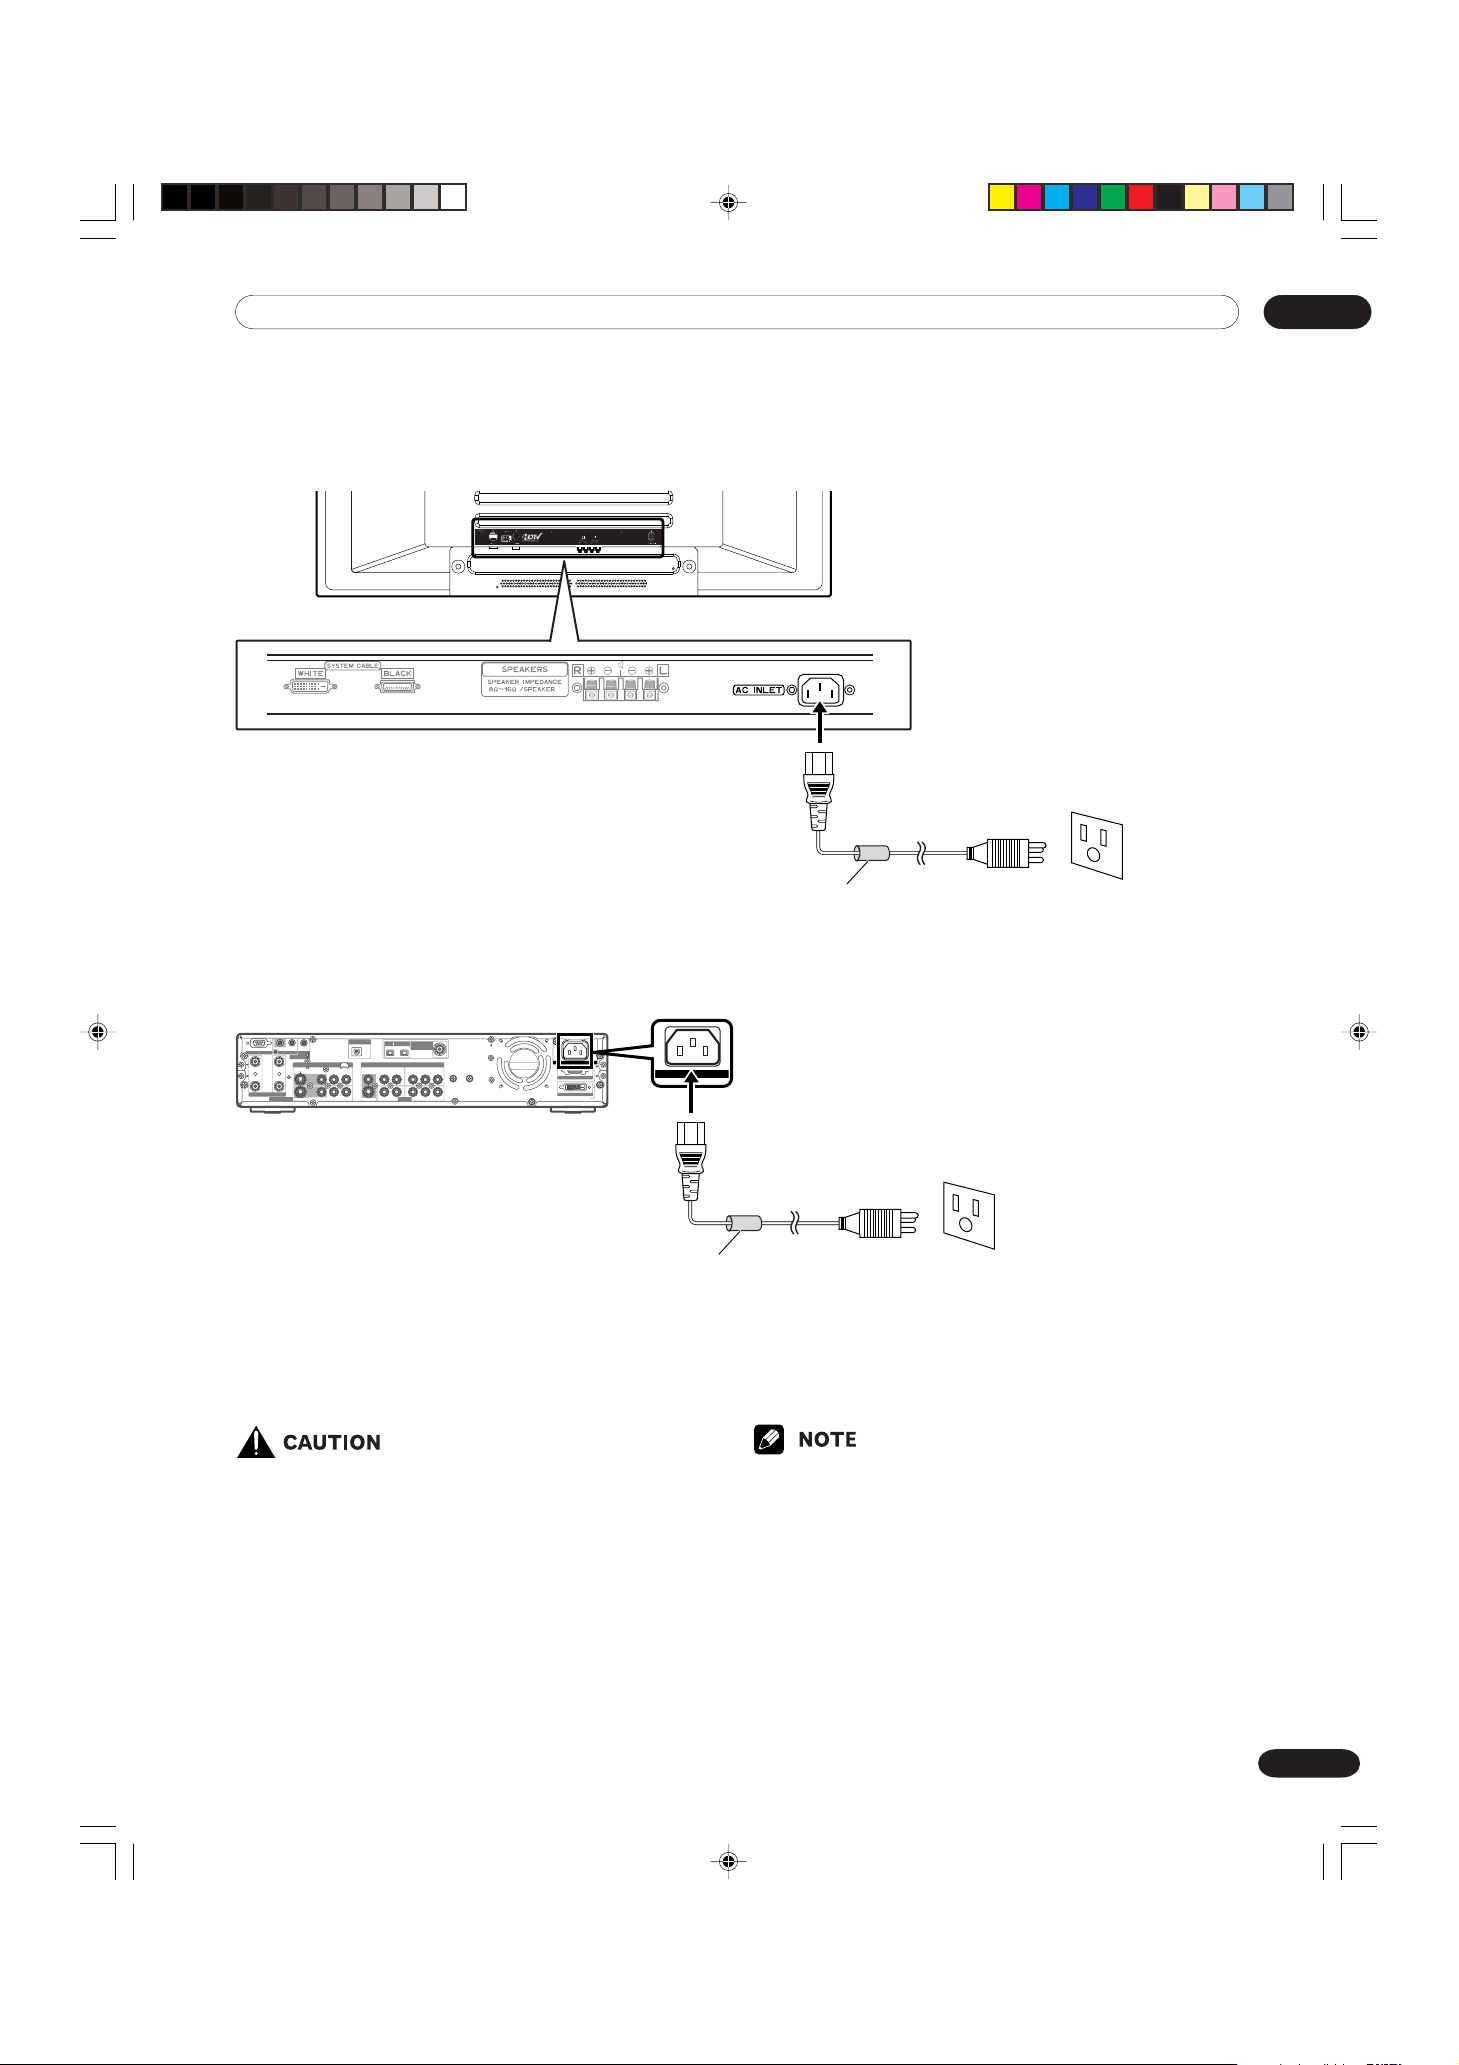
Connecting the power cord
Connect the power cord after all component connections have been completed.
Plasma Display (rear view)
Power cord
07Preparation
Media Receiver (rear view)
DIGITAL OUT
(TS)
DTV-ANTENNA
SERVICE ONLY
IN
OUT
A ANTENNA/CABLE B
MONITOR OUT
IN
OUT
CONTROL
IN
OUT
OPTICAL
VCR
CONTROL
INPUT 2
S-VIDEO
VIDEO VIDEO
R-AUDIO-L R-AUDIO-L Y
VIDEO
R-AUDIO-L R-AUDIO-L Y
S-VIDEO S-VIDEO
• Use only the power cord provided.
• Do not use a power supply voltage other than
that indicated as this may cause fire or electric
shock.
•For the Plasma Display System, a three-core
power cord with a ground terminal is used for
efficiency protection. Always connect the power
cord to a three-pronged outlet and make sure
that the cord is properly grounded. If you use a
power source converter plug, use an outlet with
a ground terminal and screw down the ground
line.
IN
S400
INPUT 1
COMPONENT VIDEO
CB/P
B
CR/P
R
B/PB
CR/P
R
C
INPUT 3
AC INLET
BLACK
WHITE
SYSTEM CABLE
Noise filter
Partially eliminates noise
caused by the power source.
AC INLET
Power cord
Noise filter
Partially eliminates noise
caused by the power source.
•Always turn off the power of the Plasma Display and
Media Receiver when connecting the power cords.
• Disconnect the power cord from the power outlet
when the Plasma Display System is not going to be
used for a long period of time.
27
En
PDP-ELITE-Eng (17-27) 9/9/03, 11:4427
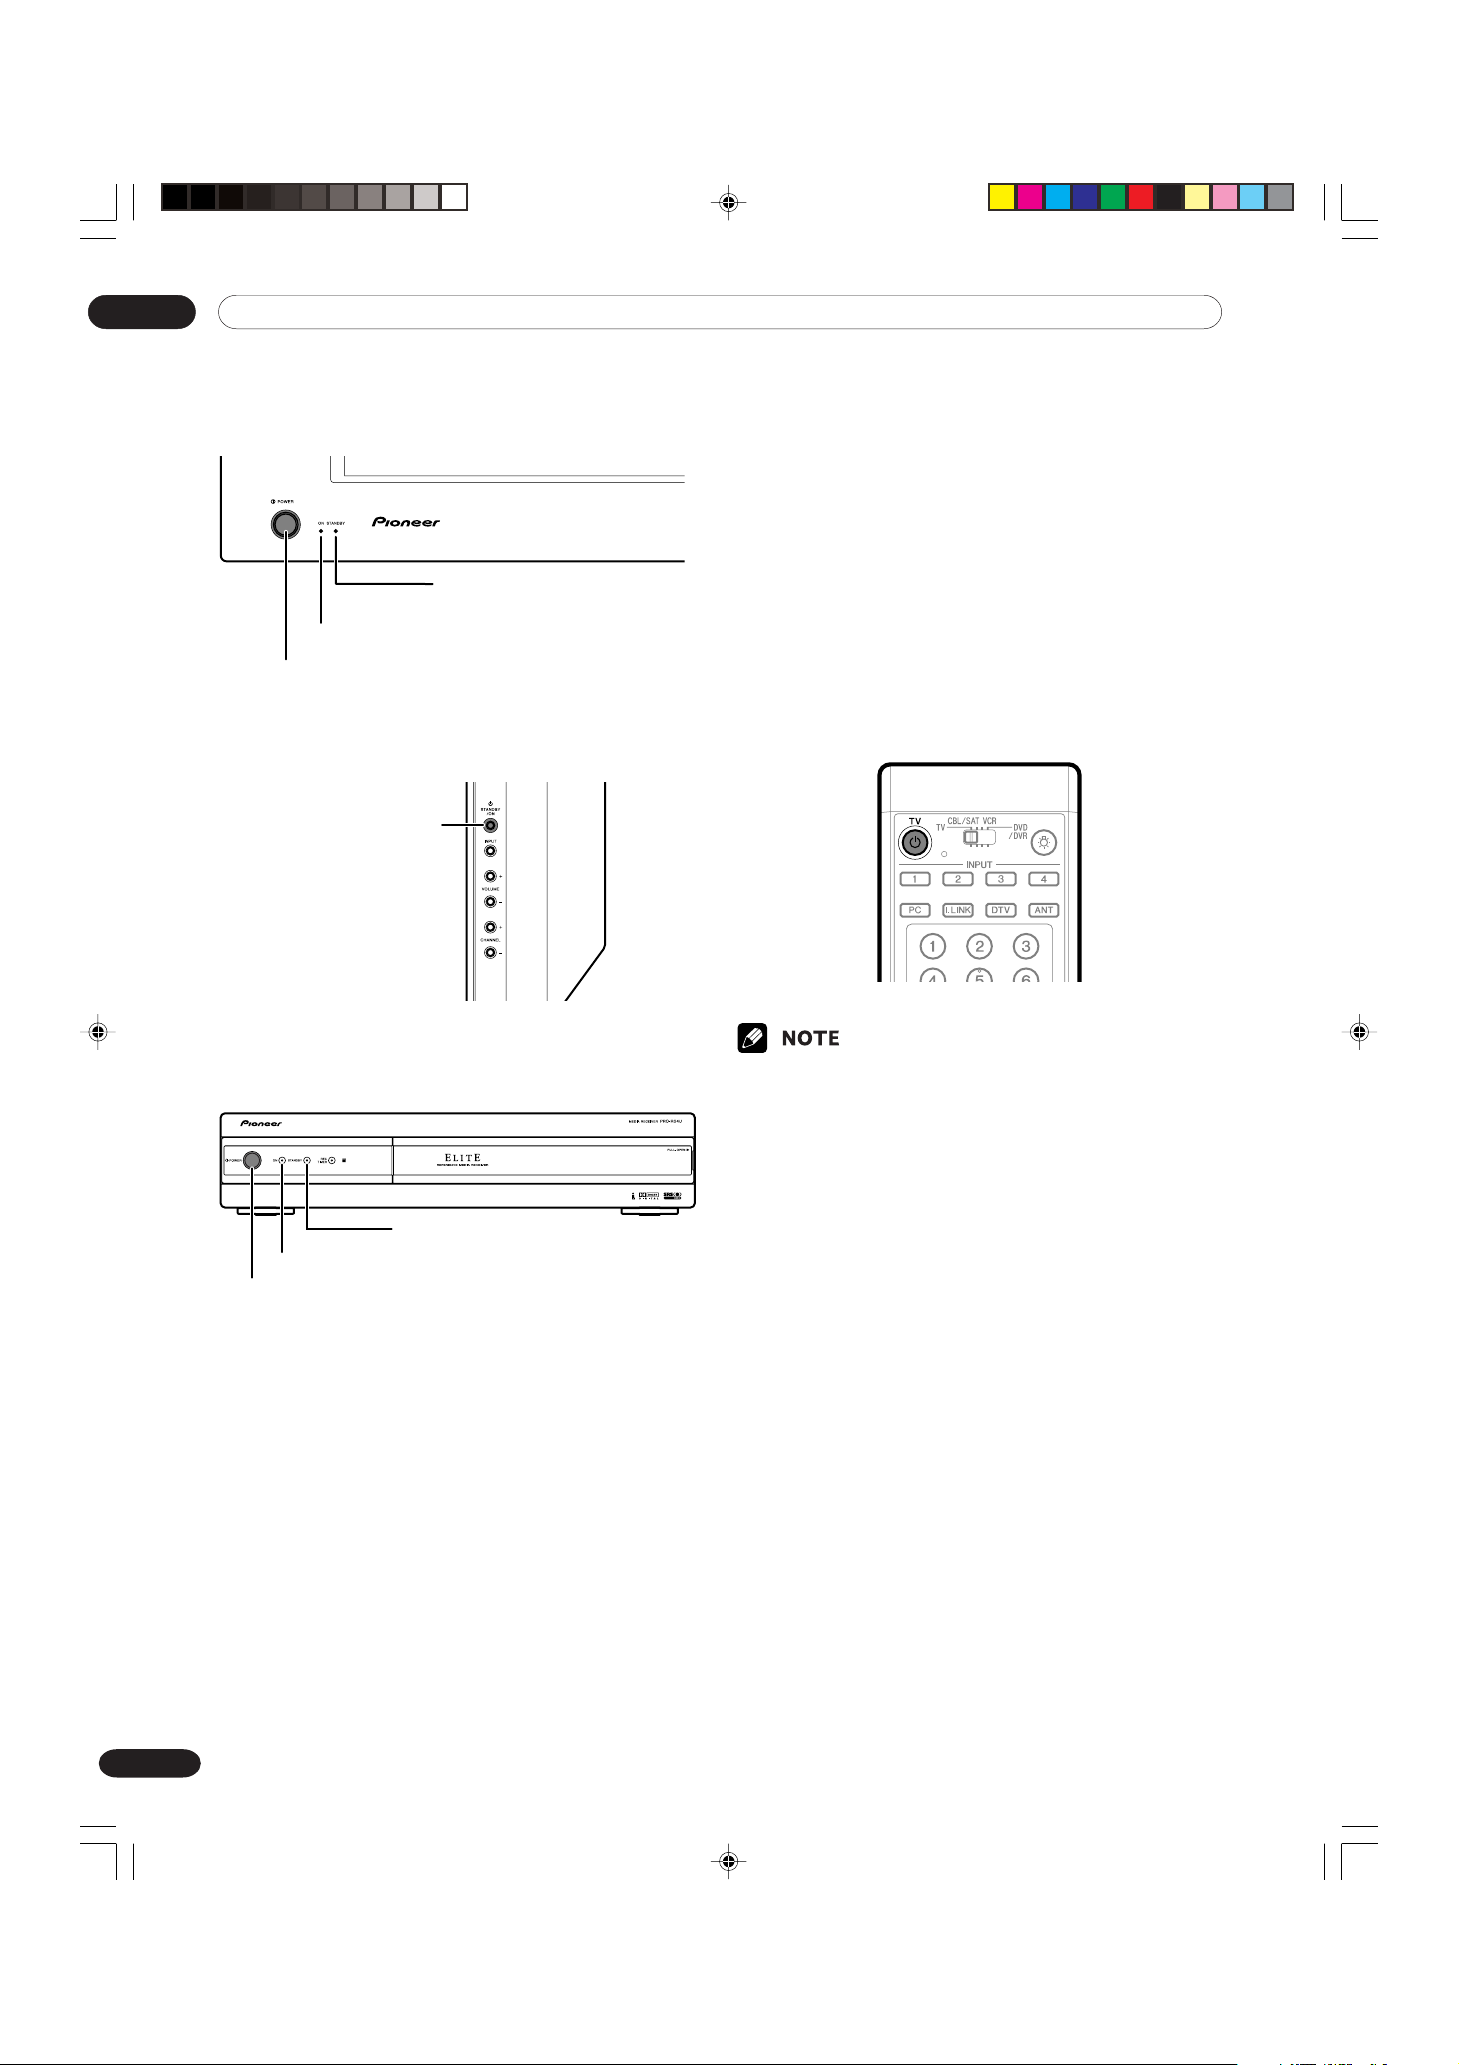
08 Basic Operations
Plasma Display
POWER ON indicator
POWER button
STANDBY/ON button
STANDBY indicator
(right view)
Tur ning on the power
1
Press POWER on the Plasma Display.
• The STANDBY indicator on the Plasma Display
flashes red.
2
Press POWER on the Media Receiver.
• The system is turned on or placed into the
standby mode.
3
Confirm that the STANDBY indicators light up red,
and then press TV a on the remote control unit
or STANDBY/ON on the Plasma Display to turn
the system on.
• The POWER ON indicators on the Plasma
Display and Media Receiver light up green.
Media Receiver
POWER ON indicator
POWER button
•In this manual, “system” means the Plasma Display
Panel and Media Receiver.
•You can also reverse steps 1 and 2.
STANDBY indicator
28
En
PDP-ELITE-Eng (28-37) 9/9/03, 11:4428
Turning off the power
1
Press TV a on the remote control unit or
STANDBY/ON on the Plasma Display.
• The system enters the standby mode and the
image on the screen disappears.
• Both STANDBY indicators light up red.
• It is recommended to place the system into the
standby mode by pressing TV a on the remote
control unit. This allows the system to
automatically receive Electronic Program Guide
information signals in the standby mode.
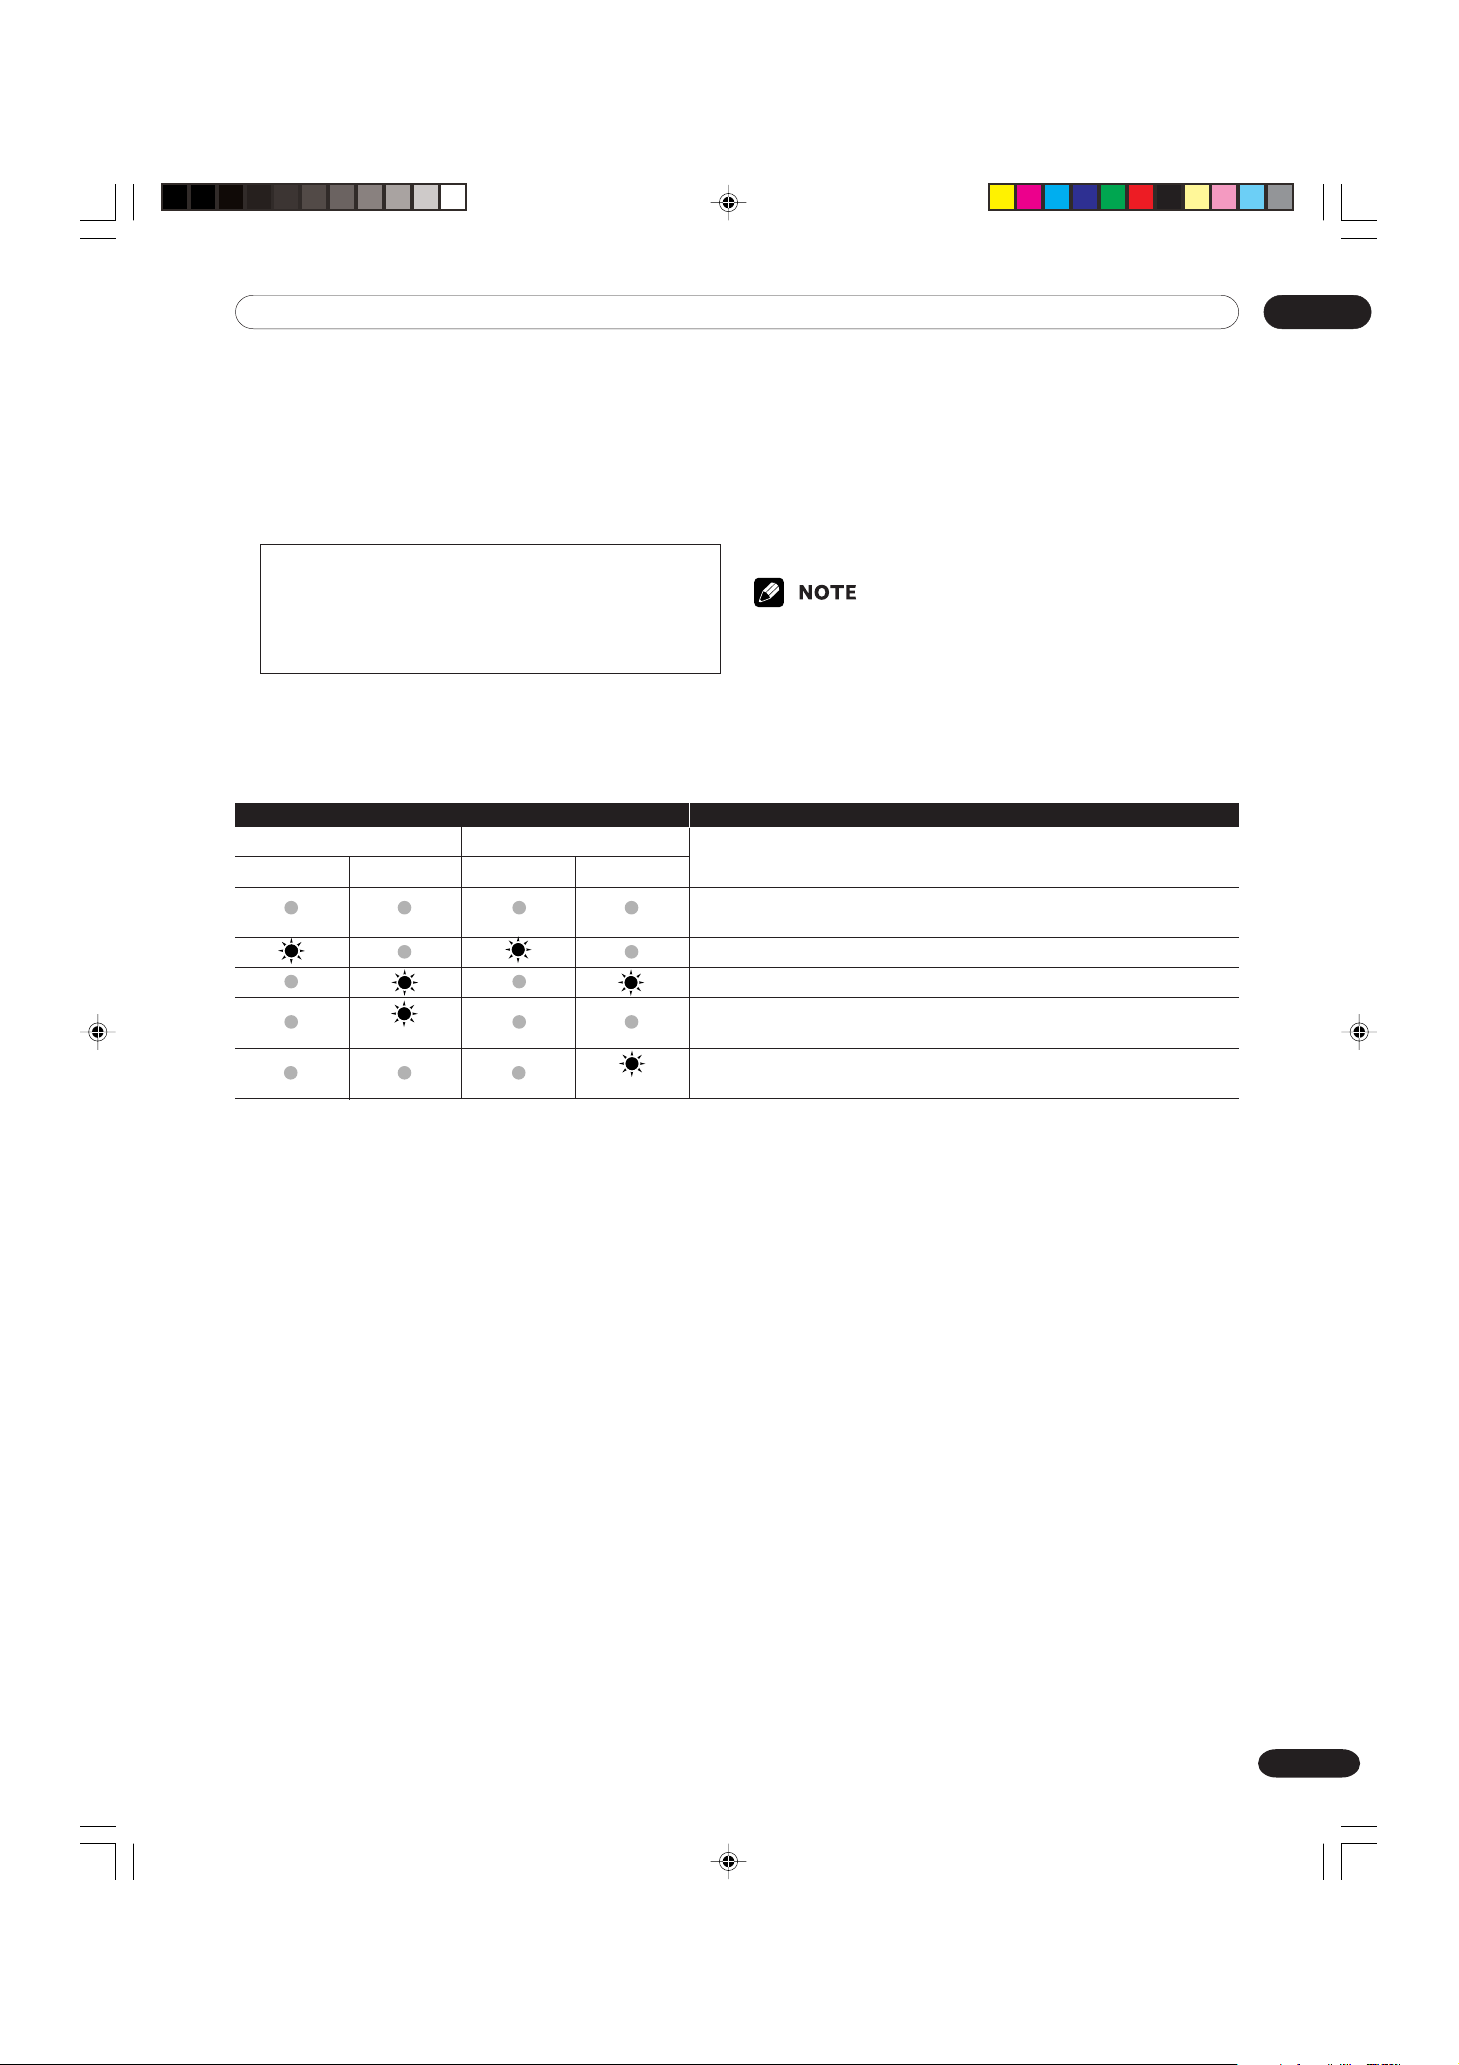
Plasma Display/Media Receiver status indicators
Indicator Status System Status
Plasma Display Media Receiver
POWER ON STANDBY POWER ON STANDBY
Power to the Plasma Display and Media Receiver is off. Or the power
cords have been disconnected.
Power to the system is on.
The system is in the standby mode.
Power to the Media Receiver is off. Or the power cord has been discon-
Flashing
Flashing
nected from the Media Receiver.
Power to the Plasma Display is off. Or the power cord has been disconnected from the Plasma Display.
2
Press POWER on the Media Receiver.
• The STANDBY indicator on the Media Receiver
turns off and the one on the Plasma Display
flashes red.
3
Press POWER on the Plasma Display.
• The STANDBY indicator on the Plasma Display
turns off.
•You can also reverse steps 2 and 3.
• If you are not going to use this system for a long
period of time, be sure to remove the power cord
from the power outlet.
08Basic Operations
For other than the above, see “Troubleshooting” on page 106.
PDP-ELITE-Eng (28-37) 9/9/03, 11:4429
29
En
08 Basic Operations
CHANNEL +/–
Plasma Display
(right view)
Watching conventional TV channels
Unless you set up conventional TV channels that you
can watch under the current conditions, you cannot
tune in those channels. For the procedure, see “Setting
up conventional TV channels” on page 41.
• Conventional TV channels in this manual designate
TV channels that are received through the conventional VHF/UHF frequencies or conventional cable TV
channels.
Selecting the antenna
After confirming that the Mode switch on the remote
control unit has been set to “TV”, press ANT on the
remote control unit to select antenna A or B.
• Make this selection depending on the connections to
the antenna input terminals on the Media Receiver
(pages 24 to 26).
Changing channels
Using CH +/– on the remote control unit
•Press CH + to increase the channel number.
•Press CH – to decrease the channel number.
Channel display
8
AAA
STEREO
STANDARD
FULL
• CHANNEL +/– on the Plasma Display operates the
same as CH +/–.
Using CH RETURN on the remote control unit
Press CH RETURN to switch the currently tuned
channel to the previously tuned channel.
Press CH RETURN again to switch back to the
currently tuned channel.
Using 0 – 9 on the remote control unit
Select channels directly by pressing buttons 0 to 9.
EXAMPLE
•To select channel 5 (1-digit channel), press 5.
•To select channel 25 (2-digit channel), press 2,
followed by 5.
•To select channel 125 (3-digit channel), press 1, then
2, followed by 5.
•After entering a channel number, you may press CH
ENTER to tune in the channel more quickly.
30
En
PDP-ELITE-Eng (28-37) 9/9/03, 11:4430

08Basic Operations
VOLUME +/–
Plasma Display
(right view)
Changing the volume and sound
Using VOL +/– on the remote control unit
•To increase the volume, press VOL +.
•To decrease the volume, press VOL –.
• VOLUME +/– on the Plasma Display operates the
same as VOL +/–.
Using e MUTING on the remote control unit
e mutes the current sound output.
1
Press e MUTING.
•“M” appears on the screen.
2
Press e MUTING again to cancel the mute
mode.
•Pressing VOL + can also cancel the mute mode.
Volume adjustment
PDP-ELITE-Eng (28-37) 9/9/03, 11:4431
Mute
31
En

08 Basic Operations
Setting MTS/SAP mode
The Plasma Display System has a feature that allows
reception of sound other than the main audio for the
program. This feature is called Multi-channel Television
Sound (MTS). The Plasma Display System with MTS
can receive mono sound, stereo sound and Secondary
Audio Programs (SAP). The SAP feature allows a TV
station to broadcast other information, which could be
audio in another language or something completely
different like weather information.
You can enjoy Hi-Fi stereo sound or SAP
broadcasts where available.
•Stereo broadcasts
View programs like live sporting events, shows and
concerts in dynamic stereo sound.
• SAP broadcasts
Receive TV broadcasts in either MAIN or SAP sound.
MAIN sound: The normal program soundtrack (either
in mono or stereo).
SAP sound: Listen to second language, supplemen-
tary commentary and other information. (SAP is
mono sound.)
If stereo sound is difficult to hear:
• Obtain a clearer sound by manually switching to the
MONO mode.
• Once the MONO mode is selected, the Plasma
Display System sound remains mono even if the
system receives a stereo broadcast. You must
reselect the STEREO mode if you want to hear stereo
sound again.
• Selecting MTS while the input source is INPUT 1 to 4
or PC does not change the type of sound. In this
case, sound is determined by the video source.
Each time you press MTS, MTS toggles as shown
below.
STEREO mode
SAP mode
MONO mode
STEREO
SAP
MONO
•In each of the MTS/SAP modes selected using the
MTS button, the display changes depending on
broadcasting signals being received. See page 33.
32
En
PDP-ELITE-Eng (28-37) 9/9/03, 11:4432

08Basic Operations
When receiving STEREO sound signals
A 125
STEREO
A 125
STEREO
A 125
MONO
In STEREO mode
In SAP mode
In MONO mode
When receiving MAIN + SAP sound signals
When receiving STEREO + SAP sound
signals
A 125
STEREO (SAP)
A 125
SAP (STEREO)
A 125
MONO (SAP)
In STEREO mode
In SAP mode
In MONO mode
When receiving MONO sound signals
A 125
MAIN (SAP)
A 125
SAP (MAIN)
A 125
MONO (SAP)
In STEREO mode
In SAP mode
In MONO mode
A 125
MONO
A 125
MONO
A 125
MONO
In STEREO mode
In SAP mode
In MONO mode
PDP-ELITE-Eng (28-37) 9/9/03, 11:4433
33
En

08 Basic Operations
CHANNEL +/–
Plasma Display
(right view)
Watching digital TV channels
Unless you set up digital TV channels that you can
watch under the current conditions, you cannot tune in
those channels. For the procedure, see “Setting up
digital TV channels” on page 44.
Selecting the digital TV input
After confirming that the Mode switch on the remote
control unit has been set to “TV”, press DTV on the
remote control unit to select the input source for digital
TV channels.
Changing channels
Using CH +/– on the remote control unit
•Press CH + to increase the channel number.
•Press CH – to decrease the channel number.
• CHANNEL +/– on the Plasma Display operates the
same as CH +/–.
Using CH RETURN on the remote control unit
Press CH RETURN to switch the currently tuned
channel to the previously tuned channel.
Press CH RETURN again to switch back to the
currently tuned channel.
Channel display
8
AAA
STEREO
STANDARD
FULL
Using 0 – 9 and • (dot) on the remote control
unit
Select channels directly by pressing buttons 0 to 9. To
select subchannels, also use the • (dot) button.
EXAMPLE
•To select channel 5 (1-digit channel), press 5.
•To select channel 25 (2-digit channel), press 2,
followed by 5.
•To select channel 125 (3-digit channel), press 1, then
2, followed by 5.
•To select subchannel 2.1, press 2, • (dot), then 1.
•To select subchannel 10.1, press 1, 0, • (dot), then 1.
•After entering a channel or subchannel number, you
may press CH ENTER to tune in the channel more
quickly.
34
En
PDP-ELITE-Eng (28-37) 9/9/03, 11:4434

08Basic Operations
VOLUME +/–
Plasma Display
(right view)
Changing the volume and sound
Using VOL +/– on the remote control unit
•To increase the volume, press VOL +.
•To decrease the volume, press VOL –.
• VOLUME +/– on the Plasma Display operates the
same as VOL +/–.
Using e MUTING on the remote control unit
e mutes the current sound output.
1
Press e MUTING.
•“M” appears on the screen.
2
Press e MUTING again to cancel the mute
mode.
•Pressing VOL + can also cancel the mute mode.
Changing the language
If you have selected a digital TV program that provides
multi-language services, you can switch among the
languages by pressing MTS on the remote control
unit.
Volume adjustment
Mute
Each time you press MTS, the language switches.
• Switchable languages differ depending on the
current broadcast.
• If the language selected through language setting is
available when the channel or program is changed,
you will hear that language.
35
En
PDP-ELITE-Eng (28-37) 9/9/03, 11:4435

08 Basic Operations
Viewing DTV banners
While watching a digital TV program, pressing DTV
INFO causes the following banner to appear.
1 2 3 5 64
WHD-TV
STEREO
CC TV-PG
7 8
1 Station name
2 Channel number
3 Program time schedule
4 Program title
5 Date
6 Time
7 Appears if closed captions (CC) are available.
8 Shows the parental control ratings.
9 Shows available audio services.
0 Information about the program
6:00 – 6:45 PM JAN. 1.Sat 5:10 AM
35 – 01
*************
***************************************************************
***************************************************************
***************************************************************
9
0
Using the multiscreen functions
Splitting the screen
Use the following procedure to select the 2-screen or
picture-in-picture mode.
2-screen
Picture-in-picture
• The above information is not displayed if not included
in broadcast signals.
36
En
PDP-ELITE-Eng (28-37) 9/9/03, 11:4436

1
Press SPLIT to select the display mode.
• Each time you press SPLIT, the display mode is
switched among 2-screen, picture-in-picture,
and single-screen.
2
When in the 2-screen or picture-in-picture mode,
press / to select a screen to be active.
zz
•“
z” appears on the active screen, which
zz
outputs sound.
3
To select the desired input source, press the
appropriate input source button.
• If watching TV programs, press CH +/– to
change the channel.
• The multiscreen function cannot display images from
the same input source at the same time. If you make
such an attempt, a warning message appears.
• When you press HOME MENU, DTV GUIDE, or
DTV INFO, the single-screen mode is restored and
the corresponding menu is displayed.
08Basic Operations
Freezing images
Use the following procedure to capture and freeze one
frame from a moving image that you are watching.
1
Press FREEZE.
•A still image appears on the right screen while a
moving image is shown on the left screen.
2
Press FREEZE again to cancel the function.
•With the screen split, any image cannot be frozen.
• When this function is not available, a warning message appears.
37
En
PDP-ELITE-Eng (28-37) 9/9/03, 11:4437

09 Basic Adjustment Settings
Using the menu
AV mode menus
Home Menu Item Description Page
Picture AV Selection Select from the five display mode options; STANDARD, DYNAMIC, MOVIE,
Contrast Adjusts the picture between light and shade. 49
Brightness Adjusts picture brightness. 49
Color Adjusts color intensity. 49
Tint Adjusts skin color to a more natural tone. 49
Sharpness Adjusts picture sharpness. 49
Pro Adjust Adjusts the levels of PureCinema, Color Temp, MPEG NR, DNR, CTI, DRE, and
Reset All image adjustment settings return to the factory defaults. 49
Sound Tr eble Adjusts the treble weaker or stronger. 53
Bass Adjusts the bass weaker or stronger. 53
Balance Adjusts audio output between left and right speakers. 53
Reset All audio adjustment settings return to the factory defaults. 53
FOCUS Shift the sound coming direction (sound images) upward and produces clear
Front Surround Provides three-dimensional sound effects and/or deep, rich bass. 54
GAME and USER. 47
Color Management. 49–53
sound contours. 54
Power Control Energy Save Saves power by decreasing picture brightness. 55
No Signal off Places the system into the standby mode when no signal is received for
No Operation off Places the system into the standby mode when no operation is performed
Sleep Timer Automatically places the system into the standby mode when the selected
Option Position Adjusts the vertical and horizontal positions of displayed images. 81
Side Mask With the 4:3 screen size selected, sets the brightness of the gray side masks
Setup Channel Setup Sets up for conventional TV channels. 41, 42
Favorite Channel Sets your favorite TV channels to the four color buttons on the remote
Parental Control Prevents your children from watching specified types of TV programs. 90–94
Password Prevents other persons from changing especially Parental Control settings. 95, 96
Closed Caption Sets up for closed captions for conventional TV channels.
Clock Corrects the date and time. 46, 47
Language Select the language to be used for on-screen display such as menus and
DTV Setup DTV Channel Setup Sets up for receiving DTV channels. 44–45
DTV Closed Caption Sets up for closed captions for DTV channels. 87–89
Digital Audio Out Sets up for optical digital audio output. 69
i.LINK Setup Sets up for the i.LINK interface. 73–76
VCR Control Sets up for the manufacture and model of recording equipment to be
15 mi n u tes. 55
for three hours. 56
time elapses. 85
that appear at both sides of the screen. 84
control unit. 43
For DTV channels, use “DTV Closed Caption” under “DTV Setup”. 86
instructions. 46
connected. 78, 79
Rec/View Timer Allows you to make DTV program presettings by manually specifying date
38
En
PDP-ELITE-Eng (38-39) 9/9/03, 11:4438
and time. 62–64

PC mode menus
Home Menu Item Description Page
Picture AV Selection Select from the two display mode options; STANDARD and USER. 47
Contrast Adjusts the picture between light and shade. 49
Brightness Adjusts picture brightness. 49
RedAdjusts red color intensity. 49
Green Adjusts green color intensity. 49
Blue Adjusts blue color intensity. 49
Reset All image adjustment settings return to the factory defaults. 49
Sound Tr eble Adjusts the treble weaker or stronger. 53
Bass Adjusts the bass weaker or stronger. 53
Balance Adjusts audio output between left and right speakers. 53
Reset All audio adjustment settings return to the factory defaults. 53
FOCUS Shifts the sound coming direction (sound images) upward and produces
clear sound contours. 54
Front Surround Provides three-dimensional sound effects and/or deep, rich bass. 54
Power Control Energy Save Saves power by decreasing picture brightness. 55
Power Management Automatically places the system into the standby mode when no signal is
received from the personal computer. 56
09Basic Adjustment Settings
Sleep Timer Automatically places the system into the standby mode when the selected
Option Auto Setup Automatically optimizes image positions and clock. 81
Manual Setup Allows you to manually adjust image positions and clock. 82
time elapses. 85
PDP-ELITE-Eng (38-39) 9/9/03, 11:4439
39
En

09 Basic Adjustment Settings
Menu operation keys
Use the following keys on the remote control to operate
the menu. For detailed menu operations, see appropriate pages that describe individual functions.
HOME MENU:Press to open or close the Home
menu.
/ :Press to select a menu item. For
some menu items, you can select
parameters using these keys.
/ :Press to select a parameter or
adjustment level for menu items.
ENTER:Press to proceed to lower menu
levels. For some menu items, you
need to press this key to complete
selections.
RETURN:Press to return to upper menu levels.
40
En
PDP-ELITE-Eng (40-56) 9/9/03, 11:4540

Setting up conventional TV channels
Auto Channel Preset
Air/Cable
Preset
Antenna
Start
Air
A
Please wait.
Auto channel preset searching.
To cancel auto channel preset,
press [RETURN].
PLASMA DISPLAY
This section describes how to search and set up
conventional TV channels that you can watch under the
current conditions. Unless you set up conventional TV
channels using Auto channel Preset, you may not be
able to tune in those channels.
• Conventional TV channels in this manual designate
TV channels that are received through the conventional VHF/ UHF frequencies or conventional cable TV
channels.
Using Auto Channel Preset
Auto Channel Preset automatically searches and sets
up conventional TV channels.
1
Press HOME MENU.
2
Press / to select “Setup”, and then press
ENTER.
3
Press / to select “Channel Setup”, and then
press ENTER.
4
Press / to select “Auto Channel Preset”, and
then press ENTER.
5
Press / to select “Antenna”, and then
press / to select “A” or “B”.
7
Press / to select “Preset:Start”, and then press
ENTER.
• Channel search automatically starts.
09Basic Adjustment Settings
Auto Channel Preset
Antenna
Air/Cable
Preset
6
Press / to select “Air/Cable”, and then
press / to select “Air” or “Cable”.
Auto Channel Preset
Antenna
Air/Cable
Preset
Air
Air
•To quit Auto Channel Preset halfway, press
A
RETURN.
8
After Auto Channel Preset has been finished,
press HOME MENU to exit the menu.
• When using the Cable Converter, you may need to
manually add Cable Converter output channels.
Start
A
Start
PDP-ELITE-Eng (40-56) 9/9/03, 11:4541
41
En

09 Basic Adjustment Settings
Setting for skipping unwanted channels
From among conventional TV channels searched and
set up using Auto Channel Preset, you can select
channels to be skipped when CH +/– are operated.
1
Press HOME MENU.
2
Press / to select “Setup”, and then press
ENTER.
3
Press / to select “Channel Setup”, and then
press ENTER.
4
Press / to select “Channel ADD/DEL”, and then
press ENTER.
5
Press / to select “Antenna”, and then
press / to select “A” or “B”.
Channel ADD/DEL
7
Press / to select “Add/Delete”, and then
press / to select “Delete”.
Channel ADD/DEL
Antenna
Channel
Add/Delete
8
Press HOME MENU to exit the menu.
A
2
Delete
Antenna
Channel
Add/Delete
6
Press / to select “Channel”, and then
A
2
Add
press / to select a channel to be skipped.
Channel ADD/DEL
Antenna
Channel
Add/Delete
A
2
Add
•To restore skipped channels, use the above procedure
except that you select “Add” in step 7.
• When using the Cable Converter, you may need to
manually add Cable Converter output channels.
42
En
PDP-ELITE-Eng (40-56) 9/9/03, 11:4542

Setting your favorite channels
Set up to four TV channels to each of the four color
buttons on the remote control unit (16 channels in
total). You can then quickly select from only your
favorite channels. You can program these buttons with
conventional channels.
1
Select and tune to a TV channel to be registered.
2
Press HOME MENU.
3
Press / to select “Setup”, and then press
ENTER.
4
Press / to select “Favorite Channel”, and then
press ENTER.
Favorite Channel
Current Channel A 69
6
Press ENTER to execute the registration.
• Before pressing ENTER, you can also change a
TV channel to be registered. Press / to select
ANT A or ANT B, and then press / to select a
TV channel. To clear the channel registered at
the current location, select “–” by pressing /
and then press ENTER.
•To register another TV channel at a different
location, select a TV channel, and then repeat
steps 5 and 6.
7
Press HOME MENU to exit the menu.
•You cannot program the four color buttons with
digital TV channels.
09Basic Adjustment Settings
A1 69
B286
B3 125
A469
5
Press / and / to select a location where the
– –––
– –––
– –––
A0
– –––
– –––
– –––
A0
B86
A69
– –––
B 125
TV channel is to be registered, and then press
ENTER.
Favorite Channel
Current Channel B 86
A
1
B
2
B
3
A
4
– –––
69
B86
86
– –––
125
A0
69
– –––
– –––
– –––
A0
B86
A
– –––
B 125
69
PDP-ELITE-Eng (40-56) 9/9/03, 11:4543
43
En

09 Basic Adjustment Settings
Setting up digital TV channels
This section describes how to search and set up
digital TV channels that you can watch under the
current conditions. Unless you set up digital TV
channels using Auto Channel Preset, you cannot
tune in those channels.
Using Auto Channel Preset
Auto Channel Preset automatically searches and
sets up digital TV channels.
1
Press HOME MENU.
2
Press / to select “DTV Setup”, and then
press ENTER.
3
Press / to select “DTV Channel Setup”,
and then press ENTER.
4
Press / to select “Auto Channel Preset”,
and then press ENTER.
5
Press / to select “Air” or “Cable”.
Auto Channel Preset
Air/Cable
Air
6
Press / to select “Start”, and then press
ENTER.
PLASMA DISPLAY
Auto channel preset searching. Please
wait.
To cancel auto channel preset, press
[RETURN].
• Channel search automatically starts.
7
Press HOME MENU to exit the menu.
•With “Cable” selected, this system can receive only
digital TV signals (Standard Channel Plan) with the
8VSB modulation. This system does not support the
QAM modulation.
Start
44
En
PDP-ELITE-Eng (40-56) 9/9/03, 11:4544

09Basic Adjustment Settings
Signal Strength
Maximum : 49
Weak Strong
Current : 49
Setting for skipping unwanted channels
From among digital TV channels searched and set up
using Auto Channel Preset, you can select channels to
be skipped when CH +/– are operated.
1
Press HOME MENU.
2
Press / to select “DTV Setup”, and then press
ENTER.
3
Press / to select “DTV Channel Setup”, and
then press ENTER.
4
Press / to select “Channel Add/Del”, and then
press ENTER.
5
Press / to select “Channel”.
6
Press / to select a channel to be skipped.
Channel Add/Del
Channel
Add/Delete
7
Press / to select “Add/Delete”.
8
Press / to select “Delete”.
120.001
Add
Checking signal strength
When watching a digital TV program, you can check its
current signal strength.
1
Press HOME MENU.
2
Press / to select “DTV Setup”, and then press
ENTER.
3
Press / to select “DTV Channel Setup”, and
then press ENTER.
4
Press / to select “Signal Strength”, and then
press ENTER.
• Adjust the direction of the antenna so that the
current signal strength reaches as close to the
maximum signal strength as possible.
5
Press HOME MENU to exit the menu.
Channel Add/Del
Channel
Add/Delete
9
Press HOME MENU to exit the menu.
120.001
Delete
•To restore skipped channels, use the above procedure
except that you select “Add” in step 8.
PDP-ELITE-Eng (40-56) 9/9/03, 11:4545
45
En

09 Basic Adjustment Settings
Language setting
You can select a language to be used for on-screen
display such as menus from among three languages;
English, French, and Spanish.
1
Press HOME MENU.
2
Press / to select “Setup”, and then press
ENTER.
3
Press / to select “Language”, and then press
ENTER.
4
Press / to select a language.
Language
Menu
5
Press HOME MENU to exit the menu.
English
Clock setting
Use the following procedure to set the time correctly.
If you disconnect the power cord from the power
outlet or power blackout occurs after setting the time,
the set time is cleared. With “Auto” selected for Clock
Setting, time information is then acquired and set
automatically. With “Manual” selected, you then need to
manually set the correct time again.
1
Press HOME MENU.
2
Press / to select “Setup”, and then press
ENTER.
3
Press / to select “Clock”, and then press
ENTER.
4
Press / to select “Clock Setting”, and then
press / to select “Auto” or “Manual”.
Clock
01/01/2003 SAT 12:30AM
Clock Setting
Clock Set Channel
Time Zone
D.S.T.
Time & Date
Auto
0 at ANT-B
ATLANTIC
Off
Adjust
• If you select “Auto”, the date and time will be
automatically corrected.
5
Press / to select “Clock Set Channel”, and then
press / to select a TV channel to be used for
auto clock setting.
6
Press / to select “Time Zone”, and then press
/ to select a time zone for your area.
7
Press / to select “D.S.T.”, and then press /
to select “On” or “Off” depending on whether
summer time is employed in your area.
• When selecting “Auto” for “Clock Setting”, be sure to
connect the Antenna B input terminal to the output
of the VHF/UHF antenna or Cable Converter. See
page 26.
46
En
PDP-ELITE-Eng (40-56) 9/9/03, 11:4546

8
Press / to select “Time & Date”, and then press
ENTER.
• The date & time entry screen appears. Enter the
current date and time using / and / , and
then press ENTER.
Time & Date
09Basic Adjustment Settings
AV Selection
AV Selection gives you five viewing options to choose
from to best match the Plasma Display System environment, which can vary due to factors like room brightness, type of program watched or the type of image
input from external equipment.
Date
01 / 01 / 2003 SAT 12 : 32 AM
9
Press HOME MENU to exit the menu.
Time
• When the time has not yet been set, the REC TIMER
indicator on the front of the Media Receiver blinks.
• When the time has not yet been set, you cannot view
EPG information, use auto channel select, and preset
TV programs for recording.
1
Press AV SELECTION.
•Present AV Selection mode appears.
2
Press AV SELECTION again before the mode
displayed on the screen disappears.
•For AV source, the mode is switched in the
order; STANDARD, DYNAMIC, MOVIE, GAME,
then USER.
•For PC source, the mode is switched between
STANDARD and USER.
PDP-ELITE-Eng (40-56) 9/9/03, 11:4547
47
En

09 Basic Adjustment Settings
You can also use the menu to change the options.
1
Press HOME MENU.
2
Press / to select “Picture”, and then press
ENTER.
3
Press / to select “AV Selection”, and then press
ENTER.
4
Press / to select the desired option, and then
press ENTER.
AV Selection
STANDARD
DYNAMIC
MOVIE
GAME
USER
For AV source
Item Description
STANDARD For a highly defined image in a normally
DYNAMIC For a very sharp image with the maximum
MOVIE For a movie
GAME Lowers image brightness for easier viewing.
USER Allows the user to customize settings as
bright room
contrast
This mode does not allow manual image
quality adjustment.
desired. You can set the mode for each
input source.
Picture adjustments
Adjust the picture to your preference for the chosen AV
Selection option (except DYNAMIC).
1
Press HOME MENU.
2
Press / to select “Picture”, and then press
ENTER.
3
Press / to select an item to be adjusted, and
then press ENTER.
Picture
AV Selection
Contrast
Brightness
Color
Tint
Sharpness
Pro Adjust
Reset
4
Press / to select the desired level, and then
press ENTER.
Contrast
• When an adjustment screen is in display, you
can also change an item to be adjusted, by
pressing / .
5
Press HOME MENU to exit the menu.
STANDARD
40
0
0
0
0
40
For PC source
Item Description
STANDARD For a highly defined image in a normally
bright room
USER Allows the user to customize settings as
5
Press HOME MENU to exit the menu.
48
En
PDP-ELITE-Eng (40-56) 9/9/03, 11:4548
desired. You can set the mode for each
input source.

09Basic Adjustment Settings
PureCinema
Off
ADV
Standard
For AV source
Item button button
Contrast For less contrast For more contrast
Brightness
Color For less color intensity For more color intensity
Tint
Sharpness
For less brightness For more brightness
Skin tones become Skin tones become
purplish greenish
For less sharpness For more sharpness
For PC source
Item button button
Contrast For less contrast For more contrast
Brightness For less brightness For more brightness
Red For weaker red For stronger red
Green For weaker green For stronger green
Blue For weaker blue For stronger blue
For PC source, the following screen appears:
Picture
AV Selection
Contrast
Brightness
Red
Green
Blue
Reset
•To make settings for “PureCinema”, “Color Temp”,
“MPEG NR”, “DNR”, “CTI”, “DRE”, and “Color
Management”, select “Pro Adjust” in step 3, and then
press ENTER. For the subsequent procedures, see
pages 49 to 52.
•To restore the factory defaults for all the items, press
/ to select “Reset” in step 3, and then press
ENTER. A confirmation screen appears. Press /
to select “Yes”, and then press ENTER.
STANDARD
40
0
0
0
0
PureCinema
Automatically detects a film-based source (originally
encoded at 24 frames/second), analyzes it, then recreates each still film frame for high-definition picture
quality.
1
Press HOME MENU.
2
Press / to select “Picture”, and then press
ENTER.
3
Press / to select “Pro Adjust”, and then press
ENTER.
4
Press / to select “PureCinema”, and then press
ENTER.
5
Press / to select the desired parameter, and
then press ENTER.
Item Description
Off Deactivates the PureCinema.
Standard Produces smooth and vivid moving images
(film specific) by automatically detecting
recorded image information when
displaying DVD or 1080i HDTV images
(e.g., movies) having 24 frames per
second.
ADV Produces smooth and quality moving
images (as shown on theater screens) by
converting to 72 Hz when displaying DVD
images (e.g., movies) having 24 frames per
second.
6
Press HOME MENU to exit the menu.
•You cannot select “Standard” when 480p or 720p
signals are being input.
49
En
PDP-ELITE-Eng (40-56) 9/9/03, 11:4549

09 Basic Adjustment Settings
Color temperature
Adjust the color temperature to give a better white
balance.
1
Press HOME MENU.
2
Press / to select “Picture”, and then press
ENTER.
3
Press / to select “Pro Adjust”, and then press
ENTER.
4
Press / to select “Color Temp”, and then press
ENTER.
5
Press / to select the desired level, and then
press ENTER.
Color Temp
High
Mid-High
Mid
Mid-Low
Low
Manual
Item Description
High White with bluish tone
Mid-High Intermediate tone between High and Mid
Mid Natural tone
Mid-Low Intermediate tone between Mid and Low
Low White with reddish tone
Manual Colour temperature adjusted to your
preference
You can manually adjust the color temperature, using
the following procedure:
1 Select “Manual” in step 5 above, and then press and
hold ENTER for more than three seconds to display
the manual adjustment screen.
2 Press / to select an item to be adjusted, and
then press ENTER.
3 Press / to select the desired level, and then
press ENTER.
Item button button
R High For weaker red For stronger red
G High For weaker green For stronger green
B High For weaker blue For stronger blue
R Low For weaker red For stronger red
G Low For weaker green For stronger green
B Low For weaker blue For stronger blue
Fine
adjustment
for bright
portions
Fine
adjustment
for dark
portions
•To perform adjustment for another item, press
RETURN, and then repeat steps 2 and 3.
•You may press / to immediately change an
item to be adjusted.
4 Press HOME MENU to exit the menu.
6
Press HOME MENU to exit the menu.
50
En
PDP-ELITE-Eng (40-56) 9/9/03, 11:4550

09Basic Adjustment Settings
DNR
Off
High
Mid
Low
MPEG NR
This eliminates mosquito noise from video images
when a DTV channel is watched or a DVD is played,
resulting in noise-free images.
1
Press HOME MENU.
2
Press / to select “Picture”, and then press
ENTER.
3
Press / to select “Pro Adjust”, and then press
ENTER.
4
Press / to select “MPEG NR”, and then press
ENTER.
5
Press / to select the desired parameter, and
then press ENTER.
MPEG NR
Off
High
Mid
Low
DNR
Select the DNR (Digital Noise Reduction) level to
eliminate video noise for a clean crisp image.
1
Press HOME MENU.
2
Press / to select “Picture”, and then press
ENTER.
3
Press / to select “Pro Adjust”, and then press
ENTER.
4
Press / to select “DNR”, and then press
ENTER.
5
Press / to select the desired level, and then
press ENTER.
Item Description
Off Deactivates the MPEG NR.
High Enhanced MPEG NR
Mid Standard MPEG NR
Low Moderate MPEG NR
6
Press HOME MENU to exit the menu.
Item Description
Off Deactivates the DNR.
High Enhanced DNR
Mid Standard DNR
Low Moderate DNR
6
Press HOME MENU to exit the menu.
51
En
PDP-ELITE-Eng (40-56) 9/9/03, 11:4551

09 Basic Adjustment Settings
CTI
Use the CTI (Color Transient Improvement) to make
images have clearer color contours.
1
Press HOME MENU.
2
Press / to select “Picture”, and then press
ENTER.
3
Press / to select “Pro Adjust”, and then press
ENTER.
4
Press / to select “CTI”, and then press ENTER.
5
Press / to select the desired parameter, and
then press ENTER.
CTI
Off
On
DRE
Use the DRE (Dynamic Range Expander) to adjust dark
and bright portions on images so that the contrast
between brightness and darkness becomes clearer.
1
Press HOME MENU.
2
Press / to select “Picture”, and then press
ENTER.
3
Press / to select “Pro Adjust”, and then press
ENTER.
4
Press / to select “DRE”, and then press
ENTER.
5
Press / to select the desired parameter, and
then press ENTER.
DRE
Off
High
Mid
Low
Item Description
Off Deactivates the CTI.
On Activates the CTI.
6
Press HOME MENU to exit the menu.
Item Description
Off Deactivates the DRE.
High Enhanced DRE
Mid Standard DRE
Low Moderate DRE
6
Press HOME MENU to exit the menu.
52
En
PDP-ELITE-Eng (40-56) 9/9/03, 11:4552

09Basic Adjustment Settings
Bass
Balance
Treble
Reset
FOCUS
Front Surround
0
0
Off
Off
2
Sound STANDARD
Color Management
Perform fine hue adjustment for each basic color.
1
Press HOME MENU.
2
Press / to select “Picture”, and then press
ENTER.
3
Press / to select “Pro Adjust”, and then press
ENTER.
4
Press / to select “Color Management”, and
then press ENTER.
5
Press / to select an item to be adjusted, and
then press ENTER.
Color Management
R
Y
G
C
B
M
6
Press / to select the desired level.
Item button button
Red Closer to magenta Closer to yellow
Yellow Closer to red Closer to green
Green Closer to yellow Closer to cyan
Cyan Closer to green Closer to blue
Blue Closer to cyan Closer to magenta
Magenta Closer to blue Closer to red
0
0
0
0
0
0
Sound adjustments
Adjust the sound to your preference for the chosen AV
Selection option. See page 47.
1
Press HOME MENU.
2
Press / to select “Sound”, and then press
ENTER.
3
Press / to select an item to be adjusted, and
then press / to select the desired level.
Item button button
Tr eble For weaker treble For stronger treble
Bass For weaker bass For stronger bass
Balance Decreases audio from Decreases audio from
the right speaker the left speaker
4
Press HOME MENU to exit the menu.
•To restore the factory defaults for all the items, press
/ to select “Reset” in step 3, and then press
ENTER. A confirmation screen appears. Press /
to select “Yes”, and then press ENTER.
•To perform adjustment for another item, press
RETURN, and then repeat steps 5 and 6.
•You may press / to immediately change an
item to be adjusted.
7
Press HOME MENU to exit the menu.
PDP-ELITE-Eng (40-56) 9/9/03, 11:4553
53
En

09 Basic Adjustment Settings
FOCUS
This shifts the sound coming direction (sound images)
upward and produces clear sound contours.
1
Press HOME MENU.
2
Press / to select “Sound”, and then press
ENTER.
3
Press / to select “FOCUS”, and then press /
to select the desired parameter.
Sound STANDARD
Treble
Bass
Balance
Reset
FOCUS
Front Surround
Item Description
Off Deactivates the FOCUS.
(factory default)
On Activates the FOCUS.
4
Press HOME MENU to exit the menu.
2
0
0
On
Off
Front Surround
This provides three-dimensional sound effects and/or
deep, rich bass.
1
Press HOME MENU.
2
Press / to select “Sound”, and then press
ENTER.
3
Press / to select “Front Surround”, and then
press / to select the desired parameter.
Sound STANDARD
Treble
Bass
Balance
Reset
FOCUS
Front Surround
Item Description
Off Deactivates both the SRS and TruBass.
SRS Reproduces highly effective three-
dimensional sound.
Tr uBass Provides deep, rich bass using a new
(factory default) technology.
TruBass + SRS Provides both TruBass and SRS effects.
2
0
0
On
TruBass+SRS
4
Press HOME MENU to exit the menu.
• (WOW) designates a status where the FOCUS
is on and TruBass + SRS has been selected for Front
Surround.
• is a trademark of SRS Labs, Inc.
• WOW technology is incorporated under license from
SRS Labs, Inc.
54
En
PDP-ELITE-Eng (40-56) 9/9/03, 11:4554

09Basic Adjustment Settings
No Signal off
Disable
Enable
Power Control
Power Control provides convenient functions for power
saving.
Power Control for AV source
Energy Save
Power consumption is saved by decreasing picture
brightness.
1
Press HOME MENU.
2
Press / to select “Power Control”, and then
press ENTER.
3
Press / to select “Energy Save”, and then press
ENTER.
4
Press / to select “Save”, and then press
ENTER.
Energy Save
Standard
Save
No Signal off
The system will be automatically placed into the
standby mode if no signal is received for 15 minutes.
1
Press HOME MENU.
2
Press / to select “Power Control”, and then
press ENTER.
3
Press / to select “No Signal off”, and then
press ENTER.
4
Press / to select “Enable”, and then press
ENTER.
Item Description
Disable Does not place the system into the
(factory default) standby mode.
Enable Places the system into the standby mode if
no signal is received for 15 minutes.
Item Description
Standard Does not decrease picture brightness.
(factory default)
Save Decreases picture brightness to save
power.
5
Press HOME MENU to exit the menu.
•You can also select this function using the Home
menu when the input source is a PC.
5
Press HOME MENU to exit the menu.
•Five minutes before the system is placed into the
standby mode, a message appears every minute.
• The system may not be placed into the standby mode
when noise signals are present at the Media Receiver
after a TV program finishes.
55
En
PDP-ELITE-Eng (40-56) 9/9/03, 11:4555

09 Basic Adjustment Settings
No Operation off
The system will be automatically placed into the
standby mode when no operation is performed for
three hours.
1
Press HOME MENU.
2
Press / to select “Power Control”, and then
press ENTER.
3
Press / to select “No Operation off”, and then
press ENTER.
4
Press / to select “Enable”, and then press
ENTER.
No Operation off
Disable
Enable
Power Control for PC source
Power Management
The system will be automatically placed into the
standby mode when no signal is received from the
personal computer.
1
Press HOME MENU.
2
Press / to select “Power Control”, and then
press ENTER.
3
Press / to select “Power Management”, and
then press ENTER.
4
Press / to select “Mode1”or”Mode2”, and then
press ENTER.
Power Management
Off
Mode1
Mode2
Item Description
Disable Does not place the system into the
(factory default) standby mode.
Enable Places the system into the standby mode if
5
Press HOME MENU to exit the menu.
no operation is performed for three hours.
•Five minutes before the system is placed into the
standby mode, a message appears every minute.
Item Description
Off No power management
(factory default)
Mode1 • Places the system into the standby mode
when no signal is received from the
personal computer for eight minutes.
• Even when you start using the computer
and a signal is received again, the system
stays off.
• The system is switched on again by
pressing STANDBY/ON on the Plasma
Display or TVa on the remote control
unit.
Mode2 • Places the system into the standby mode
when no signal is received for eight
seconds.
• When you start using the computer and
a signal is received again, the system is
switched on.
• The system is switched on again by
pressing STANDBY/ON on the Plasma
Display or TVa on the remote control
unit.
5
Press HOME MENU to exit the menu.
56
En
PDP-ELITE-Eng (40-56) 9/9/03, 11:4556

10Electronic Program Guide (EPG) (for DTV Only)
EPG display format
The Electronic Program Guide (EPG) shows the table of
scheduled digital TV programs and detailed information
about individual programs. It also allows you to easily
select and tune to a desired program.
The EPG Screen consists of the schedule window,
information window, and picture window. This section
describes information to be displayed on the schedule
and information windows. The picture window shows
moving images of a TV program watched when DTV
GUIDE is pressed.
•For digital TV programs that do not provide EPG
information, you cannot watch the corresponding
EPG information.
• If the current time has not been correctly set, there
may be TV programs whose EPG information is not
displayed.
Information window
******* 7:00 PM – 8:30 PM
*******
*******
Picture window
Schedule window
12 3 2
OCT. 25. MON 7:15pm
Program A
1.01
A
Program B
1.12
ABC
Program C
3.01
CBS
Program D
14.11
NBS
Program E
NNNNNNN
15.11
45 6 8
Program I
Program J
7
Program G
Program H
1 Current date and time
2 Appears when the schedule table can be scrolled forward
or backward.
3 Time schedule
4 Station name
5 Channel number
6 Program title
7 Highlights the currently selected channel.
8 Appears when other programs (often short ones) have
been scheduled for the period.
9:30pm9:00pm8:30pm8:00pm
Program F
1.01
1.02
3.01
4.01
4.02
ABC
ABC
CBS
NBC
NBC
Program A Program F Program K
Program G
Program H
Program I
Program J
Program N
Program L
Program M
Program O
Program P
11:30pm11:00pm10:30pm10:00pm9:30pm
Schedule window
PDP-ELITE-Eng (57-64) 9/9/03, 11:4557
57
En

10 Electronic Program Guide (EPG) (for DTV Only)
Information window
1
5
WWWWWWW 311.111
6
7
STEREO CC FV TV-PG NC-17
8
More Information
1 Station name
2 Channel number
3 Program time schedule
4 Program title
5 A blue icon appears when the program has been preset
for auto channel select; and a red icon appears when it
has been preset for recording.
6 Appears when other programs have been scheduled for
the period. You will find this arrow only for programs
(8) shown on the schedule window.
with
7 Shows services available for the program and ratings for
parent control.
8 Information about the program
2
3 4
8:00pm–9:00pm
...
DTV INFO
Using the EPG
Use the following procedure to check the schedule of
digital TV programs, view information about desired
programs, and/or select programs to watch.
6
1
Press DTV GUIDE.
• The EPG screen appears.
• “Downloading EPG data now” appears on the
picture window.
• When EPG data acquisition is finished, the
picture window shows moving images of a TV
program watched when DTV GUIDE is pressed.
2
Press / and / to select a desired TV
program.
• The schedule window may show sections whose
bottom right corners have been folded. This indicates
that other programs (often short ones) have been
scheduled for that period. To view the title of such a
program and related information, highlight a folded
section, and then press / .
•For programs whose title and/or time information
have not been acquired, “No Title” appears.
EPG
******* 7:00 PM – 8:30 PM
*******
*******
APR.11.Fri 7:00PM 7:30PM 8:00PM 8:30PM
*******
*******
*******
7:34PM
12.08
12.05*******
12.06
12.07
*******
******* *******
*******
*******
•Information about the selected program appears
in the information window.
•To watch a program currently on air, select the
program, and then press ENTER.
•You can check information about programs
scheduled for up to 12 coming hours.
• Depending on conditions, it may take some time
to acquire EPG data.
58
En
PDP-ELITE-Eng (57-64) 9/9/03, 11:4658

3
To view more information (not current displayed)
about the selected program, press DTV INFO.
• Detailed information appears on the schedule
window.
EPG
********
********
MONO
******************************************************
******************************************************
********
****************************************************************************************
****************************************************************************************
****************************************************************************************
****************************************************************************************
****************************************************************************************
****************************************************************************************
****************************************************************************************
****************************************************************************************
****************************************************************************************
4:00 PM – 7:00 PM
***
•With / shown in the schedule window, you
can scroll the window by pressing / .
•To quit display of detailed information, press
DTV INFO again (or RETURN).
4
To quit the Program Guide, press DTV GUIDE
again.
*****
Presetting TV programs using the EPG
Using the EPG, you can easily preset digital TV programs for watching later (auto channel select), recording with a D-VHS recorder, or recording via a VCR
controller.
Using auto channel select
With the power to the system left on, this function
automatically selects the preset TV program when its
on-air time comes. Then you will not miss watching an
important TV program when you are enjoying another
TV program.
1
Press DTV GUIDE.
• The EPG screen appears.
2
Press / and / to select a program to be
preset, and then press ENTER.
• Select a program not yet started.
•A setup menu appears.
*******
EPG
******* 8:30 PM – 10:00 PM
*******
******
10Electronic Program Guide (EPG) (for DTV Only)
• The schedule window does not show finished
programs.
• When the power to the system is switched off, all
acquired EPG data is cleared.
Reservation Setting Program View Program Rec
3
Press / to select “Program View”, and then
press ENTER.
•A dialog box for confirmation appears.
EPG
******* 8:30 PM – 10:00 PM
*******
*******
Reservation Setting Program View Program Rec
OK Cancel
******
PDP-ELITE-Eng (57-64) 9/9/03, 11:4659
59
En

10 Electronic Program Guide (EPG) (for DTV Only)
4
Press / to select “OK”, and then press ENTER.
• The program is preset and the schedule table is
restored.
•A blue square icon appears for the preset
program.
•A black icon appears for overlapped
presetttings.
5
Press DTV GUIDE to exit the Program Guide.
With the system switched on, a channel switch
alarm message approximately 30 seconds before
execution and the channel is switched a short
time before the start of the program.
• Auto channel select is not executed when the system
is in the standby mode.
•Finish presetting operations one minute before the
start of the program; otherwise presettings may fail.
•For priorities about overlapped presettings, see
“Priority rules for overlapped presettings” on page 63.
Recording TV programs using a D-VHS
recorder
Use the following procedure to preset TV programs for
recording with a connected D-VHS recorder.
1
Press DTV GUIDE.
• The EPG screen appears.
2
Press / and / to select a program to be
preset, and then press ENTER.
• Select a program not yet started.
•A setup menu appears.
EPG
******* 8:30 PM – 10:00 PM
*******
*******
Reservation Setting Program View Program Rec
******
3
Press / to select “Program Rec”, and then
press ENTER.
EPG
******* 8:30 PM – 10:00 PM
*******
*******
Reservation Setting Program View Program Rec
•A dialog box for mode selection appears.
4
Press / to select “i.LINK”, and then press
ENTER.
EPG
******* 10:00 PM – 11:30 PM
*******
*******
Reservation Setting Program View Program Rec
Recording Type ANALOG i.LINK
******
******
60
En
PDP-ELITE-Eng (57-64) 9/9/03, 11:4660
•A dialog box for model selection appears.

5
Press / to select the D-VHS recorder model,
and then press ENTER.
EPG
******* 10:00 PM – 11:30 PM
*******
*******
Reservation Setting Program View Program Rec
Recording Type ANALOG
Device
i.LINK
D–VHS1
******
Recording TV programs via a VCR
controller
If you connect an appropriate VCR controller to the
Media Receiver, you can preset digital TV programs for
recording with a connected VCR. See page 78.
1
Press DTV GUIDE.
• The EPG screen appears.
2
Press / and / to select a program to be
preset, and then press ENTER.
•A setup menu appears.
10Electronic Program Guide (EPG) (for DTV Only)
•A dialog box for confirmation appears.
6
Press / to select “OK”, and then press ENTER.
• The program is preset and the schedule table is
restored.
•A red square icon appears for the preset
program.
•A black icon appears for overlapped
presetttings.
7
Press DTV GUIDE to exit the Program Guide.
• Switch on the recording equipment at least 30
seconds before the start of the preset program;
otherwise recording will not be executed.
•Recording is not executed if recordable D-VHS tape is
not present in the D-VHS recorder when the preset
program starts. This is also true when a D-VHS
recorder specified for recording with a timer is not in
connection.
•Finish presetting operations two minutes before the
start of the program; otherwise presettings may fail.
•For priorities about overlapped presettings, see
“Priority rules for overlapped presettings” on page 63.
• If you switch off the system using the POWER
button, the program presetting will become
ineffective. Be careful not to switch off the power.
EPG
******* 8:30 PM – 10:00 PM
*******
*******
Reservation Setting Program View Program Rec
3
Press / to select “Program Rec”, and then
press ENTER.
EPG
******* 8:30 PM – 10:00 PM
*******
*******
Reservation Setting Program View Program Rec
•A dialog box for mode selection appears.
******
******
PDP-ELITE-Eng (57-64) 9/9/03, 11:4661
61
En

10 Electronic Program Guide (EPG) (for DTV Only)
4
Press / to select “ANALOG”, and then press
ENTER.
EPG
******* 10:00 PM – 11:30 PM
*******
*******
Reservation Setting Program View Program Rec
Recording Type ANALOG i.LINK
******
•A dialog box for confirmation appears.
5
Press / to select “OK”, and then press ENTER.
• The program is preset and the schedule table is
restored.
•A red square icon appears for the preset
program.
•A black icon appears for overlapped
presetttings.
6
Press DTV GUIDE to exit the Program Guide.
• Switch on the recording equipment at least 30
seconds before the start of the preset program;
otherwise recording will not be executed.
•Finish presetting operations two minutes before the
start of the program; otherwise presettings may fail.
•For priorities about overlapped presettings, see
“Priority rules for overlapped presettings” on page 63.
• Confirm that the video output terminals on the Media
Receiver have been connected to the signal input
terminals on the VCR to be used for recording.
• If you switch off the system using the POWER
button, the program presetting will become
ineffective. Be careful not to switch off the power.
Setting the timer manually
Using the menu, you can also preset digital TV programs by specifying their scheduled date and time.
1
Press HOME MENU.
2
Press / to select “Rec/View Timer”, and then
press ENTER.
• The schedule table appears.
Rec/View Timer
Timer Date Start Stop Channel Tar ge t Information
1
--/--
2
--/--
3
--/--
4
--/--
5
--/--
6
--/--
7
--/--
3
Press / to select a list number, then press .
•You can select any desired list number.
4
Press / to specify a date, and then press .
5
Press / to specify the start hour, and then press
.
6
Press / to specify the start minute, and then
press .
7
Press / to specify the end hour, and then press
.
8
Press / to specify the end minute, and then
press .
9
Press / to specify a channel number, and then
press .
-- : --
-- : --
-- : --
-- : --
-- : --
-- : --
-- : --
-- : --
-- : --
-- : --
-- : --
-- : --
-- : --
-- : --
---.---
---.---
---.---
---.---
---.---
---.---
---.---
Total:0 Overlap
1/4
--------
--------
--------
--------
--------
--------
--------
62
En
PDP-ELITE-Eng (57-64) 9/9/03, 11:4662

10
Press / to select “VIEW”, “ANALOG” or a
D-VHS recorder, and then press ENTER.
• Select “VIEW” when presetting the program for
auto channel select. Select “ANALOG” when
presetting it for recording via a VCR controller.
Select a D-VHS recorder when presetting it for
recording with a D-VHS recorder.
•In the Info field, “View OK” appears when
presetting for auto channel select is accepted,
and “Rec OK” appears when presetting for
recording is accepted.
Rec/View Timer
Timer Date Start Stop Channel Tar ge t Information
1
APR 11FRI
9:30 PM
11:00 PM
E 12.05
--/--
-- : --
-- : --
-- : --
-- : --
-- : --
-- : --
-- : --
---.---
---.---
---.---
---.---
---.---
---.---
2
--/--
--/--
--/--
--/--
--/--
-- : --
-- : --
-- : --
-- : --
-- : --
3
4
5
6
7
11
If presetting another program, press / to select
Tot al:1
VIEW View OK
--------
--------
--------
--------
--------
--------
Overlap
another list number, and then repeat steps 4 to 6.
•You can preset up to 28 programs.
12
Press HOME MENU to exit the menu.
1/4
10Electronic Program Guide (EPG) (for DTV Only)
Priority rules for overlapped
presettings
When preset TV programs are overlapped, the following
three rules are used to determine a higher priority. If
more than one of the three rules are met, the rules are
applied in the order; 1, 2, then 3.
Rule 1: Presetting for recording is given a higher
priority over presetting for auto channel
select.
Presetting for recording
Presetting for auto
channel select
The shaded area is not executed.
Rule 2: If two presettings are overlapped, presetting
with earlier start time is given a higher
priority. If two presettings are sequential, the
last portion of the first program is not recorded for 15 seconds because recording of
the second program is started at the exact
start time.
Program A
Program B
• If the schedule of the selected program is overlapped
with another presetting, “Overlap” appears in the Info
field. Presettigs with “Overlap” may not be partially or
entirely executed.
• When entering into the schedule table, pressing
ENTER causes the cursor to jump to an empty field.
•Presetting becomes ineffective if the start time and
the end time are identical or if presetting operations
are performed within two minutes before the start of
the program.
•Presettings made using the EPG are automatically
shown in the schedule table.
•For presetting made using the EPG, “E” appears
beside the channel number in the schedule table. If
you alter the presetting content, “E” disappears.
•For priorities about overlapped presettings, see
“Priority rules for overlapped presettings” on page 63.
• If you switch off the system using the POWER
button, the program presetting will become
ineffective. Be careful not to switch off the power.
The shaded area is not executed.
Rule 3: If presettings at the same start time are
overlapped, presetting with a smaller list
number is given a higher priority.
PDP-ELITE-Eng (57-64) 9/9/03, 11:4663
63
En

10 Electronic Program Guide (EPG) (for DTV Only)
Changing/ canceling TV program
presettings
Using the EPG
Use the following procedure to change or cancel
program presettings using the EPG.
1
Press DTV GUIDE.
• The EPG screen appears.
2
Press / and / to select the desired preset
program, and then press ENTER.
•A dialog box appears.
3
Press / to select “Edit” or “Delete”, and then
press ENTER.
PLASMA DISPLAY
Select [Edit] or [Delete].
Edit Delete
• If you select “Delete”, the program presetting is
canceled.
• If you select “Edit”, go to step 4.
4
Press / and / to make new selections, and
then press ENTER.
•A dialog box for confirmation appears.
5
Press / to select “OK”, and then press ENTER.
EPG
******* 8:00 PM – 9:30 PM
*******
STEREO
*******
******
Using the menu
Use the following procedure to change or cancel
program presetings using the menu.
1
Press HOME MENU.
2
Press / to select “Rec/View Timer”, and then
press ENTER.
• The schedule table appears.
Rec/View Timer
Timer Date Start Stop Channel Tar ge t Information
1
--/--
-- : --
-- : --
---.---
2
--/--
-- : --
-- : --
---.---
3
--/--
-- : --
-- : --
---.---
4
--/--
-- : --
-- : --
---.---
5
--/--
-- : --
-- : --
---.---
6
--/--
-- : --
-- : --
---.---
7
--/--
-- : --
-- : --
---.---
3
Press / to select a list number to be changed.
4
Press to change the presetting or press (or
ENTER) to cancel it.
• If you press (or ENTER), the cursor moves to
the Info field where “Delete” appears. Press
ENTER to execute cancel.
• If you press , go to step 5. Pressing with the
cursor positioned at the Info field also allows
you to go to step 5.
5
Press / to select a field to be corrected and
press / to make a new entry.
6
Repeat step 4 to enter for all fields to be corrected.
7
Press ENTER.
•“View OK” or “Rec OK” appears in the Info field.
8
Press HOME MENU to exit the menu.
Total:0 Overlap
--------
--------
--------
--------
--------
--------
--------
1/4
Reservation Setting
Recording Type ANALOG
Device
Program View Program Rec
D–VHS1:**************
OK
• The presetting is corrected and the schedule
table is restored.
• When you want to quit recording (in progress) started
by program presetting, for example, to change the
channel, cancel the program presetting using the
menu. In this case, you cannot cancel the program
presetting using the EPG.
64
En
PDP-ELITE-Eng (57-64) 9/9/03, 11:4664
i.LINK
D–VHS1
Cancel

You can connect many types of external equipment to
your Plasma Display System, like a DVD player, VCR,
personal computer, game console, and camcorder.
To view images coming from external equipment, select
the input source using the INPUT buttons on the
remote control (page 16) or the INPUT button on the
Plasma Display.
Watching a DVD image
Connecting a DVD player
Use the INPUT 1 terminals when connecting a DVD
player and other audiovisual equipment.
11Enjoying through External Equipment
•To protect all equipment, always turn off the system
before connecting to a DVD player, VCR, personal
computer, game console, camcorder, or other external equipment.
•Refer to the relevant operation manual (DVD player,
personal computer, etc.) carefully before making
connections.
AV cable (commercially available)
Media Receiver (rear view)
SERVICE ONLY
IN
OUT
A ANTENNA/CABLE B
OUT
IN
CONTROL
VCR
CONTROL
IN
OUT
MONITOR OUT
INPUT 2
S-VIDEO
VIDEO VIDEO
VIDEO
S-VIDEO S-VIDEO
DIGITAL OUT
OPTICAL
R-AUDIO-L R-AUDIO-L Y
R-AUDIO-L R-AUDIO-L Y
(TS)
DTV-ANTENNA
S400
INPUT 1
COMPONENT VIDEO
INPUT 3
S-Video cable (commercially
available)
Displaying a DVD image
To watch a DVD image, press INPUT 1 on the remote
control unit or press INPUT on the Plasma Display to
select INPUT1.
Component Video cable
(commercially available)
IN
CB/PB
C
CR/PR
B/PB
CR/PR
AC INLET
BLACK
WHITE
SYSTEM CABLE
DVD player
•Refer to your DVD player operation manual for the
signal type.
• The INPUT 1 terminals are checked for cable connections in the order where; 1) Component Video,
2) S-Video, 3) Video.
• Connect external equipment to only terminals that
are to be actually used.
•You can also use the INPUT 3 terminals when connecting only with the Component Video output
terminals on a DVD player.
PDP-ELITE-Eng (65-80) 9/9/03, 11:4665
65
En

11 Enjoying through External Equipment
Watching a VCR image
Connecting a VCR
Use the INPUT 2 terminals when connecting a VCR and
other audiovisual equipment.
Media Receiver (rear view)
SERVICE ONLY
IN
OUT
A ANTENNA/CABLE B
MONITOR OUT
IN
OUT
CONTROL
VCR
CONTROL
IN
OUT
INPUT 2
S-VIDEO
VIDEO VIDEO
R-AUDIO-L R-AUDIO-L Y
VIDEO
S-VIDEO S-VIDEO
R-AUDIO-L R-AUDIO-L Y
S-Video cable
(commercially available)
DIGITAL OUT
OPTICAL
AV cable
(commercially available)
S400
(TS)
INPUT 1
INPUT 3
DTV-ANTENNA
IN
COMPONENT VIDEO
CB/P
B
C
B/PB
CR/P
R
CR/P
R
AC INLET
BLACK
WHITE
SYSTEM CABLE
Displaying a VCR image
To watch a VCR image, press INPUT 2 on the remote
control unit or press INPUT on the Plasma Display to
select INPUT2.
• The INPUT 2 terminals are checked for cable connections in the order where; 1) S-Video, 2) Video.
• Connect external equipment to only terminals that
are to be actually used.
VCR
VCR
66
En
PDP-ELITE-Eng (65-80) 9/9/03, 11:4666

Enjoying a game console or watching
camcorder images
Connecting a game console or camcorder
Use the INPUT 4 terminals to connect a game console,
camcorder and other audiovisual equipment.
Media Receiver (front view)
11Enjoying through External Equipment
AV cable
(commercially available)
S-Video cable
(commercially available)
Component Video cable
(commercially available)
• The INPUT 4 terminals are checked for cable connec-
tions in the order where; 1) Component Video,
2) S-Video, 3) Video.
• Connect external equipment to only terminals that
are to be actually used.
Game console/Camcorder
Displaying an image of the game console
or camcorder
To watch an image coming from the game console or
camcorder, press INPUT 4 on the remote control unit
or press INPUT on the Plasma Display to select
INPUT4.
PDP-ELITE-Eng (65-80) 9/9/03, 11:4667
67
En

11 Enjoying through External Equipment
Recording digital TV programs using a
VCR or DVD recorder
If you connect recording equipment such as a VCR or
DVD recorder to the MONITOR OUT terminals on the
rear of the Media Receiver, you can record, for example,
digital TV programs using the recording equipment.
You can also record digital TV programs more easily by
using the supplied VCR controller. Connect the VCR
controller to the VCR control terminal on the rear of the
Media Receiver and then position the controller so that
its light emitting section faces the remote control
sensor on the recording equipment. For more information, see page 78.
Connecting a recorder
Media Receiver (rear view)
VCR controller (for
presetting digital
TV programs for
recording)
SERVICE ONLY
IN
OUT
A ANTENNA/CABLE B
IN
OUT
CONTROL
VCR
CONTROL
IN
OUT
MONITOR OUT
INPUT 2
S-VIDEO
VIDEO VIDEO
R-AUDIO-L R-AUDIO-L Y
VIDEO
S-VIDEO S-VIDEO
R-AUDIO-L R-AUDIO-L Y
S-Video cable
(commercially available)
DIGITAL OUT
OPTICAL
(TS)
S400
INPUT 1
INPUT 3
DTV-ANTENNA
IN
COMPONENT VIDEO
CB/P
B
B/PB
C
CR/P
CR/P
AV cable
(commercially available)
VCR or DVD recorder
R
R
AC INLET
BLACK
WHITE
SYSTEM CABLE
• About the MONITOR OUT terminals
The MONITOR OUT terminals cannot output the
following signals:
1 Video signals input from the COMPONENT VIDEO
terminal
2 Video signals from a personal computer
3 S-Video signals when a conventional TV channel is
being received
4 S-Video signals when Video signals (INPUT 1, 2,
and 4) are being input
68
En
PDP-ELITE-Eng (65-80) 9/9/03, 11:4668
• When watching images played back on a VCR or DVD
recorder connected to the MONITOR OUT terminals,
select an input source (e.g., TV channel reception) on
the recording equipment other than external input
sources. Selecting an external input source may
result in distorted images or noise.

11Enjoying through External Equipment
Digital Audio Out
Dolby Digital
PCM
Connecting other audio equipment
The digital audio output terminal (optical) on this
system can output Dolby Digital signals. Using an
optical digital cable, connect an AV receiver to the
digital audio output terminal (optical) on the rear of the
Media Receiver. This allows audio such as digital TV
broadcasting to be played in high quality.
Connecting an AV receiver
Media Receiver (rear view)
DIGITAL OUT
SERVICE ONLY
IN
OUT
A ANTENNA/CABLE B
IN
OUT
CONTROL
VCR
CONTROL
IN
OUT
MONITOR OUT
INPUT 2
S-VIDEO
VIDEO VIDEO
VIDEO
S-VIDEO S-VIDEO
OPTICAL
R-AUDIO-L R-AUDIO-L Y
R-AUDIO-L R-AUDIO-L Y
Audio cable
(commercially available)
If your AV receiver does not have a digital audio input
terminal (optical), connect the MONITOR OUT terminals (AUDIO) on the rear of the Media Receiver to the
audio input terminals on the AV receiver.
• When using the digital audio output terminal (opti-
cal), you need to make settings depending on your AV
receiver. For more information, see the user’s manual
for the AV receiver.
(TS)
DTV-ANTENNA
INPUT 3
IN
COMPONENT VIDEO
CB/P
B
C
B/PB
CR/P
R
CR/P
R
AC INLET
BLACK
WHITE
SYSTEM CABLE
S400
INPUT 1
Optical digital cable
(commercially available)
Switching the optical audio signal type
Set up for the DIGITAL AUDIO output terminal (OPTICAL), depending on your AV receiver.
1
Press HOME MENU.
2
Press / to select “DTV Setup”, and then press
ENTER.
3
Press / to select “Digital Audio Out”, and then
press ENTER.
AV receiver
4
Press / to select “Dolby Digital” or “PCM”, and
then press ENTER.
Item Description
PCM Always outputs in the PCM format
(factory default)
Dolby Digital For Dolby Digital encoded signals, outputs
regardless of the types of signals.
in the Dolby Digital format. For PCM
encoded signals, outputs in the PCM
format.
PDP-ELITE-Eng (65-80) 9/9/03, 11:4669
5
Press HOME MENU to exit the menu.
69
En

11 Enjoying through External Equipment
Watching a D-VHS image
What is i.LINK?
i.LINK is a digital serial interface for handling digital
video, digital audio, and other data in two directions.
i.LINK is Sony’s term for the IEEE 1394 data transport
bus. Digital AV equipment compatible with i.LINK can
be connected using a single i.LINK cable. The i.LINK
interface allows this PDP system to control one of up to
two i.LINK compatible devices (in connection) that can
be identified.
Which i.LINK devices are connectable?
For i.LINK devices, this system supports only D-VHS
recorders. The i.LINK terminals on this system cannot
be connected with other equipment such as DVD
recorders, digital video cameras, personal computers,
and PC peripheral devices because of differences in the
specifications.
When connecting a single D-VHS recorder
Media Receiver (rear view)
SERVICE ONLY
IN
OUT
A ANTENNA/CABLE B
MONITOR OUT
IN
OUT
CONTROL
VCR
CONTROL
IN
OUT
INPUT 2
S-VIDEO
VIDEO VIDEO
VIDEO
S-VIDEO S-VIDEO
DIGITAL OUT
OPTICAL
R-AUDIO-L R-AUDIO-L Y
R-AUDIO-L R-AUDIO-L Y
S400
(TS)
INPUT 1
INPUT 3
DTV-ANTENNA
IN
COMPONENT VIDEO
CB/P
B
C
B/PB
What can be recorded through i.LINK?
With D-VHS recorders connected to this system
through i.LINK, you can record only digital TV programs. You cannot record conventional TV channels
nor contents coming from external input sources and
personal computers.
Connecting D-VHS recorders
Use the i.LINK terminals when connecting D-VHS
recorders.
CR/P
R
CR/P
R
AC INLET
BLACK
WHITE
SYSTEM CABLE
(The function and performance are
the same for both terminals.)
i.LINK cable
(commercially available)
To use i.LINK, you need to
connect only an i.LINK cable;
you need not connect cables to
the video and audio terminals.
D-VHS recorder
70
En
PDP-ELITE-Eng (65-80) 9/9/03, 11:4670

When connecting two D-VHS recorders
You can connect two D-VHS recorders directly to the
i.LINK terminals on the rear of the Media Receiver.
i.LINK cables
Media Receiver D-VHS recorder
D-VHS recorder
Using i.LINK cables you can also connect up to two
D-VHS recorders in a daisy chain.
i.LINK cable
11Enjoying through External Equipment
Media Receiver
D-VHS recorder D-VHS recorder
Precautions about i.LINK connections
• Use S400 i.LINK cables that have 4-pin plugs and are
shorter than 3.5 m (11.48 feet).
• Some i.LINK devices cannot relay data when their
power is off.
• Do not make the following loop connections:
Media Receiver
D-VHS recorder D-VHS recorder
Media Receiver
PDP-ELITE-Eng (65-80) 9/9/03, 11:4671
D-VHS recorder
71
En

11 Enjoying through External Equipment
Displaying a D-VHS image
To watch a D-VHS image, press i.LINK on the remote
control unit or press INPUT on the Plasma Display to
select i.LINK.
Useful and important notification
Useful information
•D-VHS recorders connected through i.LINK can play
back digital TV programs recorded using this system.
•D-VHS recorders connected through i.LINK can
record only digital TV programs. Using i.LINK, those
recorders cannot record conventional TV channels
nor contents coming from external input sources.
• This system can be simultaneously connected with
up to two D-VHS recorders that support i.LINK. You
can control one of these D-VHS recorders (basic
functions only).
• Some D-VHS recorders connected through i.LINK
may not allow this system to control through the
control panel screen or to display images and output
sound.
•To record digital TV programs using connected D-VHS
recorders, use D-VHS tape. You cannot use VHS tape
nor S-VHS tape.
• Some D-VHS recorders connected though i.LINK may
not allow this system to play back images and sound
recorded on VHS tape, S-VHS tape, or (if with analog
signals) D-VHS tape. If this is the case, connect the
analog output terminals on the D-VHS recorder to
INPUT 1, 2, 3, or 4 terminals on this system. See
pages 65 to 67.
• This system supports the Digital Transmission Content Protection (DTCP) technology. The DTCP is a
copy protection technology that presents data coding
and device authentification.
• i.LINK may not allow copy-restricted video, audio, and
other data to be copied from one i.LINK device to
another. It also may not allow video, audio, and other
data to be transferred with equipment that does not
support the DTCP.
72
En
Precautions
• While one D-VHS recorder connected through i.LINK
is recording or playing back, do not switch on or off
the other connected D-VHS recorder (not in use) or
do not connect or disconnect the i.LINK cable from
that D-VHS recorder. Doing so can result in image
and sound interruption.
• Some D-VHS recorders that support i.LINK cannot
relay data when their power is off. Check the user’s
manual for your D-VHS recorder. This system allows
you to change the setting for data relay in the standby
mode. See “Setting up for i.LINK standby” on page
76.
PDP-ELITE-Eng (65-80) 9/9/03, 11:4672

Setting up for controlling a D-VHS recorder
You can operate the connected D-VHS recorder from
the Plasma Display that shows the control panel
screen. After making the connections, use the menu to
specify the model of the D-VHS recorder to be operated.
You can operate only a single D-VHS recorder from the
Plasma Display.
1
Press HOME MENU.
2
Press / to select “DTV Setup”, and then press
ENTER.
3
Press / to select “i.LINK Setup”, and then
press ENTER.
4
Press / to select “i.LINK List”, and then press
ENTER.
• The list of the registered D-VHS recorders
(i.LINK list) appears.
i.LINK List
Name Maker Number Status
D–VHS1 ****** ****** Connected
1/1
6
Press / to select “Connect”, and then press
ENTER.
7
Press HOME MENU to exit the menu.
• The following information appears at the right end of
the i.LINK list to indicate the connection status of the
D-VHS recorders:
Control: Data connection with the D-VHS
recorder has been established and the
recorder is ready for control.
Connected: The D-VHS recorder has been physi-
cally connected, and can be controlled
if it is selected for control.
Other: Equipment other than a D-VHS re-
corder has been physically connected
and thus cannot be controlled.
—: Currently not physically connected
11Enjoying through External Equipment
Delete All
5
Press / to select the D-VHS recorder model to
be operated, and then press ENTER.
i.LINK Setting
D–VHS1 ****** ****** Connected
Connect
Rename
Replace
Delete
PDP-ELITE-Eng (65-80) 9/9/03, 11:4673
73
En

11 Enjoying through External Equipment
Operating the control panel screen
The control panel screen appears when you press
i.LINK. It disappears when you press i.LINK again. To
select a button on the control panel screen, press /
or / , and then press ENTER on the remote control.
1
00:00:00
4
1 Shows the model and manufacture name of the D-VHS
2 Shows counter time output by the D-VHS recorder.
3 Shows the current status of the D-VHS recorder.
4 Switches on and off the D-VHS recorder.
5 Starts recording.
6 Rewinds the tape.
7 Rewinds to the start of the current program.
8 Pauses the tape.
9 Starts playing back.
0 Stops the current tape motion.
- For wards the tape.
= For wards to the start of the next program.
~ Switches the input source between i.LINK and DTV.
! Allows you to change the D-VHS recorder to be operated.
@ Shows the type of inserted video tape; D for D-VHS, S for
# Appears when any tape has been inserted.
$ Appears when the inserted tape has been write protected.
% Appears when the D-VHS recorder has been preset for
• If no i.LINK device has been connected, “No i.LINK
devices are connected.” appears. If this is the case,
connect i.LINK devices.
• If none of the connected equipment has been supported for control, you cannot execute control.
3
2
Name
Status(Play)
6
5
780 =
recorder to be operated.
After pressing this button, press
model from the list, and then press ENTER.
S-VHS, and no display for VHS.
The inserted tape cannot be used for recording when this
indicator appears.
recording and is in the standby mode.
@
$
#
D
9-
%
i.LINK/DTV
Device
/ to select the desired
~
!
Editing the i.LINK list
The i.LINK list shows all devices connected through
i.LINK interfaces. In this list, you can change the name
or order of devices or delete device information.
To change the name of a device:
1
Press / to select the desired device from the
list, and then press ENTER.
2
Press / to select “Rename”, and then press
ENTER.
i.LINK Setting
D–VHS1 ****** ****** Connected
Connect
Rename
Replace
Delete
3
Press / to change the character for the first
digit.
Rename
D–VHS1 ****** ****** Connected
Input the device name.
•You can select A to Z, 0 to 9, special codes, and
space in the order.
4
Press / to move the cursor to the second digit.
5
Press / to change the character for the second
digit.
6
Repeat steps 3 and 4 to enter up to eight digits,
and then press ENTER.
7
Press / to select OK, and then press ENTER.
D
OK Cancel
74
En
PDP-ELITE-Eng (65-80) 9/9/03, 11:4674

11Enjoying through External Equipment
i.LINK Setting
Connect
Rename
Replace
Delete
D–VHS1 ****** ****** Connected
Cancel
Delete this device?
PLASMA DISPLAY
Delete
D-VHS
Cancel
Are you sure you want to delete?
PLASMA DISPLAY
Delete
D-VHS
To change the order of devices:
1
Press / to select the desired device from the
list, and then press ENTER.
2
Press / to select “Replace”, and then press
ENTER.
i.LINK Setting
D–VHS1 ****** ****** Connected
Connect
Rename
Replace
Delete
3
Press / to select the new desired position, and
then press ENTER.
Replace
Name Maker Number Status
D–VHS1 ****** ****** Connected
D–VHS2 ****** ****** Connected
1/1
To delete information about a single device:
1
Press / to select the desired device from the
list, and then press ENTER.
2
Press / to select “Delete” and then press
ENTER.
•A confirmation message appears.
•A warning message appears if the selected
device has been preset for recording with the
timer or if its power is on. If this is the case, you
cannot delete the device that you have selected.
3
Press / to select “Delete”, and then press
ENTER.
Cancel
• The selected device is moved to the selected
position.
•A confirmation message appears.
4
Press / to select “Delete”, and then press
ENTER.
PDP-ELITE-Eng (65-80) 9/9/03, 11:4675
75
En

11 Enjoying through External Equipment
To delete information about all devices:
1
Press to select “Delete All”, and then press
ENTER.
2
Press / to select “Yes” and then press ENTER.
PLASMA DISPLAY
Are you sure you want to delete the
infomation for all devices?
Yes
•A confirmation message appears.
•A warning message appears if the selected
device has been preset for recording with the
timer or if its power is on. If you delete a device
that has been preset for recording, its all
presettings are deleted.
3
Press / to select “Yes”, and then press ENTER.
No
Setting up for i.LINK standby
Use the following procedure to enable data transfer
between multiple i.LINK devices even when the system
is in the standby mode.
1
Press HOME MENU.
2
Press / to select “DTV Setup”, and then press
ENTER.
3
Press / to select “i.LINK Setup”, and then
press ENTER.
4
Press / to select “i.LINK Standby”, and then
press ENTER.
5
Press / to select “Enable”, and then press
ENTER.
i.LINK Standby
Disable
Enable
Are you sure you want to delete?
Yes
•A confirmation message appears.
4
Press ENTER to exit the menu.
Deletion completed.
PLASMA DISPLAY
No
PLASMA DISPLAY
OK
6
Press HOME MENU to exit the menu.
•With “Enable” selected, the system relays data
between multiple i.LINK devices even when in the
standby mode; the i.LINK circuits are energized in
that mode.
•With “Disable” (factory default) selected, less power
is consumed when the system is in the standby
mode; however the system does not relay data
between multiple i.LINK devices. When i.LINK devices are not in connection, select “Disable”, resulting in less power consumption.
In standby mode
i.LINK device Media Receiver i.LINK device
No data relay
76
En
PDP-ELITE-Eng (65-80) 9/9/03, 11:4676

15
141312
9
11
10
8
7
6
5
4 321
Watching an image from a personal
computer
Connecting a personal computer
Use the PC terminals to connect a personal computer.
Media Receiver (front view)
ø 3.5 mm stereo mini-plug cable
(commercially available)
11Enjoying through External Equipment
• The PC input terminals are DDC1/2B-compatible.
•Refer to page 107 for a list of personal computer
signals compatible with the Plasma Display System.
RGB cable
(commercially available)
Personal computer
Displaying an image from a personal computer
When connecting to a personal computer, the input
signal type is automatically identified. If the personal
computer image does not come in clearly, you may
need to use Auto Setup in the menu. See page 81.
To watch an image coming from the personal computer, press PC on the remote control unit or press
INPUT on the Plasma Display to select “PC”.
Signal names for 15-pin mini D-sub connecter
(front view)
Pin No. Signal name
1 R
2 G
3 B
4 Not connected
5 Not connected
6 GND (ground)
7 GND (ground)
8 GND (ground)
9 +5V
0 GND (ground)
- Not connected
= SDA
~ HD
! VD
@ SCL
• The PC terminals cannot be used for audiovisual
equipment.
PDP-ELITE-Eng (65-80) 9/9/03, 11:4677
• A Macintosh adaptor may be required for use with
some Macintosh computers.
77
En

11 Enjoying through External Equipment
Connecting a VCR controller
Connect the supplied VCR controller to the Media
Receiver. This allows you to preset digital TV programs
for recording, using the Electronic Program Guide.
When the specified time comes, the system in the
standby mode is automatically switched on and the
specified TV program is recorded using the connected
VCR or DVD recorder.
Media Receiver (rear view)
DIGITAL OUT
(TS)
SERVICE ONLY
IN
OUT
A ANTENNA/CABLE B
MONITOR OUT
IN
OUT
CONTROL
VCR
CONTROL
INPUT 2
IN
S-VIDEO
VIDEO VIDEO
OUT
VIDEO
S-VIDEO S-VIDEO
OPTICAL
R-AUDIO-L R-AUDIO-L Y
R-AUDIO-L R-AUDIO-L Y
DTV-ANTENNA
IN
S400
INPUT 1
COMPONENT VIDEO
CB/P
B
CR/P
R
B/PB
CR/P
R
C
INPUT 3
AC INLET
BLACK
WHITE
SYSTEM CABLE
• Make sure to leave the VCR power on when presetting TV programs for recording with the VCR controller.
• Be sure to firmly connect the VCR controller to the
VCR control terminal on the rear of the Media
Receiver. If you have mistakenly connected it to the
CONTROL IN or CONTROL OUT terminal, remote
control or other operations may be disabled.
VCR
CONTROL
Position the light
emitting section on the
VCR controller cable so
that it faces the VCR.
Remote control sensor
Use the following procedure to set the manufacture of
the recording equipment:
1
Press HOME MENU.
2
Press / to select “DTV Setup”, and then press
ENTER.
3
Press / to select “VCR Control”, and then press
ENTER.
4
Press / to select the manufacture of the
recording equipment, and then press ENTER.
VCR Control
Pioneer
********
********
********
********
********
********
********
1 / 5
• The screen for recording test appears.
(Once you have positioned the VCR controller,
secure with the tape provided.)
VCR or DVD recorder
5
Check that the power to the recording equipment
is on, and insert tape into the slot.
•Insert tape you think it all right to erase its
contents. The contents will be erased because
Rec and Stop codes are output in the test.
• Check that the light emitting section on the VCR
controller cable faces the recording equipment.
6
Press ENTER to execute recording test.
• If the recording equipment fails to start and stop
recording, check and change the specified
recording equipment manufacture.
7
Press / to select “YES”, and then press
ENTER.
8
Press HOME MENU to exit the menu.
• Even if you correctly specify the manufacture of the
recording equipment, control of some models may be
disabled.
•Perform the recording test when the recording
equipment is not in recording standby or is not
recording.
• The recording test takes approximately 10 seconds.
• The PIONEER 1 (DVD recorder) has been set as the
factory default.
78
En
PDP-ELITE-Eng (65-80) 9/9/03, 11:4678

The lists of controllable recording
equipment manufactures
Manufacture Remote control type
PIONEER 1–5
PANASONIC 1–7
PHILIPS 1–6
SHARP 1–5
TOSHIBA 1–4
SAMSUNG 1–6
FISHER 1–3
GOLDSTAR 1
HITACHI 1, 2
MAGNAVOX 1
MITSUBISHI 1–7
RCA 1–6
SANYO 1–3
SONY 1–3
JVC 1–4
ZENITH 1
GRANDIENTE 1
AKAI 1
MATSUI 1
AIWA 1
ALBA 1, 2
BUSH 1
THOMSON 1
BAIRD 1
TELEFUNKEN 1
Grunding 1–3
MARANTZ 1–2
GE 1–3
YAMAHA 1–4
CURTIS MATHIS 1–3
FUNAI 1
ADMIRAL 1
KENWOOD 1–3
NEC 1, 2
WARDS 1–4
MEMOREX 1, 2
JC PENNY 1–6
11Enjoying through External Equipment
Some modes of the listed manufactures may not allow
control through the VCR controller.
PDP-ELITE-Eng (65-80) 9/9/03, 11:4679
79
En

11 Enjoying through External Equipment
Connecting control cords
Connect control codes between the Media Receiver
and other PIONEER equipment having the t logo. You
can then operate the connected equipment by sending
commands from its remote control unit to the remote
control sensor on the Media Receiver.
After the CONTROL IN terminals have been connected,
the remote control sensors on the connected equipment do not accept commands from the remote
control units. Face the remote control units to the
remote control sensor on the Plasma Display when
operating the connected equipment.
• Make sure that the power is turned off when making
connections.
• Complete all component connections before making
control cord connections.
Media Receiver (rear view)
SERVICE ONLY
IN
OUT
A ANTENNA/CABLE B
OUT
IN
CONTROL
VCR
CONTROL
IN
OUT
MONITOR OUT
INPUT 2
S-VIDEO
VIDEO VIDEO
VIDEO
S-VIDEO S-VIDEO
DIGITAL OUT
OPTICAL
R-AUDIO-L R-AUDIO-L Y
R-AUDIO-L R-AUDIO-L Y
S400
INPUT 1
(TS)
INPUT 3
DTV-ANTENNA
IN
COMPONENT VIDEO
CB/P
B
C
B/PB
CR/P
R
CR/P
R
About SR+
The CONTROL OUT terminal on the rear of the Media
Receiver supports SR+ that allows linked operations
with a PIONEER AV receiver. SR+ presents functions
such as the input switch linkage operation function and
the DSP surround mode display function. For more
information, see the user’s manual for the PIONEER AV
receiver supporting SR+.
• While in connection through SR+, the volume on
this system is temporarily minimized.
AC INLET
BLACK
WHITE
SYSTEM CABLE
IN
CONTROL
OUT
CONTROL
IN
OUT
CONTROL
IN
OUT
CONTROL
IN
OUT
80
En
PDP-ELITE-Eng (65-80) 9/9/03, 11:4680
The control cables (commercially available) are mono
sound cables with mini plugs (no resistance).

12Useful Adjustment Settings
Option
Auto Setup
Manual Setup
Adjusting image positions
(AV mode only)
Adjust the horizontal and vertical positions of images
on the Plasma Display.
1
Press HOME MENU.
2
Press / to select “Option”, and then press
ENTER.
3
Press / to select “Position”, and then press
ENTER.
4
Press / to select “H/V Position Adjust”, and
then press ENTER.
Position
H/V Position Adjust
Reset
5
Press / to adjust the vertical position or press
/ to adjust the horizontal position.
H/V Position Adjust
0 0
Adjusting image positions and clock
automatically (PC mode only)
Use Auto Setup to automatically adjust positions and
clock of images coming from a personal computer.
1
Press HOME MENU.
2
Press / to select “Option”, and then press
ENTER.
3
Press / to select “Auto Setup”, and then press
ENTER.
• Auto Setup starts.
4
Press HOME MENU to exit the menu.
• When Auto Setup is finished, “Auto Setup com-
pleted.” appears.
• Even when “Auto Setup completed.” appears, Auto
Setup may have failed, depending on conditions.
• Auto Setup may fail with a PC image composed of
similar patterns or monochrome. If not successful,
change the PC image and try again.
• Be sure to connect the computer to the Media
Receiver and switch it on before starting Auto Setup.
6
Press HOME MENU to exit the menu.
•To restore the factory defaults for all the items, press
/ to select “Reset” in step 4, and then press
ENTER. A confirmation screen appears. Press /
to select “Yes”, and then press ENTER.
• Adjustments are stored separately according to input
source.
PDP-ELITE-Eng (81-96) 9/9/03, 11:4781
81
En

12 Useful Adjustment Settings
Adjusting image positions and clock
manually (PC mode only)
Usually you can easily adjust the positions and clock of
images using Auto Setup. Use Manual Setup to optimize the positions and clock of images when necessary.
1
Press HOME MENU.
2
Press / to select “Option”, and then press
ENTER.
3
Press / to select “Manual Setup”, and then
press ENTER.
4
Press / to select the item to be adjusted, and
then press ENTER.
Manual Setup
H/V Position Adjust
Clock
Phase
Reset
0
0
5
Press / (and / ) to perform adjustment.
• Use / only when you adjust the vertical
position after selecting “H/V Position Adjust”.
6
Press HOME MENU to exit the menu.
•To restore the factory defaults for all the items, press
/ to select “Reset” in step 4, and then press
ENTER. A confirmation screen appears. Press /
to select “Yes”, and then press ENTER.
82
En
PDP-ELITE-Eng (81-96) 9/9/03, 11:4782

12Useful Adjustment Settings
AV mode
4:3
WIDE FULL
CINEMA
ZOOM
PC mode except for XGA signals
4:3
Dot by
Dot
FULL
PC mode for XGA signals
Selecting a screen size
Press SCREEN SIZE to switch among the screen size
options selectable for the type of video signals currently
received.
• Each time you press SCREEN SIZE, the selection is
switched.
• The selectable screen sizes differ depending on the
types of input signals.
AV mode
Item Description
4:3 For 4:3 “standard” pictures. A side bar appears on
each side.
FULL For 16:9 squeeze pictures.
ZOOM For 16:9 letterbox pictures. Bars may appear on
the top and bottom with some programs.
CINEMA For 14:9 letterbox pictures. Bars may appear on
the top and bottom on some programs.
WIDE In this mode pictures are progressively stretched
toward each side of the screen.
PC mode except for XGA signals
Item Description
4:3 Fills the screen without altering the input signal
aspect ratio.
FULL Full 16:9 screen display
Dot by Dot Matches input signal with same number of screen
pixels.
4:3
FULL2 FULL1
PC mode for XGA signals
(Ex. 1024 × 768 input at PRO-1110HD)
Item Description
4:3 Matches input signal with the same number of
screen pixels.
Optimized for 1024 × 768 display
FULL1 Full 16:9 screen display
Optimized for 1024 × 768 display
FULL2 For wide signal display
Use when displaying 1280 × 768 signal resolution.
• The PC mode above is for the PRO-1110HD. For the
PRO-910HD the number of panel pixels is different,
so signal processing and actual viewing conditions
will vary slightly.
PDP-ELITE-Eng (81-96) 9/9/03, 11:4783
83
En

12 Useful Adjustment Settings
Changing the brightness at both sides
of the screen (Side Mask)
With the 4:3 screen size selected for the AV mode, you
can change the brightness of the gray side masks that
appear at both sides of the screen.
1
Press HOME MENU.
2
Press / to select “Option”, and then press
ENTER.
3
Press / to select “Side Mask”, and then press
ENTER.
4
Press / to select the desired parameter, and
then press ENTER.
Side Mask
Fixed
Auto
Item Description
Fixed Always sets the same brightness for the
(factory default) gray side masks.
Auto Adjusts the brightness of the gray side
5
Press HOME MENU to exit the menu.
masks according to the brightness of
images.
84
En
PDP-ELITE-Eng (81-96) 9/9/03, 11:4784

12Useful Adjustment Settings
Sleep Timer
Remain 90min
Off
30min
60min
120min
90min
Sleep Timer
When the selected time elapses, the Sleep Timer
automatically places the system into the standby mode.
Press SLEEP to select the desired time.
• The timer starts counting.
• Each time you press SLEEP, the selection is switched
as below:
You can also use the menu to set the Sleep Timer.
1
Press HOME MENU.
2
Press / to select “Sleep Timer”, and then press
ENTER.
3
Press / to select the desired time, and then
press ENTER.
4
Press HOME MENU to exit the menu.
30 60 90
(cancel)
Off
120
(minutes)
• The factory default is “Off ”.
•To cancel the Sleep Timer, select “Off” by pressing
SLEEP.
•Five minutes before the selected time elapses, the
remaining time appears every minute.
85
En
PDP-ELITE-Eng (81-96) 9/9/03, 11:4785

12 Useful Adjustment Settings
Closed caption for conventional
TV channels
Your Plasma Display System is equipped with an
internal closed caption decoder. Closed caption is a
system which allows you to view conversations, narration, and sound effects in TV programs and home
videos as subtitles on your Plasma Display screen.
• Not all programs and videos offer closed caption.
Please look for the “N” symbol to ensure that
captions will be shown.
Activating the closed caption
1
Press HOME MENU.
2
Press / to select “Setup”, and then press
ENTER.
3
Press / to select “Closed Caption”, and then
press ENTER.
4
Press / to select “Setting”, and then press
ENTER.
5
Press / to select “On” or “On If Mute”, and then
press ENTER.
Setting
Selecting the type of closed captions
•“CC-1” or “CC-2” displays subtitles of TV dramas and
news programs while allowing a full view of the
picture.
•“T1” or “T2” superimposes on the picture other
information (e.g. TV guide, weather) that is independent of the TV in progress.
1
Press HOME MENU.
2
Press / to select “Setup”, and then press
ENTER.
3
Press / to select “Closed Caption”, and then
press ENTER.
4
Press / to select “Channel”, and then press
ENTER.
5
Press / to change the selection, and then press
ENTER.
Channel
CC-1
CC-2
TEXT-1
TEXT-2
Off
On
On If Mute
Item Description
Off Does not show closed captions.
(factory default)
On Always shows closed captions.
On If Mute Shows closed captions only while sound is
being muted.
6
Press HOME MENU to exit the menu.
• The factory default is “CC-1”.
6
Press HOME MENU to exit the menu.
86
En
PDP-ELITE-Eng (81-96) 9/9/03, 11:4786

12Useful Adjustment Settings
Analog Caption
CC-1
TEXT 2
TEXT 1
CC-2
Closed caption for digital TV channels
Your Plasma Display System is equipped with an
internal closed caption decoder also for digital TV
channels.
You can enjoy digital closed captions whenever their
services are provided. Digital closed captions allow you
to change parameters such as fonts and colors. However, some digital TV programs may provide you with
only conventional closed captions. If this is the case,
conventional closed captions are displayed.
Activating the closed caption
Use the following procedure to activate the closed
caption.
1
Press HOME MENU.
2
Press / to select “DTV Setup”, and then press
ENTER.
3
Press / to select “DTV Closed Caption”, and
then press ENTER.
4
Press / to select “Setting”, and then press
ENTER.
5
Press / to select “On” or “On If Mute”, and then
press ENTER.
Selecting the type of conventional closed
captions (for digital TV channels)
Use the following procedure to select the type of
conventional closed captions. You will watch the
selected type of closed captions when the selected
digital TV program provides only conventional closed
captions.
1
Press HOME MENU.
2
Press / to select “DTV Setup”, and then press
ENTER.
3
Press / to select “DTV Closed Caption”, and
then press ENTER.
4
Press / to select “Analog Caption”, and then
press ENTER.
5
Press / to change the selection, and then press
ENTER.
Setting
Off
On
On If Mute
Item Description
Off Does not show closed captions.
(factory default)
On Always shows closed captions.
On If Mute Shows closed captions only while sound is
6
Press HOME MENU to exit the menu.
being muted.
•For MONITOR OUT, only conventional closed caption
signals are output; digital closed caption signals are
not output.
• The factory default is “CC-1”.
6
Press HOME MENU to exit the menu.
87
En
PDP-ELITE-Eng (81-96) 9/9/03, 11:4787

12 Useful Adjustment Settings
Selecting digital closed captions
Use the following procedure to select digital closed
captions.
1
Press HOME MENU.
2
Press / to select “DTV Setup”, and then press
ENTER.
3
Press / to select “DTV Closed Caption”, and
then press ENTER.
4
Press / to select “Digital Caption”, and then
press ENTER.
5
Press / to change the selection, and then press
ENTER.
Digital Caption
Service 1
Service 2
Service 3
Service 4
Service 5
Service 6
• The factory default is “Service 1”.
6
Press HOME MENU to exit the menu.
• The Primary Caption Service is usually offered for
Service 1, and the Secondary Language Service is
usually offered for Service 2 if these services are
available.
Selecting digital closed caption parameters
Use the following procedure to change such parameters of digital closed captions as font size, font type,
foreground and background colors.
1
Press HOME MENU.
2
Press / to select “DTV Setup”, and then press
ENTER.
3
Press / to select “DTV Closed Caption”, and
then press ENTER.
4
Press / to select “Digital Caption Setup”, and
then press ENTER.
5
Press / to select the item, and then press /
to change the parameter.
Digital Caption Setup
ABCdef123
Font Size
Font Style
Foreground Color
Foreground Opacity
Background Color
Background Opacity
• The field at the bottom of the dialog box shows
how closed captions will appear.
6
Repeat step 5 as necessary, and then press
ENTER.
7
Press HOME MENU to exit the menu.
Small
Auto
Auto
Auto
Auto
Auto
88
En
PDP-ELITE-Eng (81-96) 9/9/03, 11:4788

The following table shows the parameters selectable for
each item.
Item Selection
Font Size Auto/ Small/ Standard/ Large
Font Style
1
Auto/ Font 1/ Font 2/ Font 3/ Font 4/
Font 5/ Font 6/ Font 7/ Font 8
Foreground Color
Auto/ Black/ White/ Red/ Green/ Blue/
Yellow/ Magenta/ Cyan
Foreground Opacity
Auto/ Opaque/ Translucent/ Transparent/
Flashing
Background Color
Auto/ Black/ White/ Red/ Green/ Blue/
Yellow/ Magenta/ Cyan
Background Opacity
Auto/ Opaque/ Translucent/ Transparent/
Flashing
1
Font 1 (default font)/ Font 2 (monospaced with serifs)/ Font 3
(proportionally spaced with serifs)/ Font 4 (monospaced without
serifs)/ Font 5 (proportionally spaced without serifs)/ Font 6 (casual
font)/ Font 7 (cursive font)/ Font 8 (small capitals font)
With “Auto” selected, parameters specified by the
provider are used; if not specified by the provider, the
bolded default parameters are used. If you select
parameters other than “Auto”, the selected parameters
are used regardless of provider’s specifications.
12Useful Adjustment Settings
PDP-ELITE-Eng (81-96) 9/9/03, 11:4789
89
En

12 Useful Adjustment Settings
Parental Control
(setting the V-CHIP level)
The V-CHIP is an electronic filtering device built into
your system. This tool gives parents a great degree of
control over broadcasts accessed by their children. It
allows parents to select programs judged suitable for
child viewing while blocking ones judged not suitable.
It does so automatically once you activate the V-CHIP
feature in your Plasma Display.
This tool functions for both conventional and digital TV
channels.
• The U.S. has two rating systems for viewing content:
TV Parental Guidelines and movie ratings.
• The TV Parental Guidelines work in conjunction with
the V-CHIP to help parents screen out inappropriate
television shows from their children.
• Movie ratings are used for original movies rated by
the Motion Picture Association of America (MPAA) as
watched on cable TV and not edited for television. The
V-CHIP can also be set to block MPAA-rated movies.
Voluntary movie rating system (MPAA)
Rating Description
G General audiences. All ages admitted.
PG Parental guidance suggested. Some
material may not be suitable for children.
PG-13 Parents strongly cautioned. Some material
may be inappropriate for children under
13 .
Age-Base R Restricted. Under 17 requires accompany-
ing parent or adult guardian (age varies in
some jurisdictions).
NC-17 No one 17 and under admitted.
X A rating that has now been superseded by
NC-17.
NR Not rated.
• The voluntary movie rating system only uses an agebased rating.
TV Parental Guidelines
Content
FV D L S V
Rating
TV-Y
(All children)
TV-Y7
(Directed to older children)
TV-G
Age-Base (General audience)
TV-PG
(Parental guidance suggested)
TV-14
(Parents strongly cautioned)
TV-MA
(Mature audience only) XXX
X: Content rating can be set.
(Fantasy (Sexually (Adult (Sexual (Violence)
violence) suggestive language) situation)
dialog)
X
X XXX
X XXX
Activating the Parental Control
1
Press HOME MENU.
2
Press / to select “Setup”, and then press
ENTER.
3
Press / to select “Parental Control”, and then
press ENTER.
• If you have set a password (page 95), the
password entry screen appears. Enter your 4digit password using buttons 0 – 9.
4
Press / to select “Status”, and then press
ENTER.
5
Press / to select “On”, and then press ENTER.
90
En
PDP-ELITE-Eng (81-96) 9/9/03, 11:4790
Status
Off
On
• The factory default is “Off ”.
6
Press HOME MENU to exit the menu.

12Useful Adjustment Settings
MPAA NR
View
Block
Setting the voluntary moving rating system (MPAA)
1
Press HOME MENU.
2
Press / to select “Setup”, and then press
ENTER.
3
Press / to select “Parental Control”, and then
press ENTER.
• If you have set a password (page 95), the
password entry screen appears. Enter your 4digit password using buttons 0 – 9.
4
Press / to select “MPAA Ratings”, and then
press ENTER.
5
Press / to select the desired rating, and then
press / to select “View” or “Block”.
MPAA Ratings
G
PG
PG-13
R
NC-17
X
Block
View
View
View
View
View
Blocking Not Rated (NR) TV programs
Use the following procedure to block movies not rated
by the MPAA.
1
Press HOME MENU.
2
Press / to select “Setup”, and then press
ENTER.
3
Press / to select “Parental Control”, and then
press ENTER.
• If you have set a password (page 95), the
password entry screen appears. Enter your 4digit password using buttons 0 – 9.
4
Press / to select “MPAA NR”, and then press
ENTER.
5
Press / to select “View” or “Block”, and then
press ENTER.
• The factory defaults for all the ratings are
“View”.
6
Press HOME MENU to exit the menu.
Example 1:
Changing “R” from “Block” to “View” causes “View” to
be automatically selected also for “G”, “PG”, and “PG13”.
Example 2:
Changing “R” from “View” to “Block” causes “Block” to
be automatically selected also for “NC-17” and “X”.
• The factory default is “View”.
6
Press HOME MENU to exit the menu.
91
En
PDP-ELITE-Eng (81-96) 9/9/03, 11:4791

12 Useful Adjustment Settings
Setting the TV Parental Guidelines (TV
Guidelines)
1
Press HOME MENU.
2
Press / to select “Setup”, and then press
ENTER.
3
Press / to select “Parental Control”, and then
press ENTER.
• If you have set a password (page 95), the
password entry screen appears. Enter your 4digit password using buttons 0 – 9.
4
Press / to select “TV Parental Guidelines”, and
then press ENTER.
TV Parental Guidelines
FV D L S V
TV–Y
TV–Y7
TV–G
TV–PG
TV–Y
TV–MA
5
Press / or / to select the desired cell
(rating).
6
Press ENTER to select “V” (View) or “B” (Block).
TV–Y
TV–Y7
TV–G
TV–PG
TV–Y
TV–MA
• Each time you press ENTER, the selection is
switched.
• The factory defaults for all the ratings are “V”
(View).
7
Press HOME MENU to exit the menu.
V
VV
V
V
V
V
TV Parental Guidelines
FV D L S V
V
B B
V
V
V
V
V
V
V
V
V
V
V
V
V
V
V
V
V
V
V
V
V
V
V
V
V
V
Canadian rating systems
• The TV rating systems in Canada are based on the
Canadian Radio-Television and Telecommunications
Commission (CRTC) policy on violence in television
programming.
• While violence is the most important content element
to be rated, the structure developed takes into consideration other program content like language, nudity,
sexuality and mature themes.
• When setting the V-CHIP on the Canadian system you
can chose either the Canadian English ratings or the
Canadian French ratings.
Canadian English ratings
Rating Description
E Exempt: Includes news, sports, documen-
taries and other information programming;
talk shows, music videos, and variety
programming.
C Children: Intended for younger children
under the age of 8 years. Pays careful
attention to themes that could threaten
their sense of security and well-being.
C8+ Children over 8 years old: Contains no
portrayal of violence as the preferred,
acceptable, or only way to resolve conflict;
nor encourage children to imitate dangerous acts which they may see on the
screen.
Age-Base
G General: Considered acceptable for all age
PG Parental Guidance: Intended for a general
14 + Over 14 Years: Could contain themes
18 + Adults: Intended for viewers 18 years and
groups. Appropriate viewing for the entire
family, contains very little violence,
physical, verbal or emotional.
audience, but may not be suitable for
younger children (under the age of 8)
because it could contain controversial
themes or issues.
where violence is one of the dominant
elements of the storyline, but it must be
integral to the development of plot or
character. Language usage could be
profane and nudity present within the
context of the theme.
older and might contain depictions of
violence, which while related to the
development of plot, character or themes,
are intended for adult viewing. Could
contain graphic language and portrayals of
sex and nudity.
•Blocking a low rated program will cause all higher
rated programs to be blocked.
92
En
PDP-ELITE-Eng (81-96) 9/9/03, 11:4792

12Useful Adjustment Settings
Canadian French Ratings
G
8ans+
E
13ans+
16ans+
18ans+
View
View
View
View
Block
View
Canadian French ratings
Rating Description
E Exempt programming.
G General: All ages and children, contains
8ans+ General but inadvisable for young children:
Age-Base
13ans+ Over 13 years: Could contain scenes of
16ans+ Over 16 years: Could contain frequent
18ans+ Over 18 years: Only for adult viewing.
minimal direct violence, but may be
integrated into the plot in a humorous or
unrealistic manner.
May be viewed by a wide public audience,
but could contain scenes disturbing to
children under eight who cannot distinguish between imaginary and real situations. Recommended for viewing with
parent.
frequent violent scenes and therefore
recommended for viewing with parent.
violent scenes and intense violence.
Could contain frequent violent scenes and
extreme violence.
Setting Canadian English ratings
1
Press HOME MENU.
2
Press / to select “Setup”, and then press
ENTER.
3
Press / to select “Parental Control”, and then
press ENTER.
• If you have set a password (page 95), the
password entry screen appears. Enter your 4digit password using buttons 0 – 9.
4
Press / to select “Canadian English Ratings”,
and then press ENTER.
5
Press / to select the desired rating, and then
press / to select “View” or “Block”.
Setting Canadian French ratings
1
Press HOME MENU.
2
Press / to select “Setup”, and then press
ENTER.
3
Press / to select “Parental Control”, and then
press ENTER.
• If you have set a password (page 95), the
password entry screen appears. Enter your 4digit password using buttons 0 – 9.
4
Press / to select “Canadian French Ratings”,
and then press ENTER.
5
Press / to select the desired rating, and then
press / to select “View” or “Block”.
• The factory defaults for all the ratings are
“View”.
6
Press HOME MENU to exit the menu.
Canadian English Ratings
C
C8+
G
PG
14+
18+
• The factory defaults for all the ratings are
“View”.
6
Press HOME MENU to exit the menu.
PDP-ELITE-Eng (81-96) 9/9/03, 11:4793
Block
View
View
View
View
View
93
En

12 Useful Adjustment Settings
Temporarily deactivating the V-CHIP Block
You can temporarily deactivate the V-CHIP Block. When
the V-CHIP Block is working and censors TV programs
or VCR or DVD contents to be blocked, a password
entry screen appears.
Please Input Your Password.
To temporarily deactivate the V-CHIP block, enter a 4digit password that you have set using the Home menu.
Image and sound muting is quitted.
If you press ENTER instead of entering the password,
the password entry screen disappears.
Reactivating the V-CHIP Block
Executing one of the following procedures reactivates
the V-CHIP Block.
Method 1:
Make a selection (“On” or “Off”) for “Status” under
“Parental Control” in the menu. See page 90.
Method 2:
Make a selection for “MPAA Ratings”, “MPAA NR”, “TV
Parental Guidelines”, “Canadian English Ratings” or
“Canadian French Ratings” under “Parental Control” in
the menu. See pages 91 to 93.
Method 3:
Switch off the power to the system.
• The password entry screen stays only for one minute.
Pressing ENTER causes the password entry screen
to appear again.
94
En
PDP-ELITE-Eng (81-96) 9/9/03, 11:4794

Programming a password
Change Password
Please Input New Password.
Reconfirm New Password.
****
(AV mode only)
You can program a password to prevent other persons
from changing especially Parental Control settings.
Setting and changing the password
Use the following procedure to newly set or change the
password:
1
Press HOME MENU.
2
Press / to select “Setup”, and then press
ENTER.
3
Press / to select “Password”, and then press
ENTER.
• If you have set a password, the password entry
screen appears. Enter your 4-digit password
using buttons 0 – 9.
• The factory default is “1234”.
4
Press / to select “Change Password”, and then
press ENTER.
5
Enter a 4-digit password to be newly set, using
buttons 0 – 9.
6
Enter the same password that you have entered in
step 4, using buttons 0 – 9.
7
Press HOME MENU to exit the menu.
•Take a note of the newly set password and keep it
handy.
12Useful Adjustment Settings
Change Password
Please Input New Password.
Reconfirm New Password.
PDP-ELITE-Eng (81-96) 9/9/03, 11:4795
95
En

12 Useful Adjustment Settings
Resetting the password
1
Press HOME MENU.
2
Press / to select “Setup”, and then press
ENTER.
3
Press / to select “Password”, and then press
ENTER.
• The password entry screen appears. Enter your
4-digit password using buttons 0 – 9.
4
Press / to select “Reset”, and then press
ENTER.
PLASMA DISPLAY
Resets password.
No
Yes
5
Press / to select “Yes”, and then press ENTER.
6
Press HOME MENU to exit the menu.
• The above procedure will reset the password to the
factory default (1234).
Cut along the dotted line and file after reading and filling out.
We suggested you write down your password so you don’t forget it.
PRO-1110HD/PRO-910HD
Your password No.:
96
En
PDP-ELITE-Eng (81-96) 9/9/03, 11:4796
If you forget the password
When the message “Please Input Your Password” is
displayed in step 3 above, press the ENTER button on the
remote control unit and hold it down for 3 seconds or
longer.
The password reverts to “1234”.

13Useful Features
Learning function of the remote
control unit
You can operate the connected AV products (AV Receiver, Cable Box, SAT tuner, VCR, DVD, DVD recorder,
LD) using the learning function of your remote control
unit. This remote control unit has a function that can
memorize each remote control code.
2 to 5 cm (0.8 to 2.0 inches)
Remote control Remote control of
(Supplied accessory) AV product
Using the learning function
1
Slide the Mode switch to match the device whose
remote control signal you want to be learned.
2
Press EDIT/LEARN and 2 at the same time.
•The LED flashes.
3
Press a button to be learned.
• The LED lights up.
•For the functions that can be learned, see pages
100 to 105.
• When learning is finished, the LED starts
flashing again.
4
Press EDIT/LEARN again to exit the Learn mode.
•To exit the Learn mode halfway, press EDIT/LEARN
again.
• If the Mode switch selection is changed when in the
Learn mode, the Learn mode is cancelled.
• If no operation is performed for more than one
minute, the Learn mode is cancelled.
• It takes about 2 seconds to finish code transmission.
Do not interrupt it halfway. Wait until the LED flashes
again.
•You can reset all learned codes to the factory defaults. When not in the Learn mode, press and hold
TVa, and then press D and k at the same time.
PDP-ELITE-Eng (97-105) 9/9/03, 11:4797
97
En

13 Useful Features
Presetting manufacture codes
1
Slide the Mode switch to match the device to
which you want to preset the remote control
signal.
2
Press EDIT/LEARN and 1 at the same time.
• The LED flashes.
3
Press 0 – 9 to enter the manufacture code. See
page 99.
•Preset mode is finished once the LED no longer
lights up.
•To exit the Edit mode halfway, press EDIT/LEARN
again.
• If the Mode switch selection is changed when in the
Edit mode, the Edit mode is cancelled.
• If no operation is performed for more than one
minute, the Edit mode is cancelled.
• When you enter a code not listed, the LED flashes
quickly.
• If the table on page 99 does not include your desired
manufacturer or the remote control does not work,
you can make the memory learn its signal by the
Learn mode.
• The initial mode is “000” (PIONEER).
98
En
PDP-ELITE-Eng (97-105) 9/9/03, 11:4798

Manufacture codes
CABLE/SAT
000 PIONEER1(CABLE) PIONEER PIONEER(DVD)
001 PIONEER2(CABLE) FISHER PANASONIC(DVD)
002 JERROLD1(CABLE) FISHER2 SAMSUNG(DVD)
003 JERROLD2(CABLE) FISHER3 SONY(DVD)
004 JERROLD3(CABLE) GOLDSTAR TOSHIBA(DVD)
005 JERROLD4(CABLE) HITACHI JVC(DVD)
006 JERROLD5(CABLE) HITACHI2 PIONEER(DVD-RECORDER)
007 JERROLD6(CABLE) HITACHI3 PIONEER2(DVD-RECORDER)
008 JERROLD7(CABLE) MAGNAVOX2 PIONEER3(DVD-RECORDER)
009 JERROLD8(CABLE) MITSUBISHI PANASONIC(DVD-RECORDER)
010 JERROLD9(CABLE) MITSUBISHI2 PANASONIC2(DVD-RECORDER)
01 1 JERROLD10(CABLE) MITSUBISHI3 PANASONIC3(DVD-RECORDER)
012 S.A.1(CABLE) MITSUBISHI4 PHILIPS(DVD-RECORDER)
013 S.A.2(CABLE) MITSUBISHI5 SHARP(DVD-RECORDER)
014 S.A.3(CABLE) MITSUBISHI6 SHARP2(DVD-RECORDER)
015 S.A.4(CABLE) PANASONIC TOSHIBA(DVD-RECORDER)
016 ZENITH1(CABLE) PANASONIC2 TOSHIBA2(DVD-RECORDER)
017 ZENITH2(CABLE) PANASONIC3
018 ZENITH3(CABLE) RCA
019 RCA2
020 PIONEER(SAT) RCA3 PIONEER(LD)
021RCA1(SAT) SANYO KENWOOD(LD)
022RCA2(SAT) SANYO2 PANASONIC1(LD)
023SONY(SAT) SANYO3 PANASONIC2(LD)
024 SHARP PHILIPS(LD)
025 SHARP2 RCA(LD)
026 SHARP3 SONY(MDP)
027 SONY(BETA) SONY(LD)
028 SONY(VHS)
029 SONY(8mm)
030TOSHIBA
03 1 JVC
032 JVC2
033 JVC3
034 JVC4
035 JVC5
036 ZENITH
037MITSUBISHI(J-3)
038SHARP(J-2)
039PANASONIC(J-3)
040TOSHIBA(J-3)
041 GRANDIENTE
042 AKAI
043PIONEER2
044 SANYO4
045 MATSUI
046 AIWA
047 ALBA81
048 BUSH
049 THOMSON
050BAIRD
05 1 TELEFUNKEN
052 ALBA
VCR DVD/DVR
CABLE/SAT
053Grundig1
054Grundig2
055Grundig3
056 SONY2
057 SONY3
058 SONY4
059 RCA4
060 PHILIPS
061 PHILIPS2
062 PHILIPS3
063 PHILIPS4
064 PHILIPS5
065 PHILIPS6
066 SAMSUNG
067SAMSUNG2
068 SAMSUNG3
069 SAMSUNG4
070 SAMSUNG5
071 SAMSUNG6
072 MARANTZ
073 MARANTZ2
074 GE
075 GE 2
076 GE 3
077 YAMAHA
078 YAM A HA2
079 YAMAHA3
080 YAMAHA4
081 CURTIS_MATHIS
082 CURTIS_MATHIS2
083 CURTIS_MATHIS3
084 FUNAI
085 ADMIRAL
086 KENWOOD
087 KENWOOD2
088 KENWOOD3
089 NEC
090 NEC2
091 NEC3
092 NEC4
093 WARDS
094 WARDS2
095WARDS3
096 WARDS4
097 MEMOREX
098 MEMOREX2
099 JC_PENNY
10 0 J C _PENNY2
101 J C _PENNY3
102 J C _PENNY4
103 J C _PENNY5
104 J C _PENNY6
VCR DVD/DVR
13Useful Features
PDP-ELITE-Eng (97-105) 9/9/03, 11:4799
99
En

13 Useful Features
Using the remote control unit to
control other devices
Mode switch
(with “TV”
selected)
Receiver control buttons
When a Pioneer receiver is connected to the display,
the receiver can be operated using buttons 1 to 3.
When a non-Pioneer receiver is connected to the
display, the signals for 1 to 3 must first be learned
before operating. See page 97.
1 RECEIVER a (STANDBY/ON)
Tu rns the receiver power on and off.
2 RECEIVER INPUT
Selects the input source connected to the receiver.
3 RECEIVER VOL +/–
Adjusts the receiver volume level. Press VOL + to
increase the volume and VOL – to decrease it.
• (RECEIVER) eMUTING
Allows the remote control unit to learn receiver’s
mute signal. Use this button when the mode switch
is set to a position other than TV.
• The color-highlighted buttons on the remote control
can learn the control signal from another device’s
remote control.
1
2
3
100
En
PDP-ELITE-Eng (97-105) 9/9/03, 11:47100
 Loading...