

Page 1

HDTV PROJECTION MONITOR
PRO-730HDI
PRO-530HDI
Operating Instructions
Page 2

FEATURES
g
Progressive Scan/HDTV monitor
All SDTV and HDTV signals are converted to 1080i and displayed at
high resolution.
HDMI (High-Definition Multimedia Interface) with
Copy Protection system
The combination of High-Definition Multimedia Interface (HDMI) and
High-bandwidth Digital Content Protection (HDCP) is important for
viewing copy-protected digital contents through SAT/CATV BOX or
DVD player. DIGITAL input terminal receives the signal in the form of
digital information. In this way, all signals coming into this interface
have a very high resolution and less noise compared to an analog
interface.
Dual System Component Input for NTSC/
Progressive
Connection to a DVD player using the component output terminals
makes possible a high picture-quality display, superior to that of a SVIDEO terminal connection. This also handles high resolution
component input (1080i, 480p), which will function as an interface
for high-quality images in future.
Dual Tuner (Split Screen and CH Search screen
function)
Two TV tuners are provided, making it possible to split the screen
vertically in two areas in order to display moving images
simultaneously on each of them. In addition, the channel search
function makes it possible to check and perform other functions etc.,
on the program that you choose to run in the background, while
viewing the foreground program. This adds remarkable convenience
when you are concerned with viewing two programs.
Pioneer PureCinema III Format Converter
An advanced and exclusive I/P (Interlace/Progressive) third generation
format converter called “PureCinema III”, delivers a high-resolution
progressive picture (480p) or Interlaced picture(1080i). *This is USER
SELECTABLE
It reproduces film material in a very smooth and film-like image.
This is perfect technology for movie lovers.
Anti-Reflective Tinted Protection Panel
The accompanying protective panel is AR (Anti-Reflective) coated
and tinted.
This is not only to protect the screen, but to present a more natural
and high contrast image with less light reflection. This AR coating is
very durable against scratching.
Lens System for HDTV
The adoption of a specialized lens system for high-resolution HDTV
which faithfully reproduces HDTV 1080i signals allows for highly colorsaturated images to be displayed at high resolution. Also, by
incorporating an “achromatic coated” lens for the blue CRT, the
picture image is reproduced with less halo and appears sharp.
Reference Theater mode and PRO mode
<Reference Theater Mode>
This mode reproduce film material just like a real film image. By
cutting video enhancement circuits, the picture becomes more natural
and looks film-like.
<PRO Mode>
This mode offers pro level video adjustment to the user. You can go
into several areas such as: LTI (Luminance Transient Improvement),
Gamma, CONTRAST EXP, SHARP MODE, White Balance.
Fully Illuminated Remote Control Unit
A fully illuminated universal remote control is used that makes it
possible to operate other devices. Remote operations can thus be
performed easily even in dark rooms and similar environments.
Multi-Point Convergence System
Convergence of the red, green, blue guns* in the TV is critical to a
good picture. Thanks to new convergence system digital technology,
not only can the center of the screen be adjusted, so can an amazing
72 other points across the entire viewing area. This ensures color
accuracy throughout the screen. The adjustment is easily done from
the remote control. (*guns = cathode ray tubes)
Program Block (V-CHIP)
You can block selected programs based on the established rating
system for television programs and movies. The rating systems are
defined below:
<U.S.A. RATING SYSTEM>
The TV parental Guidelines are used to rate
<TV-Y>, <TV-Y7>, <TV-G>, <TV-PG>, <TV-14> and <TV-MA>.
The Motion Picture Association of America(MPAA) guidelines are used
to rate movies: <G>, <PG>, <PG-13>, <R>, <NC-17>, <X> and <NR>.
<CANADIAN RATING SYSTEM>
The Canadian English Language Rating System is used to rate
television programming: <C>, <C8+>, <G>, <PG>, <14+> and <18+>.
The Canadian French Language Rating system is used to rate
television programming: <G>,<8+>,<13+>,<16+> and <18+>.
In order to block programming you feel is inappropriate, rating limits
can be set on both systems using the remote control and a password.
Definitions:
SDTV Standard Definition Television
HDTV High Definition Television
CH TV channel
television programming:
Read and understand these 'Operating Instructions'
before operating your Monitor.
Follow the 'IMPORTANT SAFETY INSTRUCTIONS
AND WARNINGS' section and all the warnings on
the product.
2
This HDTV monitor has the
capability to display an HDTV
(1080i) picture in its 16 x 9 viewing
area.
HDMI, the HDMI logo and High-Definition Multimedia Interface
are trademarks or re
istered trademarks of HDMI Licensing LLC.
Page 3
Thank you for purchasing this PIONEER HDTV Projection
Monitor.
Please read the precautionary instructions enclosed with these
operating instructions please do so before proceeding.
After learning how to operate the Projection Monitor, be sure
to keep this manual handy for future reference.
[For U.S. model]
IMPORTANT NOTICE H006AEn
The serial number for this equipment is located in the Rear
panel. Please write this serial number on your enclosed
warranty card and keep it in a secure area. This is for your
security.
In this manual, we refer to the 'HDTV PROJECTION MONITOR',
as the 'Projection Monitor' or the 'Monitor'.
Note on the SPLIT screen and SEARCH screen functions
The SPLIT screen and SEARCH screen functions provided in
this monitor are intended for private viewing only.
Use of the above video processing functions for profitmaking
purpose or for public viewing (clubs, hotels, etc.) without prior
authorization from the transmitter and/or owner of the video
program (s) may be an infringement of existing copyright laws.
INTRODUCTION
WARNING: Handling the cord on this product or cords
associated with accessories sold with the product will
expose you to lead, a chemical known to the State of
California and other governmental entities to cause cancer
and birth defects or other reproductive harm.
Wash hands after handling.
NOTICE ON ADVERSE EFFECTS TO TV TUBE
Image Burn-in : Displaying the same images on your Monitor (such as still or paused images, TV/video games,
close-captioning, computer programs, on-screen displays, or other images with static or virtually static portions)
for a prolonged period of time may cause permanent residual images to appear on your Monitor.
Avoid displaying the same image continuously over a long period of time. If the same image is displayed
continuously for several hours, or for shorter periods of time over several days, a permanent after-image may
remain on the screen due to burning of the phosphorous materials contained in your Monitor. Such images
may become less noticeable if moving images are later displayed, but they will not disappear completely. For
Games, please select the Game Mode (page 52), and do not view static or virtually static images on your
Monitor for more than two hours. After displaying static or virtually static images on your Monitor, it is
recommended that you view a normal moving picture in the "WIDE" or "FULL" screen setting for three (3)
times longer than the time the static or virtually static images were displayed.
3
Page 4
The following symbols are found in this
manual and on the labels on the product.
They alert the operators and service
personnel of this equipment to potentially
dangerous conditions.
This symbol refers to a hazard or unsafe
practice which can result in severe personal
injury or death.
WARNING
CAUTION
This symbol refers to a hazard or unsafe
practice which can result in personal injury
This symbol indicates an action that is
prohibited.
or property damage.
WARNING
IMPORTANT SAFETY INSTRUCTIONS AND WARNINGS
• Read all of these instructions.
• Keep these instructions for later use.
• Follow all warnings and instructions marked on the Monitor.
FOR YOUR PERSONAL SAFETY
1. This Monitor is equipped with a
polarized alternating current line
plug (a plug having one blade
wider than the other).
This plug will fit into the power
outlet only one way. This is a
safety feature.
If you are unable to insert the plug
fully into the outlet, try reversing
the plug. If the plug should still fail
to fit, contact your electrician to
replace your obsolete outlet. Do
not defeat the safety purpose of
the polarized plug.
2. If the power cord or plug becomes
damaged or frayed, unplug this
Monitor from the wall outlet and
refer to qualified service
personnel for servicing.
3. Do not overload wall outlets and
extension cords as this can result
in fire or electrical shock.
4. Do not allow anything to rest on
or roll over the power cord, and
do not place the Monitor where
the power cord maybe subject to
traffic or abuse. This may result
in electrical or fire hazard.
5. Do not attempt to service this
Monitor yourself as opening or
removing covers may expose you
to dangerous voltage or other
hazards. Refer all servicing to
qualified personnel.
6. Never push the objects of any kind
into this Monitor through cabinet
slots as they may touch
dangerous voltage points or short
out parts that could result in a fire
or electric shock. Never spill liquid
of any kind on the Monitor.
7. If the Monitor has been dropped
or the cabinet has been damaged,
unplug this Monitor from the wall
outlet and refer to qualified service
personnel for servicing.
8. If liquid has been spilled into the
Monitor, unplug the Monitor from
the wall outlet and refer servicing
to qualified service personnel.
4
Page 5
9. Do not subject your Monitor to
impact of any kind. Be particularly
careful not to damage the screen
surface.
11-1. Do not place this Monitor on an
unstable, uneven or an inclined
location. The Monitor may
overturn, causing serious injury
(to a person), and serious damage
10. Unplug the Monitor from the wall
to the appliance.
outlet before cleaning. Do not use
liquid cleaners or spray-type
cleaners. Use a damp cloth for
cleaning.
11-2. Be careful when placing the
Monitor on a cart to move it.
Quick stops, excessive force, and
uneven surfaces may cause the
Monitor and cart to overturn.
PROTECTION AND LOCATION OF YOUR HDTV PROJECTION MONITOR
12. • Do not use the Monitor near
water, for example, near a
bathtub, washbowl, kitchen sink,
or laundry tub, in a wet basement,
or near a swimming pool, etc.
• Never expose the Monitor to rain
water.
If the Monitor system has been
exposed to rain or water, unplug
the Monitor from the wall outlet
and refer servicing to qualified
service personnel.
13. Choose a place where light (artificial
or sunlight) does not shine directly
on the screen.
14. Avoid dusty places since the
buildup of dust inside the Monitor's
chassis may result in the
malfunctioning, when high
humidity persists.
15. • The Monitor has slots, or
openings in the cabinet for
ventilation purposes to ensure the
reliable operation of the Monitor,
and to protect it from overheating.
These openings must not be
blocked or covered.
• Never cover the slots or openings
with cloth or other material.
• Never block the bottom
ventilation slots of the Monitor by
placing it on a bed, sofa, rug, etc.
• Never place the Monitor near or
over a radiator or heat register.
• Never place the Monitor in a built-
in enclosure such as a bookcase,
unless proper ventilation is
provided.
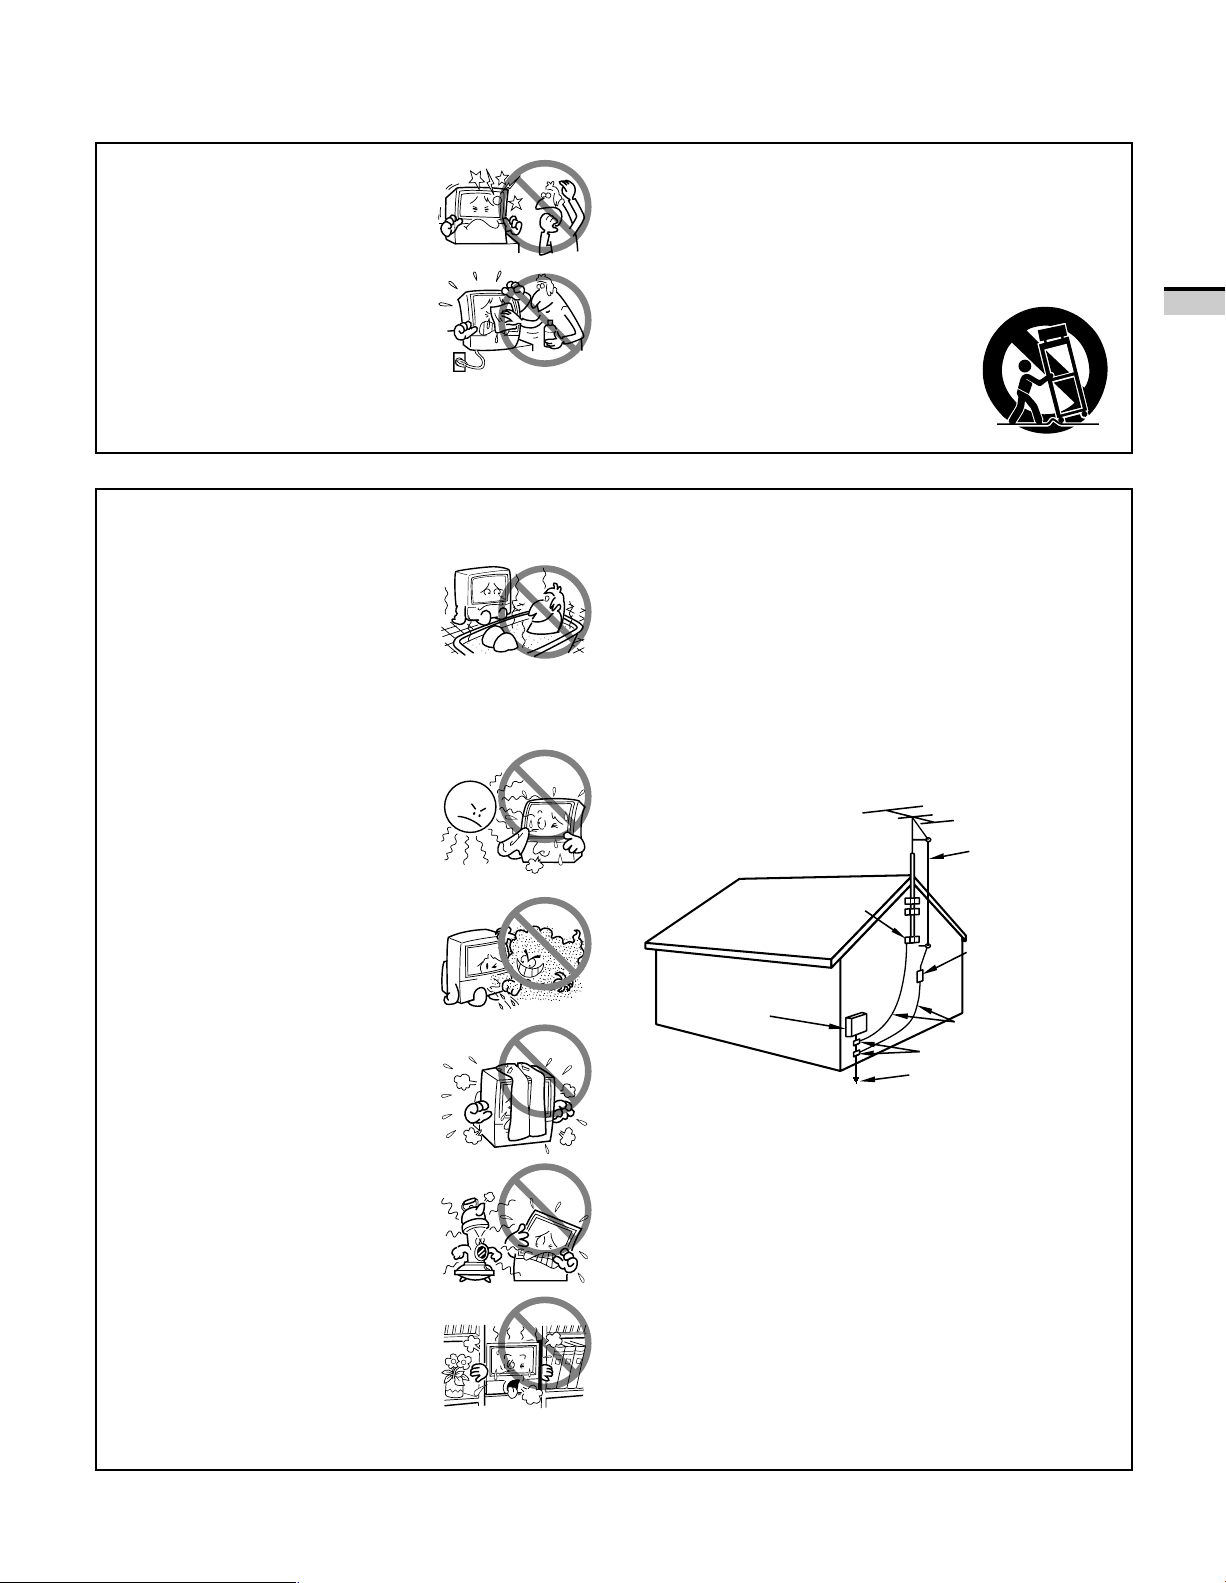
16. If an outside antenna is connected through other
equipment, be sure the antenna system is grounded so
as to provide protection against voltage surges and builtup static charges. In the U. S. A., section 810 of the
National Electrical Code, ANSI/NFPA 70, provides
information on proper grounding of the mast and
supporting structure, grounding of the lead-in wire to
an antenna-discharge unit, size of grounding
conductors, location of antenna-discharge unit,
connection to grounding electrode, and requirements
for the grounding electrode.
GROUND
CLAMP
ELECTRIC
SERVICE
EQUIPMENT
FIG. A
EXAMPLE OF ANTENNA GROUNDING IN
NATIONAL ELECTRICAL CODE INSTRUCTIONS
NEC-NATIONAL
ELECTRICAL CODE
ANTENNA
LEAD IN WIRE
ANTENNA
DISCHARGE UNIT
(NEC SECTION 810-20)
GROUNDING CONDUCTORS
(NEC SECTION 810-21)
GROUNDING CLAMPS
POWER SERVICE GROUNDING
ELECTRODE SYSTEM
(NEC ART 250, PART H)
INTRODUCTION
5
Page 6
17. An outdoor antenna system
should not be located in the
vicinity of overhead power lines/
electric lights or power circuits, or
where it can fall onto such power
lines or circuits. When installing
an outdoor antenna system,
extreme care should be taken to
keep it from touching such power
lines or circuits as contact with
them might be fatal.
18. For added protection during a
OPERATION OF YOUR HDTV PROJECTION MONITOR
19. The Monitor should be operated
only from the type of power
source indicated on the marking
label. If you are not sure of the type
of power supply at your home,
consult your dealer or local power
company.
20. If you are unable to restore normal
operation by following the
detailed procedure in your
operating instructions, unplug it
from the wall outlet and refer to
qualified service personnel for
servicing. Do not adjust other
controls than those described in
this manual. Improper
adjustments may result in
damage and will often require
extensive work by a qualified
technician to restore the Monitor
to normal operation.
21. If your Monitor is to remain
unused for a period of time, for
instance, when you go on a
holiday, turn the Monitor 'off' and
unplug it from the wall outlet.
24. It is normal for some Monitor to
FOR SERVICING AND MODIFICATION
25. Do not use attachments not
26. When replacement parts are
27. Upon completion of any service
IF THE HDTV PROJECTION MONITOR
DOES NOT OPERATE PROPERLY
22. If you are unable to restore normal
operation by following the
detailed procedure in your
operating instructions, do not
attempt any further adjustment.
Unplug the Monitor and call your
dealer or service technician.
lightning storm, or when it is left
unattended and unused for long
periods of time, unplug the
Monitor from the wall outlet and
disconnect the antenna. This will
prevent damage due to lightning
and power-line surges.
make occasional snapping or
popping sounds, particularly
when being turned on or off. If the
snapping or popping is
continuous or frequent, unplug
the Monitor and consult your
dealer or service technician.
recommended by the Monitor's
manufacturer as they may result
in the risk of fire, electrical shock
or injury to persons.
required, be sure the service
technician uses replacement parts
specified by the manufacturer that
have the same characteristics as
the original part. Unauthorized
substitutions may result in fire,
electrical shock, or injury.
or repairs to the Monitor, ask the
service technician to perform
routine safety checks to determine
that the Monitor is in a safe
operating condition.
23. Whenever the Monitor is
damaged or fails, or there is a
distinct change in performance,
unplug the Monitor and have it
checked by a professional service
technician.
6
Page 7

CONTENTS
INTRODUCTION
HOW TO USE THESE OPERATING INSTRUCTIONS ..................... 8
INSTALLING THE MONITOR ........................................................ 9
HOW TO ATTACH THE PROVIDED FRAME COVER .................... 10
HOW TO REMOVE THE PROTECTIVE SCREEN .......................... 11
BASIC OPERATIONS
BEFORE USE .............................................................................. 12
CONNECTING THE ANTENNA ................................................... 14
CONNECTING VIDEO/AUDIO EQUIPMENT ................................ 16
FRONT PANEL FUNCTIONS ....................................................... 20
REMOTE CONTROL UNIT FUNCTIONS ..................................... 22
TO WATCH TV ............................................................................ 24
CHECKING THE MENU ............................................................... 26
AUTO CHANNEL PRESET .......................................................... 28
CONVERGENCE ADJUSTMENT ................................................ 30
BASIC FUNCTIONS
PROGRAM BLOCK (V. CHIP) FUNCTION .................................... 32
CHANGING PASSWORD ............................................................ 39
CHANGING SCREEN SIZE .......................................................... 41
MULTI-SCREEN FUNCTION ....................................................... 44
CLOSED CAPTION DECODE FUNCTION .................................... 46
CHANGING CHANNEL SET UP .................................................. 47
PICTURE ADJUSTMENTS .......................................................... 52
CHANGING SCAN MODE ........................................................... 63
SOUND ADJUSTMENTS ........................................................... 64
DIGITAL INTERFACE ................................................................... 68
MULTI-POINT CONVERGENCE ADJUSTMENT .......................... 73
VARIOUS FUNCTIONS
CONNECTION WITH RECEIVER (1) ............................................. 75
CONNECTION WITH RECEIVER (2) ............................................. 78
CONNECTING THE SYSTEM REMOTE CONTROL ..................... 80
REMOTE CODE SET UP .............................................................. 81
OTHERS
MENU INDEX ............................................................................. 92
TROUBLESHOOTING ................................................................. 94
SPECIFICATIONS ........................................................................ 96
7
Page 8
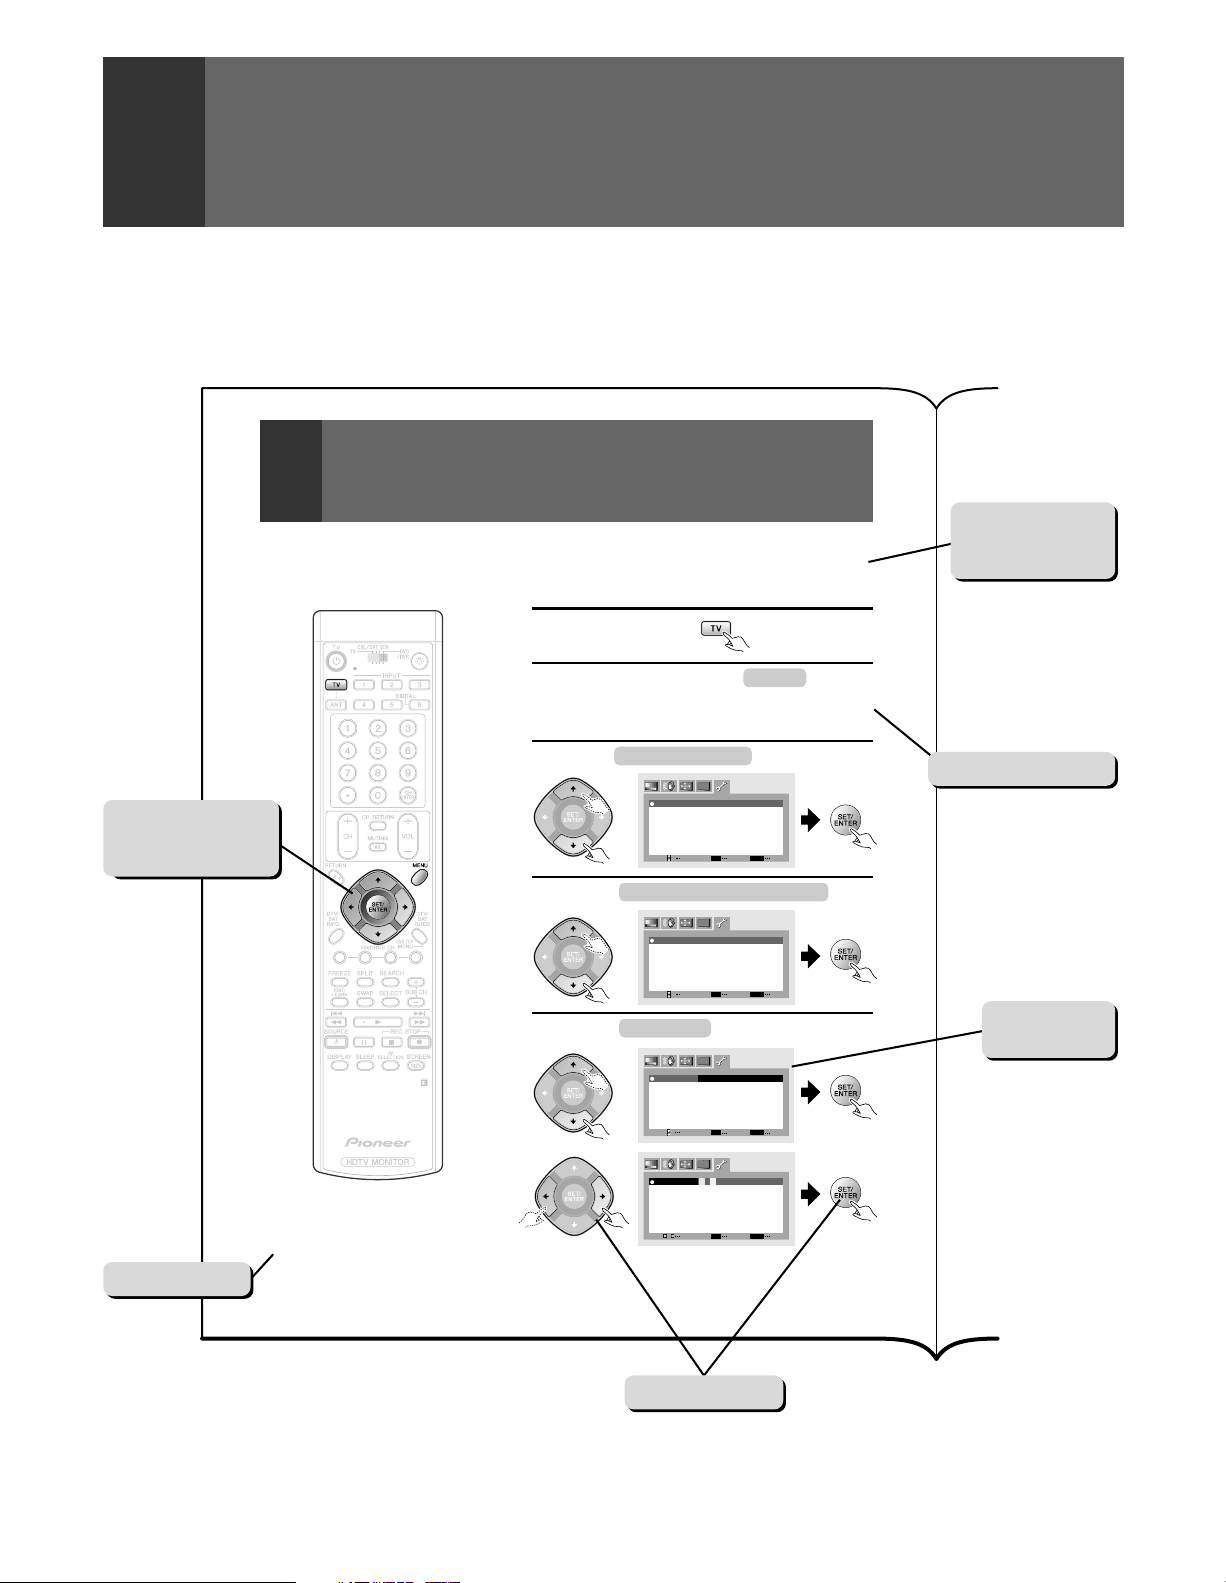
HOW TO USE THESE OPERATING
INSTRUCTIONS
The following page is an example of the way that basic operating instructions are shown in this manual.
The explanation method varies from page to page.
* The screen illustrations may be different from the actual screen display.
The button(s) that
is/are used is/are
shown in dark gray.
AUTO CHANNEL PRESET
The broadcast frequencies that can be received depend on your area.
Memorize the broadcast stations that can be received in your area in the
presets.
Select TV.
1
Press MENU and select SET UP
2
the | or \ button and then pressing «
button. (Refer to page 26.)
Select CHANNEL SET UP in the same way.
3
Select AUTO CHANNEL PRESET .
4
Select ANTENNA , then select A or B.
5
NOTES:
• The CHANNEL SET UP cannot be selected unless
the function is set up for TV.
• Failure to connect antenna cable in this procedure
will result in selection of a single TV channel.
c
c
SET UP
CHANNEL SET UP
CONVERGENCE
PROGRAM BLOCK
CHANGE PASSWORD
SYSTEM I N/OUT
DIG ITAL INTERFACE
SET
SELECT
SET
c
c
CHANNEL SET UP
AUTO CHANNE L PRESE T
ADD/DEL
CHANNEL
FAVOR ITE
CHANNEL
EXIT
SET
SELECT
SET
c
c
AUTO CHANNE L
ANTENNA:A
TV/CABLE MODE :
AUTO PRESET
EXIT
AUTO CHANNE L
ANTENNA: AB
TV/CABLE MODE :
AUTO PRESET
EXIT
PRESET
START
SET
SELECT
SET
c
c
PRESET
START
SET
SELECT
SET
CATV
CATV
MENU
MENU
MENU
MENU
Explanation of the
function on this
page.
by using
Operating procedure
END
END
Screen during
operation
END
END
Precautions etc.
8
28
Buttons used
Page 9
INSTALLING THE MONITOR
INSTALLATION PRECAUTIONS:
• Keep away from magnetic fields
The picture may be distorted if strong magnetic fields are
nearby. External speakers should be set at least 2 feet (60cm)
away from the Projection Monitor. Electric fans and other
motor driven appliances and toys may also be sources of
magnetism.
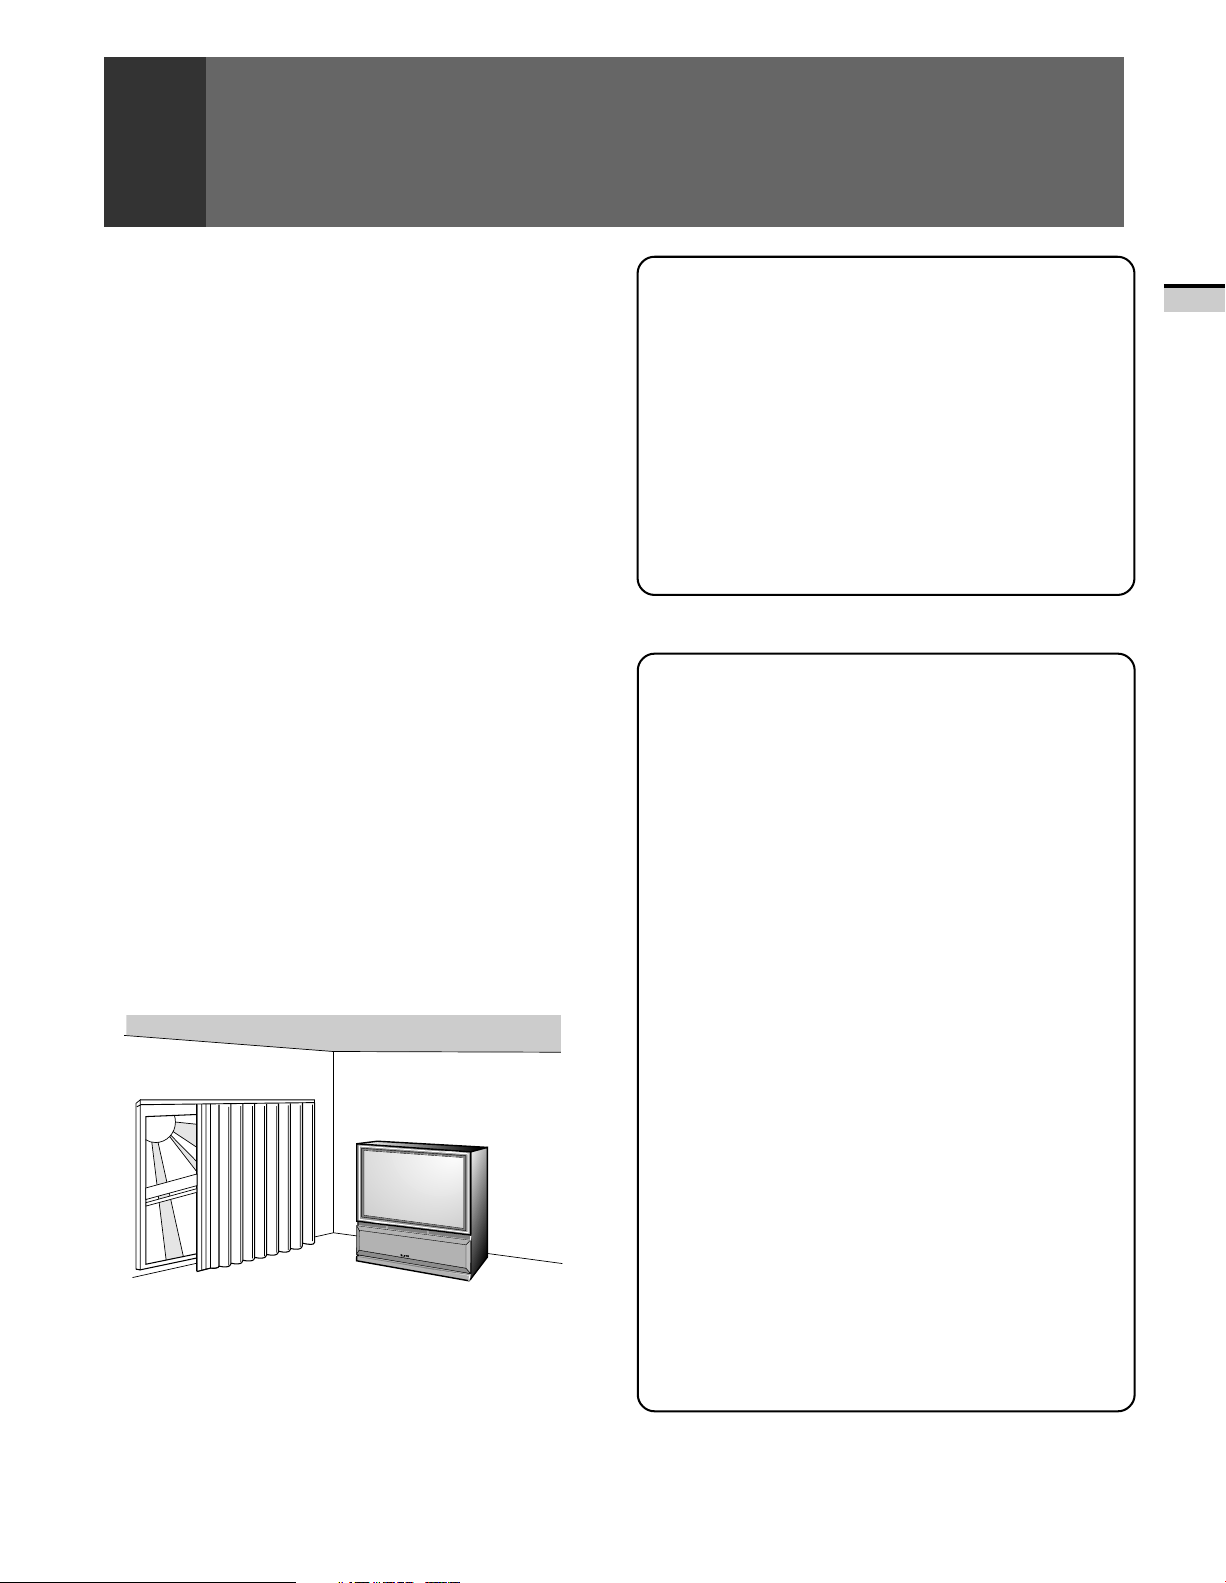
• Bright light or direct sunlight will dull the picture. Position
the Projection Monitor so that the screen faces away from
windows.
• While the Projection Monitor is operating, it is cooled by
airflow through ventilation holes in the rear and bottom.
Therefore, avoid placing it in a location where the cooling
airflow is hindered (e. g. against a wall).
• Avoid places subject to extremely high temperatures or
humidity, or to temperatures of 41°F (5°C) or lower. Also
avoid dusty places.
• If setting the Projection Monitor on a floor made of soft
material, make sure that the floor will not damaged by the
weight of the Projection Monitor.
• Do not put the Projection Monitor on a surface that is tilted,
unsteady or prone to shake or vibrate. A shaky or slanted
platform is dangerous.
• Cover shiny surfaces (floor and walls) with non reflective
materials (carpet, rugs, wallpaper, etc.).
OPERATING PRECAUTIONS
Optimum viewing distance
10 to 23 feet is the range recommended for viewing comfort.
Adjust room illumination
Excessively bright or dim lighting may strain your eyes. Draw
the curtains if necessary to shut out direct sunlight.
Condensation and picture blurring
• If the room temperature suddenly rises (or if the Projection
Monitor is moved from a cool place to a hot place),
condensation may form on the lenses resulting in picture
distortion or color fading. If this occurs, simply wait a while
(with the power switch ON) and the condensation will
disappear.
• A gradual change in temperature can prevent condensation
from forming.
CARE OF YOUR PROJECTION MONITOR
DO NOT:
• Do not use strong cleansers, solvents, polishes, or chemically
treated cloths to clean the screen or cabinet.
• Do not touch or scratch the screen.
• Do not fasten or place rubber or vinyl items on the Monitor.
• Do not stick adhesive tape onto the Monitor.
• Do not put any object on the Monitor.
DO:
• Use a soft cloth to dust the screen and cabinet.
• Handle the screen with care to avoid scratches or damages.
• Ask your dealer or a Pioneer authorized service center to
clean the interior of the monitor in your area if the picture
brightness is too low even with the max. level. This may be
caused by dust buildup inside.
USAGE GUIDELINES & PRECAUTIONS
All phosphor-based screens can be affected by
displaying static or virtually static images for a prolonged
period of time. After-image and permanent effects on
the screen can be avoided by taking some basic
precautions. By following the recommendations listed
below, you can ensure longer and satisfactory results
from your television.
• Whenever possible, avoid continuously displaying
static or virtually static images on your Monitor
(e.g., still images, TV/video games, closecaptioning, computer programs, or other images
with static or virtually static portions).
• Avoid viewing the On-Screen Display for extended
periods from a digital tuner, DVD player, VCR and
all other components.
• Do not leave the same picture freeze-framed or
paused continuously over a long period of time
when using the still picture mode from VCR, DVD
player, or other component.
• Images which have very bright areas and very dark
areas side by side should not be displayed for a
prolonged period of time.
• When playing a game, the "GAME" mode setting
(page 52) within "Picture Adjustment Settings" is
strongly recommended. It is also recommended
that such be limited to less than two (2) hours at a
time.
• After displaying static or virtually static images
on your Monitor, it is recommended that you view
a normal moving picture in the "WIDE" or "FULL"
screen setting for three (3) times longer than the
time the static or virtually static images were
displayed.
INTRODUCTION
9
Page 10
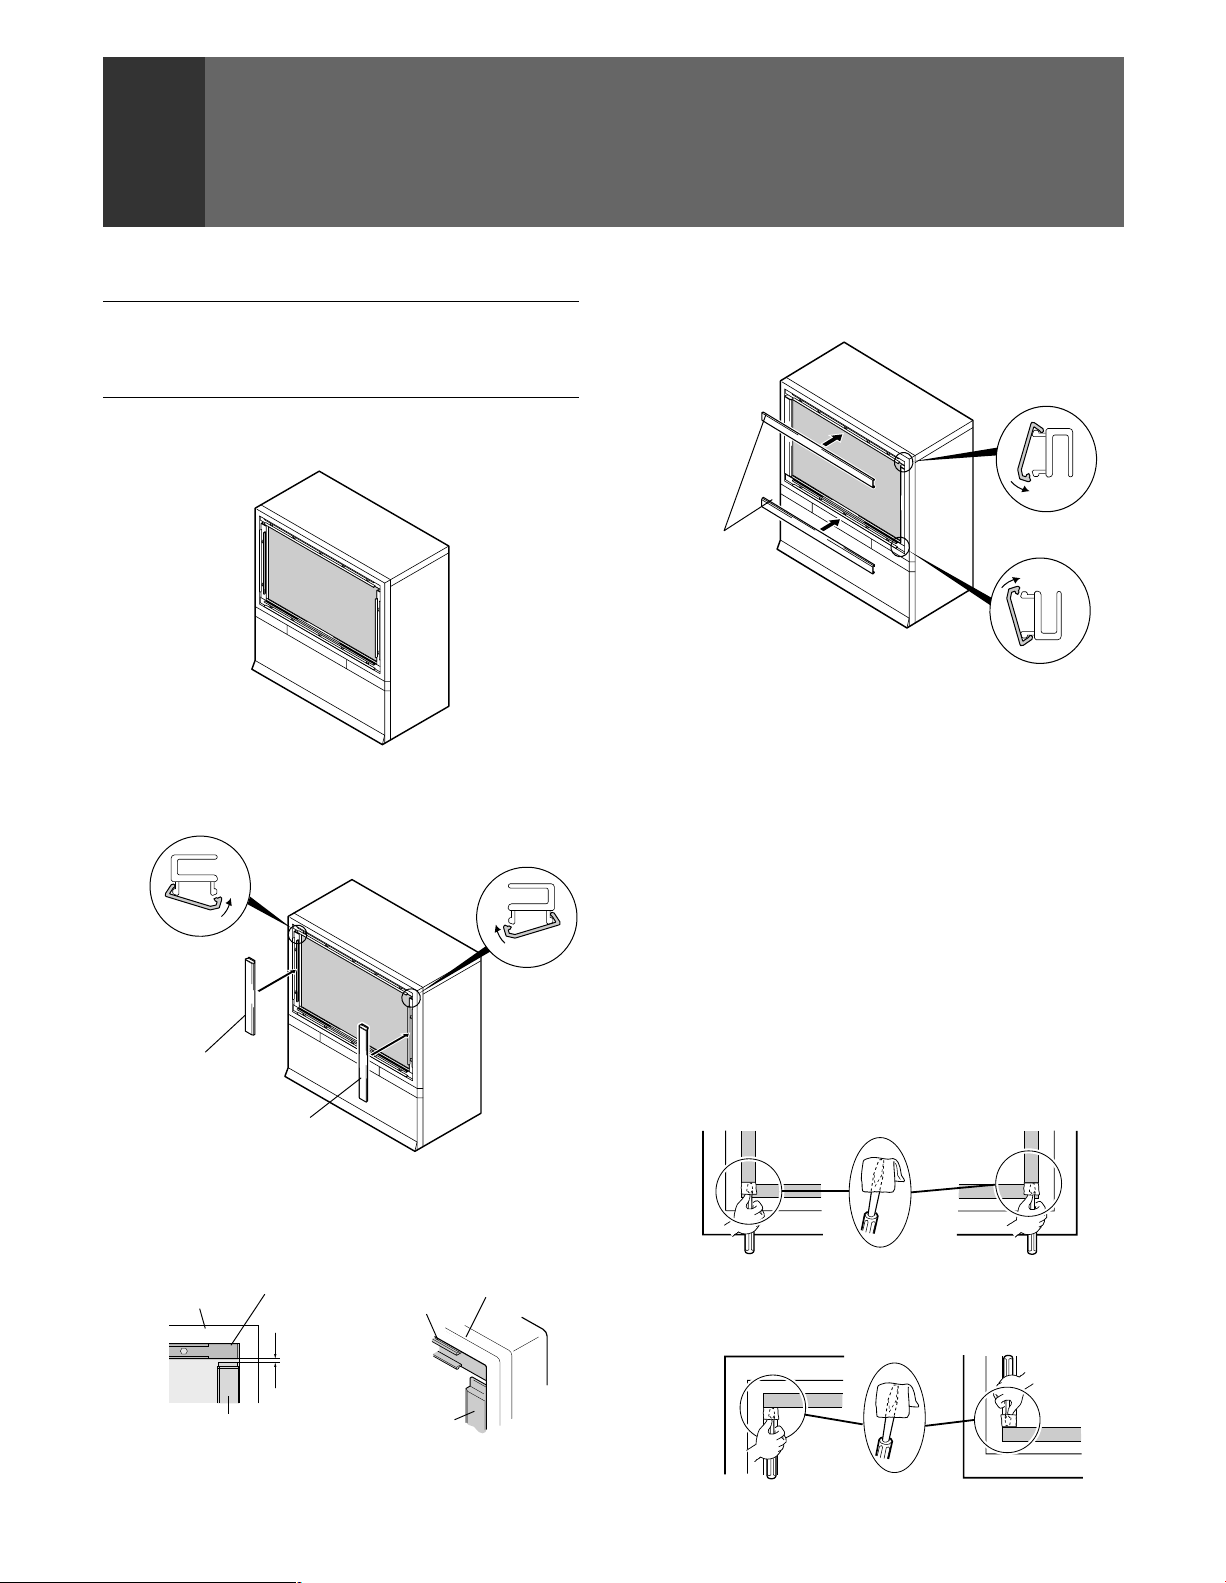
HOW TO ATTACH THE PROVIDED
FRAME COVER
ATTACH THE FRAME COVER BEFORE USING THE MONITOR.
PARTS INCLUDED FOR FRAME COVER INSTALLATION:
2 SIDE FRAME COVERS (L, R) (TRIMS) (short)
2 FRAME COVERS (TRIMS) (long)
HOW TO ATTACH THE FRAME COVER
1. Attaching the side frame covers.
Push in the side frame cover from the outside along the
groove on the panel frame until you hear a click.
2. Attaching the upper and lower frame covers
Push in the upper and lower frame covers from the outside
along the groove on the panel frame until you hear a click.
Attach
Frame cover
Attach
NOTES FOR CARE AND CLEANING OF SCREEN:
• Do not hit or throw anything onto the protective screen, as a
damaged protective screen may cause injury.
• If the protective screen surface is dirty, wipe it with a cloth
dipped in warm water and then wrung out. Wipe it dry with
a soft, dry cloth.
• Never use paint thinner or other cleaners to clean the
protective screen as they may contain harmful chemicals
that will damage the finish of the screen.
Attach
Attach
Side frame cover (L)
Side frame cover (R)
Attach side frame cover along the aluminium edge guards
leaving a space of approximately 0 to 1/32 in. (0 to 1 mm)
from the upper panel frame.
Screen frame
Side frame cover
Upper panel frame
Upper panel
frame
0 to 1 mm
(0 to 1/32 in.)
Side frame
cover
Screen frame
HOW TO REMOVE THE FRAME COVER
Remove the frame cover by the following procedure.
1 Prepare a flat–blade screw driver (large) and a small and
thick cloth.
2 Wrap the flat–blade screw driver into the end of the side
frame covers (left and right) and remove it using a lever
principle. Be sure to remove them from the bottom as
shown in the figure.
Side frame cover (L) Side frame cover (R)
3 Remove the upper and lower frame covers by the same
procedure as in 2, gently.
Upper frame cover Lower frame cover
10
Page 11
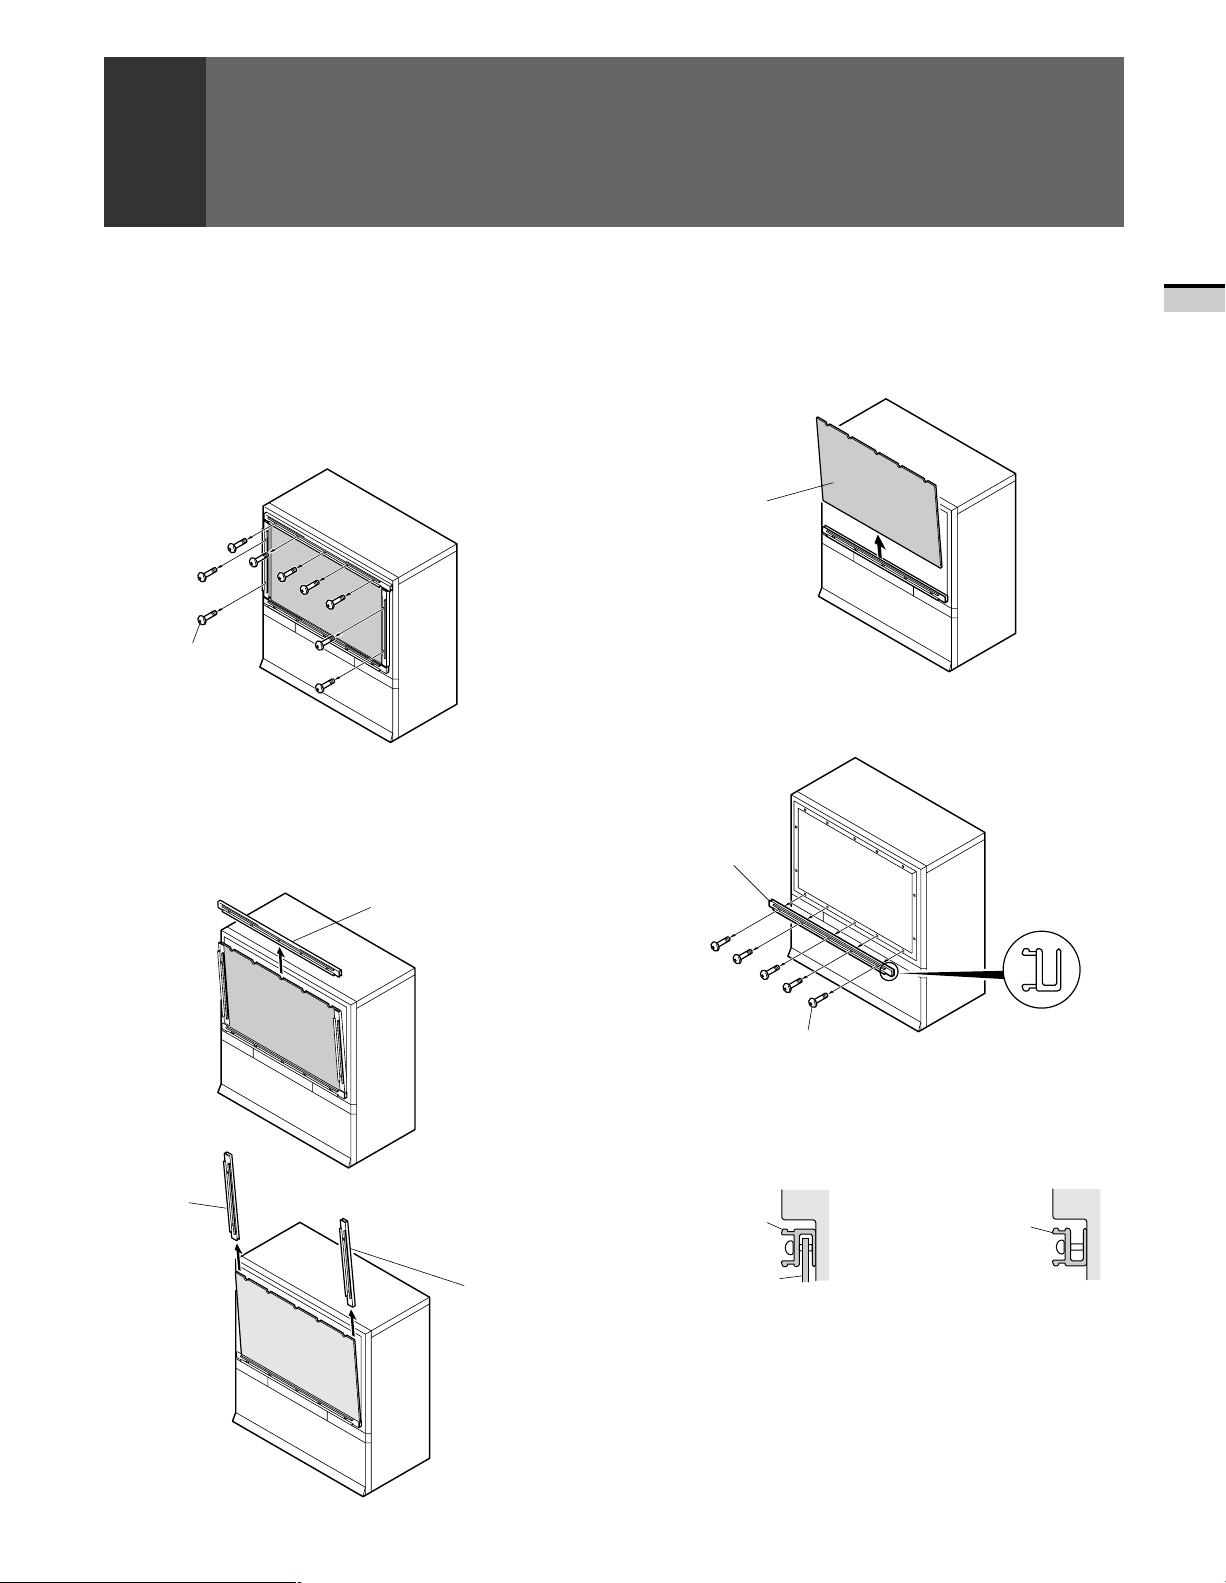
HOW TO REMOVE THE PROTECTIVE
SCREEN
The protective screen is attached when the monitor is shipped to protect the display. We do not recommend that you remove it, but
if you have to remove it, do so following the procedure shown below.
INTRODUCTION
If you decide remove the protective screen.
1. Remove the left, right, upper, and lower frame covers.
2. Remove the screws from the upper panel frame and side
panel frames. (Not remove the screw from the lower panel.)
Screw
3. While holding the screen in place, remove the upper panel
frame and side panel frames.
CAUTION:The panel frames are made of aluminum, so to
protect them from scratches, be extremely careful not to
strike them with the rim of the screen frame.
Upper panel frame
4. Remove the protective screen from the lower panel frame.
Protective
screen
5. Remove the screws from the lower panel frame.
Lower
panel frame
Side view
Side panel
frame (L)
Side panel
frame (L)
Screw
6. Reattach upper, lower and side panel frames as indicated
then follow on HOW TO ATTACH THE FRAME COVER.
<UPPER SIDE VIEW> <UPPER SIDE VIEW>
Panel frame
Protective screen
When the protective screen is
attached.
Panel frame
When the protective screen is not
attached.
(Attach the panel frames reversed
as shown in the figure.)
11
Page 12

BEFORE USE
Before you watch the TV, perform the following procedure.
UHF VHF
Connect the cables of the VHF antenna
and UHF antenna to the ANTENNA A
terminal. (See pages 14 and 15)
Mixer
A
Connect the CATV converter
to the ANTENNA B terminal.
(See pages 14 and 15)
CATV
converter
Connect the power cord to the
AC wall socket.
Turn on the MAIN POWER
button.
When the MAIN POWER is on, the red STANDBY
indicator lights up. In this state, the POWER
STANDBY/ON button or the TV Power button of
the remote control unit can be used to turn on and
off the Monitor.
B
ANTENNA
/CABLE
STANDBY
Red indicator
ON
MAIN POWER
◊B√¿≥??ÙÛ◊B√¿≥??ÙÛ
STANDBY/ON
POWER
12
Page 13

Inserting batteries into the remote control unit
1. Open the
battery cover.
2. Insert batteries
(two AA size
batteries supplied with the
product).
• Place batteries with their terminals corresponding to the (+) and (–) indicators
in the battery compartment.
3. Close the battery
cover.
Incorrect use of batteries may lead to leakage or rupture.
Always be sure to follow these instructions.
A. Never mix new and used batteries.
B. Batteries of the same size may have different voltages
depending on their type. Do not mix different types
of batteries.
C. Insert batteries so that the plus (+) and minus (–) sides
are aligned according to the markings in the battery
case.
D. When not using the remote control unit for a long
period of time (1 month or more), remove the batteries
from the remote control unit to prevent leaking of
battery fluid. If battery liquid has leaked, thoroughly
wipe the inside of the case unit all liquid is removed,
and then insert new batteries.
E. Do not charge, short, disassemble or throw the
provided batteries in a fire.
CAUTION
BEFORE USE
BASIC OPERATIONS
Remote control operation range
30˚
30˚
23 feet (7m)
• Furniture and other obstacles may block the infrared light
beam so that it cannot reach the sensor behind the Projection
Monitor's screen.
• Performance of the remote control unit is adversely affected
by strong fluorescent light. Keep such lights away from the
screen.
F. When disposing of used batteries, please comply with
governmental regulations or environmental public
instruction’s rules that apply in your country or area.
Battery replacement
Replace the batteries when any of the following phenomena
is observed.
• The transmitting LED does not blink even when the TV Power
button is pressed.
• The remote control operation range has reduced.
When replacing the batteries, prepare new batteries before
removing the old batteries.
Be sure to close the battery case cover after battery
replacement.
NOTE:
• Even when batteries are removed, learned commands remain
in memory for about 15 minutes.
• If you remove the batteries, and press any button, the memory
is erased in a few seconds.
13
Page 14
CONNECTING THE ANTENNA
• A good color picture depends on a good TV signal. So does
good multichannel (stereo program and SAP) sound. Ask
your dealer for advice on how to install your external antenna
to receive the best possible signal.
• If you subscribe to Cable TV or have a central antenna for
your building, you will not need an external antenna.
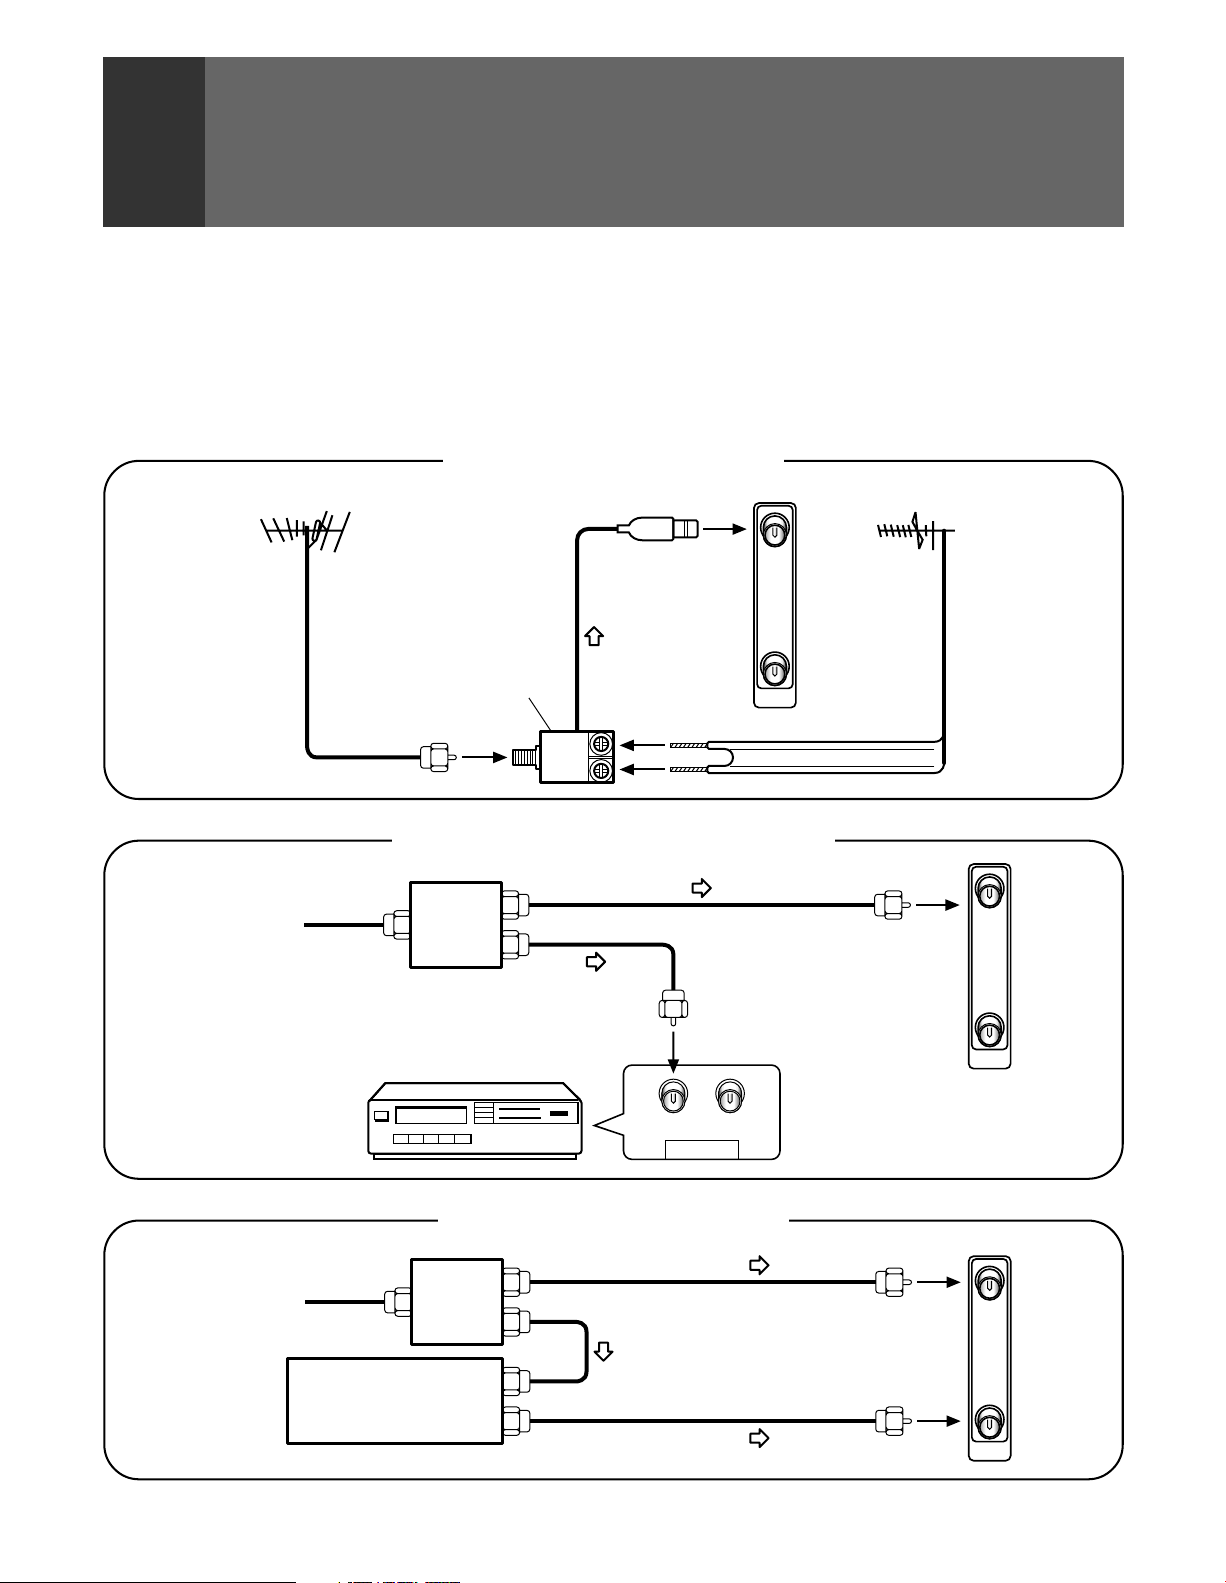
Connecting VHF/UHF antenna
VHF antenna
U/V mixer
VHF
Connecting VHF/UHF antenna with VCR
UHF
Connect the TV signal source to your Monitor properly.
Use a 75-ohm coaxial cable with an F-type connector and
connect the cable as shown in the illustration.
UHF antenna
A
B
ANTENNA
/CABLE
Antenna
or
Cable TV
Cable TV
Splitter
Splitter
CATV converter
VCR
VCR
OUTIN
ANTENNA
Connecting the CATV converter
A
B
ANTENNA
/CABLE
A
B
ANTENNA
/CABLE
14
Page 15
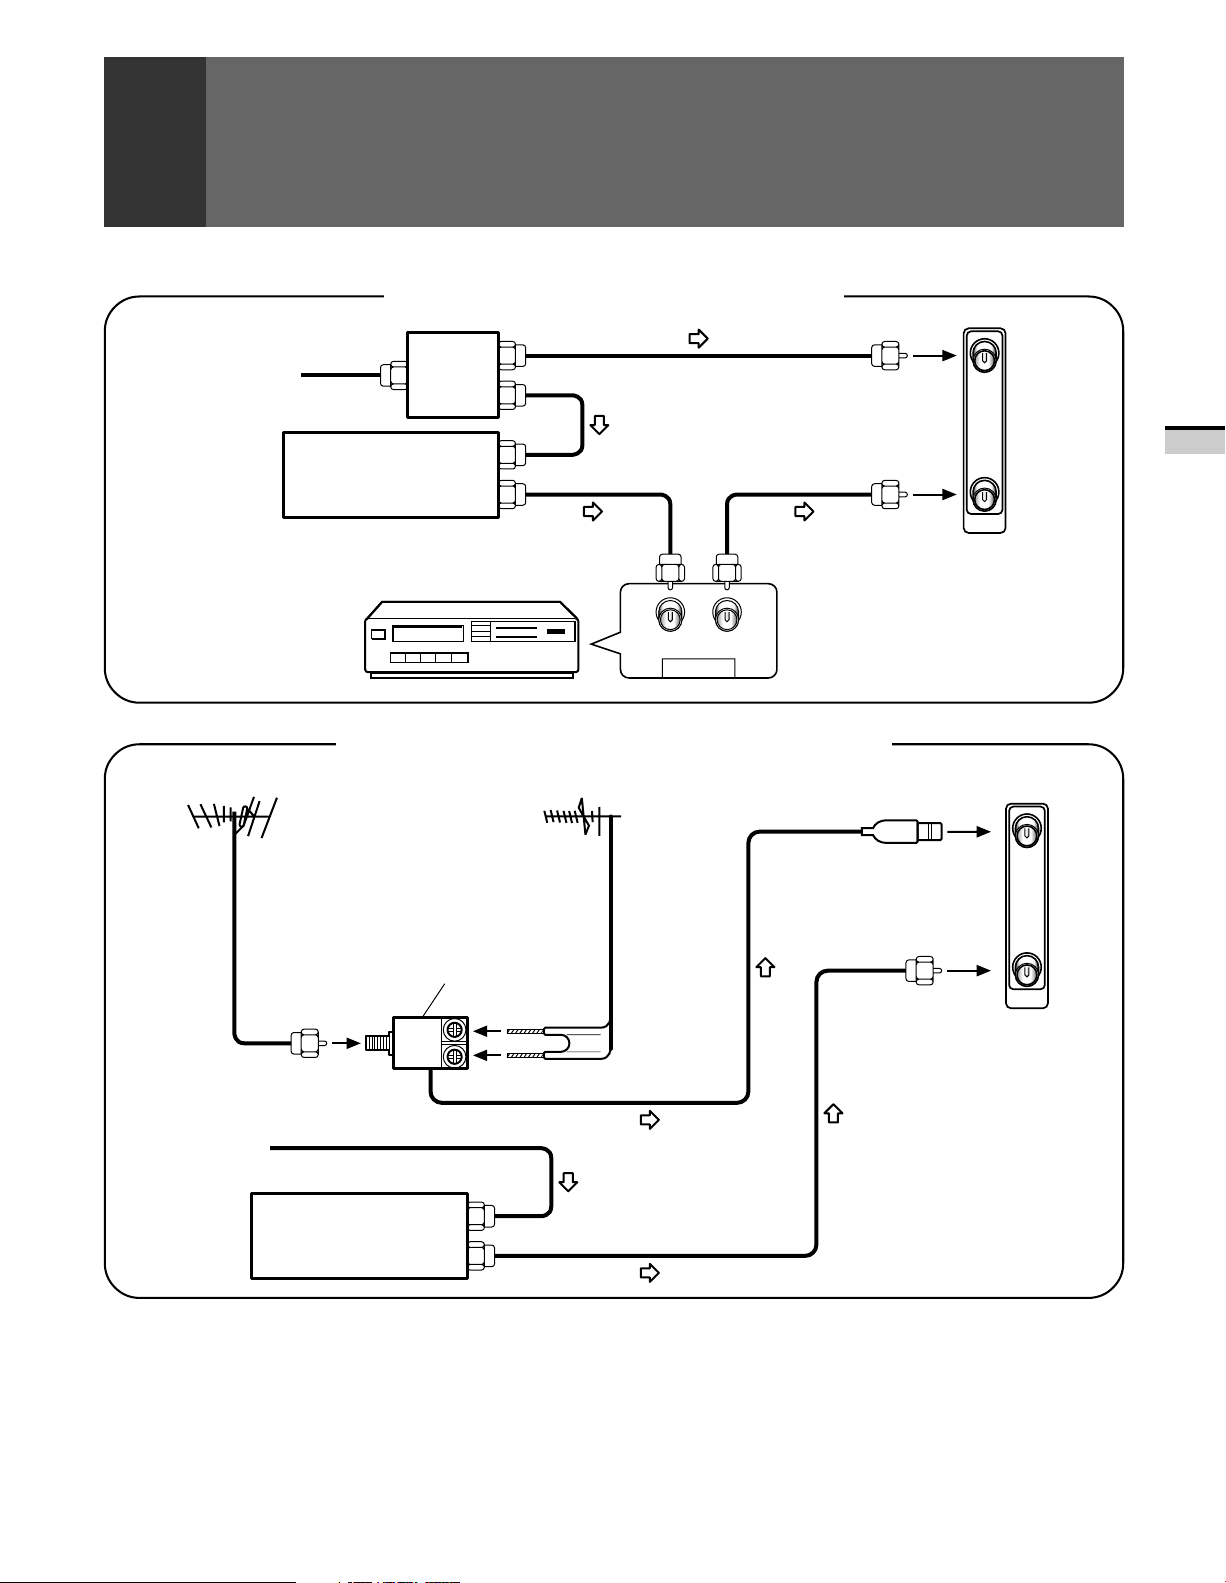
Connecting the CATV converter with VCR
CONNECTING THE ANTENNA
Cable TV
VHF antenna
Splitter
CATV converter
VCR
VCR
OUTIN
ANTENNA
Connecting VHF/UHF antenna and CATV converter
UHF antenna
U/V mixer
A
B
ANTENNA
/CABLE
A
B
ANTENNA
/CABLE
BASIC OPERATIONS
Cable TV
VHF
CATV converter
UHF
15
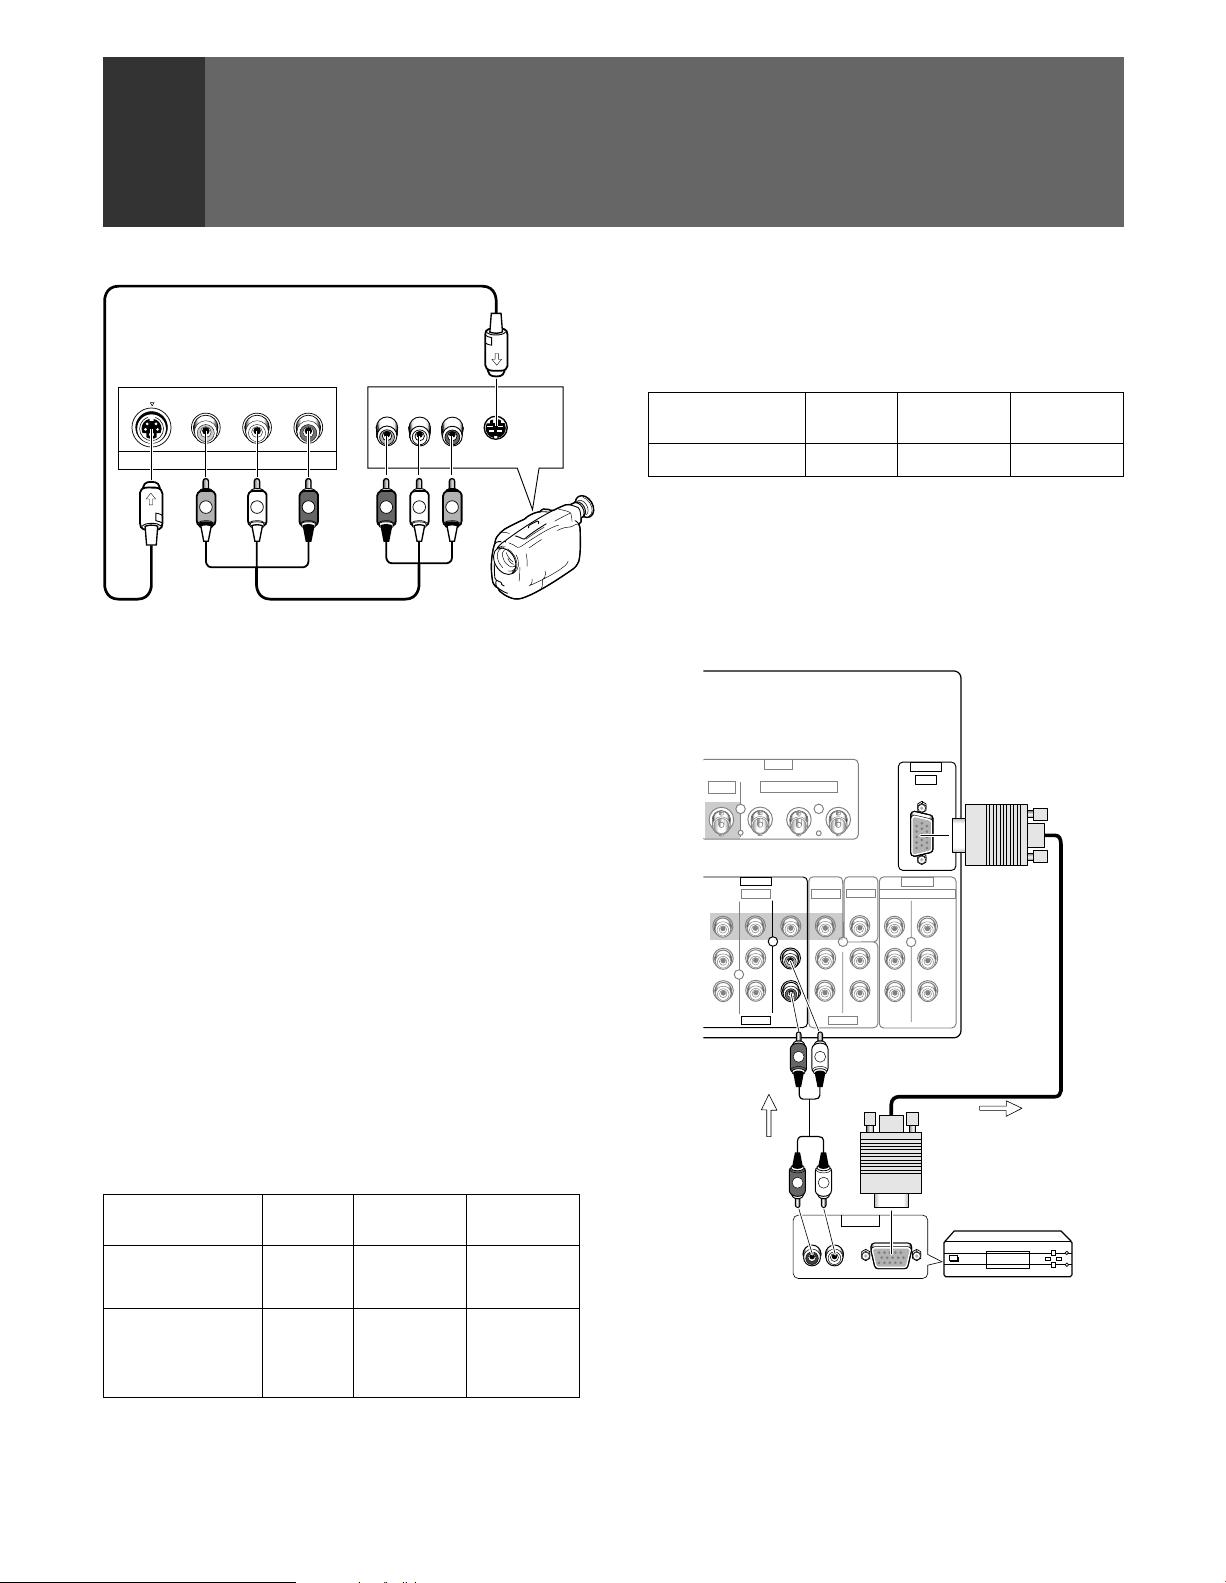
Page 16
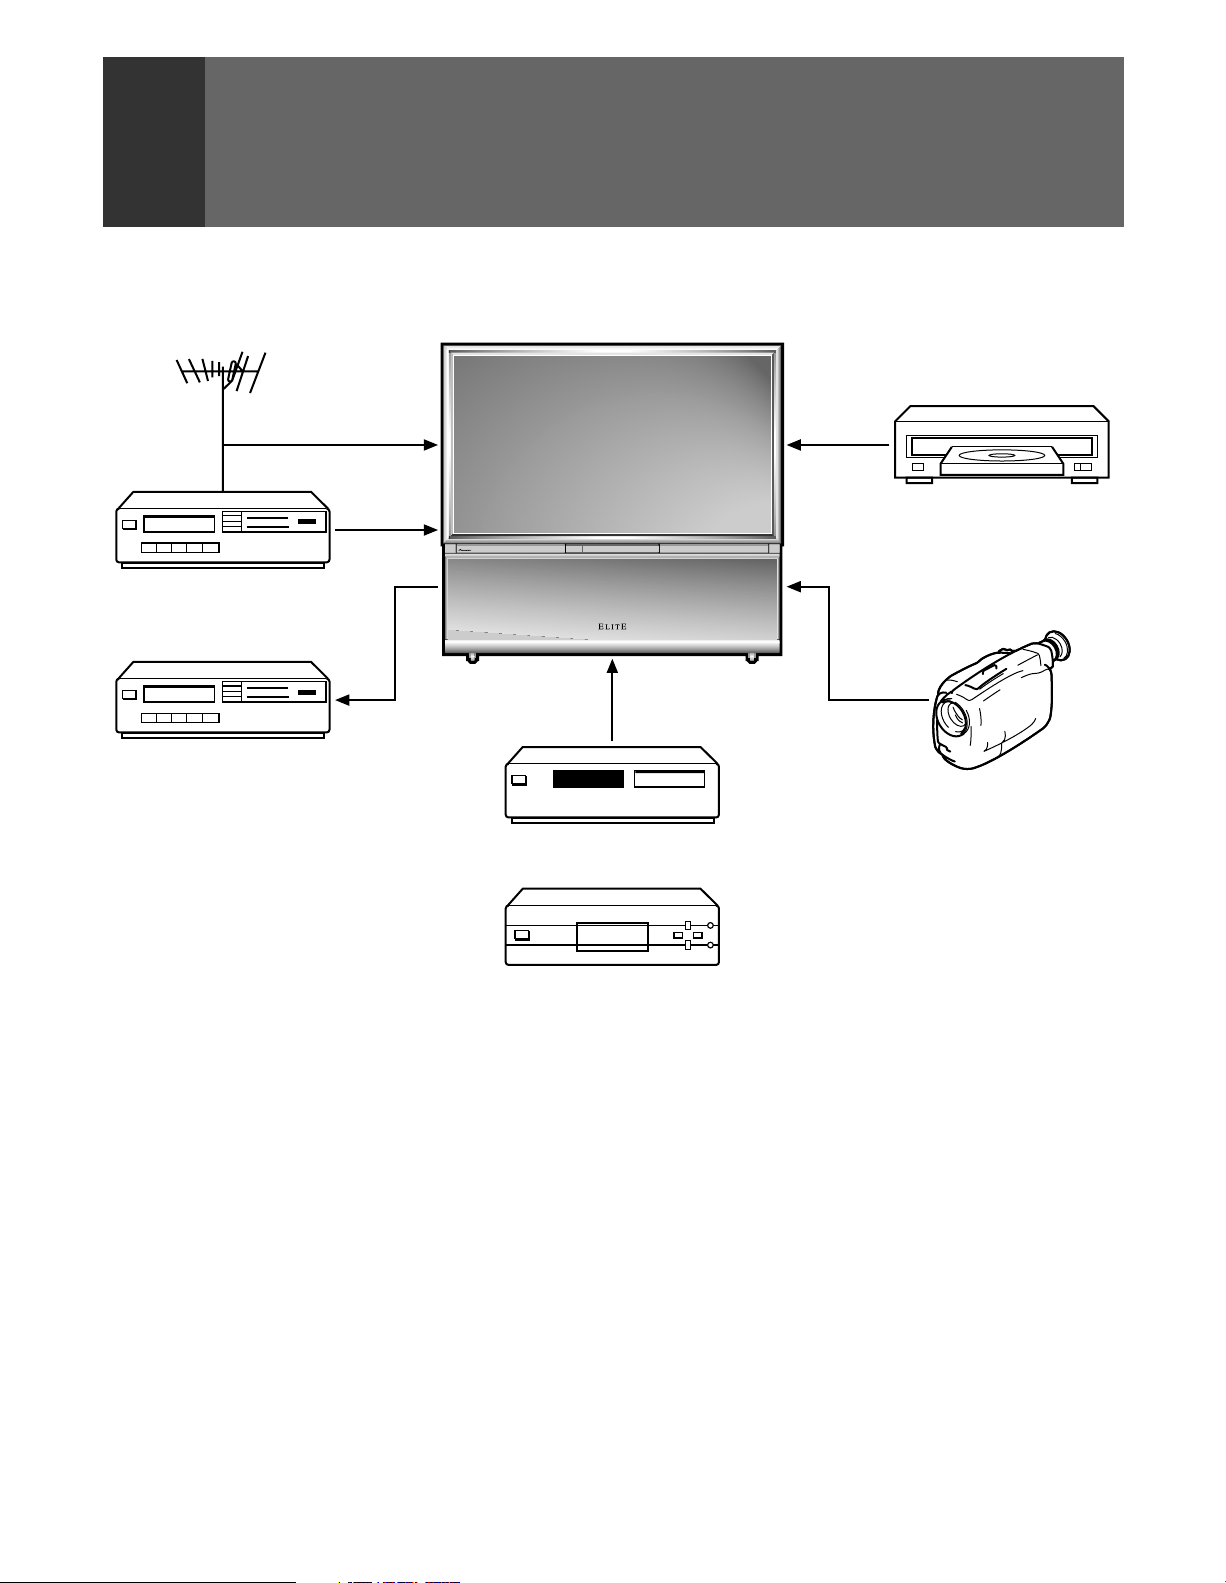
CONNECTING VIDEO/AUDIO
EQUIPMENT
DVD/DVR
VCR
VCR
VCR
VCR
Digital tuner
• Refer to the instructions of your VCR or DVD/DVR for the
detailed connections.
• Before making or changing connections, set the power
switch to off and unplug the power cord from the AC outlet.
• If both the VIDEO terminal (pin-jack type) and S-VIDEO
terminal are connected, the signals from the S-VIDEO
terminal will have priority.
◊B√¿≥??ÙÛ◊B√¿≥??ÙÛ
Video movie, etc.
SAT tuner
or
• Only the INPUT 1 and INPUT 2 jacks can input the component
video signal.
• When the component signal and other signals are input to
the INPUT 1 or INPUT 2 jacks, the component signal will be
given priority.
16
Page 17
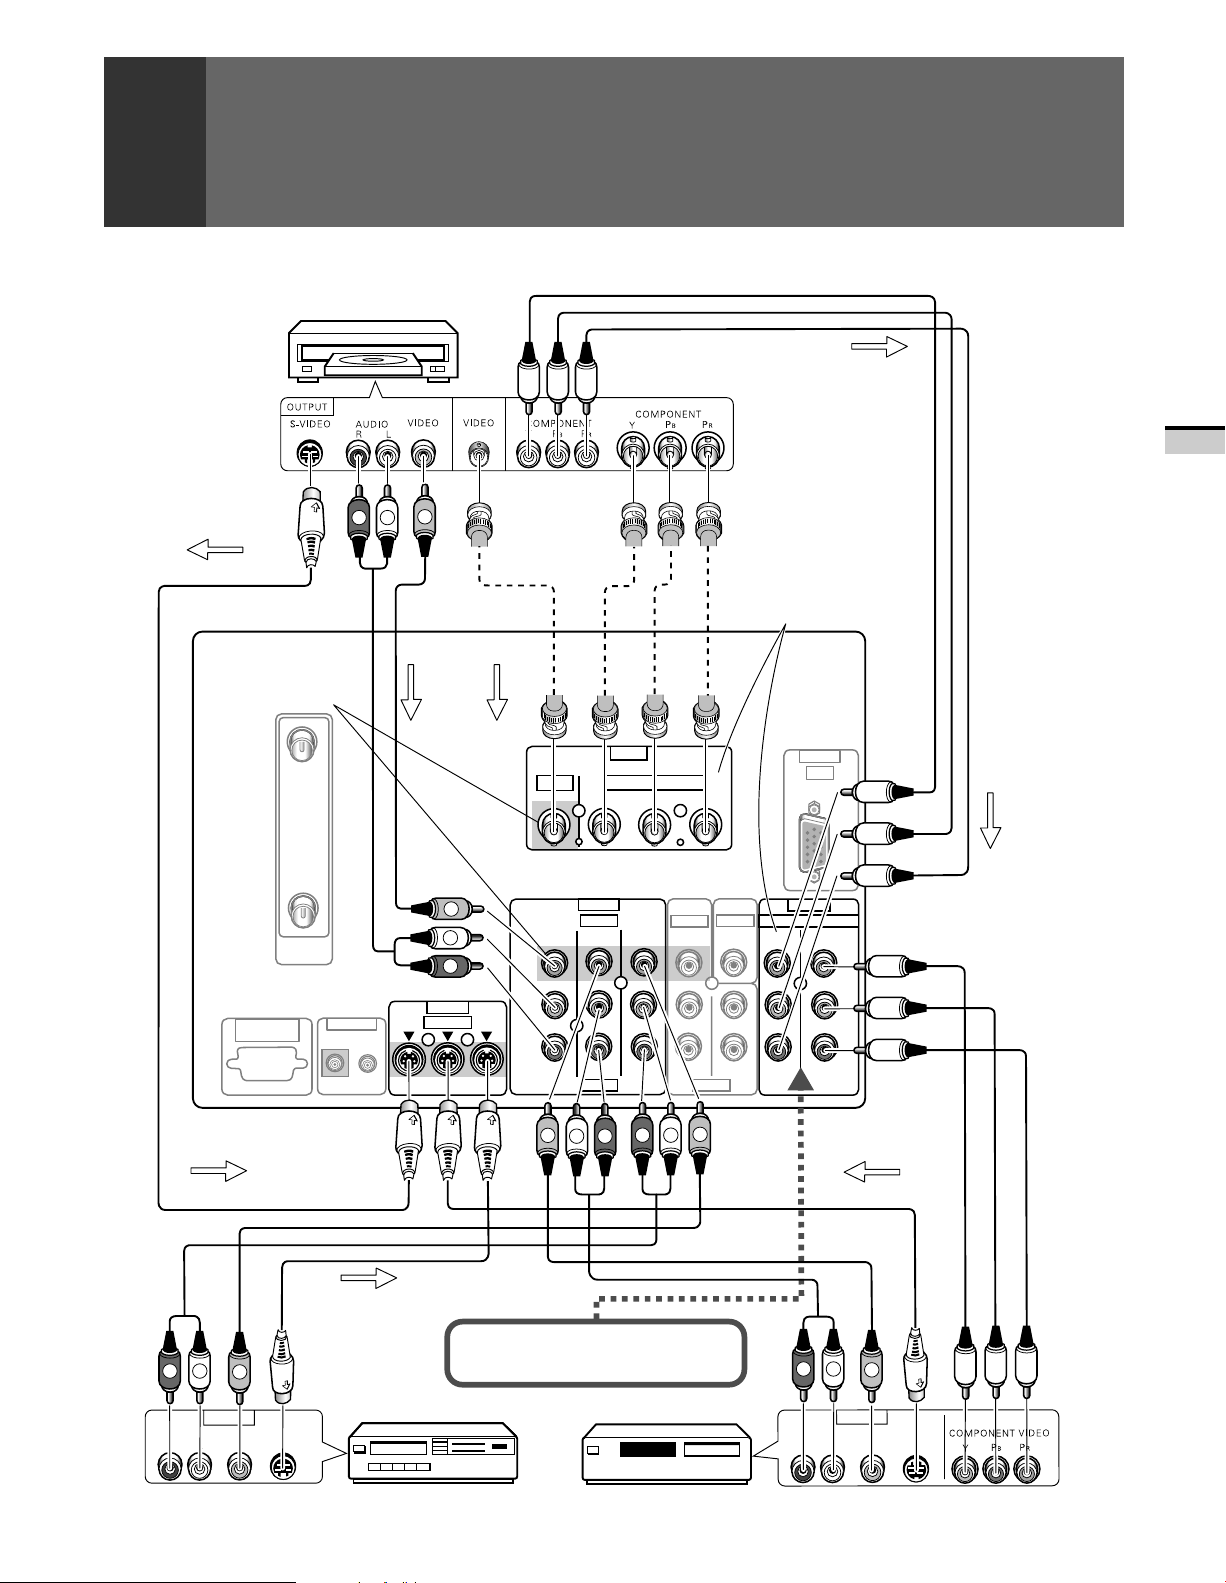
DVD/DVR
CONNECTING VIDEO/AUDIO EQUIPMENT
SIGNAL
BASIC OPERATIONS
SIGNAL
Rear panel
The video output can
be connected to BNC
or to RCA types.
A
B
ANTENNA
/CABLE
SERVICE
ONLY
R
CONTROL
OUT
IN
V
L
SIGNAL
V
L
R
INPUTS
S-VIDEO
INPUT 1 INPUT 2 INPUT 3
SIGNAL
VIDEO
INPUT 1
L
(MONO)
R
INPUT
INPUT 1 PROFESSIONAL
COMPONENT VIDEO
PB/C
Y
INPUTS
VIDEO
INPUT 2
B
OUTPUT
MONITOR
Component video output
of a DVD player can be
connected to both BNC or
RCA types.
P
R/CR
INPUT
COMPONENT VIDEO
AUDIO
VIDEO
CENTER
FIXED
/VAR
INPUT 1
/TV
AUDIOAUDIO
INPUT
INPUT 3
INPUTS
INPUT 2INPUT 3
RGB
SIGNAL
Y
P
B
/
C
B
P
R
/
C
R
SIGNAL
R
L
AUDIO
RL
OUTPUT
VIDEO
V
S-VIDEO
SIGNAL
V
R
L
Use these terminals to input signals from
a DVD player which has component video
output terminals(Y, P
B
, PR).
VCR
VCR
V
R
L
SAT tuner
SIGNAL
R
L
RL
AUDIO
V
OUTPUT
VIDEO
S-VIDEO
17
Page 18
CONNECTING VIDEO/AUDIO EQUIPMENT
Front panel
S
-
VIDEO L-AUDIO-RVIDEO
INPUT 4
(MONO)
RLVIDEO
S-VIDEO
OUTPUT
RGB INPUT jack
Inputs five signals – R, G, B, H and V – output from digital
tuners and the like.
Input format in which images can be received.
Format
Digital tuner 1080 i 33.75 kHz 60 Hz
Horizontal Vertical
frequency frequency
V
L
R
R
L
V
Video movie/VCR
INPUT jacks
The monitor is equipped with input jacks 1 to 6.
Refer to the following explanation for information about each
jack.
COMPOSITE VIDEO INPUT jacks
There are 4 sets of inputs for VCR and DVD/DVR. Use RCAtype pin plug cords (the same as those used in Hi-Fi systems)
for connections. When the audio source to be connected is
mono, connect the source to the L-(MONO) jack.
S-VIDEO INPUT jacks
• Inputs signals from a DVD/DVR that has an S-VIDEO output
jack.
• When the signal input from the S-VIDEO INPUT jack is output
from the MONITOR/TV OUTPUT jack, the output signal will
be a composite of Y and C.
NOTES:
• SPLIT screen, FREEZE screen and SEARCH screen functions
cannot be used when 1080i or 720p component signals are input.
• Signals from MONITOR/TV OUTPUT jacks will not be output
when component signals or RGB signals are input.
• The RGB input jack is designed for use in connecting a digital
tuner with RGB signal output, and it should accordingly never
be used for connecting to a personal computer or other device.
INPUT 1 PROFESSIONAL
VIDEO
INPUT 1
O)
INPUT
COMPONENT VIDEO
Y
INPUTS
VIDEO
INPUT 2
PB/C
B
P
R/CR
INPUT
OUTPUT
AUDIO
VIDEO
MONITOR
CENTER
/TV
FIXED
/VAR
AUDIOAUDIO
R
L
INPUT
RGB
INPUT 3
INPUTS
COMPONENT VIDEO
INPUT 2INPUT 3
INPUT 1
Y
P
B
C
B
/
P
R
C
R
/
COMPONENT VIDEO INPUT jack
Inputs three signals – Y, P B/ CB and PR/ CR – output from DVD
players and the like.
Input formats in which images can be received.
Format
Horizontal Vertical
frequency frequency
480 i 15.734 kHz 60 Hz
DVD player, etc.
480 p 31.468 kHz 60 Hz
720 p 45.00 kHz 60 Hz
Digital tuner, etc.
1080 i 33.75 kHz 60 Hz
480 p 31.468 kHz 60 Hz
18
SIGNAL
R
AUDIO
RL
L
OUTPUT
RGB
SIGNAL
Digital tuner
NOTE:
When the 3 signals, RGB signal, composite signal, and S signal,
are simultaneously input to INPUT 3, the RGB signal will be
displayed on screen.
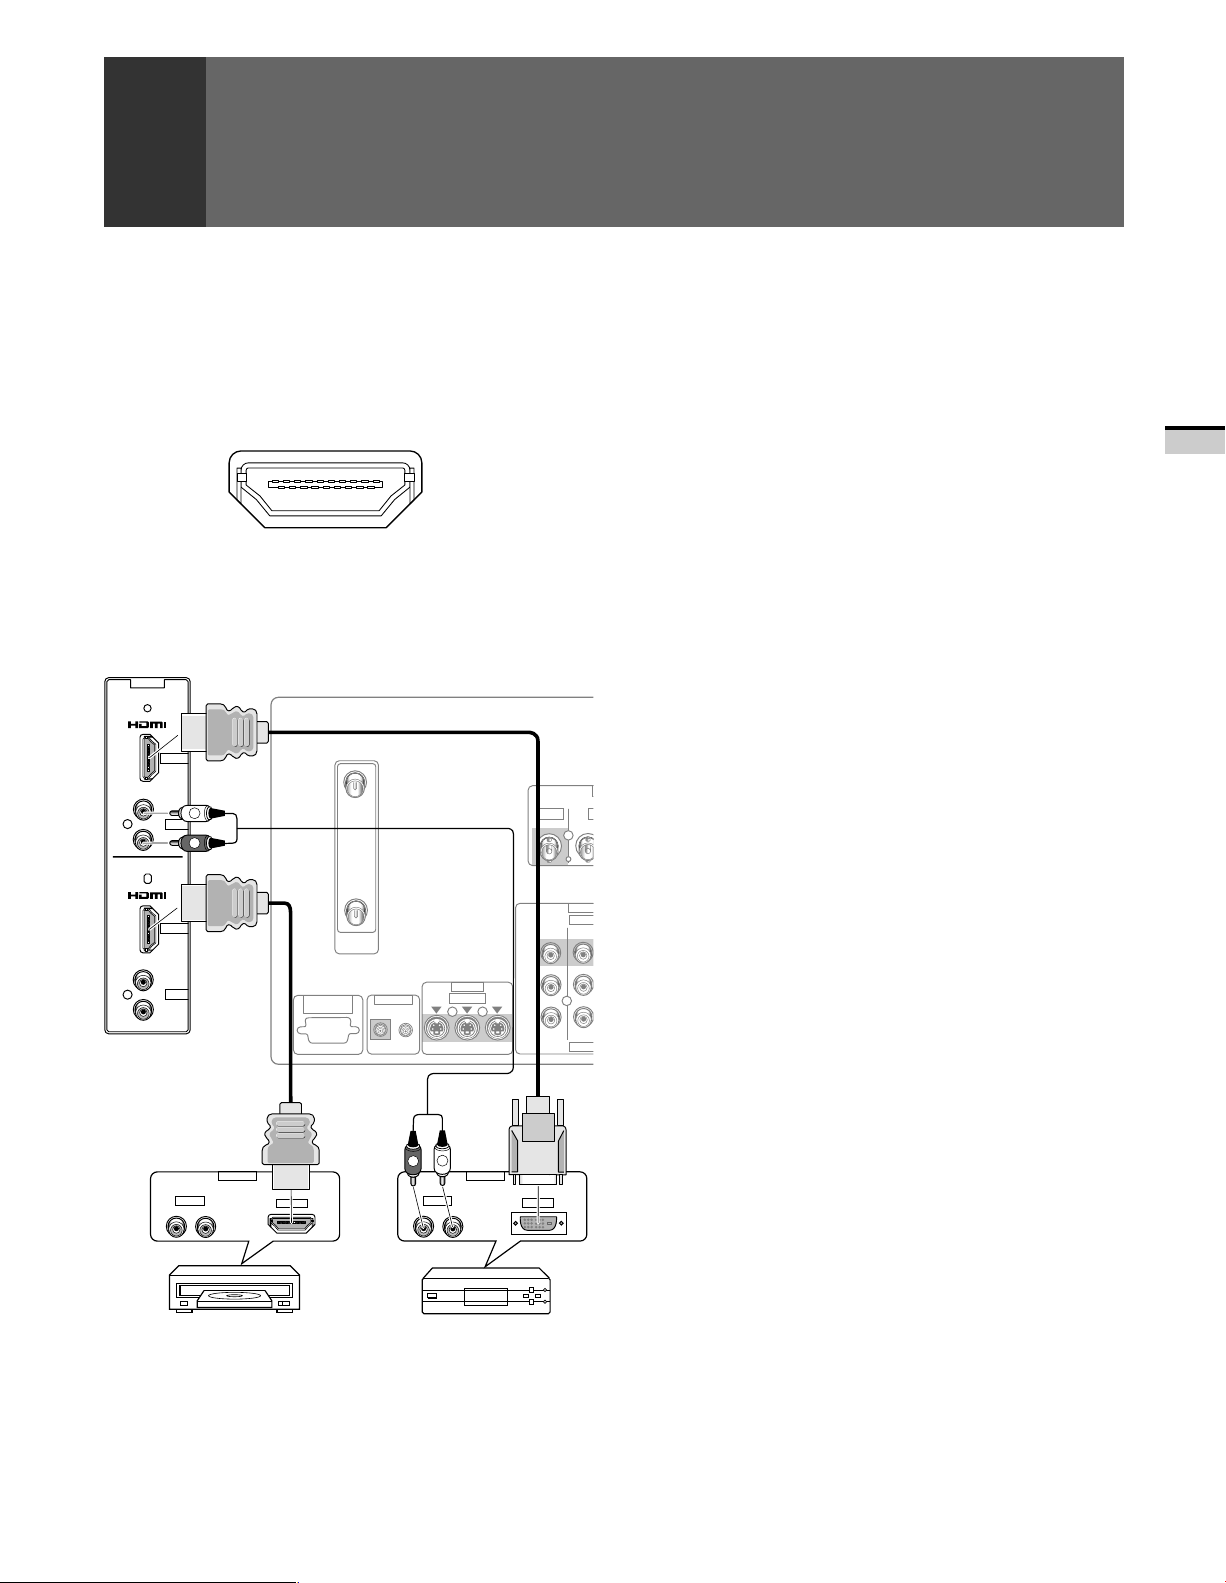
Page 19
CONNECTING VIDEO/AUDIO EQUIPMENT
C
O
O
S
DIGITAL INPUT jacks
This jack is used to connect devices with digital video output
(digital set top box, DVD player, etc.) compatible with HDCP.
Before attempting to connect one of these devices, read its
operating instructions to make sure that it can be connected.
(HDCP = High-bandwidth Digital Content Protection)
NOTES:
•
This jack is used only for 1080i and 480p video signals.
•
It is not a jack intended to be used with a personal computer.
•
A separate conversion cable is required when attaching devices
with a DVI connector.
INPUTS
INPUT 5
DIGITAL
L
R
INPUT 6
AUDIO
DIGITAL
L
R
A
B
ANTENNA
/CABLE
VIDEO
INPUT 1
INPUT 1
INPUT
VIDE
INPUT
MONITOR/TV OUTPUT jacks
These are used for connecting the monitor to a VCR for
recording, or for linking it to another monitor. These jacks output
the video and audio signals of the source currently selected
by the INPUT SELECT. Connect these output jacks to your VCR's
inputs. Connect the VCR's outputs to the monitor's VIDEO
inputs.
When the system connection is ON, the jack is TV OUTPUT
(refer to page 78).
Y
BASIC OPERATIONS
L
AUDIO
R
OUTPUT
AUDIO
R
L
SERVICE
DIGITAL
ONLY
CONTROL
IN
DVD player
OUT
INPUT 1 INPUT 2 INPUT 3
L
R
AUDIO
R
INPUTS
S-VIDEO
L
Digital tuner
OUTPUT
L
(MONO)
R
AUDI
DIGITAL
19
Page 20
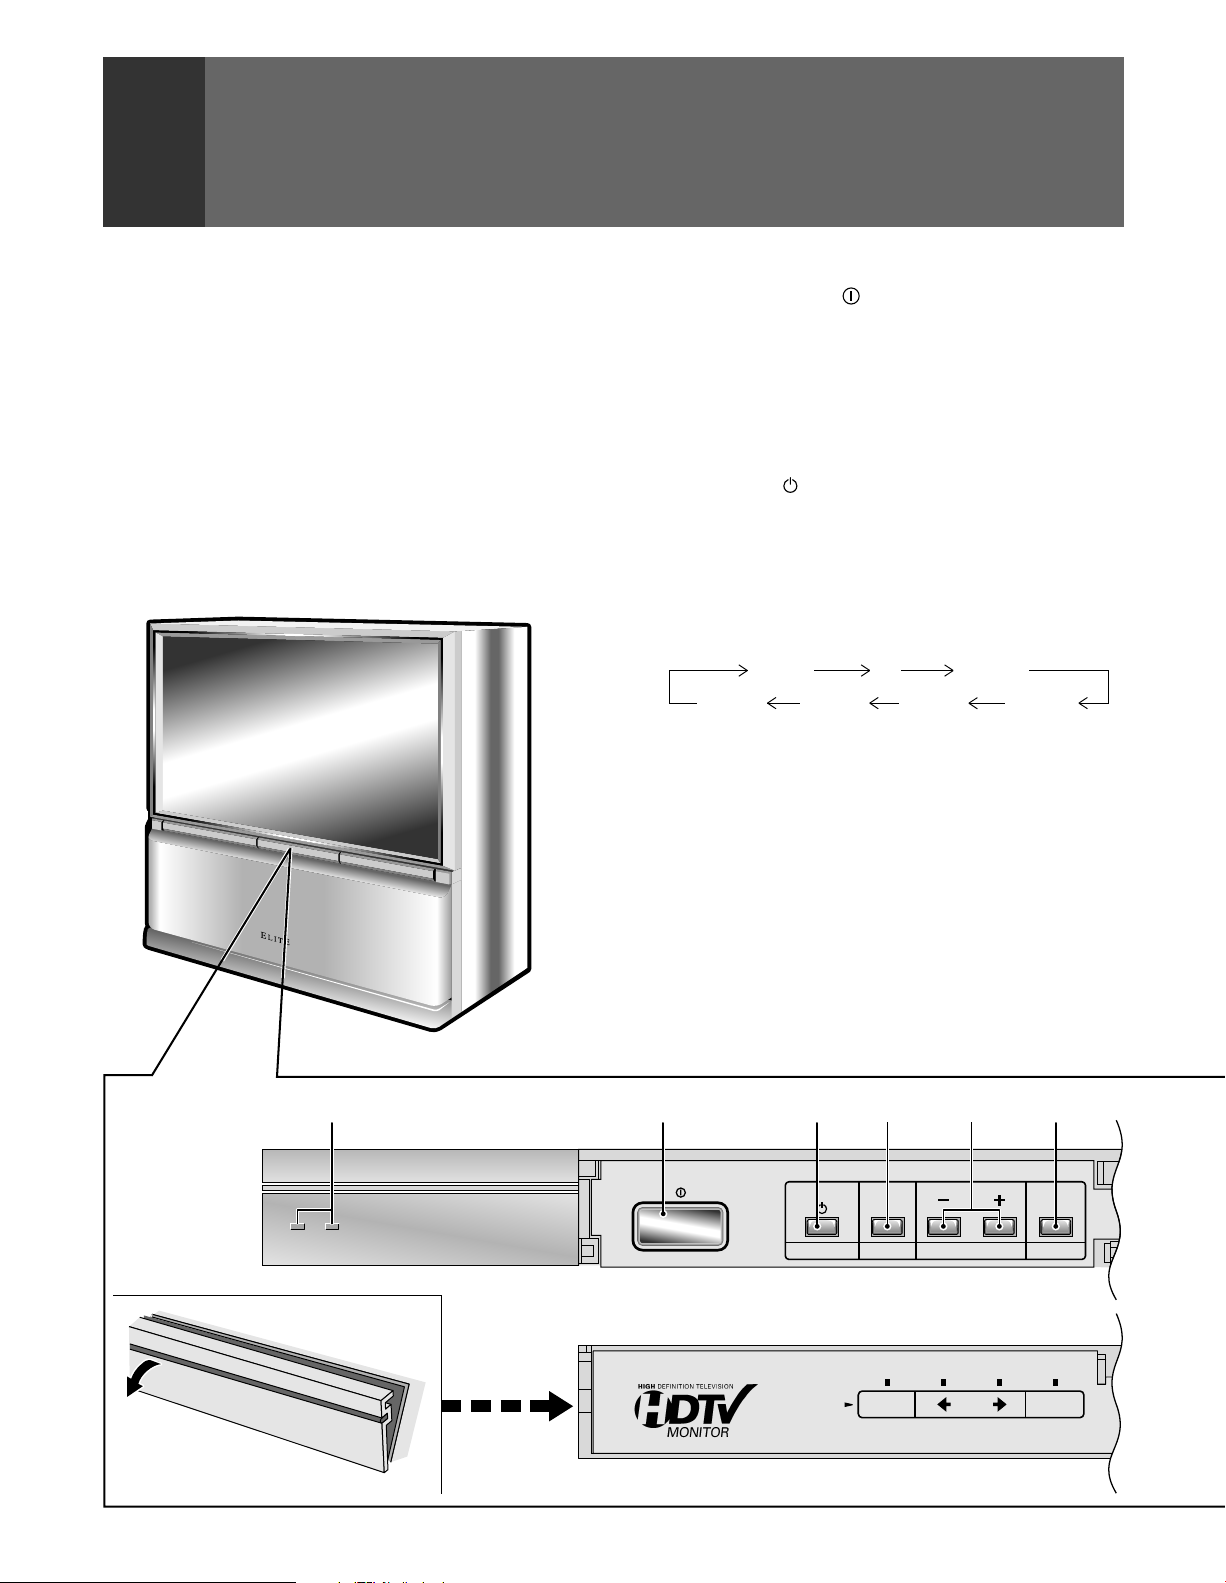
FRONT PANEL FUNCTIONS
A flip-down door conceals the INPUT 4 jacks. Push gently and
release, to open the door. To close the door, lift it back up into
place.
NOTE:
If you accidentally pull the door, it may not shut properly. Push
the door back in to shut it.
1 POWER STANDBY/ON indicators
red: STANDBY
green: when lit; ON
when flashing; power management in operation
2 MAIN POWER (OFF/ON) button
If the button is OFF, the power of the monitor is shut off and 3
STANDBY/ON button on the monitor or TV power on the
remote control will not function. Pressing the button again
will turn the monitor ON and the monitor enters the standby
mode. In the standby mode, you can turn on the monitor using
the 3 STANDBY/ON button on the monitor or TV power on
the remote control.
3 POWER ( STANDBY/ON) button
Switches the monitor between on and standby (note that the
monitor consumes a small amount of power (0.5 W) in standby
mode.
4 INPUT SELECT and SET button
Press to select your program source. Each press of the INPUT
SELECT button changes the selection to the next source.
INPUT6 TV INPUT 1
INPUT 5 INPUT 4 INPUT 3 INPUT 2
While the menu is displayed, it performs the same operation
as the SET/ENTER button on the remote control.
5 CHANNEL +, – and |, \ buttons
Press plus (+) or minus (–) to tune to a higher or lower channel.
Only the preset channels can be tuned in using these buttons.
Press to select or adjust items on the menu screen.
6 MENU button
Press to turn the menu on.
Press again to return to normal TV screen.
7 VOLUME +, – and », « buttons
Press plus (+) button to increase the volume, press minus (–)
button to decrease it.
Press to select or adjust items on the menu screen.
2 3 4561
MAIN POWER
ON
STANDBY
PUSH
Interior of the
door
STANDBY/ON
POWER CHANNEL
ACCESS
MENU
SELECT
INPUT
SET
MENU
MENU
20
Page 21
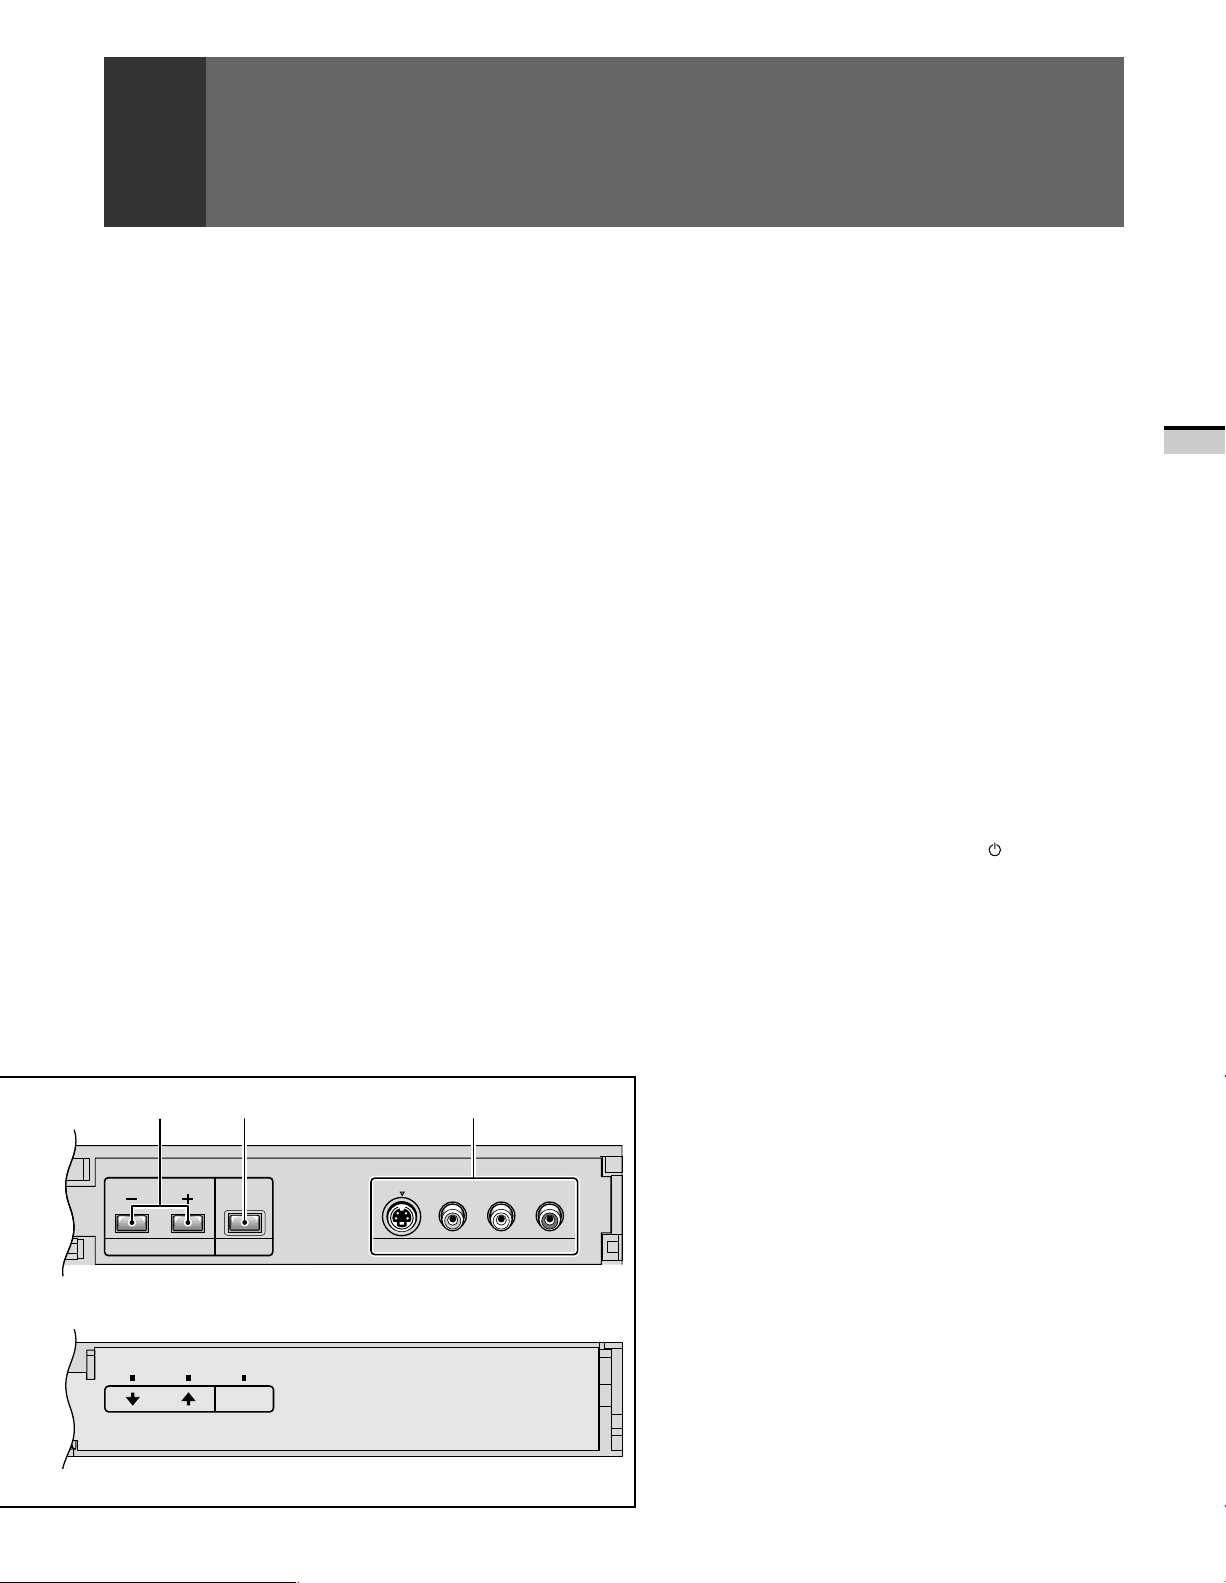
FRONT PANEL FUNCTIONS
8 RESET button
Press to set the Projection Monitor to its initial mode.
Initial mode
Input selector: Set to TV.
TV channel: Remains at the last channel set.
VOLUME: Remains at the last setting.
MUTING: OFF
PICTURE
MODE: STD
Parameters: Set to 0.
PureCinema: OFF
COLOR TEMP: STD
3D Y/C LEVEL: 3
3D NR LEVEL: 3
SVM: HIGH
FLESH TONE: ON
BLACK ENHANCE: ON
SHARP EFFECT: ON
SOUND
MTS: MAIN
Parameters: Set to 0.
SURROUND: OFF
STABLE VOLUME: OFF
SCREEN
SCAN MODE: 1080i
MODE: NATURAL WIDE
CC: OFF
SYSTEM IN/OUT
SPEAKER: NORMAL
AUDIO OUT: FIXED
SYSTEM MODE: OFF
NOTE:
When this button is pressed while adjusting the MULTI-POINT
convergence, the MULTI-POINT convergence returns to the
initial mode.
7 9
8
S
-
VIDEO L-AUDIO-RVIDEO
(MONO)
9 INPUT 4 jacks
These inputs are for Video Movie and VCR. Use RCA-type pin
plug cords (the same as those used in Hi-Fi systems) and SVIDEO cords for connections. When the audio source to be
connected is mono, connect the source to the L-(MONO) jack.
CAUTION:
Do not press any operation button on the Projection Monitor
or the remote control unit while recording. Signals from the
MONITOR/TV OUTPUT jacks may be temporarily interrupted
when a button is pressed.
ATTENTION
The Projection Monitor will not function properly in the
following cases.
• An electrical discharge in the CRT.
• Lightning storms.
• High static electricity environment.
• Poor voltage regulation in the power source.
If the Projection Monitor does not operate properly, reset it as
follows:
1. Turn off the power of the unit with the 2 MAIN POWER
button.
2. After approximately 1 minute, turn on the power with 2
MAIN POWER button and 3 POWER (
button.
If the normal operation cannot be restored after the above
treatment, immediately unplug the power cord and call your
nearest PIONEER-authorized service center.
NOTES:
•
On rare occasions, an electrical discharge may occur inside the
CRT*. It makes a short, sharp pop and either no sound is
produced or the volume level changes by itself. The SPLIT screen
and SEARCH screen functions will be cancelled automatically if
an electrical discharge occurs when this function is engaged.
*CRT: Cathode-ray Tube
•
When an electrical discharge distorts the screen and the TV
power has been automatically shut off, it can turn on.
If you notice any abnormality of the screen, turn off the MAIN
POWER button for a few minutes then turn it on.
This is not a malfunction.
STANDBY/ON)
BASIC OPERATIONS
VOLUME INPUT 4
RESET
RESET
21
Page 22
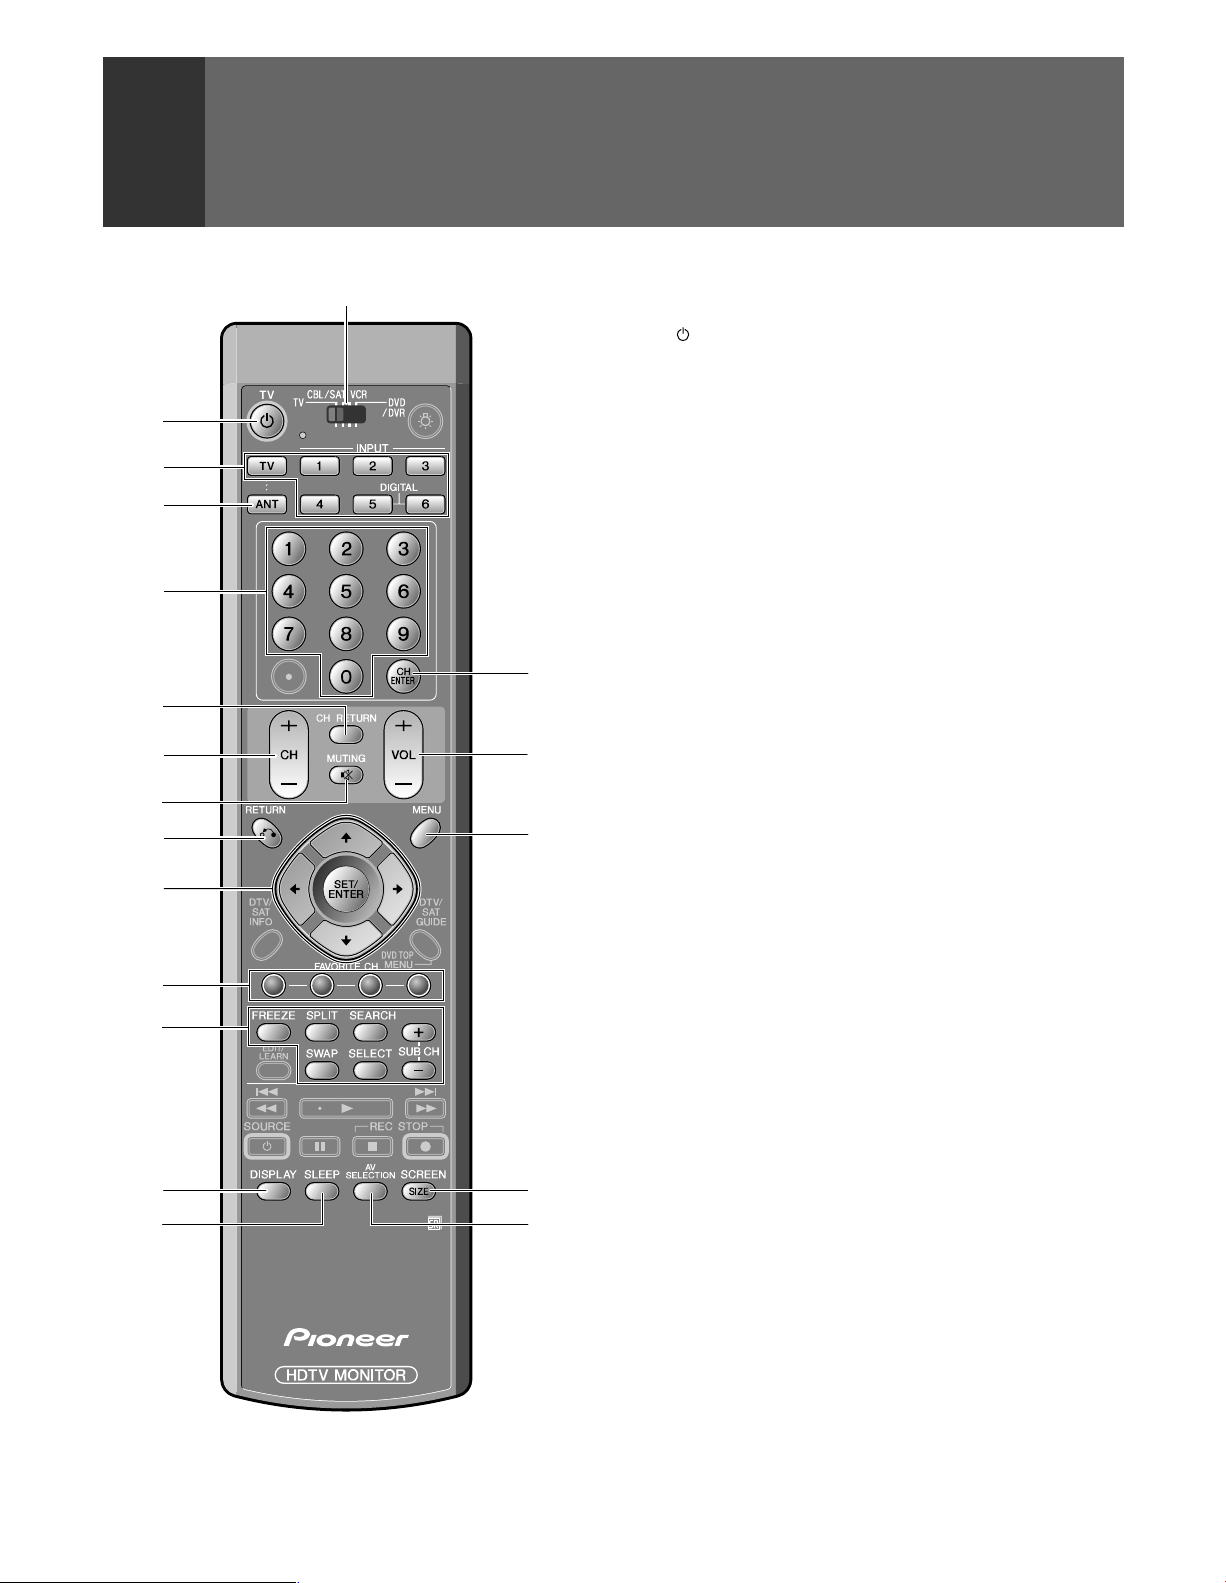
REMOTE CONTROL UNIT FUNCTIONS
1
2
3
4
5
6
7
8
9
Mode switch
!
@
#
Set the mode switch to TV.
1
TV Power button (STANDBY/ON)
Turns the power of the monitor on and off.
2 INPUT Selector buttons (TV, INPUT 1 to INPUT 6)
Press the button to select the source you wish to watch.
The screen will display your selection.
3 ANT (antenna selector) button
Press to switch between ANTENNA-A and ANTENNA-B
when you wish to watch TV.
4 Direct channel selection buttons
Press the button (or buttons) that corresponds to the
channel that you wish to watch.
5 CH RETURN (channel return) button
Press to switch between the current channel and the
channel you were watching immediately before.
6 CH (channel) +, – button
Press plus (+) or minus (–) to tune in a higher or lower
channel. Only the preset channels can be tuned in using
these buttons.
7 MUTING button
Press to temporarily turn off the sound. Press again to return
to the previous volume level.
8 RETURN button
Returns to the previous menu screen.
22
0
-
=
~
9 Select/Adjust/Set buttons (SET/ENTER, |, \, », «)
|, \, », «: Press to select or adjust items on the menu
screen.
SET/ENTER: Press to activate the selected function.
0 FAVORITE CH buttons
These buttons call up the channels that have been assigned
to them.
$
%
Page 23

REMOTE CONTROL UNIT FUNCTIONS
- SPLIT/SEARCH screen buttons
FREEZE: When this button is pressed with the regular
screen, the screen will change to the SPLIT
screen and the picture at the time the button
was pressed will become the sub-picture,
displayed as a frozen image.
SPLIT: Press to turn the SPLIT screen function on
and off.
SEARCH: Press to select the SEARCH screen mode.
SWAP: Press to switch the main picture and sub
picture when in SPLIT or 3-SEARCH screen
mode.
SELECT: Selects the screen for switching the channel
or input source.*
SUB CH +, –: Used to switch the channel for the sub-
picture of the SPLIT screen.
= DISPLAY button
Press to display the input source, channel, setting and other
screen indicators for a few seconds.
~ SLEEP timer button
Each time this button is pressed, the display will change
as follows.
The display varies according to the remaining time.
Example:
If the remaining time is 100 minutes
! CH ENTER button
Fix the selected channel with the direct channel selection
buttons.
@ VOL (volume) +, – buttons
Press plus (+) button to increase the volume, press minus
(–) button to decrease it.
Volume level will appear on the screen as numbers and a
bar graph. The maximum volume level is “63”.
The display will disappear from the screen after 2 seconds.
# MENU button
Press to turn on the menu screen for use in function
selection.
Press again to return to normal TV screen.
$ SCREEN SIZE button
Press to select the SCREEN MODE. (Refer to page 41.)
% AV SELECTION button
Selects on video setting. (PICTURE MODE: STD, REF,
THEATER, GAME, USER, PRO)
* With the 9 screen, the search picture’s input source and
channel cannot be switched.
BASIC OPERATIONS
100 min. 90 min . 60 min.
120 min. OFF 30 min.
If the remaining time is 45 minutes
45 min. 30 min . OFF
60 min. 90 min. 120 min.
23
Page 24
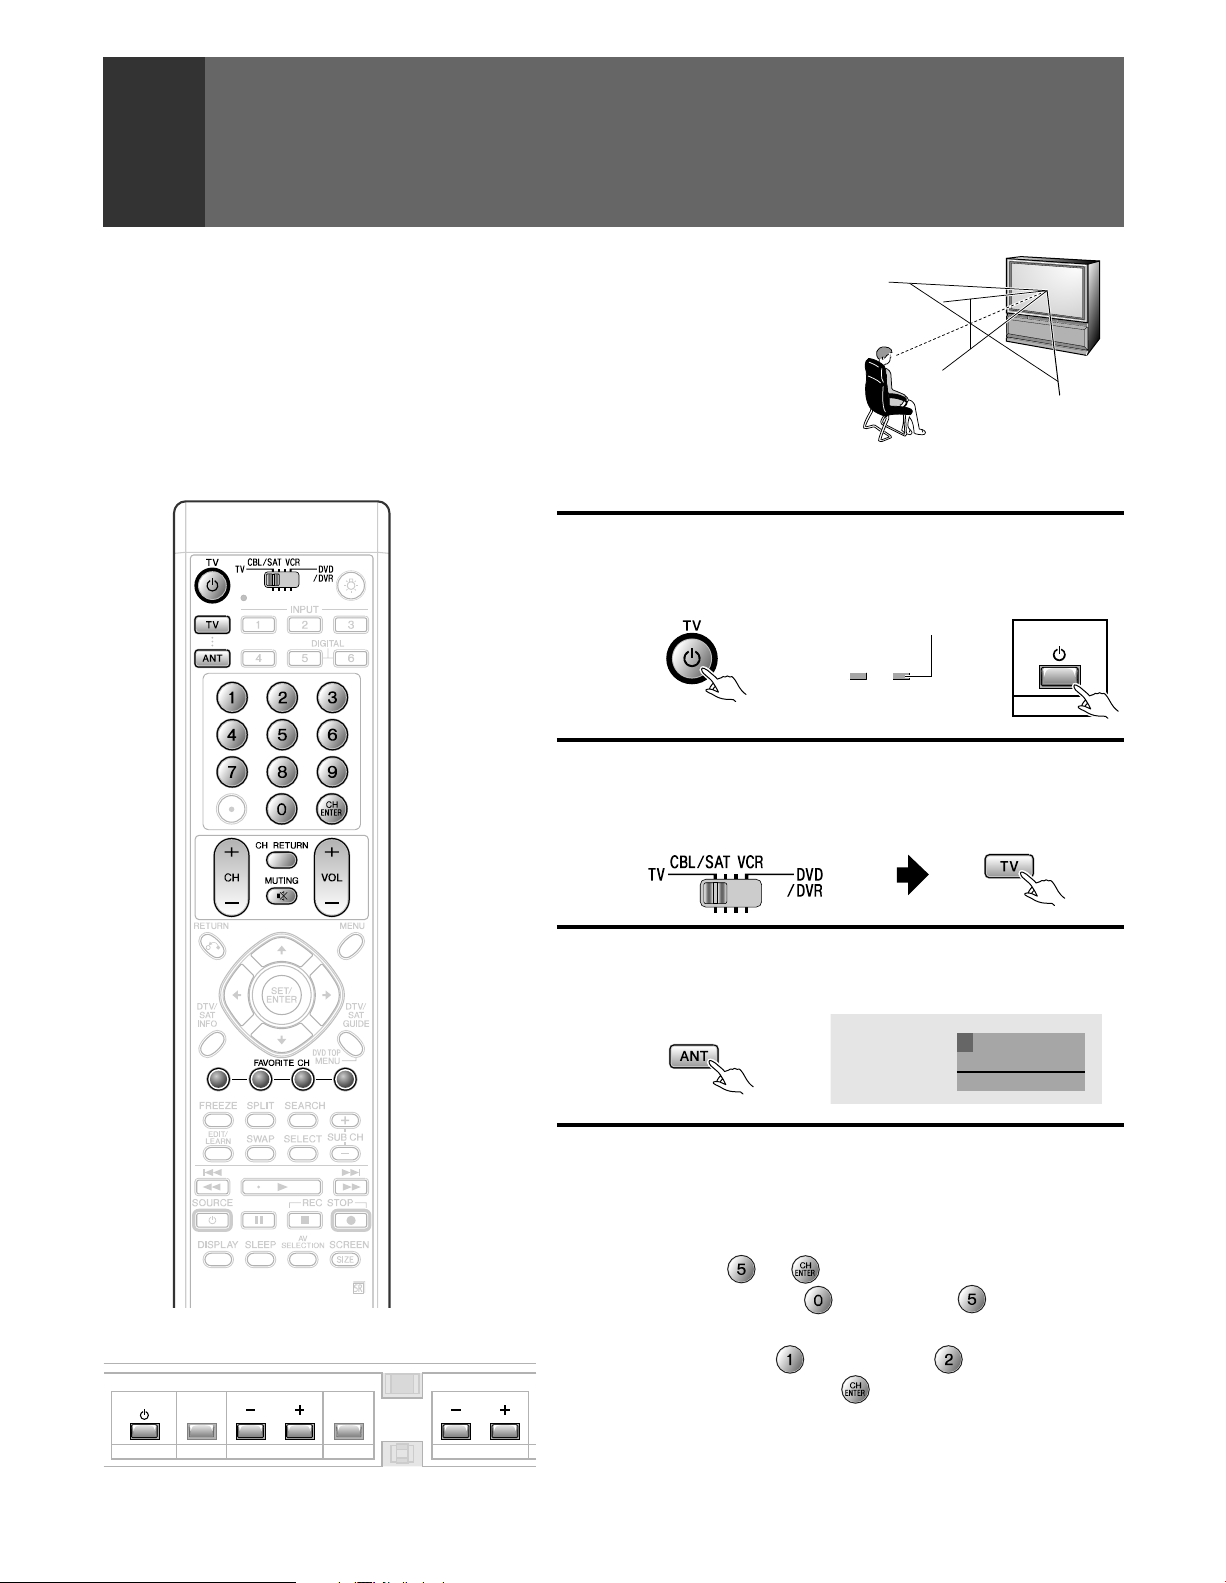
TO WATCH TV
Best Horizontal and Vertical Viewing Angle
• The optimum viewing angle is 140˚ in horizontal and 45˚ in vertical.
• Watch from at least 10 feet (3m) away from the screen (optimum viewing distance is 10 to
23 feet).
45˚
140˚
Remote control unit
Turn on the MAIN POWER button.
Turn on the POWER.
1
The green ON indicator lights up.
Control panel of the monitorRemote control unit
Green indicator
STANDBY
Set the mode switch to TV and
2
ON
then press the TV button.
Remote control unit
Select antenna A or B.
3
Check the input signals at the ANTENNA A and B terminals.
Remote control unit
A
STANDBY/ON
POWER
31
CH
KLCS
STEREO
Control panel of the monitor
STANDBY/ON
SELECT
POWER
POWER CHANNEL MENU VOLUME
INPUT
24
Select a channel.
4
There are three methods for this.
1 Select by pressing the number button
(Example)
Channel 5
Channel 12 Press
• After pressing a number button, even if you do not press the CH
ENTER button, the channel will be switched to the one selected within
2 seconds.
• Depending on the channel, this switch may occur immediately after
the number button is pressed.
→
(Or press and then press within 2 seconds
of during so.)
and then press within 2 seconds of
during so. →
Page 25

TO WATCH TV
SUPER HYPER UHF
7-13
J(23) Q(30)
K(24) R(31)
L(25) S(32)
M(26) T(33)
N(27) U(34)
O(28) V(35)
P(29) W(36)
W+1(37)
W+2(38)
W+3(39)
W+4(40)
W+5(41)
W+6(42)
W+7(43)
W+8(44)
W+9(45)
W+10(46)
TV
CATV
VHF L
MID
VHF H
2-6 7-13 14-69
2-6
(STD)
A-5(95)
A-4(96)
A-3(97)
A-2(98)
A-1(99)
A(14)
B(15)
C(16)
D(17)
E(18)
F(19)
1-6
(HRC)
(IRC)
G(20)
H(21)
I (22)
CABLE (CATV) CHANNEL
ASSIGNMENT TABLE
In the cable tuning mode, channels can only be assigned
to numbers 01 to 125. The specific channel number
assignments and the corresponding alphabet
designation are shown at the bottom left of the channel
table.
For example: Channel number '14' corresponds to
midband cable channel 'A'.
NOTE:
Cable (CATV) services can vary according to area. The
channel number assignments shown in the channel
table may not correspond with the channel numbers
used by your local cable company. Direct tuning to
cable channels without using the cable company
converter 'or preselector' will depend on the specific
channels in use by the cable company. Direct tuning
to cable channels is limited to unencoded
(unscrambled) channels only. Check with your local
cable company for compatibility requirements.
W+11(47)
W+12(48)
W+13(49)
W+14(50)
W+15(51)
W+16(52)
W+17(53)
W+18(54)
W+19(55)
W+20(56)
W+61(
102
)
112
)
113
114
115
116
117
118
119
120
121
W+81(
W+82(
)
W+83(
)
W+84(
)
)
)
)
)
)
)
W+21(57)
W+22(58)
W+23(59)
W+24(60)
W+25(61)
W+26(62)
W+27(63)
W+28(64)
W+29(65)
W+30(66)
W+31(67)
W+32(68)
W+33(69)
W+34(70)
W+35(71)
W+36(72)
W+37(73)
W+38(74)
W+39(75)
W+40(76)
W+41(77)
W+42(78)
W+43(79)
W+44(80)
W+45(81)
W+46(82)
W+47(83)
W+48(84)
W+49(85)
W+50(86)
W+51(87)
W+52(88)
W+53(89)
W+54(90)
W+55(91)
W+56(92)
W+57(93)
W+58(94)
W+59(
W+60(
100
101
W+62(
W+63(
W+64(
W+65(
W+66(
W+67(
W+68(
W+69(
)
W+70(
)
103
104
105
106
107
108
109
110
111
W+71(
)
W+72(
)
W+73(
)
W+74(
)
W+75(
)
W+76(
)
W+77(
)
W+78(
)
W+79(
)
W+80(
2 Select using the TV CH+/– button
The channels will switch according to the order set by channel
preset. (See page 28.)
Control panel of the monitorRemote control unit
CHANNEL
3 Select using the FAVORITE CH button
Select your desired channel from the 4 in the memory of each
button: blue, green, red and yellow.
Remote control unit
122
123
124
125
)
)
)
)
BASIC OPERATIONS
To turn off the sound
Press the MUTING button.
When mute is turned on, a volume indicator will
appear in red on the screen (and will disappear in
a few seconds).
When you have selected ON IF MUTE on menu
screen, if the MUTING is pressed while a closed
caption signal is being received, CC/TEXT will be
displayed. (Refer to page 46.)
Press MUTING again to return to the previous
volume level.
Auto power off function
If the monitor is receiving no input signals in TV
mode, its power will turn off (go on standby) after
some time has passed.
• Each time the button is pressed, the channel will be changed
in order of the 4 channels in that button's memory.
• The desired channels can be set. (See page 50.)
• When you select a channel using the FAVORITE CH button,
step 3 (Select antenna A or B) is not necessary.
Adjust the volume.
5
Control panel of the monitorRemote control unit
VOLUME
25
Page 26
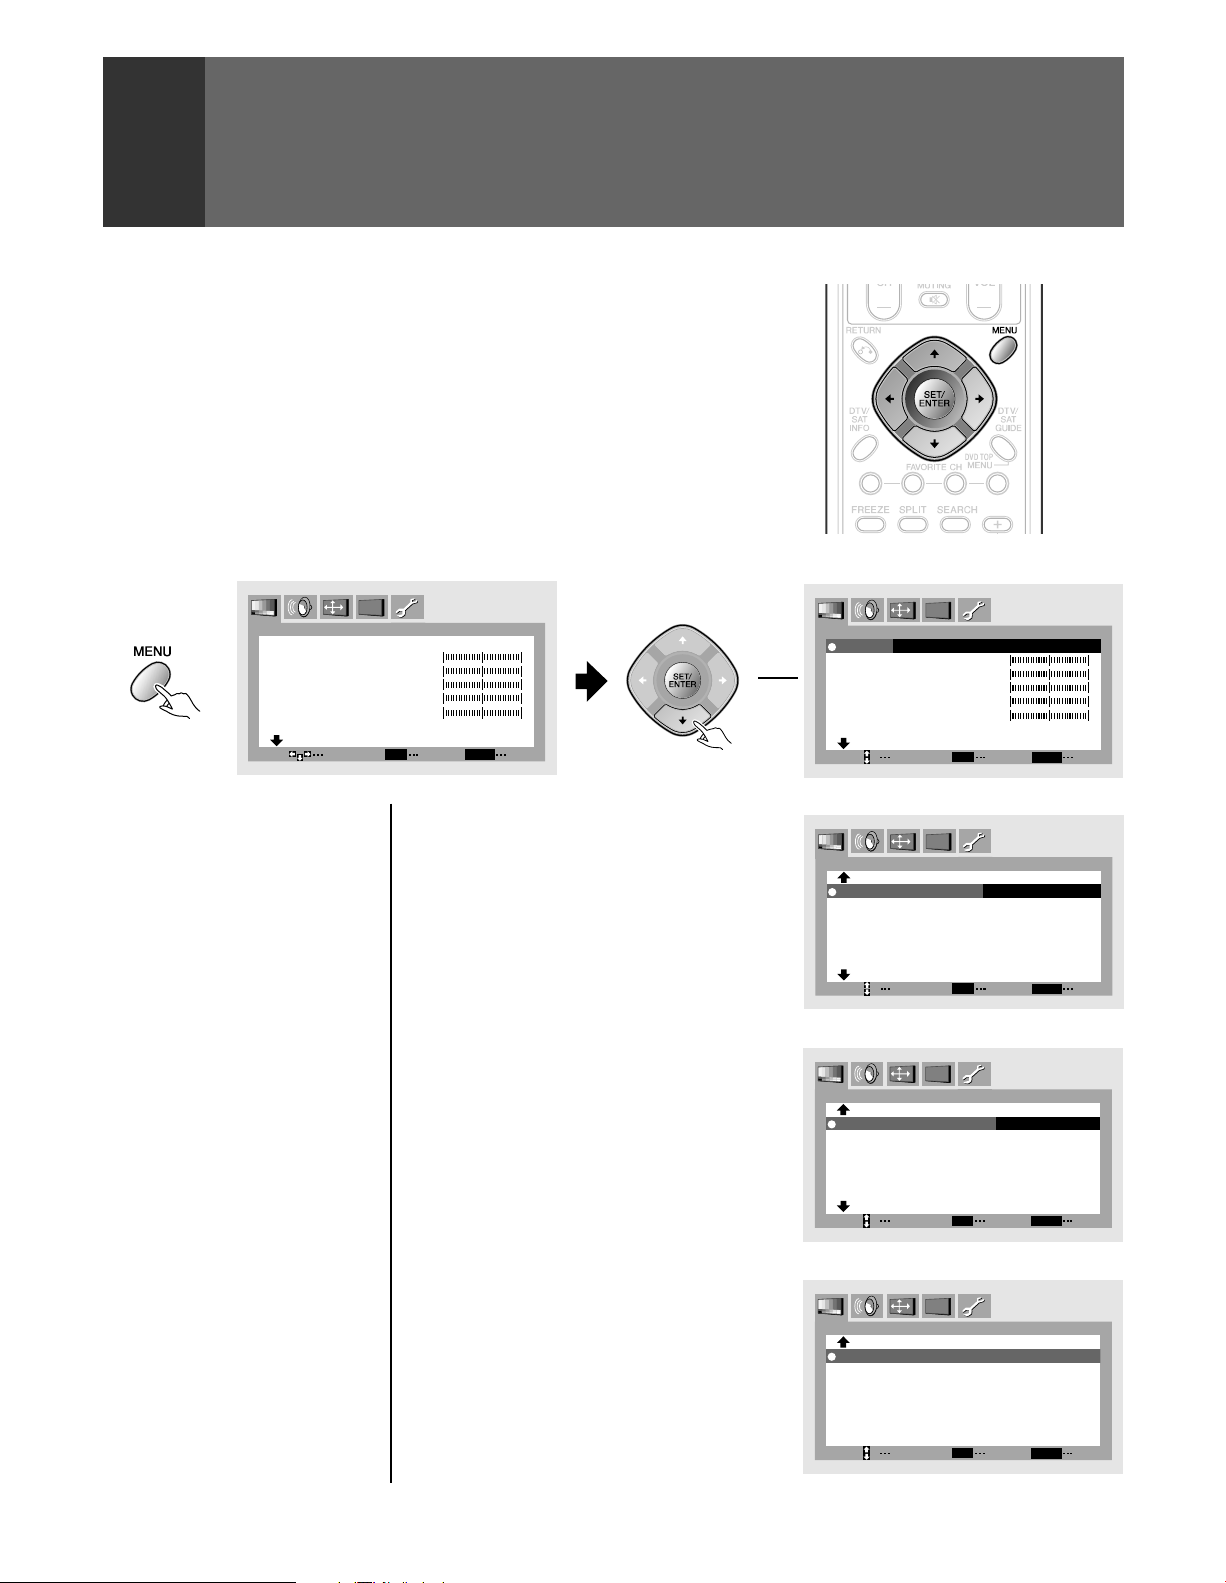
CHECKING THE MENU
MENU
END
SET
SET
CONTRAST 0
BLACK LEVEL 0
0
0
0
COLOR
TINT
SHARPNESS
SELECT
PICTURE
c
c
MOD E : P RO
MENU
END
SET
SET
COLOR T EMP: STD
3D Y / C LEVEL: 3
3D NR LEVEL : 3
SVM: H IGH
FLESH TONE: ON
SELECT
PICTURE
c
c
Pur eCi nema : STD
MENU
END
SET
SET
SHARP EFFECT: ON
LTI : MID
GAMMA: T YPE3
CONTRAST EXP : O FF
SHARP MODE : MODE1
SELECT
PICTURE
c
c
BLACK ENHANCE : ON
MENU
END
SET
SET
DEFAULT PRO MODE
SELECT
PICTURE
c
c
WHI TE BALANCE
Press MENU on the remote control unit.
The MAIN MENU will be displayed on the screen.
Select the desired menu item using | or \ button of the
remote control unit, and press » or « button to perform the
desired operations or mater settings.
It can also be operated using the buttons on the front of the
monitor.
c
c
PICTURE
MOD E : P RO
CONTRAST 0
BLACK LEVEL 0
COLOR
TINT
SHARPNESS
0
0
0
PICTURE adjustment menu (See page 52)
SELECT
SET
MENU
SET
END
∞
∞
∞
26
Page 27
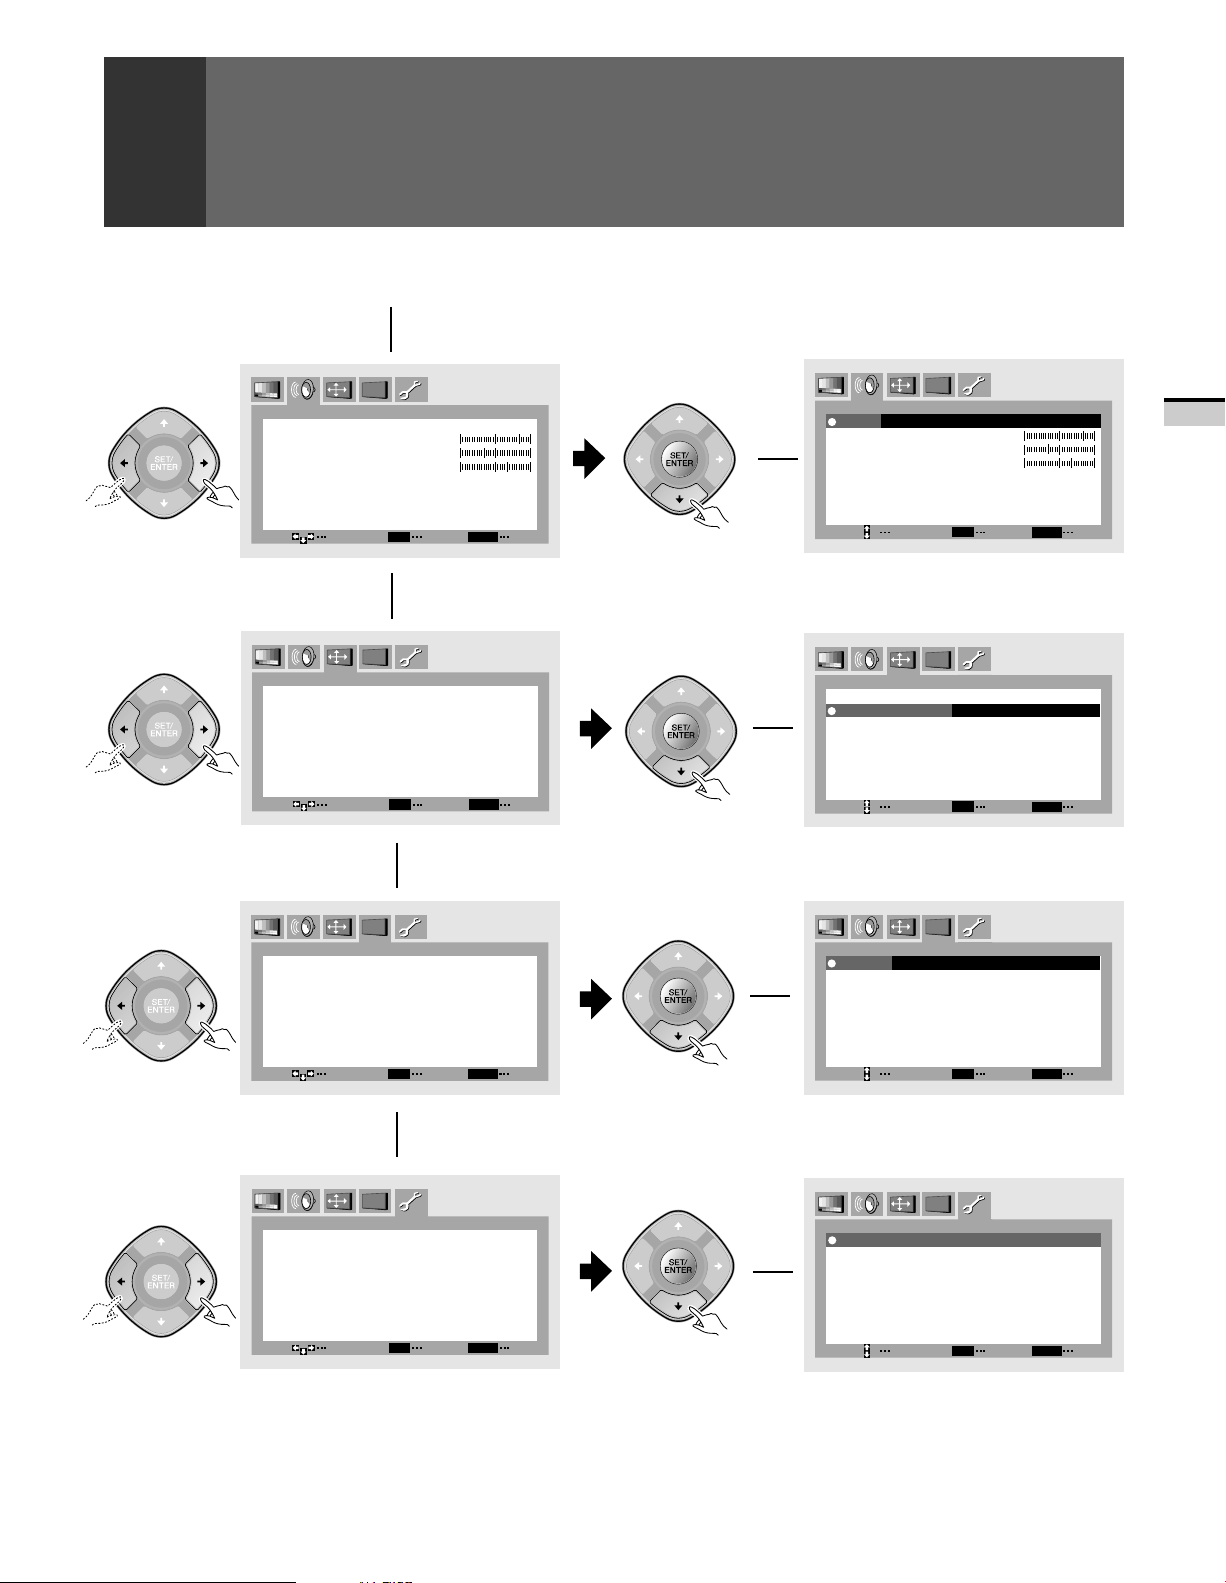
MENU
END
SET
SET
SELECT
SCREEN
c
c
MTS :MA I N
H.POSITION:
INPUT3
NATURAL WI DE
V.POSITION:
0
0
SCAN MODE:
1080i
MENU
END
SET
SET
SELECT
CC
c
c
MOD E : C C - 1
CC: ON
MENU
END
SET
SET
SELECT
SET UP
c
c
CONVERGENCE
PROGRAM BLOCK
CHA NGE PASSWORD
SYSTEM IN /OUT
D IG I TAL I NTERFACE
CHANNE L SET UP
c
MENU
END
SET
SET
TREBLE
BASS 10
– 5
BALANCE R 5
SURROUND : ON
STABLE VOLUME : OFF
SELECT
SOUND
c
c
MTS :MA I N
c
SOUND
MTS :MA I N
BASS 10
TREBLE
BALANCE R 5
SURROUND : ON
STABLE VOLUME : OFF
–5
CHECKING THE MENU
SOUND adjustment menu (See page 64)
BASIC OPERATIONS
SELECT
c
c
SCREEN
MTS :MA I N
INPUT3
SCAN MODE:
H.POSITION:
NATURAL WI DE
V.POSITION:
SELECT
c
c
CC
MTS :MA I N
CC: ON
MOD E : C C - 1
SELECT
SET
SET
SET
SET
1080i
0
0
SET
SET
MENU
MENU
MENU
END
SCREEN setting menu
(See pages 42 and 63)
END
Closed Caption menu (See page 46)
END
SET UP menu
(See pages 28, 30, 34, 39, 47, 50, 68, 69,
70, 71, 72, 76 and 79)
c
c
SET UP
CHANNE L SET UP
CONVERGENCE
PROGRAM BLOCK
CHA NGE PASSWORD
SYSTEM IN /OUT
D IG I TAL I NTERFACE
SELECT
SET
MENU
SET
END
On screen indicators
SELECT: Use arrow key to switch function on menu screen.
SET: Press SET/ENTER to select the desired function on menu screen.
END: End is for turning off the menu screen by pressing the MENU button.
EXIT: To return to the previous menu screen, use the » or « button to move to EXIT and then press SET/ENTER.
27
Page 28
AUTO CHANNEL PRESET
The broadcast frequencies that can be received depend on your area.
Memorize the broadcast stations that can be received in your area in the
presets.
Select TV.
1
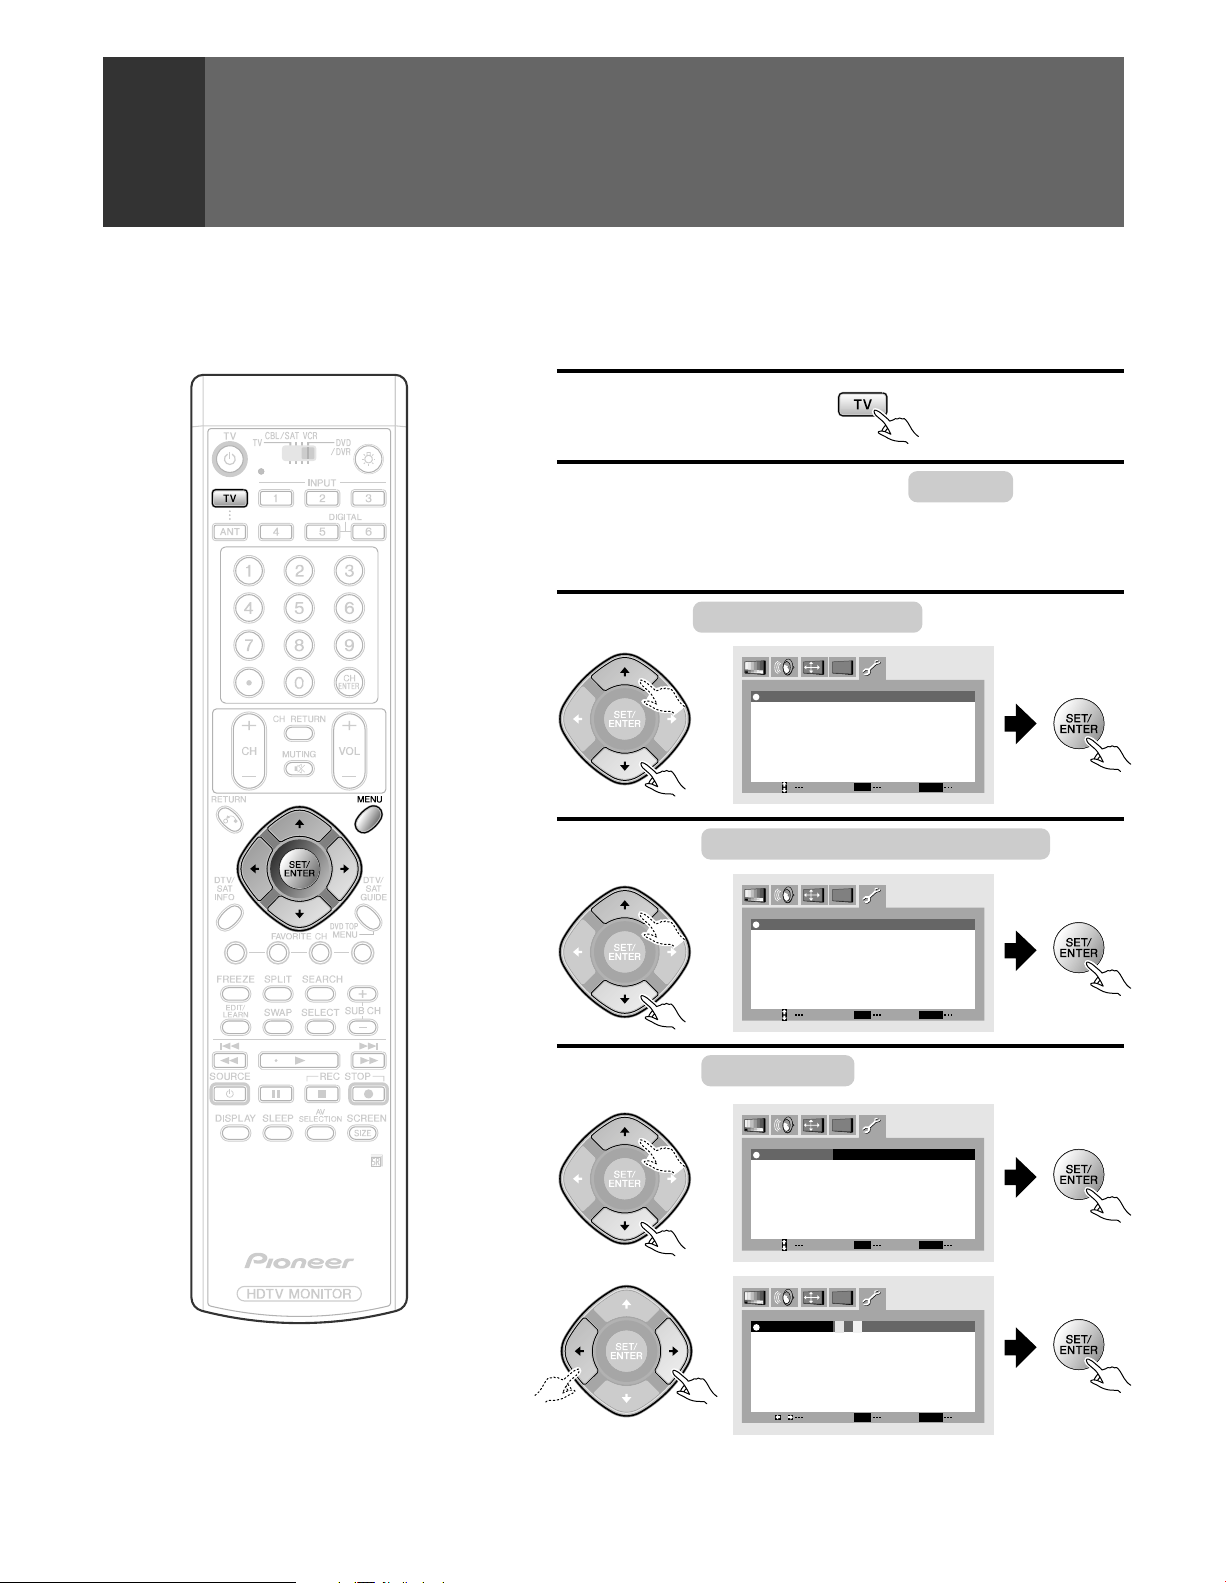
Press MENU and select SET UP
2
the | or \ button and then pressing «
button. (Refer to page 26.)
Select CHANNEL SET UP in the same way.
3
c
SELECT
SELECT
c
SET
c
c
ADD/ DEL
CHANNEL
SET
MENU
MENU
END
END
SET
SET
SET UP
CHANNEL SET UP
CONVERGENCE
PROGRAM BLOCK
CHANGE P ASSWORD
SYSTEM I N/ OUT
DIGI TAL I NTERFACE
Select AUTO CHANNEL PRESET .
4
CHANNEL SET UP
AUTO CHANNE L P RESE T
CHANNEL
FAVORI TE
EXI T
by using
NOTES:
• The CHANNEL SET UP cannot be selected unless
the function is set up for TV.
• Failure to connect antenna cable in this procedure
will result in selection of a single TV channel.
28
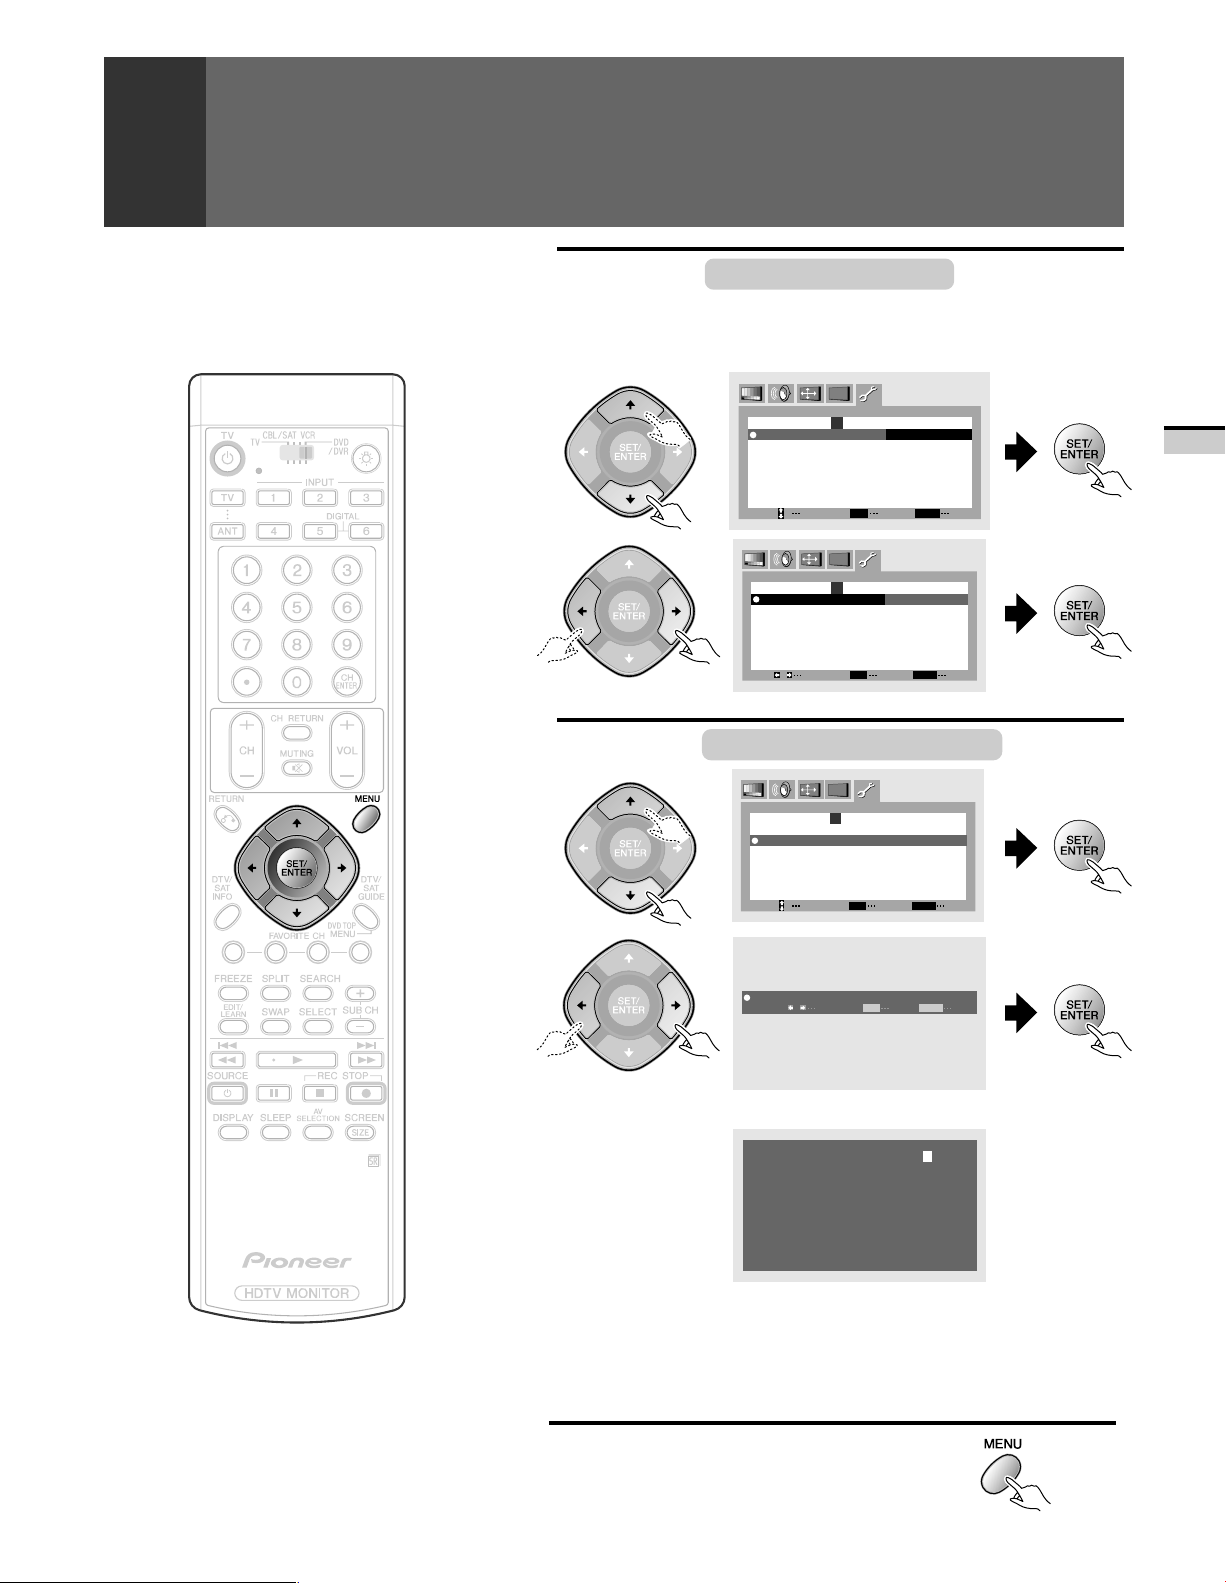
Select ANTENNA , then select A or B.
5
c
SELECT
SELECT
c
PRESET
CATV
START
SET
PRESET
CATV
START
SET
MENU
MENU
END
END
SET
c
c
SET
AUTO CHANNE L
ANTENNA:A
TV/ CABLE MODE:
AUTO PRESET
EXI T
AUTO CHANNE L
ANTENNA: AB
TV/ CABLE MODE:
AUTO PRESET
EXI T
Page 29
AUTO CHANNEL PRESET
Select TV/CABLE MODE , then select
6
the broadcast system to be received from
AIR or CATV.
c
AUTO CHANNE L PRE SE T
ANTENNA: B
TV/ CABLE MODE:
AUTO PRESET
c
CATV
START
BASIC OPERATIONS
EXI T
AUTO CHANNE L PRES ET
ANTENNA: B
TV/ CABLE MODE:
AUTO PRESET
EXI T
Select AUTO PRESET START .
7
AUTO CHANNE L PRES ET
ANTENNA: B
TV/ CABLE MODE:
AUTO PRESET
EXI T
PRESET ST ART? YES NO
SELECT
SELECT
SELECT
c
ADJUST
SET
SET
c
c
START
SET
SET
c
START
SET
SET
SET
MENU
AIR CATV
MENU
AIR
MENU
MENU
SET
END
END
END
END
NOTE:
If AUTO CHANNEL PRESET is not performed, refer to
the steps on page 47 and onwards to preset channels.
• AUTO CHANNEL PRESET starts.
PLEASE WAI T
AUTO PROGRAMMI NG
• When AUTO CHANNEL PRESET ends, the Monitor will return
to step 5. Perform steps 5 through 7 if the other antenna is also
being used.
• You can give a name to broadcast channels that have been
stored in memory with AUTO CHANNEL PRESET. (Refer to
page 47 to 49.)
After setting, press MENU
8
to turn the menu off.
CH
B
2
29
Page 30
CONVERGENCE ADJUSTMENT
Before convergence adjustment*1, please choose a stabilized input signal*2 in
order to display a stable cross pattern.
*1 Convergence adjustment ..... Color deviation adjustment
*2 Stabilized input signal .......... Examples, DVD player, digital tuner, etc.
Due to the differing magnetic fields in different locations, you may
experience color deviation, that is inaccurate colors. This is called
misconvergence. If your colors seem inaccurate, realign the color
convergence with the method below. Before doing this make sure you
warm up the TV for at least 30 minutes. A color convergence for each of 2
scan mode is necessary 480p and 1080i.
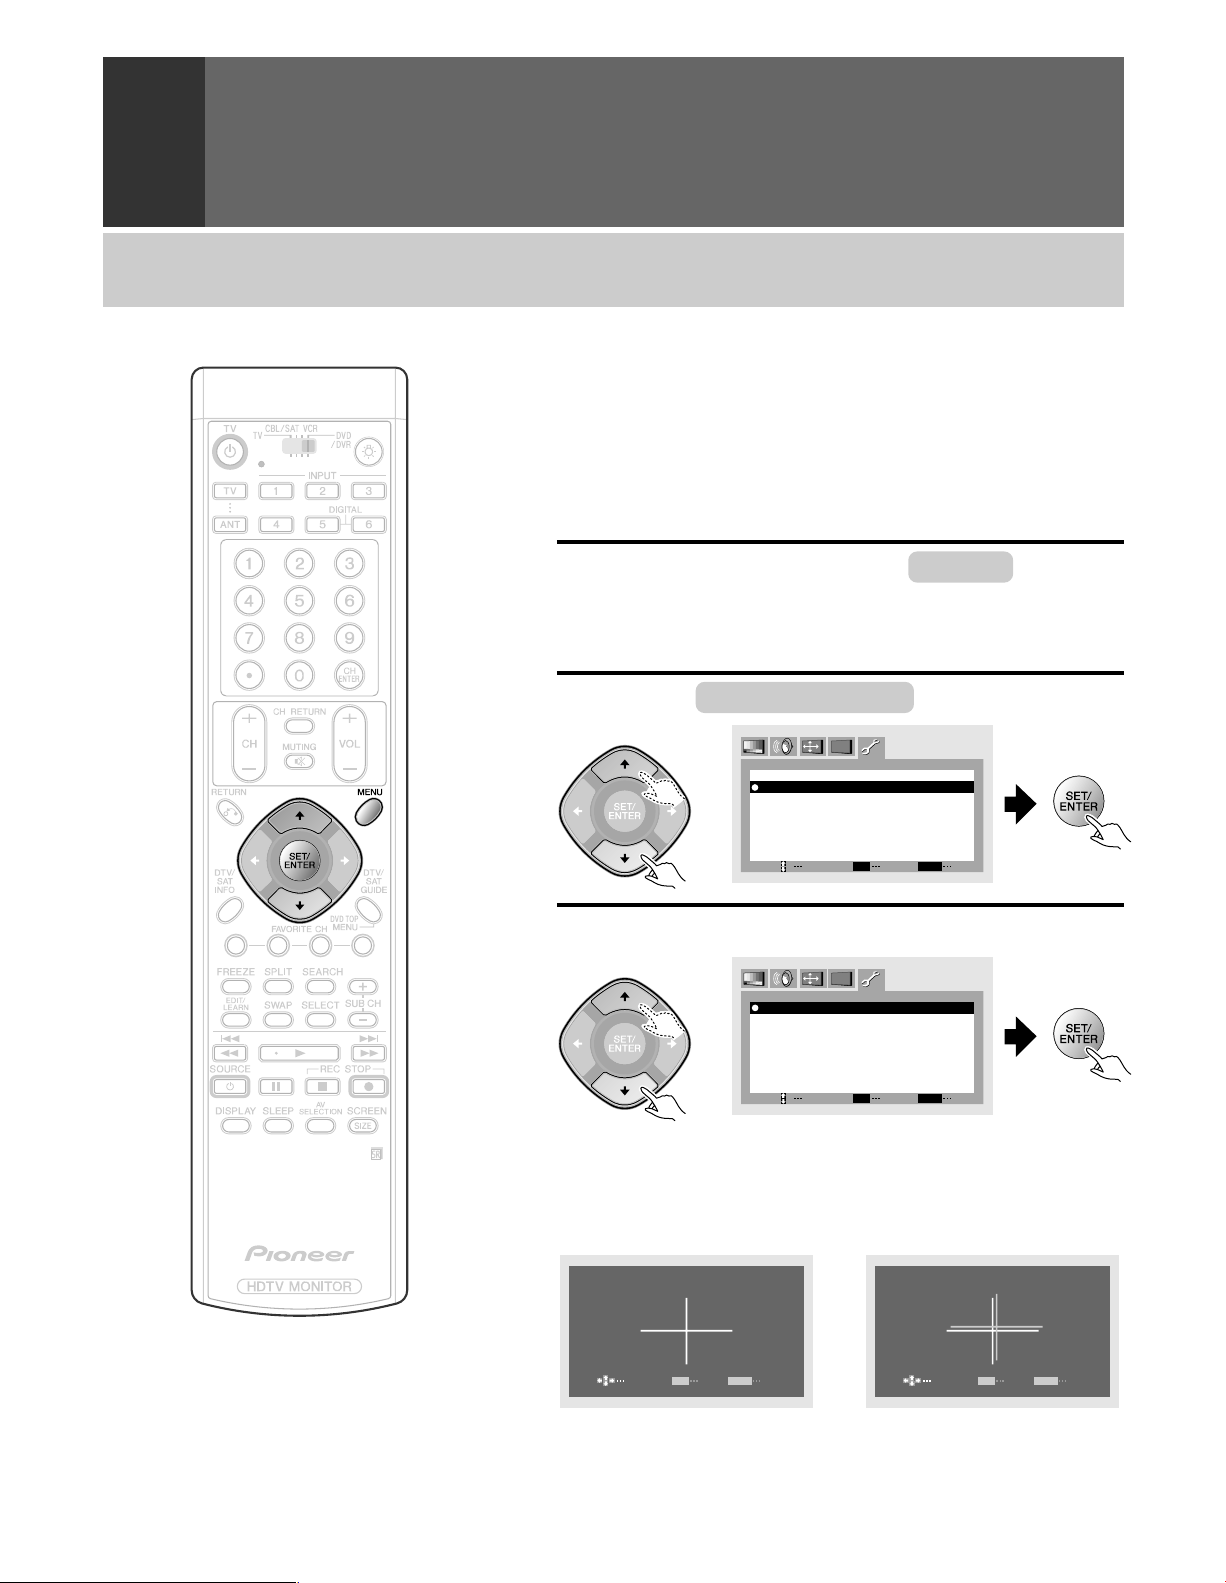
Press MENU and select SET UP
1
the | or \ button and then pressing «
button. (Refer to page 26.)
Select CONVERGENCE in the same way.
2
c
SELECT
SELECT
c
SET
c
c
SET
MENU
MENU
END
END
SET
SET
SET UP
CHANNEL SET UP
CONVERGENCE
PROGRAM BLOCK
CHANGE P ASSWORD
SYSTEM I N/ OUT
DIGI TAL I NTERFACE
Select scan mode.
3
CONVERGENCE
AD J USTMEN T F OR 4 8 0p
AD J USTMEN T F OR 1 0 80 i
EXI T
• This accesses the center convergence adjustment.
by using
30
When the cross pattern is white If the cross pattern shows other
colors or when one side of the
white line is red or blue
ADJ CONVERGENCE
MENU
SET
ADJUST
SET
END
The color is converged. Press SET/
ENTER button twice, proceed onto
page 73 and perform MULTI-
This indicates that the color is
misconverged. Proceed to step 4
and perform the adjustment.
ADJ CONVERGENCE
MENU
SET
ADJUST
SET
END
POINT convergence.
Page 31

CONVERGENCE ADJUSTMENT
Move the red line onto the green line.
4
Move the vertical line.
ADJ CONVERGENCE
MENU
SET
ADJUST
END
SET
Move the horizontal line.
ADJ CONVERGENCE
MENU
SET
ADJUST
Move the blue line onto the yellow line.
5
END
SET
BASIC OPERATIONS
ADJ CONVERGENCE
MENU
SET
ADJUST
ADJ CONVERGENCE
SET
ADJUST
c
SELECT
c
FOR 480p
SET
CONVERGENCE
AD J USTME NT
ADJ CENTE R POI NT
CONVERGENCE
ADJ MULT I –POI NT
EXI T
END
SET
MENU
END
SET
MENU
SET
END
• When ADJ CENTER POINT is selected, center convergence
adjustment will be accessed.
• Select ADJ MULTI-POINT to perform fine convergence tuning.
See page 73 for further information on multi-point convergence
adjustment.
After completing the convergence
6
adjustment, press MENU to turn the
menu off.
31
Page 32

PROGRAM BLOCK (V. CHIP) FUNCTION
Since laws have been passed in the United States requiring a way of blocking undesirable programming, the V-chip has become a
required component in television sets. The V-chip is a computer chip which decodes signals added to broadcast signals transmitted
by television broadcasters. These signals are classified by programming content (e.g., amount of violence or sexual content) and
age, and viewers may specify settings which block certain types of programming.
Program blocking may be set to a specific level judged by parents to be undesirable for children depending on their age and the
content of the programming in question. The V-chip makes it impossible for such children to view programs with ratings exceeding
the specified level.
The V-chip uses the following rating system.
<U.S.A. RATING SYSTEM>
MPAA RATING
RATING
G GENERAL AUDIENCES. All ages admitted.
PG PARENTAL GUIDANCE SUGGESTED. Some material may not be suitable for children.
PG-13 PARENTAL STRONGLY CAUTIONED. Some material may be inappropriate for children under 13.
Age-Base
R RESTRICTED. Under 17 requires accompanying parent or adult guardian.
NC-17 NO ONE 17 AND UNDER ADMITTED.
X X Rating is an older rating that is the same as NC-17 and may be encoded on the data of older movie.
NR NOT RATED
TV PARENTAL GUIDELINES
RATING
TV-Y –––––
TV-Y7 ‡ ––––
Age-Base
TV-Y All Children. This program is designed to be appropriate
for all children.
TV-Y7 Directed to Older Children. This program is designed for
children age 7 and above.
Note: For those programs where fantasy violence may be
TV-G General Audience. Most parents would find this program
suitable for all ages.
TV-PG Parental Guidance Suggested. This program contains
material that parents may find unsuitable for younger
children.
The program contains one or more of the following:
TV-G –––––
TV-PG – ‡‡‡‡
TV-14 – ‡‡‡‡
TV-MA ––‡‡‡
more intense or more combative than other programs
in this category, such programs will be designated
TV-Y7-FV.
(D) Some suggestive dialogue
(L) Infrequent coarse language
(V) Moderate violence
(S) Some sexual situations
Description and Content Themes
FV D L S V
32
FV: Fantasy Violence
D: Sexually Suggestive Dialog
L: Adult Language
S: Sexual Situations
V: Violence
TV-14 Parents Strongly Cautioned. This program contains some
material that many parents would find unsuitable for
children under 14 years of age.
This program contains one or more of the following:
(D) Intensely suggestive dialogue
(L) Strong coarse language
(S) Intense sexual situations
(V) Intense violence
TV-MA Mature Audience Only. This program is specifically designed
to be viewed by adults and therefore may be unsuitable for
children under 17.
This program contains one or more of the following:
(L) Crude indecent language
(S) Explicit sexual activity
(V) Graphic violence
Page 33

<CANADIAN RATING SYSTEM>
CANADIAN ENGLISH LANGUAGE RATING SYSTEM
RATING
C Children
C8+ Children 8 years and older
Age-Base
G General programming, suitable for all audiences
PG Parental Guidance
14+ Viewers 14 years and older
18+ Adult Programming
PROGRAM BLOCK (V. CHIP) FUNCTION
C
Programming interned for children under age 8
Careful attention is paid to themes, which could threaten children's sense of security and well-being. There will be no realistic scenes of
violence. Depictions of aggressive behaviour will be infrequent and limited to portrayals that are clearly imaginary, comedic or unrealistic
in nature.
C8+ Programming generally considered acceptable for children 8 years and over to watch on their own
Violence will not be portrayed as the preferred, acceptable, or only way to resolve conflict; or encourage children to imitate dangerous acts
which they may see on television. Any realistic depictions of violence will be infrequent, discreet, of low intensity and will show the
consequences of the acts.
G General Audience
Will contain very little violence, either physical or verbal or emotional. Will be sensitive to themes which could frighten a younger child, will
not depict realistic scenes of violence which minimize or gloss over the effects of violent acts.
PG Parental Guidance
Programming intended for a general audience but which may not be suitable for younger children. Parents may consider some content
inappropriate for unsupervised viewing by children aged 8-13.
14+ Programming contains themes or content which may not be suitable for viewers under the age of 14
Parents are strongly cautioned to exercise discretion in permitting viewing by pre-teens and early teens.
18+ Adult
May contain violence integral to the development of the plot, character or theme, intended for adult audiences.
CANADIAN FRENCH LANGUAGE RATING SYSTEM
RATING
G General
8+ Children 8 years and older
Age-Base
13+ Viewers 13 years and older
16+ Viewers 16 years and older
18+ For Adults
BASIC FUNCTIONS
G
General
Programming intended for audience of all ages. Contains no violence, or the violence it contains is minimal or is depicted appropriately
with humour or caricature or in an unrealistic manner.
8+ 8+ General – Not recommended for young children
(8 ans+)
Programming intended for a broad audience but contains light or occasional violence that could disturb young children. Viewing with an
adult is therefore recommended for young children (under the age of 8) who cannot differentiate between real and imaginary portrayals.
13+ Programming may not be suitable for children under the age of 13
(13 ans+)
Contains either a few violent scenes or one or more sufficiently violent scenes to affect them. Viewing with an adult is therefore strongly
recommended for children under 13.
16+ Programming is not suitable for children under the age of 16
(16 ans+)
Contains frequent scenes of violence or intense violence.
18+ Programming restricted to adults
(18 ans+)
Contains constant violence or scenes of extreme violence.
33
Page 34

PROGRAM BLOCK (V. CHIP) FUNCTION
SETTING THE PROGRAM BLOCKING
LEVEL
Press MENU and select SET UP
1
the | or \ button and then pressing «
button. (Refer to page 26.)
Select PROGRAM BLOCK in the same
2
way.
c
SET UP
CHANNEL SET UP
CONVERGENCE
PROGRAM BLOCK
CHA NGE P ASSWORD
SYSTEM I N/ OUT
D IGI TAL I NTERFACE
Enter a password.
3
• Press numeric buttons ‘0’ through ‘9’ to enter a four-digit
password.
• If the password has not been changed as described in Changing
Password (p. 39), enter the default password of ‘1234’.
• If you wish to change the password (recomended), see p. 39
Changing Password for instructions on how to do so.
c
SET
SELECT
PROGRAM BLOCK
I NPU T YOUR PAS SWORD
MENU
SET
c
c
––––
END
by using
34
Select BLOCK .
4
EXI T
SELECT
c
PROGRAM BLOCK
BLOCK: OFF
U.S.A.
CANADI AN RAT ING SYSTEM
EXI T
c
RAT I NG S YSTEM
SET
SELECT
SET
MENU
SET
MENU
SET
END
END
Page 35

Set BLOCK to ON.
5
PROGRAM BLOCK (V. CHIP) FUNCTION
c
PROGRAM BLOCK
BLOCK: ON OF F
U.S.A.
CANADI AN RAT ING SYSTEM
c
RAT I NG S YSTEM
EXI T
Select U.S.A. RATING SYSTEM or
6
SELECT
SET
MENU
SET
END
CANADIAN RATING SYSTEM .
c
SELECT
c
SET
MENU
SET
END
PROGRAM BLOCK
BLOCK: ON
U.S.A. RAT ING SYSTEM
CANADI AN RAT ING SYSTEM
EXI T
If you selected U.S.A. RATING SYSTEM .
7
Select MPAA RATING or TV PARENTAL
GUIDELINES .
c
PROGRAM BLOCK
U.S.A.
MPA A RA T I NG
TV PARENTAL GU I DEL INE S
EXI T
c
RAT I NG SYSTEM
SET
SELECT
SET
MENU
END
BASIC FUNCTIONS
NOTE:
•
Blocking programming with a low rating will cause
all programming with a higher rating also to be
blocked.
•
The ‘NR’ (not rated) MPAA RATING may be set to
‘View’ or ‘Block’ without regard to other ratings.
Select and then confirm the rank of the
8
MPAA RATING.
c
VIEW
SELECT
VIEW
SELECT
c
SET
c
c
SET
MENU
MENU
END
END
SET
SET
MPA A RA T I NG
G: VIEW
PG:
PG– 13 :V IEW
R: VIEW
NC– 17 :BLOCK
X: BLOCK
NR: BLOCK
EXI T
MPA A RA T I NG
G: VIEW BLOCK
PG:
PG– 13 :V IEW
R: VIEW
NC– 17 :BLOCK
X: BLOCK
NR: BLOCK
EXI T
35
Page 36

PROGRAM BLOCK (V. CHIP) FUNCTION
Select and confirm the rank of the TV
9
PARENTAL GUIDELINES.
c
TV PARENTAL GUI DEL I NES
TV– YB–––––
TV– Y7 B B ––––
TV– GV–––––
TV– PG V – VVVV
TV– 14 V – VVVV
TV– MA V ––VV V
EXI T
c
FV D L S V
SET
SELECT
MENU
SET
END
• Each time the SET/ENTER button is pressed, the setting will
toggle between ‘B’ (Block) and ‘V’ (View).
If you selected CANADIAN RATING
10
SYSTEM in step 6, select ENGLISH or
FRENCH .
c
PROGRAM BLOCK
CANADI AN RAT ING SYSTEM
ENGL ISH
FRENCH
c
EXI T
If you selected ENGLISH, select and then
11
SELECT
SET
MENU
SET
END
confirm the rank of the ENGLISH RATING
(If you selected FRENCH go to step 12).
c
SELECT
SELECT
c
SET
c
c
SET
MENU
MENU
END
END
SET
SET
ENGL ISH RATI NG
C: VIEW
C8+: VI EW
ENGL ISH
G: VIEW
PG: BLOCK
14+: BLOCK
18+: BLOCK
EXI T
ENGL ISH RATI NG
C: VIEW BLOCK
C8+: VI EW
ENGL ISH
G: VIEW
PG: BLOCK
14+: BLOCK
18+: BLOCK
EXI T
Go to step 13.
36
Page 37

PROGRAM BLOCK (V. CHIP) FUNCTION
Select and then confirm the rank of the
12
FRENCH RATING.
c
FRENCH RAT ING
G: V IEW
8+: VIEW
13+: BLOCK
16+: BLOCK
18+: BLOCK
c
13
EXI T
FRENCH RAT ING
G: VIEW BLOCK
8+: VIEW
13+: BLOCK
16+: BLOCK
18+: BLOCK
EXI T
SELECT
SELECT
SET
c
c
SET
MENU
MENU
END
END
SET
SET
After setting, press MENU to turn the
menu off.
BASIC FUNCTIONS
37
Page 38

PROGRAM BLOCK (V. CHIP) FUNCTION
HOW TO REMOVE BLOCKING
FROM A PROGRAM IN PROGRESS
If you choose a program that has a rating higher than your
program blocking rating, the picture and sound will cut off
and an enter password screen will appear.
A
2
CH
KCBS
PROGRAM BLOCKED
TV PARENTAL
:TV–14–DLSV
Press the SET/ENTER button on the remote control.
PROGRAM BLOCKED
INPUT YOUR
If you enter your password the blocking will be removed for
this viewing only.
NOTE:
If the monitor power is turn OFF then turned ON again, the Program
Blocked screen will appear again and you'll need to re-enter the
password to view the program.
GU I DEL I NES
P AS SWORD
––––
INPUT1
COMPONENT
15K
REMOVING BLOCKING IN
MULTI-SCREEN MODE
• Just as in normal single-screen mode, programs are
blocked in SEARCH screen mode (see pages 44 and 45),
but blocking can be removed only from the Main picture.
To remove blocking from Search picture screen, switch to
the Main picture for that channel and then remove blocking.
Because it is impossible to remove blocking when the main
picture of 9 screen is blocked, remove it after returning to
the single screen.
• When viewing in FREEZE screen (see page 44) mode, only
programming on the Moving screen to the left will be
blocked and the programming on the Still screen to the
right will be displayed as is.
Moving screen Still screen
«
Block
2
A
CH
KCBS
PROGRAM
BLOCKED
:TV– 14– DLSV
Still screen
38
• When blocking is on during SEARCH screen mode, the
screen at search picture side will be blacked out and won't
display: “PROGRAM BLOCKED”.
Page 39

CHANGING PASSWORD
A password must be entered to turn program blocking on and off. The
default password is '1234', but it is strongly recommended that you change
the password.
Press MENU and select SET UP
1
the | or \ button and then pressing «
button. (Refer to page 26.)
Select CHANGE PASSWORD in the same
2
way.
c
SET UP
CHANNEL SET UP
CONVERGENCE
PROGRAM BLOCK
CHA NGE P ASSWORD
SYSTEM I N/ OUT
D IGI TAL I NTERFACE
Enter current password.
3
• Press numeric buttons ‘0’ through ‘9’ to enter a four digit
password.
• If no password has been previously set, enter the default
password of ‘1234’.
c
SET
––––
MENU
c
SET
SELECT
CHA NGE P ASSWORD
I NPU T YOUR PAS SWORD
END
c
by using
BASIC FUNCTIONS
EXI T
○○○○○○○○○○○○○○○○○○○○○○○○○○○○○○○○○○○○○○○○○○○○○○○○○○○○○○○○○○○○○○○○○○○○○○○○○○○○○○
○○○○○○○○○○○○○○○○○○○○○○○
We suggest you write down your password so you don't forget it.
Cut along dotted line and file after reading and filling out.
SELECT
SET
MENU
SET
END
If you forget the password
◊B√¿≥≤?ÙÛc ◊B√¿.≤?ÙÛc
Your PROGRAM BLOCK password No.:
When the message ‘INPUT YOUR PASSWORD’ in step 3 is
displayed, press the RESET button on the front panel and hold it
down for 3 seconds or longer.
The password reverts to “1234”.
39
Page 40

CHANGING PASSWORD
Enter new password.
4
• Press numeric buttons ‘0’ through ‘9’ to enter a four-digit
password and press the SET/ENTER button.
c
CHA NGE P ASSWORD
PRESS
TO DE F INE N EW PASSWORD
c
NUMER I C K EYS
––––
EXI T
After setting, press MENU to turn the
5
SELECT
SET
MENU
SET
END
menu off.
40
Page 41

CHANGING SCREEN SIZE
SETTING SCREEN SIZE
Different source material have specific screen sizes they should use. Some
films are size in
for info. Regular TV program are 4:3, so 4:3 is the standard size.
• This Monitor is provided with sizes to deal with screens of various
aspect ratios. It is recommended that programs and software be
watched in the appropriate size.
• When 4:3 images are fully displayed on a wide TV screen in the
NATURAL WIDE size, CINEMA WIDE size, ZOOM size, or FULL size,
some parts of the images may be cut off or distorted.
Press the SCREEN SIZE button.
• Each time the SCREEN SIZE button is pressed, the size changes in the
following order.
NATURAL WIDE
Vista some in cinemascope etc. check video/DVD packaging
NATURAL WIDE CINEMA WIDE
4:3 NORMAL FULL ZOOM
BASIC FUNCTIONS
Suitable for when viewing regular TV news
or sports programs. Movies or sports
programs can be viewed with an expansive
powerful image.
NOTES:
•
When 1080i, 720p component signals or RGB
signals, 1080i DIGITAL signals are input, SCREEN
SIZE will be limited to FULL.
•
In PURE DIGITAL: ON state during digital signal
input (INPUT 5,6), SCREEN SIZE is fixed at FULL.
•
Continuous operation for extended periods in 4:3
NORMAL size may burn out the screen. We thus
recommend that this size be used only in
conjunction with another SCREEN size.
CINEMA WIDE
Mainly suitable for viewing Vista size and
other such movie images.
Provides a more expansive, powerful image.
This screen size is convenient when viewing
a Cinemascope size image that has subtitles.
ZOOM
Mainly suitable for viewing Cinemascope
size and other such movie images.
Provides a more expansive, powerful image.
FULL
Suitable for wide screen images.
4:3 NORMAL
Suitable for when viewing news sit coms or
any regular TV programs. Video software can
be viewed in its original screen frame size
with this size.
41
Page 42

CHANGING SCREEN SIZE
TO ADJUST THE SCREEN POSITION
When the screen mode is CINEMA WIDE or ZOOM, you can adjust the
screen position by pushing the » or « button.
During digital signal input, the position can be adjusted using the | or \
button.
Press MENU and select SET UP
1
the | or \ button and then pressing «
button. (Refer to page 26.)
Select V. POSITION in the same way.
2
c
SELECT
ADJUST
c
KEYS
1080i
0
–3
SET
MENU
MENU
END
END
SET
SET
SET
SCREEN
INPUT3
SCAN MODE:
H.POSITION:
CINEMA WIDE
V.POSITION:
Adjust the screen position.
3
• Adjustable range
CINEMA WIDE mode : –15 to 15
ZOOM mode : –25 to 25
V.POSITION 0
by using
NOTES:
• V screen position cannot be adjusted in NATURAL
WIDE, FULL, or 4:3 NORMAL mode.
• H screen position can be adjusted in DIGITAL
signals.
42
Select H. POSITION in the same way.
4
c
SELECT
c
1080i
+5
– 3
SET
MENU
SET
END
SCREEN
INPUT5 (DI G ITAL )
SCAN MODE:
H.POSITION:
CINEMA WIDE
V.POSITION:
Page 43

Adjust the screen position.
5
• Adjustable range
DIGITAL 31K : –10 to 10
DIGITAL 33K : –15 to 0
CHANGING SCREEN SIZE
H.POSITION 0
After adjusting, press MENU to turn the
6
ADJUST
MENU
SET
SET
END
menu off.
BASIC FUNCTIONS
43
Page 44

MULTI-SCREEN FUNCTION
KLCS
31
CH
A
STEREO
STD
NATURAL WIDE
VIEWING TWO SCREENS (SPLIT screen)
The screen can be split vertically, making it possible to view different images
on the left and right.
• The screen on left side is the main picture, and the other screen is the
sub-picture. Sound will be output for the main picture.
Sound from the TV speaker will only be output for the main picture.
To listen to sound for a sub picture, press the SWAP button and switch
the screens on the left and the right.
• Regular operations can be performed on the main picture.
Press the SPLIT button.
NOTES:
• The same image cannot be viewed as both the main
picture and the sub-picture.
• Pressing the MENU button in SPLIT or FREEZE
screen mode restores the screen display to normal
and displays the menu on screen.
• These functions cannot be used when INPUT 1 or
INPUT 2 is receiving a 1080i or 720p component
signal (or the signals might not be received or noise
might be generated).
• When a TV broadcast is being received, the screen
on the right will not show the antenna B signal.
• RGB signals input from INPUT3 cannot be
displayed.
• During 1080i input of digital signal input (INPUT 5,
6), display is not possible.
• Continuous operation for extended periods in SPLIT
or FREEZE screen mode may burn out the screen.
We thus recommend that these modes only be used
in conjunction with the normal screen mode.
• If the non-interlace signal for a TV game etc. is
entered to the left screen during SPLIT screen
mode, the right screen may be disrupted. If this
occurs, use the right screen for TV game etc. entry.
31
A
CH
KLCS
STEREO
(Main picture) (Sub picture)
A
CH
KCBS
• When the SUB CH +,– buttons are pressed, the channel for the sub-
picture will be changed.
• When the SELECT button is pressed, the \ will move to the other
screen.
• The MONITOR/TV OUTPUT terminal outputs the main picture signal.
• Pressing the SPLIT button again will restore the original screen.
MAKING NOTES ON PROGRAM
CONTENT (FREEZE screen)
The screen can be frozen, such as for taking down a recipe from a cooking
program or an address for entering a quiz or the like.
Press the FREEZE button.
Moving screen Still screenMoving screen
• This function is operable only with the normal screen.
• Pressing the FREEZE button again will restore the original screen.
2
44
Page 45

MULTI-SCREEN FUNCTION
SEARCHING FOR A PROGRAM ON A
DIFFERENT CHANNEL (SEARCH screen)
The screen can be made into nine or four different screens, making it
possible to search for programs or enjoy multiple images.
Press the SEARCH button.
• Each time the SEARCH button is pressed, the screen mode changes in
the following order.
Normal screen
4 screen 9 screen
• Pressing the MENU button in SEARCH screen mode
restores the screen display to normal and displays
the menu on screen.
• These functions cannot be used when INPUT 1 or
INPUT 2 is receiving a 1080i, 480p or 720p
component signal (or the signals might not be
received or noise might be generated).
• RGB signals input from INPUT3 cannot be
displayed. Display is also not possible during digital
signal input (INPUT 5, 6).
• Continuous operation for extended periods in
SEARCH screen mode may burn out the screen.
We thus recommend that these modes only be used
in conjunction with the normal screen mode.
• The only channels displayed on the SEARCH screen
will be those with input signals input from antenna
A. Antenna B channels cannot be displayed on this
screen.
• If the non-interlace signal for a TV game etc. is
entered to the left screen during 9 screen or 4 screen
modes, the screen may be disrupted.
1 9 screen
55
68
50
Search picture Main picture
57
53
61
4846
A
8
CH
• On the search picture, the antenna A preset channel (see page 28) will
be displayed as a frozen image. If 8 or more channels have been preset,
the screens will automatically be switched and displayed.
• The search picture cannot be operated.
• Sound output is limited to the main picture.
INPUT1
5
A
CH
KTLA
INPUT2
INPUT3
Main picture Search picture
2 4 screen
• Press the SELECT button to select the image that you wish to switch
the channel or input source to. You can operate the screen that is
selected by the arrow. (Use only the selector buttons, direct channel
selection buttons, channel, antenna and CH +,– buttons.)
• Sound output is limited to the main picture.
BASIC FUNCTIONS
45
Page 46

CLOSED CAPTION DECODE FUNCTION
Closed caption broadcasting (character
information) in the video signal allows the
displaying of characters on the screen. This unit
has a closed caption decoder which allows, these
titles to be displayed when receiving these
broadcasts or playing a video cassette or Video
Disc with the
CC
mark, etc.
Press MENU and select CC
1
by using the
| or \ button and then pressing «
button. (Refer to page 26.)
Select CC in the same way.
2
c
CC
CC: OFF
MOD E : CC – 1
c
NOTES:
• When a video cassette or Video Disc carrying the
CC
mark etc. is played, the closed caption signal
may not be output depending on your VCR or Video
disc player.
• During TV broadcast reception, closed caption
signal may not be decoded properly if the receiving
broadcast signal is weak.
• Closed caption signal may not be decoded properly
depending on the recording condition of the video
cassette tape.
• The character information will not be displayed
while a menu is displayed. To turn on the character
information, press the MENU button and turn off
MENU.
• This function can be used only during TV and 480i
input.
SET
SELECT
Set CC to ON or ON IF MUTE.
3
MENU
SET
END
• If you have selected ON IF MUTE, closed captions will be
displayed only while MUTE is functioning with the MUTING
button pressed while you are viewing or listening to the
program.
c
SELECT
SELECT
c
SET
c
c
SET
MENU
MENU
END
END
SET
SET
CC
CC: OFF ON ON I F MUTE
MOD E : CC – 1
Select MODE .
4
CC
CC: ON
MOD E : CC – 1
Select the desired CC (Closed Caption CC-
5
1 to CC-4) or TEXT (TEXT-1 to TEXT-4).
c
SELECT
c
TEXT– 1
TEXT– 2CC– 2
TEXT– 3CC– 3
TEXT– 4CC– 4
SET
MENU
SET
END
CC
CC: ON
MOD E : CC – 1
46
After setting, press MENU to turn the
6
menu off.
Page 47

CHANGING CHANNEL SET UP
TO ADD OR DELETE PRESET CHANNELS
Broadcast stations preset by auto channel preset which are unnecessary
can be deleted. Broadcast stations you want to watch that were not preset
by auto channel preset can be preset. You can add a name to a channel
that has been added. (See steps 7 and 8 on page 49.)
ADD ........... Manually presets channels that were not preset by AUTO
CHANNEL PRESET.
DEL ............ Deletes channels that are not required for reception. The
deleted channels can be skipped when selecting channels
with the + and – CH (channel) buttons.
• Perform the following after completing AUTO CHANNEL PRESET. (See
page 28.)
Press MENU and select SET UP
1
the | or \ button and then pressing «
button. (Refer to page 26.)
Select CHANNEL SET UP in the same way.
2
c
SELECT
SELECT
c
SET
c
c
ADD/ DEL
CHANNEL
SET
MENU
MENU
END
END
SET
SET
SET UP
CHANNEL SET UP
CONVERGENCE
PROGRAM BLOCK
CHA NGE P ASSWORD
SYSTEM I N/ OUT
D IGI TAL I NTERFACE
Select CHANNEL ADD/DEL .
3
CHANNEL SET UP
AUTO CHANNE L P RESE T
CHANNNEL
FAVORI TE
EXI T
Select ANTENNA receiving the channel
4
you want to delete or add with A or B.
by using
BASIC FUNCTIONS
CHANNEL
ANTENNA:A
CHANNEL:120
CHANNNEL
SETTI NG :ADD
LABEL: &&&&
EXI T
CHANNEL
ANTENNA: AB
CHANNEL:120
CHANNNEL
SETTI NG :ADD
LABEL: &&&&
EXI T
c
ADD/ DEL
SELECT
c
ADD/ DEL
SELECT
c
SET
c
SET
MENU
MENU
END
END
SET
SET
47
Page 48

CHANGING CHANNEL SET UP
Select CHANNEL , then select a channel.
5
c
CHANNEL
ANTENNA: A
CHANNEL:120
CHANNNEL
SETTI NG :ADD
LABEL: &&&&
c
ADD/ DEL
EXI T
CHANNEL
ANTENNA: A
CHANNEL:125
CHANNNEL
SETTI NG :ADD
LABEL: &&&&
EXI T
Select SETTING , then select ADD
6
SELECT
c
ADD/ DEL
SELECT
SET
c
SET
MENU
MENU
END
END
SET
SET
(addition) or DEL (deletion).
c
CHANNEL
ANTENNA: A
CHANNEL:125
CHANNNEL
SETTI NG :ADD
LABEL: &&&&
EXI T
CHANNEL
ANTENNA: A
CHANNEL:125
CHANNNEL
SETTI NG :ADD DE L
LABEL: &&&&
ADD/ DEL
SELECT
c
ADD/ DEL
c
SET
MENU
SET
END
c
48
EXI T
SELECT
SET
MENU
SET
END
Page 49

CHANGING CHANNEL SET UP
Select LABEL and input the letters for
7
the name you want to call this channel.
• When adding a channel, a label of 4 characters can be input for
the added channel.
c
CHANNEL
ANTENNA: A
CHANNEL:125
CHANNNEL
SETTI NG :ADD
LABEL: &&&&
c
ADD/ DEL
EXI T
SELECT
SET
MENU
SET
END
• Input the first character.
When
When
is selected, a space can be input.
is selected and input, label character input mode will
terminate.
c
CHANNEL
ANTENNA: A
CHANNEL:125
CHANNNEL
SETTI NG :ADD
LABEL: ABCD
EXI T
ADD/ DEL
SELECT
c
A BCDEFG
HIJKLMN
OPQRSTU
VWXY Z 1 2
3456789
0/––.&&
SET
MENU
SET
END
• Input the rest of the characters.
Repeat steps 4 to 7 to add and/or delete
8
other channels.
After setting, press MENU to turn the
9
menu off.
BASIC FUNCTIONS
49
Page 50

CHANGING CHANNEL SET UP
FAVORITE CHANNEL SET UP
Assigning your favorite channels to the four buttons (blue, green, red and
yellow) on the remote control unit makes it easy to call them up. Four
channels can be assigned to each button, making it possible to set a total
of 16 channels.
Press MENU and select SET UP
1
the | or \ button and then pressing «
button. (Refer to page 26.)
Select CHANNEL SET UP in the same way.
2
c
SELECT
SELECT
c
SET
c
c
ADD/ DEL
CHANNEL
SET
MENU
MENU
END
END
SET
SET
SET UP
CHANNEL SET UP
CONVERGENCE
PROGRAM BLOCK
CHA NGE P ASSWORD
SYSTEM I N/ OUT
D IGI TAL I NTERFACE
Select FAVORITE CHANNEL .
3
CHANNEL SET UP
AUTO CHANNE L P RESE T
CHANNNEL
FAVORI TE
EXI T
by using
NOTE:
A channel deleted with CHANNEL ADD/DEL (page 47)
cannot be set as a FAVORITE CHANNEL.
50
Select the color of the button you wish
4
to set.
c
SELECT
c
SET
MENU
SET
END
FAVORI TE CHANNEL
BLUE
RED
GREE N
YELLOW
EXI T
Page 51

CHANGING CHANNEL SET UP
Select number.
5
c
SELECT
SELECT
c
SET
c
c
SET
MENU
MENU
END
END
SET
SET
Select antenna.
6
FAVORI TE CHANNEL
YELLOW ANT CH
1114A
2B56
3A23
4A5
EXI T
FAVORI TE CHANNEL
YELLOW ANT CH
1 – 114AB
2B 56
3A 23
4A 5
EXI T
• If you made a mistake during setting, press SET to select the
incorrect entry and set it correctly.
BASIC FUNCTIONS
Select the channel.
7
c
SELECT
c
SET
MENU
SET
END
FAVORI TE CHANNEL
YELLOW ANT CH
1114B
2B56
3A23
4A5
EXI T
To set another number, repeat steps 5 to
8
7.
To set a button of a different color, repeat
steps 4 to 7.
• To return to step 4, press either the » or the « button to select
EXIT and then press the SET/ENTER button.
After setting, press MENU to turn the
9
menu off.
51
Page 52

PICTURE ADJUSTMENTS
This device has five types of picture quality settings in memory. You can
choose one from them or set the picture quality you desire and store it in
memory.
RECALL THE DESIRED SETTINGS
Press MENU and select PICTURE
1
using the | or \ button and then
pressing « button. (Refer to page 26.)
Select MODE in the same way.
2
c
PICTURE
MOD E : ST D
CONTRAST 0
BLACK LEVEL 0
COLOR
TINT
SHARPNE SS
Select the desired setting.
3
MOD E :
c
0
0
0
SET
SELECT
STD REF THEATER GAME USER PRO
SELECT
MENU
SET
MENU
SET
SET
END
END
by
NOTES on GAME mode setting:
•
We do not recommend the use of the Monitor for
video games, still pictures due to the potential
damage to the CRTs*. In the event a consumer
needs to use these devices for a short period of
time, the GAME mode will minimize potential
damage to the CRTs* by lowering the relative
contrast.
•
All signals output from the Projection Monitor will
be unaffected. Only the original output signal is sent
through the output jacks.
*CRT: Cathode-ray tube
52
STD .................... Sets standard picture quality.
REF THEATER .... This mode reproduces film material just like a
real film image. By cutting video enhancement
circuits, the picture becomes more natural and
looks filmlike.
GAME ................ Lowers the relative contrast of TV game images
to minimize discomfort to the eyes. This will
minimize bad effects such as discolored spots
or stains on the CRT of the Monitor.
USER ................. Calls up the picture quality the user has set. See
page 53 for on explanation of different picture
qualities.
PRO .................... In this mode, you can finely adjust the picture
quality to your taste.
After setting, press MENU to turn the
4
menu off.
Page 53

PICTURE ADJUSTMENTS
STORING THE SET PICTURE QUALITY
IN MEMORY
USER mode can be set for each input source: TV and INPUT 1 to INPUT 6.
Select the input source and show the
1
image on the screen.
If VCR or DVD/DVR has been
selected, start playback for the
relevant device.
Press MENU and select PICTURE .
2
c
SELECT
c
0
0
0
SET
MENU
SET
END
PICTURE
MOD E : ST D
CONTRAST 0
BLACK LEVEL 0
COLOR
TINT
SHARPNE SS
Adjust the desired picture quality.
3
(Refer to steps 2 and 3 on page 54.)
• If any mode (STD, REF THEATER, or GAME) is adjusted, setting
for USER mode.
• The last mode that was adjusted will become the USER sub
mode (indicated in parentheses).
• PRO mode displays “PRO” unchanged.
• A USER mode can be stored for TV and the six input sources.
c
SELECT
c
Indicates the adjusted picture
quality setting that is the base
for USER mode.
SET
15
–5
0
–30
SET
MENU
END
PICTURE
MOD E : USER ( S T D )
CONTRAST 30
BLACK LEVEL
COLOR
TINT
SHARPNE SS
BASIC FUNCTIONS
After adjusting, press MENU to turn the
4
menu off.
53
Page 54

PICTURE ADJUSTMENTS
TO ADJUST THE PICTURE QUALITY
Adjust the picture quality when you want improve the quality of the picture
you are watching. You can adjust the CONTRAST, BLACK LEVEL
(brightness), COLOR, TINT and SHARPNESS.
CONTRAST ........... Adjusting the contrast to match the brightness of the
surroundings so it is easier to watch.
BLACK LEVEL (brightness)
........................ Adjusting the picture so that night scenes, dark hair,
and other dark parts of the screen are easier to watch.
COLOR .................. Adjusting it to the density you prefer. (It appears
natural if it is a little light.)
TINT ...................... Adjusting it so that flesh tones appear more attractive.
SHARPNESS ......... Normally use the center value.
When you want a soft sensation, set it so that the
scale moves in the minus direction.
Press MENU and select PICTURE .
1
(Refer to page 26.)
Select the adjustment item.
2
NOTES:
• When picture quality has been adjusted, the user
mode data will be overwritten with the new
settings.
• The COLOR, TINT, and SHARPNESS settings may
not be changed when receiving RGB input (INPUT
3).
• The CONTRAST and BLACK LEVEL cannot be
adjusted in PRO mode.
• COLOR, TINT, and SHARPNESS cannot be adjusted
in PURE DIGITAL:ON state during digital signal
input (INPUT 5, 6).
c
SELECT
c
– 5
0
– 30
SET
MENU
SET
END
PICTURE
MOD E : USER ( S T D )
CONTRAST 30
BLACK LEVEL 15
COLOR
TINT
SHARPNE SS
NOTE:
If you are distracted by the screen display during adjustment, push the SET/
ENTER button for three or more seconds. You can do the adjustment with the
screen display shut off. Pushing any button on the remote control restores the
display.
Adjust by pressing |, \, » or « .
3
• The adjusting range is –30 to 30.
• The numerical value comes down to press | and comes up to
press \.
• The adjustment item change to press » or «.
CONTRAST
ADJUST
– 10
MENU
SET
SET
END
• The set picture quality will be stored in memory as USER mode
(see page 53).
• Repeat steps 2 and 3 for other items.
After adjusting, press MENU to
4
turn the menu off.
54
Page 55

PICTURE ADJUSTMENTS
OTHER PICTURE QUALITY ADJUSTMENTS
The following six fine adjustments are available.
1 PureCinema ............ This function automatically detects movie film
recorded at 24 frames per second, and converts
it into a high quality 30 frames per second
delivering the picture at the same rate as it was
recorded.
2 COLOR TEMP ......... This function enables the image to be set to five
different tones.
3 3D Y/C LEVEL .......... Perform this adjustment when noises appear at
the color borders of the image.
4 3D NR LEVEL ..........Reduces the noise level of the luminance and
chrominance signals.
5 SVM (Scan Velocity Modulation)
............................... Screen contour definition can be selected as
desired.
6 FLESH TONE .......... By the time video signals from a broadcast station
arrive at your projection monitor (on air or cable
TV), they have experienced significant
degradation.
Flesh tone reduces color noise, improves color
uniformity and corrects unnatural flesh tones to
give your natural images.
7 BLACK ENHANCE ... Changing the black part of the video signal
automatically corrects the gradation of the black.
8 SHARP EFFECT ....... This enables you to switch the SHARPNESS
correction function.
9 LTI (Luminance Transient Improvement)
............................... This enables you to switch the definition of the
luminance signal.
0 GAMMA .................This enables you to switch the balance of the
contrast between the bright parts and dark parts
of the luminance signal.
- CONTRAST EXP .....This enables you to adjust the brightness level of
dark areas in accordance with screen brightness.
= SHARP MODE ........ This enables you to switch signal bands in order
to correct sharpness.
~ WHITE BALANCE ... This enables you to adjust the color temperature
to your taste.
NOTE:
Adjustments LTI, GAMMA, CONTRAST EXP, SHARP MODE and WHITE
BALANCE can be done only in PRO mode.
BASIC FUNCTIONS
NOTES:
• The COLOR TEMP, GAMMA and WHITE BALANCE
settings may be changed when receiving RGB
input.
• In PURE DIGITAL: OFF state during digital signal
input (INPUT 5, 6) it is possible to switch between
4
and 9.
Press MENU and select PICTURE .
1
(Refer to page 26.)
Select .
2
c
SELECT
c
– 5
0
– 30
SET
MENU
SET
PICTURE
MOD E : USER ( S T D )
CONTRAST 30
BLACK LEVEL 15
COLOR
TINT
SHARPNE SS
(To the following item.)
END
55
Page 56

PICTURE ADJUSTMENTS
1 To adjust PureCinema
3
This function automatically detects movie film recorded at 24 frames
per second, and converts it into a high quality 30 frames per second
delivering the picture at the same rate as it was recorded.
NOTE:
This can be used only during 480i signal input.
Select PureCinema .
c
SELECT
c
SET
MENU
SET
END
PICTURE
Pur eCi nema: STD
COLOR TEMP: S TD
3D Y /C LEVEL: 3
3D NR LEVEL : 3
SVM: OFF
FLESH TONE: ON
Select the desired PureCinema mode.
NOTE on PureCinema mode setting:
When the mode has been set to HQ or to STD, the
picture may appear unnatural depending on the
material being viewed (TV, VCR, DVD, etc.). When this
happens, set the mode to OFF.
Pur eCi nema: OFF STD HQ
SELECT
MENU
SET
SET
END
OFF .......... No PureCinema effects
STD ..........Standard PureCinema effects.
HQ............ Maximum PureCinema effects (Optimum setting for
the movie source).
2 To adjust COLOR TEMP
This function enables the image to be set to five different tones.
Select COLOR TEMP .
c
PICTURE
Pur eCi nema: STD
COLOR TEMP: S TD
3D Y /C LEVEL: 3
3D NR LEVEL : 3
SVM: OFF
FLESH TONE: ON
Select the desired tone of the image.
COLOR TEMP:
c
SELECT
SELECT
SET
B&W FILM STD LIVE NEWS
MENU
SET
MENU
SET
SET
END
END
56
B&W ........ Warmest color
FILM .........Warmer color
STD ..........Normal color
LIVE .......... Cooler color
NEWS ...... Coolest color
Page 57

PICTURE ADJUSTMENTS
3 To adjust 3D Y/C LEVEL
Perform this adjustment when noises appear at the color borders
of the image.
NOTE:
This function can be used only when viewing a source that has been
connected to the antenna or composite video input terminal.
Select 3D Y/C LEVEL .
c
SELECT
c
SET
MENU
SET
END
PICTURE
Pur eCi nema: STD
COLOR TEMP: S TD
3D Y /C LEVEL: 3
3D NR LEVEL : 3
SVM: OFF
FLESH TONE: ON
Select the desired level.
BASIC FUNCTIONS
3D Y /C LEVEL 3
SELECT
MENU
SET
SET
END
12345
Suitable for software
using dynamic images
Suitable for software
using still images
4 To adjust 3D NR LEVEL
Reduces the noise level of the luminance and chrominance signals.
Luminance signal .............. Video signal that controls brightness.
Chrominace signal ............ Video signal that controls color.
NOTE:
This can be used only during 480i, 480p (except when SCREEN MODE
is FULL) and 720p signal input.
Select 3D NR LEVEL .
c
SELECT
c
SET
MENU
SET
END
PICTURE
Pur eCi nema: STD
COLOR TEMP: S TD
3D Y /C LEVEL: 3
3D NR LEVEL : 3
SVM: OFF
FLESH TONE: ON
Select the desired level.
3D NR LEVEL 3
SELECT
MENU
SET
SET
END
12345
Low noise reduction High noise reduction
57
Page 58

PICTURE ADJUSTMENTS
5 To adjust Scan Velocity Modulation
(SVM)
Screen contour definition can be selected as desired.
NOTES:
• This function cannot be used when SCREEN MODE is 4:3 NORMAL
or PICTURE MODE is GAME.
• It cannot be used during RGB signal input.
Select SVM .
c
SELECT
c
SET
MENU
SET
END
PICTURE
Pur eCi nema: STD
COLOR TEMP: S TD
3D Y /C LEVEL: 3
3D NR LEVEL : 3
SVM: OFF
FLESH TONE: ON
SVM: OFF MI D HIGH
SELECT
MENU
SET
SET
END
OFF .......... Provides a soft picture.
MID ..........Provides a picture with moderate contours.
HIGH ........ Provides a picture with sharp contours.
6 To adjust FLESH TONE
By the time video signals from a broadcast station arrive at your
projection monitor (on air or cable TV), they have experienced
significant degradation.
Flesh tone reduces color noise, improves color uniformity and
corrects unnatural flesh tones to give your natural images.
NOTE:
It cannot be used during RGB signal input.
Select FLESH TONE .
c
SELECT
c
SET
MENU
SET
END
PICTURE
Pur eCi nema: STD
COLOR TEMP: S TD
3D Y /C LEVEL: 3
3D NR LEVEL : 3
SVM: OFF
FLESH TONE: ON
Set FLESH TONE to ON.
58
FLESH TONE: ON OF F
ADJUST
MENU
SET
SET
END
Page 59

PICTURE ADJUSTMENTS
7 To adjust BLACK ENHANCE
Changing the black part of the video signal automatically corrects
the gradation of the black.
NOTES:
• The effectiveness varies according to the content of the video signal.
• It cannot be used during RGB signal input.
Select BLACK ENHANCE .
c
SELECT
c
SET
MENU
SET
END
PICTURE
BLACK ENHANCE: ON
SHARP EFFECT: ON
LTI : MID
GAMMA : T YPE3
CONTRAST EXP: OFF
SHARP MODE: MODE1
BASIC FUNCTIONS
BLACK ENHANCE: ON OF F
SELECT
MENU
SET
SET
END
ON ........... BLACK ENHANCE effect is on.
OFF .......... BLACK ENHANCE effect is off.
8 To adjust SHARP EFFECT
This enables you to switch the SHARPNESS correction function.
NOTE:
It cannot be used during RGB signal input.
Select SHARP EFFECT .
c
SELECT
c
SET
MENU
SET
END
PICTURE
BLACK ENHANCE: ON
SHARP EFFECT: ON
LTI : MID
GAMMA : T YPE3
CONTRAST EXP: OFF
SHARP MODE MODE 1
SHARP EFFECT: ON OFF
ADJUST
MENU
SET
SET
END
ON ........... SHARPNESS effect is on.
OFF .......... SHARPNESS effect is off.
59
Page 60

PICTURE ADJUSTMENTS
9 To adjust Luminance Transient
Improvement (LTI)
This enables you to switch the definition of the luminance signal.
NOTES:
• It cannot be used during RGB signal input.
• It can be used only during PICTURE MODE PRO.
Select LTI .
c
SELECT
c
TYPE3
SET
MENU
SET
END
PICTURE
BLACK ENHANCE: ON
SHARP EFFECT: ON
LTI : MID
GAMMA :
CONTRAST EXP: OFF
SHARP MODE: MODE1
LTI : OFF MID H IGH
SELECT
MENU
SET
SET
END
HIGH ........ Maximum LTI effects.
MID ..........Standard LTI effects.
OFF .......... No LTI effects.
0 To adjust GAMMA
This enables you to switch the balance of the contrast between the
bright parts and dark parts of the luminance signal.
NOTE:
It can be used only during PICTURE MODE PRO.
Select GAMMA .
c
SELECT
c
SET
MENU
SET
END
PICTURE
BLACK ENHANCE: ON
SHARP EFFECT: ON
LTI : MID
GAMMA : T YPE3
CONTRAST EXP: OFF
SHARP MOD E OFF
60
GAMMA : TYPE1 TYPE2 TYPE3
SELECT
MENU
SET
SET
END
TYPE1 ......Dark parts of luminance signals are more vividly
represented. It is used during movies and television
broadcasts with many dark scenes.
TYPE2 ......Luminance signal is not corrected.
TYPE3 ......It improves the contrast by widening the gap between
the bright parts and dark parts of the luminance signal.
Page 61

PICTURE ADJUSTMENTS
- To adjust CONTRAST EXP
This enables you to adjust the brightness level of dark areas in
accordance with screen brightness.
NOTES:
• It cannot be used during RGB signal input.
• Can only be adjusted when inputting 480p, 1080i and 720p, and when
the PRO mode is selected.
Select CONTRAST EXP .
c
SELECT
c
SET
MENU
SET
END
P I C T U R E
B L A C K E N H A N C E : O N
S H A R P E F F E C T : O N
L T I : M I D
G A M M A : T Y P E 3
C O N T R A S T E X P O F F
S H A R P M O D E M O D E 1
BASIC FUNCTIONS
C O N T R A S T O N O F F
SELECT
E X P :
MENU
SET
SET
END
ON ........... CONTRAST EXP effect is on.
OFF .......... CONTRAST EXP effect is off.
= To adjust SHARP MODE
This enables you to switch signal bands that correct sharpness.
NOTES:
• It cannot be used during RGB signal input.
• Can only be adjusted when inputting 1080i and 720p, and when the
PRO mode is selected.
Select SHARP MODE .
c
SELECT
c
SET
MENU
SET
END
P I C T U R E
B L A C K E N H A N C E : O N
S H A R P E F F E C T : O N
L T I : M I D
G A M M A : T Y P E 3
C O N T R A S T E X P : O F F
S H A R P M O D E : M O D E 1
S H A R P M O D E : M O D E 1 M O D E 2
SELECT
MENU
SET
SET
END
MODE 1 ....... Used to set sharpness correction in the high
bandwidth.
MODE 2 ....... Used to set sharpness correction in the low
bandwidth.
61
Page 62

PICTURE ADJUSTMENTS
~ To adjust WHITE BALANCE
This enables you to adjust the color temperature to your taste.
NOTE:
It can be used only during PICTURE MODE PRO.
Select WHITE BALANCE .
c
PICTURE
WH I TE BALANCE
DEFAULT PRO MODE
c
SELECT
c
WH I TE BALANCE
RGB DRIVE:
RDRIVE:
BDRIVE:
RGB CUTOFF :
R CUTOFF :
B CUTOF F :
EXI T
RGB DRIVE :
c
SELECT
SELECT
SET
SET
MENU
SET
– 5
10
15
15
– 5
SET
– 5
SET
END
5
MENU
END
MENU
SET
END
CUT OFF (RGB, R, B) ..... It adjusts the color temperature of dark
parts of the picture.
DRIVE (RGB, R, B) ......... It adjusts the color temperature of bright
parts of the picture.
Mutually adjust the six lines shown on the above screen to optimize
the color temperatures of bright parts and of dark parts.
Adjustments 9 to ~ can only be done when the PICTURE MODE
is PRO. Return all contents set in PRO mode to the default status
by the following procedure.
c
PICTURE
WH I TE BALANCE
DEFAULT PRO MODE
c
NOTE:
Adjustable range
RGB DRIVE ........................ –10 to 10
R DRIVE ............................. –15 to 15
B DRIVE ............................. –15 to 15
RGB CUTOFF ..................... –30 to 30
R CUTOFF .......................... –5 to 5
B CUTOFF .......................... –5 to 5
62
SELECT
DEFAULT SETT I NG? Y ES NO
After setting, press MENU
4
SELECT
to turn the menu off.
SET
MENU
SET
SET
END
MENU
SET
END
Page 63

CHANGING SCAN MODE
This function switches the display on the screen between 480p (progressive
scan) and 1080i (interlace scan) during 480i and 480p.
Press MENU and select SCREEN
1
using the | or \ button and then
pressing « button. (Refer to page 26.)
Select SCAN MODE .
2
c
SELECT
ADJUST
c
1080i
0
0
SET
MENU
MENU
END
END
SET
SET
SET
SCREEN
MTS : MA I N
INPUT3
SCAN MODE:
H.POSITION:
NATURAL WIDE
V.POSITION:
Change SCAN MODE.
3
SCAN MODE: 1080i 480p
by
BASIC FUNCTIONS
NOTE:
This function cannot be used during “INPUT1, 2
component 1080i, 720p,” “INPUT3 RGB Signals,”
“INPUT 5, 6 Digital Signals 1080i,” and “PURE
DIGITAL ON.”
1080i ........This is optimum for viewing moving
video.
480p ......... This is optimum for viewing still pictures
or text.
After adjusting, press MENU to turn the
4
menu off.
63
Page 64

SOUND ADJUSTMENTS
WATCHING STEREO AND BILINGUAL
PROGRAMS
The multichannel TV sound (MTS) decoder enables stereo program and
Second Audio Program (SAP) to be received. (SAP is often used for a
second language). This MTS decoder can only be used if a broadcast of
stereo program or SAP is received.
Press MENU and select SOUND
1
the | or \ button and then pressing «
button. (Refer to page 26.)
Select MTS in the same way.
2
c
SELECT
SELECT
c
–5TREBLE
SET
c
c
SET
MENU
MENU
END
END
SET
– 5TREBLE
SET
SOUND
MTS : MA I N
BASS 10
BALANCE R 5
SURROUND : ON
STABLE VOLUME :OFF
Select the desired audio mode.
3
SOUND
MTS : MA I N SAP MONO
BASS 10
BALANCE R 5
SURROUND : ON
STABLE VOLUME :OFF
by using
NOTES:
•
This function can only be used for TV input.
•
Broadcast stereo and SAP reception operate in
accordance with the Broadcast Television System
Committee (BTSC) standard only. Stereo audio
transmission from CATV system can vary from area
and may not be compatible with the BTSC
standards. Check with your local cable company
for specific compatibility requirements.
64
MAIN SAP MONO
After setting, press MENU to turn the
4
menu off.
Page 65

SOUND ADJUSTMENTS
TO ADJUST THE SOUND QUALITY
BASS, TREBLE and BALANCE can be adjusted.
Press MENU and select SOUND .
1
(Refer to page 26.)
Select the adjustment item.
2
c
SELECT
c
– 5TREBLE
SET
MENU
SET
END
SOUND
MTS : MA I N
BASS 10
BALANCE R 5
SURROUND : O N
STABLE VOLUME :OFF
Adjust by pressing 2 or 3 .
3
• Adjustable range
BASS, TREBLE : – 15 to 15
BALANCE : L (Left) 15 to R (Right) 15
BASIC FUNCTIONS
NOTE:
This function cannot be used when the SPEAKER
mode is CENTER IN or when the SPEAKER mode is
OFF and AUDIO OUT mode is FIXED (see page 76).
c
SELECT
c
– 5TREBLE
SET
MENU
SET
END
SOUND
MTS : MA I N
BASS 10
BALANCE R 5
SURROUND : O N
STABLE VOLUME :OFF
• Repeat steps 2 and 3 for other items.
After adjusting, press MENU to turn the
4
menu off.
65
Page 66

SOUND ADJUSTMENTS
TO SELECT THE DESIRED SURROUND
MODE
This function creates the sound with a sense of presence.
In a concert hall or in a theater, you hear a mixture of sound coming directly
to you (direct sound) and sound that reaches you with a slight delay after
being reflected from the walls (indirect sound). Surround mode applies
this principal to create a sense of presence by mixing slightly delayed
sound signals with direct sound signals.
Press MENU and select SOUND .
1
(Refer to page 26.)
Select SURROUND .
2
c
SELECT
c
– 5TREBLE
SET
MENU
SET
END
SOUND
MTS : MA I N
BASS 10
BALANCE R 5
SURROUND : ON
STABLE VOLUME :OFF
NOTES:
• This function cannot be used when the SPEAKER
mode is CENTER IN or when the SPEAKER mode
is OFF and AUDIO OUT mode is FIXED (see page
76).
• The surround effect cannot be obtained with mono
sound.
• In some cases, the surround effect may be minimal.
Select the desired SURROUND mode.
3
c
SELECT
c
– 5TREBLE
SET
MENU
SET
END
SOUND
MTS : MA I N
BASS 10
BALANCE R 5
SURROUND : O N OF F
STABLE VOLUME :OFF
ON ..................... This is an easy way to enjoy SURROUND.
OFF .................... Turns off the surround effect.
After setting, press MENU to turn the
4
menu off.
66
Page 67

SOUND ADJUSTMENTS
TO ADJUST STABLE VOLUME
A loud sound may suddenly be emitted when you change the TV channel
or when the broadcast switches to a commercial or the like. If so, setting
STABLE VOLUME to ON will enable you to automatically change the
volume level to what is comfortable.
Press MENU and select SOUND .
1
(Refer to page 26.)
Select STABLE VOLUME .
2
c
SELECT
c
– 5TREBLE
SET
MENU
SET
END
SOUND
MTS : MA I N
BASS 10
BALANCE R 5
SURROUND : O N
STABLE VOLUME :OFF
BASIC FUNCTIONS
NOTE:
Because volume level is automatically adjusted when
STABLE VOLUME is set to ON, the sound might not
be loud. In this case, set STABLE VOLUME to OFF.
Set STABLE VOLUME to ON.
3
c
SELECT
c
– 5TREBLE
SET
MENU
SET
END
SOUND
MTS : MA I N
BASS 10
BALANCE R 5
SURROUND : ON
STABLE VOLUME :ON OFF
After adjusting, press MENU to turn the
4
menu off.
67
Page 68

DIGITAL INTERFACE
PURE DIGITAL
This function faithfully reproduces the input signal without any processing
when digital signal input (INPUT 5, 6) is selected.
Press MENU and select SETUP
1
the | or \ button and then pressing «
button. (Refer to page 26.)
Select DIGITAL INTERFACE .
2
c
SELECT
SELECT
c
SET
c
c
SET
MENU
MENU
END
END
SET
SET
SET UP
CHANNEL SET UP
CONVERGENCE
PROGRAM BLOCK
CHANGE P ASSWORD
SYSTEM I N/ OUT
DIGI TAL I NTERFACE
Select PURE DIGITAL .
3
DIGI TAL INTERFACE
PURE DIGI TAL: ON
PICTURE SELECT: AUTO
PICTURE SETUP: AUTO
SOUND SEL ECT : AUTO
POWER MANAG EMEN T : O F F
by using
NOTES:
• There are items that can not be adjusted by
PICTURE ADJUSTMENT when PURE DIGITAL is on.
• This function can only be used during digital signal
input (INPUT 5, 6).
68
Set PURE DIGITAL to ON.
4
PURE DIGI TAL: ON OFF
ON ........... The input signal is faithfully reproduced without any
processing.
OFF .......... You can adjust the picture quality to your taste by
performing appropriate signal processing.
After setting, press MENU to turn the
5
SELECT
MENU
SET
SET
END
menu off.
Page 69

DIGITAL INTERFACE
PICTURE SELECT
This function allows you to switch the input signal format to automatic or
manual when inputting the digital signal.
Press MENU and select SETUP
1
the | or \ button and then pressing «
button. (Refer to page 26.)
Select DIGITAL INTERFACE .
2
c
SELECT
SELECT
c
SET
c
c
SET
MENU
MENU
END
END
SET
SET
SET UP
CHANNEL SET UP
CONVERGENCE
PROGRAM BLOCK
CHANGE P ASSWORD
SYSTEM I N/ OUT
DIGI TAL I NTERFACE
Select PICTURE SELECT .
3
D I G I T A L I N T E R F A C E
P U R E D I G I T A L : O N
P I C T U R E S E L E C T : A U T O
P I C T U R E S E T U P : A U T O
S O U N D S E L E C T : A U T O
P O W E R M A N A G E M E N T : A U T O
by using
BASIC FUNCTIONS
Set PICTURE SELECT to AUTO.
4
P I C T U R E S E L E C T : A U T O
AUTO ......... Automatically identifies input video signals.
COLOR1 ..... Accepts Y P
COLOR2 ..... Accepts Y P
COLOR3 ..... Accepts RGB signals.
After setting, press MENU to turn the
5
SELECT
B/CB PR/CR (4:2:2) signals.
B/CB PR/CR (4:4:4) signals.
MENU
SET
SET
END
menu off.
69
Page 70

DIGITAL INTERFACE
PICTURE SETUP
This function allows you to switch the input signal level to automatic or
manual when inputting the digital signal.
Press MENU and select SETUP
1
the | or \ button and then pressing «
button. (Refer to page 26.)
Select DIGITAL INTERFACE .
2
c
SELECT
SELECT
c
SET
c
c
SET
MENU
MENU
END
END
SET
SET
SET UP
CHANNEL SET UP
CONVERGENCE
PROGRAM BLOCK
CHANGE P ASSWORD
SYSTEM I N/ OUT
DIGI TAL I NTERFACE
Select PICTURE SETUP .
3
D I G I T A L I N T E R F A C E
P U R E D I G I T A L : O N
P I C T U R E S E L E C T : A U T O
P I C T U R E S E T U P : A U T O
S O U N D S E L E C T : A U T O
P O W E R M A N A G E M E N T : O F F
by using
70
Set PICTURE SETUP to AUTO.
4
P I C T U R E S E T U P : A U T O
AUTO ......... Select AUTO for normal picture set up.
TYPE1 ........ Select TYPE1 to remove white glare in the picture
when AUTO is set.
TYPE2 ........ Select TYPE2 for too dark or distorted picture when
AUTO is set.
After setting, press MENU to turn the
5
SELECT
MENU
SET
SET
END
menu off.
Page 71

DIGITAL INTERFACE
SOUND SELECT
This function allows you to switch the sound signal to automatic or manual
when inputting the digital signal.
Press MENU and select SETUP
1
the | or \ button and then pressing «
button. (Refer to page 26.)
Select DIGITAL INTERFACE .
2
c
SELECT
SELECT
c
SET
c
c
SET
MENU
MENU
END
END
SET
SET
SET UP
CHANNEL SET UP
CONVERGENCE
PROGRAM BLOCK
CHANGE P ASSWORD
SYSTEM I N/ OUT
DIGI TAL I NTERFACE
Select SOUND SELECT .
3
D I G I T A L I N T E R F A C E
P U R E D I G I T A L : O N
P I C T U R E S E L E C T : A U T O
P I C T U R E S E T U P : A U T O
S O U N D S E L E C T : A U T O
P O W E R M A N A G E M E N T : O F F
by using
BASIC FUNCTIONS
Set SOUND SELECT to AUTO.
4
c
SELECT
c
D I G I T A L
A N A L O G
SET
MENU
SET
END
D I G I T A L I N T E R F A C E
P U R E D I G I T A L : O N
P I C T U R E S E L E C T : A U T O
P I C T U R E S E T U P : A U T O
S O U N D S E L E C T : A U T O
AUTO ......... Automatically identifies input audio signals.
DIGITAL ...... Accepts digital audio signals.
ANALOG .... Accepts analog audio signals.
After setting, press MENU to turn the
5
menu off.
71
Page 72

DIGITAL INTERFACE
POWER MANAGEMENT
This function automatically turns on power management mode if no digital
signal is input when digital signal input is selected.
When digital signal input restarts, power management mode is cancelled.
Press MENU and select SETUP
1
the | or \ button and then pressing «
button. (Refer to page 26.)
Select DIGITAL INTERFACE .
2
c
SELECT
SELECT
c
SET
c
c
SET
MENU
MENU
END
END
SET
SET
SET UP
CHANNEL SET UP
CONVERGENCE
PROGRAM BLOCK
CHANGE P ASSWORD
SYSTEM I N/ OUT
DIGI TAL I NTERFACE
Select POWER MANAGEMENT .
3
DIGI TAL INTERFACE
PURE DIGI TAL: ON
PICTURE SELECT: AUTO
PICTURE SETUP: AUTO
SOUND SEL ECT : AUTO
POWER MANAG EMEN T : O F F
by using
NOTES:
• It can be used only during digital signal input
(INPUT 5, 6).
• When power management mode is operating, the
POWER STANDBY indicator (green) flashes.
At this time, power management mode can be shut
off to operate the monitor by pushing either the
INPUT SELECT, or MENU button on the front panel
or on the remote control. Pushing the POWER
button sets it in standby status.
Control panel of the monitor
STANDBY
ON
72
Set POWER MANAGEMENT to ON.
4
c
SELECT
c
SET
MENU
SET
END
DIGI TAL INTERFACE
PURE DIGI TAL: ON
PICTURE SELECT: AUTO
PICTURE SETUP: AUTO
SOUND SEL ECT : AUTO
POWER MANAG EMEN T : O N OFF
ON ........... Turns on power management mode
OFF .......... Turns off power management mode.
After setting, press MENU to turn the
5
menu off.
Page 73

MULTI-POINT CONVERGENCE
ADJUSTMENT
Before convergence adjustment*1, please choose a stabilized input signal*2 in
order to display a stable cross pattern.
*1 Convergence adjustment ..... Color deviation adjustment
*2 Stabilized input signal .......... Examples, DVD player, digital tuner, etc.
Convergence adjustment may be fined-tuned here.
Press MENU and select SETUP
1
the | or \ button and then pressing «
button. (Refer to page 26.)
Adjust the center point convergence.
2
(Refer to steps 2 to 5 on pages 30 to 31.)
Select ADJ MULTI-POINT .
3
c
SELECT
c
FOR 480p
SET
SET
MENU
END
CONVERGENCE
AD J USTMEN T
ADJ C ENTER PO INT
ADJ MULT I –POI NT
EXI T
Select the adjust point.
4
by using
BASIC FUNCTIONS
NOTES:
•
The cursor is partially invisible around the edge of
the screen according to the SCAN MODE.
•
It is not possible to adjust all these points (points
of change on the cross-hatch).
•
Some of the cross-hatch lines are not straight, but
this is not a malfunction. They are not always
straight on a normal TV.
Adjust the red line.
5
SET : SELECT AT POI NT
ADJ MULT I – POI NT
SET :BLUE PO I NT
SELECT
SELECT
MENU
MENU
END
END
73
Page 74

MULTI-POINT CONVERGENCE ADJUSTMENT
Adjust the blue line.
6
ADJ MULT I P OI NT
SET :NEXT POI NT
• The brackets which shows the adjusting point will move in
order.
Move to the next point to be adjusted, and repeat steps 4 to 6.
After completing the convergence
7
SELECT
MENU
END
adjustment, press MENU twice to turn
the menu off.
74
Page 75

CONNECTION WITH RECEIVER (1)
The audio signal output from this unit can be reproduced on
the receiver when this monitor is connected to the receiver.
When this monitor is connected to the CENTER OUT terminal
of the receiver, the speaker of this monitor can be used as the
center speaker.
Rear panel
SERVICE
ONLY
A
B
ANTENNA
/CABLE
CONTROL
OUT
IN
INPUTS
S-VIDEO
INPUT 1 INPUT 2 INPUT 3
(MONO)
R
VIDEO
INPUT 1
L
INPUT 1 PROFESSIONAL
INPUTS
INPUT 2
INPUT
COMPONENT VIDEO
Y
VIDEO
• Before making or changing connections, set the power
switch to off and unplug the power cord from the AC outlet.
• For details of connecting DVD/DVR player, VCR, SAT tuner,
etc., refer to page 16.
• After completing connections, perform the “SPEAKER and
AUDIO OUT settings” operation.
INPUT
RGB
PB/C
B
P
OUTPUT
VIDEO
MONITOR
/TV
R/CR
AUDIOAUDIO
INPUT
AUDIO
CENTER
FIXED
/VAR
INPUT 3
INPUTS
COMPONENT VIDEO
INPUT 2INPUT 3
INPUT 1
Y
P
B
/
C
B
L
P
R
/
C
R
R
AUDIO SIGNAL
Speaker
R
L
Receiver
AUDIO SIGNAL
VARIOUS FUNCTIONS
Speaker
75
Page 76

CONNECTION WITH RECEIVER (1)
SPEAKER and AUDIO OUT settings
Press MENU and select SETUP
1
the | or \ button and then pressing «
button. (Refer to page 26.)
Select SYSTEM IN/OUT in the same way.
2
c
SELECT
SELECT
c
SET
FIXED
SET
MENU
MENU
END
END
SET
c
c
SET
Select SPEAKER .
3
SET UP
CHANNEL SET UP
CONVERGENCE
PROGRAM BLOCK
CHA NGE P ASSWORD
SYSTEM I N/ OUT
D IGI TAL I NTERFACE
SYSTEM I N/ OUT
SYSTEM MODE: OFF
AUDI O OUT :
SPEAKER : NORMAL
EXI T
by using
NOTE:
After the speaker mode is set to CENTER IN, the
volume of the center speaker should be controlled
from this monitor.
76
Select the SPEAKER mode.
4
c
SELECT
c
CENTER I N
OFF
SET
MENU
SET
END
SYSTEM I N/ OUT
SYSTEM MODE: OFF
AUDI O OUT : F I XED
SPEAKER : NORMAL
EXI T
NORMAL ..... The Monitor sound is output from the speaker.
CENTER IN ... Select CENTER IN to set TV monitor speaker as the
center speaker. The TV monitor speaker will perform
as the center speaker from the audio input signal,
connected to the AUDIO CENTER INPUT terminal.
OFF .............. No sound will be output from the Monitor’s speaker.
Page 77

CONNECTION WITH RECEIVER (1)
Select AUDIO OUT .
5
• If the speaker mode was set to CENTER IN in step 4, the AUDIO
OUT mode will automatically change to FIXED, and VAR cannot
be selected.
c
SYSTEM I N/ OUT
SYSTEM MODE: OFF
AUDI O OUT : F I XED
SPEAKER : NORMAL
c
EXI T
Select the AUDIO OUT mode.
6
SYSTEM I N/ OUT
SYSTEM MODE: OFF
AUDI O OUT : FIXED VAR
SPEAKER:
EXI T
SELECT
SELECT
SET
c
c
SET
SET
NORMAL
SET
MENU
MENU
END
END
FIXED ................ Signals output from the AUDIO OUTPUT terminal
will not change even if the Monitor’s volume is
adjusted.
VAR (variable) ... Sound signals output will change as Monitor’s
volume is changed.
• When SYSTEM MODE has been set to ON, the audio out mode
will change to MUTING and sound signals will not be output
from the AUDIO OUTPUT terminal (see page 79).
• The sound signals output will change in accordance with the
SURROUND mode setting (see page 66).
VARIOUS FUNCTIONS
NOTE:
If AUDIO OUT is set to VAR and the sound is distorted,
lower the Monitor volume.
After setting, press MENU to turn the
7
menu off.
77
Page 78

CONNECTION WITH RECEIVER (2)
This unit can be used as the monitor for the receiver when this
unit is connected to the receiver. When this unit is connected
to the CENTER OUT terminal of the receiver, the speaker of
this unit can be used as the center speaker.
DVD/DVR
VCR
Receiver
R
SIGNAL
V
L
SIGNAL
Rear panel
The video output can be
connectedto BNC or to
RCA types.
• Before making or changing connections, set the power
switch to off and unplug the power cord from the AC outlet.
• Connect the DVD/DVR, VCR, SAT tuner or similar component
to the receiver.
• After completing connections, perform the “SYSTEM MODE
setting” operation.
SAT tuner
VCR
V
SpeakerSpeaker
SIGNAL
Component video output
of a Receiver can be
connected both BNC or
RCA types.
78
Mixer
CATV
converter
SIGNAL
SERVICE
ONLY
A
B
ANTENNA
/CABLE
CONTROL
IN
OUT
SIGNAL
INPUTS
S-VIDEO
INPUT 1 INPUT 3INPUT 2
SIGNAL
INPUT 1
V
L
(MONO)
R
INPUT 1 PROFESSIONAL
VIDEO
Y
INPUTS
VIDEO
INPUT 2
INPUT
COMPONENT VIDEO
PB/CB
OUTPUT
VIDEO
MONITOR
V
L
INPUT
RGB
P
R/CR
INPUT
AUDIO
CENTER
/TV
FIXED
/VAR
AUDIOAUDIO
R
INPUT 3
INPUTS
COMPONENT VIDEO
INPUT 2INPUT 3
INPUT 1
Y
PB
CB
/
PR
CR
/
SIGNAL
SIGNAL
Page 79

CONNECTION WITH RECEIVER (2)
SYSTEM MODE setting
Press MENU and select SET UP .
1
(Refer to page 26.)
Select SYSTEM IN/OUT .
2
c
SELECT
c
c
c
SET
NORMAL
SET
SET UP
CHANNEL SET UP
CONVERGENCE
PROGRAM BLOCK
CHA NGE P ASSWORD
SYSTEM I N/ OUT
D IGI TAL I NTERFACE
Select SYSTEM MODE .
3
SYSTEM I N/ OUT
SYSTEM MODE: OFF
AUDI O OUT : F I XED
SPEAKER:
MENU
END
Unless required, set the SYSTEM MODE to
OFF.
Notes on SYSTEM MODE ON :
•
The input cannot be switched even if you press the
Input selector button of the remote control unit.
•
On the sub-picture of a SPLIT screen, only the input
signal from the antenna can be displayed.
•
The SEARCH screen function will not be operable.
•
No signal will be output from the AUDIO OUTPUT
terminal.
•
Setting SYSTEM MODE ON will cause RGB input
signals and DIGITAL input signals to not be
displayed.
EXI T
SELECT
Switch the SYSTEM MODE.
4
c
SYSTEM I N/ OUT
SYSTEM MODE: ON OFF
AUDI O OUT : F I XED
SPEAKER:
EXI T
c
SELECT
SET
SET
SET
NORMAL
SET
MENU
MENU
END
END
ON ......... The Monitor input is fixed to INPUT 1 and the images of
the input source selected by the receiver will be
displayed.
OFF ........ Normal setting.
After setting, press MENU to turn the
5
menu off.
VARIOUS FUNCTIONS
79
Page 80

CONNECTING THE SYSTEM REMOTE
CONTROL (When operating Pioneer units with
If you want to control are your Pioneer equipment with the
remote for this unit, you can daisy-chain the components.
Connect the audio/video components using the pioneer
terminals as shown below. See page 86 to 91 for how to
control other components.
<Connect as shown>
CONTROL
IN OUT
Î
CONTROL CONTROL
Î
mark)
To other units bearing
the Î mark.
IN OUTIN OUT
NOTES:
• When the Pioneer unit with Î mark is connected to the
CONTROL IN terminal of the projection monitor, the remote
sensor of the projection monitor does not accept signals from
the remote control unit. In this case, point the remote control at
the unit in the chain (the equipment with no CONTROL IN
connection).
• To connect the control cord, use the commercially available mini
plug cord (monaural).
80
Page 81

REMOTE CODE SET UP
To operate other manufacturers' audio/video units using this remote control
unit, remote control codes need to be input.
There are two methods of setting remote control codes
• For calling the other manufacturers' preset remote control codes to this
remote control unit
• For learning other manufacturers' remote control codes
RECALLING OTHER
MANUFACTURERS' PRESET REMOTE
CONTROL CODES
Set the mode switch to match the device
1
to which you want to preset the remote
control code
• Example: To select DVD/DVR.
NOTES:
• To stop the EDIT mode in the middle, press the EDIT
button once more.
• If mode switch is switched while in EDIT mode, EDIT
mode will be canceled.
• After step 1 and step 2, if you do not press the
button for one minute (no operation), the EDIT
mode will be canceled.
• If the table on page 82 does not include your desired
manufacturer or the remote control code does not
work, you can make the memory learn its code by
the learning mode (see page 84).
• The initial code is “000” (PIONEER).
|\
At the same time, press the EDIT button
2
and number button 1.
LED will begin blinking.
Select the desired manufacturer.
3
• Select from the figure on page 82.
• Example: To select 006 (PIONEER) in the DVD/DVR mode.
• If the LED blinks rapidly when the number button has been
pressed, there has been an error. Input the number again.
• After setting, you can automatically use the remote control in
the usual manner.
VARIOUS FUNCTIONS
81
Page 82

REMOTE CODE SET UP
Manufacturer's preset remote control codes
CABLE/SAT
000 PIONEER1(CABLE) PIONEER PIONEER(DVD)
001 PIONEER2(CABLE) FISHER PANASONIC(DVD)
002 JERROLD1(CABLE) FISHER SAMSUNG(DVD)
003 JERROLD2(CABLE) FISHER SONY(DVD)
004 JERROLD3(CABLE) GOLDSTAR TOSHIBA(DVD)
005 JERROLD4(CABLE) HITACHI JVC(DVD)
006 JERROLD5(CABLE) HITACHI2 PIONEER(DVD-RECORDER)
007 JERROLD6(CABLE) HITACHI3 PIONEER2(DVD-RECORDER)
008 JERROLD7(CABLE) MAGNAVOX2 PIONEER3(DVD-RECORDER)
009 JERROLD8(CABLE) MITSUBISHI PANASONIC(DVD-RECORDER)
010 JERROLD9(CABLE) MITSUBISHI2 PANASONIC2(DVD-RECORDER)
011 JERROLD10(CABLE) MITSUBISHI3 PANASONIC3(DVD-RECORDER)
012 S.A.1(CABLE) MITSUBISHI4 PHILIPS(DVD-RECORDER)
013 S.A.2(CABLE) MITSUBISHI5 SHARP(DVD-RECORDER)
014 S.A.3(CABLE) MITSUBISHI6 SHARP2(DVD-RECORDER)
015 S.A.4(CABLE) PANASONIC TOSHIBA(DVD-RECORDER)
016 ZENITH1(CABLE) PANASONIC2 TOSHIBA2(DVD-RECORDER)
017 ZENITH2(CABLE) PANASONIC3
018 ZENITH3(CABLE) RCA
019 RCA2
020 PIONEER(SAT) RCA3 PIONEER(LD)
021 RCA1(SAT) SANYO KENWOOD(LD)
022 RCA2(SAT) SANYO2 PANASONIC1(LD)
023 SONY(SAT) SANYO3 PANASONIC2(LD)
024 SHARP PHILIPS(LD)
025 SHARP2 RCA(LD)
026 SHARP3 SONY(MDP)
027 SONY(BETA) SONY(LD)
028 SONY(VHS)
029 SONY(8mm)
030 TOSHIBA
031 JVC
032 JVC2
033 JVC3
034 JVC4
035 JVC5
036 ZENITH
037 MITSUBISHI(J-3)
VCR DVD/DVR
CABLE/SAT
038 SHARP(J-2)
039 PANASONIC(J-3)
040 TOSHIBA(J-3)
041 GRANDIENTE
042 AKAI
043 PIONEER2
044 SANYO4
045 MATSUI
046 AIWA
047 ALBA81
048 BUSH
049 THOMSON
050 BAIRD
051 TELEFUNKEN
052 ALBA
053 Grundig1
054 Grundig2
055 Grundig3
056 SONY2
057 SONY3
058 SONY4
059 RCA4
060 PHILIPS
061 PHILIPS2
062 PHILIPS3
063 PHILIPS4
064 PHILIPS5
065 PHILIPS6
066 SAMSUNG
067 SAMSUNG2
068 SAMSUNG3
069 SAMSUNG4
070 SAMSUNG5
071 SAMSUNG6
072 MARANTZ
073 MARANTZ2
074 GE
075 GE2
VCR DVD/DVR
Different functions can be performed by different components using the remote control buttons. (See pages 88 to 91).
82
Page 83

REMOTE CODE SET UP
CABLE/SAT
076 GE3
077 YAMAHA
078 YAMAHA2
079 YAMAHA3
080 YAMAHA4
081 CURTIS_MATHIS
082 CURTIS_MATHIS2
083 CURTIS_MATHIS3
084 FUNAI
085 ADMIRAL
086 KENWOOD
087 KENWOOD2
088 KENWOOD3
089 NEC
090 NEC2
091 NEC3
092 NEC4
093 WARDS
094 WARDS2
095 WARDS3
096 WARDS4
097 MEMOREX
098 MEMOREX2
099 JC_PENNY
100 JC_PENNY2
101 JC_PENNY3
102 JC_PENNY4
103 JC_PENNY5
104 JC_PENNY6
VCR DVD/DVR
VARIOUS FUNCTIONS
83
Page 84

REMOTE CODE SET UP
TO LEARN REMOTE CONTROL CODES
To operate other manufacturers' remote control codes not preset using
the remote control unit, have the remote control unit learn these signals.
Example) To learn the VCR power to turn on.
Before operation:
To set the mode switch to VCR when a video cassette recorder is connected
(see page 16).
At the same time, press the LEARN
1
button and number button 2.
LED will begin blinking.
Press the SOURCE POWER button to
2
memorize the desired operation.
LED will remain lit.
84
Page 85

• Buttons which can be learnt are as follows.
CBL ........... SOURCE POWER, CH (+), CH (–), CH
RETURN, CH ENTER, 1 to 9, 0
SAT ........... SOURCE POWER, CH (+), CH (–), |,
\, », «, SET/ENTER, MENU, DTV/
SAT GUIDE, DTV/SAT INFO, CH
ENTER, 1 to 9, 0, DVD TOP MENU
DTV ........... SOURCE POWER, BLUE, RED,
GREEN, YELLOW, |, \, », «, SET/
ENTER, DVD TOP MENU, CH (+),
CH (–), 1 to 9, 0, CH ENTER, •(DOT),
CH RETURN, DTV/SAT INFO, DTV/
SAT GUIDE
VCR ........... SOURCE POWER, CH (+), CH (–), 8,
1, 7, 3, ¡, ¶
DVD .......... SOURCE POWER, RETURN, ¢,
4, 8, 1, 7, 3, ¡, |, \, », «,
SET/ENTER, MENU, DVD TOP
MENU
DVR ..........SOURCE POWER, ¢, 4, 8, 1,
7, 3, ¡, CH (+), CH (–), ¶, REC
STOP
• CBL/SAT/DTV and DVD/DVR cannot be selected
at the same time.
REMOTE CODE SET UP
Face the remote control unit of the other
3
manufacturer's and the remote control
unit of the Monitor to each other, and
press the POWER button of the remote
control unit of the other manufacturer's.
Leave about 0.8 to two inch (2 to 5 cm) between the two remote
control units.
If you learn how to use the remote control unit you can adjust the
distance of the remote control units.
0.8 to 2.0 inch
(2 to 5 cm)
NOTES:
• To stop using the LEARN mode in the middle, press
the LEARN button again.
• If mode switch is switched while in LEARN mode,
LEARN mode will be canceled.
• After steps 1 and 2, if you do not press the button
for one minute (no operation), the LEARN mode
will be canceled.
• To reset the learn setting, have the LED blinking as
in step 1 and then keep the remote control unit’s
TV POWER button pressed for at least 2 seconds.
• There are some remote controls which cannot
learn.
(VCR)
POWER
• This ends learn.
Repeat steps 2 and 3 for learning pertaining to other VCR
devices.
• If the remote control unit’s LED blink four times, it means that
learning capacity has reached its maximum and no more
learning will be possible.
When the LEARN button is pressed, the
4
LED will blink.
• If blinks once, return to
step 2 for other buttons.
• Flashes four times, it
indicates an error has
occurred.
remote control unit return to normal
states.
VARIOUS FUNCTIONS
85
Page 86

REMOTE CODE SET UP
USING THE TV REMOTE
Transmitting LED
CONTROL UNIT TO CONTROL
OTHER DEVICES
2
REMOTE CONTROL UNIT SETTING BUTTONS
3
1 EDIT/LEARN button
EDIT: When the EDIT/LEARN button is pressed at the
same time as number button 1, the mode will
change to preset code edit mode. (See page
81.)
LEARN: When the EDIT/LEARN button is pressed at the
same time as number button 2, the unit’s
capability to learn and store command codes
from other remote control units will be activated.
(See page 84.)
2 Mode switch
Use to switch the remote control unit modes.
3 Light button
When this button is pressed, all the buttons on the remote
control unit will light. The lighting will turn off if no
operations are performed within five seconds.
This button is used for performing operations in dark places.
86
1
Page 87

REMOTE CODE SET UP
CABLE CONTROL BUTTONS
1
2
Mode switch
4
5
CABLE, SAT and DTV cannot be selected at the same time.
When the mode switch is set to CBL/SAT the cable converter
connected to the Monitor can be operated using the buttons
1 to 5.
Cable converters which are made by other makers and are
not preset can also be operated using the remote control unit
if buttons 1 to 5 have learnt the functions (see page 84).
1 Direct channel selection buttons
Press the button (or buttons) that corresponds to the
channel that you wish to watch.
2 CH (channel) +, – buttons
Press plus (+) or minus (–) to tune in a higher or lower
channel.
SOURCE POWER button
3
Turns the power of the cable converter on and off.
4 CH ENTER button *
Fix the selected channel with the direct channel selection
buttons.
5 CH RETURN (channel return) button *
Press to switch between the current channel and the
channel you were watching immediately before.
3
* Some manufacturers do not preset CH ENTER and CH
RETURN. Use these buttons to learn if necessary.
VARIOUS FUNCTIONS
87
Page 88

REMOTE CODE SET UP
SAT CONTROL BUTTONS
1
2
3
4
Mode switch
6
7
8
CABLE and SAT cannot be selected at the same time.
When SAT is preset by REMOTE CODE SET UP, the remote
control unit buttons will function as shown below.
• When a satellite broadcast tuner is connected to the
Monitor, press the input selector button that has the same
number as the connected input terminal and set the mode
switch to CBL/SAT.
The tuner can be operated using buttons 1 to 8.
• Satellite broadcast tuners which are made by other makers
and are not preset can also be operated with the remote
control unit if buttons 1 to 8 have learnt the functions
(see page 84).
1 Direct channel selection buttons
Press the button (or buttons) that corresponds to the
channel that you wish to watch.
2 CH (channel) +, – buttons
Press plus (+) or minus (–) to tune in a higher or lower
channel.
3 Select/Set buttons (SET/ENTER, |, \, », «)
|, \, », «: Press the button to select items on the SAT
GUIDE screen or MENU screen.
SET/ENTER: Press to activate the selected function.
4 SAT INFO button
When this button is pressed, information on satellite
broadcasting will be displayed.
• Use this button to learn if necessary.
88
5
SOURCE POWER button
5
Turns the power of the SAT (digital satellite system tuner)
on and off.
6 CH ENTER button
Fix the selected channel with the direct channel selection
buttons.
• Use this button to learn if necessary.
7 MENU button
When this button is pressed, the satellite broadcasting
menu screen will be displayed.
8 SAT GUIDE button
When this button is pressed, the satellite broadcasting
guide screen will be displayed.
Page 89

REMOTE CODE SET UP
DTV CONTROL BUTTONS
1
2
3
4
5
6
7
Mode switch
8
9
0
-
CABLE, SAT and DTV cannot be selected at the same time.
When a digital tuner is connected to the monitor, set the mode
switch to CBL/SAT. The tuner can be operated with the remote
control unit if buttons 1 to - have learnt the functions (see
page 84).
1 Direct channel selection buttons
Press the button (or buttons) that corresponds to the
channel that you wish to watch.
button
2
Used in channel selection.
3 CH (channel) +, – button
Press plus (+) or minus (–) to tune in a higher or lower
channel.
4 Select/Set buttons (SET/ENTER, |, \, », «)
|, \, », «: Press the button to select items on the DTV
MENU screen.
SET/ENTER: Press to activate the selected function.
5 DTV INFO button
When this button is pressed, information on DTV will be
displayed.
6 FAVORITE CH/Colored (blue, red, green and yellow)
buttons
FAVORITE CH: Used for making FAVORITE CH settings
with the digital tuner.
Blue, Red, Green, Yellow:
Used to make selections from the digital
tuner menu.
SOURCE POWER button
7
Turns the power of the DTV (digital tuner) on and off.
8 CH ENTER button
Fix the selected channel with the direct channel selection
buttons.
9 CH RETURN (channel return) button
Press to switch between the current channel and the
channel you were watching immediately before.
0 MENU button
When this button is pressed, the menu screen will be
displayed.
- DTV GUIDE button
When this button is pressed, the DTV guide screen will be
displayed.
VARIOUS FUNCTIONS
89
Page 90

REMOTE CODE SET UP
VCR CONTROL BUTTONS
1
Mode switch
If the VCR is preset by REMOTE CODE SET UP, the remote
control unit button will function as follows when the mode
switch of the remote control unit is set to VCR.
When the input selector button having the same number as
the input terminal connecting the VCR is pressed, the VCR can
be operated using buttons 1 to 8.
VCR which are made by other makers and are not preset can
also be operated using the remote control unit if buttons 1 to
8 have learnt the functions (see page 84).
1 CH (channel) +, – buttons
Press to select the channel of the TV tuner on the VCR.
2 3 (PLAY) button
Selects playback.
3 1 (REW) button
Rewinds the tape and allows picture search.
SOURCE POWER button
4
Turns the power of the VCR on and off.
5 8 (PAUSE/STILL) button
Set pauses and still pictures.
6 ¡ (FF) button
Rapidly advances the tape and allows picture search.
90
2
3
4
5
7 ¶ (REC) button
Starts recording.
8 7 (STOP) button
Stop the tape transport.
6
7
8
Page 91

REMOTE CODE SET UP
DVD/DVR CONTROL BUTTONS
1
2
3
4
5, 6
7
8
Mode switch
9
0
-, =
~
!, @
DVD and DVR cannot be selected at the same time.
If the DVD/DVR is preset by REMOTE CODE SET UP, the remote
control unit button will function as follows when the mode switch
of the remote control unit is set to DVD/DVR.
When the input selector button having the same number as the
input terminal connecting a DVD player or DVD recorder is pressed,
these players can be operated using buttons 1 to @ (buttons 3,
9 , 0 are for DVD players only).
DVD player/DVD recorder which are made by other makers and
are not preset can also be operated using the remote control unit
if buttons 1 to @ have learnt the functions (see page 84).
1 CH (channel) +, – button (DVR only)
Press plus (+) or minus (–) to tune in a higher or lower channel.
RETURN button
2
Returns to the previous menu screen.
3 Select/Set buttons (SET/ENTER, |, \, », «) (DVD only)
|, \, », «: Press the button to select items on the DVD
MENU screen.
SET/ENTER: Press to activate the selected function.
4 3 (PLAY) button
Selects playback.
5 1 (SCAN) button
Continue pressing to rewind.
6 4 (CHAPTER SEARCH) button
Pressing quickly once takes you to the start of the chapter
currently playing. Each time you press it, you move back to
the start of the previous chapter.
7 SOURCE POWER button
Turns the power of the DVD/DVR player on and off.
8 8 (PAUSE/STILL) button
Set pauses and still pictures.
9 MENU button (DVD only)
When this button is pressed, the DVD menu will be displayed.
0 DVD TOP MENU button (DVD only)
When this button is pressed, the DVD top menu will be
displayed.
- ¡ (SCAN) button
Continue pressing for fast forward.
= ¢ (CHAPTER SEARCH) button
Pressing quickly once takes you to the start of the next chapter.
Each time you press it, you move ahead to the start of the
next chapter.
~ ¶ (REC) button
Starts recording.
! 7 (STOP) button
Playback is stopped when pressing once.
With some DVD/DVR players, pressing the button twice may
open the disc tray.
@ 7 button
Press and hold ¶, and then press this button to stop recording.
This operation is true of only pioneer DVD recorders.
91
VARIOUS FUNCTIONS
Page 92

MENU INDEX
PICTURE adjustment menu (See page 52)
c
SELECT
c
SET
PICTURE
MOD E : PRO
CONTRAST 0
BLACK LEVEL 0
COLOR
TINT
SHARPNE SS
SOUND adjustment menu (See page 64)
c
SELECT
c
SET
SOUND
MTS : MA I N
BASS 10
TREBLE
BALANCE R 5
SURROUND : ON
STABLE VOLUME :OFF
SCREEN adjustment menu (See page 42)
c
SELECT
c
SET
c
c
SCREEN
MTS : MA I N
INPUT3
SCAN MODE:
H.POSITION:
NATURAL WIDE
V.POSITION:
Main menu (See page 26)
Closed Caption menu (See page 46)
CC
MTS : MA I N
CC: ON
MOD E : CC - 1
0
0
0
SET
–5
SET
1080i
0
0
SET
MENU
MENU
MENU
c
c
PICTURE
Pur eCi nema: STD
COLOR TEMP: STD
3D Y / C L EVEL : 3
3D NR LEVEL: 3
SVM: H IGH
FLESH TONE: ON
SET
END
SELECT
c
c
MENU
SET
END
PICTURE
BLACK ENHANCE : ON
SHARP EFFECT : ON
LTI : MID
GAMMA : T YPE3
CONTRAST EXP : OFF
END
SHARP MODE: MODE 1
SELECT
SET
c
c
MENU
SET
END
P I C T U R E
W H I T E B A L A N C E
D E F A U L T P R O M O D E
END
SELECT
SET
MENU
SET
END
92
SELECT
SET
MENU
SET
SET UP menu (See page 26)
c
SELECT
c
SET
MENU
SET
SET UP
CHANNEL SET UP
CONVERGENCE
PROGRAM BLOCK
CHANGE P AS SWORD
SYSTEM IN /OUT
DIGITAL I NTERFACE
END
END
Page 93

MENU INDEX
CHANNEL SET UP menu (See page 28)
c
SELECT
c
ADD/ DEL
CHANNEL
SET
SET
MENU
END
CHANNEL SET UP
AUTO CHANNE L PRE SET
CHANNEL
FAVORI TE
EXI T
CONVERGENCE menu (See pages 30 and 73)
c
SELECT
c
SET
MENU
SET
END
CONVERGENCE
AD J US TMEN T F OR 4 80 p
AD J US TMEN T F OR 108 0 i
CONVERGENCE
EXI T
PROGRAM BLOCK menu (See page 34)
c
PROGRAM BLOCK
INPUT YOUR PASSWARD
EXI T
c
––––
SET
SELECT
MENU
SET
END
AUTO CHANNEL PRESET menu (See page 28)
c
c
AUTO CHANNE L
ANTENNA:A
TV/ CABLE MODE:
AUTO PRES ET
EXI T
SELECT
PRESET
START
SET
CATV
SET
MENU
END
CHANNEL ADD/DEL menu (See page 47)
c
CHANNEL
ANTENNA:A
CHANNEL:120
CHANNNEL
SETTI NG :ADD
LABEL: &&& &
EXI T
ADD/ DEL
SELECT
c
SET
MENU
SET
END
FAVORITE CHANNEL menu (See page 50)
c
c
FAVORITE CHANNEL
BLUE
RED
GREE N
YELLOW
EXI T
SELECT
SET
MENU
SET
END
CHANGE PASSWORD menu (See page 39)
c
c
CHANGE P ASSWORD
INPUT YOUR PASSWARD
––––
EXI T
SELECT
SET
MENU
SET
END
SYSTEM IN/OUT menu (See pages 76 and 79)
c
c
SYSTEM I N/ OUT
SYSTEM MODE: OFF
AUDI O OUT :
SPEAKER : NORMAL
EXI T
SELECT
SET
FIXED
SET
MENU
END
DIGITAL INTERFACE menu (See page 68)
c
SELECT
c
SET
MENU
SET
END
DIGITAL I NTERFACE
PURE DIGI TAL: ON
PICTURE SELECT: AUTO
PICTURE SETUP: AUTO
SOUND SE LECT : AUTO
POWER MAN AGEME NT : O F F
CONVERGENCE menu (See page 73)
c
c
CONVERGENCE
AD J US TMEN T
ADJ CENTER PO INT
ADJ MULT I – PO I NT
EXI T
SELECT
FOR 480p
SET
SET
MENU
END
OTHERS
93
Page 94

TROUBLESHOOTING
Incorrect operations are often mistaken for trouble and malfunctions. If you think that there is something wrong with the Monitor,
check the points below. Sometimes the trouble may lie in another component. Investigate the other component and electrical
appliances being used.
If the trouble cannot be rectified even after exercising the checks listed below, ask your nearest PIONEER authorized service center or
your dealer to carry out repair work.
SYMPTOM
The power will not turn on
The Monitor is inoperative
A TV broadcast station cannot be
received
No picture appears on the screen
No sound
The Monitor cannot be operated using
the remote control unit
CAUSE/REMEDY PAGES
The power plug is disconnected.
The MAIN POWER button is not turned on.
Press the RESET button.
External influences such as lightning and static electricity may
prevent the Monitor from operating normally. In such cases, turn
on/off the MAIN POWER supply, disconnect the power cord, connect
it again a few minutes later, and try operating the Monitor.
The antenna cable is not connected properly.
The antenna cable is broken or shorted.
Channels have not been preset correctly.
The DVD/DVR or VCR is not connected and operated properly.
The input selector has not been set to the desired input source
(such as DVD/DVR and VCR).
When the POWER STANDBY indicator (green) is flashing at 2-second
intervals, a digital input signal (INPUT 5, 6) is not input.
The MUTING is on (volume indicator is red).
The batteries in the battery compartment are not correctly matching
the (+ and –) polarities.
The battery has worn out.
Strong lights striking the remote control sensor may cause the
internal microcomputer to malfunction.
12
12
21
14
28
16
69
25
13
13
The color is not normal
The color is too dim or too sharp
The color is uneven
Picture does not appear immediately after
changing channels
Closed caption is not displayed
94
Adjust the picture quality.
The room is too bright.
Adjust the color convergence.
TV-CATV MODE is set incorrectly.
Check the CC menu settings. (As at October 1, 1999, limited closed caption
information is broadcasted in field 1. The closed caption information that will be
broadcasted in field 2 in the future may not be decoded with this unit).
The character information is not displayed normally during special playback, such
as slow and still play, of the VCR or Videodisc player.
Closed caption signal may not be output depending on the VCR, Videodisc player
or other components (for details, please consult the manufacturer of your unit).
Check that the video cassette, Videodisc or broadcasting being played contains
closed caption data (The video cassette and Videodisc containing closed caption
CC
data carries the
mark etc.).
54
30 and 73
28
Page 95

The following symptoms may be mistakenly regarded as malfunctioning.
In many cases, they are not the faults of the Monitor.
SYMPTOM CAUSE
There are 2 or 3 layers of images (ghost
images)
Influence of waves from the broadcast stations reflected by nearby mountains and
high-rise buildings.
TROUBLESHOOTING
Spots appears on the screen
Noises are audible
Stripes appears on the screen
Noises are audible
A loud a crack is heard after the power is
turned on
There is a pop and the power goes off.
The POWER STANDBY indicator (green)
is flashing.
Influence of harmful waves produced by motor equipments such as hair dryers
and vacuum cleaners, ignition devices such as cars and motorbikes, flashing devices
such as thermostats and electricity discharge by transmission/distribution lines.
Mixing of electric waves from TV stations FM stations, amateur wireless, public
wireless (simple wireless), etc., or nearby personal computer, TV, VCR, audio
equipment.
Sometimes, creaking sounds will be produced when cabinets expand or contract
due to changes in the surrounding temperature. Do not suspect a fault.
The power was turned off momentarily due to the protection circuit to correct the
electric discharge phenomenon in the CRT. Do not suspect fault.
Please call your service representative if the green indicator repeatedly flashes 3
times then skips 1 flash.
95
OTHERS
Page 96

SPECIFICATIONS
Display and amplifier section
Reception system ........ American TV standard NTSC system
Screen size ................................................64" (PRO-730HDI)
53" (PRO-530HDI)
CRT ..................................................... 7" High focus CRT x 3
Brightness (White peak) ...... 360 Foot-Lambert (PRO-730HDI)
450 Foot-Lambert (PRO-530HDI)
[White window signal input contrast Max.]
without protective screen
Horizontal resolution ..... More than 1400 lines (PRO-730HDI)
More than 1150 lines (PRO-530HDI)
[Input digital test pattern (1400 lines resolution)]
Input terminals ............................................... 4 video inputs
4 S-VIDEO input jacks (Y/C separate INPUT)
2 COMPONENT VIDEO INPUT jacks (Y, P
6 audio inputs
CENTER INPUT jack
Mini D-sub 15 pin INPUT jack (RGB)
BNC VIDEO INPUT jack
BNC COMPONENT VIDEO INPUT jack (Y, P
NOTE:
INPUT 1 video and component video input can be input to both
BNC and RCA type.
Output terminals ................................ MONITOR/TV, AUDIO
Input terminal signal ratings
Input signal
Video signal:
Composite and S-VIDEO (Y): 1.0 Vp-p (75 ohms load)
COMPONENT (Y): 1.0 Vp-p (75 ohms load)
*Mini D-sub 15 pin (RGB): 0.7 Vp-p (75 ohms load)
*Digital signal: 3.3V T.M.D.S, 50 ohms
Audio signal (including CENTER): 400mV rms
Input impedance .............................. Video input: 75 ohms
Audio input (including CENTER): 22 kilo-ohms
Input signal polarity (Video) .......... Synchronized negative
Output terminal signal ratings
Output signal .............Video signal: 1 Vp-p (75 ohms load)
Audio signal: 500 mV rms (100 % modulation)
Output impedance ......................... Video output: 75 ohms
Audio output: Less than 1 kilo-ohms
Effective output
Front both channels driven ............................... 10 W + 10 W
Built-in speaker system .......... 16 cm (6-5/16 in) full range x 2
2 HDMI INPUT jack (Digital)
B, PR): 0.7 Vp-p (75 ohms load)
(P
B, PR)
B, PR)
or more
Tuner section
Circuit type ........................................ Video signal detection:
PLL full synchronous detection
PLL digital synthesizer system
Audio multiplex: BTSC system
Reception channels ........ VHF; CH2~CH13, UHF; CH14~CH69
CATV (STANDARD, IRC or HRC)
CATV 1-125 CH
Antenna terminals ........ Antenna terminal, 75 ohms UNBAL,
F-type connector (VHF, UHF MIXED)
Electrical section, miscellaneous
Power requirements ..................................... 120 V AC, 60 Hz
Power consumption ............................. 250 W, 450 VA (CSA)
Standby power consumption ...................................... 0.5 W
External dimensions
PRO-730HDI ............... 1510 (W) x 1425 (H) x 709 (D) mm
59-7/16 (W) x 56-1/8 (H) x 27-15/16 (D) inch
PRO-530HDI ................ 1268 (W) x 1289 (H) x 640 (D) mm
49-15/16 (W) x 50-3/4 (H) x 25-3/16 (D) inch
Weight of main unit
PRO-730HDI ..................................... 155 kg (341 lb 11 oz)
PRO-530HDI ....................................... 123 kg (271 lb 3 oz)
Wireless remote control unit
Operation system ................. Infrared remote control system
Power source ............. Two DURACELL
Dimensions ............................. 55 (W) x 26 (H) x 242 (D) mm
2-3/16 (W) x 1-1/32 (H) x 9-17/32 (D) inch
Weight ................................... 120 g (5 oz) (without batteries)
"AA" MN1500 1.5 V
ALKALINE dry cell batteries
Accessories
Operating instructions ........................................................ 1
Warranty card ..................................................................... 1
Remote control unit ............................................................ 1
DURACELL
Alkaline dry cell batteries .................................................... 2
Side frame cover ................................................................ 2
Frame cover ....................................................................... 2
Panel Frame Attaching screw (spare) ................................. 2
"AA" MN1500 1.5V
* This jack cannot be used with a personal computer.
96
NOTE:
Specifications and design are subject to possible modifications
without notice due to improvements.
Page 97

97
OTHERS
Page 98

98
Page 99

99
OTHERS
Page 100

Published by Pioneer Corporation.
Copyright © 2003 Pioneer Corporation.
All rights reserved.
PIONEER CORPORATION
4-1, Meguro 1-Chome, Meguro-ku, Tokyo 153-8654, Japan
PIONEER ELECTRONICS (USA) INC.
P.O. BOX 1540, Long Beach, California 90810-1540, U.S.A. TEL: (800) 421-1404
PIONEER ELECTRONICS OF CANADA, INC.
300 Allstate Parkway, Markham, Ontario L3R OP2, Canada TEL: (905) 479-4411
PIONEER EUROPE NV
Haven 1087, Keetberglaan 1, B-9120 Melsele, Belgium TEL: 03/570.05.11
PIONEER ELECTRONICS ASIACENTRE PTE. LTD.
253 Alexandra Road, #04-01, Singapore 159936 TEL: 656-472-1111
PIONEER ELECTRONICS AUSTRALIA PTY. LTD.
178-184 Boundary Road, Braeside, Victoria 3195, Australia, TEL: (03) 9586-6300
PIONEER ELECTRONICS DE MEXICO S.A. DE C.V.
Blvd.Manuel Avila Camacho 138 10 piso Col.Lomas de Chapultepec, Mexico,D.F. 11000 TEL: 55-9178-4270
K002E
<03G00000>
100
Printed in U.S.A. <ARB1557-A>
 Loading...