

Pioneer PL-560 Owners Manual
IMPORTANT
The
serial
number
write
it
in
serial
this
secure
a
NOTICE
for
number
area.
This
equipment
this
on
your
for
your
is
located
is
enclosed
security.
warranty
on
the
card
rear.
Please
and
keep
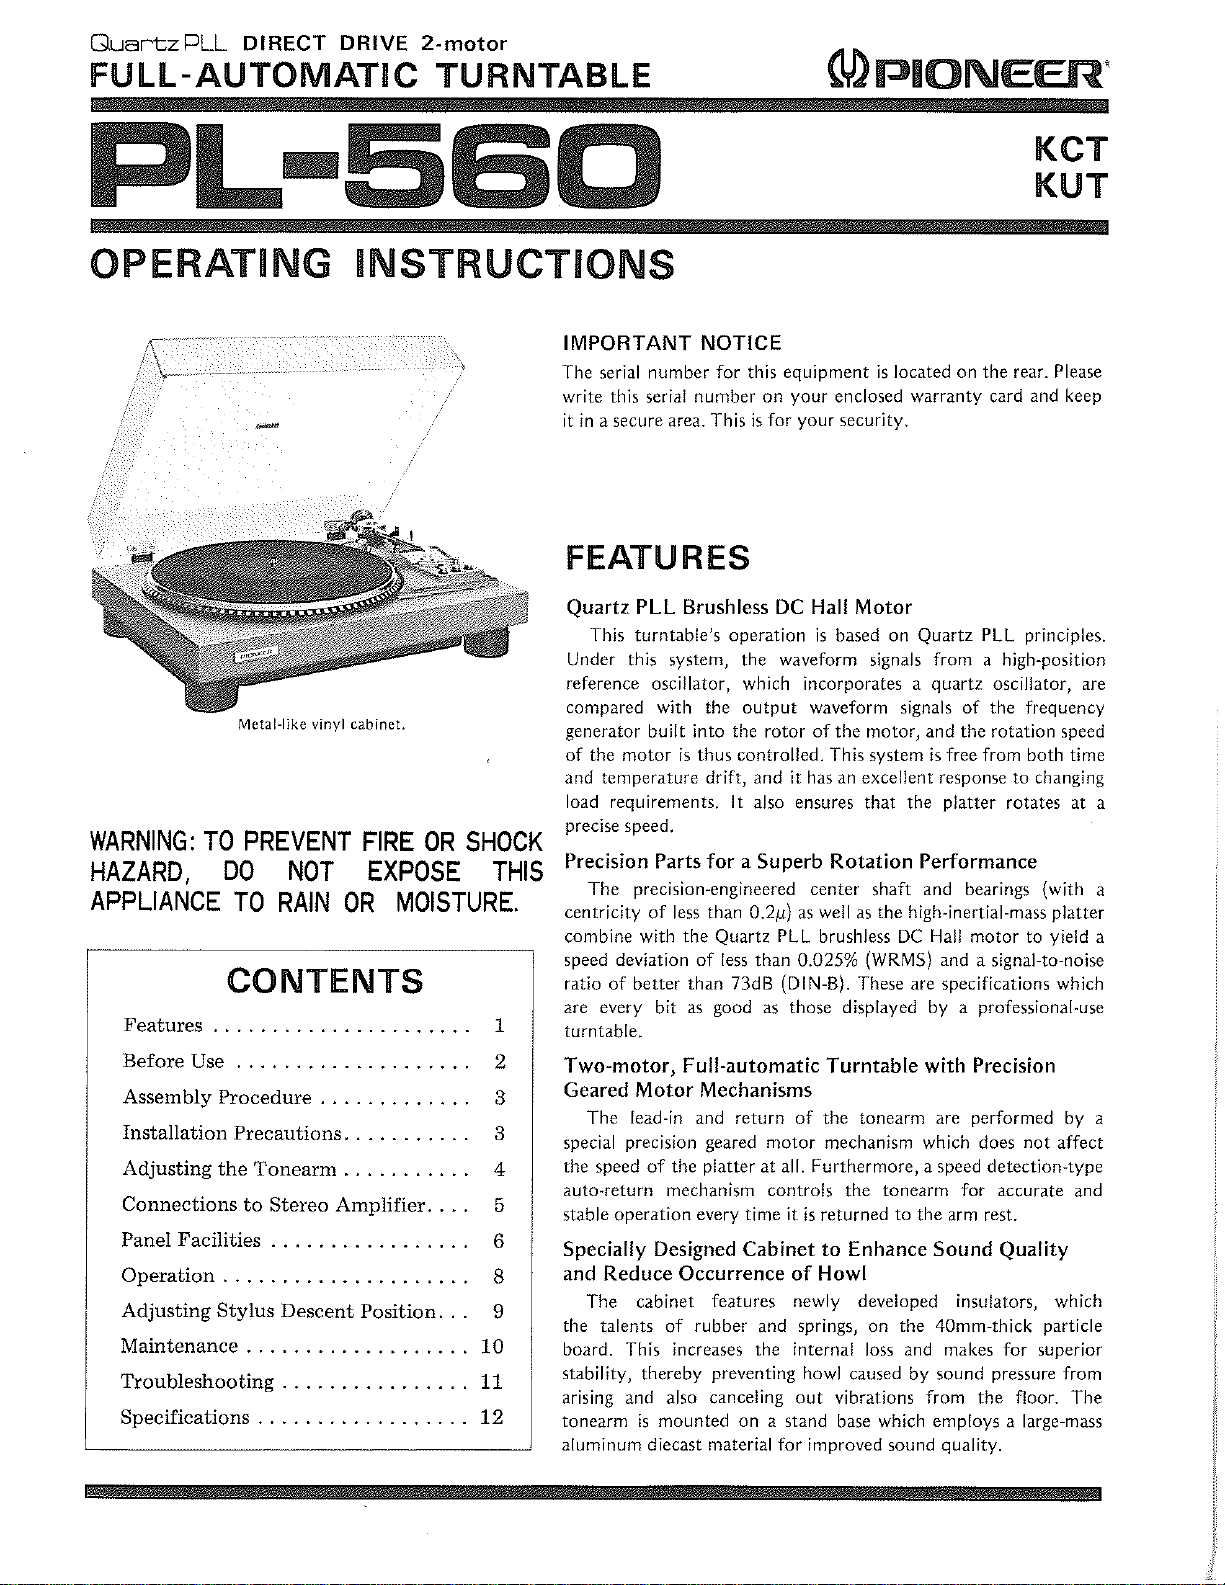
Metal
WARNING:
HAZARD,
APPLIANCE
Features
Before
Assembly
Installation
Adjusting
Connections
Panel
Operation
Adjusting
Maintenance
Troubleshooting
Specifications
TO
DO
TO
......................
Use
....................
Procedure
Precautions...........
the
Facilities
.....................
Stylus
-like
vinyl
cabinet.
PREVENT
NOT
RAIN
.
~'
Tonearm
to
Stereo
.................
Descent
...................
................
..................
FIRE
OR
EXPOSE
MOISTURE.
OR
.............
...........
Amplifier....
Position...
SHOCK
THIS
1
2
3
3
4
5
6
8
9
10
11
12
Quartz
Under
reference
compared
generator
of
and
load
precise
Precision
centricity
combine
speed
ratio
are
turntable.
Two
Geared
special
the
auto-return
stable
Specially
and
the
board.
stability,
arising
tonearm
aluminum
PLL
This
turntable's
system,
this
oscillator,
with
built
Che
motor
temperature
requirements.
speed.
Parts
The
precision-engineered
of
with
deviation
of
better
every
bit
motor,
-
Motor
The
lead
-in
precision
speed
of
the
mechanism
operation
Designed
Reduce
The
cabinet
talents
of
increases
This
thereby
and
also
mounted
is
diecast
Brushless
the
into
is
thus
drift,
DC
operation
the
waveform
which
output
the
rotor
controlled.
and
It
also
for a Superb
than
less
the
Full-
02µ)
Quartz
of
than
less
than
73dB
as
good
automatic
PLL
(DIN
as
those
Mechanisms
and
return
geared
platter
every
motor
at
all.
controls
time
it
Cabinet
Occurrence
features
rubber
and
the
preventing
canceling
on
a
stand
material
for
Hall
Motor
is
based
incorporates a quartz
waveform
of
the
This
it
has
an
ensures
Rotation
center
as
well
as
brushless
0.025%
These
-B).
displayed
Turntable
of
the
mechanism
Furthermore, a speed
the
returned
is
to
Enhance
of
Howl
newly
internal
out
developed
springs,
caused
howl
vibrations
base
improved
Quartz
on
signals
motor,
system
excellent
that
from
signals
and
is
free
response
the
platter
Performance
shaft
and
the
high
-
inertial
DC
Hall
(WRMS)
and
are
specifications
by a professional
with
tonearm
are
which
tonearm
to
the
arm
Sound
on
the
40mm
and
loss
which
by
sound
from
employs
sound
makes
quality.
of
the
bearings
for
insulators,
PLL
principles.
ahigh-
position
oscillator,
the
frequency
rotation
from
motor
asignal
speed
both
to
changing
rotates
(with
-mass
platter
to
yield
-to
-noise
which
Precision
performed
does
detection
accurate
rest.
not
by
affect
-type
Quality
which
particle
-thick
superior
for
pressure
the
floor.
alarge
-mass
from
are
time
ae
a
a
a
-use
a
and
The
~.;
CHECK
The
the
adaptor
and
and
THE
accessory
figure.
is
the
when
safely.
ACCESSORIES
box
contains
Check
used
screwdriver
mounting
Cartridge
Cartridge
Cartridge
that
for
records
the
mounting
mounting
mounting
they
is
caztridge.
~
EP
the
parts
are
all
inside.
with a large
required
for
Store
screws
(6)
washers
(2)
nuts
(2~
adaptor
shown
center
The
hole,
in
EP
adjustments
these
parts
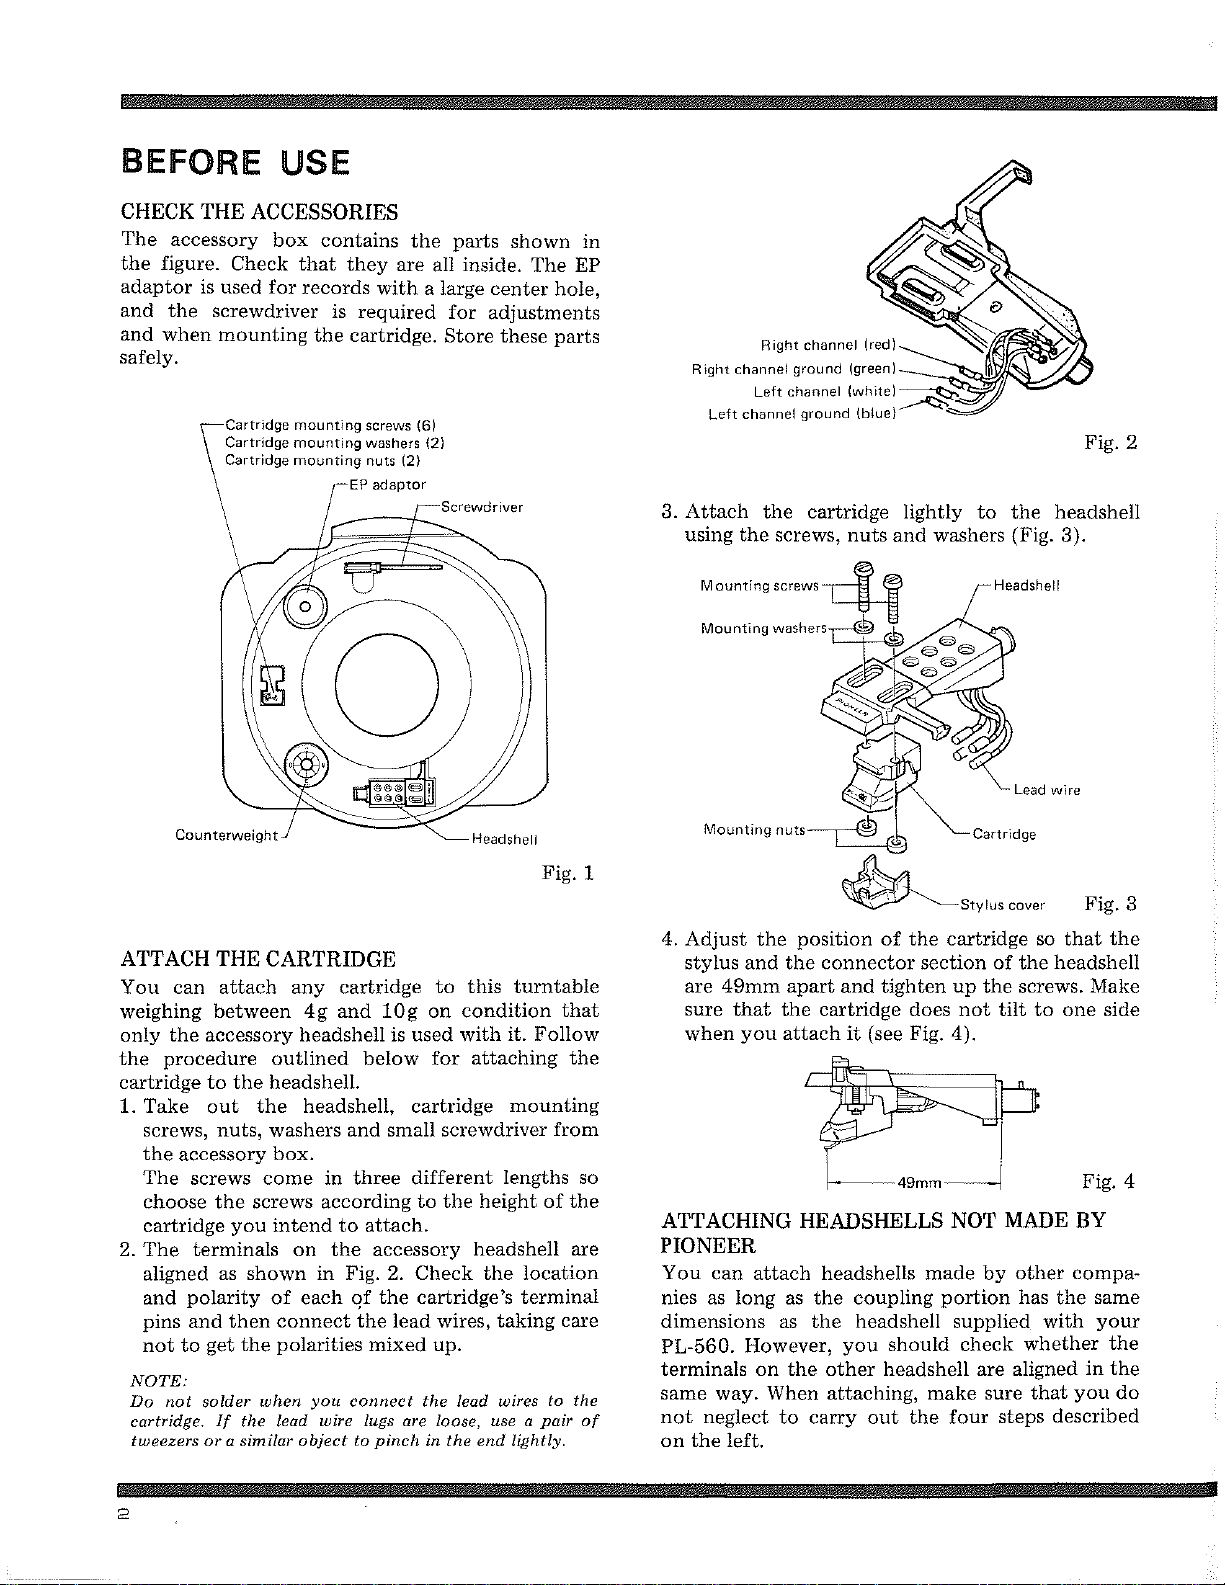
Right
Attach
3.
using
Mounting
Mounting
Left
Right
channel
channel
Left
channel
the
the
screws,
channi
ground
grounc
cartridge
nuts
lightly
and
washers
to
the
headshell
(Fig.
3).
yell
d
wire
Fig.
2
ATTACH
You
weighing
only
the
cartridge
1.
Take
screws,
the
The
choose
THE
can
attach
between
the
accessory
procedure
to
out
nuts,
accessory
screws
the
cartridge
2.
NOTE:
Do
cartridge.
tweezers
terminals
The
aligned
and
pins
not
as
polarity
and
to
get
not
solder
If
or a similar
CARTRIDGE
any
outlined
the
headshell.
the
washers
box.
come
screws
you
intend
on
shown
of
then
connect
polarities
the
when
Cead
the
cartridge
4g
and
lOg
headshell
is
below
headshell,
and
small
in
three
according
attach.
to
the
accessory
in
Fig.
2.
each
of
the
the
lead
mixed
you
cminect
wire
lugs
to
pinch
are
object
Headshell
to
this
turntable
condition
on
with
used
for
cartridge
it.
attaching
mounting
screwdriver
different
to
the
lengths
height
headshell
Check
cartridge's
wires,
location
the
terminal
taking
up.
the
lead
wires
use a pair
loose,
in
the
end
lightly.
Fig.
1
that
Follow
the
from
so
of
the
are
care
to
the
of
Mounting
4.
Adjust
stylus
are
sure
when
the
and
49mm
that
you
ATTACHING
PIONEER
You
can
attach
nies
as
long
dimensions
However,
-560.
PL
terminals
same
not
on
the
on
way.
When
neglect
left.
~~'-
position
the
connector
apart
and
the
cartridge
attach
it
o
(see
HEADSHELLS
headshells
as
the
coupling
as
the
headshell
you
the
other
attaching,
to
carry
out
i
of
Sty
the
cartridge
section
tighten
up
does
4).
Fig.
not
49mm
NOT
made
portion
supplied
should
headshell
check
are
make
four
the
cover
Ws
of
the
the
screws.
tilt
-~
MADE
other
by
has
whether
aligned
that
sure
steps
Fig.
so
that
headshell
Make
to
one
side
Fig.4
BY
compa-
same
the
with
your
in
you
described
3
the
the
the
do
s!n.,.,
.":*
,.v..
.%.,
is
.~.~r.
.._n'~,._~'.'
/s..,
~.y r~//F,',:x
~13,'/eir
rt
,r.
','.,.
.-
~f
✓<
.:..~
,-
✓
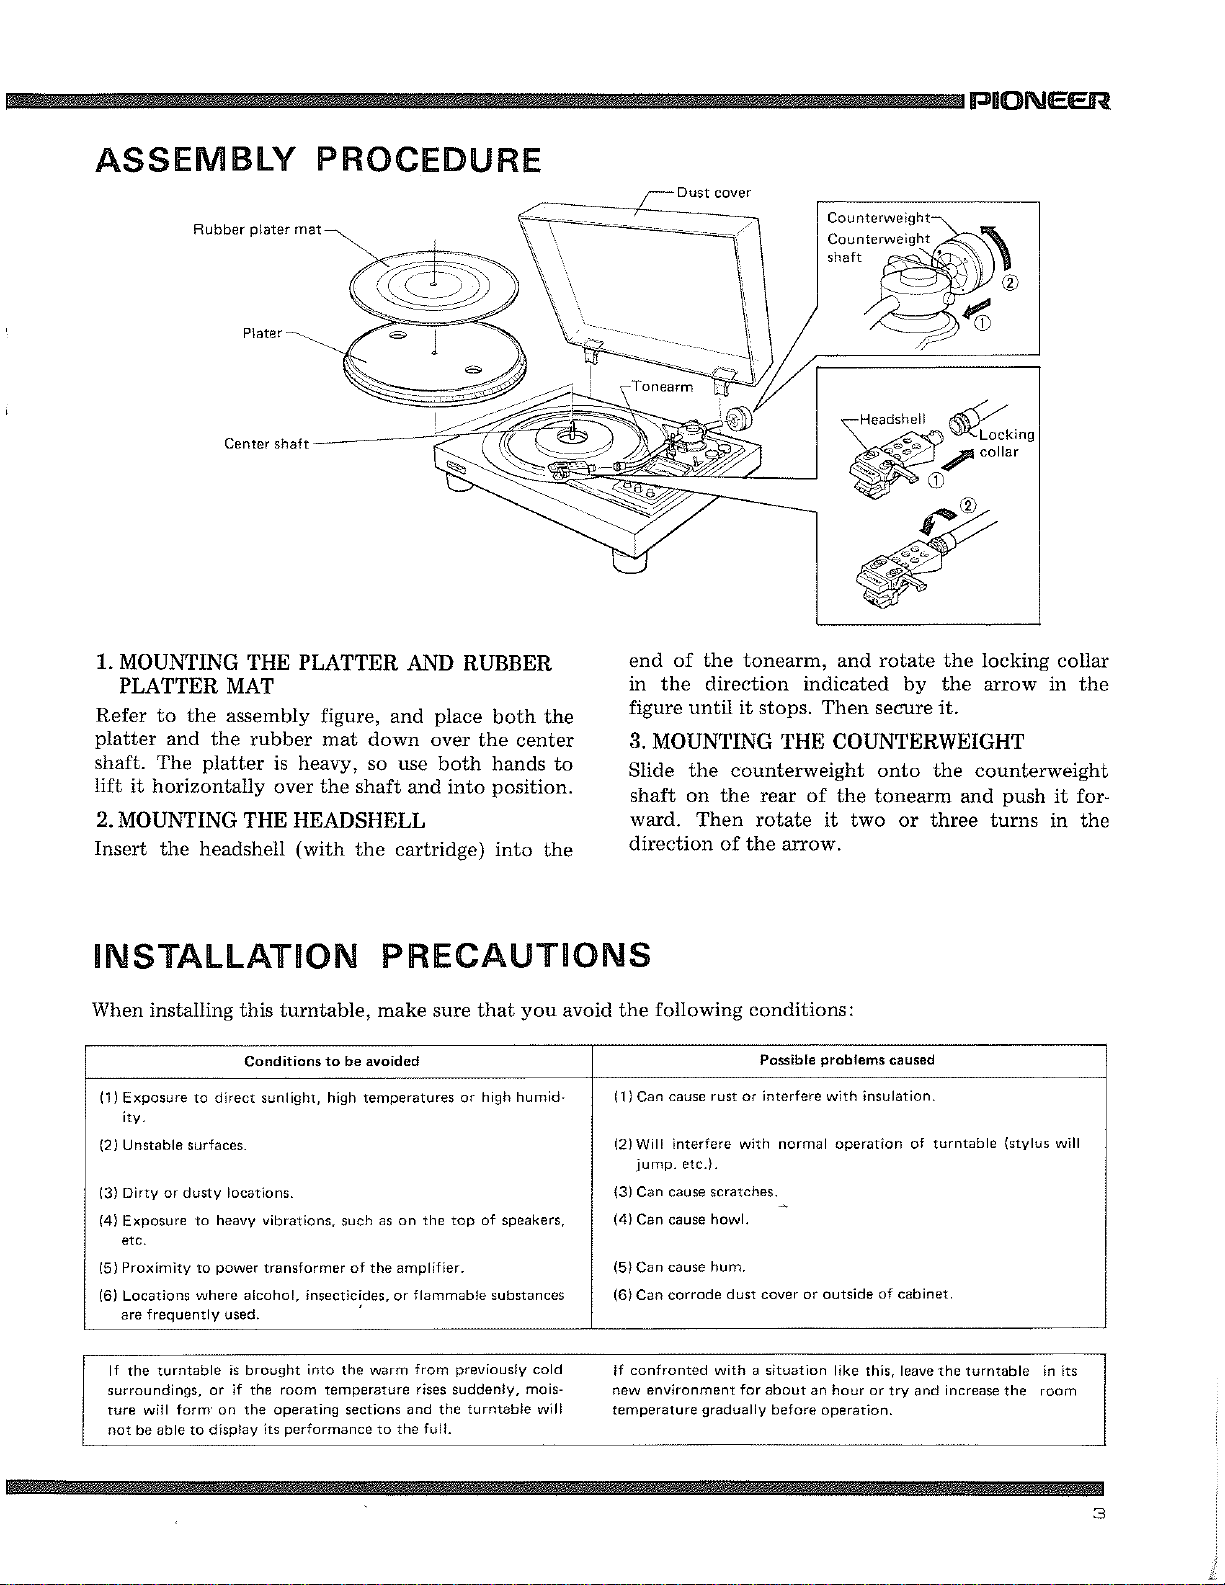
Rubber
plate.
Dust
cover
Counterweight
Counterweight
shaft
~~
rg
€~}C~t
C
i
€E
1.
MOUNTING
PLATTER
Refer
to
the
platter
shaft.
lift
2.
Insert
and
The
it
horizontally
MOUNTING
the
Plater
Center
shaft
THE
PLATTER
MAT
assembly
the
rubber
platter
is
heavy,
over
THE
HEADSHELL
headshell
(with
AND
figure,
mat
the
and
down
so
use
shaft
and
the
cartridge)
RUBBER
place
over
the
both
into
both
the
center
hands
to
position.
into
the
end
of
the
in
the
direction
figure
3.
Slide
direction
until
MOUNTING
the
shaft
on
ward.
Then
counterweight
the
of
tonearm,
indicated
it
stops.
Then
THE
rear
of
rotate
the
it
arrow.
/'
Headshel
"o%
~
~~,.
by
the
the
it.
and
rotate
secure
COUNTERWEIGHT
onto
the
the
tonearm
two
or
and
three
Locking
collar
locking
arrow
collar
in
the
counterweight
push
it
for-
turns
in
the
.
'~.'r.5~
i
.~.
When
installing
(i)
Exposure
itY.
~2)
Unstable
(31
Dirty
Exposure
(4)
etc.
Proximity
(5)
(6)
Locations
are
If
the
surroundings,
ture
not
r•~i~,~~.:&.'.:_:.-
~~=-
to
surfaces.
or
dusty
to
to
where
frequently
turntable
will
farm'
6e
able
to
`.^~..
~~
.~~
this
Conditions
direct
locations.
heavy
power
alcohol,
used.
is
brought
or
if
the
on
the
display
:..
~r_~.'~.F°
•
"~
z
turntable,
to
be
sunlight,
vibrations,
transformer
its
high
such
insecticides,
into
room
operating
the
temperature
sections
performance
~~.,.i..!.,
of
make
sure
avoided
temperatures
on
the
as
the
warm
to
top
amplifier.
or
flammable
from
suddenly,
rises
and
the
the
full.
~aa_..li
z
that
you
or
high
humid-
of
speakers,
substances
previously
mois-
to
mta6le
sryr,.
-xr"r:
cold
will
trf
,.
~
avoid
the
(1)
(2)
(3)
(4)
(5)
(6)
~f
new
temperature
~~f~~::~
following
Can
cause
rust
Will
interfere
jump.
etc.i.
Can
cause
scratches.
Can
Can
Can
confronted
environmenC
howl.
cause
cause
hum.
corrode
gradually
F.rr.~f.5.-
conditions:
Possible
or
with
cover
dust
with a situation
for
~~„y'~~,'r~i
prohlems
interfere
about
normal
or
an
before
with
outside
operation.
like
hour
caused
insulation.
of
operation
this,
or
~`,~
wrntable
of
cabinet.
leave
the
try
and
increase
Frr.S~./'r~'~..:-'s^.:
(stylus
turntable
the
r.:..;
will
in
its
room
.f.,..<:.
,~a
~I
_~..
~
~
~
:.. ~ t ~ ~I
ate
ver
knob
RELEASING
Before
mechanism
1.
2.
3.
4.
adjusting
Plug
the
Set
the
Push
the
About
to
rotate,
as
power
RECORD
START
10
disconnect
Do
NOT
releases
can
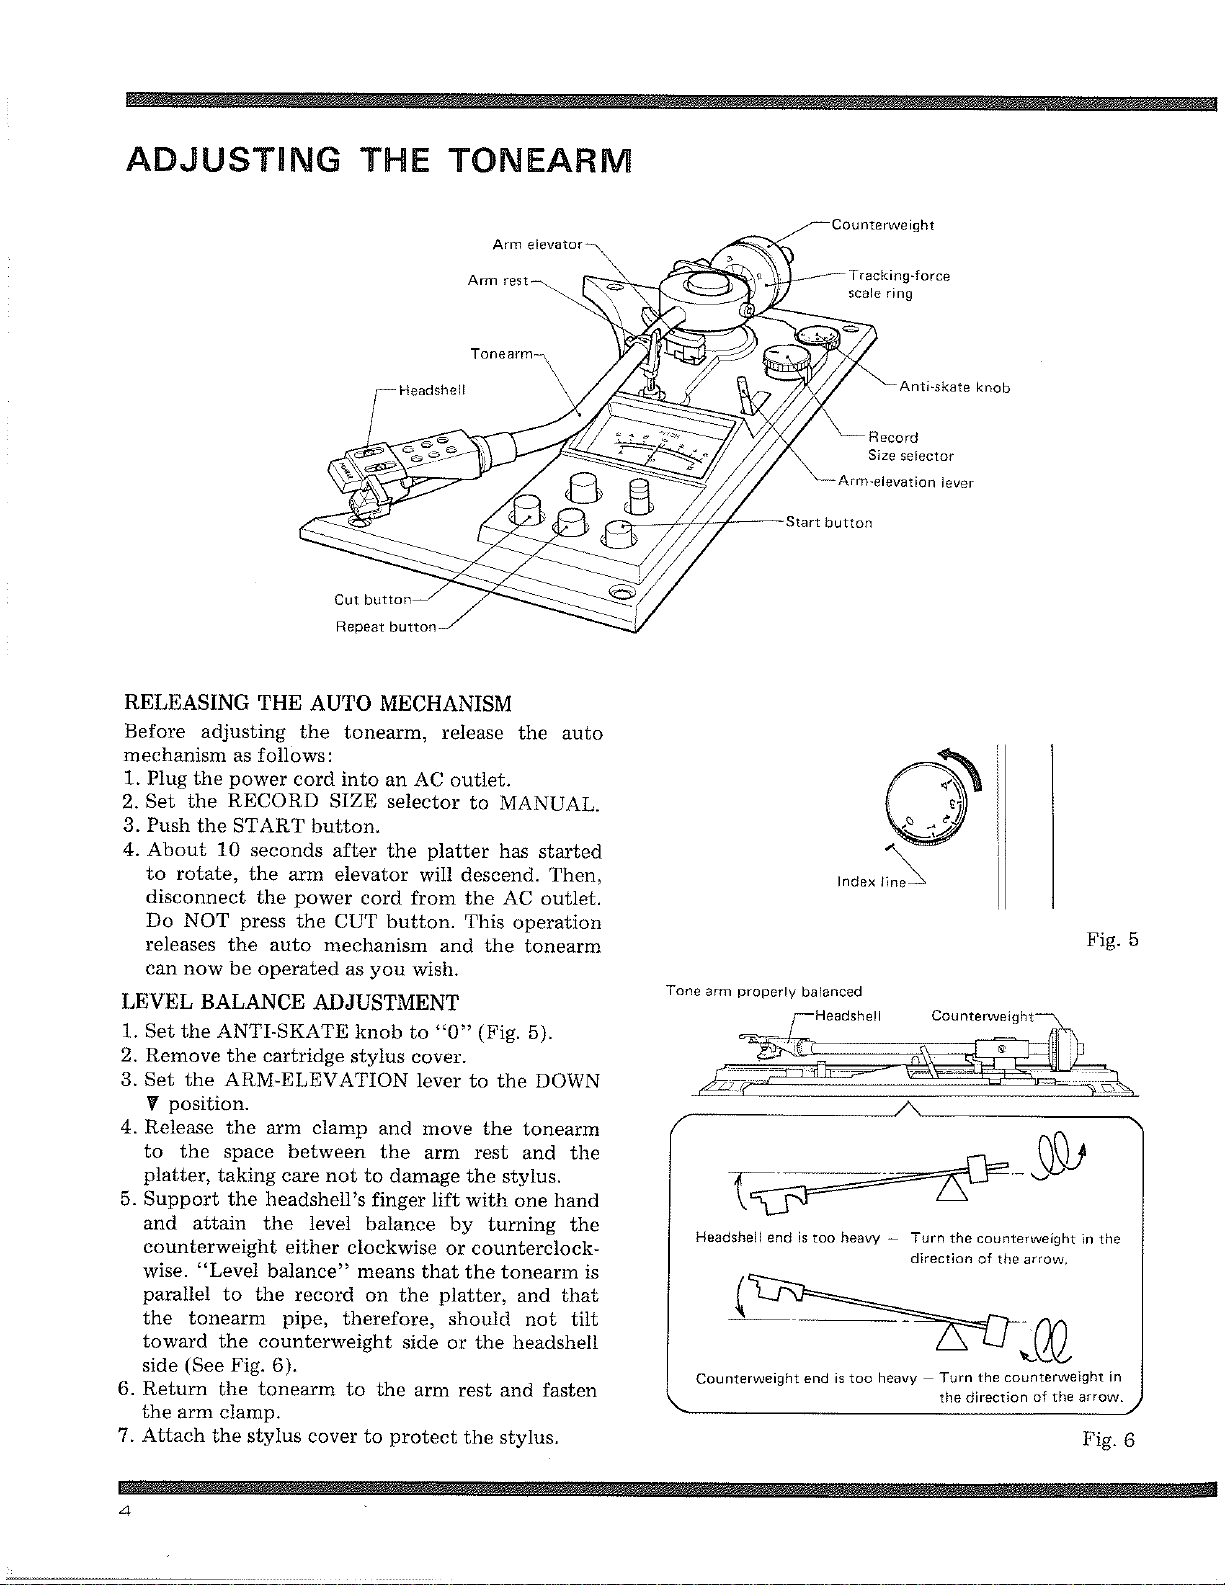
LEVEL
1.
Set
2.
Remove
3.
Set
~
4.
Release
to
platter,
5.
Support
and
counterweight
wise.
parallel
the
toward
side
6.
Return
the
7.
Attach
the
now
be
BALANCE
the
ANTI
the
the
ARM-ELEVATION
position.
the
the
space
taking
the
attain
"Level
to
tonearm
the
(See
Fig.
the
arm
clamp.
the
THE
AUTO
the
tonearm,
follows:
cord
into
SIZE
button.
seconds
the
the
press
auto
operated
after
arm
elevator
power
the
cord
CUT
mechanism
as
ADJUSTMENT
-SKATE
cartridge
arm
between
care
headshell's
the
either
balance"
the
pipe,
counterweight
6).
tonearm
stylus
knob
stylus
clamp
not
level
clockwise
means
record
therefore,
to
cover
to
to
MECHANISM
release
an
AC
outlet.
selector
the
platter
will
from
button.
and
you
wish.
to
"0"
cover.
lever
and
move
the
arm
damage
finger
balance
on
lift
that
the
side
the
arm
protect
by
or
platter,
should
or
the
auto
to
MANUAL.
has
started
descend.
the
This
the
(Fig.
to
the
rest
the
with
Then,
AC
outlet.
operation
tonearm
5).
the
DOWN
tonearm
and
stylus.
one
hand
turning
the
the
counterclock-
the
tonearm
and
that
not
tilt
the
headsheli
rest
and
fasten
the
stylus.
is
Tone
arm
Headshell
Counterweight
properly
end
balanced
is
too
heavy — Turn
is
too
end
direction
heavy
the
—Turn
the
direction
v~G
counterweight
of
the
arrow,
~~
counterweight
the
of
the
Fig.
in
the
in
arrow.
Fig.
5
6
,ri~..;
/l_~
raw'
~,
w/
~.s.
~~.;
~~y../
.fn"~~LLr5'r'!
/
/t~~Mr~./~r.'.~~.
%J~1~~'v~d~
/rr~~1~.t
Su
l/
~,.r~y'~~~~x
~.^'
/r~!:'~
✓
"'%.e r✓w.~
}3''//'x,`5",
-~_.:-
 Loading...