

Page 1
Operating Instructions | Mode d’emploi | Bedienungsanleitung |
Istruzioni per I’uso | Handleiding | Manual de instrucciones |
Инструкции по эксплуатации
Super Audio CD Player | Lecteur Super Audio CD |
Super Audio CD-Spieler | Lettore CD Super Audio |
Super-Audio CD-speler | Reproductor de Super Audio CD |
Page 2
Thank you for buying this Pioneer product.
Please read through these operating instructions so you will know how to operate your model properly. After you have finished reading the instructions, put
them away in a safe place for future reference..
IMPORTANT
CAUTION
RISK OF ELECTRIC SHOCK
DO NOT OPEN
The lightning flash with arrowhead symbol,
within an equilateral triangle, is intended to
alert the user to the presence of uninsulated
“dangerous voltage” within the product’s
enclosure that may be of sufficient
magnitude to constitute a risk of electric
shock to persons.
CAUTION:
TO PREVENT THE RISK OF ELECTRIC
SHOCK, DO NOT REMOVE COVER (OR
BACK). NO USER-SERVICEABLE PARTS
INSIDE. REFER SERVICING TO QUALIFIED
SERVICE PERSONNEL.
The exclamation point within an equilateral
triangle is intended to alert the user to the
presence of important operating and
maintenance (servicing) instructions in the
literature accompanying the appliance.
D3-4-2-1-1_A1_En
WARNING
This equipment is not waterproof. To prevent a fire or
shock hazard, do not place any container filled with
liquid near this equipment (such as a vase or flower
pot) or expose it to dripping, splashing, rain or
moisture.
D3-4-2-1-3_A1_En
WARNING
Before plugging in for the first time, read the following
section carefully.
The voltage of the available power supply differs
according to country or region. Be sure that the
power supply voltage of the area where this unit
will be used meets the required voltage (e.g., 230 V
or 120 V) written on the rear panel.
D3-4-2-1-4*_A1_En
European model only
Information for users on collection and disposal of old equipment and used batteries
Symbol for
equipment
Symbol examples
for batteries
Pb
These symbols on the products, packaging, and/or accompanying documents mean
that used electrical and electronic products and batteries should not be mixed with
general household waste.
For proper treatment, recovery and recycling of old products and used batteries,
please take them to applicable collection points in accordance with your national
legislation.
By disposing of these products and batteries correctly, you will help to save valuable
resources and prevent any potential negative effects on human health and the
environment which could otherwise arise from inappropriate waste handling.
For more information about collection and recycling of old products and batteries,
please contact your local municipality, your waste disposal service or the point of sale
where you purchased the items.
These symbols are only valid in the European Union.
For countries outside the European Union:
If you wish to discard these items, please contact your local authorities or dealer and
ask for the correct method of disposal.
K058a_A1_En
WARNING
To prevent a fire hazard, do not place any naked flame
sources (such as a lighted candle) on the equipment.
D3-4-2-1-7a_A1_En
VENTILATION CAUTION
When installing this unit, make sure to leave space
around the unit for ventilation to improve heat radiation
(at least 10 cm at top, 10 cm at rear, and 10 cm at each
side).
WARNING
Slots and openings in the cabinet are provided for
ventilation to ensure reliable operation of the product,
and to protect it from overheating. To prevent fire
hazard, the openings should never be blocked or
covered with items (such as newspapers, table-cloths,
curtains) or by operating the equipment on thick carpet
or a bed.
D3-4-2-1-7b*_A1_En
Page 3

Operating Environment
Operating environment temperature and humidity:
+5 °C to +35 °C (+41 °F to +95 °F); less than 85 %RH
(cooling vents not blocked)
Do not install this unit in a poorly ventilated area, or in
locations exposed to high humidity or direct sunlight (or
strong artificial light)
If the AC plug of this unit does not match the AC
outlet you want to use, the plug must be removed
and appropriate one fitted. Replacement and
mounting of an AC plug on the power supply cord of
this unit should be performed only by qualified
service personnel. If connected to an AC outlet, the
cut-off plug can cause severe electrical shock. Make
sure it is properly disposed of after removal.
The equipment should be disconnected by removing
the mains plug from the wall socket when left unused
for a long period of time (for example, when on
vacation).
CAUTION
The /I STANDBY/ON switch on this unit will not
completely shut off all power from the AC outlet.
Since the power cord serves as the main disconnect
device for the unit, you will need to unplug it from the
AC outlet to shut down all power. Therefore, make
sure the unit has been installed so that the power
cord can be easily unplugged from the AC outlet in
case of an accident. To avoid fire hazard, the power
cord should also be unplugged from the AC outlet
when left unused for a long period of time (for
example, when on vacation).
D3-4-2-1-7c*_A1_En
D3-4-2-2-1a_A1_En
D3-4-2-2-2a*_A1_En
This product is for general household purposes. Any
failure due to use for other than household purposes
(such as long-term use for business purposes in a
restaurant or use in a car or ship) and which requires
repair will be charged for even during the warranty
period.
K041_A1_En
POWER-CORD CAUTION
Handle the power cord by the plug. Do not pull out the
plug by tugging the cord and never touch the power
cord when your hands are wet as this could cause a
short circuit or electric shock. Do not place the unit, a
piece of furniture, etc., on the power cord, or pinch the
cord. Never make a knot in the cord or tie it with other
cords. The power cords should be routed such that they
are not likely to be stepped on. A damaged power cord
can cause a fire or give you an electrical shock. Check
the power cord once in a while. When you find it
damaged, ask your nearest PIONEER authorized
service center or your dealer for a replacement.
S002*_A1_En
CAUTION
This product is a class 1 laser product classified
under the Safety of laser products, IEC 60825-1:2007.
CLASS 1 LASER PRODUCT
D58-5-2-2a_A1_En
Contents
01 Before you start
Disc/content format playback compatibility. . . . . .4
What’s in the box. . . . . . . . . . . . . . . . . . . . . . . . . . 4
Loading the batteries in the remote control . . . . . .4
Using the remote control. . . . . . . . . . . . . . . . . . . . . 4
02 Connecting up
Analog audio output connections . . . . . . . . . . . . . 5
Digital audio output connections. . . . . . . . . . . . . . 5
Using centralized control with other Pioneer
components (PD-30 only) . . . . . . . . . . . . . . . . . . . 5
Plugging in . . . . . . . . . . . . . . . . . . . . . . . . . . . . . . 5
03 Controls and displays
Remote control . . . . . . . . . . . . . . . . . . . . . . . . . . . 6
Rear panel . . . . . . . . . . . . . . . . . . . . . . . . . . . . . . . 6
Front panel . . . . . . . . . . . . . . . . . . . . . . . . . . . . . . 7
Front panel display . . . . . . . . . . . . . . . . . . . . . . . . 7
04 Playback
Playing discs . . . . . . . . . . . . . . . . . . . . . . . . . . . . . 8
Set the power to Standby. . . . . . . . . . . . . . . . . . . . . 8
Fast forward/Fast reverse . . . . . . . . . . . . . . . . . . . .8
Skip function . . . . . . . . . . . . . . . . . . . . . . . . . . . . . .8
Direct search
(designate a specific track for playback). . . . . . . . . 8
Repeat playback . . . . . . . . . . . . . . . . . . . . . . . . . . . 8
Random playback . . . . . . . . . . . . . . . . . . . . . . . . . .8
Programmed playback (Play tracks in a
predetermined order) . . . . . . . . . . . . . . . . . . . . . . .8
View disc data . . . . . . . . . . . . . . . . . . . . . . . . . . . . .8
iPod/iPhone/iPad playback
(PD-30 only) . . . . . . . . . . . . . . . . . . . . . . . . . . . . . . 9
Confirm what iPod/iPhone/iPad models are
supported . . . . . . . . . . . . . . . . . . . . . . . . . . . . . . . .9
Playing your iPod/iPhone/iPad . . . . . . . . . . . . . . . .9
Playing files stored on USB storage devices . . . . 10
05 Using advanced functions
Playing with high-fidelity sound . . . . . . . . . . . . . . 11
Sound Retriever. . . . . . . . . . . . . . . . . . . . . . . . . . . 11
Pure Audio . . . . . . . . . . . . . . . . . . . . . . . . . . . . . .11
Changing the playback area (layer)
of an SACD/CD . . . . . . . . . . . . . . . . . . . . . . . . . . 11
Adjusting overall display illumination . . . . . . . . . 11
Auto power down (automatically sets power to
standby). . . . . . . . . . . . . . . . . . . . . . . . . . . . . . . . 11
Playback functions . . . . . . . . . . . . . . . . . . . . . . . 11
06 Additional information
Playable disc . . . . . . . . . . . . . . . . . . . . . . . . . . . . 12
Playable file formats . . . . . . . . . . . . . . . . . . . . . . 12
Cautions on use. . . . . . . . . . . . . . . . . . . . . . . . . . 13
Troubleshooting. . . . . . . . . . . . . . . . . . . . . . . . . . 14
Specifications . . . . . . . . . . . . . . . . . . . . . . . . . . . 15
Page 4
Before you start01
PD-30
PD-10
7 m
30 °
30 °
Chapter 1:
Before you start
Disc/content format playback compatibility
Discs playable on this player are as shown below.
• SACD (Super Audio CD)*
(2-channel area only)
•CD
•DSD disc
* “Super Audio CD” is a registered trademark.
Note
• This unit does not permit playback of the multichannel areas of SACD discs.
• This unit’s DIGITAL OUT terminals do not output
sound from SACD and DSD discs, nor from iPod/
iPhone/iPad devices.
• When a disc is loaded, turning on the power will not
cause playback to automatically start. As a result,
timed playback is not possible even if the unit is
connected to a timer.
About DualDisc playback
A DualDisc is a new two-sided disc, one side of which
contains DVD content video, audio, etc. while the other
side contains non-DVD content such as digital audio
material. The non-DVD, audio side of the disc is not
compliant with the CD Audio specification and therefore
may not play. For more detailed information on the
DualDisc specification, please refer to the disc
manufacturer or disc retailer.
Discs that cannot be played
•DVD-Video
• DVD-Audio
•CD-G
•Video CD
• DTS CD
It is possible that some discs other than the ones listed
above may not be playable either.
4
En
What’s in the box
Please confirm that the following accessories are in the
box when you open it.
• Remote control x1
• AAA/IEC R03 dry cell batteries x2
• RCA audio cable (red/white plugs) x1
•Power cord
•Warranty card
• Operating instructions (This document)
Note
• Illustrations featured in the Operating Instructions
may have been modified or simplified for ease of
explanation, and may therefore differ from the
actual product appearance.
• The illustrations used here are mainly of the PD-30.
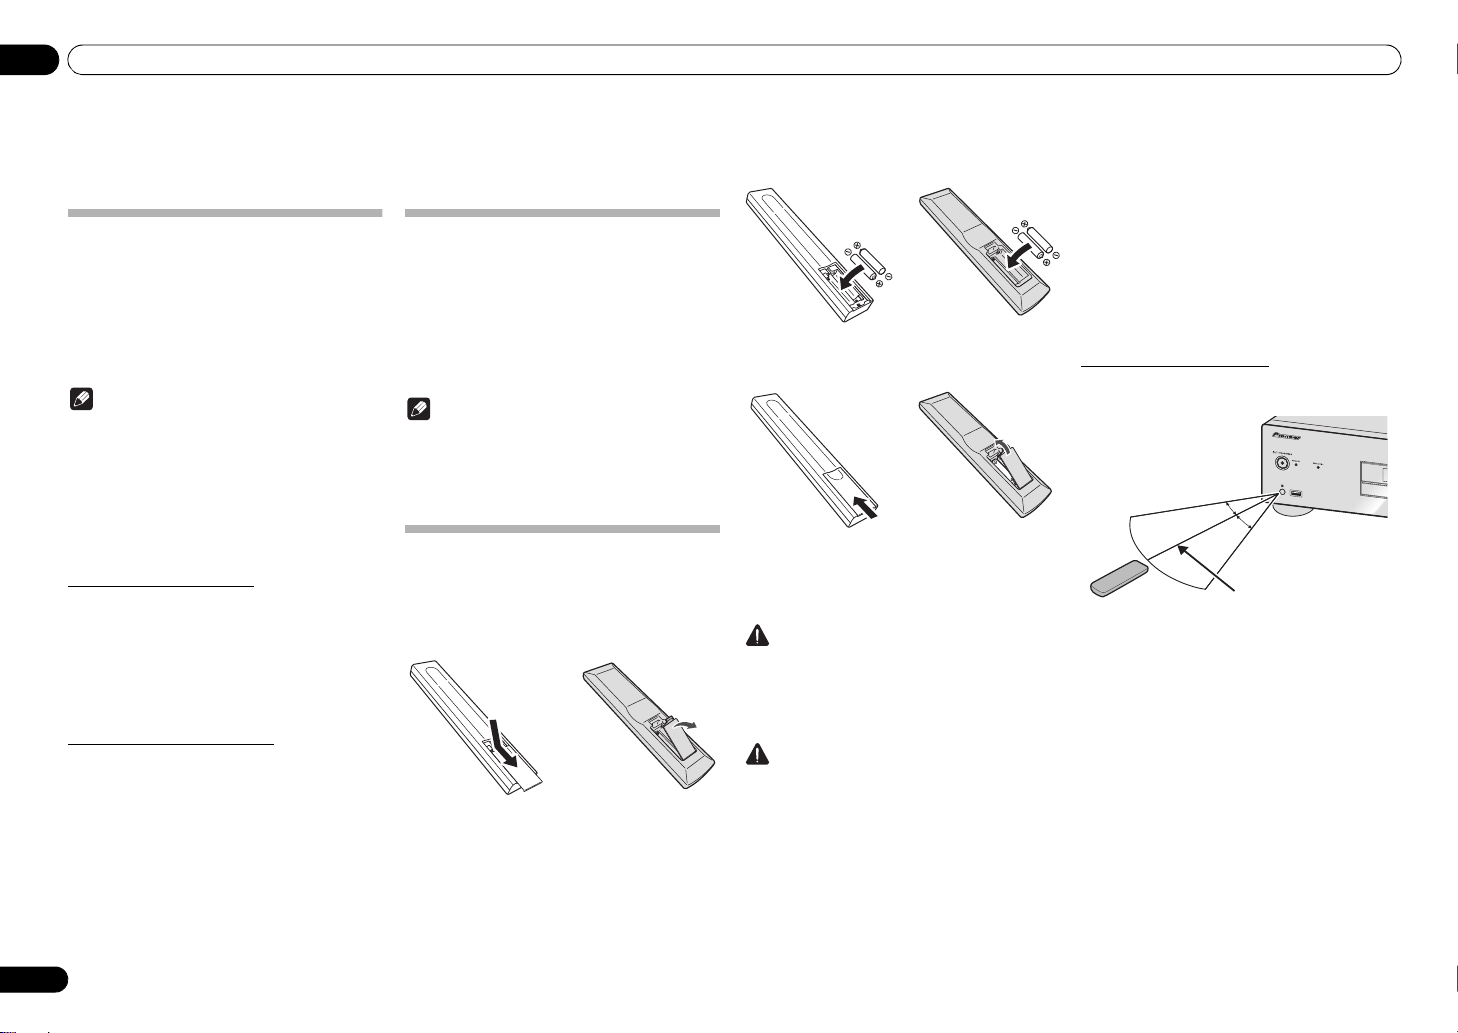
Loading the batteries in the remote control
1 Open the rear lid.
PD-30
PD-10
2 Insert the new batteries, matching the
polarities as indicated inside the case.
3 Close the rear lid.
PD-30
The batteries included with the unit have been provided
to allow you check product operation and may not last
long. We recommend using alkaline batteries that have
a longer life.
WARNING
• Do not use or store batteries in direct sunlight or
other excessively hot place, such as inside a car or
near a heater. This can cause batteries to leak,
overheat, explode or catch fire. It can also reduce
the life or performance of batteries.
Caution
Incorrect use of batteries may result in such hazards as
leakage and bursting. Observe the following
precautions:
• When inserting the batteries, make sure not to
damage the springs on the battery’s terminals.
• Do not use any batteries other than the ones
specified. Also, do not use a new battery together
with an old one.
• When loading the batteries into the remote control,
set them in the proper direction, as indicated by the
polarity marks ( and ).
PD-10
• Do not heat batteries, disassemble them, or throw
them into flames or water.
• Batteries may have different voltages, even if they
are the same size and shape. Do not use different
types of batteries together.
• To prevent leakage of battery fluid, remove the
batteries if you do not plan to use the remote
control for a long period of time (1 month or more).
If the fluid should leak, wipe it carefully off the
inside of the case, then insert new batteries. If a
battery should leak and the fluid should get on your
skin, flush it off with large quantities of water.
• When disposing of used batteries, please comply
with governmental regulations or environmental
public institution’s rules that apply in your country/
area.
Using the remote control
The remote has a range of about 7 m at an angle of about
30º from the remote sensor.
Keep in mind the following when using the remote
control:
• Make sure that there are no obstacles between the
remote and the remote sensor on the unit.
• Remote operation may become unreliable if strong
sunlight or fluorescent light is shining on the unit’s
remote sensor.
• Remote controllers for different devices can
interfere with each other. Avoid using remotes for
other equipment located close to this unit.
• Replace the batteries when you notice a fall off in
the operating range of the remote.
Page 5
Connecting up 02
Amplifier
Audio cable (included)
PD-30’s rear panel
DIGITAL IN
OPTICAL
DIGITAL IN
COAXIAL
AV amplifier or
digital recording
device
Optical fiber cable
(commercially
available)
Coaxial digital
audio cable
(commercially
available)
PD-30’s rear panel
AV amplifier or
digital recording
device
To other Pioneer
component equipped
with CONTROL IN jack
Remote control for
AV amplifier, etc.
Point the remote
control toward the
signal receiver on
the AV amplifier, etc.
Other Pioneer component
equipped with CONTROL
IN/OUT jacks
PD-30
To AC outlet
Power cord
PD-30’s rear panel
Chapter 2:
Connecting up
Caution
• Before making or changing the connections,
switch off the power and disconnect the power cord
from the AC outlet.
• Connect the power cord after all the connections
between devices have been completed.
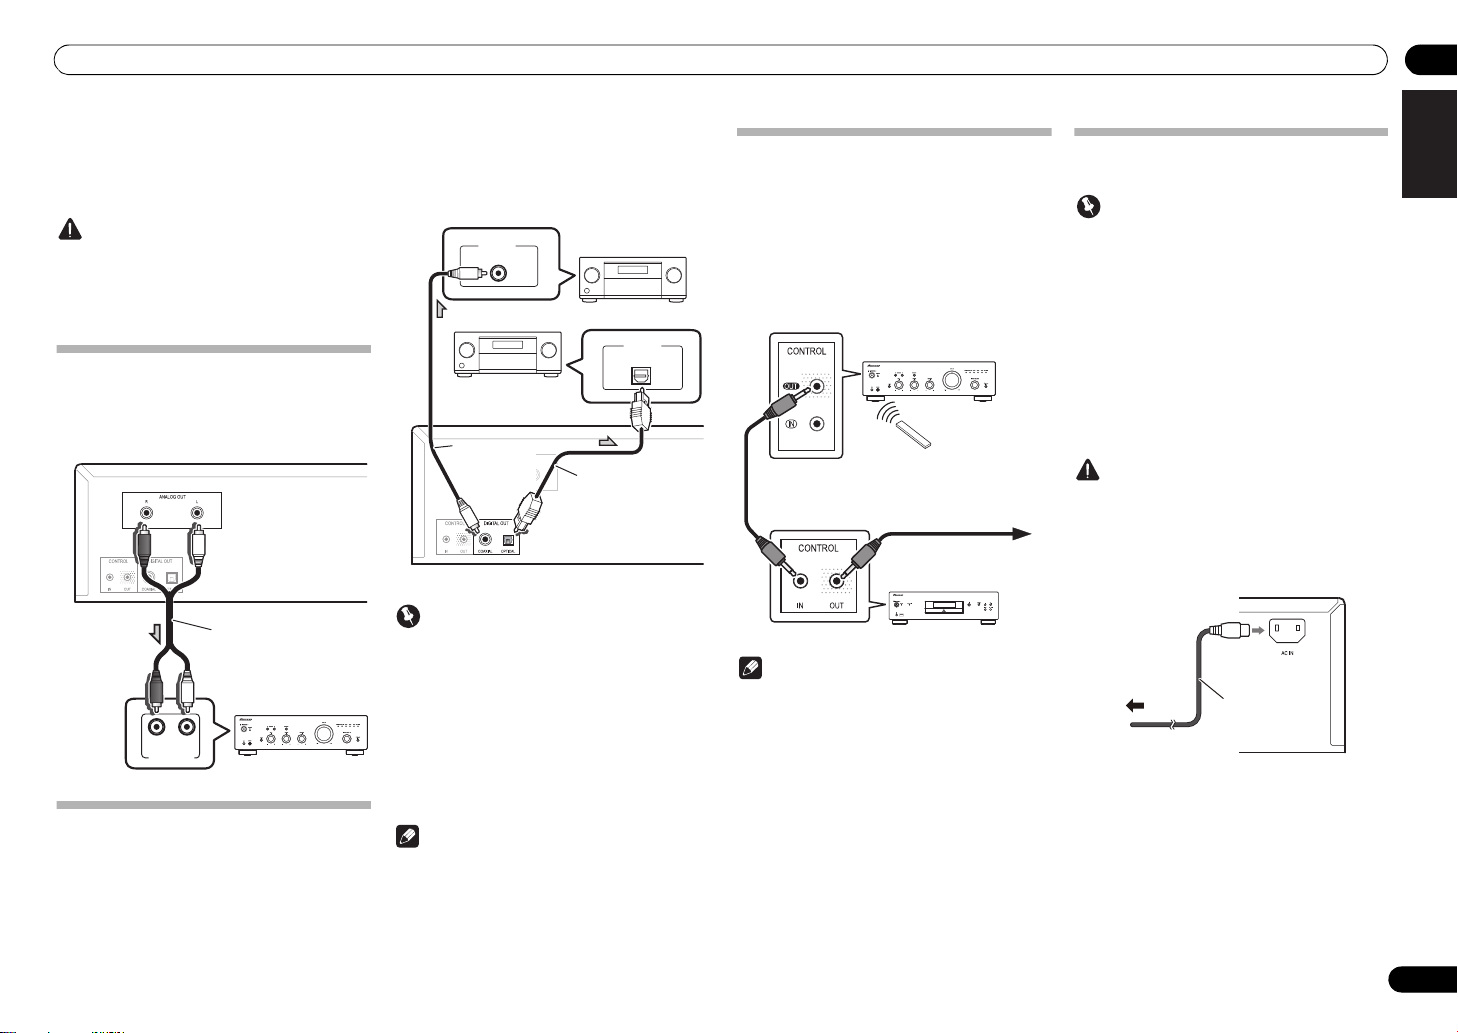
Analog audio output connections
By connecting this unit’s analog audio output to the
analog audio input of an amplifier, you can use the
amplifier to enjoy analog audio produced from this unit.
Using centralized control with other Pioneer components (PD-30 only)
This unit and other Pioneer components equipped with
CONTROL IN/OUT jacks can be controlled with a single
remote control by aiming the remote toward the signal
receptor on the AV amplifier or other component. This
also allows remote control of components not equipped
with a remote sensor, or installed in places where the
component’s remote sensor cannot be accessed.
Plugging in
Important
• If it is necessary to detach the power cord, first be
sure to press the
front panel of the unit so the PD-30 is turned OFF or
the PD-10 is in standby mode before detaching the
cord.
• Confirm that the [-OFF-] indicator is not lighted in
the main unit’s front panel display before
disconnecting the power cord. If the power cord is
disconnected while the [-OFF-] indicator is still
lighted, the unit’s settings may revert to factory
defaults.
• When going on a trip or otherwise not using the
unit for an extended period, always disconnect the
power cord from its outlet.
/I
STANDBY/ON button on the
English
DeutschFrançais
Digital audio output connections
If desired, the digital audio output from this unit can be
connected to an AV amplifier or digital recording device
(CD recorder, MD, etc.).
• This unit’s DIGITAL OUT terminals do not output
sound from SACD and DSD discs, nor from iPod/
iPhone/iPad devices.
RL
ANALOG
AUDIO INPUT
Important
Care in the handling of optical fiber cables
• Do not allow optical fiber cables to be bent at sharp
angles. When storing optical fiber cables, roll in
coils of at least 15 cm diameter.
• When connecting optical fiber cables, align the
connectors correctly and insert fully. If the
orientation of the cable connector is incorrect and
excessive force is applied in the attempt to fasten
the connector, the connector may be deformed,
preventing the shutter from closing when the cable
is removed.
Note
• For digital audio output, CDs played on this unit
must produce linear PCM signals with a sampling
rate up to 44.1 kHz and quantitative bits up to 16
bits (some discs may not be playable depending on
the connected component and environment). For
information about other files, see page 12.
Note
• For connections use a commercially available
monaural miniplug cord (without resistor).
• When connecting the CONTROL IN/OUT jacks,
commercially available audio cords must also be
used to make analog connections. Merely
connecting the CONTROL IN/OUT jacks alone will
not allow proper system control.
• When a control cord is connected to the PD-30’s
CONTROL IN jack, the unit cannot be controlled by
pointing the remote control at the PD-30 (the
remote sensor is automatically disabled).
Caution
• Do not use any power cord other than the one
supplied with this unit.
• Do not use the supplied power cord for any purpose
other than that described below.
After you’ve finished making all connections, plug the
unit into an AC outlet.
1 Plug the supplied power cord into the
AC IN
socket on the rear of the unit.
2 Plug the other end into AC outlet.
Italiano Español Русский
Nederlands
5
En
Page 6
PD-10
12
16
10
19
17
15
11
1
9
2
33
35
37
4
14
8
20
18
13
1
12
13
14
15
16
2
3
4
6
8
10
11
9
7
5
PD-30
Controls and displays03
Chapter 3:
Controls and displays
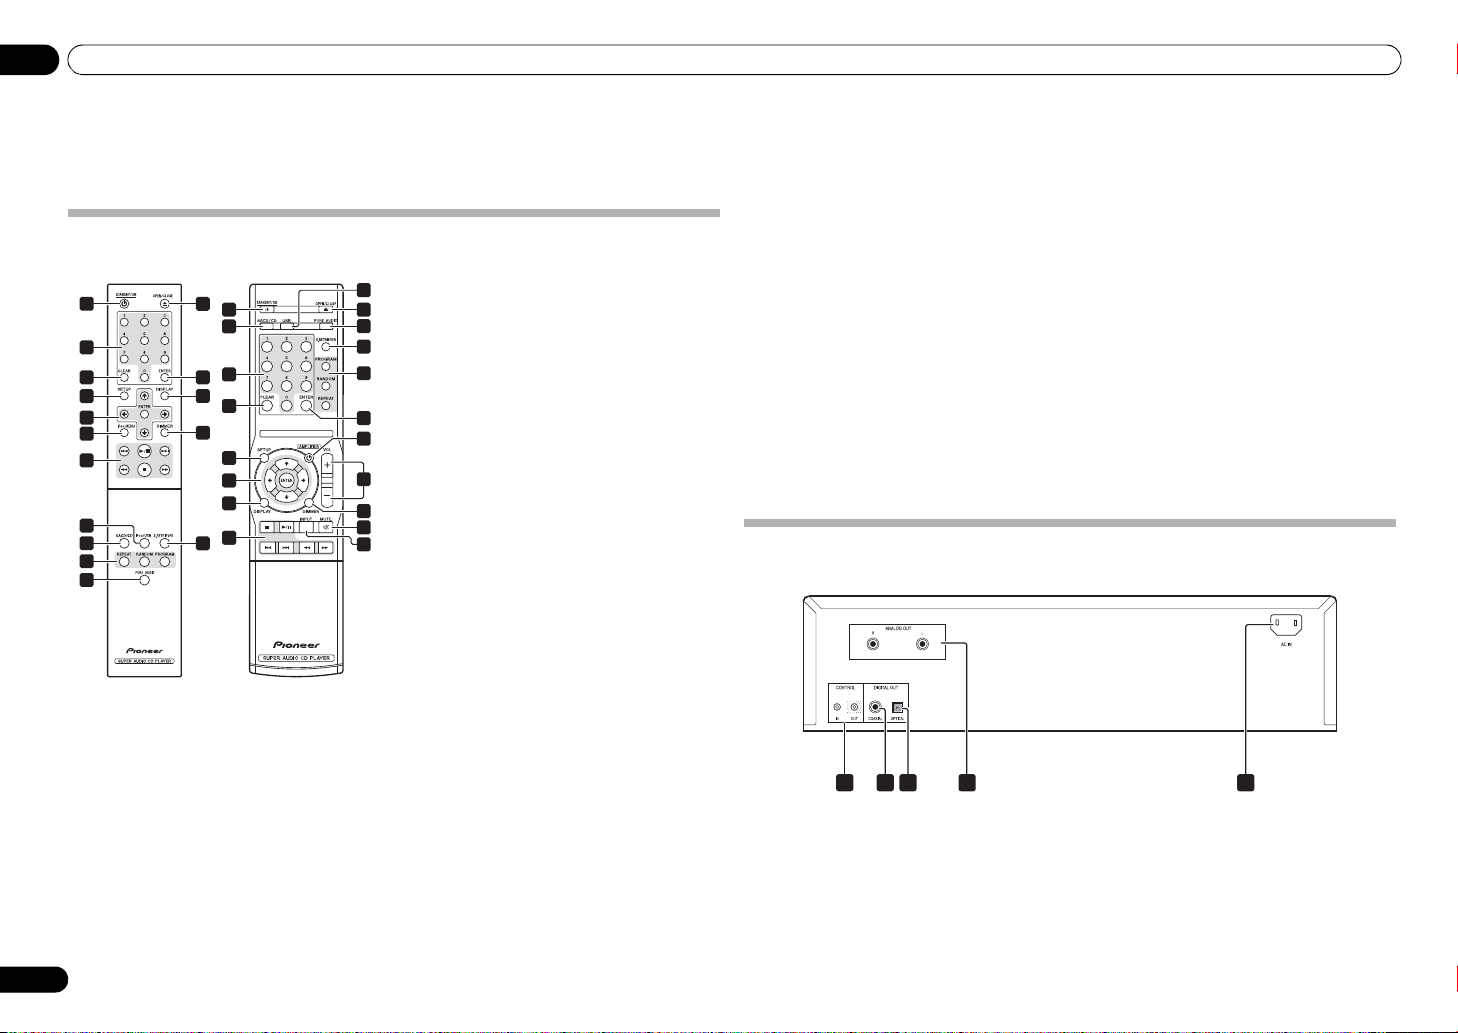
Remote control
5
///
Use these to select items, change settings and
move the cursor.
ENTER
Use this to implement the selected item or enter a
setting that you have changed.
6
iPod MENU
Use when operating the iPod/iPhone/iPad menu.
7
Press to return to the beginning of the currently
playing track. Press twice to return to the beginning
of the previous track.
Press to start playback. During playback, pause/
unpause playback.
Press during playback to skip ahead to the
beginning of the next track.
1
STANDBY/ON
Switches the amplifier between standby and on.
2 Number buttons
Use these buttons when you wish to specify a certain
track for playback. Use the number buttons to select the
track, then press ENTER to confirm the selection.
3
Press to clear the contents set for programmed playback
(page 8).
4
Use to set the auto power down function (page 11).
CLEAR
SETUP
Press to perform fast reverse on the currently
playing track. If the button is pressed again during
fast reverse, the reversing speed changes in four
steps.
Press to stop playback.
Press to perform fast forward on the currently
playing track. If the button is pressed again during
fast forward, the fast forward speed will change in
four steps.
8
iPod/USB
USB (PD-10)
Press to switch the unit’s input to iPod or USB
(page 9,10).
(PD-30 only)
(PD-30)
9
SACD/CD
Press to switch the unit’s input to SACD/CD. In the case
of hybrid SACD discs, if this button is pressed when
playback is stopped, the disc's playback area changes
(page 11).
10
REPEAT
Press to initiate repeat play (page 8).
RANDOM
Press to initiate random play (page 8).
PROGRAM
Press to initiate programmed playback (page 8).
11 PURE AUDIO
Press this button to activate the Pure Audio mode. In this
mode, audio playback is performed with greatest fidelity
to the original sounds (page 11).
12
OPEN/CLOSE
Press to open and close the disc tray (page 8).
13
ENTER
Use this to implement the selected item or enter a
setting that you have changed.
Rear panel
See page 5 for details regarding connections.
DIGITAL IN
1 2 3 54
1
CONTROL IN/OUT
DIGITAL OUT (COAXIAL)
2
3
DIGITAL OUT (OPTICAL)
jack (PD-30 only)
terminal
terminal
14
DISPLAY
Press to display various data about the disc, including
elapsed playing time and remaining playing time
(page 8).
15
DIMMER
Press to change the illumination levels for the main
unit’s front panel display and indicators (page 11).
16
S.RETRIEVER
Press to alternate between sound retriever function
settings(page 11).
17
AMPLIFIER
Press to switch the power between ON and STANDBY on
a Pioneer AV amplifier.
18
VOLUME +/–
Press these buttons to adjust the sound volume of a
Pioneer AV amplifier.
19
MUTE
Press to mute the sound on a Pioneer AV amplifier.
Press again to cancel the muting function.
20
INPUT
Press to switch the input on a Pioneer AV amplifier.
(PD-10 only)
(PD-10 only)
(PD-10 only)
(PD-10 only)
PD-30
ANALOG OUT
4
5
AC IN
jack
terminals
6
En
Page 7
Controls and displays 03
PD-30
3 5 6 7 81
9
2 4
10 12 1311
English
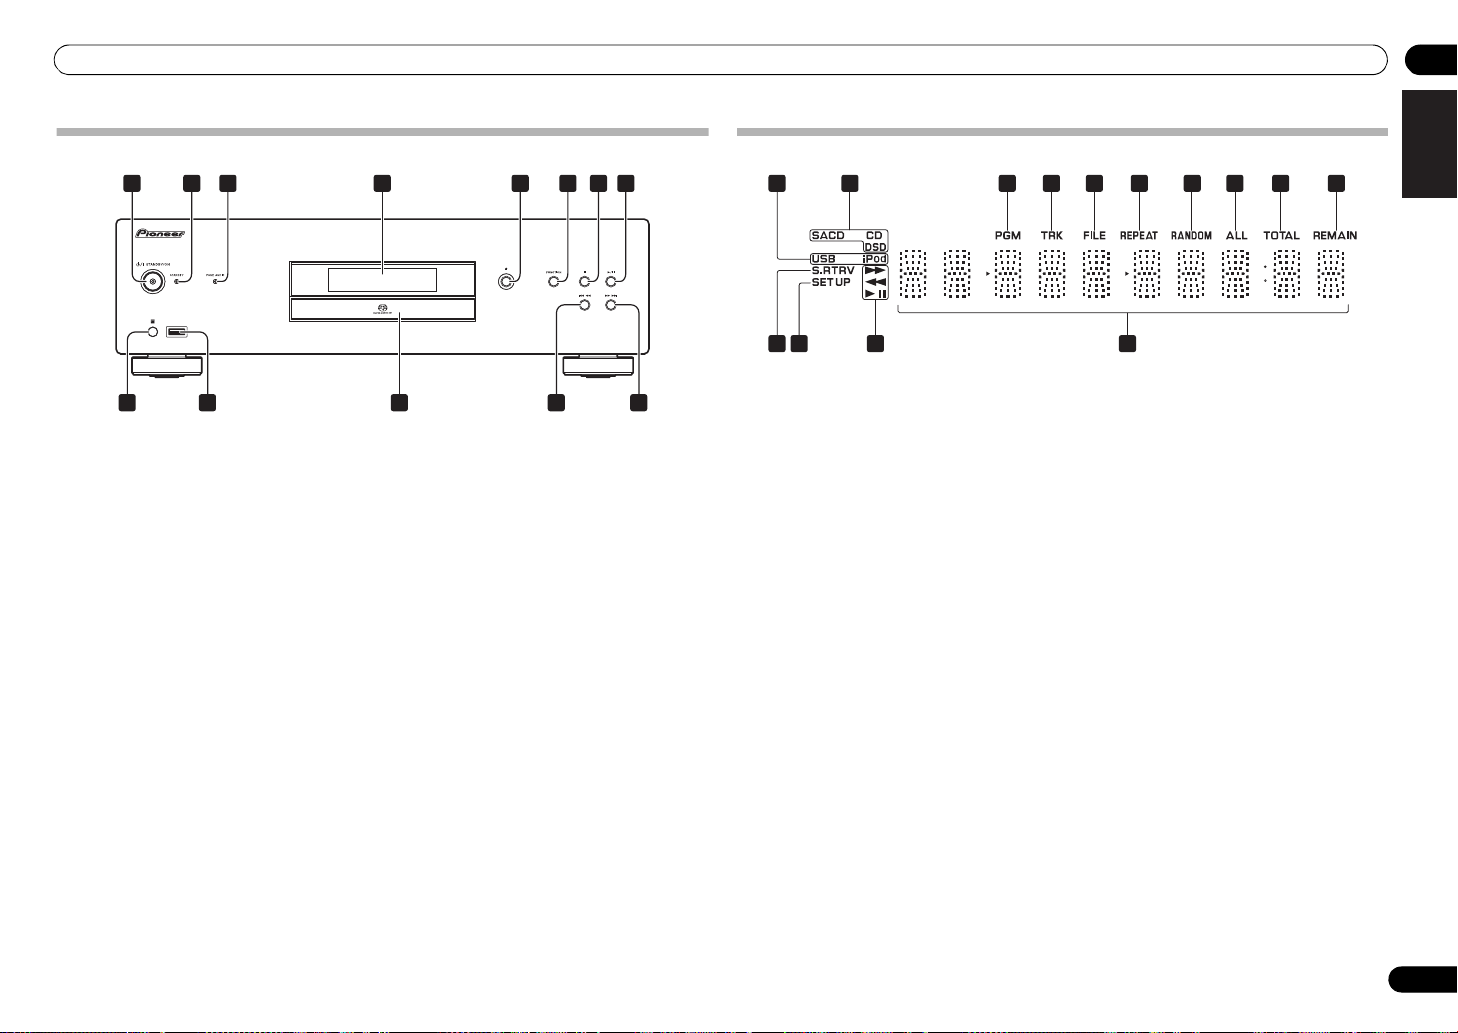
Front panel
1
/I STANDBY/ON
When power is turned on, the power indicator in the
center of the button will light.
• On the PD-30 model, this switches the amplifier
between off and on.
To turn power ON, press the button until it remains
in the depressed position.
• On the PD-10 model, this switches the amplifier
between standby and on.
2
STANDBY
Lights when power is in the STANDBY mode.
3
PURE AUDIO
Lights when Pure Audio function is ON (page 11).
4 Front panel display
(See the following description.)
5
Press to open and close the disc tray (page 8).
6
FUNCTION
Use to change the input source. The source changes as
below.
DISC iPod*
(Undisplayed).
1
*
PD-30 only
7
Press to stop playback.
indicator
indicator
1
/USB Return to the beginning
8
Press to start playback. During playback, pause/
unpause playback.
9 Remote sensor
Receives the signals from the remote control (page 4).
10
iPod/USB port
(PD-30)
USB port (PD-10)
Use to connect your Apple iPod/iPhone/iPad (page 9) or
connect a USB device (page 10).
11 Disc tray
12
Press to return to the beginning of the currently playing
track. Press twice to return to the beginning of the
previous track. When the button is held depressed, the
currently playing track will be reversed at fast speed.
• When pressed again during fast reverse, the speed
of fast reverse will change in four steps.
13
Press to advance to the beginning of the next track.
When the button is held depressed, the currently playing
track will be forwarded at fast speed.
• When pressed again during fast forward, the speed
of fast forward will change in four steps.
(page 8)
Front panel display
1 2 4 5 6
1
USB/iPod
Lights during playback of USB flash memory or iPod/
iPhone/iPad.
2
SACD/CD/DSD
The indicator lights corresponding to the currently
playing disc type.
3
PGM
Lights during programmed playback (page 8).
4
TRK
Lights when displaying the track number together with
either the elapsed playing time or remaining playing
time.
5
FILE
Lights when a file name is displayed.
6
REPEAT
Lights during repeat playback (page 8).
7
RANDOM
Lights during random playback (page 8).
8
ALL
Lights during disc-repeat playback (page 8).
9
TOTAL
Lights when the disc’s remaining playing time is
displayed.
10
REMAIN
Lights when displaying the remaining playing time for
track or disc.
11
S.RTRV
Lights when the sound retriever function is ON
(page 11).
3 7 8 9
10
1411 12 13
12
SET UP
Lights when setting the auto power-down function
(page 11).
13
Lights during fast forward.
Lights during fast reverse.
Lights during playback.
Lights during pause mode.
14 Character display
DeutschFrançais
Italiano Español Русский
Nederlands
7
En
Page 8
Playback04
single-track repeat
([REPEAT] indicator lights)
Disc repeat ([REPEAT] and [ALL] indicators light)
Repeat OFF
〜
0 9
Chapter 4:
Playback
The functions that can be used differ according to the
type of disc and file. In some cases, some of the
functions cannot be used. See Playback functions on
page 11.
Playing discs
1 Press the front panel’s
/I STANDBY/ON
power ON to the unit.
• With the PD-30, turn on the power by
pressing the POWER button in until it
remains at the depressed position.
Side view of front panel
2 Press the button to
open the disc tray and set
the disc in place.
• Set the disc with the imprinted side facing up.
3 Press the button
to begin playback.
• To pause playback, press
the button.
• To stop playback, press the button.
Note
• Steps 2 and 3 can be performed via the remote
control in the same way as for the main unit’s front
panel controls.
Set the power to Standby
Remove any disc loaded before setting the power switch
to STANDBY mode.
• Press the remote control’s
STANDBY/ON
The next time you wish to turn on the power,
press the remote control’s STANDBY/ON button.
• In the case of the PD-30, pressing the front panel
/I STANDBY/ON button sets the unit to power
OFF, not STANDBY mode. To turn on the power
again, press the front panel’s /I STANDBY/ON
button.
8
En
button to turn
button.
Note
• If the power cord is disconnected when the unit is
in the standby mode the unit will turn off, but when
the cord is then reconnected, the unit will not
automatically turn on. After reconnecting the
power cord, press the remote control’s
STANDBY/ON button to turn the power on.
Fast forward/Fast reverse
• During playback, press the
or button.
Each time the button is pressed the
forward or reverse speed is changed in four steps.
• To return to the normal play function, press the
button.
Skip function
• During playback, press the
or button.
Playback will skip ahead or backwards the
number of tracks corresponding to the times the button
is pressed.
Direct search (designate a specific track for playback)
• Using the number buttons,
input the desired track number,
then press the ENTER button to confirm the
selection.
Even if the ENTER button is not pressed,
playback will begin automatically after a 5second interval (this does not apply to
programmed playback).
0 9
〜
ENTER
Repeat playback
Repeat play can be performed for the currently playing
single track, or for all tracks on the entire disc.
• During playback, press the
REPEAT button.
REPEAT
• Repeat play will begin, and the [REPEAT] indicator
will light on the unit’s front panel display. Press the
button again to alternate the type of repeat play
between single-track repeat and disc (all-track)
repeat as follows:
トラックリピート([REPEAT]点灯)
ディスクリピート([REPEAT]、[ALL]点灯)
Note
• The repeat play function is canceled when disc
playback is stopped.
↓
↓
リピートオフ
Random playback
All tracks on the disc are selected and played in random
order, until each track has been played once.
• During playback, press the
RANDOM
Random playback starts, and the [RANDOM]
lights in the main unit's front panel display.
• Random playback continues until the disc stops, or
• The random playback function cannot be used
•If the button is pressed during random
button.
Note
until the RANDOM button is pressed once again.
simultaneously with programmed playback.
playback, play skips ahead to the next randomly
selected track. If the button is pressed,
playback returns to the beginning of the currently
playing track and starts again.
RANDOM
Programmed playback (Play tracks in a predetermined order)
This function allows you to program up to 24 tracks for
playback in the order selected.
1 From the stop mode, press the
PROGRAM
The [PGM] indicator will light in the unit’s front panel
display.
button.
2 Use the number buttons to select the
number of the desired track,
ENTER
followed by the
button.
PROGRAM
Example: To select track 15, press the 1 and 5
buttons, then press ENTER. In the event you
make a mistake, press the CLEAR button.
ENTER
3 Repeat step 2 to input the numbers of all
desired tracks.
4 Press the
Playback will begin in the order the tracks have
been programmed. If you wish to add other
tracks, repeat steps 1 and 2.
Note
•If the CLEAR button is pressed when the disc is
stopped, all programmed tracks will be cancelled.
• To clear programmed tracks, from the stop mode,
press the PROGRAM bu tto n f oll owe d b y th e CLEAR
button. The programmed tracks will be cancelled,
beginning with the last one programmed.
• A “pause” cannot be programmed.
• The contents of programmed playback (all-track
repeat) can be repeated. Just press the REPEAT
button after beginning programmed playback (see
at left).
• Single-track repeat cannot be performed during
programmed playback.
• Random playback cannot be used during
programmed playback.
•If the button is pressed during programmed
playback, play will jump ahead to begin playback of
the next programmed track.
• After playback has stopped, to begin the same
programmed playback again, press the PROGRAM
button, followed by the button.
button.
View disc data
• During playback, press the
DISPLAY
Various data, including elapsed and remaining playing
times will be displayed.
Depending on the disc, pressing the DISPLAY button
multiple times will cause the display to cycle through
different data contents.
button
Note
• Displays file name (first 8 characters) when playing
AAC files (PD-30 only), WMA/MP3 files, or files on
DSD discs. Depending on the characters used,
however, the display may not be entirely correct.
DISPLAY
Page 9
Playback 04
iPod/iPhone/iPad
iPod cable
The following operations are possible for iPod/iPhone/
iPad.
Button What it does
RANDOM
REPEAT
iPod MENU
//ENTER
1Each time you press REPEAT the repeat modes
changes as below.
Repeat 1 Repeat all Normal playback
Repeat 1: Repeats a file currently played back.
Repeat all: Repeats all files.
Starts playback. During playback, pause/
unpause playback.
Pauses playback.
Press to skip to the start of the current file,
then previous files.
Hold depressed for fast reverse.
Press to skip to the next file.
Hold depressed for fast forward.
The currently selected iPod/iPhone/iPad
files are played back in random order
(shuffle play).
The currently selected iPod/iPhone/iPad
files are played back repeatedly.
Use when operating the iPod/iPhone/iPad
menu.
Use to perform iPod/iPhone/iPad menu
operations.
1
Note
• iPod/iPhone/iPad recharging occurs whenever an
iPod/iPhone/iPad is connected to this unit.
(Recharging is enabled only when the unit’s power
is turned ON.) (does not apply when pure audio
function is ON)
• When input is switched from iPod to another
function, the iPod/iPhone/iPad’s playback will be
stopped automatically.
iPod/iPhone/iPad playback (PD-30 only)
Merely by connecting your iPod/iPhone/iPad to this unit,
you can enjoy high-quality sound from your iPod/iPhone/
iPad.
Confirm what iPod/iPhone/iPad models are supported
The iPod/iPhone/iPad playable on this unit are shown
below.
iPod/iPhone/iPad Audio Control
iPod nano 2/3/4/5/6G
iPod touch 1/2/3/4G
iPhone
iPhone 3G/3GS
iPhone 4/4S
iPad
iPad 2
• This system has been developed and tested for the
software version of iPod/iPhone/iPad indicated on
the website of Pioneer.
• Installing software versions other than indicated on
the website of Pioneer to your iPod/iPhone/iPad
may result in incompatibility with this system.
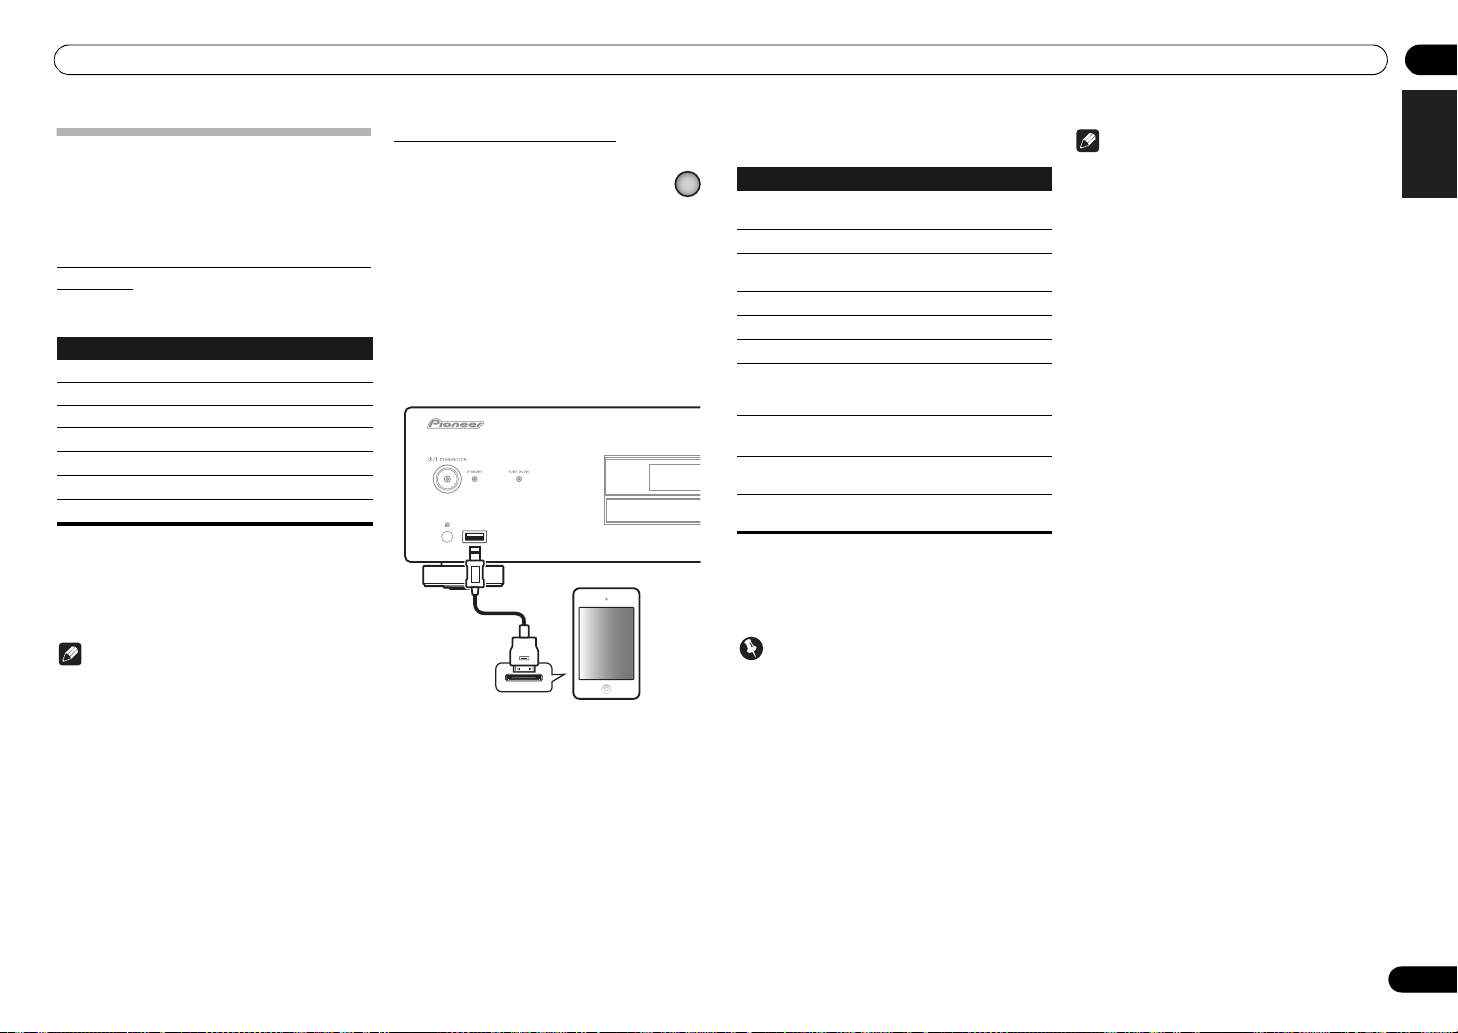
Playing your iPod/iPhone/iPad
1Press
control to select
iPod/USB
iPod
on the remote
as the input
source.
Press the remote control’s iPod/USB button.
• You can also perform the same operation by
pressing the FUNCTION on the front panel
repeatedly.
2 Connect your iPod/iPhone/iPad.
Connect your iPod/iPhone/iPad to the USB port on the
unit’s front panel. Use the iPod cable supplied with your
iPod/iPhone/iPad for the connection.
• For the cable connection, also refer to the operating
instructions for your iPod/iPhone/iPad.
iPod/USB
English
DeutschFrançais
Italiano Español Русский
Nederlands
Note
• Pioneer does not guarantee that this unit plays
iPod/iPhone/iPad models other than the ones
specified.
• Some functions may be restricted depending on
the model or software version.
• iPod/iPhone/iPad is licensed for reproduction of
non-copyrighted materials or materials the user is
legally permitted to reproduce.
• Features such as the equalizer cannot be controlled
using this system, and we recommend switching
the equalizer off before connecting.
• Pioneer cannot under any circumstances accept
responsibility for any direct or indirect loss arising
from any inconvenience or loss of recorded
material resulting from iPod/iPhone/iPad failure.
• For detailed instructions on using the iPod/iPhone/
iPad, please refer to the manual supplied with the
iPod/iPhone/iPad.
Important
If this unit cannot play your iPod/iPhone/iPad, perform
the following troubleshooting checks:
• Check whether the iPod/iPhone/iPad is supported
by this unit.
• Reconnect the iPod/iPhone/iPad to the unit. If this
doesn’t seem to work, try resetting your iPod/
iPhone/iPad.
• Check the iPod/iPhone/iPad software is supported
by this unit.
If the iPod/iPhone/iPad cannot be operated, check the
following items:
• Is the iPod/iPhone/iPad connected correctly?
Reconnect the iPod/iPhone/iPad to the unit.
• Is the iPod/iPhone/iPad experiencing a hangup? Try
resetting the iPod/iPhone/iPad, and reconnect it to
the unit.
9
En
Page 10
Playback04
USB storage device
(commercially available)
iPod/USB
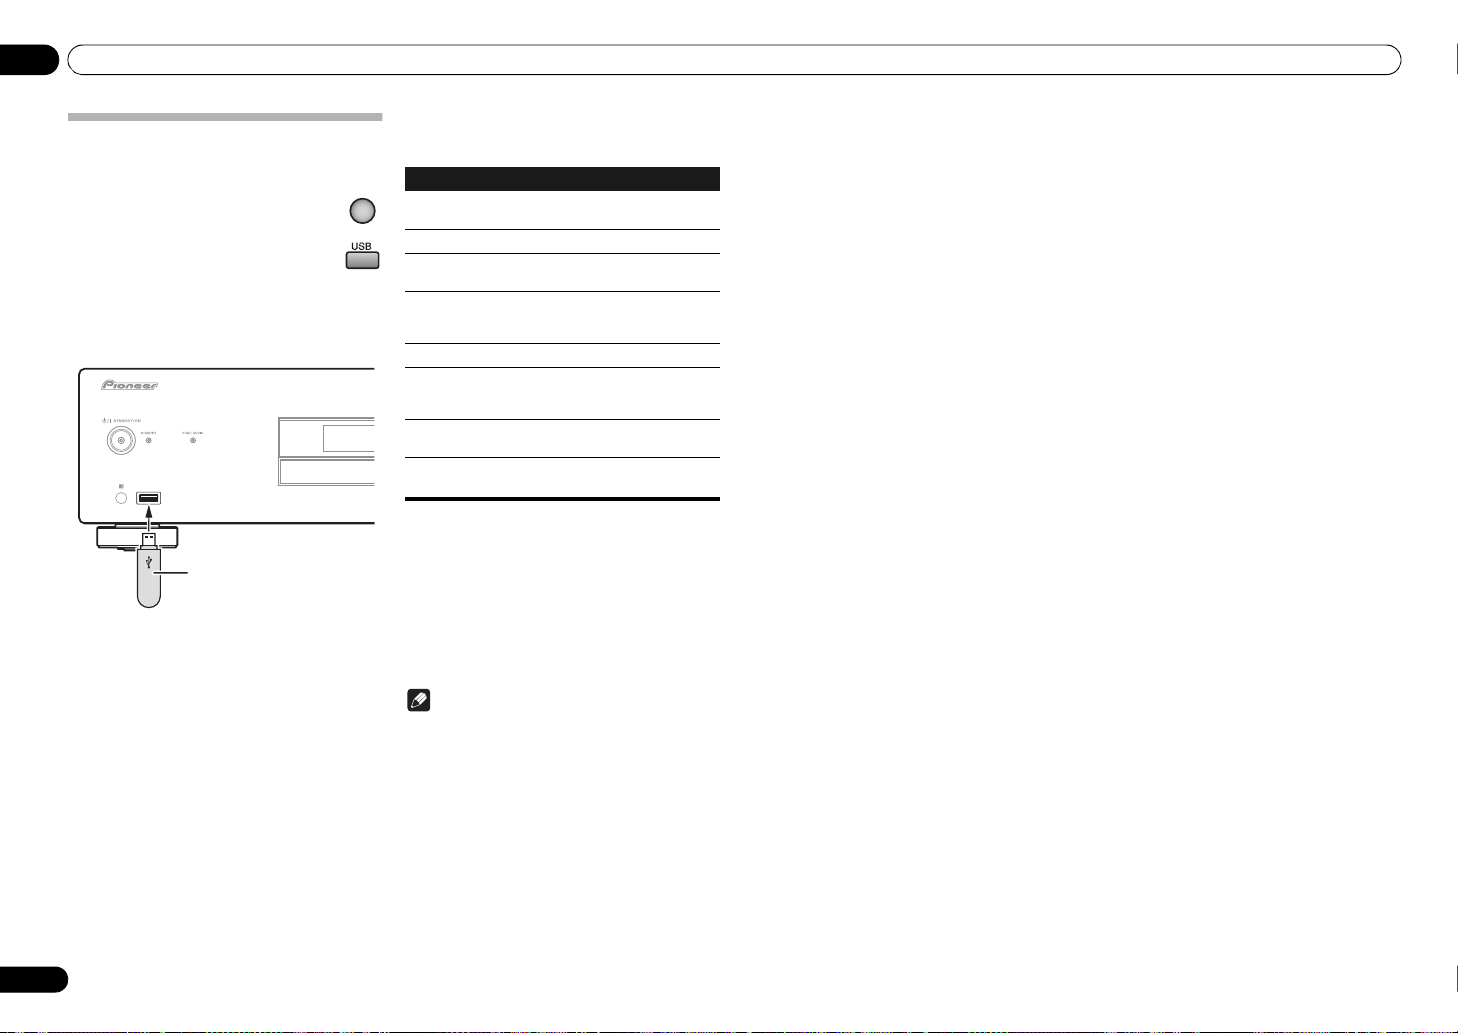
Playing files stored on USB storage devices
1 Press
to select USB as the input source.
Press the remote control’s iPod/USB button
(PD-30) or press the remote control’s
(PD-10)
2 Connect the USB storage device.
3 Press the
USB
on the remote control
USB
.
• You can also perform the same operation by
pressing the FUNCTION on the front panel
repeatedly.
• To pause playback, press the button.
• To stop playback, press the button.
button to begin playback.
button
You can perform the following operations. Note that
some buttons are not available for operation depending
on the category currently being played back.
Button What it does
RANDOM
REPEAT
1Each time you press REPEAT the repeat modes
changes as below.
Repeat 1
Repeat 1: Repeats a file currently played back.
Repeat all: Repeats all files.
When the auto power down function is set to ON, and
input is set for USB memory playback, if playback from
the USB memory device stops for 30 minutes without
other operation being performed, the power will
automatically switch to standby.
Note
• This unit may not recognize the USB storage
device, play files or supply power to the USB
storage device. For details, see Additional
information on page 12.
• Pioneer does not guarantee that any file recorded
on a USB storage device will play or that power will
be supplied to a USB storage device. Also note that
Pioneer will accept no responsibility whatsoever for
loss of files on USB storage devices caused by
connection to this unit.
• This unit does not support use of a USB hub.
Starts playback. During playback, pause/
unpause playback.
Stops playback.
Press to skip to the start of the current file,
then previous files.
Press for fast reverse. Each time button is
pressed, reverse speed changes in four
steps.
Press to skip to the next file.
Press for fast forward. Each time button is
pressed, forward speed changes in four
steps.
The currently selected files are played back
in random order (shuffle play).
The currently selected files are played
1
repeatedly.
Repeat all Normal playback
10
En
Page 11
Using advanced functions 05
S.RETRIEVER
SACD/CD
DIMMER
Chapter 5:
Playback functions
Using advanced functions
The functions that can be used differ according to the
type of disc and file. In some cases, some of the
functions cannot be used. See Playback functions on the
right column.
Playing with high-fidelity sound
Sound Retriever
When compressed sound signals are decompressed for
playback, some parts experience dropouts. By setting
the sound retriever function to ON, compensation is
added for those losses, thus producing richer, more
sumptuous sound.
• Press the S.RETRIEVER button.
Each time the button is pressed, the function
will change as follows: S.RTRV: OFF S.RTRV: LOW
S.RTRV: HI Returns to original status
• The sound retriever function is disabled when the
pure audio function is ON.
Pure Audio
This function disables digital audio output and plays
analog audio with high fidelity. When set to ON, the
display shows no indicators. The factory default
condition is OFF.
• Press the PURE AUDIO button.
Press again to turn the function OFF.
• When this function is set to ON and the main unit’s
input is switched to SACD/CD, the PURE AUDIO
indicator will light on the front panel. During disc
playback, the front panel display turns OFF.
• When the PURE AUDIO indicator is lighted, any
iPod/iPhone/iPad connected to the main unit will
not be recharged.
PURE AUDIO
Changing the playback area (layer) of an SACD/CD
Hybrid SACD discs are composed of two layers, an
SACD layer, and CD layer, allowing you to select which
layer you wish to play.
1 Press the
Input changes to SACD/CD.
SACD/CD
button.
2 In the stop mode, press the SACD/CD
button.
Each time the button is pressed, the playback alternates
between the CD area and SACD 2 channel area.
Note
• This unit does not support SACD multi-channel
areas.
Adjusting overall display illumination
This unit is equipped with a dimmer function to allow the
display illumination to be adjusted in three levels,
responding to differing levels of ambient lighting. The
factory default is the brightest setting.
• Press the
Each time the button is pressed it the brightness
cycles through the three levels.
• The dimmer setting cannot be changed when a
disc is playing with the pure audio function ON (see
at left).
• The brightness of the STANDBY indicator does not
change.
DIMMER
button.
Auto power down (automatically sets power to standby)
This function automatically switches the unit to standby
mode if no signal or switch operation is detected for 30
minutes.
1 Press the
2 Change the setting and confirm.
Use the / button to set the function ON
or OFF as desired, then press the ENTER
button to confirm.
Note
• This function is disabled when iPod input is
selected.
SET UP
button.
SET UP
ENTER
The functions that can be used differ according to the type of disc and file. In some cases, some of the functions
cannot be used. Check the usable functions on the table below.
Disc/file type
1
Function
Fast forward/Fast reverse
Skip function
Direct search
(designate a specific track for playback)
Repeat playback
Random playback
Programmed playback
(Play tracks in a predetermined order)
View disc data
Sound Retriever
Pure Audio
SACD/CD
1 Some functions may not work for some discs or files, even if indicated [] on the table.
2 Also see Playback of CD-R/CD-RW discs on page 12.
3 • AAC files can be played back only on the PD-30.
• Also see Playable file formats on page 12.
4 Also see Playing DSD discs on page 12.
5 This function is enabled only during playback of files recorded on disc.
6 Hybrid SACD discs only.
SACD CD-DA
––
––
–– –
CD-R/-RW
6
–––
WMA
2
MP3
3
AAC
5
DSD
4
English
DeutschFrançais
Italiano Español Русский
Nederlands
11
En
Page 12
Additional information06
Chapter 6:
Additional information
• A single folder can hold a maximum of 150 files.
Playable disc
Playback of CD-R/CD-RW discs
• This unit can play CD-R/CD-RW discs recorded with
CD music format, or audio data in WMA and MP3
format. However, some discs may not be playable,
or may generate noise or distorted sound.
• This unit is for playback only. It cannot record data
on CD-R/CD-RW discs.
• CD-R/CD-RW discs which have not be finalized
cannot be played on this unit. For details, consult
the operating instructions for your disc recorder.
Playing DSD discs
This unit can play DSD disc files recorded in the DSF file
format.
Playable files
• Recorded discs: DVD-R/-RW
• File Extension: .dsf
• Folder name: DSD_DISC
• Capacity: maximum 4 GB per file
• Audio: 2-channel
• Sampling frequency: 2.8224 MHz
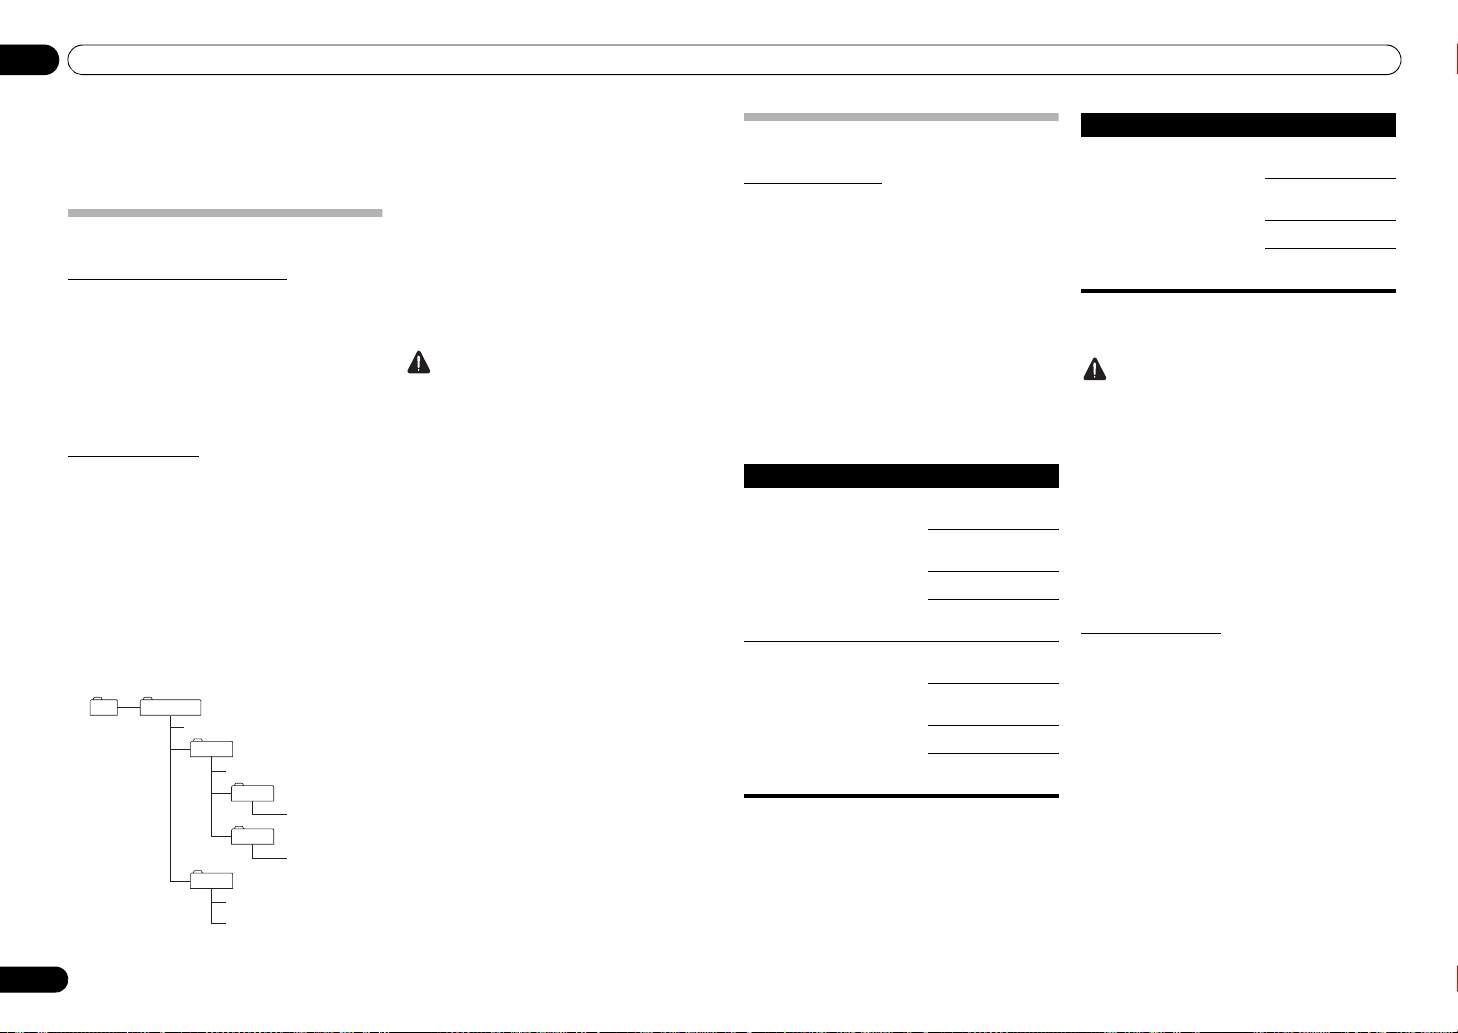
Example of folder composition
The order of file/folder playback is not alphabetical, but
depends on the order in which they were recorded to the
disc.
Root DSD_DISC
File01.dsf
FolderA
File02.dsf
FolderB
File03.dsf
FolderC
File04.dsf
FolderD
File05.dsf
File06.dsf
• A single disc can hold a maximum of 200 folders.
• Each folder should have no more than 8 levels.
• File names using Japanese language fonts and
certain other symbol fonts may not be displayed
correctly.
• Any files other than those of DSF format will be
ignored.
Caution
• Some files may not be playable.
• Discs holding large numbers of files and folders
may require substantial time to begin playback. In
this case, you can move the desired files directly to
the DSD_DISC folder, or limit the number of files to
20 or less.
Operations during playback
The following operations cannot be performed during
playback of a DSD disc:
•Direct search
• Playback of disc files other than DSF type
Display
When the unit is in the stop mode when playing a DSD
disc, the unit will display the indicator [DSD DISC].
During playback, pressing the DISPLAY button will
cause the display to cycle through the following
information each time the button is pressed:
• Number of the track and its elapsed playing time
• Name of file
Playable file formats
Playing audio files
This unit supports the following file formats.
• Note that some file formats are not available for
playback although they are listed as playable file
formats.
• If an attempt is made to play files with unsupported
formats, the sound may be intermittent or be
accompanied by noise. In such cases, confirm that
the file format is compatible with this unit.
• Music files subjected to Digital Rights
Management controls cannot be played. DRM
(Digital Rights Management) copy protection is a
technology designed to protect copyrights. To
prevent illegal copying DRM restricts playback to
the disc recorder or computer originally used to
record the music. For details, consult the operating
instructions and help files for the device or
application used during the original recording.
Category
MP3
WMA .wma
Extension
1
.mp3
Stream
MPEG-1/2
Audio
Layer-3
WMA2/7/
8/9
Sampling
frequency
Quantizat
ion bitrate
Channel 2 ch
Bitrate 8 kbps to
Sampling
frequency
Quantizat
ion bitrate
Channel 2 ch
Bitrate 32 kbps to
8kHz to
48 kHz
16 bit
320 kbps
22.05 kHz to
48 kHz
16 bit
192 kbps
Category
Extension
2
.m4a
AAC
1. “MPEG Layer-3 audio decoding technology licensed from
Fraunhofer IIS and Thomson multimedia.”
2.
PD-30 only.
Caution
• It may not be possible to play all CD-R/CD-RW discs
recorded on a CD recorder or computer, due to
characteristics of the disc, disc scratches or
soiling, or soiling or condensation on the player’s
laser lens.
• Discs recorded on a computer may not be playable
on this unit due to application settings or computer
environment. Be sure to record your discs using the
proper format (for details consult the marketer of
your application).
• Discs recorded in packet write format cannot be
played on this unit.
• CD-R/CD-RW discs that have not be finalized
cannot be played on this unit.
Stream
MPEG-4
AAC LC
MPEG-4
HE AAC
(AAC Plus
v1/2)
Sampling
8kHz to
frequency
48 kHz
Quantizat
16 bit
ion bitrate
Channel 2 ch
Bitrate 8 kbps to
320 kbps
WMA file playback
• Please use discs recorded to compatibility with CDROM file systems (ISO9660 level 1 and 2), and those
compatible with extended format (Joliet, Romeo).
• This unit does not support discs recorded with
Variable Bit Rate (VBR) or lossless encoding.
• This unit does not support multi-session discs.
• A total maximum of 648 folders and tracks can be
recognized and played. Of that number, a
maximum of 299 may be folders. However,
depending on the folder composition, not all folders
and tracks can be recognized and played.
• When using WMA files, be sure they have been
encoded using applications verified and recognized
by Microsoft Corporation. If unrecognized
applications are used, improper operation may
result.
12
En
Page 13

Additional information 06
MP3 file playback
• Please use discs recorded to compatibility with CDROM file systems (ISO9660 level 1 and 2), and those
compatible with extended format (Joliet, Romeo).
• This unit does not support Variable Bit Rate (VBR);
(even if files are playable, the times shown in the
front panel display will be incorrect due to the
change in bitrate, thus changing faster or slower
than the correct time values.)
• This unit does not support multi-session discs.
• A total maximum of 648 folders and tracks can be
recognized and played. Of that number, a
maximum of 299 may be folders. However,
depending on the folder composition, not all folders
and tracks can be recognized and played.
• For optimum sound quality, bit rates of 128 kbps or
higher are recommended for recordings.
MPEG-4 AAC file playback
• AAC is an acronym for “Advanced Audio Coding,”
the basic format for audio compression technology
used in MPEG-2 and MPEG-4.
• This unit supports the playback of AAC files with
the extension “.m4a,” as encoded by iTunes®.
However, playback may not be possible in the case
of files copy protected by DRM, and depending on
the iTunes encoding version.
• iTunes is a trademark of Apple Inc., registered in
the U.S. and other countries.
Cautions on use
Moving the player
When moving this unit to a new location, always perform
the following procedure first: Remove any disc loaded
and close the disc tray. Press the unit’s /I STANDBY/
ON button so that the [-OFF-] appears in the front panel
display, then wait ten seconds before disconnecting the
power cord. Damage or malfunctions may result if the
unit is moved with a disc loaded in the tray.
Place of installation
Select a stable place near the TV and AV system to which
the unit is connected.
Do not place the player on top of a TV or color monitor.
Keep it away from cassette decks or other components
easily affected by magnetism.
Avoid the following types of places:
• Places exposed to direct sunlight
• Humid or poorly ventilated places
• Extremely hot or cold places
• Places subject to vibration
• Places in which there is much dust or cigarette
smoke
• Places exposed to soot, steam or heat (in kitchens,
etc.)
Do not mount the unit on a sofa or other object or
material with absorbent qualities, since sound quality
may be adversely affected.
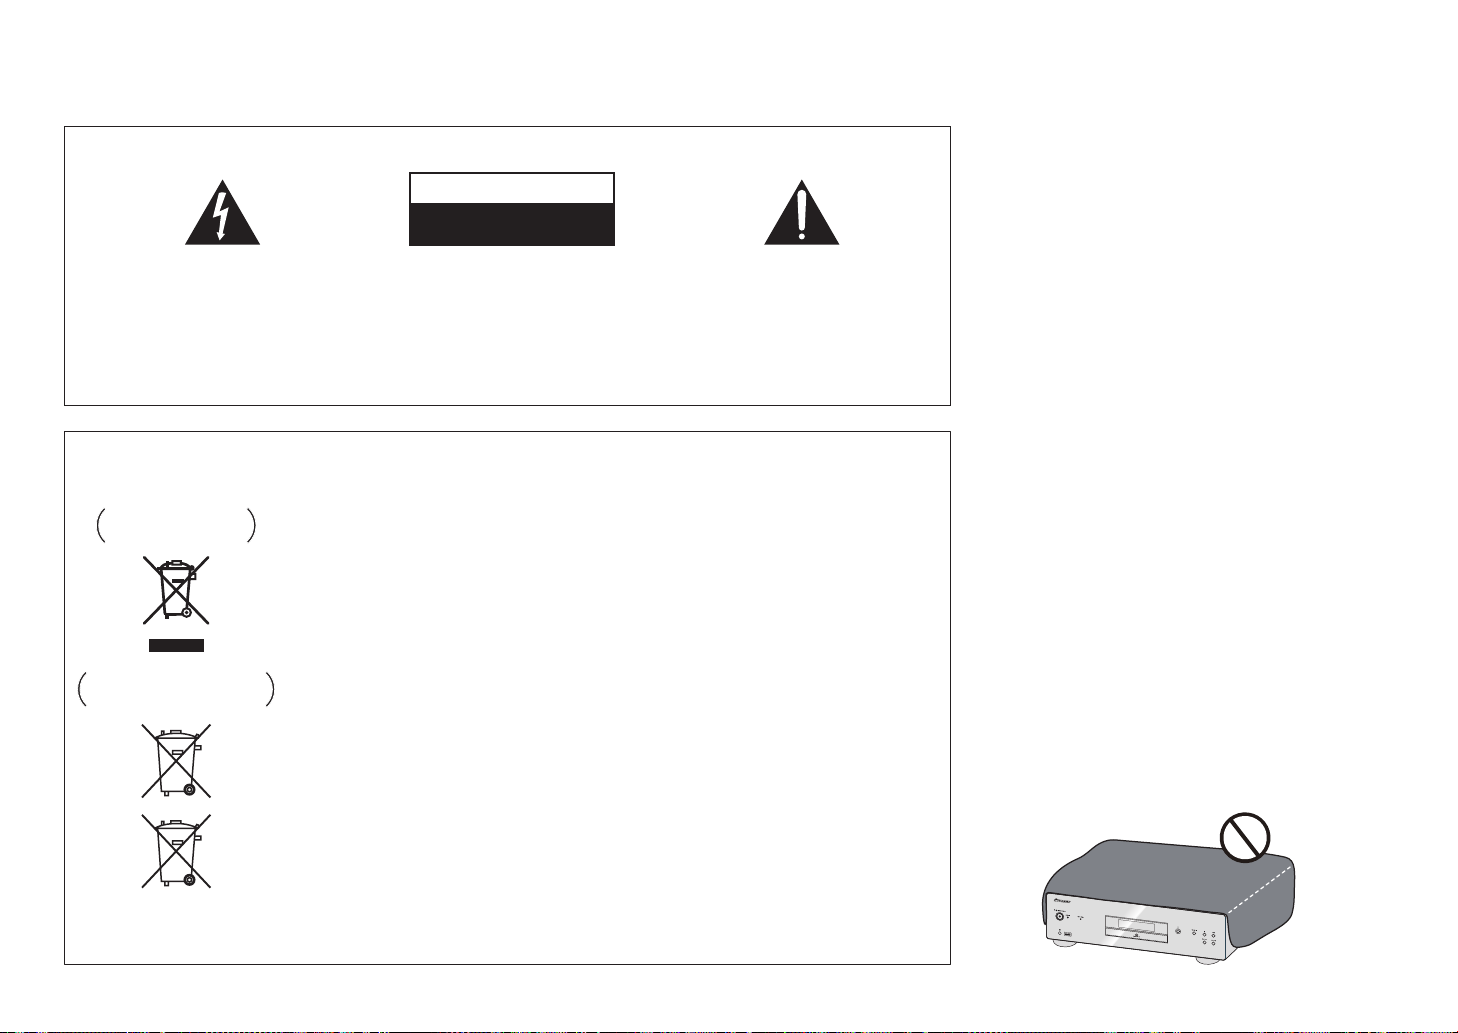
Do not place objects on top
Do not place objects on top of the player.
Keep away from heat
Do not place the player on top of an amplifier or other
device generating heat. When installing in a rack, to
avoid the heat generated by the amplifier and other
devices, place it on a shelf below the amplifier whenever
possible.
Turn the power off when not using the player
Depending on the conditions of the TV broadcast
signals, striped patterns may appear on the screen when
the TV is turned on while the player’s power is turned on.
This is not a malfunction with the player or TV. If this
happens, turn the player’s power off. In the same way,
noise may be heard in the sound of a radio.
Condensation
If the player is moved suddenly from a cold place into a
warm room (in winter, for example) or if the temperature
in the room in which the player is installed rises
suddenly due to a heater, etc., water droplets
(condensation) may form inside (on operating parts and
the lens). When condensation is present, the player will
not operate properly and playback is not possible. Let the
player stand at room temperature for 1 or 2 hours with
the power turned on (the time depends on the extent of
condensation). The water droplets will dissipate and
playback will become possible.
Condensation can also occur in the summer if the player
is exposed to the direct wind from an air-conditioner. If
this happens, move the player to a different place.
Cleaning the player
Normally, wipe the player with a soft cloth. For tough dirt,
apply some neutral detergent diluted in 5 to 6 parts water
to a soft cloth, wring out thoroughly, wipe off the dirt,
then wipe again with a dry cloth.
Note that getting alcohol, thinner, benzene or
insecticide on the player could cause the print and
coating to peel off. Also, avoid leaving rubber or vinyl
products in contact with the player for long periods of
time, as this could damage the cabinet.
When using chemical-impregnated wipes, etc., read the
wipe’s cautions carefully.
Unplug the power cord from the power outlet when
cleaning the player.
Caution for when the unit is installed in a rack with a glass door
Do not press the OPEN/CLOSE on the remote control
to open the disc tray while the glass door is closed. The
door will hamper the movement of the disc tray, and the
unit could be damaged.
Cleaning the pickup lens
The player’s lens should not become dirty in normal use,
but if for some reason it should malfunction due to dust
or dirt, consult your nearest Pioneer authorized service
center. Although lens cleaners for players are
commercially available, we advise against using them
since some may damage the lens.
Handling discs
Do not use damaged (cracked or warped) discs.
Do not scratch the disc’s signal surface or let it get dirty.
Do not load more than one disc into the player at a time.
Do not glue paper or put stickers onto the disc, or use a
pencil, ball-point pen or other sharp-tipped writing
instrument. These could all damage the disc.
Storing discs
Always store discs in their cases, and place the cases
vertically, avoiding places exposed to high temperatures
or humidity, direct sunlight or extremely low
temperatures.
Be sure to read the cautions included with the disc.
Cleaning discs
It may not be possible to play the disc if there are
fingerprints or dust on it. In this case, using a cleaning
cloth, etc., to wipe the disc gently from the center toward
the outer edge. Do not use a dirty cleaning cloth.
Do not use benzene, thinner or other volatile chemicals.
Also do not use record spray or antistatic agents.
For tough dirt, apply some water to a soft cloth, wring out
thoroughly, wipe off the dirt, then wipe off the moisture
with a dry cloth.
Specially shaped discs
Specially shaped discs (heart-shaped, hexagonal, etc.)
cannot be used on this player. Never use such discs, as
they will damage the player.
Condensation on discs
If the disc is moved suddenly from a cold place into a
warm room (in winter, for example), water droplets
(condensation) may form on the disc surface. Discs will
not play properly if there is condensation on them.
Carefully wipe off the water droplets from the disc
surface before using the disc.
English
DeutschFrançais
Italiano Español Русский
Nederlands
13
En
Page 14

Additional information06
Troubleshooting
Incorrect operations are often mistaken for trouble and malfunctions. If you think that there is something wrong with
this component, check the points below. Sometimes the trouble may lie in another component. Investigate the other
components and electrical appliances being used. If the trouble cannot be rectified even after exercising the checks
listed below, ask your nearest Pioneer authorized service center or your dealer to carry out repair work.
• If the unit does not operate normally due to external effects such as static electricity disconnect the power plug
from the outlet and insert again to return to normal operating conditions.
Problem Remedy
The disc won’t play or is automat ically
ejected after loading.
Cannot play CD-R/-RW discs. • Some CD-R/-RW discs recorded on a computer cannot be played.
Cannot play file s in WMA/MP3 or AAC
format (PD-30 only).
Cannot operate the remote
control.
Settings are erased. • If the power cord is forcibly disconnected or a power failure occurs while the unit’s
No audio, or audio is distorted. • Check that all interconnects are firmly inserted (page 5).
Noticeable difference in SACD and
CD volume.
Between tracks of an SACD disc, the
main unit's display indicates [--:--].
• Make sure the disc is loaded with the label side face-up and aligned properly in the
disc tray guide (page 8).
• Make sure the disc is free from dirt and dust and is not damaged (page 13).
• Condensation inside the player: Allow time for condensation to evaporate. Avoid
using the player near an air-conditioning uni t (page 13).
• The disc tray will open if an unsupported disc type is loaded (page 4).
• The following types of files cannot be played:
- Files with DRM copy protection
- Recorded discs not in compliance with ISO9660 format
- Files not recorded with sampling frequency of 44.1 kHz
- WMA files recorded with variable bit rate (VBR) or lossless encoding.
• Replace the battery (page 4).
• Operate within 7 m, 30° of the remote sensor on the front panel (page 4).
• Remove the obstacle or operate from another position.
• Avoid exposing the remote sensor on the front panel to direct light.
• Is the control cord for one component connected improperly? Confirm correct
connections (page 5).
power is ON, previously entered settings may be deleted. To disconnect the power
cord, first press the remote control's
[-OFF-] goes out in the front panel display; only then disconnect the cord. Particular
care should be taken when the unit's power cord is connected to an outlet on another
component, since turning off the power to the other component may simultaneously
disconnect power to this unit. Whenever possible, connect this unit's power cord
directly to a wall outlet.
• Check that the plugs and terminals are free of dirt, oxide, etc. and clean if necessary.
Also check the cable for damage.
• Check that the disc is not damaged, and free f rom dust and dirt.
• Is the unit set to “pause”? Press the button.
• Check your amplifier/receiver’s settings (volume, input function, speaker settings,
etc.).
• Make sure the player’s output is not connected to the amplifier’s phono (turntable)
inputs.
• This is due to differences in the audio format and is not a malfunction.
• This display may occur depending on the disc.
STANDBY/ON
button, then wait until the
Problem Remedy
The analog audio is OK, but there
appears to be no digital audio signal.
USB storage device is not recognized. • Connect the device securely (all the way in) (page 10).
A USB storage device is connected
and displayed, but the audio files
stored on the USB storage device
cannot be played back.
Much time is required to recognized
the USB storage device.
Power is not supplied to the USB
storage device.
Music files are played back even
though they’re not recorded in the
USB storage device.
Cannot operate the iPod/iPhone/iPad. • Make sure the iPod/iPhone/iPad is connected correctly (refer to
Power is not supplied to the iPod/
iPhone/iPad.
Sound not produced from iPod/
iPhone/iPad.
• Make sure that Pure Audio feature is switched off (page 11).
• Audio from SACD and DSD discs, as well as iPod cannot be output in digital form.
Use the
ANALOG OUT
• This unit does not support USB hubs. Connect the USB storage device directly.
• Some USB storage devices may not be recognized properly. Turn the power off then
back on.
• This unit only supports USB mass storage class devices.
• Only the FAT16 and FAT32 file systems are supported. Other file systems (ex. FAT,
NTFS, etc.) are not supported.
• This device does not support the use of external hard disc drives.
• Copyrighted audio files stored on a USB storage device cannot be played back.
Attempting to import music data from a CD, etc., to a computer may cause the
invocation of copy protection, depending on the setti ngs.
• See the list of file formats that can be played back on this unit.
• Some time may be required to load the data when large capacity USB storage
devices are connected (this could take several minutes).
• When the pure audio function is set to ON, power is not supplied to
(page 11).
• Does an error message appear in the front panel display? (page 7)
- Turn the power off then back on (page 8).
- Turn the power off, then disconnect and reconnect the USB storage device
(page 10).
- Press
FUNCTION
(When the input is switched back to USB) (page 7).
• Confirm whether any hidden files are recorded on the device. Hidden files will be
played.
playback (PD-30 only)
reconnecting it.
• Confirm that the connected iPod/iPhone/iPad is a model supported by this unit
(page 9).
• If the iPod/iPhone/iPad is experiencing a hangup, tr y resetting the iPod/iPhone/iPad,
and reconnect it to the unit.
• When the pure audio function is set to ON, power is not supplied to
(page 9).
• Does an error message appear in the front panel display? Turn the power off, then
disconnect and reconnect the iPod/iPhone/iPad.
• Is sound being produced from the speaker of the iPod/iPhone/iPad? Disconnect
power to the unit, then turn on again. After setting for iPod input, connect the iPod/
iPhone/iPad.
• Audio is not output from the
terminals for such media (page 5).
to switch to the other mode, then switch again to the USB mode.
on page 9). Also, try disconnecting the iPod/iPhone/iPad then
DIGITAL OUT
terminals.
USB
ports
iPod/iPhone/iPad
USB
ports
14
En
Page 15

Additional information 06
English
Specifications
General
System. . . . . . . . . . . . . . . . . . . . . .Super Audio CD player
Power requirements. . . .AC 220 V to 240 V , 50 Hz/60 Hz
Power consumption
PD-30 . . . . . . . . . . . . . . . . . . . . . . . . . . . . . . . . . . .37 W
PD-10 . . . . . . . . . . . . . . . . . . . . . . . . . . . . . . . . . . .20 W
Power consumption (standby) . . . . . . . . . . . . . . . 0.45 W
Weight
PD-30 . . . . . . . . . . . . . . . . . . . . . . . . . . . . . . . . . . 5.6 kg
PD-10 . . . . . . . . . . . . . . . . . . . . . . . . . . . . . . . . . . 5.2 kg
Dimensions
. . . . . . . . . . . . .435 mm (W) x 128 mm (H) x 329 mm (D)
Operating temperature . . . . . . . . . . . . . +5 °C to +35 °C
Operating humidity . . . . . . . . . . . . . . . . . . . . 5 % to 85 %
Audio output (1 stereo pair)
Output level. . . . . . . . . . . . . . . . . . . . During audio output
Number of channels . . . . . . . . . . . . . . . . . . . . . . . . . . . . 2
Jacks . . . . . . . . . . . . . . . . . . . . . . . . . . . . . . . . . . . . . . RCA
Digital audio characteristics
Frequency response
CD. . . . . . . . . . . . . . . . . . . . . . . . . . . . . . 2 Hz to 20 kHz
SACD . . . . . . . . . . . . . . . . . . . . . . . . . . . 2 Hz to 50 kHz
S/N ratio
CD. . . . . . . . . . . . . . . . . . . . . . . . . . . . . . . . . . . . 117 dB
SACD . . . . . . . . . . . . . . . . . . . . . . . . . . . . . . . . . 117 dB
Dynamic range
CD. . . . . . . . . . . . . . . . . . . . . . . . . . . . . . . . . . . . 100 dB
SACD . . . . . . . . . . . . . . . . . . . . . . . . . . . . . . . . . 108 dB
Total harmonic distortion:
CD. . . . . . . . . . . . . . . . . . . . . . . . . . . . . . . . . . .0.0022 %
SACD . . . . . . . . . . . . . . . . . . . . . . . . . . . . . . . .0.0020 %
Wow and flutter . . . . . . . . . . . . . . Limit of measurement
(±0.001 % W. PEAK) or lower
Digital output
Optical digital output . . . . . . . . . .Optical digital terminal
Coaxial digital output . . . . . . . . . . . . . . . . . .RCA terminal
Accessories
RCA audio cable (red/white plugs) . . . . . . . . . . . . . . . . . 1
Remote control. . . . . . . . . . . . . . . . . . . . . . . . . . . . . . . . . 1
AAA/IEC R03 dry cell batteries . . . . . . . . . . . . . . . . . . . . 2
Power cord
Warranty card (European model only)
Operating Instructions (This document)
(no condensation)
200 mVrms (1 kHz, –20 dB)
Note
• Specifications and the design are subject to
possible modifications without notice, due to
improvements.
• Corporation and product names mentioned herein
are trademarks or registered trademarks of the
respective corporations.
DeutschFrançais
Italiano Español Русский
Nederlands
© 2012 PIONEER CORPORATION.
All rights reserved.
15
En
Page 16
Nous vous remercions pour cet achat d’un produit Pioneer.
Nous vous demandons de lire soigneusement ce mode d’emploi ; vous serez ainsi à même de faire fonctionner l’appareil correctement. Après avoir bien lu le
mode d’emploi, le ranger dans un endroit sûr pour pouvoir s’y référer ultérieurement.
IMPORTANT
IMPORTANT
Ce symbole de l’éclair, placé dans un
triangle équilatéral, a pour but d’attirer
Ce symbole de l’éclair, placé dans un
l’attention de l’utilisateur sur la présence, à
triangle équilatéral, a pour but d’attirer
l’intérieur du coffret de l’appareil, de
l’attention de l’utilisateur sur la présence, à
“tensions dangereuses” non isolées d’une
l’intérieur du coffret de l’appareil, de
grandeur suffisante pour représenter un
“tensions dangereuses” non isolées d’une
risque d’électrocution pour les êtres
grandeur suffisante pour représenter un
humains.
risque d’électrocution pour les êtres
humains.
Information à destination des utilisateurs sur la collecte et l’élimination des
Information à destination des utilisateurs sur la collecte et l’élimination des
équipements et batteries usagés
équipements et batteries usagés
Marquage pour les
équipements
Marquage pour les
équipements
Exemples de marquage
pour les batteries
Exemples de marquage
pour les batteries
Pb
Pb
Ces symboles qui figurent sur les produits, les emballages et/ou les documents
d’accompagnement signifient que les équipements électriques et électroniques et
Ces symboles qui figurent sur les produits, les emballages et/ou les documents
batteries usagés ne doivent pas être jetés avec les déchets ménagers et font l’objet
d’accompagnement signifient que les équipements électriques et électroniques et
d’une collecte sélective.
batteries usagés ne doivent pas être jetés avec les déchets ménagers et font l’objet
d’une collecte sélective.
Pour assurer l’enlèvement et le traitement appropriés des produits et batteries
usagés, merci de les retourner dans les points de collecte sélective habilités
Pour assurer l’enlèvement et le traitement appropriés des produits et batteries
conformément à la législation locale en vigueur.
usagés, merci de les retourner dans les points de collecte sélective habilités
conformément à la législation locale en vigueur.
En respectant les circuits de collecte sélective mis en place pour ces produits, vous
contribuerez à économiser des ressources précieuses et à prévenir les impacts
En respectant les circuits de collecte sélective mis en place pour ces produits, vous
négatifs éventuels sur la santé humaine et l’environnement qui pourraient résulter
contribuerez à économiser des ressources précieuses et à prévenir les impacts
d’une mauvaise gestion des déchets.
négatifs éventuels sur la santé humaine et l’environnement qui pourraient résulter
d’une mauvaise gestion des déchets.
Pour plus d’information sur la collecte et le traitement des produits et batteries
usagés, veuillez contacter votre municipalité, votre service de gestion des déchets
Pour plus d’information sur la collecte et le traitement des produits et batteries
ou le point de vente chez qui vous avez acheté ces produits.
usagés, veuillez contacter votre municipalité, votre service de gestion des déchets
ou le point de vente chez qui vous avez acheté ces produits.
Ces symboles ne sont valables que dans les pays de l’Union Européenne.
Ces symboles ne sont valables que dans les pays de l’Union Européenne.
Pour les pays n’appartenant pas à l’Union Européenne :
Pour les pays n’appartenant pas à l’Union Européenne :
Si vous souhaitez jeter ces articles, veuillez contacter les autorités ou revendeurs
locaux pour connaître les méthodes d’élimination appropriées.
Si vous souhaitez jeter ces articles, veuillez contacter les autorités ou revendeurs
locaux pour connaître les méthodes d’élimination appropriées.
ATTENTION :
POUR ÉVITER TOUT RISQUE
ATTENTION :
D’ÉLECTROCUTION, NE PAS ENLEVER LE
POUR ÉVITER TOUT RISQUE
COUVERCLE (NI LE PANNEAU ARRIÈRE).
D’ÉLECTROCUTION, NE PAS ENLEVER LE
AUCUNE PIÈCE RÉPARABLE PAR
COUVERCLE (NI LE PANNEAU ARRIÈRE).
L’UTILISATEUR NE SE TROUVE À
AUCUNE PIÈCE RÉPARABLE PAR
L’INTÉRIEUR. CONFIER TOUT ENTRETIEN À
L’UTILISATEUR NE SE TROUVE À
UN PERSONNEL QUALIFIÉ UNIQUEMENT.
L’INTÉRIEUR. CONFIER TOUT ENTRETIEN À
UN PERSONNEL QUALIFIÉ UNIQUEMENT.
ATTENTION
ATTENTION
DANGER D´ELECTROCUTION
NE PAS OUVRIR
DANGER D´ELECTROCUTION
NE PAS OUVRIR
Ce point d’exclamation, placé dans un
triangle équilatéral, a pour but d’attirer
Ce point d’exclamation, placé dans un
l’attention de l’utilisateur sur la présence,
triangle équilatéral, a pour but d’attirer
dans les documents qui accompagnent
l’attention de l’utilisateur sur la présence,
l’appareil, d’explications importantes du
dans les documents qui accompagnent
point de vue de l’exploitation ou de
l’appareil, d’explications importantes du
l’entretien.
point de vue de l’exploitation ou de
l’entretien.
D3-4-2-1-1_A1_Fr
D3-4-2-1-1_A1_Fr
K058a_A1_Fr
K058a_A1_Fr
AVERTISSEMENT
Cet appareil n’est pas étanche. Pour éviter les risques
AVERTISSEMENT
d’incendie et de décharge électrique, ne placez près de
Cet appareil n’est pas étanche. Pour éviter les risques
lui un récipient rempli d’eau, tel qu’un vase ou un pot
d’incendie et de décharge électrique, ne placez près de
de fleurs, et ne l’exposez pas à des gouttes d’eau, des
lui un récipient rempli d’eau, tel qu’un vase ou un pot
éclaboussures, de la pluie ou de l’humidité.
de fleurs, et ne l’exposez pas à des gouttes d’eau, des
éclaboussures, de la pluie ou de l’humidité.
D3-4-2-1-3_A1_Fr
D3-4-2-1-3_A1_Fr
AVERTISSEMENT
Avant de brancher l’appareil pour la première, lisez
AVERTISSEMENT
attentivement la section suivante.
Avant de brancher l’appareil pour la première, lisez
La tension de l’alimentation électrique disponible
attentivement la section suivante.
varie selon le pays ou la région. Assurez-vous que
La tension de l’alimentation électrique disponible
la tension du secteur de la région où l’appareil sera
varie selon le pays ou la région. Assurez-vous que
utilisé correspond à la tension requise (par ex. 230
la tension du secteur de la région où l’appareil sera
V ou 120 V), indiquée sur le panneau arrière.
utilisé correspond à la tension requise (par ex. 230
V ou 120 V), indiquée sur le panneau arrière.
D3-4-2-1-4*_A1_Fr
D3-4-2-1-4*_A1_Fr
AVERTISSEMENT
Pour éviter les risques d’incendie, ne placez aucune
AVERTISSEMENT
flamme nue (telle qu’une bougie allumée) sur
Pour éviter les risques d’incendie, ne placez aucune
l’appareil.
flamme nue (telle qu’une bougie allumée) sur
l’appareil.
D3-4-2-1-7a_A1_Fr
D3-4-2-1-7a_A1_Fr
PRÉCAUTION DE VENTILATION
Lors de l’installation de l’appareil, veillez à laisser un
PRÉCAUTION DE VENTILATION
espace suffisant autour de ses parois de manière à
Lors de l’installation de l’appareil, veillez à laisser un
améliorer la dissipation de chaleur (au moins 10 cm sur
espace suffisant autour de ses parois de manière à
le dessus, 10 cm à l’arrière et 10 cm de chaque côté).
améliorer la dissipation de chaleur (au moins 10 cm sur
le dessus, 10 cm à l’arrière et 10 cm de chaque côté).
AVERTISSEMENT
Les fentes et ouvertures du coffret sont prévues pour la
AVERTISSEMENT
ventilation, pour assurer un fonctionnement stable de
Les fentes et ouvertures du coffret sont prévues pour la
l’appareil et pour éviter sa surchauffe. Pour éviter les
ventilation, pour assurer un fonctionnement stable de
risques d’incendie, ne bouchez jamais les ouvertures et
l’appareil et pour éviter sa surchauffe. Pour éviter les
ne les recouvrez pas d’objets, tels que journaux, nappes
risques d’incendie, ne bouchez jamais les ouvertures et
ou rideaux, et n’utilisez pas l’appareil posé sur un tapis
ne les recouvrez pas d’objets, tels que journaux, nappes
épais ou un lit.
ou rideaux, et n’utilisez pas l’appareil posé sur un tapis
épais ou un lit.
D3-4-2-1-7b*_A1_Fr
D3-4-2-1-7b*_A1_Fr
Page 17

Milieu de fonctionnement
Température et humidité du milieu de fonctionnement :
De +5 °C à +35 °C (de +41 °F à +95 °F) ; Humidité
relative inférieure à 85 % (orifices de ventilation non
obstrués)
N’installez pas l’appareil dans un endroit mal ventilé ou
un lieu soumis à une forte humidité ou en plein soleil
(ou à une forte lumière artificielle).
D3-4-2-1-7c*_A1_Fr
Si la fiche d’alimentation secteur de cet appareil ne
convient pas à la prise secteur à utiliser, la fiche doit
être remplacée par une appropriée. Ce
remplacement et la fixation d’une fiche secteur sur le
cordon d’alimentation de cet appareil doivent être
effectués par un personnel de service qualifié. En cas
de branchement sur une prise secteur, la fiche de
coupure peut provoquer une sérieuse décharge
électrique. Assurez-vous qu’elle est éliminée
correctement après sa dépose.
L’appareil doit être déconnecté en débranchant sa
fiche secteur au niveau de la prise murale si vous
prévoyez une période prolongée de non utilisation
(par exemple avant un départ en vacances).
D3-4-2-2-1a_A1_Fr
ATTENTION
L’interrupteur /I STANDBY/ON de cet appareil ne
coupe pas complètement celui-ci de sa prise secteur.
Comme le cordon d’alimentation fait office de
dispositif de déconnexion du secteur, il devra être
débranché au niveau de la prise secteur pour que
l’appareil soit complètement hors tension. Par
conséquent, veillez à installer l’appareil de telle
manière que son cordon d’alimentation puisse être
facilement débranché de la prise secteur en cas
d’accident. Pour éviter tout risque d’incendie, le
cordon d’alimentation sera débranché au niveau de
la prise secteur si vous prévoyez une période
prolongée de non utilisation (par exemple avant un
départ en vacances).
D3-4-2-2-2a*_A1_Fr
Ce produit est destiné à une utilisation domestique
générale. Toute panne due à une utilisation autre qu'à
des fins privées (comme une utilisation à des fins
commerciales dans un restaurant, dans un autocar
ou sur un bateau) et qui nécessite une réparation
sera aux frais du client, même pendant la période de
garantie.
K041_A1_Fr
NOTE IMPORTANTE SUR LE CABLE D’ALIMENTATION
Tenir le câble d’alimentation par la fiche. Ne pas
débrancher la prise en tirant sur le câble et ne pas
toucher le câble avec les mains mouillées. Cela risque de
provoquer un court-circuit ou un choc électrique. Ne pas
poser l’appareil ou un meuble sur le câble. Ne pas pincer
le câble. Ne pas faire de noeud avec le câble ou l’attacher
à d’autres câbles. Les câbles d’alimentation doivent être
posés de façon à ne pas être écrasés. Un câble abîmé
peut provoquer un risque d’incendie ou un choc
électrique. Vérifier le câble d’alimentation de temps en
temps. Contacter le service après-vente PIONEER le plus
proche ou le revendeur pour un remplacement.
S002*_A1_Fr
ATTENTION
Cet appareil est un produit laser de Classe 1, classé
selon l’article IEC 60825-1:2007 relatif à la Sécurité
des produits laser.
APPAREIL À LASER DE CLASSE 1
D58-5-2-2a_A2_Fr
Sommaire
01 Avant de commencer
Compatibilité en lecture des disques et du
format de gravure . . . . . . . . . . . . . . . . . . . . . . . . . 4
Contenu de l’emballage. . . . . . . . . . . . . . . . . . . . . 4
Installation des piles dans la télécommande . . . . .4
Utilisation de la télécommande. . . . . . . . . . . . . . . .4
02 Connexions
Connexions de sortie audio analogique . . . . . . . . . 5
Connexions de sortie audio numérique . . . . . . . . . 5
Commande centralisée avec d’autres composants
Pioneer (PD-30 uniquement) . . . . . . . . . . . . . . . . . 5
Branchement . . . . . . . . . . . . . . . . . . . . . . . . . . . . 5
03 Commandes et écrans
Télécommande . . . . . . . . . . . . . . . . . . . . . . . . . . . 6
Panneau arrière. . . . . . . . . . . . . . . . . . . . . . . . . . . 6
Panneau avant. . . . . . . . . . . . . . . . . . . . . . . . . . . .7
Écran du panneau avant . . . . . . . . . . . . . . . . . . . . 7
04 Lecture
Lecture d’un disque. . . . . . . . . . . . . . . . . . . . . . . . 8
Réglage de la puissance sur la mise en veille . . . . .8
Lecture en avance/retour en arrière rapide . . . . . . .8
Fonction Ignorer (Skip) . . . . . . . . . . . . . . . . . . . . . .8
Recherche directe (désigne une piste
spécifique de lecture) . . . . . . . . . . . . . . . . . . . . . . .8
Lecture répétitive. . . . . . . . . . . . . . . . . . . . . . . . . . .8
Lecture au hasard . . . . . . . . . . . . . . . . . . . . . . . . . .8
Lecture programmée (lecture des pistes dans un
ordre prédéterminé) . . . . . . . . . . . . . . . . . . . . . . . .8
Visualisation des données du disque. . . . . . . . . . . .8
Lecture de l’iPod/iPhone/iPad
(PD-30 uniquement) . . . . . . . . . . . . . . . . . . . . . . . 9
Assurez-vous que les modèles iPod/iPhone/iPad
sont pris en charge . . . . . . . . . . . . . . . . . . . . . . . . .9
Lecture de votre iPod/iPhone/iPad . . . . . . . . . . . . .9
Lecture de fichiers enregistrés sur des dispositifs
de stockage USB . . . . . . . . . . . . . . . . . . . . . . . . . 10
05 Les fonctions avancées
Lecture avec son en haute fidélité . . . . . . . . . . . . 11
Sound Retriever. . . . . . . . . . . . . . . . . . . . . . . . . . . 11
Pure Audio . . . . . . . . . . . . . . . . . . . . . . . . . . . . . .11
Modification de la zone de lecture (couche) d’un
SACD/CD. . . . . . . . . . . . . . . . . . . . . . . . . . . . . . . 11
Réglage de la luminosité de l’affichage . . . . . . . .11
Auto Power Down (Mise hors tension automatique
réglant l’unité sur veille) . . . . . . . . . . . . . . . . . . .11
Fonctions de lecture . . . . . . . . . . . . . . . . . . . . . . 11
06 Informations complémentaires
Disque pouvant être lu. . . . . . . . . . . . . . . . . . . . . 12
Formats de fichiers pouvant être lus . . . . . . . . . . 12
Précautions à prendre pour l’utilisation. . . . . . . . 13
Guide de dépannage . . . . . . . . . . . . . . . . . . . . . . 14
Spécifications . . . . . . . . . . . . . . . . . . . . . . . . . . . 15
Page 18

Avant de commencer01
Chapitre 1:
Avant de commencer
Compatibilité en lecture des disques
et du format de gravure
Les disques pouvant être lus sur ce lecteur sont
répertoriés ci-dessous.
• SACD (Super Audio CD)*
(zone à deux canaux uniquement)
•CD
• Disque DSD
* “Super Audio CD” est une marque déposée.
Remarque
• Cette unité ne permet pas de lire des zones
multicanaux des disques SACD.
• Les bornes DIGITAL OUT de cette unité ne
produisent pas de son des disques SACD et DSD ni
des iPod/iPhone/iPad.
• Lorsqu’un disque est chargé, la mise sous tension
n’entraîne pas automatiquement le lancement de
la lecture. En conséquence, la lecture
chronométrée n’est pas possible même si l’unité
est connectée à une minuterie.
À propos de la lecture de disques DualDisc
Un disque DualDisc est un nouveau disque à deux faces,
l’une d’elle comportant du contenu DVD vidéo, audio,
etc. et l’autre comportant du contenu non-DVD tel que
des données audio numériques. La face audio non-DVD
du disque n’est pas conforme aux spécifications des CD
audio et il se peut donc que la lecture soit impossible.
Pour de plus amples informations sur les
caractéristiques des DualDisc, veuillez consulter le
fabricant ou le détaillant du disque.
Disques ne pouvant pas être lus
•DVD-Vidéo
• DVD-Audio
•CD-G
•CD Vidéo
• DTS CD
Il est possible que certains disques ne faisant pas partie
de la liste ci-dessus ne puissent pas être lus.
Contenu de l’emballage
Veuillez vous assurer que les accessoires suivants sont
livrés avec l’appareil.
• Télécommande x1
• Piles sèches AAA/IEC R03 x2
• Câble audio RCA (fiches rouges/blanches) x1
• Cordon d’alimentation
•Carte de garantie
• Mode d’emploi (ce document)
Remarque
• Les illustrations des Mode d’emploi peuvent avoir
été modifiées ou simplifiées dans le but de
clarification et en conséquence peuvent différer de
l’apparence actuelle du produit.
• Les illustrations utilisées ici représentent
principalement le modèle PD-30.
Installation des piles dans la
télécommande
1 Ouvrez le couvercle arrière.
PD-30
PD-10
2 Placez les piles neuves, en faisant
correspondre la polarité à celle du boîtier.
PD-30
PD-10
3 Fermez le couvercle arrière.
PD-30
Les piles incluses avec l’unité ont été fournies pour
permettre de contrôler le fonctionnement du produit et
ne dureront pas longtemps. Nous recommandons
d’utiliser des piles alcalines qui ont une durée de vie
utile plus longue.
AVERTISSEMENT
• N’utilisez pas et ne rangez pas pas les piles sous la
lumière directe du soleil ou dans un endroit
excessivement chaud, comme une voiture ou à
proximité d’un appareil de chauffage. Les piles
risqueraient de fuir, de surchauffer, d’exploser ou
de s’enflammer. Leur durée de vie ou leurs
performances pourraient également être réduites.
Attention
Toute utilisation incorrecte des piles peut entraîner des
accidents, comme une fuite ou une explosion.
Respectez les précautions suivantes:
• Lorsque vous placez les piles, prenez soin de ne pas
endommager les ressorts des bornes des piles .
• Ne pas utiliser de piles autres que celles qui sont
indiquées. Ne pas utiliser non plus une pile neuve
avec une pile usée.
PD-10
• Lorsque vous installez les piles dans la
télécommande, orientez les piles dans la bonne
direction en respectant la polarité ( et ).
• Ne pas chauffer, ni démonter, ni ne jeter les piles
dans le feu ou l’eau.
• La tension des piles peut différer l’une de l’autre et
cela même si leur type et forme sont identiques.
Utiliser ensemble uniquement des piles du même
type.
• Pour éviter que les piles ne fuient, enlever les piles
lorsque le produit n’est pas censé être utilisé
pendant une période prolongée (à savoir 1 mois ou
plus). Si les piles ont fuit, nettoyer soigneusement
l’intérieur du compartiment et placer ensuite les
piles. Si une pile fuit et que du liquide entre en
contact avec votre peau, nettoyer à grande quantité
d’eau.
• Lorsque vous jetez des piles usées, veuillez vous
conformer aux normes gouvernementales ou à la
réglementation des institutions publiques
environnementales en vigueur dans votre pays ou
région.
Utilisation de la télécommande
La télécommande a une portée d’environ 7 m à un angle
d’environ 30° par rapport au capteur.
30 °
30 °
7 m
Respectez les consignes suivantes lorsque vous utilisez
la télécommande:
• Aucun obstacle ne doit être présent entre la
télécommande et le capteur de l’appareil.
• Le fonctionnement de la télécommande peut être
perturbé si le capteur est soumis à un éclairage
trop puissant (rayons solaires ou lumière
fluorescente).
• L’utilisation simultanée de plusieurs
télécommandes peut brouiller leur
fonctionnement. Évitez d’utiliser d’autres
télécommandes à proximité de cet appareil.
• Remplacez la pile lorsque vous notez une baisse de
portée de la télécommande.
4
Fr
Page 19
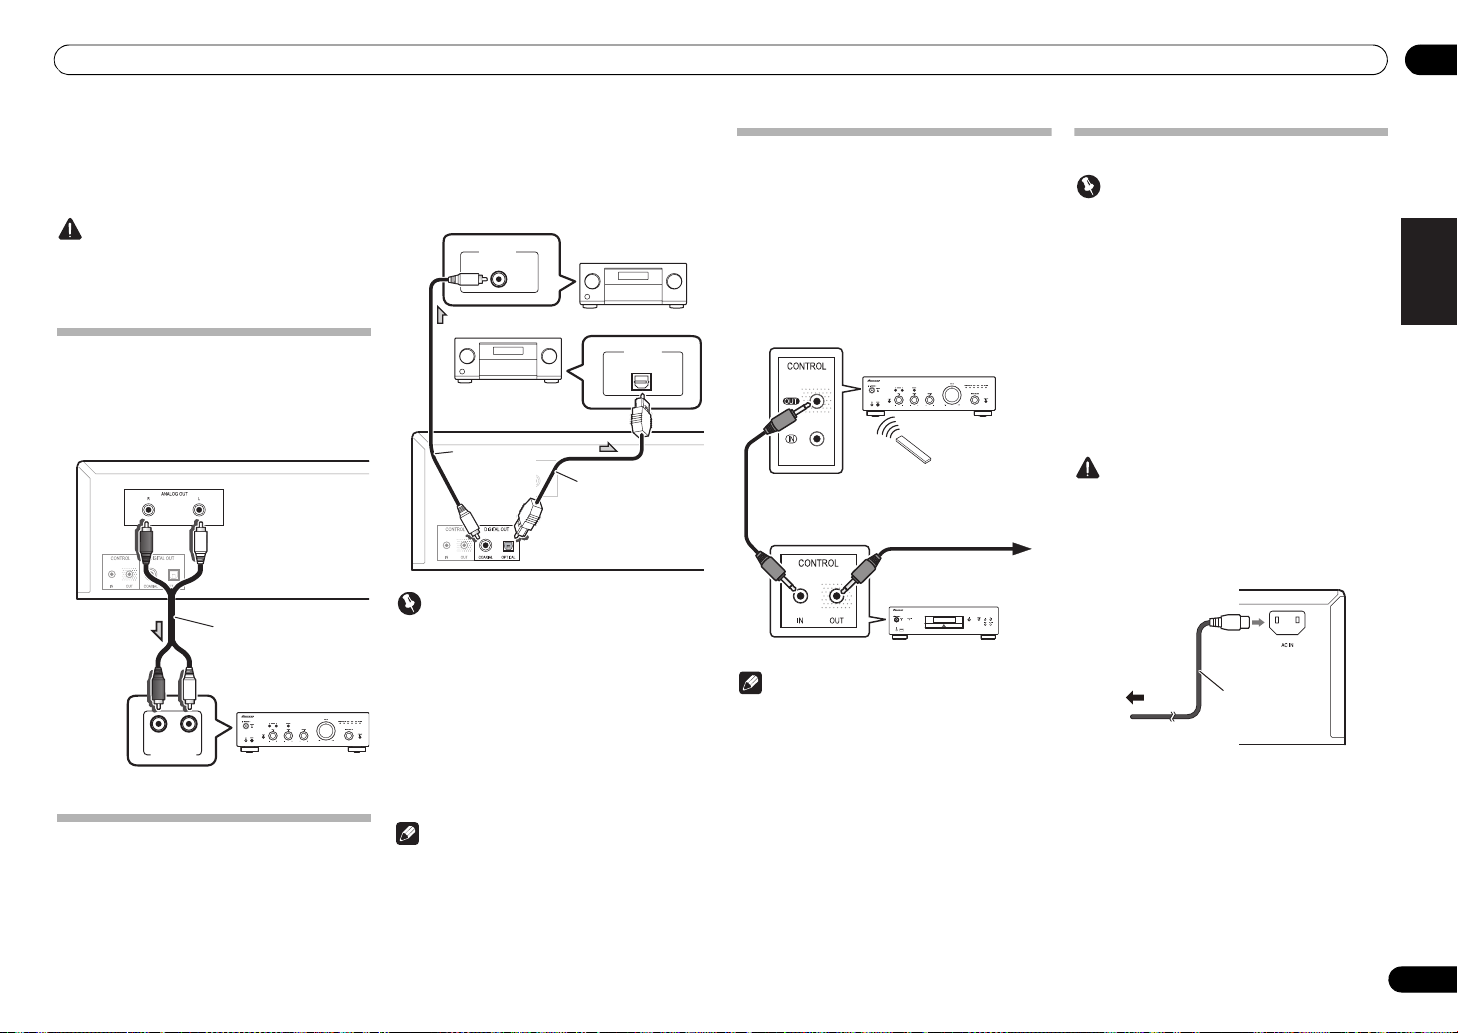
Connexions 02
n
Chapitre 2:
Connexions
Attention
• Avant d’effectuer ou de changer les connexions,
coupez le courant et déconnectez le cordon
d’alimentation de la prise CA.
• Connectez le cordon d’alimentation après avoir
effectué toutes les connexions entre les appareils.
Connexions de sortie audio analogique
Lorsque vous connectez la sortie audio analogique de
cette unité à la sortie audio analogique d’un
amplificateur, vous pouvez utiliser l’amplificateur pour
bénéficier de l’audio analogique de cette unité.
Panneau arrière du PD-30
Câble audio (inclus)
Amplificateur
RL
ANALOG
AUDIO INPUT
Connexions de sortie audio numérique
Vous pouvez, si souhaité, connecter la sortie audio
numérique de cette unité à un amplificateur AV ou un
appareil d’enregistrement numérique (enregistreur CD,
MD, etc.).
• Les bornes DIGITAL OUT de cette unité ne
produisent pas de son des disques SACD et DSD ni
des iPod/iPhone/iPad.
Amplificateur AV ou
appareil d’enregistrement
DIGITAL IN
COAXIAL
Amplificateur AV ou
appareil d’enregistrement
numérique
Câble audio
numérique coaxial
(en vente dans le
commerce)
Panneau arrière du PD-30
Important
Précaution à prendre lors de la manipulation des
câbles à fibre optique
• Prenez soin de ne pas plier les câbles à fibre
optique en angles aigus. Lorsque vous rangez les
câbles à fibre optique, enroulez-les en boucle de
15 cm de diamètre.
• Lors de la connexion des câbles à fibre optique,
alignez correctement les connecteurs et
introduisez-les complètement. Si l’orientation du
connecteur du câble est incorrecte et que vous
exercez une force excessive pour introduire le
connecteur, vous risquez de le déformer, ce qui
empêchera l’obturateur de se fermer lorsque le
câble est enlevé.
Remarque
• Pour la sortie audio numérique, les CD lus sur cette
unité doivent produire des signaux PCM linéaires
avec un taux d’échantillonnage allant jusqu’à
44,1 kHz et des bits quantitatives allant jusqu’à 16
bits (il peut s’avérer impossible de lire certains
disques sur le composant connecté et
l’environnement). Pour plus d’informations sur les
autres fichiers, voir page 12.
numérique
DIGITAL IN
OPTICAL
Câble à fibre optique (en
vente dans le commerce)
Commande centralisée avec d’autres
composants Pioneer (PD-30 uniquement)
Cette unité et les autres composants Pioneer dotés de
prises CONTROL IN/OUT peuvent être contrôlés avec
une seule télécommande en la pointant vers le récepteur
de signaux sur l’amplificateur AV ou un autre
composant. Cette centralisation permet d’utiliser une
télécommande dont les composants ne sont pas munis
d’un télécapteur ou sont installés à des emplacements
inaccessibles par le télécapteur.
Autres composants Pioneer
munis de prises CONTROL IN/
OUT
Télécommande pour u
amplificateur AV, etc.
Pintez la télécommande
vers le récepteur de
signaux sur
l’amplificateur AV, etc.
Vers d’autres composants
Pioneer munis d’une prise
CONTROL IN
PD-30
Remarque
• Pour établir la connexion, utilisez un cordon minifiche mono en vente dans le commerce (sans
résistance).
• Lors de la connexion des prises CONTROL IN/OUT,
des cordons audio en vente dans le commerce
doivent être utilisés pour établir les connexions
analogiques. La connexion des prises CONTROL
IN/OUT ne suffit pas à à assurer un contrôle
adéquat du système.
• Lorsqu’un cordon de commande est connecté à la
prise CONTROL IN du PD-30, il est impossible de
contrôler l’unité en pointant la télécommande vers
le PD-30 (le télécapteur est automatiquement
désactivé).
Branchement
Important
• Si le cordon d’alimentation doit être déconnecté,
assurez-vous d’appuyer sur le bouton
/I
STANDBY/ON situé le panneau avant de
l’unité de manière à ce que le PD-30 soit sur Arrêt
(OFF) ou le PD-10 en mode de veille avant de retirer
le cordon.
• Assurez-vous que l’indicateur [-OFF-] n’est pas
allumé sur l’écran du panneau avant de l’unité
principale avant de déconnecter le cordon
d’alimentation. Si le cordon d’alimentation est
déconnecté alors que l’indicateur [-OFF-] est
toujours allumé, l’unité peut revenir aux réglages
par défaut.
• Lorsque vous partez en voyage, ou lorsque vous
prévoyez de ne pas utiliser l’appareil pendant une
longue durée, débranchez systématiquement le
cordon d’alimentation de sa prise.
Attention
• Ne pas utiliser de cordon d’alimentation autre que
celui fourni avec cette unité.
• Ne pas utiliser le cordon d’alimentation fourni pour
un usage que celui qui est décrit ci-dessous.
Après avoir effectué toutes les connexions, branchez
l’unité dans une prise CA.
Panneau arrière du PD-30
Vers la prise CA
1 Branchez le cordon d’alimentation dans
AC IN
la prise
de l’unité.
2 Branchez l’autre extrémité dans la prise
CA.
Cordon
d’alimentation
située sur le panneau arrière
English
DeutschFrançais
Italiano Español Русский
Nederlands
5
Fr
Page 20
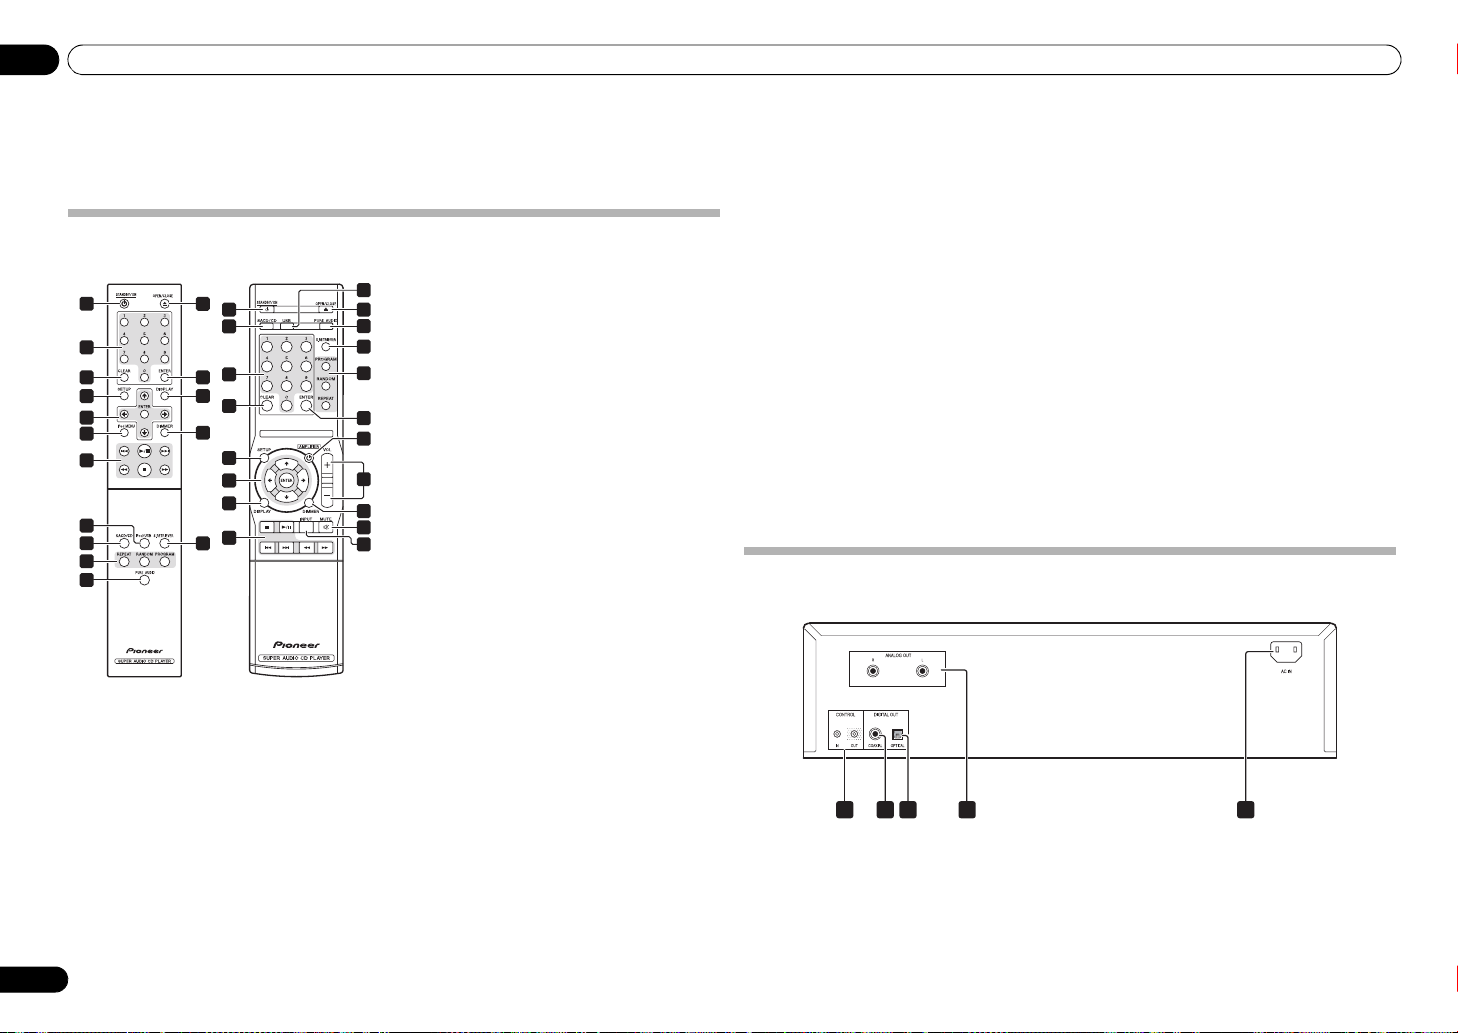
Commandes et écrans03
Chapitre 3:
Commandes et écrans
Télécommande
5
PD-30
1
2
3
4
5
6
7
8
9
10
11
1
STANDBY/ON
Permet de mettre l’amplificateur en mode veille et sous
tension.
2 Touches numérotées
Utilisez ces boutons pour spécifier la piste à lire. Utilisez
les boutons numérotés pour sélectionner la piste et
appuyez ensuite sur ENTER pour confirmer la sélection.
3
CLEAR
Appuyez pour effacer le contenu défini pour une lecture
programmée (page 8).
4
SETUP
Permet de régler la fonction de mise hors tension
automatique (page 11).
PD-10
12
1
9
2
13
14
33
15
4
35
14
37
16
8
12
11
16
10
13
17
18
15
19
20
///
Utilisez ces boutons pour sélectionner des
éléments, changer les réglages et déplacer le
curseur.
ENTER
Permet d’inclure l’élément sélectionné ou de saisir
un réglage que vous avez changé.
6
iPod MENU
A utiliser avec un menu iPod/iPhone/iPad.
7
Appuyez pour revenir au début de la piste en cours
de lecture. Appuyez deux fois pour revenir au début
de la piste précédente.
Appuyez pour lancer la lecture. Au cours de la
lecture, faites une pause/annulez la pause de la
lecture.
Appuyez pendant la lecture pour avancer jusqu’à la
prochaine piste.
Appuyez pour revenir rapidement en arrière de la
piste en cours de lecture. Si vous appuyez à
nouveau sur le bouton pendant le retour en arrière
rapide, la vitesse de l’opération change en quatre
étapes.
Appuyez pour arrêter la lecture.
Appuyez pour avancer rapidement sur la piste en
cours de lecture. Si vous appuyez à nouveau sur le
bouton pendant l’avance rapide, la vitesse de
l’opération change en quatre étapes.
8
iPod/USB
(PD-30)
USB (PD-10)
Appuyez pour permuter l’unité à iPod ou USB
(page 9,10).
(PD-30 uniquement)
9
SACD/CD
Appuyez pour permuter l’unité à SACD/CD. Dans le cas
de disques SACD hybrides, si vous appuyez sur ce
bouton lors de l’arrêt de la lecture, la zone de lecture du
disque change (page 11).
10
REPEAT
Appuyez pour lancer une lecture répétitive (page 8).
RANDOM
Appuyez pour lancer une lecture au hasard
(page 8).
PROGRAM
Appuyez pour lancer une lecture programmée
(page 8).
11 PURE AUDIO
Appuyez sur ce bouton pour activer le mode Pure Audio.
Ce mode permet d’effectuer une lecture audio d’une
qualité supérieure respectant les sons originaux
(page 11).
12
OPEN/CLOSE
Appuyez pour ouvrir et fermer le tiroir-disque (page 8).
13
ENTER
Permet d’inclure l’élément sélectionné ou de saisir un
réglage que vous avez changé.
14
Appuyez pour afficher les diverses données sur le
disque, y compris le temps de lecture écoulé ainsi que le
temps restant (page 8).
15
Appuyez pour changer les niveaux de luminosité de
l’écran du panneau avant de l’unité principale et des
indicateurs (page 11).
16
Appuyez pour alterner entre les divers réglages de la
fonction Sound Retriever (page 11).
17
Appuyez pour permuter l’alimentation entre ON et
STANDBY sur l’amplificateur Pioneer AV.
18
Appuyez sur ces boutons pour régler le volume du son
d’un amplificateur Pioneer AV.
19
Appuyez pour mettre en sourdine le volume d’un
amplificateur Pioneer AV. Appuyez à nouveau sur ce
bouton pour annuler la fonction de mise en sourdine.
20
Appuyez pour permuter l’entrée vers un amplificateur
Pioneer AV.
Panneau arrière
Pour de plus amples informations sur les connexions, voir page 5.
DIGITAL IN
1 2 3 54
1 CONTROL IN/OUT prise (PD-30 uniquement)
2
DIGITAL OUT (COAXIAL)
3
DIGITAL OUT (OPTICAL)
borne
borne
4
5
DISPLAY
DIMMER
S.RETRIEVER
AMPLIFIER
VOLUME +/–
MUTE
(PD-10 uniquement)
INPUT
(PD-10 uniquement)
ANALOG OUT
AC IN
prise
(PD-10 uniquement)
(PD-10 uniquement)
PD-30
bornes
6
Fr
Page 21
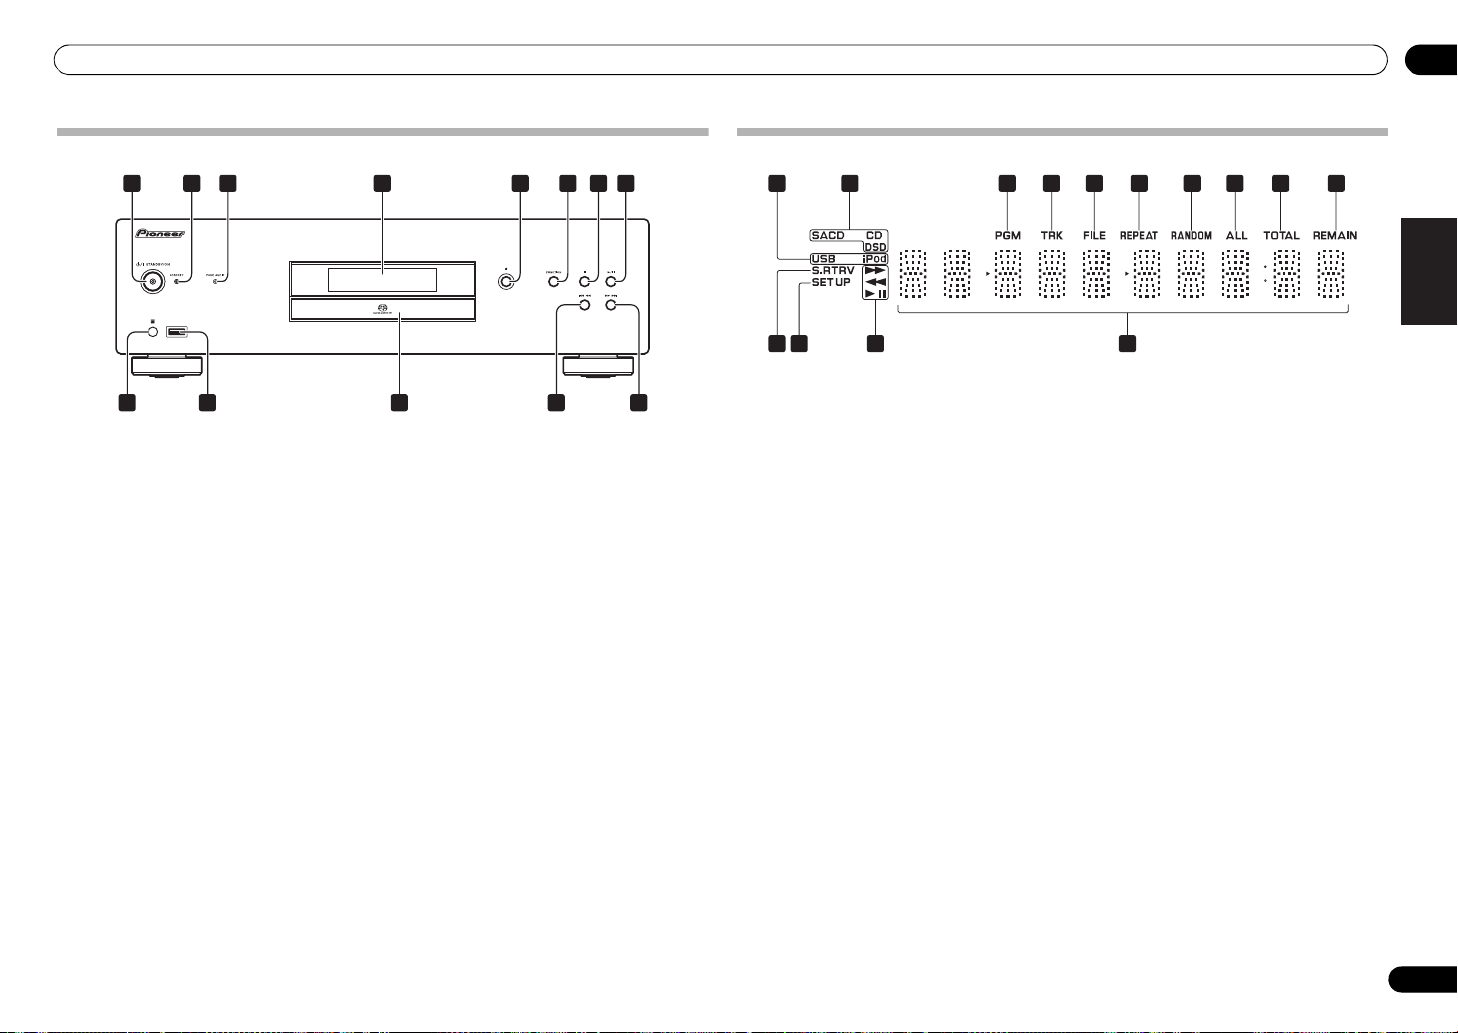
Commandes et écrans 03
English
Panneau avant
3 5 6 7 81
2 4
9
1
/I STANDBY/ON
Lors de la mise sous tension, l’indicateur au centre du
bouton s’allume.
• Sur le modèle PD-30, ce bouton permet de
permuter l’amplificateur entre une mise hors et
sous tension.
Pour mettre sous tension, appuyez sur le bouton
jusqu’à ce qu’il reste enfoncé.
• Sur le modèle PD-10, ce bouton permet de
permuter l’amplificateur entre le mode veille et la
mise sous tension.
2
STANDBY
S’allume lorsque l’alimentation est en mode de veille
(STANDBY).
3
PURE AUDIO
S’allume lorsque la fonction Pure Audio est activée
(page 11).
4 Écran du panneau avant
(Voir la description suivante.)
5
Appuyez pour ouvrir et fermer le tiroir-disque (page 8).
6
FUNCTION
Permet de changer la source d’entrée. La source change
tel qu’indiqué ci-dessous.
DISC iPod*
(masqué).
1
PD-30 uniquement
*
7
Appuyez pour arrêter la lecture.
1
10 12 1311
indicateur
indicateur
/USB Permet de revenir au début
PD-30
8
Appuyez pour lancer la lecture. Au cours de la lecture,
faites une pause/annulez la pause de la lecture.
9 Capteur à distance
Reçoit les signaux émis par la télécommande (page 4).
10
iPod/USB port
USB port (PD-10)
Permet d’effectuer la connexion à votre Apple iPod/
iPhone/iPad (page 9) ou à un appareil USB (page 10).
11 Tiroir-disque
12
Appuyez pour revenir au début de la piste en cours de
lecture. Appuyez deux fois pour revenir au début de la
piste précédente. Lorsque vous appuyez sur ce bouton et
que vous le maintenez enfoncé, la piste en cours de
lecture passera à une vitesse rapide.
13
Appuyez pour passer au début de la piste suivante.
Lorsque vous maintenez ce bouton enfoncé, la piste en
cours de lecture sera avancée à une vitesse rapide.
• Si vous appuyez à nouveau sur le bouton pendant
l’avance rapide, la vitesse de l’opération change en
quatre étapes.
• Si vous appuyez à nouveau sur le bouton pendant
l’avance rapide, la vitesse de l’opération change en
quatre étapes.
(PD-30)
(page 8)
Écran du panneau avant
1 2 4 5 6
1
USB/iPod
Voyants pendant la lecture de la mémoire flash USB ou
iPod/iPhone/iPad.
2
SACD/CD/DSD
L’indicateur s’allume en fonction du type de disque en
cours de lecture.
3
PGM
S’allume pendant une lecture programmée (page 8).
4
TRK
S’allume pendant l’affichage du numéro de la piste avec
soit le temps de lecture écoulé soit le temps de lecture
restant.
5
FILE
S’allume lorsqu’un nom de fichier s’affiche.
6
REPEAT
S’allume pendant une lecture répétitive (page 8).
7
RANDOM
S’allume pendant une lecture au hasard (page 8).
8
ALL
S’allume pendant une lecture répétitive du disque
(page 8).
9
TOTAL
S’allume lorsque le temps de lecture restant du disque
s’affiche.
10
REMAIN
S’allume lorsque le temps de lecture restant de la piste
ou du disque s’affiche.
11
S.RTRV
S’allume lorsque la fonction Sound Retriever est activée
(page 11).
3 7 8 9
10
1411 12 13
12
SET UP
S’allume lorsque la fonction de mise hors tension
automatique (page 11).
13
S’allume pendant une avance rapide.
S’allume pendant un retour en arrière rapide.
S’allume pendant une lecture.
S’allume pendant un mode pause.
14 Écran alphanumérique
DeutschFrançais
Italiano Español Русский
Nederlands
7
Fr
Page 22
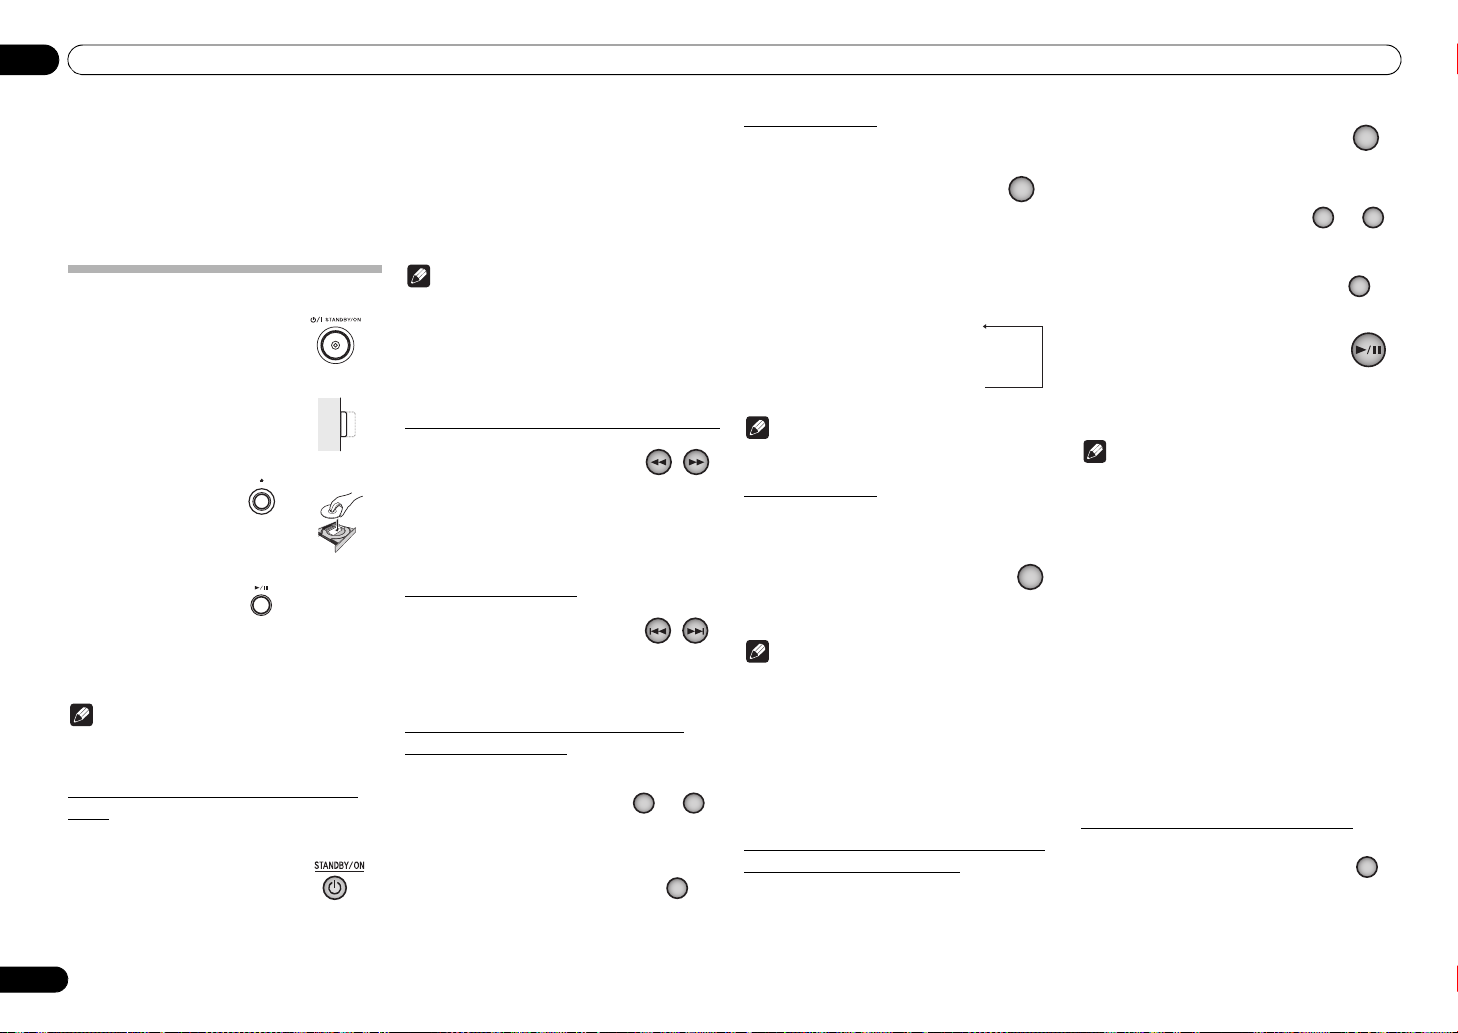
Lecture04
Chapitre 4:
Lecture
Les fonctions pouvant être sélectionnées varient selon le
ty pe d e dis que et d e fi chi er. Dans cer tai ns c as, cer tain es
fonctions ne peuvent pas être utilisées. Reportez-vous à
Fonctions de lecture
Lecture d’un disque
1 Appuyez sur le bouton
/I STANDBY/ON
avant pour mettre l’unité sous
tension.
• Avec le modèle PD-30, la mise sous
tension s’effectue en appuyant sur le
bouton POWER jusqu’à ce qu’il reste
enfoncé.
Vue de côté du p anneau avant
2 Appuyez sur le
bouton
tiroir-disque et placez
le disque.
• Placez le disque avec la face imprimée vers
le haut.
3 Appuyez sur le
bouton
la lecture.
• Pour effectuer une pause pendant la lecture,
appuyez sur le bouton .
• Pour interrompre la lecture, appuyez sur le bouton
.
Remarque
• Vous pouvez exécuter les étapes 2 et 3 avec la
télécommande de la même manière que pour les
commandes du panneau avant de l’unité.
Réglage de la puissance sur la mise en
veille
Retirez les disques du tiroir avant de régler le bouton
d’alimentation en mode de veille.
• Appuyez sur le bouton de la
télécommande
La prochaine fois que vous remettrez sous
tension, appuyez sur le bouton STANDBY/ON de la
télécommande.
à la page 11.
pour ouvrir le
pour lancer
STANDBY/ON
du panneau
.
• Pour le modèle PD-30, appuyez sur le bouton du
panneau avant /I STANDBY/ON pour mettre
l’unité hors tension et non en mode de veille. Pour
remettre sous tension
panneau avant
Remarque
• Si le cordon de l’alimentation n’est pas branché
lorsque l’unité est en mode de veille, l’unité
s’éteindra. Toutefois lorsque le cordon est
rebranché, l’unité ne se remettra pas
automatiquement en marche. Après avoir
rebranché le cordon d’alimentation, appuyez sur le
bouton STANDBY/ON de la télécommande pour
remettre sous tension.
, appuyez sur le bouton du
/I STANDBY/ON.
Lecture en avance/retour en arrière rapide
• Pendant la lecture, appuyez
sur le bouton
.
Chaque fois que vous appuyez sur le bouton pendant
l’avance ou le retour en arrière rapide, la vitesse de
l’opération change en quatre étapes.
• Pour revenir à une lecture normale, appuyez sur le
bouton .
ou le bouton
Fonction Ignorer (Skip)
• Pendant la lecture, appuyez
sur le bouton
.
La lecture ignorera, vers l’avant ou l’arrière, le nombre de
pistes correspondant au nombre de fois auquel le
bouton a été appuyé.
ou le bouton
Recherche directe (désigne une piste
spécifique de lecture)
• Utilisez les boutons
numérotés pour saisir le
numéro de la piste et appuyez
ensuite sur ENTER pour confirmer la
sélection.
Même si le bouton ENTER n’est pas
appuyé, la lecture commence
automatiquement après un intervalle de 5
secondes (ceci ne concerne pas la lecture
programmée).
0 9
〜
ENTER
Lecture répétitive
Vous pouvez effectuer une lecture répétitive pour la piste
en cours ou pour toutes les pistes du disque.
• Pendant la lecture, appuyez sur
le bouton REPEAT.
• La lecture répétitive commence et l’indicateur
[REPEAT] s’allume sur l’écran du panneau avant de
l’unité. Appuyez à nouveau sur le bouton pour
alterner le type de lecture répétitive entre une piste
simple et le disque en entier (toutes les pistes)
comme suit:
répétition d’une piste simple
(L’indicateur [REPEAT] s’allume)
トラックリピート([REPEAT]点灯)
Les indicateurs de répétition du disque ([REPEAT] et
ディスクリピート([REPEAT]、[ALL]点灯)
[ALL] s’allument)
Remarque
• La fonction de lecture répétitive est annulée lorsque
vous interrompez la lecture du disque.
↓
↓
Répétition désactivée
リピートオフ
REPEAT
Lecture au hasard
Toutes les pistes du disque sont sélectionnées et lues au
hasard jusqu’à ce que chacune d’elles aient été lues une
fois.
• Pendant la lecture, appuyez sur
le bouton
La lecture au hasard commence et l’indicateur
[RANDOM] s’allume sur le panneau avant de l’unité
principale.
• La lecture au hasard se poursuit jusqu’à ce que le
• La fonction de lecture au hasard ne peut pas être
• Si vous appuyez sur le bouton pendant la
RANDOM
Remarque
disque s’arrête ou lorsque vous appuyez à nouveau
sur le bouton RANDOM.
utilisée simultanément avec la lecture
programmée.
lecture au hasard, l’unité passe à la piste suivante
sélectionnée au hasard. Si vous appuyez sur le
bouton , l’unité revient au début de la piste en
cours et recommence.
.
RANDOM
Lecture programmée (lecture des pistes
dans un ordre prédéterminé)
Cette fonction permet de programmer 24 pistes à lire
dans un ordre sélectionné.
1 Pour interrompre la lecture,
appuyez sur le bouton
L’indicateur [PGM] s’allume sur le panneau
avant de l’unité.
PROGRAM
2 Utilisez les boutons
numérotés pour sélectionner le
numéro de la piste et appuyez
ENTER
ensuite sur
Exemple: Pour sélectionner la piste 15,
appuyez sur les boutons 1 et 5 puis sur
ENTER. Si vous vous trompez, appuyez sur le
bouton CLEAR.
.
PROGRAM
.
0 9
〜
ENTER
3 Répétez l’étape 2 pour saisir les
numéros des pistes souhaitées.
4 Appuyez sur le bouton
La lecture commence dans l’ordre de la programmation
des pistes. Pour ajouter d’autres pistes, répétez les
étapes 1 et 2.
Remarque
• Si vous appuyez sur le bouton CLEAR lorsque le
disque est arrêté, toutes les pistes programmées
seront annulées.
• Pour effacer les pistes programmées après avoir
interrompu la lecture, appuyez sur le bouton
PROGRAM puis sur CLEAR. Les pistes
programmées seront annulées en commençant
par celle qui a été programmée en dernier.
• Il est impossible de programmer une “pause”.
• Le contenu de la lecture programmée (répétition de
toutes les pistes) peut être répété. Appuyez sur le
bouton REPEAT après avoir commencé la lecture
(voir à gauche).
• Il est impossible d’effectuer la répétition d’une
seule piste pendant une lecture programmée.
• Il est impossible d’effectuer une répétition au
hasard pendant une lecture programmée.
• Si vous appuyez sur le bouton pendant la
lecture programmée, l’unité passe à la piste
programmée suivante.
• Après avoir interrompu la lecture, pour relancer la
même lecture programmée, appuyez sur le bouton
PROGRAM puis sur .
.
Visualisation des données du disque
• Pendant la lecture, appuyez sur
le bouton
Diverses données, y compris le temps de lecture écoulé
et le temps de lecture restant s’affichent.
DISPLAY
.
DISPLAY
8
Fr
Page 23
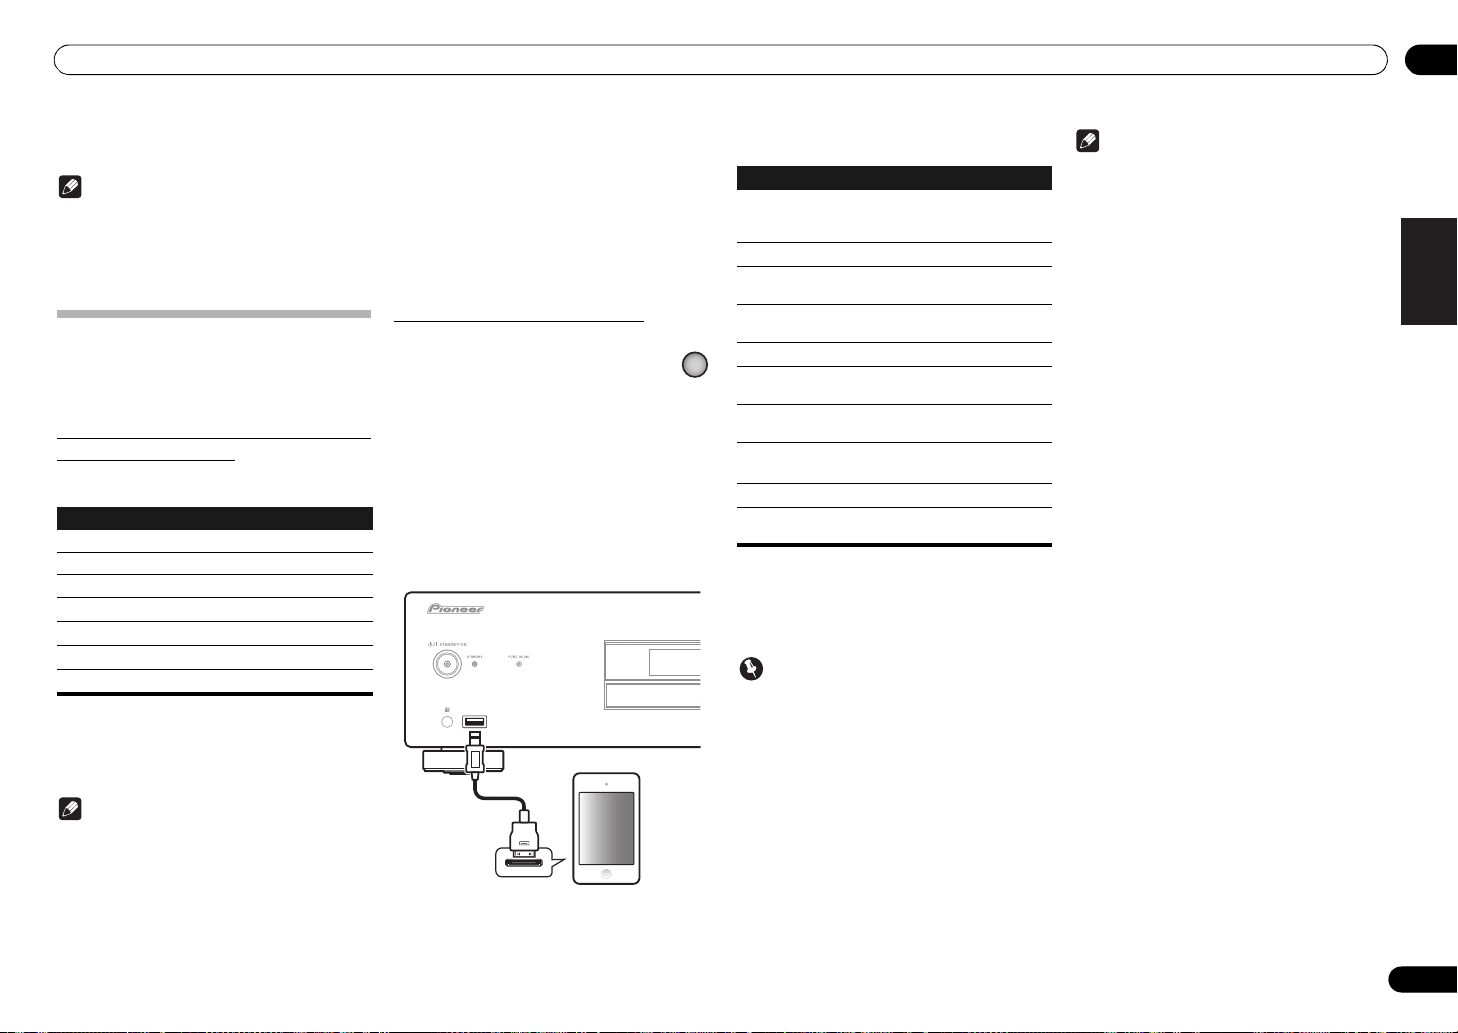
Lecture 04
En fonction du disque, si vous appuyez sur le bouton
DISPLAY plusieurs fois, l’affichage effectue un
défilement des données.
Remarque
• Affiche le nom du fichier (les premiers 8
caractères) lors de la lecture de fichiers AAC (PD30 uniquement), les fichiers WMA/MP3 ou les
fichiers sur disques DSD. Toutefois en fonction des
caractères utilisés, l’affichage peut ne pas être
totalement correct.
Lecture de l’iPod/iPhone/iPad
(PD-30 uniquement)
En principe lorsque vous connectez votre iPod/iPhone/
iPad à cette unité, vous devriez pouvoir bénéficier d’une
qualité sonore nettement supérieure.
Assurez-vous que les modèles iPod/iPhone/
iPad sont pris en charge
Les modèles iPod/iPhone/iPad pris en charge par cette
unité sont les suivants.
iPod/iPhone/iPad Audio Commande
iPod nano 2/3/4/5/6G
iPod touch 1/2/3/4G
iPhone
iPhone 3G/3GS
iPhone 4/4S
iPad
iPad 2
• Ce système a été développé et testé pour la version
logicielle des iPod/iPhone/iPad indiquée sur le site
Web de Pioneer.
• Toute version logicielle de votre iPod/iPhone/iPad
autre que celle indiquée sur le site Web de Pioneer
peut s’avérer incompatible avec ce système.
Remarque
• Pioneer ne garantit pas que cette unité est capable
de lire les modèles iPod/iPhone/iPad autres que
ceux stipulés.
• La disponibilité de certaines fonctions dépend du
modèle ou de la version logicielle.
• iPod/iPhone/iPad faitt l’objet d’un droit de
reproduction de matériaux non protégés par des
droits d’auteur ou de matériaux que l’utilisateur est
en droit de reproduire légalement.
• Les caractéristiques, telles que l’égalisateur, ne
peuvent pas être contrôlées par ce système. En
conséquence, nous recommandons de désactiver
l’égalisateur avant d’effectuer la connexion.
• En aucun cas Pioneer n’endosse les
responsabilités de pertes directes ou indirectes
résultant de problèmes ni de pertes de matériaux
enregistrés survenues lors d’une défaillance
d’iPod/iPhone/iPad.
• Pour de plus amples informations sur l’utilisation
d’iPod/iPhone/iPad, veuillez vous reporter au
manuel fournit avec iPod/iPhone/iPad.
Lecture de votre iPod/iPhone/iPad
iPod
iPod/USB
1 Appuyez sur
iPod/USB
de la
télécommande pour sélectionner
comme source d’entrée.
Appuyez sur le bouton de la télécommande iPod/USB.
• Vous pouvez effectuer la même opération en
appuyant plusieurs fois sur FUNCTION du panneau
avant.
2 Connexion de votre iPod/iPhone/iPad.
Connectez votre iPod/iPhone/iPad au port USB sur le
panneau avant de l’unité. Utilisez le câble iPod fourni
avec votre iPod/iPhone/iPad pour établir la connexion.
• Pour la connexion du câble, reportez-vous
également aux instructions de votre iPod/iPhone/
iPad.
iPod/iPhone/iPad
Câble iPod
Les opérations suivantes sont possibles pour iPod/
iPhone/iPad.
Touches Fonction
RANDOM
REPEAT
iPod MENU
//ENTER
1 Chaque fois que vous appuyez sur REPEAT, les
modes de répétition changent comme suit.
Répét
Répét
lecture.
Répét
Important
Si cette unité n’est pas en mesure de lire votre iPod/
iPhone/iPad, effectuez les vérifications suivantes:
• Assurez-vous que votre iPod/iPhone/iPad est pris
en charge par cette unité.
• Reconnectez l’iPod/iPhone/iPad à l’unité. Si l’unité
n’est toujours pas en mesure de lire, essayez de
régler iPod/iPhone/iPad.
• Assurez-vous que le logiciel de votre iPod/iPhone/
iPad est pris en charge par cette unité.
Si vous ne pouvez pas régler votre iPod/iPhone/iPad,
vérifiez les éléments suivants:
• Est-ce que votre l’iPod/iPhone/iPad est
correctement connecté à l’unité ?
Reconnectez l’iPod/iPhone/iPad à l’unité.
• Est-ce que votre l’iPod/iPhone/iPad raccroche ?
Essayez de régler l’iPod/iPhone/iPad et
reconnectez-le à l’unité.
Démarre la lecture. Au cours de la lecture,
faites une pause/annulez la pause de la
lecture.
Interrompt la lecture.
Appuyez pour passer au lancement du
fichier actuel puis aux fichiers précédents.
Maintenez le bouton enfoncé pour
effectuer un retour en arrière rapide.
Appuyez pour passer au fichier suivant.
Maintenez le bouton enfoncé pour
effectuer une avance rapide.
Les fichiers iPod/iPhone/iPad sont lus en
arrière au hasard (lecture aléatoire).
Les fichiers iPod/iPhone/iPad sélectionnés
sont lus répétitivement en arrière.
A utiliser avec un menu iPod/iPhone/iPad.
Utilisez pour exécuter les opérations du
menu iPod/iPhone/iPad.
er 1
Répét
er 1: Permet de répéter un fichier en cours de
er tout: Permet de répéter tous les fichiers.
er tout La lecture normale
1
Remarque
• Le rechargement de l’iPod/iPhone/iPad se produit
chaque fois que l’iPod/iPhone/iPad est connecté à
cette unité. (Le rechargement est activé
uniquement lorsque l’unité est mise sous tension).
(Ne se produit pas lorsque la fonction Pure Audio
est activée).
• Lorsque vous passez de l’iPod à une autre fonction,
la lecture de l’iPod/iPhone/iPads est
automatiquement interrompue.
English
DeutschFrançais
Italiano Español Русский
Nederlands
9
Fr
Page 24
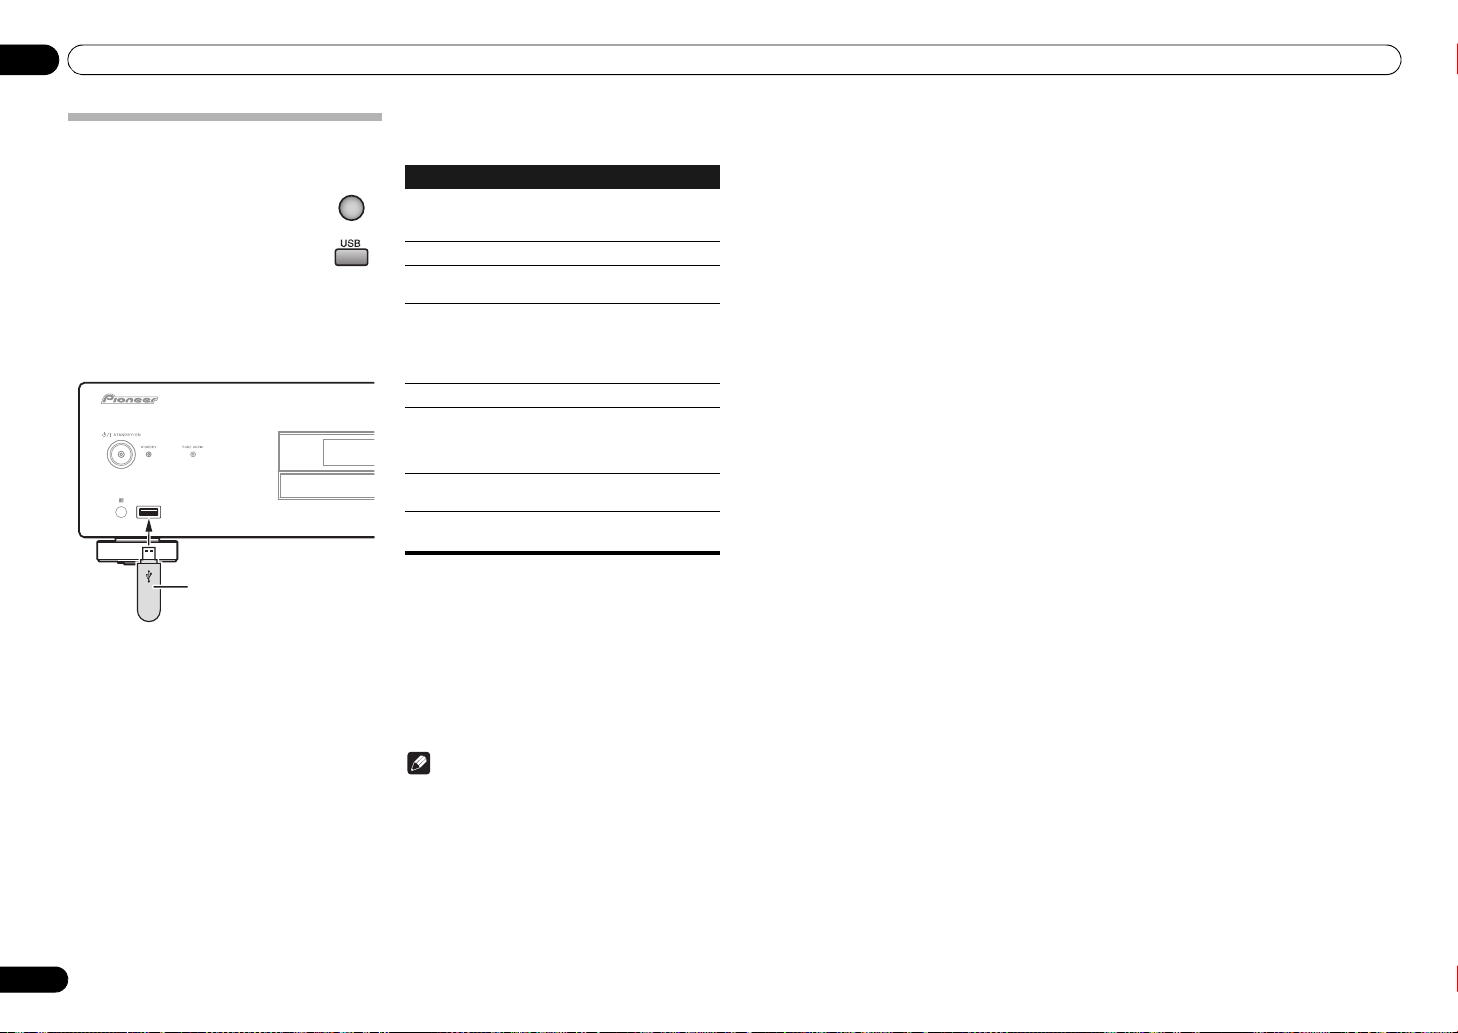
Lecture04
Lecture de fichiers enregistrés sur des
dispositifs de stockage USB
1 Appuyez sur
USB
de la
télécommande pour sélectionner
USB comme source d’entrée.
Appuyez sur le iPod/USB bouton de la
télécommande du modèle
de la télécommande du modèle PD-10
• Vous pouvez effectuer la même opération en
appuyant plusieurs fois sur FUNCTION du panneau
avant.
PD-30
ou sur USB
2 Connectez le dispositif de stockage USB.
Dispositif de stockage USB
(en vente dans le commerce)
3 Appuyez sur le bouton
la lecture.
• Pour effectuer une pause pendant la lecture,
appuyez sur le bouton .
• Pour interrompre la lecture, appuyez sur le bouton
.
iPod/USB
.
pour lancer
Vous pouvez effectuer les opérations suivantes. Certains
boutons peuvent ne pas être disponibles en fonction de
la catégorie en cours de lecture.
Touches Fonction
RANDOM
REPEAT
1 Chaque fois que vous appuyez sur REPEAT, le
mode de répétition change comme suit.
Repeat 1
Repeat 1: Permet de répéter un fichier en cours de
lecture.
Repeat all: Permet de répéter tous les fichiers.
Lorsque le fonction mise hors tension automatique est
activée et que l’entrée est définie sur une lecture de
mémoire USB, si la lecture depuis le dispositif de
mémoire USB s’arrête pendant 30 minutes sans
qu’aucune autre opération ne soit exécutée, l’unité
passe automatiquement en mode de veille.
Remarque
• Cette unité peut ne pas reconnaître le dispositif de
stockage USB, lire les fichiers ou alimenter le
dispositif de stockage USB. Pour de plus amples
informations, voir
la page 12.
Démarre la lecture. Au cours de la lecture,
faites une pause/annulez la pause de la
lecture.
Interrompt la lecture.
Appuyez pour passer au lancement du
fichier actuel puis aux fichiers précédents.
Appuyez pour effectuer un retour en
arrière rapide. Chaque fois que vous
appuyez sur le bouton vitesse vers l’arrière,
la vitesse de l’opération change en quatre
étapes.
Appuyez pour passer au fichier suivant.
Appuyez pour effectuer une avance rapide.
Chaque fois que vous appuyez sur le
bouton vitesse vers l’avant, la vitesse de
l’opération change en quatre étapes.
Les fichiers sélectionnés sont lus en
arrière au hasard (lecture aléatoire).
Les fichiers sélectionnés sont lus
répétitivement.
Repeat all Normal playback
1
Informations complémentaires
• Pioneer ne garantit pas la lecture systématique des
fichiers enregistrés sur un dispositifs de stockage
USB ni que ce dernier sera alimenté. En outre,
Pioneer n’endosse aucune responsabilité pour la
perte de fichiers enregistrés sur les dispositifs de
stockage USB qui pourrait se produire lors de la
connexion à cette unité.
• Cette unité ne prend pas en charge les
concentrateurs USB.
à
10
Fr
Page 25
Les fonctions avancées 05
Chapitre 5:
Fonctions de lecture
Les fonctions avancées
Les fonctions pouvant être sélectionnées varient selon le
type de disque et de fichier. Dans certains cas, certaines
fonctions ne peuvent pas être utilisées. Voir
de lecture
dans la colonne de droite.
Fonctions
Lecture avec son en haute fidélité
Sound Retriever
Lorsque les signaux sonores comprimés sont
décomprimés pour la lecture, certaines parties sont
perdues. En activant la fonction Sound Retriever, les
pertes sont compensées ce qui permet de produire un
son de meilleure qualité.
• Appuyez sur le bouton S.RETRIEVER.
Chaque fois que vous appuyez sur le bouton, la
fonction change comme suit: S.RTRV: OFF S.RTRV:
LOW S.RTRV: HI Permet de restaurer le statut initial
• La fonction correction de son est désactivée
lorsque la fonction pure audio est activée.
Pure Audio
Cette fonction désactive la sortie audio numérique et lit
une audio analogique à haute fidélité. Lorsque la
fonction est activée, aucun indicateur n’est affiché. Par
défaut, cette option est désactivée.
• Appuyez sur le bouton PURE
AUDIO.
Appuyez à nouveau dessus pour désactiver la fonction.
• Lorsque cette fonction est activée et l’entrée de
l’unité principale passe à SACD/CD, l’indicateur
PURE AUDIO s’allume sur le panneau avant.
Pendant la lecture du disque, le panneau avant
s’éteint.
• Lorsque l’indicateur PURE AUDIO s’allume, les
iPod/iPhone/iPad connectés à l’unité principale ne
seront pas rechargés.
PURE AUDIO
Modification de la zone de
lecture (couche) d’un SACD/CD
Les disques hybrides SACD se composent de deux
couches, une couche SACD et une couche CD. Vous
pouvez ainsi de choisir celle que vous voulez lire.
1 Appuyez sur le bouton
Entrez les changements à SACD/CD.
SACD/CD
.
2 En mode d’arrêt, appuyez sur le bouton
SACD/CD.
Chaque fois que vous appuyez sur le bouton, la lecture
alterne entre la zone CD et la zone du canal 2 de SACD.
Remarque
• Cette unité ne prend pas en charge les zones
multicanaux de SACD.
Réglage de la luminosité de l’affichage
Cette unité est dotée d’une fonction de gradation
permettant de régler la luminosité de l’affichage sur trois
niveaux correspondant à divers degrés de l’éclairage
S.RETRIEVER
ambiant. Le réglage par défaut est une luminosité
maximum.
• Appuyez sur le bouton
Chaque fois que vous appuyez sur le bouton, la
luminosité passe par les trois couches.
• Le réglage de gradation ne peut pas être changé
lorsqu’un disque est lu avec la fonction Pure Audio
activée (voir à gauche).
• La luminosité de l’indicateur STANDBY ne change
pas.
Auto Power Down (Mise hors tension
automatique réglant l’unité sur veille)
Cette fonction permute automatiquement l’unité en
mode de veille si aucun signal ou permutation ne sont
détectés pendant 30 minutes.
1 Appuyez sur le bouton
2 Changez le réglage et confirmez.
Appuyez sur le bouton / pour régler la
fonction d’activation ou désactivation (ON ou
OFF) et appuyez ensuite sur ENTER pour
confirmer l’opération.
Remarque
• Cette fonction est désactivée lorsque l’entrée iPod
SACD/CD
est sélectionnée.
DIMMER
SET UP
.
.
ENTER
Les fonctions pouvant être sélectionnées varient selon le type de disque et de fichier. Dans certains cas, certaines
fonctions ne peuvent pas être utilisées. Consultez le tableau ci-dessous répertoriant les fonctions exploitables.
Type de fichier/disque
DIMMER
SET UP
1
Fonction
Lecture en avance/retour en arrière rapide
Fonction Ignorer (Skip)
Recherche directe
(désigne une piste spécifique de lecture)
Lecture répétitive
Lecture au hasard
Lecture programmée
(lecture des pistes dans un ordre prédéterminé)
Visualisation des données du disque
Sound Retriever
Pure Audio
SACD/CD
1 Certaines options de disques ou fichiers peuvent ne pas fonctionner, même s’ils sont indiqués [] dans le tableau.
2 Voir également
3 • Les fichiers AAC peuvent être lus uniquement sur le modèle PD-30.
• Voir également
4 Voir également
5 Cette fonction est activée uniquement pendant la lecture de fichiers enregistrés sur disque.
6 Disques SACD hybrides uniquement.
Lecture des disques CD-R/CD-RW
Formats de fichiers pouvant être lus
Lecture de disques DSD
à la page 12.
SACD CD-DA
––
––
–– –
à la page 12.
à la page 12.
CD-R/-RW
6
–––
WMA
2
MP3
3
AAC
5
DSD
4
English
DeutschFrançais
Italiano Español Русский
Nederlands
11
Fr
Page 26
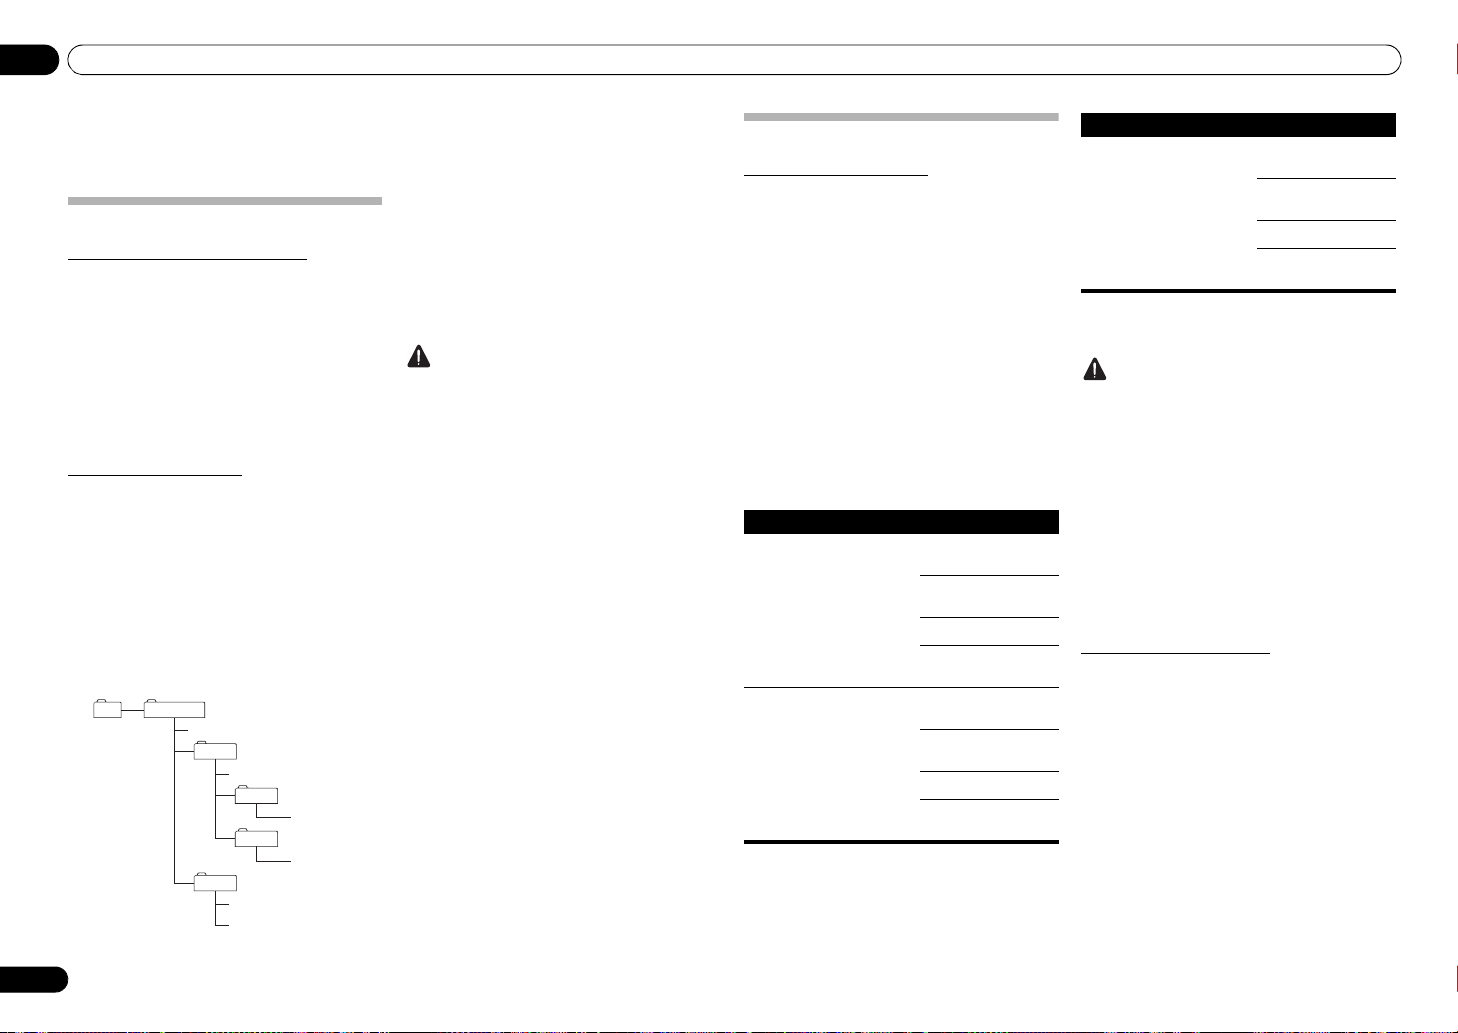
Informations complémentaires06
Chapitre 6:
Informations complémentaires
• Un dossier peut contenir 150 fichiers maximum.
Disque pouvant être lu
Lecture des disques CD-R/CD-RW
• Cette unité peut lire des disques CD-R/CD-RW
enregistrés avec un format de musique CD ou des
données au format WMA et MP3. Toutefois,
certains disques ne peuvent pas être lus ou
peuvent émettre du bruit ou déformer les sons.
• Cette unité est destinée à la lecture uniquement.
Elle n’enregistre pas de données sur les disques
CD-R/CD-RW.
• En conséquence, les disques CD-R/CD-RW qui
n’ont pas été finalisés ne peuvent pas être lus sur
cette unité. Pour de plus amples informations,
consultez les instructions de votre enregistreur
disque.
Lecture de disques DSD
Cette unité peut lire les fichiers de disques DSD
enregistrés en format fichier DSF.
Fichiers pouvant être lus
• Disques enregistrés: DVD-R/-RW
• Extension de fichier: .dsf
• Nom du dossier: DSD_DISC
• Capacité: 4 Go maximum par fichier
• Audio: 2 canaux
• Fréquence d’échantillonnage: 2,8224 MHz
Exemple de composition de dossier
L’ordre de lecture des fichiers/dossiers ne se fait pas
dans l’ordre alphabétique. Les fichiers sont lus dans
l’ordre dans lequel ils ont été enregistrés sur le disque.
Root DSD_DISC
File01.dsf
FolderA
File02.dsf
FolderB
File03.dsf
FolderC
File04.dsf
FolderD
File05.dsf
File06.dsf
• Un disque peut contenir 200 dossiers maximum.
• Un dossier ne peut contenir que 8 couches
maximum.
• Les noms de fichiers utilisant des polices d’écriture
Japonaises et autres polices de symboles peuvent
ne pas s’afficher correctement.
• Tous les fichiers qui ne sont pas au format DSF
seront ignorés.
Attention
• Il est possible que certains fichiers ne puissent pas
être lus.
• Les disques contenant un grand nombre de fichiers
et de dossiers peuvent nécessiter plus de temps
pour lancer la lecture. Dans ce cas, vous pouvez
déplacer les fichiers souhaités directement vers le
dossier DSD_DISC ou limiter le nombre de fichiers
à 20 ou moins.
Opérations pendant une lecture
Les opérations suivantes ne peuvent pas être lues
pendant la lecture d’un disque DSD:
• Recherche directe
• Lecture de fichiers disque d’un type autre que DSF
Écran
Lorsque l’unité est en mode d’arrêt pendant la lecture
d’un disque DSD, l’unité affiche l’indicateur [DSD DISC].
Pendant la lecture, chaque fois que vous appuyez sur le
bouton DISPLAY, l’écran affiche les informations
suivantes:
• Nombre de piste et le temps de lecture écoulé
• Nom du fichier
Formats de fichiers pouvant être lus
Lecture de fichiers audio
Cette unité prend en charge les formats de fichier
suivants.
• Remarque: certains formats de fichier ne sont pas
disponibles à la lecture même s’ils font partie de la
liste des formats de fichier pouvant être lus.
• Si vous essayez de lire des fichiers dont le format
n’est pas pris en charge, le son peut être
intermittent ou accompagné de bruit. Dans ces
cas-là, confirmez que le format du disque est
compatible avec cette unité.
• Les fichiers de musique soumis aux contrôles de
gestion des droits numériques (Digital Rights
Management, DRM) ne peuvent pas être lus. La
protection DRM anti-copie est une technologie
destinée à protéger les droits d’auteur. Pour
empêcher toute copie illégale, DRM limite la
lecture à l’enregistreur disque ou l’ordinateur
utilisés initialement pour l’enregistrement de la
musique. Pour de plus amples informations,
consultez les instructions d’utilisation ainsi que les
fichiers d’aide de l’appareil ou de l’application
utilisés pendant l’enregistrement initial.
Catégorie Extension
1
MP3
WMA .wma
.mp3
Flux
MPEG-1/2
Audio
Layer-3
WMA2/7/
8/9
Fréquence
d’échantillonnage
Quantification
débit binaire
Canal 2 c
Débit
binaire
Fréquence
d’échantillonnage
Quantification
débit binaire
Canal 2 c
Débit binaire 32 kbps à
8kHz à
48 kHz
16 bit
8kbps à
320 kbps
22,05 kHz
à 48 kHz
16 bit
192 kbps
Catégorie Extension
2
AAC
1. “Technologie de décodage audio MPEG Layer-3 sous
licence de Fraunhofer IIS et de Thomson multimedia.”
2.
PD-30 uniquement.
Attention
• Il peut s’avérer impossible de lire tous les disques
CD-R/CD-RW enregistrés sur un enregistreur CD
ou un ordinateur en raison des caractéristiques du
disque, des rayures ou des impuretés sur le disque
ou des impuretés ou condensation sur la lentille
laser du lecteur.
• Les disques enregistrés sur un ordinateur peuvent
ne pas être lus sur cette unité en raison des
réglages de l’application ou de l’environnement de
l’ordinateur. Enregistrez toujours vos disques à
l’aide du format approprié (pour de plus amples
informations, consultez le distributeur de votre
application).
• Les disques en format d’écriture en paquets ne
peuvent pas être lus sur cette unité.
• Les disques CD-R/CD-RW qui n’ont pas été
finalisés ne peuvent pas être lus sur cette unité.
.m4a
Flux
MPEG-4
AAC LC
MPEG-4
HE AAC
(AAC Plus
v1/2)
Fréquence
d’échantillonnage
Quantification
débit binaire
Canal 2 c
Débit binaire 8 kbps à
8kHz à
48 kHz
16 bit
320 kbps
Lecture des fichiers WMA
• Utilisez des disques enregistrés selon les normes
compatibles aux systèmes de fichier CD-ROM
(ISO9660 niveaux 1 et 2), ainsi que ceux
compatibles à un format étendu (Joliet, Romeo).
• Cette unité ne prend pas en charge les disques
enregistrés avec un débit binaire variable (VBR) ou
avec un codage sans pertes.
• Cette unité ne prend pas en charge les disques
multi-session.
• Un nombre total de 648 dossiers et pistes peuvent
être reconnues et lues. Sur ce nombre, le nombre
maximum de dossiers est de 299. Toutefois, en
fonction de la composition du dossier, certains
dossiers et pistes ne seront pas reconnus ni lus.
12
Fr
Page 27

Informations complémentaires 06
• Lorsque vous utilisez des fichiers WMA,
assurez-vous qu’ils ont été encodés à l’aide
d’applications vérifiées et validées par Microsoft
Corporation. Si des applications non validées sont
utilisées, l’unité peut ne pas fonctionner
correctement.
Lecture des fichiers MP3
• Utilisez des disques enregistrés selon les normes
compatibles aux systèmes de fichier CD-ROM
(ISO9660 niveaux 1 et 2), ainsi que ceux
compatibles à un format étendu (Joliet, Romeo).
• Cette unité ne prend pas en charge le débit binaire
variable (VBR); même si les fichiers peuvent être
lus, le temps indiqué sur l’écran du panneau avant
sera incorrect en raison du changement de , avec
un changement plus rapide ou plus lent que les
valeurs temporelles correctes.
• Cette unité ne prend pas en charge les disques
multi-session.
• Un nombre total de 648 dossiers et pistes peuvent
être reconnues et lues. Sur ce nombre, le nombre
maximum de dossiers est de 299. Toutefois, en
fonction de la composition du dossier, certains
dossiers et pistes ne seront pas reconnus ni lus.
• Pour une qualité sonore optimale, un débit de bit de
128 kbps ou plus sont recommandés pour les
enregistrements.
MPEG-4 Lecture de fichiers AAC
• AAC est l’acronyme de “Advanced Audio Coding
(Codage audio avancé),” le format de base de la
technologie de compression audio utilisée dans
MPEG-2 et MPEG-4.
• Cette unité prend en charge la lecture de fichiers
AAC avec l’extension “.m4a,” tels que codés par
iTunes®. Toutefois, la lecture peut s’avérer
impossible si les fichiers sont protégés par DRM.
Elle dépend en outre de la version de codage
iTunes.
• iTunes est une marque commerciale d’Apple Inc.,
enregistrées aux États-Unis et dans d’autres pays.
Précautions à prendre pour
l’utilisation
Déplacement du lecteur
Lorsque vous déplacez cette unité, procédez toujours
comme suit; Enlevez les disques du tiroir-disque et
fermez-le. Appuyez sur le bouton /I STANDBY/ON
pour afficher [-OFF-] sur l’écran du panneau avant et
attendez dix secondes avant de déconnecter le cordon
d’alimentation. L’unité risque de subir des dommages
ou de ne pas fonctionner correctement si elle est
déplacée avec des disques dans le tiroir-disque.
Emplacement d’installation
Sélectionnez un endroit stable près du poste de
télévision et du système AV auxquels l’unité est
connectée.
Ne placez pas le lecteur sur un poste de télévision ou un
écran en couleur. Tenez-le à l’écart des platines à
cassettes ou de tout autre composant qui subissent
l’effet du magnétisme.
Ne pas placer dans les endroits suivants:
• Endroits éclairés par la lumière du jour
• Endroits humides ou mal ventilés
• Endroits particulièrement chauds ou froids
• Endroits soumis aux vibrations
• Endroits particulièrement poussiéreux ou remplis
de fumée de cigarettes
• Endroits exposés à la suie, la vapeur ou la chaleur
(dans les cuisines par exemple)
Ne pas installer l’unité sur un divan ou tout autre objet/
matériau ayant des caractéristiques absorbantes sous
risque d’affecter la qualité du son.
Ne pas placer d’objets sur l’unité
Ne pas placer d’objets sur le lecteur.
Tenir à l’écart de la chaleur
Ne pas placer le lecteur sur un amplificateur ou tout
autre appareil émettant de la chaleur. Lors d’une
installation dans un rack afin d’éviter la chaleur émise
par l’amplificateur et les autres appareils, placez l’unité
sur une étagère sous l’amplificateur dans la mesure du
possible.
Mettez l’unité hors tension lorsque le
lecteur n’est pas utilisé
En fonction des conditions des signaux télévision, des
motifs zébrés peuvent apparaître à l’écran lorsque la
télévision est mise sous tension alors que le lecteur est
mis sous tension. Il ne s’agit pas de dysfonctionnement
du lecteur ni de la télévision. Si cette situation se
présente, mettez le lecteur hors tension. Il est également
possible que vous entendiez des grésillements de radio.
Condensation
Si le lecteur est déplacé soudainement d’une pièce
froide dans une pièce chaude (en hiver, par exemple) ou
si la température dans la pièce où est installé le lecteur
augmente soudainement à cause du chauffage, etc.,
des gouttelettes d’eau (condensation) peuvent se former
(sur les pièces fonctionnelles et l’objectif). En cas de
condensation, le lecteur ne fonctionne pas
correctement et la lecture est impossible. Laissez le
lecteur dans la pièce à une température pendant 1 ou 2
heures sous tension (la durée dépend de l’importance
de la condensation). Les gouttelettes se dissipent et la
lecture est à nouveau possible.
La condensation peut également se produire en été si le
lecteur est exposé à l’air d’un climatiseur. Si cette
situation se présente, déplacez le lecteur.
Nettoyage du lecteur
En principe, il suffit de passer un chiffon doux. Pour les
impuretés tenaces, appliquez un chiffon imprégné d’un
détergent neutre dilué dans 5/6 d’eau, rincez bien,
nettoyez les impuretés puis passez un chiffon sec.
Ne pas utiliser d’alcool, de diluant, d’essence ni
d’insecticide sur le lecteur sous risque de détacher
l’impression et le revêtement. Ne pas laisser d’articles
en caoutchouc ou vinyle entrer en contact avec le
lecteur pendant de longues périodes sous risque
d’endommager l’armoire.
Si vous utilisez des serviettes imprégnées d’agents
chimiques, consultez les précautions à prendre des
serviettes.
Débranchez le câble d’alimentation de la prise
électrique lorsque vous nettoyez le lecteur.
Précautions à prendre lorsque l’unité est
dotée dans un rack avec une porte vitrée
N’appuyez pas sur OPEN/CLOSE de la télécommande
pour ouvrir le tiroir-disque alors que la porte vitrée est
fermée. La porte bloquera le mouvement du tiroir-disque
et l’unité pourrait subir des dommages.
Nettoyage de l’objectif de prise de vue
L’objectif du lecteur ne devrait pas se salir lors dune
utilisation normale, mais si, pour une raison
quelconque, des poussières ou saletés perturbent son
fonctionnement, consultez un centre d’entretien agréé
par Pioneer. Bien que des agents de nettoyage pour
lecteurs soient disponibles dans le commerce, nous
recommandons de ne pas les utiliser puisque certains
d’entre eux peuvent endommager l’objectif.
Manipulation des disques
N’utilisez pas de disques endommagés (craquelés ou
fendus).
Ne rayez pas la surface de signal du disque et veillez à ce
qu’elle soit toujours propre.
Ne placez pas plusieurs disques dans le lecteur à la fois.
Ne collez pas de papier, n’apposez pas d’autocollant et
n’utilisez pas de crayon, stylo à bille ou tout autre
instrument d’écriture pointu. Ces instruments
pourraient endommager le disque.
Stockage des disques
Placez toujours les disques dans leur boîtier que vous
posez verticalement en évitant les endroits exposés à
des températures élevées ou à l’humidité, à la lumière
directe du soleil ou à des températures particulièrement
basses.
Prenez toujours connaissance des mises en garde
incluses avec le disque.
Nettoyage des disques
Il peut s’avérer impossible de lire un disque couvert
d’empreinte ou de poussière. Dans ce cas, en vous
servant d’un chiffon propre par exemple, nettoyez
soigneusement le disque en commençant par le centre
en direction du bord externe. N’utilisez pas de chiffon de
nettoyage sale.
N’utilisez pas d’essence, de diluant ou d’autres produits
chimiques volatiles. N’utilisez pas de vaporisateurs pour
disques ni d’agents antistatiques.
Pour les impuretés tenaces, imbibez légèrement d’eau
un chiffon doux, rincez bien, nettoyez les impuretés puis
passez un chiffon sec pour absorber l’humidité.
Disques au format particulier
Vous ne pouvez pas utiliser de disques au format
particulier, tels que les disques en forme de cœur,
hexagonaux, etc. N’utilisez jamais ces disques qui
endommageront le lecteur.
Condensation sur les disques
Si le disque est brutalement déplacé d’un endroit froid
vers un endroit chaud (comme en hiver par exemple),
des gouttelettes d’eau (condensation) peuvent se former
sur la surface du disque. Vous ne pourrez pas lire les
disques correctement s’il y a de la condensation sur leur
surface. Nettoyez bien les gouttelette d’eau de la surface
du disque avant de l’utiliser.
English
DeutschFrançais
Italiano Español Русский
Nederlands
13
Fr
Page 28

Informations complémentaires06
Guide de dépannage
Des opérations incorrectes sont souvent interprétées comme des anomalies et des dysfonctionnements. Si vous
pensez que l’appareil ne fonctionne pas correctement, vérifiez les points suivants. Parfois, l’anomalie est causée par
un autre appareil. Vérifiez les autres composants et les appareils électriques utilisés. Si les vérifications ci-dessous
ne vous permettent pas de trouver une solution au problème, consultez le service après-vente agréé par Pioneer ou
le distributeur afin de faire réparer l’appareil.
• Si l’unité ne fonctionne pas correctement en raison d’effets extérieurs, tels que l’électricité statique, débranchez
la fiche de la prise et rebranchez pour que l’appareil puisse fonctionner dans des conditions normales.
Anomalie Action corrective
La lecture du disque est impossible ou
le disque est éjecté immédiatement
après son chargement.
Impossible de lire les disques CD-R/-RW.
Impossible de lire les fichiers en
format WMA/MP3 ou AAC (PD-30
uniquement).
Impossible de faire fonctionner la
télécommande.
Les réglages sont supprimés. • Si le cordon d’alimentation est déconnecté avec force ou s’il y a une coupure de
Absence de sons ou sons déformés. • Assurez-vous que toutes les interconnexions sont insérées à fond (page 5).
Il existe une différence notable de
niveau sonore entre les SACD et les
CD.
• Assurez-vous que le disque est en place la face portant l’étiquette orientée vers le
haut et correctement aligné au guide du tiroir-disque (page 8).
• Assurez-vous que le disque est propre et qu’il n’est pas endommagé (page 13).
•
De la condensation s’est formée à l’intérieur du lecteur: Attendez que la condensation
se soit évaporée. Évitez d’utiliser le lecteur près d’un climatiseur (page 13)
• Le plateau porte-disque s’ouvre si un disque non compatible est chargé (page 4).
• Certains CD-R/-RW enregistrés sur un ordinateur ne peuvent pas être lus.
• Les types de fichiers suivants ne sont pas pris en charge:
- Fichiers avec protection anti-copie DRM
- Disques enregistrés non conformes au format ISO9660
- Fichiers non enregistrés à une fréquence d’échantillonnage de 44,1 kHz
- Fichier WMA enregistrés avec un débit binaire variable (VBR) ou avec un codage
sans pertes.
• Remplacez les piles (page 4).
• Utilisez à moins de 7 m, 30° du capteur de télécommande du panneau avant (page 4).
• Éliminez tout obstacle ou utilisez dans une autre position.
• Ne pas exposer le télécapteur du panneau avant à la lumière directe.
• Le cordon de commande d’un composant est connecté incorrectement ? S’assurer
que les connexions sont correctes (page 5).
courant alors que l’unité est sous tension, les réglages effectués peuvent être
supprimés. Pour déconnecter le cordon d’alimentation, appuyez d’abord sur le bouton
de la télécommande
l’écran du panneau avant; débranchez ensuite le cordon. Des précautions
particulières doivent être prises lorsque le cordon d’alimentation de l’unité est
connecté à la prise d’un autre composant dans la mesure où la mise hors tension de
l’autre composant peut déconnecter simultanément l’alimentation à cette unité. Dans
la mesure du possible, branchez le cordon d’alimentation à une prise murale.
• Assurez-vous que les fiches et les bornes sont propres, quelles ne sont pas oxydées,
etc.; le cas échéant, nettoyez-les. Assurez-vous également que les câbles ne sont pas
endommagés.
• Vérifiez que le disque n’est pas endommagé et qu’il est exempt de poussières et de
saletés.
• L’unité est réglée sur “pause” ? Appuyez sur le bouton .
• Contrôlez les réglages de l’amplificateur ou du récepteur (niveau de sortie, source,
enceintes choisies, etc.).
• Assurez-vous que la sortie du lecteur n’est pas reliée à l’entrée phono (platine) de
l’amplificateur.
• Cela tient aux différences des formats audio et n’est pas la conséquence d’une
anomalie.
STANDBY/ON
et attendez que le message [-OFF-] s’efface de
.
Anomalie Action corrective
Entre les pistes d’un disque SACD,
l’écran de l’unité principale indique
[--:--].
Les signaux audio analogiques sont
corrects mais les signaux audio
numériques ne semblent pas
présents.
Ce dispositif de stockage USB n’est
pas reconnu.
Un dispositif de stockage USB est
connecté et affiché mais les fichiers
audio stockés sur le dispositif USB ne
peuvent pas être lus.
La reconnaissance d’un dispositif de
stockage USB peut prendre du temps.
Le dispositif de stockage USB n’est
pas alimenté.
Les fichiers musicaux sont lus bien
qu’ils ne soient pas enregistrés sur le
périphérique de stockage USB.
Impossible de faire fonctionner l’iPod/
iPhone/iPad.
L’iPod/iPhone/iPad n’est pas alimenté. • Lorsque la fonction Pure Audio est activée, l’alimentation n’est pas fournie aux ports
L’iPod/iPhone/iPad n’émet aucun son. • Le haut-parleur de l’iPod/iPhone/iPad émet le son? Mettez l’unité hors tension puis
• Cet affichage apparait en fonction du disque.
• Vérifiez que la fonction Pure Audio est désactivée (page 11).
• L’audio des disques SACD et DSD ou provenant d’un iPod, ne peut pas être
transformé en format numérique. Utilisez les bornes
(page 5).
• Connectez bien le dispositif (à fond) (page 10).
• Cette unité ne prend pas en charge les concent rateurs USB. Connectez directement
le dispositif de stockage USB.
• Certains dispositifs de stockage USB ne sont pas reconnus. Mettez d’abord hors
tension puis sous tension.
• Cette unité prend uniquement en charge les dispositifs de stockage de masse USB.
• Seuls les systèmes de fichiers FAT16 et FAT32 sont pris en charge. Autres systèmes
de fichiers (par ex. FAT, NTFS, etc.) ne sont pas prises en charge.
• Cette unité ne prend pas en charge les lecteurs de disques durs externes.
• Les fichiers audio protégés par des droits d’auteur qui sont stockés sur le dispositif
USB ne peuvent pas être lus. Toute tentative d’importation de données musicales
depuis un CD, etc. vers un ordinateur peut activer la protection anti-copie, en fonction
des réglages.
• Voir la liste des format de fichiers ne pouvant pas être lus sur cette unité.
• Le chargement de données avec des dispositifs de stockage USB de grande
capacité connectés peut prendre du temps (parfois plusieurs minutes).
• Lorsque la fonction Pure Audio est activée, l’alimentation n’est pas fournie aux ports
USB
(page 11).
• Un message d’erreur s’affiche sur l’écran du panneau avant? (page 7)
- Mettez d’abord hors tension puis sous tension (page 8).
- Mettez hors tension puis déconnectez et reconnectez le dispositif de stockage USB
(page 10).
- Appuyez sur
USB. (Lorsque le mode USB est réactivé) (page 7).
• Confirmez si un dossier cache est enregistré sur le périphérique. Les dossiers
cachés seront lus.
• Assurez-vous que votre iPod/iPhone/iPad est connecté correctement (voir
de l’iPod/iPhone/iPad (PD-30 uniquement)
l’iPod/iPhone/iPad puis de reconnecter.
• Assurez-vous que votre iPod/iPhone/iPad est pris en charge par cette unité (page9).
• Si l’iPod/iPhone/iPad raccroche, réglez-le à nouveau et reconnectez-le à l’unité.
USB
• Un message d’erreur s’affiche sur l’écran du panneau avant? Mettez hors tension
puis déconnectez et reconnectez l’iPod/iPhone/iPad.
sous tension. Après avoir réglé le mode sur iPod, connectez l’iPod/iPhone/iPad.
• L’audio n’est pas délivrée des terminaux
(page 9).
FUNCTION
pour passer à l’autre mode, repassez ensuite au mode
ANALOG OUT
à la page 9). Essayez de déconnecter
DIGITAL OUT
pour ces médias
Lecture
.
14
Fr
Page 29

Informations complémentaires 06
English
Spécifications
Généralités
Système. . . . . . . . . . . . . . . . . . . Lecteur Super Audio CD
Alimentation . . . . . . . . . . CA 220 V à 240 V , 50 Hz/60 Hz
Consommation
PD-30 . . . . . . . . . . . . . . . . . . . . . . . . . . . . . . . . . . .37 W
PD-10 . . . . . . . . . . . . . . . . . . . . . . . . . . . . . . . . . . .20 W
Consommation en veille . . . . . . . . . . . . . . . . . . . . 0,45 W
Poids
PD-30 . . . . . . . . . . . . . . . . . . . . . . . . . . . . . . . . . . 5,6 kg
PD-10 . . . . . . . . . . . . . . . . . . . . . . . . . . . . . . . . . . 5,2 kg
Dimensions
. . . . . . . . . . . . . . 435 mm (L) x 128 mm (H) x 329 mm (P)
Température de fonctionnement . . . . . . +5 °C à +35 °C
Humidité ambiante . . . . . . . . . . . . . . . . . . . . . 5 % à 85 %
Sortie audio (1 paire stéréo)
Niveau de sortie . . . . . . . . . . . . . Pendant la sortie audio
Nombre de voies . . . . . . . . . . . . . . . . . . . . . . . . . . . . . . . 2
Prise . . . . . . . . . . . . . . . . . . . . . . . . . . . . . . . . . . . . . . RCA
Caractéristiques audio numériques
Réponse fréquence
CD. . . . . . . . . . . . . . . . . . . . . . . . . . . . . . .2 Hz à 20 kHz
SACD . . . . . . . . . . . . . . . . . . . . . . . . . . . .2 Hz à 50 kHz
Rapport signal sur bruit
CD. . . . . . . . . . . . . . . . . . . . . . . . . . . . . . . . . . . . 117 dB
SACD . . . . . . . . . . . . . . . . . . . . . . . . . . . . . . . . . 117 dB
Plage dynamique
CD. . . . . . . . . . . . . . . . . . . . . . . . . . . . . . . . . . . . 100 dB
SACD . . . . . . . . . . . . . . . . . . . . . . . . . . . . . . . . . 108 dB
Distorsion harmonique totale:
CD. . . . . . . . . . . . . . . . . . . . . . . . . . . . . . . . . . .0,0022 %
SACD . . . . . . . . . . . . . . . . . . . . . . . . . . . . . . . .0,0020 %
Pleurage et scintillement. . . . Limite du seuil de mesure
(±0,001 % crête, pondéré) ou inférieur
Sortie numérique
Sortie numérique optique . . . Borne numérique optique
Sortie numérique coaxiale. . . . . . . . . . . . . . . .Borne RCA
Accessoires
Câble audio RCA (fiches rouges/blanches). . . . . . . . . . 1
Télécommande. . . . . . . . . . . . . . . . . . . . . . . . . . . . . . . . . 1
Piles sèches AAA/IEC R03. . . . . . . . . . . . . . . . . . . . . . . . 2
Cordon d’alimentation
Cartes de garantie (modèles européens uniquement)
Mode d’emploi (ce document)
(sans condensation)
200 mVrms (1 kHz, –20 dB)
Remarque
• Les caractéristiques et la présentation peuvent être
modifiées, sans avis préalable, dans un souci
d’amélioration.
• Les noms d’entreprise et de produit mentionnés
dans les présentes sont des marques de commerce
ou des marques déposées de leur propriétaire
respectif.
DeutschFrançais
Italiano Español Русский
Nederlands
© 2012 PIONEER CORPORATION.
Tous droits de reproduction et de traduction réservés.
15
Fr
Page 30
Wir danken lhnen für den Kauf dieses Pioneer-Produkts.
Lesen Sie sich bitte diese Bedienungsanleitung durch. Dann wissen Sie, wie Sie lhr Gerät richtig bedienen. Bewahren Sie sie an einem sicheren Platz auf, um
auch zukünftig nachschlagen zu können.
WICHTIG
CAUTION
RISK OF ELECTRIC SHOCK
DO NOT OPEN
Das Blitzsymbol in einem Dreieck weist den
Benutzer darauf hin, dass eine
Berührungsgefahr mit nicht isolierten Teilen
im Geräteinneren, die eine gefährliche
Spannung führen, besteht. Die Spannung
kann so hoch sein, dass sie die Gefahr eines
elektrischen Schlages birgt.
ACHTUNG:
UM SICH NICHT DER GEFAHR EINES
ELEKTRISCHEN SCHLAGES
AUSZUSETZEN, DÜRFEN SIE NICHT DEN
DECKEL (ODER DIE RÜCKSEITE)
ENTFERNEN. IM GERÄTEINNEREN
BEFINDEN SICH KEINE VOM BENUTZER
REPARIERBAREN TEILE. ÜBERLASSEN SIE
REPARATUREN DEM QUALIFIZIERTEN
KUNDENDIENST.
Informationen für Anwender zur Sammlung und Entsorgung von Altgeräten und
gebrauchten Batterien
Symbol für
Geräte
Symbolbeispiele
für Batterien
Pb
Diese Symbole auf den Produkten, der Verpackung und/oder Begleitdokumenten
bedeuten, dass gebrauchte elektrische und elektronische Produkte und Batterien
nicht über den Haushaltsmüll entsorgt werden dürfen.
Zur richtigen Handhabung, Rückgewinnung und Wiederverwertung von Altprodukten
und gebrauchten Batterien bringen Sie diese bitte zu den gemäß der nationalen
Gesetzgebung dafür zuständigen Sammelstellen.
Mit der korrekten Entsorgung dieser Produkte und Batterien helfen Sie dabei,
wertvolle Ressourcen zu schonen und vermeiden mögliche negative Auswirkungen
auf die Gesundheit und die Umwelt, die durch eine unsachgemäße Behandlung des
Abfalls entstehen könnten.
Weitere Informationen zur Sammlung und Wiederverwertung von Altprodukten und
Batterien erhalten Sie von Ihrer örtlichen Gemeindeverwaltung, Ihrem Müllentsorger
oder dem Verkaufsort, an dem Sie die Waren erworben haben.
Diese Symbole gelten ausschließlich in der Europäischen Union.
Für Länder außerhalb der Europäischen Union:
Wenn Sie diese Gegenstände entsorgen wollen, wenden Sie sich bitte an Ihre
lokalen Behörden oder Händler und fragen Sie dort nach der korrekten
Entsorungsweise.
Ein Ausrufezeichen in einem Dreieck weist
den Benutzer auf wichtige Bedienungs- und
Wartungsanweisungen in den Dokumenten
hin, die dem Gerät beiliegen.
D3-4-2-1-1_A1_De
K058a_A1_De
WARNUNG
Dieses Gerät ist nicht wasserdicht. Zur Vermeidung der
Gefahr von Brand und Stromschlag keine Behälter mit
Flüssigkeiten (z.B. Blumenvasen und -töpfe) in die
Nähe des Gerätes bringen und dieses vor Tropfwasser,
Spritzwasser, Regen und Nässe schützen.
D3-4-2-1-3_A1_De
WARNUNG
Vor dem erstmaligen Anschluss des Gerätes an das
Stromnetz bitte den folgenden Hinweis sorgfältig
beachten.
Die Netzspannung ist je nach Land verschieden.
Vor der Inbetriebnahme des Gerätes sicherstellen,
dass die örtliche Netzspannung mit der auf dem
Typenschild an der Rückwand des Gerätes
angegebenen Nennspannung (z.B. 230 V oder 120
V) übereinstimmt.
D3-4-2-1-4*_A1_De
VORSICHTSHINWEIS ZUR BELÜFTUNG
Bei der Aufstellung dieses Gerätes muss für einen
ausreichenden Freiraum gesorgt werden, um eine
einwandfreie Wärmeabfuhr zu gewährleisten
(mindestens 10 cm oberhalb des Gerätes, 10 cm hinter
dem Gerät und jeweils 10 cm an der Seite des Gerätes).
WARNUNG
Im Gerätegehäuse sind Ventilationsschlitze und andere
Öffnungen vorgesehen, die dazu dienen, eine
Überhitzung des Gerätes zu verhindern und einen
zuverlässigen Betrieb zu gewährleisten. Um
Brandgefahr auszuschließen, dürfen diese Öffnungen
auf keinen Fall blockiert oder mit Gegenständen (z.B.
Zeitungen, Tischdecken und Gardinen) abgedeckt
werden, und das Gerät darf beim Betrieb nicht auf
einem dicken Teppich oder Bett aufgestellt sein.
D3-4-2-1-7b*_A1_De
Page 31

Betriebsumgebung
Betriebstemperatur und Betriebsluftfeuchtigkeit:
+5 °C bis +35 °C, 85 % rel. Feuchte max.
(Ventilationsschlitze nicht blockiert)
Eine Aufstellung dieses Gerät an einem unzureichend
belüfteten, sehr feuchten oder heißen Ort ist zu
vermeiden, und das Gerät darf weder direkter
Sonneneinstrahlung noch starken Kunstlichtquellen
ausgesetzt werden.
Falls der Netzstecker des Netzkabels dieses Gerätes
nicht in die Zusatzsteckdose einer anderen
Komponente passt, muss er gegen einen Netzstecker
der geeigneten Ausführung ausgewechselt werden.
Ein derartiger Austausch des Netzsteckers muss vom
Kundendienstpersonal vorgenommen werden. Wenn
der vom Netzkabel abgeschnittene ursprüngliche
Netzstecker in eine Netzsteckdose eingesteckt wird,
besteht akute Stromschlaggefahr! Daher ist
unbedingt dafür zu sorgen, dass der abgeschnittene
Netzstecker sofort vorschriftsmäßig entsorgt wird.
Vor einem längeren Nichtgebrauch des Gerätes,
beispielsweise während des Urlaubs, sollte der
Netzstecker aus der Netzsteckdose gezogen werden,
um das Gerät vollständig vom Netz zu trennen.
ACHTUNG
Der /I STANDBY/ON-Schalter dieses Gerätes
trennt das Gerät nicht vollständig vom Stromnetz. Um
das Gerät vollständig vom Netz zu trennen, muss der
Netzstecker aus der Netzsteckdose gezogen werden.
Daher sollte das Gerät so aufgestellt werden, dass
stets ein unbehinderter Zugang zur Netzsteckdose
gewährleistet ist, damit der Netzstecker in einer
Notsituation sofort abgezogen werden kann. Um
Brandgefahr auszuschließen, sollte der Netzstecker
vor einem längeren Nichtgebrauch des Gerätes,
beispielsweise während des Urlaubs, grundsätzlich
von der Netzsteckdose getrennt werden.
D3-4-2-1-7c*_A1_De
D3-4-2-2-1a_A1_De
D3-4-2-2-2a*_A1_De
Dieses Gerät ist für den Heimgebrauch vorgesehen.
Falls bei Einsatz zu einem anderem Zweck (z.B.
Langzeitgebrauch zu gewerblichen Zwecken in einem
Restaurant oder Betrieb in einem Fahrzeug bzw.
Schiff) eine Funktionsstörung auftritt, die eine
Reparatur des Gerätes erforderlich macht, werden
die Reparaturkosten dem Kunden selbst dann in
Rechnung gestellt, wenn die Garantiefrist noch nicht
abgelaufen ist.
K041_A1_De
VORSICHT MIT DEM NETZKABEL
Fassen Sie das Netzkabel immer am Stecker. Ziehen Sie
nicht am Kabel selbst, und fassen Sie das Netzkabel
niemals mit nassen Händen an, da dies einen
Kurzschluss oder elektrischen Schlag verursachen kann.
Stellen Sie nicht das Gerät, Möbelstücke o.ä. auf das
Netzkabel; sehen Sie auch zu, dass es nicht eingeklemmt
wird. Machen Sie niemals einen Knoten in das Netzkabel,
und binden Sie es nicht mit anderen Kabeln. Das
Netzkabel sollte so gelegt werden, dass niemand darauf
tritt. Ein beschädigtes Netzkabel kann einen Brand oder
elektrischen Schlag verursachen. Prüfen Sie das
Netzkabel von Zeit zu Zeit. Sollte es beschädigt sein,
wenden Sie sich an Ihre nächste autorisierte
PIONEER-Kundendienststelle oder Ihren Händler, um
es zu ersetzen.
S002*_A1_De
WARNUNG
Keine Quellen offener Flammen (z.B. eine brennende
Kerze) auf dieses Gerät stellen.
D3-4-2-1-7a_A1_De
ACHTUNG
Bei diesem Gerät handelt es sich zwar um ein
Laserprodukt der Klasse 1, das entsprechend dem
Standard Sicherheit für Laserprodukte IEC
60825-1:2007 klassifiziert ist.
LASER KLASSE 1
D58-5-2-2a_A1_De
Inhalt
01 Bevor Sie beginnen
Wiedergabekompatibilität von
Medienformaten . . . . . . . . . . . . . . . . . . . . . . . . . . 4
Lieferumfang . . . . . . . . . . . . . . . . . . . . . . . . . . . . . 4
Batterien in die Fernbedienung einlegen . . . . . . . .4
Verwendung der Fernbedienung . . . . . . . . . . . . . . .4
02 Anschließen
Analoge Audioausgänge . . . . . . . . . . . . . . . . . . . . 5
Digitale Audioausgänge . . . . . . . . . . . . . . . . . . . .5
Zentrale Steuerung mit anderen
Pioneer-Komponenten (nur PD-30) . . . . . . . . . . . . 5
Anschließen . . . . . . . . . . . . . . . . . . . . . . . . . . . . . 5
03 Bedienelemente und Anzeigen
Fernbedienung . . . . . . . . . . . . . . . . . . . . . . . . . . . 6
Rückwand . . . . . . . . . . . . . . . . . . . . . . . . . . . . . . . 6
Frontplatte. . . . . . . . . . . . . . . . . . . . . . . . . . . . . . . 7
Display an der Frontblende . . . . . . . . . . . . . . . . . . 7
04 Wiedergabe
Wiedergeben von Discs . . . . . . . . . . . . . . . . . . . . . 8
Gerät in den Bereitschaftsmodus umschalten. . . . . 8
Schneller Vorlauf/Rücklauf . . . . . . . . . . . . . . . . . . .8
Sprungfunktion . . . . . . . . . . . . . . . . . . . . . . . . . . . .8
Direktsuche (bestimmten Track zur Wiedergabe
auswählen) . . . . . . . . . . . . . . . . . . . . . . . . . . . . . . .8
Wiederholte Wiedergabe . . . . . . . . . . . . . . . . . . . . .8
Zufällige Wiedergabe. . . . . . . . . . . . . . . . . . . . . . . .8
Programmierte Wiedergabe (Tracks in einer
vorbestimmten Reihenfolge abspielen) . . . . . . . . . .8
Mediumdaten anzeigen. . . . . . . . . . . . . . . . . . . . . .9
iPod/iPhone/iPad-Wiedergabe (nur PD-30) . . . . . . 9
Vergewissern Sie sich, dass das jeweilige iPod/
iPhone/iPad-Modell unterstützt wird . . . . . . . . . . . . 9
Wiedergabe mit iPod/iPhone/iPad. . . . . . . . . . . . . .9
Dateien von USB-Speichergeräten
wiedergeben . . . . . . . . . . . . . . . . . . . . . . . . . . . . 10
05 Erweiterte Funktionen
Wiedergabe mit HiFi-Klang . . . . . . . . . . . . . . . . .11
Sound Retriever. . . . . . . . . . . . . . . . . . . . . . . . . . . 11
Pure Audio . . . . . . . . . . . . . . . . . . . . . . . . . . . . . .11
Wiedergabebereich („Layer“) einer SACD/CD
wechseln . . . . . . . . . . . . . . . . . . . . . . . . . . . . . . . 11
Displaybeleuchtung anpassen. . . . . . . . . . . . . . .11
Automatische Abschaltung (schaltet das Gerät
automatisch in den Bereitschaftsmodus) . . . . . . 11
Wiedergabefunktionen . . . . . . . . . . . . . . . . . . . . 11
06 Zusätzliche Informationen
Abspielbare Medien. . . . . . . . . . . . . . . . . . . . . . . 12
Abspielbare Dateiformate . . . . . . . . . . . . . . . . . . 12
Wichtige Hinweise zum Gebrauch. . . . . . . . . . . . 13
Störungssuche . . . . . . . . . . . . . . . . . . . . . . . . . . 14
Technische Daten . . . . . . . . . . . . . . . . . . . . . . . . 15
Page 32

Bevor Sie beginnen01
Kapitel 1:
Bevor Sie beginnen
• Fernbedienung x1
Wiedergabekompatibilität von
Medienformaten
Folgende Medien können mit diesem Gerät
wiedergegeben werden.
• SACD (Super Audio CD)*
(nur Zweikanalbereich)
•CD
• DSD-Disc
* “Super Audio CD” ist ein eingetragenes Warenzeichen.
Hinweis
• Multikanalbereiche von SACD-Medien können
nicht mit dem Gerät wiedergegeben werden.
• Über die DIGITAL OUT-Anschlüsse des Gerätes
wird kein Ton von SACD- und DSD-Medien sowie
von iPod-/iPhone-/iPad-Geräten wiedergegeben.
• Beim Einschalten des Gerätes wird ein eingelegtes
Medium nicht automatisch wiedergegeben. Daher
ist auch dann keine Uhrzeit-abhängige Wiedergabe
möglich, wenn das Gerät an eine Zeitschaltuhr
angeschlossen ist.
Hinweise zur DualDisc-Wiedergabe
Eine DualDisc ist eine neue, doppelseitige Disc, die auf
einer Seite DVD-Video-, Audioinhalte etc. enthält und auf
der anderen Seite nicht-DVD-Inhalte wie z.B. digitales
Audiomaterial. Die nicht-DVD Audioseite der Disc ist
nicht kompatibel mit den technischen Audiodaten von
CDs und lässt sich deshalb möglicherweise nicht
abspielen. Nähere Informationen zu den technischen
Daten der DualDisc erhalten Sie vom Disc-Hersteller
oder Disc-Einzelhändler.
Nicht abspielbare Medien
•DVD-Video
• DVD-Audio
•CD-G
•Video CD
• DTS CD
Eventuell können auch weitere, nicht oben angegebene
Medien ebenfalls nicht wiedergegeben werden.
Lieferumfang
Überprüfen Sie zuerst, ob die folgenden Teile im Paket
enthalten sind.
• AAA/IEC R03 Trockenbatterien x2
• Cinch-Audiokabel (rote/weiße Stecker) x1
• Netzkabel
• Garantiekarte
• Bedienungsanleitung (dieses Dokument)
Hinweis
• Die Abbildungen in der Bedienungsanleitung
können verändert oder vereinfacht dargestellt
werden, können daher etwas vom tatsächlichen
Aussehen des Gerätes abweichen.
• Vorrangig werden Abbildungen des PD-30
verwendet.
Batterien in die Fernbedienung
einlegen
1 Öffnen Sie den Deckel an der Rückseite.
2 Legen Sie frische Batterien richtig herum
ein; orientieren Sie sich dabei an der Skizze
im Gehäuse.
PD-30
PD-30
PD-10
PD-10
3 Schließen Sie den Deckel an der
Rückseite.
PD-30
Die mit dem Gerät gelieferten Batterien sollen zum
ersten Ausprobieren des Gerätes dienen und erschöpfen
eventuell recht früh. Wir empfehlen den Einsatz von
Alkalibatterien, die deutlich länger halten.
WARNUNG
• Vermeiden Sie Gebrauch und Lagerung von
Batterien unter direkter Sonneneinstrahlung oder
an einem anderen sehr heißen Ort, z.B. im Inneren
eines Fahrzeugs oder in der Nähe eines
Heizkörpers. Dies kann zu Leckage, Überhitzung,
Explosion oder Brand der Batterien führen.
Darüber hinaus kann sich dadurch die
Lebensdauer oder Leistung der Batterien
verringern.
Vorsicht
Eine unsachgemäße Verwendung der Batterien kann zu
Gefährdungen durch Auslaufen oder Explosion führen.
Beachten Sie die folgenden Vorsichtsmaßnahmen:
• Achten Sie beim Einlegen der Batterien darauf,
dass die Federn an den -Kontakten nicht
beschädigt werden.
• Verwenden Sie ausschließlich den angegebenen
Batterietyp. Mischen Sie auch keine frischen
Batterien mit älteren.
• Legen Sie die Batterien richtig herum in die
Fernbedienung ein; orientieren sich dabei an den
Markierungen ( und ).
• Batterien nicht erhitzen, nicht zerlegen, nicht mit
offenen Flammen und Flüssigkeiten in Berührung
kommen lassen.
• Batterien können auch bei identischer Größe und
Form unterschiedliche Spannungen liefern.
Verwenden Sie Batterien unterschiedlichen Typs
nicht gemeinsam.
PD-10
• Damit es nicht zu Beschädigungen durch
ausgelaufene Batterieflüssigkeit kommt, nehmen
Sie die Batterien heraus, wenn Sie das Gerät
längere Zeit (ab einem Monat) nicht benutzen. Falls
Flüssigkeit auslaufen sollte, wischen Sie diese
sorgfältig aus dem Inneren des Gehäuses ab,
anschließend legen Sie frische Batterien ein. Falls
ausgelaufene Batterieflüssigkeit an Ihre Haut
gelangen sollte, spülen Sie diese mit viel Wasser
ab.
• Halten Sie bei der Entsorgung verbrauchter
Batterien die an Ihrem Wohnort gültigen
gesetzlichen Bestimmungen ein.
Verwendung der Fernbedienung
Die Fernbedienung hat bis zu einem Winkel von etwa 30º
eine Reichweite von etwa 7 m vom
Fernbedienungssensor.
30 °
30 °
7 m
Beachten Sie bei Verwendung der Fernbedienung die
folgenden Angaben:
• Vergewissern Sie sich, dass keine Hindernisse
zwischen der Fernbedienung und dem Sensor am
Gerät vorhanden sind.
• Der Fernbedienung arbeitet nicht zuverlässig,
wenn der Fernbedienungssensor am Gerät starker
Sonneneinstrahlung oder Licht einer
Leuchtstofflampe ausgesetzt wird.
• Fernbedienungen verschiedener Geräte können
sich gegenseitig beeinflussen. Vermeiden Sie den
Gebrauch anderer Fernbedienungen in der Nähe
dieses Geräts.
• Wechseln Sie die Batterien aus, wenn die
Reichweite der Fernbedienung merklich nachlässt.
4
De
Page 33

Anschließen 02
Kapitel 2:
Anschließen
Vorsicht
• Schalten Sie das Gerät ab und ziehen Sie den
Netzstecker aus der Steckdose, bevor Sie
Verbindungen herstellen oder verändern.
• Schließen Sie das Netzkabel wieder an, sobald
sämtliche Verbindungen zwischen den
unterschiedlichen Geräten abgeschlossen wurden.
Analoge Audioausgänge
Wenn Sie den analogen Audioausgang des Gerätes an
den analogen Audioeingang eines Verstärkers
anschließen, können Sie Analogklang mit der Leistung
Ihres Verstärkers genießen.
PD-30-Rückwand
Audiokabel (mitgeliefert)
Verstärker
RL
ANALOG
AUDIO INPUT
Digitale Audioausgänge
Bei Bedarf können Sie den digitalen Audioausgang Ihres
Gerätes mit einem AV-Verstärker oder einem digitalen
Aufnahmegerät (CD-Recorder, MD etc.) verbinden.
• Über die DIGITAL OUT-Anschlüsse des Gerätes
wird kein Ton von SACD- und DSD-Medien sowie
von iPod-/iPhone-/iPad-Geräten wiedergegeben.
AV-Verstärker oder
DIGITAL IN
COAXIAL
AV-Verstärker oder
digitales
Aufnahmegerät
KoaxDigitalaudiokabel
(im Handel
erhältlich)
PD-30-Rückwand
Wichtig
Hinweise zum richtigen Umgang mit optischen
Glasfaserkabeln
• Optische Glasfaserkabel dürfen nicht stark
gebogen oder geknickt werden. Rollen Sie optische
Glasfaserkabel zum Lagern so auf, dass sich eine
Spule von mindestens 15 cm Durchmesser ergibt.
• Setzen Sie die Stecker beim Anschluss optischer
Glasfaserkabel sorgfältig an, schieben Sie den
Stecker vollständig ein. Falls Sie Stecker falsch
herum ansetzen und versuchen, den Stecker mit
Gewalt einzustecken, kann sich der Stecker
verformen und verhindern, dass sich der
Verschluss beim Abziehen des Kabels schließt.
Hinweis
• Damit Audiodaten digital ausgegeben werden
können, müssen mit Ihrem Gerät abgespielte CDs
lineare PCM-Signale bei einer Abtastfrequenz bis
44,1 kHz und bis zu 16 Quantisierungsbits zur
Verfügung stellen (je nach angeschlossenen
Komponenten und weiteren Umständen kann es
vorkommen, dass bestimmte Medien nicht
wiedergegeben werden können). Informationen zu
weiteren Dateien finden Sie auf Seite 12.
digitales
Aufnahmegerät
DIGITAL IN
OPTICAL
Optisches Glasfaserkabel
(im Handel erhältlich)
Zentrale Steuerung mit anderen
Pioneer-Komponenten (nur PD-30)
Dieses Gerät und weitere Pioneer-Komponenten mit
CONTROL IN/OUT-Anschlüssen lassen sich über eine
einzige Fernbedienung steuern, die auf den
Fernbedienungssensor des AV-Verstärkers oder anderer
Komponenten gerichtet wird. Auf diese Weise lassen
sich auch Komponenten steuern, die nicht mit einem
Fernbedienungssensor ausgestattet sind oder an
Stellen aufgestellt wurden, die nicht von der
Fernbedienung erreicht werden.
Anderes Pioneer-Gerät mit
CONTROL IN/OUT-Anschlüssen
Fernbedienung für
AV-Verstärker etc.
Fernbedienung auf den
Fernbedienungssensor
des AV-Verstärkers (oder
anderen Gerätes) richten.
Zu anderen PioneerGeräten mit CONTROL
IN-Anschluss
PD-30
Hinweis
• Nutzen Sie handelsübliche Kabel mit MonoKlinkenstecker (ohne Widerstand) zum Anschluss.
• Beim Verbinden der CONTROL IN/OUT-
Anschlüsse müssen für analoge Verbindungen
zusätzlich handelsübliche Audiokabel eingesetzt
werden. Werden ausschließlich die CONTROL IN/
OUT-Anschlüsse verbunden, reicht dies noch nicht
zur vollständigen Steuerung des Systems aus.
• Sobald ein Steuerkabel an den CONTROL IN-
Anschluss des PD-30 angeschlossen wird, lässt
sich das Gerät nicht mehr über den
Fernbedienungssensor des PD-30 steuern
(der Fernbedienungssensor wird automatisch
abgeschaltet).
Anschließen
Wichtig
• Bevor Sie das Netzkabel trennen, müssen Sie den
PD-30 zuvor mit der Taste
Frontblende ausschalten, den PD-10 in den
Bereitschaftsmodus versetzen.
• Vergewissern Sie sich, dass die Anzeige [-OFF-] an
der Frontblende des Gerätes nicht leuchtet, bevor
Sie das Netzkabel trennen. Falls das Netzkabel
getrennt wird, während die Anzeige [-OFF-] nach
wie vor leuchtet, kann es vorkommen, dass die
Einstellungen des Gerätes auf die
Werkseinstellungen zurückgesetzt werden.
• Wenn Sie auf Reisen gehen oder das Gerät eine
längere Zeit über nicht benutzen werden, trennen
Sie stets die Netzleitung von ihrem Anschluss.
Vorsicht
• Verwenden Sie ausschließlich das mit dem Gerät
gelieferten Netzkabel.
• Setzen Sie das mitgelieferte Netzkabel
ausschließlich für die in dieser
Bedienungsanleitung beschriebenen Zwecke ein.
Nachdem Sie sämtliche Verbindungen hergestellt
haben, stecken Sie den Netzstecker in die Steckdose.
PD-30-Rückwand
Zur Steckdose
1 Verbinden Sie das mitgelieferte
Netzkabel mit dem
Rückseite des Gerätes.
2 Stecken Sie den Netzstecker in eine
passende Steckdose.
/I
STANDBY/ON an der
Netzkabel
AC IN
-Anschluss an der
English
DeutschFrançais
Italiano Español Русский
Nederlands
5
De
Page 34

Bedienelemente und Anzeigen03
Kapitel 3:
Bedienelemente und Anzeigen
Fernbedienung
4
PD-30
1
2
3
4
5
6
7
8
9
10
11
1
STANDBY/ON
Schaltet den Verstärker zwischen Bereitschaftsmodus
und Betrieb um.
2 Zifferntasten
Mit diesen Tasten wählen Sie einen bestimmten Titel
(Track) zur Wiedergabe aus. Wählen Sie den
gewünschten Titel mit den Zifferntasten, drücken Sie
dann die ENTER-Taste zur Bestätigung.
3
CLEAR
Mit dieser Taste löschen Sie eine zuvor programmierte
Wiedergabeliste (Seite 8).
PD-10
12
1
9
2
13
14
33
15
4
35
14
37
16
8
12
11
16
10
13
17
18
15
19
20
SETUP
Zum Einstellen der automatischen Abschaltfunktion
(Seite 11).
5
///
Mit diesen Tasten wählen Sie Elemente aus, ändern
Einstellungen und bewegen den Cursor.
ENTER
Mit dieser Taste bestätigen Sie ein ausgewähltes
Element oder eine geänderte Einstellung.
6
iPod MENU
Kommt bei Bedienung des iPod/iPhone/iPad-Menüs
zum Einsatz.
7
Zum Sprung zum Anfang des derzeit abgespielten
Tracks. Wenn Sie zum Anfang des vorherigen
Tracks springen möchten, drücken Sie die Taste
zweimal.
(nur PD-30)
Startet die Wiedergabe. Bei laufender Wiedergabe
zum Anhalten/Fortsetzen der Wiedergabe.
Springt bei laufender Wiedergabe zum Anfang des
nächsten Tracks.
Führt einen schnellen Rücklauf im derzeit
laufenden Track aus. Wenn Sie die Taste beim
schnellen Rücklauf erneut drücken, ändert sich die
Rücklaufgeschwindigkeit in vier Stufen.
Stoppt die Wiedergabe.
Führt einen schnellen Vorlauf im derzeit laufenden
Track aus. Wenn Sie die Taste beim schnellen
Vorlauf erneut drücken, ändert sich die
Vorlaufgeschwindigkeit in vier Stufen.
8
iPod/USB
(PD-30)
USB (PD-10)
Schaltet den Eingang des Gerätes auf iPod oder USB
(Seite 9,10) um.
9
SACD/CD
Schaltet den Eingang des Gerätes auf SACD/CD um. Bei
Hybrid-SACD-Medien ändert sich der
Wiedergabebereich des Mediums (Seite 11), wenn Sie
diese Taste bei gestoppter Wiedergabe drücken.
10
REPEAT
Startet die wiederholte Wiedergabe (Seite 8).
RANDOM
Startet die zufällige Wiedergabe (Seite 8).
PROGRAM
Startet die programmierte Wiedergabe (Seite 8).
11 PURE AUDIO
Mit dieser Taste schalten Sie den „Pure Audio “-Modus
ein. Dieser Modus bietet eine Audiowiedergabe mit
höchster Klangtreue (Seite 11).
12
OPEN/CLOSE
Diese Taste öffnet und schließt die Medienschublade
(Seite 8).
13
ENTER
Mit dieser Taste bestätigen Sie ein ausgewähltes
Element oder eine geänderte Einstellung.
Rückwand
Detaillierte Hinweise zu Anschlüssen finden Sie auf Seite 5.
DIGITAL IN
1 2 3 54
1
CONTROL IN/OUT
(nur PD-30)
DIGITAL OUT (COAXIAL)
2
DIGITAL OUT (OPTICAL)
3
-Anschluss
-Anschluss
-Anschluss
14
DISPLAY
Zeigt unterschiedliche Daten zum Medium an;
beispielsweise verstrichene und restliche Spielzeit
(Seite 9).
15
DIMMER
Zum Ändern der Beleuchtungsintensität von Display
und Anzeigen an der Frontblende des Gerätes (Seite 11).
16
S.RETRIEVER
Zum Umschalten zwischen „Sound Retriever “Einstellungen (Seite 11).
17
AMPLIFIER
Zum Umschalten zwischen Betrieb und Bereitschaft
eines Pioneer-AV-Verstärkers.
18
VOLUME +/–
Mit diesen Tasten stellen Sie die Lautstärke eines
Pioneer-AV-Verstärkers ein.
19
MUTE
Schaltet den Ton eines Pioneer-AV-Verstärkers stumm.
Zum Aufheben der Stummschaltung drücken Sie die
Taste noch einmal.
20
INPUT
Schaltet den Eingang eines Pioneer-AV-Verstärkers um.
(nur PD-10)
(nur PD-10)
(nur PD-10)
(nur PD-10)
PD-30
ANALOG OUT
4
5
AC IN
-Anschluss
-Anschlüsse
6
De
Page 35

Bedienelemente und Anzeigen 03
English
Frontplatte
3 5 6 7 81
2 4
9
1
/I STANDBY/ON
Im eingeschalteten Zustand leuchtet die
Betriebsanzeige in der Mitte der Taste.
• Beim PD-30 schaltet diese Taste den Verstärker aus
und ein.
Zum Einschalten drücken Sie diese Taste bis zum
Einrasten ein.
• Beim PD-10 schaltet diese Taste den Verstärker
zwischen Bereitschaft und Betrieb um.
2
STANDBY
Leuchtet im Bereitschaftsmodus.
3
PURE AUDIO
Leuchtet bei aktiver „Pure Audio“-Funktion (Seite 11).
4 Display an der Frontblende
(Siehe folgende Beschreibung.)
5
Diese Taste öffnet und schließt die Medienschublade
(Seite 8).
6
FUNCTION
Zum Umschalten der Eingangsquelle. Die Quellen
wechseln wie folgt.
DISC iPod*
(nicht angezeigt).
1
*
nur PD-30
7
Stoppt die Wiedergabe.
1
10 12 1311
-Anzeige
-Anzeige
/USB Zurück zum Anfang
PD-30
8
Startet die Wiedergabe. Bei laufender Wiedergabe zum
Anhalten/Fortsetzen der Wiedergabe.
9 Fernbedienungssensor
Empfängt Signale der Fernbedienung (Seite 4).
10
iPod/USB-Port
USB-Port (PD-10)
Zum Anschluss Ihres Apple iPod/iPhone/iPad
(Seite 9) oder zum Anschließen eines USB-Gerätes
(Seite 10).
11 Medienschublade
12
13
Zum Sprung zum Anfang des derzeit abgespielten
Tracks. Wenn Sie zum Anfang des vorherigen
Tracks springen möchten, drücken Sie die Taste
zweimal. Wenn Sie diese Taste gedrückt halten,
wird der laufende Track schnell zurückgespult
(schneller Rücklauf).
• Wenn Sie diese Taste beim schnellen Rücklauf
noch einmal drücken, ändert sich die
Geschwindigkeit des Rücklaufs in vier Stufen.
Springt zum Anfang des nächsten Tracks. Wenn
Sie diese Taste gedrückt halten, wird der laufende
Track schnell vorgespult (schneller Vorlauf).
• Wenn Sie diese Taste beim schnellen Vorlauf noch
einmal drücken, ändert sich die Geschwindigkeit
des Vorlaufs in vier Stufen.
(PD-30)
(Seite 8)
Display an der Frontblende
1 2 4 5 6
1
USB/iPod
Leuchtet bei USB- sowie iPod-/iPhone-/iPadWiedergabe.
2
SACD/CD/DSD
Die Anzeigeleuchten spiegeln den derzeit abgespielten
Medientyp wider.
3
PGM
Leuchtet bei programmierter Wiedergabe (Seite 8).
4
TRK
Leuchtet bei Anzeige der Tracknummer mit
verstrichener oder restlicher Spielzeit.
5
FILE
Leuchtet bei der Anzeige eines Dateinamens.
6
REPEAT
Leuchtet bei wiederholter Wiedergabe (Seite 8).
7
RANDOM
Leuchtet bei zufälliger Wiedergabe (Seite 8).
8
ALL
Leuchtet bei Medium-wiederholen-Wiedergabe (Seite 8).
9
TOTAL
Leuchtet bei der Anzeige der restlichen Spielzeit eines
Mediums.
10
REMAIN
Leuchtet bei der Anzeige der restlichen Spielzeit eines
Tracks oder Mediums.
11
S.RTRV
Leuchtet bei aktiver „Sound Retriever“-Funktion
(Seite 11).
3 7 8 9
1411 12 13
12
SET UP
Leuchtet beim Einstellen der automatischen
Abschaltfunktion (Seite 11).
13
Leuchtet beim schnellen Vorlauf.
Leuchtet beim schnellen Rücklauf.
Leuchtet bei der Wiedergabe.
Leuchtet bei angehaltener Wiedergabe (Pause).
14 Zeichenfeld
10
DeutschFrançais
Italiano Español Русский
Nederlands
De
7
Page 36

Wiedergabe04
Kapitel 4:
Wiedergabe
Die nutzbaren Funktionen variieren je nach Medien- und
Dateityp. In bestimmten Fällen können einige
Funktionen nicht genutzt werden. Siehe
Wiedergabefunktionen
Wiedergeben von Discs
1 Schalten Sie das Gerät mit
der Taste
der Frontblende ein.
• Den PD-30 schalten Sie ein, indem
Sie die Ein-/Austaste bis zum
Einrasten eindrücken.
Frontblende, Seitenansicht
2 Öffnen Sie die
Medienschublade mit
der Taste
das Medium ein.
• Legen Sie das Medium so ein, dass die bedruckte Seite
oben liegt.
3 Starten Sie die
Wiedergabe mit der
Taste
• Zum Anhalten der Wiedergabe drücken Sie die
Taste .
•Mit der Taste stoppen Sie die Wiedergabe.
Hinweis
• Die Schritte 2 und 3 können Sie auch auf gleiche
Weise über die Fernbedienung ausführen.
Gerät in den Bereitschaftsmodus
umschalten
Nehmen Sie ein eventuell eingelegtes Medium heraus,
bevor Sie das Gerät über die Ein-/Austaste in den
Bereitschaftsmodus versetzen.
• Drücken Sie die Taste
STANDBY/ON
Fernbedienung.
Beim nächsten Mal schalten Sie das Gerät über die
Taste STANDBY/ON an der Fernbedienung ein.
auf Seite 11.
/I STANDBY/ON
, legen Sie
.
an der
an
• Der PD-30 schaltet sich beim Drücken der
Frontblendentaste /I STANDBY/ON aus; er
wechselt nicht in den Bereitschaftsmodus. Zum
Wiedereinschalten
/I STANDBY/ON
Hinweis
• Falls das Netzkabel getrennt wird, während sich
das Gerät im Bereitschaftsmodus befindet, schaltet
sich das Gerät ab. Beim Wiederanschließen des
Kabels wird das Gerät jedoch nicht automatisch
eingeschaltet. Zum Einschalten schließen Sie
zunächst das Netzkabel wieder an, anschließend
drücken Sie die Taste STANDBY/ON an der
Fernbedienung.
drücken Sie die Taste
an der Frontblende.
Schneller Vorlauf/Rücklauf
• Drücken Sie die Tasten
oder
Wiedergabe.
Bei jedem Tastendruck ändert sich die Vorlauf- oder
Rücklaufgeschwindigkeit in vier Stufen.
bei laufender
•Mit der Taste schalten Sie wieder zu normaler
Abspielgeschwindigkeit um.
Sprungfunktion
• Drücken Sie die Tasten
oder bei laufender
Wiedergabe.
Je nach Anzahl der Tastenbetätigung springt die
Wiedergabe entsprechend viele Tracks voraus oder
rückwärts.
Direktsuche (bestimmten Track zur
Wiedergabe auswählen)
• Geben Sie die Nummer des
gewünschten Tracks mit den
Zifferntasten ein, drücken Sie dann die
Enter-Taste zur Bestätigung.
Auch wenn Sie die ENTER-Taste nicht
drücken, beginnt die Wiedergabe nach 5
Sekunden automatisch (dies gilt nicht bei
der programmierten Wiedergabe).
0 9
〜
ENTER
Wiederholte Wiedergabe
Bei der wiederholten Wiedergabe kann/können der
derzeit abgespielte Track oder sämtliche Tracks eines
ganzen Mediums immer wieder abgespielt werden.
• Drücken Sie bei laufender
REPEAT
Wiedergabe die REPEAT-Taste.
• Die wiederholte Wiedergabe beginnt, die
[REPEAT]-Anzeige leuchtet am vorderen Display.
Durch wiederholtes Drücken der Taste können Sie
wie folgt zwischen unterschiedlichen
Wiederholungsmodi (einzelnen Track wiederholen/
Medium (alle Tracks) wiederholen) wechseln:
Einzelnen Track wiederholen
トラックリピート([REPEAT]点灯)
([REPEAT]-Anzeige leuchtet)
Medium wiederholen ([REPEAT]-und [ALL]-
ディスクリピート([REPEAT]、[ALL]点灯)
Anzeigen leuchten)
Hinweis
• Die wiederholte Wiedergabe endet, sobald die
Wiedergabe des Mediums gestoppt wird.
↓
↓
Wiederholung aus
リピートオフ
Zufällige Wiedergabe
Sämtliche Tracks des Mediums werden in zufälliger
Reihenfolge abgespielt, bis jedes Track einmal
wiedergegeben wurde.
• Drücken Sie bei laufender
Wiedergabe die
Die Wiedergabe beginnt, die [RANDOM]-Anzeige am
vorderen Display leuchtet auf.
Hinweis
• Die zufällige Wiedergabe wird fortgesetzt, bis die
Medium-Wiedergabe gestoppt oder die RANDOMTaste noch einmal gedrückt wird.
• Die zufällige Wiedergabe kann nicht simultan mit
der programmierten Wiedergabe genutzt werden.
• Falls Sie bei laufender zufälliger Wiedergabe die
Taste drücken, wird die Wiedergabe sofort mit
dem nächsten zufällig ausgewählten Track
fortgesetzt. Wenn Sie die Taste drücken, wird
der aktuelle Track wieder von Anfang an abgespielt.
RANDOM
RANDOM
-Taste.
Programmierte Wiedergabe (Tracks in
einer vorbestimmten Reihenfolge
abspielen)
Mit dieser Funktion können Sie die
Wiedergabereihenfolge von bis zu 24 Tracks
programmieren.
1 Drücken Sie bei gestoppter
Wiedergabe die
Die [PGM]-Anzeige leuchtet im vorderen Display des
Gerätes auf.
PROGRAM
-Taste.
2 Wählen Sie die Nummer des
gewünschten Tracks mit den
PROGRAM
0 9
〜
Zifferntasten, drücken Sie
ENTER
danach die
Beispiel: Zur Auswahl von Track 15 drücken
Sie die Tasten 1 und 5, anschließend drücken
Sie ENTER. Falls Ihnen dabei ein Fehler
unterlaufen sollte, drücken Sie die CLEAR-Taste.
-Taste.
ENTER
3 Wiederholen Sie Schritt 2, bis die
Nummern sämtlicher gewünschter Tracks
eingegeben sind.
4 Drücken Sie die Taste
Die Wiedergabe beginnt; dabei werden
sämtliche Tracks in der programmierten
Reihenfolge abgespielt. Falls Sie weitere
Tracks zufügen möchten, wiederholen Sie die Schritte 1
und 2.
Hinweis
• Wenn Sie die CLEAR-Taste bei gestoppter
Wiedergabe drücken, wird die Programmierung
sämtlicher Tracks aufgehoben.
• Zum Löschen einzelner Tracks drücken Sie bei
gestoppter Wiedergabe die PROGRAM-Taste,
anschließend die CLEAR-Taste. Die
Programmierung der Tracks wird aufgehoben,
beginnend mit dem letzten programmierten Track.
• Eine “Pause” kann nicht programmiert werden.
• Die programmierten Tracks können auch allesamt
wiederholt abgespielt werden. Drücken Sie nach
Beginn der programmierten Wiedergabe (siehe
links) einfach die REPEAT-Taste.
• Bei der programmierten Wiedergabe können
einzelne Tracks nicht wiederholt abgespielt
werden.
• Eine zufällige Wiedergabe ist bei der
programmierten Wiedergabe nicht möglich.
• Wenn Sie während der programmierten
Wiedergabe die Taste drücken, springt die
Wiedergabe zum Anfang des nächsten
programmierten Tracks.
• Wenn Sie die programmierten Titel nach
Beendigung der Wiedergabe erneut abspielen
möchten, drücken Sie die PROGRAM-Taste,
anschließend die Taste .
.
8
De
Page 37

Wiedergabe 04
Mediumdaten anzeigen
• Drücken Sie bei laufender
Wiedergabe die
Diverse Daten (einschließlich verstrichener und
restlicher Spielzeit) werden angezeigt.
Je nach Medium schalten Sie durch mehrmaliges
Drücken der DISPLAY-Taste zwischen
unterschiedlichen Angaben um.
Hinweis
• Der Dateiname (die ersten 8 Zeichen) wird bei der
Wiedergabe von AAC-Dateien (nur PD-30), WMA/
MP3-Dateien sowie Dateien auf DSD-Medien
angezeigt. Allerdings kann es vorkommen, dass
nicht sämtliche Zeichen richtig angezeigt werden.
DISPLAY
-Taste.
DISPLAY
iPod/iPhone/iPad-Wiedergabe
(nur PD-30)
Durch einfaches Anschließen Ihres iPod/iPhone/iPad
können Sie den Klang von iPod/iPhone/iPad in
hervorragender Qualität genießen.
Vergewissern Sie sich, dass das jeweilige
iPod/iPhone/iPad-Modell unterstützt wird
Die mit Ihrem Gerät kompatiblen iPod/iPhone/iPadModelle werden nachstehend aufgeführt.
iPod/iPhone/iPad Audio Steuerung
iPod nano 2/3/4/5/6G
iPod touch 1/2/3/4G
iPhone
iPhone 3G/3GS
iPhone 4/4S
iPad
iPad 2
• Dieses System wurde für die auf den PioneerInternetseiten angegebenen iPod/iPhone/iPadSoftwareversionen entwickelt und getestet.
• Die Installation von anderen als den auf den
Pioneer-Internetseiten angegebenen iPod/iPhone/
iPad-Softwareversionen kann zur Inkompatibilität
mit dem System führen.
Hinweis
• Pioneer garantiert nicht, dass dieses Gerät mit
anderen als den angegebenen iPod/iPhone/iPadModellen zusammenarbeitet.
• Bestimmte Funktionen können je nach Modell oder
Softwareversion eingeschränkt oder nicht
verfügbar sein.
• iPod/iPhone/iPad wurden zur Wiedergabe nicht
urheberrechtlich geschützter Medien sowie zur
Wiedergabe von Medien, die durch den Anwender
legal wiedergegeben werden dürfen, lizenziert.
• Funktionen wie der Equalizer können nicht durch
das System gesteuert werden; wir empfehlen, den
Equalizer vor dem Anschluss abzuschalten.
• Unter keinen Umständen haftet Pioneer für
jegliche direkten oder indirekten Verluste, die
durch Unannehmlichkeiten oder Verluste
aufgezeichneter Medien durch iPod/iPhone/iPadAusfall entstehen.
• Detaillierte Hinweise zum Einsatz und zur
Bedienung von iPod/iPhone/iPad entnehmen Sie
bitte der Bedienungsanleitung des jeweiligen
Gerätes.
Wiedergabe mit iPod/iPhone/iPad
1 Wählen Sie mit der Taste
an der Fernbedienung
iPod
iPod/USB
als
Eingangsquelle aus.
Drücken Sie die Taste iPod/USB an der Fernbedienung.
• Dies können Sie auch durch wiederholtes Drücken
der FUNCTION-Taste an der Frontblende erreichen.
2 Schließen Sie iPod/iPhone/iPad an.
Verbinden Sie iPod/iPhone/iPad mit dem USB-Port an
der Frontblende des Gerätes. Verwenden Sie zum
Anschluss das mit iPod/iPhone/iPad gelieferte iPodKabel.
iPod/USB
• Hinweise zum Anschluss des Kabels finden Sie in
der iPod/iPhone/iPad-Bedienungsanleitung.
iPod/iPhone/iPad
iPod-Kabel
Folgende Funktionen sind mit iPod/iPhone/iPad
möglich.
Tas t e Funktion
RANDOM
REPEAT
iPod MENU
//ENTER
1 Beim mehrmaligen Drücken der REPEAT-Taste
werden die folgenden Wiederholungsmodi
durchgeschaltet.
Einzeln wiederholen Alles wiederholen
Normale Wiedergabe
Einzeln wiederholen: Wiederholt die derzeit
abgespielte Datei.
Alles wiederholen: Wiederholt sämtliche Dateien.
Wichtig
Falls nichts von iPod/iPhone/iPad abgespielt werden
kann, führen Sie bitte die folgenden Schritte zur
Problemlösung aus:
• Vergewissern Sie sich, dass iPod/iPhone/iPad von
Ihrem Gerät unterstützt werden.
• Schließen Sie iPod/iPhone/iPad erneut an das
Gerät an. Falls dies nicht funktionieren sollte,
setzen Sie iPod/iPhone/iPad probeweise zurück.
• Vergewissern Sie sich, dass iPod/iPhone/iPadSoftware von Ihrem Gerät unterstützt wird.
Falls sich iPod/iPhone/iPad nicht bedienen lassen,
prüfen Sie Folgendes:
• Wurden iPod/iPhone/iPad richtig angeschlossen?
Schließen Sie iPod/iPhone/iPad erneut an das
Gerät an.
Startet die Wiedergabe. Bei laufender
Wiedergabe zum Anhalten/Fortsetzen der
Wiedergabe.
Hält die Wiedergabe an.
Springt zum Anfang der aktuellen Datei,
dann zu den vorherigen Dateien.
Zum schnellen Rücklauf gedrückt halten.
Springt zur nächsten Datei.
Zum schnellen Vorlauf gedrückt halten.
Die derzeit ausgewählten iPod-/iPhone-/
iPad-Dateien werden in zufälliger
Reihenfolge („Shuffle“) abgespielt.
Die derzeit ausgewählten iPod-/iPhone-/
iPad-Dateien werden wiederholt
1
abgespielt.
Kommt bei Bedienung des iPod/iPhone/
iPad-Menüs zum Einsatz.
Zum Bedienen der iPod/iPhone/iPadMenüs.
English
DeutschFrançais
Italiano Español Русский
Nederlands
De
9
Page 38

Wiedergabe04
• Haben sich iPod/iPhone/iPad aufgehängt? Setzen
Sie iPod/iPhone/iPad zurück, stellen Sie die
Verbindung zum Gerät anschließend erneut her.
Hinweis
• iPod/iPhone/iPad werden beim Anschluss an das
Gerät aufgeladen. (Das Aufladen erfolgt nur, wenn
das Gerät eingeschaltet ist.) (Gilt nicht, wenn die
Pure Audio-Funktion eingeschaltet ist.)
• Wenn der Eingang von iPod auf eine andere
Funktion umgeschaltet wird, stoppt die iPod/
iPhone/iPad-Wiedergabe automatisch.
Dateien von USB-Speichergeräten
wiedergeben
1 Wählen Sie mit der Taste
der Fernbedienung USB als
Eingangsquelle aus.
Drücken Sie die Fernbedienungstaste iPod/
USB
(PD-30) oder die Fernbedienungstaste s
USB
(PD-10)
.
• Dies können Sie auch durch wiederholtes Drücken
der FUNCTION-Taste an der Frontblende erreichen.
2 Schließen Sie das USB-Speichergerät an.
USB-Speichergerät
(im Handel erhältlich)
3 Starten Sie die Wiedergabe mit der Taste
.
• Zum Anhalten der Wiedergabe drücken Sie die
Taste .
• Zum Stoppen der Wiedergabe drücken Sie die
Taste .
USB
an
iPod/USB
Sie können folgende Funktionen ausführen. Bitte
beachten Sie, dass einige Tasten je nach derzeit
abgespielter Kategorie eventuell nicht zur Verfügung
stehen.
Ta st e Funktion
RANDOM
REPEAT
1 Beim mehrmaligen Drücken der REPEAT-Taste
werden die folgenden Wiederholungsmodi
durchgeschaltet.
Einzeln wiederholen
Normale Wiedergabe
Einzeln wiederholen: Wiederholt die derzeit
abgespielte Datei.
Alles wiederholen: Wiederholt sämtliche Dateien.
Wenn die automatische Abschaltfunktion aktiv und der
Eingang auf ein USB-Speichergerät eingestellt ist,
schaltet das Gerät automatisch in den
Bereitschaftsmodus um, wenn 30 Minuten lang keine
Wiedergabe vom USB-Speichergerät erfolgt und das
Gerät auch anderweitig nicht bedient wird.
Startet die Wiedergabe. Bei laufender
Wiedergabe zum Anhalten/Fortsetzen der
Wiedergabe.
Stoppt die Wiedergabe.
Springt zum Anfang der aktuellen Datei,
dann zu den vorherigen Dateien.
Zum schnellen Rücklauf drücken. Bei
jedem Tastendruck wechselt die
Rücklaufgeschwindigkeit in vier Stufen.
Springt zur nächsten Datei.
Zum schnellen Vorlauf drücken. Bei jedem
Tastendruck wechselt die
Vorlaufgeschwindigkeit in vier Stufen.
Die derzeit ausgewählten Dateien werden
in zufälliger Reihenfolge („Shuffle“)
abgespielt.
Die derzeit ausgewählten Dateien werden
immer wieder abgespielt.
Alles wiederholen
1
• Pioneer garantiert nicht, dass sämtliche Dateien
von USB-Speichergeräten abgespielt werden
können oder sämtliche USB-Speichergeräte mit
Strom versorgt werden. Bitte beachten Sie auch,
dass Pioneer keinerlei Haftung für Dateiverluste
von USB-Speichergeräten übernimmt, die durch
den Anschluss an das Gerät verursacht werden.
• Das Gerät kann nicht mit einem USB-Hub
eingesetzt werden.
10
De
Hinweis
• Es kann vorkommen, dass USB-Speichergeräte
nicht vom Gerät erkannt, nicht mit Strom versorgt
werden und Dateien von USB-Speichergeräten
nicht abgespielt werden. Details dazu finden Sie
unter
Zusätzliche Informationen
auf Seite 12.
Page 39

Erweiterte Funktionen 05
Kapitel 5:
Wiedergabefunktionen
Erweiterte Funktionen
Die nutzbaren Funktionen variieren je nach Medien- und
Dateityp. In bestimmten Fällen können einige
Funktionen nicht genutzt werden. Schauen Sie sich
Wiedergabefunktionen
in der rechten Spalte an.
Wiedergabe mit HiFi-Klang
Sound Retriever
Wenn komprimierter Audiosignale bei der Wiedergabe
wieder entkomprimiert werden, können Verluste
auftreten. Durch Einschalten der Sound RetrieverFunktion werden solche Verluste ausgeglichen; dies
bewirkt einen runderen, gehaltvolleren Klang.
• Drücken Sie die S.RETRIEVER-
S.RETRIEVER
Taste.
Bei jedem Tastendruck ändert sich die Funktion wie
folgt : S.RTRV: OFF S.RTRV: LOW S.RTRV: HI
Zurück zum ursprünglichen Zustand
• Die Sound Retriever-Funktion ist deaktiviert, wenn
die reine Audiofunktion eingeschaltet ist.
Pure Audio
Diese Funktion aktiviert den digitalen Audioausgang
und gibt Analogaudio mit hoher Klangtreue wieder. Im
eingeschalteten Zustand erfolgt keine gesonderte
Anzeige im Display. Die Werkseinstellung ist Aus.
• Drücken Sie die PURE AUDIOTaste.
Zum Abschalten der Funktion drücken Sie die
Taste noch einmal.
• Für diese Funktion eingeschaltet ist, schaltet der
Eingang des Gerätes auf SACD/CD um, die PURE
AUDIO-Anzeige an der Frontblende leuchtet auf.
Bei Medienwiedergabe schaltet sich das
Frontdisplay ab.
• Wenn die PURE AUDIO-Anzeige leuchtet, werden
angeschlossene iPod/iPhone/iPad-Geräte nicht
aufgeladen.
PURE AUDIO
Wiedergabebereich („Layer“)
einer SACD/CD wechseln
Hybrid-SACD-Medien bestehen aus zwei Schichten
(„Layer“): Einer SACD - und einer CD-Schicht, die Sie zur
Wiedergabe auswählen können.
1 Drücken Sie die
Der Eingang wechselt zu SACD/CD.
SACD/CD
-Taste.
2 Drücken Sie bei gestoppter Wiedergabe
die SACD/CD-Taste.
Bei jedem Tastendruck wechselt die Auswahl zwischen
CD- und SACD-Bereich zur Wiedergabe.
Hinweis
• SACD-Multikanalbereiche werden nicht vom Gerät
unterstützt.
Displaybeleuchtung anpassen
Ihr Gerät ist mit einer Dimmerfunktion ausgestattet, die
eine Anpassung der Displaybeleuchtung an
unterschiedliche Lichtverhältnisse in drei Stufen
ermöglicht. Ab Werk ist die höchste Helligkeit
voreingestellt.
• Drücken Sie die
Die drei Helligkeitseinstellungen werden per
Tastendruck durchgeschaltet.
• Die Dimmereinstellung lässt sich nicht verändern,
wenn ein Medium mit Pure Audio-Funktion (siehe
links) abgespielt wird.
• Die Helligkeit der STANDBY-Anzeige verändert
sich nicht.
Automatische Abschaltung (schaltet
das Gerät automatisch in den
Bereitschaftsmodus)
Diese Funktion versetzt das Gerät automatisch in den
Bereitschaftsmodus, wenn 30 Minuten lang kein Signal
erkannt wird und keine Tasten betätigt werden.
1 Drücken Sie die
2 Ändern Sie die Einstellung,
bestätigen Sie anschließend.
Mit / schalten Sie die Funktion nach
Wunsch oder aus, anschließend drücken Sie
die ENTER-Taste zur Bestätigung.
Hinweis
SACD/CD
• Diese Funktion wird bei Auswahl des iPodEingangs abgeschaltet.
DIMMER
SET UP
-Taste.
-Taste.
Die nutzbaren Funktionen können je nach Medien- und Dateityp variieren. In bestimmten Fällen können einige
Funktionen nicht genutzt werden. Schauen Sie sich die nutzbaren Funktionen in der nachstehenden Tabelle an.
Medien-/Dateityp
DIMMER
SET UP
ENTER
1
Funktion
Schneller Vorlauf/Rücklauf
Sprungfunktion
Direktsuche
(bestimmten Track zur Wiedergabe auswählen)
Wiederholte Wiedergabe
Zufällige Wiedergabe
Programmierte Wiedergabe (Tracks in einer
vorbestimmten Reihenfolge abspielen)
Mediumdaten anzeigen
Sound Retriever
Pure Audio
SACD/CD
1 Es kann vorkommen, dass bestimmte Funkti onen bei manchen Medien oder Dateien nicht funktionieren, auch wenn
dies in der Tabelle angegeben [] wird.
2 Lesen Sie auch
3 • AAC-Dateien können nur mit dem PD-30 wiedergegeben werden.
• Lesen Sie auch
4 Lesen Sie auch
5 Diese Funktion wird nur bei der Wiedergabe von Disc-Medien aktiv.
6 Nur Hybrid-SACD-Medien.
CD-R/CD-RW-Medien wiedergeben
Abspielbare Dateiformate
DSD-Medien wiedergeben
SACD CD-DA
auf Seite 12.
auf Seite 12.
auf Seite 12.
WMA
2
CD-R/-RW
––
––
–– –
6
–––
MP3
AAC
4
3
5
DSD
English
DeutschFrançais
Italiano Español Русский
Nederlands
11
De
Page 40

Zusätzliche Informationen06
Kapitel 6:
Zusätzliche Informationen
• Ein einzelner Ordner kann bis zu 150 Dateien
Abspielbare Medien
CD-R/CD-RW-Medien wiedergeben
• Ihr Gerät kann CD-R/CD-RW-Medien mit
Aufzeichnungen im CD-Audioformat sowie mit
Audiodaten im WMA- und MP3-Format
wiedergeben. Allerdings kann es vorkommen, dass
bestimmte Medien nicht oder nur mit
Störgeräuschen wiedergegeben werden.
• Ihr Gerät eignet sich ausschließlich zur
Wiedergabe. Eine Aufzeichnung von Daten auf
CD-R/CD-RW-Medien ist nicht möglich.
• Nicht abgeschlossene (nicht finalisierte) CD-R/CDRW-Medien können nicht mit dem Gerät abgespielt
werden. Details finden Sie in der
Bedienungsanleitung Ihres Medienrecorders.
DSD-Medien wiedergeben
Ihr Gerät kann im DSF-Dateiformat aufgenommene
DSD-Medien abspielen.
Abspielbare Dateien
• Beschriebene Medien: DVD-R/-RW
• Dateinamenerweiterung: .dsf
• Ordnername: DSD_DISC
• Kapazität: maximal 4 GB pro Datei
• Audio: Zweikanal
• Abtastfrequenz: 2,8224 MHz
Beispiel zur Ordnerzusammenstellung
Die Datei-/Ordnerwiedergabe erfolgt nicht in
alphabetischer Reihenfolge, sondern in der Reihenfolge
der Aufzeichnung.
Root DSD_DISC
File01.dsf
FolderA
File02.dsf
FolderB
File03.dsf
FolderC
File04.dsf
FolderD
File05.dsf
File06.dsf
enthalten.
• Ein einzelnes Medium kann bis zu 200 Ordner
enthalten.
• Jeder Ordner sollte nicht mehr als 8 Ebenen
aufweisen.
• Dateinamen mit japanischen Zeichen und
bestimmten anderen Symbolschriftarten werden
eventuell nicht richtig angezeigt.
• Sämtliche Dateien, die nicht im DSF-Format
vorliegen, werden ignoriert.
Vorsicht
• Es kann vorkommen, dass manche Dateien nicht
abgespielt werden können.
• Bei Medien, die sehr viele Dateien und Ordner
enthalten, kann es deutlich länger dauern, bis die
Wiedergabe beginnt. In solchen Fällen können Sie
die gewünschten Dateien direkt in den DSD_DISCOrdner verschieben oder die Anzahl der Dateien
auf maximal 20 begrenzen.
Funktionen bei der Wiedergabe
Die folgenden Funktionen können bei der Wiedergabe
eines DSD-Mediums nicht ausgeführt werden:
• Direktsuche
• Wiedergabe von nicht im DSF-Format
aufgezeichneten Mediendateien
Anzeige
Bei gestoppter Wiedergabe eines DSD-Mediums wird
[DSD DISC] vom Gerät angezeigt. Wenn Sie die
DISPLAY-Taste bei laufender Wiedergabe drücken,
werden folgende Angaben durch wiederholten
Tastendruck durchgeschaltet:
• Nummer des Tracks und seine verstrichene
Spielzeit
•Name der Datei
Abspielbare Dateiformate
Audiodateien wiedergeben
Ihr Gerät unterstützt die folgenden Dateiformate.
• Bitte beachten Sie, dass einige Dateiformate
eventuell nicht wiedergegeben werden können,
auch wenn diese als abspielbar angegeben
wurden.
• Falls Sie versuchen, nicht unterstützte
Dateiformate wiederzugeben, kann es zu
Tonausfällen oder Störgeräuschen kommen.
Vergewissern Sie sich in solchen Fällen, dass es
sich um ein mit Ihrem Gerät kompatibles
Dateiformat handelt.
• Audiodateien mit DRM-Schutz (Digital Rights
Management – digitale Rechteverwaltung) können
nicht abgespielt werden. DRM ist eine
Kopierschutztechnologie zum Schutz geistiger
Eigentumsrechte. Zum Schutz vor illegaler
Vervielfältigung beschränkt DRM die Wiedergabe
auf das Aufnahmegerät oder den Computer, mit
dem Audiodateien ursprünglich aufgezeichnet
wurden. Details dazu finden Sie in der
Bedienungsanleitung oder in den Hilfedateien des
Gerätes oder der Anwendung, mit dem/der die
ursprüngliche Aufzeichnung angelegt wurde.
Kategorie
Erweiterung
1
.mp3
MP3
WMA .wma
Stream
SamplingFrequenz
MPEG-1/
Quantisierungsbitrate
2 Audio
Layer-3
Kanal 2 Kn
Bitrate 8 kbps bis
Sampling-
Frequenz
Quantisierungsbitrate
WMA2/
7/8/9
Kanal 2 Kn
Bitrate 32 kbps bis
8kHz bis
48 kHz
16 Bit
320 kbps
22,05 kHz
bis 48 kHz
16 Bit
192 kbps
Kategorie
Erweiterung
2
.m4a
AAC
1. “MPEG Layer-3-Audio Dekodierungstechnologie durch
Fraunhofer IIS und Thomson Multimedia lizenziert.”
2.
Nur PD-30.
Vorsicht
• Es kann vorkommen, dass nicht sämtliche mit
CD-Recordern oder Computern aufgenomme
CD-R/CD-RW-Medien wiedergegeben werden
können. Mögliche Ursachen: Bestimmte
Charakteristiken, Kratzer oder Verschmutzungen
des Mediums, verschmutzte oder (durch
Kondensation) feuchte Optik des
Wiedergabegerätes.
• Mit Computern aufgezeichnete Medien lassen sich
eventuell durch Anwendungseinstellungen oder
bestimmte Computercharakteristiken bedingt
nicht wiedergeben. Achten Sie darauf, Medien im
richtigen Format aufzuzeichnen – Einzelheiten
erhalten Sie vom Anbieter der jeweiligen
Anwendung.
• Im Packet Write-Format aufgezeichnete Medien
können nicht mit Ihrem Gerät wiedergegeben
werden.
• Nicht abgeschlossene (nicht finalisierte) CD-R/CDRW-Medien können nicht mit dem Gerät abgespielt
werden.
WMA-Dateiwiedergabe
• Bitte verwenden Sie zu CD-ROM-Dateisystemen
(ISO9660 Level 1 und 2) sowie mit erweiterten
Formaten (Joliet, Romeo) kompatibel
aufgezeichnete Medien.
• Das Gerät unterstützt keine mit variabler Bitrate
(VBR) oder verlustfreier Kodierung aufgezeichnete
Medien.
• Multisession-Medien können nicht mit Ihrem Gerät
wiedergegeben werden.
•
Insgesamt können bis zu 648 Ordner und Titel
erkannt und abgespielt werden, dabei sind
maximal 299 Ordner zulässig.
nach Ordnerzusammenstellung vorkommen, dass
nicht sämtliche Ordner und Tracks erkannt und
wiedergegeben werden können.
Stream
Sampling-
MPEG-4
Frequenz
AAC LC
MPEG-4
Quantisierungsbitrate
HE AAC
(AAC
Kanal 2 Kn
Plus v1/
2)
Bitrate 8 kbps bis
8kHz bis
48 kHz
16 Bit
320 kbps
Allerdings kann es je
12
De
Page 41

Zusätzliche Informationen 06
• Wenn Sie WMA-Dateien nutzen, achten Sie darauf,
dass diese mit von der Microsoft Corporation
anerkannten und geprüften Anwendungen kodiert
wurden. Beim Einsatz nicht anerkannter
Anwendungen kann es zu Störungen und
Beeinträchtigungen kommen.
MP3-Dateiwiedergabe
• Bitte verwenden Sie zu CD-ROM-Dateisystemen
(ISO9660 Level 1 und 2) sowie mit erweiterten
Formaten (Joliet, Romeo) kompatibel
aufgezeichnete Medien.
• Ihr Gerät unterstützt keine Wiedergabe von Dateien
mit variabler Bitrate (VBR); auch wenn sich
einzelne Dateien abspielen lassen sollten, wird die
Spielzeit durch die ständigen Veränderungen der
Bitrate falsch angezeigt.
• Multisession-Medien können nicht mit Ihrem Gerät
wiedergegeben werden.
• Insgesamt können bis zu 648 Ordner und Titel
erkannt und abgespielt werden, dabei sind
maximal 299 Ordner zulässig. Allerdings kann es je
nach Ordnerzusammenstellung vorkommen, dass
nicht sämtliche Ordner und Tracks erkannt und
wiedergegeben werden können.
• Zum optimalen Klang empfehlen wir mit Bitraten
von 128 kbps oder mehr aufgezeichnete Medien.
MPEG-4 AAC-Dateiwiedergabe
• AAC ist eine Abkürzung für “Advanced Audio
Coding” und bezeichnet das Grundformat der
Audiokomprimierungstechnologie, die bei MPEG-2
und MPEG-4 eingesetzt wird.
• Ihr Gerät unterstützt die Wiedergabe von AACDateien mit der Erweiterung “.m4a”, wie von
iTunes® kodiert. Allerdings kann es je nach DRMDateischutz und iTunes-Dekodierungsversion
vorkommen, dass keine Wiedergabe möglich ist.
• iTunes ist ein Warenzeichen von Apple Inc.,
eingetragen in den USA und anderen Ländern.
Wichtige Hinweise zum Gebrauch
Gerät transportieren
Wenn Sie Ihr Gerät zu einer anderen Stelle bringen
möchten, führen Sie immer zunächst die folgenden
Schritte aus: Entnehmen Sie ein eventuell eingelegtes
Medium, schließen Sie die Medienschublade. Drücken
Sie die Taste’s /I STANDBY/ON am Gerät, achten Sie
darauf, dass [-OFF-] im Frontdisplay erscheint. Warten
Sie nun 10 Sekunden ab, bevor Sie das Netzkabel
trennen. Es kann zu Beschädigungen oder
Fehlfunktionen kommen, falls das Gerät mit
eingelegtem Medium transportiert wird.
Aufstellungsort
Wählen Sie eine stabile Stelle in der Nähe des
Fernsehgerätes oder AV-Systems, an welches das Gerät
angeschlossen werden soll.
Stellen Sie das Gerät nicht auf ein Fernsehgerät oder auf
einem Monitor. Von Cassettendecks und anderen
Komponenten fernhalten, die leicht durch Magnetfelder
beeinflusst werden können.
Meiden Sie folgende Orte:
• Stellen, die direkter Sonneneinstrahlung
ausgesetzt sind
• Feuchte oder schlecht belüftete Stellen
• Extrem heiße oder kalte Stellen
• Orte, an denen Vibrationen auftreten
• Orte, an denen viel Staub oder Zigarettenrauch in
der Luft liegt
• Stellen, an denen Ruß, Dampf oder Hitze auftreten
(Küchen etc.)
Stellen Sie das Gerät nicht auf Sofas oder ähnlich Schall
schluckenden Möbelstücken oder Materialien auf; dies
kann sich negativ auf die Klangqualität auswirken.
Stellen Sie keine Gegenstände auf dem
Gerät ab
Stellen Sie keine Gegenstände auf dem Gerät ab.
Von Hitze fernhalten.
Stellen Sie den Player nicht auf Verstärker oder andere
Geräte, die Wärme erzeugen. Bei der Aufstellung in
einem Rack platzieren Sie das Gerät wenn möglich auf
einer Ablage unterhalb des Verstärkers, damit vom
Verstärker ausgehende Wärme nicht zum Gerät empor
steigt.
Schalten Sie das Gerät ab, wenn Sie es
nicht benutzen
Je nach Signalempfang können Streifenmuster im Bild
auftreten, wenn Fernseher und Player gleichzeitig
eingeschaltet sind. Dies ist keine Störung von Player
oder Fernsehgerät. Falls dies geschieht, schalten Sie
den Player ab. Auf ähnliche Weise kann es zu
Tonstörungen beim Radioempfang kommen.
Feuchtigkeitskondensation
Falls der Player aus der Kälte in einen warmen Raum
gebracht wird (beispielsweise im Winter) oder die
Raumtemperatur plötzlich ansteigt (z. B. durch
Heizungen), können sich Wassertröpfchen im Inneren
des Gerätes und an der Abtastlinse niederschlagen.
Falls es zu einer solchen Kondensation kommt,
funktioniert der Player nicht richtig, Wiedergabe ist
eventuell nicht möglich. Lassen Sie den Player 1 bis 2
Stunden lang eingeschaltet bei Zimmertemperatur
stehen; die exakte Zeit hängt vom Grad der
Kondensation ab. Die Wassertröpfchen verdampfen, die
Wiedergabe ist wieder möglich.
Auch im Sommer kann es zu Feuchtigkeitskondensation
kommen, falls der Player im direkten Strom einer
Klimaanlage stehen sollte. Versetzen Sie den Player in
solchen Fällen an einen anderen Ort.
Player reinigen
Zur Reinigung genügt es gewöhnlich, das Gerät mit
einem weichen Tuch abzuwischen. Bei hartnäckigen
Verschmutzungen geben Sie etwas mit 5 bis 6 Teilen
Wasser verdünnten Neutralreiniger auf ein weiches
Tuch, wringen das Tuch gründlich aus, wischen die
Verschmutzung ab und trocknen das Gerät
anschließend mit einem weichen, trockenen Tuch.
Bitte beachten Sie, dass sich Aufdruck und Lackierung
vom Gerät lösen können, falls das Gerät mit Alkohol,
Verdünnung, Kraftstoffen oder Insektenschutzmitteln in
Berührung kommt. Vermeiden Sie auch längeren
Kontakt des Gerätes mit Materialien aus Gummi oder
Vinyl; andernfalls kann das Gehäuse beschädigt werden.
Wenn Sie chemisch imprägnierte Wischtücher
verwenden möchten, lesen Sie die mit den Tüchern
gelieferten Vorsichtshinweise zuvor aufmerksam durch.
Ziehen Sie den Netzstecker, bevor Sie das Gerät
reinigen.
Vorsichtshinweis beim Einsatz des Gerätes
in einem Rack mit Glastür
Öffnen Sie die Medienschublade nicht mit der Taste
OPEN/CLOSE an der Fernbedienung, solange die
Glastür geschlossen ist. Die Tür blockiert die
Medienschublade, das Gerät kann beschädigt werden.
Abtastlinse reinigen
Die Linse des Players verschmutzt bei normalem
Gebrauch praktisch nicht. Bollte sie dennoch auf Grund
von Staub oder Schmutz versagen, wenden Sie sich an
die nächste Pioneer-Kundendienststelle. Obwohl es
Linsenreinigungsmittel im Handel gibt, raten wir von der
Verwendung ab, da einige Produkte die Linse
beschädigen können.
Medien richtig handhaben
Verwenden Sie keine beschädigten Medien (gesprungen
oder verformt).
Vermeiden Sie Kratzer und Verschmutzungen auf der
Datenseite (dies ist die BESCHRIFTETE Seite) des
Mediums.
Legen Sie niemals mehrere Medien auf einmal ein.
Kleben Sie keine Zettelchen oder Aufkleber auf das
Medium, beschriften Sie das Medium nicht mit
Bleistiften, Kugelschreibern oder anderen Hilfsmitteln
mit scharfer oder harter Spitze. All dies kann das
Medium beschädigen.
Medien richtig lagern
Lagern Sie Medien grundsätzlich in ihren Hüllen, stellen
Sie die Hüllen aufrecht, meiden Sie Orte, an denen hohe
Temperaturen oder hohe Luftfeuchtigkeit herrschen, die
direkter Sonneneinstrahlung oder starker Kälte
ausgesetzt sind.
Lesen Sie die mit den Medien gelieferten
Vorsichtshinweise.
Medien reinigen
Medien lassen sich eventuell nicht oder nicht richtig
abspielen, wenn sich Fingerabdrücke oder Staub darauf
befinden. In solchen Fällen wischen Sie das Medium mit
einem Reinigungstuch von innen nach außen sauber.
Benutzen Sie keine schmutzigen Tüchern.
Verwenden Sie keine Kraftstoffe, keine Verdünnung und
keine sonstigen flüchtigen Chemikalien. Verzichten Sie
auch auf Reinigungsspray für Schallplatten sowie auf
Antistatikmittel.
Bei hartnäckigen Verschmutzungen feuchten Sie ein
weiches Tuch mit etwas Wasser an, wringen es gut aus,
wischen die Verschmutzungen damit ab und trocknen
das Medium anschließend mit einem trockenen Tuch.
Speziell geformte Medien
Speziell geformte Medien (z. B. herzförmige oder
sechseckige Medien) können nicht mit Ihrem Gerät
abgespielt werden. Legen Sie niemals solche Medien
ein; andernfalls drohen Beschädigungen des Gerätes.
Kondensationsfeuchtigkeit auf Medien
Wenn Medien aus der Kälte in einen warmen Raum
gebracht werden (beispielsweise im Winter), können
sich Wassertröpfchen auf der Oberfläche des Mediums
niederschlagen. Feuchte Medien lassen sich nicht
richtig abspielen. Wischen Sie die Wassertröpfchen
sorgfältig von der Oberfläche des Mediums ab, bevor Sie
das Medium einlegen.
English
DeutschFrançais
Italiano Español Русский
Nederlands
13
De
Page 42

Zusätzliche Informationen06
Störungssuche
Nicht selten führt falsche Bedienung zu Problemen und Fehlfunktionen. Wenn das Gerät nicht richtig arbeitet, ge hen
Sie zunächst die unten stehenden Punkte durch. Manchmal wird eine Störung auch durch ein externes Gerät
verursacht. Überprüfen Sie auch sonstige verwendete Komponenten und Elektrogeräte. Falls sich das Problem auch
durch die nachstehenden Prüfungen nicht weiter eingrenzen lassen sollte, lassen Sie das Gerät durch den
autorisierten Pioneer-Kundendienst oder Ihren Händler reparieren.
• Falls Fehlfunktionen durch äußere Einflüsse wie statische Elektrizität auftreten sollten, ziehen Sie den
Netzstecker aus der Steckdose und stecken diesen anschließend erneut ein.
Problem Abhilfe
Das Medium wird nicht abgespielt
oder nach dem Einlegen automatisch
ausgeworfen.
CD-R/-RW-Medien lassen sich nicht
abspielen.
Dateien im WMA/MP3- oder AACFormat können nicht wiedergegeben
werden (nur PD-30).
Fernbedienung funktioniert nicht. • Tauschen Sie die Batterien aus (Seite 4).
Einstellungen werden gelöscht. • Falls das Netzkabel bei eingeschaltetem Gerät getrennt wird sowie bei plötzlichen
Kein Ton, oder verzerrter Ton. • Vergewissern Sie sich, dass sämtliche Verbindungen zuverlässig hergestellt wurden
Merklicher Unterschied zwischen der
SACD- und CD-Lautstärke.
• Achten Sie darauf, dass das Medium mit der bedruckten Seite nach oben eingelegt
wird und richtig in der Medienschublade liegt (Seite 8).
• Vergewissern Sie sich, dass das Medium nicht verschmutzt, verstaubt und nicht
beschädigt ist (Seite 13).
• Feuchtigkeitsniederschlag im Inneren des Players Warten Sie, bis die Feuchtigkeit
verdunstet ist. Nutzen Sie den Player nicht in der Nähe von Klimaanlagen (Seite 13).
• Die Disc-Schublade öffnet sich wieder, wenn ein nicht unterstützter Disc-Typ
eingelegt wird (Seite 4).
• Bestimmte mit dem Computer beschriebene CD-R/-RW-Medien können nicht
abgespielt werden.
• Die folgende Dateitypen können nicht wiedergegeben werden:
- Dateien mit DRM-Kopierschutz
- Nicht ISO 9660-konform beschriebene Medien
- Dateien, die nicht mit einer Abtastfrequenz von 44,1 kHz aufgezeichnet wurden
-
Mit variabler Bitrate (VBR) oder verlustfreier Kodierung aufgezeichnete WMA-Dateien
• Achten Sie auf einen Abstand von maximal 7 m und einen Winkel von maximal 30°
zwischen Fernbedienung und dem Fernbedienungssensor an der Frontblende (Seite 4).
• Entfernen Sie Hindernisse oder bedienen Sie das Gerät von einem anderen Ort aus.
• Achten Sie darauf, dass kein Licht direkt auf den Fernbedienungssensor an der
Frontblende fällt.
• Wurde das Steuerkabel für eine Komponente falsch angeschlossen? Überzeugen
Sie sich davon, dass die Verbindungen richtig hergestellt wurden (Seite 5).
Stromausfällen können zuvor festgelegten Einstellungen gelöscht werden. Bevor Sie
das Netzkabel trennen, drücken Sie zunächst die
Fernbedienung und warten, bis [-OFF-] aus dem Frontdisplay verschwindet. Erst dann
trennen Sie das Netzkabel. Besondere Aufmerksamkeit ist geboten, falls das Netzkabel
des Gerätes an den Netzspannungsausgang einer anderen Komponente
angeschlossen wurde: In diesem Fall kann beim Ausschalten der anderen
Komponente gleichzeitig die Stromversorgung Ihres Gerätes unterbrochen werden.
Schließen Sie das Gerät möglichst direkt an eine Steckdose an.
(Seite 5).
• Überzeugen Sie sich davon, dass Stecker und Buchsen nicht verschmutzt oder oxidiert
sind; gegebenenfall s reinigen. Überprüfen Sie die Kabel auch auf Beschädigungen.
• Vergewissern Sie sich, dass das Medium nicht beschädigt, verstaubt oder verschmutzt ist.
• Ist das Gerät auf “Pause” eingestellt? Drücken Sie die Taste .
• Prüfen Sie Lautstärke, Eingang, Lautsprechereinstellungen etc. am Verstärker oder Receiver.
• Vergewissern Sie sich, dass der Ausgang des Players nicht an den
Plattenspielereingang des Verstärkers angeschlossen wurde.
• Dies liegt an Unterschieden beim Audioformat und ist keine Fehlfunktion.
STANDBY/ON
-Taste an der
Problem Abhilfe
Zwischen den einzelnen Titeln eines
SACD-Mediums erscheint [--:--] im
Display des Hauptgerätes.
Der Analogton ist einwandfrei, es
scheint jedoch kein digitales
Tonsignal vorhanden zu sein.
USB-Speichergerät wird nicht
erkannt.
Ein USB-Speichergerät wurde
angeschlossen und wird angezeigt,
allerdings lassen sich darauf
gespeicherte Audiodateien nicht
abspielen.
Die Erkennung eines USBSpeichergerätes dauert sehr lange.
Das USB-Speicherger ät wird nicht mit
Strom versorgt.
Es werden Audiodateien abgespielt,
die sich nicht auf dem USBDatenträger befinden.
iPod/iPhone/iPad lassen sich nicht
bedienen.
iPod/iPhone/iPad werden nicht mit
Strom versorgt.
Der iPod/iPhone/iPad-Klang wird
nicht wiedergegeben.
• Diese Anzeige erscheint je nach Medium.
• Achten Sie darauf, dass die Pure Audio-Funktion abgeschaltet ist (Seite 11).
• Audio auf SACD- und DSD-Discs sowie vom iPod kann nicht digital ausgegeben
werden. Verwenden Sie bei solchen Medien die
• Schließen Sie das Gerät richtig an (komplett einstecken) (Seite 10).
• Ihr Gerät arbeitet nicht mit USB-Hubs. Schließen Sie USB-Speichergeräte direkt an.
• Es kann vorkommen, dass bestimmte USB-Speichergeräte nicht richtig erkannt
werden. Schalten Sie das Gerät aus und anschließend wieder ein.
• Ihr Gerät unterstützt ausschließlich USB-Massenspeichergeräte.
• Lediglich die Dateisysteme FAT16 und FAT32 werden unterstützt. Andere
Dateisysteme (wie FAT, NTFS etc.) werden nicht unterstützt.
• Ihr Gerät arbeitet nicht mit externen Festplatten.
• Urheberrechtlich geschützte Audiodateien lassen sich nicht von USBSpeichergeräten abspielen. Je nach Einstellungen kann beim Versuch, Audiodaten
von einer CD oder anderen Datenträgern zum Computer zu übertragen, ein
Kopierschutz in Kraft treten.
• Schauen Sie sich die Liste mit Dateiformaten an, die mit Ihrem Gerät
wiedergegeben werden können.
• Wenn USB-Speichergeräte mit großer Kapazität angeschlossen werden, kann das
Laden der Daten einige Zeit (bis zu mehreren Minuten) in Anspruch nehmen.
• Wenn die Pure Audio-Funktion eingeschaltet ist, werden die
nicht mit Strom versorgt.
• Wird eine Fehlermeldung im Frontdisplay angezeigt? (Seite 7)
- Schalten Sie das Gerät aus und anschließend wieder ein. (Seite 8)
- Schalten Sie das Gerät ab, anschließend trennen Sie das USB-Speichergerät und
schließen es dann wieder an (Seite 10).
- Schalten Sie mit der
dann wieder zum USB-Modus zurück (Wenn der Eingang zu USB zurückgeschaltet
wurde) (Seite 7).
• Schauen Sie nach, ob sich verborgene Dateien auf dem Datenträger befinden.
Verborgene Dateien werden ebenfalls abgespielt.
• Vergewissern Sie sich, dass iPod/iPhone/iPad richtig angeschlossen sind (lesen Sie
iPod/iPhone/iPad-Wiedergabe (nur PD-30)
iPhone/iPad zu trennen und anschließend wieder anzuschließen.
• Vergewissern Sie sich, dass das angeschlossene iPod/iPhone/iPad-Modell von
Ihrem Gerät unterstützt wird (Seite 9).
• Falls sich iPod/iPhone/iPad aufhängen sollten, setzen Sie iPod/iPhone/iPad zurück
und schließen es dann wieder an das Gerät an.
• Wenn die Pure Audio-Funktion eingeschaltet ist, werden die
nicht mit Strom versorgt.
• Wird eine Fehlermeldung im Frontdisplay angezeigt? Schalten Sie das Gerät ab,
anschließend trennen Sie i Pod/iPhone/iPad und stellen die Verbindung dann wieder her.
• Wird Ton über die Lautsprecher von iPod/iPhone/iPad ausgegeben? Trennen Sie die
Stromversorgung des Gerätes, schalten Sie das Gerät danach erneut ein. Stellen Sie
den iPod-Eingang ein, schließen Sie dann iPod/iPhone/iPad an.
• Audio wird nicht von den
ANALOG OUT
FUNCTION
-Taste in den anderen Modus um, schalten Sie
auf Seite 9). Versuchen Sie auch, iPod/
DIGITAL OUT
-Ausgängen ausgegeben.
-Anschlüsse (Seite 5).
USB
-Ports (Seite 11)
USB
-Ports (Seite 9)
14
De
Page 43

Zusätzliche Informationen 06
English
Technische Daten
Allgemeines
System. . . . . . . . . . . . . . . . . . . . .Super Audio CD-Spieler
Spannungsversorgung
. . . . . . 220 V bis 240 V Wechselspannung, 50 Hz/60 Hz
Leistungsaufnahme
PD-30 . . . . . . . . . . . . . . . . . . . . . . . . . . . . . . . . . . .37 W
PD-10 . . . . . . . . . . . . . . . . . . . . . . . . . . . . . . . . . . .20 W
Leistungsaufnahme (Bereitschaft). . . . . . . . . . . . 0,45 W
Gewicht
PD-30 . . . . . . . . . . . . . . . . . . . . . . . . . . . . . . . . . . 5,6 kg
PD-10 . . . . . . . . . . . . . . . . . . . . . . . . . . . . . . . . . . 5,2 kg
Abmessungen
. . . . . . . . . . . . . .435 mm (B) x 128 mm (H) x 329 mm (T)
Betriebstemperatur . . . . . . . . . . . . . . . .+5 °C bis +35 °C
Betriebsluftfeuchtigkeit . . . . . . . . . . . . . . . . 5 % bis 85 %
Audioausgang (1 Stereopaar)
Ausgangspegel. . . . . . . . . . Während der Audioausgabe
Anzahl der Kanäle . . . . . . . . . . . . . . . . . . . . . . . . . . . . . . 2
Buchsen . . . . . . . . . . . . . . . . . . . . . . . . . . . . . . . . . . Cinch
Digital-Audio-Eigenschaften
Frequenzgang
CD. . . . . . . . . . . . . . . . . . . . . . . . . . . . . 2 Hz bis 20 kHz
SACD . . . . . . . . . . . . . . . . . . . . . . . . . . 2 Hz bis 50 kHz
Rauschabstand
CD. . . . . . . . . . . . . . . . . . . . . . . . . . . . . . . . . . . . 117 dB
SACD . . . . . . . . . . . . . . . . . . . . . . . . . . . . . . . . . 117 dB
Dynamikbereich
CD. . . . . . . . . . . . . . . . . . . . . . . . . . . . . . . . . . . . 100 dB
SACD . . . . . . . . . . . . . . . . . . . . . . . . . . . . . . . . . 108 dB
Gesamte Harmonische Verzerrungen:
CD. . . . . . . . . . . . . . . . . . . . . . . . . . . . . . . . . . .0,0022 %
SACD . . . . . . . . . . . . . . . . . . . . . . . . . . . . . . . .0,0020 %
Gleichlaufschwankungen . . . . . . . . . . . . . . . Messgrenze
Digitalausgang
Optischer Digitalausgang
. . . . . . . . . . . . . . . . . . . . . . . . Optischer Digitalanschluss
Koax-Digitalausgang . . . . . . . . . . . . . . . Cinchanschluss
Zubehör
Cinch-Audiokabel (rote/weiße Stecker) . . . . . . . . . . . . . 1
Fernbedienung . . . . . . . . . . . . . . . . . . . . . . . . . . . . . . . . . 1
AAA/IEC R03 Trockenbatterien. . . . . . . . . . . . . . . . . . . . 2
Netzkabel
Garantiekarte (nur europäisches Modell)
Bedienungsanleitung (dieses Dokument)
(±0,001 % W. PEAK) oder weniger
(keine Kondensation)
200 mVrms (1 kHz, –20 dB)
Hinweis
• Technische Daten und das Design können sich
aufgrund von Verbesserungen ohne Ankündigung
ändern.
• In diesem Dokument erwähnte Firmen- und
Produktnamen sind Marken oder eingetragene
Marken der jeweiligen Unternehmen.
DeutschFrançais
Italiano Español Русский
Nederlands
© 2012 PIONEER CORPORATION.
Alle Rechte vorbehalten.
15
De
Page 44

Grazie per aver acquistato questo prodotto Pioneer.
Leggere attentamente questo manuale di istruzioni per familiarizzarsi con l’uso dell’apparecchio. Conservare poi il manuale per ogni eventuale futuro
riferimento.
IMPORTANTE
CAUTION
RISK OF ELECTRIC SHOCK
DO NOT OPEN
Il simbolo del lampo con terminale a forma
di freccia situato all’interno di un triangolo
equilatero serve ad avvisare l’utilizzatore
della presenza di una “tensione pericolosa”
non isolata nella struttura del prodotto che
potrebbe essere di un’intensità tale da
provocare scosse elettriche all’utilizzatore.
ATTENZIONE:
PER EVITARE IL RISCHIO DI SCOSSE
ELETTRICHE, NON RIMUOVERE IL
COPERCHIO (O IL RETRO). NON CI SONO
PARTI INTERNE LA CUI MANUTENZIONE
POSSA ESSERE EFFETTUATA
DALL’UTENTE. IN CASO DI NECESSITÀ,
RIVOLGERSI ESCLUSIVAMENTE A
PERSONALE DI SERVIZIO QUALIFICATO.
Informazioni per gli utilizzatori finali sulla raccolta e lo smaltimento di vecchi
dispositivi e batterie esauste
Simbolo per
il prodotto
Esempi di simboli
per le batterie
Pb
Questi simboli sui prodotti, confezioni, e/o documenti allegati significano che vecchi
prodotti elettrici ed elettronici e batterie esauste non devono essere mischiati ai rifiuti
urbani indifferenziati.
Per l’appropriato trattamento, recupero e riciclaggio di vecchi prodotti e batterie
esauste, fate riferimento ai punti di raccolta autorizzati in conformità alla vostra
legislazione nazionale.
Con il corretto smaltimento di questi prodotti e delle batterie, aiuterai a salvaguardare
preziose risorse e prevenire i potenziali effetti negativi sull’ambiente e sulla salute
umana che altrimenti potrebbero sorgere da una inappropriata gestione dei rifiuti.
Per maggiori informazioni sulla raccolta e il riciclaggio di vecchi prodotti e batterie
esauste, contattate il vostro Comune, il Servizio di raccolta o il punto vendita dove
avete acquistato l’articolo.
Questi simboli sono validi solo nell’Unione Europea.
Per i paesi al di fuori dell’unione Europea:
Se volete liberarvi questi oggetti, contattate le vostre autorità locali o il punto vendita
per il corretto metodo di smaltimento.
Il punto esclamativo in un triangolo
equilatero serve ad avvisare l’utilizzatore
della presenza di importanti istruzioni di
funzionamento e manutenzione riportate nel
libretto allegato al prodotto.
D3-4-2-1-1_A1_It
K058a_A1_It
ATTENZIONE
Questo apparecchio non è impermeabile. Per prevenire
pericoli di incendi o folgorazioni, non posizionare nelle
vicinanze di questo apparecchio contenitori pieni di
liquidi (quali vasi da fiori, o simili), e non esporre
l’apparecchio a sgocciolii, schizzi, pioggia o umidità.
D3-4-2-1-3_A1_It
ATTENZIONE
Prima di collegare per la prima volta l’apparecchio alla
sorgente di alimentazione leggere attentamente la
sezione che segue.
La tensione della sorgente di elettricità differisce
da Paese a Paese e da regione a regione. Verificare
che la tensione di rete della zona in cui si intende
utilizzare l’apparecchio sia quella corretta, come
indicato sul pannello posteriore dell’apparecchio
stesso (ad es.: 230 V o 120 V).
D3-4-2-1-4*_A1_It
ATTENZIONE
Per evitare il pericolo di incendi, non posizionare
sull’apparecchio dispositivi con fiamme vive (ad
esempio una candela accesa, o simili).
D3-4-2-1-7a_A1_It
AVVERTENZA PER LA VENTILAZIONE
Installare l’apparecchio avendo cura di lasciare un
certo spazio all’intorno dello stesso per consentire una
adeguata circolazione dell’aria e migliorare la
dispersione del calore (almeno 10 cm sulla parte
superiore, 10 cm sul retro, e 10 cm su ciascuno dei lati).
ATTENZIONE
L’apparecchio è dotato di un certo numero di fessure e
di aperture per la ventilazione, allo scopo di garantirne
un funzionamento affidabile, e per proteggerlo dal
surriscaldamento. Per prevenire possibili pericoli di
incendi le aperture non devono mai venire bloccate o
coperte con oggetti vari (quali giornali, tovaglie, tende o
tendaggi, ecc.), e l’apparecchio non deve essere
utilizzato appoggiandolo su tappeti spessi o sul letto.
D3-4-2-1-7b*_A1_It
Page 45

Condizioni ambientali di funzionamento
Gamma ideale della temperatura ed umidità
dell’ambiente di funzionamento:
da +5 °C a +35 °C, umidità relativa inferiore all‘85 %
(fessure di ventilazione non bloccate)
Non installare l’apparecchio in luoghi poco ventilati, o
in luoghi esposti ad alte umidità o alla diretta luce del
sole (o a sorgenti di luce artificiale molto forti).
D3-4-2-1-7c*_A1_It
Se la spina del cavo di alimentazione di questo
apparecchio non si adatta alla presa di corrente
alternata di rete nella quale si intende inserire la
spina stessa, questa deve essere sostituita con una
adatta allo scopo. La sostituzione della spina del cavo
di alimentazione deve essere effettuata solamente da
personale di servizio qualificato. Dopo la sostituzione,
la vecchia spina, tagliata dal cavo di alimentazione,
deve essere adeguatamente eliminata per evitare
possibili scosse o folgorazioni dovute all’accidentale
inserimento della spina stessa in una presa di
corrente sotto tensione.
Se si pensa di non utilizzare l’apparecchio per un
relativamente lungo periodo di tempo (ad esempio,
durante una vacanza), staccare la spina del cavo di
alimentazione dalla presa di corrente alternata di
rete.
D3-4-2-2-1a_A1_It
AVVERTENZA
L’interruttore principale (/I STANDBY/ON)
dell’apparecchio non stacca completamente il flusso
di corrente elettrica dalla presa di corrente alternata
di rete. Dal momento che il cavo di alimentazione
costituisce l’unico dispositivo di distacco
dell’apparecchio dalla sorgente di alimentazione, il
cavo stesso deve essere staccato dalla presa di
corrente alternata di rete per sospendere
completamente qualsiasi flusso di corrente.
Verificare quindi che l’apparecchio sia stato installato
in modo da poter procedere con facilità al distacco
del cavo di alimentazione dalla presa di corrente, in
caso di necessità. Per prevenire pericoli di incendi,
inoltre, il cavo di alimentazione deve essere staccato
dalla presa di corrente alternata di rete se si pensa di
non utilizzare l’apparecchio per periodi di tempo
relativamente lunghi (ad esempio, durante una
vacanza).
D3-4-2-2-2a*_A1_It
Questo prodotto è destinato esclusivamente all'uso
domestico. Eventuali disfunzioni dovute ad usi diversi
(quali uso prolungato a scopi commerciali, in
ristoranti, o uso in auto o su navi) e che richiedano
particolari riparazioni, saranno a carico dell'utente,
anche se nel corso del periodo di garanzia.
K041_A1_It
AVVERTIMENTO RIGUARDANTE IL FILO DI
ALIMENTAZIONE
Prendete sempre il filo di alimentazione per la spina.
Non tiratelo mai agendo per il filo stesso e non toccate
mai il filo con le mani bagnati, perchè questo potrebbe
causare cortocircuiti o scosse elettriche. Non collocate
l’unità, oppure dei mobili sopra il filo di alimentazione e
controllate che lo stesso non sia premuto. Non
annodate mai il filo di alimentazione nè collegatelo con
altri fili. I fili di alimentazione devono essere collocati in
tal modo che non saranno calpestati. Un filo di
alimentazione danneggiato potrebbe causare incendi o
scosse elettriche. Controllate il filo di alimentazione
regolarmente. Quando localizzate un eventuale danno,
rivolgetevi al più vicino centro assistenza autorizzato
della PIONEER oppure al vostro rivenditore per la
sostituzione del filo di alimentazione.
S002*_A1_It
AVVERTENZA
Questo apparecchio è un prodotto al laser di Classe 1
secondo le norme di sicurezza dei prodotti al laser
IEC 60825-1:2007.
PRODOTTO LASER DI CLASSE 1
D58-5-2-2a_A1_It
Indice
01 Prima di iniziare
Disco/Compatibilità di riproduzione dei formati dei
contenuti . . . . . . . . . . . . . . . . . . . . . . . . . . . . . . . . 4
Contenuto della confezione . . . . . . . . . . . . . . . . . .4
Caricamento delle batterie nel telecomando . . . . . 4
Utilizzo del telecomando . . . . . . . . . . . . . . . . . . . . .4
02 Collegamento
Collegamenti delle uscite audio analogiche. . . . . . 5
Collegamenti delle uscite audio digitali . . . . . . . . . 5
Utilizzo di un unico telecomando per diversi
componenti Pioneer
(solo per il modello PD-30). . . . . . . . . . . . . . . . . . . 5
Inserimento della spina . . . . . . . . . . . . . . . . . . . . . 5
03 Controlli e display
Telecomando. . . . . . . . . . . . . . . . . . . . . . . . . . . . . 6
Pannello posteriore . . . . . . . . . . . . . . . . . . . . . . . . 6
Pannello anteriore . . . . . . . . . . . . . . . . . . . . . . . . . 7
Display pannello frontale . . . . . . . . . . . . . . . . . . . . 7
04 Riproduzione
Riproduzione di dischi. . . . . . . . . . . . . . . . . . . . . . 8
Impostazione della modalità di attesa . . . . . . . . . . .8
Avanti veloce/Indietro veloce . . . . . . . . . . . . . . . . . .8
Saltare una traccia . . . . . . . . . . . . . . . . . . . . . . . . .8
Ricerca diretta (indicare una traccia specifica da
riprodurre). . . . . . . . . . . . . . . . . . . . . . . . . . . . . . . .8
Ripetizione della riproduzione . . . . . . . . . . . . . . . . .8
Riproduzione casuale . . . . . . . . . . . . . . . . . . . . . . .8
Riproduzione programmata (le tracce vengono
riprodotte in ordine predeterminato) . . . . . . . . . . . .8
Visualizzazione dei dati di un disco . . . . . . . . . . . . . 8
Riproduzione da iPod/iPhone/iPad
(solo per il modello PD-30). . . . . . . . . . . . . . . . . . . 9
Verifica dei modelli di iPod/iPhone/iPad
supportati . . . . . . . . . . . . . . . . . . . . . . . . . . . . . . . .9
Riproduzione di contenuti da
iPod/iPhone/iPad . . . . . . . . . . . . . . . . . . . . . . . . . .9
Riproduzione di file salvati su dispositivi
di memoria USB . . . . . . . . . . . . . . . . . . . . . . . . . 10
05 Utilizzo delle funzioni avanzate
Riproduzione di suoni ad alta fedeltà. . . . . . . . . . 11
Sound Retriever. . . . . . . . . . . . . . . . . . . . . . . . . . . 11
Pure Audio . . . . . . . . . . . . . . . . . . . . . . . . . . . . . .11
Modifica dell’area di riproduzione (strato) di un
SACD/CD. . . . . . . . . . . . . . . . . . . . . . . . . . . . . . . 11
Regolazione dell’illuminazione generale
del display . . . . . . . . . . . . . . . . . . . . . . . . . . . . . . 11
Spegnimento automatico (configura
automaticamente la modalità dell’alimentazione
come modalità di attesa) . . . . . . . . . . . . . . . . . . . 11
Funzioni di riproduzione . . . . . . . . . . . . . . . . . . . 11
06 Informazioni aggiuntive
Dischi riproducibili . . . . . . . . . . . . . . . . . . . . . . . 12
Formati di file riproducibili. . . . . . . . . . . . . . . . . . 12
Precauzioni d’uso . . . . . . . . . . . . . . . . . . . . . . . . 13
Diagnostica . . . . . . . . . . . . . . . . . . . . . . . . . . . . . 14
Specifiche . . . . . . . . . . . . . . . . . . . . . . . . . . . . . . 15
Page 46

Prima di iniziare01
Capitolo 1:
Prima di iniziare
Disco/Compatibilità di riproduzione
dei formati dei contenuti
I dischi riproducibili con questo lettore sono illustrati di
seguito.
• SACD (Super Audio CD)*
(solo aree a due canali)
•CD
• Dischi DSD
* “Super Audio CD” è un marchio commerciale
registrato.
Nota
• Quest’unità non consente la riproduzione delle
aree multicanale dei dischi SACD.
• I terminali DIGITAL OUT dell’unità non consentono
l’emissione di suono da dischi SACD e DSD o da
apparecchi come iPod/iPhone/iPad.
• Quando un disco viene caricato, l’accensione del
lettore non provocherà l’avvio automatico della
riproduzione. Di conseguenza, anche se l’unità è
collegata a un timer, non sarà possibile eseguire
una riproduzione programmata.
Informazioni sulla riproduzione di
DualDisc
Un DualDisc è un nuovo disco con due lati, un lato
contiene contenuti DVD video, audio, ecc. mentre l’altro
lato contiene contenuti non DVD ad esempio materiale
audio digitale. Il lato audio non DVD non è compatibile
con i CD Audio e quindi non può essere riprodotto. Per
maggiori dettagli sulle caratteristiche dei DualDisc,
chiedere al fabbricante o al rivenditore del disco.
Dischi non riproducibili
•DVD-Video
• DVD-Audio
•CD-G
•Video CD
• DTS CD
È possibile che non possano essere riprodotti anche altri
tipi di dischi, diversi da quelli sopra elencati.
Contenuto della confezione
Verificare che i seguenti accessori siano inclusi nella
confezione.
• Telecomando x1
• Batterie a secco AAA/IEC R03 x2
• Cavo audio RCA (spine rosse/bianche) x1
• Cavo di alimentazione
• Certificato di garanzia
• Istruzioni per l’uso (questo documento)
Nota
• Le illustrazioni riportate nelle Istruzioni per l’uso
possono essere state modificate o semplificate per
comodità di spiegazione, pertanto l’aspetto
effettivo del prodotto potrebbe essere diverso.
• Le illustrazioni riprodotte in questa pubblicazione si
riferiscono soprattutto al modello PD-30.
Caricamento delle batterie nel
telecomando
1 Aprire il coperchio posteriore.
PD-30
PD-10
2 Inserire le nuove batterie, rispettando le
polarità indicate all’interno del vano.
PD-30
PD-10
3 Chiudere il coperchio posteriore.
PD-30
Le batterie in dotazione con l’unità sono state fornite per
consentire di controllare il funzionamento del prodotto e
potrebbero avere durata breve. Per una maggior durata
di utilizzo consigliamo di usare delle batterie alcaline.
AVVERTENZA
• Non utilizzare o conservare batterie in luoghi
esposti a luce solare diretta o troppo caldi, ad
esempio in una vettura o vicino ad un calorifero. In
caso contrario potrebbero verificarsi perdite di
liquido, surriscaldamenti, incendi o esplosioni delle
batterie. In tali condizioni anche la durata e le
prestazioni delle batterie potrebbero risultare
ridotte.
Attenzione
L’uso non corretto delle batterie può causare pericolo di
perdite e di esplosione. Osservare le seguenti
precauzioni:
• Inserendo le batterie accertarsi di non danneggiare
le molle poste sui terminali della batteria.
• Non utilizzare batterie diverse da quelle indicate.
Inoltre non utilizzare batterie nuove insieme a
batterie vecchie.
PD-10
• Inserendo le batterie nel telecomando disporle nel
senso corretto, come mostrato dai segni indicanti
le polarità ( e ).
• Non riscaldare, smontare o gettare delle batterie
tra le fiamme o nell’acqua.
• Batterie della medesima forma e dimensione
potrebbero avere delle tensioni diverse. Non
utilizzare insieme batterie di tipo diverso.
• Se si prevede di non utilizzare il telecomando per
un lungo periodo di tempo (un mese o più) togliere
le batterie per evitare fuoriuscite del fluido delle
batterie. In presenza di perdite di fluido, asportarle
con attenzione dall’interno del vano batterie, poi
inserire delle batterie nuove. Se delle fuoriuscite di
fluido delle batterie dovessero entrare a contatto
con la pelle, sciacquare la parte interessata con
abbondante acqua.
• Per lo smaltimento delle batterie usate fare
riferimento alle norme di legge o emanate dagli enti
pubblici responsabili per la protezione
dell’ambiente in vigore nel proprio paese di
appartenenza .
Utilizzo del telecomando
Il telecomando ha un raggio di azione di circa 7 m con
un angolo di circa 30° dal sensore telecomando.
30 °
30 °
7 m
Quando si utilizza il telecomando tenere presente
quanto segue:
• Verificare che tra il telecomando e il sensore per il
controllo a distanza dell’unità non siano presenti
ostacoli.
• Il corretto funzionamento del comando a distanza
può venire compromesso se il sensore dell’unità è
illuminato dalla luce diretta del sole o da una luce
fluorescente.
• I telecomandi di dispositivi diversi possono
interferire reciprocamente. Evitare l’utilizzo del
telecomando per un’altra apparecchiatura
posizionata vicino a questa unità.
• Sostituire le batterie quando si nota una
diminuzione del raggio di azione del telecomando.
4
It
Page 47

Collegamento 02
Capitolo 2:
Collegamento
Attenzione
• Prima di effettuare o modificare dei collegamenti,
interrompere l’alimentazione e staccare il cavo di
alimentazione dalla presa CA.
• Collegare il cavo di alimentazione dopo aver
completato tutti i collegamenti tra i dispositivi.
Collegamenti delle uscite audio
analogiche
Collegando l’uscita audio analogica di quest’unità
all’ingresso audio analogico di un amplificatore, si può
utilizzare l’amplificatore per ascoltare suono analogico
prodotto dall’unità.
Pannello posteriore PD-30
Cavo audio
(compreso nella confezione)
Amplificatore
RL
ANALOG
AUDIO INPUT
Collegamenti delle uscite audio digitali
Se si desidera, si può collegare l’uscita audio digitale
dell’unità a un amplificatore AV o a un apparecchio di
registrazione digitale (registratore CD, MD, ecc.).
• I terminali DIGITAL OUT dell’unità non consentono
l’emissione di suono da dischi SACD e DSD o da
apparecchi come iPod/iPhone/iPad.
Amplificatore AV o
DIGITAL IN
COAXIAL
Amplificatore AV o
apparecchio di
registrazione digitale
Cavo audio
coassiale digitale
(reperibile in
commercio)
Pannello posteriore PD-30
Importante
Fare attenzione nel maneggiare i cavi in fibra ottica
• Non lasciare che i cavi in fibra ottica si pieghino
bruscamente creando delle angolazioni accentuate.
Quando si ripongono dei cavi in fibra ottica arrotolarli
creando delle bobine di almeno 15 cm di diametro.
• Quando si collegano dei cavi in fibra ottica allineare
correttamente i connettori e inserire
completamente le spine. Se l’orientamento del
connettore del cavo non è corretto e viene applicata
una forza eccessiva nel tentativo di introdurne la
spina, il connettore potrebbe essere deformato,
impedendo allo sportello di chiudersi quando il
cavo viene rimosso.
Nota
• Per quanto concerne l’uscita audio digitale, i CD
riprodotti su quest’unità devono produrre dei
segnali PCM lineari con una frequenza di
campionamento che arriva a 44,1 kHz e fino a 16 bit
quantitativi (alcuni dischi potrebbero non essere
riproducibili a causa dei componenti collegati e
dell’ambiente). Per informazioni relative ad altri file
vd. pagina 12.
apparecchio di
registrazione digitale
DIGITAL IN
OPTICAL
Cavo in fibra ottica
(reperibile in commercio)
Utilizzo di un unico telecomando per
diversi componenti Pioneer (solo per
il modello PD-30)
Quest’unità e altri componenti Pioneer dotati di jack
CONTROL IN/OUT possono essere controllati con un
solo telecomando puntando quest’ultimo verso il
ricevitore di segnale situato sull’amplificatore AV o verso
l’altro componente. Questa funzione consente anche di
controllare mediante un telecomando dei componenti
non dotati di sensori remoti o installati in luoghi in cui
non si può avere accesso ai sensori remoti dei
componenti.
Altro componente Pioneer
dotato di jack CONTROL IN/
OUT
Telecomando per
amplificatore AV ecc.
Puntare il telecomando
verso il ricevitore di
segnale dell’amplificatore
AV ecc.
Collegamento ad altri
componenti Pioneer dotati
di jack CONTROL IN
PD-30
Nota
• Per i collegamenti fare ricorso a un cavo
monoaurale mini-plug (senza resistore) disponibile
in commercio.
• Effettuando il collegamento dei jack CONTROL IN/
OUT, per realizzare dei collegamenti analogici si
dovrà fare uso di cavi audio normalmente reperibili
in commercio. Limitarsi a collegare i jack
CONTROL IN/OUT da soli non consentirà di
controllare il sistema in modo corretto.
• Quando un cavo di controllo è collegato al jack
CONTROL IN del lettore PD-30, l’unità non può
essere controllata puntando il telecomando verso il
PD-30 (il sensore remoto è disabilitato
automaticamente).
Inserimento della spina
Importante
• Se è necessario staccare il cavo di alimentazione,
accertarsi dapprima di premere il pulsante
/I
STANDBY/ON sul pannello frontale dell’unità
in modo da SPEGNERE il lettore PD-30 o mettere in
modalità di attesa il lettore PD-10 prima di staccare
il cavo.
• Prima di staccare il cavo di alimentazione
accertarsi che sul display del pannello frontale
dell’unità principale non sia accesa la spia [-OFF-].
Se il cavo di alimentazione viene staccato mentre la
spia [-OFF-] è ancora accesa, le impostazioni
dell’unità potrebbero tornare quelle predefinite di
fabbrica.
• Se si parte per un viaggio o in altre circostanze in
cui non si utilizzi l’unità per un periodo di tempo
prolungato staccare sempre la spina del cavo di
alimentazione dalla presa.
Attenzione
• Non utilizzare cavi di alimentazione diversi da
quello in dotazione con l’unità.
• Non utilizzare il cavo di alimentazione fornito per
finalità diverse da quelle descritte di seguito.
Dopo aver eseguito tutti i collegamenti, inserire la spina
dell’unità in una presa CA.
Pannello posteriore PD-30
Collegamento alla
presa CA
1 Inserire il cavo di alimentazione fornito
nella presa
AC IN
2 Inserire l’altra estremità nella presa CA.
Cavo di
alimentazione
posta sul retro dell’unità.
English
DeutschFrançais
Italiano Español Русский
Nederlands
5
It
Page 48

Controlli e display03
Capitolo 3:
Controlli e display
Telecomando
PD-30
1
2
3
4
5
6
7
8
9
10
11
1
STANDBY/ON
Commuta lo stato dell’amplificatore da attesa ad
accensione e viceversa.
2 Pulsanti numerici
Utilizzare questi pulsanti quando si desidera specificare
che una determinata traccia deve essere riprodotta.
Usare i pulsanti numerici per selezionare la traccia, poi
premere ENTER per confermare la selezione.
3
CLEAR
Premere per eliminare i contenuti di una riproduzione
programmata (pagina 8).
4
SETUP
Utilizzare per impostare la funzione di spegnimento
automatico (pagina 11).
PD-10
12
1
9
2
13
14
33
15
4
35
14
37
16
5
8
12
11
16
10
6
Utilizzare quando si mette in funzione il menu iPod/
13
iPhone/iPad.
17
7
18
15
19
20
8
Premere per commutare l’ingresso dell’unità per
adattarlo a un iPod o a un dispositivo USB (pagina 9,10).
///
Utilizzare questi pulsanti per selezionare dei brani
musicali, cambiare le impostazioni e spostare il
cursore.
ENTER
Usare questo pulsante per dare inizio
all’esecuzione di un brano selezionato o per
inserire un’impostazione dopo averla modificata.
iPod MENU
(solo per il modello PD-30)
Premere per tornare all’inizio della traccia in
riproduzione in un determinato momento. Premere
due volte per tornare all’inizio della traccia
precedente.
Premere per dare inizio alla riproduzione. Nel corso
della riproduzione, la pressione del pulsante mette
in pausa/riprende la riproduzione.
Premere durante la riproduzione per saltare
all’inizio della traccia successiva.
Premere per eseguire un’azione di ritorno indietro
veloce su una traccia in riproduzione. Se il pulsante
viene nuovamente premuto durante un’operazione
di ritorno indietro veloce, la velocità dell’azione di
ritorno indietro muta in quattro tempi.
Premere per arrestare la riproduzione.
Premere per eseguire un avanzamento veloce su
una traccia in riproduzione. Se il pulsante viene
nuovamente premuto durante un’operazione di
avanzamento veloce, la velocità dell’azione di
avanzamento muterà in quattro tempi.
iPod/USB
(PD-30)
USB (PD-10)
9
SACD/CD
Premere per commutare l’ingresso dell’unità
adattandolo a un SACD/CD. Nel caso di dischi SACD
ibridi, se questo pulsante viene premuto quando la
riproduzione è stata arrestata, l’area di riproduzione del
disco cambia (pagina 11).
10
REPEAT
Premere per dar inizio alla ripetizione della
riproduzione (pagina 8).
RANDOM
Premere per dar inizio a una riproduzione casuale
di brani (pagina 8).
PROGRAM
Premere per dar inizio a una riproduzione
programmata (pagina 8).
11 PURE AUDIO
Premere questo pulsante per attivare la modalità audio
puro. In questa modalità la riproduzione audio viene
effettuata con la massima fedeltà ai suoni originali
(pagina 11).
12
OPEN/CLOSE
Premere per aprire e chiudere il cassetto portadisco
(pagina 8).
13
ENTER
Usare questo pulsante per dare inizio all’esecuzione di
un brano selezionato o per inserire un’impostazione
dopo averla modificata.
Pannello posteriore
Vd. pagina 5 per informazioni dettagliate sui collegamenti.
DIGITAL IN
1 2 3 54
1 jack CONTROL IN/OUT
(solo per il modello PD-30)
2terminale
3terminale
DIGITAL OUT (COAXIAL)
DIGITAL OUT (OPTICAL)
14
DISPLAY
Premere per visualizzare svariati dati inerenti al disco,
compresi il tempo di riproduzione trascorso e quello
rimanente (pagina 8).
15
DIMMER
Premere per modificare i livelli di illuminazione del
display e delle spie del pannello frontale dell’unità
principale (pagina 11).
16
S.RETRIEVER
Premere per spostarsi tra le diverse impostazioni della
funzione sound retriever (pagina 11).
17
AMPLIFIER
Premere per commutare l’alimentazione da ON a
STANDBY su un amplificatore AV Pioneer.
18
VOLUME +/–
Premere questi pulsanti per regolare il volume del suono
di un amplificatore AV Pioneer.
19
MUTE
Premere per silenziare il suono di un amplificatore AV
Pioneer. Premere di nuovo per annullare la funzione
silenziatore.
20
INPUT
Premere per commutare l’ingresso di un amplificatore
AV Pioneer.
(solo per il modello PD-10)
(solo per il modello PD-10)
(solo per il modello PD-10)
(solo per il modello PD-10)
PD-30
4terminali
5jack
ANALOG OUT
AC IN
6
It
Page 49

Controlli e display 03
English
Pannello anteriore
3 5 6 7 81
2 4
9
1
/I STANDBY/ON
Quando l’alimentazione è accesa, la spia
dell’alimentazione posta al centro del pulsante si
accenderà.
• Sul modello PD-30 questo pulsante accende e
spegne l’amplificatore.
Per ACCENDERE l’apparecchio premere il
pulsante fino a che rimane in posizione abbassata.
• Sul modello PD-10 questo pulsante accende
l’amplificatore o lo mette in modalità di attesa.
2Spia
Si accende quando l’alimentazione è in modalità di
STANDBY.
3Spia
Si accende quando la funzione audio puro è impostata
su ON (pagina 11).
STANDBY
PURE AUDIO
4 Display pannello frontale
(Vd. descrizione seguente.)
5
Premere per aprire e chiudere il cassetto portadisco
(pagina 8).
6
FUNCTION
Utilizzare per cambiare la sorgente di ingresso. La
sorgente di ingresso muta come segue.
DISC iPod*
(non visualizzato).
1
*
solo per il modello PD-30
7
Premere per arrestare la riproduzione.
1
10 12 1311
/USB Ritorno all’inizio
PD-30
8
Premere per dare inizio alla riproduzione. Nel corso della
riproduzione, la pressione del pulsante mette in pausa/
riprende la riproduzione.
9 Sensore telecomando
Riceve i segnali dal telecomando (pagina 4).
10
Porta iPod/USB
Porta USB (PD-10)
Utilizzare per collegare un iPod/iPhone/iPad Apple
(pagina 9) o un dispositivo USB (pagina 10).
11 Cassetto portadisco
12
13
Premere per tornare all’inizio della traccia in
riproduzione in un determinato momento. Premere
due volte per tornare all’inizio della traccia
precedente. Quando si mantiene premuto il
pulsante, la traccia in riproduzione tornerà indietro
in modalità “indietro-veloce”.
• Premendo nuovamente il pulsante mentre ciò
avviene, la velocità dell’azione di ritorno indietro
veloce cambierà in quattro tempi.
Premere per avanzare all’inizio della traccia
successiva. Quando si mantiene premuto il
pulsante, la traccia in riproduzione avanzerà in
modalità “avanti-veloce”.
• Premendo nuovamente il pulsante mentre ciò
avviene, la velocità dell’azione di avanzamento
veloce cambierà in quattro tempi.
(PD-30)
(pagina 8)
Display pannello frontale
1 2 4 5 6
1
USB/iPod
Si accende durante la riproduzione di brani salvati su
dispositivi USB con memoria flash o iPod/iPhone/iPad.
2
SACD/CD/DSD
La spia si accende in corrispondenza del tipo di disco in
riproduzione in un determinato momento.
3
PGM
Si accende durante la riproduzione programmata
(pagina 8).
4
TRK
Si accende quando viene visualizzato il numero di
traccia insieme al tempo di riproduzione trascorso o al
tempo di riproduzione rimanente.
5
FILE
Si accende quando viene visualizzato il nome di un file.
6
REPEAT
Si accende durante la ripetizione della riproduzione
(pagina 8).
7
RANDOM
Si accende durante una riproduzione casuale di brani
(pagina 8).
8
ALL
Si accende durante la ripetizione della riproduzione del
contenuto di un disco (pagina 8).
9
TOTAL
Si accende quando viene visualizzato il tempo di
riproduzione rimanente di un disco.
10
REMAIN
Si accende quando viene visualizzato il tempo di
riproduzione rimanente di una traccia o di un disco.
3 7 8 9
10
1411 12 13
11
S.RTRV
Si accende quando la funzione sound retriever è
impostata su ON (pagina 11).
12
SET UP
Si accende quando si sta impostando la funzione di
spegnimento automatico (pagina 11).
13
Si accende durante un’operazione di avanzamento
veloce.
Si accende durante un’operazione di ritorno
indietro veloce.
Si accende durante la riproduzione.
Si accende quando l’apparecchio è in modalità di
pausa.
14 Display dei caratteri
DeutschFrançais
Italiano Español Русский
Nederlands
7
It
Page 50

Riproduzione04
Capitolo 4:
Riproduzione
Le funzioni che possono essere utilizzate differiscono a
seconda del tipo di disco e di file. In alcuni casi
determinate funzioni non possono essere utilizzate.
Vedere
Funzioni di riproduzione
Riproduzione di dischi
1 Per ACCENDERE l’unità
premere il pulsante
/I STANDBY/ON
sul pannello frontale.
• Nel modello PD-30 accendere
l’apparecchio premendo il pulsante
POWER fino a che non rimane in
posizione abbassata.
Vista l aterale de l pannello f rontale
2 Premere il pulsante
per aprire il cassetto
portadisco e inserire un
disco.
• Inserire il disco con il lato stampato rivolto verso l’alto.
3 Premere il pulsante
per dare inizio alla
riproduzione.
• Per impostare una pausa durante la riproduzione
premere il pulsante .
• Per arrestare la riproduzione premere il pulsante .
Nota
• Le operazioni 2 e 3 possono essere eseguite con il
telecomando nello stesso modo in cui vengono
effettuate con i comandi del pannello frontale
dell’unità principale.
Impostazione della modalità di attesa
Prima di impostare l’interruttore di accensione in
modalità di STANDBY togliere qualsiasi disco caricato
nel lettore.
• Premere il pulsante
STANDBY/ON
telecomando.
Quando si desidera riaccendere l’apparecchio, premere
il pulsante STANDBY/ON del telecomando.
a pagina 11.
posizionato
del
• Nel modello PD-30, la pressione del pulsante
/I STANDBY/ON sul pannello frontale
dell’apparecchio SPEGNE l’unità anziché metterla
in modalità di STANDBY. Per riaccenderla
il pulsante
/I STANDBY/ON
Nota
• Se il cavo di alimentazione è scollegato quando
l’unità è in modalità di attesa, l’unità si spegnerà e
non si riaccenderà automaticamente quando il
cavo sarà nuovamente collegato. Dopo aver
ricollegato il cavo di alimentazione premere il
pulsante STANDBY/ON del telecomando per
accendere l’apparecchio.
del pannello frontale.
premere
Avanti veloce/Indietro veloce
• Durante la riproduzione
premere i pulsanti
Ogni volta che il pulsante viene premuto la velocità
dell’operazione di avanzamento o ritorno indietro viene
modificata in quattro tempi.
• Per tornare alla funzione di riproduzione normale
premere il pulsante .
o .
Saltare una traccia
• Durante la riproduzione
premere i pulsanti
La riproduzione salterà in avanti o indietro un numero di
tracce pari alle volte in cui il pulsante è stato premuto.
o .
Ricerca diretta (indicare una traccia
specifica da riprodurre)
• Con i pulsanti numerici
inserire il numero della traccia
desiderata, poi premere il
pulsante ENTER per confermare la selezione.
Anche se il pulsante ENTER non è premuto,
la riproduzione avrà automaticamente inizio
dopo un intervallo di cinque secondi (ciò non
vale per la riproduzione programmata).
0 9
〜
ENTER
Ripetizione della riproduzione
La ripetizione della riproduzione può interessare una
sola traccia riprodotta in un determinato momento o
tutte le tracce di un intero disco.
• Durante la riproduzione
premere il pulsante REPEAT.
• La ripetizione della riproduzione avrà
inizio e sul display del pannello frontale dell’unità si
accenderà la spia [REPEAT]. Premere nuovamente
il pulsante per alternare il tipo di ripetizione della
riproduzione tra ripetizione di una sola traccia e
ripetizione del disco (tutte le tracce) come segue:
ripetizione di una sola traccia
トラックリピート([REPEAT]点灯)
(si accende la spia [REPEAT])
Ripetizione del disco (si accendono le spie
ディスクリピート([REPEAT]、[ALL]点灯)
[REPEAT] e [ALL])
ARRESTO della ripetizione
della riproduzione
Nota
• La funzione di ripetizione della riproduzione viene
annullata quando si interrompe la riproduzione del
disco.
↓
↓
リピートオフ
REPEAT
Riproduzione casuale
Vengono selezionate e riprodotte in ordine casuale tutte
le tracce presenti sul disco fino a che ciascuna traccia è
stata riprodotta una volta.
• Durante la riproduzione premere
il pulsante
La riproduzione casuale ha inizio e sul display
del pannello frontale dell’unità principale si
accende la spia [RANDOM].
• La riproduzione casuale continua fino a che il disco
• La funzione di riproduzione casuale non può essere
• Se durante la riproduzione causale si preme il
RANDOM
Nota
si arresta o fino a che il pulsante RANDOM è
premuto di nuovo.
usata simultaneamente con quella di riproduzione
programmata.
pulsante , la riproduzione salta alla traccia
selezionata a caso successiva. Se viene premuto il
pulsante , la riproduzione torna all’inizio della
traccia in riproduzione che comincia di nuovo.
.
RANDOM
Riproduzione programmata (le tracce
vengono riprodotte in ordine
predeterminato)
Questa funzione consente di programmare la
riproduzione di un numero massimo di ventiquattro
tracce nell’ordine selezionato.
1 Dalla modalità di arresto
premere il pulsante
PROGRAM
PROGRAM
.
Sul display del pannello frontale dell’unità si accenderà
la spia [PGM].
2 Fare uso dei pulsanti
numerici per selezionare il
numero della traccia
desiderata, poi premere il pulsante
Esempio: Per selezionare la traccia 15,
premere i pulsanti 1 e 5 e poi ENTER. Nel
caso si commetta un errore, premere il
pulsante CLEAR.
0 9
〜
ENTER
ENTER
3 Ripetere l’operazione 2 per inserire i
numeri di tutte le tracce desiderate.
4 Premere il pulsante
La riproduzione avrà inizio nell’ordine in cui
le tracce sono state programmate. Se si
desidera aggiungere altre tracce, ripetere le
operazioni 1 e 2.
Nota
• Se viene premuto il pulsante CLEAR quando il disco
è in modalità di arresto, tutta la programmazione
sarà cancellata.
• Per eliminare delle tracce in programmazione,
dalla modalità di arresto, premere il pulsante
PROGRAM seguito dal pulsante CLEAR. Le tracce
in programmazione verranno annullate, a partire
dall’ultima.
• Una “pausa” non può essere programmata.
• I contenuti della riproduzione programmata
(in modalità di ripetizione di tutte le tracce)
possono essere ripetuti. Basta premere il pulsante
REPEAT dopo l’inizio della riproduzione
programmata (vd. sulla sinistra).
• Durante una riproduzione programmata non si può
eseguire una ripetizione della riproduzione di
tracce singole.
• Durante una riproduzione programmata non si può
usare la funzione di ripetizione casuale.
• Se durante la riproduzione programmata si preme
il pulsante , la riproduzione andrà avanti
passando all’inizio della traccia in programmazione
successiva.
• Dopo un arresto della riproduzione, per dare
nuovamente inizio alla riproduzione programmata
dei medesimi brani, premere il pulsante
PROGRAM e poi il pulsante .
.
Visualizzazione dei dati di un disco
• Durante la riproduzione premere
il pulsante
Appariranno svariate informazioni, compresi i tempi di
riproduzione trascorso e rimanente.
DISPLAY
.
DISPLAY
.
8
It
Page 51

Riproduzione 04
A seconda del disco, molteplici pressioni del pulsante
DISPLAY faranno in modo che sul display appaiano
ciclicamente svariati dati.
Nota
• Quando vengono riprodotti dei file AAC (solo per il
modello PD-30), WMA/MP3 o dei file presenti su
dischi DSD appare il nome del file (i primi otto
caratteri). Tuttavia la visualizzazione potrebbe non
essere del tutto corretta, dipende dal carattere
utilizzato.
Riproduzione da iPod/iPhone/iPad
(solo per il modello PD-30)
È possibile apprezzare suono di alta qualità emesso da
un iPod/iPhone/iPad semplicemente collegando uno di
questi dispositivi all’unità.
Verifica dei modelli di iPod/iPhone/iPad
supportati
I modelli di iPod/iPhone/iPad i cui contenuti sono
riproducibili con quest’unità sono indicati di seguito.
iPod/iPhone/iPad Audio Control
iPod nano 2/3/4/5/6G
iPod touch 1/2/3/4G
iPhone
iPhone 3G/3GS
iPhone 4/4S
iPad
iPad 2
• Il sistema è stato sviluppato e testato per la
versione di software dell’iPod/iPhone/iPad indicata
sul sito web Pioneer.
• L’installazione su un iPod/iPhone/iPad di software
di versioni diverse rispetto a quelle indicate sul sito
web Pioneer potrebbe comportare problemi di
incompatibilità con questo sistema.
Nota
• Pioneer non garantisce che quest’unità riproduca
contenuti da modelli di iPod/iPhone/iPad diversi da
quelli indicati.
• Alcune funzioni potrebbero essere limitate a
seconda del modello o della versione del software.
• Gli iPod/iPhone/iPad sono autorizzati alla
riproduzione di materiali non protetti da diritto
d’autore o che l’utente è legalmente autorizzato a
riprodurre.
• Caratteristiche come l’equalizzatore non possono
essere controllate con questo sistema; consigliamo
di spegnere l’equalizzatore prima di effettuare un
collegamento.
• Pioneer declina ogni responsabilità per qualsiasi
perdita diretta o indiretta derivante da disturbi o per
perdite di materiale registrato provocate da guasti a
un iPod/iPhone/iPad.
• Per istruzioni dettagliate sull’uso di iPod/iPhone/
iPad fare riferimento al manuale fornito con questi
ultimi.
Riproduzione di contenuti da iPod/iPhone/iPad
1 Premere
per selezionare
ingresso.
Premere il pulsante iPod/USB del telecomando.
La stessa operazione può essere effettuata premendo
•
ripetutamente
2 Collegamento di un iPod/iPhone/iPad.
Collegare l’iPod/iPhone/iPad alla porta USB posta sul
pannello frontale dell’unità. Per effettuare il
collegamento utilizzare il cavo per iPod fornito con
l’iPod/iPhone/iPad.
• Anche per effettuare il collegamento del cavo fare
riferimento alle istruzioni di funzionamento
dell’iPod/iPhone/iPad.
Cavo iPod
iPod/USB
iPod
come sorgente di
FUNCTION
sul telecomando
sul pannello frontale.
iPod/iPhone/iPad
Se si riproducono contenuti da iPod/iPhone/iPad è
possibile effettuare le seguenti operazioni.
Pulsante A cosa serve
iPod/USB
RANDOM
REPEAT
iPod MENU
//ENTER
Se l’unità non è in grado di riprodurre i contenuti di un
iPod/iPhone/iPad, eseguire i seguenti controlli di
localizzazione guasti:
Se non si riesce a far funzionare un iPod/iPhone/iPad
controllare i punti seguenti:
Avvia la riproduzione. Nel corso della
riproduzione, la pressione del pulsante
mette in pausa/riprende la riproduzione.
Imposta una pausa durante la
riproduzione
Premere per saltare all’inizio del file
corrente, quindi ai file precedenti.
Mantenere premuto per un’azione di
ritorno indietro rapido.
Premere per saltare al file successivo.
Mantenere premuto per un’azione di
avanzamento rapido.
I file selezionati in un dato momento su un
iPod/iPhone/iPad vengono riprodotti in
ordine casuale (riproduzione sequenza
casuale).
Viene ripetuta la riproduzione dei file
selezionati in un dato momento su un
iPod/iPhone/iPad.
Utilizzare quando si mette in funzione il
menu iPod/iPhone/iPad.
Da usare per eseguire le operazioni dei
menu degli iPod/iPhone/iPad.
1 Ogni volta che si preme REPEAT la modalità di
ripetizione della riproduzione cambia come sotto
indicato.
Ripeti 1 Ripeti tutti Riproduzione normale
Ripeti 1: ripete un file riprodotto in un dato
momento.
Ripeti tutti: ripete tutti i file.
Importante
• Controllare se l’unità supporta gli iPod/iPhone/
iPad.
• Ricollegare l’iPod/iPhone/iPad all’unità. Se questa
soluzione non sembra funzionare cercare di
resettare l’iPod/iPhone/iPad.
• Controllare se l’unità supporta il software dell’iPod/
iPhone/iPad.
1
• L’iPod/iPhone/iPad è collegato correttamente?
Ricollegare l’iPod/iPhone/iPad all’unità.
• L’iPod/iPhone/iPad si è bloccato? Cercare di
resettare l’iPod/iPhone/iPad e poi ricollegarlo
all’unità.
Nota
• Ogniqualvolta un iPod/iPhone/iPad è collegato a
quest’unità ha luogo una ricarica dell’iPod/iPhone/
iPad. (Detta ricarica è consentita soltanto quando
l’alimentazione dell’unità è ACCESA). (Il contenuto
della nota non ha applicazione quando la modalità
audio puro è impostata su ON).
• Quando l’ingresso viene commutato dall’ingresso
per iPod a un’altra funzione, la riproduzione da
iPod/iPhone/iPad sarà automaticamente arrestata.
English
DeutschFrançais
Italiano Español Русский
Nederlands
9
It
Page 52

Riproduzione04
Riproduzione di file salvati su
dispositivi di memoria USB
1 Premere
USB
sul telecomando
per selezionare USB come sorgente
di ingresso.
In presenza di apparecchi modello
premere il pulsante
invece con apparecchi modello PD-10
pulsante USB.
• La stessa operazione può essere effettuata
premendo ripetutamente FUNCTION sul pannello
frontale.
iPod/USB
PD-30
del telecomando
2 Collegare il dispositivo di memoria USB.
Dispositivo di memoria USB
(reperibile in commercio)
3 Premere il pulsante
per dare inizio
alla riproduzione.
• Per impostare una pausa durante la riproduzione
premere il pulsante .
• Per arrestare la riproduzione premere il pulsante .
iPod/USB
premere il
Si possono eseguire le operazioni seguenti. Si noti che
alcuni pulsanti non sono funzionanti, ciò dipende dalla
categoria di supporto in riproduzione in un dato
momento.
Pulsante A cosa serve
RANDOM
REPEAT
1 Ogni volta che si preme REPEAT le modalità di
riproduzione cambiano come sotto indicato.
Ripeti 1
Ripeti 1: ripete un file in riproduzione in un dato
momento.
Ripeti tutti: ripete tutti i file.
Quando la funzione di spegnimento automatico è
impostata su ON e l’ingresso è configurato per
riproduzione da memoria USB, se la riproduzione dal
dispositivo di memoria USB si arresta per trenta minuti
senza che vengano eseguite altre operazioni, la modalità
di alimentazione si commuterà automaticamente in
modalità di attesa.
Avvia la riproduzione. Nel corso della
riproduzione, la pressione del pulsante
mette in pausa/riprende la riproduzione.
Interrompe la riproduzione.
Premere per saltare all’inizio del file
corrente, quindi ai file precedenti.
Premere per un’azione di ritorno indietro
veloce. Ogni volta che il pulsante viene
premuto la velocità di ritorno indietro
cambia in quattro tempi.
Premere per saltare al file successivo.
Premere per un’azione di avanzamento
veloce. Ogni volta che il pulsante viene
premuto la velocità di avanzamento
cambia in quattro tempi.
I file selezionati in un dato momento
vengono riprodotti in ordine casuale
(riproduzione sequenza casuale).
Viene ripetuta la riproduzione dei file
selezionati in un dato momento.
Ripeti tutti Riproduzione normale
1
Nota
• L’unità potrebbe non riconoscere il dispositivo di
memoria USB, riprodurre file o alimentare il
dispositivo di memoria USB. Per informazioni
dettagliate vd.
• Pioneer non garantisce che un file registrato su un
dispositivo di memoria USB verrà riprodotto o che
al dispositivo di memoria USB verrà fornita
alimentazione. Si ricordi inoltre che Pioneer non
accetterà responsabilità di alcun tipo per la perdita
di file salvati su dispositivi di memoria USB causata
dal collegamento degli stessi a quest’unità.
• L’unità non supporta l’utilizzo di un hub USB.
Informazioni aggiuntive
a pagina 12.
10
It
Page 53

Utilizzo delle funzioni avanzate 05
Capitolo 5:
Funzioni di riproduzione
Utilizzo delle funzioni avanzate
Le funzioni che possono essere utilizzate differiscono a
seconda del tipo di disco e di file. In alcuni casi
determinate funzioni non possono essere utilizzate. Vd.
Funzioni di riproduzione
sulla colonna a destra.
Riproduzione di suoni ad alta fedeltà
Sound Retriever
Quando dei segnali audio compressi vengono
decompressi per la riproduzione, la trasmissione di
alcune parti subisce delle brevi interruzioni. Impostando
la funzione sound retriever su ON, viene aggiunta una
compensazione per quelle perdite, producendo così dei
suoni più pieni e corposi.
• Premere il pulsante S.RETRIEVER.
Ogni volta che il pulsante viene premuto la funzione
cambierà come segue: S.RTRV: OFF S.RTRV:
LOW S.RTRV: HI Ritorno allo stato originale
• La funzione Sound retriever è disabilitata quando la
funzione Pure audio è ATTIVA.
S.RETRIEVER
Pure Audio
Questa funzione disabilita l’uscita audio digitale e
riproduce suoni analogici ad alta fedeltà. Quando è
impostata su ON, sul display non compaiono spie.
L’impostazione predefinita di fabbrica è su OFF.
• Premere il pulsante PURE AUDIO.
Premere nuovamente per DISATTIVARE la
funzione.
• Quando questa funzione è impostata su ON e
l’ingresso dell’unità principale è commutato su
SACD/CD, sul pannello frontale si accenderà la
spia PURE AUDIO. Durante la riproduzione del
disco il display del pannello frontale si SPEGNE.
• Quando la spia PURE AUDIO è accesa, non verrà
effettuata la ricarica degli iPod/iPhone/iPad
collegati all’unità principale.
PURE AUDIO
Modifica dell’area di riproduzione
(strato) di un SACD/CD
I dischi SACD ibridi sono composti da due strati, uno
strato SACD e uno strato CD; ciò consente all’utente
di scegliere quale strato desidera riprodurre
1 Premere il pulsante
Modifiche dell’ingresso per i dischi SACD/CD.
SACD/CD
2 In modalità di arresto premere il
pulsante SACD/CD.
.
.
Ogni volta che il pulsante viene premuto, la riproduzione
passa dall’area CD all’area SACD a due canali e
viceversa.
Nota
• L’unità non supporta dischi SACD con aree
multicanali.
Regolazione dell’illuminazione
generale del display
L’unità è dotata di una funzione di regolazione della
luminosità per consentire la regolazione
dell’illuminazione del display su tre livelli, a fronte dei
diversi livelli di illuminazione degli ambienti.
L’impostazione predefinita di fabbrica è la regolazione
più luminosa.
• Premere il pulsante
Ogni volta che il pulsante viene premuto i tre livelli
di luminosità si alternano ciclicamente.
• L’impostazione della regolazione della luminosità
non può essere modificata quando un disco è in
riproduzione con la funzione audio puro impostata
su ON (vd. sulla sinistra).
• La luminosità della spia STANDBY non cambia.
DIMMER
Spegnimento automatico (configura
automaticamente la modalità
dell’alimentazione come modalità di
attesa)
Se per trenta minuti non vengono rilevati segnali o
attività dell’interruttore questa funzione mette
automaticamente l’unità in modalità di attesa.
1 Premere il pulsante
2 Modifica e conferma delle
impostazioni.
Usare il pulsante / per impostare la
funzione di ACCENSIONE o SPEGNIMENTO
come desiderato, poi premere il pulsante
ENTER per confermare.
SACD/CD
Nota
• Questa funzione è disabilitata quando viene
selezionato l’ingresso per iPod.
SET UP
.
.
ENTER
Le funzioni che possono essere utilizzate differiscono a seconda del tipo di disco e di file. In alcuni casi determinate
funzioni non possono essere utilizzate. Controllare le funzioni utilizzabili nella tabella sottostante.
Tipo di disco/file
DIMMER
SET UP
1
Funzione
Avanti veloce/Indietro veloce
Saltare una traccia
Ricerca diretta
(indicare una traccia specifica da riprodurre)
Ripetizione della riproduzione
Riproduzione casuale
Riproduzione programmata (le tracce vengono
riprodotte in ordine predeterminato)
Visualizzazione dei dati del disco
Sound Retriever
Pure Audio
SACD/CD
1[] Alcune funzioni potrebbero non essere utilizzabili con alcuni tipi di dischi o di file, anche se sono indicati sulla
tabella.
2Vd. anche
3 • I file AAC possono essere riprodotti unicamente con apparecchi modello PD-30.
4Vd. anche
5 Questa funzione è abilitata soltanto durante la riproduzione di file registrati su disco.
6 Soltanto dischi SACD ibridi.
Riproduzione di dischi CD-R/CD-RW
• Vd. anche
Formati di file riproducibili
Riproduzione di dischi DSD
a pagina 12.
a pagina 12.
SACD CD-DA
––
––
–– –
a pagina 12.
CD-R/-RW
6
–––
WMA
2
MP3
3
AAC
5
DSD
4
English
DeutschFrançais
Italiano Español Русский
Nederlands
11
It
Page 54

Informazioni aggiuntive06
Capitolo 6:
Informazioni aggiuntive
• Una sola cartella può contenere al massimo 150 file.
Dischi riproducibili
Riproduzione di dischi CD-R/CD-RW
• L’unità può riprodurre dischi CD-R/CD-RW
registrati in formato CD musicale, o dati audio in
formato WMA e MP3. Alcuni dischi però
potrebbero non essere riproducibili o potrebbero
generare rumori o suoni distorti.
• L’unità può essere utilizzata unicamente per la
riproduzione di suoni. Non può registrare dati su
dischi CD-R/CD-RW.
• Con quest’unità non possono essere riprodotti dei
dischi CD-R/CD-RW che non siano stati finalizzati.
Per informazioni in dettaglio consultare le istruzioni
di funzionamento del registratore di dischi.
Riproduzione di dischi DSD
L’unità è in grado di riprodurre file da dischi DSD
registrati in formato DSF.
File riproducibili
• Dischi registrati: DVD-R/-RW
• Estensioni dei file: .dsf
• Nome della cartella: DSD_DISC
• Capacità: massimo 4 GB per file
• Audio: a due canali
• Frequenza di campionamento: 2,8224 MHz
Esempio di composizione della cartella
L’ordine di riproduzione dei file/cartella non è alfabetico,
ma dipende dall’ordine con cui sono stati registrati sul
disco.
Root DSD_DISC
File01.dsf
FolderA
File02.dsf
FolderB
File03.dsf
FolderC
File04.dsf
FolderD
File05.dsf
File06.dsf
• Un unico disco può contenere al massimo 200
cartelle.
• Ciascuna cartella non dovrebbe avere più di 8 livelli.
• I nomi dei file che contengono caratteri della lingua
Giapponese ed alcuni altri caratteri o simboli,
potrebbero non essere visualizzati correttamente.
• Tutti i file diversi da quelli di formato DSF saranno
ignorati.
Attenzione
• Alcuni file potrebbero non essere riproducibili.
• I dischi contenenti ingenti quantitativi di file e di
cartelle potrebbero necessitare di parecchio tempo
prima che ne inizi la riproduzione. In questo caso è
possibile spostare i file desiderati direttamente alla
cartella DSD_DISC o limitare il numero di file a
venti o a un quantitativo inferiore.
Operazioni durante la riproduzione
Le seguenti operazioni non possono aver luogo durante
la riproduzione di un disco DSD:
• Ricerca diretta
• Riproduzione di file del disco di tipo diverso da
quelli in formato DSF
Informazioni visualizzate
Quando l’unità è in modalità di arresto durante la
riproduzione di un disco DSD, apparirà la spia [DSD
DISC]. Nel corso della riproduzione, la pressione del
pulsante DISPLAY farà sì che, ogni volta che il pulsante
viene premuto, sul display compaiano con andamento
ciclico le seguenti informazioni:
• Numero della traccia e tempo di riproduzione
trascorso
• Nome del file
Formati di file riproducibili
Riproduzione di file audio
L’unità supporta i seguenti formati di file.
• Si ricordi che alcuni formati di file non sono
riproducibili anche se sono elencati tra i formati di
file riproducibili.
• Se si cerca di riprodurre dei file di formati non
supportati, il suono potrebbe risultare intermittente
o accompagnato da rumore. In tali casi, accertarsi
che il formato del file sia compatibile con l’unità.
• File musicali soggetti a controlli attraverso
tecnologie Digital Rights Management non
possono essere riprodotti. La protezione DRM
(Digital Rights Management) nei confronti delle
copie indebite è una tecnologia progettata per
proteggere i diritti d’autore. Per evitare copie
illegali, la tecnologia DRM limita la possibilità di
riproduzione al registratore di dischi o al computer
originariamente usati per registrare la musica. Per
informazioni dettagliate consultare le istruzioni di
funzionamento e i file di guida relativi al dispositivo
o all’applicazione utilizzati durante la registrazione
originale.
Categoria Estensione
1
.mp3
MP3
WMA .wma
2
.m4a
AAC
1. “Tecnologia di decodificazione audio MPEG Layer-3
concessa in licenza da Fraunhofer IIS e Thomson
multimedia.”
2.
solo per il modello PD-30.
Stream
MPEG1/2
Audio
Layer-3
WMA2/
7/8/9
MPEG-4
AAC LC
MPEG-4
HE AAC
(AAC
Plus v1/
2)
Frequenza di
campionamento
Quantizzazion
e velocità di
trasmissione
Canale 2 ch
Velocità di
trasmissione
Frequenza di
campionamento
Quantizzazion
e velocità di
trasmissione
Canale 2 ch
Velocità di
trasmissione
Frequenza di
campionamento
Quantizzazione
velocità di
trasmissione
Canale 2 ch
Velocità di
trasmissione
da 8 kHz a
48 kHz
16 bit
da 8 kb/s a
320 kb/s
da
22,05 kHz a
48 kHz
16 bit
da 32 kb/s
a 192 kb/s
da 8 kHz a
48 kHz
16 bit
da 8 kb/s a
320 kb/s
Attenzione
• Potrebbe non essere possibile riprodurre tutti i
dischi CD-R/CD-RW registrati con un registratore
di CD o con un computer a causa delle
caratteristiche del disco, di graffi o tracce di
sporcizia presenti sul disco oppure per la presenza
di sporcizia o condensa sulla lente laser del lettore.
• Dei dischi registrati con un computer potrebbero
non essere riproducibili con quest’unità a causa
delle impostazioni dell’applicazione o
dell’ambiente del computer. Accertarsi di
effettuare registrazioni usando dischi del formato
corretto (per informazioni in merito consultare il
venditore dell’applicazione utilizzata).
• Dei dischi registrati in formato Packet Write non
possono essere riprodotti su quest’unità.
• Dei dischi CD-R/CD-RW che non sono stati
finalizzati non possono essere riprodotti con
quest’unità.
Riproduzione file WMA
• Usare dischi registrati compatibili con i sistemi di
file usati per i CD-ROM (ISO9660 di livello 1 e 2) e
con i formati estesi (Joliet, Romeo).
• L’unità non supporta dischi registrati con velocità
di trasmissione variabile (VBR) o codifica senza
perdita.
• L’unità non supporta dischi multisessione.
• Può essere riconosciuto e riprodotto un totale
massimo di 648 cartelle e tracce. Di questo numero
totale, le cartelle possono essere 299 al massimo.
Tuttavia, a seconda della composizione delle
cartelle, non tutte le cartelle e non tutte le tracce
possono essere riconosciute e riprodotte.
• Facendo uso di file WMA accertarsi che siano stati
codificati utilizzando le applicazioni verificate e
riconosciute da Microsoft Corporation. Se vengono
usate delle applicazioni non riconosciute, potrebbe
prodursi un funzionamento scorretto.
Riproduzione di file MP3
• Usare dischi registrati compatibili con i sistemi di
file usati per i CD-ROM (ISO9660 di livello 1 e 2) e
con i formati estesi (Joliet, Romeo).
• L’unità non supporta una velocità di trasmissione
variabile (VBR); anche se i file sono riproducibili, gli
intervallli di tempo mostrati sul display del pannello
frontale saranno scorretti a causa di variazioni nella
velocità di trasmissione e cambieranno pertanto
più velocemente o più lentamente rispetto ai valori
temporali corretti.
• L’unità non supporta dischi multisessione.
• Può essere riconosciuto e riprodotto un totale
massimo di 648 cartelle e tracce. Di questo numero
totale, le cartelle possono essere 299 al massimo.
Tuttavia, a seconda della composizione delle
cartelle, non tutte le cartelle e non tutte le tracce
possono essere riconosciute e riprodotte.
12
It
Page 55

Informazioni aggiuntive 06
• Per una qualità ottimale del suono si consiglia di
effettuare delle registrazioni con velocità di
trasmissione di 128 kb/s o maggiori.
Riproduzione di file in formato
AAC MPEG-4
• AAC è l’acronimo di “Advanced Audio Coding,
codifica audio avanzata” il formato basilare della
tecnologia per la compressione audio utilizzata con
i file MPEG-2 e MPEG-4.
• L’unità supporta la riproduzione di file AAC con
estensione “.m4a,” come codificati da iTunes®.
Tuttavia la loro riproduzione potrebbe non essere
possibile se i file sono protetti da copia con
tecnologie DRM e per cause legate alla versione di
codifica adottata da iTunes.
• iTunes è un marchio di Apple Inc., registrato negli
USA e in altri Paesi.
Precauzioni d’uso
Spostamento del lettore
Quando l’unità viene spostata in una nuova posizione,
effettuare sempre prima la procedura seguente: togliere
eventuali dischi presenti all’interno del lettore e chiudere
il cassetto portadisco. Premere il pulsante
/I STANDBY/ON dell’unità in modo che sul display del
pannello frontale appaia la spia [-OFF-], poi attendere
una decina di secondi prima di disconnettere il cavo di
alimentazione. Se l’unità viene spostata con un disco
caricato nel cassetto portadisco potrebbero prodursi dei
danni o ciò potrebbe provocare problemi di
funzionamento futuri.
Luogo di installazione
Scegliere una posizione stabile accando al televisore e al
sistema AV al quale l’unità deve essere collegata.
Non posizionare il lettore sopra un televisore o un
monitor a colori. Tenerlo lontano da piastre di
registrazione o altri componenti che tendono a essere
influenzati dal magnetismo.
Evitare i luoghi seguenti:
• Luoghi esposti alla luce solare diretta
• Luoghi umidi o scarsamente ventilati
• Luoghi estremamente freddi o caldi
• Luoghi soggetti a vibrazioni
• Luoghi in cui ci siano molta polvere o molto fumo di
sigarette
• Luoghi esposti a fuliggine, vapore o calore (per es.
cucine ecc.)
Non montare l’unità su un divano o un altro oggetto o
materiale dotato di qualità assorbenti in quanto ciò
potrebbe avere un’influenza negativa sulla qualità del
suono.
Non collocare oggetti nello spazio
soprastante
Non posizionare degli oggetti nello spazio sopra il
lettore.
Tenere lontano da fonti di calore
Non posizionare il lettore sopra un amplificatore o un
altro dispositivo che produca calore. Nel caso si installi
il lettore su uno scaffale, per evitare il calore generato da
un amplificatore e da altri dispositivi, se possibile,
posizionarlo su una mensola situata sotto a quella su cui
si trova l’amplificatore.
Spegnere il lettore quando non se ne fa
uso
Se un televisore fosse acceso contemporaneamente al
lettore, sul suo schermo potrebbero apparire delle
strisce, ciò dipende dalle condizioni dei segnali televisivi.
Questa circostanza non è sintomo di malfunzionamento
del lettore o del televisore. Se l’eventualità dovesse
verificarsi spegnere il lettore. Parimenti si potrebbero
udire dei rumori che disturbano la qualità del suono di
una radio accesa contemporaneamente al lettore.
Condensa
Se il lettore viene repentinamente spostato da un luogo
freddo a una stanza calda (per esempio in inverno) o se
la temperatura nella stanza in cui è installato il lettore si
alza improvvisamente per l’accensione del
riscaldamento ecc., all’interno dell’apparecchio (sugli
elementi necessari al funzionamento e sulla lente)
potrebbero formarsi delle piccole gocce d’acqua
(condensa). In presenza di condensa il lettore non
funzionerà correttamente e la riproduzione non sarà
possibile. Lasciare il lettore acceso, a temperatura
ambiente, per una o due ore (il tempo necessario
dipende dalla quantità di condensa presente). Le gocce
d’acqua si dissolveranno e la riproduzione tornerà
possibile.
Della condensa può anche prodursi in estate se il lettore
è esposto al getto d’aria diretto di un condizionatore. Se
ciò dovesse accadere spostare il lettore e posizionarlo in
un luogo diverso.
Pulizia del lettore
In condizioni normali, spolverare il lettore con un panno
morbido. In presenza di sporco ostinato, mettere del
detergente neutro, diluito in cinque-sei parti di acqua su
un panno morbido, strizzarlo molto bene, pulire via lo
sporco, poi passare un panno asciutto.
Si ricordi che il contatto tra il lettore e alcol, solventi,
benzene o insetticidi potrebbe cancellare le parti
stampate e provocare il distacco del rivestimento.
Inoltre, evitare di lasciare prodotti in gomma o vinile a
contatto con il lettore per periodi di tempo prolungati in
quanto ciò potrebbe danneggiarne il cabinet.
Quando si fa uso di panni impregnati di prodotti chimici
ecc. leggere con attenzione le relative modalità d’uso.
Quando si pulisce il lettore disinserire dalla presa di
corrente la spina del cavo di alimentazione.
Precauzioni da assumere quando l’unità è
installata su uno scaffale con uno
sportello di vetro
Non premere il pulsante OPEN/CLOSE del
telecomando per aprire il cassetto portadisco mentre lo
sportello in vetro è chiuso. Lo sportello ostacolerebbe la
libertà di movimento del cassetto portadisco e l’unità
potrebbe venire danneggiata.
Pulizia della lente della testina di lettura
La lente del lettore non dovrebbe sporcarsi se esso viene
utilizzato normalmente, ma, se per qualche ragione,
dovesse non funzionare correttamente a causa di
polvere o sporcizia, consultare il centro di assistenza
autorizzato Pioneer più vicino. Anche se in commercio
esistono dei detergenti per le lenti dei lettori ne
sconsigliamo l’utilizzo in quanto alcuni di essi
potrebbero danneggiare le lenti.
Come maneggiare i dischi
Non fare uso di dischi danneggiati (crepati o deformati).
Non graffiare la superficie del segnale del disco e non
permettere che si sporchi.
Non caricare nel lettore più di un disco alla volta.
Non incollare carta o adesivi sul disco, non scrivervi
sopra con matite, penne a sfera o altri strumenti di
scrittura dotati di punte aguzze. Tutto ciò potrebbe
danneggiare il disco.
Custodia dei dischi
Riporre sempre i dischi nelle loro custodie e mettere
queste ultime verticalmente, evitando luoghi esposti a
temperature elevate o umidità, luce solare diretta o
temperature estremamente basse.
Accertarsi di aver letto le avvertenze fornite con i dischi.
Pulizia dei dischi
Se sul disco ci sono impronte o polvere potrebbe
risultarne impossibile la riproduzione. In questo caso,
con un panno per pulizia o a un oggetto analogo
spolverare delicatamente il disco partendo dal centro e
dirigendosi verso il bordo esterno. Non usare panni
sporchi.
Non usare benzene, solventi o altri agenti chimici
volatili. Inoltre non usare spray per dischi o agenti
antistatici.
In presenza di sporco ostinato, mettere un po’ d’acqua
su un panno morbido, strizzarlo molto bene, pulire via lo
sporco, poi eliminare l’umidità con un panno asciutto.
Dischi di forma particolare
Con questo lettore non si può fare uso di dischi di forma
particolare (a cuore, esagonali ecc.). Non usare mai
questi dischi perché danneggerebbero il lettore.
Formazione di condensa sui dischi
Se un disco viene repentinamente spostato da un luogo
freddo a una stanza calda (in inverno per esempio) sulla
sua superficie potrebbero formarsi piccole gocce
d’acqua (condensa). Dei dischi su cui sia presente della
condensa non potranno essere riprodotti in modo
corretto. Asportare accuratamente le gocce d’acqua
dalla superficie del disco prima di usarlo.
English
DeutschFrançais
Italiano Español Русский
Nederlands
13
It
Page 56

Informazioni aggiuntive06
Diagnostica
Delle modalità di utilizzo scorrette spesso vengono erroneamente scambiate per guasti o cattivo funzionamento. Se
si ritiene che questo componente non funzioni bene, controllare la sezione che segue. A volte il problema risiede in
un altro componente. Controllare gli altri componenti e gli apparecchi elettronici usati. Se il problema non può venire
risolto nemmeno dopo aver effettuato i controlli suggeriti di seguito, rivolgersi al più vicino centro di assistenza
autorizzato Pioneer o al proprio negoziante di fiducia per le riparazioni.
• Se l’unità non funziona in modo normale a causa di influenze esterne, come quella dell’elettricità statica, per
tornare a delle condizioni di funzionamento normali togliere la spina dalla presa e inserirvela di nuovo.
Problema Rimedio
Il disco non viene riprodotto o viene
automaticamente espulso non
appena viene caricato.
Impossibilità di riproduzione di dischi
CD-R/-RW.
Non è possibile riprodurre file in
formato WMA/MP3 o AAC (solo per il
modello PD-30).
Impossibilità di utilizzo del
telecomando.
Le impostazioni sono cancellate. • Se la spina del cavo di alimentazione viene tolta dalla presa con violenza o si verifica
Audio mancante o distorto. • Controllare che tutti gli spinotti siano ben inseriti (pagina 5).
• Controllare che il disco sia caricato con l’etichetta rivolta verso l’alto e allineato
correttamente con la guida del cassetto portadisco (pagina 8).
• Accertarsi che il disco non sia sporco o impolverato e che non sia danneggiato
(pagina 13).
• Condensa nel lettore: Dare alla condensa il tempo di evaporare. Evitare di usare il
lettore vicino a un condizionatore d’aria (pagina 13).
• Se viene caricato un tipo di disco non supportato, il cassetto portadisco si aprirà
(pagina 4).
• Alcuni dischi CD-R/-RW registrati con un computer non possono essere riprodotti.
• I seguenti tipi di file non possono essere riprodotti:
- File protetti da copia con tecnologia DRM
- Dischi registrati non in conformità con il formato ISO9660
- File non registrati con una frequenza di campionamento di 44,1 kHz
- File WMA registrati con una velocità di trasmissione variabile (VBR) o codifica
senza perdita.
• Sostituire la batteria (pagina 4).
• Utilizzare entro un raggio di 7 m, 30° dal sensore remoto posizionato sul pannello
frontale (pagina 4).
• Eliminare eventuali ostacoli presenti o azionare da un’altra posizione.
• Evitare di esporre il sensore remoto posto sul pannello frontale alla luce diretta.
• Il cavo di controllo di un componente è collegato in modo scorretto? Verificare i
collegamenti corretti (pagina 5).
un’interruzione di corrente mentre l’unità è ACCESA, delle impostazioni
precedentemente configurate potrebbero essere annullate. Per staccare il cavo di
alimentazione, dapprima premere il pulsante
attendere che la spia [-OFF-] scompaia sul display del pannello frontale; solo a questo
punto togliere la spina del cavo dalla presa. Bisognerebbe prestare un’attenzione
particolare quando il cavo di alimentazione dell’unità è collegato a una presa situata
su un altro componente: lo spegnimento dell’altro componente potrebbe spegnere
simultaneamente quest’unità. Ogniqualvolta sia possibile collegare il cavo di
alimentazione dell’unità direttamente a una presa a muro.
• Controllare che spine e terminali non siano sporchi, non siano ossidati ecc.,
pulendoli se necessario. Controllare che il cavo non abbia danni.
• Controllare che il disco non sia danneggiato e che non presenti tracce di polvere o
sporco.
• L’unità è impostata su “pausa”? Premere il pulsante .
• Controllare le impostazioni dell’amplificatore/ricevitore (volume, funzione di
ingresso, impostazioni degli altoparlanti, ecc.).
• Controllare che l’uscita del lettore non sia collegata agli ingressi fono
(per giradischi) dell’amplificatore.
STANDBY/ON
del telecomando, poi
Problema Rimedio
Differenze considerevoli nel volume
dei SACD e CD.
Tra le tracce di un disco SACD, il
display dell’unità principale indica [--:--].
L’audio analogico è buono, ma quello
digitale è assente.
Il dispositivo di memoria USB non è
riconosciuto.
Un dispositivo di memoria USB è
collegato e viene visualizzato, ma non
si riesce a riprodurre i file audio che
esso contiene.
Ci vuole molto tempo per riconoscere
un dispositivo di memoria USB.
Il dispositivo di memoria USB non
viene alimentato.
I file musicali sono riprodotti anche
se non sono registrati nel dispositivo
d’archiviazione USB.
Non si riesce a far funzionare un iPod/
iPhone/iPad.
iPod/iPhone/iPad non vengono
alimentati.
L’iPod/iPhone/iPad non produce
suono.
• Ciò è dovuto a differenze di formato audio e non a cattivo funzionamento.
• Questa visualizzazione dipende dal disco.
• Accertarsi che sia disattivata la funzione audio puro (pagina 11).
• Non è possibile l’emissione di audio in formato digitale da dischi SACD e DSD e da
iPod. Per questi supporti fare ricorso ai terminali
• Collegare bene il dispositivo (inserendolo completamente) (pagina 10).
• L’unità non supporta hub USB. Collegare direttamente il dispositivo di memoria
USB.
• Alcuni dispositivi di memoria USB potrebbero non essere riconosciuti in modo
corretto. Spegnere e riaccendere l’apparecchio.
• L’unità supporta soltanto dispositivi USB appartenenti alla classe dei sistemi di
memorizzazione di massa.
• Sono supportati solo i sistemi di file FAT16 e FAT32. Gli altri sistemi di file (per es.
FAT, NTFS, ecc.) non sono supportati.
• Questo apparecchio non supporta l’utilizzo di unità rigide esterne.
• Dei file audio protetti da diritto d’autore salvati su un dispositivo di memoria USB
non possono essere riprodotti. Il tentativo di importare dati musicali da un CD ecc. a
un computer può provocare la richiesta di protezione da copie indebite a seconda della
configurazione adottata.
• Vd. l’elenco dei formati di file riproducibili con quest’unità.
• Quando vengono collegati dei dispositivi di memoria USB di notevole capacità
potrebbe essere necessario del tempo (svariati minuti) per caricare i dati.
• Quando la funzione audio puro è impostata su ON, al le porte
alimentazione (pagina 11).
• Sul display del pannello frontale appare un messaggio di errore? (pagina 7)
- Spegnere e riaccendere l’apparecchio (pagina 8).
- Spegnere l’apparecchio, staccare e poi ricollegare il dispositivo di memoria USB
(pagina 10).
- Premere
USB. (Quando l’ingresso viene impostato di nuovo come ingresso USB) (pagina 7).
• Verificare se sul dispositivo sono registrati dei file nascosti. I file nascosti saranno
riprodotti.
• Accertarsi che gli iPod/iPhone/iPad siano collegati correttamente (fare riferimento a
Riproduzione da iPod/iPhone/iPad (solo per il modello PD-30)
cercare di disconnettere e poi riconnettere l’iPod/iPhone/iPad.
• Accertarsi che i modelli di iPod/iPhone/iPad collegati siano supportati dall’unità
(pagina 9).
• Se l’iPod/iPhone/iPad è bloccato, cercare di resettarlo e ricollegarlo all’unità.
• Quando la funzione audio puro è impostata su ON, al le porte
alimentazione (pagina 9).
• Sul display del pannello frontale appare un messaggio di errore? Spegnere
l’apparecchio, staccare e poi ricollegare l’iPod/iPhone/iPad.
• Il suono viene emesso dall’altoparlante dell’iPod/iPhone/iPad? Spegnere e riaccendere
l’unità. Dopo aver impostato l’ingresso per iPod, collegare l’iPod/iPhone/iPad.
• I terminali
ANALOG OUT
FUNCTION
per cambiare modalità, poi tornare nuovamente alla modalità
DIGITAL OUT
non emettono audio.
(pagina 5).
USB
non viene erogata
a pagina 9). Inoltre,
USB
non viene erogata
14
It
Page 57

Informazioni aggiuntive 06
English
Specifiche
Generali
Sistema . . . . . . . . . . . . . . . . . . . . Lettore CD Super Audio
Alimentazione. . . . . . . da 220 V a 240 V CA, 50 Hz/60 Hz
Consumo di corrente
PD-30 . . . . . . . . . . . . . . . . . . . . . . . . . . . . . . . . . . .37 W
PD-10 . . . . . . . . . . . . . . . . . . . . . . . . . . . . . . . . . . .20 W
Consumo di corrente (standby) . . . . . . . . . . . . . . 0,45 W
Peso
PD-30 . . . . . . . . . . . . . . . . . . . . . . . . . . . . . . . . . . 5,6 kg
PD-10 . . . . . . . . . . . . . . . . . . . . . . . . . . . . . . . . . . 5,2 kg
Dimensioni
. . . . . . . . . . . . . . 435 mm (L) x 128 mm (A) x 329 mm (P)
Temperatura di funzionamento . . . . da +5 °C a +35 °C
Umidità tollerata. . . . . . . . . . . . . . . . . . . . . da 5 % a 85 %
Uscita audio (1 coppia stereo)
Livello di uscita. . . . . . . . . . . . . . . Durante l’uscita audio
Numero di canali . . . . . . . . . . . . . . . . . . . . . . . . . . . . . . . 2
Connettori . . . . . . . . . . . . . . . . . . . . . . . . . . . . . . . . . . RCA
Caratteristiche audio digitale
Risposta in frequenza
CD. . . . . . . . . . . . . . . . . . . . . . . . . . . . da 2 Hz a 20 kHz
SACD . . . . . . . . . . . . . . . . . . . . . . . . . da 2 Hz a 50 kHz
Rapporto S/N
CD. . . . . . . . . . . . . . . . . . . . . . . . . . . . . . . . . . . . 117 dB
SACD . . . . . . . . . . . . . . . . . . . . . . . . . . . . . . . . . 117 dB
Gamma dinamica
CD. . . . . . . . . . . . . . . . . . . . . . . . . . . . . . . . . . . . 100 dB
SACD . . . . . . . . . . . . . . . . . . . . . . . . . . . . . . . . . 108 dB
Distorsione armonica totale:
CD. . . . . . . . . . . . . . . . . . . . . . . . . . . . . . . . . . .0,0022 %
SACD . . . . . . . . . . . . . . . . . . . . . . . . . . . . . . . .0,0020 %
Distorsione di velocità e oscillazione del suono
. . . . . . . . . . . . . . . . . . . . . . . . . Ai limiti della misurabilità
Uscite digitali
Uscita digitale ottica . . . . . . . . . terminale digitale ottico
Uscita digitale coassiale . . . . . . . . . . . . . .terminale RCA
Accessori
Cavo audio RCA (spine rosse/bianche) . . . . . . . . . . . . . 1
Telecomando . . . . . . . . . . . . . . . . . . . . . . . . . . . . . . . . . . 1
Batterie a secco AAA/IEC R03 . . . . . . . . . . . . . . . . . . . . 2
Cavo di alimentazione
Certificato di garanzia (solo per i modelli destinati al
mercato europeo)
Istruzioni per l’uso (questo documento)
(senza condensa)
200 mV rms (1 kHz, –20 dB)
(±0,001 % Wp) o inferiore
Nota
• Dati tecnici e disegno soggetti a possibili modifiche
senza preavviso, dovute alle migliorie apportate.
• I nomi di società e di prodotti menzionati in questo
documento sono marchi commerciali o marchi
commerciali registrati delle rispettive società.
DeutschFrançais
Italiano Español Русский
Nederlands
© 2012 PIONEER CORPORATION.
Tutti i diritti riservati.
15
It
Page 58

Hartelijk dank voor de aanschaf van dit Pioneer produkt.
Lees de gebruiksaanwijzing aandachtig door zodat u het apparaat op de juiste wijze kunt bedienen. Bewaar de gebruiksaanwijzing voor het geval u deze in de
toekomst nogmaals nodig heeft.
BELANGRIJK
CAUTION
RISK OF ELECTRIC SHOCK
DO NOT OPEN
De lichtflash met pijlpuntsymbool in een
gelijkzijdige driehoek is bedoeld om de
aandacht van de gebruikers te trekken op
een niet geïsoleerde “gevaarlijke spanning”
in het toestel, welke voldoende kan zijn om
bij aanraking een elektrische shock te
veroorzaken.
WAARSCHUWING:
OM HET GEVAAR VOOR EEN ELEKTRISCHE
SHOCK TE VOORKOMEN, DEKSEL (OF
RUG) NIET VERWIJDEREN. AAN DE
BINNENZIJDE BEVINDEN ZICH GEEN
ELEMENTEN DIE DOOR DE GEBRUIKER
KUNNEN BEDIEND WORDEN. ENKEL
DOOR GEKWALIFICEERD PERSONEEL TE
BEDIENEN.
Gebruikersinformatie voor het verzamelen en verwijderen van oude producten en
batterijen
Symbool voor
toestellen
Symbolen
voor batterijen
De symbolen op producten, verpakkingen en bijbehorende documenten geven aan
dat de gebruikte elektronische producten en batterijen niet met het gewone
huishoudelijk afval kunnen worden samengevoegd.
Er bestaat een speciaal wettelijk voorgeschreven verzamelsysteem voor de juiste
behandling, het opnieuw bruikbaar maken en de recyclage van gebruikte producten
en batterijen.
Door een correcte verzamelhandeling zorgt u ervoor dat het verwijderde product en/of
batterij op de juiste wijze wordt behandeld, opnieuw bruikbaar wordt gemaakt, wordt
gerecycleerd en het niet schadelijk is voor de gezondheid en het milieu.
Voor verdere informatie betreffende de juiste behandling, het opnieuw bruikbaar
maken en de recyclage van gebruikte producten en batterijen kunt u contact opnemen
met de plaatselijke overheid of een verkooppunt.
Deze symbolen zijn enkel geldig in de landen van de europese unie.
Het uitroepteken in een gelijkzijdige
driehoek is bedoeld om de aandacht van de
gebruiker te trekken op de aanwezigheid van
belangrijke bedienings- en
onderhoudsinstructies in de handleiding bij
dit toestel.
D3-4-2-1-1_A1_Nl
WAARSCHUWING
Dit apparaat is niet waterdicht. Om brand of een
elektrische schok te voorkomen, mag u geen voorwerp
dat vloeistof bevat in de buurt van het apparaat zetten
(bijvoorbeeld een bloemenvaas) of het apparaat op
andere wijze blootstellen aan waterdruppels,
opspattend water, regen of vocht.
D3-4-2-1-3_A1_Nl
WAARSCHUWING
Lees zorgvuldig de volgende informatie voordat u de
stekker de eerste maal in het stopcontact steekt.
De bedrijfsspanning van het apparaat verschilt
afhankelijk van het land waar het apparaat wordt
verkocht. Zorg dat de netspanning in het land waar
het apparaat wordt gebruikt overeenkomt met de
bedrijfsspanning (bijv. 230 V of 120 V) aangegeven
op de achterkant van het apparaat.
D3-4-2-1-4*_A1_Nl
BELANGRIJKE INFORMATIE BETREFFENDE
DE VENTILATIE
Let er bij het installeren van het apparaat op dat er
voldoende vrije ruimte rondom het apparaat is om een
goede doorstroming van lucht te waarborgen
(tenminste 10 cm boven, 10 cm achter en 10 cm aan de
zijkanten van het apparaat).
WAARSCHUWING
De gleuven en openingen in de behuizing van het
apparaat zijn aangebracht voor de ventilatie, zodat een
betrouwbare werking van het apparaat wordt verkregen
en oververhitting wordt voorkomen. Om brand te
voorkomen, moet u ervoor zorgen dat deze openingen
nooit geblokkeerd worden of dat ze afgedekt worden
door voorwerpen (kranten, tafelkleed, gordijn e.d.) of
door gebruik van het apparaat op een dik tapijt of een
bed.
D3-4-2-1-7b*_A1_Nl
Pb
Indien u zich in een ander dan bovengenoemde landen bevindt kunt u contact
opnemen met de plaatselijke overheid voor meer informatie over de juiste verwijdering
van het product.
K058a_A1_Nl
Page 59

Gebruiksomgeving
Temperatuur en vochtigheidsgraad op de plaats van
gebruik:
+5 °C tot +35 °C, minder dan 85 % RH
(ventilatieopeningen niet afgedekt)
Zet het apparaat niet op een slecht geventileerde plaats
en stel het apparaat ook niet bloot aan hoge
vochtigheid of direct zonlicht (of sterke kunstmatige
verlichting).
D3-4-2-1-7c*_A1_Nl
Als de netstekker van dit apparaat niet geschikt is
voor het stopcontact dat u wilt gebruiken, moet u de
stekker verwijderen en een geschikte stekker
aanbrengen. Laat het vervangen en aanbrengen van
een nieuwe netstekker over aan vakkundig
onderhoudspersoneel. Als de verwijderde stekker per
ongeluk in een stopcontact zou worden gestoken,
kan dit resulteren in een ernstige elektrische schok.
Zorg er daarom voor dat de oude stekker na het
verwijderen op de juiste wijze wordt weggegooid.
Haal de stekker van het netsnoer uit het stopcontact
wanneer u het apparaat geruime tijd niet denkt te
gebruiken (bijv. wanneer u op vakantie gaat).
D3-4-2-2-1a_A1_Nl
LET OP
De /I STANDBY/ON schakelaar van dit apparaat
koppelt het apparaat niet volledig los van het lichtnet.
Aangezien er na het uitschakelen van het apparaat
nog een kleine hoeveelheid stroom blijft lopen, moet
u de stekker uit het stopcontact halen om het
apparaat volledig van het lichtnet los te koppelen.
Plaats het apparaat zodanig dat de stekker in een
noodgeval gemakkelijk uit het stopcontact kan
worden gehaald. Om brand te voorkomen, moet u de
stekker uit het stopcontact halen wanneer u het
apparaat langere tijd niet denkt te gebruiken (bijv.
wanneer u op vakantie gaat).
D3-4-2-2-2a*_A1_Nl
Dit apparaat is bestemd voor normaal huishoudelijk
gebruik. Indien het apparaat voor andere doeleinden
of op andere plaatsen wordt gebruikt (bijvoorbeeld
langdurig gebruik in een restaurant voor zakelijke
doeleinden, of gebruik in een auto of boot) en als
gevolg hiervan defect zou raken, zullen de reparaties
in rekening gebracht worden, ook als het apparaat
nog in de garantieperiode is.
K041_A1_Nl
WAARSCHUWING NETSNOER
Pak het netsnoer beet bij de stekker. Trek de stekker er
niet uit door aan het snoer te trekken en trek nooit aan
het netsnoer met natte handen aangezien dit
kortsluiting of een elektrische schok tot gevolg kan
hebben. Plaats geen toestel, meubelstuk o.i.d. op het
netsnoer, en klem het niet vast. Maak er nooit een
knoop in en en verbind het evenmin met andere
snoeren. De netsnoeren dienen zo te worden geleid
dat er niet per ongeluk iemand op gaat staan. Een
beschadigd netsnoer kan brand of een elektrische
schok veroorzaken. Kontroleer het netsnoer af en toe.
Wanneer u de indruk krijgt dat het beschadigd is,
dient u bij uw dichtstbijzijnde erkende PIONEER
onderhoudscentrum of uw dealer een nieuw snoer te
kopen.
S002*_A1_Nl
WAARSCHUWING
Om brand te voorkomen, mag u geen open vuur (zoals
een brandende kaars) op de apparatuur zetten.
D3-4-2-1-7a_A1_Nl
LET OP
Dit apparaat is geclassificeerd als een klasse 1
laserproduct onder de veiligheidsnormen voor
laserproducten, IEC 60825-1:2007.
KLASSE 1 LASERPRODUCT
D58-5-2-2a_A1_Nl
Inhoud
01 Voordat u begint
Ondersteunde typen schijven en mediaformaten
Inhoud van de doos . . . . . . . . . . . . . . . . . . . . . . . . 4
De batterijen in de afstandsbediening laden . . . . .4
Gebruik van de afstandsbediening. . . . . . . . . . . . . .4
02 Aansluitingen
Aansluitingen analoge audio-uitgangen . . . . . . . .5
Aansluitingen digitale audio-uitgangen . . . . . . . . . 5
Gecentraliseerde bediening met andere Pioneer-
componenten (alleen PD-30) . . . . . . . . . . . . . . . . . 5
Aansluiten . . . . . . . . . . . . . . . . . . . . . . . . . . . . . . . 5
03 Bedieningsorganen en
display-aanduidingen
Afstandsbediening . . . . . . . . . . . . . . . . . . . . . . . . 6
Achterpaneel . . . . . . . . . . . . . . . . . . . . . . . . . . . . . 6
Voorpaneel . . . . . . . . . . . . . . . . . . . . . . . . . . . . . . 7
Display voorpaneel . . . . . . . . . . . . . . . . . . . . . . . . 7
04 Afspelen
Schijven afspelen . . . . . . . . . . . . . . . . . . . . . . . . . 8
Stel de voeding in op stand-by. . . . . . . . . . . . . . . . .8
Snel vooruitspoelen/terugspoelen . . . . . . . . . . . . . .8
Functie voor overslaan. . . . . . . . . . . . . . . . . . . . . . .8
Direct zoeken (een specifieke track aanduiden voor
het afspelen) . . . . . . . . . . . . . . . . . . . . . . . . . . . . . .8
Herhaald afspelen . . . . . . . . . . . . . . . . . . . . . . . . . .8
Willekeurig afspelen . . . . . . . . . . . . . . . . . . . . . . . .8
Geprogrammeerd afspelen (tracks afspelen in een
vooraf vastgestelde volgorde) . . . . . . . . . . . . . . . . .8
Schijfgegevens weergeven . . . . . . . . . . . . . . . . . . .8
iPod/iPhone/iPad-weergave (alleen PD-30) . . . . . .9
Controleer welke iPod/iPhone/iPad-modellen
worden ondersteund . . . . . . . . . . . . . . . . . . . . . . . .9
Uw iPod/iPhone/iPad afspelen . . . . . . . . . . . . . . . .9
Bestanden afspelen die op USB-opslagapparaten
zijn opgeslagen . . . . . . . . . . . . . . . . . . . . . . . . . . 10
05 Geavanceerde functies gebruiken
Afspelen met hifi-geluid. . . . . . . . . . . . . . . . . . . . 11
Sound Retriever. . . . . . . . . . . . . . . . . . . . . . . . . . . 11
Pure Audio . . . . . . . . . . . . . . . . . . . . . . . . . . . . . .11
Het weergavegebied (de laag) van een
SACD/CD wijzigen . . . . . . . . . . . . . . . . . . . . . . . . 11
De algemene helderheid van het display
aanpassen. . . . . . . . . . . . . . . . . . . . . . . . . . . . . . 11
Auto uitschakelen (stelt de voeding automatisch
in op stand-by). . . . . . . . . . . . . . . . . . . . . . . . . . . 11
Afspeelfuncties . . . . . . . . . . . . . . . . . . . . . . . . . . 11
06 Extra informatie
Afspeelbare schijf . . . . . . . . . . . . . . . . . . . . . . . . 12
Afspeelbare bestandsindelingen . . . . . . . . . . . . . 12
Waarschuwingen betreffende het gebruik . . . . . .13
Storingen verhelpen . . . . . . . . . . . . . . . . . . . . . . 14
Technische gegevens . . . . . . . . . . . . . . . . . . . . . 15
. . . 4
Page 60

Voordat u begint01
Hoofdstuk 1:
Voordat u begint
Ondersteunde typen schijven en
mediaformaten
Schijven die op deze speler kunnen worden afgespeeld,
worden hieronder weergegeven.
• SACD (Super Audio CD)*
(alleen 2-kanaals gebied)
•CD
• DSD-schijf
* “Super Audio CD” is een geregistreerd handelsmerk.
Opmerking
• Dit apparaat staat niet toe dat meerkanaals
gebieden van SACD-schijven worden weergegeven.
•De DIGITAL OUT-aansluitingen van dit apparaat
voeren geen geluid uit van de SACD- en DSDschijven, noch van iPods/iPhones/iPads.
• Wanneer een schijf wordt geladen en u de voeding
inschakelt, betekent dit niet dat het afspelen
automatisch wordt gestart. Hierdoor is afspelen
volgens een timing niet mogelijk, zelfs als het
apparaat is aangesloten op een timer.
DualDisc afspelen
Een DualDisc is een nieuwe tweezijdige schijf, een zijde
bevat DVD-gegevens videao, audion etc, terwijl de
andere zijde niet-DVD-gegevens bevat zoals digitaal
audiomateriaal. De audiozijde van de niet-DVD is niet
compatibel met de Audio CD gegevens en daarom is het
mogelijk dat deze niet afspeelt. Voor meer gedetailleerde
informatie over de DualDisc gegevens, wendt u tot de
fabrikant of verdeler van de schijf.
Schijven die niet kunnen worden
afgespeeld
•DVD-video
• DVD-audio
•CD-G
• Video-CD
• DTS CD
Het is mogelijk dat sommige andere schijven dan de
hierboven vermelde schijven, evenmin kunnen worden
afgespeeld.
Inhoud van de doos
Controleer of de volgende accessoires in de doos zitten.
• Afstandsbediening x1
• AAA/IEC R03 droge celbatterijen x2
De batterijen in de afstandsbediening
laden
1 Open de klep op de achterzijde.
2 Plaats de nieuwe batterijen en zorg dat
de polariteit overeenkomt met de
markeringen in het batterijvak.
• RCA-audiokabel (rode/witte stekkers) x1
•Netsnoer
• Garantiebewijs
• Handleiding (dit document)
Opmerking
• Het is mogelijk dat afbeeldingen die in de
handleiding zijn weergegeven, zijn gewijzigd of
vereenvoudigd voor het vergemakkelijken van de
uitleg. Ze kunnen verschillen van het eigenlijke
uiterlijk van het product.
• De afbeeldingen die hier worden gebruikt, zijn
voornamelijk van de PD-30.
PD-30
PD-30
PD-10
PD-10
3 Sluit de klep op de achterzijde.
PD-30
De batterijen die bij het apparaat zijn geleverd, zijn
voorzien om u de mogelijkheid te bieden de werking van
het product te controleren en zullen mogelijk geen lange
levensduur hebben. Wij raden u aan alkalinebatterijen te
gebruiken. Dit type biedt een langere levensduur.
WAARSCHUWING
• Gebruik of leg de batterijen niet in direct zonlicht of
op een andere warme plaats, zoals in de buurt van
een kachel of in een auto die in de zon staat.
Batterijen kunnen hierdoor gaan lekken, oververhit
raken, exploderen of in brand vliegen. Bovendien
kan dit de levensduur of prestatie van de batterijen
reduceren.
Let op
Onjuist gebruik van de batterijen kan gevaar opleveren,
zoals lekkage of ontploffen. Neem de volgende
voorzorgsmaatregelen in acht:
• Wanneer u de batterijen plaatst, moet u zorgen dat
u de veren op de -aansluitingen van de batterij
niet beschadigd.
• Gebruik alleen de batterijen die zijn aanbevolen.
Gebruik ook nooit nieuwe batterijen samen met
oude.
• Wanneer u de batterijen in de afstandsbediening
plaatst, moet u ze in de juiste richting leggen, zoals
aangegeven door de polariteitsmarkeringen ( en
).
• U mag batterijen niet verwarmen, demonteren of in
vuur of water gooien.
• Batterijen kunnen verschillende spanningen
hebben, zelfs als ze dezelfde grootte en vorm
hebben. Gebruik nooit verschillende typen
batterijen tegelijk.
• Om lekkage van batterijvloeistof te voorkomen,
moet u de batterijen verwijderen als u de
afstandsbediening gedurende langere tijd niet zult
gebruiken (1 maand of langer). Als de vloeistof lekt,
moet u de binnenzijde van het vak zorgvuldig
PD-10
schoonmaken en vervolgens nieuwe batterijen
plaatsen. Als een batterij lekt en de vloeistof in
contact komt met uw huid, moet u deze afspoelen
met grote hoeveelheden water.
• Bij het weggooien van versleten batterijen moet u
de overheidsbepalingen of milieuwetten en andere
openbare reglementeringen die in eigen land of
streek van toepassing zijn, naleven.
Gebruik van de afstandsbediening
De afstandsbediening heeft een bereik van ongeveer 7 m
onder een hoek van ongeveer 30º ten opzichte van de
externe sensor.
30 °
30 °
7 m
Neem de volgende punten in acht bij gebruik van de
afstandsbediening:
• Zorg dat er geen obstakels zijn tussen de
afstandsbediening en de
afstandsbedieningssensor die op het apparaat is.
• Het is mogelijk dat de afstandsbediening niet goed
werkt als er zonlicht of het licht van een tl-lamp op
de afstandsbedieningssensor van het apparaat valt.
• Afstandsbedieningen van andere apparatuur
kunnen storing veroorzaken. Vermijd het gebruik
van afstandsbedieningen voor apparatuur die in de
buurt van dit apparaat is opgesteld.
• Vervang de batterijen wanneer het bereik van de
afstandsbediening aanzienlijk korter is geworden.
4
Nl
Page 61

Aansluitingen 02
Hoofdstuk 2:
Aansluitingen
Let op
• Voordat u de aansluitingen uitvoert of wijzigt, moet
u de voeding uitschakelen en het netsnoer
loskoppelen van het stopcontact.
• Sluit het netsnoer aan nadat alle aansluitingen
tussen de apparaten zijn voltooid.
Aansluitingen analoge audio-uitgangen
Door de analoge audio-uitgang van dit apparaat aan te
sluiten op de analoge audio-ingang van een versterker,
kunt u de versterker gebruikt om te genieten van analoge
audio die door dit apparaat wordt voortgebracht.
Achterpaneel PD-30
Audiokabel
(inbegrepen)
Versterker
RL
ANALOG
AUDIO INPUT
Aansluitingen digitale audio-uitgangen
Indien u dat wenst kunt u de digitale audio-uitgang van
dit apparaat aansluiten op een AV-versterker of een
digitaal opnameapparaat (cd-recorder, MD, enz.).
•De DIGITAL OUT-aansluitingen van dit apparaat
voeren geen geluid uit van de SACD- en
DSD-schijven, noch van iPods/iPhones/iPads.
AV-versterker of
DIGITAL IN
COAXIAL
AV-versterker of
digitaal
opnameapparaat
Coaxiale digitale
audiokabel (in
de handel
verkrijgbaar)
Achterpaneel PD-30
Belangrijk
Zorg dragen bij het behandelen van optische vezelkabels
• Zorg dat optische vezelkabels niet in een scherpe
hoek worden geplooid. Wanneer u optische
vezelkabels opbergt, moet u ze oprollen in een tros
met een diameter van minstens 15 cm.
• Wanneer u optische vezelkabels aansluit, moet u
de aansluitingen correct uitlijnen en volledig in de
poort stoppen. Als de richting van de
kabelaansluiting onjuist is en als er overmatige
druk wordt toegepast in een poging om de
aansluiting te bevestigen, kan de aansluiting
vervormd raken waardoor het klepje niet meer kan
sluiten wanneer de kabel wordt verwijderd.
Opmerking
• Voor een digitale audio-uitgang moeten cd’s die op
dit apparaat worden afgespeeld, lineaire PCMsignalen uitzenden met een bemonsteringsfrequentie
tot 44,1 kHz en kwantitatieve bits tot 16 bits
(sommige schijven kunnen mogelijk niet worden
afgespeeld, afhankelijk van de aangesloten
component en omgeving). Zie pagina 12 voor
informatie over andere bestanden.
digitaal
opnameapparaat
DIGITAL IN
OPTICAL
Optische vezelkabel (in
de handel verkrijgbaar)
Gecentraliseerde bediening met
andere Pioneer-componenten
(alleen PD-30)
Dit apparaat en andere Pioneer-componenten die zijn
uitgerust met CONTROL IN/OUT-aansluitingen kunnen
worden bediend met één afstandsbediening door deze
naar de signaalontvanger op de AV-versterker of een
andere component te richten. Hierdoor kunnen ook
componenten die niet zijn uitgerust met een sensor voor
de afstandsbediening of die op plaatsen zijn
geïnstalleerd waar de afstandsbedieningssensor van de
component niet toegankelijk is, op afstand worden
bediend.
Andere Pioneer-component,
uitgerust met CONTROL IN/
OUT-aansluitingen
Afstandsbediening voor
AV-versterker, enz.
Richt de afstandsbediening
naar de signaalontvanger op
de AV-versterker, enz.
Naar andere Pioneercomponent, uitgerust met
CONTROL IN-aansluiting
PD-30
Opmerking
• Gebruik een in de handel verkrijgbare mono
ministekkerkabel (zonder weerstand) voor het
maken van aansluitingen.
• Bij het aansluiten van de CONTROL IN/OUT-
aansluitingen moeten eveneens in de handel
verkrijgbare audiokabels worden gebruikt voor het
maken van analoge aansluitingen. Wanneer u
alleen de CONTROL IN/OUT-aansluitingen maakt,
is er geen goed systeembeheer mogelijk.
• Wanneer een besturingskabel is aangesloten op de
CONTROL IN-aansluiting van de PD-30, kan het
apparaat niet worden beheerd door de
afstandsbediening naar de PD-30 te richten
(de afstandsbedieningssensor wordt automatisch
uitgeschakeld).
Aansluiten
Belangrijk
• Als u het nodig is het netsnoer los te koppelen,
moet u eerst op de knop
voorpaneel van het apparaat drukken zodat de
PD-30 is UITGESCHAKELD of zodat de PD-10 in
stand-bymodus is voordat u de kabel loskoppelt.
• Controleer of de [-OFF-]-indicator niet is opgelicht
op het voorpaneeldisplay van de hoofdeenheid
voordat u het netsnoer loskoppelt. Als het netsnoer
wordt losgekoppeld terwijl de [-OFF-]-indicator nog
steeds is opgelicht, kunnen de standaardwaarden
van de hoofdeenheid worden teruggezet.
• Tijdens vakantie of als het toestel om andere
redenen enige tijd niet wordt gebruikt, neemt u
altijd de stekker uit het stopcontact.
Let op
• Gebruik geen ander netsnoer dan het snoer dat bij
dit apparaat is geleverd.
• Gebruik het bijgeleverde netsnoer alleen voor de
hieronder beschreven doeleinden.
Nadat u alle aansluitingen hebt voltooid, kunt u het
apparaat aansluiten op het stopcontact.
Achterpaneel PD-30
Naar stopcontact
1 Sluit de bijgeleverde voedingskabel aan
AC IN
op de
-aansluiting op de achterkant
van het apparaat.
2 Sluit het andere uiteinde aan op het
stopcontact.
/I
STANDBY/ON op het
Netsnoer
English
DeutschFrançais
Italiano Español Русский
Nederlands
5
Nl
Page 62

Bedieningsorganen en display-aanduidingen03
Hoofdstuk 3:
Bedieningsorganen en display-aanduidingen
Afstandsbediening
PD-30
1
2
3
4
5
6
7
8
9
10
11
1
STANDBY/ON
Schakelt de versterker tussen stand-by en aan.
2 Cijfertoetsen
Gebruik deze knoppen als u een bepaalde track wilt
opgeven om deze af te spelen. Gebruik de cijfertoetsen
om de track te selecteren en druk vervolgens op ENTER
om de selectie te bevestigen.
3
CLEAR
Indrukken om de inhoud die voor geprogrammeerd
afspelen is ingesteld, te wissen (pagina 8).
4
SETUP
Gebruiken voor het instellen van de functie voor
automatisch uitschakelen (pagina 11).
PD-10
12
1
9
2
13
14
33
15
4
35
14
37
16
5 ///
8
12
11
16
10
13
17
18
15
19
20
Gebruik deze knoppen voor het selecteren van
items, het wijzigen van instellingen en het
verplaatsen van de cursor.
ENTER
Gebruik dit om het geselecteerde item te
implementeren of om een instelling die u hebt
gewijzigd, in te voeren.
6
iPod MENU (alleen PD-30)
Gebruik bij het bedienen van het iPod/iPhone/iPadmenu.
7
Indrukken om terug te keren naar het begin van de
track die momenteel wordt afgespeeld. Tweemaal
indrukken om terug te keren naar het begin van de
vorige track.
Indrukken om het afspelen te starten. Het afspelen
pauzeren/hervatten.
Indrukken tijdens het afspellen om vooruit te gaan
naar het begin van de volgende track.
Indrukken om snel terug te keren in de track die
momenteel wordt afgespeeld. Als opnieuw op de
knop wordt gedrukt tijdens snel terugspoelen,
wijzigt de snelheid voor het terugspoelen in vier
stappen.
Indrukken om het afspelen te stoppen.
Indrukken om snel vooruit te spoelen in de track die
momenteel wordt afgespeeld. Als opnieuw op de
knop wordt gedrukt tijdens snel vooruitspoelen,
wijzigt de snelheid voor het vooruitspoelen in vier
stappen.
8
iPod/USB
(PD-30)
USB (PD-10)
Indrukken om de ingang van het apparaat te schakelen
naar iPod of USB (pagina 9,10).
9
SACD/CD
Indrukken om de ingang van het apparaat te schakelen
naar SACD/CD. Als u, in het geval van hybride SACDschijven, op deze knop drukt terwijl het afspelen is
gestopt, verandert het afspeelgebied van de schijf
(pagina 11).
10
REPEAT
Indrukken om herhaald afspelen te starten
(pagina 8).
RANDOM
Indrukken om willekeurig afspelen te starten
(pagina 8).
PROGRAM
Indrukken om geprogrammeerd afspelen te starten
(pagina 8).
11 PURE AUDIO
Druk op deze knop om de modus Pure Audio te
activeren. In deze modus blijft de audioweergave
uitgevoerd met de hoogste natuurgetrouwe weergave
van de originele geluiden (pagina 11).
12
OPEN/CLOSE
Indrukken om de schijflade te openen en te sluiten
(pagina 8).
13 ENTER
Gebruik dit om het geselecteerde item te implementeren
of om een instelling die u hebt gewijzigd, in te voeren.
Achterpaneel
Zie pagina 5 voor details over aansluitingen.
DIGITAL IN
1 2 3 54
1
CONTROL IN/OUT
2
DIGITAL OUT (COAXIAL)
DIGITAL OUT (OPTICAL)
3
-stekker (alleen PD-30)
-aansluiting
-aansluiting
14
DISPLAY
Indrukken om verschillende gegevens over de schijf
weer te geven, inclusief de verstreken en resterende
afspeelduur (pagina 8).
15
DIMMER
Indrukken om de helderheidsniveaus voor het
voorpaneeldisplay van de hoofdeenheid en de indicators
te wijzigen (pagina 11).
16
S.RETRIEVER
Indrukken om af te wisselen tussen de instellingen van
de functie Sound retriever (pagina 11).
17
AMPLIFIER (alleen PD-10)
Indrukken om de voeding te schakelen tussen AAN en
STAND-BY op een Pioneer AV-versterker.
18
VOLUME +/– (alleen PD-10)
Druk op deze knoppen om het geluidsvolume van een
Pioneer AV-versterker te regelen.
19
MUTE (alleen PD-10)
Indrukken om het geluid op een Pioneer AV-versterker te
dempen. Druk opnieuw om de dempfunctie te
annuleren.
20
INPUT (alleen PD-10)
Indrukken om de ingang op een Pioneer AV-versterker te
schakelen.
PD-30
4
ANALOG OUT
AC IN-stekker
5
-aansluitingen
6
Nl
Page 63

Bedieningsorganen en display-aanduidingen 03
English
Voorpaneel
3 5 6 7 81
2 4
9
1
/I STANDBY/ON
Wanneer de voeding wordt ingeschakeld, licht de
voedingsindicator in het midden van de knop op.
• Op het PD-30-model, schakelt dit de versterker
tussen uit en aan.
Om de voeding IN te schakelen, drukt u op de knop
tot deze ingedrukt blijft.
• Op het PD-10-model, schakelt dit de versterker
tussen stand-by en aan.
2
STANDBY
Licht op wanneer het apparaat in de modus STAND-BY is.
3
PURE AUDIO
Licht op wanneer de functie Pure Audio AAN is
(pagina 11).
4 Display voorpaneel
(Raadpleeg de volgende beschrijving.)
5
Indrukken om de schijflade te openen en te sluiten
(pagina 8).
6
FUNCTION
Gebruik deze optie om de ingangsbron te wijzigen. De
bron verandert zoals hieronder weergegeven.
DISC iPod*
(niet-weergegeven).
1
*
alleen PD-30
1
7
Indrukken om het afspelen te stoppen.
10 12 1311
-indicator
-indicator
/USB Terug naar het begin
PD-30
8
Indrukken om het afspelen te starten. Het afspelen
pauzeren/hervatten.
9 Externe sensor
Ontvangt de signalen van de afstandsbediening
(pagina 4).
10
iPod/USB-poort
USB-poort (PD-10)
Gebruiken om uw Apple iPod/iPhone/iPad (pagina 9) of
een USB-apparaat (pagina 10) aan te sluiten.
11 Schijflade
12
Indrukken om terug te keren naar het begin van de track
die momenteel wordt afgespeeld. Tweemaal indrukken
om terug te keren naar het begin van de vorige track.
Wanneer u de knop ingedrukt houdt, wordt de track die
momenteel wordt afgespeeld snel achteruitgespoeld.
• Wanneer u opnieuw drukt tijdens het snel
terugspoelen, zal de snelheid van het terugspoelen
wijzigen in vier stappen.
13
Indrukken om door te gaan naar het begin van de
volgende track. Wanneer u de knop ingedrukt houdt,
wordt de track die momenteel wordt afgespeeld snel
vooruitgespoeld.
• Wanneer u opnieuw drukt tijdens het snel
vooruitspoelen, zal de snelheid van het
vooruitspoelen wijzigen in vier stappen.
(PD-30)
(pagina 8)
Display voorpaneel
1 2 4 5 6
1
USB/iPod
Licht op tijdens het afspelen van USB-flashgeheugen of
iPod/iPhone/iPad.
2
SACD/CD/DSD
De indicatorlampjes die overeenkomen met het
schijftype dat momenteel wordt afgespeeld.
3
PGM
Licht op tijdens geprogrammeerd afspelen (pagina 8).
4
TRK
Licht op wanneer het tracknummer samen met de
verstreken of resterende afspeelduur wordt
weergegeven.
5
FILE
Licht op wanneer een bestandsnaam wordt
weergegeven.
6
REPEAT
Licht op tijdens herhaald afspelen (pagina 8).
7
RANDOM
Licht op tijdens willekeurig afspelen (pagina 8).
8
ALL
Licht op tijdens herhaald afspelen van schijf (pagina 8).
9
TOTAL
Licht op wanneer de resterende afspeelduur van de
schijf wordt weergegeven.
10
REMAIN
Licht op wanneer de resterende afspeelduur voor de
track of schijf wordt weergegeven.
11
S.RTRV
Licht op wanneer de functie Sound retriever AAN is
(pagina 11).
3 7 8 9
1411 12 13
12
SET UP
Licht op wanneer de functie voor automatisch
uitschakelen wordt ingesteld (pagina 11).
13
Licht op tijden snel vooruitspoelen.
Licht op tijden snel terugspoelen.
Licht op tijdens het afspelen.
Licht op tijdens de pauzemodus.
14 Alfanumeriek display
10
DeutschFrançais
Italiano Español Русский
Nederlands
7
Nl
Page 64

Afspelen04
Hoofdstuk 4:
Afspelen
De functies die kunnen worden gebruikt, verschillen
afhankelijk van het type schijf en bestand. In sommige
gevallen kunnen sommige functies niet worden
gebruikt. Zie
Schijven afspelen
1 Druk op de
ON
de voeding naar het apparaat in
te schakelen.
• Schakel bij de PD-30 de voeding in
2 Druk op de knop
openen en de schijf te
plaatsen.
• Plaats de schijf met de bedrukte zijde
3 Druk op de knop
om het afspelen te
starten.
• Druk op de knop om het afspelen te pauzeren.
• Druk op de knop om het afspelen te stoppen.
• Stappen 2 en 3 kunnen worden uitgevoerd via de
Stel de voeding in op stand-by
Verwijder elke schijf die is geladen voordat u de
voedingsschakelaar instelt op de modus STAND-BY.
• Druk op de
knop van de afstandsbediening.
Wanneer u de voeding de volgende keer wilt
inschakelen, drukt u op de STANDBY/ON-knop op de
afstandsbediening.
Afspeelfuncties
op pagina 11.
/I STANDBY/
-knop op het voorpaneel om
door op de knop POWER te drukken
tot deze ingedrukt blijft.
Zija anzi cht van v oorp ane el
om de schijflade te
omhoog gericht.
Opmerking
afstandsbediening op dezelfde manier als via de
bedieningselementen op het voorpaneel van de
hoofdeenheid.
STANDBY/ON
-
• Wanneer u in het geval van de PD-30 op de
/I STANDBY/ON-knop op het voorpaneel drukt,
wordt het apparaat UITGESCHAKELD en niet in
STAND-BY gezet. Om de voeding
schakelen, drukt u op de knop
het voorpaneel.
Opmerking
• Als het netsnoer wordt losgekoppeld wanneer het
apparaat in stand-by is, wordt het apparaat
uitgeschakeld, maar wanneer de kabel dan
opnieuw wordt aangesloten, wordt het apparaat
niet automatisch opnieuw ingeschakeld. Nadat u
het netsnoer opnieuw hebt aangesloten, drukt u op
de STANDBY/ON-knop op de afstandsbediening
om de voeding in te schakelen.
opnieuw in te
/I STANDBY/ON
op
Snel vooruitspoelen/terugspoelen
• Druk tijdens het afspelen op
de knop
Telkens wanneer op de knop wordt gedrukt, verandert de
snelheid voor vooruit- of terugspoelen in vier stappen.
of .
• Druk op de knop om terug te keren naar de
functie voor normaal afspelen.
Functie voor overslaan
• Druk tijdens het afspelen op
de knop
Het afspelen springt vooruit of achteruit met het aantal
tracks dat overeenkomt met het aantal keer dat op de
knop is gedrukt.
of .
Direct zoeken (een specifieke track
aanduiden voor het afspelen)
• Voer het gewenste
tracknummer in via de
cijfertoetsen en druk vervolgens
op de ENTER-knop om de selectie te bevestigen.
Zelfs als u niet op de ENTER-knop hebt
gedrukt, wordt het afspelen automatisch
gestart na een interval van 5 seconden (die
is niet van toepassing op geprogrammeerd afspelen).
0 9
〜
ENTER
Herhaald afspelen
Herhaald afspelen kan worden uitgevoerd voor de track
die momenteel wordt afgespeeld of voor alle tracks op de
volledige schijf.
• Druk tijdens het afspelen op de
knop REPEAT.
• Het herhaald afspelen wordt gestart en
de [REPEAT]-indicator zal oplichten op het display
op het voorpaneel van het apparaat. Druk opnieuw
op de knop om het type herhaald afspelen als volgt
te schakelen tussen het herhalen van één track en
het herhalen van de schijf (alle tracks):
één track herhalen
([REPEAT]-indicator licht op)
トラックリピート([REPEAT]点灯)
Schijf herhalen (indicators [REPEAT] en [ALL]
ディスクリピート([REPEAT]、[ALL]点灯)
lichten op)
Opmerking
• De functie voor herhaald afspelen wordt geannuleerd
wanneer het afspelen van de schijf wordt gestopt.
↓
↓
リピートオフ
Herhalen UIT
REPEAT
Willekeurig afspelen
Alle tracks op de schijf worden geselecteerd en
afgespeeld in willekeurige volgorde tot elke track
eenmaal is afgespeeld.
• Druk tijdens het afspelen op de
RANDOM
knop
Willekeurig afspelen wordt gestart en
[RANDOM] wordt opgelicht op het display op het
voorpaneel van de hoofdeenheid.
Opmerking
• Het willekeurig afspelen gaat verder tot de schijf stopt
of tot de RANDOM-knop opnieuw wordt ingedrukt.
• De functie voor willekeurig afspelen kan niet samen
met geprogrammeerd afspelen worden gebruikt.
• Als tijdens het willekeurig afspelen op de -knop
wordt gedrukt, springt de weergave vooruit naar de
volgende willekeurig geselecteerde track. Als op de
knop wordt gedrukt, keert de weergave terug
naar het begin van de track die momenteel wordt
afgespeeld en start opnieuw.
.
RANDOM
Geprogrammeerd afspelen (tracks
afspelen in een vooraf vastgestelde
volgorde)
Met deze functie kunt u maximaal 24 tracks selecteren
om ze in de geselecteerde volgorde af te spelen.
1 Druk in de stopmodus op de
PROGRAM
knop
De [PGM]-indicator zal oplichten op het
display op het voorpaneel van het apparaat.
.
PROGRAM
2 Gebruik de cijfertoetsen
om het nummer van de
gewenste track te selecteren,
en druk vervolgens op de
Voorbeeld: om track 15 te selecteren, drukt u
op de knoppen 1 en 5 en drukt u vervolgens
op ENTER. In het geval u een fout maakt,
drukt u op de knop CLEAR.
ENTER
0 9
〜
-knop.
ENTER
3 Herhaal stap 2 om de nummers van alle
gewenste tracks in te voeren.
4 Druk op de knop
Het afspelen start in de volgorde waarin de
tracks zijn geprogrammeerd. Als u andere
tracks wilt toevoegen, herhaalt u stappen 1 en 2.
Opmerking
• Als u op de CLEAR-knop drukt wanneer de schijf is
gestopt, worden alle geprogrammeerde tracks
geannuleerd.
• Om geprogrammeerde tracks te wissen, drukt u in
de stopmodus op de PROGRAM-knop en daarna op
de CLEAR-knop. De geprogrammeerde tracks
worden geannuleerd, te beginnen vanaf de laatste
geprogrammeerde track.
• Een “pauze” kan niet worden geprogrammeerd.
• De inhoud van het geprogrammeerd afspelen (alle
nummers herhalen) kan worden herhaald. Druk
gewoon op de REPEAT-knop nadat het
geprogrammeerd afspelen is gestart (zie links).
• Eén nummer herhalen kan niet worden uitgevoerd
tijdens het geprogrammeerd afspelen.
• Willekeurig afspelen kan niet worden gebruikt
tijdens het geprogrammeerd afspelen.
• Als tijdens het geprogrammeerd afspelen op de
knop wordt gedrukt, wordt het afspelen
vooruitgespoeld naar het begin van het afspelen
van de volgende geprogrammeerde track.
• Nadat het afspelen is gestopt en hetzelfde
geprogrammeerde afspelen opnieuw wordt gestart,
drukt u op de PROGRAM-knop en daarna op de
-knop.
.
Schijfgegevens weergeven
• Druk tijdens het afspelen op de
DISPLAY
knop
Verschillende gegevens, inclusief de
verstreken en de resterende afspeelduur, worden
weergegeven.
Afhankelijk van de schijf, drukt u meerdere keren op de
DISPLAY-knop zodat het display door de verschillende
gegevens bladert.
.
DISPLAY
8
Nl
Page 65

Afspelen 04
Opmerking
• Toont de bestandsnaam (de eerste 8 tekens) tijdens
het afspelen van AAC-bestanden (alleen
PD-30), WMA/MP3-bestanden of bestanden op
DSD-schijven. Afhankelijk van de tekens die
worden gebruikt zal de weergave echter mogelijk
niet volledig correct zijn.
iPod/iPhone/iPad-weergave
(alleen PD-30)
U hoeft de iPod/iPhone/iPad alleen aan te sluiten op dit
apparaat om te genieten van geluid met hoge kwaliteit
van uw iPod/iPhone/iPad.
Controleer welke iPod/iPhone/iPadmodellen worden ondersteund
De iPod/iPhone/iPad-modellen die op dit apparaat
kunnen worden afgespeeld, worden hieronder
weergegeven.
iPod/iPhone/iPad Audio Besturing
iPod nano 2/3/4/5/6G
iPod touch 1/2/3/4G
iPhone
iPhone 3G/3GS
iPhone 4/4S
iPad
iPad 2
• Dit systeem is ontwikkeld en getest voor de
softwareversie van de iPod/iPhone/iPad-modellen
die zijn aangegeven op de website van Pioneer.
• Wanneer u andere softwareversies dan
aangegeven op de website van Pioneer installeert
op uw iPod/iPhone/iPad, kan dit leiden tot
incompatibiliteit met dit systeem.
Opmerking
• Pioneer biedt geen garantie dat dit apparaat andere
iPod/iPhone/iPad-modellen dan de opgegeven
modellen kan afspelen.
• Sommige functies kunnen worden beperkt,
afhankelijk van het model of de softwareversie.
• Aan iPod/iPhone/iPad is een licentie verleend voor
de reproductie van niet auteursrechtelijk
beschermde materialen of materialen die de
gebruiker wettelijk mag reproduceren.
• Functies zoals de equalizer, kunnen niet worden
bestuurd via dit systeem. Wij raden u aan de
equalizer uit te schakelen vóór het aansluiten.
• Pioneer kan in geen geval aansprakelijkheid
aanvaarden voor enig direct of indirect verlies,
voortvloeiend uit elk ongemak of verlies van
opgenomen materiaal ten gevolge van een defect
van de iPod/iPhone/iPad.
• Meer gedetailleerde instructies over het gebruik
van de iPod/iPhone/iPad vindt u in de handleiding
die bij het betreffende toestel is geleverd.
Uw iPod/iPhone/iPad afspelen
1 Druk op de afstandsbediening op
iPod/USB
om
iPod
te selecteren als
ingangsbron.
Druk op de iPod/USB-knop van de afstandsbediening.
• U kunt dezelfde bewerking ook uitvoeren door op
het voorpaneel herhaaldelijk op FUNCTION te
drukken.
2 Sluit uw iPod/iPhone/iPad aan.
Sluit uw iPod/iPhone/iPad aan op de USB-poort op het
voorpaneel van het apparaat. Gebruik de iPod-kabel die
bij uw iPod/iPhone/iPad is geleverd voor de aansluiting.
• Raadpleeg eveneens de handleiding van uw iPod/
iPhone/iPad voor het aansluiten.
iPod/iPhone/iPad
iPod-kabel
iPod/USB
De volgende bewerkingen zijn mogelijk voor iPod/
iPhone/iPad.
Toe t s Functie
RANDOM
REPEAT
iPod MENU
//ENTER
1 Telkens wanneer u op REPEAT drukt, wijzigt de
herhaalmodus zoals hieronder.
1 herhalen Alles herhalen Normaal afspelen
1 herhalen: Herhaalt een bestand dat momenteel
wordt afgespeeld.
Alles herhalen: Herhaalt alle bestanden.
Belangrijk
Als dit apparaat uw iPod/iPhone/iPad niet kan afspelen,
voert u de volgende foutcontroles uit:
• Controleer of de iPod/iPhone/iPad wordt
ondersteund door dit apparaat.
• Sluit de iPod/iPhone/iPad opnieuw aan op het
apparaat. Als dat niet lijkt te werken, kunt u
proberen een reset uit te voeren van de iPod/
iPhone/iPad.
• Controleer of de iPod/iPhone/iPad-software wordt
ondersteund door dit apparaat.
Als de iPod/iPhone/iPad niet kan worden gebruikt,
raadpleegt u de volgende items:
Hiermee start u het afspelen. Het afspelen
pauzeren/hervatten.
Pauzeert het afspelen.
Indrukken om naar het begin van het
huidige bestand te gaan en vervolgens
naar eerdere bestanden.
Ingedrukt houden voor snel terugspoelen.
Indrukken om naar het volgende bestand
te springen.
Ingedrukt houden voor snel
vooruitspoelen.
De momenteel geselecteerde iPod/iPhone/
iPad-bestanden worden in willekeurige
volgorde afgespeeld (willekeurig afspelen).
De momenteel geselecteerde iPod/iPhone/
iPad-bestanden worden herhaald
1
afgespeeld.
Gebruik bij het bedienen van het iPod/
iPhone/iPad-menu.
Gebruiken voor het uitvoeren van de
bewerkingen van het iPod/iPhone/iPadmenu.
• Is de iPod/iPhone/iPad correct aangesloten?
Sluit de iPod/iPhone/iPad opnieuw aan op het
apparaat.
• Is de iPod/iPhone/iPad vastgelopen? Probeer een
reset uit te voeren van de iPod/iPhone/iPad en sluit
het toestel opnieuw aan op het apparaat.
Opmerking
• Telkens wanneer een iPod/iPhone/iPad wordt
aangesloten op dit apparaat, wordt het toestel
opgeladen. (Opladen is alleen ingeschakeld
wanneer de voeding van het apparaat is
INGESCHAKELD.) (is niet van toepassing wanneer
de functie Pure audio AAN is)
• Wanneer de ingang wordt geschakeld van de iPod
naar een andere functie, wordt het afspelen van de
iPod/iPhone/iPad automatisch gestopt.
English
DeutschFrançais
Italiano Español Русский
Nederlands
9
Nl
Page 66

Afspelen04
Bestanden afspelen die op USBopslagapparaten zijn opgeslagen
1 Druk op de afstandsbediening
op
USB
om USB te selecteren als
ingangsbron.
Druk op de afstandsbediening op de knop
iPod/USB
(PD-30) of op de knop
• U kunt dezelfde bewerking ook uitvoeren
door op het voorpaneel herhaaldelijk op
FUNCTION te drukken.
USB
2 Sluit het USB-opslagapparaat aan.
USB-opslagapparaat
(in de handel verkrijgbaar)
3 Druk op de knop
starten.
• Druk op de knop om het afspelen te pauzeren.
• Druk op de knop om het afspelen te stoppen.
om het afspelen te
(PD-10)
iPod/USB
.
U kunt de volgende bewerkingen uitvoeren. Afhankelijk
van de categorie die momenteel wordt afgespeeld,
zullen sommige knoppen niet beschikbaar zijn.
Toe t s Functie
RANDOM
REPEAT
1 Telkens wanneer u op REPEAT drukt, wijzigt de
herhaalmodus zoals hieronder weergegeven.
1 herhalen
1 herhalen: herhaalt het bestand dat momenteel
wordt afgespeeld.
Alles herhalen: Herhaalt alle bestanden.
Wanneer de functie voor automatisch uitschakelen is
ingesteld op ON, wordt de ingang ingesteld voor het
afspelen vanaf het USB-geheugen, als het USBgeheugenapparaat 30 minuten stopt zonder dat er een
bewerking wordt uitgevoerd, wordt de voeding
automatisch geschakeld naar stand-by.
Opmerking
• Dit apparaat zal het USB-opslagapparaat mogelijk
niet herkennen, de bestanden niet afspelen of geen
voeding leveren aan het USB-geheugenapparaat.
Raadpleeg
details.
Hiermee start u het afspelen. Het afspelen
pauzeren/hervatten.
Hiermee stopt u het afspelen.
Indrukken om naar het begin van het
huidige bestand te gaan en vervolgens
naar eerdere bestanden.
Indrukken voor snel terugspoelen. Telkens
wanneer u op deze knop drukt, verandert
de snelheid voor terugspoelen in vier
stappen.
Indrukken om naar het volgende bestand
te springen.
Indrukken voor snel vooruitspoelen.
Telkens wanneer u op deze knop drukt,
verandert de snelheid voor vooruitspoelen
in vier stappen.
De momenteel geselecteerde bestanden
worden in willekeurige volgorde
afgespeeld (willekeurig afspelen).
De momenteel geselecteerde bestanden
worden herhaald afgespeeld.
Alles herhalen Normaal afspelen
Extra informatie
op pagina 12 voor meer
1
• Pioneer garandeert niet dat elk bestand dat op een
USB-geheugenapparaat is opgeslagen, zal worden
afgespeeld of dat er voeding zal worden geleverd
aan een USB-opslagapparaat. Houd er ook
rekening mee dat Pioneer geen
verantwoordelijkheid aanvaardt voor elk verlies van
bestanden op USB-opslagapparaten, veroorzaakt
door het aansluiten op dit apparaat.
• Dit apparaat biedt geen ondersteuning voor het
gebruik van een USB-hub.
10
Nl
Page 67

Geavanceerde functies gebruiken 05
Hoofdstuk 5:
Afspeelfuncties
Geavanceerde functies gebruiken
De functies die kunnen worden gebruikt, verschillen
afhankelijk van het type schijf en bestand. In sommige
gevallen kunnen sommige functies niet worden
gebruikt. Zie
Afspeelfuncties
in de rechterkolom.
Afspelen met hifi-geluid
Sound Retriever
Wanneer gecomprimeerde geluidssignalen worden
gedecomprimeerd voor het afspelen, kunnen sommige
delen wegvallen. Door de functie Sound retriever IN te
schakelen, wordt compensatie toegevoegd voor die
verliezen, waardoor een rijker, voller geluid wordt
weergegeven.
• Druk op de knop S.RETRIEVER.
Telkens wanneer u op de knop drukt, verandert de
functie als volgt: S.RTRV: OFF S.RTRV: LOW
S.RTRV: HI terug naar originele status
• De geluidophaalfunctie in inactief als de pureaudiofunctie ingeschakeld is.
Pure Audio
Deze functie schakelt digitale audio-uitvoer uit en speel
analoge audio af met een natuurgetrouwe weergave.
Wanneer dit is ingesteld op ON, toont het display geen
indicators. De standaard fabrieksinstelling is OFF.
• Druk op de knop PURE AUDIO.
Druk opnieuw om de functie UIT te schakelen.
• Wanneer deze functie is ingesteld op ON en de
ingang van de hoofdeenheid wordt geschakeld
naar SACD/CD, licht de PURE AUDIO-indicator op
het voorpaneel op. Tijdens het afspelen van de
schijf wordt het display om het voorpaneel
uitgeschakeld.
• Wanneer de PURE AUDIO-indicator is opgelicht,
wordt geen enkele iPod/iPhone/iPad die op de
hoofdeenheid is aangesloten, opgeladen.
PURE AUDIO
Het weergavegebied (de laag)
van een SACD/CD wijzigen
Hybride SACD-schijven zijn samengesteld uit twee
lagen: een SACD-laag en een CD-laag waarmee u
kunt selecteren welke laag u wilt afspelen.
1 Druk op de knop
De ingang schakelt naar SACD/CD.
SACD/CD
.
2 Druk in de stopmodus op de SACD/CDknop.
Telkens wanneer op de knop wordt gebruikt, wisselt de
weergave tussen het CD-gebied en het SACD 2kanaalgebied.
Opmerking
• Dit apparaat ondersteunt geen SACD meerkanaals
gebieden.
De algemene helderheid van het
display aanpassen
S.RETRIEVER
Dit apparaat is uitgerust met een dimmerfunctie
waarom u de helderheid van het display kunt aanpassen
naar drie niveaus, in overeenstemming met de
verschillende niveaus omgevingsverlichting. De
standaard fabrieksinstelling is de helderste instelling.
• Druk op de knop
Telkens wanneer op de knop wordt gedrukt,
doorloopt de helderheid de drie niveaus.
• De dimmerinstelling kan niet worden gewijzigd
wanneer een schijf wordt afgespeeld terwijl de
functie Pure audio is INGESCHAKELD (zie links).
• De helderheid van de STANDBY-indicator
verandert niet.
DIMMER
Auto uitschakelen (stelt de voeding
automatisch in op stand-by)
Deze functie schakelt automatisch naar de standbymodus als er gedurende 30 minuten geen signaal of
schakelbewerking is gedetecteerd.
1 Druk op de knop
2 Wijzig de instelling en bevestig.
Gebruik de knop / om de functie AAN of
UIT te zetten zoals gewenst en druk vervolgens
op de ENTER-knop om te bevestigen.
Opmerking
• Deze functie wordt uitgeschakeld wanneer de iPod-
SACD/CD
ingang is geselecteerd.
SET UP
.
.
ENTER
De functies die kunnen worden gebruikt, verschillen afhankelijk van het type schijf en bestand. In sommige gevallen
kunnen sommige functies niet worden gebruikt. Controleer de functies die u kunt gebruiken in de onderstaande
tabel.
Schijf-/bestandstype
DIMMER
SET UP
1
Functie
Snel vooruitspoelen/terugspoelen
Functie voor overslaan
Direct zoeken (een specifieke track aanduiden
voor het afspelen)
Herhaald afspelen
Willekeurig afspelen
Geprogrammeerd afspelen (tracks afspelen in
een vooraf vastgestelde volgorde)
Schijfgegevens weergeven
Sound Retriever
Pure Audio
SACD/CD
1 Sommige functie zullen mogelijk niet werken voor sommige schijven of bestanden, zelfs als hiervoor [] is
aangegeven in de tabel.
2 Zie ook
Afspelen van CD-R/CD-RW-schijven
3 • AAC-bestanden kunnen alleen worden afgespeeld op de PD-30.
• Zie ook
4 Zie ook
5 Deze functie is alleen ingeschakeld tijdens het afspelen van bestanden die op de schijf zijn opgenomen.
6 Alleen hybride SACD-schijven.
Afspeelbare bestandsindelingen
DSD-schijven afspelen
op pagina 12.
SACD CD-DA
op pagina 12.
op pagina 12.
WMA
2
CD-R/-RW
––
––
–– –
6
–––
MP3
AAC
3
5
DSD
4
English
DeutschFrançais
Italiano Español Русский
Nederlands
11
Nl
Page 68

Extra informatie06
Hoofdstuk 6:
Extra informatie
Afspeelbare schijf
Afspelen van CD-R/CD-RW-schijven
• Dit apparaat kan CD-R/CD-RW-schijven afspelen
die zijn opgenomen in de cd-muziekindeling, of
audiogegevens in WMA- en MP3-indeling.
Sommige schijven zijn echter niet afspeelbaar of
kunnen ruis of een vervorm geluid genereren.
• Dit apparaat is alleen bedoeld om af te spelen. Het
kan geen gegevens opnemen op CD-R/CD-RWschijven.
• CD-R/CD-RW-schijven die niet zijn gefinaliseerd,
kunnen niet worden afgespeeld op dit apparaat.
Raadpleeg de gebruiksrichtlijnen voor uw
schijfbrander voor meer informatie.
DSD-schijven afspelen
Dit apparaat kan DSD-schijfbestanden die in de DSFbestandsindeling zijn opgenomen, afspelen.
Afspeelbare bestanden
• Opgenomen schijven: DVD-R/-RW
• Bestandsextensie: .dsf
• Mapnaam: DSD_DISC
• Capaciteit: maximum 4 GB per bestand
• Audio: 2-kanaals
• Bemonsteringsfrequentie: 2,8224 MHz
Voorbeeld van mapsamenstelling
Bestanden en mappen worden niet op alfabetische
volgorde afgespeeld. Het is afhankelijk van de volgorde
waarin ze op de schijf werden opgenomen.
Root DSD_DISC
File01.dsf
FolderA
File02.dsf
FolderB
File03.dsf
FolderC
File04.dsf
FolderD
File05.dsf
File06.dsf
• Eén map kan maximum 150 bestanden bevatten.
• Eén schijf kan maximum 200 mappen bevatten.
• Elke map mag niet meer dan 8 niveaus hebben.
• Bestandsnamen met Japanse lettertekens en
sommige andere tekens worden niet correct
getoond.
• Bestanden die niet de DSF-indeling hebben,
worden genegeerd.
Let op
• Sommige bestanden zijn mogelijk niet afspeelbaar.
• Schijven die grote hoeveelheden bestanden en
mappen bevatten, kunnen veel tijd vereisen om het
afspelen te starten. In dat geval kunt u de gewenste
bestanden direct naar de map DSD_DISC
verplaatsen of het aantal bestanden beperken tot
20 of minder.
Bewerkingen tijdens het afspelen
De volgende bewerkingen kunnen niet worden
uitgevoerd tijdens het afspelen van een DSD-schijf:
• Direct zoeken
• Afspelen van andere schijfbestanden dan het
DSF-type
Display
Wanneer het apparaat in de stopmodus is wanneer een
DSD-schijf wordt afgespeeld, toont het apparaat de
indicator [DSD DISC]. Als u tijdens het afspelen op de
knop DISPLAY drukt, zal het display, telkens wanneer u
op de knop drukt, de volgende informatie doorlopen:
• Nummer van de track en de verstreken afspeelduur
• Naam van bestand
Afspeelbare bestandsindelingen
Audiobestanden afspelen
Dit apparaat ondersteunt de volgende
bestandsindelingen.
• Sommige bestandsindelingen zijn niet beschikbaar
voor weergave ondanks het feit dat ze worden
weergegeven als afspeelbare bestandsindelingen.
• Als er wordt geprobeerd bestanden met nietondersteunde indelingen af te spelen, kan het
geluid worden onderbroken of kan er ruis worden
weergegeven. Controleer in dergelijke gevallen of
de bestandsindeling compatibel is met dit
apparaat.
• Muziekbestanden die onderhevig zijn aan de DRMvoorschriften (Digital Rights Management),
kunnen niet worden afgespeeld. DRMkopieerbeveiliging (Digital Rights Management) is
een technologie die is ontworpen voor het
beschermen van de auteursrechten. Om illegaal
kopiëren te voorkomen, beperkt DRM het afspelen
op de schijfrecorder of computer die oorspronkelijk
werd gebruikt voor het opnemen van de muziek.
Raadpleeg de handleiding en Help-bestanden voor
het apparaat of de toepassing die werd gebruikt
tijdens de originele opname.
Categorie Extensie
1
MP3
WMA .wma
.mp3
Stream
MPEG-1/2
Audio
Layer-3
WMA2/7/
8/9
Bemonsteringsfrequentie
Bitsnelheid
kwantisatie
Kanaal
Bitsnelheid
Bemonsteringsfrequentie
Bitsnelheid
kwantisatie
Kanaal
Bitsnelheid
8kHz tot
48 kHz
16 bit
2kan
8 kbps tot
320 kbps
22,05 kHz
tot 48 kHz
16 bit
2kan
32 kbps tot
192 kbps
Categorie Extensie
2
AAC
1. “MPEG Layer-3 audio decoderingstechnologie in licentie
verleend door Fraunhofer IIS en Thomson multimedia.”
2.
alleen PD-30.
Let op
• Het is mogelijk dat u niet alle CD-R/CD-RWschijven kunt spelen die op een cd-recorder of
computer zijn opgenomen, vanwege de kenmerken
van de schijf, krassen of vervuiling op de schijf, of
vervuiling of condensatie op de laserlens van de
speler.
• Schijven die op een computer zijn opgenomen, zijn
mogelijk niet afspeelbaar op dit apparaat vanwege
de instellingen van de toepassing of de
computeromgeving. Zorg dat u uw schijven
opneemt met de juiste indeling (raadpleeg de
verkoper van uw toepassing voor meer informatie).
• Schijven die zijn opgenomen in de packet writeindeling, kunnen niet worden afgespeeld op dit
apparaat.
• CD-R/CD-RW-schijven die niet zijn gefinaliseerd,
kunnen niet worden afgespeeld op dit apparaat.
.m4a
Stream
MPEG-4
AAC LC
MPEG-4
HE AAC
(AAC Plus
v1/2)
Bemonsteringsfrequentie
Bitsnelheid
kwantisatie
Kanaal
Bitsnelheid
8 kHz tot
48 kHz
16 bit
2kan
8kbps tot
320 kbps
Weergave WMA-bestanden
• Gebruik schijven die zijn opgenomen voor
compatibiliteit met cd-rombestandssystemen
(ISO9660 niveaus 1 en 2) en bestanden die
compatibel zijn met de uitgebreide indeling (Joliet,
Romeo).
• Dit apparaat ondersteunt geen schijven die zijn
opgenomen met een variabele bitsnelheid (VBR) of
verliesloze codering.
• Dit apparaat biedt geen ondersteuning voor
multisessie-schijven.
• Een maximum van 648 mappen en sporen kan
herkend en afgespeeld worden. Daaronder kunnen
zich maximaal 299 mappen bevinden. Afhankelijk
van de samenstelling van de map, zullen echter niet
alle mappen en tracks kunnen worden herkend en
afgespeeld.
12
Nl
Page 69

Extra informatie 06
• Wanneer u WMA-bestanden gebruikt, moet u
controleren of ze zijn gecodeerd met toepassingen
die door Microsoft Corporation zijn geverifieerd en
herkend. Als niet-herkende toepassingen worden
gebruikt, kan dit leiden tot een verkeerde werking.
MP3-bestand afspelen
• Gebruik schijven die zijn opgenomen voor
compatibiliteit met cd-rombestandssystemen
(ISO9660 niveaus 1 en 2) en bestanden die
compatibel zijn met de uitgebreide indeling (Joliet,
Romeo).
• Dit apparaat ondersteunt geen variabele bitsnelheid
(VBR). (Zelfs als de bestanden afspeelbaar zijn,
zullen de tijden die op het display op het voorpaneel
verschijnen, onjuist zijn door de wijziging in de
bitsnelheid, d.w.z. dat ze sneller of langzamer
veranderen dan de juiste tijdwaarden.)
• Dit apparaat biedt geen ondersteuning voor
multisessie-schijven.
• Een maximum van 648 mappen en sporen kan
herkend en afgespeeld worden. Daaronder kunnen
zich maximaal 299 mappen bevinden. Afhankelijk
van de samenstelling van de map, zullen echter niet
alle mappen en tracks kunnen worden herkend en
afgespeeld.
• Voor een optimale geluidskwaliteit, zijn
bitsnelheden van 128 kbps of hoger aanbevolen
voor opnamen.
MPEG-4 AAC-bestandsweergave
• AAC is een acroniem voor “Advanced Audio
Coding”, de standaardindeling voor de
audiocompressietechnologie die wordt gebruikt in
MPEG-2 en MPEG-4.
• Dit apparaat ondersteunt het afspelen van AACbestanden met de extensie “.m4a,” zoals gecodeerd
door iTunes®. Het kan echter onmogelijk zijn af te
spelen als de bestanden tegen kopiëren zijn
beveiligd door DRM en afhankelijk van de versie van
de iTunes-codering.
• iTunes is een handelsmerk van Apple Inc.,
geregistreerd in de Verenigde Staten en andere
landen.
Waarschuwingen betreffende het gebruik
De speler verplaatsen
Wanneer u dit apparaat verplaatst naar een nieuwe
locatie, moet u altijd eerst de volgende procedure
uitvoeren: Verwijder elke geladen schijf en sluit de
schijflade. Druk op de /I STANDBY/ON-knop op het
apparaat zodat [-OFF-] verschijnt op het
voorpaneeldisplay. Wacht vervolgens tien seconden
voordat u de voedingskabel loskoppelt. Het verplaatsen
van het apparaat terwijl een schijf in de lade is geplaatst,
kan schade of defecten veroorzaken.
Installatielocatie
Selecteer een stabiele locatie in de buurt van de TV en
het AV-systeem waarop het apparaat is aangesloten.
Plaats de speler niet bovenop een TV of kleurenscherm.
Houd het uit de buurt van cassettedecks of andere
componenten die sterk onderhevig zijn aan
magnetisme.
Vermijd de volgende locatietypes:
• Plaatsen die zijn blootgesteld aan direct zonlicht
• Vochtige of slecht verluchte plaatsen
• Extreem warme of koude plaatsen
• Plaatsen die onderhevig zijn aan trilling
• Plaatsen waar er veel stof of sigarettenrook is
• Plaatsen die zijn blootgesteld aan roet, stoom of
warmte (in keukens, enz.)
Monteer het apparaat niet op een sofa of een ander
object of materiaal met absorberende eigenschappen
omdat de geluidskwaliteit negatief kan worden
beïnvloed.
Plaats geen objecten op het apparaat
Plaats geen objecten op de speler.
Uit de buurt houden van warmte
Plaats de speler niet op een versterker of een ander
apparaat dat warmte genereert. Wanneer u het apparaat
in een rack installeert, moet u het zo mogelijk op een
niveau onder de versterker plaatsen om de warmte die
wordt gegenereerd door de versterker en andere
apparaten, te ontwijken.
Schakel de voeding uit wanneer u de
speler niet gebruikt
Afhankelijk van de toestand van de TV-zendsignalen,
kunnen gestreepte patronen verschijnen op het scherm
wanneer de tv wordt ingeschakeld terwijl de voeding van
de speler wordt ingeschakeld. Dit is geen defect van de
speler of de TV. Schakel in dat geval de voeding van de
speler uit. Op dezelfde manier kan er ruis hoorbaar zijn
in het geluid van een radio.
Condensatie
Als de speler plots wordt verplaatst van een koude naar
een warme ruimte (bijvoorbeeld in de winter) of als de
temperatuur in de kamer waar de speler is geïnstalleerd,
plots stijgt door een verwarmingsapparaat, enz., kunnen
er waterdruppels (condensatie) worden gevormd op de
binnenzijde (op werkende onderdelen en de lens).
Wanneer er condensatie aanwezig is, zal de speler niet
correct werken en is afspelen niet mogelijk. Laat de
speler gedurende 1 of 2 uur staan bij kamertemperatuur
terwijl de voeding is ingeschakeld (de tijd is afhankelijk
van de mate van condensatie). De waterdruppels zullen
vervliegen en het afspelen zal mogelijk worden.
Condensatie kan ook optreden in de zomer als de speler
wordt blootgesteld aan directe wind van de
airconditioning. Als dat gebeurt, verplaatst u de speler
naar een andere plaats.
De speler reinigen
Bij normale vervuiling veegt u de speler schoon met een
zachte doek. Voor hardnekkig vuil gebruikt u wat
neutraal wasmiddel, opgelost in 5 tot 6 delen water, op
een zachte doek, wringt u deze grondig uit, veegt u het
vuil weg en veegt u vervolgens de speler opnieuw af met
een droge doek.
Zorg dat er geen alcohol, witte spiritus, wasbenzine of
insectenbestrijdingsmiddelen op de speler terecht
komen, anders kunnen de bedrukking en coating
loskomen. Zorg dat er geen rubber of vinyl producten
gedurende langere tijd in contact komen met de speler,
anders kan de behuizing beschadigd raken.
Wanneer u kant-en-klare reinigingsdoekjes gebruikt die
zijn geïmpregneerd met chemische stoffen, enz. moet u
de waarschuwingen bij deze doekjes aandachtig lezen.
Koppel het netsnoer los van het stopcontact wanneer u
de speler reinigt.
Waarschuwing voor het geval het
apparaat is geïnstalleerd in een rack met
een glazen deur
Druk niet op OPEN/CLOSE op de afstandsbediening
om de schijflade te openen terwijl de glazen deur
gesloten is. De deur zal de beweging van de schijflade
hinderen en het apparaat kan beschadigd raken.
De lens reinigen
Bij normaal gebruik van de speler zal de lens niet vuil
worden, maar als de lens om de een of andere reden
door stof of vuil niet goed zou werken, moet u uw
dichtstbijzijnde officiële servicecentrum van Pioneer
raadplegen. Er zijn lensreinigingsproducten verkrijgbaar
in de handel, maar wij raden u af deze te gebruiken
omdat sommige producten de lens kunnen
beschadigingen.
Schijven hanteren
Gebruik geen beschadigde (gebarsten of vervormde)
schijven.
Voorkom krassen of vuil op het signaaloppervlak van de
schijf.
Laad niet meer dan één schijf per keer in de speler.
Lijm geen papier of plak geen stickers op de schijf en
gebruik geen potlood, balpen of een ander schrijfgerei
met een scherpe punt. Al deze zaken kunnen de schijf
beschadigen.
Schijven opslaan
Bewaar schijven altijd in hun doos en plaats de dozen
verticaal. Vermijd plaatsen die zijn blootgesteld aan
hoge temperaturen of vochtigheid, direct zonlicht of
extreem lage temperaturen.
Zorg dat u de waarschuwingen leest die bij de schijf zijn
geleverd.
De schijven reinigen
Als er vingerafdrukken of stof op de schijf zitten, zult u
deze mogelijk niet kunnen afspelen. Gebruik in dat geval
een reinigingsdoekje, enz. om de schijf voorzichtig vanaf
het midden naar de buitenrand schoon te vegen.
Gebruik geen vuile reinigingsdoek.
Gebruik geen wasbenzine, witte spiritus of andere
vluchtige chemische stoffen. Gebruik evenmin een
platenspray of antistatische middelen.
Voor hardnekkig vuil brengt u wat water aan op een
zachte doek, wringt u het grondig uit, veegt u het vuil weg
en veegt u vervolgens het vocht af met een droge doek.
Speciaal gevormde schijven
Speciaal gevormde schijven (hartvorm, zeshoekig, enz.)
kunnen niet worden gebruikt op deze speler. Gebruik
nooit dergelijke schijven. Ze zullen de speler
beschadigen.
Condensatie op schijven
Als de schuif plotseling van een koude naar een warme
ruimt wordt verplaatst (bijv. in de winter), kunnen
waterdruppels (condensatie) op het oppervlak worden
gevormd. De schijven worden niet correct afgespeeld als
er condensatie op is gevormd. Veeg alle waterdruppels
nauwkeurig van het schijfoppervlak voordat u de schijf
gebruikt.
English
DeutschFrançais
Italiano Español Русский
Nederlands
13
Nl
Page 70

Extra informatie06
Storingen verhelpen
Een verkeerde bediening is vaak de oorzaak van een storing of defecten. Als u denkt dat het apparaat niet juist
functioneert, doorloopt u eerst de onderstaande lijst. Soms kan de storing worden veroorzaakt door een andere
component. Controleer daarom ook de andere componenten en elektrische apparatuur die wordt gebruikt. Als u het
probleem niet kunt verhelpen, zelfs na het uitvoeren van de onderstaande controlelijsten, dient u contact op te nemen
met uw dichtstbijzijnde officiële servicecentrum van Pioneer of met uw vakhandelaar om het apparaat te laten
repareren.
• Als het apparaat niet normaal werkt vanwege externe effecten, zoals statische elektriciteit, moet u de stekker
loskoppelen van het apparaat en opnieuw aansluiten om terug te keren naar de normale
gebruiksomstandigheden.
Probleem Maatregelen
De schijf kan niet worden afgespeeld
of de schijf komt meteen weer uit het
apparaat nadat deze is geplaatst.
Kan geen CD-R/-RW-schijven
afspelen.
Bestanden met de indelingen WMA,
MP3 of AAC kunnen niet worden
afgespeeld (alleen PD-30).
Kan de afstandsbediening niet
bedienen.
De instellingen zijn gewist. • Als het netsnoer geforceerd is losgekoppeld of als er een stroomstoring is
Geen geluid of het geluid is vervormd. • Controleer of alle stekkers stevig in de aansluitbussen zitten (pagina 5).
• Controleer of de schijf met de labelzijde omhoog is gericht en correct is uitgelijnd in
de schijfladegeleider (pagina 8).
• Controleer of er geen stof en vuil op de schijf is en de schijf niet beschadigd is
(pagina 13).
• Er is condensatie in de speler: Laat het condensvocht opdrogen voordat u de speler
gebruikt. Gebruik het apparaat niet in de buurt van een airconditioning (pagina 13).
• De schijflade gaat open als er een schijf in is gelegd die niet ondersteund wordt
(pagina 4).
• Sommige CD-R/-RW-schijven die op een computer zijn geregistreerd, kunnen niet
worden afgespeeld.
• De volgende bestandstypen kunnen niet worden afgespeeld:
- Bestanden met DRM-kopieerbeveiliging
- Opgenomen schijven zijn niet conform het ISO9660-formaat
- Bestanden die niet zijn opgenomen met een bemonsteringsfrequentie van 44,1 kHz
- WMA-bestanden die zijn opgenomen met een variabele bitsnelheid (VBR) of een
verliesloze codering.
• Vervang de batterij (pagina 4).
• Gebruiken binnen een afstand van 7 m, 30° van de afstandsbediening op het
voorpaneel (pagina 4).
• Verwijder het obstakel of ga op een andere plaats staan.
• Vermijd het blootstellen van de afstandsbedieningssensor op het voorpaneel aan
direct licht.
• Is de besturingskabel voor een component verkeerd aangesloten? Controleer of de
aansluitingen goed zijn uitgevoerd (pagina 5).
opgetreden terwijl het apparaat is ingeschakeld, kunnen eerder ingevoerd instellingen
verwijderd worden. Om het netsnoer los te koppelen, moet u eerst op de knop
STANDBY/ON
[-OFF-] dooft op het display op het voorpaneel. Pas dan mag u het snoer loskoppelen.
Er moet bijzonder op worden gelet dat het netsnoer van het apparaat is aangesloten op
een uitgang op een andere component, omdat het uitschakelen van de voeding naar
de andere component ook de voeding naar dit apparaat tegelijk kan uitschakelen. Sluit
het netsnoer van dit apparaat waar mogelijk direct aan op een stopcontact.
• Controleer of er geen stof, roest, enz. op de stekkers en aansluitbussen zit en maak
deze onderdelen indien nodig schoon. Controleer ook de kabels op beschadiging.
• Controleer of de schijf niet is beschadigd en of deze geen vuil of stof bevat.
• Is het apparaat ingesteld op “pauze”? Druk op de knop .
• Controleer de instellingen op uw versterker/ontvanger (volume, ingangsfunctie,
luidsprekerinstellingen, enz.).
• Controleer of de uitgang van de speler niet is aangesloten op de phono-ingangen
(platenspeler) van de versterker.
van de afstandsbediening drukken en vervolgens wachten tot
Probleem Maatregelen
Er is een hoor baar verschil in v olume bij
het afspelen van een SACD en een CD.
Tussen de sporen van een SACDschijf verschijnt er [--:--] op het
scherm van het hoofdtoestel.
De analoge audio is in orde, maar er
schijnt geen digitaal audiosignaal te
zijn.
Het USB-opslagapparaat wordt niet
herkend.
Er is een USB-opslagapparaat
aangesloten en weergegeven, maar
de audiobestanden die op het USBopslagapparaat zijn opgeslagen,
kunnen niet worden afgespeeld.
Er is veel tijd nodig voor het herkennen
van het USB-opslagapparaat.
Er wordt geen voeding geleverd aan
het USB-opslagapparaat.
Muziekbestanden worden
afgespeeld, zelfs als ze niet zijn
opgenomen op het usb-apparaat.
Kan de iPod/iPhone/iPad niet
gebruiken.
Er wordt geen voeding geleverd aan
de iPod/iPhone/iPad.
Er wordt geen geluid weergegeven
vanaf de iPod/iPhone/iPad.
• Dit is te wijten aan de verschillen in de audio-indeling en is geen defect.
• Deze weergave is afhankelijk van de gebruikte schijf.
• Controleer of de functie Pure Audio is uitgeschakeld (pagina 11).
• Audio van SACD- en DSD-schijven alsmede iPod kan niet in digitale vorm worden
uitgevoerd. Gebruik de
• Sluit het apparaat veilig aan (volledig aansluiten) (pagina 10).
• Dit apparaat biedt geen ondersteuning voor USB-hubs. Sluit het USBopslagapparaat direct aan.
• Sommige USB-opslagapparaten worden mogelijk niet correct herkend. Schakel de
voeding uit en opnieuw in.
• Dit apparaat ondersteunt alleen USB-apparaten voor massaopslag.
• Alleen de bestandssystemen FAT16 en FAT32 worden ondersteund. Andere
bestandssystemen (bijv. FAT, NTFS, enz.) worden niet ondersteund.
• Dit apparaat biedt geen ondersteuning voor het gebruik van externe harde schijven.
• Auteursrechtelijk beschermde audiobestanden die op een USB-opslagapparaat zijn
opgeslagen, kunnen niet worden afgespeeld. Door te proberen muziekgegevens te
importeren vanaf een cd, enz. naar een computer kan, afhankelijk van de instellingen,
een kopieerbeveiliging worden opgeroepen.
• Raadpleeg de lijst met bestandsindelingen die kunnen worden afgespeeld op dit apparaat.
• Er kan wat tijd vereist zijn om de gegevens te laden wanneer USB-opslagapparaten
met een grote capaciteit worden aangesloten (dit kan meerdere minuten duren).
• Wanneer de functie Pure audio is ingesteld op AAN, wordt er geen voeding geleverd
naar de
USB
• Verschijnt er een foutbericht op het voorpaneeldisplay? (pagina 7)
- Schakel de voeding uit en opnieuw in (pagina 8).
- Schakel de voeding uit. Koppel daarna het USB-opslagapparaat los en sluit het
opnieuw aan (pagina 10).
- Druk op
opnieuw naar de USB-modus. (Wanneer de ingang opnieuw naar USB wordt
geschakeld) (pagina 7).
• Ga na of er verborgen bestanden op het apparaat zijn opgenomen. Verborgen
bestanden worden afgespeeld.
• Controleer of de iPod/iPhone/iPad correct is aangesloten (zie
weergave (alleen PD-30)
koppelen en opnieuw aan te sluiten.
• Controleer of het aangesloten iPod/iPhone/iPad-model wordt ondersteund door dit
apparaat (pagina 9).
• Als de iPod/iPhone/iPad vastloopt, kunt u proberen een reset uit te voeren van de
iPod/iPhone/iPad en dit toestel vervolgens opnieuw aansluiten op het apparaat.
• Wanneer de functie Pure audio is ingesteld op AAN, wordt er geen voeding geleverd
naar de
USB
• Verschijnt er een foutbericht op het voorpaneeldisplay? Schakel de voeding uit.
Koppel daarna de iPod/iPhone/iPad los en sluit het toestel opnieuw aan.
• Wordt er geluid weergegeven via de luidspreker van de iPod/iPhone/iPad? Koppel de
voeding los van het apparaat en schakel de voeding vervolgens opnieuw in. Nadat u de
instelling voor de iPod-ingang hebt voltooid, sluit u de iPod/iPhone/iPad aan.
• Audio is niet beschikbaar op de
ANALOG OUT
-poorten (pagina 11).
FUNCTION
om te schakelen naar de andere modus en schakel vervol gens
op pagina 9). Probeer ook de iPod/iPhone/iPad los te
-poorten (pagina 9).
-aansluitingen voor dergelijke media (pagina 5).
DIGITAL OUT
-aansluiting.
iPod/iPhone/iPad-
14
Nl
Page 71

Extra informatie 06
English
Technische gegevens
Algemeen
Systeem. . . . . . . . . . . . . . . . . . . . .Super-Audio CD-speler
Stroomvoorziening . . . . .AC 220 V tot 240 V, 50 Hz/60 Hz
Stroomverbruik
PD-30 . . . . . . . . . . . . . . . . . . . . . . . . . . . . . . . . . . .37 W
PD-10 . . . . . . . . . . . . . . . . . . . . . . . . . . . . . . . . . . .20 W
Stroomverbruik (standby) . . . . . . . . . . . . . . . . . . . 0,45 W
Gewicht
PD-30 . . . . . . . . . . . . . . . . . . . . . . . . . . . . . . . . . . 5,6 kg
PD-10 . . . . . . . . . . . . . . . . . . . . . . . . . . . . . . . . . . 5,2 kg
Afmetingen
. . . . . . . . . . . . . 435 mm (B) x 128 mm (H) x 329 mm (D)
Bedrijfstemperatuur . . . . . . . . . . . . . . . +5 °C tot +35 °C
Relatieve luchtvochtigheid . . . . . . . . . . . . . 5 % t/m 85 %
Audio-uitgang (1 stereopaar)
Uitgangsniveau. . . . . . . . . . . . . . . . Tijdens audio-uitvoer
Aantal kanalen . . . . . . . . . . . . . . . . . . . . . . . . . . . . . . . . . 2
Aansluitingen . . . . . . . . . . . . . . . RCA-tulpstekkerbussen
Kenmerken digitale audio
Frequentierespons
CD. . . . . . . . . . . . . . . . . . . . . . . . . . . . . 2 Hz tot 20 kHz
SACD . . . . . . . . . . . . . . . . . . . . . . . . . . 2 Hz tot 50 kHz
Signaal-ruisverhouding
CD. . . . . . . . . . . . . . . . . . . . . . . . . . . . . . . . . . . . 117 dB
SACD . . . . . . . . . . . . . . . . . . . . . . . . . . . . . . . . . 117 dB
Dynamisch bereik
CD. . . . . . . . . . . . . . . . . . . . . . . . . . . . . . . . . . . . 100 dB
SACD . . . . . . . . . . . . . . . . . . . . . . . . . . . . . . . . . 108 dB
Totale harmonische vervorming:
CD. . . . . . . . . . . . . . . . . . . . . . . . . . . . . . . . . . .0,0022 %
SACD . . . . . . . . . . . . . . . . . . . . . . . . . . . . . . . .0,0020 %
Wow en flutter . . . . . . . . . . . . . . . . . . . . . . . . . Meetgrens
Digitale uitgang
Optische digitale uitgang
. . . . . . . . . . . . . . . . . . . . . . .Optische digitale aansluiting
Coaxiale digitale uitgang . . . . . . . . . . . . RCA-aansluiting
Accessoires
RCA-audiokabel (rode/witte stekkers) . . . . . . . . . . . . . . 1
Afstandsbediening . . . . . . . . . . . . . . . . . . . . . . . . . . . . . . 1
AAA/IEC R03 droge celbatterijen . . . . . . . . . . . . . . . . . . 2
Netsnoer
Garantiebewijs (alleen Europees model)
Handleiding (dit document)
(geen condensatie)
200 mVrms (1 kHz, –20 dB)
(±0,001 % W. PEAK) of lager
Opmerking
• De technische gegevens en het ontwerp kunnen
met het oog op verbeteringen zonder voorafgaande
kennisgeving worden gewijzigd.
• Bedrijfs- en productnamen die hierin zijn vermeld,
zijn handelsmerken of gedeponeerde
handelsmerken van de respectieve
ondernemingen.
DeutschFrançais
Italiano Español Русский
Nederlands
© 2012 PIONEER CORPORATION.
Alle rechten voorbehouden.
15
Nl
Page 72

Enhorabuena por la adquisición de este producto Pioneer.
Lea completamente este manual de instrucciones para aprender a operar correctamente el aparato. Después de haber terminado la lectura de las
instrucciones, guarde el manual en un lugar seguro para poderlo consultar en el futuro.
IMPORTANTE
CAUTION
RISK OF ELECTRIC SHOCK
DO NOT OPEN
La luz intermitente con el símbolo de punta
de flecha dentro un triángulo equilátero.
Está convenido para avisar el usuario de la
presencia de “voltaje peligrosa” no aislada
dentro el producto que podría constituir un
peligro de choque eléctrico para las
personas.
ATENCIÓN:
PARA PREVENIR EL PELIGRO DE CHOQUE
ELÉCTRICO NO REMOVER LA TAPA NI LAS
PARTES DENTRO NO UTILIZADAS,
LLAMAR UNA PERSONA CUALIFICADA.
Información para los usuarios en la recogida y tratamiento de los equipos al final de
su vida y de las pilas y baterías usadas.
Símbolo para
equipos
Símbolo para
pilas y baterías
Pb
Estos símbolos en los productos, embalaje, y/o en los documentos que los
acompañan significa que los productos eléctricos y electrónicos al final de su vida, las
pilas y baterías no deben mezclarse con los residuos generales de su hogar.
Para el tratamiento adecuado, recuperación y reciclado de los productos viejos y las
pilas usadas, por favor deposítelos en los puntos de recogida de acuerdo con su
legislación nacional.
Mediante el tratamiento correctamente de estos productos y pilas, ayudará a preservar
los recursos y prevenir cualquier efecto negativo en la salud humana y el medioambiente que podría surgir por una inadecuada manipulación de los desperdicios.
Para más información sobre recogida y reciclado de los productos viejos, pilas y
baterías, por favor contacte con su municipio, sobre localización de los puntos limpios
o diríjase al punto de venta donde compró los productos.
Estos símbolos sólo son válidos en la Unión Europea.
Para países fuera de la Unión europea:
Si desea eliminar estos artículos, por favor contactar con las autoridades locales o el
distribuidor y pida por el método correcto de tratamiento.
El punto exclamativo dentro un triángulo
equilátero convenido para avisar el usuário
de la presencia de importantes
instrucciones sobre el funcionamiento y la
manutención en la libreta que acompaña el
aparato.
D3-4-2-1-1_A1_Es
K058a_A1_Es
ADVERTENCIA
Este aparato no es impermeable. Para evitar el riesgo
de incendio y de descargas eléctricas, no ponga ningún
recipiente lleno de líquido (como pueda ser un vaso o
un florero) cerca del aparato ni lo exponga a goteo,
salpicaduras, lluvia o humedad.
D3-4-2-1-3_A1_Es
ADVERTENCIA
Antes de enchufar el aparato a la corriente, lea la sección
siguiente con mucha atención.
La tensión de la red eléctrica es distinta según el
país o región. Asegúrese de que la tensión de la
alimentación de la localidad donde se proponga
utilizar este aparato corresponda a la tensión
necesaria (es decir, 230 V ó 120 V) indicada en el
panel posterior.
D3-4-2-1-4*_A1_Es
ADVERTENCIA
Para evitar el peligro de incendio, no ponga nada con
fuego encendido (como pueda ser una vela) encima del
aparato.
D3-4-2-1-7a_A1_Es
PRECAUCIÓN PARA LA VENTILACIÓN
Cuando instale este aparato, asegúrese de dejar
espacio en torno al mismo para la ventilación con el fin
de mejorar la disipación de calor (por lo menos 10 cm
encima, 10 cm detrás, y 10 cm en cada lado).
ADVERTENCIA
Las ranuras y aberturas de la caja del aparato sirven
para su ventilación para poder asegurar un
funcionamiento fiable del aparato y para protegerlo
contra sobrecalentamiento. Para evitar el peligro de
incendio, las aberturas nunca deberán taparse ni
cubrirse con nada (como por ejemplo, periódicos,
manteles, cortinas) ni ponerse en funcionamiento el
aparato sobre una alfombra gruesas o una cama.
D3-4-2-1-7b*_A1_Es
Page 73

Entorno de funcionamiento
Temperatura y humedad del entorno de funcionamiento
+5 °C a +35 °C; menos del 85 % de humedad relativa
(rejillas de refrigeración no obstruidas)
No instale este aparato en un lugar mal ventilado, ni en
lugares expuestos a alta humedad o a la luz directa del
sol (o de otra luz artificial potente).
D3-4-2-1-7c*_A1_Es
Si la clavija del cable de alimentación de CA de este
aparato no se adapta a la toma de corriente de CA
que usted desea utilizar, deberá cambiar la clavija por
otra que se adapte apropiadamente. El reemplazo y
montaje de una clavija del cable de alimentación de
CA sólo deberá realizarlos personal de servicio
técnico cualificado. Si se enchufa la clavija cortada a
una toma de corriente de CA, puede causar fuertes
descargas eléctricas. Asegúrese de que se tira de la
forma apropiada después de haberla extraído.
El aparato deberá desconectarse desenchufando la
clavija de la alimentación de la toma de corriente
cuando no se proponga utilizarlo durante mucho
tiempo (por ejemplo, antes de irse de vacaciones).
D3-4-2-2-1a_A1_Es
PRECAUCIÓN
El interruptor de la alimentación /I STANDBY/ON
de este aparato no corta por completo toda la
alimentación de la toma de corriente de CA. Puesto
que el cable de alimentación hace las funciones de
dispositivo de desconexión de la corriente para el
aparato, para desconectar toda la alimentación del
aparato deberá desenchufar el cable de la toma de
corriente de CA. Por lo tanto, asegúrese de instalar
el aparato de modo que el cable de alimentación
pueda desenchufarse con facilidad de la toma de
corriente de CA en caso de un accidente. Para evitar
correr el peligro de incendio, el cable de
alimentación también deberá desenchufarse de la
toma de corriente de CA cuando no se tenga la
intención de utilizarlo durante mucho tiempo
seguido (por ejemplo, antes de irse de vacaciones).
D3-4-2-2-2a*_A1_Es
Este producto es para tareas domésticas generales.
Cualquiera avería debida a otra utilización que tareas
domésticas (tales como el uso a largo plazo para
motivos de negocios en un restaurante o el uso en un
coche o un barco) y que necesita una reparación
hará que cobrarla incluso durante el período de
garantía.
K041_A1_Es
PRECAUCIONES CONCERNIENTES A LA
MANIPULACIÓN DEL CABLE DE
ALIMENTACIÓN
Tome el cable de alimentación por la clavija. No
extraiga la clavija tirando del cable. Nunca toque el
cable de alimentación cuando sus manos estén
mojadas, ya que esto podría causar cortocircuitos o
descargas eléctricas. No coloque la unidad, algún
mueble, etc., sobre el cable de alimentación.
Asegúrese de no hacer nudos en el cable ni de unirlo a
otros cables. Los cables de alimentación deberán ser
dispuestos de tal forma que la probabilidad de que
sean pisados sea mínima. Una cable de alimentación
dañado podrá causar incendios o descargas eléctricas.
Revise el cable de alimentación está dañado, solicite el
reemplazo del mismo al centro de servicio autorizado
PIONEER más cercano, o a su distribuidor.
S002*_A1_Es
PRECAUCIÓN
Este aparato es un producto de láser de clase 1
clasificado como tal en Seguridad de productos de
láser, IEC 60825-1:2007.
PRODUCTO LASER CLASE 1
D58-5-2-2a_A1_Es
Contenido
01 Antes de comenzar
Formato de discos y contenido compatibles con la
reproducción. . . . . . . . . . . . . . . . . . . . . . . . . . . . . 4
Contenido del paquete. . . . . . . . . . . . . . . . . . . . . . 4
Cargar las pilas en el mando a distancia . . . . . . . . 4
Uso del control remoto . . . . . . . . . . . . . . . . . . . . . .4
02 Conexiones
Conexiones de salida de audio analógico . . . . . . .5
Conexiones de salida de audio digital . . . . . . . . . . 5
Utilizar un control centralizado con otros
componentes de Pioneer
(solo la unidad PD-30) . . . . . . . . . . . . . . . . . . . . . . 5
Enchufar la unidad . . . . . . . . . . . . . . . . . . . . . . . . 5
03 Controles y visualizadores
Control remoto . . . . . . . . . . . . . . . . . . . . . . . . . . . 6
Panel posterior . . . . . . . . . . . . . . . . . . . . . . . . . . . 6
Panel frontal . . . . . . . . . . . . . . . . . . . . . . . . . . . . . 7
Pantalla del panel frontal. . . . . . . . . . . . . . . . . . . . 7
04 Reproducción
Reproducción de discos . . . . . . . . . . . . . . . . . . . . 8
Establecer la alimentación en el modo
de espera. . . . . . . . . . . . . . . . . . . . . . . . . . . . . . . . .8
Avance y retroceso rápidos . . . . . . . . . . . . . . . . . . .8
Función Saltar. . . . . . . . . . . . . . . . . . . . . . . . . . . . .8
Búsqueda directa (designar una pista
específica para reproducir) . . . . . . . . . . . . . . . . . . .8
Repetir reproducción. . . . . . . . . . . . . . . . . . . . . . . .8
Reproducción aleatoria . . . . . . . . . . . . . . . . . . . . . .8
Reproducción programada (reproducir pistas en un
orden predeterminado) . . . . . . . . . . . . . . . . . . . . . . 8
Ver los datos del disco. . . . . . . . . . . . . . . . . . . . . . .8
Reproducción con iPod/iPhone/iPad
(solo la unidad PD-30) . . . . . . . . . . . . . . . . . . . . . . 9
Asegúrese de que se admiten los modelos de
iPod/iPhone/iPad . . . . . . . . . . . . . . . . . . . . . . . . . .9
Reproducción con su iPod/iPhone/iPad . . . . . . . . .9
Reproducir archivos almacenados en
dispositivos de almacenamiento USB . . . . . . . . . 10
05 Utilizar funciones avanzadas
Reproducir con sonido de alta fidelidad . . . . . . . 11
Recuperador de sonido . . . . . . . . . . . . . . . . . . . . .11
Audio puro . . . . . . . . . . . . . . . . . . . . . . . . . . . . . .11
Cambiar el área de reproducción (capa) de un
SACD/CD. . . . . . . . . . . . . . . . . . . . . . . . . . . . . . . 11
Ajustar la iluminación general de la pantalla. . . . 11
Apagado automático (establece automáticamente
el modo de espera) . . . . . . . . . . . . . . . . . . . . . . . 11
Funciones de reproducción . . . . . . . . . . . . . . . . . 11
06 Información adicional
Discos reproducibles. . . . . . . . . . . . . . . . . . . . . . 12
Formatos de archivo reproducibles . . . . . . . . . . . 12
Precauciones a la hora de utilizar el producto . . .13
Solución de problemas . . . . . . . . . . . . . . . . . . . . 14
Especificaciones . . . . . . . . . . . . . . . . . . . . . . . . . 15
Page 74

Antes de comenzar01
Capítulo 1:
Antes de comenzar
Formato de discos y contenido
compatibles con la reproducción
A continuación se muestran los discos que se pueden
reproducir en este reproductor.
• SACD (Super Audio CD)*
(solo áreas de dos canales)
•CD
• Discos DSD
* “Super Audio CD” es una marca registrada.
Nota
• Esta unidad no puede reproducir áreas multicanal
de discos SACD.
• Los terminales DIGITAL OUT de esta unidad no
transfieren el sonido de discos SACD y DSD, ni de
dispositivos iPod/iPhone/iPad.
• Cuando se carga un disco, el encendido de la
alimentación no iniciará la reproducción
automáticamente. Por eso, la reproducción
programada no es posible aunque la unidad esté
conectada a un temporizador.
Acerca de la reproducción DualDisc
Un DualDisc es un nuevo disco de dos caras, una cara
contiene vídeo, audio, etc. de contenido DVD mientras
que la otra cara contiene lo que no es contenido DVD,
por ejemplo, material de audio digital. La cara de audio
(contenido no DVD) no es compatible con las
especificaciones de audio CD y, por lo tanto, puede que
no se reproduzca. Para obtener más información sobre
las especificaciones del DualDisc, consulte al fabricante
o al vendedor.
Discos que no se pueden reproducir
•DVD-Video
• DVD-Audio
•CD-G
• CD de vídeo
• DTS CD
Es posible que algunos discos distintos a los
enumerados anteriormente tampoco se puedan
reproducir.
Contenido del paquete
Confirme que estos accesorios se encuentran en la caja
una vez abierta.
• Mando a distancia x1
• 2 pilas secas AAA/IEC R03
• Cable de audio RCA (enchufes rojo y blanco) x1
• Cable de alimentación
• Tarjeta de garantía
• Manual de instrucciones (este documento)
Nota
• Las ilustraciones incluidas en las instrucciones de
funcionamiento se pueden haber modificado o
simplificado para facilitar la explicación y, por
tanto, pueden no coincidir con la apariencia del
producto real.
• Las ilustraciones aquí utilizadas corresponden
principalmente a la unidad PD-30.
Cargar las pilas en el mando a
distancia
1 Abra la tapa posterior.
PD-30
PD-10
2 Inserte las pilas nuevas, haciendo
coincidir las polaridades tal y como se indica
dentro de la carcasa.
PD-30
PD-10
3 Cierre la tapa posterior.
PD-30
Las pilas incluidas con la unidad se han proporcionado
para que pueda comprobar el funcionamiento del
producto y es posible que no duren mucho. Es
recomendable utilizar pilas alcalinas que tengan mayor
duración.
ADVERTENCIA
• No utilice ni guarde las pilas bajo la luz directa del
sol o en lugares demasiado calurosos, como por
ejemplo en el interior de un coche o cerca de un
aparato de calefacción. Las pilas podrían perder
líquido, sobrecalentarse, estallar o incendiarse.
También podrían verse afectados el rendimiento y
la vida útil de la pilas.
Precaución
El uso incorrecto de las pilas puede provocar que estas
se sulfaten o exploten. Siga las siguientes precauciones:
• Cuando inserte las pilas, asegúrese de no dañar los
muelles de los terminales de las mismas.
• No utilice pilas distintas a las especificadas.
Asimismo, no utilice ninguna pila nueva con otra
usada.
PD-10
• Cuando cargue las pilas en el mando a distancia,
colóquelas en la dirección adecuada tal y como
indican las marcas de polaridad ( y ).
• No caliente las pilas, no las desmonte ni las
exponga al fuego o al agua.
• Las pilas pueden tener diferentes voltajes, incluso
si tienen el mismo tamaño y forma. No utilice tipos
de pilas diferentes conjuntamente.
• Para evitar fugas del líquido de las pilas, quítelas si
no pretende utilizar el mando a distancia durante
un prolongado período de tiempo (1 mes o más). Si
el líquido de las pilas se fuga, quítelo con cuidado
del interior de la carcasa y, a continuación, inserte
pilas nuevas. Si el líquido de las pilas se fuga y
entra en contacto con su piel, elimínelo con
grandes cantidades de agua.
• Cuando se deshaga de las pilas usadas, asegúrese
de cumplir los requisitos de los reglamentos
gubernamentales y las normas de los organismos
públicos de medioambiente que correspondan a su
país o zona.
Uso del control remoto
El control remoto tiene un alcance de unos 7 m. en un
ángulo de unos 30º desde el sensor de control remoto.
30 °
30 °
7 m
No olvide lo siguiente al usar el control remoto:
• Asegúrese de que no haya obstáculos entre el
control remoto y el sensor de control remoto de la
unidad.
• El funcionamiento del control remoto puede
resultar inestable si se refleja la luz solar o una luz
fluorescente fuerte en el sensor de control remoto
de la unidad.
• Los controles remotos de dispositivos diferentes
pueden interferir entre sí. Evite el uso de otros
controles remotos situados cerca de esta unidad.
• Cambie las pilas si observa una disminución en el
margen de funcionamiento del control remoto.
4
Es
Page 75

Conexiones 02
Capítulo 2:
Conexiones
Precaución
• Antes de realizar o cambiar las conexiones,
desconecte la alimentación y desenchufe el cable
de alimentación de la toma de CA.
• Conecte el cable de alimentación después de que
todas las conexiones entre los dispositivos se
hayan completado.
Conexiones de salida de audio analógic
Al conectar la salida de audio analógico de esta unidad
a la entrada de audio analógico de un amplificador,
puede utilizar este para disfrutar del audio analógico
producido por dicha unidad.
Panel posterior de la unidad PD-30
Cable de audio (incluido)
Amplificador
RL
ANALOG
AUDIO INPUT
Conexiones de salida de audio digital
Si lo desea, puede conectar la salida de audio digital de
esta unidad a un amplificador de AV o a un dispositivo
de grabación digital (grabadora de CD, MD, etc.).
• Los terminales DIGITAL OUT de esta unidad no
transfieren el sonido de discos SACD y DSD, ni de
dispositivos iPod/iPhone/iPad.
o
Amplificador de AV
DIGITAL IN
COAXIAL
Amplificador de AV
o dispositivo de
grabación digital
Cable de audio digital
coaxial (disponible
en tiendas
especializadas)
Panel posterior de la unidad PD-30
Importante
Precaución a la hora de manipular los cables de fibra
óptica
• No permita que los cables de fibra óptica se doblen
en exceso (formando ángulos agudos). Cuando
guarde cables de fibra óptica, enróllelos en bobinas
de al menos 15 cm de diámetro.
• Cuando conecte cables de fibra óptica, alinéelos
correctamente e insértelos totalmente. Si la
orientación del conector del cable es incorrecta y
se aplica fuerza excesiva para insertarlo, dicho
conector se puede deformar, lo que impedirá que el
obturador se cierre cuando el cable se quite.
Nota
• Para salida de audio digital, los CDs reproducidos
en esta unidad deben generar señales PCM
lineales con una tasa de muestreo de hasta
44,1 kHz y bits cuantitativos de hasta 16 bits (en
función del componente conectado y del entorno,
es posible que algunos discos no se puedan
reproducir). Para obtener información acerca de
otros archivos, consulte la página 12.
o dispositivo de
grabación digital
DIGITAL IN
OPTICAL
Cable de fibra óptica
(disponible en tiendas
especializadas)
Utilizar un control centralizado con
otros componentes de Pioneer (solo la
unidad PD-30)
Esta unidad y otros componentes de Pioneer con
conectores CONTROL IN/OUT se pueden controlar con
un solo mando a distancia apuntando con este al
receptor de señal que se encuentra en el amplificador de
AV o de otro componente. De esta forma se puede
controlar remotamente los componentes que no
cuentan con un sensor remoto o que están instalados en
lugares donde no se puede acceder al sensor remoto del
componente.
Otro componente de Pioneer
equipado con conectores
CONTROL IN/OUT
Mando a distancia
para el amplificador
de AV, etc.
Apunte con el mando a
distancia al receptor de
señal del amplificador de
AV, etc.
A otro componente de
Pioneer equipado con el
conector CONTROL IN
PD-30
Nota
• Para las conexiones utilice un cable con
minienchufe monoaural (sin resistor) que puede
encontrar en cualquier tienda especializada.
• Cuando conecte los conectores CONTROL IN/
OUT, los cables de audio que puede encontrar en
cualquier tienda especializada también se deben
utilizar para realizar las conexiones analógicas. La
simple conexión de los conectores CONTROL IN/
OUT no permitirá el control del sistema adecuado.
• Cuando se conecte un cable de control al conector
CONTROL IN de la unidad PD-30, esta no se podrá
controlar apuntando a ella con el mando a
distancia (el sensor remoto se deshabilita
automáticamente).
Enchufar la unidad
Importante
• Si es necesario desmontar el cable de
alimentación, antes de hacerlo asegúrese de
presionar el botón
panel frontal de la unidad. Al realizar esta
operación, la unidad PD-30 se APAGARÁ y la
unidad PD-10 entrará en el modo de espera.
• Confirme que el indicador [-OFF-] no está iluminado
en la pantalla del panel frontal de la unidad antes de
desconectar el cable de alimentación. Si el cable de
alimentación se desconecta mientras el indicador
[-OFF-] sigue iluminado, se pueden restablecer los
valores predeterminados de fábrica de la
configuración de la unidad.
• Cuando salga de viaje o no vaya a utilizar la unidad
durante un prolongado período de tiempo,
desconecte siempre el cable de alimentación de su
toma de corriente eléctrica.
Precaución
• No utilice ningún otro cable de alimentación que
no sea el proporcionado con esta unidad.
• No utilice el cable de alimentación proporcionado
para ninguna otra cosa que no sea la aquí descrita.
Cuando haya terminado de realizar todas las
conexiones, enchufe la unidad a una toma de corriente
eléctrica alterna (CA).
Panel posterior de la
unidad PD-30
A una toma de CA
1 Enchufe el cable de alimentación
proporcionado a la toma
panel posterior de la unidad.
2 Enchufe el otro extremo a la toma de
corriente eléctrica alterna (CA).
/I
STANDBY/ON situado en el
Cable de
alimentación
AC IN
situada en el
English
DeutschFrançais
Italiano Español Русский
Nederlands
5
Es
Page 76

Controles y visualizadores03
Capítulo 3:
Controles y visualizadores
Control remoto
PD-30
1
2
3
4
5
6
7
8
9
10
11
1
STANDBY/ON
Permite alternar el amplificador entre el modo de espera
y encendido.
2 Botones con números
Utilice estos botones cuando desee especificar una
determinada pista para reproducir. Utilice los botones
numéricos para seleccionar la pista y, a continuación,
presione ENTER para confirmar la selección.
3
CLEAR
Presione este botón para borrar el contenido establecido
para reproducción programada (página 8).
4
SETUP
Utilícelo para establecer la función de apagado
automático (página 11).
PD-10
12
1
9
2
13
14
33
15
4
35
14
37
16
5 ///
8
12
11
16
10
13
17
18
15
19
20
Utilice estos botones para seleccionar elementos,
cambiar configuraciones y mover el cursor.
ENTER
Utilice ese botón para implementar el elemento
seleccionado o especificar un valor que haya
cambiado.
6
iPod MENU
Se utiliza para el menú de iPod/iPhone/iPad.
7
Presione este botón para volver al principio de la
pista que se esté reproduciendo actualmente.
Presione este botón dos veces para volver al
principio de la pista anterior.
(solo la unidad PD-30)
Presione este botón para iniciar la reproducción.
Durante la reproducción, presione este botón para
pausar dicha reproducción o para anular la pausa.
Presione este botón durante la reproducción para
saltar al principio de la pista siguiente.
Presione este botón para hacer retroceder
rápidamente la pista que se esté reproduciendo
actualmente. Si presiona el botón de nuevo durante
el retroceso rápido, la velocidad de retroceso
cambiará en cuatro pasos.
Presione este botón para detener la reproducción.
Presione este botón para hacer avanzar
rápidamente la pista que se esté reproduciendo
actualmente. Si presiona el botón de nuevo durante
el avance rápido, la velocidad de avance rápido
cambiará en cuatro pasos.
8
iPod/USB
(PD-30)
USB (PD-10)
Presione este botón para cambiar la entrada de la
unidad a iPod o USB (página 9,10).
9
SACD/CD
Presione este botón para cambiar la entrada de la
unidad a SACD/CD. En el caso de discos SACD híbridos,
si presiona este botón cuando la reproducción está
detenida, el área de reproducción del disco cambiará
(página 11).
10
REPEAT
Presione este botón para iniciar la reproducción
repetida (página 8).
RANDOM
Presione este botón para iniciar la reproducción
aleatoria (página 8).
PROGRAM
Presione este botón para iniciar la reproducción
programada (página 8).
11 PURE AUDIO
Presione este botón para activar el modo de audio puro.
En este modo, la reproducción de audio se realiza con la
mejor fidelidad posible respecto a los sonidos originales
(página 11).
12
OPEN/CLOSE
Presione este botón para abrir y cerrar la bandeja de
discos (página 8).
13 ENTER
Utilice ese botón para implementar el elemento
seleccionado o especificar un valor que haya cambiado.
14
DISPLAY
Presione este botón para mostrar diversa información
del disco, como por ejemplo el tiempo de reproducción
trascurrido y el tiempo de reproducción restante
(página 8).
15
DIMMER
Presione este botón para cambiar los niveles de
iluminación de la pantalla y de los indicadores del panel
frontal de la unidad principal (página 11).
16
S.RETRIEVER
Presione este botón para cambiar la configuración de la
función de recuperador de sonido (página 11).
17
AMPLIFIER
Presione este botón para cambiar entre los modos
ENCENDIDO y ESPERA en un amplificador de AV de
Pioneer.
18
VOLUME +/–
Presione estos botones para ajustar el volumen de
sonido de un amplificador de AV de Pioneer.
19
MUTE
Presione este botón para silenciar el sonido en un
amplificador de AV de Pioneer. Presione este botón de
nuevo para cancelar esta función.
20
Presione este botón para cambiar la entrada en un
amplificador de AV de Pioneer.
(solo la unidad PD-10)
INPUT
(solo la unidad PD-10)
Panel posterior
Consulte la página página 5 para obtener detalles relacionados con las conexiones.
DIGITAL IN
1 2 3 54
1 Conector
(solo la unidad PD-30)
2Terminal
3Terminal
CONTROL IN/OUT
DIGITAL OUT (COAXIAL)
DIGITAL OUT (OPTICAL)
4Terminales
5 Conector
ANALOG OUT
AC IN
(solo la unidad PD-10)
(solo la unidad PD-10)
PD-30
6
Es
Page 77

Controles y visualizadores 03
English
Panel frontal
3 5 6 7 81
2 4
9
1
/I STANDBY/ON
Cuando la alimentación está conectada, el indicador de
alimentación situado en el centro del botón se ilumina.
• En el modelo PD-30, permite cambiar el
amplificador entre el modo de apagado y
encendido.
Para ENCENDER la alimentación, presione el
botón hasta que se quede presiono.
• En el modelo PD-10, permite cambiar el
amplificador entre el modo de espera y de
encendido.
2 Indicador
Se ilumina cuando la alimentación se encuentra en el
modo de ESPERA.
3 Indicador
Se ilumina cuando la función de audio puro está
ACTIVADA (página 11).
4 Pantalla del panel frontal
(Consulte la descripción siguiente.)
5
Presione este botón para abrir y cerrar la bandeja de
discos (página 8).
6
FUNCTION
Utilícelo para cambiar la fuente de entrada. La fuente
cambia conforme a la siguiente secuencia.
DISC iPod*
(no se muestra).
1
*
Solo la unidad PD-30
7
Presione este botón para detener la reproducción.
1
10 12 1311
STANDBY
PURE AUDIO
/USB Volver al principio
PD-30
8
Presione este botón para iniciar la reproducción.
Durante la reproducción, presione este botón para
pausar dicha reproducción o para anular la pausa.
9 Sensor de control remoto
Recibe las señales del mando a distancia (página 4).
10 Puerto
11 Bandeja de discos
12
• Si vuelve a presionarlo durante el retroceso rápido,
13
• Si vuelve a presionarlo durante el avance rápido, la
iPod/USB
(PD-30)
USB Puerto (PD-10)
Utilícelo para conectar su Apple iPod/iPhone/iPad
(página 9) o un dispositivo USB (página 10).
(página 8)
Presione este botón para volver al principio de la
pista que se esté reproduciendo actualmente.
Presione este botón dos veces para volver al
principio de la pista anterior. Cuando el botón se
mantiene presionado, se hará retroceder
rápidamente la pista que se está reproduciendo
actualmente.
la velocidad de dicho retroceso cambiará en cuatro
pasos.
Presione este botón para avanzar al principio de la
siguiente pista. Cuando el botón se mantiene
presionado, se hará avanzar rápidamente la pista
que se está reproduciendo actualmente.
velocidad de dicho avance cambiará en cuatro
pasos.
Pantalla del panel frontal
1 2 4 5 6
1
USB/iPod
Se ilumina cuando se reproduce desde memoria flash
USB o iPod/iPhone/iPad.
2
SACD/CD/DSD
Se ilumina el indicador correspondiente al tipo de disco
que se está reproduciendo actualmente.
3
PGM
Se ilumina durante la reproducción programada
(página 8).
4
TRK
Se ilumina cuando se muestra el número de pista junto
con el tiempo de reproducción trascurrido o el tiempo de
reproducción restante.
5
FILE
Se ilumina cuando se muestra un nombre de archivo.
6
REPEAT
Se ilumina durante la reproducción repetida (página 8).
7
RANDOM
Se ilumina durante la reproducción aleatoria (página 8).
8
ALL
Se ilumina durante la reproducción repetida de disco
(página 8).
9
TOTAL
Se ilumina cuando se muestra el tiempo de
reproducción restante del disco.
10
REMAIN
Se ilumina cuando se muestra el tiempo de
reproducción restante de la pista o del disco.
11
S.RTRV
Se ilumina cuando la función de recuperador de sonido
está ACTIVADA (página 11).
3 7 8 9
10
1411 12 13
12
SET UP
Se ilumina cuando se establece la función de apagado
automático (página 11).
13
Se ilumina durante el avance rápido.
Se ilumina durante el retroceso rápido.
Se ilumina durante la reproducción.
Se ilumina durante el modo de pausa.
14 Visualizador de caracteres
DeutschFrançais
Italiano Español Русский
Nederlands
7
Es
Page 78

Reproducción04
Capítulo 4:
Reproducción
Las funciones que se pueden utilizar difieren en función
del tipo de disco y archivo. En algunos casos, algunas de
las funciones no se pueden utilizar. Véase
reproducción
en la página 11.
Reproducción de discos
1 Presione el botón
/I STANDBY/ON
frontal para ENCENDER la
unidad.
• Con la unidad PD-30, encienda la
alimentación presionando el botón
ALIMENTACIÓN hasta que se quede
presionado.
Vi sta late ral del p anel fro ntal
2 Presione el botón
para abrir la bandeja de
discos y colocar el disco
en su lugar.
• Coloque el disco con la cara impresa hacia arriba.
3 Presione el botón
para comenzar la
reproducción.
•
Para pausar la reproducción, presione el botón
• Para detener la reproducción, presione el botón .
Nota
• Los pasos 2 y 3 se pueden realizar mediante el
mando a distancia de la misma forma que con los
controles del panel frontal de la unidad principal.
Establecer la alimentación en el modo de
espera
Retire el disco cargado antes de colocar el conmutador
de alimentación en la posición de ESPERA.
• Presione el botón
del mando a distancia.
La próxima vez que desee encender la
alimentación, presione el botón
mando a distancia.
del panel
STANDBY/ON
STANDBY/ON
Funciones de
.
del
• En el caso de la unidad PD-30, presione el botón
/I STANDBY/ON del panel frontal para
establecer la unidad en el modo de APAGADO o
ESPERA. Para encender de
presione el botón
Nota
• Si el cable de alimentación está desconectado
cuando la unidad se encuentra en el modo de
espera, esta se apagará, pero cuando dicho cable
se vuelva a conectar, la unidad no se encenderá
automáticamente. Después de volver a conectar el
cable de alimentación, presione el botón
STANDBY/ON del mando a distancia para
encender la unidad.
/I STANDBY/ON
nuevo la alimentación,
del panel frontal.
Avance y retroceso rápidos
• Durante la reproducción,
presione el botón
Cada vez que presione el botón, la velocidad de avance
o retroceso cambiará en cuatro pasos.
• Para volver a la función de reproducción normal,
presione el botón .
o .
Función Saltar
• Durante la reproducción,
presione el botón
La reproducción saltará hacia delante o hacia atrás
tantas pistas como veces se presiona el botón.
o .
Búsqueda directa (designar una pista
específica para reproducir)
• Mediante los botones
numéricos, especifique el
número de pista que desee y, a
continuación, presione el botón ENTER para
confirmar la selección.
Aunque no se presione el botón ENTER, la
reproducción se iniciará automáticamente
después de un intervalo de 5 segundos (no
aplicable a la reproducción programada).
0 9
〜
ENTER
Repetir reproducción
La reproducción repetida se puede aplicar a la pista que
se está reproduciendo actualmente o a todas las pistas
del disco completo.
• Durante la reproducción, presione
el botón REPEAT.
• La reproducción repetida se iniciará y el
indicador [REPEAT] se iluminará en la pantalla del
panel frontal de la unidad. Presione de nuevo el
botón para cambiar el tipo de reproducción
repetida entre repetición de una sola pista y
repetición del disco (todas las pistas) según se
indica a continuación:
repetición de una sola pista
(El indicador [REPEAT] se ilumina)
トラックリピート([REPEAT]点灯)
Repetición de disco (los indicadores [REPEAT] y
ディスクリピート([REPEAT]、[ALL]点灯)
[ALL] se iluminan)
Repetición DESACTIVADA
Nota
• Esta función de reproducción repetida se cancela
cuando la reproducción del disco se detiene.
↓
↓
リピートオフ
REPEAT
Reproducción aleatoria
Todas las pistas del disco se seleccionan y reproducen
en orden aleatorio hasta que cada pista se haya
reproducido una vez.
• Durante la reproducción,
presione el botón
La reproducción aleatoria se inicia y el indicador
[RANDOM] se ilumina en la pantalla del panel frontal de
la unidad principal.
Nota
• La reproducción aleatoria continuará hasta que el
disco se detenga o hasta que se presione una vez
más el botón RANDOM.
• La función de reproducción aleatoria no se puede
utilizar simultáneamente con la reproducción
programada.
• Si se presiona el botón durante la
reproducción aleatoria, la reproducción salta a la
siguiente pista seleccionada aleatoriamente. Si se
presiona el botón , la reproducción vuelve al
principio de la pista que se está reproduciendo
actualmente y comienza de nuevo.
RANDOM
.
RANDOM
Reproducción programada (reproducir
pistas en un orden predeterminado)
Esta función permite programar hasta 24 pistas para
reproducirlas en el orden seleccionado.
1 Desde el modo de parada,
presione el botón
El indicador [PGM] se iluminará en la pantalla del panel
frontal de la unidad.
PROGRAM
PROGRAM
.
2 Utilice los botones
numéricos para seleccionar el
número de pista que desea y
después presione el botón
Ejemplo: Para seleccionar la pista 15,
presione los botones 1 y 5 y, a continuación,
presione ENTER. En el caso de que cometa
un error, presione el botón CLEAR.
ENTER
0 9
〜
.
ENTER
3 Repita el paso 2 para especificar los
números de todas las pistas que desee.
4 Presione el botón
La reproducción se iniciará en el orden en el
que se han programado las pistas. Si desea
agregar otras pistas, repita los pasos 1 y 2.
Nota
•Si el botón CLEAR se presiona cuando el disco está
detenido, todas las pistas programadas se
cancelarán.
• Para eliminar las pistas programadas, desde el
modo de reposo, presione el botón PROGRAM y, a
continuación, el botón CLEAR. Las pistas
programadas se cancelarán, empezando con la
última de ellas programada.
• Una “pausa” no se puede programar.
• El contenido de la reproducción programada
(repetición de todas las pistas) se puede repetir.
Simplemente presione el botón REPEAT después
de iniciar la reproducción programada (consulte la
columna de la izquierda).
• La reproducción de una sola pista no se puede
llevar a cabo durante la reproducción programada.
• La reproducción aleatoria no se puede utilizar
durante la reproducción programada.
• Si se presiona el botón durante la
reproducción programada, la reproducción saltará
hacia delante para iniciar la reproducción de la
siguiente pista programada.
• Cuando la reproducción se detenga, para iniciar de
nuevo la misma reproducción programada,
presione el botón PROGRAM y, a continuación, el
botón .
.
Ver los datos del disco
• Durante la reproducción,
presione el botón
Se mostrará diversa información, como el tiempo de
reproducción transcurrido y restante.
Dependiendo del disco, al presionar el botón DISPLAY
varias veces, la reproducción recorrerá cíclicamente el
contenido.
DISPLAY
.
DISPLAY
8
Es
Page 79

Reproducción 04
Nota
• Se muestra el nombre del archivo (los primeros 8
caracteres) cuando se reproducen archivos AAC
(solo la unidad PD-30), archivos WMA/MP3 o
archivos de discos DSD. No obstante, dependiendo
de los caracteres utilizados, la visualización puede
no ser completamente correcta.
Reproducción con iPod/iPhone/iPad
(solo la unidad PD-30)
Simplemente conectando su iPod/iPhone/iPad a esta
unidad, podrá disfrutar de sonido de alta calidad
procedente de dichos dispositivos.
Asegúrese de que se admiten los modelos
de iPod/iPhone/iPad
A continuación se muestran los modelos de iPod/
iPhone/iPad que se pueden reproducir en esta unidad.
iPod/iPhone/iPad Audio Control
iPod nano 2/3/4/5/6G
iPod touch 1/2/3/4G
iPhone
iPhone 3G/3GS
iPhone 4/4S
iPad
iPad 2
• Este sistema ha sido desarrollado y probado para la
versión de software de iPod/iPhone/iPad que se
indica en el sitio Web de Pioneer.
• Si instala otras versiones de software distintas a las
que se indican en el sitio Web de Pioneer, su iPod/
iPhone/iPad puede dejar de ser compatible con
este sistema.
Nota
• Pioneer no garantiza que esta unidad reproduzca
los modelos de iPod/iPhone/iPad distintos a los
especificados.
• Algunas funciones pueden estar restringidas
dependiendo del modelo o la versión de software.
• iPod/iPhone/iPad tienen licencia para reproducir
materiales no protegidos por derechos de autor o
materiales para los que el usuario tiene permiso
legal para reproducir.
• Funciones como el ecualizador no se pueden
controlar utilizando este sistema, por lo que es
recomendable desactivar el ecualizador antes de
realizar la conexión.
• Bajo ningún concepto, Pioneer asumirá ninguna
responsabilidad por ninguna pérdida directa o
indirecta derivada de cualquier problema o pérdida
de material grabado como consecuencia de un
fallo en su iPod/iPhone/iPad.
• Para obtener instrucciones detalladas sobre cómo
utilizar su iPod/iPhone/iPad, consulte el manual
suministrado con estos dispositivos.
Reproducción con su iPod/iPhone/iPad
1 Presione
distancia para seleccionar
iPod/USB
en el mando a
iPod
como
fuente de entrada.
Presione el botón iPod/USB del mando a distancia.
• También puede realizar la misma operación
presionando el botón FUNCTION del panel frontal
repetidamente.
2 Conecte su iPod/iPhone/iPad.
Conecte su iPod/iPhone/iPad al puerto USB del panel
frontal de la unidad. Utilice el cable para iPod
suministrado con su iPod/iPhone/iPad para realizar la
conexión.
• Para conectar el cable, consulte también las
instrucciones de funcionamiento de su iPod/
iPhone/iPad.
iPod/iPhone/iPad
Cable para
iPod
iPod/USB
Se pueden llevar a cabo las siguientes operaciones con
unidades iPod/iPhone/iPad.
Botón Qué hace
RANDOM
REPEAT
iPod MENU
//ENTER
1 Cada vez que presiona REPEAT los modos de
repetición cambian según se indica a
continuación.
Repetir 1 Repetir todo Reproducción normal
Repetir 1: permite repetir el archivo que se está
reproduciendo actualmente.
Repetir todo: permite repetir todos los archivos.
Importante
Si esta unidad no puede reproducir su iPod/iPhone/
iPad, lleve a cabo las siguientes comprobaciones de
solución de problemas:
• Compruebe si esta unidad admite su iPod/iPhone/
iPad.
• Vuelva a conectar su iPod/iPhone/iPad a la unidad.
Si no funciona, intente restablecer su iPod/iPhone/
iPad.
Inicia la reproducción. Durante la
reproducción, presione este botón para
pausar dicha reproducción o para anular
la pausa.
Permite pausar la reproducción.
Presione este botón para saltar al inicio del
archivo actual y, después, a los archivos
anteriores.
Mantenga presionado este botón para
retroceso rápido.
Presione este botón para saltar al archivo
siguiente.
Mantenga presionado este botón para
avance rápido.
Los archivos de iPod/iPhone/iPad
actualmente seleccionados se reproducen
en orden aleatorio (reproducción
mezclada).
Los archivos de iPod/iPhone/iPad
actualmente seleccionados se reproducen
repetidamente.
Se utiliza para el menú de iPod/iPhone/
iPad.
Utilice estos botones para realizar
operaciones en los menús de iPod/iPhone/
iPad.
1
• Compruebe si esta unidad admite el software de su
iPod/iPhone/iPad.
Si su iPod/iPhone/iPad no funciona, compruebe lo
siguiente:
• ¿Está su iPod/iPhone/iPad correctamente
conectado?
Vuelva a conectar su iPod/iPhone/iPad a la unidad.
• ¿Se ha quedado su iPod/iPhone/iPad bloqueado?
Intente restablecer su iPod/iPhone/iPad y vuelva a
conectarlo a la unidad.
Nota
• La recarga de su iPod/iPhone/iPad se produce
siempre que hay un iPod/iPhone/iPad conectado a
esta unidad. (La recarga solo se habilita cuando la
alimentación de la unidad está ACTIVADA.) (No se
aplica cuando la función de audio puro está
ACTIVADA)
• Cuando la entrada se cambia de su iPod a otra
función, la reproducción de su iPod/iPhone/iPad
se detiene automáticamente.
English
DeutschFrançais
Italiano Español Русский
Nederlands
9
Es
Page 80

Reproducción04
Reproducir archivos almacenados en
dispositivos de almacenamiento USB
1 Presione
distancia para seleccionar USB como
fuente de entrada.
Presione el botón iPod/USB
USB
(PD-10) del mando a distancia
• También puede realizar la misma operación
presionando el botón FUNCTION del panel frontal
repetidamente.
2 Conecte el dispositivo de
almacenamiento USB.
3 Presione el botón
reproducción.
• Para pausar la reproducción, presione el botón
.
• Para detener la reproducción, presione el botón .
USB
en el mando a
(PD-30) o el botón
Dispositivo de
almacenamiento USB
(disponible en tiendas
especializadas)
iPod/USB
.
para comenzar la
Puede realizar las siguientes operaciones. Tenga en
cuenta que, dependiendo de la categoría que se esté
reproduciendo en ese momento, algunos botones no
están disponibles para su uso.
Botón Qué hace
RANDOM
REPEAT
1 Cada vez que presiona REPEAT los modos de
repetición cambian según se indica a
continuación.
Repetir 1
Repetir 1: permite repetir el archivo que se está
reproduciendo actualmente.
Repetir todo: permite repetir todos los archivos.
Cuando la función de apagado automático está
ACTIVADA y la entrada está establecida para reproducir
la memoria USB, si la reproducción del dispositivo de
memoria USB se detiene durante 30 minutos sin que se
lleve a cabo ninguna otra operación, la alimentación
cambiará automáticamente al estado de espera.
Nota
• Esta unidad puede no reconocer el dispositivo de
almacenamiento USB, reproducir archivos o
proporcionar alimentación al dispositivo de
almacenamiento USB. Para obtener más detalles,
consulte la sección
página 12.
Inicia la reproducción. Durante la
reproducción, presione este botón para
pausar dicha reproducción o para anular
la pausa.
Detiene la reproducción.
Presione este botón para saltar al inicio del
archivo actual y, después, a los archivos
anteriores.
Presione este botón para retroceder
rápidamente. Cada vez que presione el
botón, la velocidad de retroceso cambiará
en cuatro pasos.
Presione este botón para saltar al archivo
siguiente.
Presione este botón para avanzar
rápidamente. Cada vez que presione el
botón, la velocidad de avance cambiará en
cuatro pasos.
Los archivos actualmente seleccionados
se reproducen en orden aleatorio
(reproducción mezclada).
Los archivos actualmente seleccionados
se reproducen repetidamente.
Repetir todo Reproducción normal
Información adicional
1
en la
• Pioneer no garantiza que ningún archivo grabado
en un dispositivo de almacenamiento USB se
reproduzca o que se suministre alimentación a un
dispositivo de almacenamiento USB. Asimismo,
tenga en cuenta que Pioneer no asumirá ninguna
responsabilidad, sea la que fuere, por la pérdida de
archivos de dispositivos de almacenamiento USB
provocada por la conexión a esta unidad.
• Esta unidad no admite el uso de un concentrador
USB.
10
Es
Page 81

Utilizar funciones avanzadas 05
Capítulo 5:
Funciones de reproducción
Utilizar funciones avanzadas
Las funciones que se pueden utilizar difieren en función
del tipo de disco y archivo. En algunos casos, algunas de
las funciones no se pueden utilizar. Consulte la sección
Funciones de reproducción
derecha.
en la columna de la
Reproducir con sonido de alta fidelidad
Recuperador de sonido
Cuando las señales de sonido comprimidas se
descomprimen en para la reproducción, algunas partes
pueden presentar interrupciones. Al ACTIVAR la función
de recuperador de sonido, se agrega una compensación
para dichas pérdidas, por lo que se genera un sonido
más rico y suntuoso.
• Presione el botón S.RETRIEVER.
Cada vez que pulse este botón, la pantalla
cambiará conforme a la secuencia que se indica
a continuación: S.RTRV: DESACTIVADA S.RTRV:
BAJO S.RTRV: ALTO Vuelve al estado original
• La función de recuperación de sonido está deshabilitada
cuando la función de audio puro está ACTIVADA.
S.RETRIEVER
Audio puro
Esta función deshabilita la salida de audio digital y
reproduce audio analógico con alta fidelidad. Cuando
está ACTIVADA, la pantalla no muestra indicadores. El
estado predeterminado de fábrica es DESACTIVADA.
• Presione el botón PURE AUDIO.
Presione de nuevo el botón para DESACTIVAR la
función.
• Cuando esta función está activada y la entrada de
la unidad principal se cambia a SACD/CD, el
indicador PURE AUDIO se iluminará en el panel
frontal. Durante la reproducción de un disco, la
pantalla del panel frontal se APAGA.
• Cuando el indicador PURE AUDIO se ilumina,
cualquier iPod/iPhone/iPad conectado a la unidad
principal no se recargará.
PURE AUDIO
Cambiar el área de reproducción
(capa) de un SACD/CD
Los discos SACD híbridos están compuestos de dos
capas, una capa de SACD y una capa de CD, lo que
permite seleccionar la capa que desea reproducir.
1 Presione el botón
Introduzca los cambios en SACD/CD.
SACD/CD
.
2 En el modo reposo, presione el botón
SACD/CD.
Cada vez que presione el botón, la reproducción
alternará entre el área de CD y el área de 2 canales
SACD.
Nota
• Esta unidad no admite áreas multicanal SACD.
Ajustar la iluminación general de la
pantalla
Esta unidad cuenta con una función de atenuación que
permite ajustar la iluminación de la pantalla en tres
niveles dependiendo de la iluminación ambiente. La
configuración predeterminada establecida de fábrica
corresponde a la iluminación máxima.
• Presione el botón
Cada vez que presione el botón, el valor de la
iluminación recorrerá cíclicamente los tres niveles.
• El valor del atenuador no se puede cambiar cuando
se reproduce un disco con la función de audio pura
ACTIVADA (consulte la columna de la izquierda).
• El brillo del indicador STANDBY no cambia.
DIMMER
.
Apagado automático (establece
automáticamente el modo de espera)
Esta función cambia automáticamente la unidad al
modo de espera si no se detecta señal o no se realiza
ninguna operación durante 30 minutos.
1 Presione el botón
2 Cambie el valor y confirme el
cambio.
Utilice el botón / para ACTIVAR o
DESACTIVAR la función según desee y, a
continuación, presione el botón ENTER para
realizar la confirmación.
Nota
• Esta función está deshabilitada cuando se
selecciona la entrada iPod.
SACD/CD
SET UP
.
ENTER
Las funciones que se pueden utilizar difieren en función del tipo de disco y archivo. En algunos casos, algunas de las
funciones no se pueden utilizar. En la tabla siguiente se muestran las funciones que se pueden utilizar.
Tipo de disco y archivo
DIMMER
SET UP
1
Función
Avance y retroceso rápidos
Función Saltar
Búsqueda directa
(designar una pista específica para reproducir)
Reproducción repetida
Reproducción aleatoria
Reproducción programada
(reproducir pistas en un orden predeterminado)
Ver los datos del disco
Recuperador de sonido
Audio puro
SACD/CD
1 Algunas funciones pueden no estar disponibles para algunos discos o archivos, incluso si se indica [] en la tabla.
2 Consulte también la sección
3 • Los archivos AAC solo se pueden reproducir en la unidad PD-30.
• Consulte también la sección
4 Consulte también la sección
5 Esta función solamente se habilita durante la reproducción de archivos grabados en disco.
6 Solo discos SACD híbridos.
Reproducción de discos CD-R/CD-RW
Formatos de archivo reproducibles
Reproducir discos DSD
SACD CD-DA
––
––
–– –
en la página 12.
6
CD-R/-RW
–––
en la página 12.
en la página 12.
WMA
2
MP3
3
AAC
5
DSD
4
English
DeutschFrançais
Italiano Español Русский
Nederlands
11
Es
Page 82

Información adicional06
Capítulo 6:
Información adicional
• Una sola carpeta puede contener un máximo de
Discos reproducibles
Reproducción de discos CD-R/CD-RW
• Esta unidad puede reproducir discos CD-R/CD-RW
grabados con formato de música de CD, o datos de
audio en formato WMA y MP3. Sin embargo,
algunos discos no se pueden reproducir o pueden
generar ruido o sonido distorsionado.
• Esta unidad solamente se debe utilizar para
reproducir. No puede grabar datos en discos CD-R/
CD-RW.
• Los discos CD-R/CD-RW que no se han cerrado no
se pueden reproducir en esta unidad. Para obtener
detalles, consulte las instrucciones de
funcionamiento de su grabadora de discos.
Reproducir discos DSD
Esta unidad puede reproducir archivos de discos DSD
grabados con el formato de archivo DSF.
Archivo reproducibles
• Discos grabados: DVD-R/-RW
• Extensión del archivo: .dsf
• Nombre de la carpeta: DSD_DISC
• Capacidad: 4 GB como máximo por archivo
• Audio: 2 canales
• Frecuencia de muestreo: 2,8224 MHz
Ejemplo de composición de carpetas
El orden de reproducción de los archivos o carpetas no
es alfabético sino que depende del orden en el que se
grabaron en el disco.
Root DSD_DISC
File01.dsf
FolderA
File02.dsf
FolderB
File03.dsf
FolderC
File04.dsf
FolderD
File05.dsf
File06.dsf
150 archivos.
• Un solo disco puede contener un máximo de 200
carpetas.
• Cada carpeta no puede contener más de 8 niveles.
• Los nombres de archivo que utilizan fuentes del
idioma japonés y otras fuentes de símbolos
determinadas no se pueden mostrar
correctamente.
• Todos los archivos cuyo formato no sea DSF se
omitirán.
Precaución
• Algunos archivos no se pueden reproducir.
• Los discos que contienen un gran número de
archivos y carpetas pueden necesitar bastante
tiempo para iniciar la reproducción. En este caso,
puede mover los archivos que desee directamente
a la carpeta DSD_DISC o limitar el número de
archivos a 20 o menos.
Operaciones durante la reproducción
Las siguientes operaciones no se pueden realizar
durante la reproducción de un disco DSD:
• Búsqueda directa
• Reproducción de archivos de disco cuyo tipo no
sea DSF
Información mostrada
Cuando la unidad se encuentra en el modo de reposo
mientras reproduce un disco DSD, dicha unidad
mostrará el indicador [DSD DISC]. Durante la
reproducción, al presionar el botón DISPLAY la
información mostrada cambiará cíclicamente según se
indica a continuación:
• Número de la pista y su tiempo de reproducción
trascurrido
• Nombre del archivo
Formatos de archivo reproducibles
Reproducir archivos de audio
Esta unidad admite los siguientes formatos de archivo.
• Tenga en cuenta que algunos formatos de archivo
no están disponibles para reproducirse aunque
figuren como formatos de archivo reproducibles.
• Si intenta reproducir archivos cuyo formato no se
admite, el sonido puede ser intermitente o tener
mucho ruido. En tales casos, asegúrese de que el
formato de archivo es compatible con esta unidad.
• Los archivos de música sujetos a los controles de
Administración de derechos digitales no se pueden
reproducir. La protección de copia DRM (Digital
Rights Management, es decir, Administración de
derechos digitales) es una tecnología diseñada
para proteger los derechos de autor. Para evitar las
copias ilegales, DRM restringe la reproducción al
disco grabado o al equipo originalmente utilizado
para grabar la música. Para obtener detalles,
consulte las instrucciones de funcionamiento y los
archivos de ayuda del dispositivo o la aplicación
que se utilizó durante la grabación original.
Categoría
MP3
WMA .wma
Extensión
1
.mp3
Secuencia
MPEG-1/2
Nivel de
audio-3
WMA2/7/
8/9
Frecuencia
de muestreo
Tasa de bits
de
cuantificación
Canal
Tasa de bits
Frecuencia
de muestreo
Tasa de bits
de
cuantificación
Canal
Tasa de bits
8kHz a
48 kHz
16 bits
2canales
8 kbps a
320 kbps
22,05 kHz a
48 kHz
16 bits
2canales
32 kbps a
192 kbps
Categoría
Extensión
2
.m4a
AAC
1. “Tecnología de descodificación de audio MPEG Nivel-3
cuyo uso permiten las licencias otorgadas por Fraunhofer
IIS y Thomson.”
2.
Solo la unidad PD-30.
Precaución
• Puede que no sea posible reproducir discos CD-R/
CD-RW grabados en una grabadora de CD o en un
equipo debido a las características del disco, a
arañazos o suciedad en este o a presencia de
suciedad o condensación en la lente del láser del
reproductor.
• Es posible los discos grabados en un equipo no se
puedan reproducir en esta unidad debido a la
configuración de la aplicación o al entorno del
equipo. Asegúrese de grabar sus discos utilizando
el formato adecuado (para obtener detalles,
consulte al comercializador de la aplicación).
• Los discos grabados con el formato de escritura de
paquetes no se pueden reproducir en esta unidad.
• Los discos CD-R/CD-RW que no se han cerrado no
se pueden reproducir en esta unidad.
Secuencia
MPEG-4
AAC LC
MPEG-4
HE AAC
(AAC Plus
v1/2)
Frecuencia
de muestreo
Tasa de bits
de
cuantificaci ón
Canal
Tasa de bits
8kHz a
48 kHz
16 bits
2canales
8 kbps a
320 kbps
Reproducción de archivos WMA
• Utilice discos grabados que sean compatibles con
los sistemas de archivo de CD-ROM (ISO9660 nivel
1 y 2) y con el formato extendido (Joliet, Romeo).
• Esta unidad no admite discos grabados con una
tasa de bits variable (VBR) o con codificación sin
pérdidas.
• Esta unidad no admite discos multisesión.
• Se pueden reconocer y reproducir un máximo de
648 carpetas y pistas. De ese número, un máximo
de 299 pueden ser carpetas. Sin embargo,
dependiendo de la composición de las carpetas, no
todas las carpetas y pistas se pueden reconocer y
reproducir.
• Cuando utilice archivos WMA, asegúrese de que se
han codificado utilizando aplicaciones verificadas y
reconocidas por Microsoft Corporation. Si se
utilizan aplicaciones no reconocidas, se puede
producir un funcionamiento inadecuado.
12
Es
Page 83

Información adicional 06
Reproducir archivos MP3
• Utilice discos grabados que sean compatibles con
los sistemas de archivo de CD-ROM (ISO9660 nivel
1 y 2) y con el formato extendido (Joliet, Romeo).
• Esta unidad no admite tasa de bits variable (VBR,
Variable Bit Rate). Aunque los archivos se puedan
reproducir, los tiempos mostrados en la pantalla
del panel frontal serán incorrectos debido al
cambio en la tasa de bits, de forma que cambiarán
más rápido o más lento que los valores de tiempo
correctos.
• Esta unidad no admite discos multisesión.
• Se pueden reconocer y reproducir un máximo de
648 carpetas y pistas. De ese número, un máximo
de 299 pueden ser carpetas. Sin embargo,
dependiendo de la composición de las carpetas, no
todas las carpetas y pistas se pueden reconocer y
reproducir.
• Para obtener una calidad de sonido óptima, se
recomienda utilizar tasas de bits de 128 kbps o
superiores.
Reproducir archivos AAC MPEG-4
• AAC es el acrónimo de “Advanced Audio Coding,
es decir, Codificación de audio avanzada,” que es el
formato básico de la tecnología de compresión de
audio utilizado en MPEG-2 y MPEG-4.
• Esta unidad admite la reproducción de archivos
AAC con la extensión “.m4a”, con el código de
iTunes®. Sin embargo, es posible que no se pueda
realizar la reproducción en el caso de copia de
archivos protegidos por DRM y dependiendo de la
versión de codificación de iTunes.
• iTunes es una marca comercial de Apple Inc.,
registrada en EE.UU. y otros países.
Precauciones a la hora de utilizar el
producto
Trasladar el reproductor
Cuando traslade esta unidad a una nueva ubicación,
realice siempre el siguiente procedimiento en primer
lugar: Extraiga cualquier disco cargado y cierre la
bandeja de discos. Presione el botón /I STANDBY/ON
de la unidad de forma que el indicador [-OFF-] aparezca
en la pantalla del panel frontal y, a continuación, espere
diez segundos antes de desconectar el cable de
alimentación. Se pueden producir daños o errores de
funcionamiento si la unidad se traslada con un disco
cargado en la bandeja.
Lugar de instalación
Seleccione un lugar estable cerca del televisor o del
sistema de AV al que va a conectar la unidad.
No coloque el reproductor sobre un televisor o monitor
en color. Manténgalo alejado de pletinas u otros
componentes susceptibles al magnetismo.
Evite las siguientes ubicaciones:
• Lugares expuestos a la luz directa del sol
• Lugares húmedos o mal ventilados
• Lugares extremadamente calurosos o fríos
• Lugares sujetos a vibración
• Lugares en los que haya mucho polvo o humo de
cigarrillos
• Lugares expuestos a hollín, vapor o calor
(en cocinas, etc.)
No instale la unidad en un sofá o en otro objeto o
material absorbente, ya que la calidad del sonido puede
verse negativamente afectada.
No colocar objetos sobre la unidad
No coloque objetos sobre el reproductor.
Mantener la unidad alejada del calor
No coloque el reproductor sobre un amplificador u otro
dispositivo que genere calor. Cuando instale el producto
en un bastidor, colóquelo en una estantería por debajo
del amplificador siempre que sea posible para evitar el
calor generado por dicho amplificador u otros
dispositivos.
Desconectar la alimentación cuando no se
utilice el reproductor
Dependiendo de las condiciones de las señales de
difusión de televisión, pueden aparecer interferencias
en la pantalla cuando el televisor se enciende mientras
el reproductor también está encendido. No se trata de
un mal funcionamiento del reproductor o el televisor. Si
esto ocurre, apague el reproductor. De la misma forma,
se puede escuchar ruido en el sonido de una radio.
Condensación
Si el reproductor se traslada repentinamente de un lugar
frío a una sala cálida (por ejemplo, en invierno) o si la
temperatura de la sala en la que está instalado el
reproductor aumenta súbitamente por el efecto de un
calefactor, etc., se pueden formar gotas de agua
(condensación) en el interior (o en los componentes de
funcionamiento y la lente). Cuando haya condensación,
el reproductor no funcionará correctamente y no se
podrá llevar a cabo la reproducción. Deje el reproductor
a la temperatura ambiente durante 1 o 2 horas con la
alimentación encendida (el tiempo depende de la
cantidad de condensación). Las gotas de agua se
disiparán y se podrá llevar a cabo la reproducción.
También se puede producir condensación durante el
verano si el reproductor se expone al aire directo
procedente de un aparato de aire acondicionado. Si esto
ocurre, traslade el reproductor a un lugar diferente.
Limpiar el reproductor
La forma normal de limpiar el reproductor es con un
paño suave. Para la suciedad rebelde, aplique un poco
de detergente neutro diluido en 5 o 6 partes de agua a un
paño suave, escúrralo completamente, limpie la
suciedad y, a continuación, vuelva a pasar un paño seco.
Tenga en cuenta que si aplica alcohol, disolventes,
benceno o insecticidas al reproductor, las letras y el
recubrimiento se puede quitar. Asimismo, no deje
productos de goma o vinilo sobre la superficie durante
prolongados períodos de tiempo, ya que la carcasa
podría resultar dañada.
Cuando utilice paños impregnados con sustancias
químicas, etc., lea atentamente las precauciones de
limpieza.
Desenchufe el cable de alimentación de la toma de
corriente antes de limpiar el reproductor.
Precaución cuando la unidad esté
instalada en un bastidor con una puerta de
cristal
No presione el botón OPEN/CLOSE del mando a
distancia para abrir la bandeja de discos mientras la
puerta de cristal está cerrada. La puerta dificultará el
movimiento de la bandeja de discos y la unidad podría
resultar dañada.
Limpieza de la lente
La lente del reproductor puede ensuciarse durante el
uso normal, pero si por alguna razón la unidad no
funciona correctamente debido al polvo o a la suciedad,
consulte a su centro de servicio autorizado más cercano
de Pioneer. Aunque puede adquirir limpiadores de
lentes para reproductores en cualquier tienda
especializada, le desaconsejamos el uso de los mismos
porque pueden dañar la lente.
Manipular discos
No utilice discos dañados (rajados o combados).
No arañe la superficie de señal del disco ni permita que
se ensucie.
No inserte varios discos al mismo tiempo en el
reproductor.
No pegue papel ni coloque etiquetas en el disco, o utilice
un lápiz, bolígrafo u otro instrumento de escritura con
punta afilada. Estos objetos podrían dañar el disco.
Almacenar discos
Almacene los discos en sus estuches y coloque estos
verticalmente, evitando lugares expuestos a
temperaturas o humedad altas, donde incida la luz solar
directa o donde la temperatura sea extremadamente
baja.
Asegúrese de leer las precauciones incluidas con el
disco.
Limpiar discos
Es posible que el disco no se pueda reproducir si tiene
huellas dactilares o polvo. En este caso, utilice un paño
de limpieza, etc. para pasarlo suavemente por el disco
desde el centro hacia el borde exterior. No utilice un
paño de limpieza sucio.
No utilice benceno, disolventes u otros productos
químicos volátiles. Tampoco utilice aerosoles o agentes
antiestáticos.
Para la suciedad rebelde, aplique un poco de agua a un
paño suave, escúrralo completamente, limpie la
suciedad y, a continuación, elimine la humedad con un
paño seco.
Discos con formas especiales
No se pueden utilizar discos con formas especiales (con
forma de corazón, hexagonales, etc.) en este
reproductor. Nunca utilice este tipo de discos: dañarán
el reproductor.
Condensación en los discos
Si el disco se traslada repentinamente de un lugar frío a
una sala cálida (por ejemplo, en invierno), se pueden
formar gotas de agua (condensación) en la superficie
del disco. Los discos no se reproducirán correctamente
si tienen condensación. Elimine con cuidado las gotas
de agua de la superficie del disco antes de utilizar este.
English
DeutschFrançais
Italiano Español Русский
Nederlands
13
Es
Page 84

Información adicional06
Solución de problemas
Las operaciones incorrectas suelen confundirse con problemas o averías. Si piensa que algo en este componente funciona
mal, compruebe los puntos que aparecen a continuación. Algunas veces, el problema puede estar en otro componente.
Analice el resto de componentes y aparatos eléctricos que se estén utilizando. Si el problema no se puede solucionar
incluso después de llevar a cabo las comprobaciones que se indican a continuación, solicite ayuda al centro de servicio
autorizado más cercano de Pioneer o a su distribuidor para llevar a cabo la reparaciones pertinentes.
• Si la unidad no funciona con normalidad debido a efectos externos como, por ejemplo, la electricidad estática,
desconecte el cable de alimentación de la toma de corriente eléctrica e insértelo de nuevo para recuperar el
estado de funcionamiento normal.
Problema Remedio
El disco no se reproducirá o se
expulsará automáticamente después
de cargarse.
No se pueden reproducir discos CD-R/-RW.
No se pueden reproducir archivos c on
el formato WMA/MP3 o AAC (solo la
unidad PD-30).
El mando a distancia no funciona. • Cambie las pilas (página 4).
Se han borrado los ajustes. • Si el cable de alimentación se desconecta a la fuerza o se produce un fallo de
No hay audio o está distorsionado. • Compruebe que todas las interconexiones están firmemente insertadas (página 5).
• Asegúrese de que el disco está cargado con el lado de la etiqueta hacia arriba y
alineado correctamente en la guía de su bandeja (página 8).
• Asegúrese de que el disco no tiene suciedad, polvo y no está dañado (página 13).
• Condensación dentro del reproductor: Deje que transcurra un tiempo para que el
vapor se evapore. Evite utilizar el reproductor cerca de una unidad de aire
acondicionado (página 13).
• La bandeja de discos se abrirá si se carga un tipo de disco que no se admite (página 4).
• Algunos discos CD-R/-RW grabados en un equipo no se pueden reproducir.
• Los siguientes tipos de archivos no se pueden reproducir:
- Archivos con protección anticopia DRM
- Discos grabados incumpliendo el formato ISO9660
- Archivos grabados con una frecuencia de muestreo diferente a 44,1 kHz
-
Archivos WMA grabados con tasa de bits variable (VBR) o con codificación sin pérdidas.
• Utilícelo a una distancia no superior a 7 m y con un ángulo no mayor de 30° del
sensor remoto del panel frontal (página 4).
• Retire cualquier obstáculo o utilícelo desde otra posición.
• Evite exponer el sensor remoto del panel frontal a la luz directa.
• ¿Está el cable de control para un componente conectado incorrectamente?
Confirme que las conexiones son correctas (página 5).
corriente mientras la alimentación de la unidad está ACTIVADA, la configuración
previamente especificada se puede eliminar. Para desconectar el cable de
alimentación, presione primero el botón
continuación, esperé a que el indicador [-OFF-] se apague en la pantalla del panel
frontal; solo entonces desconecte el cable de alimentación. Debe tener especial
cuidado cuando conecte el cable de alimentación de la unidad a una toma de
corriente eléctrica de otro componente ya que, al desconectar la alimentación de este
otro componente, se puede desconectar simultáneamente la alimentación de dicha
unidad. Siempre que sea posible, conecte el cable de alimentación de esta unidad
directamente una toma de corriente eléctrica.
• Compruebe que ninguno de los enchufes y terminales presenta suciedad, óxido, etc.
y límpielos si fuera necesario. Compruebe también el cable por si está dañado.
• Compruebe que el disco no está dañado y no tiene polvo ni suciedad.
• ¿Está la unidad establecida en “pausa”? Presione el botón .
• Compruebe la configuración de su amplificador o receptor (volumen, función de
entrada, configuración de altavoces, etc.).
• Asegúrese de que la salida del reproductor no está conectada a conectores de
entrada del amplificador (giratorios).
STANDBY/ON
del mando a distancia y, a
Problema Remedio
Hay una diferencia notable entre el
volumen de SACD y CD.
Entre las pistas de un disco SACD, la
pantalla de la unidad principal indica
[--:--].
El audio analógico está bien, pero
parece que no hay señal de audio
digital.
El dispositivo de almacenamiento
USB no se reconoce.
Hay conectado y se muestra un
dispositivo de almacenamiento USB,
pero los archivos de audio
almacenados en dicho dispositivo no
se pueden reproducir.
El dispositivo de almacenamiento USB
tarda mucho tiempo en reconocerse.
No se suministra alimentación al
dispositivo de almacenamiento USB.
Los archivos de música se
reproducen aunque no estén
grabados en el dispositivo de
almacenamiento USB.
No se puede utilizar su iPod/iPhone/
iPad.
No se suministra alimentación a su
iPod/iPhone/iPad.
Su iPod/iPhone/iPad no genera
sonido.
• Esto se debe a diferencias en el formato de audio y no se trata de un mal
funcionamiento.
• Esta visualización puede mostrarse en función del disco.
• Asegúrese de que la función de audio puro está desactivada (página 11).
• El audio procedente de discos SACD y DSD, así como de Pod no se transmitirá en
formato digital. Utilice los terminales
• Conecte el dispositivo de forma segura (insértelo completamente) (página 10).
• Esta unidad no admite concentradores USB. Conecte el dispositivo de
almacenamiento USB directamente.
• Algunos dispositivos de almacenamiento USB no se pueden reconocer
correctamente. Desconecte la alimentación y vuelva a conectarla.
• Esta unidad solo admite dispositivos de clase de almacenamiento masivo USB.
• Solamente se admiten los sistemas de archivo FAT16 y FAT32. No se admiten otros
sistemas de archivo (ejemplo: FAT, NTFS, etc.).
• Este dispositivo no admite el uso de unidades de disco duro externas.
• Los archivos de audio protegidos por derechos de autor que se encuentran
almacenados en el dispositivo de almacenamiento USB no se pueden reproducir.
Dependiendo de la configuración, si intenta importar datos de música desde un CD,
etc., a un equipo, se puede invocar a la protección anticopia.
• Consulte la lista de formatos de archivo que se pueden reproducir en esta unidad.
• Puede ser necesaria cierta cantidad de tiempo (varios minutos) para cargar los
datos cuando se conectan dispositivos de almacenamiento USB de gran capacidad.
• Cuando la función de audio puro está ACTIVADA, no se suministra alimentación a
los puertos
• ¿Aparece un mensaje de error en la pantalla del panel frontal? (página 7)
- Desconecte la alimentación y vuelva a conectarla (página 8).
- Desconecte la alimentación y, a continuación, desconecte y vuelva a conectar el
dispositivo de almacenamiento USB (página 10).
- Presione
al modo USB. (Cuando la entrada se vuelve a cambiar a USB) (página 7).
• Confirme si hay algún archivo oculto grabado en el dispositivo. Los archivos
ocultos se reproducirán.
• Asegúrese de que su iPod/iPhone/iPad está correctamente conectado (consulte la
sección
Asimismo, intente desconectar su iPod/iPhone/iPad y, a continuación, vuelva a conectarlo.
• Asegúrese de que esta unidad admite el modelo de su iPod/iPhone/iPad (página 9).
• Si su iPod/iPhone/iPad se queda bloqueado, intente restablecerlo y vuelva a
conectarlo a la unidad.
• Cuando la función de audio puro está ACTIVADA, no se suministra alimentación a
los puertos
• ¿Aparece un mensaje de error en la pantalla del panel frontal? Desconecte la
alimentación y, a continuación, desconecte y vuelva a conectar su iPod/iPhone/iPad.
• ¿Se genera sonido en el altavoz de su iPod/iPhone/iPad? Desconecte la alimentación
de la unidad y, a continuación, vuelva a conectarla. Después de establecer la unidad
para la entrada iPod, conecte su iPod/iPhone/iPad.
• El audio no se transmite desde los terminales
USB
(página 11).
FUNCTION
ANALOG OUT
para cambiar al otro modo y, a continuación, vuelva a cambiar
para tales medios (página 5).
Reproducción con iPod/iPhone/iPad (solo la unidad PD-30)
USB
(página 9).
DIGITAL OUT
.
en la página 9).
14
Es
Page 85

Información adicional 06
English
Especificaciones
General
Sistema . . . . . . . . . . . .Reproductor de Súper Audio CD
Alimentación. . . . . . . . . . . 220 V a 240 V CA, 50 Hz/60 Hz
Consumo de energía
PD-30 . . . . . . . . . . . . . . . . . . . . . . . . . . . . . . . . . . .37 W
PD-10 . . . . . . . . . . . . . . . . . . . . . . . . . . . . . . . . . . .20 W
Consumo de energía (modo de espera). . . . . . . . 0,45 W
Peso
PD-30 . . . . . . . . . . . . . . . . . . . . . . . . . . . . . . . . . . 5,6 kg
PD-10 . . . . . . . . . . . . . . . . . . . . . . . . . . . . . . . . . . 5,2 kg
Tamaño
. . . . . . . . . . . 435 mm (An) x 128 mm (Al) x 329 mm (Pr)
Temperatura de funcionamiento . . . . . . +5 °C a +35 °C
Humedad de funcionamiento . . . . . . . . . . . .5 % a 85 %
Salida de audio (1 par estéreo)
Nivel de salida. . . . . . . . . . . . . . . Durante salida de audio
Número de canales . . . . . . . . . . . . . . . . . . . . . . . . . . . . . 2
Conectores . . . . . . . . . . . . . . . . . . . . . . . . . . . . . . . . . RCA
200 mVrms (1 kHz, –20 dB)
Características de audio digital
Respuesta de frecuencia
CD. . . . . . . . . . . . . . . . . . . . . . . . . . . . . . .2 Hz a 20 kHz
SACD . . . . . . . . . . . . . . . . . . . . . . . . . . . .2 Hz a 50 kHz
Relación Señal/Ruido
CD. . . . . . . . . . . . . . . . . . . . . . . . . . . . . . . . . . . . 117 dB
SACD . . . . . . . . . . . . . . . . . . . . . . . . . . . . . . . . . 117 dB
Rango dinámico
CD. . . . . . . . . . . . . . . . . . . . . . . . . . . . . . . . . . . . 100 dB
SACD . . . . . . . . . . . . . . . . . . . . . . . . . . . . . . . . . 108 dB
Distorsión armónica total:
CD. . . . . . . . . . . . . . . . . . . . . . . . . . . . . . . . . . .0,0022 %
SACD . . . . . . . . . . . . . . . . . . . . . . . . . . . . . . . .0,0020 %
Fluctuaciones de velocidad. . . . . . . . . Límite de medida
(±0,001 % W. PICO) o menos
Salida digital
Salida digital óptica . . . . . . . . . . . Terminal digital óptico
Salida digital coaxial . . . . . . . . . . . . . . . . . Terminal RCA
Accesorios
Cable de audio RCA (enchufes rojo y blanco). . . . . . . . 1
Mando a distancia . . . . . . . . . . . . . . . . . . . . . . . . . . . . . . 1
Pilas secas AAA/IEC R03. . . . . . . . . . . . . . . . . . . . . . . . . 2
Cable de alimentación
Tarjeta de garantía (solo modelos europeos)
Manual de instrucciones (este documento)
(sin vapor)
Nota
• Las características técnicas y el diseño están
sujetos a modificaciones sin previo aviso, debido a
mejoras.
• Los nombres de productos y empresas aquí
mencionados son marcas comerciales o marcas
registradas de sus respectivas compañías.
DeutschFrançais
Italiano Español Русский
Nederlands
© 2012 PIONEER CORPORATION.
Todos los derechos reservados.
15
Es
Page 86

Благодарим вас за покупку этого изделия марки Pioneer.
Полностью прочтите настоящие инструкции по эксплуатации, чтобы знать, как правильно обращаться с этой моделью. Прочитав инструкции, сохраните их в
надежном месте для использования в будущем.
BAЖHO
IMPORTANT
Символ молнии, заключенный в
равносторонний треугольник,
используется для предупреждения
The lightning flash with arrowhead symbol,
пользователя об «опасном напряжении»
within an equilateral triangle, is intended to
внутри корпуса изделия, которое может
alert the user to the presence of uninsulated
быть достаточно высоким и стать
“dangerous voltage” within the product’s
причиной поражения людей
enclosure that may be of sufficient
электрическим током.
magnitude to constitute a risk of electric
shock to persons.
European model only
Информация для пользователей по сбору и утилизации
бывшего в эксплуатации оборудования и отработавших элементов питания
Information for users on collection and disposal of old equipment and used batteries
Обозначение
Symbol for
для оборудования
equipment
Обозначения
Symbol examples
для элементов питания
for batteries
Pb
Pb
Эти обозначения на продукции, упаковке, и/или сопроводительных документах
These symbols on the products, packaging, and/or accompanying documents mean
означают, что бывшая в эксплуатации электротехническая и электронная продукция и
that used electrical and electronic products and batteries should not be mixed with
отработанные элементы питания не должны выбрасываться вместе с обычным
general household waste.
бытовым мусором.
For proper treatment, recovery and recycling of old products and used batteries,
Для того чтобы данная бывшая в употреблении продукция и отработанные элементы
please take them to applicable collection points in accordance with your national
питания были соответствующим образом обработаны, утилизированы и переработаны,
legislation.
пожалуйста, передайте их в соответствующий пункт сбора использованных
By disposing of these products and batteries correctly, you will help to save valuable
электронных изделий в соответствии с местным законодательством.
resources and prevent any potential negative effects on human health and the
Утилизируя данные устройства и элементы питания правильно, Вы помогаете
environment which could otherwise arise from inappropriate waste handling.
сохранить ценные ресурсы и предотвратить возможные негативные последствия для
For more information about collection and recycling of old products and batteries,
здоровья людей и окружающей среды, которые могут возникнуть в результате
please contact your local municipality, your waste disposal service or the point of sale
несоответствующего удаления отходов.
where you purchased the items.
Для получения дополнительной информации о правильных способах сбора и
These symbols are only valid in the European Union.
утилизации отработавшего оборудования и использованных элементов питания
обращайтесь в соответствующие местные органы самоуправления, в центры
For countries outside the European Union:
утилизации отходов или по месту покупки данного изделия.
If you wish to discard these items, please contact your local authorities or dealer and
ask for the correct method of disposal.
Данные обозначения утверждены только для Европейского Союза.
Для стран, которые не входят в состав Европейского Союза:
Если Вы желаете утилизировать данные изделия, обратитесь в соответствующие
местные учреждения или к дилерам для получения информации о правильных
способах утилизации.
ВНИМАНИЕ:
ВО ИЗБЕЖАНИЕ ПОРАЖЕНИЯ
ЭЛЕКТРИЧЕСКИМ ТОКОМ НЕ
CAUTION:
СНИМАЙТЕ КРЫШКУ (ИЛИ ЗАДНЮЮ
TO PREVENT THE RISK OF ELECTRIC
СТЕНКУ). ВНУТРИ НЕ СОДЕРЖАТСЯ
SHOCK, DO NOT REMOVE COVER (OR
ДЕАТЛИ, ПРЕДНАЗНАЧЕННЫЕ ДЛЯ
BACK). NO USER-SERVICEABLE PARTS
РЕМОНТА ПОЛЬЗОВАТЕЛЕМ. ДЛЯ
INSIDE. REFER SERVICING TO QUALIFIED
ОБСЛУЖИВАНИЯ ОБРАТИТЕСЬ К
SERVICE PERSONNEL.
КВАЛИФИЦИРОВАННОМУ
СОТРУДНИКУ СЕРВИСНОЙ СЛУЖБЫ.
CAUTION
RISK OF ELECTRIC SHOCK
CAUTION
DO NOT OPEN
RISK OF ELECTRIC SHOCK
DO NOT OPEN
Восклицательный знак, заключенный в
равносторонний треугольник,
используется для предупреждения
The exclamation point within an equilateral
пользователя о наличии в литературе,
triangle is intended to alert the user to the
поставляемой в комплекте с изделием,
presence of important operating and
важных указаний по работе с ним и
maintenance (servicing) instructions in the
обслуживанию.
literature accompanying the appliance.
D3-4-2-1-1_A1_En
D3-4-2-1-1_A1_Ru
K058a_A1_En
K058a_A1_Ru
WARNING
ПРЕДУПРЕЖДЕНИЕ
This equipment is not waterproof. To prevent a fire or
Данное оборудование не является
shock hazard, do not place any container filled with
водонепроницаемым. Во избежание пожара или
liquid near this equipment (such as a vase or flower
поражения электрическим током не помещайте
pot) or expose it to dripping, splashing, rain or
рядом с оборудованием емкости с жидкостями
moisture.
(например, вазы, цветочные горшки) и не
допускайте попадания на него капель, брызг, дождя
D3-4-2-1-3_A1_En
или влаги.
WARNING
Before plugging in for the first time, read the following
ПРЕДУПРЕЖДЕНИЕ
section carefully.
Перед первым включением оборудования
The voltage of the available power supply differs
внимательно прочтите следующий раздел.
according to country or region. Be sure that the
Напряжение в электросети может быть разным
power supply voltage of the area where this unit
в различных странах и регионах. Убедитесь,
will be used meets the required voltage (e.g., 230 V
что сетевое напряжение в местности, где будет
or 120 V) written on the rear panel.
использоваться данное устройство,
D3-4-2-1-3_A1_Ru
D3-4-2-1-4*_A1_En
соответствует требуемому напряжению
(например, 230 В или 120 В), указанному на
WARNING
задней панели.
To prevent a fire hazard, do not place any naked flame
D3-4-2-1-4*_A1_Ru
sources (such as a lighted candle) on the equipment.
ОБЯЗАТЕЛЬНАЯ ВЕНТИЛЯЦИЯ
D3-4-2-1-7a_A1_En
При установке устройства обеспечьте достаточное
пространство для вентиляции во избежание
повышения температуры внутри устройства (не
VENTILATION CAUTION
менее 10 см сверху, 10 см сзади и по 10 см слева и
When installing this unit, make sure to leave space
справа).
around the unit for ventilation to improve heat radiation
(at least 10 cm at top, 10 cm at rear, and 10 cm at each
ПРЕДУПРЕЖДЕНИЕ
side).
В корпусе устройства имеются щели и отверстия
для вентиляции, обеспечивающие надежную
WARNING
работу изделия и защищающие его от перегрева.
Slots and openings in the cabinet are provided for
Во избежание пожара эти отверстия ни в коем
ventilation to ensure reliable operation of the product,
случае не следует закрывать или заслонять
and to protect it from overheating. To prevent fire
другими предметами (газетами, скатертями и
hazard, the openings should never be blocked or
шторами) или устанавливать оборудование на
covered with items (such as newspapers, table-cloths,
толстом ковре или постели.
curtains) or by operating the equipment on thick carpet
or a bed.
D3-4-2-1-7b*_A1_Ru
D3-4-2-1-7b*_A1_En
Page 87

Условия эксплуатации
Изделие эксплуатируется при следующих
температуре и влажности:
+5 °C до +35 °C; влажность менее 85 % (не
заслоняйте охлаждающие вентиляторы)
Не устанавливайте изделие в плохо
проветриваемом помещении или в месте с высокой
влажностью, открытом для прямого солнечного
света (или сильного искусственного света).
D3-4-2-1-7c*_A1_Ru
Если вилка шнура питания изделия не
соответствует имеющейся электророзетке, вилку
следует заменить на подходящую к розетке.
Замена и установка вилки должны производиться
только квалифицированным техником.
Отсоединенная от кабеля вилка, подключенная к
розетке, может вызвать тяжелое поражение
электрическим током. После удаления вилки
утилизируйте ее должным образом.
Оборудование следует отключать от электросети,
извлекая вилку кабеля питания из розетки, если
оно не будет использоваться в течение долгого
времени (например, если вы уезжаете в отпуск).
D3-4-2-2-1a_A1_Ru
ВНИМАНИЕ
Выключатель /I STANDBY/ON данного
устройства не полностью отключает его от
электросети. Чтобы полностью отключить
питание устройства, вытащите вилку кабеля
питания из электророзетки. Поэтому устройство
следует устанавливать так, чтобы вилку кабеля
питания можно было легко вытащить из розетки
в чрезвычайных обстоятельствах. Во избежание
пожара следует извлекать вилку кабеля питания
из розетки, если устройство не будет
использоваться в течение долгого времени
(например, если вы уезжаете в отпуск).
D3-4-2-2-2a*_A1_Ru
K041_A1_Ru
МЕРЫ ПРЕДОСТОРОЖНОСТИ ПРИ
ОБРАЩЕНИИ С СЕТЕВЫМ ШНУРОМ
Держите сетевой шнур за вилку. Не вытаскивайте
вилку, взявшись за шнур, и никогда не касайтесь
сетевого шнура, если Ваши руки влажные, так как
это может привести к короткому замыканию или
поражению электрическим током. Не ставьте
аппарат, предметы мебели и т.д. на сетевой шнур,
не зажимайте его. Не завязывайте узлов на шнуре
и не связывайте его с другими шнурами. Сетевые
шнуры должны лежать так, чтобы на них нельзя
было наступить. Поврежденный сетевой шнур
может стать причиной возникновения пожара или
поразить Вас электрическим током. Время от
времени проверяйте сетевой шнур. В случае
обнаружения повреждения обратитесь за заменой
в ближайший официальный сервисный центр
фирмы PIONEER или к Вашему дилеру.
S002*_A1_Ru
ПРЕДУПРЕЖДЕНИЕ
Во избежание пожара не приближайте к
оборудованию источники открытого огня
(например, зажженные свечи).
D3-4-2-1-7a_A1_Ru
ВНИМАНИЕ
Данное изделие является лазерным изделием
класса 1 согласно классификации по
Безопасности лазерных изделий, IEC
60825-1:2007.
ЛАЗЕРНЫЙ ПРОДУКТ КЛАСС 1
Содержание
01 Подготовка к использованию
Совместимость формата воспроизведения "диск/
контент" . . . . . . . . . . . . . . . . . . . . . . . . . . . . . . . . . . . . 4
Комплектация . . . . . . . . . . . . . . . . . . . . . . . . . . . . . . . 4
Установка батареек в пульт ДУ . . . . . . . . . . . . . . . . . 4
Использование пульта дистанционного управления
02 Подключение
Подключение выходного аналогового
аудиосигнала . . . . . . . . . . . . . . . . . . . . . . . . . . . . . . . . 5
Подключение выходного цифрового
аудиосигнала . . . . . . . . . . . . . . . . . . . . . . . . . . . . . . . . 5
Использование дистанционного управления
другими устройствами Pioneer
(только для модели PD-30) . . . . . . . . . . . . . . . . . . . . .5
Подключение . . . . . . . . . . . . . . . . . . . . . . . . . . . . . . . . 5
03 Органы управления и индикации
Пульт ДУ . . . . . . . . . . . . . . . . . . . . . . . . . . . . . . . . . . . . 6
Задняя панель. . . . . . . . . . . . . . . . . . . . . . . . . . . . . . . . 6
Передняя панель . . . . . . . . . . . . . . . . . . . . . . . . . . . . . 7
Дисплей передней панели. . . . . . . . . . . . . . . . . . . . . . 7
04 Воспроизведение
Воспроизведение дисков . . . . . . . . . . . . . . . . . . . . . .8
Переход в режим ожидания. . . . . . . . . . . . . . . . . . . . . 8
Прямая/обратная перемотка . . . . . . . . . . . . . . . . . . . . 8
Функция пропуска . . . . . . . . . . . . . . . . . . . . . . . . . . . . 8
Прямой поиск (выбор конкретной записи для
воспроизведения) . . . . . . . . . . . . . . . . . . . . . . . . . . . . . 8
Повторное воспроизведение . . . . . . . . . . . . . . . . . . . . 8
Режим воспроизведения в случайном порядке . . . . . 8
Воспроизведение по программе (воспроизведение
записей в заданном порядке). . . . . . . . . . . . . . . . . . . . 8
Просмотр информации диска . . . . . . . . . . . . . . . . . . . 8
Воспроизведение с iPod/iPhone/iPad
(только для модели PD-30) . . . . . . . . . . . . . . . . . . . . .9
Поддерживаемые модели iPod/iPhone/iPad . . . . . . . . 9
Воспроизведение с iPod/iPhone/iPad. . . . . . . . . . . . . . 9
Воспроизведение файлов, сохраненных на
USB-накопителях . . . . . . . . . . . . . . . . . . . . . . . . . . . 10
05 Использование дополнительных
функций
Воспроизведение с высокой верностью звучания
Sound Retriever . . . . . . . . . . . . . . . . . . . . . . . . . . . . . . 11
Pure Audio . . . . . . . . . . . . . . . . . . . . . . . . . . . . . . . . . . 11
Изменение зоны воспроизведения (слоя) SACD/CD
Регулировка общей яркости дисплея . . . . . . . . . . . 11
Автоматическое выключение (автоматический
переход в режим ожидания) . . . . . . . . . . . . . . . . . . . 11
Функции воспроизведения . . . . . . . . . . . . . . . . . . . . 11
06 Дополнительная информация
Воспроизводимые диски. . . . . . . . . . . . . . . . . . . . . . 12
Воспроизводимые форматы файлов . . . . . . . . . . . . 12
Меры предосторожности при использовании . . . . 13
Устранение неполадок . . . . . . . . . . . . . . . . . . . . . . . 14
Технические характеристики . . . . . . . . . . . . . . . . . . 15
. . . 4
. . . 11
. . . 11
D58-5-2-2a_A1_Ru
Page 88

01
Подготовка к использованию
Глава 1:
Подготовка к использованию
Совместимость формата
“
воспроизведения
Диски, воспроизводимые данным плеером приведены
ниже.
• SACD (Super Audio CD)*
(только 2-канальные)
•CD
•DSD-диск
* “Super Audio CD” является зарегистрированной
торговой маркой.
Примечание
• Данное устройство не позволяет воспроизводить
многоканальные SACD-диски.
• Разъемы DIGITAL OUT данного устройства не
позволяют выводить звук с дисков SACD и DSD
или с устройств iPod/iPhone/iPad.
• Если диск установлен в устройство, при его
включении воспроизведение не запускается
автоматически. Поэтому воспрои
таймеру невоз
устройства к таймеру.
диск/контент
можно даже при подключении
О воспроизведении диска DualDisc
Диск DualDisc – это новый двухсторонний диск, одна
сторона которого содержит данные DVD, например,
видео, аудио и т.д., а другая сторона содержит данные
другого типа (отличные от DVD), например, цифровые
аудиозаписи. Эта вторая сторона DVD не совместима с
форматом CD Audio и, следовательно, не может
воспроизводиться. Более подробную информацию о
характеристиках дисков DualDisc вы можете получить у
производителя или п
родавца диска.
Диски, воспроизведение которых
невозможно
• DVD-Video
• DVD-Audio
•CD-G
•Video CD
•DTS CD
Возможно, некоторые другие диски, кроме
перечисленных выше, также не будут воспроизводиться.
”
зведение по
Комплектация
Откройте упаковку и убедитесь, пожалуйста, что ней
находится.
• Пульт ДУ x1
• Сухие батарейки AAA/IEC R03 x2
• Аудиокабель RCA (с красным и белым разъемами) x1
• Кабель питания
• Гарантийный талон
• Инструкции по эксплуатации (этот документ)
Примечание
• Рисунки, приводимые в "Руководстве по
эксплуатации", могут изменяться или упрощаться
для упрощения пояснений и поэтому отличаться от
внешнего вида продукта.
• Приводимые рисунки относятся главным образом к
модели PD-30.
Установка батареек в пульт ДУ
1 Откройте заднюю крышку.
PD-30
PD-10
2 Вставьте новые батарейки с
соблюдением полярности, как указано
внутри батарейного отсека.
PD-30
PD-10
3 Закройте заднюю крышку.
PD-30
Батарейки, прилагаемые в комплекте к устройству,
предназначены для проверки работы устройства и срок
их службы может оказаться непродолжительным. Мы
рекомендуем использовать щелочные батарейки,
обладающими большим сроком службы.
ВНИМАНИЕ
• Не используйте и не храните батарейки на прямом
солнечном свету или в местах с повышенной
температурой, например в автомобиле или возле
батареи отопления. Эт
батарейки, ее перегреву,
возгоранию. Это может также сократить срок
службы батарейки.
Предупреждение
Неправильное использование батареек может привести к
таким опасным явлениям, как утечка и микровзрыв.
Придерживайтесь следующих предосторожностей:
• Устанавливая батарейки, не повредите контактные
пружины .
• Не используйте батарейки других типов, кроме
указанн
ых. Не используйте новы
старыми.
• При установке батареек в пульт ДУ соблюдайте
полярность в соответствии со знаками ( и ).
о может привести к протечке
PD-10
микровзрыву или к
е батарейки со
• Не допускайте нагрева батареек, не разбирайте их,
не бросайте в огонь или воду.
• Батарейки могут иметь разное напряжение, даже
если они имеют одинаковые размеры и форму. Не
спользуйте совм
и
• Во избежание протечки жидкости из батареек
извлеките их из пульта ДУ, если вы не собираетесь
пользоваться им продолжительное время (свыше 1
месяца). Если протечка все же произошла,
тщательно протрите внутренность батарейного
отсека перед установкой новых батареек. Если
вытекшая из батареек жидкость попала на вашу
кожу, промойте эт
воды.
• При утилизации использованных батарей следуйте
законодательным актам или общим правилам по
охране окружающей среды, которые применимы в
вашей стране или регионе.
естно батарейки разного типа.
о место большим количест
вом
Использование пульта дистанционного
управления
Пульт дистанционного управления имеет дальность
действия около 7 м, при этом отклонение от направления
на датчик не должно превышать 30°.
30 °
30 °
7 м
При использовании пульта дистанционного управления
помните о следующем:
• Следите за тем, чтобы между пультом
дистанционного управления и приемным датчиком ,
находящимся на плеере, не было мешающих
препятствий.
• Пульт дистанционного управления может работать
неустойчиво, если на п
ает сильный солнечный или флуоресцентный
попад
свет.
• Пульты дистанционного управления от разных
устройств могут мешать друг другу. Не
используйте дистанционные пульты другого
оборудования, расположенного рядом с этим
плеером.
• Если вы заметите уменьшение дальности действия
пульта дистанционного управления, замените его
батарейку.
риемник его сигналов
4
Ru
Page 89

Подключение
Глава 2:
Подключение
Предупреждение
• Перед подключением или переключением кабелей
выключите питание и отключите кабель питания от
сети.
• Подключите кабель питания после завершения всех
соединений между устройствами.
Подключение выходного аналогового
аудиосигнала
При подключении выхода аналогового аудиосигнала ко
входу аналогового аудиосигнала усилителя вы можете
пользоваться этим усилителем для воспроизведения
аналогового аудиосигнала, поступающего от данного
устройства.
Задняя панель PD-30
Аудиокабель
(в комплекте)
Усилитель
RL
ANALOG
AUDIO INPUT
Подключение выходного цифрового
аудиосигнала
При желании выход цифрового аудиосигнала данного
устройства можно подключить к AV-усилителю или
устройству цифровой записи (устройству записи на
компакт-диск, MD и т.п.).
• Разъемы DIGITAL OUT данного устройства не
позволяют выводить звук с дисков SACD и DSD
или с устройств iPod/iPhone/iPad.
AV-усилитель или
DIGITAL IN
COAXIAL
AV-усилитель или
устройство
цифровой записи
Коаксиальный
цифровой
аудиокабель
(имеется в
продаже)
Задняя панель PD-30
Важно
Соблюдайте осторожность при обращении с
оптоволоконным кабелем
• Не допускайте перегибания оптоволоконного
кабеля под острыми углами. При хранении
оптоволоконного кабеля смотайте его витками
диаметром не менее 15 см.
• При подключении оптоволоконного кабеля
выравнивайте разъемы надлежащим образом и
вставляйте их плотно. Если разъем кабеля
сориентирован неправильно, то при приложении
чрезмерных усилий при его установке разъем
может деформироваться, препятствуя закрытию
шторки при извлечении кабеля.
Примечание
• При и
спользовании цифровог
воспроизводимы на данном устройстве компактдиски должны обеспечивать передачу ИКМсигналов с линейной характеристикой, частотой
дискретизации 44,1 кГц до 16 бит (некоторые диски
могут не воспроизводиться в зависимости от
подключенного устройства и настроек).
Информацию по другим параметрам файлов см на
стр. 12.
устройство
цифровой записи
DIGITAL IN
OPTICAL
Оптоволоконный
кабель (имеется в
продаже)
о аудиовыхода
Использование дистанционного
управления другими устройствами
Pioneer (только для модели PD-30)
Данное устройство и другие компоненты Pioneer,
оборудованные разъемами CONTROL IN/OUT, могут
управляться одним пультом ДУ при направлении пульта
на приемник сигналов AV-усилителя или другого
устройства. Также возможно дистанционное управление
устройствами, не оборудованными датчиком ДУ, или
установленными в местах, в которых датчик ДУ
устройства недоступен.
Другие устройства Pioneer,
оборудованные разъемами
CONTROL IN/OUT
Пульт ДУ для AVусилителя и др.
Направьте пульт ДУ на
приемник сигналов
AV-усилителя или
другое устройство.
Другое устройство
Pioneer, оборудованное
разъемом CONTROL IN
PD-30
Примечание
• Для подключения используйте имеющийся в
продаже монофонический аудиокабель с м
разъемом (без резистора).
• При подк
• При подключении кабеля управления к разъему
лючении к разъемам CONTROL IN/OUT
имеющиеся в продаже аудиокабели можно также
использовать для аналоговых передачи сигналов.
Простое подключение к разъемам CONTROL IN/
OUT не обеспечивает надлежащее управление
системой.
CONTROL IN PD-30 устройство не может
управляться при направлении на него пульта ДУ
PD-30 (датч
ик ДУ автоматич
ески отключается).
ини-
Подключение
Важно
• При необходимости отсоединить кабель питания
сначала нажмите кнопку
передней панели устройства для выключения PD-30
или переключения PD-10 в режим ожидания.
• Перед отключением кабеля питания убедитесь, что
индикатор [-OFF-] на передней панели основного
устройства не горит. Отключение кабеля питания
при горящем индикаторе [-OFF-] может привести к
восстановлению на устройстве заводских настроек
по умолчанию.
• Если вы отправляетесь в путешествие или
длительное время не соби
данный прибор, всегда отсоединяйте кабель
питания от элект риче ской розетки.
Предупреждение
• Используйте только кабель питания, поставляемый
в комплекте с данным устройством.
• Используйте кабель из комплекта только для
назначенной цели.
После подключения всех кабелей подключите
устройство к розетке переменного тока.
Задняя панель PD-30
К розетке питания
1 Подключите кабель питания к гнезду
AC IN
на задней панели устройства.
2 Другой разъем кабеля подключите к
розетке питания.
/I
STANDBY/ON на
раетесь использов
Кабель питания
ать
02
English
DeutschFrançais
Italiano Español Русский
Nederlands
Ru
5
Page 90

03
Органы управления и индикации
Глава 3:
Органы управления и индикации
Пульт ДУ
5
PD-30
1
2
3
4
5
6
7
8
9
10
11
1
STANDBY/ON
Переключение усилителя из рабочего режима в режим
ожидания и обратно.
2 Цифровые кнопки
Используйте данные кнопки для выбора конкретной
записи для воспроизведения. Цифровыми кнопками
введите номер записи и нажмите кнопку ENTER для
подтверждения выбора.
3
CLEAR
Нажмите для очистки настроек программного
воспроизведения (стр.8).
4
SETUP
Задание функции автоматического выключения питания
(стр. 11).
PD-10
12
1
9
2
13
14
33
15
4
35
14
37
16
8
12
11
16
10
13
17
18
15
19
20
///
Используйте данные кнопки для выбора пункта
меню, изменения настроек и перемещения
указателя.
ENTER
Применение выбранного пункта или ввод
измененной настройки.
6 iPod MENU (только для модели PD-30)
Эта кнопка используется для вызова меню iPod/iPhone/
iPad.
7
Нажмите для возврата в начало текущей
воспроизводимой записи. Дважды нажмите для
возврата в начало предыдущей записи.
Нажмите для запуска воспроизведения. Во время
воспроизведения переключение из режима
воспроизведения в режим паузы и обратно.
Во время воспроизведения нажмите для перехода в
начало следующей записи.
Нажмите для обратной перемотки текущей
воспроизводимой записи. Если в процессе обратной
перемотки снова нажать данную кнопку, скорость
перемотки изменяется в четырех режимах.
Нажмите для останова воспроизведения.
Нажмите для прямой перемотки текущей
воспроизводимой записи. Если в процессе прямой
перемотки снова нажать данную кнопку, скорость
перемотки изменяется в четырех режимах.
8
iPod/USB
(PD-30)
USB (PD-10)
Нажмите для переключения входа устройства на iPod
или USB (стр. 9,10).
9
SACD/CD
Нажмите для переключения входа устройства на SACD/
CD. Если используются гибридные диски SACD, при
нажатии данной кнопки в режиме “ стоп” изменяется зона
воспроизведения диска (стр. 11).
10
REPEAT
Нажмите для включения режима повторного
воспроизведения (стр.8).
RANDOM
Нажмите для включения режима воспроизведения в
случайном порядке (стр.8).
PROGRAM
Нажмите для включения режима воспроизведения
по программе (стр.8).
11 PURE AUDIO
Нажмите данную кнопку для включения режима Pure
Audio. В данном режиме звук воспроизводится с самой
высокой точностью исходного звучания (стр. 11).
12
OPEN/CLOSE
Нажмите, чтобы открыть или закрыть лоток для диска
(стр.8).
13 ENTER
Применение выбранного пункта или ввод измененной
настройки.
Задняя панель
Подробное описание подключений см. на стр.5.
DIGITAL IN
1 2 3 54
1 Разъем
для модели PD-30)
2 Разъем
3 Разъем
CONTROL IN/OUT
(только
DIGITAL OUT (COAXIAL)
DIGITAL OUT (OPTICAL)
14
DISPLAY
Нажмите для отображения различной информации о
диске, включая время истекшее и оставшееся время
воспроизведения (стр.8).
15
DIMMER
Нажмите для изменения уровня освещения и свечения
индикаторов на передней панели главного устройства
(стр. 11).
16
S.RETRIEVER
Нажмите для изменения параметров функции Sound
Retriever (стр. 11).
17 AMPLIFIER (только для модели
PD-10)
Нажмите для переключения режимов включения и
ожидания на AV-усилителе компании Pioneer.
18 VOLUME +/– (только для модели
PD-10)
Регулировка уровня громкости AV-усилителя компании
Pioneer.
19
MUTE (только для модели PD-10)
Отключение звука AV-усилителя компании Pioneer.
Нажмите повторно для включения звука.
20
INPUT (только для модели PD-10)
Нажмите для переключения входа AV-усилителя
компании Pioneer.
PD-30
4 Разъемы
5 Разъем
ANALOG OUT
AC IN
6
Ru
Page 91

Органы управления и индикации
03
English
Передняя панель
3 5 6 7 81
2 4
9
1
/I STANDBY/ON
При включении питания загорается индикатор питания в
центре кнопки.
• В модели PD-30 включается и выключается
усилитель.
Для включения питания нажимайте данную кнопку,
пока она не останется в нажатом состоянии.
• В модели PD-10 усилитель включается или
переходит в режим ожидания.
2 Индикатор
Загорается в режиме STANDBY.
3 Индикатор
Загорается при включении функции Pure Audio (стр. 11).
4 Дисплей передней панели
(См. следующее описание.)
5
Нажмите, чтобы открыть или закрыть лоток для диска
(стр.8).
6
FUNCTION
Переключение источника входного сигнала. Источники
сигнала переключаются следующим образом.
DISC iPod*
(не отображается).
1
*
только для модели PD-30
7
Нажмите для останова воспроизведения.
10 12 1311
STANDBY
PURE AUDIO
1
/USB Возврат в начало
PD-30
8
Нажмите для запуска воспроизведения. Во время
воспроизведения переключение из режима
воспроизведения в режим паузы и обратно.
9 Датчик пульта дистанционного
управления
Прием сигналов пульта ДУ (стр.4).
10 Разъем
разъем USB (PD-10)
Подключение Apple iPod/iPhone/iPad (стр.9) или
устройства USB (стр. 10).
11 Лоток для диска
12
Нажмите для возврата в начало текущей
воспроизводимой записи. Дважды нажмите для
возврата в начало предыдущей записи. При
удерживании данной кнопки в нажатом положении
воспроизводимая запись перематывается обратно с
повышенной скоростью.
• При повторном нажатии при ускоренной обратной
перемотке скорость перемотки изменяется в
четырех режимах.
13
Нажмите для перехода в начало следующей записи.
При удерживании данной кнопки в нажатом
положении воспроизводимая запись
перематывается в прямом направлении с
повышенной скоростью.
• При повторном нажатии при ускоренной прямой
перемотке скорость перемотки изменяется в
четырех режимах.
iPod/USB
(PD-30)
(стр.8)
Дисплей передней панели
1 2 4 5 6
1
USB/iPod
Светится при воспроизведении с флэш-накопителя или
iPod/iPhone/iPad.
2
SACD/CD/DSD
Данный индикатор загорается в соответствии с типом
воспроизводимого диска.
3
PGM
Загорается в режиме программного воспроизведения
(стр.8).
4
TRK
Загорается при отображении номера записи и истекшего
или остающегося времени воспроизведения.
5
FILE
Загорается при отображении имени файла.
6
REPEAT
Загорается в режиме повторного воспроизведения
(стр.8).
7
RANDOM
Загорается в режиме случайного воспроизведения
(стр.8).
8
ALL
Загорается в режиме повторного воспроизведения диска
(стр.8).
9
TOTAL
Загорается при отображении остающегося времени
воспроизведения диска.
10
REMAIN
Загорается при отображении остающегося времени
воспроизведения записи или диска.
3 7 8 9
10
1411 12 13
11
S.RTRV
Загорается при включении функции Sound Retriever
(стр. 11).
12
SET UP
Загорается при настройке функции автоматического
выключения питания (стр. 11).
13
Загорается в режиме ускоренной прямой
перемотки.
Загорается в режиме ускоренной обратной
перемотки.
Загорается при воспроизведении.
Загорается в режиме паузы.
14 Символьный дисплей
DeutschFrançais
Italiano Español Русский
Nederlands
Ru
7
Page 92

04
Воспроизведение
Глава 4:
Воспроизведение
Использование функций зависит от типа диска и файла.
В некоторых случаях некоторые функции недоступны.
См. раздел Функции воспроизведения на стр. 11.
Воспроизведение дисков
1 Нажмите на передней
панели кнопку
/I STANDBY/ON для
включения устройства.
• При использовании модели PD-30
включите питание нажимая кнопку
POWER на устройстве, пока она не
останется в нажатом положении.
Вид сбоку на переднюю панель
2 Нажмите кнопку ,
чтобы открыть лоток
для диска и
установите в него
диск.
• Диск устанавливайте этикеткой вверх.
3 Нажмите кнопку
для запуска
воспроизведения.
• Для временного останова нажмите кнопку .
• Для возобновления воспроизведения нажмите
кнопку .
Примечание
• Операции 2 и 3 можно выполнять с пульта ДУ
таким же образом, как с передней панели
управления главного устройства.
Переход в режим ожидания
Перед переключением в режим ожидания извлеките из
лотка загруженный диск.
• Нажмите кнопку
STANDBY/ON
Для последующего включения питания
нажмите кнопку STANDBY/ON на пульте ДУ.
• В модели PD-30 при нажатии кнопки
/I STANDBY/ON на передней панели устройство
выключается, а не переходит в режим ожидания.
Для последующего включения питания
кнопку
на пульте ДУ.
/I STANDBY/ON
на передней панели.
нажмите
Прямая/обратная перемотка
• Во время воспроизведения
нажмите кнопку
При каждом нажатии данной кнопки скорость перемотки
в прямом или обратном направлении изменяется в
четырех режимах.
Функция пропуска
• Во время воспроизведения
нажмите кнопку
При каждом нажатии данной кнопки пропускается одна
запись в прямом или обратном направлении.
Прямой поиск (выбор конкретной записи
для воспроизведения)
• С помощью цифровых
кнопок введите номер
нужной записи и нажмите
кнопку ENTER для подтверждения.
Даже, если кнопка ENTER не нажимается,
воспроизведение начинается автоматически
через 5 секунды (это не относится к режиму
программного воспроизведения).
Повторное воспроизведение
Режим повторного воспроизведения применим к
текущей воспроизводимой записи или ко всем записям
на диске.
• Во время воспроизведения
нажмите кнопку REPEAT (Повтор).
Примечание
• При отключении кабеля питания в режиме
ожидания устройство выключается, однако, при
последующем подключении кабеля питания к сети
устройство автоматически не включается. После
последующего подключения кабеля питания
нажмите кнопку STANDBY/ON на пульте ДУ
для включения питания.
или .
• Для возврата в режим нормального
воспроизведения нажмите кнопку .
или .
0 9
〜
ENTER
REPEAT
• Запускается повторное воспроизведение, а на
дисплее передней панели устройства загорается
индикатор [REPEAT]. Нажмите данную кнопку
повторно для изменения типа повторного
воспроизведения (одной записи или всего диска):
повторное воспроизведение одной записи
トラックリピート([REPEAT]点灯)
(загорается индикатор [REPEAT])
Повторное воспроизведение диска (загораются
ディスクリピート([REPEAT]、[ALL]点灯)
индикаторы [REPEAT] и [ALL])
Отключение режима повторного
воспроизведения
Примечание
• Функция повторного воспроизведения отменяется
после останова воспроизведения диска.
↓
↓
リピートオフ
Режим воспроизведения в случайном
порядке
Все записи диска воспроизводятся в случайном порядке,
пока не будет воспроизведена каждая запись.
• Во время воспроизведения
нажмите кнопку
Запускается режим воспроизведения в
случайном порядке и на дисплее передней панели
загорается индикатор [RANDOM].
Примечание
• Режим воспроизведения в случайном до остановки
диска или повторно нажмите кнопку RANDOM.
• Функция воспроизведения в случайном порядке
может использоваться совместно с режимом
программного воспроизведения.
• Если в режиме воспроизведения в случайном
порядке нажимается кнопка , воспроизводится
следующая запись, выбран
орядке. При нажатии кнопки текущая запись
п
воспроизводится с начала.
RANDOM
ная в случайном
.
RANDOM
Воспроизведение по программе
(воспроизведение записей в заданном
порядке)
Данная функция позволяет выбрать до 24 записей для их
воспроизведения в заданном порядке.
1 В режиме "Стоп" нажмите
кнопку
PROGRAM
На дисплее передней панели загорается
индикатор [PGM].
.
2 С помощью цифровых
кнопок введите номер
нужной записи и нажмите
ENTER
кнопку
.
PROGRAM
0 9
〜
Пример: Чтобы выбрать запись 15, нажмите
кнопки 1 и 5, а затем нажмите кнопку
ENTER. Если вы ошиблись при вводе,
нажмите кнопку CLEAR.
ENTER
3 Повторите операцию 2 для ввода
всех нужных записей.
4 Нажмите кнопку
Воспроизведение начинается в порядке
введенных при программировании записей.
Если вы хотите добавить другие записи,
повторите операции 1 и 2.
Примечание
• Если нажать кнопку CLEAR при остановленном
диске, все запрограммированные записи
отменяются.
• Для очистки запрограммированных записей в
режиме "Стоп" нажмите кнопку PROGRAM, а
затем кнопку CLEAR. Запрограммированные
записи отменяются, а воспроизведение начинается
с последней запрограммированно
•“Пауза” не программируется.
• Воспроизведение запрограммированных записей
можно повторить. Просто нажмите кнопку
REPEAT после запуска программного
воспроизведения (см. рис. слева).
• В режиме воспроизведения по программе
повторить воспроизведение одной записи нельзя.
• Функцию воспроизведения в случайном порядке в
режиме программного воспроизведения
использовать нельзя.
• При нажатии кнопки в реж
воспроизведения з
следующей запрограммированной записи.
• После остановки воспроизведения для повторного
воспроизведения программы нажмите кнопку
PROGRAM, а затем кнопку .
.
й записи.
апускается воспроизведение
име программного
Просмотр информации диска
• Во время воспроизведения
нажмите кнопку
Отображается различная информация, включая
истекшее и оставшееся время воспроизведения.
В зависимости от используемого диска, при
многократном нажатии кнопки DISPLAY циклически
отображается различная информация.
Примечание
• Отображение имени файла (первые 8 символов) при
воспроизведении файлов в форматах AAC (только
для модели PD-30), WMA/MP3 или файлов на DSDдисках. Однако, в зависимости от национальной
кодировки используемого набора символов,
отображение может быть иск
DISPLAY
.
аженным.
DISPLAY
8
Ru
Page 93

Воспроизведение
Воспроизведение с iPod/iPhone/iPad
(только для модели PD-30)
Простым подключением iPod/iPhone/iPad к данному
устройству вы можете получить высококачественное
звучание с вашего iPod/iPhone/iPad.
Поддерживаемые модели iPod/iPhone/iPad
Список iPod/iPhone/iPad, воспроизведение с которых
доступно на данном устройстве приведен ниже.
iPod/iPhone/iPad Аудио Управлени е
iPod nano 2/3/4/5/6G
iPod touch 1/2/3/4G
iPhone
iPhone 3G/3GS
iPhone 4/4S
iPad
iPad 2
• Данная система разработана и проверена для версии
программного обеспечения iPod/iPhone/iPad,
указанной на веб-сайте компании Pioneer.
• Установка на iPod/iPhone/iPad других версий
программного обеспечения, кроме указанной на
веб-сайте компании Pioneer, может оказаться
несовместимой с данной системой.
Примечание
• Компания Pioneer не гарантирует воспроизведение
данным устройством с iPod/iP
моделе
й, корме указанных.
• Использование некоторых функций может быть
ограниченным в зависимости от модели или версии
программного обеспечения.
• iPod/iPhone/iPad лицензирован для
воспроизведения материалов, не защищенных
авторским правом или материалов, разрешенных
для воспроизведения на законных основаниях.
• Управление такими функциями, как эквалайзер,
недоступно при использовании данного устройства,
поэтому мы рекомендуем отключить эквалайзер
перед подключением устройства.
• Компания Pioneer ни при каких обстоятельствах не
несет ответственность за любой прямой или
косвенный ущерб в результате недостатков или
потери записанных материалов по причине сбоя
iPod/iPhone/iPad.
• За подробными инструкциями по использованию
iPod/iPhone/iPad обращайтесь к руководству
данного iPod/iPhone/iPad.
hone/iPad других
Воспроизведение с iPod/iPhone/iPad
1 Нажмите кнопку
пульте ДУ для выбора
качестве источника входного
сигнала.
Нажмите кнопку iPod/USB на пульте ДУ.
• Это же можно сделать, нажимая кнопку
FUNCTION на передней панели.
2 Подключите iPod/iPhone/iPad.
Подключите iPod/iPhone/iPad к разъему USB на передней
панели устройства. Для подключения iPod/iPhone/iPad
используйте кабель iPod из комплекта поставки.
• При подключении кабеля пользуйтесь также
инструкциями для iPod/iPhone/iPad.
Кабель iPod
iPod/USB
iPod
в
iPod/iPhone/iPad
на
iPod/USB
Следующие операции доступны при использовании
iPod/iPhone/iPad.
Кнопка Функции
RANDOM
REPEAT
iPod MENU Эта кнопка используется для вызова меню
//ENTER
1 При каждом нажатии кнопки
повторного воспроизведения изменяется в следующем
порядке.
Повторить 1 запись Повторить все Обычный
режим воспроизведения
Повторить 1 запись: Повторное воспроизведение
текущего файла.
Повторить все: Повторное воспроизведение всех
файлов.
Важно
Если устройство не воспроизводит записи iPod/iPhone/
iPad, проверьте следующее:
• Поддерживается ли данный iPod/iPhone/iPad
данным устройством.
• Переподключите iPod/iPhone/iPad к устройству.
Если это не помогает, попробуйте сбросить ваш
iPod/iPhone/iPad.
• Поддерживается ли ПО данного iPod/iPhone/iPad
данным устройством.
Если iPod/iPhone/iPad не работает, проверьте
следующее:
• Правильно ли подключен iPod/iPhone/iPad?
Переподключите iPod/iPhone/iPad к устройству.
•“Повешена” ли трубка iPod/iPhone/iPad
Попробуйте перенастроить iPod/iPhone/iPad и сн
подключите кго к устройству.
Запускает обычное воспроизведение. Во
время воспроизведения переключение из
режима воспроизведения в режим паузы и
обратно.
Пауза при воспроизведении.
Нажмите для перехода к началу текущего
файла, затем к предыдущим файлам.
Удерживайте в нажатом состоянии для
ускоренной обратной перемотки.
Нажмите для перехода к следующему
файлу.
Удерживайте в нажатом состоянии для
ускоренной прямой перемотки.
Выбранные файлы iPod/iPhone/iPad
воспроизводятся в случайном порядке
(в разбивку).
Выбранные файлы iPod/iPhone/iPad
воспроизводятся с повтором.
iPod/iPhone/iPad.
Выполнение операций меню iPod/iPhone/
iPad.
.
REPEAT
1
режим
?
Примечание
• При подключении iPod/iPhone/iPad к данному
устройству выполняется зарядка iPod/iPhone/iPad.
(Зарядка производится только при включенном
питании устройства.) (не применимо при
включенной функции Pure Audio)
• При переключении источника входного сигнала с
iPod на другой воспроизведение с iPod/iPhone/iPad
автоматически прекращается.
ова
04
English
DeutschFrançais
Italiano Español Русский
Nederlands
Ru
9
Page 94

04
Воспроизведение
Воспроизведение файлов,
сохраненных на USB-накопителях
1 Нажмите кнопку
пульте ДУ для выбора USB в
качестве источника входного
сигнала.
Нажмите кнопку iPod/USB на пульте ДУ
(модель PD-30) или кнопку
(модель PD-10)
• Это же можно сделать, нажимая кнопку
.
FUNCTION на передней панели.
2 Подключите USB-накопитель.
3 Нажмите кнопку
воспроизведения.
• Для временного останова нажмите кнопку .
• Для останова воспроизведения нажмите кнопку .
USB
на
USB
на пульте ДУ
USB-накопитель
(доступен в продаже)
для запуска
iPod/USB
Можно выполнить следующие операции. В зависимости
от воспроизводимого материала некоторые кнопки
могут оказаться недоступными для операций.
Кнопка Функции
RANDOM
REPEAT
1 При каждом нажатии кнопки
повторного воспроизведения изменяется следующим
образом.
Повторить 1 запись Повторить все Обычный
режим воспроизведения.
Повторить 1 запись: Повторное воспроизведение
текущего файла.
Повторить все: Повторное воспроизведение всех
файлов.
Если включена функция автоматического выключения, а
источником входного сигнала задано устройство USB, то
при останове воспроизведения с USB-накопителя в
течение 30 минут без выполнения других операций,
устройство автоматически переключается в режим
ожи
дания.
Примечание
• Данное устройство может не распознавать флэшнакопители USB, воспроизводить файлы или
обеспечивать питание для флэш-накопителей USB.
Подробно см.в разделе Дополнительная
информация на стр. 12.
• Компания Pioneer не гарантирует воспроизведение
любых файлов, записанных на флэш-накопителе
USB или обеспечение питанием флэш-накопителей
USB. Компания Pioneer также не несет
ответственность
накопителях, вызванную подключением
накопителя к данному устройству.
Запускает обычное воспроизведение. Во
время воспроизведения переключение из
режима воспроизведения в режим паузы и
обратно.
Останавливает воспроизведение.
Нажмите для перехода к началу текущего
файла, затем к предыдущим файлам.
Нажмите для ускоренной обратной
перемотки. При каждом нажатии данной
кнопки скорость обратной перемотки
изменяется в четырех режимах.
Нажмите для перехода к следующему
файлу.
Нажмите для ускоренной перемотки в
прямом направлении. При каждом нажатии
данной кнопки скорость прямой перемотки
изменяется в четырех режимах.
Выбранные файлы воспроизводятся в
случайном порядке (в разбивку).
Выбранные файлы воспроизводятся
1
повторно.
REPEAT
режим
за потерю файлов на флэш-
• Данное устройство не поддерживает USBконцентраторы.
10
Ru
Page 95

Использование дополнительных функций
Глава 5:
Использование дополнительных
функций
Использование функций зависит от типа диска и файла.
В некоторых случаях некоторые функции недоступны.
См. раздел Функции воспроизведения в правой колонке.
Воспроизведение с высокой
верностью звучания
Sound Retriever
При декодировании сжатых звуковых сигналов
некоторые участки выпадают. При включении функции
Sound Retriever данные потери компенсируются,
позволяя получить более богатое великолепное
звучание.
• Нажмите кнопку S.RETRIEVER.
При каждом нажатии данной кнопки режим
функции изменяется в следующей
последовательности: S.RTRV: OFF
S.RTRV: LOW S.RTRV: HI Возврат в
исходное состояние
• Если ВКЛЮЧЕНА функция Чистый звук, функция
восстановления звука отключается.
S.RETRIEVER
Pure Audio
Данная функция отключает выход цифрового
аудиосигнала и воспроизводит аналоговый аудиосигнал
с высокой верностью звучания. Во включенном
состоянии индикаторы на дисплее не отображаются.
Заводская настройка по умолчанию OFF (Выкл.).
• Нажмите кнопку PURE AUDIO.
Для выключения функции повторно нажмите
данную кнопку.
• Если данная функция включена, а источником
входного сигнала на главном устройстве выбран
диск SACD/CD, на дисплее передней панели
загорается индикатор PURE AUDIO. При
воспроизведении диска дисплей передней панели
выключается.
• Если горит индикатор PURE AUDIO, любое
устройство iPod/iPhone/iPad, подключенное к
главному устройству не заряжается.
PURE AUDIO
Изменение зоны воспроизведения
(слоя) SACD/CD
Гибридные диски SACD состоят из двух слоев, SACDслоя и CD-слоя, позволяя выбирать нужный слой для
воспроизведения.
1 Нажмите кнопку
Выбор слоя воспроизведения SACD/CD.
SACD/CD
SACD/CD
.
2 В режиме "Стоп" нажмите кнопку
SACD/CD.
При каждом нажатии данной кнопки выбирается зона
CD или 2-канальная зона SACD.
Примечание
• Данное устройство не поддерживает
многоканальные зоны SACD.
Регулировка общей яркости дисплея
Данное устройство оснащено функцией регулятора
яркости дисплея, позволяющая устанавливать три
уровня в зависимости от уровня внешнего освещения.
Заводская настройка по умолчанию предусматривает
самое яркое свечение.
• Нажмите кнопку
При каждом нажатии данной кнопки яркость
свечения дисплея переключается на один из трех
уровней.
• Яркость свечения дисплея нельзя изменить при
воспроизведении диска с включенной функцией
Pure Audio (см. колонку слева).
• Яркость индикатора STANDBY не изменяется.
DIMMER
.
Автоматическое выключение
(автоматический переход в режим
ожидания)
Данная функция автоматически переключает устройство
в режим ожидания, если в течение 30 минут не подается
сигнал или не выполняются какие-либо операции.
1 Нажмите кнопку
2 Измените настройку и
подтвердите.
Кнопками / выберите режим ON (Вкл.)
или OFF (Выкл.) и нажмите кнопку ENTER
для подтверждения.
Примечание
• Если источников входного сигнала выбран iPod
данная функция отключается.
SET UP
.
DIMMER
SET UP
ENTER
Функции воспроизведения
Использование функций зависит от типа диска и файла. В некоторых случаях некоторые функции недоступны. Ниже
приведена таблица применимых функций.
Тип диска/файла
1
Функция
Прямая/обратная перемотка
Функция пропуска
Прямой поиск (выбор конкретной записи для
воспроизведения)
Повторное воспроизведение
Воспроизведение в случайном порядке
Воспроизведение по программе
(воспроизведение записей в заданном порядке)
Просмотр информации диска
Sound Retriever
Pure Audio
SACD/CD
1 Некоторые функции могут не работать с некоторыми дисками или файлами, даже если они помечены в таблице
символов [].
2 См. также раздел Воспроизведение дисков CD-R/CD-RW на стр. 12.
3• Файлы в формате AAC воспроизводятся только на модели PD-30.
• См. также раздел Воспроизводимые форматы файлов на стр. 12.
4 См. также раздел Воспроизведение DSD-дисков на стр. 12.
5 Данная функция доступ на только при воспроизведении файлов, записанных на диске.
6 Только диски Hybrid SACD.
SACD CD-DA
––
––
–– –
CD-R/RW
6
–––
2
WMA
MP3
AAC
4
3
5
DSD
05
English
DeutschFrançais
Italiano Español Русский
Nederlands
11
Ru
Page 96

06
Дополнительная информация
Глава 6:
Дополнительная информация
• В одной папке может размещаться не более 150
Воспроизводимые диски
Воспроизведение дисков CD-R/CD-RW
• Данное устройство позволяет воспроизводить
диски CD-R/CD-RW, на которых записана музыка в
формате CD или аудиоданные в форматах WMA и
MP3. Однако, некоторые диски могут не
воспроизводиться или воспроизводиться с шумами
или искажениями звука.
• Данное устройство предназначено только для
воспроизведения. Оно не позволяет выполнять
запись на диски CD-R/CD-RW.
• Нефинализированные диски CD-R/CD-RW нельзя
воспроизвести на данном устройстве. За подробной
информацией обращайтесь к руков
использованию вашего устройства записи на диск.
Воспроизведение DSD-дисков
Данное устройство позволяет воспроизводить файлы с
DSD-дисков, записанных в формате DSF.
Воспроизводимые файлы
• Записи на дисках: DVD-R/-RW
• Тип файла: .dsf
• Имя папки: DSD_DISC
• Размер: не более 4 ГБ на файл
• Аудио: 2-канальный звук
• Частота дискретизации: 2,8224 МГц
Пример структуры папки
Файлы и папки воспроизводятся не в алфавитном
порядке, а в порядке их записи на диск.
Root DSD_DISC
File01.dsf
FolderA
FolderD
одству по
File02.dsf
FolderB
File03.dsf
FolderC
File04.dsf
File05.dsf
File06.dsf
файлов.
• Один диск может содержать не более 200 папок.
дой папке до
• В каж
• Имена файлов с использованием японских
символов и определенных символов могут
отображаться некорректно.
• Любые файлы не в формате DSF будут пропущены.
Предупреждение
• Некоторые файлы могут не воспроизводиться.
• Для запуска воспроизведения дисков с большим
количеством файлов и папок может потребоваться
значительное время. В этом случае, можно нужные
файлы переместить прямо в папку DSD_DISC или
ограничить число файлов до 20 или меньше.
лжно быть не более 8 уровней.
Операции во время воспроизведения
Следующие операции можно выполнять во время
воспроизведения DSD-диска:
• Прямой поиск
• Воспроизведение файлов другого типа с диска,
кроме файлов типа DSF
Дисплей
В режиме "Стоп" при воспроизведении DSD-диска на
устройстве отображается индикатор [DSD DISC]. Если
при воспроизведении нажать кнопку DISPLAY, при
каждом нажатии данной кнопки циклически
отображается следующая информация:
• Номер записи и истекшее время воспроизведения
• Имя файла
Воспроизводимые форматы файлов
Воспроизведение аудиофайлов
Данное устройство поддерживает файлы следующих
форматов.
• Файлы некоторых форматов недоступны для
воспроизведения, хотя они указаны в списке
воспроизводимых форматов файлов.
• При попытке воспроизведения файла
неподдерживаемого формата звук может
прерываться или сопровождаться шумами. В таких
случаях, проверьте совместимость файлов данного
формата с данным устройством.
• Музыкальные файлы с защитой DRM невозможно
воспроизвести. Защита от к
(управление правами
является технологией, разработанной для защиты
авторских прав. Для недопущения незаконного
копирования функция DRM ограничивает
возможности воспроизведения устройством записи
на диск или компьютером, которые первоначально
использовались для записи данной музыки.
Подробную информацию см. в инструкциях по
использованию и справочных файлах для
устройства или приложения, используемого для
о
ьной записи.
ригинал
Категория
1
MP3
WMA .wma
2
AAC
1. “Технология декодирования звука MPEG Layer-3
лицензирована компанией Fraunhofer IIS and Thomson
Multimedia.”
2. только для модели PD-30
Тип
.mp3
.m4a
Формат
данных
MPEG-1/2
Audio
Layer-3
WMA2/7/
8/9
MPEG-4
AAC LC
MPEG-4
HE AAC
(AAC Plus
v1/2)
опирования DRM
на цифровые материалы)
Частота
дискретизации
Разрядность
дискретизации
Канал 2 кан.
Битрейт
Частота
дискретизации
Разрядность
дискретизации
Канал 2 кан.
Битрейт
Частота
дискретизации
Разрядность
дискретизации
Канал 2 кан.
Битрейт
8 кГц 48 кГц
16 бит
8 Кбит/с 320 Кбит/с
22,05 кГц 48 кГц
16 бит
32 Кбит/с 192 Кбит/с
8 кГц 48 кГц
16 бит
8 Кбит/с 320 Кбит/с
Предупреждение
• Некоторые диски CD-R/CD-RW, записанные на на
устройстве записи компакт-дисков или на
компьютере, могут не воспроизводиться из-за
характеристик диска, царапин или загрязнений на
диске или загрязнения и конденсата на лазерном
датчике чтения плеера.
• Диски, записанные на компьютере могут не
воспроизводиться на данном устройстве из-за
н
астроек приложения или
оборудования. Записывайте диски в надлежащем
формате (подробности узнайте у продавца вашего
приложения).
• Диски, записанные в формате с упаковкой записи,
на данном устройстве не воспроизводятся.
• Нефинализированные диски CD-R/CD-RW нельзя
воспроизвести на данном устройстве.
компьютерного
Воспроизведение WMA-файлов
• Используйте диски, записанные в формате,
совместимом с файловыми системами CD-ROM
(ISO9660 level 1 и 2), и совместимом с
расширенным форматом (Joliet, Romeo).
• Данное устройство не поддерживает диски
записанные с технологией VBR (передача
двоичных данных с переменной скоростью) или
кодирования без потерь.
• Данное устройство не поддерживает диски,
записанные в мультисессионном режиме.
• Распознается и воспроизводится в общей
сложности не бо
числа коли че ство папок не может быть более 299.
Однако, в зависимости от структуры папки не все
папки и записи распознаются и воспроизводятся.
• Используемые WMA-файлы должны кодироваться
с использованием проверенных и распознаваемых
ОС Microsoft приложений. При использовании
нераспознаваемых приложений возможно
ненадлежащее выполнение операций.
лее 648 папок и файлов. Из этого
Воспроизведение MP3-файлов
• Используйте диски, записанные в формате,
совместимом с файловыми системами CD-ROM
(ISO9660 level 1 и 2), и совместимом с
расширенным форматом (Joliet, Romeo).
• Данное устройство не поддерживает формат VBR
(переменный поток данных); (даже если файлы
воспроизводимые, истекшее и оставшееся время
воспроизведения на дисплее передней панели будет
отображаться неверно из-за изменения скорости
передачи данных, отображая меньшее или большее
время по сравнен
• Данное устройство не поддерживает диски,
записанные в мультисессионном режиме.
• Распознается и воспроизводится в общей
сложности не более 648 папок и файлов. Из этого
числа коли че ство папок не может быть более 299.
Однако, в зависимости от структуры папки не все
папки и записи распознаются и воспроизводятся.
ию с корректными значения
ми.)
12
Ru
Page 97

Дополнительная информация
• Для оптимального качества звука для записей
рекомендуется скорость передачи данных
128 Кбит/с.
MPEG-4 Воспроизведение AAC-файлов
•AAC обозначает “Advanced Audio Coding
(Улучшенное кодирование звука),” и является
основным форматом в технологии сжатия аудио в
стандартах MPEG-2 и MPEG-4.
• Данное устройство позволяет воспроизводить
файлы в формате AAC с расширением “.m4a,”
закодированные с помощью iTunes®. Однако,
воспроизведение может оказаться невозможным в
случае использования файлов с защитой от
копирования технологией DRM, и в зависимости от
версии кодирования iTunes.
• iTunes является торговой маркой ком
Inc., зарегистрированной в США и других странах.
пании Apple
Меры предосторожности при
использовании
Перемещение плеера
При перестановке плеера на другое место сначала
выполните следующее: Извлеките установленный диск и
закройте лоток для диска. Нажмите кнопку
/I STANDBY/ON на устройстве, чтобы на дисплее
передней панели отобразился индикатор [-OFF-], затем
выждите 10 секунд и отключите кабель питания.
Перемещение устройства с установленным в лотке
диском может привести к ненадлежащей работе
устройства.
Место установки
Выберите подходящее место рядом с телевизором и AVсистемой, к которым данное устройство подключается.
Не устанавливайте плеер на телевизор или цветной
монитор. Устанавливайте на расстоянии от кассетных
магнитофонов и других устройств с магнитным
излучением.
Избегайте установку в следующих местах:
• Места, попадающие под действие прямых
солнечных лучей
• Сырые или плохо проветриваемые места
• Чрезмерно нагретые или хо
• Места, подверженные вибрации
• Сильно запыленные или прокуренные места
• Места, где присутствует копоть, пар и высокая
температура (кухни и т.п.)
Не размещайте данное устройство на диване или другом
предмете с абсорбирующим покрытием, так как качество
звучания может значительно ухудшиться.
лодные
места
Не размещайте какие-либо предметы на
верхней панели
Не размещайте какие-либо предметы на верхней панели
плеера.
Оберегайте от воздействия тепла
Не размещайте плеер на верхней панели усилителя или
других устройств, выделяющих тепло. При установке во
встроенной полке во избежание воздействия тепла,
выделяемого усилителем и другими устройствами, при
возможности, поместите плеер на полку ниже усилителя.
Отключайте питание, если плеер не
используется
В зависимости от условий эфирной трансляции ТВсигналов, если включен плеер, при включении
телевизора на его экране могут отображаться полосы.
Это не является неисправностью плеера или телевизора.
В этом случае выключите плеер. При радиоприеме также
может искажаться звук.
Конденсат
При внезапном перемещении плеера из холодного места
в теплое помещение (например, зимой) или при быстром
повышении температуры в помещении (например, при
работе обогревателя) внутри плеера (на рабочих деталях
и датчике чтения диска) могут образоваться мелкие
капли воды (конденсат). При образовании конденсата
плеер не сможет работать надлежащим образом и
воспроизведение становится невозможным. Выдержи
плеер при комнатной температуре в теч
включенном состоянии (время выдерживания зависит от
количества конденсата). Капельки воды рассеиваются и
воспроизведение становится возможным.
Также, образование конденсата возможно летом, если
плеер подвергается прямому воздействию потока
воздуха от кондиционера. В этом случае установите
плеер в другом месте.
ение 1-2 часов во
те
Очистка плеера
Обычно плеер достаточно протереть мягкой тряпкой.
Для удаления сильных загрязнений смочите мягкую
тряпку в растворе нейтрального моющего средства в
воде (5-6 частей воды на одну часть моющего средства),
тщательно отожмите, протрите грязь, затем сухой
тряпкой удалите оставшуюся влагу.
Использование спирта, растворителя, бензина или
инсектицида при обращении с плеером может привести
повреждению надписей и покрытия. Также, не
допускайте продолж
резиновых или виниловых изделий с плеером, так как это
может привести к повреждению его корпуса.
Перед использованием салфеток и т.п., пропитанных
химикатами, внимательно ознакомьтесь с указаниями по
применению.
ительного соприкосновения
При очистке плеера отключайте кабель питания от
сетевой розетки.
Меры предосторожности при установке
устройства на полку со стеклянной дверцей
Не нажимайте кнопку OPEN/CLOSE на пульте ДУ,
чтобы открыть лоток для диска, если дверца закрыта.
Дверца помешает перемещению лотка и устройство
может получить повреждения.
Очистка датчика чтения диска
Датчик чтения диска при нормальной эксплуатации не
должен загрязняться, однако, если по каким-либо
причинам характеристики воспроизведения ухудшатся
из-за скопления пыли или грязи, обратитесь в
ближайший официальный центр обслуживания
компании Pioneer. Хотя очистители для плееров
доступны в продаже, мы советуем воздержаться от их
использования, так как они могут повредить датчик
чтения.
Обращение с дисками
Не используйте поврежденные (треснувшие или
покоробленные) диски.
Не допускайте царапин на рабочей стороне диска или ее
загрязнения.
Не устанавливайте в плеер одновременно больше одного
диска.
Не наклеивайте на диск бумагу или стикеры, не
используйте карандаш, шариковую ручку или другой
пишущий инструмент с заостренным концом. Это может
повредить диск.
Хранение дисков
Храните диски в оригинальной упаковке, упаковку с
дисками размещайте вертикально, избегайте мест с
повышенной температурой или влажностью, оберегайте
от прямых солнечных лучей или очень низких
температур.
Прочтите все предупреждения относительно обращения
с диском.
Очистка дисков
Диски могут не воспроизводиться из-за наличия на них
отпечатков пальцев или пыли. В таких случаях, с
помощью протирочной тряпки осторожно протрите диск
от центра к внешнему краю. Не пользуйтесь
загрязненной обтирочной тряпкой.
Не пользуйтесь бензином, растворителем и другими
летучими химикатами. Также, не пользуйтесь спреем
для пластинок или антистатическими препаратами.
Для удаления сильных загрязн
водой мягкую тряпку, тщательно отожмите, Протрите
грязь, затем сухой тряпкой удалите с диска влагу.
ений слегка смочите
Диски особой формы
Диски особой формы (в виде сердца, шестиугольника и
т.п.) нельзя использовать на данном плеере. Не
используйте такие диски, так как они повредят плеер.
Конденсат на дисках
При внезапном перемещении диска из холодного места в
теплое помещение (например, зимой) на поверхности
диска могут образоваться мелкие капли воды
(конденсат). При наличии на диске конденсата они не
будут воспроизводиться надлежащим образом. Перед
использованием диска тщательно протрите капли воды с
его поверхности.
06
English
DeutschFrançais
Italiano Español Русский
Nederlands
13
Ru
Page 98

06
Дополнительная информация
Устранение неполадок
Проблемы и ненадлежащая работа устройства часто вызываются неправильными действиями. Если вам кажется, что
какой-то компонент работает неправильно, сначала просмотрите приведенные ниже сведения. В некоторых случаях
неисправным может оказаться другой компонент. Проверьте другие используемые устройства и электрические
приборы. Если проблема не устраняется даже после принятия всех мер, описанных ниже, обратитесь в ближайший
официальный сервисный центр
• Если устройство не работает из-за влияния внешних факторов, таких как воздействие статического
электричества, отключите вилку кабеля питания из розетки и снова ее подключите для создания нормальных
условий работы.
Неполадка Устр ан ен ие
Диск не воспроизводится нормально и
лоток диска автоматически
открывается
Не воспроизводятся диски
CD-R/-RW.
Не воспроизводятся файлы в формате
WMA/MP3 или AAC (только для
модели PD-30).
Не работает пульт ДУ.
Настройки сбрасываются.
Звук отсутствует или воспроизводится
с искажениями.
Большая разница в громкости при
воспроизведении SACD и CD дисков.
Между дорожками диска SACD на
дисплее глав но го блока отображается
надпись [--:--].
С аналоговым сигналом все в порядке,
но нет цифрового аудио сигнала.
после загрузки.
компании Pioneer или к продавцу для выполнения ремонтных работ.
•
Убеди те с ь, что диск установлен этикеткой вверх и выровнен в гнезде для установки
диска (стр.8).
•
Убеди те с ь, что диск не загрязнен и не поврежден (стр. 13).
•
Образование конд ен сат а внутри плеера. Дождитесь испарения кон де нса та . Не
устанавливайте плеер вблизи кондиционера (стр. 13).
• Лоток для диска открывается, если в него помещен диск неподдерживаемого типа
(стр. 4).
•
Некоторые записанные на компь юте ре диски CD-R/-RW не воспроизводятся.
•
Файлы следующих форматов не воспроизводятся:
- Файлы с защитой от копирования DRM
- Файлы с записями, не соответствующие формату ISO9660
- Файлы, записанные с другой частотой дискретизации, кроме 44,1 кГц
- WMA-файлы, записанные в формате VBR или с кодированием без потери
информации.
•
Замените батарейки (стр.4).
•
Используйте с расстояния не более 7 м под углом не менее 30° по направлению к
датчику ДУ на передней панели (стр.4).
•
Убе ри те препятствие или смените положение.
•
Не допускайте попадания прямого света на датчик ДУ на передней панели.
•
Проверьте правильность подключения кабелей управления ко всем устройствам?
Убеди те с ь в их правильности (стр.5).
•
При отключени и кабеля питания или перебо е в питании при включенном устройстве
выполненные перед этим настройки могут быть удалены. Перед отключением кабеля
питания сначала нажмите кнопку STANDBY/ON на пульте ДУ, затем дождитесь
отображения на дисплее передней панели индикатора [-OFF-] и только после этого
отключайте кабель питания. Особую внимательность следует проявлять, если кабель
питания плеера подключен к выходному разъему другого устройства, так как при
отключении данного устройства автоматически отключается и плеер. При
возможности, подключайте плеер непосредственно к сетевой розетке.
•
Проверьте надежность всех подключений (стр.5).
•
Убеди те с ь, что на разъемах и клеммах нет грязи, следов окисления и т.п., и, при
необходимости, очистите их. Проверьте также, не повреждены ли кабе ли.
•
Убеди те с ь, что диск не поврежден, на нем нет пыли и грязи.
•
Убеди те с ь, что плеер не установлен в режим “паузы”? Нажмите кнопку .
•
Проверьте настройки усилителя/плеера (уровень громкости, подключенный источник
входно го сигнала, настройки динамиков и т.п.).
•
Убеди те с ь, что выход плеера подключен к входам проигрывателя усилителя.
•
Это связано с различиями ауди офо рм ата и не является неисправностью.
• Эта надпись может отображаться в зависимости от диска.
•
Убеди те с ь, что функция Pure Audio отключена (стр.11).
•
Не поддерживается вывод цифрового ауди оси гн ала с дисков SACD и DSD, а также с
iPod. Используйте разъемы ANALOG OUT
(стр.5).
для воспроизведения с таких носителей
Неполадка Устр ан ен ие
USB-накопитель не распознается.
USB-накопитель подключен и
отображается, однако, записанные на
нем аудио фа йл ы не воспроизводятся.
Требуе тс я много времени на
распознавание USB-накопителя.
На USB-накопитель не поступает
питание.
Воспроизводятся аудио фа йл ы, не
записанные на USB-накопитель.
Не работает iPod/iPhone/iPad.
На iPod/iPhone/iPad не подается
питание.
С iPod/iPhone/iPad не подается звук.• Есть ли звук в динамике iPod/iPhone/iPad? Отключите питание устройства и снова
•
Проверьте надежность подключения (полностью ли разъем вошел в гнездо) (стр. 10).
•
Данное устройство не поддерживает USB-концентраторы. Подключайте USB-
накопитель прямо.
•
Некоторые USB-накопители не распознаются надлежащим образом. Выключите и
снова включите питание.
•
Данное устройство поддерживает только USB-накопители большой емкости.
•
Поддерживаются только файловые системы FAT 16 и FAT32. Другие файловые
системы (такие как FAT, N TF S и т.д.) не поддерживаются.
•
Данное устройство не поддерживает использование внешних жестких дисков.
•
Аудио фа йл ы, записанные на USB-накопителе и защищенные авторским правом,
нельзя воспроизвести. Попытка копирования музыкальных файлов с ком па кт -диска и
т.п. на компьют ер в зависимости от настроек может инициировать функцию защиты от
копирования.
•
См. список форматов файлов, которые могут воспроизводиться на данном устройстве.
•
При подключении USB-накопителя большой емкости для загрузки данных может
потребоваться некоторое время (до нескольких минут).
•
Если включена функция Pure Audio, питание на порты
•
На дисплее передней панели отображается сообщение об ошибке? (стр.7)
- Выключите и снова включите питание (стр.8).
- Выключите питание, затем отключите и снова подключите USB-накопитель
(стр. 10).
- Нажмите кнопку FUNCTION
переключитесь на режим USB. (Когда источник входного сигнала снова
переключается на режим USB) (стр.7).
• Проверьте, не записаны ли на устройство скрытые файлы. Скрытые файлы будут
воспроизводиться.
•
Проверьте правильность подключения iPod/iPhone/iPad (см. раздел
iPod/iPhone/iPad (только для модели PD-30)
и снова подключить iPod/iPhone/iPad.
•
У бедитесь, что модель подключенного iPod/iPhone/iPad поддерживается данным
устройством (стр.9).
•
Если на iPod/iPhone/iPad "повешена" трубка , попробуйте сбросить iPod/iPhone/iPad и
снова подключите его к устройству.
•
Если включена функция Pure Audio, питание на порты
•
На дисплее передней панели отображается сообщение об ошибке? Выключите
питание, затем отключите и снова подключите iPod/iPhone/iPad.
включите его. Выбрав источником входного сигнала iPod, подключите iPod/iPhone/iPad.
•
Аудио си гн ал не выводится на разъемы
для переключения на другой режим, затем снова
DIGITAL OUT
USB
не поступает (стр.11).
на стр.9). Такж е, попробуйте отключить
Воспроизведение с
USB
не поступает (стр.9).
.
14
Ru
Page 99

Дополнительная информация
06
English
Технические характеристики
Общие сведения
Устройство . . . . . . . . . . . . Плеер Super Audio CD дисков
Питание . . . . . . . . . . . . . AC 220 В
Потребляемая мощность
PD-30 . . . . . . . . . . . . . . . . . . . . . . . . . . . . . . . . . . . 37 Вт
PD-10 . . . . . . . . . . . . . . . . . . . . . . . . . . . . . . . . . . . 20 Вт
Потребляемая мощность в режиме ожидания
Вес
PD-30 . . . . . . . . . . . . . . . . . . . . . . . . . . . . . . . . . . . 5,6 кг
PD-10 . . . . . . . . . . . . . . . . . . . . . . . . . . . . . . . . . . . 5,2 кг
Размеры
. . . . . . . . . . . . . . . . 435 мм (Ш) x 128 мм (В) x 329 мм (Г)
Рабочая температура . . . . . . . . . . . . . от +5 °C до +35 °C
Рабочая влажность . . . . . . . . . . . . . . . . . . от 5 % до 85 %
(без образования конденсата)
Аудио выход (1 стерео пара)
Выходной уровень. . . . . . . . . . . . . . . . . . . . аудио выхода
Количество каналов . . . . . . . . . . . . . . . . . . . . . . . . . . . . . 2
Разъем . . . . . . . . . . . . . . . . . . . . . . . . . . . . . . . . . . . . . . RCA
Характеристики цифрового аудио
Частотный диапазон
CD . . . . . . . . . . . . . . . . . . . . . . . . . . . . . 2 Гц до 20 кГц
SACD . . . . . . . . . . . . . . . . . . . . . . . . . . . 2 Гц до 50 кГц
Соотношение “сигнал-шум”
CD . . . . . . . . . . . . . . . . . . . . . . . . . . . . . . . . . . . . 117 дБ
SACD . . . . . . . . . . . . . . . . . . . . . . . . . . . . . . . . . . 117 дБ
Динамический диапазон
CD . . . . . . . . . . . . . . . . . . . . . . . . . . . . . . . . . . . . 100 дБ
SACD . . . . . . . . . . . . . . . . . . . . . . . . . . . . . . . . . . 108 дБ
Суммарные гармонические искажения:
CD . . . . . . . . . . . . . . . . . . . . . . . . . . . . . . . . . . 0,0022 %
SACD . . . . . . . . . . . . . . . . . . . . . . . . . . . . . . . . 0,0020 %
Коэффициент детонации . . . . . . . . . . Предел измерения
(±0.001 % Вт, пиковое значение) или ниже
Цифровой выход
Цифровой оптический выход
. . . . . . . . . . . . . . Разъем цифрового оптического сигнала
Цифровой коаксиальный выход. . . . . . . . . . Разъем RCA
Принадлежности
Аудиокабель RCA (разъемы красный/белый) . . . . . . . . 1
Пульт ДУ . . . . . . . . . . . . . . . . . . . . . . . . . . . . . . . . . . . . . . 1
Сухие батарейки AAA/IEC R03 . . . . . . . . . . . . . . . . . . . .2
Кабель питания
Гарантийный талон (только модель для Европы)
Инструкции по эксплуатации (этот документ)
до
240 В, 50 Гц/60 Гц
. . . . .0,45 Вт
200 мВ (1 кГц, –20 дБ)
Примечание
• В связи с постоянным улучшением изделия его
технические характеристики и конструкция могут
изменяться без предварительного уведомления.
• Использованные здесь наименования компаний и
продуктов являются торговыми знаками или
зарегистрированными торговыми знаками
соответствующих ком
паний.
Примечание:
В соответствии со статьей 5 Закона Российской Федерации “О защите прав потребителя” и Указанием
Правительства Российской Федерации № 720 от 16 июня 1997 года корпорация Pioneer Europe NV
устанавливает условие на следующую продолжительность срока службы официально поставляемых на
Российский рынок товаров.
Аудио и видеооборудование: 7 лет
Переносное аудиооборудование: 6 лет
Другое оборудование (наушники, микрофон и т.д.): 5 лет
Автомобильная электроника: 6 лет
© PIONEER CORPORATION, 2012.
Все права защищены.
D3-7-10-6_A1_Ru
DeutschFrançais
Italiano Español Русский
Nederlands
15
Ru
Page 100

Discover the benefits of registering your product online at http://www.pioneer.co.uk (or http://www.pioneer.eu).
Découvrez les nombreux avantages offerts en enregistrant votre produit en ligne maintenant sur http://www.pioneer.fr (ou http://www.pioneer.eu).
Bitte nutzen Sie die Möglichkeit zur Registrierung Ihres Produktes unter http://www.pioneer.de (oder http://www.pioneer.eu)
Registra il tuo prodotto su http://www.pioneer.it (o http://www.pioneer.eu) e scopri subito quali vantaggi puoi ottenere!
Ontdek nu de voordelen van online registratie! Registreer uw Pioneer product via http://www.pioneer.nl - http://www.pioneer.be (of http://www.pioneer.eu)
Registre su producto en http://www.pioneer.es (o en http://www.pioneer.eu) Descubra los beneficios de registrarse on-line:
Зарегистрируйте Baшe изделие на http://www.pioneer-rus.ru (или http://www.pioneer.eu). Oзнакомьтесь с преимуществами регистрации в Интернет
PIONEER CORPORATION
1-1, Shin-ogura, Saiwai-ku, Kawasaki-shi, Kanagawa 212-0031, Japan
Корпорация Пайонир
1-1, Син-Огура, Сайвай-ку, г. Кавасаки, префектура Канагава, 212-0031, Япония
Импортер: ООО "ПИОНЕР РУС"
125040, Россия, г. Москва, ул. Правды, д.26 Тел.: +7(495) 956-89-01
PIONEER ELECTRONICS (USA) INC.
P.O. BOX 1540, Long Beach, California 90801-1540, U.S.A. TEL: (800) 421-1404
PIONEER ELECTRONICS OF CANADA, INC.
340 Ferrier Street, Unit 2, Markham, Ontario L3R 2Z5, Canada TEL: 1-877-283-5901, 905-479-4411
PIONEER EUROPE NV
Haven 1087, Keetberglaan 1, B-9120 Melsele, Belgium TEL: 03/570.05.11
PIONEER ELECTRONICS ASIACENTRE PTE. LTD.
253 Alexandra Road, #04-01, Singapore 159936 TEL: 65-6472-7555
PIONEER ELECTRONICS AUSTRALIA PTY. LTD.
5 Arco Lane, Heatherton, Victoria, 3202, Australia, TEL: (03) 9586-6300
PIONEER ELECTRONICS DE MEXICO S.A. DE C.V.
Blvd.Manuel Avila Camacho 138 10 piso Col.Lomas de Chapultepec, Mexico, D.F. 11000 TEL: 55-9178-4270
K002_B4_Ru
© 2012 PIONEER CORPORATION.
All rights reserved.
© 2012 PIONEER CORPORATION.
Tous droits de reproduction et de traduction réservés.
J1190171A SHN 00/00
Printed in Thailand / Imprimé en Thaïlande
 Loading...