

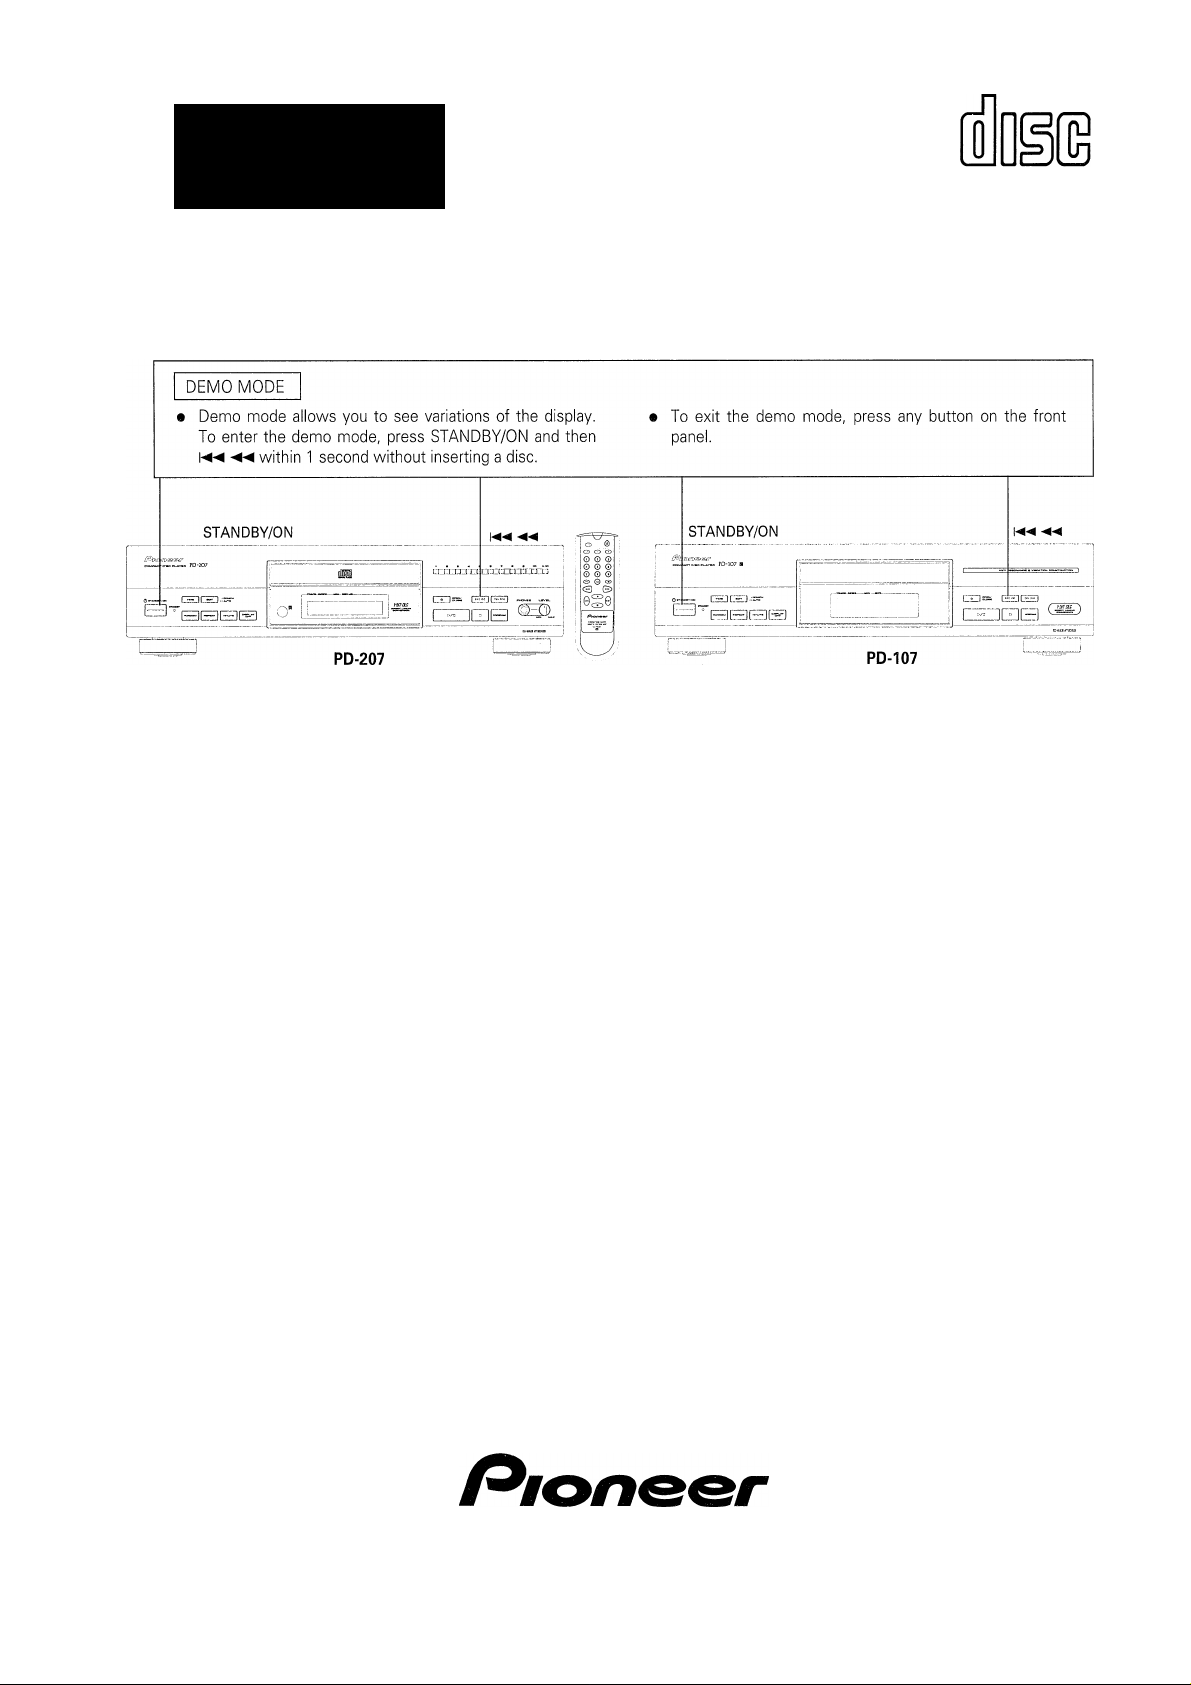
Page 1
Operating
Instructions
COMPACT DISC PLAYER
PD-207
PD-107
COMPACT
DIGITAL AUDIO
Thank you for buying this Pioneer product.
Please read through these operating instructions so you will
know how to operate your model properly. After you have
finished reading the instructions, put them away in a safe
place for future reference.
In some countries or regions, the shape of the power plug
and power outlet may sometimes differ from that shown in
the explanatory drawings. However, the method of
connecting and operating the unit is the same.
WARNING: TO PREVENT FIRE OR SHOCK HAZARD, DO
NOT EXPOSE THIS APPLIANCE TO RAIN OR MOISTURE.
"This product complies with the Low Voltage Directive (73/23/
EEC), EMC Directives (89/336/EEC, 92/31/EEC) and CE Marking
Directive (93/68/EEC)."
THE STANDBY/ON SWITCH IS SECONDARY CONNECTED
AND THEREFORE DOES NOT SEPARATE THE UNIT FROM
MAINS POWER IN THE STANDBY POSITION.
This player is for consumer use. If the player is used in a
business (for example, used for a long period at a restaurant),
the player will not be covered under warranty.
. CD Video, VIDEO CD, CD graphics and CD-ROM discs cannot
'be played with this player.
Page 2

IMPORTANT 1
A
The lightning flash with arrowhead symbol, within an
equilateral triangle, is intended to alert the user to the
presence of uninsulated "dangerous voltage" within the
product's enclosure that may be of sufficient magnitude
to constitute a risk of electric shock to persons.
CAUTION
RISK OF ELECTRIC SHOCK
DO NOT OPEN
CAUTION:
TO PREVENTTHE RISK OF ELECTRIC SHOCK, DO NOT
REMOVE COVER (OR BACK). NO USER-SERVICEABLE
PARTS INSIDE. REFER SERVICING TO QUALIFIED
SERVICE PERSONNEL.
A
The exclamation point within an equilateral triangle is
intended to alert the user to the presence of important
operating and maintenance (servicing) instructions in the
literature accompanying the appliance.
The cut-off plug should be disposed of and must not be
IMPORTANT 2
FOR USE IN THE UNITED
KINGDOM
The wires in this mains lead are coloured in
accordance with the following code:
If the plug provided is unsuitable for your socket
outlets, the plug must be cut off and a suitable plug
fitted.
Blue: Neutral
Brown: Live
inserted into any 13 amp socket as this can result in electric
shock. The plug or adaptor or the distribution panel should
be provided with a 5 amp fuse. As the colours of the wires
in the mains lead of this appliance may not correspond with
coloured markings identifying the terminals in your plug,
proceed as follows:
The wire which is coloured blue must be connected to the
terminal which is marked with the letter N or coloured black.
The wire which is coloured brown must be connected
to the terminal which is marked with the letter L or coloured
red.
IFOR EUROPEAN AND U.K. MODELS]
CAUTION
This product contains a laser diode of higher class
than 1. To ensure continued safety, do not remove
any covers or attempt to gain access to the inside
of the product.
Refer all servicing to qualified personnel.
Do not connect either wire to the earth terminal of a
three-pin plug.
NOTE
After replacing or changing a fuse, the fuse cover in the
plug must be replaced with a fuse cover which corre
sponds to the colour of the insert in the base of the plug
or the word that is embossed on the base of the plug, and
the appliance must not be used without a fuse cover. If
lost, replacement fuse covers can be obtained from your
dealer.
Only 5 A fuses approved by B.S.I. or A.S.T.A to B.S.
1362 should be used.
The following caution label appears on your player.
Location: rear of the player
n 1
LASER PRODUCT
POWER-CORD CAUTION
Handle the power cord by the plug. Do not pull out the plug by
tugging the cord and never touch the power cord when your hands
are wet as this could cause a short circuit or electric shock. Do not
place the unit, a piece of furniture, etc., on the power cord, or pinch
the cord. Never make a knot in the cord or tie it with other cords. The
power cords should be routed such that they are not likely to be
stepped on. A damaged power cord can cause a fire or give you an
electrical shock. Check the power cord once in a while. When you
find it damaged, ask your nearest PIONEER authorized service
center or your dealer for a replacement.
2
<XRB1002>
Page 3
ABOUT THESE OPERATING INSTRUCTIONS
CAUTIONS REGARDING HANDLING............................................. 3
CONNECTIONS ............................................................................... 4
CONFIRM SUPPLIED ACCESSORIES
PUT BATTERIES INTO THE REMOTE
CONTROL UNIT
NAMES AND FUNCTIONS OF PARTS
BASIC OPERATION....................................................................... 6
VARIOUS OPERATIONS
TO PLAY ONLY DESIRED TRACKS
CONVENIENT OPERATION FOR RECORDING
TIMER PLAYBACK
TROUBLESHOOTING.................................................................... 11
SPECIFICATIONS
The contents found in these Operating Instructions are based on
the PD-207 model, but they are also applicable to the PD-107
model.
AC power cord connection and functions
Some functions cannot be carried out depending on the connection
of the AC power cord.
...............................................................................
...............................................................
...............................................
..........................................................................
............................................................
...............................
...........................................
...........................................
.............................
Back cover
3
5
5
5
7
8
9
10
Cleaning the player
To clean the PLAYER, wipe with a soft, dry cloth. For stubborn dirt,
wet a soft cloth with a mild detergent solution made by diluting one
part detergent to 5 or 6 parts water, wring well, then wipe off the
dirt. Use a dry cloth to wipe the surface dry. Do not use volatile
liquids such as benzene and thinner which are harmful to the unit.
Storing discs
Be careful not to allow discs to warp; always store discs in their
cases vertically, avoiding locations with high heat or humidity, or
extremely low temperatures.
CD lens cleaner
The player's pickup lens should not become dirty in normal use, but
if for some reason it should malfunction due to soiling, consult your
nearest PIONEER authorized service center. Lens cleaners for CD
players are commercially available, but special care should be
exercised in their use since some may cause damage to the lens.
Condensation
Function
Timer playback
Program memory
Output level memory
When the AC power
cord is connected to
the unswitched outlet
of an amplifier or wall
outlet.
No
Yes
Yes
When the AC power
cord is connected to
the switched outlet
of an amplifier or
audio timer.
Yes
No
No
Location
Install the player in a well-ventilated location where it will not
be exposed to high temperatures or humidity.
Do not install the player in a location which is exposed to direct
rays of the sun, or near stoves or radiators. Excessive heat can
adversely affect the cabinet and internal components. Also,
installation of the player in a damp or dusty environment may result
in a malfunction or accident.
When this unit is brought into a v^/arm room from previously cold
surroundings or when the room temperature rises sharply,
condensation may form inside, and the unit may not be able to
attain its full performance. In cases like this, allow the unit to stand
for about an hour or raise the room temperature gradually.
Cleaning and handling compact discs
Always keep your discs clean by wiping them gently with a soft
cloth from the inner edge toward the outer periphery.
If a disc becomes very dirty, dip a soft cloth in water, and after
wringing it out well, wipe the dirt away gently, and then remove
any water drops with another soft, dry cloth.
Do not use record cleaning sprays or anti-static agents on discs.
Also, never clean discs with benzene, thinner, or other volatile
solvents, since damage to the disc surface may result.
With this player, use discs which display the mark shown below.
(Optical audio digital discs.)
When holding discs, do not touch their signal surfaces (the side
reflecting a "rainbow" pattern, opposite the label side). Hold by
the edges, or by one edge and the center hole.
Do not affix gummed labels or tape to the label surfaces. Also,
do not scratch or damage the label.
Discs rotate at high speed inside the player. Do not use damaged
(cracked or warped) discs.
Precautions regarding installation
Avoid placing the player on heat-generating sources such as
amplifiers.
Install this compact disc player as far as possible from tuners
and TV sets. Noise may be particularly noticeable when an
indoor antenna is used. In such a case, make use of an outdoor
antenna, or turn off power to the compact disc player.
Please place this unit on a level surface.
DIGITAL AUDIO
NOTES:
• When setting an 8 cnn CD single, do not use the 8 cm CD single
adaptor.
• Never attempt to load both 8 cm and 12 cm discs together,
since disc damage or other malfunctions may result. Always
load only one disc at a time.
3
<XRB1002>
Page 4
• Before making or changing the connections, switch off the
STANDBY/ON switch and disconnect the power cord from the
AC outlet.
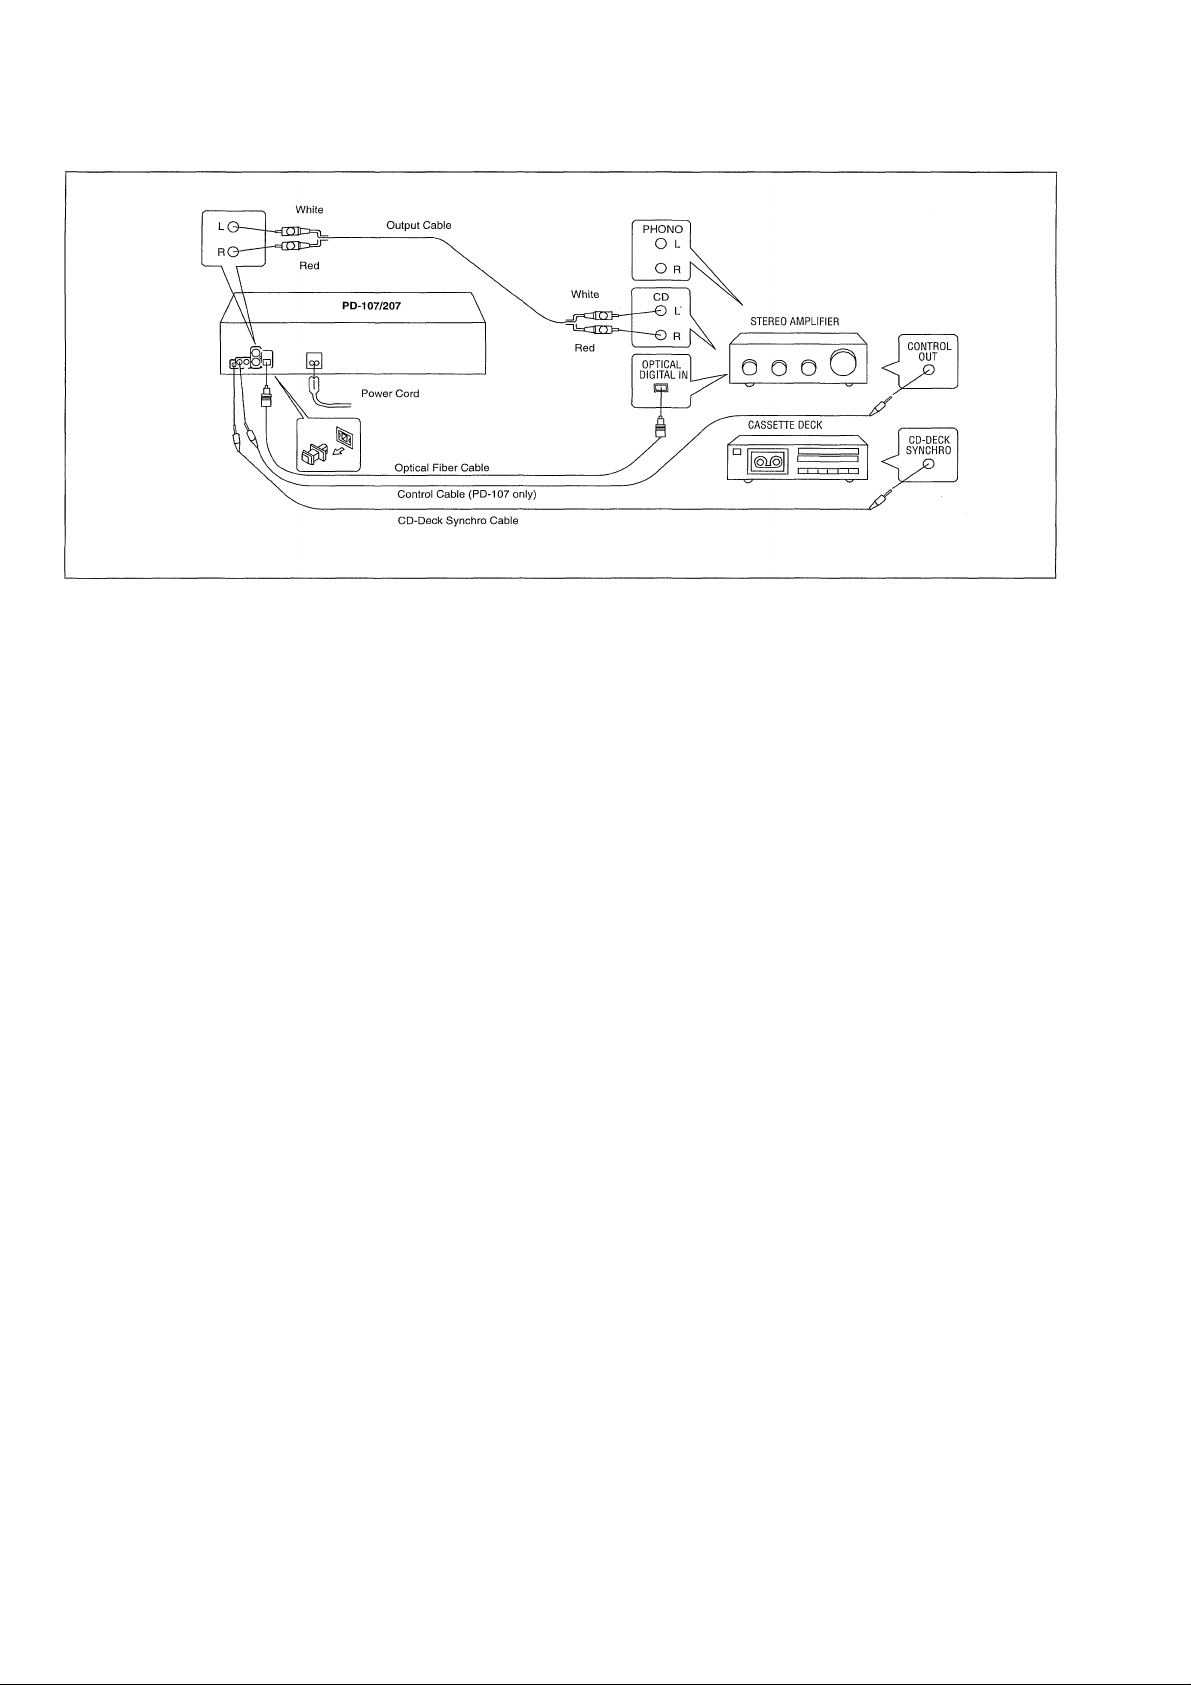
CONNECTING THE OUTPUT CABLE:
Connect the LINE OUT jacks of this unit to the input jacks (CD or
AUX) of the amplifier. Make sure that the white plugs are connected
to the left (L) jacks and the red plugs to the right (R) jacks.
• Be sure not to connect this unit to the amplifier's PHONO jacks,
as sound will be distorted and normal playback will not be
possible.
CD-Deck synchro function
If you have a Pioneer cassette deck provided with the CD-Deck
synchro function, connect the CD*DECK SYNCHRO jacks of the
CD player and cassette deck. With this function, synchro recording
can be carried out between the player and deck.
® For details on connections and operation, refer to the Operating
Instructions supplied with the cassette deck.
« The CD-DECK SYNCHRO cable is not supplied with the CD
player.
Notes for PD-107:
9 When a control cable is connected to the player's CONTROL IN
jack, direct control of the player with the remote control unit is
not possible. Operate the player with the remote control unit by
aiming it at the amplifier.
• Be sure to connect both of the control cable's plugs securely to
the CONTROL IN and CONTROL OUT terminals. Do not connect
only one end of the cable.
CONNECTING THE OPTICAL FIBER CABLE
This unit can be connected to an amplifier equipped with an optical
digital jack.
1. Remove the protective dust cap from this unit's DIGITAL OUT
OPTICAL jack
2. Use an optica! fiber cable to connect the DIGITAL OUT OPTICAL
jack of this unit to the optical input jack of the amplifier.
• Align the-plug of the optical fiber cable with the optical digital
jack and fully insert the plug to make a secure connection.
Use a separately sold optical fiber cable for the optical digital jack
connections.
NOTE:
In order to enable the CD-DECK SYNCHRO recording function, the
nornnal output cable must be connected to the stereo amplifier.
System remote control with a Pioneer stereo amplifier that has the Q mark
(Available with the PD-107 only.)
When a Pioneer stereo amplifier bearing the H >^ark is used,
connect the CONTROL IN jack on the rear panel of the CD player
to the CONTROL OUT jack of the amplifier. This will enable the
CD player to be controlled using the remote control unit supplied
with the stereo amplifier. If you do not plan to use this feature, it is
not necessary to connect the CONTROL IN/OUT jacks.
• Be sure to use the supplied control cable.
• The remote control unit supplied with the amplifier can be
used to control Play, Stop, Pause and Track Search.
• For instructions regarding connections and operation, refer
to the Operating Instructions provided with your stereo
amplifier.
4
<XRB1002>
Precautions concerning use of optical fiber cables
• Fully insert the optical fiber cable plugs all the way into the
jacks.
• Be careful not to fold or crimp the cable. When coiling an optical
fiber cable for storage, make sure the diameter of the coil is 15
cm (6 in.) or larger.
• Use an optical fiber cable with a length of 3 m (10 ft.) or less.
• Protect the optical fiber cable plugs from scratches and dust.
• When the unit is not connected using an optical fiber cable, be
sure to keep the protective dust cap plugged into the optical
digital output jack at all times.
CONNECTING THE POWER CORD:
Connect the power cord to a household AC wall outlet or an AC
outlet on your amplifier. (See the section "AC power cord connection
and functions" on page 3.)
• Make sure plugs are inserted fully into the jacks and wall outlet.
• Be sure to turn off the power of the amplifier when connecting
the power cord and output cable.
Page 5

© Output Cable x 1
@ Control Cable x 1 (PD-107 only)
@ AAA dry cell batteries x 2 (PD-207 only)
® Remote control unit x 1 (PD-207 only)
PUT BATTERIES INTO THE REMOTE
CONTROL UNIT (PD207 only)
1. Open the rear cover.
2. Install AAA batteries, correctly matching polarities.
3. Close the cover.
NOTES:
• In order to prevent battery leakage, remove the batteries when not
using the remote control unit for an extended period (one month or
more). If leakage occurs, carefully wipe away any battery fluid inside
the compartment, and replace the batteries with new ones.
• Do not allow books or other objects to rest on top of the re
mote control unit, since the buttons may be depressed, causing
fas ter exha us tion of the ba tteries.
Incorrect use of batteries may cause leakage or rupture.
Always be sure to follow these guidelines:
A. Always insert batteries into the battery compartment correctly
matching the positive © and negative © polarities, as shown
by the display inside the compartment.
B. Never mix new and used batteries.
C. Batteries of the same size may have different voltages,
depending on the brand. Do not mix different brands of
batteries.
FRONT PANEL
© STANDBY/ON switch and STANDBY indicator
@ TIME button
© COMPU/AUTO EDIT button
© Remote sensor (PD-207 only)
Receives the signal from the remote control unit.
® Disc tray
® Digit buttons (PD-207 only)
(1 -10, >10)
@ RANDOM button
® REPEAT button
® HI-LITE scan button
® DISPLAY OFF button
© OPEN/CLOSE button (^)
® Play/Pause button (►/!!)
® Track/Manual search buttons
(!◄◄ ◄◄ /►► )
© Stop button (■)
© PROGRAM button
® Headphones jack (PHONES) (PD-207 only)
® Headphones volume control (LEVEL)
(PD-207 only)
<REMOTE CONTROL OPERATIONS>
When operating the remote control unit, point the unit's infrared
signal transmitter at the remote control receiver on the front panel
of the player. The remote control unit can be used within a range
of about 7 meters from the remote sensor, and within angles of up
to about 30 degrees.
Note for PD-207:
If the remote control sensor window is in a position where it
receives strong light such as sunlight or fluorescent light, control
may not be possible.
Note for PD-107:
Operate the PD-107 using the remote control unit which accompa
nies the amplifier. (See page 4.)
<XRB1002>
Page 6

NAMES AND FUNCTIONS OF PARTS
REMOTE CONTROL UNIT (PD-207 only)
Remote control buttons with the same names or marks as buttons
on the front panel of the player control the same operations as the
corresponding front panel buttons.
® RANDOM play button
(D Program button (PGM)
(3) Digit buttons (1 -10, >10)
© MANUAL search buttons ( ◄◄ / ►► )
® TRACK search buttons (/ ►►I)
® POWER button
® OUTPUT LEVEL buttons (-/+)
® STOP button ( ■ )
@ PLAY button ( ► )
® PAUSE button (II)
Operations indicated by the [ y ] mark are performed with the
remote control unit. (PD-207 only)
1 Press STANDBY/ON (or POWER on the remote
control) to turn on the power to the player.
2 Press OPEN/CLOSE and load a disc.
• Place the disc with the label surface facing UP.
• Place a disc on the disc tray according to the 8 cm CD disc
guide or 12 cm CD disc guide respectively.
3 Press ►/!! (or ►) to start playback.
To pause playback temporarily:
Press ►/!! (or II). The ll indicator lights and playback is paused at
that point.
Pressing ►/!! (or ll) again (or ►) resumes playback from the position
where pause mode was entered.
To stop playback:
Press H.
To stop playback and take out the disc:
Press OPEN/CLOSE and remove the disc. Press OPEN/CLOSE
again to close the disc tray and then press STANDBY/ON (or
POWER on the remote control) to turn off the power.
To turn off the display
Press DISPLAY OFF. All the indicators other than DISP OFF go off.
The display circuit which may interfere with the sound quality does
not function.
• When the control button is pressed, the corresponding indicator
lights for about a few seconds.
• In stop mode or pause mode, the display remains lit even when
DISPLAY OFF is pressed.
Time display
During playback, pressing the TIME button changes the time display
in the following sequence: ® Time (elapsed playback time of the
track being played) -► ® Remain (remaining playback time of the
track being played) -► © AL Remain (remaining playback time from
the playing point to the end of the disc) -► ® Total (total playback
time of the disc).
• With track No. 30 or more, the Remain time ® cannot be
displayed.
• During random playback, AL Remain time © cannot be displayed,
o During Program playback, the remaining playback time of the
programmed tracks can be displayed with the AL Remain setting
©. The number of program steps and total time of program can
be displayed with the Total setting ®.
6
<XRB1002>
Page 7

Direct play - To play a particular track by
specifying the track number (PD-207 only)
When the track No. is specified with the digit buttons, playback
starts automatically from the beginning of the specified track.
To specify a track No. from 1 to 10, simply press the corresponding
digit button (□ - O). To specify track No. 11 or above, use I >10l.
Example : To enter track No. 26: | >10|, | 2 | ,| 6 |
To enter track No. 30: I >10|, I 3 | ,| 10 |
• When entering 11 or above, 110 I functions as 0.
• When I >10| is pressed, the digit button to be next entered
should be pressed within 5 seconds.
Track search < To search for a particular track
To display the playing time of each track
(KM CM OO C=CH
In the stop mode, pressing ►► (or ►►!) displays the playing
time of each track starting from track No.1.
• This function cannot be carried out with track No.30 or above.
Hi-Lite scan
When HI-LITE is pressed in the stop mode, playback starts from a
point 1 minute after the beginning of the track, and each track is
played for about 10 seconds. The ► indicator blinks in the Hi-Lite
scan mode.
• Hi-Lite scan can be carried out from the desired elapsed time of
the track. During playback, press HI-LITE at the point you want
to start Hi-Lite scan playback. The player memorizes the minute
and second of the point and Hi-Lite scan playback is carried out
from the memorized minute and second on each track.
When ►► (or ►►!) is pressed once or a number of times,
playback is advanced to the beginning of a track located after the
track being played. The position of the located track corresponds
to the number of times the button is pressed.
When ◄◄ (or !◄◄) is pressed once, playback returns to the
beginning of the track being played. When this button is pressed
more than once, playback is returned to a track located before the
track being played.
• When ►► (or ►►!) or ◄◄ (or !◄◄) is operated in pause
mode or stop mode, press ► to start playback.
NOTE:
During program playback, the ►► (or ►►Ij or
button can be used to select the programmed track.
(or j
c0 (3^
D /1^
(PD-207 only)
While ►► (or ►►) is kept pressed, playback rapidly
advances toward the end of the disc. When playback reaches
the end of the disc, the player enters pause mode and "END"
is displayed. While ◄◄ (or ◄◄) is kept pressed, playback
rapidly reverses toward the beginning of the disc. When the
desired passage is reached, release ►► (or ►►) or
◄◄ (or ◄◄). The player enters the original mode (playback or
pause) where ►► (or ►►) or ◄◄ (or ◄◄) is released.
NOTES:
• When the playback time of a track is less than one minute or is
shorter than the memorized time, Hi-Lite Scan playback is carried
out from the beginning of the track for about 10 seconds.
When playback time of a track is less than 10 seconds, the track
is played from the beginning to the end.
• During program playback or random playback, pressing HI-LITE
cancels program playback or random playback. The player
memorizes the time of the point at which HI-LITE was pressed
and Hi-Lite Scan playback is carried out from the memorized time
on each track. However, the program contents will not be erased.
• One track repeat cannot be performed in Hi-Lite scan playback
mode.
To repeat playback (repeat play)
To repeatedly play the displayed track, press REPEAT once. The
I^REP indicator lights. The REPEAT button can be pressed in any
playback mode.
To repeatedly play all tracks on the disc in normal playback mode
or in the specified playback mode (Program playback or Random
playback), press REPEAT twice. The REP indicator lights.
NOTE:
During program playback, Manual Search can be carried out in one
program step only.
Press RANDOM. The RND indicator lights and all tracks on the
disc are played in random order. After all tracks are played, the
player enters stop mode.
7
<XRB1002>
Page 8

VARIOUS OPERATIONS
Adjusting the sound volume (except for PD-107)
OUTPUT LEVEL
cz> c±:>
П
(PD-207 only)
IW<| <K] И> И>1
(PD-207 only)
(□ □ □ D g □ □ D Q n~g
Press OUTPUT LEVEL or" + " to aidjust the output level.
0 The output level can be aidjusteid between 0 (dB an(d -25 dB in
steps of 1 dB.
0 The ATT display shows the selected level.
0 The output level at the LINEOUT jacks and PHONES jack will
be adjusted simultaneously.
0 If the disc is in the player, the setting of the OUTPUT LEVEL
button is not erased even when the power is turned off.
However, if the power is turned off with an audio timer or by
unplugging the power cord, the setting of the OUTPUT LEVEL
button will be erased.
When the track search buttons are used:
When the digit buttons are used (PD-207 only):
о © ©
© © ©
© © ®
О ©
O/OD
5
O/DD
Program playback - To program tracks in desired order
Programming is possible in the stop or playback mode.
Only in the stop mode, the dialog display appears in each step to
facilitate programming.
When the track search buttons are used:
1 With the player stopped, press PROGRAM.
0 "TRACK?" appears on the display.
2 Then, press !◄◄◄◄ (or !◄◄) or ►►►►) (or ►►!) to
select the desired track.
0 The selected track number will be displayed.
3 Press PROGRAM. 4 Repeat steps 2-3 to program other tracks.
0 Up to 24 tracks (steps) can be programmed.
5 Press ►/!!.
The tracks are played in the programmed order. When all
programmed tracks have been played, the player enters stop
mode.
When the digit buttons are used (PD-207 only):
1 Press PROGRAM.
0 "TRACK?” appears on the display.
2 Enter the desired track numbers in a desired order
with the digit buttons.
0 Up to 24 tracks (steps) can be programmed.
3 Press ►/» (or ►).
The tracks are played in the programmed order. When all pro
grammed tracks have been played, the player enters stop mode.
8
<XRB1002>
(PD-207 only)
(PD-207 only)
To stop Program playback, press ■.
0 To go to the previous or next step in a program, press ◄◄
(or !◄◄) or ►► ►►! (or ►►!).
0 Each time a track is programmed, the display will show the
programmed number.
0 If the disc is in the player, the program contents will not be
erased even if the power is turned off.
Programming while listening to playback
During normal playback or program playback, you can program the
desired tracks.
During normal playback or Hi-Lite scan playback (Direct
program): The track being played can be programmed.
1. During playback, press PROGRAM to enter the program mode.
2. Whenever a track to be programmed is played, press PROGRAM.
You can repeat step 2 until up to 24 steps are programmed.
3. After programming, press ►/!! (or ►). The current playback is
cleared and the tracks are played in the programmed order.
During program playback:
Enter the desired tracks without pressing PROGRAM. The program
contents are added to the program being played.
Notes on time display
0 If the total playing time or total remaining time exceeds 100
minutes, the corresponding time will not be displayed.
0 If track No. 30 or above is programmed, total remaining time or
total playing time will not be displayed.
Page 9

то PLAY ONLY DESIRED TRACKS
Programming a pause (except for PD-107)
Inserting a pause in your program can be very useful when carrying
out recording. Press ll instead of entering a track number. "PA"
appears on the display.
• For example, when recording on both sides of a cassette tape, if
you program a pause after the last track to be recorded on the
first side, program playback will pause at that point to allow you
to switch tape sides. To resume program playback after the
player enters pause mode, press ►/!! (or
NOTES:
• /4 pause can be programmed only when the program procedure
is performed under stop mode.
• A pause cannot be programmed at the beginning of a program,
nor can two pauses be programmed one after the other.
• A pause inserted in a program is counted as one step.
• If a pause is programmed as the last step of a program, the
player will not enter the pause mode.
ll).
To clear all of the program contents
In the stop mode, press ■.
When the disc tray is ejected, the program contents will be
cleared.
IKM <M OO И>1
After approx, 1 second
/1
' —1
COMPU
J
1 T
■ M
11
г П Q] [T| □] ш га
1 POM 1 га га га Oil га
L ! га Ш И H И
га га га га га
With this function, tracks are automatically programmed for both
sides of the tape.
COMPU PROGRAM EDIT
The player automatically rearranges the order in which tracks are
played back so that their total playing time becomes the specified
playing time as near as possible.
AUTO PROGRAM EDIT
Tracks are selected within the designated time, starting from the
first track and progressing in order.
1 Select the Сотри Program Edit mode or Auto
Program Edit mode with COMPU/AUTO EDIT.
To enter the Сотри Program Edit mode; Press the button
once. "COMPU" appears on the display. After approximately 1
second "TIME?" appears on the display.
To enter the Auto Program Edit mode: Press the button
twice. "AUTO" appears on the display. After approximately 1
second "TIME?" appears on the display.
To program all tracks on the disc: press the button once and
do not perform step 2.
In about three seconds, the player will automatically select the
tape length (46, 60 or 90 minutes) which will allow recording
of all tracks on the disc, then program the tracks.
<XRB1002>
9
Page 10

CONVENIENT OPERATION FOR RECORDING
2 Designate the length of tape to be used.
When the digit buttons are used (PD-207 only):
Press the digit buttons to set the length (time) of the tape.
Press the 10's digit button and 1's digit button sequentially.
(To enter 9 minutes or less, press M and then the corresponding
digit button.)
When the track search buttons are used:
Press ◄◄ (or !◄◄) or ►► (or ►►!) to set the length
(time) of the tape.
• Each time the buttons are pressed, the time setting will
change in the following order:
46 ^ 54 60 ^ 74 90
I
______________
• The displayed time is memorized and the player starts
calculating when COMPU/AUTO EDIT is pressed or if no
other time setting is selected within 3 seconds.
Example: The tape playing time of 46 minutes is selected.
COMPU PROGRAM EDIT
Side A
П
в
1 .1
11 Ш CD m ш
СЖЗ
*
1 ■ 1 1
I pGH 1 СП EU [Л]
11 г
LI 0 II L L •_'/ / CD ID
[¥-'
Side
n Г
LI LI 0 L L J L ca ra
________________
СП
I Unit: Minutes
AUTO PROGRAM EDIT
Side A
Il г
Ll и
СГ"
Side В
Il г
LI LI о L
[7”
1 1 - П 1 Ш [D Ш Ш Ш
l-l г
■ L -LI L CD
4
J l -ur.
1
1 ' 1 LI CD CD CD oa
To confirm the programmed results:
After completion of programming, press COMPU/AUTO EDIT; each
time the button is pressed, the program results will be alternately
displayed for tape sides A and B.
NOTES:
• Up to 24 steps can be progrannnned.
• With discs containing 24 tracks or more, programming may not
be correctly performed.
• If the selected time is too short for any track to be programmed,
programming cannot be performed.
• If you wish to enter the time with the digit buttons after the
time is already entered with ◄◄ (or ым) or ►► (or
►Hj in step 2, press I >10\. The digit buttons can now be
operated.
• If the disc is in the player, the contents of the Сотри program
edit are not cleared even when the power is turned off.
However, if the power is turned off with an audio timer or by
unplugging the power cord, the program contents will be erased.
TIMER PLAYBACK
By using a commercially available audio timer, it is possible to
initiate playback at any time automatically.
1. Turn on the power to the player, load a disc into the disc tray
and close the disc tray with OPEN/CLOSE.
2. Set the time at which you wish playback to begin. The timer
will supply power to both the amplifier and the player at the
preset time, turning all the components on and initiating the
playback mode. Playback starts from the first track.
NOTES:
• If no disc has been loaded in the player, the player will enter the
standby mode when the audio timer turns the player's power
on.
• Pressing any function buttons before commencement of timer
start cancels the timer start function.
10
<XRB1002>
Page 11

Incorrect operations are often mistaken for trouble and malfunctions. If you think that there is something wrong with this component, check the
points below. Sometimes the trouble may lie in another component. Investigate the other components and electrical appliances being used.
If the trouble cannot be rectified even after exercising the checks listed below, ask your nearest PIONEER authorized service center or your
dealer to carry out repair work.
Symptom
Disc tray is not expelled when OPEN/
CLOSE is pressed.
When playback is started, it stops
immediately. Pauses or stops during
playback.
No sound
Sound is distorted, noise is output.
With certain discs, loud noise is
produced, or play stops.
The picture of the TV screen is
fluctuated or FM broadcast has noise
interference.
Cause Remedy
• Power plug is disconnected from outlet.
• The STANDBY/ON switch is set to STANDBY.
• Disc is loaded upside down.
• Smudges etc., on the disc.
• Output cables are connected incorrectly or
loosely.
e Incorrect operation of stereo amplifier.
• Pin plugs and/or amplifier terminals are dirty,
e Player is in pause mode.
• Incorrect connections.
• Pin plugs and/or amplifier terminals are dirty,
• Interference is being picked up from a TV
set.
• Disc has bad scratch or warp.
• Disc is extremely dirty.
• Interference is being picked up from the CD
player.
• Connect plug to amplifier or wall outlet.
• Press the STANDBY/ON switch ON.
• Load the disc correctly with the label side UP.
• Clean the smudges from the disc and then
play it again.
• Connect properly.
• Check the settings of amplifier switches and
sound volume controls.
• Clean away dirt.
• Press ►/!! (or ►).
• Connect to amplifier's AUX or CD terminals.
Do not connect to PHONO terminals.
• Clean away dirt.
• Switch OFF TV set, or move player away from
TV set.
• Replace the disc.
• Clean disc.
• Unplug the AC power cord, or move the player
away from TV or tuner.
Remote control will not function.
Abnormal functioning of this unit may be caused by static electricity or other external interference. To restore normal operation, unplug the AC
power cord and then plug it in again.
(PD-207 only)
• Dead batteries.
• Too far from player or wrong angle.
• Obstruction between player and remote
control unit.
(PD-107 only)
• Control cable is not connected.
• Replace batteries.
• The distance between the remote control unit
and player should be no more than about 7
meters . The operational angle against the front
panel is within 30° from the right or left end of
the player.
• Relocate remote control unit or remove
obstruction.
• Connect control cable properly (see page 4).
11
<XRB1002>
Page 12

TROUBLESHOOTING
SELF-DIAGNOSTICS FUNCTION
The unit incorporates the self-diagnostic function.
When an abnormality is detected during operation of the unit, an error message (service No.) appears on the unit's display automatically. Treat
the error by following the instructions in "Countermeasures".
Display on the unit
Service No.
Service No.
из
TRACK
1 1 "1
LI J
Г
ED IT
INDEX MIN SEC/dB
n
Unit Status
There may be a disc loading error.
in in Ш El Ш
ш ш ш ш ы
El ED E] ED m
СО ED El ED B
Countermeasures
• The disc may be set in a wrong position; load the set again in
the correct position.
• Check if there is any foreign object loaded.
U4
There may be a disc setup error.
• Ensure that the disc is not set upside down.
• The disc may be dirty; clean the disc and set it again.
If the same display appears again, there may be an error in the mechanical section. When requesting servicing, please also let us know the
service number displayed on the unit.
1. General
Type............................................ Compact disc digital audio system
Power requirements....................................AC 220 - 240 V, 50/60 Hz
Power consumption
Operating temperature ...................................................+5°C - +35°C
Weight.........................................................................................3.1 kg
External dimensions
....................................................................
...........................
420(W) X 101 (H) X 267(D) mm
12 W
3. Output terminal
Audio line output jacks
Control input/output jacks (PD-107 only)
CD-DECK SYNCHRO jack
Headphones jack (with volume control) (PD-207 only)
Optical digital output jack
4. Accessories
2. Audio section
PD-207, PD-107
Frequency response
S/N ratio
...........................................................................
Dynamicrange
Harmonic distortion
Output voltage....................................................................2.0 V (EIAJ)
Wow and flutter
Channels
................................................................
.......................................................2 Hz - 20 kHz
....................................................
...........................................
...............................................
96 dB or more (EIAJ)
0.003% or less (EIAJ)
Limit of measurement
(±0.001 % W.PEAK) or less (EIAJ)
2-channel (stereo)
98 dB (EIAJ)
• Remote control unit (PD-207 only)
• AAA dry cell batteries (PD-207 only)
..............................................
...........................................
• Control cable (PD-107 only).........................................................1
• Output cable................................................................................ 1
• Operating instructions................................................................. 1
« Warranty Card..............................................................................1
NOTE:
Specifications and design subject to possible modification without
notice, due to improvements.
1
2
Published by Pioneer Electronic Corporation.
Copyright © 1997 Pioneer Electronic Corporation.
All rights reserved.
PIONEER ELECTRONIC CORPORATION 41 , Meguro 1-Chôme, Meguro-ku, Tokyo 153, Japan
PIONEER ELECTRONICS [USA] INC. P.O. BOX 1540, Long Beach, California 90801 -1540
PIONEER ELECTRONICS OF CANADA, INC. 300 Allstate Parkway, Markham, Ontario L3R 0P2, Canada
PIONEER ELECTRONIC [EUROPE] N.V. Haven 1087, Keetberglaan 1, 9120 Melsele, Belgium TEL: 03/570.05.11
PIONEER ELECTRONICS AUSTRALIA PTY. LTD. 178-184 Boundary Road, Braeside, Victoria 3195, Australia, TEL: [03] 9586-6300
PIONEER ELECTRONICS DE MEXICO S.A. DE C.V. San Lorenzo Num 1009 3er piso Desp. 302 Col. Del Valle, Mexico D.F. C.P. 03100
Printed in Belgium <XRB1002-A>
TEL: 5-688-52-90
 Loading...