

Page 1

Register Your Product on
http://www.pioneerelectronics.com (US)
http://www.pioneerelectronics.ca (Canada)
Enregistrez votre produit sur:
http://www.pioneerelectronics.com (États-Unis)
http://www.pioneerelectronics.ca (Canada)
DVD Player
Lecteur DVD
DV-220V-K
Operating Instructions
Mode d’emploi
Page 2

En
2
The exclamation point within an equilateral
triangle is intended to alert the user to the
presence of important operating and
maintenance (servicing) instructions in the
literature accompanying the appliance.
The lightning flash with arrowhead symbol,
within an equilateral triangle, is intended to
alert the user to the presence of uninsulated
“dangerous voltage” within the product’s
enclosure that may be of sufficient
magnitude to constitute a risk of electric
shock to persons.
CAUTION:
TO PREVENT THE RISK OF ELECTRIC
SHOCK, DO NOT REMOVE COVER (OR
BACK). NO USER-SERVICEABLE PARTS
INSIDE. REFER SERVICING TO QUALIFIED
SERVICE PERSONNEL.
CAUTION
RISK OF ELECTRIC SHOCK
DO NOT OPEN
IMPORTANT
D3-4-2-1-1_A1_En
IMPORTANT NOTICE
THE SERIAL NUMBER FOR THIS EQUIPMENT IS LOCATED IN THE REAR.
PLEASE WRITE THIS SERIAL NUMBER ON YOUR ENCLOSED WARRANTY CARD AND KEEP IN A SECURE AREA.
THIS IS FOR YOUR SECURITY.
D1-4-2-6-1*_A1_En
NOTE:
This equipment has been tested and found to comply with the limits for a Class B digital device, pursuant to Part 15
of the FCC Rules. These limits are designed to provide reasonable protection against harmful interference in a
residential installation. This equipment generates, uses, and can radiate radio frequency energy and, if not installed
and used in accordance with the instructions, may cause harmful interference to radio communications. However,
there is no guarantee that interference will not occur in a particular installation. If this equipment does cause
harmful interference to radio or television reception, which can be determined by turning the equipment off and on,
the user is encouraged to try to correct the interference by one or more of the following measures:
— Reorient or relocate the receiving antenna.
— Increase the separation between the equipment and receiver.
— Connect the equipment into an outlet on a circuit different from that to which the receiver is connected.
— Consult the dealer or an experienced radio/TV technician for help.
D8-10-1-2_A1_En
Information to User
Alterations or modifications carried out without appropriate authorization may invalidate the user’s right to operate
the equipment.
D8-10-2_A1_En
This Class B digital apparatus complies with
Canadian ICES-003.
D8-10-1-3_A1_En
CAUTION
This product satisfies FCC regulations when shielded cables and connectors are used to connect the unit to other
equipment. To prevent electromagnetic interference with electric appliances such as radios and televisions, use
shielded cables and connectors for connections.
D8-10-3a_A1_En
WARNING
To prevent a fire hazard, do not place any naked
flame sources (such as a lighted candle) on the
equipment.
D3-4-2-1-7a_A_En
Thank you for buying this Pioneer product.
Please read through these operating instructions so you will know how to operate your model properly.
After you have finished reading the instructions, put them away in a safe place for future reference.
Page 3
En
English
3
Read these instructions.
Keep these instructions.
Heed all warnings.
Follow all instructions.
Do not use this apparatus near water.
Clean only with dry cloth.
Do not block any ventilation openings. Install in
accordance with the manufacturer’s instructions.
Do not install near any heat sources such as
radiators, heat registers, stoves, or other apparatus
(including amplifiers) that produce heat.
Do not defeat the safety purpose of the polarized or
grounding-type plug. A polarized plug has two
blades with one wider than the other. A grounding
type plug has two blades and a third grounding
prong. The wide blade or the third prong are
provided for your safety. If the provided plug does
not fit into your outlet, consult an electrician for
replacement of the obsolete outlet.
Protect the power cord from being walked on or
pinched particularly at plugs, convenience
receptacles, and the point where they exit from the
apparatus.
1)
2)
3)
4)
5)
6)
7)
8)
9)
10)
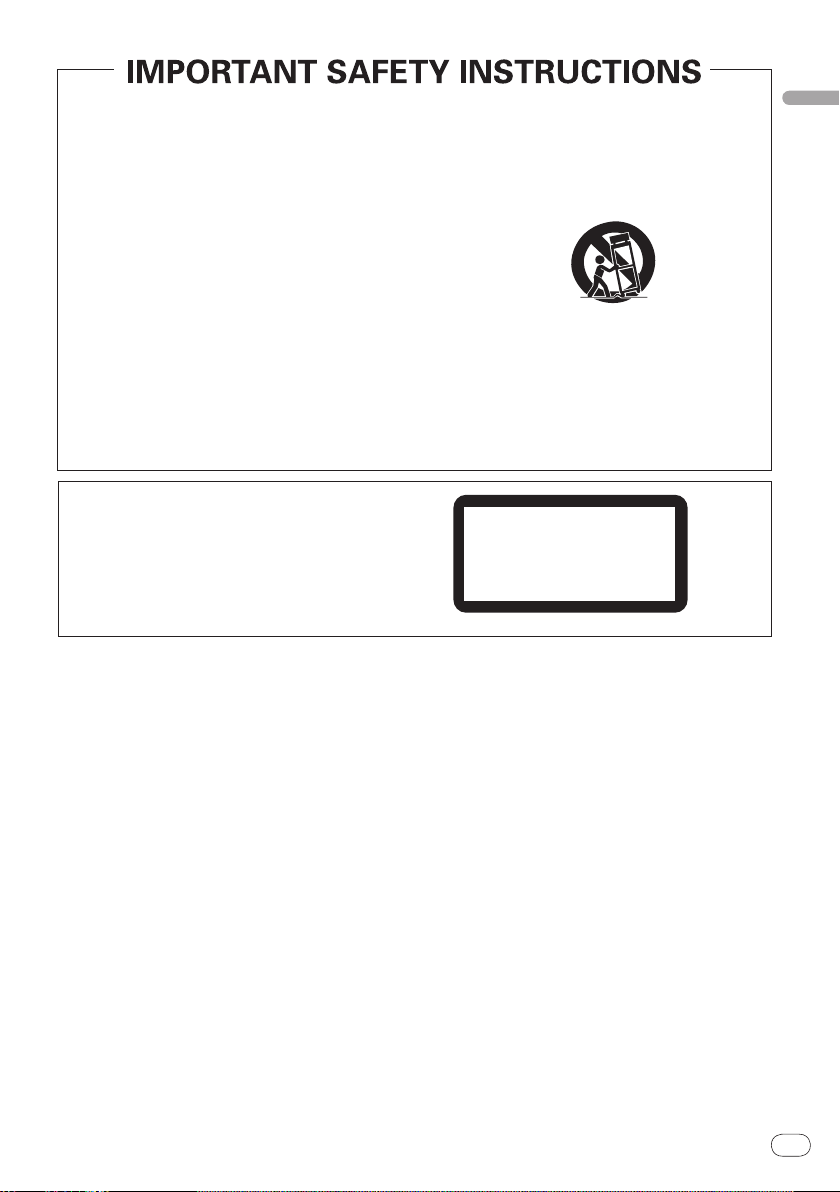
Only use attachments/accessories specified by the
manufacturer.
Use only with the cart, stand, tripod, bracket, or
table specified by the manufacturer, or sold with the
apparatus. When a cart is used, use caution when
moving the cart/apparatus combination to avoid
injury from tip-over.
Unplug this apparatus during lightning storms or
when unused for long periods of time.
Refer all servicing to qualified service personnel.
Servicing is required when the apparatus has been
damaged in any way, such as power-supply cord or
plug is damaged, liquid has been spilled or objects
have fallen into the apparatus, the apparatus has
been exposed to rain or moisture, does not operate
normally, or has been dropped.
P1-4-2-2_En
11)
12)
13)
14)
CAUTION
This product is a class 1 laser product, but this
product contains a laser diode higher than Class 1.
To ensure continued safety, do not remove any covers
or attempt to gain access to the inside of the product.
Refer all servicing to qualified personnel.
D3-4-2-1-8*_C_En
CLASS 1
LASER PRODUCT
VENTILATION CAUTION
When installing this unit, make sure to leave space
around the unit for ventilation to improve heat
radiation (at least 10 cm at top, 10 cm at rear, and
10 cm at each side).
WARNING
Slots and openings in the cabinet are provided for
ventilation to ensure reliable operation of the
product, and to protect it from overheating. To
prevent fire hazard, the openings should never be
blocked or covered with items (such as newspapers,
table-cloths, curtains) or by operating the
equipment on thick carpet or a bed.
D3-4-2-1-7b_A_En
Operating Environment
Operating environment temperature and humidity:
+5 °C to +35 °C (+41 °F to +95 °F); less than 85 %RH
(cooling vents not blocked)
Do not install this unit in a poorly ventilated area, or in
locations exposed to high humidity or direct sunlight (or
strong artificial light)
D3-4-2-1-7c*_A1_En
WARNING
This equipment is not waterproof. To prevent a fire
or shock hazard, do not place any container filled
with liquid near this equipment (such as a vase or
flower pot) or expose it to dripping, splashing, rain
or moisture. D3-4-2-1-3_B_En
WARNING
The voltage of the available power supply differs
according to country or region. Be sure that the
power supply voltage of the area where this unit
will be used meets the required voltage (e.g., 230 V
or 120 V) written on the rear panel.
D3-4-2-1-4_A_En
Before plugging in for the first time, read the following
section carefully.
Page 4

En
4
If the AC plug of this unit does not match the AC
outlet you want to use, the plug must be removed
and appropriate one fitted. Replacement and
mounting of an AC plug on the power supply cord of
this unit should be performed only by qualified
service personnel. If connected to an AC outlet, the
cut-off plug can cause severe electrical shock. Make
sure it is properly disposed of after removal.
The equipment should be disconnected by removing
the mains plug from the wall socket when left
unused for a long period of time (for example, when
on vacation).
D3-4-2-2-1a_A_En
CAUTION
The STANDBY/ON switch on this unit will not
completely shut off all power from the AC outlet.
Since the power cord serves as the main disconnect
device for the unit, you will need to unplug it from
the AC outlet to shut down all power. Therefore,
make sure the unit has been installed so that the
power cord can be easily unplugged from the AC
outlet in case of an accident. To avoid fire hazard,
the power cord should also be unplugged from the
AC outlet when left unused for a long period of time
(for example, when on vacation).
D3-4-2-2-2a_A_En
Wash hands after handling
This product contains mercury. Disposal of this
material may be regulated due to environmental
considerations. For disposal or recycling
information, please contact your local authorities or
the Electronics Industries Alliance : www.eiae.org.
K057_En
This product is for general household purposes. Any
failure due to use for other than household purposes
(such as long-term use for business purposes in a
restaurant or use in a car or ship) and which
requires repair will be charged for even during the
warranty period. K041_En
POWER-CORD CAUTION
Handle the power cord by the plug. Do not pull out the
plug by tugging the cord and never touch the power
cord when your hands are wet as this could cause a
short circuit or electric shock. Do not place the unit, a
piece of furniture, etc., on the power cord, or pinch the
cord. Never make a knot in the cord or tie it with other
cords. The power cords should be routed such that they
are not likely to be stepped on. A damaged power cord
can cause a fire or give you an electrical shock. Check
the power cord once in a while. When you find it
damaged, ask your nearest PIONEER authorized
service center or your dealer for a replacement. S002*_En
Page 5

En
English
5
S001_En
Selecting fine audio equipment such as the unit
you’ve just purchased is only the start of your
musical enjoyment. Now it’s time to consider how
you can maximize the fun and excitement your
equipment offers. This manufacturer and the
Electronic Industries Association’s Consumer
Electronics Group want you to get the most out of
your equipment by playing it at a safe level. One that
lets the sound come through loud and clear without
annoying blaring or distortion-and, most importantly,
without affecting your sensitive hearing.
Sound can be deceiving. Over time your hearing
“comfort level” adapts to higher volumes of sound.
So what sounds “normal” can actually be loud and
harmful to your hearing. Guard against this by
setting your equipment at a safe level BEFORE your
hearing adapts.
To establish a safe level:
• Start your volume control at a low setting.
• Slowly increase the sound until you can hear it
comfortably and clearly, and without distortion.
Once you have established a comfortable sound
level:
• Set the dial and leave it there.
Taking a minute to do this now will help to prevent
hearing damage or loss in the future. After all, we
want you listening for a lifetime.
We Want You Listening For A Lifetime
Used wisely, your new sound equipment will
provide a lifetime of fun and enjoyment. Since
hearing damage from loud noise is often
undetectable until it is too late, this manufacturer
and the Electronic Industries Association’s
Consumer Electronics Group recommend you avoid
prolonged exposure to excessive noise. This list of
sound levels is included for your protection.
Decibel
Level Example
30 Quiet library, soft whispers
40
Living room, refrigerator, bedroom away from traffic
50 Light traffic, normal conversation, quiet office
60 Air conditioner at 20 feet, sewing machine
70 Vacuum cleaner, hair dryer, noisy restaurant
80
Average city traffic, garbage disposals, alarm clock
at two feet.
THE FOLLOWING NOISES CAN BE DANGEROUS
UNDER CONSTANT EXPOSURE
90
Subway, motorcycle, truck traffic, lawn mower
100 Garbage truck, chain saw, pneumatic drill
120 Rock band concert in front of speakers,
thunderclap
140 Gunshot blast, jet plane
180 Rocket launching pad
Information courtesy of the Deafness Research Foundation.
Page 6

En
6
Before you start
What’s in the box .............................................................7
Loading the batteries in the remote control ................7
Connections
Connecting using an audio/video cable .......................8
Connecting using an HDMI cable .................................8
Part Names and Functions
Remote control ...............................................................10
Playback
Playing discs or files......................................................12
Example of display on main unit display window
Playing files stored on USB devices ...........................14
Recording audio CD tracks on USB devices .............14
Playing in the desired order (Programmed Play)
...........13
..........15
Changing the settings
Audio Settings parameters ..........................................16
Video Adjust parameters ..............................................16
Initial Settings parameters ...........................................16
Playable discs and files
Playable discs.................................................................18
Playable files ..................................................................19
Additional information
Troubleshooting .............................................................20
Language Code Table and Country/Area Code
Table ................................................................................24
Cautions on use .............................................................25
Handling discs ...............................................................26
Specifications .................................................................26
Page 7

En
English
7
Before you start
What’s in the box
Remote Control
Power cable
Audio/ video cable
AA batteries (R6) x 2
Warranty card
Operating instructions (this document)
Loading the batteries in the
remote control
Open the rear lid and insert the batteries
as shown on the diagram below.
To close the rear lid, line up the catch with the groove and slide
in the direction of the arrow ().
WARNING
Do not use or store batteries in direct sunlight or other
excessively hot place, such as inside a car or near
a heater. This can cause batteries to leak, overheat,
explode or catch fire. It can also reduce the life or
performance of batteries.
Notes
Do not use any batteries other than the ones
specified. Also, do not use a new battery together with
an old one.
When loading the batteries into the remote control,
set them in the proper direction, as indicated by the
polarity marks ( and ).
Do not heat batteries, disassemble them, or throw
them into flames or water.
Batteries may have different voltages, even if they are
the same size and shape. Do not use different types of
batteries together.
To prevent leakage of battery fluid, remove the
batteries if you do not plan to use the remote control
for a long period of time (1 month or more). If the fluid
should leak, wipe it carefully off the inside of the case,
then insert new batteries. If a battery should leak and
the fluid should get on your skin, flush it off with large
quantities of water.
When disposing of used batteries, please comply with
governmental regulations or environmental public
institution’s rules that apply in your country/ area.
Page 8

En
8
Connections
TV
Audio/video
cable (included)
Red
White
To audio/video
input terminals
Yellow
TV
To HDMI input
terminal
Match the direction of the plug to
the terminal and insert straight.
HDMI cable
(commercially
available)
Be sure to turn off the power and unplug the power
cord from the power outlet whenever making or
changing connections.
Connect the power cord after all the connections
between devices have been completed.
Connecting using an audio/
video cable
When an HDMI-compatible device is connected, the
resolution is displayed on the front panel display.
The resolution of the video signals output from the
player’s HDMI OUT terminal is changed manually.
Change the HDMI Resolution setting (page 17).
Settings for two units can be stored in the memory.
This player is designed for connection to HDMI-
compatible devices. It may not operate properly if
connected to DVI devices.
Player's rear panel
Connecting using an HDMI
cable
By using an HDMI cable, digital signals can be transferred to an HDMI-compatible TV on a single cable with
no loss of picture or sound quality. After connecting,
make the player’s resolution and HDMI color settings
according to the HDMI-compatible TV. Also refer to the
HDMI-compatible TV’s operating instructions.
Connecting to a TV
Player's rear panel
HDMI, the HDMI Logo and High-Definition
Multimedia Interface are trademarks or registered
trademarks of HDMI Licensing, LLC.
Notes
This player’s interface is designed based on the High-
Definition Multimedia Interface specification.
Page 9

En
English
9
Connecting to an AV receiver or
AV receiver
or amplifier
TV
From HDMI
output
terminal
To HDMI input
terminal
To HDMI input
terminal
Match the direction of the plug to
the terminal and insert straight.
HDMI cable
(commercially
available)
HDMI cable
(commercially
available)
amplifier
Player's rear panel
Connecting using commercially available
cables
The player can be connected to a TV, etc., using
commercially available component video cables.
The player can be connected to an AV amplifier, etc.,
using commercially available digital audio cables.
Audio signals that can be output
from the player’s HDMI OUT
terminal
44.1 kHz to 96 kHz, 16-bit/ 20-bit/ 24-bit 2-channel
linear PCM audio (including 2-channel downmixing)
Dolby Digital 5.1-channel audio
DTS 5.1-channel audio
MPEG audio
Manufactured under license from Dolby
Laboratories. Dolby and the double-D symbol are
trademarks of Dolby Laboratories.
Manufactured under license under U.S. Patent #:
5,451,942 & other U.S. and worldwide patents issued
& pending. DTS and DTS Digital Out are registered
trademarks and the DTS logos and Symbol are
trademarks of DTS, Inc. © 1996-2008 DTS, Inc. All
Rights Reserved.
Page 10

En
10
Part Names and Functions
STANDBY/ON
OPEN/CLOSE
AUDIO
SUBTITLE
ANGLE
1
23
CLEAR
USB
DVD/
4
5
6
7
89
0
TOP MENU
MENU
ENTER
RETURN
PLAY MODE
ZOOM
DISPLAY
PLAY
PREV
PAUSE
DVD
STOP NEXT
HOME
MENU
REC
USB
5
6
10
11
4
8
12
13
1
2
3
7
9
22
14
16
15
19
20
21
23
24
18
17
Audio Settings
Play Mode Disc Navigator
Initial Settings
Video Adjust
HOME MENU
DVD
CD –> USB Rec
A-B Repeat
Repeat
Random
Program
Search Mode
A(Start Point)
B(End Point)
Off
Play Mode
Remote control
1 STANDBY/ON
Press to turn the power on and off.
2 AUDIO
For discs or files including multiple audio streams/
channels, the audio stream/ channel can be switched
during playback.
3 SUBTITLE
On DVD-Video or DivX discs containing subtitles
in multiple languages, the subtitle can be switched
during playback.
4 Number buttons (0 to 9)
Use these to specify and play the title, chapter, track
or file you want to view/ listen to. Also use them to
select items on menu screens, etc.
5 TOP MENU
6 / / /
Press to display the top menu of the DVD-Video.
Use these to select items, change settings and move
the cursor.
ENTER
Use this to implement the selected item or enter a
setting that you have changed.
7 HOME MENU
Press to display/ hide the Home Menu.
Audio Settings (page 16)
Video Adjust (page 16)
Play Mode (PLAY MODE on page 10)
Disc Navigator (MENU on page 11)
Initial Settings (page 16)
CD -> USB Rec (page 14)
8 PLAY
Press to start playback.
9 / /
Press during playback to fast-reverse.
Press in the pause mode to move backward
frame-by-frame.
Press and hold in while in the pause mode for
slow play in the reverse direction.
a PREV
Press to return to the beginning of the currently
playing title, chapter, track or file. Press twice to
move back to the beginning of the previous title,
chapter, track or file.
b PAUSE
Press to stop playback temporarily. Press again to
resume.
c USB REC (page 14)
Press to display the CD -> USB Rec.
d PLAY MODE
Press to display/ hide the Play Mode screen.
Page 11

En
English
11
A-B Repeat
01
04
02
05
03
06
Disc Navigator: Title
01- 49: – –
The specified section within a single title or
track is played repeatedly.
Repeat
Plays titles, chapters, tracks or files repeatedly.
Random
Playes titles, chapters or tracks in random
order.
Program (page 15)
Plays titles, chapters, tracks or files in the order
in which you program them.
Search Mode
Plays the specified number or time within the
title, chapter, track or file.
The Play Mode function may not work for some
discs or files.
e OPEN/CLOSE
Open the disc tray and load the disc.
f ANGLE
On DVD-Video discs containing multiple angles, the
angle can be switched during playback.
g DVD/USB (page 14)
Press to switch between the DVD and USB modes.
h CLEAR
Press to clear the selected item. Use this for example if you input the wrong number.
i MENU
Press to display the menu screen or Disc
Navigator.
Select and play the title, chapter, track or file
from the Disc Navigator.
Ex.: DVD video Disc Navigator
l NEXT
Press during playback to skips ahead to the beginning of the next title, chapter, track or file.
m STOP
When STOP is pressed during playback, the
point at which playback was stopped is stored in
the memory. When PLAY is pressed, playback
resumes from the point at which it was stopped.
n DISPLAY
The elapsed time, amount remaining, etc., is
displayed.
o ZOOM
Zooming on the image
j RETURN
Press to return to the previous screen.
k / /
Press during playback to fast-forward.
Press in the pause mode to move forward
frame-by-frame.
Press and hold in while in the pause mode for
slow play in the forward direction.
Page 12

En
12
Playback
1
Turn the power on.
3
Load the disc.
4
Starts playback.
2
Open the disc tray.
To stop.
Playing discs or files
Before starting, turn the TV’s power on and switch the TV’s input.
The player’s screen display language can be changed (OSD Language on page 17).
Page 13

En
English
13
Example of display on main
unit display window
When the power is turned
on (ON)
When the power is turned
off (OFF)
When the disc tray is
opened (OPEN)
When the disc tray is
closed (CLOSE)
When the disc is being
loaded (LOAD)
When the disc is stopped
(STOP)
When no disc is loaded
When the title menu
or menu is displayed
(TITLE)
When the GUI is
displayed or operated
(GUI)
When in the USB mode
(USB)
Page 14

En
14
Playing files stored on USB
USB device
To USB port
CD –> USB Rec
Select Track
Bitrate
Start
Selected Track
Total Time
Track 1–13
Track01
Track02
Track03
Track04
Track05
Track06
Track07
Track08
01:43
03:17
04:18
04:59
04:20
04:38
04:40
04:11
128kbps
13
055:07
Start
Selected Track
Total Time
00
000:00
Select Track
Bitrate
Individual
Select All
All Clear
01:43
03:17
04:18
04:59
04:20
04:38
04:40
04:11
Track 1–13
Track01
Track02
Track03
Track04
Track05
Track06
Track07
Track08
CD –> USB Rec
devices
The player may not recognize the USB device, may
not play files or may not supply power to the USB
device. For details, see When a USB device is con-
nected on page 21.
Pioneer does not support that all files recorded on
all USB devices will play or that power will be supplied to the USB device. Also note that Pioneer will
accept no responsibility whatsoever for loss of files
on USB devices caused by connection to this player.
1 Turn the power on.
Press STANDBY/ON.
2 Switching the input to the USB mode.
Press DVD/USB.
USb is displayed on the front panel display.
3 Connecting USB devices.
The Disc Navigator appears automatically.
Player’s front panel
3 Start recording.
Use / / / to select Start, then press ENTER.
Selecting the track(s) to be
recorded
1 Load the audio CD.
If playback starts automatically, press STOP
to stop playback.
2 Display the Home Menu.
Press HOME MENU.
3 Select CD -> USB Rec.
Use / / / to select, then press ENTER.
4 Starts playback.
Use / / / to select the file, then press ENTER.
Turn the power off before removing the USB device.
The input will remain in the USB mode the next time
the power is turned on. To return to the DVD mode,
press DVD/USB (or press OPEN/CLOSE to open
the disc tray).
Recording audio CD tracks
on USB devices
The tracks of audio CDs loaded in the player can be
recorded on a USB device connected to the USB
port.
It may not be possible to record tracks of audio CDs
on a USB device. For details, see When a USB device
is connected on page 21.
Recording all the tracks
1 Load the audio CD.
If playback starts automatically, press STOP
to stop playback.
2 Display the CD -> USB Rec screen.
Press USB REC.
4 Select Select Track Individual the
track(s) you want to record.
Use / / / to select.
Individual: Select 1 track at a time.
Select All: Select all the tracks.
All Clear: Deselect all the tracks.
5 Select Bitrate (transfer rate).
Use / / / to select, then press ENTER.
Select 128kbps, 192kbps or 320kbps.
6 Start recording.
Use / / / to select Start, then press ENTER.
Notes
The audio signals are converted into MP3 format for
output.
CD -> USB Rec can only be selected when the audio
CD is stopped.
When recording is completed, a folder named
“PIONEER” is automatically created on the USB
device. The recorded tracks are stored in this folder.
Page 15
En
English
15
Playing in the desired order
Program Step
01.
02.
03.
04.
05.
06.
07.
08.
Title 1-01
Title 01
Program
Chapter 1-15
Chapter 001
Chapter 002
Chapter 003
Chapter 004
Chapter 005
Chapter 006
Chapter 007
Chapter 008
(Programmed Play)
1 Display the Play Mode screen.
Press PLAY MODE.
2 Select Program.
Use / to select, then press ENTER or .
3 Select Create/Edit.
Use / to select, then press ENTER.
The Create/ Edit screen differs according to the disc
or file.
4 Select the title, chapter, track or file to be
played.
Use / / / to select, then press ENTER.
To add to a program, first select the place in the
program (the program step), next select the title,
chapter or track, then press ENTER (files are added
at the end of program).
Press RETURN to return to the previous screen. If
you return to the previous screen when inputting it,
the settings you have programmed are cleared.
To delete a step, highlight it and press CLEAR.
5 Starts playback.
Press PLAY.
To play a program that has already been set, select
Playback Start from the program screen, then press
ENTER.
To resume normal playback, select Playback Stop
from the program screen, then press ENTER. The
program remains in the memory.
To cancel the entire program, select Program Delete
from the program screen, then press ENTER.
Notes
Programs can be played repeatedly. Select
Program Repeat from Repeat on the play mode
screen during programmed playback.
Programs cannot be played in random order (random
play is not possible during programmed play).
Page 16

En
16
Changing the settings
Digital Audio Out
Video Output
Language
Display
Options
HDMI Out
Digital Out
Dolby Digital Out
DTS Out
96kHz PCM Out
MPEG Out
Auto
On
Dolby Digital
DTS
96kHz > 48kHz
MPEG > PCM
Initial Settings
The factory default settings are indicated in italic.
Audio Settings parameters
Parameters (settings)
The sound of a WMA or MP3 file is
played with high sound quality. This is
Sound Retriever
(High/ Low/ Off)
Equalizer
(Off/
Rock/ Pop/
Live/ Dance/
Techno/ Classic/
Soft)
Virtual Surround
(On/
Audio DRC
(High/
Low/ Off)
Dialog
(High/
Low/ Off)
Off)
Medium/
Medium/
About Sound Retriever function
When audio data is removed during the compres-
sion process, sound quality often degrades. The
Sound Retriever function automatically enhances
compressed audio and restores CD quality sound.
Video Adjust parameters
Parameters (settings)
Sharpness
(Fine/ Standard/
Soft)
Brightness
(-20 to +20)
Contrast
(-16 to +16)
Gamma
(-3 to +3)
only valid for files with the extension
“.wma” or “.mp3”.
The effect depends on the file. Try
different settings, and choose the one
providing the good effect.
Select according to the genre of music to
be listened to.
A surround sound field with a sense
of presence can be created with two
speakers.
When set to On, linear PCM audio sig-
nals of 96 kHz or greater are converted
to 48 kHz.
This makes loud sounds weaker and
weak sounds louder. Change the
setting for example when watching
movies late at night.
This setting only affects Dolby Digital
sound.
The effect depends on the volume
of the connected TV, AV receiver or
amplifier, speakers, etc. Try different
settings, and choose the one providing the strongest effect.
Change this setting if the sound of dialogs
is low and the dialogs are hard to hear.
Adjusts the picture’s sharpness.
Adjusts the picture’s brightness.
Adjusts the ratio of the brightness of
the brightest and darkest portions of the
picture.
Adjusts the look of the dark portions of
the picture.
Parameters (settings)
Hue
(green 9 to red 9)
Chroma Level
(-9 to +9)
Brightness, Contrast, Gamma, Hue and Chroma Level are set
to 0 upon purchase.
Adjusts the balance between green and
red.
Adjusts the density of the colors. This
setting is effective for sources with many
colors, such as cartoons.
Initial Settings parameters
The player’s detailed settings can be changed here.
Initial Settings cannot be selected during playback.
Stop the disc first.
Digital Audio Out settings
Options
settings
HDMI Out
Digital Out
Dolby Digital Out
DTS Out
96 kHz PCM Out
MPEG Out
Settings
Select the audio signals to be output from
the HDMI OUT terminal (LPCM (2CH)/
Auto/ Off) according to the connected
HDMI-compatible device.
Select whether to output digital audio
signals (On) from the COAXIAL DIGITAL
AUDIO OUT terminals or not (Off).
Select whether to output Dolby Digital
audio signals (Dolby Digital) or to convert
Dolby Digital audio signals into linear
PCM signals (Dolby Digital > PCM) for
output, according to the connected AV
amplifier, etc.
Select whether to output DTS audio
signals (DTS) or not (Off), according to the
connected AV amplifier, etc.
Select whether to output 96 kHz audio
signals (96kHz) or to convert 96 kHz audio
signals into linear PCM signals (96kHz >
48kHz) for output, according to the connected AV amplifier, etc.
Select whether to output MPEG audio
signals (MPEG) or to convert MPEG audio
signals into linear PCM signals (MPEG
> PCM) for output, according to the connected AV amplifier, etc.
Page 17

En
English
17
Video Output settings
Options settings
Options
settings
TV Screen
Component Out
HDMI Resolution
HDMI Color
Settings
Change the picture’s display format
(4:3 (Letter Box)/
(Wide)/ 16:9 (Compressed)), according to
the connected TV.
Change the output format of the video signals output from the COMPONENT VIDEO
OUT terminals (Progressive/
Change the resolution of the video
signals output from the HDMI OUT ter-
minals (720x480i/
1920x1080i/ 1920x1080p).
Change the video signals output from the
HDMI OUT terminal (Full range RGB/
Component).
Language settings
Options
settings
Audio Language
Subtitle Language
DVD Menu Lang.
Subtitle Display
Settings
Change the language when listening to
the sound of DVD-Video discs (English/
available languages/ Other Language).
Change the language of the subtitles
displayed for DVD-Video discs (English/
available languages/ Other Language).
Change the language used for the menu
displays of DVD-Video discs (w/
Lang./ available languages/ Other Lan-
guage).
Select whether to display subtitles (On)
or not (Off).
Display settings
Options
settings
OSD Language
Angle Indicator
On Screen Display
Settings
Change the language of the operation
messages (Play, Stop, etc.) displayed
on the TV screen (English/
guages).
Select whether to display the angle mark
on the TV screen (On) or not (Off).
Select whether to display operation messages (Play, Stop, etc.) on the TV screen
(On) or not (Off).
4:3 (Pan & Scan)/ 16:9
Interlace).
720x480p/ 1280x720p/
Subtitle
available lan-
RGB/
Options
settings
KURO LINK
Parental Lock
DivX VOD
Auto Power Off
Settings
Select whether to operate the player using
the remote control of the AV component
connected using an HDMI cable (On) or
not (Off).
Restrict DVD-Video viewing (Password/
Level Change/ Country Code).
Display the registration code required
for playing DivX VOD files (Activate/
Deactivate).
Select whether to turn the power off
automatically (On) or not (Off). When set
to On, the power automatically turns off if
no operation is performed for 30 minutes
or more while in the stop mode.
Setting the Component Out and
HDMI Resolution settings back to
their defaults
1 Turn the player’s power off.
Press STANDBY/ON.
2 Press STANDBY/ON while pressing .
Use the buttons on the player’s front panel. The power
turns on.
Restoring all the settings to the
defaults
1 Turn the player’s power off.
Press STANDBY/ON.
2 Press STANDBY/ON while pressing .
Use the buttons on the player’s front panel.
Page 18
En
18
Playable discs and files
Playable discs
Commercially available DVD-Video discs
Fujicolor CD
KODAK Picture CD
is a trademark of DVD Format/ Logo Licensing
Corporation.
is a trademark of FUJIFILM Corporation.
This label indicates playback compatibility with
DVD-RW discs recorded in VR format (Video
Recording format). However, for discs recorded with
a record-only-once encrypted program, playback can
only be achieved using a CPRM compatible device.
Notes
This player does not support multisession discs or
multiborder recording.
Multisession/ multiborder recording is a method in
which data is recorded on a single disc in two or more
sessions/ borders. A “session” or “border” is one
recording unit, consisting of a complete set of data
from lead-in to lead-out.
DVD-R/ -RW/ -R DL and DVD+R/ +RW/ +R
DL discs recorded in the Video mode and
finalized
DVD-R/ -RW/ -R DL discs recorded in the VR
mode
Video CDs
Commercially available audio CDs
CD-R/ -RW/ -ROM discs containing music
recorded in the CD-DA format
JPEG files recorded on DVD-R/ -RW/ -R DL
discs, CD-R/ -RW/ -ROM discs or USB devices
DivX video files recorded on DVD-R/ -RW/
-R DL discs, CD-R/ -RW/ -ROM discs or USB
devices
WMA files recorded on DVD-R/ -RW/ -R DL
discs, CD-R/ -RW/ -ROM discs or USB devices
MP3 files recorded on DVD-R/ -RW/ -R DL
discs, CD-R/ -RW/ -ROM discs or USB devices
About region numbers
DVD player and DVD-Video discs are assigned region
numbers according to the region in which they are sold.
This player’s region number(s) is (are) as shown below.
DVD-Video: 1
Discs not including these numbers cannot be played.
Discs playable on this player are as shown below.
DVDs: 1 (including 1) and ALL
Regarding copy protected CDs
This player is designed to conform to the specifications
of the audio CD format. This player does not support
the playback or function of discs that do not conform to
these specifications.
About playing DualDiscs
A DualDisc is a new two-sided disc, one side of
which contains DVD content — video, audio, etc. —
while the other side contains non-DVD content such
as digital audio material.
The DVD side of a DualDisc can be played on this
player (excluding any DVD-Audio content).
The non-DVD, audio side of the disc is not compat-
ible with this player.
It is possible that when loading or ejecting a
DualDisc, the opposite side to that being played will
be scratched. Scratched discs may not be playable.
For more detailed information on the DualDisc
specification, please refer to the disc manufacturer
or disc retailer.
Playing discs created on
computers or BD/ DVD recorders
It may not be possible to play discs recorded using
a computer due to the application settings or computer’s environment settings. Record discs in a
format playable on this player. For details, contact
the dealer.
It may not be possible to play discs recorded using
a computer or a BD/ DVD recorder, if burn quality is not good due to characteristics of the disc,
scratches, dirt on the disc, dirt on the recorder’s
lens, etc.
Discs that cannot be played
DVD-Audio discs
DVD-RAM discs
SACDs
CD-G
Blu-ray discs
HD DVDs
Discs that have not been finalized
Discs recorded with packet writing
Page 19

En
English
19
Playable files
Only discs recorded in ISO9660 Level 1, Level 2 and
Joliet can be played.
Files protected by DRM (Digital Rights
Management) cannot be played.
Files other than the ones below (WMV, MPEG4-AAC,
etc.) are not guaranteed to play.
Supported image file formats
JPEG
Resolution: Up to 3 072 x 2 048 pixels
This player supports baseline JPEG.
This player supports Exif Ver.2.2.
This player does not support progressive JPEG.
Supported video file formats
DivX
DivX is a media technology created by DivX, Inc.
DivX media files contain image data.
DivX files may also include such advanced playback
functions as menu screens and selection of multiple
subtitle languages/ audio tracks.
Plays DivX® video, including premium content
DivX® is a registered trademark of DivX, Inc., and is
used under license.
Displaying external subtitle files
The font sets listed below are available for external
subtitle files. You can see the proper font set onscreen by setting the Subtitle Language on page 17
to match the subtitle file.
This player supports the following language groups:
Afrikaans (af), Basque (eu), Catalan (ca), Danish (da), Dutch (nl), English (en), Faroese (fo),
Group 1
Group 2
Group 3
Group 4 Hebrew (iw), Yiddish (ji)
Group 5 Turkish (tr)
Finnish (fi), French (fr), German (de), Icelandic
(is), Irish (ga), Italian (it), Norwegian (no), Portuguese (pt), Rhaeto-Romanic (rm), Scottish
(gd), Spanish (es), Swedish (sv)
Albanian (sq), Croatian (hr), Czech (cs), Hungarian (hu), Polish (pl), Romanian (ro), Slovak
(sk), Slovenian (sl)
Bulgarian (bg), Byelorussian (be), Macedonian
(mk), Russian (ru), Serbian (sr), Ukrainian (uk)
Supported audio file formats
This player does not support VBR (Variable Bit
Rate).
This player does not support lossless encoding.
Windows Media™ Audio (WMA)
Sampling frequencies: 32 kHz, 44.1 kHz and 48 kHz
Bit rate: Up to 192 kbps
This player supports files encoded using Windows
Media Player Ver. 7/ 7.1, Windows Media Player for
Windows XP and Windows Media Player 9 Series.
Windows Media is either a registered trademark or
trademark of Microsoft Corporation in the United
States and/ or other countries.
This product includes technology owned by
Microsoft Corporation and cannot be used or distributed without a license from Microsoft Licensing, Inc.
MPEG-1 Audio Layer 3 (MP3)
Sampling frequencies: 32 kHz, 44.1 kHz and 48 kHz
Playable file extensions
Video files
.divx .avi
Files not containing DivX video signals cannot be
played, even if they have the extension “.avi”.
Image files
.jpg .jpeg
Audio files
.wma .mp3
Some external subtitle files may be displayed incor-
rectly or not at all.
For external subtitle files the following subtitle for-
mat filename extensions are supported (please note
that these files are not shown within the disc navigation menu): .srt, .sub, .ssa, .smi
The filename of the movie file has to be repeated at
the beginning of the filename for the external subtitle file.
The number of external subtitle files which can be
switched for the same movie file is limited to a maximum of 10.
Page 20

En
20
Additional information
Troubleshooting
Incorrect operation is often mistaken for trouble or malfunction. If you think that there is something wrong with
this component, check the points below. Sometimes the trouble may lie in another component. Inspect the other
components and electrical appliances being used. If the trouble cannot be rectified after checking the items
below, ask your nearest Pioneer authorized service center or your dealer to carry out repair work.
The player may not operate properly due to static electricity or other external influences. In such cases, normal
operation may be restored by unplugging the power cord then plugging it back in.
General problems
Problem Check Remedy
Settings you have made have been
cleared.
Difference in volume between DVDs
and CDs.
Player cannot be operated with the
remote control.
Disc cannot be played or disc tray
opens automatically.
The player’s power turns off automatically.
Power turns on or off automatically. Is KURO LINK set to On? The player’s power may turn on together with the
Input of connected TV and AV system switches automatically.
Picture is stretched, or aspect ratio
cannot be switched.
Was the power cord unplugged forcibly
while the player’s power was on?
This is not a problem with the player. The volume may sound different due to differences
Are you operating from far away? Operate from within a distance of 7 m (23 ft.) from
Is the remote control sensor exposed to
direct sunlight or strong artificial light
from a fluorescent bulb, etc.?
Are the batteries dead? Replace the batteries (page 7).
Is the disc scratched? Scratched discs may not play.
Is the disc dirty? Wipe the dirt off the disc (page 26).
Is the disc properly set in the disc tray? Set the disc with the printed side facing up.
Does the disc have the right region
number?
Is the player placed in a humid location?
Is Auto Power Off set to On? If Auto Power Off is set to On, the player’s power
Is KURO LINK set to On? The input of the TV, AV system (AV receiver or
Is the aspect ratio properly set on the
connected TV?
Is TV Screen properly set? Set TV Screen properly (page 17).
Be sure to press STANDBY/
front panel or press STANDBY/ ON on the remote
control and wait for the OFF indicator on the front
panel display to turn off before unplugging the
power cord.
in how the signals are recorded on the disc.
the remote control sensor.
The remote control signals may not be received
properly if the remote control sensor is exposed
to direct sunlight or strong artificial light from a
fluorescent bulb, etc.
Set the disc within the groove in the disc tray.
Discs with the region number “1 (including 1)” and
“ALL” can be played on this player.
There could be condensation inside. Wait a while
for the condensation to evaporate. Do not place the
player near an air-conditioner, etc. (page 25).
turns off automatically if no operation is performed
for over 30 minutes (page 17).
power of the TV connected to the HDMI OUT terminal. If you do not want the player’s power to turn on
when the TV’s power is turned on, set KURO LINK
to Off (page 17).
amplifier, etc.) and HD AV Converter connected to
the HDMI OUT terminal may automatically switch
to the player when playback starts on the player or
the menu screen (Home Menu, etc.) is displayed. If
you do not want the inputs of the connected TV, AV
system (AV receiver or amplifier, etc.) and HD AV
Converter to switch automatically, set KURO LINK
to Off (page 17).
Refer to the TV’s operating instructions and set the
TV’s aspect ratio properly.
ON on the player’s
Page 21

En
English
21
Problem Check Remedy
During playback, picture is disturbed
or dark.
Digital audio signals are not output
from the COAXIAL DIGITAL AUDIO
OUT terminals.
88.2 kHz digital audio signals
96 kHz/
are not output from the COAXIAL
DIGITAL AUDIO OUT terminals.
Folder or file names are not recognized.
Time is required to play JPEG files. Are you playing large files? Some time may be required to display large files.
Black bars are displayed when play-
ing JPEG files.
This is not a problem with the player. This player supports Macrovision copy protection.
Are the player and TV connected via a
video deck?
Is Digital Out set to On? When connected to the COAXIAL DIGITAL AUDIO
Is 96 kHz PCM Out set to 96kHz? Set 96 kHz PCM Out to 96kHz > 48kHz.
Are you playing a copyright-protected
disc?
Have you exceeded the maximum num-
ber of folder or file names the player
can recognize?
Are you playing files with different
aspect ratios?
With some TVs, the picture may not display properly when playing discs including copy prevention
signals. This is not a malfunction.
When the player and TV are connected via a video
deck, the player’s analog copy protect function may
cause the picture being played on the video deck
not to display properly. Connect the player and TV
directly.
OUT terminals, set Digital Out to On (page 16).
The 96 kHz/
right-protected discs cannot be output.
Up to 299 folders can be recognized on one disc.
Up to 648 files can be recognized within one folder.
Depending on the folder structure, however, the
player may not be able to recognized certain folders
or files.
Black bars may be displayed along the top and bottom or sides when JPEG files with different aspect
ratios are played.
88.2 kHz digital audio signals of copy-
When a USB device is connected
Problem Check Remedy
USB device is not recognized. Is the USB device properly connected? Connect the device securely (all the way in).
Is the USB device connected via a
USB hub?
This is not a problem with the player. Turn the power off then back on.
This is not a problem with the player. Some USB devices may not be recognized properly.
File cannot be played. Is the file copyright-protected (by
Folder or file names are not displayed or are not properly displayed.
Folder or file names are not displayed in alphabetical order.
Much time is required to recognized
the USB device.
DRM)?
This is not a problem with the player. Files stored on a computer cannot be played.
This is not a problem with the player. It may not be possible to play some files.
Do the folder of file names contain
more than 14 characters?
This is not a problem with the player. The order of the folder and file names displayed
What is the USB device’s capacity? Some time may be required to load the data when
This player does not support USB hubs. Connect
the USB device directly.
This player only supports USB mass storage class
devices.
This player supports portable flash memory and
digital audio playback devices.
Only the FAT16 and FAT32 file systems are supported. Other file systems (exFAT, NTFS, etc.) are
not supported.
Copyright-protected files cannot be played.
The maximum number of characters displayable
for the folder and file names on the Disc Navigator
is 14.
on the Disc Navigator depends on the order in
which the folders or files were recorded on the USB
device.
large capacity USB devices are connected (this
could take several minutes).
Page 22

En
22
Problem Check Remedy
Power is not supplied to the USB
device.
Audio CD tracks cannot be recorded
on a USB device.
No power is supplied if the power
consumption is too high.
Is there enough free space on the USB
device?
Are there 300 or more folders on the
USB device?
Are there already 99 PIONEER folders
on the USB device?
Turn the power off then back on.
Turn the power off, then disconnect and reconnect
the USB device.
Press DVD/
then switch again to the USB mode. (When the
input is switched back to the DVD mode, LOAd is
displayed on the front panel display and the disc
is recognized. When the input is switched back
to USB, USb is displayed on the front panel display.)
If the USB device is equipped with an AC adapter,
use the USB device with the AC adapter connected.
Recording is not possible if there is not enough free
space left on the USB device. In this case, Available
USB space is low is displayed.
Recording is not possible if the USB device contains 300 or more folders.
Recording is not possible if there are already 99
PIONEER folders on the USB device.
USB to switch back to the DVD mode,
When connected to an HDMI-compatible device
Problem Check Remedy
Picture is not displayed. Is the resolution properly set? Set HDMI Resolution properly for the connected
Is the HDMI cable properly connected? Connect the cable securely (all the way in).
Sound is not produced or is distorted.
Multichannel audio signals are not
output.
Colors are not properly displayed on
TV screen.
Is HDMI Out properly set? Set HDMI Out to LPCM (2CH) or Auto (page 16).
Is HDMI Out properly set? Set HDMI Out to Auto (page 16).
Is HDMI Color properly set? Change the HDMI Color setting (page 17).
device (page 17).
Restore HDMI Resolution to the default setting
(720x480p) (page 17).
With some cables, 1 080p video signals will not be
output.
Page 23

En
English
23
Problem Check Remedy
KURO LINK function does not work. Is the HDMI cable you are using a High
The message CEC200 appears. Is the player’s power turned off? When the Disc Navigator is selected using the
Speed HDMI™ cable?
Is KURO LINK set to On on the player? Set KURO LINK to On on the player (page 17).
Does the connected device support the
KURO LINK function?
Is KURO LINK set to On on the con-
nected device?
Are multiple players connected? The KURO LINK function may not work if three or
Use a High Speed HDMI™ cable.
The KURO LINK function does not work with
devices of other brands, even if connected using an
HDMI cable.
The KURO LINK function will not work if devices
that do not support the KURO LINK function or
devices of other brands are connected between the
KURO LINK-compatible device and the player.
Even when connected to a Pioneer product compatible with the KURO LINK function, some of the
functions may not work.
Set “KURO LINK” on the connected component to
“ON”. The KURO LINK function works when “KURO
LINK” is set to “ON” for all the components connected to the HDMI OUT terminals.
more players, including this player, are connected
by HDMI cable.
Flat Screen TV’s remote controller, the message
CEC200 is displayed if the player’s power is turned
off. This is not a malfunction. You may continue
using the player and Flat Screen TV as such.
Page 24

En
24
Language Code Table and Country/ Area Code Table
Language Code Table
Language names (codes) and input codes
Japanese (ja), 1001 Bhutani (dz), 0426 Kirghiz (ky), 1125 Sinhalese (si), 1909
English (en), 0514 Esperanto (eo), 0515 Latin (la), 1201 Slovak (sk), 1911
French (fr), 0618 Estonian (et), 0520 Lingala (ln), 1214 Slovenian (sl), 1912
German (de), 0405 Basque (eu), 0521 Laothian (lo), 1215 Samoan (sm), 1913
Italian (it), 0920 Persian (fa), 0601 Lithuanian (lt), 1220 Shona (sn), 1914
Spanish (es), 0519 Finnish (fi), 0609 Latvian (lv), 1222 Somali (so), 1915
Chinese (zh), 2608 Fiji (fj), 0610 Malagasy (mg), 1307 Albanian (sq), 1917
Dutch (nl), 1412 Faroese (fo), 0615 Maori (mi), 1309 Serbian (sr), 1918
Portuguese (pt), 1620 Frisian (fy), 0625 Macedonian (mk), 1311 Siswati (ss), 1919
Swedish (sv), 1922 Irish (ga), 0701 Malayalam (ml), 1312 Sesotho (st), 1920
Russian (ru), 1821 Scots-Gaelic (gd), 0704 Mongolian (mn), 1314 Sundanese (su), 1921
Korean (ko), 1115 Galician (gl), 0712 Moldavian (mo), 1315 Swahili (sw), 1923
Greek (el), 0512 Guarani (gn), 0714 Marathi (mr), 1318 Tamil (ta), 2001
Afar (aa), 0101 Gujarati (gu), 0721 Malay (ms), 1319 Telugu (te), 2005
Abkhazian (ab), 0102 Hausa (ha), 0801 Maltese (mt), 1320 Tajik (tg), 2007
Afrikaans (af), 0106 Hindi (hi), 0809 Burmese (my), 1325 Thai (th), 2008
Amharic (am), 0113 Croatian (hr), 0818 Nauru (na), 1401 Tigrinya (ti), 2009
Arabic (ar), 0118 Hungarian (hu), 0821 Nepali (ne), 1405 Turkmen (tk), 2011
Assamese (as), 0119 Armenian (hy), 0825 Norwegian (no), 1415 Tagalog (tl), 2012
Aymara (ay), 0125 Interlingua (ia), 0901 Occitan (oc), 1503 Setswana (tn), 2014
Azerbaijani (az), 0126 Interlingue (ie), 0905 Oromo (om), 1513 Tonga (to), 2015
Bashkir (ba), 0201 Inupiak (ik), 0911 Oriya (or), 1518 Turkish (tr), 2018
Byelorussian (be), 0205 Indonesian (in), 0914 Panjabi (pa), 1601 Tsonga (ts), 2019
Bulgarian (bg), 0207 Icelandic (is), 0919 Polish (pl), 1612 Tatar (tt), 2020
Bihari (bh), 0208 Hebrew (iw), 0923 Pashto, Pushto (ps), 1619 Twi (tw), 2023
Bislama (bi), 0209 Yiddish (ji), 1009 Quechua (qu), 1721 Ukrainian (uk), 2111
Bengali (bn), 0214 Javanese (jw), 1023 Rhaeto-Romance (rm), 1813 Urdu (ur), 2118
Tibetan (bo), 0215 Georgian (ka), 1101 Kirundi (rn), 1814 Uzbek (uz), 2126
Breton (br), 0218 Kazakh (kk), 1111 Romanian (ro), 1815 Vietnamese (vi), 2209
Catalan (ca), 0301 Greenlandic (kl), 1112 Kinyarwanda (rw), 1823 Volapük (vo), 2215
Corsican (co), 0315 Cambodian (km), 1113 Sanskrit (sa), 1901 Wolof (wo), 2315
Czech (cs), 0319 Kannada (kn), 1114 Sindhi (sd), 1904 Xhosa (xh), 2408
Welsh (cy), 0325 Kashmiri (ks), 1119 Sangho (sg), 1907 Yoruba (yo), 2515
Danish (da), 0401 Kurdish (ku), 1121 Serbo-Croatian (sh), 1908 Zulu (zu), 2621
Country/Area Code Table
Country/ Area name, Input codes and Country/ Area code
United States, 2119, us Canada, 0301, ca Chile, 0312, cl Mexico, 1324, mx
Argentina, 0118, ar Korea, Republic of, 1118, kr Denmark, 0411, dk Russian Federation, 1821, ru
United Kingdom, 0702, gb Singapore, 1907, sg Germany, 0405, de Brazil, 0218, br
Italy, 0920, it Switzerland, 0308, ch Japan, 1016, jp France, 0618, fr
India, 0914, in Sweden, 1905, se New Zealand, 1426, nz Belgium, 0205, be
Indonesia, 0904, id Spain, 0519, es Norway, 1415, no Portugal, 1620, pt
Australia, 0121, au Thailand, 2008, th Pakistan, 1611, pk Hong Kong, 0811, hk
Austria, 0120, at Taiwan, 2023, tw Philippines, 1608, ph Malaysia, 1325, my
Netherlands, 1412, nl China, 0314, cn Finland, 0609, fi
Page 25

En
English
25
Cautions on use
When moving the player
When moving the player, check first that there is no
disc loaded and that the disc tray is closed. Then press
STANDBY/ON on the player (or STANDBY/ON on
the remote control), wait for the OFF indicator on the
front panel display to turn off, then unplug the power
cord. Moving the player with a disc inside it could result
in damage.
Place of installation
Choose a stable place near the TV or stereo system
being used with the player.
Do not place the player on top of a TV or color moni-
tor. Also install it away from cassette decks and
other devices easily affected by magnetic forces.
Avoid the following types of places:
Places exposed to direct sunlight
Humid or poorly ventilated places
Extremely hot places
Places exposed to vibrations
Places in which there is much dust or cigarette
smoke
Places exposed to soot, steam or heat (kitchens,
etc.)
Do not place objects on the player.
Do not place any objects on top of the player.
Do not obstruct the ventilation holes.
Do not use the player on shaggy rugs, beds, sofas, etc.,
or wrapped in cloth, etc. Doing so will prevent the heat
from dispersing, leading to damage.
Do not expose to heat.
Do not place the player on top of an amplifier or other
component that generates heat. When placing it in
a rack, to avoid the heat given off by the amplifier or
other audio component, place it on a shelf below the
amplifier.
Turn off the player’s power
when not using it.
Depending on signal conditions, striped patterns may
appear on a TV screen and noise may enter the sound of
radio broadcasts when the player’s power is on. If this
happens, turn the player’s power off.
the power turned on (the time depends on the extent
of condensation). The water droplets will dissipate and
playback will become possible. Condensation can also
occur in the summer if the player is exposed to the
direct wind from an air-conditioner. If this happens,
move the player to a different place.
Cleaning the product
Unplug the power cord from the power outlet when
cleaning the player.
Clean the player using a soft cloth. For tough dirt,
apply some neutral detergent diluted in 5 to 6 parts
water to a soft cloth, wring out thoroughly, wipe off
the dirt, then wipe again with a soft, dry cloth.
Alcohol, thinner, benzene, insecticides, etc., could
cause the print or paint to peel off. Also, leaving rubber or vinyl products in contact with the player for
long periods of time could mar the cabinet.
When using chemical-impregnated wipes, etc., read
the cautions included with the wipes carefully.
Caution for when the unit is
installed in a rack with a glass
door
Do not press OPEN/CLOSE on the remote control to
open the disc tray while the glass door is closed. The
door will hamper the movement of the disc tray, and the
unit could be damaged.
Cleaning the lens
The player’s lens should not become dirty in normal
use, but if for some reason it should malfunction due
to dust or dirt, consult your nearest Pioneer authorized
service center. Although lens cleaners for players are
commercially available, we advise against using them
since some may damage the lens.
About copyrights
This product incorporates copyright protection technology that is protected by method claims of certain U.S.
patents and other intellectual property rights owned by
Macrovision Corporation and other rights owners. Use
of this copyright protection technology must be authorized by Macrovision Corporation, and is intended for
home and other limited viewing uses only unless otherwise authorized by Macrovision Corporation. Reverse
engineering or disassembly is prohibited.
About condensation
If the player is moved suddenly from a cold place into
a warm room (in winter, for example) or if the temperature in the room in which the player is installed rises
suddenly due to a heater, etc., water droplets (condensation) may form inside (on operating parts and the
lens). When condensation is present, the player will not
operate properly and playback is not possible. Let the
player stand at room temperature for 1 or 2 hours with
Page 26
En
26
Handling discs
Storing
Always place discs in their cases and store them ver-
tically, avoiding hot, humid places, places exposed
to direct sunlight and extremely cold places.
Be sure to read the cautions included with the disc.
About condensation on discs
Water droplets (condensation) may form on the surface
of discs if they are moved from a cold place (particularly in winter) into a warm room. Discs may not play
normally if there is condensation on them. Carefully
wipe the water droplets off the surface of the disc before
loading it.
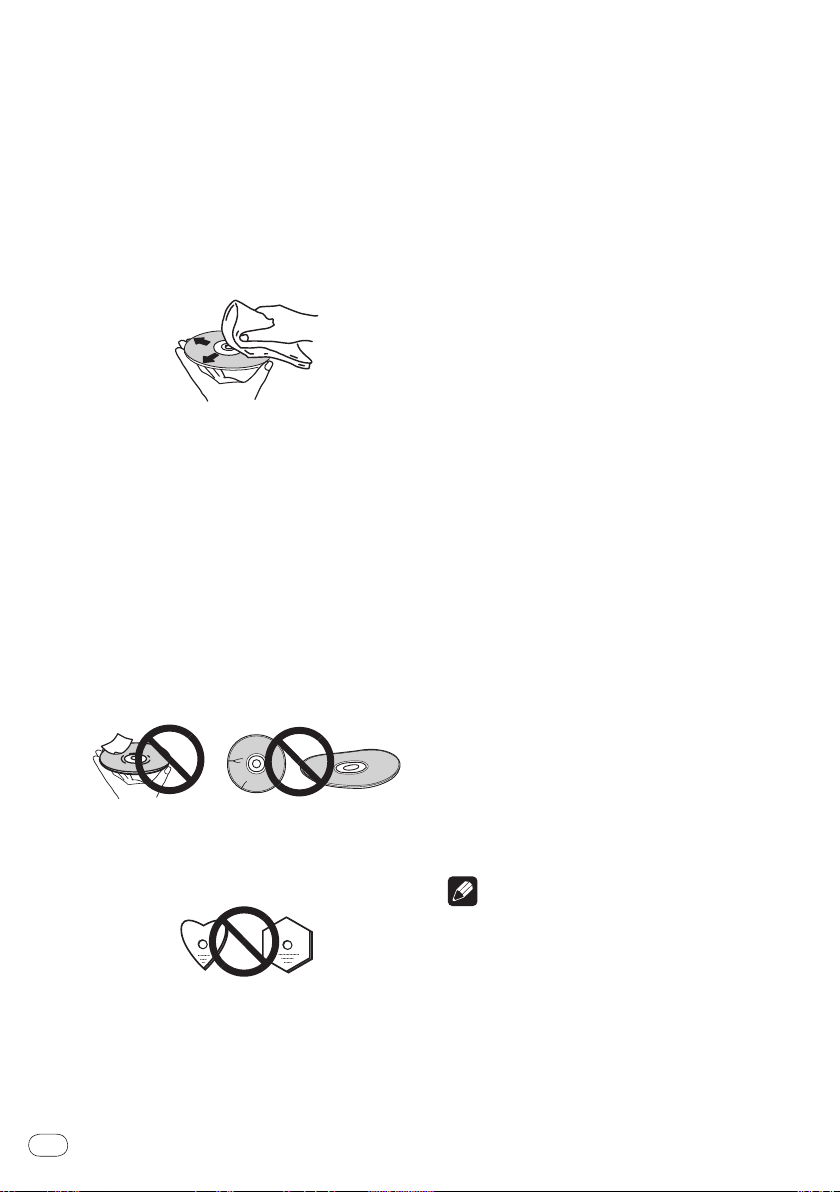
Cleaning discs
Discs may not play if there are fingerprints or dust
on them. In this case, use a cleaning cloth, etc., to
gently wipe the disc from the inside towards the
outside. Do not use dirty cleaning cloths.
Do not use benzene, thinner or other volatile
chemicals. Also do not use record spray or antistatic
agents.
For tough dirt, apply some water to a soft cloth,
wring out thoroughly, wipe off the dirt, then wipe off
the moisture with a dry cloth.
Do not use damaged (cracked or warped) discs.
Do not let the signal surface of discs get scratched
or dirty.
Do not place two discs in the disc tray, one on top of
the other.
Do not attach pieces of paper or stickers to discs.
Doing so could warp discs, making it impossible
to play them. Also note that rental discs often have
labels attached to them, and the label’s glue may
have oozed out. Check that there is no glue around
the edges of such labels before using rented discs.
About specially shaped discs
Specially shaped discs (heart-shaped, hexagonal, etc.)
cannot be played on this player. Do not attempt to play
such discs, as they could damage the player.
Specifications
Power requirements ...................................AC 120 V, 60 Hz
Power consumption .....................................................11 W
Power consumption (standby) ................................... 0.6 W
Weight ....................................................... 1.3 kg (2 lb 14 oz)
External dimensions
.................................... 360 mm (W) x 42 mm (H) x 202 mm (D)
Tolerable operating temperature ...................+5 °C to +35 °C
Tolerable operating humidity ........................... 5 % to 85 %
Video output
Output level ..................................................... 1 Vp-p (75 Ω)
Output terminal ..............................................RCA terminal
Component video output (Y, CB/ PB, CR/ PR)
Y output level ................................................... 1 Vp-p (75 Ω)
CB/ PB, CR/ PR output level ........................... 0.7 Vp-p (75 Ω)
Output terminal ..............................................RCA terminal
HDMI output
Output terminal ...........................................................19-pin
Audio output (stereo L/ R)
Audio output level .................... 200 mVrms (1 kHz, -20 dB)
Output terminal ..............................................RCA terminal
Frequency response ..................................... 4 Hz to 44 kHz
N ratio ...................................................................... 114 dB
S/
Dynamic range ............................................................. 87 dB
Total harmonic distortion ........................................0.007 %
Digital audio output
Coaxial digital output ....................................RCA terminal
Additional information
USB port ......................................................................A type
Notes
The specifications and design of this product are
subject to change without notice.
This product includes FontAvenue
by NEC Corporation. FontAvenue is a registered
trademark of NEC Corporation.
(14 3/16 in. (W) x 1 11/16 in. (H) x 8 in. (D))
(+41 °F to +95 °F)
(no condensation)
®
fonts licensed
Published by Pioneer Corporation.
Copyright © 2009 by Pioneer Corporation.
All rights reserved.
Page 27

En
English
27
Page 28
Fr
2
Ce point d’exclamation, placé dans un
triangle équilatéral, a pour but d’attirer
l’attention de l’utilisateur sur la présence,
dans les documents qui accompagnent
l’appareil, d’explications importantes du
point de vue de l’exploitation ou de
l’entretien.
Ce symbole de l’éclair, placé dans un
triangle équilatéral, a pour but d’attirer
l’attention de l’utilisateur sur la présence, à
l’intérieur du coffret de l’appareil, de
“tensions dangereuses” non isolées d’une
grandeur suffisante pour représenter un
risque d’électrocution pour les êtres
humains.
ATTENTION :
POUR ÉVITER TOUT RISQUE
D’ÉLECTROCUTION, NE PAS ENLEVER LE
COUVERCLE (NI LE PANNEAU ARRIÈRE).
AUCUNE PIÈCE RÉPARABLE PAR
L’UTILISATEUR NE SE TROUVE À
L’ INTÉRIEUR. CONFIER TOUT ENTRETIEN À
UN PERSONNEL QUALIFIÉ UNIQUEMENT.
ATTENTION
DANGER D´ELECTROCUTION
NE PAS OUVRIR
IMPORTANT
D3-4-2-1-1_A1_Fr
AVERTISSEMENT
Pour éviter les risques d’incendie, ne placez aucune
flamme nue (telle qu’une bougie allumée) sur
l’appareil. D3-4-2-1-7a_A_Fr
ATTENTION
Cet appareil est un produit laser de Classe 1, mais la
diode laser qu’il renferme est supérieure à la Classe 1.
Pour garantir une sécurité constante, ne retirez aucun
des couvercles et n’essayez pas d’avoir accès à
l’intérieur de l’appareil.
Confiez toute réparation à un personnel qualifié.
D3-4-2-1-8*_C_Fr
APPAREIL Á LASER
DE CLASSE 1
PRÉCAUTION DE VENTILATION
Lors de l’installation de l’appareil, veillez à laisser
un espace suffisant autour de ses parois de
manière à améliorer la dissipation de chaleur (au
moins 10 cm sur le dessus, 10 cm à l’arrière et 10 cm
de chaque côté).
AVERTISSEMENT
Les fentes et ouvertures du coffret sont prévues
pour la ventilation, pour assurer un fonctionnement
stable de l’appareil et pour éviter sa surchauffe.
Pour éviter les risques d’incendie, ne bouchez
j
amais les ouvertures et ne les recouvrez pas
d’objets, tels que journaux, nappes ou rideaux, et
n’utilisez pas l’appareil posé sur un tapis épais ou
un lit.
D3-4-2-1-7b_A_Fr
Milieu de fonctionnement
Te mpérature et humidité du milieu de fonctionnement :
De +5 °C à +35 °C (de +41 °F à +95 °F) ; Humidité
relative inférieure à 85 % (orifices de ventilation non
obstrués)
N’installez pas l’appareil dans un endroit mal ventilé ou
un lieu soumis à une forte humidité ou en plein soleil
(ou à une forte lumière artificielle).
D3-4-2-1-7c*_A1_Fr
AVERTISSEMENT
Cet appareil n’est pas étanche. Pour éviter les
risques d’incendie et de décharge électrique, ne
placez près de lui un récipient rempli d’eau, tel
qu’un vase ou un pot de fleurs, et ne l’exposez pas
à des gouttes d’eau, des éclaboussures, de la pluie
ou de l’humidité. D3-4-2-1-3_A_Fr
AVERTISSEMENT
La tension de l’alimentation électrique disponible
varie selon le pays ou la région. Assurez-vous que
la tension du secteur de la région où l’appareil sera
utilisé correspond à la tension requise (par ex. 230
V ou 120 V), indiquée sur le panneau arrière.
D3-4-2-1-4_A_Fr
Avant de brancher l’appareil pour la première, lisez
attentivement la section suivante.
Nous vous remercions d’avoir acquis un produit Pioneer.
Veuillez lire attentivement ce mode d’emploi afin de connaître la manière d’utiliser l’appareil comme il convient. Cela
fait, conservez le mode d’emploi de façon à pouvoir vous y référer en cas de nécessité.
Page 29

Fr
Français
3
Cet appareil numérique de la Classe B est conforme
à la norme NMB-003 du Canada.
D8-10-1-3_A1_Fr
Si la fiche d’alimentation secteur de cet appareil ne
convient pas à la prise secteur à utiliser, la fiche doit
être remplacée par une appropriée. Ce
remplacement et la fixation d’une fiche secteur sur le
cordon d’alimentation de cet appareil doivent être
effectués par un personnel de service qualifié. En cas
de branchement sur une prise secteur, la fiche de
coupure peut provoquer une sérieuse décharge
électrique. Assurez-vous qu’elle est éliminée
correctement après sa dépose.
L’appareil doit être déconnecté en débranchant sa
fiche secteur au niveau de la prise murale si vous
prévoyez une période prolongée de non utilisation
(par exemple avant un départ en vacances).
D3-4-2-2-1a_A1_Fr
Ce produit est destiné à une utilisation domestique
générale. Toute panne due à une utilisation autre
qu'à des fins privées (comme une utilisation à des
fins commerciales dans un restaurant, dans un
autocar ou sur un bateau) et qui nécessite une
réparation sera aux frais du client, même pendant la
période de garantie.
K041_Fr
NOTE IMPORTANTE SUR LE CABLE
D’ALIMENTATION
Tenir le câble d’alimentation par la fiche. Ne pas
débrancher la prise en tirant sur le câble et ne pas
toucher le câble avec les mains mouillées. Cela risque
de provoquer un court-circuit ou un choc électrique. Ne
pas poser l’appareil ou un meuble sur le câble. Ne pas
pincer le câble. Ne pas faire de noeud avec le câble ou
l’attacher à d’autres câbles. Les câbles d’alimentation
doivent être posés de façon à ne pas être écrasés. Un
câble abîmé peut provoquer un risque d’incendie ou un
choc électrique. Vérifier le câble d’alimentation de
temps en temps. Contacter le service après-vente
PIONEER le plus proche ou le revendeur pour un
remplacement. S002*_Fr
ATTENTION
L’interrupteur STANDBY/ON de cet appareil ne
coupe pas complètement celui-ci de sa prise
secteur. Comme le cordon d’alimentation fait office
de dispositif de déconnexion du secteur, il devra être
débranché au niveau de la prise secteur pour que
l’appareil soit complètement hors tension. Par
conséquent, veillez à installer l’appareil de telle
manière que son cordon d’alimentation puisse être
facilement débranché de la prise secteur en cas
d’accident. Pour éviter tout risque d’incendie, le
cordon d’alimentation sera débranché au niveau de
la prise secteur si vous prévoyez une période
prolongée de non utilisation (par exemple avant un
départ en vacances).
D3-4-2-2-2a_A_Fr
Page 30

Fr
4
Avant de commencer
Contenu du carton d’emballage ....................................5
Mise en place des piles dans la télécommande
.............5
Raccordements
Raccordement avec un cordon audio/vidéo ................6
Raccordement avec un câble HDMI .............................6
Noms et fonctions des éléments
Télécommande ................................................................8
Lecture
Lecture de disques ou de fichiers ................................10
Exemple d’informations apparaissant sur
l’afficheur de l’appareil .................................................11
Lecture des fichiers enregistrés sur des
appareils USB.................................................................12
Enregistrement de plages de CD Audio sur un
appareil USB ..................................................................12
Lecture dans l’ordre souhaité (Lecture de
programme) ....................................................................13
Changement des réglages
Paramètres Audio Settings ..........................................14
Paramètres Video Adjust ..............................................14
Paramètres Initial Settings ..........................................14
Disques et fichiers lisibles
Disques lisibles ..............................................................16
Fichiers lisibles...............................................................17
Informations supplémentaires
En cas de panne .............................................................19
Tableau des codes de langues et Tableau des
codes de pays et régions ..............................................23
Précautions d’emploi ....................................................24
Manipulation des disques ............................................25
Spécifications .................................................................26
Page 31
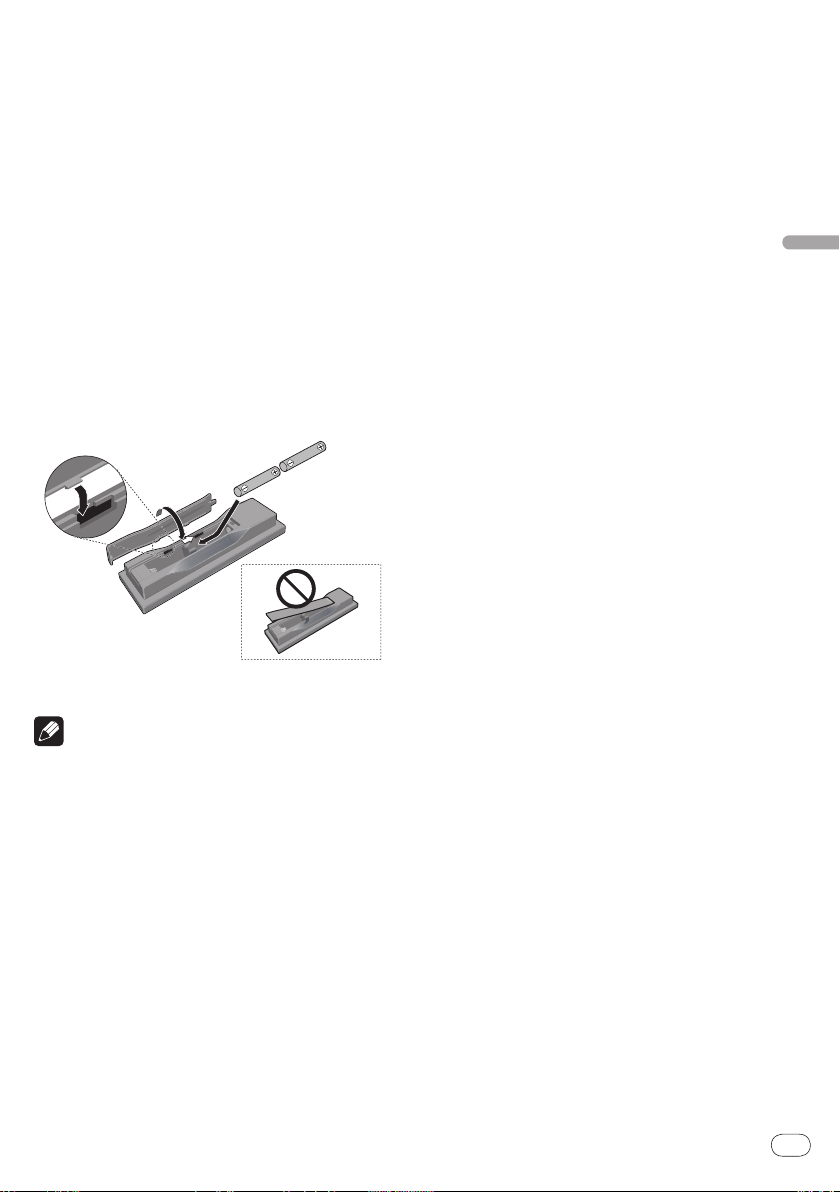
Fr
Français
5
Avant de commencer
Contenu du carton
d’emballage
Télécommande
Câble d’alimentation
Cordon audio/ vidéo
Piles AA (R6) x 2
Carte de garantie
Mode d’emploi (ce document)
Mise en place des piles dans
la télécommande
Ouvrez le couvercle arrière et insérez les
piles de la façon indiquée sur le schéma cidessous.
Pour fermer le couvercle arrière, emboîtez l’onglet dans la rainure et faites glisser le couvercle dans le sens de la flèche ().
Lorsque vous mettez des piles usées au rebut, veuillez
vous conformer à la réglementation gouvernementale
ou environnementale en vigueur dans votre pays ou
région.
AVERTISSEMENT
Ne pas utiliser ni ranger les piles à la lumière directe
du soleil ou à un endroit excessivement chaud,
comme dans une voiture ou à proximité d’un appareil
de chauffage. Les piles risqueraient de fuir, de
surchauffer, d’exploser ou de s’enflammer. Leur durée
de vie ou leur performance pourrait également être
réduite.
Remarques
N’utilisez que les piles spécifiées à l’exclusion de
toute autre. N’utilisez pas non plus une pile neuve
avec une pile usée.
Lorsque vous insérez les piles dans la télécommande,
orientez-les correctement, comme indiqué par les
symboles de polarité ( et ).
Ne chauffez pas les piles, ne les ouvrez pas et ne les
jetez pas au feu ou dans l’eau.
Les piles peuvent avoir des tensions différentes,
même si elles sont de même taille et forme. N’utilisez
pas différents types de piles.
Pour éviter toute fuite d’électrolyte, retirez les piles
si vous prévoyez de ne pas utiliser la télécommande
pendant un certain temps (1 mois ou plus). Si une
pile devait fuir, essuyez soigneusement l’intérieur du
logement puis insérez de nouvelles piles. Si le liquide
d’une pile devait fuir et se répandre sur votre peau,
nettoyez-le avec une grande quantité d’eau.
Page 32
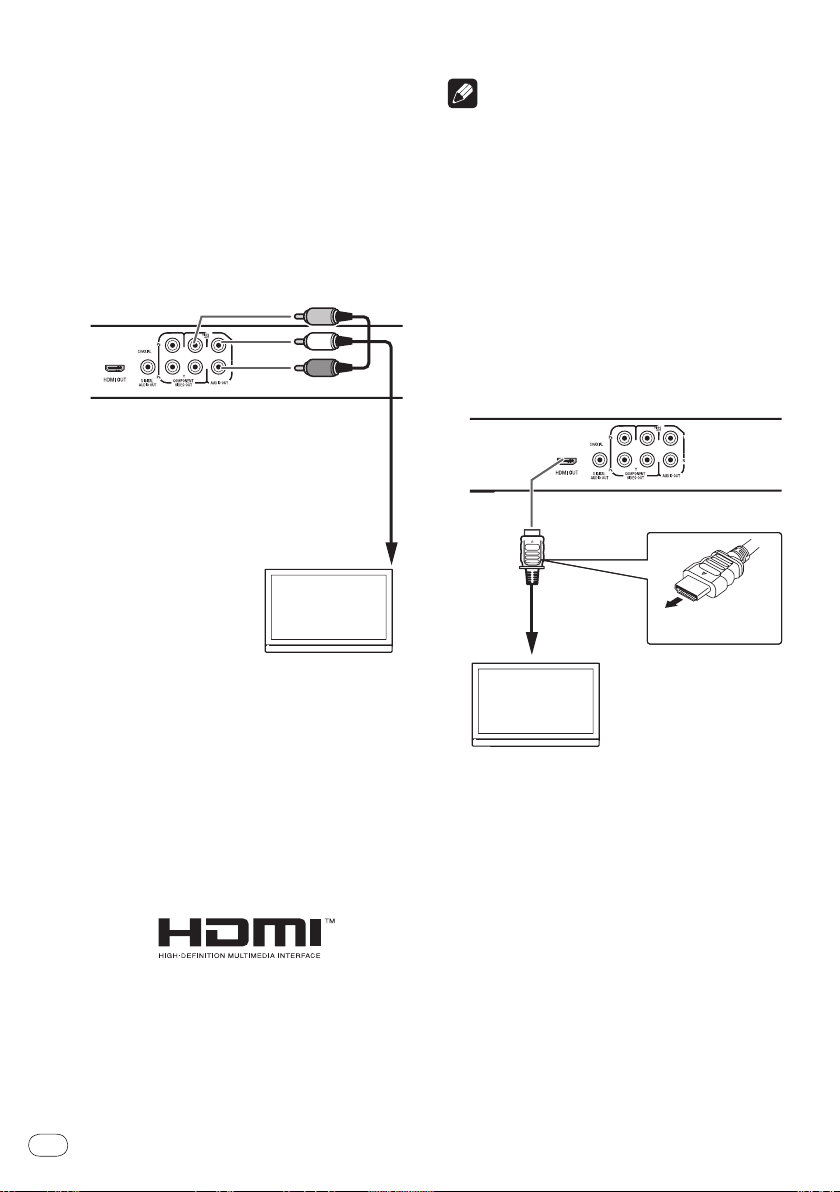
Fr
6
Raccordements
Téléviseur
Rouge
Blanc
Aux prises d’entrée
audio/vidéo
Jaune
Câble
audio/vidéo
(fourni)
Téléviseur
À la prise
d’entrée HDMI
Orientez correctement la fiche
par rapport à la prise et insérez-la
tout droit.
Câble HDMI
(en vente dans
le commerce)
Veillez à toujours éteindre les appareils et à débran-
cher le cordon d’alimentation de la prise secteur
avant de raccorder un appareil ou de changer les
liaisons.
Lorsque tous les appareils ont été raccordés, vous
pouvez brancher le cordon d’alimentation.
Raccordement avec un
cordon audio/ vidéo
Panneau arrière du lecteur
Remarques
L’interface de ce lecteur est conforme aux
spécifications High-Definition Multimedia Interface.
Lorsqu’un appareil compatible HDMI est raccordé, la
résolution est indiquée sur l’afficheur de la face avant.
La résolution des signaux vidéo restitués par la prise
HDMI OUT du lecteur se change manuellement.
Changez le réglage de HDMI Resolution (la page
15). Les réglages de deux appareils peuvent être
enregistrés dans la mémoire.
Ce lecteur peut être raccordé à des appareils
compatibles HDMI. Il se peut qu’il ne fonctionne pas
correctement s’il est raccordé à un appareil DVI.
Raccordement à un téléviseur
Panneau arrière du lecteur
Raccordement avec un câble
HDMI
Lorsqu’un câble HDMI est utilisé, les signaux numériques peuvent être transférés sur un téléviseur compatible HDMI par un seul câble, sans perte de qualité de
l’image et du son. Après avoir raccordé le câble, réglez
la résolution et la couleur HDMI du lecteur en fonction
du téléviseur compatible HDMI utilisé. Reportez-vous
aussi au mode d’emploi du téléviseur compatible HDMI.
HDMI, le logo HDMI et High-Definition Multimedia
Interface sont des marques commerciales ou des
marques déposées de HDMI Licensing, LLC.
Page 33
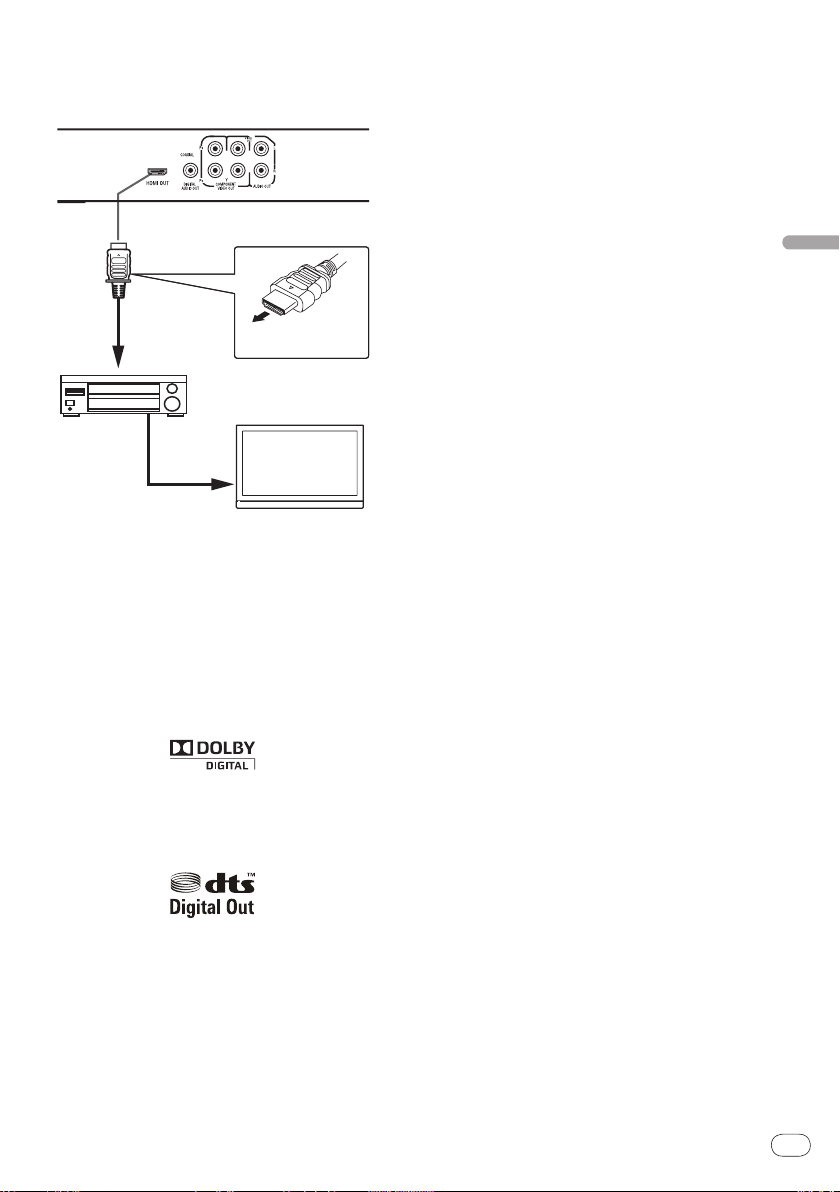
Fr
Français
7
Raccordement à un récepteur ou
Téléviseur
Récepteurou
amplificateur AV
De la prise
de sortie
HDMI
À la prise
d’entrée HDMI
À la prise
d’entrée HDMI
Orientez correctement la fiche
par rapport à la prise et insérez-la
tout droit.
Câble HDMI
(en vente dans
le commerce)
Câble HDMI
(en vente dans
le commerce)
amplificateur AV
Panneau arrière du lecteur
Raccordement avec des câbles audio du
commerce
Le lecteur peut être raccordé à un téléviseur, etc.
avec des câbles vidéo à composantes, en vente dans
le commerce.
Le lecteur peut être raccordé à un amplificateur AV,
etc. avec des câbles audio numériques, en vente
dans le commerce.
Signaux audio pouvant être
restitués par la prise HDMI OUT
du lecteur
Son PCM linéaire à 2 canaux de 44,1 kHz à 96 kHz, 16
bits/ 20 bits/ 24 bits (remixage en 2 canaux compris)
Son à 5.1 canaux Dolby Digital
Son à 5.1 canaux DTS
Son MPEG
Fabriqué sous licence de Dolby Laboratories. Le
terme Dolby et le sigle double D sont des marques
commerciales de Dolby Laboratories.
Fabriqué sous licence sous couvert du brevet U.S. N°
: 5,451,942 et d’autre brevets U.S. et mondiaux émis
et en cours d’enregistrement. DTS et DTS Digital
Out sont des marques commerciales déposées et les
logos et le symbole DTS sont des marques commerciales de DTS, Inc. © 1996-2008 DTS, Inc. Tous droits
réservés.
Page 34
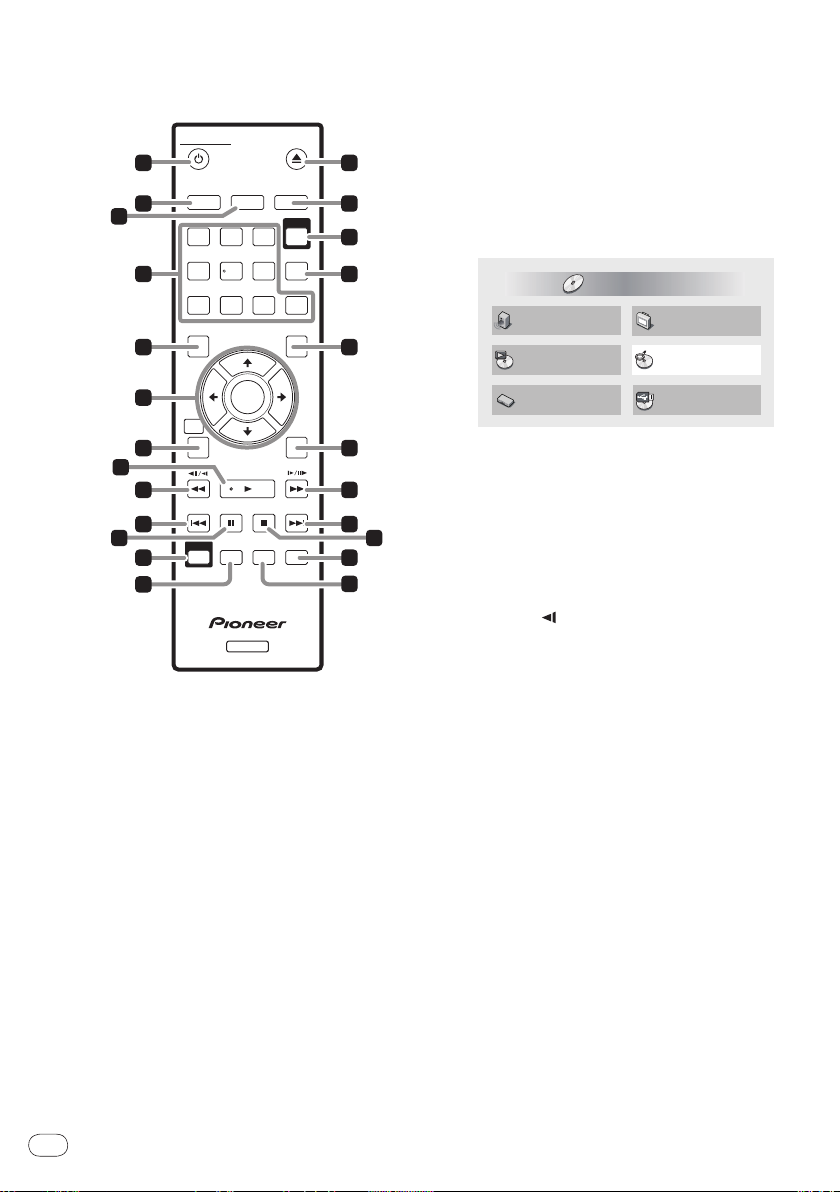
Fr
8
Noms et fonctions des éléments
STANDBY/ON
OPEN/CLOSE
AUDIO
SUBTITLE
ANGLE
1
23
CLEAR
USB
DVD/
4
5
6
7
89
0
TOP MENU
MENU
ENTER
RETURN
PLAY MODE
ZOOM
DISPLAY
PLAY
PREV
PAUSE
DVD
STOP NEXT
HOME
MENU
REC
USB
5
6
10
11
4
8
12
13
1
2
3
7
9
22
14
16
15
19
20
21
23
24
18
17
Audio Settings
Play Mode Disc Navigator
Initial Settings
Video Adjust
HOME MENU
DVD
CD –> USB Rec
Télécommande
1 STANDBY/ON
Sert à mettre le lecteur en ou hors service.
2 AUDIO
Le flux ou le canal audio peut être changé pendant la
lecture si le disque ou le fichier comprend plusieurs
flux ou canaux audio.
3 SUBTITLE
Les sous-titres des disque DVD-Vidéo ou DivX peuvent être changés pendant la lecture dans la mesure
où ces disques contiennent des sous-titres en plusieurs langues.
4 Touches numériques (0 à 9)
Servent à spécifier et lire le titre, le chapitre, la plage
ou le fichier à voir ou écouter. Elles servent aussi à
sélectionner des éléments sur les pages du menu,
etc.
5 TOP MENU
Sert à afficher la première page du menu du
DVD-Vidéo.
6 / / /
Servent à sélectionner des éléments, changer de
réglages et déplacer le curseur.
ENTER
Sert à valider l’élément sélectionné ou le réglage
effectué.
7 HOME MENU
Sert à afficher/ masquer la page Home Menu.
Audio Settings (la page 14)
Video Adjust (la page 14)
Play Mode (la page 8, PLAY MODE)
Disc Navigator (la page 9, MENU)
Initial Settings (la page 14)
CD -> USB Rec (la page 12)
8 PLAY
Sert à démarrer la lecture.
9 / /
Sert revenir rapidement en arrière pendant la
lecture.
Sert à revoir les images une à une pendant la
pause.
En maintenant un instant la pression pendant la
pause, sert à ralentir la lecture vers l’arrière.
a PREV
Sert à revenir au début du titre, du chapitre, de la
plage ou du fichier actuellement lu. Appuyez deux
fois pour revenir au début du titre, du chapitre, de la
plage ou du fichier précédent.
b PAUSE
Sert à arrêter temporairement la lecture. Appuyez
une nouvelle fois pour la poursuivre.
c USB REC (la page 12)
Sert à afficher la page CD -> USB Rec.
d PLAY MODE
Sert à afficher/ masquer la page Play Mode.
Page 35
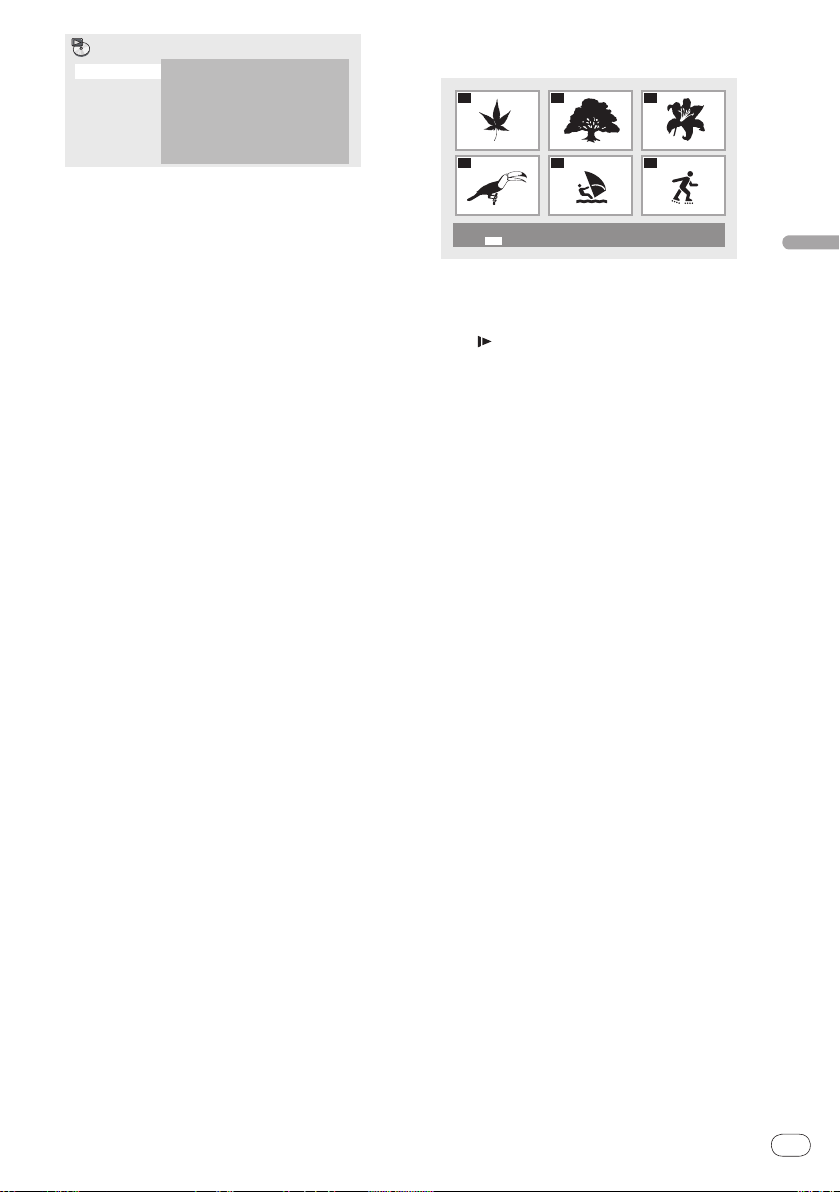
Fr
Français
9
A-B Repeat
Repeat
Random
Program
Search Mode
A(Start Point)
B(End Point)
Off
Play Mode
A-B Repeat
01
04
02
05
03
06
Disc Navigator: Title
01- 49: – –
Le passage spécifié d’un titre ou d’une plage est
lu de façon répétée.
Repeat
Les titres, chapitres, plages ou fichiers sont lus
de façon répétée.
Random
Lit les titres, chapitres ou plages dans un ordre
aléatoire.
Program (la page 13)
Les titres, chapitres, plages ou fichiers sont lus
dans l’ordre programmé.
Search Mode
Le numéro ou le temps spécifié à l’intérieur d’un
titre, d’un chapitre, d’une plage ou d’un fichier
est lu.
La fonction Play Mode peut ne pas agir pour certains
disques ou fichiers.
e OPEN/CLOSE
Ouvrez le tiroir à disque et insérez le disque.
f ANGLE
L’angle de prise de vue peut être changé pendant la
lecture si le DVD-Vidéo lu contient des scènes prises
sous plusieurs angles.
g DVD/USB (la page 12)
Sert à basculer entre les modes DVD et USB.
h CLEAR
Sert à supprimer l’élément sélectionné. Vous l’utilisez, par exemple, lorsque vous vous trompez de
numéro.
i MENU
Sert à afficher le menu ou la page Disc
Navigator.
Sert à sélectionner et lire le titre, le chapitre,
la plage ou le fichier depuis la page Disc
Navigator.
Ex. : Page Disc Navigator pour DVD
vidéo
j RETURN
Sert à revenir à la page précédente.
k / /
Sert à avancer rapidement pendant la lecture.
Sert à voir les images une à une pendant la
pause.
En maintenant un instant la pression pendant la
pause, sert à ralentir la lecture vers l’avant.
l NEXT
Pendant la lecture sert à passer au début du titre, du
chapitre ou de la plage suivante.
m STOP
Si vous appuyez sur STOP pendant la lecture, le
point où la lecture a été arrêtée est enregistré dans
la mémoire. Il suffit alors d’appuyer sur PLAY pour
que la lecture se poursuive à partir du point où elle
a été arrêtée.
n DISPLAY
Le temps écoulé, le temps restant, etc. est affiché.
o ZOOM
Zoom avant sur l’image
Page 36
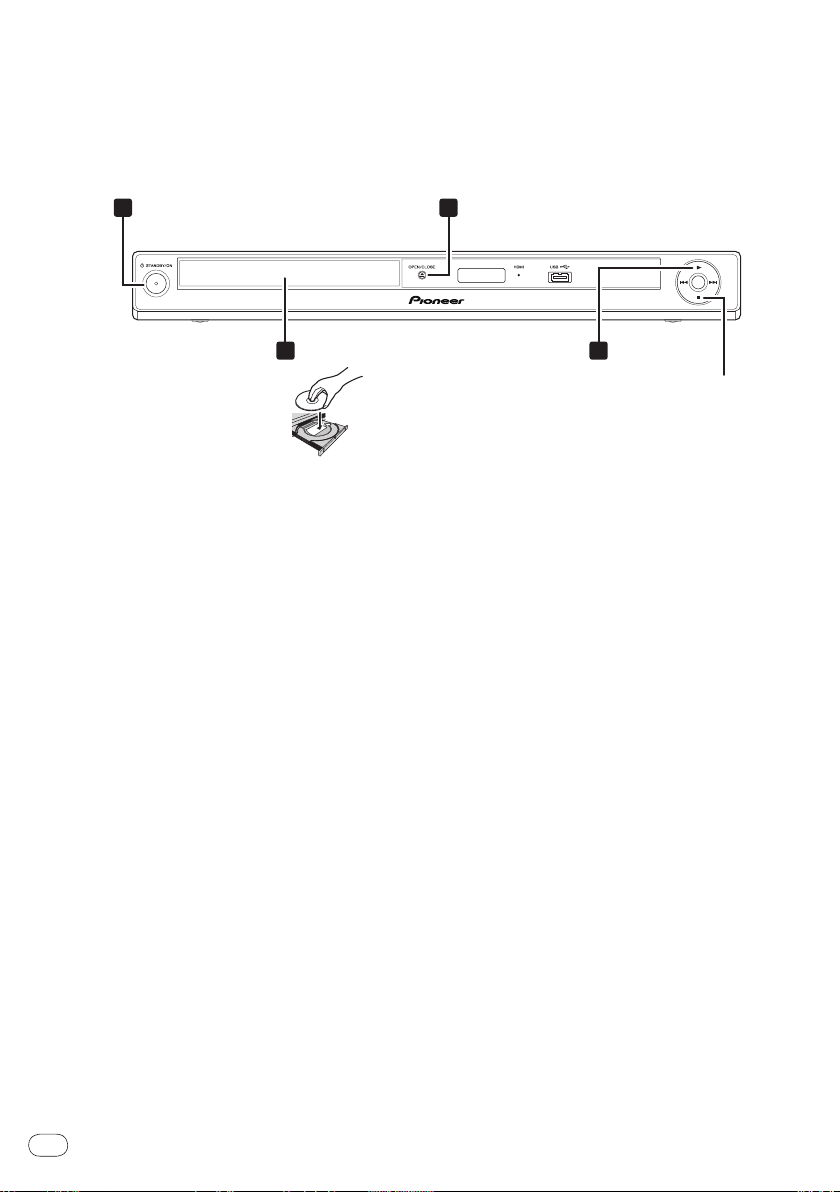
Fr
10
Lecture
1
Mettez le lecteur en service.
3
Insérez le disque.
4
Procédez à la
lecture.
2
Ouvrez le tiroir à disque.
Pour arrêter
la lecture.
Lecture de disques ou de fichiers
Avant de commencer, mettez le téléviseur en service et commutez l’entrée du téléviseur.
La langue de l’affichage sur écran du lecteur peut être changée (la page 15, OSD Language).
Page 37
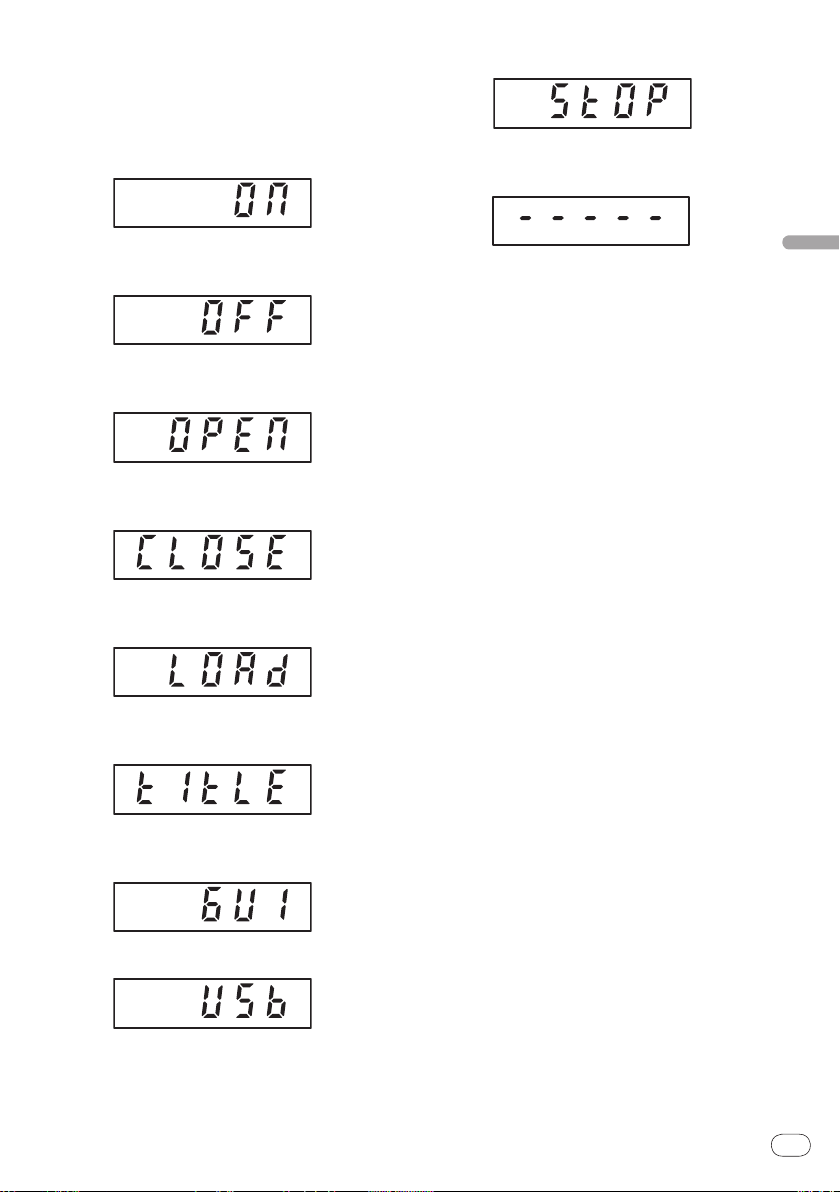
Fr
Français
11
Exemple d’informations
apparaissant sur l’afficheur
de l’appareil
Lorsque le lecteur est mis
en service (ON)
Lorsque le disque est arrêté
(STOP)
Lorsqu’il n’y a pas de
disque
Lorsque le lecteur est mis
hors service (OFF)
Lorsque le tiroir à disque est
ouvert (OPEN)
Lorsque le tiroir à disque est
fermé (CLOSE)
Lorsque le disque est inséré
(LOAD)
Lorsque le menu du titre ou le
menu est affiché (TITLE)
Lorsque le menu GUI est
affiché ou utilisé (GUI)
En mode USB (USB)
Page 38

Fr
12
Lecture des fichiers
Mémoire USB
À la port USB
CD –> USB Rec
Select Track
Bitrate
Start
Selected Track
Total Time
Track 1–13
Track01
Track02
Track03
Track04
Track05
Track06
Track07
Track08
01:43
03:17
04:18
04:59
04:20
04:38
04:40
04:11
128kbps
13
055:07
Start
Selected Track
Total Time
00
000:00
Select Track
Bitrate
Individual
Select All
All Clear
01:43
03:17
04:18
04:59
04:20
04:38
04:40
04:11
Track 1–13
Track01
Track02
Track03
Track04
Track05
Track06
Track07
Track08
CD –> USB Rec
enregistrés sur des appareils
USB
Le lecteur peut ne pas reconnaître le dispositif USB,
ne pas lire les fichiers ou ne pas alimenter le dispositif USB. Pour le détail, reportez-vous à la page 21,
Lorsqu’un appareil USB est raccordé.
Pioneer ne garantit pas que tous les fichiers enre-
gistrés sur tous les appareils USB pourront être lus
ni que l’appareil USB pourra être alimenté par le
lecteur. Notez aussi que Pioneer décline toute responsabilité en cas de perte de fichiers d’un appareil
USB résultant de la connexion à ce lecteur.
1 Mettez le lecteur en service.
Appuyez sur STANDBY/ON.
2 Commutation de l’entrée sur le mode
USB.
Appuyez sur DVD/USB.
USb apparaît sur l’afficheur de la face avant.
3 Raccordement d’appareils USB.
La page Disc Navigator apparaît automatiquement.
Face avant du lecteur
4 Procédez à la lecture.
Utilisez / / / pour sélectionner le fichier, puis
appuyez sur ENTER.
Mettez le lecteur hors service avant de débrancher
l’appareil USB.
L’entrée sera encore en mode USB la prochaine fois
que le lecteur sera mis en service. Pour revenir au
mode DVD, appuyez sur DVD/USB (ou appuyez sur
OPEN/CLOSE pour ouvrir le tiroir à disque).
Enregistrement de toutes les
plages
1 Insérez le CD Audio.
Si la lecture démarre automatiquement,
appuyez sur STOP pour l’arrêter.
2 Affichez la page CD -> USB Rec.
Appuyez sur USB REC.
3 Procédez à l’enregistrement.
Utilisez / / / pour sélectionner Start, puis
appuyez sur ENTER.
Sélection de la ou des plages à
enregistrer
1 Insérez le CD Audio.
Si la lecture démarre automatiquement,
appuyez sur STOP pour l’arrêter.
2 Affichez la page Home Menu.
Appuyez sur HOME MENU.
3 Sélectionnez CD -> USB Rec.
Utilisez / / / pour effectuer un choix, puis
appuyez sur ENTER.
Enregistrement de plages
de CD Audio sur un appareil
USB
Les plages d’un CD Audio inséré dans le lecteur peu-
vent être enregistrées sur un appareil USB raccordé
au port USB.
Il peut être impossible d’enregistrer des plages de
CD audio sur un dispositif USB. Pour le détail, reportez-vous à la page 21, Lorsqu’un appareil USB est
raccordé.
4 Sélectionnez Select Track Individual
la ou les plages que vous voulez enregistrer.
Utilisez / / / pour effectuer un choix.
Individual : Sélectionnez 1 plage à la fois.
Select All : Sélectionnez toutes les plages.
All Clear : Désélectionnez toutes les plages.
5 Sélectionnez Bitrate (vitesse de transfert).
Utilisez / / / pour effectuer un choix, puis
appuyez sur ENTER.
Sélectionnez 128kbps, 192kbps ou 320kbps.
Page 39
Fr
Français
13
6 Procédez à l’enregistrement.
Program Step
01.
02.
03.
04.
05.
06.
07.
08.
Title 1-01
Title 01
Program
Chapter 1-15
Chapter 001
Chapter 002
Chapter 003
Chapter 004
Chapter 005
Chapter 006
Chapter 007
Chapter 008
Utilisez / / / pour sélectionner Start, puis
appuyez sur ENTER.
Remarques
Les signaux audio sont convertis dans le format MP3
à la sortie.
CD -> USB Rec ne peut être sélectionné que lorsque le
CD Audio est arrêté.
Lorsque l’enregistrement est terminé, un dossier
intitulé “PIONEER” est automatiquement créé sur
l’appareil USB. Les plages enregistrées se trouvent
dans ce dossier.
Lecture dans l’ordre souhaité
(Lecture de programme)
1 Affichez la page Play Mode.
Appuyez sur PLAY MODE.
2 Sélectionnez Program.
Utilisez / pour effectuer un choix, puis appuyez sur
ENTER ou .
3 Sélectionnez Create/Edit.
Utilisez / pour effectuer un choix, puis appuyez sur
ENTER.
La page Create/ Edit varie selon le disque ou le
fichier.
4 Sélectionnez le titre, le chapitre, la plage
ou le fichier devant être lu.
Utilisez / / / pour effectuer un choix, puis
appuyez sur ENTER.
5 Procédez à la lecture.
Appuyez sur PLAY.
Pour lire un programme existant, sélectionnez
Playback Start sur la page du programme, puis
appuyez sur ENTER.
Pour revenir à la lecture normale, sélectionnez
Playback Stop sur l’écran du programme, puis
appuyez sur ENTER. Le programme reste en
mémoire.
Pour annuler tout le programme, sélectionnez
Program Delete sur l’écran du programme, puis
appuyez sur ENTER.
Remarques
Les programmes peuvent être répétés. Pendant la
lecture de programme, sélectionnez Program Repeat
pour Repeat sur l’écran du mode de lecture.
Les programmes ne peuvent pas être lus dans un
ordre aléatoire (la lecture aléatoire n’est pas possible
pendant la lecture de programme).
Pour ajouter un programme, sélectionnez d’abord
sa place dans la programmation (étape de la programmation), puis le titre, le chapitre ou la plage et
appuyez sur ENTER (les fichiers sont ajoutés à la fin
du programme).
Appuyez sur RETURN pour revenir à la page précé-
dente. Si vous revenez à la page précédente pendant
la programmation, le programme effectué sera
effacé.
Pour supprimer une étape, sélectionnez-la en la
mettant en surbrillance et appuyez sur CLEAR.
Page 40
Fr
14
Changement des réglages
Digital Audio Out
Video Output
Language
Display
Options
HDMI Out
Digital Out
Dolby Digital Out
DTS Out
96kHz PCM Out
MPEG Out
Auto
On
Dolby Digital
DTS
96kHz > 48kHz
MPEG > PCM
Initial Settings
Les réglages par défaut sont indiqués en italique.
Paramètres Audio Settings
Paramètres (réglages)
Le son d’un fichier WMA ou MP3
est restitué avec une grande qualité
Sound Retriever
(High/ Low/ Off)
Equalizer
(Off/
Rock/ Pop/
Live/ Dance/
Techno/ Classic/
Soft)
Virtual Surround
(On/
Audio DRC
(High/
Low/ Off)
Dialog
(High/
Low/ Off)
Off)
Medium/
Medium/
À propos de la fonction Sound Retriever
Lors de la compression du son, des données audio
sont supprimées ce qui entraîne une certaine perte
de qualité. La fonction Sound Retriever améliore le
son compressé et rétablit la qualité sonore des CD.
Paramètres Video Adjust
Paramètres (réglages)
Sharpness
(Fine/ Standard/
Soft)
Brightness
(-20 à +20)
Contrast
(-16 à +16)
Gamma
(-3 à +3)
sonore. Ceci n’est valide que pour les
fichiers pourvus de l’extension “.wma”
ou “.mp3”.
L’effet dépend du fichier. Essayez
différents réglages et choisissez celui
qui procure le meilleur effet.
Effectuez un choix selon le genre de musique que vous voulez écouter.
Un champ ambiophonique recréant
une certaine présence peut être
obtenu à partir de deux enceintes
seulement.
Lorsque le réglage est On, les signaux
audio PCM linéaires de 96 kHz ou plus
sont convertis en signaux de 48 kHz.
Rend les sons forts plus faibles et
les sons faibles plus forts. Changez
ce réglage par exemple lorsque vous
regardez des films tard le soit.
Ce réglage ne se répercute que sur le
son Dolby Digital.
L’effet dépend du volume du télévi-
seur, du récepteur ou l’amplificateur
AV, des enceintes, etc. raccordés.
Essayez différents réglages et choisissez celui qui procure le meilleur effet.
Changez ce réglage si le son des dialogues est trop faible et les dialogues à
peine audibles.
Ajuste la netteté de l’image.
Ajuste la luminosité de l’image.
Ajuste le rapport de luminosité entre les
parties éclairées et sombres de l’image.
Ajuste l’aspect des parties sombres de
l’image.
Paramètres (réglages)
Hue
(green 9 à red 9)
Chroma Level
(-9 à +9)
Brightness, Contrast, Gamma, Hue et Chroma Level ont été
réglés sur 0 en usine.
Ajuste la balance entre le vert et le rouge.
Ajuste la densité des couleurs. Ce réglage
agit efficacement sur les sources très
colorées, comme les dessins animées.
Paramètres Initial Settings
Les réglages détaillés du lecteur peuvent être chan-
gés ici.
Initial Settings ne peut pas être sélectionné pendant
la lecture. Arrêtez d’abord le disque.
Réglages Digital Audio Out
Réglages des
options
HDMI Out
Digital Out
Dolby Digital Out
DTS Out
96 kHz PCM Out
MPEG Out
Réglages
Sélectionnez les signaux audio devant être
restitués par la prise HDMI OUT (LPCM
Auto/ Off) selon l’appareil compati-
(2CH)/
ble HDMI raccordé.
Précisez si les signaux audio numériques
doivent être restitués (On) par les prises
COAXIAL DIGITAL AUDIO OUT ou non
(Off).
Précisez si les signaux audio Dolby Digital
doivent être restitués tels quels (Dolby
Digital) ou s’ils doivent être convertis en
signaux PCM linéaires (Dolby Digital >
PCM) à leur sortie selon l’amplificateur
AV, etc. raccordé.
Précisez si les signaux audio DTS doivent
être restitués (DTS) ou non (Off) selon
l’amplificateur AV, etc. raccordé.
Précisez si les signaux audio de 96 kHz
doivent être restitués tels quels (96kHz)
ou s’ils doivent être convertis en signaux
PCM linéaires (96kHz > 48kHz) à leur sor-
tie selon l’amplificateur AV, etc. raccordé.
Précisez si les signaux audio MPEG
doivent être restitués tels quels (MPEG)
ou s’ils doivent être convertis en signaux
PCM linéaires (MPEG > PCM) à leur sortie
selon l’amplificateur AV, etc. raccordé.
Page 41
Fr
Français
15
Réglages Video Output
Réglages Options
Réglages des
options
TV Screen
Component Out
HDMI Resolution
HDMI Color
Réglages
Changez le format d’affichage de l’image
(4:3 (Letter Box)/
(Wide)/ 16:9 (Compressed)) selon le
téléviseur raccordé.
Changez le format de sortie des signaux
vidéo restitués par les prises COMPO-
NENT VIDEO OUT (Progressive/
Changez la résolution des signaux
vidéo restitués par les prises HDMI
OUT (720x480i/
1920x1080i/ 1920x1080p).
Changez les signaux vidéo restitués par
la prise HDMI OUT (Full range RGB/
Component).
Réglages Language
Réglages des
options
Audio Language
Subtitle Language
DVD Menu Lang.
Subtitle Display
Réglages
Changez la langue des dialogues des
disques DVD-Vidéo (English/
disponibles/ Other Language).
Changez la langue des sous-titres des
disques DVD-Vidéo (English/
disponibles/
Changez la langue utilisée pour l’affichage
des menus des disques DVD-Vidéo (w/
Subtitle Lang./ langues disponibles/ Other
Language).
Précisez si les sous-titres doivent être
affichés (On) ou non (Off).
Réglages Display
Réglages des
options
OSD Language
Angle Indicator
On Screen Display
Réglages
Changez la langue des messages fonctionnels (Play, Stop, etc.) apparaissant
sur l’écran de télévision (English/
disponibles).
Précisez si la marque d’angle de prise de
vue doit être affichée (On) ou non (Off)
sur l’écran de télévision.
Précisez si les messages fonctionnels
(Play, Stop, etc.) doivent être affichés (On)
ou non (Off) sur l’écran de télévision.
4:3 (Pan & Scan)/ 16:9
720x480p/ 1280x720p/
Other Language).
Interlace).
langues
langues
langues
RGB/
Réglages des
options
KURO LINK
Parental Lock
DivX VOD
Auto Power Off
Réglages
Précisez si le lecteur doit fonctionner
avec la télécommande de l’appareil AV
raccordé avec un câble HDMI (On) ou
non (Off).
Restreignez le visionnage de DVD-Vidéo
(Password/
Affichez le code d’immatriculation requis
pour la lecture de fichiers VOD DivX
(Activate/
Précisez si le lecteur doit être éteint automatiquement (On) ou non (Off). Lorsque
On est spécifié, le lecteur s’éteint de luimême après un minimum de 30 minutes
d’inactivité en mode d’arrêt.
Level Change/ Country Code).
Deactivate).
Rétablissement des réglages
par défaut de Component Out et
HDMI Resolution
1 Mettez le lecteur hors service.
Appuyez sur STANDBY/ON.
2 Appuyez sur STANDBY/ON tout en
tenant enfoncé.
Utilisez les touches sur la face avant du lecteur.
L’appareil se met en service.
Rétablissement de tous les
réglages par défaut
1 Mettez le lecteur hors service.
Appuyez sur STANDBY/ON.
2 Appuyez sur STANDBY/ON tout en
tenant enfoncé.
Utilisez les touches sur la face avant du lecteur.
Page 42

Fr
16
Disques et fichiers lisibles
Disques lisibles
Disques DVD-Vidéo en vente dans le
commerce
CD Fujicolor
CD Photos KODAK
est une marque de commerce de DVD Format/
Logo Licensing Corporation.
est une marque commerciale de FUJIFILM
Corporation.
Cette étiquette indique la compatibilité lors de
la lecture avec les disques DVD-RW enregistrés
dans le format VR (format d’enregistrement vidéo).
Toutefois, dans le cas de disques enregistrés avec
un programme crypté pour un enregistrement unique, la lecture n’est possible qu’à l’aide d’un dispositif compatible avec le CPRM.
Remarques
Ce lecteur ne prend pas en charge les disques
multisession ni l’enregistrement multiborder.
L’enregistrement multisession/ multiborder est une
technique permettant d’enregistrer un disque en
plusieurs sessions/ bords. Une “session” ou “bord”
est une unité d’enregistrement, consistant en un jeu
complet de données de la zone d’entrée à la zone de
sortie.
Disques DVD-R/ -RW/ -R DL et DVD+R/
+RW/ +R DL enregistrés en mode Vidéo
et clôturés
Disques DVD-R/ -RW/ -R DL enregistrés en
mode VR
CD Vidéo
CD Audio en vente dans le commerce
Disques CD-R/
la musique enregistrée dans le format
CD-DA
Fichiers JPEG enregistrés sur des disques
DVD-R/ -RW/ -R DL, CD-R/ -RW/ -ROM ou des
appareils USB
Fichiers vidéo DivX enregistrés sur des
disques DVD-R/ -RW/ -R DL, CD-R/ -RW/ -ROM
ou des appareils USB
Fichiers WMA enregistrés sur des disques
DVD-R/ -RW/ -R DL, CD-R/ -RW/ -ROM ou des
appareils USB
Fichiers MP3 enregistrés sur des disques
DVD-R/
-RW/ -R DL, CD-R/ -RW/ -ROM ou des
appareils USB
-RW/ -ROM contenant de
Disques illisibles
Disques DVD-Audio
Disques DVD-RAM
SACD
CD-G
Disques Blu-ray
HD DVD
Les disques qui n’ont pas été clôturés
Disques enregistrés par paquets
À propos des codes régionaux
Des codes régionaux sont attribués aux lecteurs de DVD
et aux disques DVD-Vidéo selon la région où ils sont
commercialisés. Le(s) code(s) régional(aux) de ce lecteur est (sont) indiqué(s) ci-dessous.
DVD-Vidéo : 1
Les disques ne contenant pas ces codes ne peuvent pas
être lus.
Les disques suivants peuvent être lus sur ce lecteur.
DVD : 1 (comprenant 1) et ALL
À propos de la copie de CD
protégés
Ce lecteur se conforme aux spécifications du format CD
Audio. Il ne prend pas en charge la lecture ou les fonctions des disques non conformes à ces spécifications.
À propos de la lecture des
DualDisc
Un DualDisc est un nouveau format de disque à
deux faces dont une face renferme les données du
DVD — données vidéo, données audio, etc. — et
l’autre face les données non DVD, par exemple les
données audio numériques.
La face DVD d’un DualDisc peut être lue sur ce
lecteur (mais pas le contenu DVD Audio).
La face audio, non DVD du disque ne peut pas être
lue par ce lecteur.
Il est possible que lors du chargement et de l’éjec-
tion d’un DualDisc, la face opposée à la face de
lecture soit rayée. La lecture d’un disque rayé n’est
plus possible.
Pour tout complément d’informations sur les spé-
cifications d’un DualDisc, consultez le fabricant du
disque ou le magasin d’achat.
Page 43

Fr
Français
17
Lecture de disques créés sur un
ordinateur ou un enregistreur
BD/ DVD
Les réglages de l’application utilisée ou de l’envi-
ronnement de l’ordinateur peuvent empêcher la
lecture de disques enregistrés sur un ordinateur.
Enregistrez vos disques dans un format lisible sur ce
lecteur. Pour le détail, contactez votre revendeur.
Il se peut qu’un disque enregistré sur un ordinateur
ou un enregistreur BD/ DVD ne puisse pas être lu
parce que les caractéristiques de ce disque, des
rayures, de la saleté sur le disque, ou de la saleté
sur la lentille de l’enregistreur, etc. n’ont pas permis
d’effectuer une gravure de qualité.
Fichiers lisibles
Seuls les disques enregistrés dans le format
ISO9660 Niveau 1, Niveau 2 et Joliet peuvent être
lus.
Les fichiers protégés par le DRM (Gestion des droits
numériques) ne peuvent pas être lus.
La lecture des fichiers qui ne sont pas mentionnés
ci-dessous (WMV, MPEG4-AAC, etc.) n’est pas
garantie.
Formats de fichiers vidéo pris en
charge
DivX
DivX est une technologie multimédia créée par DivX,
Inc. Les fichiers multimédia DivX incluent les données d’images.
Les fichiers DivX peuvent aussi inclure des fonctions
de lecture plus sophistiquées, comme l’affichage de
menus et la sélection de diverses langues pour les
sous-titres et la sélection de pistes audio.
Prend en charge la lecture DivX®, y compris des
contenus premium
DivX® est une marque déposée de DivX, Inc., utilisée
sous licence.
Affichage de sous-titres externes
Les polices suivantes sont disponibles pour les
sous-titres externes. Vous pourrez afficher la police
appropriée en réglant la page 15, Subtitle Language
en fonction des sous-titres utilisés.
Ce lecteur prend en charge les groupes de langues
suivants :
Afrikaans (af), Basque (eu), Catalan (ca),
Danois (da), Hollandais (nl), Anglais (en), Férin-
Groupe 1
Groupe 2
Groupe 3
Groupe 4 Hébreu (iw), Yiddish (ji)
Groupe 5 Turc (tr)
gien (fo), Finnois (fi), Français (fr), Islandais
(is), Irlandais (ga), Italien (it), Norvégien (no),
Portugais (pt), Rhéto-Roman (rm), ÉcossaisGaélique (gd), Espagnol (es), Suédois (sv)
Albanais (sq), Croate (hr), Tchèque (cs), Hongrois (hu), Polonais (pl), Roumain (ro), Slovaque (sk), Slovène (sl)
Bulgare (bg), Biélorusse (be), Macédonien
(mk), Russe (ru), Serbe (sr), Ukrainien (uk)
Certains sous-titres externes ne s’afficheront pas
correctement ou pas du tout.
Page 44

Fr
18
Les extensions de fichiers suivantes sont prises en
charge pour les sous-titres externes (notez toutefois
que ces fichiers n’apparaissent pas dans le menu de
navigation du disque) : .srt, .sub, .ssa, .smi
Le nom de fichier du film doit être répété au début
du nom de fichier des sous-titres externes.
Le nombre de fichiers de sous-titres externes pou-
vant être associés au même film est limité à 10.
Formats de fichiers photo pris en
charge
JPEG
Résolution : Jusqu’à 3 072 x 2 048 pixels
Ce lecteur prend en charge le JPEG Baseline.
Ce lecteur prend en charge le format Exif Ver.2.2.
Ce lecteur ne prend pas en charge le JPEG
progressif.
Formats de fichiers audio pris en
charge
Ce lecteur ne prend pas en charge le VBR (Débit
variable).
Ce lecteur ne prend pas en charge le codage sans
perte.
Windows Media™ Audio (WMA)
Fréquences d’échantillonnage : 32 kHz, 44,1 kHz et
48 kHz
Débits binaires : Jusqu’à 192 kbps
Ce lecteur prend en charge les fichiers codés avec
Windows Media Player Ver. 7/ 7.1, Windows Media
Player pour Windows XP et Windows Media Player
Série 9.
Windows Media est une marque déposée ou une
marque commerciale de Microsoft Corporation aux
États-Unis et/
Ce produit intègre une technologie détenue par
Microsoft Corporation, qui ne peut être utilisée et
distribuée que sous licence de Microsoft Licensing,
Inc.
MPEG-1 Audio Layer 3 (MP3)
Fréquences d’échantillonnage : 32 kHz, 44,1 kHz et
48 kHz
ou dans d’autres pays.
Extensions des fichiers lisibles
Fichiers vidéo
.divx .avi
Les fichiers ne contenant pas de la vidéo DivX ne
peuvent pas être lus, même s’ils ont l’extension
“.avi”.
Fichiers photo
.jpg .jpeg
Fichiers audio
.wma .mp3
Page 45

Fr
Français
19
Informations supplémentaires
En cas de panne
Une erreur de commande est souvent prise pour une anomalie de fonctionnement ou une panne. Si vous
estimez que cet appareil ne fonctionne pas correctement, vérifiez les points ci-dessous. Parfois, le problème
peut provenir d’un autre composant. Examinez les autres composants et les appareils électriques utilisés. Si le
problème persiste malgré les vérifications des points suivants, confiez les réparations au service après-vente
Pioneer le plus proche ou à votre revendeur.
De l’électricité statique ou des interférences externes ont peut être déréglé le lecteur. Dans ce cas, il suffit proba-
blement de débrancher puis de rebrancher le cordon d’alimentation pour que le lecteur fonctionne de nouveau.
Problèmes d’ordre général
Problème Vérification Solution
Les réglages effectués ont été
effacés.
Différence de volume entre les DVD
et les CD.
La commande du lecteur à l’aide de
la télécommande n’est pas possible.
Le disque ne peut pas être lu ou le
tiroir à disque s’ouvre automatiquement.
Le lecteur se met automatiquement
hors service.
Le lecteur se met automatiquement
en ou hors service.
Est-ce que le cordon d’alimentation a
été débranché alors que le lecteur était
encore en service ?
Ce problème ne provient pas du lecteur. Le volume peut sembler différent parce que les
Est-ce que vous êtes éloigné du lecteur ?
Est-ce que le capteur de télécommande
est exposé à la lumière directe du soleil
ou à la lumière d’une lampe fluorescente, etc. ?
Est-ce que les piles sont vides ? Remplacez les piles (la page 5).
Est-ce que le disque est rayé ? Les disques rayés peuvent ne pas être lus.
Est-ce que le disque est sale ? Essuyez la saleté du disque (la page 25).
Est-ce que le disque est bien posé sur le
tiroir à disque ?
Est-ce que le disque a le bon numéro
régional ?
Est-ce que lecteur se trouve dans une
pièce humide ?
Est-ce que Auto Power Off est réglé
sur On ?
Est-ce que KURO LINK est réglé sur
On ?
Veillez à appuyer sur STANDBY/
avant du lecteur ou sur STANDBY/ ON sur la
télécommande et à attendre que l’indicateur OFF
sur l’afficheur de la face avant s’éteigne avant de
débrancher le cordon d’alimentation.
signaux ne sont pas enregistrés de la même façon
sur les disques.
Utilisez la télécommande à moins de 7 m du capteur de télécommande.
Il est possible que les signaux de télécommande
ne soient pas reçus correctement si le capteur de
télécommande est exposé par exemple à la lumière
directe du soleil ou d’une lampe fluorescente
puissante.
Posez le disque en orientant sa face imprimée vers
le haut.
Posez le disque dans le renfoncement du tiroir à
disque.
Les disques avec un code régional “1 (1 compris)” et
“ALL” peuvent être lus sur ce lecteur.
De l’humidité s’est peut-être condensée à l’intérieur. Attendez que la condensation se soit évaporée. N’installez pas le lecteur près d’un climatiseur,
etc. (la page 24).
Si Auto Power Off est réglé sur On, le lecteur se
met de lui-même hors service après 30 minutes
d’inactivité (la page 15).
Le lecteur se met en et hors service en même que
le téléviseur raccordé à la prise HDMI OUT. Si vous
ne voulez pas que le lecteur se mette en service en
même temps que le téléviseur, réglez KURO LINK
sur Off (la page 15).
ON sur la face
Page 46

Fr
20
Problème Vérification Solution
L’entrée du téléviseur et de la chaîne
AV raccordés est automatiquement
sélectionnée.
L’image est étirée ou le format ne
peut pas être changé.
Pendant la lecture l’image est perturbée ou sombre.
Aucun signal audio numérique n’est
restitué par les prises COAXIAL
DIGITAL AUDIO OUT.
Les signaux audio numériques de
88,2 kHz ne sont pas restitués
96 kHz/
par les prises COAXIAL DIGITAL
AUDIO OUT.
Les noms de dossiers ou de fichiers
ne sont pas reconnus.
Il faut un certain temps pour lire des
fichiers JPEG.
Des barres noires apparaissent pendant la lecture de fichiers JPEG.
Est-ce que KURO LINK est réglé sur
On ?
Est-ce que le format est réglé correctement sur le téléviseur raccordé ?
Est-ce que TV Screen est réglé correctement ?
Ce problème ne provient pas du lecteur. Ce lecteur intègre un système anticopie
Est-ce que le lecteur et le téléviseur
sont raccordés par un magnétoscope ?
Est-ce que Digital Out est réglé sur On? Lorsque le lecteur est raccordé aux prises COAXIAL
Est-ce que 96 kHz PCM Out est réglé
sur 96kHz ?
Est-ce que le disque lu est protégé ? Les signaux audio numériques de 96 kHz/
Avez-vous dépassé le nombre maximal
de noms de dossiers ou de fichiers
pouvant être reconnu par le lecteur ?
Êtes-vous en train de lire de gros
fichiers ?
Lisez-vous des fichiers comportant
différents formats d’images ?
L’entrée du téléviseur, de la chaîne AV (récepteur ou
amplificateur AV, etc.) et du convertisseur AV HD
raccordé à la prise HDMI OUT peut se régler auto-
matiquement sur le lecteur lorsque vous activez la
lecture sur le lecteur ou lorsque vous affichez une
page du menu (Home Menu, etc.). Si vous ne voulez
pas que les entrées du téléviseur, de la chaîne AV
(récepteur ou amplificateur AV, etc.) et du convertisseur AV HD raccordés changent automatiquement, réglez KURO LINK sur Off (la page 15).
Reportez-vous au mode d’emploi du téléviseur et
réglez correctement le format sur le téléviseur.
Réglez TV Screen correctement (la page 15).
Macrovision. L’image peut ne pas s’afficher correctement sur certains téléviseurs lorsque les disques
lus contiennent des signaux anticopie. Il ne s’agit
pas d’un dysfonctionnement.
Lorsque le lecteur et le téléviseur sont raccordés par
l’intermédiaire d’un magnétoscope, la fonction anticopie analogique du lecteur peut empêcher l’image
de s’afficher correctement sur le magnétoscope.
Raccordez directement le lecteur et le téléviseur.
DIGITAL AUDIO OUT, réglez Digital Out sur On (la
page 14).
Réglez 96 kHz PCM Out sur 96kHz > 48kHz.
des disques protégés ne peuvent pas être restitués.
Un maximum de 299 dossiers peuvent être recon-
nus sur un disque. Un maximum de 648 fichiers
peuvent être reconnus à l’intérieur d’un dossier.
Toutefois, selon la structure du dossier, le lecteur
peut ne pas être capable de reconnaître certains
dossiers ou fichiers.
L’affichage de gros fichiers peut requérir un certain
temps.
Des barres noires peuvent s’afficher au haut et au
bas, ou encore sur les côtés de l’image, lorsque des
fichiers JPEG d’un autre format sont affichés.
88,2 kHz
Page 47

Fr
Français
21
Lorsqu’un appareil USB est raccordé
Problème Vérification Solution
L’appareil USB n’est pas reconnu. Est-ce que l’appareil USB est raccordé
Le fichier ne peut pas être lu. Est-ce que le fichier est protégé (par le
Les noms de dossiers ou de fichiers
ne sont pas affichés, ou bien ils sont
mal affichés.
Les noms de dossiers ou de fichiers
ne sont pas affichés dans l’ordre
alphabétique.
Le lecteur a besoin d’un certain
temps pour reconnaître un appareil
USB.
L’alimentation n’est pas fournie à
l’appareil USB.
Les plages d’un CD Audio ne peuvent pas être enregistrées sur un
appareil USB.
correctement ?
Est-ce que l’appareil USB est raccordé
par l’intermédiaire d’un concentrateur
USB ?
Ce problème ne provient pas du lecteur. Mettez le lecteur hors puis de nouveau en service.
Ce problème ne provient pas du lecteur. Il se peut que certains appareils USB ne soient pas
système DRM) ?
Ce problème ne provient pas du lecteur. Les fichiers enregistrés sur un ordinateur ne peu-
Ce problème ne provient pas du lecteur. Il se peut que certains fichiers ne soient pas lus
Est-ce que les noms de dossiers ou
de fichiers contiennent plus de 14
caractères ?
Ce problème ne provient pas du lecteur. L’ordre des noms de dossiers et fichiers apparais-
Quelle est la capacité d’un appareil
USB ?
L’alimentation n’est pas fournie si la
consommation est trop élevée.
L’espace disponible sur l’appareil USB
est-il suffisant ?
L’appareil USB contient-il 300 dossiers
ou plus ?
L’appareil USB contient-il déjà 99
dossiers PIONEER ?
Raccordez l’appareil correctement (bien enfoncé).
Ce lecteur ne peut pas être raccordé à un concentrateur USB. Raccordez l’appareil USB directement
au lecteur.
Ce lecteur prend en charge seulement les appareils
USB de stockage de masse.
Ce lecteur prend en charge les lecteurs à mémoire
flash et audio numériques portables.
Seuls les systèmes de fichiers FAT16 et FAT32 sont
pris en charge. Les autres systèmes de fichiers
(exFAT, NTFS, etc.) ne sont pas pris en charge.
reconnus correctement.
Les fichiers protégés contre la copie ne peuvent
pas être lus.
vent pas être lus.
correctement.
Le nombre de caractères pouvant être affichés pour
les noms de dossiers et de fichiers sur la page Disc
Navigator est limité à 14.
sant sur la page Disc Navigator dépend de l’ordre
dans lequel les dossiers ou les fichiers ont été
enregistrés sur le dispositif USB.
Le chargement des données peut prendre un certain temps quand des appareils USB de grande
capacité sont raccordés (c’est-à-dire plusieurs
minutes).
Mettez le lecteur hors puis en service.
Mettez hors service l’appareil USB, débranchez-le
puis rebranchez-le.
Appuyez sur DVD/
puis revenez au mode USB. (Lorsque l’entrée bascule en mode DVD, LOAd apparaît sur l’afficheur
de la face avant et le disque est reconnu. Lorsque
l’entrée revient au mode USB, USb apparaît sur
l’afficheur de la face avant.)
Si l’appareil USB a été vendu avec un adaptateur
secteur, raccordez cet adaptateur lorsque vous
utilisez l’appareil USB.
L’enregistrement n’est pas possible si l’espace disponible sur l’appareil USB n’est pas suffisant. Dans
ce cas, Espace faible sur la clé USB s’affiche.
L’enregistrement ne sera pas possible si l’appareil
USB contient 300 dossiers, ou plus.
L’enregistrement n’est pas possible si l’appareil
USB contient déjà 99 dossiers PIONEER.
USB pour basculer en mode DVD,
Page 48

Fr
22
Lorsque le lecteur est raccordé à un appareil compatible HDMI
Problème Vérification Solution
Aucune image ne s’affiche. Est-ce que la résolution est réglée
Aucun son produit ou son déformé. Est-ce que HDMI Out est réglé correc-
Les signaux audio multicanal ne sont
pas restitués.
Les couleurs ne s’affichent pas correctement sur l’écran de télévision.
La fonction KURO LINK ne fonctionne pas.
Le message CEC200 apparaît. Est-ce que le lecteur est éteint ? Lorsque le navigateur de disque est sélectionné
correctement ?
Est-ce que le câble HDMI est correctement raccordé ?
tement ?
Est-ce que HDMI Out est réglé correc-
tement ?
Est-ce que HDMI Color est réglé cor-
rectement ?
Est-ce que le câble HDMI que vous utili-
sez est un câble HDMI™ High Speed ?
Est-ce que KURO LINK est réglé sur On
sur le lecteur ?
Est-ce que l’appareil raccordé est com-
patible avec la fonction KURO LINK ?
Est-ce que KURO LINK est réglé sur On
sur le lecteur ?
Est-ce que plusieurs lecteurs sont
raccordés ?
Réglez HDMI Resolution correctement pour l’appareil raccordé (la page 15).
Rétablissez les réglages par défaut de HDMI Reso-
lution (720x480p) (la page 15).
Raccordez le câble correctement (à fond dans la
prise).
Avec certains câbles, les signaux vidéo 1 080p ne
sont pas restitués.
Réglez HDMI Out sur LPCM (2CH) ou Auto (la
page 14).
Réglez HDMI Out sur Auto (la page 14).
Changez le réglage de HDMI Color (la page 15).
Utilisez un câble HDMI™ High Speed.
Réglez KURO LINK sur On sur le lecteur (la page
15).
La fonction KURO LINK n’agit pas avec les appa-
reils d’autres marques, même s’ils sont raccordés à
l’aide d’un câble HDMI.
La fonction KURO LINK n’agit pas si des appareils
non compatibles avec la fonction KURO LINK ou
des appareils d’autres marques sont raccordés
entre un appareil compatible avec la fonction KURO
LINK et le lecteur.
Même lorsqu’un produit Pioneer compatible avec
la fonction KURO LINK est raccordé, certaines des
fonctions n’agissent pas.
Réglez “KURO LINK” sur “On” sur l’appareil raccordé. La fonction KURO LINK agit lorsque “KURO
LINK” est réglé sur “ON” sur tous les appareils
raccordés aux prises HDMI OUT.
La fonction KURO LINK peut ne pas fonctionner
si trois lecteurs dont celui-ci, ou plus de trois, sont
raccordés à l’aide d’un câble HDMI.
avec la télécommande du Téléviseur à Écran Plat,
le message CEC200 apparaît si le lecteur est éteint.
Il ne s’agit pas d’un défaut. Vous pouvez continuer
à utiliser le lecteur et le Téléviseur à Écran Plat en
l’état.
Page 49

Fr
Français
23
Tableau des codes de langues et Tableau des codes de pays
et régions
Tableau des codes de langues
Noms (codes) de langues et codes numériques
Japanese (ja), 1001 Bhutani (dz), 0426 Kirghiz (ky), 1125 Sinhalese (si), 1909
English (en), 0514 Esperanto (eo), 0515 Latin (la), 1201 Slovak (sk), 1911
French (fr), 0618 Estonian (et), 0520 Lingala (ln), 1214 Slovenian (sl), 1912
German (de), 0405 Basque (eu), 0521 Laothian (lo), 1215 Samoan (sm), 1913
Italian (it), 0920 Persian (fa), 0601 Lithuanian (lt), 1220 Shona (sn), 1914
Spanish (es), 0519 Finnish (fi), 0609 Latvian (lv), 1222 Somali (so), 1915
Chinese (zh), 2608 Fiji (fj), 0610 Malagasy (mg), 1307 Albanian (sq), 1917
Dutch (nl), 1412 Faroese (fo), 0615 Maori (mi), 1309 Serbian (sr), 1918
Portuguese (pt), 1620 Frisian (fy), 0625 Macedonian (mk), 1311 Siswati (ss), 1919
Swedish (sv), 1922 Irish (ga), 0701 Malayalam (ml), 1312 Sesotho (st), 1920
Russian (ru), 1821 Scots-Gaelic (gd), 0704 Mongolian (mn), 1314 Sundanese (su), 1921
Korean (ko), 1115 Galician (gl), 0712 Moldavian (mo), 1315 Swahili (sw), 1923
Greek (el), 0512 Guarani (gn), 0714 Marathi (mr), 1318 Tamil (ta), 2001
Afar (aa), 0101 Gujarati (gu), 0721 Malay (ms), 1319 Telugu (te), 2005
Abkhazian (ab), 0102 Hausa (ha), 0801 Maltese (mt), 1320 Tajik (tg), 2007
Afrikaans (af), 0106 Hindi (hi), 0809 Burmese (my), 1325 Thai (th), 2008
Amharic (am), 0113 Croatian (hr), 0818 Nauru (na), 1401 Tigrinya (ti), 2009
Arabic (ar), 0118 Hungarian (hu), 0821 Nepali (ne), 1405 Turkmen (tk), 2011
Assamese (as), 0119 Armenian (hy), 0825 Norwegian (no), 1415 Tagalog (tl), 2012
Aymara (ay), 0125 Interlingua (ia), 0901 Occitan (oc), 1503 Setswana (tn), 2014
Azerbaijani (az), 0126 Interlingue (ie), 0905 Oromo (om), 1513 Tonga (to), 2015
Bashkir (ba), 0201 Inupiak (ik), 0911 Oriya (or), 1518 Turkish (tr), 2018
Byelorussian (be), 0205 Indonesian (in), 0914 Panjabi (pa), 1601 Tsonga (ts), 2019
Bulgarian (bg), 0207 Icelandic (is), 0919 Pologne (pl), 1612 Tatar (tt), 2020
Bihari (bh), 0208 Hebrew (iw), 0923 Pashto, Pushto (ps), 1619 Twi (tw), 2023
Bislama (bi), 0209 Yiddish (ji), 1009 Quechua (qu), 1721 Ukrainian (uk), 2111
Bengali (bn), 0214 Javanese (jw), 1023 Rhaeto-Romance (rm), 1813 Urdu (ur), 2118
Tibetan (bo), 0215 Georgian (ka), 1101 Kirundi (rn), 1814 Uzbek (uz), 2126
Breton (br), 0218 Kazakh (kk), 1111 Romanian (ro), 1815 Vietnamese (vi), 2209
Catalan (ca), 0301 Greenlandic (kl), 1112 Kinyarwanda (rw), 1823 Volapük (vo), 2215
Corsican (co), 0315 Cambodian (km), 1113 Sanskrit (sa), 1901 Wolof (wo), 2315
Czech (cs), 0319 Kannada (kn), 1114 Sindhi (sd), 1904 Xhosa (xh), 2408
Welsh (cy), 0325 Kashmiri (ks), 1119 Sangho (sg), 1907 Yoruba (yo), 2515
Danish (da), 0401 Kurdish (ku), 1121 Serbo-Croatian (sh), 1908 Zulu (zu), 2621
Tableau des codes de pays et régions
Noms de pays et régions, Codes numériques et Codes de pays et régions
États-Unis, 2119, us Canada, 0301, ca Chili, 0312, cl Mexique, 1324, mx
Argentine, 0118, ar Corée, République de, 1118, kr Danemark, 0411, dk Fédération russe, 1821, ru
Royaume-uni, 0702, gb Singapour, 1907, sg Allemagne, 0405, de Brésil, 0218, br
Italie, 0920, it Suisse, 0308, ch Japon, 1016, jp France, 0618, fr
Inde, 0914, in Suède, 1905, se Nouvelle-Zélande, 1426, nz Belgique, 0205, be
Indonésie, 0904, id Espagne, 0519, es Norvège, 1415, no Portugal, 1620, pt
Australie, 0121, au Thaïlande, 2008, th Pakistan, 1611, pk Hong-Kong, 0811, hk
Autriche, 0120, at Taiwan, 2023, tw Philippines, 1608, ph Malaisie, 1325, my
Pays-bas, 1412, nl Chine, 0314, cn Finlande, 0609, fi
Page 50

Fr
24
Précautions d’emploi
Déplacement du lecteur
Avant de déplacer le lecteur, assurez-vous qu’il ne
contient pas de disque et que le tiroir à disque est
fermé. Appuyez ensuite sur STANDBY/ON sur le lec-
teur (ou STANDBY/ON sur la télécommande), attendez que l’indicateur OFF sur l’afficheur de la face avant
s’éteigne, puis débranchez le cordon d’alimentation. Le
déplacement du lecteur avec un disque peut causer des
dommages.
Emplacement du lecteur
Choisissez un endroit stable près du téléviseur ou de
la chaîne stéréo utilisés avec le lecteur.
N’installez pas le lecteur sur un téléviseur ou un
moniteur couleur. Installez-le aussi à l’écart de platines à cassette ou d’appareils facilement affectés par
le magnétisme.
Évitez les endroits suivants :
Exposés à la lumière directe du soleil ;
Humides ou mal aérés ;
Extrêmement chauds ;
Exposés à des vibrations ;
Exposés à une grande quantité de poussière ou à la
fumée de cigarettes
Exposés à la suie, la vapeur ou la chaleur (par exem-
ple dans un cuisine).
Ne pas poser d’objets sur le lecteur
Ne posez pas d’objets sur le lecteur.
N’obstruez pas les orifices de ventilation.
N’utilisez pas le lecteur sur une couverture, un lit, un
sofa, etc. pelucheux, et ne l’enveloppez pas dans un
tissu, etc. La chaleur ne pourra pas se disperser et causera des dommages.
N’exposez pas le lecteur à la chaleur.
N’installez pas le lecteur sur un amplificateur ou un
autre appareil produisant de la chaleur. Si vous l’installez dans un meuble, mettez-le sous l’amplificateur ou
l’appareil audio pour éviter qu’il ne reçoive leur chaleur.
Mettez le lecteur hors service
lorsque vous ne l’utilisez pas.
Des rayures peuvent apparaître sur l’écran de télévision
et du bruit peut parasiter le son des émissions de radio,
selon l’état des signaux, lorsque le lecteur est en service. Dans ce cas, mettez le lecteur hors service.
À propos de la condensation
Si vous transportez sans transition le lecteur d’un
endroit froid dans un pièce chaude (par exemple, en
hiver), ou si la température de la pièce où se trouve le
lecteur augmente rapidement, des gouttelettes d’eau
(condensation) peuvent se former à l’intérieur du
lecteur (sur les pièces et la lentille). En cas de condensation, le lecteur ne fonctionne pas correctement et la
lecture n’est pas possible. Laissez le lecteur en service
pendant 1 ou 2 heures à la température ambiante (pour
que l’humidité ait le temps de s’évaporer). Les gouttelettes d’eau se dissiperont et la lecture sera de nouveau
possible. De la condensation peut aussi se former en
été si le lecteur est exposé à l’air d’un climatiseur. Dans
ce cas, éloignez le lecteur du climatiseur.
Nettoyage du produit
Débranchez le cordon d’alimentation de la prise
secteur avant de nettoyer le lecteur.
Nettoyez le lecteur avec un chiffon doux. Pour enle-
ver les taches rebelles, imprégnez le chiffon d’un
détergent neutre dilué dans 5 à 6 fois plus d’eau,
tordez bien le chiffon, essuyez la saleté, puis passez
un chiffon sec et doux sur lecteur.
L’alcool, le diluant, le benzène, les insecticides,
etc. peuvent abîmer les inscriptions et la peinture
du lecteur. Évitez aussi de laisser des produits en
caoutchouc ou en vinyle très longtemps au contact
du lecteur pour ne pas endommager le coffret.
Lorsque vous utilisez des lavettes imprégnées de
produit chimique, etc. lisez attentivement dans la
notice les précautions à prendre.
Attention si l’appareil est installé
dans un meuble avec une porte
en verre
N’appuyez pas sur OPEN/CLOSE de la télécommande
pour ouvrir le tiroir à disque lorsque la porte de verre est
fermée. La porte gênerait l’ouverture du tiroir à disque
et le lecteur pourrait être endommagé.
Nettoyage de la lentille
La lentille de ce lecteur ne devrait pas se salir normalement mais si, pour une raison quelconque, de la poussière ou de la saleté causait un problème, consultez
un service après-vente agréé Pioneer. Bien que divers
produits de nettoyage pour lentille de lecteur soient
en vente dans le commerce, nous déconseillons leur
utilisation, car certains d’entre eux risquent, en fait,
d’endommager la lentille.
Page 51

Fr
Français
25
À propos des copyrights
Cet appareil fait appel à des principes technologiques
destinés à interdire la piraterie des oeuvres protégées
par des droits d’auteurs, principes qui sont eux-mêmes
couverts aux États-Unis par des brevets et d’autres formes de propriété intellectuelle détenus par Macrovision
Corporation et d’autres personnes physiques ou morales. L’utilisation de ces principes technologiques visant
à la protection des droits d’auteur doit être autorisée
par Macrovision Corporation et doit être limitée à des
fins domestiques, ou similaires, sauf accord préalable
de Macrovision Corporation. La rétro-technique ou le
désassemblage sont proscrits.
Manipulation des disques
Rangement
Remettez toujours les disques dans leurs boîtiers
et rangez-les à la verticale, à l’abri de la chaleur, de
l’humidité, des rayons directs du soleil et d’un froid
extrême.
Veillez à lire les précautions fournies avec le disque.
Nettoyage des disques
Les disques couverts de traces de doigts ou de pous-
sière risquent de ne pas être lus. Si le cas se présente, essuyez doucement le disque avec un tissu de
nettoyage, etc. en allant du centre vers la périphérie
du disque. N’utilisez pas de tissu de nettoyage sale.
N’utilisez pas de benzène, diluant ni d’autres pro-
duits chimiques volatils. N’utilisez pas non plus
de vaporisateur pour microsillons ni de produits
antistatiques.
Pour enlever les taches rebelles, imprégnez d’eau
un chiffon doux, tordez bien le chiffon, essuyez la
saleté, puis passez un chiffon sec sur le disque.
N’utilisez pas de disques endommagés (fendus ou
déformés).
Faites attention de ne pas rayer ni salir la face enre-
gistrée des disques.
Ne posez pas deux disques sur le tiroir à disque, l’un
sur l’autre.
Ne collez pas de morceaux de papier ni d’étiquet-
tes sur les disques. Ceci risque des déformer les
disques et ceux-ci ne pourront plus être lus. Faites
attention aussi aux disques loués sur lesquels des
étiquettes sont souvent collées, parce que la colle
de l’étiquette peut salir le disque. Vérifiez si la colle
ne déborde pas de ces étiquettes avant d’utiliser des
disques loués.
Page 52
Fr
26
À propos des disques à formes
spéciales
Les disques à formes spéciales (en coeur, hexagonaux,
etc.) ne peuvent pas être lus sur ce lecteur. N’essayez
pas de lire de tels disques car ils pourraient endommager le lecteur.
À propos de la condensation sur
les disques
Si les disques sont portés d’un endroit froid (en particulier en hiver) dans une pièce chaude, des gouttelettes d’eau (condensation) peuvent se former sur leur
surface. Les disques risquent de ne pas pouvoir être
lus correctement s’il y a de la condensation dessus.
Essuyez doucement les gouttelettes d’eau sur la surface
du disque avant de l’insérer.
Spécifications
Alimentation ................................................CA 120 V, 60 Hz
Consommation .............................................................. 11 W
Consommation (en veille) ........................................... 0,6 W
Poids ..............................................................................1,3 kg
Dimensions extérieures
.................................360 mm (L) x 42 mm (H) x 202 mm (P)
Température de fonctionnement tolérée ....... +5 °C à +35 °C
Humidité de fonctionnement tolérée ................5 % à 85 %
(sans condensation)
Sortie vidéo
Niveau de sortie ...............................................1 Vc-c (75 Ω)
Prise de sortie.......................................................Prise RCA
Sortie vidéo à composantes (Y, CB/ PB, CR/ PR)
Niveau de sortie Y ............................................1 Vc-c (75 Ω)
Niveau de sortie CB/ PB, CR/ PR .....................0,7 Vc-c (75 Ω)
Prise de sortie.......................................................Prise RCA
Sortie HDMI
Prise de sortie......................................................19 broches
Sortie audio (stéréo G/ D)
Niveau de sortie audio.........200 mV efficaces (1 kHz, -20 dB)
Prise de sortie.......................................................Prise RCA
Réponse en fréquence ...................................4 Hz à 44 kHz
Rapport S/ B ................................................................114 dB
Plage dynamique .........................................................87 dB
Distorsion harmonique totale .................................0,007 %
Sortie audio numérique
Sortie numérique coaxiale ..................................Prise RCA
Informations supplémentaires
Port USB .....................................................................Type A
Remarques
Les caractéristiques et la présentation peuvent
être modifiées, sans avis préalable, dans un souci
d’amélioration.
Ce produit utilise les polices FontAvenue® sous
licence de NEC Corporation. FontAvenue est une
marque déposée de NEC Corporation.
Publication de Pioneer Corporation.
Tous droits de reproduction et de traduction réservés.
© 2009 Pioneer Corporation.
Page 53

Français
Fr
27
Page 54

Fr
28
Page 55

Fr
Français
29
Page 56
Printed in Thailand/Imprimé en Thaïlande
Published by Pioneer Corporation.
Copyright © 2010 Pioneer Corporation.
All rights reserved.
Publication de Pioneer Corporation.
© 2010 Pioneer Corporation.
Tous droits de reproduction et de traduction réservés.
Should this product require service in the U.S.A. and you wish to locate the nearest Pioneer
Authorized Independent Service Company, or if you wish to purchase replacement parts,
operating instructions, service manuals, or accessories, please call the number shown
below.
1 – 8 0 0 – 4 2 1 – 1 4 0 4
Please do not ship your product to Pioneer without first calling the Customer Support at the
above listed number for assistance.
Pioneer Electronics Service, Inc.
P. O. BOX 1760, Long Beach,
CA 90801-1760, U.S.A.
For warranty information please see the Limited Warranty sheet included with your product.
Should this product require service in Canada, please contact a Pioneer Canadian
Authorized Dealer to locate the nearest Pioneer Authorized Service Company in Canada.
Alternatively, please contact the Customer Satisfaction Department at the following address:
Pioneer Electronics of Canada, Inc.
Customer Satisfaction Department
300 Allstate Parkway, Markham, Ontario L3R 0P2
1-877-283-5901
905-479-4411
For warranty information please see the Limited Warranty sheet included with your product.
Si ce produit doit être réparé au Canada, veuillez vous adresser à un distributeur autorisé
Pioneer du Canada pour obtenir le nom du Centre de Service Autorisé Pioneer le plus près
de chez-vous. Vous pouvez aussi contacter le Service à la clientèle de Pioneer:
Pioneer Électroniques du Canada, Inc.
Service Clientèle
300, Allstate Parkway, Markham, Ontario L3R 0P2
1-877-283-5901
905-479-4411
Pour obtenir des renseignements sur la garantie, veuillez vous reporter au feuillet sur la
garantie restreinte qui accompagne le produit.
S018_C_EF
J2M21121B SH
10/04
K
PIONEER CORPORATION
1-1, Shin-ogura, Saiwai-ku, Kawasaki-shi, Kanagawa 212-0031, Japan
PIONEER ELECTRONICS (USA) INC.
P. O. BOX 1540, Long Beach, California 90801-1540, U.S.A. TEL: (800) 421-1404
PIONEER ELECTRONICS OF CANADA, INC.
300 Allstate Parkway, Markham, Ontario L3R 0P2, Canada TEL: 1-877-283-5901, 905-479-4411
PIONEER EUROPE NV
Haven 1087, Keetberglaan 1, B-9120 Melsele, Belgium TEL: 03/570.05.11
PIONEER ELECTRONICS ASIACENTRE PTE. LT D.
253 Alexandra Road, #04-01, Singapore 159936 TEL: 65-6472-7555
PIONEER ELECTRONICS AUSTRALIA PTY. LT D.
178-184 Boundary Road, Braeside, Victoria 3195, Australia, TEL: (03) 9586-6300
PIONEER ELECTRONICS DE MEXICO S.A. DE C.V.
Blvd.Manuel Avila Camacho 138 10 piso Col.Lomas de Chapultepec, Mexico, D. F. 11000 TEL: 55-9178-4270
K002_B1_En
 Loading...