

Page 1

DJ MIXER
TABLE DE MIXAGE
DJM-5000
Operating Instructions
Mode d’emploi
Page 2
En
2
Thank you for buying this Pioneer product. Please read through these operating instructions so you will know how to operate your model properly. After you have fin-
The exclamation point within an equilateral
triangle is intended to alert the user to the
presence of important operating and
maintenance (servicing) instructions in the
literature accompanying the appliance.
The lightning flash with arrowhead symbol,
within an equilateral triangle, is intended to
alert the user to the presence of uninsulated
“dangerous voltage” within the product’s
enclosure that may be of sufficient
magnitude to constitute a risk of electric
shock to persons.
CAUTION:
TO PREVENT THE RISK OF ELECTRIC
SHOCK, DO NOT REMOVE COVER (OR
BACK). NO USER-SERVICEABLE PARTS
INSIDE. REFER SERVICING TO QUALIFIED
SERVICE PERSONNEL.
CAUTION
RISK OF ELECTRIC SHOCK
DO NOT OPEN
IMPORTANT
D3-4-2-1-1_A1_En
NOTE: THE NO USER-SERVICEABLE PARTS COMPARTMENT WARNING IS LOCATED ON THE
APPLIANCE BOTTOM.
P1-4-2-2_En
NOTE:
This equipment has been tested and found to comply with the limits for a Class B digital
device, pursuant to Part 15 of the FCC Rules. These limits are designed to provide
reasonable protection against harmful interference in a residential installation. This
equipment generates, uses, and can radiate radio frequency energy and, if not installed and
used in accordance with the instructions, may cause harmful interference to radio
communications. However, there is no guarantee that interference will not occur in a
particular installation. If this equipment does cause harmful interference to radio or
television reception, which can be determined by turning the equipment off and on, the
user is encouraged to try to correct the interference by one or more of the following
measures:
— Reorient or relocate the receiving antenna.
— Increase the separation between the equipment and receiver.
— Connect the equipment into an outlet on a circuit different from that to which the
receiver is connected.
— Consult the dealer or an experienced radio/TV technician for help.
D8-10-1-2_A1_En
Information to User
Alterations or modifications carried out without appropriate authorization may invalidate
the user’s right to operate the equipment.
D8-10-2_A1_En
CAUTION
This product satisfies FCC regulations when shielded cables and connectors are used to
connect the unit to other equipment. To prevent electromagnetic interference with electric
appliances such as radios and televisions, use shielded cables and connectors for
connections.
D8-10-3a_A1_En
ished reading the instructions, put them away in a safe place for future reference.
In some countries or regions, the shape of the power plug and power outlet may sometimes differ from that shown in the explanatory drawings. However the method of
connecting and operating the unit is the same.
Page 3

En
3
English
FEDERAL COMMUNICATIONS COMMISSION DECLARATION OF CONFORMITY
This device complies with part 15 of the FCC Rules. Operation is subject to the following two conditions: (1) This
device may not cause harmful interference, and (2) this device must accept any interference received, including
interference that may cause undesired operation.
Product Name: DJ MIXER
Model Number: DJM-5000
Responsible Pa rty Name: PIONEER ELECTRONICS (USA), INC.
SERVICE SUPPORT DIVISION
Address: 1925 E. DOMINGUEZ ST. LONG BEACH, CA 90810-1003, U.S.A.
Phone: 1-800-421-1404
URL: http://www.pioneerelectronics.com
D8-10-4*_B1_En
This Class B digital apparatus complies with
Canadian ICES-003.
D8-10-1-3_A1_En
WARNING
This equipment is not waterproof. To prevent a fire
or shock hazard, do not place any container filled
with liquid near this equipment (such as a vase or
flower pot) or expose it to dripping, splashing, rain
or moisture.
D3-4-2-1-3_B_En
WARNING
The voltage of the available power supply differs
according to country or region. Be sure that the
power supply voltage of the area where this unit
will be used meets the required voltage (e.g., 230V
or 120V) written on the rear panel.
D3-4-2-1-4_A_En
Before plugging in for the first time, read the following
section carefully.
WARNING
To prevent a fire hazard, do not place any naked
flame sources (such as a lighted candle) on the
equipment.
D3-4-2-1-7a_A_En
VENTILATION CAUTION
When installing this unit, make sure to leave space
around the unit for ventilation to improve heat
radiation (at least 5 cm at rear, and 3 cm at each
side).
WARNING
Slots and openings in the cabinet are provided for
ventilation to ensure reliable operation of the
product, and to protect it from overheating. To
prevent fire hazard, the openings should never be
blocked or covered with items (such as newspapers,
table-cloths, curtains) or by operating the
equipment on thick carpet or a bed.
D3-4-2-1-7b_A_En
Operating Environment
Operating environment temperature and humidity:
+5 °C to +35 °C (+41 °F to +95 °F); less than 85 %RH
(cooling vents not blocked)
Do not install this unit in a poorly ventilated area, or in
locations exposed to high humidity or direct sunlight (or
strong artificial light)
D3-4-2-1-7c*_A1_En
If the AC plug of this unit does not match the AC
outlet you want to use, the plug must be removed
and appropriate one fitted. Replacement and
mounting of an AC plug on the power supply cord of
this unit should be performed only by qualified
service personnel. If connected to an AC outlet, the
cut-off plug can cause severe electrical shock. Make
sure it is properly disposed of after removal.
The equipment should be disconnected by removing
the mains plug from the wall socket when left unused
for a long period of time (for example, when on
vacation).
D3-4-2-2-1a_A1_En
CAUTION
The POWER switch on this unit will not completely
shut off all power from the AC outlet. Since the
power cord serves as the main disconnect device for
the unit, you will need to unplug it from the AC outlet
to shut down all power. Therefore, make sure the
unit has been installed so that the power cord can
be easily unplugged from the AC outlet in case of an
accident. To avoid fire hazard, the power cord should
also be unplugged from the AC outlet when left
unused for a long period of time (for example, when
on vacation).
D3-4-2-2-2a_A_En
POWER-CORD CAUTION
Handle the power cord by the plug. Do not pull out the
plug by tugging the cord and never touch the power
cord when your hands are wet as this could cause a
short circuit or electric shock. Do not place the unit, a
piece of furniture, etc., on the power cord, or pinch the
cord. Never make a knot in the cord or tie it with other
cords. The power cords should be routed such that they
are not likely to be stepped on. A damaged power cord
can cause a fire or give you an electrical shock. Check
the power cord once in a while. When you find it
damaged, ask your nearest PIONEER authorized
service center or your dealer for a replacement.
S002*_En
When using this product follow the instructions
written on the underside of the unit, which
concern rated voltage, etc.
D3-4-2-2-4_En
IMPORTANT NOTICE
THE SERIAL NUMBER FOR THIS EQUIPMENT IS
LOCATED ON THE BOTTOM.
PLEASE WRITE THIS SERIAL NUMBER ON YOUR
ENCLOSED WARRANTY CARD AND KEEP IN A
SECURE AREA. THIS IS FOR YOUR SECURITY.
D1-4-2-6-1*_A1_En
WARNING: Handling the cord on this product or
cords associated with accessories sold with the
product will expose you to chemicals listed on
proposition 65 known to the State of California and
other governmental entities to cause cancer and
birth defect or other reproductive harm.
D36-P4_A_En
Wash hands after handling
Page 4
En
4
S001_En
Selecting fine audio equipment such as the unit
you’ve just purchased is only the start of your
musical enjoyment. Now it’s time to consider how
you can maximize the fun and excitement your
equipment offers. This manufacturer and the
Electronic Industries Association’s Consumer
Electronics Group want you to get the most out of
your equipment by playing it at a safe level. One that
lets the sound come through loud and clear without
annoying blaring or distortion-and, most importantly,
without affecting your sensitive hearing.
Sound can be deceiving. Over time your hearing
“comfort level” adapts to higher volumes of sound.
So what sounds “normal” can actually be loud and
harmful to your hearing. Guard against this by
setting your equipment at a safe level BEFORE your
hearing adapts.
To establish a safe level:
• Start your volume control at a low setting.
• Slowly increase the sound until you can hear it
comfortably and clearly, and without distortion.
Once you have established a comfortable sound
level:
• Set the dial and leave it there.
Taking a minute to do this now will help to prevent
hearing damage or loss in the future. After all, we
want you listening for a lifetime.
We Want You Listening For A Lifetime
Used wisely, your new sound equipment will
provide a lifetime of fun and enjoyment. Since
hearing damage from loud noise is often
undetectable until it is too late, this manufacturer
and the Electronic Industries Association’s
Consumer Electronics Group recommend you avoid
prolonged exposure to excessive noise. This list of
sound levels is included for your protection.
Decibel
Level Example
30 Quiet library, soft whispers
40
Living room, refrigerator, bedroom away from traffic
50 Light traffic, normal conversation, quiet office
60 Air conditioner at 20 feet, sewing machine
70 Vacuum cleaner, hair dryer, noisy restaurant
80
Average city traffic, garbage disposals, alarm clock
at two feet.
THE FOLLOWING NOISES CAN BE DANGEROUS
UNDER CONSTANT EXPOSURE
90
Subway, motorcycle, truck traffic, lawn mower
100 Garbage truck, chain saw, pneumatic drill
120 Rock band concert in front of speakers,
thunderclap
140 Gunshot blast, jet plane
180 Rocket launching pad
Information courtesy of the Deafness Research Foundation.
Page 5

En
5
English
Contents
How to read this manual
The names of displays, menus, and buttons in this manual are enclosed in brackets. (e.g. [Collection] pane, [File] menu, [f])
Before start
Features ...........................................................................................................................6
What’s in the box .............................................................................................................6
Connections
Rear Panel .......................................................................................................................7
Connecting input terminals ...........................................................................................8
Connecting output terminals .........................................................................................8
Connecting to the control panel ....................................................................................9
Connecting a computer ..................................................................................................9
About the USB audio driver software ............................................................................9
About USB-MIDI channel setting ................................................................................11
Operations
Control Panel .................................................................................................................13
Operating the DJ section..............................................................................................14
Operating the MC section ............................................................................................15
Operating the PA section .............................................................................................16
Additional information
Troubleshooting ............................................................................................................17
About the exemption clauses ......................................................................................17
Block Diagram...............................................................................................................18
Specifications ................................................................................................................19
Mounting on a rack conforming to EIA
standards
The screw holes on the left and right of the control panel of this unit match 5U size
of any EIA standard 19-inch rack. The maximum depth of this unit is 225.1 mm.
! Secure this unit with screws (not supplied) matching the rack.
! Do not install this unit directly above a power amplifier. Heat radiating from the
power amplifier may damage this unit. Also, noise (hum noise, etc.) may be
generated.
! When transporting this unit, remove it from the rack. Transporting this unit
without removing it from the rack may damage this unit.
! If you transport this unit without removing it from the rack, make sure vibration
or shock is not applied to this unit.
Page 6

En
6
PA Section
Before start
Features
The DJM-5000 is a high quality, high performance mixer designed for high sound
quality and equipped with many functions offering powerful support for three
roles: MC, DJ and PA.
High sound quality processing with 96 kHz sampling, 24-bit high quality A/ D
converter and 32-bit DSP achieves powerful, high grade sound.
A user-friendly panel layout arranging the three roles (MC, DJ and PA) in separate sections for makes for intuitive operation of the many functions.
MC Section
Microphone features failthfully realizing a high-quality
MC performance (page 15)
! This unit is equipped with 2 exclusive channels for a microphone that can be
operated intuitively. As you can control the volume and the 3-band equalizer
independently, you can adjust the volume and quality of sound according to
the voice of an MC in each channel.
! This unit is also equipped with 4 exclusive types of effects for a microphone
(REVERB/ ECHO+VERB/ OCTAVER/ PITCH). It is possible to carry out a variety of performances with a microphone.
! CH1 in the DJ section is also available for a microphone input. You can use
up to 3 microphones simultaneously.
The world’s first 1, “Advanced Talkover” feature (page 15)
! This unit is equipped with the “Advanced Talkover” feature that makes the
sound from a microphone more listenable by automatically lowering the
volume in the frequency range of voice against music. The volume of music
is not affected by using a microphone, making it possible for you to continue
with an MC performance without hurting the atmosphere of the venue (the
music level can be adjusted with the knob on the control panel).
1 As of 8/
10/ 2009, for a DJ mixer, as determined by Pioneer.
“MASTER/ ZONE Split Output” that makes individual
performances possible in 2 separate venues with only
one device (page 16)
! This unit is equipped with 2-channel output independently assigned to
MASTER output and ZONE output. You can output sound in separate channels to 2 venues, realizing a flexible party performance according to the atmosphere of each venue. Likewise, you can output sound from a microphone
to a selected destination, realizing an announcement or an MC performance
according to the atmosphere of each venue.
“SOUND MAXIMIZER” that can realize the sound setting
optimized for specific conditions or atmospheres (page 16)
! This unit is equipped with the “DYNAMICS” and “CLARITY” knobs used to
adjust the sound quality. You can generate a deep bass sound in the low-frequency range and a crispy clear sound in the mid- and high-frequency range,
which has never been possible with an equalizer. As you can easily adjust
the sound quality in the low- and high-frequency range, you can realize an
optimum sound setting according to the progress of a party. Also for a compressed sound format like MP3, the sound lost in the low- and high-frequency
range is reinforced.
What’s in the box
! USB Cable
! CD-ROM
! Warranty card
! Operating instructions (this document)
DJ Section
A built-in “USB audio interface” that makes it possible to
input audio directly from a computer (page 9)
! This unit has a built-in “USB audio interface” that can input audio being
played back on a computer to a mixer via USB connection to the computer.
This makes it possible for you to realize a DJ performance using a computer
without an external sound card.
! You can mix up to 3-channel2 audio assigned each CH of DJM-5000 with only
one computer.
2 A CD-ROM with a driver software is supplied (compatible with Windows
and Mac). You can use the audio interface feature by installing the driver
software in your computer (For Windows, you can assign 3-channel audio
only when an ASIO-compatible software is used).
The “Assignable USB MIDI” feature that can control a
MIDI-compatible DJ software (page 11)
! This unit is equipped with the “Assignable USB MIDI” feature that can trans-
mit the operation information of almost all buttons and faders on DJM-5000
to a DJ software in MIDI signals via USB connection to a computer. You can
also use it as a MIDI controller with flexible operability.
Page 7
En
7
Connections
MASTER1
MASTER2
CH-4
ZONE
1 GND
1 GND
3 COLD
3 COLD
2 HOT
2 HOT
MASTER ATT.
-
12dB
-
6dB
0dB
-
12dB
-
6dB
0dB
ZONE ATT.
CD
L
L
L
L
RR
R
R
R
LINE
CH-3 CH-2 CH-1
DJM-
5000
CD CD
L
R
L
LINE
REC OUT
L
R
BOOTH
(TRS)
CONTROL
CD
R
L
CONTROL
SEND
L
(
MONO
)
R
L
(
MONO
)
R
L
R
RETURN
DIGITAL IN USB
21
MIC 3
MIC 2
1
6 72
3 3 4 4
4 4 5 5
16 141517 13 12 11 10
9 8
Be sure to turn off the power and unplug the power cord from the power outlet whenever making or changing connections.
Refer to the operating instructions for the component to be connected.
Connect the power cord after all the connections between devices have been completed.
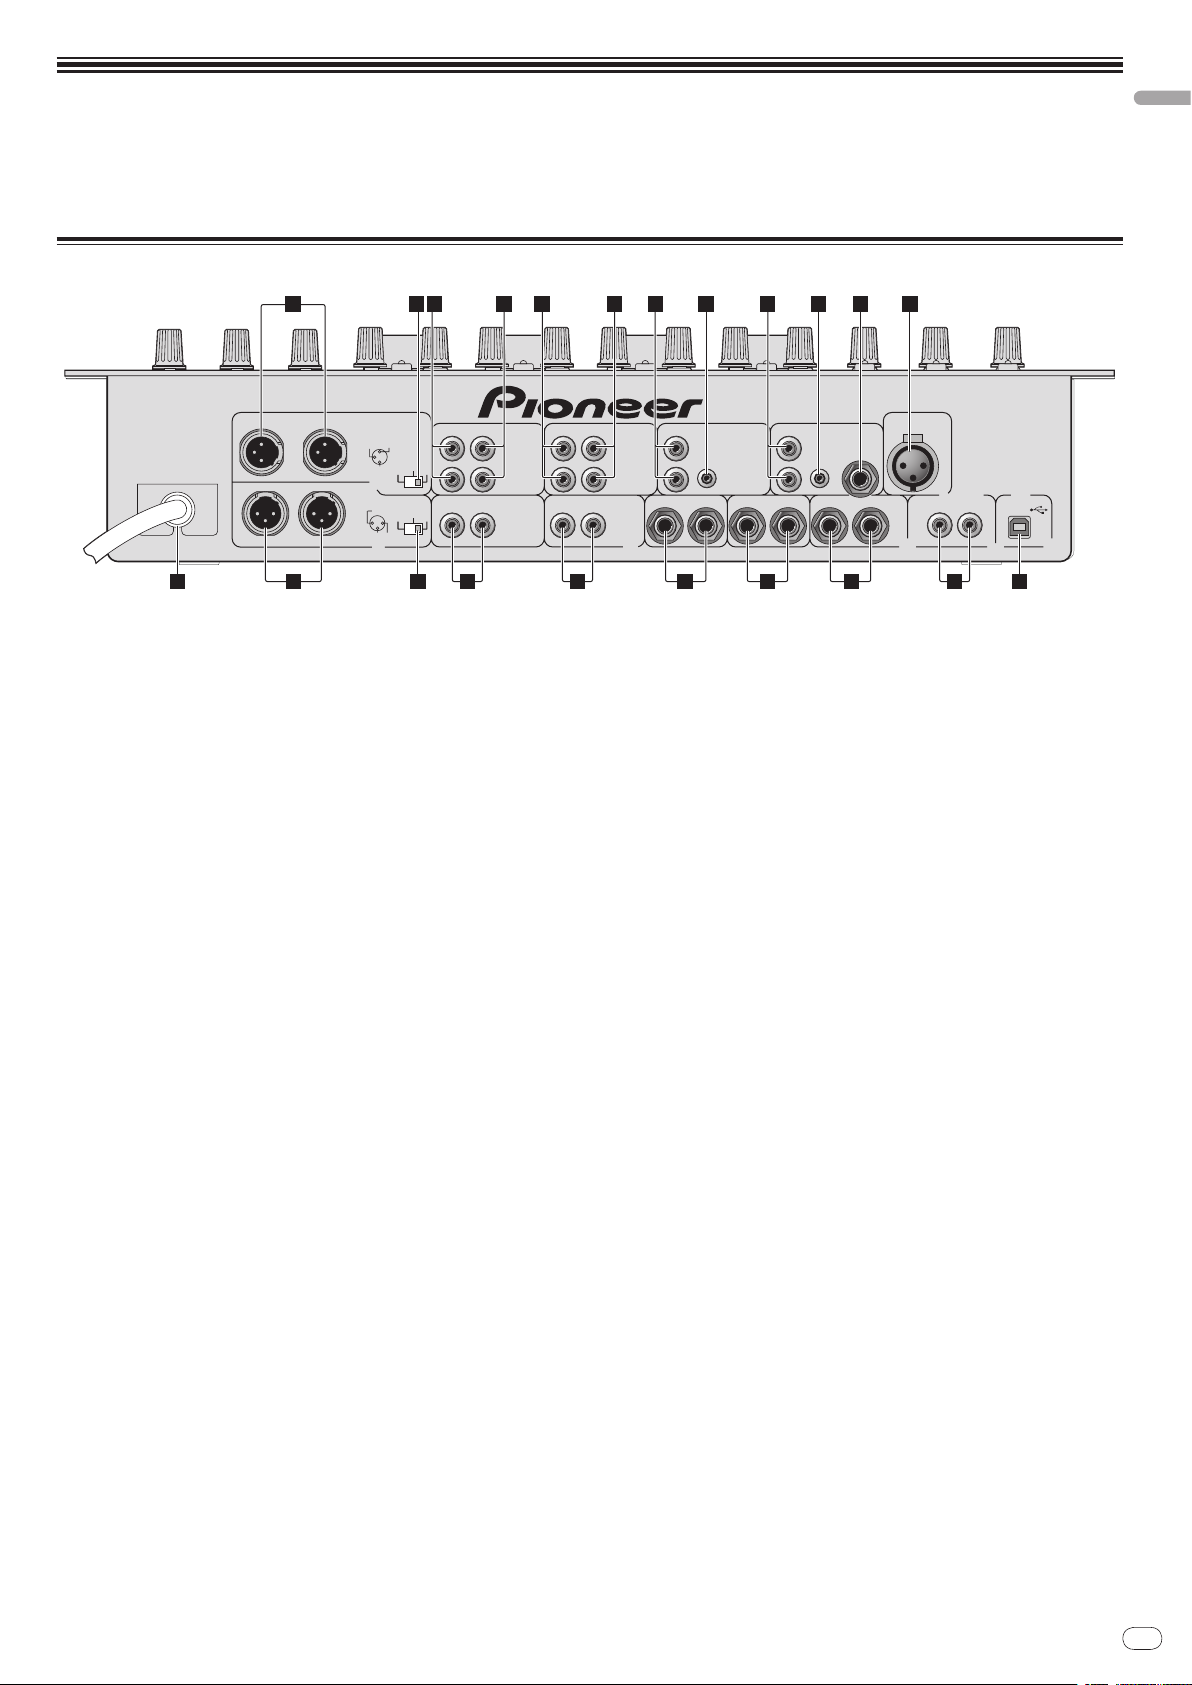
Rear Panel
English
1 ZONE (page 8)
An output terminal for the ZONE channel.
2 ZONE ATT
Use to switch the attenuation level of audio signals output at the [ZONE]
terminal. Select from 0 dB, -6 dB and -12 dB.
3 LINE (page 8)
Connect to a cassette deck or a line level output component.
4 CD (page 8)
Connect to a DJ player or a line level output component.
5 CONTROL (page 8)
This is a control terminal for a DJ player. Use the fader of this unit to control
a DJ player.
6 MIC3 (page 8)
Connect to a microphone.
7 MIC2 (page 8)
Connect to a microphone.
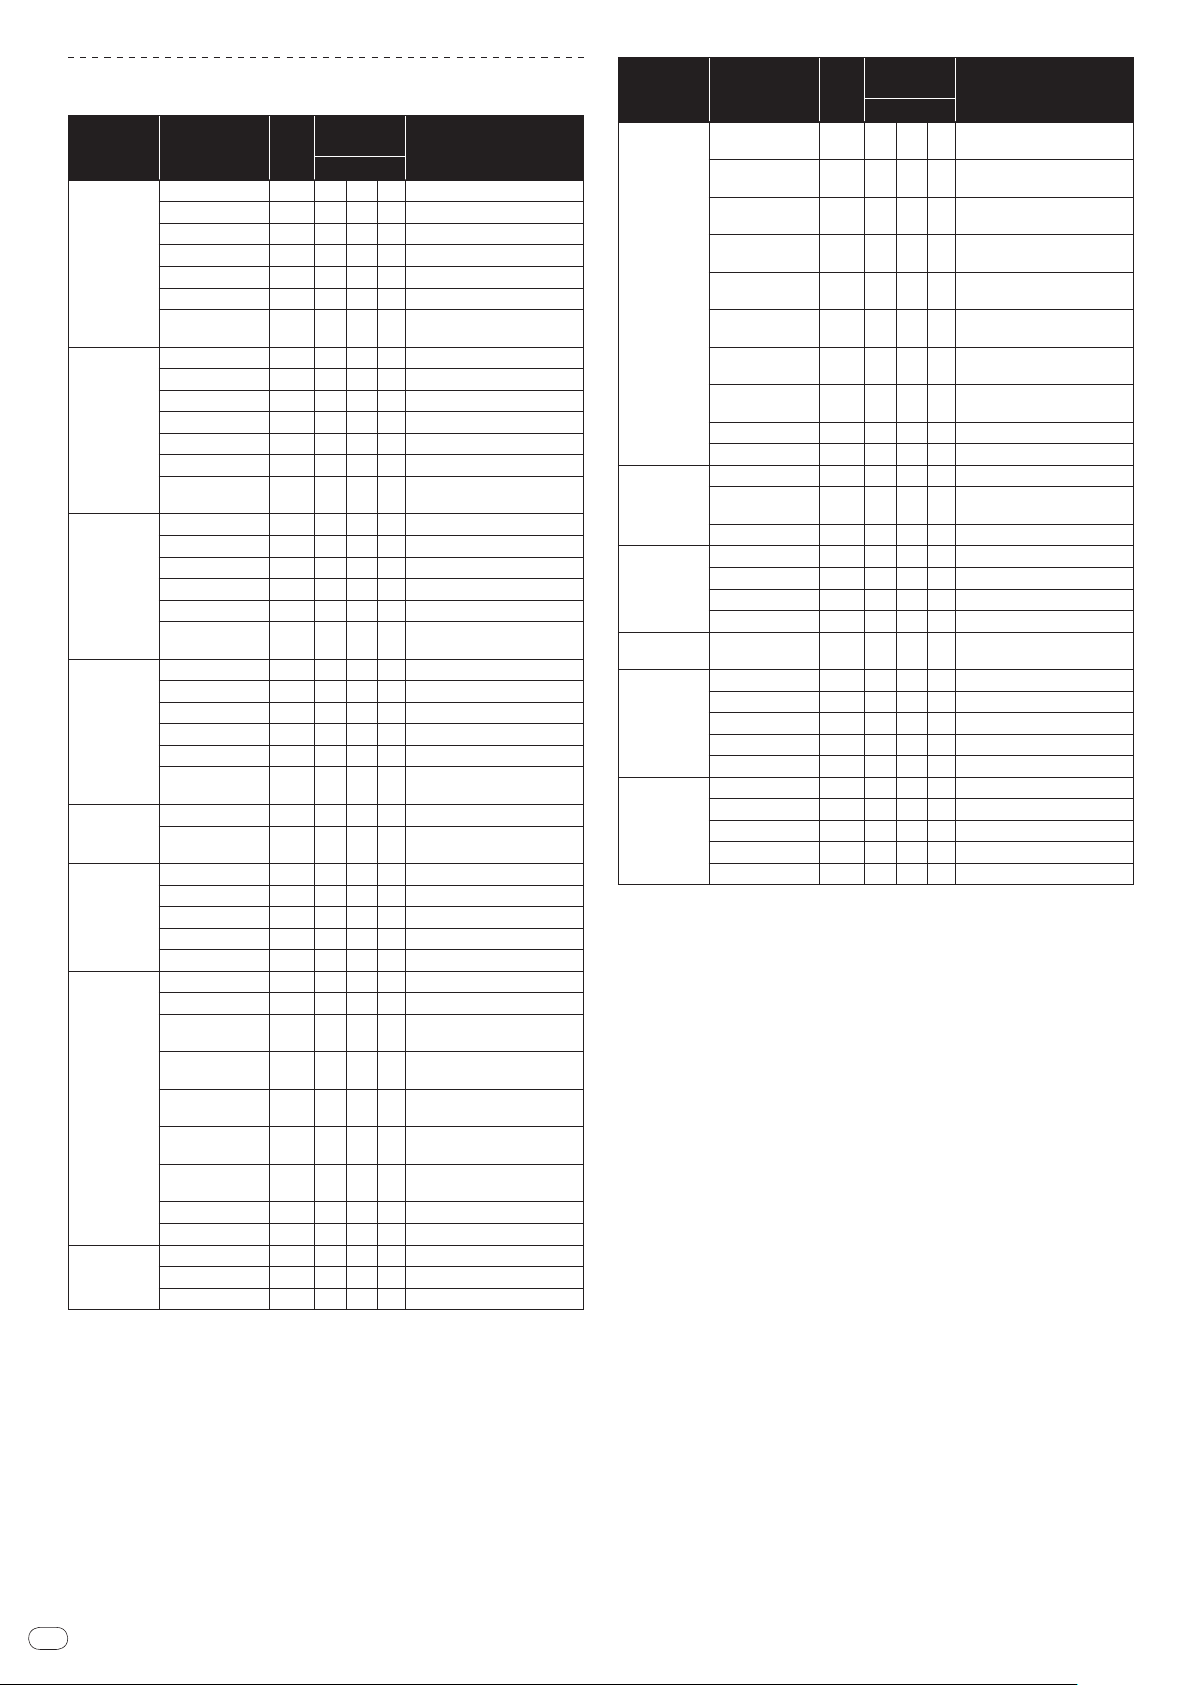
8 USB (page 9)
Connect to a computer.
9 DIGITAL IN (page 8)
Connect to a digital audio output component.
a RETURN (page 8)
Connect to the output terminal of an external effector. When the [L] channel
only is connected, the [L] channel input is simultaneously input to the [R]
channel.
b SEND (page 8)
Connect to the input terminal of an external effector. When the [L] channel
only is connected, a monaural audio signal is output.
c BOOTH (page 8)
Output terminals for a booth monitor, compatible with balanced or unbalanced output for a TRS connector.
d REC OUT (page 8)
This is an output terminal for recording.
e MASTER2 (page 8)
Connect to a power amplifier, etc.
f MASTER ATT
Use to switch the attenuation level of audio signals output at the [MASTER1]
or [MASTER2] terminal. Select from 0 dB, -6 dB and -12 dB.
g MASTER1 (page 8)
Connect to a power amplifier, etc.
h Power cable
Connect to an AC outlet. Plug in the power cord after all connections have
been made.
Page 8
En
8
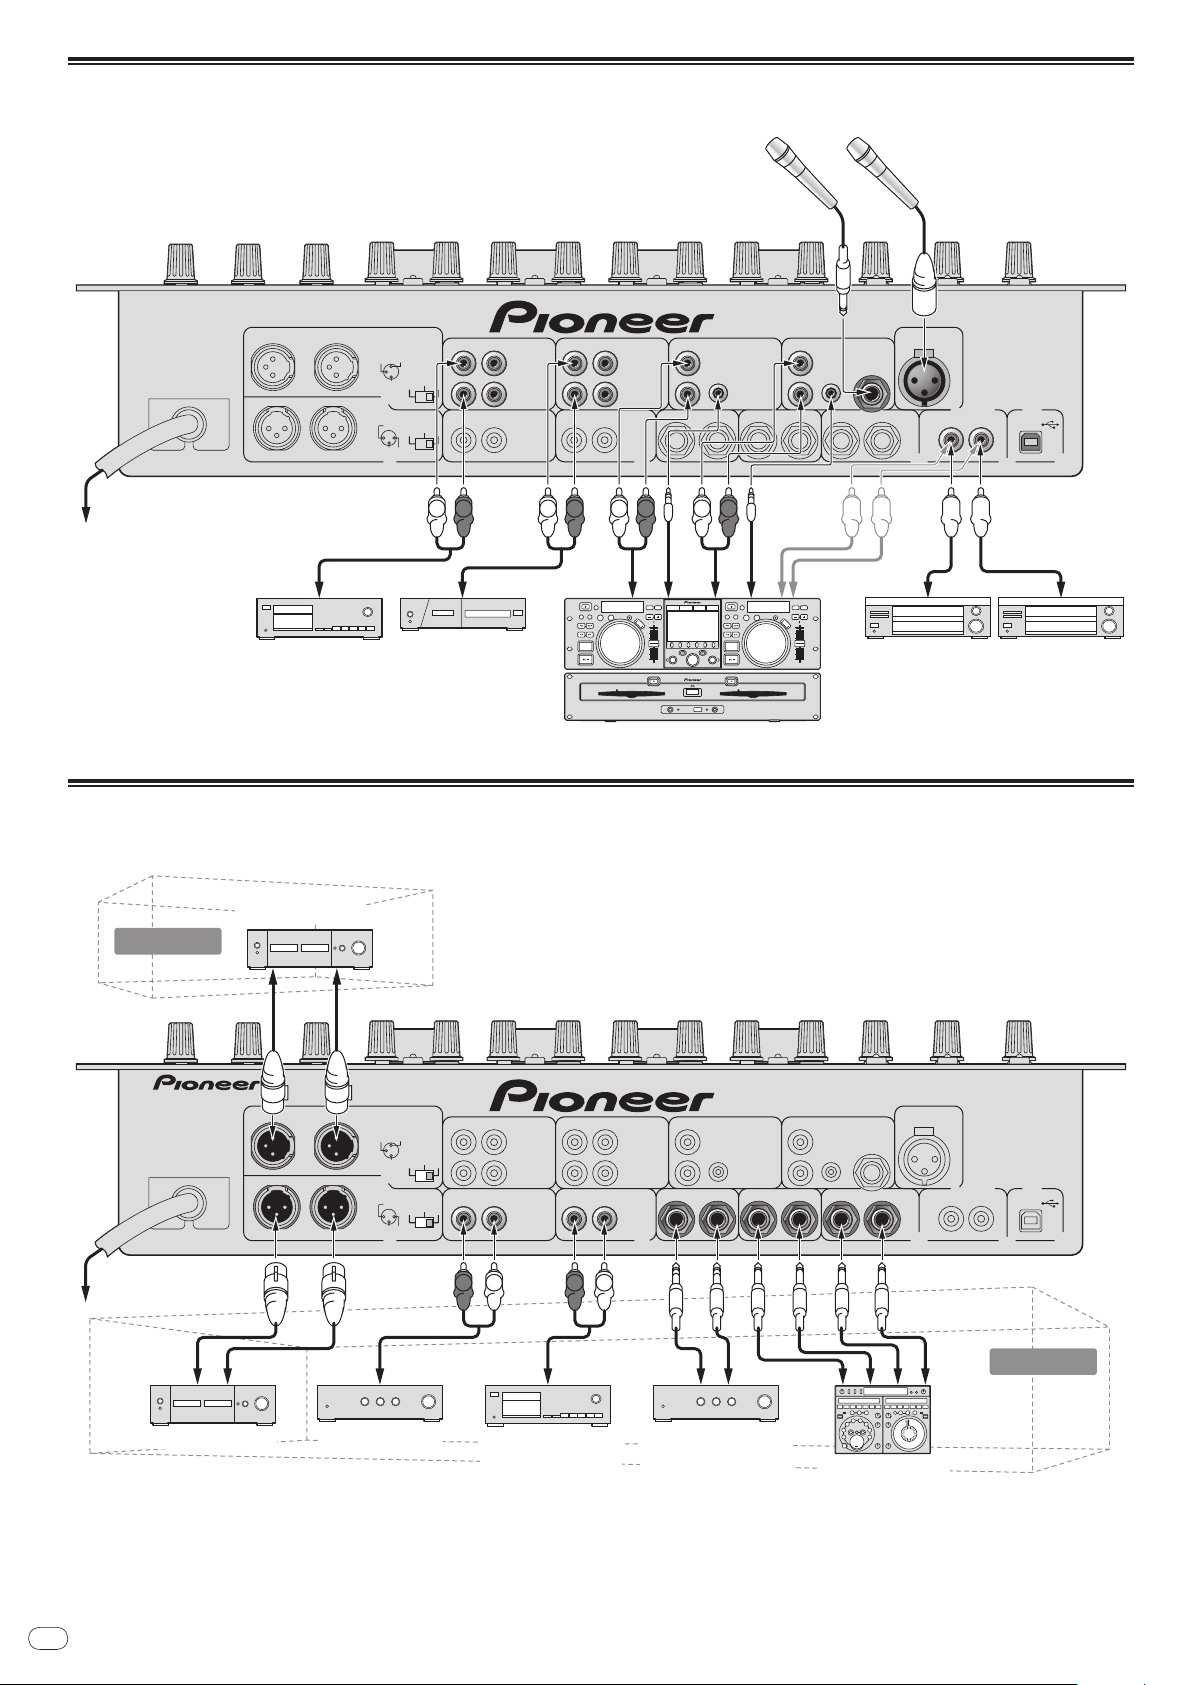
Connecting input terminals
MASTER1
MASTER2
CH-4
ZONE
1 GND
1 GND
3 COLD
3 COLD
2 HOT
2 HOT
MASTER ATT.
-
12dB
-
6dB
0dB
-
12dB
-
6dB
0dB
ZONE ATT.
CD
L
L
L
L
RR
R
R
R
LINE
CH-3 CH-2 CH-1
CD CD
L
R
L
LINE
REC OUT
L
R
CONTROL
CD
R
L
CONTROL
SEND
L
(
MONO
)
R
L
(
MONO
)
R
L
R
RETURN
DIGITAL IN USB
21
MIC 3
MIC 2
DJM-
5000
BOOTH
(TRS)
L
L
RR
L
L
RR
Pioneer DJ player
1
Microphone
To an AC outlet
Cassette deck, CD player, etc.
(a line level output device)
Digital audio output device
MASTER1
MASTER2
CH-4
ZONE
1 GND
1 GND
3 COLD
3 COLD
2 HOT
2 HOT
MASTER ATT.
-
12dB
-
6dB
0dB
-
12dB
-
6dB
0dB
ZONE ATT.
CD
L
L
L
L
RR
R
R
R
LINE
CH-3 CH-2 CH-1
CD CD
L
R
L
LINE
REC OUT
L
R
CONTROL
CD
R
L
CONTROL
SEND
L
(
MONO
)
R
L
(
MONO
)
R
L
R
RETURN
DIGITAL IN USB
21
MIC 3
MIC 2
DJM-
5000
BOOTH
(TRS)
R LR L
Power amplifier
2
Power amplifier
(for a booth monitor)
External effector
Cassette deck, etc.
(an analog input
recording device)
Power amplifierPower amplifier
Main room
Subroom
To an AC outlet
1 Connect a control cable to use the fader start feature (page 14).
Connecting output terminals
2 A sound is output separately from the one in the master channel (MASTER/ ZONE split-out).
Page 9
En
9
English
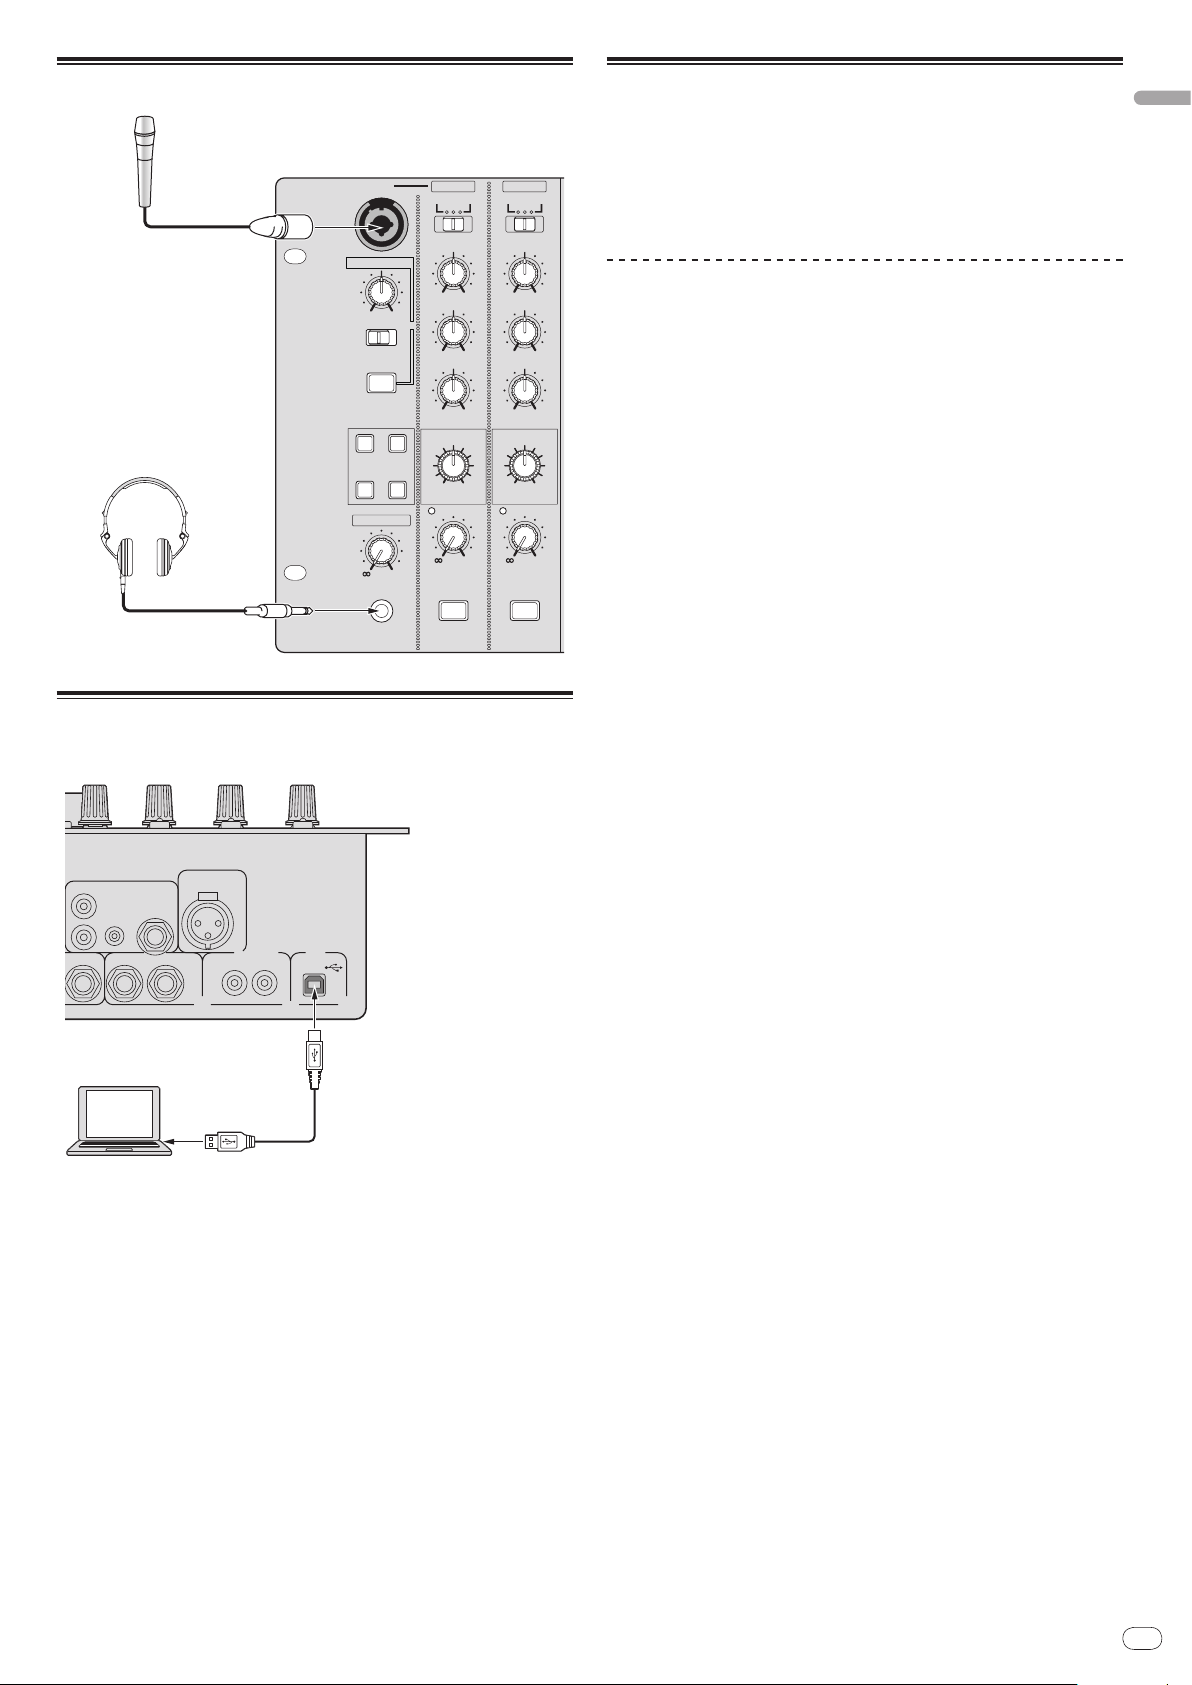
Connecting to the control panel
PHONES
LEVEL
-
0
HEAD PHONES
NORMAL
ADVANCED
ON/OFF
TALK OVER
MIC1 ON
LEVEL
-
0
EFFECT
LOWHI
LOW
-
12 +12
MID
-
12 +12
HI
-
12 +12
OUTPUT
MASTER ZONE
BOTH
MIC 1 MIC 1
MIC2 ON
LEVEL
-
0
EFFECT
LOWHI
LOW
-
12 +12
MID
-
12 +12
HI
-
12 +12
OUTPUT
MASTER ZONE
BOTH
MIC 2
MINMAX
PITCHOCTAVER
ECHO+VERB
REVERB
MIC EFFECT
Microphone
Headphones
CH-1
CD
R
L
CONTROL
D
L
(
MONO
)
L
(
MONO
)
R
RETURN
DIGITAL IN USB
21
MIC 3
MIC 2
DJM-
5000
Computer
Connecting a computer
Connect with the supplied USB cable.
About the USB audio driver software
The driver software is an audio driver exclusively used to output audio signals
from a computer. If you would like to connect this unit to a Windows- or Macinstalled computer, we recommend you install the driver software in your computer first.
! You can find the latest information on the driver software on our website
(shown below).
http://www.prodjnet.com/support/
Software Use Agreement
This software usage agreement (hereafter referred to as “the agreement”) determines matters related to use of the DJ function software (hereafter referred to
as “the software”) between the customer and Pioneer Corporation (hereafter
referred to as “Pioneer”).
Be sure to read the following articles carefully before installing and using the
software. Use of the software implies that the customer has consented to the
agreement. If you do not consent to the agreement, do not install or use the
software.
[Usage agreement]
On the condition of complying with the contents of this agreement, the customer
has permission to install and use this software on a single personal computer.
[Restrictions]
The customer shall not create, distribute or send reproductions of this software
over networks or from one computer to another. In addition, the customer shall
not modify, sell, lend, transfer or resell the software, nor distribute, create, etc.,
secondary works of the software. Furthermore, the customer shall not reverse
compile, reverse engineer, reverse assemble or otherwise change the software
into formats perceptible by humans.
[Copyrights, etc.]
Copyrights and all other intellectual property rights related to this software are
the property of Pioneer and its affiliates. This software is protected by copyright
laws and the provisions of international treaties.
[Repudiation of guarantee and technical support]
This software and all associated documentation, etc., is provided on an “as is”
basis. Pioneer does not guarantee the customer nor third parties regarding
merchantability, compatibility with specific purposes, violation of rights of others or any other matters, nor does it guarantee technical support related to this
software or associated documentation. Note that repudiation of guarantee may
not be not recognized in some countries and regions by mandatory provisions, in
which case this repudiation of guarantee may not apply. The customer’s rights
may differ in some countries and regions.
[Limitation of liability]
Pioneer and other suppliers of this software shall accept no responsibility
whatsoever for damages incurred through use of or inability to use this software
or any associated documentation (including but not limited to loss of profits,
business interruptions, damages resulting from loss or impairment of information, etc.), even if Pioneer has been notified of the possibility of such damages.
Limitation of liability related to incidental or direct damages may not be recognized in some countries and regions by mandatory provisions, in which case this
limitation of liability may not apply. Note that, regardless of the case, the responsibility of Pioneer and its subsidiaries regarding this software shall not exceed
the sum paid by the customer to Pioneer or its subsidiaries. This repudiation of
limitation of liability is a fundamental element of the arrangement between the
customer and Pioneer.
[Governing law]
This agreement complies with the laws and ordinances of Japan and shall be
interpreted accordingly. This agreement stipulates all articles of the arrangement
between the customer and Pioneer, and shall be applied with priority over any
prior and existing agreements related to this matter (regardless of whether oral
or in writing). The Tokyo District Court shall be the court of exclusive jurisdiction
in first instance for any disputes arising regarding this agreement.
Page 10

En
10
Cautions on Installation
! Before installing the driver software, be sure to turn off the power of this unit
and disconnect the USB cable from both this unit and your computer.
! If you connect this unit to your computer without installing the driver soft-
ware first, an error may occur on your computer depending on the system
environment.
! If you have discontinued the installation process in progress, step through
the installation process again from the beginning according to the following
procedure.
! Carefully read the provisions of the Software Use Agreement before installing
the driver software for exclusive use with this unit.
! Before installing the driver software, terminate all other programs running on
your computer.
! The driver software is compatible with the following OSs.
— Mac OS X (10.3.9 and later)
— Windows Vista
— Windows® XP Home Edition/ Professional (SP2 or later)
The driver software is not compatible with 64-bit OS (Windows® XP
Professional x64 edition and Windows Vista® 64-bit).
! The CD-ROM with the driver software includes an installer running in the fol-
lowing 12 languages.
English, French, German, Italian, Dutch, Spanish, Portuguese, Russian,
Simplified Chinese, Traditional Chinese, Korean, and Japanese
If the language of your OS is one other than the ones listed above, select
[English] following the instructions on the screen.
®
Home Basic/ HomePremium/ Ultimate/ Business
Installing the driver software
Installation Procedure (Windows)
Carefully read “Cautions on Installation” before installing the driver software.
! To install or uninstall the driver software, you need to be authorized by the
administrator of your computer. Log in as the administrator of your computer
before proceeding with the installation.
1 Insert the supplied CD-ROM into the CD drive of your
computer
The CD-ROM folder appears.
! If the CD-ROM folder is not displayed after a CD-ROM is loaded, open the CD
drive from [Computer (or My Computer)] in the [START] menu.
2 Double-click [DJM-5000_X.XXX.exe]
The driver installation screen appears.
3 When the language selection screen appears, select [English]
and click [OK]
You can select one from multiple languages depending on the system environment of your computer.
4 Carefully read the Software Use Agreement and if you consent to
the provisions, put a check mark in [I agree.] and click [OK]
If you do not consent to the provisions of the Software Use Agreement, click
[Cancel] and stop installation.
5 Proceed with installation according to the instructions on the
screen
If [Windows Security] appears on the screen while the installation is in progress,
click [Install this driver software anyway] and continue with the installation.
! When installing on Windows XP
If [Hardware Installation] appears on the screen while the installation is in
progress, click [Continue Anyway] and continue with the installation.
! When the installation program is completed, a completion message appears.
! When the installation of the driver software is completed, you need to reboot
your computer.
Installation Procedure (Macintosh)
Carefully read “Cautions on Installation” before installing the driver software.
! To install or uninstall the driver software, you need to be authorized by the
administrator of your computer. Have the name and password of the administrator of your computer ready in advance.
1 Insert the supplied CD-ROM into the CD drive of your
computer
The CD-ROM folder appears.
! Double-click the CD icon on the desktop when folders are not displayed after
a CD-ROM has been loaded.
2 Double-click [DJM-5000_M_X.X.X.dmg]
The [DJM-5000AudioDriver] menu screen appears.
3 Double-click [DJM-5000AudioDriver.pkg]
The driver installation screen appears.
4 Check the details on the screen and click [Continue Anyway]
5 When the Software Use Agreement screen appears, select
[English], carefully read the Software Use Agreement and click
[Continue Anyway]
You can select one from multiple languages depending on the system environment of your computer.
6 If you consent to the provisions of the Software End User
License Agreement, click [Agree]
If you do not consent to the provisions of the Software Use Agreement, click [I
disagree] and stop installation.
7 Proceed with installation according to the instructions on the
screen
! To stop installation in progress, click [Cancel].
! When the installation of the driver software is completed, you need to reboot
your computer.
Connecting the DJM-5000 and computer
1 Connect this unit to your computer via a USB cable
This unit functions as an audio device conforming to the ASIO standards.
! When using applications supporting ASIO, [USB 1/ 2], [USB 3/ 4] and
[USB 5/ 6] can be used as inputs.
! When using applications supporting DirectX, only [USB 5/ 6] can be used as
the input.
! The computer’s recommended operating environment depends on the DJ
application. Be sure to check the recommended operating environment for
the DJ application you are using.
2 Press [POWER]
Turn on the power of this unit.
! The message [Installing device driver software] may appear when the DJM-
5000 is connected to the computer for the first time or when it is reconnected
to the computer’s USB port. Wait until the [Your devices are ready for use]
message appears.
! When installing on Windows XP
— [Can Windows connect to Windows Update to search for software?]
may appear while the installation is in progress. Select [No, not this
time] and click [Next] to continue with the installation.
— [What do you want the wizard to do?] may appear while the instal-
lation is in progress. Select [Install the software automatically
(Recommended)] and click [Next] to continue with the installation.
— If [Windows Security] appears on the screen while the installation is in
progress, click [Install this driver software anyway] and continue with
the installation.
Page 11

En
11
English
Adjusting the buffer size (Windows)
dB
14
9
5
2
0
–2
–4
–7
–10
–15
LR
Use this procedure to adjust the computer’s buffer size when using an ASIO
audio driver.
Click Windows [START] menu >[View All
Programs)]>[Pioneer]>[DJM-5000]>[DJM-5000 ASIO Settings
Utility]
A sufficiently large buffer size decreases the chance of sound dropout (sound
interruption) but increases audio signal transmission delay (latency).
! When an application program (DJ software, etc.) with this unit set as a fixed
device is running, terminate the program before adjusting the buffer size.
Checking the version of the driver software
Procedure for checking (Windows)
Click Windows [START] menu >[View All
Programs]>[Pioneer]>[DJM-5000]>[DJM-5000 Version Display
Utility]
The [Version] screen appears.
Procedure for checking (Macintosh)
Click [Apple]>[About This Mac]>[More Info]>[Extensions]>[DJM5000 USBAudio].
The [Version] screen appears.
Checking the latest information on the driver
software
For the latest information on the driver software for exclusive use with this unit,
visit our website shown below.
http://www.prodjnet.com/support/
About USB-MIDI channel setting
Turn off the power of this unit in advance.
1 Set [MIDI] to [ON]
2 Press and hold [FADER START] for [CH-1] and [CH-2]
simultaneously and press [POWER]
When the MASTER [CUE] and ZONE [CUE] buttons light orange, the MIDI channel
setting mode is set. Press and hold in [FADER START] for [CH-1] and [CH-2] until
the buttons light orange.
! The current MIDI channel setting is displayed in the master level indicator.
[L] shows the position of 10, while [R] the position of 1.
! The MIDI channel is initially set to [1].
Example: to show 16
3 Press [CUE] in the [MASTER] channel
The MIDI channel changes by one channel each time you press it.
Select a MIDI channel to change the setting.
4 Press and hold [CUE] for the [ZONE] channel
Save the changes made for the MIDI channel.
While settings are being saved, [ON/ OFF] flashes for the [SOUND MAXIMIZER]
channel. Lights up when the saving is completed.
! Do not turn off the power while saving MIDI channel settings.
5 Press [POWER]
Turn off the power of this unit.
6 Press [POWER]
Turn on the power of this unit again.
Start in the normal mode. The MIDI channel setting is changed.
Page 12
En
12
List of MIDI Messages
Category SW Name
HI
MID
LOW
CH-1
CH-2
CH-3
CH-4
CROSS FADER
MASTER
ZONE
SOUND
MAXIMIZER
FADER START
CUE
Channel fader VR Bn 11 dd 0-127
Crossfader
Assign Switch
HI
MID
LOW
FADER START
CUE
Channel fader VR Bn 12 dd 0-127
Crossfader
Assign Switch
HI
MID
LOW
CUE
Channel fader VR Bn 13 dd 0-127
Crossfader
Assign Switch
HI
MID
LOW
CUE
Channel fader VR Bn 14 dd 0-127
Crossfader
Assign Switch
Crossfader VR Bn 0B dd 0-127
CROSS FADER
LEVEL
CUE
BALANCE
STEREO SW Bn 60 dd MONO=0, STEREO=127
MONO/
BOOTH MONITOR
LEVEL
CUE
ZONE ASSIGN
CH-1
ZONE ASSIGN
CH-2
ZONE ASSIGN
CH-3
ZONE ASSIGN
CH-4
ZONE ASSIGN
MASTER
ZONE ASSIGN OFF
OFF BTN Bn 63 dd OFF=0, ON=127
ON/
CLARITY
DYNAMICS
OFF BTN Bn 4E dd OFF=0, ON=127
ON/
SW
Type
VR Bn 2 dd 0-127
VR Bn 3 dd 0-127
VR Bn 4 dd 0-127
BTN Bn 58 dd OFF=0, ON=127
BTN Bn 46 dd OFF=0, ON=127
SW Bn 41 dd A=0, THRU=64, B=127
VR Bn 7 dd 0-127
VR Bn 8 dd 0-127
VR Bn 9 dd 0-127
BTN Bn 59 dd OFF=0, ON=127
BTN Bn 47 dd OFF=0, ON=127
SW Bn 42 dd A=0, THRU=64, B=127
VR Bn OE dd 0-127
VR Bn OF dd 0-127
VR Bn 15 dd 0-127
BTN Bn 48 dd OFF=0, ON=127
SW Bn 43 dd A=0, THRU=64, B=127
VR Bn 51 dd 0-127
VR Bn 5C dd 0-127
VR Bn 52 dd 0-127
BTN Bn 49 dd OFF=0, ON=127
SW Bn 44 dd A=0, THRU=64, B=127
SW Bn 5F dd
VR Bn 18 dd 0-127
BTN Bn 4A dd OFF=0, ON=127
VR Bn 17 dd 0-127
VR Bn 19 dd 0-127
VR Bn 61 dd 0-127
BTN Bn 62 dd OFF=0, ON=127
SW Bn 20 dd 127
SW Bn 21 dd 127
SW Bn 22 dd 127
SW Bn 23 dd 127
SW Bn 24 dd 127
SW Bn 25 dd 127
VR Bn 64 dd 0-127
VR Bn 65 dd 0-127
MIDI
Messages
MSB
Notes
Left=0, Middle=64,
Right=127
MIDI
SW
Category SW Name
SEND/
RETURN
CH-1
RETURN
SEND/
CH-2
RETURN
SEND/
CH-3
RETURN
SEND/
CH-4
RETURN
SEND/
RETURN
TALK OVER
MIC EFFECT
HEAD
PHONES
MIC 1
MIC 2
! MIDI ON/
! “n” in the MIDI message “Bn” is a value of the MIDI channel set by the user, ranging
from 0x00 to 0x0F (1 to 16 on the setting screen)
SEND/
MIC 1
RETURN
SEND/
MIC 2
RETURN
SEND/
MIC 1+2
RETURN
SEND/
MASTER
LEVEL
OFF VR Bn 40 dd OFF=0, ON=127
ON/
LEVEL
NORMAL/
ADVANCED
OFF BTN Bn 69 dd OFF=0, ON=127
ON/
REVERB
ECHO+VERB
OCTAVER
PITCH
LEVEL
HI
MID
LOW
EFFECT
MIC1 ON
HI
MID
LOW
EFFECT
MIC2 ON
OFF controls whether to transmit MIDI messages.
Messages
Type
MSB
SW Bn 30 dd 127
SW Bn 31 dd 127
SW Bn 32 dd 127
SW Bn 33 dd 127
SW Bn 34 dd 127
SW Bn 35 dd 127
SW Bn 36 dd 127
SW Bn 37 dd 127
VR Bn 66 dd 0-127
VR Bn 67 dd 0-127
SW Bn 68 dd
BTN Bn 6A dd OFF=0, ON=127
BTN Bn 6B dd OFF=0, ON=127
BTN Bn 6C dd OFF=0, ON=127
BTN Bn 6D dd OFF=0, ON=127
VR Bn 1A dd 0-127
VR Bn 1E dd 0-127
VR Bn 6E dd 0-127
VR Bn 1F dd 0-127
VR Bn 70 dd 0-127
BTN Bn 71 dd OFF=0, ON=127
VR Bn 72 dd 0-127
VR Bn 73 dd 0-127
VR Bn 74 dd 0-127
VR Bn 75 dd 0-127
BTN Bn 76 dd OFF=0, ON=127
Notes
NORMAL=0,
ADVANCED=127
Page 13

En
13
Operations
DJM-
5000
PROFESSIONAL MIXER
PHONES
LEVEL
-
0
HEAD PHONES
PITCHOCTAVER
ECHO+VERB
REVERB
MIC EFFECT
NORMAL
ADVANCED
ON/OFF
TALK OVER
MIN MAX
MIC1 ON
LEVEL
-
0
EFFECT
LOWHI
LOW
-
12 +12
MID
-
12 +12
HI
-
12 +12
OUTPUT
MASTER ZONE
BOTH
MIC 1 MIC 1
MIC2 ON
LEVEL
-
0
EFFECT
LOWHI
LOW
-
12 +12
MID
-
12 +12
HI
-
12 +12
OUTPUT
MASTER ZONE
BOTH
MIC 2
ABTHRU
CH -1
LOW
-
26
+6
MID
-
26
+6
HI
-
26
+6
CUE
FADER
START
TRIM
-
+9
CD
MIC 3
DIGITAL1
dB
14
9
5
2
0
–2
–4
–7
–10
–15
ABTHRU
CH -2
LOW
-
26
+6
MID
-
26
+6
HI
-
26
+6
CUE
FADER
START
TRIM
-
+9
CD
USB 1/2
DIGITAL2
dB
14
9
5
2
0
–2
–4
–7
–10
–15
ABTHRU
CH -3
LOW
-
26
+6
MID
-
26
+6
HI
-
26
+6
CUE
TRIM
-
+9
CD
USB 3/4
LINE
dB
14
9
5
2
0
–2
–4
–7
–10
–15
ABTHRU
CH -4
LOW
-
26
+6
MID
-
26
+6
HI
-
26
+6
CUE
TRIM
-
+9
CD
USB 5/6
LINE
dB
14
9
5
2
0
–2
–4
–7
–10
–15
OFFON
MIDI
CROSS
FADER
BOOTH MONITOR
-
0
STEREOMONO
BALANCE
L
R
CUE
dB
14
9
5
2
0
–2
–4
–7
–10
–15
LR
LEVEL
-
0
MASTER
ZONE ON
CUE
1
2
34
MASTER
MIC
dB
14
9
5
2
0
–2
–4
–7
–10
–15
LEVEL
-
0
ZONE
ZONE ASSIGN
POWER
SOUND
MAXIMIZER
DYNAMICS
MINMAX
CLARITY
MINMAX
ON/OFF
1
2
3
4
MIC1
MIC2
MIC1+2
MASTER
SEND/RETURN
LEVEL
MINMAX
ON/OFF
MC Section DJ Section PA Section
7
b
5
1
3
2
8
9
a
4
7
6
665
1
3
2
8
4
7
65
5
1
2
8
7
8
4
1
2
4
2
3
4
6
8
7
1
9
a
5
b
c
d
1
2
4
3
5
6
9
7
8
a
b
i
c
d
e
f
g
h
MIC 1
MIC 2
TALK OVER
HEAD PHONES
CH-1
CH-4
CROSS FADER
MIDI
MASTER
ZONE
SOUND MAXIMIZER
SEND/ RETURN
POWER
Control Panel
MC Section
,
1 MIC 1 (page 15)
2 OUTPUT (page 15)
3 HI, MID, LOW (page 15)
4 EFFECT (page 15)
5 MIC EFFECT (page 15)
6 Peak Level Indicator
7 LEVEL (page 15)
8 MIC1 ON, MIC2 ON (page 15)
9 Talk-Over Level (page 15)
a NORMAL/
b ON/
c LEVEL (page 14)
d PHONES (page 14)
ADVANCED (page 15)
OFF (page 15)
8 Crossfader Assign Switch (page 14)
9 Crossfader (page 14)
a [CROSS FADER] (Crossfader Curve
Selector Switch) (page 14)
b MIDI (page 14)
PA Section
1 LEVEL (page 14)
2 Master Level Indicator (page 14)
Displays the level of audio signals that have
passed through [LEVEL] in the [MASTER]
channel.
3 CUE (page 14)
4 BALANCE (page 16)
5 MONO/
6 BOOTH MONITOR (page 16)
STEREO (page 16)
c CLARITY (page 16)
d DYNAMICS (page 16)
e ON/
OFF (page 16)
f Output Channel Selector Switch (page 16)
g LEVEL (page 16)
h ON/
OFF (page 16)
i POWER (page 14)
English
DJ Section
—
1 Input Selector Switch (page 14)
2 TRIM (page 14)
3 FADER START (page 14)
4 CUE (page 14)
5 Channel Level Indicator (page 14)
6 HI, MID, LOW (page 14)
7 Channel Fader (page 14)
7 LEVEL (page 16)
8 Zone Level Indicator (page 16)
9 CUE (page 14)
a Output Channel Selector Switch (page 16)
b ZONE ON (page 16)
Displays the level of audio signals that have
passed through [LEVEL] in the [ZONE] channel.
Page 14

En
14
Operating the DJ section
ON
OFF
OFF
ON
ON
OFF
ON
OFF
ON
OFF
ON
OFF
ON
ON
OFF
OFF
ON
OFF
ON
ON
ON
CH (L)
MASTER (L)
ZONE (L)
CH (MONO)
CH (MONO)
MASTER (L)+ZONE (L)
CH (MONO)
CH (R)
MASTER (R)
ZONE (R)
MASTER (MONO)
ZONE (MONO)
MASTER (R)+ZONE (R)
MASTER (MONO)
+ZONE (MONO)
CH-1
‒
CH-4
MASTER ZONE
Headphone Output
L channel
R channel
Outputting sound
1 Press [POWER]
Turn on the power of this unit.
2 Set the input selector switch
Select the input source of each channel from the components connected to this
unit.
! To output sound of the computer connected to the [USB] terminal, switch the
input selector switch for [CH-2], [CH-3], and [CH-4] to [USB].
3 Rotate [TRIM]
Adjusts the level of audio signals input in each channel.
! The channel level indicator lights when the sound is being properly input to
the channel.
4 Set the channel fader to the inner position
Adjusts the level of audio signals output in each channel.
5 Adjust the crossfader assign switch
Switches the output destination of each channel.
— [A]: Assigns to [A] (left) of the crossfader.
— [B]: Assigns to [B] (right) of the crossfader.
— [THRU]: Assigns to the [MASTER] channel (the crossfader is not passed
through).
6 Adjust the crossfader curve switch ([CROSS FADER])
Switches the crossfader curve characteristics.
— [ ]: Makes a sharply increasing curve (if the crossfader is moved away
from the [A] side, audio signals are immediately output from the [B]
side).
— [ ]: Makes a curve shaped between the two curves above and below.
— [
]: Makes a gradually increasing curve (if the crossfader is moved
away from the [A] side, the sound on the [B] side gradually increases,
while the sound on the [A] gradually decreases).
7 Set the crossfader
Outputs audio signals assigned by the crossfader assign switch corresponding to
the curve characteristics selected by [CROSS FADER] (Crossfader Curve Selector
Switch).
! You do not need to follow this step when the crossfader assign switch is set to
[THRU].
8 Rotate [LEVEL] for the [MASTER] channel
The sound is output from [MASTER1] and [MASTER2]. The master level indicator
lights.
Adjusting the sound quality
Rotate [HI], [MID] or [LOW] in each channel
Refer to Specifications on page 19 for the range of sound that can be adjusted by
each control.
Monitoring sound with headphones
1 Connect headphones to the [PHONES] jack
2 Press [CUE] for the channel to be monitored
The button lights up brightly in orange.
3 Turn the [LEVEL] dial for [HEAD PHONES]
Sound is output from the headphones in the channel selected by [CUE].
! Sound output from the headphones varies according to the combination of
channels selected by [CUE]. See the table below.
Using the fader to play a Pioneer DJ player
(fader start)
If you connect a Pioneer DJ player using a control cable (supplied with a DJ
player), you can start playback of control other operations of the DJ player with
the fader of this unit.
The fader start feature is available only when a Pioneer DJ player is connected to
[CH-1] or [CH-2].
Connect a Pioneer DJ player to this unit in advance (page 8).
Start playback using the channel fader
1 Set the crossfader assign switch to [THRU]
2 Press [FADER START]
Turn on the fader start function. The button lights up brightly in orange.
3 Set the channel fader to the outermost position
4 Set the cue on the DJ player
The DJ player pauses playback at the cue point.
5 Set the channel fader to the inner position
Playback starts on the DJ player.
! If you set the channel fader back to the original position, the player instanta-
neously returns to the cue point already set and pauses playback (back cue).
Start playback using the crossfader
1 Set the crossfader assign switch to [A] or [B]
2 Press [FADER START]
Turn on the fader start function. The button lights up brightly in orange.
3 Set the crossfader
Set to the farmost end in the opposite direction to the channel to be fader started.
4 Set the cue on the DJ player
The DJ player pauses playback at the cue point.
5 Set the crossfader
Playback starts on the DJ player.
! If you set the crossfader back to the original position, the player instanta-
neously returns to the cue point already set and pauses playback (back cue).
Operating the DJ software
The DJM-5000 also outputs the operating data for the buttons and dials in MIDI
format. If you connect a computer with a built-in MIDI-compatible DJ software
via a USB cable, you can operate the DJ software on this unit.
Install the DJ software on your computer in advance. Also, adjust audio and MIDI
settings for the DJ software.
1 Connect the USB port on this unit to your computer
For details about connections, see Connecting a computer on page 9.
2 Start the DJ software
3 Set [MIDI] to [ON]
Transmission of the MIDI messages begin.
! You can send MIDI messages altogether according to the position of buttons,
faders, or control knobs (snapshot).
! Adjust faders and control knobs to transmit messages based on the corre-
sponding position. For details about the messages generated by this unit, see
List of MIDI Messages on page 12.
4 Set [MIDI] to [OFF]
The MIDI messages are not transmitted even if you operate this unit.
! Monitoring is canceled if you press [CUE] again. The button lights up dimly in
orange.
Page 15

En
15
English
Operating the MC section
dB
Frequency
NORMAL
ADVANCED
dB
Frequency
NORMAL
ADVANCED
Using a microphone
1 Switch [OUTPUT]
Select the output destination of the sound output from the [MIC1] or [MIC2]
channel.
2 Rotate [LEVEL] for the microphone channel
Adjusts the level of audio signals output from the microphone channel.
! Pay attention that rotating to the extreme right position outputs a very loud
sound.
3 Press [MIC1 ON] for the [MIC1] channel or [MIC2 ON] for the
[MIC2] channel.
Turn on the microphone channel. The button lights up in green.
4 Input audio signals to the microphone
Sound is output to the output destination selected in step 1.
! The peak level indicator lights in different colors corresponding to the level of
audio being input.
— Green: Permissible level
— Orange: Appropriate level
— Red: Excessive level (lower the level of audio by rotating [LEVEL] to the
left)
Adjusting the sound quality
Rotate [HI], [MID] or [LOW] for the [MIC1] or [MIC2] channel
Refer to Specifications on page 19 for the range of sound that can be adjusted by
each control.
Using the microphone effect feature
Using the talk-over feature
1 Rotate the talk-over level
Set the attenuation level of sound besides the one in the microphone channel.
2 Switch between [NORMAL]/ [ADVANCED]
The attenuation mode for the talk-over function switches.
! Normal talk over:
The sound output from channels other than the microphone channel is
attenuated by the amount set for the talk over level.
! Advanced talk over:
Only the voice band of the sound output from channels other than the
microphone channel is attenuated by the amount set for the talk over
level.
3 Press [ON/ OFF] for [TALK OVER]
Turn on the talk-over function. The button lights up in red.
! When audio signals are input in the microphone channel, the sound, besides
the one in the microphone channel, is attenuated according to the attenuation mode setting and the position of the control.
1 Press [MIC EFFECT (REVERB, ECHO+VERB, OCTAVER or PITCH)]
Turn on the microphone effect function. The button flashes in blue.
! The effect varies depending on the button.
2 Rotate [EFFECT]
Adds an effect to the sound output from the microphone channel.
! The effect varies according to the rotation direction and position of [EFFECT].
Effect Name Descriptions
1
REVERB
ECHO+VERB
1
OCTAVER
PITCH
1 The more you rotate it to the right, the louder the effect sound.
! When you turn off the microphone effect function, press the flashing
[MIC EFFECT (REVERB, ECHO+VERB, OCTAVER, PITCH)] once again. The button lights up in blue.
Adds a reverberation effect to the original sound.
1
Adds reverberation and echo effects to the original sound.
Adds sound with 1 octave up and down to the original sound.
Changes the musical interval within the range of 1 octave up and
down. Rotate it to the right and left to change the interval 1 octave up
and down respectively.
Page 16

En
16
Operating the PA section
dB
Frequency
DYNAMICS
MINMAX
CLARITY
MINMAX
! To stop the sound output at the [SEND] terminal, press the flashing [ON/ OFF].
The button lights up.
Outputting sound from the ZONE terminal
You can output sound from the [ZONE] terminal besides the sound output from
the master channel.
1 Set the output channel selector switch for the [ZONE] channel
Select the channel output from the [ZONE] terminal.
! Sound output varies according to the position of the switch.
Switch
Position
Audio
Output
1 Audio is output regardless of the position of faders and control knobs.
2 Audio is output regardless of the position of [LEVEL] for the [MASTER] channel.
3 Audio is output only from the microphone channel, for which [OUTPUT] is set to [BOTH]
1 2 3 4 MASTER MIC
1
Microphone
Channel
or [ZONE].
CH-1
1
CH-21CH-31CH-4
2
Microphone
3
Channel
2 Press [ZONE ON] for the [ZONE] channel
Turn on the [ZONE] channel. The button lights up in green.
3 Rotate [LEVEL] for the [ZONE] channel
Sound is output at the [ZONE] terminal. The zone level indicator lights up.
! To turn the [ZONE] channel off, press [ZONE ON] again. The button turns off.
Using the sound maximizer feature
1 Press [ON/ OFF] for [SOUND MAXIMIZER]
Turn on the sound maximizer function. The button lights up in blue.
2 Rotate [CLARITY] or [DYNAMICS]
The effect of the sound maximizer varies according to the rotation direction and
position of the control.
! The output audio level increases according to the sound maximizer effect
when the dial is turned clockwise. Pay attention to the output audio level
when using the sound maximizer function.
Switching between monaural and stereo audio
You can switch between monaural and stereo audio for the sound output at the
[MASTER1], [MASTER2], [BOOTH], [REC OUT] or [PHONES] terminal.
Switch between [MONO]/ [STEREO]
! [MONO]: Outputs monaural audio.
! [STEREO]: Outputs stereo audio.
Adjusting the L/ R balance of audio
The left/ right balance of the sound output from the [MASTER1], [MASTER2],
[BOOTH], [REC OUT] and [PHONES] terminals can be adjusted.
1 Set [MONO]/ [STEREO] to [STEREO]
2 Rotate [BALANCE]
The L/ R balance of audio varies according to the rotation direction and position
of the [BALANCE] control.
! Rotating to the rightmost position outputs only the right sound of stereo
audio. Rotating to the leftmost position outputs only the left sound of stereo
audio.
Audio is output from the [BOOTH] terminal
The master channel audio, except the microphone channel audio, is output from
the [BOOTH] terminal regardless of the position of [LEVEL] in the [MASTER]
channel.
Rotate [BOOTH MONITOR]
Adjusts the level of audio signals output at the [BOOTH] terminal.
! The range of sound that can be adjusted varies according to the control.
— CLARITY: Adjusts the attack and outline of sound mainly in the mid and
high range (high hat, snare, etc.).
— DYNAMICS: Adjusts modulation and rhythm mainly in the low range.
! When you turn off the sound maximizer function, press [ON/ OFF] again. The
light of the button turns off.
Using the external effector
1 Connect the external effector
[ON/ OFF] of [SEND/ RETURN] lights up in red. When the external effector is not
connected, [ON/ OFF] does not light up.
! For details about connections, see Connections on page 7.
2 Set the output channel selector switch for the [SEND/ RETURN]
channel
Select the channel output from the [SEND] terminal.
! Sound output varies according to the position of the switch.
Switch
Position
Audio
Output
1 The microphone sound output from the master channel is output from the [SEND] chan-
3 Press [ON/ OFF] for [SEND/ RETURN]
Sound is output at the [SEND] terminal. The button flashes in red.
4 Turn the [LEVEL] dial for [SEND/ RETURN]
Adjusts the level of audio signals input at the [RETURN] terminal.
1 2 3 4 MIC 1 MIC 2 MIC1+2 MASTER
CH-1 CH-2 CH-3 CH-4 MIC 1 MIC 2
nel.
MIC1+2
1
Master Channel
Page 17

En
17
Additional information
Troubleshooting
! Incorrect operation is often mistaken for trouble or malfunction. If you think that there is something wrong with this component, check the points below. Sometimes
the trouble may lie in another component. Inspect the other components and electrical appliances being used. If the trouble cannot be rectified after checking the
items below, ask your nearest Pioneer authorized service center or your dealer to carry out repair work.
! The player may not operate properly due to static electricity or other external influences. In such cases, normal operation may be restored by unplugging the power
cord then plugging it back in.
Problem Check Remedy
The power is not turned on. Is the power cord properly connected? Plug in the power cord to an AC outlet.
No sound or small sound. Is the position of the input selector switch properly set? Switch the input source of a channel with the input selector switch (page
Are the connection cables properly connected? Connect the connection cables properly (page 8).
Are the terminals and plugs dirty? Clean the terminals and plugs before making connections.
Is [MASTER ATT] on the rear panel set to a level like -12 dB?
Distorted sound. Is the level of audio output from the microphone channel
Can’t crossfade. Is the crossfader assign switch properly set? Set the crossfader assign switch properly for each channel (page 13).
Can’t fader start a DJ player. Is [FADER START] set to off? Set [FADER START] to on (page 14).
No effect. Is [EFFECT] set to a proper position? Set [EFFECT] to a position other than [LOW] (page 13).
Can’t use an external effector. Is [SEND/
Distorted sound from an external effector. Is the level of audio input from the external effector prop-
This unit is not recognized after it has been connected
to a computer.
properly set?
Is the level of audio input to each channel properly set? Adjust the [TRIM] control such that the channel level indicator lights up
Is the DJ player properly connected to the [CONTROL]
terminal?
Are the audio cables properly connected? Connect this unit to the audio output terminal of a DJ player with an audio
RETURN] [ON/ OFF] set to on? Press [ON/ OFF] of [SEND/ RETURN] to turn on [SEND/ RETURN] (page 13).
Is the external effector properly connected to the [SEND]
or [RETURN] terminal?
Is the output channel switch of [SEND/
set?
erly set?
Is the driver software properly installed on your computer? Install the driver software. Reinstall it if the driver software has already been
RETURN] properly
13).
Switch [MASTER ATT] (page 7).
Adjust the [LEVEL] dial for [MASTER] so that the master channel level
indicator lights at about 0 dB at the peak level (page 13).
Set [MASTER ATT] to [-6 dB] or [-12 dB] (page 7).
near 0 dB at the peak level (page 13).
Connect a DJ player to the [CONTROL] terminal with a control cord (page 8).
cable (page 8).
Connect an external effector to the [SEND] or [RETURN] terminal. When the
connection is made properly, [ON/
(page 8).
Switch the output channel with the output channel selector switch(page 13).
Turn the [LEVEL] dial for [SEND/
from the external effector (page 13).
installed (page 9).
Unless this unit is properly connected to the computer and there is no error
in data transmission, the version display utility program cannot display the
firmware of this unit. For details of how to check, see Checking the version of
the driver software on page 11.
OFF] of [SEND/ RETURN] lights up in red
RETURN] to adjust the audio level output
English
About the exemption clauses
! Pioneer is a registered trademark of Pioneer Corporation.
! Microsoft®, Windows Vista®, and Windows® are registered trademarks
or trademarks of Microsoft Corporation in the United States and/ or other
countries.
! Pentium is a registered trademark of Intel Corporation.
! Adobe and Reader are either registered trademarks or trademarks of Adobe
Systems Incorporated in the United States and/ or other countries.
! Apple, Macintosh or Mac OS are registered trademarks of Apple Inc. in the
United States and/ or other countries.
! ASIO is a trademark of Steinberg Media Technologies GmbH.
! The names of companies and products mentioned herein are the trademarks of
their respective owners.
This product has been licensed for nonprofit use. This product has not been
licensed for commercial purposes (for profit-making use), such as broadcasting (terrestrial, satellite, cable or other types of broadcasting), streaming on
the Internet, Intranet (a corporate network) or other types of networks or distributing of electronic information (online digital music distribution service).
You need to acquire the corresponding licenses for such uses. For details, visit
/
www.mp3licensing.com.
http:/
The audio compression technology for MP3 is offered under the license of
Fraunhofer IIS and Thomson Multimedia.
Page 18

En
18
Block Diagram
Digital in
3Band
CHx
EQ
H.P
CUE
[CHx]
Analog in
Zone
CHx Fader
Send
Return
[Master]
Send
Return
[MIC1+2]
Sound
Maximizer
Normal
Talk
Over
Advanced
Talk
Over
Master
Mono
Stereo
Zone
Master MIC
Talk Over Parameter
Zone MIC
Normal
Talk
Over
Advanced
Talk
Over
Volume, Switch,Command
Master CUE
Zone CUE
CHx CUE
H.P. Level
Zone Level
Zone Out
Zone
CH
Select
Zone
Talk Over Parameter
Send Out
MIC 1/2 in
MIC 1/2 COMMON
3Band
MIC
EQ
MIC
Effect
MIC 1/2
Send
Return
MIC 1/2
Master
Both
Zone
Mic Level Indicator
Talk Over Parameter
EFFECT
Processing
Master Mic
Zone Mic
Mic SW
MIC 1/2
Low
Cut
Filter
Talk Over
Normal/
Advanced
Talk Over
Level
MIC
Detect
Filter
Talk Over
SW
Send/Return
SW
Return
Level
ON/OFF SW
CH 1-4
MIC 1/2
MIC 1+2
Master
Zone Level Meter
Zone CUE
Zone Out[ Sound Maximizer ]
[ Send/Return ]
CH Select
Send/Return Out
CH Level Meter
Master Level Meter
Zone Level Meter
MIC 1/2 Level Meter
ON/OFF
SW
Clarity Dynamics
OutIn
[ MIC Effect ]
MIC 1/2 OutMIC 1/2 In
Reverb
Echo+Verb
Octaver Pitch
Page 19

En
19
English
Specifications
General
Power requirements .............................................................................. AC 120 V, 60 Hz
Power consumption .................................................................................................31 W
Main unit weight ...................................................................................... 6.9 kg (15.2 lb)
External dimensions ............................482.6 mm (W) x 107.8 mm (H) x 225.1 mm (D)
(19.0 in. (W) x 4.2 in. (H) x 8.9 in. (D))
Tolerable operating temperature ......................... +5 °C to +35 °C (+41 °F to +95 °F)
Tolerable operating humidity ...................................... 5 % to 85 % (no condensation)
Audio Section
Sampling rate ........................................................................................................96 kHz
A/ D, D/ A converter ................................................................................................. 24 bits
Frequency characteristic
CD/ LINE/ MIC .................................................................................... 20 Hz to 20 kHz
S/ N ratio (rated output)
CD/ LINE ...........................................................................................................102 dB
MIC .................................................................................................................... 84 dB
Total harmonic distortion (LINE — MASTER1)................................................. 0.005 %
Standard input level / Input impedance
MIC1, MIC2 ........................................................................................-52 dBu/ 22 kW
MIC3 ...................................................................................................-52 dBu/ 47 kW
CD/ LINE (3, 4).....................................................................................-12 dBu/ 47 kW
RETURN ..............................................................................................-12 dBu/ 47 kW
Standard output level / Load impedance / Output impedance
MASTER1 ...................................................................+8 dBu/ 10 kW/ 10 W or lower
MASTER2 ...................................................................+2 dBu/ 10 kW/ 10 W or lower
REC OUT .......................................................................-8 dBu/ 10 kW/ 10 W or lower
BOOTH ....................................................................................+8 dBu/ 10 kW/ 600 W
ZONE .................................................................... +8 dBu/ 10 kW/ 600 W (ATT 0 dB)
SEND ...........................................................................-12 dBu/ 10 kW/ 1 kW or lower
PHONES .....................................................................+8.5 dBu/ 32 W/ 22 W or lower
Rated output level / Load impedance
MASTER1 .........................................................................................+25 dBu/ 10 kW
MASTER2 .........................................................................................+20 dBu/ 10 kW
ZONE ............................................................................. +25 dBu/ 10 kW (ATT 0 dB)
Crosstalk (LINE) ...................................................................................................... 80 dB
Channel equalizer characteristic
HI .......................................................................................-26 dB to +6 dB (13 kHz)
MID .....................................................................................-26 dB to +6 dB (1 kHz)
LOW .................................................................................... -26 dB to +6 dB (70 Hz)
Microphone equalizer characteristic
HI .....................................................................................-12 dB to +12 dB (10 kHz)
MID ................................................................................-12 dB to +12 dB (2.5 kHz)
LOW ................................................................................ -12 dB to +12 dB (100 Hz)
Input / Output terminals
CD input terminal
RCA pin jack ............................................................................................................ 4
LINE input terminal
RCA pin jack ............................................................................................................ 2
MIC input terminal
XLR connector/ Phone jack (Ø 6.3 mm) ................................................................ 1
XLR connector ......................................................................................................... 1
Phone jack (Ø 6.3 mm) ...........................................................................................1
RETURN Input terminals
Phone jack (Ø 6.3 mm) ...........................................................................................1
ZONE output terminal
XLR connector ......................................................................................................... 1
MASTER output terminal
XLR connector ......................................................................................................... 1
RCA pin jack ............................................................................................................ 1
BOOTH output terminal
Phone jack (Ø 6.3 mm) ...........................................................................................1
REC OUT output terminal
RCA pin jack ............................................................................................................ 1
SEND output terminal
Phone jack (Ø 6.3 mm) ...........................................................................................1
DIGITAL IN coaxial input terminal
RCA pin jack ............................................................................................................ 2
PHONES output terminal
Stereo phone jack (Ø 6.3 mm) ............................................................................... 1
USB terminal
B-type ....................................................................................................................... 1
CONTROL terminal
Mini phone jack (Ø 3.5 mm) ................................................................................... 2
! The specifications and design of this product are subject to change without
notice.
! Published by Pioneer Corporation. Copyright © 2009 Pioneer Corporation. All
rights reserved.
Page 20

Fr
2
Nous vous remercions d’avoir acquis un produit Pioneer. Veuillez lire attentivement ce mode d’emploi afin de connaître la manière d’utiliser l’appareil comme il
Ce point d’exclamation, placé dans un
triangle équilatéral, a pour but d’attirer
l’attention de l’utilisateur sur la présence,
dans les documents qui accompagnent
l’appareil, d’explications importantes du
point de vue de l’exploitation ou de
l’entretien.
Ce symbole de l’éclair, placé dans un
triangle équilatéral, a pour but d’attirer
l’attention de l’utilisateur sur la présence, à
l’intérieur du coffret de l’appareil, de
“tensions dangereuses” non isolées d’une
grandeur suffisante pour représenter un
risque d’électrocution pour les êtres
humains.
ATTENTION :
POUR ÉVITER TOUT RISQUE
D’ÉLECTROCUTION, NE PAS ENLEVER LE
COUVERCLE (NI LE PANNEAU ARRIÈRE).
AUCUNE PIÈCE RÉPARABLE PAR
L’UTILISATEUR NE SE TROUVE À
L’ INTÉRIEUR. CONFIER TOUT ENTRETIEN À
UN PERSONNEL QUALIFIÉ UNIQUEMENT.
ATTENTION
DANGER D´ELECTROCUTION
NE PAS OUVRIR
IMPORTANT
D3-4-2-1-1_A1_Fr
REMARQUE:LA NOTICE RELATIVE AU LOGEMENT DES PIÈCES NON ACCESSIBLES À
L'UTILISATEUR SE TROUVE SUR LE FOND DE L'APPAREIL.
Cet appareil numérique de la Classe B est conforme
à la norme NMB-003 du Canada.
D8-10-1-3_A1_Fr
AVERTISSEMENT
Cet appareil n’est pas étanche. Pour éviter les
risques d’incendie et de décharge électrique, ne
placez près de lui un récipient rempli d’eau, tel
qu’un vase ou un pot de fleurs, et ne l’exposez pas
à des gouttes d’eau, des éclaboussures, de la pluie
ou de l’humidité.
D3-4-2-1-3_A_Fr
AVERTISSEMENT
La tension de l’alimentation électrique disponible
varie selon le pays ou la région. Assurez-vous que
la tension du secteur de la région où l’appareil sera
utilisé correspond à la tension requise (par ex. 230
V ou 120 V), indiquée sur le panneau arrière.
D3-4-2-1-4_A_Fr
Avant de brancher l’appareil pour la première, lisez
attentivement la section suivante.
AVERTISSEMENT
Pour éviter les risques d’incendie, ne placez aucune
flamme nue (telle qu’une bougie allumée) sur
l’appareil.
D3-4-2-1-7a_A_Fr
PRÉCAUTION DE VENTILATION
Lors de l’installation de l’appareil, veillez à laisser
un espace suffisant autour de ses parois de
manière à améliorer la dissipation de chaleur (au
moins 5 cm à l’arrière et 3 cm de chaque côté).
AVERTISSEMENT
Les fentes et ouvertures du coffret sont prévues
pour la ventilation, pour assurer un fonctionnement
stable de l’appareil et pour éviter sa surchauffe.
Pour éviter les risques d’incendie, ne bouchez
jamais les ouvertures et ne les recouvrez pas
d’objets, tels que journaux, nappes ou rideaux, et
n’utilisez pas l’appareil posé sur un tapis épais ou
un lit.
D3-4-2-1-7b_A_Fr
Milieu de fonctionnement
Température et humidité du milieu de fonctionnement :
De +5 °C à +35 °C (de +41 °F à +95 °F) ; Humidité
relative inférieure à 85 % (orifices de ventilation non
obstrués)
N’installez pas l’appareil dans un endroit mal ventilé ou
un lieu soumis à une forte humidité ou en plein soleil
(ou à une forte lumière artificielle).
D3-4-2-1-7c*_A1_Fr
convient. Cela fait, conservez le mode d’emploi de façon à pouvoir vous y référer en cas de nécessité.
Dans certains pays ou certaines régions, la forme de la fiche d’alimentation et de la prise d’alimentation peut différer de celle qui figure sur les schémas, mais les branchements et le fonctionnement de l’appareil restent les mêmes.
Page 21

Fr
3
Français
Si la fiche d’alimentation secteur de cet appareil ne
convient pas à la prise secteur à utiliser, la fiche doit
être remplacée par une appropriée. Ce
remplacement et la fixation d’une fiche secteur sur le
cordon d’alimentation de cet appareil doivent être
effectués par un personnel de service qualifié. En cas
de branchement sur une prise secteur, la fiche de
coupure peut provoquer une sérieuse décharge
électrique. Assurez-vous qu’elle est éliminée
correctement après sa dépose.
L’appareil doit être déconnecté en débranchant sa
fiche secteur au niveau de la prise murale si vous
prévoyez une période prolongée de non utilisation
(par exemple avant un départ en vacances).
D3-4-2-2-1a_A1_Fr
ATTENTION
L’ interrupteur POWER de cet appareil ne coupe pas
complètement celui-ci de sa prise secteur. Comme le
cordon d’alimentation fait office de dispositif de
déconnexion du secteur, il devra être débranché au
niveau de la prise secteur pour que l’appareil soit
complètement hors tension. Par conséquent, veillez à
installer l’appareil de telle manière que son cordon
d’alimentation puisse être facilement débranché de
la prise secteur en cas d’accident. Pour éviter tout
risque d’incendie, le cordon d’alimentation sera
débranché au niveau de la prise secteur si vous
prévoyez une période prolongée de non utilisation
(par exemple avant un départ en vacances).
D3-4-2-2-2a_A1_Fr
NOTE IMPORTANTE SUR LE CABLE
D’ALIMENTATION
Tenir le câble d’alimentation par la fiche. Ne pas
débrancher la prise en tirant sur le câble et ne pas
toucher le câble avec les mains mouillées. Cela risque
de provoquer un court-circuit ou un choc électrique. Ne
pas poser l’appareil ou un meuble sur le câble. Ne pas
pincer le câble. Ne pas faire de noeud avec le câble ou
l’attacher à d’autres câbles. Les câbles d’alimentation
doivent être posés de façon à ne pas être écrasés. Un
câble abîmé peut provoquer un risque d’incendie ou un
choc électrique. Vérifier le câble d’alimentation de
temps en temps. Contacter le service après-vente
PIONEER le plus proche ou le revendeur pour un
remplacement.
S002*_Fr
Lorsque vous utilisez ce produit, respectez les
instructions inscrites sur le fond à propos de la
tension nominale et d’autres paramètres.
D3-4-2-2-4_Fr
Page 22

Fr
4
Sommaire
Comment lire ce manuel
Les noms d’écrans, de menus et de touches dans ce manuel sont entre crochets.
(ex. sous-fenêtre [Collection], menu [File], [f])
Informations préliminaires
Caractéristiques ..............................................................................................................5
Contenu du carton d’emballage ....................................................................................5
Raccordements
Panneau arrière...............................................................................................................6
Raccordement des prises d’entrée ...............................................................................7
Raccordement des prises de sortie ...............................................................................7
Raccordement au panneau de commande .................................................................8
Raccordement à un ordinateur .....................................................................................8
À propos du pilote audio USB........................................................................................8
À propos du réglage du canal USB-MIDI ...................................................................10
Opérations
Panneau de commande ...............................................................................................12
Fonctionnement de la section DJ ................................................................................13
Fonctionnement de la section MC ..............................................................................14
Fonctionnement de la section PA ...............................................................................15
Informations supplémentaires
En cas de panne ............................................................................................................16
À propos des clauses d’exemption .............................................................................16
Schéma fonctionnel......................................................................................................17
Spécifications ................................................................................................................18
Montage en rack conforme aux normes
EIA
Les trous de vis sur la gauche et la droite du panneau de commande de cet appareil
correspondent à la taille 5U d’un rack 19 pouces de normes EIA. La profondeur
maximale de cet appareil est de 225,1 mm.
! Fixer cet appareil avec des vis (non fournies) adaptées au rack.
! Ne pas installer cet appareil directement au-dessus d’un amplificateur de puis-
sance. La chaleur dégagée par l’amplificateur de puissance peut endommager
cet appareil. De plus, du bruit (ronflement, etc.) peut se produire.
! Pour transporter cet appareil, le retirer du rack. L’appareil risque d’être endom-
magé s’il est transporté avec le rack.
! Si l’appareil doit être transporté sans être retiré du rack, faire attention de ne pas
l’exposer à des vibrations ou chocs.
Page 23

Fr
5
Section PA
Informations
préliminaires
Caractéristiques
La DJM-5000 est une table de mixage de grande qualité, extrêmement performante, conçue pour les équipements de haute qualité sonore et présentant de
nombreuses fonctions puissantes pour les trois emplois suivants : MC, DJ et PA.
Traitement de haute qualité sonore avec convertisseur A/ N haute qualité 24 bits,
échantillonnage à 96 kHz et DSP 32 bits produisant un son excellent et puissant.
La présentation conviviale du panneau avec ses sections distinctes pour les
trois emplois (MC, DJ et PA) autorise une utilisation intuitive des nombreuses
fonctions.
Section MC
Microphone restituant fidèlement le son avec une très
grande qualité MC (la page 14)
! Cet appareil dispose de 2 canaux exclusivement réservés à un microphone
pouvant être utilisé de manière intuitive. Le volume et l’égaliseur à 3 bandes
pouvant être contrôlés séparément, le volume et la qualité du son peuvent
être réglés en fonction de la voix captée par le microphone sur chaque canal.
! Cet appareil présente également 4 types d’effets réservés exclusivement à
un microphone (REVERB/ ECHO+VERB/ OCTAVER/ PITCH). Avec un microphone, il est possible de produire des animations variées.
! CH1 dans la section DJ peut également être utilisé pour une entrée micro-
phone. Vous pouvez utiliser jusqu’à 3 microphones en même temps.
“Sortie divisée MASTER/ ZONE” permettant des
animations distinctes à 2 endroits avec un seul appareil
(la page 15)
! Cet appareil présente une sortie à 2 canaux indépendants, associée à la
sortie MASTER et à la sortie ZONE. Le son peut être transmis à 2 endroits
sur des canaux séparés, ce qui permet d’adapter l’animation à l’atmosphère
de chaque endroit. De même, le son d’un microphone peut être transmis à
une destination précise, soit pour des annonces soit pour une animation MC,
selon l’atmosphère de chaque endroit.
Réglage sonore optimal obtenu avec le “SOUND
MAXIMIZER” pour des situations ou atmosphères
particulières (la page 15)
! Cet appareil est pourvu des boutons “DYNAMICS” et “CLARITY” pour le
réglage de la qualité sonore. Un son grave profond peut être obtenu dans les
basses fréquences et un son clair et net peut être obtenu dans la plage des
moyennes et hautes fréquences, ce qui n’était pas le cas jusqu’à présent avec
un égaliseur. Comme la qualité sonore peut facilement être réglée dans la
plage des moyennes et des hautes fréquences, il est facile de régler de façon
optimale le son selon le déroulement de la soirée. D’autre part, un son compressé, par exemple dans le format MP3, qui se caractérise par une perte de
basses et de hautes fréquences, est renforcé.
Contenu du carton d’emballage
! Câble USB
! CD-ROM
! Carte de garantie
! Mode d’emploi (ce document)
Français
La première fonction “Talkover avancée” 1 au monde (la
page 14)
! Cet appareil est pourvu de la fonction “Talkover avancée” qui rend le son d’un
microphone mieux audible en réduisant automatiquement le volume dans
la plage de fréquences de la voix par rapport à la musique. Le volume de la
musique n’est pas influencé par l’emploi d’un microphone, ce qui permet
d’introduire une animation avec le microphone sans heurter l’atmosphère du
concert (le niveau de la musique peut être réglé avec le bouton du panneau
de commande.
1 À dater de 8/
Pioneer.
10/ 2009, pour une table de mixage DJ, tel que défini par
Section DJ
“Interface audio USB” intégrée permettant de
transmettre directement le son depuis un ordinateur (la
page 8)
! Cet appareil dispose d’une “interface audio USB” par laquelle le son lu sur un
ordinateur peut être transmis à un mixeur dans la mesure où l’ordinateur lui
est relié par une connexion USB. Ceci permet de réaliser des animations DJ
en utilisant un ordinateur sans carte son externe.
! Avec un seul ordinateur, vous pouvez mixer du son comportant 3 canaux2,
affecté à chaque CH de la DJM-5000.
2 Un CD-ROM contenant un pilote est fourni (compatible avec Windows et
Mac). En installant ce pilote sur votre ordinateur, vous pourrez utiliser l’interface audio (Avec Windows, le son à 3 canaux peut être affecté seulement si
un logiciel compatible ASIO est utilisé).
Fonction “USB MIDI affectable” pouvant contrôler un
logiciel DJ compatible MIDI (la page 10)
! Cet appareil présente une fonction “USB MIDI affectable” permettant de
transmettre des informations concernant le fonctionnement de presque
toutes les touches et tous les faders de la DJM-5000 à un logiciel DJ avec les
signaux MIDI dans la mesure où l’ordinateur lui est relié par une connexion
USB. Il peut aussi être utilisé comme contrôleur MIDI grâce à sa flexibilité.
Page 24

Fr
6
Raccordements
MASTER1
MASTER2
CH-4
ZONE
1 GND
1 GND
3 COLD
3 COLD
2 HOT
2 HOT
MASTER ATT.
-
12dB
-
6dB
0dB
-
12dB
-
6dB
0dB
ZONE ATT.
CD
L
L
L
L
RR
R
R
R
LINE
CH-3 CH-2 CH-1
DJM-
5000
CD CD
L
R
L
LINE
REC OUT
L
R
BOOTH
(TRS)
CONTROL
CD
R
L
CONTROL
SEND
L
(
MONO
)
R
L
(
MONO
)
R
L
R
RETURN
DIGITAL IN USB
21
MIC 3
MIC 2
1
6 72
3 3 4 4
4 4 5 5
16 141517 13 12 11 10
9 8
Veillez à toujours éteindre les appareils et à débrancher le cordon d’alimentation de la prise secteur avant de raccorder un appareil ou de changer les liaisons.
Reportez-vous au mode d’emploi de l’appareil devant être raccordé.
Lorsque tous les appareils ont été raccordés, vous pouvez brancher le cordon d’alimentation.
Panneau arrière
1 ZONE (la page 7)
Prise de sortie du canal ZONE.
2 ZONE ATT
Sert à changer le niveau d’atténuation des signaux audio présents à la prise
[ZONE]. Sélectionnez 0 dB, -6 dB ou -12 dB.
3 LINE (la page 7)
Pour raccorder une platine à cassette ou un appareil avec sortie niveau ligne.
4 CD (la page 7)
Pour raccorder un lecteur DJ ou un appareil avec sortie niveau ligne.
5 CONTROL (la page 7)
Cette prise est dédiée à la commande d’un lecteur DJ. Utilisez le fader de cet
appareil pour contrôler un lecteur DJ.
6 MIC3 (la page 7)
Pour raccorder un microphone.
7 MIC2 (la page 7)
Pour raccorder un microphone.
8 USB (la page 8)
Pour raccorder un ordinateur.
9 DIGITAL IN (la page 7)
Pour raccorder un appareil pourvu d’une sortie audio numérique.
a RETURN (la page 7)
À raccorder à la prise de sortie d’un processeur d’effets externe. Lorsque le
canal [L] seulement est raccordé, l’entrée du canal [L] est transmise simultanément au canal [R].
b SEND (la page 7)
À raccorder à la prise d’entrée d’un processeur d’effets externe. Lorsque
le canal [L] seulement est raccordé, un signal audio monophonique est
transmis.
c BOOTH (la page 7)
Prises de sortie pour moniteur de cabine, compatible avec une sortie symétrique ou asymétrique pour connecteur TRS.
d REC OUT (la page 7)
Cette prise de sortie est prévue pour l’enregistrement.
e MASTER2 (la page 7)
À raccorder à un amplificateur de puissance, etc.
f MASTER ATT
Sert à changer le niveau d’atténuation des signaux audio présents à la prise
[MASTER1] ou [MASTER2]. Sélectionnez 0 dB, -6 dB ou -12 dB.
g MASTER1 (la page 7)
À raccorder à un amplificateur de puissance, etc.
h Câble d’alimentation
À raccorder à une prise secteur. Branchez-y le cordon d’alimentation lorsque
tous les raccordements sont terminés.
Page 25

Fr
7
Français
Raccordement des prises d’entrée
MASTER1
MASTER2
CH-4
ZONE
1 GND
1 GND
3 COLD
3 COLD
2 HOT
2 HOT
MASTER ATT.
-
12dB
-
6dB
0dB
-
12dB
-
6dB
0dB
ZONE ATT.
CD
L
L
L
L
RR
R
R
R
LINE
CH-3 CH-2 CH-1
CD CD
L
R
L
LINE
REC OUT
L
R
CONTROL
CD
R
L
CONTROL
SEND
L
(
MONO
)
R
L
(
MONO
)
R
L
R
RETURN
DIGITAL IN USB
21
MIC 3
MIC 2
DJM-
5000
BOOTH
(TRS)
L
L
RR
L
L
RR
Lecteur DJ Pioneer
1
Microphone
À une prise secteur
Platine à cassette, Lecteur CD, etc.
(dispositif avec sortie de ligne)
Dispositif avec sortie audio numérique
MASTER1
MASTER2
CH-4
ZONE
1 GND
1 GND
3 COLD
3 COLD
2 HOT
2 HOT
MASTER ATT.
-
12dB
-
6dB
0dB
-
12dB
-
6dB
0dB
ZONE ATT.
CD
L
L
L
L
RR
R
R
R
LINE
CH-3 CH-2 CH-1
CD CD
L
R
L
LINE
REC OUT
L
R
CONTROL
CD
R
L
CONTROL
SEND
L
(
MONO
)
R
L
(
MONO
)
R
L
R
RETURN
DIGITAL IN USB
21
MIC 3
MIC 2
DJM-
5000
BOOTH
(TRS)
R LR L
Amplificateur
de puissance
2
Processeur
d’effets externe
Platine à cassette, etc.
(enregistreur avec entrée
analogique)
Amplificateur
de puissance
Amplificateur
de puissance
Amplificateur de
puissance (pour un
moniteur de cabine)
Pièce
principale
Seconde
pièce
À une prise secteur
1 Raccordez un câble de commande pour utiliser le départ au fader (la page 13).
Raccordement des prises de sortie
2 Un son est transmis indépendamment de celui du canal principal (Séparation MASTER/ ZONE).
Page 26

Fr
8
PHONES
LEVEL
-
0
HEAD PHONES
NORMAL
ADVANCED
ON/OFF
TALK OVER
MIC1 ON
LEVEL
-
0
EFFECT
LOWHI
LOW
-
12 +12
MID
-
12 +12
HI
-
12 +12
OUTPUT
MASTER ZONE
BOTH
MIC 1 MIC 1
MIC2 ON
LEVEL
-
0
EFFECT
LOWHI
LOW
-
12 +12
MID
-
12 +12
HI
-
12 +12
OUTPUT
MASTER ZONE
BOTH
MIC 2
MINMAX
PITCHOCTAVER
ECHO+VERB
REVERB
MIC EFFECT
Casque
Microphone
CH-1
CD
R
L
CONTROL
D
L
(
MONO
)
L
(
MONO
)
R
RETURN
DIGITAL IN USB
21
MIC 3
MIC 2
DJM-
5000
Ordinateur
Raccordement au panneau de commande
Raccordement à un ordinateur
Utilisez le câble USB fourni pour ce raccordement.
À propos du pilote audio USB
Ce pilote audio sert exclusivement à transmettre des signaux audio à un ordinateur. Il est conseillé d’installer le pilote sur l’ordinateur avant de raccorder cet
appareil à un ordinateur Windows ou Mac.
! Les toutes dernières informations sur le pilote se trouvent sur notre site (voir
ci-dessous).
http://www.prodjnet.com/support/
Contrat d’utilisation du logiciel
Le contrat d’utilisation de ce logiciel (désigné ci-dessous par “le contrat”) fixe les
conditions d’emploi du logiciel DJ (désigné ci-dessous par “le logiciel”) liant le
client et Pioneer Corporation (désigné ci-dessous par “Pioneer”).
Veuillez lire attentivement les articles suivants avant d’installer et d’utiliser le
logiciel. L’emploi du logiciel implique l’acceptation du contrat par le client. Si
vous n’acceptez pas le contrat, n’installez pas ou n’utilisez pas le logiciel.
[Contrat d’utilisation]
Le client a l’autorisation d’installer et d’utiliser ce logiciel sur un ordinateur unique à condition de se conformer au contenu de ce contrat.
[Restrictions]
Le client n’a pas l’autorisation de créer, de distribuer ou d’envoyer des reproductions de ce logiciel sur des réseaux ou d’un ordinateur à un autre. De plus,
le client n’a pas l’autorisation de modifier, vendre, prêter, transférer ou revendre
le logiciel, ni de distribuer, créer, etc. des oeuvres secondaires de ce logiciel. En
outre, le client ne doit pas décompiler, désosser, désassembler ni changer le
logiciel d’aucune autre façon dans des formats accessibles aux hommes.
[Copyrights, etc.]
Les copyrights et autres droits de propriété intellectuelle liés à ce logiciel sont
la propriété de Pioneer et de ses filiales. Ce logiciel est protégé par les lois sur le
copyright et les clauses des traités internationaux.
[Refus de garantie et de support technique]
Ce logiciel et toute la documentation afférente, etc. sont fournis “comme tels”.
Pioneer ne garantit pas au client ni à un tiers la commerciabilité, l’aptitude à un
but précis, la violation des droits de tiers, ni aucune autre chose, et ne garantit pas non plus d’assistance technique pour ce logiciel ou la documentation
afférente. Il faut savoir que le refus de garantie peut ne pas être reconnu dans
certains pays et dans certaines régions en vertu de clauses particulières, et que
dans ce cas le refus de garantie peut ne pas s’appliquer. Les droits du client
peuvent être différents dans certains pays et dans certaines régions.
[Limitation de responsabilité]
Pioneer et les fournisseurs de ce logiciel déclinent toute responsabilité, quelle
qu’elle soit, quant aux dommages résultant de l’utilisation ou de l’impossibilité
d’utiliser ce logiciel ou la documentation afférente (y compris mais sans s’y limiter la perte de profits, l’interruption d’activité commerciale, les dommages liés à
la perte ou à l’altération d’informations, etc.) même si Pioneer avait été prévenu
de la possibilité de tels dommages. La limitation de responsabilité liée aux dommages directs ou indirects peut ne pas être reconnue dans certains pays et dans
certaines régions en vertu de clauses particulières, et dans ce cas la limitation de
responsabilité peut ne pas s’appliquer. Quel que soit le cas, la responsabilité de
Pioneer et de ses filiales quant à ce logiciel ne doit pas dépasser la somme payée
par le client à Pioneer ou à ses filiales. Le refus de limitation de responsabilité est
un élément essentiel du contrat qui lie le client et Pioneer.
[Droit applicable]
Ce contrat est conforme à la législation et à la réglementation japonaises et doit
être interprété en conséquence. Ce contrat contient toutes les clauses qui lient
le client et Pioneer, et a priorité sur tout contrat antérieur ou existant à ce sujet
(qu’il soit oral ou écrit). Le Tribunal de Tokyo est la seule et unique juridiction de
première instance pouvant régler les différends émanant de ce contrat.
Page 27

Fr
9
Français
Précautions à prendre lors de l’installation
! Avant d’installer le pilote, veillez à éteindre cet appareil et à débrancher le
câble USB de cet appareil et de l’ordinateur.
! Le pilote doit être d’abord installé sur l’ordinateur puis cet appareil raccordé
à l’ordinateur sinon, selon l’environnement système, une erreur peut se
produire.
! Si vous interrompez l’installation en cours, recommencez l’installation depuis
le début en procédant de la façon suivante.
! Lisez attentivement les conditions du Contrat d’utilisation du logiciel avant
d’installer le pilote dédié exclusivement à cet appareil.
! Avant d’installer le pilote, fermez tous les programmes ouverts sur votre
ordinateur.
! Le pilote est compatible avec les systèmes d’exploitation suivants :
— Mac OS X (10.3.9 ou ultérieur)
— Windows Vista® Édition Familiale Basique/ Familiale Premium/ Ultimate/
Professionnel
— Windows® XP Édition Familiale/ Professionnelle (SP2 ou ultérieur)
Le pilote n’est pas compatible avec le système d’exploitation à 64 bits
(Windows® XP Édition Professionnelle x64 et Windows Vista® 64 bits).
! Le CD-ROM du pilote contient un programme d’installation employant les 12
langues suivantes.
Anglais, Français, Allemand, Italien, Hollandais, Espagnol, Portugais, Russe,
Chinois simplifié, Chinois traditionnel, Coréen et Japonais
Si la langue de votre système d’exploitation n’est pas mentionnée ci-dessus,
sélectionnez [English (Anglais)] et suivez les instructions sur l’écran.
Installation du pilote
Marche à suivre (Windows)
Lisez attentivement les “Précautions à prendre lors de l’installation” avant d’installer le pilote.
! Pour installer ou désinstaller le pilote, vous devez avoir l’autorisation de
l’administrateur de votre ordinateur. Connectez-vous comme administrateur
de votre ordinateur avant de procéder à l’installation.
1 Insérez le CD-ROM fourni dans le lecteur CD de votre
ordinateur
Le dossier du CD-ROM apparaît.
! Si le dossier du CD-ROM n’apparaît pas après l’insertion du CD-ROM, ouvrez
le lecteur CD dans [Ordinateur (ou Poste de travail)] à partir du menu
[DÉMARRER].
2 Double-cliquez sur [DJM-5000_X.XXX.exe]
L’écran d’installation du pilote apparaît.
3 Lorsque l’écran de sélection de la langue apparaît,
sélectionnez [Français] et cliquez sur [OK]
Vous pouvez sélectionner un certain nombre de langues selon le système d’exploitation de votre ordinateur.
4 Lisez attentivement le Contrat d’utilisation du logiciel, puis
cochez [D'accord.] et cliquez sur [OK] si vous en acceptez les
conditions
Si vous n’acceptez pas les conditions du Contrat d’utilisation du logiciel, cliquez
sur [Annuler] et arrêtez l’installation.
5 Procédez à l’installation en suivant les instructions qui
apparaissent à l’écran
Si [Sécurité de Windows] apparaît à l’écran au cours de l’installation, cliquez sur
[Installer ce pilote quand même] et continuez l’installation.
! Installation sur Windows XP
Si [Installation matérielle] apparaît à l’écran au cours de l’installation, cli-
quez sur [Continuer] et continuez l’installation.
! Lorsque le programme d’installation est terminé, le message Installation
terminée apparaît.
! Lorsque l’installation du pilote est terminée, vous devez redémarrer votre
ordinateur.
Marche à suivre (Macintosh)
Lisez attentivement les “Précautions à prendre lors de l’installation” avant d’installer le pilote.
! Pour installer ou désinstaller le pilote, vous devez avoir l’autorisation de l’ad-
ministrateur de votre ordinateur. Ayez à disposition le nom et le mot de passe
de l’administrateur de votre ordinateur.
1 Insérez le CD-ROM fourni dans le lecteur CD de votre
ordinateur
Le dossier du CD-ROM apparaît.
! Double-cliquez sur l’icône du CD sur le bureau si les dossiers n’apparaissent
pas après l’insertion du CD-ROM.
2 Double-cliquez sur [DJM-5000_M_X.X.X.dmg]
L’écran du menu [DJM-5000AudioDriver] apparaît.
3 Double-cliquez sur [DJM-5000AudioDriver.pkg]
L’écran d’installation du pilote apparaît.
4 Vérifiez les détails sur l’écran et cliquez sur [Continuer]
5 Quand l’écran du Contrat d’utilisation du logiciel apparaît,
sélectionnez [Français], lisez attentivement le Contrat d’utilisation
du logiciel et cliquez sur [Continuer]
Vous pouvez sélectionner un certain nombre de langues selon le système d’exploitation de votre ordinateur.
6 Si vous acceptez les conditions du Contrat d’utilisation du
logiciel, cliquez sur [Agree]
Si vous n’acceptez pas les conditions du Contrat d’utilisation du logiciel, cliquez
sur [N'accepte pas] et arrêtez l’installation.
7 Procédez à l’installation en suivant les instructions qui
apparaissent à l’écran
! Pour arrêter l’installation en cours, cliquez sur [Annuler].
! Lorsque l’installation du pilote est terminée, vous devez redémarrer votre
ordinateur.
Raccordement de la DJM-5000 et de l’ordinateur
1 Raccordez cet appareil à votre ordinateur avec un câble USB
Cet appareil est un dispositif audio conforme aux normes ASIO.
! Lorsque des applications prenant en charge ASIO sont utilisées, [USB 1/ 2],
[USB 3/ 4] et [USB 5/ 6] peuvent être utilisées comme entrées.
! Lorsque des applications prenant en charge DirectX sont utilisées, seule
[USB 5/ 6] peut être utilisée comme entrée.
! L’environnement recommandé pour l’ordinateur dépend de l’application DJ.
Veillez à vérifier l’environnement d’exploitation recommandé pour qu’il corresponde à l’application DJ utilisée.
2 Appuyez sur [POWER]
Allumez cet appareil.
! Le message [Installation du pilote logiciel de périphérique] peut apparaître
la première fois que vous raccordez la DJM-5000 à l’ordinateur ou lorsque
vous le raccordez au port USB de l’ordinateur. Attendez que le message [Vos
périphériques sont prêts à être utilisés.] apparaisse.
! Installation sur Windows XP
— [Autorisez-vous Windows à se connecter à Windows Update pour
rechercher des mise à jour ?] peut apparaître au cours de l’installation.
Sélectionnez [Non, pas pour cette fois] et cliquez sur [Suivant] pour
continuer l’installation.
— [Quelle tâche voulez-vous que l'Assistant exécute ?] peut apparaître
au cours de l’installation. Sélectionnez [Installer le logiciel automa-
tiquement (recommandé)] et cliquez sur [Suivant] pour continuer
l’installation.
— Si [Sécurité de Windows] apparaît à l’écran au cours de l’installation,
cliquez sur [Installer ce pilote quand même] et continuez l’installation.
Page 28

Fr
10
Réglage de la taille de la mémoire tampon
dB
14
9
5
2
0
–2
–4
–7
–10
–15
LR
(Windows)
Procédez de la façon suivante pour régler la taille de la mémoire de l’ordinateur
lorsque le pilote audio ASIO est utilisé.
Cliquez sur le menu [DÉMARRER] de Windows puis, [Voir Tous
Programmes]>[Pioneer]>[DJM-5000]>[Utilitaire de réglages ASIO
DJM-5000]
Le risque de perte sonore (interruption du son) diminue si une mémoire suffisamment grande est attribuée mais le retard (latence) dans la transmission du signal
audio augmente.
! Si une application (logiciel DJ, etc.) fonctionne alors que cet appareil est
spécifié comme dispositif, fermez l’application avant de régler la taille de la
mémoire tampon.
Vérification de la version du pilote
Procédure de vérification (Windows)
À propos du réglage du canal USB-MIDI
Éteignez d’abord cet appareil.
1 Réglez [MIDI] sur [ON]
2 Appuyez sur [FADER START] et maintenez enfoncées
simultanément pour [CH-1] et [CH-2] et appuyez sur [POWER]
Lorsque les touches MASTER [CUE] et ZONE [CUE] s’éclairent en orange, le mode
de réglage du canal MIDI est spécifié. Maintenez [FADER START] pour [CH-1] et
[CH-2] enfoncés jusqu’à ce que les touches s’éclairent en orange.
! Le réglage du canal MIDI actuel est indiqué par l’indicateur de niveau princi-
pal. [L] correspond à la position 10, tandis que [R] correspond à la position 1.
! Le canal MIDI est initialement réglé sur [1].
Exemple : pour indiquer 16
Cliquez sur le menu [DÉMARRER] de Windows puis, [Voir Tous
Programmes]>[Pioneer]>[DJM-5000]>[Utilitaire d'affichage de
version de DJM-5000]
L’écran [Version ] apparaît.
Procédure de vérification (Macintosh)
Cliquez sur [Pomme]>[À propos de ce Mac]>[Plus
d’infos]>[Extensions]>[DJM-5000 USBAudio].
L’écran [Version ] apparaît.
Vérification des toutes dernières informations
concernant le pilote
Les toutes dernières informations sur le pilote dédié exclusivement à cet appareil
se trouve sur notre site à l’adresse suivante.
http://www.prodjnet.com/support/
3 Appuyez sur [CUE] sur le canal [MASTER]
Le canal MIDI change d’un canal à la fois chaque fois que vous appuyez sur cette
touche.
Sélectionnez un canal MIDI pour changer le réglage.
4 Appuyez sur [CUE] du canal [ZONE]
Sauvegardez les changements effectués pour le canal MIDI.
Pendant que les réglages sont sauvegardés, [ON/ OFF] clignote pour le canal
[SOUND MAXIMIZER]. S’éclaire lorsque la sauvegarde est terminée.
! Ne l’éteignez pas pendant la sauvegarde des réglages du canal MIDI.
5 Appuyez sur [POWER]
Éteignez cet appareil.
6 Appuyez sur [POWER]
Allumez de nouveau cet appareil.
Démarrez en mode normal. Le réglage du canal MIDI est changé.
Page 29

Fr
11
Français
Liste de messages MIDI
Catégorie Nom SW
HI
MID
LOW
CH-1
CH-2
CH-3
CH-4
CROSS FADER
MASTER
ZONE
SOUND
MAXIMIZER
FADER START
CUE
Fader de canal VR Bn 11 dd 0-127
Commutateur
d’affectation de
crossfader
HI
MID
LOW
FADER START
CUE
Fader de canal VR Bn 12 dd 0-127
Commutateur
d’affectation de
crossfader
HI
MID
LOW
CUE
Fader de canal VR Bn 13 dd 0-127
Commutateur
d’affectation de
crossfader
HI
MID
LOW
CUE
Fader de canal VR Bn 14 dd 0-127
Commutateur
d’affectation de
crossfader
Crossfader VR Bn 0B dd 0-127
CROSS FADER
LEVEL
CUE
BALANCE
MONO/
BOOTH MONITOR
LEVEL
CUE
ZONE ASSIGN
CH-1
ZONE ASSIGN
CH-2
ZONE ASSIGN
CH-3
ZONE ASSIGN
CH-4
ZONE ASSIGN
MASTER
ZONE ASSIGN OFF
OFF BTN Bn 63 dd OFF=0, ON=127
ON/
CLARITY
DYNAMICS
OFF BTN Bn 4E dd OFF=0, ON=127
ON/
STEREO SW Bn 60 dd MONO=0, STÉRÉO=127
Type
SW
VR Bn 2 dd 0-127
VR Bn 3 dd 0-127
VR Bn 4 dd 0-127
BTN Bn 58 dd OFF=0, ON=127
BTN Bn 46 dd OFF=0, ON=127
SW Bn 41 dd A=0, THRU=64, B=127
VR Bn 7 dd 0-127
VR Bn 8 dd 0-127
VR Bn 9 dd 0-127
BTN Bn 59 dd OFF=0, ON=127
BTN Bn 47 dd OFF=0, ON=127
SW Bn 42 dd A=0, THRU=64, B=127
VR Bn OE dd 0-127
VR Bn OF dd 0-127
VR Bn 15 dd 0-127
BTN Bn 48 dd OFF=0, ON=127
SW Bn 43 dd A=0, THRU=64, B=127
VR Bn 51 dd 0-127
VR Bn 5C dd 0-127
VR Bn 52 dd 0-127
BTN Bn 49 dd OFF=0, ON=127
SW Bn 44 dd A=0, THRU=64, B=127
SW Bn 5F dd
VR Bn 18 dd 0-127
BTN Bn 4A dd OFF=0, ON=127
VR Bn 17 dd 0-127
VR Bn 19 dd 0-127
VR Bn 61 dd 0-127
BTN Bn 62 dd OFF=0, ON=127
SW Bn 20 dd 127
SW Bn 21 dd 127
SW Bn 22 dd 127
SW Bn 23 dd 127
SW Bn 24 dd 127
SW Bn 25 dd 127
VR Bn 64 dd 0-127
VR Bn 65 dd 0-127
Messages
MIDI
MSB
Remarques
Gauche=0, Moyen=64,
Droit=127
Messages
Type
Catégorie Nom SW
SEND/
RETURN
CH-1
RETURN
SEND/
CH-2
RETURN
SEND/
CH-3
RETURN
SEND/
CH-4
RETURN
SEND/
RETURN
TALK OVER
MIC EFFECT
HEAD PHONES
MIC 1
MIC 2
! MIDI ON/
! “n” dans le message MIDI “Bn” est une valeur du canal MIDI utilisé par l’utilisateur
allant de 0x00 à 0x0F (1 à 16 sur l’écran de réglage)
SEND/
MIC 1
RETURN
SEND/
MIC 2
RETURN
SEND/
MIC 1+2
RETURN
SEND/
MASTER
LEVEL
OFF VR Bn 40 dd OFF=0, ON=127
ON/
LEVEL
NORMAL/
ADVANCED
OFF BTN Bn 69 dd OFF=0, ON=127
ON/
REVERB
ECHO+VERB
OCTAVER
PITCH
LEVEL
HI
MID
LOW
EFFECT
MIC1 ON
HI
MID
LOW
EFFECT
MIC2 ON
OFF précise si les messages MIDI doit être envoyés.
MIDI
SW
MSB
SW Bn 30 dd 127
SW Bn 31 dd 127
SW Bn 32 dd 127
SW Bn 33 dd 127
SW Bn 34 dd 127
SW Bn 35 dd 127
SW Bn 36 dd 127
SW Bn 37 dd 127
VR Bn 66 dd 0-127
VR Bn 67 dd 0-127
SW Bn 68 dd
BTN Bn 6A dd OFF=0, ON=127
BTN Bn 6B dd OFF=0, ON=127
BTN Bn 6C dd OFF=0, ON=127
BTN Bn 6D dd OFF=0, ON=127
VR Bn 1A dd 0-127
VR Bn 1E dd 0-127
VR Bn 6E dd 0-127
VR Bn 1F dd 0-127
VR Bn 70 dd 0-127
BTN Bn 71 dd OFF=0, ON=127
VR Bn 72 dd 0-127
VR Bn 73 dd 0-127
VR Bn 74 dd 0-127
VR Bn 75 dd 0-127
BTN Bn 76 dd OFF=0, ON=127
Remarques
NORMAL=0,
ADVANCED=127
Page 30

Fr
12
Opérations
DJM-
5000
PROFESSIONAL MIXER
PHONES
LEVEL
-
0
HEAD PHONES
PITCHOCTAVER
ECHO+VERB
REVERB
MIC EFFECT
NORMAL
ADVANCED
ON/OFF
TALK OVER
MIN MAX
MIC1 ON
LEVEL
-
0
EFFECT
LOWHI
LOW
-
12 +12
MID
-
12 +12
HI
-
12 +12
OUTPUT
MASTER ZONE
BOTH
MIC 1 MIC 1
MIC2 ON
LEVEL
-
0
EFFECT
LOWHI
LOW
-
12 +12
MID
-
12 +12
HI
-
12 +12
OUTPUT
MASTER ZONE
BOTH
MIC 2
ABTHRU
CH -1
LOW
-
26
+6
MID
-
26
+6
HI
-
26
+6
CUE
FADER
START
TRIM
-
+9
CD
MIC 3
DIGITAL1
dB
14
9
5
2
0
–2
–4
–7
–10
–15
ABTHRU
CH -2
LOW
-
26
+6
MID
-
26
+6
HI
-
26
+6
CUE
FADER
START
TRIM
-
+9
CD
USB 1/2
DIGITAL2
dB
14
9
5
2
0
–2
–4
–7
–10
–15
ABTHRU
CH -3
LOW
-
26
+6
MID
-
26
+6
HI
-
26
+6
CUE
TRIM
-
+9
CD
USB 3/4
LINE
dB
14
9
5
2
0
–2
–4
–7
–10
–15
ABTHRU
CH -4
LOW
-
26
+6
MID
-
26
+6
HI
-
26
+6
CUE
TRIM
-
+9
CD
USB 5/6
LINE
dB
14
9
5
2
0
–2
–4
–7
–10
–15
OFFON
MIDI
CROSS
FADER
BOOTH MONITOR
-
0
STEREOMONO
BALANCE
L
R
CUE
dB
14
9
5
2
0
–2
–4
–7
–10
–15
LR
LEVEL
-
0
MASTER
ZONE ON
CUE
1
2
34
MASTER
MIC
dB
14
9
5
2
0
–2
–4
–7
–10
–15
LEVEL
-
0
ZONE
ZONE ASSIGN
POWER
SOUND
MAXIMIZER
DYNAMICS
MINMAX
CLARITY
MINMAX
ON/OFF
1
2
3
4
MIC1
MIC2
MIC1+2
MASTER
SEND/RETURN
LEVEL
MINMAX
ON/OFF
7
b
5
1
3
2
8
9
a
4
7
6
665
1
3
2
8
4
7
65
5
1
2
8
7
8
4
1
2
4
2
3
4
6
8
7
1
9
a
5
b
c
d
1
2
4
3
5
6
9
7
8
a
b
i
c
d
e
f
g
h
Section MC Section DJ Section PA
MIC 1
MIC 2
TALK OVER
HEAD PHONES
CH-1
CH-4
CROSS FADER
MIDI
MASTER
ZONE
SOUND MAXIMIZER
SEND/ RETURN
POWER
Panneau de commande
Section MC
,
1 MIC 1 (la page 14)
2 OUTPUT (la page 14)
3 HI, MID, LOW (la page 14)
4 EFFECT (la page 14)
5 MIC EFFECT (la page 14)
6 Indicateur de niveau de crête
7 LEVEL (la page 14)
8 MIC1 ON, MIC2 ON (la page 14)
8 Commutateur d’affectation de
crossfader (la page 13)
9 Crossfader (la page 13)
a CROSS FADER (Sélecteur de courbe de
crossfader) (la page 13)
b MIDI (la page 13)
Section PA
f Sélecteur de canal de sortie (la page 15)
g LEVEL (la page 15)
h ON/
OFF (la page 15)
i POWER (la page 13)
9 Niveau de talkover (la page 14)
a NORMAL/
b ON/
ADVANCED (la page 14)
OFF (la page 14)
2 Indicateur de niveau principal (la page 13)
Indique le niveau des signaux audio passant par
[LEVEL] dans le canal [MASTER].
3 CUE (la page 13)
4 BALANCE (la page 15)
1 LEVEL (la page 13)
c LEVEL (la page 13)
d PHONES (la page 13)
5 MONO/
6 BOOTH MONITOR (la page 15)
STEREO (la page 15)
Section DJ
1 Sélecteur d’entrée (la page 13)
2 TRIM (la page 13)
3 FADER START (la page 13)
4 CUE (la page 13)
5 Indicateur de niveau de canal (la page 13)
6 HI, MID, LOW (la page 13)
7 Fader de canal (la page 13)
—
7 LEVEL (la page 15)
8 Indicateur de niveau de zone (la page 15)
9 CUE (la page 13)
a Sélecteur de canal de sortie (la page 15)
b ZONE ON (la page 15)
Indique le niveau des signaux audio passant par
[LEVEL] dans le canal [ZONE].
c CLARITY (la page 15)
d DYNAMICS (la page 15)
OFF (la page 15)
e ON/
Page 31

Fr
13
Français
Fonctionnement de la section DJ
ON
OFF
OFF
ON
ON
OFF
ON
OFF
ON
OFF
ON
OFF
ON
ON
OFF
OFF
ON
OFF
ON
ON
ON
CH (L)
MASTER (L)
ZONE (L)
CH (MONO)
CH (MONO)
MASTER (L)+ZONE (L)
CH (MONO)
CH (R)
MASTER (R)
ZONE (R)
MASTER (MONO)
ZONE (MONO)
MASTER (R)+ZONE (R)
MASTER (MONO)
+ZONE (MONO)
CH-1
‒
CH-4
MASTER ZONE
Sortie casque
Canal L
Canal R
Restitution du son
1 Appuyez sur [POWER]
Allumez cet appareil.
2 Réglez le sélecteur d’entrée
Sélectionnez la source d’entrée de chaque canal correspondant aux appareils
raccordés à cet appareil.
! Pour restituer le son de l’ordinateur raccordé à la prise [USB], réglez le sélec-
teur d’entrée de [CH-2], [CH-3], et [CH-4] sur [USB].
3 Tournez [TRIM]
Règle le niveau des signaux audio présents à l’entrée de chaque canal.
! L’indicateur de niveau du canal s’éclaire lorsque le son est transmis correcte-
ment au canal.
4 Réglez le fader de canal sur la position intérieure
Règle le niveau des signaux audio présents à la sortie de chaque canal.
5 Réglez le commutateur d’affectation de crossfader
Commute la destination de la sortie de chaque canal.
— [A]: Affectation à [A] (gauche) du crossfader.
— [B]: Affectation à [B] (droite) du crossfader.
— [THRU]: Affectation au canal [MASTER] (pas de passage par le
crossfader).
6 Réglez le commutateur de courbe du crossfader
([CROSS FADER])
Change les caractéristiques de la courbe du crossfader.
7 Réglez le crossfader
Restitue les signaux audio affectés par le commutateur d’affectation de
crossfader correspondant aux caractéristiques de la courbe sélectionnée par
[CROSS FADER] (Sélecteur de courbe de crossfader).
! Cette étape est inutile lorsque le commutateur d’affectation de crossfader est
8 Tournez [LEVEL] du canal [MASTER]
Le son est restitué par [MASTER1] et [MASTER2]. L’indicateur de niveau principal
s’éclaire.
Réglage de la qualité du son
Tournez [HI], [MID] ou [LOW] sur chaque canal
Reportez-vous à la page 18, Spécifications pour la plage de réglage du son de
chaque commande.
Contrôle du son par un casque
1 Raccordez le casque à la prise [PHONES]
2 Appuyez sur [CUE] du canal à contrôler
La touche s’éclaire en orange vif.
3 Tournez la molette [LEVEL] de [HEAD PHONES]
Le son est restitué par le casque sur le canal sélectionné par [CUE].
! Le son restitué par le casque dépend de la combinaison de canaux sélection-
]: Courbe croissant rapidement (quand le crossfader est éloigné du
— [
côté [A], les signaux audio sortent immédiatement du côté [B]).
— [ ]: Courbe se situant entre les deux courbes précédente et suivante.
— [ ]: Courbe croissant graduellement (quand le crossfader est éloigné
du côté [A], le son du côté [B] augmente graduellement tandis que le son
du côté [A] diminue graduellement).
réglé sur [THRU].
nés par [CUE]. Reportez-vous au tableau ci-dessous.
Utilisation du fader pour lancer un lecteur DJ
Pioneer (lancement au fader)
Si vous raccordez un lecteur DJ Pioneer avec un câble de commande (fourni
avec le lecteur DJ), vous pourrez lancer la lecture et contrôler d’autres opérations
du lecteur DJ avec le fader de cet appareil.
Le départ au fader n’est disponible que si un lecteur DJ Pioneer est raccordé à
[CH-1] ou [CH-2].
Raccordez au préalable un lecteur DJ Pioneer à cet appareil (la page 7).
Lancer la lecture en utilisant le fader de canal
1 Réglez le commutateur d’affectation de crossfader sur [THRU]
2 Appuyez sur [FADER START]
Activez le départ au fader. La touche s’éclaire en orange vif.
3 Réglez le fader de canal sur la position la plus extérieure
4 Spécifiez le repère sur le lecteur DJ
Le lecteur DJ se met en pause au point de repère.
5 Réglez le fader de canal sur la position intérieure
La lecture démarre sur le lecteur DJ.
! Si vous ramenez le fader de canal à la position originale, le lecteur revient ins-
tantanément au point de repère déjà spécifié et interrompt la lecture (repère
arrière).
Lancer la lecture en utilisant le crossfader
1 Réglez le commutateur d’affectation de crossfader sur [A] ou [B]
2 Appuyez sur [FADER START]
Activez le départ au fader. La touche s’éclaire en orange vif.
3 Réglez le crossfader
Réglez-le sur la position la plus éloignée dans le sens opposé au canal devant
être lancé au fader.
4 Spécifiez le repère sur le lecteur DJ
Le lecteur DJ se met en pause au point de repère.
5 Réglez le crossfader
La lecture démarre sur le lecteur DJ.
! Si vous ramenez le crossfader à la position originale, le lecteur revient ins-
tantanément au point de repère déjà spécifié et interrompt la lecture (repère
arrière).
Fonctionnement du logiciel DJ
La DJM-5000 fournit aussi les données de fonctionnement des touches et molettes dans le format MIDI. Si vous raccordez un ordinateur contenant un logiciel DJ
compatible MIDI avec un câble USB, vous pourrez utiliser le logiciel DJ depuis
cet appareil.
Installez le logiciel DJ au préalable sur votre ordinateur. Effectuez aussi les réglages audio et MIDI pour le logiciel DJ.
1 Raccordez le port USB de cet appareil à votre ordinateur
Pour le détail sur les raccordements, reportez-vous à la page 8, Raccordement à
un ordinateur.
2 Lancez le logiciel DJ
3 Réglez [MIDI] sur [ON]
La transmission des messages MIDI commence.
! Vous pouvez envoyer des messages MIDI en temps selon la position des
touches, faders et boutons de commande (instantané).
! Réglez les faders et boutons de commande pour transmettre des messages
faisant référence à la position correspondante. Pour le détail sur les messages
produits par cet appareil, reportez-vous à la page 11, Liste de messages MIDI.
4 Réglez [MIDI] sur [OFF]
Les messages MIDI ne sont pas transmis même si vous exploitez cet appareil.
! Le contrôle s’annule par un nouvel appui sur [CUE]. La touche s’éclaire en
orange sombre.
Page 32

Fr
14
Fonctionnement de la section MC
dB
Fréquence
NORMAL
ADVANCED
dB
Fréquence
NORMAL
ADVANCED
Utilisation d’un microphone
1 Commutez [OUTPUT]
Sélectionnez la destination de la sortie du son transmis par le canal [MIC1] ou
[MIC2].
2 Tournez [LEVEL] du canal du microphone
Règle le niveau des signaux audio présents à la sortie du canal microphone.
! Attention, car une rotation jusqu’à la position extrême droite produit un son
très fort.
3 Appuyez sur [MIC1 ON] du canal [MIC1] ou [MIC2 ON] du canal
[MIC2].
Mettez le canal microphone en service. La touche s’éclaire en vert.
4 Fournissez des signaux audio au microphone
Le son est transmis à la destination de sortie sélectionnée par 1.
! L’indicateur de niveau de crête s’éclaire de différentes couleurs selon le
niveau du son présent à l’entrée.
— Vert : Niveau autorisé
— Orange : Niveau approprié
— Rouge : Niveau excessif (baissez le niveau du son en tournant [LEVEL]
vers la gauche)
Réglage de la qualité du son
Utilisation de la fonction talkover
1 Tournez le niveau de talkover
Réglez le niveau d’atténuation du son en plus de celui du canal microphone.
2 Commutez entre [NORMAL]/ [ADVANCED]
Le mode d’atténuation de la fonction talkover change.
! Niveau de talkover :
Le son provenant d’autres canaux que le canal microphone est atténué
selon le niveau de talkover spécifié.
! Talkover avancé :
Seule la bande des voix du son provenant d’autres canaux que le canal
microphone est atténuée selon le niveau de talkover spécifié.
Tournez [HI], [MID] ou [LOW] du canal [MIC1] ou [MIC2]
Reportez-vous à la page 18, Spécifications pour la plage de réglage du son de
chaque commande.
Utilisation de la fonction effets de microphone
1 Appuyez sur [MIC EFFECT (REVERB, ECHO+VERB, OCTAVER ou
PITCH)]
Mettez la fonction effets de microphone en service. La touche clignote en bleu.
! L’effet dépend de la touche.
2 Tournez [EFFECT]
Ajoute un effet au son provenant du canal microphone.
! L’effet varie selon le sens de rotation et la position de [EFFECT].
Nom de l’effet Descriptions
1
REVERB
ECHO+VERB
1
OCTAVER
PITCH
1 Plus vous tournez vers la droite, plus le son de l’effet est fort.
! Pour mettre la fonction effets du microphone hors service, appuyez une
nouvelle fois sur la touche clignotante [MIC EFFECT (REVERB, ECHO+VERB,
OCTAVER, PITCH)]. La touche s’éclaire en bleu.
Ajoute un effet de réverbération au son original.
1
Ajoute des effets de réverbération et d’écho au son original.
Ajoute un son à 1 octave au-dessus et au-dessous du son original.
Change l’intervalle musical dans la plage de 1 octave vers le haut et le
bas. Tournez vers la droite et la gauche pour changer l’intervalle de 1
octave vers le haut et le bas respectivement.
3 Appuyez sur [ON/ OFF] du canal [TALK OVER]
Mettez la fonction talkover en service. La touche s’éclaire en rouge.
! Lorsque des signaux audio sont présents à l’entrée du canal microphone, le
son, outre celui du canal du microphone, est atténué selon le mode d’atténuation spécifié et la position de la commande.
Page 33

Fr
15
Français
Fonctionnement de la section PA
dB
Fréquence
DYNAMICS
MINMAX
CLARITY
MINMAX
Restitution du son par la prise ZONE
Le son peut être restitué par la prise [ZONE] en plus du son du canal principal.
1 Réglez le sélecteur de canal de sortie du canal [ZONE]
Sélectionnez le canal provenant de la prise [ZONE].
! La sortie sonore dépend de la position du sélecteur.
Position du
sélecteur
Sortie
audio
1 Le son est restitué quelle que soit la position des faders et des boutons de commande.
2 Le son est restitué quelle que soit la position de [LEVEL] du canal [MASTER].
3 Le son est restitué seulement pour le canal microphone pour lequel [OUTPUT] est réglé
2 Appuyez sur [ZONE ON] du canal [ZONE]
Mettez le canal [ZONE] en service. La touche s’éclaire en vert.
3 Tournez [LEVEL] du canal [ZONE]
Le son est présent en sortie à la prise [ZONE]. L’indicateur de niveau de la zone
s’éclaire.
! Pour mettre le canal [ZONE] hors service, appuyez de nouveau sur
Utilisation de la fonction d’optimisation du son
1 Appuyez sur [ON/ OFF] du canal [SOUND MAXIMIZER]
Mettez la fonction d’optimisation du son en service. La touche s’éclaire en bleu.
2 Tournez [CLARITY] ou [DYNAMICS]
L’effet d’optimisation du son varie selon le sens de rotation et la position de la
commande.
! Le niveau de sortie du son augmente en fonction de l’effet d’optimisation du
1 2 3 4 MASTER MIC
1
CH-1
sur [BOTH] ou [ZONE].
CH-21CH-31CH-4
1
Canal microphone
Canal micro-
2
phone
3
[ZONE ON]. La touche s’éteint.
son quand la molette est tournée dans le sens horaire. Faites attention au
niveau de sortie audio lorsque vous utilisez la fonction d’optimisation du son.
4 Tournez la molette [LEVEL] de [SEND/ RETURN]
Règle le niveau des signaux audio présents en entrée à la prise [RETURN].
! Pour arrêter le son présent en sortie à la prise [SEND], appuyez sur la touche
clignotante [ON/
OFF]. La touche s’éclaire.
Commutation du son entre mono et stéréo
Vous pouvez commuter entre mono et stéréo le son présent en sortie à la prise
[MASTER1], [MASTER2], [BOOTH], [REC OUT] ou [PHONES].
Commutez entre [MONO]/ [STEREO]
! [MONO] : Le son est en mono.
! [STEREO] : Le son est en stéréo.
Réglage de la balance G/ D du son
La balance G/ D du son présent en sortie aux prises [MASTER1], [MASTER2],
[BOOTH], [REC OUT] et [PHONES] peut être réglée.
1 Réglez [MONO]/ [STEREO] sur [STEREO]
2 Tournez [BALANCE]
La balance G/ D du son varie selon le sens de rotation et la position de la commande [BALANCE].
! La voie droite d’un son stéréo est restituée lorsque la commande est tournée
complètement vers la droite. La voie gauche d’un son stéréo est restituée
lorsque la commande est tournée complètement vers la gauche.
Le son est restitué par la prise [BOOTH]
Le son du canal principal, à l’exception du son du canal microphone, est restitué par la prise [BOOTH] quelle que soit la position de [LEVEL] sur le canal
[MASTER].
Tournez [BOOTH MONITOR]
Règle le niveau des signaux audio présents en sortie à la prise [BOOTH].
! La plage de réglage du son dépend de la commande.
— CLARITY : Ajuste l’attaque et le profil du son principalement dans la
plage des médiums et aigus (cymbales, caisse claire, etc.).
— DYNAMICS : Ajuste la modulation et le rythme principalement dans la
plage des graves.
! Pour mettre la fonction d’optimisation du son hors service, appuyez de nou-
veau sur [ON/
OFF]. La touche s’éteint.
Utilisation du processeur d’effets externe
1 Raccordez le processeur d’effets externe
[ON/ OFF] de [SEND/ RETURN] s’éclaire en rouge. Quand le processeur d’effets
externe n’est pas raccordé, [ON/ OFF] ne s’éclaire pas.
! Pour le détail sur les raccordements, reportez-vous à la page 6,
Raccordements.
2 Réglez le sélecteur de canal de sortie du canal [SEND/ RETURN]
Sélectionnez le canal provenant de la prise [SEND].
! La sortie sonore dépend de la position du sélecteur.
Position du
sélecteur
Sortie
audio
1 Le son du microphone provenant du canal principal est restitué par le canal [SEND].
3 Appuyez sur [ON/ OFF] du canal [SEND/ RETURN]
Le son est présent en sortie à la prise [SEND]. La touche clignote en rouge.
1 2 3 4 MIC 1 MIC 2 MIC1+2 MASTER
CH-1 CH-2 CH-3 CH-4 MIC 1 MIC 2
MIC1+2
1
Canal principal
Page 34

Fr
16
Informations supplémentaires
En cas de panne
! Une erreur de commande est souvent prise pour une anomalie de fonctionnement ou une panne. Si vous estimez que cet appareil ne fonctionne pas correctement,
vérifiez les points ci-dessous. Parfois, le problème peut provenir d’un autre composant. Examinez les autres composants et les appareils électriques utilisés. Si le
problème persiste malgré les vérifications des points suivants, confiez les réparations au service après-vente Pioneer le plus proche ou à votre revendeur.
! De l’électricité statique ou des interférences externes ont peut être déréglé le lecteur. Dans ce cas, il suffit probablement de débrancher puis de rebrancher le cor-
don d’alimentation pour que le lecteur fonctionne de nouveau.
Problème Vérification Solution
L’appareil ne s’allume pas. Est-ce que le cordon d’alimentation est correctement
Aucun son ou son faible. Est-ce que la position du sélecteur d’entrée est correcte ? Changez la source d’entrée d’un canal avec le sélecteur d’entrée (la page
Distorsion du son. Est-ce que le niveau de sortie du son provenant du canal
Impossible de faire un fondu enchaîné. Est-ce que le commutateur d’affectation de crossfader est
Départ au crossfader d’un lecteur DJ impossible. Est-ce que [FADER START] est réglé sur arrêt ? Réglez [FADER START] sur marche (la page 13).
Aucun effet. Est-ce que [EFFECT] est à la bonne position ? Réglez [EFFECT] sur une autre position que [LOW] (la page 12).
Impossible d’utiliser un processeur d’effets externe.
Distorsion du son provenant du processeur d’effets
externe.
Cet appareil n’est pas reconnu après avoir été raccordé à un ordinateur.
raccordé ?
Est-ce que les câbles de liaison sont correctement raccordés ?
Est-ce que les prises et fiches sont sales ? Nettoyez les prises et les fiches avant d’effectuer les raccordements.
Est-ce que [MASTER ATT] sur le panneau arrière est réglé
sur un niveau tel que -12 dB ?
microphone est réglé correctement ?
Est-ce que le niveau du son transmis à chaque canal est
réglé correctement ?
réglé correctement ?
Est-ce que le lecteur DJ est raccordé correctement à la
prise [CONTROL] ?
Est-ce que les câbles audio sont correctement raccordés ? Raccordez cet appareil à la prise de sortie audio du lecteur DJ avec un câble
Est-ce que [SEND/ RETURN] [ON/ OFF] est réglé sur marche ?
Est-ce que le processeur d’effets externe est raccordé
correctement à la prise [SEND] ou [RETURN] ?
Est-ce que le sélecteur de canal de sortie de [SEND/
RETURN] est réglé correctement ?
Est-ce que le niveau d’entrée du son provenant du processeur d’effets externe est réglé correctement ?
Est-ce que le pilote a été installé correctement sur votre
ordinateur ?
Branchez le cordon d’alimentation sur une prise secteur.
12).
Raccordez correctement les câbles de liaison (la page 7).
Réglez [MASTER ATT] (la page 6).
Réglez la molette [LEVEL] de [MASTER] de sorte que l’indicateur de niveau
du canal principal s’éclaire près de 0 dB au niveau de crête (la page 12).
Réglez [MASTER ATT] sur [-6 dB] ou [-12 dB] (la page 6).
Réglez [TRIM] de sorte que l’indicateur de niveau du canal s’éclaire près de
0 dB au niveau de crête (la page 12).
Réglez le commutateur d’affectation de crossfader correctement pour
chaque canal (la page 12).
Raccordez le lecteur DJ à la prise [CONTROL] avec un câble de commande
(la page 7).
audio (la page 7).
Appuyez sur [ON/ OFF] de [SEND/ RETURN] pour activer [SEND/ RETURN] (la
page 12).
Raccordez le processeur d’effets externe à la prise [SEND] ou [RETURN].
Quand le raccordement est correctement effectué [ON/
RETURN] s’éclaire en rouge (la page 7).
Réglez le canal de sortie avec le sélecteur de canal de sortie du canal(la
page 12).
Tournez la molette [LEVEL] de [SEND/
signaux audio provenant du processeur d’effets externe (la page 12).
Installez le pilote. Réinstallez le pilote s’il a déjà été installé (À propos du
pilote audio USB).
Cet appareil doit être raccordé correctement à l’ordinateur et la transmission doit être sans erreur pour que l’utilitaire d’affichage de la version
puisse afficher le micrologiciel de cet appareil. Pour le détail sur la vérification, reportez-vous à la page 10, Vérification de la version du pilote.
RETURN] pour ajuster le niveau des
OFF] de [SEND/
À propos des clauses d’exemption
! Pioneer est une marque déposée de Pioneer Corporation.
! Microsoft®, Windows Vista® et Windows® sont des marques déposées ou des
marques commerciales de Microsoft Corporation aux États-Unis et/
d’autres pays.
! Pentium est une marque déposée de Intel Corporation.
! Adobe et Reader sont soit des marques déposées soit des marques
commerciales de Adobe Systems Incorporated aux États-Unis et/ ou dans
d’autres pays.
! Apple, Macintosh ou Mac OS sont des marques déposées de Apple Inc. aux
États-Unis et/ ou dans d’autres pays.
! ASIO est une marque commerciale de Steinberg Media Technologies GmbH.
! Les noms de sociétés et de produits mentionnés ici sont des marques
commerciales de leurs détenteurs respectifs.
ou dans
La licence de ce produit a été accordée pour un usage non lucratif. La licence
n’a pas été accordée à ce produit pour un usage commercial (but lucratif),
comme la diffusion radiotélévision (terrestre, satellite, câblée ou autre), la
diffusion sur Internet ou Intranet (réseau d’entreprise) ou sur tout autre type de
réseaux ou de services de distribution d’informations électroniques (services
de distribution de musique numérique en ligne). Pour de tels usages vous
devez acquérir les licences appropriées. Pour le détail, consultez le site: http:/
www.mp3licensing.com.
La technologie de compression audio MP3 est offerte sous licence de
Fraunhofer IIS et Thomson Multimedia.
/
Page 35

Fr
17
Français
Schéma fonctionnel
Digital in
3Band
CHx
EQ
H.P
CUE
[CHx]
Analog in
Zone
CHx Fader
Send
Return
[Master]
Send
Return
[MIC1+2]
Sound
Maximizer
Normal
Talk
Over
Advanced
Talk
Over
Master
Mono
Stereo
Zone
Master MIC
Talk Over Parameter
Zone MIC
Normal
Talk
Over
Advanced
Talk
Over
Volume, Switch,Command
Master CUE
Zone CUE
CHx CUE
H.P. Level
Zone Level
Zone Out
Zone
CH
Select
Zone
Talk Over Parameter
Send Out
MIC 1/2 in
MIC 1/2 COMMON
3Band
MIC
EQ
MIC
Effect
MIC 1/2
Send
Return
MIC 1/2
Master
Both
Zone
Mic Level Indicator
Talk Over Parameter
EFFECT
Processing
Master Mic
Zone Mic
Mic SW
MIC 1/2
Low
Cut
Filter
Talk Over
Normal/
Advanced
Talk Over
Level
MIC
Detect
Filter
Talk Over
SW
Send/Return
SW
Return
Level
ON/OFF SW
CH 1-4
MIC 1/2
MIC 1+2
Master
Zone Level Meter
Zone CUE
Zone Out[ Sound Maximizer ]
[ Send/Return ]
CH Select
Send/Return Out
CH Level Meter
Master Level Meter
Zone Level Meter
MIC 1/2 Level Meter
ON/OFF
SW
Clarity Dynamics
OutIn
[ MIC Effect ]
MIC 1/2 OutMIC 1/2 In
Reverb
Echo+Verb
Octaver Pitch
Page 36

Fr
18
Spécifications
Général
Alimentation ........................................................................................... CA 120 V, 60 Hz
Consommation ..........................................................................................................31 W
Poids de l’appareil principal .................................................................................. 6,9 kg
Dimensions extérieures ........................482,6 mm (L) x 107,8 mm (H) x 225,1 mm (P)
Température de fonctionnement tolérée ............................................. +5 °C à +35 °C
Humidité de fonctionnement tolérée .......................5 % à 85 % (sans condensation)
Section audio
Fréquence d’échantillonnage ..............................................................................96 kHz
Convertisseur A/ N, N/ A ........................................................................................24 bits
Caractéristiques des fréquences
CD/ LINE/ MIC ..................................................................................... 20 Hz à 20 kHz
Rapport S/ B (sortie nominale)
CD/ LINE ...........................................................................................................102 dB
MIC .................................................................................................................... 84 dB
Distorsion harmonique totale (LINE — MASTER1) .......................................... 0,005 %
Niveau d’entrée standard / Impédance d’entrée
MIC1, MIC2 ........................................................................................-52 dBu/ 22 kW
MIC3 ...................................................................................................-52 dBu/ 47 kW
CD/ LINE (3, 4).....................................................................................-12 dBu/ 47 kW
RETURN ..............................................................................................-12 dBu/ 47 kW
Niveau de sortie standard / Impédance de charge / Impédance de sortie
MASTER1 .............................................................+8 dBu/
MASTER2 .............................................................+2 dBu/
REC OUT .................................................................-8 dBu/ 10 kW/ 10 W ou inférieur
BOOTH ....................................................................................+8 dBu/ 10 kW/ 600 W
ZONE .................................................................... +8 dBu/ 10 kW/ 600 W (ATT 0 dB)
SEND .....................................................................-12 dBu/ 10 kW/ 1 kW ou inférieur
PHONES ...............................................................+8,5 dBu/ 32 W/ 22 W ou inférieur
Niveau de sortie nominal / Impédance de charge
MASTER1 .........................................................................................+25 dBu/ 10 kW
MASTER2 .........................................................................................+20 dBu/ 10 kW
ZONE ............................................................................. +25 dBu/ 10 kW (ATT 0 dB)
Diaphonie (LINE) ..................................................................................................... 80 dB
Caractéristiques de l’égaliseur de canal
HI ........................................................................................ -26 dB à +6 dB (13 kHz)
MID ......................................................................................-26 dB à +6 dB (1 kHz)
LOW ..................................................................................... -26 dB à +6 dB (70 Hz)
Caractéristiques de l’égaliseur de microphone
HI ...................................................................................... -12 dB à +12 dB (10 kHz)
MID .................................................................................-12 dB à +12 dB (2,5 kHz)
LOW ................................................................................. -12 dB à +12 dB (100 Hz)
Prises d’entrée/ sortie
Prise d’entrée CD
Prise RCA ................................................................................................................. 4
Prise d’entrée LINE
Prise RCA ................................................................................................................. 2
Prise d’entrée MIC
Connecteur XLR/ Jack (Ø 6,3 mm) ......................................................................... 1
Connecteur XLR ...................................................................................................... 1
Jack (Ø 6,3 mm) ....................................................................................................... 1
Prises d’entrée RETURN
Jack (Ø 6,3 mm) ....................................................................................................... 1
Prise de sortie ZONE
Connecteur XLR ...................................................................................................... 1
Prise de sortie MASTER
Connecteur XLR ...................................................................................................... 1
RCA pin jack ............................................................................................................ 1
Prise de sortie BOOTH
Jack (Ø 6,3 mm) ....................................................................................................... 1
Prise de sortie REC OUT
RCA pin jack ............................................................................................................ 1
Prise de sortie SEND
Jack (Ø 6,3 mm) ....................................................................................................... 1
Prise d’entrée coaxiale DIGITAL IN
Prise RCA ................................................................................................................. 2
Prise de sortie PHONES
Jack stéréo (Ø 6,3 mm) ........................................................................................... 1
Prise USB
Type B ...................................................................................................................... 1
Prise CONTROL
Minijack (Ø 3,5 mm) ................................................................................................ 2
10 kW/ 10 W ou inférieur
10 kW/ 10 W ou inférieur
! Les caractéristiques et la présentation peuvent être modifiées, sans avis
préalable, dans un souci d’amélioration.
! Publication de Pioneer Corporation. © 2009 Pioneer Corporation. Tous droits de
reproduction et de traduction réservés.
Page 37

<DRB1491-B>
Printed in / Imprimé au
Publication de Pioneer Corporation.
© 2009 Pioneer Corporation.
Tous droits de reproduction et de
traduction réservés.
Published by Pioneer Corporation.
Copyright © 2009 Pioneer Corporation.
All rights reserved.
PIONEER CORPORATION 4-1, Meguro 1-Chome, Meguro-ku, Tokyo 153-8654, Japan
PIONEER ELECTRONICS (USA) INC.
Multimedia and Mass Storage Division: 2265 East 220th Street, Long Beach, CA 90810, U.S.A. TEL: 800-444-OPTI (6784)
PIONEER ELECTRONICS OF CANADA, INC.
Industrial Products Departmen
t: 300 Allstate Parkway, Markham, Ontario L3R OP2, Canada TEL: 905-479-4411
Should this product require service in the U.S.A. and you wish to locate the nearest Pioneer
Authorized Independent Service Company, or if you wish to purchase replacement parts,
operating instructions, service manuals, or accessories, please call the number shown
below.
1 – 8 0 0 – 8 7 2 – 4 1 5 9
Please do not ship your product to Pioneer without first calling the Customer Support at the
above listed number for assistance.
Pioneer Electronics (USA), INC.
Service Support Division
P. O. BOX 1760, Long Beach, CA 90801-1760, U.S.A.
For warranty information please see the Limited Warranty sheet included with your product.
Should this product require service in Canada, please contact a Pioneer Canadian
Authorized Dealer to locate the nearest Pioneer Authorized Service Company in Canada.
Alternatively, please contact the Customer Satisfaction Department at the following address:
Pioneer Electronics of Canada, Inc.
Customer Satisfaction Department
300 Allstate Parkway, Markham, Ontario L3R 0P2
1-877-283-5901
905-479-4411
For warranty information please see the Limited Warranty sheet included with your product.
Si ce produit doit être réparé au Canada, veuillez vous adresser à un distributeur autorisé
Pioneer du Canada pour obtenir le nom du Centre de Service Autorisé Pioneer le plus près
de chez-vous. Vous pouvez aussi contacter le Service à la clientèle de Pioneer:
Pioneer Électroniques du Canada, Inc.
Service Clientèle
300, Allstate Parkway, Markham, Ontario L3R 0P2
1-877-283-5901
905-479-4411
Pour obtenir des renseignements sur la garantie, veuillez vous reporter au feuillet sur la
garantie restreinte qui accompagne le produit.
S021_C_EF
 Loading...