

Page 1
DJ MIXER
TABLE DE MIXAGE
DJ-MISCHPULT
DJM-350
MIXER PER DJ
DJ MENGPANEEL
MESA DE MEZCLAS DJ
DJ микшерный пульт
http://www.prodjnet.com/support/
The Pioneer website listed above provides answers to frequently asked questions, information about
software, and other up-to-date data of assistance to our customers.
Le site Web de Pionner ci-dessus fournit des réponses aux questions souvent posées, des informations
au sujet des logiciels et d’autres données mises à jour afin de venir en aide à notre clientèle.
Auf der oben angegebenen Pioneer-Website werden unseren Kunden Antworten auf häufig gestellte
Fragen, Informationen über Software und weitere Unterstützung mit neuesten Daten angeboten.
Operating Instructions
Mode d’emploi
Bedienungsanleitung
Istruzioni per l’uso
Handleiding
Manual de instrucciones
Инструкции по эксплуатации
Page 2
Thank you for buying this Pioneer product. Please read through these operating instructions so you will know how to operate your model prop-
The exclamation point within an equilateral
triangle is intended to alert the user to the
presence of important operating and
maintenance (servicing) instructions in the
literature accompanying the appliance.
The lightning flash with arrowhead symbol,
within an equilateral triangle, is intended to
alert the user to the presence of uninsulated
“dangerous voltage” within the product’s
enclosure that may be of sufficient
magnitude to constitute a risk of electric
shock to persons.
CAUTION:
TO PREVENT THE RISK OF ELECTRIC
SHOCK, DO NOT REMOVE COVER (OR
BACK). NO USER-SERVICEABLE PARTS
INSIDE. REFER SERVICING TO QUALIFIED
SERVICE PERSONNEL.
CAUTION
RISK OF ELECTRIC SHOCK
DO NOT OPEN
IMPORTANT
D3-4-2-1-1_A1_En
D3-4-2-1-2-2*_A2_En
Replacement and mounting of an AC plug on the power supply cord of this unit should be performed only by qualified
service personnel.
IMPORTANT: THE MOULDED PLUG
This appliance is supplied with a moulded three pin mains plug for your safety and convenience. A 5 amp fuse is fitted in this plug.
Should the fuse need to be replaced, please ensure that the replacement fuse has a rating of 5 amps and that it is approved by ASTA or BSI to
BS1362.
Check for the ASTA mark or the BSI mark on the body of the fuse.
If the plug contains a removable fuse cover, you must ensure that it is refitted when the fuse is replaced. If you lose the fuse cover the plug
must not be used until a replacement cover is obtained. A replacement fuse cover can be obtained from your local dealer.
If the fitted moulded plug is unsuitable for your socket outlet, then the fuse shall be removed and the plug cut off and disposed of
safely. There is a danger of severe electrical shock if the cut off plug is inserted into any 13 amp socket.
If a new plug is to be fitted, please observe the wiring code as shown below. If in any doubt, please consult a qualified electrician.
IMPORTANT: The wires in this mains lead are coloured in accordance with the following code:
Blue : Neutral Brown : Live
As the colours of the wires in the mains lead of this appliance may not correspond with the coloured markings identifying the terminals in
your plug, proceed as follows;
The wire which is coloured BLUE must be connected to the terminal which is marked with the
letter N or coloured BLACK.
The wire which is coloured BROWN must be connected to the terminal which is marked with the
letter L or coloured RED.
How to replace the fuse: Open the fuse compartment with a screwdriver and replace the fuse.
If you want to dispose this product, do not mix it with general household waste. There is a separate collection system for used
electronic products in accordance with legislation that requires proper treatment, recovery and recycling.
Private households in the member states of the EU, in Switzerland and Norway may return their used electronic products free of charge to
designated collection facilities or to a retailer (if you purchase a similar new one).
For countries not mentioned above, please contact your local authorities for the correct method of disposal.
By doing so you will ensure that your disposed product undergoes the necessary treatment, recovery and recycling and thus prevent potential
negative effects on the environment and human health.
K058b_A1_En
erly. After you have finished reading the instructions, put them away in a safe place for future reference.
In some countries or regions, the shape of the power plug and power outlet may sometimes differ from that shown in the explanatory drawings.
However the method of connecting and operating the unit is the same.
En
2
Page 3

WARNING
This equipment is not waterproof. To prevent a fire or
shock hazard, do not place any container filled with
liquid near this equipment (such as a vase or flower
pot) or expose it to dripping, splashing, rain or
moisture.
D3-4-2-1-3_A1_En
WARNING
Before plugging in for the first time, read the following
section carefully.
The voltage of the available power supply differs
according to country or region. Be sure that the
power supply voltage of the area where this unit
will be used meets the required voltage (e.g., 230 V
or 120 V) written on the rear panel.
D3-4-2-1-4*_A1_En
WARNING
To prevent a fire hazard, do not place any naked flame
sources (such as a lighted candle) on the equipment.
D3-4-2-1-7a_A1_En
WARNING
Slots and openings in the cabinet are provided for
ventilation to ensure reliable operation of the product,
and to protect it from overheating. To prevent fire
hazard, the openings should never be blocked or
covered with items (such as newspapers, table-cloths,
curtains) or by operating the equipment on thick carpet
or a bed.
D3-4-2-1-7b*_A1_En
Operating Environment
Operating environment temperature and humidity:
+5 °C to +35 °C (+41 °F to +95 °F); less than 85 %RH
(cooling vents not blocked)
Do not install this unit in a poorly ventilated area, or in
locations exposed to high humidity or direct sunlight (or
strong artificial light)
D3-4-2-1-7c*_A1_En
If the AC plug of this unit does not match the AC
outlet you want to use, the plug must be removed
and appropriate one fitted. Replacement and
mounting of an AC plug on the power supply cord of
this unit should be performed only by qualified
service personnel. If connected to an AC outlet, the
cut-off plug can cause severe electrical shock. Make
sure it is properly disposed of after removal.
The equipment should be disconnected by removing
the mains plug from the wall socket when left unused
for a long period of time (for example, when on
vacation).
D3-4-2-2-1a_A1_En
CAUTION
The switch on this unit will not completely shut off
all power from the AC outlet. Since the power cord
serves as the main disconnect device for the unit,
you will need to unplug it from the AC outlet to shut
down all power. Therefore, make sure the unit has
been installed so that the power cord can be easily
unplugged from the AC outlet in case of an accident.
To avoid fire hazard, the power cord should also be
unplugged from the AC outlet when left unused for a
long period of time (for example, when on vacation).
D3-4-2-2-2a*_A1_En
POWER-CORD CAUTION
Handle the power cord by the plug. Do not pull out the
plug by tugging the cord and never touch the power
cord when your hands are wet as this could cause a
short circuit or electric shock. Do not place the unit, a
piece of furniture, etc., on the power cord, or pinch the
cord. Never make a knot in the cord or tie it with other
cords. The power cords should be routed such that they
are not likely to be stepped on. A damaged power cord
can cause a fire or give you an electrical shock. Check
the power cord once in a while. When you find it
damaged, ask your nearest PIONEER authorized
service center or your dealer for a replacement.
S002*_A1_En
En
3
Page 4

How to read this manual
The names of displays, menus, and buttons in this manual are
enclosed in brackets. (e.g. [MASTER] channel, [ON/ OFF], [File] menu)
Before start
Features .......................................................................................................5
System setup example ................................................................................5
What’s in the box .........................................................................................5
Connections
Names of terminals.....................................................................................6
Connecting the input/
output terminals ....................................................7
Operations
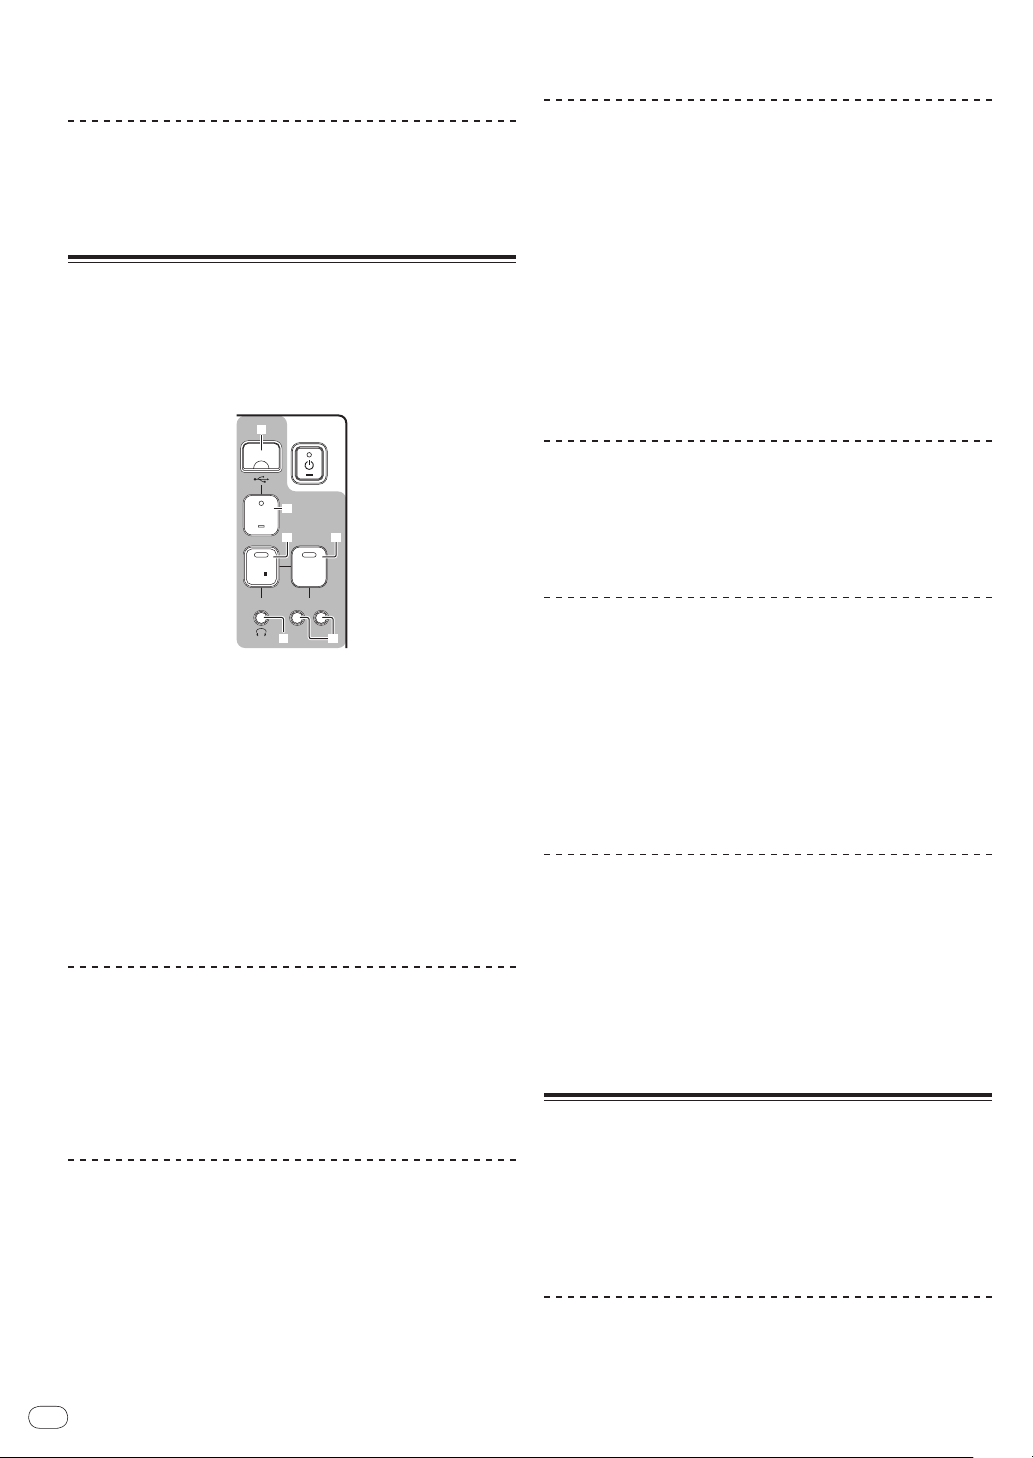
Control panel ...............................................................................................8
About the power switch of this unit ...........................................................9
Basic operations (mixer section) ...............................................................9
Monitoring the sound over headphones (headphones section) ..........11
Using the effect function (master effect section) ..................................11
Using a microphone or external device (MIC/ AUX section)
Recording the performance (USB recording section) ..........................12
About the auto standby function .............................................................12
...........................11
Additional information
Troubleshooting ........................................................................................14
About errors ...............................................................................................15
About USB devices/ files usable on this unit ..........................................15
About the exemption clauses ..................................................................16
Specifications ............................................................................................ 16
En
4
Page 5
Before start
MULTI PLAYER
TEMPO
0
PLAY/PAUSE
SEARCH
TRACK SEARCH
IN/CUE OUT
OUT ADJUSTHOT LOOP
RELOOP/EXIT
BEAT LOOP
LOOP DRIVE
VINYL MODE
TEMPO RANGE
MASTER TEMPO
LOOP
USB
STOP
SOURCE SELECT
MP3/AAC
WAV/AIFF
CUE
PLAYLIST
BPM
DISC
LOCK
REVFWD
BACK
SELECT PUSH
TIME MODE
AUTO CUE
DISPLAY
UTILITY
A.CUE
LOCK
16
REMAIN
MS
FTEMPO %
INFO
BROWSE
BPM
2 CHANNEL DJ MIXER
MIC /AUX
MIC
0
LEVEL
HI
AUX
LOW
MIC/AUX
ON
12
12
12
12
HEADPHONES
CUE
CH-1
CUE
MIXING
CUE MASTER
CH-2
LEVEL
PHONES
0
9
9
9
9
CD
PHONO
CH- 1
FADER
START
FADER
START
CH- 1 CH- 2
9
9
9
9
CH-2
THRU
CD
PHONO
TRIMTRIM
HI
MID
LOW
HI
MID
LOW
LEVEL
MASTER
LEVEL/DEPTH
FILTERCRUSH
GATE JET
MASTER EFFECT
0
PREVIEW
TRACK MARK SEARCH
PLAY
USB
STOP
REC
MASTER LEVEL
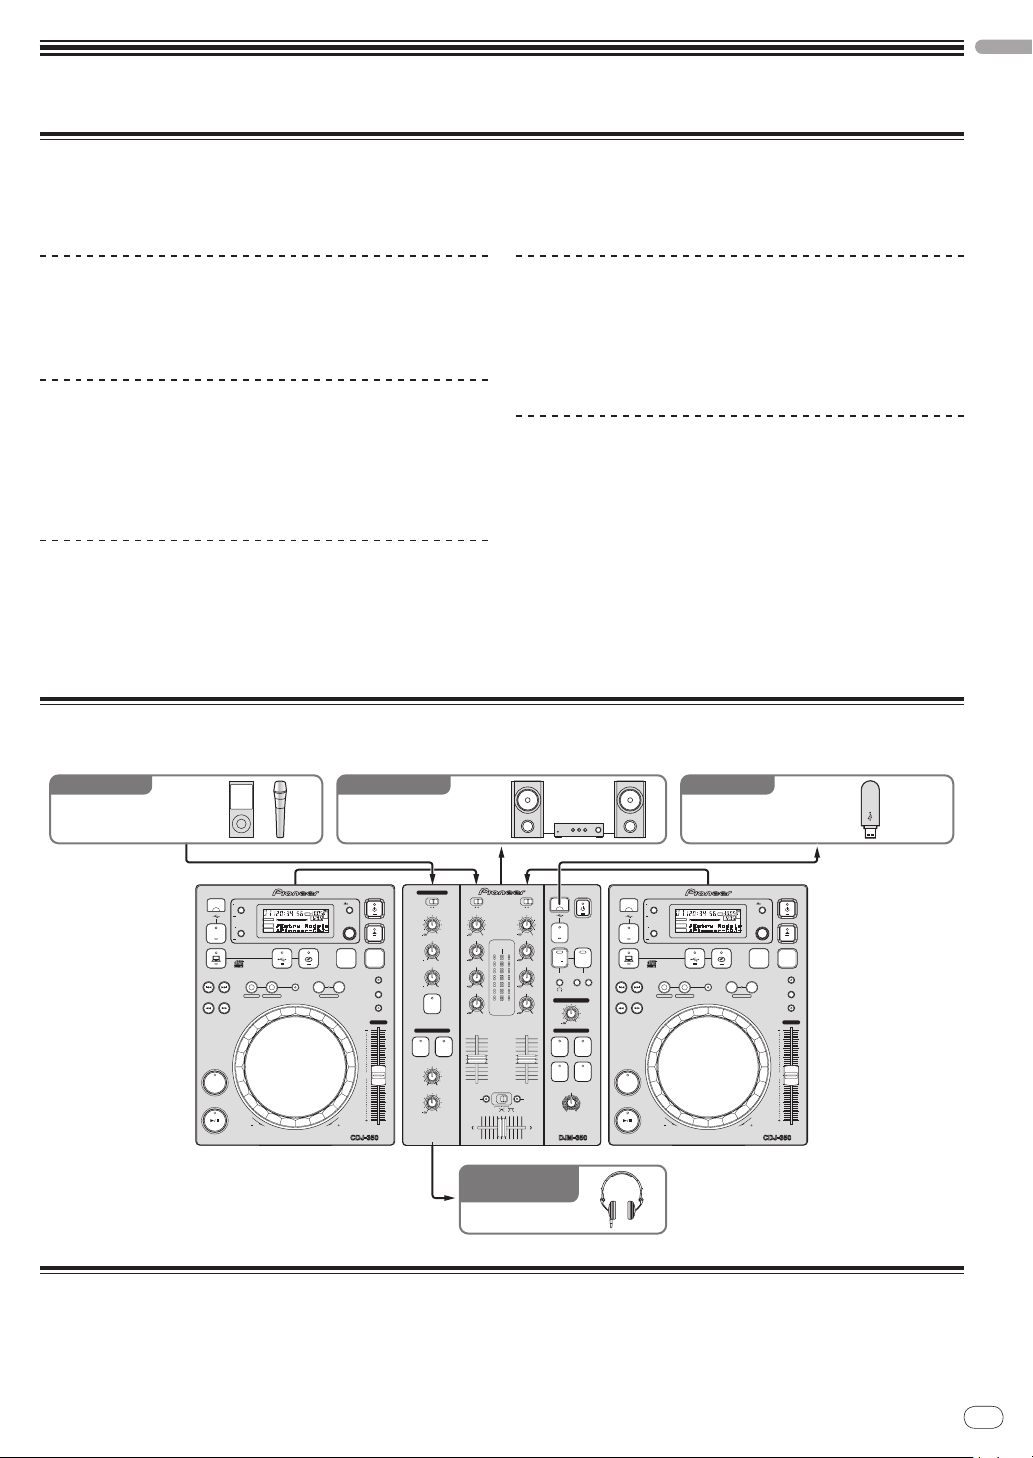
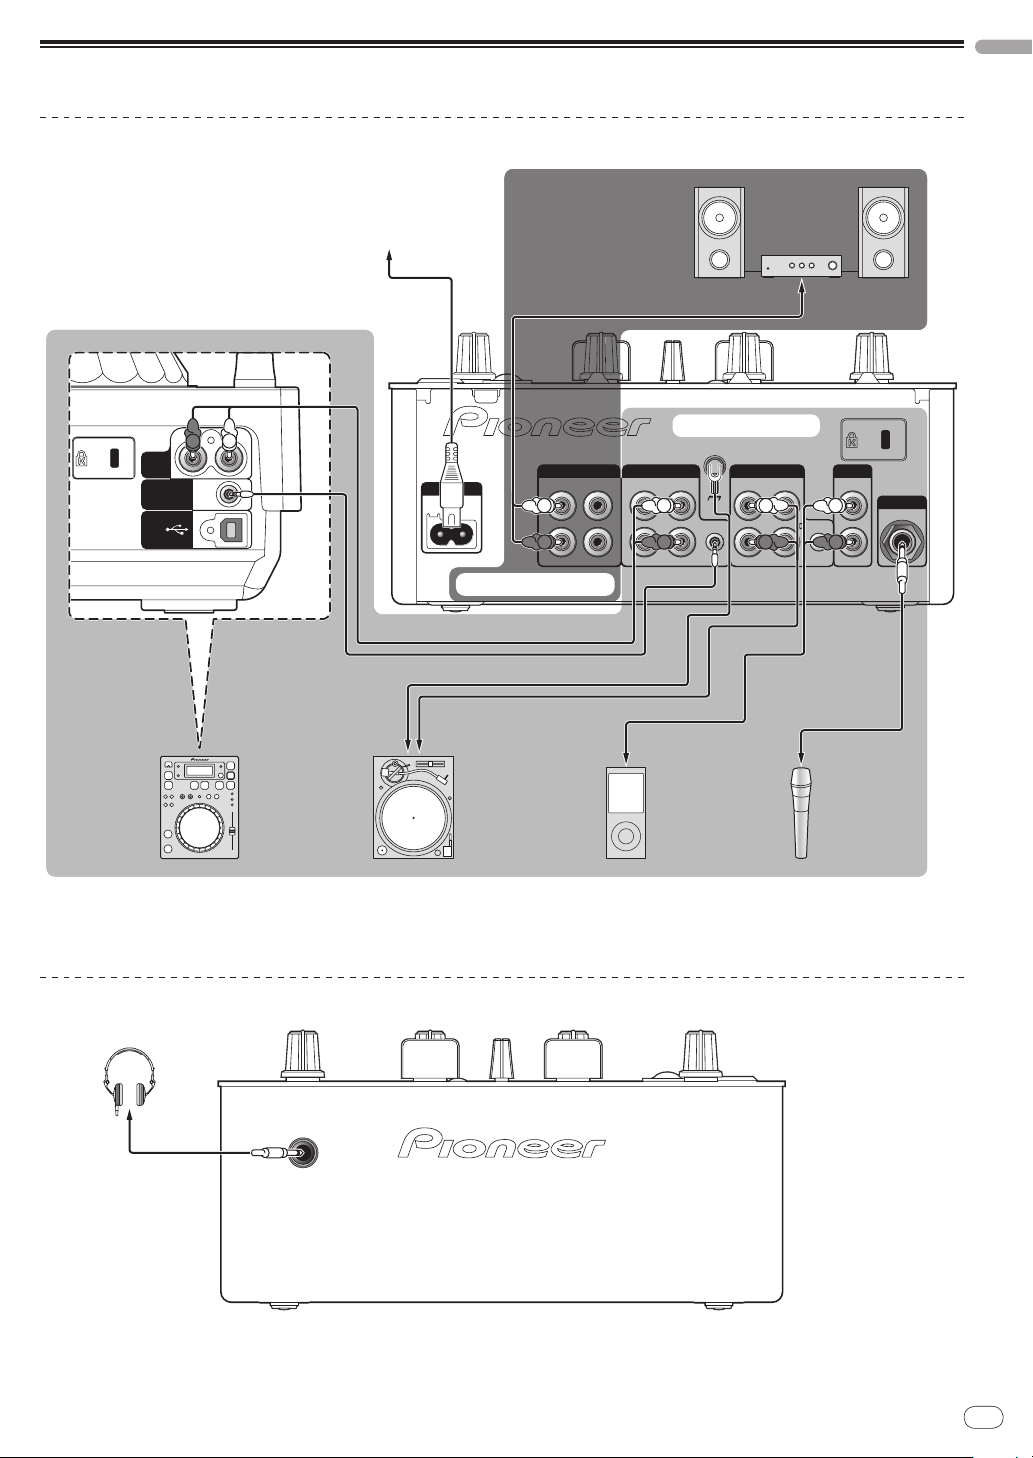
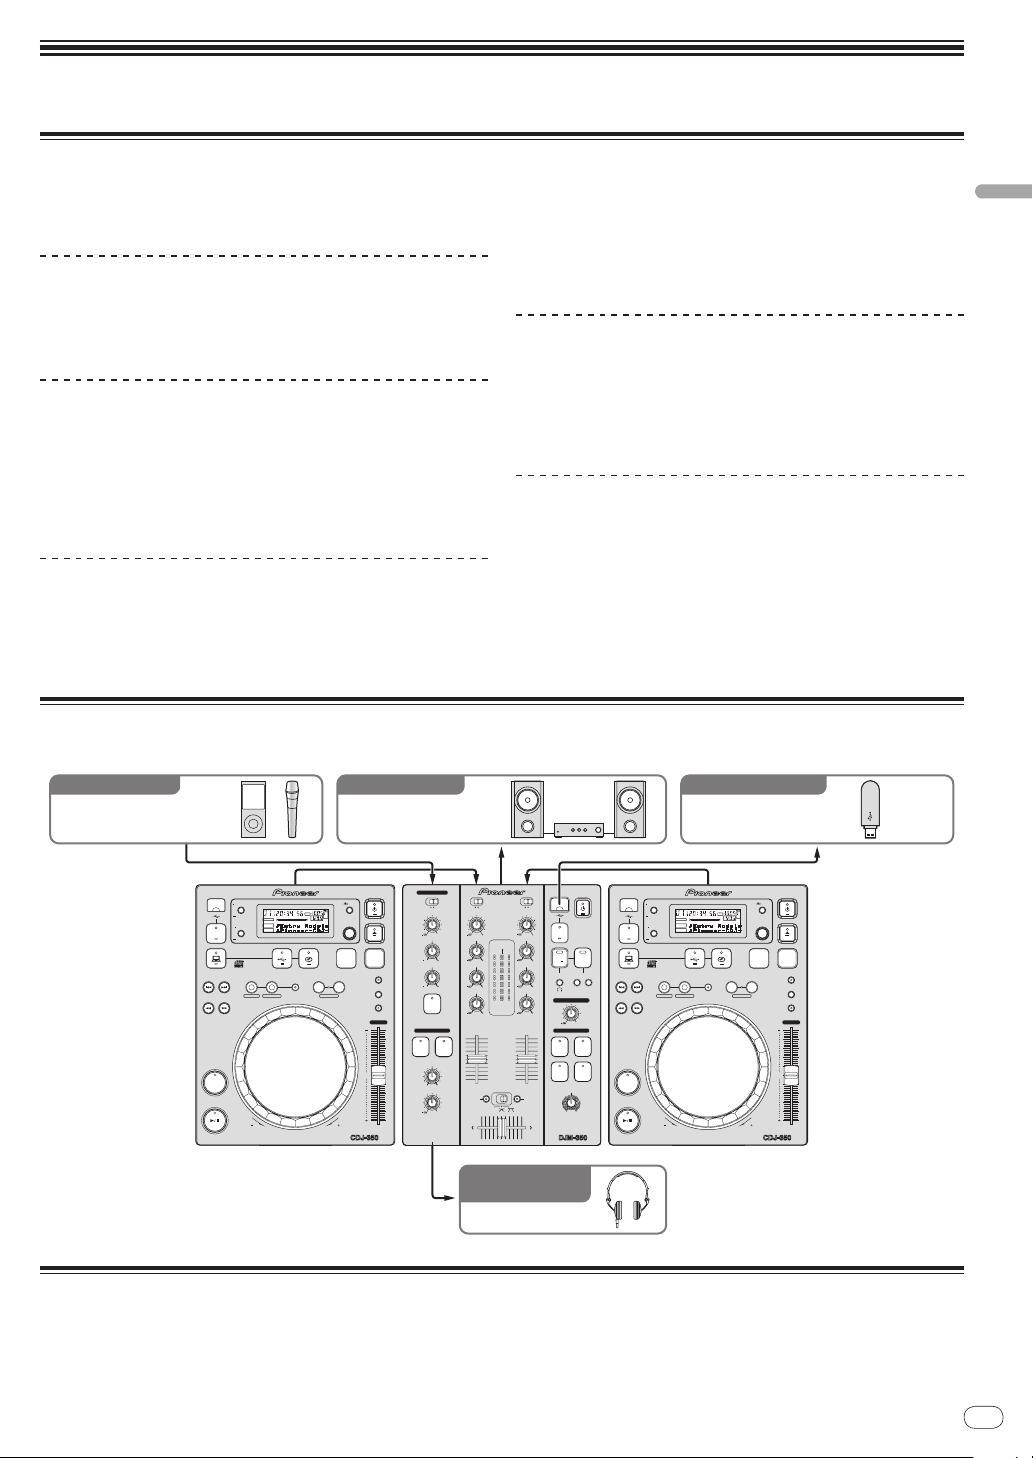
Portable audio device/
microphone
Headphones
CDJ-350CDJ-350 DJM-350
Component, amplifier,
powered speaker, etc.
USB device
For audio output For recordingFor audio input
For checking the
audio input/output
Features
This unit is a DJ mixer that carries over the technology of the Pioneer DJM series, the world standard in club sound. It is a standard type unit
equipped with the basic functions required for mixing, enabling full-fledged DJ play easily.
English
USB recording
With this unit, the sound of DJ performances can easily be recorded
on USB devices (portable flash memory devices, etc.). The recorded
sound can also be played on this unit.
MIC/ AUX INPUT
This unit is equipped with a microphone/ auxiliary input allowing connection of a microphone or external device (sampler, portable audio
device, etc.). DJ play is possible using up to three sets of inputs: CH-1
(channel 1), CH-2 (channel 2) and MIC/ AUX (microphone/ auxiliary
channel).
3-band equalizer
This unit is equipped with a 3-band equalizer allowing the volume of
the high, medium and low frequency ranges to be adjusted separately.
Not only can the tone be adjusted to your tastes, the sound for a certain range can be turned completely off by turning the control all the
way counterclockwise (isolator function).
FADER START
When connected to a Pioneer DJ player with a control cord (included
with the DJ player), playback on the DJ player can be started by operating this unit’s fader (Fader Start Play).
MASTER EFFECT (GATE, CRUSH, JET,
FILTER)
This unit is equipped with four effect buttons allowing the sound to
be changed in various ways. The mood of the sound can be modified
easily, simply by pressing a button and turning the control.
System setup example
A DJ system like the one shown on the diagram below can be achieved by combining this unit with a DJ player and peripheral equipment.
What’s in the box
! Power cable
! Warranty card
! Operating instructions (this document)
En
5
Page 6
Connections
AC IN
MASTER OUTCH-2
1
L
R
2
PHONO
CONTROL
SIGNAL
GND
L
R
CD
CH-1 AUX
MIC
PHONO
CONTROL
L
R
L
R
CD
1 2 7 8 93 4 5 3 4 56
a
Be sure to turn off the power and unplug the power cord from the power outlet whenever making or changing connections.
Refer to the operating instructions for the component to be connected.
Connect the power cord after all the connections between devices have been completed.
Be sure to use the included power cord.
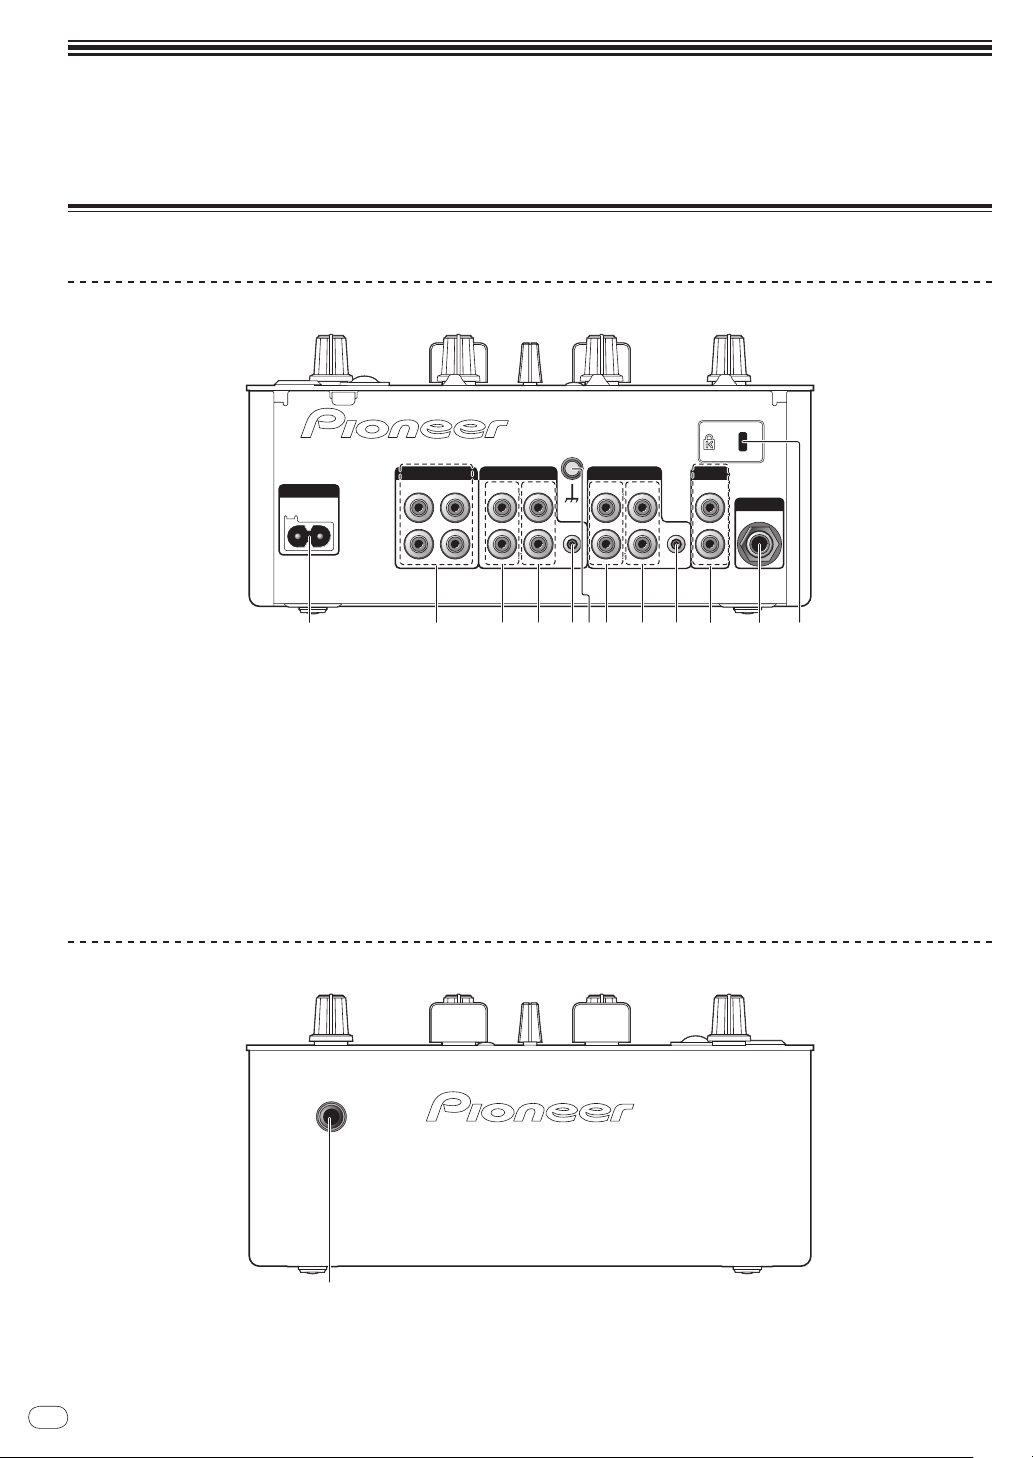
Names of terminals
Rear panel
1 AC IN
Connect to an AC outlet. Plug in the power cord after all connections
have been made.
Be sure to use the included power cord.
2 MASTER OUT 1, 2 (page 7)
Connect to a power amplifier, etc.
3 PHONO (page 7)
Connect to an analog player or other phono level (MM cartridge)
output device. Do not connect to a DJ player or other line level device.
4 CD (page 7)
Connect to a DJ player or other line level device.
Front panel
5 CONTROL (page 7)
Connect using a control cord (included with Pioneer DJ players).
6 SIGNAL GND (page 7)
Connect an analog player’s ground wire here. This helps reduce
noise when the analog player is connected.
7 AUX (page 7)
Connect to the output terminal of an external device (sampler, portable audio device, etc.)
8 MIC (page 7)
Connect to a microphone.
9 Kensington security slot
a PHONES (page 7)
Connect headphones here.
En
6
Page 7
Connecting the input/ output terminals
AC IN
AUDIO
OUT
RL
CONTROL
USB
MASTER OUTCH-2
1
L
R
2
PHONO
CONTROL
SIGNAL
GND
L
R
CD
CH-1 AUX
MIC
PHONO
CONTROL
L
R
L
R
CD
Microphone
Component, amplifier,
powered speaker, etc.
To audio input terminals
Audio input section
Audio output section
Audio cable
Audio cable
Audio cable
To audio
output terminals
To audio
output terminals
Control cord
1
Ground wire
To ground
wire terminals
Audio cable
2
Microphone
cable
To microphone
Portable
audio
device
Analog player
DJ player
Example:
CDJ-350
Power cord (included)
To power outlet
R
L
R
L
R
L
R
L
R
L
Headphones
Headphones cord
Rear panel
English
1 To use the fader start function, connect a control cord (page 10).
The fader start function can only be used when connected to a Pioneer DJ player.
2 A portable audio device can be connected using an RCA pin - mini-plug (Ø 3.5 mm) converter cable (page 11).
Front panel
En
7
Page 8

Operations
2 CHANNEL DJ MIXER
MIC /AUX
MIC
0
LEVEL
HI
AUX
LOW
MIC/AUX
ON
12
12
12
12
HEADPHONES
CUE
CH-1
CUE
MIXING
CUE MASTER
CH-2
LEVEL
PHONES
0
9
9
9
9
CD
PHONO
CH- 1
FADER
START
FADER
START
CH- 1CH- 2
9
9
9
9
CH-2
THRU
CD
PHONO
TRIM TRIM
HI
MID
LOW
HI
MID
LOW
LEVEL
MASTER
LEVEL/DEPTH
FILTERCRUSH
GATE JET
MASTER EFFECT
0
PREVIEW
TRACK MARK SEARCH
PLAY
USB
STOP
REC
MASTER LEVEL
MIC/AUX section Mixer section
Headphones section
Master effect section
USB recording
section
Flow of audio signals
EQ
LEVEL
MIC/AUX
ON/OFF
MASTER
EFFECT
MASTER
LEVEL
MASTER
OUT 1
MASTER
OUT 2
RECPLAY
CROSS FADER
MIC
AUX
CD1 PHONO1 CD2 PHONO2
USB I/F
PREVIEW
EQ/
ISOLATOR
TRIM
CH
FADER
EQ/
ISOLATOR
TRIM
CH
FADER
3
1
2
r
b
c
g
4
8
9
a
6
5
h
f
e
i
j
7
d d
o
p
k
l
q
m n
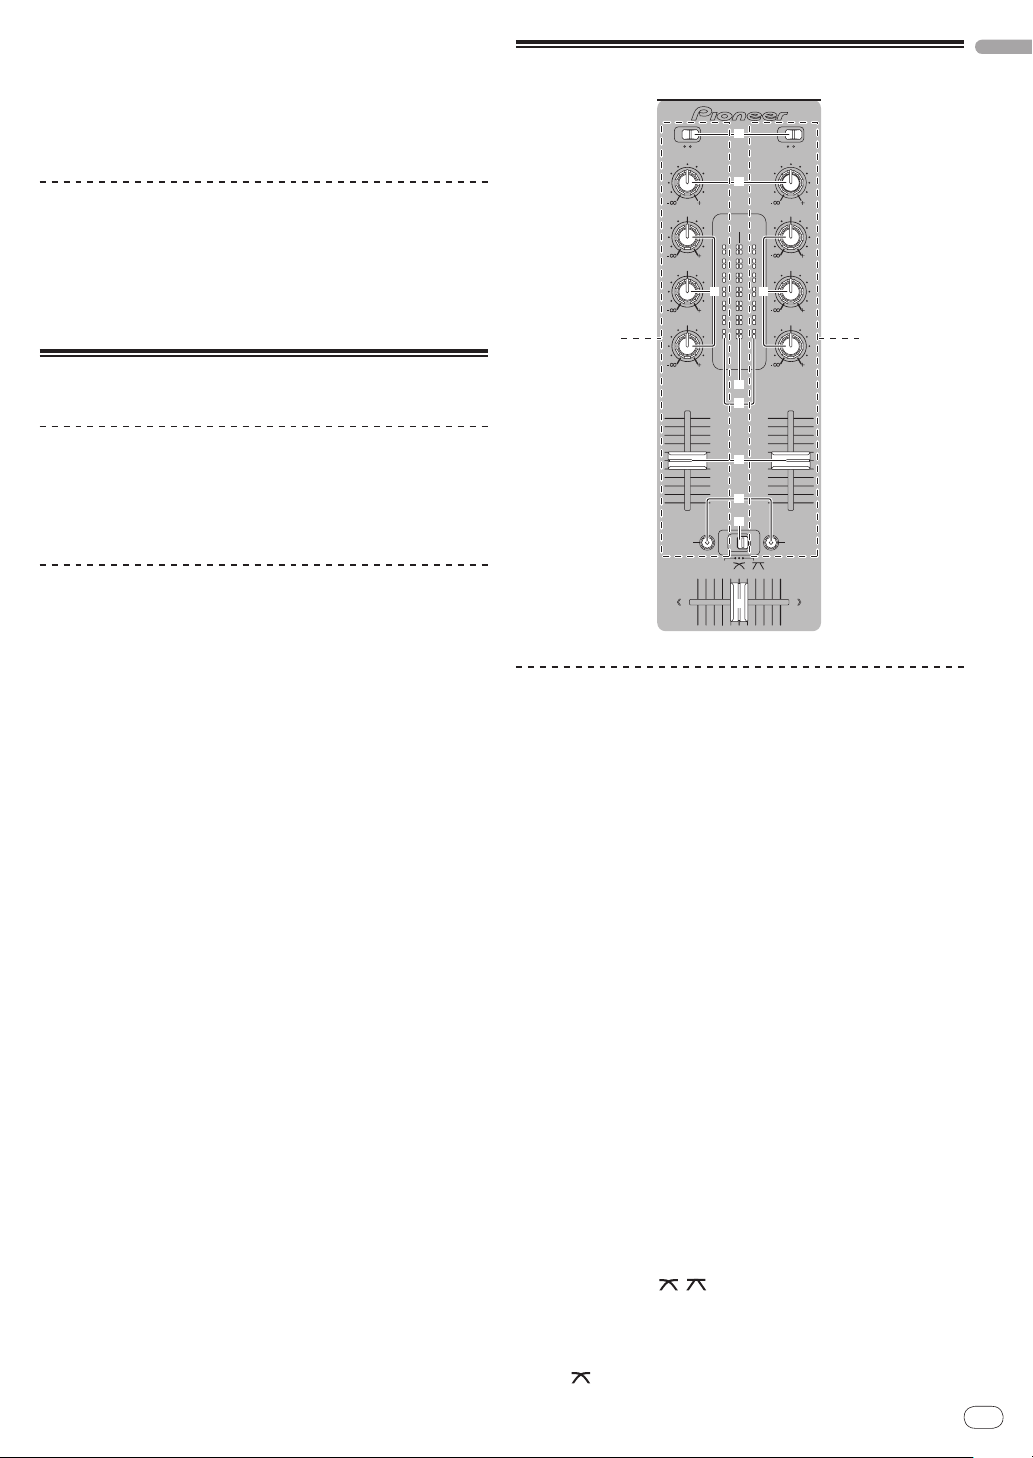
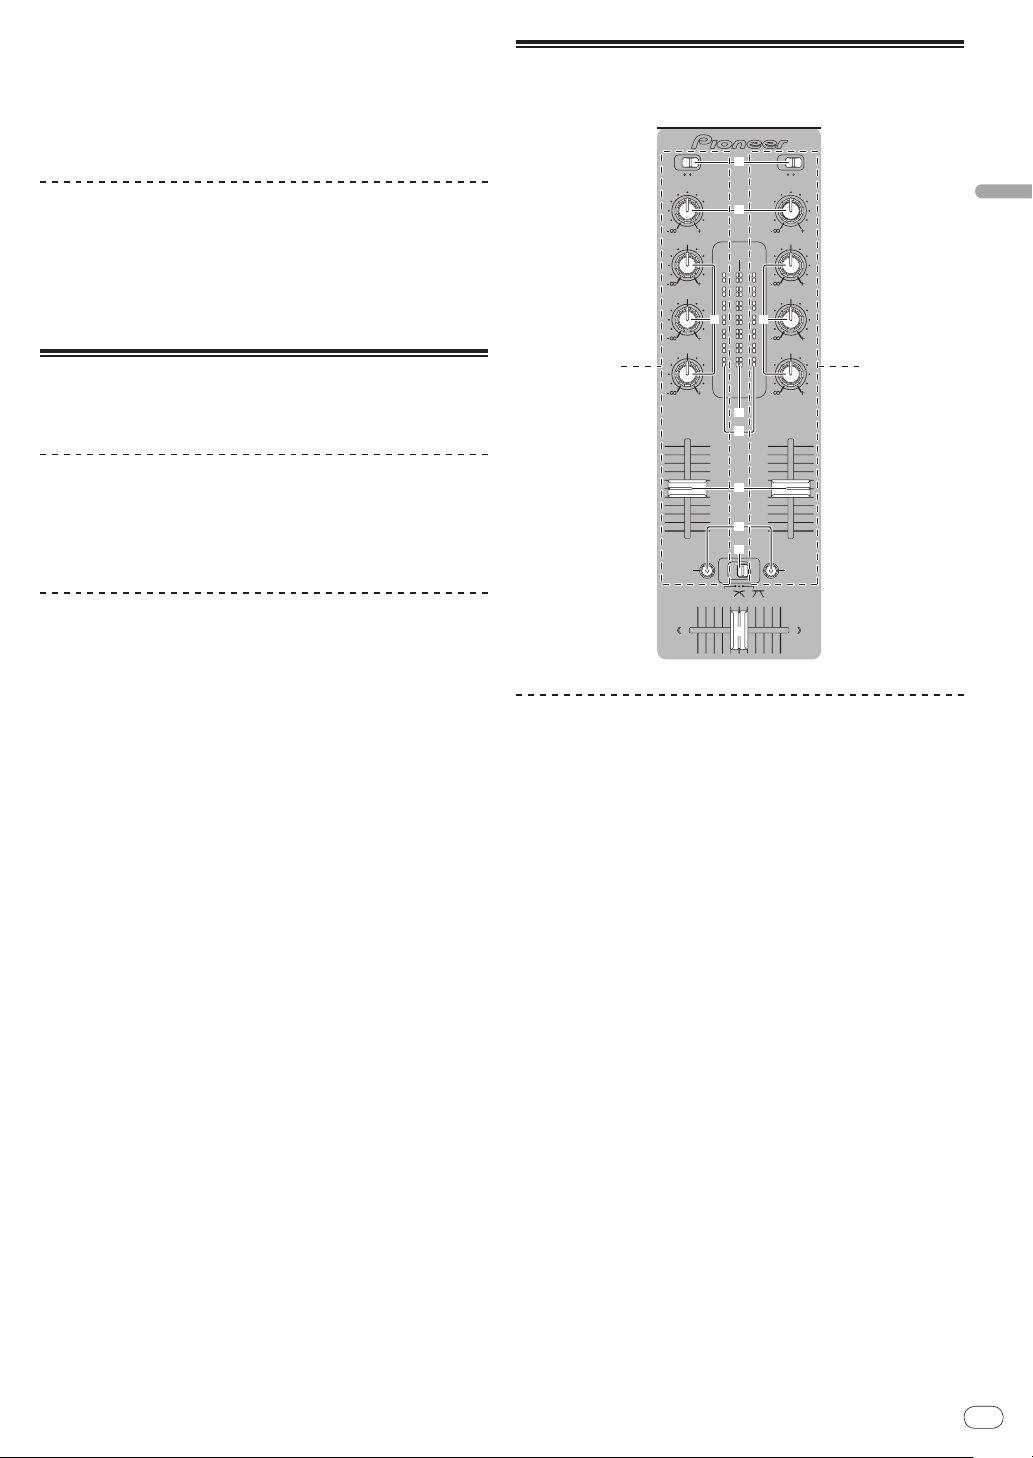
Control panel
1 u (Power switch) (page 9)
2 MASTER LEVEL (page 9)
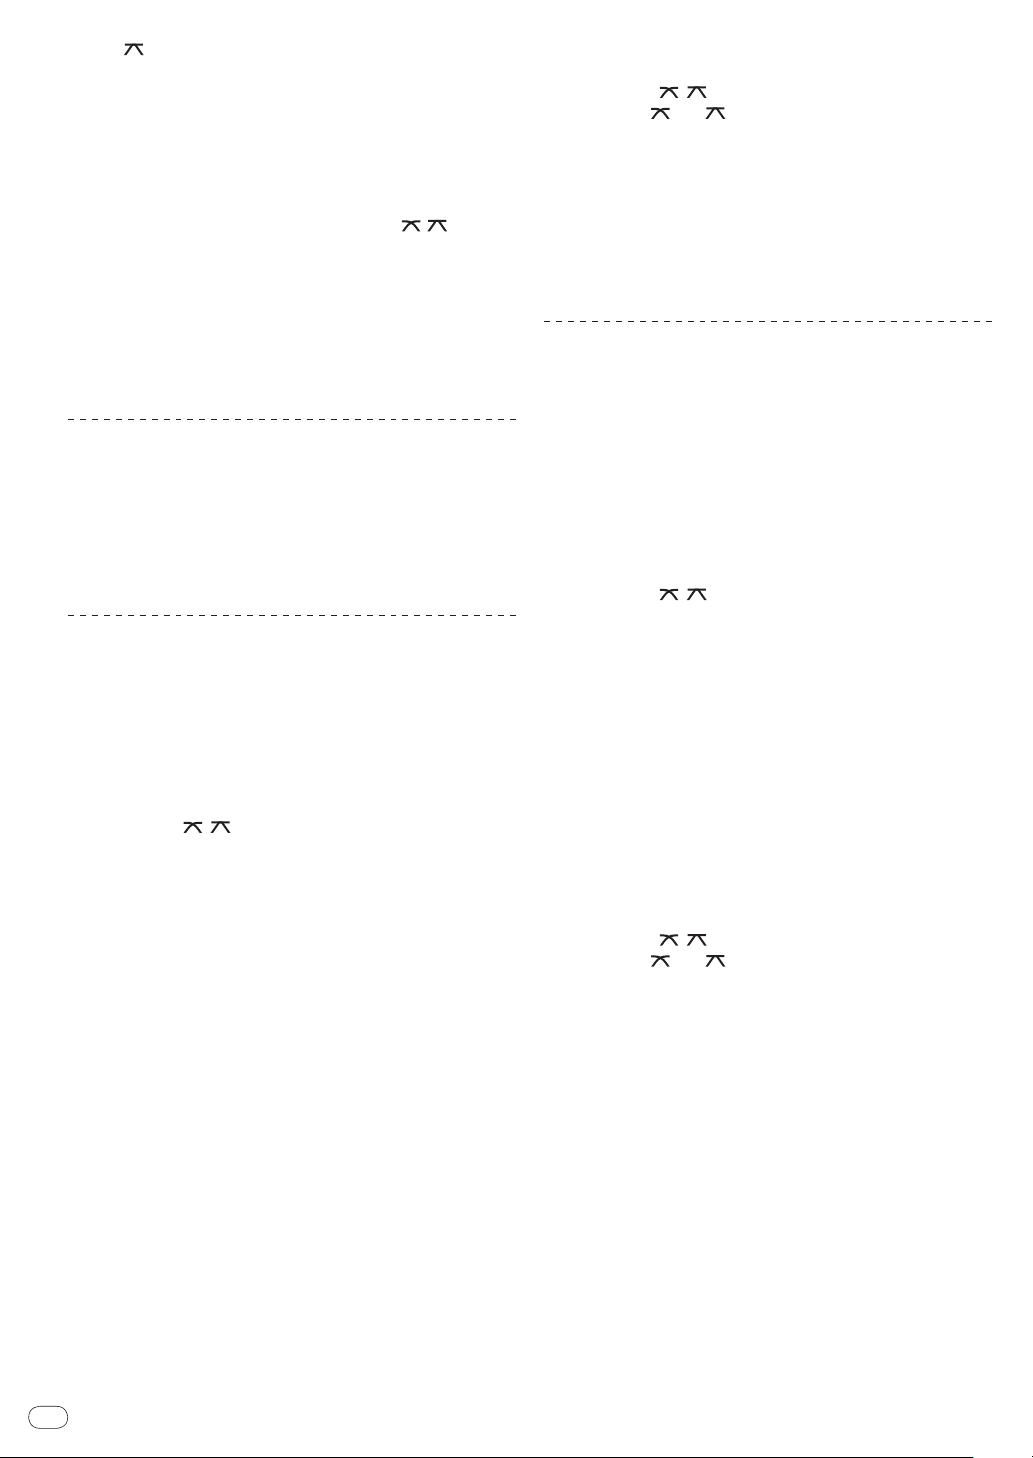
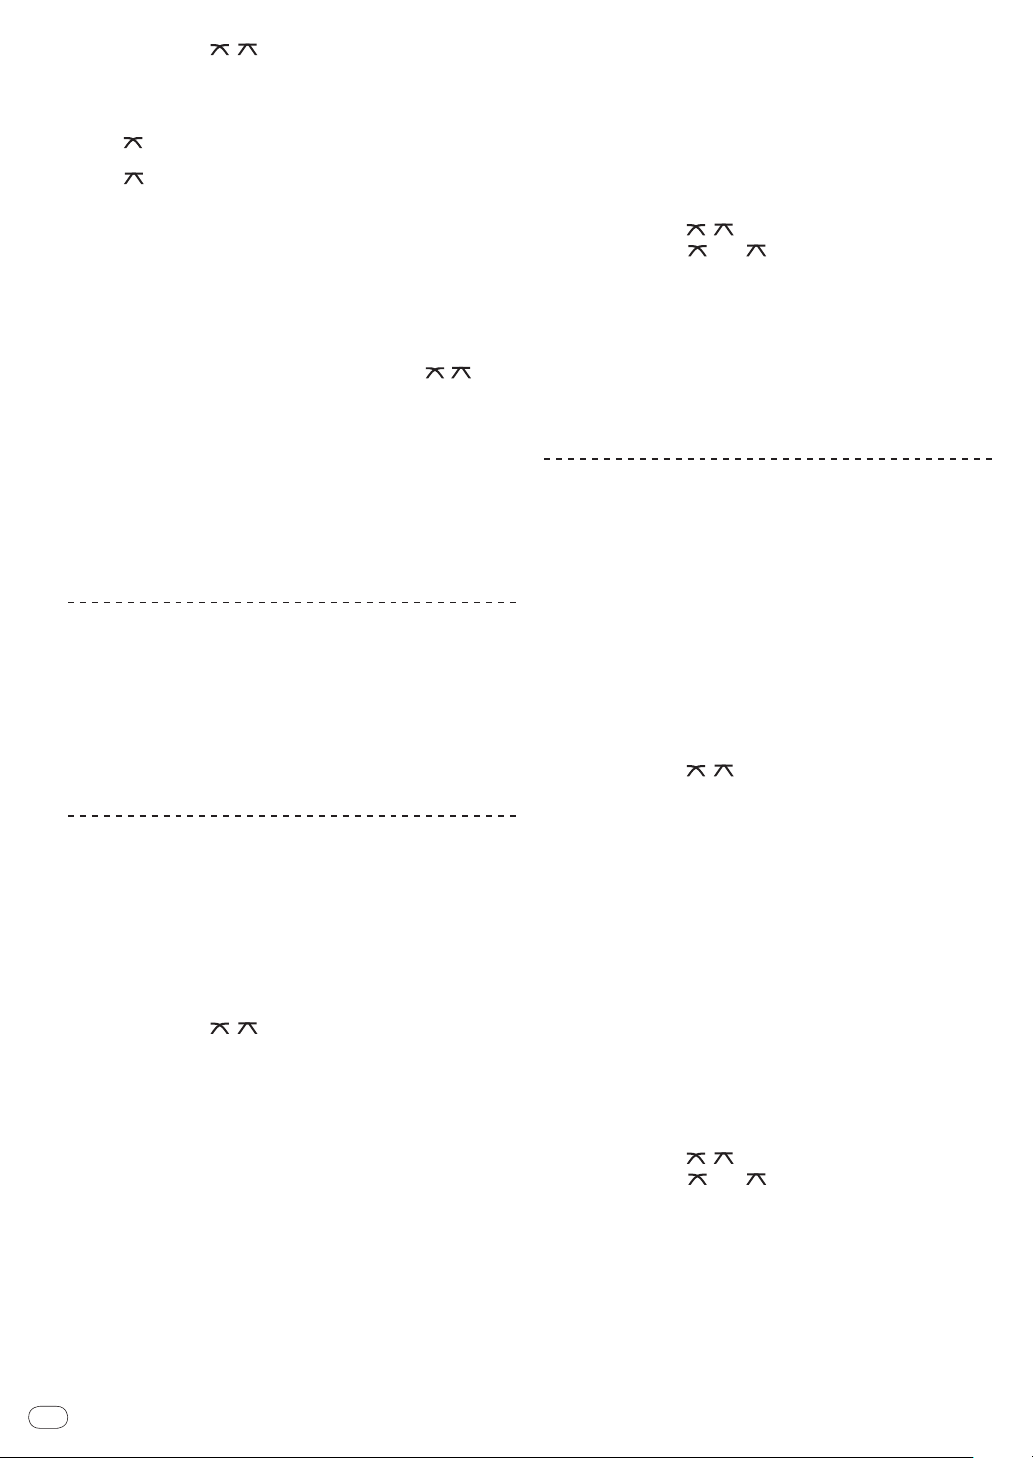
MIC/ AUX section
The sound of a microphone or external device (sampler, portable audio
device, etc.) can be handled (page 11).
3 MIC, AUX
4 LEVEL
5 HI, LOW
6 MIC/AUX ON
Headphones section
The sound being input to this unit can be checked over headphones
(page 11).
7 CH-1 CUE, CH-2 CUE
8 MIXING
9 LEVEL
a PHONES
En
8
Mixer section
Two sets of audio signals can be adjusted separately for basic DJ
mixing (page 9).
b CD, PHONO (input selector switch)
c TRIM
d HI, MID, LOW
e Master level indicator
f Channel level indicator
g Channel fader
h FADER START
i THRU,
j Crossfader
, (crossfader curve selector switch)
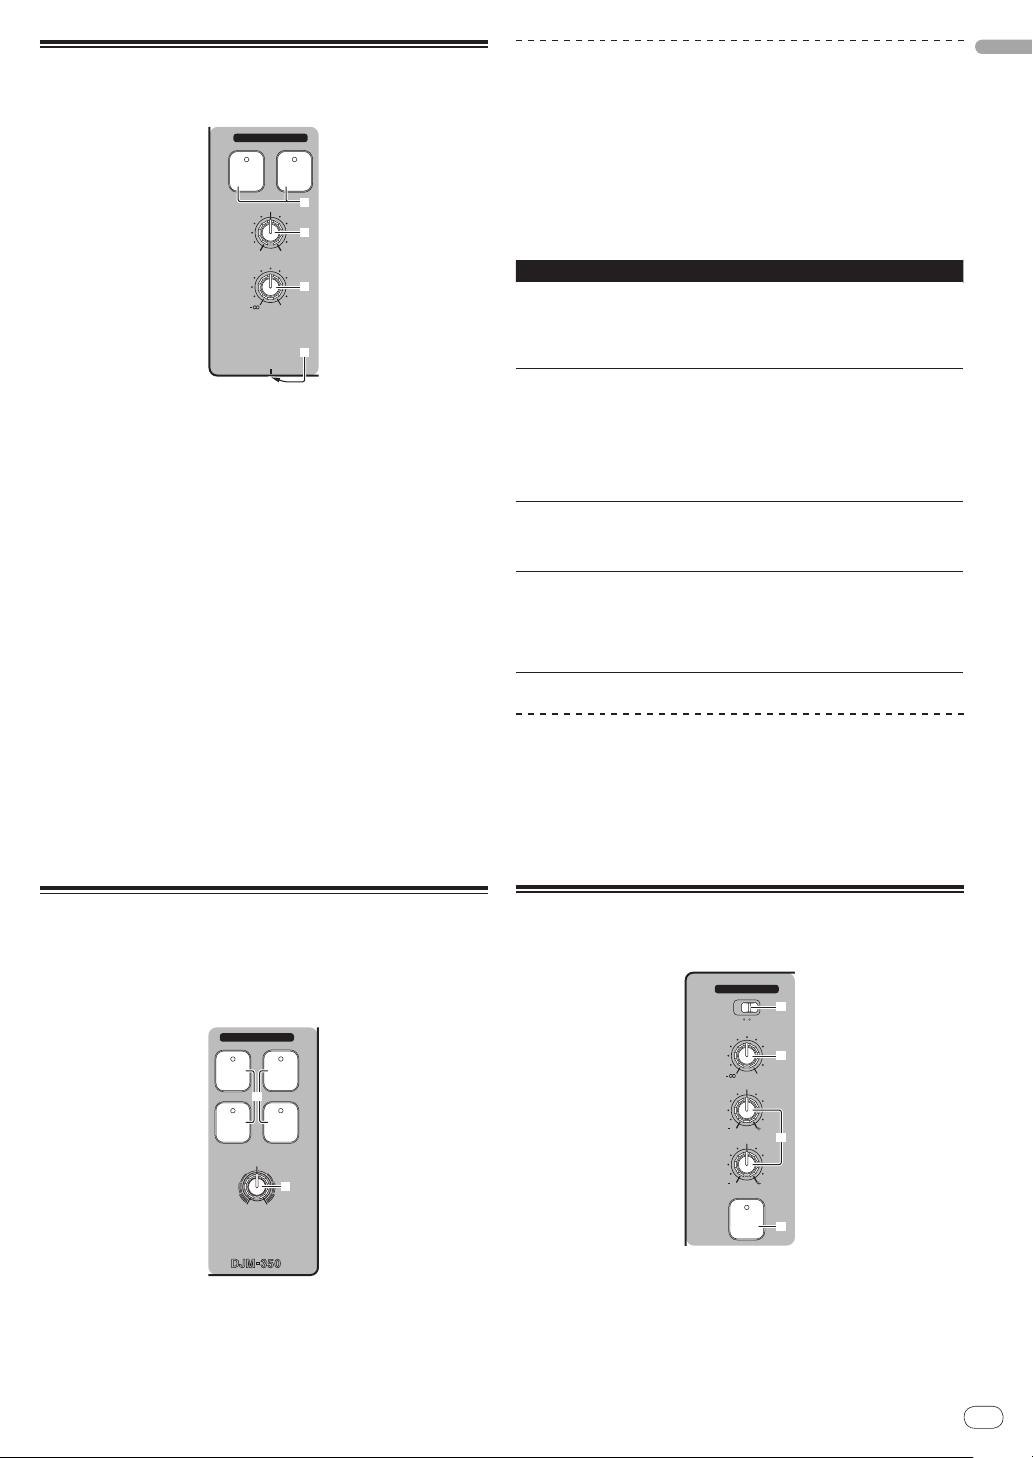
USB recording section
DJ performances can be recorded onto and played from USB devices
(page 12).
k USB device insertion slot
l USB STOP
Page 9
m REC k/ g
9
9
9
9
CD
PHONO
CH- 1
FADER
START
FADER
START
CH- 1 CH- 2
9
9
9
9
CH-2
THRU
CD
PHONO
TRIM TRIM
HI
MID
LOW
HI
MID
LOW
LEVEL
MASTER
b
c
1 2
g
h
f
e
i
j
d d
n PLAY f
o TRACK MARK (PREVIEW)
p SEARCH o, p
Master effect section
Effects can be applied to the sound output from [MASTER OUT 1, 2]
(page 11).
q MASTER EFFECT (GATE, CRUSH, JET, FILTER)
r LEVEL/
DEPTH
About the power switch of this unit
To turn the power on
Press [u] 1.
Turn on the power of this unit.
The [u] indicator lights green.
To set to the standby mode
Basic operations (mixer section)
English
When this unit’s power is on, press [u] 1 for at least 2
seconds.
This unit is set to the standby mode.
The [u] indicator lights red.
! When [u] is pressed again, the power turns on.
! This unit is equipped with an auto standby function. For details,
see About the auto standby function on page 12.
Outputting sound
Check that this unit is properly connected to the DJ player, etc., before
outputting sound. For instructions on connections, see Connecting the
input/ output terminals on page 7.
Set the volume of the power amplifiers connected to the [MASTER
OUT 1, 2] terminals to an appropriate level. Note that very loud sounds
will be output if the volume is set too high.
To output the sound of channel 1 [CH-1] 1
To output the sound of channel 2 ([CH-2]) 2, perform the procedure
below replacing [CH-1] with [CH-2].
1 Switch the [CD, PHONO] (input selector) switch b for
the [CH-1] 1.
Select the input source for [CH-1] from among the devices connected
to this unit.
— [CD]: Selects the DJ player connected to the [CD] terminals.
— [PHONO]: Selects the analog player connected to the
[PHONO] terminals.
2 Turn the [TRIM] c control for the [CH-1] 1 clockwise.
Adjusts the audio level input to the [CH-1] terminal.
The [CH-1] channel level indicator f lights when audio signals are
being properly input to [CH-1].
Adjust [TRIM] so that the orange indicator lights at the point in the
track where the volume is loudest (the climax, etc.).
Be careful that the red indicator does not light, or the sound could be
distorted.
3 Move the [CH-1] 1 channel fader g to the back side.
The level of the sound output from the [CH-1] terminals is adjusted.
4 Switch [THRU, , ] (the crossfader curve selector
switch) i.
This switches the crossfader curve characteristics.
— [THRU]: Choose this when you do not want to use the
crossfader.
— [ ]: Set here for a curve that rises gradually.
En
9
Page 10
— [ ]: Set here for a curve that rises steeply. (When the cross-
fader moves away from either the left or right edge, the sound
is immediately output from the opposite side.)
5 Move the crossfader j.
Switch the channel whose sound is output from the speakers.
— Left edge: The [CH-1] sound is output.
— Center position: The sound of [CH-1] and [CH-2] is mixed and
output.
— Right edge: The [CH-2] sound is output.
! This operation is not necessary when the [THRU,
fader curve selector) switch is set to [THRU].
, ] (cross-
6 Turn [MASTER LEVEL] 2 clockwise.
Sound is output from the speakers.
The master level indicator e on the control panel lights.
Adjust [MASTER LEVEL] so that the orange indicator lights at the point
in the track where the volume is loudest (the climax, etc.).
Be careful that the red indicator does not light, or the sound could be
distorted.
Adjusting the sound quality
Turn the [CH-1] 1 or [CH-2] 2 [HI], [MID] or [LOW] d
control.
Refer to Specifications on page 16 for the range of sound that can be
adjusted by each control.
! The sound for that range can be turned completely off by turning
the control all the way counterclockwise (isolator function).
Mixing using the faders
Prepare the unit in advance so that the sound of [CH-1] 1 is being output from the speakers. For instructions on preparation, see Outputting
sound on page 9.
For instructions on monitoring the sound, see Monitoring the sound
over headphones (headphones section) on page 11.
Mixing using the channel faders
1 Set [THRU,
switch) i to [THRU].
2 Switch the [CD, PHONO] (input selector) switch b for
the [CH-2] 2.
3 Turn the [TRIM] c control for the [CH-2] 2 clockwise.
4 Press [CH-2 CUE] 7.
The sound of [CH-2] is monitored from the headphones.
5 Turn [MIXING] 8.
This adjusts the balance of the monitor volume between the sound
output from the [MASTER OUT 1, 2] terminals (the sound of [CH-1])
and the sound of [CH-2].
6 Operate the DJ player connected to the [CH-2]
terminals.
While checking the sound over the headphones, adjust the tempo of
[CH-2] track to match the tempo of [CH-1] track.
7 While moving the [CH-2] 2 channel fader to the back,
move the [CH-1] 1 channel fader to the front.
While checking the sound output from the speakers, operate the channel faders to substitute the sound of [CH-1] with the sound of [CH-2].
Mixing is completed once only the [CH-2] sound is being output from
the speakers.
, ] (the crossfader curve selection
Mixing using the crossfader
1 Set [THRU,
, ] (the crossfader curve selector
switch) i to [ ] or [ ].
2 Operate [CH-2] 2.
Operate as described in steps 2 to 6 under Mixing using the channel
faders on page 10.
3 Move the crossfader j gradually to the right.
While checking the sound output from the speakers, operate the
crossfader to substitute the sound of [CH-1] with the sound of [CH-2].
Mixing is completed once only the [CH-2] sound is being output from
the speakers.
Using the fader to play a Pioneer DJ
player (fader start)
If you connect a Pioneer DJ player using a control cable (supplied with
a DJ player), you can start playback of control other operations of the
DJ player with the fader of this unit.
The fader start function can only be used when connected to a Pioneer
DJ player.
Connect this unit and Pioneer DJ player beforehand. For instructions
on connections, see Connecting the input/ output terminals on page 7.
To start playback using the channel faders
1 Set [THRU,
switch) i to [THRU].
2 Press [FADER START] h.
Turn the fader start function on.
3 Move the channel fader g all the way to the front.
4 Set the cue on the DJ player.
The DJ player pauses playback at the cue point.
5 Move the channel fader g to the back.
Playback starts on the DJ player.
! If you set the channel fader back to the original position, the player
instantaneously returns to the cue point already set and pauses
playback (back cue).
To start playback using the crossfader
1 Set [THRU,
switch) i to [ ] or [ ].
2 Press [FADER START] h.
Turn the fader start function on.
3 Move the crossfader j.
Move the crossfader to the opposite edge from the channel for which
you want to use the fader start function.
4 Set the cue on the DJ player.
The DJ player pauses playback at the cue point.
5 Move the crossfader j.
Playback starts on the DJ player.
! If you set the crossfader back to the original position, the player
instantaneously returns to the cue point already set and pauses
playback (back cue).
, ] (the crossfader curve selection
, ] (the crossfader curve selector
10
En
Page 11
Monitoring the sound over
HEADPHONES
CUE
CH-1
CUE
MIXING
CUE MASTER
CH-2
LEVEL
PHONES
0
8
9
a
7
2 CHANNEL DJ MIXER
LEVEL/DEPTH
FILTERCRUSH
GATE JET
MASTER EFFECT
q
r
MIC /AUX
MIC
0
LEVEL
HI
AUX
LOW
MIC/AUX
ON
12
12
12
12
3
4
6
5
headphones (headphones section)
1 Connect headphones to the [PHONES] jack.
For instructions on connections, see Connecting the input/ output
terminals on page 7.
2 Press [CH-1 CUE] or [CH-2 CUE] 7.
Select the channel you want to monitor.
— [CH-1 CUE]: The sound of [CH-1] is monitored.
— [CH-2 CUE]: The sound of [CH-2] is monitored.
! This operation is not necessary to monitor the master channel
sound (the sound output from the [MASTER OUT 1, 2] terminals).
3 Turn [MIXING] 8.
— When turned counterclockwise: The volume of [CH-1] and
[CH-2] becomes relatively louder.
— At the center position: The sound of [CH-1] and [CH-2] has
the same volume as the sound from the [MASTER OUT 1, 2]
terminals.
— When turned clockwise: The volume of the sound output from
the [MASTER OUT 1, 2] terminals becomes relatively louder.
4 Turn [LEVEL] 9 in the headphones section clockwise.
Sound is output from the headphones.
! Monitoring is canceled when [CH-1 CUE] or [CH-2 CUE] is pressed
again.
! Monitoring of the sound output from the [MASTER OUT 1, 2] termi-
nals cannot be canceled.
Applying an effect
Press one of the [MASTER EFFECT (GATE, CRUSH, JET,
FILTER)] q buttons.
The effect is applied to the sound.
The button that was pressed flashes.
The effect differs for the different buttons. For details on the different
effects, see the table below.
! When a button that is flashing is pressed again, the effect is turned
off.
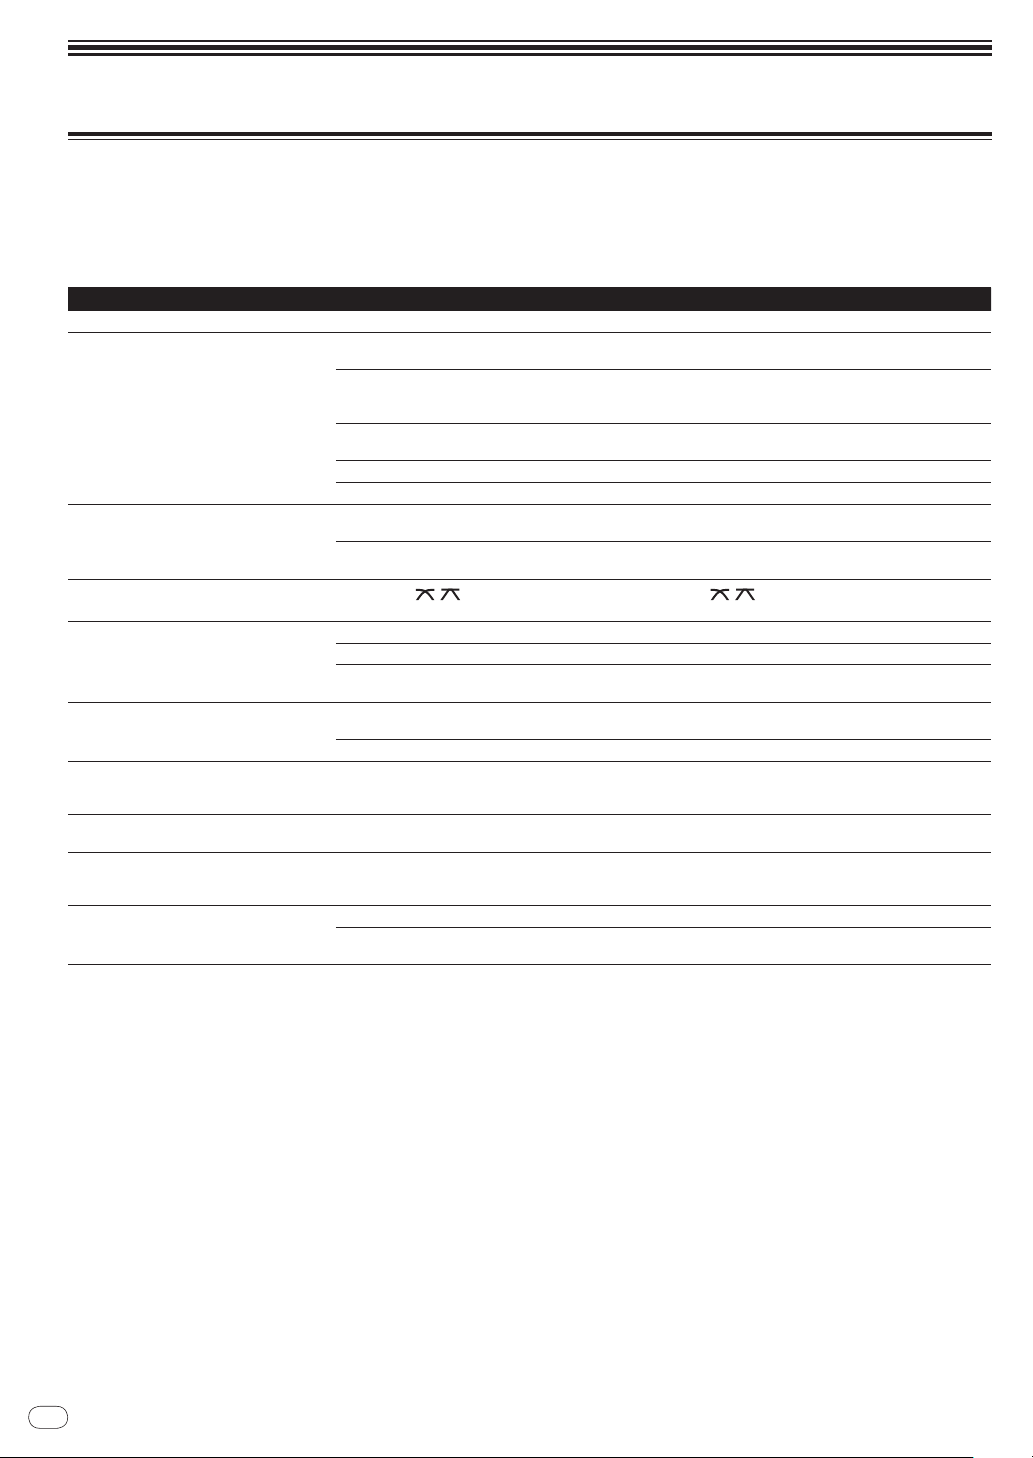
Effect Name Descriptions LEVEL/ DEPTH
Left: The high range (high
hat, etc.) is given variation.
Right: The low range (bass
drum, etc.) is given variation.
Left: The sound is crushed
and an effect as if the high
range was gradually cut is
achieved.
Right: The sound is crushed
and an effect as if the low
range was gradually cut is
achieved.
Left: An effect like a jet
descending is achieved.
Right: An effect like a jet
ascending is achieved.
Left: An effect as if the high
range was gradually cut is
achieved.
Right: An effect as if the low
range was gradually cut is
achieved.
GATE
CRUSH
JET
FILTER
The distinctive range is
cut from the sound of the
track’s rhythm section to
give variation to the rhythm.
The sound is moderately
crushed, adding accent.
An effect like a jet ascending and descending is
achieved.
The sound of the high or
low range is filtered out,
greatly changing the tone.
Varying the effect
Turn [LEVEL/ DEPTH] r.
The effect changes according to the direction in which the [LEVEL/
DEPTH] is turned and its position.
! The original sound is output when [LEVEL/ DEPTH] is set to the
center position.
English
Using the effect function (master
effect section)
This unit is equipped with four effect buttons. When an effect button
is pressed, the corresponding effect is applied to the audio signals
output from the [MASTER OUT 1, 2] terminals.
Using a microphone or external
device (MIC/ AUX section)
1 Switch [MIC, AUX] 3.
— [MIC]: The microphone connected to the [MIC] terminal is
selected.
— [AUX]: The external device connected to the [AUX] terminals
is selected.
2 Press [MIC/AUX ON] 6.
En
11
Page 12
3 Turn [LEVEL] 4 in the MIC/ AUX section clockwise.
PREVIEW
TRACK MARK SEARCH
PLAY
USB
STOP
REC
o
p
k
l
m n
The sound of the microphone or external device is output from the
speakers.
Adjusting the sound quality
! Previewing is not possible while the track is being recorded or
played.
Fast-forwarding/ reversing recorded
tracks
Turn [HI] or [LOW] 5 in the MIC/ AUX section.
Refer to Specifications on page 16 for the range of sound that can be
adjusted by each control.
Recording the performance (USB
recording section)
The same sound as the sound being output from the [MASTER OUT 1,
2] terminals can be recorded as a WAV file on a USB device.
! The name of the files created when the sound is recorded is in the
1 Insert the USB device into the USB device insertion
slot k.
The [USB STOP] indicator l flashes.
After a while, the [USB STOP] indicator stops flashing, remaining lit,
and the recording standby mode is set.
2 Press [REC k/ g] m.
Recording starts.
The [REC k/
! When [REC k/ g] is pressed again, the [REC k/ g] indicator turns
! Continuous recording is possible for 180 minutes. If recording con-
! Recording is possible for about 90 minutes on a 1 GB USB device.
Playing recorded tracks
Press [PLAY f] n.
Playback starts.
The [PLAY f] indicator n lights.
! When [PLAY f] is pressed again, playback is paused.
! Only WAV files stored in the [PIONEER DJM / DJM350 REC] folder
Previewing recorded tracks
1 Turn [MIXING] 8 counterclockwise from the center
position.
2 Press and hold in [TRACK MARK (PREVIEW)] o.
The sound of the recorded track can be heard over the headphones
while the button is pressed.
! The sound being previewed is added to the sound of [CH-1] and
! The sound being previewed is not output from the speakers.
12
format [REC***.WAV] (*** is a 3-digit number).
g] indicator m flashes.
off and recording stops.
tinues for over 180 minutes, the recording data on the USB device
is automatically split.
on the USB device can be played.
[CH-2] and output from the headphones.
En
During playback, press and hold in [SEARCH o, p] p.
The track is fast-forwarded when [p] is pressed and held in.
The track is fast reversed when [o] is pressed and held in.
The [PLAY f] indicator flashes during fast-forwarding/ reversing.
! Fast-forwarding/ reversing is not possible when in the pause mode.
Cuing to the beginning of recorded tracks
Press [SEARCH o, p] p.
Press the [p] to move to the beginning of the next track.
Press [o] once to move to the beginning of the currently playing
track, twice to move to the beginning of the previous track.
Splitting tracks while recording
During recording, press [TRACK MARK (PREVIEW)] o.
The currently recording track is split and stored on the USB device.
! When split tracks are played on this unit, the sound may be inter-
rupted at the boundary between the two tracks.
Deleting recorded tracks
1 While playing the track, press [PLAY f] n.
The track you want to delete is paused.
2 Press [PLAY f] n for at least 2 seconds.
The [REC k/ g] indicator flashes.
3 While pressing [PLAY f] n, press [REC k/ g] m.
The [REC k/ g] indicator lights and the track is deleted.
! Track deleting is canceled if [PLAY f] is released while the [REC
k/ g] indicator is flashing.
Disconnecting USB devices
Always perform the following procedure to disconnect USB devices.
Pulling the USB device out without performing this procedure could
make the USB device unreadable.
When turning the set’s power off, be sure to remove the USB device
first.
1 Press [USB STOP] l for at least 1 second.
The [USB STOP] indicator flashes, then turns off.
2 Disconnect the USB device.
About the auto standby function
When the auto standby function is turned on, the power is automatically set to the standby mode after the set time has passed with all of
the conditions below met.
— That none of this unit’s buttons or controls are operated.
— That this unit’s channel level indicator is not lit.
— That the USB device’s recording and playback functions are not in
use.
Setting the auto standby function
First set this unit to the standby mode.
Page 13

1 Press [u] 1 while pressing [o] and [p] p.
This unit switches to the mode for changing the auto standby function’s setting.
The topmost point on the master level indicator flashes. The other
points on the indicator light according to the currently set time.
2 Press [o] or [p] p.
Set the time until the standby mode is set.
The set time switches each time the button is pressed.
The points on the master level indicator light according to the set time
(not including the topmost point).
— Off — 20 minutes — 40 minutes — 60 minutes
— 20 minutes: The bottom two points light.
— 40 minutes: The bottom four points light.
— 60 minutes: The bottom six points light.
! The time is set to 20 minutes upon shipment from the factory.
3 Press [u] 1 for at least 2 seconds.
The new auto standby function setting is saved.
The [u] indicator flashes green while the setting is being saved, then
stops flashing, remaining lit, once the setting has been saved.
! Do not disconnect the power cord while the setting is being saved.
English
En
13
Page 14
Additional information
Troubleshooting
! Incorrect operation is often mistaken for trouble or malfunction. If you think that there is something wrong with this component, check the points
below. Sometimes the trouble may lie in another component. Inspect the other components and electrical appliances being used. If the trouble cannot be rectified after checking the items below, ask your nearest Pioneer authorized service center or your dealer to carry out repair work.
! This unit may not operate properly due to static electricity or other external factors. In this case, normal operation may be restored by unplug-
ging the power cord, waiting about 5 seconds or more, then plugging the power cord back in.
Problem Check Remedy
The power is not turned on. Is the power cord properly connected? Plug in the power cord to an AC outlet. (page 7)
No sound or small sound. Is the [CD, PHONO] (input selector) switch set to
Distorted sound. Is [MASTER LEVEL] set at the proper position? Adjust [MASTER LEVEL] so that the orange indicator on the
Can’t crossfade.
Can’t fader start a DJ player. Is [FADER START] set to off? Set [FADER START] to on. (page 10)
No effect. Has one of the [MASTER EFFECT (GATE, CRUSH,
No sound is produced or the sound is faint
when playing a track recorded on a USB
device.
Sound is distorted when playing a track
recorded on a USB device.
The sound of a recorded track cannot be previewed over the headphones even when [TRACK
MARK (PREVIEW)] is pressed and held.
USB device is not recognized. Is the USB device properly connected? Insert the USB device securely all the way in. (page 12)
the proper position?
Are the [TRIM], [channel fader], [crossfader] and
[MASTER LEVEL] controls set to the proper positions?
Are the connected components, amplifiers, etc.,
properly set?
Are the connection cables properly connected? Connect the connection cables properly. (page 7)
Are the terminals and plugs dirty? Clean the terminals and plugs before making connections.
Is [TRIM] set at the proper position? Adjust [TRIM] so that the orange indicator on the channel level
Is the [THRU,
switch set to [THRU]?
Is the control cord properly connected? Connect this unit and DJ player with a control cord. (page 7)
Are the audio cables properly connected? Connect this unit to the audio output terminal of a DJ player with
JET, FILTER)] buttons been pressed?
Is [LEVEL/
Is [MASTER LEVEL] set at the proper position? Before recording, adjust [MASTER LEVEL] so that the orange
Is [TRIM] set at the proper position? Before recording, adjust [TRIM] so that the orange indicator on
Is [MIXING] turned all the way clockwise?
Is the USB device one that can be used on this
unit?
, ] (crossfader curve selector)
DEPTH] set to the center position? Turn [LEVEL/ DEPTH] clockwise or counterclockwise. (page 11)
Switch the [CD, PHONO] (input selector) switch to select the
input source for that channel. (page 9)
Set the [TRIM], [channel fader], [crossfader] and [MASTER
LEVEL] controls to the proper positions. (page 9)
Set the external input selection, volume, etc., on the components/
amplifiers properly.
master level indicator lights at the peak level. (page 9)
indicator lights at the peak level. (page 9)
Set the [THRU, , ] (crossfader curve selector) switch to a
position other than [THRU]. (page 9)
an audio cable. (page 7)
Press one of the [MASTER EFFECT (GATE, CRUSH, JET, FILTER)]
buttons. (page 11)
indicator on the master level indicator lights at the peak level.
(page 9)
the channel level indicator lights at the peak level. (page 9)
Turn [MIXING] counterclockwise from the center position. (page 12)
This unit supports such USB mass storage class USB devices as
external hard disks and portable flash memory devices.
14
En
Page 15
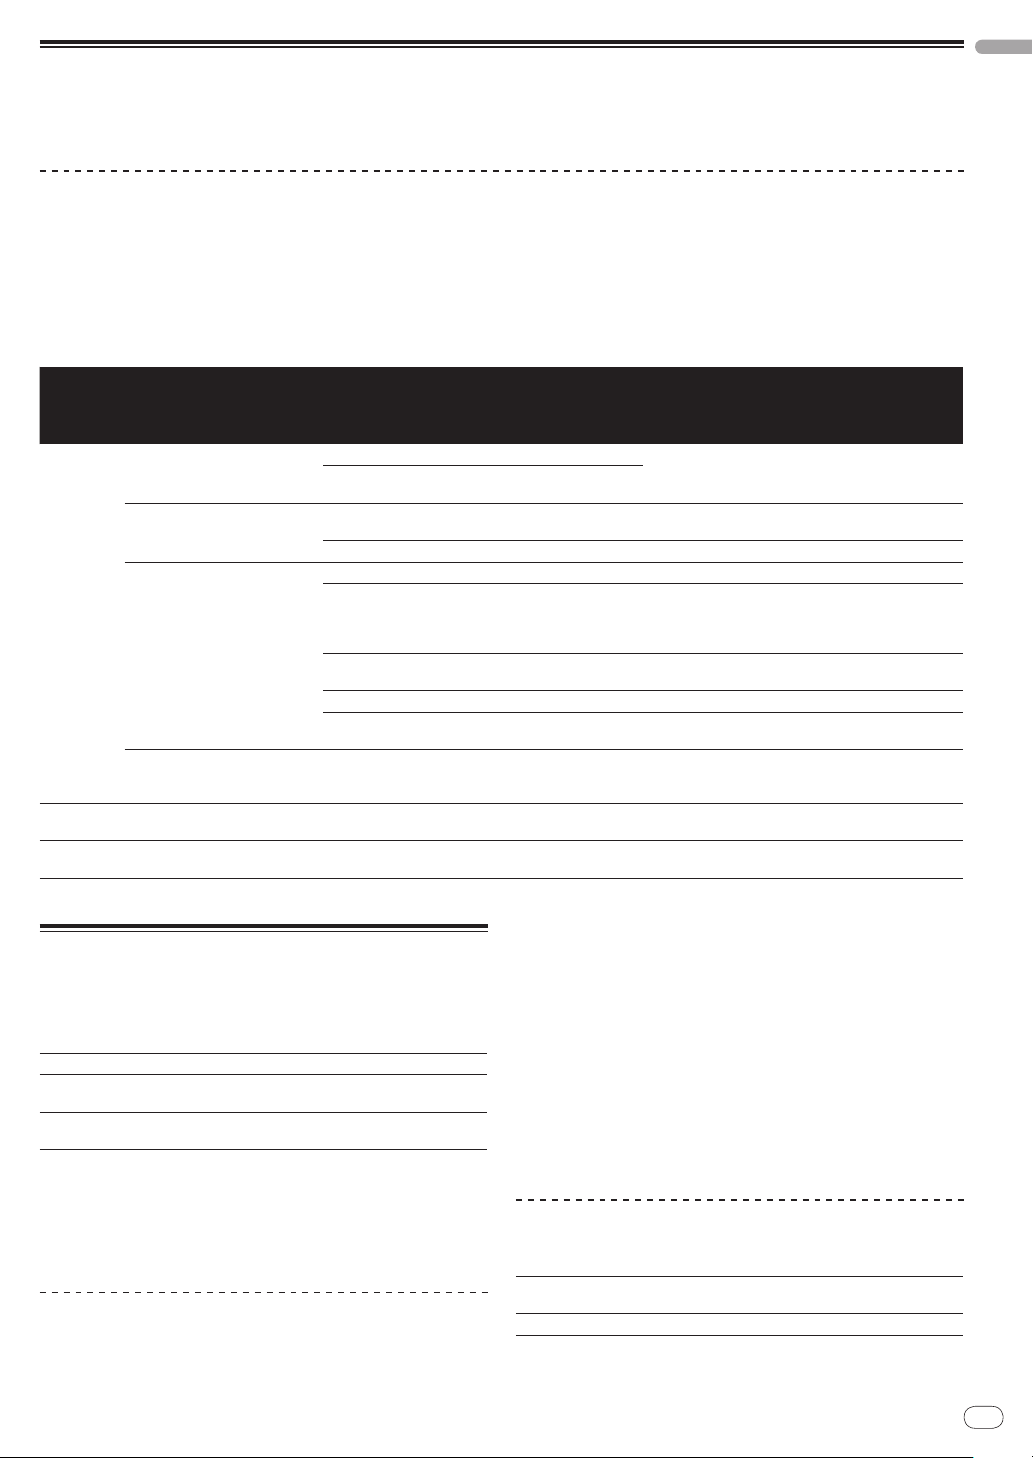
About errors
If this unit cannot operate normally, the [u] (the power switch), [USB STOP] and [PLAY f] indicators flash to indicate an error.
Check the table below and take the measures indicated.
If the same error is indicated after the measures have been taken, contact your store of purchase or nearby Pioneer service station.
About the [USB STOP] indicator’s error indication
If the [USB STOP] indicator flashes repeatedly 2 to 5 times
1 Disconnect the USB device.
2 Press [USB STOP].
Check the table below and take the measures indicated.
English
Indicator
name
of times
indicator
Description of
error
Cause Measure
flashes
Number
USB device is not formatted.
You are using a USB device with a file system that is not
supported by this unit.
A device other than a USB mass storage class device is
connected.
A USB hub is connected. Do not connect USB hubs.
Not enough free space on the USB device. Use a USB device with sufficient free space.
There is a file name “REC999.WAV” in the recorded data
storage folder (PIONEER DJM / DJM350 REC).
USB device’s write protect switch is set to the on position.
You are using a USB device with a security function. Use a USB device without a security function.
The recorded data storage folder (PIONEER DJM /
DJM350 REC) is set to “Read Only”.
You are using a USB device (such as a bus power-driven
hard disk) whose current is higher than this unit’s rated
current (500 mA).
There are no playable files in the recorded data storage
folder (PIONEER DJM / DJM350 REC).
USB STOP
PLAY f
u (power
switch)
2 times
repeatedly
3 times
repeatedly
4 times
repeatedly
5 times
repeatedly
3 times Playback error
Continuous Circuit problem There is a problem in the internal circuitry. Unplug this unit’s power cord from the power outlet.
File format problem
USB class problem
Problem writing
on the USB device
USB device overcurrent detected
About USB devices/ files usable on
this unit
This unit supports external hard disks, portable flash memory devices
and other USB mass storage class devices.
Folder layers Max. 2 layers (PIONEER DJM / DJM350 REC)
Max. number of
files
Supported file
systems
! Optical disk type devices such as external DVD/
ported.
! When there are many folders or files, some time may be required for load-
ing.
! If multiple partitions are set for the USB device, the device may not be
recognized.
Cautions on using USB devices
! Some USB devices may not operate properly. Please note that
Pioneer will accept no responsibility whatsoever for loss of data
recorded on USB devices.
Maximum 999 tracks
FAT, FAT32 and HFS+
CD drives, etc., are not sup-
Use a USB device formatted with a file system supported by this unit (FAT or HFS+).
Connect a USB mass storage class USB device.
Files created through recording are given a 3-digit number. Once the number 999 is reached, no new files can
be created in the folder. If this happens, move the files in
the folder to a different folder.
Set the USB device’s write-protect switch to the off
position.
Change the setting so that the recorded data storage
folder is writable.
Use a USB device within this unit’s rated current (such
as a hard disk driven by an AC adapter or other external
power supply).
Perform the recording operation on this unit to create
playable files before playing them.
! USB hubs cannot be used.
! USB devices equipped with flash card readers may not operate.
! It may happen that, when a current stronger than the maxi-
mum allowable current is detected in this unit’s USB port, the
[USB STOP] indicator flashes 5 times, the power supply to the
USB device is cut off, and communications with the USB device
are interrupted. To restore normal operation, disconnect the USB
device from this unit, then press [USB STOP]. Avoid reusing USB
devices for which an excess current has been detected. If normal
operation is not restored (if communications cannot be established) after the above procedure is performed, try turning off this
unit’s power then turning it back on.
! Depending on the USB device you are using, the desired perfor-
mance may not be achieved.
About WAV files
The DJM-350 supports WAV files in the formats shown below.
Compatible
formats
File extension .WAV or .wav
Files in 16-bit non-compressed PCM format with a sampling frequency of 44.1 kHz are supported.
En
15
Page 16

About the exemption clauses
! Pioneer is a registered trademark of Pioneer Corporation.
! The names of companies and products mentioned herein are the
trademarks of their respective owners.
! When playing music files you have acquired on this unit, we kindly
ask you to respect copyrights.
Specifications
General
Power requirements .................................. AC 220 V to 240 V, 50 Hz/ 60 Hz
Power consumption ..............................................................................17 W
Power consumption (standby) ............................................................ 0.4 W
Main unit weight .................................................................................. 3.2 kg
Max. dimensions ..................... 218 mm (W) × 107 mm (H) × 301 mm (D)
Tolerable operating temperature ...................................... +5 °C to +35 °C
Tolerable operating humidity ....................5 % to 85 % (no condensation)
Audio Section
Sampling rate ...................................................................................... 48 kHz
A/ D, D/ A converter .............................................................................. 24 bits
Frequency characteristic
CD/ AUX/ MIC ................................................................. 20 Hz to 20 kHz
S/ N ratio (rated output)
CD ....................................................................................................97 dB
PHONO ...........................................................................................86 dB
MIC ..................................................................................................80 dB
Total harmonic distortion (CD — MASTER1) .................................0.007 %
Standard input level / Input impedance
CD .................................................................................... –12 dBu/ 36 kW
PHONO ........................................................................... –52 dBu/ 47 kW
MIC .................................................................................. –52 dBu/ 10 kW
AUX ................................................................................. –12 dBu/ 27 kW
Standard output level / Load impedance / Output impedance
MASTER OUT........................................................+2 dBu/ 10 kW/ 2.5 W
PHONES ..................................................................+2 dBu/ 32 W/ 150 W
Rated output level / Load impedance
MASTER OUT................................................................+18 dBu/ 10 kW
Crosstalk (CD) .......................................................................................78 dB
Channel equalizer characteristic
HI ........................................................................–
MID ......................................................................–
LOW ......................................................................–
MIC/ AUX equalizer characteristics
HI ................................................................. –12 dB to +12 dB (10 kHz)
LOW ............................................................ –12 dB to +12 dB (100 Hz)
Input/ output terminals
CD input terminal
RCA pin jack ..................................................................................2 sets
PHONO input terminal
RCA pin jack ..................................................................................2 sets
MIC input terminal
Phone jack (Ø 6.3 mm) .................................................................. 1 set
AUX input terminal
RCA pin jack ..................................................................................1 sets
MASTER output terminal
RCA pin jack ..................................................................................2 sets
PHONES output terminal
Stereo phone jack (Ø 6.3 mm) ...................................................... 1 set
USB terminal
Type A .............................................................................................. 1 set
CONTROL terminal
Mini phone jack (Ø 3.5 mm) .........................................................2 sets
∞ to + 9 dB (13 kHz)
∞ to + 9 dB (1 kHz)
∞ to +9 dB (70 Hz)
! The specifications and design of this product are subject to change
without notice.
! Published by Pioneer Corporation. Copyright © 2010 Pioneer
Corporation. All rights reserved.
En
16
Page 17

Page 18
Nous vous remercions d’avoir acquis un produit Pioneer. Veuillez lire attentivement ce mode d’emploi afin de connaître la manière d’utiliser
Ce point d’exclamation, placé dans un
triangle équilatéral, a pour but d’attirer
l’attention de l’utilisateur sur la présence,
dans les documents qui accompagnent
l’appareil, d’explications importantes du
point de vue de l’exploitation ou de
l’entretien.
Ce symbole de l’éclair, placé dans un
triangle équilatéral, a pour but d’attirer
l’attention de l’utilisateur sur la présence, à
l’intérieur du coffret de l’appareil, de
“tensions dangereuses” non isolées d’une
grandeur suffisante pour représenter un
risque d’électrocution pour les êtres
humains.
ATTENTION :
POUR ÉVITER TOUT RISQUE
D’ÉLECTROCUTION, NE PAS ENLEVER LE
COUVERCLE (NI LE PANNEAU ARRIÈRE).
AUCUNE PIÈCE RÉPARABLE PAR
L’UTILISATEUR NE SE TROUVE À
L’ INTÉRIEUR. CONFIER TOUT ENTRETIEN À
UN PERSONNEL QUALIFIÉ UNIQUEMENT.
ATTENTION
DANGER D´ELECTROCUTION
NE PAS OUVRIR
IMPORTANT
D3-4-2-1-1_A1_Fr
Si vous souhaitez vous débarrasser de cet appareil, ne le mettez pas à la poubelle avec vos ordures ménagères. Il existe un système de
collecte séparé pour les appareils électroniques usagés, qui doivent être récupérés, traités et recyclés conformément à la législation.
Les habitants des états membres de l’UE, de Suisse et de Norvège peuvent retourner gratuitement leurs appareils électroniques usagés aux
centres de collecte agréés ou à un détaillant (si vous rachetez un appareil similaire neuf).
Dans les pays qui ne sont pas mentionnés ci-dessus, veuillez contacter les autorités locales pour savoir comment vous pouvez vous débarrasser
de vos appareils.
Vous garantirez ainsi que les appareils dont vous vous débarrassez sont correctement récupérés, traités et recyclés et préviendrez de cette façon
les impacts néfastes possibles sur l’environnement et la santé humaine.
K058b_A1_Fr
l’appareil comme il convient. Cela fait, conservez le mode d’emploi de façon à pouvoir vous y référer en cas de nécessité.
Dans certains pays ou certaines régions, la forme de la fiche d’alimentation et de la prise d’alimentation peut différer de celle qui figure sur les
schémas, mais les branchements et le fonctionnement de l’appareil restent les mêmes.
Fr
2
Page 19

AVERTISSEMENT
Cet appareil n’est pas étanche. Pour éviter les risques
d’incendie et de décharge électrique, ne placez près de
lui un récipient rempli d’eau, tel qu’un vase ou un pot
de fleurs, et ne l’exposez pas à des gouttes d’eau, des
éclaboussures, de la pluie ou de l’humidité.
D3-4-2-1-3_A1_Fr
AVERTISSEMENT
Avant de brancher l’appareil pour la première, lisez
attentivement la section suivante.
La tension de l’alimentation électrique disponible
varie selon le pays ou la région. Assurez-vous que
la tension du secteur de la région où l’appareil sera
utilisé correspond à la tension requise (par ex. 230
V ou 120 V), indiquée sur le panneau arrière.
D3-4-2-1-4*_A1_Fr
AVERTISSEMENT
Pour éviter les risques d’incendie, ne placez aucune
flamme nue (telle qu’une bougie allumée) sur
l’appareil.
D3-4-2-1-7a_A1_Fr
PAVERTISSEMENT
Les fentes et ouvertures du coffret sont prévues pour la
ventilation, pour assurer un fonctionnement stable de
l’appareil et pour éviter sa surchauffe. Pour éviter les
risques d’incendie, ne bouchez jamais les ouvertures et
ne les recouvrez pas d’objets, tels que journaux, nappes
ou rideaux, et n’utilisez pas l’appareil posé sur un tapis
épais ou un lit.
D3-4-2-1-7b*_A1_Fr
Milieu de fonctionnement
Température et humidité du milieu de fonctionnement :
De +5 °C à +35 °C (de +41 °F à +95 °F) ; Humidité
relative inférieure à 85 % (orifices de ventilation non
obstrués)
N’installez pas l’appareil dans un endroit mal ventilé ou
un lieu soumis à une forte humidité ou en plein soleil
(ou à une forte lumière artificielle).
D3-4-2-1-7c*_A1_Fr
Si la fiche d’alimentation secteur de cet appareil ne
convient pas à la prise secteur à utiliser, la fiche doit
être remplacée par une appropriée. Ce
remplacement et la fixation d’une fiche secteur sur le
cordon d’alimentation de cet appareil doivent être
effectués par un personnel de service qualifié. En cas
de branchement sur une prise secteur, la fiche de
coupure peut provoquer une sérieuse décharge
électrique. Assurez-vous qu’elle est éliminée
correctement après sa dépose.
L’ appareil doit être déconnecté en débranchant sa
fiche secteur au niveau de la prise murale si vous
prévoyez une période prolongée de non utilisation
(par exemple avant un départ en vacances).
D3-4-2-2-1a_A1_Fr
ATTENTION
L’ interrupteur de cet appareil ne coupe pas
complètement celui-ci de sa prise secteur. Comme le
cordon d’alimentation fait office de dispositif de
déconnexion du secteur, il devra être débranché au
niveau de la prise secteur pour que l’appareil soit
complètement hors tension. Par conséquent, veillez à
installer l’appareil de telle manière que son cordon
d’alimentation puisse être facilement débranché de la
prise secteur en cas d’accident. Pour éviter tout
risque d’incendie, le cordon d’alimentation sera
débranché au niveau de la prise secteur si vous
prévoyez une période prolongée de non utilisation (par
exemple avant un départ en vacances).
D3-4-2-2-2a*_A1_Fr
NOTE IMPORTANTE SUR LE CABLE
D’ALIMENTATION
Tenir le câble d’alimentation par la fiche. Ne pas
débrancher la prise en tirant sur le câble et ne pas
toucher le câble avec les mains mouillées. Cela risque
de provoquer un court-circuit ou un choc électrique. Ne
pas poser l’appareil ou un meuble sur le câble. Ne pas
pincer le câble. Ne pas faire de noeud avec le câble ou
l’attacher à d’autres câbles. Les câbles d’alimentation
doivent être posés de façon à ne pas être écrasés. Un
câble abîmé peut provoquer un risque d’incendie ou un
choc électrique. Vérifier le câble d’alimentation de
temps en temps. Contacter le service après-vente
PIONEER le plus proche ou le revendeur pour un
remplacement.
S002*_A1_Fr
Fr
3
Page 20

Comment lire ce manuel
Les noms d’écrans, de menus et de touches sont entre crochets dans
ce manuel. (ex. canal [MASTER], menu [ON/ OFF], [File])
Informations préliminaires
Caractéristiques ..........................................................................................5
Exemple de configuration du système ...................................................... 5
Contenu du carton d’emballage ................................................................5
Raccordements
Noms des prises .......................................................................................... 6
Raccordement des prises d’entrée/
sortie ................................................7
Opérations
Panneau de commande ............................................................................. 8
À propos de l’interrupteur d’alimentation de cet appareil
Opérations élémentaires (Section Mixeur) ............................................... 9
Contrôle du son par le casque d’écoute (Section Casque d’écoute) ...11
Utilisation des effets (Section Effets principaux) ...................................11
Utilisation d’un microphone ou d’un dispositif externe (Section
AUX) ...................................................................................................12
MIC/
Enregistrement de la prestation (Section d’enregistrement USB) ......12
À propos de la mise en veille automatique .............................................13
................................9
Informations supplémentaires
En cas de panne ........................................................................................14
À propos des erreurs ................................................................................15
À propos des dispositifs USB/ fichiers utilisables sur cet appareil ......15
À propos des clauses d’exemption .........................................................16
Spécifications ............................................................................................ 16
Fr
4
Page 21
Informations préliminaires
MULTI PLAYER
TEMPO
0
PLAY/PAUSE
SEARCH
TRACK SEARCH
IN/CUE OUT
OUT ADJUSTHOT LOOP
RELOOP/EXIT
BEAT LOOP
LOOP DRIVE
VINYL MODE
TEMPO RANGE
MASTER TEMPO
LOOP
USB
STOP
SOURCE SELECT
MP3/AAC
WAV/AIFF
CUE
PLAYLIST
BPM
DISC
LOCK
REVFWD
BACK
SELECT PUSH
TIME MODE
AUTO CUE
DISPLAY
UTILITY
A.CUE
LOCK
16
REMAIN
MS
FTEMPO %
INFO
BROWSE
BPM
2 CHANNEL DJ MIXER
MIC /AUX
MIC
0
LEVEL
HI
AUX
LOW
MIC/AUX
ON
12
12
12
12
HEADPHONES
CUE
CH-1
CUE
MIXING
CUE MASTER
CH-2
LEVEL
PHONES
0
9
9
9
9
CD
PHONO
CH- 1
FADER
START
FADER
START
CH- 1 CH- 2
9
9
9
9
CH-2
THRU
CD
PHONO
TRIMTRIM
HI
MID
LOW
HI
MID
LOW
LEVEL
MASTER
LEVEL/DEPTH
FILTERCRUSH
GATE JET
MASTER EFFECT
0
PREVIEW
TRACK MARK SEARCH
PLAY
USB
STOP
REC
MASTER LEVEL
Dispositif audio portable/
microphone
Casque d’ écoute
CDJ-350CDJ-350 DJM-350
Composant, amplificateur,
enceinte amplifiée, etc.
Dispositif USB
Pour la sortie audio Pour l’ enregistrementPour l’ entrée audio
Pour contrôler
l’ entrée/la sortie audio
Caractéristiques
Cet appareil est une table de mixage DJ intégrant la technologie spécifique des DJM Pioneer, la référence mondiale pour les discothèques. Cet
appareil de type standard est pourvu des fonctions élémentaires indispensables pour le mixage et permet des prestations DJ de qualité.
Français
Enregistrement USB
che et tournant la commande.
Avec cet appareil, le son de vos prestations DJ peut facilement être
modifier aisément l’ambiance en appuyant simplement sur une tou-
enregistré sur des dispositifs USB (mémoires flash portables, etc.). Le
son enregistré peut également être lu sur cet appareil.
MIC/ AUX INPUT
Cet appareil est pourvu d’une entrée microphone/ auxiliaire par
laquelle un microphone ou un dispositif externe (échantillonneur,
Égaliseur à 3 bandes
Cet appareil est pourvu d’un égaliseur à 3 bandes grâce auquel les
plages des fréquences élevées, moyennes et basses peuvent être
dispositif audio portable, etc.) peut être raccordé. La lecture DJ est
possible grâce aux trois jeux d’entrées : CH-1 (canal 1), CH-2 (canal 2)
et MIC/ AUX (canal microphone/ auxiliaire).
ajustées individuellement. Non seulement le timbre peut être ajusté
selon vos préférences, mais le son d’une plage précise peut également
être complètement coupé par une rotation antihoraire complète de la
commande (fonction d’isolation).
FADER START
Lorsque cet appareil est raccordé à un lecteur DJ Pioneer à l’aide d’un
cordon de commande (fourni avec le lecteur DJ), la lecture peut être
lancée sur le lecteur DJ par le fader de cet appareil (Lancement de la
MASTER EFFECT (GATE, CRUSH, JET,
lecture par le fader).
FILTER)
Cet appareil présente quatre touches d’effets par lesquelles le son
peut être changé de diverses manières. Ainsi, il est possible de
Exemple de configuration du système
Un système DJ, similaire à celui qui figure sur le schéma ci-dessous, peut être obtenu à partir de cet appareil, d’un lecteur DJ et de périphériques.
Contenu du carton d’emballage
! Câble d’alimentation
! Carte de garantie
! Mode d’emploi (ce document)
Fr
5
Page 22

Raccordements
AC IN
MASTER OUTCH-2
1
L
R
2
PHONO
CONTROL
SIGNAL
GND
L
R
CD
CH-1 AUX
MIC
PHONO
CONTROL
L
R
L
R
CD
1 2 7 8 93 4 5 3 4 56
a
Veillez à toujours éteindre les appareils et à débrancher le cordon d’alimentation de la prise secteur avant de raccorder un appareil ou de changer
les liaisons.
Reportez-vous au mode d’emploi de l’appareil devant être raccordé.
Lorsque tous les appareils ont été raccordés, vous pouvez brancher le cordon d’alimentation.
Veillez à utiliser le cordon d’alimentation fourni.
Noms des prises
Panneau arrière
1 AC IN
À raccorder à une prise secteur. Branchez-y le cordon d’alimentation
lorsque tous les raccordements sont terminés.
Veillez à utiliser le cordon d’alimentation fourni.
2 MASTER OUT 1, 2 (la page 7)
À raccorder à un amplificateur de puissance, etc.
3 PHONO (la page 7)
À raccorder à un lecteur analogique ou à un appareil à sortie phono
(cartouche MM). Ne raccordez pas cette prise à un lecteur DJ ou à un
appareil à sortie de ligne.
4 CD (la page 7)
Ne raccordez pas cette prise à un lecteur DJ ou à un appareil à sortie
de ligne.
Face avant
5 CONTROL (la page 7)
Pour raccorder un cordon de commande (fourni avec les lecteurs DJ
Pioneer).
6 SIGNAL GND (la page 7)
Pour raccorder le fil de terre d’un lecteur analogique. Ceci permet de
réduire le bruit lorsqu’un lecteur analogique est raccordé.
7 AUX (la page 7)
Raccordez-le à la prise de sortie d’un dispositif externe (échantillonneur, dispositif audio portable, etc.)
8 MIC (la page 7)
Pour raccorder un microphone.
9 Fente de sécurité Kensington
a PHONES (la page 7)
Pour raccorder un casque d’écoute.
Fr
6
Page 23

Raccordement des prises d’entrée/ sortie
AC IN
AUDIO
OUT
RL
CONTROL
USB
MASTER OUTCH-2
1
L
R
2
PHONO
CONTROL
SIGNAL
GND
L
R
CD
CH-1 AUX
MIC
PHONO
CONTROL
L
R
L
R
CD
Microphone
Composant, amplificateur,
enceinte amplifiée, etc.
Aux prises d’ entrée audio
Section Entrée audio
Section Sortie audio
Câble audio
Câble audio
Câble audio
Aux prises
de sortie audio
Aux prises
de sortie audio
Cordon de commande
1
Fil de terre
Aux prises de
fil de terre
Câble audio
2
Câble de
microphone
Au microphone
Dispositif
audio
portable
Lecteur
analogique
Lecteur DJ
Exemple:
CDJ-350
Cordon d’ alimentation (fourni)
À la prise secteur
R
L
R
L
R
L
R
L
R
L
Casque d’ écoute
Cordon de casque
d’ écoute
Panneau arrière
Français
1 Pour lancer la lecture par le fader, raccordez un cordon de commande (la page 10).
Le lancement par le fader ne peut être utilisé que lorsqu’un lecteur DJ Pioneer est raccordé.
2 Un dispositif audio portable peut être raccordé à l’aide d’un câble de conversion à fiche RCA - minifiche (Ø 3,5 mm) (la page 12).
Face avant
Fr
7
Page 24

Opérations
2 CHANNEL DJ MIXER
MIC /AUX
MIC
0
LEVEL
HI
AUX
LOW
MIC/AUX
ON
12
12
12
12
HEADPHONES
CUE
CH-1
CUE
MIXING
CUE MASTER
CH-2
LEVEL
PHONES
0
9
9
9
9
CD
PHONO
CH- 1
FADER
START
FADER
START
CH- 1CH- 2
9
9
9
9
CH-2
THRU
CD
PHONO
TRIM TRIM
HI
MID
LOW
HI
MID
LOW
LEVEL
MASTER
LEVEL/DEPTH
FILTERCRUSH
GATE JET
MASTER EFFECT
0
PREVIEW
TRACK MARK SEARCH
PLAY
USB
STOP
REC
MASTER LEVEL
Section MIC/AUX Section Mixeur
Section Casque d’ écoute Section Principaux effets
Section Enregistrement
USB
Sens des signaux audio
EQ
LEVEL
MIC/AUX
ON/OFF
MASTER
EFFECT
MASTER
LEVEL
MASTER
OUT 1
MASTER
OUT 2
RECPLAY
CROSS FADER
MIC
AUX
CD1 PHONO1 CD2 PHONO2
USB I/F
PREVIEW
EQ/
ISOLATOR
TRIM
CH
FADER
EQ/
ISOLATOR
TRIM
CH
FADER
3
1
2
r
b
c
g
4
8
9
a
6
5
h
f
e
i
j
7
d d
o
p
k
l
q
m n
Panneau de commande
1 u (Interrupteur d’alimentation) (la page 9)
2 MASTER LEVEL (la page 9)
Section MIC/ AUX
Section permettant de traiter le son d’un microphone ou d’un appareil
externe (échantillonneur, dispositif audio portable, etc.) (la page 12).
3 MIC, AUX
4 LEVEL
5 HI, LOW
6 MIC/AUX ON
Section Casque d’écoute
Le son transmis à cet appareil peut être contrôlé par un casque
d’écoute (la page 11).
7 CH-1 CUE, CH-2 CUE
8 MIXING
9 LEVEL
a PHONES
Fr
8
Section Mixeur
Deux jeux de signaux audio peuvent être réglés séparément pour
réaliser un mixage DJ de base (la page 9).
b CD, PHONO (sélecteur d’entrée)
c TRIM
d HI, MID, LOW
e Indicateur de niveau principal
f Indicateur de niveau de canal
g Fader de canal
h FADER START
i THRU,
j Crossfader
Section Enregistrement USB
Les prestations DJ peuvent être enregistrées sur des dispositifs USB,
puis lues depuis ceux-ci (la page 12).
k Fente d’insertion de dispositif USB
l USB STOP
, (sélecteur de courbe de crossfader)
Page 25
m REC k/ g
9
9
9
9
CD
PHONO
CH- 1
FADER
START
FADER
START
CH- 1 CH- 2
9
9
9
9
CH-2
THRU
CD
PHONO
TRIM TRIM
HI
MID
LOW
HI
MID
LOW
LEVEL
MASTER
b
c
1 2
g
h
f
e
i
j
d d
n PLAY f
o TRACK MARK (PREVIEW)
p SEARCH o, p
Opérations élémentaires (Section
Mixeur)
Section Principaux effets
Des effets peuvent être appliqués au son transmis par [MASTER OUT
1, 2] (la page 11).
q MASTER EFFECT (GATE, CRUSH, JET, FILTER)
r LEVEL/
DEPTH
À propos de l’interrupteur
d’alimentation de cet appareil
Pour allumer l’appareil
Appuyez sur [u] 1.
Allumez cet appareil.
L’indicateur [u] s’allume en vert.
Pour mettre l’appareil en veille
Lorsque cet appareil est allumé, appuyez au moins 2
secondes sur [u] 1.
L’appareil se met en veille.
L’indicateur [u] s’allume en rouge.
! Lorsque vous appuyez une nouvelle fois sur [u], l’appareil
s’allume.
! Cet appareil présente une fonction de mise en veille automatique.
Pour le détail, reportez-vous à la page 13, À propos de la mise en
veille automatique.
Restitution du son
Assurez-vous que cet appareil est raccordé correctement au lecteur
DJ, etc. avant d’émettre le son. Pour les instructions sur le raccordement, reportez-vous à la page 7, Raccordement des prises d’entrée/
sortie.
Réglez le volume des amplificateurs de puissance raccordés aux
prises [MASTER OUT 1, 2] au niveau approprié. Le son sera très fort si
le niveau sonore est réglé trop haut.
Français
Pour émettre le son du canal 1 [CH-1] 1
Pour émettre le son du canal 2 ([CH-2]) 2, procédez de la façon sui-
vante en remplaçant [CH-1] par [CH-2].
1 Réglez le commutateur [CD, PHONO] (sélecteur
d’entrée) b de [CH-1] 1.
Sélectionnez la source d’entrée pour [CH-1] parmi les dispositifs raccordés à cet appareil.
— [CD] : Sélectionne le lecteur DJ raccordé aux prises [CD].
— [PHONO] : Sélectionne le lecteur analogique raccordé aux
prises [PHONO].
2 Tournez la commande [TRIM] c de [CH-1] 1 dans le
sens horaire.
Ajuste le niveau sonore à l’entrée de la prise [CH-1].
L’indicateur de niveau du canal [CH-1] f s’allume lorsque les signaux
audio sont transmis correctement à [CH-1].
Ajustez [TRIM] de sorte que l’indicateur orange s’allume au point où le
volume du morceau est le plus fort (le point culminant, etc.).
Attention à ce que l’indicateur rouge ne s’allume pas sinon de la distorsion peut apparaître.
3 Poussez le fader du canal [CH-1] 1 g vers l’arrière.
Le niveau de la sortie sonore des prises [CH-1] est ajusté.
Fr
9
Page 26
4 Réglez [THRU, , ] (le sélecteur de courbe du
crossfader) i.
Les caractéristiques de la courbe du crossfader changent.
— [THRU] : Choisissez cette option si vous ne voulez pas utiliser
le crossfader.
] : Sélectionnez cette option si vous voulez une courbe
— [
ascendante douce.
— [ ] : Sélectionnez cette option si vous voulez une courbe
ascendante forte. (Lorsque le crossfader est déplacé depuis le
côté gauche ou le côté droit, le son sort immédiatement par le
côté opposé.)
5 Bougez le crossfader j.
Basculez sur le canal dont le son est restitué par les enceintes.
— Côté gauche : Le son de [CH-1] est restitué.
— Position centrale : Le son de [CH-1] et [CH-2] est mixé et
restitué.
— Côté droit : Le son de [CH-2] est restitué.
! Cette opération est inutile si le commutateur [THRU, , ]
(sélecteur de courbe de crossfader) est réglé sur [THRU].
6 Tournez [MASTER LEVEL] 2 dans le sens horaire.
Le son est restitué par les enceintes.
L’indicateur de niveau principal e sur le panneau de commande
s’allume.
Ajustez [MASTER LEVEL] de sorte que l’indicateur orange s’allume
au point où le volume du morceau est le plus fort (le point culminant,
etc.).
Attention à ce que l’indicateur rouge ne s’allume pas sinon de la distorsion peut apparaître.
Réglage de la qualité du son
Tournez la commande [CH-1] 1 ou [CH-2] 2 [HI], [MID]
ou [LOW] d.
Reportez-vous à la page 16, Spécifications pour la plage de réglage du
son de chaque commande.
! Le son de cette plage peut être complètement coupé en tournant
la commande complètement dans le sens antihoraire (fonction
d’isolation).
Mixage avec les faders
Configurez l’appareil au préalable pour que le son de [CH-1] 1 soit
émis par les enceintes. Pour les instructions à ce sujet, reportez-vous
à la page 9, Restitution du son.
Pour les instructions sur le contrôle du son, reportez-vous à la page 11,
Contrôle du son par le casque d’écoute (Section Casque d’écoute).
Mixage avec les faders de canaux
1 Réglez [THRU,
crossfader) i sur [THRU].
2 Réglez le commutateur [CD, PHONO] (sélecteur
d’entrée) b de [CH-2] 2.
3 Tournez la commande [TRIM] c de [CH-2] 2 dans le
sens horaire.
4 Appuyez sur [CH-2 CUE] 7.
Le son de [CH-2] se contrôle par le casque d’écoute.
5 Tournez [MIXING] 8.
La balance du volume de contrôle entre le son provenant des prises
[MASTER OUT 1, 2] (le son de [CH-1]) et le son de [CH-2] est ajusté.
6 Mettez en marche le lecteur DJ raccordé aux prises
[CH-2].
Tout en contrôlant le son par le casque d’écoute, ajustez le tempo du
morceau [CH-2] pour qu’il corresponde au tempo du morceau [CH-1].
, ] (le sélecteur de courbe du
7 Tout en poussant le fader de canal [CH-2] 2 vers
l’arrière, amenez le fader de canal [CH-1] 1 vers l’avant.
Tout en contrôlant le son restitué par les enceintes, déplacez les
faders de canaux pour remplacer le son de [CH-1] par le son de [CH-2].
Le mixage est terminé lorsque le son de [CH-2] est restitué par les
enceintes.
Mixage avec le crossfader
1 Réglez [THRU,
crossfader) i sur [
, ] (le sélecteur de courbe du
] ou [ ].
2 Actionnez [CH-2] 2.
Suivez les instructions des étapes 2 à 6 dans la page 10, Mixage avec
les faders de canaux.
3 Poussez graduellement le crossfader j vers la droite.
Tout en contrôlant le son restitué par les enceintes, déplacez le crossfader pour remplacer le son de [CH-1] par le son de [CH-2].
Le mixage est terminé lorsque le son de [CH-2] est restitué par les
enceintes.
Utilisation du fader pour lancer un lecteur
DJ Pioneer (lancement au fader)
Si vous raccordez un lecteur DJ Pioneer avec un câble de commande
(fourni avec le lecteur DJ), vous pourrez lancer la lecture et contrôler
d’autres opérations du lecteur DJ avec le fader de cet appareil.
Le lancement par le fader ne peut être utilisé que lorsqu’un lecteur DJ
Pioneer est raccordé.
Raccordez cet appareil et le lecteur DJ Pioneer au préalable. Pour
les instructions sur le raccordement, reportez-vous à la page 7,
Raccordement des prises d’entrée/ sortie.
Pour lancer la lecture en utilisant les faders de
canaux
1 Réglez [THRU,
crossfader) i sur [THRU].
2 Appuyez sur [FADER START] h.
Activez le lancement par le fader.
3 Amenez le fader de canal g complètement vers
l’avant.
4 Spécifiez le repère sur le lecteur DJ
Le lecteur DJ se met en pause au point de repère.
5 Poussez le fader de canal g complètement vers
l’arrière.
La lecture démarre sur le lecteur DJ.
! Si vous ramenez le fader de canal à la position originale, le lecteur
revient instantanément au point de repère déjà spécifié et interrompt la lecture (repère arrière).
Pour lancer la lecture en utilisant le crossfader
1 Réglez [THRU,
crossfader) i sur [ ] ou [ ].
2 Appuyez sur [FADER START] h.
Activez le lancement par le fader.
3 Bougez le crossfader j.
Amenez le crossfader à l’extrémité opposée du canal pour lequel vous
voulez utiliser le lancement par le fader.
4 Spécifiez le repère sur le lecteur DJ
Le lecteur DJ se met en pause au point de repère.
, ] (le sélecteur de courbe du
, ] (le sélecteur de courbe du
10
Fr
Page 27
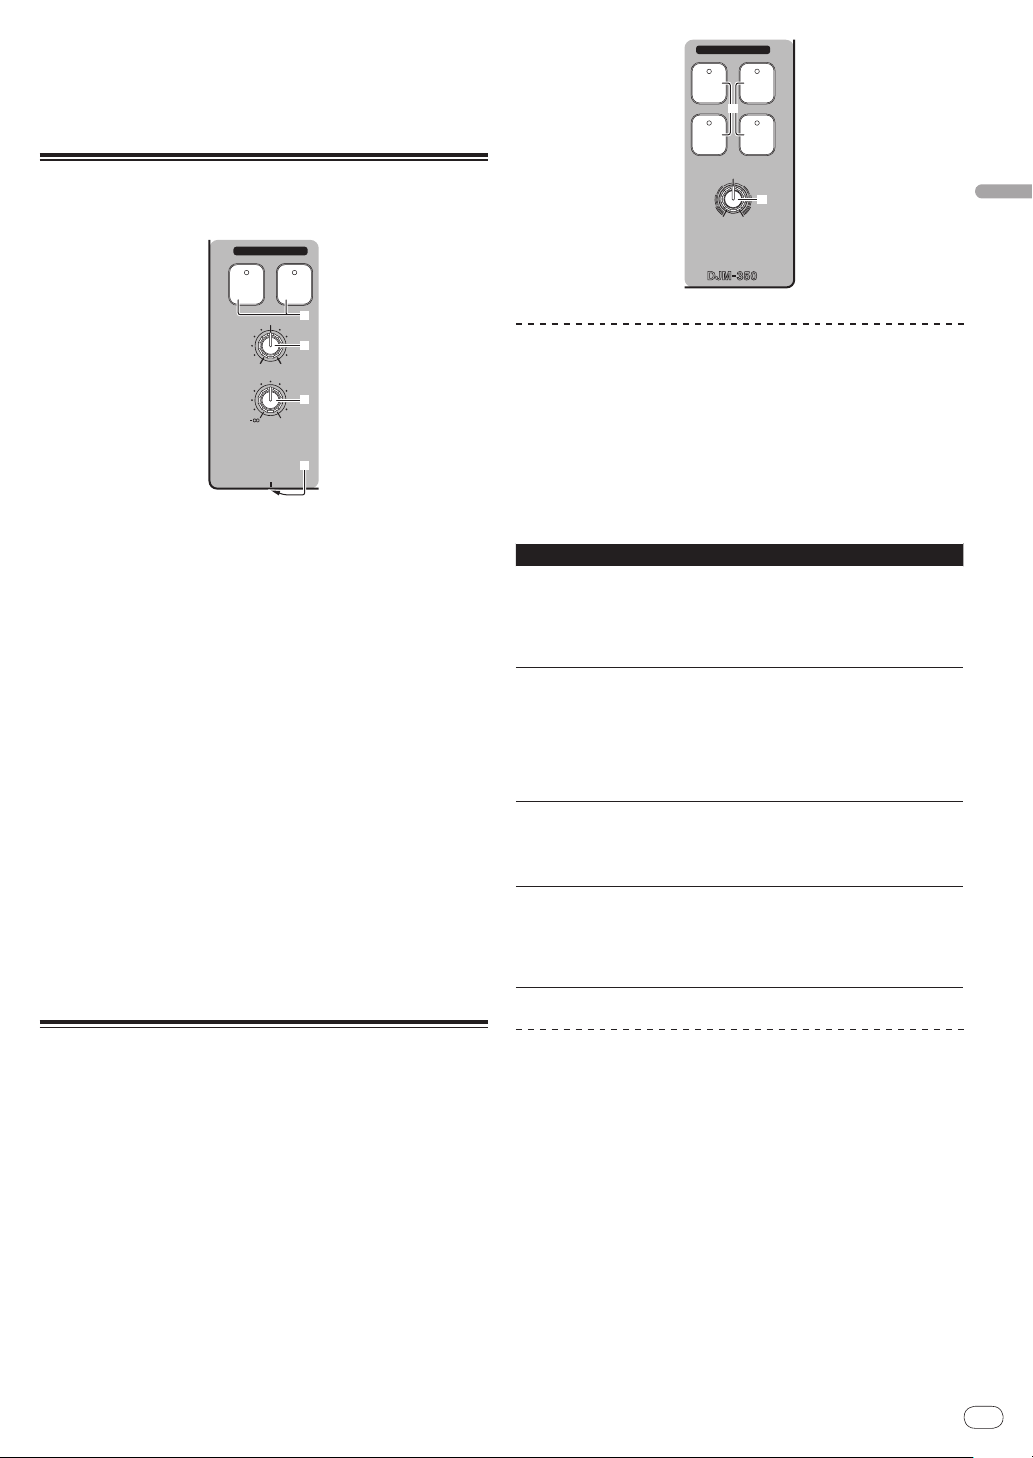
5 Bougez le crossfader j.
HEADPHONES
CUE
CH-1
CUE
MIXING
CUE MASTER
CH-2
LEVEL
PHONES
0
8
9
a
7
2 CHANNEL DJ MIXER
LEVEL/DEPTH
FILTERCRUSH
GATE JET
MASTER EFFECT
q
r
La lecture démarre sur le lecteur DJ.
! Si vous ramenez le crossfader à la position originale, le lecteur
revient instantanément au point de repère déjà spécifié et interrompt la lecture (repère arrière).
Contrôle du son par le casque
d’écoute (Section Casque d’écoute)
1 Raccordez le casque à la prise [PHONES]
Pour les instructions sur le raccordement, reportez-vous à la page 7,
Raccordement des prises d’entrée/ sortie.
2 Appuyez sur [CH-1 CUE] ou [CH-2 CUE] 7.
Sélectionnez le canal que vous voulez contrôler.
— [CH-1 CUE] : Le son de [CH-1] est contrôlé.
— [CH-2 CUE] : Le son de [CH-2] est contrôlé.
! Cette opération n’est pas nécessaire pour contrôler le son du canal
principal (le son restitué par les prises [MASTER OUT 1, 2]).
3 Tournez [MIXING] 8.
— Rotation dans le sens antihoraire : Le volume de [CH-1] et
[CH-2] devient plus fort.
— À la position centrale : Le son de [CH-1] et [CH-2] est au même
niveau sonore que le son provenant des prises [MASTER OUT
1, 2].
— Rotation horaire : Le volume du son provenant des prises
[MASTER OUT 1, 2] devient plus fort.
4 Tournez [LEVEL] 9 dans la section Casque d’écoute
dans le sens horaire.
Le son est restitué par le casque d’écoute.
! Le contrôle s’annule par une nouvelle pression sur [CH-1 CUE] ou
[CH-2 CUE].
! Le contrôle du son provenant des prises [MASTER OUT 1, 2] ne
peut pas être annulé.
Application d’un effet
Appuyez sur une des touches [MASTER EFFECT (GATE,
CRUSH, JET, FILTER)] q.
L’effet est appliqué au son.
La touche sur laquelle une pression a été exercée clignote.
L’effet est différent selon les touches. Pour le détail sur les différents
effets, reportez-vous au tableau suivant.
! L’effet se désactive par une nouvelle pression sur une touche
clignotante.
Nom de l’effet Descriptions LEVEL/ DEPTH
Gauche : La variation
concerne les aigus (cymbale charleston, etc.).
Droite : La variation
concerne les graves (grosse
caisse, etc.).
Gauche : Le son est aplani
et l’effet obtenu est similaire à une coupure graduelle des aigus.
Droite : Le son est aplani et
l’effet obtenu est similaire à
une coupure graduelle des
graves.
Gauche : L’effet obtenu
est celui d’un avion atterrissant.
Droite : L’effet obtenu est
celui d’un avion décollant.
Gauche : L’effet obtenu est
similaire à une coupure
graduelle des aigus.
Droite : L’effet obtenu est
similaire à une coupure
graduelle des graves.
GATE
CRUSH
JET
FILTER
La plage pertinente du son
est coupée dans la partie
rythmique du morceau pour
varier le rythme.
Le son est modérément
aplani et de l’accentuation
est ajoutée.
L’effet obtenu est celui d’un
avion décollant et atterrissant.
Le son des aigus et graves
est filtré, ce qui change
énormément le timbre.
Français
Utilisation des effets (Section Effets
principaux)
Ce appareil présente quatre touches d’effets. Lorsque vous appuyez
sur une touche d’effet, l’effet correspondant est appliqué aux signaux
audio provenant des prises [MASTER OUT 1, 2].
Variation de l’effet
Tournez [LEVEL/ DEPTH] r.
L’effet change selon le sens dans lequel [LEVEL/ DEPTH] est tournée et
selon sa position.
! Le son original est restitué lorsque [LEVEL/ DEPTH] est à la position
centrale.
Fr
11
Page 28
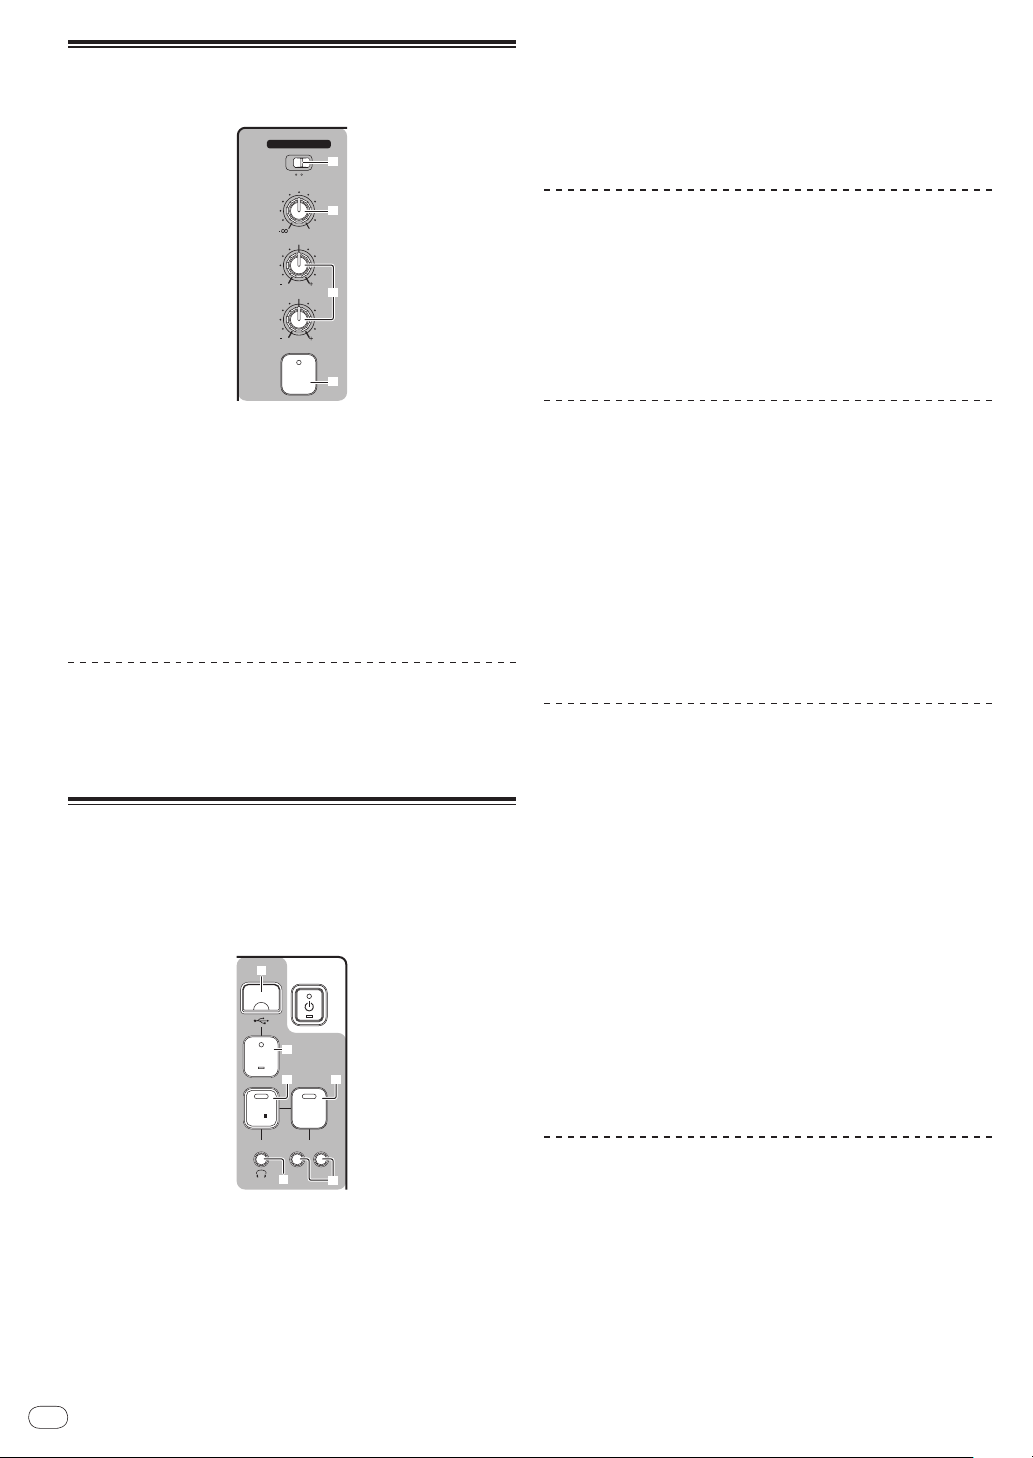
Utilisation d’un microphone ou d’un
MIC /AUX
MIC
0
LEVEL
HI
AUX
LOW
MIC/AUX
ON
12
12
12
12
3
4
6
5
PREVIEW
TRACK MARK SEARCH
PLAY
USB
STOP
REC
o
p
k
l
m n
dispositif externe (Section MIC/ AUX)
! Si vous appuyez une nouvelle fois sur [REC k/ g], l’indicateur [REC
k/ g] s’éteint et l’enregistrement s’arrête.
! L’enregistrement peut se poursuivre durant 180 minutes. S’il conti-
nue au-delà de 180 minutes, les données de l’enregistrement sont
automatiquement divisées sur le dispositif USB.
! Un enregistrement de 90 minutes est possible sur un dispositif
USB de 1 Go.
Lecture des morceaux enregistrés
Appuyez sur [PLAY f] n.
La lecture commence.
L’indicateur [PLAY f] n s’allume.
! Si vous appuyez une nouvelle fois sur [PLAY f], la lecture se
met en pause.
! Seuls les fichiers WAV enregistrés dans le dossier [PIONEER DJM
/ DJM350 REC] sur le dispositif USB peuvent être lus.
1 Commutez [MIC, AUX] 3.
— [MIC] : Le microphone raccordé à la prise [MIC] est
sélectionné.
— [AUX] : Le dispositif externe raccordé aux prises [AUX] est
sélectionné.
2 Appuyez sur [MIC/AUX ON] 6.
3 Tournez [LEVEL] 4 dans la section MIC/
AUX dans le
sens horaire.
Le son du microphone ou du dispositif externe est fourni par les
enceintes.
Réglage de la qualité du son
Tournez [HI] ou [LOW] 5 dans la section MIC/ AUX.
Reportez-vous à la page 16, Spécifications pour la plage de réglage du
son de chaque commande.
Enregistrement de la prestation
(Section d’enregistrement USB)
Le même son que celui qui provient des prises [MASTER OUT 1, 2]
peut être enregistré sous forme de fichier WAV sur un dispositif USB.
! Le nom des fichiers créés lorsque le son est enregistré prend la
forme [REC***.WAV] (*** étant un nombre à 3 chiffres).
Pré-écoute des morceaux enregistrés
1 Tournez [MIXING] 8 dans le sens antihoraire depuis
la position centrale.
2 Appuyez sur [TRACK MARK (PREVIEW)] o et
maintenez enfoncée.
Le son du morceau enregistré peut être écouté par le casque d’écoute
tant que la touche est maintenue enfoncée.
! Le son contrôlé est ajouté au son de [CH-1] et [CH-2] et restitué par
le casque.
! Le son contrôlé n’est pas restitué par les enceintes.
! La pré-écoute n’est pas possible pendant l’enregistrement ou la
lecture du morceau.
Exploration avant/ arrière rapide des
morceaux enregistrés
Pendant la lecture, appuyez sur [SEARCH o, p] p et
maintenez enfoncée.
Le morceau est exploré vers l’avant lorsque vous appuyez sur [p] et
la maintenez enfoncée.
Le morceau est exploré vers l’arrière lorsque vous appuyez sur [o] et
la maintenez enfoncée.
L’indicateur [PLAY f] clignote pendant l’exploration avant/ arrière
rapide.
! L’exploration avant/
pause.
arrière rapide n’est pas possible pendant la
1 Insérez le dispositif USB dans la fente d’insertion de
dispositif USB k.
L’indicateur [USB STOP] l clignote.
Un peu après, l’indicateur [USB STOP] cesse de clignoter, reste allumé
et l’appareil se met en attente d’enregistrement.
2 Appuyez sur [REC k/ g] m.
L’enregistrement commence.
L’indicateur [REC k/ g] m clignote.
12
Repèrage du début des morceaux enregistrés
Appuyez sur [SEARCH o, p] p.
Appuyez sur [p] pour localiser le début du morceau suivant.
Appuyez une fois sur [o] pour revenir au début du morceau en cours
de lecture, deux fois pour revenir au début du morceau précédent.
Division de morceaux pendant
l’enregistrement
Fr
Pendant l’enregistrement, appuyez sur [TRACK MARK
(PREVIEW)] o.
Le morceau en cours d’enregistrement est divisé et enregistré sur le
dispositif USB.
! Lorsque des morceaux divisés sont lus sur cet appareil, le son peut
être interrompu à la séparation des deux morceaux.
Page 29

Suppression de morceaux enregistrés
1 Pendant la lecture du morceau, appuyez sur [PLAY
f] n.
Le morceau que vous voulez supprimer se met en pause.
2 Appuyez au moins 2 secondes sur [PLAY f] n.
L’indicateur [REC k/ g] clignote.
3 Tout en appuyant sur [PLAY f] n, appuyez sur
[REC k/ g] m.
L’indicateur [REC k/ g] s’allume et le morceau est supprimé.
! La suppression de morceaux est annulée si [PLAY f] est relâ-
chée lorsque l’indicateur [REC k/ g] clignote.
Débranchement de dispositifs USB
Effectuez toujours les opérations suivantes pour débrancher des dispositifs USB. Si vous débranchez le dispositif USB sans effectuer ces
opérations, le dispositif USB peut devenir illisible.
Avant d’éteindre l’appareil, veillez à retirer le dispositif USB.
1 Appuyez au moins 1 seconde sur [USB STOP] l.
L’indicateur [USB STOP] clignote puis s’éteint.
2 Débranchez le dispositif USB.
À propos de la mise en veille
automatique
Lorsque la mise en veille automatique est en service, l’appareil se met
automatiquement en mode de veille quand le temps réglé s’est écoulé
dans la mesure où toutes les conditions suivantes sont remplies.
— Aucune des touches ou commandes de l’appareil ne sont
actionnées.
— L’indicateur de niveau du canal de cet appareil n’est pas allumé.
— Les fonctions d’enregistrement et de lecture du dispositif USB ne
sont pas utilisées.
Français
Réglage de la fonction de mise en veille
automatique
Mettez d’abord cet appareil en veille.
1 Appuyez sur [u] 1 tout en appuyant sur [o] et
[p] p.
L’appareil se met dans le mode permettant de changer le réglage de
mise en veille automatique.
Le point supérieur de l’indicateur de niveau principal clignote. Les
autres points sur l’indicateur s’allument selon le temps actuellement
réglé.
2 Appuyez sur [o] ou [p] p.
Réglé le temps nécessaire pour la mise en veille.
Le temps réglé change chaque fois que vous appuyez sur la touche.
Les points sur l’indicateur de niveau principal s’allument selon le
temps réglé (point supérieur non compris).
— Hors service — 20 minutes — 40 minutes — 60 minutes
— 20 minutes : Les deux points inférieurs s’allument.
— 40 minutes : Les quatre points inférieurs s’allument.
— 60 minutes : Les six points inférieurs s’allument.
! Le temps a été réglé sur 20 minutes en usine.
3 Appuyez au moins 2 secondes sur [u] 1.
Le nouveau réglage de mise en veille automatique est sauvegardé.
L’indicateur [u] clignote en vert pendant que le réglage est sauvegardé, puis cesse de clignoter, mais reste allumé lorsque le réglage a
été sauvegardé.
! Ne débranchez pas le cordon d’alimentation pendant la sauve-
garde du réglage.
Fr
13
Page 30
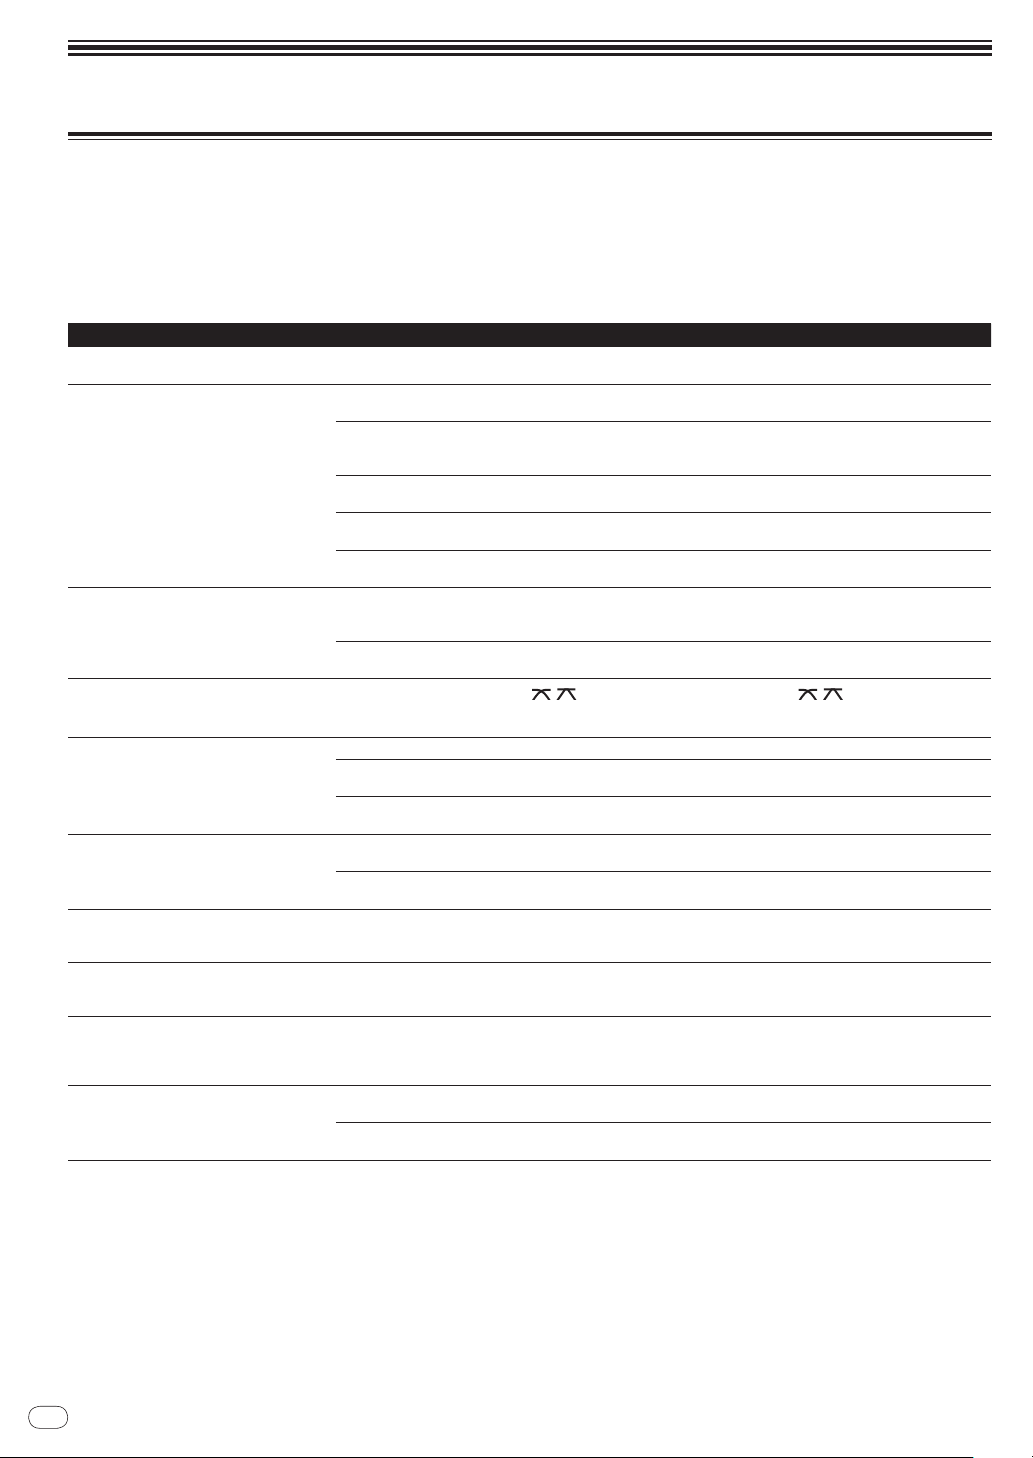
Informations supplémentaires
En cas de panne
! Une erreur de commande est souvent prise pour une anomalie de fonctionnement ou une panne. Si vous estimez que cet appareil ne fonc-
tionne pas correctement, vérifiez les points ci-dessous. Parfois, le problème peut provenir d’un autre composant. Examinez les autres composants et les appareils électriques utilisés. Si le problème persiste malgré les vérifications des points suivants, confiez les réparations au
service après-vente Pioneer le plus proche ou à votre revendeur.
! De l’électricité statique ou des facteurs externes ont peut être déréglé cet appareil. Dans ce cas, le fonctionnement normal de l’appareil
peut éventuellement être rétabli en débranchant le cordon d’alimentation, attendant 5 secondes ou plus, puis rebranchant le cordon
d’alimentation.
Problème Vérification Solution
L’appareil ne s’allume pas. Est-ce que le cordon d’alimentation est correcte-
Aucun son ou son faible. Est-ce que le commutateur [CD, PHONO] (sélec-
Distorsion du son. Est-ce que [MASTER LEVEL] est à la bonne posi-
Impossible de faire un fondu enchaîné.
Départ au crossfader d’un lecteur DJ impossible.
Aucun effet. Est-ce qu’une des touches [MASTER EFFECT
Aucun son émis ou le son est faible lors de la
lecture d’un morceau enregistré sur un dispositif USB.
Le son présente de la distorsion lors de la
lecture d’un morceau enregistré sur un dispositif USB.
Le son du morceau enregistré ne peut pas
être pré-écouté par le casque d’écoute même
lorsque [TRACK MARK (PREVIEW)] est pressée
et maintenue enfoncée.
Le dispositif USB n’est pas reconnu. Est-ce que le dispositif USB est raccordé correc-
ment raccordé ?
teur d’entrée) est à la bonne position ?
Est-ce que les commandes [TRIM], [fader de
canal], [crossfader] et [MASTER LEVEL] sont aux
bonnes positions ?
Est-ce que les composants, amplificateurs, etc.
raccordés sont réglés correctement ?
Est-ce que les câbles de liaison sont correctement
raccordés ?
Est-ce que les prises et fiches sont sales ? Nettoyez les prises et les fiches avant d’effectuer les raccorde-
tion ?
Est-ce que [TRIM] est à la bonne position ? Réglez [TRIM] de sorte que l’indicateur orange sur l’indicateur de
Est-ce que le commutateur [THRU,
(sélecteur de courbe de crossfader) est réglé sur
[THRU] ?
Est-ce que [FADER START] est réglé sur arrêt ? Réglez [FADER START] sur marche. (la page 10)
Est-ce que le cordon de commande est correcte-
ment raccordé ?
Est-ce que les câbles audio sont correctement
raccordés ?
(GATE, CRUSH, JET, FILTER)] a été enfoncée ?
Est-ce que [LEVEL/
trale ?
Est-ce que [MASTER LEVEL] est à la bonne posi-
tion ?
Est-ce que [TRIM] est à la bonne position ? Avant l’enregistrement, réglez [TRIM] de sorte que l’indicateur
Est-ce que [MIXING] a été tourné complètement
dans le sens horaire ?
tement ?
Est-ce que le dispositif USB peut être utilisé avec
cet appareil ?
DEPTH] est à la position cen-
, ]
Branchez le cordon d’alimentation sur une prise secteur. (la
page 7)
Réglez le commutateur [CD, PHONO] (sélecteur d’entrée) pour
sélectionner la source d’entrée pour ce canal. (la page 9)
Réglez les commandes [TRIM], [fader de canal], [crossfader] et
[MASTER LEVEL] sur les bonnes positions. (la page 9)
Sélectionnez l’entrée externe, réglez le volume, etc. correctement
sur les composants/
Raccordez correctement les câbles de liaison. (la page 7)
ments.
Réglez [MASTER LEVEL] de sorte que l’indicateur orange sur
l’indicateur de niveau principal s’allume au niveau des crêtes.
(la page 9)
niveau de canal s’allume au niveau des crêtes. (la page 9)
Réglez le commutateur [THRU, , ] (sélecteur de courbe de
crossfader) sur une autre position que [THRU]. (la page 9)
Reliez cet appareil et le lecteur DJ avec un cordon de commande.
(la page 7)
Raccordez cet appareil à la prise de sortie audio d’un lecteur DJ
avec un câble audio. (la page 7)
Appuyez sur une des touches [MASTER EFFECT (GATE, CRUSH,
JET, FILTER)]. (la page 11)
Tournez [LEVEL/ DEPTH] dans le sens horaire ou antihoraire. (la
page 11)
Avant l’enregistrement, réglez [MASTER LEVEL] de sorte que
l’indicateur orange sur l’indicateur de niveau principal s’allume
au niveau des crêtes. (la page 9)
orange sur l’indicateur de canal s’allume au niveau des crêtes.
(la page 9)
Tournez [MIXING] dans le sens antihoraire depuis la position
centrale. (la page 12)
Insérez à fond le dispositif USB. (la page 12)
Cet appareil prend en charge les dispositifs USB de stockage de
masse, comme les disques durs et les mémoires flash portables.
amplificateurs.
14
Fr
Page 31

À propos des erreurs
Si cet appareil ne fonctionne pas normalement, les indicateurs [u] (interrupteur d’alimentation), [USB STOP] et [PLAY f] clignotent pour
signaler une erreur.
Reportez-vous au tableau suivant et prenez les mesures indiquées.
Si la même erreur se reproduit malgré les mesures prises, contactez le magasin d’où provient votre produit ou le service après-vente Pioneer le
plus proche.
À propos de l’indication d’erreur de l’indicateur [USB STOP]
Si l’indicateur [USB STOP] clignote 2 à 5 fois
1 Débranchez le dispositif USB.
2 Appuyez sur [USB STOP].
Reportez-vous au tableau suivant et prenez les mesures indiquées.
Nom de
l’indicateur
USB STOP
PLAY f
u (interrupteur d’alimentation)
Nombre de
clignotements de
l’indicateur
2 fois de
suite
3 fois de
suite
4 fois de
suite
5 fois de
suite
3 fois Erreur de lecture
En permanence
Description de
l’erreur
Problème de
format du fichier
Problème de
classe USB
Problème d’écriture sur le dispositif USB
Surtension détectée dans le dispositif USB
Problème de
circuit
Cause Mesure
Le dispositif USB n’est pas formaté.
Vous utilisez un dispositif USB dont le système de
fichier n’est pas reconnu par cet appareil.
Un dispositif qui n’est pas un dispositif USB de stockage
de masse est raccordé.
Un concentrateur USB est raccordé. Ne raccordez pas de concentrateurs USB.
Pas d’espace disponible suffisant sur le dispositif USB.
Il y a un nom de fichier “REC999.WAV” dans le dossier
où les données sont enregistrées (PIONEER DJM /
DJM350 REC).
Le commutateur de protection du dispositif USB est en
position de protection.
Vous utilisez un dispositif USB doté d’une fonction de
sécurité.
Le dossier contenant les données enregistrées (PIONEER DJM / DJM350 REC) est réglé pour la “Lecture
seulement”.
Vous utilisez un dispositif USB (par ex. un disque dur
alimenté par bus) dont la tension est supérieure à la
tension nominale de cet appareil (500 mA).
Il n’y a pas de fichiers lisibles dans le dossier contenant
les données enregistrées (PIONEER DJM / DJM350
REC).
Il y a un problème dans le circuit interne.
Utilisez un dispositif USB formaté dans un système de
fichier reconnu par cet appareil (FAT ou HFS+).
Raccordez un dispositif USB de stockage de masse.
Utilisez un dispositif USB disposant de suffisamment
d’espace.
Les fichiers créés par enregistrement ont un numéro à
3 chiffres. Lorsque le numéro 999 est atteint, il n’est pas
possible de créer de nouveaux fichiers. Dans ce cas,
mettez les fichiers de ce dossier dans un autre dossier.
Mettez le commutateur de protection du dispositif USB
en position d’écriture.
Utilisez un dispositif USB sans fonction de sécurité.
Changez le réglage pour pouvoir enregistrer des données dans ce dossier.
Utilisez un dispositif USB dont la tension ne dépasse
pas la tension nominale de cet appareil (par ex. un
disque dur alimenté par un adaptateur secteur ou une
autre source d’alimentation).
Effectuez un enregistrement sur cet appareil pour créer
des fichiers lisibles avant de les lire.
Débranchez le cordon d’alimentation de cet appareil de
la prise secteur.
Français
À propos des dispositifs USB/ fichiers
utilisables sur cet appareil
Cet appareil prend en charge les disques durs externes, les mémoires
flash portables et les dispositifs de classe de stockage de masse USB.
Niveaux de dossiers
Nombre maximal
de fichiers
Systèmes de
fichiers pris en
charge
! Les dispositifs à disque optique, tels que les lecteurs DVD/
ne sont pas pris en charge.
! Le chargement peut durer un certain temps si la quantité de dossiers ou de
fichiers est importante.
! Si le dispositif USB comprend plusieurs partitions, il risque de ne pas être
reconnu.
Max. 2 couches (PIONEER DJM / DJM350 REC)
Maximum 999 morceaux
FAT, FAT32 et HFS+
CD externes, etc.
Précautions à prendre lors de l’utilisation
de dispositifs USB
! Certains dispositifs USB peuvent ne pas être reconnus correc-
tement. Veuillez noter que Pioneer décline toute responsabilité,
quelle qu’elle soit, quant aux pertes des données enregistrées sur
des dispositifs USB.
! Les concentrateurs USB ne peuvent pas être utilisés.
! Les dispositifs USB pourvus de lecteurs de cartes flash peuvent ne
pas fonctionner.
! Il se peut que, lorsqu’un courant supérieur au courant maxi-
mal autorisé est détecté au port USB de l’appareil, l’indicateur
[USB STOP] clignote 5 fois, que l’alimentation de l’appareil USB
soit coupée et que la communication avec le dispositif USB
soit interrompue. Pour revenir à un fonctionnement normal,
débranchez le dispositif USB de cet appareil, puis appuyez sur
[USB STOP]. Évitez de réutiliser des dispositifs USB sur lesquels
un courant excessif a été détecté. S’il n’est pas possible de revenir
à un fonctionnement normal (si la communication ne peut pas
Fr
15
Page 32

être rétablie) de la façon indiquée ci-dessus, essayez d’éteindre cet
appareil puis de le rallumer.
! Selon le dispositif USB utilisé, vous pouvez ne pas atteindre les
performances souhaitées.
À propos des fichiers WAV
Le DJM-350 prend en charge les fichiers WAV enregistrés dans les
formats suivants.
Formats compatibles
Extension de
fichier
Les fichiers de format PCM 16 bits non compressés ayant une
fréquence d’échantillonnage de 44,1 kHz sont acceptés.
.WAV ou .wav
À propos des clauses d’exemption
! Pioneer est une marque déposée de Pioneer Corporation.
! Les noms de sociétés et de produits mentionnés ici sont des
marques commerciales de leurs détenteurs respectifs.
! Lors de la lecture de fichiers de musique obtenus sur cet appareil,
nous vous prions de respecter les droits d’auteur.
Spécifications
Général
Alimentation .................................................CA 220 V à 240 V, 50 Hz/ 60 Hz
Consommation ....................................................................................... 17 W
Consommation (en veille) .................................................................... 0,4 W
Poids de l’appareil principal ............................................................... 3,2 kg
Dimensions maximales ...........218 mm (L) × 107 mm (H) × 301 mm (P)
Température de fonctionnement tolérée ...........................+5 °C à +35 °C
Humidité de fonctionnement tolérée .... 5 % à 85 % (sans condensation)
Section audio
Fréquence d’échantillonnage............................................................48 kHz
Convertisseur A/ N, N/ A ..................................................................... 24 bits
Caractéristiques des fréquences
CD/ AUX/ MIC ...................................................................20 Hz à 20 kHz
Rapport S/ B (sortie nominale)
CD ....................................................................................................97 dB
PHONO ...........................................................................................86 dB
MIC ..................................................................................................80 dB
Distorsion harmonique totale (CD — MASTER1) ..........................0,007 %
Niveau d’entrée standard / Impédance d’entrée
CD .................................................................................... –12 dBu/ 36 kW
PHONO ........................................................................... –52 dBu/ 47 kW
MIC .................................................................................. –52 dBu/ 10 kW
AUX ................................................................................. –12 dBu/ 27 kW
Niveau de sortie standard / Impédance de charge / Impédance de
sortie
MASTER OUT........................................................+2 dBu/ 10 kW/ 2,5 W
PHONES ..................................................................+2 dBu/ 32 W/ 150 W
Niveau de sortie nominal / Impédance de charge
MASTER OUT................................................................+18 dBu/ 10 kW
Diaphonie (CD) ......................................................................................78 dB
Caractéristiques de l’égaliseur de canal
HI ............................................................................. –
MID ...........................................................................–
LOW ....................................................................... –
Caractéristiques de l’égaliseur MIC/ AUX
HI ...................................................................–12 dB à +12 dB (10 kHz)
LOW .............................................................. –12 dB à +12 dB (100 Hz)
Prises d’entrée/ sortie
Prise d’entrée CD
Prise RCA ...................................................................................... 2 jeux
Prise d’entrée PHONO
Prise RCA ...................................................................................... 2 jeux
∞ à 9 dB (13 kHz)
∞ à 9 dB (1 kHz)
∞ à +9 dB (70 Hz)
Prise d’entrée MIC
Jack (Ø 6,3 mm) .............................................................................. 1 jeu
Prise d’entrée AUX
Prise RCA ........................................................................................ 1 jeu
Prise de sortie MASTER
Prise RCA ...................................................................................... 2 jeux
Prise de sortie PHONES
Jack stéréo (Ø 6,3 mm) .................................................................. 1 jeu
Prise USB
Type A .............................................................................................. 1 jeu
Prise CONTROL
Minijack (Ø 3,5 mm) ..................................................................... 2 jeux
! Les caractéristiques et la présentation peuvent être modifiées, sans
avis préalable, dans un souci d’amélioration.
! Publication de Pioneer Corporation. © 2010 Pioneer Corporation.
Tous droits de reproduction et de traduction réservés.
16
Fr
Page 33

Page 34

Vielen Dank, dass Sie sich für dieses Pioneer-Produkt entschieden haben. Bitte lesen Sie diese Bedienungsanleitung gründlich durch, um
Ein Ausrufezeichen in einem Dreieck weist
den Benutzer auf wichtige Bedienungs- und
Wartungsanweisungen in den Dokumenten
hin, die dem Gerät beiliegen.
Das Blitzsymbol in einem Dreieck weist den
Benutzer darauf hin, dass eine
Berührungsgefahr mit nicht isolierten Teilen
im Geräteinneren, die eine gefährliche
Spannung führen, besteht. Die Spannung
kann so hoch sein, dass sie die Gefahr eines
elektrischen Schlages birgt.
ACHTUNG:
UM SICH NICHT DER GEFAHR EINES
ELEKTRISCHEN SCHLAGES
AUSZUSETZEN, DÜRFEN SIE NICHT DEN
DECKEL (ODER DIE RÜCKSEITE)
ENTFERNEN. IM GERÄTEINNEREN
BEFINDEN SICH KEINE VOM BENUTZER
REPARIERBAREN TEILE. ÜBERLASSEN SIE
REPARATUREN DEM QUALIFIZIERTEN
KUNDENDIENST.
CAUTION
RISK OF ELECTRIC SHOCK
DO NOT OPEN
WICHTIG
D3-4-2-1-1_A1_De
Mischen Sie dieses Produkt, wenn Sie es entsorgen wollen, nicht mit gewöhnlichen Haushaltsabfällen. Es gibt ein getrenntes
Sammelsystem für gebrauchte elektronische Produkte, über das die richtige Behandlung, Rückgewinnung und Wiederverwertung
gemäß der bestehenden Gesetzgebung gewährleistet wird.
Privathaushalte in den Mitgliedsstaaten der EU, in der Schweiz und in Norwegen können ihre gebrauchten elektronischen Produkte an
vorgesehenen Sammeleinrichtungen kostenfrei zurückgeben oder aber an einen Händler zurückgeben (wenn sie ein ähnliches neues Produkt
kaufen).
Bitte wenden Sie sich in den Ländern, die oben nicht aufgeführt sind, hinsichtlich der korrekten Verfahrensweise der Entsorgung an die örtliche
Kommunalverwaltung.
Auf diese Weise stellen Sie sicher, dass das zu entsorgende Produkt der notwendigen Behandlung, Rückgewinnung und Wiederverwertung
unterzogen wird, und so mögliche negative Einflüsse auf die Umwelt und die menschliche Gesundheit vermieden werden.
K058b_A1_De
sich mit der Bedienung des Geräts vertraut zu machen. Nachdem Sie die Bedienungsanleitung gelesen haben, legen Sie sie griffbereit zum
Nachschlagen ab.
In manchen Ländern oder Verkaufsgebieten weichen die Ausführungenvon Netzstecker oder Netzsteckdose u.U. von den in den
Abbildungengezeigten ab; die Anschluß- und Bedienungsverfahren des Gerätes sind jedoch gleich.
De
2
Page 35

WARNUNG
Dieses Gerät ist nicht wasserdicht. Zur Vermeidung der
Gefahr von Brand und Stromschlag keine Behälter mit
Flüssigkeiten (z.B. Blumenvasen und -töpfe) in die
Nähe des Gerätes bringen und dieses vor Tropfwasser,
Spritzwasser, Regen und Nässe schützen.
D3-4-2-1-3_A1_De
WARNUNG
Vor dem erstmaligen Anschluss des Gerätes an das
S
tromnetz bitte den folgenden Hinweis sorgfältig
beachten.
Die Netzspannung ist je nach Land verschieden.
Vor der Inbetriebnahme des Gerätes sicherstellen,
dass die örtliche Netzspannung mit der auf dem
Ty penschild an der Rückwand des Gerätes
angegebenen Nennspannung (z.B. 230 V oder 120
V) übereinstimmt.
D3-4-2-1-4*_A1_De
WARNUNG
Keine Quellen offener Flammen (z.B. eine brennende
Kerze) auf dieses Gerät stellen.
D3-4-2-1-7a_A1_De
WARNUNG
Im Gerätegehäuse sind Ventilationsschlitze und andere
Öffnungen vorgesehen, die dazu dienen, eine
Überhitzung des Gerätes zu verhindern und einen
zuverlässigen Betrieb zu gewährleisten. Um
Brandgefahr auszuschließen, dürfen diese Öffnungen
auf keinen Fall blockiert oder mit Gegenständen (z.B.
Zeitungen, Tischdecken und Gardinen) abgedeckt
werden, und das Gerät darf beim Betrieb nicht auf
einem dicken Teppich oder Bett aufgestellt sein.
D3-4-2-1-7b*_A1_De
Betriebsumgebung
Betriebstemperatur und Betriebsluftfeuchtigkeit:
+5 °C bis +35 °C, 85 % rel. Feuchte max.
(Ventilationsschlitze nicht blockiert)
Eine Aufstellung dieses Gerät an einem unzureichend
belüfteten, sehr feuchten oder heißen Ort ist zu
vermeiden, und das Gerät darf weder direkter
Sonneneinstrahlung noch starken Kunstlichtquellen
ausgesetzt werden.
D3-4-2-1-7c*_A1_De
Falls der Netzstecker des Netzkabels dieses Gerätes
nicht in die Zusatzsteckdose einer anderen
Komponente passt, muss er gegen einen Netzstecker
der geeigneten Ausführung ausgewechselt werden.
Ein derartiger Austausch des Netzsteckers muss vom
Kundendienstpersonal vorgenommen werden. Wenn
der vom Netzkabel abgeschnittene ursprüngliche
Netzstecker in eine Netzsteckdose eingesteckt wird,
besteht akute Stromschlaggefahr! Daher ist
unbedingt dafür zu sorgen, dass der abgeschnittene
Netzstecker sofort vorschriftsmäßig entsorgt wird.
Vor einem längeren Nichtgebrauch des Gerätes,
beispielsweise während des Urlaubs, sollte der
Netzstecker aus der Netzsteckdose gezogen werden,
um das Gerät vollständig vom Netz zu trennen.
D3-4-2-2-1a_A1_De
ACHTUNG
Der -Schalter dieses Gerätes trennt das Gerät nicht
vollständig vom Stromnetz. Um das Gerät vollständig
vom Netz zu trennen, muss der Netzstecker aus der
Netzsteckdose gezogen werden. Daher sollte das
Gerät so aufgestellt werden, dass stets ein
unbehinderter Zugang zur Netzsteckdose
gewährleistet ist, damit der Netzstecker in einer
Notsituation sofort abgezogen werden kann. Um
Brandgefahr auszuschließen, sollte der Netzstecker
vor einem längeren Nichtgebrauch des Gerätes,
beispielsweise während des Urlaubs, grundsätzlich
von der Netzsteckdose getrennt werden.
D3-4-2-2-2a*_A1_De
VORSICHT MIT DEM NETZKABEL
Fassen Sie das Netzkabel immer am Stecker. Ziehen Sie
nicht am Kabel selbst, und fassen Sie das Netzkabel
niemals mit nassen Händen an, da dies einen
Kurzschluss oder elektrischen Schlag verursachen
kann. Stellen Sie nicht das Gerät, Möbelstücke o.ä. auf
das Netzkabel; sehen Sie auch zu, dass es nicht
eingeklemmt wird. Machen Sie niemals einen Knoten
in das Netzkabel, und binden Sie es nicht mit anderen
Kabeln. Das Netzkabel sollte so gelegt werden, dass
niemand darauf tritt. Ein beschädigtes Netzkabel kann
einen Brand oder elektrischen Schlag verursachen.
Prüfen Sie das Netzkabel von Zeit zu Zeit. Sollte es
beschädigt sein, wenden Sie sich an Ihre nächste
autorisierte PIONEER-Kundendienststelle oder Ihren
Händler, um es zu ersetzen.
S002*_A1_De
De
3
Page 36

Zum Lesen dieser Anleitung
Die Namen von Anzeigen, Menüs und Tasten sind in dieser Anleitung
in eckigen Klammern angegeben. (z.B. Kanal [MASTER], Menü [ON/
OFF], [File])
Vor der Inbetriebnahme
Merkmale .....................................................................................................5
Beispiel für System-Setup .......................................................................... 5
Lieferumfang ...............................................................................................5
Anschlüsse
Bezeichnungen der Anschlüsse ...............................................................6
Anschließen an die Eingangs-/ Ausgangsbuchsen .................................7
Bedienungen
Bedienpult ...................................................................................................8
Über den Netzschalter dieses Geräts ........................................................9
Grundlegender Betrieb (Mixer-Sektion) ....................................................9
Mithören des Sounds über Kopfhörer (Kopfhörer-Sektion)..................11
Verwendung der Effekt-Funktion (Mastereffekt-Sektion)
Verwendung eines Mikrofons oder externen Geräts (MIC/ AUX-
Sektion) ......................................................................................................12
Aufnehmen des Auftritts (USB-Aufnahmesektion) ...............................12
Über die Auto-Standby-Funktion .............................................................13
...............................11
Zusätzliche Informationen
Störungssuche ..........................................................................................14
Über Fehler ................................................................................................15
Info zu USB-Geräten/ Dateien, die auf diesem Gerät verwendet
werden können ..........................................................................................15
Über die Ausnahmeklauseln ...................................................................16
Technische Daten .....................................................................................16
De
4
Page 37

Vor der Inbetriebnahme
MULTI PLAYER
TEMPO
0
PLAY/PAUSE
SEARCH
TRACK SEARCH
IN/CUE OUT
OUT ADJUSTHOT LOOP
RELOOP/EXIT
BEAT LOOP
LOOP DRIVE
VINYL MODE
TEMPO RANGE
MASTER TEMPO
LOOP
USB
STOP
SOURCE SELECT
MP3/AAC
WAV/AIFF
CUE
PLAYLIST
BPM
DISC
LOCK
REV FWD
BACK
SELECT PUSH
TIME MODE
AUTO CUE
DISPLAY
UTILITY
A.CUE
LOCK
16
REMAIN
MS
F TEMPO%
INFO
BROWSE
BPM
MULTI PLAYER
TEMPO
0
PLAY/PAUSE
SEARCH
TRACK SEARCH
IN/CUE OUT
OUT ADJUSTHOT LOOP
RELOOP/EXIT
BEAT LOOP
LOOP DRIVE
VINYL MODE
TEMPO RANGE
MASTER TEMPO
LOOP
USB
STOP
SOURCE SELECT
MP3/AAC
WAV/AIFF
CUE
PLAYLIST
BPM
DISC
LOCK
REV FWD
BACK
SELECT PUSH
TIME MODE
AUTO CUE
DISPLAY
UTILITY
A.CUE
LOCK
16
REMAIN
MS
FTEMPO %
INFO
BROWSE
BPM
2 CHANNEL DJ MIXER
MIC /AUX
MIC
0
LEVEL
HI
AUX
LOW
MIC/AUX
ON
12
12
12
12
HEADPHONES
CUE
CH-1
CUE
MIXING
CUE MASTER
CH-2
LEVEL
PHONES
0
9
9
9
9
CD
PHONO
CH- 1
FADER
START
FADER
START
CH- 1CH- 2
9
9
9
9
CH-2
THRU
CD
PHONO
TRIM TRIM
HI
MID
LOW
HI
MID
LOW
LEVEL
MASTER
LEVEL/DEPTH
FILTERCRUSH
GATE JET
MASTER EFFECT
0
PREVIEW
TRACK MARK SEARCH
PLAY
USB
STOP
REC
MASTER LEVEL
Tragbares Audiogerät/
Mikrofon
Kopfhörer
Komponente, Verstärker,
aktiver Lautsprecher usw.
USB-Gerät
Für Audio-Ausgang Für AufnahmeFür Audio-Eingang
Zum Prüfen von AudioEingang/Ausgang
CDJ-350CDJ-350 DJM-350
Merkmale
Dieses Gerät ist ein DJ-Mixer, der die Technologie der Pioneer DJM-Serie fortführt, dem Weltstandard im Club-Sound. Es ist ein Standardtyp,
ausgestattet mit den Grundfunktionen zum Mischen, das umfassende DJ-Auftritte leicht macht.
USB-Aufnahme
Taste und Drehen des Reglers.
Mit diesem Gerät kann der Sound von DJ-Auftritten leicht auf USB-
Sounds kann leicht modifiziert werden, durch einfaches Drücken einer
Geräten (tragbaren Flash-Speichergeräten usw.) aufgezeichnet
werden. Der aufgenommene Sound kann auch auf diesem Gerät abgespielt werden.
MIC/ AUX INPUT
Das Gerät ist mit einem Mikrofon/ AUX-Eingang ausgestattet, der den
Anschluss eines Mikrofons oder externen Geräts (Sampler, portables
Audiogerät usw.) erlaubt. DJ-Wiedergabe ist mit bis zu drei Sets von
3-Bereich-Equalizer
Dieses Gerät ist mit einem 3-Bereich-Equalizer ausgestattet, der
Eingängen möglich: CH-1 (Kanal 1), CH-2 (Kanal 2) und MIC/ AUX
(Mikrofon/ Auxiliary-Kanal).
es erlaubt, die Lautstärke von hohen, mittleren und niedrigen
Frequenzbereichen getrennt einzustellen. Nicht nur kann der Ton nach
Ihrem Geschmack eingestellt werden, der Sound für einen bestimmten Bereich kann auch vollständig ausgeschaltet werden, indem der
Regler ganz gegen den Uhrzeigersinn gestellt wird (Isolatorfunktion).
FADER START
Bei Anschluss an einen Pioneer DJ-Player mit einem Steuerkabel (mit
dem DJ-Player mitgeliefert), kann die Wiedergabe auf dem DJ-Player
durch Bedienung des Faders dieses Geräts (Fader-Start-Wiedergabe)
gestartet werden.
MASTER EFFECT (GATE, CRUSH, JET,
FILTER)
Dieses Gerät ist mit vier Effekt-Tasten ausgestattet, die es erlauben,
den Sound auf verschiedene Weisen zu ändern. Die Stimmung des
Beispiel für System-Setup
Ein DJ-System wie das in der Zeichnung unten gezeigte kann erzielt werden, indem dieses Gerät mit einem DJ-Player und Peripheriegeräten
verbunden wird.
Deutsch
Lieferumfang
! Netzkabel
! Garantiekarte
! Bedienungsanleitung (dieses Dokument)
De
5
Page 38

Anschlüsse
AC IN
MASTER OUTCH-2
1
L
R
2
PHONO
CONTROL
SIGNAL
GND
L
R
CD
CH-1 AUX
MIC
PHONO
CONTROL
L
R
L
R
CD
1 2 7 8 93 4 5 3 4 56
a
Schalten Sie die Stromversorgung aus und ziehen Sie das Netzkabel aus der Netzsteckdose, bevor Sie Geräte anschließen oder die Anschlüsse
ändern.
Beachten Sie die Bedienungsanleitung der angeschlossenen Komponente.
Schließen Sie das Netzkabel an, nachdem alle Anschlüsse zwischen den Geräten vorgenommen wurden.
Verwenden Sie immer das mitgelieferte Netzkabel.
Bezeichnungen der Anschlüsse
Rückseite
1 AC IN
Schließen Sie an eine Netzsteckdose an. Stecken Sie den Netzstecker
erst ein, nachdem alle Anschlüsse vorgenommen wurden.
Verwenden Sie immer das mitgelieferte Netzkabel.
2 MASTER OUT 1, 2 (Seite 7)
Schließen Sie einen Endstufenverfstärker usw. an.
3 PHONO (Seite 7)
Schließen Sie einen Plattenspieler oder ein anderes Ausgabegerät
auf Phono-Ebene (MM-Tonabnehmer) an dieses Gerät an. Schließen
Sie nicht einen DJ-Player oder ein anderes Gerät mit Line-Pegel an.
4 CD (Seite 7)
Schließen Sie einen DJ-Player oder ein anderes Gerät mit Line-Pegel an.
Frontplatte
5 CONTROL (Seite 7)
Stellen Sie die Verbindung mit einem Steuerkabel her (mit Pioneer
DJ-Playern mitgeliefert).
6 SIGNAL GND (Seite 7)
Schließen Sie hier den Massedraht eines Plattenspielers an. Dadurch
wird Rauschen beim angeschlossenem Plattenspieler vermieden.
7 AUX (Seite 7)
Schließen Sie an die Ausgangsbuchse eines externen Geräts
(Sampler, portables Audiogerät usw.) an.
8 MIC (Seite 7)
Schließen Sie ein Mikrofon an.
9 Kensington-Diebstahlsicherung
a PHONES (Seite 7)
Schließen Sie hier Kopfhörer an.
De
6
Page 39

Anschließen an die Eingangs-/ Ausgangsbuchsen
AC IN
AUDIO
OUT
RL
CONTROL
USB
MASTER OUTCH-2
1
L
R
2
PHONO
CONTROL
SIGNAL
GND
L
R
CD
CH-1 AUX
MIC
PHONO
CONTROL
L
R
L
R
CD
Mikrofon
Komponente, Verstärker,
aktiver Lautsprecher usw.
Zu den Audio-
Eingangsbuchsen
Audio-Eingangssektion
Audio-Ausgangssektion
Audiokabel
Audiokabel
Audiokabel
Zu den AudioAusgangsbuchsen
Zu den AudioAusgangsbuchsen
Steuerkabel
1
Massekabel
Zu den
Massekabelklemmen
Audiokabel
2
Mikrofonkabel
Zum Mikrofon
Tragbares
Audiogerät
PlattenspielerDJ-Player
Beispiel:
CDJ-350
Netzkabel (mitgeliefert)
Zur Netzsteckdose
R
L
R
L
R
L
R
L
R
L
Kopfhörer
Kopfhörerkabel
Rückseite
Deutsch
1 Zur Verwendung der Fader-Startfunktion schließen Sie ein Steuerkabel an (Seite 10).
Die Fader-Start-Funktion steht nur zur Verfügung, wenn ein Pioneer DJ-Player angeschlossen ist.
2 Ein tragbares Audiogerät kann über ein Cinch-Ministecker (Ø 3,5 mm) Wandlerkabel (Seite 12) angeschlossen werden.
Frontplatte
De
7
Page 40

Bedienungen
2 CHANNEL DJ MIXER
MIC /AUX
MIC
0
LEVEL
HI
AUX
LOW
MIC/AUX
ON
12
12
12
12
HEADPHONES
CUE
CH-1
CUE
MIXING
CUE MASTER
CH-2
LEVEL
PHONES
0
9
9
9
9
CD
PHONO
CH- 1
FADER
START
FADER
START
CH- 1CH- 2
9
9
9
9
CH-2
THRU
CD
PHONO
TRIM TRIM
HI
MID
LOW
HI
MID
LOW
LEVEL
MASTER
LEVEL/DEPTH
FILTERCRUSH
GATE JET
MASTER EFFECT
0
PREVIEW
TRACK MARK SEARCH
PLAY
USB
STOP
REC
MASTER LEVEL
MIC/AUX-Sektion Mixer-Sektion
Kopfhörer-Sektion
Mastereffekt-Sektion
USB-
Aufnahmesektion
Fluss der Audiosignale
EQ
LEVEL
MIC/AUX
ON/OFF
MASTER
EFFECT
MASTER
LEVEL
MASTER
OUT 1
MASTER
OUT 2
RECPLAY
CROSS FADER
MIC
AUX
CD1 PHONO1 CD2 PHONO2
USB I/F
PREVIEW
EQ/
ISOLATOR
TRIM
CH
FADER
EQ/
ISOLATOR
TRIM
CH
FADER
3
1
2
r
b
c
g
4
8
9
a
6
5
h
f
e
i
j
7
d d
o
p
k
l
q
m n
Bedienpult
1 u (Netzschalter) (Seite 9)
2 MASTER LEVEL (Seite 9)
MIC/ AUX-Sektion
Der Sound von einem Mikrofon oder externen Gerät (Sampler, portables Audiogerät usw.) kann hier gehandhabt werden (Seite 12).
3 MIC, AUX
4 LEVEL
5 HI, LOW
6 MIC/AUX ON
Kopfhörer-Sektion
Der an diesem Gerät angelegte Sound kann über Kopfhörer (Seite 11)
geprüft werden.
7 CH-1 CUE, CH-2 CUE
8 MIXING
9 LEVEL
a PHONES
De
8
Mixer-Sektion
Zwei Sets von Audiosignalen können getrennt für grundlegendes
DJ-Mischen eingestellt werden (Seite 9).
b CD, PHONO (Eingabe-Wahlschalter)
c TRIM
d HI, MID, LOW
e Master-Pegelanzeige
f Kanalpegelanzeige
g Kanalfader
h FADER START
i THRU,
j Crossfader
, (Crossfader Curve-Wahlschalter)
USB-Aufnahmesektion
DJ-Auftritte können auf USB-Geräten aufgezeichnete und davon abgespielt werden (Seite 12).
k USB-Gerät-Einsetzschacht
l USB STOP
Page 41

m REC k/ g
9
9
9
9
CD
PHONO
CH- 1
FADER
START
FADER
START
CH- 1 CH- 2
9
9
9
9
CH-2
THRU
CD
PHONO
TRIM TRIM
HI
MID
LOW
HI
MID
LOW
LEVEL
MASTER
b
c
1 2
g
h
f
e
i
j
d d
n PLAY f
o TRACK MARK (PREVIEW)
p SEARCH o, p
Mastereffekt-Sektion
Effekte können auf den Soundausgang von [MASTER OUT 1, 2] (Seite
11) angelegt werden.
q MASTER EFFECT (GATE, CRUSH, JET, FILTER)
r LEVEL/
DEPTH
Über den Netzschalter dieses Geräts
Zum Einschalten
Drücken Sie [u] 1.
Schalten Sie die Stromversorgung dieses Geräts ein.
Die [u]-Anzeige leuchtet grün.
Zum Umschalten auf Standby-Modus
Grundlegender Betrieb (MixerSektion)
Deutsch
Wenn das Gerät eingeschaltet ist, drücken Sie [u] 1
mindestens 2 Sekunden lang.
Dieses Gerät ist auf Standby-Modus geschaltet.
Die [u]-Anzeige leuchtet rot.
! Wenn [u] erneut gedrückt wird, wird die Stromversorgung
eingeschaltet.
! Dieses Gerät hat eine Auto-Standby-Funktion. Einzelheiten siehe
Über die Auto-Standby-Funktion auf Seite 13.
Tonausgabe
Prüfen Sie vor der Tonausgabe, ob dieses Gerät richtig an den
DJ-Player usw. angeschlossen ist. Anweisungen zu Verbindungen finden Sie in Anschließen an die Eingangs-/ Ausgangsbuchsen auf Seite 7.
Stellen Sie die Lautstärke von Endstufenverstärkern, die an die
[MASTER OUT 1, 2]-Buchsen angeschlossen sind, auf einen geeigneten Pegel ein. Beachten Sie, dass sehr laute Töne ausgegeben werden
können, wenn die Lautstärke zu hoch gestellt ist.
Zum Ausgeben des Tons von Kanal 1 [CH-1] 1
Zum Ausgeben des Tons von Kanal 2 ([CH-2]) 2, verfahren Sie wie
unten beschrieben und ersetzen [CH-1] mit [CH-2].
1 Schalten Sie den [CD, PHONO] (Eingangswahl)
Schalter b für [CH-1] 1 ein.
Wählen Sie die Eingangsquelle für [CH-1] unter den an dieses Gerät
angeschlossenen Geräten.
— [CD]: Wählt den DJ-Player, der an die Buchsen [CD] ange-
schlossen ist.
— [PHONO]: Wählt den Plattenspieler, der an die Buchsen
[PHONO] angeschlossen ist.
2 Drehen Sie den Regler [TRIM] c für [CH-1] 1 im
Uhrzeigersinn.
Stellen Sie den Audiopegel ein, der an die Buchse [CH-1] angelegt
wird.
Die [CH-1]-Kanalpegelanzeige f leuchtet auf, wenn Audiosignale
richtig an [CH-1] angelegt werden.
Stellen Sie [TRIM] so ein, dass die orangefarbene Anzeige an der
Stelle im Track aufleuchtet, wo die Lautstärke am größten ist (die
Klimax usw.).
Seien Sie vorsichtig, wenn die rote Anzeige nicht leuchtet, da sonst
der Sound verzerrt sein kann.
De
9
Page 42
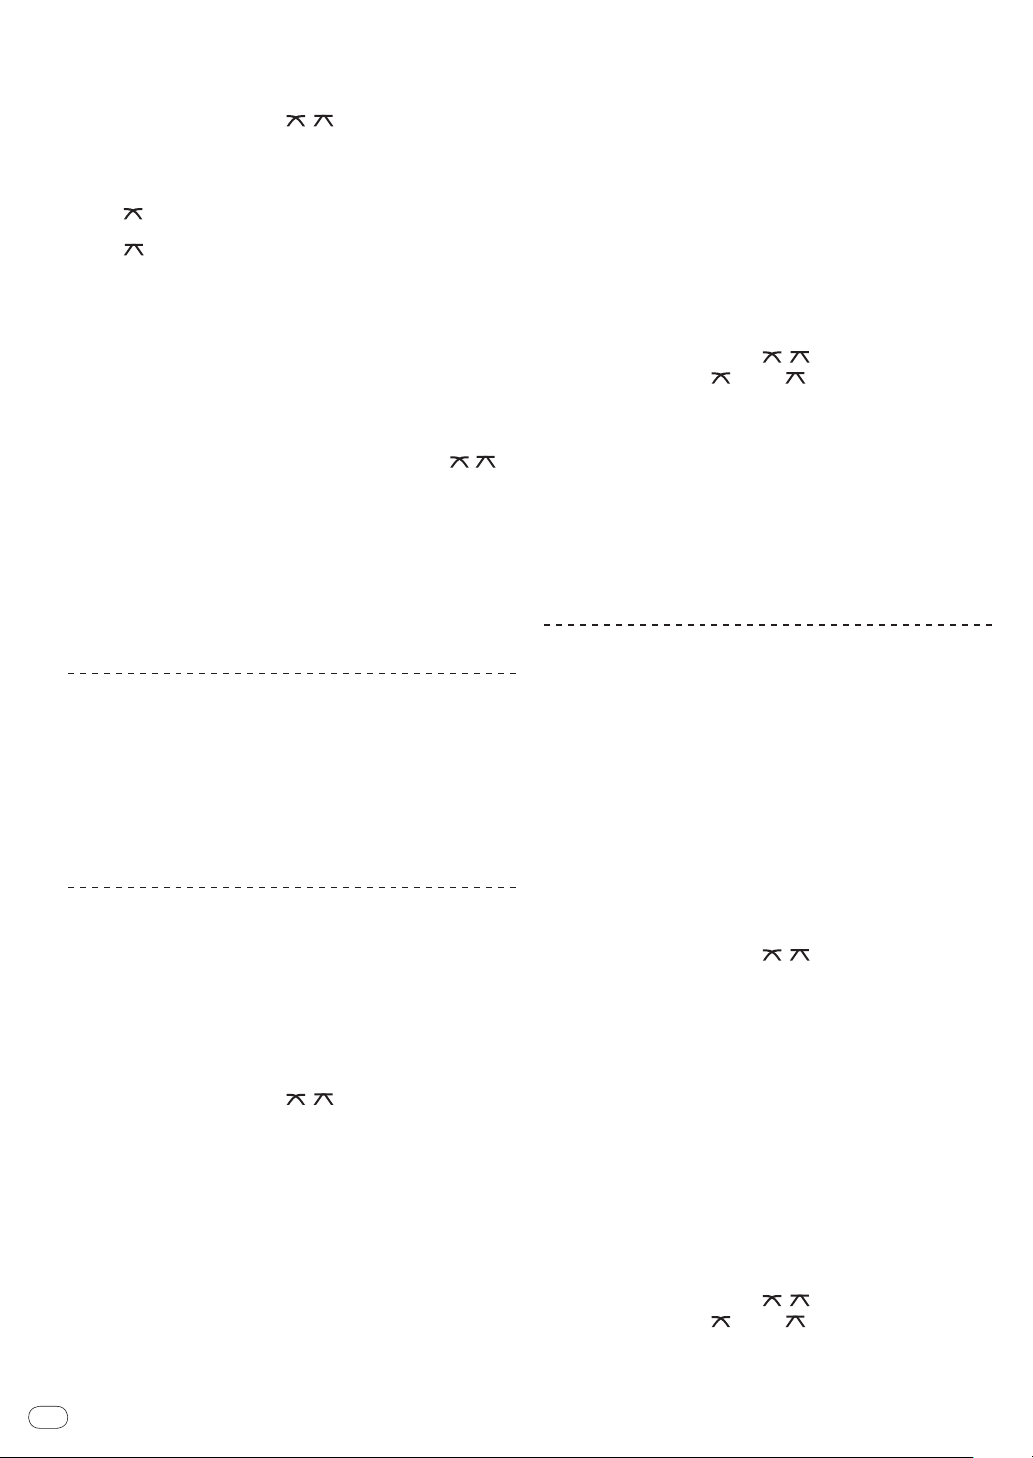
3 Bewegen Sie den Kanalfader [CH-1] 1 g zur
Rückseite.
Der Pegel des Tonausgangs von den Buchsen [CH-1] wird eingestellt.
4 Schalten Sie den [THRU, , ] (Crossfader CurveWahlschalter) i um.
Dadurch werden die Crossfader-Curve-Eigenschaften umgeschaltet.
— [THRU]: Wählen Sie diese Option, wenn Sie den Crossfader
nicht verwenden möchten.
— [ ]: Stellen Sie hier für eine allmählich ansteigende Kurve
ein.
— [ ]: Stellen Sie hier für eine scharf ansteigende Kurve
ein. (Wenn der Crossfader vom linken oder rechten Rand
wegbewegt wird, wird der Ton sofort von der Gegenseite
ausgegeben.)
5 Stellen Sie den Crossfader j ein.
Schalten Sie den Kanal um, dessen Ton von den Lautsprechern ausgegeben wird.
— Linker Rand: Der [CH-1] Ton wird ausgegeben.
— Mittenposition: Der Ton von [CH-1] und [CH-2] wird gemischt
und ausgegeben.
— Rechter Rand: Der [CH-2] Ton wird ausgegeben.
! Diese Bedienung ist nicht erforderlich, wenn der [THRU, , ]
(Crossfader Curve-Wahlschalter) auf [THRU] gestellt ist.
6 Drehen Sie [MASTER LEVEL] 2 im Uhrzeigersinn.
Der Ton wird von den Lautsprechern ausgegeben.
Die Masterpegel-Anzeige e am Bedienpult leuchtet.
Stellen Sie [MASTER LEVEL] so ein, dass die orangefarbene Anzeige
an der Stelle im Track aufleuchtet, wo die Lautstärke am größten ist
(die Klimax usw.).
Seien Sie vorsichtig, wenn die rote Anzeige nicht leuchtet, da sonst
der Sound verzerrt sein kann.
Abstimmen der Tonqualität
Drehen Sie den Regler [CH-1] 1 oder [CH-2] 2 [HI], [MID]
oder [LOW] d.
Siehe Technische Daten auf Seite 16 für den Bereich der Töne, die von
jedem Regler angepasst werden können.
! Der Sound für den Bereich kann vollständig ausgeschaltet werden,
indem der Regler ganz gegen den Uhrzeigersinn gestellt wird
(Isolatorfunktion).
6 Bedienen Sie den DJ-Player, der an die Buchsen [CH-2]
angeschlossen ist.
Während Sie den Ton über den Kopfhörer prüfen, passen Sie das
Tempo von Track [CH-2] an das Tempo von Track [CH-1] an.
7 Während Sie den Kanalfader [CH-2] 2 zur Rückseite
bewegen, bewegen Sie den Kanalfader [CH-1] 1 nach
vorne.
Während Sie die Tonausgabe von den Lautsprechern prüfen, bedienen
Sie die Kanal-Fader, um den Ton von [CH-1] mit dem Ton von [CH-2]
zu ersetzen.
Mischen wird fertiggestellt, wenn nur der [CH-2]-Ton von den
Lautsprechern ausgeben wird.
Mischen mit dem Crossfader
1 Schalten Sie den [THRU,
, ] (Crossfader Curve-
Wahlschalter) i auf [ ] oder [ ].
2 Bedienen Sie [CH-2] 2.
Bedienen Sie, wie in Schritt 2 bis 6 unter Mischen mit den KanalFadern auf Seite 10 beschrieben.
3 Bewegen Sie den Crossfader j allmählich nach
rechts.
Während Sie die Tonausgabe von den Lautsprechern prüfen, bedienen
Sie den Crossfader, um den Ton von [CH-1] mit dem Ton von [CH-2] zu
ersetzen.
Mischen wird fertiggestellt, wenn nur der [CH-2]-Ton von den
Lautsprechern ausgeben wird.
Verwenden Sie den Fader zum Spielen
eines Pioneer DJ-Players (Fader Start)
Wenn Sie einen Pioneer DJ-Player mit einem Steuerkabel (mit einem
DJ-Player mitgeliefert) verwenden, können Sie mit dem Fader dieses Geräts die Wiedergabe starten oder andere Bedienungen am
DJ-Player ausführen.
Die Fader-Start-Funktion steht nur zur Verfügung, wenn ein Pioneer
DJ-Player angeschlossen ist.
Schließen Sie im voraus einen Pioneer DJ-Player an dieses Gerät an.
Anweisungen zu Verbindungen siehe Anschließen an die Eingangs-/
Ausgangsbuchsen auf Seite 7.
Mischen mit den Fadern
Bereiten Sie das Gerät im Voraus vor, so dass der Ton von [CH-1]
1 von den Lautsprechern ausgegeben wird. Anweisungen zur
Vorbereitung siehe Tonausgabe auf Seite 9.
Anweisungen zum Mithören des Sounds finden Sie in Mithören des
Sounds über Kopfhörer (Kopfhörer-Sektion) auf Seite 11.
Mischen mit den Kanal-Fadern
1 Schalten Sie den [THRU,
Wahlschalter) i auf [THRU].
2 Schalten Sie den [CD, PHONO] (Eingangswahl)
Schalter b für [CH-2] 2 ein.
3 Drehen Sie den Regler [TRIM] c für [CH-2] 2 im
Uhrzeigersinn.
4 Drücken Sie [CH-2 CUE] 7.
Der Sound von [CH-2] wird im Kopfhörer mitgehört.
5 Drehen Sie [MIXING] 8.
Dadurch wird die Balance der Mithörlautstärke zwischen der
Tonausgabe von den Buchsen [MASTER OUT 1, 2] angepasst (der Ton
von [CH-1]) und der Ton von [CH-2].
De
10
, ] (Crossfader Curve-
Zum Starten der Wiedergabe mit den Kanal-
Fadern
1 Schalten Sie den [THRU,
, ] (Crossfader Curve-
Wahlschalter) i auf [THRU].
2 Drücken Sie [FADER START] h.
Schalten Sie die Fader-Start-Funktion ein.
3 Bewegen Sie den Kanalfader g ganz nach vorne.
4 Stellen Sie Cue auf dem DJ-Player ein
Der DJ-Player pausiert die Wiedergabe am Cue-Punkt.
5 Bewegen Sie den Kanalfader g zur Rückseite.
Die Wiedergabe auf dem DJ-Player beginnt.
! Wenn Sie den Kanal-Fader zurück in Ausgangsposition stellen,
kehrt der Player sofort auf den bereits eingestellten Cue-Punkt
zurück und pausiert die Wiedergabe (Back Cue).
Zum Starten der Wiedergabe mit dem Crossfader
1 Schalten Sie den [THRU,
, ] (Crossfader Curve-
Wahlschalter) i auf [ ] oder [ ].
2 Drücken Sie [FADER START] h.
Schalten Sie die Fader-Start-Funktion ein.
Page 43

3 Stellen Sie den Crossfader j ein.
HEADPHONES
CUE
CH-1
CUE
MIXING
CUE MASTER
CH-2
LEVEL
PHONES
0
8
9
a
7
2 CHANNEL DJ MIXER
LEVEL/DEPTH
FILTERCRUSH
GATE JET
MASTER EFFECT
q
r
Bewegen Sie den Crossfader auf die Randposition entgegengesetzt
dem Kanal, für den die Faderfunktion verwendet werden soll.
4 Stellen Sie Cue auf dem DJ-Player ein
Der DJ-Player pausiert die Wiedergabe am Cue-Punkt.
5 Stellen Sie den Crossfader j ein.
Die Wiedergabe auf dem DJ-Player beginnt.
! Wenn Sie den Crossfader zurück in Ausgangsposition stellen,
kehrt der Player sofort auf den bereits eingestellten Cue-Punkt
zurück und pausiert die Wiedergabe (Back Cue).
Mithören des Sounds über
Kopfhörer (Kopfhörer-Sektion)
1 Schließen Sie Kopfhörer an die Buchse [PHONES] an
Anweisungen zu Verbindungen siehe Anschließen an die Eingangs-/
Ausgangsbuchsen auf Seite 7.
2 Drücken Sie [CH-1 CUE] oder [CH-2 CUE] 7.
Wählen Sie den mitzuhören gewünschten Kanal.
— [CH-1 CUE]: Der Sound von [CH-1] wird mitgehört.
— [CH-2 CUE]: Der Sound von [CH-2] wird mitgehört.
! Diese Bedienung ist nicht erforderlich, um den Master-Kanal-Ton
(den von den Buchsen [MASTER OUT 1, 2] ausgegebenen Ton)
mitzuhören.
3 Drehen Sie [MIXING] 8.
— Beim Drehen gegen den Uhrzeigersinn: Die Lautstärke von
[CH-1] und [CH-2] wird relativ höher.
— In der Mittenposition: Der Ton von [CH-1] und [CH-2] hat die
gleiche Lautstärke wie der Ton von den Buchsen [MASTER
OUT 1, 2].
— Beim Drehen im Uhrzeigersinn: Die Lautstärke des von den
Buchsen [MASTER OUT 1, 2] ausgegebenen Tons wird relativ
höher.
4 Drehen Sie [LEVEL] 9 in der Kopfhörer-Sektion im
Uhrzeigersinn.
Ton wird vom Kopfhörer ausgegeben.
! Mithören wird aufgehoben, wenn Sie [CH-1 CUE] oder [CH-2 CUE]
erneut drücken.
! Mithören des von den Buchsen [MASTER OUT 1, 2] ausgegebenen
Tons kann nicht ausgeschaltet werden.
Verwendung der Effekt-Funktion
(Mastereffekt-Sektion)
Dieses Gerät hat vier Effekt-Funktionen. Wenn eine Effekt-Taste
gedrückt wird, wird der entsprechende Effekt auf die Audiosignale
angelegt, die von den Buchsen [MASTER OUT 1, 2] ausgegeben
werden.
Anlegen eines Effekts
Drücken Sie eine der Tasten [MASTER EFFECT (GATE,
CRUSH, JET, FILTER)] q.
Der Effekt wird auf den Ton angelegt.
Die Taste, die gedrückt wurde, blinkt.
Der Effekt unterscheidet sich für die verschiedenen Tasten.
Einzelheiten über die verschiedenen Effekte siehe nachstehende
Tabelle.
! Wenn eine blinkende Taste erneut gedrückt wird, wird der Effekt
ausgeschaltet.
Effekt-Name Beschreibungen LEVEL/ DEPTH
Der distinkte Bereich
wird von dem Sound der
GATE
CRUSH
JET
FILTER
Rhythmus-Sektion des
Tracks abgeschnitten, um
dem Rhythmus Variation
zu geben.
Der Ton wird moderat
gecrusht und erhält mehr
Akzent.
Ein Effekt wie ein abhebender und landender Jet wird
erhielt.
Der Sound des Höhen- oder
Tiefenbereichs wird ausgefiltert, wodurch sich der Ton
stark ändert.
Links: Der Höhenbereich
(High-Hat usw.) erhält
Variation.
Rechts: Der Tiefenbereich
(Basstrommel usw.) erhält
Variation.
Links: Der Sound wird
gecrusht und ein Effekt wie
allmähliches Abschneiden
des Höhenbereichs wird
erzielt.
Rechts: Der Sound wird
gecrusht und ein Effekt wie
allmähliches Abschneiden
des Tiefenbereichs wird
erzielt.
Links: Ein Effekt wie ein
landender Jet wird erhielt.
Rechts: Ein Effekt wie ein
abhebender Jet wird erhielt.
Links: Ein Effekt wie allmähliches Abschneiden des
Höhenbereichs wird erzielt.
Rechts: Ein Effekt wie
allmähliches Abschneiden
des Tiefenbereichs wird
erzielt.
Den Effekt variieren
Drehen Sie [LEVEL/ DEPTH] r.
Der Effekt ändert sich entsprechend der Richtung, in der [LEVEL/
DEPTH] gedreht wird und seiner Position.
! Der Originalton wird ausgegeben, wenn [LEVEL/ DEPTH] auf
Mittenposition gestellt wird.
Deutsch
De
11
Page 44
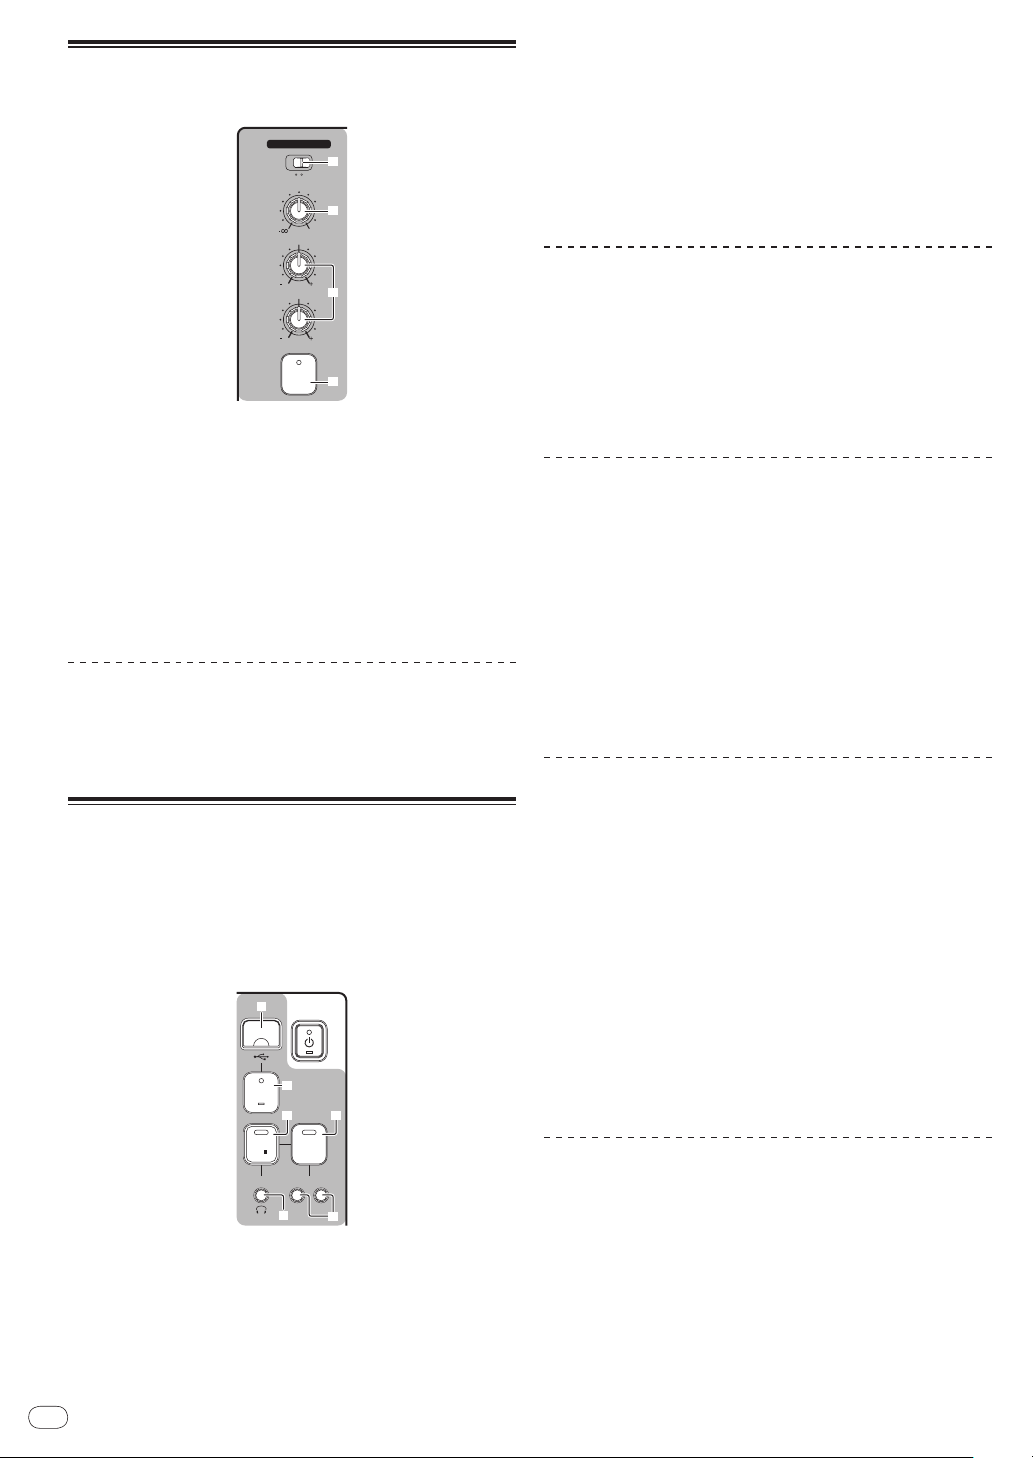
Verwendung eines Mikrofons oder
MIC /AUX
MIC
0
LEVEL
HI
AUX
LOW
MIC/AUX
ON
12
12
12
12
3
4
6
5
PREVIEW
TRACK MARK SEARCH
PLAY
USB
STOP
REC
o
p
k
l
m n
externen Geräts (MIC/ AUX-Sektion)
1 Schalter [MIC, AUX] 3.
— [MIC]: Das an der Buchse [MIC] angeschlossene Mikrofon ist
gewählt.
— [AUX]: Das an der Buchse [AUX] angeschlossene externe
Gerät ist gewählt.
2 Drücken Sie [MIC/AUX ON] 6.
3 Drehen Sie [LEVEL] 4 in der MIC/
AUX-Sektion im
Uhrzeigersinn.
Der Ton vom Mikrofon oder externen Gerät wird von den
Lautsprechern ausgegeben.
Abstimmen der Tonqualität
Drehen Sie [HI] oder [LOW] 5 in der MIC/ AUX-Sektion.
Siehe Technische Daten auf Seite 16 für den Bereich der Töne, die von
jedem Regler angepasst werden können.
Aufnehmen des Auftritts (USBAufnahmesektion)
Der gleiche Ton wie der von den Buchsen [MASTER OUT 1, 2] ausgegebene kann als WAV-Datei auf einem USB-Gerät aufgenommen
werden.
! Der Name der Dateien, die erzeugt werden, wenn der Ton im
Format [REC***.WAV] aufgenommen wird (*** ist eine 3-stellige
Zahl).
2 Drücken Sie [REC k/ g] m.
Die Aufnahme beginnt.
Die [REC k/ g]-Anzeige m blinkt.
! Wenn [REC k/ g] erneut gedrückt wird, schaltet die Anzeige [REC
k/ g] aus, und die Aufnahme stoppt.
! Kontinuierliche Aufnahme ist für 180 Minuten möglich. Wenn
die Aufnahme für über 180 Minuten fortgesetzt wird, werden die
Aufnahmedaten auf dem USB-Gerät automatisch geteilt.
! Kontinuierliche Aufnahme ist für ca. 90 Minuten auf einem 1 GB
USB-Gerät möglich.
Aufgenommene Tracks abspielen
Drücken Sie [PLAY f] n.
Die Wiedergabe startet.
Die Anzeige [PLAY f] n leuchtet.
! Wenn [PLAY f] erneut gedrückt wird, schaltet die Wiedergabe
auf Pause.
! Nur WAV-Dateien, die im Ordner [PIONEER DJM / DJM350 REC]
auf dem USB-Gerät gespeichert sind, können abgespielt werden.
Aufgenommene Tracks vorprüfen
1 Drehen Sie [MIXING] 8 aus der Mittenposition gegen
den Uhrzeigersinn.
2 Halten Sie [TRACK MARK (PREVIEW)] o gedrückt.
Der Ton des aufgenommenen Tracks kann über den Kopfhörer gehört
werden, während die gedrückt gehalten wird.
! Der vorgeprüfte Sound wird dem Sound von [CH-1] und [CH-2]
hinzugefügt und vom Kopfhörer ausgegeben.
! Der vorgeprüfte Ton wird nicht von den Lautsprechern
ausgegeben.
! Vorprüfen ist nicht möglich, während der Track aufgenommen
oder abgespielt wird.
Vorspulen/ Rückspulen aufgenomener
Tracks
Halten Sie während der Wiedergabe [SEARCH o, p]
p eingedrückt.
Der Track wird vorgespult, wenn [p] gedrückt gehalten wird.
Der Track wird zurückgespult, wenn [o] gedrückt gehalten wird.
Die Anzeige [PLAY f] blinkt beim Vorspulen/ Rückspulen.
! Vorspulen/ Rückspulen ist nicht im Pausenbetrieb möglich.
Cueing zum Anfang der aufgenommenen Tracks
1 Stecken Sie das USB-Gerät im USB-GeräteEinsetzschacht k ein.
Die Anzeige [USB STOP] l blinkt.
Nach kurzer Zeit hört die [USB STOP]-Anzeige zu blinken auf, beginnt
kontinuierlich zu leuchten, und der Aufnahme-Standbymodus ist
eingeschaltet.
12
Drücken Sie [SEARCH o, p] p.
Drücken Sie [p], um zum Anfang des nächsten Tracks zu gehen.
Drücken Sie [o] einmal, um zum Anfang des aktuell laufenden
Tracks zu springen und zweimal, um zum Anfang des vorherigen
Tracks zu springen.
Aufteilen von Tracks beim Aufnehmen
De
Während der Aufnahme drücken Sie [TRACK MARK
(PREVIEW)] o.
Der aktuell aufgenommene Track wird aufgeteilt und auf dem USBGerät gespeichert.
! Wenn aufgeteilte Tracks auf diesem Gerät abgespielt werden,
kann der Sound an der Grenze zwischen zwei Tracks unterbrochen
werden.
Page 45

Aufgenommene Tracks löschen
1 Während der Track abgespielt wird, drücken Sie
[PLAY f] n.
Der zu löschen gewünschte Track wird auf Pause geschaltet.
2 Drücken Sie [PLAY f] n mindestens 2 Sekunden
lang.
Die [REC k/ g]-Anzeige blinkt.
3 Während Sie [PLAY f] n gedrückt halten, drücken
Sie [REC k/
Die [REC k/ g]-Anzeige leuchtet auf, und der Track wird gelöscht.
! Track-Löschen wird abgebrochen, wenn [PLAY f] losgelassen
wird, wenn die Anzeige [REC k/ g] blinkt.
g] m.
Abtrennen von USB-Geräten
Führen Sie immer das folgende Verfahren aus, um USB-Geräte abzutrennen. Wenn Sie das USB-Gerät abziehen, ohne dies Verfahren
auszuführen, kann das USB-Gerät unlesbar werden.
Beim Ausschalten der Stromversorgung des Set nehmen Sie immer
zuerst das USB-Gerät ab.
1 Drücken Sie [USB STOP] l mindestens 1 Sekunde
lang.
Die [USB STOP]-Anzeige blinkt und erlischt dann.
2 Trennen Sie das USB-Gerät ab.
Deutsch
Über die Auto-Standby-Funktion
Wenn die Auto-Standby-Funktion eingeschaltet wird, wird automatisch auf den Standby-Modus geschaltet, nachdem die Zeit mit allen
unten aufgeführten Bedingungen abgelaufen ist.
— Das keine der Tasten oder Regler dieses Geräts bedient wird.
— Dass die Kanalpegelanzeige dieses Geräts nicht leuchtet.
— Dass die Aufnahme- und Wiedergabefunktionen des USB-Geräts
nicht verwendet werden.
Einstellen der Auto-Standby-Funktion
Stellen Sie zuerst dieses Gerät ist auf Standby-Modus.
1 Drücken Sie [u] 1, während Sie [o] und [p] p
gedrückt halten.
Dieses Gerät schaltet auf den Modus zum Ändern der Auto-StandbyFunktion um.
Der höchste Punkt an der Master-Pegel-Anzeige blinkt. Die anderen
Punkte an der Anzeige leuchten entsprechend der aktuell eingestellten Zeit.
2 Drücken Sie [o] oder [p] p.
Stellen Sie die Zeit bis zum Einstellen des Standby-Modus ein.
Die Einstellzeit schaltet bei jedem Drücken der Taste um.
Die Punkte an der Master-Pegelanzeige leuchten entsprechend der
Einstellzeit (mit Ausnahme des obersten Punkts).
— Aus — 20 Minuten — 40 Minuten — 60 Minuten
— 20 Minuten: Die unteren beiden Punkte leuchten.
— 40 Minuten: Die unteren vier Punkte leuchten.
— 60 Minuten: Die unteren sechs Punkte leuchten.
! Die Zeit ist werkseitig auf 20 Minuten eingestellt.
3 Drücken Sie [u] 1 mindestens 2 Sekunden lang.
Die neue Einstellung für die Auto-Standby-Funktion ist gespeichert.
Die [u]-Anzeige blinkt grün, während die Einstellung gespeichert
wird, und hört dann zu blinken auf und leuchtet kontinuierlich, wenn
die Einstellung gespeichert ist.
! Trennen Sie nicht das Netzkabel ab, während die Einstellung
gespeichert wird.
De
13
Page 46
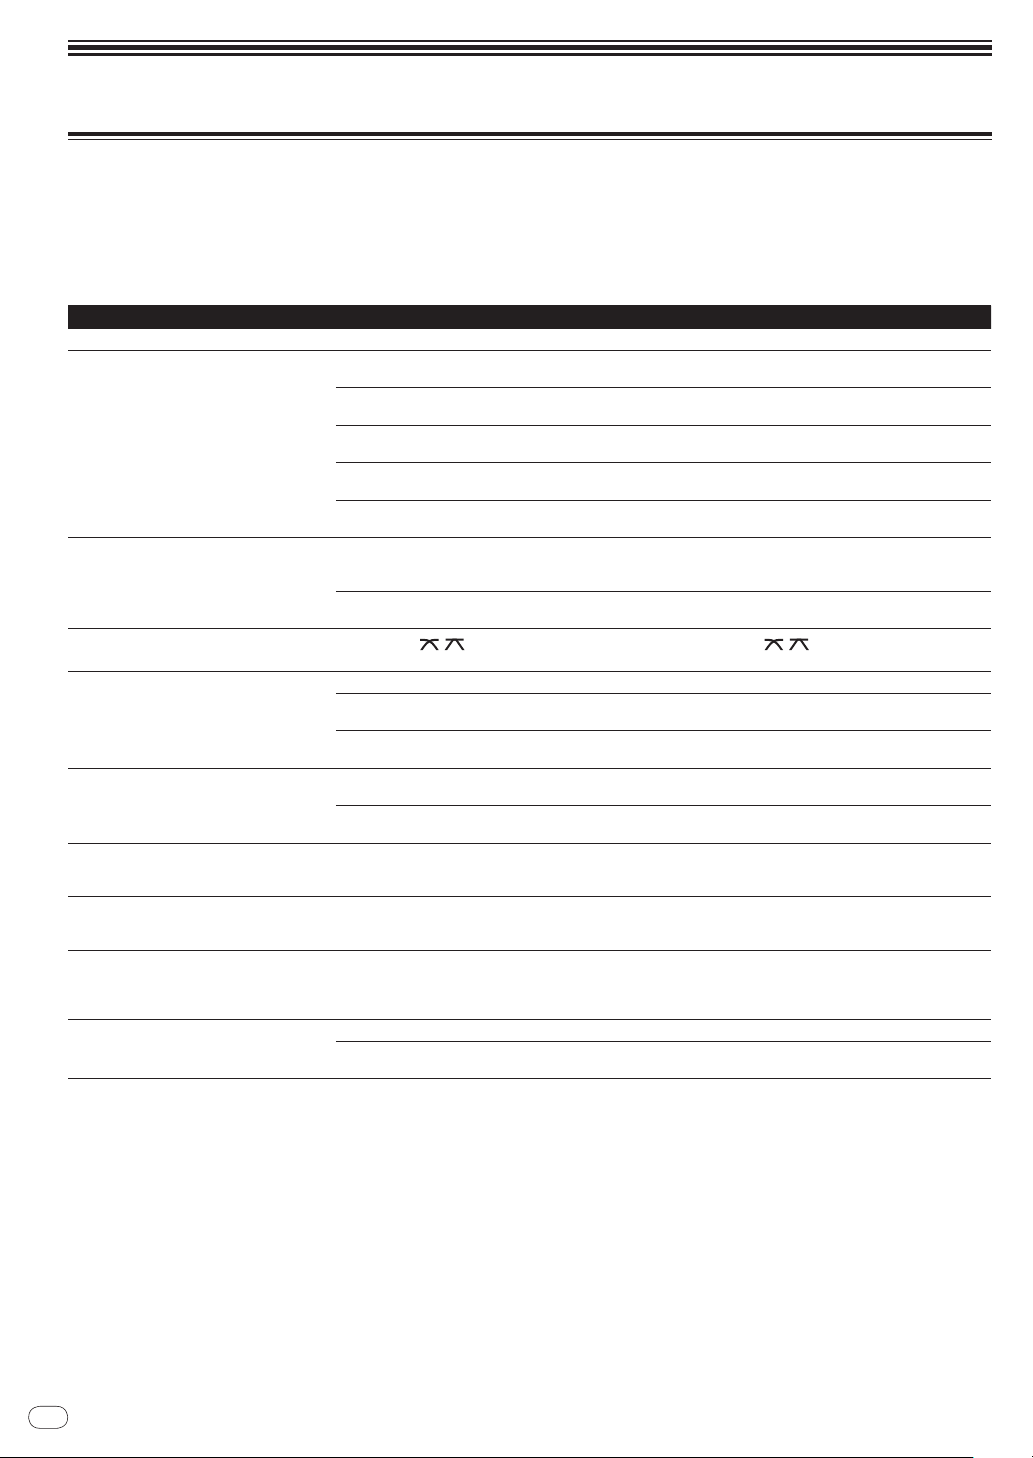
Zusätzliche Informationen
Störungssuche
! Bedienungsfehler werden oft irrtümlich für Störungen oder Ausfälle gehalten. Wenn Sie den Eindruck haben, dass diese Komponente nicht
ordnungsgemäß funktioniert, überprüfen Sie bitte die folgenden Punkte. Manchmal wird eine Störung auch durch ein externes Gerät verursacht. Überprüfen Sie die anderen verwendeten Komponenten und elektrischen Geräte. Wenn Sie die Störung nicht beheben können, wenden
Sie sich an die nächste Pioneer-Kundendienststelle oder an Ihren Händler.
! Dieses Gerät kann möglicherweise aufgrund von statischer Elektrizität oder anderen externen Einflüssen nicht richtig arbeiten. In diesem Fall
kann normaler Betrieb durch Abziehen des Netzsteckers, mindestens 5 Sekunden Warten und erneutes Einstecken wieder hergestellt werden.
Problem Prüfen Abhilfe
Das Gerät schaltet nicht ein. Ist das Netzkabel richtig angeschlossen? Stecken Sie den Netzstecker in eine Netzsteckdose. (Seite 7)
Es wird kein oder nur sehr schwacher Ton
erzeugt.
Verzerrter Ton. Ist [MASTER LEVEL] in die richtige Stellung
Crossfade ist unmöglich.
Fader-Start eines DJ-Players ist unmöglich. Ist [FADER START] auf Aus-Stellung gestellt? Stellen Sie [FADER START] auf Ein-Stellung. (Seite 10)
Kein Effekt. Wurde eine der [MASTER EFFECT (GATE, CRUSH,
Es wird kein Sound erzeugt, oder der Sound
ist schwach, wenn ein auf einem USB-Gerät
aufgenommener Track abgespielt wird.
Der Sound ist verzerrt, wenn ein auf einem
USB-Gerät aufgenommener Track abgespielt
wird.
Der Ton eines aufgenommenen Tracks kann
nicht über den Kopfhörer vorgeprüft werden, auch wenn [TRACK MARK (PREVIEW)]
gedrückt gehalten wird.
USB-Speichergerät wird nicht erkannt. Ist das USB-Gerät richtig angeschlossen? Setzen Sie das USB-Gerät vollständig ein. (Seite 12)
Ist der [CD, PHONO] (Eingangswahl) Schalter
richtig eingestellt?
Sind die Regler [TRIM] [Kanalfader], [Crossfader]
und [MASTER LEVEL] in die richtigen Stellungen?
Sind die angeschlossenen Komponenten, Verstärker usw. richtig eingestellt?
Sind die Verbindungskabel richtig angeschlossen?
Sind Buchsen und Stecker verschmutzt? Reinigen Sie Buchsen und Stecker vor dem Herstellen von
gestellt?
Ist [TRIM] in die richtige Stellung gestellt? Stellen Sie [TRIM] so ein, dass die orangefarbene Anzeige an der
Ist der [THRU,
schalter) auf [THRU] gestellt?
Ist das Steuerkabel richtig angeschlossen? Verbinden Sie dieses Gerät und einen DJ-Player mit einem
Sind die Audiokabel richtig angeschlossen? Schließen Sie dieses Gerät an den Audioausgang eines DJ-Play-
JET, FILTER)]-Tasten gedrückt?
Ist [LEVEL/
Ist [MASTER LEVEL] in die richtige Stellung
gestellt?
Ist [TRIM] in die richtige Stellung gestellt? Stellen Sie vor der Aufnahme [TRIM] so ein, dass die orange-
Ist [MIXING] ganz im Uhrzeigersinn gedreht? Drehen Sie [MIXING] aus der Mittenposition gegen den Uhrzei-
Ist das USB-Gerät eines, das auf diesem Gerät
verwendet werden kann?
, ] (Crossfader Curve-Wahl-
DEPTH] auf Mittenposition gestellt? Drehen Sie [LEVEL/ DEPTH] im Uhrzeigersinn oder gegen den
Schalten Sie den [CD, PHONO] (Eingangswahl) Schalter um, um
die Eingangsquelle für den Kanal zu wählen. (Seite 9)
Stellen Sie die Regler [TRIM] [Kanalfader], [Crossfader] und
[MASTER LEVEL] in die richtigen Stellungen. (Seite 9)
Stellen Sie die externe Eingangswahl, Lautstärke usw. an den
Komponenten/
Schließen Sie die Verbindungskabel richtig an. (Seite 7)
Verbindungen.
Stellen Sie [MASTER LEVEL] so ein, dass die orangefarbene
Anzeige an der Masterpegel-Anzeige beim Spitzenpegel aufleuchtet. (Seite 9)
Kanalpegel-Anzeige beim Spitzenpegel aufleuchtet. (Seite 9)
Schalten Sie den [THRU, , ] (Crossfader Curve-Wahlschalter) auf eine andere Position als [THRU]. (Seite 9)
Steuerkabel. (Seite 7)
ers mit einem Audiokabel an. (Seite 7)
Drücken Sie eine der [MASTER EFFECT (GATE, CRUSH, JET,
FILTER)]-Tasten. (Seite 11)
Uhrzeigersinn. (Seite 11)
Stellen Sie vor der Aufnahme [MASTER LEVEL] so ein, dass die
orangefarbene Anzeige an der Masterpegel-Anzeige beim Spitzenpegel aufleuchtet. (Seite 9)
farbene Anzeige an der Kanalpegel-Anzeige beim Spitzenpegel
aufleuchtet. (Seite 9)
gersinn. (Seite 12)
Dieses Gerät unterstützt USB-Massenspeichergeräte wie externe
Festplatten und portable Flash-Speicher-Geräte.
Verstärkern richtig ein.
14
De
Page 47

Über Fehler
Wenn dieses Gerät nicht normal arbeiten kann blinken die Anzeigen [u] (Netzschalter), [USB STOP] und [PLAY f], um einen Fehler
anzuzeigen.
Gehen Sie die Tabelle unten durch und treffen Sie die erforderlichen Maßnahmen.
Wenn der gleiche Fehlercode erscheint, nachdem die angegebenen Maßnahmen getroffen worden sind, wenden Sie sich an das Geschäft, in dem
das Gerät gekauft wurde, oder an eine Pioneer-Kundendienstvertretung in Ihrer Nähe.
Über die Fehleranzeige der [USB STOP]-Anzeige
Wenn die [USB STOP]-Anzeige wiederholt 2 bis 5 Mal blinkt
1 Trennen Sie das USB-Gerät ab.
2 Drücken Sie [USB STOP].
Gehen Sie die Tabelle unten durch und treffen Sie die erforderlichen Maßnahmen.
AnzeigeName
USB STOP
PLAY f
u (Netzschalter)
Anzahl der
Blinkzeichen
der Anzeige
2 Mal wiederholt
3 Mal wiederholt
4 Mal wiederholt
5 Mal wiederholt
3 Mal Wiedergabefehler
Kontinuierlich
Beschreibung
des Fehlers
DateiformatProblem
USB-KlasseProblem
Problem beim
Schreiben auf
USB-Gerät
USB-Gerät Überstrom erkannt
Schaltkreisproblem
Ursache Maßnahme
USB-Speichergerät ist nicht formatiert.
Sie verwenden ein USB-Gerät mit einem Dateisystem,
das nicht von diesem Gerät unterstützt wird.
Ein anderes Gerät als ein USB-Massenspeichergerät ist
angeschlossen.
Ein USB-Hub ist angeschlossen. Schließen Sie nicht einen USB-Hub an.
Nicht genug freier Platz auf dem USB-Gerät.
Es befindet sich eine Datei mit dem Namen “REC999.
WAV” im Speicherordner für aufgezeichnete Daten (PIONEER DJM/
Der Schreibschutz-Schalter des USB-Geräts ist in EinStellung gestellt.
Sie verwenden ein USB-Gerät mit einer Sicherheitsfunktion.
Der Speicherordner für aufgezeichnete Daten (PIONEER
DJM / DJM350 REC) ist auf “Read Only” gesetzt.
Sie verwenden ein USB-Gerät (wie eine Festplatte mit
Stromversorgung über Bus), deren Stromstärke höher
als die Nennstärke dieses Geräts ist (500 mA).
Es befinden sich keine abspielbaren Dateien in dem
Speicherordner für aufgezeichnete Daten (PIONEER
DJM / DJM350 REC).
Es liegt ein Problem in der internen Schaltung vor.
DJM350 REC).
Verwenden Sie ein USB-Gerät, das mit einem von diesem Gerät unterstützten Dateisystem formatiert ist (FAT
oder HFS+).
Schließen Sie ein USB-Massenspeichergerät an.
Verwenden Sie ein USB-Gerät mit ausreichend freien
Speicherplatz.
Durch Aufnahme erstellte Dateien erhalten eine
3-stellige Nummer. Wenn die Nummer 999 erreicht ist,
können keine weiteren Dateien in dem Ordner erzeugt
werden. In diesem Fall verschieben Sie die Dateien aus
dem Ordner in einen anderen Ordner.
Stellen Sie den Schreibschutz-Schalter des USB-Geräts
in Aus-Stellung.
Verwenden Sie ein USB-Gerät ohne eine Sicherheitsfunktion.
Ändern Sie die Einstellung, so dass der Speicherordner
für aufgezeichnete Daten beschreibbar ist.
Verwenden Sie ein USB-Gerät innerhalb der Nennleistung dieses Geräts (wie eine Festplatte mit Stromversorgung über ein Netzteil oder eine andere externe
Stromversorgung).
Führen Sie den Aufnahmevorgang auf diesem Gerät aus,
um vor der Wiedergabe abspielbare Dateien zu erhalten.
Ziehen Sie den Netzstecker dieses Geräts von der Steckdose ab.
Deutsch
Info zu USB-Geräten/ Dateien, die auf
diesem Gerät verwendet werden
können
Dieses Gerät unterstützt externe Festplatten, portable Flash-SpeicherGeräte und USB-Massenspeichergeräte.
Ordner-Ebenen Max. 2 Ebenen (PIONEER DJM / DJM350 REC)
Max. Anzahl der
Dateien
Unterstützte
Dateisysteme
! Optische Disc-Geräte wie externe DVD/
unterstützt.
! Wenn es viele Ordner oder Dateien gibt, kann einige Zeit kann für das Laden
erforderlich sein.
! Wenn mehrere Partitionen für das USB-Gerät gesetzt sind, kann das Gerät
möglicherweise nicht erkannt werden.
Maximum 999 Tracks
FAT, FAT32 und HFS+
CD-Laufwerke usw. werden nicht
Vorsichtshinweise zur Verwendung von
USB-Geräten
! Manche USB-Geräte arbeiten möglicherweise nicht ordnungsge-
mäß. Bitte beachten Sie, dass Pioneer keine Verantwortung für
den Verlust von Daten auf USB-Geräten übernimmt.
! USB-Hubs können nicht verwendet werden.
! USB-Geräte mit Flash-Card-Lesern arbeiten möglichweise nicht.
! Es kann vorkommen, dass wenn ein Strom im am USB-Anschluss
dieses Geräts erkannt wird, der stärker als der zulässige Strom
ist, die Anzeige [USB STOP] 5 Mal blinkt, die Stromversorgung
zum USB-Gerät abgetrennt wird und die Kommunikation mit dem
USB-Gerät unterbrochen wird. Zur Wiederherstellung des normalen Betriebs trennen Sie das USB-Gerät von diesem Gerät ab und
drücken dann [USB STOP]. Vermeiden Sie die Wiederverwendung
von USB-Geräten, für die Überstrom erkannt wurde. Wenn normaler Betrieb nach der oben beschriebenen Maßnahme nicht wieder
hergestellt wird, (wenn die Kommunikation nicht hergestellt werden kann,) schalten Sie das Gerät aus und wieder ein.
! Je nach verwendetem USB-Gerät wird die gewünschte Leistung
möglicherweise nicht erzielt.
De
15
Page 48

Über WAV-Dateien
Der DJM-350 unterstützt WAV-Dateien in den unten gezeigten
Formaten.
Kompatible
Formate
Dateierweiterung .WAV oder .wav
Dateien im 16-Bit nicht-komprimierten PCM-Format mit
einer Abtastfrequenz von 44,1 kHz werden unterstützt.
Über die Ausnahmeklauseln
! Pioneer ist ein eingetragenes Markenzeichen der Pioneer
Corporation.
! Die hier erwähnten Produkt- oder Firmennamen sind Markenzeichen
der jeweiligen Eigentümer.
! Bei der Wiedergabe von Musikdateien, die auf dieses Gerät
übernommen wurden, müssen Sie bestehende Urheberrechte
beachten.
Technische Daten
Allgemeine
Stromanforderungen .... 220 V bis 240 V Wechselspannung, 50 Hz/ 60 Hz
Leistungsaufnahme ............................................................................... 17 W
Leistungsaufnahme (Standby) ...........................................................0,4 W
Gewicht des Hauptgeräts ................................................................... 3,2 kg
Max. Abmessungen ..................218 mm (B) × 107 mm (H) × 301 mm (T)
Betriebstemperatur ...........................................................+5 °C bis +35 °C
Betriebsluftfeuchtigkeit ..................... 5 % bis 85 % (keine Kondensation)
Audio-Sektion
Abtastrate ............................................................................................48 kHz
A/ D-, D/ A-Wandler ..............................................................................24 bits
Frequenzeigenschaften
AUX/ MIC ............................................................... 20 Hz bis 20 kHz
CD/
Signalrauschabstand (Nennausgang)
CD ....................................................................................................97 dB
PHONO ...........................................................................................86 dB
MIC ..................................................................................................80 dB
Gesamtklirrfaktor (CD — MASTER1) ...............................................0,007 %
Standard-Eingangspegel / Eingangsimpedanz
CD .................................................................................... –12 dBu/ 36 kW
PHONO ........................................................................... –52 dBu/ 47 kW
MIC .................................................................................. –52 dBu/
AUX ................................................................................. –12 dBu/ 27 kW
Standard-Ausgangspegel / Lastimpedanz / Ausgangsimpedanz
MASTER OUT........................................................+2 dBu/ 10 kW/ 2,5 W
PHONES ...................................................................+2 dBu/
Nenn-Ausgangspegel / Lastimpedanz
MASTER OUT................................................................+18 dBu/
Übersprechen (CD) ............................................................................... 78 dB
Kanal-Equalizer-Eigenschaften
HI ...................................................................... –
MID ....................................................................–
LOW .................................................................... –
MIC/ AUX Equalizer-Eigenschaften
HI ................................................................–12 dB bis +12 dB (10 kHz)
LOW ...........................................................–12 dB bis +12 dB (100 Hz)
Eingangs-/ Ausgangsbuchsen
CD Eingangsbuchse
Cinch-Buchse .............................................................................2 Sätze
PHONO Eingangsbuchse
Cinch-Buchse .............................................................................2 Sätze
MIC Eingangsbuchse
Klinkenbuchse (Ø 6,3 mm) .........................................................1 Satz
AUX Eingangsbuchse
Cinch-Buchse ...............................................................................1 Satz
MASTER Ausgangsbuchse
Cinch-Buchse .............................................................................2 Sätze
De
16
∞ bis + 9 dB (13 kHz)
∞ bis + 9 dB (1 kHz)
∞ bis +9 dB (70 Hz)
10 kW
32 W/ 150W
10 kW
PHONES Ausgangsbuchse
Stereo-Klinkenbuchse (Ø 6,3 mm) .............................................1 Satz
USB-Buchse
Typ A .............................................................................................. 1 Satz
CONTROL-Buchse
Mini-Klinkenbuchse (Ø 3,5 mm) ..............................................2 Sätze
! Änderungen der technischen Daten und das Design dieses Geräts
ohne vorherige Ankündigung bleiben vorbehalten.
! Veröffentlicht von Pioneer Corporation. Urheberrechtlich geschützt
© 2010 Pioneer Corporation. Alle Rechte vorbehalten.
Page 49

Page 50

Vi ringraziamo per avere acquistato questo prodotto Pioneer. Vi preghiamo di leggere queste queste istruzioni per l’uso in modo da sapere usare
Il punto esclamativo in un triangolo
equilatero serve ad avvisare l’utilizzatore
della presenza di importanti istruzioni di
funzionamento e manutenzione riportate nel
libretto allegato al prodotto.
Il simbolo del lampo con terminale a forma
di freccia situato all’interno di un triangolo
equilatero serve ad avvisare l’utilizzatore
della presenza di una “tensione pericolosa”
non isolata nella struttura del prodotto che
potrebbe essere di un’intensità tale da
provocare scosse elettriche all’utilizzatore.
ATTENZIONE:
PER EVITARE IL RISCHIO DI SCOSSE
ELETTRICHE, NON RIMUOVERE IL
COPERCHIO (O IL RETRO). NON CI SONO
PARTI INTERNE LA CUI MANUTENZIONE
POSSA ESSERE EFFETTUATA
DALL’UTENTE. IN CASO DI NECESSITÀ,
RIVOLGERSI ESCLUSIVAMENTE A
PERSONALE DI SERVIZIO QUALIFICATO.
CAUTION
RISK OF ELECTRIC SHOCK
DO NOT OPEN
IMPORTANTE
D3-4-2-1-1_A1_It
Se si vuole eliminare questo prodotto, non gettarlo insieme ai rifiuti domestici. Esiste un sistema di raccolta differenziata in conformità
alle leggi che richiedono appositi trattamenti, recupero e riciclo.
I privati cittadini dei paesi membri dell’UE, di Svizzera e Norvegia, possono restituire senza alcun costo i loro prodotti elettronici usati ad appositi
servizi di raccolta o a un rivenditore (se si desidera acquistarne uno simile).
Per i paesi non citati qui sopra, si prega di prendere contatto con le autorità locali per il corretto metodo di smaltimento.
In questo modo, si è sicuri che il proprio prodotto eliminato subirà il trattamento, il recupero e il riciclo necessari per prevenire gli effetti
potenzialmente negativi sull’ambiente e sulla vita dell’uomo.
K058b_A1_It
correttamente il proprio modello. Dopo aver letto queste istruzioni, riporle in un luogo sicuro per poterle consultare di nuovo al momento del
bisogno.
I modelli disponibili in alcuni paesi o regioni possono avere la forma della spina del cavo d’alimentazione e della presa ausiliaria di corrente
diversa daquella mostrata nelle illustrazioni, ma il loro modo di collegamento e funzionamento è lo stesso.
It
2
Page 51

ATTENZIONE
Questo apparecchio non è impermeabile. Per prevenire
pericoli di incendi o folgorazioni, non posizionare nelle
vicinanze di questo apparecchio contenitori pieni di
liquidi (quali vasi da fiori, o simili), e non esporre
l’apparecchio a sgocciolii, schizzi, pioggia o umidità.
D3-4-2-1-3_A1_It
ATTENZIONE
Prima di collegare per la prima volta l’apparecchio alla
sorgente di alimentazione leggere attentamente la
sezione che segue.
La tensione della sorgente di elettricità differisce
da Paese a Paese e da regione a regione. Ve rificare
che la tensione di rete della zona in cui si intende
utilizzare l’apparecchio sia quella corretta, come
indicato sul pannello posteriore dell’apparecchio
stesso (ad es.: 230 V o 120 V).
D3-4-2-1-4*_A1_It
ATTENZIONE
Per evitare il pericolo di incendi, non posizionare
sull’apparecchio dispositivi con fiamme vive (ad
esempio una candela accesa, o simili).
D3-4-2-1-7a_A1_It
ATTENZIONE
L’apparecchio è dotato di un certo numero di fessure e
di aperture per la ventilazione, allo scopo di garantirne
un funzionamento affidabile, e per proteggerlo dal
surriscaldamento. Per prevenire possibili pericoli di
incendi le aperture non devono mai venire bloccate o
coperte con oggetti vari (quali giornali, tovaglie, tende o
tendaggi, ecc.), e l’apparecchio non deve essere
utilizzato appoggiandolo su tappeti spessi o sul letto.
D3-4-2-1-7b*_A1_It
Condizioni ambientali di funzionamento
Gamma ideale della temperatura ed umidità
dell’ambiente di funzionamento:
da +5 °C a +35 °C, umidità relativa inferiore all‘85 %
(fessure di ventilazione non bloccate)
Non installare l’apparecchio in luoghi poco ventilati, o
in luoghi esposti ad alte umidità o alla diretta luce del
sole (o a sorgenti di luce artificiale molto forti).
D3-4-2-1-7c*_A1_It
Se la spina del cavo di alimentazione di questo
apparecchio non si adatta alla presa di corrente
alternata di rete nella quale si intende inserire la
spina stessa, questa deve essere sostituita con una
adatta allo scopo. La sostituzione della spina del cavo
di alimentazione deve essere effettuata solamente da
personale di servizio qualificato. Dopo la sostituzione,
la vecchia spina, tagliata dal cavo di alimentazione,
deve essere adeguatamente eliminata per evitare
possibili scosse o folgorazioni dovute all’accidentale
inserimento della spina stessa in una presa di
corrente sotto tensione.
Se si pensa di non utilizzare l’apparecchio per un
relativamente lungo periodo di tempo (ad esempio,
durante una vacanza), staccare la spina del cavo di
alimentazione dalla presa di corrente alternata di
rete.
D3-4-2-2-1a_A1_It
AVVERTENZA
L’ interruttore principale ( ) dell’apparecchio non
stacca completamente il flusso di corrente elettrica
dalla presa di corrente alternata di rete. Dal momento
che il cavo di alimentazione costituisce l’unico
dispositivo di distacco dell’apparecchio dalla
sorgente di alimentazione, il cavo stesso deve essere
staccato dalla presa di corrente alternata di rete per
sospendere completamente qualsiasi flusso di
corrente. Verificare quindi che l’apparecchio sia stato
installato in modo da poter procedere con facilità al
distacco del cavo di alimentazione dalla presa di
corrente, in caso di necessità. Per prevenire pericoli
di incendi, inoltre, il cavo di alimentazione deve
essere staccato dalla presa di corrente alternata di
rete se si pensa di non utilizzare l’apparecchio per
periodi di tempo relativamente lunghi (ad esempio,
durante una vacanza).
D3-4-2-2-2a*_A1_It
AVVERTIMENTO RIGUARDANTE IL FILO DI
ALIMENTAZIONE
Prendete sempre il filo di alimentazione per la spina.
Non tiratelo mai agendo per il filo stesso e non toccate
mai il filo con le mani bagnati, perchè questo potrebbe
causare cortocircuiti o scosse elettriche. Non collocate
l’unità, oppure dei mobili sopra il filo di alimentazione e
controllate che lo stesso non sia premuto. Non
annodate mai il filo di alimentazione nè collegatelo con
altri fili. I fili di alimentazione devono essere collocati in
tal modo che non saranno calpestati. Un filo di
alimentazione danneggiato potrebbe causare incendi o
scosse elettriche. Controllate il filo di alimentazione
regolarmente. Quando localizzate un eventuale danno,
rivolgetevi al più vicino centro assistenza autorizzato
della PIONEER oppure al vostro rivenditore per la
sostituzione del filo di alimentazione.
S002*_A1_It
It
3
Page 52

Come leggere questo manuale
I nomi di display, menu e pulsanti in questo manuale sono compresi
fra parentesi. (ad es. canale [MASTER], [ON/ OFF], menu [File])
Prima di cominciare
Caratteristiche ............................................................................................. 5
Esempio di impostazione del sistema .......................................................5
Contenuto della confezione .......................................................................5
Collegamenti
Nome del terminali .....................................................................................6
Collegamento ai terminali di ingresso/
uscita ..........................................7
Operazioni
Pannello di controllo ...................................................................................8
L’interruttore di alimentazione di questa unità ........................................9
Operazioni di base (sezione mixer) ............................................................9
Monitoraggio in cuffia del suono (sezione cuffia) ..................................11
Uso della funzione di effetto (sezione principale effetti)
Uso di un microfono o dispositivo esterno (sezione MIC/
Registrazione della performance (sezione registrazione USB) ............12
La funzione auto standby .........................................................................13
..............................11
AUX) ............11
Informazioni aggiuntive
Diagnostica................................................................................................14
Eventuali errori ..........................................................................................15
I dispositivi USB/ file utilizzabili con questa unità ..................................15
Le clausole di esenzione ........................................................................... 16
Dati tecnici .................................................................................................16
It
4
Page 53

Prima di cominciare
MULTI PLAYER
TEMPO
0
PLAY/PAUSE
SEARCH
TRACK SEARCH
IN/CUE OUT
OUT ADJUSTHOT LOOP
RELOOP/EXIT
BEAT LOOP
LOOP DRIVE
VINYL MODE
TEMPO RANGE
MASTER TEMPO
LOOP
USB
STOP
SOURCE SELECT
MP3/AAC
WAV/AIFF
CUE
PLAYLIST
BPM
DISC
LOCK
REVFWD
BACK
SELECT PUSH
TIME MODE
AUTO CUE
DISPLAY
UTILITY
A.CUE
LOCK
16
REMAIN
MS
FTEMPO %
INFO
BROWSE
BPM
2 CHANNEL DJ MIXER
MIC /AUX
MIC
0
LEVEL
HI
AUX
LOW
MIC/AUX
ON
12
12
12
12
HEADPHONES
CUE
CH-1
CUE
MIXING
CUE MASTER
CH-2
LEVEL
PHONES
0
9
9
9
9
CD
PHONO
CH- 1
FADER
START
FADER
START
CH- 1 CH- 2
9
9
9
9
CH-2
THRU
CD
PHONO
TRIMTRIM
HI
MID
LOW
HI
MID
LOW
LEVEL
MASTER
LEVEL/DEPTH
FILTERCRUSH
GATE JET
MASTER EFFECT
0
PREVIEW
TRACK MARK SEARCH
PLAY
USB
STOP
REC
MASTER LEVEL
Dispositivo audio
portatile/microfono
Cuffia
CDJ-350CDJ-350 DJM-350
Componente, amplificatore,
diffusore attivo, ecc.
Dispositivo USB
Per l’ uscita audio Per la registrazionePer l’ ingresso audio
Per il controllo
dell’ ingresso/uscita audio
Caratteristiche
Questa unità è un mixer DJ che eredita tutta la tecnologia della serie DJM Pioneer, lo standard mondiale dell’audio per club. È una unità di tipo
standard che possiede le funzione di base richieste per il missaggio, permettendo con facilità tutte le funzioni di riproduzione DJ.
Registrazione USB
controllo.
Con questa unità, il suono delle performance DJ può venire registrato
facilmente semplicemente premendo un pulsante e girando il
facilmente su dispositivi USB (memorie flash portatili, ecc.). L’audio
registrato può anche venire riprodotto con questa unità.
MIC/ AUX INPUT
Questa unità possiede un ingresso per microfono/ ausiliario che
permette il collegamento di un microfono o dispositivo esterno (cam-
Equalizzatore a 3 bande
Questa unità possiede un equalizzatore a 3 bande che permette la
regolazione separata del volume delle alte, medie e basse frequenze.
pionatore, dispositivo audio portatile, ecc.). La riproduzione DJ è
possibile con fino a tre serie di ingressi: CH-1 (canale 1), CH-2 (canale
2) e MIC/ AUX (canale per microfono/ ausiliario).
Non solo è possibile regolare a piacere i toni, ma certe gamme di frequenza possono venire del tutto escluse portando il relativo controllo
del tutto a sinistra (funzione di isolatore).
FADER START
Se ci si collega ad un lettore DJ Pioneer con un cavo di controllo
(accluso al lettore DJ), la riproduzione del lettore DJ può venire
MASTER EFFECT (GATE, CRUSH, JET,
FILTER)
iniziata con i cursori di questa unità (avvio della riproduzione con i
cursori).
Questa unità possiede quattro pulsanti di effetto che permettono la
modifica dell’audio in vari modi. L’atmosfera dell’audio è modificabile
Esempio di impostazione del sistema
Un sistema DJ come quello nel diagramma è ottenibile combinando questa unità con un lettore DJ ed una periferica.
Italiano
Contenuto della confezione
! Cavo di alimentazione
! Documento di garanzia
! Istruzioni per l’uso (questo documento)
It
5
Page 54

Collegamenti
AC IN
MASTER OUTCH-2
1
L
R
2
PHONO
CONTROL
SIGNAL
GND
L
R
CD
CH-1 AUX
MIC
PHONO
CONTROL
L
R
L
R
CD
1 2 7 8 93 4 5 3 4 56
a
Prima di fare o modificare collegamenti, non mancare di spegnere l’apparecchio e di scollegare il cavo di alimentazione.
Consultare le istruzioni per l’uso del componente da collegare.
Collegare il cavo di alimentazione dopo che tutti i collegamenti fra dispositivi sono stati fatti.
Usare solo il cavo di alimentazione accluso.
Nome del terminali
Pannello posteriore
1 AC IN
Da collegare ad una presa di c.a. Collegare il cavo di alimentazione
solo a collegamenti ultimati.
Usare solo il cavo di alimentazione accluso.
2 MASTER OUT 1, 2 (a pagina 7)
Da collegare ad un amplificatore di potenza, ecc.
3 PHONO (a pagina 7)
Collegare ad un lettore analogico o altro dispositivo di riproduzione
fono (con puntina MM). Non collegare ad un lettore DJ o altro dispositivo a livello di linea.
4 CD (a pagina 7)
Collegare ad un lettore DJ o altro dispositivo a livello di linea.
Pannello anteriore
5 CONTROL (a pagina 7)
Collegare con un cavo di controllo (accluso al lettori DJ Pioneer).
6 SIGNAL GND (a pagina 7)
Collegare qui il filo di terra di lettori analogici. Questo aiuta a ridurre
il rumore quando si usano lettori analogici.
7 AUX (a pagina 7)
Collegare al terminale di uscita di un dispositivo esterno (campionatore, lettore audio portatile, ecc.)
8 MIC (a pagina 7)
Collegare ad un microfono.
9 Slot di sicurezza Kensington
a PHONES (a pagina 7)
Collegare qui una cuffia.
It
6
Page 55

Collegamento ai terminali di ingresso/ uscita
AC IN
AUDIO
OUT
RL
CONTROL
USB
MASTER OUTCH-2
1
L
R
2
PHONO
CONTROL
SIGNAL
GND
L
R
CD
CH-1 AUX
MIC
PHONO
CONTROL
L
R
L
R
CD
Microfono
Componente, amplificatore,
diffusore attivo, ecc.
Ai terminali di ingresso audio
Sezione ingresso audio
Sezione uscita audio
Cavo audio
Cavo audio
Cavo audio
Ai terminali
di uscita audio
Ai terminali
di uscita audio
Cavo di controllo
1
Filo di terra
AI terminali del
filo di terra
Cavo audio
2
Cavo del
microfono
Al microfono
Dispositivo
audio
portatile
Lettore analogicoLettore DJ
Esempio:
CDJ-350
Cavo di alimentazione (accluso)
Ad una presa di corrente
R
L
R
L
R
L
R
L
R
L
Cua
Cavo per cua
Pannello posteriore
Italiano
1 Per iniziare la riproduzione con i cursori di questa unità, collegare un cavo di controllo (a pagina 10).
La funzione di avvio della dissolvenza può venire usata solo quando si è collegati ad un lettore Pioneer DJ.
2 È possibile collegare un dispositivo audio portatile usando un cavo di conversione con minispinotti RCA (Ø 3,5 mm) (a pagina 11).
Pannello anteriore
It
7
Page 56

Operazioni
2 CHANNEL DJ MIXER
MIC /AUX
MIC
0
LEVEL
HI
AUX
LOW
MIC/AUX
ON
12
12
12
12
HEADPHONES
CUE
CH-1
CUE
MIXING
CUE MASTER
CH-2
LEVEL
PHONES
0
9
9
9
9
CD
PHONO
CH- 1
FADER
START
FADER
START
CH- 1CH- 2
9
9
9
9
CH-2
THRU
CD
PHONO
TRIM TRIM
HI
MID
LOW
HI
MID
LOW
LEVEL
MASTER
LEVEL/DEPTH
FILTERCRUSH
GATE JET
MASTER EFFECT
0
PREVIEW
TRACK MARK SEARCH
PLAY
USB
STOP
REC
MASTER LEVEL
Sezione MIC/AUX Sezione mixer
Sezione cuffia
Sezione effetti principale
Sezione registrazione
USB
Flusso dei segnali audio
EQ
LEVEL
MIC/AUX
ON/OFF
MASTER
EFFECT
MASTER
LEVEL
MASTER
OUT 1
MASTER
OUT 2
RECPLAY
CROSS FADER
MIC
AUX
CD1 PHONO1 CD2 PHONO2
USB I/F
PREVIEW
EQ/
ISOLATOR
TRIM
CH
FADER
EQ/
ISOLATOR
TRIM
CH
FADER
3
1
2
r
b
c
g
4
8
9
a
6
5
h
f
e
i
j
7
d d
o
p
k
l
q
m n
Pannello di controllo
1 u (Interruttore di alimentazione) (a pagina 9)
2 MASTER LEVEL (a pagina 9)
Sezione MIC/ AUX
È possibile gestire un microfono o dispositivo esterno (campionatore,
dispositivo audio portatile, ecc.) (a pagina 11).
3 MIC, AUX
4 LEVEL
5 HI, LOW
6 MIC/AUX ON
Sezione cuffia
L’audio ricevuto da questa unità è controllabile in cuffia (a pagina 11).
7 CH-1 CUE, CH-2 CUE
8 MIXING
9 LEVEL
a PHONES
It
8
Sezione mixer
È possibile regolare separatamente due serie di segnali audio per il
missaggio DJ di base (a pagina 9).
b CD, PHONO (selettore d’ingresso)
c TRIM
d HI, MID, LOW
e Indicatore del livello principale
f Indicatore del livello del canali
g Fader canali
h FADER START
i THRU,
j Crossfader
, (selettore della curva del crossfader)
Sezione registrazione USB
Le performance DJ posson venire registrate su e riprodotte da dispositivi USB (a pagina 12).
k Slot del dispositivo USB
l USB STOP
Page 57

m REC k/ g
9
9
9
9
CD
PHONO
CH- 1
FADER
START
FADER
START
CH- 1 CH- 2
9
9
9
9
CH-2
THRU
CD
PHONO
TRIM TRIM
HI
MID
LOW
HI
MID
LOW
LEVEL
MASTER
b
c
1 2
g
h
f
e
i
j
d d
n PLAY f
o TRACK MARK (PREVIEW)
p SEARCH o, p
Sezione effetti principale
Gli effetti possono venire applicati al suono emessi da [MASTER OUT
1, 2] (a pagina 11).
q MASTER EFFECT (GATE, CRUSH, JET, FILTER)
r LEVEL/
DEPTH
L’interruttore di alimentazione di
questa unità
Operazioni di base (sezione mixer)
Per accendere il sistema
Premere [u] 1.
Accendere questa unità.
L’indicatore u si illumina in verde.
Per impostare la modalità di standby
Se questa unità è accesa, premere [u] 1 per almeno 2
secondi.
Questa unità si porta in modalità di standby.
L’indicatore [u] si illumina in verde.
! Quando [u] viene premuto di nuovo, l’unità si riaccende.
! Questa unità possiede una funzione di auto standby. Per dettagli,
vedere La funzione auto standby a pagina 13.
Emissione di suono
Prima della riproduzione, controllare che questa unità sia bene collegata ad un lettore DJ, ecc. Per istruzioni sui collegamenti, vedere
Collegamento ai terminali di ingresso/ uscita a pagina 7.
Impostare il volume degli amplificatori di potenza collegati ai terminali [MASTER OUT 1, 2] ad un livello appropriato. Tenere presente che
dei suoni molto forti vengono prodotti se il volume è eccessivo.
Per emettere il segnale del canale 1 [CH-1] 1
Per emettere il segnale del canale 2 ([CH-2]) 2, fare quanto segue
sostituendo [CH-1] con [CH-2].
1 Regolare il selettore d’ingresso [CD, PHONO] b per il
[CH-1] 1.
Scegliere la sorgente di segnale per [CH-1] fra i dispositivi collegati a
questa unità.
— [CD]: Sceglie il lettore DJ collegato ai terminali [CD].
— [PHONO]: Sceglie il lettore analogico collegato ai terminali
[PHONO].
2 Girare il controllo [TRIM] c del [CH-1] 1 in senso
orario.
Regola il livello dell’audio che arriva al terminale [CH-1].
L’indicatore del livello del canale [CH-1] f si accende quando i
segnali audio vengono regolarmente ricevuti dal [CH-1].
Regolare [TRIM] in modo che l’indicatore arancione si illumini nel
punto in cui il volume del brano è massimo (l’apice, ecc.).
Evitare che l’indicatore rosso si accenda o il suono sarà distorto.
3 Portare il cursore del canale [CH-1] 1 g all’indietro.
Viene regolato il livello del suono emesso dai terminali [CH-1].
4 Muovere [THRU, , ] (il selettore della curva del
crossfader) i.
Cambia la caratteristiche della curva del crossfader.
— [THRU]: Scegliere questa opzione per non fare uso del
crossfader.
— [ ]: Impostare qui una curva che aumenta gradualmente.
It
Italiano
9
Page 58
— [ ]: Impostare qui una curva che aumenta rapidamente.
(Quando il crossfader si allontana dal bordo sinistro o destro,
il suono viene immediatamente emesso dal lato opposto.)
5 Muovere il crossfader j.
Passare al canale il cui audio viene emesso dai diffusori.
— Bordo sinistro: Non viene emesso il suono [CH-1].
— Posizione centrale: Il suono di [CH-1] e [CH-2] viene missato
ed emesso.
— Bordo destro: Non viene emesso il suono [CH-2].
! Questa operazione non è necessaria se [THRU,
della curva del crossfader) si trova su [THRU].
, ] (selettore
6 Girare [MASTER LEVEL] 2 in senso orario.
Il suono viene emesso dai diffusori.
L’indicatore del livello principale e del pannello di comando si
illumina.
Regolare [MASTER LEVEL] in modo che l’indicatore arancione si illumini nel punto in cui il volume del brano è massimo (l’apice, ecc.).
Evitare che l’indicatore rosso si accenda o il suono sarà distorto.
Regolazione della qualità dell’audio
Girare il controllo [CH-1] 1 o [CH-2] 2 [HI], [MID] o [LOW] d.
Per quanto riguarda la gamma audio di ciascun comando, consultare
Dati tecnici a pagina 16.
! Il suono per quella gamma può venire disattivato completamente
girando il comando del tutto in senso orario (funzione di isolatore).
Missaggio con i cursori
Preparare questa unità in anticipo in modo che il suono [CH-1] 1
venga emesso dai diffusori. Per istruzioni sui preparativi, vedere
Emissione di suono a pagina 9.
Per istruzioni sul monitoraggio del suono, vedere Monitoraggio in
cuffia del suono (sezione cuffia) a pagina 11.
Missaggio con i cursori dei canali
1 Portare [THRU,
crossfader) i su [THRU].
2 Regolare il selettore d’ingresso [CD, PHONO] b per il
[CH-2] 2.
3 Girare il controllo [TRIM] c del [CH-2] 2 in senso
orario.
4 Premere [CH-2 CUE] 7.
Viene monitorato in cuffia il suono di [CH-2].
5 Girare [MIXING] 8.
Questo regola il bilanciamento del volume di monitoraggio fra il suono
emesso dai terminali [MASTER OUT 1, 2] (il suono [CH-1]) e il suono
di [CH-2].
6 Azionare il lettore DJ collegato ai terminali [CH-2].
Controllare il suono in cuffia e regolare il tempo del brano [CH-2] in
modo adatto a quello del brano [CH-1].
7 Spostando il cursore del canale [CH-2] 2 all’indietro,
portare quello del canale [CH-1] 1 in avanti.
Controllare il suono riprodotto dai diffusori ed azionare i cursori dei
canali in modo da sostituire il suono [CH-1] con quello [CH-2].
Il missaggio è completo una volta che solo il suono [CH-2] viene
emesso dai diffusori.
, ] (il selettore della curva del
2 Azionare [CH-2] 2.
Fare come descritto nelle fasi da 2 a 6 di Missaggio con i cursori dei
canali a pagina 10.
3 Muovere il crossfader j gradualmente verso destra.
Controllare il suono riprodotto dai diffusori ed azionare il crossfader in
modo da sostituire il suono [CH-1] con quello [CH-2].
Il missaggio è completo una volta che solo il suono [CH-2] viene
emesso dai diffusori.
Uso del fader per riprodurre con un
lettore DJ Pioneer (apertura col fader)
Collegando un lettore DJ Pioneer attraverso un cavo di controllo (allegato al lettore DJ) è possibile iniziare la riproduzione o altre operazioni
del lettore DJ usando il fader di questa unità.
La funzione di avvio della dissolvenza può venire usata solo quando si
è collegati ad un lettore Pioneer DJ.
Collegare anticipatamente questa unità ed il lettore DJ Pioneer.
Per istruzioni sui collegamenti, vedere Collegamento ai terminali di
ingresso/ uscita a pagina 7.
Per iniziare la riproduzione con la dissolvenza dei
canali
1 Portare [THRU,
crossfader) i su [THRU].
2 Premere [FADER START] h.
Attivare la funzione di apertura con in dissolvenza.
3 Spostare il cursore del canale g del tutto in avanti.
4 Impostare il punto cue del lettore DJ
Il lettore DJ si porta in pausa di riproduzione presso il punto cue.
5 Muovere il cursore del canale g verso il retro.
La riproduzione del lettore DJ inizia.
! Portando il fader di canale sulla sua posizione originaria, il lettore
torna istantaneamente al punto cue già impostato e si porta in
pausa di riproduzione (back cue).
Inizio della riproduzione col crossfader
1 Portare [THRU,
crossfader) i su [ ] o [ ].
2 Premere [FADER START] h.
Attivare la funzione di apertura con in dissolvenza.
3 Muovere il crossfader j.
Portare il crossfader sul bordo opposto a quello del canale per il quale
volete usare l’avvio con i cursori.
4 Impostare il punto cue del lettore DJ
Il lettore DJ si porta in pausa di riproduzione presso il punto cue.
5 Muovere il crossfader j.
La riproduzione del lettore DJ inizia.
! Portando il crossfader sulla sua posizione originaria, il lettore
torna istantaneamente al punto cue già impostato e si porta in
pausa di riproduzione (back cue).
, ] (il selettore della curva del
, ] (il selettore della curva del
Missaggio con il crossfader
1 Portare [THRU,
crossfader) i su [ ] o [ ].
It
10
, ] (il selettore della curva del
Page 59

Monitoraggio in cuffia del suono
HEADPHONES
CUE
CH-1
CUE
MIXING
CUE MASTER
CH-2
LEVEL
PHONES
0
8
9
a
7
2 CHANNEL DJ MIXER
LEVEL/DEPTH
FILTERCRUSH
GATE JET
MASTER EFFECT
q
r
MIC /AUX
MIC
0
LEVEL
HI
AUX
LOW
MIC/AUX
ON
12
12
12
12
3
4
6
5
(sezione cuffia)
Applicazione di un effetto
Premere uno dei pulsanti [MASTER EFFECT (GATE,
CRUSH, JET, FILTER)] q.
L’effetto viene applicato al suono.
Il pulsante premuto lampeggia.
L’effetto dei vari pulsanti è diverso. Per dettagli sui vari effetti, vedere
la tabella di seguito.
! Quando un pulsante che lampeggia viene premuto, l’effetto viene
disattivato.
1 Collegare una cuffia alla presa [PHONES]
Per istruzioni sui collegamenti, vedere Collegamento ai terminali di
ingresso/
uscita a pagina 7.
2 Premere [CH-1 CUE] o [CH-2 CUE] 7.
Scegliere il canale da monitorare.
— [CH-1 CUE]: Viene monitorato il suono di [CH-1].
— [CH-2 CUE]: Viene monitorato il suono di [CH-2].
! Questa operazione non è necessaria per monitorare il suono del
canale principale (quello emesso dai terminali [MASTER OUT 1, 2]).
3 Girare [MIXING] 8.
— Se viene girato in senso antiorario: Il volume di [CH-1] e [CH-2]
diviene relativamente più alto.
— Al centro: Il suono di [CH-1] e [CH-2] ha lo stesso volume di
quello dei terminali [MASTER OUT 1, 2].
— Se viene girato in senso orario: Il volume del suono emesso
dai terminali [MASTER OUT 1, 2] diviene relativamente più
alto.
4 Girare [LEVEL] 9 della sezione cuffia in senso orario.
Il suono viene emesso dalla cuffia.
! Il monitoraggio viene cancellato quando [CH-1 CUE] o [CH-2 CUE]
viene premuto di nuovo.
! Il monitoraggio del suono emesso dai terminali [MASTER OUT 1,
2] non viene cancellato.
Uso della funzione di effetto
(sezione principale effetti)
Questa unità possiede quattro pulsanti di effetto. Premendo un pulsante di effetto, l’effetto corrispondente viene applicato ai segnali
audio emessi dai terminali [MASTER OUT 1, 2].
Nome
dell’effetto
GATE
CRUSH
JET
FILTER
Descrizioni LEVEL/
La gamma rispettiva viene
eliminata dal segnale audio
della sezione ritmica del brano
per dare varietà al ritmo.
Al suono viene applicato
un leggero effetto “crush”,
dandogli un accento.
Viene applicato un effetto
simile a quello di un aviogetto che sale e scende.
I suoni della gamma alta
o bassa vengono filtrati,
cambiando grandemente
il tono.
DEPTH
Sinistra: Viene variata la
gamma degli acuti (hi-hat,
ecc.).
Destra: Viene variata la
gamma dei bassi (grancassa, ecc.).
Sinistra: Viene applicato
l’effetto crush tagliando la
gamma degli acuti gradualmente.
Destra: Viene applicato
l’effetto crush tagliando la
gamma dei bassi gradualmente.
Sinistra: Viene applicato un
effetto simile a quello di un
aviogetto che scende.
Destra: Viene applicato un
effetto simile a quello di un
aviogetto che sale.
Sinistra: Viene applicato
un effetto consistente
nell’eliminazione graduale
degli acuti.
Destra: Viene applicato
un effetto consistente
nell’eliminazione graduale
dei bassi.
Variazione dell’effetto
Girare [LEVEL/ DEPTH] r.
L’effetto cambia a seconda della direzione in cui [LEVEL/ DEPTH] viene
girato e della sua posizione.
! Il suono originale viene emesso se [LEVEL/ DEPTH] si trova al
centro.
Uso di un microfono o dispositivo
esterno (sezione MIC/ AUX)
Italiano
It
11
Page 60

1 Interruttore [MIC, AUX] 3.
PREVIEW
TRACK MARK SEARCH
PLAY
USB
STOP
REC
o
p
k
l
m n
— [MIC]: Viene scelto il microfono collegato al terminale [MIC].
— [AUX]: Viene scelto il dispositivo esterno collegato ai terminali
[AUX].
2 Premere [MIC/AUX ON] 6.
3 Girare [LEVEL] 4 della sezione MIC/
AUX in senso
orario.
Il suono del microfono o del dispositivo esterno viene riprodotto dai
diffusori.
Regolazione della qualità dell’audio
Girare [HI] o [LOW] 5 della sezione MIC/ AUX.
Per quanto riguarda la gamma audio di ciascun comando, consultare
Dati tecnici a pagina 16.
Registrazione della performance
(sezione registrazione USB)
È possibile registrare il suono emesso dai terminali [MASTER OUT 1,
2] come file WAV su dispositivi USB.
! Il nome del file creato registrando ha il formato [REC***.WAV] (***
è un numero a 3 cifre).
2 Tenere premuto [TRACK MARK (PREVIEW)] o.
Il brano registrato viene riprodotto in cuffia mentre il pulsante è
premuto.
! Il suono monitorato viene aggiunto a quello di [CH-1] e [CH-2], poi
emesso in cuffia.
! Il suono monitorato non viene mandato ai diffusori.
! L’anteprima non è udibile mentre il brano sta venendo registrato o
riprodotto.
Avanzamento/ ritorno rapido di brani
registrati
Tenere premuto [SEARCH o, p] p durante la
riproduzione.
Il brano viene fatto avanzare rapidamente mentre [p] viene tenuto
premuto.
Il brano viene fatto indietreggiare rapidamente mentre [o] viene
tenuto premuto.
L’indicatore [PLAY f] lampeggia durante l’avanzamento/
rapidi.
! L’avanzamento/ ritorno rapido non è possibile in pausa.
Ascolto dell’inizio dei brani registrati
Premere [SEARCH o, p] p.
Premere [p] per portarsi all’inizio del brano successivo.
Premere [o] una volta per portarsi all’inizio del brano attuale, due
per raggiungere quello del brano precedente.
ritorno
1 Inserire il dispositivo USB nella slot USB k.
L’indicatore [USB STOP] l lampeggia.
Dopo qualche tempo, l’indicatore [USB STOP] smette di lampeggiare e
rimane acceso, quindi inizia la modalità di attesa di registrazione.
2 Premere [REC k/ g] m.
La registrazione inizia.
L’indicatore [REC k/ g] m lampeggia.
! Premendo di nuovo [REC k/ g], l’indicatore [REC k/ g] si spegne e
! Una singola registrazione può durare al massimo 180 minuti. Se
! La registrazione è possibile per 90 minuti usando un dispositivo
Riproduzione di brani registrati
Premere [PLAY f] n.
La riproduzione inizia.
L’indicatore [PLAY f] n si accende.
! Premendo [PLAY f] di nuovo, la riproduzione si porta in pausa.
! Solo i file WAV nella cartella [PIONEER DJM / DJM350 REC] del
Anteprima di brani registrati
1 Girare [MIXING] 8 in senso antiorario dal centro.
12
la registrazione si ferma.
la registrazione continua oltre i 180 minuti, i dati nel dispositivo
vengono automaticamente divisi in più file.
USB da 1 GB.
dispositivo USB possono venire riprodotti.
It
Divisione di brani durante la
registrazione
Durante la registrazione, premere [TRACK MARK
(PREVIEW)] o.
Il brano al momento registrato viene diviso e memorizzato nel dispositivo USB.
! Se un brano diviso in parti viene riprodotto, il suono può interrom-
persi brevemente nel punto di giunzione.
Cancellazione di brani registrati
1 Premere [PLAY f] n durante la riproduzione del
brano.
Il brano da cancellare viene portato in pausa.
2 Premere [PLAY f] n per più di 2 secondi.
L’indicatore [REC k/ g] lampeggia.
3 Tenere premuto [PLAY f] n e premere [REC k/ g] m.
L’indicatore [REC k/ g] si accende ed il brano viene cancellato.
! La cancellazione del brano viene annullata se [PLAY f] è
lasciato andare mentre l’indicatore [REC k/ g] lampeggia.
Scollegamento di dispositivi USB
Per scollegare dispositivi USB, fare sempre quanto segue. Estraendo
un dispositivo USB senza fare le operazioni descritte lo si potrebbe
danneggiare.
Quando si spegne l’apparecchio, accertarsi di rimuovere prima il
dispositivo USB.
1 Premere [USB STOP] l per almeno 1 secondo.
L’indicatore [USB STOP] lampeggia, poi si spegne.
2 Scollegare il dispositivo USB.
Page 61

La funzione auto standby
Se la funzione di auto standby è attiva, l’unità si porta da sola in standby dopo che un certo tempo è passato nelle seguenti condizioni.
— Nessun pulsante o controllo di questa unità viene usato.
— L’indicatore di livello dei canali di questa unità non si è acceso.
— La funzione di registrazione o riproduzione del dispositivo USB
non è in uso.
Impostazione della funzione di auto
standby
Porta questa unità in modalità di standby.
1 Premere [u] 1 mentre si tengono premuti [o] e
[p] p.
Questa unità passa alla modalità di cambiamento delle impostazioni
della funzione di auto standby.
Il punto più alto dell’indicatore del livello principale lampeggia.
Gli altri punti dell’indicatore si accendono a seconda del tempo al
momento impostato.
2 Premere [o] o [p] p.
Impostare il tempo dopo cui si deve attivare l’auto standby.
Il tempo impostato cambia ad ogni pressione del pulsante.
I punti dell’indicatore del livello principale cambiano a seconda
dell’ora impostata (escluso il punto superiore).
— Spento — 20 minuti — 40 minuti — 60 minuti
— 20 minuti: Si accendono i due punti inferiori.
— 40 minuti: Si accendono i quattro punti inferiori.
— 60 minuti: Si accendono i sei punti inferiori.
! Al momento della spedizione dalla fabbrica, il tempo impostato è
20 minuti.
3 Premere [u] 1 per almeno 2 secondi.
Le nuove impostazioni di auto standby vengono salvate.
L’indicatore [u] lampeggia in verde durante il salvataggio dell’impostazione e rimane acceso ad impostazione salvata.
! Non scollegare il cavo di alimentazione mentre si salvano le
impostazioni.
Italiano
It
13
Page 62

Informazioni aggiuntive
Diagnostica
! L’uso scorretto dell’apparecchio viene spesso scambiato per un guasto. Se si ritiene che questo componente non funzioni bene, controllare
la sezione che segue. A volte il problema risiede in un altro componente. Controllare tutti i componenti ed apparecchi elettronici usati. Se il
problema non può venire eliminato neppure dopo aver fatto i controlli suggeriti, chiedere assistenza tecnica al più vicino centro assistenza o
rivenditore autorizzato Pioneer.
! Questa unità può non funzionare a causa di elettricità statica o altre influenze esterne. In tal caso, essa torna alla normalità scollegando il
cavo di alimentazione, attendendo 5 secondi o più, quindi ricollegando il cavo.
Problema Controllare Rimedio
L’apparecchio non è acceso. Il cavo di alimentazione è collegato corretta-
Audio assente o insufficiente. L’interruttore [CD, PHONO] (selettore d’ingresso)
Audio distorto. [MASTER LEVEL] è regolato in una posizione
Il crossfader non funziona.
L’apertura in dissolvenza con un lettore DJ è
impossibile.
Nessun effetto. Si è premuto uno dei pulsanti [MASTER EFFECT
Durante la riproduzione da un dispositivo USB,
non viene prodotto suono o il suono è debole.
Durante la riproduzione da un dispositivo USB
la riproduzione è distorta.
Un brano non è monitorabile in cuffia anche
se [TRACK MARK (PREVIEW)] viene tenuto
premuto.
Il dispositivo USB non viene riconosciuto. Il dispositivo USB è correttamente collegato? Inserire bene a fondo il dispositivo USB. (a pagina 12)
mente?
è in posizione corretta?
I comandi [TRIM], [cursore dei canali], [cros-
sfader] e [MASTER LEVEL] sono nelle posizioni
corrette?
I componenti, amplificatori ecc. collegati sono
regolati correttamente?
I cavi di collegamento sono collegati correttamente?
I terminali o gli spinotti sono sporchi? Pulire i terminali e gli spinotti prima di procedere con i collega-
corretta?
[TRIM] è regolato in una posizione corretta? Regolare [TRIM] in modo che l’indicatore arancione dell’indica-
L’interruttore [THRU,
curva del crossfader) si trova su [THRU]?
[FADER START] è su off? Portare [FADER START] su on. (a pagina 10)
Il cavo di controllo è collegato correttamente? Collegare questa unità ed il lettore DJ con un cavo di controllo.
I cavi audio sono collegati correttamente? Collegare questa unità al terminale di uscita audio di un lettore
(GATE, CRUSH, JET, FILTER)]?
DEPTH] è al centro? Girare [LEVEL/ DEPTH] in senso orario o antiorario. (a pagina 11)
[LEVEL/
[MASTER LEVEL] è regolato in una posizione
corretta?
[TRIM] è regolato in una posizione corretta? Prima della registrazione, regolare [TRIM] in modo che l’indica-
[MIXING] è del tutto a sinistra? Girare [MIXING] in senso antiorario dal centro. (a pagina 12)
Il dispositivo USB è compatibile con questa unità? Questa unità supporta i dispositivi di memoria di massa USB
, ] (selettore della
Collegare il cavo di alimentazione ad una presa di c.a. (a pagina 7)
Portare l’interruttore [CD, PHONO] (selettore d’ingresso) sulla
posizione giusta per scegliere quel canale. (a pagina 9)
Portare i controlli [TRIM], [cursore dei canali], [crossfader] e
[MASTER LEVEL] nelle posizioni corrette. (a pagina 9)
Regolare correttamente l’ingresso di segnale, il volume, ecc. dei
componenti/
Collegare correttamente i cavi di collegamento. (a pagina 7)
menti.
Regolare [MASTER LEVEL] in modo che l’indicatore arancione
dell’indicatore di livello principale si illumini al livello di picco.
(a pagina 9)
tore di livello del canale si illumini al livello di picco. (a pagina 9)
Portare il comando [THRU, , ] (selettore della curva del
crossfader) su di una posizione diversa da [THRU]. (a pagina 9)
(a pagina 7)
DJ con un cavo audio. (a pagina 7)
Premere uno dei pulsanti [MASTER EFFECT (GATE, CRUSH, JET,
FILTER)]. (a pagina 11)
Prima della registrazione, regolare [MASTER LEVEL] in modo
che l’indicatore arancione dell’indicatore di livello principale si
illumini al livello di picco. (a pagina 9)
tore arancione dell’indicatore di livello del canale si illumini al
livello di picco. (a pagina 9)
come i dischi fissi esterni e le memoria flash.
amplificatori.
14
It
Page 63

Eventuali errori
Se questa unità non funziona normalmente, gli indicatori [u] (interruttore di accensione), [USB STOP] e [PLAY f] lampeggiano ad indicare un
errore.
Controllare la tabella seguente e prendere le misure suggerite.
Se la stesso errore ricompare, entrare in contatto col negozio di acquisto o con un centro assistenza Pioneer.
Le indicazioni di errore dell’indicatore [USB STOP]
Se l’indicatore [USB STOP] lampeggia ripetutamente da 2 a 5 volte
1 Scollegare il dispositivo USB.
2 Premere [USB STOP].
Controllare la tabella seguente e prendere le misure suggerite.
Nome
dell’indicatore
USB STOP
PLAY f
u (interruttore di
alimentazione)
Numero di
lampeggi
2 volte ripetutamente
3 volte ripetutamente
4 volte ripetutamente
5 volte ripetutamente
3 volte
Continua
Descrizione
errore
Problemi di
formato dei file
Problema di
classe USB
Problemi nello
scrivere dati su
dispositivi USB
Rilevata corrente
eccessiva nel
dispositivo USB
Errore di riproduzione
Problema di
circuito
Causa Rimedio
Il dispositivo USB non è formattato.
Si usa un dispositivo USB dal file system non supportato
da questa unità.
Si è collegato diverso da un dispositivo di memoria di
massa USB.
Si usa un hub USB. Non usare hub USB.
Non c’è spazio a sufficienza sul dispositivo USB. Usare un dispositivo USB con spazio sufficiente.
Un nome di file di tipo “REC999.WAV” si trova nella cartella delle registrazioni (PIONEER DJM / DJM350 REC).
La protezione dalla scrittura del dispositivo USB è
inserita.
Si usa un dispositivo USB dotato di funzioni di sicurezza.
La cartella dei dati memorizzati (PIONEER DJM /
DJM350 REC) è regolata su “Solo lettura”.
Si usa un dispositivo USB (ad esempio un disco fisso
alimentato dal bus) che consuma più della corrente
erogata da questa unità (500 mA).
La cartella dei dati (PIONEER DJM / DJM350 REC) non
contiene file riproducibili.
I circuiti di questa unità sono guasti.
I dispositivi USB/ file utilizzabili con
questa unità
Questa unità supporta i dischi fissi esterni, i dispositivi di memoria
flash portatili ed altri dispositivi di memoria di massa USB.
Livelli cartelle Max. 2 strati (PIONEER DJM / DJM350 REC)
Mass. numero
di file
File system sup-
portati
! I dispositivi ottici a disco come le unità DVD/
supportati.
! Quando vi sono molte cartelle o file, il caricamento potrebbe richiedere un
certo tempo.
! Se per il dispositivo USB vengono impostate partizioni multiple, il disposi-
tivo potrebbe non essere riconosciuto.
Massimo 999 brani
FAT, FAT32 e HFS+
CD esterne ecc. non sono
Usare un dispositivo USB formattato con un file system
supportato da questa unità (FAT o HFS+).
Collegare un dispositivo di memoria di massa USB.
I file registrati ricevono un numero a tre cifre. Una volta
che il numero 999 viene raggiunto, non si possono creare nuovi file nella cartella. Se questo appare, spostare i
file della cartella in un’altra cartella.
Disattivare la protezione dalla scrittura del dispositivo
USB.
Non usare dispositivi USB dotati di funzione di sicurezza.
Cambiare l’impostazione in modo da poter scrivere dati
nella cartella dei dati.
Usare un dispositivo USB (ad esempio un disco fisso
alimentato da un adattatore di c.a. o altra sorgente di
energia) di consumo accettabile.
Registrare dei file con questa unità per poterli poi
riprodurre.
Scollegare il cavo di alimentazione dalla presa di corrente.
Precauzioni per l’uso di dispositivi USB
! Alcuni dispositivi USB potrebbero non funzionare correttamente.
Si prega di notare che Pioneer non si assume alcuna responsabilità di alcun tipo per la perdita di dati registrati dal cliente su dispositivi USB.
! Gli hub USB non possono essere utilizzati.
! Dispositivi USB forniti di lettori di schede flash potrebbero non
funzionare.
! Può accadere che, quando un consumo superiore al massimo
permissibile viene rilevata dalla porta USB di questa unità, l’indicatore [USB STOP] lampeggi 5 volte, l’alimentazione del dispositivo
USB cessi e che la comunicazione col dispositivo USB si interrompa. Per fare riprendere il funzionamento normale, scollegare
il dispositivo USB da questa unità e premere [USB STOP]. Evitare
di riutilizzare dispositivi USB associati a consumi in eccesso. Se il
funzionamento normale non fa ritorno (se la comunicazione non
può venire ristabilita) con la procedura vista, provare a spegnere e
riaccendere questa unità.
! Con certe dispositivi USB può non essere possibile ottenere le
prestazioni desiderate.
Italiano
It
15
Page 64

File WAV
Il DJM-350 supporta file WAV nei formati sottoindicati.
Formati compatibili
Estensione del file .WAV o .wav
Sono supportati i file PCM a 16 bit non compressi con
frequenza di campionamento da 44,1 kHz.
Le clausole di esenzione
! Pioneer è un marchio di fabbrica depositato della Pioneer
Corporation.
! I nomi delle aziende e dei prodotti menzionati sono marchi di
fabbrica dei rispettivi proprietari.
! Si pregano gli utenti di riprodurre file audio con questa unità nel
rispetto delle leggi sui diritti d’autore.
Dati tecnici
Generale
Requisiti di alimentazione .................... CA da 220 V a 240 V, 50 Hz/ 60 Hz
Consumo di corrente ............................................................................. 17 W
Consumo di corrente (in attesa) .........................................................0,4 W
Peso unità principale .......................................................................... 3,2 kg
Dimensioni massime ............... 218 mm (L) × 107 mm (A) × 301 mm (P)
Temperature di funzionamento tollerabili ...................Da +5 °C a +35 °C
Umidità di funzionamento tollerabile .. Da 5 % a 85 % (senza condensa)
Sezione audio
Frequenza di campionamento...........................................................48 kHz
Convertitore A/
Caratteristiche di frequenza
CD/ AUX/ MIC .............................................................Da 20 Hz a 20 kHz
Rapporto S/ R (uscita dichiarata)
CD ....................................................................................................97 dB
PHONO ...........................................................................................86 dB
MIC ..................................................................................................80 dB
Distorsione armonica complessiva (CD — MASTER1) .................0,007 %
Livello/ impedenza di ingresso standard
CD .................................................................................... –12 dBu/ 36 kW
PHONO ........................................................................... –52 dBu/
MIC .................................................................................. –52 dBu/ 10 kW
AUX ................................................................................. –12 dBu/ 27 kW
Livello di uscita/
MASTER OUT........................................................+2 dBu/ 10 kW/ 2,5 W
PHONES ..................................................................+2 dBu/ 32 W/ 150W
Livello di uscita/ impedenza di carico dichiarati
MASTER OUT................................................................+18 dBu/
Diafonia (CD) .........................................................................................78 dB
Caratteristiche di equalizzazione dei canali
HI ....................................................................... Da –
MID .....................................................................Da –
LOW ................................................................. Da –
Caratteristiche di equalizzazione MIC/
HI ............................................................. Da –12 dB a +12 dB (10 kHz)
LOW ........................................................ Da –12 dB a +12 dB (100 Hz)
Terminali di ingresso/ uscita
Terminale di ingresso CD
Prese a spinotto RCA .................................................................... 2 set
Terminale di ingresso PHONO
Prese a spinotto RCA .................................................................... 2 set
Terminale di ingresso MIC
Presa fono (Ø 6,3 mm) ................................................................... 1 set
Terminale di ingresso AUX
Prese a spinotto RCA .................................................................... 1 set
Terminale di uscita MASTER
Prese a spinotto RCA .................................................................... 2 set
Terminale di uscita PHONES
Presa fono stereo (Ø 6,3 mm) ....................................................... 1 set
It
16
D, D/ A ..........................................................................24 bit
impedenza di carico/ impedenza di uscita standard
∞ a 9 dB (13 kHz)
∞ a 9 dB (1 kHz)
∞ a +9 dB (70 Hz)
AUX
47 kW
10 kW
Terminale USB
Tipo A .............................................................................................. 1 set
Terminale CONTROL
Mini spinotto fono (Ø 3,5 mm) ...................................................... 2 set
! I dati tecnici ed il design di questo prodotto sono soggetti a
modifiche senza preavviso.
! Pubblicato da Pioneer Corporation. Copyright © 2010 Pioneer
Corporation. Tutti i diritti riservati.
Page 65

Page 66

Hartelijk dank voor uw aankoop van dit Pioneer product. Lees deze gebruiksaanwijzing aandachtig door om bekend te raken met de juiste bedie-
Het uitroepteken in een gelijkzijdige
driehoek is bedoeld om de aandacht van de
gebruiker te trekken op de aanwezigheid van
belangrijke bedienings- en
onderhoudsinstructies in de handleiding bij
dit toestel.
De lichtflash met pijlpuntsymbool in een
gelijkzijdige driehoek is bedoeld om de
aandacht van de gebruikers te trekken op
een niet geïsoleerde “gevaarlijke spanning”
in het toestel, welke voldoende kan zijn om
bij aanraking een elektrische shock te
veroorzaken.
WAARSCHUWING:
OM HET GEVAAR VOOR EEN ELEKTRISCHE
SHOCK TE VOORKOMEN, DEKSEL (OF
RUG) NIET VERWIJDEREN. AAN DE
BINNENZIJDE BEVINDEN ZICH GEEN
ELEMENTEN DIE DOOR DE GEBRUIKER
KUNNEN BEDIEND WORDEN. ENKEL
DOOR GEKWALIFICEERD PERSONEEL TE
BEDIENEN.
CAUTION
RISK OF ELECTRIC SHOCK
DO NOT OPEN
BELANGRIJK
D3-4-2-1-1_A1_Nl
Deponeer dit product niet bij het gewone huishoudelijk afval wanneer u het wilt verwijderen. Er bestaat een speciaal wettelijk
voorgeschreven verzamelsysteem voor de juiste behandeling, het opnieuw bruikbaar maken en de recycling van gebruikte
elektronische producten.
In de lidstaten van de EU, Zwitserland en Noorwegen kunnen particulieren hun gebruikte elektronische producten gratis bij de daarvoor
bestemde verzamelplaatsen of een verkooppunt (indien u aldaar een gelijkwaardig nieuw product koopt) inleveren.
Indien u zich in een ander dan bovengenoemd land bevindt kunt u contact opnemen met de plaatselijke overheid voor informatie over de juiste
verwijdering van het product.
Zodoende zorgt u ervoor dat het verwijderde product op de juiste wijze wordt behandeld, opnieuw bruikbaar wordt gemaakt, t gerecycleerd en het
niet schadelijk is voor de gezondheid en het milieu.
K058b_A1_Nl
ning van uw apparaat. Na het doorlezen van de gebruiksaanwijzing dient u deze te bewaren op een veilige plaats, voor latere naslag.
Het is mogelijk dat in bepaalde landen of gebieden de uitvoering van de netstekker en het stopkontakt verschilt van hetgeen in deze gebuiksaanwijzingis afgebeeld. De aansluitmethode en bediening zijn in dergelijke gevallen echter precies hetzelfde.
Nl
2
Page 67

WAARSCHUWING
Dit apparaat is niet waterdicht. Om brand of een
elektrische schok te voorkomen, mag u geen voorwerp
dat vloeistof bevat in de buurt van het apparaat zetten
(bijvoorbeeld een bloemenvaas) of het apparaat op
andere wijze blootstellen aan waterdruppels,
opspattend water, regen of vocht.
D3-4-2-1-3_A1_Nl
WAARSCHUWING
Lees zorgvuldig de volgende informatie voordat u de
stekker de eerste maal in het stopcontact steekt.
De bedrijfsspanning van het apparaat verschilt
afhankelijk van het land waar het apparaat wordt
verkocht. Zorg dat de netspanning in het land waar
het apparaat wordt gebruikt overeenkomt met de
bedrijfsspanning (bijv. 230 V of 120 V) aangegeven
op de achterkant van het apparaat.
D3-4-2-1-4*_A1_Nl
WAARSCHUWING
Om brand te voorkomen, mag u geen open vuur (zoals
een brandende kaars) op de apparatuur zetten.
D3-4-2-1-7a_A1_Nl
WAARSCHUWING
De gleuven en openingen in de behuizing van het
apparaat zijn aangebracht voor de ventilatie, zodat een
betrouwbare werking van het apparaat wordt verkregen
en oververhitting wordt voorkomen. Om brand te
voorkomen, moet u ervoor zorgen dat deze openingen
nooit geblokkeerd worden of dat ze afgedekt worden
door voorwerpen (kranten, tafelkleed, gordijn e.d.) of
door gebruik van het apparaat op een dik tapijt of een
bed.
D3-4-2-1-7b*_A1_Nl
Gebruiksomgeving
Temperatuur en vochtigheidsgraad op de plaats van
gebruik:
+5 °C tot +35 °C, minder dan 85 % RH
(ventilatieopeningen niet afgedekt)
Zet het apparaat niet op een slecht geventileerde plaats
en stel het apparaat ook niet bloot aan hoge
vochtigheid of direct zonlicht (of sterke kunstmatige
verlichting).
D3-4-2-1-7c*_A1_Nl
Als de netstekker van dit apparaat niet geschikt is
voor het stopcontact dat u wilt gebruiken, moet u de
stekker verwijderen en een geschikte stekker
aanbrengen. Laat het vervangen en aanbrengen van
een nieuwe netstekker over aan vakkundig
onderhoudspersoneel. Als de verwijderde stekker per
ongeluk in een stopcontact zou worden gestoken,
kan dit resulteren in een ernstige elektrische schok.
Zorg er daarom voor dat de oude stekker na het
verwijderen op de juiste wijze wordt weggegooid.
Haal de stekker van het netsnoer uit het stopcontact
wanneer u het apparaat geruime tijd niet denkt te
gebruiken (bijv. wanneer u op vakantie gaat).
D3-4-2-2-1a_A1_Nl
LET OP
De schakelaar van dit apparaat koppelt het
apparaat niet volledig los van het lichtnet. Aangezien
er na het uitschakelen van het apparaat nog een
kleine hoeveelheid stroom blijft lopen, moet u de
stekker uit het stopcontact halen om het apparaat
volledig van het lichtnet los te koppelen. Plaats het
apparaat zodanig dat de stekker in een noodgeval
gemakkelijk uit het stopcontact kan worden gehaald.
Om brand te voorkomen, moet u de stekker uit het
stopcontact halen wanneer u het apparaat langere
tijd niet denkt te gebruiken (bijv. wanneer u op
vakantie gaat).
D3-4-2-2-2a*_A1_Nl
WAARSCHUWING NETSNOER
Pak het netsnoer beet bij de stekker. Trek de stekker er
niet uit door aan het snoer te trekken en trek nooit aan
het netsnoer met natte handen aangezien dit
kortsluiting of een elektrische schok tot gevolg kan
hebben. Plaats geen toestel, meubelstuk o.i.d. op het
netsnoer, en klem het niet vast. Maak er nooit een
knoop in en en verbind het evenmin met andere
snoeren. De netsnoeren dienen zo te worden geleid dat
er niet per ongeluk iemand op gaat staan. Een
beschadigd netsnoer kan brand of een elektrische
schok veroorzaken. Kontroleer het netsnoer af en toe.
Wanneer u de indruk krijgt dat het beschadigd is, dient
u bij uw dichtstbijzijnde erkende PIONEER
onderhoudscentrum of uw dealer een nieuw snoer te
kopen.
S002*_A1_Nl
Nl
3
Page 68

Opmerkingen over deze handleiding
De namen van aanduidingen, menu’s en toetsen staan in deze handleiding tussen vierkante haken aangegeven. (bijv. [MASTER]-kanaal,
[ON/ OFF], [File]-menu)
Alvorens te beginnen
Kenmerken ..................................................................................................5
Voorbeeld systeemconfiguratie ................................................................. 5
Inhoud van de doos ..................................................................................... 5
Aansluitingen
Benaming van de aansluitingen ................................................................ 6
Aansluiten van de in/ uitgangsaansluitingen ...........................................7
Bediening
Regelpaneel ................................................................................................. 8
Omtrent de aan/ uit-schakelaar van dit apparaat ..................................... 9
Basisbediening (mengpaneel-gedeelte) ...................................................9
Controleren van de weergave via de hoofdtelefoon
(hoofdtelefoon-gedeelte) ..........................................................................11
Gebruik van de effectfunctie (hoofdeffect-gedeelte)
Gebruik van een microfoon of een extern apparaat (MIC/ AUX-
gedeelte) ....................................................................................................12
Opnemen van uw optreden (USB-opnamegedeelte) ............................12
Omtrent de automatische ruststandfunctie...........................................13
..............................11
Aanvullende informatie
Verhelpen van storingen...........................................................................14
Omtrent storingen ....................................................................................15
Omtrent USB-apparaten/ bestanden die bruikbaar zijn met dit
apparaat .....................................................................................................15
Omtrent de uitzonderingsclausules ........................................................16
Specificaties ..............................................................................................16
Nl
4
Page 69

Alvorens te beginnen
MULTI PLAYER
TEMPO
0
PLAY/PAUSE
SEARCH
TRACK SEARCH
IN/CUE OUT
OUT ADJUSTHOT LOOP
RELOOP/EXIT
BEAT LOOP
LOOP DRIVE
VINYL MODE
TEMPO RANGE
MASTER TEMPO
LOOP
USB
STOP
SOURCE SELECT
MP3/AAC
WAV/AIFF
CUE
PLAYLIST
BPM
DISC
LOCK
REVFWD
BACK
SELECT PUSH
TIME MODE
AUTO CUE
DISPLAY
UTILITY
A.CUE
LOCK
16
REMAIN
MS
FTEMPO %
INFO
BROWSE
BPM
2 CHANNEL DJ MIXER
MIC /AUX
MIC
0
LEVEL
HI
AUX
LOW
MIC/AUX
ON
12
12
12
12
HEADPHONES
CUE
CH-1
CUE
MIXING
CUE MASTER
CH-2
LEVEL
PHONES
0
9
9
9
9
CD
PHONO
CH- 1
FADER
START
FADER
START
CH- 1 CH- 2
9
9
9
9
CH-2
THRU
CD
PHONO
TRIMTRIM
HI
MID
LOW
HI
MID
LOW
LEVEL
MASTER
LEVEL/DEPTH
FILTERCRUSH
GATE JET
MASTER EFFECT
0
PREVIEW
TRACK MARK SEARCH
PLAY
USB
STOP
REC
MASTER LEVEL
Draagbare muziekspeler/
microfoon
Hoofdtelefoon
CDJ-350CDJ-350 DJM-350
Weergave-apparatuur,
versterker, actieve
luidsprekers, enz.
USB-apparaat
Voor audio-weergave Voor opnameVoor audio-ingangssignaal
Voor controle van het
audio-in/uitgangssignaal
Kenmerken
Dit DJ-mengpaneel presenteert de verfijnde techniek van Pioneer’s DJM-serie, de wereldstandaard in muziek op clubniveau. Het is een standaardmodel met alle vereiste functies voor veelzijdig geluidsmengen, voor moeiteloos dynamische DJ-optredens.
USB-opname
aan een knop te draaien.
Met dit apparaat kunt u het geluid van uw DJ-optreden gemakkelijk
muziek drastisch veranderen, enkel door een toets in te drukken en
opnemen op USB-opslagmedia (draagbare flash-geheugensticks e.d.).
Het opgenomen geluid kan ook worden afgespeeld met dit apparaat.
MIC/ AUX INPUT
Dit apparaat is voorzien van een microfoon/ hulpingang waarop u een
microfoon kunt aansluiten of een externe geluidsbron (sampler, draag-
3-banden equalizer
Dit apparaat is voorzien van een 3-bands equalizer waarmee u de
geluidssterkte van de hoge, lage en middentonen afzonderlijk kunt
bare muziekspeler, enz.). DJ-afspelen is mogelijk met maximaal drie
stel ingangen: CH-1 (kanaal 1), CH-2 (kanaal 2) en MIC/ AUX (microfoon/ hulpkanaal).
instellen. Zo kunt u niet alleen de klankkleur naar wens instellen,
maar u kunt ook de weergave in een bepaald toonbereik compleet wegdraaien door de regelaar helemaal naar links te draaien
(isolatorfunctie).
FADER START
Na aansluiten op een Pioneer DJ-speler met een bedieningssnoer
(inbegrepen bij de DJ-speler) kunt u het afspelen op de DJ-speler
starten met de fader-schuifregelaar van dit apparaat (fader-
MASTER EFFECT (GATE, CRUSH, JET,
weergavestart).
FILTER)
Dit apparaat is voorzien van vier effecttoetsen waarmee u de klank
op verschillende manieren kunt aanpassen. Zo kunt u de sfeer van de
Voorbeeld systeemconfiguratie
Een DJ-systeem zoals dat in het onderstaande schema kunt u opzetten door dit apparaat te combineren met een DJ-speler en randapparatuur.
Nederlands
Inhoud van de doos
! Netsnoer
! Garantiekaart
! Handleiding (dit document)
Nl
5
Page 70

Aansluitingen
AC IN
MASTER OUTCH-2
1
L
R
2
PHONO
CONTROL
SIGNAL
GND
L
R
CD
CH-1 AUX
MIC
PHONO
CONTROL
L
R
L
R
CD
1 2 7 8 93 4 5 3 4 56
a
Schakel altijd eerst de stroom uit en trek de stekker uit het stopcontact alvorens u enige aansluiting maakt of verbreekt.
Zie tevens de gebruiksaanwijzingen van de aan te sluiten apparatuur.
Sluit het netnoer pas aan nadat alle aansluitingen tussen de apparatuur volledig zijn gemaakt.
Gebruik alleen het bijgeleverde netsnoer.
Benaming van de aansluitingen
Achterpaneel
1 AC IN
Voor aansluiten op een stopcontact. Steek de stekker pas in het
stopcontact nadat alle andere aansluitingen in orde zijn.
Gebruik alleen het bijgeleverde netsnoer.
2 MASTER OUT 1, 2 (bladzijde 7)
Voor aansluiten van een eindversterker e.d.
3 PHONO (bladzijde 7)
Voor aansluiten op een analoge platenspeler of een ander weergaveapparaat met een phono-uitgang (MM-element). Sluit hierop geen
DJ-speler of ander apparaat met een gewone lijnuitgang aan.
4 CD (bladzijde 7)
Sluit hierop een DJ-speler of ander apparaat met een gewone lijnuitgang aan.
Voorpaneel
5 CONTROL (bladzijde 7)
Aansluiten via een bedieningssnoer (inbegrepen bij Pioneer
DJ-spelers).
6 SIGNAL GND (bladzijde 7)
Sluit hierop de aardingsdraad van een analoge platenspeler aan.
Dit vermindert storende geluiden bij aansluiten van een analoge
platenspeler.
7 AUX (bladzijde 7)
Aansluiten op de uitgangsaansluiting van een extern apparaat (sampler, draagbare muziekspeler, enz.)
8 MIC (bladzijde 7)
Voor aansluiten van een microfoon.
9 Kensington-beveiligingsgleuf
a PHONES (bladzijde 7)
Sluit hierop een hoofdtelefoon aan.
Nl
6
Page 71

Aansluiten van de in/ uitgangsaansluitingen
AC IN
AUDIO
OUT
RL
CONTROL
USB
MASTER OUTCH-2
1
L
R
2
PHONO
CONTROL
SIGNAL
GND
L
R
CD
CH-1 AUX
MIC
PHONO
CONTROL
L
R
L
R
CD
Microfoon
Weergave-apparatuur,
versterker, actieve
luidsprekers, enz.
Naar audio-
ingangsaansluitingen
Audio-ingangsgedeelte
Audio-uitgangsgedeelte
Audiosnoer
Audiosnoer
Audiosnoer
Naar audiouitgangsaansluitingen
Naar audiouitgangsaansluitingen
Bedieningssnoer
1
Aarddraad
Naar aardings-
aansluitklemmen
Audiosnoer
2
Microfoonsnoer
Naar microfoon
Draagbare
muziekspeler
Analoge
platenspeler
DJ-speler
Voorbeeld:
CDJ-350
Netsnoer (inbegrepen)
Naar stopcontact
R
L
R
L
R
L
R
L
R
L
Hoofdtelefoon
Hoofdtelefoonsnoer
Achterpaneel
Nederlands
1 Voor het gebruik van de fader-startfunctie sluit u een bedieningskabel aan (bladzijde 10).
De fader-startfunctie is alleen te gebruiken bij aansluiting op een Pioneer DJ-speler.
2 Een draagbare muziekspeler kan worden aangesloten met een audioverloopsnoer van tulpstekkers naar ministekker (Ø 3,5 mm) (bladzijde 12).
Voorpaneel
Nl
7
Page 72
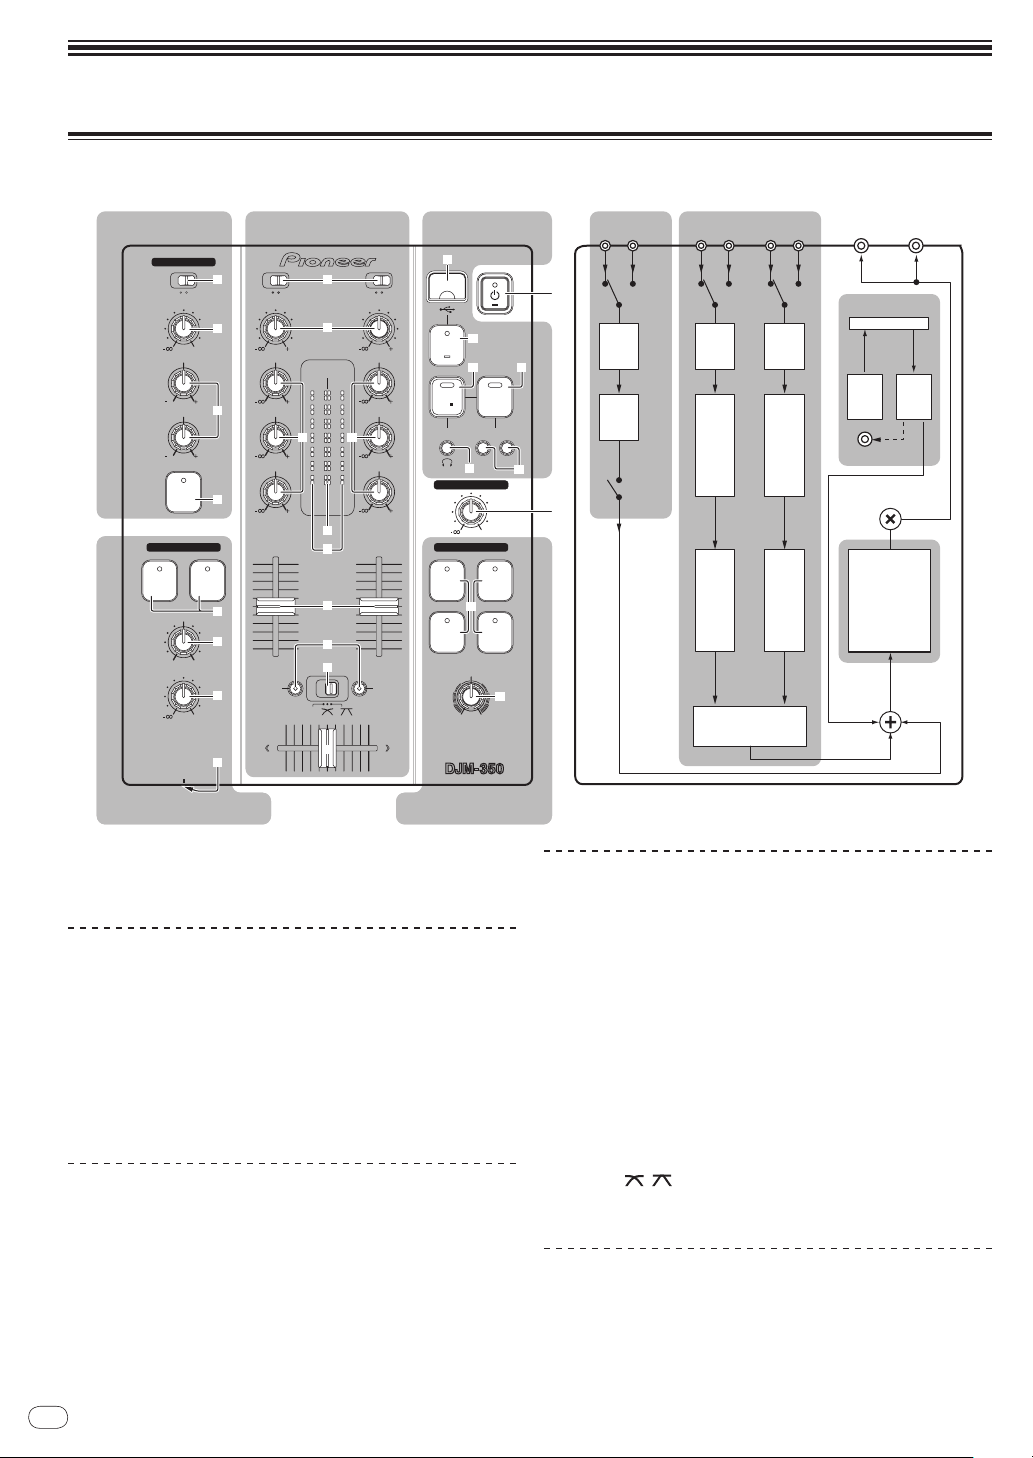
Bediening
2 CHANNEL DJ MIXER
MIC /AUX
MIC
0
LEVEL
HI
AUX
LOW
MIC/AUX
ON
12
12
12
12
HEADPHONES
CUE
CH-1
CUE
MIXING
CUE MASTER
CH-2
LEVEL
PHONES
0
9
9
9
9
CD
PHONO
CH- 1
FADER
START
FADER
START
CH- 1CH- 2
9
9
9
9
CH-2
THRU
CD
PHONO
TRIM TRIM
HI
MID
LOW
HI
MID
LOW
LEVEL
MASTER
LEVEL/DEPTH
FILTERCRUSH
GATE JET
MASTER EFFECT
0
PREVIEW
TRACK MARK SEARCH
PLAY
USB
STOP
REC
MASTER LEVEL
MIC/AUX-gedeelte Mengpaneel-gedeelte
Hoofdtelefoon-gedeelte Hoofdeffect-gedeelte
USB-
opnamegedeelte
Stroomschema audiosignalen
EQ
LEVEL
MIC/AUX
ON/OFF
MASTER
EFFECT
MASTER
LEVEL
MASTER
OUT 1
MASTER
OUT 2
RECPLAY
CROSS FADER
MIC
AUX
CD1 PHONO1 CD2 PHONO2
USB I/F
PREVIEW
EQ/
ISOLATOR
TRIM
CH
FADER
EQ/
ISOLATOR
TRIM
CH
FADER
3
1
2
r
b
c
g
4
8
9
a
6
5
h
f
e
i
j
7
d d
o
p
k
l
q
m n
Regelpaneel
1 u (aan/ uit-schakelaar) (bladzijde 9)
2 MASTER LEVEL (bladzijde 9)
MIC/ AUX-gedeelte
Geschikt voor het geluidsignaal van een microfoon of extern apparaat
(sampler, draagbare muziekspeler enz.) (bladzijde 12).
3 MIC, AUX
4 LEVEL
5 HI, LOW
6 MIC/AUX ON
Hoofdtelefoon-gedeelte
Het geluid dat binnekomt bij dit apparaat is te controleren via een
hoofdtelefoon (bladzijde 11).
7 CH-1 CUE, CH-2 CUE
8 MIXING
9 LEVEL
a PHONES
Nl
8
Mengpaneel-gedeelte
Twee stel audiosignalen kunnen afzonderlijk worden bijgeregeld voor
eenvoudig DJ-mengen (bladzijde 9).
b CD, PHONO (ingangskeuzeschakelaar)
c TRIM
d HI, MID, LOW
e Hoofdniveau-aanduiding
f Kanaalniveau-aanduiding
g Kanaal-fader
h FADER START
i THRU,
j Crossfader-regelaar
USB-opnamegedeelte
DJ-optredens kunnen worden opgenomen op en afgespeeld vanaf
USB-apparaten (bladzijde 12).
k USB-aansluitbus
l USB STOP
, (crossfader-curveschakelaar)
Page 73

m REC k/ g
9
9
9
9
CD
PHONO
CH- 1
FADER
START
FADER
START
CH- 1 CH- 2
9
9
9
9
CH-2
THRU
CD
PHONO
TRIM TRIM
HI
MID
LOW
HI
MID
LOW
LEVEL
MASTER
b
c
1 2
g
h
f
e
i
j
d d
n PLAY f
o TRACK MARK (PREVIEW)
p SEARCH o, p
Hoofdeffect-gedeelte
Effecten kunnen worden toegepast op het geluid dat wordt weergegeven via [MASTER OUT 1, 2] (bladzijde 11).
q MASTER EFFECT (GATE, CRUSH, JET, FILTER)
r LEVEL/
DEPTH
Omtrent de aan/ uit-schakelaar van
dit apparaat
Voor inschakelen van de stroom
Druk op [u] 1.
Schakel dit apparaat in.
Het [u]-indicator licht groen op.
Basisbediening (mengpaneelgedeelte)
Voor uitschakelen in de ruststand
Met de stroom ingeschakeld, houdt u [u] 1 tenminste 2
seconden lang ingedrukt.
Dit apparaat komt dan in de ruststand.
Het [u]-indicator licht rood op.
! Wanneer u nogmaals op [u] drukt, wordt de stroom weer
ingeschakeld.
! Dit apparaat heeft een automatische ruststandfunctie. Zie Omtrent
de automatische ruststandfunctie op bladzijde 13 voor verdere
informatie.
Geluid weergeven
Controleer of dit apparaat naar behoren is aangesloten op een
DJ-speler, enz. voordat u het geluid gaat weergeven. Nadere aanwijzingen voor het aansluiten vindt u onder Aansluiten van de in/ uitgangsaansluitingen op bladzijde 7.
Stel de geluidssterkte van de eindversterkers aangesloten op
[MASTER OUT 1, 2] in op een geschikt niveau. Als u de geluidssterkte
te hoog instelt, kunnen er erg harde geluiden klinken.
Voor uitsturen van het geluid van kanaal 1 [CH-1] 1
Voor uitsturen van het geluid van kanaal 2 ([CH-2]) 2, volgt u de
onderstaande aanwijzingen, maar vervangt u [CH-1] door [CH-2].
1 Stel de [CD, PHONO] ingangskeuzeschakelaar b voor
[CH-1] 1 in.
Kies de ingangsbron van het [CH-1] kanaal voor de componenten die
op dit apparaat zijn aangesloten.
— [CD]: Voor keuze van de DJ-speler die is aangesloten op de
[CD]-aansluiting.
— [PHONO]: Voor keuze van een analoge muziekspeler aange-
sloten op de [PHONO]-aansluiting.
2 Draai de [TRIM] c-knop voor het kanaal-[CH-1] 1
naar rechts.
Regelt het niveau van de geluidssignalen die binnenkomen via de
[CH-1]-aansluiting.
De [CH-1] kanaalniveau-aanduiding f licht op wanneer er geluidssignalen goed doorkomen voor kanaal [CH-1].
Verstel [TRIM] zo, dat het het oranje indicator oplicht bij het luidste
punt in het muziekstuk (een crescendo, enz.).
Let op dat de rode indicator niet oplicht, anders kan er vervorming in
het geluid optreden.
Nl
Nederlands
9
Page 74

3 Schuif de [CH-1] 1 kanaalfader-regelaar g naar
achteren toe.
Hiermee regelt u het geluid dat wordt weergegeven via de [CH-1]aansluitingen.
4 Schakel de [THRU, , ] crossfader-curveschakelaar
i om.
Voor omschakelen van de crossfader-curvekarakteristiek.
— [THRU]: Kies deze stand wanneer u de crossfader niet wilt
gebruiken.
]: Kies deze stand voor een geleidelijk stijgende curve.
— [
— [
]: Kies deze stand voor een steilere curve. (Naarmate de
crossfader verder van de linker- of rechterkant komt, wordt er
meer geluid weergegeven aan de tegenovergestelde kant.
5 Verschuif de crossfader-regelaar j.
Schakel over op het kanaal waarvan het geluid wordt weergegeven
door de luidsprekers.
— Linkerkant: Het geluid van [CH-1] wordt weergegeven.
— Middenpositie: Het geluid van [CH-1] en [CH-2] wordt samen-
gevoegd en weergegeven.
— Rechterkant: Het geluid van [CH-2] wordt weergegeven.
! Deze handeling is niet nodig als de [THRU, , ] crossfader-
curvekiezer in de [THRU] stand is gezet.
6 Draai de [MASTER LEVEL] 2-knop naar rechts.
Het geluid wordt weergegeven via de luidsprekers.
De hoofdniveau-aanduiding e in het bedieningspaneel licht op.
Verstel [MASTER LEVEL] zo, dat het het oranje indicator oplicht bij het
luidste punt in het muziekstuk (een crescendo, enz.).
Let op dat de rode indicator niet oplicht, anders kan er vervorming in
het geluid optreden.
6 Bedien de DJ-speler die is aangesloten op de [CH-2]aansluitingen.
Bij het meeluisteren via de hoofdtelefoon kunt u het tempo van het
[CH-2]-muziekstuk bijregelen, zodat het gelijkloopt met het tempo van
het [CH-1]-muziekstuk.
7 Terwijl u de [CH-2] 2 kanaalschuifregelaar
naar achteren schuift, schuift u de [CH-1] 1
kanaalschuifregelaar naar voren toe.
Luister naar het geluid dat wordt weergegeven via de luidsprekers en
gebruik de kanaalschuifregelaars om het geluid van [CH-1] geleidelijk
te vervangen door het geluid van [CH-2].
Het geluidsmengen is voltooid wanneer alleen het [CH-2]-geluid wordt
weergegeven via de luidsprekers.
Geluid mengen met de crossfader-regelaar
1 Zet de [THRU,
, ] crossfader-curveschakelaar i
op [ ] of [ ].
2 Regel nu [CH-2] 2.
Ga te werk volgens stappen 2 t/ m 6 onder Geluid mengen met de
kanaalregelaars op bladzijde 10.
3 Schuif de crossfader-regelaar j geleidelijk naar
rechts.
Luister naar het geluid dat wordt weergegeven via de luidsprekers en
gebruik de crossfader-regelaar om het geluid van [CH-1] geleidelijk te
vervangen door het geluid van [CH-2].
Het geluidsmengen is voltooid wanneer alleen het [CH-2]-geluid wordt
weergegeven via de luidsprekers.
Bijregelen van de geluidskwaliteit
Draai aan de [CH-1] 1 of [CH-2] 2 [HI], [MID] of [LOW]
d-regelaar.
Zie Specificaties op bladzijde 16 voor het bereik van het geluid dat kan
worden bijgeregeld met elk van deze regelaars.
! Het geluid voor dat bereik kan ook helemaal worden uitgeschakeld
door de knop helemaal naar links te draaien (isolatiefunctie).
Geluid mengen met de schuifregelaars
Stel dit apparaat van tevoren zo in dat het geluid van [CH-1] 1 wordt
weergegeven via de luidsprekers. Nadere aanwijzingen voor het aansluiten vindt u onder Geluid weergeven op bladzijde 9.
Nadere aanwijzingen voor het controleren van het geluid vindt u onder
Controleren van de weergave via de hoofdtelefoon (hoofdtelefoongedeelte) op bladzijde 11.
Geluid mengen met de kanaalregelaars
1 Schakel de [THRU,
i over naar [THRU].
2 Stel de [CD, PHONO] ingangskeuzeschakelaar b voor
[CH-2] 2 in.
3 Draai de [TRIM] c-knop voor het kanaal-[CH-2] 2
naar rechts.
4 Druk op [CH-2 CUE] 7.
Het geluid van [CH-2] is te horen via de hoofdtelefoon.
5 Draai aan [MIXING] 8.
Hiermee regelt u de balans van de geluidssterkte voor het geluid
weergegeven via de [MASTER OUT 1, 2]-aansluitingen (het geluid van
[CH-1]) en het geluid van [CH-2].
, ] crossfader-curveschakelaar
Gebruik van de fader voor het afspelen
van een Pioneer DJ-speler (fader-start)
Als u een Pioneer DJ-speler aansluit met een bedieningskabel (bijgeleverd bij de DJ-speler), kunt u de weergave starten of andere functies
van de DJ-speler bedienen met de fader van dit apparaat.
De fader-startfunctie is alleen te gebruiken bij aansluiting op een
Pioneer DJ-speler.
Sluit vooraf dit apparaat aan op een Pioneer DJ-speler. Nadere aanwijzingen voor het aansluiten vindt u onder Aansluiten van de in/ uitgangsaansluitingen op bladzijde 7.
Beginnen met afspelen met de kanaal-
schuifregelaars
1 Schakel de [THRU,
i over naar [THRU].
2 Druk op [FADER START] h.
Schakel de fader-startfunctie in.
3 Schuif de kanaalschuifregelaar g helemaal naar
voren toe.
4 Stel de cue in op de DJ-speler
De DJ-speler pauzeert de weergave bij het cue-punt.
5 Schuif de kanaalfader-regelaar g naar achteren toe.
Het afspelen begint op de DJ-speler.
! Wanneer u de kanaal-fader terugzet in de oorspronkelijke stand,
keert de speler onmiddellijk terug naar het eerder ingestelde cuepunt, om daar de weergave te pauzeren (back-cue).
Beginnen met afspelen met de crossfader
1 Zet de [THRU,
op [ ] of [ ].
, ] crossfader-curveschakelaar
, ] crossfader-curveschakelaar i
10
Nl
Page 75

2 Druk op [FADER START] h.
HEADPHONES
CUE
CH-1
CUE
MIXING
CUE MASTER
CH-2
LEVEL
PHONES
0
8
9
a
7
2 CHANNEL DJ MIXER
LEVEL/DEPTH
FILTERCRUSH
GATE JET
MASTER EFFECT
q
r
Schakel de fader-startfunctie in.
3 Verschuif de crossfader-regelaar j.
Schuif de crossfader-regelaar naar de tegenovergestelde rand van het
kanaal waarvoor u de fader-startfunctie wilt gebruiken.
4 Stel de cue in op de DJ-speler
De DJ-speler pauzeert de weergave bij het cue-punt.
5 Verschuif de crossfader-regelaar j.
Het afspelen begint op de DJ-speler.
! Wanneer u de crossfader terugzet in de oorspronkelijke stand,
keert de speler onmiddellijk terug naar het eerder ingestelde cuepunt, om daar de weergave te pauzeren (back-cue).
Controleren van de weergave via
de hoofdtelefoon (hoofdtelefoongedeelte)
1 Sluit een hoofdtelefoon aan op de [PHONES]aansluiting
Nadere aanwijzingen voor het aansluiten vindt u onder Aansluiten van
de in/ uitgangsaansluitingen op bladzijde 7.
2 Druk op [CH-1 CUE] of [CH-2 CUE] 7.
Kies het kanaal dat u wilt beluisteren.
— [CH-1 CUE]: Het geluid van [CH-1] is te horen.
— [CH-2 CUE]: Het geluid van [CH-2] is te horen.
! Deze handeling is niet nodig als u het geluid van het hoofdkanaal
wilt horen (het geluid dat wordt weergegeven door de [MASTER
OUT 1, 2]-aansluitingen).
3 Draai aan [MIXING] 8.
— Wanneer u de knop naar links draait: Het geluid van [CH-1] en
[CH-2] gaat relatief luider klinken.
— In de middenpositie: Het geluid van [CH-1] en [CH-2] klinkt
op dezelfde sterkte als het geluid via de [MASTER OUT 1,
2]-aansluitingen.
— Wanneer u de knop naar rechts draait: Het geluid dat wordt
weergegeven via de [MASTER OUT 1, 2]-aansluitingen gaat
relatief luider klinken.
4 Draai de [LEVEL] 9-knop in het hoofdtelefoongedeelte naar rechts.
Het geluid wordt weergegeven via de hoofdtelefoon.
! Het meeluisteren wordt uitgeschakeld wanneer u nogmaals op
[CH-1 CUE] of [CH-2 CUE] drukt.
! Het geluid dat wordt weergegeven via de [MASTER OUT 1, 2]-aan-
sluitingen kan niet worden uitgeschakeld.
Gebruik van de effectfunctie
(hoofdeffect-gedeelte)
Dit apparaat is voorzien van vier effecttoetsen. Wanneer u op een
effecttoets drukt, wordt het bijbehorende effect toegepast op de
geluidssignalen die worden weergegeven via de [MASTER OUT 1,
2]-aansluitingen.
Een effect toepassen
Druk op een van de [MASTER EFFECT (GATE, CRUSH, JET,
FILTER)] q-toetsen.
Het effect wordt toegepast op het geluid.
De ingedrukte toets gaat knipperen.
De effecten verschillen voor de diverse toetsen. Zie voor nadere bijzonderheden over de verschillende effecten de onderstaande tabel.
! Wanneer u nogmaals drukt op een toets die knippert, wordt het
effect uitgeschakeld.
Effectnaam Beschrijving LEVEL/ DEPTH
GATE
CRUSH
JET
FILTER
Een karakteristieke passage
wordt uit het ritmische
basispatroon van het
muziekstuk genomen, om
een variatie in het ritme te
bereiken.
Het geluid wordt in geringe
mate ineengedrukt, hetgeen een accent toevoegt.
Er klinkt een effect als van
een opstijgend en dalend
straalvliegtuig.
Het geluid van het hoge of
het lage toonbereik wordt
weggefilterd, hetgeen de
klank enorm verandert.
Links: Het hogere bereik
(hi-hat voetbekken e.d.)
wordt gevarieerd.
Rechts: Het lagere bereik
(de basdrum e.d.) wordt
gevarieerd.
Links: Het geluid wordt
ineengedrukt, met een
effect alsof het hogere
bereik geleidelijk wordt
afgesneden.
Rechts: Het geluid wordt
ineengedrukt, met een
effect alsof het lage toonbereik geleidelijk wordt
afgesneden.
Links: Er klinkt een effect
als van een dalend straalvliegtuig.
Rechts: Er klinkt een effect
als van een opstijgend
straalvliegtuig.
Links: Er klinkt een effect
alsof het hogere bereik
geleidelijk wordt afgesneden.
Rechts: Er klinkt een effect
alsof het lage toonbereik
geleidelijk wordt afgesneden.
Het effect varieren
Draai aan [LEVEL/ DEPTH] r.
Het effect verandert, al naar gelang de richting waarin u de [LEVEL/
DEPTH]-knop draait en hoe ver.
! Het oorspronkelijk geluid wordt weergegeven wanneer u de
[LEVEL/ DEPTH]-knop in de middenstand zet.
Nederlands
Nl
11
Page 76

Gebruik van een microfoon of een
MIC /AUX
MIC
0
LEVEL
HI
AUX
LOW
MIC/AUX
ON
12
12
12
12
3
4
6
5
PREVIEW
TRACK MARK SEARCH
PLAY
USB
STOP
REC
o
p
k
l
m n
extern apparaat (MIC/ AUX-gedeelte)
De [REC k/ g]-indicator m knippert.
! Wanneer u nogmaals op [REC k/ g] drukt, dooft het [REC k/ g]-
indicator en stopt het opnemen.
! U kunt 180 minuten achtereen opnemen. Als u langer dan 180
minuten achtereen blijft opnemen, worden de opnamegegevens op
het USB-apparaat automatisch gesplitst.
! U kunt ongeveer 90 minuten lang opnemen op een USB-apparaat
van 1 GB.
Opgenomen muziekstukken afspelen
Druk op [PLAY/ f] n.
Het afspelen begint.
De [PLAY f]-indicator n gaat branden.
! Wanneer u nogmaals op [PLAY f]drukt, pauzeert de weergave.
! Alleen WAV-bestanden die zijn opgeslagen in de [PIONEER
DJM / DJM350 REC]-map op het USB-apparaat kunnen worden
afgespeeld.
1 Schakel [MIC, AUX] 3 om.
— [MIC]: De microfoon die is aangesloten op de [MIC]-
aansluiting wordt gekozen.
— [AUX]: Een extern apparaat aangesloten op de [AUX]-
aansluiting wordt gekozen.
2 Druk op [MIC/AUX ON] 6.
3 Draai knop [LEVEL] 4 in het MIC/
AUX-gedeelte naar
rechts.
Het geluid van de microfoon of de externe bron wordt via de luidsprekers weergegeven.
Bijregelen van de geluidskwaliteit
Draai aan knop [HI] of [LOW] 5 in het MIC/ AUXgedeelte.
Zie Specificaties op bladzijde 16 voor het bereik van het geluid dat kan
worden bijgeregeld met elk van deze regelaars.
Opnemen van uw optreden (USBopnamegedeelte)
Het zelfde geluid als wordt weergegeven via de [MASTER OUT 1,
2]-aansluitingen kan worden opgenomen als WAV-bestand op een
USB-apparaat.
! De bestanden die worden aangemaakt bij opname van het geluid
krijgen een naam in de vorm [REC***.WAV] (met voor *** een
getal van 3 cijfers).
Opgenomen muziekstukken controleren
1 Draai de [MIXING]-regelaar 8 vanuit het midden naar
links.
2 Houd [TRACK MARK (PREVIEW)] o ingedrukt.
Het geluid van het opgenomen muziekstuk is via de hoofdtelefoon te
horen zolang u de toets indrukt.
! Het geluid dat u controleert wordt toegevoegd aan het geluid van
[CH-1] en [CH-2] en wordt weergegeven door de hoofdtelefoon.
! Het geluid dat u controleert wordt niet weergegeven door de
luidsprekers.
! Deze controle is niet mogelijk wanneer een muziekstuk wordt
opgenomen of afgespeeld.
Snel vooruit/ terugzoeken door
opgenomen muziekstukken
Houd tijdens afspelen [SEARCH o, p] ingedrukt p.
Het muziekstuk wordt voorwaarts versneld wanneer u [p] ingedrukt
houdt.
Het muziekstuk wordt terugwaarts versneld wanneer u [o] ingedrukt houdt.
Het [PLAY f]-indicator knippert tijdens het snel vooruit/
terugzoeken.
! Snel vooruit/ terugzoeken is niet mogelijk in de pauzestand.
Direct naar het begin van een opgenomen
muziekstuk gaan
1 Sluit een USB-apparaat aan op de USB-aansluitbus k.
De [USB STOP]-indicator l knippert.
Na een tijdje stopt het [USB STOP]-indicator met knipperen en blijft
branden en dan is de opname-wachtstand ingesteld.
2 Druk op [REC k/ g] m.
Het opnemen begint.
12
Druk op [SEARCH o, p] p.
Druk op [p] om door te gaan naar het begin van het volgende
muziekstuk.
Druk eenmaal op [o] om terug te keren naar het begin van het dan
weergegeven muziekstuk, tweemaal om naar het begin van het voorgaande muziekstuk te gaan.
Muziekstukken splitsen tijdens het
Nl
opnemen
Druk tijdens het opnemen op [TRACK MARK (PREVIEW)] o.
Het op dat moment opgenomen muziekstuk wordt dan gesplitst op het
USB-apparaat vastgelegd.
! Wanneer een gesplitst muziekstuk op dit apparaat wordt afge-
speeld, kan het geluid even worden onderbroken bij de overgang
tussen de twee stukken.
Page 77

Opgenomen muziekstukken wissen
1 Druk terwijl het muziekstuk wordt afgespeeld op
[PLAY f] n.
Het muziekstuk dat u wilt wissen wordt gepauzeerd.
2 Houd [PLAY/ f] n tenminste 2 seconden lang
ingedrukt.
Het [REC k/ g]-indicator knippert.
3 Terwijl u [PLAY f] n ingedrukt houdt, drukt u op
[REC k/
Het [REC k/ g]-indicator blijft branden en het muziekstuk wordt
gewist.
! Het wissen van het muziekstuk wordt geannuleerd als u [PLAY
g] m.
f] loslaat terwijl het [REC k/
g]-indicator knippert.
Losmaken van USB-apparaten
Ga altijd als volgt te werk om een USB-apparaat los te maken.
Losmaken van een USB-apparaat zonder deze aanwijzingen te volgen
kan het USB-apparaat onleesbaar maken.
Voordat u het apparaat uitschakelt, dient u altijd eerst het USBapparaat los te maken.
1 Houd [USB STOP] l tenminste 1 seconde lang
ingedrukt.
Het [USB STOP]-indicator knippert en dooft dan.
2 Verwijder het USB-apparaat.
Het [u]-spanningslampje knippert groen terwijl de instelling wordt
opgeslagen en blijft dan branden wanneer de instelling is vastgelegd.
! Trek nooit de stekker uit het stopcontact wanneer deze instelling
nog wordt opgeslagen.
Nederlands
Omtrent de automatische
ruststandfunctie
Wanneer de automatische ruststandfunctie is ingeschakeld, wordt
het apparaat na een vooraf ingestelde tijd automatisch in de ruststand
gezet als aan de onderstaande voorwaarden is voldaan.
— Als geen van de bedieningsknoppen of regelaars wordt bediend.
— Dat de kanaalniveau-indicator van dit apparaat niet oplicht.
— Mits de opname- en weergavefuncties van het USB-apparaat niet
in gebruik zijn.
Instellen van de automatische
ruststandfunctie
Zet eerst dit apparaat uit, in de ruststand.
1 Druk op [u] 1 terwijl u [o] en [p] p ingedrukt
houdt.
Dan schakelt het apparaat over naar de instelstand voor de automatische ruststandfunctie.
Het bovenste segment van de hoofdniveau-indicator gaat knipperen.
De andere segmenten van de indicator lichten op volgens de nu ingestelde tijd.
2 Druk op [o] of [p] p.
Stel de tijd in voordat de ruststand moet ingaan.
De ingestelde tijd verandert bij elke druk op de toets.
De segmenten van de hoofdniveau-indicator lichten op volgens de
ingestelde tijd (uitgezonderd het bovenste segment).
— Uit — 20 minuten — 40 minuten — 60 minuten
— 20 minuten: De twee onderste segmenten lichten op.
— 40 minuten: De vier onderste segmenten lichten op.
— 60 minuten: De zes onderste segmenten lichten op.
! Deze tijd staat bij aflevering vanaf de fabriek ingesteld op 20
minuten.
3 Houd [u] 1 tenminste 2 seconden lang ingedrukt.
De nieuw gekozen instelling voor de automatische ruststandfunctie
wordt opgeslagen.
Nl
13
Page 78

Aanvullende informatie
Verhelpen van storingen
! Verkeerde bediening kan vaak de oorzaak zijn van een schijnbare storing of foutieve werking. Wanneer u denkt dat er iets mis is met dit appa-
raat, controleert u eerst de onderstaande punten. Soms ligt de oorzaak van het probleem bij een ander apparaat. Controleer daarom ook de
andere componenten en elektrische apparatuur die gebruikt wordt. Als u het probleem aan de hand van de onderstaande controlepunten niet
kunt verhelpen, verzoekt u dan uw dichtstbijzijnde officiële Pioneer onderhoudsdienst of uw vakhandelaar om het apparaat te laten repareren.
! Dit apparaat kan soms niet goed werken vanwege statische elektriciteit of andere externe invloeden. In dat geval kunt u de normale werking
herstellen door de stekker uit het stopcontact te trekken en die na ongeveer 5 seconden of langer weer aan te sluiten.
Probleem Controle Oplossing
De stroom wordt niet ingeschakeld. Is het netsnoer naar behoren aangesloten? Steek de netsnoerstekker in het stopcontact. (bladzijde 7)
Er klinkt niet of nauwelijks geluid. Staat de [CD, PHONO] ingangskeuzeschakelaar in
Vervorming in het geluid. Staat [MASTER LEVEL] in de juiste stand? Verstel [MASTER LEVEL] zo dat de oranje indicator in de hoofdni-
De crossfader werkt niet.
Het starten van de DJ-spaler via de fader lukt
niet.
Geen effect te horen. Is er op een van de [MASTER EFFECT (GATE,
Er klinkt niet of nauwelijks geluid bij afspelen
van een muziekstuk dat is opgenomen op een
USB-apparaat.
Het geluid klinkt vervormd bij afspelen van een
muziekstuk dat is opgenomen op een USBapparaat.
Het geluid van een opgenomen muziekstuk is
niet te controleren via de hoofdtelefoon, ook
niet door ingedrukt houden van [TRACK MARK
(PREVIEW)].
Het USB-apparaat wordt niet herkend. Is het USB-appparaat naar behoren aangesloten? Steek het USB-apparaat stevig helemaal in de aansluitbus.
de juiste stand?
Staan de [TRIM], [kanaal-schuifregelaar], [crossfa-
der] en [MASTER LEVEL]-regelaars juist ingesteld?
Zijn de aangesloten apparaten, versterkers e.d.
juist ingesteld?
Zijn de aansluitsnoeren goed aangesloten? Zorg dat de aansluitsnoeren juist zijn aangesloten. (bladzijde 7)
Zijn de aansluitbussen en de stekkers vuil? Maak de aansluitbussen en de stekkers schoon voordat u aaslui-
Staat [TRIM] in de juiste stand? Verstel [TRIM] zo dat de oranje indicator in de kanaalniveau-
Staat de [THRU,
ingesteld op [THRU]?
Staat [FADER START] in de uit-stand? Zet [FADER START] aan. (bladzijde 10)
Is het bedieningssnoer naar behoren aangesloten? Sluit dit apparaat aan op uw DJ-speler met een bedieningssnoer.
Zijn de audiosnoeren goed aangesloten? Sluit dit apparaat aan op de audio-uitgangsaansluiting van een
CRUSH, JET, FILTER)]-toetsen gedrukt?
Staat [LEVEL/
Staat [MASTER LEVEL] in de juiste stand? Verstel voor het opnemen [MASTER LEVEL] zo dat de oranje
Staat [TRIM] in de juiste stand? Verstel voor het opnemen [TRIM] zo dat de oranje indicator in
Staat [MIXING] helemaal naar rechts gedraaid? Draai de [MIXING]-regelaar vanuit het midden naar links. (blad-
Is het USB-apparaat wel geschikt voor gebruik
met dit apparaat?
, ] crossfader-curvekiezer
DEPTH] in de middenpositie? Draai [LEVEL/ DEPTH] naar rechts of naar links. (bladzijde 11)
Stel de [CD, PHONO] ingangskeuzeschakelaar in op de gewenste
ingangsbron voor dat kanaal. (bladzijde 9)
Zet de [TRIM], [kanaalschuifregelaar], [crossfader] en [MASTER
LEVEL]-regelaar in de juiste stand. (bladzijde 9)
Zorg dat de externe geluidsbronkeuze, de geluidssterkte e.d. op
de geluidsbronnen/
tingen gaat maken.
veau-aanduiding alleen bij het piekniveau oplicht. (bladzijde 9)
aanduiding alleen bij het piekniveau oplicht. (bladzijde 9)
Zet de [THRU, , ] crossfader-curveschakelaar in een andere
stand dan [THRU]. (bladzijde 9)
(bladzijde 7)
DJ-speler met een audiokabel. (bladzijde 7)
Druk op een van de [MASTER EFFECT (GATE, CRUSH, JET,
FILTER)]-toetsen. (bladzijde 11)
indicator in de hoofdniveau-aanduiding alleen bij het piekniveau
oplicht. (bladzijde 9)
de kanaalniveau-aanduiding alleen bij het piekniveau oplicht.
(bladzijde 9)
zijde 12)
(bladzijde 12)
Dit apparaat is geschikt voor USB-apparaten voor gegevensop-
slag zoals externe harde schijven en draagbare flash-geheugensticks.
versterkers juist zijn ingesteld.
14
Nl
Page 79

Omtrent storingen
Als dit apparaat niet normaal functioneert, gaan de [u] aan/ uit-schakelaar en de [USB STOP] en [PLAY f]-indicatorlampjes knipperen om het
optreden van een storing te melden.
Controleer dan de onderstaande tabel en neem de aanbevolen maatregelen.
Als ook na het uitvoeren van de aanbevolen maatregelen dezelfde storing weer optreedt, raadpleeg dan de dichtstbijzijnde Pioneer onderhoudsdienst of de winkel waar u het apparaat hebt gekocht.
Omtrent de foutmelding van de [USB STOP]-indicator
Als het [USB STOP]-indicatorlampje herhaaldelijk 2 tot 5 keer knippert
1 Verwijder het USB-apparaat.
2 Druk op [USB STOP].
Controleer dan de onderstaande tabel en neem de aanbevolen maatregelen.
Aantal
Naam
indicator
USB STOP
PLAY f
uit-
u (aan/
schakelaar)
malen
dat de
indicator
knippert
2 maal
achtereen
3 maal
achtereen
4 maal
achtereen
5 maal
achtereen
3 maal Afspeelfout
Continu
Beschrijving
van de storing
Bestandsformaatprobleem
USB-typeprobleem
Probleem bij het
schrijven naar het
USB-apparaat
Het USB-apparaat
neemt teveel
stroom af
Schakelingsprobleem
Oorzaak Maatregelen
Het USB-apparaat is niet geformatteerd.
U gebruikt een USB-apparaat met een bestandssysteem
dat niet geschikt is voor dit apparaat.
Er is een USB-apparaat aangesloten dat niet geschikt is
voor gegevensopslag.
Er is een USB-verdeelhub aangesloten. Sluit geen USB-verdeelhubs aan.
Is er voldoende ruimte op het USB-apparaat beschik-
baar.
Er is een bestandsnaam eindigend op “REC999.WAV” in
de map met opnamegegevens (PIONEER DJM / DJM350
REC).
Wellicht staat het schrijfbeveiligingsknopje van het
USB-apparaat in de blokkeerstand.
Misschien gebruikt u een USB-apparaat met een beveiligingsfunctie.
De map voor opslag van de opnamegegevens (PIONEER
DJM / DJM350 REC) staat ingesteld op “Alleen lezen”.
U gebruikt een USB-apparaat (zoals een harde schijf op
aansluitbusvoeding) dat meer stroom verbruikt dan de
nominale stroomsterkte van dit apparaat (500 mA).
De map voor opslag van de opnamegegevens (PIONEER
DJM / DJM350 REC) bevat geen afspeelbare bestanden.
Er is iets mis in de inwendige circuits. Trek de stekker van het netsnoer uit het stopcontact.
Gebruik een USB-apparaat dat geformatteerd is volgens
een bestandssysteem dat geschikt is voor dit apparaat
(FAT of HFS+).
Sluit een USB-apparaat aan dat werkt volgens de USBgegevensopslagregels.
Gebruik een USB-apparaat met voldoende vrije ruimte.
Bestanden die worden gemaakt tijdens het opnemen
krijgen een 3-cijferig nummer. Wanneer het aantal 999
wordt bereikt, kunnen er geen nieuwe bestanden meer
in de map worden gemaakt. In dat geval kunt u de
bestanden uit de map verplaatsen naar een andere map.
Zet het schrijfbeveiligingsknopje van het USB-apparaat
in de vrije stand.
Gebruik een USB-apparaat zonder beveiligingsfunctie.
Verander de instelling zodat er ook gegevens in de
opslagmap kunnen worden geschreven.
Gebruik een USB-apparaat met een stroomverbruik
binnen de nominale stroomcapaciteit van dit apparaat
(zoals een harde schijf met een netspanningsadapter of
een andere voedingsbron).
Verricht het opnemen van de bestanden met dit
apparaat, om te zorgen dat de opgenomen bestanden
afspeelbaar zijn.
Nederlands
Omtrent USB-apparaten/ bestanden
die bruikbaar zijn met dit apparaat
Dit apparaat is geschikt voor externe harde schijven, draagbare flashmemorysticks en andere opslagapparatuur met USB-aansluiting.
Mappenhiërarchie
Max. aantal
bestanden
Maximaal 2 lagen in de hiërarchie (PIONEER DJM /
DJM350 REC)
Maximaal 999 aantal muziekstukken
Geschikte
bestandssystemen
! Optische disc-apparatuur zoals externe DVD/
geschikt.
! Wanneer er veel mappen of bestanden zijn, kan het laden ervan enige tijd
vergen.
! Als er meerdere partities zijn gemaakt op een USB-apparaat, kan dat appa-
raat niet altijd herkend worden.
FAT, FAT32 en HFS+
CD-stations, enz. zijn niet
Voorzorgen bij het gebruik van USBapparaten
! Het is mogelijk dat bepaalde USB-apparaten niet goed werken.
Pioneer aanvaardt geen enkele aansprakelijkheid voor enig verlies
aan gegevens die zijn opgenomen op USB-apparaten.
! USB-verdeelhubs zijn niet bruikbaar.
Nl
15
Page 80

! USB-apparaten die zijn voorzien van flashgeheugenlezers kunnen
niet altijd goed werken.
! Wanneer er in de USB-aansluiting van dit apparaat een te hoge
stroomsterkte wordt waargenomen, kan het [USB STOP]-indicator
5 maal knipperen, waarna de stroom naar het USB-apparaat wordt
afgesloten en de communicatie met het USB-apparaat wegvalt. Om
dan de normale werking te herstellen, maakt u het USB-apparaat los
en dan drukt u op [USB STOP]. USB-apparaten waarvoor een te hoge
stroomsterkte is waargenomen, kunt u beter maar niet meer gebruiken. Als na de bovenstaande ingreep de normale werking niet hervat
kan worden (als er geen communicatie plaatsvindt), schakelt u dit
apparaat dan eenmaal uit en even later weer in.
! Afhankelijk van het USB-apparaat dat u gebruikt, kan niet altijd de
gewenste prestatie worden bereikt.
Omtrent WAV-bestanden
De DJM-350 is geschikt voor WAV-bestanden in de hieronder
getoonde formaten.
Geschikte formaten
Bestandsnaamextensie
Bestanden in een 16-bit niet-gecomprimeerd PCM-formaat
met een bemonsteringsfrequentie van 44,1 kHz zijn
geschikt.
.WAV of .wav
Omtrent de uitzonderingsclausules
! Pioneer is een gedeponeerd handelsmerk van Pioneer Corporation.
! De hierin vermelde namen van bedrijven en hun producten zijn de
handelsmerken van hun respectieve eigenaars.
! Bij het afspelen van muziek op dit apparaat verzoeken wij u
vriendelijk om rekening te houden met de geldende auteursrechten.
LOW .................................................................. –
MIC/ AUX equalizer-karakteristiek
HI ................................................................ –12 dB tot +12 dB (10 kHz)
LOW ........................................................... –12 dB tot +12 dB (100 Hz)
∞ tot +9 dB (70 kHz)
In/ uitgangsaansluitingen
CD ingangsaansluiting
Tulpstekkerbussen ..........................................................................2 st.
PHONO-ingangsaansluiting
Tulpstekkerbussen ..........................................................................2 st.
MIC ingangsaansluiting
Klinkstekkerbus (Ø 6,3 mm) ...........................................................1 st.
AUX-ingangsaansluiting
Tulpstekkerbus .................................................................................1 st.
MASTER-uitgangsaansluiting
Tulpstekkerbussen ..........................................................................2 st.
PHONES-uitgangsaansluiting
Stereo-klinkstekkerbus (Ø 6,3 mm) ...............................................1 st.
USB-aansluiting
Type A ................................................................................................1 st.
CONTROL-aansluiting
Mini-klinkstekkerbus (Ø 3,5 mm) ...................................................2 st.
! De technische gegevens en het ontwerp van dit product
kunnen vanwege voortgaande verbetering zonder voorafgaande
kennisgeving worden gewijzigd.
! Uitgegeven door Pioneer Corporation. Copyright © 2010 Pioneer
Corporation. Alle rechten voorbehouden.
Specificaties
Algemene
Stroomvereisten ......................220 V tot 240 V wisselstroom, 50 Hz/ 60 Hz
Stroomverbruik ...................................................................................... 17 W
Stroomverbruik (in stand-by) ..............................................................0,4 W
Gewicht hoofdapparaat ...................................................................... 3,2 kg
Buitenafmetingen .................... 218 mm (B) × 107 mm (H) × 301 mm (D)
Toegestane bedrijfstemperatuur .....................................+5 °C tot +35 °C
Toegestane luchtvochtigheid ............. 5 % tot 85 % (zonder condensatie)
Audiogedeelte
Bemonsteringswaarde ....................................................................... 48 kHz
A/ D-, D/ A-omzetter ............................................................................24 bits
Frequentiekarakteristiek
CD/ AUX/ MIC ................................................................20 Hz tot 20 kHz
Signaal/ ruisverhouding (nominaal uitgangsvermogen)
CD ....................................................................................................97 dB
PHONO ...........................................................................................86 dB
MIC ..................................................................................................80 dB
Totale harmonische vervorming (CD — MASTER1) ......................0,007 %
Standaard ingansniveau / Ingangsimpedantie
CD .................................................................................... –12 dBu/ 36 kW
PHONO ........................................................................... –52 dBu/ 47 kW
MIC .................................................................................. –52 dBu/ 10 kW
AUX ................................................................................. –12 dBu/ 27 kW
Standaard uitgangsniveau / Belastingsimpedantie /
Uitgangsimpedantie
MASTER OUT........................................................+2 dBu/
PHONES ..................................................................+2 dBu/ 32 W/ 150W
Nominaal uitgangsniveau / Belastingsimpedantie
MASTER OUT................................................................+18 dBu/
Overspraak (CD) ....................................................................................78 dB
Kanaalequalizerkarakteristiek
HI ....................................................................... –
MID .....................................................................–
∞ tot +9 dB (13 kHz)
10 kW/ 2,5 W
10 kW
∞ tot +9 dB (1 kHz)
16
Nl
Page 81

Page 82

Le damos las gracias por la adquisición de este producto Pioneer. Lea a fondo estas instrucciones de utilización para que aprenda a utilizar
El punto exclamativo dentro un triángulo
equilátero convenido para avisar el usuário
de la presencia de importantes
instrucciones sobre el funcionamiento y la
manutención en la libreta que acompaña el
aparato.
La luz intermitente con el símbolo de punta
de flecha dentro un triángulo equilátero.
Está convenido para avisar el usuario de la
presencia de “voltaje peligrosa” no aislada
dentro el producto que podría constituir un
peligro de choque eléctrico para las
personas.
ATENCIÓN:
PARA PREVENIR EL PELIGRO DE CHOQUE
ELÉCTRICO NO REMOVER LA TAPA NI LAS
PARTES DENTRO NO UTILIZADAS,
LLAMAR UNA PERSONA CUALIFICADA.
CAUTION
RISK OF ELECTRIC SHOCK
DO NOT OPEN
IMPORTANTE
D3-4-2-1-1_A1_Es
Si desea deshacerse de este producto, no lo mezcle con los residuos generales de su hogar. De conformidad con la legislación
vigente, existe un sistema de recogida distinto para los productos electrónicos que requieren un procedimiento adecuado de
tratamiento, recuperación y reciclado.
Las viviendas privadas en los estados miembros de la UE, en Suiza y Noruega pueden devolver gratuitamente sus productos electrónicos usados
en las instalaciones de recolección previstas o bien en las instalaciones de minoristas (si adquieren un producto similar nuevo).
En el caso de los países que no se han mencionado en el párrafo anterior, póngase en contacto con sus autoridades locales a fin de conocer el
método de eliminación correcto.
Al actuar siguiendo estas instrucciones, se asegurará de que el producto de desecho se somete a los procesos de tratamiento, recuperación y
reciclaje necesarios, con lo que se previenen los efectos negativos potenciales para el entorno y la salud humana.
K058b_A1_Es
correctamente su modelo. Después de haber terminado de leer estas instrucciones, guárdelas en un lugar seguro para, en caso de ser necesario,
consultarlas en el futuro.
En algunos países o regiones, la forma de la clavija de alimentación y del enchufe de corriente pueden ser diferentes de la mostrada en las ilustraciones de explicación. Sin embargo, el método de conexión y operación del aparato es el mismo.
Es
2
Page 83

ADVERTENCIA
Este aparato no es impermeable. Para evitar el riesgo
de incendio y de descargas eléctricas, no ponga ningún
recipiente lleno de líquido (como pueda ser un vaso o
un florero) cerca del aparato ni lo exponga a goteo,
salpicaduras, lluvia o humedad.
D3-4-2-1-3_A1_Es
ADVERTENCIA
Antes de enchufar el aparato a la corriente, lea la sección
siguiente con mucha atención.
La tensión de la red eléctrica es distinta según el
país o región. Asegúrese de que la tensión de la
alimentación de la localidad donde se proponga
utilizar este aparato corresponda a la tensión
necesaria (es decir, 230 V ó 120 V) indicada en el
panel posterior.
D3-4-2-1-4*_A1_Es
ADVERTENCIA
Para evitar el peligro de incendio, no ponga nada con
fuego encendido (como pueda ser una vela) encima del
aparato.
D3-4-2-1-7a_A1_Es
ADVERTENCIA
Las ranuras y aberturas de la caja del aparato sirven
para su ventilación para poder asegurar un
funcionamiento fiable del aparato y para protegerlo
contra sobrecalentamiento. Para evitar el peligro de
incendio, las aberturas nunca deberán taparse ni
cubrirse con nada (como por ejemplo, periódicos,
manteles, cortinas) ni ponerse en funcionamiento el
aparato sobre una alfombra gruesas o una cama.
D3-4-2-1-7b*_A1_Es
Entorno de funcionamiento
Temperatura y humedad del entorno de funcionamiento
+5 °C a +35 °C; menos del 85 % de humedad relativa
(rejillas de refrigeración no obstruidas)
No instale este aparato en un lugar mal ventilado, ni en
lugares expuestos a alta humedad o a la luz directa del
sol (o de otra luz artificial potente).
D3-4-2-1-7c*_A1_Es
Si la clavija del cable de alimentación de CA de este
aparato no se adapta a la toma de corriente de CA
que usted desea utilizar, deberá cambiar la clavija por
otra que se adapte apropiadamente. El reemplazo y
montaje de una clavija del cable de alimentación de
CA sólo deberá realizarlos personal de servicio
técnico cualificado. Si se enchufa la clavija cortada a
una toma de corriente de CA, puede causar fuertes
descargas eléctricas. Asegúrese de que se tira de la
forma apropiada después de haberla extraído.
El aparato deberá desconectarse desenchufando la
clavija de la alimentación de la toma de corriente
cuando no se proponga utilizarlo durante mucho
tiempo (por ejemplo, antes de irse de vacaciones).
D3-4-2-2-1a_A1_Es
PRECAUCIÓN
El interruptor de la alimentación de este aparato
no corta por completo toda la alimentación de la
toma de corriente de CA. Puesto que el cable de
alimentación hace las funciones de dispositivo de
desconexión de la corriente para el aparato, para
desconectar toda la alimentación del aparato deberá
desenchufar el cable de la toma de corriente de CA.
Por lo tanto, asegúrese de instalar el aparato de
modo que el cable de alimentación pueda
desenchufarse con facilidad de la toma de corriente
de CA en caso de un accidente. Para evitar correr el
peligro de incendio, el cable de alimentación también
deberá desenchufarse de la toma de corriente de CA
cuando no se tenga la intención de utilizarlo durante
mucho tiempo seguido (por ejemplo, antes de irse de
vacaciones).
D3-4-2-2-2a*_A1_Es
PRECAUCIONES CONCERNIENTES A LA
MANIPULACIÓN DEL CABLE DE
ALIMENTACIÓN
To me el cable de alimentación por la clavija. No
extraiga la clavija tirando del cable. Nunca toque el
cable de alimentación cuando sus manos estén
mojadas, ya que esto podría causar cortocircuitos o
descargas eléctricas. No coloque la unidad, algún
mueble, etc., sobre el cable de alimentación.
Asegúrese de no hacer nudos en el cable ni de unirlo a
otros cables. Los cables de alimentación deberán ser
dispuestos de tal forma que la probabilidad de que
sean pisados sea mínima. Una cable de alimentación
dañado podrá causar incendios o descargas eléctricas.
Revise el cable de alimentación está dañado, solicite el
reemplazo del mismo al centro de servicio autorizado
PIONEER más cercano, o a su distribuidor.
S002*_A1_Es
Es
3
Page 84

Cómo leer este manual
Los nombres de las visualizaciones, menús y botones de este manual
van entre corchetes. (p. ej.: Canal [MASTER], [ON/ OFF], menú [File])
Antes de empezar a usar la unidad
Características ............................................................................................5
Ejemplo de configuración del sistema .....................................................5
Contenido de la caja ...................................................................................5
Conexiones
Nombres de los terminales ........................................................................6
Conexión de los terminales de entrada/
salida .........................................7
Operaciones
Panel de control ..........................................................................................8
Acerca del interruptor de alimentación de esta unidad
Operaciones básicas (sección del mezclador) ........................................9
Monitoreo del sonido con los auriculares (sección de auriculares) ....11
Uso de la función de efecto (sección de efecto maestro)
Utilizando un micrófono o aparato externo (Sección MIC/
Grabación de la actuación (Sección de grabación de USB)
Acerca de la función de espera automática ...........................................13
..............................9
...........................11
AUX) ..........11
........................12
Información adicional
Solución de problemas .............................................................................14
Sobre los errores ....................................................................................... 15
Acerca de los aparatos USB/ archivos utilizables en esta unidad ........15
Acerca de las cláusulas de exención ...................................................... 16
Especificaciones .......................................................................................16
Es
4
Page 85

Antes de empezar a usar la unidad
MULTI PLAYER
TEMPO
0
PLAY/PAUSE
SEARCH
TRACK SEARCH
IN/CUE OUT
OUT ADJUSTHOT LOOP
RELOOP/EXIT
BEAT LOOP
LOOP DRIVE
VINYL MODE
TEMPO RANGE
MASTER TEMPO
LOOP
USB
STOP
SOURCE SELECT
MP3/AAC
WAV/AIFF
CUE
PLAYLIST
BPM
DISC
LOCK
REVFWD
BACK
SELECT PUSH
TIME MODE
AUTO CUE
DISPLAY
UTILITY
A.CUE
LOCK
16
REMAIN
MS
FTEMPO %
INFO
BROWSE
BPM
2 CHANNEL DJ MIXER
MIC /AUX
MIC
0
LEVEL
HI
AUX
LOW
MIC/AUX
ON
12
12
12
12
HEADPHONES
CUE
CH-1
CUE
MIXING
CUE MASTER
CH-2
LEVEL
PHONES
0
9
9
9
9
CD
PHONO
CH- 1
FADER
START
FADER
START
CH- 1 CH- 2
9
9
9
9
CH-2
THRU
CD
PHONO
TRIMTRIM
HI
MID
LOW
HI
MID
LOW
LEVEL
MASTER
LEVEL/DEPTH
FILTERCRUSH
GATE JET
MASTER EFFECT
0
PREVIEW
TRACK MARK SEARCH
PLAY
USB
STOP
REC
MASTER LEVEL
Aparato de audio
portátil /micrófono
Auriculares
CDJ-350CDJ-350 DJM-350
Componente, amplificador,
altavoz activo, etc.
Aparato USB
Para salida de audio Para grabación
Para entrada de audio
Para comprobar la
entrada/salida de audio
Características
Esta unidad es un mezclador DJ que emplea la tecnología de la serie DJM de Pioneer, la norma mundial en sonido de clubes. La unidad es del
tipo estándar, equipada con las funciones básicas necesarias para mezclar sonidos, lo que permite al DJ realizar una reproducción completa.
Grabación USB
control.
Con esta unidad, el sonido de las actuaciones del DJ se puede grabar
modificar fácilmente pulsando simplemente un botón y girando el
fácilmente en aparatos USB (aparatos de memoria flash portátiles,
etc.). El sonido grabado también se puede reproducir en esta unidad.
MIC/ AUX INPUT
Esta unidad está equipada con una entrada de micrófono/ equipo auxiliar que permite conectar un micrófono o un aparato externo (mues-
Ecualizador de 3 bandas
Esta unidad está equipada con un ecualizador de 3 bandas que permite ajustar por separado el volumen de las gamas de frecuencias
treador, aparato de audio portátil, etc.). La reproducción DJ es posible
usando hasta tres juegos de entradas: CH-1 (canal 1), CH-2 (canal 2) y
MIC/ AUX (micrófono/ canal auxiliar).
altas, medias y bajas. No sólo se puede ajustar el tono a su gusto, sino
que el sonido de cierta gama se puede apagar completamente girando
el control totalmente a la izquierda (función de aislador).
FADER START
Cuando se conecta a un reproductor DJ de Pioneer con un cable de
control (incluido con el reproductor DJ), la reproducción en el repro-
MASTER EFFECT (GATE, CRUSH, JET,
FILTER)
ductor DJ se puede iniciar empleando el fader de esta unidad (reproducción con inicio de fader).
Esta unidad está equipada con cuatro botones de efecto que permiten
cambiar el sonido de varias formas. El ambiente del sonido se puede
Ejemplo de configuración del sistema
Combinando esta unidad con un reproductor DJ y un equipo periférico se puede crear un sistema DJ como el mostrado en el diagrama de más
abajo.
Español
Contenido de la caja
! Cable de alimentación
! Tarjeta de garantía
! Manual de Instrucciones (este manual)
Es
5
Page 86

Conexiones
AC IN
MASTER OUTCH-2
1
L
R
2
PHONO
CONTROL
SIGNAL
GND
L
R
CD
CH-1 AUX
MIC
PHONO
CONTROL
L
R
L
R
CD
1 2 7 8 93 4 5 3 4 56
a
Asegúrese de desconectar la alimentación y desenchufar el cable de alimentación de la toma de corriente siempre que haga o cambie
conexiones.
Consulte el manual de instrucciones del componente que va a ser conectado.
Conecte el cable de alimentación después de terminar las conexiones entre los aparatos.
Asegúrese de usar el cable de alimentación incluido.
Nombres de los terminales
Panel trasero
1 AC IN
Conecte a una toma de CA. Enchufe el cable de alimentación después de haber hecho todas las conexiones.
Asegúrese de usar el cable de alimentación incluido.
2 MASTER OUT 1, 2 (la página 7)
Conecte a un amplificador de potencia, etc.
3 PHONO (la página 7)
Conecte a un reproductor analógico o a un aparato con salida
fonográfica (cápsula MM). No conecte a un reproductor DJ ni a otro
aparato de nivel de línea.
4 CD (la página 7)
Conecte a un reproductor DJ o a otro aparato de nivel de línea.
Panel frontal
5 CONTROL (la página 7)
Conecte usando un cable de control (incluido con los reproductores
DJ de Pioneer).
6 SIGNAL GND (la página 7)
Conecte aquí el cable de tierra de un reproductor analógico.
Esto ayuda a reducir el ruido cuando se conecta un reproductor
analógico.
7 AUX (la página 7)
Conecte al terminal de salida de un aparato externo (muestreador,
aparato de audio portátil, etc.)
8 MIC (la página 7)
Conecte a un micrófono.
9 Ranura de seguridad Kensington
a PHONES (la página 7)
Conecte aquí los auriculares.
Es
6
Page 87

Conexión de los terminales de entrada/ salida
AC IN
AUDIO
OUT
RL
CONTROL
USB
MASTER OUTCH-2
1
L
R
2
PHONO
CONTROL
SIGNAL
GND
L
R
CD
CH-1 AUX
MIC
PHONO
CONTROL
L
R
L
R
CD
Micrófono
Componente, amplificador,
altavoz activo, etc.
A terminales de
entrada de audio
Sección de entrada de audio
Sección de salida de audio
Cable de audio
Cable de audio
Cable de audio
A terminales de
salida de audio
A terminales de
salida de audio
Cable de control
1
Cable de tierra
A terminales de
cables de tierra
Cable de audio
2
Cable de micrófono
A micrófono
Aparato de
audio portátil
Reproductor
analógico
Reproductor DJ
Ejemplo:
CDJ-350
Cable de alimentación (incluido)
A una toma de corriente
R
L
R
L
R
L
R
L
R
L
Auriculares
Cable de auriculares
Panel trasero
1 Para usar la función de inicio de fader, conecte un cable de control (la página 10).
La función de inicio del fader sólo se puede usar cuando hay conexión con un reproductor DJ de Pioneer.
2 Usando un cable convertidor con clavija RCA - miniclavija (Ø 3,5 mm) se puede conectar un aparato de audio portátil (la página 11).
Panel frontal
Español
Es
7
Page 88

Operaciones
2 CHANNEL DJ MIXER
MIC /AUX
MIC
0
LEVEL
HI
AUX
LOW
MIC/AUX
ON
12
12
12
12
HEADPHONES
CUE
CH-1
CUE
MIXING
CUE MASTER
CH-2
LEVEL
PHONES
0
9
9
9
9
CD
PHONO
CH- 1
FADER
START
FADER
START
CH- 1CH- 2
9
9
9
9
CH-2
THRU
CD
PHONO
TRIM TRIM
HI
MID
LOW
HI
MID
LOW
LEVEL
MASTER
LEVEL/DEPTH
FILTERCRUSH
GATE JET
MASTER EFFECT
0
PREVIEW
TRACK MARK SEARCH
PLAY
USB
STOP
REC
MASTER LEVEL
Sección MIC/AUX Sección de mezclador
Sección de auriculares
Sección de efectos maestros
Sección de grabación
de USB
Circulación de señales de audio
EQ
LEVEL
MIC/AUX
ON/OFF
MASTER
EFFECT
MASTER
LEVEL
MASTER
OUT 1
MASTER
OUT 2
RECPLAY
CROSS FADER
MIC
AUX
CD1 PHONO1 CD2 PHONO2
USB I/F
PREVIEW
EQ/
ISOLATOR
TRIM
CH
FADER
EQ/
ISOLATOR
TRIM
CH
FADER
3
1
2
r
b
c
g
4
8
9
a
6
5
h
f
e
i
j
7
d d
o
p
k
l
q
m n
Panel de control
1 u (Interruptor de alimentación) (la página 9)
2 MASTER LEVEL (la página 9)
Sección MIC/ AUX
El sonido de un micrófono o aparato externo (muestreador, aparato de
audio portátil, etc.) se puede manipular (la página 11).
3 MIC, AUX
4 LEVEL
5 HI, LOW
6 MIC/AUX ON
Sección de auriculares
El sonido introducido en esta unidad se puede comprobar con los
auriculares (la página 11).
7 CH-1 CUE, CH-2 CUE
8 MIXING
9 LEVEL
a PHONES
Es
8
Sección de mezclador
Para hacer la mezcla de DJ básica se pueden ajustar por separado dos
juegos de señales de audio (la página 9).
b CD, PHONO (conmutador selector de entrada)
c TRIM
d HI, MID, LOW
e Indicador de nivel maestro
f Indicador de nivel de canales
g Fader de canal
h FADER START
i THRU,
crossfader)
j Crossfader
Sección de grabación de USB
Las actuaciones del DJ se pueden grabar en aparatos USB y reproducirlas desde los mismos (la página 12).
k Ranura de inserción de aparato USB
, (conmutador selector de curva de
Page 89

l USB STOP
9
9
9
9
CD
PHONO
CH- 1
FADER
START
FADER
START
CH- 1 CH- 2
9
9
9
9
CH-2
THRU
CD
PHONO
TRIM TRIM
HI
MID
LOW
HI
MID
LOW
LEVEL
MASTER
b
c
1 2
g
h
f
e
i
j
d d
m REC k/
g
n PLAY f
o TRACK MARK (PREVIEW)
p SEARCH o, p
Sección de efectos maestros
Los efectos se pueden aplicar al sonido que sale por [MASTER OUT 1,
2] (la página 11).
q MASTER EFFECT (GATE, CRUSH, JET, FILTER)
r LEVEL/
DEPTH
Acerca del interruptor de
alimentación de esta unidad
Para conectar la alimentación
Pulse [u] 1.
Conecte la alimentación de esta unidad.
El indicador [u] se enciende en verde.
Operaciones básicas (sección del
mezclador)
Para establecer el modo de espera
Cuando la alimentación de la unidad esté conectada,
pulse [u] 1 durante un mínimo de 2 segundos.
Esta unidad está en el modo de espera.
El indicador [u] se enciende en rojo.
! Cuando se pulsa de nuevo [u], la alimentación se conecta.
! Esta unidad está equipada con una función de espera automática.
Para conocer detalles, vea Acerca de la función de espera automática en la página 13.
Salida de sonido
Verifique que esta unidad esté bien conectada al reproductor DJ, etc.
antes de reproducir sonido. Para conocer instrucciones de conexión,
vea Conexión de los terminales de entrada/ salida en la página 7.
Ajuste a un nivel apropiado el volumen de los amplificadores de
potencia conectados a los terminales [MASTER OUT 1, 2]. Note que si
se ajusta un volumen demasiado alto se producirán sonido muy altos.
Para dar salida al sonido del canal 1 [CH-1] 1
Para dar salida al sonido del canal 2 ([CH-2]) 2, realice el procedimiento de abajo sustituyendo [CH-1] con [CH-2].
1 Cambie el conmutador (selector de entrada) [CD,
PHONO] b para el [CH-1] 1.
Seleccione la fuente de entrada para [CH-1] de entre los aparatos
conectados a esta unidad.
— [CD]: Selecciona el reproductor DJ conectado a los terminales
[CD].
— [PHONO]: Selecciona el reproductor analógico conectado a
los terminales [PHONO].
2 Gire a la derecha el control [TRIM] c para el [CH-1] 1.
Ajusta la entrada de nivel de audio al terminal [CH-1].
El indicador de nivel de canal [CH-1] f se enciende cuando las señales de audio están entrando correctamente en [CH-1].
Ajusta [TRIM] para que el indicador naranja se encienda en el punto
de la pista donde el volumen está mas alto (el clímax, etc.).
Tenga cuidado para que no se encienda el indicador rojo o el sonido
podría distorsionarse.
3 Mueva el fader de canal 1 [CH-1] g hacia el lado
trasero.
El nivel de la salida de sonido de los terminales [CH-1] se ajusta.
Es
Español
9
Page 90
4 Cambie [THRU, , ] (el conmutador selector de
curva de crossfader) i.
Cambia las características de curva de crossfader.
— [THRU]: Elija esto cuando no quiera usar el crossfader.
]: Póngalo aquí para una curva que ascienda
— [
gradualmente.
— [ ]: Póngalo aquí para una curva que ascienda abrupta-
mente. (Cuando el crossfader se aleje del borde derecho o
izquierdo, el sonido saldrá inmediatamente desde el lado
opuesto.)
5 Mueva el crossfader j.
Cambie el canal cuyo sonido sale por los altavoces.
— Borde izquierdo: Sale el sonido [CH-1].
— Posición central: El sonido de [CH-1] y [CH-2] se mezcla y sale.
— Borde derecho: Sale el sonido [CH-2].
! Esta operación no es necesaria cuando el conmutador [THRU, ,
] (selector de curva de crossfader) se pone en [THRU].
6 Gire [MASTER LEVEL] 2 a la derecha.
Sale sonido de los altavoces.
El indicador de nivel maestro e del panel de control se enciende.
Ajusta [MASTER LEVEL] para que el indicador naranja se encienda en
el punto de la pista donde el volumen está mas alto (el clímax, etc.).
Tenga cuidado para que no se encienda el indicador rojo o el sonido
podría distorsionarse.
Ajuste de la calidad del sonido
Mezcla usando el crossfader
1 Ponga [THRU,
, ] (el conmutador selector de
curva de crossfader) i en [ ] o [ ].
2 Use [CH-2] 2.
Siga las indicaciones de los pasos 2 a 6 bajo Mezcla usando los fader
de canales en la página 10.
3 Mueva poco a poco el crossfader j a la derecha.
Mientras verifica la salida de sonido de los altavoces, use el crossfader
para sustituir el sonido de [CH-1] con el sonido de [CH-2].
La mezcla termina una vez que sale el sonido [CH-2] por los altavoces.
Uso del fader para reproducir en un
reproductor DJ de Pioneer (inicio de
fader)
Si conecta un reproductor DJ de Pioneer usando un cable de control
(suministrado con el reproductor DJ), usted puede iniciar la reproducción o el control de otra operaciones del reproductor DJ con el fader
de esta unidad.
La función de inicio del fader sólo se puede usar cuando hay conexión
con un reproductor DJ de Pioneer.
Conecte de antemano esta unidad y el reproductor DJ de Pioneer.
Para conocer instrucciones de conexión, vea Conexión de los termina-
les de entrada/
salida en la página 7.
Gire el control [CH-1] 1 o [CH-2] 2 [HI], [MID] o [LOW] d.
Consulte Especificaciones en la página 16 para conocer el margen de
sonido que se puede ajustar con cada control.
! El sonido de esa gama se puede apagar completamente girando el
control al extremo izquierdo (función de aislador).
Mezcla usando los fader
Prepare de antemano la unidad para que el sonido de [CH-1] 1 salga
por los altavoces. Para conocer instrucciones de preparación, vea
Salida de sonido en la página 9.
Para conocer instrucciones del monitoreo del sonido, vea Monitoreo
del sonido con los auriculares (sección de auriculares) en la página 11.
Mezcla usando los fader de canales
1 Ponga [THRU,
curva de crossfader) i en [THRU].
2 Cambie el conmutador (selector de entrada) [CD,
PHONO] b para el [CH-2] 2.
3 Gire a la derecha el control [TRIM] c para el [CH-2] 2.
4 Pulse [CH-2 CUE] 7.
El sonido de [CH-2] se monitorea desde los auriculares.
5 Gire [MIXING] 8.
Esto ajusta el balance del volumen de monitoreo entre la salida de
sonido de los terminales [MASTER OUT 1, 2] (el sonido de [CH-1]) y el
sonido de [CH-2].
6 Utilice el reproductor DJ conectado a los terminales
[CH-2].
Mientras verifica el sonido por los auriculares, ajuste el tempo de la
pista [CH-2] para que concuerde con el tempo de la pista [CH-1].
7 Mientras mueve el fader del canal 2 [CH-2] hacia
atrás, mueva el fader del canal 1 [CH-1] hacia delante.
Mientras verifica la salida de sonido de los altavoces, use los fader de
canales para sustituir el sonido de [CH-1] con el sonido de [CH-2].
La mezcla termina una vez que sale el sonido [CH-2] por los altavoces.
, ] (el conmutador selector de
Para iniciar la reproducción usando los fader de
canales
1 Ponga [THRU,
, ] (el conmutador selector de
curva de crossfader) i en [THRU].
2 Pulse [FADER START] h.
Active la función de inicio del fader.
3 Mueva el fader de canal g completamente hacia
delante.
4 Ajuste el cue del reproductor DJ
El reproductor DJ hace una pausa en la reproducción en el punto cue.
5 Mueva el fader de canal g hacia atrás.
La reproducción empieza en el reproductor DJ.
! Si vuelve a ajustar el fader de canal en la posición original, el
reproductor vuelve instantáneamente al punto cue ya establecido
y hace una pausa en la reproducción (vuelta a punto cue).
Para iniciar la reproducción usando el crossfader
1 Ponga [THRU,
curva de crossfader) i en [
, ] (el conmutador selector de
] o [ ].
2 Pulse [FADER START] h.
Active la función de inicio del fader.
3 Mueva el crossfader j.
Mueva el crossfader al borde opuesto al canal para el que usted quiera
usar la función de inicio de fader.
4 Ajuste el cue del reproductor DJ
El reproductor DJ hace una pausa en la reproducción en el punto cue.
5 Mueva el crossfader j.
La reproducción empieza en el reproductor DJ.
! Si vuelve a ajustar el crossfader en la posición original, el repro-
ductor vuelve instantáneamente al punto cue ya establecido y
hace una pausa en la reproducción (vuelta a punto cue).
10
Es
Page 91

Monitoreo del sonido con los
HEADPHONES
CUE
CH-1
CUE
MIXING
CUE MASTER
CH-2
LEVEL
PHONES
0
8
9
a
7
2 CHANNEL DJ MIXER
LEVEL/DEPTH
FILTERCRUSH
GATE JET
MASTER EFFECT
q
r
MIC /AUX
MIC
0
LEVEL
HI
AUX
LOW
MIC/AUX
ON
12
12
12
12
3
4
6
5
auriculares (sección de auriculares)
Aplicación de un efecto
Pulse uno de los botones [MASTER EFFECT (GATE,
CRUSH, JET, FILTER)] q.
El efecto se aplica al sonido.
El botón que fue pulsado parpadea.
El efecto es diferente para botones diferentes. Para conocer detalles
de los efectos diferentes, vea la tabla de abajo.
! Cuando se pulsa de nuevo un botón que está parpadeando, el
efecto se apaga.
1 Conecte los auriculares al conector [PHONES]
Para conocer instrucciones de conexión, vea Conexión de los terminales de entrada/
salida en la página 7.
2 Pulse [CH-1 CUE] o [CH-2 CUE] 7.
Seleccione el canal que quiera monitorear.
— [CH-1 CUE]: El sonido de [CH-1] se monitorea.
— [CH-2 CUE]: El sonido de [CH-2] se monitorea.
! Esta operación no es necesaria para monitorear el sonido del canal
maestro (el sonido que sale de los terminales [MASTER OUT 1, 2]).
3 Gire [MIXING] 8.
— Cuando lo gire a la izquierda: El volumen de [CH-1] y [CH-2]
sube relativamente.
— En la posición central: El sonido de [CH-1] y [CH-2] tiene el
mismo volumen que el sonido de los terminales [MASTER
OUT 1, 2].
— Cuando se gira a la derecha: El nivel de la salida de sonido de
los terminales [MASTER OUT 1, 2] sube relativamente.
4 Gire [LEVEL] 9 en la sección de los auriculares a la
derecha.
Sale sonido de los auriculares.
! El monitoreo se cancela cuando se pulsa de nuevo [CH-1 CUE] o
[CH-2 CUE].
! El monitoreo de la salida de sonido de los terminales [MASTER
OUT 1, 2] no se puede cancelar.
Uso de la función de efecto (sección
de efecto maestro)
Esta unidad está equipada con cuatro botones de efectos. Cuando
se pulsa un botón de efecto, el efecto correspondiente se aplica a la
salida de señales de audio de los terminales [MASTER OUT 1, 2].
Nombre de
efecto
GATE
CRUSH
JET
FILTER
Descripciones LEVEL/
La gama distintiva se corta
del sonido de la sección de
ritmo de la pista para variar
el ritmo.
El sonido se apaga moderadamente, añadiendo
acento.
Se logra un efecto como el
de un reactor que asciende
y desciende.
El sonido de la gama alta o
baja se elimina, cambiando
considerablemente el tono.
DEPTH
Izquierda: La gama alta
(hi-hat, etc.) adquiere
variación.
Derecha: La gama baja
(bombo, etc.) adquiere
variación.
Izquierda: El sonido se
aplana y se logra un sonido
de efecto como si la gama
alta fuese cortada poco
a poco.
Derecha: El sonido se
aplana y se logra un sonido
de efecto como si la gama
baja fuese cortada poco
a poco.
Izquierda: Se logra un
efecto como el de un reactor que desciende.
Derecha: Se logra un efecto
como el de un reactor que
asciende.
Izquierda: Se logra un
efecto como si la gama alta
fuese cortada poco a poco.
Derecha: Se logra un efecto
como si la gama baja fuese
cortada poco a poco.
Variación del efecto
Gire [LEVEL/ DEPTH] r.
El efecto cambia según el sentido de giro de [LEVEL/ DEPTH] y su
posición.
! El sonido original sale cuando se pone [LEVEL/ DEPTH] en la posi-
ción central.
Utilizando un micrófono o aparato
externo (Sección MIC/ AUX)
Español
Es
11
Page 92

1 Cambie [MIC, AUX] 3.
PREVIEW
TRACK MARK SEARCH
PLAY
USB
STOP
REC
o
p
k
l
m n
— [MIC]: Se selecciona el micrófono conectado al terminal
[MIC].
— [AUX]: Selecciona el reproductor analógico conectado a los
terminales [AUX].
2 Pulse [MIC/AUX ON] 6.
3 Gire [LEVEL] 4 en la sección MIC/
El sonido del micrófono o del aparato externo sale por los altavoces.
AUX a la derecha.
Ajuste de la calidad del sonido
Gire [HI] o [LOW] 5 en la sección MIC/ AUX.
Consulte Especificaciones en la página 16 para conocer el margen de
sonido que se puede ajustar con cada control.
Grabación de la actuación (Sección
de grabación de USB)
En un aparato USB se puede grabar como un archivo WAV el mismo
sonido que el sonido que sale de los terminales [MASTER OUT 1, 2].
! El nombre de los archivos creados cuando el sonido se graba en el
formato [REC***.WAV] (*** es un número de 3 dígitos).
Vista preliminar de pistas grabadas
1 Gire [MIXING] 8 a la izquierda desde la posición
central.
2 Mantenga pulsado [TRACK MARK (PREVIEW)] o.
El sonido de la pista grabada se puede oír por los auriculares mientras
se mantiene pulsado el botón.
! El sonido que está escuchándose de manera previa se añade al
sonido de [CH-1] y [CH-2] y sale por los auriculares.
! El sonido que está escuchándose de manera previa no sale por los
altavoces.
! La vista previa no es posible mientras se graba o reproduce la
pista.
Avance rápido/ retroceso rápido de pistas
grabadas
Durante la reproducción, mantenga pulsado [SEARCH
o, p] p.
La pista avanza rápidamente cuando se pulsa y mantiene pulsado
[p].
La pista retrocede rápidamente cuando se pulsa y mantiene pulsado
[o].
El indicador [PLAY f] parpadea durante el avance rápido/
rápido.
! En el modo de pausa no es posible el avance rápido/ retroceso
rápido.
retroceso
1 Inserte el aparato USB en la ranura de inserción del
aparato USB k.
El indicador [USB STOP] l parpadea.
Después de un rato, el indicador [USB STOP] deja de parpadear y permanece encendido, y se establece el modo de espera de grabación.
2 Pulse [REC k/ g] m.
La grabación empieza.
El indicador [REC k/ g] m parpadea.
! Cuando se pulsa de nuevo [REC k/ g], el indicador [REC k/ g] se
! La grabación continua se puede hacer durante 180 minutos. Si
! En un aparato USB de 1 GB se puede grabar durante unos 90
Reproducción de pistas grabadas
Pulse [PLAY f] n.
La reproducción empieza.
El indicador [PLAY f] n se enciende.
! Cuando se pulsa de nuevo [PLAY f], la reproducción hace una
! Sólo se pueden reproducir archivos WAV guardados en la carpeta
12
apaga y se detiene la grabación.
la grabación continúa durante más de 180 minutos, los datos de
grabación en el aparato USB se dividen automáticamente.
minutos.
pausa.
[PIONEER DJM / DJM350 REC] del aparato USB.
Es
Salto al comienzo de las pistas grabadas
Pulse [SEARCH o, p] p.
Pulse [p] para ir al principio de la pista siguiente.
Pulse una vez [o] para ir al comienzo de la pista que está reproduciéndose, y dos veces para ir al comienzo de la pista anterior.
División de pistas durante la grabación
Durante la grabación, pulse [TRACK MARK (PREVIEW)] o.
La pista de grabación actual se divide y se guarda en el aparato USB.
! Cuando se reproducen en esta unidad pistas divididas, el sonido
se puede interrumpir en el límite de las dos pistas.
Eliminación de pistas grabadas
1 Mientras reproduce la pista, pulse [PLAY f] n.
La pista que quiere eliminar hace una pausa.
2 Pulse [PLAY f] n durante un mínimo de 2
segundos.
El indicador [REC k/ g] parpadea.
3 Mientras pulsa [PLAY f] n, pulse [REC k/ g] m.
El indicador [REC k/ g] se enciende y la pista se elimina.
! La eliminación de la pista se cancela si se suelta [PLAY f]
mientras parpadea el indicador [REC k/ g].
Desconexión de los aparatos USB
Para desconectar los aparatos USB realice siempre el procedimiento
siguiente. Desconectar el aparato USB sin realizar este procedimiento
podría ser la causa de que el aparato USB no se pudiera leer.
Cuando desconecte la alimentación del aparato, asegúrese de quitar
primero el aparato USB.
Page 93

1 Pulse [USB STOP] l durante un mínimo de 1
segundo.
El indicador [USB STOP] parpadea y luego se apaga.
2 Desconecte el aparato USB.
Acerca de la función de espera
automática
Cuando se active la función de espera automática, la alimentación
se pondrá automáticamente en el modo de espera después de haber
pasado un tiempo bajo las condiciones indicadas a continuación.
— Que no se utilicen ninguno de los botones o controles de la
unidad.
— Que el indicador de nivel de canales de esta unidad no esté
encendido.
— Que las funciones de grabación y reproducción del aparato USB
no se estén usando.
Configuración de la función de espera
automática
Ponga primero esta unidad en el modo de espera.
1 Pulse [u] 1 mientras pulsa [o] y [p] p.
Esta unidad cambia al modo para cambiar la configuración de la
función de espera automática.
El punto superior del indicador de nivel maestro parpadea. Los otros
puntos del indicador se encienden según el tiempo establecido
actualmente.
2 Pulse [o] o [p] p.
Ponga el tiempo hasta que se establezca el modo de espera.
El tiempo establecido cambia cada vez que se pulsa el botón.
Los puntos del indicador de nivel maestro se encienden según el
tiempo establecido (no se incluye el punto superior).
— Apagado — 20 minutos — 40 minutos — 60 minutos
— 20 minutos: Los dos puntos inferiores se encienden.
— 40 minutos: Los cuatro puntos inferiores se encienden.
— 60 minutos: Los seis puntos inferiores se encienden.
! El tiempo establecido al salir la unidad de fábrica es de 20 minutos.
3 Pulse [u] 1 durante un mínimo de 2 segundos.
La configuración nueva de la función de espera automática se guarda.
El indicador [u] parpadea en verde mientras se guarda la configuración, y luego deja de parpadear, permaneciendo encendido, una vez
guardada la configuración.
! No desconecte el cable de alimentación mientras se guarda la
configuración.
Español
Es
13
Page 94

Información adicional
Solución de problemas
! La operación incorrecta se confunde a menudo con un problema o un fallo de funcionamiento. Si piensa que algo funciona mal con este com-
ponente, compruebe los puntos de abajo. Algunas veces, el problema puede estar en otro componente. Inspeccione los otros componentes y
los aparatos eléctricos que esté utilizando. Si no se puede corregir el problema después de comprobar los elementos de abajo, pida al servicio
de Pioneer autorizado más cercano o a su concesionario que realice el trabajo de reparación.
! Esta unidad puede no funcionar bien debido a la electricidad estática o a otros factores externos. En este caso, el funcionamiento normal se
puede restaurar desenchufando el cable de alimentación, esperando unos 5 segundos o más, y volviéndolo a enchufar.
Problema Verificación Remedio
La alimentación no se conecta. ¿Está bien conectado el cable de alimentación? Enchufe el cable de alimentación a una toma de CA. (la página 7)
No hay sonido o éste está muy bajo. ¿Está el conmutador [CD, PHONO] (selector de
Sonido distorsionado. ¿Está [MASTER LEVEL] en la posición apropiada? Ajuste [MASTER LEVEL] de forma que el indicador naranja del
No se puede usar crossfade.
No se puede iniciar un reproductor DJ con
fader.
No hay efecto. ¿Se ha pulsado uno de los botones [MASTER
Cuando se reproduce una pista grabada en
un aparato USB no se produce sonido o éste
apenas se percibe.
El sonido se distorsiona cuando se reproduce
una pista grabada en un aparato USB.
El sonido de una pista grabada no se puede
oír previamente por los auriculares a pesar de
mantener pulsado [TRACK MARK (PREVIEW)].
No se reconoce el aparato USB. ¿Está bien conectado el aparato USB? Inserte firmemente el aparato USB hasta el fondo. (la página 12)
entrada) en la posición apropiada?
¿Están los controles [TRIM], [fader de canales],
[crossfader] y [MASTER LEVEL] en las posiciones
apropiadas?
¿Están bien preparados los componentes, amplificadores, etc., conectados?
¿Están bien conectados los cables de conexión? Conecte correctamente los cables de conexión. (la página 7)
¿Están sucios los terminales y las clavijas? Limpie los terminales y las clavijas antes de hacer conexiones.
¿Está [TRIM] en la posición apropiada? Ajuste [TRIM] de forma que el indicador naranja del indicador de
¿Está el conmutador [THRU,
curva de crossfader) en [THRU]?
¿Está apagado [FADER START]? Ponga [FADER START] en ON. (la página 10)
¿Está bien conectado el cable de control? Conecte esta unidad y el reproductor DJ con un cable de control.
¿Están bien conectados los cables de audio? Conecte esta unidad al terminal de salida de audio de un repro-
EFFECT (GATE, CRUSH, JET, FILTER)]?
¿Está [LEVEL/
¿Está [MASTER LEVEL] en la posición apropiada? Antes de grabar, ajuste [MASTER LEVEL] de forma que el indica-
¿Está [TRIM] en la posición apropiada? Antes de grabar, ajuste [TRIM] de forma que el indicador naranja
¿Está girado [MIXING] completamente a la derecha?
¿Se puede usar el aparato USB en esta unidad? Esta unidad es compatible con aparatos USB de almacenamiento
DEPTH] en la posición central? Gire [LEVEL/ DEPTH] a derecha o izquierda. (la página 11)
, ] (selector de
Cambie el conmutador [CD, PHONO] (selector de entrada) para
seleccionar la fuente de entrada para ese canal. (la página 9)
Están los controles [TRIM], [fader de canal], [crossfader] y [MAS-
TER LEVEL] en las posiciones apropiadas. (la página 9)
Ajuste bien la selección de entrada externa, el volumen, etc., de
los componentes/
indicador de nivel maestro se encienda en el nivel de pico. (la
página 9)
nivel de canales se encienda en el nivel de pico. (la página 9)
Ponga el conmutador [THRU, , ] (selector de curva de
crossfader) en una posición que no sea [THRU]. (la página 9)
(la página 7)
ductor DJ con un cable de audio. (la página 7)
Pulse uno de los botones [MASTER EFFECT (GATE, CRUSH, JET,
FILTER)]. (la página 11)
dor naranja del indicador de nivel maestro se encienda en el nivel
de pico. (la página 9)
del indicador de nivel de canales se encienda en el nivel de pico.
(la página 9)
Gire [MIXING] a la izquierda desde la posición central. (la página 12)
en masa USB como discos duros externos y aparatos de memoria
flash portátiles.
amplificadores.
14
Es
Page 95
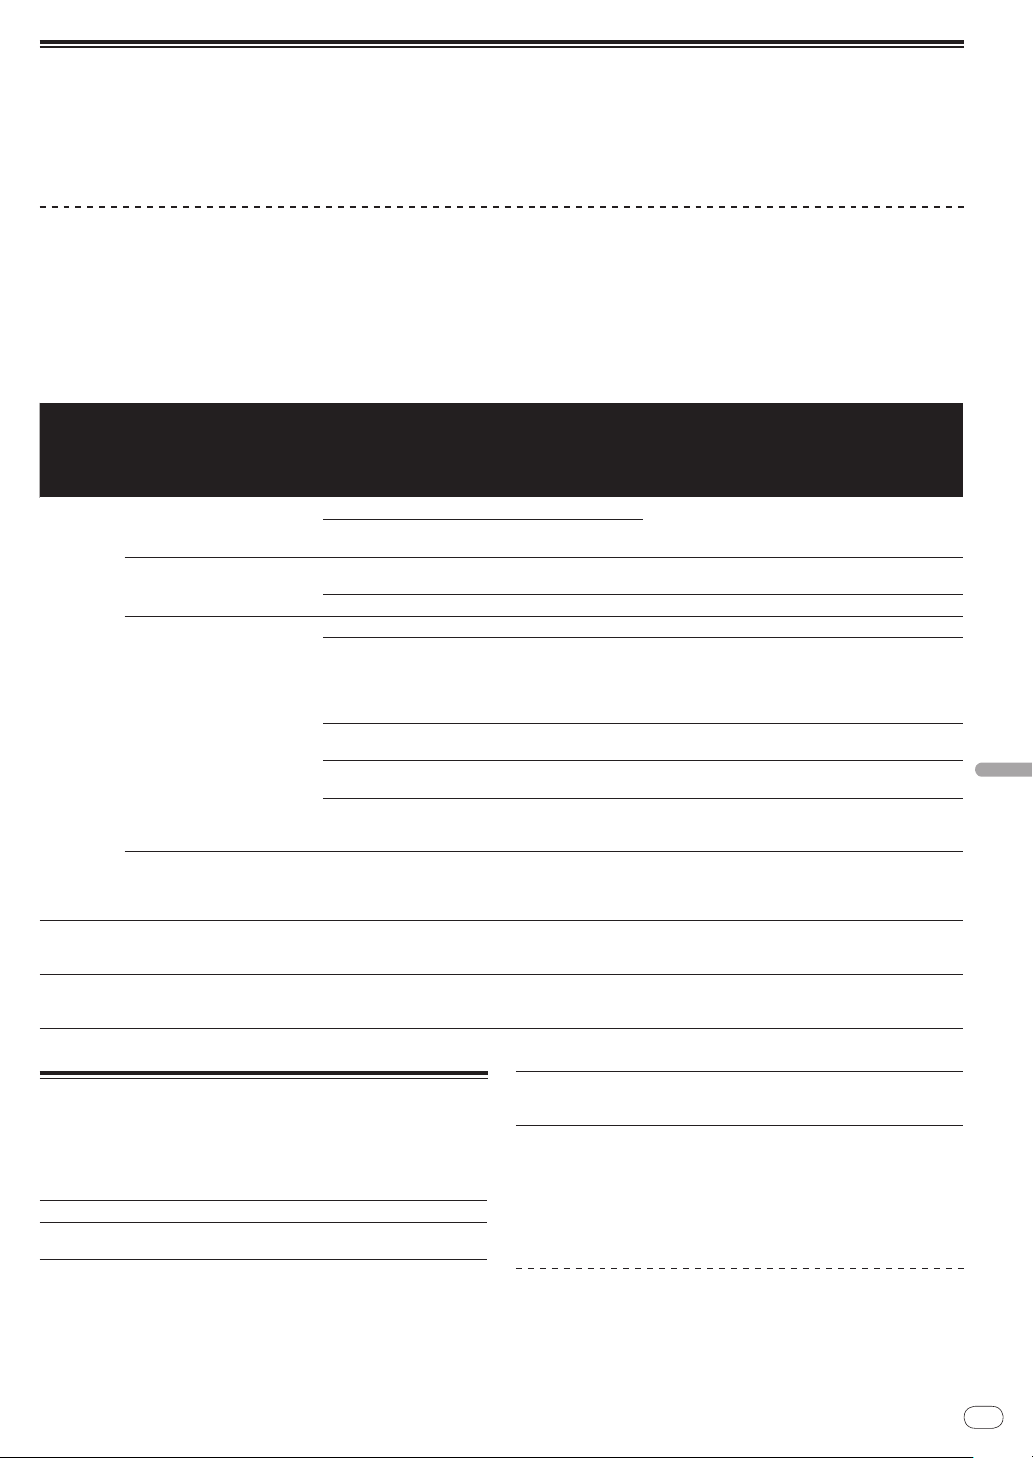
Sobre los errores
Si esta unidad no puede funcionar normalmente, los indicadores [u] (interruptor de alimentación), [USB STOP] y [PLAY f] parpadearán para
indicar el error.
Consulte la tabla de abajo y tome las medidas indicadas.
Si se indica el mismo error después de tomar las medidas, póngase en contacto con la tienda donde adquirió la unidad o con el centro de servicio
Pioneer más cercano.
Sobre la indicación de error del indicador [USB STOP]
Si el indicador [USB STOP] parpadea repetidamente de 2 a 5 veces
1 Desconecte el aparato USB.
2 Pulse [USB STOP].
Consulte la tabla de abajo y tome las medidas indicadas.
Nombre
del
indicador
USB STOP
PLAY f
u (interruptor de alimentación)
Número de
veces que
parpadea
el
indicador
2 veces repetidamente
3 veces repetidamente
4 veces repetidamente
5 veces repetidamente
3 veces
Continuo
Descripción
del error
Problema con el
formato de archivo
Problema con la
clase USB
Problema escribiendo en el
aparato USB
Se detectó sobrecorriente en el
aparato USB
Error de reproducción
Problema de
circuito
Causa Medida
El aparato USB no está formateado.
Está usando un aparato USB con un sistema de archivo
no compatible con esta unidad.
Está conectado un aparato que no es de la clase de
almacenamiento en masa USB.
Está conectado un concentrador USB. No conecte concentradores USB.
No hay suficiente espacio libre en el aparato USB. Use un aparato USB con suficiente espacio libre.
Hay un nombre de archivo “REC999.WAV” en la carpeta
de almacenamiento de datos grabados (PIONEER DJM
/ DJM350 REC).
El interruptor de protección contra escritura del aparato
USB está en la posición de activado.
Está usando un aparato USB con una función de seguridad.
La carpeta de almacenamiento de datos grabados
(PIONEER DJM / DJM350 REC) está puesta en “Solo
lectura”.
Está usando un aparato USB (un disco duro accionado
por alimentación de bus) cuya corriente es superior a la
corriente nominal de esta unidad (500 mA).
No hay archivos que se puedan reproducir en la carpeta
de almacenamiento de datos grabados (PIONEER DJM
/ DJM350 REC).
Hay un problema en el circuito interno.
Use un aparato USB formateado con un sistema de
archivo compatible con esta unidad (FAT o HFS+).
Conecte un aparato USB de la clase de almacenamiento
en masa USB.
Los archivos creados mediante grabación tienen un
número de 3 dígitos. Una vez alcanzado el número 999
no se pueden crear archivos nuevos en la carpeta. Si
pasa esto, traslade los archivos de la carpeta a otra
carpeta diferente.
Ponga el interruptor de protección contra escritura del
aparato USB en la posición de desactivado.
Use un aparato USB sin función de seguridad.
Cambie el ajuste para que se pueda escribir en la carpeta de almacenamiento de datos grabados.
Use un aparato USB que funcione con la corriente
nominal de esta unidad (un disco duro accionado por
un adaptador de CA u otro suministro de alimentación
externo).
Antes de reproducir archivos, haga la operación de
grabación en esta unidad para crear archivos que se
puedan reproducir.
Desenchufe el cable de alimentación de la unidad de la
toma de corriente.
Español
Acerca de los aparatos USB/ archivos
utilizables en esta unidad
Esta unidad es compatible con discos duros, aparatos de memoria
flash portátiles y otros aparatos de almacenamiento en masa USB.
Capas de carpetas Máximo de 2 capas (PIONEER DJM / DJM350 REC)
Máximo número
de archivos
Máximo de 999 pistas
Sistemas de
archivo compatibles
! Los aparatos de disco óptico, como las unidades DVD/
son compatibles.
! Cuando haya muchas carpetas o archivos se necesitará algo de tiempo para
hacer la carga.
! Si se establecen múltiples particiones para el aparato USB puede que éste
no sea reconocido.
FAT, FAT32 y HFS+
CD externas, etc., no
Cuidados al usar aparatos USB
! Algunos aparatos USB pueden no funcionar bien. Tenga en cuenta
que Pioneer no aceptará ninguna responsabilidad en absoluto por
la pérdida de datos grabados en aparatos USB.
! No se pueden usar concentradores USB.
Es
15
Page 96

! Los aparatos USB equipados con lectores de tarjetas flash pueden
no funcionar.
! Puede que, cuando se detecta una corriente superior a la corriente
máxima permitida en el puerto USB de esta unidad, el indicador
[USB STOP] parpadee 5 veces, la alimentación al aparato USB se
corte y las comunicaciones con el aparato USB se interrumpan.
Para restablecer la operación normal, desconecte el aparato USB
de esta unidad y luego pulse [USB STOP]. Evite volver a usar aparatos USB en los que se ha detectado un exceso de corriente. Si
no se restablece la operación normal (si no se pueden establecer
comunicaciones) después de realizar el procedimiento de arriba,
inténtelo de nuevo apagando y encendiendo esta unidad.
! Dependiendo del aparato USB que esté usando puede que no se
logre el rendimiento deseado.
Acerca de los archivos WAV
El DJM-350 es compatible con archivos WAV de los formatos mostrados abajo.
Formatos compatibles
Extensión de
archivo
Los archivos del formato PCM sin comprimir de 16 bits con
frecuencia de muestreo de 44,1 kHz son compatibles.
.WAV o .wav
Acerca de las cláusulas de exención
! Pioneer es una marca registrada de Pioneer Corporation.
! Los nombres de compañías y productos mencionados aquí son
marcas de fábrica de sus respectivos propietarios.
! Cuando reproduzca archivos de música adquiridos en esta unidad le
rogamos que respete los derechos de autor.
Características del ecualizador del micrófono/
HI ...................................................................–12 dB a +12 dB (10 kHz)
LOW .............................................................. –12 dB a +12 dB (100 Hz)
AUX
Terminales entrada/ salida
Terminal de entrada CD
Conector de contactos RCA ...................................................2 juegos
Terminal de entrada PHONO
Conector de contactos RCA ...................................................2 juegos
Terminal de entrada MIC
Conector fonográfico (Ø 6,3 mm) ............................................. 1 juego
Terminal de entrada AUX
Conector de contactos RCA .....................................................1 juego
Terminal de salida MASTER
Conector de contactos RCA ...................................................2 juegos
Terminal de salida PHONES
Conector fonográfico estéreo (Ø 6,3 mm) ............................... 1 juego
Terminal USB
Tipo A ..........................................................................................1 juego
Terminal CONTROL
Miniconector fonográfico (Ø 3,5 mm)....................................2 juegos
! Las especificaciones y diseño de este producto están sujetos a
cambios sin previo aviso.
! Publicado por Pioneer Corporation. Copyright © 2010 Pioneer
Corporation. Todos los derechos reservados.
Especificaciones
Generales
Requisitos de potencia................................CA 220 V a 240 V, 50 Hz/ 60 Hz
Consumo de energía ............................................................................. 17 W
Consumo de energía (modo de espera) ............................................. 0,4 W
Peso de la unidad principal ............................................................... 3,2 kg
Dimensiones máximas........218 mm (An) × 107 mm (Al) × 301 mm (Pr)
Temperatura de funcionamiento tolerable ........................+5 °C a +35 °C
Humedad de funcionamiento tolerable .. 5 % a 85 % (sin condensación)
Sección de audio
Frecuencia de muestreo ....................................................................48 kHz
Convertidor A/ D y D/ A ........................................................................ 24 bits
Características de frecuencia
CD/ AUX/ MIC ...................................................................20 Hz a 20 kHz
Relación señal/ ruido (salida nominal)
CD ....................................................................................................97 dB
PHONO ...........................................................................................86 dB
MIC ..................................................................................................80 dB
Distorsión armónica total (CD — MASTER1) .................................0,007 %
Nivel de entrada / Impedancia de entrada estándar
CD .................................................................................... –12 dBu/ 36 kW
PHONO ........................................................................... –52 dBu/ 47 kW
MIC .................................................................................. –52 dBu/ 10 kW
AUX ................................................................................. –12 dBu/ 27 kW
Nivel de salida / Impedancia de carga / Impedancia de salida estándar
MASTER OUT........................................................+2 dBu/ 10 kW/ 2,5 W
PHONES ................................................................. +2 dBu/ 32 W/ 150 W
Nivel de salida nominal / Impedancia de carga
MASTER OUT................................................................+18 dBu/ 10 kW
Diafonía (CD) .........................................................................................78 dB
Características del ecualizador de canales
HI ......................................................................... –
MID .......................................................................–
LOW ....................................................................... –
∞ a + 9 dB (13 kHz)
∞ a + 9 dB (1 kHz)
∞ a +9 dB (70 Hz)
16
Es
Page 97

Page 98

Благодарим вас за покупку данного изделия Pioneer. Пожалуйста, внимательно изучите данные инструкции по эксплуатации для надлежа-
Восклицательный знак, заключенный в
равносторонний треугольник,
используется для предупреждения
пользователя о наличии в литературе,
поставляемой в комплекте с изделием,
важных указаний по работе с ним и
обслуживанию.
Символ молнии, заключенный в
равносторонний треугольник,
используется для предупреждения
пользователя об «опасном напряжении»
внутри корпуса изделия, которое может
быть достаточно высоким и стать
причиной поражения людей
электрическим током.
ВНИМАНИЕ:
ВО ИЗБЕЖАНИЕ ПОРАЖЕНИЯ
ЭЛЕКТРИЧЕСКИМ ТОКОМ НЕ
СНИМАЙТЕ КРЫШКУ (ИЛИ ЗАДНЮЮ
СТЕНКУ). ВНУТРИ НЕ СОДЕРЖАТСЯ
ДЕАТЛИ, ПРЕДНАЗНАЧЕННЫЕ ДЛЯ
РЕМОНТА ПОЛЬЗОВАТЕЛЕМ. ДЛЯ
ОБСЛУЖИВАНИЯ ОБРАТИТЕСЬ К
КВАЛИФИЦИРОВАННОМУ
СОТРУДНИКУ СЕРВИСНОЙ СЛУЖБЫ.
CAUTION
RISK OF ELECTRIC SHOCK
DO NOT OPEN
BAЖHO
D3-4-2-1-1_A1_Ru
Если вы желаете утилизировать данное изделие, не выбрасывайте его вместе с обычным бытовым мусором. Существует
отдельная система сбора использованных электронных изделий в соответствии с законодательством, которая предполагает
соответствующее обращение, возврат и переработку.
Чacтные клиенты-в странах-членах ЕС, в Швейцарии и Норвегии могут бесплатно возвращать использованные электронные изделия
в соответствующие пункты сбора или дилеру (при покупке сходного нового изделия).
В странах, не перечисленных выше, для получения информации о правильных способах утилизации обращайтесь в cooтветcтвующие
учреждения.
Поступая таким образом, вы можете быть уверены в том, что утилизируемый продукт будет соответствующим образом обработан,
передан в соответствующий пункт и переработан без возможных негативных последствий для окружающей среды и здоровья людей.
K058b_A1_Ru
щего использования данной модели. По завершению изучения инструкций, храните их в надежном месте для справок в будущем.
В некоторых странах или регионах форма вилки питания и розетки может иногда отличаться от того, что отображено на иллюстрациях.
Однако способ подключения и работы аппарата остается неизменным.
Ru
2
Page 99

ПРЕДУПРЕЖДЕНИЕ
Д
анное оборудование не является
водонепроницаемым. Во избежание пожара или
поражения электрическим током не помещайте
рядом с оборудованием емкости с жидкостями
(например, вазы, цветочные горшки) и не
д
опускайте попадания на него капель, брызг, дождя
или влаги.
D3-4-2-1-3_A1_Ru
ПРЕДУПРЕЖДЕНИЕ
Перед первым включением оборудования
внимательно прочтите следующий раздел.
Напряжение в электросети может быть разным
в различных странах и регионах. Убедитесь, что
сетевое напряжение в местности, где будет
использоваться данное устройство,
соответствует требуемому напряжению
(например, 230 В или 120 В), указанному на
задней панели.
D3-4-2-1-4*_A1_Ru
ПРЕДУПРЕЖДЕНИЕ
Во избежание пожара не приближайте к
оборудованию источники открытого огня
(например, зажженные свечи).
D3-4-2-1-7a_A1_Ru
ПРЕДУПРЕЖДЕНИЕ
В корпусе устройства имеются щели и отверстия
для вентиляции, обеспечивающие надежную
работу изделия и защищающие его от перегрева.
Во избежание пожара эти отверстия ни в коем
случае не следует закрывать или заслонять
другими предметами (газетами, скатертями и
шторами) или устанавливать оборудование на
толстом ковре или постели.
D3-4-2-1-7b*_A1_Ru
Условия эксплуатации
Изделие эксплуатируется при следующих
температуре и влажности:
+5 °C до +35 °C; влажность менее 85 % (не
заслоняйте охлаждающие вентиляторы)
Не устанавливайте изделие в плохо
проветриваемом помещении или в месте с высокой
влажностью, открытом для прямого солнечного
света (или сильного искусственного света).
D3-4-2-1-7c*_A1_Ru
Если вилка шнура питания изделия не
соответствует имеющейся электророзетке, вилку
следует заменить на подходящую к розетке.
Замена и установка вилки должны производиться
только квалифицированным техником.
Отсоединенная от кабеля вилка, подключенная к
розетке, может вызвать тяжелое поражение
электрическим током. После удаления вилки
утилизируйте ее должным образом.
Оборудование следует отключать от электросети,
извлекая вилку кабеля питания из розетки, если
оно не будет использоваться в течение долгого
времени (например, если вы уезжа
ете в отпуск).
D3-4-2-2-1a_A1_Ru
ВНИМАНИЕ
Выключатель данного устройства не
полностью отключает его от электросети. Чтобы
полностью отключить питание устройства,
вытащите вилку кабеля питания из
электророзетки. Поэтому устройство следует
устанавливать так, чтобы вилку кабеля питания
можно было легко вытащить из розетки в
чрезвычайных обстоятельствах. Во избежание
пожара следует извлекать вилку кабеля питания
из розетки, если устройство не будет
использоваться в течение долгого времени
(например, если вы уезжаете в отпуск).
D3-4-2-2-2a*_A1_Ru
МЕРЫ ПРЕДОСТОРОЖНОСТИ ПРИ
ОБРАЩЕНИИ С СЕТЕВЫМ ШНУРОМ
Держите сетевой шнур за вилку. Не вытаскивайте
вилку, взявшись за шнур, и никогда не касайтесь
сетевого шнура, если Ваши руки влажные, так как
это может привести к короткому замыканию или
поражению электрическим током. Не ставьте
аппарат, предметы мебели и т.д. на сетевой шнур,
не зажимайте его. Не завязывайте узлов на шнуре
и не связывайте его с другими шнурами. Сетевые
шнуры должны лежать так, чтобы на них нельзя
было наступить. Поврежденный сетевой шнур
может стать причиной возникновения пожара или
поразить Вас электрическим током. Время от
времени проверяйте сетевой шнур. В случае
обнаружения повреждения обратитесь за заменой
в ближайший официальный сервисный центр
фирмы PIONEER или к Вашему дилеру.
S002*_A1_Ru
Ru
3
Page 100

Как следует читать данное руководство
Названия экранов, меню и кнопок в данном руководстве указаны в
скобках. (например, канал [MASTER], меню [ON/ OFF], [File])
До начала
Свойства ............................................................................................ 5
Пример настройки системы ............................................................. 5
Комплект поставки ............................................................................ 5
Подключения
Имена терминалов ........................................................................... 6
Подключение входных/
выходных терминалов .............................. 7
Операции
Панель управления .......................................................................... 8
О переключателе питания данного аппарата ................................9
Основное управление (раздел микшера) ....................................... 9
Управление звучанием через наушники (раздел наушников) .... 11
Использование функции эффектов (раздел мастер эффектов) 11
Использование микрофона или внешнего устройства
(раздел MIC/
Запись исполнения (раздел записи на USB) ................................ 12
О функции автоматического режима ожидания ..........................13
AUX) ........................................................................... 12
Дополнительная информация
Возможные неисправности и способы их устранения
Об ошибках ...................................................................................... 15
Об устройствах USB/ файлах, используемых на данном
аппарате .......................................................................................... 15
Оговорки об ограничении ответственности ................................. 16
Технические характеристики ......................................................... 16
....................14
Ru
4
 Loading...