

Pioneer DEH-X2900UI User Manual [de]

CD RDS RECEIVER
AUTORADIO CD RDS
SINTOLETTORE CD RDS
REPRODUCTOR DE CD CON RECEPTOR RDS
CD RDS-EMPFÄNGER
CD RDS-ONTVANGER
CD RDS ПРИЕМНИК
DEH-X2900UI
English Français Italiano Español Deutsch Nederlands Русский
Owner’s Manual
Mode d’emploi
Manuale d’istruzioni
Manual de instrucciones
Bedienungsanleitung
Handleiding
Руководство пользователя
About this manual:
Table of Contents
WARNING
CAUTION
Before You Start....................................................................................... 2
Getting Started........................................................................................ 3
Radio.......................................................................................................... 4
CD/USB/iPod/AUX................................................................................... 5
App Mode................................................................................................. 7
Spotify®..................................................................................................... 7
Using Pioneer ARC APP.......................................................................... 8
Settings..................................................................................................... 9
FUNCTION settings ................................................................................. 9
AUDIO settings...................................................................................... 10
SYSTEM settings ................................................................................... 10
ILLUMINATION settings ....................................................................... 11
MIXTRAX settings................................................................................. 12
Connections/Installation..................................................................... 12
Additional Information........................................................................ 14
Before You Start
Thank you for purchasing this PIONEER product
To ensure proper use, please read through this manual before using this product. It is especially
important that you read an d observe WARNI NGs and CAUTIONs in this manual. Please keep the
manual in a safe and accessible place for future reference.
If you want to dispose this product, do not mix it with general household waste. There is a separate
collection system for used electronic products in accordance with legislation that requires proper
treatment, recovery and recycling.
Private households in the member states of the EU, in Switzerland and Norway may return their used
electronic products free of charge to designated collec tion facilities or to a retaile r (if you purchase a
similar new one).
For countries not mentioned abov e, please cont act your local authoriti es for the correct method of
disposal.
By doing so you will ensure that your disposed product undergoes the necessary treatment, recovery
and recycling and thus prevent potential negative effects on the environment and human health.
• Do not attempt to install or service this product by yourself. Installation or servicing of this
product by persons with out training and experience in electro nic equipment and automotive
accessories may be dangerous and could expose you to the risk of electric shock, injury or other
hazards.
• Do not attempt to operate the unit while driving. Make sure to pull off the road and park your vehicle
in a safe location before attempting to use the controls on the device.
• In the following instructions, a USB memory or USB audio player are referred to as
“USB device”.
• In this manual, iPod and iPhone are referred to as “iPod”.
2En
• Do not allow this unit to come into contact with moisture and/or liquids. Electrical shock could result.
Also, damage to this unit, smoke, and overheating could result from contact with liquids.
• Always keep the volume low enough to hear outside sounds.
• The Pioneer CarStereo-Pass is for use only in Germany.
• This product is evaluated in moderate and tropical climate condition under the Audio, video and
similar electronic apparatus - Safety requirements, IEC 60065.
CAUTION
This product is a class 1 laser product classified under the Safety of laser products, IEC 60825-1:2007.
English
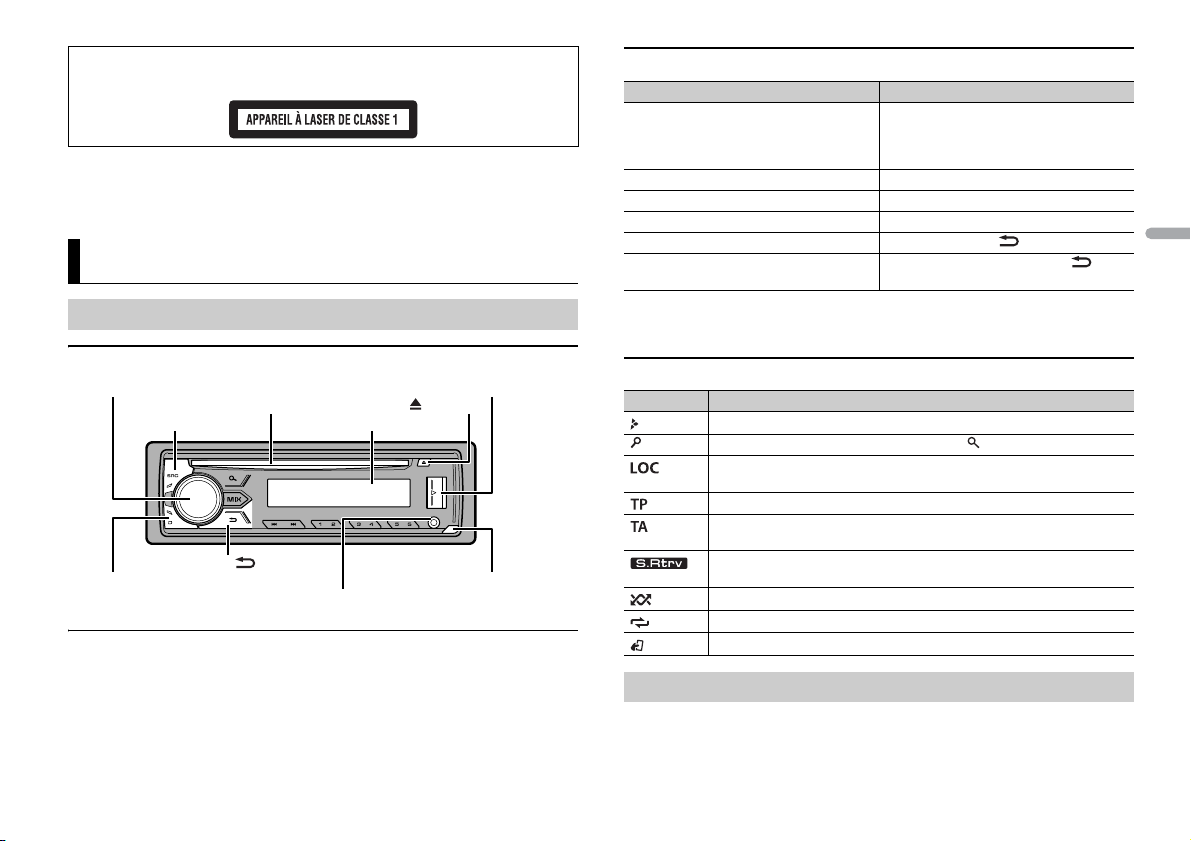
If you experience problems
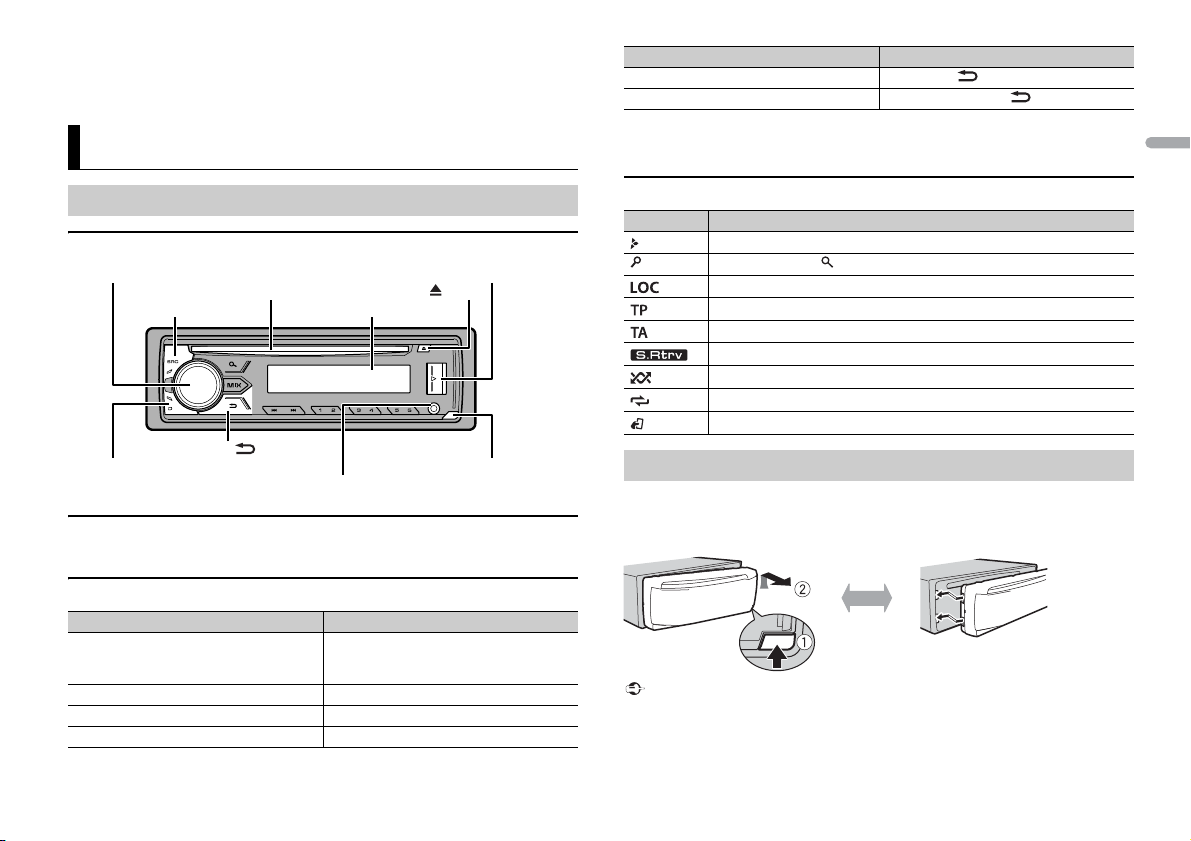
Detach button
Display window
M.C. (multi-control) dial
BAND/
DISP (display)
SRC (source)/OFF
USB port
(eject)
AUX input jack (3.5 mm stereo jack)
Disc loading slot
Important
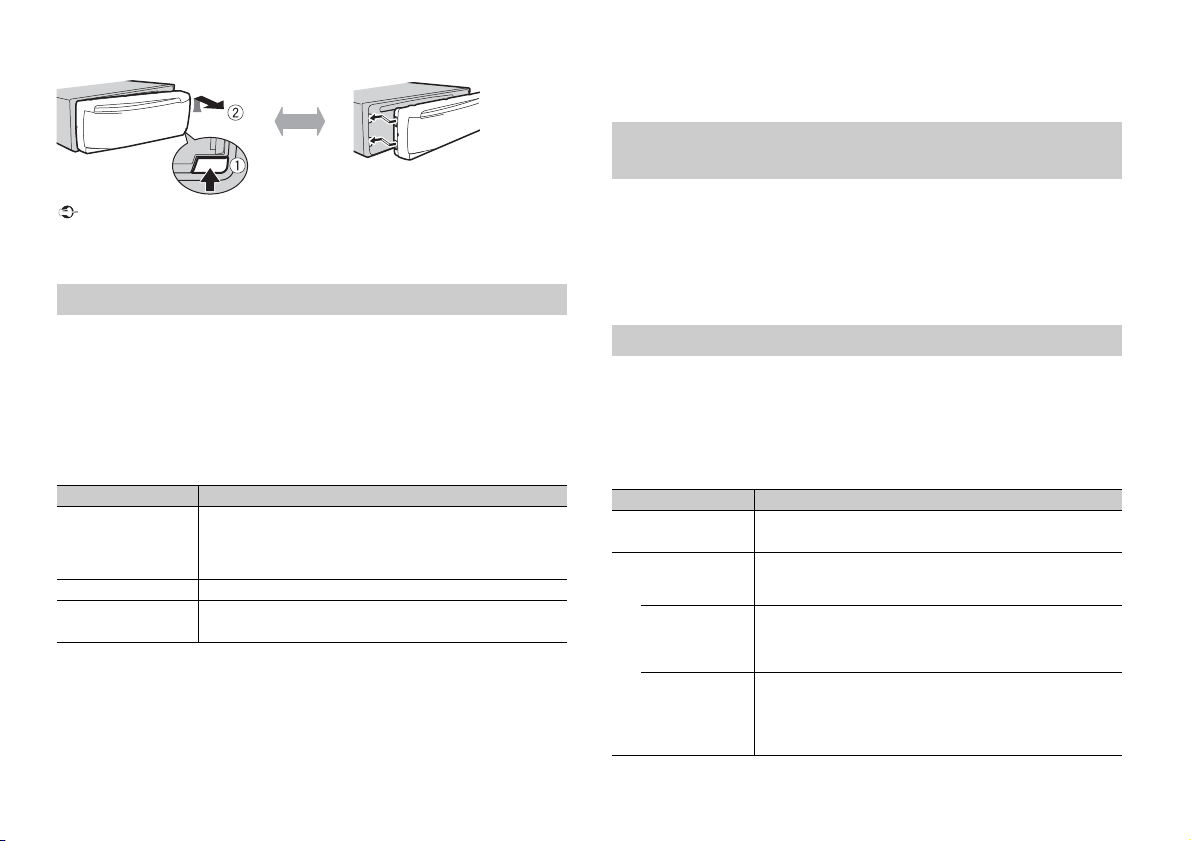
Detach Attach
Should this unit fail to work properly, please contact your dealer or nearest authorized PIONEER Service
Station.
Getting Started
Purpose Operation
Return to the previous display/list Press BAN D/ .
Return to th e normal display from the men u Press and hold BAND/ .
* When this unit’s blue/white lead is connected to the vehicle’s auto-antenna relay control terminal,
the vehicle’s antenna extends when this unit’s source is turned on. To retract the anten na, turn the
source off.
Basic operation
DEH-X2900UI
Optional remote control
The remote control CD-R320 is sold separately.
Frequently used operations
Purpose Operation
Turn on the power* Press SRC
Adjust the volume Tur n the M.
Select a source Press SRC
Change the display information Press DISP re
/OFF to turn on the power.
Press and hold SR
power.
C. dial.
/OFF repeatedly.
peatedly.
C/OFF to turn off the
Display indication
Indication Description
Appears when a lower tier of the menu or folder exists.
Appears when the button is pressed.
Appears when the local seek tuning function is set (page 9).
Appears when a traffic program is received.
Appears when the TA (traffic announcements) function is set (page 9).
Appears when the sound retriever function is set (page 10).
Appears when random/shuffle play is set.
Appears when repeat play is set.
Appears when the iPod control function is set (page 6).
Detaching the front panel
Detach the front panel to prevent theft. Remove any cables and devices attached to the
front panel and turn off the unit before detaching it.
• Avoid subjecting the f ront panel to excessive shock.
• Keep the front panel out of direct sunlight and high temperatures.
• Always store the deta ched front panel in a protective case or bag.
3En

NOTES
Setup menu
When you turn the ignition switch to ON after installation, [SET UP :YES] appears in the
di
splay.
1 Press the M.C. dial.
The setup menu disappears after 30 seconds of no operation. If you prefer not to set
at
this time, turn the M.C. dial to select [NO], then press to confirm.
2 Turn the M.C. dial to select the options, then press to confirm.
To proceed to the next menu option, you need to confirm your selection.
Menu Item Description
LANGUAGE Select the language to display the text information from a
[ENG](English),
](Russian),
[РУС
[TUR](Turkish)
CLOCK SET Set the clock.
FM STEP Select the FM tuning step from 100 kHz or 50 kHz.
[100], [50]
c
ompressed audio file.
3 [QUIT :YES] appears when all the settings have been made.
To return to the first item of the setup menu, turn the M.C
then press to confirm.
. dial to select [QUIT :NO],
4 Press the M.C. dial to confirm the settings.
• You can cancel the menu setting by pressing SRC/OFF.
• These settings can be made at any time from the SYSTEM settings (page 10) and INITIAL settings
(page 4).
Canceling the demonstration display (DEMO OFF)
1 Press the M.C. dial to display the main menu.
2 Turn the M.C. dial to select [SYSTEM], then press to confirm.
3 Turn the M.C. dial to select [DEMO OFF], then press to confirm.
4 Turn the M.C. dial to select [YES], then press to confirm.
INITIAL settings
1 Press and hold SRC/OFF until the unit turns off.
2 Press and hold SRC/OFF to display the main menu.
3 Tur n the M.C. dial to select [INITIAL], then press to confirm.
4 Tur n the M.C. dial to select an option, then press to confirm.
Menu Item Description
FM STEP Select the FM tuning step from 100 kHz or 50 kHz.
[100], [50]
SP-P/O MODE Select when there is a full-range speaker connected to the rear
[REAR/SUB.W]
[SUB.W/SUB.W] Select when there is a passive subwoofer connected directly to
[REAR/REAR] Select when there are full-range speakers connected to the rear
S/W UPDATE Select to confirm the latest system information on the unit.
[SYSTEM INFO]
[SYSTEM UPDATE] Select to update the unit to the latest software and initialize the
SYSTEM RESET Select [YES] to initialize the unit settings. The unit will be
[YES], [NO]
s
peaker output leads and there is a s ubwoofer connected to the
RCA output.
the rear speaker output leads and there is a subwoofer
connected to the RCA output.
peaker output leads and RCA output. If there is a full-range
s
speaker connected to the rear speaker output leads, and the
RCA output is not used, you may select either [REAR/SUB.W] or
[REAR/REAR].
nit setting s. For details on the latest software and updating,
u
visit our website.
restarted automatically.
(Some of the settings may be retained even after resetting the
t.)
uni
Radio
The tuner frequencies on this unit are allocated for use in Western Europe, Asia, the
iddle East, Africa and Oceania. Use in other areas may result in poor reception. The RDS
M
(radio data system) function only works in areas that broadcast RDS signals for FM
stations.
4En
English
TIP
NOTE
Receiving preset stations
NOTES
NOTE
CAUTION
1 Press SRC/OFF to select [RADIO].
2 Press BAND/ to select the band from [FM1], [FM2], [FM3], [MW] or [LW].
3 Press a number button (1/ to 6/ ).
The / buttons can be also used to select a preset station when [SEEK] is set to [PCH] in the
FUNCTION settings (page 9).
Best stations memory (BSM)
The six strongest stations are stored on the number buttons (1/ to 6/ ).
1 After selecting the band, press the M.C. dial to display the main menu.
2 Turn t he M.C. dial to select [FUNCTION], then press to confirm.
3 Turn t he M.C. dial to select [BSM], then press to confirm.
To seek a station manually
1 After selecting the band, press / to select a station.
Press and hold / then release to seek an available station. Scanning stops
when the unit receives a station. To cancel seek tuning, press / .
[SEEK] needs to be set to [MAN] in the FUNCTION settings (page 9).
To store stations manually
1 While receiving the station you want to store, press and hold one of the number
buttons (1/ to 6/ ) until it stops flashing.
Using PTY functions
The unit searches for a station by PTY (program type) information.
1 Press during FM reception.
2 Turn t he M.C. dial to select a program type from [NEWS/INFO], [POPULAR],
[CLASSICS] or [OTHERS].
3 Press the M.C. dial.
The unit begins to search for a station. When it is found, its program service name is
displayed.
• To cancel the search, press the M.C. dial.
• The program of some stations may differ from that indicated by the transmitted PTY.
• If no stati on is broadcasting the type of program you searched for, [NOT FOUND] is displayed for
about two seconds and then the tuner returns to the original station.
CD/USB/iPod/AUX
Playing back
Disconnect headphones from the device before connecting it to the unit.
CD
1 Insert a disc into the disc loading slot with the label side up.
To eject a disc, stop playback first then press .
USB devices (including Android™)/iPod
1 Open the USB port cover.
2 Plug in the USB device/iPod using an appropriate cable.
To automatically switch to [USB] source when a U SB device/iPod is connected to the uni t, set [USB
AUTO] to [ON] in the SYSTEM settings (page 11).
Use an optional Pioneer USB cable (CD-U50E) to connect the USB device as any device connected
directly to the unit will protrude out from the unit, w hich could be dangerous.
Before removing the device, stop playback.
AOA connections
For details on AOA connection, see page 8.
MTP connection
A device installed with Android OS 4.0 or later can be connected to the unit via MTP, using the cable
supplied with the device. However, depending on the connected device and the numbers of the files in
the device, audio files/songs may not be able to be played back via MTP. Note that MTP connection is
not compatible with WAV file formats, and cannot be used with the MIXTRAX function.
5En
NOTE
If you use an MTP connection, [ANDROID WIRED] needs to be set to [MEMORY] in the SYSTEM settings
NOTE
NOTE
(page 11).
AUX
1 Insert the stereo mini plug into the AUX input jack.
2 Press SRC /OFF to select [AUX] as the source.
If [AUX] is set to [OFF] in the SYSTEM settings, [AUX] cannot be selected as a source (page 11).
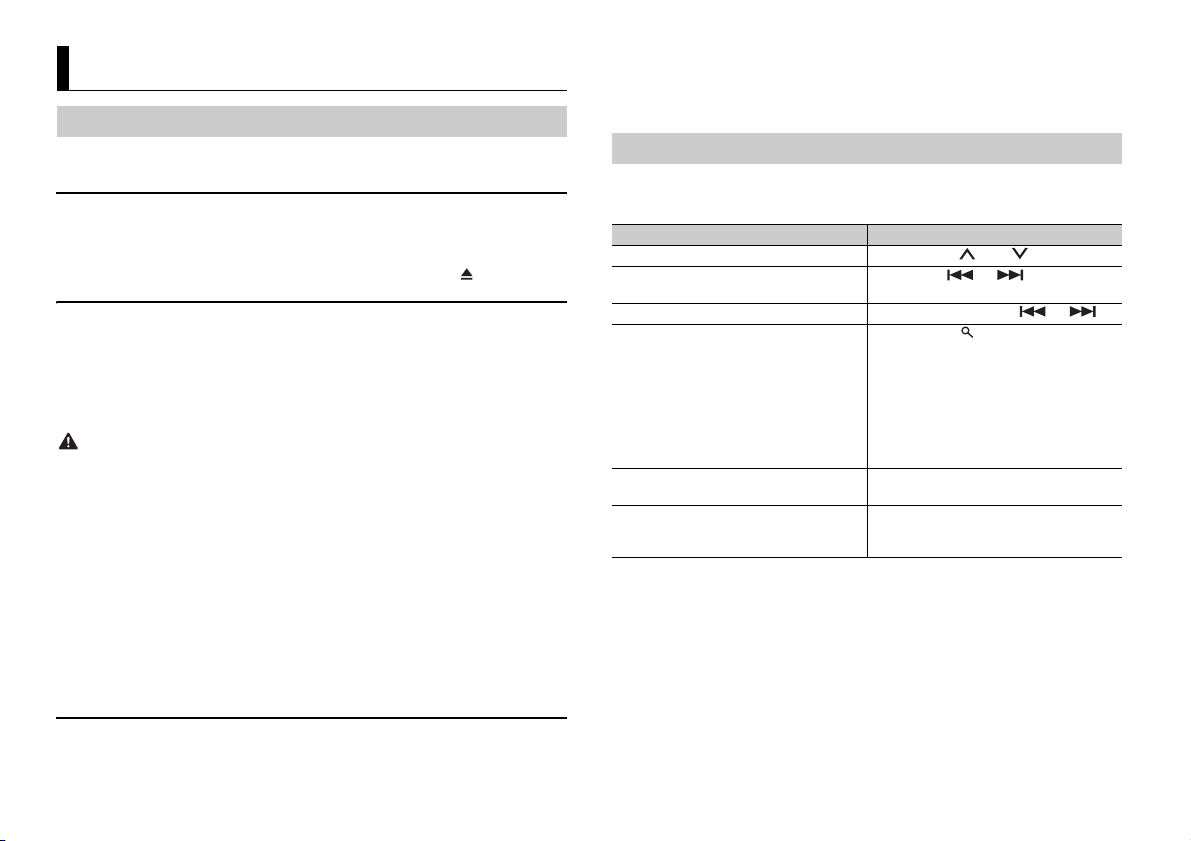
Operations
You can make various adjustments in the FUNCTION settings (page 9).
Note that the following operations do not w
device, use the device itself.
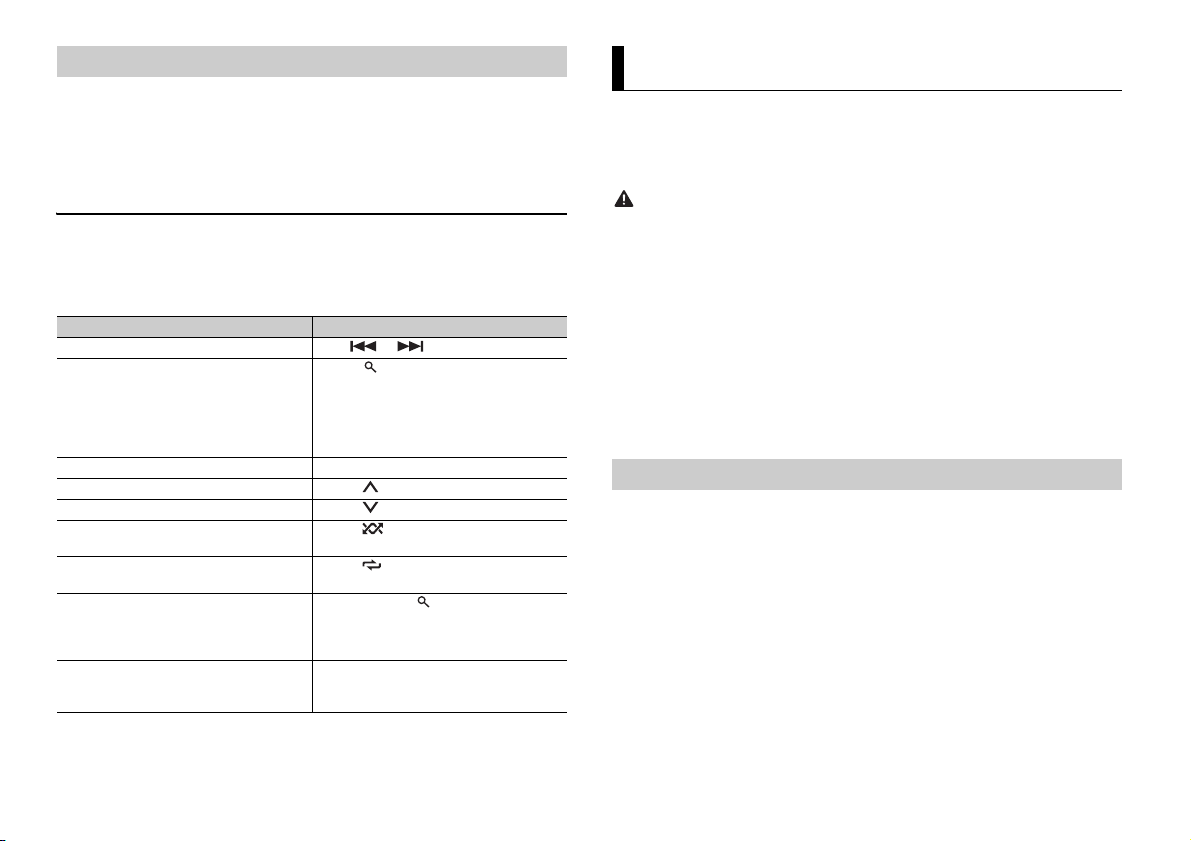
Purpose Operation
Select a folder/album*1 Press 1/ or 2/ .
Select a track/song (chapter) Press or .
Fast forwa rd or re verse *3 Press and hold or .
Search for a file from a list 1 Press to display the list.
View a list of the files in the selected folder/
category*1
Play a song in the selected folder/
cat
egory*1
Alphabetical search (iPod only) 1 P
ork for an AUX device. To operate an AUX
rn the M.C. dial to select the desired
2 Tu
file (folder) name or category, then press
to confirm.
rn the M.C. dial to select the desired
3 Tu
file, then press to confirm.
Playback starts.
Press the M.C. dial when a folder/category
is selected.
Press and hold the M.C. dial when a folder/
category is selected.
ress to display the list.
rn the M.C. dial to select the desired
2 Tu
category list, then press to enter th e
alphabetical search mode.
(Turning the M.
the alphabetical search mode.)
rn the M.C. dial to select a letter, then
3 Tu
press to display the alphabetical list.
To cancel alphabetical search, press BA
.
C. dial twice also enters
ND/
Purpose Operation
Repeat play Press 6/ .
Random/shuffle play Press 5/ .
Shuffle all play (iPod only) Press and hold 5/ .
Pause/resume playback Press 4/PA
Sound retriever*1*2 Press 3/S.
Return to root folder (CD/USB only)*1 Press and hold .
Switch between compressed audio and CD-
CD only)
DA (
Change drives in USB device
(Devices that support the USB mass storage
device class protocol only)
*1 Compressed audio files only
*2 This function is disabled when USB is selected as a source and the MIXTRAX function is on .
*3 When you use the fast forwa rd or reverse func tion while playing a VBR file, the pl ayback time may
be not correct.
US E.
Rtrv.
[1]: Effective for low compression rates
[2]: Effective for high compression rates
Press BAND/ .
Press BAND/ .
Useful functions for iPod
Link play mode
You can access songs based on the artist, album, or genre currently playing.
1 While listening to a song, press and hold to enter the link play mode.
2 Tur n the M.C. dial to select the mode ([ARTIST], [ALBUM], [GENRE]), then press to
confirm.
The selected song/album will be played after the currently playing song.
The selected song/album may be canceled if you use functions other than those from the link play
mode (e.g. fast forward and reverse).
iPod control
You can control the unit via a connected iPod.
The following iPod models are not compatible with this function.
–iPod nano 1st generation, iPod with video
1 Press BAND/ during playback, then select the control mode.
[CO
NTROL iPod ]: The unit’s iPod function can be operated from the connected iPod.
6En
English
[CONTR OL AUDIO]: The unit’s iPod function can only be operated by the buttons on
NOTES
NOTES
Important
NOTE
Important
the unit. In this mode, the connected iPod cannot be turned on or off.
• Switching the control mode to [CONTROL iPod] pauses song playback. Use the connected iPod to
resume playback.
• The following operations are still accessible from the unit, even if the control mode is set to
[CONTROL iPod].
– Pause, fast forward/reverse, song/chapter selection
• The volume can only be adjusted from the unit.
About MIXTRAX (USB/iPod only)
The MIXTRAX function creates a non-stop mix of your music library, accompanied by
illumination effects. For details on MIXTRAX settings, see page 12.
• This function is not compatible with an Android device connected via MTP.
• When USB is selected as a source and the MIXTRAX function is in use, the sound retriever function is
disabled.
• Depending on the file/song, sound effects may not be available.
• Turn the MIXTRAX function off if the illumination effects it produces interfere with driving.
1 Press MIX to turn MIXTRAX on/off.
PIONEER IS NOT LIAB LE FOR ANY THIRD PARTY APPS OR CONTENT, INCLUDING WITHOUT LIMITATION
THEIR ACCURACY OR COMPLETENESS. THE CONTENT AND FUNCTIONALITY OF SUCH APPS ARE THE
SOLE RESPONSIBILITY OF THE APP PROVIDER.
Playback of an application via the unit
1 Connect this unit with the mobile device.
• i
Phone via USB (page 5)
2 Press SRC/OFF to select [APP].
3 Operate the mobile device to start up the application.
Basic operations
You can make various adjustments in the FUNCTION settings (page 9).
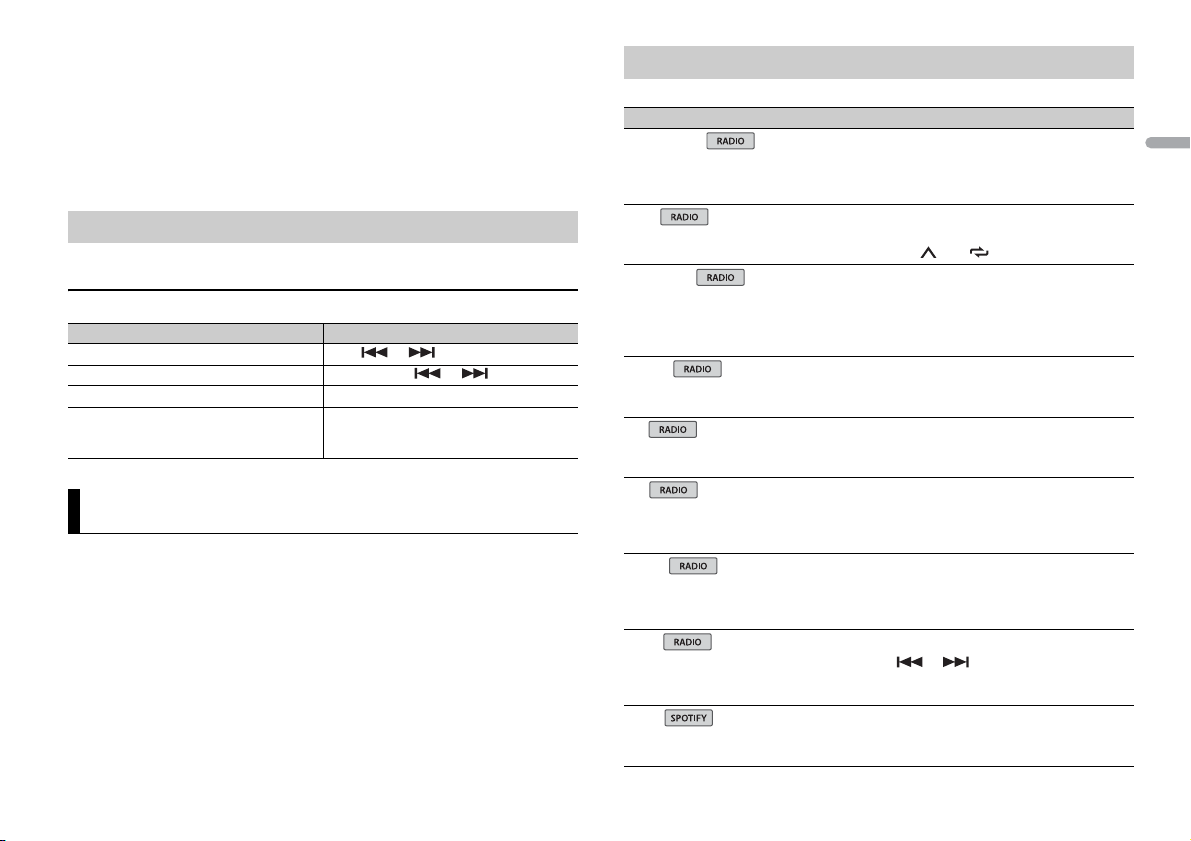
Purpose Operation
Select a track Press or .
Fast forward or reverse Press and hold or .
Pause/resume playback Pres s BA
ND/ .
App Mode
You can enjoy listening to an application on an iPhone via the unit. In some cases, you
an control an application by using the unit.
c
For details on compatible devices, visit our website.
Use of third part y apps may involve or require the provision of per sonally identifiable informati on,
whether through the creation of a user account or otherwise, and for certain applications, the provision
of geolocation data.
ALL THIRD PARTY APPS ARE THE SOLE RESPONSIBILITY OF THE PROVIDERS, INCLUDING WITHOUT
LIMITATION COLLECTION AND S ECURITY OF USER DATA AND PRIVACY PRACTICES. BY ACCESS ING
THIRD PARTY APPS, YOU AGREE TO REVIEW THE TERMS OF SERVICE AND PRIVACY POLICIES OF THE
PROVIDERS. IF YOU DO NOT AGREE WITH THE TERMS OR POLICIES OF ANY PROVIDER OR DO NOT
CONSENT TO THE USE OF GEOLOCATION DATA WHERE APPLICABLE, DO NOT USE THAT THIRD PARTY
APP.
For iP hone u sers
This function is compatible with iPhones and iPod touches installed with iOS 5.0 or later.
Spotify®
(DEH-X2900UI is only compatible with Spotify installed on iPhone.)
Spotify is a music streaming distribution service not affiliated with Pioneer. More
i
nformation is available at http://www.spotify.com.
The Spotify application is available for compatible smartphones, please visit https://
sup
port.spotify.com/ for the latest compatibility information.
To enjoy Spotify as you drive, first download the Spotify app to your iPhone. You can
d
ownload it on the iTunes App Store. Choose a free account or a paid Premium account,
either in the app or at spotify.com. A Premium account gives you more features, like
offline listening.
• This product incorporates Spotify software which is subject to 3rd party licenses found here:
www.spotify.com/connect/third- party-licenses.
• For information on the countries and regions where Spotify can be used, take a look at https://
www.spotify.com/us/select-your-country/.
7En
NOTE
NOTE
Listening to Spotify
WAR NING
NOTE
Update the firmware of the Spotify application to the latest version before use.
1 Connect this unit with the mobile device.
• iP
hone via USB (page 5)
2 Press SRC/OFF to select [SPOTIFY].
3 Launch the Spotify application on the mobile device and star t playback.
Using Pioneer ARC APP
You can operate the unit from Pioneer ARC APP installed on an iPhone/Android device.
In some cases, you can control aspects of the application, such as source selection,
pause, etc., by using the unit.
For details on what operations are available on the application, see the application’s help
section.
Basic operations
You can make various adjustments in the FUNCTION settings (page 9).
The available operations may vary according to the type of contents (track/album/artist/playlist/radio)
you want to play.
Purpose Operation
Skip a track Press or .
Search for a track from a list 1 Press (list) to display the list.
Pause/resume playback Press 4/
Thumbs Up (Only for radio) Press 1/ .
Thumbs Down (Only for radio) Press 2/ .
Random play (Only for track/album/artist/
pl
aylist)
Repeat play (Only for track/album/artist/
pl
aylist)
Start a radio channel based on the song
cur
rently being played.
Store the information about the song
rently being played.
cur
Remove the song information stored.
Some functions of Spotify may not be operated from the unit.
rn the M.C. dial to select the desired
2 Tu
category, then press to confirm.
rn the M.C. dial to select the desired
3 Tu
file, then press to confirm.
Playback starts.
PAUSE.
Press 5/ .
Press 6/ .
1 Press and hold (list) to start a radio.
ress the M.C. dial.
2 P
his function may not be available
• T
depending on the selected song.
1 Press and hold 3/S.Rtrv.
[SAVE]/[UNSAVE] appears.
ress the M.C. dial.
2 P
8En
Do not attempt to o perate the application while dr iving. Make sure to pull off the road and park your
vehicle in a safe location before attempting to use the controls on the application.
For iPhone users
This function is compatible with iPhones (iPhone 5 or later) and iPod touches installed
wit
h iOS 8.0 or later.
You can download Pioneer ARC APP on iTunes App Store.
For An droid device u sers
This function is compatible with devices that have Android OS 4.1 or later installed and
also sup
port AOA (Android Open Accessory) 2.0.
You can download Pioneer ARC APP on Google Play™.
Some Android devices connected via AOA 2.0 may not work properly or emit sounds due to their own
software design, regardless of the OS version.
Making a connection with Pioneer ARC APP
1 Connect this unit with the mobile device.
• i
Phone/Android device via USB (page 5)
Proceed to step 6 if you select the USB connection for iPhone.
2 Press the M.C. dial to display the main menu.
3 Tur n the M.C. dial to select [SYSTEM], then press to confirm.
4 Tur n the M.C. dial to select [ANDROID WIRED], then press to confirm.
5 Tur n the M.C. dial to select [APP CONTROL] for an Android device connected via
USB.
If [ON] is selected in [P.APP AUTO ON] (page 11), Pioneer ARC APP on the Android
device starts automatically, and all the steps are finished.
English
NOTE
If Pioneer ARC APP has not been installed on you r Android device yet, a messa ge that prompts you
NOTE
to install the application will appear on your Android device. Select [OFF] in [P.APP AUTO ON] to
clear the message (page 11).
6 Press SRC/OFF to select any source.
7 Launch Pioneer ARC APP on the mobile device.
You can also launch the application by pressing and holding the M.C. dial for iPhon e.
Listening to music on Android
1 Press SRC/OFF to select [ANDROID].
Basic operations
Purpose Operation
Select a track Press or .
Fast forward or reverse Press and hol d or .
Pause/resume playback Press 4/PA
Sound retriever Press 3/S.
US E.
Rtrv.
[1]: Effective for low compression rates
[2]: Effective for high compression rates
Settings
You can adjust various settings in the main menu.
1 Press the M.C. dial to display the main menu.
2 Turn t he M.C. dial to select one of the categories below, then press to confirm.
• FUNCTION settings (page 9)
• AUDIO settings (pag e 10)
• SYSTEM settings (page 10)
• ILLUMINATION settings (page 11)
• MIXTRAX settings (page 12)
3 Turn t he M.C. dial to select the options, then press to confirm.
FUNCTION settings
The menu items vary according to the source.
Menu Item Description
FM SETTING
[TALK], [STANDARD], [MUSIC] Match the sou nd quality level with the broa dcast
BSM
REGIONAL
[ON], [OFF] Limit the reception to the specific regional
LOCA L
OFF], [LV1], [LV2], [LV3], [LV4]
FM: [
MW/LW: [O
TA
[ON], [OFF] Receive current traffic information if available.
AF
[ON], [OFF] Allow the unit to retune to a different frequency
NEWS
[ON], [OFF] Interrupt the currently selected source with
SEEK
[MAN], [PCH] Assign or buttons to seek the stations
SAVE
FF], [LV1], [LV2]
s
ignal conditions of the FM band signal.
(Available only when FM band is selected.)
Store the six strongest stations on the number
tons (1/ to 6/ ) automatically.
but
programs when AF (alternative frequencies
search) is selected. (Available only when FM
band is selected.)
Restrict the tuning station according to the
si
gnal strength.
Available only when FM band is selected.)
(
viding the same station. (Available only when
pro
FM band is selected.)
ews programs. (Available only when FM band is
n
selected.)
one by one (manual tuning) or select a station
rom the preset channels.
f
Store the information about the song currently
ng played to your music list on Spotify.
bei
9En
Menu Item Description
USB
iPod
iPod
UNSAVE
Remove the song information stored in [SAVE].
S.RTRV
[1] (effective for low compression
ra
tes),
[2] (effective for high
mpression rates),
co
[OFF]
AUDIO BOOK
[FASTER], [NORMAL], [SLOWER] C hange the playback speed. (Not available when
PAUS E
Enhance compressed audio and restore rich
und.
so
Not available when:
SB is selected as a source and the MIXTRAX
• U
function is set to on.
D-DA/CD-TEXT is played back.
• C
ONTROL iPod] is selected in the control mode.)
[C
Pause or resume playback.
AUDIO settings
Menu Item Description
FAD ER *1
Adjust the front and rear speaker balance.
BALANCE
Adjust the left and right speaker balance.
EQ SETTING
[SUPER BASS], [POWERFUL],
[NATURAL], [VOCAL], [CUSTOM1],
[CUSTOM2], [FLAT]
Select an equalizer band and
r further customising.
level fo
Equalizer band: [80H
[800HZ ], [2.5KHZ], [8K HZ]
Equalizer level : [+
LOU DNES S
[OFF], [LOW], [MID], [HI] Compensate for clear sound at low volume.
Z], [250HZ],
6] to [–6]
Select or customise the equalizer curve.
[CUSTOM1] can be set separately for each source.
owever, each of the below combinations are set
H
to the same se tting automatically.
SB, iPod, ANDROID, SPOTIFY, and APP
• U
(iPhone)
[CUSTOM2] is a shared setting used for all
urces.
so
Menu Item Description
SUB.W*2
[NOR], [REV], [OFF] Select the subwoofer phase.
SUB.W CTRL*2
BASS BOOST
HPF SETTING
SLA
*1 Not available whe n [SUB.W/SUB.W] is sel ected in [SP-P/O MO DE] in the INITI AL settings (page 4).
*2 Not available when [REAR/REAR] is selected in [SP-P/O MODE] in the INITIAL settings (page 4).
*3 Not available when [OFF] is selected in [SUB.W].
*3
Cut- off frequ ency: [50H
[63HZ], [80HZ], [100HZ], [125HZ],
[160HZ], [200HZ]
Output level:
Slope level: [–12
[0] to [+6] Select the bass boost level.
Cut- off fre quenc y: [
[63HZ], [80HZ], [100HZ], [125HZ],
[160HZ], [200HZ]
Slope level: [–12
[+4] to [–4] Adjust the volume level for each source except
[–24] to [+6]
], [–24]
OFF], [50HZ],
], [–24]
Z],
Only frequencies lower than those in the
ected range are output from the subwoofer.
sel
Only frequencies higher than the high-pass filter
HPF) cutoff are output from the speakers.
(
.
FM
Each of the below combinations are set to the
ame setting automatica lly.
s
SB, iPod, ANDROID, SPOTIFY, and APP
• U
(iPhone)
SYSTEM settings
You can also access to these menus when the unit is turned off.
Menu Item Description
LANGUAGE
[ENG](English), [РУС](Russian),
[TUR](Turkish)
CLOCK SET
12H/24H
[12H], [24H] Select the time notation.
Select the language to display the text
information from a compressed audio file.
Set the clock (page 4).
10En

English
Menu Item Description
AUTO P I
[ON], [OFF] Search for a different station with the same
AUX
[ON], [OFF] Set to [ON] when using an auxiliary device
SPOTIFY
[ON], [OFF] Set to [ON] when using the Spotify function.
PW SAVE*
[ON], [OFF] Reduce the battery power consumption.
ANDROID WIRED
[MEMORY], [APP CONTROL] Select the appropr iate connection meth od for an
P. AP P AU T O O N
[ON], [OFF]
USB AUTO
[ON], [OFF] Select [ON] to automatically switch to [USB]
* [PW SAVE] is canceled if the vehicle battery is disconnected and will need to be turned back on once
the battery is reconnected. When [PW SAVE] is off, depending on connection methods, t he unit may
continue to draw power from the bat tery if your vehicle’s ignition does not h ave an ACC (accessory)
position.
gramming, even if using a preset station.
pro
onnected to the unit.
c
Turning on the source is the only operation
lowed when this function is on.
al
ndroid device.
A
Select [ON] to automatically launch Pioneer ARC
APP when an Android device is connected to the
unit via AOA. (Not available when [MEMORY] is
selected in [ANDROID WIRED].)
so
urce when a USB device/iPod is connected to
the unit.
Select [OFF] when a USB device/iPod is being
connected to the unit just for charging.
ILLUMINATION settings
Menu Item Description
COLOUR
[KEY COLOUR], [DISP COLOUR],
[BOTH COLOUR]
DIM SETTING
[SYNC ILLUMI], [SYNC CLOCK],
NUAL]
[MA
BRIGHTNESS
[KEY], [DISP] Select the brightness for the keys/display of the
ILLUMI FX
[ON], [OFF] The illumination effect can be seen when a CD is
Sel ect co lour fo r the k eys/d isplay of the unit fro m
12 preset colours, [SCAN] or [CUSTOM]*.
SCAN]: Cycle through a variety of colours
• [
automatica lly.
USTOM]*:
• [C
ress and hold the M.C. dial until the colour
1 P
setting display appears.
et the primary colour (R (red)/G (green)/B
2 S
(blue)) and brightness level ([0] to [60]).
You cannot select a level below 10 for all three
R (red), G (green), B (blue) at the same time.
of
You can also customise the preset colours. Select
ne of the preset colours, then press and hold
o
the M.C. dial until the colour setting display
appears.
* The CUSTOM setting is only available for [KEY
COLOUR] and [DISP COLOUR].
Change the display brightness.
uni
t from [1] to [10].
The available setting ranges differ depending o n
IM SETTING].
[D
serted/ejected.
in
The illumination effect will activate when the
CC power is turned on/off regardless of this
A
setting.
11En
MIXTRAX settings
Important
ACC posi tion No ACC position
Menu Item Description
SHORT PLAYBCK
[1.0 MIN], [1.5 MIN], [2.0 MIN],
[2.5 MIN], [3.0 MIN], [OFF]
FLASH AREA
[KEY/DISPLAY], [KEY], [OFF] Select the area for the illumination effect.
FLASH PATTERN
[SOUND LEVEL 1] to [SOUND LEVEL 6]Change the illumination effect according to
[LOW PASS 1] to [LOW PASS 6] The flash pattern changes according to th e
[RANDOM1] The flash pattern changes randomly according
[RANDOM2] The flash pattern changes randomly according
[RANDOM3] The flash pattern changes randomly according
DISPLAY FX
[ON], [OFF] Set the MIXTRAX special effects on/off.
CUT IN FX
[ON], [OFF] Turn the MIXTRAX sound effects on/off while
Select the length of the playback time.
When [OFF] is selected, the colour set under
th
e ILLUMINATION settings (page 11) is used as
the display colour.
he sound and bass level.
t
The flash pattern changes according to the
und level.
so
bas
s level.
t
o the sound level mode and low pass mode.
t
o the sound level mode.
t
o the low pass mode.
anually changing the tracks.
m
Connections/Installation
Connections
• When installing this unit in a vehicle
without an ACC (accessory) position on
the ignition switch, failure to connect the
red cable to the terminal that detects
operation of the ignition key may result
in battery drain.
• Use of this unit in conditions other than
the following could result in fire or
malfunction.
– Vehicles with a 12-volt battery and
ative grounding.
neg
– When speaker output is used by 4
nels, use speakers over 50 W
chan
(maximum input power) and between 4
Ω to 8 Ω (impedance value). Do not use
1 Ω to 3 Ω speakers for this unit.
– When rear speaker output is used by 2
of subwoofer, use speakers over 70 W
Ω
(maximum input power).
* Please refer to connections for a
nnection method.
co
o prevent a short-circuit, overheating or
• T
malfunction, be sure to follow the
directions below.
– Disconnect the negative terminal of the
tery before installation.
bat
– Secure the wiring with cable clamps or
dhesive tape. Wrap adhesive tape
a
around wiring that comes into contact
with metal parts to protect the wiring.
– Place all cables away from moving parts,
ch as the shift lever and seat rails.
su
– Place all cables away
such as near the heater outlet.
– Do not connect the yellow cable to the
tery by passing it through the hole
bat
to the engine compartment.
– Cover any disconnected cable
nnectors with insulating tape.
co
– Do not shorten any cables.
– Never cut the insulation of the power
e of this unit in order to share the
cabl
power with other devices. The current
capacity of the cable is limited.
– Use a fuse of the rating prescribed.
– Never wire the negative speaker cable
rectly to ground.
di
– Never band together negative cables of
ultiple speakers.
m
• When t
sent through the blue/white cable.
Connect this cable to the system remote
control of an external power amp or the
vehicle’s auto-antenna relay control
terminal (max. 300mA 12 V DC). If the
vehicle is equipped with a glass antenna,
connect it to the antenna booster power
supply terminal.
er connect the blue/white cable to
• Nev
the power terminal of an external power
amp. Also, never connect it to the power
terminal of the auto antenna. Doing so
may result in battery drain or a
malfunc tion.
he black cable is ground. Ground cables
• T
for this unit and other equipment
(especially, high-current products such as
power amps) must be wired separately. If
they are not, an accidental detachment
may result in a fire or malfunction.
e graphical symbol placed on
• Th
the product means direct current.
from hot places,
his unit is on, control signals are
12En
English
NOTES
Important
Leave ample
space
5 cm
5 cm
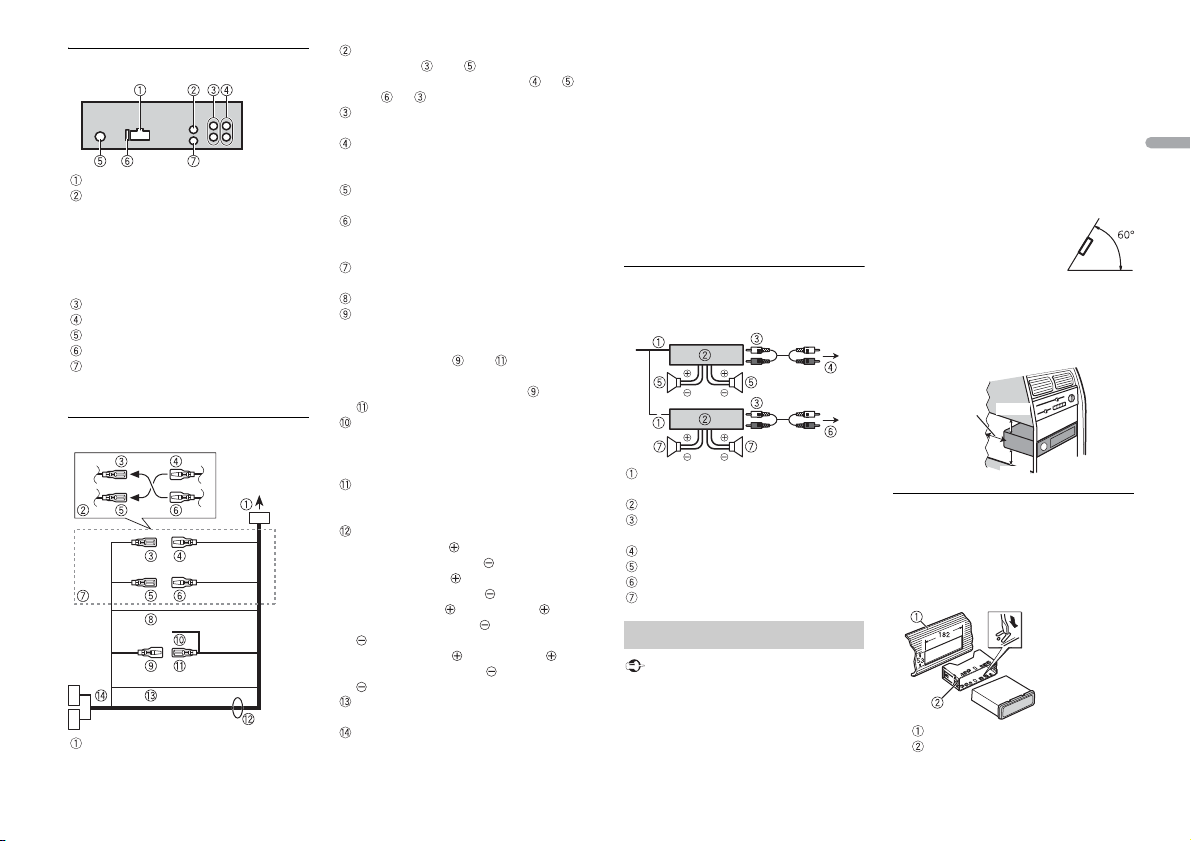
This unit
Power cord input
Rear AUX IN | [Tel In] (3.5mm stereo jack)
A dedicated rear input that is only
patible with external Bluetooth
com
hands-free telephone kits. The audio
signal is muted during a phone call
when the yellow/black wire is
connected/activated.
Rear output or subwoofer output
Front output
Antenna input
Fuse (10 A)
Wired remote input
Hard-wired remote cont rol adapter can
ted (sold separately).
be connec
Power cord
To power cord input
Depending on the kind of vehicle, the
function of and may be different.
In this case, be sure to connect to
and to .
Yel l ow
Back-up (or accessory)
Yel l ow
Connect to the constant 12 V supply
rminal.
te
Red
Accessory (or back-up)
Red
Connect to ter minal controlled by the
ition switch (12 V DC).
ign
Connect leads of the same colour to
each other.
Black (chassis ground)
Blue/white
The pin position of the ISO connector
ill differ depending on the type of
w
vehicle. Connect and when Pin 5
is an antenna control type. In another
ype of ve hicle, never connect and
t
.
Blue/white
Connect to the system control terminal
the power amp (max. 300 mA 12 V
of
DC).
Blue/white
Connect to the auto-antenna relay
ontrol terminal (max. 300 mA 12 V DC).
c
Speaker leads
White: Front left
White/black: Front left
Gray: Front right
Gray/black: Front right
Green: Rear left or subwoofer
Green/black: Rear left or subwoofer
Violet: Rear right or subwoofer
Violet/black: Rear right or subwoofer
Orange/white
Connect to a car’s illumination signal.
ISO connector
In some vehicles, the ISO connector
may be divided into two. In this case, be
sure to connect to both connectors.
• Change the initial menu of this unit. Refer
to [SP-P/O MODE]
subwoofer output of this unit is
naural.
mo
hen using a subwoofer of 2 Ω, be sure
• W
to connect the subwoofer to the violet
and violet/black leads of this unit. Do not
connect anything to the green and
green/black leads.
(page 4). The
Power amp (sold separately)
Perform these connections when us ing the
optional amplifier.
System remote control
Connect to blue/white cable.
Power amp (sold separately)
Connect with RCA cables (sold
separately)
To front output
Front speake r
To rear output or subwoofer output
Rear speaker or subwoofer
Installation
• Check al l connections and systems before
final installation.
• Do not use unauthorized parts as this
may cause malfunctions.
• Consult your dealer if installation requires
drilling of holes or other modifications to
the vehicle.
not install this unit where:
• Do
– it may interfere with operation of the
e.
vehicl
– it may cause injury to a passenger as a
esult of a sudden stop.
r
he semiconductor laser w ill be damaged
• T
if it overheats. Install this unit away from
hot places such as near the heater outlet.
imum performance is
• Opt
obtained when the unit is
installed at an angle of less
than 60°.
hen installing, to ensure proper heat
• W
dispersal when using this unit, make sure
you leave ample space behind the rear
panel and wrap any loose cables so they
are not blocking the vents.
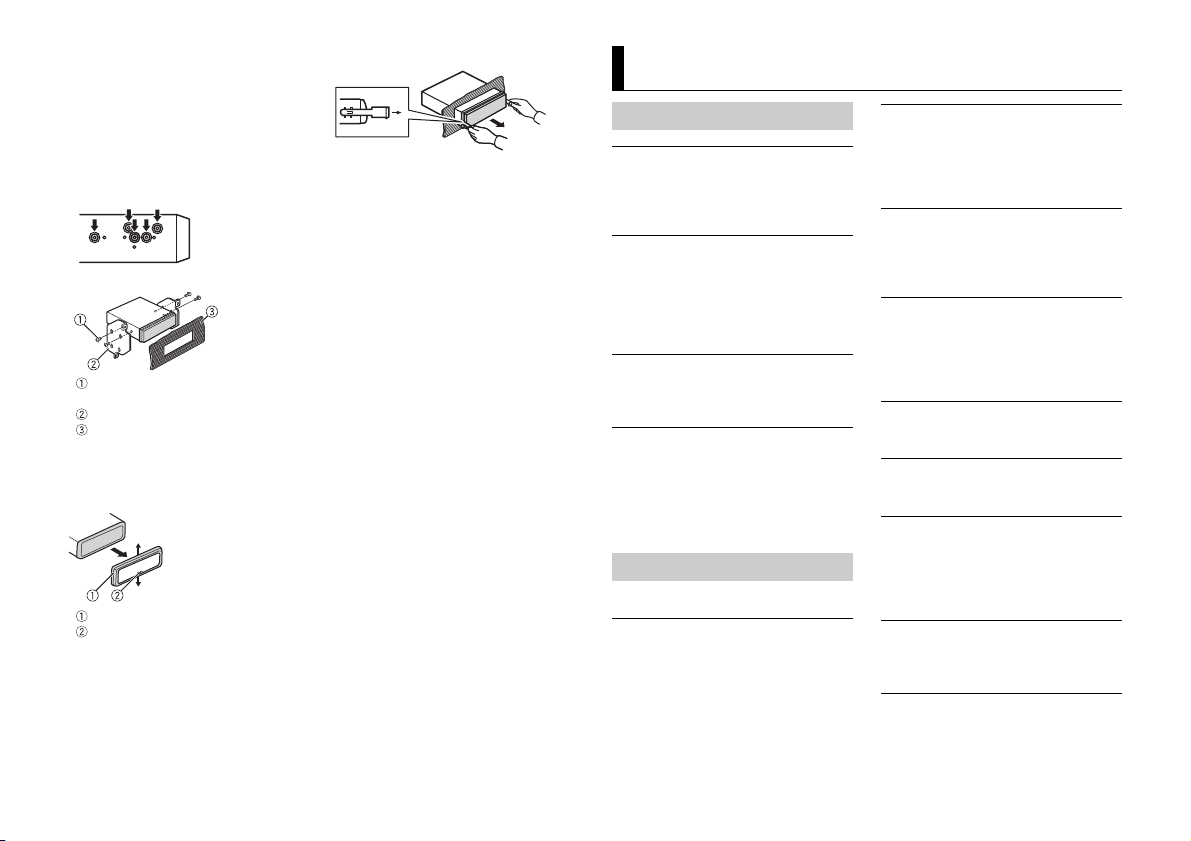
DIN mount installation
1 Insert the supplied mounting sleeve
into the dashboard.
2 Secure the mounting sleeve by using a
screwdriver to bend the metal tabs
(90°) into place.
Dashboard
Mounting sleeve
13En
• Make sure that the unit is installed
securely in place. An unstable
installation may cause skipping or
other malfunctions.
When not using the supplied
mounting sleeve
1 Determine the appropriate position
where the holes on the bracket and
the side of the unit match.
2 Tighten two screws on each side.
Tapping screw (5 mm × 9 mm, not
supplied with product)
Mounting bracket
Dashboard or console
Removing the unit (installed with
the supplied mounting sleeve)
1 Remove the trim ring.
Trim ring
Notched tab
eleasing the front panel allows easier
• R
access to the trim ring.
en reattaching the trim ring, point
• Wh
the side with the notched tab down.
2 Insert the supplied extraction keys
into both sides of the unit until they
click into place.
3 Pull the unit out of the dashboard.
Additional Information
Troubleshooting
The display automatically returns to the
normal display.
→ No operations have been made for
about 30 seconds.
– Perform an operation.
The repeat play range changes
unexpectedly.
→ Depending on the repeat play range,
the selected range may change when
another folder or track is being selected
or during fast for warding/reversing.
– Select the repeat play range again.
A subfolder is not played back.
→ Subfolders cannot be played when
[FLD] (folder repeat) is selected.
– Select another repeat play range.
The sound is intermittent.
→ You are using a device, such as a cellular
phone, that may cause audible
interference.
– Move electrical devices that may be
ausing the interference away from
c
the unit.
Error messages
Common
AMP ERROR
→ This unit fails to operate or the speaker
connection is incorrect.
he protective circuit is activated.
→ T
– Check the speaker connection.
– Turn the ignition switch OFF and back
o ON again. If the message remains,
t
contact your dealer or an authorized
Pioneer Service Station for assistance.
NO XXXX (NO TITLE, for example)
→ There is no embedded text information.
– Switch the display or play another
CD player
ERROR-07, 11, 12, 17, 30
→ The disc is dirty.
–Clean the disc.
→ T
– Replace the disc.
ERROR-07, 10, 11, 12, 15, 17, 30, A0
→ There is an electrical or mechanical
error.
– Turn the ignition switch OFF and back
ERROR-15
→ The inserted disc is blank .
– Replace the disc.
ERROR-23
→ Unsupported CD format.
– Replace the disc.
FORMAT READ
→ Sometimes there is a delay between the
start of playback and when you start to
hear any sound.
– Wait until the message disappears and
NO AUDIO
→ The inserted disc does not contain any
playable files.
– Replace the disc.
SKIPPED
→ The inserted disc contains DRM
protected files.
– The protected files are skipped.
ack/file.
tr
he disc is scratched.
ON, or switch to a different source,
to
then back to the CD player.
ou hear sound.
y
14En

English
PROTECT
→ All the files on the inserted disc are
embedded with DRM.
– Replace the disc.
USB device/iPod
FORMAT READ
→ Sometimes there is a del ay between the
start of playback and when you start to
hear any sound.
– Wait until the message disappears and
ou hear sound.
y
NO AUDIO
→ There are no songs.
– Transfer the audio files to the USB
vice and connect.
de
nnected USB device has security
→ The co
enabled.
– Follow the USB device instructions to
isable the security.
d
SKIPPED
→ The connected USB device contains
DRM protected files.
– The protected files are skipped.
PROTECT
→ All the files on the connected USB
device are embedded with DRM.
– Replace the USB device.
N/A USB
→ The connected USB device is not
supported by this unit.
– Disconnect your device and replace it
h a compatible USB device.
wit
HUB ERROR
→ The USB device connected via a USB
hub is not supporte d by this unit.
– Connect the USB device directly to this
nit using a USB cable.
u
CHECK USB
→ The USB connector or USB cable has
short- circuited.
– Check that the USB connector or USB
not caught in something or
cable is
damaged.
nnected USB device consumes
→ The co
more than maximum allowable current.
– Disconnect the USB device and do not
. Turn the ignition switch OFF
use it
and back to ACC or ON. Connect only
compliant USB devices.
iPod operates correctly but does
→ The
not charge.
– Make sure the connection cable for
he iPod has not shorted out (e.g., not
t
caught in metal objects). After
checking , turn the ignition switch OFF
and back to ON, or disconnect the
iPod and reconnect.
ERROR-19
→ Communication failed.
– Perform one of the following
erations, then return to the USB
op
source.
urn the ignition switch OFF and
• T
back to ON.
sconnect the USB device.
• Di
hange to a different source.
• C
od failure.
→ iP
– Disconnect the cable from the iPod.
nce the iPod’s main menu is
O
displayed, reconnect the iPod and
reset it.
ERROR-23
→ USB device was not formatted properly.
– Format the USB device with FAT12,
16 or FAT 32.
FAT
ERROR-16
→ The iPod firmware version is old.
– Update the iPod version.
od failure.
→ iP
– Disconnect the cable from the iPod.
nce the iPod’s main menu is
O
displayed, reconnect the iPod and
reset it.
STOP
→ There are no songs in the current list.
– Select a list that contains songs.
NOT FOUND
→ No related songs.
– Transfer songs to the iPod.
Apps
START UP APP
→ The application has not star ted running
yet.
– Operate the mobile device to start up
he application.
t
Spotify
CHECK APP
→ Connection to the Spotify application
failed.
– Follow the instructions that appear on
he screen.
t
Handling guidelines
Discs and player
• Use only discs that feature either of the
follow ing two lo gos.
• Use 12- cm discs.
se only conventional, fully circular discs.
• U
he following types of discs cannot be
• T
used with this unit:
–DualDiscs
– 8-cm discs: Attempts to use such discs
ith an adaptor may cause the unit to
w
malfunction.
– Oddly shaped discs
–Discs other than CDs
– Damaged discs, including discs that are
cked, chipped or warped
cra
– CD-R/RW discs that have not been
nalized
fi
o not write on or apply chemicals to the
• D
surface of the discs.
o clean a CD, wipe the disc with a soft
• T
cloth outward from the center.
ondensation may temporarily impair
• C
the player’s performance. Let it rest for
about one hour to adjust to a warmer
temperature. Also, wipe any damp discs
off with a soft cloth.
hen using discs that can be printed on
• W
label surfaces, check the instructions and
the warnings of the discs. Depending on
the discs, inserting and ejecting may not
be possible. Using such discs may result
in damage to this equipment.
o not attach commercially available
• D
labels or other materials to the discs.
– The discs may warp making the disc
ayable.
unpl
– The labels may come off during
back and prevent ejection of the
play
discs, which may result in damage to
the equipment.
USB storage device
• Connections via USB hubs are not
supported.
irmly secure the USB storage device
• F
before driving. Do not let the U SB storage
device fall onto the floor, where it may
become jammed under the brake or
accelerator pedal.
epending on the USB storage device,
• D
the following problems may occur.
–Operations may vary.
– The storage device may not be
gnized.
reco
– Files may not be played back properly.
– The device may cause audible
erference when you are listening to
int
the radio.
15En

iPod
CAUTION
CAUTION
• Do not leave the iPod in places with high
temperatures.
irmly secure the iPod when driving. Do
• F
not let the iPod fall onto the floor, where
it may become jammed under the brake
or accelerator pedal.
ttings of the iPod such as the
• The se
equalizer and repeat play are changed
automatically when the iPod is
connected to the unit. Once the iPod is
disconnected, those settings will return
to the original settings.
ncompatible text saved on the iPod will
• I
not be displayed by the unit.
Compressed audio
compatibility
• Only the first 32 characters can be
displayed as a file name (including the file
extension) or a folder name.
t may not work properly
• The uni
depending on the application used to
encode WMA files.
ay be a slight delay at the start of
• There m
the playback of audio files embedded
with image data, or audio files stored on a
USB device with numerous folder
hierarchies.
ussian text to be displayed on this unit
• R
should be encoded in one of the
following character sets:
– Unicode (UTF-8, UTF-16)
– A character set other than Unicode that
d in a Windows environment and
is use
is set to Russian in the multi-language
setting
• Pioneer cannot guarantee compatibility
with all USB mass storage devices, and
assumes no responsibility for any loss of
data on media players, smartphones, or
other devices while using this product.
• Do not leave discs or a USB storage
device in any place that is subject to high
temperatures.
WMA files
File ex tension .wma
Bit rate 48 kbps to 320 kbps
Sampling frequency 32 kHz, 44.1 kHz, 48
Windows Media™
Audio Profession al,
Lossless, Voice/DRM
Stream/Stream with
video
(CBR), 48 kbps to 384
kbps (VBR)
kHz
Not compatible
MP3 files
File ex tension .mp3
Bit rate 8 kbps to 320 kbps
Sampling frequency 8 kHz to 48 kHz (32
Compatible ID3 tag
versio n
M3u playlist Not compatible
MP3i (MP3
interactive), mp3 PRO
(CBR), VBR
kHz, 44.1 kHz , 48 kHz
for emphasis )
1.0, 1.1, 2.2, 2.3, 2.4
(ID3 tag Version 2.x is
given priority over
Versi on 1.x .)
Not compatible
WAV files
• WAV file formats cannot be connected via
MTP.
File ex tension .wav
Quantization bits 8 and 16 (LPCM), 4
Sampling frequency 16 kHz to 48 kHz
(MSADPCM)
(LPCM), 22.05 kHz and
44.1 kHz (MS ADPCM)
Disc
• Regardless of the length of the blank
section between the songs from the
original recording, compressed audio
discs play with a short pause between
songs.
Playable folder
hierarchy
Playable folders Up to 99
Playable files Up to 999
File system ISO 9660 Level 1 a nd
Multi-session
playback
Packet write data
transfer
Up to eight tiers ( A
practical hie rarchy is
less than two tiers.)
2, Romeo, Joliet
Compati ble
Not compatible
USB device
• There m ay be a slight delay when starting
playback of audio files on a USB storage
device with numerous folder hierarchies.
Playable folder
hierarchy
Playable folders Up to 500
Playable files Up to 15 000
Playback of copyright -
protected files
Partitioned USB
device
Up to eight tiers ( A
practical hie rarchy is
less than two tiers.)
Not compatible
Only the first par tition
can be played.
iPod compatibility
This unit supports only the following iPod
models. Supported iPod software versions are
shown below. Older versions may n ot be
supported.
Made for
–iPod touch (1st through 6th generation)
–iPod classic
–iPod with video
–iPod nano (1st through 7th generation)
–iPhone 6s
– iPhone 6s Plus
–iPhone 6
–iPhone 6 Plus
–iPhone 5s
–iPhone 5c
–iPhone 5
–iPhone 4s
–iPhone 4
–iPhone 3GS
–iPhone 3G
–iPhone
perations may vary depending on the
• O
generation and/or software version of
the iPod.
sers of iPod with the Lightning
• U
Connector should use the Lightning to
USB Cable (supplied with iPod).
sers of iPod with the Dock Connector
• U
should use the CD-IU51. For details,
consult your dealer.
o the iPod manuals for information
• Refer t
about the file/format compatibility.
udiobook, Podcast: Compatible
• A
Pioneer accepts no responsibility for data
lost on the iPod, even if that data is lost
while this unit is used.
Sequence of audio files
The user cannot assign folder numbers and
specify playback sequences with this unit.
Sequence of audio file depends on the
connected device.
Note that the hidden files in a USB device
not be played back.
can
16En

English
Example of a hierarchy
Folder
Compressed
audio file
to : Playback sequence
01 to 05: Folde r number
D: Display C: Character
NOTE
Russian character chart
Copyright and trademark
iTunes
Apple and iTunes are trademarks of Apple
nc., registered in the U.S. and other
I
countries.
WMA
Windows Media is either a registered
ademark or trademark of Microsoft
tr
Corporation in the United States and/or
other countries.
This product includes technology owned
Microsoft Corporation and cannot be
by
used or distributed without a license from
Microsoft Licensing, Inc.
iPod & iPhone
iPhone, iPod, iPod classic, iPod nano, and
od touch are trademarks of Apple Inc.,
iP
stered in the U.S. and other countries.
regi
Lightning is a trademark of Apple Inc.
“Made for iPod” and “Made for iPhone”
ean that an electronic accessory has
m
been designed to connect specifically to
iPod or iPhone, respectively, and has been
certified by the developer to meet Apple
performance standards. Apple is not
responsible for the operation of thi s device
or its compliance with safety and
regulatory standards. Please note that the
use of this accessory with iPod or iPhone
may affect wireless performance.
Android & Google Play
Android, Google Play, and the Google Play
ogo are trademarks of Google Inc.
l
MIXTRAX
MIXTRAX is a trademark of the PIONEER
PORATION.
COR
Spotify®
SPOTIFY and the Spotify logo are among
he registered trademarks of Spotify AB.
t
Compatible mobile digital devices and
premium subscription required, where
available, see https://www.spotify.com.
Specifications
General
Power source: 14.4 V DC (10.8 V to 15.1 V
allowable)
Grounding system: Negative type
Maximum current consumption: 10.0 A
Dimensions ( W × H × D):
DIN
Chassis: 178 mm × 50 mm × 165 mm
Nose: 188 mm × 58 mm × 17 mm
D
Chassis: 178 mm × 50 mm × 165 mm
Nose: 170 mm × 46 mm × 17 mm
Weight: 1 kg
Audio
Maximum power output:
• 50 W × 4 ch/4 Ω (for no subwoofer)
50 W × 2 ch/4 Ω + 70 W × 1 ch/2 Ω
•
(for subwoofer)
Continuous power output:
22 W × 4 (50 Hz to 15 000 Hz, 5 %
D, 4 Ω load, both channels driven)
TH
Load impedance: 4 Ω (4 Ω to 8 Ω allowable)
Preout maximum out put level: 2.0 V
Loudness contour: +10 dB (100 Hz), +6.5
(10 kHz) (volume: –30 dB)
dB
Equalizer (5-Band Graphic Equalizer):
Frequency: 80 Hz/250 Hz/800 Hz/2.5
/8 kHz
kHz
Equalization range: ±12 dB (2 dB step)
Subwoofer (mono):
Frequency: 50 Hz/63 Hz/80 Hz/100
z/125 Hz/160 Hz/200 Hz
H
Slope: –12 dB/oct, –24 dB/oct
Gain: +6 dB to –24 dB
Phase: Normal/Reverse
CD player
System: Compact disc audio system
Usable discs: Compact disc
Signal-to-noise ratio: 94 dB (1 kHz) (IEC-A
twork)
ne
Number of channels: 2 (stereo)
MP3 decoding format: MPEG-1 & 2 Audio
yer 3
La
WMA decoding format: Ver. 7, 7.1, 8, 9, 10,
WAV signal format: Linear PCM & MS
(2 ch audio) (Windows Media
11, 12
Player)
DPCM (Non-compressed)
A
USB
USB standard specification: USB 2.0 full
speed
Maximum current supply: 1.5 A
USB Protocol:
MSC (Mass Storage Class)
MTP (Media Transfer Protocol)
AOA (Android Open Accessory) 2.0
Fi le s yst em: FAT 12, FAT16, FAT32
MP3 decoding format: MPEG-1 & 2 Audio
yer 3
La
WMA decoding format: Ver. 7, 7.1, 8, 9, 10,
WAV signal format: Linear PCM & MS
(2 ch audio) (Windows Media
11, 12
Player)
DPCM (Non-compressed)
A
FM tuner
Frequency range: 87.5 MHz to 108.0 MHz
Usable sensitivity: 11 dBf (1.0 μV/75 Ω,
o, S/N: 30 dB)
mon
Signal-to-noise ratio: 72 dB (IEC-A network)
MW tuner
Frequency range: 531 kHz to 1 602 kHz
Usable sensitivity: 25 μV (S/N: 20 dB)
Signal-to-noise ratio: 62 dB (IEC-A network)
LW tuner
Frequency range: 153 kHz to 281 kHz
Usable sensitivity: 28 μV (S/N: 20 dB)
Signal-to-noise ratio: 62 dB (IEC-A network)
Specifications and the design are subject
to modifications without notice.
17En
À propos de ce mode d’emploi :
Table des matières
ATTEN TION
PRÉCAUTION
Avant de commencer ............................................................................. 2
Mise en route ........................................................................................... 3
Radio.......................................................................................................... 5
CD/USB/iPod/AUX................................................................................... 6
Mode d’application................................................................................. 8
Spotify®..................................................................................................... 8
Utilisation de Pioneer ARC APP............................................................ 9
Réglages ................................................................................................. 10
Réglages FUNCTION ............................................................................ 10
Réglages AUDIO.................................................................................... 11
Réglages SYSTEM ................................................................................. 12
Réglages ILLUMINATION ..................................................................... 13
Réglages MIXTRAX............................................................................... 13
Raccordements/Installation................................................................ 14
Informations complémentaires.......................................................... 16
• Parmi les instructions suivantes, les clés USB ou les lecteurs audio USB sont
collectivement désignés sous le nom de « périphérique USB ».
• Dans ce mode d’emploi, les iPod et les iPhone sont collectivement désignés sous le
nom d’« iPod ».
Avant de commencer
Nous vous remercions d’avoir acheté cet appareil PIONEER
Pour garantir une utilisation correcte, lisez bien ce mode d’emploi avant d’utiliser cet appareil. Il est
particulièrement important que vous lisiez et respectiez les indications AT T E N T I O N et PRÉCAUTION
de ce mode d’emploi. Conservez-le dans un endroit sûr et facilement accessible pour toute
consultatio n ultérieure.
Si vous souhaitez vous débarrasser de cet appareil, ne le mettez pas à la poubelle avec vos ordures
ménagères. Il existe un système de collecte séparé pour les appareils électroniques usagés, qui
doivent être récupérés, traités et recyclés conformément à la législation.
Dans les états membres de l’UE, en Suisse et en Norvège, les foyers domestiques peuvent rapporter
leurs produits électroniques usagés gratuitement à des points de collecte spécifiés ou à un revendeur
(sous réserve d’ach at d’un produit similaire).
Dans les pays qui ne sont pas mentionnés ci-dessus, veuillez contacter les autorités locales pour vous
informer de la méthode correcte de mise au rebut.
En agissant ainsi vous assurerez que le produit que vous mettez au rebut est soumis au processus de
traitement, de récupération et de recyclage nécessaire et éviterez ainsi les effets négatifs potentiels sur
l’environnement et la santé publique.
• N’essayez pas d’installer cet appareil ou d’en faire l’entretien vous-même. L’installation ou
l’entretien de cet appareil par des personnes sans formation et sans expérience en équipement
électronique et en a ccessoires automobiles peut être dan gereux et vous exposer à des risques
d’électrocution ou à d’autres dangers.
• N’essayez pas de démonter ou de mo difier cet appareil. Veillez à quitter la route et garer votre véhicule
en lieu sûr avant d’essayer d’utiliser les commandes de l’appareil.
• Ne laissez pas cet appareil entrer en contact avec de l’humidité et/ou des liquides. Cela pourrait
provoquer une décharge électrique. Tout contact avec des liquides pourrait également provoquer des
dommages, de la fumée et une surchauffe de l’appareil.
• Maintenez le niveau d’écoute à une valeur telle que vous puissiez entendre les sons provenant de
l’extérieur.
• Le Pioneer CarStereo-Pass est utilisable seulement en Allemagne.
• Ce produit est évalué sous des conditions climatiques modérées et tropicales conformément à la
norme CEI 60065 sur les Appareils audio, vidéo et appareils électroniques analogues - Exigences de
sécurité.
2Fr
França is
PRÉCAUTION
Touc he de retra it
Fenêtre d’affichage
Molette M.C. (multi-contrôle)
BAND/
DISP (affichage)
SRC (source)/OFF
Port USB
(éjection)
Prise d’entrée AUX (prise stéréo 3,5 mm)
Fente de chargement des disques
Cet appareil est un produit laser de Classe 1, classé selon l’article IEC 60825-1:2007 relatif à la Sécurité
des produits laser.
Si vous rencontrez des problèmes
En cas d’anomalie, veuillez contacter votre revendeur ou le centre d’entretien agréé par PIONEER le plus
proche.
Mise en route
Fonctionnement de base
DEH-X2900UI
Télécommande en option
La télécommande CD-R320 est vendue séparément.
Opérations fréquemment utilisées
Objectif Opération
Mettre l’appareil sous tension* Appuyez sur SR
Régler le volume Tournez la molette M.
Sélectionner une source Appuyez plusieurs fois sur SR
Modifier les informations d’affichage Appuyez plusieurs fois sur DI
Revenir à l’affichage/la liste précédent(e) Appuyez sur BAND/ .
Revenir à l’affichage normal à partir du
menu
* Si le fil bleu/blanc de l’appareil est relié à la borne de commande du relais d’antenne automatique du
véhicule, l’antenne se déploie lorsque la source de cet appareil est mise en service. Pour rétracter
l’antenne, mettez la source hors service.
l’appareil sous tension.
Appuyez longuement sur SRC
mettre l’appareil hors tension.
Appuyez longuement sur BAND / .
C/OFF pour mettre
/OFF pour
C..
C/OFF.
SP.
Indication de l’affichage
Indication Description
Apparaît lorsqu’il existe un niveau inférieur de menu ou de dossier.
Apparaît lorsque vous appuyez sur la touche .
Apparaît lorsque la fonction d’accord sur une station locale est en service
(page 10).
Apparaît lorsqu’un programme d’informations routières est capté.
Apparaît lorsque la fonction TA (informations routières) est activée
(page 10).
Apparaît lorsque le sound retriever (correcteur de son compressé) est en
vice (page 11).
ser
Apparaît lorsque la lecture aléatoire est en ser vice.
Apparaît lorsque la lecture répétée est en ser vice.
Apparaît lorsque la fonction de commande d’iPod est en service (page 7).
Retrait de la face avant
Retirez la face avant pour empêcher tout vol. Débranchez tous les câbles et les
périphériques branchés à la face avant et mettez l’appareil hors tension avant de le
retirer.
3Fr
Important
• Évitez de soumettre la face avant à des chocs excessifs.
Retirer Fixer
REMARQUES
• Tenez la face avant à l’abri du soleil et des températures élevées.
• Stockez toujou rs la face avant détachée, dans un étui de prote ction ou un sac.
Menu de configuration
Lorsque vous mettez le contact sur ON après avoir installé l’appareil, [SET UP :YES]
s’affiche.
1 Appuyez sur la molette M.C..
Si vous n’utilisez pas l’appareil dans les 30 secondes qui suivent, le menu de
con
figuration disparaît. Si vous préférez ne pas effectuer la configuration pour
l’instant, tournez la molette M.C. pour sélectionner [NO], puis appuyez pour valider.
2 Tournez la molette M.C. pour sélectionner les options, puis appuyez pour valider.
Pour passer à l’option de menu suivante, vous devez valider votre sélection.
Élément de menu Description
LANGUAGE Sélectionnez la langue d’affichage des informations textuelles à
[ENG] (anglais),
] (russe),
[РУС
R] (turc)
[TU
CLOCK SET Réglez l’horloge.
FM STEP Sélectionnez l’incrément d’accord FM à partir de 100 kHz ou de
[100], [50]
par
tir d’un fichier audio compressé.
50 kHz.
3 [QUIT :YES] apparaît lorsque tous les réglages sont terminés.
Pour revenir au premier élément du menu de configuration, tournez la molette M.
pour sélectionner [QUIT :NO], puis appuyez pour valider.
4 Appuyez sur la molette M.C. pour valider les réglages.
• Vous pouvez annuler le réglage du menu en appuyant sur SRC/OFF.
• Ces paramètres peuvent être ajustés à tout moment à partir des réglages SYSTEM (page 12) et des
réglages INITIAL (page 4).
Annulation de l’affichage de démonstration (DEMO
OFF)
1 Appuyez sur la molette M.C. pour afficher le menu principal.
2 Tournez la molette M.C. pour sélectionner [SYSTEM], puis appuyez pour valider.
3 Tournez la molette M.C. pour sélectionner [DEMO OFF], puis appuyez pour
valider.
4 Tournez la molette M.C. pour sélectionner [YES], puis appuyez pour valider.
Réglages INITIAL
1 Appuyez longuem ent sur SRC/OFF jusqu’à ce que l’appareil se mette hors
tension.
2 Appuyez longuem ent sur SRC/OFF pour afficher le menu principal.
3 Tournez la molette M.C. pour sélectionner [INITIAL], puis appuyez pour valider.
4 Tournez la molette M.C. pour sélectionner une option, puis appuyez pour valider.
Élément de menu Description
FM STEP Sélectionnez l’incrément d’accord FM à partir de 100 kHz ou de
[100], [50]
SP-P/O MODE À sélectionner lorsqu’un haut-parleur à gamme étendue est
[REAR/SUB.W]
[SUB.W/SUB.W] À sélectionner lorsqu’un haut-parleur d’extrêmes graves passif
C.
[REAR/REAR] À sélectionner lorsque des haut-parleurs à gamme étendue sont
50 kHz.
elié aux fils de sortie du haut-parleur arrière et qu’un haut-
r
parleur d’extrêmes graves est branché à la sortie RCA.
t directement relié aux fils de sortie du haut-parleur arrière et
es
qu’un haut-parleur d’extrêmes graves est branché à la sortie
RCA.
iés aux fils de sortie du haut-parleur arrière et à la sortie RCA.
rel
Si un haut-parleur à gamme étendue est relié aux fils de sortie
du haut-parleur arrière et que la sortie RCA n’est pas utilisée,
vous pouvez sélectionner [REAR/SUB.W] ou [REAR/REAR].
4Fr
França is
CONSE IL
Élément d e menu Description
REMARQUE
REMARQUES
S/W UPDATE À sélectionner pour valider les dernières informations relatives
[SYSTEM INFO]
[SYSTEM UPDATE] À sélectionner pour effectuer la dernière mise à jour des
SYSTEM RESET Sélectionnez [YES] pour réinitialiser les réglages de l’appareil.
[YES], [NO]
au système de l’appareil.
logiciels de l’appareil et réinitialiser se s réglages. Pour obtenir de
plus amples informations sur les derniers logiciels et mises à
jour, veuillez vous rendre sur notre site Web.
’appareil redémarre automatiquement.
L
(Certains réglages sont conservés même après la réinitialisation
e l’appareil.)
d
Radio
Les fréquences du syntoniseur de cet appareil sont destinées à une utilisation en Europe
de l’Ouest, Asie, Moyen-Orient, Afrique et Océanie. Son utilisation dans d’autres régions
peut se traduire par une réception de mauvaise qualité. La fonction RDS (Radio Data
System) n’est opérationnelle que dans les régions où des signaux RDS sont diffusés pour
les stations FM.
Réception des stations présélectionnées
1 Appuyez sur SRC/OFF pour sélectionner [RADIO].
2 Appuyez sur BAND/ pour sélectionner la bande [FM1], [FM2], [FM3], [MW] ou
[LW].
3 Appuyez sur l’une des touches numériques (1/ à 6/ ).
Les touches / peuvent également servir à sélectionner une station préréglée lorsque [SEEK]
est réglé sur [PCH] dans les réglages FUNCTION (page 11).
Mémoire des meilleures stations (BSM)
Les six stations les plus puissantes sont mémorisées sur les touches numériques (1/ à
6/ ).
1 Après avoir sélectionné la bande, appuyez sur la molette M.C. pour afficher le
menu principal.
2 Tournez la molette M.C. pour sélectionner [FUNCTION], puis appuyez pour
valider.
3 Tournez la molette M.C. pour sélectionner [BSM], puis appuyez pour valider.
Pour rechercher une station manuellement
1 Après avoir sélectionné la bande, appuyez sur / pour sélectionner une
station.
Appuyez longuement sur / , puis relâchez pour rechercher une station
disponible. Le balayage s’arrête lorsque l’a
l’accord par recherche, appuyez sur / .
[SEEK] doit être réglé sur [MAN] dans les réglages FUNCTION (page 11).
ppareil capte une station. Pour annuler
Pour mémoriser des stations manuellement
1 Lorsque vous captez la station que vous souhaitez mémoriser, appuyez
longuement sur l’une des touches numériques (1/ à 6/ ) jusqu’à ce qu’elle
cesse de clignoter.
Utilisation des fonctions PTY
L’appareil recherche une station diffusant des informations PTY (type de programme).
1 Appuyez sur pendant la réception FM.
2 Tournez la molette M.C. pour sélectionner le type de programme [NEWS/INFO],
[POPULAR], [CLASSICS] ou [OTHERS].
3 Appuyez sur la molette M.C..
L’appareil continue à rechercher une station. Lorsqu’il en trouve une, son nom de
s
ervice de pro gramme s’affiche.
• Pour annuler la recherche, appuyez sur la molette M.C..
• Le programme de cer taines stations peut différe r de celui qu’indique le PTY transm is.
• Si aucune station ne diffuse le type de programme que vous recherchez, [NOT FOUND] s’affiche
pendant environ deux secondes, puis le syntoniseur revient à la station de départ.
5Fr
REMARQUE
PRÉCAUTION
REMARQUE
CD/USB/iPod/AUX
REMARQUE
Lecture
Débranchez le casque ou les écouteurs du périphérique avant de raccorder ce dernier à
l
’appareil.
CD
1 Insérez un disq ue dans la fente de chargement des disques en or ientant l’étiquette
vers le haut.
Pour éjecter un disque, arrêtez d’abord la lecture avant d’appuyer sur .
Périphériques USB (y compris Android™)/iPod
1 Ouvrez le cache du port USB.
2 Raccordez le périphérique USB/l’iPod à l’aide d’un câble approprié.
Pour basculer automatiquement sur une source [USB] lorsqu’un périphérique USB/iPod est connecté à
l’appareil, réglez [USB AUTO] sur [ON] dans les paramèt res SYSTEM (page 12).
Utilisez un câble USB Pioneer en option (CD-U50E) pour raccorder le périphérique USB, car tout
périphérique raccordé directement à l’appareil dépasse de ce dernier, ce qui peut être dangereux.
Avant de retirer le périphérique, arrêtez la lecture.
Connexions AOA
Pour plus de détails sur la connexion AOA, voir page 9.
Connexion MTP
Il est possible de connecter un périphérique Android (utilisant le système d’exploitation Android 4.0 ou
une version supérieure) via une connexion MTP à l’aide du câble fourni avec le périphérique. Toutefois,
selon le périphérique connecté et les numéros des fichiers qu’il contient, il se peut que la lecture de
fichiers audio/morceaux soit impossible via MTP. Notez que la connexion MTP n’est pas compatible
avec les formats de fichier WAV et ne peut pas être utilisée avec la fonction MIXTRAX.
2 Appuyez sur SRC/OFF pour sélectionner la source [AUX].
Si [AUX] est réglé sur [OFF] dans les réglages SYSTEM, il est impossible de sélectionner [AUX] en tant
que source (page 12).
Opérations
Vous pouvez procéder à différents ajustements dans les réglages FUNCTION (page 10).
Notez que les opérations suivantes ne fonctionnent pas pour un péri phérique AUX. Pour
uti
liser un périphérique AUX, utilisez le périphér ique proprement dit.
Objectif Opération
Sélectionner un dossier/album*1 Appuyez sur 1/ ou 2/ .
Sélectionner une piste/un morceau
(chapitre)
Avance ou retour rapide*3 Appuyez longuement sur ou .
Rechercher un fichier dans une liste 1 Ap
Afficher une liste de fichiers dans la
égorie/le dossier sélectionné(e)*1
cat
Lire un morceau de la catégorie/du dossier
sél
ectionné(e)*1
Appuyez sur ou .
puyez sur pour afficher la liste.
ournez la molette M.C. pour
2 T
sélectionner la catégorie ou le nom de
fichier (dossier) de votre choix, puis
appuyez pour valider.
ournez la molette M.C. pour
3 T
sélectionner le fichier de votre choix, puis
appuyez pour valider.
La lecture démarre.
Appuyez sur la molette M.C. lorsqu’une
catégorie/un dossier est sélectionné(e).
Appuyez longuement sur la molette M.C.
lorsqu’une catégorie/un dossier est
sélectionné(e).
Si vous utilisez une connexion MTP, vous devez régler [ANDROID WIRED] sur [MEMORY] dans les
paramètres SYSTEM (page 12).
AUX
1 Insérez la mini-fiche stéréo dans la prise d’entrée AUX.
6Fr
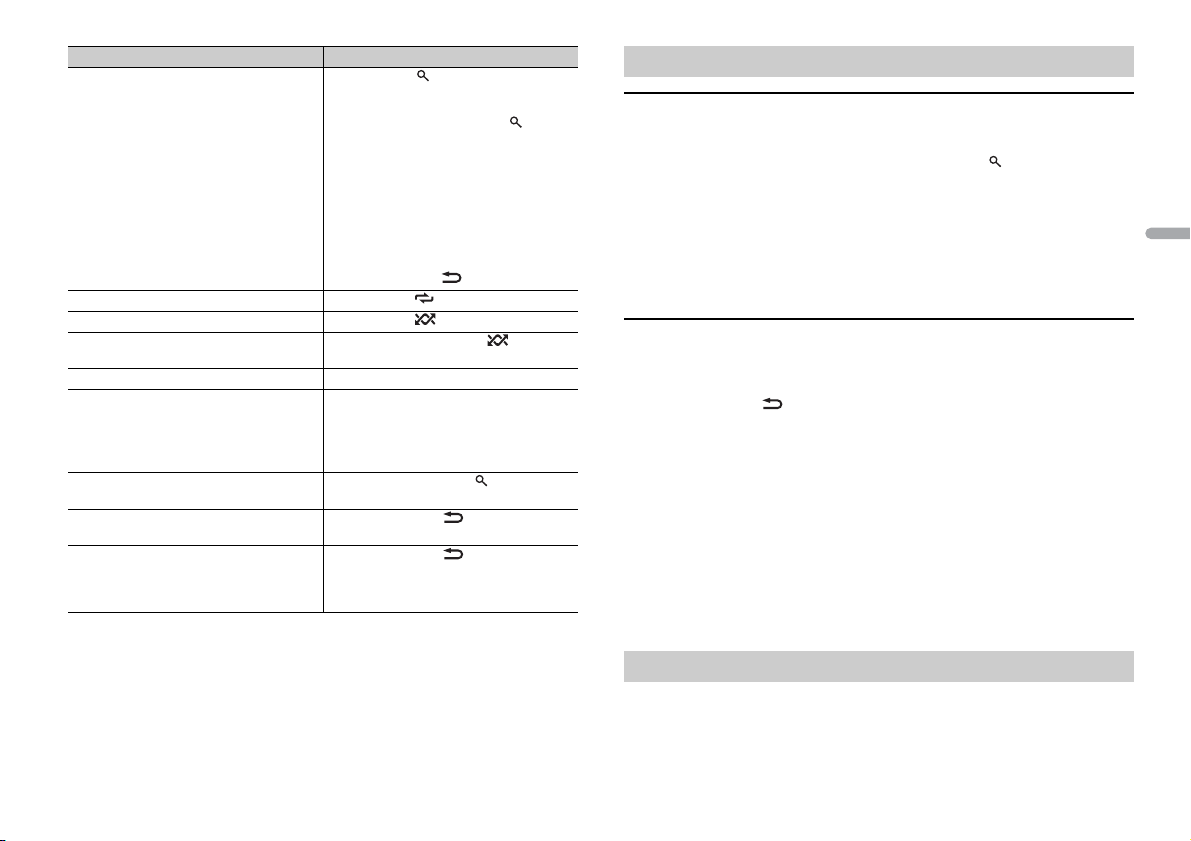
França is
Objectif Opération
REMARQUE
REMARQUES
Recherche alphabétique (iPod uniquement) 1 Appuyez sur pour afficher la liste.
Lecture répétée Appuyez sur 6 / .
Lecture aléatoire Appuyez sur 5/ .
Lecture aléatoire de toutes les pistes (iPod
uniq
uement)
Pause/Reprise de la lecture Appuyez sur 4/PA
Sound retriever (correcteur de son
mpressé)*1*2
co
Retour au dossier racine (CD/USB
uement)*1
uniq
Commutation entre les modes audio
compr
essé et CD-DA (CD uniquement)
Changer de lecteur sur le périphérique USB
(périphériques prenant en charge le
protocole de classe de périphérique de
stockage de masse USB uniquement)
*1 Fichiers d’audio compressé uniquement
*2 Cette fonction est désactivée lorsque USB est sélectionné en tant que source et que la fonction
MIXTRAX est activée.
*3 Si vous utilisez la fonction avance ou retour rap ide au moment de la lecture d’un fichier VBR, la
durée de lecture peut ne pas être correcte.
ournez la molette M.C. pour
2 T
sélectionner la liste de catégories de
votre choix, puis appuyez sur pour
accéder au mode de recherche
phabétique.
al
(Pour accéder au mode de recherche
phabétique, vous pouvez également
al
tourner deux fois la molette M.C
ournez la molette M.C. pour
3 T
sélectionner une lettre, puis appuyez
pour afficher la liste alphabétique.
Pour annuler la recherche alphabétique,
puyez sur BAND/ .
ap
Appuyez longuement sur 5/ .
Appuyez sur 3/S.Rtr v.
[1] : efficace pour les taux de compression
ibles
fa
[2] : efficace pour les taux de compression
evés
él
Appuyez longuement sur .
Appuyez sur BAND/ .
Appuyez sur BAND/
US E.
Fonctions utiles pour iPod
Mode de lecture en lien
Vous pouvez accéder à des morceaux en vous basant sur l’artiste, l’album ou le genre en
cours de lecture.
1 Pendant l’écoute d’un morceau, appuyez longuement sur pour entrer en mode
de lecture en lien.
..)
2 Tournez la molette M.C. pour sélectionner le mode ([ARTIST], [ALBUM], [GENRE]),
puis appuyez pour valider.
Le morceau/l’album sélectionné est lu après le morceau en cours de lecture.
Le morceau/l’album sélectionné peut être annulé si vous utilisez d’autres fonctions que le mode de
lecture en lien (ex. : avance et retour rapides).
Commande d’un iPod
Vous pouvez commander l’appareil via un iPod raccordé.
Les modèles d’iPod suivants ne sont pas compatibles avec cette fonction.
–iPod nano 1e génération, iPod avec vidéo
1 Appuyez sur BAND/ en cours de lecture, puis sélectionnez le mode de
commande.
[CO
NTRO L iPod] : la fonction iPod de l’appareil peut être activée à partir de l’iPod
raccordé.
[CO
NTRO L AUDIO] : la fonction iPod de l’appareil ne peut être activée que par les
touches situées sur l’appareil. Dans ce mode, il est impossible de mettre l’iPod
raccordé sous ou hors tension.
.
• La commutation du mode de commande sur [CONTROL iPod] me t en pause la lecture d’un morceau.
Utilisez l’iPod raccordé pour reprendre la lecture.
• Les opérations suivantes sont toujours accessibles à partir de l’appareil, même si le mode de
commande est réglé sur [CONTROL iPod].
– Pause, avance/retour rapide, s élection d’un morceau/chapitre
• Le volume ne p eut être réglé qu’à part ir de cet appareil.
À propos de MIXTRAX (USB/iPod uniquement)
La fonction MIXTRAX crée un mélange ininterrompu de pistes de votre bibliothèque
musicale, agrémenté d’effets d’éclairage. Pour plus de détails sur les réglages de
MIXTRAX, voir page 13.
7Fr
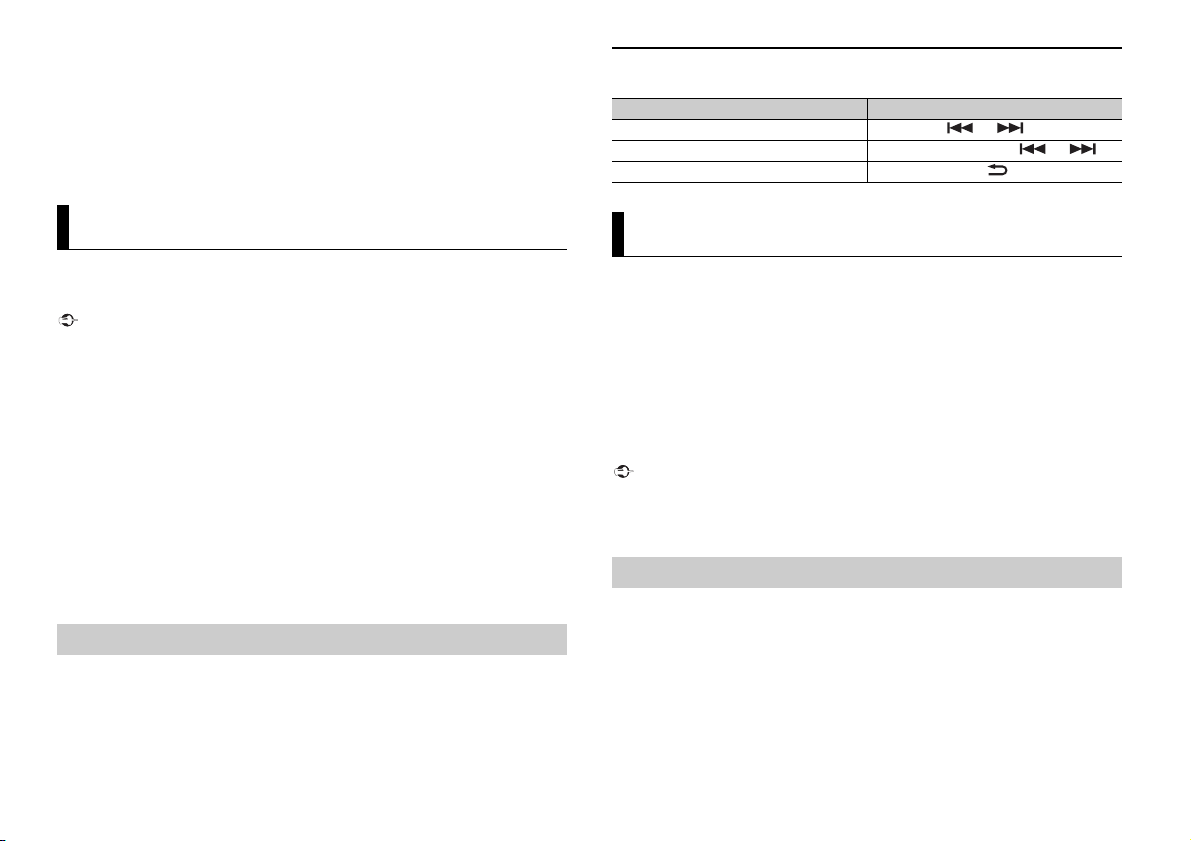
REMARQUES
• Cette fonction n’est pas compatible avec un périphérique Android connecté via MTP.
Important
REMARQUE
Important
• Lorsque USB est sélectionné en tant que source et que la fonction MIXTRAX est en cours d’utilisation,
la fonction de sound retriever (correcteur de son compressé) est désactivée.
• Selon le fichier/morceau, il se peut que les effets sonores soient indisponibles.
• Désactivez la fonction MIXTRAX si les effets d’éclairage qu’elle produit vous gênent dans votre
conduite.
1 Appuyez sur MIX pour activer/désactiver MIXTRAX.
Opérations de base
Vous pouvez procéder à différents ajustements dans les réglages FUNCTION (page 10).
Objectif Opération
Sélectionner une piste Appuyez sur ou .
Avance ou retour rapide Appuyez longuement sur ou .
Pause/Reprise de la lecture Appuyez sur BAN
D/ .
Mode d’application
Vous pouvez écouter une application sur un iPhone via cet appareil. Dans certains cas,
ous pouvez commander une application en utilisant cet appareil.
v
Pour plus de détails sur les périphériques compatibles, visitez notre site Web.
L’utilisation d’applications tierces peut impliquer ou nécessiter la fourniture d’informations
personnelles, que ce soit en créant un compte d’utilisateur ou une autre méthode ainsi que, pour
certaines applications, la fourniture de données de géolocalisation.
TOUTES LES APPLICATIONS TIERCES RELÈVENT DE L’ENTIÈRE RESPONSABILITÉ DES FOURNISSEURS,
NOTAMMENT MAIS SANS S’ Y LIMITER, LA COLLEC TE ET LA PROTEC TION DES DONNÉES UTIL ISATEUR ET
LES BONNES P RATIQUES DE CONFIDENTIALITÉ. EN ACCÉ DANT À UNE APPLICATION TIE RCE, VOUS
ACCEPTEZ DE PRENDRE CONNAISSANCE DES CONDITIONS DE SERVICE ET DES RÈGLES DE
CONFIDENTIALITÉ DES FOURNISSEURS. SI VOUS N’ACCEPTEZ PAS LES CONDITIONS OU RÈGLES D’UN
FOURNISSEUR OU SI VOUS N’ACCEPTEZ PAS L’UTILISATION DES DONNÉES DE GÉOLOCALISATION, LE
CAS ÉCHÉANT, N’UTILISEZ PAS CETTE APPLICATION TIERCE.
Pour les utilisateurs d’iPhone
Cette fonction est compatible avec les iPhone et les iPod touch instal lés avec iOS 5.0 ou une version
ultérieure.
PIONEER DÉCLINE TOUTE RESPONSABILITÉ QUANT AUX APPLICATIONS OU AUX CONTENUS TIERS, Y
COMPRIS, SANS S’Y LIMITER, QUANT À LEUR EXAC TITUDE OU À LEUR EXHAUSTIVITÉ. LE CONTENU ET
LA FONCTIONNALITÉ DE CES APPLICATIONS RELÈVENT DE LA SEULE RESPONSABILITÉ DU
FOURNISSEUR DE L’APPLICATION.
Lecture d’une application via cet appareil
1 Connectez cet appareil au périphérique mobile.
• iP
hone via USB (page 6)
2 Appuyez sur SRC/OFF pour sélectionner [APP].
3 Activez le périphérique mobile pour lancer l’application.
8Fr
Spotify®
(DEH-X2900UI est compatible uniquement avec les iPhone sur lesquels Spotify est
in
stallé.)
Spotify est un service de diffusion de musique en continu non affilié à Pioneer. Des
i
nformations complémentaires sont disponibles sur http://www.spotify.com.
L’application Spotify est disponible pour les smartphones compatibles ; veuillez
consulter h
compatibilité.
Pour profiter de Spotify pendant que vous condui
Spotify sur votre iPhone. Vous pouvez la télécharger sur iTune s App Store. Optez pour un
compte gratuit ou payant Premium, sur l’application ou sur spotify.com. Un compte
Premium vous permet d’accéder à davantage de fonctionnalités, comme l’écoute horsligne.
• Ce produit contie nt le logiciel Spotify qui fait l’objet de licences tierces que vous trouverez ici :
• Pour obtenir de plu s amples informations sur les pays et les régions où Spotify peut être util isé,
Mettez à jour le microprogramme de l’application Spotify à sa dernière version avant de
l’utiliser.
1 Connectez cet appareil au périphérique mobile.
2 Appuyez sur SRC/OFF pour sélectionner [SPOTIFY].
3 Lancez l’application Spotify sur le périphérique mobile, puis lancez la lecture.
ttps://support.spotify.com/ afin d’obtenir les dernières informations sur la
sez, téléchargez d’abord l’application
www.spotify. com/connect/third-party-licenses.
consultez h ttps://www.spotify.com/us/ select-your-countr y/.
Écoute de Spotify
• iP
hone via USB (page 6)
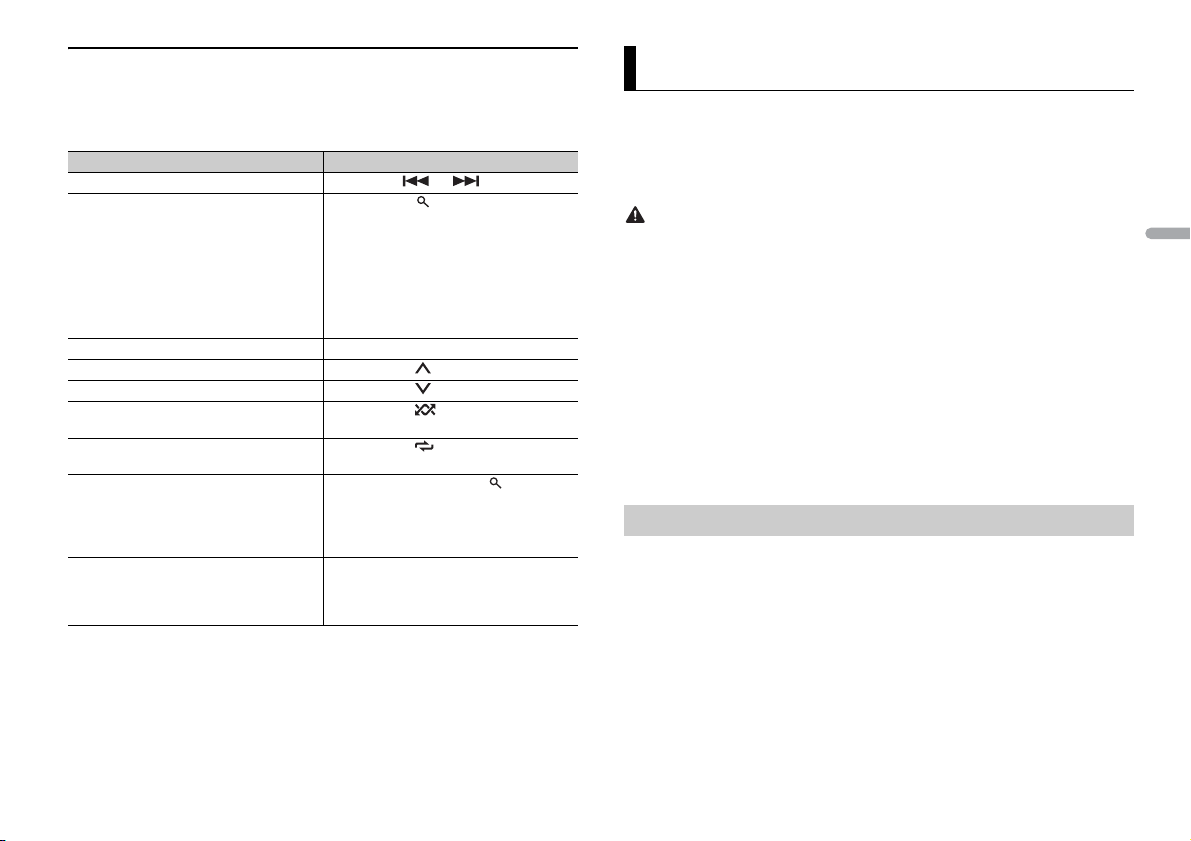
França is
Opérations de base
REMARQUE
REMARQUE
ATTENTIO N
REMARQUE
Vous pouvez procéder à différents ajustements dans les réglages FUNCTION (page 10).
Les opérations disponibles peuvent varier selon le type de contenus (titres/albums/artistes/listes de
lecture/radio s) que vous souhaitez l ire.
Objectif Opération
Sauter une piste Appuyez sur ou .
Rechercher un titre dans une liste 1 Appuyez sur (liste) pour afficher la
Pause/Reprise de la lecture Appuyez sur 4/
Pouces levés (uniquement pour la radio) Appuyez sur 1/ .
Pouces baissés (uniquement pour la radio) Appuyez sur 2/ .
Lecture aléatoire (uniquement pour les
t
itres/albums/artistes/listes de lecture)
Lecture répétée (uniquement pour les
t
itres/albums/artistes/listes de lecture)
Lancez une station de radio en fonction de
la c
hanson en cours de lecture.
Enregistrez les informations concernant la
cha
nson en cours de lecture.
Supprimez les informations relatives à la
nson enregistrées.
cha
Certaines fon ctions de Spotify ne peuvent pa s être activées à partir de cet ap pareil.
liste.
ournez la molette M.C. pour
2 T
sélectionner la catégorie de votre choix,
puis appuyez pour valider.
ournez la molette M.C. pour
3 T
sélectionner le fichier de votre choix, puis
appuyez pour valider.
La lecture commence.
PAUSE.
Appuyez sur 5/ .
Appuyez sur 6/ .
1 Appuyez longuement sur (l iste) pour
lancer une radio.
puyez sur la molette M.C..
2 Ap
tte fonction peut ne pas être dis ponible
• Ce
selon la chanson sélectionnée.
puyez longuement sur 3/S.Rtrv.
1 Ap
[SAVE]/[UNSAVE] apparaît.
puyez sur la molette M.C..
2 Ap
Utilisation de Pioneer ARC APP
Vous pouvez faire fonctionner l’appareil à partir de Pioneer ARC APP installé sur un
périphérique iPhone/Android. Dans certains cas, vous pouvez commander des aspects
de l’application, par exemple, la sélection de la source, la mise en pause, etc. à l’aide de
l’appareil.
Pour plus de détails sur les opérations disponibles sur l’application, consultez la section
d’aide de l’application.
N’essayez pas d’utiliser l’application tout en conduisant. Veillez à quitter la route et à garer votre
véhicule en lieu sûr avant d’essayer d’utiliser les commandes de l’application.
Pour les utilisateurs d’iPhone
Cette fonction est compatible avec les iPhone (iPhone 5 ou ultérieur) et les iPod touch
sur lesq
uels iOS 8.0 ou ultérieur est installé.
Vous pouvez télécharger Pioneer ARC APP sur iTunes App Store.
Pour les utilisateurs de périphérique Android
Cette fonction est compatible avec les périphériques sur lesquels est installé Android
OS 4.1 ou une version ultérieure et qui prennent également en charge les profils AOA
(
Android Open Accessory) 2.0.
Vous pouvez télécharger Pioneer ARC APP sur Google Play™.
Certains périphériques Android connectés via AOA 2.0 risquent de ne pas fonctionner correctement ou
d’émettre des sons en raison de leur conception logicielle propre, indépendamment de la version du
système d’exploitation.
Connectez-vous à Pioneer ARC APP
1 Connectez cet appareil au périphérique mobile.
• i
Phone/périphérique Android via USB (page 6)
Passez à l’étape 6 si vous sélectionnez la connexion USB pour iPhone.
2 Appuyez sur la molette M.C. pour afficher le menu principal.
3 Tournez la molette M.C. pour sélectionner [SYSTEM], puis appuyez pour valider.
4 Tournez la molette M.C. pour sélectionner [ANDROID WIRED], puis appuyez pour
valider.
5 Tournez la molette M.C. pour sélectionner [APP CONTROL] pour un périphérique
Android connecté via USB.
9Fr
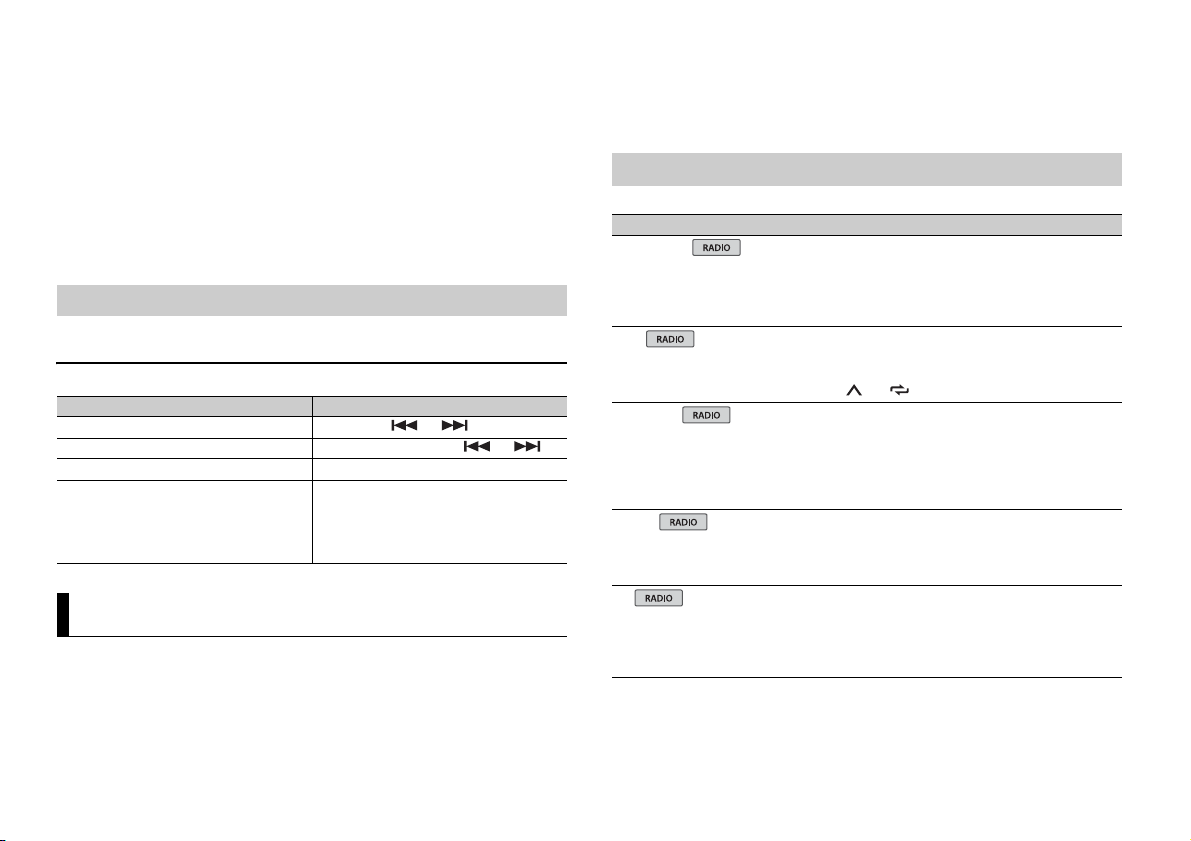
Si [ON] est sélectionné dans [P.APP AUTO ON] (page 12), Pioneer ARC APP sur le
REMARQUE
REMARQUE
périphérique Android démarrera automatiquement et toutes les étapes se
te
rmineront.
Si Pioneer ARC APP n’a pas encore été installé sur votre périphérique Android, un message vous
invitant à installer l’application apparaîtra sur votre appareil Android. Sélectionnez [OFF] dans
[P.APP AUTO ON] pour effacer le message (page 12).
6 Appuyez sur SRC/OFF pour sélectionner une source.
7 Lancer Pioneer ARC APP sur le périphérique mobile.
Vous pouvez également lancer l’application en maintenant enfoncé la commande M.C. pour
l’iPhone.
Écoute de musique sur Android
1 Appuyez sur SRC/OFF pour sélectionner [ANDROID].
Opérations de base
Objectif Opération
Sélectionner une piste Appuyez sur ou .
Avance ou retour rapide Appuyez longuement sur ou .
Pause/Reprise de la lecture Appuyez sur 4/PA
Sound retriever (correcteur de son
mpressé)
co
Appuyez sur 3/S.Rtrv.
[1] : efficace pour les taux de compression
ibles
fa
[2] : efficace pour les taux de compression
élevés
USE .
Réglages
Vous pouvez régler divers paramètres dans le menu principal.
1 Appuyez sur la molette M.C. pour afficher le menu principal.
2 Tournez la molette M.C. pour sélectionner l’une des catégories suivantes, puis
appuyez pour valider.
• Réglages FUNCTION (page 10)
• Réglages AUDIO (page 11)
• Réglages SYSTEM (page 12)
• Réglages ILLUMINATION (page 13)
• Réglages MIXTRAX (page 13)
3 Tournez la molette M.C. pour sélectionner les options, puis appuyez pour valider.
Réglages FUNCTION
Les éléments de menu varient selon la source.
Élément de menu Description
FM SETTING
[TALK], [STANDARD], [MUSIC] Adaptez le niveau de qualité sonore aux
BSM
REGIONAL
[ON], [OFF] Limitez la réception des programmes régionaux
LOC AL
FF], [LV1], [LV2], [LV3],
FM : [O
[LV4]
MW/LW : [O
TA
[ON], [OFF] Recevez des programmes d’informations
FF], [LV1], [LV2]
onditions de signal de radiodiffusion du signal
c
de la bande FM. (Disponible uniquement lorsque
la bande FM est sélectionnée.)
Mémorisez automatiquement les six stations les
puissantes sur les touches numériques (1/
plus
à 6/ ).
ifiques lorsque AF (recherche des autres
spéc
fréquences) est sélectionné. (Disponible
uniquement lorsque la bande FM est
sélectionnée.)
Restreignez la station d’accord suivant la
p
uissance du signal.
utières, le cas échéant. (Disponible
ro
uniquement lorsque la bande FM est
sélectionnée.)
10Fr
França is
Élément d e menu Description
USB
iPod
iPod
AF
[ON], [OFF] Laissez l’appareil s’accorder sur une autre
NEWS
[ON], [OFF] Interro mpez la source actuellement sélectionnée
SEEK
[MAN], [PCH] Attribuez aux touches ou la
SAVE
UNSAVE
S.RTRV
[1] (efficace pour les taux de
mpression faibles),
co
[2] (efficace pour les taux de
ompression élevés),
c
[OFF]
AUDIO BOOK
[FASTER], [NORMAL], [SLOWER] Modifiez la vitesse de lecture. (Indisponible
PAU SE
fréquence fournissant la même station.
(Disponible uniquement lorsque la bande FM est
sélectionnée.)
ec des bulletins d’informations. (Disponible
av
uniquement lorsque la bande FM est
sélectionnée.)
recherche de stations une par une (accord
anuel) ou sélectionnez une station à partir des
m
canaux préréglés.
Enregistrez les informations concern ant la
anson en cours de lecture sur votre liste de
ch
lecture sur Spotify.
Supprimez les informations relatives à la
anson enregistrées dans [SAVE].
ch
Améliorez l’audio compressé et restaurez un son
che.
ri
Indisponible lorsque :
B est sélectionné en tant que source et que
• US
la fonction MIXTRAX est activée ;
D-DA/CD-TEXT est en cours de lecture.
• C
l
orsque [CONTROL iPod] est sélectionné en
mode de commande.)
Mettez sur pause ou reprenez la lecture.
Réglages AUDIO
Élément d e menu Description
FAD ER *1
Réglez l’équilibre sonore entre les haut-parleurs
avant et arrière.
BALANCE
Réglez l’équilibre sonore entre les haut-parleurs
uche et droite.
ga
EQ SETTING
[SUPER BASS], [POWERFUL],
TURAL], [VOCAL], [CUSTOM1],
[NA
[CUSTOM2], [FLAT]
Sélectionnez la bande et le
niveau de l’égaliseur pour une
personnalisation approfondie.
Bande de l’égaliseur : [80HZ
[250HZ], [800HZ], [2.5KHZ],
[8KHZ]
Niveau de l’égaliseur : [+
LOUDN ESS
[OFF], [LOW], [MID], [HI] Compensez pour obtenir un son net à faible
SUB.W*2
[NOR], [REV], [OFF] Sélectionnez la phase du haut-parleur
SUB.W CTRL*2
BASS BOOST
*3
Fréquence de coupure : [50HZ
[63HZ], [80HZ], [100HZ], [125HZ],
[160HZ], [200HZ]
Niveau de sortie : [–2
Niveau de la pente : [–12],
[0] à [+6] Sélectionnez le niveau d’accentuation des
4] à [+6]
Sélectionnez ou personnalisez la courbe de
l’
égaliseur.
[CUSTOM1] peut être défini séparément pour
aque source. Cependant, chacune des
ch
combinaisons ci-dessous est définie
automatiquement sur le même réglage.
SB, iPod, ANDROID, SPOTIFY et APP (iPhone)
• U
],
[CUSTOM2] est un réglage partagé et commun à
outes les sources.
t
6] à [–6]
volume
.
’extrêmes graves.
d
],
Seules les fréquences inférieures à celles de la
amme sélectionnée sont émises par le haut-
g
parleur d’extrêmes graves.
[–24]
ves.
gra
11Fr

Élément de menu Description
HPF SETTING
FF],
Fréquence de coupure : [O
[50HZ], [63HZ], [80HZ], [100HZ],
[125HZ], [160HZ], [200HZ]
Niveau de la pente : [–12]
SLA
[+4] à [–4] Réglez le niveau de volume de chaque source,
*1 Indisponible lorsque [SUB.W/SUB.W] est sélectionné sous [SP-P/O MODE] dans les réglages INITIAL
(page 4).
*2 Indisponible lorsque [REAR/REAR] est sélectionné sous [SP-P/O MODE] dans les réglages INITIAL
(page 4).
*3 Indisponible lorsque [OFF] est sélectionné sous [SUB.W].
Seules les fréquences supérieures à la coupure
u filtre passe-haut (HPF) sont émises en sortie
d
via les haut-parleurs.
, [–24]
sau
f celui de la FM.
Chacune des combinaisons ci-dessous est
éfinie automatiquement sur le même réglage.
d
B, iPod, ANDROID, SPOTIFY et APP (iPhone)
• US
Réglages SYSTEM
Vous pouvez également accéder à ces menus lorsque l’appareil est hors tension.
Élément de menu Description
LANGUAGE
[ENG] (anglais), [РУС] (russe),
[TUR] (turc)
CLOCK SET
12H/24H
[12H], [24H] Sélectionnez la notation de l’heure.
AUTO P I
[ON], [OFF] Recherchez une autre station avec la même
AUX
[ON], [OFF] Sélectionnez [ON] lors de l’utilisation d’un
Sélectionnez la langue d’affichage des
informations textuelles à par tir d’un fichier audio
compressé.
Réglez l’horloge (page 4).
ogrammation, même si vous utilisez une
pr
station présélectionnée.
iphérique auxiliaire connecté à l’appareil.
pér
Élément de menu Description
SPOTIFY
[ON], [OFF] Sélectionnez [ON] lorsque vous utilisez la
PW SAVE*
[ON], [OFF] Réduisez la consommation d’énergie de la
ANDROID WIRED
[MEMORY], [APP CONTROL] Sélectionnez la méthode de connexion adaptée
P. AP P A U TO O N
[ON], [OFF]
USB AUTO
[ON], [OFF] Sélectionnez [ON] pour basculer
* [PW SAVE] s’annule si la batterie du véhicule est débranchée, et il doit être réactivé une fois la batterie
rebranchée. Lorsque [PW SAVE] est désactivé, selon les méthodes de connexion, l’appareil peut
continuer à consommer l’énergie de la batterie s’il n’y a pas de position ACC (accessoire) sur le
contac t de votre véhic ule.
onction Spotify.
f
terie.
bat
L’activati on de la source est la seule opération
orisée lorsque cette fonction est activée.
aut
iphérique Android.
à un pér
Sélectionnez [ON] pour lancer automatiquement
Pioneer ARC APP lorsqu’un périphérique Android
est connecté à l’appa reil via AOA. (Indisponible
lorsque [MEMORY] est sélectionné sous [ANDROID
WIRED]. )
aut
omatiquement sur la source [USB] lorsqu’un
périphérique USB/iPod est connecté à l’appareil.
Sélectionnez [OFF] lorsqu’un périphérique USB/
iPod est connecté à l’appareil uniquement à des
fins de charge.
12Fr

França is
Réglages ILLUMINATION
Élément d e menu Description
COLOUR
[KEY COLOUR], [DISP COLOUR],
[BOTH COLOUR]
DIM SETTING
[SYNC ILLUMI], [SYNC CLOCK],
[MA
NUAL]
BRIGHTNESS
[KEY], [DISP] Sélectionnez la luminosité des touches ou de
ILLUMI FX
[ON], [OFF] L’effet d’éclairage peut être visible lors de
Sélectionnez la couleur des touches ou de
l’affichage de l’appareil parmi 12 couleurs
lectionnées, [SCAN] ou [CUSTOM]*.
présé
CAN] : parcourez automatiquement une
• [S
variété de couleurs.
USTOM]* :
• [C
puyez longuement sur la molette M.C.
1 Ap
jusqu’à ce que l’affichage de réglage des
couleurs apparaisse.
églez la couleur primaire (R (rouge)/G (vert)/
2 R
B (bleu)) et le niveau de luminosité ([0] à [60]).
Vous ne pouvez pas sélectionner un niveau
nférieur à 10 pour les trois couleurs R (rouge),
i
t), B (bleu) à la fois.
G (ver
Vous pouvez également personnaliser les
uleurs présélectionnées. Sélectionnez l’une
co
des couleurs présélectionnées, puis appuyez
longuement sur la molette M.C. jusqu’à ce que
l’affichage de réglage des couleurs appa raisse.
* Le réglage CUSTOM est uniquement disponible pour
[KEY COLOUR] et [DISP COLOUR].
Changez la luminosité de l’affichage.
’affichage de l’appareil de [1] à [10].
l
Les plages de réglage disponibles varient selon
paramètre [DIM SE TTING].
le
’insertion/éjection d’un CD.
l
L’effet d’éclairage s’active lorsque l’alimentation
C est activée/désactivée, indépendamment
AC
de ce réglage.
Réglages MIXTRAX
Élément d e menu Description
SHORT PLAYBCK
[1.0 MIN], [1.5 MIN], [2.0 MIN],
[2.5 MIN], [3.0 MIN], [OFF]
FLASH AREA
[KEY/DISPLAY], [KEY], [OFF] Sélectionnez la zone de l’effet d’éclairage.
FLASH PATTERN
[SOUND LEVEL 1] à [SOUND LEVEL 6]Modifiez l’effet d’éclairage suivant le niveau
[LOW PASS 1] à [LOW PASS 6] Le modèle de clignotement change suivant le
[RANDOM1] Le modèle de clignotement change de
[RANDOM2] Le modèle de clignotement change de
[RANDOM3] Le modèle de clignotement change de
DISPLAY FX
[ON], [OFF] Activez/désactivez les effets spéciaux de
CUT IN FX
[ON], [OFF] Activez/désactivez les effets sonores de
Sélectionnez la durée de lecture.
Lorsque [OFF] est sélectionné, la couleur
dé
finie dans les réglages ILLUMINATION
(page 13) sert de couleur d’affichage.
nore et le niveau des graves.
so
Le modèle de clignotement change suivant le
veau sonore.
ni
ni
veau des graves.
m
anière aléatoire suivant le mode de niveau
sonore et le mode passe-bas.
anière aléatoire suivant le mode de niveau
m
sonore.
anière aléatoire suivant le mode passe-bas.
m
XTRAX.
MI
IXTRAX tout en changeant manuellement de
M
piste.
13Fr
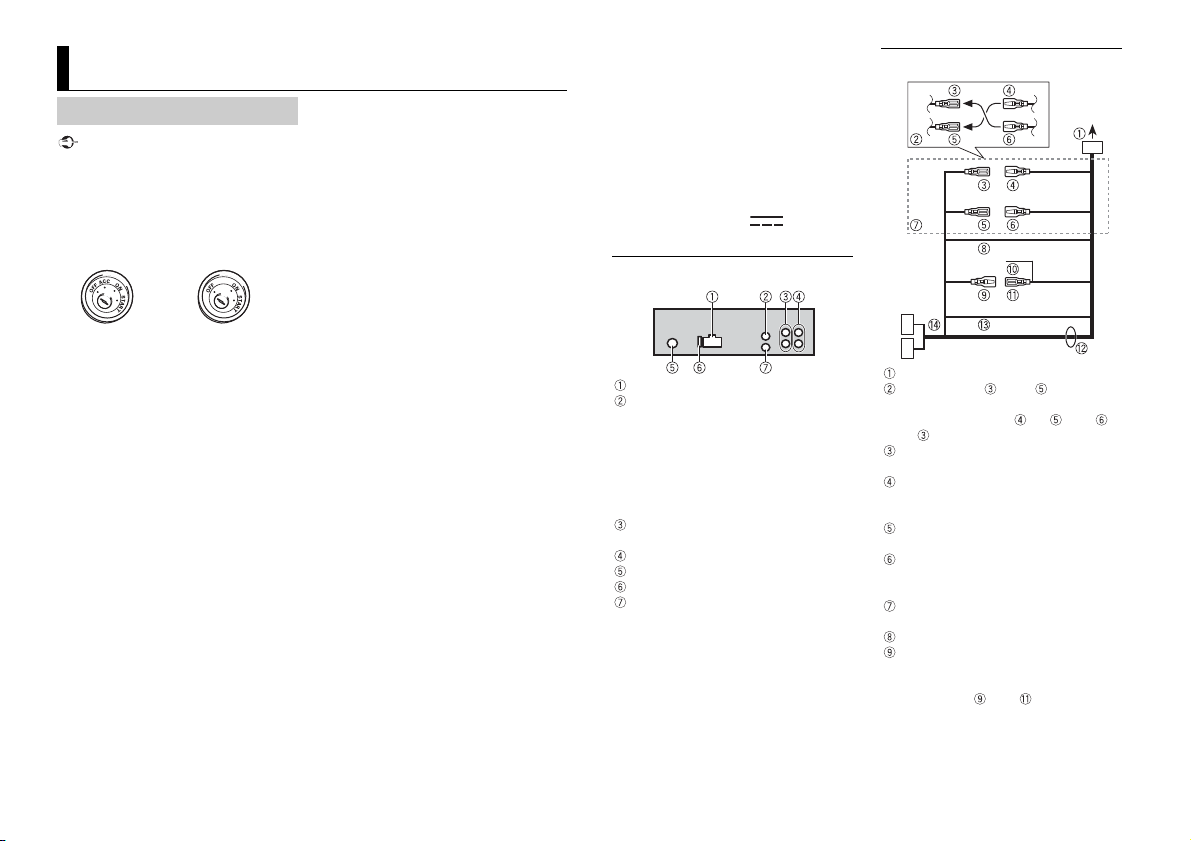
Important
Raccordements/Installation
Avec po sition ACC Sans p osition ACC
Raccordements
• Lorsque vous installez cet appareil dans
un véhicule sans position ACC
(accessoire) sur le contact, si vous
omettez de brancher le câble rouge à la
borne qui détecte le fonctionnement de
la clé de contact, vous risquez d’entraîner
une fuite de la batterie.
• L’utilisation de cet appareil dans des
conditions autres que ce qui suit peut
provoquer un incendie ou un
dysfonctionnement.
– Véhicules équipés d’une batterie de
12 volts et d’une mise à la terre
ative.
nég
– Lorsque la sortie de l’enceinte est
ilisée par 4 stations, utilisez les haut-
ut
parleurs de plus de 50 W (puissance
’entrée maximale) et entre 4 Ω et 8 Ω
d
’impédance). N’utilisez pas de
(valeur d
haut-parleurs de 1 Ω à 3 Ω pour cet
eil.
appar
– Si la sortie du haut-parleur arrière est
tilisée par un caiss on de graves de 2 Ω,
u
utilisez les haut-parleurs de plus de
70 W (puissance d’entrée maximale).
* Veuillez voir les branchements pour la
thode de connexion.
mé
our éviter un court-circuit, une
• P
surchauffe ou un dysfonctionnement,
assurez-vous de suivre les instructions cidessous.
– Débranchez la borne négative de la
atterie avant l’installation.
b
– Fixez les câbles au moyen de serre-
âbles o u de ruban adhé sif. Enroulez d u
c
ruban adhésif autour du câblage qui
entre en contact avec des pièces
métalliques afin de protéger le câblage.
– Placez tous les câbles à l’écart des
obiles, comme le levier de
pièces m
vitesse et les rails des sièges.
– Placez tous les câbles à l’écart des
ndroits chauds (ex. : la sortie du
e
fage).
chauf
– Ne raccordez pas le câble jaune à la
terie en le faisant passer par le trou
bat
du compartiment moteur.
– Recouvrez de ruban isolant tous les
s non raccordés.
câble
– Ne raccourcissez pas les câbles.
– Ne coupez jamais l’isolation du câble
alimentation de cet appareil dans le
d’
but de partager l’alimentation avec
d’autres périphériques. La capacité
actuelle du câble est limitée.
– Utilisez un fusible de la valeur indiquée.
– Ne raccordez jamais le câble de haut-
leur négatif directement à la masse.
par
– N’attachez jamais ensemble les câbles
atifs de plusieurs haut-parleurs.
nég
orsque cet appareil est sous tension, les
• L
signaux de commande sont transmis via
le câble bleu/blanc. Branchez ce câ ble à la
télécommande de système d’un
amplificateur de puissance externe ou à
la borne de commande du relais
d’antenne automatique du véhicule
(max. 300 mA 12 V CC). Si le véhicule est
uipé d’une antenne de vitre, raccordez
éq
cette dernière à la borne d’alimentation
de l’amplificateur d’antenne.
e raccordez jamais le câble bleu/b lanc à
• N
la borne d’alimentation d’un
amplificateur de puissance externe. De
même, ne le raccordez jamais à la borne
d’alimentation de l’antenne automatique.
Cela pourrait entraîner la fuite de la
batterie ou un dysfonctionnement de
l’appareil.
• Le câ ble noir est la masse. Les câbles de
masse de cet appareil et d’autres
équipements (notamment les produits à
haute intensité tels que les amplificateurs
de puissance) doivent être câblés
séparément. Dans le cas contraire, un
détachement accidentel peut provoquer
un incendie ou un dysfonctionnement.
e symbole graphique situé sur le
• L
produit représente le courant continu.
Cet appareil
Entrée du cordon d’alimentation
AUX IN arrière | [Tel In] (prise stéréo
3,5 mm)
Entrée arrière dédiée, uniquement
mpatible avec les kits téléphoniques
co
mains libres Bluetooth externes. Le
signal audio est coupé durant un appel
téléphonique lorsque le fil jaune/noir
est raccordé/activé.
Sortie arrière ou sortie du haut-parleur
d’extrêmes graves
Sortie avant
Entrée de l’antenne
Fusi ble (1 0 A)
Entrée de la télécommande filaire
Il est possible de raccorder un
daptateur de télécommande câblé
a
(vendu séparément).
Cordon d’alimentation
Vers l’entrée du cordon d’alimentation
La fonction du et du peut varier
selon le type de véhicule. Dans ce cas,
eillez à brancher le au et le
v
au .
Jaune
Secours (ou accessoire)
Jaune
À raccorder à la borne d’alimentation
nstante de 12 V.
co
Rouge
Accessoire (ou secours)
Rouge
À raccorder à la borne commandée par
é de contact (12 V CC).
la cl
Raccordez les fils de même couleur les
uns aux autres.
Noir (masse du châssis)
Bleu/blanc
La position des broches du connecteur
O varie selon le type de véhicule.
IS
Raccordez le et le lorsque la
broche 5 est un type de commande
’antenne. Dans un autre type de
d
14Fr
 Loading...