

Pioneer DEH-9300SD User Manual

CD RDS RECEIVER
AUTORADIO CD RDS
SINTOLETTORE CD RDS
REPRODUCTOR DE CD CON RECEPTOR RDS
CD RDS-EMPFÄNGER
CD RDS-ONTVANGER
CD RDS ПРИЕМНИК
DEH-9300SD
Printed in Thailand
Imprimé en Thaïlande
<QRD3079-A/N> EW
Quick start guide
Guide de démarrage rapide
Guida rapida all’uso
Guía de iniciación rápida
Schnellstartanleitung
Snelstartgids
Быстрый запуск проводника
<KOKZX> <10I00000>
English
This guide is intended to guide you through the basic functions of this unit.
For details, please refer to the Operation manual stored on the CD-ROM.
Furthermore, manuals are available on the website.
http://www.pioneer.eu
Français
Ce guide a pour but de vous présenter les fonctions de base de cet appareil.
Pour les détails, veuillez vous reporter au mode d’emploi qui se trouve sur le CD-ROM.
Des manuels supplémentaires sont aussi disponible sur notre site web.
http://www.pioneer.eu
Italiano
Questa guida illustra le funzioni principali dell’apparecchio.
Per informazioni particolareggiate s’invita a consultare il manuale d’uso fornito nel CD-ROM.
I manuali sono inoltre disponibili presso il sito
http://www.pioneer.eu
Español
Se ha diseñado esta guía con la intención de guiarle a través de las funciones básicas de esta unidad.
Para los detalles, consulte el Manual de instrucciones que se encuentra almacenado en el CD-ROM.
Además, los manuales están disponibles en el sitio Web.
http://www.pioneer.eu
Deutsch
Diese Anleitung führt Sie durch die grundlegenden Funktionen dieses Geräts.
Einzelheiten finden Sie in der Bedienungsanleitung, die auf der CD-ROM enthalten ist.
Außerdem sind die Bedienungsanleitungen auch auf unserer Website verfügbar.
http://www.pioneer.eu
Nederlands
Deze gids is bedoeld om u bekend te maken met de basisfuncties van dit toestel.
Raadpleegt u voor details de handleiding op de CD-ROM.
Handleidingen zijn ook verkrijgbaar op onze website.
http://www.pioneer.eu
Русский
Этот проводник предназначен, чтобы провести Вас через основные функции данного устройства.
За деталями, пожалуйста, обращайтесь к Рабочей инструкции, хранящейся на CD-ROM.
Кроме того, инструкция доступна на вебсайте.
http://www.pioneer.eu

Notepad / Bloc-notes / Appunti / Bloc de notas / Notepad / Notities / Блокнот

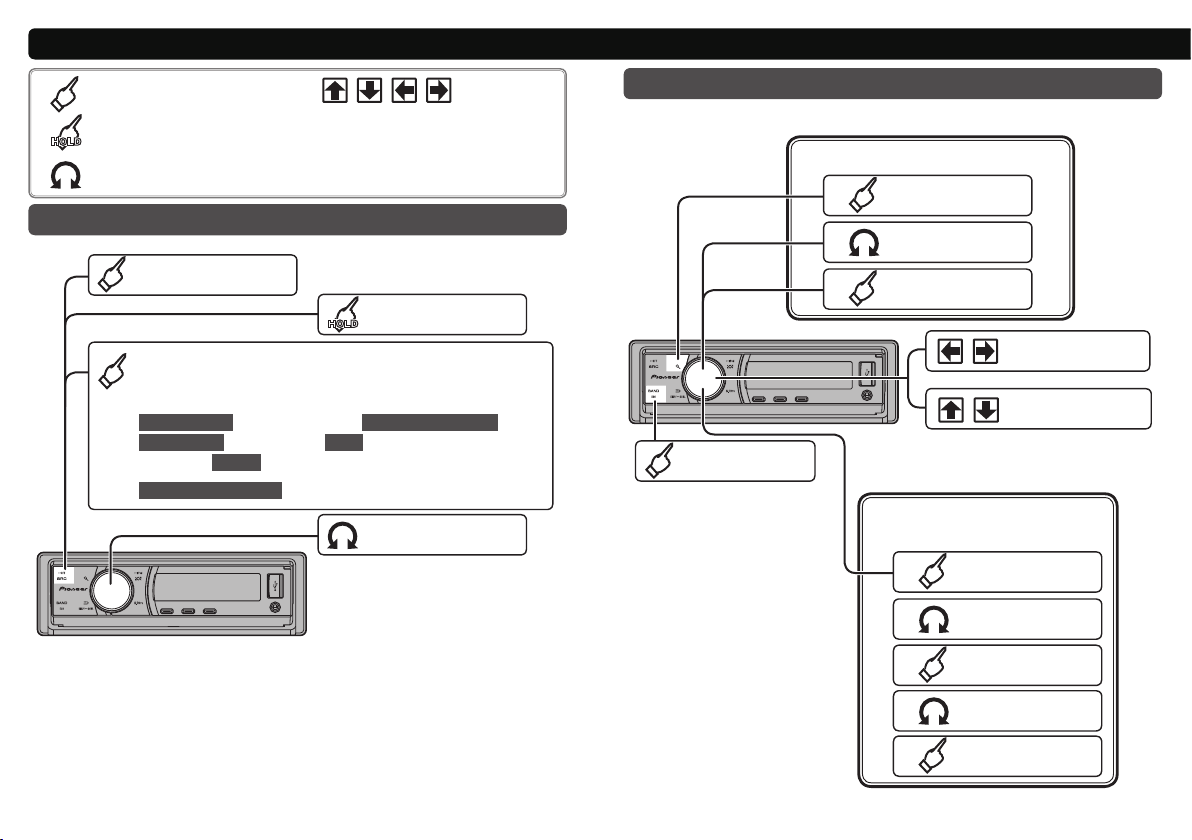
English
: Press
: Press and hold
: Rotate
Basic operation
Power on
Select a source
Sources can be selected in the following order:
Tuner (tuner) – CD (bulit-in CD player) – USB (USB) / iPod
(iPod) – SD (SD memory card) – AUX (AUX)
:
Push in the direction of the arrow
Power off
Volume adjust
Tuner operation
Select a band
Select a preset channel
Display the preset
1
list
Change a channel
2
Select a channel
3
Select a frequency
Select a
preset frequency
Store the strongest
broadcast frequencies
Display the
1
main menu
Select FUNCTION
2
Display the function
3
menu
4
5
Select BSM
Turn BSM on

Built-in CD, USB and SD operation
iPod operation
Select a song from list
Display the list
1
Select a song
2
Play a selected song
(If folder is selected,
see lower tier.)
Play all songs in a
selected folder
Return to higher tier
Display the text information
Select a track
Select a folder
Select a song from list
Display the list
1
Change the category
2
Select a category
Play all songs in a
selected category
Return to the
previous category
Select a track
(chapter)
Display the text information
Shuffle all tracks
Français
: Pulsar
: Mantener pulsado
: Girar
Operaciones básicas
Encendido
Seleccionar una fuente
Las fuentes pueden seleccionarse en el siguiente orden:
Sintonizador – Televisor – DVD – Reproductor de CD
incorporado – MCD– iPod – USB – Unidad externa 1 – Unidad
externa 2 – AUX 1 – AUX 2 – Audio BT – Teléfono BT
Nombre de la fuente : Fuente incorporada
:
Presionar en la dirección de la
flecha
Apagado
Ajuste del volumen
Operación del sintonizador
Seleccionar un canal predeterminado
Visualizar la lista
1
predeterminada
Cambiar un canal
2
Seleccionar un canal
3
Seleccionar una
banda
Almacenar las frecuencias
con las señales más fuertes
1
2
3
Seleccionar una
frecuencia
Seleccionar una
frecuencia predeterminada
Visualizar el menú
principal
Seleccionar
FUNCTION
Visualizar el menú
de funciones
Seleccionar la BSM
4
Activar la BSM
5
 Loading...