

Page 1
CD RDS RECEIVER
REPRODUCTOR DE CD CON RECEPTOR RDS
CD PLAYER COM RDS
EspañolEnglish
Português (B)
DEH-8350SD
Owner’s Manual
Manual de instrucciones
Manual do proprietário
Page 2

Section
01
Contents
Before You Start
Before YouStart
About this unit 2
In case of trouble 2
Demo mode 2
Reverse mode 3
About this manual 3
Operating this unit
Head unit 3
Remote control 3
Basic Operations 4
Use and care of the remote control 4
Menu operations identical for function
settings/audio adjustments/initial
settings/lists 5
Tuner 5
CD/CD-R/CD-RW and external storage
devices (USB, SD) 5
iPod 6
Audio Adjustments 8
Initial Settings 9
Other Functions 10
Installation
Connections 11
Installation 12
Additional Information
Troubleshooting 13
Error messages 13
Handling guidelines 15
Compressed audio compatibility (disc, USB,
SD) 16
iPod compatibility 16
Sequence of audio files 17
Copyright and trademark 17
Specifications 18
Thank you for purchasing this PIONEER
product.
To ensure proper use, please read through this
manual before using this product. It is especially
important that you read and observe WARN-
INGs and CAUTIONs in this manual. Please
keep the manual in a safe and accessible place for
future reference.
About this unit
CAUTION
! Do not allow this unit to come into contact
with liquids. Electrical shock could result.
Also, damage to this unit, smoke, and overheating could result from contact with
liquids.
! Always keep the volume low enough to hear
outside sounds.
! Avoid exposure to moisture.
! If the battery is disconnected or discharged,
any preset memory will be erased.
CAUTION
This product is a class 1 laser product classified under the Safety of laser products, IEC
60825-1:2007, and contains a class 1M laser
module. To ensure continued safety, do not remove any covers or attempt to gain access to
the inside of the product. Refer all servicing to
qualified personnel.
CAUTION—CLASS 1M INVISIBLE LASER
RADIATION WHEN OPEN, DO NOT VIEW
DIRECTLY WITH OPTICAL INSTRUMENTS.
CAUTION:
USE OF CONTROL OR ADJUSTMENT OR
PERFORMANCE OF PROCEDURES
OTHER THAN THOSE SPECIFIED HEREIN
MAY RESULT IN HAZARDOUS RADIATION
EXPOSURE.
CAUTION:
THE USE OF OPTICAL INSTRUMENTS
WITH THIS PRODUCT WILL INCREASE
EYE HAZARD.
In case of trouble
Should this unit fail to operate properly, please
contact your dealer or nearest authorized
PIONEER Service Station.
Demo mode
Important
! Failure to connect the red lead (ACC) of this
unit to a terminal coupled with ignition
switch on/off operations may lead to battery
drain.
! Remember that if the feature demo contin-
ues operating when the car engine is turned
off, it may drain battery power.
The demo automatically starts when the ignition
switch is set to ACC or ON while the unit is
turned off. Turning off the unit does not cancel
demo mode. To cancel the demo mode, press
DISP/
/SCRL. Press DISP/ /SCRL again to
start. Operating the demo while the ignition
switch is set to ACC may drain battery power.
2
En
Page 3

89f abdce
g
h
o
m
f
a
i
l
knj
Before You Start
Operating this unit
Section
02
English
Reverse mode
If you do not perform an operation within about
30 seconds, screen indications start to reverse,
and then continue reversing every 10 seconds.
Pressing button BAND/ESC when power to this
unit is turned off while the ignition switch is set
to ACC or ON cancels the reverse mode. Press
button BAND/ESC again to start the reverse
mode.
About this manual
In the following instructions, USB memories,
USB portable audio players, and SD memory
cards are collectively referred to as “external
storage devices (USB, SD).” If only USB memories and USB portable audio players are indicated, they are collectively referred to as “USB
storage devices.”
In this manual, iPod and iPhone will be referred
to as “iPod”.
Head unit
1 2 3 4
Part Part
1 CLK/DISP OFF 9
2 SW/BASS a BAND/ESC
3 S.Rtrv b
MULTI-CONTROL
4
(M.C.)
5 Disc loading slot d
6 h (eject) e DISP/
7 USB port f SRC/OFF
8 Detach button g
5
c
AUX input jack
(3.5 mm stereo
jack)
(list)
(iPod)/LOC
(random)
SD memory card
slot
Remove the front
panel to access
the SD memory
card slot.
6 7
/SCRL
CAUTION
Use an optional Pioneer USB cable (CD-U50E)
to connect the USB audio player/USB memory
as any device connected directly to the unit will
protrude out from the unit and may be dangerous.
Do not use unauthorized products.
Remote control
Part Operation
h VOLUME
i MUTE
j a/b/c/d
k AUDIO
l DISP/SCRL
Press to increase or decrease
volume.
Press to mute. Press again to
unmute.
Press to perform manual seek
tuning, fast forward, reverse
and track search controls.
Also used for controlling
functions.
Press to select an audio function.
Press to select different displays.
Press and hold to scroll
through the text information.
3
En
Page 4
Section
02
Operating this unit
Operating this unit
Part Operation
m e
n FUNCTION
o LIST/ENTER
Press to pause or resume
playback.
Press to select functions.
Press and hold to recall the
initial setting menu when the
sources are off.
Press to display the disc title,
track title, folder,or file list depending on the source.
While in the operating menu,
press to control functions.
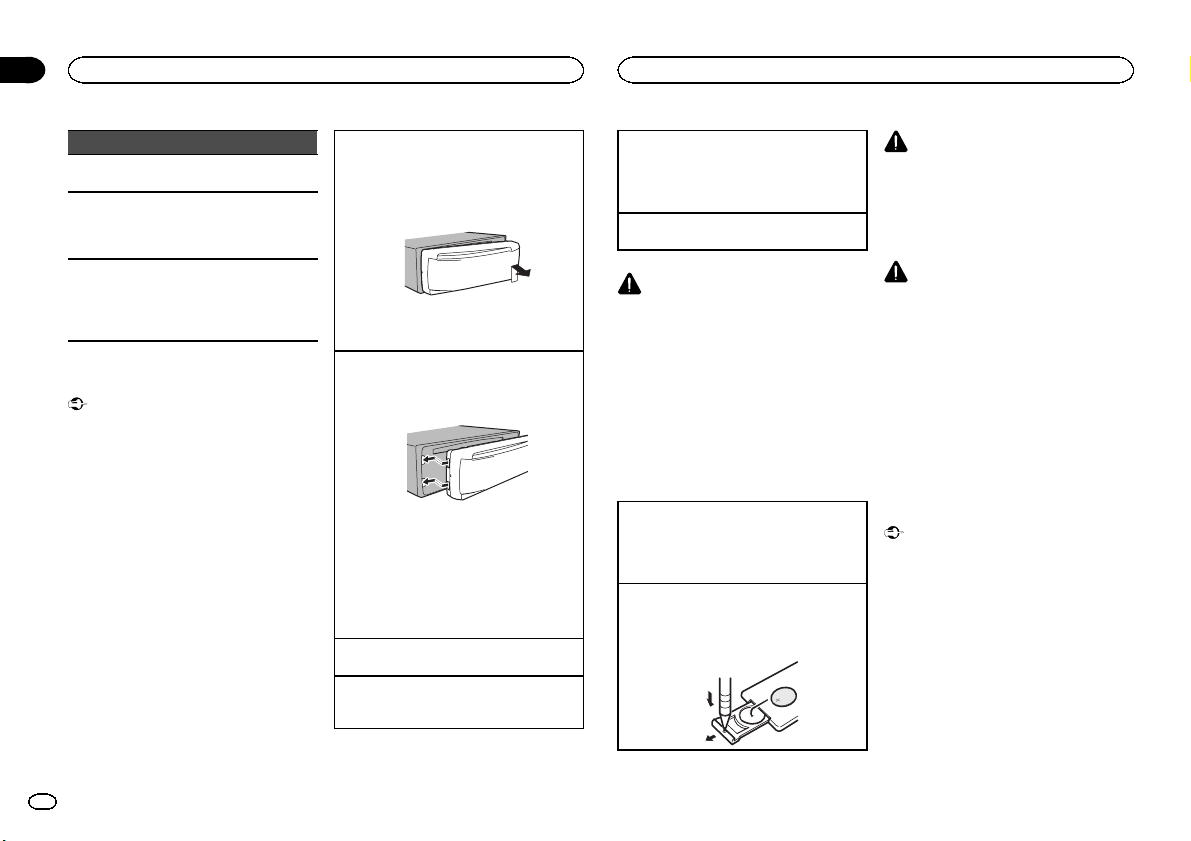
Basic Operations
Important
! Handle gently when removing or attaching
the front panel.
! Avoid subjecting the front panel to excessive
shock.
! Keep the front panel out of direct sunlight
and high temperatures.
! To avoid damaging the device or vehicle inte-
rior, remove any cables and devices attached
to the front panel before detaching it.
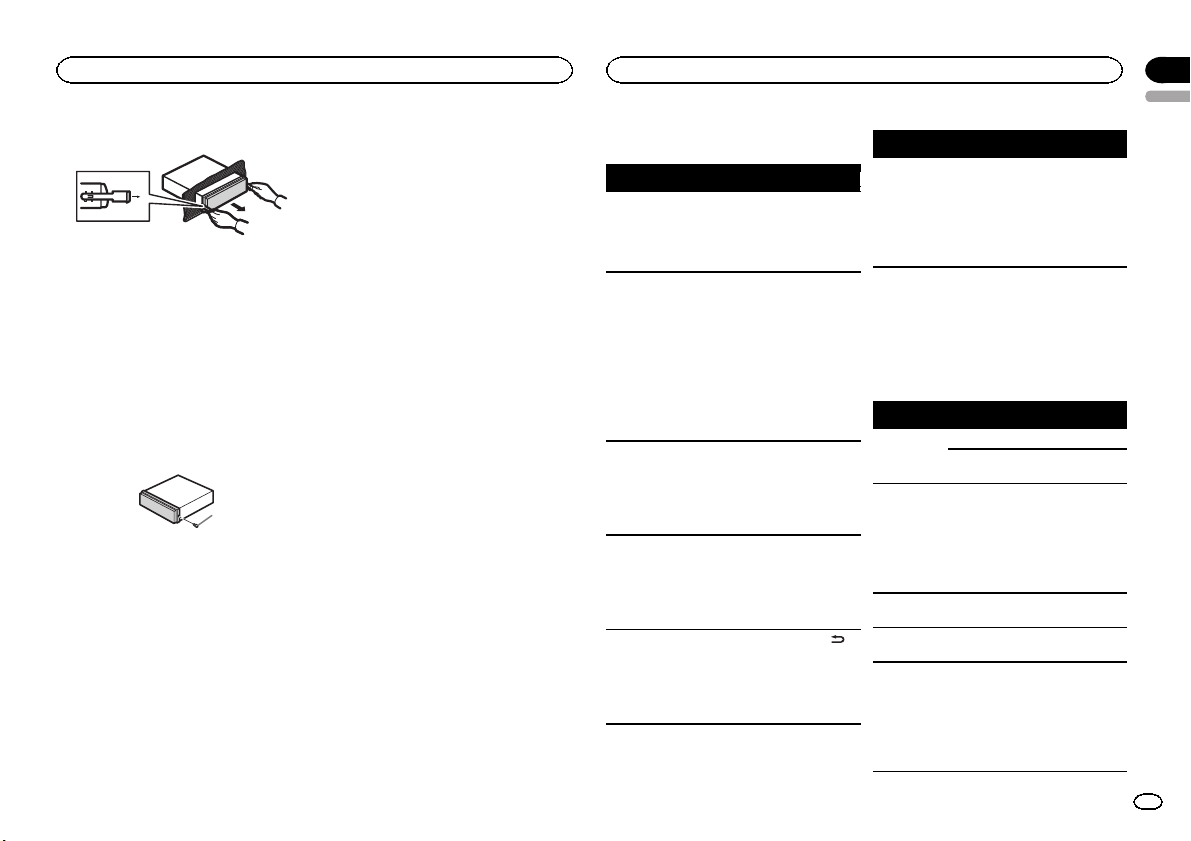
Removing the front panel to protect your unit from
theft
1 Press the detach button to release the front
panel.
2 Push the front panel upward and pull it toward
you.
3 Always keep the detached front panel in a pro-
tection device such as a protection case.
Re-attaching the front panel
1 Slide the front panel to the left.
Make sure to insert the tabs on the left side of
the head unit into the slots on the front panel.
2 Press the right side of the front panel until it is
firmly seated.
If you cannot attach the front panel to the
head unit successfully, make sure that you are
placing the front panel onto the head unit correctly. Forcing the front panel into place may
result in damage to the front panel or head
unit.
Turning the unit on
1 Press SRC/OFF to turn the unit on.
Turning the unit off
1 Press and hold SRC/OFF until the unit turns
off.
Selecting a source
1 Press SRC/OFF to cycle between:
TUNER (tuner)—CD (built-in CD player)—USB
(USB)/iPod (iPod)—SD (SD memory card)—
AUX (AUX)
Adjusting the volume
1 Turn M.C. to adjust the volume.
CAUTION
For safety reasons, park your vehicle when removing the front panel.
Note
When this unit’s blue/white lead is connected to
the vehicle’s auto-antenna relay control terminal, the vehicle’s antenna extends when this
unit’s source is turned on. To retract the antenna, turn the source off.
Use and care of the remote
control
Using the remote control
1 Point the remote control in the direction of the
front panel to operate.
When using for the first time, pull out the film
protruding from the tray.
Replacing the battery
1 Slide the tray out on the back of the remote
control.
2 Insert the battery with the plus (+) and minus
(–) poles aligned properly.
WARNING
! Keep the battery out of the reach of children.
Should the battery be swallowed, consult a
doctor immediately.
! Batteries (battery pack or batteries installed)
must not be exposed to excessive heat such
as sunshine, fire or the like.
CAUTION
! Use one CR2025 (3 V) lithium battery.
! Remove the battery if the remote control is
not used for a month or longer.
! There is a danger of explosion if the battery is
incorrectly replaced. Replace only with the
same or equivalent type.
! Do not handle the battery with metallic tools.
! Do not store the battery with metallic ob-
jects.
! If the battery leaks, wipe the remote control
completely clean and install a new battery.
! When disposing of used batteries, comply
with governmental regulations or environmental public institutions’ rules that apply in
your country/area.
Important
! Do not store the remote control in high tem-
peratures or direct sunlight.
! The remote control may not function properly
in direct sunlight.
! Do not let the remote control fall onto the
floor, where it may become jammed under
the brake or accelerator pedal.
4
En
Page 5
6
75 64
Operating this unit
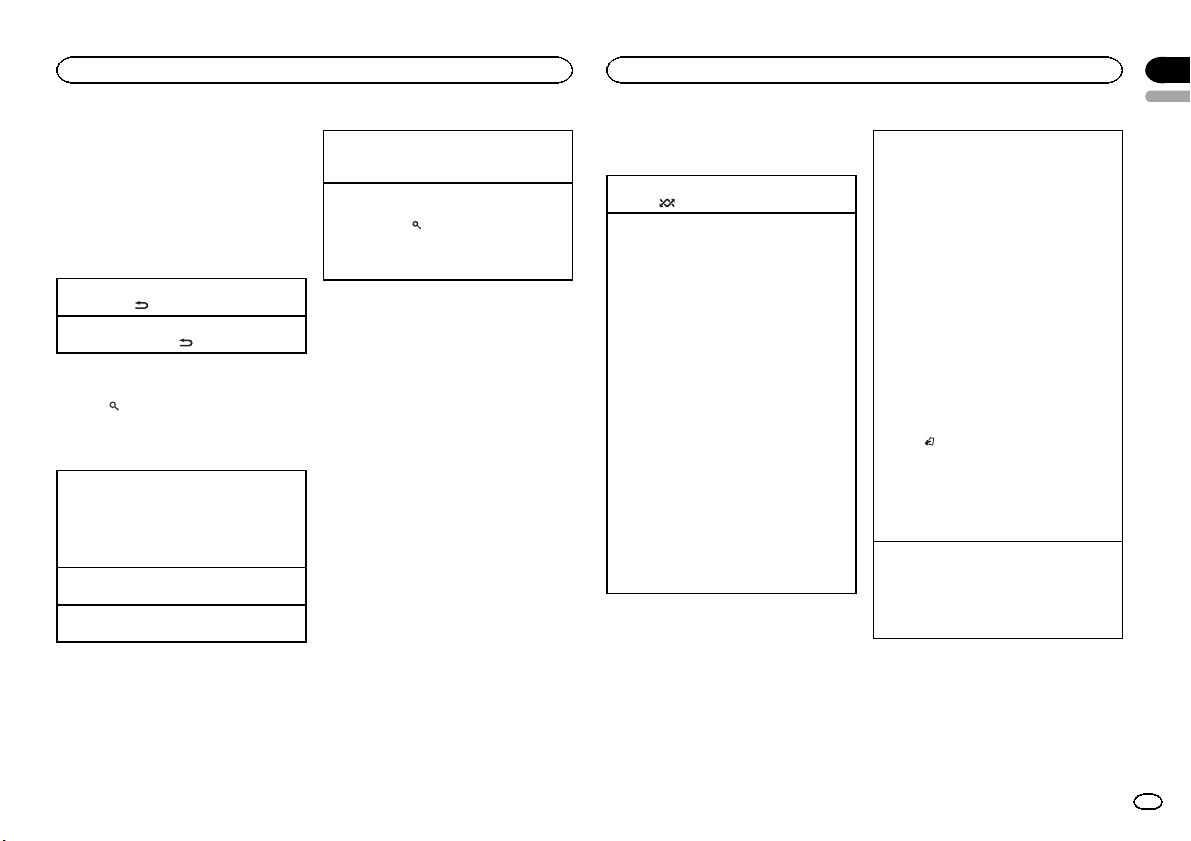
Menu operations identical
for function settings/audio
adjustments/initial settings/
lists
Returning to the previous display
Returning to the previous list/category (the folder/
category one level higher.)
1 Press DISP/
Returning to the main menu
Returning to the top tier of the list/category.
1 Press and hold DISP/
Returning to the ordinary display
Canceling the initial setting menu
1 Press BAND/ESC.
Returning to the ordinary display from the list/category
1 Press BAND/ESC.
/SCRL.
/SCRL.
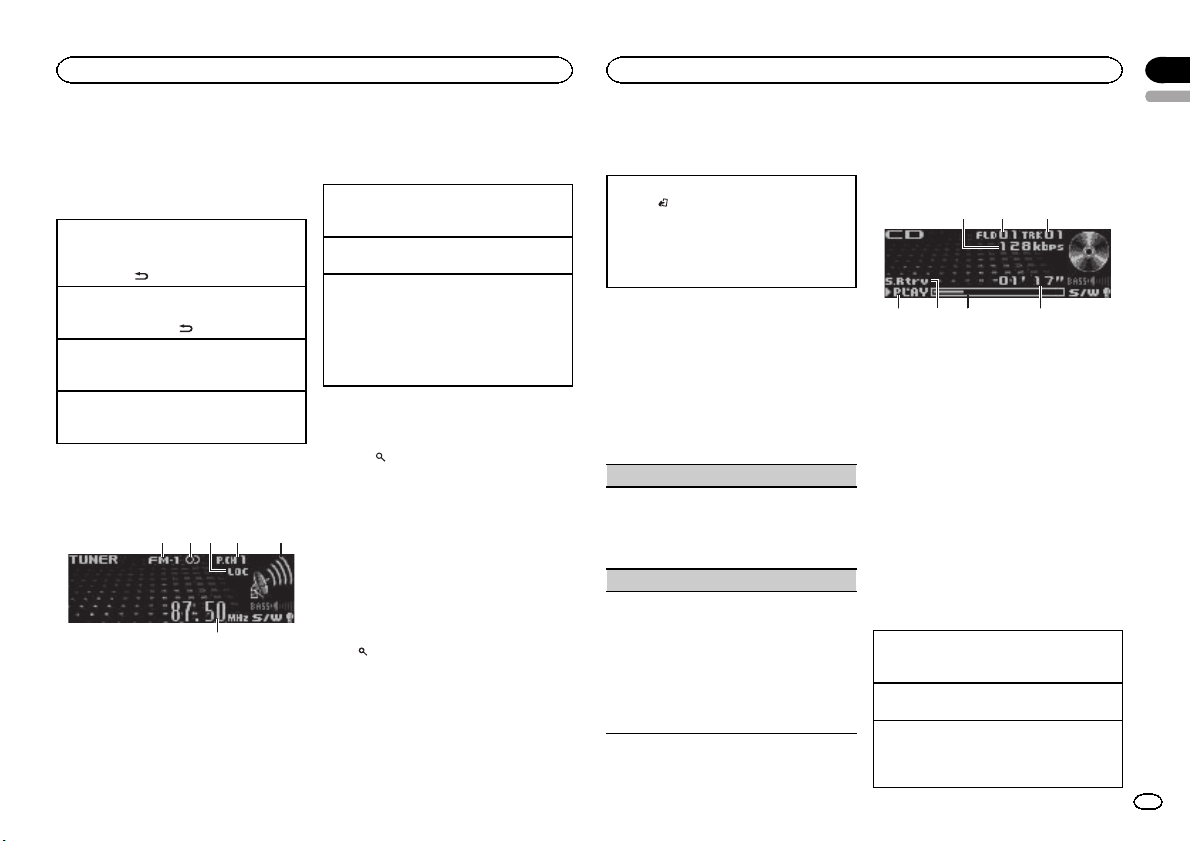
Tuner
Basic Operations
3
1 2 4 5
1 Band indicator
2 5 (stereo) indicator
3 LOC indicator
Appears when local seek tuning is on.
4 Preset number indicator
5 Signal level indicator
6 Frequency indicator
! If this unit can pick up the program serv-
ice name information, program service
name will be displayed.
Selecting a band
1 Press BAND/ESC until the desired band (FM-
1, FM-2, FM-3 for FM or AM) is displayed.
Manual tuning (step by step)
1 Push M.C. left or right.
Seeking
1 Push and hold M.C. left or right.
You can cancel seek tuning by pushing M.C.
left or right.
While pushing and holding M.C. left or right,
you can skip stations. Seek tuning starts as
soon as you release M.C.
Storing and recalling stations
for each band
1 Press (list).
The preset screen is displayed.
2 Use M.C. to store the selected frequency
in the memory.
Turn to change the preset number. Press and
hold to store.
3 Use M.C. to select the desired station.
Turn to change the station. Press to select.
# You can also change the station by pushing M.C.
up or down.
# To return to the ordinary display, press BAND/
(list).
ESC or
Operating this unit
Advanced operations using
special buttons
Local seek tuning
1 Press
/LOC to select the desired setting.
FM: Level 1—Level 2—Level 3—Level 4
AM: Level 1—Level 2
The highest level setting allows reception of
only the strongest stations, while lower levels
allow the reception of weaker stations.
Function settings
1 Press M.C. to display the main menu.
2 Turn M.C. to change the menu option
and press to select FUNCTION.
3 Turn M.C. to select the function.
After selecting, perform the following procedures to set the function.
BSM (best stations memory)
BSM (best stations memory) automatically stores
the six strongest stations in the order of their signal strength.
1 Press M.C. to turn BSM on.
! To cancel, press M.C. again.
Local (local seek tuning)
Local seek tuning lets you tune in to only those
radio stations with sufficiently strong signals for
good reception.
1 Press M.C. to turn local on.
! To cancel, press M.C. again.
2 Push M.C. left or right to select the desired set-
ting.
For details, refer to Local seek tuning on this
page.
CD/CD-R/CD-RW and external
storage devices (USB, SD)
Basic Operations
1
1 Bit rate/sampling frequency indicator
Shows the bit rate or sampling frequency of
the current track (file) when the compressed
audio is playing.
! When playing back VBR (variable bit
rate)-recorded AAC files, the average bit
rate value is displayed. However, depending on the software used to decode AAC
files, VBR may be displayed.
2 Folder number indicator
Shows the folder number currently playing
when the compressed audio is playing.
3 Track number indicator
4 PLAY/PAUSE indicator
5 S.Rtrv indicator
Appears when Sound Retriever function is
on.
6 Song time (progress bar)
7 Play time indicator
Playing a CD/CD-R/CD-RW
1 Insert the disc into the disc loading slot with
the label side up.
Ejecting a CD/CD-R/CD-RW
1 Press h (eject).
Playing songs on a USB storage device
1 Open the USB connector cover.
2 Plug in the USB storage device using a USB
cable.
32
Section
02
English
5
En
Page 6
75 64
Section
02
Operating this unit
Operating this unit
Stopping playback of files on a USB storage device
1 You may disconnect the USB storage device at
any time.
Playing songs on an SD memory card
1 Remove the front panel.
2 Insert an SD memory card into the SD card
slot.
Insert it with the contact surface facing down,
and press on the card until it clicks and completely locks into place.
3 Re-attach the front panel.
4 Press SRC/OFF to select SD as the source.
Playback will start.
Stopping playback of files on an SD memory card
1 Remove the front panel.
2 Press on the SD memory card until it clicks.
The SD memor y card is ejected.
3 Pull out the SD memory card.
4 Re-attach the front panel.
Selecting a folder
1 Push M.C. up or down.
Selecting a track
1 Push M.C. left or right.
Fast forwarding or reversing
1 Push and hold M.C. left or right.
Returning to root folder
1 Press and hold BAND/ESC.
Switching between compressed audio and CD-DA
1 Press BAND/ESC.
Notes
! When playing compressed audio, there is no
sound during fast forward or reverse.
! Disconnect USB storage devices from the
unit when not in use.
6
En
Displaying text information
Selecting the desired text information
1 Press DISP/
Scrolling the text information to the left
1 Press and hold DISP/
/SCRL.
/SCRL.
Notes
! Depending on the version of iTunes used to
write MP3 files to a disc or media file types,
incompatible text stored within an audio file
may be displayed incorrectly.
! Text information items that can be changed
depend on the media.
Selecting and playing files/
tracks from the name list
1 Press (list) to switch to the file/track
name list mode.
2 Use M.C. to select the desired file name
(or folder name).
Changing the file or folder name
1 Turn M.C.
Playing
1 When a file or track is selected, press M.C.
Viewing a list of the files (or folders) in the selected folder
1 When a folder is selected, press M.C.
Playing a song in the selected folder
1 When a folder is selected, press and hold M.C.
Advanced operations using
special buttons
Playing tracks in random order
1 Press
Enhancing compressed audio and restoring rich
sound (sound retriever)
1 Press S.Rtrv to cycle between:
to turn random play on or off.
Tracks in a selected repeat range are played in
random order.
OFF (off)—1—2
1 is effective for low compression rates, and 2
is effective for high compression rates.
Function settings
1 Press M.C. to display the main menu.
2 Turn M.C. to change the menu option
and press to select FUNCTION.
3 Turn M.C. to select the function.
After selecting, perform the following procedures to set the function.
Play mode (repeat play)
1 Press M.C. to select a repeat play range.
CD/CD-R/CD-RW
! Disc repeat – Repeat all tracks
! Track repeat – Repeat the current track
! Folder repeat – Repeat the current folder
External storage device (USB, SD)
! All repeat – Repeat all files
! Track repeat – Repeat the current file
! Folder repeat – Repeat the current folder
Random mode (random play)
1 Press M.C. to turn random play on or off.
Pause (pause)
1 Press M.C. to pause or resume.
Sound Retriever (sound retriever)
Automatically enhances compressed audio and
restores rich sound.
1 Press M.C. to select the desired setting.
For details, refer to Enhancing compressed
audio and restoring rich sound (sound retriever)
on this page.
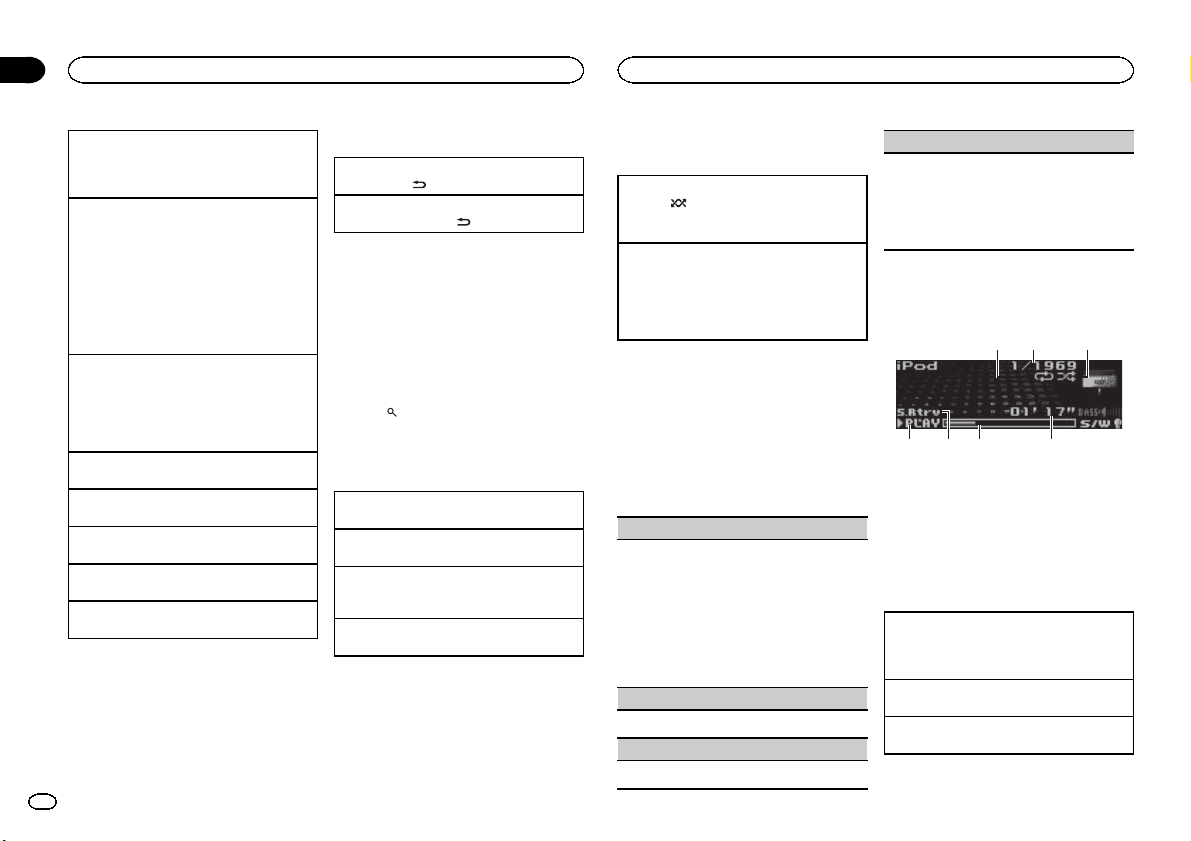
iPod
Basic Operations
1
2
3
1 Repeat indicator
2 Song number indicator
3 Shuffle indicator
4 PLAY/PAUSE indicator
5 S.Rtrv indicator
Appears when Sound Retriever function is
on.
6 Song time (progress bar)
7 Play time indicator
Playing songs on an iPod
1 Open the USB connector cover and plug in an
iPod using the iPod Dock Connector to USB
Cable.
Selecting a track (chapter)
1 Push M.C. left or right.
Fast forwarding or reversing
1 Push and hold M.C. left or right.
Page 7
Operating this unit
Notes
! The iPod cannot be turned on or off when the
control mode is set to AUDIO.
! Disconnect headphones from the iPod be-
fore connecting it to this unit.
! The iPod will turn off about two minutes after
the ignition switch is set to OFF.
Displaying text information
Selecting the desired text information
1 Press DISP/
Scrolling the text information to the left
1 Press and hold DISP/
Browsing for a song
1 Press (list) to switch to the top menu
of the list search.
2 Use M.C. to select a category/song.
Changing the name of the song or category
1 Turn M.C.
Playlists (playlists)—Artists (artists)—Albums
(albums)—Songs (songs)—Podcasts (podcasts)—Genres (genres)—Composers (composers)—Audiobooks (audiobooks)
Playing
1 When a song is selected, press M.C.
Viewing a list of songs in the selected category
1 When a category is selected, press M.C.
/SCRL.
/SCRL.
Playing a song in the selected category
1 When a category is selected, press and hold
M.C.
Searching the list by alphabet
1 When a list for the selected category is dis-
played, press
mode.
2 Turn M.C. to select a letter.
3 Press M.C. to display the alphabetical list.
to switch to alphabet search
Notes
! You can play playlists created with the PC ap-
plication (MusicSphere). The application will
be available on our website.
! Playlists that you created with the PC appli-
cation (MusicSphere) are displayed in abbreviated form.
Operating this unit
Advanced operations using
special buttons
Playing all songs in random order (shuffle all)
1 Press
Playing songs related to the currently playing
song
You can play songs from the following lists.
• Album list of the currently playing artist
• Song list of the currently playing album
• Album list of the currently playing genre
1 Press and hold M.C. to switch to link play
2 Push M.C. left or right to change the mode;
! The selected song/album may be canceled if
! Depending on the song selected to play, the
to turn shuffle all on.
mode.
press to select.
! Artist – Plays an album of the artist cur-
rently being played.
! Album – Plays a song from the album cur-
rently being played.
! Genre – Plays an album from the genre
currently being played.
The selected song/album will be played after
the currently playing song.
you operate functions other than link play (e.g.
fast forward and reverse).
end of the currently playing song and the beginning of the selected song/album may be
cut off.
Operating this unit’s iPod function from your iPod
You can listen to the sound from your iPod applications using your car's speakers, when APP is selected.
This function is not compatible with the following
iPod models.
! iPod nano 1st generation
! iPod 5th generation
APP mode is compatible with the following iPod
models.
! iPod touch 3rd generation (software version
3.0 or later)
! iPod touch 2nd generation (software version
3.0 or later)
! iPod touch 1st generation (software version
3.0 or later)
! iPhone 4 (software version 4.0 or later)
! iPhone 3GS (software version 3.0 or later)
! iPhone 3G (software version 3.0 or later)
! iPhone (software version 3.0 or later)
/LOC to switch the control mode.
1 Press
! iPod – This unit’s iPod function can be op-
erated from the connected iPod.
! APP – Play back the sound from your iPod
applications.
! AUDIO – This unit’s iPod function can be
operated from this unit.
Enhancing compressed audio and restoring rich
sound (sound retriever)
1 Press S.Rtrv to cycle between:
OFF (off)—1—2
1 is effective for low compression rates, and 2
is effective for high compression rates.
Section
02
English
Function settings
1 Press M.C. to display the main menu.
2 Turn M.C. to change the menu option
and press to select FUNCTION.
7
En
Page 8
1
Section
02
Operating this unit
Operating this unit
3 Turn M.C. to select the function.
After selecting, perform the following procedures to set the function.
Play mode (repeat play)
1 Press M.C. to select a repeat play range.
! Repeat One – Repeat the current song
! Repeat All – Repeat all songs in the se-
lected list
Shuffle mode (shuffle)
1 Press M.C. to select your favorite setting.
! Shuffle Songs – Play back songs in the se-
lected list in random order.
! Shuffle Albums – Play back songs from a
randomly selected album in order.
! Shuffle OFF – Cancel random play.
Shuffle all (shuffle all)
1 Press M.C. to turn shuffle all on.
To turn off, set Shuffle mode in the FUNC-
TION menu to off.
Link play (link play)
1 Push M.C. left or right to change the mode;
press to select.
For details about the settings, refer to Playing
songs related to the currently playing song on
the previous page.
PAUSE (pause)
1 Press M.C. to pause or resume.
Audiobooks (audiobook speed)
1 Press M.C. to select your favorite setting.
! Faster – Playback at a speed faster than
normal
! Normal – Playback at normal speed
! Slower – Playback at a speed slower than
normal
8
En
Sound Retriever (sound retriever)
1 Press M.C. to select the desired setting.
For details, refer to Enhancing compressed
audio and restoring rich sound (sound retriever)
on the previous page.
Notes
! Switching the control mode to iPod pauses
song playback. Operate the iPod to resume
playback.
! The following functions are still accessible
from the unit even if the control mode is set
to iPod/APP.
— Switching the text information (iPod)
— Pausing
— Fast forward/reverse
— Track up/down
— Random play (shuffle)
(list) to use iPod menu
—
— Press M.C. to press the iPod click wheel
— Push M.C. up to turn the iPod click wheel to
the left
— Push M.C. down to turn the iPod click wheel
to the right
! When the control mode is set to iPod/APP,
operations are limited as follows:
— The function settings are not available.
— The browse function cannot be operated from
this unit.
Audio Adjustments
1 Audio display
Shows the audio adjustment status.
Advanced operations using
special buttons
Subwoofer on/off setting
1 Press SW/BASS to select the subwoofer on/off
setting menu.
2 Press M.C. to turn subwoofer output on or off.
3 Push M.C. left or right to select the phase of
subwoofer output.
Subwoofer adjustment
1 Press SW/BASS to select the subwoofer ad-
justment menu.
2 Push M.C. left or right to select the cut-off fre-
quency.
50Hz—63Hz—80Hz—100Hz—125Hz
3 Push M.C. up or down to adjust the output
level of the subwoofer.
Each time M.C. is pushed up or down, subwoofer level increases or decreases. +6 to -24
is displayed as the level is increased or decreased.
Bass boost
1 Press and hold SW/BASS to select the bass
boost setting menu.
2 Push M.C. up or down to select a desired level.
Audio function settings
1 Press M.C. to display the main menu.
2 Turn M.C. to change the menu option
and press to select AUDIO.
3 Turn M.C. to select the audio function.
After selecting, perform the following procedures to set the audio function.
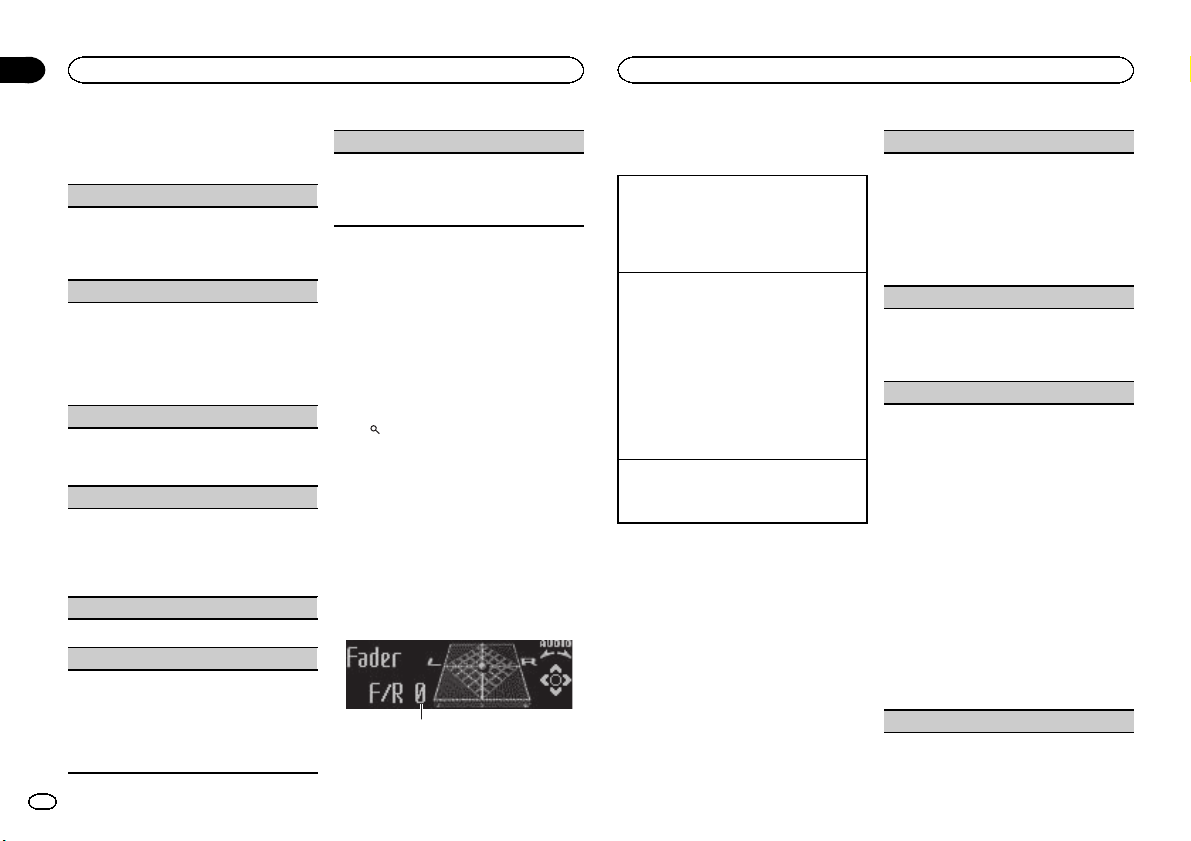
Fader/Balance (fader/balance adjustment)
1 Push M.C. up or down to adjust the front/rear
speaker balance.
! The front/rear speaker balance cannot be
adjusted when the rear output setting is
Rear SP :S/W. Refer to S/W control (rear
output and subwoofer setting) on page 10.
2 Push M.C. left or right to adjust the left/right
speaker balance.
Powerful (equalizer recall)
1 Push M.C. left or right to select an equalizer
curve.
Powerful—Natural—Vocal—Custom1—Custom2—Flat—Super bass
100 Hz (equalizer adjustment)
You can adjust the currently selected equalizer
curve setting as desired. Adjusted equalizer curve
settings are stored in Custom1 or Custom2.
! A separate Custom1 curve can be created for
each source. If you make adjustments when a
curve other than Custom2 is selected, the
equalizer curve settings will be stored in Cus-
tom1.
! A Custom2 curve that is common for all sour-
ces can be created. If you make adjustments
when the Custom2 curve is selected, the Cus-
tom2 curve will be updated.
1 Recall the equalizer curve you want to adjust.
2 Push M.C. left or right to select the equalizer
band to adjust.
100Hz—315Hz—1.25kHz—3.15kHz—8kHz
3 Push M.C. up or down to adjust the equalizer
curve.
+6 to –6 is displayed as the equalizer curve is
increased or decreased.
LOUD (loudness)
Page 9
1
Operating this unit
Loudness compensates for deficiencies in the lowand high-frequency ranges at low volume.
1 Press M.C. to turn loudness on or off.
2 Push M.C. left or right to select the desired set-
ting.
Low (low)—Mid (mid)—High (high)
Sub W.1 (subwoofer on/off setting)
This unit is equipped with a subwoofer output
which can be turned on or off.
1 Press M.C. to turn subwoofer output on or off.
2 Push M.C. left or right to select the phase of
subwoofer output.
Push M.C. left to select reverse phase and Re-
verse appears in the display. Push M.C. right
to select normal phase and Normal appears in
the display.
Sub W.2 (subwoofer adjustment)
The cut-off frequency and output level can be adjusted when the subwoofer output is on.
Only frequencies lower than those in the selected
range are outputted from the subwoofer.
1 Push M.C. left or right to select the cut-off fre-
quency.
50Hz—63Hz—80Hz—100Hz—125Hz
2 Push M.C. up or down to adjust the output
level of the subwoofer.
Each time M.C. is pushed up or down, subwoofer level increases or decreases. +6 to -24
is displayed as the level is increased or decreased.
Bass (bass boost)
1 Push M.C. up or down to select a desired level.
0 to +6 is displayed as the level is increased or
decreased.
HPF (high pass filter adjustment)
When you do not want low sounds from the subwoofer output frequency range to play from the
front or rear speakers, turn on the HPF (high pass
filter). Only frequencies higher than those in the
selected range are output from the front or rear
speakers.
1 Press M.C. to turn high pass filter on or off.
2 Push M.C. left or right to select the cut-off fre-
quency.
50Hz—63Hz—80Hz—100Hz—125Hz
SLA (source level adjustment)
SLA (Source Level Adjustment) lets you adjust the
volume level of each source to prevent radical
changes in volume when switching between sources.
! When selecting FM as the source, you cannot
switch to SLA.
! Settings are based on the FM volume level,
which remains unchanged.
! The AM volume level can also be adjusted with
this function.
1 Push M.C. up or down to adjust the source vol-
ume.
Adjustment range: +4 to –4
Initial Settings
1 Function display
! Shows the function status.
1 Press and hold SRC/OFF until the unit
turns off.
Operating this unit
2 Press M.C. and hold until the initial setting menu appears in the display.
3 Turn M.C. to select the initial setting.
After selecting, perform the following procedures to set the initial setting.
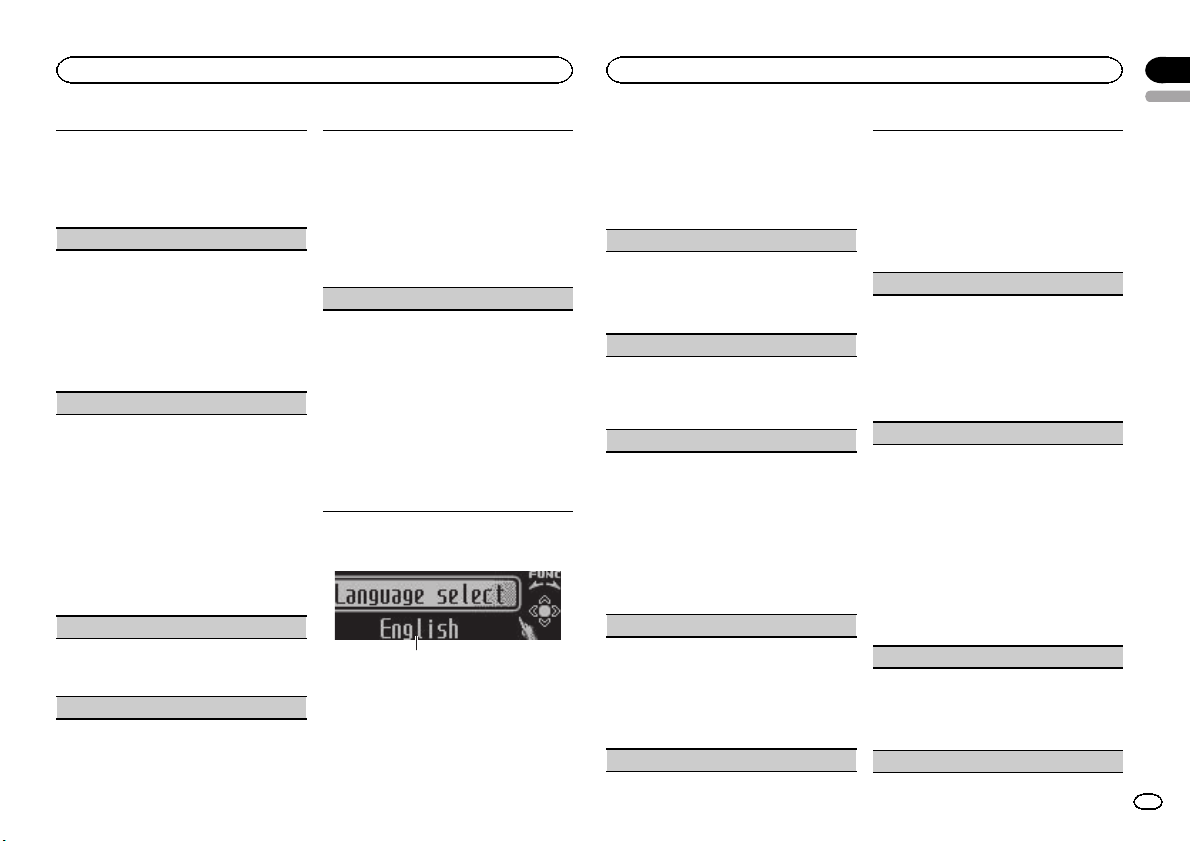
Language select (multi-language)
For your convenience, this unit equips multiple
language display. You can select the language
best suited to your first language.
1 Press M.C. to select the language.
English—Español—Português
Calendar (setting the date)
1 Push M.C. left or right to select the segment of
the calendar display you wish to set.
Year—Day—Month
2 Push M.C. up or down to set the date.
Clock (setting the clock)
1 Push M.C. left or right to select the segment of
the clock display you wish to set.
Hour—Minute
2 Push M.C. up or down to put a clock right.
! You can match the clock to a time signal by
pressing M.C.
! If 00 to 29, the minutes are rounded down.
(e.g., 10:18 becomes 10:00.)
! If 30 to 59, the minutes are rounded up. (e.
g., 10:36 becomes 11:00.)
EngineTime alert (elapsed time display setting)
This setting allows you to measure the length of
time that elapses from when the machine is
turned on and display the amount of elapsed time
per set period.
Also, you will hear alarm.
1 Press M.C. to select your favorite setting.
OFF—15Minutes—30Minutes
FM step (FM tuning step)
The FM tuning step employed by seek tuning can
be switched between 100 kHz, the preset step, and
50 kHz.
If seek tuning is per formed in 50 kHz steps, stations may be tuned in imprecisely. Tune in the stations with manual tuning or use seek tuning
again.
1 Press M.C. to select the FM tuning step.
50kHz (50 kHz)—100kHz (100 kHz)
AM STEP (AM tuning step)
The AM tuning step can be switched between 9
kHz, the preset step, and 10 kHz. When using the
tuner in North, Central or South America, reset
the tuning step from 9 kHz (531 kHz to 1 602 kHz
allowable) to 10 kHz (530 kHz to 1 640 kHz allowable).
1 Press M.C. to select the AM tuning step.
10 KHZ (10 kHz)—9 KHZ (9 kHz)
USB plug&play (plug and play)
This setting allows you to switch your source to
USB/iPod automatically.
1 Press M.C. to turn the plug and play function
on or off.
! ON – When USB storage device/iPod is
connected, the source is automatically
switched to USB/iPod. If you disconnect
your USB storage device/iPod, this unit’s
source is turned off.
! OFF – When USB storage device/iPod is
connected, the source does not switch to
USB/iPod automatically. Please manually
change the source to USB/iPod.
Warning tone (warning tone setting)
If the front panel is not detached from the head
unit within four seconds of turning off the ignition,
a warning tone sounds. You can turn off the warning tone.
1 Press M.C. to turn the warning tone on or off.
AUX (auxiliary input)
Section
02
English
9
En
Page 10

Section
02
Operating this unit
Operating this unit
Activate this setting when using an auxiliary device connected to this unit.
1 Press M.C. to turn auxiliary setting on or off.
Dimmer (dimmer setting)
To prevent the display from being too bright at
night, the display is automatically dimmed when
the car’s headlights are turned on. You can turn
the dimmer on or off.
1 Press M.C. to turn dimmer on or off.
Brightness (display brightness setting)
1 Push M.C. left or right to adjust the brightness
level.
0 to 15 is displayed as the level is increased or
decreased.
! When dimmer is functioning, the bright-
ness level can be adjusted 0 to 10.
S/W control (rear output and subwoofer setting)
This unit’s rear output (rear speaker leads output
and RCA rear output) can be used for full-range
speaker (Rear SP :F.Range) or subwoofer (Rear
SP :S/W) connection. If you switch the rear output
setting to Rear SP :S/W, you can connect a rear
speaker lead directly to a subwoofer without using
an auxiliary amp.
1 Press M.C. to switch the rear output setting.
! When no subwoofer is connected to the
rear output, select Rear SP :F.Range (fullrange speaker).
! When a subwoofer is connected to the rear
output, select Rear SP :S/W (subwoofer).
! Even if you change this setting, there will be
no output unless you turn the subwoofer output on (refer to Sub W.1 (subwoofer on/off set-
ting) on the previous page).
! If you change this setting, subwoofer output in
the audio menu will return to the factory settings.
! Both rear speaker lead outputs and RCA rear
output are switched simultaneously in this setting.
10
En
Demonstration (demo display setting)
1 Press M.C. to turn the demo display on or off.
! You can also turn on or off feature demo by
pressing DISP while this unit is turned off.
For more details, refer to Demo mode on
page 2.
Reverse mode (reverse mode setting)
1 Press M.C. to turn the reverse mode on or off.
! You can also turn on or off reverse mode by
pressing BAND while this unit is turned
off. For more details, refer to Reverse mode
on page 3.
Ever-scroll (scroll mode setting)
When ever scroll is set to ON, recorded text information scrolls continuously in the display. Set to
OFF if you prefer the information to scroll just
once.
1 Press M.C. to turn the ever scroll on or off.
Other Functions
Using an AUX source
1 Insert the stereo mini plug into the AUX
input jack.
2 Press SRC/OFF to select AUX as the
source.
Note
AUX cannot be selected unless the auxiliary setting is turned on. For more details, refer to AUX
(auxiliary input) on the previous page.
Clock display
% Press CLK/DISP OFF to select the desired
setting.
Clock off—clock display—elapsed time display
Switching the display indication
and button illumination
Display indication and button illumination can
be switched on or off.
% Press and hold CLK/DISP OFF.
Pressing and holding CLK/DISP OFF switches
the display indication and button illumination
on or off.
# Even if the display indication is turned off, operation can be conducted. If operation is conducted
while the display indication is off, display will light
up for a few seconds and then turn off again.
Using different entertainment
displays
You can enjoy entertainment displays while listening to each sound source.
1 Press M.C. to display the main menu.
2 Turn M.C. to change the menu option
and press to select ENTERTAINMENT.
3 Turn M.C. to change the display.
Background visual—genre—background picture 1—background picture 2—background picture 3—background picture 4—simple display—
movie screen 1—movie screen 2—calendar
# Genre display changes depending on the genre
of music.
# Genre display may not operate correctly depending on the application used to encode audio files.
Page 11

y
7
h
Installation
Connections
WARNING
! Use speakers over 50 W (output value) and
between 4 W to 8 W (impedance value). Do
not use 1 W to 3 W speakers for this unit.
! The black cable is ground. When installing
this unit or power amp (sold separately),
make sure to connect the ground wire first.
Ensure that the ground wire is properly connected to metal parts of the car ’s body. The
ground wire of the power amp and the one of
this unit or any other device must be connected to the car separately with different
screws. If the screw for the ground wire loosens or falls out, it could result in fire, generation of smoke or malfunction.
Ground wire
Other devices
(Another electronic
device in the car)
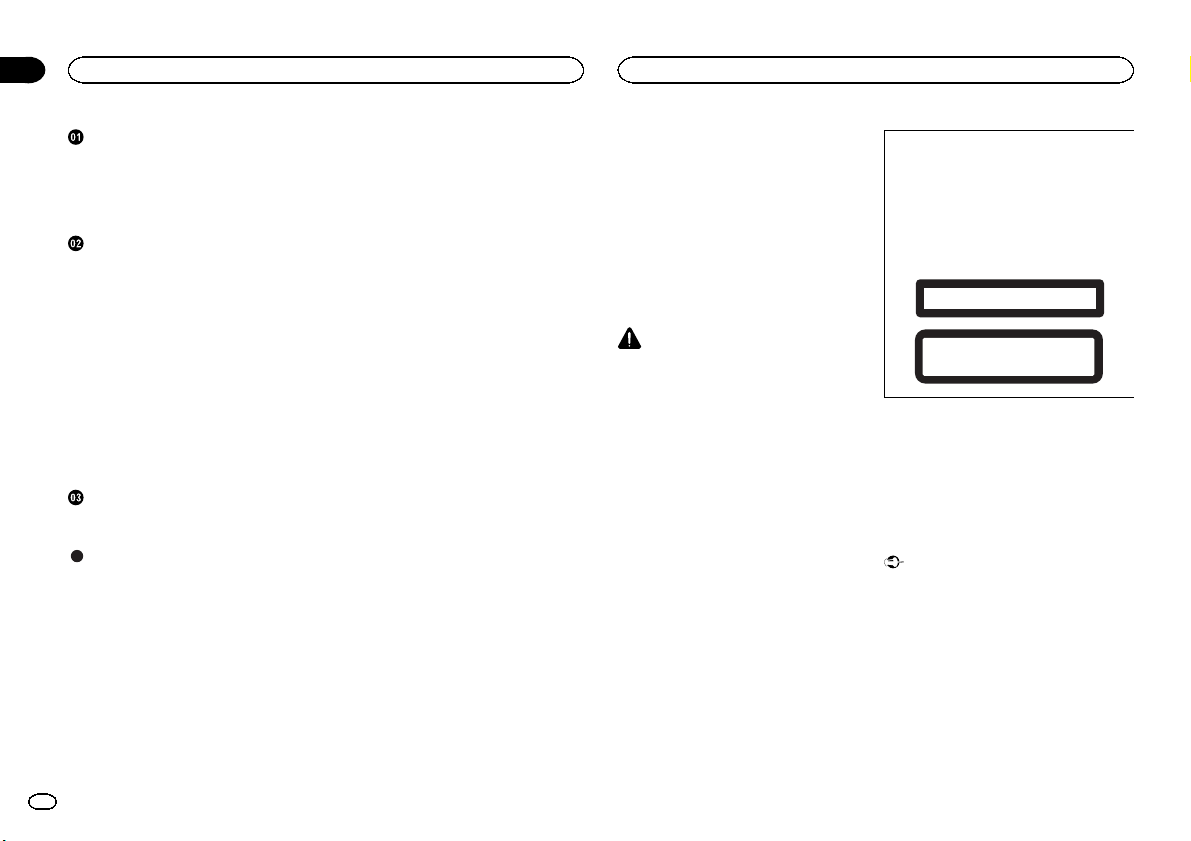
Important
! When installing this unit in a vehicle without
an ACC (accessory) position on the ignition
switch, failure to connect the red cable to the
terminal that detects operation of the ignition
key may result in battery drain.
ACC position No ACC position
! Use this unit with a 12-volt battery and nega-
tive grounding only. Failure to do so may result in a fire or malfunction.
POWER AMP
Metal parts of car’s bod
O
F
N
F
O
S
T
A
R
T
! To prevent a short-circuit, overheating or mal-
function, be sure to follow the directions
below.
— Disconnect the negative terminal of the bat-
tery before installation.
— Secure the wiring with cable clamps or adhe-
sive tape. Wrap adhesive tape around wiring
that comes into contact with metal parts to
protect the wiring.
— Place all cables away from moving parts,
such as the gear shift and seat rails.
— Place all cables away from hot places, such
as near the heater outlet.
— Do not connect the yellow cable to the battery
by passing it through the hole to the engine
compartment.
— Cover any disconnected cable connectors
with insulating tape.
— Do not shorten any cables.
— Never cut the insulation of the power cable of
this unit in order to share the power with
other devices. The current capacity of the
cable is limited.
— Use a fuse of the rating prescribed.
— Never wire the negative speaker cable directly
to ground.
— Never band together negative cables of multi-
ple speakers.
! When this unit is on, control signals are sent
through the blue/white cable. Connect this
cable to the system remote control of an external power amp or the vehicle’s auto-antenna relay control terminal (max. 300 mA 12 V
DC). If the vehicle is equipped with a glass
antenna, connect it to the antenna booster
power supply terminal.
! Never connect the blue/white cable to the
power terminal of an external power amp.
Also, never connect it to the power terminal
of the auto antenna. Doing so may result in
battery drain or a malfunction.
Installation
This unit
1 2364 5
1 Antenna input
2 Fuse (10 A)
3 Power cord input
4 Wired remote input
Hard-wired remote control adaptor can be
connected (sold separately).
5 Front output
6 Rear output
7 Subwoofer output
Power cord
Perform these connections when not connecting a rear speaker lead to a subwoofer.
LR
4
F
5
R
1
32
8
6
9
7
a
b
e
f
g
c
d
Perform these connections when using a subwoofer without the optional amplifier.
LR
4
F
i
SW
1 To power cord input
2 Left
3 Right
4 Front speaker
5 Rear speaker
6 White
7 White/black
8 Gray
9 Gray/black
a Green
b Green/black
c Violet
d Violet/black
e Black (chassis ground)
Connect to a clean, paint-free metal location.
f Yellow
Connect to the constant 12 V supply terminal.
g Red
Connect to terminal controlled by ignition
switch (12 V DC).
h Blue/white
Connect to system control terminal of the
power amp or auto-antenna relay control terminal (max. 300 mA 12 V DC).
i Subwoofer (4 Ω)
1
8
6
9
7
a
c
d
b
j
e
a
f
g
k l
h
b
32
c
d
Section
03
English
11
En
Page 12
Section
03
Installation
Installation
j When using a subwoofer of 70 W (2 Ω), be
sure to connect the subwoofer to the violet
and violet/black leads of this unit. Do not
connect anything to the green and green/
black leads.
k Not used.
l Subwoofer (4 Ω)× 2
Notes
! With a 2 speaker system, do not connect any-
thing to the speaker leads that are not connected to speakers.
! Change the initial setting of this unit. Refer
to S/W control (rear output and subwoofer
setting) on page 10.
The subwoofer output of this unit is monaural.
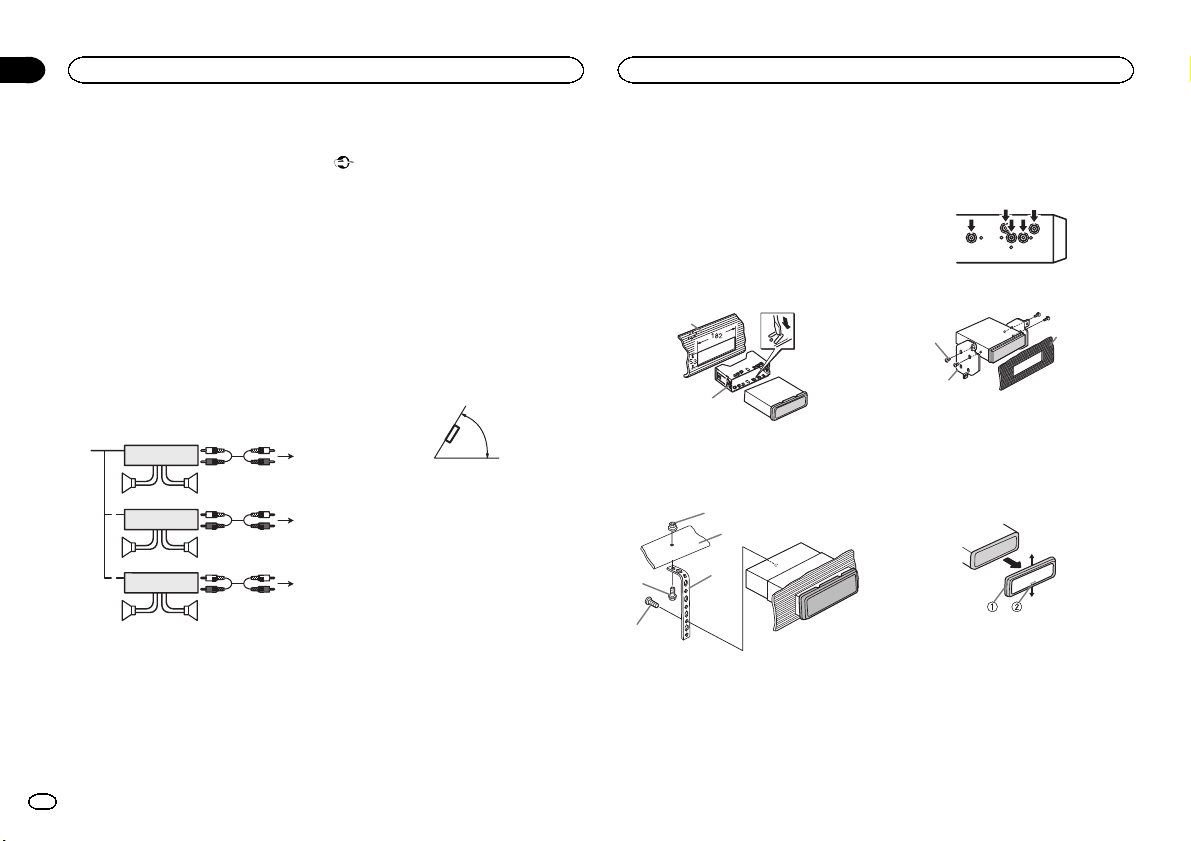
Power amp (sold separately)
Perform these connections when using the optional amplifier.
2
2
2
3
55
3
77
3
99
1
1
1
1 System remote control
Connect to Blue/white cable.
2 Power amp (sold separately)
3 Connect with RCA cables (sold separately)
4 To Rear output
5 Rear speaker
6 To Front output
7 Front speaker
8 To subwoofer output
9 Subwoofer
12
En
Installation
Important
! Check all connections and systems before
final installation.
! Do not use unauthorized parts as this may
cause malfunctions.
! Consult your dealer if installation requires
drilling of holes or other modifications to the
vehicle.
! Do not install this unit where:
— it may interfere with operation of the vehicle.
— it may cause injury to a passenger as a result
of a sudden stop.
! The semiconductor laser will be damaged if
it overheats. Install this unit away from hot
places such as near the heater outlet.
! Optimum performance is obtained when the
unit is installed at an angle of less than 60°.
4
! To ensure proper heat dispersal when using
this unit, make sure you leave ample space
behind the rear panel and wrap any loose ca-
6
8
bles so they are not blocking the vents when
installing the unit.
DIN front/rear mount
This unit can be properly installed using either
front-mount or rear-mount installation.
Use commercially available parts when installing.
60°
DIN Front-mount
1 Insert the mounting sleeve into the dashboard.
For installation in shallow spaces, use the supplied mounting sleeve. If there is enough space,
use the mounting sleeve that came with the vehicle.
2 Secure the mounting sleeve by using a
screwdriver to bend the metal tabs (90°) into
place.
1
2
1 Dashboard
2 Mounting sleeve
3 Install the unit as illustrated.
1
2
4
5
1 Nut
2 Firewall or metal support
3 Metal strap
4 Screw
5 Screw (M4 × 8)
# Make sure that the unit is installed securely in
place. An unstable installation may cause skipping
or other malfunctions.
3
DIN Rear-mount
1 Determine the appropriate position
where the holes on the bracket and the side
of the unit match.
2 Tighten two screws on each side.
1
2
1 Truss screw (5 mm × 8 mm)
2 Mounting bracket
3 Dashboard or console
3
Removing the unit
1 Remove the trim ring.
1 Trim ring
2 Notched tab
! Releasing the front panel allows easier ac-
cess to the trim ring.
! When reattaching the trim ring, point the
side with the notched tab down.
2 Insert the supplied extraction keys into
both sides of the unit until they click into
place.
Page 13
Installation
3 Pull the unit out of the dashboard.
Removing and re-attaching the
front panel
You can remove the front panel to protect your
unit from theft.
Press the detach button and push the front
panel upward and pull it toward you.
For details, refer to Removing the front panel to
protect your unit from theft and Re-attaching the
front panel on page 4.
Securing the front panel
The front panel can be secured with the supplied screw.
1
1 Screw
Additional Information
Troubleshooting
Symptom Cause Action
The display
automatically
returns to the
ordinary display.
The repeat
play range
changes unexpectedly.
A subfolder is
not played
back.
NO XXXX appears when a
display is
changed (NO
TITLE, for example).
The display is
illuminated
when the unit
is turned off.
You did not perform any operation within
about 30 seconds.
Depending on
the repeat play
range, the selected range
may change
when another
folder or track is
being selected
or during fast
forwarding/reversing.
Subfolders cannot be played
when Folder re-
peat (folder repeat) is
selected.
There is no embedded text information.
Demo mode is
on.
Perform operation
again.
Select the repeat
play range again.
Select another repeat play range.
Switch the display
or play another
track/file.
! Press DISP/
/SCRL to cancel
demo mode.
! Turn off the
demo display setting.
Symptom Cause Action
The unit is
malfunctioning.
There is interference.
You are using a
device, such as
a cellular
phone, that
transmits electric waves near
the unit.
Move electrical
devices that may
be causing the interference away
from the unit.
Error messages
When you contact your dealer or your nearest
Pioneer Service Center, be sure to note the error
message.
Built-in CD Player
Message Cause Action
ERROR-07,
11, 12, 17, 30
ERROR-10,
11, 12, 15,
17, 30, A0
ERROR-15 The inserted
ERROR-23 Unsupported
FORMAT
READ
The disc is dirty. Clean the disc.
The disc is
scratched.
There is an elec-
trical or mechanical error.
disc is blank.
CD format.
Sometimes
there is a delay
between the
start of playback
and when you
start to hear any
sound.
Replace the disc.
Turn the ignition
switch OFF and
back ON, or
switch to a different source, then
back to the CD
player.
Replace the disc.
Replace the disc.
Wait until the
message disappears and you
hear sound.
Appendix
English
13
En
Page 14

Appendix
Additional Information
Additional Information
Message Cause Action
NO AUDIO The inserted
SKIPPED The inserted
PROTECT All the files on
External storage device (USB, SD)/iPod
Message Cause Action
NO DEVICE When plug and
FORMAT
READ
NO AUDIO There are no
disc does not
contain any
playable files.
disc contains
DRM protected
files.
the inserted
disc are embedded with
DRM.
play is off, no
USB storage device or iPod is
connected.
Sometimes
there is a delay
between the
start of playback
and when you
start to hear any
sound.
songs.
The connected
USB storage device has security enabled.
Replace the disc.
Replace the disc.
Replace the disc.
! Turn the plug
and play on.
! Connect a compatible USB storage device/iPod.
Wait until the
message disappears and you
hear sound.
Transfer the audio
files to the USB
storage device
and connect.
Follow the USB
storage device instructions to disable the security.
Message Cause Action
SKIPPED The connected
PROTECT All the files in
NOT COMPATIBLE
USB storage device contains
files embedded
with Windows
Mediaä DRM 9/
10.
the USB storage
device are embedded with
Windows Media
DRM 9/10.
The connected
USB storage device is not supported by this
unit.
Non-compatible
iPod
Non-compatible
SD storage device
Play an audio file
not embedded
with Windows
Media DRM 9/10.
Transfer audio
files not embedded with
Windows Media
DRM 9/10 to the
USB storage device and connect.
! Connect a USB
Mass Storage
Class compliant
device.
! Disconnect
your device and
replace it with a
compatible USB
storage device.
Disconnect your
device and replace it with a
compatible iPod.
Remove your device and replace it
with a compatible
SD storage device.
Message Cause Action
CHECK USB The USB con-
nector or USB
cable has shortcircuited.
The connected
USB storage device consumes
more than 500
mA (maximum
allowable current).
The iPod operates correctly
but does not
charge.
Check that the
USB connector or
USB cable is not
caught in something or damaged.
Disconnect the
USB storage device and do not
use it. Turn the
ignition switch to
OFF, then to ACC
or ON and then
connect only
compliant USB
storage devices.
Make sure the
connection cable
for the iPod has
not shorted out
(e.g., not caught
in metal objects).
After checking,
turn the ignition
switch OFF and
back ON, or disconnect the iPod
and reconnect.
Message Cause Action
ERROR-19 Communication
ERROR-23 USB storage de-
failed.
iPod failure. Disconnect the
vice was not formatted with
FAT12, FAT16 or
FAT32.
! Perform one of
the following operations.
–Turn the ignition
switch OFF and
back ON.
–Disconnect or
eject the external
storage device.
–Change to a different source.
Then, return to
the USB or SD
source.
! Disconnect the
cable from the
iPod. Once the
iPod’s main
menu is displayed, reconnect
the iPod and reset
it.
cable from the
iPod. Once the
iPod’s main
menu is displayed, reconnect
the iPod and reset
it.
USB storage device should be formatted with
FAT12, FAT16 or
FAT32.
14
En
Page 15
Additional Information
Appendix
Additional Information
English
Message Cause Action
ERROR-16 The iPod firm-
STOP There are no
Not found No related
ware version is
old.
iPod failure. Disconnect the
songs in the
current list.
songs.
Update the iPod
version.
cable from the
iPod. Once the
iPod’s main
menu is displayed, reconnect
the iPod and reset
it.
Select a list that
contains songs.
Transfer songs to
the iPod.
Handling guidelines
Discs and player
Use only discs that feature either of the following
two logos.
Use 12-cm discs. Do not use 8-cm discs or an
adapter for 8-cm discs.
Use only conventional, fully circular discs. Do not
use shaped discs.
Do not insert anything other than a CD into the
CD loading slot.
Do not use cracked, chipped, warped, or otherwise damaged discs as they may damage the player.
Unfinalized CD-R/CD-RW discs cannot be played
back.
Do not touch the recorded surface of the discs.
Store discs in their cases when not in use.
Do not attach labels, write on or apply chemicals
to the surface of the discs.
To clean a CD, wipe the disc with a soft cloth outward from the center.
Condensation may temporarily impair the player ’s
performance. Let it rest for about one hour to adjust to a warmer temperature. Also, wipe any
damp discs off with a soft cloth.
Playback of discs may not be possible because of
disc characteristics, disc format, recorded application, playback environment, storage conditions,
and so on.
Road shocks may interrupt disc playback.
External storage device (USB, SD)
Address any questions you have about your external storage device (USB, SD) to the manufacturer
of the device.
Do not leave the external storage device (USB, SD)
in places with high temperatures.
Depending on the external storage device (USB,
SD), the following problems may occur.
! Operations may vary.
! The storage device may not be recognized.
! Files may not be played back properly.
USB storage device
Connections via USB hub are not supported.
Do not connect anything other than a USB storage device.
Firmly secure the USB storage device when driving. Do not let the USB storage device fall onto the
floor, where it may become jammed under the
brake or accelerator pedal.
Depending on the USB storage device, the following problems may occur.
! The device may generate noise in the radio.
SD memory card
This unit supports only the following types of SD
memory cards.
! SD
! miniSD
! microSD
! SDHC
Keep the SD memor y card out of the reach of children. Should the SD memory card be swallowed,
consult a doctor immediately.
Do not touch the connectors of the SD memor y
card directly with your fingers or with any metal
device.
Do not insert anything other than an SD memory
card into the SD card slot. If a metal object (such
as a coin) is inserted into the slot, the internal circuits may break and cause malfunctions.
When inserting a miniSD or microSD, use an
adapter. Do not use an adapter which has metal
parts other than the connectors exposed.
Do not insert a damaged SD memor y card (e.g.
warped, label peeled off) as it may not be ejected
from the slot.
Do not try to force an SD memory card into the SD
card slot as the card or this unit may be damaged.
When ejecting an SD memor y card, press it and
hold it until it clicks. It is dangerous for you to release your finger immediately after you press on
the card as the card may shoot out of the slot and
hit you in the face, etc. If the card shoots out of
the slot, it may become lost.
iPod
To ensure proper operation, connect the dock connector cable from the iPod directly to this unit.
Firmly secure the iPod when driving. Do not let the
iPod fall onto the floor, where it may become
jammed under the brake or accelerator pedal.
About iPod settings
! When an iPod is connected, this unit changes
the EQ (equalizer) setting of the iPod to off in
order to optimize the acoustics. When you disconnect the iPod, the EQ returns to the original
setting.
! You cannot set Repeat to off on the iPod when
using this unit. Repeat is automatically
changed to All when the iPod is connected to
this unit.
Incompatible text saved on the iPod will not be displayed by the unit.
DualDiscs
DualDiscs are two-sided discs that have a recordable CD for audio on one side and a recordable
DVD for video on the other.
Since the CD side of DualDiscs is not physically
compatible with the general CD standard, it may
not be possible to play the CD side with this unit.
15
En
Page 16

Appendix
Additional Information
Additional Information
Frequent loading and ejecting of a DualDisc may
result in scratches on the disc. Serious scratches
can lead to playback problems on this unit. In
some cases, a DualDisc may become stuck in the
disc loading slot and will not eject. To prevent this,
we recommend you refrain from using DualDisc
with this unit.
Please refer to the information from the disc manufacturer for more detailed information about
DualDiscs.
CAUTION
Do not leave the discs/external storage device
(USB, SD) or iPod in places with high temperatures.
Compressed audio
compatibility (disc, USB, SD)
WMA
File extension: .wma
Bit rate: 48 kbps to 320 kbps (CBR), 48 kbps to 384
kbps (VBR)
Sampling frequency: 32 kHz, 44.1 kHz, 48 kHz
Windows Media Audio Professional, Lossless,
Voice/DRM Stream/Stream with video: Not compatible
MP3
File extension: .mp3
Bit rate: 8 kbps to 320 kbps (CBR), VBR
Sampling frequency: 8 kHz to 48 kHz (32 kHz,
44.1 kHz, 48 kHz for emphasis)
Compatible ID3 tag version: 1.0, 1.1, 2.2, 2.3, 2.4
(ID3 tag Version 2.x is given priority over Version 1.
x.)
16
En
M3u playlist: Not compatible
MP3i (MP3 interactive), mp3 PRO: Not compatible
WAV
File extension: .wav
Quantization bits: 8 and 16 (LPCM), 4 (MS
ADPCM)
Sampling frequency: 16 kHz to 48 kHz (LPCM),
22.05 kHz and 44.1 kHz (MS ADPCM)
AAC
Compatible format: AAC encoded by iTunes
File extension: .m4a
Sampling frequency: 11.025 kHz to 48 kHz
Transmission rate: 16 kbps to 320 kbps, VBR
Apple Lossless: Not compatible
AAC file bought from the iTunes Store (.m4p file
extension): Not compatible
Supplemental information
Only the first 32 characters can be displayed as a
file name (including the file extension) or a folder
name.
This unit may not operate correctly depending on
the application used to encode WMA files.
There may be a slight delay when starting playback of audio files embedded with image data.
Disc
Playable folder hierarchy: up to eight tiers (A practical hierarchy is less than two tiers.)
Playable folders: up to 99
Playable files: up to 999
File system: ISO 9660 Level 1 and 2, Romeo, Joliet
Multi-session playback: Compatible
Packet write data transfer: Not compatible
Regardless of the length of blank sections between the songs from the original recording, compressed audio discs play with a short pause
between songs.
External storage device (USB, SD)
Playable folder hierarchy: up to eight tiers (A practical hierarchy is less than two tiers.)
Playable folders: up to 1 500
Playable files: up to 15 000
Playback of copyright-protected files: Not compatible
Partitioned external storage device (USB, SD):
Only the first playable partition can be played.
There may be a slight delay when starting playback of audio files on a USB storage device with
numerous folder hierarchies.
SD memory card
There is no compatibility for Multi Media Cards
(MMC).
Compatibility with all SD memor y cards is not
guaranteed.
This unit is not compatible with SD-Audio.
CAUTION
Pioneer accepts no responsibility for data lost
on USB memory/USB portable audio players/SD
memory cards/SDHC memory cards, even if that
data is lost while this unit is used.
iPod compatibility
This unit supports only the following iPod models.
Supported iPod software versions are shown
below. Older versions may not be supported.
! iPhone 4 (software version 4.0)
! iPhone 3GS (software version 4.0)
! iPhone 3G (software version 4.0)
! iPhone (software version 3.1.3)
! iPod nano 5th generation (software version
1.0.2)
! iPod nano 4th generation (software version
1.0.4)
! iPod nano 3rd generation (software version
1.1.3)
! iPod nano 2nd generation (software version
1.1.3)
! iPod nano 1st generation (software version
1.3.1)
! iPod touch 3rd generation (software version
4.0)
! iPod touch 2nd generation (software version
4.0)
! iPod touch 1st generation (software version
3.1.3)
! iPod classic 160GB (software version 2.0.4)
! iPod classic 120GB (software version 2.0.1)
! iPod classic (software version 1.1.2)
! iPod 5th generation (software version 1.3)
Depending on the generation or version of the
iPod, some functions may not be available.
Operations may vary depending on the software
version of iPod.
Page 17
Additional Information
When using an iPod, an iPod Dock Connector to
USB Cable is required.
A Pioneer CD-IU50 interface cable is also available. For details, consult your dealer.
About the file/format compatibility, refer to the
iPod manuals.
Audio Book, Podcast: Compatible
CAUTION
Pioneer accepts no responsibility for data lost
on the iPod, even if that data is lost while this
unit is used.
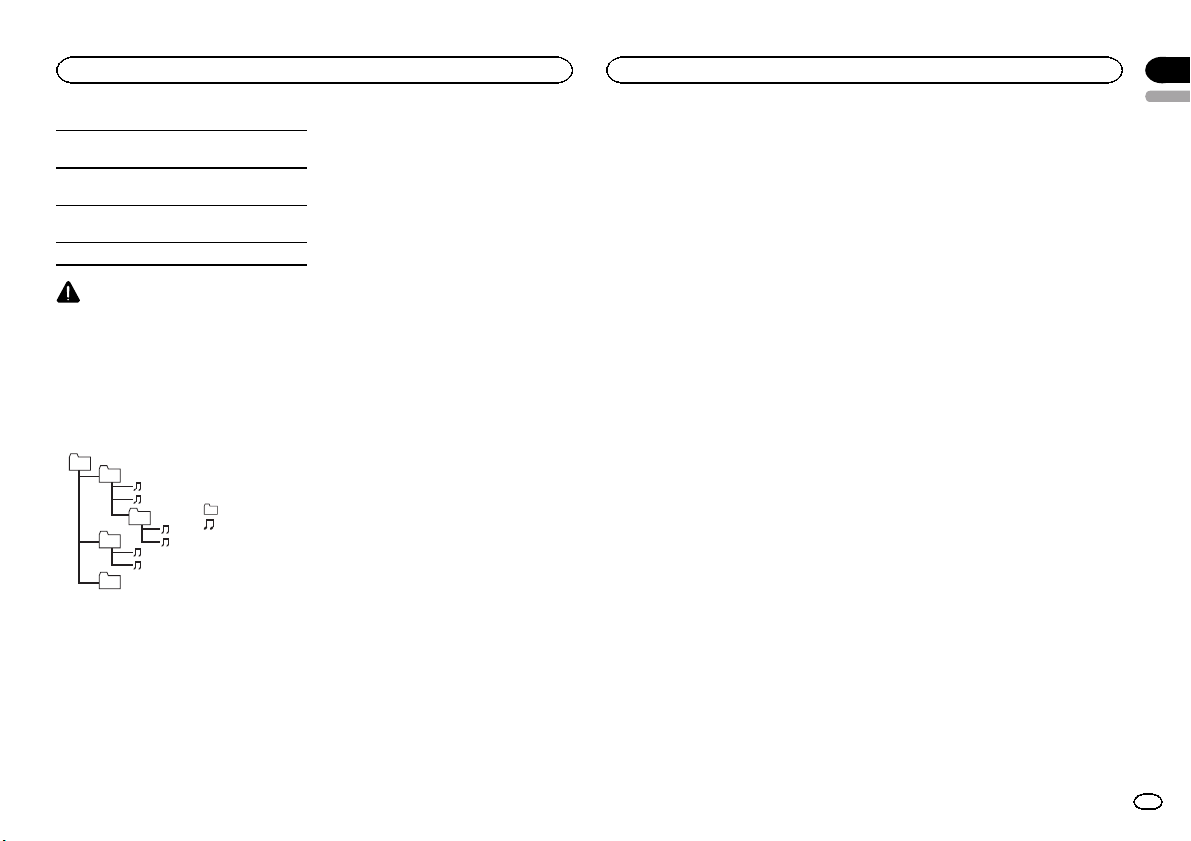
Sequence of audio files
The user cannot assign folder numbers and
specify playback sequences with this unit.
Example of a hierarchy
01
02
03
04
05
Level 1 Level 2 Level 3 Level 4
Disc
Folder selection sequence or other operation
may differ depending on the encoding or writing
software.
External storage device (USB, SD)
The playback sequence is the same as the recorded sequence in the external storage device
(USB, SD).
: Folder
: Compressed
audio file
01 to 05: Folder
number
1 to 6 : Playback
sequence
To specify the playback sequence, the following
method is recommended.
1 Create a file name that includes numbers
that specify the playback sequence (e.g.,
001xxx.mp3 and 099yyy.mp3).
2 Put those files into a folder.
3 Save the folder that contains the files to the
external storage device (USB, SD).
However,depending on the system environment,
you may not be able to specify the playback sequence.
For USB portable audio players, the sequence is
different and depends on the player.
Copyright and trademark
iTunes
Apple and iTunes are trademarks of Apple Inc.,
registered in the U.S. and other countries.
MP3
Supply of this product only conveys a license for
private, non-commercial use and does not convey a license nor imply any right to use this product in any commercial (i.e. revenue-generating)
real time broadcasting (terrestrial, satellite,
cable and/or any other media), broadcasting/
streaming via internet, intranets and/or other
networks or in other electronic content distribution systems, such as pay-audio or audio-on-demand applications. An independent license for
such use is required. For details, please visit
http://www.mp3licensing.com.
WMA
Windows Media is either a registered trademark
or trademark of Microsoft Corporation in the
United States and/or other countries.
This product includes technology owned by
Microsoft Corporation and cannot be used or
distributed without a license from Microsoft
Licensing, Inc.
Additional Information
SD memory card
SD Logo is a trademark of SD-3C, LLC.
miniSD Logo is a trademark of SD-3C, LLC.
microSD Logo is a trademark of SD-3C, LLC.
SDHC Logo is a trademark of SD-3C, LLC.
iPod & iPhone
iPhone, iPod, iPod classic, iPod nano, and iPod
touch are trademarks of Apple Inc., registered in
the U.S. and other countries.
“Made for iPod” and “Made for iPhone” mean
that an electronic accessory has been designed
to connect specifically to iPod or iPhone, respectively, and has been certified by the developer to
meet Apple performance standards.
Apple is not responsible for the operation of this
device or its compliance with safety and regulatory standards.
Appendix
English
17
En
Page 18

Appendix
Additional Information
Additional Information
Specifications
General
Rated power source ......... 14.4 V DC
Grounding system ............ Negative type
Maximum current consum ption
................................... 10.0 A
Dimensions (W × H × D):
DIN
Chassis .............. 178mm × 50 mm ×
Nose .................. 188 mm × 58 mm ×
D
Chassis .............. 178mm × 50 mm ×
Nose .................. 170 mm × 46 mm ×
Weight ............................. 1.4 kg
Audio
Maximum power output ... 50 W × 4
Continuous power output
................................... 22W × 4 (50 Hz to 15 000 Hz,
Load impedance .............. 4 W to 8 W ×4
Preout maximum output level
................................... 4.0 V
Equalizer (5-Band Graph ic Equalizer):
Frequency ................. 100/315/1.25k/3.15k/8k Hz
Gain ......................... ±12 dB
HPF:
Frequency ................. 50/63/80/100/125 Hz
Slope ........................ –12 dB/oct
Subwoofer (mono):
Frequency ................. 50/63/80/100/125 Hz
Slope ........................ –18 dB/oct
Gain ......................... +6 dB to –24 dB
Phase ....................... Normal/Reverse
Bass boo st:
Gain ......................... +12 dB to 0 dB
(allowable voltage range: 12.0
V to 14.4 V DC)
165 mm
18 mm
165 mm
18 mm
50 W × 2/4 W + 70 W × 1/2 W
(for subwoofer)
5 % THD, 4 W load, both channels driven)
4 W to 8 W ×2+2W ×1
CD player
System ............................ Compact disc audio system
Usable discs .................... Compact disc
Signal-to-noise ratio ......... 94 dB (1 kHz) (IEC-A network)
Number of channels ........ 2 (stereo)
MP3 decoding format ...... MPEG -1 & 2 Audio Layer 3
WMA decoding format ..... Ver.7, 7.1,8, 9, 10, 11, 12 (2ch
AAC decoding format ....... MPEG-4 AAC (iTunes encoded
WAV signal format ........... Linear PCM & MS ADPCM
USB
USB standard specific ation
................................... USB 2.0 full speed
Maximum current supply
................................... 500 mA
USB Class ....................... MSC (Mass Storage Class)
File system ....................... FAT12, FAT16, FAT32
MP3 decoding format ...... MPEG -1 & 2 Audio Layer 3
WMA decoding format ..... Ver.7, 7.1,8, 9, 10, 11, 12 (2ch
AAC decoding format ....... MPEG-4 AAC (iTunes encoded
WAV signal format ........... Linear PCM & MS ADPCM
SD
Compatible physical format
................................... Version 2.00
Maximum memory capacity
................................... 32 GB (for SD and SDHC)
File system ....................... FAT12, FAT16, FAT32
MP3 decoding format ...... MPEG -1 & 2 Audio Layer 3
WMA decoding format ..... Ver.7, 7.1,8, 9, 10, 11, 12 (2ch
AAC decoding format ....... MPEG-4 AAC (iTunes encoded
WAV signal format ........... Linear PCM & MS ADPCM
audio)
(Windows Media Player)
only) (.m4a)
(Ver.9.2 and earlier)
(Non-compressed)
audio)
(Windows Media Player)
only) (.m4a)
(Ver.9.2 and earlier)
(Non-compressed)
audio)
(Windows Media Player)
only) (.m4a)
(Ver.9.2 and earlier)
(Non-compressed)
FM tuner
Frequency range .............. 87.5 MHz to 108.0 MHz
Usable sensitiv ity ............. 9 dBf (0.8 µV/75 W, mono, S/N:
Signal-to-noise ratio ......... 72 dB (IEC-A network)
AM tuner
Frequency range .............. 531 kHz to 1 602 kHz (9 kHz)
Usable sensitiv ity ............. 25 µV (S/N: 20 dB)
Signal-to-noise ratio ......... 62 dB (IEC-A network)
Infrared remote control
Wavelength ...................... 940 nm ±50 nm
Output ............................. typ; 12 mw/sr per Infrared LED
30 dB)
530 kHz to 1 640 kHz (10 kHz)
Note
Specifications and the design are subject to
modifications without notice.
18
En
Page 19

English
19En
Page 20
Sección
01
Índice
Antes de comenzar
Antes de comenzar
Acerca de esta unidad 20
En caso de problemas 20
Modo demo 20
Modo inverso 21
Acerca de este manual 21
Utilización de esta unidad
Unidad principal 21
Mando a distancia 21
Funciones básicas 22
Uso y cuidado del mando a distancia 22
Las operaciones del menú son idénticas
para los ajustes de función/ajustes de
audio/ajustes iniciales/listas 23
Sintonizador 23
CD/CD-R/CD-RW y dispositivos de
almacenamiento externos (USB,
SD) 23
iPod 25
Ajustes de audio 26
Ajustes iniciales 28
Otras funciones 29
Instalación
Conexiones 30
Instalación 31
Información adicional
Solución de problemas 32
Mensajes de error 32
Pautas para el manejo 34
Compatibilidad con audio comprimido
(disco, USB, SD) 35
Compatibilidad con iPod 36
Secuencia de archivos de audio 36
Copyright y marcas registradas 37
Especificaciones 37
Gracias por haber adquirido este producto
PIONEER.
Lea con detenimiento este manual antes de utilizar el producto por primera vez para que pueda
darle el mejor uso posible. Es muy importante
que lea y cumpla con la información que aparece bajo los mensajes de ADVERTENCIA y
PRECAUCIÓN en este manual. Una vez leído,
guarde el manual en un lugar seguro y a mano
para poder consultarlo en el futuro.
Acerca de esta unidad
PRECAUCIÓN
! No permita que esta unidad entre en contac-
to con líquidos, ya que puede producir una
descarga eléctrica. Además, el contacto con
líquidos puede causar daños en la unidad,
humo y recalentamiento.
! Mantenga siempre el volumen lo suficiente-
mente bajo como para poder escuchar los
sonidos que provienen del exterior.
! Evite la exposición a la humedad.
! Si se desconecta o se descarga la batería,
todas las memorias preajustadas se borrarán.
PRECAUCIÓN
Este producto contiene un diodo de láser de
clase 1, clasificado en la directiva IEC 608251:2007 concerniente a la Seguridad de los productos láser. Para garantizar la seguridad
continua, no extraiga ninguna tapa ni intente
acceder a la parte interna del producto. Solicite a personal cualificado que realice todos los
trabajos de mantenimiento.
PRODUCTO LASER CLASE 1
PRECAUCIÓN—LOS PRODUCTOS LÁSER CLASE 1M
EMITEN RADIACIÓN INVISIBLE UNA VEZ ABIERTOS. NO
LOS MIRE DIRECTAMENTE CON INSTRUMENTOS ÓPTICOS.
En caso de problemas
En caso de que esta unidad no funcione correctamente, póngase en contacto con su concesionario o con el centro de servicio PIONEER
autorizado más cercano.
Modo demo
Importante
! Si no se conecta el cable rojo (ACC) de esta
unidad a un terminal acoplado con las funciones de activación/desactivación de la
llave de encendido del automóvil, se puede
descargar la batería.
! Recuerde que si este modo de demostración
sigue funcionando cuando el motor del vehículo está apagado, se puede descargar la
batería.
20
Es
Page 21

89f abdce
g
h
o
m
f
a
i
l
knj
Antes de comenzar
Utilización de esta unidad
Sección
02
La demostración se inicia automáticamente
cuando la llave de encendido del automóvil está
en ACC o en ON mientras la unidad está apagada. Aunque la unidad se apague, el modo de demostración seguirá activado. Para cancelar el
modo de demostración, pulse DISP/
Pulse DISP/
utiliza el modo de demostración cuando la llave
de encendido está en ACC, se puede descargar
la batería.
/SCRL de nuevo para iniciarlo. Si
/SCRL.
Modo inverso
Si no se realiza ninguna operación en unos 30
segundos, las indicaciones de la pantalla comienzan a invertirse y siguen haciéndolo cada
10 segundos. Al pulsar el botón BAND/ESC
cuando se apaga la unidad mientras la llave de
encendido está en ACC u ON, se cancelará el
modo inverso. Vuelva a pulsar el botón
BAND/ESC para iniciar el modo inverso.
Acerca de este manual
En las siguientes instrucciones, las memorias
USB, los reproductores de audio USB portátiles
y las tarjetas de memoria SD se denominan conjuntamente “dispositivos de almacenamiento externo (USB, SD)”. Cuando se habla únicamente
de las memorias USB y de los reproductores de
audio USB portátiles, se denominarán conjuntamente “dispositivos de almacenamiento USB”.
En este manual, se utiliza el término “iPod” para
denominar tanto a iPod como a iPhone.
Unidad principal
1 2 3 4
Parte Parte
1 CLK/DISP OFF 9
2 SW/BASS a BAND/ESC
3 S.Rtrv b
MULTI-CONTROL
4
(M.C.)
Ranura de carga
5
de discos
6 h (expulsar) e DISP/
7 Puerto USB f SRC/OFF
8 Botón de soltar g
5
c
d
Conector de entrada AUX (conector estéreo de
3,5 mm)
(lista)
(iPod)/LOC
(aleatorio)
Ranura para la
tarjeta de memoria SD
Extraiga el panel
delantero para acceder a la ranura
de la tarjeta de
memoria SD.
6 7
/SCRL
PRECAUCIÓN
Utilice un cable USB Pioneer opcional (CDU50E) para conectar el reproductor de audio
USB / memoria USB, ya que cualquier dispositivo conectado directamente a la unidad sobresaldrá de ésta y podría resultar peligroso.
No utilice productos no autorizados.
Mando a distancia
Parte Operación
h VOLUME
i MUTE
j a/b/c/d
k AUDIO
Pulse para aumentar o disminuir el volumen.
Pulse para silenciar. Pulse de
nuevo para desactivar el silenciamiento.
Pulse estos botones para utilizar los controles de sintonización por búsqueda manual,
avance rápido, retroceso y
búsqueda de pista.
También se utilizan para controlar las funciones.
Pulse para seleccionar una
función de audio.
Español
21
Es
Page 22
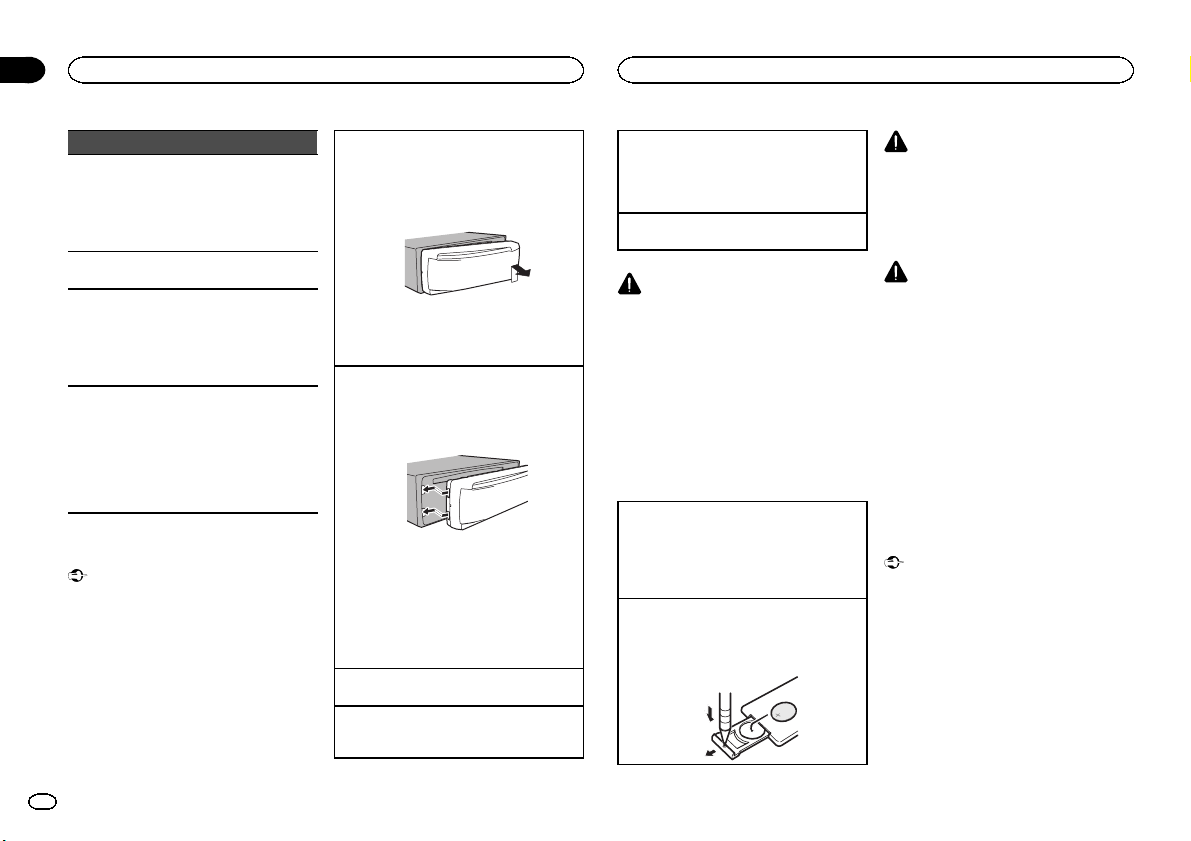
Sección
02
Utilización de esta unidad
Utilización de esta unidad
Parte Operación
Pulse este botón para seleccionar diferentes visualizacio-
l DISP/SCRL
m e
n FUNCTION
o LIST/ENTER
nes.
Manténgalo pulsado para
desplazarse por la información de texto.
Pulse este botón para pausar
o reanudar.
Presione este botón para seleccionar las funciones.
Mantenga pulsado este botón
para acceder al menú de
ajustes iniciales si las fuentes
están desactivadas.
Pulse para visualizar la lista
de título del disco, la lista de
título de la pista, la lista de
carpetas o la lista de archivos
según la fuente.
Cuando esté en el menú de
funcionamiento, pulse para
controlar las funciones.
Funciones básicas
Importante
! Proceda con cuidado al retirar o colocar el
panel delantero.
! Evite someter el panel delantero a impactos
excesivos.
! Mantenga el panel delantero fuera del alcan-
ce de la luz solar directa y no la exponga a
temperaturas elevadas.
! Para evitar que el dispositivo o el interior del
vehículo sufran daños, retire todos los cables
o dispositivos conectados al panel delantero
antes de extraerlo.
Extracción del panel delantero para proteger la
unidad contra robo
1 Pulse el botón de soltar para liberar el panel
delantero.
2 Empuje el panel delantero hacia arriba y tire
de él hacia sí.
3 Mantenga siempre el panel delantero que se
ha extraído en su medio de protección, como
por ejemplo su caja protectora.
Colocación del panel delantero
1 Deslice la carátula hacia la izquierda.
Inserte las pestañas que hay en la parte izquierda de la unidad principal dentro de las ranuras del panel delantero.
2 Pulse el lado derecho del panel delantero
hasta que se ajuste correctamente.
Si no logra encajar adecuadamente el panel
delantero a la unidad principal, colóquelo en
la unidad principal de la forma correcta. No
apriete ni use la fuerza para encajarlo, ya que
puede provocar daños en el panel delantero o
en la unidad principal.
Encendido de la unidad
1 Pulse SRC/OFF para encender la unidad.
Apagado de la unidad
1 Mantenga pulsado SRC/OFF hasta que se apa-
gue la unidad.
Selección de una fuente
1 Pulse SRC/OFF para desplazarse entre:
TUNER (sintonizador)—CD (reproductor de
CD incorporado)—USB (USB)/iPod (iPod)—
SD (Tarjeta de memoria SD)—AUX (AUX)
Ajuste del volumen
1 Haga girar M.C. para ajustar el volumen.
PRECAUCIÓN
Por motivos de seguridad, detenga su vehículo
antes de extraer el panel delantero.
Nota
Si el cable azul/blanco de esta unidad está conectado al terminal de control del relé de la antena automática del vehículo, la antena se
extiende cuando se enciende el equipo. Para retraer la antena, apague la fuente.
Uso y cuidado del mando a
distancia
Uso del mando a distancia
1 Apunte el mando a distancia hacia el panel
delantero para que funcione la unidad.
Al utilizar el mando a distancia por primera
vez, extraiga la película que sobresale de la
bandeja.
Reemplazo de la batería
1 Deslice y extraiga la bandeja de la parte poste-
rior del mando a distancia.
2 Inserte la pila con los polos positivo (+) y ne-
gativo (– ) en la dirección correcta.
ADVERTENCIA
! Mantenga la pila fuera del alcance de los
niños. En caso de ingestión accidental de
ésta, consulte a un médico de inmediato.
! Las pilas o baterías no deben exponerse a
altas temperaturas ni fuentes de calor como
el sol, el fuego, etc.
PRECAUCIÓN
! Utilice una sola batería de litio CR2025
(3 V).
! Extraiga la pila si no piensa utilizar el mando
a distancia durante un mes o más tiempo.
! Si la pila se sustituye de forma incorrecta
existe cierto riesgo de explosión. Reemplácela sólo por una del mismo tipo o equivalente.
! No manipule la pila con herramientas metáli-
cas.
! No guarde la pila junto a objetos metálicos.
! En el caso de que se produzcan fugas de la
pila, limpie completamente el mando a distancia e instale una pila nueva.
! Para desechar las pilas usadas, cumpla con
los reglamentos gubernamentales o las normas ambientales pertinentes de las instituciones públicas aplicables en su país/zona.
Importante
! No guarde el mando a distancia en lugares
expuestos a altas temperaturas o a la luz
solar directa.
! Es posible que el mando a distancia no fun-
cione correctamente si lo expone a la luz
solar directa.
! No deje caer el mando a distancia al suelo,
ya que puede quedar atascado debajo del
freno o del acelerador.
22
Es
Page 23

6
75 64
Utilización de esta unidad
Utilización de esta unidad
Sección
02
Las operaciones del menú
son idénticas para los
ajustes de función/ajustes de
audio/ajustes iniciales/listas
Para volver a la visualización anterior
Para volver a la lista/categoría anterior (la carpeta/
categoría de un nivel superior)
1 Pulse DISP/
Para volver al menú principal
Para volver al nivel superior de la lista/categoría
1 Mantenga pulsado DISP/
Para volver a la visualización normal
Para cancelar el menú de ajustes iniciales
1 Pulse BAND/ESC.
Para volver a la visualización normal desde la
lista/categoría
1 Pulse BAND/ESC.
/SCRL.
/SCRL.
Sintonizador
Funciones básicas
3
1 2 4 5
1 Indicador de banda
2 Indicador 5 (estéreo)
3 Indicador LOC
Aparece cuando la sintonización por búsqueda local está activada.
4 Indicador de número de presintonía
5 Indicador de nivel de señal
6 Indicador de frecuencia
! Si esta unidad puede captar el nombre
del programa, se mostrará el nombre del
servicio de programa.
Selección de una banda
1 Pulse BAND/ESC hasta que se visualice la
banda deseada (FM-1, FM-2, FM-3 para FM o
AM).
Sintonización manual (paso a paso)
1 Pulse M.C. hacia la izquierda o hacia la dere-
cha.
Búsqueda
1 Mantenga pulsado M.C. hacia la izquierda o
hacia la derecha.
Se puede cancelar la sintonización por búsqueda pulsando M.C. hacia la izquierda o
hacia la derecha.
Al mantener pulsado M.C. hacia la izquierda o
hacia la derecha se pueden saltar las emisoras. La sintonización por búsqueda comienza
inmediatamente después de soltar M.C.
Almacenamiento y recuperación
de emisoras para cada banda
1 Pulse (lista).
Se muestra la pantalla de ajuste de presintonías.
2 Utilice M.C. para almacenar la frecuencia
seleccionada en la memoria.
Haga girar el control para cambiar el número de
presintonía. Manténgalo pulsado para almacenarlo.
3 Utilice M.C. para seleccionar la emisora
deseada.
Haga girar el control para cambiar de emisora.
Pulse para seleccionar.
# También puede cambiar la emisora pulsando
M.C. hacia arriba o abajo.
# Para volver a la visualización normal, pulse
BAND/ESC o
(lista).
Operaciones avanzadas mediante
el uso de botones especiales
Sintonización por búsqueda local
/LOC para seleccionar el ajuste desea-
1 Pulse
do.
FM: Level 1—Level 2—Level 3—Level 4
AM: Level 1—Level 2
El ajuste de nivel superior sólo permite recibir
las emisoras con las señales más intensas,
mientras que los ajustes más bajos permiten
recibir las emisoras con señales más débiles.
Ajustes de funciones
1 Pulse M.C. para acceder al menú principal.
2 Haga girar M.C. para cambiar la opción
de menú y pulse para seleccionar FUNCTION.
3 Gire M.C. para seleccionar la función.
Una vez seleccionada, siga los siguientes pasos
para ajustar la función:
BSM (memoria de las mejores emisoras)
BSM (memoria de las mejores emisoras) guarda
automáticamente las seis emisoras más fuertes
ordenadas por la intensidad de la señal.
1 Pulse M.C. para activar la función BSM.
! Para cancelar, vuelva a pulsar M.C.
Local (sintonización por búsqueda local)
La sintonización por búsqueda local le permite
sintonizar sólo las emisoras de radio con señales
lo suficientemente intensas como para asegurar
una correcta recepción.
1 Pulse M.C. para activar la función local.
! Para cancelar, vuelva a pulsar M.C.
2 Pulse M.C. hacia la izquierda o hacia la dere-
cha para seleccionar el ajuste deseado.
Para obtener más información, consulte Sinto-
nización por búsqueda local en esta página.
CD/CD-R/CD-RW y dispositivos
de almacenamiento externos
(USB, SD)
Funciones básicas
1
1 Indicador de frecuencia de muestreo/veloci-
dad de grabación
Muestra la frecuencia de muestreo o velocidad de grabación de la pista (archivo) actual
cuando el audio comprimido se está reproduciendo.
! Al reproducir archivos AAC grabados con
VBR (velocidad de grabación variable), se
visualizará el valor promedio de la velocidad de grabación. Sin embargo, dependiendo del software que se haya
empleado para decodificar los archivos
AAC, es posible que aparezca además
VBR.
32
Español
23
Es
Page 24
Sección
02
Utilización de esta unidad
Utilización de esta unidad
2 Indicador del número de carpeta
Muestra el número de carpeta que se está reproduciendo actualmente cuando el audio
comprimido se está reproduciendo.
3 Indicador de número de pista
4 Indicador PLAY/PAUSE
5 Indicador S.Rtrv
Aparece cuando la función Sound Retriever
está activada.
6 Tiempo de canción (barra de progreso)
7 Indicador de tiempo de reproducción
Reproducción de un CD/CD-R/CD-RW
1 Inserte el disco en la ranura de carga de dis-
cos con el lado de la etiqueta hacia arriba.
Expulsión de un CD/CD-R/CD-RW
1 Pulse h (expulsar).
Reproducción de canciones de un dispositivo de
almacenamiento USB
1 Abra la tapa del conector USB.
2 Conecte el dispositivo de almacenamiento
USB mediante un cable USB.
Detención de la reproducción de archivos en un
dispositivo de almacenamiento USB
1 Puede desconectar el dispositivo de almace-
namiento USB en cualquier momento.
Reproducción de canciones en una tarjeta de memoria SD
1 Extraiga el panel delantero.
2 Inserte una tarjeta de memoria SD en la ranu-
ra para la tarjeta SD.
Insértela con la super ficie de contacto hacia
abajo y presione la tarjeta hasta que oiga un
chasquido y quede completamente encajada.
3 Vuelva a colocar el panel delantero.
4 Pulse SRC/OFF para seleccionar SD como
fuente.
Se iniciará la reproducción.
Detención de la reproducción de archivos en una
tarjeta de memoria SD
1 Extraiga el panel delantero.
2 Presione la tarjeta de memoria SD hasta que
oiga un chasquido.
La tarjeta de memoria SD se ha expulsado.
3 Extraiga la tarjeta de memoria SD.
4 Vuelva a colocar el panel delantero.
Selección de una carpeta
1 Pulse M.C. hacia arriba o hacia abajo.
Selección de una pista
1 Pulse M.C. hacia la izquierda o hacia la dere-
cha.
Avance rápido o retroceso
1 Mantenga pulsado M.C. hacia la izquierda o
hacia la derecha.
Regreso a la carpeta raíz
1 Mantenga pulsado BAND/ESC.
Cambio entre audio comprimido y CD-DA
1 Pulse BAND/ESC.
Notas
! Al reproducir audio comprimido, no hay soni-
do durante el avance rápido o el retroceso.
! Desconecte los dispositivos de almacena-
miento USB de la unidad cuando no los utilice.
Visualización de información de
texto
Selección de la información de texto deseada
1 Pulse DISP/
Desplazamiento de la información de texto a la izquierda
1 Mantenga pulsado DISP/
/SCRL.
/SCRL.
Notas
! Según la versión de iTunes utilizada para gra-
bar archivos MP3 en un disco u otro tipo de
archivos de medios, es posible que los textos
contenidos en el archivo de audio no se
muestren correctamente si su formato es incompatible.
! Los elementos de información de texto pue-
den cambiar según el tipo de medio.
Selección y reproducción de
archivos/pistas de la lista de
nombres
1 Pulse (lista) para cambiar al modo de
lista por nombre de archivo/pista.
2 Utilice M.C. para seleccionar el nombre
del archivo deseado (o de la carpeta deseada).
Cambio del nombre del archivo o la carpeta
1 Haga girar M.C.
Reproducción
1 Tras seleccionar un archivo o una pista, pulse
M.C.
Visualización de una lista de los archivos (o las
carpetas) de la carpeta seleccionada
1 Tras seleccionar una carpeta, pulse M.C.
Reproducción de una canción de la carpeta seleccionada
1 Tras seleccionar una carpeta, mantenga pulsa-
do M.C.
Operaciones avanzadas mediante
el uso de botones especiales
Reproducción de las pistas en orden aleatorio
1 Pulse
Mejora del audio comprimido y restauración del
sonido óptimo (Sound Retriever)
1 Pulse S.Rtrv para desplazarse entre:
para activar o desactivar la reproducción aleatoria.
Las pistas de una gama de repetición seleccionada se reproducen en orden aleatorio.
OFF (desactivado)—1—2
1 es efectivo para tasas de compresión baja, y
2 para tasas de compresión alta.
Ajustes de funciones
1 Pulse M.C. para acceder al menú principal.
2 Haga girar M.C. para cambiar la opción
de menú y pulse para seleccionar FUNCTION.
3 Gire M.C. para seleccionar la función.
Una vez seleccionada, siga los siguientes pasos
para ajustar la función:
Play mode (repetición de reproducción)
1 Pulse M.C. para seleccionar la gama de repeti-
ción de reproducción.
CD/CD-R/CD-RW
! Disc repeat – Repite todas las pistas
! Track repeat – Repite la pista actual
! Folder repeat – Repite la carpeta actual
Dispositivo de almacenamiento externo
(USB, SD)
! All repeat – Repite todos los archivos
! Track repeat – Repite el archivo actual
! Folder repeat – Repite la carpeta actual
Random mode (reproducción aleatoria)
24
Es
Page 25

75 64
Utilización de esta unidad
Utilización de esta unidad
Sección
02
1 Pulse M.C. para activar o desactivar la repro-
ducción aleatoria.
Pause (pausa)
1 Pulse M.C. para pausar o reanudar.
Sound Retriever (Sound Retriever)
Mejora automáticamente el audio comprimido y
restaura el sonido óptimo.
1 Pulse M.C. para seleccionar el ajuste deseado.
Para obtener más información, consulte Mejo-
ra del audio comprimido y re stauración del sonido óptimo (Sound Retriever) en la página
anterior.
iPod
Funciones básicas
1
2
3
1 Indicador de repetición
2 Indicador de número de canción
3 Indicador de selección aleatoria
4 Indicador PLAY/PAUSE
5 Indicador S.Rtrv
Aparece cuando la función Sound Retriever
está activada.
6 Tiempo de canción (barra de progreso)
7 Indicador de tiempo de reproducción
Reproducción de canciones en un iPod
1 Abra la cubierta del conector USB y conecte
un iPod utilizando el conector del Dock del
iPod para el cable USB.
Selección de una pista (capítulo)
1 Pulse M.C. hacia la izquierda o hacia la dere-
cha.
Avance rápido o retroceso
1 Mantenga pulsado M.C. hacia la izquierda o
hacia la derecha.
Notas
! El iPod no puede encenderse o apagarse
cuando el modo de control está ajustado en
AUDIO.
! Desconecte los auriculares del iPod antes de
conectarlo a esta unidad.
! El iPod se apagará aproximadamente dos mi-
nutos después de que la llave de encendido
del automóvil se ponga en OFF.
Visualización de información de
texto
Selección de la información de texto deseada
1 Pulse DISP/
Desplazamiento de la información de texto a la izquierda
1 Mantenga pulsado DISP/
/SCRL.
/SCRL.
Para buscar una canción
1 Para ir al menú superior de la búsqueda
de listas, pulse
(lista).
2 Utilice M.C. para seleccionar una categoría/canción.
Cambio del nombre de la canción o la categoría
1 Haga girar M.C.
Playlists (listas de reproducción)—Artists (in-
térpretes)—Albums (álbumes)—Songs (canciones)—Podcasts (podcasts)—Genres
(géneros)—Composers (compositores)—Au-
diobooks (audiolibros)
Reproducción
1 Tras seleccionar una canción, pulse M.C.
Visualización de una lista de canciones de la categoría seleccionada
1 Tras seleccionar una categoría, pulse M.C.
Reproducción de una canción de la categoría seleccionada
1 Tras seleccionar una categoría, mantenga pul-
sado M.C.
Búsqueda alfabética en las listas
1 Cuando se visualice una lista de la categoría
seleccionada, pulse
de búsqueda alfabética.
2 Haga girar M.C. para seleccionar una letra.
3 Pulse M.C. para visualizar la lista alfabética.
para cambiar al modo
Notas
! Es posible reproducir listas creadas con el
programa MusicSphere. Dicho programa estará disponible en nuestro sitio web.
! Las listas de reproducción creadas con el
programa MusicSphere se muestran de
forma abreviada.
Operaciones avanzadas mediante
el uso de botones especiales
Reproducción de todas las canciones en orden
aleatorio (shuffle all)
1 Pulse
Reproducción de canciones relacionadas con la
canción que se está reproduciendo
Se pueden reproducir canciones de las siguientes
listas:
• Lista de álbumes del artista que se está reproduciendo
• Lista de canciones del álbum que se está reproduciendo
• Lista de álbumes del género que se está reproduciendo
1 Mantenga pulsado M.C. para cambiar al
2 Pulse M.C. hacia la izquierda o hacia la dere-
! Se puede cancelar la canción o el álbum se-
! Según la canción seleccionada, pueden cor-
para activar la función de reproducción aleatoria de todas las canciones (shuffle
all).
modo de reproducción de enlace.
cha para cambiar el modo; púlselo para realizar la selección.
! Artist – Reproduce un álbum del artista
que se está reproduciendo.
! Album – Reproduce una canción del
álbum que se está reproduciendo.
! Genre – Reproduce un álbum del género
que se está reproduciendo.
La canción o el álbum seleccionado se reproducirá después de la canción que se esté reproduciendo en ese momento.
leccionado si utiliza funciones diferentes a la
reproducción de enlace (p. ej., avance rápido y
retroceso).
tarse el final de la canción que se está reproduciendo o el principio de la canción o del
álbum seleccionados.
Español
25
Es
Page 26

1
Sección
02
Utilización de esta unidad
Utilización de esta unidad
Uso de la función iPod de la unidad desde el iPod
Puede escuchar el sonido de las aplicaciones que
tenga en el iPod a través de los altavoces del automóvil cuando está seleccionado APP.
Esta función no es compatible con los siguientes
modelos de iPod.
! iPod nano 1ª generación
! iPod 5ª generación
Dicho modo APP es compatible con los siguientes modelos de iPod:
! iPod touch de 3ª generación (versión del soft-
ware 3.0 o posterior)
! iPod touch de 2ª generación (versión del soft-
ware 3.0 o posterior)
! iPod touch de 1ª generación (versión del soft-
ware 3.0 o posterior)
! iPhone 4 (versión del software 4.0 o posterior)
! iPhone 3GS (versión del software 3.0 o poste-
rior)
! iPhone 3G (versión del software 3.0 o poste-
rior)
! iPhone (versión del software 3.0 o posterior)
/LOC para cambiar el modo de con-
1 Pulse
trol.
! iPod – La función iPod de esta unidad se
puede utilizar desde el iPod conectado.
! APP – Reproduce el sonido de las aplica-
ciones del iPod.
! AUDIO – La función iPod de esta unidad
se puede utilizar desde esta unidad.
Mejora del audio comprimido y restauración del
sonido óptimo (Sound Retriever)
1 Pulse S.Rtrv para desplazarse entre:
OFF (desactivado)—1—2
1 es efectivo para tasas de compresión baja, y
2 para tasas de compresión alta.
Ajustes de funciones
1 Pulse M.C. para acceder al menú principal.
2 Haga girar M.C. para cambiar la opción
de menú y pulse para seleccionar FUNCTION.
3 Gire M.C. para seleccionar la función.
Una vez seleccionada, siga los siguientes pasos
para ajustar la función:
Play mode (repetición de reproducción)
1 Pulse M.C. para seleccionar la gama de repeti-
ción de reproducción.
! Repeat One – Repite la canción actual
! Repeat All – Repite todas las canciones de
la lista seleccionada
Shuffle mode (reproducción aleatoria)
1 Pulse M.C. para seleccionar el ajuste que pre-
fiera.
! Shuffle Songs – Reproduce canciones si-
guiendo un orden aleatorio dentro de la
lista.
! Shuffle Albums – Reproduce canciones
siguiendo un orden aleatorio dentro del
álbum.
! Shuffle OFF – Cancela la reproducción
aleatoria.
Shuffle all (reproducción aleatoria de todas las
canciones)
1 Pulse M.C. para activar la función de repro-
ducción aleatoria de todas las canciones
(shuffle all).
Para desactivarla, desactive Shuffle mode en
el menú FUNCTION.
Link play (reproducción de enlace)
1 Pulse M.C. hacia la izquierda o hacia la dere-
cha para cambiar el modo; púlselo para realizar la selección.
Para obtener detalles sobre los ajustes, consulte Reproducción de canciones rel acionadas con
la canción que se está reproduciendo en la página anterior.
PAUSE (pausa)
1 Pulse M.C. para pausar o reanudar.
Audiobooks (velocidad del audiolibro)
1 Pulse M.C. para seleccionar el ajuste que pre-
fiera.
! Faster – Reproducción con velocidad supe-
rior a la normal
! Normal – Reproducción con velocidad nor-
mal
! Slower – Reproducción con velocidad infe-
rior a la normal
Sound Retriever (Sound Retriever)
1 Pulse M.C. para seleccionar el ajuste deseado.
Para obtener más información, consulte Mejo-
ra del audio comprimido y re stauración del sonido óptimo (Sound Retriever) en esta página.
Notas
! Al cambiar el modo de control a iPod,se
pausa la reproducción de la canción. Utilice
el iPod para reanudar la reproducción.
! Las siguientes funciones estarán disponibles
en esta unidad incluso si se ajusta el modo
de control en iPod/APP.
— Cambio de la información de texto (iPod)
— Pausa
— Avance rápido/retroceso
— Pista arriba/abajo
— Reproducción aleatoria (shuffle)
(lista) para el menú de iPod
—
— Pulse M.C. para accionar la rueda pulsable
del iPod
— Pulse M.C. hacia arriba para girar la rueda
pulsable del iPod hacia la izquierda
— Pulse M.C. hacia abajo para girar la rueda
pulsable del iPod hacia la derecha
! Cuando el modo de control esté ajustado en
iPod/APP, las operaciones estarán limitadas
de la siguiente manera:
— No se puede ajustar la configuración.
— La función de exploración no puede utilizarse
desde esta unidad.
Ajustes de audio
1 Visualización de audio
Muestra el estado de los ajustes de audio.
26
Es
Page 27

Utilización de esta unidad
Utilización de esta unidad
Sección
02
Operaciones avanzadas mediante
el uso de botones especiales
Ajuste de subgraves activado/desactivado
1 Pulse SW/BASS para seleccionar el menú de
encendido y apagado de subgraves.
2 Pulse M.C. para activar o desactivar la salida
de subgraves.
3 Pulse M.C. hacia la izquierda o hacia la dere-
cha para seleccionar la fase de la salida de
subgraves.
Ajuste de subgraves
1 Presione SW/BASS para seleccionar el menú
de ajuste de subgraves.
2 Pulse M.C. hacia la izquierda o hacia la dere-
cha para seleccionar la frecuencia de corte.
50Hz—63Hz—80Hz—100Hz—125Hz
3 Pulse M.C. hacia arriba o hacia abajo para
ajustar el nivel de salida del altavoz de subgraves.
Cada vez que se pulsa M.C. arriba o abajo, aumenta o disminuye el nivel de subgraves. Se
visualiza +6 a -24 a medida que se aumenta o
disminuye el nivel.
Intensificación de graves
1 Mantenga pulsado SW/BASS para seleccionar
el menú del intensificador de graves.
2 Pulse M.C. hacia arriba o abajo para seleccio-
nar el nivel deseado.
Ajustes de función de audio
1 Pulse M.C. para acceder al menú principal.
2 Haga girar M.C. para cambiar la opción
de menú y pulse para seleccionar AUDIO.
3 Haga girar M.C. para seleccionar la función de audio.
Una vez seleccionada, siga los siguientes pasos
para ajustar la función de audio:
Fader/Balance (ajuste del fader/balance)
1 Pulse M.C. hacia arriba o hacia abajo para
ajustar el balance entre los altavoces delanteros/traseros.
! No se puede ajustar el balance entre los al-
tavoces delanteros/traseros cuando el ajuste de la salida posterior es Rear SP :S/W.
Consulte S/W control (ajuste de la salida
posterior y del altavoz de subgraves) en la
página 29.
2 Pulse M.C. hacia la izquierda o hacia la dere-
cha para ajustar el balance entre los altavoces
izquierdos/derechos.
Powerful (recuperación de ecualizador)
1 Pulse M.C. hacia la izquierda o hacia la dere-
cha para seleccionar una cur va de ecualización.
Powerful—Natural—Vocal—Custom1—Custom2—Flat—Super bass
100 Hz (ajuste de ecualizador)
Puede configurar el ajuste de la curva de ecualización seleccionado según lo desee. Los ajustes de
la curva de ecualización configurados se almacenan en Custom1 oenCustom2.
! Se puede crear una curva Custom1 separada
por cada fuente. Si se realizan ajustes cuando
una curva distinta a Custom2 está seleccionada, los ajustes de la cur va de ecualización se
almacenarán en Custom1.
! Se puede crear una curva Custom2 común a
todas las fuentes. Si se realizan ajustes cuando la curva Custom2 está seleccionada, la
curva Custom2 se actualizará.
1 Recupere la curva de ecualización que desea
ajustar.
2 Pulse M.C. hacia la izquierda o hacia la dere-
cha para seleccionar la banda de ecualización
que desea ajustar.
100Hz—315Hz—1.25kHz—3.15kHz—8kHz
3 Pulse M.C. hacia arriba o hacia abajo para
ajustar la curva de ecualización.
Se visualiza +6 a –6 mientras se aumenta o
disminuye el nivel.
LOUD (sonoridad)
La sonoridad compensa las deficiencias en las
gamas de frecuencias bajas y altas cuando se escucha a un volumen bajo.
1 Pulse M.C. para activar o desactivar la sonori-
dad.
2 Pulse M.C. hacia la izquierda o hacia la dere-
cha para seleccionar el ajuste deseado.
Low (bajo)—Mid (medio)—High (alto)
Sub W.1 (ajuste de subgraves activado/desactiva-
do)
Esta unidad está equipada con una salida de subgraves que se puede activar o desactivar.
1 Pulse M.C. para activar o desactivar la salida
de subgraves.
2 Pulse M.C. hacia la izquierda o hacia la dere-
cha para seleccionar la fase de la salida de
subgraves.
Si pulsa M.C. hacia la izquierda para seleccionar la fase inversa, Reverse aparecerá en el
display. Si pulsa M.C. hacia derecha para seleccionar la fase normal, Normal aparecerá en
el display.
Sub W.2 (ajuste de subgraves)
Se puede ajustar la frecuencia de corte y el nivel
de salida cuando la salida de subgraves está activada.
Sólo las frecuencias más bajas que aquellas de la
gama seleccionada se generan a través del altavoz
de subgraves.
1 Pulse M.C. hacia la izquierda o hacia la dere-
cha para seleccionar la frecuencia de corte.
50Hz—63Hz—80Hz—100Hz—125Hz
2 Pulse M.C. hacia arriba o hacia abajo para
ajustar el nivel de salida del altavoz de subgraves.
Cada vez que se pulsa M.C. arriba o abajo, aumenta o disminuye el nivel de subgraves. Se visualiza +6 a -24 a medida que se aumenta o
disminuye el nivel.
Bass (intensificación de graves)
1 Pulse M.C. hacia arriba o abajo para seleccio-
nar el nivel deseado.
Se visualiza 0 a +6 mientras se aumenta o disminuye el nivel.
HPF (ajuste del filtro de paso alto)
Español
27
Es
Page 28
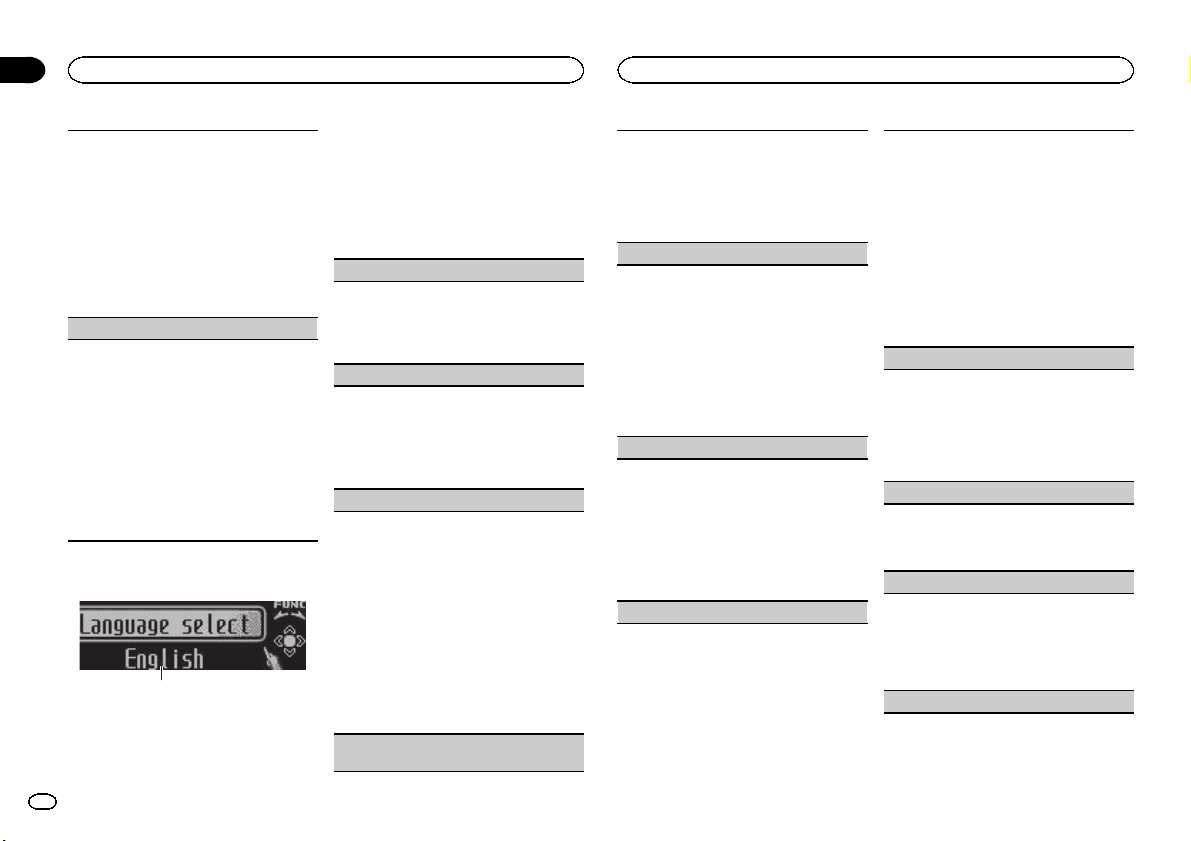
1
Sección
02
Utilización de esta unidad
Utilización de esta unidad
Cuando no desee que se generen los sonidos
bajos de la gama de frecuencias de salida de subgraves a través de los altavoces delanteros o traseros, active el filtro de paso alto (HPF). Sólo las
frecuencias más altas que aquellas de la gama seleccionada se generan a través de los altavoces
delanteros o traseros.
1 Pulse M.C. para activar o desactivar el filtro de
paso alto.
2 Pulse M.C. hacia la izquierda o hacia la dere-
cha para seleccionar la frecuencia de corte.
50Hz—63Hz—80Hz—100Hz—125Hz
SLA (ajuste del nivel de fuente)
SLA (ajuste del nivel de fuente) le permite ajustar
el nivel de volumen de cada fuente para evitar
cambios radicales en el volumen cuando se cambia entre las fuentes.
! Al seleccionar FM como fuente, no se puede
cambiar a SLA.
! Los ajustes se basan en el nivel de volumen de
FM, que se mantiene inalterado.
! El nivel del volumen de AM también se puede
ajustar con esta función.
1 Pulse M.C. hacia arriba o hacia abajo para
ajustar el volumen de la fuente.
Gama de ajuste: de +4 a –4
Ajustes iniciales
1 Visualización de función
! Muestra el estado de la función.
1 Mantenga pulsado SRC/OFF hasta que se
apague la unidad.
28
Es
2 Mantenga pulsado M.C. hasta que el
menú de ajustes iniciales aparezca en la pantalla.
3 Haga girar M.C. para seleccionar el ajuste
inicial.
Una vez seleccionada, siga los siguientes pasos
para configurar el ajuste inicial:
Language select (idiomas múltiples)
Para una mayor comodidad, esta unidad incluye
un display en varios idiomas. Es posible seleccionar el idioma deseado.
1 Pulse M.C. para seleccionar el idioma.
English—Español—Português
Calendar (ajuste de la fecha)
1 Pulse M.C. hacia la izquierda o hacia la dere-
cha para seleccionar el segmento de la visualización del calendario que desea ajustar.
Año—Día—Mes
2 Pulse M.C. hacia arriba o hacia abajo para
ajustar la fecha.
Clock (ajuste del reloj)
1 Pulse M.C. hacia la izquierda o hacia la dere-
cha para seleccionar el segmento de la visualización del reloj que desea ajustar.
Hora—Minuto
2 Pulse M.C. hacia arriba o hacia abajo para
ajustar el reloj.
! Se puede sincronizar el reloj con una señal
temporal pulsando M.C.
! Si los minutos son 00 a 29, éstos se redon-
dean hacia abajo (p. ej., 10:18 se redondea
en 10:00).
! Si los minutos son 30 a 59, estos se redon-
dean hacia arriba (p. ej., 10:36 se redondea
en 11:00).
EngineTime alert (ajuste de visualización de
tiempo transcurrido)
Este ajuste le permite medir el espacio de tiempo
que transcurre desde que se enciende y mostrar
el tiempo transcurrido por período ajustado.
También podrá oír la alarma.
1 Pulse M.C. para seleccionar el ajuste que pre-
fiera.
OFF—15Minutes—30Minutes
FM step (paso de sintonía de FM)
El paso de sintonía de FM que utiliza la sintonización por búsqueda se puede cambiar entre 100
kHz, el paso predefinido y 50 kHz.
Si la sintonización por búsqueda se realiza en
pasos de 50 kHz, es posible que las emisoras se
sintonicen de manera imprecisa. En ese caso, sintonícelas manualmente o vuelva a utilizar la función de sintonización por búsqueda.
1 Pulse M.C. para seleccionar el paso de sinto-
nía de FM.
50kHz (50 kHz)—100kHz (100 kHz)
AM STEP (paso de sintonía de AM)
El paso de sintonía de AM se puede cambiar entre
9 kHz, el paso predefinido y 10 kHz. Si se utiliza el
sintonizador en América del Norte, América Central o América del Sur, se deberá cambiar el paso
de sintonía de 9 kHz (531 a 1 602 kHz permisibles)
a 10 kHz (530 a 1 640 kHz permisibles).
1 Pulse M.C. para seleccionar el paso de sinto-
nía de AM.
10 KHZ (10 kHz)—9 KHZ (9 kHz)
USB plug&play (plug and play)
Este ajuste permite cambiar la fuente a USB/iPod
automáticamente.
1 Pulse M.C. para activar o desactivar Plug and
Play.
! ON – Cuando el dispositivo de almacena-
miento USB está conectado, la fuente
cambia automáticamente a USB/iPod.Si
desconecta su dispositivo de almacenamiento USB/iPod, la fuente de esta unidad
se apagará.
! OFF – Cuando el dispositivo de almacena-
miento USB/iPod está conectado, la fuente
no cambia automáticamente a USB/iPod.
Cámbiela manualmente a USB/iPod.
Warning tone (ajuste del tono de advertencia)
Si no se extrae el panel delantero de la unidad
principal trascurridos cuatro segundos después
de desconectar la llave de contacto del automóvil,
escuchará un sonido de advertencia. Puede desactivar este tono de advertencia.
1 Pulse M.C. para activar o desactivar el tono de
advertencia.
AUX (entrada auxiliar)
Active este ajuste si utiliza un dispositivo auxiliar
conectado a esta unidad.
1 Pulse M.C. para activar o desactivar el ajuste
auxiliar.
Dimmer (ajuste del atenuador de luz)
Para evitar que el display brille demasiado por la
noche, éste se atenúa automáticamente cuando
se encienden las luces del automóvil. Se puede
activar y desactivar el atenuador de luz.
1 Pulse M.C. para activar o desactivar el atenua-
dor de luz.
Brightness (ajuste de la visualización del brillo)
Page 29
Utilización de esta unidad
Utilización de esta unidad
Sección
02
1 Pulse M.C. hacia la izquierda o la derecha
para ajustar el nivel de brillo.
Se visualiza 0 a 15 mientras se aumenta o disminuye el nivel.
! Cuando el atenuador de luz está activado
(ON), el nivel de brillo se puede ajustar de
0 a 10.
S/W control (ajuste de la salida posterior y del al-
tavoz de subgraves)
La salida posterior de esta unidad (salida de cables de altavoces traseros y salida RCA posterior)
se puede usar para la conexión de altavoces de
toda la gama (Rear SP :F.Range) o subgraves
(Rear SP :S/W). Si se cambia el ajuste de la salida
posterior a Rear SP :S/W, se podrá conectar el
cable de altavoces traseros directamente al altavoz de subgraves sin necesidad de usar un amplificador auxiliar.
1 Pulse M.C. para cambiar el ajuste de la salida
posterior.
! Si no se conecta un altavoz de subgraves a
la salida posterior, seleccione Rear SP :F.
Range (altavoz de toda la gama).
! Si se conecta un altavoz de subgraves a la
salida posterior, seleccione Rear SP :S/W
(altavoz de subgraves).
! Aunque cambie este ajuste, no se producirá
ningún sonido a menos que active la salida de
subgraves (consulte Sub W.1 (ajuste de sub-
graves activado/desactivado) en la página 27).
! Si cambia este ajuste, la salida de subgraves
retomará los ajustes de fábrica en el menú de
audio.
! Las salidas de cables de altavoces traseros y la
salida RCA posterior se cambian simultáneamente en este ajuste.
Demonstration (ajuste de la visualización de la
demostración)
1 Pulse M.C. para activar o desactivar la visuali-
zación de la demostración.
! También puede activar o desactivar la de-
mostración de características pulsando
DISP mientras la unidad está apagada.
Para obtener más información, consulte
Modo demo en la página 20.
Reverse mode (ajuste del modo inverso)
1 Pulse M.C. para activar o desactivar el modo
inverso.
! También puede activar o desactivar el
modo inverso pulsando BAND mientras la
unidad está apagada. Para obtener más información, consulte Modo inverso en la página 21.
Ever-scroll (ajuste del modo de desplazamiento)
Si la función de desplazamiento continuo está activada (ON), la información de texto que hay registrada se desplaza de manera ininterrumpida por el
display. Desactive la función (OFF) si desea que la
información se desplace una sola vez.
1 Pulse M.C. para activar o desactivar el despla-
zamiento continuo.
Otras funciones
Uso de una fuente AUX
1 Inserte el miniconector estéreo en el conector de entrada AUX.
2 Pulse SRC/OFF para seleccionar AUX
como fuente.
Nota
No se puede seleccionar AUX si no se activa el
ajuste auxiliar. Para obtener más información,
consulte AUX (entrada auxiliar) en la página anterior.
Visualización del reloj
% Pulse CLK/DISP OFF para seleccionar el
ajuste deseado.
Reloj apagado—visualización del reloj—visualización del tiempo transcurrido
Cambio de la indicación del display
y la iluminación de los botones
La indicación del display y la iluminación de los
botones se pueden activar o desactivar.
% Mantenga presionado CLK/DISP OFF.
Cada vez que se mantiene pulsado CLK/
DISP OFF, se activa o desactiva la indicación del
display y la iluminación de los botones.
# Aunque el indicador de display esté apagado,
pueden realizarse operaciones. Si se realiza una operación mientras el indicador de display está apagado, el display se iluminará durante unos segundos y
después volverá a apagarse.
Uso de diferentes
visualizaciones de fondo
Se puede disfrutar de distintas visualizaciones
de fondo mientras se escucha cada fuente.
1 Pulse M.C. para acceder al menú principal.
2 Haga girar M.C. para cambiar la opción
de menú y pulse para seleccionar
ENTERTAINMENT.
3 Haga girar M.C. para cambiar la visualización.
Presentación visual de fondo—género—imagen
de fondo 1—imagen de fondo 2—imagen de
fondo 3—imagen de fondo 4—pantalla simple—
pantalla de películas 1—pantalla de películas 2
—calendario
# La visualización para el género varía en función
del género musical.
# La visualización del género puede no funcionar
correctamente dependiendo de la aplicación utilizada para codificar los archivos de audio.
Español
29
Es
Page 30

7
h
Sección
03
Instalación
Instalación
Conexiones
ADVERTENCIA
! Utilice altavoces de más de 50 W (valor de
salida) y de entre 4 W y8W (valor de impedancia). No utilice altavoces de 1 W a3W
con esta unidad.
! El cable negro es el cable a tierra. Cuando
instale esta unidad o el amplificador de potencia (vendido por separado), siempre conecte primero el cable a tierra. Compruebe
que el cable de tierra está conectado adecuadamente a las partes metálicas de la carrocería del automóvil. El cable a tierra del
amplificador, el de esta unidad o el de cualquier otro dispositivo debe conectarse al
automóvil por separado usando tornillos diferentes. Si el tornillo para el cable a tierra se
afloja o se cae, puede provocar incendios,
humo o averías.
30
Es
Importante
! Cuando esta unidad se instale en un ve-
hículo sin posición ACC (accesorio) en la
llave de encendido, el cable rojo se debe conectar al terminal que pueda detectar la operación de la llave de encendido. De lo
contrario, puede descargarse la batería.
O
F
N
F
O
S
T
A
R
T
Posición ACC Sinposición ACC
! Utilice esta unidad únicamente con una ba-
tería de 12 voltios y conexión a tierra negativa. De lo contrario, pueden producirse
incendios o averías.
! Para evitar cortocircuitos, sobrecalentamien-
to o fallos de funcionamiento, asegúrese de
seguir las siguientes instrucciones.
— Desconecte el terminal negativo de la batería
antes de la instalación.
— Asegure el cableado con pinzas para cables
o cinta adhesiva. Envuelva con cinta adhesiva
las partes en contacto con piezas metálicas
para proteger el cableado.
— Coloque todos los cables alejados de las par-
tes móviles, como la palanca de cambios y
los rieles de los asientos.
— Coloque todos los cables alejados de lugares
calientes, como cerca de la salida del calefactor.
— No conecte el cable amarillo a la batería pa-
sándolo a través del orificio hasta el compartimiento del motor.
— Cubra con cinta aislante los conectores de
cables que queden desconectados.
— No acorte ningún cable.
— Nunca corte el aislamiento del cable de ali-
mentación de esta unidad para compartir la
corriente con otros equipos. La capacidad de
corriente del cable es limitada.
— Utilice un fusible con la intensidad nominal
indicada.
— Nunca conecte el cable negativo de los alta-
voces directamente a tierra.
— Nunca empalme los cables negativos de va-
rios altavoces.
! Cuando se enciende esta unidad, se emite
una señal de control a través del cable azul/
blanco. Conecte este cable al mando a distancia del sistema de un amplificador de potencia externo o al terminal de control del
relé de la antena automática del vehículo
(máx. 300 mA 12 V CC). Si el vehículo posee
una antena integrada en el cristal del parabrisas, conéctela al terminal de la fuente de
alimentación del amplificador de la antena.
! Nunca conecte el cable azul/blanco al termi-
nal de potencia de un amplificador de potencia externo. Ni tampoco lo conecte al
terminal de potencia de la antena automática. De lo contrario, puede descargarse la batería o producirse un fallo de
funcionamiento.
Esta unidad
1 2 3645
1 Entrada de la antena
2 Fusible (10 A)
3 Entrada del cable de alimentación
4 Entrada remota conectada
Es posible conectar un adaptador de mando
a distancia físicamente conectado (se vende
por separado).
5 Salida delantera
6 Salida trasera
7 Salida de subgraves
Cable de alimentación
Realice estas conexiones cuando no esté conectado un altavoz trasero a uno de subgraves.
LR
4
F
5
R
Realice estas conexiones cuando esté usando
un altavoz de subgraves sin el amplificador opcional.
LR
4
F
i
SW
1 A la toma del cable de alimentación
2 Izquierda
3 Derecha
4 Altavoz delantero
5 Altavoz trasero
6 Blanco
7 Blanco/negro
8 Gris
1
8
6
9
7
a
c
d
b
e
f
g
1
8
6
9
7
a
c
d
b
j
e
a
f
g
k l
h
b
32
32
c
d
Page 31

Instalación
Instalación
Sección
03
9 Gris/negro
a Verde
b Verde/negro
c Violeta
d Violeta/negro
e Negro (toma de tierra del chasis)
Conectar a una parte metálica limpia, sin
pintura.
f Amarillo
Conectar al terminal de alimentación constante 12 V.
g Rojo
Conectar al terminal controlado por la llave
de encendido (12 V CC).
h Azul/blanco
Conectar al terminal de control del sistema
del amplificador de potencia o al terminal de
control del relé de la antena (máx. 300 mA 12
V CC).
i Altavoz de subgraves (4 Ω)
j Al usar un altavoz de subgraves de 70 W (2
Ω), conecte el mismo a los cables violeta y
violeta/negro de esta unidad. No conecte
nada al cable verde ni al verde/negro.
k No se utiliza.
l Altavoz de subgraves (4 Ω)×2
Notas
! Con un sistema de 2 altavoces, no conecte
ningún otro aparato a las salidas de cable
que no estén conectadas a los altavoces.
! Cambie la configuración inicial de esta uni-
dad. Consulte S/W control (ajuste de la sali-
da posterior y del altavoz de subgraves) en la
página 29.
La salida de graves de esta unidad es monoaural.
Amplificador de potencia (se
vende por separado)
Realice estas conexiones cuando utilice el amplificador opcional.
2
2
2
3
55
3
77
3
99
4
6
8
1
1
1
1 Control remoto del sistema
Conexión a cable azul/blanco.
2 Amplificador de potencia (se vende por sepa-
rado)
3 Conectar con cables RCA (se venden por se-
parado)
4 A la salida trasera
5 Altavoz trasero
6 Salida delantera
7 Altavoz delantero
8 Salida de subgraves
9 Altavoz de subgraves
Instalación
Importante
! Compruebe todas las conexiones y sistemas
antes de la instalación final.
! No utilice piezas no autorizadas, ya que pue-
den causar fallos de funcionamiento.
! Consulte a su distribuidor si para la instala-
ción es necesario taladrar orificios o hacer
otras modificaciones al vehículo.
! No instale esta unidad en un lugar donde:
— pueda interferir con la conducción del ve-
hículo.
— pueda lesionar a un pasajero como conse-
cuencia de un frenazo brusco.
! El láser semiconductor se dañará si se sobre-
calienta. Instale esta unidad alejada de
zonas que alcancen altas temperaturas,
como cerca de la salida del calefactor.
! Se logra un rendimiento óptimo si la unidad
se instala en un ángulo inferior a 60°.
60°
! Cuando instale esta unidad y con el fin de
asegurar la dispersión apropiada del calor
durante el uso de la misma, asegúrese de
dejar un amplio espacio por detrás del panel
trasero y enrolle cualesquiera cables sueltos
de modo que no bloqueen las aberturas de
ventilación.
Montaje delantero/posterior de DIN
Esta unidad puede instalarse correctamente
tanto si se realiza una instalación frontal o trasera.
En la instalación, emplee piezas disponibles en
el mercado.
Montaje delantero DIN
1 Inserte el manguito de montaje en el salpicadero.
Si realiza la instalación en un espacio poco profundo, utilice el manguito de montaje suministrado. Si hay suficiente espacio, utilice el
manguito de montaje que venía con el vehículo.
2 Fije el manguito de montaje utilizando
un destornillador para doblar las pestañas
metálicas (90°) y colocarlas en su lugar.
1
2
1 Salpicadero
2 Manguito de montaje
3 Instale la unidad según la ilustración.
1
2
4
5
1 Tuerca
2 Muro cortafuego o soporte de metal
3 Correa metálica
4 Tornillo
5 Tornillo (M4 × 8)
# Asegúrese de que la unidad esté firmemente instalada en su lugar. Una instalación inestable puede
causar saltos en el audio o un mal funcionamiento
de la unidad.
3
Español
31
Es
Page 32

Apéndice
Instalación
Información adicional
Montaje trasero DIN
1 Determine la posición correcta, de modo
que los orificios del soporte y del lateral de
la unidad coincidan.
2 Apriete los dos tornillos en cada lado.
1
2
1 Tornillo de cabeza redonda (5 mm × 8 mm)
2 Carcasa
3 Salpicadero o consola
3
Extracción de la unidad
1 Retire el anillo de guarnición.
1 Anillo de guarnición
2 Pestaña con muesca
! Libere el panel delantero para acceder más
fácilmente al anillo de guarnición.
! Al volver a colocar el anillo de guarnición,
oriente hacia abajo la pestaña con muesca.
2 Inserte en ambos lados de la unidad las
llaves de extracción provistas hasta que se
escuche un ligero chasquido.
3 Extraiga la unidad del salpicadero.
Retirada y colocación del panel
delantero
Puede extraer el panel delantero para proteger
la unidad contra robo.
Pulse el botón de soltar, empuje el panel delantero hacia arriba y tire de él hacia sí.
Para obtener más información, consulte Extrac-
ción del panel delantero para proteger la unidad
contra robo y Colocación del panel delantero en la
página 22.
Fijación del panel delantero
El panel delantero puede fijarse con el tornillo
suministrado.
1
1 Tornillo
Solución de problemas
Síntoma Causa Resolución
La pantalla
vuelve automáticamente
a la visualización normal.
La gama de
repetición de
reproducción
cambia de
manera inesperada.
No se reproduce una subcarpeta.
NO XXXX
aparece cuando se cambia
un display
(NO TITLE,
por ejemplo).
No ha realizado
ninguna operación en aproximadamente 30
segundos.
Dependiendo
de la gama de
repetición de reproducción, la
gama seleccionada puede
cambiar cuando
se selecciona
otra carpeta o
pista o cuando
se utilice el
avance rápido/
retroceso.
No se pueden
reproducir las
subcarpetas
cuando se selecciona Folder
repeat (repetición de carpeta).
No hay información de texto incorporada.
Realice la operación de nuevo.
Seleccione de
nuevo la gama de
repetición de reproducción.
Seleccione otra
gama de repetición de reproducción.
Cambie la pantalla o reproduzca
otra pista/archivo.
Síntoma Causa Resolución
La pantalla se
ilumina cuando la unidad
está apagada.
La unidad no
funciona correctamente.
Hay una interferencia.
Activado el
modo de demostración.
Está usando un
dispositivo,
como un teléfono móvil, que
transmite ondas
eléctricas cerca
de la unidad.
! Pulse DISP/
/SCRL para cancelar el modo de
demostración.
! Desactive el
ajuste de la visualización de la demostración.
Aleje de la unidad
los dispositivos
eléctricos que
puedan estar causando inter ferencias.
Mensajes de error
Anote el mensaje de error antes de contactar
con su concesionario o con el servicio técnico
oficial de Pioneer más cercano.
Reproductor de CD incorporado
Mensaje Causa Resolución
ERROR-07,
11, 12, 17, 30
El disco está
sucio.
El disco está rayado.
Limpie el disco.
Sustituya el disco.
32
Es
Page 33

Información adicional
Apéndice
Información adicional
Mensaje Causa Resolución
ERROR-10,
11, 12, 15,
17, 30, A0
ERROR-15 El disco inser-
ERROR-23 Formato de CD
FORMAT
READ
NO AUDIO El disco inser-
SKIPPED El disco inser-
PROTECT Todos los archi-
Se ha producido
un error eléctrico o mecánico.
tado aparece en
blanco
no compatible
A veces se pro-
duce un retraso
entre el comienzo de la reproducción y la
emisión del sonido.
tado no contiene archivos
reproducibles.
tado contiene
archivos protegidos con DRM.
vos del disco insertado tienen
DRM integrado.
Cambie la llave
de encendido del
automóvil a la posición de desactivación y luego
pase de nuevo a
activación, o cambie a una fuente
diferente, y después vuelva a activar el
reproductor de
CD.
Sustituya el disco.
Sustituya el disco.
Espere hasta que
el mensaje desaparezca y oiga sonido.
Sustituya el disco.
Sustituya el disco.
Sustituya el disco.
Dispositivo de almacenamiento externo (USB,
SD)/iPod
Mensaje Causa Resolución
NO DEVICE Cuando Plug
FORMAT
READ
NO AUDIO No hay cancio-
SKIPPED El dispositivo de
and Play está
desactivado, no
hay conectado
ningún dispositivo USB ni ningún iPod.
A veces se produce un retraso
entre el comienzo de la reproducción y la
emisión del sonido.
nes.
El dispositivo de
almacenamiento USB conectado tiene la
seguridad activada
almacenamiento USB conectado contiene
archivos integrados con
Windows
Mediaä
DRM 9/10
! Active Plug and
Play.
! Conecte un dispositivo de almacenamiento USB
o un iPod compatible.
Espere hasta que
el mensaje desaparezca y oiga sonido.
Transfiera los archivos de audio al
dispositivo de almacenamiento
USB y conéctelo.
Para desactivar la
seguridad, siga
las instrucciones
del dispositivo de
almacenamiento
USB.
Reproduzca un
archivo de audio
que no esté integrado con
Windows Media
DRM 9/10.
Mensaje Causa Resolución
PROTECT Todos los archi-
NOT COMPATIBLE
vos del dispositivo de
almacenamiento USB están integrados con
Windows Media
DRM 9/10
El dispositivo de
almacenamiento USB conectado no es
compatible con
esta unidad.
iPod no compatible
Dispositivo de
almacenamiento SD no compatible
Transfiera archivos de audio no
integrados con
Windows Media
DRM 9/10 al dispositivo de almacenamiento USB
y conéctelo.
! Conecte un dispositivo que cumpla con la clase
de almacenamiento masivo
USB.
! Desconecte su
dispositivo y sustitúyalo por un dispositivo de
almacenamiento
USB compatible.
Desconecte su
dispositivo y sustitúyalo por un
iPod compatible.
Retire su dispositivo y sustitúyalo
por un dispositivo
de almacenamiento USB compatible.
Mensaje Causa Resolución
CHECK USB El conector
USB o el cable
USB está cortocircuitado.
El dispositivo de
almacenamiento USB conectado consume
más de 500 mA
(corriente máxima permitida).
El iPod funciona
correctamente
pero no se
carga
Compruebe que
el conector USB o
el cable USB no
esté enganchado
en algo ni dañado.
Desconecte el
dispositivo de almacenamiento
USB y no lo utilice. Coloque la
llave de encendido del automóvil
en posición OFF,
luego en ACC u
ON y, a continuación, conecte únicamente dispositivos de
almacenamiento
USB compatibles.
Compruebe que
el cable de conexión del iPod no
esté cortocircuitado (p. ej., atrapado entre
objetos metálicos). Una vez confirmado, cambie
la llave de encendido del automóvil a la posición
de desactivación
y luego pase de
nuevo a activación; o bien desconecte una vez
el iPod y conéctelo de nuevo.
Español
33
Es
Page 34

Apéndice
Información adicional
Información adicional
Mensaje Causa Resolución
ERROR-19 Error de comu-
nicación.
Fallo del iPod Desconecte el
! Realice una de
las siguientes
operaciones:
–Cambie la llave
de encendido del
automóvil a la posición de desactivación y luego
pase de nuevo a
activación.
–Desconecte o expulse el dispositivo de
almacenamiento
externo.
–Cambie a una
fuente diferente.
Después, vuelva a
la fuente SD o al
USB.
! Desconecte el
cable del iPod.
Una vez que aparezca el menú
principal del iPod,
vuelva a conectar
el iPod y reinícielo.
cable del iPod.
Una vez que aparezca el menú
principal del iPod,
vuelva a conectar
el iPod y reinícielo.
Mensaje Causa Resolución
ERROR-23 El dispositivo de
ERROR-16 La versión de
STOP No hay cancio-
Not found No hay cancio-
almacenamiento USB no está
formateado con
FAT12, FAT16 ni
FAT32
firmware del
iPod es antigua
Fallo del iPod Desconecte el
nes en la lista
actual.
nes relacionadas
El dispositivo de
almacenamiento
USB debe formatearse con FAT12,
FAT16 o FAT32.
Actualice la versión del iPod.
cable del iPod.
Una vez que aparezca el menú
principal del iPod,
vuelva a conectar
el iPod y reinícielo.
Seleccione una
lista que contenga canciones.
Transfiera canciones al iPod.
Pautas para el manejo
Discos y reproductor
Utilice únicamente discos que tengan uno de
estos dos logotipos:
Utilice discos de 12 cm. No utilice discos de 8 cm
o un adaptador de discos de 8 cm.
Utilice sólo discos convencionales y completamente circulares. No use discos con formas irregulares.
No inserte ningún otro elemento que no sea un
CD en la ranura de inserción de CD.
No use discos con roturas, picaduras, deformados
o dañados de otro modo, ya que pueden causar
daños al reproductor.
No es posible reproducir discos CD-R/CD-RW no
finalizados.
No toque la superficie grabada de los discos.
Cuando no utilice los discos, guárdelos en sus
cajas.
No fije etiquetas, no escriba ni aplique sustancias
químicas en la superficie de los discos.
Para limpiar un CD, pásele un paño suave desde
el centro hacia afuera.
La condensación puede afectar temporalmente al
rendimiento del reproductor. Deje de usarlo durante una hora aproximadamente para que se adapte
a la temperatura más cálida. Además, si los discos tienen humedad, séquelos con un paño
suave.
Quizá no pueda reproducir algunos discos debido
a sus características, formato, programas grabados, entorno de reproducción, condiciones de almacenamiento u otras causas.
Las vibraciones en las carreteras pueden interrumpir la reproducción de un disco.
Dispositivo de almacenamiento
externo (USB, SD)
Si tiene preguntas sobre su dispositivo de almacenamiento externo (USB, SD), póngase en contacto
con el fabricante del mismo.
No deje el dispositivo de almacenamiento externo
(USB, SD) en lugares expuestos a altas temperaturas.
Se pueden producir los siguientes problemas
según el dispositivo de almacenamiento externo
(USB, SD) que se utilice.
! Las operaciones pueden variar.
! Es posible que no se reconozca el dispositivo
de almacenamiento.
! Puede que los archivos no se reproduzcan co-
rrectamente.
Dispositivo de almacenamiento
USB
No se admiten las conexiones a través de un concentrador USB.
No conecte ningún otro objeto que no sea un dispositivo de almacenamiento USB.
34
Es
Page 35

Información adicional
Apéndice
Información adicional
Cuando conduzca, fije el dispositivo de almacenamiento USB firmemente. No deje caer el dispositivo de almacenamiento USB al suelo, ya que
puede quedar atascado debajo del freno o del acelerador.
Se pueden producir los siguientes problemas
según el dispositivo de almacenamiento USB que
se utilice.
! El dispositivo puede generar ruido en la radio.
Tarjeta de memoria SD
Esta unidad sólo admite los siguientes tipos de
tarjetas de memoria SD:
! SD
! miniSD
! microSD
! SDHC
Mantenga la tarjeta de memoria SD fuera del alcance de los niños. En caso de ingestión accidental, consulte a un médico de inmediato.
No toque los conectores de la tarjeta de memoria
SD directamente con los dedos o con cualquier
objeto metálico.
No introduzca ningún otro elemento que no sea
una tarjeta de memoria SD en la ranura para la
tarjeta SD. Si se introduce un objeto metálico
(como una moneda) en la ranura, puede que los
circuitos internos se estropeen y que se produzcan fallos de funcionamiento en la unidad.
Cuando introduzca un tarjeta miniSD o microSD,
utilice un adaptador. No utilice un adaptador que
tenga piezas metálicas aparte de los conectores
expuestos.
No inserte una tarjeta de memoria SD dañada (p.
ej. torcida o con la etiqueta despegada), ya que
puede tener problemas para la posterior expulsión
de la ranura.
No intente forzar la tarjeta de memoria SD en la
ranura para la tarjeta SD, ya que la tarjeta o la unidad podrían dañarse.
Cuando expulse una tarjeta de memoria SD, manténgala presionada hasta que escuche oiga un
chasquido. Es peligroso presionar la tarjeta y
soltar de inmediato, ya que ésta podría dispararse
fuera de la ranura y herirle en la cara, etc. Si la tarjeta salta fuera de la ranura, puede perderse.
iPod
Para asegurar un funcionamiento correcto, conecte el cable conector del Dock del iPod directamente a esta unidad.
Cuando conduzca, fije el iPod firmemente. No
deje caer el iPod al suelo, ya que puede quedar
atascado debajo del freno o del acelerador.
Acerca de los ajustes del iPod
! Cuando el iPod está conectado, esta unidad
desactiva el ajuste EQ (ecualizador) del iPod
para mejorar la acústica. Al desconectar el
iPod, el EQ retoma su valor original.
! No puede desactivar la Repetición del iPod
cuando utiliza esta unidad. La Repetición se
cambiará automáticamente a Todo cuando el
iPod esté conectado a esta unidad.
La unidad no mostrará el texto incompatible guardado en el iPod.
Discos dobles
Los discos dobles son discos de dos caras que incluyen un CD grabable de audio en una cara y un
DVD grabable de vídeo en la otra cara.
Debido a que la cara del CD de los discos dobles
no es físicamente compatible con el estándar general de CD, es posible que no se pueda reproducir la cara del CD en esta unidad.
La carga y expulsión frecuente de un disco
DualDisc puede producir ralladuras en el disco.
Las ralladuras graves pueden producir problemas
de reproducción en esta unidad. En algunos
casos, un DualDisc puede atascarse en la ranura
de carga del disco y no se expulsará. Para evitarlo,
recomendamos que no utilice DualDisc en esta
unidad.
Consulte la información del fabricante del disco
para obtener más información sobre DualDisc.
PRECAUCIÓN
No deje discos, dispositivos de almacenamiento
externo (USB, SD) ni el iPod en lugares expuestos a altas temperaturas.
Compatibilidad con audio
comprimido (disco, USB, SD)
WMA
Extensión de archivo: .wma
Velocidad de grabación: de 48 kbps a 320 kbps
(CBR) y de 48 kbps a 384 kbps (VBR)
Frecuencia de muestreo: 32 kHz, 44,1 kHz, 48 kHz
Windows Media Audio Professional, Lossless,
Voice/DRM Stream/Stream con vídeo: no compatible
MP3
Extensión de archivo: .mp3
Velocidad de grabación: de 8 kbps a 320 kbps
(CBR), VBR
Frecuencia de muestreo: de 8 kHz a 48 kHz (32
kHz, 44,1 kHz, 48 kHz para énfasis)
Versiones de etiqueta ID3 compatibles: 1.0, 1.1,
2.2, 2.3, 2.4 (la etiqueta ID3 versión 2.x tiene prioridad sobre la versión 1.x)
Lista de reproducción M3u: no compatible
MP3i (MP3 interactivo), mp3 PRO: no compatible
WAV
Extensión de archivo: .wav
Bits de cuantificación: 8 y 16 (LPCM), 4 (MS
ADPCM)
Frecuencia de muestreo: 16 kHz a 48 kHz (LPCM),
22,05 kHz y 44,1 kHz (MS ADPCM)
AAC
Formato compatible: AAC codificado con iTunes
Extensión de archivo: .m4a
Frecuencia de muestreo: de 11,025 kHz a 48 kHz
Velocidad de transmisión: de 16 kbps a 320 kbps,
VBR
Apple Lossless: no compatible
Archivo AAC adquirido en iTunes Store (extensión
del archivo .m4p): no compatible
Español
35
Es
Page 36

Apéndice
Información adicional
Información adicional
Información complementaria
Sólo se pueden visualizar los primeros 32 caracteres como nombre de archivo (incluida la extensión) o nombre de carpeta.
Esta unidad puede no funcionar correctamente,
dependiendo de la aplicación utilizada para codificar archivos WMA.
Es posible que se produzca un pequeño retardo al
iniciar la reproducción de archivos de audio integrados con datos de imagen.
Disco
Jerarquía de carpetas reproducibles: hasta ocho
niveles (una jerarquía práctica de carpetas tiene
menos de dos niveles).
Carpetas reproducibles: hasta 99
Archivos reproducibles: hasta 999
Sistema de archivos: ISO 9660 Nivel 1 y 2, Romeo,
Joliet
Reproducción multisesión: compatible
Transferencia de datos en formato Packet Write:
no compatible
Independientemente de la longitud de la secciones en blanco que haya entre las canciones de la
grabación original, los discos de audio comprimidos se reproducirán con una breve pausa entre
cada canción.
Dispositivo de almacenamiento
externo (USB, SD)
Jerarquía de carpetas reproducibles: hasta ocho
niveles (una jerarquía práctica de carpetas tiene
menos de dos niveles).
Carpetas reproducibles: hasta 1 500
Archivos reproducibles: hasta 15 000
Reproducción de archivos protegidos por derechos de autor: no compatible
Dispositivo de almacenamiento externo particionado (USB, SD): sólo se puede reproducir la primera partición.
Puede producirse cierto retraso cuando se inicie
la reproducción de archivos de audio en un dispositivo de almacenamiento USB con numerosas jerarquías de carpetas.
Tarjeta de memoria SD
No existe compatibilidad con las tarjetas multimedia (MMC).
No se garantiza la compatibilidad con todas las
tarjetas de memoria SD.
Esta unidad no es compatible con SD-Audio.
PRECAUCIÓN
Pioneer no asume ninguna responsabilidad por
la pérdida de datos en la memoria USB/en reproductores de audio portátil USB/en tarjetas de
memoria SD/en tarjetas de memoria SDHC, incluso si la pérdida ocurre durante el uso de esta
unidad.
Compatibilidad con iPod
Esta unidad sólo es compatible con los siguientes
modelos de iPod. Las versiones compatibles del
software iPod se muestran abajo. Es posible que
las versiones más antiguas no sean compatibles.
! iPhone 4 (versión del software 4.0)
! iPhone 3GS (versión del software 4.0)
! iPhone 3G (versión del software 4.0)
! iPhone (versión del software 3.1.3)
! iPod nano de 5ª generación (versión del soft-
ware 1.0.2)
! iPod nano 4ª generación (versión del software
1.0.4)
! iPod nano 3ª generación (versión del software
1.1.3)
! iPod nano 2ª generación (versión del software
1.1.3)
! iPod nano 1ª generación (versión del software
1.3.1)
! iPod touch 3ª generación (versión del software
4.0)
! iPod touch 2ª generación (versión del software
4.0)
! iPod touch 1ª generación (versión del software
3.1.3)
! iPod classic 160 GB (versión del software 2.0.4)
! iPod classic 120GB (versión del software 2.0.1)
! iPod classic (versión del software 1.1.2)
! iPod 5ª generación (versión del software 1.3)
Según la generación o versión del iPod, es posible
que algunas funciones no estén disponibles.
Las funciones pueden variar según la versión de
software del iPod.
Al utilizar un iPod se requiere un conector del
Dock del iPod para el cable USB.
El cable de la inter faz CD-IU50 de Pioneer también
está disponible. Para obtener información, consulte con su proveedor.
Si desea más información sobre la compatibilidad
de archivos y formatos, consulte los manuales del
iPod.
Audiolibro, podcast: compatible
PRECAUCIÓN
Pioneer no asume ninguna responsabilidad por
la pérdida de datos en el iPod, incluso si la pérdida ocurre durante el uso de esta unidad.
Secuencia de archivos de audio
El usuario no puede asignar números de carpeta ni especificar secuencias de reproducción
con esta unidad.
Ejemplo de una jerarquía
01
02
1
2
03
04
5
6
05
Nivel 1 Nivel 2 Nivel 3 Nivel 4
Disco
La secuencia de selección de carpetas u otras
operaciones pueden diferir, dependiendo del
software de codificación o escritura.
Dispositivo de almacenamiento
externo (USB, SD)
La secuencia de reproducción es la misma que
la secuencia grabada en el dispositivo de almacenamiento externo (USB, SD).
Para especificar la secuencia de reproducción,
se recomienda el siguiente método.
: carpeta
: archivo de audio
3
comprimido
4
01 a 05: número de
carpeta
1 a 6: secuencia
de reproducción
36
Es
Page 37

Información adicional
Apéndice
Información adicional
1 Cree un nombre del archivo que incluya nú-
meros que especifiquen la secuencia de reproducción (p. ej., 001xxx.mp3 y 099yyy.mp3).
2 Coloque esos archivos en una carpeta.
3 Guarde la carpeta que contiene los archivos
en el dispositivo de almacenamiento externo
(USB, SD).
Sin embargo, dependiendo del entorno del sistema, tal vez no pueda especificar la secuencia de
reproducción.
Para reproductores de audio portátiles USB, la
secuencia es diferente y depende del reproductor.
Copyright y marcas registradas
iTunes
Apple e iTunes son marcas comerciales de
Apple Inc., registradas en los EE.UU. y en otros
países.
MP3
La venta de este producto sólo otorga una licencia para su uso privado, no comercial. No otorga
ninguna licencia ni concede ningún derecho a
utilizar este producto en transmisiones comerciales (es decir, lucrativas) en tiempo real (terrestres, vía satélite, por cable y/o por cualquier
otro medio), transmisiones/streaming por Internet, intranets y/u otras redes o en otros sistemas
de distribución de contenido electrónico, como
por ejemplo, aplicaciones de pago por escucha
(pay-audio) o audio bajo demanda (audio-on-demand). Se necesita una licencia independiente
para su uso comercial. Para obtener más información, visite
http://www.mp3licensing.com.
WMA
Windows Media es una marca registrada o una
marca de fábrica de Microsoft Corporation en
los Estados Unidos y/u otros países.
Este producto incluye tecnología propiedad de
Microsoft Corporation, y no se puede usar ni distribuir sin una licencia de Microsoft Licensing,
Inc.
Tarjeta de memoria SD
El logotipo de SD es una marca comercial de
SD-3C, LLC.
El logotipo de miniSD es una marca comercial
de SD-3C, LLC.
El logotipo de microSD es una marca comercial
de SD-3C, LLC.
El logotipo de SDHC es una marca comercial de
SD-3C, LLC.
iPod y iPhone
iPhone, iPod, iPod classic, iPod nano y iPod son
marcas comerciales de Apple Inc., registradas
en los EE.UU. y en otros países.
“Made for iPod” y “Made for iPhone” significan
que un accesorio electrónico ha sido diseñado
para ser conectado específicamente a un iPod o
a un iPhone, respectivamente, y ha sido homologado por quien lo desarrolló para cumplir con
las normas de funcionamiento de Apple.
Apple no es responsable del funcionamiento de
este aparato ni de que cumpla con las normas
de seguridad y reguladoras.
Especificaciones
Generales
Fuente de alimentación nominal
................................... 14,4 V CC
Sistema de derivación a tierra
................................... Tipo negativo
Consumo máximo de corriente
................................... 10,0 A
Dimensiones (An × Al × Pr):
DIN
Bastidor ............. 178 mm × 50 mm × 165
Cara anterior ...... 188 mm × 58 mm × 18
D
Bastidor ............. 178 mm × 50 mm × 165
Cara anterior ...... 170 mm × 46 mm × 18
Peso ................................ 1,4 kg
Audio
Potencia de salida máxima
................................... 50 W × 4
Potencia de salida continua
................................... 22 W × 4 (50 a 15 000 Hz, 5 %
Impedancia de carga ....... de 4 W a8W ×4
Nivel de salida máxima del preamplificador (Pre-out)
................................... 4,0 V
Ecualizador (ecualizador gráfico de 5 bandas):
Frecuencia ................ 100/315/1,25k/3,15k/8k Hz
Ganancia .................. ±12 dB
HPF:
Frecuencia ................ 50/63/80/100/125 Hz
Pendiente ................. –12 dB/oct
Altavoz de subgraves (mono):
Frecuencia ................ 50/63/80/100/125 Hz
Pendiente ................. –18 dB/oct
Ganancia .................. +6 dB a –24 dB
Fase .......................... Normal/Inversa
(gama de tensión permisible:
12,0 V a 14,4 V CC)
mm
mm
mm
mm
50 W × 2/4 W + 70 W × 1/2 W
(para altavoz de subgraves)
THD, 4 W de carga, ambos canales activados)
de 4 W a8W ×2+2W ×1
Intensificación de graves:
Ganancia .................. +12 dB a 0 dB
Reproductor de CD
Sistema ........................... Sistema de audio de discos
Discos utilizables ............. Disco compacto
Relación de señal a ruido
................................... 94 dB (1 kHz) (red IEC -A)
Número de canales .......... 2 (estéreo)
Formato de decodificación MP3
................................... MPEG-1 & 2 Audio Layer 3
Formato de decodificación WMA
................................... Ver. 7, 7.1, 8, 9, 10, 11, 12
Formato de decodificación AAC
................................... MPEG-4 AAC (sólo codificad o
Formato de señal WAV ..... PCM lineal & MS ADPCM
USB
Especificación de la norma USB
................................... USB 2.0 velocidad máxima
Corriente máxima suministrada
................................... 500 mA
Clase USB ....................... MSC (Clase de almacena-
Sistema de archivos ......... FAT12, FAT16, FAT32
Formato de decodificación MP3
................................... MPEG-1 & 2 Audio Layer 3
Formato de decodificación WMA
................................... Ver. 7, 7.1, 8, 9, 10, 11, 12
Formato de decodificación AAC
................................... MPEG-4 AAC (sólo codificad o
Formato de señal WAV ..... PCM lineal & MS ADPCM
SD
Formato físico compatible
................................... Versión 2,00
compactos
(audio 2 canales)
(Windows Media Player)
con iTunes) (.m4a)
(Ver.9,2 y anteriores)
(No comprimido)
miento masivo)
(audio 2 canales)
(Windows Media Player)
con iTunes) (.m4a)
(Ver.9,2 y anteriores)
(No comprimido)
Español
37
Es
Page 38

Apéndice
Información adicional
Capacidad máxima de memoria
................................... 32 GB (para SD y SDHC)
Sistema de archivos ......... FAT12, FAT16, FAT32
Formato de decodificación MP3
................................... MPEG-1 & 2 Audio Layer 3
Formato de decodificación WMA
................................... Ver. 7, 7.1, 8, 9, 10, 11, 12
Formato de decodificación AAC
................................... MPEG-4 AAC (sólo codificad o
Formato de señal WAV ..... PCM lineal & MS ADPCM
Sintonizador de FM
Gama de frecuencias ....... 87,5 MHz a 108,0 MHz
Sensibilidad utilizable ...... 9 dBf (0,8 µV/75 W, mono,
Relación de señal a ruido
................................... 72 dB (red IEC -A)
Sintonizador de AM
Gama de frecuencias ....... 531 kHz a 1 602 kHz (9 kHz)
Sensibilidad utilizable ...... 25 µV (señal/ruido: 20 dB)
Relación de señal a ruido
................................... 62 dB (red IEC -A)
Nota
Las especificaciones y el diseño están sujetos a
modificaciones sin previo aviso.
(audio 2 canales)
(Windows Media Player)
con iTunes) (.m4a)
(Ver.9,2 y anteriores)
(No comprimido)
señal/ruido: 30 dB)
530 kHz a 1 640 kHz (10 kHz)
38
Es
Page 39

Español
39Es
Page 40

Seção
01
Conteúdo
Antes de utilizar este produto
Antes de utilizar este produto
Sobre esta unidade 40
No caso de problemas 40
Modo de demonstração 40
Modo de demonstração de
retrocesso 41
Sobre este manual 41
Funcionamento desta unidade
Unidade principal 41
Controle remoto 41
Operações básicas 42
Utilização e cuidados do controle
remoto 42
As operações de menu são idênticas às dos
ajustes de função/ajustes de áudio/
ajustes iniciais/listas 43
Sintonizador 43
CD/CD-R/CD-RW e dispositivos de
armazenamento externos (USB,
SD) 43
iPod 45
Ajustes de áudio 46
Ajustes iniciais 48
Outras funções 49
Instalação
Conexões 50
Instalação 51
Informações adicionais
Solução de problemas 52
Mensagens de erro 52
Orientações de manuseio 54
Compatibilidade com áudio compactado
(disco, USB, SD) 55
Compatibilidade com iPod 56
Sequência de arquivos de áudio 56
Direitos autorais e marcas
comerciais 57
Especificações 57
Agradecemos por você ter adquirido este
produto PIONEER.
Leia este manual antes de utilizar o produto
para garantir seu uso adequado. É especialmente importante que você leia e observe as
ADVERTÊNCIAS eosAVISOS neste manual.
Guarde-o em local seguro e acessível para referência futura.
Sobre esta unidade
AVISO
! Não permita que esta unidade entre em con-
tato com líquidos. Há risco de choque elétrico. Além disso, o contato com líquidos pode
causar danos, fumaça e superaquecimento
desta unidade.
! Sempre deixe o volume baixo para poder
ouvir os sons do tráfego.
! Evite a exposição à umidade.
! Se a bateria do carro estiver desconectada
ou descarregada, a memória programada
será apagada.
CUIDADO
Este é um produto laser classe 1, classificado
de acordo com a Segurança de produtos
laser, IEC 60825-1:2007, e contém um módulo
laser classe 1M. Para garantir segurança contínua, não remova nenhuma tampa nem tente
acessar o interior do produto. Todo tipo de
manutenção deverá ser executado por pessoal qualificado.
PRODUTO A LASER DA CLASSE 1
No caso de problemas
Se esta unidade não funcionar corretamente,
entre em contato com o revendedor ou a central
de serviços autorizada da PIONEER mais próxima.
Modo de demonstração
Importante
! Se você não conseguir conectar o fio condu-
tor vermelho (ACC) desta unidade a um terminal acoplado às operações de ativação/
desativação da chave de ignição, a bateria
poderá descarregar.
! Lembre-se de que se o modo de demonstra-
ção de recursos continuar funcionando com
o motor do carro desligado, a bateria poderá
descarregar.
A demonstração é automaticamente iniciada
quando a chave de ignição é colocada na posição ACC ou ON com a unidade desligada. Desligar a unidade não cancelará o modo de
demonstração. Para cancelar o modo de demonstração, pressione DISP/
/SCRL novamente para iniciá-lo. A
ne DISP/
operação de demonstração, enquanto a chave
de ignição estiver em ACC, pode fazer com que
a bateria seja descarregada.
/SCRL. Pressio-
CUIDADO—RADIAÇÃO A LASER INVISÍVEL DA
CLASSE 1M QUANDO ABERTO, NÃO OLHE
DIRETAMENTE COM INSTRUMENTOS ÓPTICOS.
40
Ptbr
Page 41

89f abdce
g
h
o
m
f
a
i
l
knj
Antes de utilizar este produto
Funcionamento desta unidade
Seção
02
Modo de demonstração de
retrocesso
Se você não executar uma operação em aproximadamente 30 segundos, as indicações na tela
começarão a retroceder e continuarão retrocedendo a cada 10 segundos. Quando esta unidade estiver desligada enquanto a chave de
ignição estiver definida a ACC ou ON, pressionar o botão BAND/ ESC cancelará o modo de
demonstração de retrocesso. Pressione novamente o botão BAND/ ESC para iniciar o modo
de demonstração de retrocesso.
Sobre este manual
Nas instruções a seguir, as memórias USB, os
áudio players USB e os cartões de memória SD
são coletivamente referidos como “dispositivos
de armazenamento externos (USB, SD)”. Se apenas memórias USB e áudio players portáteis
USB forem indicados, eles serão referidos coletivamente como “dispositivos de armazenamento
USB”.
Neste manual, iPod e iPhone serão referidos
como “iPod”.
Unidade principal
1 2 3 4
Parte Parte
1 CLK/DISP OFF 9
2 SW/BASS a BAND/ESC
3 S.Rtrv b
MULTI-CONTROL
4
(M.C.)
Slot de carrega-
5
mento de disco
6 h (Ejetar) e DISP/
7 Porta USB f SRC/OFF
Botão Desencai-
8
xar
5
c
d
g
Conector de entrada AUX (conector estéreo de
3,5 mm)
(Lista)
(iPod)/LOC
(Reprodução
aleatória)
Slot para cartão
de memória SD
Remova o painel
frontal para acessar o slot para
cartão de memória SD.
6 7
/SCRL
AVISO
Utilize um cabo USB opcional da Pioneer (CDU50E) para conectar o áudio player USB/memória USB, já que qualquer dispositivo conectado
diretamente à unidade fica projetado para fora e
pode ser perigoso.
Não utilize produtos não autorizados.
Controle remoto
Parte Operação
h VOLUME
i MUTE
j a/b/c/d
k AUDIO
Pressione para aumentar ou
diminuir o volume.
Pressione para emudecer.
Pressione novamente para
cancelar.
Pressione para enviar comandos de sintonia por busca
manual, avanço rápido, retrocesso e busca por faixa.
Também utilizado para controlar funções.
Pressione para selecionar
uma função de áudio.
Português (B)
41
Ptbr
Page 42

Seção
02
Funcionamento desta unidade
Funcionamento desta unidade
Parte Operação
Pressione para selecionar di-
l DISP/SCRL
m e
n FUNCTION
o LIST/ENTER
ferentes displays.
Pressione e segure para rolar
pelas informações de texto.
Pressione para pausar ou retomar a reprodução.
Pressione para selecionar as
funções.
Pressione e segure para chamar da memória o menu de
ajuste inicial quando as fontes estiverem desligadas.
Pressione para visualizar a
lista de títulos de disco, títulos de faixa, pastas ou arquivos dependendo da fonte.
Enquanto opera o menu,
pressione para controlar as
funções.
Operações básicas
Importante
! Ao remover ou colocar o painel frontal, ma-
nuseie-o com cuidado.
! Evite expor o painel frontal a impactos exces-
sivos.
! Mantenha o painel frontal distante da luz di-
reta do sol e não o exponha a temperaturas
altas.
! Para evitar que ocorram danos ao dispositivo
ou interior do veículo, remova quaisquer
cabos e dispositivos acoplados ao painel
frontal antes de retirá-lo.
Remoção do painel frontal para proteger a unidade contra roubo
1 Pressione o botão Desencaixar para soltar o
painel frontal.
2 Empurre o painel frontal para cima e puxe-o
em sua direção.
3 Sempre mantenha o painel frontal removido
em um dispositivo de proteção, como um estojo.
Recolocação do painel frontal
1 Deslize o painel frontal para a esquerda.
Certifique-se de inserir as linguetas no lado esquerdo da unidade principal nos slots do painel frontal.
2 Pressione o lado direito do painel frontal até o
seu total encaixe.
Se você não conseguir colocar o painel frontal
na unidade principal com êxito, verifique se
está colocando-o corretamente na unidade
principal. Forçar o encaixe do painel frontal
poderá ocasionar danos a ele ou à unidade
principal.
Como ligar a unidade
1 Pressione SRC/OFF para ligar a unidade.
Como desligar a unidade
1 Pressione e segure SRC/OFF até desligar a uni-
dade.
Seleção de uma fonte
1 Pressione SRC/OFF para alternar entre:
TUNER (Sintonizador) —CD (CD player incor-
porado)—USB (USB)/iPod (iPod)—SD (Cartão
de memória SD)—AUX (AUX)
Ajuste do volume
1 Gire M.C. para ajustar o volume.
AVISO
Por razões de segurança, estacione seu veículo
ao remover o painel frontal.
Nota
Quando o fio condutor azul/branco desta unidade é conectado ao terminal de controle do relé
da antena automática do veículo, a antena se
estende quando a fonte da unidade é ligada.
Para retrair a antena, desligue a fonte.
Utilização e cuidados do
controle remoto
Utilização do controle remoto
1 Aponte o controle remoto para a direção do
painel frontal para operá-lo.
Ao utilizar pela primeira vez, puxe o filme que
se projeta da bandeja.
Substituição da bateria
1 Deslize para fora a bandeja na parte posterior
do controle remoto.
2 Insira a bateria com os polos de mais (+) e
menos (– ) corretamente alinhados.
ADVERTÊNCIA
! Mantenha a bateria fora do alcance de crian-
ças. Caso ela seja ingerida, consulte um médico imediatamente.
! As baterias (bateria ou baterias instaladas)
não devem ser expostas a calor excessivo,
como luz direta do sol, fogo ou situação semelhante.
AVISO
! Utilize uma bateria de lítio CR2025 (3 V).
! Remova a bateria se não for utilizar o contro-
le remoto por um mês ou mais.
! Se a bateria for substituída incorretamente,
haverá perigo de explosão. Substitua-a apenas por uma do mesmo tipo ou equivalente.
! Não manuseie a bateria com ferramentas
metálicas.
! Não armazene a bateria com objetos metáli-
cos.
! Em caso de vazamento da bateria, limpe
completamente o controle remoto e instale
uma nova bateria.
! Ao descartar baterias usadas, certifique-se
de estar em conformidade com as regulamentações governamentais ou com as normas das instituições públicas do meio
ambiente que se aplicam ao seu país/região.
Importante
! Não deixe o controle remoto exposto a tem-
peraturas altas ou à luz direta do sol.
! O controle remoto poderá não funcionar cor-
retamente se ficar exposto à luz direta do sol.
! Não deixe o controle remoto cair no chão,
onde pode ficar preso embaixo do pedal do
freio ou acelerador.
42
Ptbr
Page 43

6
75 64
Funcionamento desta unidade
Funcionamento desta unidade
Seção
02
As operações de menu são
idênticas às dos ajustes de
função/ajustes de áudio/
ajustes iniciais/listas
Retorno à visualização anterior
Retorna à lista/categoria anterior (a pasta/categoria que está um nível acima)
1 Pressione DISP/
Retorno ao menu principal
Retorna à camada superior de lista/categoria.
1 Pressione e segure DISP/
Retorno à visualização normal
Cancela o menu de ajuste inicial
1 Pressione BAND/ESC.
Retorno à visualização normal da lista/categoria
1 Pressione BAND/ESC.
/SCRL.
/SCRL.
Sintonizador
Operações básicas
3
1 2 4 5
1 Indicador de banda
2 Indicador 5 (Estéreo)
3 Indicador LOC
É visualizado quando a sintonia por busca
local está ativada.
4 Indicador de número programado
5 Indicador de nível de sinal
6 Indicador de frequência
! Se esta unidade puder obter as informa-
ções sobre o nome do serviço do programa, esse nome será exibido.
Seleção de uma banda
1 Pressione BAND/ESC até visualizar a banda
desejada (FM-1, FM-2, FM-3 para FM ou AM).
Sintonia manual (passo a passo)
1 Pressione M.C. para a esquerda ou para a di-
reita.
Busca
1 Pressione e segure M.C. para a esquerda ou
para a direita.
Você pode cancelar a sintonia por busca ao
pressionar M.C. para a esquerda ou para a direita.
Enquanto você pressiona e segura M.C. para a
esquerda ou para a direita, poderá pular as
emissoras. A sintonia por busca começará
assim que M.C. for liberado.
Armazenamento e chamada das
emissoras de cada banda
1 Pressione (Lista).
A tela programada é visualizada.
2 Utilize M.C. para armazenar a frequência
selecionada na memória.
Gire para alterar o número programado. Pressione e segure para armazenar.
3 Utilize M.C. para selecionar a emissora
desejada.
Gire para alterar a emissora. Pressione para selecionar.
# Você também pode alterar a emissora ao pressionar M.C. para cima ou para baixo.
# Para retornar ao display normal, pressione
BAND/ESC ou
(Lista).
Operações avançadas utilizando
botões especiais
Sintonia por busca local
1 Pressione
/LOC para selecionar o ajuste desejado.
FM: Level 1—Level 2—Level 3—Level 4
AM: Level 1—Level 2
O ajuste de nível mais alto permite a recepção
apenas das emissoras com sinais mais fortes,
enquanto os níveis mais baixos permitem a recepção das emissoras com sinais mais fracos.
Configurações de funções
1 Pressione M.C. para visualizar o menu
principal.
2 Gire M.C. para alterar a opção de menu e
pressione para selecionar FUNCTION.
3 Gire M.C. para selecionar a função.
Após selecionar, execute os seguintes procedimentos para definir a função.
BSM (Memória das melhores emissoras)
A BSM (Memória das melhores emissoras) armazena automaticamente as seis emissoras mais fortes na ordem de intensidade do sinal.
1 Pressione M.C. para ativar BSM.
! Para cancelar, pressione M.C. novamente.
Local (Sintonia por busca local)
A sintonia por busca local permite que você sintonize apenas as emissoras de rádio com sinais suficientemente fortes para uma boa recepção.
1 Pressione M.C. para ativar a função Local.
! Para cancelar, pressione M.C. novamente.
2 Pressione M.C. para a esquerda ou para a di-
reita para selecionar o ajuste desejado.
Para obter detalhes, consulte Sintonia por
busca local nesta página.
CD/CD-R/CD-RW e dispositivos
de armazenamento externos
(USB, SD)
Operações básicas
1
1 Indicador de taxa de bit/frequência de amos-
tragem
Mostra a taxa de bit ou a frequência de
amostragem da faixa atual (arquivo), quando
o áudio compactado estiver sendo reproduzido.
! Ao reproduzir arquivos AAC gravados
como VBR (Taxa de bit variável), o valor
médio da taxa de bit será exibido. No entanto, dependendo do software utilizado
para decodificar arquivos AAC, VBR poderá ser visualizado.
2 Indicador de número da pasta
Mostra o número da pasta atualmente sendo
reproduzida, quando o áudio compactado estiver sendo reproduzido.
3 Indicador de número da faixa
4 Indicador PLAY/PAUSE
5 Indicador S.Rtrv
É visualizado quando a função Recuperação
de som está ativada.
6 Tempo da música (barra de progresso)
7 Indicador de tempo de reprodução
32
Português (B)
43
Ptbr
Page 44

Seção
02
Funcionamento desta unidade
Funcionamento desta unidade
Reprodução de um CD/CD-R/CD-RW
1 Insira o disco no slot de carregamento com a
etiqueta voltada para cima.
Ejeção de um CD/CD-R/CD-RW
1 Pressione h (Ejetar).
Reprodução de músicas em um dispositivo de armazenamento USB
1 Abra a tampa do conector USB.
2 Conecte o dispositivo de armazenamento USB
utilizando um cabo USB.
Interrupção da reprodução de arquivos em um
dispositivo de armazenamento USB
1 Você pode desconectar o dispositivo de arma-
zenamento USB a qualquer momento.
Reprodução de músicas em um cartão de memória SD
1 Remova o painel frontal.
2 Insira um cartão de memória SD no slot para
cartão SD.
Insira-o com a superfície de contato voltada
para baixo e pressione o cartão até ouvir um
clique de encaixe total.
3 Recoloque o painel frontal.
4 Pressione SRC/OFF para selecionar SD como
a fonte.
A reprodução iniciará.
Interrupção da reprodução de arquivos em um
cartão de memória SD
1 Remova o painel frontal.
2 Pressione o cartão de memória SD até ouvir
um clique de encaixe.
O cartão de memória SD é ejetado.
3 Retire o cartão de memória SD.
4 Recoloque o painel frontal.
Seleção de uma pasta
1 Pressione M.C. para cima ou para baixo.
Seleção de uma faixa
1 Pressione M.C. para a esquerda ou para a di-
reita.
Avanço rápido ou retrocesso
1 Pressione e segure M.C. para a esquerda ou
para a direita.
Retorno à pasta raiz
1 Pressione e segure BAND/ESC.
Alternância entre áudio compactado e CD-DA
1 Pressione BAND/ESC.
Notas
! Ao reproduzir um áudio compactado, o som
não é transmitido durante as operações de
avanço rápido ou retrocesso.
! Desconecte os dispositivos de armazena-
mento USB da unidade quando não estiverem em uso.
Visualização de informações de
texto
Seleção de informações de texto desejadas
1 Pressione DISP/
Rolagem das informações de texto para a esquerda
1 Pressione e segure DISP/
Notas
! Dependendo da versão do iTunes utilizada
para gravar arquivos MP3 em um disco ou
tipos de arquivos de mídia, o texto incompatível armazenado em um arquivo de áudio poderá ser exibido incorretamente.
! Os itens de informações de texto que podem
ser alterados dependem da mídia.
/SCRL.
/SCRL.
Seleção e reprodução de
arquivos/faixas da lista de nomes
1 Pressione (Lista) para alternar para o
modo de lista de nomes de arquivo/faixa.
2 Utilize M.C. para selecionar o nome do arquivo desejado (ou nome da pasta).
Alteração do nome do arquivo ou da pasta
1 Gire M.C.
Reprodução
1 Quando um arquivo ou uma faixa estiver sele-
cionado, pressione M.C.
Visualização de uma lista de arquivos (ou pastas)
na pasta selecionada
1 Quando uma pasta estiver selecionada, pres-
sione M.C.
Reprodução de uma música na pasta selecionada
1 Quando uma pasta estiver selecionada, pres-
sione e segure M.C.
Operações avançadas utilizando
botões especiais
Reprodução de faixas em ordem aleatória
1 Pressione
dução aleatória.
As faixas em uma série de repetição selecionada são reproduzidas em ordem aleatória.
Aprimoramento de áudio compactado e restauração de um som rico (Recuperação de som)
1 Pressione S.Rtrv para alternar entre:
OFF (Desativado)—1—2
1 terá efeito para taxas de compactação bai-
xas e 2 terá efeito para taxas de compactação
altas.
para ativar ou desativar a repro-
Configurações de funções
1 Pressione M.C. para visualizar o menu
principal.
2 Gire M.C. para alterar a opção de menu e
pressione para selecionar FUNCTION.
3 Gire M.C. para selecionar a função.
Após selecionar, execute os seguintes procedimentos para definir a função.
Play mode (Reprodução com repetição)
1 Pressione M.C. para selecionar uma faixa de
reprodução com repetição.
CD/CD-R/CD-RW
! Disc repeat – Repete todas as faixas
! Track repeat – Repete a faixa atual
! Folder repeat – Repete a pasta atual
Dispositivo de armazenamento externo
(USB, SD)
! All repeat – Repete todos os arquivos
! Track repeat – Repete o arquivo atual
! Folder repeat – Repete a pasta atual
Random mode (Reprodução aleatória)
1 Pressione M.C. para ativar ou desativar a re-
produção aleatória.
Pause (Pausa)
1 Pressione M.C. para pausar ou retomar.
Sound Retriever (Recuperação de som)
Aprimora automaticamente o áudio compactado
e restaura um som rico.
1 Pressione M.C. para selecionar o ajuste dese-
jado.
Para obter detalhes, consulte Aprimoramento
de áudio compactado e restauração de um som
rico (Recuperação de som) nesta página.
44
Ptbr
Page 45

75 64
Funcionamento desta unidade
Funcionamento desta unidade
Seção
02
iPod
Operações básicas
1
2
3
1 Indicador de repetição
2 Indicador de número da música
3 Indicador de ordem aleatória (Shuffle)
4 Indicador PLAY/PAUSE
5 Indicador S.Rtrv
É visualizado quando a função Recuperação
de som está ativada.
6 Tempo da música (barra de progresso)
7 Indicador de tempo de reprodução
Reprodução de músicas em um iPod
1 Abra a tampa do conector USB e conecte um
iPod utilizando o conector dock do iPod e o
cabo USB.
Seleção de uma faixa (capítulo)
1 Pressione M.C. para a esquerda ou para a di-
reita.
Avanço rápido ou retrocesso
1 Pressione e segure M.C. para a esquerda ou
para a direita.
Notas
! O iPod não poderá ser ligado nem desligado
quando o modo de controle estiver definido
como AUDIO.
! Desconecte os fones de ouvido do iPod
antes de conectá-lo a esta unidade.
! Depois que a chave de ignição for colocada
na posição OFF, o iPod será desligado em
dois minutos.
Visualização de informações de
texto
Seleção de informações de texto desejadas
1 Pressione DISP/
Rolagem das informações de texto para a esquerda
1 Pressione e segure DISP/
/SCRL.
/SCRL.
Busca de uma música
1 Pressione (Lista) para ir para o menu
inicial de busca na lista.
2 Utilize M.C. para selecionar uma categoria/música.
Alteração do nome da música ou categoria
1 Gire M.C.
Playlists (Listas de reprodução)—Artists (Ar-
tistas)—Albums (Álbuns)—Songs (Músicas)
—Podcasts (Podcasts)—Genres (Estilos)—
Composers (Compositores)—Audiobooks
(Audiobooks)
Reprodução
1 Quando uma música estiver selecionada,
pressione M.C.
Visualização de uma lista de músicas na categoria selecionada
1 Quando uma categoria estiver selecionada,
pressione M.C.
Reprodução de uma música na categoria selecionada
1 Quando uma categoria estiver selecionada,
pressione e segure M.C.
Busca na lista por ordem alfabética
1 Quando uma lista da categoria selecionada
for visualizada, pressione
para o modo de busca por ordem alfabética.
2 Gire M.C. para selecionar uma letra.
3 Pressione M.C. para visualizar a lista em
ordem alfabética.
para alternar
Notas
! É possível reproduzir listas de reprodução
criadas com o aplicativo de PC (MusicSphere). O aplicativo estará disponível em nosso
site.
! As listas de reprodução que você criou com
o aplicativo de PC (MusicSphere) são visualizadas no formato abreviado.
Operações avançadas utilizando
botões especiais
Reprodução de todas as músicas em ordem aleatória (Shuffle todas)
1 Pressione
Reprodução de músicas relacionadas à música
atualmente sendo reproduzida
Você pode reproduzir as músicas das seguintes
listas.
• Lista de álbuns do artista atualmente sendo reproduzido
• Lista de músicas do álbum atualmente sendo
reproduzido
• Lista de álbuns do estilo atualmente sendo reproduzido
1 Pressione e segure M.C. para alternar para o
modo de reprodução de link.
2 Pressione M.C. para a esquerda ou para a di-
reita para alterar o modo; pressione para selecionar.
! Artist – Reproduz um álbum do artista
! Album – Reproduz uma música do álbum
! Genre – Reproduz um álbum do estilo
O álbum/música selecionado será reproduzido
depois da música atualmente sendo reproduzida.
! O álbum/música selecionado poderá ser can-
celado se você operar funções diferentes da
reprodução de link (por exemplo, avanço rápido e retrocesso).
! Dependendo da música selecionada para re-
produção, o final da música atualmente sendo
reproduzida e o início do álbum/música selecionado podem ser cortados.
para ativar Shuffle todas.
atualmente sendo reproduzido.
atualmente sendo reproduzido.
atualmente sendo reproduzido.
Ptbr
Português (B)
45
Page 46

1
Seção
02
Funcionamento desta unidade
Operação da função iPod desta unidade no seu
iPod
Você poderá ouvir o som dos aplicativos iPod
usando os alto-falantes do carro, quando APP for
selecionado.
Esta função não é compatível com os seguintes
modelos de iPod:
! iPod nano da primeira geração
! iPod da quinta geração
O modo APP é compatível com os seguintes modelos de iPod.
! iPod touch da terceira geração (versão de soft-
ware 3.0 ou posterior)
! iPod touch da segunda geração (versão de
software 3.0 ou posterior)
! iPod touch da primeira geração (versão de
software 3.0 ou posterior)
! iPhone 4 (versão de software 4.0 ou posterior)
! iPhone 3GS (versão de software 3.0 ou posteri-
or)
! iPhone 3G (versão de software 3.0 ou posteri-
or)
! iPhone (versão de software 3.0 ou posterior)
1 Pressione
de controle.
! iPod – A função iPod desta unidade pode
! APP – Reproduz o som dos aplicativos
! AUDIO – A função iPod desta unidade
Aprimoramento de áudio compactado e restauração de um som rico (Recuperação de som)
1 Pressione S.Rtrv para alternar entre:
OFF (Desativado)—1—2
1 terá efeito para taxas de compactação bai-
xas e 2 terá efeito para taxas de compactação
altas.
/LOC para alternar para o modo
ser operada a partir do iPod conectado.
iPod.
pode ser operada a partir desta unidade.
Configurações de funções
1 Pressione M.C. para visualizar o menu
principal.
2 Gire M.C. para alterar a opção de menu e
pressione para selecionar FUNCTION.
3 Gire M.C. para selecionar a função.
Após selecionar, execute os seguintes procedimentos para definir a função.
Play mode (Reprodução com repetição)
1 Pressione M.C. para selecionar uma faixa de
reprodução com repetição.
! Repeat One – Repete a música atual
! Repeat All – Repete todas as músicas na
lista selecionada
Shuffle mode (Shuffle)
1 Pressione M.C. para selecionar seu ajuste fa-
vorito.
! Shuffle Songs – Reproduz músicas em
uma ordem aleatória na lista selecionada.
! Shuffle Albums – Reproduz músicas de
um álbum selecionado aleatoriamente, na
ordem correta das músicas.
! Shuffle OFF – Cancela a reprodução alea-
tória.
Shuffle all (Shuffle todas)
1 Pressione M.C. para ativar Shuffle todas.
Para desativar, defina Shuffle mode no menu
FUNCTION como desativado.
Link play (Reprodução de link)
Funcionamento desta unidade
1 Pressione M.C. para a esquerda ou para a di-
reita para alterar o modo; pressione para selecionar.
Para obter detalhes sobre os ajustes, consulte
Reprodução de músicas relacionadas à música
atualmente sendo reproduzida na página ante-
rior.
PAUSE (Pausa)
1 Pressione M.C. para pausar ou retomar.
Audiobooks (Velocidade do audiobook)
1 Pressione M.C. para selecionar seu ajuste fa-
vorito.
! Faster – Reprodução a uma velocidade
mais rápida do que a normal
! Normal – Reprodução na velocidade nor-
mal
! Slower – Reprodução a uma velocidade
mais lenta do que a normal
Sound Retriever (Recuperação de som)
1 Pressione M.C. para selecionar o ajuste dese-
jado.
Para obter detalhes, consulte Aprimoramento
de áudio compactado e restauração de um som
rico (Recuperação de som) nesta página.
Notas
! Se você alternar o modo de controle para
iPod, ocorrerá uma pausa na reprodução de
música. Opere o iPod para retomar a reprodução.
! As funções a seguir continuarão acessíveis
na unidade mesmo que o modo de controle
seja definido como iPod/APP.
— Ativação das informações de texto (iPod)
— Pausa
— Avançar/retroceder rapidamente
— Faixa para cima/para baixo
— Reprodução aleatória (Shuffle)
—
(Listar) para utilizar o menu iPod
— Pressione M.C. para pressionar a roda clicá-
vel do iPod
— Pressione M.C. para cima para girar a roda
clicável do iPod para a esquerda
— Pressione M.C. para baixo para girar a roda
clicável do iPod para a direita
! Quando o modo de controle estiver definido
como iPod/APP, as operações serão limitadas como a seguir:
— Os ajustes de função não estão disponíveis.
— A função de busca não pode ser operada a
partir desta unidade.
Ajustes de áudio
1 Display de áudio
Mostra o status do ajuste de áudio.
46
Ptbr
Page 47

Funcionamento desta unidade
Funcionamento desta unidade
Seção
02
Operações avançadas utilizando
botões especiais
Ajuste para ativar/desativar o alto-falante de graves secundário
1 Pressione SW/BASS para selecionar o menu
de ajuste para ativar/desativar o alto-falante de
graves secundário.
2 Pressione M.C. para ativar ou desativar a
saída do alto-falante de graves secundário.
3 Pressione M.C. para a esquerda ou para a di-
reita para selecionar a fase de saída do alto-falante de graves secundário.
Ajuste do alto-falante de graves secundário
1 Pressione SW/BASS para selecionar o menu
de ajuste do alto-falante de graves secundário.
2 Pressione M.C. para a esquerda ou para a di-
reita para selecionar a frequência de corte.
50Hz—63Hz—80Hz—100Hz—125Hz
3 Pressione M.C. para cima ou para baixo para
ajustar o nível de saída do alto-falante de graves secundário.
Cada vez que você pressionar M.C. para cima
ou para baixo, o nível do alto-falante de graves
secundário aumentará ou diminuirá. +6 a -24
é visualizado à medida que o nível é aumentado ou diminuído.
Intensificador de graves
1 Pressione e segure SW/BASS para selecionar
o menu de ajuste do intensificador de graves.
2 Pressione M.C. para cima ou para baixo para
selecionar um nível desejado.
Ajustes da função de áudio
1 Pressione M.C. para visualizar o menu
principal.
2 Gire M.C. para alterar a opção de menu e
pressione para selecionar AUDIO.
3 Gire M.C. para selecionar a função de
áudio.
Após selecionar, execute os seguintes procedimentos para definir a função de áudio.
Fader/Balance (Ajuste de fader/equilíbrio)
1 Pressione M.C. para cima ou para baixo para
ajustar o equilíbrio dos alto-falantes dianteiros/
traseiros.
! O equilíbrio dos alto-falantes dianteiros/tra-
seiros não poderá ser ajustado, quando o
ajuste da saída traseira for Rear SP :S/W.
Consulte S/ W control (Ajuste da saída tra-
seira e do alto-falante de graves secundário)
na página 49.
2 Pressione M.C. para a esquerda ou para a di-
reita para ajustar o equilíbrio dos alto-falantes
esquerdos/direitos.
Powerful (Recuperação do equalizador)
1 Pressione M.C. para a esquerda ou para a di-
reita para selecionar uma cur va do equalizador.
Powerful—Natural—Vocal—Custom1—Custom2—Flat—Super bass
100 Hz (Ajuste do equalizador)
Você pode ajustar a curva do equalizador atualmente selecionada, conforme desejado. A curva
do equalizador ajustada é armazenada em Cus-
tom1 ou Custom2.
! Uma curva Custom1 separada pode ser criada
para cada fonte. Se você fizer ajustes quando
uma curva diferente de Custom2 for selecionada, os ajustes da curva do equalizador serão
armazenados em Custom1.
! Uma curva Custom2 que é comum para todas
as fontes pode ser criada. Se você fizer ajustes
quando a curva Custom2 estiver selecionada,
a curva Custom2 será atualizada.
1 Chame a curva do equalizador que deseja
ajustar da memória.
2 Pressione M.C. para a esquerda ou para a di-
reita para selecionar a banda do equalizador a
ser ajustada.
100Hz—315Hz—1.25kHz—3.15kHz—8kHz
3 Pressione M.C. para cima ou para baixo para
ajustar a curva do equalizador.
+6 a –6 é visualizado à medida que a curva do
equalizador é aumentada ou diminuída.
LOUD (Sonoridade)
A sonoridade compensa as deficiências das faixas
de frequência baixas e altas com volume baixo.
1 Pressione M.C. para ativar ou desativar a sono-
ridade.
2 Pressione M.C. para a esquerda ou para a di-
reita para selecionar o ajuste desejado.
Low (Baixa)—Mid (Média)—High (Alta)
Sub W.1 (Ajuste para ativar/desativar o alto-falan-
te de graves secundário)
Esta unidade está equipada com uma saída do
alto-falante de graves secundário que pode ser ativada ou desativada.
1 Pressione M.C. para ativar ou desativar a saída
do alto-falante de graves secundário.
2 Pressione M.C. para a esquerda ou para a di-
reita para selecionar a fase de saída do alto-falante de graves secundário.
Pressione M.C. para a esquerda para selecionar a fase inversa e visualizar Reverse no display. Pressione M.C. para a direita para
selecionar a fase normal e visualizar Normal
no display.
Sub W.2 (Ajuste do alto-falante de graves secundário)
A frequência de corte e o nível de saída poderão
ser ajustados quando a saída do alto-falante de
graves secundários estiver ativada.
Apenas as frequências inferiores às que estavam
na faixa selecionada serão emitidas no alto-falante
de graves secundário.
1 Pressione M.C. para a esquerda ou para a di-
reita para selecionar a frequência de corte.
50Hz—63Hz—80Hz—100Hz—125Hz
2 Pressione M.C. para cima ou para baixo para
ajustar o nível de saída do alto-falante de graves secundário.
Cada vez que você pressionar M.C. para cima
ou para baixo, o nível do alto-falante de graves
secundário aumentará ou diminuirá. +6 a -24
é visualizado à medida que o nível é aumentado ou diminuído.
Bass (Intensificador de graves)
1 Pressione M.C. para cima ou para baixo para
selecionar um nível desejado.
0 a +6 é visualizado à medida que o nível é aumentado ou diminuído.
HPF (Ajuste do filtro de alta frequência)
Português (B)
Ptbr
47
Page 48

1
Seção
02
Funcionamento desta unidade
Funcionamento desta unidade
Quando você não quiser que sons baixos da faixa
de frequência de saída do alto-falante de graves
secundário sejam reproduzidos nos alto-falantes
dianteiros ou traseiros, ative o HPF (Filtro de alta
frequência). Apenas as frequências superiores às
que estavam na faixa selecionada serão emitidas
nos alto-falantes dianteiros e traseiros.
1 Pressione M.C. para ativar ou desativar o filtro
de alta frequência.
2 Pressione M.C. para a esquerda ou para a di-
reita para selecionar a frequência de corte.
50Hz—63Hz—80Hz—100Hz—125Hz
SLA (Ajuste de nível de fonte)
SLA (Ajuste de nível de fonte) permite ajustar o
nível de volume de cada fonte para evitar mudanças radicais de volume ao alternar entre as fontes.
! Ao selecionar FM como a fonte, você não pode
alternar para SLA.
! Os ajustes são baseados no nível de volume
de FM, que permanece inalterado.
! O nível de volume de AM também pode ser
ajustado com essa função.
1 Pressione M.C. para cima ou para baixo para
ajustar o volume da fonte.
Faixa de ajuste: +4 a –4
Ajustes iniciais
1 Display de função
! Mostra o status da função.
1 Pressione e segure SRC/OFF até desligar a
unidade.
2 Pressione e segure M.C. até visualizar o
menu de ajuste inicial no display.
3 Gire M.C. para selecionar o ajuste inicial.
Após selecionar, execute os seguintes procedimentos para definir o ajuste inicial.
Language select (Vários idiomas)
Para sua conveniência, esta unidade vem com o
recurso de visualização de vários idiomas. Você
pode selecionar o idioma mais apropriado.
1 Pressione M.C. para selecionar o idioma.
English—Español—Português
Calendar (Ajuste da data)
1 Pressione M.C. para a esquerda ou para a di-
reita para selecionar a visualização do calendário que deseja ajustar.
Ano—Dia—Mês
2 Pressione M.C. para cima ou para baixo para
ajustar a data.
Clock (Ajuste da hora)
1 Pressione M.C. para a esquerda ou para a di-
reita para selecionar o segmento da hora visualizada que deseja ajustar.
Horas—Minutos
2 Pressione M.C. para cima ou para baixo para
ajustar as horas.
! Você pode correlacionar o relógio a um sinal
de hora ao pressionar M.C.
! Se 00 a 29, os minutos serão arredonda-
dos para baixo. (Por exemplo, 10:18 ficará
10:00.)
! Se 30 a 59, os minutos serão arredonda-
dos para cima. (Por exemplo, 10:36 ficará
11:00.)
EngineTime alert (Ajuste do display de tempo de-
corrido)
Esse ajuste permite medir o tempo decorrido
desde o momento em que a máquina é ligada e
exibe o tempo decorrido por período definido.
Além disso, você ouvirá um alarme.
1 Pressione M.C. para selecionar seu ajuste fa-
vorito.
OFF—15Minutes—30Minutes
FM step (Passo de sintonia FM)
O passo de sintonia FM empregado pela sintonia
por busca pode ser alternado entre 100 kHz, o
passo programado e 50 kHz.
Se a sintonia por busca for executada em passos
de 50 kHz, as emissoras poderão ser sintonizadas
de forma imprecisa. Sintonize as emissoras utilizando a sintonia manual ou utilize novamente a
sintonia por busca.
1 Pressione M.C. para selecionar o passo de sin-
tonia FM.
50kHz (50 kHz)—100kHz (100 kHz)
AM STEP (Passo de sintonia AM)
O passo de sintonia AM pode ser alternado entre
9 kHz, o passo predefinido e 10 kHz. Ao utilizar o
sintonizador na América do Norte, Central ou do
Sul, reajuste o passo de sintonia de 9 kHz (531 a
1 602 kHz permissível) para 10 kHz (530 a 1 640
kHz permissível).
1 Pressione M.C. para selecionar o passo de sin-
tonia AM.
10 KHZ (10 kHz)—9 KHZ (9 kHz)
USB plug&play (Plug and play)
Este ajuste permite alternar sua fonte para USB/
iPod automaticamente.
1 Pressione M.C. para ativar ou desativar a fun-
ção plug and play.
! ON – Quando o dispositivo de armazena-
mento USB/iPod for conectado, a fonte
será automaticamente alternada para
USB/iPod. Se você desconectar o dispositivo de armazenamento USB/iPod, a fonte
desta unidade será desativada.
! OFF – Quando o dispositivo de armazena-
mento USB/iPod for conectado, a fonte
não será alternada para USB/iPod automaticamente. Altere a fonte para USB/iPod
manualmente.
Warning tone (Ajuste do som de advertência)
Se após desligar a ignição, o painel frontal não for
extraído da unidade principal dentro de quatro segundos, um som de advertência será emitido.
Você pode desativar o som de advertência.
1 Pressione M.C. para ativar ou desativar o som
de advertência.
AUX (Entrada auxiliar)
Ative este ajuste ao utilizar um dispositivo auxiliar
conectado a esta unidade.
1 Pressione M.C. para ativar ou desativar o ajus-
te auxiliar.
Dimmer (Ajuste do redutor de luz)
Para evitar que o display fique com muito brilho à
noite, a luz do display é automaticamente reduzida quando os faróis do carro são acesos. Você
pode ativar ou desativar o redutor de luz.
1 Pressione M.C. para ativar ou desativar o redu-
tor de luz.
Brightness (Ajuste do brilho do display)
48
Ptbr
Page 49

Funcionamento desta unidade
Funcionamento desta unidade
Seção
02
1 Pressione M.C. para a esquerda ou para a di-
reita para ajustar o nível de brilho.
0 a 15 é visualizado à medida que o nível é aumentado ou diminuído.
! Quando o redutor de luz estiver funcionan-
do, o nível de brilho poderá ser ajustado de
0 a 10.
S/W control (Ajuste da saída traseira e do alto-fa-
lante de graves secundário)
A saída traseira desta unidade (saída dos condutores dos alto-falantes traseiros e de RCA) pode
ser utilizada para conexão de alto-falantes de faixa
total (Rear SP :F.Range) ou alto-falantes de graves
secundários (Rear SP :S/W). Se você alternar o
ajuste da saída traseira para Rear SP :S/W, poderá
conectar um condutor do alto-falante traseiro diretamente a um alto-falante de graves secundário
sem utilizar um amplificador auxiliar.
1 Pressione M.C. para alternar o ajuste da saída
traseira.
! Quando nenhum alto-falante de graves se-
cundário estiver conectado à saída traseira, selecione Rear SP :F.Range (Altofalante de faixa total).
! Quando um alto-falante de graves secun-
dário estiver conectado à saída traseira, selecione Rear SP :S/W (Alto-falante de
graves secundário).
! Mesmo se você alterar esse ajuste, não haverá
saída a menos que você ative a saída do altofalante de graves secundário (consulte
Sub W.1 (Ajuste para ativar/desativar o alto-falante de graves secundário) na página 47).
! No menu Áudio, se você alterar esse ajuste, a
saída do alto-falante de graves secundário retornará aos ajustes de fábrica.
! As saídas traseiras de fio condutor dos alto-fa-
lantes e de RCA são alternadas simultaneamente neste ajuste.
Demonstration (Ajuste do display de demonstração)
1 Pressione M.C. para ativar ou desativar o dis-
play de demonstração.
! Você também pode ativar ou desativar o
modo de demonstração de recursos ao
pressionar DISP enquanto esta unidade estiver desligada. Para obter mais detalhes,
consulte Modo de demonstração na página
40.
Reverse mode (Ajuste do modo de demonstração
de retrocesso)
1 Pressione M.C. para ativar ou desativar o
modo de demonstração de retrocesso.
! Você também pode ativar ou desativar o
modo de demonstração de retrocesso ao
pressionar BAND enquanto esta unidade
estiver desligada. Para obter mais detalhes,
consulte Modo de demonstração de r etro-
cesso na página 41.
Ever-scroll (Ajuste do modo de rolagem)
Quando a Rolagem contínua estiver ativada (ON),
as informações de texto gravadas no CD rolarão
continuamente no display. Desative-a (OFF) se preferir que as informações rolem apenas uma vez.
1 Pressione M.C. para ativar ou desativar a rola-
gem contínua.
Outras funções
Utilização de uma fonte AUX
1 Insira o miniplugue estéreo no conector
AUX de entrada.
2 Pressione SRC/OFF para selecionar AUX
como a fonte.
Nota
A opção AUX não poderá ser selecionada a
menos que o ajuste auxiliar esteja ativado. Para
obter mais detalhes, consulte AUX (Entrada au-
xiliar) na página anterior.
Display de hora
% Pressione CLK/DISP OFF para selecionar o
ajuste desejado.
Hora desativada—Display de hora—Display de
tempo decorrido
Ativação da indicação do
display e iluminação dos botões
A indicação do display e a iluminação dos botões podem ser ativadas ou desativadas.
% Pressione e segure CLK/DISP OFF.
Pressionar e segurar CLK/DISP OFF ativará ou
desativará a indicação do display e a iluminação
dos botões.
# Mesmo se a indicação do display estiver desativada, a operação poderá ser conduzida. Se a operação for conduzida com a indicação do display
desativada, o display acenderá por alguns segundos
e desligará novamente.
Utilização de diferentes
visualizações de entretenimento
Você pode apreciar as visualizações de entretenimento enquanto ouve cada fonte de áudio.
1 Pressione M.C. para visualizar o menu
principal.
2 Gire M.C. para alterar a opção de menu e
pressione para selecionar ENTERTAINMENT.
3 Gire M.C. para alterar a visualização.
Visual do plano de fundo—Estilo—Imagem do
plano de fundo 1—Imagem do plano de fundo 2
—Imagem do plano de fundo 3—Imagem do
plano de fundo 4—Display simples—Tela para
filmes 1—Tela para filmes 2—Calendário
# O display de estilo muda dependendo do estilo
da música.
# Dependendo do aplicativo utilizado para codificar arquivos de áudio, pode ser que o display de estilo não opere corretamente.
Português (B)
Ptbr
49
Page 50

7
h
Seção
03
Instalação
Instalação
Conexões
ADVERTÊNCIA
! Utilize alto-falantes com mais de 50 W (valor
de saída) e entre 4 W a8W (valor de impedância). Não utilize alto-falantes de 1 W a3W
nesta unidade.
! O cabo preto é o terra. Ao instalar esta unida-
de ou amplificador de potência (vendido separadamente), conecte primeiro o fio-terra.
Certifique-se de que o fio-terra seja corretamente conectado às peças metálicas do
corpo do carro. O fio-terra do amplificador de
potência e o desta unidade ou de qualquer
outro dispositivo devem ser conectados ao
carro separadamente com parafusos diferentes. Se o parafuso do fio-terra ficar solto ou
cair, isso poderá causar incêndio, geração de
fumaça ou problemas de funcionamento.
Importante
! Quando esta unidade estiver instalada em
um veículo sem uma posição ACC (acessório) na chave de ignição, se você não conectar o cabo vermelho ao terminal que detecta
a operação da chave de ignição, a bateria poderá ser descarregada.
Posição ACC Sem posição ACC
50
Ptbr
! Utilize esta unidade com bateria de 12 volts e
aterramento negativo apenas. Do contrário,
poderá ocasionar incêndio ou problemas de
funcionamento.
! Para evitar curto-circuito, superaquecimento
ou problemas de funcionamento, siga as instruções abaixo.
— Desconecte o terminal negativo da bateria
antes da instalação.
— Proteja a fiação com presilhas para cabos ou
fita adesiva. Para proteger a fiação, utilize fita
adesiva ao redor da fiação que fica em contato com as peças metálicas.
— Coloque todos os cabos afastados de peças
que se movimentam, como a marcha e os trilhos do assento.
— Coloque todos os cabos afastados de lugares
que possam aquecer,como perto da saída do
aquecedor.
— Não conecte o cabo amarelo à bateria pas-
sando-o pelo orifício em direção ao compartimento do motor.
— Cubra quaisquer conectores de cabo desco-
nectados com fita isolante.
— Não encurte os cabos.
— Nunca corte o isolamento do cabo de alimen-
tação desta unidade para compartilhar a
energia com outros dispositivos. A capacidade de corrente do cabo é limitada.
— Utilize um fusível com a classificação prescri-
ta.
— Nunca faça a conexão do cabo negativo do
alto-falante diretamente ao terra.
— Nunca conecte juntos os cabos negativos de
vários alto-falantes.
O
F
N
F
O
S
T
A
R
T
! Quando esta unidade estiver ligada, os sinais
de controle serão emitidos pelo cabo azul/
branco. Conecte esse cabo ao controle remoto do sistema de um amplificador de potência externo ou terminal de controle do relé
da antena automática do veículo (máx. 300
mA 12 V CC). Se o veículo estiver equipado
com uma antena acoplada ao vidro, conectea ao terminal da fonte de alimentação do intensificador da antena.
! Nunca conecte o cabo azul/branco ao termi-
nal de potência de um amplificador externo.
Além disso, nunca o conecte ao terminal de
potência da antena automática. Se fizer isso,
a bateria poderá descarregar ou apresentar
defeitos.
Esta unidade
1 2 3645
1 Entrada da antena
2 Fusível (10 A)
3 Entrada do cabo de alimentação
4 Entrada do controle remoto fixo
Um adaptador de controle remoto fixo pode
ser conectado (vendido separadamente).
5 Saída dianteira
6 Saída traseira
7 Saída do alto-falante de graves secundário
Cabo de alimentação
Faça estas conexões quando não for conectar
um condutor do alto-falante traseiro a um altofalante de graves secundário.
LR
4
F
5
R
Faça estas conexões ao utilizar um alto-falante
de graves secundário sem o amplificador opcional.
LR
4
F
i
SW
1 Para a entrada do cabo de alimentação
2 Da esquerda
3 Da direita
4 Alto-falante dianteiro
5 Alto-falante traseiro
6 Branco
7 Branco/preto
1
8
6
9
7
a
c
d
b
e
f
g
1
8
6
9
7
a
c
d
b
j
e
a
f
g
k l
h
b
32
32
c
d
Page 51

Instalação
Instalação
Seção
03
8 Cinza
9 Cinza/preto
a Verde
b Verde/preto
c Violeta
d Violeta/preto
e Preto (terra do chassi)
Conecte a um local com metal livre de tinta e
limpo.
f Amarelo
Conecte ao terminal da fonte de alimentação
constante de 12 V.
g Vermelho
Conecte ao terminal controlado pela chave
de ignição (12 V CC).
h Azul/branco
Conecte ao terminal de controle do sistema
do amplificador de potência ou ao terminal
de controle do relé da antena automática
(máx. 300 mA, 12 V CC).
i Alto-falante de graves secundário (4 Ω)
j Ao utilizar um alto-falante de graves secun-
dário de 70 W (2 Ω), certifique-se de conectálo aos fios condutores violeta e violeta/preto
desta unidade. Não conecte nada aos fios
condutores verde e verde/preto.
k Não utilizado.
l Alto-falante de graves secundário (4 Ω)×2
Notas
! Com um sistema de 2 alto-falantes, não co-
necte nada aos condutores não conectados
aos alto-falantes.
! Altere o ajuste inicial desta unidade. Consul-
te S/ W control (Ajuste da saída traseira e do
alto-falante de graves secundário) na página
49.
A saída do alto-falante de graves secundário
desta unidade é monoauricular.
Amplificador de potência
(vendido separadamente)
Faça essas conexões ao utilizar o amplificador
opcional.
2
2
2
3
55
3
77
3
99
4
6
8
1
1
1
1 Controle remoto do sistema
Conecte ao cabo azul/branco.
2 Amplificador de potência (vendido separada-
mente)
3 Conecte com cabos RCA (vendido separada-
mente)
4 Para a saída traseira
5 Alto-falante traseiro
6 Para a saída dianteira
7 Alto-falante dianteiro
8 Para a saída do alto-falante de graves secun-
dário
9 Alto-falante de graves secundário
Instalação
Importante
! Verifique todas as conexões e os sistemas
antes da instalação final.
! Não utilize peças não autorizadas, pois isso
pode causar problemas de funcionamento.
! Consulte o revendedor se a instalação exigir
a perfuração de orifícios ou outras modificações no veículo.
! Não instale esta unidade onde:
— possa existir interferência com a operação do
veículo.
— possa causar danos a um passageiro, como
resultado de uma parada brusca.
! O laser semicondutor será danificado se su-
peraquecer. Instale esta unidade afastada de
lugares que possam aquecer, como perto da
saída do aquecedor.
! Um ótimo desempenho é obtido quando a
unidade é instalada a um ângulo inferior a
60°.
60°
! Na instalação, para assegurar a dispersão de
calor apropriada ao utilizar esta unidade, certifique-se de deixar um espaço amplo atrás
do painel traseiro e amarre os cabos soltos
de forma que não bloqueiem as saídas de ar.
Montagem dianteira/traseira DIN
Esta unidade pode ser instalada adequadamente utilizando a instalação da montagem
dianteira ou traseira.
Utilize peças comercializadas convencionalmente para a instalação.
Montagem dianteira DIN
1 Insira a manga de montagem no painel.
Para a instalação em espaços rasos, utilize a
manga de montagem fornecida. Se houver espaço suficiente, utilize a manga de montagem fornecida com o veículo.
2 Fixe a manga de montagem utilizando
uma chave de fenda para dirigir as linguetas
de metal (90°) ao local apropriado.
1
2
1 Painel
2 Manga de montagem
3 Instale a unidade conforme a ilustração.
1
2
4
5
1 Porca
2 Firewall ou suporte de metal
3 Tira de metal
4 Parafuso
5 Parafuso (M4 × 8)
# Verifique se a unidade foi instalada com segurança no local. Uma instalação instável pode fazer com
que ela pule ou apresente problemas de funcionamento.
3
Ptbr
Português (B)
51
Page 52

Apêndice
Instalação
Informações adicionais
Montagem traseira DIN
1 Determine a posição apropriada em que
os orifícios no suporte e a lateral da unidade
coincidem.
2 Aperte dois parafusos em cada lado.
1
2
1 Parafusos de cabeça treliçada (5 mm × 8
mm)
2 Suporte de montagem
3 Painel ou console
Remoção da unidade
1 Remova a moldura de acabamento.
1 Moldura de acabamento
2 Guia chanfrada
! Se você retirar o painel frontal, o acesso ao
anel de acabamento ficará mais fácil.
! Ao recolocar o anel de acabamento no lugar,
direcione o lado com a lingueta entalhada
para baixo.
52
Ptbr
2 Insira as chaves de extração fornecidas
nas laterais da unidade até ouvir um clique
de encaixe.
3 Puxe a unidade para fora do painel.
3
Remoção e reconexão do painel
frontal
Você pode remover o painel frontal para proteger a unidade contra roubo.
Pressione o botão para desencaixar, empurre o
painel frontal para cima e puxe-o em sua direção.
Para obter detalhes, consulte Remoção do painel
frontal para proteger a unidade contra roubo e Recolocação do painel frontal na página 42.
Fixação do painel frontal
O painel frontal pode ser fixado com o parafuso
fornecido.
1
1 Parafuso
Solução de problemas
Sintoma Causa Ação
O display retorna automaticamente ao
normal.
A série de reprodução
com repetição
muda inesperadamente.
Uma subpasta não é reproduzida.
NO XXXX é
visualizado
quando um
display é alterado (por
exemplo, NO
TITLE).
Você ficou sem
executar uma
operação por
aproximadamente 30 segundos.
Dependendo da
série de reprodução com repetição, a série
selecionada
pode mudar ao
selecionar outra
pasta ou faixa,
ou ao executar
o avanço rápido/retrocesso.
As subpastas
não podem ser
reproduzidas
quando a opção
Folder repeat
(Repetição de
pasta) está selecionada.
Não há informações de texto incorporadas.
Execute a operação novamente.
Selecione a série
de reprodução
com repetição novamente.
Selecione outra
série de reprodução com repetição.
Alterne o display
ou reproduza
outra faixa/arquivo.
Sintoma Causa Ação
O display é
iluminado
quando a unidade é desligada.
A unidade
está com defeito.
Há interferência.
O modo de demonstração é
ativado.
Você está usando um dispositivo, como um
telefone celular,
que transmite
ondas elétricas
perto da unidade.
! Pressione DISP/
/SCRL para
cancelar o modo
de demonstração.
! Desative o display de demonstração.
Distancie da unidade os dispositivos elétricos que
possam causar
interferência.
Mensagens de erro
Ao entrar em contato com o revendedor ou a
Central de Serviços da Pioneer mais próxima,
anote a mensagem de erro.
CD player incorporado
Mensagem Causa Ação
ERROR-07,
11, 12, 17, 30
ERROR-10,
11, 12, 15,
17, 30, A0
ERROR-15 O disco inserido
O disco está
sujo.
O disco está riscado.
Há um erro elétrico ou mecânico.
está vazio
Limpe o disco.
Substitua o disco.
Desligue a chave
de ignição (OFF) e
volte a ligá-la
(ON), ou alterne
para uma fonte
diferente e, em
seguida, volte ao
CD player.
Substitua o disco.
Page 53

Informações adicionais
Apêndice
Informações adicionais
Mensagem Causa Ação
ERROR-23 Formato de CD
FORMAT
READ
NO AUDIO O disco inserido
SKIPPED O disco inserido
PROTECT Todos os arqui-
Dispositivo de armazenamento externo (USB,
SD)/iPod
Mensagem Causa Ação
NO DEVICE Quando a fun-
não suportado
Às vezes, há um
atraso entre o
início da reprodução e o início
da recepção do
som.
não contém arquivos que possam ser
reproduzidos.
contém arquivos protegidos
por DRM.
vos no disco inserido estão
incorporados
com DRM.
ção plug and
play está desativada, não há
um dispositivo
de armazenamento USB ou
iPod conectado.
Substitua o disco.
Aguarde até que
a mensagem desapareça e você
ouvirá o som.
Substitua o disco.
Substitua o disco.
Substitua o disco.
! Ative a função
plug and play.
! Conecte um dispositivo de armazenamento USB/
iPod compatível.
Mensagem Causa Ação
FORMAT
READ
NO AUDIO Não há músi-
SKIPPED O dispositivo de
PROTECT Todos os arqui-
Às vezes, há um
atraso entre o
início da reprodução e o início
da recepção do
som.
cas.
O dispositivo de
armazenamento
USB conectado
está com segurança ativada
armazenamento
USB conectado
contém arquivos incorporados com
Windows
Mediaä
DRM 9/10
vos no dispositivo de
armazenamento
USB estão incorporados
com Windows
Media DRM 9/
10
Aguarde até que
a mensagem desapareça e você
ouvirá o som.
Transfira os arquivos de áudio para
o dispositivo de
armazenamento
USB e conecte-o.
Siga as instruções do dispositivo de
armazenamento
USB para desativar a segurança.
Reproduza um arquivo de áudio
não incorporado
com Windows
Media DRM 9/10.
Transfira os arquivos de áudio não
incorporados
com Windows
Media DRM 9/10
para o dispositivo
de armazenamento USB e conecteo.
Mensagem Causa Ação
NOT COMPATIBLE
O dispositivo de
armazenamento
USB conectado
não é suportado
por esta unidade.
Não é um iPod
compatível
Não é um dispositivo de armazenamento SD
compatível
! Conecte um dispositivo compatível com USB
Mass Storage
Class.
! Desconecte o
dispositivo e substitua-o por um
dispositivo de armazenamento
USB compatível.
Desconecte o dispositivo e substitua-o por um iPod
compatível.
Desconecte o dispositivo e substitua-o por um
dispositivo de armazenamento
USB compatível.
Mensagem Causa Ação
CHECK USB O conector USB
ou cabo USB
está em curto.
O dispositivo de
armazenamento
USB conectado
consome mais
do que 500 mA
(corrente máxima permitida).
O iPod funciona
corretamente,
mas não é recarregado
Verifique se o conector USB ou o
cabo USB não
está preso em alguma coisa ou se
está danificado.
Desconecte o dispositivo de armazenamento USB e
não o utilize. Coloque a chave de
ignição na posição OFF, depois
em ACC ou ON, e
conecte apenas
dispositivos de armazenamento
USB compatíveis.
Verifique se o
cabo de conexão
do iPod entrou
em curto-circuito
(por exemplo, não
está em contato
com objetos metálicos). Após a
verificação, desligue a chave de ignição (OFF) e
volte a ligá-la
(ON), ou desconecte o iPod e conecte-o
novamente.
Português (B)
Ptbr
53
Page 54

Apêndice
Informações adicionais
Informações adicionais
Mensagem Causa Ação
ERROR-19 Falha de comu-
ERROR-23 O dispositivo de
nicação.
Falha no iPod Desconecte o
armazenamento
USB não foi formatado com
FAT12, FAT16 ou
FAT32
! Execute uma
das seguintes
operações.
–Desligue a
chave de ignição
(OFF) e volte a
ligá-la (ON).
–Desconecte ou
ejete o dispositivo
de armazenamento externo.
–Altere para uma
fonte diferente.
Em seguida, retorne à fonte USB
ou SD.
! Desconecte o
cabo do iPod.
Uma vez que o
menu principal
do iPod é visualizado, reconecte e
reinicie o iPod.
cabo do iPod.
Uma vez que o
menu principal
do iPod é visualizado, reconecte e
reinicie o iPod.
O dispositivo de
armazenamento
USB deve ser formatado com
FAT12, FAT16 ou
FAT32.
Mensagem Causa Ação
ERROR-16 A versão do
STOP Não há músicas
Not found Nenhuma músi-
firmware do
iPod é antiga
Falha no iPod Desconecte o
na lista atual.
ca relacionada
Atualize a versão
do iPod.
cabo do iPod.
Uma vez que o
menu principal
do iPod é visualizado, reconecte e
reinicie o iPod.
Selecione uma
lista que contenha músicas.
Transfira as músicas para o iPod.
Orientações de manuseio
Discos e player
Utilize apenas os discos com os logotipos a seguir.
Utilize discos de 12 cm. Não utilize discos de 8 cm
nem um adaptador para discos de 8 cm.
Utilize apenas discos convencionais, totalmente
circulares. Não utilize discos com outros formatos.
Não insira outros objetos que não sejam CDs no
slot de carregamento de CD.
Não utilize discos rachados, lascados, tortos ou
com defeitos, pois podem danificar o player.
Não é possível reproduzir CD-R/CD-RW não finalizados.
Não toque na super fície gravada dos discos.
Quando não for utilizá-los, guarde os discos em
suas caixas.
Não cole etiquetas, escreva ou aplique produtos
químicos à superfície dos discos.
Para remover sujeiras de um CD, limpe-o com um
tecido macio, do centro para fora.
A condensação pode temporariamente prejudicar
o desempenho do player. Deixe-o sem uso por
aproximadamente uma hora para que se ajuste a
uma temperatura mais quente. Além disso, seque
os discos com um pano macio.
A reprodução de discos pode não ser possível devido às suas características, aos seus formatos,
ao aplicativo gravado, ao ambiente de reprodução,
às condições de armazenamento e assim por
diante.
Impactos nas estradas ao dirigir podem interromper a reprodução do disco.
Dispositivo de armazenamento
externo (USB, SD)
Solucione quaisquer dúvidas que você possa ter
sobre o seu dispositivo de armazenamento externo
(USB, SD) com o fabricante.
Não deixe o dispositivo de armazenamento externo (USB, SD) em locais com alta temperatura.
Dependendo do dispositivo de armazenamento externo (USB, SD), os problemas a seguir podem
ocorrer.
! As operações podem variar.
! Pode ser que o dispositivo de armazenamento
não seja reconhecido.
! Pode ser que os arquivos não sejam reproduzi-
dos corretamente.
Dispositivo de armazenamento
USB
Conexões via hub USB não são suportadas.
Não conecte nada a não ser um dispositivo de armazenamento USB.
Fixe de forma segura o dispositivo de armazenamento USB enquanto você estiver dirigindo. Não
deixe o dispositivo de armazenamento USB cair
no chão, onde possa ficar preso embaixo do pedal
do freio ou acelerador.
Dependendo do dispositivo de armazenamento
USB, os seguintes problemas podem ocorrer.
! O dispositivo pode gerar ruído no rádio.
54
Ptbr
Page 55

Informações adicionais
Apêndice
Informações adicionais
Cartão de memória SD
Esta unidade oferece suporte apenas para os seguintes tipos de cartões de memória SD.
! SD
! miniSD
! microSD
! SDHC
Mantenha o cartão de memória SD fora do alcance de crianças. Caso ele seja ingerido, consulte
um médico imediatamente.
Não toque nos conectores do cartão de memória
SD diretamente com os dedos ou com qualquer
dispositivo de metal.
Não insira nada além de um cartão de memória
SD no slot para cartão SD. Se um objeto metálico
(por exemplo, uma moeda) for inserido no slot, os
circuitos internos podem se quebrar e causar defeitos.
Ao inserir um miniSD ou microSD, utilize um
adaptador. Não utilize um adaptador que contenha peças metálicas que não sejam os conectores
expostos.
Não insira um cartão de memória SD danificado
(por exemplo, rachado, com a etiqueta destacada),
pois ele pode não ser ejetado do slot.
Não tente forçar um cartão de memória SD para
dentro do slot correspondente, já que ele ou esta
unidade podem ser danificados.
Ao ejetar um cartão de memória SD, pressione-o e
segure até ouvir um clique de encaixe. É perigoso
soltar seu dedo imediatamente após pressionar o
cartão, já que o cartão pode ser lançado para fora
do slot e atingir seu rosto, etc. Se o cartão for lançado para fora do slot, ele poderá se perder.
iPod
Para garantir uma operação correta, acople o
cabo do conector dock do iPod diretamente a esta
unidade.
Fixe de forma segura o iPod enquanto você estiver
dirigindo. Não deixe o iPod cair no chão, onde
possa ficar preso embaixo do pedal do freio ou
acelerador.
Sobre os ajustes do iPod
! Quando um iPod está conectado, esta unidade
altera o ajuste da cur va do EQ (equalizador) do
iPod para Desativado a fim de otimizar a acústica. Ao desconectar o iPod, o EQ retorna ao
ajuste original.
! Não é possível desativar a função Repetir no
iPod ao utilizar esta unidade. Essa função é alterada automaticamente para Todos quando o
iPod for conectado a esta unidade.
Texto incompatível salvo no iPod não será visualizado na unidade.
Discos duais
Discos duais são discos com dois lados que possuem, de um lado, um CD de áudio gravável e, do
outro, um DVD de vídeo gravável.
Como o lado do CD dos discos duais não é compatível com o padrão dos CDs comuns, talvez não
seja possível reproduzir o lado do CD nesta unidade.
Inserir e ejetar um disco dual com frequência
pode causar arranhões no disco. Arranhões profundos podem causar problemas na reprodução
com esta unidade. Em alguns casos, o disco dual
pode ficar preso no slot de carregamento e não
ser ejetado. Para evitar que isso aconteça, recomendamos que você não use discos duais nesta
unidade.
Consulte as informações fornecidas pelo fabricante do disco para saber mais a respeito dos discos
duais.
AVISO
Não deixe os discos/dispositivo de armazenamento externo (USB, SD) ou iPod em locais
com alta temperatura.
Compatibilidade com áudio
compactado (disco, USB, SD)
WMA
Extensão de arquivo: .wma
Taxa de bit: 48 kbps a 320 kbps (CBR), 48 kbps a
384 kbps (VBR)
Frequência de amostragem: 32 kHz, 44,1 kHz, 48
kHz
Windows Media Audio Professional, Sem perdas,
Voz/DRM Stream/Stream com vídeo: Não compatível
MP3
Extensão de arquivo: .mp3
Taxa de bit: 8 kbps a 320 kbps (CBR), VBR
Frequência de amostragem: 8 kHz a 48 kHz (32
kHz, 44,1 kHz, 48 kHz para ênfase)
Versão de identificação ID3 compatível: 1.0, 1.1,
2.2, 2.3, 2.4 (a versão de identificação ID3 2.x tem
prioridade sobre a versão 1.x.)
Lista de reprodução M3u: Não compatível
MP3i (MP3 interativo), mp3 PRO: Não compatível
WAV
Extensão de arquivo: .wav
Bits de quantização: 8 e 16 (LPCM), 4 (MS
ADPCM)
Frequência de amostragem: 16 kHz a 48 kHz
(LPCM), 22,05 kHz e 44,1 kHz (MS ADPCM)
AAC
Formato compatível: codificado por AAC pelo
iTunes
Extensão de arquivo: .m4a
Frequência de amostragem: 11,025 kHz a 48 kHz
Taxa de transmissão: 16 kbps a 320 kbps, VBR
Apple sem perdas: não compatível
Arquivo AAC adquirido na iTunes Store (a extensão do arquivo é .m4p): não compatível
Português (B)
Ptbr
55
Page 56

Apêndice
Informações adicionais
Informações adicionais
Informações suplementares
Apenas os primeiros 32 caracteres podem ser visualizados como um nome de arquivo (incluindo
a extensão do arquivo) ou um nome de pasta.
Dependendo do aplicativo utilizado para codificar
arquivos WMA, pode ser que esta unidade não
opere corretamente.
Pode ocorrer um pequeno atraso ao iniciar a reprodução de arquivos de áudio incorporados com
dados de imagem.
Disco
Hierarquia de pastas reproduzíveis: até oito camadas (uma hierarquia prática contém menos de
duas camadas).
Pastas reproduzíveis: até 99
Arquivos reproduzíveis: até 999
Sistema de arquivos: ISO 9660 níveis 1 e 2,
Romeo, Joliet
Reprodução de múltiplas sessões: Compatível
Transferência de dados por gravação de pacotes:
Não compatível
Independentemente da duração de seções sem
gravação entre as músicas da gravação original,
os discos de áudio compactado serão reproduzidos com uma curta pausa entre as músicas.
Dispositivo de armazenamento
externo (USB, SD)
Hierarquia de pastas reproduzíveis: até oito camadas (uma hierarquia prática contém menos de
duas camadas).
Pastas reproduzíveis: até 1 500
Arquivos reproduzíveis: até 15 000
56
Ptbr
Reprodução de arquivos protegidos por direitos
autorais: não compatível
Dispositivo de armazenamento externo particionado (USB, SD): somente a primeira partição reproduzível pode ser reproduzida.
Pode ocorrer um pequeno atraso ao iniciar a reprodução de arquivos de áudio em um dispositivo
de armazenamento USB com várias hierarquias
de pastas.
Cartão de memória SD
Não há compatibilidade com cartões multimídia
(MMC).
A compatibilidade com todos os cartões de memória SD não é garantida.
Esta unidade não é compatível com Áudio SD.
AVISO
A Pioneer não se responsabilizará pela perda
dos dados na memória USB/áudio players portáteis USB/cartões de memória SD/cartões de memória SDHC, mesmo se esses dados tiverem
sido perdidos durante a utilização desta unidade.
Compatibilidade com iPod
Esta unidade suporta apenas os modelos de iPod
a seguir. As versões de software de iPod suportadas são mostradas abaixo. Pode ser que versões
antigas não tenham suporte.
! iPhone 4 (versão de software 4.0)
! iPhone 3GS (versão de software 4.0)
! iPhone 3G (versão de software 4.0)
! iPhone (versão de software 3.1.3)
! iPod nano da quinta geração (versão de soft-
ware 1.0.2)
! iPod nano da quarta geração (versão de soft-
ware 1.0.4)
! iPod nano da terceira geração (versão de soft-
ware 1.1.3)
! iPod nano da segunda geração (versão de soft-
ware 1.1.3)
! iPod nano da primeira geração (versão de soft-
ware 1.3.1)
! iPod touch da terceira geração (versão de soft-
ware 4.0)
! iPod touch da segunda geração (versão de
software 4.0)
! iPod touch da primeira geração (versão de
software 3.1.3)
! iPod classic de 160GB (versão de software
2.0.4)
! iPod classic de 120 GB (versão de software
2.0.1)
! iPod classic (versão de software 1.1.2)
! iPod da quinta geração (versão de software
1.3)
Dependendo da geração ou da versão do iPod,
pode ser que algumas funções não estejam dispo níveis.
As operações podem variar dependendo da versão
de software do iPod.
Ao utilizar um iPod, é necessário um cabo proveniente do iPod com conector Dock para USB.
Um cabo de inter face da Pioneer CD-IU50 também está disponível. Para obter mais detalhes,
entre em contato com o seu fornecedor.
Para obter informações sobre compatibilidade
com formatos de arquivo, consulte os manuais do
iPod.
Audiobook, Podcast: Compatível
AVISO
A Pioneer não se responsabilizará pela perda
dos dados no iPod, mesmo se esses dados tiverem sido perdidos durante a utilização desta
unidade.
Sequência de arquivos de áudio
O usuário não pode atribuir números de pasta e
especificar as sequências de reprodução com
esta unidade.
Exemplo de uma hierarquia
01
02
1
2
03
04
5
6
05
Nível 1 Nível 2 Nível 3 Nível 4
Disco
A sequência de seleção de pastas ou outra operação pode ser diferente, dependendo do software de codificação ou gravação.
: Pasta
: Arquivo de áudio
3
compactado
4
01 a 05: Número de
pasta
1 a 6: Sequência
de reprodução
Page 57

Informações adicionais
Apêndice
Informações adicionais
Dispositivo de armazenamento
externo (USB, SD)
A sequência de reprodução é a mesma que a sequência gravada no dispositivo de armazenamento externo (USB, SD).
Para especificar a sequência de reprodução, o
método a seguir é recomendado.
1 Crie um nome de arquivo incluindo números
que especifiquem a sequência de reprodução (por exemplo, 001xxx.mp3 e 099yyy.mp3).
2 Coloque esses arquivos em uma pasta.
3 Salve a pasta contendo os arquivos no dispo-
sitivo de armazenamento externo (USB, SD).
No entanto, dependendo do ambiente de sistema, talvez você não consiga especificar a sequência de reprodução.
Para áudio players portáteis USB, a sequência é
diferente e depende do player.
Direitos autorais e marcas
comerciais
iTunes
Apple e iTunes são marcas comerciais da Apple
Inc., registradas nos EUA e em outros países.
MP3
O fornecimento deste produto dá o direito a apenas uma licença para uso particular e não comercial, e não dá o direito a uma licença nem
implica qualquer direito de uso deste produto
em qualquer transmissão em tempo real (terrestre, via satélite, cabo e/ou qualquer outro meio)
comercial (ou seja, que gere receita), transmissão/reprodução via Internet, intranets e/ou outras redes ou em outros sistemas de
distribuição de conteúdo eletrônico, como aplicativos de áudio pago ou áudio por demanda. É
necessária uma licença independente para tal
uso. Para obter detalhes, visite
http://www.mp3licensing.com.
WMA
Windows Media é uma marca comercial ou registrada da Microsoft Corporation nos Estados
Unidos e/ou em outros países.
Este produto inclui a tecnologia proprietária da
Microsoft Corporation e não pode ser utilizado
nem distribuído sem uma licença da Microsoft
Licensing, Inc.
Cartão de memória SD
O logotipo SD é uma marca comercial da SD3C, LLC.
O logotipo miniSD é uma marca comercial da
SD-3C, LLC.
O logotipo microSD é uma marca comercial da
SD-3C, LLC.
O logotipo SDHC é uma marca comercial da
SD-3C, LLC.
iPod & iPhone
iPhone, iPod, iPod classic, iPod nano e iPod
touch são marcas comerciais da Apple Inc., registradas nos Estados Unidos e em outros países.
“Manufaturado para iPod” e “Manufaturado
para iPhone” siginificam que um acessório eletrônico foi projetado para se conectar especificamente a um iPod ou iPhone, respectivamente,
e que foi certificado pelo desenvolvedor para
estar de acordo com os padrões de desempenho Apple.
A Apple não se responsabiliza pela operação
deste dispositivo ou com o cumprimento com
os padrões de segurança ou regulatórios.
Especificações
Geral
Fonte de alimentação nominal
................................... 14,4 V CC
Sistema de aterramento ... Tipo negativo
Consumo máx. de energia
................................... 10,0 A
Dimensões (L × A × P):
DIN
Chassi ............... 178 mm × 50 mm × 165
Face ................... 188 mm × 58 mm × 18
D
Chassi ............... 178 mm × 50 mm × 165
Face ................... 170 mm × 46 mm × 18
Peso ................................ 1,4 kg
Áudio
Potência de saída máxima
................................... 50 W × 4
Potência de saída contínua
................................... 22 W × 4 (50 a 15 000 Hz, 5 %
Impedância de carga ....... 4 W a8 W ×4
Nível de saída máx. pré-saída
................................... 4,0 V
Equalizador (Equalizador gráfico de 5 bandas):
Frequência ................ 100/315/1,25k/3,15k/8k Hz
Ganho ...................... ±12 dB
HPF:
Frequência ................ 50/63/80/100/125 Hz
Inclinação ................. –12 dB/oct
Alto-falante de graves secundário (mono):
Frequência ................ 50/63/80/100/125 Hz
Inclinação ................. –18 dB/oct
Ganho ...................... +6 dB a –24 dB
Fase .......................... Normal/Inversa
(faixa de tensão permissível:
12,0 V a 14,4 V CC)
mm
mm
mm
mm
50 W × 2/4 W + 70 W × 1/2 W
(para alto-falante de grave s
secundário)
de THD, carga de 4 W, ambos
os canais acionados)
4 W a8W ×2+2W ×1
Intensificador de graves:
Ganho ...................... +12 dB a 0 dB
CD player
Sistema ........................... Sistema de áudio de CDs
Discos utilizáveis ............. CDs
Relação do sinal ao ruído
................................... 94 dB (1 kHz) (rede IEC - A)
Número de canais ............ 2 (estéreo)
Formato de decodificação MP3
................................... MPEG-1 & 2 Camada de áudio
Formato de decodificação WMA
................................... Ver. 7, 7.1, 8, 9, 10, 11, 12
Formato de decodificação AAC
................................... MPEG- 4 AAC (codificado por
Formato de sinal WAV ...... PCM linear & MS ADPCM
USB
Especificação padrão USB
................................... USB 2.0 de velocidade total
Corrente de energia máxima
................................... 500 mA
Classe USB ...................... MSC (Mass Storage Class)
Sistema de arquivos ......... FAT12, FAT16, FAT32
Formato de decodificação MP3
................................... MPEG-1 & 2 Camada de áudio
Formato de decodificação WMA
................................... Ver. 7, 7.1, 8, 9, 10, 11, 12
Formato de decodificação AAC
................................... MPEG- 4 AAC (codificado por
Formato de sinal WAV ...... PCM linear & MS ADPCM
SD
Formato físico compatível
................................... Versão 2.00
3
(áudio de 2 canais)
(Windows Media Player)
iTunes apenas) (.m4a)
(Ver.9,2 e anterior)
(Não compactado)
3
(áudio de 2 canais)
(Windows Media Player)
iTunes apenas) (.m4a)
(Ver.9,2 e anterior)
(Não compactado)
Português (B)
Ptbr
57
Page 58

Apêndice
Informações adicionais
Capacidade máxima de memóri a
................................... 32 GB (para SD e SDHC)
Sistema de arquivos ......... FAT12, FAT16, FAT32
Formato de decodificação MP3
................................... MPEG-1 & 2 Camada de áudio
Formato de decodificação WMA
................................... Ver. 7, 7.1, 8, 9, 10, 11, 12
Formato de decodificação AAC
................................... MPEG- 4 AAC (codificado por
Formato de sinal WAV ...... PCM linear & MS ADPCM
Sintonizador de FM
Faixa de frequência .......... 87,5 MHz a 108,0 MHz
Sensibilidade utilizável ..... 9 dBf (0,8 µV/75 W, mono,
Relação do sinal ao ruído
................................... 72 dB (rede IEC - A)
Sintonizador de AM
Faixa de frequências ........ 531 kHz a 1 602 kHz (9 kHz)
Sensibilidade utilizável ..... 25 µV (Sinal/Ruído: 20 dB)
Relação do sinal ao ruído
................................... 62 dB (rede IEC - A)
Nota
As especificações e o design estão sujeitos a
modificações sem aviso prévio.
3
(áudio de 2 canais)
(Windows Media Player)
iTunes apenas) (.m4a)
(Ver.9,2 e anterior)
(Não compactado)
Sinal/Ruído: 30 dB)
530 kHz a 1 640 kHz (10 kHz)
58
Ptbr
Page 59

Português (B)
59Ptbr
Page 60

節
01
目錄
開始使用前
關於本機 60
出現故障時 60
示範模式 60
倒轉模式 60
關於本手冊 60
操作本機
主機 61
遙控器 61
基本操作 61
遙控器的使用與保養 61
功能表的操作與功能設定/音訊調整/初始
設定/清單完全相同 62
調諧器 62
CD/CD-R/CD-RW及外部儲存裝置(USB、
SD) 62
iPod 63
音訊調整 65
初始設定 65
其他功能 66
安裝
連接 67
安裝 68
附加資訊
故障排除 69
錯誤訊息 69
操作指南 70
壓縮音訊相容性(碟片、USB、SD) 71
iPod相容性 71
音訊檔案順序 71
版權及商標 72
規格 72
開始使用前
感謝您
購買本先鋒產品。
為確保使用方式正確,使用本產品前請詳閱本
手冊。尤為重要的是要閱讀並遵照本手冊中的
警告與注意。
考時方便取得的地方。
請將本手冊存放於安全及將來參
關於本機
注意
! 請勿讓本機接觸到液體。否則可能造成人員
觸電。此外,接觸到液體可能導致本機損
壞、冒煙和過熱。
! 請務必保持在適當的低音量,確保能聽見外
面的聲響。
! 避免暴露在濕氣中。
! 若與電池中斷連接或電池電量耗盡,將清除
所有預設記憶。
注意
本產品屬IEC 60825-1:2007雷射安全產品分類
之類別 1 雷射產品,並包含1M級雷射模組。
為避免發生危險,切勿拆下任何機蓋或試圖
接觸本機內部。所有維修事宜應交由專業人
員處理。
示範模式
重要事項
! 無法連接本機的紅色引線(ACC)與點火開
關的開/關操作耦合端子,可能會導致電池
電量耗盡。
! 請記住,如果功能示範在汽車引擎關閉時繼
續工作,則可能會造成汽車電池放電。
關閉本機時,當點火開關設為ACC或ON,將自動
啟動示範模式。關閉本機不會取消示範模式。
若要取消示範模式,請按DISP/
一次DISP/
將點火開關設為ACC,可能會耗盡電池電量。
/SCRL即可開始。操作示範模式時
/SCRL。再按
倒轉模式
如果有約30秒的時間未執行任何操作,畫面指
示會開始倒轉,而且每隔10秒持續倒轉一次。
如果本機電源關閉正值點火開關設定於ACC或ON
位置取消倒轉模式時,請按BAND/ESC按鈕。再
按一次按鈕BAND/ESC則可啟動倒轉模式。
關於本手冊
在下列說明中,將USB隨身碟、USB可攜式音訊
播放器和SD記憶卡統稱為「外部儲存裝置
(USB、SD)」。如果僅指示USB隨身碟和USB可
攜式音訊播放器,則統稱為「USB儲存裝置」。
在本手冊中,iPod和iPhone都視為「iPod」。
出現故障時
如果本機無法正常運作,請聯絡您的經銷商或
最近的先鋒授權服務站。
60
Zhtw
Page 61

89f abdce
g
h
o
m
f
a
i
l
knj
操作本機
操作本機
節
02
主機
1 2 3 4
部位 部位
1 CLK/DISP OFF 9
2 SW/BASS a BAND/ESC
3 S.Rtrv b
MULTI-CONTROL
4
(M.C.)
5 碟片槽 d
6 h(退出) e DISP/
7 USB埠 f SRC/OFF
8 拆卸按鈕 g
注意
使用選購的先鋒USB纜線(CD-U50E)將USB聲音
播放機/USB隨身碟像任何裝置一樣直接連接本
機時,連接本機的突出部分可能會造成危險。
請勿使用未經授權的產品。
5
c
6 7
AUX輸入插孔
(3.5 mm立體聲插
孔)
(清單)
(iPod)/LOC
(隨機播放)
/SCRL
SD記憶卡插槽
拆卸前面板,您
便可以接觸SD記
憶卡插槽。
遙控器
部位 操作功能
h VOLUME
i MUTE
j a/b/c/d
k AUDIO 按下可選擇音訊功能。
l DISP/SCRL
m e
n FUNCTION
LIST/
o
ENTER
按此按鈕可調高或調低音
量。
按此按鈕可靜音。再按一次
即可取消靜音。
按下以執行手動搜尋調頻、
快進、倒退和曲目搜尋控
制。
同樣也可用於控制功能。
按此按鈕可選擇不同的顯示
模式。
按住可捲動文字資訊。
按此按鈕可暫停或繼續播
放。
按此按鈕可選擇各項功能。
播放源關閉時,按住該鍵可
調出初始設定選單。
按此按鈕可根據播放來源顯
示碟片標題、曲目標題、資
料夾或檔案清單。
在操作選單中,按下可控制
功能。
基本操作
重要事項
! 拆卸或安裝前面板時動作要輕巧。
! 請避免使前面板受到劇烈撞擊。
! 請將前面板遠離陽光直射和高溫。
! 拆下前面板前拔除所有連接本機的纜線及裝
置,可避免裝置或車子內部受損。
拆下前面板可防止本機遭竊
1 按下拆卸按鈕以取下前面板。
2 向上推起前面板,然後拉向您的方向。
3 務必將卸下的前面板放置在保護裝置中,如保
護盒。
重新安裝前面板
1 將前面板向左滑動。
請確定將主機左側上的突出部位插入前面板的
插槽中。
2 按下前面板右側,直至其固定。
若您無法順利的將前面板安裝在主機上,請確
定可正確的將前面板放置在主機上。強制固定
前面板可能會導致前面板或主機受損。
開啟本機電源
1 按SRC/OFF可開啟本機電源。
關閉本機電源
1 按住SRC/OFF直至本機關閉。
選擇播放來源
1 按SRC/OFF可在下列項目間切換:
TUNER(調諧器)-CD(內置式CD播放器)
-USB(USB)/iPod(iPod)-SD(SD記憶
卡)-AUX(AUX)
調整音量
1 轉動M.C.可調整音量。
注意
為了安全起見,拆下前面板時請先停好車輛。
註
當本機的藍色/白色引線連接至汽車自動天線
中繼控制端子時,汽車天線會在本機播放來源
啟動時伸出。收回天線時,請關閉播放來源。
遙控器的使用與保養
使用遙控器
1 將遙控器對著前面板進行操作。
首次使用時,請拉出從托盤伸出的薄片。
更換電池
1 滑出遙控器的背板。
2 裝入電池,正極(+)與負極(-)端的電極確
實對齊。
警告
! 請將電池存放在兒童無法拿取之處。若誤吞
電池,請立即就醫。
! 電池(已安裝的電池組或電池)不得暴露在
陽光直射、火源等類似的過熱環境下。
Zhtw
中文
61
Page 62

6
75 64
節
02
操作本機
操作本機
注意
! 請使用CR2025(3V)鋰電池。
! 至少一個月不使用遙控器時,請取出電池。
! 如果換用錯誤的電池,則會有爆炸的危險。
僅限換用相同或同類型的電池。
! 請勿使用金屬工具夾取電池。
! 請勿將電池存放於金屬置物盒中。
! 如果電池漏液,請將遙控器徹底擦拭乾淨並
裝上新電池。
! 處理廢舊電池時,請遵守政府條例或適用於
貴國或地區的環境公共指令規則。
重要事項
! 請勿將遙控器存放於高溫或陽光直射的區域
中。
! 遙控器在陽光直射下可能無法正常工作。
! 請勿讓遙控器掉落到地板上,否則可能卡在
煞車或油門踏板之下。
功能表的操作與功能設定/音訊
調整/初始設定/清單完全相同
返回上一個顯示畫面
返回上一個清單/類別(上一層資料夾/類別)
1 按DISP/
返回主選單
返回清單/類別的最上層。
1 按住DISP/
返回一般顯示畫面
取消初始設定選單
1 按BAND/ESC。
從清單/類別返回一般顯示畫面
1 按BAND/ESC。
/SCRL。
/SCRL。
調諧器
基本操作
3
1 2 4 5
1 波段指示器
2 5(立體聲)指示器
3 LOC指示器
在本地頻道搜尋開啟時出現。
4 預設號碼指示器
5 訊號電平顯示器
6 頻率指示器
! 若本機可挑選程式服務名稱資訊,將顯示
程式服務名稱。
選擇波段
1 按BAND/ESC直至所需的波段(FM-1、FM-
2、FM-3為FM或AM)顯示。
手動調整(逐格)
1 向左或向右推M.C.。
搜尋
1 向左或向右推並按住M.C.。
向左或向右推M.C.,可取消搜尋調頻。
向左或向右按住M.C.時,您可以跳過電台。搜
尋調頻會在放開M.C.的同時啟動。
儲存和調用各頻段的電台
1 按 (清單)。
顯示預設畫面。
2 使用M.C.在記憶體中儲存所選的頻率。
轉動可變更預設號碼。按住以儲存。
3 使用M.C.選擇所需電台。
轉動可切換電台。 按下可選擇。
# 向上或向下推M.C.也可以切換電台。
# 若要返回一般顯示,請按BAND/ESC或
單)。
(清
使用特殊按鈕進行進階操作
本地頻道搜尋
/LOC選擇所需設定。
1 按
FM:Level 1-Level 2-Level 3-Level 4
AM:Level 1-Level 2
最高等級僅接收訊號最強的電台。隨著等級降
低,可接收的電台訊號將逐漸減弱。
功能設定
1 按M.C.顯示主選單。
2 轉動M.C.可變更選單選項,且按下可選擇
FUNCTION。
3 轉動M.C.選擇功能。
選擇後,執行下列程序以設定功能。
BSM(電台自動存儲)
BSM(電台自動存儲)自動依電台的訊號強度儲存
六個最強的電台。
1 按M.C.開啟BSM。
! 若要取消,請再按一次M.C.。
Local(本地頻道搜尋)
本地頻道搜尋只能收聽訊號夠強,且接收效果良
好的廣播電台。
1 按M.C.開啟本地頻道。
! 若要取消,請再按一次M.C.。
2 向左或向右推M.C.選擇所需設定。
如需詳細資料,請參閱本頁上
本地頻道搜尋
CD/CD-R/CD-RW及外部儲存裝
置(USB、SD)
基本操作
1
1 位元率/取樣頻率指示器
播放壓縮音訊時顯示目前曲目(檔案)的位
元率或取樣頻率。
! 播放以VBR(可變位元率)錄製的AAC檔案
時,平均位元率值會顯示。不過,視用來
解碼AAC檔案的軟體而定,可能會顯示
VBR。
2 資料夾編號指示器
播放壓縮音訊時顯示目前正在播放的資料夾
編號。
3 曲目號碼指示器
4 PLAY/PAUSE指示器
5 S.Rtrv指示器
在數位音樂修補功能開啟時出現。
6 歌曲時間(進程欄)
7 播放時間指示器
播放CD/CD-R/CD-RW
1 將碟片標籤面朝上插入碟片槽。
退出CD/CD-R/CD-RW
1 按h(退出)。
播放USB儲存裝置上的歌曲
1 打開USB接頭蓋。
2 使用USB纜線插入USB儲存裝置。
。
停止播放USB儲存裝置上的檔案
1 您可以隨時中斷連接USB儲存裝置。
32
62
Zhtw
Page 63

75 64
操作本機
操作本機
節
02
播放SD記憶卡上的歌曲
1 拆下前面板。
2 將SD記憶卡插入SD記憶卡插槽中。
插入時,接觸面朝下,然後按下記憶卡,直到
卡入定位並完全鎖定為止。
3 重新安裝前面板。
4 按SRC/OFF選擇SD作為播放來源。
播放將會開始。
停止播放SD記憶卡上的檔案
1 拆下前面板。
2 按下SD記憶卡,直到它卡入定位為止。
SD記憶卡已退出。
3 拉出SD記憶卡。
4 重新安裝前面板。
選擇資料夾
1 向上或向下推M.C.。
選擇曲目
1 向左或向右推M.C.。
快速前進或快速倒轉
1 向左或向右推並按住M.C.。
返回根資料夾
1 按住BAND/ESC。
切換壓縮音訊和CD-DA
1 按BAND/ESC。
註
! 播放壓縮音訊時,快速前進或快速倒轉時無
聲。
! 不使用時,請中斷USB儲存裝置與本機的連
接。
顯示文字資訊
選擇所需的文字資訊
1 按DISP/
捲動文字資訊至左側
1 按住DISP/
/SCRL。
/SCRL。
註
! 視用於將MP3檔案寫入碟片或媒體檔案類型
的iTunes版本而定,儲存在音訊檔案中的不
相容文字可能會錯誤顯示。
! 可變更的文字資訊項目視媒體而定。
選擇並播放名稱清單中的檔案/曲目
1 按 (清單)切換至檔案/曲目名稱清單模
式。
2 使用M.C.選擇所需的檔案名稱(或資料夾名
稱)。
變更檔案或資料夾名稱
1 轉動M.C.。
播放
1 選擇檔案或曲目時,按下M.C.。
查看所選資料夾中的檔案(或資料夾)清單
1 選擇資料夾後,按M.C.。
播放所選資料夾中的歌曲
1 選擇資料夾後,按住M.C.。
使用特殊按鈕進行進階操作
依隨機順序播放曲目
1 按
可開啟或關閉隨機播放。
所選擇重播範圍中的曲目以隨機順序播放。
增強壓縮音訊並還原豐富的聲音(數位音樂修
補)
1 按S.Rtrv可在下列項目間切換:
OFF(關閉)-1-2
1對低壓縮率有影響,而2則對高壓縮率有影
響。
功能設定
1 按M.C.顯示主選單。
2 轉動M.C.可變更選單選項,且按下可選擇
FUNCTION。
3 轉動M.C.選擇功能。
選擇後,執行下列程序以設定功能。
Play mode(重播)
1 按M.C.可選擇重播範圍。
CD/CD-R/CD-RW
! Disc repeat-重播所有曲目
! Track repeat-重播目前曲目
! Folder repeat-重播目前資料夾
外部儲存裝置(USB、SD)
! All repeat-重播所有檔案
! Track repeat-重播目前檔案
! Folder repeat-重播目前資料夾
Random mode(隨機播放)
1 按M.C.可開啟或關閉隨機播放。
Pause(暫停)
1 按M.C.可暫停或繼續播放。
Sound Retriever(數位音樂修補)
自動增強壓縮音訊並還原豐富聲音。
1 按M.C.選擇所需設定。
如需詳細資料,請參閱本頁上
還原豐富的聲音(數位音樂修補)
增強壓縮音訊並
iPod
基本操作
1
2
1 重播指示器
2 歌曲編號指示器
3 隨機選曲指示器
4 PLAY/PAUSE指示器
5 S.Rtrv指示器
在數位音樂修補功能開啟時出現。
6 歌曲時間(進程欄)
7 播放時間指示器
在iPod上播放歌曲
1 打開USB接頭蓋,並使用iPod Dock接頭至USB
纜線插入iPod。
選擇曲目(章)
1 向左或向右推M.C.。
快速前進或快速倒轉
1 向左或向右推並按住M.C.。
註
! 當控制模式設為AUDIO時,無法開啟或關閉
iPod。
! 連接iPod與本機前,請中斷耳機與iPod的連
接。
! 點火開關設為OFF後,iPod將關閉約兩分
鐘。
中文
顯示文字資訊
。
3
選擇所需的文字資訊
1 按DISP/
捲動文字資訊至左側
1 按住DISP/
/SCRL。
/SCRL。
瀏覽歌曲
1 按 (清單)切換至清單搜尋的頂層選單。
Zhtw
63
Page 64

節
02
操作本機
操作本機
2 使用M.C.選擇一個類別/一首歌曲。
變更歌曲或類別的名稱
1 轉動M.C.。
Playlists(播放清單)-Artists(作者)-Albums(專輯)-Songs(歌曲)-Podcasts
(播客)-Genres(曲風)-Composers
(作曲家)-Audiobooks(有聲書)
播放
1 選擇歌曲後,按M.C.。
查看所選類別中的歌曲清單
1 選擇類別後,按M.C.。
播放所選類別中的歌曲
1 選擇類別後,按住M.C.。
按字母順序搜尋清單
1 顯示所選類別的清單時,請按
尋模式。
2 轉動M.C.選擇字母。
3 按M.C.顯示字母清單。
註
! 您可播放以PC應用程式(MusicSphere)建
立的播放清單。您可在我們的網站上找到可
用的應用程式。
! 使用PC應用程式(MusicSphere)建立的播
放清單會以縮寫形式顯示。
64
Zhtw
切換至字母搜
使用特殊按鈕進行進階操作
按隨機順序播放所有歌曲(全部隨機播放)
1 按
開啟全部隨機播放。
播放與目前播放歌曲有關的歌曲
您可以從下列清單播放歌曲。
• 目 前播放作者的專輯清單
‧ 目 前播放專輯的歌曲清單
‧ 目 前播放曲風的專輯清單
1 按住M.C.以切換至連結播放模式。
2 向左或向右推M.C.以切換模式,按下則可選
擇。
! Artist - 播放目前播放作者的專輯清單。
! Album - 播放目前播放專輯的歌曲清
單。
! Genre - 播放目前播放曲風的專輯清單。
選擇的歌曲/專輯將在目前播放歌曲後播放。
! 若您操作除連結播放以外的功能(例如快速前
進及快速倒轉),選擇的歌曲/專輯可能會取
消。
! 視選擇播放的歌曲而定,目前播放歌曲的尾端
及所選歌曲/專輯的開頭可能會遭截斷。
從您的iPod操作本機的iPod功能
選擇APP時,可使用車用揚聲器聆聽iPod應用程
式中的聲音。
此功能不相容於下列iPod型號。
! 第一代iPod nano
! 第五代iPod
APP模式相容於下列iPod型號。
! 第三代iPod touch(軟體版本3.0以上)
! 第二代iPod touch(軟體版本3.0以上)
! 第一代iPod touch(軟體版本3.0以上)
! iPhone 4(軟體版本4.0以上)
! iPhone 3GS(軟體版本3.0以上)
! iPhone 3G(軟體版本3.0以上)
! iPhone(軟體版本3.0以上)
/LOC可切換控制模式。
1 按
! iPod-從連接的iPod上操作本機的iPod功
能。
! APP - 播放iPod應用程式中的聲音。
! AUDIO-從本機中操作本機的iPod功能。
增強壓縮音訊並還原豐富的聲音(數位音樂修
補)
1 按S.Rtrv可在下列項目間切換:
OFF(關閉)-1-2
1對低壓縮率有影響,而2則對高壓縮率有影
響。
功能設定
1 按M.C.顯示主選單。
2 轉動M.C.可變更選單選項,且按下可選擇
FUNCTION。
3 轉動M.C.選擇功能。
選擇後,執行下列程序以設定功能。
Play mode(重播)
1 按M.C.可選擇重播範圍。
! Repeat One-重播目前歌曲
! Repeat All-重播所選清單內的所有歌曲
Shuffle mode(隨機選曲)
1 按M.C.選擇常用設定。
! Shuffle Songs-依隨機順序播放所選擇清
單中的歌曲。
! Shuffle Albums-依序播放隨機選擇的專
輯中的歌曲。
! Shuffle OFF-取消隨機播放。
Shuffle all(全部隨機播放)
1 按M.C.開啟全部隨機播放。
若要關閉,請將FUNCTION選單中的Shuffle
mode設定為關閉。
Link play(連結播放)
1 向左或向右推M.C.以切換模式,按下則可選
擇。
如需有關設定的詳細資料,請參閱本頁上
與目前播放歌曲有關的歌曲
PAUSE(暫停)
1 按M.C.可暫停或繼續播放。
Audiobooks(有聲書速度)
1 按M.C.選擇常用設定。
! Faster - 比正常還快的速度播放
! Normal-正常速度播放
! Slower - 比正常還慢的速度播放
Sound Retriever(數位音樂修補)
1 按M.C.選擇所需設定。
如需詳細資料,請參閱本頁上
還原豐富的聲音(數位音樂修補)
。
播放
增強壓縮音訊並
。
註
! 切換控制模式至iPod以暫停播放歌曲。操作
iPod以繼續播放。
! 即使控制模式設為iPod/APP,下列本機功能
仍可存取。
— 切換文字資訊 (iPod)
— 暫停
— 快進/快倒
Page 65

1
1
操作本機
操作本機
節
02
— 曲目往上/往下
— 隨機播放(隨機)
(清單)可使用iPod選單
—
— 按下M.C.可按下iPod按鍵轉盤
— 向上推M.C.可將iPod按鍵轉盤轉至左側
— 向下推M.C.可將iPod按鍵轉盤轉至右側
! 控制模式設定為iPod/APP時,操作所受的限
制如下所示:
— 無法使用功能設定。
— 從本機無法操作瀏覽功能。
音訊調整
1 音訊顯示
顯示音訊調整狀態。
使用特殊按鈕進行進階操作
重低音揚聲器開/關設定
1 按SW/BASS可選擇重低音揚聲器開/關設定
選單。
2 按M.C.可開啟或關閉重低音揚聲器輸出。
3 向左或向右推M.C.,選擇重低音揚聲器輸出的
相位。
重低音揚聲器調整
1 按SW/BASS可選擇重低音揚聲器調整選單。
2 向左或向右推M.C.選擇截止頻率。
50Hz-63Hz-80Hz-100Hz-125Hz
3 向上或向下推M.C.調整重低音揚聲器的輸出電
平。
每向上或向下推一次M.C.即調高或降低重低音
音量。+6至-24隨著電平增加或減少而顯示。
低音增強
1 按住SW/BASS可選擇低音增強設定選單。
2 向上或向下推M.C.,選擇所需音壓。
音訊功能設定
1 按M.C.顯示主選單。
2 轉動M.C.可變更選單選項,且按下可選擇
AUDIO。
3 轉動M.C.選擇音訊功能。
選擇後,執行下列程序以設定音訊功能。
Fader/Balance(淡化器/平衡調整)
1 向上或向下推M.C.調整前置/後置揚聲器平
衡。
! 後置輸出設定為Rear SP :S/W時,無法調
整前/後揚聲器平衡。請參閱下一頁上
S/W control(後置輸出及重低音揚聲器設
。
定)
2 向左或向右推M.C.調整左置/右置揚聲器平
衡。
Powerful(等化器調用)
1 向左或向右推M.C.選擇等化器曲線。
Powerful-Natural-Vocal-Custom1-Custom2-Flat-Super bass
100 Hz(等化器調整)
您可視需要調整目前選擇的等化器曲線設定。經
調整的等化器曲線設定會儲存在Custom1或Cus-
tom2中。
! 您可以為各播放來源單獨建立一條Custom1曲
線。如果在選擇Custom2以外的曲線時進行調
整,等化器曲線設定將儲存在Custom1中。
! 可建立一條所有來源共用的Custom2曲線。如
果您在選擇Custom2曲線時調整,將會更新
Custom2曲線。
1 調用需調整的等化器曲線。
2 向左或向右推M.C.,選擇要調整的等化器頻
段。
100Hz-315Hz-1.25kHz-3.15kHz-8kHz
3 向上或向下推M.C.調整等化器曲線。
+6至-6會隨著等化器曲線增大或減小而顯示。
LOUD(響度)
響度可在低音量時補償低音及高頻範圍中的不
足。
1 按M.C.可開關響度。
2 向左或向右推M.C.選擇所需設定。
Low(低)-Mid(中)-High(高)
Sub W.1(重低音揚聲器開/關設定)
本機配備可開關的重低音揚聲器輸出。
1 按M.C.可開啟或關閉重低音揚聲器輸出。
2 向左或向右推M.C.,選擇重低音揚聲器輸出的
相位。
向左推M.C.選擇相反相位,然後Reverse出現
在顯示幕中。 向右推M.C.選擇正常相位,然
後Normal出現在顯示幕中。
Sub W.2(重低音揚聲器調整)
重低音揚聲器輸出開啟後,即可調整截止頻率及
輸出電平。
只有低於所選擇範圍的頻率可以從重低音揚聲器
輸出。
1 向左或向右推M.C.選擇截止頻率。
50Hz-63Hz-80Hz-100Hz-125Hz
2 向上或向下推M.C.調整重低音揚聲器的輸出電
平。
每向上或向下推一次M.C.即調高或降低重低音
音量。+6至-24隨著電平增加或減少而顯示。
Bass(低音增強)
1 向上或向下推M.C.,選擇所需音壓。
0至+6隨著電平增大或減小而顯示。
HPF(高通濾波器調整)
當您不要前置或後置揚聲器播放重低音輸出頻率
範圍的低音時,請開啟HPF(高通濾波器)。僅高
於選定範圍的頻率可從前置或後置揚聲器輸出。
1 按M.C.可開啟或關閉高通濾波器。
2 向左或向右推M.C.選擇截止頻率。
50Hz-63Hz-80Hz-100Hz-125Hz
SLA(音源電平調整)
SLA(音源電平調整)可調整各播放來源的音量電
平,以免在播放來源之間切換時音量驟然變化。
! 選擇FM調諧器作為播放來源時,您無法切換至
SLA。
! 設定以FM調諧器的音量電平為依據,該音量電
平保持不變。
! 也可以使用此功能調整AM調諧器的音量等級。
1 向上或向下推M.C.,調整播放來源音量。
調整範圍: +4 至 –4
初始設定
1 功能顯示
! 顯示功能狀態。
1 按住SRC/OFF直至本機關閉。
2 按住M.C.,直到初始設定選單出現在顯示幕
為止。
3 轉動M.C.可選擇初始設定。
選擇後,執行下列程序以進行初始設定。
Language select(多種語言)
為了您的方便起見,本機有多種語言顯示。您可
以選擇最適合您的優先語言。
1 按M.C.選擇語種。
英文-西班牙文-葡萄牙文
Calendar(設定日期)
Zhtw
中文
65
Page 66

節
02
操作本機
操作本機
1 向左或向右推M.C.,選擇所需設定的日曆顯示
部分。
年-日-月
2 向上或向下推M.C.以設定日期。
Clock(設定時鐘)
1 向左或向右推M.C.,選擇所需設定的時鐘顯示
部分。
時-分
2 向上或向下推M.C.,正確設定時鐘。
! 按M.C.,可使時鐘與時間訊號相符合。
! 如果是00到29,分鐘數會進位。(例如
10:18變成10:00。)
! 如果是30到59,分鐘數會進位。(例如
10:36變成11:00。)
EngineTime alert(已播放時間顯示設定)
此設定可讓您計算自機器開啟後耗用的時間長
度,以及顯示每段期間所耗用的時間總量。
此外,您會聽見警告音。
1 按M.C.選擇常用設定。
OFF-15Minutes-30Minutes
FM step(FM調頻間隔)
搜尋調頻所用之FM調頻間隔可在100 kHz、預設間
隔及50 kHz之間進行切換。
如果搜尋調頻以50 kHz為間隔進行,則會無法準確
收聽電台。 請用手動調頻或再次使用搜尋調頻收
聽電台。
1 按M.C.,選擇FM調頻間隔。
50kHz(50 kHz)-100kHz(100 kHz)
AM STEP(AM調頻間隔)
AM調頻間隔可在9 kHz、預設間隔及10 kHz之間切
換。在北美、中美或南美使用調諧器時,請將調
頻間隔從9 kHz(容許範圍531 kHz至1 602 kHz)重
設為10 kHz(容許範圍530 kHz至1 640 kHz)。
1 按M.C.選擇AM調頻間隔。
10 KHZ(10 kHz)-9 KHZ(9 kHz)
USB plug&play(隨插即用)
66
Zhtw
此設定可讓您自動切換來源為USB/iPod。
1 按M.C.可開啟或關閉隨插即用功能。
! ON-連接USB儲存裝置 /iPod時,來源會
自動切換為USB/iPod。若您中斷USB儲存
裝置 /iPod的連接,就會關閉本機的來
源。
! OFF-連接USB儲存裝置/iPod時,來源不
會自動切換為USB/iPod。請手動變更來源
為USB/iPod。
Warning tone(警告音設定)
如果點火裝置關閉後四秒內前面板不從主機卸
下,警告音將響起。警告音可關閉。
1 按M.C.可開關警告音。
AUX(輔助輸入)
使用連接至本機的輔助裝置時,請啟動此設定。
1 按M.C.可開啟或關閉輔助設定。
Dimmer(顯示幕亮度設定)
為避免顯示幕在夜間過亮,當汽車前頭燈打開時
顯示幕會自動調暗。可打開或關閉時鐘顯示。
1 按M.C.可開關顯示幕亮度。
Brightness(顯示亮度設定)
1 向左或向右推M.C.調整亮度等級。
0至15隨著電平增大或減小而顯示。
! 當顯示幕亮度調整作用時,亮度等級可在0
至10之間調整。
S/W control(後置輸出及重低音揚聲器設定)
本機的後置輸出(後置揚聲器喇叭線輸出與RCA後
置輸出)可用於全音域揚聲器(Rear SP :F.
Range)或重低音揚聲器(Rear SP :S/W)的連
接。如果您將後置輸出設定切換至Rear SP :S/
W,無須使用輔助放大器便可將後置揚聲器喇叭
線直接連接至重低音揚聲器。
1 按M.C.,切換後置輸出設定。
! 沒有任何重低音揚聲器與本機連接時,請
選擇Rear SP :F.Range(全音域揚聲器)。
! 有重低音揚聲器連接至後置輸出時,請選
擇Rear SP :S/W(重低音揚聲器)。
! 即使更改該設定,除非開啟重低音揚聲器輸
出,否則將無聲音輸出(請參閱上一頁上
Sub W.1(重低音揚聲器開/關設定)
! 如果您更改該設定,則音訊選單中的重低音揚
聲器輸出會恢復原廠設定。
! 在此設定中,後置揚聲器喇叭線輸出與RCA後
置輸出會同時切換。
Demonstration(示範顯示設定)
1 按M.C.可打開或關閉示範顯示。
! 您也可以在本機關閉時透過按DISP開啟或
關閉功能示範。更多詳情請參閱第60頁上
示範模式
。
Reverse mode(倒轉模式設定)
1 按M.C.可開啟或關閉倒轉模式。
! 您也可以在本機關閉時透過按BAND開啟
或關閉倒轉模式。更多詳情請參閱第60頁
上
倒轉模式
。
Ever-scroll(捲動模式設定)
不斷捲動功能設為ON時,錄製的文字資訊會不斷
在顯示幕中捲動。如果想要資訊只捲動一次,請
設定為OFF(關閉)。
1 按M.C.可開啟或關閉不斷捲動功能。
)。
其他功能
使用AUX播放來源
1 將立體聲迷你插頭插入AUX輸入插孔。
2 按SRC/OFF選擇AUX作為播放來源。
註
除非開啟輔助設定,否則無法選擇AUX。更多詳
情請參閱本頁上
AUX(輔助輸入)
。
時鐘顯示
% 按CLK/DISP OFF選擇所需設定。
關閉時鐘-顯示時鐘-顯示經過時間
切換顯示指示與按鈕冷光
您可以開啟或關閉顯示指示與按鈕冷光。
% 按住CLK/DISP OFF。
按住CLK/DISP OFF可開啟或關閉顯示指示與按
鈕冷光。
# 即使已關閉顯示指示,仍然可以操作本機。如果
在顯示指示關閉時進行操作,顯示幕會亮起數秒
鐘,然後再次熄滅。
使用不同的娛樂顯示
收聽各音源的同時可欣賞娛樂顯示。
1 按M.C.顯示主選單。
2 轉動M.C.可變更選單選項,且按下可選擇
ENTERTAINMENT。
3 轉動M.C.以切換顯示畫面。
背景視覺-曲風-背景圖像 1-背景圖像 2-背
景圖像 3-背景圖像 4-簡易顯示-電影畫面 1
-電影畫面 2-日曆
# 曲風顯示的變化會依音樂的曲風變更。
# 曲風顯示可能會因使用將音訊檔案編碼的應用程
式,而無法正常運作。
Page 67

7
h
安裝
安裝
節
03
連接
警告
! 使用超過50 W(輸出值)與介於 4 W 至 8 W
(阻抗值)的揚聲器。本機請勿使用1 W 至3
W 揚聲器。
! 黑色纜線為接地。安裝本機或功率放大器
(另售)時,請確實優先連接接地線。確定
接地線已正確連接至車輛本體的金屬部位。
功率放大器的接地線及本機或其他裝置,必
須以不同的螺絲分別連接車輛。若接地線的
螺絲鬆動或掉落,可能會導致起火、冒煙或
故障。
重要事項
! 當本機安裝在點火開關沒有ACC(附加)位
置的車輛中時,若無法將紅色纜線連接可以
偵測點火開關運作的端子上,可能會導致電
池電量耗盡。
O
F
N
F
O
S
T
A
R
T
ACC位置 無ACC位置
! 本機限使用12伏特電池與負接地。 不這麼做
可能會導致起火或故障。
! 為防止短路,過熱或故障發生,請務必遵守
下列指示。
— 安裝之前請斷開電池的負極。
— 以纜線夾或膠帶固定纜線。請使用膠帶包覆
纜線與金屬部位接觸的部分以保護纜線。
— 請勿將纜線置於活動部件上,比如汽車排檔
與座位扶手。
— 請勿將纜線置於受熱位置,比如暖風機出口
附近。
— 請勿將黃色纜線穿過引擎室的孔連接至電
池。
— 以絕緣膠帶包覆任何未連接的纜線接頭。
— 請勿縮短纜線長度。
— 切勿為了與其他裝置共用電源而割開本機電
源線絕緣層。纜線的電流負載量有一定限
度。
— 請使用規定額定值的保險絲。
— 請勿將揚聲器負極線直接接地。
— 請勿將多個揚聲器的負極線綑紮在一起。
! 當本機電源開啟時,控制訊號會透過藍/白
色纜線輸出。請將其連接至外部功率放大器
系統遙控器或車輛的自動天線中繼控制端子
(最大300 mA 12 V DC)。若車輛配備有玻璃
天線,請將其連接至天線增強電源端子。
! 切勿將藍/白纜線連接到外部的變壓電源端
子。同時,請避免將其連接到自動天線的電
源端子。這麼做可能會導致電源電量耗盡或
故障。
本機
1 2 3645
1 天線輸入
2 保險絲(10 A)
3 電源線輸入
4 有線遙控輸入
可連接實體線路的遙控器轉接器(另售)。
5 前置輸出
6 後置輸出
7 重低音揚聲器輸出
電源線
超低音揚聲器未連接後置揚聲器喇叭線時,請
執行這些連接。
LR
4
F
5
R
使用超低音揚聲器卻未使用選購的擴大機時,
請執行這些連接。
LR
4
F
i
SW
1 至電源線輸入
2 左置
3 右置
4 前置揚聲器
5 後置揚聲器
6 白
7 白/黑
8 灰
9 灰/黑
1
8
6
9
7
a
c
d
b
e
f
g
1
8
6
9
7
a
c
d
b
j
e
a
f
g
k l
h
b
32
32
c
d
a 綠
b 綠/黑
c 紫
d 紫/黑
e 黑(機身接地)
連接到乾淨、無塗料的金屬部位。
f 黃
連接到固定的12 V電源端子。
g 紅
連接到由點火開關(12 V DC)控制的端子。
h 藍/白
連接到功率放大器的系統控制端子或自動天
線中繼控制端子(最大300 mA 12 V DC)。
i 超低音揚聲器(4 Ω)
j 使用70 W(2 Ω)的超低音揚聲器時,確定
將超低音揚聲器連接至紫色與本機紫色/黑
色喇叭線。綠色及綠色/黑色喇叭線請勿連
接任何揚聲器。
k 不使用。
l 超低音揚聲器(4 Ω)×2
註
! 使用雙揚聲器系統時,請勿連接任何物品到
未與揚聲器連接的揚聲器接線。
! 變更本機的初始設定。請參閱上一頁上
S/W control(後置輸出及重低音揚聲器設
。
定)
本機的超低音揚聲器輸出為單音輸出。
Zhtw
中文
67
Page 68

5cmcm
節
03
安裝
安裝
功率放大器(另售)
使用選購的放大器時,請執行這些連接。
2
2
2
3
55
3
77
3
99
1
1
1
1 系統遙控器
連接至藍色/白色纜線。
2 功率放大器(另售)
3 以RCA纜線連接(另售)
4 至後置輸出
5 後置揚聲器
6 至前置輸出
7 前置揚聲器
8 至重低音揚聲器輸出
9 重低音揚聲器
安裝
重要事項
! 最後安裝之前,請檢查所有的連接和系統。
! 請勿使用未獲授權的部分,這麼做可能會造
成故障。
! 若安裝需要在車輛上鑽孔或進行其他修改,
請洽詢您的經銷商。
! 請勿將本機安裝在:
— 可能會干擾車輛操作的位置。
— 因突然停車可能會傷及乘客的位置。
! 半導體雷射在過熱的狀況下可能會損壞。請
勿將本機安裝在受熱位置,例如暖風機出口
附近。
68
Zhtw
! 當本機以小於60°的角度安裝時,會獲得優
化效能。
4
! 為了確保在使用本機時能有適當的散熱,安
6
8
裝時請確認在後面板後方留有足夠的空間,
並纏住鬆散的纜線,以防其堵住出風口。
ᮽӛ⭁᱿ἇ⿵
DIN前/後座
本機可使用前座或後座安裝進行正確安裝。
安裝時,請使用市售零件。
DIN前座
1 將座套插入儀表板中。
在狹窄空間中安裝時,請使用隨附的座套。若
有足夠的空間,請使用車輛隨附的座套。
2 使用螺絲起子折彎金屬突出部位(90°)至
定位,藉以固定座套。
1
2
1 儀表板
60°
2 座套
3 依照圖示方式安裝本機。
1
2
4
5
1 螺帽
2 防火牆或金屬支架
3 金屬帶
4 螺絲
5 螺絲(M4 × 8)
# 確認本機已確實安裝至定位。安裝不確實可能會
造成跳動或其他故障。
3
DIN後座
1 選定適當的位置,讓托架孔與本機側面密
合。
2 鎖緊各邊的兩顆螺絲。
1
2
1 十字槽螺絲(5mm×8mm)
2 托架
3 儀表板或操縱台
3
移除本機
1 取下飾環。
1 飾環
2 缺口突出部位
! 拆下前面板後,可更輕易的進入飾環。
! 若您要重新裝上飾環,請對準有向下缺口突
出部位的側邊並接上飾環。
2 將隨附的抽取鑰匙插入本機的兩側,使其卡
至定位。
3 將本機拉出儀表板。
拆下並重新安裝前面板
您可拆下前面板以防止本機遭竊。
按下拆卸按鍵並向上推入前面板,再朝您的方
向拉。
如需詳細資料,請參閱
遭竊
及第61頁上
拆下前面板可防止本機
重新安裝前面板
。
固定前面板
前面板可使用隨附的螺絲固定。
1
1 螺絲
Page 69

附加資訊
附錄
附加資訊
故障排除
故障情況 原因 措施
顯示畫面會自
動返回一般顯
示畫面。
重播範圍意外
變更。
子資料夾未播放。選擇Folder re-
顯示畫面變更
時(例如NO
TITLE),出
現NO
XXXX。
關閉本機後,
顯示幕會亮
起。
本機故障中。
有干擾產生。
您無法在30秒內
執行任何操作。
選擇其他資料夾
或曲目,或快速
前進/快速倒轉
時,根據重播範
圍的不同,選擇
的範圍可能會變
更。
peat(重播資
料夾)時,無法
播放子資料夾。
無內嵌文字資訊。切換顯示畫面或
示範模式開啟。 ! 按DISP/
您正在使用的裝
置如手機,所傳
送的電波太靠近
本機。
再執行操作一
次。
再次選擇重播範
圍。
選擇其他重播範
圍。
播放其他曲目/
檔案。
SCRL可取消示範
模式。
! 關閉示範顯示
設定。
將可能會造成干
擾的電子裝置遠
離本機。
錯誤訊息
與經銷商或就近的先鋒授權服務中心聯絡時,
請務必記錄錯誤訊息。
內置式CD播放器
訊息 原因 措施
ERROR-07,
11, 12, 17, 30
ERROR-10,
11, 12, 15,
17, 30, A0
ERROR-15 插入碟片是空的 請更換碟片。
ERROR-23 不支援CD格式 請更換碟片。
FORMAT
READ
NO AUDIO 插入的碟片不含
SKIPPED 插入的碟片包含
PROTECT 插入之碟片上的
/
外部儲存裝置(USB、SD)/iPod
訊息 原因 措施
NO DEVICE 隨插即用為關閉
FORMAT
READ
碟片髒污。 清潔碟片。
碟片有刮傷。 請更換碟片。
有電氣或機械錯誤。關閉點火開關,
在開始播放及開
始聽見聲音之
間,有時會出現
延遲。
任何可播放的檔
案。
受DRM保護的檔
案。
所有檔案均內嵌
DRM。
時,表示未連接
任何USB儲存裝
置或iPod。
在開始播放及開
始聽見聲音之
間,有時會出現
延遲。
然後再開啟,或
切換至其他播放
來源,然後再回
到CD播放器。
等到訊息消失後
才聽見聲音。
請更換碟片。
請更換碟片。
請更換碟片。
! 開啟隨插即
用。
! 連接相容的USB
儲存裝置/iPod。
等到訊息消失後
才聽見聲音。
訊息 原因 措施
NO AUDIO 沒有歌曲。 將音訊檔案傳送
連接的USB儲存
裝置已啟用安全
SKIPPED 所連接USB儲存
PROTECT USB儲存裝置中
NOT COMPATIBLE
防護
裝置包含已內嵌
Windows Mediaä
DRM 9/10 的檔案
的所有檔案均內
嵌Windows
Media DRM 9/
10。
本機不支援所連
接的USB儲存裝
置。
不相容的iPod 中斷裝置連接並
不相容的SD儲存裝置移除裝置並更換
至USB儲存裝置並
連接。
依USB儲存裝置的
指示停用安全功
能。
播放未內嵌
Windows Media
DRM 9/10 的音訊檔
案。
傳送未內嵌
Windows Media
DRM 9/10 的檔案到
USB儲存裝置並連
接。
! 連接與USB大量
儲存等級相容的
裝置。
! 中斷裝置連接
並更換為相容的
USB儲存裝置。
更換為相容的
iPod。
為相容的SD儲存
裝置。
訊息 原因 措施
CHECK USB USB接頭或USB纜
線短路。
連接的USB儲存
裝置消耗超過
500 mA( 最大允
許電流)的功
率。
iPod操作正常但
無法充電
檢查USB接頭或
USB纜線是否未卡
在某個物品中或
損壞。
拔除USB儲存裝置
且不使用它。將
點火開關轉至
OFF,再轉至ACC
或ON,然後僅連
接相容的USB儲存
裝置。
確定iPod的連接
線沒有短路(例
如,未卡在金屬
物體中)。檢查
之後,請先關閉
點火開關,然後
再重新開啟,或
中斷與iPod的連
接後再重新連
接。
中文
Zhtw
69
Page 70

附錄
附加資訊
附加資訊
訊息 原因 措施
ERROR-19 通訊失敗。 ! 執行下列其中
iPod故障 中斷與iPod纜線
ERROR-23 USB儲存裝置未
ERROR-16 iPod韌體版本過時更新iPod版本。
STOP 目前清單中無歌曲。選擇含有歌曲的
Not found 無相關歌曲 傳送歌曲至
格式化為
FAT12、FAT16或
FAT32檔案系統
iPod故障 中斷與iPod纜線
一項操作。
-將點火開關轉
到OFF,然後再轉
回ON。
-中斷連接或退
出外部儲存裝
置。
-切換至不同的
播放來源。
然後返回USB或SD
播放來源。
! 中斷與iPod纜
線的連接。iPod
主選單顯示後,
重新連接iPod並
重設。
的連接。iPod主
選單顯示後,重
新連接iPod並重
設。
USB儲存裝置應該
格式化為FAT12,
FAT16或FAT32檔
案系統。
的連接。iPod主
選單顯示後,重
新連接iPod並重
設。
清單。
iPod。
操作指南
碟片與播放器
請僅使用具有以下兩種標誌之一的碟片。
使用12-cm碟片。請勿使用8-cm碟片或適用8-cm碟
片的轉接器。
僅限使用傳統的圓形碟片。不可使用其他形狀的
碟片。
CD槽中請勿插入CD以外的任何其他物品。
請勿使用破裂、缺口、扭曲或有其他瑕疵的碟
片,否則可能會損壞播放器。
未最終化的CD-R/CD-RW碟片無法播放。
請勿觸摸碟片的錄製面。
碟片不使用時,請存放在護套中。
請勿在碟片表面黏貼標籤、書寫或使用化學藥
品。
清潔CD時,請用軟布從中心向外擦拭碟片。
凝結可能會暫時影響播放器之效能。請將其放置
約一小時,適應較高的溫度。另外,請用軟布擦
乾潮溼的碟片。
由於碟片特性、碟片格式、錄製的應用軟體、播
放環境、存放條件等原因,碟片可能無法播放。
道路顛簸會中斷碟片的播放。
外部儲存裝置(USB、SD)
有關任何外部儲存裝置(USB、SD)的問題,請向
裝置製造商洽詢。
請勿將外部儲存裝置(USB、SD)置於高溫位置。
視外部儲存裝置(USB、SD)而定,可能會出現下
列問題。
! 操作方式可能不同。
! 本機可能無法識別儲存裝置。
! 檔案可能不會正常播放。
USB儲存裝置
不支援透過USB集線器的連線。
請勿連接除USB儲存裝置以外的裝置。
開車時,請牢牢固定USB儲存裝置。請勿讓USB儲
存裝置掉落到地板上,否則可能卡在煞車或油門
踏板之下。
視USB儲存裝置而定,可能會出現下列問題。
! 裝置可能會造成收音機產生雜訊。
SD記憶卡
本機僅支援下列類型的SD記憶卡。
! SD
! miniSD
! microSD
! SDHC
請將SD記憶卡存放在兒童無法拿取之處。若誤吞
SD記憶卡,請立即就醫。
請勿直接用手指或任何金屬裝置碰觸SD記憶卡的
接頭。
請勿插入非SD記憶卡至SD記憶卡插槽中。如果將
金屬物體(例如硬幣)插入插槽中,內部電路會
斷路並導致故障。
插入miniSD或microSD時,請使用轉接器。請勿使
用露出部分超出接頭之金屬零件的轉接器。
請勿插入損壞的SD記憶卡(例如彎曲、已撕下標
籤),否則可能從插槽中退出。
請勿強行將SD記憶卡插入記憶卡插槽中,否則記
憶卡或本機可能會受損。
退出SD記憶卡時,按下並確實拿取,直到完全退
出卡至定位。按下記憶卡後立即放開手指相當危
險,因為記憶卡可能會彈出插槽外並擊中您的臉
部等部位。若記憶卡彈出插槽,可能會遺失。
iPod
為確保操作正常,請直接連接iPod的dock接頭與
本機。
駕駛時請牢牢固定iPod。請勿讓遙控器掉落到地
板上,否則可能卡在煞車或油門踏板之下。
關於iPod設定
! 連接iPod時,本機變更iPod的EQ(等化器)設
定為關閉以優化聲音。中斷與iPod的連接時,
EQ回復原始設定。
! 使用本機時,您將無法在iPod上將「Repeat」
(重播)設為關。連接iPod與本機時,重播會
自動變更為全部。
儲存在iPod的不相容文字將不會顯示在本機上。
雙面碟
雙面碟有兩面,一面為音訊的可燒錄CD,另一面
為視訊的可燒錄DVD。
由於雙面碟的CD面不能相容一般的CD標準,因此
可能無法在本機上播放CD面。
經常載入和退出雙面碟可能會刮壞碟片。嚴重的
刮痕會導致本機無法播放碟片。有時雙面碟可能
會卡在碟片槽中而無法退出。為防止這種情形發
生,建議您不要在本機中播放雙面碟。
如需有關雙面碟的詳細資料,請參閱碟片製造商
提供的資訊。
70
Zhtw
Page 71

附加資訊
附錄
附加資訊
注意
請勿將碟片/外部儲存裝置(USB、SD)或iPod
置於高溫位置。
壓縮音訊相容性(碟片、USB、SD)
WMA
副檔名:.wma
位元率:48 kbps至320 kbps(CBR),48 kbps至
384 kbps(VBR)
取樣頻率:32 kHz、44.1 kHz、48 kHz
Windows Media Audio Professional、Lossless、
語音 /DRM 資料流/視訊資料流:不相容
MP3
副檔名:.mp3
位元率:8 kbps至320 kbps(CBR),VBR
取樣頻率: 8 kHz至48 kHz(32 kHz,44.1 kHz,48
kHz用於加強)
相容的ID3標籤版本:1.0、1.1、2.2、2.3、2.4
(ID3標籤2.x版本優先於1.x版本。)
M3u播放清單:不相容
MP3i(互動式MP3),mp3 PRO:不相容
WAV
副檔名:.wav
量化位元數:8與16(LPCM),4(MS ADPCM)
取樣頻率:16 kHz至48 kHz(LPCM),22.05 kHz及
44.1 kHz(MS ADPCM)
AAC
相容格式:iTunes編碼的AAC
副檔名:.m4a
取樣頻率:11.025 kHz至48 kHz
傳輸速率:16 kbps至320 kbps,VBR
Apple Lossless:不相容
AAC檔可至iTunes商店(.m4p副檔名)購買:不相
容
補充資訊
只能顯示前32個字元作為檔案名稱(包括副檔
名)或資料夾名稱。
本機可能會因使用將WMA檔案編碼的應用程式,而
無法正常運作。
開始播放內嵌影像資料的音訊檔案時,可能會略
有延遲。
碟片
可播放的資料夾階層:最多八層(實際的階層少
於兩層)。
可播放的資料夾:最多99
可播放的檔案:最多999
檔案系統:ISO 9660 Level 1及2、Romeo、Joliet
多區段播放:相容
封包寫入資料傳送:不相容
無論原始錄製歌曲之間空白部分的長短,壓縮音
訊播放時歌曲之間都會出現短暫的暫停。
外部儲存裝置(USB、SD)
可播放的資料夾階層:最多八層(實際的階層少
於兩層)。
可播放的資料夾:最多1 500
可播放的檔案:最多15 000
播放有版權保護的檔案:不相容
已分割的外部儲存裝置(USB、SD):只能播放第
一個可播放的磁碟分割。
開始播放有多個資料夾層級的USB儲存裝置上的音
訊檔案時,可能會有輕微的延遲。
SD記憶卡
Multi Media記憶卡(MMC)沒有相容性。
本機不保證與所有SD記憶卡的相容性。
本機與SD-Audio不相容。
注意
若USB隨身碟/USB可攜式音訊播放器/SD記憶卡/
SDHC記憶卡的資料遺失,即使發生在使用本機
時,先鋒概不負責。
iPod相容性
本機僅支援下列iPod機型。支援的iPod軟體版本
如下所示。本機可能不支援較舊的版本。
! iPhone 4(軟體版本4.0)
! iPhone 3GS(軟體版本4.0)
! iPhone 3G(軟體版本4.0)
! iPhone(軟體版本3.1.3)
! 第五代iPod nano(軟體版本1.0.2)
! 第四代iPod nano(軟體版本1.0.4)
! 第三代iPod nano(軟體版本1.1.3)
! 第二代iPod nano(軟體版本1.1.3)
! 第一代iPod nano(軟體版本1.3.1)
! 第三代iPod touch(軟體版本4.0)
! 第二代iPod touch(軟體版本4.0)
! 第一代iPod touch(軟體版本3.1.3)
! iPod classic 160GB(軟體版本2.0.4)
! iPod classic 120GB(軟體版本2.0.1)
! iPod classic(軟體版本1.1.2)
! 第五代iPod(軟體版本1.3)
視iPod的世代或版本而定,有些功能無法操作。
操作可能會因iPod的軟體版本而異。
使用有Dock接頭的iPod時,需要與USB纜線連接的
iPod Dock接頭。
也可以使用先鋒CD-IU50介面纜線。如需詳細資
料,請洽詢您的經銷商。
關於檔案/格式相容性,請參閱iPod操作手冊。
有聲書、Podcast:相容
注意
對於iPod數據的遺失,即使發生在使用本機
時,先鋒概不負責。
音訊檔案順序
使用者無法使用本機指定資料夾編號和播放順
序。
中文
Zhtw
71
Page 72

6
05
附錄
附加資訊
附加資訊
階層實例
01
02
1
2
03
3
04
5
碟片
資料夾選擇順序或其他操作可能會因編碼或寫
入軟體而異。
外部儲存裝置(USB、SD)
播放順序和外部儲存裝置(USB、SD)中的錄製
順序相同。
建議您使用下列方法指定播放順序。
1 建立指示播放順序且包括編號的檔案名稱
(例如001xxx.mp3和099yyy.mp3)。
2 將那些檔案放入資料夾中。
3 將含有檔案的資料夾儲存到外部儲存裝置
(USB、SD)中。
但您是否可指定播放的順序,將視系統環境而
定。
USB可攜式音訊播放器的播放順序不同且視播放
器而定。
4
:壓縮音訊檔案
01至05:資料夾編
號
1至6:播放順序
:資料夾
版權及商標
iTunes
Apple及iTunes均是Apple Inc.於美國及其他國
家註冊的商標。
MP3
本產品僅針對私人、非商業的使用提供授權許
可;除此之外,並未提供授權許可,或暗示任
何使用者具有將本產品用於任何商業(即創造
營收)即時播放(陸上、衛星、有線和/或任
何其他媒體)、透過網際網路、內部網路和/
或其他網路的廣播/串流,或其他電子內容傳
播系統(如付費音訊或隨選音訊應用程式)之
權利。此類用途須另行授權許可。如需詳細資
料,請造訪
http://www.mp3licensing.com。
WMA
Windows Media 是Microsoft Corporation於美國
及/或其他國家的商標或註冊商標。
本產品採用Microsoft Corporation開發之技
術,未獲Microsoft Licensing, Inc.授權不得
使用或散布本技術。
SD記憶卡
SD Logo是SD-3C, LLC的商標。
miniSD Logo是SD-3C, LLC的商標。
microSD Logo是SD-3C, LLC的商標。
SDHC Logo是SD-3C, LLC的商標。
iPod & iPhone
iPhone、iPod、iPod classic、iPod nano及
iPod touch皆為Apple Inc.在美國及其他國家註
冊的商標。
「Made for iPod」(專為iPod製造)及「Made
for iPhone」(專為iPhone製造)表示該電子配
件是專為連接至iPod或iPhone而設計,而且已
通過開發廠商的認證以符合Apple的效能標準。
對於本裝置的操作或是否符合安全與規範標
準,Apple概不擔負任何責任。
規格
一般
額定電源 ......................... 14.4 V DC
接地系統 ......................... 負極 型
最大電流消耗 .................. 10.0 A
尺寸(寬×高×深):
DIN
機身 .................. 178 mm × 50 mm × 165 mm
前端部分 ........... 188 mm × 58 mm × 18 mm
D
機身 .................. 178 mm × 50 mm × 165 mm
前端部分 ........... 170 mm × 46 mm × 18 mm
重量 ................................ 1.4 kg
音訊
最大輸出功率 .................. 50Wx4
連續輸出功率 .................. 22 W × 4(50 Hz至15 000 Hz,
負載阻抗 ......................... 4W 至 8W x4
前輸出最大輸出電平 ........ 4.0 V
等化器(5段圖形等化器):
頻率 ......................... 100/315/1.25k/3.15k/8k
增益 ......................... ±12 dB
HPF:
頻率 ......................... 50/63/80/100/125 Hz
斜率 ......................... -12 dB/oct
重低音揚聲器(單聲道):
頻率 ......................... 50/63/80/100/125 Hz
斜率 ......................... -18 dB/oct
增益 ......................... +6 dB至-24 dB
相位 ......................... 正相/反相
低音增強:
增益 ......................... +12 dB至0dB
CD播放器
系統 ................................ CD音訊系統
可用碟片 ......................... CD
訊噪比 ............................. 94 dB (1 kHz)(IEC-A網路)
聲道數 ............................. 2(立體聲)
MP3解碼格式 .................... MPEG-1 & 2 Audio Layer 3
WMA解碼格式 .................... 第7、7.1、8、9、10、11、12
(容許電壓範圍:12.0 V至
14.4 V DC)
50 W x 2/4 W +70Wx1/2W
(對於重低音揚聲器)
5% THD,4 W負載,雙聲 道驅
動)
4W至8W x2+2W x1
Hz
版本(雙聲道音訊)
(Windows Me dia Playe r)
AAC解碼格式 .................... MPEG-4 AAC(僅限iTunes編
WAV訊號格式 .................... 線性PCM&MS ADPCM
USB
USB標準規格 .................... USB 2.0全速版
最大電流供應 .................. 500 mA
USB等級 ........................... MSC(大量儲存等級)
檔案系統 ......................... FAT1 2、FAT16、FAT32
MP3解碼格式 .................... MPEG-1 & 2 Audio Layer 3
WMA解碼格式 .................... 第7、7.1、8、9、10、11、12
AAC解碼格式 .................... MPEG-4 AAC(僅限iTunes編
WAV訊號格式 .................... 線性PCM&MS ADPCM
SD
相容實體格式 .................. 2.00版
最大記憶體容量 ............... 32 GB(用於SD 和SDHC)
檔案系統 ......................... FAT1 2、FAT16、FAT32
MP3解碼格式 .................... MPEG-1 & 2 Audio Layer 3
WMA解碼格式 .................... 第7、7.1、8、9、10、11、12
AAC解碼格式 .................... MPEG-4 AAC(僅限iTunes編
WAV訊號格式 .................... 線性PCM&MS ADPCM
FM調諧器
頻率範圍 ......................... 87.5 MHz至10 8.0 MHz
有效靈敏度 ...................... 9 dBf(0.8 μV/75 W,單聲
訊噪比 ............................. 72 dB (IEC-A網路)
AM調諧器
頻率範圍 ......................... 531 kHz至1 602 kHz (9 kHz)
可用靈敏度 ...................... 25 μV(S/N :20 dB)
訊噪比 ............................. 62 dB (IEC-A網路)
碼)(.m4a)
(9.2版和更舊版本)
(無壓縮)
版本(雙聲道音訊)
(Windows Me dia Playe r)
碼)(.m4a)
(9.2版和更舊版本)
(無壓縮)
版本(雙聲道音訊)
(Windows Me dia Playe r)
碼)(.m4a)
(9.2版和更舊版本)
(無壓縮)
道,S/N: 30 dB)
530 kHz至1 640 kHz(10 kHz)
註
規格與設計可能改變,恕不另行通知。
72
Zhtw
Page 73

中文
73Zhtw
Page 74

ﺿﻤﻴﻤﻪ
ﺍﻃﻼﻋﺎﺕﺑﯿﺸﺘﺮ
،S/N: ۳۰ﺩﺳﯽﺑﻞ(
ﮐﯿﻠﻮﻫﺮﺗﺰ(
۵۳۰ﮐﯿﻠﻮﻫﺮﺗﺰﺗﺎ۱۶۴۰ﮐﯿﻠﻮﻫﺮﺗﺰ)۱۰
ﮐﯿﻠﻮﻫﺮﺗﺰ(
ﺣﺴﺎﺳﯿﺖﻗﺎﺑﻞﺍﺳﺘﻔﺎﺩﻩ...............۹dBf (۸/۰ µV/۷۵ﺃﻭﻡ،mono
ﻧﺴﺒﺖﺳﯿﮕﻨﺎﻝﺑﻪﭘﺎﺭﺍﺯﯾﺖ...........۷۲ﺩﺳﯿﺒﻞ)ﺷﺒﮑﻪIEC-A(
ﻣﻮﺝﯾﺎﺏAM
ﻣﺤﺪﻭﺩﻩﻓﺮﮐﺎﻧﺲ.....................۵۳۱ﮐﯿﻠﻮﻫﺮﺗﺰﺗﺎ۱۶۰۲ﮐﯿﻠﻮﻫﺮﺗﺰ)۹
ﺣﺴﺎﺳﯿﺖﻗﺎﺑﻞﺍﺳﺘﻔﺎﺩﻩ...............۲۵µV (S/N: 20ﺩﺳﯽﺑﻞ(
ﻧﺴﺒﺖﺳﯿﮕﻨﺎﻝﺑﻪﭘﺎﺭﺍﺯﯾﺖ...........۶۲ﺩﺳﯿﺒﻞ)ﺷﺒﮑﻪIEC-A(
ﻧﮑﺎﺕ
!ﻣﻤﮑﻦﺍﺳﺖﻣﺸﺨﺼﺎﺕﻭﻃﺮﺍﺣﯽﺑﺪﻭﻥﺍﻋﻼﻡﺗﻐﯿﯿﺮﮐﻨﺪ.
!ﺍﻳﻦﻣﺤﺼﻮﻝﺩﺭﭘﺮﺗﻐﺎﻝﺳﺎﺧﺘﻪﺷﺪﻩﺍﺳﺖ.
۳۱
Fa
Page 75

ﺿﻤﻴﻤﻪ
ﺍﻃﻼﻋﺎﺕﺑﯿﺸﺘﺮ
ﺍﻃﻼﻋﺎﺕﺑﯿﺸﺘﺮ
ﭘﺨﺶﮐﻨﻨﺪﻩﺳﯽﺩﯼ
ﺳﻴﺴﺘﻢ................................ﺳﻴﺴﺘﻢﺻﻮﺗﯽﺩﻳﺴﮏﻓﺸﺮﺩﻩ
ﺩﻳﺴﮏﻫﺎﯼﻗﺎﺑﻞﺍﺳﺘﻔﺎﺩﻩ............ﺩﻳﺴﮏﻓﺸﺮﺩﻩ
USB
SD
ﻧﺴﺒﺖﺳﯿﮕﻨﺎﻝﺑﻪﭘﺎﺭﺍﺯﯾﺖ...........۹۴ﺩﺳﯿﺒﻞ)۱ﮐﯿﻠﻮﻫﺮﺗﺰ()ﺷﺒﮑﻪ
ﺗﻌﺪﺍﺩﮐﺎﻧﺎﻝﻫﺎ........................۲)ﺍﺳﺘﺮﻳﻮ(
ﻓﺮﻣﺖﺭﻣﺰﮔﺸﺎﯾﯽMP3...........MPEG-1 & 2 Audio Layer 3
ﻓﺮﻣﺖﺭﻣﺰﮔﺸﺎﯾﯽWMA..........ﻧﺴﺨﻪ۷,۷.۱,۸,۹,۱۰,۱۱,۱۲
ﻓﺮﻣﺖﺭﻣﺰﮔﺸﺎﯾﯽAAC...........MPEG-4 AAC)ﻓﻘﻂiTunes
ﻓﺮﻣﺖﺳﻴﮕﻨﺎﻝWAV...............PCMﺧﻄﯽﻭMS ADPCM
ﻣﺸﺨﺼﺎﺕﺍﺳﺘﺎﻧﺪﺍﺭﺩUSB........USB 2.0ﭘﺮﺳﺮﻋﺖ
ﺣﺪﺍﮐﺜﺮﺟﺮﯾﺎﻥﺑﺮﻕﺩﺭﯾﺎﻓﺘﯽ........۵۰۰ﻣﯿﻠﯽﺁﻣﭙﺮ
ﮐﻼﺱUSB........................MSC)ﮐﻼﺱﺩﺳﺘﮕﺎﻩﺫﺧﯿﺮﻩﺳﺎﺯﯼ
ﺳﻴﺘﻢﻓﺎﻳﻞ.............................FAT12 ،FAT16 ،FAT32
ﻓﺮﻣﺖﺭﻣﺰﮔﺸﺎﯾﯽMP3...........MPEG-1 & 2 Audio Layer 3
ﻓﺮﻣﺖﺭﻣﺰﮔﺸﺎﯾﯽWMA..........ﻧﺴﺨﻪ۷,۷.۱,۸,۹,۱۰,۱۱,۱۲
ﻓﺮﻣﺖﺭﻣﺰﮔﺸﺎﯾﯽAAC...........MPEG-4 AAC)ﻓﻘﻂiTunes
ﻓﺮﻣﺖﺳﻴﮕﻨﺎﻝWAV...............PCMﺧﻄﯽﻭMS ADPCM
ﻗﺎﻟﺐﻓﯿﺰﯾﮑﯽﺳﺎﺯﮔﺎﺭ...............ﻧﺴﺨﻪ2.00
ﺣﺪﺍﮐﺜﺮﻇﺮﻓﯿﺖﺣﺎﻓﻈﻪ..............32ﮔﯿﮕﺎﺑﺎﯾﺖ)ﺑﺮﺍﯼSDﻭSDHC(
ﺳﻴﺘﻢﻓﺎﻳﻞ.............................FAT12 ،FAT16 ،FAT32
ﻓﺮﻣﺖﺭﻣﺰﮔﺸﺎﯾﯽMP3...........MPEG-1 & 2 Audio Layer 3
ﻓﺮﻣﺖﺭﻣﺰﮔﺸﺎﯾﯽWMA..........ﻧﺴﺨﻪ۷,۷.۱,۸,۹,۱۰,۱۱,۱۲
ﻓﺮﻣﺖﺭﻣﺰﮔﺸﺎﯾﯽAAC...........MPEG-4 AAC)ﻓﻘﻂiTunes
ﻓﺮﻣﺖﺳﻴﮕﻨﺎﻝWAV...............PCMﺧﻄﯽﻭMS ADPCM
ﻣﻮﺝﯾﺎﺏFM
ﻣﺤﺪﻭﺩﻩﻓﺮﮐﺎﻧﺲ.....................۵/۸۷ﻣﮕﺎﻫﺮﺗﺰﺗﺎ۱۰۸ﻣﮕﺎﻫﺮﺗﺰ
)ﻣﺤﺪﻭﺩﻩﻭﻟﺘﺎﮊﻣﺠﺎﺯ:۰/۱۲ﻭﻟﺖﺗﺎ۴/۱۴
ﻭﻟﺖﺟﺮﯾﺎﻥﻣﺴﺘﻘﯿﻢ(
۱۶۵ﻣﯿﻠﯽﻣﺘﺮ
۱۸ﻣﯿﻠﯽﻣﺘﺮ
۱۶۵ﻣﯿﻠﯽﻣﺘﺮ
۱۸ﻣﯿﻠﯽﻣﺘﺮ
۵۰ﻭﺍﺕ×۴/۲ﺃﻭﻡ+۷۰ﻭﺍﺕ×۲/۱
ﺃﻭﻡ)ﺑﺮﺍﯼﺳﺎﺑﻮﻭﻓﺮ(
ﻫﺮﺗﺰ،۵٪THD،۴ﺃﻭﻡﺑﺎﺭﮐﻠﯽ،ﺩﺭ
ﺣﯿﻦﻓﻌﺎﻝﺑﻮﺩﻥﻫﺮﺩﻭﮐﺎﻧﺎﻝ(
۴ﺃﻭﻡﺗﺎ۸ﺃﻭﻡ×۲+۲ﺃﻭﻡ×۱
...................................۴٫۰ﻭﻟﺖ
۸ﮐﻴﻠﻮﻫﺮﺗﺰ
IEC-A(
)ﺻﺪﺍﯼ۲ﮐﺎﻧﺎﻟﻪ(
)Windows Media Playe r(
ﺭﻣﺰﮔﺬﺍﺭﯼﺷﺪﻩ().m4a(
)ﻧﺴﺨﻪ۹٫۲ﻭﻗﺪﯾﻤﯽﺗﺮ(
)ﻏﻴﺮﻓﺸﺮﺩﻩ(
ﺍﻧﺒﻮﻩ(
)ﺻﺪﺍﯼ۲ﮐﺎﻧﺎﻟﻪ(
)Windows Media Playe r(
ﺭﻣﺰﮔﺬﺍﺭﯼﺷﺪﻩ().m4a(
)ﻧﺴﺨﻪ۹٫۲ﻭﻗﺪﯾﻤﯽﺗﺮ(
)ﻏﻴﺮﻓﺸﺮﺩﻩ(
)ﺻﺪﺍﯼ۲ﮐﺎﻧﺎﻟﻪ(
)Windows Media Playe r(
ﺭﻣﺰﮔﺬﺍﺭﯼﺷﺪﻩ().m4a(
)ﻧﺴﺨﻪ۹٫۲ﻭﻗﺪﯾﻤﯽﺗﺮ(
)ﻏﻴﺮﻓﺸﺮﺩﻩ(
ﻣﺸﺨﺼﺎﺕ
ﻣﻮﺍﺭﺩﮐﻠﯽ
ﻣﻨﺒﻊﺑﺮﻕﺩﺭﺟﻪﺑﻨﺪﯼﺷﺪﻩ...........۴/۱۴ﻭﻟﺖﺑﺮﻕﻣﺴﺘﻘﯿﻢ
ﺳﻴﺴﺘﻢﺍﺗﺼﺎﻝﺯﻣﻴﻨﯽ................ﻧﻮﻉﻣﻨﻔﯽ
ﺣﺪﺍﮐﺜﺮﻣﯿﺰﺍﻥﻣﺼﺮﻑﺑﺮﻕ........۱۰٫۰A
ﺍﺑﻌﺎﺩ)ﻋﺮﺽ×ﻃﻮﻝ×ﻗﻄﺮ(:
DIN
ﺷﺎﺳﯽ..................۱۷۸ﻣﯿﻠﯽﻣﺘﺮ×۵۰ﻣﯿﻠﯽﻣﺘﺮ×
ﺩﻣﺎﻏﻪ)ﻗﺴﻤﺖﺟﻠﻮ(...۱۸۸ﻣﯿﻠﯽﻣﺘﺮ×۵۸ﻣﯿﻠﯽﻣﺘﺮ×
D
ﺷﺎﺳﯽ..................۱۷۸ﻣﯿﻠﯽﻣﺘﺮ×۵۰ﻣﯿﻠﯽﻣﺘﺮ×
ﺩﻣﺎﻏﻪ)ﻗﺴﻤﺖﺟﻠﻮ(...۱۷۰ﻣﯿﻠﯽﻣﺘﺮ×۴۶ﻣﯿﻠﯽﻣﺘﺮ×
ﻭﺯﻥ.................................۱٫۴ﮐﯿﻠﻮﮔﺮﻡ
ﺻﺪﺍ
ﺣﺪﺍﮐﺜﺮﺧﺮﻭﺟﯽﺑﺮﻕ................۵۰ﻭﺍﺕ×۴
ﺧﺮﻭﺟﯽﺑﺮﻕﻣﺘﻮﺍﻟﯽ................۲۲ﻭﺍﺕ×۴)۵۰ﻫﺮﺗﺰﺗﺎ۱۵۰۰۰
ﺍﻣﭙﺪﺍﻧﺲﺑﺎﺭ..........................۴ﺃﻭﻡﺗﺎ۸ﺃﻭﻡ×۴
ﺣﺪﺍﮐﺜﺮﺳﻄﺢﺧﺮﻭﺟﯽﺍﺯﭘﯿﺶﺗﻮﻟﯿﺪﺷﺪﻩ
ﺍﮐﻮﻻﯾﺰﺭ)ﺍﮐﻮﻻﯾﺰﺭﮔﺮﺍﻓﯿﮑﯽ۵ﺑﺎﻧﺪﻩ(:
ﻓﺮﮐﺎﻧﺲ.......................۱۰۰/۳۱۵/۲۵/۱ﮐﻴﻠﻮ/۱۵/۳ﮐﻴﻠﻮ/
ﺩﺭﯾﺎﻓﺖ........................۱۲±ﺩﺳﯿﺒﻞ
HPF:
ﻓﺮﮐﺎﻧﺲ.......................۵۰/۶۳/۸۰/۱۰۰/۱۲۵ﻫﺮﺗﺰ
ﺍﻧﺤﺮﺍﻑ.......................۱۲–ﺩﺳﯿﺒﻞ/ﺍﻭﮐﺘﺎﻭ
ﺳﺎﺑﻮﻭﻓﺮ)ﺗﮏﺻﻮﺗﯽ(:
ﻓﺮﮐﺎﻧﺲ.......................۵۰/۶۳/۸۰/۱۰۰/۱۲۵ﻫﺮﺗﺰ
ﺍﻧﺤﺮﺍﻑ.......................۱۸–ﺩﺳﯿﺒﻞ/ﺍﻭﮐﺘﺎﻭ
ﺩﺭﯾﺎﻓﺖ........................۶+ﺩﺳﯿﺒﻞ۲۴–ﺩﺳﯿﺒﻞ
ﻓﺎﺯ............................ﻣﻌﻤﻮﻟﯽ/ﻣﻌﮑﻮﺱ
ﺗﻘﻮﻳﺖﺻﺪﺍﯼﺑﻢ:
ﺩﺭﯾﺎﻓﺖ........................۱۲+ﺩﺳﯿﺒﻞﺗﺎ۰ﺩﺳﯿﺒﻞ
http://www.mp3licensing.comﺩﯾﺪﻥﮐﻨﯿﺪ.
iPhone, iPod ،iPod classic ،iPod nano،ﻭiPod
MP3
ﺍﺭﺍﺋﻪﺍﯾﻦﻣﺤﺼﻮﻝﻓﻘﻂﺑﺎﺍﺭﺍﺋﻪﻣﺠﻮﺯﺑﺮﺍﯼﺍﺳﺘﻔﺎﺩﻩﺷﺨﺼﯽﻭ
ﻏﯿﺮﺗﺠﺎﺭﯼﺻﻮﺭﺕﮔﺮﻓﺘﻪﻭﻣﺠﻮﺯﻭﯾﺎﻫﺮﮔﻮﻧﻪﺣﻘﯽﺩﺭﺭﺍﺑﻄﻪﺑﺎ
ﺍﺳﺘﻔﺎﺩﻩﺍﺯﺍﯾﻦﻣﺤﺼﻮﻝﺩﺭﻫﺮﻧﻮﻉﭘﺨﺶ)ﺭﺳﺎﻧﻪﻫﺎﯼﺟﻬﺎﻧﯽ،
ﻣﺎﻫﻮﺍﺭﻩ،ﮐﺎﺑﻠﯽﻭﯾﺎﺩﯾﮕﺮﺍﻧﻮﺍﻉﺭﺳﺎﻧﻪ(ﺗﺠﺎﺭﯼ)ﺑﺎﻫﺪﻑﺗﻮﻟﯿﺪ
ﺩﺭﺁﻣﺪ(،ﭘﺨﺶ/ﭘﺨﺶﺍﺯﻃﺮﯾﻖﺍﯾﻨﺘﺮﻧﺖ،ﺍﯾﻨﺘﺮﺍﻧﺖﻭ/ﯾﺎﺩﯾﮕﺮﺷﺒﮑﻪﻫﺎ
ﯾﺎﺩﯾﮕﺮﺳﯿﺴﺘﻢﻫﺎﯼﺗﻮﺯﯾﻊﻣﺤﺘﻮﺍﯼﺍﻟﮑﺘﺮﻭﻧﯿﮑﯽﻣﺎﻧﻨﺪﺑﺮﻧﺎﻣﻪﻫﺎﯾﯽ
ﺍﺯﻧﻮﻉﺻﺪﺍﯼﭘﺮﺩﺍﺧﺘﯽﻭﺻﺪﺍﯼﺩﺭﺧﻮﺍﺳﺘﯽﺍﺭﺍﺋﻪﻧﻤﯽﮐﻨﺪ.ﺑﺮﺍﯼ
ﭼﻨﯿﻦﻣﻮﺍﺭﺩﺍﺳﺘﻔﺎﺩﻩﺍﯼﺑﺎﯾﺪﻣﺠﻮﺯﺟﺪﺍﮔﺎﻧﻪﺗﻬﯿﻪﺷﻮﺩ.ﺑﺮﺍﯼﺍﻃﻼﻉ
ﺍﺯﺟﺰﺋﯿﺎﺕﺍﺯﺳﺎﯾﺖ
WMA
Windows Mediaﯾﮏﻋﻼﻣﺖﺗﺠﺎﺭﯼﺛﺒﺖﺷﺪﻩﻭﻳﺎﻋﻼﻣﺖ
Licensing, Incﺍﻣﮑﺎﻥﺍﺳﺘﻔﺎﺩﻩﯾﺎﺗﻮﺯﯾﻊﺁﻥﻭﺟﻮﺩﻧﺨﻮﺍﻫﺪﺩﺍﺷﺖ.
miniSD Logoﻋﻼﻣﺖﺗﺠﺎﺭﯼ.SD-3C, LLCﺍﺳﺖ.
microSD Logoﻋﻼﻣﺖﺗﺠﺎﺭﯼ.SD-3C, LLCﺍﺳﺖ.
SDHC Logoﻋﻼﻣﺖﺗﺠﺎﺭﯼ.SD-3C, LLCﺍﺳﺖ.
ﺗﺠﺎﺭﯼﺛﺒﺖﺷﺪﻩﺷﺮﮐﺖMicrosoftﺩﺭﺍﻳﺎﻻﺕﻣﺘﺤﺪﻩﻭ/ﻳﺎﺳﺎﻳﺮ
ﮐﺸﻮﺭﻫﺎﺳﺖ.
ﺍﯾﻦﻣﺤﺼﻮﻝﺩﺍﺭﺍﯼﻓﻦﺁﻭﺭﯼﻣﺘﻌﻠﻖﺑﻪMicrosoft
Corporationﺍﺳﺖﻭﺑﺪﻭﻥﮐﺴﺐﻣﺠﻮﺯﺍﺯ.Microsoft
ﮐﺎﺭﺕﺣﺎﻓﻈﻪSD
SD Logoﻋﻼﻣﺖﺗﺠﺎﺭﯼ.SD-3C, LLCﺍﺳﺖ.
ﻓﺎﺭﺳﯽ
iPodﻭiPhone
touchﻣﺎﺭﮎﻫﺎﯼﺗﺠﺎﺭﯼApple Inc.ﻫﺴﺘﻨﺪﮐﻪﺩﺭﺁﻣﺮﯾﮑﺎﻭ
ﺩﯾﮕﺮﮐﺸﻮﺭﻫﺎﺑﻪﺛﺒﺖﺭﺳﯿﺪﻩﺍﻧﺪ.
"ﺳﺎﺧﺘﻪﺷﺪﻩﺑﺮﺍﯼiPod"ﻭ"ﺳﺎﺧﺘﻪﺷﺪﻩﺑﺮﺍﯼiPhone"ﺑﺪﯾﻦ
ﻣﻌﻨﺎﺳﺖﮐﻪﯾﮏﻟﻮﺍﺯﻡﺟﺎﻧﺒﯽﺍﻟﮑﺘﺮﻭﻧﯿﮑﯽﺑﻪﻣﻨﻈﻮﺭﺍﺗﺼﺎﻝﺧﺎﺹ
ﺑﻪiPodﯾﺎiPhoneﻃﺮﺍﺣﯽﺷﺪﻩﺍﺳﺖﻭﺗﻮﺳﻂﺗﻮﻟﯿﺪﮐﻨﻨﺪﻩﺑﺮﺍﯼ
ﺗﺒﻌﯿﺖﺍﺯﺍﺳﺘﺎﻧﺪﺍﺭﺩﻫﺎﯼﺍﺟﺮﺍﯾﯽAppleﻣﻮﺭﺩﺗﺄﯾﯿﺪﻗﺮﺍﺭﮔﺮﻓﺘﻪ
ﺍﺳﺖ.
Appleﺩﺭﻗﺒﺎﻝﻋﻤﻠﮑﺮﺩﺍﯾﻦﺩﺳﺘﮕﺎﻩﯾﺎﺳﺎﺯﮔﺎﺭﯼﺁﻥﺑﺎ
ﺍﺳﺘﺎﻧﺪﺍﺭﺩﻫﺎﯼﺍﯾﻤﻨﯽﻭﻗﺎﻧﻮﻧﯽﻣﺴﺌﻮﻟﯿﺘﯽﻧﺨﻮﺍﻫﺪﺩﺍﺷﺖ.
۳۰
Fa
Page 76

ﺿﻤﻴﻤﻪ
ﺍﻃﻼﻋﺎﺕﺑﯿﺸﺘﺮ
ﺍﻃﻼﻋﺎﺕﺑﯿﺸﺘﺮ
ﺗﻮﺍﻟﯽﻓﺎﯾﻞﻫﺎﯼﺻﻮﺗﯽ
ﮐﺎﺭﺑﺮﻧﻤﯽﺗﻮﺍﻧﺪﺑﺎﺍﯾﻦﺩﺳﺘﮕﺎﻩﺷﻤﺎﺭﻩﻫﺎﯼﭘﻮﺷﻪﻫﺎﺭﺍﺗﻌﯿﯿﻦﮐﺮﺩﻩ
ﻭﺗﻮﺍﻟﯽﭘﺨﺶﺁﻧﻬﺎﺭﺍﻣﺸﺨﺺﮐﻨﺪ.
ﻧﻤﻮﻧﻪﺍﯼﺍﺯﺗﻮﺍﻟﯽﻣﻮﺟﻮﺩ
:ﭘﻮﺷﻪ
:ﻓﺎﯾﻞﺻﻮﺗﯽﻓﺸﺮﺩﻩ
۰۱ﺗﺎ۰۵:ﺷﻤﺎﺭﻩﭘﻮﺷﻪ
1ﺗﺎ6:ﺗﻮﺍﻟﯽﭘﺨﺶ
ﺩﻳﺴﮏ
ﺑﺴﺘﻪﺑﻪﺭﻣﺰﮔﺬﺍﺭﯼﯾﺎﻧﻮﺷﺘﻦﻧﺮﻡﺍﻓﺰﺍﺭ،ﺗﻮﺍﻟﯽﺍﻧﺘﺨﺎﺏﭘﻮﺷﻪﯾﺎﺩﯾﮕﺮ
ﮐﺎﺭﮐﺮﺩﻫﺎﻣﻤﮑﻦﺍﺳﺖﻣﺘﻔﺎﻭﺕﺑﺎﺷﺪ.
ﺩﺳﺘﮕﺎﻩﺫﺧﯿﺮﻩﺳﺎﺯﯼﺧﺎﺭﺟﯽ)USB
،SD(
ﺗﺮﺗﻴﺐﭘﺨﺶﺑﺎﺗﺮﺗﻴﺐﺿﺒﻂﺑﺮﺭﻭﯼﺩﺳﺘﮕﺎﻩﺫﺧﻴﺮﻩﺳﺎﺯﯼﺧﺎﺭﺟﯽ
)USB ،SD(ﯾﮑﺴﺎﻥﺍﺳﺖ.
ﺑﺮﺍﯼﺗﻌﯿﯿﻦﺗﻮﺍﻟﯽﭘﺨﺶ،ﺗﻮﺻﯿﻪﻣﯽﺷﻮﺩﺍﺯﺭﻭﺵﺯﯾﺮﺍﺳﺘﻔﺎﺩﻩ
ﮐﻨﯿﺪ.
1ﻧﺎﻡﻓﺎﯾﻞﺭﺍﺑﺎﺍﺳﺘﻔﺎﺩﻩﺍﺯﺷﻤﺎﺭﻩﻫﺎﯾﯽﮐﻪﺗﻮﺍﻟﯽﭘﺨﺶﺭﺍ
ﻣﺸﺨﺺﻣﯽﮐﻨﻨﺪ،ﺍﯾﺠﺎﺩﮐﻨﯿﺪ)ﻣﺎﻧﻨﺪ001xxx.mp3ﻭ
099yyy.mp3(.
2ﺁﻥﻓﺎﯾﻞﻫﺎﺭﺍﺩﺭﻭﻥﭘﻮﺷﻪﻗﺮﺍﺭﺩﻫﯿﺪ.
3ﭘﻮﺷﻪﺣﺎﻭﯼﻓﺎﯾﻞﻫﺎﺭﺍﺩﺭﺩﺳﺘﮕﺎﻩﺫﺧﯿﺮﻩﺳﺎﺯﯼﺧﺎﺭﺟﯽ،
ﺫﺧﯿﺮﻩﮐﻨﯿﺪ)USB ،SD(.
ﺑﺎﺍﯾﻦﻭﺟﻮﺩ،ﺑﺴﺘﻪﺑﻪﻣﺤﯿﻂﺳﯿﺴﺘﻢ،ﻣﻤﮑﻦﺍﺳﺖﻧﺘﻮﺍﻧﯿﺪﺗﻮﺍﻟﯽﭘﺨﺶ
ﺭﺍﻣﺸﺨﺺﮐﻨﯿﺪ.
ﺑﺮﺍﯼﭘﺨﺶﮐﻨﻨﺪﻩﻫﺎﯼﺻﺪﺍﯼﻗﺎﺑﻞﺣﻤﻞUSB،ﺗﻮﺍﻟﯽﻣﺘﻔﺎﻭﺕﺍﺳﺖ
ﻭﺑﻪﭘﺨﺶﮐﻨﻨﺪﻩﺑﺴﺘﮕﯽﺩﺍﺭﺩ.
ﺣﻖﻧﺴﺨﻪﺑﺮﺩﺍﺭﯼﻭﻋﻼﻣﺖﺗﺠﺎﺭﯼ
iTunes
AppleﻭiTunesﻣﺎﺭﮎﻫﺎﯼﺗﺠﺎﺭﯼApple Inc.،ﺛﺒﺖﺷﺪﻩ
ﺩﺭﺁﻣﺮﯾﮑﺎﻭﺩﯾﮕﺮﮐﺸﻮﺭﻫﺎﻫﺴﺘﻨﺪ.
۲۹
Fa
ﺳﺎﺯﮔﺎﺭﯼﺑﺎiPod
ﺍﯾﻦﺩﺳﺘﮕﺎﻩﻓﻘﻂﺍﺯﻣﺪﻝﻫﺎﯼiPodﺯﯾﺮﭘﺸﺘﯿﺒﺎﻧﯽﻣﯽﮐﻨﺪ.ﻧﺴﺨﻪﻫﺎﯼ
ﻧﺮﻡﺍﻓﺰﺍﺭiPodﭘﺸﺘﯿﺒﺎﻧﯽﺷﺪﻩﺩﺭﺯﯾﺮﻧﻤﺎﯾﺶﺩﺍﺩﻩﻣﯽﺷﻮﺩ.ﻣﻤﮑﻦ
ﺍﺳﺖﻧﺴﺨﻪﻫﺎﯼﻗﺪﯾﻤﯽﭘﺸﺘﯿﺒﺎﻧﯽﻧﺸﻮﺩ.
!iPhone 4)ﻧﺴﺨﻪﻧﺮﻡﺍﻓﺰﺍﺭ۴٫۰(
!iPhone 3GS)ﻧﺴﺨﻪﻧﺮﻡﺍﻓﺰﺍﺭ۴٫۰(
!iPhone 3G)ﻧﺴﺨﻪﻧﺮﻡﺍﻓﺰﺍﺭ۴٫۰(
!iPhone)ﻧﺴﺨﻪﻧﺮﻡﺍﻓﺰﺍﺭ۳٫۱٫۳(
!ﻧﺴﻞﭘﻨﺠﻢiPod nano)ﻧﺴﺨﻪﻧﺮﻡﺍﻓﺰﺍﺭ۱٫۰٫۲(
!ﻧﺴﻞ۴iPodﻧﺎﻧﻮ)ﻧﺴﺨﻪﻧﺮﻡﺍﻓﺰﺍﺭ۱٫۰٫۴(
!ﻧﺴﻞ۳iPodﻧﺎﻧﻮ)ﻧﺴﺨﻪﻧﺮﻡﺍﻓﺰﺍﺭ۱٫۱٫۳(
!ﻧﺴﻞ۲iPodﻧﺎﻧﻮ)ﻧﺴﺨﻪﻧﺮﻡﺍﻓﺰﺍﺭ۱٫۱٫۳(
!ﻧﺴﻞ۱iPodﻧﺎﻧﻮ)ﻧﺴﺨﻪﻧﺮﻡﺍﻓﺰﺍﺭ۱٫۳٫۱(
!ﻧﺴﻞﺳﻮﻡiPod touch)ﻧﺴﺨﻪﻧﺮﻡﺍﻓﺰﺍﺭ۴٫۰(
!ﻧﺴﻞ۲iPod touchﻟﻤﺴﯽ)ﻧﺴﺨﻪﻧﺮﻡﺍﻓﺰﺍﺭ۴٫۰(
!ﻧﺴﻞ۱iPod touchﻟﻤﺴﯽ)ﻧﺴﺨﻪﻧﺮﻡﺍﻓﺰﺍﺭ۳٫۱٫۳(
!iPod classic ۱۶۰ﮔﯿﮕﺎﺑﺎﯾﺖ)ﻧﺴﺨﻪﻧﺮﻡﺍﻓﺰﺍﺭ۲٫۰٫۴(
!iPodﮐﻼﺳﯿﮏ۱۲۰ﮔﯿﮕﺎﺑﺎﯾﺖ)ﻧﺴﺨﻪﻧﺮﻡﺍﻓﺰﺍﺭ۲٫۰٫۱(
!iPodﮐﻼﺳﯿﮏ)ﻧﺴﺨﻪﻧﺮﻡﺍﻓﺰﺍﺭ۱٫۱٫۲(
!ﻧﺴﻞ۵iPod)ﻧﺴﺨﻪﻧﺮﻡﺍﻓﺰﺍﺭ۱٫۳(
ﺑﺴﺘﻪﺑﻪﻧﺴﻞﯾﺎﻧﺴﺨﻪiPod،ﻣﻤﮑﻦﺍﺳﺖﺑﺮﺧﯽﺍﺯﻋﻤﻠﮑﺮﺩﻫﺎﻗﺎﺑﻞ
ﺩﺳﺘﺮﺳﯽﻧﺒﺎﺷﻨﺪ.
ﺑﺴﺘﻪﺑﻪﻧﺴﺨﻪﻧﺮﻡﺍﻓﺰﺍﺭiPodﻣﻤﮑﻦﺍﺳﺖﻋﻤﻠﮑﺮﺩﻫﺎﻣﺘﻔﺎﻭﺕﺑﺎﺷﻨﺪ.
ﻫﻨﮕﺎﻡﺍﺳﺘﻔﺎﺩﻩﺍﺯiPod،ﻻﺯﻡﺍﺳﺖﮐﻪﺭﺍﺑﻂﺻﻔﺤﻪiPodﺭﺍﺑﻪﺳﯿﻢ
USBﻣﺘﺼﻞﮐﻨﯿﺪ.
ﺳﯿﻢﺭﺍﺑﻂPioneerCD-IU50ﻧﯿﺰﻣﻮﺟﻮﺩﺍﺳﺖ.ﺑﺮﺍﯼﺍﻃﻼﻉﺍﺯ
ﺟﺰﺋﯿﺎﺕﺑﺎﻓﺮﻭﺷﻨﺪﻩﺧﻮﺩﺗﻤﺎﺱﺑﮕﯿﺮﯾﺪ.
ﺑﺮﺍﯼﺍﻃﻼﻉﺍﺯﺳﺎﺯﮔﺎﺭﯼﻓﺎﯾﻞﺑﻪﺩﻓﺘﺮﭼﻪﺭﺍﻫﻨﻤﺎﻫﺎﯼiPodﻣﺮﺍﺟﻌﻪ
ﮐﻨﯿﺪ.
ﮐﺘﺎﺑﭽﻪﺻﻮﺗﯽ،ﭘﺎﺩﮐﺴﺖ:ﺳﺎﺯﮔﺎﺭ
ﺍﺣﺘﯿﺎﻁ
PioneerﺩﺭﻗﺒﺎﻝﺍﺯﺑﯿﻦﺭﻓﺘﻦﺩﺍﺩﻩﻫﺎﯼﻣﻮﺟﻮﺩﺩﺭiPodﻫﯿﭻ
ﻣﺴﺌﻮﻟﯿﺘﯽﻧﺨﻮﺍﻫﺪﺩﺍﺷﺖ،ﺣﺘﯽﺍﮔﺮﺍﯾﻦﺍﻣﺮﺩﺭﺣﯿﻦﺍﺳﺘﻔﺎﺩﻩﺍﺯ
ﺩﺳﺘﮕﺎﻩﺭﺥﺩﻫﺪ.
ﻓﺎﻳﻞﻫﺎﯼﻗﺎﺑﻞﭘﺨﺶ:ﺣﺪﺍﮐﺜﺮﺗﺎ15,000
ﭘﺨﺶﻓﺎﯾﻞﻫﺎﯼﻣﺤﺎﻓﻈﺖﺷﺪﻩﺑﺎﺣﻖﻧﺴﺨﻪﺑﺮﺩﺍﺭﯼ:ﺳﺎﺯﮔﺎﺭﻧﯿﺴﺖ
ﺩﺳﺘﮕﺎﻩﺫﺧﯿﺮﻩﺳﺎﺯﯼﺧﺎﺭﺟﯽﭘﺎﺭﺗﯿﺸﻦﺑﻨﺪﯼﺷﺪﻩ)USB ،SD(:ﻓﻘﻂ
ﭘﺎﺭﺗﯿﺸﻦﻗﺎﺑﻞﭘﺨﺶﺍﻭﻝﭘﺨﺶﻣﯽﺷﻮﺩ.
ﻣﻤﮑﻦﺍﺳﺖﻫﻨﮕﺎﻡﺷﺮﻭﻉﺑﻪﭘﺨﺶﻓﺎﯾﻞﻫﺎﺹﺻﻮﺗﯽﻣﻮﺟﻮﺩﺩﺭ
ﺩﺳﺘﮕﺎﻩﺫﺧﯿﺮﻩﺳﺎﺯﯼUSBﺑﺎﺗﻌﺪﺍﺩﺯﯾﺎﺩﯼﻣﺠﻤﻮﻋﻪﭘﻮﺷﻪ،ﮐﻤﯽ
ﺗﺄﺧﯿﺮﻭﺟﻮﺩﺩﺍﺷﺘﻪﺑﺎﺷﺪ.
Apple Lossless:ﺳﺎﺯﮔﺎﺭﻧﯿﺴﺖ
ﮐﺎﺭﺕﺣﺎﻓﻈﻪSD
ﺳﺎﺯﮔﺎﺭﯼﺑﺎﮐﺎﺭﺕﻫﺎﯼﭼﻨﺪﺭﺳﺎﻧﻪﺍﯼ)MMC(ﻭﺟﻮﺩﻧﺪﺍﺭﺩ.
ﺳﺎﺯﮔﺎﺭﯼﺑﺎﺗﻤﺎﻡﮐﺎﺭﺕﻫﺎﯼﺣﺎﻓﻈﻪSDﺗﻀﻤﯿﻦﻧﻤﯽﺷﻮﺩ.
ﺍﯾﻦﺩﺳﺘﮕﺎﻩﺑﺎSD-Audioﺳﺎﺯﮔﺎﺭﻧﯿﺴﺖ.
ﺍﺣﺘﯿﺎﻁ
Pioneerﺩﺭﻗﺒﺎﻝﺍﺯﺑﯿﻦﺭﻓﺘﻦﺩﺍﺩﻩﻫﺎﯼﻣﻮﺟﻮﺩﺩﺭﺣﺎﻓﻈﻪ
USB/ﭘﺨﺶﮐﻨﻨﺪﻩﺻﺪﺍﯼﻗﺎﺑﻞﺣﻤﻞUSB/ﮐﺎﺭﺕﺣﺎﻓﻈﻪSD/
ﮐﺎﺭﺕﺣﺎﻓﻈﻪSDHCﻣﺴﺌﻮﻟﯿﺘﯽﻧﺨﻮﺍﻫﺪﺩﺍﺷﺖ،ﺣﺘﯽﺍﮔﺮﺍﺯﺑﯿﻦ
ﺭﻓﺘﻦﺩﺍﺩﻩﻫﺎﺩﺭﺣﯿﻦﺍﺳﺘﻔﺎﺩﻩﺍﺯﺩﺳﺘﮕﺎﻩﺭﺥﺩﺍﺩﻩﺑﺎﺷﺪ.
VBR
.m4p(:ﺳﺎﺯﮔﺎﺭﻧﯿﺴﺖ
ﻓﺮﮐﺎﻧﺲﻧﻤﻮﻧﻪ:۰۲۵/۱۱ﮐﻴﻠﻮﻫﺮﺗﺰﺗﺎ۴۸ﮐﻴﻠﻮﻫﺮﺗﺰ
ﺳﺮﻋﺖﺍﻧﺘﻘﺎﻝ:۱۶ﮐﻴﻠﻮﺑﻴﺖﺑﺮﺛﺎﻧﻴﻪﺗﺎ۳۲۰ﮐﻴﻠﻮﺑﻴﺖﺑﺮﺛﺎﻧﻴﻪ،
ﻓﺎﯾﻞAACﺧﺮﯾﺪﺍﺭﯼﺷﺪﻩﺩﺭﻓﺮﻭﺷﮕﺎﻩiTunes)ﭘﺴﻮﻧﺪﻓﺎﯾﻞ
ﺍﻃﻼﻋﺎﺕﺗﮑﻤﻴﻠﯽ
ﻓﻘﻂ۳۲ﻧﻮﯾﺴﻪﺍﺑﺘﺪﺍﻳﯽﺍﺯﻧﺎﻡﻓﺎﻳﻞ)ﺷﺎﻣﻞﭘﺴﻮﻧﺪﻓﺎﻳﻞ(ﻳﺎﭘﻮﺷﻪﻗﺎﺑﻞ
ﻧﻤﺎﻳﺶﺍﺳﺖ.
ﺑﺴﺘﻪﺑﻪﺑﺮﻧﺎﻣﻪﻣﻮﺭﺩﺍﺳﺘﻔﺎﺩﻩﺩﺭﺭﻣﺰﮔﺬﺍﺭﯼﻓﺎﯾﻞﻫﺎﯼWMAﻣﻤﮑﻦ
ﺍﺳﺖﺍﯾﻦﺩﺳﺘﮕﺎﻩﺑﺪﺭﺳﺘﯽﮐﺎﺭﻧﮑﻨﺪ.
ﻣﻤﮑﻦﺍﺳﺖﻫﻨﮕﺎﻡﺷﺮﻭﻉﭘﺨﺶﻓﺎﯾﻞﻫﺎﯼﺻﻮﺗﯽﻣﻮﺟﻮﺩﺑﻬﻤﺮﺍﻩﺩﺍﺩﻩ
ﻫﺎﯼﺗﺼﻮﯾﺮﯼ،ﮐﻤﯽﺗﺄﺧﯿﺮﻭﺟﻮﺩﺩﺍﺷﺘﻪﺑﺎﺷﺪ.
ﺩﻳﺴﮏ
ﺳﻠﺴﻠﻪﻣﺮﺍﺗﺐﭘﻮﺷﻪﻗﺎﺑﻞﭘﺨﺶ:ﺣﺪﺍﮐﺜﺮﺗﺎﻫﺸﺖﺭﺩﻩ)ﺳﻠﺴﻠﻪﻣﺮﺍﺗﺐ
ﻋﻤﻼًﮐﻤﺘﺮﺍﺯﺩﻭﺭﺩﻩﺍﺳﺖ.(
ﭘﻮﺷﻪﻫﺎﯼﻗﺎﺑﻞﭘﺨﺶ:ﺣﺪﺍﮐﺜﺮﺗﺎ99
ﻓﺎﻳﻞﻫﺎﯼﻗﺎﺑﻞﭘﺨﺶ:ﺣﺪﺍﮐﺜﺮﺗﺎ999
ﺳﻴﺴﺘﻢﻓﺎﻳﻞ:ISO 9660ﺳﻄﺢ1ﻭ2،Romeo ،Joliet
ﭘﺨﺶﭼﻨﺪﺟﻠﺴﻪﺍﯼ:ﺳﺎﺯﮔﺎﺭ
ﺍﻧﺘﻘﺎﻝﺩﺍﺩﻩﻣﺘﻦﺑﺴﺘﻪﺍﯼ:ﺳﺎﺯﮔﺎﺭﻧﯿﺴﺖ
ﺑﺪﻭﻥﺩﺭﻧﻈﺮﮔﺮﻓﺘﻦﻃﻮﻝﺑﺨﺶﺧﺎﻟﯽﺑﯿﻦﺁﻫﻨﮓﻫﺎﺩﺭﻫﻨﮕﺎﻡﺿﺒﻂ
ﺍﻭﻟﯿﻪ،ﺩﯾﺴﮏﻫﺎﯼﺻﻮﺗﯽﻓﺸﺮﺩﻩﺑﺎﯾﮏﻭﻗﻔﻪﮐﻮﺗﺎﻩﺑﯿﻦﺁﻫﻨﮓﻫﺎﭘﺨﺶ
ﻣﯽﺷﻮﺩ.
ﺩﺳﺘﮕﺎﻩﺫﺧﯿﺮﻩﺳﺎﺯﯼﺧﺎﺭﺟﯽ)USB
،SD(
ﺳﻠﺴﻠﻪﻣﺮﺍﺗﺐﭘﻮﺷﻪﻗﺎﺑﻞﭘﺨﺶ:ﺣﺪﺍﮐﺜﺮﺗﺎﻫﺸﺖﺭﺩﻩ)ﺳﻠﺴﻠﻪﻣﺮﺍﺗﺐ
ﻋﻤﻼًﮐﻤﺘﺮﺍﺯﺩﻭﺭﺩﻩﺍﺳﺖ.(
ﭘﻮﺷﻪﻫﺎﯼﻗﺎﺑﻞﭘﺨﺶ:ﺣﺪﺍﮐﺜﺮﺗﺎ1,500
Page 77

ﺿﻤﻴﻤﻪ
ﺍﻃﻼﻋﺎﺕﺑﯿﺸﺘﺮ
ﺍﻃﻼﻋﺎﺕﺑﯿﺸﺘﺮ
WMA
،۴۸ﮐﻴﻠﻮﺑﻴﺖﺑﺮﺛﺎﻧﻴﻪﺗﺎ۳۸۴ﮐﻴﻠﻮﺑﻴﺖﺑﺮﺛﺎﻧﻴﻪ)VBR(
Windows Media Audio Professional ،Lossless
،Voice/DRM Stream/Streamﻫﻤﺮﺍﻩﺑﺎﻓﯿﻠﻢ:ﺳﺎﺯﮔﺎﺭﻧﯿﺴﺖ
MP3
،VBR
MP3i (MP3ﺗﻌﺎﻣﻠﯽ(،mp3 PRO:ﺳﺎﺯﮔﺎﺭﻧﯿﺴﺖ
WAV
AAC
SDﺧﻮﺩﺩﺍﺭﯼﮐﻨﯿﺪ.ﺍﮔﺮﺟﺴﻤﯽﻓﻠﺰﯼ)ﻣﺎﻧﻨﺪﺳﮑﻪ(ﺩﺭﻭﻥﺷﮑﺎﻑﻗﺮﺍﺭ
iPod
iPodﺑﻪﺍﯾﻦﺩﺳﺘﮕﺎﻩﻣﺘﺼﻞﮐﻨﯿﺪ.
ﮐﺎﺭﺕﺣﺎﻓﻈﻪSD
ﺍﯾﻦﺩﺳﺘﮕﺎﻩﻓﻘﻂﺍﻧﻮﺍﻉﮐﺎﺭﺕﻫﺎﯼSDﺯﯾﺮﺭﺍﭘﺸﺘﯿﺒﺎﻧﯽﻣﯽﮐﻨﺪ.
!SD
!miniSD
!microSD
!SDHC
ﮐﺎﺭﺕﺣﺎﻓﻈﻪSDﺭﺍﺩﻭﺭﺍﺯﺩﺳﺘﺮﺱﮐﻮﺩﮐﺎﻥﻗﺮﺍﺭﺩﻫﯿﺪ.ﺩﺭﺻﻮﺭﺕ
ﺑﻠﻌﯿﺪﻩﺷﺪﻥﮐﺎﺭﺕﺣﺎﻓﻈﻪSD،ﻓﻮﺭﺍًﺑﻪﭘﺰﺷﮏﻣﺮﺍﺟﻌﻪﮐﻨﯿﺪ.
ﺍﺯﻟﻤﺲﮐﺮﺩﻥﺭﺍﺑﻂﻫﺎﯼﮐﺎﺭﺕSDﺑﻄﻮﺭﻣﺴﺘﻘﯿﻢﺑﺎﺍﻧﮕﺸﺘﺎﻥﯾﺎ
ﻫﺮﮔﻮﻧﻪﺩﺳﺘﮕﺎﻩﻓﻠﺰﯼﺧﻮﺩﺩﺍﺭﯼﮐﻨﯿﺪ.
ﺍﺯﻗﺮﺍﺭﺩﺍﺩﻥﻫﺮﺟﺴﻤﯽﺑﺠﺰﮐﺎﺭﺕﺣﺎﻓﻈﻪSDﺩﺭﻭﻥﺷﮑﺎﻑﮐﺎﺭﺕ
ﺩﺍﺩﻩﺷﻮﺩ،ﻣﻤﮑﻦﺍﺳﺖﻣﺪﺍﺭﻫﺎﯼﺩﺍﺧﻠﯽﺷﮑﺴﺘﻪﺷﺪﻩﻭﺩﺭﻋﻤﻠﮑﺮﺩ
ﺩﺳﺘﮕﺎﻩﻧﻘﺺﺍﯾﺠﺎﺩﺷﻮﺩ.
ﻫﻨﮕﺎﻡﻗﺮﺍﺭﺩﺍﺩﻥminiSDﯾﺎmicroSD،ﺍﺯﺁﺩﺍﭘﺘﻮﺭﺍﺳﺘﻔﺎﺩﻩﮐﻨﯿﺪ.
ﺍﺯﺁﺩﺍﭘﺘﻮﺭﯼﮐﻪﺑﺠﺰﺭﺍﺑﻂﻫﺎﺩﺍﺭﺍﯼﺑﺨﺶﻫﺎﯼﻓﻠﺰﯼﻧﯿﺰﻫﺴﺖ
ﺧﻮﺩﺩﺍﺭﯼﮐﻨﯿﺪ.
ﺍﺯﻗﺮﺍﺭﺩﺍﺩﻥﮐﺎﺭﺕﺣﺎﻓﻈﻪSDﺁﺳﯿﺐﺩﯾﺪﻩ)ﻣﺎﻧﻨﺪﭘﯿﭽﯿﺪﮔﯽﯾﺎﮐﻨﺪﻩ
ﺷﺪﻥﺑﺮﭼﺴﺐ(ﺩﺭﻭﻥﺩﺳﺘﮕﺎﻩﺧﻮﺩﺩﺍﺭﯼﮐﻨﯿﺪﺯﯾﺮﺍﻣﻤﮑﻦﺍﺳﺖﺍﺯ
ﺷﮑﺎﻑﺧﺎﺭﺝﻧﺸﻮﺩ.
ﺳﻌﯽﻧﮑﻨﻴﺪﮐﺎﺭﺕﺣﺎﻓﻈﻪSDﺭﺍﺑﺎﻓﺸﺎﺭﺑﻪﺩﺭﻭﻥﺷﮑﺎﻑﮐﺎﺭﺕSD
ﻭﺍﺭﺩﮐﻨﻴﺪ،ﺯﯾﺮﺍﻣﻤﮑﻦﺍﺳﺖﺑﻪﮐﺎﺭﺕﯾﺎﺍﯾﻦﺩﺳﺘﮕﺎﻩﺁﺳﯿﺐﻭﺍﺭﺩﺷﻮﺩ.
ﻫﻨﮕﺎﻡﺑﯿﺮﻭﻥﺁﻭﺭﺩﻥﮐﺎﺭﺕﺣﺎﻓﻈﻪSD،ﺁﻥﺭﺍﻓﺸﺎﺭﺩﺍﺩﻩﻭﺗﺎﺯﻣﺎﻥ
ﺷﻨﻴﺪﻩﺷﺪﻩﺻﺪﺍﯼﮐﻠﻴﮏ،ﻧﮕﻪﺩﺍﺭﯾﺪ.ﺑﺮﺩﺍﺷﺘﻦﻓﻮﺭﯼﺍﻧﮕﺸﺖﺑﻼﻓﺎﺻﻠﻪ
ﭘﺲﺍﺯﻓﺸﺮﺩﻥﮐﺎﺭﺕﻣﻤﮑﻦﺍﺳﺖﺧﻄﺮﻧﺎﮎﺑﺎﺷﺪﺯﯾﺮﺍﻣﻤﮑﻦﺍﺳﺖ
ﮐﺎﺭﺕﺍﺯﺷﮑﺎﻑﺑﻪﺑﯿﺮﻭﻥﭘﺮﺗﺎﺏﺷﻮﺩ،ﺑﻪﺻﻮﺭﺕﺷﻤﺎﺑﺮﺧﻮﺭﺩﮐﻨﺪﻭ
ﯾﺎﺍﺗﻔﺎﻕﺩﯾﮕﺮﯼﺭﺥﺩﻫﺪ.ﺩﺭﺻﻮﺭﺕﭘﺮﺗﺎﺏﺷﺪﻥﮐﺎﺭﺕﺑﻪﺑﯿﺮﻭﻥﺍﺯ
ﺷﮑﺎﻑ،ﻣﻤﮑﻦﺍﺳﺖﮐﺎﺭﺕﮔﻢﺷﻮﺩ.
ﺑﺮﺍﯼﺍﻃﻤﯿﻨﺎﻥﺍﺯﻋﻤﻠﮑﺮﺩﺻﺤﯿﺢﺩﺳﺘﮕﺎﻩ،ﺳﯿﻢﺭﺍﺑﻂﺭﺍﻣﺴﺘﻘﯿﻤﺎًﺍﺯ
ﻫﻨﮕﺎﻡﺭﺍﻧﻨﺪﮔﯽiPodﺭﺍﻣﺤﮑﻢﮐﻨﯿﺪ.ﺍﺯﺍﻓﺘﺎﺩﻥiPodﺑﺮﺭﻭﯼﺯﻣﯿﻦ
ﻭﮔﯿﺮﮐﺮﺩﻥﺯﯾﺮﭘﺪﺍﻝﺗﺮﻣﺰﯾﺎﮔﺎﺯﺧﻮﺩﺩﺍﺭﯼﮐﻨﯿﺪ.
ﭘﺨﺶﺩﯾﺴﮏﻫﺎﺑﻪﺩﻟﯿﻞﻣﺸﺨﺼﺎﺕﺩﯾﺴﮏ،ﻓﺮﻣﺖﺩﯾﺴﮏ،ﺑﺮﻧﺎﻣﻪ
ﺿﺒﻂﺷﺪﻩ،ﻣﺤﯿﻂﭘﺨﺶ،ﺷﺮﺍﯾﻂﺫﺧﯿﺮﻩﺳﺎﺯﯼﻭﺩﯾﮕﺮﻣﻮﺍﺭﺩﻣﻤﮑﻦ
ﺍﺳﺖﺍﻣﮑﺎﻥﭘﺬﯾﺮﻧﺒﺎﺷﺪ.
ﺗﮑﺎﻥﻫﺎﯼﺣﺎﺻﻞﺍﺯﺣﺮﮐﺖﺩﺭﻣﺴﯿﺮﻣﯽﺗﻮﺍﻧﺪﭘﺨﺶﺩﯾﺴﮏﺭﺍ
ﻣﺘﻮﻗﻒﮐﻨﺪ.
ﺩﺳﺘﮕﺎﻩﺫﺧﯿﺮﻩﺳﺎﺯﯼﺧﺎﺭﺟﯽ)USB
،SD(
ﺳﻮﺍﻻﺕﺧﻮﺩﺭﺍﺩﺭﺯﻣﻴﻨﻪﺩﺳﺘﮕﺎﻩﺫﺧﻴﺮﻩﺳﺎﺯﯼﺧﺎﺭﺟﯽ)USB،
SD(ﺑﺎﺗﻮﻟﻴﺪﮐﻨﻨﺪﻩﺍﻳﻦﺩﺳﺘﮕﺎﻩﻣﻄﺮﺡﮐﻨﻴﺪ.
ﺍﺯﻗﺮﺍﺭﺩﺍﺩﻥﺩﺳﺘﮕﺎﻩﺫﺧﯿﺮﻩﺳﺎﺯﯼﺧﺎﺭﺟﯽ)USB ،SD(ﺩﺭﻣﮑﺎﻥ
ﻫﺎﯾﯽﺑﺎﺩﺭﺟﻪﺣﺮﺍﺭﺕﺯﯾﺎﺩﺧﻮﺩﺩﺍﺭﯼﮐﻨﯿﺪ.
ﺑﺴﺘﻪﺑﻪﺩﺳﺘﮕﺎﻩﺫﺧﯿﺮﻩﺳﺎﺯﯼﺧﺎﺭﺟﯽ)USB ،SD(،ﻣﺸﮑﻼﺕﺯﯾﺮ
ﻣﻤﮑﻦﺍﺳﺖﺭﺥﺩﻫﺪ.
!ﻋﻤﻠﮑﺮﺩﻫﺎﻣﻤﮑﻦﺍﺳﺖﻣﺘﻔﺎﻭﺕﺑﺎﺷﻨﺪ.
!ﻣﻤﮑﻦﺍﺳﺖﺩﺳﺘﮕﺎﻩﺫﺧﯿﺮﻩﺳﺎﺯﯼﺷﻨﺎﺳﺎﯾﯽﻧﺸﻮﺩ.
!ﻣﻤﮑﻦﺍﺳﺖﻓﺎﯾﻞﻫﺎﺑﻪﺩﺭﺳﺘﯽﭘﺨﺶﻧﺸﻮﻧﺪ.
ﺩﺳﺘﮕﺎﻩﺫﺧﯿﺮﻩﺳﺎﺯﯼUSB
ﻓﺎﺭﺳﯽ
ﺍﺗﺼﺎﻝﺍﺯﻃﺮﻳﻖﻫﺎﺏUSBﭘﺸﺘﻴﺒﺎﻧﯽﻧﻤﯽﺷﻮﺩ.
ﺍﺯﺍﺗﺼﺎﻝﻫﺮﮔﻮﻧﻪﺩﺳﺘﮕﺎﻩﺫﺧﯿﺮﻩﺳﺎﺯﯼﺑﺠﺰﺩﺳﺘﮕﺎﻩﺫﺧﯿﺮﻩﺳﺎﺯﯼ
USBﺧﻮﺩﺩﺍﺭﯼﮐﻨﯿﺪ.
ﻫﻨﮕﺎﻡﺭﺍﻧﻨﺪﮔﯽ،ﺩﺳﺘﮕﺎﻩﺫﺧﯿﺮﻩﺳﺎﺯﯼUSBﺭﺍﻣﺤﮑﻢﮐﻨﯿﺪ.ﺍﺯﺍﻓﺘﺎﺩﻥ
ﺩﺳﺘﮕﺎﻩﺫﺧﯿﺮﻩﺳﺎﺯﯼUSBﺑﺮﺭﻭﯼﺯﻣﯿﻦﻭﮔﯿﺮﮐﺮﺩﻥﺯﯾﺮﭘﺪﺍﻝ
ﺗﺮﻣﺰﯾﺎﮔﺎﺯﺧﻮﺩﺩﺍﺭﯼﮐﻨﯿﺪ.
ﺑﺴﺘﻪﺑﻪﺩﺳﺘﮕﺎﻩﺫﺧﻴﺮﻩUSB،ﻣﺸﮑﻼﺕﺯﻳﺮﻣﻤﮑﻦﺍﺳﺖﺑﺮﻭﺯﮐﻨﺪ.
!ﺍﻳﻦﺩﺳﺘﮕﺎﻩﻣﻤﮑﻦﺍﺳﺖﺑﺎﻋﺚﺍﻳﺠﺎﺩﻧﻮﻳﺰﺩﺭﺭﺍﺩﻳﻮﺷﻮﺩ.
ﺳﺎﺯﮔﺎﺭﯼﺑﺎﺻﺪﺍﯼﻓﺸﺮﺩﻩ
)ﺩﯾﺴﮏ،USB ،SD(
ﭘﺴﻮﻧﺪﻓﺎﻳﻞ:.wma
ﺳﺮﻋﺖﺑﯿﺖ:۴۸ﮐﻴﻠﻮﺑﻴﺖﺑﺮﺛﺎﻧﻴﻪﺗﺎ۳۲۰ﮐﻴﻠﻮﺑﻴﺖﺑﺮﺛﺎﻧﻴﻪ)CBR(
ﻓﺮﮐﺎﻧﺲﻧﻤﻮﻧﻪ:۳۲ﮐﻴﻠﻮﻫﺮﺗﺰ،۱/۴۴ﮐﻴﻠﻮﻫﺮﺗﺰ،۴۸ﮐﻴﻠﻮﻫﺮﺗﺰ
ﺩﺭﺑﺎﺭﻩﺗﻨﻈﯿﻤﺎﺕiPod
!ﻫﻨﮕﺎﻡﺍﺗﺼﺎﻝiPod،ﺍﯾﻦﺩﺳﺘﮕﺎﻩﺗﻨﻈﯿﻤﺎﺕﺍﮐﻮﻻﯾﺰﺭﺭﺍﺩﺭﺍﺭﺗﺒﺎﻁ
ﺑﺎiPodﺗﻐﯿﯿﺮﻣﯽﺩﻫﺪﻭﺧﺎﻣﻮﺵﻣﯽﮐﻨﺪﺗﺎﺍﺯﺍﯾﻦﺭﻭﺻﺪﺍﺭﺍ
ﺑﻬﺒﻮﺩﺑﺨﺸﺪ.ﻫﻨﮕﺎﻡﺟﺪﺍﮐﺮﺩﻥiPod،ﺍﮐﻮﻻﯾﺰﺭﺑﻪﺗﻨﻈﯿﻤﺎﺕﺍﻭﻟﯿﻪ
ﺧﻮﺩﺑﺎﺯﻣﯽﮔﺮﺩﺩ.
!ﻫﻨﮕﺎﻡﺍﺳﺘﻔﺎﺩﻩﺍﺯﺍﯾﻦﺩﺳﺘﮕﺎﻩﻧﻤﯽﺗﻮﺍﻧﯿﺪﺣﺎﻟﺖRepeat)ﺗﮑﺮﺍﺭ(
ﺭﺍﺩﺭiPodﺭﻭﯼﺧﺎﻣﻮﺵﺗﻨﻈﯿﻢﮐﻨﯿﺪ.ﺑﺎﺍﺗﺼﺎﻝiPodﺑﻪﺍﯾﻦ
ﺩﺳﺘﮕﺎﻩ،ﺗﮑﺮﺍﺭﺑﻄﻮﺭﺧﻮﺩﮐﺎﺭﺑﻪﺣﺎﻟﺖAll)ﻫﻤﻪﻣﻮﺍﺭﺩ(ﺗﻐﯿﯿﺮ
ﻣﯿﺎﺑﺪ.
ﻣﺘﻦﻧﺎﺳﺎﺯﮔﺎﺭﺫﺧﯿﺮﻩﺷﺪﻩﺑﺮﺭﻭﯼiPodﺗﻮﺳﻂﺍﯾﻦﺩﺳﺘﮕﺎﻩﻧﻤﺎﯾﺶ
ﺩﺍﺩﻩﻧﻤﯽﺷﻮﺩ.
DualDisc)ﺩﯾﺴﮏﻫﺎﯼﺩﻭﺗﺎﯾﯽ(
ﺩﯾﺴﮏﻫﺎﯼﺩﻭﺗﺎﯾﯽﺑﻪﺩﯾﺴﮏﻫﺎﯾﯽﮔﻔﺘﻪﻣﯽﺷﻮﺩﮐﻪﺩﺍﺭﺍﯼﯾﮏﺳﯽ
ﭘﺴﻮﻧﺪﻓﺎﻳﻞ:.mp3
ﺳﺮﻋﺖﺑﯿﺖ:۸ﮐﯿﻠﻮﺑﯿﺖﺩﺭﺛﺎﻧﯿﻪﺗﺎ۳۲۰ﮐﯿﻠﻮﺑﯿﺖﺩﺭﺛﺎﻧﯿﻪ)CBR)
ﻓﺮﮐﺎﻧﺲﻧﻤﻮﻧﻪ:۸ﮐﯿﻠﻮﻫﺮﺗﺰﺗﺎ۴۸ﮐﯿﻠﻮﻫﺮﺗﺰ)۳۲،۱/۴۴،۴۸
ﮐﯿﻠﻮﻫﺮﺗﺰﺑﺮﺍﯼﺗﺄﮐﯿﺪ(
ﻧﺴﺨﻪﺑﺮﭼﺴﺐID3ﺳﺎﺯﮔﺎﺭ:1.0،1.1،2.2،2.3،2.4)ﻧﺴﺨﻪ2.
xﺑﺮﭼﺴﺐID3ﺑﺮﻧﺴﺨﻪ1.xﺍﻭﻟﻮﻳﺖﺩﺍﺭﺩ(.
ﻟﯿﺴﺖﭘﺨﺶM3u:ﺳﺎﺯﮔﺎﺭﻧﯿﺴﺖ
ﭘﺴﻮﻧﺪﻓﺎﻳﻞ:.wav
ﺑﻴﺖﻫﺎﯼﮐﻤﯽﺳﺎﺯﯼ:۸ﻭ۱۶)LPCM)،۴(MS ADPCM(
ﻓﺮﮐﺎﻧﺲﻧﻤﻮﻧﻪ:۱۶ﮐﻴﻠﻮﻫﺮﺗﺰﺗﺎ۴۸ﮐﻴﻠﻮﻫﺮﺗﺰ)LPCM)،۰۵/۲۲
ﮐﻴﻠﻮﻫﺮﺗﺰﻭ۱/۴۴ﮐﻴﻠﻮﻫﺮﺗﺰ)MS ADPCM(
ﻓﺮﻣﺖﺳﺎﺯﮔﺎﺭ:AACﺭﻣﺰﮔﺬﺍﺭﯼﺷﺪﻩﺑﺎiTunes
ﭘﺴﻮﻧﺪﻓﺎﻳﻞ:.m4a
ﺩﯼﻗﺎﺑﻞﺿﺒﻂﺑﺮﺍﯼﺻﺪﺍﺑﺮﺭﻭﯼﯾﮏﻃﺮﻑﻭﯾﮏDVDﻗﺎﺑﻞ
ﺿﺒﻂﺑﺮﺍﯼﻓﯿﻠﻢﺩﺭﻃﺮﻑﺩﯾﮕﺮﺁﻥﻫﺴﺘﻨﺪ.
ﺑﻪﺩﻟﻴﻞﺍﻳﻨﮑﻪﺳﻤﺖﺳﯽﺩﯼﻣﺮﺑﻮﻁﺑﻪDualDiscﻫﺎﺍﺯﻧﻈﺮ
ﻓﻴﺰﻳﮑﯽﺑﺎﺍﺳﺘﺎﻧﺪﺍﺭﺩﻋﻤﻮﻣﯽﺳﯽﺩﯼﺳﺎﺯﮔﺎﺭﻧﻴﺴﺖ،ﺷﺎﻳﺪﺍﻣﮑﺎﻥﭘﺨﺶ
ﺳﻤﺖﺳﯽﺩﯼﺑﺎﺍﻳﻦﺩﺳﺘﮕﺎﻩﻭﺟﻮﺩﻧﺪﺍﺷﺘﻪﺑﺎﺷﺪ.
ﻗﺮﺍﺭﺩﺍﺩﻥﻭﺑﯿﺮﻭﻥﺁﻭﺭﺩﻥDualDiscﺑﻪﺩﻓﻌﺎﺕﺑﺴﯿﺎﺭﺯﯾﺎﺩﺳﺒﺐ
ﺍﯾﺠﺎﺩﺧﺮﺍﺵﺑﺮﺭﻭﯼﺩﯾﺴﮏﻣﯽﺷﻮﺩ.ﺧﺮﺍﺵﻫﺎﯼﻋﻤﯿﻖﻭﺟﺪﯼﺳﺒﺐ
ﺑﺮﻭﺯﻣﺸﮑﻞﺩﺭﭘﺨﺶﺩﺭﺍﯾﻦﺩﺳﺘﮕﺎﻩﻣﯽﺷﻮﺩ.ﺩﺭﺑﺮﺧﯽﺷﺮﺍﯾﻂ
ﻣﻤﮑﻦﺍﺳﺖDualDiscﺩﺭﺷﮑﺎﻑﻗﺮﺍﺭﺩﺍﺩﻥﺩﯾﺴﮏﺩﺭﻭﻥﺩﺳﺘﮕﺎﻩ
ﮔﯿﺮﮐﻨﺪﻭﺧﺎﺭﺝﻧﺸﻮﺩ.ﺑﺮﺍﯼﺟﻠﻮﮔﯿﺮﯼﺍﺯﺑﺮﻭﺯﺍﯾﻦﺍﻣﺮ،ﺗﻮﺻﯿﻪﻣﯽ
ﮐﻨﯿﻢﮐﻪﺍﺯﺑﮑﺎﺭﺑﺮﺩﻥDualDiscﺩﺭﺍﯾﻦﺩﺳﺘﮕﺎﻩﺧﻮﺩﺩﺍﺭﯼﮐﻨﯿﺪ.
ﺑﺮﺍﯼﮐﺴﺐﺍﻃﻼﻋﺎﺕﺑﯿﺸﺘﺮﺩﺭﺑﺎﺭﻩDualDisc،ﺑﻪﺍﻃﻼﻋﺎﺕﺍﺭﺍﺋﻪ
ﺷﺪﻩﺗﻮﺳﻂﺳﺎﺯﻧﺪﻩﺩﯾﺴﮏﻣﺮﺍﺟﻌﻪﮐﻨﯿﺪ.
ﺍﺣﺘﯿﺎﻁ
ﺍﺯﻗﺮﺍﺭﺩﺍﺩﻥﺩﯾﺴﮏ/ﺩﺳﺘﮕﺎﻩﺫﺧﯿﺮﻩﺳﺎﺯﯼﺧﺎﺭﺟﯽ)USB ،SD(
ﯾﺎiPodﺩﺭﻣﮑﺎﻥﻫﺎﯾﯽﺑﺎﺩﺭﺟﻪﺣﺮﺍﺭﺕﺯﯾﺎﺩﺧﻮﺩﺩﺍﺭﯼﮐﻨﯿﺪ.
۲۸
Fa
Page 78

ﺿﻤﻴﻤﻪ
ﺍﻃﻼﻋﺎﺕﺑﯿﺸﺘﺮ
ﺍﻃﻼﻋﺎﺕﺑﯿﺸﺘﺮ
NO DEVICEﺩﺭﻫﻨﮕﺎﻡﺧﺎﻣﻮﺵ
FORMAT
NO AUDIOﻫﯿﭻﺻﺪﺍﯾﯽﭘﺨﺶﻧﻤﯽ
SKIPPEDﺩﺳﺘﮕﺎﻩﺫﺧﻴﺮﻩﺳﺎﺯﯼ
PROTECTﺗﻤﺎﻡﻓﺎﻳﻞﻫﺎﯼﺩﺭﻭﻥ
ﺩﺳﺘﮕﺎﻩﺫﺧﯿﺮﻩﺳﺎﺯﯼﺧﺎﺭﺟﯽ)USB ،SD)/iPod
ﭘﻴﺎﻡﻋﻠﺖﺍﻗﺪﺍﻡﻻﺯﻡ
READ
ﺍﺳﺘﻔﺎﺩﻩﺍﺯﺩﺳﺘﻮﺭﺍﻟﻌﻤﻞﻫﺎ
ﺩﻳﺴﮏﻫﺎﻭﭘﺨﺶﮐﻨﻨﺪﻩ
ﻓﻘﻂﺍﺯﺩﻳﺴﮏﻫﺎﻳﯽﺍﺳﺘﻔﺎﺩﻩﮐﻨﯿﺪﮐﻪﺩﺍﺭﺍﯼﻳﮑﯽﺍﺯﺩﻭﺁﺭﻡﺯﻳﺮﻫﺴﺘﻨﺪ.
ﺍﺯﺩﯾﺴﮏﻫﺎﯼ۱۲ﺳﺎﻧﺘﯽﻣﺘﺮﯼﺍﺳﺘﻔﺎﺩﻩﮐﻨﯿﺪ.ﺍﺯﺍﺳﺘﻔﺎﺩﻩﺍﺯﺩﯾﺴﮏ۸
ﺳﺎﻧﺘﯽﻣﺘﺮﯼﯾﺎﺁﺩﺍﭘﺘﻮﺭﻣﺨﺼﻮﺹﺩﯾﺴﮏ۸ﺳﺎﻧﺘﯽﻣﺘﺮﯼﺧﻮﺩﺩﺍﺭﯼ
ﮐﻨﯿﺪ.
ﻓﻘﻂﺍﺯﺩﯾﺴﮏﻫﺎﯼﻣﻌﻤﻮﻟﯽﻭﮐﺎﻣﻼًﺩﺍﯾﺮﻩﺍﯼﺷﮑﻞﺍﺳﺘﻔﺎﺩﻩﮐﻨﯿﺪ.ﺍﺯﺑﻪ
ﮐﺎﺭﺑﺮﺩﻥﺩﯾﺴﮏﻫﺎﯼﺷﮑﻞﺩﺍﺭﺧﻮﺩﺩﺍﺭﯼﮐﻨﯿﺪ.
ﻏﻴﺮﺍﺯﺳﯽﺩﯼ،ﭼﻴﺰﺩﻳﮕﺮﯼﺩﺭﺷﮑﺎﻑﺑﺎﺭﮔﺬﺍﺭﯼﺩﻳﺴﮏﻭﺍﺭﺩﻧﮑﻨﻴﺪ.
ﺍﺯﺑﻪﮐﺎﺭﺑﺮﺩﻥﺩﯾﺴﮏﻫﺎﯼﺩﺍﺭﺍﯼﺗﺮﮎﺧﻮﺭﺩﮔﯽ،ﺷﮑﺴﺘﮕﯽ،ﭘﯿﭻ
ﺧﻮﺭﺩﮔﯽﻭﺩﯾﮕﺮﻣﺸﮑﻼﺕﮐﻪﻣﻤﮑﻦﺍﺳﺖﺳﺒﺐﺁﺳﯿﺐﻭﺍﺭﺩﺁﻣﺪﻥﺑﻪ
ﭘﺨﺶﮐﻨﻨﺪﻩﺷﻮﺩﺧﻮﺩﺩﺍﺭﯼﮐﻨﯿﺪ.
ﭘﺨﺶﺩﯾﺴﮏCD-R/CD-RWﻧﻬﺎﯾﯽﻧﺸﺪﻩﺍﻣﮑﺎﻥﭘﺬﯾﺮﻧﯿﺴﺖ.
ﺍﺯﻟﻤﺲﮐﺮﺩﻥﺳﻄﺢﺿﺒﻂﺷﺪﻩﺩﯾﺴﮏﺧﻮﺩﺩﺍﺭﯼﮐﻨﯿﺪ.
ﻫﻨﮕﺎﻣﯽﮐﻪﺍﺯﺩﯾﺴﮏﻫﺎﺍﺳﺘﻔﺎﺩﻩﻧﻤﯽﮐﻨﯿﺪ،ﺁﻧﻬﺎﺭﺍﺩﺭﻣﺤﻔﻈﻪ
ﻣﺨﺼﻮﺹﺧﻮﺩﻗﺮﺍﺭﺩﻫﯿﺪ.
ﺍﺯﺍﺗﺼﺎﻝﺑﺮﭼﺴﺐ،ﻧﻮﺷﺘﻦﺑﺮﺭﻭﯼﺳﻄﺢﺩﯾﺴﮏﯾﺎﺑﻪﮐﺎﺭﺑﺮﺩﻥﻣﻮﺍﺩ
ﺷﯿﻤﯿﺎﯾﯽﺑﺮﺭﻭﯼﺳﻄﺢﺩﯾﺴﮏﻫﺎﺧﻮﺩﺩﺍﺭﯼﮐﻨﯿﺪ.
ﺗﻤﻴﺰﮐﺮﺩﻥﺳﯽﺩﯼﺭﺍﺑﺎﻳﮏﭘﺎﺭﭼﻪﻧﺮﻡﺍﺯﺳﻤﺖﻣﺮﮐﺰﺑﻪﺑﻴﺮﻭﻥ،
ﺍﻧﺠﺎﻡﺩﻫﻴﺪ.
ﺗﻮﻟﯿﺪﻣﯿﻌﺎﻥﺑﻪﺗﺪﺭﯾﺞﺳﺒﺐﺍﯾﺠﺎﺩﻧﻘﺺﺩﺭﮐﺎﺭﮐﺮﺩﭘﺨﺶﮐﻨﻨﺪﻩﻣﯽ
ﺷﻮﺩ.ﺩﯾﺴﮏﺭﺍﺑﺮﺍﯼﻣﺪﺕﺯﻣﺎﻥﺗﻘﺮﯾﺒﯽﺑﺪﻭﻥﮐﺎﺭﮐﺮﺩﻧﮕﻬﺪﺍﺭﯾﺪﺗﺎﺑﺎ
ﺩﻣﺎﯼﮔﺮﻡﺗﺮﺗﻄﺒﯿﻖﭘﯿﺪﺍﮐﻨﺪ.ﻫﻤﭽﻨﯿﻦﺩﯾﺴﮏﻫﺎﯼﻣﺮﻃﻮﺏﺭﺍﺑﺎﯾﮏ
ﭘﺎﺭﭼﻪﻧﺮﻡﺧﺸﮏﮐﻨﯿﺪ.
۲۷
Fa
!ﻳﮑﯽﺍﺯﮐﺎﺭﻫﺎﯼﺯﻳﺮ
ﺭﺍﺍﻧﺠﺎﻡﺩﻫﻴﺪ.
–ﺳﻮﻳﻴﭻﺍﺳﺘﺎﺭﺕﺭﺍﺩﺭ
ﻭﺿﻌﻴﺖOFFﻭﺳﭙﺲ
ONﻗﺮﺍﺭﺩﻫﻴﺪ.
–ﺩﺳﺘﮕﺎﻩﺫﺧﻴﺮﻩﺳﺎﺯﯼ
ﺧﺎﺭﺟﯽﺭﺍﺟﺪﺍﮐﺮﺩﻩﻳﺎ
ﺧﺎﺭﺝﮐﻨﻴﺪ.
–ﻣﻨﺒﻊﺩﻳﮕﺮﯼﺍﻧﺘﺨﺎﺏ
ﮐﻨﻴﺪ.
ﺳﭙﺲﻣﻨﺒﻊUSBﻳﺎSD
ﺭﺍﺍﻧﺘﺨﺎﺏﮐﻨﻴﺪ.
!ﺳﯿﻢﺭﺍﺍﺯiPodﺟﺪﺍ
ﮐﻨﯿﺪ.ﺑﺎﻧﻤﺎﯾﺶﻣﻨﻮﯼ
ﺍﺻﻠﯽiPod،ﺁﻥﺭﺍ
ﻣﺠﺪﺩﺍًﻭﺻﻞﮐﺮﺩﻩﻭ
ﻣﺠﺪﺩﺍًﺗﻨﻈﯿﻢﮐﻨﯿﺪ.
ﮐﻨﯿﺪ.ﺑﺎﻧﻤﺎﯾﺶﻣﻨﻮﯼ
ﺍﺻﻠﯽiPod،ﺁﻥﺭﺍ
ﻣﺠﺪﺩﺍًﻭﺻﻞﮐﺮﺩﻩﻭ
ﻣﺠﺪﺩﺍًﺗﻨﻈﯿﻢﮐﻨﯿﺪ.
ﺩﺳﺘﮕﺎﻩﺫﺧﻴﺮﻩﺳﺎﺯﯼ
USBﺑﺎﻳﺪﺑﺎFAT16،
FAT12ﻳﺎFAT 3 2
ﻓﺮﻣﺖﺑﻨﺪﯼﺷﻮﺩ.
ﻧﺴﺨﻪiPodﺭﺍﺑﻪﺭﻭﺯ
ﮐﻨﯿﺪ.
ﮐﻨﯿﺪ.ﺑﺎﻧﻤﺎﯾﺶﻣﻨﻮﯼ
ﺍﺻﻠﯽiPod،ﺁﻥﺭﺍ
ﻣﺠﺪﺩﺍًﻭﺻﻞﮐﺮﺩﻩﻭ
ﻣﺠﺪﺩﺍًﺗﻨﻈﯿﻢﮐﻨﯿﺪ.
ﻟﯿﺴﺘﯽﺭﺍﺍﻧﺘﺨﺎﺏﮐﻨﯿﺪﮐﻪ
ﺩﺍﺭﺍﯼﺁﻫﻨﮓﺑﺎﺷﺪ.
ﺁﻫﻨﮓﻫﺎﺭﺍﺑﻪiPod
ﻣﻨﺘﻘﻞﮐﻨﯿﺪ.
ﺷﻮﺩ.
ﻧﻘﺺiPodﺳﯿﻢﺭﺍﺍﺯiPodﺟﺪﺍ
ﺑﺎFAT16، FAT12
ﻳﺎFAT 3 2ﻓﺮﻣﺖ
ﺑﻨﺪﯼﻧﺸﺪﻩﺍﺳﺖ
iPodﻗﺪﯾﻤﯽﺍﺳﺖ
ﻧﻘﺺiPodﺳﯿﻢﺭﺍﺍﺯiPodﺟﺪﺍ
ﻓﻌﻠﯽﻭﺟﻮﺩﻧﺪﺍﺭﺩ.
ﻭﺟﻮﺩﻧﺪﺍﺭﺩ
ﭘﻴﺎﻡﻋﻠﺖﺍﻗﺪﺍﻡﻻﺯﻡ
ERROR-19ﺍﺭﺗﺒﺎﻁﺑﺮﻗﺮﺍﺭﻧﻤﯽ
ERROR-23ﺩﺳﺘﮕﺎﻩﺫﺧﻴﺮﻩUSB
ERROR-16ﻧﺴﺨﻪﻣﯿﺎﻥﺍﻓﺰﺍﺭ
STOPﻫﯿﭻﺁﻫﻨﮕﯽﺩﺭﻟﯿﺴﺖ
Not foundﻫﯿﭻﺁﻫﻨﮓﻣﺮﺗﺒﻄﯽ
!ﯾﮏﺩﺳﺘﮕﺎﻩﺫﺧﯿﺮﻩ
ﺳﺎﺯﯼﺍﻧﺒﻮﻩUSB
ﻣﺘﺼﻞﮐﻨﯿﺪﮐﻪﺑﺎﺍﯾﻦ
ﺩﺳﺘﮕﺎﻩﺳﺎﺯﮔﺎﺭﺑﺎﺷﺪ.
!ﺩﺳﺘﮕﺎﻩﺧﻮﺩﺭﺍﺟﺪﺍ
ﮐﺮﺩﻩﻭﺁﻥﺭﺍﺑﺎﻳﮏ
ﺩﺳﺘﮕﺎﻩﺫﺧﻴﺮﻩUSB
ﺳﺎﺯﮔﺎﺭ،ﺗﻌﻮﻳﺾﮐﻨﻴﺪ.
ﻭﺁﻥﺭﺍﺑﺎﻳﮏiPod
ﺳﺎﺯﮔﺎﺭ،ﺗﻌﻮﻳﺾﮐﻨﻴﺪ.
ﺩﺳﺘﮕﺎﻩﺧﻮﺩﺭﺍﺧﺎﺭﺝ
ﮐﺮﺩﻩﻭﺁﻥﺭﺍﺑﺎﯾﮏ
ﺩﺳﺘﮕﺎﻩﺫﺧﯿﺮﻩﺳﺎﺯﯼ
SDﺳﺎﺯﮔﺎﺭﺗﻌﻮﯾﺾ
ﮐﻨﯿﺪ.
ﺑﺮﺭﺳﯽﮐﻨﯿﺪﮐﻪﺭﺍﺑﻂ
USBﯾﺎﮐﺎﺑﻞUSB
ﮔﯿﺮﻧﮑﺮﺩﻩﺑﺎﺷﺪﯾﺎﺁﺳﯿﺐ
ﻧﺪﯾﺪﻩﺑﺎﺷﺪ.
ﺩﺳﺘﮕﺎﻩﺫﺧﻴﺮﻩﺳﺎﺯﯼ
USBﺭﺍﺟﺪﺍﮐﺮﺩﻩﻭﺍﺯ
ﺁﻥﺍﺳﺘﻔﺎﺩﻩﻧﮑﻨﻴﺪ.ﺳﻮﻳﻴﭻ
ﺍﺳﺘﺎﺭﺕﺭﺍﺧﺎﻣﻮﺵﮐﻨﻴﺪ
ﻭﭘﺲﺍﺯﺁﻥﺩﺭﻭﺿﻌﻴﺖ
ACCﻳﺎONﻗﺮﺍﺭ
ﺩﻫﻴﺪ.ﺳﭙﺲﻓﻘﻂﻳﮏ
ﺩﺳﺘﮕﺎﻩﺫﺧﻴﺮﻩﺳﺎﺯﯼ
USBﺳﺎﺯﮔﺎﺭﺭﺍﻣﺘﺼﻞ
ﮐﻨﻴﺪ.
ﻣﻄﻤﺌﻦﺷﻮﻳﺪﮐﻪﮐﺎﺑﻞ
ﺍﺗﺼﺎﻝﻣﺨﺼﻮﺹiPod
ﺩﭼﺎﺭﺍﺗﺼﺎﻝﮐﻮﺗﺎﻩﻧﻴﺴﺖ
)ﻣﺜﻼً،ﺍﺷﻴﺎﯼﻓﻠﺰﯼﺩﺭﺁﻥ
ﻓﺮﻭﻧﺮﻓﺘﻪﺍﺳﺖ(.ﭘﺲﺍﺯ
ﺑﺮﺭﺳﯽ،ﺳﻮﻳﻴﭻﺍﺳﺘﺎﺭﺕ
ﺭﺍﺩﺭﻭﺿﻌﻴﺖOFFﻭ
ﺳﭙﺲONﻗﺮﺍﺭﺩﻫﻴﺪﻳﺎ
iPodﺭﺍﺟﺪﺍﮐﺮﺩﻩﻭ
ﺩﻭﺑﺎﺭﻩﻣﺘﺼﻞﮐﻨﻴﺪ.
ﺩﺳﺘﮕﺎﻩﺫﺧﯿﺮﻩﺳﺎﺯﯼ
USBﻣﺘﺼﻞﺗﻮﺳﻂ
ﺍﯾﻦﺩﺳﺘﮕﺎﻩﭘﺸﺘﯿﺒﺎﻧﯽ
ﻧﻤﯽﺷﻮﺩ.
iPodﻧﺎﺳﺎﺯﮔﺎﺭﺩﺳﺘﮕﺎﻩﺧﻮﺩﺭﺍﺟﺪﺍﮐﺮﺩﻩ
ﺩﺳﺘﮕﺎﻩﺫﺧﯿﺮﻩﺳﺎﺯﯼ
SDﺳﺎﺯﮔﺎﺭﻧﯿﺴﺖ
USBﺩﺍﺭﺍﯼﻣﺪﺍﺭ
ﮐﻮﺗﺎﻩﺍﺳﺖ.
ﻣﺼﺮﻑﺩﺳﺘﮕﺎﻩﺫﺧﻴﺮﻩ
ﺳﺎﺯﯼUSBﻣﺘﺼﻞ
ﺷﺪﻩ،ﺑﻴﺶﺍﺯ۵۰۰
ﻣﻴﻠﯽﺁﻣﭙﺮ)ﺣﺪﺍﮐﺜﺮ
ﺟﺮﻳﺎﻥﻣﺠﺎﺯ(ﺍﺳﺖ.
iPodﺩﺭﺳﺖﮐﺎﺭﻣﯽ
ﮐﻨﺪﻭﻟﯽﺷﺎﺭﮊﻧﻤﯽ
ﺷﻮﺩ
NOT COMPA-
ﭘﻴﺎﻡﻋﻠﺖﺍﻗﺪﺍﻡﻻﺯﻡ
DRM 9/10ﻫﺴﺘﻨﺪﺑﻪ
!ﻋﻤﻠﮑﺮﺩﺍﺗﺼﺎﻝﻭ
ﭘﺨﺶﺭﺍﺭﻭﺷﻦﮐﻨﻴﺪ.
!ﻳﮏﺩﺳﺘﮕﺎﻩﺫﺧﻴﺮﻩ
ﺳﺎﺯﯼUSB/iPodﺭﺍ
ﻣﺘﺼﻞﮐﻨﻴﺪ.
ﻣﻨﺘﻈﺮﺑﻤﺎﻧﯿﺪﺗﺎﭘﯿﺎﻡﻣﺤﻮ
ﺷﻮﺩﻭﺻﺪﺍﺭﺍﺑﺸﻨﻮﯾﺪ.
ﻓﺎﻳﻞﻫﺎﯼﺻﻮﺗﯽﺭﺍﺑﻪ
ﺩﺳﺘﮕﺎﻩﺫﺧﻴﺮﻩﺳﺎﺯﯼ
USBﺍﻧﺘﻘﺎﻝﺩﺍﺩﻩﻭﺁﻥ
ﺭﺍﻣﺘﺼﻞﮐﻨﻴﺪ.
ﺑﺮﺍﯼﻏﻴﺮﻓﻌﺎﻝﮐﺮﺩﻥ
ﻗﺎﺑﻠﻴﺖﺍﻣﻨﻴﺘﯽ،ﺍﺯ
ﺩﺳﺘﻮﺭﺍﻟﻌﻤﻞﻫﺎﯼﻣﺮﺑﻮﻁ
ﺑﻪﺩﺳﺘﮕﺎﻩﺫﺧﻴﺮﻩﺳﺎﺯﯼ
USBﭘﻴﺮﻭﯼﮐﻨﻴﺪ.
ﻓﺎﯾﻞﺻﻮﺗﯽﺭﺍﭘﺨﺶﮐﻨﯿﺪ
ﮐﻪﺩﺍﺭﺍﯼWindows
ﻧﺒﺎﺷﺪ.
ﻓﺎﻳﻞﻫﺎﻳﯽﺭﺍﮐﻪﻓﺎﻗﺪ
ﺩﺳﺘﮕﺎﻩﺫﺧﻴﺮﻩﺳﺎﺯﯼ
USBﺍﻧﺘﻘﺎﻝﺩﺍﺩﻩﻭ
ﺩﻭﺑﺎﺭﻩﻣﺘﺼﻞﺷﻮﻳﺪ.
iPodﻣﺘﺼﻞﻧﻤﯽ
USBﻣﺘﺼﻞﺷﺪﻩﺍﺯ
USBﻣﺘﺼﻞﺷﺪﻩ
Windows
DRM 9/10ﻫﺴﺘﻨﺪ
USB،ﺩﺍﺭﺍﯼ
Windows Media
DRM 9/10ﻫﺴﺘﻨﺪ
ﺑﻮﺩﻥﺍﺗﺼﺎﻝﻭﭘﺨﺶ،
ﻫﻴﭻﺩﺳﺘﮕﺎﻩﺫﺧﻴﺮﻩ
ﺳﺎﺯﯼUSBﻳﺎ
ﺷﻮﺩ.
ﺑﺮﺧﯽﻣﻮﺍﻗﻊﺑﯿﻦﺯﻣﺎﻥ
ﺷﺮﻭﻉﭘﺨﺶﻭﺯﻣﺎﻧﯽ
ﮐﻪﺻﺪﺍﺭﺍﻣﯽﺷﻨﻮﯾﺪ
ﻣﺪﺗﯽﺗﺄﺧﯿﺮﻭﺟﻮﺩ
ﺩﺍﺭﺩ.
ﺷﻮﺩ.
ﺩﺳﺘﮕﺎﻩﺫﺧﻴﺮﻩﺳﺎﺯﯼ
ﻧﻈﺮﺍﻣﻨﻴﺘﯽﻓﻌﺎﻝﺍﺳﺖ
ﺣﺎﻭﯼﻓﺎﻳﻞﻫﺎﻳﯽﺍﺳﺖ
ﮐﻪﺩﺍﺭﺍﯼ
äMedia
ﺩﺳﺘﮕﺎﻩﺫﺧﻴﺮﻩﺳﺎﺯﯼ
TIBLE
CHECK USBﺭﺍﺑﻂUSBﯾﺎﮐﺎﺑﻞ
Media DRM 9/10
Windows Media
Page 79

ﺿﻤﻴﻤﻪ
ﺍﻃﻼﻋﺎﺕﺑﯿﺸﺘﺮ
ﻧﺼﺐ
ﭘﻴﺎﻡﻫﺎﯼﺧﻄﺎ
ﻫﻨﮕﺎﻡﺗﻤﺎﺱﺑﺎﻓﺮﻭﺷﻨﺪﻩﯾﺎﻧﺰﺩﯾﮑﺘﺮﯾﻦﻣﺮﮐﺰﺧﺪﻣﺎﺕPioneer،
ﭘﯿﺎﻡﺧﻄﺎﺭﺍﺑﻪﺁﻧﻬﺎﺍﻃﻼﻉﺩﻫﯿﺪ.
ﭘﺨﺶﮐﻨﻨﺪﻩﺳﯽﺩﯼﺩﺍﺧﻠﯽ
ﭘﻴﺎﻡﻋﻠﺖﺍﻗﺪﺍﻡﻻﺯﻡ
ERROR-07,
ﺩﻳﺴﮏﮐﺜﻴﻒﺍﺳﺖ.ﺩﻳﺴﮏﺭﺍﺗﻤﻴﺰﮐﻨﻴﺪ.
11, 12, 17, 30
ﺩﻳﺴﮏﺭﺍﺗﻌﻮﻳﺾﮐﻨﻴﺪ.
ﺳﻮﻳﻴﭻﺍﺳﺘﺎﺭﺕﺭﺍ
ﺧﺎﻣﻮﺵﮐﺮﺩﻩﻭﺳﭙﺲ
ﺭﻭﺷﻦﮐﻨﻴﺪ،ﻳﺎﻣﻨﺒﻊﺭﺍ
ﺗﻐﻴﻴﺮﺩﻫﻴﺪﻭﺳﭙﺲﭘﺨﺶ
ﮐﻨﻨﺪﻩﺳﯽﺩﯼﺭﺍﺭﺍﻩ
ﺍﻧﺪﺍﺯﯼﮐﻨﯿﺪ.
ﺩﻳﺴﮏﺭﺍﺗﻌﻮﻳﺾﮐﻨﻴﺪ.
ﺩﻳﺴﮏﺭﺍﺗﻌﻮﻳﺾﮐﻨﻴﺪ.
ﻣﻨﺘﻈﺮﺑﻤﺎﻧﯿﺪﺗﺎﭘﯿﺎﻡﻣﺤﻮ
ﺷﻮﺩﻭﺻﺪﺍﺭﺍﺑﺸﻨﻮﯾﺪ.
ﺩﻳﺴﮏﺭﺍﺗﻌﻮﻳﺾﮐﻨﻴﺪ.
ﺩﻳﺴﮏﺭﺍﺗﻌﻮﻳﺾﮐﻨﻴﺪ.
ﺩﻳﺴﮏﺭﺍﺗﻌﻮﻳﺾﮐﻨﻴﺪ.
ﺩﯾﺴﮏﺩﺍﺭﺍﯼ
ﺧﺮﺍﺷﯿﺪﮔﯽﺍﺳﺖ.
ﯾﮏﺧﻄﺎﯼﺍﻟﮑﺘﺮﯾﮑﯽ
ﯾﺎﻣﮑﺎﻧﯿﮑﯽﺭﺥﺩﺍﺩﻩ
ﺍﺳﺖ.
ﺍﺳﺖ
ﭘﺸﺘﯿﺒﺎﻧﯽﻧﺸﺪﻩ
ﺑﺮﺧﯽﻣﻮﺍﻗﻊﺑﯿﻦﺯﻣﺎﻥ
ﺷﺮﻭﻉﭘﺨﺶﻭﺯﻣﺎﻧﯽ
ﮐﻪﺻﺪﺍﺭﺍﻣﯽﺷﻨﻮﯾﺪ
ﻣﺪﺗﯽﺗﺄﺧﯿﺮﻭﺟﻮﺩ
ﺩﺍﺭﺩ.
ﺩﺳﺘﮕﺎﻩﻗﺮﺍﺭﺩﺍﺩﻩﺍﯾﺪ
ﻫﯿﭻﻓﺎﯾﻞﻗﺎﺑﻞﭘﺨﺸﯽ
ﻧﺪﺍﺭﺩ.
ﺩﺳﺘﮕﺎﻩﻗﺮﺍﺭﺩﺍﺩﻩﺍﯾﺪ
ﺩﺍﺭﺍﯼﻓﺎﯾﻞﻫﺎﯾﯽﺍﺳﺖ
ﮐﻪﺗﻮﺳﻂDRM
ﻣﺤﺎﻓﻈﺖﻣﯽﺷﻮﻧﺪ.
ﺩﯾﺴﮏﻭﺟﻮﺩﺩﺍﺭﺩ
ﺩﺍﺭﺍﯼDRMﻫﺴﺘﻨﺪ.
ERROR-10,
11, 12, 15,
17, 30, A0
ERROR-15ﺩﻳﺴﮏﻭﺍﺭﺩﺷﺪﻩﺧﺎﻟﯽ
ERROR-23ﻓﺮﻣﺖﺳﯽﺩﯼ
FORMAT
READ
NO AUDIOﺩﯾﺴﮑﯽﮐﻪﺩﺭﻭﻥ
SKIPPEDﺩﯾﺴﮑﯽﮐﻪﺩﺭﻭﻥ
PROTECTﺗﻤﺎﻡﻓﺎﯾﻞﻫﺎﯾﯽﮐﻪﺩﺭ
ﻋﻤﻞﻣﻮﺭﺩﻧﻈﺮﺭﺍ
ﺩﻭﺑﺎﺭﻩﺍﻧﺠﺎﻡﺩﻫﻴﺪ.
ﻣﺤﺪﻭﺩﻩﭘﺨﺶﺗﮑﺮﺍﺭﯼ
ﺭﺍﺩﻭﺑﺎﺭﻩﺍﻧﺘﺨﺎﺏﮐﻨﯿﺪ.
ﻣﺤﺪﻭﺩﻩﺩﻳﮕﺮﯼﺭﺍﺑﺮﺍﯼ
ﺗﮑﺮﺍﺭﭘﺨﺶﺍﻧﺘﺨﺎﺏ
ﮐﻨﻴﺪ.
ﺻﻔﺤﻪﻧﻤﺎﯾﺶﺭﺍﺗﻐﯿﯿﺮ
ﺩﺍﺩﻩﯾﺎﯾﮏﺗﺮﺍﮎ/ﻓﺎﯾﻞ
ﺩﯾﮕﺮﺭﺍﭘﺨﺶﮐﻨﯿﺪ.
!ﺑﺮﺍﯼﻏﻴﺮﻓﻌﺎﻝﮐﺮﺩﻥ
ﺣﺎﻟﺖﻧﻤﺎﯾﺸﯽ،DISP/
/SCRLﺭﺍﻓﺸﺎﺭ
ﺩﻫﻴﺪ.
!ﺗﻨﻈﻴﻤﺎﺕﭘﺨﺶﻧﻤﺎﯾﺸﯽ
ﺭﺍﺧﺎﻣﻮﺵﮐﻨﯿﺪ.
ﺍﺑﺰﺍﺭﻫﺎﯼﺑﺮﻗﯽﺭﺍﮐﻪ
ﻣﻤﮑﻦﺍﺳﺖﺑﺎﻋﺚﺍﺧﺘﻼﻝ
ﺷﻮﻧﺪ،ﺍﺯﻧﺰﺩﻳﮑﯽﺩﺳﺘﮕﺎﻩ
ﺩﻭﺭﮐﻨﻴﺪ.
ﺷﻤﺎﺑﻪﻣﺪﺕﺗﻘﺮﻳﺒﺎً۳۰
ﺛﺎﻧﻴﻪﻫﻴﭻﻋﻤﻠﯽﺍﻧﺠﺎﻡ
ﻧﺪﺍﺩﻩﺍﻳﺪ.
ﺑﺴﺘﻪﺑﻪﻣﺤﺪﻭﺩﻩﭘﺨﺶ
ﺗﮑﺮﺍﺭﯼ،ﻣﺤﺪﻭﺩﻩ
ﺍﻧﺘﺨﺎﺑﯽﻣﻤﮑﻦﺍﺳﺖ
ﺩﺭﻫﻨﮕﺎﻡﺍﻧﺘﺨﺎﺏﭘﻮﺷﻪ
ﻳﺎﺗﺮﺍﮎﺩﻳﮕﺮﻳﺎﺩﺭ
ﻫﻨﮕﺎﻡﺣﺮﮐﺖﺳﺮﻳﻊ
ﺭﻭﺑﻪﺟﻠﻮ/ﺭﻭﺑﻪ
ﻋﻘﺐ،ﺗﻐﻴﻴﺮﮐﻨﺪ.
ﭘﻮﺷﻪﻫﺎﯼﻓﺮﻋﯽﺭﺍ
ﻧﻤﯽﺗﻮﺍﻥﺩﺭﻫﻨﮕﺎﻡ
ﺍﻧﺘﺨﺎﺏFolder re-
peat)ﺗﮑﺮﺍﺭﭘﻮﺷﻪ(
ﭘﺨﺶﮐﺮﺩ.
ﻫﯿﭻﺍﻃﻼﻋﺎﺕﻣﺘﻨﯽ
ﺩﺭﻭﻥﺩﯾﺴﮏﻭﺟﻮﺩ
ﻧﺪﺍﺭﺩ.
ﺣﺎﻟﺖﻧﻤﺎﯾﺸﯽﻓﻌﺎﻝ
ﺍﺳﺖ.
ﺷﻤﺎﺩﺭﺣﺎﻝﺍﺳﺘﻔﺎﺩﻩﺍﺯ
ﺩﺳﺘﮕﺎﻫﯽﻣﺎﻧﻨﺪﺗﻠﻔﻦ
ﻫﻤﺮﺍﻩﻫﺴﺘﻴﺪﮐﻪﺩﺭ
ﻧﺰﺩﻳﮑﯽﺩﺳﺘﮕﺎﻩ،
ﺍﻣﻮﺍﺝﺍﻟﮑﺘﺮﯾﮑﯽ
ﻣﻨﺘﺸﺮﻣﯽﮐﻨﺪ.
ﺭﻓﻊﻋﯿﺐ
ﻋﻼﻣﺖﻋﻠﺖﺍﻗﺪﺍﻡﻻﺯﻡ
ﺻﻔﺤﻪﻧﻤﺎﻳﺶﺑﻪ
ﻃﻮﺭﺧﻮﺩﮐﺎﺭﺑﻪ
ﺻﻔﺤﻪﻣﻌﻤﻮﻝﺑﺎﺯ
ﻣﯽﮔﺮﺩﺩ.
ﻣﺤﺪﻭﺩﻩﭘﺨﺶ
ﺗﮑﺮﺍﺭﯼﺑﻪﻃﻮﺭ
ﻏﻴﺮﻣﻨﺘﻈﺮﻩﺗﻐﻴﻴﺮ
ﻣﯽﮐﻨﺪ.
ﻳﮑﯽﺍﺯﭘﻮﺷﻪﻫﺎﯼ
ﻓﺮﻋﯽﭘﺨﺶﻧﻤﯽ
ﺷﻮﺩ.
NO XXXXﺑﺎ
ﺗﻐﯿﯿﺮﺻﻔﺤﻪﻧﻤﺎﯾﺶ
ﻧﺸﺎﻥﺩﺍﺩﻩﻣﯽﺷﻮﺩ
)ﻣﺎﻧﻨﺪNO TI-
TLE(.
ﺩﺭﻫﻨﮕﺎﻡﺧﺎﻣﻮﺵ
ﺷﺪﻥﺩﺳﺘﮕﺎﻩﺻﻔﺤﻪ
ﻧﻤﺎﻳﺶﺭﻭﺷﻦﻣﯽ
ﺷﻮﺩ.
ﺩﺳﺘﮕﺎﻩﺑﻪﺩﺭﺳﺘﯽ
ﮐﺎﺭﻧﻤﯽﮐﻨﺪ.
ﺍﺧﺘﻼﻝﻣﺸﺎﻫﺪﻩﻣﯽ
ﺷﻮﺩ.
1
ﺻﻔﺤﻪﺟﻠﻮﯾﯽﺭﺍﻣﺤﮑﻢﮐﻨﯿﺪ
ﺑﺎﺍﺳﺘﻔﺎﺩﻩﺍﺯﭘﯿﭻﺍﺭﺍﺋﻪﺷﺪﻩﻣﯽﺗﻮﺍﻧﯿﺪﺻﻔﺤﻪﺟﻠﻮﺭﺍﻣﺤﮑﻢﮐﻨﯿﺪ.
1ﭘﯿﭻ
ﻓﺎﺭﺳﯽ
۲۶
Fa
Page 80

۰۳
ﺑﺨﺶ
ﻧﺼﺐ
ﻧﺼﺐ
ﺟﺪﺍﮐﺮﺩﻥﺩﺳﺘﮕﺎﻩ
۱ﺟﺪﺍﮐﺮﺩﻥﺣﻠﻘﻪﺗﻨﻈﯿﻢ.
4
5
1ﺣﻠﻘﻪﺗﻨﻈﯿﻢ
2ﺯﺑﺎﻧﻪﺩﻧﺪﺍﻧﻪﺩﺍﺭ
!ﺑﺎﺟﺪﺍﮐﺮﺩﻥﺻﻔﺤﻪﺟﻠﻮﯾﯽ،ﺩﺳﺘﺮﺳﯽﺑﻪﺣﻠﻘﻪﺗﻨﻈﯿﻢﺳﺎﺩﻩﺗﺮﻣﯽ
ﺷﻮﺩ.
!ﻫﻨﮕﺎﻡﺍﺗﺼﺎﻝﻣﺠﺪﺩﺣﻠﻘﻪﺗﻨﻈﯿﻢ،ﮐﻨﺎﺭﻩﻫﺎﺭﺍﺑﺎﺍﺳﺘﻔﺎﺩﻩﺍﺯﺯﺑﺎﻧﻪ
ﺩﻧﺪﺍﻧﻪﺩﺍﺭﺑﻪﺳﻤﺖﭘﺎﯾﯿﻦﻗﺮﺍﺭﺩﻫﯿﺪ.
۲ﮐﻠﯿﺪﻫﺎﯼﺗﺨﻠﯿﻪﺍﺭﺍﺋﻪﺷﺪﻩﺭﺍﺩﺭﺩﻭﻃﺮﻑﺩﺳﺘﮕﺎﻩﻭﺍﺭﺩﮐﻨﯿﺪﺗﺎ
ﺯﻣﺎﻧﯽﮐﻪﺑﺎﺻﺪﺍﯼﮐﻠﯿﮏﺩﺭﻣﺤﻞﺧﻮﺩﻗﺮﺍﺭﺑﮕﯿﺮﻧﺪ.
1
2
3
۳ﺩﺳﺘﮕﺎﻩﺭﺍﺍﺯﺩﺍﺷﺒﻮﺭﺩﺑﯿﺮﻭﻥﺑﮑﺸﯿﺪ.
۳ﺩﺳﺘﮕﺎﻩﺭﺍﺑﻪﮔﻮﻧﻪﺍﯼﮐﻪﻧﺸﺎﻥﺩﺍﺩﻩﺷﺪﻩﺍﺳﺖ،ﻧﺼﺐﮐﻨﯿﺪ.
60°
1ﻣﻬﺮﻩ
2ﻣﺤﺎﻓﻆﯾﺎﭘﺸﺘﯿﺒﺎﻥﻓﻠﺰﯼ
3ﻧﻮﺍﺭﻓﻠﺰﯼ
4ﭘﯿﭻ
5ﭘﯿﭻ)M4 × ۸(
#ﺑﺮﺭﺳﯽﮐﻨﯿﺪﮐﻪﺩﺳﺘﮕﺎﻩﺑﻪﺩﺭﺳﺘﯽﺩﺭﺟﺎﯼﺧﻮﺩﻧﺼﺐﺷﺪﻩﺑﺎﺷﺪ.
ﻧﺼﺐﻧﺎﭘﺎﯾﺪﺍﺭﺳﺒﺐﺍﻓﺘﺎﺩﻥﺩﺳﺘﮕﺎﻩﯾﺎﻋﻤﻠﮑﺮﺩﻧﺎﺩﺭﺳﺖﺁﻥﻣﯽﺷﻮﺩ.
ﺍﺗﺼﺎﻝDINﺩﺭﻋﻘﺐ
۱ﺑﺮﺭﺳﯽﮐﻨﯿﺪﮐﻪﻣﺤﻞﻣﻨﺎﺳﺐﻗﺮﺍﺭﮔﯿﺮﯼﺳﻮﺭﺍﺥﻫﺎﺩﺭﻗﻼﺏ
ﻧﺼﺐﻭﮐﻨﺎﺭﻩﻫﺎﯼﺩﺳﺘﮕﺎﻩﺑﺎﯾﮑﺪﯾﮕﺮﻣﺘﻨﺎﺳﺐﺑﺎﺷﻨﺪ.
ﺑﯿﺮﻭﻥﺁﻭﺭﺩﻥﻭﻧﺼﺐﻣﺠﺪﺩﺻﻔﺤﻪﺟﻠﻮﻳﯽ
ﺑﺮﺍﯼﺟﻠﻮﮔﯿﺮﯼﺍﺯﺳﺮﻗﺖﺩﺳﺘﮕﺎﻩﻣﯽﺗﻮﺍﻧﯿﺪﺻﻔﺤﻪﺟﻠﻮﯾﯽﺭﺍﺑﯿﺮﻭﻥ
ﺑﯿﺎﻭﺭﯾﺪ.
ﺩﮐﻤﻪﺭﺍﻓﺸﺎﺭﺩﻫﯿﺪﻭﺑﯿﺮﻭﻥﺑﯿﺎﻭﺭﯾﺪ،ﺻﻔﺤﻪﺟﻠﻮﺭﺍﻧﯿﺰﺑﻪﺳﻤﺖ
ﺑﺎﻻﻓﺸﺎﺭﺩﻫﯿﺪﻭﺑﻪﻃﺮﻑﺧﻮﺩﺑﮑﺸﯿﺪ.
1
ﺑﺮﺩﺍﺷﺘﻦﺻﻔﺤﻪﺟﻠﻮﻳﯽﺑﺮﺍﯼﺟﻠﻮﮔﻴﺮﯼ
ﻭ
ﺩﺭﺻﻔﺤﻪ۱۷
۲۵
Fa
ﻧﺼﺐﺩﻭﺑﺎﺭﻩﺻﻔﺤﻪﺟﻠﻮﻳﯽ
ﺑﺮﺍﯼﺍﻃﻼﻉﺍﺯﺟﺰﺋﯿﺎﺕﺑﻪ
ﺍﺯﺳﺮﻗﺖﺩﺳﺘﮕﺎﻩ
ﻣﺮﺍﺟﻌﻪﮐﻨﯿﺪ.
2
3
۲ﺩﻭﭘﯿﭻﺭﺍﺩﺭﻫﺮﺳﻤﺖﻣﺤﮑﻢﮐﻨﯿﺪ.
1
2
1ﭘﯿﭻﺭﺍﺑﺒﻨﺪﯾﺪ)۵×۸ﻣﯿﻠﯽﻣﺘﺮ(
2ﻗﻼﺏﺍﺗﺼﺎﻝ
3ﺩﺍﺷﺒﻮﺭﺩﯾﺎﮐﻨﺴﻮﻝ
!ﺩﺭﺻﻮﺭﺕﺁﺳﯿﺐﻭﺍﺭﺩﺁﻣﺪﻥﺑﻪﻟﯿﺰﺭﻧﯿﻤﻪﺭﺳﺎﻧﺎﺩﺭﻧﺘﯿﺠﻪﮔﺮﻡ
ﺷﺪﻥﺑﯿﺶﺍﺯﺣﺪ.ﺍﺯﻧﺼﺐﺍﯾﻦﺩﺳﺘﮕﺎﻩﺩﺭﻣﮑﺎﻥﻫﺎﯼﮔﺮﻡﺑﻪ
ﻋﻨﻮﺍﻥﻣﺜﺎﻝﺩﺭﻧﺰﺩﯾﮑﯽﺧﺮﻭﺟﯽﺑﺨﺎﺭﯼﺧﻮﺩﺩﺍﺭﯼﮐﻨﯿﺪ.
!ﻋﻤﻠﮑﺮﺩﺑﻬﯿﻨﻪﺩﺳﺘﮕﺎﻩﺯﻣﺎﻧﯽﺻﻮﺭﺕﻣﯽﮔﯿﺮﺩﮐﻪﺩﺳﺘﮕﺎﻩﺩﺭ
ﺯﺍﻭﯾﻪﮐﻤﺘﺮﺍﺯ۶۰ﺩﺭﺟﻪﻧﺼﺐﺷﻮﺩ.
!ﺑﺮﺍﯼﺍﻃﻤﯿﻨﺎﻥﺍﺯﭘﺨﺶﻣﻨﺎﺳﺐﮔﺮﻣﺎﺩﺭﻫﻨﮕﺎﻡﺍﺳﺘﻔﺎﺩﻩﺍﺯﺍﯾﻦ
ﺩﺳﺘﮕﺎﻩ،ﺑﺮﺭﺳﯽﮐﻨﯿﺪﮐﻪﻓﺎﺻﻠﻪﺯﯾﺎﺩﯼﺩﺭﭘﺸﺖﺻﻔﺤﻪﻋﻘﺐ
ﺩﺭﻧﻈﺮﺑﮕﯿﺮﯾﺪﻭﺗﻤﺎﻡﺳﯿﻢﻫﺎﯼﺭﻫﺎﺷﺪﻩﺭﺍﺑﺒﻨﺪﯾﺪﺗﺎﻣﺎﻧﻊﺍﺯ
ﻣﺴﺪﻭﺩﺷﺪﻥﻣﺤﻔﻈﻪﻧﺼﺐﺩﺳﺘﮕﺎﻩﺷﻮﺩ.
ﺍﺗﺼﺎﻝDINﺩﺭﺟﻠﻮ/ﻋﻘﺐ
ﺧﻮﺑﯽﻧﺼﺐﮐﺮﺩ.
ﻫﻨﮕﺎﻡﻧﺼﺐ،ﺍﺯﻗﻄﻌﺎﺕﻣﻮﺟﻮﺩﺩﺭﺑﺎﺯﺍﺭﺍﺳﺘﻔﺎﺩﻩﮐﻨﯿﺪ.
1
1
1
ﺍﯾﻦﺩﺳﺘﮕﺎﻩﺭﺍﺑﺎﺍﺳﺘﻔﺎﺩﻩﺍﺯﺭﻭﺵﻧﺼﺐﺩﺭﺟﻠﻮﯾﺎﻋﻘﺐﻣﯽﺗﻮﺍﻥﺑﻪ
3
2
55
3
2
77
3
2
99
ﺍﺗﺼﺎﻝDINﺩﺭﺟﻠﻮ
۱ﺩﺳﺘﻪﺍﺗﺼﺎﻝﺭﺍﺑﻪﺩﺭﻭﻥﺩﺍﺷﺒﻮﺭﺩﻓﺸﺎﺭﺩﻫﯿﺪ.
ﺑﺮﺍﯼﻧﺼﺐﺩﺭﻣﮑﺎﻥﻫﺎﯾﯽﺑﺎﺍﺭﺗﻔﺎﻉﮐﻢ،ﺍﺯﺩﺳﺘﻪﻧﺼﺐﺍﺭﺍﺋﻪﺷﺪﻩ
ﺍﺳﺘﻔﺎﺩﻩﮐﻨﯿﺪ.ﺍﮔﺮﻓﻀﺎﯼﮐﺎﻓﯽﻭﺟﻮﺩﻧﺪﺍﺭﺩ،ﺍﺯﺩﺳﺘﻪﻧﺼﺐﺍﺭﺍﺋﻪ
ﺷﺪﻩﺑﻪﻫﻤﺮﺍﻩﻭﺳﯿﻠﻪﻧﻘﻠﯿﻪﺍﺳﺘﻔﺎﺩﻩﮐﻨﯿﺪ.
۲ﺑﺎﺍﺳﺘﻔﺎﺩﻩﺍﺯﯾﮏﭘﯿﭻﮔﻮﺷﺘﯽ،ﺩﺳﺘﻪﻧﺼﺐﺭﺍﻣﺤﮑﻢﮐﻨﯿﺪﺑﻪ
ﮔﻮﻧﻪﺍﯼﮐﻪﺯﺑﺎﻧﻪﻫﺎﯼﻓﻠﺰﯼ)۹۰ﺩﺭﺟﻪ(ﺩﺭﺟﺎﯼﺧﻮﺩﻣﺤﮑﻢ
ﺷﻮﻧﺪ.
ﺁﻣﭙﻠﯽﻓﺎﯾﺮﺑﺮﻕ)ﺑﻪﺻﻮﺭﺕﺟﺪﺍﮔﺎﻧﻪﺑﻪ
ﻓﺮﻭﺵﻣﯽﺭﺳﺪ(
ﻫﻨﮕﺎﻡﺍﺳﺘﻔﺎﺩﻩﺍﺯﺁﻣﭙﻠﯽﻓﺎﯾﺮﺍﺧﺘﯿﺎﺭﯼ،ﺍﯾﻦﺍﺗﺼﺎﻝﻫﺎﺭﺍﺑﺮﻗﺮﺍﺭﮐﻨﯿﺪ.
4
6
8
1ﮐﻨﺘﺮﻝﺍﺯﺭﺍﻩﺩﻭﺭﺳﯿﺴﺘﻢ
ﺑﻪﺳﯿﻢﺁﺑﯽ/ﺳﻔﯿﺪﺭﻧﮓﻣﺘﺼﻞﮐﻨﯿﺪ.
2ﺁﻣﭙﻠﯽﻓﺎﯾﺮﺑﺮﻕ)ﺑﻪﺻﻮﺭﺕﺟﺪﺍﮔﺎﻧﻪﺑﻪﻓﺮﻭﺵﻣﯽﺭﺳﺪ(
3ﺑﺎﺍﺳﺘﻔﺎﺩﻩﺍﺯﺳﯿﻢﻫﺎﯼRCA)ﺑﻪﺻﻮﺭﺕﺟﺪﺍﮔﺎﻧﻪﺑﻪﻓﺮﻭﺵ
ﻣﯽﺭﺳﻨﺪ(ﻣﺘﺼﻞﮐﻨﯿﺪ
4ﺑﻪﺧﺮﻭﺟﯽﻋﻘﺐ
5ﺑﻠﻨﺪﮔﻮﯼﻋﻘﺐ
6ﺑﻪﺧﺮﻭﺟﯽﺟﻠﻮ
7ﺑﻠﻨﺪﮔﻮﯼﺟﻠﻮ
8ﺑﻪﺧﺮﻭﺟﯽﺳﺎﺏﻭﻭﻓﺮ
9ﺳﺎﺑﻮﻭﻓﺮ
ﻧﺼﺐ
ﻣﻬﻢ
!ﻗﺒﻞﺍﺯﺍﻧﺠﺎﻡﻧﺼﺐﻧﻬﺎﯾﯽ،ﺗﻤﺎﻡﺍﺗﺼﺎﻝﻫﺎﻭﺳﯿﺴﺘﻢﻫﺎﺭﺍ
ﺑﺮﺭﺳﯽﮐﻨﯿﺪ.
!ﺍﺯﺑﻪﮐﺎﺭﺑﺮﺩﻥﻗﻄﻌﺎﺕﻏﯿﺮﻣﺠﺎﺯﺧﻮﺩﺩﺍﺭﯼﮐﻨﯿﺪ،ﺯﯾﺮﺍﺍﯾﻦﺍﻣﺮ
ﺳﺒﺐﻋﻤﻠﮑﺮﺩﻧﺎﺩﺭﺳﺖﺩﺳﺘﮕﺎﻩﻣﯽﺷﻮﺩ.
!ﺍﮔﺮﺑﺮﺍﯼﻧﺼﺐﺑﻪﺳﻮﺭﺍﺥﮐﺮﺩﻥﯾﺎﺍﻧﺠﺎﻡﺳﺎﯾﺮﺗﻐﯿﯿﺮﺍﺕﺩﺭ
ﻭﺳﯿﻠﻪﻧﻘﻠﯿﻪﻧﯿﺎﺯﺍﺳﺖ،ﺑﺎﻓﺮﻭﺷﻨﺪﻩﺗﻤﺎﺱﺑﮕﯿﺮﯾﺪ.
1ﺩﺍﺷﺒﻮﺭﺩ
2ﺩﺳﺘﻪﺍﺗﺼﺎﻝ
!ﺍﺯﻧﺼﺐﺍﯾﻦﺩﺳﺘﮕﺎﻩﺩﺭﺷﺮﺍﯾﻂﺯﯾﺮﺧﻮﺩﺩﺍﺭﯼﮐﻨﯿﺪ:
—ﺩﺭﺻﻮﺭﺕﺍﯾﺠﺎﺩﺗﺪﺍﺧﻞﺑﺎﻋﻤﻠﮑﺮﺩﻭﺳﯿﻠﻪﻧﻘﻠﯿﻪ.
—ﺩﺭﺻﻮﺭﺕﺑﺮﻭﺯﺟﺮﺍﺣﺖﺑﺮﺍﯼﺳﺮﻧﺸﯿﻦﺑﻪﺩﻟﯿﻞﺍﻓﺘﺎﺩﻥﻧﺎﮔﻬﺎﻧﯽ
ﺩﺳﺘﮕﺎﻩ.
Page 81

ﺁ
7
h
ﺑﺨﺶ
ﻧﺼﺐ
ﻧﺼﺐ
۰۳
S/W control
4ﺑﻠﻨﺪﮔﻮﯼﺟﻠﻮ
5ﺑﻠﻨﺪﮔﻮﯼﻋﻘﺐ
6ﺳﻔﯿﺪ
7ﺳﻔﯿﺪ/ﺳﯿﺎﻩ
8ﺧﺎﮐﺴﺘﺮﯼ
9ﺧﺎﮐﺴﺘﺮﯼ/ﺳﯿﺎﻩ
aﺳﺒﺰ
bﺳﺒﺰ/ﺳﯿﺎﻩ
cﺍﺭﻏﻮﺍﻧﯽ
dﺍﺭﻏﻮﺍﻧﯽ/ﺳﯿﺎﻩ
eﺳﯿﺎﻩ)ﺍﺗﺼﺎﻝﺷﺎﺳﯽﺑﻪﺯﻣﯿﻦ(
ﺑﻪﺑﺨﺸﯽﻓﻠﺰﯼ،ﺗﻤﯿﺰﻭﺑﺪﻭﻥﺭﻧﮓﻣﺘﺼﻞﮐﻨﯿﺪ.
fﺯﺭﺩ
ﺑﻪﭘﺎﯾﺎﻧﻪﺑﺮﻕﺛﺎﺑﺖ۱۲ﻭﻟﺖﻣﺘﺼﻞﮐﻨﯿﺪ.
gﻗﺮﻣﺰ
ﺑﻪﭘﺎﯾﺎﻧﻪﮐﻨﺘﺮﻝﺷﺪﻩﺑﺎﺳﻮﯾﯿﭻﺍﺳﺘﺎﺭﺕ)۱۲ﻭﻟﺖﺑﺮﻕﻣﺴﺘﻘﯿﻢ(
ﻣﺘﺼﻞﮐﻨﯿﺪ.
hﺁﺑﯽ/ﺳﻔﯿﺪ
ﺑﻪﭘﺎﯾﺎﻧﻪﮐﻨﺘﺮﻝﺳﯿﺴﺘﻢﺁﻣﭙﻠﯽﻓﺎﯾﺮﺑﺮﻕﯾﺎﭘﺎﯾﺎﻧﻪﮐﻨﺘﺮﻝﺗﻘﻮﯾﺖ
ﺁﻧﺘﻦﺧﻮﺩﮐﺎﺭ)ﺣﺪﺍﮐﺜﺮ۳۰۰ﻣﯿﻠﯽﺁﻣﭙﺮ۱۲ﻭﻟﺖﺑﺮﻕﻣﺴﺘﻘﯿﻢ(
ﻣﺘﺼﻞﮐﻨﯿﺪ.
iﺳﺎﺑﻮﻭﻓﺮ)۴ﺍﻫﻢ(
jﻫﻨﮕﺎﻡﺍﺳﺘﻔﺎﺩﻩﺍﺯﺳﺎﺑﻮﻭﻓﺮﺑﺎﻗﺪﺭﺕ۷۰ﻭﺍﺕ)۲ﺍﻫﻢ(،ﺑﺮﺭﺳﯽ
ﮐﻨﯿﺪﮐﻪﺳﺎﺑﻮﻭﻓﺮﺭﺍﺑﻪﺳﯿﻢﻫﺎﯼﺍﺭﻏﻮﺍﻧﯽﻭﺍﺭﻏﻮﺍﻧﯽ/ﺳﯿﺎﻩ
ﺭﻧﮓﺍﯾﻦﺩﺳﺘﮕﺎﻩﻣﺘﺼﻞﮐﻨﯿﺪ.ﺍﺯﺑﺮﻗﺮﺍﺭﯼﻫﺮﮔﻮﻧﻪﺍﺗﺼﺎﻝﺑﻪ
ﺳﯿﻢﻫﺎﯼﺳﺒﺰﻭﺳﺒﺰ/ﺳﯿﺎﻩﺭﻧﮓﺧﻮﺩﺩﺍﺭﯼﮐﻨﯿﺪ.
kﺍﺳﺘﻔﺎﺩﻩﻧﻤﯽﺷﻮﺩ.
lﺳﺎﺑﻮﻭﻓﺮ)۴ﺍﻫﻢ(×۲
ﻧﮑﺎﺕ
!ﺑﺎﻭﺟﻮﺩ۲ﺳﯿﺴﺘﻢﺑﻠﻨﺪﮔﻮ،ﺍﺯﺑﺮﻗﺮﺍﺭﯼﻫﺮﮔﻮﻧﻪﺍﺗﺼﺎﻝﺑﻪﺳﯿﻢ
ﻫﺎﯼﺑﻠﻨﺪﮔﻮﮐﻪﺑﻪﺑﻠﻨﺪﮔﻮﻫﺎﻭﺻﻞﻧﯿﺴﺘﻨﺪ،ﺧﻮﺩﺩﺍﺭﯼﮐﻨﯿﺪ.
ﺩﺭﺻﻔﺤﻪﻗﺒﻞﻣﺮﺍﺟﻌﻪ
!ﺗﻨﻈﯿﻤﺎﺕﺍﻭﻟﯿﻪﺍﯾﻦﺩﺳﺘﮕﺎﻩﺭﺍﺗﻐﯿﯿﺮﺩﻫﯿﺪ.ﺑﻪ
)ﺗﻨﻈﻴﻤﺎﺕﺧﺮﻭﺟﯽﻋﻘﺐﻭﺳﺎﺑﻮﻭﻓﺮ(
ﮐﻨﯿﺪ.
ﺧﺮﻭﺟﯽﺳﺎﺑﻮﻭﻓﺮﺍﯾﻦﺩﺳﺘﮕﺎﻩﺗﮏﺻﻮﺗﯽﺍﺳﺖ.
LR
4
F
5
R
LR
4
F
i
SW
1
8
6
9
7
a
c
d
b
e
f
g
1
8
6
9
7
a
c
d
b
j
e
a
f
g
k l
h
b
ﺁﺩﺍﭘﺘﻮﺭﮐﻨﺘﺮﻝﺍﺯﺭﺍﻩﺩﻭﺭﺑﺎﺳﯿﻢﺳﺨﺖﺭﺍﻣﯽﺗﻮﺍﻥﻣﺘﺼﻞﮐﺮﺩ
)ﺑﻪﺻﻮﺭﺕﺟﺪﺍﮔﺎﻧﻪﺑﻪﻓﺮﻭﺵﻣﯽﺭﺳﺪ(.
5ﺧﺮﻭﺟﯽﺟﻠﻮ
6ﺧﺮﻭﺟﯽﻋﻘﺐ
7ﺧﺮﻭﺟﯽﺳﺎﺑﻮﻭﻓﺮ
ﺳﯿﻢﺑﺮﻕ
ﻫﻨﮕﺎﻣﯽﮐﻪﺳﯿﻢﺑﻠﻨﺪﮔﻮﯼﻋﻘﺐﺭﺍﺑﻪﺳﺎﺑﻮﻭﻓﺮﻣﺘﺼﻞﻧﻤﯽﮐﻨﯿﺪ،ﺍﯾﻦ
ﺍﺗﺼﺎﻝﻫﺎﺭﺍﺑﺮﻗﺮﺍﺭﮐﻨﯿﺪ.
32
ﻫﻨﮕﺎﻡﺍﺳﺘﻔﺎﺩﻩﺍﺯﺳﺎﺑﻮﻭﻓﺮﺑﺪﻭﻥﺁﻣﭙﻠﯽﻓﺎﯾﺮﺍﺧﺘﯿﺎﺭﯼ،ﺍﯾﻦﺍﺗﺼﺎﻝﻫﺎ
ﺭﺍﺑﺮﻗﺮﺍﺭﮐﻨﯿﺪ.
32
c
d
1ﺑﻪﻭﺭﻭﺩﯼﺳﯿﻢﺑﺮﻕ
2ﭼﭗ
3ﺭﺍﺳﺖ
1 2 3645
—ﻗﺒﻞﺍﺯﻧﺼﺐ،ﭘﺎﯾﺎﻧﻪﻣﻨﻔﯽﺩﺳﺘﮕﺎﻩﺭﺍﻗﻄﻊﮐﻨﯿﺪ.
—ﺳﯿﻢﻫﺎﺭﺍﺑﺎﺍﺳﺘﻔﺎﺩﻩﺍﺯﮔﯿﺮﻩﻫﺎﯼﻣﺨﺼﻮﺹﺳﯿﻢﯾﺎﻧﻮﺍﺭﭼﺴﺐ
ﻣﺤﮑﻢﮐﻨﯿﺪ.ﺑﺮﺍﯼﻣﺤﺎﻓﻈﺖﺍﺯﺳﯿﻢﭘﯿﭽﯽﺍﻧﺠﺎﻡﺷﺪﻩ،ﻧﻮﺍﺭﭼﺴﺐ
ﺭﺍﺩﺭﺍﻃﺮﺍﻑﺳﯿﻢﻫﺎﯾﯽﮐﻪﺩﺭﺗﻤﺎﺱﺑﺎﺑﺨﺶﻫﺎﯼﻓﻠﺰﯼﺍﺳﺖ
ﺑﭙﯿﭽﺎﻧﯿﺪ.
—ﺳﯿﻢﻫﺎﺭﺍﺍﺯﺑﺨﺶﻫﺎﯼﻣﺘﺤﺮﮎﻣﺎﻧﻨﺪﻣﺤﻞﺣﺮﮐﺖﺩﻧﺪﻩﯾﺎﻣﺴﯿﺮ
ﺣﺮﮐﺖﺻﻨﺪﻟﯽﺩﻭﺭﻧﮕﻬﺪﺍﺭﯾﺪ.
—ﺗﻤﺎﻡﺳﯿﻢﻫﺎﺭﺍﺍﺯﻣﮑﺎﻥﻫﺎﯼﮔﺮﻡﺑﻪﻋﻨﻮﺍﻥﻣﺜﺎﻝﺩﺭﻧﺰﺩﯾﮑﯽ
ﺧﺮﻭﺟﯽﺑﺨﺎﺭﯼﺩﻭﺭﻧﮕﻬﺪﺍﺭﯾﺪ.
—ﺑﺮﺍﯼﺍﺗﺼﺎﻝﺳﯿﻢﺯﺭﺩﺭﻧﮓﺑﻪﺑﺎﺗﺮﯼ،ﺁﻥﺭﺍﺍﺯﺳﻮﺭﺍﺥﻣﻮﺟﻮﺩ
ﺑﻪﺳﻤﺖﻣﺤﻔﻈﻪﻣﻮﺗﻮﺭﻣﻨﺘﻘﻞﮐﻨﯿﺪ.
—ﺗﻤﺎﻡﺭﺍﺑﻂﻫﺎﯼﺳﯿﻢﻣﺘﺼﻞﻧﺸﺪﻩﺭﺍﺑﺎﺍﺳﺘﻔﺎﺩﻩﺍﺯﻧﻮﺍﺭﻋﺎﯾﻖ
ﺑﭙﻮﺷﺎﻧﯿﺪ.
—ﺍﺯﮐﻮﺗﺎﻩﮐﺮﺩﻥﺳﯿﻢﻫﺎﺧﻮﺩﺩﺍﺭﯼﮐﻨﯿﺪ.
—ﻫﺮﮔﺰﺑﺮﺍﯼﺍﺳﺘﻔﺎﺩﻩﻣﺸﺘﺮﮎﺍﺯﺑﺮﻕﺑﺎﺩﯾﮕﺮﺩﺳﺘﮕﺎﻩﻫﺎ،ﭘﻮﺷﺶ
ﻋﺎﯾﻖﺳﯿﻢﺑﺮﻕﺍﯾﻦﺩﺳﺘﮕﺎﻩﺭﺍﻧﺒﺮﯾﺪ.ﻣﯿﺰﺍﻥﺟﺮﯾﺎﻥﺳﯿﻢﺩﺭﺣﺪ
ﻣﺤﺪﻭﺩﯼﺍﺳﺖ.
—ﺍﺯﻓﯿﻮﺯﯼﺑﺎﺩﺭﺟﻪﺗﻮﺻﯿﻪﺷﺪﻩﺍﺳﺘﻔﺎﺩﻩﮐﻨﯿﺪ.
—ﻫﺮﮔﺰﺳﯿﻢﻣﻨﻔﯽﺑﻠﻨﺪﮔﻮﺭﺍﻣﺴﺘﻘﯿﻤﺎًﺑﻪﺯﻣﯿﻦﻣﺘﺼﻞﻧﮑﻨﯿﺪ.
—ﻫﺮﮔﺰﺳﯿﻢﻫﺎﯼﻣﻨﻔﯽﭼﻨﺪﯾﻦﺑﻠﻨﺪﮔﻮﺭﺍﺑﺎﯾﮑﺪﯾﮕﺮﻣﺘﺼﻞﮐﻨﯿﺪ.
!ﻫﻨﮕﺎﻣﯽﮐﻪﺍﯾﻦﺩﺳﺘﮕﺎﻩﺭﻭﺷﻦﺍﺳﺖ،ﺳﯿﮕﻨﺎﻝﻫﺎﯼﮐﻨﺘﺮﻝﺍﺯ
ﻃﺮﯾﻖﺳﯿﻢﺁﺑﯽ/ﺳﻔﯿﺪﺍﺭﺳﺎﻝﻣﯽﺷﻮﺩ.ﺍﯾﻦﺳﯿﻢﺭﺍﺑﻪﺳﯿﺴﺘﻢ
ﮐﻨﺘﺮﻝﺍﺯﺭﺍﻩﺩﻭﺭﯾﮏﺁﻣﭙﻠﯽﻓﺎﯾﺮﺑﺮﻕﺧﺎﺭﺟﯽﯾﺎﭘﺎﯾﺎﻧﻪﮐﻨﺘﺮﻝ
ﺗﻘﻮﯾﺖﺁﻧﺘﻦﺧﻮﺩﮐﺎﺭ)ﺣﺪﺍﮐﺜﺮ۳۰۰ﻣﯿﻠﯽﺁﻣﭙﺮ۱۲ﻭﻟﺖﺑﺮﻕ
ﻣﺴﺘﻘﯿﻢ(ﻣﺘﺼﻞﮐﻨﯿﺪ.ﺍﮔﺮﺩﺳﺘﮕﺎﻩﺩﺍﺭﺍﯼﯾﮏﺁﻧﺘﻦﺷﯿﺸﻪﺍﯼ
ﺍﺳﺖ،ﺁﻥﺭﺍﺑﻪﭘﺎﯾﺎﻧﻪﺗﻘﻮﯾﺖﺗﻮﺍﻥﺑﺮﻕﺁﻧﺘﻦﻣﺘﺼﻞﮐﻨﯿﺪ.
!ﻫﺮﮔﺰﺳﯿﻢﺁﺑﯽ/ﺳﻔﯿﺪﺭﻧﮓﺭﺍﺑﻪﭘﺎﯾﺎﻧﻪﺑﺮﻕﺁﻣﭙﻠﯽﻓﺎﯾﺮﺑﺮﻕ
ﺧﺎﺭﺟﯽﻣﺘﺼﻞﻧﮑﻨﯿﺪ.ﻫﻤﭽﻨﯿﻦﻫﺮﮔﺰﺁﻥﺭﺍﺑﻪﭘﺎﯾﺎﻧﻪﺑﺮﻕﺁﻧﺘﻦ
ﺧﻮﺩﮐﺎﺭﻣﺘﺼﻞﻧﮑﻨﯿﺪ.ﺍﻧﺠﺎﻡﺍﯾﻦﮐﺎﺭﺳﺒﺐﺗﺨﻠﯿﻪﺑﺎﺗﺮﯼﯾﺎ
ﻋﻤﻠﮑﺮﺩﻧﺎﺩﺭﺳﺖﺩﺳﺘﮕﺎﻩﻣﯽﺷﻮﺩ.
ﺎﻫ ﻩﺎﮕﺘﺳﺩ ﺮﯾﺎﺳ
ﻩﺎﮕﺘﺳﺩ ﺮﮕﯾﺩ)
ﯽﮑﯿﻧﻭﺮﺘﮑﻟﺍ
(ﻦﯿﺷﺎﻣ ﺭﺩ
ﯽﻨﯿﻣﺯ ﻢﯿﺳ
ﻕﺮﺑ ﺮﯾﺎﻓ ﯽﻠﭙﻣ
ﻦﯿﺷﺎﻣ ﻪﻧﺪﺑ یﺰﻠﻓ ﺕﺎﻌﻄﻗ
ﺍﯾﻦﺩﺳﺘﮕﺎﻩ
O
F
N
F
O
S
T
A
R
T
ﺑﺪﻭﻥﻣﺤﻞACC ﻣﺤﻞACC
1ﺧﺮﻭﺟﯽﺁﻧﺘﻦ
2ﻓﯿﻮﺯ)۱۰ﺁﻣﭙﺮ(
3ﻭﺭﻭﺩﯼﺳﯿﻢﺑﺮﻕ
4ﻭﺭﻭﺩﯼﺭﺍﻩﺩﻭﺭﺳﯿﻢﺩﺍﺭ
ﺍﺗﺼﺎﻝﻫﺎ
ﻫﺸﺪﺍﺭ
!ﺍﺯﺑﻠﻨﺪﮔﻮﻫﺎﯼﺑﯿﺸﺘﺮﺍﺯ۵۰ﻭﺍﺕ)ﻣﻘﺪﺍﺭﺧﺮﻭﺟﯽ(ﻭﺑﯿﻦ۴ﺃﻭﻡ
ﺗﺎ۸ﺃﻭﻡ)ﻣﻘﺪﺍﺭﺍﻣﭙﺪﺍﻧﺲ(ﺍﺳﺘﻔﺎﺩﻩﮐﻨﯿﺪ.ﺍﺯﺑﻪﮐﺎﺭﺑﺮﺩﻥ
ﺑﻠﻨﺪﮔﻮﻫﺎﯼ۱ﺃﻭﻡﺗﺎ۳ﺃﻭﻡﺑﺮﺍﯼﺍﯾﻦﺩﺳﺘﮕﺎﻩﺧﻮﺩﺩﺍﺭﯼﮐﻨﯿﺪ.
!ﺳﯿﻢﺳﯿﺎﻩﺭﻧﮓﻣﺨﺼﻮﺹﺍﺗﺼﺎﻝﺑﻪﺯﻣﯿﻦﺍﺳﺖ.ﻫﻨﮕﺎﻡﻧﺼﺐ
ﺍﯾﻦﺩﺳﺘﮕﺎﻩﯾﺎﺁﻣﭙﻠﯽﻓﺎﻳﺮﺑﺮﻕ)ﺑﻪﺻﻮﺭﺕﺟﺪﺍﮔﺎﻧﻪﺑﻪﻓﺮﻭﺵ
ﻣﯽﺭﺳﺪ(،ﺑﺮﺭﺳﯽﮐﻨﯿﺪﮐﻪﺍﺑﺘﺪﺍﺳﯿﻢﺍﺗﺼﺎﻝﺑﻪﺯﻣﯿﻦﺭﺍﻣﺘﺼﻞ
ﮐﻨﯿﺪ.ﺑﺮﺭﺳﯽﮐﻨﯿﺪﮐﻪﺳﯿﻢﺍﺗﺼﺎﻝﺑﻪﺯﻣﯿﻦﺑﻪﺩﺭﺳﺘﯽﺑﻪﺑﺨﺶ
ﻫﺎﯼﻓﻠﺰﯼﺑﺪﻧﻪﺩﺳﺘﮕﺎﻩﻣﺘﺼﻞﺑﺎﺷﺪ.ﺳﯿﻢﺍﺗﺼﺎﻝﺑﻪﺯﻣﯿﻦﺁﻣﭙﻠﯽ
ﻓﺎﯾﺮﺑﺮﻕﻭﺍﯾﻦﺩﺳﺘﮕﺎﻩﯾﺎﺳﯿﻢﻫﺎﯼﺳﺎﯾﺮﺩﺳﺘﮕﺎﻩﻫﺎﺑﺎﯾﺪﺑﻪ
ﺻﻮﺭﺕﺟﺪﺍﮔﺎﻧﻪﻭﺑﺎﭘﯿﭻﻫﺎﯼﺟﺪﺍﮔﺎﻧﻪﺍﯼﺑﻪﻣﺎﺷﯿﻦﻣﺘﺼﻞﺷﺪﻩ
ﺑﺎﺷﻨﺪ.ﺍﮔﺮﭘﯿﭻﺳﯿﻢﺍﺗﺼﺎﻝﺑﻪﺯﻣﯿﻦﺷﻞﺷﺪﻩﯾﺎﺑﯿﻔﺘﺪ،ﻣﻤﮑﻦ
ﺍﺳﺖﻣﻨﺠﺮﺑﻪﺁﺗﺶﺳﻮﺯﯼ،ﺗﻮﻟﯿﺪﺩﻭﺩﯾﺎﻋﻤﻠﮑﺮﺩﻧﺎﺩﺭﺳﺖ
ﺩﺳﺘﮕﺎﻩﺷﻮﺩ.
ﻓﺎﺭﺳﯽ
ﻣﻬﻢ
!ﻫﻨﮕﺎﻡﺍﺗﺼﺎﻝﺍﯾﻦﺩﺳﺘﮕﺎﻩﺩﺭﻣﺎﺷﯿﻨﯽﺑﺪﻭﻥﻣﺤﻞACC)ﻟﻮﺍﺯﻡ
ﺟﺎﻧﺒﯽ(ﺭﻭﯼﺳﻮﯾﯿﭻﺍﺳﺘﺎﺭﺕ،ﻋﺪﻡﺍﺗﺼﺎﻝﺳﯿﻢﻗﺮﻣﺰﺭﻧﮓﺑﻪ
ﭘﺎﯾﺎﻧﻪﺗﺸﺨﯿﺺﻋﻤﻠﮑﺮﺩﮐﻠﯿﺪﺍﺳﺘﺎﺭﺕﺳﺒﺐﺗﺨﻠﯿﻪﺑﺎﺗﺮﯼﻣﯽ
ﺷﻮﺩ.
!ﺍﺯﺍﯾﻦﺩﺳﺘﮕﺎﻩﻓﻘﻂﻫﻤﺮﺍﻩﺑﺎﺑﺎﺗﺮﯼ۱۲ﻭﻟﺖﻭﺍﺗﺼﺎﻝﻣﻨﻔﯽﺑﻪ
ﺯﻣﯿﻦﺍﺳﺘﻔﺎﺩﻩﮐﻨﯿﺪ.ﻋﺪﻡﺍﻧﺠﺎﻡﺍﯾﻦﮐﺎﺭﺳﺒﺐﺍﯾﺠﺎﺩﺁﺗﺶﺳﻮﺯﯼﯾﺎ
ﻋﻤﻠﮑﺮﺩﻧﺎﺩﺭﺳﺖﺩﺳﺘﮕﺎﻩﻣﯽﺷﻮﺩ.
!ﺑﺮﺍﯼﺟﻠﻮﮔﯿﺮﯼﺍﺯﺍﯾﺠﺎﺩﻣﺪﺍﺭﮐﻮﺗﺎﻩ،ﮔﺮﻡﺷﺪﻥﺑﯿﺶﺍﺯﺣﺪﯾﺎ
ﻋﻤﻠﮑﺮﺩﻧﺎﺩﺭﺳﺖﺩﺳﺘﮕﺎﻩ،ﺩﺳﺘﻮﺭﺍﻟﻌﻤﻞﻫﺎﯼﺯﯾﺮﺭﺍﺩﻧﺒﺎﻝﮐﻨﯿﺪ.
۲۴
Fa
Page 82

۰۲
ﺑﺨﺶ
ﺍﺳﺘﻔﺎﺩﻩﺍﺯﺩﺳﺘﮕﺎﻩ
ﺍﺳﺘﻔﺎﺩﻩﺍﺯﺩﺳﺘﮕﺎﻩ
ﺍﺳﺘﻔﺎﺩﻩﺍﺯﺳﺮﮔﺮﻣﯽﻫﺎﯼﻧﻤﺎﯾﺸﯽ
ﻣﺨﺘﻠﻒ
ﺩﺭﻫﻨﮕﺎﻡﮔﻮﺵﮐﺮﺩﻥﺑﻪﻫﺮﮐﺪﺍﻡﺍﺯﻣﻨﺎﺑﻊﺻﻮﺗﯽﻣﯽﺗﻮﺍﻧﯿﺪﺍﺯ
ﺳﺮﮔﺮﻣﯽﻫﺎﯼﻧﻤﺎﯾﺸﯽﻟﺬﺕﺑﺒﺮﯾﺪ.
۱ﺑﺮﺍﯼﻧﻤﺎﻳﺶﻣﻨﻮﯼﺍﺻﻠﯽM.C.ﺭﺍﻓﺸﺎﺭﺩﻫﻴﺪ.
ENTERTAINMENTﺭﺍﻓﺸﺎﺭﺩﻫﻴﺪ.
۲ﺑﺮﺍﯼﺗﻐﻴﻴﺮﮔﺰﻳﻨﻪﻫﺎﯼﻣﻨﻮM.C.،ﻭﺑﺮﺍﯼﺍﻧﺘﺨﺎﺏ،
۳ﺑﺮﺍﯼﺗﻐﻴﻴﺮﺻﻔﺤﻪﻧﻤﺎﯾﺶ،M.C.ﺭﺍﺑﭽﺮﺧﺎﻧﻴﺪ.
ﺗﺼﻮﯾﺮﭘﺲﺯﻣﯿﻨﻪ-ﺳﺒﮏ-ﺗﺼﻮﯾﺮﭘﺲﺯﻣﯿﻨﻪ-۱ﺗﺼﻮﯾﺮﭘﺲﺯﻣﯿﻨﻪ
-۲ﺗﺼﻮﯾﺮﭘﺲﺯﻣﯿﻨﻪ3-ﺗﺼﻮﯾﺮﭘﺲﺯﻣﯿﻨﻪ-۴ﺻﻔﺤﻪﺳﺎﺩﻩ-ﺻﻔﺤﻪ
ﻓﯿﻠﻢ۱-ﺻﻔﺤﻪﻓﯿﻠﻢ-۲ﺗﻘﻮﯾﻢ
#ﺑﺴﺘﻪﺑﻪﺳﺒﮏﻣﻮﺳﯿﻘﯽ،ﺻﻔﺤﻪﺳﺒﮏﺗﻐﯿﯿﺮﻣﯽﮐﻨﺪ.
#ﺑﺴﺘﻪﺑﻪﺑﺮﻧﺎﻣﻪﻣﻮﺭﺩﺍﺳﺘﻔﺎﺩﻩﺩﺭﺭﻣﺰﮔﺬﺍﺭﯼﻓﺎﯾﻞﻫﺎﯼﺻﻮﺗﯽ،ﻣﻤﮑﻦ
ﺍﺳﺖﺻﻔﺤﻪﺳﺒﮏﺑﺪﺭﺳﺘﯽﮐﺎﺭﻧﮑﻨﺪ.
ﺣﺎﻟﺖﻣﻌﮑﻮﺱ
ﺩﺭﺻﻔﺤﻪ
1ﺑﺮﺍﯼﺭﻭﺷﻦ/ﺧﺎﻣﻮﺵﮐﺮﺩﻥﺣﺎﻟﺖﻣﻌﮑﻮﺱ،M.C.ﺭﺍﻓﺸﺎﺭ
ﺩﻫﻴﺪ.
!ﻫﻤﭽﻨﯿﻦﺑﺎﻓﺸﺮﺩﻥBANDﺩﺭﻫﻨﮕﺎﻡﺧﺎﻣﻮﺵﺑﻮﺩﻥﺍﯾﻦ
ﺩﺳﺘﮕﺎﻩﻣﯽﺗﻮﺍﻧﯿﺪﺣﺎﻟﺖﻣﻌﮑﻮﺱﺭﺍﻓﻌﺎﻝﯾﺎﻏﯿﺮﻓﻌﺎﻝﮐﻨﯿﺪ.
ﺑﺮﺍﯼﺍﻃﻼﻉﺍﺯﺟﺰﺋﯿﺎﺕﺑﯿﺸﺘﺮﺑﻪ
۱۶ﻣﺮﺍﺟﻌﻪﮐﻨﯿﺪ.
Ever-scroll)ﺗﻨﻈﻴﻤﺎﺕﺣﺎﻟﺖﺍﺳﮑﺮﻭﻝ(
ﺩﺭﺻﻮﺭﺕﻓﻌﺎﻝﺑﻮﺩﻥﺍﺳﮑﺮﻭﻝﺩﺍﺋﻤﯽ،ﺍﻃﻼﻋﺎﺕﻣﺘﻨﯽﺿﺒﻂﺷﺪﻩﺑﻪ
ﻃﻮﺭﭘﻴﻮﺳﺘﻪﺑﺮﺭﻭﯼﺻﻔﺤﻪﻧﻤﺎﻳﺶﺣﺮﮐﺖﻣﯽﮐﻨﺪ.ﺍﮔﺮﻣﯽﺧﻮﺍﻫﻴﺪ
ﮐﻪﺍﻃﻼﻋﺎﺕﻓﻘﻂﻳﮏﺑﺎﺭﻧﺸﺎﻥﺩﺍﺩﻩﺷﻮﺩ،ﺍﺳﮑﺮﻭﻝﺭﺍﻏﻴﺮﻓﻌﺎﻝﮐﻨﻴﺪ.
1ﺑﺮﺍﯼﻓﻌﺎﻝ/ﻏﻴﺮﻓﻌﺎﻝﮐﺮﺩﻥﺍﺳﮑﺮﻭﻝﺩﺍﺋﻤﯽ،M.C.ﺭﺍﻓﺸﺎﺭﺩﻫﻴﺪ.
ﺳﺎﻳﺮﻋﻤﻠﮑﺮﺩﻫﺎ
ﺍﺳﺘﻔﺎﺩﻩﺍﺯﻣﻨﺒﻊAUX
۱ﺍﺗﺼﺎﻝﮐﻮﭼﮏﺍﺳﺘﺮﻳﻮﺭﺍﺩﺭﻭﻥﻓﻴﺶﻭﺭﻭﺩﯼAUXﻭﺍﺭﺩ
ﮐﻨﻴﺪ.
۲SRC/OFFﺭﺍﻓﺸﺎﺭﺩﻫﻴﺪﺗﺎAUXﺑﻪﻋﻨﻮﺍﻥﻣﻨﺒﻊﺍﻧﺘﺨﺎﺏ
ﺷﻮﺩ.
Rear SP :S/W،ﻣﯽﺗﻮﺍﻧﯿﺪﺳﯿﻢﺑﻠﻨﺪﮔﻮﯼﻋﻘﺐﺭﺍﻣﺴﺘﻘﯿﻤﺎًﻭﺑﺪﻭﻥ
ﻧﮑﺘﻪ
ﺗﺎﺯﻣﺎﻥﻓﻌﺎﻝﻧﺸﺪﻥﺗﻨﻈﻴﻤﺎﺕﮐﻤﮑﯽ،AUXﻗﺎﺑﻞﺍﻧﺘﺨﺎﺏﻧﻴﺴﺖ.
ﺩﺭﺍﻳﻦ
AUX)ﻭﺭﻭﺩﯼﮐﻤﮑﯽ(
ﺑﺮﺍﯼﺍﻃﻼﻉﺍﺯﺟﺰﺋﯿﺎﺕﺑﯿﺸﺘﺮﺑﻪ
ﺻﻔﺤﻪﻣﺮﺍﺟﻌﻪﮐﻨﯿﺪ.
ﺻﻔﺤﻪﻧﻤﺎﯾﺶﺳﺎﻋﺖ
%CLK/DISP OFFﺭﺍﺑﺮﺍﯼﺍﻧﺘﺨﺎﺏﺗﻨﻈﯿﻢﺩﻟﺨﻮﺍﻩﻓﺸﺎﺭﺩﻫﯿﺪ.
ﺳﺎﻋﺖﺧﺎﻣﻮﺵ—ﺻﻔﺤﻪﺳﺎﻋﺖ—ﻧﻤﺎﯾﺶﻣﺪﺕﺯﻣﺎﻥﺳﭙﺮﯼﺷﺪﻩ
ﺗﻐﻴﻴﺮﺻﻔﺤﻪﻧﻤﺎﻳﺶﻭﺭﻭﺷﻨﺎﻳﯽﺩﮐﻤﻪ
ﺻﻔﺤﻪﻧﻤﺎﻳﺶﻭﺭﻭﺷﻨﺎﻳﯽﺩﮐﻤﻪﺭﺍﻣﯽﺗﻮﺍﻥﻓﻌﺎﻝﻳﺎﻏﻴﺮﻓﻌﺎﻝﮐﺮﺩ.
%CLK/DISP OFFﺭﺍﻓﺸﺎﺭﺩﺍﺩﻩﻭﻧﮕﻪﺩﺍﺭﻳﺪ.
ﺑﺎﻓﺸﺎﺭﺩﺍﺩﻥﻭﻧﮕﻪﺩﺍﺷﺘﻦCLK/DISP OFF،ﻧﺸﺎﻧﮕﺮﺻﻔﺤﻪ
ﻧﻤﺎﯾﺶﻭﺭﻭﺷﻨﺎﯾﯽﺩﮐﻤﻪﺭﻭﺷﻦﯾﺎﺧﺎﻣﻮﺵﻣﯽﺷﻮﺩ.
#ﺣﺘﯽﺩﺭﺻﻮﺭﺕﻏﻴﺮﻓﻌﺎﻝﺑﻮﺩﻥﺻﻔﺤﻪﻧﻤﺎﻳﺶ،ﺍﻳﻦﻋﻤﻞﻗﺎﺑﻞﺍﻧﺠﺎﻡ
ﺍﺳﺖ.ﺍﮔﺮﺍﻳﻦﻋﻤﻞﺩﺭﻫﻨﮕﺎﻡﺧﺎﻣﻮﺵﺑﻮﺩﻥﺻﻔﺤﻪﻧﻤﺎﻳﺶﺍﻧﺠﺎﻡﺷﻮﺩ،
ﺻﻔﺤﻪﻧﻤﺎﻳﺶﺑﻪﻣﺪﺕﭼﻨﺪﺛﺎﻧﻴﻪﺭﻭﺷﻦﺷﺪﻩﻭﺩﻭﺑﺎﺭﻩﺧﺎﻣﻮﺵﻣﯽﺷﻮﺩ.
Sub W.1)ﺗﻨﻈﻴﻤﺎﺕ
ﺩﺭﺻﻔﺤﻪﻗﺒﻞﻣﺮﺍﺟﻌﻪﮐﻨﯿﺪ(.
Demonstration)ﺗﻨﻈﻴﻤﺎﺕﭘﺨﺶﻧﻤﺎﯾﺸﯽ(
ﺣﺎﻟﺖﻧﻤﺎﯾﺸﯽ
ﺩﺭﺻﻔﺤﻪ۱۶ﻣﺮﺍﺟﻌﻪ
Reverse mode)ﺗﻨﻈﻴﻤﺎﺕﺣﺎﻟﺖﻣﻌﮑﻮﺱ(
ﺑﺮﺍﯼﺟﻠﻮﮔﯿﺮﯼﺍﺯﺭﻭﺷﻦﺷﺪﻥﺑﯿﺶﺍﺯﺣﺪﻧﻤﺎﯾﺸﮕﺮﺩﺭﺷﺐ،ﺑﺎﺭﻭﺷﻦ
ﺷﺪﻥﭼﺮﺍﻍﻫﺎﯼﻣﺎﺷﯿﻦ،ﻧﻮﺭﻧﻤﺎﯾﺸﮕﺮﺑﻪﻃﻮﺭﺧﻮﺩﮐﺎﺭﮐﻢﻣﯽﺷﻮﺩ.
ﮐﺎﻫﺶﺩﻫﻨﺪﻩﻧﻮﺭﺭﺍﻣﯽﺗﻮﺍﻧﯿﺪﺭﻭﺷﻦﯾﺎﺧﺎﻣﻮﺵﮐﻨﯿﺪ.
1M.C.ﺭﺍﺑﺮﺍﯼﺭﻭﺷﻦﯾﺎﺧﺎﻣﻮﺵﮐﺮﺩﻥﮐﺎﻫﺶﺩﻫﻨﺪﻩﻧﻮﺭﻓﺸﺎﺭ
ﺩﻫﻴﺪ.
Brightness)ﺗﻨﻈﻴﻢﺭﻭﺷﻨﺎﻳﯽﺻﻔﺤﻪﻧﻤﺎﻳﺶ(
1M.C.ﺭﺍﺑﺮﺍﯼﺗﻨﻈﯿﻢﺳﻄﺢﺭﻭﺷﻨﺎﯾﯽﺑﻪﺳﻤﺖﭼﭗﯾﺎﺭﺍﺳﺖ
ﻓﺸﺎﺭﺩﻫﯿﺪ.
ﺑﺎﺍﻓﺰﺍﯾﺶﯾﺎﮐﺎﻫﺶﺳﻄﺢ،0ﺗﺎ15ﻧﻤﺎﯾﺶﺩﺍﺩﻩﻣﯽﺷﻮﺩ.
!ﻫﻨﮕﺎﻡﮐﺎﺭﮐﺮﺩﮐﺎﻫﺶﺩﻫﻨﺪﻩﻧﻮﺭ،ﺳﻄﺢﺭﻭﺷﻨﺎﯾﯽﺭﺍﻣﯽ
ﺗﻮﺍﻧﯿﺪﺭﻭﯼ0ﺗﺎ10ﺗﻨﻈﯿﻢﮐﻨﯿﺪ.
S/W control)ﺗﻨﻈﻴﻤﺎﺕﺧﺮﻭﺟﯽﻋﻘﺐﻭﺳﺎﺑﻮﻭﻓﺮ(
ﺧﺮﻭﺟﯽﻋﻘﺐﺍﯾﻦﺩﺳﺘﮕﺎﻩ)ﺧﺮﻭﺟﯽﺳﯿﻢﻫﺎﯼﺑﻠﻨﺪﮔﻮﯼﻋﻘﺐﻭﺧﺮﻭﺟﯽ
RCAﻋﻘﺐ(ﺭﺍﻣﯽﺗﻮﺍﻥﺑﺮﺍﯼﻓﺮﺍﻫﻢﮐﺮﺩﻥﺍﺗﺼﺎﻝﺑﻠﻨﺪﮔﻮ)Rear
SP :F.Range(ﯾﺎﺳﺎﺑﻮﻭﻓﺮﺑﺎﺩﺍﻣﻨﻪﮐﺎﻣﻞ)Rear SP :S/W(،
ﻣﻮﺭﺩﺍﺳﺘﻔﺎﺩﻩﻗﺮﺍﺭﺩﺍﺩ.ﺩﺭﺻﻮﺭﺕﺗﻐﯿﯿﺮﺗﻨﻈﯿﻢﺧﺮﻭﺟﯽﻋﻘﺐﺑﻪ
ﺍﺳﺘﻔﺎﺩﻩﺍﺯﺁﻣﭙﻠﯽﻓﺎﯾﺮﮐﻤﮑﯽﺑﻪﺳﺎﺑﻮﻭﻓﺮﻣﺘﺼﻞﮐﻨﯿﺪ.
1ﺑﺮﺍﯼﺗﻐﯿﯿﺮﺗﻨﻈﯿﻢﺧﺮﻭﺟﯽﭘﺸﺖ،M.C.ﺭﺍﻓﺸﺎﺭﺩﻫﯿﺪ.
!ﺩﺭﺻﻮﺭﺗﯽﮐﻪﻫﯿﭻﺳﺎﺑﻮﻭﻓﺮﯼﺑﻪﺧﺮﻭﺟﯽﻋﻘﺐﻣﺘﺼﻞ
ﻧﺒﺎﺷﺪ،Rear SP :F.Rangeﺭﺍﺍﻧﺘﺨﺎﺏﮐﻨﯿﺪ)ﺑﻠﻨﺪﮔﻮﺑﺎ
ﺩﺍﻣﻨﻪﮐﺎﻣﻞ(.
!ﺩﺭﺻﻮﺭﺗﯽﮐﻪﻫﯿﭻﺳﺎﺑﻮﻭﻓﺮﯼﺑﻪﺧﺮﻭﺟﯽﻋﻘﺐﻣﺘﺼﻞ
ﻧﺒﺎﺷﺪ،Rear SP :S/Wﺭﺍﺍﻧﺘﺨﺎﺏﮐﻨﯿﺪ)ﺳﺎﺑﻮﻭﻓﺮ(.
!ﺣﺘﯽﺑﺎﺗﻐﯿﯿﺮﺍﯾﻦﺗﻨﻈﯿﻢ،ﻫﯿﭻﺧﺮﻭﺟﯽﭘﺨﺶﻧﻤﯽﺷﻮﺩﻣﮕﺮﺁﻧﮑﻪ
ﺧﺮﻭﺟﯽﺳﺎﺑﻮﻭﻓﺮﺭﺍﺭﻭﺷﻦﮐﻨﯿﺪ)ﺑﻪ
ﺭﻭﺷﻦ/ﺧﺎﻣﻮﺵﺳﺎﺑﻮﻭﻓﺮ(
!ﺩﺭﺻﻮﺭﺕﺗﻐﯿﯿﺮﺍﯾﻦﺗﻨﻈﯿﻢ،ﺧﺮﻭﺟﯽﺳﺎﺑﻮﻭﻓﺮﺩﺭﻣﻨﻮﯼﺻﻮﺗﯽ
ﺑﻪﺗﻨﻈﯿﻤﺎﺕﭘﯿﺶﻓﺮﺽﮐﺎﺭﺧﺎﻧﻪﺑﺎﺯﻣﯽﮔﺮﺩﺩ.
!ﺧﺮﻭﺟﯽﻫﺎﯼﺳﯿﻢﺑﻠﻨﺪﮔﻮﯼﻋﻘﺐﻭﺧﺮﻭﺟﯽﻋﻘﺐRCAﺑﻄﻮﺭ
ﻫﻤﺰﻣﺎﻥﺩﺭﺍﯾﻦﺗﻨﻈﯿﻢﺗﻐﯿﯿﺮﻣﯽﮐﻨﻨﺪ.
1ﺑﺮﺍﯼﻓﻌﺎﻝ/ﻏﻴﺮﻓﻌﺎﻝﮐﺮﺩﻥﭘﺨﺶﻧﻤﺎﯾﺸﯽ،M.C.ﺭﺍﻓﺸﺎﺭﺩﻫﻴﺪ.
!ﻫﻤﭽﻨﻴﻦﻣﯽﺗﻮﺍﻧﻴﺪﭘﺨﺶﻧﻤﺎﯾﺸﯽﻗﺎﺑﻠﻴﺖﻫﺎﺭﺍﺑﺎﻓﺸﺎﺭDISP
ﺩﺭﻫﻨﮕﺎﻡﺧﺎﻣﻮﺵﺑﻮﺩﻥﺩﺳﺘﮕﺎﻩﻏﻴﺮﻓﻌﺎﻝﮐﻨﻴﺪ.ﺑﺮﺍﯼﺍﻃﻼﻉ
ﺍﺯﺟﺰﺋﯿﺎﺕﺑﯿﺸﺘﺮﺑﻪ
ﮐﻨﯿﺪ.
USB plug&play)ﺍﺗﺼﺎﻝﻭﭘﺨﺶ(
Warning tone)ﺗﻨﻈﻴﻤﺎﺕﺯﻧﮓﻫﺸﺪﺍﺭ(
ﮔﺎﻡﻣﻮﺝﯾﺎﺑﯽFMﺭﺍﻣﯽﺗﻮﺍﻧﯿﺪﺍﺯﻃﺮﯾﻖﻣﻮﺝﯾﺎﺑﯽﺑﯿﻦ۱۰۰
ﮐﯿﻠﻮﻫﺮﺗﺰ،ﻣﻘﺎﺩﯾﺮﺍﺯﭘﯿﺶﺗﻌﯿﯿﻦﺷﺪﻩﻭ۵۰ﮐﯿﻠﻮﻫﺮﺗﺰﺗﻐﯿﯿﺮﺩﻫﯿﺪ.
ﺍﮔﺮﻣﻮﺝﯾﺎﺑﯽﺑﺎﻓﻮﺍﺻﻞ۵۰ﻫﺮﺗﺰﯼﺍﻧﺠﺎﻡﺷﻮﺩ،ﺗﻨﻈﯿﻢﺍﯾﺴﺘﮕﺎﻩﻫﺎ
ﺑﺪﺭﺳﺘﯽﺍﻧﺠﺎﻡﻧﻤﯽﺷﻮﺩ.ﺑﺎﺍﺳﺘﻔﺎﺩﻩﺍﺯﻣﻮﺝﯾﺎﺑﯽﺩﺳﺘﯽﺍﯾﺴﺘﮕﺎﻫﺎﺭﺍ
ﭘﯿﺪﺍﮐﻨﯿﺪﻭﯾﺎﻣﻮﺝﯾﺎﺑﯽﻣﻌﻤﻮﻟﯽﺭﺍﻣﺠﺪﺩﺍًﺗﮑﺮﺍﺭﮐﻨﯿﺪ.
1ﺑﺮﺍﯼﺍﻧﺘﺨﺎﺏﻣﺮﺣﻠﻪﺗﻨﻈﯿﻢFM،M.C.ﺭﺍﻓﺸﺎﺭﺩﻫﯿﺪ.
50kHz)۵۰ﮐﻴﻠﻮﻫﺮﺗﺰ(—100kHz)۱۰۰ﮐﻴﻠﻮﻫﺮﺗﺰ(
AM STEP)ﮔﺎﻡﻣﻮﺝﻳﺎﺑﯽAM(
ﮔﺎﻡﻣﻮﺝﯾﺎﺑﯽAMﺭﺍﻣﯽﺗﻮﺍﻧﯿﺪﺑﯿﻦ۹ﮐﯿﻠﻮﻫﺮﺗﺮ،ﻓﺎﺻﻠﻪﺍﺯﭘﯿﺶ
ﺗﻌﯿﯿﻦﺷﺪﻩﻭ۱۰ﮐﯿﻠﻮﻫﺮﺗﺰﺗﻐﯿﯿﺮﺩﻫﯿﺪ.ﻫﻨﮕﺎﻡﺍﺳﺘﻔﺎﺩﻩﺍﺯﺗﻨﻈﯿﻢﮐﻨﻨﺪﻩﺩﺭ
ﺁﻣﺮﯾﮑﺎﯼﺷﻤﺎﻟﯽ،ﻣﺮﮐﺰﯼﻭﺟﻨﻮﺑﯽ،ﮔﺎﻡﻣﻮﺝﯾﺎﺑﯽﺭﺍﺍﺯ۹ﮐﯿﻠﻮﻫﺮﺗﺰ
)۵۳۱ﮐﯿﻠﻮﻫﺮﺗﺰﺗﺎ۱۶۰۲ﮐﯿﻠﻮﻫﺮﺗﺰﻣﺠﺎﺯ(ﺗﺎ۱۰ﮐﯿﻠﻮﻫﺮﺗﺰ)۵۳۰
ﮐﯿﻠﻮﻫﺮﺗﺰﺗﺎ۱۶۴۰ﮐﯿﻠﻮﻫﺮﺗﺰﻣﺠﺎﺯ(ﻣﺠﺪﺩﺍًﺗﻨﻈﯿﻢﮐﻨﯿﺪ.
1ﺑﺮﺍﯼﺍﻧﺘﺨﺎﺏﮔﺎﻡﻣﻮﺝﻳﺎﺑﯽAM،M.C.ﺭﺍﻓﺸﺎﺭﺩﻫﯿﺪ.
10 KHZ)۱۰ﮐﻴﻠﻮﻫﺮﺗﺰ(—9 KHZ)۹۰ﮐﻴﻠﻮﻫﺮﺗﺰ(
ﺍﻳﻦﺗﻨﻈﻴﻤﺎﺕﺍﻣﮑﺎﻥﺍﻧﺘﺨﺎﺏﺧﻮﺩﮐﺎﺭﻣﻨﺎﺑﻊUSB/iPodﺭﺍﺑﻪﺷﻤﺎﻣﯽ
ﺩﻫﺪ.
1ﺑﺮﺍﯼﻓﻌﺎﻝ/ﻏﻴﺮﻓﻌﺎﻝﮐﺮﺩﻥﻋﻤﻠﮑﺮﺩﺍﺗﺼﺎﻝﻭﭘﺨﺶ،M.C.ﺭﺍ
ﻓﺸﺎﺭﺩﻫﻴﺪ.
!ON–ﺩﺭﺻﻮﺭﺕﺍﺗﺼﺎﻝﺩﺳﺘﮕﺎﻩﺫﺧﻴﺮﻩﺳﺎﺯﯼUSB/
iPod،ﻣﻨﺒﻊﺑﻪﺻﻮﺭﺕﺧﻮﺩﮐﺎﺭﺑﺮﺭﻭﯼUSB/iPod
ﻗﺮﺍﺭﻣﯽﮔﻴﺮﺩ.ﺩﺭﺻﻮﺭﺕﻗﻄﻊﺍﺗﺼﺎﻝﺩﺳﺘﮕﺎﻩﺫﺧﻴﺮﻩ
ﺳﺎﺯﯼUSB/iPod،ﻣﻨﺒﻊﺍﻳﻦﺩﺳﺘﮕﺎﻩﻏﻴﺮﻓﻌﺎﻝﻣﯽﺷﻮﺩ.
!OFF–ﺩﺭﺻﻮﺭﺕﺍﺗﺼﺎﻝﺩﺳﺘﮕﺎﻩﺫﺧﻴﺮﻩﺳﺎﺯﯼUSB/
iPod،ﻣﻨﺒﻊﺑﻪﺻﻮﺭﺕﺧﻮﺩﮐﺎﺭﺑﺮﺭﻭﯼUSB/iPod
ﻗﺮﺍﺭﻣﯽﮔﻴﺮﺩ.ﻟﻄﻔﺎًﻣﻨﺒﻊﺭﺍﺑﻪﺻﻮﺭﺕﺩﺳﺘﯽﺑﻪUSB/
iPodﺗﻐﻴﻴﺮﺩﻫﻴﺪ.
ﺍﮔﺮﻇﺮﻑﻣﺪﺕﭼﻬﺎﺭﺛﺎﻧﻴﻪﭘﺲﺍﺯﺧﺎﻣﻮﺵﮐﺮﺩﻥﺧﻮﺩﺭﻭ،ﺻﻔﺤﻪﺟﻠﻮ
ﺍﺯﻭﺍﺣﺪﺍﺻﻠﯽﺟﺪﺍﻧﺸﻮﺩ،ﺯﻧﮓﻫﺸﺪﺍﺭﺑﻪﺻﺪﺍﺩﺭﻣﯽﺁﻳﺪ.ﺷﻤﺎﻣﯽ
ﺗﻮﺍﻧﻴﺪﺯﻧﮓﻫﺸﺪﺍﺭﺭﺍﻏﻴﺮﻓﻌﺎﻝﮐﻨﻴﺪ.
1ﺑﺮﺍﯼﻓﻌﺎﻝ/ﻏﻴﺮﻓﻌﺎﻝﮐﺮﺩﻥﺯﻧﮓﻫﺸﺪﺍﺭ،M.C.ﺭﺍﻓﺸﺎﺭﺩﻫﻴﺪ.
AUX)ﻭﺭﻭﺩﯼﮐﻤﮑﯽ(
ﻫﻨﮕﺎﻡﺍﺳﺘﻔﺎﺩﻩﺍﺯﯾﮏﺩﺳﺘﮕﺎﻩﮐﻤﮑﯽﻣﺘﺼﻞﺑﻪﺍﯾﻦﺩﺳﺘﮕﺎﻩ،ﺍﯾﻦﺗﻨﻈﯿﻢ
ﺭﺍﻓﻌﺎﻝﮐﻨﯿﺪ.
1ﺑﺮﺍﯼﻓﻌﺎﻝ/ﻏﻴﺮﻓﻌﺎﻝﮐﺮﺩﻥﺗﻨﻈﻴﻤﺎﺕﮐﻤﮑﯽ،M.C.ﺭﺍﻓﺸﺎﺭﺩﻫﻴﺪ.
Dimmer)ﺗﻨﻈﯿﻢﮐﺎﻫﺶﺩﻫﻨﺪﻩﻧﻮﺭ(
۲۳
Fa
Page 83

1
ﺑﺨﺶ
ﺍﺳﺘﻔﺎﺩﻩﺍﺯﺩﺳﺘﮕﺎﻩ
ﺍﺳﺘﻔﺎﺩﻩﺍﺯﺩﺳﺘﮕﺎﻩ
۰۲
۳M.C.ﺭﺍﺑﭽﺮﺧﺎﻧﻴﺪﺗﺎﺗﻨﻈﻴﻤﺎﺕﺍﻭﻟﻴﻪﺍﻧﺘﺨﺎﺏﺷﻮﺩ.
ﭘﺲﺍﺯﺍﻧﺘﺨﺎﺏ،ﺑﺮﺍﯼﺍﻧﺠﺎﻡﺗﻨﻈﻴﻤﺎﺕﺍﻭﻟﻴﻪﺍﻗﺪﺍﻣﺎﺕﺯﻳﺮﺭﺍﺍﻧﺠﺎﻡ
ﺩﻫﻴﺪ.
Language select)ﭼﻨﺪﺯﺑﺎﻧﯽ(
ﺑﺮﺍﯼﺭﺍﺣﺘﯽﺷﻤﺎ،ﺍﯾﻦﺩﺳﺘﮕﺎﻩﺩﺍﺭﺍﯼﯾﮏﺻﻔﺤﻪﻧﻤﺎﯾﺶﺯﺑﺎﻥﺍﺳﺖ.
ﺑﻬﺘﺮﯾﻦﺯﺑﺎﻥﻣﺘﻨﺎﺳﺐﺭﺍﺑﻪﻋﻨﻮﺍﻥﺯﺑﺎﻥﺍﻭﻝﺍﻧﺘﺨﺎﺏﮐﻨﯿﺪ.
1M.C.ﺭﺍﻓﺸﺎﺭﺩﻫﻴﺪﺗﺎﺯﺑﺎﻥﺍﻧﺘﺨﺎﺏﺷﻮﺩ.
ﺍﻧﮕﻠﯿﺴﯽ—ﺍﺳﭙﺎﻧﯿﺎﯾﯽ—ﭘﺮﺗﻐﺎﻟﯽ
Calendar)ﺗﻨﻈﻴﻢﺗﺎﺭﯾﺦ(
1ﺑﺮﺍﯼﺍﻧﺘﺨﺎﺏﻗﺴﻤﺘﯽﺍﺯﺻﻔﺤﻪﺗﻘﻮﯾﻢﮐﻪﻣﯽﺧﻮﺍﻫﯿﺪﺁﻥﺭﺍﺗﻨﻈﯿﻢ
ﮐﻨﯿﺪ،M.C.ﺭﺍﺑﻪﺳﻤﺖﭼﭗﯾﺎﺭﺍﺳﺖﻓﺸﺎﺭﺩﻫﯿﺪ.
ﺳﺎﻝ-ﺭﻭﺯ-ﻣﺎﻩ
2ﺑﺮﺍﯼﺗﻨﻈﯿﻢﺗﺎﺭﯾﺦ،M.C.ﺭﺍﺑﻪﺑﺎﻻﻳﺎﭘﺎﻳﻴﻦﻓﺸﺎﺭﺩﻫﻴﺪ.
Clock)ﺗﻨﻈﻴﻢﺳﺎﻋﺖ(
1ﺑﺮﺍﯼﺍﻧﺘﺨﺎﺏﻗﺴﻤﺘﯽﺍﺯﺻﻔﺤﻪﺳﺎﻋﺖﮐﻪﻣﯽﺧﻮﺍﻫﯿﺪﺁﻥﺭﺍﺗﻨﻈﯿﻢ
ﮐﻨﯿﺪ،M.C.ﺭﺍﺑﻪﺳﻤﺖﭼﭗﯾﺎﺭﺍﺳﺖﻓﺸﺎﺭﺩﻫﯿﺪ.
ﺳﺎﻋﺖ—ﺩﻗﻴﻘﻪ
2ﺑﺮﺍﯼﻗﺮﺍﺭﺩﺍﺩﻥﺳﺎﻋﺖﺩﺭﺳﻤﺖﺭﺍﺳﺖ،M.C.ﺭﺍﺑﻪﺑﺎﻻﻳﺎ
ﭘﺎﻳﻴﻦﻓﺸﺎﺭﺩﻫﻴﺪ.
!ﺑﺎﻓﺸﺎﺭﺩﺍﺩﻥM.C.ﻣﯽﺗﻮﺍﻧﯿﺪﺳﺎﻋﺖﺭﺍﻣﻄﺎﺑﻖﺑﺎﺳﯿﮕﻨﺎﻝﺯﻣﺎﻥ
ﺗﻨﻈﯿﻢﮐﻨﯿﺪ.
!ﺩﺭﺻﻮﺭﺕﻭﺟﻮﺩ00ﺗﺎ29،ﺩﻗﺎﯾﻖﺑﻪﺻﻮﺭﺕﮔﺮﺩﺷﺪﻩﺑﻪ
ﺭﻗﻢﮐﻮﭼﮑﺘﺮﻧﺸﺎﻥﺩﺍﺩﻩﻣﯽﺷﻮﻧﺪ.)ﺑﻪﻋﻨﻮﺍﻥﻣﺜﺎﻝ،10:18
ﺑﻪ10:00ﺗﺒﺪﯾﻞﻣﯽﺷﻮﺩ.(
!ﺩﺭﺻﻮﺭﺕﻭﺟﻮﺩ30ﺗﺎ59،ﺩﻗﺎﯾﻖﺑﻪﺻﻮﺭﺕﮔﺮﺩﺷﺪﻩﺑﻪ
ﺭﻗﻢﺑﺰﺭﮔﺘﺮﻧﺸﺎﻥﺩﺍﺩﻩﻣﯽﺷﻮﻧﺪ.)ﺑﻪﻋﻨﻮﺍﻥﻣﺜﺎﻝ،10:36
ﺑﻪ11:00ﺗﺒﺪﯾﻞﻣﯽﺷﻮﺩ.(
EngineTime alert)ﺗﻨﻈﻴﻤﺎﺕﭘﺨﺶﻣﺪﺕﺯﻣﺎﻥﺳﭙﺮﯼﺷﺪﻩ(
ﺍﯾﻦﺗﻨﻈﯿﻢﺑﻪﺷﻤﺎﺍﻣﮑﺎﻥﻣﯽﺩﻫﺪﺗﺎﻃﻮﻝﻣﺪﺕﺯﻣﺎﻥﺳﭙﺮﯼﺷﺪﻩﺭﺍﺍﺯ
ﺯﻣﺎﻥﺭﻭﺷﻦﺷﺪﻥﺩﺳﺘﮕﺎﻩﺗﻨﻈﯿﻢﮐﻨﯿﺪﻭﻣﻘﺪﺍﺭﺯﻣﺎﻥﺳﭙﺮﯼﺷﺪﻩﺭﺍﺩﺭ
ﯾﮏﺯﻣﺎﻥﺗﻨﻈﯿﻢﺷﺪﻩﻧﺸﺎﻥﻣﯽﺩﻫﺪ.
ﻫﻤﭽﻨﯿﻦﯾﮏﻫﺸﺪﺍﺭﺻﻮﺗﯽﺧﻮﺍﻫﯿﺪﺷﻨﯿﺪ.
1M.C.ﺭﺍﻓﺸﺎﺭﺩﻫﻴﺪﺗﺎﺗﻨﻈﻴﻤﺎﺕﻣﻮﺭﺩﻋﻼﻗﻪﺷﻤﺎﺍﻧﺘﺨﺎﺏﺷﻮﺩ.
OFF—15Minutes—30Minutes
FM step)ﻓﺎﺻﻠﻪﻣﻮﺝﻳﺎﺑﯽFM(
ﺍﮔﺮﻧﻤﯽﺧﻮﺍﻫﯿﺪﺻﺪﺍﯼﺿﻌﯿﻔﯽﺩﺭﻣﺤﺪﻭﺩﻩﻓﺮﮐﺎﻧﺲﺧﺮﻭﺟﯽﺳﺎﺑﻮﻭﻓﺮ
ﺍﺯﺑﻠﻨﺪﮔﻮﻫﺎﯼﺟﻠﻮﻭﻋﻘﺐﭘﺨﺶﺷﻮﺩ،HPF)ﻓﯿﻠﺘﺮﺻﺪﺍﯼﻗﻮﯼﺗﺮ(
ﺭﺍﺭﻭﺷﻦﮐﻨﯿﺪ.ﻓﻘﻂﻓﺮﮐﺎﻧﺲﻫﺎﯼﺑﺎﻻﺗﺮﺍﺯﻣﻮﺍﺭﺩﻣﻮﺟﻮﺩﺩﺭﻣﺤﺪﻭﺩﻩ
ﺍﻧﺘﺨﺎﺑﯽﺍﺯﺑﻠﻨﺪﮔﻮﻫﺎﯼﺟﻠﻮﯾﺎﻋﻘﺐﭘﺨﺶﻣﯽﺷﻮﻧﺪ.
1M.C.ﺭﺍﺑﺮﺍﯼﺭﻭﺷﻦﯾﺎﺧﺎﻣﻮﺵﮐﺮﺩﻥﻓﯿﻠﺘﺮﻋﺒﻮﺭﺑﺎﻻﻓﺸﺎﺭ
ﺩﻫﻴﺪ.
2M.C.ﺭﺍﺑﺮﺍﯼﺍﻧﺘﺨﺎﺏﻓﺮﮐﺎﻧﺲﻗﻄﻊﺑﻪﺳﻤﺖﭼﭗﯾﺎﺭﺍﺳﺖﻓﺸﺎﺭ
ﺩﻫﯿﺪ.
50Hz—63Hz—80Hz—100Hz—125Hz
SLA)ﺗﻨﻈﻴﻢﺳﻄﺢﻣﻨﺒﻊ(
SLA)ﺗﻨﻈﻴﻢﺳﻄﺢﻣﻨﺒﻊ(ﺑﻪﺷﻤﺎﺍﻣﮑﺎﻥﻣﯽﺩﻫﺪﮐﻪﺳﻄﺢﺻﺪﺍﯼ
ﻫﺮﻳﮏﺍﺯﻣﻨﺎﺑﻊﺭﺍﺑﺮﺍﯼﺟﻠﻮﮔﻴﺮﯼﺍﺯﺗﻐﻴﻴﺮﺍﺕﺻﻮﺗﯽﺍﺳﺎﺳﯽﺩﺭ
ﻫﻨﮕﺎﻡﺍﻧﺘﺨﺎﺏﺍﺯﺑﻴﻦﻣﻨﺎﺑﻊ،ﺗﻨﻈﻴﻢﮐﻨﻴﺪ.
!ﻫﻨﮕﺎﻡﺍﻧﺘﺨﺎﺏFMﺑﻌﻨﻮﺍﻥﻣﻨﺒﻊ،ﺍﻣﮑﺎﻥﺟﺎﺑﺠﺎﯾﯽﺑﻪSLAﻭﺟﻮﺩ
ﻧﺪﺍﺭﺩ.
!ﺍﯾﻦﺗﻈﯿﻤﺎﺕﺑﺮﺍﺳﺎﺱﺳﻄﺢﻣﯿﺰﺍﻥﺻﺪﺍﯼFMﺍﻧﺠﺎﻡﻣﯽﮔﯿﺮﻧﺪ
ﮐﻪﺑﺪﻭﻥﻫﯿﭻﺗﻐﯿﯿﺮﺣﻔﻆﻣﯽﺷﻮﻧﺪ.
!ﺑﺎﺍﺳﺘﻔﺎﺩﻩﺍﺯﺍﯾﻦﻋﻤﻠﮑﺮﺩﻣﯽﺗﻮﺍﻧﯿﺪﺳﻄﺢﺻﺪﺍﯼAMﺭﺍﻧﯿﺰ
ﺗﻨﻈﯿﻢﮐﻨﯿﺪ.
1ﺑﺮﺍﯼﺗﻨﻈﯿﻢﻣﯿﺰﺍﻥﺻﺪﺍﯼﻣﻨﺒﻊ،M.C.ﺭﺍﺑﻪﺑﺎﻻﻳﺎﭘﺎﻳﻴﻦﻓﺸﺎﺭ
ﺩﻫﻴﺪ.
ﻣﺤﺪﻭﺩﻩﺗﻨﻈﻴﻢ:+4ﺗﺎ–4
ﺗﻨﻈﻴﻤﺎﺕﺍﻭﻟﻴﻪ
1ﻧﻤﺎﯾﺶﻋﻤﻠﮑﺮﺩ
!ﻭﺿﻌﯿﺖﻋﻤﻠﮑﺮﺩﺭﺍﻧﺸﺎﻥﻣﯽﺩﻫﺪ.
۱SRC/OFFﺭﺍﻓﺸﺎﺭﺩﺍﺩﻩﻭﻧﮕﻪﺩﺍﺭﻳﺪﺗﺎﺩﺳﺘﮕﺎﻩﺧﺎﻣﻮﺵ
ﺷﻮﺩ.
۲M.C.ﺭﺍﻓﺸﺎﺭﺩﺍﺩﻩﻭﻧﮕﻪﺩﺍﺭﻳﺪﺗﺎﻣﻨﻮﯼﺗﻨﻈﻴﻤﺎﺕﺍﻭﻟﻴﻪﺑﺮ
ﺭﻭﯼﺻﻔﺤﻪﻇﺎﻫﺮﺷﻮﺩ.
ﻧﻘﺺﻫﺎﯼﻣﻮﺟﻮﺩﺩﺭﻓﺮﮐﺎﻧﺲﻫﺎﯼﭘﺎﯾﯿﻦﻭﺑﺎﻻﺩﺭﻣﯿﺰﺍﻥﺻﺪﺍﯼﮐﻢﺭﺍ
ﻣﯽﺗﻮﺍﻥﺑﺎﺑﻠﻨﺪﮐﺮﺩﻥﺻﺪﺍﺟﺒﺮﺍﻥﮐﺮﺩ.
1M.C.ﺭﺍﺑﺮﺍﯼﺭﻭﺷﻦﯾﺎﺧﺎﻣﻮﺵﮐﺮﺩﻥﺑﻠﻨﺪﯼﺻﺪﺍﻓﺸﺎﺭﺩﻫﻴﺪ.
2M.C.ﺭﺍﺑﺮﺍﯼﺍﻧﺘﺨﺎﺏﺗﻨﻈﯿﻢﺩﻟﺨﻮﺍﻩﺑﻪﺳﻤﺖﭼﭗﯾﺎﺭﺍﺳﺖﻓﺸﺎﺭ
ﺩﻫﯿﺪ.
Low)ﮐﻢ(—Mid)ﻣﺘﻮﺳﻂ(—High)ﺯﯾﺎﺩ(
Sub W.1)ﺗﻨﻈﻴﻤﺎﺕﺭﻭﺷﻦ/ﺧﺎﻣﻮﺵﺳﺎﺑﻮﻭﻓﺮ(
ﺍﯾﻦﺩﺳﺘﮕﺎﻩﺩﺍﺭﺍﯼﯾﮏﺧﺮﻭﺟﯽﺳﺎﺑﻮﻭﻓﺮﺍﺳﺖﮐﻪﻣﯽﺗﻮﺍﻥﺁﻥﺭﺍ
ﺭﻭﺷﻦﯾﺎﺧﺎﻣﻮﺵﮐﺮﺩ.
1M.C.ﺭﺍﺑﺮﺍﯼﺭﻭﺷﻦﯾﺎﺧﺎﻣﻮﺵﮐﺮﺩﻥﺧﺮﻭﺟﯽﺳﺎﺑﻮﻭﻓﺮﻓﺸﺎﺭ
ﺩﻫﻴﺪ.
2M.C.ﺭﺍﺑﺮﺍﯼﺍﻧﺘﺨﺎﺏﺗﻨﻈﯿﻢﻣﺮﺣﻠﻪﺧﺮﻭﺟﯽﺳﺎﺑﻮﻭﻓﺮﺑﻪﺳﻤﺖ
ﭼﭗﯾﺎﺭﺍﺳﺖﻓﺸﺎﺭﺩﻫﯿﺪ.
ﺑﺮﺍﯼﺍﻧﺘﺨﺎﺏﻣﺮﺣﻠﻪﻣﻌﮑﻮﺱM.C.ﺭﺍﺑﻪﺳﻤﺖﭼﭗﻓﺸﺎﺭﺩﻫﯿﺪ
ﻭReverseﺑﺮﺭﻭﯼﺻﻔﺤﻪﻧﺸﺎﻥﺩﺍﺩﻩﻣﯽﺷﻮﺩ.ﺑﺮﺍﯼﺍﻧﺘﺨﺎﺏ
ﻣﺮﺣﻠﻪﻣﻌﻤﻮﻟﯽM.C.ﺭﺍﺑﻪﺳﻤﺖﺭﺍﺳﺖﻓﺸﺎﺭﺩﻫﯿﺪﻭ
Normalﺑﺮﺭﻭﯼﺻﻔﺤﻪﻧﺸﺎﻥﺩﺍﺩﻩﻣﯽﺷﻮﺩ.
Sub W.2)ﺗﻨﻈﻴﻢﺳﺎﺑﻮﻭﻓﺮ(
ﺑﺎﺭﻭﺷﻦﺑﻮﺩﻥﺧﺮﻭﺟﯽﺳﺎﺑﻮﻭﻓﺮﻣﯽﺗﻮﺍﻧﯿﺪﻓﺮﮐﺎﻧﺲﻗﻄﻊﻭﺳﻄﺢ
ﺧﺮﻭﺟﯽﺭﺍﺗﻨﻈﯿﻢﮐﻨﯿﺪ.
ﻓﻘﻂﻓﺮﮐﺎﻧﺲﻫﺎﯾﯽﮐﻤﺘﺮﺍﺯﻣﻘﺎﺩﯾﺮﻣﻮﺟﻮﺩﺩﺭﻣﺤﺪﻭﺩﻩﺍﻧﺘﺨﺎﺑﯽﺍﺯ
ﺳﺎﺑﻮﻭﻓﺮﭘﺨﺶﻣﯽﺷﻮﻧﺪ.
1M.C.ﺭﺍﺑﺮﺍﯼﺍﻧﺘﺨﺎﺏﻓﺮﮐﺎﻧﺲﻗﻄﻊﺑﻪﺳﻤﺖﭼﭗﯾﺎﺭﺍﺳﺖﻓﺸﺎﺭ
ﺩﻫﯿﺪ.
50Hz—63Hz—80Hz—100Hz—125Hz
2ﺑﺮﺍﯼﺗﻨﻈﯿﻢﺳﻄﺢﺧﺮﻭﺟﯽﺳﺎﺑﻮﻭﻓﺮ،M.C.ﺭﺍﺑﻪﺳﻤﺖﺑﺎﻻﯾﺎ
ﭘﺎﯾﯿﻦﻓﺸﺎﺭﺩﻫﯿﺪ.
ﺑﺎﻫﺮﺑﺎﺭﻓﺸﺮﺩﻥM.C.ﺑﻪﺳﻤﺖﺑﺎﻻﯾﺎﭘﺎﯾﯿﻦ،ﺳﻄﺢﺳﺎﺑﻮﻭﻓﺮﮐﻢ
ﯾﺎﺯﯾﺎﺩﻣﯽﺷﻮﺩ.ﺑﺎﮐﻢﻭﺯﯾﺎﺩﺷﺪﻥﺳﻄﺢ،-24ﺗﺎ+6ﻧﻤﺎﯾﺶﺩﺍﺩﻩ
ﻣﯽﺷﻮﺩ.
Bass)ﺍﻓﺰﺍﻳﺶﺑﻤﯽﺻﺪﺍ(
1ﺑﺮﺍﯼﺍﻧﺘﺨﺎﺏﺳﻄﺢﺩﻟﺨﻮﺍﻩ،M.C.ﺭﺍﺑﻪﺑﺎﻻﻳﺎﭘﺎﻳﻴﻦﻓﺸﺎﺭﺩﻫﻴﺪ.
ﺑﺎﺍﻓﺰﺍﯾﺶﯾﺎﮐﺎﻫﺶﺳﻄﺢ،0ﺗﺎ+6ﻧﻤﺎﯾﺶﺩﺍﺩﻩﻣﯽﺷﻮﺩ.
HPF)ﺗﻨﻈﻴﻢﻓﻴﻠﺘﺮﻋﺒﻮﺭﺑﺎﻻ(
Fader/Balance)ﺗﻨﻈﻴﻢﻓﻴﺪﺭ/ﺗﻮﺍﺯﻥ(
1M.C.ﺭﺍﺑﺮﺍﯼﺗﻨﻈﯿﻢﺗﻮﺍﺯﻥﺻﻮﺗﯽﺑﻠﻨﺪﮔﻮﯼﺟﻠﻮ/ﻋﻘﺐﺑﻪﺳﻤﺖ
ﺑﺎﻻﯾﺎﭘﺎﯾﯿﻦﻓﺸﺎﺭﺩﻫﯿﺪ.
!ﺍﮔﺮﺗﻨﻈﯿﻤﺎﺕﺧﺮﻭﺟﯽﭘﺸﺘﯽﺭﻭﯼRear SP :S/Wﺑﺎﺷﺪ،
ﺍﻣﮑﺎﻥﺗﻨﻈﯿﻢﻣﯿﺰﺍﻥﺻﺪﺍﯼﺑﻠﻨﺪﮔﻮﯼﺟﻠﻮ/ﻋﻘﺐﻭﺟﻮﺩﻧﺪﺍﺭﺩ.
S/W control)ﺗﻨﻈﻴﻤﺎﺕﺧﺮﻭﺟﯽﻋﻘﺐﻭﺳﺎﺑﻮﻭﻓﺮ(
ﺑﻪ
ﺩﺭﺻﻔﺤﻪﺑﻌﺪﻣﺮﺍﺟﻌﻪﮐﻨﻴﺪ.
2M.C.ﺭﺍﺑﺮﺍﯼﺗﻨﻈﯿﻢﺗﻮﺍﺯﻥﺻﻮﺗﯽﺑﻠﻨﺪﮔﻮﯼﭼﭗ/ﺭﺍﺳﺖﺑﻪ
ﺳﻤﺖﭼﭗﯾﺎﺭﺍﺳﺖﻓﺸﺎﺭﺩﻫﯿﺪ.
Powerful)ﻓﺮﺍﺧﻮﺍﻧﯽﺍﮐﻮﺍﻻﻳﺰﺭ(
1M.C.ﺭﺍﺑﺮﺍﯼﺍﻧﺘﺨﺎﺏﺗﻨﻈﯿﻢﯾﮏﻣﻨﺤﻨﯽﺍﮐﻮﻻﯾﺰﺭﺑﻪﺳﻤﺖﭼﭗ
ﯾﺎﺭﺍﺳﺖﻓﺸﺎﺭﺩﻫﯿﺪ.
Powerful—Natural—Vocal—Custom1—
Custom2—Flat—Super bass
100 Hz)ﺗﻨﻈﻴﻢﺍﮐﻮﺍﻻﻳﺰﺭ(
ﻣﯽﺗﻮﺍﻧﻴﺪﻣﻨﺤﻨﯽﺍﮐﻮﺍﻻﻳﺰﺭﺍﻧﺘﺨﺎﺏﺷﺪﻩﺭﺍﻣﻄﺎﺑﻖﻣﻴﻞﺧﻮﺩﺗﻨﻈﻴﻢﮐﻨﻴﺪ.
ﺗﻨﻈﻴﻤﺎﺕﻣﻨﺤﻨﯽﺍﮐﻮﺍﻻﻳﺰﺭﺫﺧﻴﺮﻩﺷﺪﻩﺩﺭCustom1ﻳﺎ
Custom2ﺭﺍﺗﻨﻈﻴﻢﮐﻨﻴﺪ.
!ﺑﺮﺍﯼﻫﺮﻣﻨﺒﻊﻣﯽﺗﻮﺍﻧﯿﺪﯾﮏﻣﻨﺤﻨﯽCustom1ﺟﺪﺍﮔﺎﻧﻪﺍﯾﺠﺎﺩ
ﮐﻨﯿﺪ.ﺩﺭﺻﻮﺭﺕﺍﻧﺠﺎﻡﺗﻨﻈﻴﻤﺎﺕﺩﺭﺻﻮﺭﺕﺍﻧﺘﺨﺎﺏﻣﻨﺤﻨﯽﻏﻴﺮ
ﻣﺸﺘﺮﮎﺑﺎﺷﺪ.ﺩﺭﺻﻮﺭﺕﺍﻧﺠﺎﻡﺗﻨﻈﻴﻤﺎﺕﺩﺭﺻﻮﺭﺕﺍﻧﺘﺨﺎﺏ
ﻣﻨﺤﻨﯽCustom2،ﻣﻨﺤﻨﯽCustom2ﺑﻪﺭﻭﺯﺧﻮﺍﻫﺪﺷﺪ.
100Hz—315Hz—1.25kHz—3.15kHz—8kHz
ﺷﻮﺩ.
LOUD)ﺑﻠﻨﺪﯼ(
ﻓﺎﺭﺳﯽ
ﺍﺯCustom2،ﺗﻨﻈﻴﻤﺎﺕﻣﻨﺤﻨﯽﺍﮐﻮﺍﻻﻳﺰﺭﺩﺭCustom1
ﺫﺧﻴﺮﻩﺧﻮﺍﻫﻨﺪﺷﺪ.
!ﻣﯽﺗﻮﺍﻥﻳﮏﻣﻨﺤﻨﯽCustom2ﺍﻳﺠﺎﺩﮐﺮﺩﮐﻪﺑﺮﺍﯼﺗﻤﺎﻡﻣﻨﺎﺑﻊ
1ﻣﻨﺤﻨﯽﺍﮐﻮﻻﯾﺰﺭﻣﻮﺭﺩﻧﻈﺮﺑﺮﺍﯼﺗﻨﻈﯿﻢﺭﺍﺑﺎﺯﺧﻮﺍﻧﯽﮐﻨﯿﺪ.
2ﺑﺮﺍﯼﺍﻧﺘﺨﺎﺏﺑﺎﻧﺪﺍﮐﻮﻻﯾﺰﺭﺟﻬﺖﺗﻨﻈﯿﻢ،M.C.ﺭﺍﺑﻪﺳﻤﺖﭼﭗ
ﯾﺎﺭﺍﺳﺖﻓﺸﺎﺭﺩﻫﯿﺪ.
3ﺑﺮﺍﯼﺗﻨﻈﯿﻢﻣﻨﺤﻨﯽﺍﮐﻮﻻﯾﺰﺭ،M.C.ﺭﺍﺑﻪﺑﺎﻻﻳﺎﭘﺎﻳﻴﻦﻓﺸﺎﺭ
ﺩﻫﻴﺪ.
ﺑﺎﺍﻓﺰﺍﯾﺶﯾﺎﮐﺎﻫﺶﻣﻨﺤﻨﯽﺍﮐﻮﻻﯾﺰﺭ،+6ﺗﺎ–6ﻧﻤﺎﯾﺶﺩﺍﺩﻩﻣﯽ
۲۲
Fa
Page 84

1
۰۲
ﺑﺨﺶ
ﺍﺳﺘﻔﺎﺩﻩﺍﺯﺩﺳﺘﮕﺎﻩ
ﺍﺳﺘﻔﺎﺩﻩﺍﺯﺩﺳﺘﮕﺎﻩ
ﻋﻤﻠﻴﺎﺕﭘﻴﺸﺮﻓﺘﻪﺑﺎﺍﺳﺘﻔﺎﺩﻩﺍﺯﺩﮐﻤﻪ
ﻫﺎﯼﻭﻳﮋﻩ
ﺗﻨﻈﻴﻤﺎﺕﺭﻭﺷﻦ/ﺧﺎﻣﻮﺵﺳﺎﺑﻮﻭﻓﺮ
1SW/BASSﺭﺍﺑﺮﺍﯼﺍﻧﺘﺨﺎﺏﻣﻨﻮﯼﺗﻨﻈﯿﻤﺎﺕﺭﻭﺷﻦ/ﺧﺎﻣﻮﺵ
ﺳﺎﺑﻮﻭﻓﺮﻓﺸﺎﺭﺩﻫﯿﺪ.
2M.C.ﺭﺍﺑﺮﺍﯼﺭﻭﺷﻦﯾﺎﺧﺎﻣﻮﺵﮐﺮﺩﻥﺧﺮﻭﺟﯽﺳﺎﺑﻮﻭﻓﺮﻓﺸﺎﺭ
ﺩﻫﻴﺪ.
3M.C.ﺭﺍﺑﺮﺍﯼﺍﻧﺘﺨﺎﺏﺗﻨﻈﯿﻢﻣﺮﺣﻠﻪﺧﺮﻭﺟﯽﺳﺎﺑﻮﻭﻓﺮﺑﻪﺳﻤﺖ
ﭼﭗﯾﺎﺭﺍﺳﺖﻓﺸﺎﺭﺩﻫﯿﺪ.
ﺗﻨﻈﻴﻢﺳﺎﺑﻮﻭﻓﺮ
1SW/BASSﺭﺍﺑﺮﺍﯼﺍﻧﺘﺨﺎﺏﻣﻨﻮﯼﺗﻨﻈﯿﻤﺎﺕﺳﺎﺑﻮﻭﻓﺮﻓﺸﺎﺭ
ﺩﻫﯿﺪ.
2M.C.ﺭﺍﺑﺮﺍﯼﺍﻧﺘﺨﺎﺏﻓﺮﮐﺎﻧﺲﻗﻄﻊﺑﻪﺳﻤﺖﭼﭗﯾﺎﺭﺍﺳﺖ
ﻓﺸﺎﺭﺩﻫﯿﺪ.
50Hz—63Hz—80Hz—100Hz—125Hz
3ﺑﺮﺍﯼﺗﻨﻈﯿﻢﺳﻄﺢﺧﺮﻭﺟﯽﺳﺎﺑﻮﻭﻓﺮ،M.C.ﺭﺍﺑﻪﺳﻤﺖﺑﺎﻻﯾﺎ
ﭘﺎﯾﯿﻦﻓﺸﺎﺭﺩﻫﯿﺪ.
ﺑﺎﻫﺮﺑﺎﺭﻓﺸﺮﺩﻥM.C.ﺑﻪﺳﻤﺖﺑﺎﻻﯾﺎﭘﺎﯾﯿﻦ،ﺳﻄﺢﺳﺎﺑﻮﻭﻓﺮﮐﻢ
ﯾﺎﺯﯾﺎﺩﻣﯽﺷﻮﺩ.ﺑﺎﮐﻢﻭﺯﯾﺎﺩﺷﺪﻥﺳﻄﺢ،-24ﺗﺎ+6ﻧﻤﺎﯾﺶﺩﺍﺩﻩ
ﻣﯽﺷﻮﺩ.
ﺗﻘﻮﻳﺖﺻﺪﺍﯼﺑﻢ
1SW/BASSﺭﺍﺑﺮﺍﯼﺍﻧﺘﺨﺎﺏﻣﻨﻮﯼﺗﻨﻈﯿﻤﺎﺕﺗﻘﻮﯾﻢﺻﺪﺍﯼﺑﻢ
ﻓﺸﺎﺭﺩﻫﯿﺪﻭﻧﮕﻬﺪﺍﺭﯾﺪ.
2ﺑﺮﺍﯼﺍﻧﺘﺨﺎﺏﺳﻄﺢﺩﻟﺨﻮﺍﻩ،M.C.ﺭﺍﺑﻪﺑﺎﻻﻳﺎﭘﺎﻳﻴﻦﻓﺸﺎﺭﺩﻫﻴﺪ.
ﺗﻨﻈﯿﻢﻋﻤﻠﮑﺮﺩﺻﻮﺗﯽ
۱ﺑﺮﺍﯼﻧﻤﺎﻳﺶﻣﻨﻮﯼﺍﺻﻠﯽM.C.ﺭﺍﻓﺸﺎﺭﺩﻫﻴﺪ.
۲ﺑﺮﺍﯼﺗﻐﻴﻴﺮﮔﺰﻳﻨﻪﻫﺎﯼﻣﻨﻮM.C.،ﻭﺑﺮﺍﯼﺍﻧﺘﺨﺎﺏ،
AUDIOﺭﺍﻓﺸﺎﺭﺩﻫﻴﺪ.
۳M.C.ﺭﺍﺑﭽﺮﺧﺎﻧﻴﺪﺗﺎﻋﻤﻠﮑﺮﺩﺻﻮﺗﯽﺍﻧﺘﺨﺎﺏﺷﻮﺩ.
ﭘﺲﺍﺯﺍﻧﺘﺨﺎﺏ،ﺑﺮﺍﯼﺗﻨﻈﻴﻢﻋﻤﻠﮑﺮﺩﺻﻮﺗﯽﺍﻗﺪﺍﻣﺎﺕﺯﻳﺮﺭﺍﺍﻧﺠﺎﻡ
ﺩﻫﻴﺪ.
!ﺣﺘﯽﺩﺭﺻﻮﺭﺗﯽﮐﻪﺣﺎﻟﺖﮐﻨﺘﺮﻝﺑﺮﺭﻭﯼiPod/APPﺗﻨﻈﻴﻢ
ﺷﺪﻩﺑﺎﺷﺪ،ﻋﻤﻠﮑﺮﺩﻫﺎﯼﺯﻳﺮﻫﻤﭽﻨﺎﻥﺗﻮﺳﻂﺩﺳﺘﮕﺎﻩﻗﺎﺑﻞ
ﺩﺳﺘﺮﺳﯽﺧﻮﺍﻫﻨﺪﺑﻮﺩ.
—ﺍﻧﺘﺨﺎﺏﺍﻃﻼﻋﺎﺕﻣﺘﻨﯽ)iPod(
—ﺍﻳﺠﺎﺩﻣﮑﺚ
—ﺣﺮﮐﺖﺳﺮﻳﻊﺭﻭﺑﻪﺟﻠﻮ/ﺭﻭﺑﻪﻋﻘﺐ
—ﺍﻧﺘﺨﺎﺏﺗﺮﺍﮎﺑﻌﺪﯼ/ﻗﺒﻠﯽ
—ﭘﺨﺶﺑﺪﻭﻥﺗﺮﺗﯿﺐ)ﺗﺮﺗﻴﺐﺗﺼﺎﺩﻓﯽ(
)ﻟﯿﺴﺖ(ﺑﺮﺍﯼﺍﺳﺘﻔﺎﺩﻩﺍﺯﻣﻨﻮﯼiPod
—
—ﺑﺮﺍﯼﻓﺸﺮﺩﻥﭼﺮﺥﮐﻠﯿﮏiPod،M.C.ﺭﺍﻓﺸﺎﺭﺩﻫﯿﺪ
—ﺑﺮﺍﯼﭼﺮﺧﺎﻧﺪﻥﭼﺮﺥﮐﻠﯿﮏiPodﺑﻪﺳﻤﺖﭼﭗ،M.C.ﺭﺍﺑﻪ
ﺳﻤﺖﺑﺎﻻﻓﺸﺎﺭﺩﻫﯿﺪ
—ﺑﺮﺍﯼﭼﺮﺧﺎﻧﺪﻥﭼﺮﺥﮐﻠﯿﮏiPodﺑﻪﺳﻤﺖﺭﺍﺳﺖ،M.C.ﺭﺍ
ﺑﻪﺳﻤﺖﭘﺎﯾﯿﻦﻓﺸﺎﺭﺩﻫﯿﺪ
!ﺍﮔﺮﺣﺎﻟﺖﮐﻨﺘﺮﻝﺑﺮﺭﻭﯼiPod/APPﺗﻨﻈﻴﻢﺷﺪﻩﺑﺎﺷﺪ،
ﻋﻤﻠﮑﺮﺩﻫﺎﺑﻪﺻﻮﺭﺕﺯﯾﺮﻣﺤﺪﻭﺩﺧﻮﺍﻫﻨﺪﺷﺪ:
—ﺗﻨﻈﯿﻤﺎﺕﻋﻤﻠﮑﺮﺩﻗﺎﺑﻞﺩﺳﺘﺮﺳﯽﻧﺨﻮﺍﻫﺪﺑﻮﺩ.
—ﻋﻤﻠﮑﺮﺩﻣﺮﻭﺭﺭﺍﻧﻤﯽﺗﻮﺍﻥﺩﺭﺍﻳﻦﺩﺳﺘﮕﺎﻩﻣﻮﺭﺩﺍﺳﺘﻔﺎﺩﻩﻗﺮﺍﺭ
ﺩﺍﺩ.
ﭘﺨﺶﺁﻫﻨﮓ
ﺩﺭﺻﻔﺤﻪﻗﺒﻞﻣﺮﺍﺟﻌﻪﮐﻨﻴﺪ.
ﺗﻨﻈﻴﻢﺧﻮﺩﮐﺎﺭ
1ﻧﻤﺎﯾﺶﺻﻮﺗﯽ
ﻭﺿﻌﯿﺖﺗﻨﻈﯿﻤﺎﺕﺻﻮﺗﯽﺭﺍﻧﺸﺎﻥﻣﯽﺩﻫﺪ.
Shuffle mode)ﭘﺨﺶﺗﺼﺎﺩﻓﯽ(
1M.C.ﺭﺍﻓﺸﺎﺭﺩﻫﻴﺪﺗﺎﺗﻨﻈﻴﻤﺎﺕﻣﻮﺭﺩﻋﻼﻗﻪﺷﻤﺎﺍﻧﺘﺨﺎﺏﺷﻮﺩ.
!Shuffle Songs–ﺁﻫﻨﮓﻫﺎﺩﺭﻟﯿﺴﺖﺍﻧﺘﺨﺎﺑﯽﺑﺪﻭﻥ
ﺗﺮﺗﯿﺐﭘﺨﺶﻣﯽﺷﻮﻧﺪ.
!Shuffle Albums–ﭘﺨﺶﺗﺮﺗﻴﺒﯽﺁﻫﻨﮓﺍﺯﺁﻟﺒﻮﻡ
ﺍﻧﺘﺨﺎﺏﺷﺪﻩﺑﻪﺻﻮﺭﺕﺗﺼﺎﺩﻓﯽ.
!Shuffle OFF–ﭘﺨﺶﺑﺪﻭﻥﺗﺮﺗﯿﺐﺭﺍﻟﻐﻮﻣﯽﮐﻨﺪ.
Shuffle all)ﭘﺨﺶﺗﺼﺎﺩﻓﯽﻫﻤﻪ(
1ﺑﺮﺍﯼﻓﻌﺎﻝﮐﺮﺩﻥﭘﺨﺶﺗﺼﺎﺩﻓﯽﻫﻤﻪ،M.C.ﺭﺍﻓﺸﺎﺭﺩﻫﻴﺪ.
ﺑﺮﺍﯼﻏﻴﺮﻓﻌﺎﻝﮐﺮﺩﻥ،Shuffle modeﺭﺍﺩﺭﻣﻨﻮﯼ
FUNCTIONﻏﻴﺮﻓﻌﺎﻝﮐﻨﻴﺪ.
Link play)ﭘﺨﺶﭘﻴﻮﻧﺪﯼ(
1ﺑﺮﺍﯼﺗﻐﻴﻴﺮﺣﺎﻟﺖ،M.C.ﺭﺍﺑﻪﺳﻤﺖﭼﭗﯾﺎﺭﺍﺳﺖﻓﺸﺎﺭﺩﻫﯿﺪﻭ
ﺑﺮﺍﯼﺍﻧﺘﺨﺎﺏ،ﺁﻥﺭﺍﻓﺸﺎﺭﺩﻫﻴﺪ.
ﺑﺮﺍﯼﻣﺸﺎﻫﺪﻩﺟﺰﻳﻴﺎﺕﻣﺮﺑﻮﻁﺑﻪﺍﻳﻦﺗﻨﻈﻴﻤﺎﺕ،ﺑﻪ
ﻫﺎﯼﻣﺮﺑﻮﻁﺑﻪﺁﻫﻨﮓﺩﺭﺣﺎﻝﭘﺨﺶ
PAUSE)ﻣﮑﺚ(
1ﺑﺮﺍﯼﺍﻳﺠﺎﺩﻣﮑﺚﺩﺭﭘﺨﺶﻳﺎﺍﺩﺍﻣﻪﭘﺨﺶ،M.C.ﺭﺍﻓﺸﺎﺭﺩﻫﻴﺪ.
Audiobooks)ﺳﺮﻋﺖﮐﺘﺎﺑﭽﻪﺻﻮﺗﯽ(
1M.C.ﺭﺍﻓﺸﺎﺭﺩﻫﻴﺪﺗﺎﺗﻨﻈﻴﻤﺎﺕﻣﻮﺭﺩﻋﻼﻗﻪﺷﻤﺎﺍﻧﺘﺨﺎﺏﺷﻮﺩ.
!Faster–ﭘﺨﺶﺑﺎﺳﺮﻋﺘﯽﺑﯿﺶﺍﺯﺣﺎﻟﺖﻣﻌﻤﻮﻟﯽﺍﻧﺠﺎﻡ
ﻣﯽﺷﻮﺩ
!Normal–ﭘﺨﺶﺑﺎﺳﺮﻋﺖﻣﻌﻤﻮﻟﯽﺍﻧﺠﺎﻡﻣﯽﮔﯿﺮﺩ
!Slower–ﭘﺨﺶﺑﺎﺳﺮﻋﺘﯽﮐﻤﺘﺮﺍﺯﺣﺎﻟﺖﻣﻌﻤﻮﻟﯽﺍﻧﺠﺎﻡ
ﻣﯽﺷﻮﺩ
Sound Retriever)ﺑﺎﺯﻳﺎﺏﺻﺪﺍ(
ﺑﻬﺒﻮﺩﮐﻴﻔﻴﺖﺻﺪﺍﯼﻓﺸﺮﺩﻩﻭﺑﺎﺯﻳﺎﺑﯽ
ﺩﺭﺍﻳﻦﺻﻔﺤﻪﻣﺮﺍﺟﻌﻪﮐﻨﯿﺪ.
1M.C.ﺭﺍﺑﺮﺍﯼﺍﻧﺘﺨﺎﺏﺗﻨﻈﯿﻢﺩﻟﺨﻮﺍﻩﻓﺸﺎﺭﺩﻫﯿﺪ.
ﺑﺮﺍﯼﺍﻃﻼﻉﺍﺯﺟﺰﺋﯿﺎﺕﺑﻪ
ﮐﻴﻔﻴﺖﺻﺪﺍ)ﺑﺎﺯﻳﺎﺏﺻﺪﺍ(
/LOCﺭﺍﻓﺸﺎﺭﺩﻫﻴﺪ.
ﻧﮑﺎﺕ
!ﺗﻨﻈﻴﻢﺣﺎﻟﺖﮐﻨﺘﺮﻝﺑﺮﺭﻭﯼiPod،ﺑﺎﻋﺚﺍﻳﺠﺎﺩﻣﮑﺚﺩﺭﭘﺨﺶ
ﺁﻫﻨﮓﻣﯽﺷﻮﺩ.ﺑﺮﺍﯼﺍﺩﺍﻣﻪﭘﺨﺶ،iPodﺭﺍﺑﻪﮐﺎﺭﺑﻴﻨﺪﺍﺯﻳﺪ.
ﺍﺳﺘﻔﺎﺩﻩﺍﺯﻋﻤﻠﮑﺮﺩiPodﺍﻳﻦﺩﺳﺘﮕﺎﻩﺍﺯﻃﺮﻳﻖiPodﺷﻤﺎ
ﻫﻨﮕﺎﻡﺍﻧﺘﺨﺎﺏAPP،ﺑﺎﺍﺳﺘﻔﺎﺩﻩﺍﺯﺑﻠﻨﺪﮔﻮﻫﺎﯼﻣﺎﺷﯿﻦﻣﯽﺗﻮﺍﻧﯿﺪﺑﻪ
ﺻﺪﺍﯼﺑﺮﻧﺎﻣﻪﻫﺎﯼiPodﺧﻮﺩﮔﻮﺵﺩﻫﯿﺪ.
ﺍﻳﻦﻋﻤﻠﮑﺮﺩﺑﺎﻣﺪﻝﻫﺎﯼiPodﺯﻳﺮﺳﺎﺯﮔﺎﺭﻧﻴﺴﺖ.
!ﻧﺴﻞ۱iPodﻧﺎﻧﻮ
!ﻧﺴﻞ۵iPod
ﺣﺎﻟﺖAPPﺑﺎﻣﺪﻝﻫﺎﯼiPodﺯﻳﺮﺳﺎﺯﮔﺎﺭﺍﺳﺖ.
!ﻧﺴﻞﺳﻮﻡiPodﻟﻤﺴﯽ)ﻧﺴﺨﻪﻧﺮﻡﺍﻓﺰﺍﺭ۳٫۰ﯾﺎﺟﺪﯾﺪﺗﺮ(
!ﻧﺴﻞﺩﻭﻡiPodﻟﻤﺴﯽ)ﻧﺴﺨﻪﻧﺮﻡﺍﻓﺰﺍﺭ۳٫۰ﯾﺎﺟﺪﯾﺪﺗﺮ(
!ﻧﺴﻞﺍﻭﻝiPodﻟﻤﺴﯽ)ﻧﺴﺨﻪﻧﺮﻡﺍﻓﺰﺍﺭ۳٫۰ﯾﺎﺟﺪﯾﺪﺗﺮ(
!iPhone 4)ﻧﺴﺨﻪﻧﺮﻡﺍﻓﺰﺍﺭ۴٫۰ﯾﺎﺟﺪﯾﺪﺗﺮ(
!iPhone 3GS)ﻧﺴﺨﻪﻧﺮﻡﺍﻓﺰﺍﺭ۳٫۰ﯾﺎﺟﺪﯾﺪﺗﺮ(
!iPhone 3G)ﻧﺴﺨﻪﻧﺮﻡﺍﻓﺰﺍﺭ۳٫۰ﯾﺎﺟﺪﯾﺪﺗﺮ(
!iPhone)ﻧﺴﺨﻪﻧﺮﻡﺍﻓﺰﺍﺭ۳٫۰ﯾﺎﺟﺪﯾﺪﺗﺮ(
1ﺑﺮﺍﯼﺟﺎﺑﺠﺎﯾﯽﺑﻪﺣﺎﻟﺖﮐﻨﺘﺮﻝ،
!iPod–ﻋﻤﻠﮑﺮﺩiPodﺍﻳﻦﺩﺳﺘﮕﺎﻩﺭﺍﻣﯽﺗﻮﺍﻥﺍﺯﻃﺮﻳﻖ
iPodﻣﺘﺼﻞﺑﻪﺁﻥﮐﻨﺘﺮﻝﮐﺮﺩ.
!APP-ﺻﺪﺍﯼﺑﺮﻧﺎﻣﻪﻫﺎﯼiPodﺭﺍﭘﺨﺶﮐﻨﯿﺪ.
!AUDIO–ﻋﻤﻠﮑﺮﺩiPodﺍﻳﻦﺩﺳﺘﮕﺎﻩﺭﺍﻣﯽﺗﻮﺍﻥﺍﺯﺍﻳﻦ
ﺩﺳﺘﮕﺎﻩﮐﻨﺘﺮﻝﮐﺮﺩ.
ﺑﻬﺒﻮﺩﮐﻴﻔﻴﺖﺻﺪﺍﯼﻓﺸﺮﺩﻩﻭﺑﺎﺯﻳﺎﺑﯽﮐﻴﻔﻴﺖﺻﺪﺍ)ﺑﺎﺯﻳﺎﺏﺻﺪﺍ(
1S.Rtrvﺭﺍﻓﺸﺎﺭﺩﻫﻴﺪﺗﺎﻣﻮﺍﺭﺩﺯﻳﺮﺟﺎﺑﺠﺎﺷﻮﯾﺪ:
OFF)ﺧﺎﻣﻮﺵ(—1—2
1ﺑﺮﺍﯼﻧﺮﺥﻫﺎﯼﭘﺎﻳﻴﻦﻓﺸﺮﺩﻩﺳﺎﺯﯼﻭ2ﺑﺮﺍﯼﻧﺮﺥﻫﺎﯼﺑﺎﻻﯼ
ﻓﺸﺮﺩﻩﺳﺎﺯﯼﻣﻮﺛﺮﺍﺳﺖ.
ﺗﻨﻈﻴﻤﺎﺕﻋﻤﻠﮑﺮﺩ
۱ﺑﺮﺍﯼﻧﻤﺎﻳﺶﻣﻨﻮﯼﺍﺻﻠﯽM.C.ﺭﺍﻓﺸﺎﺭﺩﻫﻴﺪ.
۲ﺑﺮﺍﯼﺗﻐﻴﻴﺮﮔﺰﻳﻨﻪﻫﺎﯼﻣﻨﻮM.C.،ﻭﺑﺮﺍﯼﺍﻧﺘﺨﺎﺏ،
FUNCTIONﺭﺍﻓﺸﺎﺭﺩﻫﻴﺪ.
۳M.C.ﺭﺍﺑﭽﺮﺧﺎﻧﻴﺪﺗﺎﻋﻤﻠﮑﺮﺩﺍﻧﺘﺨﺎﺏﺷﻮﺩ.
ﭘﺲﺍﺯﺍﻧﺘﺨﺎﺏ،ﺑﺮﺍﯼﺗﻨﻈﻴﻢﻋﻤﻠﮑﺮﺩﺍﻗﺪﺍﻣﺎﺕﺯﻳﺮﺭﺍﺍﻧﺠﺎﻡﺩﻫﻴﺪ:
Play mode)ﺗﮑﺮﺍﺭﭘﺨﺶ(
1ﺑﺮﺍﯼﺍﻧﺘﺨﺎﺏﻣﺤﺪﻭﺩﻩﺗﮑﺮﺍﺭﭘﺨﺶ،M.C.ﺭﺍﻓﺸﺎﺭﺩﻫﯿﺪ.
!Repeat One–ﺗﮑﺮﺍﺭﺁﻫﻨﮓﻓﻌﻠﯽ
!Repeat All–ﺗﮑﺮﺍﺭﺗﻤﺎﻡﺁﻫﻨﮓﻫﺎﯼﻣﻮﺟﻮﺩﺩﺭ
ﻓﻬﺮﺳﺖﺍﻧﺘﺨﺎﺑﯽ
۲۱
Fa
Page 85

75 64
ﺑﺨﺶ
ﺍﺳﺘﻔﺎﺩﻩﺍﺯﺩﺳﺘﮕﺎﻩ
ﺍﺳﺘﻔﺎﺩﻩﺍﺯﺩﺳﺘﮕﺎﻩ
۰۲
ﻋﻤﻠﻴﺎﺕﭘﻴﺸﺮﻓﺘﻪﺑﺎﺍﺳﺘﻔﺎﺩﻩﺍﺯﺩﮐﻤﻪ
ﻫﺎﯼﻭﻳﮋﻩ
ﭘﺨﺶﺗﻤﺎﻡﺁﻫﻨﮓﻫﺎﺑﺪﻭﻥﺗﺮﺗﯿﺐ)ﭘﺨﺶﺗﺼﺎﺩﻓﯽﻫﻤﻪﺁﻫﻨﮓﻫﺎ(
ﺭﺍﻓﺸﺎﺭﺩﻫﻴﺪ.
1ﺑﺮﺍﯼﻓﻌﺎﻝﮐﺮﺩﻥﭘﺨﺶﺗﺼﺎﺩﻓﯽﻫﻤﻪ،
ﭘﺨﺶﺁﻫﻨﮓﻫﺎﯼﻣﺮﺑﻮﻁﺑﻪﺁﻫﻨﮓﺩﺭﺣﺎﻝﭘﺨﺶ
ﺷﻤﺎﻣﯽﺗﻮﺍﻧﻴﺪﺁﻫﻨﮓﻫﺎﺭﺍﺍﺯﻓﻬﺮﺳﺖﻫﺎﯼﺯﻳﺮﭘﺨﺶﮐﻨﻴﺪ.
•ﻓﻬﺮﺳﺖﺁﻟﺒﻮﻡﻫﺎﯼﺧﻮﺍﻧﻨﺪﻩﺍﯼﮐﻪﺁﻫﻨﮓﺍﻭﺩﺭﺣﺎﻝﭘﺨﺶﺍﺳﺖ
•ﻓﻬﺮﺳﺖﺁﻫﻨﮓﻫﺎﯼﺁﻟﺒﻮﻡﺩﺭﺣﺎﻝﭘﺨﺶ
•ﻓﻬﺮﺳﺖﺁﻟﺒﻮﻡﮐﻼﺱﺩﺭﺣﺎﻝﭘﺨﺶ
1ﺑﺮﺍﯼﺍﻧﺘﺨﺎﺏﺣﺎﻟﺖﭘﺨﺶﭘﻴﻮﻧﺪﯼ،M.C.ﺭﺍﻓﺸﺎﺭﺩﺍﺩﻩﻭﻧﮕﻪ
ﺩﺍﺭﻳﺪ.
2ﺑﺮﺍﯼﺗﻐﻴﻴﺮﺣﺎﻟﺖ،M.C.ﺭﺍﺑﻪﺳﻤﺖﭼﭗﯾﺎﺭﺍﺳﺖﻓﺸﺎﺭﺩﻫﯿﺪﻭ
ﺑﺮﺍﯼﺍﻧﺘﺨﺎﺏ،ﺁﻥﺭﺍﻓﺸﺎﺭﺩﻫﻴﺪ.
!Artist–ﺁﻟﺒﻮﻣﯽﺭﺍﺍﺯﻫﻨﺮﻣﻨﺪﯼﮐﻪﺁﻫﻨﮓﻭﯼﺩﺭﺣﺎﻝ
ﭘﺨﺶﺍﺳﺖ،ﭘﺨﺶﻣﯽﮐﻨﺪ.
!Album–ﺁﻫﻨﮕﯽﺭﺍﺍﺯﺁﺍﻟﺒﻮﻡﺩﺭﺣﺎﻝﭘﺨﺶ،ﭘﺨﺶﻣﯽ
ﮐﻨﺪ.
!Genre–ﺁﻟﺒﻮﻣﯽﺭﺍﺍﺯﮐﻼﺱﺩﺭﺣﺎﻝﭘﺨﺶ،ﭘﺨﺶﻣﯽ
ﮐﻨﺪ.
ﺁﻫﻨﮓ/ﺁﻟﺒﻮﻡﺍﻧﺘﺨﺎﺑﯽﭘﺲﺍﺯﺁﻫﻨﮓﺩﺭﺣﺎﻝﭘﺨﺶ،ﭘﺨﺶﺧﻮﺍﻫﺪ
ﺷﺪ.
!ﺩﺭﺻﻮﺭﺕﺍﺳﺘﻔﺎﺩﻩﺍﺯﻋﻤﮑﺮﺩﻫﺎﻳﯽﺑﺠﺰﭘﺨﺶﭘﯿﻮﻧﺪﯼ)ﻣﺎﻧﻨﺪ
ﺣﺮﮐﺖﺳﺮﻳﻊﺑﻪﺟﻠﻮﯾﺎﻋﻘﺐ(،ﻣﻤﮑﻦﺍﺳﺖﭘﺨﺶﺁﻫﻨﮓ/ﺁﻟﺒﻮﻡ
ﺍﻧﺘﺨﺎﺑﯽﻟﻐﻮﺷﻮﺩ.
!ﺑﺴﺘﻪﺑﻪﺁﻫﻨﮓﺍﻧﺘﺨﺎﺏﺷﺪﻩﺑﺮﺍﯼﭘﺨﺶ،ﺍﻧﺘﻬﺎﯼﺁﻫﻨﮓﺩﺭﺣﺎﻝ
ﭘﺨﺶﻭﺍﺑﺘﺪﺍﯼﺁﻫﻨﮓ/ﺁﻟﺒﻮﻡﺍﻧﺘﺨﺎﺑﯽﻣﻤﮑﻦﺍﺳﺖﺣﺬﻑﺷﻮﻧﺪ.
ﺭﺍﻓﺸﺎﺭﺩﻫﻴﺪ.
۲ﺑﺮﺍﯼﺍﻧﺘﺨﺎﺏﻳﮏﻣﻘﻮﻟﻪ/ﺁﻫﻨﮓ،ﺍﺯM.C.ﺍﺳﺘﻔﺎﺩﻩﮐﻨﻴﺪ.
ﺗﻐﻴﻴﺮﻧﺎﻡﺁﻫﻨﮓﻳﺎﻣﻘﻮﻟﻪ
1M.C.ﺭﺍﺑﭽﺮﺧﺎﻧﻴﺪ.
Playlists)ﻟﯿﺴﺖﻫﺎﯼﭘﺨﺶ(—Artists)ﻫﻨﺮﻣﻨﺪﺍﻥ(—
Albums)ﺁﻟﺒﻮﻡﻫﺎ(—Songs)ﺁﻫﻨﮓﻫﺎ(—Podcasts
)ﭘﺎﺩﮐﺴﺖﻫﺎ(—Genres)ﺳﺒﮏﻫﺎ(—Composers
)ﺁﻫﻨﮓﺳﺎﺯﺍﻥ(—Audiobooks)ﮐﺘﺎﺏﻫﺎﯼﺻﻮﺗﯽ(
ﭘﺨﺶ
1ﭘﺲﺍﺯﺍﻧﺘﺨﺎﺏﻳﮏﺁﻫﻨﮓ،M.C.ﺭﺍﻓﺸﺎﺭﺩﻫﻴﺪ.
ﻣﺸﺎﻫﺪﻩﻓﻬﺮﺳﺖﺁﻫﻨﮓﻫﺎﯼﻣﻮﺟﻮﺩﺩﺭﻣﻘﻮﻟﻪﺍﻧﺘﺨﺎﺏﺷﺪﻩ
1ﭘﺲﺍﺯﺍﻧﺘﺨﺎﺏﻳﮏﻣﻘﻮﻟﻪ،M.C.ﺭﺍﻓﺸﺎﺭﺩﻫﻴﺪ.
ﭘﺨﺶﻳﮏﺁﻫﻨﮓﺍﺯﻣﻘﻮﻟﻪﺍﻧﺘﺨﺎﺏﺷﺪﻩ
1ﭘﺲﺍﺯﺍﻧﺘﺨﺎﺏﻳﮏﻣﻘﻮﻟﻪ،M.C.ﺭﺍﻓﺸﺎﺭﺩﺍﺩﻩﻭﻧﮕﻪﺩﺍﺭﻳﺪ.
ﺟﺴﺘﺠﻮﯼﻟﯿﺴﺖﺑﺮﺍﺳﺎﺱﺣﺮﻭﻑﺍﻟﻔﺒﺎ
1ﭘﺲﺍﺯﻧﻤﺎﻳﺶﻓﻬﺮﺳﺖﻣﺮﺑﻮﻁﺑﻪﻣﻘﻮﻟﻪﺍﻧﺘﺨﺎﺏﺷﺪﻩ،ﺑﺮﺍﯼ
ﺍﻧﺘﺨﺎﺏﺣﺎﻟﺖﺟﺴﺘﺠﻮﯼﺍﻟﻔﺒﺎﻳﯽ،
2M.C.ﺭﺍﺑﭽﺮﺧﺎﻧﻴﺪﺗﺎﻳﮏﺣﺮﻑﺍﻧﺘﺨﺎﺏﺷﻮﺩ.
3ﺑﺮﺍﯼﻧﻤﺎﻳﺶﻓﻬﺮﺳﺖﺍﻟﻔﺒﺎﻳﯽ،M.C.ﺭﺍﻓﺸﺎﺭﺩﻫﻴﺪ.
ﻧﮑﺎﺕ
!ﻟﯿﺴﺖﻫﺎﯼﭘﺨﺶﺍﯾﺠﺎﺩﺷﺪﻩﺗﻮﺳﻂﺑﺮﻧﺎﻣﻪﺭﺍﯾﺎﻧﻪ)Music-
Sphere(ﺭﺍﻣﯽﺗﻮﺍﻧﯿﺪﭘﺨﺶﮐﻨﯿﺪ.ﺍﯾﻦﺑﺮﻧﺎﻣﻪﺩﺭﺳﺎﯾﺖﻣﺎ
ﻗﺎﺑﻞﺩﺳﺘﺮﺳﯽﺧﻮﺍﻫﺪﺑﻮﺩ.
!ﻟﯿﺴﺖﻫﺎﯼﭘﺨﺶﺍﯾﺠﺎﺩﺷﺪﻩﺗﻮﺳﻂﺑﺮﻧﺎﻣﻪﺭﺍﯾﺎﻧﻪ)Music-
Sphere(ﺑﻪﺻﻮﺭﺕﺍﺧﺘﺼﺎﺭﯼﻧﻤﺎﯾﺶﺩﺍﺩﻩﻣﯽﺷﻮﻧﺪ.
5ﻧﺸﺎﻧﮕﺮS.Rtrv
ﻫﻨﮕﺎﻣﯽﮐﻪﻋﻤﻠﮑﺮﺩﺑﺎﺯﯾﺎﺑﯽﺻﺪﺍﻓﻌﺎﻝﺍﺳﺖ،ﻧﻤﺎﯾﺶﺩﺍﺩﻩﻣﯽ
ﺷﻮﺩ.
6ﺯﻣﺎﻥﺁﻫﻨﮓ)ﻧﻮﺍﺭﭘﯿﺸﺮﻓﺘﻪ(
7ﻧﺸﺎﻧﮕﺮﺯﻣﺎﻥﭘﺨﺶ
ﭘﺨﺶﺁﻫﻨﮓﺩﺭiPod
1ﺩﺭﭘﻮﺵﺭﺍﺑﻂUSBﺭﺍﺑﺎﺯﮐﺮﺩﻩﻭiPodﺭﺍﺑﺎﺍﺳﺘﻔﺎﺩﻩﺍﺯﺭﺍﺑﻂ
iPodﺑﻪﮐﺎﺑﻞUSBﻣﺘﺼﻞﮐﻨﯿﺪ.
ﺍﻧﺘﺨﺎﺏﻳﮏﺗﺮﺍﮎ)ﻗﺴﻤﺖ(
1M.C.ﺭﺍﺑﻪﺳﻤﺖﭼﭗﻳﺎﺭﺍﺳﺖﻓﺸﺎﺭﺩﻫﻴﺪ.
ﺣﺮﮐﺖﺳﺮﻳﻊﺭﻭﺑﻪﺟﻠﻮﻳﺎﺭﻭﺑﻪﻋﻘﺐ
1M.C.ﺭﺍﺑﻪﺳﻤﺖﭼﭗﻳﺎﺭﺍﺳﺖﻓﺸﺎﺭﺩﺍﺩﻩﻭﻧﮕﻪﺩﺍﺭﻳﺪ.
ﻧﮑﺎﺕ
!ﺩﺭﻣﻮﺍﺭﺩﯼﮐﻪﺣﺎﻟﺖﮐﻨﺘﺮﻝﺭﻭﯼAUDIOﺗﻨﻈﯿﻢﺷﺪﻩﺑﺎﺷﺪ،
ﺍﻣﮑﺎﻥﺭﻭﺷﻦﯾﺎﺧﺎﻣﻮﺵﮐﺮﺩﻥiPodﻭﺟﻮﺩﻧﺪﺍﺭﺩ.
!ﻗﺒﻞﺍﺯﺍﺗﺼﺎﻝiPodﺑﻪﺍﯾﻦﺩﺳﺘﮕﺎﻩ،ﻫﺪﻓﻮﻥﻫﺎﺭﺍﺟﺪﺍﮐﻨﯿﺪ.
!ﺑﺎﮔﺬﺷﺖﺣﺪﻭﺩﺍًﺩﻭﻗﻴﻘﻪﺍﺯﻗﺮﺍﺭﮔﺮﻓﺘﻦﺳﻮﻳﻴﭻﺍﺳﺘﺎﺭﺕﺩﺭ
ﻭﺿﻌﻴﺖOFF، iPodﺧﺎﻣﻮﺵﻣﯽﺷﻮﺩ.
ﻧﻤﺎﻳﺶﺍﻃﻼﻋﺎﺕﻣﺘﻨﯽ
ﺍﻧﺘﺨﺎﺏﺍﻃﻼﻋﺎﺕﻣﺘﻨﯽﺩﻟﺨﻮﺍﻩ
/SCRLﺭﺍﻓﺸﺎﺭﺩﻫﻴﺪ.
1DISP/
ﺣﺮﮐﺖﺩﺍﺩﻥﺍﻃﻼﻋﺎﺕﻣﺘﻨﯽﺑﻪﺳﻤﺖﭼﭗ
1DISP/
/SCRLﺭﺍﻓﺸﺎﺭﺩﺍﺩﻩﻭﻧﮕﻪﺩﺍﺭﻳﺪ.
Play mode)ﺗﮑﺮﺍﺭﭘﺨﺶ(
CD/CD-R/CD-RW
Random mode)ﭘﺨﺶﺗﺼﺎﺩﻓﯽ(
Sound Retriever)ﺑﺎﺯﻳﺎﺏﺻﺪﺍ(
ﺑﻬﺒﻮﺩﮐﻴﻔﻴﺖﺻﺪﺍﯼﻓﺸﺮﺩﻩﻭﺑﺎﺯﻳﺎﺑﯽ
ﺩﺭﺻﻔﺤﻪﻗﺒﻞﻣﺮﺍﺟﻌﻪﮐﻨﯿﺪ.
1ﺑﺮﺍﯼﺍﻧﺘﺨﺎﺏﻣﺤﺪﻭﺩﻩﺗﮑﺮﺍﺭﭘﺨﺶ،M.C.ﺭﺍﻓﺸﺎﺭﺩﻫﯿﺪ.
!Disc repeat-ﺗﮑﺮﺍﺭﺗﻤﺎﻡﺗﺮﺍﮎﻫﺎ
!Track repeat–ﺗﮑﺮﺍﺭﺗﺮﺍﮎﻓﻌﻠﯽ
!Folder repeat–ﺗﮑﺮﺍﺭﭘﻮﺷﻪﻓﻌﻠﯽ
ﺩﺳﺘﮕﺎﻩﺫﺧﯿﺮﻩﺳﺎﺯﯼﺧﺎﺭﺟﯽ)USB ،SD(
!All repeat–ﺗﮑﺮﺍﺭﺗﻤﺎﻡﻓﺎﻳﻞﻫﺎ
!Track repeat–ﺗﮑﺮﺍﺭﻓﺎﯾﻞﻓﻌﻠﯽ
!Folder repeat–ﺗﮑﺮﺍﺭﭘﻮﺷﻪﻓﻌﻠﯽ
1ﺑﺮﺍﯼﻓﻌﺎﻝ/ﻏﻴﺮﻓﻌﺎﻝﮐﺮﺩﻥﭘﺨﺶﺗﺼﺎﺩﻓﯽ،M.C.ﺭﺍﻓﺸﺎﺭﺩﻫﻴﺪ.
Pause)ﻣﮑﺚ(
1ﺑﺮﺍﯼﺍﻳﺠﺎﺩﻣﮑﺚﺩﺭﭘﺨﺶﻳﺎﺍﺩﺍﻣﻪﭘﺨﺶ،M.C.ﺭﺍﻓﺸﺎﺭﺩﻫﻴﺪ.
1M.C.ﺭﺍﺑﺮﺍﯼﺍﻧﺘﺨﺎﺏﺗﻨﻈﯿﻢﺩﻟﺨﻮﺍﻩﻓﺸﺎﺭﺩﻫﯿﺪ.
ﺑﺮﺍﯼﺍﻃﻼﻉﺍﺯﺟﺰﺋﯿﺎﺕﺑﻪ
ﮐﻴﻔﻴﺖﺻﺪﺍ)ﺑﺎﺯﻳﺎﺏﺻﺪﺍ(
iPod
ﺻﺪﺍﯼﻓﺸﺮﺩﻩﺭﺍﺑﻄﻮﺭﺧﻮﺩﮐﺎﺭﺍﺭﺗﻘﺎﻣﯽﺩﻫﺪﻭﺻﺪﺍﯾﯽﺑﺎﮐﯿﻔﺖﺑﺮﺗﺮ
ﺭﺍﺑﺎﺯﯾﺎﺑﯽﻣﯽﮐﻨﺪ.
ﻓﺎﺭﺳﯽ
ﻋﻤﻠﮑﺮﺩﻫﺎﯼﺍﺻﻠﯽ
ﺟﺴﺘﺠﻮﯼﺁﻫﻨﮓﻫﺎ
۱ﺑﺮﺍﯼﺭﻓﺘﻦﺑﻪﻣﻨﻮﯼﺑﺎﻻﻳﯽﺟﺴﺘﺠﻮﯼﻓﻬﺮﺳﺖ،)ﻟﯿﺴﺖ(
ﺭﺍﻓﺸﺎﺭﺩﻫﻴﺪ.
1
2
3
1ﻧﺸﺎﻧﮕﺮﺗﮑﺮﺍﺭ
2ﻧﺸﺎﻧﮕﺮﺷﻤﺎﺭﻩﺁﻫﻨﮓ
3ﻧﺸﺎﻧﮕﺮﭘﺨﺶﺗﺼﺎﺩﻓﯽ
4ﻧﺸﺎﻧﮕﺮPLAY/PAUSE
۲۰
Fa
Page 86

75 64
۰۲
ﺑﺨﺶ
ﺍﺳﺘﻔﺎﺩﻩﺍﺯﺩﺳﺘﮕﺎﻩ
ﺍﺳﺘﻔﺎﺩﻩﺍﺯﺩﺳﺘﮕﺎﻩ
ﺍﻧﺘﺨﺎﺏﻭﭘﺨﺶﻓﺎﻳﻞﻫﺎ/ﺗﺮﺍﮎﻫﺎﺍﺯ
ﻓﻬﺮﺳﺖﻧﺎﻡ
۱ﺑﺮﺍﯼﺟﺎﺑﺠﺎﯾﯽﺑﻪﺣﺎﻟﺖﻟﯿﺴﺖﻧﺎﻡﻓﺎﯾﻞ/ﺗﺮﺍﮎ،)ﻟﯿﺴﺖ(ﺭﺍ
ﻓﺸﺎﺭﺩﻫﯿﺪ.
۲ﺑﺮﺍﯼﺍﻧﺘﺨﺎﺏﻧﺎﻡﻓﺎﻳﻞ)ﻳﺎﻧﺎﻡﭘﻮﺷﻪ(ﻣﻮﺭﺩﻧﻈﺮ،ﺍﺯM.C.
ﺍﺳﺘﻔﺎﺩﻩﮐﻨﻴﺪ.
ﺗﻐﻴﻴﺮﻧﺎﻡﻓﺎﻳﻞﻳﺎﭘﻮﺷﻪ
1M.C.ﺭﺍﺑﭽﺮﺧﺎﻧﻴﺪ.
ﭘﺨﺶ
1ﭘﺲﺍﺯﺍﻧﺘﺨﺎﺏﺍﻧﺘﺨﺎﺏﻳﮏﻓﺎﻳﻞﻳﺎﺗﺮﺍﮎ،M.C.ﺭﺍﻓﺸﺎﺭﺩﻫﻴﺪ.
ﻣﺸﺎﻫﺪﻩﻓﻬﺮﺳﺖﻓﺎﻳﻞ)ﻳﺎﭘﻮﺷﻪ(ﻫﺎﯼﻣﻮﺟﻮﺩﺩﺭﭘﻮﺷﻪﺍﻧﺘﺨﺎﺏﺷﺪﻩ
1ﭘﺲﺍﺯﺍﻧﺘﺨﺎﺏﻳﮏﭘﻮﺷﻪ،M.C.ﺭﺍﻓﺸﺎﺭﺩﻫﻴﺪ.
ﭘﺨﺶﻳﮏﺁﻫﻨﮓﺍﺯﭘﻮﺷﻪﺍﻧﺘﺨﺎﺏﺷﺪﻩ
1ﭘﺲﺍﺯﺍﻧﺘﺨﺎﺏﻳﮏﭘﻮﺷﻪ،M.C.ﺭﺍﻓﺸﺎﺭﺩﺍﺩﻩﻭﻧﮕﻪﺩﺍﺭﻳﺪ.
ﻋﻤﻠﻴﺎﺕﭘﻴﺸﺮﻓﺘﻪﺑﺎﺍﺳﺘﻔﺎﺩﻩﺍﺯﺩﮐﻤﻪ
ﻫﺎﯼﻭﻳﮋﻩ
ﺭﺍﻓﺸﺎﺭﺩﻫﻴﺪ.
ﭘﺨﺶﺗﺮﺍﮎﻫﺎﺑﻪﺗﺮﺗﻴﺐﺗﺼﺎﺩﻓﯽ
1ﺑﺮﺍﯼﻓﻌﺎﻝ/ﻏﻴﺮﻓﻌﺎﻝﮐﺮﺩﻥﭘﺨﺶﺗﺼﺎﺩﻓﯽ،
ﺗﺮﺍﮎﻫﺎﯼﻣﻮﺟﻮﺩﺩﺭﻣﺤﺪﻭﺩﻩﺍﻧﺘﺨﺎﺏﺷﺪﻩﺑﺮﺍﯼﺗﮑﺮﺍﺭﺑﻪ
ﺻﻮﺭﺕﺗﺼﺎﺩﻓﯽﭘﺨﺶﻣﯽﺷﻮﻧﺪ.
ﺑﻬﺒﻮﺩﮐﻴﻔﻴﺖﺻﺪﺍﯼﻓﺸﺮﺩﻩﻭﺑﺎﺯﻳﺎﺑﯽﮐﻴﻔﻴﺖﺻﺪﺍ)ﺑﺎﺯﻳﺎﺏﺻﺪﺍ(
1S.Rtrvﺭﺍﻓﺸﺎﺭﺩﻫﻴﺪﺗﺎﻣﻮﺍﺭﺩﺯﻳﺮﺟﺎﺑﺠﺎﺷﻮﯾﺪ:
OFF)ﺧﺎﻣﻮﺵ(—1—2
1ﺑﺮﺍﯼﻧﺮﺥﻫﺎﯼﭘﺎﻳﻴﻦﻓﺸﺮﺩﻩﺳﺎﺯﯼﻭ2ﺑﺮﺍﯼﻧﺮﺥﻫﺎﯼﺑﺎﻻﯼ
ﻓﺸﺮﺩﻩﺳﺎﺯﯼﻣﻮﺛﺮﺍﺳﺖ.
ﺗﻨﻈﻴﻤﺎﺕﻋﻤﻠﮑﺮﺩ
۱ﺑﺮﺍﯼﻧﻤﺎﻳﺶﻣﻨﻮﯼﺍﺻﻠﯽM.C.ﺭﺍﻓﺸﺎﺭﺩﻫﻴﺪ.
۲ﺑﺮﺍﯼﺗﻐﻴﻴﺮﮔﺰﻳﻨﻪﻫﺎﯼﻣﻨﻮM.C.،ﻭﺑﺮﺍﯼﺍﻧﺘﺨﺎﺏ،
FUNCTIONﺭﺍﻓﺸﺎﺭﺩﻫﻴﺪ.
۳M.C.ﺭﺍﺑﭽﺮﺧﺎﻧﻴﺪﺗﺎﻋﻤﻠﮑﺮﺩﺍﻧﺘﺨﺎﺏﺷﻮﺩ.
ﭘﺲﺍﺯﺍﻧﺘﺨﺎﺏ،ﺑﺮﺍﯼﺗﻨﻈﻴﻢﻋﻤﻠﮑﺮﺩﺍﻗﺪﺍﻣﺎﺕﺯﻳﺮﺭﺍﺍﻧﺠﺎﻡﺩﻫﻴﺪ:
ﺗﻮﻗﻒﭘﺨﺶﻓﺎﻳﻞﻫﺎﯼﺩﺭﻭﻥﮐﺎﺭﺕﺣﺎﻓﻈﻪSD
1ﺻﻔﺤﻪﺟﻠﻮﯾﯽﺭﺍﺑﯿﺮﻭﻥﺑﯿﺎﻭﺭﯾﺪ.
2ﺭﻭﯼﮐﺎﺭﺕﺣﺎﻓﻈﻪSDﻓﺸﺎﺭﺩﻫﯿﺪﺗﺎﺯﻣﺎﻧﯽﮐﻪﺻﺪﺍﯼﮐﻠﯿﮏﺑﻪ
ﮔﻮﺵﺑﺮﺳﺪ.
ﮐﺎﺭﺕﺣﺎﻓﻈﻪSDﺧﺎﺭﺝﺷﺪﻩﺍﺳﺖ.
3ﮐﺎﺭﺕﺣﺎﻓﻈﻪSDﺭﺍﺑﯿﺮﻭﻥﺑﯿﺎﻭﺭﯾﺪ.
4ﺻﻔﺤﻪﺟﻠﻮﻳﯽﺭﺍﻣﺠﺪﺩﺍًﻧﺼﺐﮐﻨﯿﺪ.
ﺍﻧﺘﺨﺎﺏﻳﮏﭘﻮﺷﻪ
1M.C.ﺭﺍﺑﻪﺑﺎﻻﻳﺎﭘﺎﻳﻴﻦﻓﺸﺎﺭﺩﻫﻴﺪ.
ﺍﻧﺘﺨﺎﺏﻳﮏﺗﺮﺍﮎ
1M.C.ﺭﺍﺑﻪﺳﻤﺖﭼﭗﻳﺎﺭﺍﺳﺖﻓﺸﺎﺭﺩﻫﻴﺪ.
ﺣﺮﮐﺖﺳﺮﻳﻊﺭﻭﺑﻪﺟﻠﻮﻳﺎﺭﻭﺑﻪﻋﻘﺐ
1M.C.ﺭﺍﺑﻪﺳﻤﺖﭼﭗﻳﺎﺭﺍﺳﺖﻓﺸﺎﺭﺩﺍﺩﻩﻭﻧﮕﻪﺩﺍﺭﻳﺪ.
ﺑﺎﺯﮔﺸﺖﺑﻪﭘﻮﺷﻪﺭﻳﺸﻪ
1BAND/ESCﺭﺍﻓﺸﺎﺭﺩﺍﺩﻩﻭﻧﮕﻪﺩﺍﺭﻳﺪ.
ﺍﻧﺘﺨﺎﺏﺍﺯﺑﻴﻦﺻﺪﺍﯼﻓﺸﺮﺩﻩﻭCD-DA
1BAND/ESCﺭﺍﻓﺸﺎﺭﺩﻫﻴﺪ.
ﻧﮑﺎﺕ
!ﺩﺭﺯﻣﺎﻥﭘﺨﺶﺻﺪﺍﯼﻓﺸﺮﺩﻩ،ﺩﺭﺣﻴﻦﺣﺮﮐﺖﺳﺮﻳﻊﺭﻭﺑﻪ
ﺟﻠﻮﻳﺎﺭﻭﺑﻪﻋﻘﺐﺻﺪﺍﻳﯽﻭﺟﻮﺩﻧﺨﻮﺍﻫﺪﺩﺍﺷﺖ.
!ﺩﺭﺻﻮﺭﺕﻋﺪﻡﺍﺳﺘﻔﺎﺩﻩﺍﺯﺩﺳﺘﮕﺎﻩﺫﺧﻴﺮﻩUSB،ﺁﻥﺭﺍﺍﺯ
ﺩﺳﺘﮕﺎﻩﺟﺪﺍﮐﻨﻴﺪ.
ﻧﻤﺎﻳﺶﺍﻃﻼﻋﺎﺕﻣﺘﻨﯽ
ﺍﻧﺘﺨﺎﺏﺍﻃﻼﻋﺎﺕﻣﺘﻨﯽﺩﻟﺨﻮﺍﻩ
/SCRLﺭﺍﻓﺸﺎﺭﺩﻫﻴﺪ.
1DISP/
ﺣﺮﮐﺖﺩﺍﺩﻥﺍﻃﻼﻋﺎﺕﻣﺘﻨﯽﺑﻪﺳﻤﺖﭼﭗ
1DISP/
/SCRLﺭﺍﻓﺸﺎﺭﺩﺍﺩﻩﻭﻧﮕﻪﺩﺍﺭﻳﺪ.
ﻧﮑﺎﺕ
!ﺑﺴﺘﻪﺑﻪﻧﺴﺨﻪiTunesﻣﻮﺭﺩﺍﺳﺘﻔﺎﺩﻩﺑﺮﺍﯼﻧﻮﺷﺘﻦﻓﺎﯾﻞﻫﺎﯼ
MP3ﺭﻭﯼﺩﯾﺴﮏﯾﺎﺍﻧﻮﺍﻉﻓﺎﯾﻞﺭﺳﺎﻧﻪ،ﻣﺘﻦﻧﺎﺳﺎﺯﮔﺎﺭﺫﺧﯿﺮﻩ
ﺷﺪﻩﺩﺭﻓﺎﯾﻞﺻﻮﺗﯽﻣﻤﮑﻦﺍﺳﺖﺑﻪﺩﺭﺳﺘﯽﻧﻤﺎﯾﺶﺩﺍﺩﻩﻧﺸﻮﺩ.
!ﻣﻮﺍﺭﺩﻣﺮﺑﻮﻁﺑﻪﺍﻃﻼﻋﺎﺕﻣﺘﻦﮐﻪﺑﺴﺘﻪﺑﻪﺭﺳﺎﻧﻪﻣﯽﺗﻮﺍﻧﯿﺪﺁﻥ
ﺭﺍﺗﻐﯿﯿﺮﺩﻫﯿﺪ.
ﻧﺮﺥﺑﯿﺖﯾﺎﻓﺮﮐﺎﻧﺲﻧﻤﻮﻧﻪﺗﺮﺍﻧﻪﻓﻌﻠﯽ)ﻓﺎﯾﻞ(ﺭﺍﺩﺭﺣﯿﻦﭘﺨﺶ
ﺻﺪﺍﯼﻓﺸﺮﺩﻩﺷﺪﻩﻧﻤﺎﯾﺶﻣﯽﺩﻫﺪ.
!ﺩﺭﻫﻨﮕﺎﻡﭘﺨﺶﻓﺎﻳﻞﻫﺎﯼﺿﺒﻂﺷﺪﻩAACﺑﺎﺧﺎﺻﻴﺖ
VBR)ﻧﺮﺥﺑﻴﺖﻣﺘﻐﻴﺮ(،ﻣﻘﺪﺍﺭﻣﺘﻮﺳﻂﻧﺮﺥﺑﻴﺖﻧﻤﺎﻳﺶ
ﺩﺍﺩﻩﻣﯽﺷﻮﺩ.ﻫﺮﭼﻨﺪ،ﺑﺴﺘﻪﺑﻪﻧﺮﻡﺍﻓﺰﺍﺭﻣﻮﺭﺩﺍﺳﺘﻔﺎﺩﻩ
ﺑﺮﺍﯼﺭﻣﺰﮔﺬﺍﺭﯼﻓﺎﻳﻞﻫﺎﯼAAC،ﻣﻤﮑﻦﺍﺳﺖVBR
ﻧﻤﺎﻳﺶﺩﺍﺩﻩﺷﻮﺩ.
2ﻧﺸﺎﻧﮕﺮﺗﻌﺪﺍﺩﭘﻮﺷﻪ
ﺗﻌﺪﺍﺩﭘﻮﺷﻪﻫﺎﯾﯽﮐﻪﺩﺭﺣﺎﻝﺣﺎﺿﺮﺩﺭﺣﺎﻝﭘﺨﺶﺍﺳﺖﺭﺍ
ﺑﻬﻨﮕﺎﻡﭘﺨﺶﺻﺪﺍﯼﻓﺸﺮﺩﻩﻧﻤﺎﯾﺶﻣﯽﺩﻫﺪ.
3ﻧﺸﺎﻧﮕﺮﺷﻤﺎﺭﻩﺗﺮﺍﻧﻪ
4ﻧﺸﺎﻧﮕﺮPLAY/PAUSE
5ﻧﺸﺎﻧﮕﺮS.Rtrv
ﻫﻨﮕﺎﻣﯽﮐﻪﻋﻤﻠﮑﺮﺩﺑﺎﺯﯾﺎﺑﯽﺻﺪﺍﻓﻌﺎﻝﺍﺳﺖ،ﻧﻤﺎﯾﺶﺩﺍﺩﻩﻣﯽ
ﺷﻮﺩ.
6ﺯﻣﺎﻥﺁﻫﻨﮓ)ﻧﻮﺍﺭﭘﯿﺸﺮﻓﺘﻪ(
7ﻧﺸﺎﻧﮕﺮﺯﻣﺎﻥﭘﺨﺶ
ﭘﺨﺶﻳﮏCD/CD-R/CD-RW
1ﺩﯾﺴﮏﺭﺍﺑﮕﻮﻧﻪﺍﯼﺩﺭﻭﻥﺷﮑﺎﻑﻣﺨﺼﻮﺹﻗﺮﺍﺭﺩﺍﺩﻥﺩﯾﺴﮏ
ﺑﮕﺬﺍﺭﯾﺪﮐﻪﺳﻤﺖﺩﺍﺭﺍﯼﺑﺮﭼﺴﺐﺁﻥﺑﻪﻃﺮﻑﺑﺎﻻﺑﺎﺷﺪ.
ﺧﺎﺭﺝﮐﺮﺩﻥCD/CD-R/CD-RW
1h)ﺧﺮﻭﺝ(ﺭﺍﻓﺸﺎﺭﺩﻫﯿﺪ.
ﭘﺨﺶﻳﮏﺁﻫﻨﮓﺍﺯﺩﺳﺘﮕﺎﻩﺫﺧﻴﺮﻩﺳﺎﺯﯼUSB
1ﭘﻮﺷﺶﺍﺗﺼﺎﻝUSBﺭﺍﺑﺎﺯﮐﻨﻴﺪ.
2ﺩﺳﺘﮕﺎﻩﺫﺧﻴﺮﻩﺳﺎﺯﯼUSBﺭﺍﺑﺎﺍﺳﺘﻔﺎﺩﻩﺍﺯﻳﮏﮐﺎﺑﻞUSB
ﻣﺘﺼﻞﮐﻨﻴﺪ.
ﺗﻮﻗﻒﭘﺨﺶﻓﺎﻳﻞﻫﺎﯼﺩﺭﻭﻥﺩﺳﺘﮕﺎﻩﺫﺧﻴﺮﻩﺳﺎﺯﯼUSB
1ﺍﺗﺼﺎﻝﺩﺳﺘﮕﺎﻩﺫﺧﻴﺮﻩﺳﺎﺯﯼUSBﺭﺍﺩﺭﻫﺮﺯﻣﺎﻥﻣﯽﺗﻮﺍﻧﯿﺪ
ﻗﻄﻊﮐﻨﻴﺪ.
ﭘﺨﺶﺁﻫﻨﮓﻫﺎﯼﻣﻮﺟﻮﺩﺩﺭﮐﺎﺭﺕﺣﺎﻓﻈﻪSD
1ﺻﻔﺤﻪﺟﻠﻮﯾﯽﺭﺍﺑﯿﺮﻭﻥﺑﯿﺎﻭﺭﯾﺪ.
2ﮐﺎﺭﺕﺣﺎﻓﻈﻪSDﺭﺍﺩﺭﻭﻥﺷﮑﺎﻑﮐﺎﺭﺕSDﻗﺮﺍﺭﺩﻫﯿﺪ.
ﮐﺎﺭﺕﺭﺍﺑﻪﮔﻮﻧﻪﺍﯼﺩﺭﻭﻥﺩﺳﺘﮕﺎﻩﻗﺮﺍﺭﺩﻫﯿﺪﮐﻪﺳﻄﺢﺗﻤﺎﺱﺁﻥ
ﺑﻪﺳﻤﺖﭘﺎﯾﯿﻦﺑﺎﺷﺪﻭﺳﭙﺲﺭﻭﯼﮐﺎﺭﺕﻓﺸﺎﺭﺩﻫﯿﺪﺗﺎﺯﻣﺎﻧﯽﮐﻪ
ﺻﺪﺍﯼﮐﻠﯿﮏﺑﻪﮔﻮﺵﺑﺮﺳﺪﻭﺑﻪﻃﻮﺭﮐﺎﻣﻞﺩﺭﺟﺎﯼﺧﻮﺩﻗﻔﻞ
ﺷﻮﺩ.
3ﺻﻔﺤﻪﺟﻠﻮﻳﯽﺭﺍﻣﺠﺪﺩﺍًﻧﺼﺐﮐﻨﯿﺪ.
4SRC/OFFﺭﺍﻓﺸﺎﺭﺩﻫﻴﺪﺗﺎSDﺑﻪﻋﻨﻮﺍﻥﻣﻨﺒﻊﺍﻧﺘﺨﺎﺏﺷﻮﺩ.
ﭘﺨﺶﺁﻏﺎﺯﻣﯽﺷﻮﺩ.
ﻣﻮﺝﻳﺎﺑﯽﻣﺤﻠﯽ
ﺩﺭﺻﻔﺤﻪﻗﺒﻞ
CD/CD-R/CD-RWﻭﺩﺳﺘﮕﺎﻩﻫﺎﯼ
1
32
ﺗﻨﻈﻴﻤﺎﺕﻋﻤﻠﮑﺮﺩ
۱ﺑﺮﺍﯼﻧﻤﺎﻳﺶﻣﻨﻮﯼﺍﺻﻠﯽM.C.ﺭﺍﻓﺸﺎﺭﺩﻫﻴﺪ.
۲ﺑﺮﺍﯼﺗﻐﻴﻴﺮﮔﺰﻳﻨﻪﻫﺎﯼﻣﻨﻮM.C.،ﻭﺑﺮﺍﯼﺍﻧﺘﺨﺎﺏ،
FUNCTIONﺭﺍﻓﺸﺎﺭﺩﻫﻴﺪ.
۳M.C.ﺭﺍﺑﭽﺮﺧﺎﻧﻴﺪﺗﺎﻋﻤﻠﮑﺮﺩﺍﻧﺘﺨﺎﺏﺷﻮﺩ.
ﭘﺲﺍﺯﺍﻧﺘﺨﺎﺏ،ﺑﺮﺍﯼﺗﻨﻈﻴﻢﻋﻤﻠﮑﺮﺩﺍﻗﺪﺍﻣﺎﺕﺯﻳﺮﺭﺍﺍﻧﺠﺎﻡﺩﻫﻴﺪ:
BSM)ﺣﺎﻓﻈﻪﺑﻬﺘﺮﻳﻦﺍﻳﺴﺘﮕﺎﻩﻫﺎ(
BSM)ﺣﺎﻓﻈﻪﺑﻬﺘﺮﻳﻦﺍﻳﺴﺘﮕﺎﻩﻫﺎ(ﺑﻪﺻﻮﺭﺕﺧﻮﺩﮐﺎﺭﺣﺪﺍﮐﺜﺮﺷﺶ
ﻣﻮﺭﺩﺍﺯﻗﻮﯼﺗﺮﻳﻦﺍﻳﺴﺘﮕﺎﻩﻫﺎﺭﺍﺑﻪﺗﺮﺗﻴﺐﺷﺪﺕﺳﻴﮕﻨﺎﻝﺁﻧﻬﺎﺫﺧﻴﺮﻩ
ﻣﯽﮐﻨﺪ.
1ﺑﺮﺍﯼﻓﻌﺎﻝﮐﺮﺩﻥBSMM.C.ﺭﺍﻓﺸﺎﺭﺩﻫﻴﺪ.
!ﺑﺮﺍﯼﻟﻐﻮ،M.C.ﺭﺍﺩﻭﺑﺎﺭﻩﻓﺸﺎﺭﺩﻫﻴﺪ.
Local)ﻣﻮﺝﻳﺎﺑﯽﺟﺴﺘﺠﻮﻳﯽﻣﺤﻠﯽ(
ﻣﻮﺝﯾﺎﺑﯽﻣﺤﻠﯽﺑﻪﺷﻤﺎﺍﻣﮑﺎﻥﻣﯽﺩﻫﺪﺗﺎﻓﻘﻂﺍﯾﺴﺘﮕﺎﻩﻫﺎﯼﺭﺍﺩﯾﻮﯾﯽﺭﺍ
ﺑﯿﺎﺑﯿﺪﮐﻪﺍﺯﻗﺪﺭﺕﺳﯿﮕﻨﺎﻝﮐﺎﻓﯽﺑﺮﺍﯼﺩﺭﯾﺎﻓﺖﻣﻨﺎﺳﺐﺑﺮﺧﻮﺩﺍﺭﺑﺎﺷﻨﺪ.
1M.C.ﺭﺍﺑﺮﺍﯼﺭﻭﺷﻦﮐﺮﺩﻥﻣﺤﻠﯽﻓﺸﺎﺭﺩﻫﯿﺪ.
!ﺑﺮﺍﯼﻟﻐﻮ،M.C.ﺭﺍﺩﻭﺑﺎﺭﻩﻓﺸﺎﺭﺩﻫﻴﺪ.
2M.C.ﺭﺍﺑﺮﺍﯼﺍﻧﺘﺨﺎﺏﺗﻨﻈﯿﻢﺩﻟﺨﻮﺍﻩﺑﻪﺳﻤﺖﭼﭗﯾﺎﺭﺍﺳﺖﻓﺸﺎﺭ
ﺩﻫﯿﺪ.
ﺑﺮﺍﯼﺍﻃﻼﻉﺍﺯﺟﺰﺋﯿﺎﺕﺑﻪ
ﻣﺮﺍﺟﻌﻪﮐﻨﯿﺪ.
ﺫﺧﻴﺮﻩﺳﺎﺯﯼﺧﺎﺭﺟﯽ)USB ،SD(
ﻋﻤﻠﮑﺮﺩﻫﺎﯼﺍﺻﻠﯽ
1ﻧﺮﺥﺑﯿﺖ/ﻧﺸﺎﻧﮕﺮﻓﺮﮐﺎﻧﺲﻧﻤﻮﻧﻪ
۱۹
Fa
Page 87

6
ﺑﺨﺶ
ﺍﺳﺘﻔﺎﺩﻩﺍﺯﺩﺳﺘﮕﺎﻩ
ﺍﺳﺘﻔﺎﺩﻩﺍﺯﺩﺳﺘﮕﺎﻩ
۰۲
ﺍﻧﺘﺨﺎﺏﺑﺎﻧﺪ
1BAND/ESCﺭﺍﻓﺸﺎﺭﺩﻫﻴﺪﺗﺎﺑﺎﻧﺪﻣﻮﺭﺩﻧﻈﺮ)FM-1,FM-
2,FM-3ﺑﺮﺍﯼFMﻳﺎAM(ﻧﻤﺎﻳﺎﻥﺷﻮﺩ.
ﻣﻮﺝﻳﺎﺑﯽﺩﺳﺘﯽ)ﮔﺎﻡﺑﻪﮔﺎﻡ(
1M.C.ﺭﺍﺑﻪﺳﻤﺖﭼﭗﻳﺎﺭﺍﺳﺖﻓﺸﺎﺭﺩﻫﻴﺪ.
ﺟﺴﺘﺠﻮ
1M.C.ﺭﺍﺑﻪﺳﻤﺖﭼﭗﻳﺎﺭﺍﺳﺖﻓﺸﺎﺭﺩﺍﺩﻩﻭﻧﮕﻪﺩﺍﺭﻳﺪ.
ﺷﻤﺎﻣﯽﺗﻮﺍﻧﻴﺪﻣﻮﺝﻳﺎﺑﯽﺟﺴﺘﺠﻮﻳﯽﺭﺍﺑﺎﻓﺸﺎﺭﺩﺍﺩﻥM.C.ﺑﻪ
ﺳﻤﺖﭼﭗﻳﺎﺭﺍﺳﺖﻟﻐﻮﮐﻨﻴﺪ.
ﺑﺎﻓﺸﺎﺭﺩﺍﺩﻥﻭﻧﮕﻪﺩﺍﺷﺘﻦM.C.ﺑﻪﺳﻤﺖﭼﭗﻳﺎﺭﺍﺳﺖ،ﻣﯽ
ﺗﻮﺍﻧﻴﺪﺍﺯﺍﻳﺴﺘﮕﺎﻫﻬﺎﺭﺩﺷﻮﻳﺪ.ﺑﻪﻣﺤﺾﺭﻫﺎﮐﺮﺩﻥM.C.،ﻣﻮﺝ
ﻳﺎﺑﯽﺟﺴﺘﺠﻮﻳﯽﺁﻏﺎﺯﻣﯽﺷﻮﺩ.
3
1 2 4 5
ﺑﺎﺯﮔﺸﺖﺑﻪﺻﻔﺤﻪﻣﻌﻤﻮﻝ
ﻟﻐﻮﻣﻨﻮﯼﺗﻨﻈﻴﻤﺎﺕﺍﻭﻟﻴﻪ
1BAND/ESCﺭﺍﻓﺸﺎﺭﺩﻫﻴﺪ.
ﺑﺎﺯﮔﺸﺖﺑﻪﻧﻤﺎﻳﺶﻣﻌﻤﻮﻝﺍﺯﻓﻬﺮﺳﺖ/ﻣﻘﻮﻟﻪ
1BAND/ESCﺭﺍﻓﺸﺎﺭﺩﻫﻴﺪ.
ﻣﻮﺝﯾﺎﺏ
ﻋﻤﻠﮑﺮﺩﻫﺎﯼﺍﺻﻠﯽ
ً
ﺫﺧﯿﺮﻩﻭﺑﺎﺯﯾﺎﺑﯽﺍﯾﺴﺘﮕﺎﻩﻫﺎﯼﻫﺮﺑﺎﻧﺪ
۱)ﻟﯿﺴﺖ(ﺭﺍﻓﺸﺎﺭﺩﻫﻴﺪ.
ﺻﻔﺤﻪﭘﯿﺶﺗﻨﻈﯿﻢﻧﻤﺎﯾﺶﺩﺍﺩﻩﻣﯽﺷﻮﺩ.
۲ﺑﺮﺍﯼﺫﺧﻴﺮﻩﻓﺮﮐﺎﻧﺲﻫﺎﺍﻧﺘﺨﺎﺑﯽﺩﺭﺣﺎﻓﻈﻪ،ﺍﺯM.C.
ﺍﺳﺘﻔﺎﺩﻩﮐﻨﻴﺪ.
ﺑﺮﺍﯼﺗﻐﻴﻴﺮﻋﺪﺩﺍﺯﭘﻴﺶﺗﻨﻈﻴﻢﺷﺪﻩ،ﺑﭽﺮﺧﺎﻧﻴﺪ.ﺑﺮﺍﯼﺫﺧﻴﺮﻩﮐﺮﺩﻥ،
ﻓﺸﺎﺭﺩﺍﺩﻩﻭﻧﮕﻪﺩﺍﺭﻳﺪ.
۳ﺑﺮﺍﯼﺍﻧﺘﺨﺎﺏﺍﻳﺴﺘﮕﺎﻩﻣﻮﺭﺩﻧﻈﺮ،ﺍﺯM.C.ﺍﺳﺘﻔﺎﺩﻩﮐﻨﻴﺪ.
ﺑﺮﺍﯼﺗﻐﻴﻴﺮﺍﻳﺴﺘﮕﺎﻩ،ﺑﭽﺮﺧﺎﻧﻴﺪ.ﺑﺮﺍﯼﺍﻧﺘﺨﺎﺏ،ﻓﺸﺎﺭﺩﻫﻴﺪ.
#ﻫﻤﭽﻨﯿﻦﺑﺎﻓﺸﺎﺭﺩﺍﺩﻥM.C.ﺑﻪﺳﻤﺖﺑﺎﻻﻭﭘﺎﯾﯿﻦﻣﯽﺗﻮﺍﻧﻴﺪﺍﯾﺴﺘﮕﺎﻩ
ﺭﺍﺗﻐﯿﯿﺮﺩﻫﯿﺪ.
)ﻟﯿﺴﺖ(ﺭﺍ
#ﺑﺮﺍﯼﺑﺎﺯﮔﺸﺖﺑﻪﻧﻤﺎﻳﺶﻣﻌﻤﻮﻟﯽ،BAND/ESCﯾﺎ
ﻓﺸﺎﺭﺩﻫﯿﺪ.
1ﻧﺸﺎﻧﮕﺮﺑﺎﻧﺪ
25ﻧﺸﺎﻧﮕﺮ)ﺍﺳﺘﺮﻳﻮ(
3ﻧﺸﺎﻧﮕﺮLOC
ﺯﻣﺎﻧﯽﮐﻪﻣﻮﺝﻳﺎﺑﯽﺟﺴﺘﺠﻮﯼﻣﺤﻠﯽﻓﻌﺎﻝﺍﺳﺖ،ﻧﻤﺎﯾﺶﺩﺍﺩﻩ
ﻣﯽﺷﻮﺩ.
4ﻧﺸﺎﻧﮕﺮﺷﻤﺎﺭﻩﺍﺯﭘﻴﺶﺗﻌﻴﻴﻦﺷﺪﻩ
5ﻧﺸﺎﻧﮕﺮﺳﻄﺢﺳﯿﮕﻨﺎﻝ
6ﻧﺸﺎﻧﮕﺮﻓﺮﮐﺎﻧﺲ
!ﺍﮔﺮﺍﯾﻦﺩﺳﺘﮕﺎﻩﻗﺎﺩﺭﺑﻪﺍﻧﺘﺨﺎﺏﺍﻃﻼﻋﺎﺕﻣﺮﺑﻮﻁﺑﻪﻧﺎﻡ
ﺳﺮﻭﯾﺲﺑﺮﻧﺎﻣﻪﺑﺎﺷﺪ،ﻧﺎﻡﺳﺮﻭﯾﺲﺑﺮﻧﺎﻣﻪﻧﻤﺎﯾﺶﺩﺍﺩﻩ
ﺧﻮﺍﻫﺪﺷﺪ.
ﻋﻤﻠﻴﺎﺕﭘﻴﺸﺮﻓﺘﻪﺑﺎﺍﺳﺘﻔﺎﺩﻩﺍﺯﺩﮐﻤﻪ
ﻫﺎﯼﻭﻳﮋﻩ
ﻣﻮﺝﻳﺎﺑﯽﻣﺤﻠﯽ
/LOCﺭﺍﺑﺮﺍﯼﺍﻧﺘﺨﺎﺏﺗﻨﻈﯿﻢﺩﻟﺨﻮﺍﻩﻓﺸﺎﺭﺩﻫﯿﺪ.
1
FM:Level 1—Level 2—Level 3—Level 4
AM:Level 1—Level 2
ﺑﺎﻻﺗﺮﯾﻦﺳﻄﺢﺗﻨﻈﯿﻢﺑﻪﺷﻤﺎﺍﻣﮑﺎﻥﻣﯽﺩﻫﺪﺗﺎﻓﻘﻂﻗﻮﯼﺗﺮﯾﻦ
ﺍﯾﺴﺘﮕﺎﻩﻫﺎﺭﺍﺩﺭﯾﺎﻓﺖﮐﻨﯿﺪ،ﺩﺭﺣﺎﻟﯽﮐﻪﺗﻨﻈﯿﻤﺎﺕﭘﺎﯾﯿﻦﺗﺮﺑﻪﺷﻤﺎ
ﺍﻣﮑﺎﻥﻣﯽﺩﻫﻨﺪﺗﺎﺍﯾﺴﺘﮕﺎﻩﻫﺎﯼﺿﻌﯿﻒﺗﺮﺭﺍﺩﺭﯾﺎﻓﺖﮐﻨﯿﺪ.
!ﺑﺎﺗﺮﯼﻫﺎ)ﺑﺴﺘﻪﺑﺎﺗﺮﯼﻳﺎﺑﺎﺗﺮﯼﻫﺎﯼﻧﺼﺐﺷﺪﻩ(ﻧﺒﺎﻳﺪﺩﺭ
ﻣﻌﺮﺽﮔﺮﻣﺎﯼﺑﻴﺶﺍﺯﺣﺪﻣﺎﻧﻨﺪﻧﻮﺭﺧﻮﺭﺷﻴﺪ،ﺁﺗﺶﻳﺎﻣﻮﺍﺭﺩ
ﻣﺸﺎﺑﻪﻗﺮﺍﺭﺑﮕﻴﺮﻧﺪ.
ﺍﺣﺘﯿﺎﻁ
!ﺍﺯﺑﺎﺗﺮﯼﻟﻴﺘﻴﻮﻡCR2025)۳V(ﺍﺳﺘﻔﺎﺩﻩﮐﻨﻴﺪ.
!ﺍﮔﺮﺍﺯﮐﻨﺘﺮﻝﺍﺯﺭﺍﻩﺩﻭﺭﺑﺮﺍﯼﯾﮏﻣﺎﻩﯾﺎﻣﺪﺕﺑﯿﺸﺘﺮﯼﺍﺳﺘﻔﺎﺩﻩ
ﻧﻤﯽﮐﻨﯿﺪ،ﺑﺎﺗﺮﯼﺭﺍﺍﺯﺁﻥﺧﺎﺭﺝﮐﻨﯿﺪ.
!ﺩﺭﺻﻮﺭﺕﺗﻌﻮﯾﺾﺍﺷﺘﺒﺎﻩﺑﺎﺗﺮﯼ،ﺧﻄﺮﺍﻧﻔﺠﺎﺭﻭﺟﻮﺩﺩﺍﺭﺩ.
ﺑﺎﺗﺮﯼﺭﺍﻓﻘﻂﺑﺎﻧﻤﻮﻧﻪﻣﺸﺎﺑﻪﻭﯾﮑﺴﺎﻥﺗﻌﻮﯾﺾﮐﻨﯿﺪ.
!ﺑﺎﺗﺮﯼﺭﺍﺑﺎﺍﺑﺰﺍﺭﻫﺎﯼﻓﻠﺰﯼﻧﮕﯿﺮﯾﺪ.
!ﺍﺯﻧﮕﻬﺪﺍﺭﯼﺑﺎﺗﺮﯼﺩﺭﺍﺑﺰﺍﺭﻫﺎﯼﻓﻠﺰﯼﺧﻮﺩﺩﺍﺭﯼﮐﻨﯿﺪ.
!ﺩﺭﺻﻮﺭﺕﻭﺟﻮﺩﻧﺸﺘﯽﺩﺭﺑﺎﺗﺮﯼ،ﮐﻨﺘﺮﻝﺍﺯﺭﺍﻩﺩﻭﺭﺭﺍﮐﺎﻣﻼ
ﺗﻤﯿﺰﮐﻨﯿﺪﻭﯾﮏﺑﺎﺗﺮﯼﺟﺪﯾﺪﺩﺭﻭﻥﺁﻥﻗﺮﺍﺭﺩﻫﯿﺪ.
!ﻫﻨﮕﺎﻡﺩﻭﺭﺍﻧﺪﺍﺧﺘﻦﺑﺎﺗﺮﯼﻫﺎﯼﺍﺳﺘﻔﺎﺩﻩﺷﺪﻩ،ﺍﺯﻗﻮﺍﻧﯿﻦﺩﻭﻟﺘﯽﯾﺎ
ﻗﻮﺍﻧﯿﻦﺗﻌﯿﯿﻦﺷﺪﻩﺗﻮﺳﻂﻣﺆﺳﺴﺎﺕﻋﻤﻮﻣﯽﻭﻣﺤﯿﻄﯽﮐﻪﺩﺭ
ﮐﺸﻮﺭﯾﺎﻣﻨﻄﻘﻪﺷﻤﺎﺍﻋﻤﺎﻝﻣﯽﺷﻮﺩﭘﯿﺮﻭﯼﮐﻨﯿﺪ.
ﻣﻬﻢ
!ﺍﺯﻧﮕﻬﺪﺍﺭﯼﮐﻨﺘﺮﻝﺍﺯﺭﺍﻩﺩﻭﺭﺩﺭﺩﻣﺎﯼﺑﺎﻻﯾﺎﺩﺭﻣﮑﺎﻧﯽﺑﺎ
ﺗﺎﺑﺶﻣﺴﺘﻘﯿﻢﻧﻮﺭﺧﻮﺭﺷﯿﺪﺧﻮﺩﺩﺍﺭﯼﮐﻨﯿﺪ.
!ﻣﻤﮑﻦﺍﺳﺖﮐﻨﺘﺮﻝﺍﺯﺭﺍﻩﺩﻭﺭﺩﺭﺗﺎﺑﺶﻣﺴﺘﻘﯿﻢﻧﻮﺭﺧﻮﺭﺷﯿﺪﺑﻪ
ﺩﺭﺳﺘﯽﮐﺎﺭﻧﮑﻨﺪ.
!ﺍﺯﺍﻓﺘﺎﺩﻥﮐﻨﺘﺮﻝﺍﺯﺭﺍﻩﺩﻭﺭﺑﺮﺭﻭﯼﺯﻣﯿﻦﻭﮔﯿﺮﮐﺮﺩﻥﺯﯾﺮ
ﭘﺪﺍﻝﺗﺮﻣﺰﯾﺎﮔﺎﺯﺧﻮﺩﺩﺍﺭﯼﮐﻨﯿﺪ.
ﻋﻤﻠﮑﺮﺩﻫﺎﯼﻣﻨﻮﮐﻪﺑﺮﺍﯼﺗﻨﻈﻴﻤﺎﺕ
ﻋﻤﻠﮑﺮﺩ/ﺗﻨﻈﻴﻤﺎﺕﺻﺪﺍ/ﺗﻨﻈﻴﻤﺎﺕ
ﺍﻭﻟﻴﻪ/ﻓﻬﺮﺳﺖﻫﺎﻣﺸﺘﺮﮎﻫﺴﺘﻨﺪ
ﺑﻪﺻﻔﺤﻪﻧﻤﺎﯾﺶﻗﺒﻠﯽﺑﺎﺯﻣﯽﮔﺮﺩﺩ
ﺑﻪﻟﯿﺴﺖ/ﻣﻘﻮﻟﻪﻗﺒﻠﯽﺑﺎﺯﮔﺮﺩﯾﺪ)ﭘﻮﺷﻪ/ﻣﻘﻮﻟﻪﺍﯼﮐﻪﺩﺭﯾﮏﺳﻄﺢﺑﺎﻻﺗﺮ
ﻗﺮﺍﺭﺩﺍﺭﺩ(
/SCRLﺭﺍﻓﺸﺎﺭﺩﻫﻴﺪ.
1DISP/
ﺑﺎﺯﮔﺸﺖﺑﻪﻣﻨﻮﯼﺍﺻﻠﯽ
ﺑﻪﺑﺎﻻﺗﺮﻳﻦﺭﺩﻩﻓﻬﺮﺳﺖ/ﻣﻘﻮﻟﻪﺑﺎﺯﻣﯽﮔﺮﺩﯾﺪ.
/SCRLﺭﺍﻓﺸﺎﺭﺩﺍﺩﻩﻭﻧﮕﻪﺩﺍﺭﻳﺪ.
1DISP/
ﺍﻧﺘﺨﺎﺏﻣﻨﺒﻊ
1SRC/OFFﺭﺍﻓﺸﺎﺭﺩﻫﻴﺪﺗﺎﻣﻮﺍﺭﺩﺯﻳﺮﺑﻪﻃﻮﺭﭼﺮﺧﺸﯽﻧﻤﺎﻳﺶ
ﺩﺍﺩﻩﺷﻮﻧﺪ:
TUNER)ﻣﻮﺝﯾﺎﺏ(—CD)ﭘﺨﺶﮐﻨﻨﺪﻩﺳﯽﺩﯼﺩﺍﺧﻠﯽ(—
USB)USB(/iPod)iPod(—SD)ﮐﺎﺭﺕﺣﺎﻓﻈﻪSD(—
AUX)AUX(
ﺗﻨﻈﻴﻢﻣﯿﺰﺍﻥﺻﺪﺍ
1ﺑﺮﺍﯼﺗﻨﻈﻴﻢﺻﺪﺍM.C.ﺭﺍﺑﭽﺮﺧﺎﻧﻴﺪ.
ﺍﺣﺘﯿﺎﻁ
ﺑﺮﺍﯼﺣﻔﻆﺍﯾﻤﻨﯽ،ﻫﻨﮕﺎﻡﺟﺪﺍﮐﺮﺩﻥﺻﻔﺤﻪﺟﻠﻮ،ﻭﺳﯿﻠﻪﻧﻘﻠﯿﻪﺧﻮﺩﺭﺍ
ﻣﺘﻮﻗﻒﮐﻨﯿﺪ.
ﻧﮑﺘﻪ
ﺩﺭﺻﻮﺭﺕﺍﺗﺼﺎﻝﺳﻴﻢﺁﺑﯽ/ﺳﻔﻴﺪﺩﺳﺘﮕﺎﻩﺑﻪﭘﺎﻳﺎﻧﻪﮐﻨﺘﺮﻝﺗﻘﻮﻳﺖﺁﻧﺘﻦ
ﺧﻮﺩﮐﺎﺭﺍﺗﻮﻣﺒﻴﻞ،ﺁﻧﺘﻦﺍﺗﻮﻣﺒﻴﻞﭘﺲﺍﺯﻓﻌﺎﻝﺷﺪﻥﻣﻨﺒﻊﺩﺳﺘﮕﺎﻩ،ﺑﺎﺯ
ﻣﯽﺷﻮﺩ.ﺑﺮﺍﯼﺟﻤﻊﮐﺮﺩﻥﺁﻧﺘﻦ،ﻣﻨﺒﻊﺭﺍﻏﻴﺮﻓﻌﺎﻝﮐﻨﻴﺪ.
ﺍﺳﺘﻔﺎﺩﻩﻭﻣﺮﺍﻗﺒﺖﺍﺯﮐﻨﺘﺮﻝﺍﺯﺭﺍﻩﺩﻭﺭ
ﺍﺳﺘﻔﺎﺩﻩﺍﺯﮐﻨﺘﺮﻝﺍﺯﺭﺍﻩﺩﻭﺭ
ﻓﺎﺭﺳﯽ
1ﻫﻨﮕﺎﻡﮐﺎﺭﮐﺮﺩﻥﺑﺎﮐﻨﺘﺮﻝﺍﺯﺭﺍﻩﺩﻭﺭﺁﻥﺭﺍﺩﺭﻣﻘﺎﺑﻞﺻﻔﺤﻪ
ﺟﻠﻮﯾﯽﺑﮕﯿﺮﯾﺪ.
ﻫﻨﮕﺎﻡﺍﺳﺘﻔﺎﺩﻩﺑﺮﺍﯼﺍﻭﻟﯿﻦﺑﺎﺭ،ﺑﺮﺁﻣﺪﮔﯽﻣﻮﺟﻮﺩﺭﺍﺍﺯﺳﯿﻨﯽ
ﺑﯿﺮﻭﻥﺑﮑﺸﯿﺪ.
ﺗﻌﻮﻳﺾﺑﺎﺗﺮﯼ
1ﺻﻔﺤﻪﻣﻮﺟﻮﺩﺩﺭﭘﺸﺖﮐﻨﺘﺮﻝﺍﺯﺭﺍﻩﺩﻭﺭﺭﺍﺑﻴﺮﻭﻥﺑﮑﺸﯿﺪ.
2ﺑﺎﺗﺮﯼﻫﺎﺭﺍﺑﺎﺗﻮﺟﻪﺑﻪﻗﻄﺐﻫﺎﯼﻣﺜﺒﺖ)+(ﻭﻣﻨﻔﯽ)–(
ﺟﺎﮔﺬﺍﺭﯼﮐﻨﻴﺪ.
ﻫﺸﺪﺍﺭ
!ﺑﺎﺗﺮﯼﺭﺍﺩﻭﺭﺍﺯﺩﺳﺘﺮﺱﮐﻮﺩﮐﺎﻥﻗﺮﺍﺭﺩﻫﯿﺪ.ﺩﺭﺻﻮﺭﺕ
ﺑﻠﻌﻴﺪﻩﺷﺪﻥﺑﺎﺗﺮﯼ،ﻓﻮﺭﺍًﺑﻪﭘﺰﺷﮏﻣﺮﺍﺟﻌﻪﮐﻨﻴﺪ.
۱۸
Fa
Page 88

89f abdce
g
h
o
m
f
a
i
l
k
n
j
۰۲
ﺑﺨﺶ
ﺍﺳﺘﻔﺎﺩﻩﺍﺯﺩﺳﺘﮕﺎﻩ
ﺍﺳﺘﻔﺎﺩﻩﺍﺯﺩﺳﺘﮕﺎﻩ
6 7
ﺩﺳﺘﮕﺎﻩﺍﺻﻠﯽ
ﺑﺨﺶﺑﺨﺶ
1CLK/DISP OFF9
2SW/BASSaBAND/ESC
3S.Rtrvb
4
)M.C.(
ﺷﮑﺎﻑﻗﺮﺍﺭﺩﺍﺩﻥﺩﯾﺴﮏ
5
ﺩﺭﻭﻥﺩﺳﺘﮕﺎﻩ
6h)ﺧﺮﻭﺝ(eDISP/
7ﺩﺭﮔﺎﻩUSBfSRC/OFF
8ﺩﮐﻤﻪﺟﺪﺍﺳﺎﺯﯼg
ﺑﺮﺩﺍﺷﺘﻦﺻﻔﺤﻪﺟﻠﻮﻳﯽﺑﺮﺍﯼﺟﻠﻮﮔﻴﺮﯼﺍﺯﺳﺮﻗﺖﺩﺳﺘﮕﺎﻩ
1ﺩﮐﻤﻪﺟﺪﺍﺳﺎﺯﯼﺭﺍﻓﺸﺎﺭﺩﻫﻴﺪﺗﺎﺻﻔﺤﻪﺟﻠﻮﻳﯽﺁﺯﺍﺩﺷﻮﺩ.
2ﺻﻔﺤﻪﺟﻠﻮﺭﺍﺑﻪﺳﻤﺖﺑﺎﻻﻓﺸﺎﺭﺩﻫﯿﺪﻭﺁﻥﺭﺍﺑﻪﺳﻤﺖﺧﻮﺩ
ﺑﮑﺸﯿﺪ.
3ﺻﻔﺤﻪﺟﻠﻮﻳﯽﺭﺍﻫﻤﻴﺸﻪﺩﺭﻭﻥﻳﮏﺣﻔﺎﻅ،ﻧﻈﻴﺮﻗﺎﺏﻣﺤﺎﻓﻈﺖ
ﮐﻨﻨﺪﻩ،ﻗﺮﺍﺭﺩﻫﻴﺪ.
ﻧﺼﺐﺩﻭﺑﺎﺭﻩﺻﻔﺤﻪﺟﻠﻮﻳﯽ
1ﺻﻔﺤﻪﺟﻠﻮﺭﺍﺑﻪﺳﻤﺖﭼﭗﺑﻠﻐﺰﺍﻧﯿﺪ.
ﺑﺮﺭﺳﯽﮐﻨﯿﺪﮐﻪﺯﺑﺎﻧﻪﻫﺎﯼﻣﻮﺟﻮﺩﺩﺭﺳﻤﺖﭼﭗﻗﺴﻤﺖﺑﺎﻻﯼ
ﺩﺳﺘﮕﺎﻩﺩﺭﻭﻥﺷﮑﺎﻑﻫﺎﯼﻣﻮﺟﻮﺩﺩﺭﺻﻔﺤﻪﺟﻠﻮﯾﯽﻗﺮﺍﺭﺑﮕﯿﺮﺩ.
ﺑﺮﺍﯼﺗﻮﻗﻒﻣﻮﻗﺖﯾﺎﺍﺩﺍﻣﻪﭘﺨﺶﺍﯾﻦﺩﮐﻤﻪ
ﺭﺍﻓﺸﺎﺭﺩﻫﯿﺪ.
ﺑﺮﺍﯼﺍﻧﺘﺨﺎﺏﻋﻤﻠﮑﺮﺩﻫﺎﻓﺸﺎﺭﺩﻫﻴﺪ.
ﺑﺮﺍﯼﻓﺮﺍﺧﻮﺍﻧﯽﻣﻨﻮﯼﺗﻨﻈﻴﻤﺎﺕﺍﻭﻟﻴﻪﺩﺭ
ﺯﻣﺎﻥﺧﺎﻣﻮﺵﺑﻮﺩﻥﻣﻨﺎﺑﻊ،ﻓﺸﺎﺭﺩﺍﺩﻩﻭ
ﻧﮕﻪﺩﺍﺭﻳﺪ.
ﺑﺮﺍﯼﻧﻤﺎﻳﺶﻋﻨﻮﺍﻥﺩﯾﺴﮏ،ﻋﻨﻮﺍﻥﺗﺮﺍﮎ،
ﭘﻮﺷﻪﻳﺎﻓﻬﺮﺳﺖﻓﺎﻳﻞﻫﺎﺑﺮﺣﺴﺐﻣﻨﺒﻊ،
ﻓﺸﺎﺭﺩﻫﻴﺪ.
ﺩﺭﻫﻨﮕﺎﻡﻓﻌﺎﻝﺑﻮﺩﻥﻣﻨﻮﯼﻋﻤﻠﻴﺎﺗﯽ،ﺑﺮﺍﯼ
ﮐﻨﺘﺮﻝﻋﻤﻠﮑﺮﺩﻫﺎﻓﺸﺎﺭﺩﻫﻴﺪ.
ﺑﺨﺶﻋﻤﻠﮑﺮﺩ
me
nFUNCTION
ﺍﺣﺘﯿﺎﻁ
ﺍﺳﺘﻔﺎﺩﻩﺍﺯﯾﮏﺳﯿﻢUSBﺍﺧﺘﯿﺎﺭﯼPioneer)CD-U50E(
ﺑﺮﺍﯼﺍﺗﺼﺎﻝﭘﺨﺶﮐﻨﻨﺪﻩﺻﺪﺍﯼUSB/ﺣﺎﻓﻈﻪUSBﺑﻪﻫﺮ
ﺩﺳﺘﮕﺎﻫﯽﮐﻪﻣﺴﺘﻘﯿﻤﺎًﺑﻪﺍﯾﻦﺩﺳﺘﮕﺎﻩﻣﺘﺼﻞﺍﺳﺖﺳﺒﺐﺑﯿﺮﻭﻥﺁﻣﺪﻥ
ﺁﻥﺍﺯﺩﺳﺘﮕﺎﻩﻣﯽﺷﻮﺩﻭﻣﻤﮑﻦﺍﺳﺖﺧﻄﺮﺍﺗﯽﺭﺍﺍﯾﺠﺎﺩﮐﻨﺪ.
ﺍﺯﻣﺤﺼﻮﻻﺕﺗﺄﯾﯿﺪﻧﺸﺪﻩﺍﺳﺘﻔﺎﺩﻩﻧﮑﻨﯿﺪ.
1 2 3 4
5
ﮐﻨﺘﺮﻝﺍﺯﺭﺍﻩﺩﻭﺭ
oLIST/ENTER
ﻋﻤﻠﮑﺮﺩﻫﺎﯼﺍﺻﻠﯽ
ﻣﻬﻢ
!ﺩﺭﻫﻨﮕﺎﻡﺑﺮﺩﺍﺷﺘﻦﻳﺎﻧﺼﺐﺻﻔﺤﻪﺟﻠﻮﻳﯽ،ﺑﺎﺍﺣﺘﻴﺎﻁﻋﻤﻞ
ﮐﻨﻴﺪ.
!ﺍﺯﻗﺮﺍﺭﺩﺍﺩﻥﺻﻔﺤﻪﺟﻠﻮﻳﯽﺩﺭﻣﻌﺮﺽﺗﮑﺎﻧﻬﺎﯼﺷﺪﻳﺪ،
ﺑﭙﺮﻫﻴﺰﻳﺪ.
2ﺳﻤﺖﺭﺍﺳﺖﺻﻔﺤﻪﺟﻠﻮﻳﯽﺭﺍﻓﺸﺎﺭﺩﻫﻴﺪﺗﺎﮐﺎﻣﻼًﺩﺭﺟﺎﯼﺧﻮﺩ
ﻣﺤﮑﻢﺷﻮﺩ.
ﺍﮔﺮﻧﻤﯽﺗﻮﺍﻧﯿﺪﺻﻔﺤﻪﺟﻠﻮﯾﯽﺭﺍﺑﻪﺩﺭﺳﺘﯽﺑﻪﻗﺴﻤﺖﺑﺎﻻﯼ
ﺩﺳﺘﮕﺎﻩﻣﺘﺼﻞﮐﻨﯿﺪ،ﺑﺮﺭﺳﯽﮐﻨﯿﺪﮐﻪﺻﻔﺤﻪﺟﻠﻮﯾﯽﺭﺍﺑﻪﺩﺭﺳﺘﯽ
ﺩﺭﻭﻥﻗﺴﻤﺖﺑﺎﻻﯾﯽﺩﺳﺘﮕﺎﻩﻗﺮﺍﺭﺩﻫﯿﺪ.ﻓﺸﺎﺭﻭﺍﺭﺩﺁﻭﺭﺩﻥﺑﺮ
ﻗﺴﻤﺖﺟﻠﻮﻭﻗﺮﺍﺭﺩﺍﺩﻥﺁﻥﺩﺭﻣﺤﻞﺳﺒﺐﺁﺳﯿﺐﻭﺍﺭﺩﺁﻭﺭﺩﻥﺑﻪ
ﺻﻔﺤﻪﺟﻠﻮﯾﺎﻗﺴﻤﺖﺑﺎﻻﯼﺩﺳﺘﮕﺎﻩﻣﯽﺷﻮﺩ.
ﺭﻭﺷﻦﮐﺮﺩﻥﺩﺳﺘﮕﺎﻩ
1ﺑﺮﺍﯼﺭﻭﺷﻦﮐﺮﺩﻥﺩﺳﺘﮕﺎﻩSRC/OFFﺭﺍﻓﺸﺎﺭﺩﻫﻴﺪ.
ﺧﺎﻣﻮﺵﮐﺮﺩﻥﺩﺳﺘﮕﺎﻩ
1SRC/OFFﺭﺍﻓﺸﺎﺭﺩﺍﺩﻩﻭﻧﮕﻪﺩﺍﺭﻳﺪﺗﺎﺩﺳﺘﮕﺎﻩﺧﺎﻣﻮﺵﺷﻮﺩ.
!ﺻﻔﺤﻪﺟﻠﻮﻳﯽﺭﺍﺩﺭﻣﻌﺮﺽﺗﺎﺑﺶﻣﺴﺘﻘﻴﻢﻧﻮﺭﺧﻮﺭﺷﻴﺪﻭ
ﺩﻣﺎﯼﺑﺎﻻﻗﺮﺍﺭﻧﺪﻫﻴﺪ.
!ﺑﺮﺍﯼﺟﻠﻮﮔﻴﺮﯼﺍﺯﺁﺳﻴﺐﺩﻳﺪﻥﺩﺳﺘﮕﺎﻩﻳﺎﻗﺴﻤﺘﻬﺎﯼﺩﺍﺧﻠﯽ
ﺍﺗﻮﻣﺒﻴﻞ،ﮐﺎﺑﻞﻫﺎﻭﺗﺠﻬﻴﺰﺍﺕﻣﺘﺼﻞﺑﻪﺻﻔﺤﻪﺟﻠﻮﻳﯽﺭﺍﻗﺒﻞﺍﺯ
ﺑﺮﺩﺍﺷﺘﻦﺁﻥ،ﺟﺪﺍﮐﻨﻴﺪ.
ﺑﺮﺍﯼﻗﻄﻊﺻﺪﺍﻓﺸﺎﺭﺩﻫﻴﺪ.ﺑﺮﺍﯼﻭﺻﻞ
ﺩﻭﺑﺎﺭﻩﺻﺪﺍ،ﺩﻭﺑﺎﺭﻩﻓﺸﺎﺭﺩﻫﻴﺪ.
ﺑﺮﺍﯼﺍﻧﺠﺎﻡﮐﻨﺘﺮﻝﻫﺎﯼﺟﺴﺘﺠﻮﺟﻬﺖﻣﻮﺝ
ﻳﺎﺑﯽﺩﺳﺘﯽ،ﺣﺮﮐﺖﺳﺮﻳﻊﺭﻭﺑﻪﺟﻠﻮ،
ﺣﺮﮐﺖﺭﻭﺑﻪﻋﻘﺐﻭﺟﺴﺘﺠﻮﯼﺗﺮﺍﮎ،
ﻓﺸﺎﺭﺩﻫﻴﺪ.
ﻫﻤﭽﻨﻴﻦﺑﺮﺍﯼﮐﻨﺘﺮﻝﻋﻤﻠﮑﺮﺩﻫﺎﻣﻮﺭﺩ
ﺍﺳﺘﻔﺎﺩﻩﻗﺮﺍﺭﻣﯽﮔﯿﺮﺩ.
ﺑﺮﺍﯼﺍﻧﺘﺨﺎﺏﻳﮏﻋﻤﻠﮑﺮﺩﺻﻮﺗﯽﻓﺸﺎﺭ
ﺩﻫﻴﺪ.
ﺑﺮﺍﯼﺍﻧﺘﺨﺎﺏﻧﻤﺎﻳﺶﻫﺎﯼﻣﺨﺘﻠﻒ،ﻓﺸﺎﺭ
ﺩﻫﻴﺪ.
ﺑﺮﺍﯼﺣﺮﮐﺖﺩﺍﺩﻥﺍﻃﻼﻋﺎﺕﻣﺘﻨﯽﻓﺸﺎﺭ
ﺩﺍﺩﻩﻭﻧﮕﻪﺩﺍﺭﻳﺪ.
ﺑﺨﺶﻋﻤﻠﮑﺮﺩ
hVOLUMEﺑﺮﺍﯼﺍﻓﺰﺍﻳﺶﯾﺎﮐﺎﻫﺶﺻﺪﺍﻓﺸﺎﺭﺩﻫﻴﺪ.
iMUTE
ja/b/c/d
kAUDIO
lDISP/SCRL
ﻓﻴﺶﻭﺭﻭﺩﯼAUX
)ﻓﻴﺶﺍﺳﺘﺮﻳﻮﯼ۵/۳
ﻣﻴﻠﯽﻣﺘﺮﯼ(
)ﻟﯿﺴﺖ(
MULTI-CONTROL
c
)iPod(/LOC
d
)ﺗﺼﺎﺩﻓﯽ(
/SCRL
ﺷﮑﺎﻑﮐﺎﺭﺕﺣﺎﻓﻈﻪ
SD
ﺑﺮﺍﯼﺩﺳﺘﺮﺳﯽﺑﻪﺷﮑﺎﻑ
ﮐﺎﺭﺕﺣﺎﻓﻈﻪSD،
ﺻﻔﺤﻪﺟﻠﻮﯾﯽﺭﺍ
ﺑﺮﺩﺍﺭﯾﺪ.
۱۷
Fa
Page 89

ﺑﺨﺶ
ﻗﺒﻞﺍﺯﺷﺮﻭﻉﺑﻪﮐﺎﺭ
ﻓﻬﺮﺳﺖﻣﻄﺎﻟﺐ
۰۱
ﺩﺭﺻﻮﺭﺕﻭﺟﻮﺩﻣﺸﮑﻞ
ﺍﮔﺮﺩﺳﺘﮕﺎﻩﺑﺪﺭﺳﺘﯽﮐﺎﺭﻧﮑﺮﺩ،ﺑﻪﻓﺮﻭﺷﻨﺪﻩﯾﺎﻧﺰﺩﯾﮑﺘﺮﯾﻦﻣﺮﮐﺰ
ﺗﻌﻤﯿﺮﺍﺕﻣﺠﺎﺯPIONEERﻣﺮﺍﺟﻌﻪﮐﻨﯿﺪ.
ﺣﺎﻟﺖﻧﻤﺎﯾﺸﯽ
ﻣﻬﻢ
!ﺩﺭﺻﻮﺭﺕﻋﺪﻡﺍﺗﺼﺎﻝﺳﯿﻢﻗﺮﻣﺰﺭﻧﮓ)ACC(ﺍﯾﻦﺩﺳﺘﮕﺎﻩ
ﺑﻪﭘﺎﯾﺎﻧﻪﻣﺘﺼﻞﺑﻪﻋﻤﻠﮑﺮﺩﻫﺎﯼﺭﻭﺷﻦ/ﺧﺎﻣﻮﺵﺳﻮﯾﯿﭻﺍﺳﺘﺎﺭﺕ
ﺳﺒﺐﺗﺨﻠﯿﻪﺑﺎﺗﺮﯼﻣﯽﺷﻮﺩ.
!ﺑﻪﻳﺎﺩﺩﺍﺷﺘﻪﺑﺎﺷﻴﺪﮐﻪﺍﮔﺮﻗﺎﺑﻠﻴﺖﻧﻤﺎﯾﺸﯽﭘﺲﺍﺯﺧﺎﻣﻮﺵﺷﺪﻥ
ﻣﻮﺗﻮﺭﺧﻮﺩﺭﻭﻧﻴﺰﺍﺩﺍﻣﻪﺩﺍﺷﺘﻪﺑﺎﺷﺪ،ﻣﻤﮑﻦﺍﺳﺖﻧﻴﺮﻭﯼﺑﺎﺗﺮﯼ
ﺗﺨﻠﻴﻪﺷﻮﺩ.
ﺍﮔﺮﺩﺭﻫﻨﻔﺎﺻﻠﻪﺧﺎﻣﻮﺵﺑﻮﺩﻥﺩﺳﺘﮕﺎﻩﺳﻮﻳﻴﭻﺍﺳﺘﺎﺭﺕﺩﺭﻭﺿﻌﻴﺖ
ACCﻳﺎONﻗﺮﺍﺭﺑﮕﻴﺮﺩ،ﭘﺨﺶﻧﻤﺎﯾﺸﯽﺑﻪﻃﻮﺭﺧﻮﺩﮐﺎﺭﺁﻏﺎﺯ
ﻣﯽﺷﻮﺩ.ﺧﺎﻣﻮﺵﮐﺮﺩﻥﺩﺳﺘﮕﺎﻩﺑﺎﻋﺚﻟﻐﻮﺣﺎﻟﺖﻧﻤﺎﯾﺸﯽﻧﻤﯽﺷﻮﺩ.
/SCRLﺭﺍﻓﺸﺎﺭﺩﻫﻴﺪ.ﺑﺮﺍﯼ
/SCRLﺭﺍﺩﻭﺑﺎﺭﻩﻓﺸﺎﺭﺩﻫﻴﺪ.ﺭﺍﻩﺍﻧﺪﺍﺯﯼﭘﺨﺶ
ﺑﺮﺍﯼﻟﻐﻮﺣﺎﻟﺖﻧﻤﺎﯾﺸﯽ،DISP/
ﺷﺮﻭﻉ،DISP/
ﻧﻤﺎﯾﺸﯽﺩﺭﺣﺎﻟﯽﮐﻪﺳﻮﻳﻴﭻﺍﺳﺘﺎﺭﺕﺑﺮﺭﻭﯼACCﻗﺮﺍﺭﺩﺍﺭﺩ،
ﻣﻤﮑﻦﺍﺳﺖﺑﺎﻋﺚﺗﺨﻠﻴﻪﻧﻴﺮﻭﯼﺑﺎﺗﺮﯼﺷﻮﺩ.
ﺩﻓﺘﺮﭼﻪﺭﺍﻫﻨﻤﺎﺭﺍﺩﺭﻣﮑﺎﻧﯽﺍﯾﻤﻦ
ﺣﺎﻟﺖﻣﻌﮑﻮﺱ
ﺍﮔﺮﺩﺭﻣﺪﺕﺯﻣﺎﻥ۳۰ﺛﺎﻧﯿﻪﻫﯿﭻﮐﺎﺭﯼﺍﻧﺠﺎﻡﻧﺪﻫﯿﺪ،ﻧﺸﺎﻧﮕﺮﻫﺎﯼ
ﺭﻭﯼﺻﻔﺤﻪﺑﻪﺣﺎﻟﺖﻣﻌﮑﻮﺱﺟﺎﺑﺠﺎﻣﯽﺷﻮﻧﺪﻭﺳﭙﺲﻫﺮ۱۰ﺛﺎﻧﯿﻪ
ﺍﯾﻦﺣﺎﻟﺖﻣﻌﮑﻮﺱﺍﺩﺍﻣﻪﻣﯿﺎﺑﺪ.ﺍﮔﺮﺩﺭﻫﻨﮕﺎﻡﺧﺎﻣﻮﺵﺑﻮﺩﻥﺍﯾﻦ
ﺩﺳﺘﮕﺎﻩﻭﺩﺭﺣﺎﻟﯽﮐﻪﺳﻮﯾﯿﭻﺍﺳﺘﺎﺭﺕﺭﻭﯼﻣﻮﻗﻌﯿﺖACCﯾﺎON
ﻗﺮﺍﺭﺩﺍﺭﺩﺩﮐﻤﻪBAND/ESCﺭﺍﻓﺸﺎﺭﺩﻫﯿﺪ،ﺣﺎﻟﺖﻣﻌﮑﻮﺱﻟﻐﻮ
ﻣﯽﺷﻮﺩ.ﺩﮐﻤﻪBAND/ESCﺭﺍﺩﻭﺑﺎﺭﻩﻓﺸﺎﺭﺩﻫﻴﺪﺗﺎﺣﺎﻟﺖ
ﻣﻌﮑﻮﺱﺷﺮﻭﻉﺷﻮﺩ.
ﻣﺘﺸﮑﺮﯾﻢ)ﺑﺪﻭﻥﭼﺎﭖ(
ﺧﺮﯾﺪﺍﯾﻦﻣﺤﺼﻮﻝPIONEERﻣﺘﺸﮑﺮﯾﻢ.
ﺍﺯﺷﻤﺎﺑﻪﺧﺎﻃﺮ
ﺑﺮﺍﯼﺍﻃﻤﯿﻨﺎﻥﺍﺯﻋﻤﻠﮑﺮﺩﺻﺤﯿﺢﺁﻥ،ﻗﺒﻞﺍﺯﺍﺳﺘﻔﺎﺩﻩﺍﺯﻣﺤﺼﻮﻝ،
ﺍﯾﻦﺩﻓﺘﺮﭼﻪﺭﺍﺑﻄﻮﺭﮐﺎﻣﻞﻣﻄﺎﻟﻌﻪﮐﻨﯿﺪ.ﻣﻄﺎﻟﻌﻪﻭﺭﻋﺎﯾﺖﻣﻮﺍﺭﺩ
ﻫﺸﺪﺍﺭﻭﺍﺣﺘﯿﺎﻁﮐﻪﺩﺭﺍﯾﻦﺩﻓﺘﺮﭼﻪﺭﺍﻫﻨﻤﺎﺁﻭﺭﺩﻩﺷﺪﻩﺍﺳﺖﺍﺯ
ﺍﻫﻤﯿﺖﺧﺎﺻﯽﺑﺮﺧﻮﺭﺩﺍﺭﺍﺳﺖ.
ﻧﮕﻬﺪﺍﺭﯼﮐﻨﯿﺪﮐﻪﺑﺮﺍﯼﺍﺳﺘﻔﺎﺩﻩﻫﺎﯼﺑﻌﺪﯼﺑﻪﺭﺍﺣﺘﯽﻗﺎﺑﻞﺩﺳﺘﺮﺳﯽ
ﺑﺎﺷﺪ.
ﺩﺭﺑﺎﺭﻩﺍﻳﻦﺩﺳﺘﮕﺎﻩ
ﺍﺣﺘﯿﺎﻁ
!ﺍﺯﺗﻤﺎﺱﻣﺎﯾﻌﺎﺕﺑﺎﺍﯾﻦﺩﺳﺘﮕﺎﻩﺧﻮﺩﺩﺍﺭﯼﮐﻨﯿﺪ.ﻣﻤﮑﻦﺍﺳﺖ
ﺑﺮﻕﮔﺮﻓﺘﮕﯽﺍﯾﺠﺎﺩﺷﻮﺩ.ﻫﻤﭽﻨﯿﻦﺩﺭﺻﻮﺭﺕﺗﻤﺎﺱﺑﺎﻣﺎﯾﻌﺎﺕ
ﻣﻤﮑﻦﺍﺳﺖﺑﻪﺩﺳﺘﮕﺎﻩﺁﺳﯿﺐﻭﺍﺭﺩﺷﻮﺩ،ﺩﻭﺩﺍﯾﺠﺎﺩﺷﺪﻩﯾﺎﺑﯿﺶ
ﺍﺯﺣﺪﮔﺮﻡﺷﻮﺩ.
!ﻫﻤﯿﺸﻪﺻﺪﺍﺭﺍﮐﻢﻭﺩﺭﺳﻄﺢﻣﻨﺎﺳﺒﯽﺣﻔﻆﮐﻨﯿﺪﺗﺎﺻﺪﺍﯼ
ﻣﺤﯿﻂﺍﻃﺮﺍﻑﺭﺍﺑﺸﻨﻮﯾﺪ.
!ﺍﺯﺗﻤﺎﺱﺩﺳﺘﮕﺎﻩﺑﺎﺭﻃﻮﺑﺖﺧﻮﺩﺩﺍﺭﯼﮐﻨﯿﺪ.
!ﺩﺭﺻﻮﺭﺕﻗﻄﻊﺍﺗﺼﺎﻝﺑﺎﺗﺮﯼﯾﺎﺧﺎﻟﯽﺷﺪﻥﺷﺎﺭﮊﺁﻥ،ﮐﻠﯿﻪ
ﻣﻮﺍﺭﺩﺍﺯﭘﯿﺶﺗﻨﻈﯿﻢﺷﺪﻩﺩﺭﺣﺎﻓﻈﻪﭘﺎﮎﻣﯽﺷﻮﺩ.
ﺍﺣﺘﯿﺎﻁ
ﺍﯾﻦﺩﺳﺘﮕﺎﻩﯾﮏﻣﺤﺼﻮﻝﻟﯿﺰﺭﯼﮐﻼﺱ۱ﺍﺳﺖﮐﻪﺗﺤﺖﺍﯾﻤﻨﯽ
ﻣﺤﺼﻮﻻﺕﻟﯿﺰﺭﯼ،IEC 60825-1:2007،ﮔﺮﻭﻩﺑﻨﺪﯼﺷﺪﻩ
ﺍﺳﺖﻭﺩﺍﺭﺍﯼﻣﺎﺩﻭﻝﻟﯿﺰﺭﯼﮐﻼﺱ۱Mﺍﺳﺖ.ﺑﺮﺍﯼﺍﻃﻤﯿﻨﺎﻥﺍﺯ
ﺍﯾﻤﻨﯽﻣﺪﺍﻭﻡﺩﺳﺘﮕﺎﻩ،ﺍﺯﺧﺎﺭﺝﮐﺮﺩﻥﺩﺭﭘﻮﺵﻫﺎﻭﺩﺳﺘﺮﺳﯽﺑﻪ
ﺑﺨﺶﻫﺎﯼﺩﺍﺧﻠﯽﺩﺳﺘﮕﺎﻩﺧﻮﺩﺩﺍﺭﯼﮐﻨﯿﺪ.ﮐﻠﯿﻪﺗﻌﻤﯿﺮﺍﺕﺭﺍﺑﻪ
ﺍﻓﺮﺍﺩﻣﺘﺨﺼﺺﻭﺍﮔﺬﺍﺭﮐﻨﯿﺪ.
CD/CD-R/CD-RWﻭﺩﺳﺘﮕﺎﻩﻫﺎﯼﺫﺧﻴﺮﻩﺳﺎﺯﯼ
ﻗﺒﻞﺍﺯﺷﺮﻭﻉﺑﻪﮐﺎﺭ
ﻣﺘﺸﮑﺮﯾﻢ)ﺑﺪﻭﻥﭼﺎﭖ(۱۶
ﺩﺭﺑﺎﺭﻩﺍﻳﻦﺩﺳﺘﮕﺎﻩ۱۶
ﺩﺭﺻﻮﺭﺕﻭﺟﻮﺩﻣﺸﮑﻞ۱۶
ﺣﺎﻟﺖﻧﻤﺎﯾﺸﯽ۱۶
ﺣﺎﻟﺖﻣﻌﮑﻮﺱ۱۶
ﺩﺭﺑﺎﺭﻩﺍﯾﻦﺩﻓﺘﺮﭼﻪﺭﺍﻫﻨﻤﺎ۱۶
ﺍﺳﺘﻔﺎﺩﻩﺍﺯﺩﺳﺘﮕﺎﻩ
ﺩﺳﺘﮕﺎﻩﺍﺻﻠﯽ۱۷
ﮐﻨﺘﺮﻝﺍﺯﺭﺍﻩﺩﻭﺭ۱۷
ﻋﻤﻠﮑﺮﺩﻫﺎﯼﺍﺻﻠﯽ۱۷
ﺍﺳﺘﻔﺎﺩﻩﻭﻣﺮﺍﻗﺒﺖﺍﺯﮐﻨﺘﺮﻝﺍﺯﺭﺍﻩﺩﻭﺭ۱۸
ﻋﻤﻠﮑﺮﺩﻫﺎﯼﻣﻨﻮﮐﻪﺑﺮﺍﯼﺗﻨﻈﻴﻤﺎﺕﻋﻤﻠﮑﺮﺩ/ﺗﻨﻈﻴﻤﺎﺕﺻﺪﺍ/
ﺗﻨﻈﻴﻤﺎﺕﺍﻭﻟﻴﻪ/ﻓﻬﺮﺳﺖﻫﺎﻣﺸﺘﺮﮎﻫﺴﺘﻨﺪ۱۸
ﻣﻮﺝﯾﺎﺏ۱۸
ﺧﺎﺭﺟﯽ)USB ،SD(۱۹
iPod۲۰
ﺗﻨﻈﻴﻢﺧﻮﺩﮐﺎﺭ۲۱
ﺗﻨﻈﻴﻤﺎﺕﺍﻭﻟﻴﻪ۲۲
ﺳﺎﻳﺮﻋﻤﻠﮑﺮﺩﻫﺎ۲۳
ﻧﺼﺐ
ﺍﺗﺼﺎﻝﻫﺎ۲۴
ﻧﺼﺐ۲۵
ﻓﺎﺭﺳﯽ
ﺍﻃﻼﻋﺎﺕﺑﯿﺸﺘﺮ
ﺭﻓﻊﻋﯿﺐ۲۶
ﭘﻴﺎﻡﻫﺎﯼﺧﻄﺎ۲۶
ﺍﺳﺘﻔﺎﺩﻩﺍﺯﺩﺳﺘﻮﺭﺍﻟﻌﻤﻞﻫﺎ۲۷
ﺳﺎﺯﮔﺎﺭﯼﺑﺎﺻﺪﺍﯼﻓﺸﺮﺩﻩ)ﺩﯾﺴﮏ،USB ،SD(۲۸
ﺳﺎﺯﮔﺎﺭﯼﺑﺎiPod۲۹
ﺗﻮﺍﻟﯽﻓﺎﯾﻞﻫﺎﯼﺻﻮﺗﯽ۲۹
ﺣﻖﻧﺴﺨﻪﺑﺮﺩﺍﺭﯼﻭﻋﻼﻣﺖﺗﺠﺎﺭﯼ۲۹
ﻣﺸﺨﺼﺎﺕ۳۰
ﺩﺭﺑﺎﺭﻩﺍﯾﻦﺩﻓﺘﺮﭼﻪﺭﺍﻫﻨﻤﺎ
ﺩﺭﺩﺳﺘﻮﺭﺍﻟﻌﻤﻞﻫﺎﯼﺯﻳﺮ،ﺍﺯﺣﺎﻓﻈﻪﻫﺎﯼUSB،ﭘﺨﺶﮐﻨﻨﺪﻩﻫﺎﯼ
ﺻﻮﺗﯽUSBﻗﺎﺑﻞﺣﻤﻞﻭﮐﺎﺭﺕﻫﺎﯼﺣﺎﻓﻈﻪSDﺑﻪﻃﻮﺭﮐﻠﯽﺑﺎ
ﻋﻨﻮﺍﻥ"ﺩﺳﺘﮕﺎﻩﺫﺧﻴﺮﻩﺳﺎﺯﯼUSBﺧﺎﺭﺟﯽ)USB ،SD("ﺍﺯ
ﺁﻧﻬﺎﻧﺎﻡﺑﺮﺩﻩﺷﺪﻩﺍﺳﺖ.ﺍﮔﺮﺗﻨﻬﺎﺣﺎﻓﻈﻪﻫﺎﯼUSBﻭﭘﺨﺶﮐﻨﻨﺪﻩ
ﻫﺎﯼﺻﻮﺗﯽUSBﻗﺎﺑﻞﺣﻤﻞﻭﺟﻮﺩﺩﺍﺷﺘﻪﺑﺎﺷﻨﺪ،ﺑﻪﻃﻮﺭﮐﻠﯽﺑﺎ
ﻋﻨﻮﺍﻥ"ﺩﺳﺘﮕﺎﻩﺫﺧﻴﺮﻩﺳﺎﺯﯼUSB"ﺍﺯﺁﻧﻬﺎﻧﺎﻡﺑﺮﺩﻩﺷﺪﻩﺍﺳﺖ.
ﺩﺭﺍﯾﻦﺩﻓﺘﺮﭼﻪﺭﺍﻫﻨﻤﺎﺑﺮﺍﯼﺍﺷﺎﺭﻩﺑﻪiPodﻭiPhoneﺍﺯ
ﻋﺒﺎﺭﺕ"iPod"ﺍﺳﺘﻔﺎﺩﻩﻣﯽﺷﻮﺩ.
۱۶
Fa
Page 90

ﺍﻟﻤﻠﺤﻘﺎﺕ
ﻣﻌﻠﻮﻣﺎﺕﺇﺿﺎﻓﻴﺔ
USB
SD
ﺗﻨﺴﻴﻖﺇﺷﺎﺭﺓWA V.................Linear PCM & MS ADPCM
ﻣﻮﺍﺻﻔﺎﺕUSBﺍﻟﻘﻴﺎﺳﻴﺔ...........USB 2.0ﺑﺎﻟﺴﺮﻋﺔﺍﻟﻜﺎﻣﻠﺔ
ﺍﻟﺤﺪﺍﻷﻗﺼﻰﻹﻣﺪﺍﺩﺍﻟﺘﻴﺎﺭ...........٥٠٠ﻡﺃ
ﻓﺌﺔUSB...........................MSC)ﻓﺌﺔﺍﻟﺘﺨﺰﻳﻦﺍﻟﻜﺒﻴﺮ(
ﻧﻈﺎﻡﺍﻟﻤﻠﻔﺎﺕ.........................FAT12ﻭFAT16ﻭFAT32
ﺗﻨﺴﻴﻖﺗﺮﻣﻴﺰMP3.................MPEG-1 & 2 Audio Layer 3
ﺗﻨﺴﻴﻖﺗﺮﻣﻴﺰWMA...............ﺍﻹﺻﺪﺍﺭﺍﺕ7ﻭ7.1ﻭ8ﻭ9ﻭ10ﻭ11
ﺗﻨﺴﻴﻖﺗﺮﻣﻴﺰAAC.................MPEG-4 AAC)ﺗﺸﻔﻴﺮiTunes
ﺗﻨﺴﻴﻖﺇﺷﺎﺭﺓWA V.................Linear PCM & MS ADPCM
ﺍﻟﺼﻴﻐﺔﺍﻟﻤﺎﺩﻳﺔﺍﻟﻤﺘﻮﺍﻓﻘﺔ.............ﺍﻹﺻﺪﺍﺭ2.00
ﺍﻟﺤﺪﺍﻷﻗﺼﻰﻟﺴﻌﺔﺍﻟﺬﺍﻛﺮﺓ..........٣٢ﺟﻴﺠﺎﺑﺎﻳﺖ)ﻟﺒﻄﺎﻗﺔSDﻭSDHC(
ﻧﻈﺎﻡﺍﻟﻤﻠﻔﺎﺕ.........................FAT12ﻭFAT16ﻭFAT32
ﺗﻨﺴﻴﻖﺗﺮﻣﻴﺰMP3.................MPEG-1 & 2 Audio Layer 3
ﺗﻨﺴﻴﻖﺗﺮﻣﻴﺰWMA...............ﺍﻹﺻﺪﺍﺭﺍﺕ7ﻭ7.1ﻭ8ﻭ9ﻭ10ﻭ11
ﺗﻨﺴﻴﻖﺗﺮﻣﻴﺰAAC.................MPEG-4 AAC)ﺗﺸﻔﻴﺮiTunes
ﺗﻨﺴﻴﻖﺇﺷﺎﺭﺓWA V.................Linear PCM & MS ADPCM
ﻣﻮﺍﻟﻒFM
ﻧﻄﺎﻕﺍﻟﺘﺮﺩﺩﺍﺕ......................٨٧٫ ٥ﻡﻫﺮﺗﺰﺇﻟﻰ١٠٨٫ ٠ﻡﻫﺮﺗﺰ
ﺣﺴﺎﺳﻴﺔﻗﺎﺑﻠﻴﺔﺍﻻﺳﺘﺨﺪﺍﻡ.............٩ﺩﻳﺴﻴﺒﻞﻑ)٠٫٨ﻣﺎﻳﻜﺮﻭﻓﻮﻟﺖ/٧٥ﺃﻭﻡ،
ﻧﺴﺒﺔﺍﻹﺷﺎﺭﺓﺇﻟﻰﺍﻟﻀﻮﺿﺎﺀ........٧٢ﺩﻳﺴﻴﺒﻞ)ﺷﺒﻜﺔIEC-A(
ﻣﻮﺍﻟﻒAM
ﻧﻄﺎﻕﺍﻟﺘﺮﺩﺩﺍﺕ......................٥٣١ﻙﻫﺮﺗﺰﺇﻟﻰ١٦٠٢ﻙﻫﺮﺗﺰ)٩ﻙ
ﺣﺴﺎﺳﻴﺔﻗﺎﺑﻠﻴﺔﺍﻻﺳﺘﺨﺪﺍﻡ.............٢٥ﻣﺎﻳﻜﺮﻭﻓﻮﻟﺖ)ﻧﺴﺒﺔﺍﻹﺷﺎﺭﺓﺇﻟﻰ
ﻧﺴﺒﺔﺍﻹﺷﺎﺭﺓﺇﻟﻰﺍﻟﻀﻮﺿﺎﺀ........٦٢ﺩﻳﺴﻴﺒﻞ)ﺷﺒﻜﺔIEC-A(
ﻣﻼﺣﻈﺔ
ﺍﻟﻤﻮﺍﺻﻔﺎﺕﻭﺍﻟﺘﺼﻤﻴﻢﻋﺮﺿﺔﻟﻠﺘﻌﺪﻳﻞﺑﺪﻭﻥﺇﺷﻌﺎﺭﻣﺴﺒﻖ.
)ﻣﺪﻯﻧﻄﺎﻕﺍﻟﺠﻬﺪﺍﻟﻤﺴﻤﻮﺡﺑﻪ:١٢٫٠
ﻓﻮﻟﺖﺇﻟﻰﻓﻮﻟﺖ١٤٫٤ﺗﻴﺎﺭﻣﺴﺘﻤﺮ(
٥٠ﻭﺍﺕ×٤/٢ﺃﻭﻡ+٧٠ﻭﺍﺕ×٢/١
ﺃﻭﻡ)ﻟﻤﻀﺨﻢﺍﻟﺼﻮﺕ(
ﻫﺮﺗﺰ،ﺗﺸﻮﻳﺶﺗﻮﺍﻓﻘﻲﻛﻠﻲ٥٪ﺣﻤﻮﻟﺔ٤
ﺃﻭﻡ،ﻣﻊﺩﻓﻊﻛﻠﺘﻲﺍﻟﻘﻨﺎﺗﻴﻦ(
٤ﺃﻭﻡﺇﻟﻰ٨ﺃﻭﻡ×٢+٢ﺃﻭﻡ×١
...................................٤٫٠ﻓﻮﻟﺖ
ﻭ12)ﻗﻨﺎﺗﺎﻥﺻﻮﺗﻴﺘﺎﻥ(
)Windows Media Playe r(
ﻓﻘﻂ().m4a(
)ﺍﻹﺻﺪﺍﺭ٩٫٢ﻭﺃﻗﺪﻡ(
)ﻏﻴﺮﻣﻀﻐﻮﻁ(
ﻭ12)ﻗﻨﺎﺗﺎﻥﺻﻮﺗﻴﺘﺎﻥ(
)Windows Media Playe r(
ﻓﻘﻂ().m4a(
)ﺍﻹﺻﺪﺍﺭ٩٫٢ﻭﺃﻗﺪﻡ(
)ﻏﻴﺮﻣﻀﻐﻮﻁ(
ﻭ12)ﻗﻨﺎﺗﺎﻥﺻﻮﺗﻴﺘﺎﻥ(
)Windows Media Playe r(
ﻓﻘﻂ().m4a(
)ﺍﻹﺻﺪﺍﺭ٩٫٢ﻭﺃﻗﺪﻡ(
)ﻏﻴﺮﻣﻀﻐﻮﻁ(
ﺃﺣﺎﺩﻱﺍﻟﺼﻮﺕ،ﻧﺴﺒﺔﺍﻹﺷﺎﺭﺓﺇﻟﻰ
ﺍﻟﻀﻮﺿﺎﺀ:٣٠ﺩﻳﺴﻴﺒﻞ(
ﻫﺮﺗﺰ(
٥٣٠ﻙﻫﺮﺗﺰﺇﻟﻰ١٦٤٠ﻙﻫﺮﺗﺰ)١٠
ﻙﻫﺮﺗﺰ(
ﺍﻟﻀﻮﺿﺎﺀ:٢٠ﺩﻳﺴﻴﺒﻞ(
١٥
Ar
ﺍﻟﻤﻮﺍﺻﻔﺎﺕ
ﻋﺎﻡ
ﻣﺼﺪﺭﺍﻟﻄﺎﻗﺔﺍﻟﻤﺤﺪﺩ................١٤٫٤ﻓﻮﻟﺖﺗﻴﺎﺭﻣﺴﺘﻤﺮ
ﻧﻈﺎﻡﺍﻟﺘﺄﺭﻳﺾ.......................ﻧﻮﻉﺳﺎﻟﺐ
ﺍﻟﺤﺪﺍﻷﻗﺼﻰﻻﺳﺘﻬﻼﻙﺍﻟﺘﻴﺎﺭ.......١٠٫٠ﺃﻣﺒﻴﺮ
ﺍﻷﺑﻌﺎﺩ)ﻃﻮﻝ×ﻋﺮﺽ×ﺍﺭﺗﻔﺎﻉ(:
DIN
ﺍﻟﻬﻴﻜﻞ..................١٧٨ﻣﻢ×٥٠ﻣﻢ×١٦٥ﻣﻢ
ﺍﻟﻤﻘﺪّﻣﺔ.................١٨٨ﻣﻢ×٥٨ﻣﻢ×١٨ﻣﻢ
D
ﺍﻟﻬﻴﻜﻞ..................١٧٨ﻣﻢ×٥٠ﻣﻢ×١٦٥ﻣﻢ
ﺍﻟﻤﻘﺪّﻣﺔ.................١٧٠ﻣﻢ×٤٦ﻣﻢ×١٨ﻣﻢ
ﺍﻟﻮﺯﻥ................................١٫٤ﻛﺠﻢ
ﺍﻟﺼﻮﺕ
ﺍﻟﺤﺪﺍﻷﻗﺼﻰﻟﺨﺮﺝﺍﻟﻄﺎﻗﺔ..........٥٠ﻭﺍﺕ×٤
ﺧﺮﺝﺍﻟﺘﻴﺎﺭﺍﻟﻤﺴﺘﻤﺮ.................٢٢ﻭﺍﺕ×٤)ﻣﻦ٥٠ﻫﺮﺗﺰﺇﻟﻰ١٥٠٠٠
ﻣﻌﺎﻭﻗﺔﺍﻟﺤﻤﻮﻟﺔ......................ﻣﻦ٤ﺃﻭﻡﺇﻟﻰ٨ﺃﻭﻡ×٤
ﺍﻟﺤﺪﺍﻷﻗﺼﻰﻟﻤﺴﺘﻮﻯﺍﻟﺨﺮﺝﺍﻟﻤﺒﺪﺋﻲ
ﺍﻟﻤﻮﺍﺯﻥ)ﻣﻮﺍﺯﻥﺗﺨﻄﻴﻄﻲ٥ﺣﺰﻣﺔ(:
ﺍﻟﺘﺮﺩﺩ.........................١٠٠/٣١٥/١.٢٥ﻙ/٣.١٥ﻙ/٨ﻙﻫﺮﺗﺰ
ﺍﻟﻜﺴﺐ........................±١٢ﺩﻳﺴﻴﺒﻞ
HPF:
ﺍﻟﺘﺮﺩﺩ.........................٥٠/٦٣/٨٠/١٠٠/١٢٥ﻫﺮﺗﺰ
ﻣﻨﺤﻨﻰ.........................١٢–ﺩﻳﺴﺒﻞ/ﺃﻭﻛﺘﺎﻑ
ﻣﻀﺨﻢﺻﻮﺕ)ﺃﺣﺎﺩﻱﺍﻟﺼﻮﺕ(:
ﺍﻟﺘﺮﺩﺩ.........................٥٠/٦٣/٨٠/١٠٠/١٢٥ﻫﺮﺗﺰ
ﻣﻨﺤﻨﻰ.........................١٨–ﺩﻳﺴﺒﻞ/ﺃﻭﻛﺘﺎﻑ
ﺍﻟﻜﺴﺐ........................ﻣﻦ+٦ﺩﻳﺴﻴﺒﻞﺇﻟﻰ٢٤–ﺩﻳﺴﻴﺒﻞ
ﺍﻟﻄﻮﺭ.........................ﻋﺎﺩﻱ/ﻋﻜﺴﻲ
ﺗﻌﺰﻳﺰﺍﻟﺠﻬﻴﺮ:
ﺍﻟﻜﺴﺐ........................ﻣﻦ+١٢ﺩﻳﺴﻴﺒﻞﺇﻟﻰ٠ﺩﻳﺴﻴﺒﻞ
ﻣﺸﻐّﻞﺃﻗﺮﺍﺹCD
ﺍﻟﻨﻈﺎﻡ................................ﻧﻈﺎﻡﺻﻮﺗﻲﻷﻗﺮﺍﺹﺍﻟﻤﺪﻣﺠﺔ
ﺍﻷﻗﺮﺍﺹﺍﻟﻘﺎﺑﻠﺔﻟﻼﺳﺘﺨﺪﺍﻡ...........ﻗﺮﺹﻣﺪﻣﺞ
ﻧﺴﺒﺔﺍﻹﺷﺎﺭﺓﺇﻟﻰﺍﻟﻀﻮﺿﺎﺀ........٩٤ﺩﻳﺴﻴﺒﻞ)١ﻙﻫﺮﺗﺰ()ﺷﺒﻜﺔIEC-A(
ﻋﺪﺩﺍﻟﻘﻨﻮﺍﺕ..........................٢)ﺳﺘﺮﻳﻮ(
ﺗﻨﺴﻴﻖﺗﺮﻣﻴﺰMP3.................MPEG-1 & 2 Audio Layer 3
ﺗﻨﺴﻴﻖﺗﺮﻣﻴﺰWMA...............ﺍﻹﺻﺪﺍﺭﺍﺕ7ﻭ7.1ﻭ8ﻭ9ﻭ10ﻭ11
ﺗﻨﺴﻴﻖﺗﺮﻣﻴﺰAAC.................MPEG-4 AAC)ﺗﺸﻔﻴﺮiTunes
Page 91

ﺍﻟﻤﻠﺤﻘﺎﺕ
ﻣﻌﻠﻮﻣﺎﺕﺇﺿﺎﻓﻴﺔ
ﻣﻌﻠﻮﻣﺎﺕﺇﺿﺎﻓﻴﺔ
http://www.mp3licensing.com.
MP3
WMA
Windows Mediaﻫﻲﻋﻼﻣﺔﺗﺠﺎﺭﻳﺔﻣﺴﺠﻠﺔﺃﻭﻋﻼﻣﺔﺗﺠﺎﺭﻳﺔ
Corporationﻭﻻﻳﻤﻜﻦﺍﺳﺘﺨﺪﺍﻣﻬﺎﺃﻭﺗﻮﺯﻳﻌﻬﺎﺑﺪﻭﻥﺗﺮﺧﻴﺺﻣﻦ
iPod & iPhone
iPodﻭiPodﻭiPod classicﻭiPod nanoﻭiPod
touchﻫﻲﻋﻼﻣﺎﺕﺗﺠﺎﺭﻳﺔﻟﺸﺮﻛﺔApple Inc.ﻣﺴﺠﻠﺔﻓﻲ
iPhoneﻋﻠﻰﺍﻟﺘﻮﺍﻟﻲﻭﺗﻢﺗﺮﺧﻴﺼﻪﻣﻦﻗﺒﻞﺟﻬﺔﺍﻟﺘﺼﻨﻴﻊﻻﺳﺘﻴﻔﺎﺀ
Appleﻏﻴﺮﻣﺴﺆﻭﻟﺔﻋﻦﺗﺸﻐﻴﻞﻫﺬﺍﺍﻟﺠﻬﺎﺯﺃﻭﺗﻮﺍﻓﻘﻪﻣﻊﻣﻌﺎﻳﻴﺮ
1
2
03
5
6
3
4
ﺍﻟﺘﺸﻐﻴﻞ)ﻣﺜﺎﻝ،001xxx.mp3ﻭ099yyy.mp3(.
)SD، USB(.
iTunes
AppleﻭiTunesﻫﻤﺎﻋﻼﻣﺘﺎﻥﺗﺠﺎﺭﻳﺘﺎﻥﻟﺸﺮﻛﺔApple Inc.،
ﻣﺜﺎﻝﻋﻠﻰﺍﻟﺘﺴﻠﺴﻞﺍﻟﻬﺮﻣﻲ
ﺍﻟﻘﺮﺹ
ﻗﺪﻳﺨﺘﻠﻒﺗﺴﻠﺴﻞﺍﺧﺘﻴﺎﺭﺍﻟﻤﺠﻠﺪﺃﻭﺃﻱﻋﻤﻠﻴﺔﺃﺧﺮﻯﺣﺴﺐﺍﻟﺘﺸﻔﻴﺮﺃﻭ
ﺑﺮﺍﻣﺞﺍﻟﻜﺘﺎﺑﺔ.
ﺟﻬﺎﺯﺍﻟﺘﺨﺰﻳﻦﺍﻟﺨﺎﺭﺟﻲ)SD، USB(
ﺗﺴﻠﺴﻞﺍﻟﺘﺸﻐﻴﻞﻫﻮﻣﺜﻞﺗﺴﻠﺴﻞﺍﻟﺘﺴﺠﻴﻞﻓﻲﺟﻬﺎﺯﺍﻟﺘﺨﺰﻳﻦﺍﻟﺨﺎﺭﺟﻲ
)SD، USB(.
ﻟﺘﺤﺪﻳﺪﺗﺴﻠﺴﻞﺍﻟﺘﺸﻐﻴﻞ،ﻳﻮﺻﻰﺑﺎﻟﻄﺮﻳﻘﺔﺍﻟﺘﺎﻟﻴﺔ.
1ﻗﻢﺑﺈﻧﺸﺎﺀﺍﺳﻢﺍﻟﻤﻠﻒﺍﻟﺬﻱﻳﺸﺘﻤﻞﻋﻠﻰﺃﺭﻗﺎﻡﺗﺤﺪﺩﺗﺴﻠﺴﻞ
2ﺿﻊﺗﻠﻚﺍﻟﻤﻠﻔﺎﺕﺩﺍﺧﻞﻣﺠﻠﺪ.
3ﺍﺣﻔﻆﺍﻟﻤﺠﻠﺪﺍﻟﻤﺤﺘﻮﻱﻋﻠﻰﺍﻟﻤﻠﻔﺎﺕﻓﻲﺟﻬﺎﺯﺍﻟﺘﺨﺰﻳﻦﺍﻟﺨﺎﺭﺟﻲ
ﻭﻣﻊﺫﻟﻚ،ﺗﺒﻌًﺎﻟﺒﻴﺌﺔﺍﻟﻨﻈﺎﻡ،ﻻﻳﻤﻜﻨﻚﺗﺤﺪﻳﺪﺗﺴﻠﺴﻞﺍﻟﺘﺸﻐﻴﻞ.
ﺑﺎﻟﻨﺴﺒﺔﻟﻠﻤﺸﻐﻼﺕﺍﻟﺼﻮﺗﻴﺔﺍﻟﻤﺤﻤﻮﻟﺔUSB،ﺍﻟﺘﺴﻠﺴﻞﻣﺨﺘﻠﻒﻭﻳﻌﺘﻤﺪ
ﻋﻠﻰﺍﻟﻤﺸﻐﻞ.
ﺣﻘﻮﻕﺍﻟﻨﺸﺮﻭﺍﻟﻌﻼﻣﺎﺕﺍﻟﺘﺠﺎﺭﻳﺔ
ﻣﺴﺠﻠﺘﺎﻥﻓﻲﺍﻟﻮﻻﻳﺎﺕﺍﻟﻤﺘﺤﺪﺓﻭﺩﻭﻝﺃﺧﺮﻯ.
ﺗﻮﺭﻳﺪﻫﺬﺍﺍﻟﻤُﻨﺘﺞﻻﻳﺸﺘﻤﻞﺇﻻﻋﻠﻰﺗﺮﺧﻴﺺﻟﻼﺳﺘﺨﺪﺍﻡﺍﻟﺸﺨﺼﻲ
ﻏﻴﺮﺍﻟﺘﺠﺎﺭﻱﻭﻻﻳﺸﺘﻤﻞﻋﻠﻰﺗﺮﺧﻴﺺﺃﻭﻳﻌﻨﻲﺿﻤﻨﻴًﺎﺃﻱﺣﻖ
ﺑﺎﺳﺘﺨﺪﺍﻡﺍﻟﻤُﻨﺘﺞﻓﻲﺃﻱﺑﺚﺗﺠﺎﺭﻱ)ﺃﻱﻳﺤﻘﻖﺇﻳﺮﺍﺩًﺍ(ﻓﻲﺍﻟﺰﻣﻦ
ﺍﻟﻔﻌﻠﻲ)ﺃﺭﺿﻲ،ﻓﻀﺎﺋﻲ،ﺳﻠﻜﻲﻭ/ﺃﻭﺃﻱﻭﺳﺎﺋﻂﺃﺧﺮﻯ(ﻭﻻﺍﻟﺒﺚ/
ﺍﻟﻨﻘﻞﺍﻟﻤﺒﺎﺷﺮﻋﺒﺮﺷﺒﻜﺔﺍﻹﻧﺘﺮﻧﺖ،ﺍﻟﺸﺒﻜﺎﺕﺍﻟﺪﺍﺧﻠﻴﺔﻭ/ﺃﻭﺍﻟﺸﺒﻜﺎﺕ
ﺍﻷﺧﺮﻯﺃﻭﻓﻲﺃﻱﺃﻧﻈﻤﺔﺃﺧﺮﻯﻟﺘﻮﺯﻳﻊﺍﻟﻤﺤﺘﻮﻳﺎﺕﺍﻹﻟﻜﺘﺮﻭﻧﻴﺔ،ﻣﺜﻞ
ﺍﺳﺘﺨﺪﺍﻣﺎﺕﺍﻟﺘﺸﻐﻴﻞﺑﻤﻘﺎﺑﻞﺃﻭﺍﻟﺘﺸﻐﻴﻞﺣﺴﺐﺍﻟﻄﻠﺐ.ﻣﺜﻞﻫﺬﻩ
ﺍﻻﺳﺘﺨﺪﺍﻣﺎﺕﺗﺘﻄﻠﺐﺗﺮﺧﻴﺼًﺎﻣﻨﻔﺼﻼً.ﺑﺨﺼﻮﺹﺍﻟﺘﻔﺎﺻﻴﻞ،ﻳُﺮﺟﻲ
ﺯﻳﺎﺭﺓﻣﻮﻗﻊ
ﻟﺸﺮﻛﺔMicrosoft Corporationﻓﻲﺍﻟﻮﻻﻳﺎﺕﺍﻟﻤﺘﺤﺪﺓﻭ/ﺃﻭ
ﺩﻭﻝﺃﺧﺮﻯ.
ﻫﺬﺍﺍﻟﺠﻬﺎﺯﻳﺤﺘﻮﻱﻋﻠﻰﺗﻘﻨﻴﺔﻣﻤﻠﻮﻛﺔﻟﺸﺮﻛﺔMicrosoft
:ﻣﺠﻠﺪ
:ﻣﻠﻒﺻﻮﺕﻣﻀﻐﻮﻁ
٠١ﺇﻟﻰ٠٥:ﺭﻗﻢﺍﻟﻤﺠﻠﺪ
1ﺇﻟﻰ6:ﺗﺴﻠﺴﻞﺍﻟﺘﺸﻐﻴﻞ
02
04
05
ﺷﺮﻛﺔMicrosoft Licensing, Inc.
ﺑﻄﺎﻗﺔﺫﺍﻛﺮﺓSD
ﺷﻌﺎﺭSDﻫﻮﻋﻼﻣﺔﺗﺠﺎﺭﻳﺔﻟﺸﺮﻛﺔSD-3C, LLC.
ﺷﻌﺎﺭminiSDﻫﻮﻋﻼﻣﺔﺗﺠﺎﺭﻳﺔﻟﺸﺮﻛﺔSD-3C, LLC.
ﺷﻌﺎﺭmicroSDﻫﻮﻋﻼﻣﺔﺗﺠﺎﺭﻳﺔﻟﺸﺮﻛﺔSD-3C, LLC.
ﺷﻌﺎﺭSDHCﻫﻮﻋﻼﻣﺔﺗﺠﺎﺭﻳﺔﻟﺸﺮﻛﺔSD-3C, LLC.
ﺍﻟﻮﻻﻳﺎﺕﺍﻟﻤﺘﺤﺪﺓﺍﻷﻣﺮﻳﻜﻴﺔﻭﺑﻠﺪﺍﻥﺃﺧﺮﻯ.
”ﺻﻨﻊﻷﺟﻬﺰﺓiPod“ﻭ”ﺻﻨﻊﻷﺟﻬﺰﺓiPhone“ﺗﻌﻨﻲﺃﻥﺍﻟﻤﻠﺤﻖ
ﺍﻹﻟﻜﺘﺮﻭﻧﻲﺗﻢﺗﺼﻤﻴﻤﻪﺧﺼﻴﺼًﺎﻟﻠﺘﻮﺻﻴﻞﺑﺄﺟﻬﺰﺓiPodﺃﻭ
ﻣﻌﺎﻳﻴﺮﺃﺩﺍﺀApple.
ﺍﻟﺴﻼﻣﺔﻭﺍﻟﻠﻮﺍﺋﺢ.
ﺍﻟﺘﻮﺍﻓﻖﻣﻊiPod
ﻫﺬﺍﺍﻟﺠﻬﺎﺯﻳﺪﻋﻢﻃﺮﺯiPodﺍﻟﺘﺎﻟﻴﺔﻓﻘﻂ.ﺇﺻﺪﺍﺭﺍﺕﺑﺮﺍﻣﺞiPod
ﺍﻟﻤﺪﻋﻮﻣﺔﻣﺒﻴﻨﺔﺃﺩﻧﺎﻩ.ﻗﺪﻻﻳﺘﻢﺩﻋﻢﺍﻹﺻﺪﺍﺭﺍﺕﺍﻷﻗﺪﻡ.
!iPhone 4)ﺇﺻﺪﺍﺭﺍﻟﺒﺮﻧﺎﻣﺞ٤٫٠(
!iPhone 3GS)ﺇﺻﺪﺍﺭﺍﻟﺒﺮﻧﺎﻣﺞ٤٫٠(
!iPhone 3G)ﺇﺻﺪﺍﺭﺍﻟﺒﺮﻧﺎﻣﺞ٤٫٠(
!iPhone)ﺇﺻﺪﺍﺭﺍﻟﺒﺮﻧﺎﻣﺞ٣٫١٫٣(
!ﺍﻟﺠﻴﻞﺍﻟﺨﺎﻣﺲﻣﻦiPod nano)ﺇﺻﺪﺍﺭﺍﻟﺒﺮﻧﺎﻣﺞ١٫٠٫٢(
!ﺍﻟﺠﻴﻞﺍﻟﺮﺍﺑﻊﻣﻦiPod nano)ﺇﺻﺪﺍﺭﺍﻟﺒﺮﻧﺎﻣﺞ١٫٠٫٤(
!ﺍﻟﺠﻴﻞﺍﻟﺜﺎﻟﺚﻣﻦiPod nano)ﺇﺻﺪﺍﺭﺍﻟﺒﺮﻧﺎﻣﺞ١٫١٫٣(
!ﺍﻟﺠﻴﻞﺍﻟﺜﺎﻧﻲﻣﻦiPod nano)ﺇﺻﺪﺍﺭﺍﻟﺒﺮﻧﺎﻣﺞ١٫١٫٣(
!ﺍﻟﺠﻴﻞﺍﻷﻭﻝﻣﻦiPod nano)ﺇﺻﺪﺍﺭﺍﻟﺒﺮﻧﺎﻣﺞ١٫٣٫١(
!ﺍﻟﺠﻴﻞﺍﻟﺜﺎﻟﺚﻣﻦiPod touch)ﺇﺻﺪﺍﺭﺍﻟﺒﺮﻧﺎﻣﺞ٤٫٠(
!ﺍﻟﺠﻴﻞﺍﻟﺜﺎﻧﻲﻣﻦiPod touch)ﺇﺻﺪﺍﺭﺍﻟﺒﺮﻧﺎﻣﺞ٤٫٠(
!ﺍﻟﺠﻴﻞﺍﻷﻭﻝﻣﻦiPod touch)ﺇﺻﺪﺍﺭﺍﻟﺒﺮﻧﺎﻣﺞ٣٫١٫٣(
!iPod classic ١٦٠ﺟﻴﺠﺎﺑﺎﻳﺖ)ﺇﺻﺪﺍﺭﺍﻟﺒﺮﻧﺎﻣﺞ٢٫٠٫٤(
!iPod classic 120ﺟﻴﺠﺎﺑﺎﻳﺖ)ﺇﺻﺪﺍﺭﺍﻟﺒﺮﻧﺎﻣﺞ٢٫٠٫١(
!iPod classic)ﺇﺻﺪﺍﺭﺍﻟﺒﺮﻧﺎﻣﺞ١٫١٫٢(
!ﺍﻟﺠﻴﻞﺍﻟﺨﺎﻣﺲﻣﻦiPod)ﺇﺻﺪﺍﺭﺍﻟﺒﺮﻧﺎﻣﺞ١٫٣(
ﻗﺪﻻﺗﺘﻮﻓﺮﺑﻌﺾﺍﻟﻮﻇﺎﺋﻒ،ﻭﺫﻟﻚﺗﺒﻌًﺎﻟﺠﻴﻞiPodﺃﻭﺇﺻﺪﺍﺭﻩ.
ﻗﺪﺗﺨﺘﻠﻒﻋﻤﻠﻴﺎﺕﺍﻟﺘﺸﻐﻴﻞﻭﺫﻟﻚﺣﺴﺐﺇﺻﺪﺍﺭﺍﻟﺒﺮﻧﺎﻣﺞﺍﻟﺨﺎﺹﺑﺠﻬﺎﺯ
iPod.
ﻋﻨﺪﺍﺳﺘﻌﻤﺎﻝﺟﻬﺎﺯiPod،ﻓﺈﻧﻪﻳﺘﻄﻠﺐﺗﻮﺻﻴﻞﻣﻮﺻّﻞiPod Dock
ConnectorﺇﻟﻰﻛﺎﺑﻞUSB.
ﻳﺘﻮﻓﺮﺃﻳﻀﺎﻛﺒﻞﻭﺍﺟﻬﺔﺑﻴﻨﻴﺔCD-IU50ﻣﻦPioneer.ﺑﺨﺼﻮﺹ
ﺍﻟﺘﻔﺎﺻﻴﻞ،ﻗﻢﺑﺎﺳﺘﺸﺎﺭﺓﺍﻟﻮﻛﻴﻞ.
ﻟﻠﺤﺼﻮﻝﻋﻠﻰﻣﻌﻠﻮﻣﺎﺕﺣﻮﻝﺗﻮﺍﻓﻖﺍﻟﻤﻠﻒ/ﺍﻟﺘﻨﺴﻴﻖ,ﺭﺍﺟﻊﺃﺩﻟﺔiPod.
ﻛﺘﺎﺏﺻﻮﺗﻲ،ﻣﻠﻒPodcast:ﻣﺘﻮﺍﻓﻖ
ﺗﻨﺒﻴﻪ
ﻻﺗﺘﺤﻤّﻞPioneerﺍﻟﻤﺴﺌﻮﻟﻴﺔﻋﻦﺑﻴﺎﻧﺎﺕﻓُﻘﺪﺕﻋﻠﻰﺟﻬﺎﺯiPod
ﺣﺘﻰﻭﻟﻮﺗﻢﻓﻘﺪﺍﻥﺗﻠﻚﺍﻟﺒﻴﺎﻧﺎﺕﺃﺛﻨﺎﺀﺍﺳﺘﺨﺪﺍﻡﻫﺬﺍﺍﻟﺠﻬﺎﺯ.
ﻧﻘﻞﺑﻴﺎﻧﺎﺕﻛﺘﺎﺑﺔﺍﻟﻤﺠﻤﻮﻋﺎﺕ:ﻏﻴﺮﻣﺘﻮﺍﻓﻖ
ﺑﻐﺾﺍﻟﻨﻈﺮﻋﻦﻃﻮﻝﺍﻟﻤﻘﺎﻃﻊﺍﻟﻔﺎﺭﻏﺔﺑﻴﻦﺃﻏﻨﻴﺎﺕﺍﻟﺘﺴﺠﻴﻞﺍﻷﺻﻠﻲ،
ﻳﺘﻢﻋﺮﺽﺃﻗﺮﺍﺹﺍﻟﺼﻮﺕﺍﻟﻤﻀﻐﻮﻃﺔﺑﻮﻗﻔﺔﻣﺆﻗﺘﺔﻗﺼﻴﺮﺓﺑﻴﻦ
ﺍﻷﻏﻨﻴﺎﺕ.
ﺟﻬﺎﺯﺍﻟﺘﺨﺰﻳﻦﺍﻟﺨﺎﺭﺟﻲ)SD، USB(
ﺍﻟﺘﺴﻠﺴﻞﺍﻟﻬﺮﻣﻲﻟﻠﻤﺠﻠﺪﺍﻟﻘﺎﺑﻞﻟﻠﺘﺸﻐﻴﻞ:ﻣﺎﻳﺼﻞﺇﻟﻰﺛﻤﺎﻥﻃﺒﻘﺎﺕ
)ﺍﻟﺘﺴﻠﺴﻞﺍﻟﻬﺮﻣﻲﺍﻟﻔﻌﻠﻲﺃﻗﻞﻣﻦﻃﺒﻘﺘﻴﻦ.(
ﺍﻟﻤﺠﻠﺪﺍﺕﺍﻟﻘﺎﺑﻠﺔﻟﻠﺘﺸﻐﻴﻞ:ﺣﺘﻰ١٥٠٠
ﺍﻟﻤﻠﻔﺎﺕﺍﻟﻘﺎﺑﻠﺔﻟﻠﺘﺸﻐﻴﻞ:ﺣﺘﻰ١٥٠٠٠
ﺗﺸﻐﻴﻞﺍﻟﻤﻠﻔﺎﺕﺍﻟﻤﺤﻤﻴﺔﺑﺤﻘﻮﻕﺍﻟﻨﺸﺮ:ﻏﻴﺮﻣﺘﻮﺍﻓﻖ
ﺟﻬﺎﺯﺗﺨﺰﻳﻦﺧﺎﺭﺟﻲﻣﻘﺴﻢ)USB، SD(:ﻳﻤﻜﻦﺗﺸﻐﻴﻞﺍﻟﻘﺴﻢﺍﻷﻭﻝ
ﻓﻘﻂ.
ﻗﺪﻳﺤﺪﺙﺗﺄﺧﻴﺮﺑﺴﻴﻂﻋﻨﺪﺑﺪﺀﺗﺸﻐﻴﻞﻣﻠﻔﺎﺕﺍﻟﺼﻮﺕﻋﻠﻰﻭﺣﺪﺓﺗﺨﺰﻳﻦ
USBﺑﻬﺎﻋﺪﺩﻛﺒﻴﺮﻣﻦﺍﻟﻤﺠﻠﺪﺍﺕﺍﻟﻤﺘﺴﻠﺴﻠﺔ.
ﺑﻄﺎﻗﺔﺫﺍﻛﺮﺓSD
ﻻﻳﻮﺟﺪﺗﻮﺍﻓﻖﻣﻊﺑﻄﺎﻗﺎﺕﺍﻟﻮﺳﺎﺋﻂﺍﻟﻤﺘﻌﺪﺩﺓ)MMC(.
ﺍﻟﺘﻮﺍﻓﻖﻣﻊﻛﻞﺑﻄﺎﻗﺎﺕﺫﺍﻛﺮﺓSDﻏﻴﺮﻣﻀﻤﻮﻥ.
ﻻﺗﺘﻮﺍﻓﻖﻫﺬﻩﺍﻟﻮﺣﺪﺓﻣﻊSD-Audio.
ﺗﻨﺒﻴﻪ
SDHCﺣﺘﻰﻭﻟﻮﻓﻘﺪﺕﺗﻠﻚﺍﻟﺒﻴﺎﻧﺎﺕﺃﺛﻨﺎﺀﺍﺳﺘﺨﺪﺍﻡﻫﺬﻩﺍﻟﻮﺣﺪﺓ.
ﺍﻟﻌﺮﺑﻴﺔ
ﻻﺗﺘﺤﻤّﻞPioneerﺍﻟﻤﺴﺌﻮﻟﻴﺔﻋﻦﺍﻟﺒﻴﺎﻧﺎﺕﺍﻟﻤﻔﻘﻮﺩﺓﻋﻠﻰﺫﺍﻛﺮﺓ
USB/ﺍﻟﻤﺸﻐّﻼﺕﺍﻟﺼﻮﺗﻴﺔﺍﻟﻨﻘّﺎﻟﺔUSB/ﺑﻄﺎﻗﺔﺫﺍﻛﺮﺓSD/
ﺗﺴﻠﺴﻞﻣﻠﻔﺎﺕﺍﻟﺼﻮﺕ
ﻻﻳﺴﺘﻄﻴﻊﺍﻟﻤﺴﺘﺨﺪﻡﺗﻌﻴﻴﻦﺃﺭﻗﺎﻡﺍﻟﻤﺠﻠﺪﺍﺕﻭﺗﺤﺪﻳﺪﺗﺴﻠﺴﻼﺕﺍﻟﺘﺸﻐﻴﻞ
ﺑﻬﺬﻩﺍﻟﻮﺣﺪﺓ.
١٤
Ar
Page 92

ﺍﻟﻤﻠﺤﻘﺎﺕ
ﻣﻌﻠﻮﻣﺎﺕﺇﺿﺎﻓﻴﺔ
ﻣﻌﻠﻮﻣﺎﺕﺇﺿﺎﻓﻴﺔ
WAV
ﺍﻣﺘﺪﺍﺩﺍﻟﻤﻠﻒ:.wav
ﺍﻟﺒِﺖﺍﻟﻜﻤّﻲ:٨ﻭ١٦)LPCM(،٤)MS ADPCM(
ﺗﺮﺩﺩﺃﺧﺬﺍﻟﻌﻴﻨﺔ:١٦ﻙﻫـﺇﻟﻰ٤٨ﻙﻫـ)LPCM(،٢٢٫٠٥ﻙﻫـ
ﻭ٤٤٫١ﻙﻫـ)MS ADPCM(
AAC
ﺍﻟﺼﻴﻐﺔﺍﻟﻤﺘﻮﺍﻓﻘﺔ:ﻣﻠﻔﺎﺕAACﺍﻟﻤﺸﻔّﺮﺓﺑﺎﺳﺘﺨﺪﺍﻡﺑﺮﻧﺎﻣﺞiTunes
ﺍﻣﺘﺪﺍﺩﺍﻟﻤﻠﻒ:.m4a
ﺗﺮﺩﺩﺍﻟﻤﻌﺎﻳﻨﺔ:ﻣﻦ١١.٠٢٥ﻙﻫـﺇﻟﻰ٤٨ﻙﻫـ
ﻣﻌﺪّﻝﺍﻹﺭﺳﺎﻝ:١٦ﻙﺏ/ﺙﺇﻟﻰ٣٢٠ﻙﺏ/ﺙ،VBR
Apple Lossless:ﻏﻴﺮﻣﺘﻮﺍﻓﻖ
ﻣﻠﻒAACﺍﻟﻤﺸﺘﺮﻯﻣﻦﻣﺘﺠﺮiTunes Store)ﺍﻣﺘﺪﺍﺩﺍﻟﻤﻠﻒ
.m4p(:ﻏﻴﺮﻣﺘﻮﺍﻓﻖ
ﻣﻌﻠﻮﻣﺎﺕﺗﻜﻤﻴﻠﻴﺔ
ﻳﻤﻜﻦﻋﺮﺽﺃﻭﻝ٣٢ﺣﺮﻓًﺎﻛﺎﺳﻢﻣﻠﻒ)ﻳﺘﻀﻤﻦﺍﻣﺘﺪﺍﺩﺍﻟﻤﻠﻒ(ﺃﻭﺍﺳﻢ
ﻣﺠﻠﺪ.
ﻗﺪﻻﻳﻌﻤﻞﻫﺬﺍﺍﻟﺠﻬﺎﺯﺑﻄﺮﻳﻘﺔﺻﺤﻴﺤﺔﻭﺫﻟﻚﺗﺒﻌًﺎﻟﻠﺒﺮﻧﺎﻣﺞﺍﻟﺘﻄﺒﻴﻘﻲ
ﺍﻟﻤﺴﺘﺨﺪﻡﻟﺘﺸﻔﻴﺮﻣﻠﻔﺎﺕWMA.
ﻗﺪﻳﻜﻮﻥﻫﻨﺎﻙﺗﺄﺧﻴﺮﺑﺴﻴﻂﻋﻨﺪﺑﺪﺀﺗﺸﻐﻴﻞﻣﻠﻔﺎﺕﺍﻟﺼﻮﺕﺍﻟﻤﻀﻤﻨﺔ
ﺑﺒﻴﺎﻧﺎﺕﺍﻟﺼﻮﺭ.
Windows Media Audio ProfessionalﻭLossless
ﺍﻟﻘﺮﺹ
ﺍﻟﺘﺴﻠﺴﻞﺍﻟﻬﺮﻣﻲﻟﻠﻤﺠﻠﺪﺍﻟﻘﺎﺑﻞﻟﻠﺘﺸﻐﻴﻞ:ﻣﺎﻳﺼﻞﺇﻟﻰﺛﻤﺎﻥﻃﺒﻘﺎﺕ
)ﺍﻟﺘﺴﻠﺴﻞﺍﻟﻬﺮﻣﻲﺍﻟﻔﻌﻠﻲﺃﻗﻞﻣﻦﻃﺒﻘﺘﻴﻦ.(
ﺍﻟﻤﺠﻠﺪﺍﺕﺍﻟﻘﺎﺑﻠﺔﻟﻠﺘﺸﻐﻴﻞ:ﺣﺘﻰ٩٩
ﺍﻟﻤﻠﻔﺎﺕﺍﻟﻘﺎﺑﻠﺔﻟﻠﺘﺸﻐﻴﻞ:ﺣﺘﻰ٩٩٩
ﻧﻈﺎﻡﺍﻟﻤﻠﻔﺎﺕ:ISO 9660ﺍﻟﻤﺴﺘﻮﻯ١ﻭ٢،RomeoﻭJoliet
ﺍﻟﺘﺸﻐﻴﻞﻣﺘﻌﺪﺩﺍﻟﺠﻠﺴﺎﺕ:ﻣﺘﻮﺍﻓﻖ
١٣
Ar
ﻛﺜﺮﺓﺇﺩﺧﺎﻝﻭﺇﺧﺮﺍﺝﺍﻟﻘﺮﺹﺍﻟﻤﺰﺩﻭﺝDualDiscﻳﻤﻜﻦﺃﻥﻳﺆﺩﻱﺇﻟﻰ
ﺧﺪﻭﺵﻋﻠﻰﺍﻟﻘﺮﺹ.ﻭﺍﻟﺨﺪﻭﺵﺍﻟﻜﺒﻴﺮﺓﻳﻤﻜﻦﺃﻥﺗﺆﺩﻱﺇﻟﻰﻣﺸﺎﻛﻞﻓﻲ
ﺗﺸﻐﻴﻞﺍﻟﺠﻬﺎﺯ.ﻭﻓﻲﺑﻌﺾﺍﻟﺤﺎﻻﺕ،ﻳﻤﻜﻦﻟﻠﻘﺮﺹﺍﻟﻤﺰﺩﻭﺝ
DualDiscﺃﻥﻳﻠﺘﺼﻖﺑﻔﺘﺤﺔﺇﺩﺧﺎﻝﺍﻷﻗﺮﺍﺹﻭﻻﻳﻤﻜﻦﺇﺧﺮﺍﺟﻪ.ﻟﻤﻨﻊ
ﺫﻟﻚ،ﻧﻮﺻﻲﺑﺎﻻﻣﺘﻨﺎﻉﻋﻦﺍﺳﺘﺨﺪﺍﻡﺍﻷﻗﺮﺍﺹﺍﻟﻤﺰﺩﻭﺟﺔDualDiscs
ﻣﻊﻫﺬﺍﺍﻟﺠﻬﺎﺯ.
ﻳﺮﺟﻰﺍﻟﺮﺟﻮﻉﺇﻟﻰﻣﻌﻠﻮﻣﺎﺕﺻﺎﻧﻊﺍﻟﻘﺮﺹﻟﻤﺰﻳﺪﻣﻦﺍﻟﻤﻌﻠﻮﻣﺎﺕ
ﺍﻟﻤﻔﺼﻠﺔﺣﻮﻝﺍﻷﻗﺮﺍﺹﺍﻟﻤﺰﺩﻭﺟﺔDualDiscs.
ﺗﻨﺒﻴﻪ
ﻻﺗﺘﺮﻙﺍﻷﻗﺮﺍﺹ/ﺟﻬﺎﺯﺍﻟﺘﺨﺰﻳﻦﺍﻟﺨﺎﺭﺟﻲ)SD، USB(ﺃﻭiPod
ﻓﻲﺃﻣﺎﻛﻦﺫﺍﺕﺩﺭﺟﺔﺣﺮﺍﺭﺓﻋﺎﻟﻴﺔ.
ﺗﻮﺍﻓﻖﻣﻠﻔﺎﺕﺍﻟﺼﻮﺕﺍﻟﻤﻀﻐﻮﻃﺔ
)ﻗﺮﺹ،SD، USB(
WMA
ﺍﻣﺘﺪﺍﺩﺍﻟﻤﻠﻒ:.wma
ﻣﻌﺪّﻝﺍﻟﺒِﺖ:٤٨ﻙﺏ/ﺙﺇﻟﻰ٣٢٠ﻙﺏ/ﺙ)ﻣﻌﺪﻝﺑِﺖﻣﺴﺘﻤﺮCBR(
،٤٨ﻙﺏ/ﺙﺇﻟﻰ٣٨٤ﻙﺏ/ﺙ)ﻣﻌﺪﻝﺑِﺖﻣﺘﻐﻴّﺮVBR(
ﺗﺮﺩﺩﺃﺧﺬﺍﻟﻌﻴﻨﺔ:٣٢ﻙﻫـ،٤٤٫١ﻙﻫـ،٤٨ﻙﻫـ
ﻭVoice/DRM Stream/Streamﻣﻊﻓﻴﺪﻳﻮ:ﻏﻴﺮﻣﺘﻮﺍﻓﻖ
MP3
ﺍﻣﺘﺪﺍﺩﺍﻟﻤﻠﻒ:.mp3
ﻣﻌﺪّﻝﺍﻟﺒِﺖ:٨ﻙﺏ/ﺙﺇﻟﻰ٣٢٠ﻙﺏ/ﺙ)ﻣﻌﺪﻝﺑِﺖﻣﺴﺘﻤﺮCBR(،
ﻣﻌﺪﻝﺑِﺖﻣﺘﻐﻴّﺮVBR
ﺗﺮﺩﺩﺍﻟﻤﻌﺎﻳﻨﺔ:٨ﻙﻫﺮﺗﺰﺇﻟﻰ٤٨ﻙﻫﺮﺗﺰ)٣٢،٤٤٫١،٤٨
ﻟﻺﺑﺮﺍﺯ(
ﻣﺘﻮﺍﻓﻘﺔﻣﻊﺇﺻﺪﺍﺭID3 tagﺭﻗﻢ:1.0،1.1،2.2،2.3،2.4)ﻳﺘﻢ
ﺇﻋﻄﺎﺀﺍﻷﻭﻟﻮﻳﺔﻟﻺﺻﺪﺍﺭID3 tag 2.xﻋﻠﻰﺍﻹﺻﺪﺍﺭID3 tag 1.
x.(
ﻗﺎﺋﻤﺔﺗﺸﻐﻴﻞM3u:ﻏﻴﺮﻣﺘﻮﺍﻓﻘﺔ
MP3i (MP3ﺗﻔﺎﻋﻠﻲ(،mp3 PRO:ﻏﻴﺮﻣﺘﻮﺍﻓﻖ
ﻻﺗﺪﺧﻞﺑﻄﺎﻗﺔSDﺗﺎﻟﻔﺔ)ﻣﺜﻼً:ﻣﻠﺘﻮﻳﺔ،ﺫﺍﺕﻣﻠﺼﻖﻣﺘﻘﺸﺮ(ﻓﻘﺪﻳﺘﺴﺒﺐ
ﺫﻟﻚﻓﻲﻣﻨﻊﺧﺮﻭﺟﻬﺎﻣﻦﺍﻟﻔﺘﺤﺔ.
ﻻﺗﺤﺎﻭﻝﺇﺩﺧﺎﻝﺑﻄﺎﻗﺔﺫﺍﻛﺮﺓSDﻓﻲﺍﻟﻔﺘﺤﺔﺍﻟﺨﺎﺻﺔﺑﻬﺎﺑﺎﻟﻘﻮﺓﺣﺘﻰﻻ
ﻳﺆﺩﻱﺫﻟﻚﺇﻟﻰﺗﻠﻒﺍﻟﺒﻄﺎﻗﺔﺃﻭﺍﻟﻮﺣﺪﺓ.
ﻋﻨﺪﺇﺧﺮﺍﺝﺑﻄﺎﻗﺔﺫﺍﻛﺮﺓSD،ﺍﺿﻐﻂﻋﻠﻴﻬﺎﻣﻊﺍﻻﺳﺘﻤﺮﺍﺭﺣﺘﻰﺗﺴﻤﻊ
ﺻﻮﺕﻃﻘﻄﻘﺔ.ﻣﻦﺍﻟﺨﻄﻮﺭﺓﺑﺎﻟﻨﺴﺒﺔﻟﻚﺃﻥﺗﺮﻓﻊﺇﺻﺒﻌﻚﻋﻠﻰﺍﻟﻔﻮﺭﺑﻌﺪ
ﺍﻟﻀﻐﻂﻋﻠﻰﺍﻟﺒﻄﺎﻗﺔﺣﻴﺚﻗﺪﺗﻨﺪﻓﻊﺍﻟﺒﻄﺎﻗﺔﻣﻦﺍﻟﻔﺘﺤﺔﻭﺗﺼﻴﺒﻚﻓﻲ
ﻭﺟﻬﻚ،ﺃﻭﻣﺎﺷﺎﺑﻪﺫﻟﻚ.ﻛﻤﺎﺃﻥﺍﻧﺪﻓﺎﻉﺍﻟﺒﻄﺎﻗﺔﻗﺪﻳﺘﺴﺒﺐﻓﻲﺿﻴﺎﻋﻬﺎ.
iPod
ﻟﻠﺘﺄﻛﺪﻣﻦﺍﻟﺘﺸﻐﻴﻞﺍﻟﺼﺤﻴﺢ،ﻗﻢﺑﺘﻮﺻﻴﻞﻛﺒﻞﻣﻮﺻﻞﺍﻹﺭﺳﺎﺀﻣﻦﺟﻬﺎﺯ
iPodﻣﺒﺎﺷﺮﺓﺇﻟﻰﻫﺬﻩﺍﻟﻮﺣﺪﺓ.
ﺛﺒﺖﺑﺈﺣﻜﺎﻡﺟﻬﺎﺯiPodﻋﻨﺪﺍﻟﻘﻴﺎﺩﺓ.ﻻﺗﺪﻉﺟﻬﺎﺯiPodﻳﺴﻘﻂﻋﻠﻰ
ﺍﻷﺭﺿﻴﺔﺣﻴﺚﻗﺪﻳﻨﺤﺸﺮﺗﺤﺖﺩﻭﺍﺳﺔﺍﻟﻔﺮﺍﻣﻞﺃﻭﺩﻭﺍﺳﺔﺍﻟﺴﺮﻋﺔ.
ﺣﻮﻝﺇﻋﺪﺍﺩﺍﺕiPod
!ﻋﻨﺪﺗﻮﺻﻴﻞﺟﻬﺎﺯiPod،ﺗﻐﻴﺮﻫﺬﻩﺍﻟﻮﺣﺪﺓﺿﺒﻂ)ﺍﻟﻤﻮﺍﺯﻥ(EQ
ﻟﻠﺠﻬﺎﺯiPodﺇﻟﻰﺍﻹﻳﻘﺎﻑﻭﺫﻟﻚﻟﺘﺤﺴﻴﻦﺍﻟﺨﺼﺎﺋﺺﺍﻟﺼﻮﺗﻴﺔ.
ﻭﻋﻨﺪﻓﺼﻞﺟﻬﺎﺯiPod،ﻳﻌﻮﺩﺍﻟﻤﻮﺍﺯﻥEQﺇﻟﻰﺍﻟﻀﺒﻂﺍﻷﺻﻠﻲ.
!ﻻﻳﻤﻜﻨﻚﺿﺒﻂﺍﻟﺘﻜﺮﺍﺭﻋﻠﻰﺇﻳﻘﺎﻑﻓﻲiPodﻋﻨﺪﺍﺳﺘﺨﺪﺍﻡﻫﺬﻩ
ﺍﻟﻮﺣﺪﺓ.ﻳﺘﻐﻴﺮﺍﻟﺘﻜﺮﺍﺭﺗﻠﻘﺎﺋﻴًﺎﺇﻟﻰAll)ﺍﻟﻜﻞ(ﻋﻨﺪﺗﻮﺻﻴﻞiPod
ﺑﻬﺬﻩﺍﻟﻮﺣﺪﺓ.
ﻟﻦﻳﺘﻢﻋﺮﺽﺍﻟﻨﺺﻏﻴﺮﺍﻟﻤﺘﻮﺍﻓﻖﺍﻟﻤُﺨﺰﻥﻓﻲiPodﺑﻮﺍﺳﻄﺔﻫﺬﻩ
ﺍﻟﻮﺣﺪﺓ.
ﺍﻷﻗﺮﺍﺹﺍﻟﻤﺰﺩﻭﺟﺔDualDiscs
DualDiscsﻫﻲﺃﻗﺮﺍﺹﺫﺍﺕﻭﺟﻬﻴﻦﺗﺘﻜﻮﻥﻣﻦﻗﺮﺹCDﻗﺎﺑﻞ
ﻟﺘﺴﺠﻴﻞﺍﻟﺼﻮﺕﻋﻠﻰﺃﺣﺪﺍﻟﻮﺟﻬﻴﻦﻭﻗﺮﺹDVDﻗﺎﺑﻞﻟﺘﺴﺠﻴﻞﺍﻟﻔﻴﺪﻳﻮ
ﻋﻠﻰﺍﻟﻮﺟﻪﺍﻵﺧﺮ.
ﺑﻤﺎﺃﻥﻭﺟﻪﻗﺮﺹCDﻓﻲﺍﻷﻗﺮﺍﺹﺍﻟﻤﺰﺩﻭﺟﺔDualDiscsﻻ
ﻳﺘﻮﺍﻓﻖﻣﺎﺩﻳﺎًﻣﻊﻣﻌﻴﺎﺭCDﺍﻟﻌﺎﻡﻓﻘﺪﻻﻳﻜﻮﻥﺑﺎﻹﻣﻜﺎﻥﺗﺸﻐﻴﻞﻭﺟﻪ
ﻗﺮﺹCDﺑﺎﺳﺘﺨﺪﺍﻡﻫﺬﻩﺍﻟﻮﺣﺪﺓ.
ﺟﻬﺎﺯﺍﻟﺘﺨﺰﻳﻦﺍﻟﺨﺎﺭﺟﻲ)SD، USB(
ﻗﻢﺑﺘﻮﺟﻴﻪﺃﻳﺔﺃﺳﺌﻠﺔﻟﺪﻳﻚﺣﻮﻝﺟﻬﺎﺯﺍﻟﺘﺨﺰﻳﻦﺍﻟﺨﺎﺭﺟﻲ)SD، USB(
ﺇﻟﻰﺍﻟﺠﻬﺔﺍﻟﻤﺼﻨﻌﺔﻟﻠﺠﻬﺎﺯ.
ﻻﺗﺘﺮﻙﺟﻬﺎﺯﺍﻟﺘﺨﺰﻳﻦﺍﻟﺨﺎﺭﺟﻲ)SD، USB(ﻓﻲﺃﻣﺎﻛﻦﺩﺭﺟﺔ
ﺣﺮﺍﺭﺗﻬﺎﻋﺎﻟﻴﺔ.
ﺑﻨﺎﺀًﻋﻠﻰﺟﻬﺎﺯﺍﻟﺘﺨﺰﻳﻦﺍﻟﺨﺎﺭﺟﻲ)SD، USB(،ﻗﺪﺗﺤﺪﺙﺍﻟﻤﺸﺎﻛﻞ
ﺍﻟﺘﺎﻟﻴﺔ.
!ﻗﺪﺗﺨﺘﻠﻒﻋﻤﻠﻴﺎﺕﺍﻟﺘﺸﻐﻴﻞ.
!ﻗﺪﻻﻳﺘﻢﺍﻟﺘﻌﺮﻑﻋﻠﻰﺟﻬﺎﺯﺍﻟﺘﺨﺰﻳﻦ.
!ﻗﺪﻻﻳﺘﻢﺗﺸﻐﻴﻞﺍﻟﻤﻠﻔﺎﺕﺑﺸﻜﻞﺻﺤﻴﺢ.
ﺟﻬﺎﺯﺗﺨﺰﻳﻦUSB
ﺍﻟﺘﻮﺻﻴﻼﺕﻋﺒﺮﻣﺸﺘﺮﻙUSBﻏﻴﺮﻣﺪﻋﻮﻣﺔ.
ﻻﺗﻮﺻﻞﺃﻱﺷﻲءﻏﻴﺮﺟﻬﺎﺯﺗﺨﺰﻳﻦUSB.
ﺛﺒﺖﺑﺈﺣﻜﺎﻡﺟﻬﺎﺯﺗﺨﺰﻳﻦUSBﻋﻨﺪﺍﻟﻘﻴﺎﺩﺓ.ﻻﺗﺪﻋﻪﻳﺴﻘﻂﻋﻠﻰ
ﺍﻷﺭﺿﻴﺔﺣﻴﺚﻗﺪﻳﺤﺘﺒﺲﺗﺤﺖﺩﻭﺍﺳﺔﺍﻟﻔﺮﺍﻣﻞﺃﻭﺩﻭﺍﺳﺔﺍﻟﺴﺮﻋﺔ.
ﺑﻨﺎﺀًﻋﻠﻰﺟﻬﺎﺯﺗﺨﺰﻳﻦUSB،ﻗﺪﺗﺤﺪﺙﺍﻟﻤﺸﺎﻛﻞﺍﻟﺘﺎﻟﻴﺔ.
!ﻗﺪﻳﻮﻟﺪﺍﻟﺠﻬﺎﺯﺿﻮﺿﺎﺀﻓﻲﺍﻟﺮﺍﺩﻳﻮ.
ﺑﻄﺎﻗﺔﺫﺍﻛﺮﺓSD
ﺗﺪﻋﻢﻫﺬﻩﺍﻟﻮﺣﺪﺓﺃﻧﻮﺍﻉﺑﻄﺎﻗﺎﺕﺫﺍﻛﺮﺓSDﺍﻟﺘﺎﻟﻴﺔ.
!SD
!miniSD
!microSD
!SDHC
ﺍﺣﺘﻔﻆﺑﺒﻄﺎﻗﺔﺫﺍﻛﺮﺓSDﺑﻌﻴﺪًﺍﻋﻦﻣﺘﻨﺎﻭﻝﺍﻷﻃﻔﺎﻝ.ﺇﺫﺍﺗﻢﺍﺑﺘﻼﻉﺑﻄﺎﻗﺔ
ﺫﺍﻛﺮﺓSD،ﺭﺍﺟﻊﺍﻟﻄﺒﻴﺐﻋﻠﻰﺍﻟﻔﻮﺭ.
ﻻﺗﻠﻤﺲﻣﻮﺻﻼﺕﺑﻄﺎﻗﺔﺫﺍﻛﺮﺓSDﻣﺒﺎﺷﺮﺓﺑﺈﺻﺒﻌﻚﺃﻭﺑﺄﻱﺟﺴﻢ
ﻣﻌﺪﻧﻲ.
ﻻﺗﺪﺧﻞﺃﻱﺷﻲءﻏﻴﺮﺑﻄﺎﻗﺔﺫﺍﻛﺮﺓSDﻓﻲﻓﺘﺤﺔﺑﻄﺎﻗﺔﺫﺍﻛﺮﺓSD.
ﻓﻲﺣﺎﻟﺔﺇﺩﺧﺎﻝﺃﻱﺟﺴﻢﻣﻌﺪﻧﻲ)ﻛﻌﻤﻠﺔﻣﻌﺪﻧﻴﺔ(ﻓﻲﺍﻟﻔﺘﺤﺔ؛ﻗﺪﻳﺤﺪﺙ
ﻗﺼﺮﻓﻲﺍﻟﺪﻭﺍﺋﺮﺍﻟﺪﺍﺧﻠﻴﺔﻣﻤﺎﻳﺘﺴﺒﺐﻓﻲﺗﻌﻄﻞﺍﻟﺠﻬﺎﺯ.
ﻋﻨﺪﺇﺩﺧﺎﻝﺑﻄﺎﻗﺔminiSDﺃﻭmicroSD،ﺍﺳﺘﺨﺪﻡﺍﻟﻤﻬﺎﻳﺊ.ﻭﻻ
ﺗﺴﺘﺨﺪﻡﻣﻬﺎﻳﺌًﺎﺑﻪﺃﺟﺰﺍﺀﻣﻌﺪﻧﻴﺔﻣﻜﺸﻮﻓﺔﻏﻴﺮﺃﻃﺮﺍﻑﺍﻟﺘﻮﺻﻴﻞ.
Page 93

ﺍﻟﻤﻠﺤﻘﺎﺕ
ﻣﻌﻠﻮﻣﺎﺕﺇﺿﺎﻓﻴﺔ
ﻣﻌﻠﻮﻣﺎﺕﺇﺿﺎﻓﻴﺔ
ﺍﻟﺘﻌﺎﻣﻞﻣﻊﺍﻹﺭﺷﺎﺩﺍﺕ
ﺍﻷﻗﺮﺍﺹﻭﺍﻟﻤﺸﻐﻞ
ﻗﻢﺑﺎﺳﺘﺨﺪﺍﻡﺍﻷﻗﺮﺍﺹﺍﻟﺘﻲﻋﻠﻴﻬﺎﺃﺣﺪﺍﻟﺸﻌﺎﺭﻳﻦﺍﻟﺘﺎﻟﻴﻴﻦﻓﻘﻂ.
ﺍﺳﺘﺨﺪﻡﺃﻗﺮﺍﺻًﺎ١٢ﺳﻢ.ﻭﻻﺗﺴﺘﺨﺪﻡﺃﻗﺮﺍﺻًﺎ٨ﺳﻢﺃﻭﻣﻬﺎﻳﺌًﺎﻷﻗﺮﺍﺹ٨
ﺳﻢ.
ﺍﺳﺘﺨﺪﻡﻓﻘﻂﺍﻷﻗﺮﺍﺹﺍﻟﺘﻘﻠﻴﺪﻳﺔﺍﻟﻤﺴﺘﺪﻳﺮﺓﺑﺎﻟﻜﺎﻣﻞ.ﻻﺗﺴﺘﺨﺪﻡﺍﻷﻗﺮﺍﺹ
ﺍﻟﻤﺸﻜّﻠﺔ.
ﻻﺗﻘﻢﺑﺈﺩﺧﺎﻝﺃﻱﺷﻲءﺁﺧﺮﺧﻼﻑﻗﺮﺹCDﺩﺍﺧﻞﻓﺘﺤﺔﺗﺤﻤﻴﻞ
ﺍﻟﻘﺮﺹCD.
ﻻﺗﺴﺘﺨﺪﻡﺃﻗﺮﺍﺻًﺎﻣﺘﺸﻘﻘﺔﺃﻭﻣﺨﺪﻭﺷﺔﺃﻭﻣﺸﻮﻫﺔﻭﺇﻻﻓﺎﻥﺍﻷﻗﺮﺍﺹ
ﺍﻟﺘﺎﻟﻔﺔﻗﺪﺗﺆﺩﻱﺇﻟﻰﺗﻠﻒﺍﻟﻤﺸﻐﻞ.
ﻻﻳﻤﻜﻦﺗﺸﻐﻴﻞﺃﻗﺮﺍﺹCD-R/CD-RWﻏﻴﺮﺍﻟﻤﻨﺘﻬﻴﺔ.
ﻻﺗﻠﻤﺲﺳﻄﺢﺍﻷﻗﺮﺍﺹﺍﻟﻤﺴﺠﻠﺔ.
ﻗﻢﺑﺘﺨﺰﻳﻦﺍﻷﻗﺮﺍﺹﻓﻲﺍﻟﻌﻠﺐﺍﻟﺨﺎﺻﺔﺑﻬﺎﻋﻨﺪﻋﺪﻡﺍﻻﺳﺘﺨﺪﺍﻡ.
ﻻﺗﻘﻢﺑﻠﺼﻖﺑﻄﺎﻗﺎﺕﻋﻠﻰﺃﺳﻄﺢﺍﻷﻗﺮﺍﺹﺃﻭﺍﻟﻜﺘﺎﺑﺔﻋﻠﻴﻬﺎﺃﻭﺗﻌﺮﻳﻀﻬﺎ
ﻟﻤﻮﺍﺩﻛﻴﻤﺎﻭﻳﺔ.
ﻟﺘﻨﻈﻴﻒﻗﺮﺹCD،ﺍﻣﺴﺢﺍﻟﻘﺮﺹﺑﺎﺳﺘﺨﺪﺍﻡﻗﻄﻌﺔﻗﻤﺎﺵﻧﺎﻋﻤﺔ
ﻟﻠﺨﺎﺭﺝﻣﻦﺍﻟﻤﺮﻛﺰ.
ﻗﺪﻳﻀﻌﻒﺍﻟﺘﻜﺜﻴﻒﺃﺩﺍﺀﺍﻟﻤﺸﻐﻞﻟﻔﺘﺮﺓﻣﺆﻗﺘﺔ.ﺍﺗﺮﻙﺍﻷﻣﺮﻟﻤﺪﺓﺳﺎﻋﺔ
ﺗﻘﺮﻳﺒًﺎﻟﻴﺘﻢﺍﻟﻀﺒﻂﻋﻠﻰﺩﺭﺟﺔﺣﺮﺍﺭﺓﺃﻛﺜﺮﺩﻓﺌًﺎ.ﻗﻢﺃﻳﻀًﺎﺑﻤﺴﺢﺃﻱ
ﺃﻭﺳﺎﺥﻋﻠﻰﺍﻷﻗﺮﺍﺹﺑﻘﻄﻌﺔﻗﻤﺎﺵﻧﺎﻋﻤﺔ.
ﻗﺪﻻﻳﻜﻮﻥﺗﺸﻐﻴﻞﺍﻷﻗﺮﺍﺹﻣﻤﻜﻨًﺎﺑﺴﺒﺐﺧﺼﺎﺋﺺﺍﻟﻘﺮﺹﻭﺗﻨﺴﻴﻖ
ﺍﻟﻘﺮﺹﻭﺍﻟﺘﻄﺒﻴﻖﺍﻟﻤﺴﺠﻞﻭﺑﻴﺌﺔﺍﻟﺘﺸﻐﻴﻞﻭﻇﺮﻭﻑﺍﻟﺘﺨﺰﻳﻦﻭﻏﻴﺮﻫﺎ.
ﺍﻟﻌﻮﺍﺋﻖﻓﻲﺍﻟﻄﺮﻳﻖﻗﺪﺗﻌﻴﻖﺗﺸﻐﻴﻞﺍﻟﻘﺮﺹ.
ﺍﻟﺘﺎﻟﻴﺔ.
–ﺇﻳﻘﺎﻑﺗﺸﻐﻴﻞﻣﻔﺘﺎﺡ
ﺍﻟﺘﺸﻐﻴﻞﺛﻢﺇﻋﺎﺩﺓﺗﺸﻐﻴﻠﻪ.
–ﻓﺼﻞﺃﻭﺇﺧﺮﺍﺝﺟﻬﺎﺯ
ﺍﻟﺘﺨﺰﻳﻦﺍﻟﺨﺎﺭﺟﻲ.
–ﺍﻟﺘﻐﻴﻴﺮﻟﻤﺼﺪﺭﻣﺨﺘﻠﻒ.
ﺛﻢﺍﻟﻌﻮﺩﺓﺇﻟﻰﻣﺼﺪﺭ
USBﺃﻭSD.
!ﺍﻓﺼﻞﺍﻟﻜﺒﻞﻋﻦﺟﻬﺎﺯ
iPod.ﻭﺑﻤﺠﺮﺩﻋﺮﺽ
ﺍﻟﻘﺎﺋﻤﺔﺍﻟﺮﺋﻴﺴﻴﺔﻟﺠﻬﺎﺯ
iPod،ﺻﻞﺍﻟﻜﺒﻞﻣﻦ
ﺟﺪﻳﺪ.ﺃﻋِﺪﺿﺒﻂﺟﻬﺎﺯ
iPod.
iPod.ﻭﺑﻤﺠﺮﺩﻋﺮﺽ
ﺍﻟﻘﺎﺋﻤﺔﺍﻟﺮﺋﻴﺴﻴﺔﻟﺠﻬﺎﺯ
iPod،ﺻﻞﺍﻟﻜﺒﻞﻣﻦ
ﺟﺪﻳﺪ.ﺃﻋِﺪﺿﺒﻂﺟﻬﺎﺯ
iPod.
ﻳﺠﺐﺃﻥﻳﻜﻮﻥﺟﻬﺎﺯ
ﺗﺨﺰﻳﻦUSBﺑﺘﻨﺴﻴﻖ
FAT12ﺃﻭFAT16ﺃﻭ
FAT32.
ﻗﻢﺑﺘﺤﺪﻳﺚﺇﺻﺪﺍﺭﺟﻬﺎﺯ
iPod.
iPod.ﻭﺑﻤﺠﺮﺩﻋﺮﺽ
ﺍﻟﻘﺎﺋﻤﺔﺍﻟﺮﺋﻴﺴﻴﺔﻟﺠﻬﺎﺯ
iPod،ﺻﻞﺍﻟﻜﺒﻞﻣﻦ
ﺟﺪﻳﺪ.ﺃﻋِﺪﺿﺒﻂﺟﻬﺎﺯ
iPod.
ﺍﺧﺘﺮﻗﺎﺋﻤﺔﺗﺤﺘﻮﻱﻋﻠﻰ
ﺃﻏﺎﻥ.
ﺍﻧﻘﻞﺍﻟﻤﻘﻄﻮﻋﺎﺕﺇﻟﻰ
ﺟﻬﺎﺯiPod.
ﺇﺧﻔﺎﻕﺟﻬﺎﺯiPodﺍﻓﺼﻞﺍﻟﻜﺒﻞﻋﻦﺟﻬﺎﺯ
ﻳﺘﻢﺗﻬﻴﺌﺘﻪﺑﺘﻨﺴﻴﻖ
FAT12ﺃﻭFAT16
ﺃﻭFAT32
iPodﺍﻟﺜﺎﺑﺖﻗﺪﻳﻤًﺎ
ﺇﺧﻔﺎﻕﺟﻬﺎﺯiPodﺍﻓﺼﻞﺍﻟﻜﺒﻞﻋﻦﺟﻬﺎﺯ
ﺍﻟﻘﺎﺋﻤﺔﺍﻟﺤﺎﻟﻴﺔ.
ﺻﻠﺔ
ﺍﻟﺮﺳﺎﻟﺔﺍﻟﺴﺒﺐﺍﻹﺟﺮﺍﺀ
ERROR-19ﻓﺸﻞﺍﻻﺗﺼﺎﻝ.!ﻧﻔﺬﺇﺣﺪﻯﺍﻟﻌﻤﻠﻴﺎﺕ
ERROR-23ﺟﻬﺎﺯﺗﺨﺰﻳﻦUSBﻟﻢ
ERROR-16ﻳﻌﺘﺒﺮﺇﺻﺪﺍﺭﺑﺮﻧﺎﻣﺞ
STOPﻻﺗﻮﺟﺪﻣﻘﻄﻮﻋﺎﺕﻓﻲ
Not foundﻻﺗﻮﺟﺪﺃﻏﺎﻥﺫﺍﺕ
ﺗﺄﻛﺪﻣﻦﺃﻥﻣﻮﺻّﻞ
USBﺃﻭﻛﺒﻞUSB
ﻏﻴﺮﻋﺎﻟﻖﺑﺸﻲءﻣﺎﺃﻭ
ﺗﺎﻟﻒ.
ﺍﻓﺼﻞﺟﻬﺎﺯﺗﺨﺰﻳﻦ
USBﻭﻻﺗﺴﺘﺨﺪﻣﻪ.ﺃﺩﺭ
ﻣﻔﺘﺎﺡﺗﺸﻐﻴﻞﺍﻟﺴﻴﺎﺭﺓﺇﻟﻰ
ﺍﻟﻮﺿﻊOFFﺛﻢﺇﻟﻰ
ﺍﻟﻮﺿﻊONﺃﻭACC
ﺛﻢﻗﻢﺑﺘﻮﺻﻴﻞﺃﺟﻬﺰﺓ
ﺗﺨﺰﻳﻦUSBﺍﻟﻤﺘﻮﺍﻓﻘﺔ
ﻓﻘﻂ.
ﺗﺄﻛﺪﻣﻦﻋﺪﻡﺣﺼﻮﻝ
ﺗﻤﺎﺱﻛﻬﺮﺑﺎﺋﻲﻟﻜﺎﺑﻞ
ﺗﻮﺻﻴﻞﺟﻬﺎﺯiPod
)ﻣﺜﺎﻝ،ﻏﻴﺮﻣﺤﺘﺒﺲﺑﻴﻦ
ﺃﺟﺴﺎﻡﻣﻌﺪﻧﻴﺔ(.ﺑﻌﺪ
ﺍﻟﺘﺤﻘﻖ،ﻟﻒﻣﻔﺘﺎﺡﺗﺸﻐﻴﻞ
ﺍﻟﺴﻴﺎﺭﺓﻟﻮﺿﻊﺍﻹﻳﻘﺎﻑ
OFFﺛﻢﺍﻟﻌﻮﺩﺓﻟﻮﺿﻊ
ﺍﻟﺘﺸﻐﻴﻞONﺃﻭﺍﻓﺼﻞ
ﺟﻬﺎﺯiPodﺛﻢﺻﻠﻪﻣﺮﺓ
ﺃﺧﺮﻯ.
ﻣﻊﻣﻮﺻﻞUSBﺃﻭ
ﻛﺒﻞUSB.
ﺟﻬﺎﺯﺗﺨﺰﻳﻦUSB
ﺍﻟﻤﻮﺻﻞﻳﺴﺘﻬﻠﻚﺃﻛﺜﺮ
ﻣﻦ٥٠٠ﻡﺃ)ﺍﻟﺤﺪ
ﺍﻷﻗﺼﻰﺍﻟﻤﺴﻤﻮﺡﺑﻪ
ﻟﻠﺘﻴﺎﺭ(.
ﻳﺘﻢﺗﺸﻐﻴﻞiPod
ﺑﺸﻜﻞﺻﺤﻴﺢﻭﻟﻜﻦﻻ
ﻳﺘﻢﺷﺤﻨﻪ
ﺍﻟﺮﺳﺎﻟﺔﺍﻟﺴﺒﺐﺍﻹﺟﺮﺍﺀ
CHECK USBﺣﺪﺙﺗﻤﺎﺱﻛﻬﺮﺑﺎﺋﻲ
Windows Media
Windows Media
ﺟﻬﺎﺯﺗﺨﺰﻳﻦUSBﻭﻗﻢ
ﺑﺎﻟﺘﻮﺻﻴﻞ.
ﺍﺗْﺒﻊﺗﻌﻠﻴﻤﺎﺕﺟﻬﺎﺯ
ﺗﺨﺰﻳﻦUSBﻟﺘﻌﻄﻴﻞ
ﺍﻟﺤﻤﺎﻳﺔ.
ﻗﻢﺑﺘﺸﻐﻴﻞﻣﻠﻒﺻﻮﺕ
ﻏﻴﺮﻣﻀﻤﻦﻣﻊ
DRM 9/10.
ﺍﻧﻘﻞﻣﻠﻔﺎﺕﺍﻟﺼﻮﺕﻏﻴﺮ
ﺍﻟﻤﻀﻤﻨﺔﻣﻊ
DRM 9/10ﺇﻟﻰﺟﻬﺎﺯ
ﺗﺨﺰﻳﻦUSBﻭﻗﻢ
ﺑﺎﻟﺘﻮﺻﻴﻞ.
!ﻗﻢﺑﺘﻮﺻﻴﻞﺟﻬﺎﺯ
ﻣﺘﻮﺍﻓﻖﻣﻊﻓﺌﺔﺍﻟﺘﺨﺰﻳﻦ
ﺍﻟﻜﺒﻴﺮUSB.
!ﺍﻓﺼﻞﺍﻟﺠﻬﺎﺯﻭﺍﺳﺘﺒﺪﻟﻪ
ﺑﺠﻬﺎﺯﺗﺨﺰﻳﻦUSB
ﻣﺘﻮﺍﻓﻘًﺎ.
ﺍﻓﺼﻞﺍﻟﺠﻬﺎﺯﻭﺍﺳﺘﺒﺪﻝﺑﻪ
ﺟﻬﺎﺯiPodﻣﺘﻮﺍﻓﻘًﺎ.
ﺍﻓﺼﻞﺍﻟﺠﻬﺎﺯﻭﺍﺳﺘﺒﺪﻟﻪ
ﺑﺠﻬﺎﺯﺗﺨﺰﻳﻦSD
ﻣﺘﻮﺍﻓﻖ.
USBﺍﻟﻤﻮﺻﻞﻋﻠﻰ
Windows
DRM 9/10
Media
DRM 9/10
ﺟﻬﺎﺯﺗﺨﺰﻳﻦUSB
ﺍﻟﻤﻮﺻﻞﻣﻤﻜﻦﺑﺸﻜﻞ
ﺁﻣﻦ
ﻣﻠﻔﺎﺕﻣﻀﻤﻨﺔﻣﻊ
äMedia
ﺗﺨﺰﻳﻦUSBﻣﻀﻤﻨﺔ
ﻣﻊWindows
ﻫﺬﻩﺍﻟﻮﺣﺪﺓﻻﺗﺪﻋﻢ
COMPATIBLE
ﻭﺣﺪﺓﺗﺨﺰﻳﻦUSB
ﺍﻟﻤﺘﺼﻠﺔ.
ﺟﻬﺎﺯiPodﻏﻴﺮ
ﻣﺘﻮﺍﻓﻖ
ﺟﻬﺎﺯﺗﺨﺰﻳﻦSDﻏﻴﺮ
ﻣﺘﻮﺍﻓﻖ
ﺍﻟﺮﺳﺎﻟﺔﺍﻟﺴﺒﺐﺍﻹﺟﺮﺍﺀ
NO AUDIOﻻﺗﻮﺟﺪﺃﻏﻨﻴﺎﺕ.ﺍﻧﻘﻞﻣﻠﻔﺎﺕﺍﻟﺼﻮﺕﺇﻟﻰ
SKIPPEDﻳﺤﺘﻮﻱﺟﻬﺎﺯﺗﺨﺰﻳﻦ
PROTECTﻛﻞﺍﻟﻤﻠﻔﺎﺕﻓﻲﺟﻬﺎﺯ
NOT
ﺍﻟﻌﺮﺑﻴﺔ
١٢
Ar
Page 94

ﺍﻟﻤﻠﺤﻘﺎﺕ
ﻣﻌﻠﻮﻣﺎﺕﺇﺿﺎﻓﻴﺔ
ﺍﻟﺘﺮﻛﻴﺐ
ﻣﺸﻐّﻞﺃﻗﺮﺍﺹCDﺍﻟﻤﺪﻣﺞ
ﺍﻟﺮﺳﺎﻟﺔﺍﻟﺴﺒﺐﺍﻹﺟﺮﺍﺀ
ERROR-07,
ﺍﻟﻘﺮﺹﻣﺘﺴﺦ.ﻧﻈّﻒﺍﻟﻘﺮﺹ.
11, 12, 17, 30
ﺍﻟﻘﺮﺹﻣﺨﺪﻭﺵ.ﺍﺳﺘﺒﺪﻝﺍﻟﻘﺮﺹ.
ERROR-10,
ﻗﻢﺑﺈﺩﺍﺭﺓﻣﻔﺘﺎﺡﺗﺸﻐﻴﻞ
ﺍﻟﻤﺤﺮﻙﻟﻮﺿﻊﺍﻹﻳﻘﺎﻑ
OFFﻭﺍﻟﻌﻮﺩﺓﻟﻮﺿﻊ
ﺍﻟﺘﺸﻐﻴﻞONﺃﻭﻗﻢ
ﺑﺎﻟﺘﺤﻮﻳﻞﺇﻟﻰﻣﺼﺪﺭ
ﻣﺨﺘﻠﻒﺛﻢﺍﻟﻌﻮﺩﺓﺇﻟﻰ
ﻣﺸﻐّﻞﺍﻷﻗﺮﺍﺹCD.
ﺍﺳﺘﺒﺪﻝﺍﻟﻘﺮﺹ.
ﺍﺳﺘﺒﺪﻝﺍﻟﻘﺮﺹ.
ﺍﻧﺘﻈﺮﺣﺘﻰﺗﺨﺘﻔﻲ
ﺍﻟﺮﺳﺎﻟﺔﻭﺗﺴﻤﻊﺻﻮﺗًﺎ.
ﺍﺳﺘﺒﺪﻝﺍﻟﻘﺮﺹ.
ﺍﺳﺘﺒﺪﻝﺍﻟﻘﺮﺹ.
ﺍﺳﺘﺒﺪﻝﺍﻟﻘﺮﺹ.
!ﻗﻢﺑﺘﺸﻐﻴﻞﺍﻟﺘﻮﺻﻴﻞ
ﻭﺍﻟﺘﺸﻐﻴﻞ.
!ﻗﻢﺑﺘﻮﺻﻴﻞﺟﻬﺎﺯ
ﺗﺨﺰﻳﻦUSB/iPod
ﻣﺘﻮﺍﻓﻖ.
ﺍﻧﺘﻈﺮﺣﺘﻰﺗﺨﺘﻔﻲ
ﺍﻟﺮﺳﺎﻟﺔﻭﺗﺴﻤﻊﺻﻮﺗًﺎ.
١١
Ar
ﻳﻮﺟﺪﻋﻄﻞﻛﻬﺮﺑﻲﺃﻭ
11, 12, 15,
ﻣﻴﻜﺎﻧﻴﻜﻲ.
17, 30, A0
ERROR-15ﺍﻟﻘﺮﺹﺍﻟﺬﻱﺗﻢﺇﺩﺧﺎﻟﻪ
ﻓﺎﺭﻍ
ERROR-23ﺗﻨﺴﻴﻖﺍﻟﻘﺮﺹCD
ﻏﻴﺮﻣﺪﻋﻮﻡ
FORMAT
ﺃﺣﻴﺎﻧًﺎﻳﺤﺪﺙﺗﺄﺧﻴﺮﺑﻴﻦ
READ
ﺑﺪﺀﺍﻟﺘﺸﻐﻴﻞﻭﺳﻤﺎﻉﺃﻱ
ﺻﻮﺕ.
NO AUDIOﺍﻟﻘﺮﺹﺍﻟﺬﻱﺗﻢﺇﺩﺧﺎﻟﻪ
ﻻﻳﺤﺘﻮﻱﻋﻠﻰﺃﻱ
ﻣﻠﻔﺎﺕﻗﺎﺑﻠﺔﻟﻠﺘﺸﻐﻴﻞ.
SKIPPEDﺍﻟﻘﺮﺹﺍﻟﺬﻱﺗﻢﺇﺩﺧﺎﻟﻪ
ﻳﺤﺘﻮﻱﻋﻠﻰﻣﻠﻔﺎﺕ
ﻣﺤﻤﻴﺔﺑﺤﻘﻮﻕDRM.
PROTECTﻛﻞﺍﻟﻤﻠﻔﺎﺕﻓﻲﺍﻟﻘﺮﺹ
ﺍﻟﺬﻱﺗﻢﺇﺩﺧﺎﻟﻪﻣﺤﻤﻴﺔ
ﺑﺤﻘﻮﻕDRM.
ﺟﻬﺎﺯﺍﻟﺘﺨﺰﻳﻦﺍﻟﺨﺎﺭﺟﻲ)SD، USB)/iPod
ﺍﻟﺮﺳﺎﻟﺔﺍﻟﺴﺒﺐﺍﻹﺟﺮﺍﺀ
NO DEVICEﻋﻨﺪﺇﻳﻘﺎﻑﺍﻟﺘﻮﺻﻴﻞ
ﻭﺍﻟﺘﺸﻐﻴﻞ،ﻟﻦﻳﺘﻢ
ﺗﻮﺻﻴﻞﺃﻱﺟﻬﺎﺯ
ﺗﺨﺰﻳﻦUSBﺃﻭ
iPod.
FORMAT
ﺃﺣﻴﺎﻧًﺎﻳﺤﺪﺙﺗﺄﺧﻴﺮﺑﻴﻦ
READ
ﺑﺪﺀﺍﻟﺘﺸﻐﻴﻞﻭﺳﻤﺎﻉﺃﻱ
ﺻﻮﺕ.
ﻗﻢﺑﺈﺟﺮﺍﺀﺍﻟﻌﻤﻠﻴﺔﻣﺮﺓ
ﺃﺧﺮﻯ.
ﻗﻢﺑﺎﺧﺘﻴﺎﺭﻧﻄﺎﻕﺗﺸﻐﻴﻞ
ﺍﻟﺘﻜﺮﺍﺭﻣﺮﺓﺃﺧﺮﻯ.
ﺍﺧﺘﺮﻧﻄﺎﻕﺗﺸﻐﻴﻞﺗﻜﺮﺍﺭ
ﺁﺧﺮ.
ﻗﻢﺑﺘﺤﻮﻳﻞﺍﻟﻌﺮﺽﺃﻭ
ﺍﻟﺘﺸﻐﻴﻞﺇﻟﻰﻣﻠﻒ/ﻣﺴﺎﺭ
ﺁﺧﺮ.
!ﺍﺿﻐﻂﻋﻠﻰDISP/
/SCRLﻹﻟﻐﺎﺀﻭﺿﻊ
ﺍﻟﻌﺮﺽﺍﻟﺘﻮﺿﻴﺤﻲ.
!ﺃﻭﻗﻒﺗﺸﻐﻴﻞﺇﻋﺪﺍﺩ
ﺍﻟﻌﺮﺽﺍﻹﻳﻀﺎﺣﻲ.
ﺃﺑﻌﺪﻋﻦﺍﻟﻮﺣﺪﺓﺍﻷﺟﻬﺰﺓ
ﺍﻟﻜﻬﺮﺑﻴﺔﺍﻟﺘﻲﻗﺪﺗﺴﺒﺐ
ﺗﺸﻮﻳﺸًﺎ.
ﺧﻼﻝﺣﻮﺍﻟﻲ٣٠ﺛﺎﻧﻴﺔ.
ﻻﻳﻤﻜﻦﺗﺸﻐﻴﻞ
repeat)ﺗﻜﺮﺍﺭ
ﻣﺠﻠﺪ(.
ﻻﺗﻮﺟﺪﻣﻌﻠﻮﻣﺎﺕ
ﻣﺜﻞﻫﺎﺗﻒﺧﻠﻮﻱ-
ﺣﻞﺍﻟﻤﺸﺎﻛﻞ
ﺍﻷﻋﺮﺍﺽﺍﻟﺴﺒﺐﺍﻹﺟﺮﺍﺀ
ﻟﻢﺗﻘﻢﺑﺘﻨﻔﻴﺬﺃﻳﺔﻋﻤﻠﻴﺎﺕ
ﺑﻨﺎﺀًﻋﻠﻰﻧﻄﺎﻕﺗﺸﻐﻴﻞ
ﺍﻟﺘﻜﺮﺍﺭ،ﻗﺪﻳﺘﻐﻴﺮ
ﺍﻟﻨﻄﺎﻕﺍﻟﻤﺤﺪﺩﻋﻨﺪ
ﺗﺤﺪﻳﺪﻣﺠﻠﺪﺃﻭﻣﻘﻄﻮﻋﺔ
ﺃﺧﺮﻯﺃﻭﻋﻨﺪﺍﻟﺘﻘﺪﻳﻢ/
ﺍﻟﺘﺮﺟﻴﻊﺍﻟﺴﺮﻳﻊ.
ﺍﻟﻤﺠﻠﺪﺍﺕﺍﻟﻔﺮﻋﻴﺔﻋﻨﺪ
ﺍﺧﺘﻴﺎﺭFolder
ﻧﺼﻴﺔﻣﻀﻤﻨﺔ.
ﺗﻢﺗﺸﻐﻴﻞﻭﺿﻊ
ﺍﻟﻌﺮﺽﺍﻟﺘﻮﺿﻴﺤﻲ.
ﺇﻧﻚﺗﺴﺘﺨﺪﻡﺟﻬﺎﺯًﺍ-
ﻳﺒﺚﻣﻮﺟﺎﺕﻛﻬﺮﺑﻴﺔ
ﺑﺎﻟﻘﺮﺏﻣﻦﺍﻟﻮﺣﺪﺓ.
ﺗﻌﻮﺩﺍﻟﺸﺎﺷﺔﺗﻠﻘﺎﺋﻴًﺎ
ﺇﻟﻰﺍﻟﻮﺿﻊﺍﻟﻌﺎﺩﻱ.
ﻳﺘﻐﻴﺮﻧﻄﺎﻕﺗﺸﻐﻴﻞ
ﺍﻟﺘﻜﺮﺍﺭﺑﺸﻜﻞﻏﻴﺮ
ﻣﺘﻮﻗﻊ.
ﻻﻳﺘﻢﺗﺸﻐﻴﻞﻣﺠﻠﺪ
ﻓﺮﻋﻲ.
ﻳﻈﻬﺮNO
XXXXﻋﻨﺪﺗﻐﻴﺮ
ﻋﺮﺽ)NO
TITLE،ﻋﻠﻰﺳﺒﻴﻞ
ﺍﻟﻤﺜﺎﻝ(.
ﺗﻀﻲءﺍﻟﺸﺎﺷﺔﻋﻨﺪ
ﺇﻳﻘﺎﻑﺗﺸﻐﻴﻞ
ﺍﻟﻮﺣﺪﺓ.
ﺍﻟﻮﺣﺪﺓﻣﻌﻄﻠﺔ.
ﺛﻤﺔﺗﺸﻮﻳﺶ.
ﻓﻲﺻﻔﺤﺔ٣.
ﺭﺳﺎﺋﻞﺍﻟﺨﻄﺄ
ﻋﻨﺪﻣﺎﺗﺘﺼﻞﺑﻮﻛﻴﻠﻚﺃﻭﺑﺄﻗﺮﺏﻣﺮﻛﺰﺻﻴﺎﻧﺔﺗﺎﺑﻊﻟﺸﺮﻛﺔ
Pioneer،ﺗﺄﻛﺪﻣﻦﺗﺴﺠﻴﻞﺭﺳﺎﻟﺔﺍﻟﺨﻄﺄ.
1
ﻓﻚﺍﻟﻮﺣﺪﺓ
١ﻓﻚﺣﻠﻘﺔﺍﻟﺘﺸﻄﻴﺐ.
1
2
4
1ﺣﻠﻘﺔﺍﻟﺘﺸﻄﻴﺐ
2ﻟﺴﻴﻦﻣﺜﻠﻮﻡ
5
!ﻳﺴﻤﺢﻓﻚﺍﻟﻠﻮﺣﺔﺍﻷﻣﺎﻣﻴﺔﺑﻮﺻﻮﻝﺃﺳﻬﻞﺇﻟﻰﺣﻠﻘﺔﺍﻟﺘﺸﻄﻴﺐ.
!ﻋﻨﺪﺇﻋﺎﺩﺓﺗﺮﻛﻴﺐﺣﻠﻘﺔﺍﻟﺘﺸﻄﻴﺐ؛ﻭﺟّﻪﺍﻟﺠﺎﻧﺐﺫﺍﺍﻟﻠﺴﺎﻥﺍﻟﻤﺜﻠﻮﻡ
ﻷﺳﻔﻞ.
٢ﺃﺩﺧﻞﻣﻔﺎﺗﻴﺢﺍﻻﺳﺘﺨﺮﺍﺝﺍﻟﻤﺮﻓﻘﺔﻓﻲﻛﻼﺟﺎﻧﺒﻲﺍﻟﻮﺣﺪﺓﺇﻟﻰﺃﻥ
ﺗﺴﺘﻘﺮﻓﻲﻣﻜﺎﻧﻬﺎ.
3
٣ﺍﺳﺤﺐﺍﻟﻮﺣﺪﺓﺧﺎﺭﺝﻟﻮﺣﺔﺍﻟﻌﺪﺍﺩﺍﺕ.
ﻓﻚﻭﺇﻋﺎﺩﺓﺗﻮﺻﻴﻞﺍﻟﻠﻮﺣﺔﺍﻷﻣﺎﻣﻴﺔ
ﻳﻤﻜﻦﻓﻚﺍﻟﻠﻮﺣﺔﺍﻷﻣﺎﻣﻴﺔﻟﺤﻤﺎﻳﺔﺍﻟﻮﺣﺪﺓﺍﻷﻣﺎﻣﻴﺔﻣﻦﺍﻟﺴﺮﻗﺔ.
ﺍﺿﻐﻂﺯﺭﺍﻟﻔﻚ،ﺛﻢﺣﺮﻙﺍﻟﻠﻮﺣﺔﺍﻷﻣﺎﻣﻴﺔﻷﻋﻠﻰﻭﺍﺳﺤﺒﻬﺎﻧﺤﻮﻙ.
ﻓﻚﺍﻟﻠﻮﺣﺔﺍﻷﻣﺎﻣﻴﺔﻟﺤﻤﺎﻳﺔﺍﻟﻮﺣﺪﺓﻣﻦﺍﻟﺴﺮﻗﺔﻭﺇﻋﺎﺩﺓ
ﻟﻠﺘﻔﺎﺻﻴﻞ،ﺭﺍﺟﻊ
ﺗﻮﺻﻴﻞﺍﻟﻠﻮﺣﺔﺍﻷﻣﺎﻣﻴﺔ
ﻧﺰﻉﺍﻟﻠﻮﺣﺔﺍﻷﻣﺎﻣﻴﺔ
1
ﻳﻤﻜﻨﻚﺗﺄﻣﻴﻦﺍﻟﻠﻮﺣﺔﺍﻷﻣﺎﻣﻴﺔﺑﺎﻟﺒﺮﻏﻲﺍﻟﻤﻮﻓﺮ.
2
1ﺑﺮﻏﻲ
2ﺟﻠﺒﺔﺍﻟﺘﺮﻛﻴﺐ
٣ﺭﻛّﺐﺍﻟﻮﺣﺪﺓﻛﻤﺎﻓﻲﺍﻟﺸﻜﻞ.
1ﺻﺎﻣﻮﻟﺔ
2ﺣﺎﺟﺰﺃﻭﺩﻋﺎﻣﺔﻣﻌﺪﻧﻴﺔ
3ﺷﺮﻳﻂﻣﻌﺪﻧﻲ
4ﺑﺮﻏﻲ
5ﺑﺮﻏﻲ)M4 × ٨(
#ﺗﺄﻛﺪﻣﻦﺗﺮﻛﻴﺐﺍﻟﻮﺣﺪﺓﺑﺈﺣﻜﺎﻡﻓﻲﻣﻜﺎﻧﻬﺎ.ﺍﻟﺘﺮﻛﻴﺐﻏﻴﺮﺍﻟﻤﺴﺘﻘﺮﻗﺪ
ﻳﺘﺴﺒﺐﻓﻲﺗﺠﺎﻭﺯﺃﻭﺃﻋﻄﺎﻝﺃﺧﺮﻯ.
ﺗﺮﻛﻴﺐDINﺍﻟﺨﻠﻔﻲ
١ﺣﺪﺩﺍﻟﻮﺿﻊﺍﻟﻤﻨﺎﺳﺐﺣﻴﺚﺗﺘﻮﺍﻓﻖﻓﺘﺤﺎﺕﺍﻟﻜﺘﻴﻔﺔﻣﻊﺟﺎﻧﺐ
ﺍﻟﻮﺣﺪﺓ.
٢ﺍﺭﺑﻂﻣﺴﻤﺎﺭﻳﻦﻋﻠﻰﻛﻞﺟﺎﻧﺐ.
3
1ﻣﺴﻤﺎﺭﺭﺑﻂ)٥ﻣﻠﻢ×٨ﻣﻠﻢ(
2ﻛﺘﻴﻔﺔﺍﻟﺘﺮﻛﻴﺐ
3ﻟﻮﺣﺔﺍﻟﻌﺪﺍﺩﺍﺕﺃﻭﻟﻮﺣﺔﺍﻟﺘﺤﻜﻢ
Page 95

h
5cmcm
ﺍﻟﻘﺴﻢ
ﺍﻟﺘﺮﻛﻴﺐ
ﺍﻟﺘﺮﻛﻴﺐ
٠٣
!ﻳﺘﻢﺍﻟﺤﺼﻮﻝﻋﻠﻰﺃﻓﻀﻞﺃﺩﺍﺀﻋﻨﺪﺗﺮﻛﻴﺐﺍﻟﻮﺣﺪﺓﺑﺰﺍﻭﻳﺔﺃﻗﻞﻣﻦ
٦٠ﺩﺭﺟﺔ.
60°
1
!ﻟﻠﺘﺄﻛﺪﻣﻦﺍﻟﺘﺒﺪﻳﺪﺍﻟﺼﺤﻴﺢﻟﻠﺤﺮﺍﺭﺓﻋﻨﺪﺍﺳﺘﺨﺪﺍﻡﻫﺬﻩﺍﻟﻮﺣﺪﺓ،ﺗﺄﻛﺪ
ﻣﻦﺗﺮﻙﻣﺴﺎﺣﺔﻭﺍﺳﻌﺔﺧﻠﻒﺍﻟﻠﻮﺣﺔﺍﻟﺨﻠﻔﻴﺔﻭﻟﻒﺃﻳﺔﻛﺒﻼﺕ
ﻣﻔﻜﻮﻛﺔﺑﺤﻴﺚﻻﺗﺴﺪﺍﻟﻔﺘﺤﺎﺕﻋﻨﺪﺗﺮﻛﻴﺐﺍﻟﻮﺣﺪﺓ.
1
1
2
2
2
3
55
3
77
3
99
ﺗﺮﻛﻴﺐDINﺍﻷﻣﺎﻣﻲ/ﺍﻟﺨﻠﻔﻲ
ﻳﻤﻜﻦﺗﺮﻛﻴﺐﻫﺬﻩﺍﻟﻮﺣﺪﺓﺗﺮﻛﻴﺒًﺎﺻﺤﻴﺤًﺎﺑﺎﺳﺘﺨﺪﺍﻡﺍﻟﺘﺮﻛﻴﺐﺍﻷﻣﺎﻣﻲ
ﺃﻭﺍﻟﺨﻠﻔﻲ.
ﺍﺳﺘﺨﺪﻡﺃﺟﺰﺍﺀﻣﺘﺎﺣﺔﺗﺠﺎﺭﻳًﺎﻋﻨﺪﺍﻟﺘﺮﻛﻴﺐ.
ﺗﺮﻛﻴﺐDINﺍﻷﻣﺎﻣﻲ
١ﺃﺩﺧﻞﺟﻠﺒﺔﺍﻟﺘﺮﻛﻴﺐﻓﻲﻟﻮﺣﺔﺍﻟﻌﺪﺍﺩﺍﺕ.
ﻟﻠﺘﺮﻛﻴﺐﻓﻲﺍﻟﻤﺴﺎﺣﺎﺕﺍﻟﺼﻐﻴﺮﺓ،ﺍﺳﺘﺨﺪﻡﺟﻠﺒﺔﺍﻟﺘﺮﻛﻴﺐﺍﻟﻤﺮﻓﻘﺔ.ﻭﺇﺫﺍ
ﻛﺎﻥﻫﻨﺎﻙﻣﺴﺎﺣﺔﻛﺎﻓﻴﺔ،ﺍﺳﺘﺨﺪﻡﺟﻠﺒﺔﺍﻟﺘﺮﻛﻴﺐﺍﻟﻤﺮﻓﻘﺔﻣﻊﺍﻟﺴﻴﺎﺭﺓ.
٢ﻗﻢﺑﺘﺜﺒﻴﺖﺟﻠﺒﺔﺍﻟﺘﺮﻛﻴﺐﺑﺎﺳﺘﺨﺪﺍﻡﻣﻔﻚﻟﺜﻨﻲﺍﻷﺷﺮﻃﺔﺍﻟﻤﻌﺪﻧﻴﺔ
)٩٠ﺩﺭﺟﺔ(ﻓﻲﻣﻜﺎﻧﻬﺎ.
1
2
1ﻟﻮﺣﺔﺍﻟﻌﺪﺍﺩﺍﺕ
ﻣﻀﺨﻢﻗﺪﺭﺓ)ﻳﺒﺎﻉﺑﺸﻜﻞﻣﻨﻔﺼﻞ(
ﻧﻔﺬﻫﺬﻩﺍﻟﻮﺻﻼﺕﻋﻨﺪﺍﺳﺘﺨﺪﺍﻡﻣﻀﺨﻢﺍﺧﺘﻴﺎﺭﻱ.
4
6
8
1ﻭﺣﺪﺓﺍﻟﺘﺤﻜﻢﻋﻦﺑﻌﺪﻓﻲﺍﻟﻨﻈﺎﻡ
ﺻﻞﺑﺎﻟﻜﺎﺑﻞﺍﻷﺯﺭﻕ/ﺍﻷﺑﻴﺾ.
2ﻣﻀﺨﻢﻗﺪﺭﺓ)ﻳﺒﺎﻉﺑﺸﻜﻞﻣﻨﻔﺼﻞ(
3ﺻﻞﺑﻜﺒﻼﺕRCA)ﺗُﺒﺎﻉﺑﺸﻜﻞﻣﻨﻔﺼﻞ(
4ﺇﻟﻰﺍﻟﺨﺮﺝﺍﻟﺨﻠﻔﻲ
5ﺳﻤﺎﻋﺔﺧﻠﻔﻴﺔ
6ﺇﻟﻰﺍﻟﺨﺮﺝﺍﻷﻣﺎﻣﻲ
7ﺳﻤﺎﻋﺔﺃﻣﺎﻣﻴﺔ
8ﺇﻟﻰﺧﺮﺝﻣﺠﻬﺎﺭﺍﻟﺘﺮﺩﺩﺍﺕﺍﻟﺨﻔﻴﻀﺔﺍﻟﻔﺮﻋﻲ
9ﻣﺠﻬﺎﺭﺍﻟﺘﺮﺩﺩﺍﺕﺍﻟﺨﻔﻴﻀﺔ
S/W control)ﺇﻋﺪﺍﺩﺍﻟﺨﺮﺝﺍﻟﺨﻠﻔﻲﻭﻣﺠﻬﺎﺭﺍﻟﺘﺮﺩﺩﺍﺕ
ﺍﻟﺘﺮﻛﻴﺐ
ﻫﺎﻡ
!ﺗﺤﻘﻖﻣﻦﻛﺎﻓﺔﺍﻟﺘﻮﺻﻴﻼﺕﻭﺍﻷﻧﻈﻤﺔﻗﺒﻞﺍﻟﺘﺮﻛﻴﺐﺍﻟﻨﻬﺎﺋﻲ.
!ﻻﺗﺴﺘﺨﺪﻡﺃﺟﺰﺍﺀﻏﻴﺮﻣﺮﺧﺼﺔﺣﻴﺚﻗﺪﻳﺘﺴﺒﺐﺫﻟﻚﻓﻲﺣﺪﻭﺙ
ﺃﻋﻄﺎﻝ.
!ﺍﺳﺘﺸﺮﺍﻟﻮﻛﻴﻞﺇﺫﺍﻛﺎﻥﺍﻟﺘﺮﻛﻴﺐﻳﺘﻄﻠﺐﺛﻘﺐﻓﺘﺤﺎﺕﺃﻭﺗﻌﺪﻳﻼﺕ
ﺃﺧﺮﻯﺑﺎﻟﺴﻴﺎﺭﺓ.
!ﻻﺗﻘﻢﺑﺘﺮﻛﻴﺐﻫﺬﻩﺍﻟﻮﺣﺪﺓﻓﻲﺍﻷﻣﺎﻛﻦﺍﻟﺘﺎﻟﻴﺔ:
—ﺣﻴﺚﻳﻤﻜﻦﺃﻥﺗﺘﺪﺍﺧﻞﻣﻊﺗﺸﻐﻴﻞﺍﻟﺴﻴﺎﺭﺓ.
—ﺣﻴﺚﻳﻤﻜﻦﺃﻥﺗﺤﺪﺙﺇﺻﺎﺑﺔﻟﻠﺮﺍﻛﺐﻛﻨﺘﻴﺠﺔﻟﻠﺘﻮﻗﻒﺍﻟﻤﻔﺎﺟﺊ.
!ﺳﻴﺘﻠﻒﻟﻴﺰﺭﺷﺒﻪﺍﻟﻤﻮﺻﻞﻓﻲﺣﺎﻟﺔﺍﻟﺴﺨﻮﻧﺔﺍﻟﺰﺍﺋﺪﺓ.ﻗﻢﺑﺘﺮﻛﻴﺐ
ﻫﺬﻩﺍﻟﻮﺣﺪﺓﺑﻌﻴﺪًﺍﻋﻦﺍﻷﻣﺎﻛﻦﺍﻟﺴﺎﺧﻨﺔﻣﺜﻞﺍﻷﻣﺎﻛﻦﺍﻟﻘﺮﻳﺒﺔﻣﻦ
ﻣﺨﺮﺝﺳﺨﺎﻥ.
aﺃﺧﻀﺮ
bﺃﺧﻀﺮ/ﺃﺳﻮﺩ
cﺑﻨﻔﺴﺠﻲ
dﺑﻨﻔﺴﺠﻲ/ﺃﺳﻮﺩ
eﺃﺳﻮﺩ)ﺃﺭﺿﻲﺍﻟﺸﺎﺳﻴﻪ(
ﺻﻞﺑﻤﻮﻗﻊﻣﻌﺪﻧﻲﻧﻈﻴﻒﺧﺎﻝٍﻣﻦﺍﻟﺪﻫﺎﻧﺎﺕ.
fﺃﺻﻔﺮ
ﺻﻞﺑﻄﺮﻑﺍﻹﻣﺪﺍﺩﺍﻟﺪﺍﺋﻢ١٢ﻓﻮﻟﺖ.
gﺃﺣﻤﺮ
ﺻﻞﺑﻄﺮﻑﻣﺤﻜﻮﻡﺑﻤﻔﺘﺎﺡﺍﻹﺷﻌﺎﻝ)١٢ﻓﻮﻟﺖﺗﻴﺎﺭﻣﺴﺘﻤﺮ(.
hﺃﺯﺭﻕ/ﺃﺑﻴﺾ
ﺻﻞﺑﻄﺮﻑﺗﺤﻜﻢﺍﻟﻨﻈﺎﻡﺑﻤﻀﺨﻢﻗﺪﺭﺓﺃﻭﻃﺮﻑﺗﺤﻜﻢﻣﺮﺣﻞ
ﺍﻟﻬﻮﺍﺋﻲﺍﻟﺘﻠﻘﺎﺋﻲ)ﺍﻟﺤﺪﺍﻷﻗﺼﻰ٣٠٠ﻣﻴﻠﻠﻲﺃﻣﺒﻴﺮ١٢ﻓﻮﻟﺖﺗﻴﺎﺭ
ﻣﺴﺘﻤﺮ(.
iﻣﺠﻬﺎﺭﺍﻟﺘﺮﺩﺩﺍﺕﺍﻟﺨﻔﻴﻀﺔ)٤ﺃﻭﻣﻴﺠﺎ(
jﻋﻨﺪﺍﺳﺘﺨﺪﺍﻡﻣﺠﻬﺎﺭﺍﻟﺘﺮﺩﺩﺍﺕﺍﻟﺨﻔﻴﻀﺔ٧٠ﻭﺍﻁ)٢ﺃﻭﻣﻴﺠﺎ(،
ﺗﺄﻛﺪﻣﻦﺗﻮﺻﻴﻞﻣﺠﻬﺎﺭﺍﻟﺘﺮﺩﺩﺍﺕﺍﻟﺨﻔﻴﻀﺔﺑﺎﻷﻃﺮﺍﻑﺍﻟﺒﻨﻔﺴﺠﻴﺔ
ﻭﺍﻷﻃﺮﺍﻑﺍﻟﺒﻨﻔﺴﺠﻴﺔ/ﺍﻟﺴﻮﺩﺍﺀﺑﻬﺬﻩﺍﻟﻮﺣﺪﺓ.ﻻﺗﻘﻢﺑﺘﻮﺻﻴﻞﺃﻱ
ﺷﻲءﺑﺎﻷﻃﺮﺍﻑﺍﻟﺨﻀﺮﺍﺀﻭﺍﻷﻃﺮﺍﻑﺍﻟﺨﻀﺮﺍﺀ/ﺍﻟﺴﻮﺩﺍﺀ.
kﻏﻴﺮﻣﺴﺘﻌﻤﻞ.
lﻣﺠﻬﺎﺭﺍﻟﺘﺮﺩﺩﺍﺕﺍﻟﺨﻔﻴﻀﺔ)٤ﺃﻭﻣﻴﺠﺎ(×٢
ﻣﻼﺣﻈﺎﺕ
!ﻣﻊﻧﻈﺎﻡﺍﻟﺴﻤﺎﻋﺘﻴﻦ,ﻻﺗﺼﻞﺃﻱﺷﻲءﺑﺄﺳﻼﻙﺍﻟﺴﻤﺎﻋﺔﻏﻴﺮ
ﺍﻟﻤﺘﺼﻠﺔﺑﺎﻟﺴﻤﺎﻋﺎﺕ.
!ﻗﻢﺑﺘﻐﻴﻴﺮﺍﻹﻋﺪﺍﺩﺍﻟﺘﻤﻬﻴﺪﻱﻟﻬﺬﻩﺍﻟﻮﺣﺪﺓ.ﺍﺭﺟﻊﺇﻟﻰ
ﻓﻲﺻﻔﺤﺔ٨.
ﺍﻟﺨﻔﻴﻀﺔ(
ﺧﺮﺝﻣﺠﻬﺎﺭﺍﻟﺘﺮﺩﺩﺍﺕﺍﻟﺨﻔﻴﻀﺔﻟﻬﺬﻩﺍﻟﻮﺣﺪﺓﺃﺣﺎﺩﻱ.
LR
4
F
5
R
LR
4
F
i
SW
1
8
6
9
7
a
c
d
b
e
f
g
1
8
6
9
7
a
c
d
b
j
e
a
f
g
k l
h
b
ﺳﻠﻚﺍﻟﻜﻬﺮﺑﺎﺀ
ﻗﻢﺑﺈﺟﺮﺍﺀﻫﺬﻩﺍﻟﺘﻮﺻﻴﻼﺕﻋﻨﺪﻋﺪﻡﺗﻮﺻﻴﻞﻃﺮﻑﻣﻜﺒﺮﺻﻮﺕ
ﺧﻠﻔﻲﺑﻤﺠﻬﺎﺭﺗﺮﺩﺩﺍﺕﺧﻔﻴﻀﺔ.
32
ﻗﻢﺑﺈﺟﺮﺍﺀﻫﺬﻩﺍﻟﺘﻮﺻﻴﻼﺕﻋﻨﺪﺍﺳﺘﺨﺪﺍﻡﻣﺠﻬﺎﺭﺍﻟﺘﺮﺩﺩﺍﺕﺍﻟﺨﻔﻴﻀﺔ
ﺑﺪﻭﻥﻣﻀﺨﻢﺻﻮﺕﺍﺧﺘﻴﺎﺭﻱ.
32
c
d
ﺍﻟﻌﺮﺑﻴﺔ
1ﺇﻟﻰﺩﺧﻞﺳﻠﻚﺍﻟﻜﻬﺮﺑﺎﺀ
2ﻳﺴﺎﺭ
3ﻳﻤﻴﻦ
4ﺳﻤﺎﻋﺔﺃﻣﺎﻣﻴﺔ
5ﺳﻤﺎﻋﺔﺧﻠﻔﻴﺔ
6ﺃﺑﻴﺾ
7ﺃﺑﻴﺾ/ﺃﺳﻮﺩ
8ﺭﻣﺎﺩﻱ
9ﺭﻣﺎﺩﻱ/ﺃﺳﻮﺩ
١٠
Ar
Page 96

7
٠٣
ﺍﻟﻘﺴﻢ
ﺍﻟﺘﺮﻛﻴﺐ
ﺗﺸﻐﻴﻞﻫﺬﺍﺍﻟﺠﻬﺎﺯ
—ﺿﻊﻛﺎﻓﺔﺍﻟﻜﺒﻼﺕﺑﻌﻴﺪًﺍﻋﻦﺍﻷﺟﺰﺍﺀﺍﻟﻤﺘﺤﺮﻛﺔﻣﺜﻞﺫﺭﺍﻉﻧﻘﻞ
ﺍﻟﺴﺮﻋﺔﻭﻗﻀﺒﺎﻥﺍﻟﻤﻘﻌﺪ.
—ﺿﻊﻛﺎﻓﺔﺍﻟﻜﺒﻼﺕﺑﻌﻴﺪًﺍﻋﻦﺍﻷﻣﺎﻛﻦﺍﻟﺴﺎﺧﻨﺔﻣﺜﻞﺍﻷﻣﺎﻛﻦﺍﻟﻘﺮﻳﺒﺔ
ﻣﻦﻣﺨﺮﺝﺍﻟﺴﺨﺎﻥ.
—ﻻﺗﻮﺻﻞﺍﻟﻜﺒﻞﺍﻷﺻﻔﺮﺑﺎﻟﺒﻄﺎﺭﻳﺔﻋﻦﻃﺮﻳﻖﺗﻤﺮﻳﺮﻩﺧﻼﻝ
ﺍﻟﻔﺘﺤﺔﺇﻟﻰﻣﻜﺎﻥﺍﻟﻤﺤﺮﻙ.
—ﻗﻢﺑﺘﻐﻄﻴﺔﺃﻳﺔﻣﻮﺻﻼﺕﻛﺒﻼﺕﻣﻔﺼﻮﻟﺔﺑﺸﺮﻳﻂﻋﺎﺯﻝ.
—ﻻﺗُﻘﺼﺮﺃﻱﻛﺒﻼﺕ.
—ﻻﺗﻘﻄﻊﻋﺎﺯﻝﻛﺒﻞﺍﻟﻄﺎﻗﺔﺍﻟﺨﺎﺹﺑﻬﺬﻩﺍﻟﻮﺣﺪﺓﻟﻤﺸﺎﺭﻛﺔﺍﻟﻄﺎﻗﺔ
ﻣﻊﺃﺟﻬﺰﺓﺃﺧﺮﻯ.ﺍﻟﻘﺪﺭﺓﺍﻟﺤﺎﻟﻴﺔﻟﻠﻜﺒﻞﻣﺤﺪﻭﺩﺓ.
—ﺍﺳﺘﺨﺪﻡﻓﻴﻮﺯﺑﺎﻟﻤﻘﻨﻦﺍﻟﻤﺤﺪﺩ.
—ﻻﺗﻘﻢﻣﻄﻠﻘﺎﺑﺘﻮﺻﻴﻞﻛﺒﻞﺍﻟﺴﻤﺎﻋﺔﺍﻟﺴﺎﻟﺐﺑﺎﻷﺭﺽﻣﺒﺎﺷﺮﺓ.
—ﻻﺗﺮﺑﻂﺍﻟﻜﺒﻼﺕﺍﻟﺴﺎﻟﺒﺔﻟﻌﺪﺓﺳﻤﺎﻋﺎﺕﻣﻌًﺎﻣﻄﻠﻘًﺎ.
!ﻋﻨﺪﺗﺸﻐﻴﻞﻫﺬﻩﺍﻟﻮﺣﺪﺓ،ﻳﺘﻢﺇﺭﺳﺎﻝﺇﺷﺎﺭﺍﺕﺍﻟﺘﺤﻜﻢﺧﻼﻝﺍﻟﻜﺒﻞ
ﺍﻷﺯﺭﻕ/ﺍﻷﺑﻴﺾ.ﺻﻞﻫﺬﺍﺍﻟﻜﺒﻞﺑﻨﻈﺎﻡﺍﻟﺘﺤﻜﻢﻋﻦﺑﻌﺪﺍﻟﺨﺎﺹ
ﺑﻄﺮﻑﺗﺤﻜﻢﻣﺮﺣﻞﺍﻟﻬﻮﺍﺀﺍﻟﺘﻠﻘﺎﺋﻲﺍﻟﺨﺎﺹﺑﺎﻟﺴﻴﺎﺭﺓﺃﻭﺃﻣﺒﻴﺮ
ﻃﺎﻗﺔﺧﺎﺭﺟﻴﺔ)ﺍﻟﺤﺪﺍﻷﻗﺼﻰ٣٠٠ﻣﻠﻠﻲﺃﻣﺒﻴﺮ١٢ﻓﻮﻟﺖﺗﻴﺎﺭ
ﻣﺴﺘﻤﺮ(.ﺇﺫﺍﻛﺎﻧﺖﺍﻟﺴﻴﺎﺭﺓﻣﺠﻬﺰﺓﺑﻬﻮﺍﺋﻲﺯﺟﺎﺝ،ﻗﻢﺑﺘﻮﺻﻴﻠﻪ
ﺑﻄﺮﻑﻣﺼﺪﺭﻃﺎﻗﺔﻣﻌﺰﺯﺍﻟﻬﻮﺍﺋﻲ.
!ﻻﺗﻮﺻﻞﻣﻄﻠﻘﺎًﺍﻟﻜﺒﻞﺍﻷﺑﻴﺾ/ﺍﻷﺯﺭﻕﺑﻄﺮﻑﺍﻟﻄﺎﻗﺔﺍﻟﺨﺎﺹ
ﺑﺄﻣﺒﻴﺮﻃﺎﻗﺔﺟﻬﺎﺯﺧﺎﺭﺟﻲ.ﻭﺃﻳﻀًﺎﻻﺗﻮﺻﻠﻪﺑﻄﺮﻑﺍﻟﻄﺎﻗﺔ
ﺍﻟﺨﺎﺹﺑﺎﻟﻬﻮﺍﺋﻲﺍﻟﺘﻠﻘﺎﺋﻲ.ﺍﻟﻘﻴﺎﻡﺑﺬﻟﻚﻗﺪﻳﺆﺩﻱﺇﻟﻰﺗﺴﺮﺏ
ﺍﻟﺒﻄﺎﺭﻳﺔﺃﻭﻋﻄﻞ.
ﻫﺬﻩﺍﻟﻮﺣﺪﺓ
1 2 3645
O
F
N
F
O
S
T
A
R
1ﺩﺧﻞﻫﻮﺍﺋﻲ
2ﻣﻨﺼﻬﺮ)١٠ﺃﻣﺒﻴﺮ(
3ﺩﺧﻞﺳﻠﻚﺍﻟﻜﻬﺮﺑﺎﺀ
4ﺩﺧﻞﺳﻠﻜﻲﺑﻌﻴﺪ
ﻳﻤﻜﻦﺗﻮﺻﻴﻞﻣﻬﺎﻳﺊﻭﺣﺪﺓﺍﻟﺘﺤﻜﻢﻋﻦﺑﻌﺪﺫﻱﺍﻷﺳﻼﻙﺍﻟﺼﻠﺒﺔ
)ﻳﺒﺎﻉﺑﺸﻜﻞﻣﻨﻔﺼﻞ(.
5ﺍﻹﺧﺮﺍﺝﺍﻷﻣﺎﻣﻲ
6ﺧﺮﺝﺧﻠﻔﻲ
7ﺧﺮﺝﻣﺠﻬﺎﺭﺍﻟﺘﺮﺩﺩﺍﺕﺍﻟﺨﻔﻴﻀﺔﺍﻟﻔﺮﻋﻲ
٩
Ar
T
ﺑﻼﻭﺿﻊACC ﻭﺿﻊACC
ﺍﻟﺘﻮﺻﻴﻼﺕ
ﺗﺤﺬﻳﺮ
!ﺍﺳﺘﺨﺪﻡﺳﻤﺎﻋﺎﺕﺑﻄﺎﻗﺔﺃﻛﺜﺮﻣﻦ٥٠ﻭﺍﺕ)ﻗﻴﻤﺔﺍﻟﺨﺮﺝ(ﻭﺑﻴﻦ٤
ﺃﻭﻡﺇﻟﻰ٨ﺃﻭﻡ)ﻗﻴﻤﺔﺍﻟﻤﻌﺎﻭﻗﺔ(.ﻻﺗﺴﺘﺨﺪﻡﺍﻟﺴﻤﺎﻋﺎﺕ١ﺃﻭﻡﺇﻟﻰ
٣ﺃﻭﻡﻟﻬﺬﻩﺍﻟﻮﺣﺪﺓ.
!ﺍﻟﻜﺒﻞﺍﻷﺳﻮﺩﻫﻮﻛﺒﻞﺍﻷﺭﺿﻲ.ﻋﻨﺪﺗﺮﻛﻴﺐﻫﺬﻩﺍﻟﻮﺣﺪﺓﺃﻭ
ﻣﻀﺨﻢﺍﻟﻄﺎﻗﺔ)ﻳﺒﺎﻉﺑﺸﻜﻞﻣﻨﻔﺼﻞ(؛ﺗﺄﻛﺪﻣﻦﺗﻮﺻﻴﻞﺳﻠﻚ
ﺍﻷﺭﺿﻲﺃﻭﻻً.ﺗﺄﻛﺪﺃﻥﺳﻠﻚﺍﻷﺭﺿﻲﻣﺘﺼﻞﺑﺸﻜﻞﺻﺤﻴﺢ
ﺑﺎﻷﺟﺰﺍﺀﺍﻟﻤﻌﺪﻧﻴﺔﻣﻦﺟﺴﻢﺍﻟﺴﻴﺎﺭﺓ.ﻳﺠﺐﺗﻮﺻﻴﻞﺳﻠﻚﺍﻷﺭﺿﻲ
ﻟﻤﻀﺨﻢﺍﻟﻄﺎﻗﺔﻭﻟﻬﺬﻩﺍﻟﻮﺣﺪﺓﺃﻭﺃﻱﺟﻬﺎﺯﺁﺧﺮﺑﺎﻟﺴﻴﺎﺭﺓﺑﺸﻜﻞ
ﻣﺴﺘﻘﻞﺑﺎﺳﺘﺨﺪﺍﻡﺑﺮﺍﻍﻣﺨﺘﻠﻔﺔ.ﺇﺫﺍﺗﺤﺮﺭﺑﺮﻏﻲﺍﻷﺭﺿﻲﺃﻭ
ﺳﻘﻂ؛ﻓﻘﺪﻳﻨﺘﺞﻋﻨﻪﺣﺮﻳﻖﺃﻭﻇﻬﻮﺭﺩﺧﺎﻥﺃﻭﻋﻄﻞ.
ﻓﻲﺍﻟﺼﻔﺤﺔﺍﻟﺴﺎﺑﻘﺔ.
ﻫﺎﻡ
!ﻋﻨﺪﺗﺮﻛﻴﺐﻫﺬﻩﺍﻟﻮﺣﺪﺓﻓﻲﺳﻴﺎﺭﺓﺑﺪﻭﻥﺿﺒﻂﻣﻔﺘﺎﺡﺗﺸﻐﻴﻞ
ﺍﻟﺴﻴﺎﺭﺓﻋﻠﻰﻭﺿﻊACC)ﻣﻠﺤﻘﺎﺕ(،ﻗﺪﻳﺘﺴﺒﺐﻋﺪﻡﺗﻮﺻﻴﻞ
ﺍﻟﻜﺒﻞﺍﻷﺣﻤﺮﺑﺎﻟﻄﺮﻑﺍﻟﺬﻱﻳﻜﺘﺸﻒﺗﺸﻐﻴﻞﻣﻔﺘﺎﺡﺗﺸﻐﻴﻞﺍﻟﺴﻴﺎﺭﺓ
ﻓﻲﺗﺴﺮﻳﺐﺑﺎﻟﺒﻄﺎﺭﻳﺔ.
!ﺍﺳﺘﺨﺪﻡﻫﺬﻩﺍﻟﻮﺣﺪﺓﻣﻊﺑﻄﺎﺭﻳﺔ١٢ﻓﻮﻟﺖﻭﺗﺄﺭﻳﺾﺳﺎﻟﺐﻓﻘﻂ.
ﻭﻋﺪﻡﺍﻻﻟﺘﺰﺍﻡﺑﺬﻟﻚﻗﺪﻳﻨﺘﺞﻋﻨﻪﺣﺮﻳﻖﺃﻭﻋﻄﻞ.
!ﻟﻤﻨﻊﺣﺪﻭﺙﻣﺎﺱﻛﻬﺮﺑﺎﺋﻲﺃﻭﺳﺨﻮﻧﺔﺯﺍﺋﺪﺓﺃﻭﻋﻄﻞ،ﺗﺄﻛﺪﻣﻦ
ﺍﺗﺒﺎﻉﺍﻟﺘﻮﺟﻴﻬﺎﺕﺃﺩﻧﺎﻩ.
—ﺍﻓﺼﻞﺍﻟﻄﺮﻑﺍﻟﺴﺎﻟﺐﻟﻠﺒﻄﺎﺭﻳﺔﻗﺒﻞﺗﺮﻛﻴﺒﻬﺎ.
—ﻗﻢﺑﺘﺜﺒﻴﺖﺍﻟﺘﻮﺻﻴﻼﺕﺍﻟﻜﻬﺮﺑﺎﺋﻴﺔﺑﺎﺳﺘﺨﺪﺍﻡﻣﺸﺎﺑﻚﻛﺒﻼﺕﺃﻭ
ﺃﺷﺮﻃﺔﻻﺻﻘﺔ.ﻗﻢﺑﻠﻒﺍﻟﺸﺮﻳﻂﺍﻟﻼﺻﻖﺣﻮﻝﺍﻷﺳﻼﻙﺍﻟﺘﻲ
ﺗﺘﻼﻣﺲﻣﻊﺃﺟﺰﺍﺀﻣﻌﺪﻧﻴﺔﻟﺤﻤﺎﻳﺔﺍﻷﺳﻼﻙ.
AUX)ﺇﺩﺧﺎﻝﻣﺴﺎﻋﺪ(
ENTERTAINMENT.
ﻭﻇﺎﺋﻒﺃﺧﺮﻯ
ﺍﺳﺘﺨﺪﺍﻡﻣﺼﺪﺭAUX
١ﺃﺩﺧِﻞﻗﺎﺑﺲﺍﻻﺳﺘﺮﻳﻮﺍﻟﺼﻐﻴﺮﻓﻲﻣﻘﺒﺲﺍﻟﺪﺧﻞAUX.
٢ﺍﺿﻐﻂSRC/OFFﻻﺧﺘﻴﺎﺭAUXﻛﻤﺼﺪﺭ.
ﻣﻼﺣﻈﺔ
ﻻﻳﻤﻜﻦﺍﺧﺘﻴﺎﺭAUXﺇﻻﺇﺫﺍﺗﻢﺗﺸﻐﻴﻞﺍﻹﻋﺪﺍﺩﺍﻟﻤﺴﺎﻋﺪ.ﻟﻤﺰﻳﺪﻣﻦ
ﺍﻟﺘﻔﺎﺻﻴﻞ،ﺭﺍﺟﻊ
ﺷﺎﺷﺔﻋﺮﺽﺍﻟﺴﺎﻋﺔ
%ﺍﺿﻐﻂCLK/DISP OFFﻻﺧﺘﻴﺎﺭﺍﻹﻋﺪﺍﺩﺍﻟﻤﺮﻏﻮﺏ.
ﺳﺎﻋﺔﺍﻹﻳﻘﺎﻑ—ﻋﺮﺽﺍﻟﺴﺎﻋﺔ—ﻋﺮﺽﺍﻟﻮﻗﺖﺍﻟﻤﻨﻘﻀﻲ
ﺗﺤﻮﻳﻞﺑﻴﺎﻧﺎﺕﺍﻟﻌﺮﺽﻭﺇﺿﺎﺀﺓﺍﻟﺰﺭ
ﻳﻤﻜﻦﺗﺸﻐﻴﻞﺃﻭﺇﻳﻘﺎﻑﺑﻴﺎﻧﺎﺕﺍﻟﻌﺮﺽﻭﺃﺿﺎﺀﺓﺍﻟﺰﺭ.
%ﺍﺿﻐﻂﻣﻊﺍﻻﺳﺘﻤﺮﺍﺭﻋﻠﻰCLK/DISP OFF.
ﺍﻟﻀﻐﻂﻭﺍﻻﺳﺘﻤﺮﺍﺭﺑﻀﻐﻂCLK/DISP OFFﻳﻘﻮﻡﺑﺘﺸﻐﻴﻞﺃﻭ
ﺇﻳﻘﺎﻑﺑﻴﺎﻧﺎﺕﺍﻟﻌﺮﺽﻭﺇﺿﺎﺀﺓﺍﻟﺰﺭ.
#ﺣﺘﻰﺇﺫﺍﺗﻢﺇﻳﻘﺎﻑﺑﻴﺎﻧﺎﺕﺍﻟﻌﺮﺽ،ﻳﻤﻜﻦﺇﺟﺮﺍﺀﺍﻟﻌﻤﻠﻴﺔ.ﺇﺫﺍﺗﻢﺇﺟﺮﺍﺀ
ﺍﻟﻌﻤﻠﻴﺔﺑﻴﻨﻤﺎﺗﻜﻮﻥﺑﻴﺎﻧﺎﺕﺍﻟﻌﺮﺽﻋﻠﻰﻭﺿﻊﺍﻹﻳﻘﺎﻑ،ﺳﺘﻀﻲءﺍﻟﺸﺎﺷﺔ
ﻟﺒﻀﻊﺛﻮﺍﻥﺛﻢﺗﺘﻮﻗﻒﻣﺮﺓﺃﺧﺮﻯ.
ﺍﺳﺘﻌﻤﺎﻝﻋﺮﻭﺽﺍﻟﺘﺮﻓﻴﻪﺍﻟﻤﺨﺘﻠﻔﺔ
ﻳﻤﻜﻨﻚﺍﻟﺘﻤﺘﻊﺑﻌﺮﻭﺽﻣﻤﺘﻌﺔﺃﺛﻨﺎﺀﺍﻻﺳﺘﻤﺎﻉﻟﻜﻞﻣﺼﺪﺭﺻﻮﺗﻲ.
١ﺍﺿﻐﻂM.C.ﻟﻌﺮﺽﺍﻟﻘﺎﺋﻤﺔﺍﻟﺮﺋﻴﺴﻴﺔ.
٢ﺃﺩﺭM.C.ﻟﺘﻐﻴﻴﺮﺧﻴﺎﺭﺍﻟﻘﺎﺋﻤﺔﻭﺍﺿﻐﻂﻻﺧﺘﻴﺎﺭ
٣ﺃﺩﺭM.C.ﻟﺘﻐﻴﻴﺮﺍﻟﻘﺮﺍﺀﺓﺍﻟﻤﻌﺮﻭﺿﺔ.
ﻣﻨﻈﺮﺍﻟﺨﻠﻔﻴﺔ—ﻋﺎﻡ—ﺻﻮﺭﺓﺍﻟﺨﻠﻔﻴﺔ١—ﺻﻮﺭﺓﺍﻟﺨﻠﻔﻴﺔ٢—
ﺻﻮﺭﺓﺍﻟﺨﻠﻔﻴﺔ٣—ﺻﻮﺭﺓﺍﻟﺨﻠﻔﻴﺔ٤—ﻋﺮﺽﺑﺴﻴﻂ—ﺷﺎﺷﺔﺍﻷﻓﻼﻡ
١—ﺷﺎﺷﺔﺍﻷﻓﻼﻡ٢—ﺍﻟﺘﻘﻮﻳﻢ
#ﻳﺘﻐﻴﺮﺍﻟﻌﺮﺽﺍﻟﻌﺎﻡﻭﻓﻘًﺎﻟﻨﻮﻉﺍﻟﻤﻮﺳﻴﻘﻰ.
#ﻗﺪﻻﻳﻌﻤﻞﺍﻟﻌﺮﺽﺍﻟﻌﺎﻡﺑﻄﺮﻳﻘﺔﺻﺤﻴﺤﺔﻭﺫﻟﻚﺗﺒﻌًﺎﻟﻠﺒﺮﻧﺎﻣﺞﺍﻟﺘﻄﺒﻴﻘﻲ
ﺍﻟﻤﺴﺘﺨﺪﻡﻟﺘﺸﻔﻴﺮﻣﻠﻔﺎﺕﺍﻟﺼﻮﺕ.
Page 97

1
ﺍﻟﻘﺴﻢ
ﺗﺸﻐﻴﻞﻫﺬﺍﺍﻟﺠﻬﺎﺯ
ﺗﺸﻐﻴﻞﻫﺬﺍﺍﻟﺠﻬﺎﺯ
٠٢
ﻳﻤﻜﻦﺍﺳﺘﻌﻤﺎﻝﺍﻟﺨﺮﺝﺍﻟﺨﻠﻔﻲﻟﻠﺠﻬﺎﺯ)ﺧﺮﺝﺃﺳﻼﻙﺍﻟﺴﻤﺎﻋﺎﺕﺍﻟﺨﻠﻔﻴﺔ
ﻭﺧﺮﺝRCAﺍﻟﺨﻠﻔﻲ(ﻟﺘﻮﺻﻴﻞﺳﻤﺎﻋﺔﻛﺎﻣﻠﺔﺍﻟﻨﻄﺎﻕ)Rear SP :F.
Range(ﺃﻭﻣﺠﻬﺎﺭﺗﺮﺩﺩﺍﺕﺧﻔﻴﻀﺔﻓﺮﻋﻲ)Rear SP :S/W(.ﺇﺫﺍ
ﻏﻴّﺮﺕﺗﻬﻴﺌﺔﺍﻟﺨﺮﺝﺍﻟﺨﻠﻔﻴﺔﺇﻟﻰRear SP :S/W،ﻳﻤﻜﻨﻚﺗﻮﺻﻴﻞ
ﺳﻠﻚﺍﻟﺴﻤﺎﻋﺔﺍﻟﺨﻠﻔﻴﺔﻣﺒﺎﺷﺮﺓﺑﻤﺠﻬﺎﺭﺗﺮﺩﺩﺍﺕﺧﻔﻴﻀﺔﻓﺮﻋﻲﺑﺎﺳﺘﻌﻤﺎﻝ
ﻣﻀﺨﻢﺛﺎﻧﻮﻱ.
ً
ً
ﻓﻲ
Demonstration)ﺇﻋﺪﺍﺩﺷﺎﺷﺔﺍﻟﻌﺮﺽﺍﻟﺘﻮﺿﻴﺤﻲ(
ﻭﺿﻊﺍﻟﻌﺮﺽ
ﻓﻲﺻﻔﺤﺔ٢.
ﻓﻲﺻﻔﺤﺔ٢.
Reverse mode)ﺇﻋﺪﺍﺩﻭﺿﻊﺍﻟﻌﻜﺲ(
ﻭﺿﻊﺍﻟﻌﻜﺲ
1ﺇﺿﻐﻂM.C.ﻟﺘﻐﻴﻴﺮﺗﻬﻴﺌﺔﺧﺮﺝﺍﻟﺨﻠﻒ.
!ﻋﻨﺪﻣﺎﻻﻳﻜﻮﻥﻣﺠﻬﺎﺭﺍﻟﺘﺮﺩﺩﺍﺕﺍﻟﺨﻔﻴﻀﺔﺍﻟﻔﺮﻋﻲﻣﻮﺻﻮﻻ
ﺑﺎﻟﺨﺮﺝﺍﻟﺨﻠﻔﻲ،ﻗﻢﺑﺎﺧﺘﻴﺎﺭRear SP :F.Range)ﺳﻤﺎﻋﺔ
ﻛﺎﻣﻠﺔﺍﻟﻨﻄﺎﻕ(.
!ﻋﻨﺪﻣﺎﻳﻜﻮﻥﻣﺠﻬﺎﺭﺍﻟﺘﺮﺩﺩﺍﺕﺍﻟﺨﻔﻴﻀﺔﺍﻟﻔﺮﻋﻲﻣﻮﺻﻮﻻ
ﺑﺎﻟﺨﺮﺝﺍﻟﺨﻠﻔﻲ،ﻗﻢﺑﺎﺧﺘﻴﺎﺭRear SP :S/W)ﻣﺠﻬﺎﺭ
ﺍﻟﺘﺮﺩﺩﺍﺕﺍﻟﺨﻔﻴﻀﺔﺍﻟﻔﺮﻋﻲ(.
!ﺣﺘﻰﺇﺫﺍﻗﻤﺖﺑﺘﻐﻴﻴﺮﻫﺬﻩﺍﻟﺘﻬﻴﺌﺔ،ﻓﺈﻧﻪﻟﻦﻳﻜﻮﻥﻫﻨﺎﻙﺧﺮﺝﺣﺘﻰ
ﺗﻘﻮﻡﺑﺘﺸﻐﻴﻞﺧﺮﺝﻣﺠﻬﺎﺭﺍﻟﺘﺮﺩﺩﺍﺕﺍﻟﺨﻔﻴﻀﺔﺍﻟﻔﺮﻋﻲ)ﺭﺍﺟﻊ
Sub W.1)ﺇﻋﺪﺍﺩﺗﺸﻐﻴﻞ/ﺇﻳﻘﺎﻑﻣﺠﻬﺎﺭﺍﻟﺘﺮﺩﺩﺍﺕﺍﻟﺨﻔﻴﻀﺔ(
ﺍﻟﺼﻔﺤﺔﺍﻟﺴﺎﺑﻘﺔ(.
!ﺇﺫﺍﻗﻤﺖﺑﺘﻐﻴﻴﺮﻫﺬﻩﺍﻟﺘﻬﻴﺌﺔ،ﻓﺈﻥﺧﺮﺝﻣﺠﻬﺎﺭﺍﻟﺘﺮﺩﺩﺍﺕﺍﻟﺨﻔﻴﻀﺔ
ﺍﻟﻔﺮﻋﻲﻓﻲﻗﺎﺋﻤﺔﺍﻟﺼﻮﺕﺳﺘﻌﻮﺩﻟﻮﺿﻊﺗﻬﻴﺌﺔﺍﻟﻤﺼﻨﻊ.
!ﻛﻼﺧﺮﺟﻲّﺳﻠﻜﻲّﺍﻟﺴﻤﺎﻋﺘﻴﻦﺍﻟﺨﻠﻔﻴﺘﻴﻦﻭﺧﺮﺝRCAﺍﻟﺨﻠﻔﻲﻳﺘﻢ
ﺗﺤﻮﻳﻠﻬﻤﺎﻓﻲﻧﻔﺲﺍﻟﻮﻗﺖﻓﻲﻫﺬﻩﺍﻟﺘﻬﻴﺌﺔ.
1ﺍﺿﻐﻂﻋﻠﻰM.C.ﻟﺘﺸﻐﻴﻞﺍﻟﻌﺮﺽﺍﻹﻳﻀﺎﺣﻲﺃﻭﺇﻳﻘﺎﻑﺗﺸﻐﻴﻠﻪ.
!ﻳﻤﻜﻨﻚﺃﻳﻀًﺎﺗﺸﻐﻴﻞﺃﻭﺇﻳﻘﺎﻑﺍﻟﻌﺮﺽﺍﻹﻳﻀﺎﺣﻲﻟﻠﺨﺼﺎﺋﺺ
ﺍﻟﻤﻤﻴّﺰﺓﻋﻦﻃﺮﻳﻖﺿﻐﻂDISPﺑﻴﻨﻤﺎﻳﻜﻮﻥﻫﺬﺍﺍﻟﺠﻬﺎﺯﻓﻲ
ﻭﺿﻊﺍﻹﻳﻘﺎﻑ.ﻟﻤﺰﻳﺪﻣﻦﺍﻟﺘﻔﺎﺻﻴﻞ٬ﺭﺍﺟﻊ
ﺍﻟﺘﻮﺿﻴﺤﻲ
1ﺍﺿﻐﻂM.C.ﻟﺘﺸﻐﻴﻞﻭﺿﻊﺍﻟﻌﻜﺲﺃﻭﺇﻳﻘﺎﻓﻪ.
!ﻳﻤﻜﻨﻚﺃﻳﻀًﺎﺗﺸﻐﻴﻞﺃﻭﺇﻳﻘﺎﻑﻭﺿﻊﺍﻟﻌﻜﺲﻋﻦﻃﺮﻳﻖﺿﻐﻂ
BANDﺑﻴﻨﻤﺎﻳﻜﻮﻥﻫﺬﺍﺍﻟﺠﻬﺎﺯﻓﻲﻭﺿﻊﺍﻹﻳﻘﺎﻑ.ﻟﻤﺰﻳﺪﻣﻦ
ﺍﻟﺘﻔﺎﺻﻴﻞ،ﺭﺍﺟﻊ
Ever-scroll)ﺇﻋﺪﺍﺩﻭﺿﻊﺍﻟﺘﺤﺮﻳﻚ(
ﻋﻨﺪﺿﺒﻂﻭﻇﻴﻔﺔﺍﻟﺘﺤﺮﻳﻚﺍﻟﻤﺴﺘﻤﺮﻋﻠﻰﻭﺿﻊﺍﻟﺘﺸﻐﻴﻞON،ﻓﺈﻥ
ﻣﻌﻠﻮﻣﺎﺕﺍﻟﻨﺺﺍﻟﻤﺴﺠﻠﺔﺗﺘﺤﺮﻙﺑﺎﺳﺘﻤﺮﺍﺭﻋﻠﻰﻟﻮﺣﺔﺍﻟﻌﺮﺽ.ﺍﺿﺒﻂ
ﻋﻠﻰﻭﺿﻊﺍﻹﻳﻘﺎﻑOFFﺇﺫﺍﻛﻨﺖﺗﻔﻀﻞﺃﻥﺗﺘﺤﺮﻙﺍﻟﻤﻌﻠﻮﻣﺎﺕﻣﺮﺓ
ﻭﺍﺣﺪﺓﻓﻘﻂ.
1ﺍﺿﻐﻂM.C.ﻟﺘﺸﻐﻴﻞﻭﺿﻊﺍﻟﺘﺤﺮﻳﻚﺍﻟﺪﺍﺋﻢﺃﻭﺇﻳﻘﺎﻓﻪ.
USB plug&play)ﺗﻮﺻﻴﻞﻭﺗﺸﻐﻴﻞ(
ﻳﺴﻤﺢﻫﺬﺍﺍﻹﻋﺪﺍﺩﺑﺘﺤﻮﻳﻞﺍﻟﻤﺼﺪﺭﺇﻟﻰUSB/iPodﺗﻠﻘﺎﺋﻴًﺎ.
1ﺍﺿﻐﻂﻋﻠﻰM.C.ﻟﺘﺸﻐﻴﻞﻭﻇﻴﻔﺔﺍﻟﺘﻮﺻﻴﻞﻭﺍﻟﺘﺸﻐﻴﻞﺃﻭﺇﻳﻘﺎﻑ
ﺗﺸﻐﻴﻠﻬﺎ.
!ON–ﻋﻨﺪﺗﻮﺻﻴﻞiPod/ﺟﻬﺎﺯﺗﺨﺰﻳﻦUSB،ﻳﺘﻢﺗﺤﻮﻳﻞ
ﺍﻟﻤﺼﺪﺭﺗﻠﻘﺎﺋﻴًﺎﺇﻟﻰUSB/iPod.ﺇﺫﺍﻗﻤﺖﺑﻔﺼﻞiPod/
ﺟﻬﺎﺯﺗﺨﺰﻳﻦUSB،ﻳﺘﻢﺇﻳﻘﺎﻑﺗﺸﻐﻴﻞﻣﺼﺪﺭﺍﻟﻮﺣﺪﺓ.
!OFF–ﻋﻨﺪﺗﻮﺻﻴﻞiPod/ﺟﻬﺎﺯﺗﺨﺰﻳﻦUSB،ﻻﻳﺘﻢ
ﺗﺤﻮﻳﻞﺍﻟﻤﺼﺪﺭﺇﻟﻰUSB/iPodﺗﻠﻘﺎﺋﻴًﺎ.ﻳﺮﺟﻰﺗﻐﻴﻴﺮ
ﺍﻟﻤﺼﺪﺭﺇﻟﻰUSB/iPodﻳﺪﻭﻳًﺎ.
Warning tone)ﺇﻋﺪﺍﺩﻧﻐﻤﺔﺍﻟﺘﺤﺬﻳﺮ(
ﺇﺫﺍﻟﻢﻳﺘﻢﻧﺰﻉﺍﻟﻠﻮﺣﺔﺍﻷﻣﺎﻣﻴﺔﻋﻦﺍﻟﺠﻬﺎﺯﺍﻟﺮﺋﻴﺴﻲﺧﻼﻝﺃﺭﺑﻊﺛﻮﺍﻥﻣﻦ
ﺗﺤﻮﻳﻞﻣﻔﺘﺎﺡﺗﺸﻐﻴﻞﻣﺤﺮﻙﺍﻟﺴﻴﺎﺭﺓﺇﻟﻰﻭﺿﻊﺍﻹﻳﻘﺎﻑ،ﺗﺼﺪﺭﻧﻐﻤﺔ
ﺗﺤﺬﻳﺮ.ﻳﻤﻜﻨﻚﺇﻳﻘﺎﻑﻧﻐﻤﺔﺍﻟﺘﺤﺬﻳﺮ.
1ﺍﺿﻐﻂﻋﻠﻰM.C.ﻟﺘﺸﻐﻴﻞﻧﻐﻤﺔﺍﻟﺘﺤﺬﻳﺮﺃﻭﺇﻳﻘﺎﻓﻬﺎ.
AUX)ﺇﺩﺧﺎﻝﻣﺴﺎﻋﺪ(
ﻗﻢﺑﺘﻔﻌﻴﻞﻫﺬﺍﺍﻹﻋﺪﺍﺩﻋﻨﺪﺍﺳﺘﺨﺪﺍﻡﺟﻬﺎﺯﺇﺿﺎﻓﻲﻣﻮﺻﻞﺑﻬﺬﺍﺍﻟﺠﻬﺎﺯ.
1ﺍﺿﻐﻂﻋﻠﻰM.C.ﻟﺘﺸﻐﻴﻞﺍﻹﻋﺪﺍﺩﺍﻹﺿﺎﻓﻲﺃﻭﺇﻳﻘﺎﻓﻪ.
Dimmer)ﺇﻋﺪﺍﺩﺍﻟﻤﺨﻔّﺖ(
ﻟﻠﺤﻴﻠﻮﻟﺔﺩﻭﻥﺯﻳﺎﺩﺓﺳﻄﻮﻉﻟﻮﺣﺔﺍﻟﻌﺮﺽﻟﻴﻼً،ﻳﺘﻢﺗﺨﻔﻴﺖﺇﺿﺎﺀﺓﻟﻮﺣﺔ
ﺍﻟﻌﺮﺽﺗﻠﻘﺎﺋﻴﺎًﻋﻨﺪﺗﺸﻐﻴﻞﺍﻷﺿﻮﺍﺀﺍﻟﺮﺋﻴﺴﻴﺔﻟﻠﺴﻴﺎﺭﺓ.ﻳﻤﻜﻨﻚﺗﺸﻐﻴﻞﺃﻭ
ﺇﻳﻘﺎﻑﻭﻇﻴﻔﺔﺗﺨﻔﻴﺖﺍﻹﺿﺎﺀﺓ.
1ﺍﺿﻐﻂﻋﻠﻰM.C.ﻟﺘﺸﻐﻴﻞﺍﻟﻤﺨﻔّﺖﺃﻭﺇﻳﻘﺎﻓﻪ.
Brightness)ﺿﺒﻂﺳﻄﻮﻉﺍﻟﺸﺎﺷﺔ(
1ﺍﺩﻓﻊM.C.ﻟﺠﻬﺔﺍﻟﻴﺴﺎﺭﺃﻭﺍﻟﻴﻤﻴﻦﻟﻀﺒﻂﻣﺴﺘﻮﻯﺍﻟﺴﻄﻮﻉ.
0ﺇﻟﻰ15ﻳﺘﻢﻋﺮﺿﻪﻛﻠﻤﺎﺍﺭﺗﻔﻊﺍﻟﻤﺴﺘﻮﻯﺃﻭﺍﻧﺨﻔﺾ.
!ﺃﺛﻨﺎﺀﻋﻤﻞﻭﻇﻴﻔﺔﻣﺨﻔّﺖﺍﻹﺿﺎﺀﺓ،ﻳﻤﻜﻦﺿﺒﻂﻣﺴﺘﻮﻯ
ﺳﻄﻮﻉﺍﻹﺿﺎﺀﺓ0ﺇﻟﻰ10.
S/W control)ﺇﻋﺪﺍﺩﺍﻟﺨﺮﺝﺍﻟﺨﻠﻔﻲﻭﻣﺠﻬﺎﺭﺍﻟﺘﺮﺩﺩﺍﺕﺍﻟﺨﻔﻴﻀﺔ(
EngineTime alert)ﺿﺒﻂﺷﺎﺷﺔﺍﻟﻮﻗﺖﺍﻟﻤﻨﻘﻀﻲ(
1ﺇﺩﻓﻊM.C.ﻟﻠﻴﺴﺎﺭﺃﻭﻟﻠﻴﻤﻴﻦﻹﺧﺘﻴﺎﺭﺧﺎﻧﺔﺍﻟﺘﻘﻮﻳﻢﺍﻟﺘﻲﺗﻮﺩ
ﺿﺒﻄﻬﺎ.
ﺍﻟﺴﻨﺔ—ﺍﻟﻴﻮﻡ—ﺍﻟﺸﻬﺮ
2ﺇﺩﻓﻊM.C.ﻟﻸﻋﻠﻰﺃﻭﻟﻸﺳﻔﻞﻹﺧﺘﻴﺎﺭﺍﻟﻴﻮﻡ.
Clock)ﺿﺒﻂﺍﻟﺴﺎﻋﺔ(
1ﺍﺿﻐﻂM.C.ﻟﺠﻬﺔﺍﻟﻴﺴﺎﺭﺃﻭﺍﻟﻴﻤﻴﻦﻻﺧﺘﻴﺎﺭﺧﺎﻧﺔﺍﻟﺴﺎﻋﺔﺍﻟﺘﻲﺗﻮﺩ
ﺿﺒﻄﻬﺎ.
ﺩﻗﻴﻘﺔ—ﺳﺎﻋﺔ
2ﺍﺩﻓﻊM.C.ﻟﻸﻋﻠﻰﺃﻭﻟﻸﺳﻔﻞﻟﺘﺼﺤﻴﺢﻗﺮﺍﺀﺓﺍﻟﺴﺎﻋﺔ.
!ﺗﺴﺘﻄﻴﻊﻣﻄﺎﺑﻘﺔﺍﻟﺴﺎﻋﺔﻣﻊﺇﺷﺎﺭﺓﺍﻟﻮﻗﺖﻭﺫﻟﻚﺑﺎﻟﻀﻐﻂﻋﻠﻰM.
C..
!ﺇﺫﺍﻛﺎﻧﺖﺍﻟﺪﻗﻴﻘﺔﻣﻦ00ﺇﻟﻰ29،ﻳﺘﻢﺗﻘﺮﻳﺐﺍﻟﺪﻗﺎﺋﻖﺗﻨﺎﺯﻟﻴًﺎ.
)ﻣﺜﻼً،10:18ﺗﺼﺒﺢ10:00.(
!ﺇﺫﺍﻛﺎﻧﺖﺍﻟﺪﻗﻴﻘﺔﻣﻦ30ﺇﻟﻰ59،ﻳﺘﻢﺗﻘﺮﻳﺐﺍﻟﺪﻗﺎﺋﻖ
ﺗﺼﺎﻋﺪﻳًﺎ.)ﻣﺜﻼً،10:36ﺗﺼﺒﺢ11:00.(
ﻳﺘﻴﺢﻟﻚﻫﺬﺍﺍﻟﻀﺒﻂﺇﻣﻜﺎﻧﻴﺔﻗﻴﺎﺱﺍﻟﻤﺪﺓﺍﻟﺰﻣﻨﻴﺔﺍﻟﻤﻨﻘﻀﻴﺔﻣﻨﺬﺗﺸﻐﻴﻞ
ﺍﻟﺠﻬﺎﺯﻭﻋﺮﺽﺍﻟﻮﻗﺖﺍﻟﻤﻨﻘﻀﻲﻟﻜﻞﻓﺘﺮﺓﺯﻣﻨﻴﺔﻣﺤﺪﺩﺓ.
ﻭﺳﻮﻑﺗﺴﻤﻊﺃﻳﻀًﺎﺻﻮﺕﺗﻨﺒﻴﻪ.
1ﺍﺿﻐﻂﻋﻠﻰM.C.ﻻﺧﺘﻴﺎﺭﺍﻹﻋﺪﺍﺩﺍﻟﻤﻔﻀﻞ.
OFF—15Minutes—30Minutes
FM step)ﻣﺮﺣﻠﺔﻣﻮﺍﻟﻔﺔﺍﻟﻤﻮﺟﺔFM(
ﻣﺮﺣﻠﺔﻣﻮﺍﻟﻔﺔﺍﻟﻤﻮﺟﺔFMﺍﻟﺘﻲﺗﻢﺍﺳﺘﺨﺪﺍﻣﻬﺎﺑﻮﺍﺳﻄﺔﻣﻮﺍﻟﻔﺔﺍﻟﺒﺤﺚ
ﻳﻤﻜﻦﺗﺤﻮﻳﻠﻬﺎﺑﻴﻦ١٠٠ﻙﻫﺮﺗﺰﻭﻣﺮﺣﻠﺔﺍﻟﻀﺒﻂﺍﻟﻤﺴﺒﻖﻭ٥٠ﻙ
ﻫﺮﺗﺰ.
ﺇﺫﺍﺗﻢﺍﻟﻘﻴﺎﻡﺑﻤﻮﺍﻟﻔﺔﺍﻟﺒﺤﺚﻋﻠﻰﺧﻄﻮﺍﺕﻛﻞﺧﻄﻮﺓ٥٠ﻙﻫﺮﺗﺰ،ﻗﺪﻳﺘﻢ
ﺍﻟﻤﻮﺍﻟﻔﺔﻋﻠﻰﺍﻟﻤﺤﻄﺎﺕﺑﺸﻜﻞﻏﻴﺮﺩﻗﻴﻖ.ﻗﻢﺑﺎﻟﻤﻮﺍﻟﻔﺔﻋﻠﻰﺍﻟﻤﺤﻄﺎﺕ
ﺑﺎﺳﺘﺨﺪﺍﻡﺍﻟﻤﻮﺍﻟﻔﺔﺍﻟﻴﺪﻭﻳﺔﺃﻭﺍﺳﺘﺨﺪﻡﻣﻮﺍﻟﻔﺔﺍﻟﺒﺤﺚﻣﺮﺓﺃﺧﺮﻯ.
1ﺍﺿﻐﻂM.C.ﻻﺧﺘﻴﺎﺭﻣﺮﺣﻠﺔﻣﻮﺍﻟﻔﺔﺍﻟﻤﻮﺟﺔFM.
50kHz)٥٠ﻙﻫﺮﺗﺰ(—100kHz)١٠٠ﻙﻫﺮﺗﺰ(
AM STEP)ﻣﺮﺣﻠﺔﻣﻮﺍﻟﻔﺔﺍﻟﻤﻮﺟﺔAM(
ﻣﺮﺣﻠﺔﻣﻮﺍﻟﻔﺔAMﻳﻤﻜﻦﺗﻐﻴﻴﺮﻫﺎﺑﻴﻦ٩ﻙﻫﺮﺗﺰ،ﻭﻣﺮﺣﻠﺔﺍﻟﻀﺒﻂ
ﺍﻟﻤﺴﺒﻖﻭ١٠ﻙﻫﺮﺗﺰ.ﻋﻨﺪﺍﺳﺘﺨﺪﺍﻡﺍﻟﻤﻮﺍﻟﻒﻓﻲﺃﻣﺮﻳﻜﺎﺍﻟﺸﻤﺎﻟﻴﺔﺃﻭ
ﺍﻟﻮﺳﻄﻰﺃﻭﺍﻟﺠﻨﻮﺑﻴﺔ،ﺃﻋِﺪﺿﺒﻂﻣﺮﺣﻠﺔﺍﻟﻤﻮﺍﻟﻔﺔﻣﻦ٩ﻙﻫﺮﺗﺰ)ﺍﻟﻨﻄﺎﻕ
ﺍﻟﻤﺴﻤﻮﺡﺑﻪ٥٣١ﻙﻫﺮﺗﺰﺇﻟﻰ١٦٠٢ﻙﻫﺮﺗﺰ(ﺇﻟﻰ١٠ﻙﻫﺮﺗﺰ
)ﺍﻟﻨﻄﺎﻕﺍﻟﻤﺴﻤﻮﺡﺑﻪ٥٣٠ﻙﻫﺮﺗﺰﺇﻟﻰ١٦٤٠ﻙﻫﺮﺗﺰ(.
1ﺍﺿﻐﻂM.C.ﻻﺧﺘﻴﺎﺭﻣﺮﺣﻠﺔﻣﻮﺍﻟﻔﺔﺍﻟﻤﻮﺟﺔAM.
10 KHZ)10ﻙﻫﺮﺗﺰ(—9 KHZ)9ﻙﻫﺮﺗﺰ(
Language select)ﻟﻐﺎﺕﻣﺘﻌﺪﺩﺓ(
SLA)ﺿﺒﻂﻣﺴﺘﻮﻯﺍﻟﻤﺼﺪﺭ(
ﺗﺘﻴﺢSLA)ﻋﻤﻠﻴﺎﺕﺿﺒﻂﻣﺴﺘﻮﻯﺍﻟﻤﺼﺪﺭ(ﺿﺒﻂﻣﺴﺘﻮﻯﺍﻟﺼﻮﺕ
ﻟﻜﻞﻣﺼﺪﺭﻟﻤﻨﻊﺣﺪﻭﺙﺗﻐﻴّﺮﺍﺕﺟﻮﻫﺮﻳﺔﻓﻲﺍﻟﺼﻮﺕﻋﻨﺪﺍﻟﺘﺒﺪﻳﻞﺑﻴﻦ
ﺍﻟﻤﺼﺎﺩﺭ.
!ﻋﻨﺪﺍﺧﺘﻴﺎﺭFMﻛﻤﺼﺪﺭ،ﻻﻳﻤﻜﻨﻚﺍﻟﺘﺤﻮﻳﻞﺇﻟﻰSLA.
!ﺗﻌﺘﻤﺪﺍﻹﻋﺪﺍﺩﺍﺕﻋﻠﻰﻣﺴﺘﻮﻯﺻﻮﺕFMﻭﺍﻟﺬﻱﻳﻈﻞﺩﻭﻥﺗﻐﻴﻴﺮ.
!ﻳﻤﻜﻦﺃﻳﻀًﺎﺿﺒﻂﻣﺴﺘﻮﻯﺻﻮﺕAMﺑﺎﺳﺘﺨﺪﺍﻡﻫﺬﻩﺍﻟﻮﻇﻴﻔﺔ.
1ﺍﺿﻐﻂM.C.ﻟﻸﻋﻠﻰﺃﻭﻟﻸﺳﻔﻞﻟﻀﺒﻂﻣﺴﺘﻮﻯﺻﻮﺕﺍﻟﻤﺼﺪﺭ.
ﻧﻄﺎﻕﺍﻟﻀﺒﻂ:+4ﺇﻟﻰ–4
ﺍﻹﻋﺪﺍﺩﺍﺕﺍﻷﻭﻟﻴﺔ
1ﻋﺮﺽﺍﻟﻮﻇﻴﻔﺔ
!ﻳﺒﻴّﻦﺣﺎﻟﺔﺍﻟﻮﻇﻴﻔﺔ.
١ﺍﺿﻐﻂﺍﻟﺰﺭSRC/OFFﻣﻊﺍﻻﺳﺘﻤﺮﺍﺭﺣﺘﻰﻳﺘﻢﺇﻳﻘﺎﻑﺗﺸﻐﻴﻞ
ﺍﻟﻮﺣﺪﺓ.
٢ﺍﺿﻐﻂﻣﻊﺍﻻﺳﺘﻤﺮﺍﺭﻋﻠﻰM.C.ﺇﻟﻰﺃﻥﺗﻈﻬﺮﻗﺎﺋﻤﺔﺍﻟﺘﻬﻴﺌﺔ
ﺍﻟﻤﺒﺪﺋﻴﺔﻋﻠﻰﺍﻟﺸﺎﺷﺔ.
ﺍﻟﻌﺮﺑﻴﺔ
٣ﺃﺩﺭM.C.ﻻﺧﺘﻴﺎﺭﺍﻹﻋﺪﺍﺩﺍﻷﻭﻟﻲ.
ﺑﻌﺪﺍﻻﺧﺘﻴﺎﺭ؛ﻧﻔﺬﺍﻟﺨﻄﻮﺍﺕﺍﻟﺘﺎﻟﻴﺔﻟﻀﺒﻂﺍﻹﻋﺪﺍﺩﺍﻷﻭﻟﻲ.
ﻟﺮﺍﺣﺘﻚ،ﺗﻢﺗﺠﻬﻴﺰﻫﺬﺍﺍﻟﺠﻬﺎﺯﺑﺸﺎﺷﺔﻣﺘﻌﺪﺩﺓﺍﻟﻠﻐﺎﺕ.ﻳﻤﻜﻨﻚﺍﺧﺘﻴﺎﺭﺍﻟﻠﻐﺔ
ﺍﻷﻛﺜﺮﻣﻼﺀﻣﺔﻟﻠﻐﺘﻚﺍﻷﺳﺎﺳﻴﺔ.
1ﺍﺿﻐﻂM.C.ﻻﺧﺘﻴﺎﺭﺍﻟﻠﻐﺔ.
English—Español—Português
Calendar)ﺿﺒﻂﺍﻟﺘﺎﺭﻳﺦ(
٨
Ar
Page 98

1
٠٢
ﺍﻟﻘﺴﻢ
ﺗﺸﻐﻴﻞﻫﺬﺍﺍﻟﺠﻬﺎﺯ
ﺗﺸﻐﻴﻞﻫﺬﺍﺍﻟﺠﻬﺎﺯ
ﻫﺬﻩﺍﻟﻮﺣﺪﺓﻣﺠﻬّﺰﺓﺑﻤﺠﻬﺎﺭﺗﺮﺩﺩﺍﺕﺧﻔﻴﻀﺔﻓﺮﻋﻲﻳﻤﻜﻦﺗﺸﻐﻴﻠﻪﺃﻭ
ﺇﻳﻘﺎﻓﻪ.
1ﺍﺿﻐﻂﻋﻠﻰM.C.ﻟﺘﺸﻐﻴﻞﺧﺮﺝﻣﺠﻬﺎﺭﺍﻟﺘﺮﺩﺩﺍﺕﺍﻟﺨﻔﻴﻀﺔﺃﻭ
ﺇﻳﻘﺎﻑﺗﺸﻐﻴﻠﻪ.
2ﺍﺩﻓﻊM.C.ﻟﻠﻴﺴﺎﺭﺃﻭﺍﻟﻴﻤﻴﻦﻟﺘﺤﺪﻳﺪﻃﻮﺭﺧﺮﺝﻣﺠﻬﺎﺭﺍﻟﺘﺮﺩﺩﺍﺕ
ﺍﻟﺨﻔﻴﻀﺔ.
ﺍﺩﻓﻊM.C.ﻟﻠﻴﺴﺎﺭﻻﺧﺘﻴﺎﺭﺍﻟﻄﻮﺭﺍﻟﻌﻜﺴﻲﻭﺳﺘﻈﻬﺮﺍﻟﻌﺒﺎﺭﺓ
Reverseﻋﻠﻰﻟﻮﺣﺔﺍﻟﻌﺮﺽ.ﺍﺩﻓﻊM.C.ﻟﻠﻴﻤﻴﻦﻻﺧﺘﻴﺎﺭ
ﺍﻟﻄﻮﺭﺍﻟﻌﺎﺩﻱﻭﺳﺘﻈﻬﺮﺍﻟﻌﺒﺎﺭﺓNormalﻋﻠﻰﻟﻮﺣﺔﺍﻟﻌﺮﺽ.
Sub W.2)ﺿﺒﻂﻣﺠﻬﺎﺭﺍﻟﺘﺮﺩﺩﺍﺕﺍﻟﺨﻔﻴﻀﺔ(
ﻳﻤﻜﻦﺿﺒﻂﺗﺮﺩﺩﺍﻟﻘﻄﻊﻭﻣﺴﺘﻮﻯﺍﻟﺨﺮﺝﻋﻨﺪﺗﺸﻐﻴﻞﺧﺮﺝﺍﻟﺴﻤﺎﻋﺔ.
ﻻﺗﺨﺮﺝﻣﻦﻣﺠﻬﺎﺭﺍﻟﺘﺮﺩﺩﺍﺕﺍﻟﺨﻔﻴﻀﺔﺍﻟﻔﺮﻋﻲﺳﻮﻯﺍﻟﺘﺮﺩﺩﺍﺕﺍﻟﺘﻲ
ﺗﻘﻞﻋﻦﺗﺮﺩﺩﺍﺕﺍﻟﻨﻄﺎﻕﺍﻟﻤﺨﺘﺎﺭ.
1ﺍﺿﻐﻂM.C.ﻟﻠﻴﺴﺎﺭﺃﻭﺍﻟﻴﻤﻴﻦﻻﺧﺘﻴﺎﺭﺗﺮﺩﺩﺍﻟﻘﻄﻊ.
50Hz—63Hz—80Hz—100Hz—125Hz
2ﺇﺿﻐﻂM.C.ﻟﻸﻋﻠﻰﺃﻭﺍﻷﺳﻔﻞﻟﻀﺒﻂﻣﺴﺘﻮﻯﺍﻟﺨﺮﺝﻟﻤﺠﻬﺎﺭ
ﺍﻟﺘﺮﺩﺩﺍﺕﺍﻟﺨﻔﻴﻀﺔﺍﻟﻔﺮﻋﻲ.
ﻛﻠﻤﺎﺩﻓﻌﺖM.C.ﻟﻸﻋﻠﻰﺃﻭﻟﻸﺳﻔﻞ،ﻳﺰﺩﺍﺩﺃﻭﻳﻨﻘﺺﻣﺴﺘﻮﻯ
ﻣﺠﻬﺎﺭﺍﻟﺘﺮﺩﺩﺍﺕﺍﻟﺨﻔﻴﻀﺔﺍﻟﻔﺮﻋﻲ.ﻳﺘﻢﻋﺮﺽﻗﻴﻤﺔﻣﻦ+6ﺇﻟﻰ
-24ﻛﻠﻤﺎﺗﺰﺍﻳﺪﺃﻭﺗﻨﺎﻗﺺﺍﻟﻤﺴﺘﻮﻯ.
Bass)ﺗﻌﺰﻳﺰﺍﻟﺠﻬﻴﺮ(
1ﺍﺩﻓﻊM.C.ﻷﻋﻠﻰﺃﻭﻷﺳﻔﻞﻻﺧﺘﻴﺎﺭﺍﻟﻤﺴﺘﻮﻯﺍﻟﻤﺮﻏﻮﺏ.
0ﺇﻟﻰ+6ﻳﺘﻢﻋﺮﺿﻪﻛﻠﻤﺎﺍﺭﺗﻔﻊﺍﻟﻤﺴﺘﻮﻯﺃﻭﺍﻧﺨﻔﺾ.
HPF)ﺿﺒﻂﻣﺮﺷﺢﺍﻟﺘﻤﺮﻳﺮﺍﻟﻤﺮﺗﻔﻊ(
ﻋﻨﺪﻣﺎﻻﺗﺮﻳﺪﻟﻸﺻﻮﺍﺕﺍﻟﻤﻨﺨﻔﻀﺔﻣﻦﻧﻄﺎﻕﺗﺮﺩﺩﺧﺮﺝﻣﺠﻬﺎﺭ
ﺍﻟﺘﺮﺩﺩﺍﺕﺍﻟﺨﻔﻴﻀﺔﺍﻟﻔﺮﻋﻲﺃﻥﺗُﺴﻤﻊﻣﻦﺍﻟﺴﻤﺎﻋﺎﺕﺍﻷﻣﺎﻣﻴﺔﺃﻭﺍﻟﺨﻠﻔﻴﺔ،
ﻗﻢﺑﺘﺸﻐﻴﻞ)ﻣﺮﺷّﺢﺍﻟﺘﻤﺮﻳﺮﺍﻟﻌﺎﻟﻲ(HPF.ﻻﺗﺨﺮﺝﻣﻦﺍﻟﺴﻤﺎﻋﺎﺕ
ﺍﻷﻣﺎﻣﻴﺔﺃﻭﺍﻟﺨﻠﻔﻴﺔﺳﻮﻯﺍﻟﺘﺮﺩﺩﺍﺕﺍﻷﻋﻠﻰﻣﻦﺗﺮﺩﺩﺍﺕﺍﻟﻨﻄﺎﻕﺍﻟﻤﺨﺘﺎﺭ.
1ﺇﺿﻐﻂM.C.ﻟﺘﺸﻐﻴﻞﻣﺮﺷّﺢﺍﻟﺘﻤﺮﻳﺮﺍﻟﻌﺎﻟﻲﺃﻭﺇﻳﻘﺎﻓﻪ.
2ﺍﺿﻐﻂM.C.ﻟﻠﻴﺴﺎﺭﺃﻭﺍﻟﻴﻤﻴﻦﻻﺧﺘﻴﺎﺭﺗﺮﺩﺩﺍﻟﻘﻄﻊ.
50Hz—63Hz—80Hz—100Hz—125Hz
Fader/Balance)ﺿﺒﻂﺍﻟﻤﻀﺎﺋﻞ/ﺍﻟﺘﻮﺍﺯﻥ(
1ﺍﺿﻐﻂM.C.ﻷﻋﻠﻰﺃﻭﻷﺳﻔﻞﻟﻀﺒﻂﺗﻮﺍﺯﻥﺍﻟﺴﻤﺎﻋﺔﺍﻷﻣﺎﻣﻴﺔ/
ﺍﻟﺨﻠﻔﻴﺔ.
!ﻻﻳﻤﻜﻦﺿﺒﻂﺗﻮﺍﺯﻥﺍﻟﺴﻤﺎﻋﺔﺍﻟﺨﻠﻔﻴﺔ/ﺍﻷﻣﺎﻣﻴﺔﻋﻨﺪﻣﺎﻳﻜﻮﻥ
ﺇﻋﺪﺍﺩﺍﻟﺨﺮﺝﺍﻟﺨﻠﻔﻲﻫﻮRear SP :S/W.ﺍﺭﺟﻊﺇﻟﻰ
S/W control)ﺇﻋﺪﺍﺩﺍﻟﺨﺮﺝﺍﻟﺨﻠﻔﻲﻭﻣﺠﻬﺎﺭﺍﻟﺘﺮﺩﺩﺍﺕ
ﻓﻲﺍﻟﺼﻔﺤﺔﺍﻟﺘﺎﻟﻴﺔ.
ﺍﻟﺨﻔﻴﻀﺔ(
2ﺍﺿﻐﻂM.C.ﻟﺠﻬﺔﺍﻟﻴﺴﺎﺭﺃﻭﺍﻟﻴﻤﻴﻦﻟﻀﺒﻂﺗﻮﺍﺯﻥﺍﻟﺴﻤﺎﻋﺔ
ﺍﻟﻴﺴﺮﻯ/ﺍﻟﻴﻤﻨﻰ.
Powerful)ﺍﺳﺘﺪﻋﺎﺀﺍﻟﻤﻮﺍﺯﻥ(
1ﺇﺩﻓﻊM.C.ﻟﻠﻴﺴﺎﺭﺃﻭﻟﻠﻴﻤﻴﻦﻻﺧﺘﻴﺎﺭﻣﻨﺤﻨﻰﺍﻟﻤﻮﺍﺯﻥ.
Powerful—Natural—Vocal—Custom1—
Custom2—Flat—Super bass
100 Hz)ﺿﺒﻂﺍﻟﻤﻮﺍﺯﻥ(
ﻳﻤﻜﻦﺿﺒﻂﺗﻬﻴﺌﺔﻣﻨﺤﻨﻰﺍﻟﻤﻮﺍﺯﻥﺍﻟﻤﺤﺪﺩﺣﺎﻟﻴًﺎﻛﻤﺎﻫﻮﻣﺮﻏﻮﺏ.ﻳﺘﻢ
ﺗﺨﺰﻳﻦﺇﻋﺪﺍﺩﺍﺕﻣﻨﺤﻨﻰﺍﻟﻤﻮﺍﺯﻥﺍﻟﺘﻲﺗﻢﺿﺒﻄﻬﺎﻓﻲﺍﻟﺬﺍﻛﺮﺓﻓﻲ
Custom1ﺃﻭCustom2.
!ﻳﻤﻜﻦﺇﻧﺸﺎﺀﻣﻨﺤﻨﻰCustom1ﻣﻨﻔﺼﻞﻟﻜﻞﻣﺼﺪﺭ.ﻭﻓﻲﺣﺎﻟﺔ
ﺗﻨﻔﻴﺬﻋﻤﻠﻴﺎﺕﺍﻟﻀﺒﻂﻋﻨﺪﺗﺤﺪﻳﺪﻣﻨﺤﻨﻰﺁﺧﺮﻏﻴﺮCustom2،
ﻳﺘﻢﺗﺨﺰﻳﻦﺇﻋﺪﺍﺩﺍﺕﻣﻨﺤﻨﻰﺍﻟﻤﻮﺍﺯﻥﻓﻲCustom1.
!ﻳﻤﻜﻦﺇﻧﺸﺎﺀﻣﻨﺤﻨﻰCustom2ﻣﺸﺘﺮﻙﻟﺠﻤﻴﻊﺍﻟﻤﺼﺎﺩﺭ.ﺇﺫﺍﻗﻤﺖ
ﺑﻌﻤﻠﻴﺎﺕﺍﻟﻀﺒﻂﻣﻊﺍﺧﺘﻴﺎﺭﺍﻟﻤﻨﺤﻨﻰCustom2،ﻓﺴﻴﺘﻢﺗﺤﺪﻳﺚ
ﺍﻟﻤﻨﺤﻨﻰCustom2.
1ﻗﻢﺑﺎﺳﺘﺪﻋﺎﺀﻣﻨﺤﻨﻰﺍﻟﻤﻮﺍﺯﻥﺍﻟﺬﻱﺗﺮﻳﺪﺿﺒﻄﻪ.
2ﺍﺿﻐﻂM.C.ﻟﺠﻬﺔﺍﻟﻴﺴﺎﺭﺃﻭﺍﻟﻴﻤﻴﻦﻻﺧﺘﻴﺎﺭﺣﺰﻣﺔﺍﻟﻤﻮﺍﺯﻥ
ﻟﻠﻀﺒﻂ.
100Hz—315Hz—1.25kHz—3.15kHz—8kHz
3ﺇﺩﻓﻊM.C.ﻟﻸﻋﻠﻰﺃﻭﻟﻸﺳﻔﻞﻟﻀﺒﻂﻣﻨﺤﻨﻰﺍﻟﻤﻮﺍﺯﻥ.
+6ﺇﻟﻰ6–ﻳﺘﻢﻋﺮﺿﻪﻛﻠﻤﺎﺯﺍﺩﻣﻨﺤﻨﻰﺍﻟﻤﻮﺍﺯﻥﺃﻭﺍﻧﺨﻔﺾ.
LOUD)ﻋﻠﻮﺍﻟﺼﻮﺕ(
ﻭﻇﻴﻔﺔﻋﻠﻮﺍﻟﺼﻮﺕﺗﻌﻮّﺽﺍﻟﻨﻘﺺﻓﻲﻧﻄﺎﻗﺎﺕﺍﻟﺘﺮﺩﺩﺍﻟﻤﻨﺨﻔﺾﻭﺍﻟﻌﺎﻟﻲ
ﻋﻨﺪﻣﺎﻳﻜﻮﻥﻣﺴﺘﻮﻯﺍﻟﺼﻮﺕﻣﻨﺨﻔﻀﺎً.
1ﺍﺿﻐﻂM.C.ﻟﺘﺸﻐﻴﻞﻋﻠﻮﺍﻟﺼﻮﺕﺃﻭﺇﻳﻘﺎﻑﺗﺸﻐﻴﻠﻪ.
2ﺍﺩﻓﻊM.C.ﻟﻠﻴﺴﺎﺭﺃﻭﻟﻠﻴﻤﻴﻦﻻﺧﺘﻴﺎﺭﺍﻟﺘﻬﻴﺌﺔﺍﻟﻤﺮﻏﻮﺑﺔ.
Low)ﻣﻨﺨﻔﺾ(—Mid)ﻣﺘﻮﺳﻂ(—High)ﻣﺮﺗﻔﻊ(
Sub W.1)ﺇﻋﺪﺍﺩﺗﺸﻐﻴﻞ/ﺇﻳﻘﺎﻑﻣﺠﻬﺎﺭﺍﻟﺘﺮﺩﺩﺍﺕﺍﻟﺨﻔﻴﻀﺔ(
ﻋﻤﻠﻴﺎﺕﺗﺸﻐﻴﻞﻣﺘﻘﺪﻣﺔﺑﺎﺳﺘﺨﺪﺍﻡ
ﺃﺯﺭﺍﺭﺧﺎﺻﺔ
ﺗﻬﻴﺌﺔﺗﺸﻐﻴﻞ/ﺇﻳﻘﺎﻑﻣﺠﻬﺎﺭﺍﻟﺘﺮﺩﺩﺍﺕﺍﻟﺨﻔﻴﻀﺔ
1ﺍﺿﻐﻂﻋﻠﻰSW/BASSﻟﺘﺤﺪﻳﺪﻗﺎﺋﻤﺔﺗﻬﻴﺌﺔﺗﺸﻐﻴﻞ/ﺇﻳﻘﺎﻑﻣﺠﻬﺎﺭ
ﺍﻟﺘﺮﺩﺩﺍﺕﺍﻟﺨﻔﻴﻀﺔﺍﻟﻔﺮﻋﻲ.
2ﺍﺿﻐﻂﻋﻠﻰM.C.ﻟﺘﺸﻐﻴﻞﺧﺮﺝﻣﺠﻬﺎﺭﺍﻟﺘﺮﺩﺩﺍﺕﺍﻟﺨﻔﻴﻀﺔﺃﻭ
ﺇﻳﻘﺎﻑﺗﺸﻐﻴﻠﻪ.
3ﺍﺩﻓﻊM.C.ﻟﻠﻴﺴﺎﺭﺃﻭﺍﻟﻴﻤﻴﻦﻟﺘﺤﺪﻳﺪﻃﻮﺭﺧﺮﺝﻣﺠﻬﺎﺭﺍﻟﺘﺮﺩﺩﺍﺕ
ﺍﻟﺨﻔﻴﻀﺔ.
ﺿﺒﻂﻣﺠﻬﺎﺭﺍﻟﺘﺮﺩﺩﺍﺕﺍﻟﺨﻔﻴﻀﺔ
1ﺍﺿﻐﻂSW/BASSﻟﺘﺤﺪﻳﺪﻗﺎﺋﻤﺔﺿﺒﻂﻣﺠﻬﺎﺭﺍﻟﺘﺮﺩﺩﺍﺕ
ﺍﻟﺨﻔﻴﻀﺔﺍﻟﻔﺮﻋﻲ.
2ﺍﺿﻐﻂM.C.ﻟﻠﻴﺴﺎﺭﺃﻭﺍﻟﻴﻤﻴﻦﻻﺧﺘﻴﺎﺭﺗﺮﺩﺩﺍﻟﻘﻄﻊ.
50Hz—63Hz—80Hz—100Hz—125Hz
3ﺇﺿﻐﻂM.C.ﻟﻸﻋﻠﻰﺃﻭﺍﻷﺳﻔﻞﻟﻀﺒﻂﻣﺴﺘﻮﻯﺍﻟﺨﺮﺝﻟﻤﺠﻬﺎﺭ
ﺍﻟﺘﺮﺩﺩﺍﺕﺍﻟﺨﻔﻴﻀﺔﺍﻟﻔﺮﻋﻲ.
ﻛﻠﻤﺎﺩﻓﻌﺖM.C.ﻟﻸﻋﻠﻰﺃﻭﻟﻸﺳﻔﻞ،ﻳﺰﺩﺍﺩﺃﻭﻳﻨﻘﺺﻣﺴﺘﻮﻯ
ﻣﺠﻬﺎﺭﺍﻟﺘﺮﺩﺩﺍﺕﺍﻟﺨﻔﻴﻀﺔﺍﻟﻔﺮﻋﻲ.ﻳﺘﻢﻋﺮﺽﻗﻴﻤﺔﻣﻦ+6ﺇﻟﻰ
-24ﻛﻠﻤﺎﺗﺰﺍﻳﺪﺃﻭﺗﻨﺎﻗﺺﺍﻟﻤﺴﺘﻮﻯ.
ﺗﻌﺰﻳﺰﺍﻟﺠﻬﻴﺮ
1ﺍﺿﻐﻂﻣﻊﺍﻻﺳﺘﻤﺮﺍﺭﻋﻠﻰSW/BASSﻟﺘﺤﺪﻳﺪﻗﺎﺋﻤﺔﺗﻬﻴﺌﺔﺗﻌﺰﻳﺰ
ﺍﻟﺠﻬﻴﺮ.
2ﺍﺩﻓﻊM.C.ﻷﻋﻠﻰﺃﻭﻷﺳﻔﻞﻻﺧﺘﻴﺎﺭﺍﻟﻤﺴﺘﻮﻯﺍﻟﻤﺮﻏﻮﺏ.
ﺇﻋﺪﺍﺩﺍﺕﻭﻇﺎﺋﻒﺍﻟﺼﻮﺕ
١ﺍﺿﻐﻂM.C.ﻟﻌﺮﺽﺍﻟﻘﺎﺋﻤﺔﺍﻟﺮﺋﻴﺴﻴﺔ.
٢ﺃﺩﺭM.C.ﻟﺘﻐﻴﻴﺮﺧﻴﺎﺭﺍﻟﻘﺎﺋﻤﺔﻭﺍﺿﻐﻂﻻﺧﺘﻴﺎﺭAUDIO.
٣ﺃﺩﺭM.C.ﻻﺧﺘﻴﺎﺭﻭﻇﻴﻔﺔﺍﻟﺼﻮﺕ.
ﺑﻌﺪﺍﻻﺧﺘﻴﺎﺭ،ﻧﻔﺬﺍﻟﺨﻄﻮﺍﺕﺍﻟﺘﺎﻟﻴﺔﻟﻀﺒﻂﻭﻇﻴﻔﺔﺍﻟﺼﻮﺕ.
ﻣﻼﺣﻈﺎﺕ
!ﺗﺤﻮﻳﻞﻭﺿﻊﺍﻟﺘﺤﻜﻢﺇﻟﻰiPodﻭﻗﻒﺗﺸﻐﻴﻞﺍﻷﻏﻨﻴﺔﻣﺆﻗﺘًﺎ.ﻗﻢ
ﺑﺘﺸﻐﻴﻞﺟﻬﺎﺯiPodﻟﻤﺘﺎﺑﻌﺔﺍﻟﺘﺸﻐﻴﻞ.
!ﻣﺎﺯﺍﻟﺖﺍﻟﻮﻇﺎﺋﻒﺍﻟﺘﺎﻟﻴﺔﻗﺎﺑﻠﺔﻟﻠﻮﺻﻮﻝﺇﻟﻴﻬﺎﻣﻦﺍﻟﻮﺣﺪﺓﺣﺘﻰﺇﺫﺍ
ﺗﻢﺿﺒﻂﻭﺿﻊﺍﻟﺘﺤﻜﻢﻋﻠﻰiPod/APP.
—ﺗﺒﺪﻳﻞﺍﻟﻤﻌﻠﻮﻣﺎﺕﺍﻟﻨﺼﻴﺔ)iPod(
—ﺍﻹﻳﻘﺎﻑﺍﻟﻤﺆﻗﺖ
—ﺗﻘﺪﻳﻢ/ﺗﺮﺟﻴﻊﺳﺮﻳﻊ
—ﺍﻟﻤﻘﻄﻮﻋﺔﻷﻋﻠﻰ/ﻷﺳﻔﻞ
—ﺍﻟﺘﺸﻐﻴﻞﺍﻟﻌﺸﻮﺍﺋﻲ)ﺧﻠﻂ(
)ﻗﺎﺋﻤﺔ(ﻻﺳﺘﺨﺪﺍﻡﻗﺎﺋﻤﺔiPod
—
—ﺍﺿﻐﻂﻋﻠﻰM.C.ﻟﻠﻀﻐﻂﻋﻠﻰﻋﺠﻠﺔﻧﻘﺮiPod
—ﺍﺩﻓﻊM.C.ﻷﻋﻠﻰﻹﺩﺍﺭﺓﻋﺠﻠﺔﻧﻘﺮiPodﺇﻟﻰﺍﻟﻴﺴﺎﺭ
—ﺍﺩﻓﻊM.C.ﻷﺳﻔﻞﻹﺩﺍﺭﺓﻋﺠﻠﺔﻧﻘﺮiPodﺇﻟﻰﺍﻟﻴﻤﻴﻦ
!ﻋﻨﺪﻣﺎﻳﺘﻢﺿﺒﻂﻭﺿﻊﺍﻟﺘﺤﻜﻢﻋﻠﻰiPod/APP،ﺗﻜﻮﻥﻋﻤﻠﻴﺎﺕ
ﺍﻟﺘﺸﻐﻴﻞﻣﺤﺪﻭﺩﺓﻛﻤﺎﻳﻠﻲ:
—ﺇﻋﺪﺍﺩﺍﺕﺍﻟﻮﻇﺎﺋﻒﻏﻴﺮﻣﺘﺎﺣﺔ.
—ﻻﻳﻤﻜﻦﺗﺸﻐﻴﻞﻭﻇﻴﻔﺔﺍﻟﺘﺼﻔﺢﻣﻦﻫﺬﻩﺍﻟﻮﺣﺪﺓ.
ﻋﻤﻠﻴﺎﺕﺿﺒﻂﺍﻟﺼﻮﺕ
1ﻟﻮﺣﺔﻋﺮﺽﺍﻟﺼﻮﺕ
ﺗﺒﻴّﻦﺣﺎﻟﺔﺿﺒﻂﺍﻟﺼﻮﺕ.
٧
Ar
Page 99

ﺍﻟﻘﺴﻢ
ﺗﺸﻐﻴﻞﻫﺬﺍﺍﻟﺠﻬﺎﺯ
ﺗﺸﻐﻴﻞﻫﺬﺍﺍﻟﺠﻬﺎﺯ
٠٢
Play mode)ﺗﺸﻐﻴﻞﻣﺘﻜﺮﺭ(
1ﺍﺿﻐﻂM.C.ﻻﺧﺘﻴﺎﺭﻧﻄﺎﻕﺍﻟﺘﺸﻐﻴﻞﺍﻟﻤﺘﻜﺮﺭ.
!Repeat One–ﺗﻜﺮﺍﺭﺍﻷﻏﻨﻴﺔﺍﻟﺤﺎﻟﻴﺔ
!Repeat All–ﺗﻜﺮﺍﺭﻛﻞﺍﻷﻏﻨﻴﺎﺕﻓﻲﺍﻟﻘﺎﺋﻤﺔﺍﻟﻤﺨﺘﺎﺭﺓ
Shuffle mode)ﺧﻠﻂ(
1ﺍﺿﻐﻂﻋﻠﻰM.C.ﻻﺧﺘﻴﺎﺭﺍﻹﻋﺪﺍﺩﺍﻟﻤﻔﻀﻞ.
!Shuffle Songs–ﺗﺸﻐﻴﻞﺍﻷﻏﻨﻴﺎﺕﺍﻟﻤﻮﺟﻮﺩﺓﻓﻲﺍﻟﻘﺎﺋﻤﺔ
ﺍﻟﻤﺨﺘﺎﺭﺓﺑﺘﺮﺗﻴﺐﻋﺸﻮﺍﺋﻲ.
!Shuffle Albums–ﺗﺸﻐﻴﻞﺍﻷﻏﻨﻴﺎﺕﻣﻦﺃﻟﺒﻮﻡﻣﺨﺘﺎﺭ
ﻋﺸﻮﺍﺋﻴًﺎﺑﺎﻟﺘﺮﺗﻴﺐ.
!Shuffle OFF–ﺇﻟﻐﺎﺀﺍﻟﺘﺸﻐﻴﻞﺑﺘﺮﺗﻴﺐﻋﺸﻮﺍﺋﻲ.
Shuffle all)ﺧﻠﻂﺍﻟﻜﻞ(
1ﺍﺿﻐﻂM.C.ﻟﺘﺸﻐﻴﻞﺗﻐﻴﻴﺮﺗﺮﺗﻴﺐﺍﻟﻜﻞ.
ﻹﻳﻘﺎﻑﺍﻟﺘﺸﻐﻴﻞ،ﺍﺿﺒﻂShuffle modeﻓﻲﻗﺎﺋﻤﺔ
FUNCTIONﻋﻠﻰﻭﺿﻊﺍﻹﻳﻘﺎﻑ.
Link play)ﺗﺸﻐﻴﻞﺍﻟﺮﻭﺍﺑﻂ(
ﺗﺸﻐﻴﻞﺃﻏﺎﻥ
ﻓﻲﻫﺬﻩﺍﻟﺼﻔﺤﺔ.
Sound Retriever)ﻣﺴﺘﺮﺟﻊﺍﻟﺼﻮﺕ(
ﺗﺤﺴﻴﻦﺍﻟﺼﻮﺕﺍﻟﻤﻀﻐﻮﻁﻭﺍﺳﺘﻌﺎﺩﺓﺍﻟﺼﻮﺕ
ﻓﻲﻫﺬﻩﺍﻟﺼﻔﺤﺔ.
1ﺍﺩﻓﻊM.C.ﻟﻠﻴﺴﺎﺭﺃﻭﻟﻠﻴﻤﻴﻦﻟﺘﻐﻴﻴﺮﺍﻟﻮﺿﻊ،ﺍﺿﻐﻂﻟﻼﺧﺘﻴﺎﺭ.
ﻟﻠﺤﺼﻮﻝﻋﻠﻰﺗﻔﺎﺻﻴﻞﺣﻮﻝﺍﻹﻋﺪﺍﺩﺍﺕ،ﺭﺍﺟﻊ
ﻣﺮﺗﺒﻄﺔﺑﺎﻷﻏﻨﻴﺔﺍﻟﺘﻲﻳﺘﻢﺗﺸﻐﻴﻠﻬﺎﺣﺎﻟﻴًﺎ
PAUSE)ﺇﻳﻘﺎﻑﻣﺆﻗﺖ(
1ﺍﺿﻐﻂﻋﻠﻰM.C.ﻟﻺﻳﻘﺎﻑﺍﻟﻤﺆﻗﺖﺃﻭﺍﻟﻤﺘﺎﺑﻌﺔ.
Audiobooks)ﺳﺮﻋﺔﺍﻟﻜﺘﺎﺏﺍﻟﺼﻮﺗﻲ(
1ﺍﺿﻐﻂﻋﻠﻰM.C.ﻻﺧﺘﻴﺎﺭﺍﻹﻋﺪﺍﺩﺍﻟﻤﻔﻀﻞ.
!Faster–ﺍﻟﺘﺸﻐﻴﻞﺑﺴﺮﻋﺔﺃﻛﺒﺮﻣﻦﺍﻟﺴﺮﻋﺔﺍﻟﻌﺎﺩﻳﺔ
!Normal–ﺍﻟﺘﺸﻐﻴﻞﺑﺴﺮﻋﺔﻋﺎﺩﻳﺔ
!Slower–ﺍﻟﺘﺸﻐﻴﻞﺑﺴﺮﻋﺔﺃﻗﻞﻣﻦﺍﻟﺴﺮﻋﺔﺍﻟﻌﺎﺩﻳﺔ
1ﺍﺿﻐﻂM.C.ﻻﺧﺘﻴﺎﺭﺍﻹﻋﺪﺍﺩﺍﻟﻤﺮﻏﻮﺏ.
ﻟﻠﺘﻔﺎﺻﻴﻞ،ﺭﺍﺟﻊ
ﺍﻟﺜﺮﻱ)ﻣﺴﺘﺮﺟﻊﺍﻟﺼﻮﺕ(
ﺗﺸﻐﻴﻞﻭﻇﻴﻔﺔﺟﻬﺎﺯiPodﻫﺬﻩﻣﻦﺟﻬﺎﺯﻙiPod
ﻳﻤﻜﻨﻚﺍﻻﺳﺘﻤﺎﻉﺇﻟﻰﺍﻟﺼﻮﺕﻣﻦﺗﻄﺒﻴﻘﺎﺕiPodﺑﺎﺳﺘﺨﺪﺍﻡﻣﻜﺒﺮﺍﺕ
ﺻﻮﺕﺍﻟﺴﻴﺎﺭﺓ،ﻋﻨﺪﺗﺤﺪﻳﺪAPP.
ﻫﺬﻩﺍﻟﻮﻇﻴﻔﺔﻏﻴﺮﻣﺘﻮﺍﻓﻘﺔﻣﻊﻃﺮﺯiPodﺍﻟﺘﺎﻟﻴﺔ.
!ﺍﻟﺠﻴﻞﺍﻷﻭﻝﻣﻦiPod nano
!ﺍﻟﺠﻴﻞﺍﻟﺨﺎﻣﺲﻣﻦiPod
ﻭﺿﻊAPPﻣﺘﻮﺍﻓﻖﻣﻊﻃﺮﺯiPodﺍﻟﺘﺎﻟﻴﺔ.
!ﺍﻟﺠﻴﻞﺍﻟﺜﺎﻟﺚﻣﻦiPod touch)ﺇﺻﺪﺍﺭﺍﻟﺒﺮﻧﺎﻣﺞ٣٫٠ﺃﻭ
ﺍﻷﺣﺪﺙ(
!ﺍﻟﺠﻴﻞﺍﻟﺜﺎﻧﻲﻣﻦiPod touch)ﺇﺻﺪﺍﺭﺍﻟﺒﺮﻧﺎﻣﺞ٣٫٠ﺃﻭ
ﺍﻷﺣﺪﺙ(
!ﺍﻟﺠﻴﻞﺍﻷﻭﻝﻣﻦiPod touch)ﺇﺻﺪﺍﺭﺍﻟﺒﺮﻧﺎﻣﺞ٣٫٠ﺃﻭ
ﺍﻷﺣﺪﺙ(
!iPhone 4)ﺇﺻﺪﺍﺭﺍﻟﺒﺮﻧﺎﻣﺞ٤٫٠ﺃﻭﺍﻷﺣﺪﺙ(
!iPhone 3GS)ﺇﺻﺪﺍﺭﺍﻟﺒﺮﻧﺎﻣﺞ٣٫٠ﺃﻭﺍﻷﺣﺪﺙ(
!iPhone 3G)ﺇﺻﺪﺍﺭﺍﻟﺒﺮﻧﺎﻣﺞ٣٫٠ﺃﻭﺍﻷﺣﺪﺙ(
!iPhone)ﺇﺻﺪﺍﺭﺍﻟﺒﺮﻧﺎﻣﺞ٣٫٠ﺃﻭﺍﻷﺣﺪﺙ(
/LOCﻟﺘﻐﻴﻴﺮﻭﺿﻊﺍﻟﺘﺤﻜﻢ.
1ﺍﺿﻐﻂ
!iPod–ﻳﻤﻜﻦﺗﺸﻐﻴﻞﻭﻇﻴﻔﺔﺟﻬﺎﺯiPodﻫﺬﻩﻣﻦﺟﻬﺎﺯ
iPodﺍﻟﻤﻮﺻّﻞ.
!APP–ﺗﺸﻐﻴﻞﺍﻟﺼﻮﺕﻣﻦﺗﻄﺒﻴﻘﺎﺕiPod.
!AUDIO–ﻳﻤﻜﻦﺗﺸﻐﻴﻞﻭﻇﻴﻔﺔﺟﻬﺎﺯiPodﻫﺬﻩﻣﻦﻫﺬﺍ
ﺍﻟﺠﻬﺎﺯ.
ﺗﺤﺴﻴﻦﺍﻟﺼﻮﺕﺍﻟﻤﻀﻐﻮﻁﻭﺍﺳﺘﻌﺎﺩﺓﺍﻟﺼﻮﺕﺍﻟﺜﺮﻱ)ﻣﺴﺘﺮﺟﻊﺍﻟﺼﻮﺕ(
1ﺍﺿﻐﻂﻋﻠﻰS.Rtrvﻟﻠﺘﺒﺪﻳﻞﺑﻴﻦ:
OFF)ﺇﻳﻘﺎﻑ(—1—2
ﻳﻜﻮﻥ1ﻓﻌﺎﻻًﻟﻤﻌﺪﻻﺕﺍﻟﻀﻐﻂﺍﻟﻤﻨﺨﻔﻀﺔﻭﻳﻜﻮﻥ2ﻓﻌﺎﻻًﻟﻤﻌﺪﻻﺕ
ﺍﻟﻀﻐﻂﺍﻟﻌﺎﻟﻴﺔ.
ﺇﻋﺪﺍﺩﺍﺕﺍﻟﻮﻇﺎﺋﻒ
١ﺍﺿﻐﻂM.C.ﻟﻌﺮﺽﺍﻟﻘﺎﺋﻤﺔﺍﻟﺮﺋﻴﺴﻴﺔ.
٢ﺃﺩﺭM.C.ﻟﺘﻐﻴﻴﺮﺧﻴﺎﺭﺍﻟﻘﺎﺋﻤﺔﻭﺍﺿﻐﻂﻻﺧﺘﻴﺎﺭ
FUNCTION.
٣ﺃﺩﺭM.C.ﻻﺧﺘﻴﺎﺭﺍﻟﻮﻇﻴﻔﺔ.
ﺑﻌﺪﺍﻻﺧﺘﻴﺎﺭ؛ﻧﻔﺬﺍﻹﺟﺮﺍﺀﺍﺕﺍﻟﺘﺎﻟﻴﺔﻟﻀﺒﻂﺍﻟﻮﻇﻴﻔﺔ.
ﻋﻤﻠﻴﺎﺕﺗﺸﻐﻴﻞﻣﺘﻘﺪﻣﺔﺑﺎﺳﺘﺨﺪﺍﻡ
ﺃﺯﺭﺍﺭﺧﺎﺻﺔ
ﻟﺘﺸﻐﻴﻞﺗﻐﻴﻴﺮﺗﺮﺗﻴﺐﺍﻟﻜﻞ.
ﺗﺸﻐﻴﻞﺃﻏﺎﻥﻣﺮﺗﺒﻄﺔﺑﺎﻷﻏﻨﻴﺔﺍﻟﺘﻲﻳﺘﻢﺗﺸﻐﻴﻠﻬﺎﺣﺎﻟﻴًﺎ
ﻳﻤﻜﻨﻚﺗﺸﻐﻴﻞﺃﻏﺎﻥﻣﻦﺍﻟﻘﻮﺍﺋﻢﺍﻟﺘﺎﻟﻴﺔ.
•ﻗﺎﺋﻤﺔﺍﻷﻟﺒﻮﻡﻟﻠﻔﻨﺎﻥﺍﻟﺬﻱﻳﺘﻢﺍﻻﺳﺘﻤﺎﻉﺇﻟﻴﻪﺣﺎﻟﻴًﺎ
•ﻗﺎﺋﻤﺔﺍﻷﻏﺎﻧﻲﻟﻸﻟﺒﻮﻡﺍﻟﺬﻱﻳﺘﻢﺍﻻﺳﺘﻤﺎﻉﺇﻟﻴﻪﺣﺎﻟﻴًﺎ
•ﻗﺎﺋﻤﺔﺍﻷﻟﺒﻮﻡﻟﻠﻔﺌﺔﺍﻟﻤﻮﺳﻴﻘﻴﺔﺍﻟﺘﻲﻳﺘﻢﺍﻻﺳﺘﻤﺎﻉﺇﻟﻴﻬﺎﺣﺎﻟﻴًﺎ
1ﺍﺿﻐﻂﻣﻊﺍﻻﺳﺘﻤﺮﺍﺭﻋﻠﻰM.C.ﻟﻠﺘﺤﻮﻳﻞﺇﻟﻰﻭﺿﻊﺗﺸﻐﻴﻞ
ﺍﻟﺮﻭﺍﺑﻂ.
2ﺍﺩﻓﻊM.C.ﻟﻠﻴﺴﺎﺭﺃﻭﻟﻠﻴﻤﻴﻦﻟﺘﻐﻴﻴﺮﺍﻟﻮﺿﻊ،ﺍﺿﻐﻂﻟﻼﺧﺘﻴﺎﺭ.
!Artist–ﻟﺘﺸﻐﻴﻞﺃﻟﺒﻮﻡﺍﻟﻔﻨﺎﻥﺍﻟﺬﻱﻳﺘﻢﺍﻻﺳﺘﻤﺎﻉﺇﻟﻴﻪﺣﺎﻟﻴًﺎ.
!Album–ﻟﺘﺸﻐﻴﻞﺃﻏﻨﻴﺔﺍﻷﻟﺒﻮﻡﺍﻟﺬﻱﻳﺘﻢﺍﻻﺳﺘﻤﺎﻉﺇﻟﻴﻪ
ﺣﺎﻟﻴًﺎ.
!Genre–ﻟﺘﺸﻐﻴﻞﺃﻟﺒﻮﻡﺍﻟﻔﺌﺔﺍﻟﻤﻮﺳﻴﻘﻴﺔﺍﻟﺘﻲﻳﺘﻢﺍﻻﺳﺘﻤﺎﻉ
ﺇﻟﻴﻬﺎﺣﺎﻟﻴًﺎ.
ﺳﻴﺘﻢﺗﺸﻐﻴﻞﺍﻷﻏﻨﻴﺔ/ﺍﻷﻟﺒﻮﻡﺑﻌﺪﺗﺸﻐﻴﻞﺍﻷﻏﻨﻴﺔﺍﻟﺤﺎﻟﻴﺔ.
!ﻗﺪﻳﺘﻢﺇﻟﻐﺎﺀﺍﻷﻏﻨﻴﺔ/ﺍﻷﻟﺒﻮﻡﺍﻟﻤﺨﺘﺎﺭﺇﺫﺍﻛﻨﺖﺗﻘﻮﻡﺑﺘﺸﻐﻴﻞﻭﻇﺎﺋﻒ
ﻏﻴﺮﺗﺸﻐﻴﻞﺍﻟﺮﻭﺍﺑﻂ)ﻋﻠﻰﺳﺒﻴﻞﺍﻟﻤﺜﺎﻝ،ﺍﻟﺘﻘﺪﻳﻢﻭﺍﻟﺘﺮﺟﻴﻊﺍﻟﺴﺮﻳﻊ(.
!ﺍﺳﺘﻨﺎﺩًﺍﺇﻟﻰﺍﻷﻏﻨﻴﺔﺍﻟﺘﻲﺗﻢﺗﺤﺪﻳﺪﻫﺎﻟﻠﺘﺸﻐﻴﻞ،ﻗﺪﻳﺘﻢﻗﻄﻊﻧﻬﺎﻳﺔ
ﺍﻷﻏﻨﻴﺔﺍﻟﺘﻲﻳﺘﻢﺗﺸﻐﻴﻠﻬﺎﺣﺎﻟﻴًﺎﻭﺑﺪﺍﻳﺔﺍﻷﻏﻨﻴﺔ/ﺍﻷﻟﺒﻮﻡﺍﻟﻤﺤﺪﺩ.
/SCRL.
ﻟﻠﺘﺤﻮﻝﺇﻟﻰﻭﺿﻊ
ﺗﺸﻐﻴﻞﻛﻞﺍﻷﻏﻨﻴﺎﺕﺑﺘﺮﺗﻴﺐﻋﺸﻮﺍﺋﻲ)ﺧﻠﻂﺍﻟﻜﻞ(
1ﺍﺿﻐﻂ
/SCRL.
Composers)ﻣﻠﺤﻨﻮﻥ(—Audiobooks)ﻛﺘﺐﺻﻮﺗﻴﺔ(
ﻋﺮﺽﺍﻟﻤﻌﻠﻮﻣﺎﺕﺍﻟﻨﺼﻴﺔ
ﺍﺧﺘﻴﺎﺭﺍﻟﻤﻌﻠﻮﻣﺎﺕﺍﻟﻨﺼﻴﺔﺍﻟﻤﺮﻏﻮﺑﺔ
1ﺍﺿﻐﻂDISP/
ﺗﻤﺮﻳﺮﺍﻟﻤﻌﻠﻮﻣﺎﺕﺍﻟﻨﺼﻴﺔﺇﻟﻰﺍﻟﻴﺴﺎﺭ
1ﺍﺿﻐﻂﻣﻊﺍﻻﺳﺘﻤﺮﺍﺭﻋﻠﻰDISP/
ﺍﻟﺘﺼﻔّﺢﺑﺤﺜًﺎﻋﻦﺃﻏﻨﻴﺔ
١ﺍﺿﻐﻂ)ﻗﺎﺋﻤﺔ(ﻟﻠﺘﺤﻮﻝﺇﻟﻰﺍﻟﻘﺎﺋﻤﺔﺍﻟﻌﻠﻮﻳﺔﻣﻦﺑﺤﺚ
ﺍﻟﻘﺎﺋﻤﺔ.
٢ﺍﺳﺘﺨﺪﻡM.C.ﻻﺧﺘﻴﺎﺭﻓﺌﺔ/ﺃﻏﻨﻴﺔ.
ﺗﻐﻴﻴﺮﺍﺳﻢﺍﻷﻏﻨﻴﺔﺃﻭﺍﻟﻔﺌﺔ
1ﺃﺩﺭM.C..
Playlists)ﻗﻮﺍﺋﻢﺍﻟﻌﺮﺽ(—Artists)ﺍﻟﻔﻨﺎﻧﻮﻥ(—
Albums)ﺍﻷﻟﺒﻮﻣﺎﺕ(—Songs)ﺍﻷﻏﻨﻴﺎﺕ(—Podcasts
)ﺑﺚPodcast(—Genres)ﺍﻟﻔﺌﺎﺕﺍﻟﻤﻮﺳﻴﻘﻴﺔ(—
ﺗﺸﻐﻴﻞ
1ﻋﻨﺪﺍﺧﺘﻴﺎﺭﺃﻏﻨﻴﺔ،ﺍﺿﻐﻂﻋﻠﻰM.C..
ﻋﺮﺽﻗﺎﺋﻤﺔﺃﻏﺎﻥﻓﻲﺍﻟﻔﺌﺔﺍﻟﻤﺤﺪﺩﺓ
1ﻋﻨﺪﺍﺧﺘﻴﺎﺭﻓﺌﺔ،ﺍﺿﻐﻂﻋﻠﻰM.C..
ﺗﺸﻐﻴﻞﺃﻏﻨﻴﺔﻓﻲﺍﻟﻔﺌﺔﺍﻟﻤﺨﺘﺎﺭﺓ
1ﻋﻨﺪﺍﺧﺘﻴﺎﺭﻓﺌﺔ،ﺍﺿﻐﻂﻣﻊﺍﻻﺳﺘﻤﺮﺍﺭﻋﻠﻰM.C..
ﺍﻟﺒﺤﺚﻓﻲﺍﻟﻘﺎﺋﻤﺔﺃﺑﺠﺪﻳًﺎ
ﺍﻟﻌﺮﺑﻴﺔ
1ﻋﻨﺪﻋﺮﺽﻗﺎﺋﻤﺔﻟﻠﻔﺌﺔﺍﻟﻤﺨﺘﺎﺭﺓ،ﺍﺿﻐﻂ
ﺍﻟﺒﺤﺚﺍﻷﺑﺠﺪﻱ.
2ﺃﺩﺭM.C.ﻻﺧﺘﻴﺎﺭﺣﺮﻑ.
3ﺍﺿﻐﻂM.C.ﻟﻌﺮﺽﻗﺎﺋﻤﺔﺍﻟﺤﺮﻭﻑﺍﻷﺑﺠﺪﻳﺔ.
ﻣﻼﺣﻈﺎﺕ
!ﻳﻤﻜﻨﻚﺗﺸﻐﻴﻞﻗﻮﺍﺋﻢﺍﻟﺘﺸﻐﻴﻞﺍﻟﺘﻲﺗﻢﺇﻧﺸﺎﺋﻬﺎﺑﺎﺳﺘﺨﺪﺍﻡﺗﻄﺒﻴﻖPC
)MusicSphere(.ﺳﻴﺘﻮﻓﺮﺍﻟﺘﻄﺒﻴﻖﻋﻠﻰﻣﻮﻗﻊﺍﻟﻮﻳﺐﺍﻟﺨﺎﺹ
ﺑﻨﺎ.
!ﻳﺘﻢﻋﺮﺽﻗﻮﺍﺋﻢﺍﻟﺘﺸﻐﻴﻞﺍﻟﺘﻲﻗﻤﺖﺑﺈﻧﺸﺎﺋﻬﺎﺑﺎﺳﺘﺨﺪﺍﻡﺗﻄﺒﻴﻖ
PC)MusicSphere(ﻓﻲﺗﻨﺴﻴﻖﻣﺨﺘﺼﺮ.
٦
Ar
Page 100

75 64
٠٢
ﺍﻟﻘﺴﻢ
ﺗﺸﻐﻴﻞﻫﺬﺍﺍﻟﺠﻬﺎﺯ
ﺗﺸﻐﻴﻞﻫﺬﺍﺍﻟﺠﻬﺎﺯ
iPod
ﺍﻟﻌﻤﻠﻴﺎﺕﺍﻷﺳﺎﺳﻴﺔ
1
2
3
1ﻣﺆﺷﺮﺍﻟﺘﻜﺮﺍﺭ
2ﻣﺆﺷﺮﺭﻗﻢﺍﻷﻏﻨﻴﺔ
3ﻣﺆﺷﺮﺍﻻﺳﺘﻤﺎﻉﺍﻟﻌﺸﻮﺍﺋﻲ
4ﺍﻟﻤﺆﺷﺮPLAY/PAUSE
5ﺍﻟﻤﺆﺷﺮS.Rtrv
ﻳﻈﻬﺮﻋﻨﺪﺗﺸﻐﻴﻞﻭﻇﻴﻔﺔ"ﻣﺴﺘﺮﺟﻊﺍﻟﺼﻮﺕ".
6ﻣﺪﺓﺍﻷﻏﻨﻴﺔ)ﺷﺮﻳﻂﺍﻟﺘﻘﺪﻡ(
7ﻣﺆﺷﺮﻣﺪﺓﺍﻟﺘﺸﻐﻴﻞ
ﺗﺸﻐﻴﻞﺍﻷﻏﺎﻧﻲﻋﻠﻰﺟﻬﺎﺯiPod
1ﺍﻓﺘﺢﻏﻄﺎﺀﻣﻮﺻﻞUSBﻭﻗﻢﺑﺘﻮﺻﻴﻞﺟﻬﺎﺯiPodﺑﺎﺳﺘﺨﺪﺍﻡ
ﻣﻮﺻﻞiPod Dock ConnectorﺑﻜﺒﻞUSB.
ﺍﺧﺘﻴﺎﺭﻣﻘﻄﻮﻋﺔ)ﻓﺼﻞ(
1ﺍﺩﻓﻊM.C.ﻟﻠﻴﺴﺎﺭﺃﻭﻟﻠﻴﻤﻴﻦ.
ﺍﻟﺘﻘﺪﻳﻢﺃﻭﺍﻟﺘﺮﺟﻴﻊﺍﻟﺴﺮﻳﻊ
1ﺍﺩﻓﻊﻣﻊﺍﻻﺳﺘﻤﺮﺍﺭM.C.ﻟﻠﻴﺴﺎﺭﺃﻭﻟﻠﻴﻤﻴﻦ.
ﻣﻼﺣﻈﺎﺕ
!ﻻﻳﻤﻜﻦﺗﺸﻐﻴﻞiPodﺃﻭﺇﻳﻘﺎﻑﺗﺸﻐﻴﻠﻪﺇﺫﺍﺗﻢﺿﺒﻂﻭﺿﻊ
ﺍﻟﺘﺤﻜﻢﻋﻠﻰAUDIO.
!ﺍﻓﺼﻞﺳﻤﺎﻋﺎﺕﺍﻟﺮﺃﺱﻣﻦiPodﻗﺒﻞﺍﻟﺘﻮﺻﻴﻞﺑﻬﺬﻩﺍﻟﻮﺣﺪﺓ.
!ﺳﻴﺘﻢﺇﻳﻘﺎﻑﺗﺸﻐﻴﻞﺟﻬﺎﺯiPodﺑﻌﺪﺣﻮﺍﻟﻲﺩﻗﻴﻘﺘﻴﻦﻣﻦﺿﺒﻂ
ﻣﻔﺘﺎﺡﺗﺸﻐﻴﻞﺍﻟﺴﻴﺎﺭﺓﻋﻠﻰﻭﺿﻊﺍﻹﻳﻘﺎﻑOFF.
Random mode)ﺗﺸﻐﻴﻞﻋﺸﻮﺍﺋﻲ(
Sound Retriever)ﻣﺴﺘﺮﺟﻊﺍﻟﺼﻮﺕ(
ﺗﺤﺴﻴﻦﺍﻟﺼﻮﺕﺍﻟﻤﻀﻐﻮﻁﻭﺍﺳﺘﻌﺎﺩﺓﺍﻟﺼﻮﺕ
ﻓﻲﻫﺬﻩﺍﻟﺼﻔﺤﺔ.
٢ﺃﺩﺭM.C.ﻟﺘﻐﻴﻴﺮﺧﻴﺎﺭﺍﻟﻘﺎﺋﻤﺔﻭﺍﺿﻐﻂﻻﺧﺘﻴﺎﺭ
FUNCTION.
٣ﺃﺩﺭM.C.ﻻﺧﺘﻴﺎﺭﺍﻟﻮﻇﻴﻔﺔ.
ﺑﻌﺪﺍﻻﺧﺘﻴﺎﺭ؛ﻧﻔﺬﺍﻹﺟﺮﺍﺀﺍﺕﺍﻟﺘﺎﻟﻴﺔﻟﻀﺒﻂﺍﻟﻮﻇﻴﻔﺔ.
Play mode)ﺗﺸﻐﻴﻞﻣﺘﻜﺮﺭ(
1ﺍﺿﻐﻂM.C.ﻻﺧﺘﻴﺎﺭﻧﻄﺎﻕﺍﻟﺘﺸﻐﻴﻞﺍﻟﻤﺘﻜﺮﺭ.
ﺃﻗﺮﺍﺹCD-RW/CD-R/CD
!Disc repeat–ﺗﻜﺮﺍﺭﺟﻤﻴﻊﺍﻟﻤﺴﺎﺭﺍﺕ
!Track repeat–ﺗﻜﺮﺍﺭﺍﻟﻤﺴﺎﺭﺍﻟﺤﺎﻟﻲ
!Folder repeat–ﺗﻜﺮﺍﺭﺍﻟﻤﺠﻠﺪﺍﻟﺤﺎﻟﻲ
ﺟﻬﺎﺯﺍﻟﺘﺨﺰﻳﻦﺍﻟﺨﺎﺭﺟﻲ)SD، USB(
!All repeat–ﺗﻜﺮﺍﺭﺟﻤﻴﻊﺍﻟﻤﻠﻔﺎﺕ
!Track repeat–ﺗﻜﺮﺍﺭﺍﻟﻤﻠﻒﺍﻟﺤﺎﻟﻲ
!Folder repeat–ﺗﻜﺮﺍﺭﺍﻟﻤﺠﻠﺪﺍﻟﺤﺎﻟﻲ
1ﺍﺿﻐﻂﻋﻠﻰM.C.ﻟﻠﺘﺸﻐﻴﻞﺍﻟﻌﺸﻮﺍﺋﻲﺃﻭﺇﻳﻘﺎﻑﺗﺸﻐﻴﻠﻪ.
Pause)ﺇﻳﻘﺎﻑﻣﺆﻗﺖ(
1ﺍﺿﻐﻂﻋﻠﻰM.C.ﻟﻺﻳﻘﺎﻑﺍﻟﻤﺆﻗﺖﺃﻭﺍﻟﻤﺘﺎﺑﻌﺔ.
ﻳﻘﻮﻡﺗﻠﻘﺎﺋﻴًﺎﺑﺘﺤﺴﻴﻦﺍﻟﺼﻮﺕﺍﻟﻤﻀﻐﻮﻁﻭﺍﺳﺘﻌﺎﺩﺓﺍﻟﺼﻮﺕﺍﻟﺜﺮﻱ.
1ﺍﺿﻐﻂM.C.ﻻﺧﺘﻴﺎﺭﺍﻹﻋﺪﺍﺩﺍﻟﻤﺮﻏﻮﺏ.
ﻟﻠﺘﻔﺎﺻﻴﻞ،ﺭﺍﺟﻊ
ﺍﻟﺜﺮﻱ)ﻣﺴﺘﺮﺟﻊﺍﻟﺼﻮﺕ(
ﻟﻠﺘﺸﻐﻴﻞﺍﻟﻌﺸﻮﺍﺋﻲﺃﻭﺇﻳﻘﺎﻑﺗﺸﻐﻴﻠﻪ.
ﻣﻼﺣﻈﺎﺕ
!ﺗﺒﻌًﺎﻹﺻﺪﺍﺭiTunesﺍﻟﻤﺴﺘﺨﺪﻡﻟﻜﺘﺎﺑﺔﻣﻠﻔﺎﺕMP3ﻋﻠﻰ
ﻗﺮﺹﺃﻭﺃﻧﻮﺍﻉﻣﻠﻔﺎﺕﺍﻟﻮﺳﺎﺋﻂ،ﻗﺪﻳﻈﻬﺮﺍﻟﻨﺺﻏﻴﺮﺍﻟﻤﺘﻮﺍﻓﻖ
ﺍﻟﻤﺨﺰﻥﻓﻲﺍﻟﻤﻠﻒﺍﻟﺼﻮﺗﻲﺑﻄﺮﻳﻘﺔﻏﻴﺮﺻﺤﻴﺤﺔ.
!ﺗﻌﺘﻤﺪﻋﻨﺎﺻﺮﺍﻟﻤﻌﻠﻮﻣﺎﺕﺍﻟﻨﺼﻴﺔﺍﻟﺘﻲﻳﻤﻜﻦﺗﻐﻴﻴﺮﻫﺎﻋﻠﻰ
ﺍﻟﻮﺳﺎﺋﻂ.
ﺍﺧﺘﻴﺎﺭﺍﻟﻤﻠﻔﺎﺕ/ﺍﻟﻤﻘﻄﻮﻋﺎﺕﻣﻦﻗﺎﺋﻤﺔ
ﺍﻷﺳﻤﺎﺀﻭﺗﺸﻐﻴﻠﻬﺎ
١ﺍﺿﻐﻂ)ﻗﺎﺋﻤﺔ(ﻟﻠﺘﺤﻮﻝﺇﻟﻰﻭﺿﻊﻗﺎﺋﻤﺔﺃﺳﻤﺎﺀﺍﻟﻤﻠﻔﺎﺕ/
ﺍﻟﻤﻮﺍﺩ.
٢ﺍﺳﺘﺨﺪﻡM.C.ﻻﺧﺘﻴﺎﺭﺍﺳﻢﺍﻟﻤﻠﻒ)ﺃﻭﺍﺳﻢﺍﻟﻤﺠﻠﺪ(ﺍﻟﻤﺮﻏﻮﺏ.
ﺗﻐﻴﻴﺮﺍﺳﻢﻣﻠﻒﺃﻭﻣﺠﻠﺪ
1ﺃﺩﺭM.C..
ﺗﺸﻐﻴﻞ
1ﻋﻨﺪﺍﺧﺘﻴﺎﺭﻣﻠﻒﺃﻭﻣﻘﻄﻮﻋﺔ،ﺍﺿﻐﻂﻋﻠﻰM.C..
ﻋﺮﺽﻗﺎﺋﻤﺔﻣﻠﻔﺎﺕ)ﺃﻭﻣﺠﻠﺪﺍﺕ(ﻓﻲﺍﻟﻤﺠﻠﺪﺍﻟﻤﺨﺘﺎﺭ
1ﻋﻨﺪﺍﺧﺘﻴﺎﺭﻣﺠﻠﺪ،ﺍﺿﻐﻂﻋﻠﻰM.C..
ﺗﺸﻐﻴﻞﺃﻏﻨﻴﺔﻓﻲﺍﻟﻤﺠﻠﺪﺍﻟﻤﺨﺘﺎﺭ
1ﻋﻨﺪﺍﺧﺘﻴﺎﺭﻣﺠﻠﺪ،ﺍﺿﻐﻂﻣﻊﺍﻻﺳﺘﻤﺮﺍﺭﻋﻠﻰM.C..
ﻋﻤﻠﻴﺎﺕﺗﺸﻐﻴﻞﻣﺘﻘﺪﻣﺔﺑﺎﺳﺘﺨﺪﺍﻡ
ﺃﺯﺭﺍﺭﺧﺎﺻﺔ
ﺍﻻﺳﺘﻤﺎﻉﻟﻠﻤﻘﻄﻮﻋﺎﺕﺑﺘﺮﺗﻴﺐﻋﺸﻮﺍﺋﻲ
1ﺍﺿﻐﻂﻋﻠﻰ
ﻳﺘﻢﻋﺮﺽﺍﻟﻤﻘﻄﻮﻋﺎﺕﻓﻲﻧﻄﺎﻕﺍﻟﺘﻜﺮﺍﺭﺍﻟﻤﺨﺘﺎﺭﺑﺘﺮﺗﻴﺐ
ﻋﺸﻮﺍﺋﻲ.
ﺗﺤﺴﻴﻦﺍﻟﺼﻮﺕﺍﻟﻤﻀﻐﻮﻁﻭﺍﺳﺘﻌﺎﺩﺓﺍﻟﺼﻮﺕﺍﻟﺜﺮﻱ)ﻣﺴﺘﺮﺟﻊﺍﻟﺼﻮﺕ(
1ﺍﺿﻐﻂﻋﻠﻰS.Rtrvﻟﻠﺘﺒﺪﻳﻞﺑﻴﻦ:
OFF)ﺇﻳﻘﺎﻑ(—1—2
ﻳﻜﻮﻥ1ﻓﻌﺎﻻًﻟﻤﻌﺪﻻﺕﺍﻟﻀﻐﻂﺍﻟﻤﻨﺨﻔﻀﺔﻭﻳﻜﻮﻥ2ﻓﻌﺎﻻًﻟﻤﻌﺪﻻﺕ
ﺍﻟﻀﻐﻂﺍﻟﻌﺎﻟﻴﺔ.
/SCRL.
/SCRL.
ﺗﺸﻐﻴﻞﺃﻏﺎﻥﻋﻠﻰﺑﻄﺎﻗﺔﺫﺍﻛﺮﺓSD
1ﻓﻚﺍﻟﻠﻮﺣﺔﺍﻷﻣﺎﻣﻴﺔ.
2ﺃﺩﺧﻞﺑﻄﺎﻗﺔﺫﺍﻛﺮﺓSDﻓﻲﻓﺘﺤﺔﺑﻄﺎﻗﺔSD.
ﺃﺩﺧﻞﺍﻟﺠﻬﺎﺯﺑﺤﻴﺚﺗﻜﻮﻥﻭﺍﺟﻬﺔﺍﻟﺘﻮﺻﻴﻞﻣﺘﺠﻬﺔﻷﺳﻔﻞﻭﺍﺿﻐﻂ
ﻋﻠﻰﺍﻟﺒﻄﺎﻗﺔﺣﺘﻰﺗﺴﻤﻊﺻﻮﺕﻃﻘﻄﻘﺔﻭﺗﺜﺒﺖﻓﻲﻣﻜﺎﻧﻬﺎﺑﺈﺣﻜﺎﻡ.
3ﺃﻋﺪﺗﻮﺻﻴﻞﺍﻟﻠﻮﺣﺔﺍﻷﻣﺎﻣﻴﺔ.
4ﺍﺿﻐﻂSRC/OFFﻻﺧﺘﻴﺎﺭSDﻛﻤﺼﺪﺭ.
ﻳﺒﺪﺃﺍﻟﺘﺸﻐﻴﻞ.
ﺇﻳﻘﺎﻑﺗﺸﻐﻴﻞﺍﻟﻤﻠﻔﺎﺕﻋﻠﻰﺑﻄﺎﻗﺔﺫﺍﻛﺮﺓSD
1ﻓﻚﺍﻟﻠﻮﺣﺔﺍﻷﻣﺎﻣﻴﺔ.
2ﺍﺿﻐﻂﻋﻠﻰﺑﻄﺎﻗﺔﺫﺍﻛﺮﺓSDﺣﺘﻰﺗﺴﻤﻊﻃﻘﻄﻘﺔ.
ﺗﺨﺮﺝﺍﻟﺒﻄﺎﻗﺔﻣﻦﻣﻜﺎﻧﻬﺎ.
3ﺍﺳﺤﺐﺑﻄﺎﻗﺔSDﻟﻠﺨﺎﺭﺝ.
4ﺃﻋﺪﺗﻮﺻﻴﻞﺍﻟﻠﻮﺣﺔﺍﻷﻣﺎﻣﻴﺔ.
ﺍﺧﺘﻴﺎﺭﻣﺠﻠﺪ
1ﺍﺩﻓﻊM.C.ﻷﻋﻠﻰﺃﻭﻷﺳﻔﻞ.
ﺍﺧﺘﻴﺎﺭﻣﺴﺎﺭ
1ﺍﺩﻓﻊM.C.ﻟﻠﻴﺴﺎﺭﺃﻭﻟﻠﻴﻤﻴﻦ.
ﺍﻟﺘﻘﺪﻳﻢﺃﻭﺍﻟﺘﺮﺟﻴﻊﺍﻟﺴﺮﻳﻊ
1ﺍﺩﻓﻊﻣﻊﺍﻻﺳﺘﻤﺮﺍﺭM.C.ﻟﻠﻴﺴﺎﺭﺃﻭﻟﻠﻴﻤﻴﻦ.
ﺍﻟﻌﻮﺩﺓﻟﻠﻤﺠﻠﺪﺍﻷﺻﻠﻲ
1ﺍﺿﻐﻂﻣﻊﺍﻻﺳﺘﻤﺮﺍﺭﻋﻠﻰBAND/ESC.
ﺍﻟﺘﺤﻮﻳﻞﺑﻴﻦﺍﻟﺼﻮﺕﺍﻟﻤﻀﻐﻮﻁﻭCD-DA
1ﺍﺿﻐﻂBAND/ESC.
ﻣﻼﺣﻈﺎﺕ
!ﻋﻨﺪﺗﺸﻐﻴﻞﺍﻟﺼﻮﺕﺍﻟﻤﻀﻐﻮﻁ،ﻻﻳﺼﺪﺭﺻﻮﺕﻋﻨﺪﺍﻟﺘﻘﺪﻳﻢﺃﻭ
ﺍﻟﺘﺮﺟﻴﻊﺍﻟﺴﺮﻳﻊ.
!ﺍﻓﺼﻞﺃﺟﻬﺰﺓﺗﺨﺰﻳﻦUSBﻣﻦﺍﻟﻮﺣﺪﺓﺇﺫﺍﻟﻢﺗﻜﻦﻣﺴﺘﺨﺪﻣﺔ.
ﻋﺮﺽﺍﻟﻤﻌﻠﻮﻣﺎﺕﺍﻟﻨﺼﻴﺔ
ﺍﺧﺘﻴﺎﺭﺍﻟﻤﻌﻠﻮﻣﺎﺕﺍﻟﻨﺼﻴﺔﺍﻟﻤﺮﻏﻮﺑﺔ
1ﺍﺿﻐﻂDISP/
ﺗﻤﺮﻳﺮﺍﻟﻤﻌﻠﻮﻣﺎﺕﺍﻟﻨﺼﻴﺔﺇﻟﻰﺍﻟﻴﺴﺎﺭ
1ﺍﺿﻐﻂﻣﻊﺍﻻﺳﺘﻤﺮﺍﺭﻋﻠﻰDISP/
ﺇﻋﺪﺍﺩﺍﺕﺍﻟﻮﻇﺎﺋﻒ
١ﺍﺿﻐﻂM.C.ﻟﻌﺮﺽﺍﻟﻘﺎﺋﻤﺔﺍﻟﺮﺋﻴﺴﻴﺔ.
٥
Ar
 Loading...