

Pioneer DEH-6350SD User Manual
CD RDS RECEIVER
REPRODUCTOR DE CD CON RECEPTOR RDS
CD PLAYER COM RDS
EspañolEnglish
Português (B)
DEH-6350SD
Owner’s Manual
Manual de instrucciones
Manual do proprietário
Section
01
Contents
Before You Start
Before YouStart
About this unit 2
Demo mode 2
In case of trouble 2
About this manual 3
Operating this unit
Head unit 3
Remote control 3
Display indication 4
Basic Operations 4
Use and care of the remote control 4
Menu operations identical for function
settings/audio adjustments/initial
settings/lists 5
Tuner 5
CD/CD-R/CD-RW and external storage
devices (USB, SD) 6
iPod 6
Audio Adjustments 8
Initial Settings 9
Other Functions 10
Installation
Connections 10
Installation 11
Additional Information
Troubleshooting 13
Error messages 13
Handling guidelines 14
Compressed audio compatibility (disc, USB,
SD) 15
iPod compatibility 16
Sequence of audio files 16
Copyright and trademark 16
Specifications 17
Thank you for purchasing this PIONEER
product.
To ensure proper use, please read through this
manual before using this product. It is especially
important that you read and observe WARN-
INGs and CAUTIONs in this manual. Please
keep the manual in a safe and accessible place for
future reference.
About this unit
CAUTION
! Do not allow this unit to come into contact
with liquids. Electrical shock could result.
Also, damage to this unit, smoke, and overheating could result from contact with
liquids.
! Always keep the volume low enough to hear
outside sounds.
! Avoid exposure to moisture.
! If the battery is disconnected or discharged,
any preset memory will be erased.
CAUTION
This product is a class 1 laser product classified under the Safety of laser products, IEC
60825-1:2007, and contains a class 1M laser
module. To ensure continued safety, do not remove any covers or attempt to gain access to
the inside of the product. Refer all servicing to
qualified personnel.
CAUTION—CLASS 1M INVISIBLE LASER
RADIATION WHEN OPEN, DO NOT VIEW
DIRECTLY WITH OPTICAL INSTRUMENTS.
CAUTION:
USE OF CONTROL OR ADJUSTMENT OR
PERFORMANCE OF PROCEDURES
OTHER THAN THOSE SPECIFIED HEREIN
MAY RESULT IN HAZARDOUS RADIATION
EXPOSURE.
CAUTION:
THE USE OF OPTICAL INSTRUMENTS
WITH THIS PRODUCT WILL INCREASE
EYE HAZARD.
Note
Function setting operations are completed even
if the menu is cancelled before the operations
are confirmed.
Demo mode
Important
Failure to connect the red lead (ACC) of this unit
to a terminal coupled with ignition switch on/off
operations may lead to battery drain.
Demo mode
The demo automatically starts when the ignition
switch is set to ACC or ON while the unit is
turned off. Turning off the unit does not cancel
demo mode. To cancel the demo mode, press
/DISP/SCRL. Press /DISP/SCRL again to
start. Operating the demo while the ignition
switch is set to ACC may drain battery power.
In case of trouble
Should this unit fail to operate properly, please
contact your dealer or nearest authorized
PIONEER Service Station.
2
En
d
Before You Start
Operating this unit
Section
02
English
About this manual
! In the following instructions, USB memories,
USB portable audio players, and SD memory
cards are collectively referred to as “external
storage devices (USB, SD).” If only USB
memories and USB portable audio players
are indicated, they are collectively referred to
as “USB storage devices.”
! In this manual, iPod and iPhone will be re-
ferred to as “iPod”.
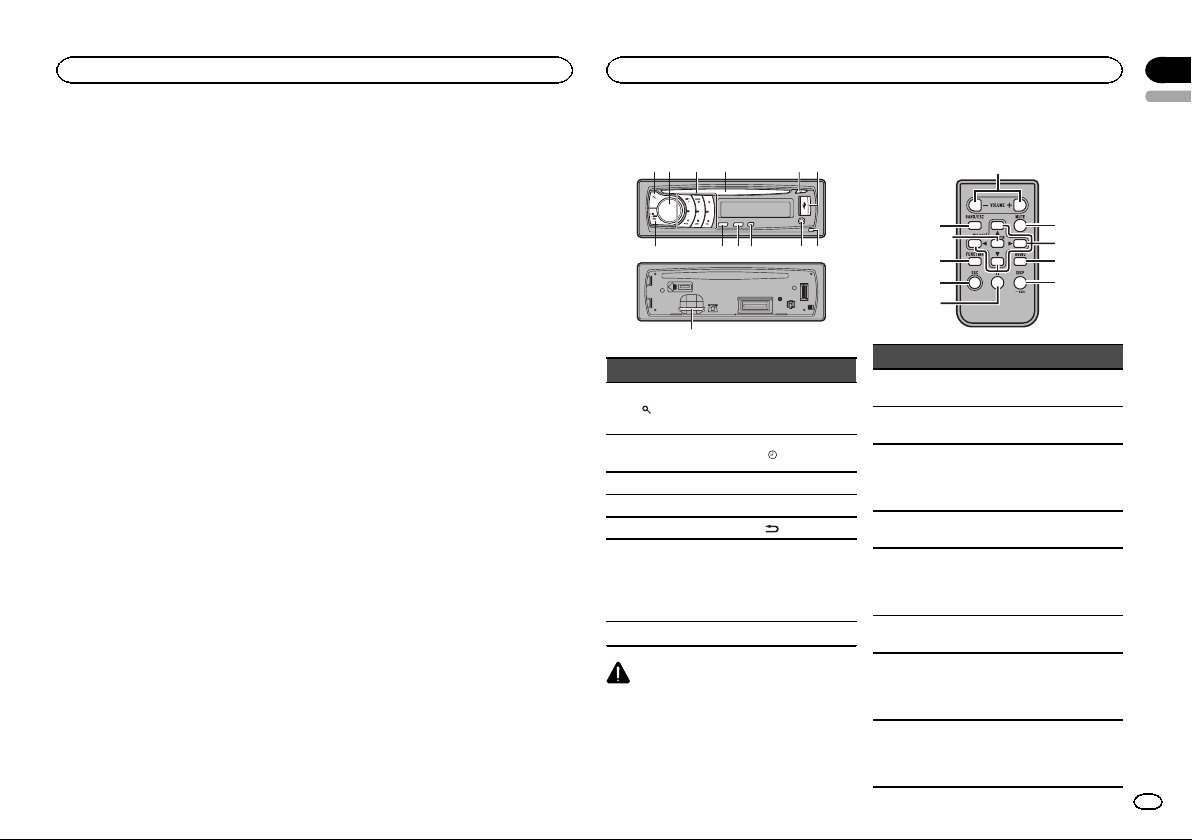
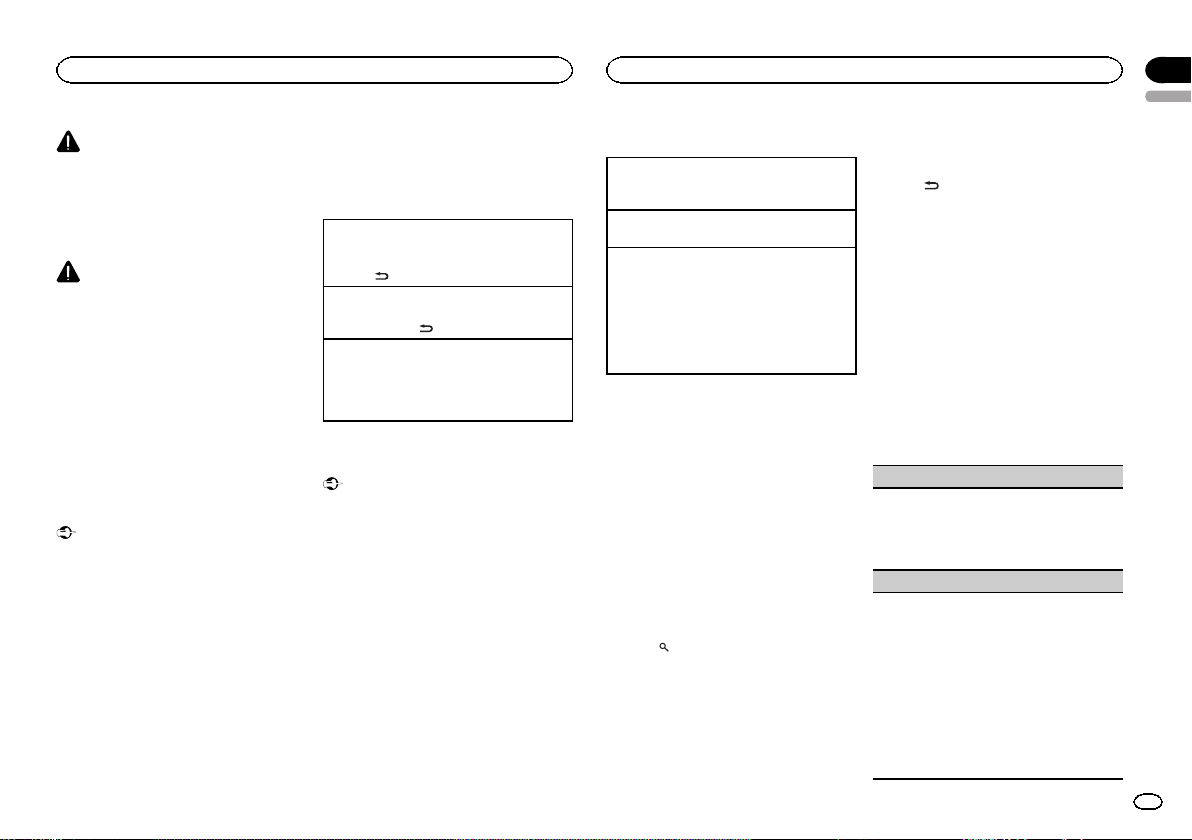
Head unit
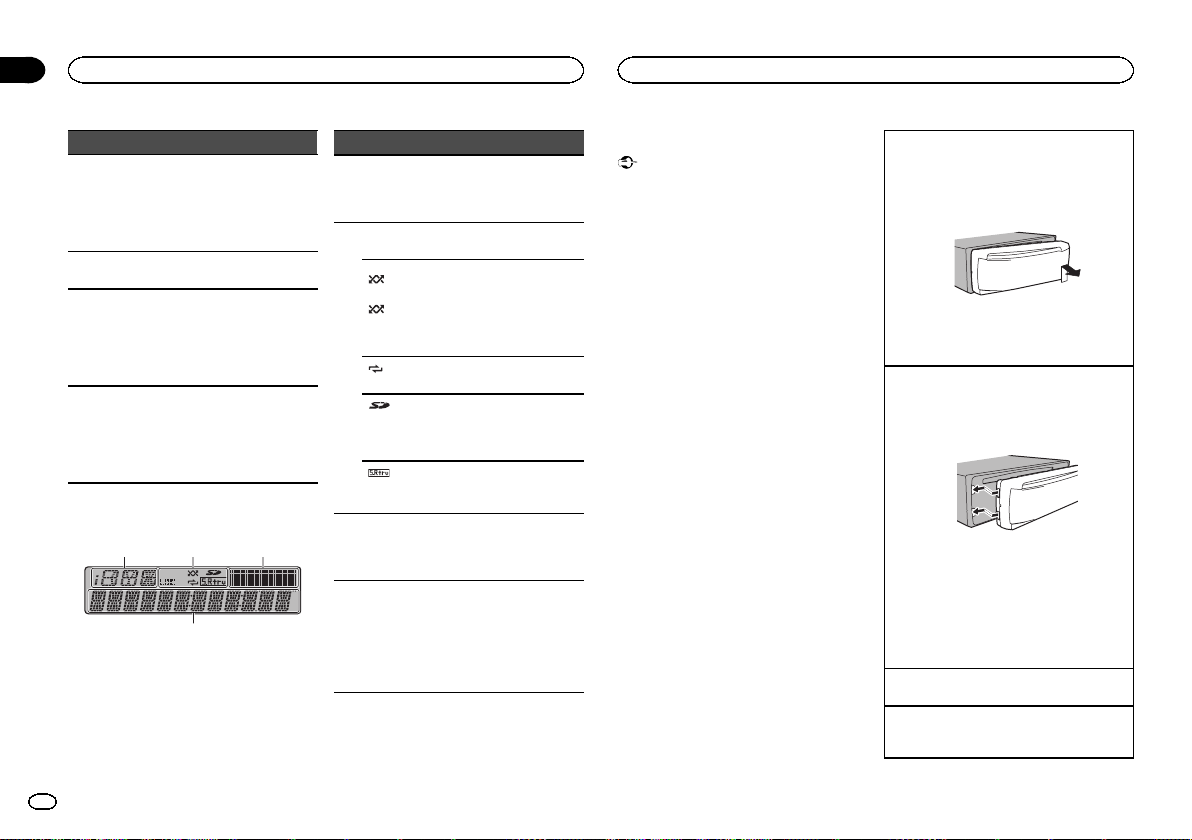
2 4 5
3
b a 9c
Part Part
1
(list) 8
MULTI-CONTROL
2
(M.C.)
3 1 to 6 a BAND/ESC
4 Disc loading slot b SRC/OFF
5 h (eject) c
6 USB port d
7 Detach button
CAUTION
Use an optional Pioneer USB cable (CD-U50E)
to connect the USB audio player/USB memory
as any device connected directly to the unit will
protrude out from the unit and may be dangerous.
Do not use unauthorized products.
9
61
78
AUX input jack
(3.5 mm stereo
jack)
/DISP OFF
/DISP/SCRL
Removing the
front panel, you
can see the SD
memory card
slot.
Remote control
a
l
b
j
Part Operation
e VOLUME
f MUTE
g a/b/c/d
h AUDIO
i DISP/SCRL
j e
FUNC-
k
TION
LIST/
l
ENTER
Press to increase or decrease
volume.
Press to mute. Press again to
unmute.
Press to perform manual seek
tuning, fast forward, reverse
and track search controls. Also
used for controlling functions.
Press to select an audio function.
Press to select different displays.
Press and hold to scroll
through the text information.
Press to pause or resume playback.
Press to select functions.
Press and hold to recall the initial setting menu when the
sources are off.
Press to display the list depending on the source.
While in the operating menu,
press to control functions.
e
f
g
hk
i
3
En
4
Section
02
Operating this unit
Operating this unit
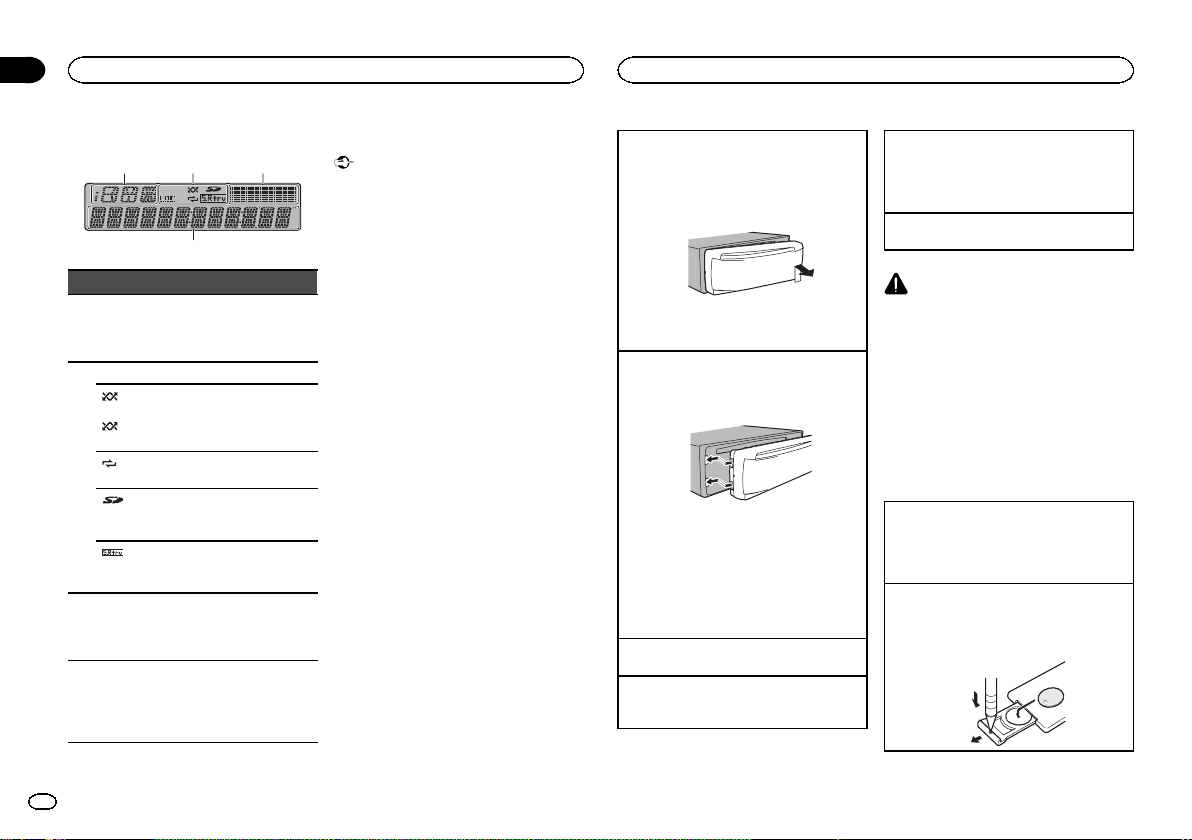
Display indication
1
Indicator State
Information dis-
1
play section
LOC Local seek tuning is on.
(ran-
dom)
(shuf-
fle)
(re-
peat)
2
memory
card)
(sound retriever)
Level
meter dis-
3
play section
Main dis-
4
play section
2 3
Source, band, and menu operation guides are displayed.
The random function is on.
The iPod source is selected
and the shuffle or shuffle all
function is on.
The repeat function is on.
(SD
SD/SDHC memory card is inserted.
The sound retriever function is
on.
The levels of the audio outputs
are displayed.
Tuner: frequency
Built-in CD, external storage
device (USB, SD) and iPod:
elapsed playback time and text
information
Basic Operations
Important
! Handle gently when removing or attaching
the front panel.
! Avoid subjecting the front panel to excessive
shock.
! Keep the front panel out of direct sunlight
and high temperatures.
! To avoid damaging the device or vehicle inte-
rior, remove any cables and devices attached
to the front panel before detaching it.
Removing the front panel to protect your unit from
theft
1 Press the detach button to release the front
panel.
2 Push the front panel upward and pull it toward
you.
3 Always keep the detached front panel in a pro-
tection device such as a protection case.
Re-attaching the front panel
1 Slide the front panel to the left.
Make sure to insert the tabs on the left side of
the head unit into the slots on the front panel.
2 Press the right side of the front panel until it is
firmly seated.
If you cannot attach the front panel to the
head unit successfully, make sure that you are
placing the front panel onto the head unit correctly. Forcing the front panel into place may
result in damage to the front panel or head
unit.
Turning the unit on
1 Press SRC/OFF to turn the unit on.
Turning the unit off
1 Press and hold SRC/OFF until the unitturns
off.
Selecting a source
1 Press SRC/OFF to cycle between:
TUNER (tuner)—CD (built-in CD player)—USB
(USB)/USB-iPod (iPod)—SD (SD memory
card)—AUX (AUX)
Adjusting the volume
1 Turn M.C. to adjust the volume.
CAUTION
For safety reasons, park your vehicle when removing the front panel.
Note
When this unit’s blue/white lead is connected to
the vehicle’s auto-antenna relay control terminal, the vehicle’s antenna extends when this
unit’s source is turned on. To retract the antenna, turn the source off.
Use and care of the remote
control
Using the remote control
1 Point the remote control in the direction of the
front panel to operate.
When using for the first time, pull out the film
protruding from the tray.
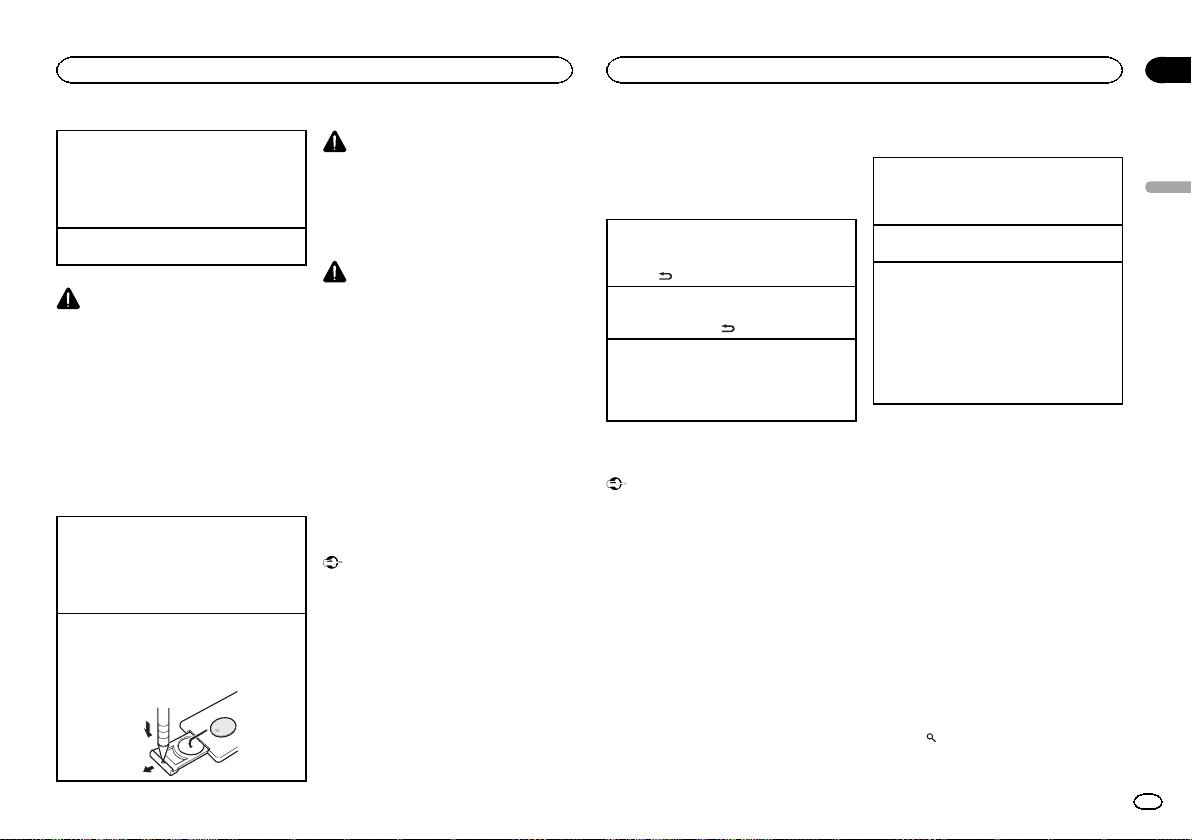
Replacing the battery
1 Slide the tray out on the back of the remote
control.
2 Insert the battery with the plus (+) and minus
(–) poles aligned properly.
4
En
Operating this unit
Operating this unit
Section
02
English
WARNING
! Keep the battery out of the reach of children.
Should the battery be swallowed, consult a
doctor immediately.
! Batteries (battery pack or batteries installed)
must not be exposed to excessive heat such
as sunshine, fire or the like.
CAUTION
! Use one CR2025 (3 V) lithium battery.
! Remove the battery if the remote control is
not used for a month or longer.
! There is a danger of explosion if the battery is
incorrectly replaced. Replace only with the
same or equivalent type.
! Do not handle the battery with metallic tools.
! Do not store the battery with metallic ob-
jects.
! If the battery leaks, wipe the remote control
completely clean and install a new battery.
! When disposing of used batteries, comply
with governmental regulations or environmental public institutions’ rules that apply in
your country/area.
Important
! Do not store the remote control in high tem-
peratures or direct sunlight.
! The remote control may not function properly
in direct sunlight.
! Do not let the remote control fall onto the
floor, where it may become jammed under
the brake or accelerator pedal.
Menu operations identical
for function settings/audio
adjustments/initial settings/
lists
Returning to the previous display
Returning to the previous list/category (the folder/
category one level higher)
/DISP/SCRL.
1 Press
Returning to the main menu
Returning to the top tier of the list/category.
1 Press and hold
Returning to the ordinary display
Canceling the initial setting menu
Returning to the ordinary display from the list/category
1 Press BAND/ESC.
/DISP/SCRL.
Tuner
Important
If you are using this unit in North, Central or
South America, reset the AM tuning step (refer
to AM STEP (AM tuning step) on page 9).
Basic Operations
Selecting a band
1 Press BAND/ESC until the desired band (FM1,
FM2, FM3 for FM or AM) is displayed.
Manual tuning (step by step)
1 Push M.C. left or right.
Seeking
1 Push and hold M.C. left or right, and then re-
lease.
You can cancel seek tuning by pushing M.C.
left or right.
While pushing and holding M.C. left or right,
you can skip stations. Seek tuning starts as
soon as you release M.C.
Storing and recalling stations
for each band
Using preset tuning buttons
1 When you find a station that you want
to store in memory, press one of the preset
tuning buttons (1 to 6) and hold until the
preset number stops flashing.
2 Press one of the preset tuning buttons (1
to 6) to select the desired station.
# You can also recall stored radio stations by pushing M.C. up or down during the frequency display.
Using the preset screen
1 Press to switch to the preset screen.
2 Use M.C. to store the selected frequency
in the memory.
Turn to change the preset number. Pressand
hold to store.
3 Use M.C. to select the desired station.
Turn to change the station. Press to select.
Switching the display
Selecting the desired text information
% Press
Program service name—Frequency
# The frequency appear on the display for eight
seconds.
Note
Depending on the area, you cannot switch the
display.
/DISP/SCRL.
Function settings
1 Press M.C. to display the main menu.
2 Turn M.C. to change the menu option
and press to select FUNCTION.
3 Turn M.C. to select the function.
After selecting, perform the following procedures to set the function.
BSM (best stations memory)
BSM (best stations memory) automatically stores
the six strongest stations in the order of their signal strength.
1 Press M.C. to turn BSM on.
To cancel, press M.C. again.
LOCAL (local seek tuning)
Local seek tuning lets you tune in to only those
radio stations with sufficiently strong signals for
good reception.
1 Press M.C. to display the setting mode.
2 Turn M.C. to select the desiredsetting.
FM: OFF—LEVEL1—LEVEL2—LEVEL3—
LEVEL4
AM: OFF—LEVEL1—LEVEL2
The highest level setting allows reception of
only the strongest stations, while lower levels
allow the reception of weaker stations.
3 Press M.C. to confirm the selection.
5
En

Section
02
Operating this unit
Operating this unit
CD/CD-R/CD-RW and external
storage devices (USB, SD)
Basic Operations
Playing a CD/CD-R/CD-RW
1 Insert the disc into the disc loading slot with
the label side up.
Ejecting a CD/CD-R/CD-RW
1 Press h (eject).
Playing songs on a USB storage device
1 Open the USB connector cover and plug in
the USB storage device using a USB cable.
Stopping playback of files on a USB storage device
1 You may disconnect the USB storage device at
any time.
Playing songs on an SD memory card
1 Remove the front panel.
2 Insert an SD memory card into the SD card
slot.
Insert it with the contact surface facing down,
and press on the card until it clicks and completely locks into place.
3 Re-attach the front panel.
4 Press SRC/OFF to select SD as the source.
Playback will start.
Stopping playback of files on an SD memory card
1 Remove the front panel.
2 Press on the SD memory card until it clicks.
The SD memory card is ejected.
3 Pull out the SD memory card.
4 Re-attach the front panel.
Selecting a folder
1 Push M.C. up or down.
Selecting a track
1 Push M.C. left or right.
Fast forwarding or reversing
1 Push and hold M.C. left or right.
6
En
Returning to root folder
1 Press and hold BAND/ESC.
Switching between compressed audio and CD-DA
1 Press BAND/ESC.
Notes
! When playing compressed audio, there is no
sound during fast forward or reverse.
! Disconnect USB storage devices from the
unit when not in use.
Displaying text information
Selecting the desired text information
1 Press
/DISP/SCRL.
Scrolling the text information to the left
1 Press and hold
/DISP/SCRL.
Notes
! Depending on the version of iTunes used to
write MP3 files to a disc or media file types,
incompatible text stored within an audio file
may be displayed incorrectly.
! Text information items that can be changed
depend on the media.
Selecting and playing files/
tracks from the name list
1 Press to switch to the file/track name
list mode.
2 Use M.C. to select the desired file name
(or folder name).
Changing the file or folder name
1 Turn M.C.
Playing
1 When a file or track is selected, press M.C.
Viewing a list of the files (or folders) in the selected folder
1 When a folder is selected, press M.C.
Playing a song in the selected folder
1 When a folder is selected, press and hold M.C.
Advanced operations using
special buttons
Selecting a repeat play range
1 Press 6/
Playing tracks in random order
1 Press 5/
Pausing playback
1 Press 2/PAUSEtopauseor resume.
Enhancing compressed audio and restoring rich
sound (sound retriever)
1 Press 1/S.Rtrv to cycle between:
to cycle between the following:
CD/CD-R/CD-RW
! DISC – Repeat all tracks
! TRACK – Repeat the current track
! FOLDER – Repeat the current folder
External storage device (USB, SD)
! ALL – Repeat all files
! TRACK – Repeat the current file
! FOLDER – Repeat the current folder
to turn random play on or off.
Tracks in a selected repeat rangeareplayedin
random order.
OFF (off)—1—2
1 is effective for low compression rates, and 2
is effective for high compression rates.
Function settings
1 Press M.C. to display the main menu.
2 Turn M.C. to change the menu option
and press to select FUNCTION.
3 Turn M.C. to select the function.
After selecting, perform the following procedures to set the function.
REPEAT (repeat play)
1 Press M.C. to display the setting mode.
2 Turn M.C. to select a repeat play range.
For details, refer to Selecting a repeat play range
on this page.
3 Press M.C. to confirm the selection.
RANDOM (random play)
1 Press M.C. to turn random play on or off.
PAUSE (pause)
1 Press M.C. to pause or resume.
S.RTRV (sound retriever)
Automatically enhances compressed audio and
restores rich sound.
1 Press M.C. to display the setting mode.
2 Turn M.C. to select the desired setting.
For details, refer to Enhancing compressed
audio and restoring rich sound (sound retriever)
on this page.
3 Press M.C. to confirm the selection.
iPod
Basic Operations
Playing songs on an iPod
1 Open the USB connector cover.
2 Connect an iPod to the USB cable using an
iPod Dock Connector.
Selecting a track (chapter)
1 Push M.C. left or right.
Fast forwarding or reversing
1 Push and hold M.C. left or right.

Operating this unit
Notes
! The iPod cannot be turned on or off when the
control mode is set to AUDIO.
! Disconnect headphones from the iPod be-
fore connecting it to this unit.
! The iPod will turn off about two minutes after
the ignition switch is set to OFF.
Displaying text information
Selecting the desired text information
/DISP/SCRL.
1 Press
Scrolling the text information to the left
1 Press and hold
Browsing for a song
1 Press to switch to the top menu of list
search.
2 Use M.C. to select a category/song.
Changing the name of the song or category
1 Turn M.C.
Playlists—artists—albums—songs—podcasts
—genres—composers—audiobooks
Playing
1 When a song is selected, press M.C.
Viewing a list of songs in the selected category
1 When a category is selected, press M.C.
Playing a song in the selected category
1 When a category is selected, press and hold
M.C.
Searching the list by alphabet
1 When a list for the selected category is dis-
played, press
mode.
2 Turn M.C. to select a letter.
3 Press M.C. to display the alphabetical list.
/DISP/SCRL.
to switch to alphabet search
Notes
! You can play playlists created with the PC ap-
plication (MusicSphere). The application will
be available on our website.
! Playlists that you created with the PC appli-
cation (MusicSphere) are displayed in abbreviated form.
Advanced operations using
special buttons
Selecting a repeat play range
1 Press 6/
Playing all songs in random order (shuffle all)
1 Press 5/
! When the control mode is set to iPod/APP,
Pausing playback
Press 2/PAUSE to pause or resume.
to cycle between the following:
! ONE – Repeat the current song
! ALL – Repeat all songs in the selected list
to turn shuffle all on.
shuffle play is on.
Operating this unit
Playing songs related to the currently playing
song
You can play songs from the following lists.
• Album list of the currently playing artist
• Song list of the currently playing album
• Album list of the currently playing genre
1 Press and hold M.C. to switch to link play
mode.
2 Turn M.C. to change the mode; press to select.
! ARTIST – Plays an album of the artist cur-
rently being played.
! ALBUM – Plays a song from the album
currently being played.
! GENRE – Plays an album from the genre
currently being played.
The selected song/album will be played after
the currently playing song.
The selected song/album may be canceled if you
operate functions other than link play (e.g. fast forward and reverse).
Depending on the song selected to play, the end
of the currently playing song and the beginning of
the selected song/album may be cut off.
Operating this unit’s iPod function from your iPod
You can listen to the sound from your iPod applications using your car's speakers, when APP is selected.
This function is not compatible with the following
iPod models.
! iPod nano 1st generation
! iPod 5th generation
APP mode is compatible with the following iPod
models.
! iPod touch 3rd generation (software version
3.0 or later)
! iPod touch 2nd generation (software version
3.0 or later)
! iPod touch 1st generation (software version
3.0 or later)
! iPhone 4 (software version 4.0 or later)
! iPhone 3GS (software version 3.0 or later)
! iPhone 3G (software version 3.0 or later)
1 Press 4/iPod to switch the control mode.
! iPod – This unit’s iPod function can be op-
erated from the connected iPod.
! APP – Play back the sound from your iPod
applications.
! AUDIO – This unit’s iPod function can be
operated from this unit.
Enhancing compressed audio and restoring rich
sound (sound retriever)
1 Press 1/S.Rtrv to cycle between:
OFF (off)—1—2
1 is effective for low compression rates, and 2
is effective for high compression rates.
Function settings
1 Press M.C. to display the main menu.
2 Turn M.C. to change the menu option
and press to select FUNCTION.
Section
02
English
7
En
Section
02
Operating this unit
Operating this unit
3 Turn M.C. to select the function.
After selecting, perform the following procedures to set the function.
REPEAT (repeat play)
1 Press M.C. to display the setting mode.
2 Turn M.C. to select a repeat play range.
For details about the settings, refer to Selecting
a repeat play range on the previous page.
3 Press M.C. to confirm the selection.
SHUFFLE (shuffle)
1 Press M.C. to display the setting mode.
2 Turn M.C. to select your favorite setting.
! SONGS – Play back songs in the selected
list in random order.
! ALBUMS – Play back songs from a ran-
domly selected album in order.
! OFF – Cancel random play.
3 Press M.C. to confirm the selection.
SHUFFLE ALL (shuffle all)
! Press M.C. to turn shuffle all on.
To turn off, set SHUFFLE in the FUNCTION
menu to off.
LINK PLAY (link play)
1 Press M.C. to display the setting mode.
2 Turn M.C. to change the mode; press to select.
For details about the settings, refer to Playing
songs related to the currently playing song on
the previous page.
PAUSE (pause)
1 Press M.C. to pause or resume.
AUDIO BOOKS (audiobook speed)
1 Press M.C. to display the setting mode.
2 Turn M.C. to select your favorite setting.
! FASTER – Playback at a speed faster than
normal
! NORMAL – Playback at normal speed
! SLOWER – Playback at a speed slower
than normal
3 Press M.C. to confirm the selection.
S.RTRV (sound retriever)
1 Press M.C. to display the setting mode.
2 Turn M.C. to select the desired setting.
For details, refer to Enhancing compressed
audio and restoring rich sound (sound retriever)
on the previous page.
3 Press M.C. to confirm the selection.
Notes
! Switching the control mode to iPod pauses
song playback. Operate the iPod to resume
playback.
! The following functions are still accessible
from the unit even if the control mode is set
to iPod/APP.
— Switching the text information (iPod)
— Pausing
— Fastforward/reverse
— Track up/down
— Repeat play (ONE/ALL/OFF)
— Random play (shuffle)
(list) to use iPod menu
—
— Press M.C. to press the iPod click wheel
— Push M.C. up to turn the iPod click wheel to
the left
— Push M.C. down to turn the iPod click wheel
to the right
! When the control mode is set to iPod/APP,
operations are limited as follows:
— The function settings are not available.
— The browse function cannot be operated from
this unit.
Audio Adjustments
1 Press M.C. to display the main menu.
2 Turn M.C. to change the menu option
and press to select AUDIO.
3 Turn M.C. to select the audio function.
After selecting, perform the following procedures to set the audio function.
FAD/BAL (fader/balance adjustment)
1 Press M.C. to display the setting mode.
2 Press M.C. to cycle between fader (front/rear)
and balance (left/right).
3 Turn M.C. to adjust the speaker balance.
! When the rear output setting is SW, you
cannot adjust front/rear speaker balance.
Refer to SW CONTROL (rear output and
subwoofer setting) on the next page.
PRESET EQ (equalizer recall)
1 Press M.C. to display the setting mode.
2 Turn M.C. to select an equalizer curve.
POWERFUL—NATURAL—VOCAL—CUSTOM1—CUSTOM2—FLAT—SUPER BASS
3 Press M.C. to confirm the selection.
GRAPHIC EQ (equalizer adjustment)
You can adjust the currently selected equalizer
curve setting as desired. Adjusted equalizer curve
settings are stored in CUSTOM1 or CUSTOM2.
! A separate CUSTOM1 curve can be created
for each source. If you make adjustments
when a curve other than CUSTOM2 is selected, the equalizer cur ve settings will be
stored in CUSTOM1.
! A CUSTOM2 curve that is common for all
sources can be created. If you make adjustments when the CUSTOM2 curve is selected,
the CUSTOM2 curve will be updated.
1 Press M.C. to display the setting mode.
2 Press M.C. to cycle between equalizer band
and level.
3 Press M.C. to switch to equalizer band and
then turn M.C. to select.
100HZ—315HZ—1.25KHZ—3.15KHZ—8KHZ
4 Press M.C. to switch to level and then turn M.
C. to adjust.
Adjustment range: +6 to –6
LEVEL METER (level meter display setting)
1 Press M.C. to display the setting mode.
2 Turn M.C. to select the desired setting.
OFF (off) — MODE1—MODE2—MODE3—
MODE4
3 Press M.C. to confirm the selection.
LOUDNESS (loudness)
Loudness compensates for deficiencies in the lowand high-frequency ranges at low volume.
1 Press M.C. to display the setting mode.
2 Turn M.C. to select the desired setting.
OFF (off) — LOW (low)—MID (mid)—HIGH
(high)
3 Press M.C. to confirm the selection.
SW SETTING 1 (subwoofer on/off setting)
8
En

Operating this unit
Operating this unit
Section
02
English
This unit is equipped with a subwoofer output
which can be turned on or off.
1 Press M.C. to display the setting mode.
2 Turn M.C. to select the desired setting.
NORMAL (normal phase)—REVERSE (reverse
phase)—OFF (subwoofer off)
3 Press M.C. to confirm the selection.
SW SETTING 2 (subwoofer adjustment)
The cut-off frequency and output level can be adjusted when the subwoofer output is on.
Only frequencies lower than those in the selected
range are outputted from the subwoofer.
1 Press M.C. to display the setting mode.
2 Press M.C. to cycle between the cut-off fre-
quency and output level of the subwoofer.
3 Press M.C. to switch to cut-off frequency and
then turn M.C. to select the cut-off frequency.
50HZ—63HZ—80HZ—100HZ—125HZ
4 Press M.C. to switch to output level and then
turn M.C. to adjust the output level.
Adjustment range: +6 to -24
HPF SETTING (high pass filter adjustment)
When you do not want low sounds from the subwoofer output frequency range to play from the
front or rear speakers, turn on the HPF (high pass
filter). Only frequencies higher than those in the
selected range are output from the front or rear
speakers.
1 Press M.C. to display the setting mode.
2 Turn M.C. to select the cut-off frequency.
OFF (off)— 50HZ—63HZ—80HZ—100HZ—
125HZ
3 Press M.C. to confirm the selection.
BASS BOOSTER (bass boost)
1 Press M.C. to display the setting mode.
2 Turn M.C. to adjust the level.
Adjustment range: 0 to +6
3 Press M.C. to confirm the selection.
SLA (source level adjustment)
SLA (Source Level Adjustment) lets you adjust the
volume level of each source to prevent radical
changes in volume when switching between sources.
! When selecting FM as the source, you cannot
switch to SLA.
! Settings are based on the FM volume level,
which remains unchanged.
! The AM volume level can also be adjusted with
this function.
1 Press M.C. to display the setting mode.
2 Turn M.C. to adjust the source volume.
Adjustment range: +4 to –4
3 Press M.C. to confirm the selection.
Initial Settings
1 Press and hold SRC/OFF until the unit
turns off.
2 Press M.C. and hold until the initial setting menu appears in the display.
3 Turn M.C. to select the initial setting.
After selecting, perform the following procedures to set the initial setting.
CLOCK SET (setting the clock)
1 Press M.C. to display the setting mode.
2 Press M.C. to select the segment of the clock
display you wish to set.
Hour—Minute
3 Turn M.C. to adjust the clock.
FM STEP (FM tuning step)
The FM tuning step employed by seek tuning can
be switched between 100 kHz, the preset step, and
50 kHz.
! If seek tuning is performed in 50 kHz steps,
stations may be tuned in imprecisely. Tune in
the stations with manual tuning or use seek
tuning again.
! The tuning step remains at 50 kHz during man-
ual tuning.
1 Press M.C. to display the setting mode.
2 Turn M.C. to select the FM tuning step.
100KHz (100 kHz)—50KHz (50 kHz)
3 Press M.C. to confirm the selection.
AM STEP (AM tuning step)
The AM tuning step can be switched between 9
kHz, the preset step, and 10 kHz. When using the
tuner in North, Central or South America, reset
the tuning step from 9 kHz (531 kHz to 1 602 kHz
allowable) to 10 kHz (530 kHz to 1 640 kHz allowable).
1 Press M.C. to display the setting mode.
2 Turn M.C. to select the AM tuning step.
9kHZ (9 kHz)—10kHZ (10 kHz)
3 Press M.C. to confirm the selection.
AUX (auxiliar y input)
Activate this setting when using an auxiliary device connected to this unit.
1 Press M.C. to turn AUX on or off.
USB PNP (plug and play)
This setting allows you to switch your source to
USB/USB-iPod automatically.
1 Press M.C. to turn the plug and play function
on or off.
ON – When a USB storage device/iPod is con-
nected, depending on the type of device, the
source is automatically switched to USB/USB-
iPod when you turn on the engine. If you disconnect your USB storage device/iPod, this
unit’s source is turned off.
OFF – When a USB storage device/iPod is con-
nected, the source is not switched to USB/
USB-iPod automatically. Please change the
source to USB/USB-iPod manually.
SW CONTROL (rear output and subwoofer setting)
This unit’s rear output (rear speaker leads output)
can be used for full-range speaker (FUL) or subwoofer (SW) connection. If you switch the rear output setting to SW, you can connect a rear speaker
lead directly to a subwoofer without using an auxiliary amp.
Initially, REAR SP is set for rear full-range speaker
connection (FUL).
1 Press M.C. to display the setting mode.
2 Turn M.C. to change the output and press to
select.
REAR SP: FUL—SW
3 Press M.C. to confirm the selection.
DEMO (demo display setting)
1 Press M.C. to turn the demo display on or off.
EVER SCRL (scroll mode setting)
When ever scroll is set to ON, recorded text information scrolls continuously in the display. Set to
OFF if you prefer the information to scroll just
once.
1 Press M.C. to turn the ever scroll on or off.
9
En
y
Section
03
Operating this unit
Installation
Other Functions
Using an AUX source
1 Insert the stereo mini plug into the AUX
input jack.
2 Press SRC/OFF to select AUX as the
source.
Note
AUX cannot be selected unless the auxiliary setting is turned on. For more details, refer to AUX
(auxiliary input) on the previous page.
Turning the clock display on or off
% Press /DISP OFF to turn the clock display on or off.
# The clock display disappears temporarily when
you perform other operations, but the clock display
appears again after 25 seconds.
Turning the display off and on
% Press /DISP OFF and hold until the display turns off and on.
# Even if the display indication is turned off, operation can be conducted. If operation is conducted
while the display indication is off, display will light
up for a few seconds and then turn off again.
10
En
Connections
WARNING
! Use speakers over 50 W (output value) and
between 4 W to 8 W (impedance value). Do
not use 1 W to 3 W speakers for this unit.
! The black cable is ground. When installing
this unit or power amp (sold separately),
make sure to connect the ground wire first.
Ensure that the ground wire is properly connected to metal parts of the car ’s body. The
ground wire of the power amp and the one of
this unit or any other device must be connected to the car separately with different
screws. If the screw for the ground wire loosens or falls out, it could result in fire, generation of smoke or malfunction.
Ground wire
Other devices
(Another electronic
device in the car)
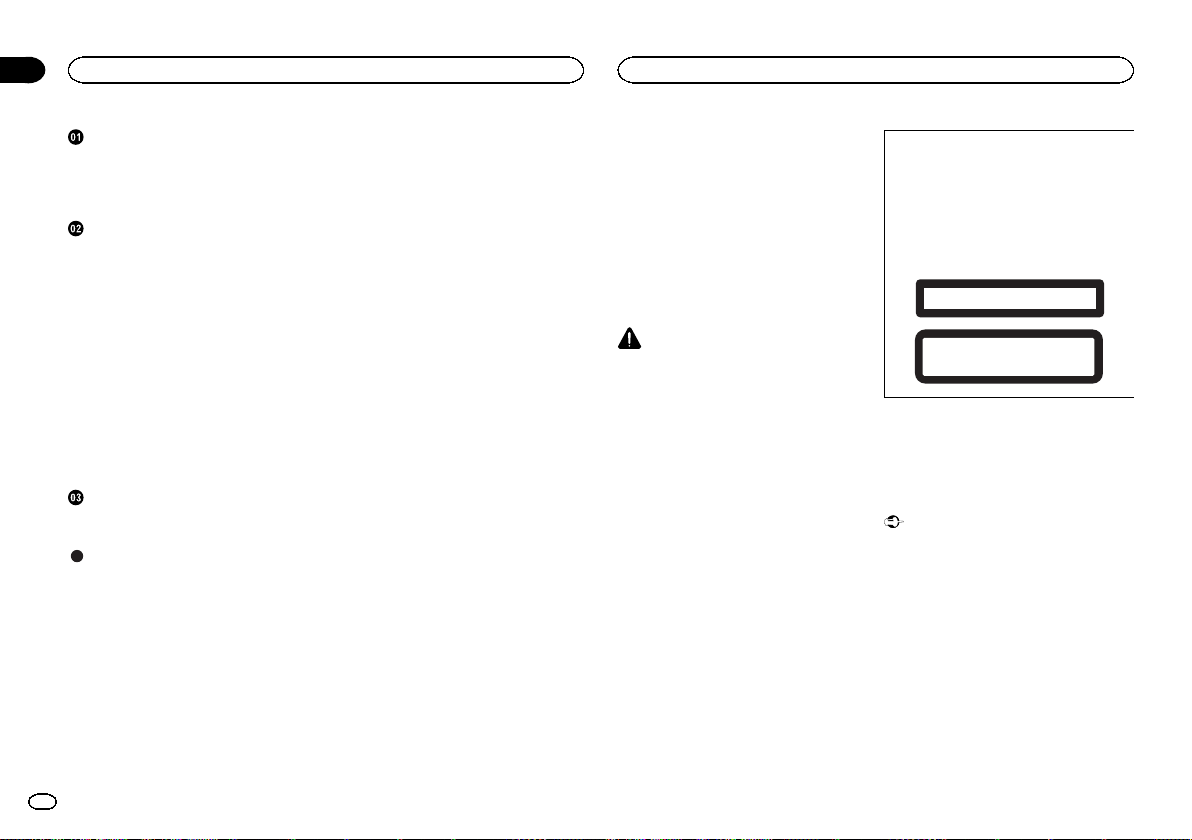
Important
! When installing this unit in a vehicle without
an ACC (accessory) position on the ignition
switch, failure to connect the red cable to the
terminal that detects operation of the ignition
key may result in battery drain.
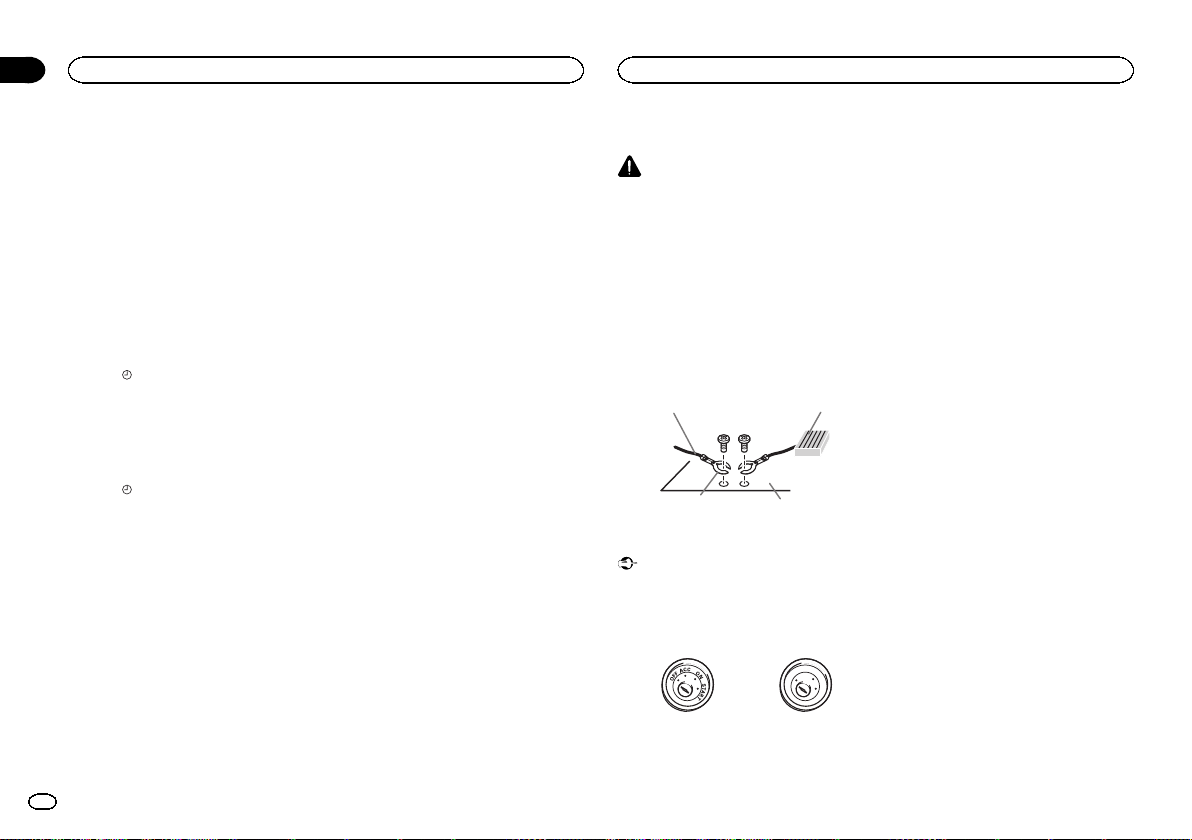
ACC position No ACC position
! Use this unit with a 12-volt battery and nega-
tive grounding only. Failure to do so may result in a fire or malfunction.
POWER AMP
Metal parts of car’s bod
O
F
N
F
O
S
T
A
R
T
! To prevent a short-circuit, overheating or mal-
function, be sure to follow the directions
below.
— Disconnect the negative terminal of the bat-
tery before installation.
— Secure the wiring with cable clamps or adhe-
sive tape. Wrap adhesive tape around wiring
that comes into contact with metal parts to
protect the wiring.
— Place all cables away from moving parts,
such as the gear shift and seat rails.
— Place all cables away from hot places, such
as near the heater outlet.
— Do not connect the yellow cable to the battery
by passing it through the hole to the engine
compartment.
— Cover any disconnected cable connectors
with insulating tape.
— Do not shorten any cables.
— Never cut the insulation of the power cable of
this unit in order to share the power with
other devices. The current capacity of the
cable is limited.
— Use a fuse of the rating prescribed.
— Never wire the negative speaker cable directly
to ground.
— Never band together negative cables of multi-
ple speakers.
! When this unit is on, control signals are sent
through the blue/white cable. Connect this
cable to the system remote control of an external power amp or the vehicle’s auto-antenna relay control terminal (max. 300 mA 12 V
DC). If the vehicle is equipped with a glass
antenna, connect it to the antenna booster
power supply terminal.
! Never connect the blue/white cable to the
power terminal of an external power amp.
Also, never connect it to the power terminal
of the auto antenna. Doing so may result in
battery drain or a malfunction.
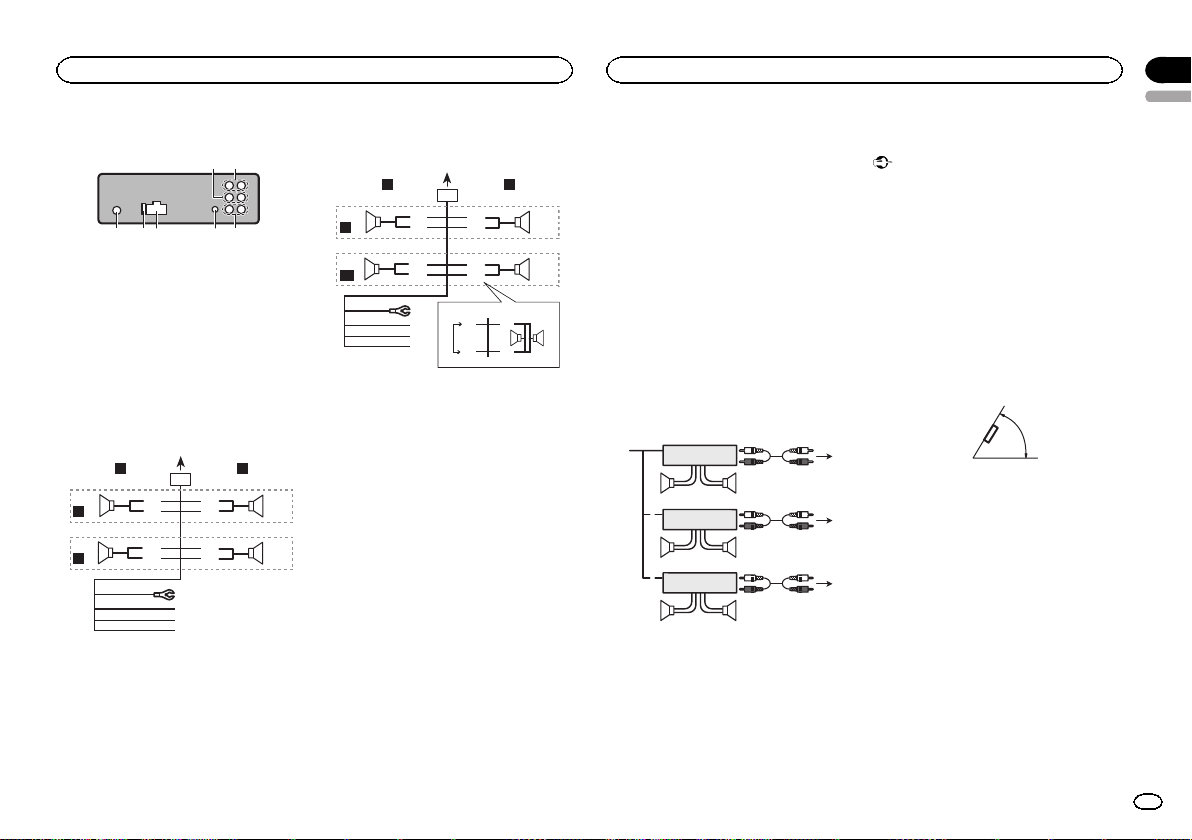
345 6 7
h
Installation
This unit
21
1 Front output
2 Rear output
3 Antenna input
4 Fuse (10 A)
5 Power cord input
6 Wired remote input
Hard-wired remote control adaptor can be
connected (sold separately).
7 Subwoofer output
Power cord
Perform these connections when not connecting a rear speaker lead to a subwoofer.
LR
4
F
5
R
1
32
8
6
9
7
a
b
e
f
g
c
d
Perform these connections when using a subwoofer without the optional amplifier.
LR
4
F
i
SW
1 To power cord input
2 Left
3 Right
4 Front speaker
5 Rear speaker
6 White
7 White/black
8 Gray
9 Gray/black
a Green
b Green/black
c Violet
d Violet/black
e Black (chassis ground)
Connect to a clean, paint-free metal location.
f Yellow
Connect to the constant 12 V supply terminal.
g Red
Connect to terminal controlled by ignition
switch (12 V DC).
h Blue/white
Connect to system control terminal of the
power amp or auto-antenna relay control terminal (max. 300 mA 12 V DC).
i Subwoofer (4 Ω)
1
8
6
9
7
a
c
d
b
j
e
a
f
g
k l
h
b
32
c
d
Installation
j When using a subwoofer of 70 W (2 Ω), be
sure to connect the subwoofer to the violet
and violet/black leads of this unit. Do not
connect anything to the green and green/
black leads.
k Not used.
l Subwoofer (4 Ω)× 2
Notes
! With a 2 speaker system, do not connect any-
thing to the speaker leads that are not connected to speakers.
! Change the initial setting of this unit. Refer
to SW CONTROL (rear output and subwoofer
setting) on page 9.
The subwoofer output of this unit is monaural.
Power amp (sold separately)
Perform these connections when using the optional amplifier.
2
2
2
3
55
3
77
3
99
4
6
8
1
1
1
1 System remote control
Connect to Blue/white cable.
2 Power amp (sold separately)
3 Connect with RCA cables (sold separately)
4 To Rear output
5 Rear speaker
6 To Front output
7 Front speaker
8 To subwoofer output
9 Subwoofer
Installation
Important
! Check all connections and systems before
final installation.
! Do not use unauthorized parts as this may
cause malfunctions.
! Consult your dealer if installation requires
drilling of holes or other modifications to the
vehicle.
! Do not install this unit where:
— it may interfere with operation of the vehicle.
— it may cause injury to a passenger as a result
of a sudden stop.
! The semiconductor laser will be damaged if
it overheats. Install this unit away from hot
places such as near the heater outlet.
! Optimum performance is obtained when the
unit is installed at an angle of less than 60°.
60°
! To ensure proper heat dispersal when using
this unit, make sure you leave ample space
behind the rear panel and wrap any loose cables so they are not blocking the vents when
installing the unit.
DIN front/rear mount
This unit can be properly installed using either
front-mount or rear-mount installation.
Use commercially available parts when installing.
Section
03
English
11
En

Section
03
Installation
Installation
DIN Front-mount
1 Insert the mounting sleeve into the dashboard.
For installation in shallow spaces, use the supplied mounting sleeve. If there is enough space,
use the mounting sleeve that came with the vehicle.
2 Secure the mounting sleeve by using a
screwdriver to bend the metal tabs (90°) into
place.
1
2
1 Dashboard
2 Mounting sleeve
3 Install the unit as illustrated.
1
2
4
5
1 Nut
2 Firewall or metal support
3 Metal strap
4 Screw
5 Screw (M4 × 8)
# Make sure that the unit is installed securely in
place. An unstable installation may cause skipping
or other malfunctions.
12
En
3
DIN Rear-mount
1 Determine the appropriate position
where the holes on the bracket and the side
of the unit match.
2 Tighten two screws on each side.
1
2
1 Truss screw (5 mm × 8 mm)
2 Mounting bracket
3 Dashboard or console
3
Removing the unit
1 Remove the trim ring.
1 Trim ring
2 Notched tab
! Releasing the front panel allows easier ac-
cess to the trim ring.
! When reattaching the trim ring, point the
side with the notched tab down.
2 Insert the supplied extraction keys into
both sides of the unit until they click into
place.
3 Pull the unit out of the dashboard.
Removing and re-attaching the
front panel
You can remove the front panel to protect your
unit from theft.
Press the detach button and push the front
panel upward and pull it toward you.
For details, refer to Removing the front panel to
protect your unit from theft and Re-attaching the
front panel on page 4.

Additional Information
Appendix
Additional Information
English
Troubleshooting
Symptom Cause Action
The display
automatically
returns to the
ordinary display.
The repeat
play range
changes unexpectedly.
A subfolder is
not played
back.
NO XXXX appears when a
display is
changed (NO
TITLE, for example).
The display is
illuminated
when the unit
is turned off.
You did not perform any operation within
about 30 seconds.
Depending on
the repeat play
range, the selected range
may change
when another
folder or track is
being selected
or during fast
forwarding/reversing.
Subfolders cannot be played
when FOLDER
(folder repeat) is
selected.
There is no embedded text information.
Demo mode is
on.
Perform operation
again.
Select the repeat
play range again.
Select another repeat play range.
Switch the display
or play another
track/file.
! Press
SCRL to cancel
demo mode.
! Turn off the
demo display setting.
Symptom Cause Action
The unit is
malfunctioning.
There is interference.
You are using a
device, such as
a cellular
phone, that
transmits electric waves near
the unit.
Error messages
When you contact your dealer or your nearest
Pioneer Service Center, be sure to note the error
message.
Built-in CD Player
Message Cause Action
ERROR-07,
11, 12, 17, 30
ERROR-10,
11, 12, 15,
17, 30, A0
ERROR-15 The inserted
/DISP/
ERROR-23 Unsupported
FORMAT
READ
The disc is dirty. Clean the disc.
The disc is
scratched.
There is an elec-
trical or mechanical error.
disc is blank
CD format
Sometimes
there is a delay
between the
start of playback
and when you
start to hear any
sound.
Move electrical
devices that may
be causing the interference away
from the unit.
Replace the disc.
Turn the ignition
switch OFF and
back ON, or
switch to a different source, then
back to the CD
player.
Replace the disc.
Replace the disc.
Wait until the
message disappears and you
hear sound.
Message Cause Action
NO AUDIO The inserted
SKIPPED The inserted
PROTECT All the files on
External storage device (USB, SD)/iPod
Message Cause Action
NO DEVICE When plug and
FORMAT
READ
NO AUDIO There are no
disc does not
contain any
playable files.
disc contains
DRM protected
files.
the inserted
disc are embedded with
DRM.
play is off, no
USB storage device or iPod is
connected.
Sometimes
there is a delay
between the
start of playback
and when you
start to hear any
sound.
songs.
The connected
USB storage device has security enabled
Replace the disc.
Replace the disc.
Replace the disc.
! Turn the plug
and play on.
! Connect a compatible USB storage device/iPod.
Wait until the
message disappears and you
hear sound.
Transfer the audio
files to the USB
storage device
and connect.
Follow the USB
storage device instructions to disable the security.
Message Cause Action
SKIPPED The connected
PROTECT All the files in
N/A USB The connected
N/A SD Non-compatible
USB storage device contains
files embedded
with Windows
Mediaä DRM 9/
10
the USB storage
device are embedded with
Windows Media
DRM 9/10
USB storage device is not supported by this
unit.
Non-compatible
iPod
SD storage device
Play an audio file
not embedded
with Windows
Media DRM 9/10.
Transfer audio
files not embedded with
Windows Media
DRM 9/10 to the
USB storage device and connect.
! Connect a USB
Mass Storage
Class compliant
device.
! Disconnect
your device and
replace it with a
compatible USB
storage device.
Disconnect your
device and replace it with a
compatible iPod.
Remove your device and replace it
with a compatible
SD storage device.
13
En
Appendix
Additional Information
Additional Information
Message Cause Action
CHECK USB The USB con-
nector or USB
cable has shortcircuited.
The connected
USB storage device consumes
more than 500
mA (maximum
allowable current).
The iPod operates correctly
but does not
charge
Check that the
USB connector or
USB cable is not
caught in something or damaged.
Disconnect the
USB storage device and do not
use it. Turn the
ignition switch to
OFF, then to ACC
or ON and then
connect only
compliant USB
storage devices.
Make sure the
connection cable
for the iPod has
not shorted out
(e.g., not caught
in metal objects).
After checking,
turn the ignition
switch OFF and
back ON, or disconnect the iPod
and reconnect.
Message Cause Action
ERROR-19 Communication
ERROR-23 USB storage de-
failed.
iPod failure Disconnect the
vice was not formatted with
FAT12, FAT16 or
FAT32
! Perform one of
the following operations.
–Turn the ignition
switch OFF and
back ON.
–Disconnect or
eject the external
storage device.
–Change to a different source.
Then, return to
the USB or SD
source.
! Disconnect the
cable from the
iPod. Once the
iPod's main menu
is displayed, reconnect the iPod
and reset it.
cable from the
iPod. Once the
iPod's main menu
is displayed, reconnect the iPod
and reset it.
USB storage device should be formatted with
FAT12, FAT16 or
FAT32.
Message Cause Action
ERROR-16 The iPod firm-
STOP There are no
NOT FOUND No related
ware version is
old
iPod failure Disconnect the
songs in the
current list.
songs
Update the iPod
version.
cable from the
iPod. Once the
iPod's main menu
is displayed, reconnect the iPod
and reset it.
Select a list that
contains songs.
Transfer songs to
the iPod.
Handling guidelines
Discs and player
Use only discs that feature either of the following
two logos.
Use 12-cm discs. Do not use 8-cm discs or an
adapter for 8-cm discs.
Use only conventional, fully circular discs. Do not
use shaped discs.
Do not insert anything other than a CD into the
CD loading slot.
Do not use cracked, chipped, warped, or otherwise damaged discs as they may damage the player.
Unfinalized CD-R/CD-RW discs cannot be played
back.
Do not touch the recorded surface of the discs.
Store discs in their cases when not in use.
Do not attach labels, write on or apply chemicals
to the surface of the discs.
To clean a CD, wipe the disc with a soft cloth outward from the center.
Condensation may temporarily impair the player ’s
performance. Let it rest for about one hour to adjust to a warmer temperature. Also, wipe any
damp discs off with a soft cloth.
Playback of discs may not be possible because of
disc characteristics, disc format, recorded application, playback environment, storage conditions,
and so on.
Road shocks may interrupt disc playback.
External storage device (USB, SD)
Address any questions you have about your external storage device (USB, SD) to the manufacturer
of the device.
Do not leave the external storage device (USB, SD)
in places with high temperatures.
Depending on the external storage device (USB,
SD), the following problems may occur.
! Operations may vary.
! The storage device may not be recognized.
! Files may not be played back properly.
14
En
Additional Information
Appendix
Additional Information
English
USB storage device
Connections via USB hub are not supported.
Do not connect anything other than a USB storage device.
Firmly secure the USB storage device when driving. Do not let the USB storage device fall onto the
floor, where it may become jammed under the
brake or accelerator pedal.
Depending on the USB storage device, the following problems may occur.
! The device may generate noise in the radio.
SD memory card
This unit supports only the following types of SD
memory cards.
! SD
! miniSD
! microSD
! SDHC
Keep the SD memory card out of the reach of children. Should the SD memory card be swallowed,
consult a doctor immediately.
Do not touch the connectors of the SD memory
card directly with your fingers or with any metal
device.
Do not insert anything other than an SD memory
card into the SD card slot. If a metal object (such
as a coin) is inserted into the slot, the internal circuits may break and cause malfunctions.
When inserting a miniSD or microSD, use an
adapter. Do not use an adapter which has metal
parts other than the connectors exposed.
Do not insert a damaged SD memory card (e.g.
warped, label peeled off) as it may not be ejected
from the slot.
Do not try to force an SD memory card into the SD
card slot as the card or this unit may be damaged.
When ejecting an SD memory card, press it and
hold it until it clicks. It is dangerous for you to release your finger immediately after you press on
the card as the card may shoot out of the slot and
hit you in the face, etc. If the card shoots out of
the slot, it may become lost.
iPod
To ensure proper operation, connect the dock connector cable from the iPod directly to this unit.
Firmly secure the iPod when driving. Do not let the
iPod fall onto the floor, where it may become
jammed under the brake or accelerator pedal.
About iPod settings
! When an iPod is connected, this unit changes
the EQ (equalizer) setting of the iPod to off in
order to optimize the acoustics. When you disconnect the iPod, the EQ returns to the original
setting.
! You cannot set Repeat to off on the iPod when
using this unit. Repeat is automatically
changed to All when the iPod is connected to
this unit.
Incompatible text saved on the iPod will not be displayed by the unit.
DualDiscs
DualDiscs are two-sided discs that have a recordable CD for audio on one side and a recordable
DVD for video on the other.
Since the CD side of DualDiscs is not physically
compatible with the general CD standard, it may
not be possible to play the CD side with this unit.
Frequent loading and ejecting of a DualDisc may
result in scratches on the disc. Serious scratches
can lead to playback problems on this unit. In
some cases, a DualDisc may become stuck in the
disc loading slot and will not eject. To prevent this,
we recommend you refrain from using DualDisc
with this unit.
Please refer to the information from the disc manufacturer for more detailed information about
DualDiscs.
CAUTION
Do not leave the discs/external storage device
(USB, SD) or iPod in places with high temperatures.
Compressed audio
compatibility (disc, USB, SD)
WMA
File extension: .wma
Bit rate: 48 kbps to 320 kbps (CBR), 48 kbps to 384
kbps (VBR)
Sampling frequency: 32 kHz, 44.1 kHz, 48 kHz
Windows Media Audio Professional, Lossless,
Voice/DRM Stream/Stream with video: Not compatible
MP3
File extension: .mp3
Bit rate: 8 kbps to 320 kbps (CBR), VBR
Sampling frequency: 8 kHz to 48 kHz (32 kHz, 44.1
kHz, 48 kHz for emphasis)
Compatible ID3 tag version: 1.0, 1.1, 2.2, 2.3, 2.4
(ID3 tag Version 2.x is given priority over Version 1.
x.)
M3u playlist: Not compatible
MP3i (MP3 interactive), mp3 PRO: Not compatible
WAV
File extension: .wav
Quantization bits: 8 and 16 (LPCM), 4 (MS
ADPCM)
Sampling frequency: 16 kHz to 48 kHz (LPCM),
22.05 kHz and 44.1 kHz (MS ADPCM)
AAC
Compatible format: AAC encoded by iTunes
File extension: .m4a
Sampling frequency: 11.025 kHz to 48 kHz
Transmission rate: 16 kbps to 320 kbps, VBR
Apple Lossless: Not compatible
AAC file bought from the iTunes Store (.m4p file
extension): Not compatible
Supplemental information
Only the first 32 characters can be displayed as a
file name (including the file extension) or a folder
name.
This unit may not operate correctly depending on
the application used to encode WMA files.
There may be a slight delay when starting playback of audio files embedded with image data.
15
En
Appendix
Additional Information
Additional Information
Disc
Playable folder hierarchy: up to eight tiers (A practical hierarchy is less than two tiers.)
Playable folders: up to 99
Playable files: up to 999
File system: ISO 9660 Level 1 and 2, Romeo, Joliet
Multi-session playback: Compatible
Packet write data transfer: Not compatible
Regardless of the length of blank sections between the songs from the original recording, compressed audio discs play with a short pause
between songs.
External storage device (USB, SD)
Playable folder hierarchy: up to eight tiers (A practical hierarchy is less than two tiers.)
Playable folders: up to 1 500
Playable files: up to 15 000
Playback of copyright-protected files: Not compatible
Partitioned external storage device (USB, SD):
Only the first playable partition can be played.
There may be a slight delay when starting playback of audio files on a USB storage device with
numerous folder hierarchies.
SD memory card
There is no compatibility for Multi Media Cards
(MMC).
Compatibility with all SD memory cards is not
guaranteed.
This unit is not compatible with SD-Audio.
CAUTION
Pioneer accepts no responsibility for data lost
on USB memory/USB portable audio players/SD
memory cards/SDHC memory cards, even if that
data is lost while this unit is used.
iPod compatibility
This unit supports only the following iPod models.
Supported iPod software versions are shown
below. Older versions may not be supported.
! iPhone 4 (software version 4.0)
! iPhone 3GS (software version 4.0)
! iPhone 3G (software version 4.0)
! iPod nano 5th generation (software version
1.0.2)
! iPod nano 4th generation (software version
1.0.4)
! iPod nano 3rd generation (software version
1.1.3)
! iPod nano 2nd generation (software version
1.1.3)
! iPod nano 1st generation (software version
1.3.1)
! iPod touch 3rd generation (software version
4.0)
! iPod touch 2nd generation (software version
4.0)
! iPod touch 1st generation (software version
3.1.3)
! iPod classic 160GB (software version 2.0.4)
! iPod classic 120GB (software version 2.0.1)
! iPod classic (software version 1.1.2)
! iPod 5th generation (software version 1.3)
Depending on the generation or version of the
iPod, some functions may not be available.
Operations may var y depending on the software
version of iPod.
When using an iPod, an iPod Dock Connector to
USB Cable is required.
A Pioneer CD-IU50 interface cable is also available. For details, consult your dealer.
About the file/format compatibility, refer to the
iPod manuals.
Audio Book, Podcast: Compatible
CAUTION
Pioneer accepts no responsibility for data lost
on the iPod, even if that data is lost while this
unit is used.
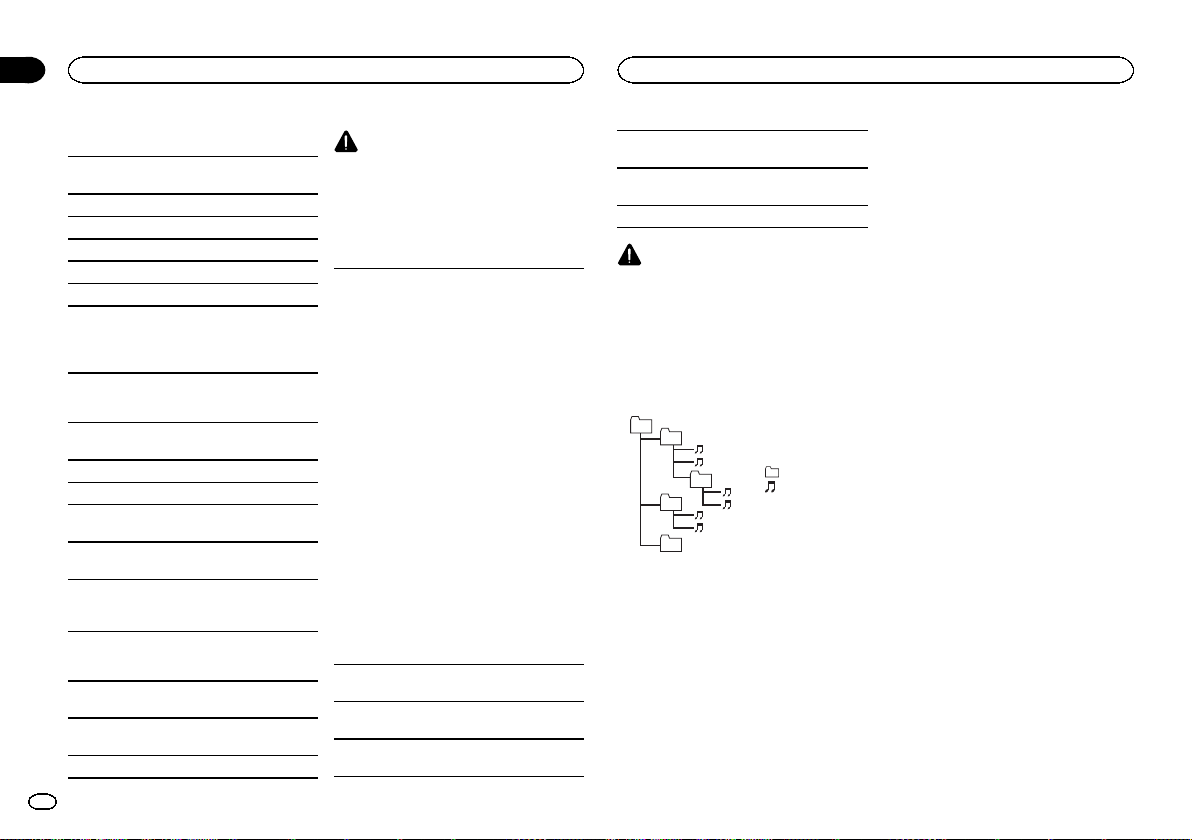
Sequence of audio files
The user cannot assign folder numbers and
specify playback sequences with this unit.
Example of a hierarchy
01
02
03
04
05
Level 1 Level 2 Level 3 Level 4
Disc
Folder selection sequence or other operation
may differ depending on the encoding or writing
software.
External storage device (USB, SD)
The playback sequence is the same as the recorded sequence in the external storage device
(USB, SD).
To specify the playback sequence, the following
method is recommended.
audio file
01 to 05: Folder
number
1 to 6: Playback
sequence
: Folder
: Compressed
1 Create a file name that includes numbers
that specify the playback sequence (e.g.,
001xxx.mp3 and 099yyy.mp3).
2 Put those files into a folder.
3 Save the folder that contains the files to the
external storage device (USB, SD).
However,depending on the system environment,
you may not be able to specify the playback sequence.
For USB portable audio players, the sequence is
different and depends on the player.
Copyright and trademark
iTunes
Apple and iTunes are trademarks of Apple Inc.,
registered in the U.S. and other countries.
MP3
Supply of this product only conveys a license for
private, non-commercial use and does not convey a license nor imply any right to use this product in any commercial (i.e. revenue-generating)
real time broadcasting (terrestrial, satellite,
cable and/or any other media), broadcasting/
streaming via internet, intranets and/or other
networks or in other electronic content distribution systems, such as pay-audio or audio-on-demand applications. An independent license for
such use is required. For details, please visit
http://www.mp3licensing.com.
WMA
Windows Media and the Windows logo are
trademarks or registered trademarks of
Microsoft Corporation in the United States and/
or other countries.
This product includes technology owned by
Microsoft Corporation and cannot be used or
distributed without a license from Microsoft
Licensing, Inc.
16
En

Additional Information
SD memory card
SD Logo is a trademark of SD-3C, LLC.
miniSD Logo is a trademark of SD-3C, LLC.
microSD Logo is a trademark of SD-3C, LLC.
SDHC Logo is a trademark of SD-3C, LLC.
iPod & iPhone
iPhone, iPod, iPod classic, iPod nano, and iPod
touch are trademarks of Apple Inc., registered in
the U.S. and other countries.
“Made for iPod” and “Made for iPhone” mean
that an electronic accessory has been designed
to connect specifically to iPod or iPhone, respectively, and has been certified by the developer to
meet Apple performance standards.
Apple is not responsible for the operation of this
device or its compliance with safety and regulatory standards.
Specifications
General
Power source ................... 14.4 V DC (12.0 V to 14.4 V al-
Grounding system ............ Negative type
Maximum curre nt consumption
................................... 10.0 A
Dimensions (W × H × D):
DIN
Chassis .............. 178 mm × 50 mm × 165
Nose .................. 188 mm × 58 mm × 18
D
Chassis .............. 178 mm × 50 mm × 165
Nose .................. 170 mm × 46 mm × 18
Weight ............................. 1.16 kg
Audio
Maximum power output ... 50 W × 4
lowable)
mm
mm
mm
mm
70 W × 1/2 W (for subwoofer)
Continuous power output
................................... 22 W × 4 (50 Hz to 15 000 Hz,
Load impedance .............. 4 W (4 W to 8 W allowable)
Preout maximum output level
................................... 4.0 V
Equalizer (5-Band Graphic Equalizer):
Frequency ................. 100/315/1.25k/3.15k/8k Hz
Gain ......................... ±12 dB
HPF:
Frequency ................. 50/63/80/100/125 Hz
Slope ........................ –12 dB/oct
Subwoofer (mon o):
Frequency ................. 50/63/80/100/125 Hz
Slope ........................ –18 dB/oct
Gain ......................... +6 dB to –24 dB
Phase ....................... Normal/Reverse
Bass boost:
Gain ......................... +12 dB to 0 dB
CD player
System ............................ Compact disc audio system
Usable discs .................... Compact disc
Signal-to-noise ratio ......... 94 dB (1 kHz) (IEC-A network)
Number of channels ........ 2 (stereo)
MP3 decoding format ...... MPEG-1 & 2 Audio Layer 3
WMA decoding format ..... Ver.7, 7.1,8, 9, 10, 11, 12 (2ch
AAC deco ding format ....... MPEG-4 AAC (iTunes encoded
WAV signal format ........... Linear PCM & MS ADPCM
USB
USB standard specification
................................... USB 2.0 full sp eed
Maximum curre nt supply
................................... 500 mA
USB Class ....................... MSC (Mass Storage Class)
File system ....................... FAT12, FAT16, FAT32
MP3 decoding format ...... MPEG-1 & 2 Audio Layer 3
WMA decoding format ..... Ver.7, 7.1,8, 9, 10, 11, 12 (2ch
5 % THD, 4 W load, both channels driven)
audio)
(Windows Media Player)
only) (.m4a)
(Ver.9.2 and earlier)
(Non-compressed)
audio)
(Windows Media Player)
Additional Information
AAC deco ding format ....... MPEG-4 AAC (iTunes encoded
WAV signal format ........... Linear PCM & MS ADPCM
SD
Compatible physical format
................................... Version 2.00
Maximum memory capacity
................................... 32 GB (for SD and SDHC)
File system ....................... FAT12, FAT16, FAT32
MP3 decoding format ...... MPEG-1 & 2 Audio Layer 3
WMA decoding format ..... Ver.7, 7.1,8, 9, 10, 11, 12 (2ch
AAC deco ding format ....... MPEG-4 AAC (iTunes encoded
WAV signal format ........... Linear PCM & MS ADPCM
FM tuner
Frequency range .............. 87.5 MHz to 1 08.0 MHz
Usable sensitivity ............. 9 dBf (0.8 µV/75 W, mono, S/N:
Signal-to-noise ratio ......... 72 dB (IEC-A network)
AM tuner
Frequency range .............. 531 kHz to 1 602 kHz (9 kHz)
Usable sensitivity ............. 25 µV (S/N: 20 dB)
Signal-to-noise ratio ......... 62 dB (IEC-A network)
Infrared remote control
Wavelength ...................... 940 nm ±50 nm
Output ............................. typ; 12 mw/sr per Infrared LED
Note
Specifications and the design are subject to
modifications without notice.
only) (.m4a)
(Ver.9.2 and earlier)
(Non-compressed)
audio)
(Windows Media Player)
only) (.m4a)
(Ver.9.2 and earlier)
(Non-compressed)
30 dB)
530 kHz to 1 640 kHz (10 kHz)
Appendix
English
17
En
Sección
01
Índice
Antes de comenzar
Antes de comenzar
Acerca de esta unidad 18
Modo demo 18
En caso de problemas 19
Acerca de este manual 19
Utilización de esta unidad
Unidad principal 19
Mando a distancia 19
Indicaciones del display 20
Funciones básicas 20
Uso y cuidado del mando a distancia 21
Las operaciones del menú son idénticas
para los ajustes de función/ajustes de
audio/ajustes iniciales/listas 21
Sintonizador 21
CD/CD-R/CD-RW y dispositivos de
almacenamiento externos (USB,
SD) 22
iPod 23
Ajustes de audio 25
Ajustes iniciales 25
Otras funciones 26
Instalación
Conexiones 27
Instalación 28
Información adicional
Solución de problemas 29
Mensajes de error 29
Pautas para el manejo 31
Compatibilidad con audio comprimido
(disco, USB, SD) 32
Compatibilidad con iPod 33
Secuencia de archivos de audio 33
Copyright y marcas registradas 34
Especificaciones 34
Gracias por haber adquirido este producto
PIONEER.
Lea con detenimiento este manual antes de utilizar el producto por primera vez para que pueda
darle el mejor uso posible. Es muy importante
que lea y observe la información que aparece
bajo los mensajes de ADVERTENCIA y PRE-
CAUCIÓN en este manual. Una vez leído, guar-
de el manual en un lugar seguro y a mano para
que pueda consultarlo en el futuro.
Acerca de esta unidad
PRECAUCIÓN
! No permita que esta unidad entre en contac-
to con líquidos, ya que puede producir una
descarga eléctrica. Además, el contacto con
líquidos puede causar daños en la unidad,
humo y recalentamiento.
! Mantenga siempre el volumen lo suficiente-
mente bajo como para poder escuchar los
sonidos que provienen del exterior.
! Evite la exposición a la humedad.
! Si se desconecta o se descarga la batería,
todas las memorias preajustadas se borrarán.
PRECAUCIÓN
Este producto contiene un diodo de láser de
clase 1, clasificado en la directiva IEC 608251:2007 concerniente a la Seguridad de los productos láser. Para garantizar la seguridad
continua, no extraiga ninguna tapa ni intente
acceder a la parte interna del producto. Solicite a personal cualificado que realice todos los
trabajos de mantenimiento.
PRODUCTO LASER CLASE 1
PRECAUCIÓN—LOS PRODUCTOS LÁSER CLASE 1M
EMITEN RADIACIÓN INVISIBLE UNA VEZ ABIERTOS. NO
LOS MIRE DIRECTAMENTE CON INSTRUMENTOS ÓPTICOS.
Nota
Las operaciones se realizan incluso si se cancela el menú antes de confirmar.
Modo demo
Importante
Si no se conecta el cable rojo (ACC) de esta unidad a un terminal acoplado con las funciones
de activación/desactivación de la llave de encendido del automóvil, se puede descargar la batería.
18
Es

d
Antes de comenzar
Utilización de esta unidad
Sección
02
Modo demo
La demostración se inicia automáticamente
cuando la llave de encendido del automóvil está
en ACC o en ON mientras la unidad está apagada. Aunque la unidad se apague, el modo de demostración seguirá activado. Para cancelar el
modo de demostración, pulse
Pulse
/DISP/SCRL de nuevo para iniciarlo. Si
utiliza el modo de demostración cuando la llave
de encendido está en ACC, se puede descargar
la batería.
/DISP/SCRL.
En caso de problemas
En caso de que esta unidad no funcione correctamente, póngase en contacto con su concesionario o con el centro de servicio PIONEER
autorizado más cercano.
Acerca de este manual
! En las siguientes instrucciones, las memo-
rias USB, los reproductores de audio USB
portátiles y las tarjetas de memoria SD se denominan conjuntamente “dispositivos de almacenamiento externo (USB, SD)”. Cuando
se habla únicamente de las memorias USB y
de los reproductores de audio USB portátiles, se denominarán conjuntamente “dispositivos de almacenamiento USB”.
! En este manual, se utiliza el término “iPod”
para denominar tanto a iPod como a iPhone.
Unidad principal
2 4 5
3
b a 9c
Parte Parte
Conector de en-
1
(lista) 8
MULTI-CONTROL
2
(M.C.)
3 1 a 6 a BAND/ESC
Ranura de inser-
4
ción de discos
5 h (expulsar) c
6 Puerto USB d
7 Botón de soltar
trada AUX (conector estéreo de
3,5 mm)
/DISP OFF
9
b SRC/OFF
/DISP/SCRL
Al extraer el panel
delantero, podrá
ver la ranura de la
tarjeta de memoria SD.
PRECAUCIÓN
61
78
Utilice un cable USB Pioneer opcional (CDU50E) para conectar el reproductor de audio
USB / memoria USB, ya que cualquier dispositivo conectado directamente a la unidad sobresaldrá de ésta y podría resultar peligroso.
No utilice productos no autorizados.
Español
Mando a distancia
e
a
l
b
j
Parte Operación
e VOLUME
f MUTE
g a/b/c/d
h AUDIO
Pulse para aumentar o disminuir el volumen.
Pulse para silenciar. Pulse de
nuevo para desactivar el silenciamiento.
Pulse estos botones para utilizar los controles de sintonización por búsqueda manual,
avance rápido, retroceso y búsqueda de pista. También se
usan para controlar las funciones.
Pulse para seleccionar una
función de audio.
f
g
hk
i
19
Es
4
Sección
02
Utilización de esta unidad
Utilización de esta unidad
Parte Operación
Pulse este botón para seleccionar diferentes modos de visua-
i DISP/SCRL
j e
FUNC-
k
TION
LIST/
l
ENTER
lización.
Manténgalo pulsado para desplazarse por la información de
texto.
Pulse este botón para pausar o
reanudar.
Pulse este botón para seleccionar las funciones.
Mantenga pulsado este botón
para acceder al menú de ajustes iniciales si las fuentes
están desactivadas.
Pulse para visualizar la lista
según la fuente de que se
trate.
Cuando esté en el menú de
funcionamiento, pulse para
controlar las funciones.
Indicaciones del display
1
2 3
Indicador Estado
Visualizador de la
1
información
LOC
(alea-
torio)
(reproducción
aleatoria)
(repeti-
2
ción)
jeta de
memoria
SD)
(Sound
Retriever)
Visualizador del
3
medidor
de nivel
Sección
4
principal
del display
Se indica la fuente, la banda y
la guía de funcionamiento del
menú.
Sintonización por búsqueda
local activada.
La función de reproducción
aleatoria está activada.
Está seleccionado iPod como
fuente y están activadas las
funciones de reproducción
aleatoria.
La función de repetición está
activada.
(Tar-
Se ha insertado una tarjeta de
memoria SD/SDHC.
La función Sound Retriever
(restauración del sonido) está
activada.
Se muestran los niveles de las
salidas de audio.
Sintonizador: frecuencia
Reproductor de CD incorporado, dispositivo de almacenamiento externo (USB, SD) e
iPod: tiempo de reproducción
transcurrido e información de
texto
Funciones básicas
Importante
! Proceda con cuidado al retirar o colocar el
panel delantero.
! Evite someter el panel delantero a impactos
excesivos.
! Mantenga el panel delantero fuera del alcan-
ce de la luz solar directa y no lo exponga a
temperaturas elevadas.
! Para evitar que el dispositivo o el interior del
vehículo sufran daños, retire todos los cables
o dispositivos conectados al panel delantero
antes de extraerlo.
Extracción del panel delantero para proteger la
unidad contra robo
1 Pulse el botón de soltar para liberar el panel
delantero.
2 Empuje el panel delantero hacia arriba y tire
de él hacia sí.
3 Mantenga siempre el panel delantero que se
ha extraído en su medio de protección, como
por ejemplo su caja protectora.
Colocación del panel delantero
1 Deslice la carátula hacia la izquierda.
Inserte las pestañas que hay en la parte izquierda de la unidad principal dentro de las ranuras del panel delantero.
2 Pulse el lado derecho del panel delantero
hasta que se ajuste correctamente.
Si no logra encajar adecuadamente el panel
delantero a la unidad principal, colóquelo en
la unidad principal de la forma correcta. No
apriete ni use la fuerza para encajarlo, ya que
puede provocar daños en el panel delantero o
en la unidad principal.
Encendido de la unidad
1 Pulse SRC/OFF para encender la unidad.
Apagado de la unidad
1 Mantenga pulsado SRC/OFF hasta que se apa-
gue la unidad.
20
Es
Utilización de esta unidad
Utilización de esta unidad
Sección
02
Selección de una fuente
1 Pulse SRC/OFF para desplazarse entre:
TUNER (sintonizador)—CD (reproductor de
CD incorporado)—USB (USB)/USB-iPod
(iPod)—SD (Tarjeta de memoria SD)—AUX
(AUX)
Ajuste del volumen
1 Haga girar M.C. para ajustar el volumen.
PRECAUCIÓN
Por motivos de seguridad, detenga su vehículo
antes de extraer el panel delantero.
Nota
Si el cable azul/blanco de esta unidad está conectado al terminal de control del relé de la antena automática del vehículo, la antena se
extiende cuando se enciende el equipo. Para retraer la antena, apague la fuente.
Uso y cuidado del mando a
distancia
Uso del mando a distancia
1 Apunte el mando a distancia hacia el panel
delantero para que funcione la unidad.
Al utilizar el mando a distancia por primera
vez, extraiga la película que sobresale de la
bandeja.
Reemplazo de la batería
1 Deslice y extraiga la bandeja de la parte poste-
rior del mando a distancia.
2 Inserte la pila con los polos positivo (+) y ne-
gativo (–) en la dirección correcta.
ADVERTENCIA
! Mantenga la pila fuera del alcance de los
niños. En caso de ingestión accidental de
ésta, consulte a un médico de inmediato.
! Las pilas o baterías no deben exponerse a
altas temperaturas ni fuentes de calor como
el sol, el fuego, etc.
PRECAUCIÓN
! Utilice una sola batería de litio CR2025
(3 V).
! Extraiga la pila si no piensa utilizar el mando
a distancia durante un mes o más tiempo.
! Si la pila se sustituye de forma incorrecta
existe cierto riesgo de explosión. Reemplácela sólo por una del mismo tipo o equivalente.
! No manipule la pila con herramientas metáli-
cas.
! No guarde la pila junto a objetos metálicos.
! En el caso de que se produzcan fugas de la
pila, limpie completamente el mando a distancia e instale una pila nueva.
! Para desechar las pilas usadas, cumpla con
los reglamentos gubernamentales o las normas ambientales pertinentes de las instituciones públicas aplicables en su país/zona.
Importante
! No guarde el mando a distancia en lugares
expuestos a altas temperaturas o a la luz
solar directa.
! Es posible que el mando a distancia no fun-
cione correctamente si lo expone a la luz
solar directa.
! No deje caer el mando a distancia al suelo,
ya que puede quedar atascado debajo del
freno o del acelerador.
Las operaciones del menú
son idénticas para los
ajustes de función/ajustes de
audio/ajustes iniciales/listas
Para volver a la visualización anterior
Para volver a la lista/categoría anterior (la carpeta/
categoría de un nivel superior)
/DISP/SCRL.
1 Pulse
Para volver al menú principal
Para volver al nivel superior de la lista/categoría
1 Mantenga pulsado
Para volver a la visualización normal
Para cancelar el menú de ajustes iniciales
Para volver a la visualización normal desde la
lista/categoría
1 Pulse BAND/ESC.
/DISP/SCRL.
Sintonizador
Importante
Si se utiliza esta unidad en América del Norte,
América Central o América del Sur, se deberá
restablecer el paso de sintonía de AM (consulte
AM STEP (paso de sintonía de AM) en la página
26).
Funciones básicas
Selección de una banda
1 Pulse BAND/ESC hasta que se visualice la
banda deseada (FM1, FM2, FM3 para FM o
AM).
Sintonización manual (paso a paso)
1 Pulse M.C. izquierda o derecha.
Búsqueda
1 Mantenga pulsado M.C. hacia izquierda o de-
recha y luego suéltelo.
Se puede cancelar la sintonización por búsqueda pulsando M.C. izquierda o derecha.
Al mantener pulsado M.C. hacia la izquierda o
hacia la derecha se pueden saltar las emisoras. La sintonización por búsqueda comienza
inmediatamente después de soltar M.C.
Almacenamiento y recuperación
de emisoras para cada banda
Uso de los botones de ajuste de
presintonías
1 Cuando encuentre la emisora que desea
almacenar en la memoria, pulse uno de los
botones de ajuste de presintonías (1 a 6) y
manténgalo pulsado hasta que el número de
presintonía deje de parpadear.
2 Pulse uno de los botones de ajuste de
presintonías (1 a 6) para seleccionar la emisora deseada.
# También se pueden recuperar las emisoras de
radio almacenadas pulsando M.C. arriba o abajo durante la visualización de frecuencias.
Uso de la pantalla de presintonías
1 Pulse para cambiar a la pantalla de
presintonías.
Español
21
Es
Sección
02
Utilización de esta unidad
Utilización de esta unidad
2 Utilice M.C. para almacenar la frecuencia
seleccionada en la memoria.
Haga girar el control para cambiar el número de
presintonía. Manténgalo pulsado para almacenarlo.
3 Utilice M.C. para seleccionar la emisora
deseada.
Haga girar el control para cambiar de emisora.
Pulse para seleccionar.
Cambio de la visualización
Selección de la información de texto deseada
% Pulse
Nombre del servicio de programa—Frecuencia
# La frecuencia aparece en el display durante ocho
segundos.
/DISP/SCRL.
Nota
En determinadas zonas no es posible cambiar la
visualización.
Ajustes de funciones
1 Pulse M.C. para acceder al menú principal.
2 Haga girar M.C. para cambiar la opción
de menú y pulse para seleccionar FUNCTION.
3 Gire M.C. para seleccionar la función.
Una vez seleccionada, siga los siguientes pasos
para ajustar la función:
BSM (memoria de las mejores emisoras)
BSM (memoria de las mejores emisoras) guarda
automáticamente las seis emisoras más fuertes
ordenadas por la intensidad de la señal.
1 Pulse M.C. para activar la función BSM.
Para cancelar, vuelva a pulsar M.C.
22
Es
LOCAL (sintonización por búsqueda local)
La sintonización por búsqueda local le permite
sintonizar sólo las emisoras de radio con señales
lo suficientemente intensas como para asegurar
una correcta recepción.
1 Pulse M.C. para mostrar el modo de ajuste.
2 Gire M.C. para seleccionar el ajuste deseado.
FM: OFF— LEVEL1—LEVEL2—LEVEL3—
LEVEL4
AM: OFF— LEVEL1—LEVEL2
El ajuste de nivel superior sólo permite recibir
las emisoras con las señales más intensas,
mientras que los ajustes más bajos permiten
recibir las emisoras con señales más débiles.
3 Pulse M.C. para confirmar la selección.
CD/CD-R/CD-RW y dispositivos
de almacenamiento externos
(USB, SD)
Funciones básicas
Reproducción de un CD/CD-R/CD- RW
1 Inserte el disco en la ranura de carga de dis-
cos con el lado de la etiqueta hacia arriba.
Expulsión de un CD/CD-R/CD-RW
1 Pulse h (expulsar).
Reproducción de canciones de un dispositivo de
almacenamiento USB
1 Abra la tapa del conector USB y conecte el dis-
positivo de almacenamiento USB mediante un
cable USB.
Detención de la reproducción de archivos en un
dispositivo de almacenamiento USB
1 Puede desconectar el dispositivo de almace-
namiento USB en cualquier momento.
Reproducción de canciones en una tarjeta de memoria SD
1 Extraiga el panel delantero.
2 Inserte una tarjeta de memoria SD en la ranu-
ra para la tarjeta SD.
Insértela con la super ficie de contacto hacia
abajo y presione la tarjeta hasta que oiga un
chasquido y quede completamente encajada.
3 Vuelva a colocar el panel delantero.
4 Pulse SRC/OFF para seleccionar SD como
fuente.
Se iniciará la reproducción.
Detención de la reproducción de archivos en una
tarjeta de memoria SD
1 Extraiga el panel delantero.
2 Presione la tarjeta de memoria SD hasta que
oiga un chasquido.
La tarjeta de memoria SD se ha expulsado.
3 Extraiga la tarjeta de memoria SD.
4 Vuelva a colocar el panel delantero.
Selección de una carpeta
1 Pulse M.C. hacia arriba o hacia abajo.
Selección de una pista
1 Pulse M.C. izquierda o derecha.
Avance rápido o retroceso
1 Mantenga pulsado M.C. hacia la izquierda o
hacia la derecha.
Regreso a la carpeta raíz
1 Mantenga pulsado BAND/ESC.
Cambio entre audio comprimido y CD-DA
1 Pulse BAND/ESC.
Notas
! Al reproducir audio comprimido, no hay soni-
do durante el avance rápido o el retroceso.
! Desconecte los dispositivos de almacena-
miento USB de la unidad cuando no los utilice.
Visualización de información de
texto
Selección de la información de texto deseada
1 Pulse
/DISP/SCRL.
Desplazamiento de la información de texto a la izquierda
1 Mantenga pulsado
/DISP/SCRL.
Notas
! Según la versión de iTunes utilizada para gra-
bar archivos MP3 en un disco u otro tipo de
archivos de medios, es posible que los textos
contenidos en el archivo de audio no se
muestren correctamente si su formato es incompatible.
! Los elementos de información de texto pue-
den cambiar según el tipo de medio.
Selección y reproducción de
archivos/pistas de la lista de
nombres
1 Pulse para cambiar al modo de lista
por nombre de archivo/pista.
2 Utilice M.C. para seleccionar el nombre
del archivo deseado (o de la carpeta).
Cambio del nombre del archivo o la carpeta
1 Haga girar M.C.
Reproducción
1 Tras seleccionar un archivo o una pista, pulse
M.C.
Visualización de una lista de los archivos (o las
carpetas) de la carpeta seleccionada
1 Tras seleccionar una carpeta, pulse M.C.
Reproducción de una canción de la carpeta seleccionada
1 Tras seleccionar una carpeta, mantenga pulsa-
do M.C.
Utilización de esta unidad
Utilización de esta unidad
Sección
02
Operaciones avanzadas mediante
el uso de botones especiales
Selección de una gama de repetición de reproducción
1 Pulse 6/
Reproducción de las pistas en orden aleatorio
1 Pulse 5/
Interrupción de la reproducción
1 Pulse 2/PAUSE para pausar o reanudar.
Mejora del audio comprimido y restauración del
sonido óptimo (Sound Retriever)
1 Pulse 1/S.Rtrv para desplazarse entre:
para desplazarse entre las siguien-
tes opciones:
CD/CD-R/CD-RW
! DISC – Repite todas las pistas
! TRACK – Repite la pista actual
! FOLDER – Repite la carpeta actual
Dispositivo de almacenamiento externo
(USB, SD)
! ALL – Repite todos los archivos
! TRACK – Repite el archivo actual
! FOLDER – Repite la carpeta actual
para activar o desactivar la reproducción aleatoria.
Las pistas de una gama de repetición seleccionada se reproducen en orden aleatorio.
OFF (desactivado)—1—2
1 es efectivo para tasas de compresión baja, y
2 para tasas de compresión alta.
Ajustes de funciones
1 Pulse M.C. para acceder al menú principal.
2 Haga girar M.C. para cambiar la opción
de menú y pulse para seleccionar FUNCTION.
3 Gire M.C. para seleccionar la función.
Una vez seleccionada, siga los siguientes pasos
para ajustar la función:
REPEAT (repetición de reproducción)
1 Pulse M.C. para mostrar el modo de ajuste.
2 Haga girar M.C. para seleccionar una gama
de repetición de reproducción.
Para obtener más información, consulte Selec-
ción de una gama de rep etición de reproducción
en esta página.
3 Pulse M.C. para confirmar la selección.
RANDOM (reproducción aleatoria)
1 Pulse M.C. para activar o desactivar la repro-
ducción aleatoria.
PAUSE (pausa)
1 Pulse M.C. para pausar o reanudar.
S.RTRV (Sound Retriever)
Mejora automáticamente el audio comprimido y
restaura el sonido óptimo.
1 Pulse M.C. para mostrar el modo de ajuste.
2 Gire M.C. para seleccionar el ajuste deseado.
Para obtener más información, consulte Mejora del audio comprimido y re stauración del sonido óptimo (Sound Retriever) en esta página.
3 Pulse M.C. para confirmar la selección.
iPod
Funciones básicas
Reproducción de canciones en un iPod
1 Abra la tapa del conector USB.
2 Conecte un iPod al cable USB utilizando un
conector del Dock del iPod.
Selección de una pista (capítulo)
1 Pulse M.C. izquierda o derecha.
Avance rápido o retroceso
1 Mantenga pulsado M.C. hacia la izquierda o
hacia la derecha.
Notas
! El iPod no puede encenderse o apagarse
cuando el modo de control está ajustado en
AUDIO.
! Desconecte los auriculares del iPod antes de
conectarlo a esta unidad.
! El iPod se apagará aproximadamente dos mi-
nutos después de que la llave de encendido
del automóvil se ponga en OFF.
Visualización de información de
texto
Selección de la información de texto deseada
/DISP/SCRL.
1 Pulse
Desplazamiento de la información de texto a la izquierda
1 Mantenga pulsado
/DISP/SCRL.
Para buscar una canción
1 Para ir al menú superior de la búsqueda
de listas, pulse
2 Utilice M.C. para seleccionar una categoría/canción.
Cambio del nombre de la canción o la categoría
1 Haga girar M.C.
Listas de reproducción—artistas—álbumes—
canciones—podcasts—géneros—compositores—audiolibros
Reproducción
1 Tras seleccionar una canción, pulse M.C.
Visualización de una lista de canciones de la categoría seleccionada
1 Tras seleccionar una categoría, pulse M.C.
.
Reproducción de una canción de la categoría seleccionada
1 Tras seleccionar una categoría, mantenga pul-
sado M.C.
Búsqueda alfabética en las listas
1 Cuando se visualice una lista de la categoría
seleccionada, pulse
de búsqueda alfabética.
2 Haga girar M.C. para seleccionar una letra.
3 Pulse M.C. para visualizar la lista alfabética.
para cambiar al modo
Notas
! Es posible reproducir listas creadas con el
programa MusicSphere. Dicho programa estará disponible en nuestro sitio web.
! Las listas de reproducción creadas con el
programa MusicSphere se muestran de
forma abreviada.
Operaciones avanzadas mediante
el uso de botones especiales
Selección de una gama de repetición de reproducción
1 Pulse 6/
Reproducción de todas las canciones en orden
aleatorio (shuffle all)
1 Pulse 5/
! Cuando el modo de control está ajustado en
Interrupción de la reproducción
Pulse 2/PAUSE para pausar o reanudar.
para desplazarse entre las siguien-
tes opciones:
! ONE – Repite la canción actual
! ALL – Repite todas las canciones de la
lista seleccionada
para activar la función de repro-
ducción aleatoria.
iPod/APP, está activada la reproducción aleatoria.
Español
23
Es

Sección
02
Utilización de esta unidad
Utilización de esta unidad
Reproducción de canciones relacionadas con la
canción que se está reproduciendo
Se pueden reproducir canciones de las siguientes
listas.
• Lista de álbumes del artista que se está reproduciendo
• Lista de canciones del álbum que se está reproduciendo
• Lista de álbumes del género que se está reproduciendo
1 Mantenga pulsado M.C. para cambiar al
modo de reproducción de enlace.
2 Haga girar M.C. para cambiar el modo y pulse
para seleccionarlo.
! ARTIST – Reproduce un álbum del artista
que se está reproduciendo.
! ALBUM – Reproduce una canción del
álbum que se está reproduciendo.
! GENRE – Reproduce un álbum del género
que se está reproduciendo.
La canción o el álbum seleccionado se reproducirá después de la canción que se esté reproduciendo en ese momento.
Se puede cancelar la canción o el álbum seleccionado si utiliza funciones diferentes a la reproducción de enlace (p. ej., avance rápido y retroceso).
Según la canción seleccionada, pueden cortarse
el final de la canción que se está reproduciendo o
el principio de la canción o del álbum seleccionados.
Uso de la función iPod de esta unidad desde el
iPod
Puede escuchar el sonido de las aplicaciones que
tenga en el iPod a través de los altavoces del automóvil cuando está seleccionado APP.
Esta función no es compatible con los siguientes
modelos de iPod.
! iPod nano 1ª generación
! iPod 5ª generación
Dicho modo APP es compatible con los siguientes modelos de iPod:
! iPod touch de 3ª generación (versión del soft-
ware 3.0 o posterior)
! iPod touch de 2ª generación (versión del soft-
ware 3.0 o posterior)
! iPod touch de 1ª generación (versión del soft-
ware 3.0 o posterior)
! iPhone 4 (versión del software 4.0 o posterior)
! iPhone 3GS (versión del software 3.0 o poste-
rior)
! iPhone 3G (versión del software 3.0 o poste-
rior)
1 Pulse 4/iPod para cambiar el modo de control.
! iPod – La función iPod de esta unidad se
puede utilizar desde el iPod conectado.
! APP – Reproduce el sonido de las aplica-
ciones del iPod.
! AUDIO – La función iPod de esta unidad
se puede utilizar desde esta unidad.
Mejora del audio comprimido y restauración del
sonido óptimo (Sound Retriever)
1 Pulse 1/S.Rtrv para desplazarse entre:
OFF (desactivado)—1—2
1 es efectivo para tasas de compresión baja, y
2 para tasas de compresión alta.
Ajustes de funciones
1 Pulse M.C. para acceder al menú principal.
2 Haga girar M.C. para cambiar la opción
de menú y pulse para seleccionar FUNCTION.
3 Gire M.C. para seleccionar la función.
Una vez seleccionada, siga los siguientes pasos
para ajustar la función:
REPEAT (repetición de reproducción)
1 Pulse M.C. para mostrar el modo de ajuste.
2 Haga girar M.C. para seleccionar una gama
de repetición de reproducción.
Para obtener detalles sobre los ajustes, consulte Selección de una gama de repetición de repro-
ducción en la página anterior.
3 Pulse M.C. para confirmar la selección.
SHUFFLE (reproducción aleatoria)
1 Pulse M.C. para mostrar el modo de ajuste.
2 Gire M.C. para seleccionar su ajuste favorito.
! SONGS – Reproduce canciones siguiendo
un orden aleatorio dentro de la lista.
! ALBUMS – Reproduce canciones siguien-
do un orden aleatorio dentro del álbum.
! OFF – Cancela la reproducción aleatoria.
3 Pulse M.C. para confirmar la selección.
SHUFFLE ALL (reproducción aleatoria de todas las
canciones)
! Pulse M.C. para activar la función de repro-
ducción aleatoria de todas las canciones
(shuffle all).
Para desactivarla, desactive SHUFFLE en el
menú FUNCTION.
LINK PLAY (reproducción de enlace)
1 Pulse M.C. para mostrar el modo de ajuste.
2 Haga girar M.C. para cambiar el modo y pulse
para seleccionarlo.
Para obtener detalles sobre los ajustes, consulte Reproducción de canciones rel acionadas con
la canción que se está r eproduciendo en esta
página.
PAUSE (pausa)
1 Pulse M.C. para pausar o reanudar.
AUDIO BOOKS (velocidad del audiolibro)
1 Pulse M.C. para mostrar el modo de ajuste.
2 Gire M.C. para seleccionar su ajuste favorito.
! FASTER – Reproducción con velocidad su-
perior a la normal
! NORMAL – Reproducción con velocidad
normal
! SLOWER – Reproducción con velocidad in-
ferior a la normal
3 Pulse M.C. para confirmar la selección.
S.RTRV (Sound Retriever)
1 Pulse M.C. para mostrar el modo de ajuste.
2 Gire M.C. para seleccionar el ajuste deseado.
Para obtener más información, consulte Mejora del audio comprimido y re stauración del sonido óptimo (Sound Retriever) en esta página.
3 Pulse M.C. para confirmar la selección.
Notas
! Al cambiar el modo de control a iPod,se
pausa la reproducción de la canción. Utilice
el iPod para reanudar la reproducción.
! Las siguientes funciones estarán disponibles
en esta unidad incluso si se ajusta el modo
de control en iPod/APP.
— Cambio de la información de texto (iPod)
— Pausa
— Avance rápido/retroceso
— Pista arriba/abajo
24
Es

Utilización de esta unidad
Utilización de esta unidad
Sección
02
— Repetición de reproducción (ONE/ALL/OFF)
— Reproducción aleatoria (shuffle)
(lista) para el menú de iPod
—
— Pulse M.C. para accionar la rueda pulsable
del iPod
— Pulse M.C. hacia arriba para girar la rueda
pulsable del iPod hacia la izquierda
— Pulse M.C. hacia abajo para girar la rueda
pulsable del iPod hacia la derecha
! Cuando el modo de control esté ajustado en
iPod/APP, las operaciones estarán limitadas
de la siguiente manera:
— No se puede ajustar la configuración.
— La función de exploración no puede utilizarse
desde esta unidad.
Ajustes de audio
1 Pulse M.C. para acceder al menú principal.
2 Haga girar M.C. para cambiar la opción
de menú y pulse para seleccionar AUDIO.
3 Haga girar M.C. para seleccionar la función de audio.
Una vez seleccionada, siga los siguientes pasos
para ajustar la función de audio:
FAD/BAL (ajuste del fader/balance)
1 Pulse M.C. para mostrar el modo de ajuste.
2 Pulse M.C. para cambiar entre fader (delante-
ro/trasero) y balance (izquierdo/derecho).
3 Gire M.C. para ajustar el balance entre los alta-
voces.
! Cuando el ajuste de la salida posterior es
SW,no se puede ajustar el balance entre
los altavoces delanteros/traseros. Consulte
SW CONTROL (ajuste de la salida posterior
y del altavoz de subgraves) en la página si-
guiente.
PRESET EQ (recuperación de ecualizador)
1 Pulse M.C. para mostrar el modo de ajuste.
2 Gire M.C. para seleccionar una curva de ecua-
lización.
POWERFUL—NATURAL—VOCAL—CUSTOM1—CUSTOM2—FLAT—SUPER BASS
3 Pulse M.C. para confirmar la selección.
GRAPHIC EQ (ajuste de ecualizador)
Puede configurar el ajuste de la curva de ecualización seleccionado según lo desee. Los ajustes de
la curva de ecualización configurados se almacenan en CUSTOM1 oenCUSTOM2.
! Se puede crear una curva CUSTOM1 separada
por cada fuente. Si se realizan ajustes cuando
una curva distinta a CUSTOM2 está seleccionada, los ajustes de la curva de ecualización
se almacenarán en CUSTOM1.
! Se puede crear una curva CUSTOM2 común a
todas las fuentes. Si se realizan ajustes cuando la curva CUSTOM2 está seleccionada, la
curva CUSTOM2 se actualizará.
1 Pulse M.C. para mostrar el modo de ajuste.
2 Pulse M.C. para desplazarse entre la banda de
ecualización y el nivel.
3 Pulse M.C. para cambiar a la banda de ecuali-
zación y después gire M.C. para seleccionar.
100HZ—315HZ—1.25KHZ—3.15KHZ—8KHZ
4 Pulse M.C. para cambiar al nivel y después
gire M.C. para ajustarlo.
Gama de ajuste: de +6 a –6
LEVEL METER (configuración de visualización del
medidor de nivel)
1 Pulse M.C. para mostrar el modo de ajuste.
2 Gire M.C. para seleccionar el ajuste deseado.
OFF (desactivado)—MODE1—MODE2—
MODE3—MODE4
3 Pulse M.C. para confirmar la selección.
LOUDNESS (sonoridad)
La sonoridad compensa las deficiencias en las
gamas de frecuencias bajas y altas cuando se escucha a un volumen bajo.
1 Pulse M.C. para mostrar el modo de ajuste.
2 Gire M.C. para seleccionar el ajuste deseado.
OFF (desactivado)—LOW (bajo)—MID
(medio)—HIGH (alto)
3 Pulse M.C. para confirmar la selección.
SW SETTING 1 (ajuste de subgraves activado/de-
sactivado)
Esta unidad está equipada con una salida de subgraves que se puede activar o desactivar.
1 Pulse M.C. para mostrar el modo de ajuste.
2 Gire M.C. para seleccionar el ajuste deseado.
NORMAL (fase normal)—REVERSE (fase inversa)—OFF (subgraves desactivados)
3 Pulse M.C. para confirmar la selección.
SW SETTING 2 (ajuste de subgraves)
Se puede ajustar la frecuencia de corte y el nivel
de salida cuando la salida de subgraves está activada.
Sólo las frecuencias más bajas que aquellas en la
gama seleccionada se generan por el altavoz de
subgraves.
1 Pulse M.C. para mostrar el modo de ajuste.
2 Pulse M.C. para desplazarse entre la frecuen-
cia de corte y el nivel de salida del altavoz de
subgraves.
3 Pulse M.C. para cambiar a la frecuencia de
corte y después gire M.C. para seleccionar la
frecuencia de corte.
50HZ—63HZ—80HZ—100HZ—125HZ
4 Pulse M.C. para cambiar al nivel de salida y
después gire M.C. para ajustarlo.
Gama de ajuste: de +6 a -24
HPF SETTING (ajuste del filtro de paso alto)
Cuando no desee que se generen los sonidos
bajos de la gama de frecuencias de salida de subgraves a través de los altavoces delanteros o traseros, active el filtro de paso alto (HPF). Sólo las
frecuencias más altas que aquellas de la gama seleccionada se generan a través de los altavoces
delanteros o traseros.
1 Pulse M.C. para mostrar el modo de ajuste.
2 Gire M.C. para seleccionar la frecuencia de
corte.
OFF (desactivado)—50HZ—63HZ—80HZ—
100HZ—125HZ
3 Pulse M.C. para confirmar la selección.
BASS BOOSTER (intensificación de graves)
1 Pulse M.C. para mostrar el modo de ajuste.
2 Gire M.C. para ajustar el nivel.
Gama de ajuste: de 0 a +6
3 Pulse M.C. para confirmar la selección.
SLA (ajuste del nivel de fuente)
SLA (ajuste del nivel de fuente) le permite ajustar
el nivel de volumen de cada fuente para evitar
cambios radicales en el volumen cuando se cambia entre las fuentes.
! Al seleccionar FM como fuente, no se puede
cambiar a SLA.
! Los ajustes se basan en el nivel de volumen de
FM, que se mantiene inalterado.
! El nivel del volumen de AM también se puede
ajustar con esta función.
1 Pulse M.C. para mostrar el modo de ajuste.
2 Gire M.C. para ajustar el volumen de la fuente.
Gama de ajuste: de +4 a –4
3 Pulse M.C. para confirmar la selección.
Ajustes iniciales
1 Mantenga pulsado SRC/OFF hasta que se
apague la unidad.
Español
25
Es
Sección
02
Utilización de esta unidad
Utilización de esta unidad
2 Mantenga pulsado M.C. hasta que el
menú de ajustes iniciales aparezca en la pantalla.
3 Haga girar M.C. para seleccionar el ajuste
inicial.
Una vez seleccionada, siga los siguientes pasos
para configurar el ajuste inicial:
CLOCK SET (ajuste del reloj)
1 Pulse M.C. para mostrar el modo de ajuste.
2 Pulse M.C. para seleccionar el segmento de la
pantalla del reloj que desea ajustar.
Hora—Minuto
3 Haga girar M.C. para ajustar el reloj.
FM STEP (paso de sintonía de FM)
El paso de sintonía de FM que utiliza la sintonización por búsqueda se puede cambiar entre 100
kHz, el paso predefinido y 50 kHz.
! Si la sintonización por búsqueda se realiza en
pasos de 50 kHz, es posible que las emisoras
se sintonicen de manera imprecisa. En ese
caso, sintonícelas manualmente o vuelva a utilizar la función de sintonización por búsqueda.
! El paso de sintonía es de 50 kHz durante la sin-
tonización manual.
1 Pulse M.C. para mostrar el modo de ajuste.
2 Gire M.C. para seleccionar el paso de sintonía
de FM.
100KHz (100 kHz)—50KHz (50 kHz)
3 Pulse M.C. para confirmar la selección.
AM STEP (paso de sintonía de AM)
El paso de sintonía de AM se puede cambiar entre
9 kHz, el paso predefinido y 10 kHz. Si se utiliza el
sintonizador en América del Norte, América Central o América del Sur, se deberá cambiar el paso
de sintonía de 9 kHz (531 a 1 602 kHz permisibles)
a 10 kHz (530 a 1 640 kHz permisibles).
1 Pulse M.C. para mostrar el modo de ajuste.
2 Gire M.C. para seleccionar el paso de sintonía
de AM.
9kHZ (9 kHz)—10kHZ (10 kHz)
3 Pulse M.C. para confirmar la selección.
AUX (entrada auxiliar)
Active este ajuste si utiliza un dispositivo auxiliar
conectado a esta unidad.
1 Pulse M.C. para activar o desactivar la función
AUX.
USB PNP (plug and play)
Este ajuste permite cambiar la fuente a USB/USBiPod automáticamente.
1 Pulse M.C. para activar o desactivar Plug and
Play.
ON – Si está conectado un dispositivo de al-
macenamiento USB o un iPod, y dependiendo
del tipo de dispositivo, la fuente cambia automáticamente a USB/USB-iPod al arrancar el
motor. Si se desconecta el dispositivo de almacenamiento USB o el iPod, se apaga la fuente
de la unidad.
OFF – Cuando un dispositivo de almacena-
miento USB o un iPod está conectado, la fuente no cambia automáticamente a USB/USB-
iPod. Cambie la fuente a USB/USB-iPod manualmente.
SW CONTROL (ajuste de la salida posterior y del
altavoz de subgraves)
La salida posterior de esta unidad (salida de cables de altavoces traseros) se puede usar para la
conexión de altavoces de toda la gama (FUL)ode
subgraves (SW). Si se cambia el ajuste de la salida
posterior a SW,se podrá conectar el cable de altavoces traseros directamente al altavoz de subgraves sin necesidad de usar un amplificador auxiliar.
En principio, REAR SP está ajustado para una conexión de altavoces traseros de toda la gama
(FUL).
1 Pulse M.C. para mostrar el modo de ajuste.
2 Gire M.C. para cambiar la salida y púlselo para
realizar la selección.
REAR SP: FUL—SW
3 Pulse M.C. para confirmar la selección.
DEMO (ajuste de la visualización de la demostra-
ción)
1 Pulse M.C. para activar o desactivar la visuali-
zación de la demostración.
EVER SCRL (ajuste del modo de desplazamiento)
Si la función de desplazamiento continuo está activada (ON), la información de texto que hay registrada se desplaza de manera ininterrumpida por el
display. Desactive la función (OFF) si desea que la
información se desplace una sola vez.
1 Pulse M.C. para activar o desactivar el despla-
zamiento continuo.
Otras funciones
Uso de una fuente AUX
1 Inserte el miniconector estéreo en el conector de entrada AUX.
2 Pulse SRC/OFF para seleccionar AUX
como fuente.
Nota
No se puede seleccionar AUX si no se activa el
ajuste auxiliar. Para obtener más información,
consulte AUX (entrada auxiliar) en esta página.
Activación y desactivación de la
visualización del reloj
% Pulse /DISP OFF para activar o desactivar la visualización del reloj.
# La visualización del reloj desaparece momentáneamente cuando se utilizan otras funciones, pero
vuelve a aparecer después de 25 segundos.
Encendido y apagado de la pantalla
% Mantenga pulsado /DISP OFF hasta
que la pantalla se encienda o se apague.
# Aunque el indicador de display esté apagado,
pueden realizarse operaciones. Si se realiza una operación mientras el indicador de display está apagado, el display se iluminará durante unos segundos y
después volverá a apagarse.
26
Es
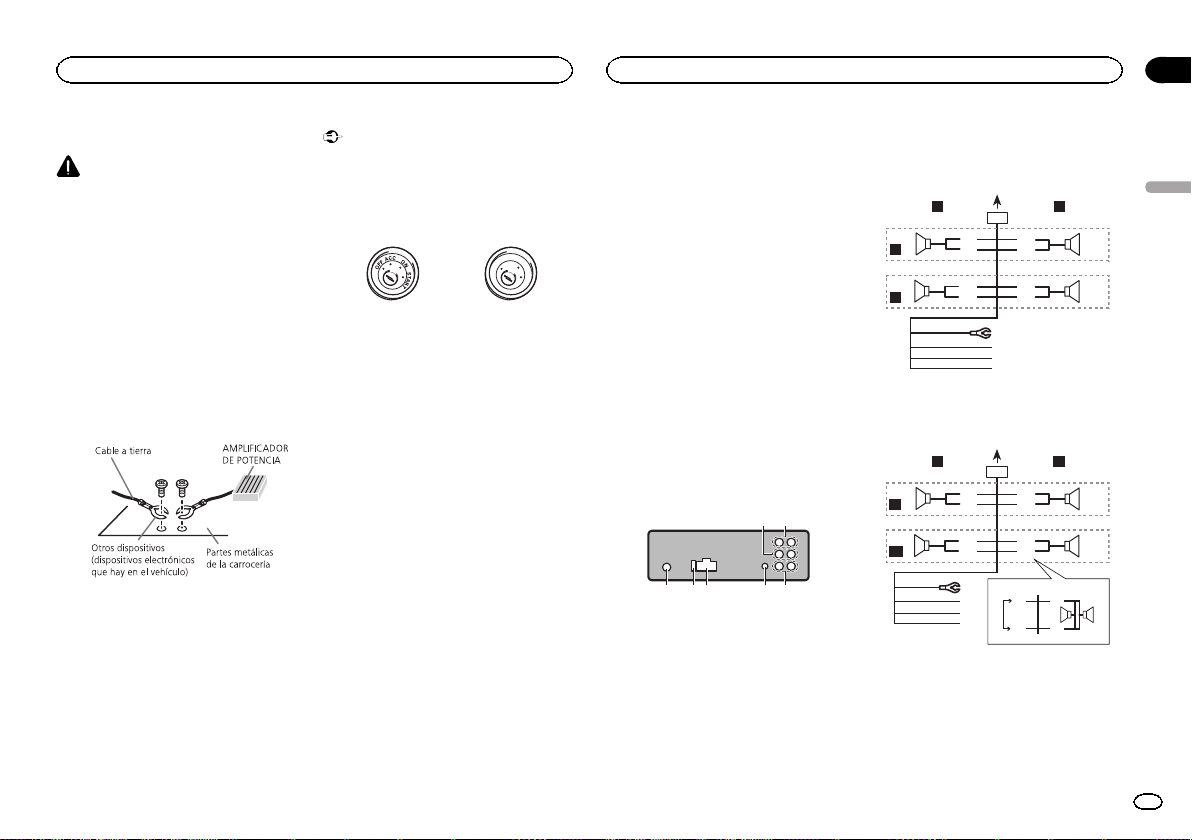
345 6 7
h
Instalación
Instalación
Sección
03
Conexiones
ADVERTENCIA
! Utilice altavoces de más de 50 W (valor de
salida) y de entre 4 W y8W (valor de impedancia). No utilice altavoces de 1 W a3W
con esta unidad.
! El cable negro es el cable a tierra. Cuando
instale esta unidad o el amplificador de potencia (vendido por separado), siempre conecte primero el cable a tierra. Compruebe
que el cable de tierra está conectado adecuadamente a las partes metálicas de la carrocería del automóvil. El cable a tierra del
amplificador, el de esta unidad o el de cualquier otro dispositivo debe conectarse al
automóvil por separado usando tornillos diferentes. Si el tornillo para el cable a tierra se
afloja o se cae, puede provocar incendios,
humo o averías.
Importante
! Cuando esta unidad se instale en un ve-
hículo sin posición ACC (accesorio) en la
llave de encendido, el cable rojo se debe conectar al terminal que pueda detectar la operación de la llave de encendido. De lo
contrario, puede descargarse la batería.
O
F
N
F
O
S
T
A
R
T
Posición ACC Sin posición ACC
! Utilice esta unidad únicamente con una ba-
tería de 12 voltios y conexión a tierra negativa. De lo contrario, pueden producirse
incendios o averías.
! Para evitar cortocircuitos, sobrecalentamien-
to o fallos de funcionamiento, asegúrese de
seguir las siguientes instrucciones.
— Desconecte el terminal negativo de la batería
antes de la instalación.
— Asegure el cableado con pinzas para cables
o cinta adhesiva. Envuelva con cinta adhesiva
las partes en contacto con piezas metálicas
para proteger el cableado.
— Coloque todos los cables alejados de las par-
tes móviles, como la palanca de cambios y
los rieles de los asientos.
— Coloque todos los cables alejados de lugares
calientes, como cerca de la salida del calefactor.
— No conecte el cable amarillo a la batería pa-
sándolo a través del orificio hasta el compartimiento del motor.
— Cubra con cinta aislante los conectores de
cables que queden desconectados.
— No acorte ningún cable.
— Nunca corte el aislamiento del cable de ali-
mentación de esta unidad para compartir la
corriente con otros equipos. La capacidad de
corriente del cable es limitada.
— Utilice un fusible con la intensidad nominal
indicada.
— Nunca conecte el cable negativo de los alta-
voces directamente a tierra.
— Nunca empalme los cables negativos de va-
rios altavoces.
! Cuando se enciende esta unidad, se emite
una señal de control a través del cable azul/
blanco. Conecte este cable al mando a distancia del sistema de un amplificador de potencia externo o al terminal de control del
relé de la antena automática del vehículo
(máx. 300 mA 12 V CC). Si el vehículo posee
una antena integrada en el cristal del parabrisas, conéctela al terminal de la fuente de
alimentación del amplificador de la antena.
! Nunca conecte el cable azul/blanco al termi-
nal de potencia de un amplificador de potencia externo. Ni tampoco lo conecte al
terminal de potencia de la antena automática. De lo contrario, puede descargarse la batería o producirse un fallo de
funcionamiento.
Esta unidad
21
1 Salida delantera
2 Salida trasera
3 Entrada de la antena
4 Fusible (10 A)
5 Entrada del cable de alimentación
6 Entrada remota conectada
Es posible conectar un adaptador de mando
a distancia físicamente conectado (se vende
por separado).
7 Salida de subgraves
Cable de alimentación
Realice estas conexiones cuando no esté conectado un altavoz trasero a uno de subgraves.
LR
4
F
5
R
Realice estas conexiones cuando esté usando
un altavoz de subgraves sin el amplificador opcional.
LR
4
F
i
SW
1 A la toma del cable de alimentación
2 Izquierda
3 Derecha
4 Altavoz delantero
5 Altavoz trasero
6 Blanco
7 Blanco/negro
8 Gris
1
8
6
9
7
a
c
d
b
e
f
g
1
8
6
9
7
a
c
d
b
j
e
a
f
g
k l
h
b
32
32
c
d
Español
27
Es
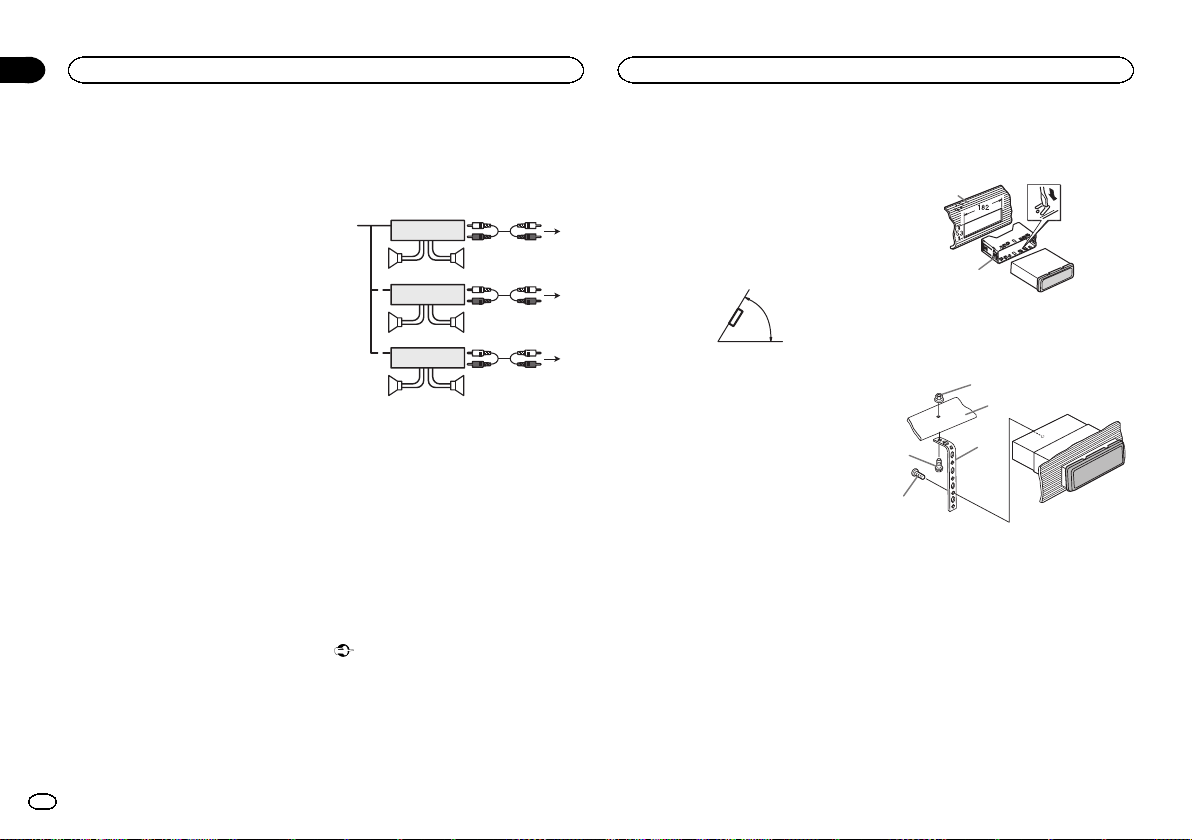
Sección
03
Instalación
Instalación
9 Gris/negro
a Verde
b Verde/negro
c Violeta
d Violeta/negro
e Negro (toma de tierra del chasis)
Conectar a una parte metálica limpia, sin
pintura.
f Amarillo
Conectar al terminal de alimentación constante 12 V.
g Rojo
Conectar al terminal controlado por la llave
de encendido (12 V CC).
h Azul/blanco
Conectar al terminal de control del sistema
del amplificador de potencia o al terminal de
control del relé de la antena (máx. 300 mA 12
V CC).
i Altavoz de subgraves (4 Ω)
j Al usar un altavoz de subgraves de 70 W (2
Ω), conecte el mismo a los cables violeta y
violeta/negro de esta unidad. No conecte
nada al cable verde ni al verde/negro.
k No se utiliza.
l Altavoz de subgraves (4 Ω)×2
Notas
! Con un sistema de 2 altavoces, no conecte
ningún otro aparato a las salidas de cable
que no estén conectadas a los altavoces.
! Cambie la configuración inicial de esta uni-
dad. Consulte SW CONTROL (ajuste de la sa-
lida posterior y del altavoz de subgraves) en la
página 26.
La salida de graves de esta unidad es monoaural.
28
Es
Amplificador de potencia (se
vende por separado)
Realice estas conexiones cuando utilice el amplificador opcional.
1
1
1
1 Control remoto del sistema
Conexión a cable azul/blanco.
2 Amplificador de potencia (se vende por sepa-
rado)
3 Conectar con cables RCA (se venden por se-
parado)
4 A la salida trasera
5 Altavoz trasero
6 Salida delantera
7 Altavoz delantero
8 Salida de subgraves
9 Altavoz de subgraves
3
2
55
3
2
77
3
2
99
4
6
8
Instalación
Importante
! Compruebe todas las conexiones y sistemas
antes de la instalación final.
! No utilice piezas no autorizadas, ya que pue-
den causar fallos de funcionamiento.
! Consulte a su distribuidor si para la instala-
ción es necesario taladrar orificios o hacer
otras modificaciones al vehículo.
! No instale esta unidad en un lugar donde:
— pueda interferir con la conducción del ve-
hículo.
— pueda lesionar a un pasajero como conse-
cuencia de un frenazo brusco.
! El láser semiconductor se dañará si se sobre-
calienta. Instale esta unidad alejada de
zonas que alcancen altas temperaturas,
como cerca de la salida del calefactor.
! Se logra un rendimiento óptimo si la unidad
se instala en un ángulo inferior a 60°.
60°
! Cuando instale esta unidad y con el fin de
asegurar la dispersión apropiada del calor
durante el uso de la misma, asegúrese de
dejar un amplio espacio por detrás del panel
trasero y enrolle cualesquiera cables sueltos
de modo que no bloqueen las aberturas de
ventilación.
Montaje delantero/posterior de DIN
Esta unidad puede instalarse correctamente
tanto si se realiza una instalación frontal o trasera.
En la instalación, emplee piezas disponibles en
el mercado.
Montaje delantero DIN
1 Inserte el manguito de montaje en el salpicadero.
Si realiza la instalación en un espacio poco profundo, utilice el manguito de montaje suministrado. Si hay suficiente espacio, utilice el
manguito de montaje que venía con el vehículo.
2 Fije el manguito de montaje utilizando
un destornillador para doblar las pestañas
metálicas (90°) y colocarlas en su lugar.
1
2
1 Salpicadero
2 Manguito de montaje
3 Instale la unidad según la ilustración.
1
2
4
5
1 Tuerca
2 Muro cortafuego o soporte de metal
3 Correa metálica
4 Tornillo
5 Tornillo (M4 × 8)
# Asegúrese de que la unidad esté firmemente instalada en su lugar. Una instalación inestable puede
causar saltos en el audio o un mal funcionamiento
de la unidad.
3
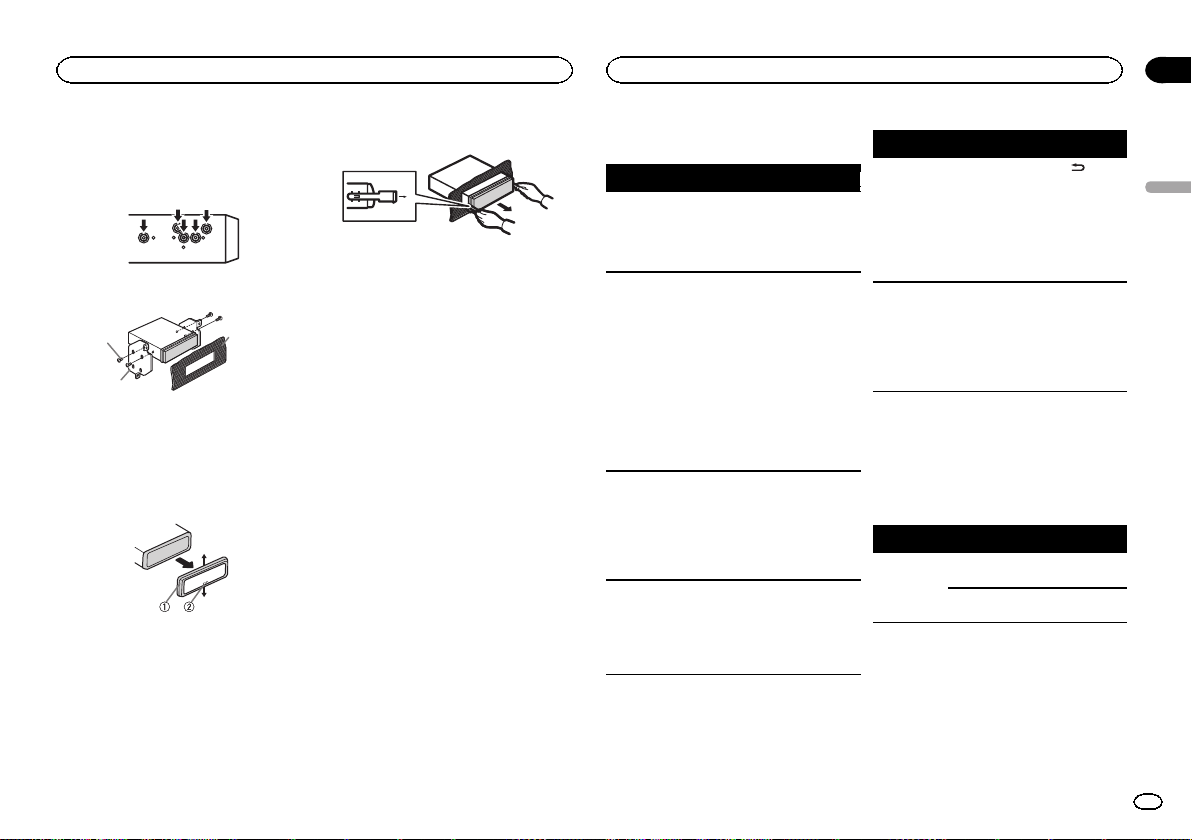
Instalación
Apéndice
Información adicional
Montaje trasero DIN
1 Determine la posición correcta, de modo
que los orificios del soporte y del lateral de
la unidad coincidan.
2 Apriete los dos tornillos en cada lado.
1
2
1 Tornillo de cabeza redonda (5 mm × 8 mm)
2 Carcasa
3 Salpicadero o consola
3
Extracción de la unidad
1 Retire el anillo de guarnición.
1 Anillo de guarnición
2 Pestaña con muesca
! Libere el panel delantero para acceder más
fácilmente al anillo de guarnición.
! Al volver a colocar el anillo de guarnición,
oriente hacia abajo la pestaña con muesca.
2 Inserte en ambos lados de la unidad las
llaves de extracción provistas hasta que se
escuche un ligero chasquido.
3 Extraiga la unidad del salpicadero.
Retirada y colocación del panel
delantero
Puede extraer el panel delantero para proteger
la unidad contra robo.
Pulse el botón de soltar, empuje el panel delantero hacia arriba y tire de él hacia sí.
Para obtener más información, consulte Extrac-
ción del panel delantero para proteger la unidad
contra robo y Colocación del panel delantero en la
página 20.
Solución de problemas
Síntoma Causa Resolución
La pantalla
vuelve automáticamente
a la visualización normal.
La gama de
repetición de
reproducción
cambia de
manera inesperada.
No se reproduce una subcarpeta.
NO XXXX
aparece cuando se cambia
un display
(NO TITLE,
por ejemplo).
No ha realizado
ninguna operación en aproximadamente 30
segundos.
Dependiendo
de la gama de
repetición de reproducción, la
gama seleccionada puede
cambiar cuando
se selecciona
otra carpeta o
pista o cuando
se utilice el
avance rápido/
retroceso.
No se pueden
reproducir las
subcarpetas
cuando se selecciona FOL-
DER (repetición
de carpeta).
No hay información de texto incorporada.
Realice la operación de nuevo.
Seleccione de
nuevo la gama de
repetición de reproducción.
Seleccione otra
gama de repetición de reproducción.
Cambie la pantalla o reproduzca
otra pista/archivo.
Síntoma Causa Resolución
La pantalla se
ilumina cuando la unidad
está apagada.
La unidad no
funciona correctamente.
Hay una interferencia.
Activado el
modo de demostración.
Está usando un
dispositivo,
como un teléfono móvil, que
transmite ondas
eléctricas cerca
de la unidad.
/DISP/
! Pulse
SCRL para cancelar el modo de demostración.
! Desactive el
ajuste de la visualización de la demostración.
Aleje de la unidad
los dispositivos
eléctricos que
puedan estar causando interferencias.
Mensajes de error
Cuando contacte con su concesionario o con el
Servicio Técnico Oficial de Pioneer más cercano, asegúrese de anotar el mensaje de error.
Reproductor de CD incorporado
Mensaje Causa Resolución
ERROR-07,
11, 12, 17, 30
El disco está
sucio.
El disco está rayado.
Limpie el disco.
Sustituya el disco.
Español
29
Es

Apéndice
Información adicional
Información adicional
Mensaje Causa Resolución
ERROR-10,
11, 12, 15,
17, 30, A0
ERROR-15 El disco inser-
ERROR-23 Formato de CD
FORMAT
READ
NO AUDIO El disco inser-
SKIPPED El disco inser-
PROTECT Todos los archi-
Se ha producido
un error eléctrico o mecánico.
tado aparece en
blanco
no compatible
A veces se pro -
duce un retraso
entre el comienzo de la reproducción y la
emisión del sonido.
tado no contiene archivos
reproducibles.
tado contiene
archivos protegidos con DRM.
vos del disco insertado tienen
DRM integrado.
Cambie la llave
de encendido del
automóvil a la posición de desactivación y luego
pase de nuevo a
activación, o cambie a una fuente
diferente, y después vuelva a activar el
reproductor de
CD.
Sustituya el disco.
Sustituya el disco.
Espere hasta que
el mensaje desaparezca y oiga sonido.
Sustituya el disco.
Sustituya el disco.
Sustituya el disco.
Dispositivo de almacenamiento externo (USB,
SD)/iPod
Mensaje Causa Resolución
NO DEVICE Si Plug and
FORMAT
READ
NO AUDIO No hay cancio-
SKIPPED El dispositivo de
Play está desactivado, no hay
conectado ningún dispositivo
USB ni ningún
iPod.
A veces se pro duce un retraso
entre el comienzo de la reproducción y la
emisión del sonido.
nes.
El dispositivo de
almacenamiento USB conectado tiene la
seguridad activada
almacenamiento USB conectado contiene
archivos integrados con
Windows
Mediaä
DRM 9/10
! Active Plug and
Play.
! Conecte un dispositivo de almacenamiento USB
o un iPod compatible.
Espere hasta que
el mensaje desaparezca y oiga sonido.
Transfiera los archivos de audio al
dispositivo de almacenamiento
USB y conéctelo.
Para desactivar la
seguridad, siga
las instrucciones
del dispositivo de
almacenamiento
USB.
Reproduzca un
archivo de audio
que no esté integrado con
Windows Media
DRM 9/10.
Mensaje Causa Resolución
PROTECT Todos los archi-
N/A USB El dispositivo de
N/A SD Dispositivo de
vos del dispositivo de
almacenamiento USB están integrados con
Windows Media
DRM 9/10
almacenamiento USB conectado no es
compatible con
esta unidad.
iPod no compatible
almacenamiento SD no compatible
Transfiera archivos de audio no
integrados con
Windows Media
DRM 9/10 al dispositivo de almacenamiento USB
y conéctelo.
! Conecte un dispositivo que cumpla con la clase
de almacenamiento masivo
USB.
! Desconecte su
dispositivo y sustitúyalo por un dispositivo de
almacenamiento
USB compatible.
Desconecte su
dispositivo y sustitúyalo por un
iPod compatible.
Retire su dispositivo y sustitúyalo
por un dispositivo
de almacenamiento USB compatible.
Mensaje Causa Resolución
CHECK USB El conector
USB o el cable
USB está cortocircuitado.
El dispositivo de
almacenamiento USB conectado consume
más de 500 mA
(corriente máxima permitida).
El iPod funciona
correctamente
pero no se
carga
Compruebe que
el conector USB o
el cable USB no
esté enganchado
en algo ni dañado.
Desconecte el
dispositivo de almacenamiento
USB y no lo utilice. Coloque la
llave de encendido del automóvil
en posición OFF,
luego en ACC u
ON y, a continuación, conecte únicamente dispositivos de
almacenamiento
USB compatibles.
Compruebe que
el cable de conexión del iPod no
esté cortocircuitado (p. ej., atrapado entre
objetos metálicos). Una vez confirmado, cambie
la llave de encendido del automóvil a la posición
de desactivación
y luego pase de
nuevo a activación; o bien desconecte una vez
el iPod y conéctelo de nuevo.
30
Es
 Loading...