

Page 1
Operation Manual
Manual de instrucciones
CD RECEIVER
RADIO CD
DEH-4150SD
DEH-3100UB
English
Español
YRD5269A_cover.indd 1 2008/08/20 19:09:54
Page 2
Black plate (2,1)
/
Contents
Thank you for purchasing this PIONEER product.
Please read through this manual before using the product for the first time, to ensure proper use. After reading, please keep the manual in a safe and accessible place
for future reference.
Before You Start
About this unit 4
Features 4
Visit our website 4
Protecting your unit from theft 4
– Removing the front panel 4
– Attaching the front panel 5
Use and care of the remote control 5
– Installing the battery 5
– Using the remote control 5
Operating this unit
What’s what 6
– Head unit 6
– Remote control 7
– Display indication 7
Basic Operations 9
– Power ON/OFF 9
– Selecting a source 9
– Adjusting the volume 9
Tuner 10
– Basic Operations 10
– Storing and recalling broadcast
frequencies 10
– Introduction to advanced
operations 10
– Storing the strongest broadcast
frequencies 10
– Tuning in strong signals 11
Built-in CD Player 11
– Basic Operations 11
– Displaying text information on disc 12
– Selecting files from the file name
list 12
– Introduction to advanced
operations 12
– Selecting a repeat play range 13
– Playing tracks in random order 13
– Scanning folders and tracks 13
2
En
– Pausing playback 13
– Using Sound Retriever 13
Playing songs in an external storage device
(USB, SD) 14
– Basic Operations 14
– Displaying text information of an audio
file 15
– Selecting files from the file name
list 15
– Introduction to advanced
operations 15
Playing songs on iPod 16
– Basic Operations 16
– Browsing for a song 17
– Displaying text information on
iPod 17
– Introduction to advanced
operations 18
– Playing songs in a random order
(shuffle) 18
– Playing all songs in a random order
(shuffle all) 18
– Selecting songs from lists related to the
currently playing song 19
– Operating this unit’s iPod function
from your iPod 19
– Changing audiobook speed 19
Audio Adjustments
Introduction of audio adjustments 21
Using balance adjustment 21
Using the equalizer 21
– Recalling equalizer curves 22
– Adjusting equalizer curves 22
– Fine-adjusting equalizer curve 22
Adjusting loudness 23
Using subwoofer output 23
– Adjusting subwoofer settings 23
Using the high pass filter 24
Boosting the bass 24
<YRD5269-A
S>2
Page 3
/
Contents
Black plate (3,1)
English
Adjusting source levels 24
Initial Settings
Adjusting initial settings 25
Setting the clock 25
Setting the FM tuning step 25
Setting the AM tuning step 25
Switching the auxiliary setting 26
Setting the rear output and subwoofer
controller 26
Switching the ever scroll 27
Other Functions
Using the AUX source 28
– Selecting AUX as the source 28
Turning the clock display on or off 28
Switching the display indication and button
illumination 28
Additional Information
Error messages 29
Handling guideline of discs and player 30
Dual Discs 31
Handling guideline of external storage device
(USB, SD) and this unit 31
– USB storage device 31
– SD memory card 32
Compressed audio compatibility (disc, USB,
SD) 32
– Supplemental information of
compressed audio (disc, USB, SD) 32
Compressed audio files on the disc 33
Compressed audio files in the external
storage device (USB, SD) 33
Example of a hierarchy and playback
sequences 33
– The sequence of audio files on the
disc 33
– The sequence of audio files on the
external storage device (USB, SD) 33
iPod 34
– iPod compatibility 34
– About handling the iPod 34
– About iPod settings 34
Copyright and trademark notice 34
Specifications 36
<YRD5269-A
S>3
En
3
Page 4

Section
01
Black plate (4,1)
Before You Start
About this unit
CAUTION
! Do not allow this unit to come into contact
with liquids. Electrical shock could result.
Also, damage to this unit, smoke, and overheating could result from contact with liquids.
! “CLASS 1 LASER PRODUCT”
This product contains a laser diode of higher
class than 1. To ensure continued safety, do
not remove any covers or attempt to gain access to the inside of the product. Refer all servicing to qualified personnel.
! Keep this manual handy as a reference for op-
erating procedures and precautions.
! Always keep the volume low enough so that
you can hear sounds from outside the vehicle.
! Protect this unit from moisture.
! If the battery is disconnected or discharged,
the preset memory will be erased and must be
reprogrammed.
Features
This unit is compatible with a wide variety of
file formats and media/storage devices.
File format compatibility
! WMA
! MP3
! AAC
! WAV
For details about compatibility, refer to Additional Information.
Media/storage device compatibility
! CD/CD-R/CD-RW
! USB portable audio player/USB memory
! SD memory card (SDHC compatible)
The SD memory card is only available for DEH4150SD.
Make inquiries to the manufacturer about
your USB portable audio player/USB memory
and SD memory card.
For details about compatibility, refer to Addi-
tional Information.
iPod compatibility
This unit can control and listen to songs on an
iPod.
For details about the supported iPod, refer to
iPod compatibility on page 34.
CAUTION
! Pioneer accepts no responsibility for data lost
on the USB memory/USB portable audio
player/SD memory card/SDHC memory card
even if that data is lost while using this unit.
! Pioneer accepts no responsibility for data lost
on the iPod even if that data is lost while
using this unit.
Visit our website
Visit us at the following site:
http://pioneer.jp/group/index-e.html
! We offer the latest information about
Pioneer Corporation on our website.
Protecting your unit from
theft
The front panel can be detached to deter theft.
Important
! Handle gently when removing or attaching
the front panel.
! Avoid subjecting the front panel to excessive
shock.
! Keep the front panel out of direct sunlight and
high temperatures.
! Before detaching, be sure to remove the AUX/
USB cable and USB device from the front
panel. Otherwise, this unit, connected device
or vehicle interior may be damaged.
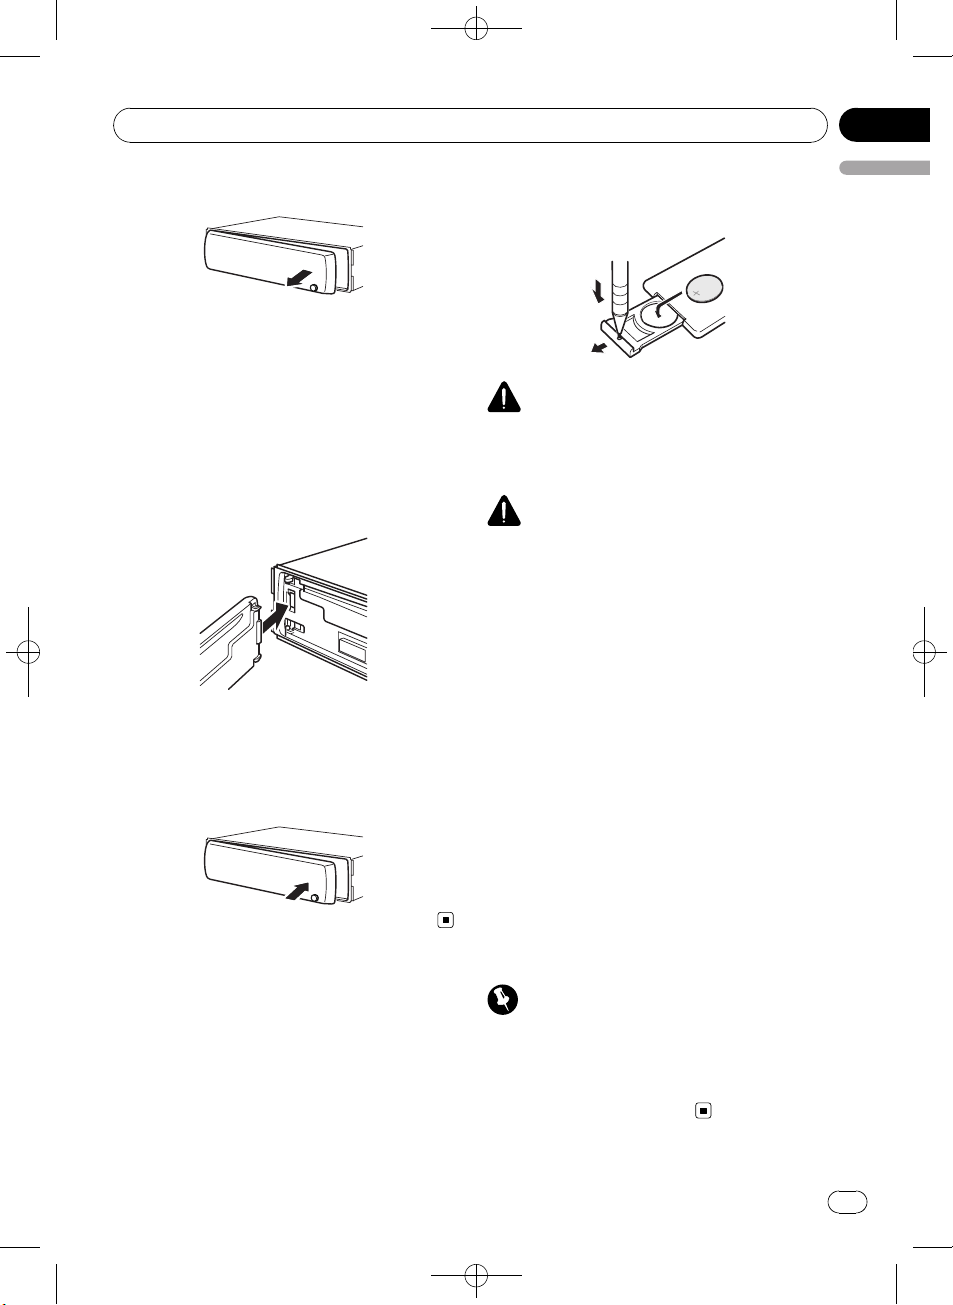
Removing the front panel
1 Press (detach) to release the front
panel.
4
En
<
YRD5269-A/S>4
Page 5
/
Before You Start
Black plate (5,1)
Section
01
2 Grab the front panel and remove.
3 Put the front panel into the provided
protective case for safe keeping.
Attaching the front panel
1 Slide the front panel to the left until it
clicks.
Front panel and the head unit are jointed on
the left side. Make sure that the front panel
has been jointed to the head unit.
2 Press the right side of the front panel
until it is firmly seated.
# If you can’t attach the front panel to the head
unit successfully, try again. Front panel may be
damaged if you attach the front panel forcedly.
! When using for the first time, pull out the
English
film protruding from the tray.
WARNING
Keep the battery out of the reach of children.
Should the battery be swallowed, consult a doctor immediately.
CAUTION
! Use one CR2025 (3 V) lithium battery.
! Remove the battery if the remote control is not
used for a month or longer.
! There is a danger of explosion if the battery is
incorrectly replaced. Replace only with the
same or equivalent type.
! Do not handle the battery with metallic tools.
! Do not store the battery with metallic objects.
! If the battery leaks, wipe the remote control
completely clean and install a new batter y.
! When disposing of used batteries, comply
with governmental regulations or environmental public institutions’ rules that apply in your
country/area.
Use and care of the remote
control
Installing the battery
Slide the tray on the back of the remote control out and insert the battery with the plus (+)
and minus (–) poles aligned properly.
Using the remote control
Point the remote control in the direction of the
front panel to operate.
! The remote control may not function prop-
erly in direct sunlight.
Important
! Do not store the remote control in high tem-
peratures or direct sunlight.
! Do not let the remote control fall onto the
floor, where it may become jammed under the
brake or accelerator pedal.
En
<YRD5269-A
S>5
5
Page 6
178a2
345
6
bcdef
9
g
Section
02
Black plate (6,1)
Operating this unit
What’s what
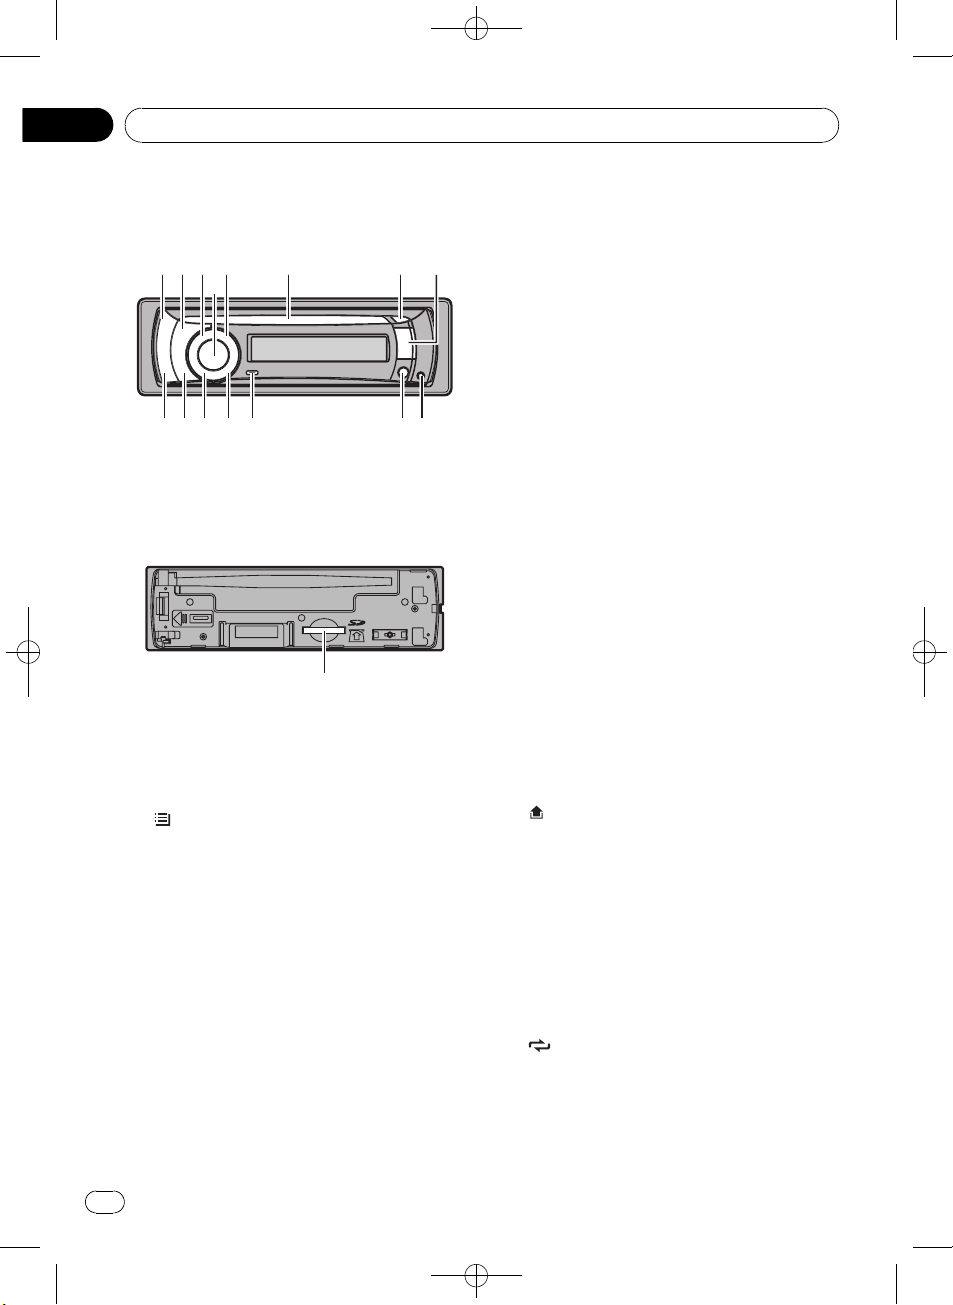
Head unit
SD memory card slot
This function is available only for DEH4150SD.
Removing the front panel, you can see the SD
memory card slot.
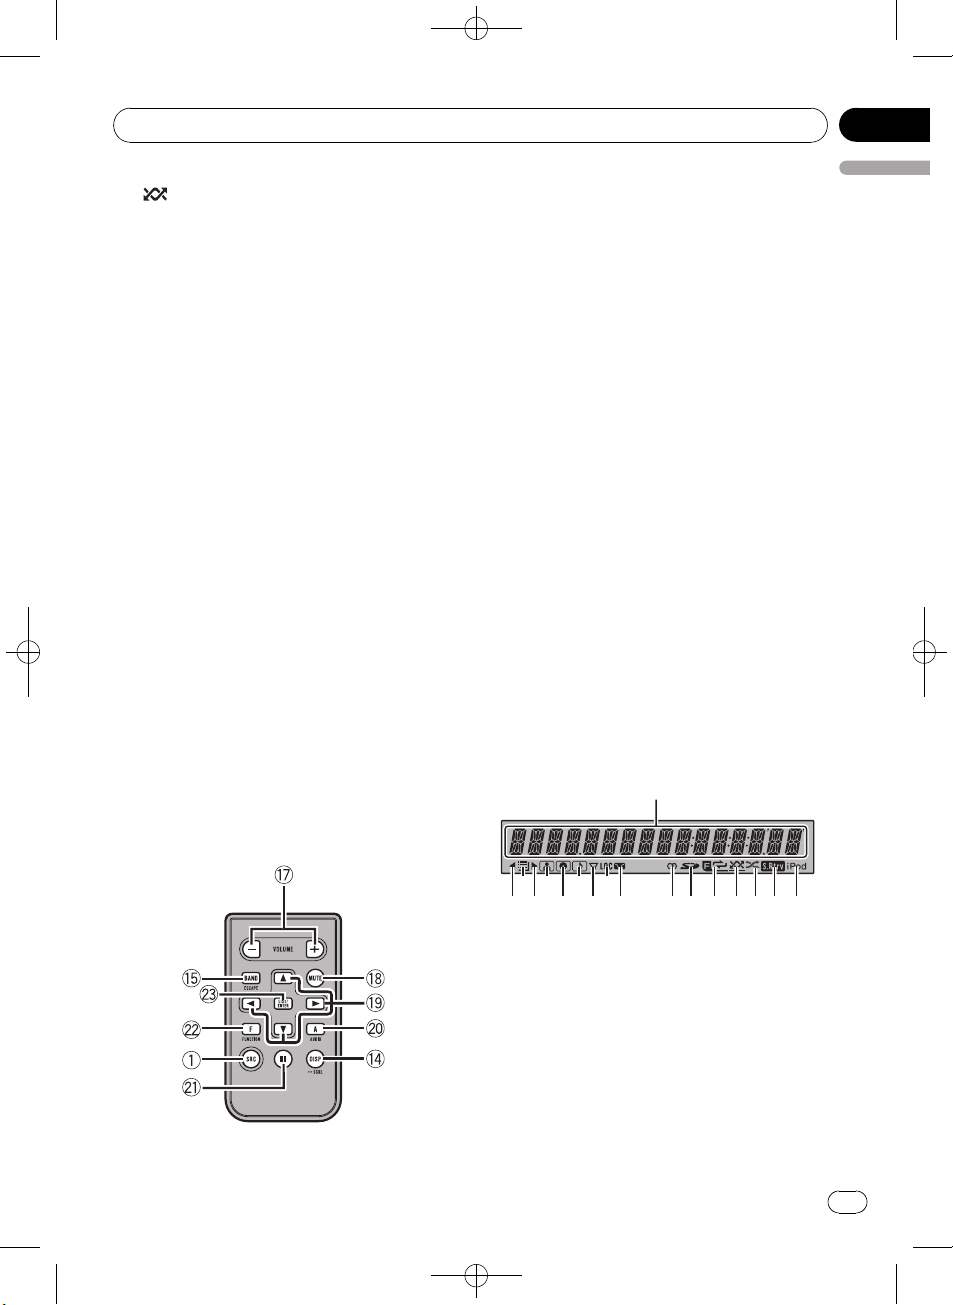
1 SRC/OFF button
This unit is turned on by selecting a source.
Press to cycle through all the available
sources.
2
/LIST button
Press to display the track title list, folder list,
file list or preset channel list depending on
the source.
Press and hold to switch to link play mode
while using an iPod.
For details, refer to Selecting songs from
lists related to the currently playing song on
page 19.
3 S.Rtrv button
Press to switch Sound Retriever settings.
For details, refer to Using Sound Retriever on
page 13.
4 MULTI-CONTROL
Move to perform manual seek tuning, fast
forward, reverse and track search controls.
Also used for controlling functions.
Turn to increase or decrease the volume.
5 SW/BASS button
Press to switch to subwoofer setting menu.
When operating subwoofer menu, press to
switch menu.
Press and hold to switch to bass boost
menu.
6 Disc loading slot
Insert a CD/CD-R/CD-RW to play.
7 h (eject) button
Press to eject a CD/CD-R/CD-RW.
8 USB port
Use to connect a USB storage device.
! When connecting, open up the USB con-
nector lid.
! Use a USB cable to connect the USB sto-
rage device to the USB port. Since the
USB storage device is projected forward
from the unit, it is dangerous to connect
directly.
Pioneer CD-U50E USB cable is also available. For details, consult your dealer.
9
(detach) button
Press to remove the front panel from the
head unit.
a AUX input jack (3.5 mm stereo jack)
Use to connect an auxiliary device.
b CLOCK/DISP OFF button
Press to change to the clock display.
Press and hold to turn the display indication
and button illumination off or on.
c
(repeat)/LOC button
Press to switch the repeat play range while
using CD, USB/SD or iPod.
Press to switch local settings while using
tuner as the source.
6
En
<
YRD5269-A/S>6
Page 7
1
2 4 6 8
a e g h
bdfc
Operating this unit
Black plate (7,1)
Section
02
d (random)/iPod button
Press to turn random function on or off
while using CD or USB/SD.
While using an iPod, press to shuffle all
tracks.
Press and hold to switch the control mode
while using an iPod.
For details, refer to Operating this unit’siPod
function from your iPod on page 19.
e DISP/BACK/SCRL button
Press to select different displays.
Press and hold to scroll through the text information.
Press to return to the previous display when
operating the menu.
Press and hold to return to the main menu
when operating the menu.
f BAND/ESC button
Press to select among three FM bands and
one AM band.
Press to return to the ordinary display when
operating the menu.
g SD memory card slot
Only for DEH-4150SD.
Inset an SD memory card to play.
h VOLUME buttons
English
Press to increase or decrease the volume.
i MUTE button
Press to turn off the sound. To turn on the
sound, press again.
j a/b/c/d buttons
Press to perform manual seek tuning, fast
forward, reverse and track search controls.
Also used for controlling functions.
k AUDIO button
Press to select an audio function.
l e button
Press to turn pause on or off.
m FUNCTION button
Press to select functions.
n LIST/ENTER button
Press to display the disc title list, track title
list, folder list, file list or preset channel list
depending on the source.
While in the operating menu, press to control functions.
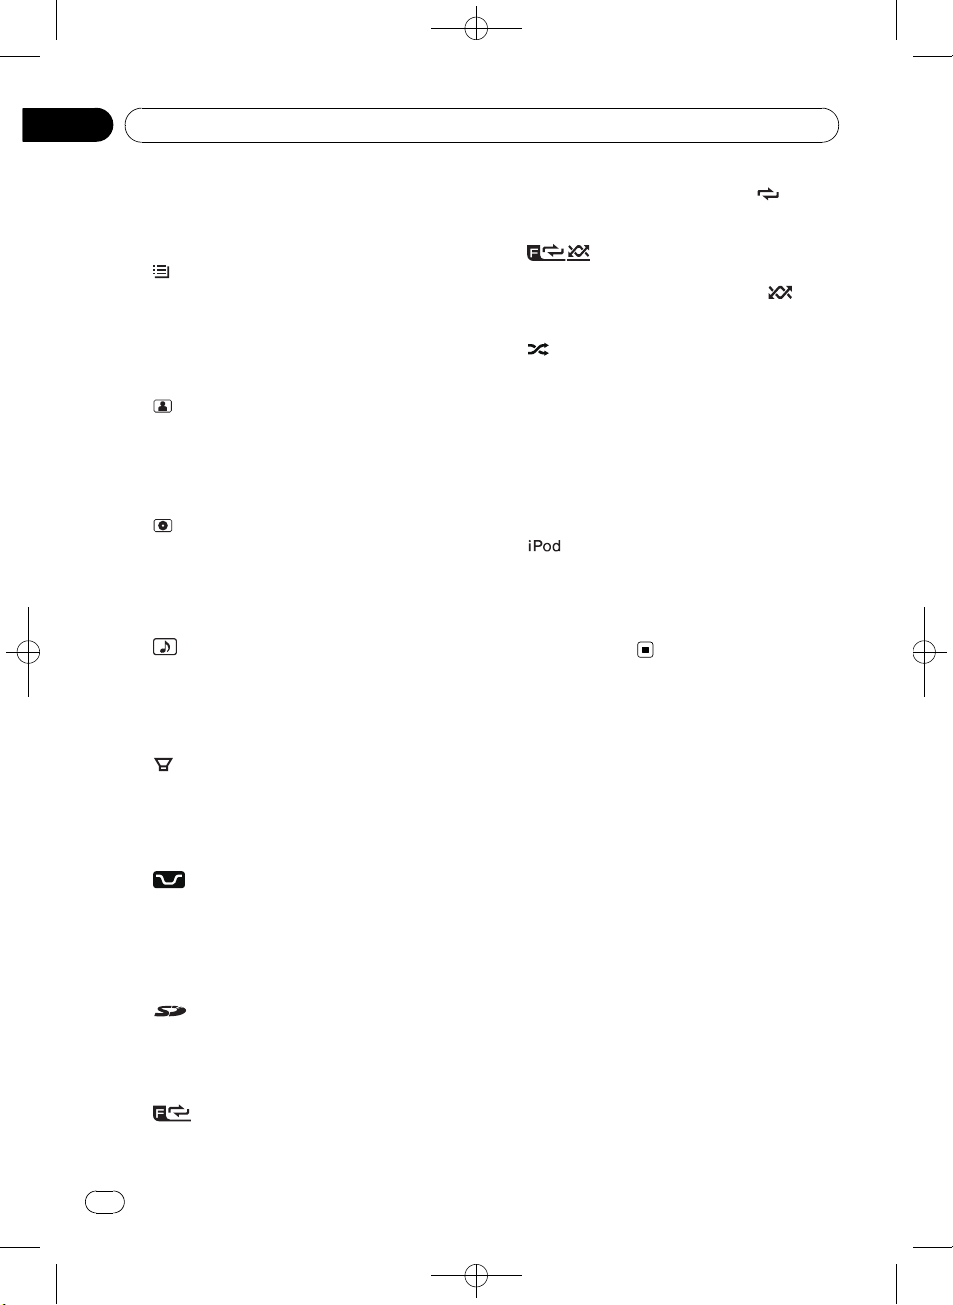
Display indication
Remote control
Operation is the same as when using the buttons on the head unit.
3 5 79
1 Main display section
Displays band, frequency, elapsed playback
time and other settings.
! Tuner
Band and frequency are displayed.
! Built-in CD player, external storage de-
vice (USB, SD), iPod
Elapsed playback time and literal information are displayed.
<
YRD5269-A/S>7
En
7
Page 8
/
Section
02
Black plate (8,1)
Operating this unit
2 c indicator
Appears when an upper tier of folder or
menu exists.
3
(list) indicator
Appears when operating list function.
4 d indicator
Appears when a lower tier of folder or menu
exists.
5
(artist) indicator
Appears when the disc (track) artist name is
displayed on the main display section.
Appears when artist search refinement on
the iPod browsing function is in use.
6
(disc) indicator
Appears when the disc (album) name is displayed on the main display section.
Appears when album search refinement on
the iPod browsing function is in use.
7
(song) indicator
Appears when the track (song) name is displayed on the main display section.
Appears when song search refinement on
the iPod browsing function is in use.
8
(subwoofer) indicator
Appears when subwoofer is on.
When repeat function is on, only
played.
e
Appears when folder random is on.
When random function is on, only
played.
f
Appears when shuffle function is on while
iPod source is being selected.
g S.Rtrv indicator
Appears when Sound Retriever function is
on.
For details, refer to Using Sound Retriever on
page 13.
h
Appears when CONTROL (control mode) is
set to IPOD.
For details about the control mode, refer to
Operating this unit’s iPod function from your
iPod on page 19.
(folder random) indicator
(shuffle) indicator
indicator
is dis-
is dis-
9 LOC indicator
Appears when local seek tuning is on.
a
b 5 (stereo) indicator
c
d
8
(loudness) indicator
Appears when loudness is on.
Appears when the selected frequency is
being broadcast in stereo.
(SD memory card) indicator
Only for DEH-4150SD.
Appears when SD/SDHC memory card is inserted.
(folder repeat) indicator
Appears when folder repeat is on.
En
<YRD5269-A
S>8
Page 9
/
Operating this unit
Black plate (9,1)
Section
02
Basic Operations
Power ON/OFF
Turning the unit on
% Press SRC/OFF to turn the unit on.
Turning the unit off
% Press SRC/OFF and hold until the unit
turns off.
Selecting a source
You can select a source you want to listen to.
% Press SRC/OFF repeatedly to switch between the following sources.
DEH-4150SD
TUNER (tuner)—COMPACT DISC (built-in CD
player)—USB (USB storage device)/USB-IPOD
(iPod connected using USB input)—SD (SD
memory card)—AUX (AUX)
DEH-3100UB
TUNER (tuner)—COMPACT DISC (built-in CD
player)—USB (USB storage device)/USB-IPOD
(iPod connected using USB input)—AUX
(AUX)
! When this unit’s blue/white lead is connected
English
to the vehicle’s auto-antenna relay control
terminal, the vehicle’s antenna extends when
this unit’s source is turned on. To retract the
antenna, turn the source off.
Adjusting the volume
% Turn MULTI-CONTROL to adjust the
sound level.
Notes
! In the following cases, the sound source will
not change.
— When there is no disc in the unit.
— When the SD memory card is not inserted
into the slot.
— When AUX (auxiliary input) is set to off
(refer to page 26).
! When a USB storage device or iPod is not
connected to the USB port of this unit,
NO DEVICE is displayed.
! AUX is set to on by default. Turn off the AUX
when not in use (refer to Switching the auxili-
ary setting on page 26).
! Charging the portable audio player using
car’s DC power source while connecting it to
AUX input may generate noise. In this case,
stop charging.
<YRD5269-A
S>9
En
9
Page 10
Section
02
Black plate (10,1)
Operating this unit
Tuner
Basic Operations
Important
If you are using this unit in North, Central or
South America, reset the AM tuning step (refer to
Setting the AM tuning step on page 25).
% Selecting a band
Press BAND/ESC.
# Band can be selected from among FM1, FM2,
FM3 or AM.
% Manual tuning (step by step)
Push MULTI-CONTROL left or right.
% Seeking tuning
Push and hold MULTI-CONTROL left or right,
and then release.
# You can cancel seek tuning by pushing
MULTI-CONTROL left or right.
# While pushing and holding MULTI-CONTROL
left or right, you can skip stations. Seek tuning
starts as soon as you release MULTI-CONTROL.
Storing and recalling broadcast
frequencies
You can easily store up to six broadcast frequencies for later recall.
! Six stations for each band can be stored in
memory.
1 Press
Preset screen is displayed.
2 Use MULTI-CONTROL to store the selected frequency in memory.
Turn to change the preset number. Press and
hold to store.
# You can also store the frequency in memory
by pushing and holding MULTI-CONTROL right.
3 Use MULTI-CONTROL to select the desired station.
Turn to change the station. Press to select.
# You can also change the station by pushing
MULTI-CONTROL up or down.
/LIST.
# To return to the ordinary display, press
BAND/ESC or
# If you do not operate the list within about 30
seconds, the display automatically returns to the
ordinary display.
Note
You can also recall radio station frequencies assigned to preset tuning numbers by pushing
MULTI-CONTROL up or down during the frequency display.
/LIST.
Introduction to advanced
operations
1 Press MULTI-CONTROL to display the
main menu.
2 Use MULTI-CONTROL to select
FUNCTION.
Turn to change the menu option. Press to select.
3 Turn MULTI-CONTROL to select the
function.
BSM (best stations memory)—LOCAL (local
seek tuning)
Notes
! To return to the previous display, press
DISP/BACK/SCRL.
! To return to the main menu, press and hold
DISP/BACK/SCRL.
! To return to the ordinary display, press
BAND/ESC.
Storing the strongest broadcast
frequencies
BSM (best stations memory) lets you automatically store the six strongest broadcast frequencies.
1 Use MULTI-CONTROL to select BSM in
the function menu.
10
En
YRD5269-A/S>10
<
Page 11

/
Operating this unit
Black plate (11,1)
Section
02
2 Press MULTI-CONTROL to turn BSM on.
The six strongest broadcast frequencies are
stored in the order of their signal strength.
# To cancel, press MULTI-CONTROL again.
Tuning in strong signals
Local seek tuning lets you tune in only those
radio stations with sufficiently strong signals
for good reception.
% Press
desired setting.
FM: OFF—LEVEL1—LEVEL2—LEVEL3—
LEVEL4
AM: OFF—LEVEL1—LEVEL2
The LEVEL4 setting allows reception of only
the strongest stations, while lower settings let
you receive progressively weaker stations.
Note
You can also perform this operation in the menu
that appears by using MULTI-CONTROL.
/LOC repeatedly to select the
English
Built-in CD Player
Basic Operations
% Inserting a CD/CD-R/CD-RW into the
disc loading slot
Playback will automatically start.
# When loading a CD/CD-R/CD-RW, face
the label side of a disc up.
% Ejecting a CD/CD-R/CD-RW
Press h (eject).
% Selecting a folder
Push MULTI-CONTROL up or down.
# You cannot select a folder that does not have
a compressed audio file recorded in it.
% Selecting a track
Push MULTI-CONTROL left or right.
% Fast forwarding or reversing
Push and hold MULTI-CONTROL left or right.
# When playing compressed audio, there is no
sound on fast forward or reverse.
% Returning to root folder
Press and hold BAND/ESC.
# If folder 01 (ROOT) contains no files, playback
commences with folder 02.
% Switching between compressed audio
and CD-DA
Press BAND/ESC.
# This operation is available only when playing
CD-EXTRA or MIXED-MODE CDs.
# If you have switched between compressed
audio and CD-DA, playback starts at the first
track on the disc.
Notes
! The built-in CD player can play back audio CD
and compressed audio recorded on a CD/CDR/CD-RW. (Refer to page 33 for files that can
be played back.)
! Read the precautions for the player and discs
in the following section. Refer to page 30.
! A disc has already been inserted, press SRC/
OFF to select the built-in CD player.
En
<YRD5269-A
S>11
11
Page 12

Section
02
Black plate (12,1)
Operating this unit
! There is sometimes a delay between starting
up disc playback and the sound being issued.
When being read, FORMAT READ is displayed.
! If an error message is displayed, refer to Error
messages on page 29.
! Playback is carried out in order of file number.
Folders are skipped if they contain no files. (If
folder 01 (ROOT) contains no files, playback
commences with folder 02.)
Displaying text information on
disc
% Press DISP/BACK/SCRL to select the desired text information.
For WMA/MP3/AAC
Play time—folder name—file name—track
title—artist name—album title—comment—
bit rate
For WAV
Play time—folder name—file name—sampling frequency
Notes
! You can scroll to the left of the title by pressing
and holding DISP/BACK/SCRL.
! If specific information is not recorded on a
disc, title or name is not displayed.
! Depending on the version of iTunes used to
write MP3 files onto a disc, comment information may not be correctly displayed.
! Depending on the version of Windows
Media™ Player used to encode WMA files,
album names and other text information may
not be correctly displayed.
! When playing back VBR (variable bit rate)-re-
corded WMA files, the average bit rate value is
displayed.
! When playing back VBR (variable bit rate)-re-
corded MP3 files, VBR is displayed instead of
bit rate value.
! The sampling frequency shown in the display
may be abbreviated.
! When Ever Scroll is set to ON at the initial set-
ting, text information scrolls continuously in
the display. Refer to Switching the ever scroll
on page 27.
Selecting files from the file
name list
File name list lets you see the list of file names
(or folder names) and select one of them to
playback.
1 Press
/LIST to switch to the file name
list mode.
Names of files and folders appear in the display.
2 Use MULTI-CONTROL to select the desired file name (or folder name).
Turn to change the name of file or folder.
— when a file is selected, press to play.
— when a folder is selected, press to see a list
of files (or folders) in the seleted folder.
— when a folder is selected, press and hold to
play a song in the selected folder.
# You can also play the file by pushing
MULTI-CONTROL right.
# You can also play a song in the selected folder
by pushing and holding MULTI-CONTROL right.
# To return to the previous list (the folder one
level higher), press DISP/BACK/SCRL. You can
also perform this operation by pushing
MULTI-CONTROL left.
# To return to the top tier of list, press and hold
DISP/BACK/SCRL.
# To return to the ordinary display, press
BAND/ESC or
# If you do not operate the list within about 30
seconds, the display automatically returns to the
ordinary display.
/LIST.
Introduction to advanced
operations
1 Press MULTI-CONTROL to display the
main menu.
12
En
<
YRD5269-A/S>12
Page 13
Operating this unit
Black plate (13,1)
Section
02
2 Use MULTI-CONTROL to select
FUNCTION.
Turn to change the menu option. Press to select.
3 Turn MULTI-CONTROL to select the
function.
REPEAT (repeat play)—RANDOM (random
play)—SCAN (scan play)—PAUSE (pause)—
SOUND RETRIEVER (sound retriever)
Notes
! To return to the previous display, press
DISP/BACK/SCRL.
! To return to the main menu, press and hold
DISP/BACK/SCRL.
! To return to the ordinary display, press
BAND/ESC.
! If you do not operate functions within about
30 seconds, the display automatically returns
to the ordinary display.
Selecting a repeat play range
% Press /LOC repeatedly to select the
desired setting.
! DISC – Repeat all tracks
! TRACK – Repeat the current track
! FOLDER – Repeat the current folder
# If you select another folder during repeat play,
the repeat play range changes to disc repeat.
# Performing track search or fast forward/reverse during TRACK (track repeat) changes the
repeat play range to disc/folder.
# When FOLDER (folder repeat) is selected, it is
not possible to play back a subfolder of that
folder.
Note
You can also perform this operation in the menu
that appears by using MULTI-CONTROL.
Playing tracks in random order
Tracks in a selected repeat range are played in
random order.
% Press
/iPod to turn random play on.
Tracks play in a random order.
# To turn random play off, press /iPod again.
Note
You can also turn this function on or off in the
menu that appears by using MULTI-CONTROL.
Scanning folders and tracks
Scan play searches the song within the selected repeat range.
1 Use MULTI-CONTROL to select SCAN in
the function menu.
2 Press MULTI-CONTROL to turn scan play
on.
The first 10 seconds of each track is played.
3 When you find the desired track press
MULTI-CONTROL to turn scan play off.
# If the display has automatically returned to
the playback display, select SCAN again by using
MULTI-CONTROL.
# After scanning of a disc (folder) is finished,
normal playback of the tracks begins.
Pausing playback
% Press e (pause) on the remote control
to turn pause on.
Playback of the current track pauses.
# To turn pause off, press e (pause) again.
Note
You can also turn this function on or off in the
menu that appears by using MULTI-CONTROL.
Using Sound Retriever
Sound Retriever function automatically enhances compressed audio and restores rich
sound.
% Press S.Rtrv repeatedly to select the desired setting.
OFF (off)—1—2
English
YRD5269-A/S>13
<
En
13
Page 14
/
Section
02
Black plate (14,1)
Operating this unit
# 2 is more effective than 1.
Note
You can also perform this operation in the menu
that appears by using MULTI-CONTROL.
Playing songs in an external
storage device (USB, SD)
You can play compressed audio files stored in
an external storage device (USB, SD).
! The SD memory card is only available for
DEH-4150SD.
! For details about compatibility, refer to Ad-
ditional Information.
! In the following instructions, USB mem-
ories, USB audio players and SD memory
cards are collectively referred to as the “external storage device (USB, SD).” If only
USB memories and USB portable players
are indicated, they are referred to as the
“USB storage device.”
Basic Operations
% Plugging a USB storage device and
playing
1 Plug a USB storage device into the USB
port.
Regarding the position of USB port, refer to
Head unit on page 6.
2 Press SRC/OFF to select USB as a source.
Playback will start.
# Use a USB cable to connect the USB storage
device to the USB port. Since the USB storage device is projected forward from the unit, it is dangerous to connect directly.
% Inserting an SD memory card and playing
1 Remove the front panel.
For details, refer to Removing the front panel
on page 4.
2 Insert an SD memory card into the SD card
slot.
Insert it with the contact surface facing
down and press the card until it clicks and
completely locks.
Regarding the position of the SD card slot,
refer to Head unit on page 6.
3 Attach the front panel.
For details, refer to Attaching the front panel
on page 5.
4 Press SRC/OFF to select SD as the source.
14
En
<YRD5269-A
S>14
Page 15
/
Operating this unit
Black plate (15,1)
Section
02
Playback will start.
% Selecting a folder
Push MULTI-CONTROL up or down.
% Fast forwarding or reversing
Push and hold MULTI-CONTROL left or right.
% Selecting a track
Push MULTI-CONTROL left or right.
% Returning to root folder
Press and hold BAND/ESC.
% Unplugging a USB storage device
Pull out the USB storage device.
You can disconnect the USB storage device
anytime you want to finish listening to it.
% Ejecting an SD memory card
1 Remove the front panel.
For details, refer to Removing the front panel
on page 4.
2 Press the SD memory card until it clicks.
The SD memory card is ejected.
3 Pull out the SD memory card.
4 Attach the front panel.
For details, refer to Attaching the front panel
on page 5.
Notes
! Read the precautions for external storage de-
vices (USB, SD) and this unit in the following
section. Refer to Additional Information.
! If an error message is displayed, refer to Error
messages on page 29.
! If folder 01 (ROOT) contains no files, playback
commences with folder 02.
! When the USB portable audio player having
battery charging function is connected to this
unit and the ignition switch is set to ACC or
ON, the battery is charged.
Displaying text information of
an audio file
The operation is the same as that of the compressed audio on the built-in CD player. (Refer
to Displaying text information on disc on page
12.)
Selecting files from the file
name list
The operation is the same as that of the builtin CD player. (Refer to Selecting files from the
file name list on page 12.)
Introduction to advanced
operations
1 Press MULTI-CONTROL to display the
main menu.
2 Use MULTI-CONTROL to select
FUNCTION.
Turn to change the menu option. Press to select.
3 Turn MULTI-CONTROL to select the
function.
REPEAT (repeat play)—RANDOM (random
play)—SCAN (scan play)—PAUSE (pause)—
SOUND RETRIEVER (sound retriever)
Function and operation
REPEAT, RANDOM, SCAN, PAUSE and
SOUND RETRIEVER operations are basically
the same as that of the built-in CD player.
Function name Operation
Refer to Selecting a repeat play
range on page 13.
However, the repeat play
ranges you can select are different from that of the built-in
CD player. The repeat play
REPEAT
RANDOM
ranges of the external storage
device (USB, SD) are:
! TRACK – Repeat just the
current file
! FOLDER – Repeat the cur-
rent folder
! ALL – Repeat all files
Refer to Playing tracks in ran-
dom order on page 13.
English
<YRD5269-A
S>15
En
15
Page 16
/
Section
02
Black plate (16,1)
Operating this unit
SCAN
PAUSE
SOUND RETRIEVER
Notes
! To return to the previous display, press
DISP/BACK/SCRL.
! To return to the main menu, press and hold
DISP/BACK/SCRL.
! To return to the ordinary display, press
BAND/ESC.
! If you select another folder during repeat play,
the repeat play range changes to ALL.
! If you perform track search or fast forward/re-
verse during TRACK, the repeat play range
changes to FOLDER.
! After file or folder scanning is finished, nor-
mal playback of the files begins again.
! If you do not operate functions within about
30 seconds, the display automatically returns
to the ordinary display.
Refer to Scanning folders and
tracks on page 13.
Refer to Pausing playback on
page 13.
Refer to Using Sound Retriever
on page 13.
Playing songs on iPod
You can control and listen to songs on an
iPod.
! For details about the supported iPod, refer
to iPod compatibility on page 34.
! When using an iPod, iPod Dock Connector
to USB Cable is required.
Basic Operations
% Plugging an iPod
1 Plug an iPod into the USB port using the
iPod Dock Connector to USB Cable.
Regarding the position of USB port, refer to
Head unit on page 6.
2 Press SRC/OFF to select USB-IPOD as a
source.
Playback will start.
% Fast forwarding or reversing
Push and hold MULTI-CONTROL left or right.
% Selecting a track (chapter)
Push MULTI-CONTROL left or right.
% Disconnecting an iPod
Pull out the iPod Dock Connector to USB
Cable.
16
En
Notes
! Read the precautions for iPod in the following
section. Refer to page 34.
! While iPod is connected to this unit, PIONEER
(check mark)) is displayed on the iPod.
(or
! If an error message is displayed, refer to Error
messages on page 29.
! When the ignition switch is set to ACC or ON,
the iPod’s battery is charged while the iPod is
connected to this unit.
! While the iPod is connected to this unit, the
iPod cannot be turned on or off. However
when the control mode is set to IPOD, you can
turn the iPod on or off.
! Before connecting the dock connector of this
unit to the iPod, disconnect the headphones
from the iPod.
! The iPod is turned off about two minutes after
the ignition switch is set to OFF.
<YRD5269-A
S>16
Page 17
/
Operating this unit
Black plate (17,1)
Section
02
Browsing for a song
Operations to control an iPod with this unit is
designed to be as close to the iPod as possible
to make operation and song search easy.
! Depending on the number of files in the
iPod, there may be a delay when displaying
a list.
! If the characters recorded on the iPod are
not compatible with this unit, those characters are not displayed.
Searching songs by category
1 Press /LIST to switch to the top menu
of the list search.
2 Use MULTI-CONTROL to select a category.
Turn to change the category; press to select.
PLAYLISTS (playlists)—ARTISTS (artists)—
ALBUMS (albums)—SONGS (songs)—
PODCASTS (podcasts)—GENRES (genres)—
COMPOSERS (composers)—AUDIOBOOKS
(audiobooks)
List for the selected category is displayed.
# You can start playback throughout the selected category by pressing and holding
MULTI-CONTROL. You can also perform this operation by pushing and holding
MULTI-CONTROL right.
# You can also change the category by pushing
MULTI-CONTROL up or down.
# You can also select the category by pushing
MULTI-CONTROL right.
3 Repeat step 2 to find a song you want
to listen to.
# To return to the previous category (one level
higher), press DISP/BACK/SCRL. You can also
perform this operation by pushing
MULTI-CONTROL left.
# To return to the top tier of categories, press
and hold DISP/BACK/SCRL.
# To return to the ordinary display, press
BAND/ESC.
# If you do not operate the list within about 30
seconds, the display automatically returns to the
ordinary display.
Searching by alphabet in the list
1 Use MULTI-CONTROL to select a category.
Turn to change the category. Press to select.
2 When a list for the selected category is
displayed, press
/LIST to switch to alpha-
bet search mode.
ABC SEARCH is displayed.
3 Turn MULTI-CONTROL to select a letter
of the alphabet.
4 Press MULTI-CONTROL to display the alphabetical list.
The list is displayed starting from the selected
letter of the alphabet.
# If alphabet search fails, NOT FOUND is dis-
played.
Displaying text information on
iPod
% Press DISP/BACK/SCRL to select the desired text information.
Play time—song title—artist name—album
title
# If the characters recorded on the iPod are not
compatible with this unit, those characters are
not displayed.
Notes
! You can scroll the text information to the left
by pressing and holding DISP/BACK/SCRL.
! When Ever Scroll is set to ON at the initial set-
ting, text information scrolls continuously in
the display. Refer to Switching the ever scroll
on page 27.
English
<YRD5269-A
S>17
En
17
Page 18
/
Section
02
Black plate (18,1)
Operating this unit
Introduction to advanced
operations
1 Press MULTI-CONTROL to display the
main menu.
2 Use MULTI-CONTROL to select
FUNCTION.
Turn to change the menu option. Press to select.
3 Turn MULTI-CONTROL to select the
function.
REPEAT (repeat play)—SHUFFLE (shuffle)—
SHUFFLE ALL (shuffle all)—LINK PLAY (link
play)—CONTROL (control mode)—PAUSE
(pause)—AUDIOBOOKS SPEED (audiobook
speed)—SOUND RETRIEVER (sound retriever)
Function and operation
REPEAT, PAUSE and SOUND RETRIEVER op-
erations are basically the same as that of the
built-in CD player.
Function name Operation
Refer to Selecting a repeat play
range on page 13.
However, the repeat play
ranges you can select are different from that of the built-in
REPEAT
PAUSE
SOUND RETRIEVER
CD player. The repeat play
ranges of the iPod are:
! ONE – Repeat the current
song
! ALL – Repeat all songs in
the selected list
Refer to Pausing playback on
page 13.
Refer to Using Sound Retriever
on page 13.
! To return to the ordinary display, press
BAND/ESC.
! If you do not operate functions within about
30 seconds, the display automatically returns
to the ordinary display.
! When CONTROL is on, only CONTROL,
PAUSE and SOUND RETRIEVER can be oper-
ated.
Playing songs in a random
order (shuffle)
1 Use MULTI-CONTROL to select SHUFFLE
in the function menu.
2 Press MULTI-CONTROL to display the
setting mode.
3 Use MULTI-CONTROL to select the desired setting.
Turn to change the setting.
! SONGS – Play back songs in the selected
list in random order.
! ALBUMS – Play back songs from a ran-
domly selected album in order.
! OFF – Cancel random play.
4 Press MULTI-CONTROL to determine
the selection.
# Even if the menu has been cancelled before
determination, operation is settled.
Playing all songs in a random
order (shuffle all)
% Press /iPod to turn shuffle all on.
All songs on the iPod play randomly.
# To turn shuffle all off, set SHUFFLE in the
FUNCTION menu to off.
Notes
! To return to the previous display, press
DISP/BACK/SCRL.
! To return to the main menu, press and hold
DISP/BACK/SCRL.
18
En
Note
You can also turn this function on in the menu
that appears by using MULTI-CONTROL.
<YRD5269-A
S>18
Page 19
Operating this unit
Black plate (19,1)
Section
02
Selecting songs from lists related
to the currently playing song
Lists related to the currently playing song are
displayed. You can select songs from the following lists.
— Album list of currently playing artist
— Song list of currently playing album
— Album list of currently playing genre
! Depending on the number of files in the
iPod, there may be a delay when displaying
a list.
1 Press and hold
link play mode.
LINK :ARTIST is displayed.
2 Use MULTI-CONTROL to select the desired mode.
Turn to change the mode; press to select.
! ARTIST – Displays the album list of cur-
rently playing artist.
! ALBUM – Displays the song list of currently
playing album.
! GENRE – Displays the album list of cur-
rently playing genre.
While searching the list, SEARCHING flashes.
# If the related albums/songs are not found,
NOT FOUND is displayed.
3 Use MULTI-CONTROL to select an album
or song from the list.
For more details about the selecting operation,
please see Step 2 of the following section.
Refer to Browsing for a song on page 17.
Note
You can also turn this function on in the menu
that appears by using MULTI-CONTROL.
/LIST to switch to the
This unit’s iPod function can be operated from
your iPod. Sound can be heard from the car’s
speakers, and operation can be conducted
from your iPod.
1 Press
/iPod and hold to switch the
control mode.
Each pressing and holding
/iPod switches
the control mode as follows:
! IPOD – This unit’s iPod function can be op-
erated from the connected iPod.
! AUDIO – This unit’s iPod function can be
operated from this unit.
2 When you select IPOD, operate the connected iPod to select a song and play.
# Switching the control mode to IPOD pauses
song playback. Operate the iPod to start playback.
# Even if the control mode is set to IPOD, follow-
ing functions are available from this unit.
! Volume
! Fast forward/reverse
! Track up/down
! Pausing
! Switching the text information
Notes
! You can also switch the control mode in the
menu that appears by using
MULTI-CONTROL.
! When the control mode is set to IPOD, opera-
tions are limited as follows:
— Functions other than CONTROL (control
mode), PAUSE (pause) and
SOUND RETRIEVER (advanced sound retriever) cannot be selected.
— Browse function cannot be operated from
this unit.
English
Operating this unit’s iPod
function from your iPod
This function cannot be operated with the following iPod models.
— iPod nano first generation
— iPod fifth generation
Changing audiobook speed
While listening to an audiobook on iPod, playback speed can be changed.
1 Use MULTI-CONTROL to select
AUDIOBOOKS SPEED in the function menu.
En
<
YRD5269-A/S>19
19
Page 20

/
Section
02
Operating this unit
2 Press MULTI-CONTROL to display the
setting mode.
3 Use MULTI-CONTROL to select the desired setting.
Turn to change the setting.
! FASTER – Playback faster than normal
speed
! NORMAL – Playback in normal speed
! SLOWER – Playback slower than normal
speed
4 Press MULTI-CONTROL to determine
the selection.
# Even if the menu has been cancelled before
determination, operation is settled.
Black plate (20,1)
20
En
<YRD5269-A
S>20
Page 21
Audio Adjustments
Black plate (21,1)
Section
03
Introduction of audio
adjustments
1 Press MULTI-CONTROL to display the
main menu.
2 Use MULTI-CONTROL to select AUDIO.
Turn to change the menu option. Press to select.
3 Turn MULTI-CONTROL to select the
audio function.
Turn MULTI-CONTROL to switch between the
audio functions in the following order.
FADER/BALANCE (balance adjustment)—
PRESET EQUALIZER (equalizer recall)—
EQ SETTING 1 (equalizer adjustment)—
EQ SETTING 2 (equalizer fine adjustment)—
LOUDNESS (loudness)—SW SETTING 1 (sub-
woofer on/off setting)—SW SETTING 2 (subwoofer setting)—HIGH PASS FILTER (high
pass filter)—BASS BOOST (bass boost)—
SRC LV ADJUST (source level adjustment)
4 Press MULTI-CONTROL to display the
setting mode of each function.
# Push MULTI-CONTROL left to display the
function selection menu.
# Push and hold MULTI-CONTROL left to dis-
play the main menu.
5 Adjust the each function.
Notes
! To return to the previous display, press
DISP/BACK/SCRL.
! To return to the main menu, press and hold
DISP/BACK/SCRL.
! To return to the ordinary display, press
BAND/ESC.
! When the subwoofer controller setting is
PREOUT:REAR, you cannot switch to
SW SETTING 1 (subwoofer on/off setting).
(Refer to page 26.)
! You can select the SW SETTING 2 only when
subwoofer output is turned on in
SW SETTING 1.
! When selecting FM as the source, you cannot
English
switch to SRC LVADJUST.
! If you do not operate functions within about
30 seconds, the display automatically returns
to the ordinary display.
Using balance adjustment
You can change the fader/balance setting so
that it can provide the ideal listening environment in all occupied seats.
1 Use MULTI-CONTROL to select
FADER/BALANCE in the audio function
menu.
2 Press MULTI-CONTROL to display the
setting mode.
3 Press MULTI-CONTROL to select the segment you wish to set.
Press MULTI-CONTROL repeatedly to switch
between fader and balance.
4 Turn MULTI-CONTROL to adjust speaker
balance.
Front/rear speaker balance can be adjusted
between FAD F15 and FAD R15.
Left/right speaker balance can be adjusted between BAL L15 and BAL R15.
# You can also perform the same operations by
pushing MULTI-CONTROL up or down.
# FAD 0 is the proper setting when only two
speakers are used.
# When the rear output setting is
REAR SP :SUB W, adjusting the front/rear speaker balance is not effective. Refer to Setting the
rear output and subwoofer controller on page
26.
Using the equalizer
The equalizer lets you adjust the equalization
to match the car’s interior acoustic characteristics as desired.
<
YRD5269-A/S>21
En
21
Page 22
Section
03
Black plate (22,1)
Audio Adjustments
Recalling equalizer curves
There are six stored equalizer curves which
you can easily recall at any time. Here is a list
of the equalizer curves.
Display Equalizer curve
POWERFUL Powerful
NATURAL Natural
VOCAL Vocal
CUSTOM Custom
FLAT Flat
SUPER BASS Super bass
! CUSTOM is an adjusted equalizer curve
that you create.
! When FLAT is selected, no supplement or
correction is made to the sound. This is
useful to check the effect of the equalizer
curves by switching alternatively between
FLAT and a set equalizer curve.
1 Use MULTI-CONTROL to select
PRESET EQUALIZER in the audio function
menu.
2 Press MULTI-CONTROL to display the
setting mode.
3 Turn MULTI-CONTROL to select the
equalizer.
# You can also perform the same operations by
pushing MULTI-CONTROL up or down.
4 Press MULTI-CONTROL to determine
the selection.
# Even if the menu has been cancelled before
determination, operation is settled.
Adjusting equalizer curves
The factory supplied equalizer curves can be
adjusted to a fine degree (nuance control).
1 Use MULTI-CONTROL to select
EQ SETTING 1 in the audio function menu.
2 Press MULTI-CONTROL to display the
setting mode.
3 Press MULTI-CONTROL to select the segment you wish to set.
Press MULTI-CONTROL repeatedly to switch
the segment in the following order:
L (low)—M (mid)—H (high)
4 Turn MULTI-CONTROL to adjust the
level of the equalization band.
+6 to –6 is displayed as the level is increased
or decreased.
# You can also perform the same operations by
pushing MULTI-CONTROL up or down.
# You can then select another band and adjust
the level.
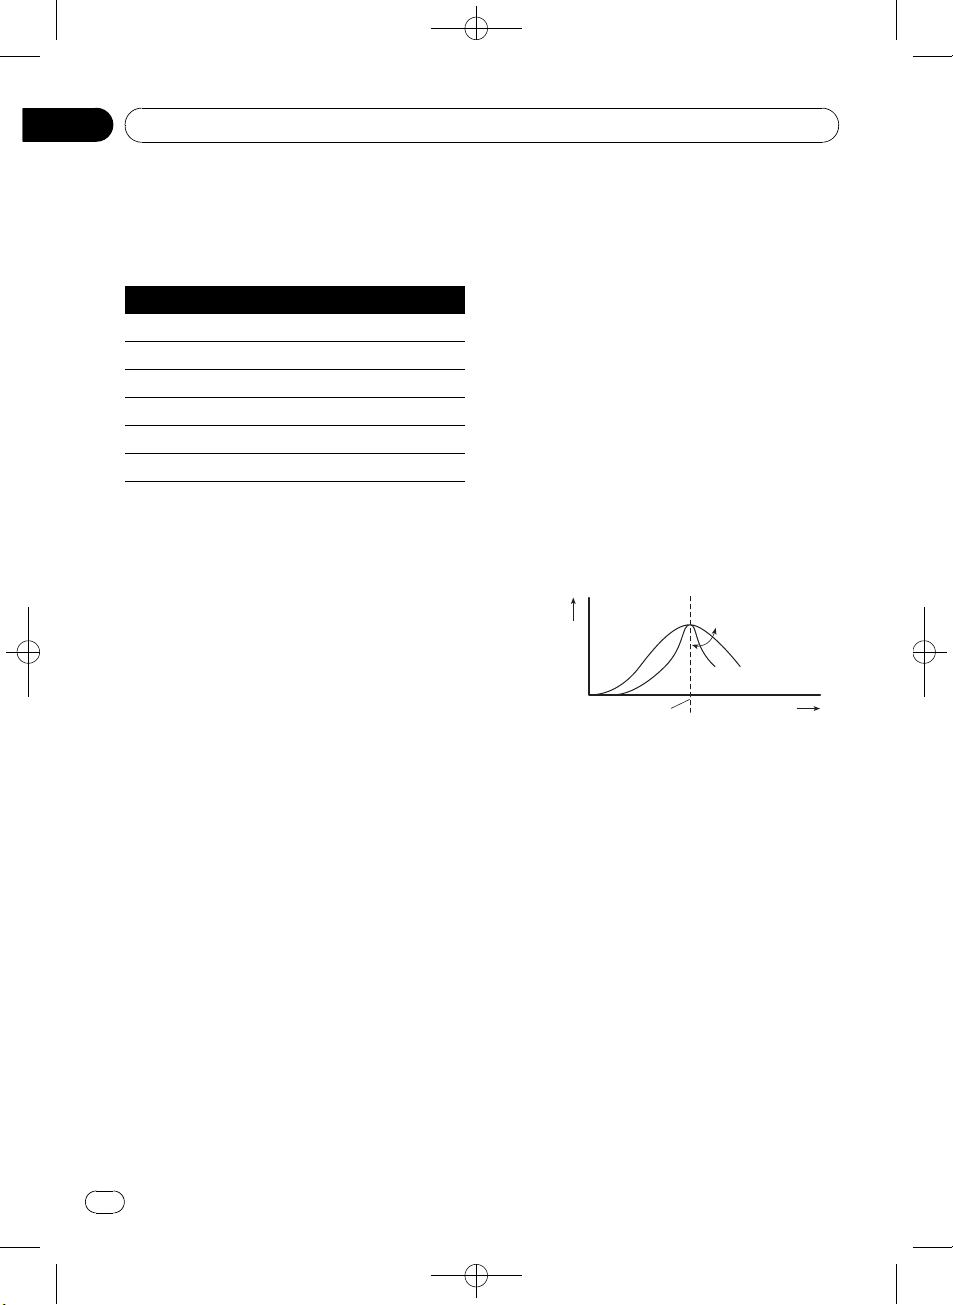
Fine-adjusting equalizer curve
You can adjust the center frequency and the Q
factor (curve characteristics) of each currently
selected curve band (LOW/MID/HI).
Level (dB)
Q=2W
Q=2N
Center frequency
1 Use MULTI-CONTROL to select
EQ SETTING 2.
2 Press MULTI-CONTROL to display the
setting mode.
3 Press MULTI-CONTROL to select the segment you wish to set.
Press MULTI-CONTROL repeatedly to switch
the segment in the following order:
Band—Frequency—Q factor
4 Turn MULTI-CONTROL to adjust the selected segement.
Band
LOW (low)—MID (mid)—HI (high)
Frequency
Low: 40HZ—80HZ—100HZ—160HZ
Mid: 200HZ—500HZ—1KHZ—2KHZ
High: 3KHZ—8KHZ—10KHZ—12KHZ
Frequency (Hz)
22
En
YRD5269-A/S>22
<
Page 23
Audio Adjustments
Black plate (23,1)
Section
03
Q factor
2W—1W—1N—2N
# You can also perform the same operations by
pushing MULTI-CONTROL up or down.
Adjusting loudness
Loudness compensates for deficiencies in the
low- and high-sound ranges at low volume.
1 Use MULTI-CONTROL to select
LOUDNESS in the audio function menu.
2 Press MULTI-CONTROL to display the
setting mode.
3 Use MULTI-CONTROL to select the desired setting.
Turn to change the setting.
LOW (low)—MID (mid)—HIGH (high)—OFF
(off)
# You can also perform the same operations by
pushing MULTI-CONTROL up or down.
4 Press MULTI-CONTROL to determine
the selection.
# Even if the menu has been cancelled before
determination, operation is settled.
Using subwoofer output
This unit is equipped with a subwoofer output
which can be turned on or off.
Also, phase can be selected between normal
and reverse.
1 Press SW/BASS to display the subwoofer setting mode.
Press SW/BASS repeatedly to switch between
the subwoofer setting modes in the following
order.
SW SETTING 1 (subwoofer on/off setting) setting mode—SW SETTING 2 (subwoofer setting) setting mode
2 Select SW SETTING 1 setting mode.
3 Turn MULTI-CONTROL to select the de-
English
sired setting.
NORMAL (normal phase)—REV (reverse
phase)—OFF (subwoofer off)
# You can also perform the same operations by
pushing MULTI-CONTROL up or down.
4 Press MULTI-CONTROL to determine
the selection.
# Even if the menu has been cancelled before
determination, operation is settled.
Note
You can also switch to this setting mode in the
menu that appears by using MULTI-CONTROL.
Adjusting subwoofer settings
When the subwoofer output is on, you can adjust the cut-off frequency and the output level
of the subwoofer.
! When the subwoofer output is on, you can
select SW SETTING 2.
1 Press SW/BASS to display the subwoofer setting mode.
Press SW/BASS repeatedly to switch between
the subwoofer setting modes in the following
order.
SW SETTING 1 (subwoofer on/off setting) setting mode—SW SETTING 2 (subwoofer setting) setting mode
2 Select SW SETTING 2 setting mode.
3 Press MULTI-CONTROL to select the segment you wish to set.
Press MULTI-CONTROL repeatedly to switch
the segment in the following order:
Cut off frequency—Level
4 Turn MULTI-CONTROL to adjust the selected segement.
Cut off frequency
50HZ—63HZ—80HZ—100HZ—125HZ
Level
+6 to –24 is displayed as the level is increased
or decreased.
YRD5269-A/S>23
<
En
23
Page 24
/
Section
03
Black plate (24,1)
Audio Adjustments
# You can also perform the same operations by
pushing MULTI-CONTROL up or down.
Note
You can also switch to this setting mode in the
menu that appears by using
MULTI-CONTROL.
Using the high pass filter
When you do not want low sounds from the
subwoofer output frequency range to play
from the front or rear speakers, turn on the
HPF (high pass filter). Only frequencies higher
than those in the selected range are output
from the front or rear speakers.
1 Use MULTI-CONTROL to select
HIGH PASS FILTER.
2 Press MULTI-CONTROL to display the
setting mode.
3 Use MULTI-CONTROL to select the desired setting.
Turn to change the setting.
OFF—50HZ—63HZ—80HZ—100HZ—125HZ
# You can also perform the same operations by
pushing MULTI-CONTROL up or down.
4 Press MULTI-CONTROL to determine
the selection.
# Even if the menu has been cancelled before
determination, operation is settled.
Boosting the bass
Bass boost function boosts the bass level of
sound.
1 Press and hold SW/BASS to display
BASS BOOST setting mode.
2 Turn MULTI-CONTROL to adjust the
level.
0 to +6 is displayed as the level is increased or
decreased.
# You can also perform the same operations by
pushing MULTI-CONTROL up or down.
3 Press MULTI-CONTROL to determine
the selection.
# Even if the menu has been cancelled before
determination, operation is settled.
Note
You can also switch to this setting mode in the
menu that appears by using
MULTI-CONTROL.
Adjusting source levels
SLA (source level adjustment) lets you adjust
the volume level of each source to prevent radical changes in volume when switching between sources.
! Settings are based on the FM volume level,
which remains unchanged.
1 Compare the FM volume level with the
level of the source you wish to adjust.
2 Use MULTI-CONTROL to select
SRC LV ADJUST in the audio function menu.
3 Press MULTI-CONTROL to display the
setting mode.
4 Turn MULTI-CONTROL to adjust the
source volume.
+4 to –4 is displayed as the source volume is
increased or decreased.
# You can also perform the same operations by
pushing MULTI-CONTROL up or down.
5 Press MULTI-CONTROL to determine
the selection.
# Even if the menu has been cancelled before
determination, operation is settled.
Note
The AM volume level can also be adjusted with
source level adjustments.
24
En
<YRD5269-A
S>24
Page 25

Initial Settings
Adjusting initial settings
1 Press SRC/OFF and hold until the unit
turns off.
2 Press MULTI-CONTROL and hold until
CLOCK SET appears in the display.
3 Turn MULTI-CONTROL to select one of
the initial settings.
CLOCK SET (clock)—FM STEP (FM tuning
step)—AM STEP (AM tuning step)—AUX
(auxiliary input)—SW CONTROL (rear output
and subwoofer controller)—EVER SCROLL
(ever scroll)
# You can also perform the same operations by
pushing MULTI-CONTROL up or down.
# To cancel initial settings, press BAND/ESC.
Setting the clock
Use these instructions to set the clock.
1 Use MULTI-CONTROL to select
CLOCK SET in the initial setting menu.
Refer to Adjusting initial settings on this page.
2 Press MULTI-CONTROL to display the
setting mode.
# Press DISP/BACK/SCRL to return to the pre-
vious display.
3 Press MULTI-CONTROL to select the segment of the clock display you wish to set.
Each time you press MULTI-CONTROL, one
segment of the clock display is selected.
Hour—Minute
As you select segments of the clock display,
the selected segment blinks.
4 Turn MULTI-CONTROL to put a clock
right.
# You can also perform the same operations by
pushing MULTI-CONTROL up or down.
Black plate (25,1)
Section
04
English
Setting the FM tuning step
The FM tuning step employed by seek tuning
can be switched between 100 kHz, the preset
step, and 50 kHz.
! If seek tuning is performed in 50 kHz steps,
stations may be tuned in imprecisely. Tune
in the stations with manual tuning or use
seek tuning again.
1 Use MULTI-CONTROL to select FM STEP
in the initial setting menu.
Refer to Adjusting initial settings on this page.
2 Press MULTI-CONTROL to display the
setting mode.
3 Turn MULTI-CONTROL to select the FM
tuning step.
Turning MULTI-CONTROL will switch the FM
tuning step between 50 kHz and 100 kHz. The
selected FM tuning step will appear in the display.
# You can also perform the same operations by
pushing MULTI-CONTROL up or down.
4 Press MULTI-CONTROL to determine
the selection.
# Even if the menu has been cancelled before
determination, operation is settled.
Note
The tuning step remains at 50 kHz during manual
tuning.
Setting the AM tuning step
The AM tuning step can be switched between
9 kHz, the preset step, and 10 kHz. When
using the tuner in North, Central or South
America, reset the tuning step from 9 kHz (531
kHz to 1 602 kHz allowable) to 10 kHz (530 kHz
to 1 640 kHz allowable).
1 Use MULTI-CONTROL to select AM STEP
in the initial setting menu.
Refer to Adjusting initial settings on this page.
En
<
YRD5269-A/S>25
25
Page 26
/
Section
04
Black plate (26,1)
Initial Settings
2 Press MULTI-CONTROL to display the
setting mode.
3 Turn MULTI-CONTROL to select the AM
tuning step.
Turning MULTI-CONTROL will switch the AM
tuning step between 9 kHz and 10 kHz. The selected AM tuning step will appear in the display.
# You can also perform the same operations by
pushing MULTI-CONTROL up or down.
4 Press MULTI-CONTROL to determine
the selection.
# Even if the menu has been cancelled before
determination, operation is settled.
Switching the auxiliary setting
It is possible to use auxiliary device with this
unit. Activate the auxiliary setting when using
auxiliary device connected to this unit.
1 Use MULTI-CONTROL to select AUX in
the initial setting menu.
Refer to Adjusting initial settings on the previous page.
2 Press MULTI-CONTROL to turn AUX on.
# To turn AUX off, press MULTI-CONTROL
again.
output is connected to full range speakers
(when REAR SP :FULL is selected), you can
connect the RCA subwoofer output to a subwoofer. In this case, you can select whether to
use the subwoofer controller’s (low pass filter,
phase) built-in PREOUT :SUB W or the auxiliary PREOUT :REAR.
1 Use MULTI-CONTROL to select
SW CONTROL in the initial setting menu.
Refer to Adjusting initial settings on the previous page.
2 Press MULTI-CONTROL to display the
setting mode.
# Press DISP/BACK/SCRL to return to the pre-
vious display.
3 Use MULTI-CONTROL to select the desired setting.
Press to switch the segment you wish to set
between left and right. Turn to change the setting of each segment.
Left segment Right segment
REAR SP
(rear speaker setting)
PREOUT
(RCA output setting)
# When you select REAR SP :SUB W, you can
not set PREOUT (RCA output setting).
FULL (full-range speaker)
SUB W (subwoofer)
SUB W (subwoofer)
REAR (full-range speaker)
Setting the rear output and
subwoofer controller
This unit’s rear output (rear speaker lead output and RCA rear output) can be used for fullrange speaker (REAR SP :FULL/
PREOUT:REAR) or subwoofer
(REAR SP :SUB W/PREOUT:SUB W) connection. If you switch the rear output setting to
REAR SP :SUB W, you can connect a rear
speaker lead directly to a subwoofer without
using an auxiliary amp.
Initially, the unit is set for rear full-range speaker connection (REAR SP :FULL). When rear
26
En
Notes
! Even if you change this setting, there is no
output unless you turn the subwoofer output
on (refer to Using subwoofer output on page
23).
! If you change this setting, subwoofer output
in the audio menu will return to the factory
settings.
! Both rear speaker lead outputs and RCA rear
output are switched simultaneously in this
setting.
<YRD5269-A
S>26
Page 27
/
Initial Settings
Switching the ever scroll
When Ever Scroll is set to ON, recorded text information scrolls continuously in the display.
Set to OFF if you prefer the information to
scroll just once.
1 Use MULTI-CONTROL to select
EVER SCROLL in the initial setting menu.
Refer to Adjusting initial settings on page 25.
2 Press MULTI-CONTROL to turn the ever
scroll on.
# To turn the Ever Scroll off, press
MULTI-CONTROL again.
Black plate (27,1)
Section
04
English
<YRD5269-A
S>27
En
27
Page 28
/
Section
05
Black plate (28,1)
Other Functions
Using the AUX source
You can connect an auxiliary device to this
unit using a stereo mini plug cable.
% Insert the stereo mini plug into the
input jack on this unit.
For more details, refer to Head unit on page 6.
Selecting AUX as the source
% Press SRC/OFF to select AUX as the
source.
# If the auxiliary setting is not turned on, AUX
cannot be selected. For more details, refer to
Switching the auxiliary setting on page 26.
Turning the clock display
on or off
You can turn the clock display on or off.
! Even when the sources are off, the clock
display appears on the display.
% Press CLOCK/DISP OFF to turn the clock
display on or off.
Each press of CLOCK/DISP OFF turns the
clock display on or off.
# The clock display disappears temporarily
when you perform other operations, but the clock
display appears again after 25 seconds.
# Even if the display indication is turned off, operation can be conducted. If operation is conducted while the display indication is off, display
will light up for a few seconds and then turn off
again.
Switching the display
indication and button
illumination
Display indication and button illumination can
be switched on or off.
% Press and hold CLOCK/DISP OFF.
Pressing and holding CLOCK/DISP OFF
switches the display indication and button illumination on or off.
# While the display indication is turned off,
CLOCK/DISP OFF button lights up.
28
En
<YRD5269-A
S>28
Page 29
/
Additional Information
Error messages
When you contact your dealer or your nearest
Pioneer Service Center, be sure to have the
error message recorded.
! The SD memory card is only available for
DEH-4150SD.
Built-in CD Player
Message Cause Action
ERROR-11, 12,
17, 30
ERROR-10, 11,
12, 15, 17, 30,
A0
ERROR-15 The inserted disc
ERROR-22, 23 The CD format
NO AUDIO The inserted disc
SKIPPED The inserted disc
PROTECT All the files on
External storage device (USB, SD)
Message Cause Action
NO AUDIO No songs Transfer the audio
Dirty disc Clean disc.
Scratched disc Replace disc.
Electrical or me-
chanical
does not contain
any data
cannot be played
back
does not contain
any files that can
be played back
contains WMA
files that are protected by DRM
the inserted disc
are secured by
DRM
USB memory
with security enabled is connected
Turn the ignition
switch OFF and
back ON, or switch
to a different
source, then back
to the CD player.
Replace disc.
Replace disc.
Replace disc.
Replace disc.
Replace disc.
files to the external
storage device and
connect.
Follow the USB
memory instructions to disable the
security.
Black plate (29,1)
The USB storage
NO DEVICE
SKIPPED The connected
PROTECT All the files in the
N/A USB The USB storage
CHECK USB The USB connec-
CHECK SD Overcurrent to
device or iPod is
not connected to
the USB port of
this unit.
external storage
device contains
WMA files that
are protected by
Windows
Media™ DRM 9/
10
external storage
device are protected by
Windows Media
DRM 9/10
device connected
to is not supported by this
unit.
tor or USB cable
is short-circuited.
The connected
USB storage device consumes
more than 500
mA (maximum
allowable current).
the SD memory
card
Communication
failure
Appendix
English
Connect a compatible USB storage
device.
Play an audio file
not protected by
Windows Media
DRM 9/10.
Transfer audio files
not protected by
Windows Media
DRM 9/10 to the
external storage
device and connect.
Connect a USB
storage device that
is USB Mass Storage Class compliant.
Confirm that the
USB connector or
USB cable is not
caught in something or damaged.
Disconnect the
USB storage device and do not
use it. Turn the
ignition switch to
OFF, then to ACC
or ON and then
connect the compliant USB storage
device.
Eject the SD memory card and then
insert it again.
Eject the SD memory card and then
insert it again.
<YRD5269-A
S>29
En
29
Page 30
Appendix
Black plate (30,1)
Additional Information
Communication
ERROR-19
ERROR-23 External storage
failure
device is not formatted with
FAT16 or FAT32
Perform one of the
following operations.
–Turn the ignition
switch OFF and
back ON.
–Disconnect or
eject the external
storage device.
–Change to a different source.
Then, return to the
USB or SD source.
External storage
device should be
formatted with
FAT16 or FAT32.
iPod
Message Cause Action
ERROR-19 Communication
failure
iPod failure Disconnect the
N/A USB Old version of
iPod
iPod failure Reset the iPod.
ERROR-16 Old version of
iPod
iPod failure Disconnect the
Disconnect the
cable from iPod.
Once iPod main
menu is displayed,
connect the cable
again.
Reset the iPod.
cable from iPod.
Once iPod main
menu is displayed,
connect the cable
again.
Reset the iPod.
Update the iPod
version.
Update the iPod
version.
cable from iPod.
Once iPod main
menu is displayed,
connect the cable
again.
Reset the iPod.
iPod is not
ERROR-A1
CHECK USB
NO SONGS No songs Transfer the songs
STOP No songs in the
NO DEVICE The USB storage
charged but operates correctly
current list
device or iPod is
not connected to
the USB port of
this unit.
Check if the connection cable for
iPod shorted out
(e.g., not caught in
metal objects).
After checking,
turn the ignition
switch OFF and
back ON or disconnect the iPod and
connect again.
to iPod.
Select a list that
contains the
songs.
Connect a compatible iPod.
Handling guideline of discs
and player
! Use only discs featuring either of following
two logos.
! Use only conventional, fully circular discs.
Do not use shaped discs.
! Use 12-cm or 8-cm CD. Do not use an
adapter when playing 8-cm CDs.
! Do not insert anything other than a CD into
the CD loading slot.
30
En
<
YRD5269-A/S>30
Page 31

Additional Information
Black plate (31,1)
Appendix
! Do not use cracked, chipped, warped, or
otherwise damaged discs as they may damage the player.
! Unfinalized CD-R/CD-RW disc playback is
not possible.
! Do not touch the recorded surface of the
discs.
! Store discs in their cases when not in use.
! Avoid leaving discs in excessively hot envir-
onments including under direct sunlight.
! Do not attach labels, write on or apply che-
micals to the surface of the discs.
! To clean a CD, wipe the disc with a soft
cloth outward from the center.
! Condensation may temporarily impair the
player’s performance. Leave it to adjust to
the warmer temperature for about one
hour. Also, wipe any dump discs with a soft
cloth.
! Playback of discs may not be possible be-
cause of disc characteristics, disc format,
recorded application, playback environment, storage conditions, and so on.
! Road shocks may interrupt disc playback.
! Read the precautions for discs before
using them.
Dual Discs
! Dual Discs are two-sided discs that have a
recordable CD for audio on one side and a
recordable DVD for video on the other.
! Since the CD side of Dual Discs is not phy-
sically compatible with the general CD
standard, it may not be possible to play the
CD side with this unit.
! Frequent loading and ejecting of a Dual
Disc may result in scratches on the disc.
Serious scratches can lead to playback problems on this unit. In some cases, a Dual
Disc may become stuck in the disc loading
slot and will not eject. To prevent this, we
recommend you refrain from using Dual
Disc with this unit.
! Please refer to the information from the
English
disc manufacturer for more detailed information about Dual Discs.
Handling guideline of
external storage device
(USB, SD) and this unit
The SD memory card is only available for DEH4150SD.
! Optimum performance of this unit may not
be obtained depending on the connected
external storage device (USB, SD).
! Do not leave the external storage device
(USB, SD) in any place with high temperatures.
! Depending on the kind of external storage
device (USB, SD) you use, this unit may not
recognize the storage device or file may not
be played back properly.
! Operations may vary depending on the
kind of an external storage device (USB,
SD).
USB storage device
! This unit can play back files in the USB por-
table audio player/USB memory that is
USB Mass Storage Class.
! You cannot connect a USB storage device
to this unit via a USB hub.
! Do not plug anything other than the USB
storage device into the USB port.
! Firmly secure the USB storage device when
driving. Do not let the USB storage device
fall onto the floor, where it may become
jammed under the brake or accelerator
pedal.
! Partitioned USB storage device is not com-
patible with this unit.
! Depending on the USB storage device con-
nected to this unit, it may generate noise in
the radio.
<
YRD5269-A/S>31
En
31
Page 32

/
Appendix
Black plate (32,1)
Additional Information
SD memory card
! This unit supports only the following SD
memory cards.
— SD
— miniSD
— microSD
— SDHC
! Keep the SD memory card out of the reach
of children. Should the SD memory card be
swallowed, consult a doctor immediately.
! Do not touch the connectors of the SD
memory card directly with your fingers or
with any metal device.
! Do not insert anything other than an SD
memory card into the SD card slot. If a
metal object (e.g. a coin) is inserted into
the slot, the internal circuits may break and
cause malfunctions.
! When inserting a miniSD or microSD, use
an adapter. Do not use an adapter which
has metal parts other than the connectors
exposed.
! Do not insert a damaged SD memory card
(e.g. warped, label peeled off) as it may not
be ejected from the slot.
! Do not try to force an SD memory card into
the SD card slot as the SD memory card or
this unit may be damaged.
! When you eject an SD memory card, press
it and hold until it clicks. It is dangerous to
press the SD memory card and release
your finger immediately as the SD card
may shoot out of the slot and hit you in the
face, etc. If the SD memory card shoots out
of the slot, it may go missing.
Compressed audio
compatibility (disc, USB, SD)
The SD memory card is only available for DEH4150SD.
WMA
! Compatible format: WMA encoded by
Windows Media Player
! File extension: .wma
! Bit rate: 48 kbps to 320 kbps (CBR), 48 kbps
to 384 kbps (VBR)
! Sampling frequency: 32 kHz to 48 kHz
! Windows Media Audio 9 Professional, Loss-
less, Voice: No
MP3
! File extension: .mp3
! Bit rate: 8 kbps to 320 kbps (CBR, VBR)
! Sampling frequency: 16 kHz to 48 kHz (32,
44.1, 48 kHz for emphasis)
! Compatible ID3 tag version: 1.0, 1.1, 2.2,
2.3, 2.4 (ID3 tag Version 2.x is given priority
than Version 1.x.)
! M3u playlist: No
! MP3i (MP3 interactive), mp3 PRO: No
AAC
! Compatible format: AAC encoded by iTunes
! File extension: .m4a
! Transmission rate: 16 kbps to 320 kbps
(CBR)
! Sampling frequency: 11.025 kHz to 48 kHz
! Apple Lossless: No
WAV
! Compatible format: Linear PCM (LPCM),
MS ADPCM
! File extension: .wav
! Quantization bits: 8 and 16 (LPCM), 4 (MS
ADPCM)
! Sampling frequency: 16 kHz to 48 kHz
(LPCM), 22.05 kHz to 44.1 kHz (MS
ADPCM)
Supplemental information of
compressed audio (disc, USB, SD)
! There may be a slight delay when starting
playback of audio files encoded with image
data.
! File extensions must be used properly.
! Only 32 characters from the beginning can
be displayed as a file name (including the
extension) or a folder name.
! The text information of some audio files
may not be correctly displayed.
32
En
<YRD5269-A
S>32
Page 33

1
2
5
6
Additional Information
Black plate (33,1)
Appendix
Compressed audio files on
the disc
! ISO 9660 Level 1 and 2 compliant. Romeo
and Joliet file systems are both compatible
with this player.
! Multi-session playback is possible.
! Compressed audio files are not compatible
with packet write data transfer.
! Regardless of the length of blank section
between the songs of original recording,
compressed audio discs play with a short
pause between songs.
Compressed audio files in
the external storage device
(USB, SD)
The SD memory card is only available for DEH4150SD.
About USB storage device compatibility, refer
to Specifications on page 36.
About SD memory card compatibility, refer to
Specifications on page 36.
! Copyright protected files cannot be played
back.
! There may be a slight delay when starting
playback of audio files on an external storage device (USB, SD) with numerous
folder hierarchies.
! There is no compatibility for Multi Media
Cards (MMC).
! Compatibility with all SD memory cards is
not guaranteed.
! This unit is not compatible with SD-
Audio.
Example of a hierarchy and
playback sequences
The SD memory card is only available for DEH4150SD.
: Folder
English
: Compressed audio file
3
4
Level 1 Level 2 Level 3 Level 4
The sequence of audio files on
the disc
! This unit assigns folder numbers. The user
cannot assign folder numbers.
! Folder selection sequence or other opera-
tion may be altered depending on the encoding or writing software.
! Folder hierarchy is allowed up to eight tiers.
However, a practical hierarchy of folder is
less than two tiers.
! Up to 99 folders on a disc can be played
back.
The sequence of audio files on the
external storage device (USB, SD)
For USB portable audio players, the sequence is
different from that of the other external storage
device and depends on the player.
! 01 to 05 represent assigned folder num-
bers. 1 to 6 represent the playback sequence. The user cannot assign folder
numbers and specify the playback sequence with this unit.
! Playback sequence of the audio file is the
same as recorded sequence in the external
storage device (USB, SD).
! To specify the playback sequence, the fol-
lowing method is recommended.
33
En
YRD5269-A/S>33
<
Page 34

Appendix
Black plate (34,1)
Additional Information
1 Create the file name including numbers
that specify the playback sequence (e.g.,
001xxx.mp3 and 099yyy.mp3).
2 Put those files into a folder.
3 Record the folder containing files into the
external storage device (USB, SD).
However, depending on the system environment, you cannot specify the file playback
sequence.
! Up to 15 000 files in an external storage de-
vice (USB, SD) can be played back.
! Up to 500 folders in an external storage de-
vice (USB, SD) can be played back.
! Up to eight tiers directory in an external
storage device (USB, SD) can be played
back.
iPod
iPod compatibility
! This unit supports only the following iPods.
Supported iPod software versions are
shown below. Older versions of iPod software may not be supported.
— iPod nano first generation (software ver-
sion 1.3.1)
— iPod nano second generation (software
version 1.1.3)
— iPod nano third generation (software
version 1.1.2)
— iPod fifth generation (software version
1.3.0)
— iPod classic (software version 1.1.2)
— iPod touch (software version 2.0)
— iPhone 3G (software version 2.0)
! Operations may vary depending on the soft-
ware version of iPod.
! When using an iPod, iPod Dock Connector
to USB Cable is required.
! Pioneer CD-IU50 interface cable is also
available. For details, consult your dealer.
About handling the iPod
! Do not leave the iPod in direct sunlight for
extended amounts of time. Extended exposure to direct sunlight can result in iPod
malfunction due to the resulting high temperature.
! Do not leave the iPod in a high tempera-
ture.
! Connect directly the dock connector cable
to the iPod so that this unit works properly.
! Firmly secure the iPod when driving. Do
not let the iPod fall onto the floor, where it
may become jammed under the brake or
accelerator pedal.
! For details, refer to the iPod’s manuals.
About iPod settings
! When an iPod is connected, this unit
changes the EQ (equalizer) setting of the
iPod to Flat in order to optimize the acoustics. When you disconnect the iPod, the EQ
returns to the original setting.
! You cannot set Repeat to off on the iPod
when using this unit. Even if you set Repeat
to off on the iPod, Repeat is automatically
changed to All when connecting the iPod
to this unit.
Copyright and trademark
notice
The SD memory card is only available for DEH4150SD.
WMA
Windows Media and the Windows logo are trademarks or registered trademarks of Microsoft
Corporation in the United States and/or other
countries.
34
En
YRD5269-A/S>34
<
Page 35

/
Additional Information
Black plate (35,1)
Appendix
This product includes technology owned by
Microsoft Corporation and cannot be used or
distributed without a license from Microsoft
Licensing, Inc.
MP3
Supply of this product only conveys a license
for private, non-commercial use and does not
convey a license nor imply any right to use
this product in any commercial (i.e. revenuegenerating) real time broadcasting (terrestrial,
satellite, cable and/or any other media), broadcasting/streaming via internet, intranets and/
or other networks or in other electronic content distribution systems, such as pay-audio or
audio-on-demand applications. An independent license for such use is required. For details, please visit
http://www.mp3licensing.com.
iTunes
iTunes is a trademark of Apple Inc., registered
in the U.S. and other countries.
SD memory card
microSD Logo is a trademark.
English
SDHC Logo is a trademark.
iPod
iPod is a trademark of Apple Inc., registered in
the U.S. and other countries.
iPhone
SD Logo is a trademark.
miniSD Logo is a trademark.
iPhone is a trademark of Apple Inc.
<YRD5269-A
S>35
En
35
Page 36

/
Appendix
Black plate (36,1)
Additional Information
Specifications
General
Rated power source ............... 14.4 V DC
(allowable voltage range:
12.0 V to 14.4 V DC)
Grounding system ................... Negative type
Max. current consumption
..................................................... 10.0 A
Dimensions (W × H × D):
DIN
Chassis ..................... 178 mm × 50 mm × 162
mm
Nose ........................... 188 mm × 58 mm × 24 mm
D
Chassis ..................... 178 mm × 50 mm × 162
mm
Nose ........................... 170 mm × 46 mm × 24 mm
Weight .......................................... 1.3 kg
Audio
Maximum power output ....... 50 W × 4
50 W × 2/4 W + 70 W × 1/2
W (for subwoofer)
Continuous power output ... 22 W × 4 (50 Hz to 15 000
Hz, 5 % THD, 4 W load, both
channels driven)
Load impedance ...................... 4 W to 8 W ×4
4 W to 8 W ×2+2W ×1
Preout max output level ....... 2.2 V
Equalizer (3-Band Parametric Equalizer):
Low
Frequency ................ 40/80/100/160 Hz
Q Factor .................... 0.35/0.59/0.95/1.15 (+6 dB
when boosted)
Gain ............................ ±12 dB
Mid
Frequency ................ 200/500/1k/2k Hz
Q Factor .................... 0.35/0.59/0.95/1.15 (+6 dB
when boosted)
Gain ............................ ±12 dB
High
Frequency ................ 3.15k/8k/10k/12.5k Hz
Q Factor .................... 0.35/0.59/0.95/1.15 (+6 dB
when boosted)
Gain ............................ ±12 dB
HPF:
Frequency .......................... 50/63/80/100/125 Hz
Slope .................................... –12 dB/oct
Subwoofer (mono):
Frequency .......................... 50/63/80/100/125 Hz
Slope .................................... –18 dB/oct
Gain ...................................... +6 dB to –24 dB
Phase .................................. Normal/Reverse
Bass boost:
Gain ...................................... +12 dB to 0 dB
CD player
System .......................................... Compact disc audio system
Usable discs .............................. Compact disc
Signal-to-noise ratio ............... 94 dB (1 kHz) (IEC-A net-
work)
Number of channels .............. 2 (stereo)
MP3 decoding format ........... MPEG-1 & 2 Audio Layer 3
WMA decoding format ......... Ver. 7, 7.1, 8, 9, 10, 11 (2ch
audio)
(Windows Media Player)
AAC decoding format ............ MPEG-4 AAC (iTunes en-
coded only) (.m4a)
(Ver. 7.7 and earlier)
WAV signal format .................. Linear PCM & MS ADPCM
(Non-compressed)
USB
USB standard specification
..................................................... USB 2.0 full speed
Maximum current supply .... 500 mA
Maximum memory capacity
..................................................... 250 GB
Minimum memory capacity
..................................................... 256 MB
File system .................................. FAT16, FAT32
MP3 decoding format ........... MPEG-1 & 2 Audio Layer 3
WMA decoding format ......... Ver. 7, 7.1, 8, 9, 10, 11 (2ch
audio)
(Windows Media Player)
AAC decoding format ............ MPEG-4 AAC (iTunes en-
coded only) (.m4a)
(Ver. 7.7 and earlier)
WAV signal format .................. Linear PCM & MS ADPCM
(Non-compressed)
SD
Compatible physical format
..................................................... Version 2.00
Maximum memory capacity
..................................................... 16 GB (for SD and SDHC)
Minimum memory capacity
..................................................... 256 MB
File system .................................. FAT16, FAT32
MP3 decoding format ........... MPEG-1 & 2 Audio Layer 3
WMA decoding format ......... Ver. 7, 7.1, 8, 9, 10, 11 (2ch
audio)
(Windows Media Player)
AAC decoding format ............ MPEG-4 AAC (iTunes en-
coded only) (.m4a)
(Ver. 7.7 and earlier)
36
En
<YRD5269-A
S>36
Page 37

/
Additional Information
Black plate (37,1)
Appendix
WAV signal format .................. Linear PCM & MS ADPCM
(Non-compressed)
FM tuner
Frequency range ...................... 87.5 MHz to 108.0 MHz
Usable sensitivity ..................... 9 dBf (0.7 µV/75 W, mono,
S/N: 30 dB)
Signal-to-noise ratio ............... 72 dB (IEC-A network)
AM tuner
Frequency range ...................... 531 kHz to 1 602 kHz (9 kHz)
530 kHz to 1640 kHz (10
kHz)
Usable sensitivity ..................... 25 µV (S/N: 20 dB)
Signal-to-noise ratio ............... 62 dB (IEC-A network)
Infrared remote control
Wavelength ................................. 940 nm ±50 nm
Output ........................................... typ; 12 mw/sr per Infrared
LED
Notes
! The SD memory card is only available for
DEH-4150SD.
! Specifications and the design are subject to
modifications without notice due to improvements.
English
<YRD5269-A
S>37
En
37
Page 38

Black plate (38,1)
/
Contenido
Gracias por haber comprado este producto PIONEER.
Lea con detenimiento este manual antes de utilizar el producto por primera vez,
para que pueda darle el mejor uso posible. Una vez leído, guarde este manual en un
lugar seguro y a mano para consultarlo en el futuro.
Antes de comenzar
Acerca de esta unidad 40
Características 40
Visite nuestro sitio Web 40
Protección del producto contra robo 40
– Extracción del panel delantero 41
– Colocación del panel delantero 41
Uso y cuidado del mando a distancia 41
– Instalación de la batería 41
– Uso del mando a distancia 42
Utilización de esta unidad
Qué es cada cosa 43
– Unidad principal 43
– Mando a distancia 44
– Indicaciones del display 45
Funciones básicas 46
– Encendido y apagado 46
– Selección de una fuente 46
– Ajuste del volumen 47
Sintonizador 47
– Funciones básicas 47
– Almacenamiento y recuperación de
frecuencias 47
– Introducción a las funciones
avanzadas 48
– Almacenamiento de las frecuencias de
radio más fuertes 48
– Sintonización de señales fuertes 48
Reproductor de CD incorporado 49
– Funciones básicas 49
– Visualización de información de texto
en el disco 50
– Selección de archivos de la lista de
nombres de archivos 50
– Introducción a las funciones
avanzadas 51
– Selección de una gama de repetición
de reproducción 51
– Reproducción de las pistas en orden
aleatorio 51
– Exploración de carpetas y pistas 52
– Pausa de la reproducción 52
– Utilización del Sound Retriever 52
Reproducción de canciones en un
dispositivo de almacenamiento externo
(USB, SD) 53
– Funciones básicas 53
– Visualización de información de texto
de un archivo de audio 54
– Selección de archivos de la lista de
nombres de archivos 54
– Introducción a las funciones
avanzadas 54
Para reproducir canciones en el iPod 55
– Funciones básicas 55
– Para buscar una canción 56
– Visualización de información de texto
en el iPod 57
– Introducción a las funciones
avanzadas 57
– Reproducción de las canciones en un
orden aleatorio (selección
aleatoria) 57
– Reproducción de todas las canciones
en un orden aleatorio 58
– Selección de canciones de las listas
relacionadas con la canción que se
está reproduciendo 58
– Uso de la función iPod de esta unidad
desde el iPod 58
– Cambio de la velocidad del
audiolibro 59
Ajustes de audio
Introducción a los ajustes de audio 60
Uso del ajuste del balance 60
Uso del ecualizador 61
– Recuperación de las curvas de
ecualización 61
– Ajuste de las curvas de
ecualización 61
38
Es
<YRD5269-A
S>38
Page 39

/
Contenido
Black plate (39,1)
Español
– Ajuste preciso de la curva de
ecualización 61
Ajuste de la sonoridad 62
Uso de la salida de subgraves 62
– Configuración de los ajustes de
subgraves 62
Uso del filtro de paso alto 63
Intensificación de los graves 63
Ajuste de los niveles de la fuente 64
Ajustes iniciales
Configuración de los ajustes iniciales 65
Ajuste del reloj 65
Ajuste del paso de sintonía de FM 65
Ajuste del paso de sintonía de AM 66
Cambio del ajuste de un dispositivo
auxiliar 66
Ajuste de la salida posterior y del controlador
de subgraves 66
Cambio del desplazamiento continuo 67
Otras funciones
Uso de la fuente AUX 68
– Selección de AUX como fuente 68
Activación y desactivación de la visualización
del reloj 68
Cambio de la indicación del display y la
iluminación de los botones 68
Información adicional
Mensajes de error 69
Pautas para el manejo de discos y del
reproductor 71
Discos dobles 71
Pautas para el manejo del dispositivo de
almacenamiento externo (USB, SD) y para
esta unidad 72
– Dispositivo de almacenamiento
USB 72
– Tarjeta de memoria SD 72
Compatibilidad con audio comprimido
(disco, USB, SD) 73
– Información suplementaria de audio
comprimido (disco, USB, SD) 73
Archivos de audio comprimido en el
disco 73
Archivos de audio comprimido en el
dispositivo de almacenamiento externo
(USB, SD) 73
Ejemplo de una jerarquía y de secuencias de
reproducción 74
– Secuencia de archivos de audio en el
disco 74
– Secuencia de archivos de audio en el
dispositivo de almacenamiento externo
(USB, SD) 74
iPod 75
– Compatibilidad con iPod 75
– Acerca del manejo del iPod 75
– Acerca de los ajustes del iPod 75
Aviso de copyright y marcas registradas 75
Especificaciones 77
<YRD5269-A
S>39
39
Es
Page 40

/
Sección
01
Black plate (40,1)
Antes de comenzar
Acerca de esta unidad
PRECAUCIÓN
! No permita que esta unidad entre en contacto
con líquidos, ya que ello puede producir una
descarga eléctrica. Además, el contacto con
líquidos puede causar daños en la unidad,
humo y sobrecalentamiento.
! Conserve este manual a mano para que
pueda consultar los procedimientos de uso y
las precauciones cuando sea necesario.
! Mantenga siempre el volumen lo suficiente-
mente bajo para escuchar los sonidos procedentes del exterior del vehículo.
! Proteja esta unidad de la humedad.
! Si se desconecta o se descarga la batería, la
memoria preajustada se borrará y deberá ser
reprogramada.
Características
Esta unidad es compatible con una gran variedad de formatos de archivo y dispositivos/soportes de almacenamiento.
Compatibilidad con formatos de
archivo
! WMA
! MP3
! AAC
! WAV
Para obtener más información sobre la compatibilidad, consulte Información adicional.
audio portátil USB/memoria USB y tarjeta de
memoria SD.
Para obtener más información sobre la compatibilidad, consulte Información adicional.
Compatibilidad con iPod
Esta unidad permite el control y la escucha de
canciones en un iPod.
Para obtener más información sobre los iPod
compatibles, consulte Compatibilidad con iPod
en la página 75.
PRECAUCIÓN
! Pioneer no asume ninguna responsabilidad
por la pérdida de datos en la memoria USB/en
el reproductor de audio portátil USB/en la tarjeta de memoria SD/en la tarjeta de memoria
SDHC, incluso si la pérdida ocurre durante el
uso de esta unidad.
! Pioneer no asume ninguna responsabilidad
por la pérdida de datos en el iPod, incluso si
la pérdida ocurre durante el uso de esta
unidad.
Visite nuestro sitio Web
Visítenos en el siguiente sitio:
http://pioneer.jp/group/index-e.html
! En nuestro sitio Web ofrecemos la informa-
ción más reciente acerca de Pioneer
Corporation.
Compatibilidad con dispositivos/
soportes de almacenamiento
! CD/CD-R/CD-RW
! Reproductor de audio portátil USB/memo-
ria USB
! Tarjeta de memoria SD (compatible con
SDHC)
La tarjeta de memoria SD sólo está disponible
en DEH-4150SD.
Póngase en contacto con el fabricante para
obtener información sobre su reproductor de
40
Es
Protección del producto
contra robo
Se puede extraer el panel delantero como medida antirrobo.
Importante
! Proceda con cuidado al retirar o colocar el
panel delantero.
! Evite someter el panel delantero a impactos
excesivos.
<YRD5269-A
S>40
Page 41

/
Antes de comenzar
! Mantenga el panel delantero fuera del alcan-
ce de la luz solar directa y no lo exponga a
altas temperaturas.
! Antes de extraer el panel delantero, asegúrese
de retirar del mismo el cable AUX/USB y el
dispositivo USB. De lo contrario, puede dañarse la unidad, el dispositivo conectado o el interior del vehículo.
Extracción del panel delantero
1 Presione (soltar) para liberar el panel
delantero.
2 Sujete el panel delantero y extráigalo.
Black plate (41,1)
Sección
01
Español
Uso y cuidado del mando a
distancia
Instalación de la batería
Deslice y extraiga la bandeja de la parte posterior del mando a distancia e inserte la pila con
los polos positivo (+) y negativo (–) en la dirección correcta.
! Al utilizar el mando a distancia por primera
vez, extraiga la película que sobresale de la
bandeja.
3 Coloque el panel delantero en la funda
protectora provista para guardarlo de manera segura.
Colocación del panel delantero
1 Deslice el panel delantero hacia la izquierda hasta que oiga un chasquido.
El panel frontal y la unidad principal quedan
unidos por el lado izquierdo. Asegúrese de
que el panel delantero haya quedado unido a
la unidad principal.
2 Presione el lado derecho del panel delantero hasta que asiente firmemente.
# Si no puede fijar con éxito el panel delantero a
la unidad principal, inténtelo de nuevo. Si aplica
fuerza excesiva para fijar el panel delantero, éste
puede dañarse.
ADVERTENCIA
Mantenga la batería fuera del alcance de los
niños. En caso de ingestión accidental de ésta,
consulte a un médico de inmediato.
PRECAUCIÓN
! Utilice una sola batería de litio CR2025 (3 V).
! Extraiga la batería si no piensa utilizar el
mando a distancia durante un mes o más
tiempo.
! Si la pila se sustituye de forma incorrecta exis-
te riesgo de explosión. Reemplácela sólo con
una del mismo tipo, o equivalente.
! No manipule la batería con herramientas me-
tálicas.
! No guarde la pila junto a objetos metálicos.
! En el caso de que se produzcan fugas de la
pila, limpie completamente el mando a distancia e instale una pila nueva.
<YRD5269-A
S>41
41
Es
Page 42

/
Sección
01
Antes de comenzar
! Para desechar las pilas usadas, cumpla con
los reglamentos gubernamentales o las nor-
mas ambientales pertinentes de las institucio-
nes públicas aplicables en su país/zona.
Uso del mando a distancia
Apunte el mando a distancia hacia la carátula
para hacer funcionar la unidad.
! Es posible que el mando a distancia no
funcione correctamente si lo expone a la
luz solar directa.
Importante
! No guarde el mando a distancia en lugares ex-
puestos a altas temperaturas o a la luz solar
directa.
! No deje caer el mando a distancia al suelo, ya
que puede quedar atascado debajo del freno
o del acelerador.
Black plate (42,1)
42
Es
<YRD5269-A
S>42
Page 43

178a2
345
6
bcdef
9
g
Utilización de esta unidad
Black plate (43,1)
Sección
02
Qué es cada cosa
Unidad principal
Ranura para la tarjeta de memoria SD
Esta función está disponible sólo para DEH4150SD.
Al extraer la carátula, podrá ver la ranura de la
tarjeta de memoria SD.
1 Botón SRC/OFF
Esta unidad se enciende al seleccionar una
fuente. Presione este botón para visualizar
todas las fuentes disponibles.
2 Botón
Presione este botón para visualizar la lista
de títulos de las pistas, la de carpetas, la de
ficheros o la de canales presintonizados,
según la fuente de que se trate.
Manténgalo presionado para cambiar al
modo de reproducción de enlace cuando
utilice un iPod.
Para obtener más información, consulte Se-
lección de canciones de las listas relacionadas con la canción que se está reproduciendo
en la página 58.
3 Botón S.Rtrv
Presione para cambiar los ajustes del
Sound Retriever.
/LIST
Para obtener más información, consulte Utilización del Sound Retriever en la página 52.
4 MULTI-CONTROL
Muévalo para utilizar los controles de sintonización por búsqueda manual, avance rápido, retroceso y búsqueda de pista. También
se usa para controlar funciones.
Gire el control para aumentar o disminuir el
volumen.
5 Botón SW/BASS
Pulse este botón para cambiar al menú de
ajuste de subgraves. Al utilizar el menú de
subgraves, pulse este botón para cambiar el
menú.
Manténgalo presionado para cambiar al
menú de intensificación de graves.
6 Ranura de carga de discos
Inserte un CD/CD-R/CD-RW a reproducir.
7 Botón h (expulsar)
Presione este botón para expulsar el CD/
CD-R/CD-RW.
8 Puerto USB
Permite conectar un dispositivo de almacenamiento USB.
! Al conectarlo, abra la tapa del conector
USB.
! Utilice un cable USB para conectar el
dispositivo de almacenamiento USB al
puerto USB. Puesto que el dispositivo de
almacenamiento USB se proyecta hacia
fuera de la unidad, es peligroso conectarlo directamente.
El cable USB CD-U50E de Pioneer también está disponible. Para obtener información, consulte a su proveedor.
9 Botón
Presione este botón para extraer el panel delantero de la unidad principal.
a Conector de entrada AUX (conector estéreo de 3,5 mm)
Utilícelo para conectar un dispositivo auxiliar.
(soltar)
Español
<
YRD5269-A/S>43
43
Es
Page 44

Sección
02
Black plate (44,1)
Utilización de esta unidad
b Botón CLOCK/DISP OFF
Pulse este botón para cambiar a la visualización del reloj.
Mantenga presionado para activar o desactivar la indicación del display y la iluminación de los botones.
c Botón
Presione este botón para cambiar la gama
de repetición de reproducción mientras utiliza CD, USB/SD o iPod.
Presiónelo para cambiar los ajustes locales
cuando utilice el sintonizador como fuente.
d Botón
Presione este botón para activar o desactivar la función de orden aleatorio al utilizar
el CD o USB/SD.
Cuando utilice un iPod, presione para reproducir todas las pistas en orden aleatorio.
Mantenga presionado para cambiar el
modo de control cuando utilice un iPod.
Para obtener más información, consulte
Uso de la función iPod de esta unidad desde
el iPod en la página 58.
e Botón DISP/BACK/SCRL
Presione este botón para seleccionar las diferentes visualizaciones.
Manténgalo presionado para desplazarse
por la información de texto.
Presiónelo para volver a la visualización anterior cuando utilice el menú.
Manténgalo presionado para volver al menú
principal cuando utilice el menú.
f Botón BAND/ESC
Presione este botón para seleccionar entre
tres bandas FM y una banda AM.
Presione este botón para volver a la visualización normal cuando utilice el menú.
g Ranura para la tarjeta de memoria SD
Sólo para DEH-4150SD.
Inserte una tarjeta de memoria SD a reproducir.
(repetir)/LOC
(aleatorio)/iPod
Mando a distancia
Las funciones se utilizan de la misma manera
que al usar los botones de la unidad principal.
h Botones VOLUME
Presione este botón para aumentar o disminuir el volumen.
i Botón MUTE
Presione este botón para desactivar el sonido. Para volver a activar el sonido, presiónelo de nuevo.
j Botones a/b/c/d
Presione estos botones para utilizar los controles de sintonización por búsqueda manual, avance rápido, retroceso y búsqueda
de pista. También se usan para controlar las
funciones.
k Botón AUDIO
Presione este botón para seleccionar una
función de audio.
l Botón e
Presione este botón para activar o desactivar la pausa.
m Botón FUNCTION
Presione este botón para seleccionar las
funciones.
44
Es
<
YRD5269-A/S>44
Page 45

1
2 4 6 8
a e g h
bdfc
Utilización de esta unidad
Black plate (45,1)
Sección
02
n Botón LIST/ENTER
Presione este botón para visualizar la lista
de títulos de los discos, de títulos de las pistas, de carpetas, de archivos o de canales
presintonizados, según la fuente de que se
trate.
Cuando esté en el menú de funcionamiento,
presiónelo para controlar las funciones.
Indicaciones del display
3 5 79
1 Sección principal del display
Muestra la banda, frecuencia, tiempo de reproducción transcurrido y otros ajustes.
! Sintonizador
Se muestran la banda y la frecuencia.
! Reproductor de CD incorporado, disposi-
tivo de almacenamiento externo (USB,
SD), iPod
Se muestra el tiempo de reproducción
transcurrido e información de texto.
2 Indicador c
Aparece cuando existe un nivel, carpeta o
menú superior.
3 Indicador
Aparece cuando utiliza la función de lista.
4 Indicador d
Aparece cuando existe un nivel, carpeta o
menú inferior.
5 Indicador
Aparece cuando se muestra el nombre del
artista del disco (pista) en la sección principal del display.
Aparece durante la búsqueda precisa de artista en la función de exploración del iPod.
(lista)
(artista)
6 Indicador
Aparece cuando se muestra el nombre del
disco (álbum) en la sección principal del
display.
Aparece durante la búsqueda precisa de
álbum en la función de exploración del
iPod.
7 Indicador
Aparece cuando se muestra el nombre de la
pista (canción) en la sección principal del
display.
Aparece durante la búsqueda precisa de
canción en la función de exploración del
iPod.
8 Indicador
Aparece cuando el altavoz de subgraves
está activado.
9 Indicador LOC
Aparece cuando la sintonización por búsqueda local está activada.
a Indicador
Aparece cuando la sonoridad está activada.
b Indicador 5 (estéreo)
Aparece cuando la frecuencia seleccionada
se está transmitiendo en estéreo.
c Indicador
Sólo para DEH-4150SD.
Aparece cuando se ha insertado una tarjeta
de memoria SD/SDHC.
d Indicador
Aparece cuando la repetición de carpeta
está activada.
Cuando la función de repetición está activada, sólo aparece
e Indicador
carpeta)
Aparece cuando el orden aleatorio de carpeta está activado.
Cuando la función de orden aleatorio está
activada, sólo aparece
(disco)
(canción)
(subgraves)
(sonoridad)
(tarjeta de memoria SD)
(repetición de carpeta)
.
(orden aleatorio de
.
Español
<
YRD5269-A/S>45
45
Es
Page 46

/
Sección
02
Black plate (46,1)
Utilización de esta unidad
f Indicador (selección aleatoria)
Aparece cuando la función de selección
aleatoria está activada mientras se selecciona la fuente iPod.
g Indicador S.Rtrv
Aparece cuando la función de Sound Retriever está activada.
Para obtener más información, consulte Uti-
lización del Sound Retriever en la página 52.
h Indicador
Aparece cuando CONTROL (modo de control) está ajustado en IPOD.
Para obtener más información sobre el
modo de control, consulte Uso de la función
iPod de esta unidad desde el iPod en la página 58.
Funciones básicas
Encendido y apagado
Encendido de la unidad
% Presione SRC/OFF para encender la unidad.
Apagado de la unidad
% Mantenga presionado SRC/OFF hasta
que la unidad se apague.
Selección de una fuente
Puede seleccionar una fuente que desee escuchar.
% Presione SRC/OFF varias veces para
cambiar entre las siguientes fuentes.
DEH-4150SD
TUNER (sintonizador)—COMPACT DISC (reproductor de CD incorporado)—USB (dispositivo de almacenamiento USB)/USB-IPOD
(iPod conectado por la entrada de USB)—SD
(tarjeta de memoria SD)—AUX (AUX)
DEH-3100UB
TUNER (sintonizador)—COMPACT DISC (reproductor de CD incorporado)—USB (dispositivo de almacenamiento USB)/USB-IPOD
(iPod conectado por la entrada de USB)—
AUX (AUX)
46
Notas
! En los siguientes casos, la fuente sonora no
cambiará.
— Cuando no hay un disco cargado en la uni-
dad.
— Cuando la tarjeta de memoria SD no está
insertada en la ranura.
— Cuando AUX (entrada auxiliar) está apaga-
da (consulte la página 66).
! Cuando el dispositivo de almacenamiento
USB o el iPod no está conectado al puerto
USB de esta unidad, se visualiza NO DEVICE.
Es
<YRD5269-A
S>46
Page 47

Utilización de esta unidad
Black plate (47,1)
Sección
02
! AUX está activada de forma predeterminada.
Desactive AUX cuando no la utilice (consulte
Cambio del ajuste de un dispositivo auxiliar en
la página 66).
! Si el reproductor de audio portátil se carga
mediante la fuente de alimentación CC del vehículo mientras se conecta a la entrada AUX,
puede generarse cierto ruido. En este caso,
detenga la carga.
! Si el cable azul/blanco de esta unidad está co-
nectado al terminal de control del relé de la
antena automática del vehículo, la antena se
extiende cuando se enciende el equipo. Para
retraer la antena, apague la fuente.
Ajuste del volumen
% Gire MULTI-CONTROL para ajustar el
nivel de sonido.
Sintonizador
Funciones básicas
Importante
Si se utiliza esta unidad en América del Norte,
América Central o América del Sur, se deberá restablecer el paso de sintonía de AM (consulte
Ajuste del paso de sintonía de AM en la página
66).
% Selección de una banda
Presione BAND/ESC.
# Se puede seleccionar la banda de entre FM1,
FM2, FM3 o AM.
% Sintonización manual (paso a paso)
Presione MULTI-CONTROL izquierda o dere-
cha.
% Sintonización por búsqueda
Mantenga presionado MULTI-CONTROL izquierda o derecha y luego suéltelo.
# Se puede cancelar la sintonización por búsqueda presionado MULTI-CONTROL izquierda o
derecha.
# Al mantener presionado MULTI-CONTROL iz-
quierda o derecha se pueden saltar las emisoras.
La sintonización por búsqueda comienza inmediatamente después de soltar MULTI-CONTROL.
Español
Almacenamiento y
recuperación de frecuencias
Se pueden almacenar con facilidad hasta seis
frecuencias de emisoras para recuperarlas
posteriormente.
! Se pueden almacenar en la memoria seis
emisoras de cada banda.
1 Presione
Se muestra la pantalla de ajuste de presintonías.
/LIST.
<
YRD5269-A/S>47
Es
47
Page 48

Sección
02
Black plate (48,1)
Utilización de esta unidad
2 Utilice MULTI-CONTROL para almacenar
la frecuencia seleccionada en la memoria.
Gire el control para cambiar el número de presintonía. Manténgalo presionado para almacenarla.
# También puede almacenar la frecuencia en la
memoria manteniendo presionado
MULTI-CONTROL derecha.
3 Utilice MULTI-CONTROL para seleccionar la emisora deseada.
Gire el control para cambiar de emisora. Presiónelo para seleccionar.
# También puede cambiar la emisora presionando MULTI-CONTROL arriba o abajo.
# Para volver a la visualización normal, presione
BAND/ESC o
# Si no se utiliza la lista en unos 30 segundos,
el display volverá automáticamente a la visualización normal.
Nota
También se pueden recuperar las frecuencias de
las emisoras de radio asignadas a los números
de ajuste de presintonías presionando
MULTI-CONTROL hacia arriba o abajo durante la
visualización de frecuencias.
/LIST.
Notas
! Para volver a la visualización anterior, presione
DISP/BACK/SCRL.
! Para volver al menú principal, mantenga pre-
sionado DISP/BACK/SCRL.
! Para volver a la visualización normal, presione
BAND/ESC.
Almacenamiento de las
frecuencias de radio más fuertes
La función BSM (memoria de las mejores emisoras) permite guardar automáticamente las
seis frecuencias de emisoras de mayor intensidad.
1 Utilice MULTI-CONTROL para seleccionar BSM en el menú de funciones.
2 Presione MULTI-CONTROL para activar
la función BSM.
Las seis frecuencias de emisoras de mayor intensidad se almacenarán en orden según la
intensidad de las señales.
# Para cancelar, presione MULTI-CONTROL de
nuevo.
Introducción a las funciones
avanzadas
1 Presione MULTI-CONTROL para visualizar el menú principal.
2 Utilice MULTI-CONTROL para seleccionar FUNCTION.
Gire el control para cambiar la opción de
menú. Presiónelo para seleccionar.
3 Gire MULTI-CONTROL para seleccionar
la función.
BSM (memoria de las mejores emisoras)—
LOCAL (sintonización por búsqueda local)
48
Es
Sintonización de señales fuertes
La sintonización por búsqueda local le permite
sintonizar sólo las emisoras de radio con señales lo suficientemente fuertes como para asegurar una buena recepción.
% Presione
leccionar el ajuste deseado.
FM: OFF—LEVEL1—LEVEL2—LEVEL3—
LEVEL4
AM: OFF—LEVEL1—LEVEL2
El ajuste LEVEL4 sólo permite recibir las emisoras con las señales más fuertes, mientras
que los ajustes más bajos permiten recibir de
manera progresiva las emisoras con las señales más débiles.
/LOC varias veces para se-
<
YRD5269-A/S>48
Page 49

/
Utilización de esta unidad
Black plate (49,1)
Sección
02
Nota
También puede realizar esta operación en el
menú que aparece al utilizar
MULTI-CONTROL.
Reproductor de CD
incorporado
Funciones básicas
% Introducción de un CD/CD-R/CD-RW en
la ranura de carga de discos
La reproducción comenzará automáticamente.
# Cuando inserte un CD/CD-R/CD-RW, coloque el lado de la etiqueta del disco hacia arriba.
% Expulsión de un CD/CD-R/CD-RW
Presione h (expulsar).
% Selección de una carpeta
Presione MULTI-CONTROL arriba o abajo.
# No se puede seleccionar una carpeta que no
tenga un archivo de audio comprimido grabado
en ella.
% Selección de una pista
Presione MULTI-CONTROL izquierda o dere-
cha.
% Avance rápido o retroceso
Mantenga presionado MULTI-CONTROL izquierda o derecha.
# Al reproducir audio comprimido, no hay sonido en el avance rápido o en el retroceso.
Español
% Regreso a la carpeta raíz
Mantenga presionado BAND/ESC.
# Si la carpeta 01 (RAÍZ) no contiene archivos,
la reproducción se inicia en la carpeta 02.
% Cambio entre audio comprimido y CDDA
Presione BAND/ESC.
# Esta operación sólo está disponible cuando
reproduce un CD-EXTRA o CD DE MODO MIXTO.
# Si se cambia entre audio comprimido y CDDA, la reproducción comienza en la primera pista
del disco.
Es
<YRD5269-A
S>49
49
Page 50

/
Sección
02
Black plate (50,1)
Utilización de esta unidad
Notas
! El reproductor de CD incorporado puede re-
producir CD de audio y audio comprimido gra-
bado en un CD/CD-R/CD-RW. (Consulte la
página 73 para los archivos que se pueden re-
producir.)
! Lea las precauciones relativas al reproductor
y a los discos en la siguiente sección. Consul-
te la página 71.
! Después de insertar un disco, presione SRC/
OFF para seleccionar el reproductor de CD in-
corporado.
! A veces se produce una demora entre el co-
mienzo de la reproducción de un disco y la
emisión del sonido. Durante la lectura inicial,
se visualiza FORMAT READ.
! Si aparece un mensaje de error, consulte Men-
sajes de error en la página 69.
! Los discos se reproducen según el orden del
número de archivo. Se saltan las carpetas que
no tienen archivos. (Si la carpeta 01 (RAÍZ) no
contiene archivos, la reproducción se inicia
en la carpeta 02.)
Visualización de información
de texto en el disco
% Presione DISP/BACK/SCRL para seleccionar la información de texto deseada.
Para WMA/MP3/AAC
Tiempo de reproducción—nombre de la carpeta—nombre del archivo—título de la pista—
nombre del artista—título del álbum—comentarios—velocidad de grabación
Para WAV
Tiempo de reproducción—nombre de la carpeta—nombre del archivo—frecuencia de muestreo
Notas
! Puede desplazarse hacia la izquierda del título
manteniendo presionado DISP/BACK/SCRL.
! Si la información específica no se graba en
un disco, no se visualizará el título o el nom-
bre.
! Según sea la versión de iTunes utilizada para
grabar archivos MP3 en un disco, es posible
que no se visualice correctamente la información de los comentarios.
! Según la versión del Windows Media™ Player
utilizada para codificar los archivos WMA, es
posible que no se visualicen correctamente
los nombres de álbumes y demás información
de texto.
! Al reproducir archivos WMA grabados con
VBR (velocidad de grabación variable), se visualizará el valor medio de la velocidad de grabación.
! Al reproducir archivos MP3 grabados con
VBR (velocidad de grabación variable), aparece VBR en lugar del valor de velocidad de grabación.
! La frecuencia de muestreo que se visualiza en
el display puede estar abreviada.
! Si se activa la función de desplazamiento con-
tinuo en el ajuste inicial, la información de
texto se desplazará de manera ininterrumpida
por el display. Consulte Cambio del desplaza-
miento continuo en la página 67.
Selección de archivos de la lista
de nombres de archivos
Esta función le permite ver la lista de los nombres de los archivos (o de las carpetas) y seleccionar uno de ellos para su reproducción.
1 Presione
de lista de nombres de archivos.
Los nombres de los archivos y las carpetas
aparecen en el display.
2 Utilice MULTI-CONTROL para seleccionar el nombre del archivo deseado (o de la
carpeta deseada).
Gire el control para cambiar el nombre del archivo o carpeta.
— tras seleccionar un archivo, presione para
reproducirlo.
— presione para ver una lista de archivos (o
carpetas) de una carpeta seleccionada.
/LIST para cambiar al modo
50
Es
<YRD5269-A
S>50
Page 51

/
Utilización de esta unidad
Black plate (51,1)
Sección
02
— cuando se selecciona una carpeta, manten-
ga presionado para reproducir una canción
en la carpeta seleccionada.
# También puede reproducir el archivo presionando MULTI-CONTROL derecha.
# También puede reproducir una canción en la
carpeta seleccionada manteniendo presionado
MULTI-CONTROL derecha.
# Para volver a la lista anterior (la carpeta de un
nivel superior), presione DISP/BACK/SCRL. También puede realizar esta operación presionando
MULTI-CONTROL izquierda.
# Para volver al nivel superior de la lista, mantenga presionado DISP/BACK/SCRL.
# Para volver a la visualización normal, presione
BAND/ESC o
# Si no se utiliza la lista en unos 30 segundos,
el display volverá automáticamente a la visualización normal.
/LIST.
Introducción a las funciones
avanzadas
1 Presione MULTI-CONTROL para visualizar el menú principal.
2 Utilice MULTI-CONTROL para seleccionar FUNCTION.
Gire el control para cambiar la opción de
menú. Presiónelo para seleccionar.
3 Gire MULTI-CONTROL para seleccionar
la función.
REPEAT (repetición de reproducción)—
RANDOM (reproducción aleatoria)—SCAN
(reproducción con exploración)—PAUSE
(pausa)—SOUND RETRIEVER (sound retriever)
Notas
! Para volver a la visualización anterior, presione
DISP/BACK/SCRL.
! Para volver al menú principal, mantenga pre-
sionado DISP/BACK/SCRL.
! Para volver a la visualización normal, presione
BAND/ESC.
! Si no se utiliza ninguna función en unos 30
segundos, el display volverá automáticamente
a la visualización normal.
Selección de una gama de
repetición de reproducción
% Presione /LOC varias veces para se-
leccionar el ajuste deseado.
! DISC – Repite todas las pistas
! TRACK – Repite la pista actual
! FOLDER – Repite la carpeta actual
# Si selecciona otra carpeta durante la repeti-
ción de reproducción, la gama de repetición cambia a repetición de disco.
# Si realiza una búsqueda de pista o utiliza la
función de avance rápido/retroceso durante
TRACK (repetición de pista), la gama de repetición de reproducción cambiará a disco/carpeta.
# Cuando se selecciona FOLDER (repetición de
carpeta), no se puede reproducir una subcarpeta
de esa carpeta.
Nota
También puede realizar esta operación en el
menú que aparece al utilizar MULTI-CONTROL.
Reproducción de las pistas en
orden aleatorio
Las pistas de una gama de repetición seleccionada se reproducen en orden aleatorio.
% Presione
ducción aleatoria.
Las pistas se reproducirán en orden aleatorio.
# Vuelva a presionar /iPod para desactivar la
reproducción aleatoria.
Nota
También puede activar o desactivar esta función
en el menú que aparece mediante
MULTI-CONTROL.
/iPod para activar la repro-
Español
<YRD5269-A
S>51
51
Es
Page 52

/
Sección
02
Black plate (52,1)
Utilización de esta unidad
Exploración de carpetas y pistas
La reproducción con exploración busca la
canción dentro de la gama de repetición seleccionada.
1 Utilice MULTI-CONTROL para seleccionar SCAN en el menú de funciones.
2 Presione MULTI-CONTROL para activar
la reproducción con exploración.
Se reproducirán los primeros 10 segundos de
cada pista.
3 Cuando encuentre la pista deseada,
presione MULTI-CONTROL para desactivar
la reproducción con exploración.
# Si el display vuelve automáticamente a la visualización de reproducción, seleccione SCAN
de nuevo usando MULTI-CONTROL.
# Una vez finalizada la exploración de un disco
(carpeta), comenzará la reproducción normal de
las pistas.
Pausa de la reproducción
% Presione e (pausa) en el mando a dis-
tancia para activar la función de pausa.
Se detiene temporalmente la reproducción de
la pista actual.
# Para desactivar la pausa, vuelva a presionar e
(pausa).
Nota
También puede realizar esta operación en el
menú que aparece al utilizar
MULTI-CONTROL.
Nota
También puede activar o desactivar esta función
en el menú que aparece mediante
MULTI-CONTROL.
Utilización del Sound Retriever
La función Sound Retriever mejora automáticamente el audio comprimido y restaura el sonido óptimo.
% Presione S.Rtrv repetidamente para seleccionar el ajuste deseado.
OFF (desactivado)—1—2
# 2 es más eficaz que 1.
52
Es
<YRD5269-A
S>52
Page 53

/
Utilización de esta unidad
Black plate (53,1)
Sección
02
Reproducción de canciones
en un dispositivo de
almacenamiento externo
(USB, SD)
Puede reproducir archivos de audio comprimido en un dispositivo de almacenamiento externo (USB, SD).
! La tarjeta de memoria SD sólo está disponi-
ble en DEH-4150SD.
! Para obtener más información sobre la
compatibilidad, consulte Información adi-
cional.
! En las siguientes instrucciones, las memo-
rias USB, los reproductores de audio USB
y las tarjetas de memoria SD se denominan
conjuntamente “dispositivo de almacenamiento externo (USB, SD).” Si sólo se hace
referencia a las memorias USB y a los reproductores portátiles USB, éstos se denominan “dispositivos de almacenamiento
USB.”
Funciones básicas
% Conexión de un dispositivo de almacenamiento USB y reproducción
1 Conecte un dispositivo de almacenamiento
USB en el puerto USB.
Respecto a la posición del puerto USB, con-
sulte Unidad principal en la página 43.
2 Presione SRC/OFF para seleccionar USB
como fuente.
Se iniciará la reproducción.
# Utilice un cable USB para conectar el dispositivo de almacenamiento USB al puerto USB.
Puesto que el dispositivo de almacenamiento
USB se proyecta hacia fuera de la unidad, es peligroso conectarlo directamente.
% Inserción de una tarjeta de memoria SD
y reproducción
1 Extraiga el panel delantero.
Para obtener más información, consulte Ex-
tracción del panel delantero en la página 41.
2 Inserte una tarjeta de memoria SD en la ra-
nura para la tarjeta SD.
Insértela con la superficie de contacto
hacia abajo y presione la tarjeta hasta que
escuche un clic y quede completamente
bloqueada.
Respecto a la posición de la ranura de la
tarjeta SD, consulte Unidad principal en la
página 43.
3 Coloque el panel delantero.
Para obtener más información, consulte
Colocación del panel delantero en la página
41.
4 Presione SRC/OFF para seleccionar SD
como fuente.
Se iniciará la reproducción.
% Selección de una carpeta
Presione MULTI-CONTROL arriba o abajo.
% Avance rápido o retroceso
Mantenga presionado MULTI-CONTROL izquierda o derecha.
% Selección de una pista
Presione MULTI-CONTROL izquierda o dere-
cha.
% Regreso a la carpeta raíz
Mantenga presionado BAND/ESC.
% Desconexión de un dispositivo de almacenamiento USB
Extraiga el dispositivo de almacenamiento
USB.
Puede desconectar el dispositivo de almacenamiento USB en cualquier momento para
dejar de escucharlo.
% Expulsión de una tarjeta de memoria
SD
1 Extraiga el panel delantero.
Para obtener más información, consulte Ex-
tracción del panel delantero en la página 41.
2 Presione la tarjeta de memoria SD hasta
que escuche un clic.
La tarjeta de memoria SD se ha expulsado.
3 Extraiga la tarjeta de memoria SD.
Español
<YRD5269-A
S>53
53
Es
Page 54

/
Sección
02
Black plate (54,1)
Utilización de esta unidad
4 Coloque el panel delantero.
Para obtener más información, consulte
Colocación del panel delantero en la página
41.
Notas
! Lea las precauciones relativas a los dispositi-
vos de almacenamiento externo (USB, SD) y a
esta unidad en la siguiente sección. Consulte
Información adicional.
! Si aparece un mensaje de error, consulte Men-
sajes de error en la página 69.
! Si la carpeta 01 (RAÍZ) no contiene archivos,
la reproducción se inicia en la carpeta 02.
! Si el reproductor de audio portátil USB tiene
una función de carga de la batería y se conecta a esta unidad, la batería se cargará al
poner la llave de encendido del automóvil en
la posición ACC o en ON.
Visualización de información
de texto de un archivo de audio
Es la misma operación que la de reproducción
de audio comprimido en el reproductor de CD
incorporado. (Consulte Visualización de infor-
mación de texto en el disco en la página 50.)
Selección de archivos de la lista
de nombres de archivos
Es la misma operación que la del reproductor
de CD incorporado. (Consulte Selección de ar-
chivos de la lista de nombres de archivos en la
página 50.)
Introducción a las funciones
avanzadas
1 Presione MULTI-CONTROL para visualizar el menú principal.
2 Utilice MULTI-CONTROL para seleccionar FUNCTION.
Gire el control para cambiar la opción de
menú. Presiónelo para seleccionar.
3 Gire MULTI-CONTROL para seleccionar
la función.
REPEAT (repetición de reproducción)—
RANDOM (reproducción aleatoria)—SCAN
(reproducción con exploración)—PAUSE
(pausa)—SOUND RETRIEVER (sound retriever)
Función y operación
Las operaciones REPEAT, RANDOM, SCAN,
PAUSE y SOUND RETRIEVER son básicamen-
te las mismas que las del reproductor de CD
incorporado.
Nombre de la función Operación
Consulte Selección de una
gama de repetición de reproducción en la página 51.
Sin embargo, las gamas de
repetición de reproducción
que puede seleccionar son
diferentes a las de un reproductor de CD incorporado. Las gamas de
REPEAT
RANDOM
SCAN
PAUSE
SOUND RETRIEVER
repetición para la reproducción del dispositivo de
almacenamiento externo
(USB, SD) son:
! TRACK – Sólo repite el
archivo actual
! FOLDER – Repite la car-
peta actual
! ALL – Repite todos los
archivos
Consulte Reproducción de
las pistas en orden aleatorio
en la página 51.
Consulte Exploración de car-
petas y pistas en la página
52.
Consulte Pausa de la repro-
ducción en la página 52.
Consulte Utilización del
Sound Retriever en la página 52.
54
Es
<YRD5269-A
S>54
Page 55

/
Utilización de esta unidad
Black plate (55,1)
Sección
02
Notas
! Para volver a la visualización anterior, presione
DISP/BACK/SCRL.
! Para volver al menú principal, mantenga pre-
sionado DISP/BACK/SCRL.
! Para volver a la visualización normal, presione
BAND/ESC.
! Si se selecciona otra carpeta durante la repeti-
ción de reproducción, la gama de repetición
cambia a ALL.
! Si se realiza una búsqueda de pista o un avan-
ce rápido/retroceso durante TRACK, la gama
de repetición de reproducción cambia a
FOLDER.
! Una vez finalizada la exploración de archivos
o carpetas, volverá a comenzar la reproducción normal de los archivos.
! Si no se utiliza ninguna función en unos 30
segundos, el display volverá automáticamente
a la visualización normal.
Para reproducir canciones
en el iPod
Le permite controlar y escuchar canciones en
un iPod.
! Para obtener más información sobre los
iPod compatibles, consulte Compatibilidad
con iPod en la página 75.
! Cuando utiliza un iPod, se requiere un co-
nector del Dock del iPod para el cable
USB.
Funciones básicas
% Conexión de un iPod
1 Conecte un iPod en el puerto USB utilizan-
do el conector del Dock del iPod para el
cable USB.
Respecto a la posición del puerto USB, consulte Unidad principal en la página 43.
2 Presione SRC/OFF para seleccionar
USB-IPOD como fuente.
Se iniciará la reproducción.
% Avance rápido o retroceso
Mantenga presionado MULTI-CONTROL izquierda o derecha.
% Selección de una pista (capítulo)
Presione MULTI-CONTROL izquierda o dere-
cha.
Español
% Desconexión de un iPod
Extraiga el conector del Dock del iPod para el
cable USB.
Notas
! Lea las precauciones relativas al iPod en la si-
guiente sección. Consulte la página 75.
! Mientras el iPod está conectado a esta uni-
dad, aparece en él PIONEER (o
verificación)).
! Si aparece un mensaje de error, consulte Men-
sajes de error en la página 69.
<YRD5269-A
(marca de
Es
S>55
55
Page 56

/
Sección
02
Black plate (56,1)
Utilización de esta unidad
! Cuando la llave de encendido del automóvil
está fijada en ACC o en ON, la batería del
iPod se carga mientras está conectado a esta
unidad.
! Cuando el iPod está conectado a esta unidad,
no se puede encender ni apagar. Sin embargo, si se ajusta el modo de control a IPOD,el
iPod podrá encenderse o apagarse.
! Antes de conectar el conector del Dock de
esta unidad al iPod, desconecte los auriculares del iPod.
! El iPod se apaga aproximadamente dos minu-
tos después de que la llave de encendido del
automóvil se fije en OFF.
Para buscar una canción
Las operaciones para controlar un iPod con
esta unidad se han diseñado para ser lo más
parecidas posible al funcionamiento del iPod,
para facilitar el funcionamiento y la búsqueda
de canciones.
! Dependiendo del número de archivos en el
iPod, puede haber un retraso al mostrar
una lista.
! Si los caracteres grabados en el iPod no
son compatibles con esta unidad, no aparecerán en el display.
Búsqueda de canciones por categoría
1 Para ir al menú superior de la búsqueda
de listas, presione
2 Utilice MULTI-CONTROL para seleccionar una categoría.
Gire el control para cambiar la categoría y presiónelo para seleccionarla.
PLAYLISTS (listas de reproducción)—ARTISTS
(artistas)—ALBUMS (álbumes)—SONGS
(canciones)—PODCASTS (podcasts)—
GENRES (géneros)—COMPOSERS (compositores)—AUDIOBOOKS (audiolibros)
Se visualiza la lista de la categoría seleccionada.
# Puede comenzar la reproducción en la categoría seleccionada manteniendo presionado
/LIST.
MULTI-CONTROL. También puede realizar esta
operación manteniendo presionando
MULTI-CONTROL derecha.
# También puede cambiar de categoría presionando MULTI-CONTROL arriba o abajo.
# También puede seleccionar la categoría presionando MULTI-CONTROL derecha.
3 Repita el paso 2 para encontrar una
canción que desee escuchar.
# Para volver a la categoría anterior (un nivel
más arriba), presione DISP/BACK/SCRL. También
puede realizar esta operación presionando
MULTI-CONTROL izquierda.
# Para volver al nivel superior de las categorías,
mantenga presionado DISP/BACK/SCRL.
# Para volver a la visualización normal, presione
BAND/ESC.
# Si no se utiliza la lista en unos 30 segundos,
el display volverá automáticamente a la visualización normal.
Búsqueda en la lista por orden alfabético
1 Utilice MULTI-CONTROL para seleccionar una categoría.
Gire el control para cambiar la categoría. Presiónelo para seleccionar.
2 Cuando se visualice una lista de la categoría seleccionada, presione
/LIST para
cambiar al modo de búsqueda alfabética.
Se visualiza ABC SEARCH.
3 Gire MULTI-CONTROL para seleccionar
una letra del alfabeto.
4 Presione MULTI-CONTROL para visualizar la lista alfabética.
Se visualiza la lista empezando por la letra seleccionada del alfabeto.
# Si falla la búsqueda alfabética, aparece
NOT FOUND.
56
Es
<YRD5269-A
S>56
Page 57

Utilización de esta unidad
Black plate (57,1)
Sección
02
Visualización de información
de texto en el iPod
% Presione DISP/BACK/SCRL para seleccionar la información de texto deseada.
Tiempo de reproducción—título de la canción
—nombre del artista—nombre del álbum
# Si los caracteres grabados en el iPod no son
compatibles con esta unidad, no aparecerán en
el display.
Notas
! Puede desplazar la información de texto hacia
la izquierda manteniendo presionado
DISP/BACK/SCRL.
! Si se activa la función de desplazamiento con-
tinuo en el ajuste inicial, la información de
texto se desplazará de manera ininterrumpida
por el display. Consulte Cambio del desplaza-
miento continuo en la página 67.
Introducción a las funciones
avanzadas
1 Presione MULTI-CONTROL para visualizar el menú principal.
2 Utilice MULTI-CONTROL para seleccionar FUNCTION.
Gire el control para cambiar la opción de
menú. Presiónelo para seleccionar.
3 Gire MULTI-CONTROL para seleccionar
la función.
REPEAT (repetición de reproducción)—
SHUFFLE (shuffle)—SHUFFLE ALL (shuffle all)
—LINK PLAY (búsqueda de enlace)—
CONTROL (modo de control)—PAUSE (pausa)
—AUDIOBOOKS SPEED (velocidad del audio-
libro)—SOUND RETRIEVER (sound retriever)
Función y operación
Las operaciones REPEAT, PAUSE y
SOUND RETRIEVER son básicamente las mis-
mas que las del reproductor de CD incorporado.
Nombre de la función Operación
Consulte Selección de una
gama de repetición de reproducción en la página 51.
Sin embargo, las gamas de
repetición de reproducción
que puede seleccionar son
diferentes a las de un re-
REPEAT
PAUSE
SOUND RETRIEVER
Notas
! Para volver a la visualización anterior, presione
DISP/BACK/SCRL.
! Para volver al menú principal, mantenga pre-
sionado DISP/BACK/SCRL.
! Para volver a la visualización normal, presione
BAND/ESC.
! Si no se utiliza ninguna función en unos 30
segundos, el display volverá automáticamente
a la visualización normal.
! Cuando CONTROL está activado, sólo se po-
drán utilizar CONTROL, PAUSE y
SOUND RETRIEVER.
productor de CD incorporado. Las gamas de
repetición para la reproducción del iPod son:
! ONE – Repite la can-
ción actual
! ALL – Repite todas las
canciones de la lista seleccionada
Consulte Pausa de la repro-
ducción en la página 52.
Consulte Utilización del
Sound Retriever en la página 52.
Reproducción de las canciones
en un orden aleatorio
(selección aleatoria)
1 Utilice MULTI-CONTROL para seleccionar SHUFFLE en el menú de funciones.
2 Presione MULTI-CONTROL para mostrar
el modo de ajuste.
Español
<
YRD5269-A/S>57
57
Es
Page 58

Sección
02
Black plate (58,1)
Utilización de esta unidad
3 Utilice MULTI-CONTROL para seleccionar el ajuste deseado.
Gire el control para cambiar de ajuste.
! SONGS – Reproduce canciones siguiendo
un orden aleatorio dentro de la lista.
! ALBUMS – Reproduce por orden las can-
ciones de un álbum seleccionado aleatoriamente.
! OFF – Cancela la reproducción aleatoria.
4 Presione MULTI-CONTROL para determinar la selección.
# Aunque se haya cancelado el menú antes de
determinarla, la operación se lleva a cabo.
Reproducción de todas las
canciones en un orden aleatorio
% Presione /iPod para activar la fun-
ción de selección aleatoria de todas las canciones.
Todas las canciones en el iPod se reproducirán de forma aleatoria.
# Para desactivar la función de selección aleatoria de todas las canciones, desactive SHUFFLE en
el menú FUNCTION.
Nota
También puede activar esta función en el menú
que aparece utilizando MULTI-CONTROL.
Selección de canciones de las
listas relacionadas con la canción
que se está reproduciendo
Se visualizarán las listas relacionadas con la
canción que se está reproduciendo. Puede seleccionar canciones de las siguientes listas.
— Lista de álbumes del artista que se está reproduciendo
— Lista de canciones del álbum que se está
reproduciendo
— Lista de álbumes del género que se está reproduciendo
! Dependiendo del número de archivos en el
iPod, puede haber un retraso al mostrar
una lista.
1 Mantenga presionado
cambiar al modo de reproducción de enlace.
Se visualiza LINK :ARTIST.
2 Utilice MULTI-CONTROL para seleccionar el modo deseado.
Gire el control para cambiar el modo y presiónelo para seleccionarlo.
! ARTIST – Muestra la lista de álbumes del
artista que se está reproduciendo.
! ALBUM – Muestra la lista de canciones del
álbum que se está reproduciendo.
! GENRE – Muestra la lista de álbumes del
género que se está reproduciendo.
Durante la búsqueda de lista, parpadea
SEARCHING.
# Si no se encuentran los álbumes/canciones
afines, se vizualiza NOT FOUND.
3 Utilice MULTI-CONTROL para seleccionar un álbum o canción de la lista.
Para obtener más información sobre la operación de selcción, consulte el Paso 2 de la siguiente sección. Consulte Para buscar una
canción en la página 56.
Nota
También puede activar esta función en el menú
que aparece utilizando MULTI-CONTROL.
/LIST para
Uso de la función iPod de esta
unidad desde el iPod
Esta función no se puede utilizar en los siguientes modelos de iPod.
— iPod nano de primera generación
— iPod de quinta generación
La función iPod de esta unidad se puede utilizar desde el iPod. Puede oír el sonido desde
los altavoces del coche y controlar las funciones desde el iPod.
58
Es
<
YRD5269-A/S>58
Page 59

/
Utilización de esta unidad
Black plate (59,1)
Sección
02
1 Mantenga presionado /iPod para
cambiar el modo de control.
Cada vez que se mantiene presionado
/
iPod se cambia el modo de control de la siguiente manera:
! IPOD – La función iPod de esta unidad se
puede utilizar desde el iPod conectado.
! AUDIO – La función iPod de esta unidad se
puede utilizar desde esta unidad.
2 Si se selecciona IPOD, pondrá en funcionamiento el iPod conectado para seleccionar una canción y reproducirla.
# Al ajustar el modo de control en IPOD se
pone en pausa la reproducción de la canción.
Ponga en funcionamiento el iPod para iniciar la
reproducción.
# Incluso si se ajusta el modo de control en
IPOD, las siguientes funciones estarán disponibles en la unidad.
! Volumen
! Avance rápido/retroceso
! Pista arriba/abajo
! Pausa
! Cambio de la información de texto
Notas
! También puede cambiar el modo de control
en el menú que aparece utilizando
MULTI-CONTROL.
! Cuando el modo de control esté ajustado en
IPOD, las operaciones estarán limitadas de la
siguiente manera:
— No se pueden seleccionar otras funciones
aparte de CONTROL (modo de control),
PAUSE (pausa) y SOUND RETRIEVER (advanced sound retriever).
— La función de exploración sólo puede utili-
zarse desde esta unidad.
1 Utilice MULTI-CONTROL para seleccionar AUDIOBOOKS SPEED en el menú de
funciones.
2 Presione MULTI-CONTROL para mostrar
el modo de ajuste.
3 Utilice MULTI-CONTROL para seleccionar el ajuste deseado.
Gire el control para cambiar de ajuste.
! FASTER – Reproducción con velocidad su-
perior a la normal
! NORMAL – Reproducción con velocidad
normal
! SLOWER – Reproducción con velocidad in-
ferior a la normal
4 Presione MULTI-CONTROL para determinar la selección.
# Aunque se haya cancelado el menú antes de
determinarla, la operación se lleva a cabo.
Español
Cambio de la velocidad del
audiolibro
Mientras escucha un audiolibro en el iPod,
puede modificar la velocidad de reproducción.
<YRD5269-A
S>59
59
Es
Page 60

/
Sección
03
Black plate (60,1)
Ajustes de audio
Introducción a los ajustes
de audio
1 Presione MULTI-CONTROL para visualizar el menú principal.
2 Utilice MULTI-CONTROL para seleccionar AUDIO.
Gire el control para cambiar la opción de
menú. Presiónelo para seleccionar.
3 Gire MULTI-CONTROL para seleccionar
la función de audio.
Gire MULTI-CONTROL para cambiar entre las
funciones de audio en el siguiente orden.
FADER/BALANCE (ajuste del balance)—
PRESET EQUALIZER (recuperación de ecuali-
zador)—EQ SETTING 1 (ajuste del ecualizador)—EQ SETTING 2 (ajuste de precisión del
ecualizador)—LOUDNESS (sonoridad)—
SW SETTING 1 (ajuste de subgraves activado/
desactivado)—SW SETTING 2 (ajuste de subgraves)—HIGH PASS FILTER (filtro de paso
alto)—BASS BOOST (intensificación de graves)—SRC LV ADJUST (ajuste del nivel de
fuente)
4 Presione MULTI-CONTROL para mostrar
el modo de ajuste de cada función.
# Presione MULTI-CONTROL izquierda para
mostrar el menú de selección de funciones.
# Mantenga presionado MULTI-CONTROL iz-
quierda y mostrar el menú principal.
5 Ajuste cada función.
Notas
! Para volver a la visualización anterior, presione
DISP/BACK/SCRL.
! Para volver al menú principal, mantenga pre-
sionado DISP/BACK/SCRL.
! Para volver a la visualización normal, presione
BAND/ESC.
! Cuando el ajuste del controlador de subgraves
es PREOUT:REAR, no se puede cambiar a
SW SETTING 1 (ajuste de subgraves activado/
desactivado). (Consulte la página 66.)
! Se puede seleccionar SW SETTING 2 sólo
cuando la salida de subgraves se activa en
SW SETTING 1.
! Al seleccionar FM como fuente, no se puede
cambiar a SRC LVADJUST.
! Si no se utiliza ninguna función en unos 30
segundos, el display volverá automáticamente
a la visualización normal.
Uso del ajuste del balance
Se puede cambiar el ajuste de fader/balance,
de manera que proporcione un entorno de
audio ideal en todos los asientos ocupados.
1 Utilice MULTI-CONTROL para seleccionar FADER/BALANCE en el menú de funciones de audio.
2 Presione MULTI-CONTROL para mostrar
el modo de ajuste.
3 Presione MULTI-CONTROL para seleccionar el segmento que desea ajustar.
Presione MULTI-CONTROL varias veces para
cambiar entre fader y balance.
4 Gire MULTI-CONTROL para ajustar el
balance entre los altavoces.
El balance entre los altavoces delanteros/traseros se puede ajustar entre FAD F15 y
FAD R15.
El balance entre los altavoces izquierdos/derechos se puede ajustar entre BAL L15 y
BAL R15.
# También puede realizar estas operaciones presionando MULTI-CONTROL arriba o abajo.
# FAD 0 es el ajuste apropiado cuando se usan
sólo dos altavoces.
# Cuando el ajuste de la salida posterior es
REAR SP :SUB W, no se puede ajustar el balance
entre los altavoces delanteros/traseros. Consulte
Ajuste de la salida posterior y del controlador de
subgraves en la página 66.
60
Es
<YRD5269-A
S>60
Page 61

/
Ajustes de audio
Black plate (61,1)
Sección
03
Uso del ecualizador
El ecualizador le permite ajustar la ecualización de acuerdo con las características acústicas del interior del automóvil.
Recuperación de las curvas de
ecualización
Hay seis tipos de curvas de ecualización memorizadas que se pueden recuperar con facilidad en cualquier momento. A continuación se
ofrece una lista de estas curvas de ecualización.
Visualización Curva de ecualización
POWERFUL Potente
NATURAL Natural
VOCAL Vocal
CUSTOM Personalizada
FLAT Plana
SUPER BASS Supergraves
! CUSTOM es una curva de ecualización
ajustada creada por el usuario.
! Cuando se selecciona FLAT no se introdu-
ce ningún suplemento ni corrección en el
sonido. Esto es útil para verificar el efecto
de las curvas de ecualización al cambiar alternativamente entre FLAT y una curva de
ecualización ajustada.
4 Presione MULTI-CONTROL para determinar la selección.
# Aunque se haya cancelado el menú antes de
determinarla, la operación se lleva a cabo.
Ajuste de las curvas de
ecualización
Las curvas de ecualización que vienen predefinidas de fábrica se pueden ajustar a un nivel
preciso (control de matiz).
1 Utilice MULTI-CONTROL para seleccionar EQ SETTING 1 en el menú de funciones
de audio.
2 Presione MULTI-CONTROL para mostrar
el modo de ajuste.
3 Presione MULTI-CONTROL para seleccionar el segmento que desea ajustar.
Presione MULTI-CONTROL varias veces para
cambiar el segmento en el siguiente orden:
L (bajo)—M (medio)—H (alto)
4 Gire el control MULTI-CONTROL para
ajustar el nivel de la banda de ecualización.
Se visualiza +6 a –6 mientras se aumenta o
disminuye el nivel.
# También puede realizar estas operaciones presionando MULTI-CONTROL arriba o abajo.
# Se puede seleccionar otra banda y ajustar su
nivel.
Español
1 Utilice MULTI-CONTROL para seleccionar PRESET EQUALIZER en el menú de funciones de audio.
2 Presione MULTI-CONTROL para mostrar
el modo de ajuste.
3 Gire el MULTI-CONTROL para seleccionar el ecualizador.
# También puede realizar estas operaciones presionando MULTI-CONTROL arriba o abajo.
Ajuste preciso de la curva de
ecualización
Se puede ajustar la frecuencia central y el factor Q (características de las curvas) de cada
banda de curvas seleccionada (LOW/MID/HI).
Nivel (dB)
Q=2W
Q=2N
Frecuencia central
<YRD5269-A
Frecuencia (Hz)
Es
S>61
61
Page 62

Sección
03
Black plate (62,1)
Ajustes de audio
1 Utilice MULTI-CONTROL para seleccionar EQ SETTING 2.
2 Presione MULTI-CONTROL para mostrar
el modo de ajuste.
3 Presione MULTI-CONTROL para seleccionar el segmento que desea ajustar.
Presione MULTI-CONTROL varias veces para
cambiar el segmento en el siguiente orden:
Banda—Frecuencia—Factor Q
4 Gire MULTI-CONTROL para ajustar el
segmento seleccionado.
Banda
LOW (baja)—MID (media)—HI (alta)
Frecuencia
Baja: 40HZ—80HZ—100HZ—160HZ
Media: 200HZ—500HZ—1KHZ—2KHZ
Alta: 3KHZ—8KHZ—10KHZ—12KHZ
Factor Q
2W—1W—1N—2N
# También puede realizar estas operaciones presionando MULTI-CONTROL arriba o abajo.
Ajuste de la sonoridad
La sonoridad compensa las deficiencias en
las gamas de sonido bajas y altas cuando se
escucha a un volumen bajo.
4 Presione MULTI-CONTROL para determinar la selección.
# Aunque se haya cancelado el menú antes de
determinarla, la operación se lleva a cabo.
Uso de la salida de subgraves
Esta unidad está equipada con una salida de
subgraves que se puede activar o desactivar.
Además, se puede seleccionar la fase entre
normal e inversa.
1 Presione SW/BASS para ver el modo de
ajuste de subgraves.
Presione SW/BASS repetidamente para cambiar entre los modos de ajuste de subgraves
en el siguiente orden.
Modo de ajuste SW SETTING 1 (ajuste de subgraves activado/desactivado)—modo de ajuste
SW SETTING 2 (ajuste de subgraves)
2 Seleccione el modo de ajuste
SW SETTING 1.
3 Active MULTI-CONTROL para seleccionar el ajuste deseado.
NORMAL (fase normal)—REV (fase inversa)—
OFF (subgraves desactivados)
# También puede realizar estas operaciones presionando MULTI-CONTROL arriba o abajo.
1 Utilice MULTI-CONTROL para seleccionar LOUDNESS en el menú de funciones de
audio.
2 Presione MULTI-CONTROL para mostrar
el modo de ajuste.
3 Utilice MULTI-CONTROL para seleccionar el ajuste deseado.
Gire el control para cambiar de ajuste.
LOW (bajo)—MID (medio)—HIGH (alto)—
OFF (desactivado)
# También puede realizar estas operaciones presionando MULTI-CONTROL arriba o abajo.
62
Es
4 Presione MULTI-CONTROL para determinar la selección.
# Aunque se haya cancelado el menú antes de
determinarla, la operación se lleva a cabo.
Nota
También puede activar este modo de ajuste en el
menú que aparece utilizando MULTI-CONTROL.
Configuración de los ajustes de
subgraves
Cuando la salida de subgraves está activada,
se puede ajustar la frecuencia de corte y el
nivel de salida del altavoz de subgraves.
<
YRD5269-A/S>62
Page 63

/
Ajustes de audio
Black plate (63,1)
Sección
03
! Cuando la salida de subgraves está activa-
da, se puede seleccionar SW SETTING 2.
1 Presione SW/BASS para ver el modo de
ajuste de subgraves.
Presione SW/BASS repetidamente para cambiar entre los modos de ajuste de subgraves
en el siguiente orden.
Modo de ajuste SW SETTING 1 (ajuste de subgraves activado/desactivado)—modo de ajuste
SW SETTING 2 (ajuste de subgraves)
2 Seleccione el modo de ajuste
SW SETTING 2.
3 Presione MULTI-CONTROL para seleccionar el segmento que desea ajustar.
Presione MULTI-CONTROL varias veces para
cambiar el segmento en el siguiente orden:
Frecuencia de corte—Nivel
4 Gire MULTI-CONTROL para ajustar el
segmento seleccionado.
Frecuencia de corte
50HZ—63HZ—80HZ—100HZ—125HZ
Nivel
Se visualiza +6 a –24 mientras se aumenta o
disminuye el nivel.
# También puede realizar estas operaciones presionando MULTI-CONTROL arriba o abajo.
Nota
También puede activar este modo de ajuste en el
menú que aparece utilizando
MULTI-CONTROL.
1 Utilice MULTI-CONTROL para seleccionar HIGH PASS FILTER.
2 Presione MULTI-CONTROL para mostrar
el modo de ajuste.
3 Utilice MULTI-CONTROL para seleccionar el ajuste deseado.
Gire el control para cambiar de ajuste.
OFF—50HZ—63HZ—80HZ—100HZ—125HZ
# También puede realizar estas operaciones presionando MULTI-CONTROL arriba o abajo.
4 Presione MULTI-CONTROL para determinar la selección.
# Aunque se haya cancelado el menú antes de
determinarla, la operación se lleva a cabo.
Intensificación de los graves
La función de intensificación de graves intensifica el nivel de graves del sonido.
1 Mantenga presionado SW/BASS para
visualizar el modo de ajuste BASS BOOST.
2 Gire MULTI-CONTROL para ajustar el
nivel.
Se visualiza 0 a +6 mientras se aumenta o disminuye el nivel.
# También puede realizar estas operaciones presionando MULTI-CONTROL arriba o abajo.
3 Presione MULTI-CONTROL para determinar la selección.
# Aunque se haya cancelado el menú antes de
determinarla, la operación se lleva a cabo.
Español
Uso del filtro de paso alto
Si no desea que se generen los sonidos bajos
de la gama de frecuencias de la salida de subgraves a través de los altavoces delanteros o
traseros, active el filtro de paso alto (HPF).
Sólo las frecuencias más altas que las de la
gama seleccionada se emiten a través de los
altavoces delanteros o traseros.
Nota
También puede activar este modo de ajuste en el
menú que aparece utilizando
MULTI-CONTROL.
Es
<YRD5269-A
S>63
63
Page 64

/
Sección
03
Ajustes de audio
Ajuste de los niveles de la
fuente
La función SLA (ajuste del nivel de fuente) le
permite ajustar el nivel de volumen de cada
fuente para evitar cambios radicales en el volumen cuando se cambia entre las fuentes.
! Los ajustes se basan en el nivel de volumen
de FM, que se mantiene inalterado.
1 Compare el nivel de volumen de FM
con el de la fuente que desea ajustar.
2 Utilice MULTI-CONTROL para seleccionar SRC LV ADJUST en el menú de funciones de audio.
3 Presione MULTI-CONTROL para mostrar
el modo de ajuste.
4 Gire MULTI-CONTROL para ajustar el
volumen de la fuente.
Se visualiza +4 a –4 mientras se aumenta o
disminuye el volumen de la fuente.
# También puede realizar estas operaciones presionando MULTI-CONTROL arriba o abajo.
Black plate (64,1)
5 Presione MULTI-CONTROL para determinar la selección.
# Aunque se haya cancelado el menú antes de
determinarla, la operación se lleva a cabo.
Nota
El nivel del volumen de AM también se puede regular con el ajuste del nivel de fuente.
64
Es
<YRD5269-A
S>64
Page 65

/
Ajustes iniciales
Black plate (65,1)
Sección
04
Configuración de los
ajustes iniciales
1 Mantenga presionado SRC/OFF hasta
que la unidad se apague.
2 Mantenga presionado MULTI-CONTROL
hasta que CLOCK SET aparezca en el display.
3 Gire MULTI-CONTROL para seleccionar
uno de los ajustes iniciales.
CLOCK SET (reloj)—FM STEP (paso de sintoni-
zación de FM)—AM STEP (paso de sintonización de AM)—AUX (entrada auxiliar)—
SW CONTROL (salida trasera y controlador de
subgraves)—EVER SCROLL (desplazamiento
continuo)
# También puede realizar estas operaciones presionando MULTI-CONTROL arriba o abajo.
# Para cancelar los ajustes iniciales, presione
BAND/ESC.
Ajuste del reloj
Siga estas instrucciones para ajustar el reloj.
1 Utilice MULTI-CONTROL para seleccionar CLOCK SET en el menú de ajustes iniciales.
Consulte Configuración de los ajustes iniciales
en esta página.
2 Presione MULTI-CONTROL para mostrar
el modo de ajuste.
# Presione DISP/BACK/SCRL para volver a la vi-
sualización anterior.
3 Presione MULTI-CONTROL para seleccionar el segmento de la pantalla del reloj que
desea ajustar.
Cada vez que se presiona MULTI-CONTROL,
se selecciona un solo segmento de la pantalla
del reloj.
Hora—Minuto
Al seleccionar las horas o los minutos del
reloj, el segmento seleccionado parpadeará.
4 Haga girar MULTI-CONTROL para poner
el reloj en hora.
# También puede realizar estas operaciones presionando MULTI-CONTROL arriba o abajo.
Ajuste del paso de sintonía
de FM
El paso de sintonía de FM que utiliza la sintonización por búsqueda se puede cambiar
entre 100 kHz, el paso predefinido, y 50 kHz.
! Si la sintonización por búsqueda se realiza
en pasos de 50 kHz, es posible que las emisoras se sintonicen de manera imprecisa.
En ese caso, sintonícelas manualmente o
vuelva a utilizar la función de sintonización
por búsqueda.
1 Utilice MULTI-CONTROL para seleccionar FM STEP en el menú de ajustes iniciales.
Consulte Configuración de los ajustes iniciales
en esta página.
2 Presione MULTI-CONTROL para mostrar
el modo de ajuste.
3 Gire MULTI-CONTROL para seleccionar
el paso de sintonía de FM.
Al girar MULTI-CONTROL se cambiará el paso
de sintonía de FM entre 50 kHz y 100 kHz. El
paso de sintonía de FM seleccionado aparecerá en el display.
# También puede realizar estas operaciones presionando MULTI-CONTROL arriba o abajo.
4 Presione MULTI-CONTROL para determinar la selección.
# Aunque se haya cancelado el menú antes de
determinarla, la operación se lleva a cabo.
Nota
El paso de sintonía es de 50 kHz durante la sintonización manual.
Español
<YRD5269-A
S>65
65
Es
Page 66

/
Sección
04
Black plate (66,1)
Ajustes iniciales
Ajuste del paso de sintonía
de AM
El paso de sintonía de AM se puede cambiar
entre 9 kHz, el paso predefinido, y 10 kHz. Si
se utiliza el sintonizador en América del Norte,
América Central o América del Sur, se deberá
cambiar el paso de sintonía de 9 kHz (531 a
1 602 kHz permisibles) a 10 kHz (530 a 1 640
kHz permisibles).
1 Utilice MULTI-CONTROL para seleccionar AM STEP en el menú de ajustes iniciales.
Consulte Configuración de los ajustes iniciales
en la página anterior.
2 Presione MULTI-CONTROL para mostrar
el modo de ajuste.
3 Gire MULTI-CONTROL para seleccionar
el paso de sintonía de AM.
Al girar MULTI-CONTROL se cambiará el paso
de sintonía de AM entre 9 kHz y 10 kHz. El
paso de sintonía de AM seleccionado aparecerá en el display.
# También puede realizar estas operaciones presionando MULTI-CONTROL arriba o abajo.
4 Presione MULTI-CONTROL para determinar la selección.
# Aunque se haya cancelado el menú antes de
determinarla, la operación se lleva a cabo.
Cambio del ajuste de un
dispositivo auxiliar
Se puede utilizar un dispositivo auxiliar con
esta unidad. Active el ajuste auxiliar si utiliza
un dispositivo auxiliar conectado a esta unidad.
1 Utilice MULTI-CONTROL para seleccionar AUX en el menú de ajustes iniciales.
Consulte Configuración de los ajustes iniciales
en la página anterior.
2 Pulse MULTI-CONTROL para activar
AUX.
# Para desactivar la función AUX, vuelva a presionar MULTI-CONTROL.
Ajuste de la salida posterior y
del controlador de subgraves
La salida posterior de esta unidad (salida de
cables de altavoces traseros y salida RCA posterior) se puede usar para la conexión de altavoces de toda la gama (REAR SP :FULL/
PREOUT:REAR) o subgraves
(REAR SP :SUB W/PREOUT:SUB W). Si se
cambia el ajuste de la salida posterior a
REAR SP :SUB W, se podrá conectar el cable
de altavoces traseros directamente al altavoz
de subgraves sin necesidad de usar un amplificador auxiliar.
Inicialmente, la unidad está ajustada para una
conexión de altavoces traseros de toda la
gama (REAR SP :FULL). Cuando se conectan
las salidas posteriores a altavoces de toda la
gama (cuando se selecciona REAR SP :FULL),
se puede conectar la salida RCA de subgraves
a un altavoz de subgraves. En este caso,
puede optar por usar la función
PREOUT:SUB W incorporada (fase del filtro
de paso bajo) del controlador de subgraves o
la función PREOUT :REAR auxiliar.
1 Utilice MULTI-CONTROL para seleccionar SW CONTROL en el menú de ajustes iniciales.
Consulte Configuración de los ajustes iniciales
en la página anterior.
2 Presione MULTI-CONTROL para mostrar
el modo de ajuste.
# Presione DISP/BACK/SCRL para volver a la vi-
sualización anterior.
66
Es
<YRD5269-A
S>66
Page 67

/
Ajustes iniciales
Black plate (67,1)
Sección
04
3 Utilice MULTI-CONTROL para seleccionar el ajuste deseado.
Presiónelo para cambiar el segmento que
quiera configurar entre izquierda y derecha.
Gire el control para cambiar el ajuste de cada
segmento.
Segmento izquierdo
REAR SP
(ajuste de los altavoces traseros)
PREOUT
(ajuste de salida RCA)
# Si selecciona REAR SP :SUB W, no podrá con-
figurar PREOUT (ajuste de salida RCA).
Notas
! Aunque cambie este ajuste, no se producirá
ningún sonido a menos que active la salida
de subgraves (consulte Uso de la salida de
subgraves en la página 62).
! Si cambia este ajuste, la salida de subgraves
retomará los ajustes de fábrica en el menú de
audio.
! Las salidas de cables de altavoces traseros y
la salida RCA posterior se cambian simultáneamente en este ajuste.
Segmento derecho
FULL (altavoz de
toda la gama)
SUB W (subgraves)
SUB W (subgraves)
REAR (altavoz de
toda la gama)
1 Utilice MULTI-CONTROL para seleccionar EVER SCROLL en el menú de ajustes iniciales.
Consulte Configuración de los ajustes iniciales
en la página 65.
2 Presione MULTI-CONTROL para activar
la función de desplazamiento continuo.
# Para desactivar la función de desplazamiento
continuo, vuelva a presionar
MULTI-CONTROL.
Español
Cambio del
desplazamiento continuo
Si la función de desplazamiento continuo está
activada (ON), la información de texto grabada
se desplaza de manera ininterrumpida. Desactive la función (OFF) si desea que la información se desplace una sola vez.
<YRD5269-A
S>67
67
Es
Page 68

/
Sección
05
Black plate (68,1)
Otras funciones
Uso de la fuente AUX
Puede conectar un dispositivo auxiliar a esta
unidad utilizando un cable miniconector estéreo.
% Inserte el miniconector estéreo en el conector de entrada de esta unidad.
Para obtener más información, consulte Unidad principal en la página 43.
Selección de AUX como fuente
% Presione SRC/OFF para seleccionar AUX
como fuente.
# Si el ajuste auxiliar no está activado, no es posible seleccionar AUX. Para obtener más información, consulte Cambio del ajuste de un
dispositivo auxiliar en la página 66.
Activación y desactivación
de la visualización del reloj
Se puede activar y desactivar la visualización
del reloj.
! Aunque las fuentes estén apagadas, la vi-
sualización del reloj aparece en el display.
% Mantenga presionado CLOCK/
DISP OFF.
Cada vez que se mantiene presionado CLOCK/
DISP OFF, se activa o desactiva la indicación
del display y la iluminación de los botones.
# Cuando el indicador de display está apagado,
se ilumina el botón CLOCK/DISP OFF.
# Aunque el indicador de display esté apagado,
pueden realizarse operaciones. Si se realiza una
operación mientras el indicador de display está
apagado, el display se iluminará durante unos segundos y después volverá a apagarse.
% Presione CLOCK/DISP OFF para activar
o desactivar la visualización del reloj.
Cada vez que se presiona CLOCK/DISP OFF,
se activa o desactiva la visualización del reloj.
# La visualización del reloj desaparece momentáneamente cuando se utilizan otras funciones,
pero vuelve a aparecer después de 25
segundos.
Cambio de la indicación del
display y la iluminación de
los botones
La indicación del display y la iluminación de
los botones se pueden activar o desactivar.
68
Es
<YRD5269-A
S>68
Page 69

/
Información adicional
Black plate (69,1)
Apéndice
Mensajes de error
Cuando contacte con su proveedor o con el
Servicio Técnico Oficial de Pioneer más cercano, asegúrese de haber anotado el mensaje de
error.
! La tarjeta de memoria SD sólo está disponi-
ble en DEH-4150SD.
Reproductor de CD incorporado
Mensaje Causa Acción
ERROR-11, 12,
17, 30
ERROR-10, 11,
12, 15, 17, 30,
A0
ERROR-15 El disco inser-
ERROR-22, 23 No se puede re-
NO AUDIO El disco que se
SKIPPED El disco que se
PROTECT Todos los archi-
Disco sucio Limpie el disco.
Disco rayado Reemplace el
Problema eléctrico o mecánico
tado no contiene
datos
producir el formato del CD
ha colocado no
contiene archivos que se puedan reproducir
ha colocado contiene archivos
WMA protegidos
con DRM
vos del disco
están protegidos
con DRM
disco.
Cambie la llave de
encendido del
automóvil a la posición de desactivación y luego pase
de nuevo a activación, o cambie a
una fuente diferente, y después vuelva a activar el
reproductor de CD.
Reemplace el
disco.
Reemplace el
disco.
Reemplace el
disco.
Reemplace el
disco.
Reemplace el
disco.
Dispositivo de almacenamiento externo
(USB, SD)
Mensaje Causa Acción
NO AUDIO No hay cancio-
nes
La memoria USB
está conectada
con la seguridad
activada
NO DEVICE El dispositivo de
almacenamiento
USB o el iPod no
está conectado
al puerto USB de
esta unidad.
SKIPPED El dispositivo de
almacenamiento
externo conectado contiene archivos WMA
protegidos con
Windows
Media™ DRM 9/
10
PROTECT Todos los archi-
vos del dispositivo de
almacenamiento
externo están
protegidos con
Windows Media
DRM 9/10
N/A USB El dispositivo de
almacenamiento
USB conectado
no es compatible
con esta unidad.
Transfiera archivos
de audio al dispositivo de almacenamiento externo y
conéctelo.
Para desactivar la
seguridad, siga las
instrucciones de la
memoria USB.
Conecte un dispositivo de almacenamiento USB
compatible.
Reproduzca un archivo de audio que
no esté protegido
con Windows
Media DRM 9/10.
Transfiera archivos
de audio no protegidos con
Windows Media
DRM 9/10 al dispositivo de almacenamiento externo y
conéctelo.
Conecte un dispositivo de almacenamiento USB que
sea compatible
con la clase de almacenamiento
masivo USB.
Español
<YRD5269-A
S>69
69
Es
Page 70

/
Apéndice
Black plate (70,1)
Información adicional
El conector USB
CHECK USB
CHECK SD Sobrecorriente
ERROR-19 Fallo de comuni-
ERROR-23 El dispositivo de
o el cable USB
está cortocircuitado.
El dispositivo de
almacenamiento
USB conectado
consume más de
500 mA (corriente máxima permitida).
en la tarjeta de
memoria SD
Fallo de comunicación
cación
almacenamiento
externo no está
formateado con
FAT16 o FAT32
Verifique que no
esté enganchado
en algo ni dañado
el conector USB o
el cable USB.
Desconecte el dispositivo de almacenamiento USB y
no lo utilice. Cambie la llave de encendido del
automóvil a la posición de desactivación, luego a ACC
o activación y, a
continuación, conecte el dispositivo
de almacenamiento USB compatible.
Expulse la tarjeta
de memoria SD e
insértela de nuevo.
Expulse la tarjeta
de memoria SD e
insértela de nuevo.
Realice una de las
siguientes operaciones.
–Cambie la llave de
encendido del
automóvil a la posición de desactivación y luego pase
de nuevo a activación.
–Desconecte o expulse el dispositivo
de almacenamiento externo.
–Cambie a una
fuente diferente.
Después, vuelva a
la fuente SD o al
USB.
El dispositivo de almacenamiento externo debe
formatearse con
FAT16 o FAT32.
iPod
Mensaje Causa Acción
ERROR-19 Fallo de comuni-
N/A USB Versión de iPod
ERROR-16 Versión de iPod
ERROR-A1
CHECK USB
NO SONGS No hay cancio-
STOP No hay cancio-
cación
Fallo del iPod Desconecte el
antigua
Fallo del iPod Reinicie el iPod.
antigua
Fallo del iPod Desconecte el
El iPod no está
cargado pero
funciona correctamente
nes
nes en la lista actual
Desconecte el
cable del iPod. Una
vez que aparezca el
menú principal del
iPod, conecte el
cable nuevamente.
Reinicie el iPod.
cable del iPod. Una
vez que aparezca el
menú principal del
iPod, conecte el
cable nuevamente.
Reinicie el iPod.
Actualice la versión del iPod.
Actualice la versión del iPod.
cable del iPod. Una
vez que aparezca el
menú principal del
iPod, conecte el
cable nuevamente.
Reinicie el iPod.
Compruebe que el
cable de conexión
del iPod no esté
cortocircuitado (p.
ej., atrapado entre
objetos metálicos).
Una vez confirmado, cambie la llave
de encendido del
automóvil a la posición de desactivación y luego pase
de nuevo a activación; o bien desconecte una vez el
iPod y conéctelo de
nuevo.
Transfiera canciones al iPod.
Seleccione una
lista que contenga
canciones.
70
Es
<YRD5269-A
S>70
Page 71

/
Información adicional
Black plate (71,1)
Apéndice
NO DEVICE
El dispositivo de
almacenamiento
USB o el iPod no
está conectado
al puerto USB de
esta unidad.
Conecte un iPod
compatible.
Pautas para el manejo de
discos y del reproductor
! Use únicamente discos que tengan uno de
los siguientes dos logotipos.
! Utilice sólo discos convencionales y com-
pletamente circulares. No use discos con
formas irregulares.
! Utilice un CD de 12 cm u 8 cm. No utilice
un adaptador cuando reproduzca un CD de
8 cm.
! No coloque ningún otro elemento que no
sea un CD en la ranura de carga de CD.
! No use discos rajados, rotos, deformados o
dañados de otro modo, ya que pueden causar daños al reproductor.
! No es posible reproducir discos CD-R/CD-
RW no finalizados.
! No toque la superficie grabada de los dis-
cos.
! Almacene los discos en sus cajas cuando
no los utilice.
! Evite dejar discos en ambientes excesiva-
mente calientes o expuestos a la luz solar
directa.
! No fije etiquetas, no escriba ni aplique sus-
tancias químicas en la superficie de los
discos.
! Para limpiar un CD, pásele un paño suave
desde el centro hacia afuera.
! La condensación puede afectar temporal-
mente al rendimiento del reproductor. Deje
que se adapte a la temperatura más cálida
durante aproximadamente una hora. Además, si los discos tienen humedad, séquelos con un paño suave.
! Quizás no pueda reproducir algunos discos
debido a sus características, formato, aplicación grabada, entorno de reproducción,
condiciones de almacenamiento u otras
causas.
! Las vibraciones en las carreteras pueden
interrumpir la reproducción de un disco.
! Lea las advertencias de los discos antes de
utilizarlos.
Discos dobles
! Los discos dobles son discos de dos caras
que incluyen CD grabable de audio en una
cara y DVD grabable de vídeo en la otra
cara.
! Debido a que la cara CD de los discos do-
bles no es físicamente compatible con el
estándar CD general, es posible que no se
pueda reproducir la cara CD en esta unidad.
! La carga y expulsión frecuente de un disco
doble puede rayar el disco. Los rayones graves pueden producir problemas de repro ducción en esta unidad. En algunos casos,
un disco doble puede atascarse en la ranura de carga del disco y no se expulsará.
Para evitarlo, recomendamos que no utilice
un disco doble en esta unidad.
! Consulte la información del fabricante del
disco para obtener más información sobre
los discos dobles.
Español
<YRD5269-A
S>71
71
Es
Page 72

/
Apéndice
Black plate (72,1)
Información adicional
Pautas para el manejo del
dispositivo de
almacenamiento externo
(USB, SD) y para esta unidad
La tarjeta de memoria SD sólo está disponible
en DEH-4150SD.
! Es posible que esta unidad no ofrezca un
rendimiento óptimo según el dispositivo de
almacenamiento externo conectado (USB,
SD).
! No deje el dispositivo de almacenamiento
externo (USB, SD) en lugares expuestos a
altas temperaturas.
! Dependiendo del tipo de dispositivo de al-
macenamiento externo utilizado (USB, SD),
es posible que esta unidad no reconozca el
dispositivo de almacenamiento o que no se
reproduzca el archivo de manera adecuada.
! Las operaciones pueden variar según el
tipo de dispositivo de almacenamiento externo (USB, SD).
Dispositivo de almacenamiento
USB
! La unidad puede reproducir archivos de
una reproductor de audio portátil USB/memoria USB que cumpla con la clase de almacenamiento masivo USB.
! No puede conectar un dispositivo de alma-
cenamiento USB a esta unidad a través de
un concentrador USB.
! No conecte al puerto USB ningún dispositi-
vo diferente al de almacenamiento USB.
! Fije bien el dispositivo de almacenamiento
USB mientras conduce. No deje caer el dispositivo de almacenamiento USB al suelo,
ya que puede quedar atascado debajo del
freno o del acelerador.
! Un dispositivo de almacenamiento USB
particionado no es compatible con esta
unidad.
! En función del dispositivo de almacena-
miento USB conectado a esta unidad, se
puede generar ruido en la radio.
Tarjeta de memoria SD
! Esta unidad sólo admite las siguientes tar-
jetas de memoria SD.
— SD
— miniSD
— microSD
— SDHC
! Mantenga la tarjeta de memoria SD fuera
del alcance de los niños. En caso de ingestión accidental de la tarjeta de memoria
SD, consulte a un médico de inmediato.
! No toque los conectores de la tarjeta de
memoria SD directamente con los dedos o
con cualquier objeto metálico.
! En la ranura para la tarjeta SD no inserte
nada aparte de la tarjeta de memoria SD.
Si se introduce un objeto metálico (p. e.j.,
una moneda) en la ranura, puede que los
circuitos internos se estropeen y se produzcan fallos de funcionamiento en la unidad.
! Cuando introduzca un tarjeta miniSD o mi-
croSD, utilice un adaptador. No utilice un
adaptador con piezas metálicas aparte de
los conectores expuestos.
! No inserte una tarjeta de memoria SD da-
ñada (p. e.j., con deterioros en la propia tarjeta o en la etiqueta), ya que puede tener
problemas para la posterior expulsión de la
ranura.
! No intente forzar la tarjeta de memoria SD
en la ranura para la tarjeta SD ya que la tarjeta o la unidad podrían dañarse.
! Cuando expulse una tarjeta de memoria
SD, manténgala presionada hasta que escuche un clic. Es peligroso presionar la tarjeta de memoria SD y soltar de inmediato,
ya que la tarjeta SD podría dispararse fuera
de la ranura y herirle en la cara, etc. Si la
tarjeta de memoria SD es expulsada bruscamente de la ranura, puede que se
pierda.
72
Es
<YRD5269-A
S>72
Page 73

Información adicional
Black plate (73,1)
Apéndice
Compatibilidad con audio
comprimido (disco, USB, SD)
La tarjeta de memoria SD sólo está disponible
en DEH-4150SD.
WMA
! Formato compatible: WMA codificado con
Windows Media Player
! Extensión de archivo: .wma
! Velocidad de grabación: 48 kbps a 320 kbps
(CBR), 48 kbps a 384 kbps (VBR)
! Frecuencia de muestreo: 32 kHz a 48 kHz
! Windows Media Audio 9 Professional, Loss-
less, Voice: no
MP3
! Extensión de archivo: .mp3
! Velocidad de grabación: 8 kbps a 320 kbps
(CBR, VBR)
! Frecuencia de muestreo: 16 kHz a 48 kHz
(32; 44,1; 48 kHz para énfasis)
! Versiones de etiqueta ID3 compatibles: 1.0,
1.1, 2.2, 2.3, 2.4 (la etiqueta ID3 Versión 2.x
tiene prioridad sobre la Versión 1.x)
! Lista de reproducción M3u: no
! MP3i (MP3 interactivo), mp3 PRO: no
AAC
! Formato compatible: AAC codificado con
iTunes
! Extensión de archivo: .m4a
! Velocidad de transmisión: 16 kbps a 320
kbps (CBR)
! Frecuencia de muestreo: 11,025 kHz a 48
kHz
! Apple Lossless: no
WAV
! Formato compatible: PCM lineal (LPCM),
MS ADPCM
! Extensión de archivo: .wav
! Bits de cuantificación: 8 y 16 (LPCM), 4
(MS ADPCM)
! Frecuencia de muestreo: 16 kHz a 48 kHz
(LPCM), 22,05 kHz a 44,1 kHz (MS ADPCM)
Información suplementaria de
audio comprimido (disco, USB, SD)
! La reproducción de archivos de audio codi-
ficados con datos de imagen puede tardar
varios minutos en comenzar.
! Las extensiones de archivo se deben utili-
zar adecuadamente.
! Se pueden visualizar sólo 32 caracteres
desde el principio como nombre de archivo
(incluida la extensión) o nombre de carpeta.
! Es posible que la información de texto de
algunos archivos de audio no se visualice
correctamente.
Archivos de audio
comprimido en el disco
! Conforme con ISO 9660 Nivel 1 y 2. Los sis-
temas de archivo Romeo y Joliet son compatibles con este reproductor.
! Es posible la reproducción multi-sesión.
! Los archivos de audio comprimido no son
compatibles con la transferencia de datos
en formato Packet Write.
! Independientemente de la longitud de la
sección en blanco que haya entre las canciones de la grabación original, los discos
de audio comprimido se reproducirán con
una breve pausa entre canciones.
Archivos de audio
comprimido en el dispositivo
de almacenamiento externo
(USB, SD)
La tarjeta de memoria SD sólo está disponible
en DEH-4150SD.
Para obtener información sobre la compatibilidad del dispositivo de almacenamiento USB,
consulte Especificaciones en la página 77.
Español
<
YRD5269-A/S>73
73
Es
Page 74

1
2
5
6
Apéndice
Black plate (74,1)
Información adicional
Para obtener información sobre la compatibilidad de la tarjeta de memoria SD, consulte Es-
pecificaciones en la página 77.
! Los archivos protegidos mediante derechos
de autor no se pueden reproducir.
! Puede producirse cierto retraso al iniciar la
reproducción de los archivos de audio en
un dispositivo de almacenamiento externo
(USB, SD) con numerosas jerarquías de
carpetas.
! No existe compatibilidad con las tarjetas
multimedia (MMC).
! No se garantiza la compatibilidad con
todas las tarjetas de memoria SD.
! Esta unidad no es compatible con SD-
Audio.
Ejemplo de una jerarquía y de
secuencias de reproducción
La tarjeta de memoria SD sólo está disponible
en DEH-4150SD.
: Carpeta
: Archivo de audio comprimido
3
4
Nivel 1 Nivel 2 Nivel 3 Nivel 4
Secuencia de archivos de audio
en el disco
! Esta unidad asigna los números de carpe-
tas. El usuario no puede asignarlos.
! La secuencia de selección de carpetas u
otras operaciones pueden cambiar, depen-
diendo del software de codificación o escritura.
! Se permite una jerarquía de carpetas de
hasta ocho niveles. Sin embargo, la jerarquía práctica de carpetas es de menos de
dos niveles.
! Es posible reproducir hasta 99 carpetas en
un disco.
Secuencia de archivos de audio en
el dispositivo de almacenamiento
externo (USB, SD)
Para los reproductores de audio portátiles USB,
la secuencia es diferente de la hallada en otros
dispositivos de almacenamiento externo y depende del tipo de reproductor.
! 01 a 05 representan los números de carpe-
ta asignados. 1 a 6 representan la secuencia de reproducción. El usuario no
puede asignar números de carpeta ni especificar la secuencia de reproducción con
esta unidad.
! La secuencia de reproducción de los archi-
vos de audio es la misma que la secuencia
grabada en el dispositivo de almacenamiento externo (USB, SD).
! Para especificar la secuencia de reproduc-
ción, se recomienda el siguiente método.
1 Cree el nombre del archivo incluyendo nú-
meros que especifiquen la secuencia de
reproducción (p. ej., 001xxx.mp3 y
099yyy.mp3).
2 Coloque esos archivos en una carpeta.
3 Grabe la carpeta que contiene los archivos
en el dispositivo de almacenamiento exter-
no (USB, SD).
Sin embargo, dependiendo del entorno del
sistema, tal vez no pueda especificar la secuencia de reproducción de los archivos.
! Se pueden reproducir hasta 15 000 archivos
en un dispositivo de almacenamiento externo (USB, SD).
! Se pueden reproducir hasta 500 carpetas
en un dispositivo de almacenamiento externo (USB, SD).
74
Es
<
YRD5269-A/S>74
Page 75

Información adicional
Black plate (75,1)
Apéndice
! Se puede reproducir un directorio de hasta
ocho niveles en un dispositivo de almacenamiento externo (USB, SD).
iPod
Compatibilidad con iPod
! Esta unidad sólo es compatible con los si-
guientes modelos de iPod. Las versiones
compatibles del software iPod se muestran
abajo. Es posible que las versiones más
antiguas no sean compatibles.
— iPod nano de primera generación (soft-
ware versión 1.3.1)
— iPod nano de segunda generación (soft-
ware versión 1.1.3)
— iPod nano de tercera generación (soft-
ware versión 1.1.2)
— iPod de quinta generación (software ver-
sión 1.3.0)
— iPod classic (software versión 1.1.2)
— iPod touch (software versión 2.0)
— iPhone 3 G (software versión 2.0)
! Las funciones pueden variar según la ver-
sión de software del iPod.
! Cuando utiliza un iPod, se requiere un co-
nector del Dock del iPod para el cable
USB.
! El cable de la interfaz CD-IU50 de Pioneer
también está disponible. Para obtener información, consulte a su proveedor.
! Fije bien el iPod cuando conduzca. No deje
caer el iPod al suelo, ya que puede quedar
atascado debajo del freno o del acelerador.
! Consulte los manuales del iPod para más
información.
Acerca de los ajustes del iPod
! Cuando el iPod está conectado, esta uni-
dad cambia el ajuste EQ (ecualizador) del
iPod a Flat (Neutro) para mejorar la acústica. Cuando desconecta el iPod, el EQ se
restablece a su valor original.
! No puede desactivar la Repetición del iPod
cuando utiliza esta unidad. Aunque la desactive, se cambiará automáticamente a
Todo cuando conecte el iPod a la
unidad.
Aviso de copyright y
marcas registradas
La tarjeta de memoria SD sólo está disponible
en DEH-4150SD.
WMA
Español
Acerca del manejo del iPod
! No deje el iPod expuesto a la luz solar di-
recta durante un largo periodo de tiempo.
La exposición prolongada a la luz solar
puede causar un fallo de funcionamiento
del iPod como consecuencia de las altas
temperaturas generadas.
! No exponga el iPod a altas temperaturas.
! Conecte directamente el cable conector del
Dock al iPod para que esta unidad funcione adecuadamente.
Windows Media y el logotipo de Windows son
marcas comerciales o registradas de
Microsoft Corporation en los EE.UU. y/o en
otros países.
Este producto incorpora tecnología propiedad
de Microsoft Corporation y no puede utilizarse
ni distribuirse sin una licencia de Microsoft
Licensing, Inc.
Es
<
YRD5269-A/S>75
75
Page 76

/
Apéndice
Black plate (76,1)
Información adicional
MP3
La venta de este producto sólo otorga una licencia para su uso privado, no comercial. No
otorga ninguna licencia ni concede ningún
derecho a utilizar este producto en transmisiones comerciales (es decir, lucrativas) en tiempo real (terrestres, vía satélite, por cable y/o
por cualquier otro medio), transmisiones/
streaming por Internet, intranets y/u otras
redes o en otros sistemas de distribución de
contenido electrónico, como por ejemplo, aplicaciones de pago por escucha (pay-audio) o
audio bajo demanda (audio-on-demand). Se
necesita una licencia independiente para su
uso comercial. Para obtener más información,
visite
http://www.mp3licensing.com.
iTunes
iTunes es una marca comercial de Apple Inc.,
registrada en los EE.UU. y en otros países.
Tarjeta de memoria SD
El logotipo SD es una marca comercial.
El logotipo SDHC es una marca comercial.
iPod
iPod es una marca comercial de Apple Inc., registrada en los EE.UU. y en otros países.
iPhone
iPhone es una marca comercial de Apple
Inc.
El logotipo miniSD es una marca comercial.
El logotipo microSD es una marca comercial.
76
Es
<YRD5269-A
S>76
Page 77

/
Información adicional
Black plate (77,1)
Apéndice
Especificaciones
General
Fuente de alimentación nominal
..................................................... 14,4 V CC
(gama de tensión permisible: 12,0 V a 14,4 V CC)
Sistema de conexión a tierra
..................................................... Tipo negativo
Consumo máximo de corriente
..................................................... 10,0 A
Dimensiones (An × Al × Pr):
DIN
Bastidor .................... 178 mm × 50 mm × 162
mm
Cara anterior .......... 188 mm × 58 mm × 24 mm
D
Bastidor .................... 178 mm × 50 mm × 162
mm
Cara anterior .......... 170 mm × 46 mm × 24 mm
Peso ............................................... 1,3 kg
Audio
Potencia de salida máxima
..................................................... 50 W × 4
50 W × 2/4 W + 70 W × 1/2
W (para altavoz de subgraves)
Potencia de salida continua
..................................................... 22 W × 4 (50 a 15 000 Hz,
5% THD, 4 W de carga,
ambos canales activados)
Impedancia de carga ............. 4 W a8W ×4
4 W a8W ×2+2W ×1
Nivel de salida máx. del preamplificador (Pre-out)
..................................................... 2,2 V
Ecualizador (ecualizador paramétrico de 3 bandas):
Baja
Frecuencia .............. 40/80/100/160 Hz
Factor Q .................... 0,35/0,59/0,95/1,15 (+6 dB
si intensificado)
Ganancia ................. ±12 dB
Media
Frecuencia .............. 200/500/1k/2k Hz
Factor Q .................... 0,35/0,59/0,95/1,15 (+6 dB
si intensificado)
Ganancia ................. ±12 dB
Alta
Frecuencia .............. 3,15k/8k/10k/12,5k Hz
Factor Q .................... 0,35/0,59/0,95/1,15 (+6 dB
si intensificado)
Ganancia ................. ±12 dB
HPF:
Frecuencia ........................ 50/63/80/100/125 Hz
Pendiente .......................... –12 dB/oct
Altavoz de subgraves (mono):
Frecuencia ........................ 50/63/80/100/125 Hz
Pendiente .......................... –18 dB/oct
Ganancia ........................... +6 dB a –24 dB
Fase ...................................... Normal/Inversa
Intensificación de graves:
Ganancia ........................... +12 dB a 0 dB
Reproductor de CD
Sistema ........................................ Sistema de audio de discos
compactos
Discos utilizables .................... Disco compacto
Relación de señal a ruido .... 94 dB (1 kHz) (red IEC-A)
Número de canales ................ 2 (estéreo)
Formato de decodificación MP3
..................................................... MPEG-1 & 2 Audio Layer 3
Formato de decodificación WMA
..................................................... Ver. 7, 7.1, 8, 9, 10, 11 (audio
2 canales)
(Windows Media Player)
Formato de decodificación AAC
..................................................... MPEG-4 AAC (solo codifica-
do con iTunes) (.m4a)
(Ver. 7,7 y anteriores)
Formato de señal WAV ......... PCM lineal & MS ADPCM
(No comprimido)
USB
Especificación de la norma USB
..................................................... USB 2.0 velocidad máxima
Corriente máxima suministrada
..................................................... 500 mA
Capacidad máxima de memoria
..................................................... 250 GB
Capacidad mínima de memoria
..................................................... 256 MB
Sistema de archivos ............... FAT16, FAT32
Formato de decodificación MP3
..................................................... MPEG-1 & 2 Audio Layer 3
Formato de decodificación WMA
..................................................... Ver. 7, 7.1, 8, 9, 10, 11 (audio
2 canales)
(Windows Media Player)
Formato de decodificación AAC
..................................................... MPEG-4 AAC (solo codifica-
do con iTunes) (.m4a)
(Ver. 7,7 y anteriores)
Formato de señal WAV ......... PCM lineal & MS ADPCM
(No comprimido)
SD
Formato físico compatible
..................................................... Versión 2.00
Español
<YRD5269-A
S>77
77
Es
Page 78

/
Apéndice
Información adicional
Capacidad máxima de memoria
..................................................... 16 GB (para SD y SDHC)
Capacidad mínima de memoria
..................................................... 256 MB
Sistema de archivos ............... FAT16, FAT32
Formato de decodificación MP3
..................................................... MPEG-1 & 2 Audio Layer 3
Formato de decodificación WMA
..................................................... Ver. 7, 7.1, 8, 9, 10, 11 (audio
2 canales)
(Windows Media Player)
Formato de decodificación AAC
..................................................... MPEG-4 AAC (solo codifica-
do con iTunes) (.m4a)
(Ver. 7,7 y anteriores)
Formato de señal WAV ......... PCM lineal & MS ADPCM
(No comprimido)
Sintonizador de FM
Gama de frecuencias ............ 87,5 MHz a 108,0 MHz
Sensibilidad utilizable ........... 9 dBf (0,7 µV/75 W, mono,
Señal/ruido: 30 dB)
Relación de señal a ruido .... 72 dB (red IEC-A)
Black plate (78,1)
Sintonizador de AM
Gama de frecuencias ............ 531 kHz a 1 602 kHz (9 kHz)
Sensibilidad utilizable ........... 25 µV (Señal/ruido: 20 dB)
Relación de señal a ruido .... 62 dB (red IEC-A)
530 kHz a 1640 kHz (10 kHz)
Notas
! La tarjeta de memoria SD sólo está disponible
en DEH-4150SD.
! Las especificaciones y el diseño están sujetos
a posibles modificaciones, para incorporar
mejoras, sin previo aviso.
78
Es
<YRD5269-A
S>78
Page 79

Black plate (79,1)
/
Español
<YRD5269-A
S>79
79
Es
Page 80

Black plate (114,1)
/
٣٣
Ar
<YRD5269-A
S>80
Page 81

Black plate (113,1)
/
ﺃﻭﻡ،ﺃﺣﺎﺩﻱﺍﻟﺼﻮﺕ،ﻧﺴﺒﺔﺍﻹﺷﺎﺭﺓﺇﻟﻰ
ﺍﻟﻀﻮﺿﺎﺀ:٣٠ﺩﻳﺴﻴﺒﻞ(
ﻫـ(
ﻣﻦ٥٣٠ﻙﻫـﺇﻟﻰ١٦٤٠ﻙﻫـ)١٠
ﻙﻫـ(
ﺍﻟﻀﻮﺿﺎﺀ:٢٠ﺩﻳﺴﻴﺒﻞ(
ﺍﻟﻤﻠﺤﻘﺎﺕ
ﻣﻌﻠﻮﻣﺎﺕﺇﺿﺎﻓﻴﺔ
ﻣﻮﺍﻟﻒFM
ﻧﻄﺎﻕﺍﻟﺘﺮﺩﺩﺍﺕ..................................ﻣﻦ٨٧٫٥ﻡﻫـﺇﻟﻰ١٠٨٫٠ﻡﻫـ
ﺍﻟﺤﺴﺎﺳﻴﺔﺍﻟﻘﺎﺑﻠﺔﻟﻼﺳﺘﻌﻤﺎﻝ.................٩ﺩﻳﺴﻴﺒﻞﻑ)٠٫٧ﻣﺎﻳﻜﺮﻭﻓﻮﻟﺖ/٧٥
ﻧﺴﺒﺔﺍﻹﺷﺎﺭﺓﺇﻟﻰﺍﻟﻀﻮﺿﺎﺀ...............٧٢ﺩﻳﺴﻴﺒﻞ)ﺷﺒﻜﺔIEC-A(
ﻣﻮﺍﻟﻒAM
ﻧﻄﺎﻕﺍﻟﺘﺮﺩﺩﺍﺕ..................................ﻣﻦ٥٣١ﻙﻫـﺇﻟﻰ١٦٠٢ﻙﻫـ)٩ﻙ
ﺍﻟﺤﺴﺎﺳﻴﺔﺍﻟﻘﺎﺑﻠﺔﻟﻺﺳﺘﻌﻤﺎﻝ.................٢٥ﻣﺎﻳﻜﺮﻭﻓﻮﻟﺖ)ﻧﺴﺒﺔﺍﻹﺷﺎﺭﺓﺇﻟﻰ
ﻧﺴﺒﺔﺍﻹﺷﺎﺭﺓﺇﻟﻰﺍﻟﻀﻮﺿﺎﺀ...............٦٢ﺩﻳﺴﻴﺒﻞ)ﺷﺒﻜﺔIEC-A(
ﻣﻼﺣﻈﺎﺕ
ﺍﻟﻌﺮﺑﻴﺔ
!ﺑﻄﺎﻗﺔﺍﻟﺬﺍﻛﺮﺓSDﻣﺘﺎﺣﺔﻓﻘﻂﻣﻊﺍﻟﻤﻮﺩﻳﻞDEH-4150SD.
!ﺍﻟﻤﻮﺍﺻﻔﺎﺕﻭﺍﻟﺘﺼﻤﻴﻢﻋﺮﺿﺔﻟﻠﺘﻌﺪﻳﻞﺑﺪﻭﻥﺇﺷﻌﺎﺭﺑﺴﺒﺐ
ﺍﻟﺘﺤﺴﻴﻨﺎﺕ.
<YRD5269-A
S>81
٣٢
Ar
Page 82

Black plate (112,1)
/
ﺍﻟﻤﻠﺤﻘﺎﺕ
ﻣﻌﻠﻮﻣﺎﺕﺇﺿﺎﻓﻴﺔ
ﺗﻌﺰﻳﺰﺍﻟﺠﻬﻴﺮ:
ﺍﻟﻜﺴﺐ.....................................ﻣﻦ+١٢ﺩﻳﺴﻴﺒﻞﺇﻟﻰﺻﻔﺮﺩﻳﺴﻴﺒﻞ
ﻣﺸﻐّﻞﺍﻻﺳﻄﻮﺍﻧﺎﺕCD
ﺍﻟﻨﻈﺎﻡ................................................ﻧﻈﺎﻡﺍﺳﻄﻮﺍﻧﺔﻣﺤﻜﻤﺔﺻﻮﺗﻴﺔ
ﺍﻻﺳﻄﻮﺍﻧﺎﺕﺍﻟﻘﺎﺑﻠﺔﻟﻺﺳﺘﻌﻤﺎﻝ.............ﺍﺳﻄﻮﺍﻧﺔﻣﺤﻜﻤﺔ
ﻧﺴﺒﺔﺍﻹﺷﺎﺭﺓﺇﻟﻰﺍﻟﻀﻮﺿﺎﺀ...............٩٤ﺩﻳﺴﻴﺒﻞ)١ﻙﻫﺮﺗﺰ()ﺷﺒﻜﺔ
IEC-A(
ﻋﺪﺩﺍﻟﻘﻨﻮﺍﺕ......................................٢)ﺳﺘﻴﺮﻳﻮ(
ﺻﻴﻐﺔﺗﺤﻠﻴﻞﺭﻣﻮﺯMP3.................MPEG-1 & 2 Audio Layer 3
ﺻﻴﻐﺔﺗﺸﻔﻴﺮWMA........................ﺍﻹﺻﺪﺍﺭﺍﺕ٧ﻭ٧٫١ﻭ٨ﻭ٩ﻭ١٠ﻭ
١١)ﻗﻨﺎﺗﺎﻥﺻﻮﺗﻴﺘﺎﻥ(
)Windows Media Player(
ﺻﻴﻐﺔﺗﺤﻠﻴﻞﺭﻣﻮﺯAAC.................MPEG-4 AAC)ﺗﺸﻔﻴﺮiTunes
ﻓﻘﻂ()m4a.(
)Ve r.٧٫٧ﻭﺃﺣﺪﺙ(
ﺻﻴﻐﺔﺇﺷﺎﺭﺓWAV..........................ﺗﻀﻤﻴﻦﺍﻟﺮﻣﺰﺍﻟﻨﺒﻀﻲﺍﻟﺨﻄّﻲPCM
ﻭMS ADPCM
)ﻏﻴﺮ-ﻣﻀﻐﻮﻁ(
USB
ﻤﻮﺍﺻﻔﺎﺕUSBﺍﻟﻘﻴﺎﺳﻴﺔ..................USB 2.0ﺑﺎﻟﺴﺮﻋﺔﺍﻟﻜﺎﻣﻠﺔ
ﺍﻟﺤﺪﺍﻷﻗﺼﻰﻹﻣﺪﺍﺩﺍﻟﺘﻴﺎﺭ..................٥٠٠ﻡﺃ
ﺍﻟﺤﺪﺍﻷﻗﺼﻰﻟﺴﻌﺔﺍﻟﺬﺍﻛﺮﺓ.................٢٥٠ﺝﺏ
ﺍﻟﺤﺪﺍﻷﺩﻧﻰﻟﺴﻌﺔﺍﻟﺬﺍﻛﺮﺓ....................٢٥٦ﻡﺏ
ﻧﻈﺎﻡﺍﻟﻤﻠﻔﺎﺕ......................................FAT16،FAT32
ﺻﻴﻐﺔﺗﺤﻠﻴﻞﺭﻣﻮﺯMP3.................MPEG-1 & 2 Audio Layer 3
ﺻﻴﻐﺔﺗﺸﻔﻴﺮWMA........................ﺍﻹﺻﺪﺍﺭﺍﺕ٧ﻭ٧٫١ﻭ٨ﻭ٩ﻭ١٠ﻭ
١١)ﻗﻨﺎﺗﺎﻥﺻﻮﺗﻴﺘﺎﻥ(
)Windows Media Player(
ﺻﻴﻐﺔﺗﺤﻠﻴﻞﺭﻣﻮﺯAAC.................MPEG-4 AAC)ﺗﺸﻔﻴﺮiTunes
ﻓﻘﻂ()m4a.(
)Ve r.٧٫٧ﻭﺃﺣﺪﺙ(
ﺻﻴﻐﺔﺇﺷﺎﺭﺓWAV..........................ﺗﻀﻤﻴﻦﺍﻟﺮﻣﺰﺍﻟﻨﺒﻀﻲﺍﻟﺨﻄّﻲPCM
ﻭMS ADPCM
)ﻏﻴﺮ-ﻣﻀﻐﻮﻁ(
)ﻣﺪﻯﻧﻄﺎﻕﺍﻟﻔﻮﻟﺘﻴﺔﺍﻟﻤﺴﻤﻮﺡﺑﻪ:١٢٫٠
ﻓﻮﻟﺖﺍﻟﻰﻓﻮﻟﺖ١٤٫٤ﺗﻴﺎﺭﻣﺒﺎﺷﺮ(
٥٠ﻭﺍﺕ×٢/٤ﺃﻭﻡ+٧٠ﻭﺍﺕ×١/٢
ﺃﻭﻡ)ﻟﻤﺠﻬﺎﺭﺍﻟﺘﺮﺩﺩﺍﺕﺍﻟﺨﻔﻴﻀﺔ
ﺍﻟﻔﺮﻋﻲ(
ﻫـ،ﺗﺸﻮﻳﺶﺗﻮﺍﻓﻘﻲﻛﻠﻲ٥٪ﺣﻤﻮﻟﺔ٤
ﺃﻭﻡ،ﻣﻊﺩﻓﻊﻛﻠﺘﻲﺍﻟﻘﻨﺎﺗﻴﻦ(
٤ﺃﻭﻡﺇﻟﻰ٨ﺃﻭﻡ×٢+٢ﺃﻭﻡ×١
.....................................................٢٫٢ﻓﻮﻟﺖ
ﺩﻳﺴﻴﺒﻞﻋﻨﺪﺗﻌﺰﻳﺰﻩ(
SD
ﺍﻟﺘﻮﺍﻓﻖﻣﻊﺍﻟﺼﻴﻐﺔﺍﻟﺤﻘﻴﻘﻴﺔ................ﺇﺻﺪﺍﺭ٢٫٠٠
ﺍﻟﺤﺪﺍﻷﻗﺼﻰﻟﺴﻌﺔﺍﻟﺬﺍﻛﺮﺓ.................١٦ﺝﺏ)ﻟﺒﻄﺎﻗﺎﺕSDﻭSDHC(
ﺍﻟﺤﺪﺍﻷﺩﻧﻰﻟﺴﻌﺔﺍﻟﺬﺍﻛﺮﺓ....................٢٥٦ﻡﺏ
ﻧﻈﺎﻡﺍﻟﻤﻠﻔﺎﺕ......................................FAT16،FAT32
ﺻﻴﻐﺔﺗﺤﻠﻴﻞﺭﻣﻮﺯMP3.................MPEG-1 & 2 Audio Layer 3
ﺻﻴﻐﺔﺗﺸﻔﻴﺮWMA........................ﺍﻹﺻﺪﺍﺭﺍﺕ٧ﻭ٧٫١ﻭ٨ﻭ٩ﻭ١٠ﻭ
١١)ﻗﻨﺎﺗﺎﻥﺻﻮﺗﻴﺘﺎﻥ(
)Windows Media Player(
ﺻﻴﻐﺔﺗﺤﻠﻴﻞﺭﻣﻮﺯAAC.................MPEG-4 AAC)ﺗﺸﻔﻴﺮiTunes
ﻓﻘﻂ()m4a.(
)Ve r.٧٫٧ﻭﺃﺣﺪﺙ(
ﺻﻴﻐﺔﺇﺷﺎﺭﺓWAV..........................ﺗﻀﻤﻴﻦﺍﻟﺮﻣﺰﺍﻟﻨﺒﻀﻲﺍﻟﺨﻄّﻲPCM
ﻭMS ADPCM
)ﻏﻴﺮ-ﻣﻀﻐﻮﻁ(
ﺩﻳﺴﻴﺒﻞﻋﻨﺪﺗﻌﺰﻳﺰﻩ(
ﺩﻳﺴﻴﺒﻞﻋﻨﺪﺗﻌﺰﻳﺰﻩ(
ﺍﻟﻤﻮﺍﺻﻔﺎﺕ
ﻋﺎﻡ
ﻣﺼﺪﺭﺍﻟﻘﺪﺭﺓﺍﻟﻤﻌﺎﻳﺮ.........................١٤٫٤ﻓﻮﻟﺖﺗﻴﺎﺭﻣﺒﺎﺷﺮ
ﻧﻈﺎﻡﺍﻟﺘﺄﺭﻳﺾ...................................ﻃﺮﺍﺯﺳﺎﻟﺐ
ﺍﻟﺤﺪﺍﻷﻗﺼﻰﻹﺳﺘﻬﻼﻙﺍﻟﺘﻴﺎﺭ.............١٠٫٠ﺃﻣﺒﻴﺮ
ﺍﻷﺑﻌﺎﺩ)ﻋﺮﺽ×ﺇﺭﺗﻔﺎﻉ×ﻋﻤﻖ(:
DIN
ﺍﻟﻬﻴﻜﻞ...........................١٧٨ﻣﻢ×٥٠ﻣﻢ×١٦٢ﻣﻢ
ﺍﻟﻤﻘﺪّﻣﺔ..........................١٨٨ﻣﻢ×٥٨ﻣﻢ×٢٤ﻣﻢ
D
ﺍﻟﻬﻴﻜﻞ...........................١٧٨ﻣﻢ×٥٠ﻣﻢ×١٦٢ﻣﻢ
ﺍﻟﻤﻘﺪّﻣﺔ..........................١٧٠ﻣﻢ×٤٦ﻣﻢ×٢٤ﻣﻢ
ﺍﻟﻮﺯﻥ................................................١٫٣ﻛﺠﻢ
ﺍﻟﺼﻮﺕ
ﺧﺮﺝﺍﻟﻘﺪﺭﺓﺍﻟﻤﺴﺘﻤﺮ..........................٥٠ﻭﺍﺕ×٤
ﺧﺮﺝﺍﻟﺘﻴﺎﺭﺍﻟﻤﺴﺘﻤﺮ...........................٢٢ﻭﺍﺕ×٤)ﻣﻦ٥٠ﻫـﺇﻟﻰ١٥٠٠٠
ﻣﻌﺎﻭﻗﺔﺍﻟﺤﻤﻮﻟﺔ..................................ﻣﻦ٤ﺃﻭﻡﺇﻟﻰ٨ﺃﻭﻡ×٤
ﺍﻟﺤﺪﺍﻷﻗﺼﻰﻟﻤﺴﺘﻮﻯﺍﻟﺨﺮﺝﺍﻟﻤﺒﺪﺋﻲ
ﺍﻟﻤﻮﺍﺯﻥ)ﻣﻮﺍﺯﻥﻣﺘﻐﻴّﺮ٣ﺣﺰﻣﺎﺕ(:
ﻣﻨﺨﻔﺾ
ﺍﻟﺘﺮﺩﺩ............................٤٠/٨٠/١٠٠/١٦٠ﻫﺮﺗﺰ
ﺍﻟﻤﻌﺎﻣﻞQ....................٠٫٣٥/٠٫٥٩/٠٫٩٥/١٫١٥)+٦
ﺍﻟﻜﺴﺐ...........................±١٢ﺩﻳﺴﻴﺒﻞ
ﻣﺘﻮﺳﻂ
ﺍﻟﺘﺮﺩﺩ............................٢٠٠/٥٠٠/١ﻙ/٢ﻙﻫﺮﺗﺰ
ﺍﻟﻤﻌﺎﻣﻞQ....................٠٫٣٥/٠٫٥٩/٠٫٩٥/١٫١٥)+٦
ﺍﻟﻜﺴﺐ...........................±١٢ﺩﻳﺴﻴﺒﻞ
ﻣﺮﺗﻔﻊ
ﺍﻟﺘﺮﺩﺩ............................٣٫١٥ﻙ/٨ﻙ/١٠ﻙ/١٢٫٥ﻙﻫﺮﺗﺰ
ﺍﻟﻤﻌﺎﻣﻞQ....................٠٫٣٥/٠٫٥٩/٠٫٩٥/١٫١٥)+٦
ﺍﻟﻜﺴﺐ...........................±١٢ﺩﻳﺴﻴﺒﻞ
HPF:
ﺍﻟﺘﺮﺩﺩ......................................٥٠/٦٣/٨٠/١٠٠/١٢٥ﻫـ
ﻣﻨﺤﻨﻰ.....................................–١٢ﺩﻳﺴﺒﻞ/ﺃﻭﻛﺘﺎﻑ
ﻣﺠﻬﺎﺭﺍﻟﺘﺮﺩﺩﺍﺕﺍﻟﺨﻔﻴﻀﺔﺍﻟﻔﺮﻋﻲ)ﺃﺣﺎﺩﻱﺍﻟﺼﻮﺕ(:
ﺍﻟﺘﺮﺩﺩ......................................٥٠/٦٣/٨٠/١٠٠/١٢٥ﻫـ
ﻣﻨﺤﻨﻰ.....................................–١٨ﺩﻳﺴﺒﻞ/ﺃﻭﻛﺘﺎﻑ
ﺍﻟﻜﺴﺐ.....................................ﻣﻦ+٦ﺩﻳﺴﻴﺒﻞﺇﻟﻰ–٢٤ﺩﻳﺴﻴﺒﻞ
ﺍﻟﻄﻮﺭ.....................................ﻋﺎﺩﻱ/ﻋﻜﺴﻲ
٣١
Ar
<YRD5269-A
S>82
Page 83

Black plate (111,1)
/
ﺍﻟﻤﻠﺤﻘﺎﺕ
ﻣﻌﻠﻮﻣﺎﺕﺇﺿﺎﻓﻴﺔ
iPod
iPodﻫﻲﻋﻼﻣﺔﺗﺠﺎﺭﻳﺔﻟﺸﺮﻛﺔ.Apple Inc،ﻣﺴﺠﻠﺔﻓﻲ
iPhone
iPhoneﻫﻲﻋﻼﻣﺔﺗﺠﺎﺭﻳﺔﻣﺴﺠﻠﺔﻟﺸﺮﻛﺔApple Inc.
MP3
ﺗﻮﺭﻳﺪﻫﺬﺍﺍﻟﻤُﻨﺘﺞﻻﻳﺸﺘﻤﻞﺇﻻﻋﻠﻰﺗﺮﺧﻴﺺﻟﻼﺳﺘﻌﻤﺎﻝﺍﻟﺸﺨﺼﻲ
ﻏﻴﺮﺍﻟﺘﺠﺎﺭﻱﻭﻻﻳﺸﺘﻤﻞﻋﻠﻰﺗﺮﺧﻴﺺﺃﻭﻳﻌﻨﻲﺿﻤﻨﻴًﺎﺃﻱﺣﻖ
ﺑﺎﺳﺘﻌﻤﺎﻝﻫﺬﺍﺍﻟﻤُﻨﺘﺞﻓﻲﺃﻱﺑﺚﺗﺠﺎﺭﻱ)ﺃﻱﻳﺤﻘﻖﺇﻳﺮﺍﺩًﺍ(ﻓﻲ
ﺍﻟﺰﻣﻦﺍﻟﻔﻌﻠﻲ)ﺃﺭﺿﻲ،ﻓﻀﺎﺋﻲ،ﺳﻠﻜﻲﻭ/ﺃﻭﺃﻱﻭﺳﺎﺋﻂﺃﺧﺮﻯ(ﻭﻻ
ﺍﻟﺒﺚ/ﺍﻟﻨﻘﻞﺍﻟﻤﺒﺎﺷﺮﻋﺒﺮﺷﺒﻜﺔﺍﻹﻧﺘﺮﻧﺖ،ﺍﻟﺸﺒﻜﺎﺕﺍﻟﺪﺍﺧﻠﻴﺔﻭ/ﺃﻭ
ﺍﻟﺸﺒﻜﺎﺕﺍﻷﺧﺮﻯﺃﻭﻓﻲﺃﻱﺃﻧﻈﻤﺔﺃﺧﺮﻯﻟﺘﻮﺯﻳﻊﺍﻟﻤﺤﺘﻮﻳﺎﺕ
ﺍﻹﻟﻴﻜﺘﺮﻭﻧﻴﺔ،ﻣﺜﻞﺍﺳﺘﺨﺪﺍﻣﺎﺕﺍﻻﺳﺘﻤﺎﻉﺑﻤﻘﺎﺑﻞﺃﻭﺍﻻﺳﺘﻤﺎﻉﺣﺴﺐ
ﺍﻟﻄﻠﺐ.ﻣﺜﻞﻫﺬﻩﺍﻻﺳﺘﻌﻤﺎﻻﺕﺗﺘﻄﻠﺐﺗﺮﺧﻴﺼًﺎﻣﻨﻔﺼﻼً.ﺑﺨﺼﻮﺹ
iTunes
iTunesﻫﻲﻋﻼﻣﺔﺗﺠﺎﺭﻳﺔﻟﺸﺮﻛﺔ.Apple Inc،ﻣﺴﺠﻠﺔﻓﻲ
ﺍﻟﺘﻔﺎﺻﻴﻞ،ﻳُﺮﺟﻰﺯﻳﺎﺭﺓﺍﻟﻤﻮﻗﻊ
ﺍﻟﻮﻻﻳﺎﺕﺍﻟﻤﺘﺤﺪﺓﻭﺩﻭﻝﺃﺧﺮﻯ.
ﺑﻄﺎﻗﺔﺫﺍﻛﺮﺓSD
ﺍﻟﻌﺮﺑﻴﺔ
ﺷﻌﺎﺭSDﻫﻮﻋﻼﻣﺔﺗﺠﺎﺭﻳﺔ.
ﺷﻌﺎﺭﺑﻄﺎﻗﺔminiSDﻫﻮﻋﻼﻣﺔﺗﺠﺎﺭﻳﺔ.
ﺍﻟﻮﻻﻳﺎﺕﺍﻟﻤﺘﺤﺪﺓﻭﺩﻭﻝﺃﺧﺮﻯ.
http://www.mp3licensing.com.
<YRD5269-A
S>83
ﺷﻌﺎﺭﺑﻄﺎﻗﺔmicroSDﻫﻮﻋﻼﻣﺔﺗﺠﺎﺭﻳﺔ.
ﺷﻌﺎﺭSDHCﻫﻮﻋﻼﻣﺔﺗﺠﺎﺭﻳﺔ.
٣٠
Ar
Page 84

Black plate (110,1)
ﺍﻟﻤﻠﺤﻘﺎﺕ
ﻣﻌﻠﻮﻣﺎﺕﺇﺿﺎﻓﻴﺔ
ﺣﻮﻝﺍﻟﺘﻌﺎﻣﻞﻣﻊﺟﻬﺎﺯiPod
!ﻻﺗﺘﺮﻙﺟﻬﺎﺯiPodﻓﻲﺿﻮﺀﺍﻟﺸﻤﺲﺍﻟﻤﺒﺎﺷﺮﻟﻤﺪﺓﻃﻮﻳﻠﺔ.
ﺍﻟﺘﻌﺮﺽﻟﻀﻮﺀﺍﻟﺸﻤﺲﻟﻔﺘﺮﺍﺕﻃﻮﻳﻠﺔﻳﻤﻜﻦﺃﻥﻳﺆﺩﻱﺇﻟﻰ
ﺇﺻﺎﺑﺔﺟﻬﺎﺯiPodﺑﺨﻠﻞﺑﺴﺒﺐﺩﺭﺟﺔﺍﻟﺤﺮﺍﺭﺓﺍﻟﻤﺮﺗﻔﻌﺔ.
!ﻻﺗﺘﺮﻙﺟﻬﺎﺯiPodﺗﺤﺖﺩﺭﺟﺔﺣﺮﺍﺭﺓﻋﺎﻟﻴﺔ.
!ﻗﻢﻣﺒﺎﺷﺮﺓﺑﺘﻮﺻﻴﻞﻛﺒﻞﺍﻟﻤﻮﺻّﻞDockﺑﺠﻬﺎﺯiPodﺑﺤﻴﺚ
ﻳﻌﻤﻞﻫﺬﺍﺍﻟﺠﻬﺎﺯﺑﺼﻮﺭﺓﻣﻨﺎﺳﺒﺔ.
!ﺛﺒﺖﺑﺈﺣﻜﺎﻡﺟﻬﺎﺯiPodﻋﻨﺪﺍﻟﻘﻴﺎﺩﺓ.ﻻﺗﺪﻉﺟﻬﺎﺯiPod
ﺗﺴﻘﻂﻋﻠﻰﺍﻷﺭﺿﻴﺔﺣﻴﺚﻗﺪﻳﺤﺘﺒﺲﺗﺤﺖﺩﻭﺍﺳﺔﺍﻟﻔﺮﺍﻣﻞﺃﻭ
ﺩﻭﺍﺳﺔﺍﻟﺴﺮﻋﺔ.
!ﻟﻤﻌﺮﻓﺔﺍﻟﺘﻔﺎﺻﻴﻞ،ﺭﺍﺟﻊﺍﻟﻜﺘﻴﺒﺎﺕﺍﻟﺨﺎﺻﺔﺑﺠﻬﺎﺯiPod.
ﺣﻮﻝﺗﻬﻴﺌﺎﺕiPod
!ﻋﻨﺪﺗﻮﺻﻴﻞﺟﻬﺎﺯiPod،ﻳﻌﻤﻞﺍﻟﺠﻬﺎﺯﻋﻠﻰﺗﻐﻴﻴﺮﺗﻬﻴﺌﺔ
ﺍﻟﻤﻮﺍﺯﻥEQﻟﻠﺠﻬﺎﺯiPodﺇﻟﻰﺍﻟﺸﻜﻞﺍﻟﻤﺴﺘﻮﻱﻭﺫﻟﻚ
ﻟﺘﺤﺴﻴﻦﺍﻟﺨﺼﺎﺋﺺﺍﻟﺼﻮﺗﻴﺔ.ﻋﻨﺪﻣﺎﺗﻘﻮﻡﺑﻔﺼﻞﺟﻬﺎﺯ
iPod،ﻳﻌﻮﺩﺍﻟﻤﻮﺍﺯﻥEQﺇﻟﻰﺍﻟﺘﻬﻴﺌﺔﺍﻷﺻﻠﻴﺔ.
!ﻻﻳﻤﻜﻨﻚﺿﺒﻂﻭﻇﻴﻔﺔﺍﻟﺘﻜﺮﺍﺭRepeatﻋﻠﻰﻭﺿﻊﺍﻹﻳﻘﺎﻑ
ﻋﻠﻰﺟﻬﺎﺯiPodﻋﻨﺪﺍﺳﺘﻌﻤﺎﻝﻫﺬﺍﺍﻟﺠﻬﺎﺯ.ﺣﺘﻰﻭﻟﻮﻗﻤﺖ
ﺑﻀﺒﻂﻭﻇﻴﻔﺔﺍﻟﺘﻜﺮﺍﺭRepeatﻋﻠﻰﻭﺿﻊﺍﻹﻳﻘﺎﻑﻋﻠﻰ
ﺟﻬﺎﺯiPod،ﻓﺴﻴﺘﻢﺗﻠﻘﺎﺋﻴًﺎﺗﻐﻴﻴﺮRepeatﺇﻟﻰAll)ﺍﻟﻜﻞ(
ﻋﻨﺪﺗﻮﺻﻴﻞﺟﻬﺎﺯiPodﺑﻬﺬﺍﺍﻟﺠﻬﺎﺯ.
ﺗﺴﻠﺴﻞﻣﻠﻔﺎﺕﺍﻟﺼﻮﺕﻋﻠﻰﺟﻬﺎﺯ
ﺍﻟﺘﺨﺰﻳﻦﺍﻟﺨﺎﺭﺟﻲ)USB, SD(
ﻟﻠﻤﺸﻐّﻞﺍﻟﺴﻤﻌﻲﺍﻟﻨﻘّﺎﻝUSB،ﻳﺨﺘﻠﻒﺗﺴﻠﺴﻞﻣﻠﻔﺎﺕﺍﻟﺼﻮﺕﻋﻦ
ﺟﻬﺎﺯﺍﻟﺘﺨﺰﻳﻦﺍﻟﺨﺎﺭﺟﻲﻭﻳﻌﺘﻤﺪﻋﻠﻰﺍﻟﻤﺸﻐّﻞ.
!ﻣﻦ01ﺇﻟﻰ05ﻳﻤﺜﻞﺃﺭﻗﺎﻡﺍﻟﻔﻮﻟﺪﺭﺍﺕﺍﻟﻤﺨﺼﺼﺔ.1ﺇﻟﻰ
6ﻳﻤﺜﻞﺗﺴﻠﺴﻞﺍﻻﺳﺘﻤﺎﻉ.ﻻﻳﺴﺘﻄﻴﻊﺍﻟﻤﺴﺘﺨﺪﻡﺗﺨﺼﻴﺺ
ﺃﺭﻗﺎﻡﺍﻟﻔﻮﻟﺪﺭﺍﺕﻭﺗﺤﺪﻳﺪﺗﺴﻠﺴﻞﺍﻻﺳﺘﻤﺎﻉﺑﺎﺳﺘﻌﻤﺎﻝﻫﺬﺍ
ﺍﻟﺠﻬﺎﺯ.
!ﺍﻟﺘﺴﻠﺴﻞﺍﻟﻤﻌﺮﻭﺽﻟﻤﻠﻒﺍﻟﺼﻮﺕﻫﻮﻧﻔﺲﺍﻟﺘﺴﻠﺴﻞﺍﻟﻤﺴﺠّﻞ
ﻓﻲﺟﻬﺎﺯﺍﻟﺘﺨﺰﻳﻦﺍﻟﺨﺎﺭﺟﻲ)USB, SD(.
!ﻟﺘﺤﺪﻳﺪﺗﺴﻠﺴﻞﺍﻟﻌﺮﺽ،ﻳﻮﺻﻰﺑﺎﻟﻄﺮﻕﺍﻟﺘﺎﻟﻴﺔ.
١ﻗﻢﺑﺈﻧﺸﺎﺀﺍﺳﻢﺍﻟﻤﻠﻒﺑﻤﺎﻓﻲﺫﻟﻚﺃﺭﻗﺎﻣًﺎﻟﺘﺤﺪﻳﺪﺗﺴﻠﺴﻞ
ﺍﻟﻌﺮﺽ)ﻣﺜﺎﻝ،001xxx.mp3ﻭ099yyy.mp3(.
٢ﺿﻊﺗﻠﻚﺍﻟﻤﻠﻔﺎﺕﺩﺍﺧﻞﻓﻮﻟﺪﺭ.
٣ﻗﻢﺑﺘﺴﺠﻴﻞﺍﻟﻔﻮﻟﺪﺭﺍﻟﻤﺤﺘﻮﻱﻋﻠﻰﻣﻠﻔﺎﺕﺩﺍﺧﻞﺟﻬﺎﺯﺍﻟﺘﺨﺰﻳﻦ
ﺍﻟﺨﺎﺭﺟﻲ)USB, SD(.
ﻋﻠﻰﺃﻧﻪ،ﺗﺒﻌًﺎﻟﺒﻴﺌﺔﺍﻟﻨﻈﺎﻡ،ﻻﻳﻤﻜﻨﻚﺗﺤﺪﻳﺪﺗﺴﻠﺴﻞﻋﺮﺽ
ﺍﻟﻤﻠﻒ.
!ﻳﻤﻜﻦﻋﺮﺽﻣﺎﻳﺼﻞﺇﻟﻰ١٥٠٠٠ﻣﻠﻒﻓﻲﺟﻬﺎﺯﺍﻟﺘﺨﺰﻳﻦ
ﺍﻟﺨﺎﺭﺟﻲ)USB،SD(.
!ﻳﻤﻜﻦﻋﺮﺽﻣﺎﻳﺼﻞﺇﻟﻰ٥٠٠ﻓﻮﻟﺪﺭﻓﻲﺟﻬﺎﺯﺍﻟﺘﺨﺰﻳﻦ
ﺍﻟﺨﺎﺭﺟﻲ)USB،SD(.
!ﻳﻤﻜﻦﻋﺮﺽﺩﻟﻴﻞﻳﺼﻞﻋﻤﻘﻪﺇﻟﻰﺛﻤﺎﻧﻲﻃﺒﻘﺎﺕﻓﻲﺟﻬﺎﺯ
ﺍﻟﺘﺨﺰﻳﻦﺍﻟﺨﺎﺭﺟﻲ)USB, SD(.
ﺇﺷﻌﺎﺭﺣﻘﻮﻕﺍﻟﻄﺒﻊﻭﺍﻟﻌﻼﻣﺔ
ﺍﻟﺘﺠﺎﺭﻳﺔ
ﺑﻄﺎﻗﺔﺍﻟﺬﺍﻛﺮﺓSDﻣﺘﺎﺣﺔﻓﻘﻂﻣﻊﺍﻟﻤﻮﺩﻳﻞDEH-4150SD.
WMA
Windows MediaﻭﺷﻌﺎﺭWindowsﻫﻤﺎﻋﻼﻣﺘﺎﻥ
ﺗﺠﺎﺭﻳﺘﺎﻥﻣﺴﺠﻠﺘﺎﻥﻟﺸﺮﻛﺔMicrosoft Corporationﻓﻲ
ﺍﻟﻮﻻﻳﺎﺕﺍﻟﻤﺘﺤﺪﺓﻭ/ﺃﻭﺩﻭﻝﺃﺧﺮﻯ.
ﻫﺬﺍﺍﻟﺠﻬﺎﺯﻳﺤﺘﻮﻱﻋﻠﻰﺗﻘﻨﻴﺔﻣﻤﻠﻮﻛﺔﻟﺸﺮﻛﺔMicrosoft
Corporationﻭﻻﻳﻤﻜﻦﺍﺳﺘﻌﻤﺎﻟﻬﺎﺃﻭﺗﻮﺯﻳﻌﻬﺎﺑﺪﻭﻥﺗﺮﺧﻴﺺ
ﻣﻦﺷﺮﻛﺔMicrosoft Licensing, Inc.
iPod Dock ConnectorﺇﻟﻰﻛﺒﻞUSB.
iPod
ﺗﻮﺍﻓﻖﻣﻊiPod
!ﻳﺪﻋﻢﻫﺬﺍﺍﻟﺠﻬﺎﺯﺃﺟﻬﺰﺓiPodﺍﻟﺘﺎﻟﻴﺔﻓﻘﻂ.ﻣﺒﻴﻦﺃﺩﻧﺎﻩ
ﺇﺻﺪﺍﺭﺍﺕﺑﺮﺍﻣﺞiPodﺍﻟﻤﺪﻋﻮﻣﺔ.ﻗﺪﻻﻳﺘﻢﺩﻋﻢﺍﻹﺻﺪﺍﺭﺍﺕ
ﺍﻷﻗﺪﻡﻟﺒﺮﻧﺎﻣﺞiPod.
—ﺍﻟﺠﻴﻞﺍﻷﻭﻝﻣﻦiPod nano)ﺇﺻﺪﺍﺭﺍﻟﺒﺮﻧﺎﻣﺞ
١٫٣٫١(
—ﺍﻟﺠﻴﻞﺍﻟﺜﺎﻧﻲﻣﻦiPod nano)ﺇﺻﺪﺍﺭﺍﻟﺒﺮﻧﺎﻣﺞ
١٫١٫٣(
—ﺍﻟﺠﻴﻞﺍﻟﺜﺎﻟﺚﻣﻦiPod nano)ﺇﺻﺪﺍﺭﺍﻟﺒﺮﻧﺎﻣﺞ
١٫١٫٢(
—ﺍﻟﺠﻴﻞﺍﻟﺨﺎﻣﺲﻣﻦiPod)ﺇﺻﺪﺍﺭﺍﻟﺒﺮﻧﺎﻣﺞ١٫٣٫٠(
—iPod classic)ﺇﺻﺪﺍﺭﺍﻟﺒﺮﻧﺎﻣﺞ١٫١٫٢(
—iPod touch)ﺇﺻﺪﺍﺭﺍﻟﺒﺮﻧﺎﻣﺞ٢٫٠(
—iPhone 3G)ﺇﺻﺪﺍﺭﺍﻟﺒﺮﻧﺎﻣﺞ٢٫٠(
!ﻗﺪﺗﺨﺘﻠﻒﻋﻤﻠﻴﺎﺕﺍﻟﺘﺸﻐﻴﻞﻭﺫﻟﻚﺇﻋﺘﻤﺎﺩﺍًﻋﻠﻰﺇﺻﺪﺍﺭﺍﻟﺒﺮﻧﺎﻣﺞ
ﺍﻟﺨﺎﺹﺑﺠﻬﺎﺯiPod.
!ﻋﻨﺪﺍﺳﺘﻌﻤﺎﻝﺟﻬﺎﺯiPod،ﻓﺈﻧﻪﻳﺘﻄﻠﺐﺗﻮﺻﻴﻞﻣﻮﺻّﻞ
!ﻳﺘﻮﻓﺮﺃﻳﻀًﺎﻛﺒﻞﺳﻄﺢﺍﻟﺮﺑﻂCD-IU50ﻣﻦPioneer.
ﺑﺨﺼﻮﺹﺍﻟﺘﻔﺎﺻﻴﻞ،ﻗﻢﺑﺎﺳﺘﺸﺎﺭﺓﺍﻟﻮﻛﻴﻞ.
٢٩
Ar
<
YRD5269-A/S>84
Page 85

Black plate (109,1)
ﺍﻟﻤﻠﺤﻘﺎﺕ
ﻣﻌﻠﻮﻣﺎﺕﺇﺿﺎﻓﻴﺔ
ﻣﻠﻔﺎﺕﺍﻟﺼﻮﺕﺍﻟﻤﻀﻐﻮﻁﻓﻲﺟﻬﺎﺯ
ﺍﻟﺘﺨﺰﻳﻦﺍﻟﺨﺎﺭﺟﻲ)USB, SD(
ﺑﻄﺎﻗﺔﺍﻟﺬﺍﻛﺮﺓSDﻣﺘﺎﺣﺔﻓﻘﻂﻣﻊﺍﻟﻤﻮﺩﻳﻞDEH-4150SD.
ﻓﻲ
ﺍﻟﻤﻮﺍﺻﻔﺎﺕ
ﻓﻲﺻﻔﺤﺔ
ﺍﻟﻤﻮﺍﺻﻔﺎﺕ
ﺣﻮﻝﺍﻟﺘﻮﺍﻓﻖﻣﻊﺟﻬﺎﺯﺍﻟﺘﺨﺰﻳﻦUSB،ﺭﺍﺟﻊ
ﺻﻔﺤﺔ٣١.
ﺣﻮﻝﺍﻟﺘﻮﺍﻓﻖﻣﻊﺑﻄﺎﻗﺔﺫﺍﻛﺮﺓSD،ﺭﺍﺟﻊ
٣١.
!ﻻﻳﻤﻜﻦﻋﺮﺽﺍﻟﻤﻠﻔﺎﺕﺍﻟﻤﺤﻤﻴﺔﺑﺤﻘﻮﻕﺍﻟﻨﺴﺦ.
!ﻗﺪﻳﺤﺪﺙﺗﺄﺧﻴﺮﺑﺴﻴﻂﻋﻨﺪﺑﺪﺀﺍﻻﺳﺘﻤﺎﻉﻟﻤﻠﻔﺎﺕﺍﻟﺼﻮﺕﻋﻠﻰ
ﺟﻬﺎﺯﺗﺨﺰﻳﻦﺧﺎﺭﺟﻲ)USB،SD(ﻳﺤﺘﻮﻱﻋﻠﻰﻋﺪﺩﻛﺒﻴﺮ
ﻣﻦﺍﻟﻔﻮﻟﺪﺭﺍﺕﺍﻟﻤﺘﺴﻠﺴﻠﺔ.
!ﻻﻳﻮﺟﺪﺗﻮﺍﻓﻖﻣﻊﺑﻄﺎﻗﺎﺕﺍﻟﻮﺳﺎﺋﻂﺍﻟﻤﺘﻌﺪﺩﺓ)MMC(.
!ﺍﻟﺘﻮﺍﻓﻖﻣﻊﻛﻞﺑﻄﺎﻗﺎﺕﺫﺍﻛﺮﺓSDﻏﻴﺮﻣﻀﻤﻮﻥ.
!ﻫﺬﺍﺍﻟﺠﻬﺎﺯﻏﻴﺮﻣﺘﻮﺍﻓﻖﻣﻊﺍﻟﺼﻮﺕSD.
ﻣﺜﺎﻝﻋﻠﻰﺍﻟﻤﺴﺘﻮﻯﺍﻟﻬﺮﻣﻲ
iTunes
ADPCM
ﻭﺍﻟﻌﺮﺽﺍﻟﻤﺘﺴﻠﺴﻞ
ﺑﻄﺎﻗﺔﺍﻟﺬﺍﻛﺮﺓSDﻣﺘﺎﺣﺔﻓﻘﻂﻣﻊﺍﻟﻤﻮﺩﻳﻞDEH-4150SD.
:ﺍﻟﻔﻮﻟﺪﺭ
:ﻣﻠﻒﺻﻮﺕﻣﻀﻐﻮﻁ
١٫٠ﻭ١٫١ﻭ٢٫٢ﻭ٢٫٣ﻭ٢٫٤)ﻳﺘﻢﺇﻋﻄﺎﺀﺍﻷﻭﻟﻮﻳﺔ
ﻟﻺﺻﺪﺍﺭ٢٫xﻣﻦﻻﺣﻘﺔﺍﻟﺘﻌﺮﻳﻒID3 Tagﺑﺎﻟﻤﻘﺎﺭﻧﺔﻣﻊ
ﺍﻹﺻﺪﺍﺭ١٫x(.
AAC
ﻣﺴﺘﻤﺮCBR(
WAV
ﻙﻫـﺇﻟﻰ٤٤٫١ﻙﻫـ)MS ADPCM(
!ﻣﺘﻮﺍﻓﻘﺔﻣﻊﺻﻴﻎﻻﺣﻘﺔﺍﻟﺘﻌﺮﻳﻒID3 Tagﺍﻹﺻﺪﺍﺭﺍﺕ:
!ﻗﺎﺋﻤﺔﺍﺳﺘﻤﺎﻉM3u:ﻻ
!MP3i)MP3ﻣﺘﻔﺎﻋﻠ(،mp3 PRO:ﻻ
!ﺍﻟﺼﻴﻐﺔﺍﻟﻤﺘﻮﺍﻓﻘﺔ:ﻣﻠﻔﺎﺕAACﺍﻟﻤﺸﻔّﺮﺓﺑﺎﺳﺘﺨﺪﺍﻡﺑﺮﻧﺎﻣﺞ
!ﺯﺍﺋﺪﺓﺍﻟﻤﻠﻒ:.m4a
!ﻣﻌﺪّﻝﺍﻹﺭﺳﺎﻝ:١٦ﻙﺏ/ﺙﺇﻟﻰ٣٢٠ﻙﺏ/ﺙ)ﻣﻌﺪﻝﺑِﺖ
!ﺗﺮﺩﺩﺍﻟﻤﻌﺎﻳﻨﺔ:ﻣﻦ١١٫٠٢٥ﻙﻫـﺇﻟﻰ٤٨ﻙﻫـ
!Apple Lossless:ﻻ
ﺍﻟﻌﺮﺑﻴﺔ
!ﺍﻟﺼﻴﻐﺔﺍﻟﻤﺘﻮﺍﻓﻘﺔ:Linear PCM (LPCM)، MS
!ﺯﺍﺋﺪﺓﺍﻟﻤﻠﻒ:.wav
!ﺍﻟﺒِﺖﺍﻟﻜﻤّﻲ:٨ﻭ١٦)LPCM(،٤)MS ADPCM(
!ﺗﺮﺩﺩﺍﻟﻤﻌﺎﻳﻨﺔ:١٦ﻙﻫـﺇﻟﻰ٤٨ﻙﻫـ)LPCM(،٢٢٫٠٥
ﺍﻟﻤﻌﻠﻮﻣﺎﺕﺍﻹﺿﺎﻓﻴﺔﻟﻠﺼﻮﺕ
ﺍﻟﻤﻀﻐﻮﻁ)disc،USB،SD(
!ﻗﺪﻳﻜﻮﻥﻫﻨﺎﻙﺗﺄﺧﻴﺮﺑﺴﻴﻂﻋﻨﺪﺑﺪﺀﺍﻻﺳﺘﻤﺎﻉﻟﻤﻠﻔﺎﺕﺻﻮﺕ
ﺍﻟﻤﺸﻔﺮﺓﺑﺒﻴﺎﻧﺎﺕﺍﻟﺼﻮﺭﺓ.
!ﻳﺠﺐﺍﺳﺘﻌﻤﺎﻝﺯﺍﺋﺪﺓﺇﺳﻢﻣﻠﻒﺑﺼﻮﺭﺓﺻﺤﻴﺤﺔ.
!ﻳﻤﻜﻦﻋﺮﺽ32ﺣﺮﻑﻣﻦﺍﻟﺒﺪﺍﻳﺔﻋﻠﻰﺃﻧﻬﺎﺍﺳﻢﻣﻠﻒ
)ﻳﺘﻀﻤﻦﺫﻟﻚﺍﻟﻼﺣﻘﺔ(ﺃﻭﺍﺳﻢﻓﻮﻟﺪﺭ.
!ﻣﻌﻠﻮﻣﺎﺕﺍﻟﺘﻌﻠﻴﻘﺎﺕﺍﻟﺨﺎﺻﺔﺑﺒﻌﺾﻣﻠﻔﺎﺕﺍﻟﺼﻮﺕﻗﺪﻻﻳﺘﻢ
ﺍﻻﺳﺘﻤﺎﻉﻟﻬﺎﺑﻄﺮﻳﻘﺔﺻﺤﻴﺤﺔ.
ﻣﻠﻔﺎﺕﺻﻮﺕﻣﻀﻐﻮﻃﺔﻋﻠﻰ
ﺍﺳﻄﻮﺍﻧﺔ
ﺗﺴﻠﺴﻞﻣﻠﻔﺎﺕﺍﻟﺼﻮﺕﻋﻠﻰﺍﻻﺳﻄﻮﺍﻧﺔ
!ﻫﺬﻩﺍﻟﻮﺣﺪﺓﺗﺨﺼﺺﺃﺭﻗﺎﻡﻟﻠﻔﻮﻟﺪﺭﺍﺕ.ﻻﻳﻤﻜﻦﻟﻠﻤﺴﺘﺨﺪِﻡ
ﺗﺨﺼﻴﺺﺃﺭﻗﺎﻡﺍﻟﻔﻮﻟﺪﺭﺍﺕ.
!ﺗﺴﻠﺴﻞﺍﺧﺘﻴﺎﺭﺍﻟﻔﻮﻟﺪﺭﺃﻭﺃﻳﺔﻋﻤﻠﻴﺎﺕﺗﺸﻐﻴﻠﻴﺔﻗﺪﺗﺘﻐﻴﺮ
ﺑﺎﻻﻋﺘﻤﺎﺩﻋﻠﻰﺍﻟﺒﺮﻣﺠﻴﺔﺍﻟﻤﺸﻔﺮﺓﺃﻭﺍﻟﻤﻜﺘﻮﺑﺔ.
!ﺍﻟﺘﺴﻠﺴﻞﺍﻟﻬﺮﻣﻲﻟﻠﻔﻮﻟﺪﺭﻣﺴﻤﻮﺡﺑﻪﺑﻤﺴﺘﻮﻯﺛﻤﺎﻥﻃﺒﻘﺎﺕ.
ﻭﻣﻊﺫﻟﻚﻓﺈﻥﺍﻟﺘﺴﻠﺴﻞﺍﻟﻔﻌﻠﻲﻟﻠﻔﻮﻟﺪﺭﺍﺕﺃﻗﻞﻣﻦﻃﺒﻘﺘﻴﻦ.
!ﻳﻤﻜﻦﺇﻋﺎﺩﺓﻋﺮﺽﺣﺘﻰ٩٩ﻓﻮﻟﺪﺭﻋﻠﻰﺍﻻﺳﻄﻮﺍﻧﺔ.
YRD5269-A/S>85
<
RomeoﻭJolietﻛﻼﻫﺎﻣﺘﻮﺍﻓﻘﺔﻣﻊﻫﺬﺍﺍﻟﻤﺸﻐﻞ.
!ﻣﺴﺘﻮﻓﻲﻟﻤﻘﺎﻳﻴﺲISO 9660ﻣﺴﺘﻮﻯ١ﻭ٢.ﺃﻧﻈﻤﺔﻣﻠﻒ
!ﺇﻣﻜﺎﻧﻴﺔﺍﻋﺎﺩﺓﺍﻟﻌﺮﺽﻣﺘﻌﺪﺩﺓﺍﻟﺸﻌﺐ.
!ﻣﻠﻔﺎﺕﺍﻟﺼﻮﺕﺍﻟﻤﻀﻐﻮﻁﻏﻴﺮﻣﺘﻮﺍﻓﻘﺔﻣﻊﻧﻘﻞﺍﻟﺒﻴﺎﻧﺎﺕﺑﻜﺘﺎﺑﺔ
ﺍﻟﺒﺎﻛﻴﺘﺎﺕ.
!ﺑﻐﺾﺍﻟﻨﻈﺮﻋﻦﻃﻮﻝﺍﻟﻤﻘﺎﻃﻊﺍﻟﻔﺎﺭﻏﺔﺑﻴﻦﺃﻏﻨﻴﺎﺕﺍﻟﺘﺴﺠﻴﻞ
ﺍﻷﺻﻠﻲ،ﻳﺘﻢﻋﺮﺽﺍﺳﻄﻮﺍﻧﺎﺕﺍﻟﺼﻮﺕﺍﻟﻤﻀﻐﻮﻁﻣﻊﻭﻗﻔﺔ
ﻣﺆﻗﺘﺔﻗﺼﻴﺮﺓﺑﻴﻦﺍﻷﻏﻨﻴﺎﺕ.
٢٨
Ar
Page 86

Black plate (108,1)
ﺍﻟﻤﻠﺤﻘﺎﺕ
ﻣﻌﻠﻮﻣﺎﺕﺇﺿﺎﻓﻴﺔ
—SD
—ﺑﻄﺎﻗﺔminiSD
—ﺑﻄﺎﻗﺔmicroSD
—SDHC
SDﻷﻧﻪﻗﺪﺗﺘﻠﻒﺑﻄﺎﻗﺔﺫﺍﻛﺮﺓSDﺃﻭﻫﺬﺍﺍﻟﺠﻬﺎﺯ.
SDﻭﺗﺘﺮﻙﺃﺻﺎﺑﻌﻚﻣﺒﺎﺷﺮﺓًﻷﻧﻪﻗﺪﺗﻨﺪﻓﻊﺑﻄﺎﻗﺔﺫﺍﻛﺮﺓSD
WMA
Media Player
CBRﻭﻣﻌﺪﻝﺑِﺖﻣﺘﻐﻴّﺮVBR(
ﺍﺑﺘﻼﻉﺑﻄﺎﻗﺔﺍﻟﺬﺍﻛﺮﺓSD،ﺭﺍﺟﻊﺍﻟﻄﺒﻴﺐﻋﻠﻰﺍﻟﻔﻮﺭ.
ﺑﺄﻱﺃﺩﺍﺓﻣﻌﺪﻧﻴﺔ.
ﺑﻄﺎﻗﺔﺍﻟﺬﺍﻛﺮﺓSD.ﺇﺫﺍﺗﻢﺇﺩﺧﺎﻝﺃﺩﺍﺓﻣﻌﺪﻧﻴﺔ)ﻣﺜﻞﻗﻄﻌﺔﻧﻘﻮﺩ(
ﻓﻲﺍﻟﻔﺘﺤﺔ،ﻗﺪﺗﻨﻘﻄﻊﺍﻟﺪﺍﺋﺮﺓﺍﻟﺪﺍﺧﻠﻴﺔﻭﺗﺴﺒﺐﺃﻋﻄﺎﻻً.
ﺑﺎﺳﺘﻌﻤﺎﻝﻣﺤﻮّﻝ.ﻻﺗﺴﺘﻌﻤﻞﻣﻌﺪّﻝﺍﺳﻄﻮﺍﻧﺎﺕﻳﺤﺘﻮﻱﻋﻠﻰ
ﺃﺟﺰﺍﺀﻣﻌﺪﻧﻴﺔﻏﻴﺮﺍﻟﻤﻮﺻﻼﺕﺍﻟﻤﻜﺸﻮﻓﺔ.
ﺍﻟﺒﻄﺎﻗﺔ(ﻗﺪﻻﻳﻤﻜﻦﺍﺧﺮﺍﺟﻬﺎﻣﻦﺍﻟﻔﺘﺤﺔ.
ﺃﻥﺗﺼﺪﺭﻋﻨﻬﺎﻃﻘﺔ.ﻣﻦﺍﻟﺨﻄﺮﺃﻥﺗﻀﻐﻂﻋﻠﻰﺑﻄﺎﻗﺔﺫﺍﻛﺮﺓ
ﺧﺎﺭﺝﺍﻟﻔﺘﺤﺔﻭﺗﺼﻄﺪﻡﺑﻚﻓﻲﻭﺟﻬﻚ،ﺇﻟﺦ.ﺇﺫﺍﺍﻧﺪﻓﻌﺖﺑﻄﺎﻗﺔ
ﺫﺍﻛﺮﺓSDﺧﺎﺭﺝﺍﻟﻔﺘﺤﺔﻗﺪﻳﺘﻢﻓﻘﺪﻫﺎ.
ﻣﺴﺘﻤﺮCBR)،٤٨ﻙﺏ/ﺙﺇﻟﻰ٣٨٤ﻙﺏ/ﺙ)ﻣﻌﺪﻝﺑِﺖ
ﻣﺘﻐﻴّﺮVBR(
ﺍﻟﻔﻘﺪ،ﺻﻮﺕ:ﻻ
MP3
ﻟﻺﺑﺮﺍﺯ(
ﺑﻄﺎﻗﺔﺫﺍﻛﺮﺓSD
!ﻫﺬﺍﺍﻟﺠﻬﺎﺯﻳﻘﻮﻡﺑﺪﻋﻢﻓﻘﻂﺑﻄﺎﻗﺎﺕﺍﻟﺬﺍﻛﺮﺓSDﺍﻟﺘﺎﻟﻴﺔ.
!ﺍﺣﺘﻔﻆﺑﺒﻄﺎﻗﺔﺍﻟﺬﺍﻛﺮﺓSDﺑﻌﻴﺪًﺍﻋﻦﻣﺘﻨﺎﻭﻝﺍﻷﻃﻔﺎﻝ.ﺇﺫﺍﺗﻢ
!ﻻﺗﻠﻤﺲﻣﻮﺻﻼﺕﺑﻄﺎﻗﺔﺍﻟﺬﺍﻛﺮﺓSDﻣﺒﺎﺷﺮﺓﺑﺄﺻﺎﺑﻌﻚﺃﻭ
!ﻻﺗﻘﻢﺑﺎﺩﺧﺎﻝﺃﻱﺷﻲءﺁﺧﺮﻏﻴﺮﺑﻄﺎﻗﺔﺍﻟﺬﺍﻛﺮﺓSDﺑﻔﺘﺤﺔ
!ﻋﻨﺪﺇﺩﺧﺎﻝﺑﻄﺎﻗﺔminiSDﺃﻭﺑﻄﺎﻗﺔmicroSD،ﻗﻢ
!ﻻﺗﻘﻢﺑﺈﺩﺧﺎﻝﺑﻄﺎﻗﺔﺫﺍﻛﺮﺓSDﺗﺎﻟﻔﺔ)ﻣﺜﺎﻝﻣﺸﻮﻫﺔ،ﺗﻢﻧﺰﻉ
!ﻻﺗﺤﺎﻭﻝﺩﻓﻊﺑﻄﺎﻗﺔﺫﺍﻛﺮﺓSDﺑﺎﻟﻘﻮﺓﺩﺍﺧﻞﻓﺘﺤﺔﺑﻄﺎﻗﺔﺫﺍﻛﺮﺓ
!ﻋﻨﺪﺇﺧﺮﺍﺝﺑﻄﺎﻗﺔﺫﺍﻛﺮﺓSD،ﺍﺿﻐﻄﻬﺎﻭﺍﺳﺘﻤﺮﺑﻀﻐﻄﻬﺎﺇﻟﻰ
ﺍﻟﺘﻮﺍﻓﻖﻣﻊﺍﻟﺼﻮﺕﺍﻟﻤﻀﻐﻮﻁ
)disc،USB،SD(
ﺑﻄﺎﻗﺔﺍﻟﺬﺍﻛﺮﺓSDﻣﺘﺎﺣﺔﻓﻘﻂﻣﻊﺍﻟﻤﻮﺩﻳﻞDEH-4150SD.
!ﺍﻟﺼﻴﻐﺔﺍﻟﻤﺘﻮﺍﻓﻘﺔ:WMAﻣﺸﻔﺮﺓﻣﻦﻗﺒﻠWindows
!ﺯﺍﺋﺪﺓﺍﻟﻤﻠﻒ:.wma
!ﻣﻌﺪّﻝﺍﻟﺒِﺖ:٤٨ﻙﺏ/ﺙﺇﻟﻰ٣٢٠ﻙﺏ/ﺙ)ﻣﻌﺪﻝﺑِﺖ
!ﺗﺮﺩﺩﺍﻟﻤﻌﺎﻳﻨﺔ:ﻣﻦ٣٢ﻙﻫـﺇﻟﻰ٤٨ﻙﻫـ
!Windows Media Audio 9 Professional،ﻋﺪﻳﻢ
!ﺯﺍﺋﺪﺓﺍﻟﻤﻠﻒ:.mp3
!ﻣﻌﺪّﻝﺍﻟﺒﺖ:٨ﻙﺏ/ﺙﺇﻟﻰ٣٢٠ﻙﺏ/ﺙ)ﻣﻌﺪﻝﺑِﺖﻣﺴﺘﻤﺮ
!ﺗﺮﺩﺩﺍﻟﻤﻌﺎﻳﻨﺔ:١٦ﻙﻫـﺇﻟﻰ٤٨ﻙﻫـ)٣٢،٤٤٫١،٤٨
ﺍﺳﻄﻮﺍﻧﺎﺕﻣﺰﺩﻭﺟﺔ
!ﺍﻻﺳﻄﻮﺍﻧﺔﺍﻟﻤﺰﺩﻭﺟﺔﻫﻲﺍﺳﻄﻮﺍﻧﺔﺫﺍﺕﻭﺟﻬﻴﻦﺗﺘﻜﻮﻥﻣﻦ
ﺍﺳﻄﻮﺍﻧﺔCDﻗﺎﺑﻠﺔﻟﻠﺘﺴﺠﻴﻞﻟﻠﺼﻮﺕﻋﻠﻰﺃﺣﺪﺍﻟﻮﺟﻬﻴﻦ
ﻭﺍﺳﻄﻮﺍﻧﺔDVDﻗﺎﺑﻠﺔﻟﻠﺘﺴﺠﻴﻞﻟﻠﻔﻴﺪﻳﻮﻋﻠﻰﺍﻟﻮﺟﻪﺍﻵﺧﺮ.
!ﺑﻤﺎﺃﻥﺍﻟﻮﺟﻪﺍﻟﺨﺎﺹﺑﺎﺳﻄﻮﺍﻧﺔCDﻓﻲﺍﻻﺳﻄﻮﺍﻧﺔﺍﻟﻤﺰﺩﻭﺟﺔ
ﻻﻳﺘﻮﺍﻓﻖﻣﺎﺩﻳﺎًﻣﻊﻣﻘﻴﺎﺱCDﺍﻟﻌﺎﻡﻓﻘﺪﻻﻳﻜﻮﻥﺑﺎﻹﻣﻜﺎﻥ
ﺍﻻﺳﺘﻤﺎﻉﻟﻠﻮﺟﻪﺍﻟﺨﺎﺹﺑﺎﺳﻄﻮﺍﻧﺔCDﺑﺎﺳﺘﻌﻤﺎﻝﻫﺬﻩﺍﻟﻮﺣﺪﺓ.
!ﻛﺜﺮﺓﺇﺩﺧﺎﻝﻭﺇﺧﺮﺍﺝﺍﻻﺳﻄﻮﺍﻧﺔﺍﻟﻤﺰﺩﻭﺟﺔﻳﻤﻜﻦﺃﻥﻳﺆﺩﻱﺇﻟﻰ
ﺧﺪﻭﺵﻋﻠﻰﺍﻻﺳﻄﻮﺍﻧﺔ.ﻭﺍﻟﺨﺪﻭﺵﺍﻟﻜﺒﻴﺮﺓﻳﻤﻜﻦﺃﻥﺗﺆﺩﻱﺇﻟﻰ
ﻣﺸﺎﻛﻞﻓﻲﺍﻟﻌﺮﺽﺑﺎﺳﺘﻌﻤﺎﻝﻫﺬﺍﺍﻟﺠﻬﺎﺯ.ﻓﻲﺑﻌﺾﺍﻟﺤﺎﻻﺕ،
ﻳﻤﻜﻦﻟﻼﺳﻄﻮﺍﻧﺔﺍﻟﻤﺰﺩﻭﺟﺔﺃﻥﺗﺤﺘﺒﺲﻓﻲﻓﺘﺤﺔﺗﺤﻤﻴﻞ
ﺍﻻﺳﻄﻮﺍﻧﺎﺕﻭﻻﻳﻤﻜﻦﺇﺧﺮﺍﺟﻬﺎ.ﻟﻤﻨﻊﺫﻟﻚ،ﻧﻮﺻﻲﺑﺎﻻﻣﺘﻨﺎﻉ
ﻋﻦﺍﺳﺘﻌﻤﺎﻝﺍﻻﺳﻄﻮﺍﻧﺎﺕﺍﻟﻤﺰﺩﻭﺟﺔﻣﻊﻫﺬﺍﺍﻟﺠﻬﺎﺯ.
!ﺍﻟﺮﺟﺎﺀﺍﻟﺮﺟﻮﻉﺇﻟﻰﻣﻌﻠﻮﻣﺎﺕﺻﺎﻧﻊﺍﻻﺳﻄﻮﺍﻧﺔﻟﻠﻤﺰﻳﺪﻣﻦ
ﺍﻟﻤﻌﻠﻮﻣﺎﺕﺍﻟﻤﻔﺼﻠﺔﺣﻮﻝﺍﻻﺳﻄﻮﺍﻧﺎﺕﺍﻟﻤﺰﺩﻭﺟﺔ.
ﺍﻟﺘﻌﺎﻣﻞﻣﻊﺍﻹﺭﺷﺎﺩﺍﺕﺍﻟﺨﺎﺻﺔ
ﺑﺠﻬﺎﺯﺍﻟﺘﺨﺰﻳﻦﺍﻟﺨﺎﺭﺟﻲ)USB،
SD(ﻭﻫﺬﺍﺍﻟﺠﻬﺎﺯ
ﺑﻄﺎﻗﺔﺍﻟﺬﺍﻛﺮﺓSDﻣﺘﺎﺣﺔﻓﻘﻂﻣﻊﺍﻟﻤﻮﺩﻳﻞDEH-4150SD.
!ﻗﺪﻻﻳﺘﻢﺍﻟﺤﺼﻮﻝﻋﻠﻰﺍﻷﺩﺍﺀﺍﻷﻣﺜﻞﻟﻬﺬﺍﺍﻟﺠﻬﺎﺯﺗﺒﻌًﺎﻟﺠﻬﺎﺯ
ﺍﻟﺘﺨﺰﻳﻦﺍﻟﺨﺎﺭﺟﻲﺍﻟﻤﻮﺻﻞ)USB،SD(.
!ﻻﺗﺘﺮﻙﺟﻬﺎﺯﺍﻟﺘﺨﺰﻳﻦﺍﻟﺨﺎﺭﺟﻲ)USB،SD(ﻓﻲﺃﻱﻣﻜﺎﻥ
ﺑﺪﺭﺟﺎﺕﺣﺮﺍﺭﺓﻋﺎﻟﻴﺔ.
!ﺗﺒﻌًﺎﻟﻨﻮﻉﺟﻬﺎﺯﺍﻟﺘﺨﺰﻳﻦﺍﻟﺨﺎﺭﺟﻲ)SD ،USB(ﺍﻟﺬﻱ
ﺗﺴﺘﻌﻤﻠﻪ،ﻳﻤﻜﻦﻟﻬﺬﺍﺍﻟﺠﻬﺎﺯﺃﻻﻳﺘﻌﺮّﻑﻋﻠﻰﺟﻬﺎﺯﺍﻟﺘﺨﺰﻳﻦ
ﺍﻟﺨﺎﺭﺟﻲ)SD ،USB(ﺃﻭﻗﺪﻻﻳﺘﻢﺍﻻﺳﺘﻤﺎﻉﻟﻠﻤﻠﻔﺎﺕ
ﺑﻄﺮﻳﻘﺔﺻﺤﻴﺤﺔ.
!ﻗﺪﺗﺨﺘﻠﻒﻋﻤﻠﻴﺎﺕﺍﻟﺘﺸﻐﻴﻞﻭﺫﻟﻚﺍﻋﺘﻤﺎﺩًﺍﻋﻠﻰﻧﻮﻉﺟﻬﺎﺯ
ﺍﻟﺘﺨﺰﻳﻦﺍﻟﺨﺎﺭﺟﻲ)USB،SD(.
ﺟﻬﺎﺯﺍﻟﺘﺨﺰﻳﻦUSB
!ﻳﻤﻜﻦﺃﻥﻳﻘﻮﻡﻫﺬﺍﺍﻟﺠﻬﺎﺯﺑﻌﺮﺽﺍﻟﻤﻠﻔﺎﺕﻣﻦﺧﻼﻝﺍﻟﻤﺸﻐّﻞ
ﺍﻟﺴﻤﻌﻲﺍﻟﻨﻘّﺎﻝUSB/ﺫﺍﻛﺮﺓUSBﺍﻟﺘﻲﻫﻲﻣﻦﻓﺌﺔﺍﻟﺘﺨﺰﻳﻦ
ﺍﻟﺠﻤﺎﻋﻲUSB Mass Storage Class.
!ﻻﻳﻤﻜﻨﻚﺗﻮﺻﻴﻞﺟﻬﺎﺯﺍﻟﺘﺨﺰﻳﻦUSBﺑﻬﺬﺍﺍﻟﺠﻬﺎﺯﻣﻦﺧﻼﻝ
ﻣﺠﻤﻊﺗﻮﺻﻴﻞUSB.
!ﻻﺗﻌﻤﺪﺇﻟﻰﺇﺩﺧﺎﻝﺃﻱﺷﻲءﻏﻴﺮﺟﻬﺎﺯﺍﻟﺘﺨﺰﻳﻦUSBﺑﻤﻨﻔﺬ
USB.
!ﺛﺒﺖﺑﺈﺣﻜﺎﻡﺟﻬﺎﺯﺍﻟﺘﺨﺰﻳﻦUSBﻋﻨﺪﺍﻟﻘﻴﺎﺩﺓ.ﻻﺗﺪﻉﺟﻬﺎﺯ
ﺍﻟﺘﺨﺰﻳﻦUSBﻳﺴﻘﻂﻋﻠﻰﺍﻷﺭﺿﻴﺔﺣﻴﺚﻗﺪﻳﺤﺘﺒﺲﺗﺤﺖ
ﺩﻭﺍﺳﺔﺍﻟﻔﺮﺍﻣﻞﺃﻭﺩﻭﺍﺳﺔﺍﻟﺴﺮﻋﺔ.
!ﺟﻬﺎﺯﺍﻟﺘﺨﺰﻳﻦUSBﺍﻟﻤﺠﺰﺃﻏﻴﺮﻣﺘﻮﺍﻓﻖﻣﻊﻫﺬﺍﺍﻟﺠﻬﺎﺯ.
!ﺗﺒﻌًﺎﻟﺠﻬﺎﺯﺍﻟﺘﺨﺰﻳﻦUSBﺍﻟﻤﻮﺻّﻞﻣﻊﻫﺬﺍﺍﻟﺠﻬﺎﺯ،ﻗﺪﻳﺘﻮﻟﺪ
ﺿﺠﻴﺞﻣﻦﺍﻟﺮﺍﺩﻳﻮ.
٢٧
Ar
YRD5269-A/S>86
<
Page 87

Black plate (107,1)
/
ﺍﻟﻤﻠﺤﻘﺎﺕ
ﻣﻌﻠﻮﻣﺎﺕﺇﺿﺎﻓﻴﺔ
ﺍﻟﺘﻌﺎﻣﻞﻣﻊﺇﺭﺷﺎﺩﺍﺕﺍﻟﺨﺎﺻﺔ
ﺑﺎﻻﺳﻄﻮﺍﻧﺎﺕﻭﺍﻟﻤﺸﻐﻞ
!ﻗﻢﺑﺎﺳﺘﻌﻤﺎﻝﺍﻻﺳﻄﻮﺍﻧﺎﺕﺍﻟﺘﻲﺗﺤﻤﻞﺍﻱﻣﻦﺍﻟﻌﻼﻣﺘﻴﻦﺍﻟﺘﺎﻟﻴﺘﻴﻦ
ﻓﻘﻂ.
!ﻓﻘﻂﺍﺳﺘﻌﻤﻞﺍﻻﺳﻄﻮﺍﻧﺎﺕﺍﻟﺘﻘﻠﻴﺪﻳﺔ،ﺍﻟﻤﺴﺘﺪﻳﺮﺓﺑﺎﻟﻜﺎﻣﻞ.ﻻﺗﻌﻤﺪ
ﺇﻟﻰﺍﺳﺘﻌﻤﺎﻝﺍﻻﺳﻄﻮﺍﻧﺎﺕﺍﻟﻤﺸﻜّﻠﺔ.
!ﺍﺳﺘﻌﻤﻞﺍﺳﻄﻮﺍﻧﺔCDﻣﻘﺎﺱ١٢ﺳﻢﺃﻭ٨ﺳﻢ.ﻻﺗﺴﺘﻌﻤﻞ
ﻣﻌﺪّﻝﺍﺳﻄﻮﺍﻧﺎﺕﻋﻨﺪﺍﻻﺳﺘﻤﺎﻉﻻﺳﻄﻮﺍﻧﺎﺕCDﻣﻘﺎﺱ٨ﺳﻢ.
!ﻻﺗﻘﻢﺑﺈﺩﺧﺎﻝﺃﻱﺷﻲءﺁﺧﺮﺧﻼﻑﺍﺳﻄﻮﺍﻧﺔCDﺩﺍﺧﻞﻓﺘﺤﺔ
ﺗﺤﻤﻴﻞﺍﻻﺳﻄﻮﺍﻧﺔCD.
!ﻻﺗﺴﺘﻌﻤﻞﺍﺳﻄﻮﺍﻧﺎﺕﺑﻬﺎﺗﺼﺪﻋﺎﺕ،ﻣﻘﻄﻌﺔﺃﻭﻣﺸﻮﻫﺔﻭﺇﻻ
ﻓﺎﻥﺍﻻﺳﻄﻮﺍﻧﺎﺕﺍﻟﺘﺎﻟﻔﺔﻗﺪﺗﺆﺩﻱﺇﻟﻰﺗﻠﻒﺍﻟﻤﺸﻐﻞ.
!ﻋﺮﺽﺍﻻﺳﻄﻮﺍﻧﺎﺕCD-R/CD-RWﻏﻴﺮﺍﻟﻤﺨﺘﻮﻣﺔﻏﻴﺮ
ﻣﻤﻜﻦ.
!ﻻﺗﻌﻤﺪﺇﻟﻰﻟﻤﺲﺳﻄﺢﺍﻻﺳﻄﻮﺍﻧﺎﺕﺍﻟﺘﻲﺗﻢﺗﺴﺠﻴﻠﻬﺎ.
!ﻗﻢﺑﺘﺨﺰﻳﻦﺍﻹﺳﻄﻮﺍﻧﺎﺕﻓﻲﺍﻟﻌﻠﺐﺍﻟﺨﺎﺻﺔﺑﻬﻢﻋﻨﺪﻋﺪﻡ
ﺍﻹﺳﺘﻌﻤﺎﻝ.
!ﺗﻔﺎﺩﻯﺗﺮﻙﺍﻻﺳﻄﻮﺍﻧﺎﺕﻓﻲﺑﻴﺌﺎﺕﺣﺎﺭﺓﺟﺪًﺍﺑﻤﺎﻓﻲﺫﻟﻚﺃﺷﻌﺔ
ﺍﻟﺸﻤﺲﺍﻟﻤﺒﺎﺷﺮﺓ.
!ﻻﺗﻘﻢﺑﺘﺜﺒﻴﺖﺑﻄﺎﻗﺎﺕﻻﺻﻘﺔ،ﺍﻟﻜﺘﺎﺑﺔﻋﻠﻰﺍﻭﺗﻌﺮﻳﺾﺳﻄﺢ
ﺍﻹﺳﻄﻮﺍﻧﺔﻟﻠﻤﻮﺍﺩﺍﻟﻜﻴﻤﺎﻭﻳﺔ.
!ﻟﺘﻨﻈﻴﻒﺍﺳﻄﻮﺍﻧﺔCD،ﻗﻢﺑﻤﺴﺢﺍﻻﺳﻄﻮﺍﻧﺔﺑﺎﺳﺘﻌﻤﺎﻝﻗﻄﻌﺔ
ﻗﻤﺎﺵﻧﺎﻋﻤﺔﻣﻦﺍﻟﺨﺎﺭﺝﺇﻟﻰﺍﻟﻤﺮﻛﺰ.
!ﻗﺪﻳﻀﻌﻒﺍﻟﺘﻜﺜﻴﻒﺃﺩﺍﺀﺍﻟﻤﺸﻐﻞﻟﻔﺘﺮﺓﻣﺆﻗﺘﺔ.ﺃﺗﺮﻙﺍﻷﻣﺮﻟﻴﺘﻢ
ﺗﻌﺪﻳﻠﻪﺑﺪﺭﺟﺔﺣﺮﺍﺭﺓﺃﺩﻓﺄﻟﻤﺪﺓﺳﺎﻋﺔﺗﻘﺮﻳﺒًﺎ.ﻗﻢﺑﻤﺴﺢﺃﻱ
ﺃﻭﺳﺎﺥﻋﻠﻰﺍﻻﺳﻄﻮﺍﻧﺎﺕﺑﻘﻄﻌﺔﻗﻤﺎﺷﺔﻧﺎﻋﻤﺔ.
!ﻗﺪﻻﻳﻜﻮﻥﺇﻋﺎﺩﺓﻋﺮﺽﺍﻻﺳﻄﻮﺍﻧﺎﺕﻣﻤﻜﻨًﺎﺑﺴﺒﺐﺧﺼﺎﺋﺺ
ﺍﻻﺳﻄﻮﺍﻧﺔﻭﻧﻤﻂﺍﻻﺳﻄﻮﺍﻧﺔﻭﺍﻟﺒﺮﻧﺎﻣﺞﺍﻟﺘﻄﺒﻴﻘﻲﻟﻠﺘﺴﺠﻴﻞﻭﺑﻴﺌﺔ
iPod.ﻋﻨﺪﻇﻬﻮﺭﻗﺎﺋﻤﺔ
ﺍﻻﺧﺘﻴﺎﺭﺍﺕﺍﻟﺮﺋﻴﺴﻴﺔﻟﺠﻬﺎﺯ
iPod،ﻗﻢﺑﺘﻮﺻﻴﻞﺍﻟﻜﺒﻞ
ﻣﻦﺟﺪﻳﺪ.
ﺃﻋِﺪﺗﻬﻴﺌﺔﺟﻬﺎﺯiPod.
iPod.ﻋﻨﺪﻇﻬﻮﺭﻗﺎﺋﻤﺔ
ﺍﻻﺧﺘﻴﺎﺭﺍﺕﺍﻟﺮﺋﻴﺴﻴﺔﻟﺠﻬﺎﺯ
iPod،ﻗﻢﺑﺘﻮﺻﻴﻞﺍﻟﻜﺒﻞ
ﻣﻦﺟﺪﻳﺪ.
ﺃﻋِﺪﺗﻬﻴﺌﺔﺟﻬﺎﺯiPod.
ﻗﻢﺑﺘﺤﺪﻳﺚﺇﺻﺪﺍﺭﺟﻬﺎﺯ
iPod.
ﻗﻢﺑﺘﺤﺪﻳﺚﺇﺻﺪﺍﺭﺟﻬﺎﺯ
iPod.
iPod.ﻋﻨﺪﻇﻬﻮﺭﻗﺎﺋﻤﺔ
ﺍﻻﺧﺘﻴﺎﺭﺍﺕﺍﻟﺮﺋﻴﺴﻴﺔﻟﺠﻬﺎﺯ
iPod،ﻗﻢﺑﺘﻮﺻﻴﻞﺍﻟﻜﺒﻞ
ﻣﻦﺟﺪﻳﺪ.
ﺃﻋِﺪﺗﻬﻴﺌﺔﺟﻬﺎﺯiPod.
ﺗﺤﻘﻖﻣﻦﻋﺪﻡﺣﺼﻮﻝ
ﺗﻤﺎﺱﻛﻬﺮﺑﺎﺋﻲﻟﻜﺒﻞ
ﺗﻮﺻﻴﻞﺟﻬﺎﺯiPod
)ﻣﺜﺎﻝ،ﻏﻴﺮﻣﺤﺘﺒﺲﺑﻴﻦ
ﺟﺴﻤﻴﻦﻣﻌﺪﻧﻴﻴﻦ(.ﺑﻌﺪ
ﺍﻟﺘﺤﻘﻖ،ﻗﻢﺑﺈﺩﺍﺭﺓﻣﻔﺘﺎﺡ
ﺗﺸﻐﻴﻞﺍﻟﻤﺤﺮﻙﻟﻮﺿﻊ
ﺍﻹﻳﻘﺎﻑOFFﻭﺍﻟﻌﻮﺩﺓ
ﻟﻮﺿﻊﺍﻟﺘﺸﻐﻴﻞONﺃﻭ
ﺍﻓﺼﻞﺟﻬﺎﺯiPodﻭﻗﻢ
ﺑﺘﻮﺻﻴﻠﻪﻣﺮﺓﺃﺧﺮﻯ.
iPod.
ﻗﻢﺑﺎﺧﺘﻴﺎﺭﻗﺎﺋﻤﺔﺗﺤﺘﻮﻱ
ﻋﻠﻰﺃﻏﻨﻴﺎﺕ.
ﻗﻢﺑﺘﻮﺻﻴﻞﺟﻬﺎﺯiPod
ﻣﺘﻮﺍﻓﻖ.
ﺇﺧﻔﺎﻕﺟﻬﺎﺯiPodﺍﻓﺼﻞﺍﻟﻜﺒﻞﻋﻦﺟﻬﺎﺯ
iPod
ﺇﺧﻔﺎﻕﺟﻬﺎﺯiPodﺃﻋِﺪﺗﻬﻴﺌﺔﺟﻬﺎﺯiPod.
iPod
ﺇﺧﻔﺎﻕﺟﻬﺎﺯiPodﺍﻓﺼﻞﺍﻟﻜﺒﻞﻋﻦﺟﻬﺎﺯ
ﺟﻬﺎﺯiPodﻏﻴﺮ
ﻣﺸﺤﻮﻥﻭﻟﻜﻦﻳﻌﻤﻞ
ﺑﺼﻮﺭﺓﺻﺤﻴﺤﺔ
ﺍﻟﻘﺎﺋﻤﺔﺍﻟﺤﺎﻟﻴﺔ
ﺍﻟﺘﺨﺰﻳﻦUSBﺃﻭﺟﻬﺎﺯ
iPodﺑﻤﻨﻔﺬUSBﻟﻬﺬﺍ
ﺍﻟﺠﻬﺎﺯ.
iPod
ﺍﻹﺧﻄﺎﺭﺍﻟﺴﺒﺐﺍﻟﻔﻌﻞ
ERROR-19ﺇﺧﻔﺎﻕﺍﻻﺗﺼﺎﻝﺍﻓﺼﻞﺍﻟﻜﺒﻞﻋﻦﺟﻬﺎﺯ
N/A USBﺇﺻﺪﺍﺭﻗﺪﻳﻢﻣﻦﺟﻬﺎﺯ
ﺍﻟﻌﺮﺑﻴﺔ
ERROR-16ﺇﺻﺪﺍﺭﻗﺪﻳﻢﻣﻦﺟﻬﺎﺯ
ERROR-A1
CHECK USB
NO SONGSﻻﺗﻮﺟﺪﺃﻏﻨﻴﺎﺕﺍﻧﻘﻞﺍﻷﻏﻨﻴﺎﺕﺇﻟﻰﺟﻬﺎﺯ
STOPﻻﺗﻮﺟﺪﺃﻏﻨﻴﺎﺕﻓﻲ
NO DEVICEﻟﻢﻳﺘﻢﺗﻮﺻﻴﻞﺟﻬﺎﺯ
ﺇﻋﺎﺩﺓﺍﻟﻌﺮﺽﻭﺷﺮﻭﻁﺍﻟﺘﺨﺰﻳﻦﻭﻏﻴﺮﻫﺎ.
!ﺍﻟﻌﻮﺍﺋﻖﻓﻲﺍﻟﻄﺮﻳﻖﻗﺪﺗﻌﻴﻖﺍﻹﺳﺘﻤﺎﻉﻟﻼﺳﻄﻮﺍﻧﺔ.
!ﻗﻢﺑﻘﺮﺍﺀﺓﺍﻟﺘﻨﺒﻴﻬﺎﺕﺍﻻﺣﺘﻴﺎﻃﻴﺔﺍﻟﻤﺮﻓﻘﺔﻟﻼﺳﻄﻮﺍﻧﺎﺕﻗﺒﻞ
ﺍﺳﺘﻌﻤﺎﻟﻬﺎ.
<YRD5269-A
S>87
٢٦
Ar
Page 88

Black plate (106,1)
/
ﺍﻟﻤﻠﺤﻘﺎﺕ
ﻣﻌﻠﻮﻣﺎﺕﺇﺿﺎﻓﻴﺔ
Windows Media
DRM 9/10.
Windows Media
DRM 9/10ﺇﻟﻰﺟﻬﺎﺯ
USBﺍﻟﺘﻲﺗﺴﺘﻮﻓﻲﺷﺮﻭﻁ
USB Mass
Storage Class.
USBﻭﻻﺗﺴﺘﻌﻤﻠﻪ.ﺃﺩِﺭ
USBﺍﻟﻤﺴﺘﻮﻓﻲﻟﻠﺸﺮﻭﻁ.
SDﻭﻣﻦﺛﻢﻗﻢﺑﺈﺩﺧﺎﻟﻬﺎ
SDﻭﻣﻦﺛﻢﻗﻢﺑﺈﺩﺧﺎﻟﻬﺎ
OFFﻭﺍﻟﻌﻮﺩﺓﻟﻮﺿﻊ
USBﺃﻭSD.
FAT16ﺃﻭFAT32.
ﻗﻢﺑﺎﻻﺳﺘﻤﺎﻉﻟﻤﻠﻒﺻﻮﺕ
ﻏﻴﺮﻣﺤﻤﻲﺑﻮﺍﺳﻄﺔ
Media™ DRM
ﺍﻧﻘﻞﻣﻠﻔﺎﺕﺍﻟﺼﻮﺕﻏﻴﺮ
ﺍﻟﻤﺤﻤﻴﺔﺑﻮﺍﺳﻄﺔ
Media DRM 9/10
ﺍﻟﺘﺨﺰﻳﻦﺍﻟﺨﺎﺭﺟﻲﻭﻗﻢ
ﺑﺎﻟﺘﻮﺻﻴﻞ.
ﻗﻢﺑﺘﻮﺻﻴﻞﺟﻬﺎﺯﺍﻟﺘﺨﺰﻳﻦ
ﻓﺌﺔﺍﻟﺘﺨﺰﻳﻦﺍﻟﺠﻤﺎﻋﻲ
ﺗﺄﻛﺪﻣﻦﺃﻥﻣﻮﺻّﻞUSB
ﺃﻭﻛﺒﻞUSBﻏﻴﺮﻋﺎﻟﻖ
ﺑﺸﻲءﻣﺎﺃﻭﺗﺎﻟﻒ.
ﺍﻓﺼﻞﺟﻬﺎﺯﺍﻟﺘﺨﺰﻳﻦ
ﻣﻔﺘﺎﺡﺗﺸﻐﻴﻞﺍﻟﻤﺤﺮﻙﺇﻟﻰ
ﺍﻟﻮﺿﻊOFF،ﺛﻢﺇﻟﻰ
ﺍﻟﻮﺿﻊACCﺃﻭONﺛﻢ
ﻗﻢﺑﺘﻮﺻﻴﻞﺟﻬﺎﺯﺍﻟﺘﺨﺰﻳﻦ
ﻗﻢﺑﺈﺧﺮﺍﺝﺑﻄﺎﻗﺔﺍﻟﺬﺍﻛﺮﺓ
ﻣﺮﺓﺃﺧﺮﻯ.
ﻣﺮﺓﺃﺧﺮﻯ.
ﺍﻟﺘﺎﻟﻴﺔ.
–ﻗﻢﺑﺈﺩﺍﺭﺓﻣﻔﺘﺎﺡﺗﺸﻐﻴﻞ
ﺍﻟﻤﺤﺮﻙﻟﻮﺿﻊﺍﻹﻳﻘﺎﻑ
ﺍﻟﺘﺸﻐﻴﻞON.
–ﺍﻓﺼﻞﻭﻗﻢﺑﺈﺧﺮﺍﺝﺟﻬﺎﺯ
ﺍﻟﺘﺨﺰﻳﻦﺍﻟﺨﺎﺭﺟﻲ.
–ﻗﻢﺑﺎﻟﺘﻐﻴﻴﺮﻟﻤﺼﺪﺭ
ﻣﺨﺘﻠﻒ.
ﺛﻢﻗﻢﺑﺎﻟﻌﻮﺩﺓﺇﻟﻰﻣﺼﺪﺭ
ﻳﻨﺒﻐﻲﺻﻴﺎﻏﺔﺟﻬﺎﺯ
ﺍﻟﺘﺨﺰﻳﻦﺍﻟﺨﺎﺭﺟﻲﺑﺎﺳﺘﻌﻤﺎﻝ
9/10
USB.
FAT32
ﻳﺤﺘﻮﻱﺟﻬﺎﺯﺍﻟﺘﺨﺰﻳﻦ
ﺍﻟﺨﺎﺭﺟﻲﺍﻟﻤﻮﺻﻮﻝﻋﻠﻰ
SKIPPED
ﻣﻠﻔﺎﺕWMAﺍﻟﻤﺤﻤﻴّﺔ
ﺑﻮﺍﺳﻄﺔWindows
ﺇﺧﻄﺎﺭﺍﺕﺍﻟﺨﻄﺄ
ﻋﻨﺪﻣﺎﺗﺘﺼﻞﺑﻮﻛﻴﻠﻚﺃﻭﺑﺄﻗﺮﺏﻣﺮﻛﺰﺻﻴﺎﻧﺔﻟﺒﺎﻳﻮﻧﻴﺮ،ﺗﺄﻛﺪﻣﻦ
ﺗﺴﺠﻴﻞﺇﺧﻄﺎﺭﺍﻟﺨﻄﺄ.
!ﺑﻄﺎﻗﺔﺍﻟﺬﺍﻛﺮﺓSDﻣﺘﺎﺣﺔﻓﻘﻂﻣﻊﺍﻟﻤﻮﺩﻳﻞDEH-
4150SD.
PROTECTﺟﻤﻴﻊﺍﻟﻤﻠﻔﺎﺕﺍﻟﻤﻮﺟﻮﺩﺓ
ﻓﻲﺟﻬﺎﺯﺍﻟﺘﺨﺰﻳﻦ
ﺍﻟﺨﺎﺭﺟﻲﻣﺤﻤﻴﺔﺑﻮﺍﺳﻄﺔ
ﺍﻟﺒﺮﺍﻣﺞWindows
ERROR-11, 12,
ﺇﺳﻄﻮﺍﻧﺔﻣﺘﺴﺨﺔﻗﻢﺑﺘﻨﻈﻴﻒﺍﻹﺳﻄﻮﺍﻧﺔ.
N/A USBﺟﻬﺎﺯﺍﻟﺘﺨﺰﻳﻦUSB
ﺍﻟﻤﻮﺻﻞﻏﻴﺮﻣﺪﻋﻮﻡﻣﻦ
ﻗﺒﻞﻫﺬﺍﺍﻟﺠﻬﺎﺯ.
CHECK USBﺣﺪﺙﺗﻤﺎﺱﻛﻬﺮﺑﺎﺋﻲﻣﻊ
ﻣﻮﺻﻞUSBﺃﻭﻛﺒﻞ
ﺟﻬﺎﺯﺍﻟﺘﺨﺰﻳﻦUSB
ﻳﺴﺘﻬﻠﻚﺃﻛﺜﺮﻣﻦ٥٠٠ﻡ
ﺃ)ﺍﻟﺤﺪﺍﻷﻗﺼﻰ
ﺍﻟﻤﺴﻤﻮﺡﺑﻪﻟﻠﺘﻴﺎﺭ(.
CHECK SDﺗﻴﺎﺭﻛﻬﺮﺑﺎﺋﻲﻋﺎﻟﻲﻋﻠﻰ
ﺑﻄﺎﻗﺔﺫﺍﻛﺮﺓSD
ﺇﺧﻔﺎﻕﺍﻻﺗﺼﺎﻝﻗﻢﺑﺈﺧﺮﺍﺝﺑﻄﺎﻗﺔﺍﻟﺬﺍﻛﺮﺓ
ERROR-19ﺇﺧﻔﺎﻕﺍﻻﺗﺼﺎﻝﻗﻢﺑﺘﻨﻔﻴﺬﺇﺣﺪﻯﺍﻟﻌﻤﻠﻴﺎﺕ
ﺍﻟﻤﺤﺮﻙﻟﻮﺿﻊﺍﻹﻳﻘﺎﻑ
OFFﻭﺍﻟﻌﻮﺩﺓﻟﻮﺿﻊ
ﺍﻟﺘﺸﻐﻴﻞON،ﺃﻭﻗﻢ
ﺑﺎﻟﺘﺤﻮﻳﻞﺇﻟﻰﻣﺼﺪﺭ
ﻣﺨﺘﻠﻒ،ﺛﻢﺍﻟﻌﻮﺩﺓﺇﻟﻰ
ﻣﺸﻐّﻞﺍﻻﺳﻄﻮﺍﻧﺎﺕCD.
ﺇﺳﺘﺒﺪﻝﺍﻹﺳﻄﻮﺍﻧﺔ.
ﺇﺳﺘﺒﺪﻝﺍﻹﺳﻄﻮﺍﻧﺔ.
ﺇﺳﺘﺒﺪﻝﺍﻹﺳﻄﻮﺍﻧﺔ.
ﺇﺳﺘﺒﺪﻝﺍﻹﺳﻄﻮﺍﻧﺔ.
ﺇﺳﺘﺒﺪﻝﺍﻹﺳﻄﻮﺍﻧﺔ.
ﺍﺳﻄﻮﺍﻧﺔﺑﻬﺎﺧﺪﻭﺵﺇﺳﺘﺒﺪﻝﺍﻹﺳﻄﻮﺍﻧﺔ.
ﻛﻬﺮﺑﺎﺋﻲﺃﻭﻣﻴﻜﺎﻧﻴﻜﻲﻗﻢﺑﺈﺩﺍﺭﺓﻣﻔﺘﺎﺡﺗﺸﻐﻴﻞ
ﺇﺩﺧﺎﻟﻬﺎﻻﺗﺤﺘﻮﻱﻋﻠﻰ
ﺃﻱﺑﻴﺎﻧﺎﺕ
ﺍﻻﺳﻄﻮﺍﻧﺔ
ﺇﺩﺧﺎﻟﻬﺎﻻﺗﺤﺘﻮﻱﻋﻠﻰ
ﺃﻱﻣﻠﻔﺎﺕﻳﻤﻜﻦ
ﺍﻻﺳﺘﻤﺎﻉﺇﻟﻴﻬﺎ
ﺇﺩﺧﺎﻟﻬﺎﺗﺤﺘﻮﻱﻋﻠﻰ
ﻣﻠﻔﺎﺕWMAﻣﺤﻤﻴﺔ
ﺑﻮﺍﺳﻄﺔDRM
ﺍﻻﺳﻄﻮﺍﻧﺔﺍﻟﺘﻲﺗﻢ
ﺇﺩﺧﺎﻟﻬﺎﻣﺤﻤﻴﺔﺑﻮﺍﺳﻄﺔ
DRM
ERROR-10, 11,
12, 15, 17, 30,
ERROR-22, 23ﻻﻳﻤﻜﻦﻋﺮﺽﺻﻴﻐﺔ
NO AUDIOﺍﻻﺳﻄﻮﺍﻧﺔﺍﻟﺘﻲﺗﻢ
ﻣﺸﻐّﻞﺍﻻﺳﻄﻮﺍﻧﺎﺕCDﺍﻟﺪﺍﺧﻠﻲ
ﺍﻹﺧﻄﺎﺭﺍﻟﺴﺒﺐﺍﻟﻔﻌﻞ
17, 30
A0
ERROR-15ﺍﻻﺳﻄﻮﺍﻧﺔﺍﻟﺘﻲﺗﻢ
SKIPPEDﺍﻻﺳﻄﻮﺍﻧﺔﺍﻟﺘﻲﺗﻢ
PROTECTﻛﻞﺍﻟﻤﻠﻔﺎﺕﻓﻲ
ﺟﻬﺎﺯﺍﻟﺘﺨﺰﻳﻦﺍﻟﺨﺎﺭﺟﻲ)USB،SD(
ﺍﻹﺧﻄﺎﺭﺍﻟﺴﺒﺐﺍﻟﻔﻌﻞ
ﺟﻬﺎﺯﺍﻟﺘﺨﺰﻳﻦﺍﻟﺨﺎﺭﺟﻲ
ﻭﻗﻢﺑﺘﻮﺻﻴﻠﻪ.
ERROR-23ﻻﻳﻤﻜﻦﺻﻴﺎﻏﺔﺟﻬﺎﺯ
ﺍﻟﺘﺨﺰﻳﻦﺍﻟﺨﺎﺭﺟﻲ
ﺑﺎﺳﺘﻌﻤﺎﻝFAT16ﺃﻭ
ﺍﺗْﺒﻊﺗﻌﻠﻴﻤﺎﺕﺫﺍﻛﺮﺓUSB
ﻟﻤﻨﻊﺗﻌﻄﻴﻞﺍﻟﻮﻇﻴﻔﺔ
ﺍﻷﻣﻨﻴﺔ.
ﻗﻢﺑﺘﻮﺻﻴﻞﺟﻬﺎﺯﺗﺨﺰﻳﻦ
USBﻣﺘﻮﺍﻓﻖ.
iPodﺑﻤﻨﻔﺬUSBﻟﻬﺬﺍ
NO AUDIOﻻﺗﻮﺟﺪﺃﻏﻨﻴﺎﺕﺍﻧﻘﻞﻣﻠﻔﺎﺕﺍﻟﺼﻮﺕﺇﻟﻰ
ﺗﻢﺗﻮﺻﻴﻞﺫﺍﻛﺮﺓUSB
ﻣﻊﻭﻇﻴﻔﺔﺃﻣﻨﻴﺔ
NO DEVICEﻟﻢﻳﺘﻢﺗﻮﺻﻴﻞﺟﻬﺎﺯ
ﺍﻟﺘﺨﺰﻳﻦUSBﺃﻭﺟﻬﺎﺯ
ﺍﻟﺠﻬﺎﺯ.
٢٥
Ar
<YRD5269-A
S>88
Page 89

Black plate (105,1)
/
ﻓﻲﺻﻔﺤﺔ٦.
ﻓﻲﺍﻟﺼﻔﺤﺔﺍﻟﺴﺎﺑﻘﺔ.
ﺍﻟﻘﺴﻢ
٠٥
ﻭﻇﺎﺋﻒﺃﺧﺮﻯ
ﺇﺳﺘﻌﻤﺎﻝﺍﻟﻤﺼﺪﺭﺍﻟﺜﺎﻧﻮﻱ
ﻳﻤﻜﻨﻚﺗﻮﺻﻴﻞﺟﻬﺎﺯﺛﺎﻧﻮﻱﺑﻬﺬﺍﺍﻟﺠﻬﺎﺯﺑﺎﺳﺘﻌﻤﺎﻝﻛﺒﻞﺫﻱﻗﺎﺑﺲ
ﺳﻴﺘﺮﻳﻮﻣﻴﻨﻲ.
%ﺃﺩﺧِﻞﻗﺎﺑﺲﺍﻟﺴﻴﺘﺮﻳﻮﻣﻴﻨﻲﻓﻲﻣﻘﺒﺲﺍﻟﺪﺧﻞﻋﻠﻰﻫﺬﺍ
ﺍﻟﺠﻬﺎﺯ.
ﺍﻟﻮﺣﺪﺓﺍﻟﺮﺋﻴﺴﻴﺔ
ﻟﻤﺰﻳﺪﻣﻦﺍﻟﺘﻔﺎﺻﻴﻞ،ﺭﺍﺟﻊ
ﺇﺧﺘﻴﺎﺭﺍﻟﺜﺎﻧﻮﻱAUXﻛﻤﺼﺪﺭ
%ﺍﺿﻐﻂSRC/OFFﻻﺧﺘﻴﺎﺭAUXﻛﻤﺼﺪﺭ.
#ﺇﺫﺍﻟﻢﻳﺘﻢﺗﺸﻐﻴﻞﺍﻟﺘﻬﻴﺌﺔﺍﻟﺜﺎﻧﻮﻳﺔ،ﻓﻼﻳﻤﻜﻦﺍﺧﺘﻴﺎﺭAUX.ﻟﻤﺰﻳﺪ
ﺗﺤﻮﻳﻞﺍﻟﻮﺿﻊﺍﻟﺜﺎﻧﻮﻱ
ﻣﻦﺍﻟﺘﻔﺎﺻﻴﻞ،ﺭﺍﺟﻊ
ﺍﻟﻌﺮﺑﻴﺔ
ﺗﺸﻐﻴﻞﺃﻭﺇﻳﻘﺎﻑﻋﺎﺭﺿﺔﺍﻟﺴﺎﻋﺔ
ﻳﻤﻜﻨﻚﺗﺸﻐﻴﻞﺃﻭﺇﻳﻘﺎﻑﻋﺎﺭﺿﺔﺍﻟﺴﺎﻋﺔ.
!ﻋﺮﺽﺍﻟﺴﺎﻋﺔﻳﻈﻬﺮﻓﻲﻟﻮﺣﺔﺍﻟﻌﺮﺽﺣﺘﻰﻋﻨﺪﻣﺎﺗﻜﻮﻥ
ﺍﻟﻤﺼﺎﺩﺭﻓﻲﻭﺿﻊﺍﻹﻳﻘﺎﻑ.
%ﺍﺿﻐﻂCLOCK/DISP OFFﻟﺘﺸﻐﻴﻞﺃﻭﺇﻳﻘﺎﻑﻋﺎﺭﺿﺔ
ﺍﻟﺴﺎﻋﺔ.
ﻛﻠﻤﺎﺿﻐﻄﺖCLOCK/DISP OFFﻳﺘﻢﺗﺸﻐﻴﻞﺃﻭﺇﻳﻘﺎﻑ
ﻋﺎﺭﺿﺔﺍﻟﺴﺎﻋﺔ.
#ﺗﺨﺘﻔﻲﻋﺎﺭﺿﺔﺍﻟﺴﺎﻋﺔﻣﺆﻗﺘﺎًﻋﻨﺪﻗﻴﺎﻣﻚﺑﻌﻤﻠﻴﺎﺕﺗﺸﻐﻴﻞﺃﺧﺮﻯ،
ﻭﻟﻜﻦﺗﻌﻮﺩﻋﺎﺭﺿﺔﺍﻟﺴﺎﻋﺔﻟﻠﻈﻬﻮﺭﻣﺮﺓﺃﺧﺮﻯﺑﻌﺪ٢٥ﺛﻮﺍﻥ.
ﺗﺤﻮﻳﻞﺑﻴﺎﻧﺎﺕﺍﻟﻌﺮﺽﻭﺃﺿﺎﺀﺓﺍﻟﺰﺭ
ﻳﻤﻜﻦﺗﺸﻐﻴﻞﺃﻭﺇﻳﻘﺎﻑﺑﻴﺎﻧﺎﺕﺍﻟﻌﺮﺽﻭﺃﺿﺎﺀﺓﺍﻟﺰﺭ.
%ﺍﺿﻐﻂﻭﺍﺳﺘﻤﺮﺑﻀﻐﻂCLOCK/DISP OFF.
ﺍﻟﻀﻐﻂﻭﺍﻻﺳﺘﻤﺮﺍﺭﺑﻀﻐﻂCLOCK/DISP OFFﻳﻘﻮﻡﺑﺘﺸﻐﻴﻞ
ﺃﻭﺇﻳﻘﺎﻑﺑﻴﺎﻧﺎﺕﺍﻟﻌﺮﺽﻭﺇﺿﺎﺀﺓﺍﻟﺰﺭ.
#ﺑﻴﻨﻤﺎﻳﺘﻢﺇﻳﻘﺎﻑﺑﻴﺎﻧﺎﺕﺍﻟﻌﺮﺽ،ﻳﻀﻲءﺍﻟﺰﺭ
CLOCK/DISP OFF.
#ﺣﺘﻰﺇﺫﺍﺗﻢﺇﻳﻘﺎﻑﺑﻴﺎﻧﺎﺕﺍﻟﻌﺮﺽ،ﻳﻤﻜﻦﺇﺟﺮﺍﺀﺍﻟﻌﻤﻠﻴﺔ.ﺇﺫﺍﺗﻢ
ﺇﺟﺮﺍﺀﺍﻟﻌﻤﻠﻴﺔﺑﻴﻨﻤﺎﺗﻜﻮﻥﺑﻴﺎﻧﺎﺕﺍﻟﻌﺮﺽﻋﻠﻰﻭﺿﻊﺍﻹﻳﻘﺎﻑ،ﺳﺘﻀﻲء
ﺍﻟﺸﺎﺷﺔﻟﺒﻀﻊﺛﻮﺍﻥﻭﺛﻢﺗﺘﻮﻗﻒﻣﺮﺓﺃﺧﺮﻯ.
٢٤
Ar
<YRD5269-A
S>89
Page 90

/
٠٤
Black plate (104,1)
ﺍﻟﻘﺴﻢ
ﺍﻟﺘﻬﻴﺌﺎﺕﺍﻟﻤﺒﺪﺋﻴﺔ
SUB W)ﻣﺠﻬﺎﺭﺍﻟﺘﺮﺩﺩﺍﺕﺍﻟﺨﻔﻴﻀﺔﺍﻟﻔﺮﻋﻲ(
REAR)ﺳﻤﺎﻋﺔﻛﺎﻣﻠﺔﺍﻟﻨﻄﺎﻕ(
PREOUT
)ﺗﻬﻴﺌﺔﺧﺮﺝRCA(
ﺗﺤﻮﻳﻞﺍﻟﻮﺿﻊﺍﻟﺜﺎﻧﻮﻱ
ﻳﻤﻜﻦﺍﺳﺘﻌﻤﺎﻝﺟﻬﺎﺯﺛﺎﻧﻮﻱﻣﻊﻫﺬﺍﺍﻟﺠﻬﺎﺯ.ﻗﻢﺑﺘﺸﻐﻴﻞﺍﻟﺘﻬﻴﺌﺔ
ﺍﻟﺜﺎﻧﻮﻳﺔﻋﻨﺪﺍﺳﺘﻌﻤﺎﻝﺟﻬﺎﺯﺛﺎﻧﻮﻱﻣﻮﺻﻞﺑﻬﺬﺍﺍﻟﺠﻬﺎﺯ.
#ﻋﻨﺪﻣﺎﺗﺨﺘﺎﺭREAR SP :SUB W,ﻻﻳﻤﻜﻨﻚﺿﺒﻂ
PREOUT)ﺗﻬﻴﺌﺔﺧﺮﺝRCA(.
ﻣﻼﺣﻈﺎﺕ
!ﺣﺘﻰﺇﺫﺍﻗﻤﺖﺑﺘﻐﻴﻴﺮﻫﺬﻩﺍﻟﺘﻬﻴﺌﺔ،ﻓﺈﻧﻪﻟﻦﻳﻜﻮﻥﻫﻨﺎﻙﺧﺮﺝﺣﺘﻰ
ﺗﻘﻮﻡﺑﺘﺸﻐﻴﻞﺧﺮﺝﻣﺠﻬﺎﺭﺍﻟﺘﺮﺩﺩﺍﺕﺍﻟﺨﻔﻴﻀﺔﺍﻟﻔﺮﻋﻲ)ﺭﺍﺟﻊ
ﻓﻲﺻﻔﺤﺔ
ﺇﺳﺘﻌﻤﺎﻝﺧﺮﺝﻣﺠﻬﺎﺭﺍﻟﺘﺮﺩﺩﺍﺕﺍﻟﺨﻔﻴﻀﺔﺍﻟﻔﺮﻋﻲ
١٩(.
!ﺇﺫﺍﻗﻤﺖﺑﺘﻐﻴﻴﺮﻫﺬﻩﺍﻟﺘﻬﻴﺌﺔ،ﻓﺈﻥﺧﺮﺝﻣﺠﻬﺎﺭﺍﻟﺘﺮﺩﺩﺍﺕﺍﻟﺨﻔﻴﻀﺔ
ﺍﻟﻔﺮﻋﻲﻓﻲﻗﺎﺋﻤﺔﺍﻟﺼﻮﺕﺳﺘﻌﻮﺩﻟﻮﺿﻊﺗﻬﻴﺌﺔﺍﻟﻤﺼﻨﻊ.
!ﻛﻼﺧﺮﺟﻲّﺳﻠﻜﻲّﺍﻟﺴﻤﺎﻋﺘﻴﻦﺍﻟﺨﻠﻔﻴﺘﻴﻦﻭﺧﺮﺝRCAﺍﻟﺨﻠﻔﻲﻳﺘﻢ
ﺗﺤﻮﻳﻠﻬﻤﺎﻓﻲﻧﻔﺲﺍﻟﻮﻗﺖﻓﻲﻫﺬﻩﺍﻟﺘﻬﻴﺌﺔ.
ﻓﻲﺍﻟﺼﻔﺤﺔﺍﻟﺴﺎﺑﻘﺔ.
١ﺍﺳﺘﻌﻤﻞMULTI-CONTROLﻻﺧﺘﻴﺎﺭAUXﻓﻲﻗﺎﺋﻤﺔ
ﺍﻟﺘﻬﻴﺌﺔﺍﻟﻤﺒﺪﺋﻴﺔ.
ﺿﺒﻂﻋﻤﻠﻴﺎﺕﺍﻟﺘﻬﻴﺌﺎﺕﺍﻟﻤﺒﺪﺋﻴﺔ
ﺭﺍﺟﻊ
٢ﺍﺿﻐﻂMULTI-CONTROLﻟﺘﺸﻐﻴﻞAUX.
#ﻹﻳﻘﺎﻑAUX،ﺇﺿﻐﻂMULTI-CONTROLﻣﺮﺓ
ﺃﺧﺮﻯ.
ﺗﻬﻴﺌﺔﺍﻟﺨﺮﺝﺍﻟﺨﻠﻔﻲﻭﺿﺎﺑﻂ
ﻣﺠﻬﺎﺭﺍﻟﺘﺮﺩﺩﺍﺕﺍﻟﺨﻔﻴﻀﺔﺍﻟﻔﺮﻋﻲ
ﻳﻤﻜﻦﺍﺳﺘﻌﻤﺎﻝﺍﻟﺨﺮﺝﺍﻟﺨﻠﻔﻲﻟﻬﺬﺍﺍﻟﺠﻬﺎﺯ)ﺧﺮﺝﺳﻠﻚﺍﻟﺴﻤﺎﻋﺎﺕ
ﺍﻟﺨﻠﻔﻴﺔﻭﺧﺮﺝRCAﺍﻟﺨﻠﻔﻲ(ﻟﺘﻮﺻﻴﻞﺳﻤﺎﻋﺔﻛﺎﻣﻠﺔﺍﻟﻨﻄﺎﻕ
ﺗﺤﻮﻳﻞﺍﻟﺘﺤﺮﻳﻚﺍﻟﺪﺍﺋﻢ
ﻛﻠﻤﺎﻛﺎﻧﺖﻭﻇﻴﻔﺔﺍﻟﺘﺤﺮﻳﻚﺍﻟﻤﺴﺘﻤﺮEver Scrollﻣﻬﻴﺄﺓﻋﻠﻰ
ﻭﺿﻊﺍﻟﺘﺸﻐﻴﻞON،ﻓﺈﻥﻣﻌﻠﻮﻣﺎﺕﺍﻟﻨﺺﺍﻟﻤﺴﺠﻠﺔﺗﺘﺤﺮﻙ
ﺑﺎﺳﺘﻤﺮﺍﺭﻋﻠﻰﻟﻮﺣﺔﺍﻟﻌﺮﺽ.ﺍﺿﺒﻂﻋﻠﻰﻭﺿﻊﺍﻹﻳﻘﺎﻑOFF
ﺇﺫﺍﻛﻨﺖﺗﻔﻀﻞﺃﻥﺗﺘﺤﺮﻙﺍﻟﻤﻌﻠﻮﻣﺎﺕﻣﺮﺓﻭﺍﺣﺪﺓﻓﻘﻂ.
١ﺍﺳﺘﻌﻤﻞMULTI-CONTROLﻻﺧﺘﻴﺎﺭ
EVER SCROLLﻓﻲﻗﺎﺋﻤﺔﺍﻟﺘﻬﻴﺌﺔﺍﻟﻤﺒﺪﺋﻴﺔ.
ﻓﻲﺍﻟﺼﻔﺤﺔﺍﻟﺴﺎﺑﻘﺔ.
ﺿﺒﻂﻋﻤﻠﻴﺎﺕﺍﻟﺘﻬﻴﺌﺎﺕﺍﻟﻤﺒﺪﺋﻴﺔ
ﺭﺍﺟﻊ
٢ﺇﺿﻐﻂMULTI-CONTROLﻟﺘﺸﻐﻴﻞﻭﺿﻊﺍﻟﺘﺤﺮﻳﻚ
ﺍﻟﺪﺍﺋﻢ.
#ﻹﻳﻘﺎﻑﺗﺸﻐﻴﻞﻭﺿﻊﺍﻟﺘﺤﺮﻳﻚﺍﻟﺪﺍﺋﻢ،ﺇﺿﻐﻂ
MULTI-CONTROLﻣﺮﺓﺃﺧﺮﻯ.
PREOUT:SUB W(.ﺇﺫﺍﻏﻴّﺮﺕﺗﻬﻴﺌﺔﺍﻟﺨﺮﺝﺍﻟﺨﻠﻔﻴﺔﺇﻟﻰ
REAR SP :SUB W،ﻳﻤﻜﻨﻚﺗﻮﺻﻴﻞﺳﻠﻚﺍﻟﺴﻤﺎﻋﺔﺍﻟﺨﻠﻔﻴﺔ
REAR SP :FULL(،ﺗﺴﺘﻄﻴﻊﻭﺻﻞﺧﺮﺝﻣﺠﻬﺎﺭﺍﻟﺘﺮﺩﺩﺍﺕ
PREOUT:SUB WﺍﻟﺪﺍﺧﻠﻲﺃﻭPREOUT :REAR
)REAR SP :FULL/PREOUT:REAR(ﺃﻭﻣﺠﻬﺎﺭﺗﺮﺩﺩﺍﺕ
ﺧﻔﻴﻀﺔﻓﺮﻋﻲ)REAR SP :SUB W/
ﻣﺒﺎﺷﺮﺓﺑﻤﺠﻬﺎﺭﺗﺮﺩﺩﺍﺕﺧﻔﻴﻀﺔﻓﺮﻋﻲﺩﻭﻥﺍﺳﺘﻌﻤﺎﻝﻣﻀﺨﻢ
ﺛﺎﻧﻮﻱ.
ﻣﺒﺪﺋﻴﺎً،ﺍﻟﻮﺣﺪﺓﻣﻬﻴﺌﺔﻟﻮﺻﻠﺔﺍﻟﻨﻄﺎﻕﺍﻟﻜﺎﻣﻞﻟﻠﺴﻤﺎﻋﺔﺍﻟﺨﻠﻔﻴﺔ
)REAR SP :FULL(.ﻋﻨﺪﻣﺎﻳﺘﻢﻭﺻﻞﺍﻟﺨﺮﺝﺍﻟﺨﻠﻔﻲﻣﻊ
ﺳﻤﺎﻋﺎﺕﺫﺍﺕﻧﻄﺎﻕﻛﺎﻣﻞ)ﻋﻨﺪﻣﺎﻳﺘﻢﺍﺧﺘﻴﺎﺭ
ﺍﻟﺨﻔﻴﻀﺔﺍﻟﻔﺮﻋﻲRCAﻣﻊﻣﺠﻬﺎﺭﺍﻟﺘﺮﺩﺩﺍﺕﺍﻟﺨﻔﻴﻀﺔﺍﻟﻔﺮﻋﻲ.
ﻓﻲﻫﺬﻩﺍﻟﺤﺎﻟﺔ،ﻳﻤﻜﻨﻚﺃﻥﺗﺨﺘﺎﺭﺇﺳﺘﻌﻤﺎﻝﺿﺎﺑﻂﻣﺠﻬﺎﺭﺍﻟﺘﺮﺩﺩﺍﺕ
ﺍﻟﺨﻔﻴﻀﺔﺍﻟﻔﺮﻋﻲ)ﻣﺮﺷّﺢﺍﻟﺘﻤﺮﻳﺮﺍﻟﻤﻨﺨﻔﺾ،ﻃﻮﺭ(ﺃﻭ
ﺍﻟﺜﺎﻧﻮﻱ.
١ﺍﺳﺘﻌﻤﻞMULTI-CONTROLﻻﺧﺘﻴﺎﺭ
SW CONTROLﻓﻲﻗﺎﺋﻤﺔﺍﻟﺘﻬﻴﺌﺔﺍﻟﻤﺒﺪﺋﻴﺔ.
ﻓﻲﺍﻟﺼﻔﺤﺔﺍﻟﺴﺎﺑﻘﺔ.
ﺿﺒﻂﻋﻤﻠﻴﺎﺕﺍﻟﺘﻬﻴﺌﺎﺕﺍﻟﻤﺒﺪﺋﻴﺔ
ﺭﺍﺟﻊ
٢ﺍﺿﻐﻂMULTI-CONTROLﻟﻌﺮﺽﻭﺿﻊﺍﻟﺘﻬﻴﺌﺔ.
#ﺍﺿﻐﻂDISP/BACK/SCRLﻟﻠﻌﻮﺩﺓﺇﻟﻰﺍﻟﻌﺮﺽﺍﻟﺴﺎﺑﻖ.
٣ﺍﺳﺘﻌﻤﻞMULTI-CONTROLﻻﺧﺘﻴﺎﺭﺍﻟﺘﻬﻴﺌﺔ
ﺍﻟﻤﺮﻏﻮﺑﺔ.
ﺍﺿﻐﻂﻟﺘﻐﻴﻴﺮﺍﻟﺨﺎﻧﺔﺍﻟﺘﻲﺗﻮﺩﺿﺒﻄﻬﺎﺑﻴﻦﻳﺴﺎﺭﻭﻳﻤﻴﻦ.ﺃﺩﺭﻟﺘﻐﻴﻴﺮ
ﺍﻟﺘﻬﻴﺌﺔﻟﻜﻞﺧﺎﻧﺔ.
٢٣
ﺍﻟﺨﺎﻧﺔﺍﻟﻴﺴﺮﻯﺍﻟﺨﺎﻧﺔﺍﻟﻴﻤﻨﻰ
FULL)ﺳﻤﺎﻋﺔﻛﺎﻣﻠﺔﺍﻟﻨﻄﺎﻕ(
SUB W)ﻣﺠﻬﺎﺭﺍﻟﺘﺮﺩﺩﺍﺕﺍﻟﺨﻔﻴﻀﺔﺍﻟﻔﺮﻋﻲ(
Ar
<YRD5269-A
S>90
REAR SP
)ﺗﻬﻴﺌﺔﺍﻟﺴﻤﺎﻋﺔﺍﻟﺨﻠﻔﻴﺔ(
Page 91

Black plate (103,1)
/
ﺍﻟﻘﺴﻢ
٠٤
ﺍﻟﺘﻬﻴﺌﺎﺕﺍﻟﻤﺒﺪﺋﻴﺔ
ﺍﻟﻤﺤﻄﺎﺕﺑﺎﺳﺘﻌﻤﺎﻝﺍﻟﻤﻮﺍﻟﻔﺔﺍﻟﻴﺪﻭﻳﺔﺃﻭﺍﺳﺘﻌﻤﻞﻣﻮﺍﻟﻔﺔﺍﻟﺒﺤﺚ
ﻣﺮﺓﺃﺧﺮﻯ.
١ﺍﺳﺘﻌﻤﻞMULTI-CONTROLﻻﺧﺘﻴﺎﺭFM STEPﻓﻲ
ﻗﺎﺋﻤﺔﺍﻟﺘﻬﻴﺌﺔﺍﻟﻤﺒﺪﺋﻴﺔ.
ﻓﻲﻫﺬﻩﺍﻟﺼﻔﺤﺔ.
ﺿﺒﻂﻋﻤﻠﻴﺎﺕﺍﻟﺘﻬﻴﺌﺎﺕﺍﻟﻤﺒﺪﺋﻴﺔ
ﺭﺍﺟﻊ
٢ﺍﺿﻐﻂMULTI-CONTROLﻟﻌﺮﺽﻭﺿﻊﺍﻟﺘﻬﻴﺌﺔ.
٣ﺃﺩﺭMULTI-CONTROLﻻﺧﺘﻴﺎﺭﻣﺮﺣﻠﺔﻣﻮﺍﻟﻔﺔﺍﻟﻤﻮﺟﺔ
FM.
ﺇﺩﺍﺭﺓMULTI-CONTROLﻳﻐﻴّﺮﻣﺮﺣﻠﺔﻣﻮﺍﻟﻔﺔﺑﺚﻣﻮﺟﺎﺕ
FMﺑﻴﻦ٥٠ﻙﻫـﻭ١٠٠ﻙﻫـ.ﻣﺮﺣﻠﺔﻣﻮﺍﻟﻔﺔﺑﺚFM
ﺍﻟﻤﺨﺘﺎﺭﺓﺗﻈﻬﺮﻓﻲﻟﻮﺣﺔﺍﻟﻌﺮﺽ.
#ﻳﻤﻜﻨﻚﻛﺬﻟﻚﺇﺟﺮﺍﺀﻧﻔﺲﺍﻟﻌﻤﻠﻴﺎﺕﺑﺪﻓﻊMULTI-CONTROL
ﻟﻸﻋﻠﻰﺃﻭﻟﻸﺳﻔﻞ.
٤ﺍﺿﻐﻂMULTI-CONTROLﻟﺘﺤﺪﻳﺪﺍﻻﺧﺘﻴﺎﺭ.
#ﺣﺘﻰﻟﻮﺗﻢﺇﻟﻐﺎﺀﺍﻟﻘﺎﺋﻤﺔﻗﺒﻞﺍﻟﺘﺤﺪﻳﺪ،ﻳﺘﻢﺗﺜﺒﻴﺖﺍﻟﻌﻤﻠﻴﺔ.
ﻣﻼﺣﻈﺔ
ﺗﻈﻞﻣﺮﺣﻠﺔﺍﻟﻤﻮﺍﻟﻔﺔﻋﻠﻰ٥٠ﻙﻫـﺃﺛﻨﺎﺀﺍﻟﻤﻮﺍﻟﻔﺔﺍﻟﻴﺪﻭﻳﺔﻟﻠﺒﺚ.
CLOCK SET)ﺍﻟﺴﺎﻋﺔ(—FM STEP)ﻣﺮﺣﻠﺔﻣﻮﺍﻟﻔﺔﺍﻟﻤﻮﺟﺔ
ﺗﻬﻴﺌﺔﻣﺮﺣﻠﺔﻣﻮﺍﻟﻔﺔﺍﻟﻤﻮﺟﺔAM
ﻣﺮﺣﻠﺔﻣﻮﺍﻟﻔﺔﺑﺚAMﻳﻤﻜﻦﺗﻐﻴﻴﺮﻫﺎﺑﻴﻦ٩ﻙﻫـ،ﻭﻫﻲﻣﺮﺣﻠﺔ
ﺍﻟﻤﻮﺍﻟﻔﺔﺍﻟﻤﺒﺮﻣﺠﺔﻣﺴﺒﻘﺎً،ﻭ١٠ﻙﻫـ.ﻋﻨﺪﺍﺳﺘﻌﻤﺎﻝﻣﻮﺍﻟﻒﺍﻟﺒﺚ
ﻓﻲﺃﻣﻴﺮﻛﺎﺍﻟﺸﻤﺎﻟﻴﺔﺃﻭﻛﻨﺪﺍﺃﻭﺃﻣﻴﺮﻛﺎﺍﻟﺠﻨﻮﺑﻴﺔ،ﺃﻋِﺪﺿﺒﻂﻣﺮﺣﻠﺔ
ﺍﻟﻤﻮﺍﻟﻔﺔﻣﻦ٩ﻙﻫـ)ﺍﻟﻨﻄﺎﻕﺍﻟﻤﺴﻤﻮﺡﺑﻪ٥٣١ﺇﻟﻰ١٦٠٢ﻙﻫـ(
ﺇﻟﻰ١٠ﻙﻫـ)ﺍﻟﻨﻄﺎﻕﺍﻟﻤﺴﻤﻮﺡﺑﻪ٥٣٠ﺇﻟﻰ١٦٤٠ﻙﻫـ(.
١ﺍﺳﺘﻌﻤﻞMULTI-CONTROLﻻﺧﺘﻴﺎﺭAM STEPﻓﻲ
ﻗﺎﺋﻤﺔﺍﻟﺘﻬﻴﺌﺔﺍﻟﻤﺒﺪﺋﻴﺔ.
ﻓﻲﻫﺬﻩﺍﻟﺼﻔﺤﺔ.
ﺿﺒﻂﻋﻤﻠﻴﺎﺕﺍﻟﺘﻬﻴﺌﺎﺕﺍﻟﻤﺒﺪﺋﻴﺔ
ﺭﺍﺟﻊ
٢ﺍﺿﻐﻂMULTI-CONTROLﻟﻌﺮﺽﻭﺿﻊﺍﻟﺘﻬﻴﺌﺔ.
٣ﺃﺩﺭMULTI-CONTROLﻻﺧﺘﻴﺎﺭﻣﺮﺣﻠﺔﻣﻮﺍﻟﻔﺔﺍﻟﻤﻮﺟﺔ
AM.
ﺇﺩﺍﺭﺓMULTI-CONTROLﺗﻐﻴّﺮﻣﺮﺣﻠﺔﻣﻮﺍﻟﻔﺔﺑﺚﻣﻮﺟﺎﺕ
AMﺑﻴﻦ٩ﻙﻫـﻭ١٠ﻙﻫـ.ﻣﺮﺣﻠﺔﻣﻮﺍﻟﻔﺔﺑﺚAMﺍﻟﻤﺨﺘﺎﺭﺓ
ﺗﻈﻬﺮﻓﻲﻟﻮﺣﺔﺍﻟﻌﺮﺽ.
#ﻳﻤﻜﻨﻚﻛﺬﻟﻚﺇﺟﺮﺍﺀﻧﻔﺲﺍﻟﻌﻤﻠﻴﺎﺕﺑﺪﻓﻊMULTI-CONTROL
ﻟﻸﻋﻠﻰﺃﻭﻟﻸﺳﻔﻞ.
٤ﺍﺿﻐﻂMULTI-CONTROLﻟﺘﺤﺪﻳﺪﺍﻻﺧﺘﻴﺎﺭ.
#ﺣﺘﻰﻟﻮﺗﻢﺇﻟﻐﺎﺀﺍﻟﻘﺎﺋﻤﺔﻗﺒﻞﺍﻟﺘﺤﺪﻳﺪ،ﻳﺘﻢﺗﺜﺒﻴﺖﺍﻟﻌﻤﻠﻴﺔ.
ﻓﻲﻫﺬﻩﺍﻟﺼﻔﺤﺔ.
ﺿﺒﻂﻋﻤﻠﻴﺎﺕﺍﻟﺘﻬﻴﺌﺎﺕﺍﻟﻤﺒﺪﺋﻴﺔ
١ﺍﺿﻐﻂSRC/OFFﻭﺍﺳﺘﻤﺮﺑﺎﻟﻀﻐﻂﺇﻟﻰﺃﻥﻳﺘﻢﺇﻳﻘﺎﻑ
ﺗﺸﻐﻴﻞﺍﻟﺠﻬﺎﺯ.
٢ﺍﺿﻐﻂMULTI-CONTROLﻭﺃﺑﻘﻪﻣﻀﻐﻮﻃًﺎﺇﻟﻰﺃﻥ
ﺗﻈﻬﺮCLOCK SETﻋﻠﻰﺍﻟﺸﺎﺷﺔ.
٣ﺃﺩﺭMULTI-CONTROLﻹﺧﺘﻴﺎﺭﺃﺣﺪﺃﻭﺿﺎﻉﺍﻟﻀﺒﻂ
ﺍﻟﻤﺒﺪﺋﻴﺔ.
FM(—AM STEP)ﻣﺮﺣﻠﺔﻣﻮﺍﻟﻔﺔﺍﻟﻤﻮﺟﺔAM(—AUX
)ﺩﺧﻞﺛﺎﻧﻮﻱ(—SW CONTROL)ﺍﻟﺨﺮﺝﺍﻟﺨﻠﻔﻲﻭﺿﺎﺑﻂ
ﻣﺠﻬﺎﺭﺍﻟﺘﺮﺩﺩﺍﺕﺍﻟﺨﻔﻴﻀﺔﺍﻟﻔﺮﻋﻲ(—EVER SCROLL
)ﺍﻟﺘﺤﺮﻳﻚﺍﻟﻤﺴﺘﻤﺮ(
#ﻳﻤﻜﻨﻚﻛﺬﻟﻚﺇﺟﺮﺍﺀﻧﻔﺲﺍﻟﻌﻤﻠﻴﺎﺕﺑﺪﻓﻊMULTI-CONTROL
ﻟﻸﻋﻠﻰﺃﻭﻟﻸﺳﻔﻞ.
ﺍﻟﻌﺮﺑﻴﺔ
#ﻹﻟﻐﺎﺀﺍﻟﺘﻬﻴﺌﺎﺕﺍﻟﻤﺒﺪﺋﻴﺔ،ﺇﺿﻐﻂﺍﻟﺰﺭBAND/ESC.
ﺗﻬﻴﺌﺔﺍﻟﺴﺎﻋﺔ
ﺇﺗّﺒﻊﺍﻟﺘﻌﻠﻴﻤﺎﺕﺍﻟﺘﺎﻟﻴﺔﻟﺘﻬﻴﺌﺔﺍﻟﺴﺎﻋﺔ.
١ﺍﺳﺘﻌﻤﻞMULTI-CONTROLﻻﺧﺘﻴﺎﺭCLOCK SET
ﻓﻲﻗﺎﺋﻤﺔﺍﻟﺘﻬﻴﺌﺔﺍﻟﻤﺒﺪﺋﻴﺔ.
ﺿﺒﻂﻋﻤﻠﻴﺎﺕﺍﻟﺘﻬﻴﺌﺎﺕﺍﻟﻤﺒﺪﺋﻴﺔ
ﺭﺍﺟﻊ
٢ﺍﺿﻐﻂMULTI-CONTROLﻟﻌﺮﺽﻭﺿﻊﺍﻟﺘﻬﻴﺌﺔ.
#ﺍﺿﻐﻂDISP/BACK/SCRLﻟﻠﻌﻮﺩﺓﺇﻟﻰﺍﻟﻌﺮﺽﺍﻟﺴﺎﺑﻖ.
٣ﺍﺿﻐﻂMULTI-CONTROLﻻﺧﺘﻴﺎﺭﺧﺎﻧﺔﻋﺎﺭﺿﺔ
ﺍﻟﺴﺎﻋﺔﺍﻟﺘﻲﺗﻮﺩﺿﺒﻄﻬﺎ.
ﻛﻠﻤﺎﺿﻐﻄﺖMULTI-CONTROL،ﻳﺘﻢﺍﺧﺘﻴﺎﺭﺧﺎﻧﺔﻭﺍﺣﺪﺓ
ﻟﻌﺎﺭﺿﺔﺍﻟﺴﺎﻋﺔ.
ﺳﺎﻋﺔ—ﺩﻗﻴﻘﺔ
ﻋﻨﺪﺍﺧﺘﻴﺎﺭﻙﻟﺨﺎﻧﺎﺕﻋﺎﺭﺿﺔﺍﻟﺴﺎﻋﺔ،ﺗﻮﻣﺾﺍﻟﺨﺎﻧﺔﺍﻟﺘﻲﺗﻢ
ﺍﺧﺘﻴﺎﺭﻫﺎ.
٤ﺃﺩﺭMULTI-CONTROLﻟﺘﺼﺤﻴﺢﺍﻟﺴﺎﻋﺔ.
#ﻳﻤﻜﻨﻚﻛﺬﻟﻚﺇﺟﺮﺍﺀﻧﻔﺲﺍﻟﻌﻤﻠﻴﺎﺕﺑﺪﻓﻊMULTI-CONTROL
ﻟﻸﻋﻠﻰﺃﻭﻟﻸﺳﻔﻞ.
ﺗﻬﻴﺌﺔﻣﺮﺣﻠﺔﻣﻮﺍﻟﻔﺔﺍﻟﻤﻮﺟﺔFM
ﻣﺮﺣﻠﺔﻣﻮﺍﻟﻔﺔﺍﻟﻤﻮﺟﺔFMﺍﻟﺘﻲﺗﻢﺍﺳﺘﺨﺪﺍﻣﻬﺎﺑﻮﺍﺳﻄﺔﻣﻮﺍﻟﻔﺔ
ﺍﻟﺒﺤﺚﻳﻤﻜﻦﺗﺤﻮﻳﻠﻬﺎﺑﻴﻦ١٠٠ﻙﻫﺮﺗﺰ،ﺍﻟﻤﺮﺣﻠﺔﺍﻟﺘﻲﺗﻢﺗﻬﻴﺌﺘﻬﺎ
ﻣﺴﺒﻘﺎً،ﻭ٥٠ﻫﺮﺗﺰ.
!ﺍﺫﺍﺗﻢﺍﻟﻘﻴﺎﻡﺑﻤﻮﺍﻟﻔﺔﺍﻟﺒﺤﺚﺑﻤﺮﺍﺣﻞ٥٠ﻙﻫﺮﺗﺰ،ﻗﺪﻳﺘﻢ
ﺍﻟﻤﻮﺍﻟﻔﺔﻋﻠﻰﺍﻟﻤﺤﻄﺎﺕﺑﺸﻜﻞﻏﻴﺮﺩﻗﻴﻖ.ﻗﻢﺑﺎﻟﻤﻮﺍﻟﻔﺔﻋﻠﻰ
<YRD5269-A
S>91
٢٢
Ar
Page 92

/
٠٣
Black plate (102,1)
ﺍﻟﻘﺴﻢ
ﻋﻤﻠﻴﺎﺕﺿﺒﻂﺍﻟﺼﻮﺕ
ﺿﺒﻂﻣﺴﺘﻮﻳﺎﺕﺍﻟﻤﺼﺪﺭ
ﺗﺘﻴﺢﻟﻚﺍﻟﻮﻇﻴﻔﺔSLA)ﻋﻤﻠﻴﺎﺕﺿﺒﻂﻣﺴﺘﻮﻯﺍﻟﻤﺼﺪﺭ(ﺿﺒﻂ
ﻣﺴﺘﻮﻯﺍﻟﺼﻮﺕﻟﻜﻞﻣﺼﺪﺭﻟﻤﻨﻊﺍﻟﺘﻐﻴّﺮﺍﺕﺍﻟﺠﻮﻫﺮﻳﺔﻓﻲﺍﻟﺼﻮﺕ
ﻋﻨﺪﺍﻟﺘﺤﻮﻳﻞﺑﻴﻦﺍﻟﻤﺼﺎﺩﺭ.
!ﺗﻌﺘﻤﺪﺍﻟﺘﻬﻴﺌﺎﺕﻋﻠﻰﻣﺴﺘﻮﻯﺻﻮﺕFM،ﻭﺍﻟﺬﻱﻳﻈﻞﺩﻭﻥ
ﺗﻐﻴﻴﺮ.
١ﻗﻢﺑﻤﻘﺎﺭﻧﺔﻣﺴﺘﻮﻯﺻﻮﺕFMﻣﻊﻣﺴﺘﻮﻯﺍﻟﻤﺼﺪﺭﺍﻟﺬﻱ
ﺗﺮﻏﺐﻓﻲﺿﺒﻄﻪ.
٢ﺍﺳﺘﻌﻤﻞMULTI-CONTROLﻻﺧﺘﻴﺎﺭ
SRC LVADJUSTﻓﻲﻗﺎﺋﻤﺔﻭﻇﻴﻔﺔﺍﻟﺼﻮﺕ.
٣ﺍﺿﻐﻂMULTI-CONTROLﻟﻌﺮﺽﻭﺿﻊﺍﻟﺘﻬﻴﺌﺔ.
٤ﺃﺩﺭMULTI-CONTROLﻟﻀﺒﻂﻣﺴﺘﻮﻯﺻﻮﺕ
ﺍﻟﻤﺼﺪﺭ.
ﻳﺘﻢﻋﺮﺽ+4ﺇﻟﻰ–4ﻣﻊﺗﺰﺍﻳﺪﺃﻭﺗﻨﺎﻗﺺﻣﺴﺘﻮﻯﺻﻮﺕ
ﺍﻟﻤﺼﺪﺭ.
#ﻳﻤﻜﻨﻚﻛﺬﻟﻚﺇﺟﺮﺍﺀﻧﻔﺲﺍﻟﻌﻤﻠﻴﺎﺕﺑﺪﻓﻊMULTI-CONTROL
ﻟﻸﻋﻠﻰﺃﻭﻟﻸﺳﻔﻞ.
٥ﺍﺿﻐﻂMULTI-CONTROLﻟﺘﺤﺪﻳﺪﺍﻻﺧﺘﻴﺎﺭ.
#ﺣﺘﻰﻟﻮﺗﻢﺇﻟﻐﺎﺀﺍﻟﻘﺎﺋﻤﺔﻗﺒﻞﺍﻟﺘﺤﺪﻳﺪ،ﻳﺘﻢﺗﺜﺒﻴﺖﺍﻟﻌﻤﻠﻴﺔ.
٢١
ﻣﻼﺣﻈﺔ
ﻳﻤﻜﻦﺃﻳﻀًﺎﺿﺒﻂﻣﺴﺘﻮﻯﺻﻮﺕAMﺑﺎﺳﺘﻌﻤﺎﻝﻋﻤﻠﻴﺎﺕﺿﺒﻂ
ﻣﺴﺘﻮﻯﺍﻟﻤﺼﺪﺭ.
Ar
<YRD5269-A
S>92
Page 93

Black plate (101,1)
/
ﺍﻟﻘﺴﻢ
٠٣
ﻋﻤﻠﻴﺎﺕﺿﺒﻂﺍﻟﺼﻮﺕ
ﺍﻟﻤﺴﺘﻮﻯ
ﻳﺘﻢﻋﺮﺽ+6ﺇﻟﻰ–24ﻛﻠﻤﺎﺗﻤﺖﺯﻳﺎﺩﺓﺃﻭﺗﻨﺎﻗﺺﺍﻟﻤﺴﺘﻮﻯ.
#ﻳﻤﻜﻨﻚﻛﺬﻟﻚﺇﺟﺮﺍﺀﻧﻔﺲﺍﻟﻌﻤﻠﻴﺎﺕﺑﺪﻓﻊMULTI-CONTROL
ﻟﻸﻋﻠﻰﺃﻭﻟﻸﺳﻔﻞ.
ﻣﻼﺣﻈﺔ
MULTI-CONTROL.
ﺢﺍﻟﺘﻤﺮﻳﺮﺍﻟﻌﺎﻟﻲ
ّ
HIGH PASS FILTER.
ﻳﻤﻜﻨﻚﺃﻳﻀًﺎﺍﻟﺘﺤﻮﻳﻞﻟﻮﺿﻊﺍﻟﺘﻬﻴﺌﺔﻫﺬﺍﻓﻲﺍﻟﻘﺎﺋﻤﺔﺍﻟﺘﻲﺗﻈﻬﺮﺑﺎﺳﺘﻌﻤﺎﻝ
ﺇﺳﺘﻌﻤﺎﻝﻣﺮﺷ
ﻋﻨﺪﻣﺎﻻﺗﺮﻳﺪﻟﻸﺻﻮﺍﺕﺍﻟﻤﻨﺨﻔﻀﺔﻣﻦﻧﻄﺎﻕﺗﺮﺩﺩﺧﺮﺝﻣﺠﻬﺎﺭ
ﺍﻟﺘﺮﺩﺩﺍﺕﺍﻟﺨﻔﻴﻀﺔﺍﻟﻔﺮﻋﻲﺃﻥﺗُﺴﻤﻊﻣﻦﺍﻟﺴﻤﺎﻋﺎﺕﺍﻷﻣﺎﻣﻴﺔﺃﻭ
ﺍﻟﺨﻠﻔﻴﺔ،ﻗﻢﺑﺘﺸﻐﻴﻞ)ﻣﺮﺷّﺢﺍﻟﺘﻤﺮﻳﺮﺍﻟﻌﺎﻟﻲ(HPF.ﻻﺗﺨﺮﺝﻣﻦ
ﺍﻟﺴﻤﺎﻋﺎﺕﺍﻷﻣﺎﻣﻴﺔﺃﻭﺍﻟﺨﻠﻔﻴﺔﺳﻮﻯﺍﻟﺘﺮﺩﺩﺍﺕﺍﻷﻋﻠﻰﻣﻦﺗﺮﺩﺩﺍﺕ
ﺍﻟﻨﻄﺎﻕﺍﻟﻤﺨﺘﺎﺭ.
١ﺇﺳﺘﺨﺪﻡMULTI-CONTROLﻹﺧﺘﻴﺎﺭ
٢ﺍﺿﻐﻂMULTI-CONTROLﻟﻌﺮﺽﻭﺿﻊﺍﻟﺘﻬﻴﺌﺔ.
٣ﺍﺳﺘﻌﻤﻞMULTI-CONTROLﻻﺧﺘﻴﺎﺭﺍﻟﺘﻬﻴﺌﺔ
ﺍﻟﻤﺮﻏﻮﺑﺔ.
ﺃﺩﺭﻟﺘﻐﻴﻴﺮﺍﻟﺘﻬﻴﺌﺔ.
OFF—50HZ—63HZ—80HZ—100HZ—125HZ
#ﻳﻤﻜﻨﻚﻛﺬﻟﻚﺇﺟﺮﺍﺀﻧﻔﺲﺍﻟﻌﻤﻠﻴﺎﺕﺑﺪﻓﻊMULTI-CONTROL
ﻟﻸﻋﻠﻰﺃﻭﻟﻸﺳﻔﻞ.
٤ﺍﺿﻐﻂMULTI-CONTROLﻟﺘﺤﺪﻳﺪﺍﻻﺧﺘﻴﺎﺭ.
#ﺣﺘﻰﻟﻮﺗﻢﺇﻟﻐﺎﺀﺍﻟﻘﺎﺋﻤﺔﻗﺒﻞﺍﻟﺘﺤﺪﻳﺪ،ﻳﺘﻢﺗﺜﺒﻴﺖﺍﻟﻌﻤﻠﻴﺔ.
SW SETTING 1ﻭﺿﻊﺍﻟﺘﻬﻴﺌﺔ)ﺗﻬﻴﺌﺔﺗﺸﻐﻴﻞ/ﺇﻳﻘﺎﻑﻣﺠﻬﺎﺭ
NORMAL)ﺍﻟﻄﻮﺭﺍﻟﻌﺎﺩﻱ(—REV)ﺍﻟﻄﻮﺭﺍﻟﻌﻜﺴﻲ(—
MULTI-CONTROL.
ﺗﻌﺰﻳﺰﺍﻟﺠﻬﻴﺮ
ﺗﻌﻤﻞﻭﻇﻴﻔﺔﺗﻌﺰﻳﺰﺍﻟﺠﻬﻴﺮﻋﻠﻰﺗﻌﺰﻳﺰﻣﺴﺘﻮﻯﺟﻬﻴﺮﺍﻟﺼﻮﺕ.
BASS BOOST.
١ﺍﺿﻐﻂﻭﺍﺳﺘﻤﺮﺑﻀﻐﻂSW/BASSﻟﻌﺮﺽﻭﺿﻊﺍﻟﺘﻬﻴﺌﺔ
٢ﺃﺩﺭMULTI-CONTROLﻟﻀﺒﻂﺍﻟﻤﺴﺘﻮﻯ.
ﻳﺘﻢﻋﺮﺽ0ﺇﻟﻰ+6ﻛﻠﻤﺎﺗﻤﺖﺯﻳﺎﺩﺓﺃﻭﺗﻨﺎﻗﺺﺍﻟﻤﺴﺘﻮﻯ.
#ﻳﻤﻜﻨﻚﻛﺬﻟﻚﺇﺟﺮﺍﺀﻧﻔﺲﺍﻟﻌﻤﻠﻴﺎﺕﺑﺪﻓﻊMULTI-CONTROL
ﻟﻸﻋﻠﻰﺃﻭﻟﻸﺳﻔﻞ.
٣ﺍﺿﻐﻂMULTI-CONTROLﻟﺘﺤﺪﻳﺪﺍﻻﺧﺘﻴﺎﺭ.
#ﺣﺘﻰﻟﻮﺗﻢﺇﻟﻐﺎﺀﺍﻟﻘﺎﺋﻤﺔﻗﺒﻞﺍﻟﺘﺤﺪﻳﺪ،ﻳﺘﻢﺗﺜﺒﻴﺖﺍﻟﻌﻤﻠﻴﺔ.
ﻣﻼﺣﻈﺔ
ﻳﻤﻜﻨﻚﺃﻳﻀًﺎﺍﻟﺘﺤﻮﻳﻞﻟﻮﺿﻊﺍﻟﺘﻬﻴﺌﺔﻫﺬﺍﻓﻲﺍﻟﻘﺎﺋﻤﺔﺍﻟﺘﻲﺗﻈﻬﺮﺑﺎﺳﺘﻌﻤﺎﻝ
MULTI-CONTROL.
SW SETTING 1ﻭﺿﻊﺍﻟﺘﻬﻴﺌﺔ)ﺗﻬﻴﺌﺔﺗﺸﻐﻴﻞ/ﺇﻳﻘﺎﻑﻣﺠﻬﺎﺭ
١ﺍﺿﻐﻂSW/BASSﻟﻌﺮﺽﻭﺿﻊﺗﻬﻴﺌﺔﻣﺠﻬﺎﺭﺍﻟﺘﺮﺩﺩﺍﺕ
ﺍﻟﺨﻔﻴﻀﺔﺍﻟﻔﺮﻋﻲ.
ﺍﺿﻐﻂSW/BASSﺗﻜﺮﺍﺭًﺍﻟﻠﺘﺤﻮﻳﻞﺑﻴﻦﺃﻭﺿﺎﻉﺗﻬﻴﺌﺔﻣﺠﻬﺎﺭ
ﺍﻟﺘﺮﺩﺩﺍﺕﺍﻟﺨﻔﻴﻀﺔﺍﻟﻔﺮﻋﻲﺣﺴﺐﺍﻟﺘﺮﺗﻴﺐﺍﻟﺘﺎﻟﻲ.
ﺍﻟﺘﺮﺩﺩﺍﺕﺍﻟﺨﻔﻴﻀﺔﺍﻟﻔﺮﻋﻲ(—SW SETTING 2ﻭﺿﻊﺍﻟﺘﻬﻴﺌﺔ
)ﺗﻬﻴﺌﺔﻣﺠﻬﺎﺭﺍﻟﺘﺮﺩﺩﺍﺕﺍﻟﺨﻔﻴﻀﺔﺍﻟﻔﺮﻋﻲ(
٢ﺍﺧﺘﻴﺎﺭﻭﺿﻊﺍﻟﺘﻬﻴﺌﺔSW SETTING 1.
٣ﺃﺩﺭMULTI-CONTROLﻻﺧﺘﻴﺎﺭﺍﻟﺘﻬﻴﺌﺔﺍﻟﻤﺮﻏﻮﺑﺔ.
OFF)ﺇﻳﻘﺎﻑﻣﺠﻬﺎﺭﺍﻟﺘﺮﺩﺩﺍﺕﺍﻟﺨﻔﻴﻀﺔﺍﻟﻔﺮﻋﻲ(
#ﻳﻤﻜﻨﻚﻛﺬﻟﻚﺇﺟﺮﺍﺀﻧﻔﺲﺍﻟﻌﻤﻠﻴﺎﺕﺑﺪﻓﻊMULTI-CONTROL
ﻟﻸﻋﻠﻰﺃﻭﻟﻸﺳﻔﻞ.
٤ﺍﺿﻐﻂMULTI-CONTROLﻟﺘﺤﺪﻳﺪﺍﻻﺧﺘﻴﺎﺭ.
ﺍﻟﻌﺮﺑﻴﺔ
#ﺣﺘﻰﻟﻮﺗﻢﺇﻟﻐﺎﺀﺍﻟﻘﺎﺋﻤﺔﻗﺒﻞﺍﻟﺘﺤﺪﻳﺪ،ﻳﺘﻢﺗﺜﺒﻴﺖﺍﻟﻌﻤﻠﻴﺔ.
ﻣﻼﺣﻈﺔ
ﻳﻤﻜﻨﻚﺃﻳﻀًﺎﺍﻟﺘﺤﻮﻳﻞﻟﻮﺿﻊﺍﻟﺘﻬﻴﺌﺔﻫﺬﺍﻓﻲﺍﻟﻘﺎﺋﻤﺔﺍﻟﺘﻲﺗﻈﻬﺮﺑﺎﺳﺘﻌﻤﺎﻝ
ﺿﺒﻂﺃﻭﺿﺎﻉﺗﻬﻴﺌﺔﻣﺠﻬﺎﺭﺍﻟﺘﺮﺩﺩﺍﺕ
ﺍﻟﺨﻔﻴﻀﺔﺍﻟﻔﺮﻋﻲ
ﻋﻨﺪﻣﺎﻳﻜﻮﻥﺧﺮﺝﻣﺠﻬﺎﺭﺍﻟﺘﺮﺩﺩﺍﺕﺍﻟﺨﻔﻴﻀﺔﺍﻟﻔﺮﻋﻲﻓﻲﻭﺿﻊ
ﺍﻟﺘﺸﻐﻴﻞ،ﻳﻤﻜﻨﻚﺿﺒﻂﺗﺮﺩﺩﺍﻟﻘﻄﻊﻭﻣﺴﺘﻮﻯﺧﺮﺝﻣﺠﻬﺎﺭﺍﻟﺘﺮﺩﺩﺍﺕ
ﺍﻟﺨﻔﻴﻀﺔﺍﻟﻔﺮﻋﻲ.
!ﻋﻨﺪﻣﺎﻳﻜﻮﻥﺧﺮﺝﻣﺠﻬﺎﺭﺍﻟﺘﺮﺩﺩﺍﺕﺍﻟﺨﻔﻴﻀﺔﺍﻟﻔﺮﻋﻲﻓﻲ
ﻭﺿﻊﺍﻟﺘﺸﻐﻴﻞ،ﻳﻤﻜﻨﻚﺇﺧﺘﻴﺎﺭSW SETTING 2.
١ﺍﺿﻐﻂSW/BASSﻟﻌﺮﺽﻭﺿﻊﺗﻬﻴﺌﺔﻣﺠﻬﺎﺭﺍﻟﺘﺮﺩﺩﺍﺕ
ﺍﻟﺨﻔﻴﻀﺔﺍﻟﻔﺮﻋﻲ.
ﺍﺿﻐﻂSW/BASSﺗﻜﺮﺍﺭًﺍﻟﻠﺘﺤﻮﻳﻞﺑﻴﻦﺃﻭﺿﺎﻉﺗﻬﻴﺌﺔﻣﺠﻬﺎﺭ
ﺍﻟﺘﺮﺩﺩﺍﺕﺍﻟﺨﻔﻴﻀﺔﺍﻟﻔﺮﻋﻲﺣﺴﺐﺍﻟﺘﺮﺗﻴﺐﺍﻟﺘﺎﻟﻲ.
ﺍﻟﺘﺮﺩﺩﺍﺕﺍﻟﺨﻔﻴﻀﺔﺍﻟﻔﺮﻋﻲ(—SW SETTING 2ﻭﺿﻊﺍﻟﺘﻬﻴﺌﺔ
)ﺗﻬﻴﺌﺔﻣﺠﻬﺎﺭﺍﻟﺘﺮﺩﺩﺍﺕﺍﻟﺨﻔﻴﻀﺔﺍﻟﻔﺮﻋﻲ(
٢ﺍﺧﺘﻴﺎﺭﻭﺿﻊﺍﻟﺘﻬﻴﺌﺔSW SETTING 2.
٣ﺍﺿﻐﻂMULTI-CONTROLﻻﺧﺘﻴﺎﺭﺍﻟﺨﺎﻧﺔﺍﻟﺘﻲﺗﻮﺩ
ﺿﺒﻄﻬﺎ.
ﺍﺿﻐﻂMULTI-CONTROLﺗﻜﺮﺍﺭًﺍﻟﺘﺤﻮﻳﻞﺍﻟﺨﺎﻧﺔﺣﺴﺐ
ﺍﻟﺘﺮﺗﻴﺐﺍﻟﺘﺎﻟﻲ:
ﺗﺮﺩﺩﺍﻟﻘﻄﻊ—ﺍﻟﻤﺴﺘﻮﻯ
٤ﺃﺩﺭMULTI-CONTROLﻟﻀﺒﻂﺍﻟﺨﺎﻧﺔﺍﻟﻤﺨﺘﺎﺭﺓ.
ﺗﺮﺩﺩﺍﻟﻘﻄﻊ
50HZ—63HZ—80HZ—100HZ—125HZ
<YRD5269-A
S>93
٢٠
Ar
Page 94

٠٣
Black plate (100,1)
ﺍﻟﻘﺴﻢ
ﻋﻤﻠﻴﺎﺕﺿﺒﻂﺍﻟﺼﻮﺕ
EQ SETTING 2.
١ﺍﺳﺘﻌﻤﻞMULTI-CONTROLﻻﺧﺘﻴﺎﺭ
٢ﺍﺿﻐﻂMULTI-CONTROLﻟﻌﺮﺽﻭﺿﻊﺍﻟﺘﻬﻴﺌﺔ.
٣ﺍﺿﻐﻂMULTI-CONTROLﻻﺧﺘﻴﺎﺭﺍﻟﺨﺎﻧﺔﺍﻟﺘﻲﺗﻮﺩ
ﺿﺒﻄﻬﺎ.
ﺍﺿﻐﻂMULTI-CONTROLﺗﻜﺮﺍﺭًﺍﻟﺘﺤﻮﻳﻞﺍﻟﺨﺎﻧﺔﺣﺴﺐ
ﺍﻟﺘﺮﺗﻴﺐﺍﻟﺘﺎﻟﻲ:
ﺣﺰﻣﺔ—ﺗﺮﺩﺩ—ﻣﻌﺎﻣﻞQ
٤ﺃﺩﺭMULTI-CONTROLﻟﻀﺒﻂﺍﻟﺨﺎﻧﺔﺍﻟﻤﺨﺘﺎﺭﺓ.
ﺍﻟﺤﺰﻣﺔ
LOW)ﻣﻨﺨﻔﺾ(—MID)ﻣﺘﻮﺳﻂ(—HI)ﻣﺮﺗﻔﻊ(
ﺍﻟﺘﺮﺩﺩ
ﻣﻨﺨﻔﺾ:40HZ—80HZ—100HZ—160HZ
ﻣﺘﻮﺳﻂ:200HZ—500HZ—1KHZ—2KHZ
ﻣﺮﺗﻔﻊ:3KHZ—8KHZ—10KHZ—12KHZ
ﻣﻌﺎﻣﻞQ
2W—1W—1N—2N
#ﻳﻤﻜﻨﻚﻛﺬﻟﻚﺇﺟﺮﺍﺀﻧﻔﺲﺍﻟﻌﻤﻠﻴﺎﺕﺑﺪﻓﻊMULTI-CONTROL
ﻟﻸﻋﻠﻰﺃﻭﻟﻸﺳﻔﻞ.
PRESET EQUALIZERﻓﻲﻗﺎﺋﻤﺔﻭﻇﻴﻔﺔﺍﻟﺼﻮﺕ.
EQ SETTING 1ﻓﻲﻗﺎﺋﻤﺔﻭﻇﻴﻔﺔﺍﻟﺼﻮﺕ.
ﺿﺒﻂﻋﻠﻮﺍﻟﺼﻮﺕ
ﻭﻇﻴﻔﺔﻋﻠﻮﺍﻟﺼﻮﺕﺗﻌﻮّﺽﺍﻟﻨﻘﺺﻓﻲﻧﻄﺎﻗﺎﺕﺍﻟﺼﻮﺕﺍﻟﻤﻨﺨﻔﻀﺔ
ﻭﺍﻟﻌﺎﻟﻴﺔﻋﻨﺪﻣﺎﻳﻜﻮﻥﻣﺴﺘﻮﻯﺍﻟﺼﻮﺕﻣﻨﺨﻔﻀﺎً.
١ﺍﺳﺘﻌﻤﻞMULTI-CONTROLﻻﺧﺘﻴﺎﺭLOUDNESS
ﻓﻲﻗﺎﺋﻤﺔﻭﻇﻴﻔﺔﺍﻟﺼﻮﺕ.
٢ﺍﺿﻐﻂMULTI-CONTROLﻟﻌﺮﺽﻭﺿﻊﺍﻟﺘﻬﻴﺌﺔ.
٣ﺍﺳﺘﻌﻤﻞMULTI-CONTROLﻻﺧﺘﻴﺎﺭﺍﻟﺘﻬﻴﺌﺔ
ﺍﻟﻤﺮﻏﻮﺑﺔ.
ﺃﺩﺭﻟﺘﻐﻴﻴﺮﺍﻟﺘﻬﻴﺌﺔ.
LOW)ﻣﻨﺨﻔﺾ(—MID)ﻣﺘﻮﺳﻂ(—HIGH)ﻣﺮﺗﻔﻊ(—
OFF)ﺇﻳﻘﺎﻑ(
#ﻳﻤﻜﻨﻚﻛﺬﻟﻚﺇﺟﺮﺍﺀﻧﻔﺲﺍﻟﻌﻤﻠﻴﺎﺕﺑﺪﻓﻊMULTI-CONTROL
ﻟﻸﻋﻠﻰﺃﻭﻟﻸﺳﻔﻞ.
٤ﺍﺿﻐﻂMULTI-CONTROLﻟﺘﺤﺪﻳﺪﺍﻻﺧﺘﻴﺎﺭ.
#ﺣﺘﻰﻟﻮﺗﻢﺇﻟﻐﺎﺀﺍﻟﻘﺎﺋﻤﺔﻗﺒﻞﺍﻟﺘﺤﺪﻳﺪ،ﻳﺘﻢﺗﺜﺒﻴﺖﺍﻟﻌﻤﻠﻴﺔ.
!ﻋﻨﺪﺍﺧﺘﻴﺎﺭFLAT،ﻓﻠﻦﻳﻜﻮﻥﻫﻨﺎﻙﺃﻳﺔﺇﺿﺎﻓﺔﺃﻭﺗﺼﺤﻴﺢ
ﻋﻠﻰﺍﻟﺼﻮﺕ.ﻫﺬﺍﻳﻔﻴﺪﻟﻠﺘﺤﻘﻖﻣﻦﺗﺄﺛﻴﺮﻣﻨﺤﻨﻴﺎﺕﺍﻟﻤﻮﺍﺯﻥﻋﻦ
ﻃﺮﻳﻖﺍﻟﺘﺒﺪﻳﻞﺑﺎﻟﺘﻨﺎﻭﺏﺑﻴﻦFLATﻭﻣﻨﺤﻨﻰﺍﻟﻤﻮﺍﺯﻥﺍﻟﺬﻱﺗﻢ
ﺿﺒﻄﻪ.
١ﺍﺳﺘﻌﻤﻞMULTI-CONTROLﻻﺧﺘﻴﺎﺭ
٢ﺍﺿﻐﻂMULTI-CONTROLﻟﻌﺮﺽﻭﺿﻊﺍﻟﺘﻬﻴﺌﺔ.
٣ﺃﺩﺭMULTI-CONTROLﻻﺧﺘﻴﺎﺭﺍﻟﻤﻮﺍﺯﻥ.
#ﻳﻤﻜﻨﻚﻛﺬﻟﻚﺇﺟﺮﺍﺀﻧﻔﺲﺍﻟﻌﻤﻠﻴﺎﺕﺑﺪﻓﻊMULTI-CONTROL
ﻟﻸﻋﻠﻰﺃﻭﻟﻸﺳﻔﻞ.
٤ﺍﺿﻐﻂMULTI-CONTROLﻟﺘﺤﺪﻳﺪﺍﻻﺧﺘﻴﺎﺭ.
#ﺣﺘﻰﻟﻮﺗﻢﺇﻟﻐﺎﺀﺍﻟﻘﺎﺋﻤﺔﻗﺒﻞﺍﻟﺘﺤﺪﻳﺪ،ﻳﺘﻢﺗﺜﺒﻴﺖﺍﻟﻌﻤﻠﻴﺔ.
ﺿﺒﻂﻣﻨﺤﻨﻴﺎﺕﺍﻟﻤﻮﺍﺯﻥ
ﺍﻟﻤﻨﺤﻨﻴﺎﺕﺍﻟﺘﻲﺗﻢﺿﺒﻄﻬﺎﻓﻲﺍﻟﻤﺼﻨﻊﻳﻤﻜﻦﺿﺒﻄﻬﺎﺑﺪﻗﺔ)ﺍﻟﺘﺤﻜﻢ
ﻓﻲﺍﻟﺘﺪﺭّﺟﺎﺕ(.
١ﺍﺳﺘﻌﻤﻞMULTI-CONTROLﻻﺧﺘﻴﺎﺭ
٢ﺍﺿﻐﻂMULTI-CONTROLﻟﻌﺮﺽﻭﺿﻊﺍﻟﺘﻬﻴﺌﺔ.
٣ﺍﺿﻐﻂMULTI-CONTROLﻻﺧﺘﻴﺎﺭﺍﻟﺨﺎﻧﺔﺍﻟﺘﻲﺗﻮﺩ
ﺿﺒﻄﻬﺎ.
ﺍﺿﻐﻂMULTI-CONTROLﺗﻜﺮﺍﺭًﺍﻟﺘﺤﻮﻳﻞﺍﻟﺨﺎﻧﺔﺣﺴﺐ
ﺍﻟﺘﺮﺗﻴﺐﺍﻟﺘﺎﻟﻲ:
L)ﻣﻨﺨﻔﺾ(—M)ﻣﺘﻮﺳﻂ(—H)ﻣﺮﺗﻔﻊ(
٤ﺃﺩﺭMULTI-CONTROLﻟﻀﺒﻂﺍﻟﻤﺴﺘﻮﻯﻟﺤﺰﻣﺔ
ﺍﻟﻤﻮﺍﺯﻥ.
+6ﺇﻟﻰ–6ﻳﺘﻢﻋﺮﺿﻬﻢﻛﻠﻤﺎﺗﻢﺯﻳﺎﺩﺓﺃﻭﺧﻔﺾﺍﻟﻤﺴﺘﻮﻯ.
#ﻳﻤﻜﻨﻚﻛﺬﻟﻚﺇﺟﺮﺍﺀﻧﻔﺲﺍﻟﻌﻤﻠﻴﺎﺕﺑﺪﻓﻊMULTI-CONTROL
ﻟﻸﻋﻠﻰﺃﻭﻟﻸﺳﻔﻞ.
#ﻳﻤﻜﻨﻚﺣﻴﻨﻬﺎﺇﺧﺘﻴﺎﺭﺣﺰﻣﺔﺃﺧﺮﻯﻭﺿﺒﻂﺍﻟﻤﺴﺘﻮﻯ.
ﺍﻟﻀﺒﻂﺍﻟﺪﻗﻴﻖﻟﻤﻨﺤﻨﻰﺍﻟﺘﻮﺍﺯﻥ
ﻳﻤﻜﻨﻚﺿﺒﻂﺍﻟﺘﺮﺩﺩﺍﻟﻮﺳﻄﻲﻭﻣﻌﺎﻣﻞQ)ﺧﺼﺎﺋﺺﺍﻟﻤﻨﺤﻨﻰ(ﻟﻜﻞ
ﺣﺰﻣﺔﻣﻨﺤﻨﻴﺎﺕﻣﺨﺘﺎﺭﺓﺣﺎﻟﻴﺎً)LOW/MID/HI(.
١٩
ﺇﺳﺘﻌﻤﺎﻝﺧﺮﺝﻣﺠﻬﺎﺭﺍﻟﺘﺮﺩﺩﺍﺕ
ﺍﻟﺨﻔﻴﻀﺔﺍﻟﻔﺮﻋﻲ
ﻫﺬﻩﺍﻟﻮﺣﺪﺓﻣﺠﻬّﺰﺓﺑﻤﺠﻬﺎﺭﺗﺮﺩﺩﺍﺕﺧﻔﻴﻀﺔﻓﺮﻋﻲﻳﻤﻜﻦﺗﺸﻐﻴﻠﻪﺃﻭ
ﺇﻳﻘﺎﻓﻪ.
ﺃﻳﻀًﺎ،ﻳﻤﻜﻦﺍﺧﺘﻴﺎﺭﺍﻟﻄﻮﺭﺑﻴﻦﺍﻟﻮﺿﻌﻴﻦﺍﻟﻌﺎﺩﻱﻭﺍﻟﻌﻜﺴﻲ.
Ar
<
YRD5269-A/S>94
Page 95

Black plate (99,1)
ﺍﻟﻘﺴﻢ
٠٣
ﻋﻤﻠﻴﺎﺕﺿﺒﻂﺍﻟﺼﻮﺕ
ﺇﺳﺘﻌﻤﺎﻝﺿﺒﻂﺍﻟﺘﻮﺍﺯﻥ
ﻳﻤﻜﻨﻚﺗﻐﻴﻴﺮﺗﻬﻴﺌﺔﺍﻟﻤﻀﺎﺋﻞ/ﺍﻟﺘﻮﺍﺯﻥﺑﺤﻴﺚﻳﻤﻜﻨﻬﺎﺃﻥﺗﻌﻄﻲﺑﻴﺌﺔ
ﺍﺳﺘﻤﺎﻉﻣﺜﺎﻟﻴﺔﻓﻲﻛﻞﺍﻟﻤﻘﺎﻋﺪﺍﻟﻤﺸﻐﻮﻟﺔ.
FADER/BALANCEﻓﻲﻗﺎﺋﻤﺔﻭﻇﻴﻔﺔﺍﻟﺼﻮﺕ.
ﺗﻬﻴﺌﺔ
ﻓﻲﺻﻔﺤﺔ
١ﺍﺳﺘﻌﻤﻞMULTI-CONTROLﻻﺧﺘﻴﺎﺭ
٢ﺍﺿﻐﻂMULTI-CONTROLﻟﻌﺮﺽﻭﺿﻊﺍﻟﺘﻬﻴﺌﺔ.
٣ﺍﺿﻐﻂMULTI-CONTROLﻻﺧﺘﻴﺎﺭﺍﻟﺨﺎﻧﺔﺍﻟﺘﻲﺗﻮﺩ
ﺿﺒﻄﻬﺎ.
ﺍﺿﻐﻂMULTI-CONTROLﺗﻜﺮﺍﺭًﺍﻟﻠﺘﺤﻮﻳﻞﺑﻴﻦﺍﻟﻤﻀﺎﺋﻞ
ﻭﺍﻟﺘﻮﺍﺯﻥ.
FADER/BALANCE)ﺿﺒﻂﺍﻟﺘﻮﺍﺯﻥ(—
PRESET EQUALIZER)ﺍﺳﺘﺪﻋﺎﺀﺍﻟﻤﻮﺍﺯﻥ(—
EQ SETTING 1)ﺿﺒﻂﺍﻟﻤﻮﺍﺯﻥ(—EQ SETTING 2
٤ﺃﺩﺭMULTI-CONTROLﻟﻀﺒﻂﺗﻮﺍﺯﻥﺍﻟﺴﻤﺎﻋﺔ.
ﻳﻤﻜﻦﺿﺒﻂﺗﻮﺍﺯﻥﺍﻟﺴﻤﺎﻋﺔﺍﻷﻣﺎﻣﻴﺔ/ﺍﻟﺨﻠﻔﻴﺔﺑﻴﻦFAD F15ﻭ
SW SETTING 1)ﺗﻬﻴﺌﺔﺗﺸﻐﻴﻞ/ﺇﻳﻘﺎﻑﻣﺠﻬﺎﺭﺍﻟﺘﺮﺩﺩﺍﺕ
FAD R15.
ﻳﻤﻜﻦﺿﺒﻂﺗﻮﺍﺯﻥﺍﻟﺴﻤﺎﻋﺔﺍﻟﻴﺴﺮﻯ/ﺍﻟﻴﻤﻨﻰﺑﻴﻦBAL L15ﻭ
BAL R15.
#ﻳﻤﻜﻨﻚﻛﺬﻟﻚﺇﺟﺮﺍﺀﻧﻔﺲﺍﻟﻌﻤﻠﻴﺎﺕﺑﺪﻓﻊMULTI-CONTROL
ﻟﻸﻋﻠﻰﺃﻭﻟﻸﺳﻔﻞ.
#FAD 0ﻫﻲﺍﻟﺘﻬﻴﺌﺔﺍﻟﻤﻨﺎﺳﺒﺔﻋﻨﺪﺍﺳﺘﻌﻤﺎﻝﺳﻤﺎﻋﺘﻴﻦﻓﻘﻂ.
#ﻋﻨﺪﻣﺎﺗﻜﻮﻥﺗﻬﻴﺌﺔﺍﻟﺨﺮﺝﺍﻟﺨﻠﻔﻲﻋﻠﻰREAR SP :SUB W،
ﻳﻜﻮﻥﺿﺒﻂﺗﻮﺍﺯﻥﺍﻟﺴﻤﺎﻋﺎﺕﺍﻷﻣﺎﻣﻴﺔ/ﺍﻟﺨﻠﻔﻴﺔﻏﻴﺮﻓﻌّﺎﻻً.ﺭﺍﺟﻊ
ﺍﻟﺨﺮﺝﺍﻟﺨﻠﻔﻲﻭﺿﺎﺑﻂﻣﺠﻬﺎﺭﺍﻟﺘﺮﺩﺩﺍﺕﺍﻟﺨﻔﻴﻀﺔﺍﻟﻔﺮﻋﻲ
٢٣.
SRC LVADJUST)ﺿﺒﻂﻣﺴﺘﻮﻯﺍﻟﻤﺼﺪﺭ(
ﻣﻘﺪﻣﺔﻟﻌﻤﻠﻴﺎﺕﺿﺒﻂﺍﻟﺼﻮﺕ
١ﺇﺿﻐﻂMULTI-CONTROLﻟﻌﺮﺽﻗﺎﺋﻤﺔﺍﻹﺧﺘﻴﺎﺭﺍﺕ
ﺍﻟﺮﺋﻴﺴﻴﺔ.
٢ﺇﺳﺘﺨﺪﻡMULTI-CONTROLﻹﺧﺘﻴﺎﺭAUDIO.
ﺃﺩﺭﻟﺘﻐﻴﻴﺮﺧﻴﺎﺭﺍﻟﻘﺎﺋﻤﺔ.ﺍﺿﻐﻂﻟﻼﺧﺘﻴﺎﺭ.
٣ﺃﺩﺭMULTI-CONTROLﻹﺧﺘﻴﺎﺭﻭﻇﻴﻔﺔﺍﻟﺼﻮﺕ.
ﺃﺩﺭMULTI-CONTROLﻟﻠﺘﺤﻮﻳﻞﺑﻴﻦﻭﻇﺎﺋﻒﺍﻟﺼﻮﺕﻭﺫﻟﻚ
ﺣﺴﺐﺍﻟﺘﺮﺗﻴﺐﺍﻟﺘﺎﻟﻲ.
)ﺍﻟﻀﺒﻂﺍﻟﺪﻗﻴﻖﻟﻠﻤﻮﺍﺯﻥ(—LOUDNESS)ﻋﻠﻮﺍﻟﺼﻮﺕ(—
ﺍﻟﺨﻔﻴﻀﺔﺍﻟﻔﺮﻋﻲ(—SW SETTING 2)ﺗﻬﻴﺌﺔﻣﺠﻬﺎﺭ
ﺍﻟﻌﺮﺑﻴﺔ
ﺍﻟﺘﺮﺩﺩﺍﺕﺍﻟﺨﻔﻴﻀﺔﺍﻟﻔﺮﻋﻲ(—HIGH PASS FILTER)ﻣﺮﺷّﺢ
ﺍﻟﺘﻤﺮﻳﺮﺍﻟﻌﺎﻟﻲ(—BASS BOOST)ﺗﻌﺰﻳﺰﺍﻟﺠﻬﻴﺮ(—
٤ﺍﺿﻐﻂMULTI-CONTROLﻟﻌﺮﺽﻭﺿﻊﺍﻟﺘﻬﻴﺌﺔﻟﻜﻞ
ﻭﻇﻴﻔﺔ.
#ﺍﺩﻓﻊMULTI-CONTROLﻟﻠﻴﺴﺎﺭﻟﻌﺮﺽﻗﺎﺋﻤﺔﺍﺧﺘﻴﺎﺭ
ﺍﻟﻮﻇﻴﻔﺔ.
#ﺍﺩﻓﻊﻭﺍﺳﺘﻤﺮﺑﺪﻓﻊMULTI-CONTROLﻟﻠﻴﺴﺎﺭﻟﻌﺮﺽﺍﻟﻘﺎﺋﻤﺔ
ﺍﻟﺮﺋﻴﺴﻴﺔ.
٥ﺿﺒﻂﻛﻞﻭﻇﻴﻔﺔ.
ﺍﺳﺘﻌﻤﺎﻝﺍﻟﻤﻮﺍﺯﻥ
ﺍﻟﻤﻮﺍﺯﻥﻳﻤﻜّﻨﻚﻣﻦﺿﺒﻂﺍﻟﻤﻮﺍﺯﻧﺔﻟﻤﻄﺎﺑﻘﺔﺍﻟﺨﺼﺎﺋﺺﺍﻟﺼﻮﺗﻴﺔ
ﻟﺪﺍﺧﻞﺍﻟﺴﻴﺎﺭﺓﺣﺴﺐﺍﻟﺮﻏﺒﺔ.
ﺇﺳﺘﺪﻋﺎﺀﻣﻨﺤﻨﻴﺎﺕﺍﻟﻤﻮﺍﺯﻥ
DISP/BACK/SCRL.
ﺗﻮﺟﺪﺳﺖﻣﻨﺤﻨﻴﺎﺕﻣﻮﺍﺯﻥﻣﺨﺰﻧﺔﻭﺍﻟﺘﻲﻳﻤﻜﻦﺍﺳﺘﺪﻋﺎﺅﻫﺎﺑﺴﻬﻮﻟﺔ
ﻓﻲﺃﻱﻭﻗﺖ.ﻭﻓﻴﻤﺎﻳﻠﻲﻗﺎﺋﻤﺔﺑﻤﻨﺤﻨﻴﺎﺕﺍﻟﻤﻮﺍﺯﻥ.
ﻟﻮﺣﺔﺍﻟﻌﺮﺽﻣﻨﺤﻨﻰﺍﻟﻤﻮﺍﺯﻥ
POWERFULﻗﻮﻱ
NATURALﻃﺒﻴﻌﻲ
VOCALﺻﻮﺕﺍﻟﻤﻄﺮﺏ
CUSTOMﺣﺴﺐﺍﻟﺮﻏﺒﺔ
FLATﻋﺎﺩﻱ
SUPER BASSﺻﻮﺕﺟﻬﻴﺮﻣﺘﻔﻮّﻕ
PREOUT:REAR،ﻟﻦﻳﻤﻜﻨﻚﺍﻟﺘﺤﻮﻳﻞﺇﻟﻰ
SW SETTING 1)ﺗﻬﻴﺌﺔﺗﺸﻐﻴﻞ/ﺇﻳﻘﺎﻑﻣﺠﻬﺎﺭﺍﻟﺘﺮﺩﺩﺍﺕ
SW SETTING 1.
SRC LVADJUST.
ﻣﻼﺣﻈﺎﺕ
!ﻟﻠﻌﻮﺩﺓﺇﻟﻰﺍﻟﻌﺮﺽﺍﻟﺴﺎﺑﻖ،ﺍﺿﻐﻂDISP/BACK/SCRL.
!ﻟﻠﻌﻮﺩﺓﺇﻟﻰﺍﻟﻘﺎﺋﻤﺔﺍﻟﺮﺋﻴﺴﻴﺔ،ﺍﺿﻐﻂﻭﺍﺳﺘﻤﺮﺑﻀﻐﻂ
!ﻟﻠﻌﻮﺩﺓﺇﻟﻰﺍﻟﻌﺮﺽﺍﻟﻌﺎﺩﻱ،ﺍﺿﻐﻂBAND/ESC.
!ﻋﻨﺪﻣﺎﺗﻜﻮﻥﺗﻬﻴﺌﺔﺿﺎﺑﻂﻣﺠﻬﺎﺭﺍﻟﺘﺮﺩﺩﺍﺕﺍﻟﺨﻔﻴﻀﺔﺍﻟﻔﺮﻋﻲﻫﻲ
ﺍﻟﺨﻔﻴﻀﺔﺍﻟﻔﺮﻋﻲ(.)ﺭﺍﺟﻊﺻﻔﺤﺔ٢٣.(
!ﻳﻤﻜﻨﻚﺇﺧﺘﻴﺎﺭSW SETTING 2ﻓﻘﻂﻋﻨﺪﻣﺎﻳﻜﻮﻥﺧﺮﺝﻣﺠﻬﺎﺭ
ﺍﻟﺘﺮﺩﺩﺍﺕﺍﻟﺨﻔﻴﻀﺔﺍﻟﻔﺮﻋﻲﻓﻲﺣﺎﻟﺔﺗﺸﻐﻴﻞﻓﻲ
!ﻋﻨﺪﺍﺧﺘﻴﺎﺭFMﻛﻤﺼﺪﺭ،ﻻﻳﻤﻜﻨﻚﺍﻟﺘﺤﻮﻳﻞﺇﻟﻰ
!ﺇﺫﺍﻟﻢﺗﻘﻢﺑﺘﺸﻐﻴﻞﺍﻟﻮﻇﺎﺋﻒﺧﻼﻝﺣﻮﺍﻟﻲ٣٠ﺛﺎﻧﻴﺔ،ﺗﻌﻮﺩﻟﻮﺣﺔ
ﺍﻟﻌﺮﺽﺗﻠﻘﺎﺋﻴًﺎﺇﻟﻰﺍﻟﻌﺮﺽﺍﻟﻌﺎﺩﻱ.
!CUSTOMﻫﻮﻣﻨﺤﻨﻰﻣﻮﺍﺯﻥﻣﻌﺎﻳﺮﺗﻘﻮﻡﺃﻧﺖﺑﺈﻧﺸﺎﺋﻪ.
١٨
Ar
<
YRD5269-A/S>95
Page 96

/
٠٢
Black plate (98,1)
ﺍﻟﻘﺴﻢ
ﺗﺸﻐﻴﻞﻫﺬﺍﺍﻟﺠﻬﺎﺯ
ﺗﻐﻴﻴﺮﺳﺮﻋﺔﺍﻟﻜﺘﺎﺏﺍﻟﺼﻮﺗﻲ
ﺃﺛﻨﺎﺀﺍﻻﺳﺘﻤﺎﻉﺇﻟﻰﺍﻟﻜﺘﺎﺏﺍﻟﺼﻮﺗﻲﻋﻠﻰﺟﻬﺎﺯiPod،ﻓﺈﻧﻪﻳﻤﻜﻦ
ﺗﻐﻴﻴﺮﺳﺮﻋﺔﺍﻟﻌﺮﺽ.
MULTI-CONTROL.
ﻣﻼﺣﻈﺔ
ﻳﻤﻜﻨﻚﺃﻳﻀًﺎﺗﺸﻐﻴﻞﻫﺬﻩﺍﻟﻮﻇﻴﻔﺔﻓﻲﺍﻟﻘﺎﺋﻤﺔﺍﻟﺘﻲﺗﻈﻬﺮﺑﺎﺳﺘﻌﻤﺎﻝ
١ﺇﺳﺘﻌﻤﻞMULTI-CONTROLﻻﺧﺘﻴﺎﺭ
AUDIOBOOKS SPEEDﻓﻲﻗﺎﺋﻤﺔﺍﻟﻮﻇﺎﺋﻒ.
٢ﺍﺿﻐﻂMULTI-CONTROLﻟﻌﺮﺽﻭﺿﻊﺍﻟﺘﻬﻴﺌﺔ.
٣ﺍﺳﺘﻌﻤﻞMULTI-CONTROLﻻﺧﺘﻴﺎﺭﺍﻟﺘﻬﻴﺌﺔ
ﺍﻟﻤﺮﻏﻮﺑﺔ.
ﺃﺩﺭﻟﺘﻐﻴﻴﺮﺍﻟﺘﻬﻴﺌﺔ.
!FASTER–ﻳﺘﻢﺍﻻﺳﺘﻤﺎﻉﺑﺴﺮﻋﺔﺃﻛﺒﺮﻣﻦﺍﻟﺴﺮﻋﺔﺍﻟﻌﺎﺩﻳﺔ
!NORMAL–ﻳﺘﻢﺍﻻﺳﺘﻤﺎﻉﺑﺴﺮﻋﺔﻋﺎﺩﻳﺔ
!SLOWER–ﻳﺘﻢﺍﻻﺳﺘﻤﺎﻉﺑﺴﺮﻋﺔﺃﻗﻞﻣﻦﺍﻟﺴﺮﻋﺔﺍﻟﻌﺎﺩﻳﺔ
٤ﺍﺿﻐﻂMULTI-CONTROLﻟﺘﺤﺪﻳﺪﺍﻻﺧﺘﻴﺎﺭ.
#ﺣﺘﻰﻟﻮﺗﻢﺇﻟﻐﺎﺀﺍﻟﻘﺎﺋﻤﺔﻗﺒﻞﺍﻟﺘﺤﺪﻳﺪ،ﻳﺘﻢﺗﺜﺒﻴﺖﺍﻟﻌﻤﻠﻴﺔ.
/iPodﻳﻐﻴّﺮﻭﺿﻊﺍﻟﺘﺤﻜﻢ
/iPodﻭﺃﺑﻘﻪﻣﻀﻐﻮﻃًﺎﻟﺘﻐﻴﻴﺮﻭﺿﻊﺍﻟﺘﺤﻜﻢ.
iPodﺍﻟﻤﻮﺻّﻞ.
ﺗﺸﻐﻴﻞﻭﻇﻴﻔﺔﺟﻬﺎﺯiPodﻫﺬﻩﻣﻦ
ﺟﻬﺎﺯﻙiPod
ﻻﻳﻤﻜﻦﺗﺸﻐﻴﻞﻫﺬﻩﺍﻟﻮﻇﻴﻔﺔﺑﻮﺍﺳﻄﺔﻣﻮﺩﻳﻼﺕiPodﺍﻟﺘﺎﻟﻴﺔ.
—ﺍﻟﺠﻴﻞﺍﻷﻭﻝﻣﻦiPod nano
—ﺍﻟﺠﻴﻞﺍﻟﺨﺎﻣﺲﻣﻦiPod
ﻳﻤﻜﻦﺗﺸﻐﻴﻞﻭﻇﻴﻔﺔﺟﻬﺎﺯiPodﻫﺬﻩﻣﻦﺟﻬﺎﺯﻙiPod.ﻳﻤﻜﻦ
ﺳﻤﺎﻉﺍﻟﺼﻮﺕﻣﻦﺳﻤﺎﻋﺎﺕﺍﻟﺴﻴﺎﺭﺓ،ﻭﻳﻤﻜﻦﺇﺟﺮﺍﺀﺍﻟﻌﻤﻠﻴﺔﻣﻦ
ﺟﻬﺎﺯﻙiPod.
١ﺍﺿﻐﻂ
ﻛﻞﺿﻐﻄﺔﻭﺍﻻﺳﺘﻤﺮﺍﺭﺑﻀﻐﻂ
ﻛﺎﻟﺘﺎﻟﻲ:
!IPOD–ﻳﻤﻜﻦﺗﺸﻐﻴﻞﻭﻇﻴﻔﺔﺟﻬﺎﺯiPodﻫﺬﻩﻣﻦﺟﻬﺎﺯ
!AUDIO–ﻳﻤﻜﻦﺗﺸﻐﻴﻞﻭﻇﻴﻔﺔﺟﻬﺎﺯiPodﻫﺬﻩﻣﻦﻫﺬﺍ
ﺍﻟﺠﻬﺎﺯ.
٢ﻋﻨﺪﻣﺎﺗﺨﺘﺎﺭIPOD،ﻗﻢﺑﺘﺸﻐﻴﻞﺟﻬﺎﺯiPodﺍﻟﻤﻮﺻّﻞ
ﻻﺧﺘﻴﺎﺭﻭﻋﺮﺽﺃﻏﻨﻴﺔ.
#ﺗﺤﻮﻳﻞﻭﺿﻊﺍﻟﺘﺤﻜﻢﺇﻟﻰﺍﻟﻮﺿﻊIPODﻳﻮﻗﻒﺍﻻﺳﺘﻤﺎﻉﻟﻸﻏﻨﻴﺔ
ﻣﺆﻗﺘًﺎ.ﻗﻢﺑﺘﺸﻐﻴﻞﺟﻬﺎﺯiPodﻟﺒﺪﺀﺍﻟﻌﺮﺽ.
#ﺍﻟﻮﻇﺎﺋﻒﺍﻟﺘﺎﻟﻴﺔﻣﺘﻮﻓﺮﺓﻓﻲﻫﺬﺍﺍﻟﺠﻬﺎﺯ،ﺣﺘﻰﻭﻟﻮﺗﻢﺿﺒﻂﻭﺿﻊ
ﺍﻟﺘﺤﻜﻢﻋﻠﻰﺍﻟﻮﺿﻊIPOD.
!ﻣﺴﺘﻮﻯﺍﻟﺼﻮﺕ
!ﺗﻘﺪﻳﻢﺳﺮﻳﻊ/ﺗﺮﺟﻴﻊ
!ﺍﻟﻤﺴﺎﺭﻟﻸﻋﻠﻰ/ﻟﻸﺳﻔﻞ
!ﺍﻹﻳﻘﺎﻑﺍﻟﻤﺆﻗﺖ
!ﺗﺤﻮﻳﻞﻣﻌﻠﻮﻣﺎﺕﺍﻟﻨﺺ
١٧
ﻣﻼﺣﻈﺎﺕ
!ﻳﻤﻜﻨﻚﺃﻳﻀًﺎﺗﻐﻴﻴﺮﻭﺿﻊﺍﻟﺘﺤﻜﻢﻫﺬﺍﻓﻲﺍﻟﻘﺎﺋﻤﺔﺍﻟﺘﻲﺗﻈﻬﺮ
ﺑﺎﺳﺘﻌﻤﺎﻝMULTI-CONTROL.
!ﻋﻨﺪﻣﺎﻳﺘﻢﺿﺒﻂﻭﺿﻊﺍﻟﺘﺤﻜﻢﻋﻠﻰﺍﻟﻮﺿﻊIPOD،ﺗﻜﻮﻥﻋﻤﻠﻴﺎﺕ
ﺍﻟﺘﺸﻐﻴﻞﻣﺤﺪﻭﺩﺓﻛﻤﺎﻳﻠﻲ:
—ﻻﻳﻤﻜﻦﺍﺧﺘﻴﺎﺭﻭﻇﺎﺋﻒﻏﻴﺮCONTROL)ﻭﺿﻊﺍﻟﺘﺤﻜﻢ(,
PAUSE)ﺍﻹﻳﻘﺎﻑﺍﻟﻤﺆﻗﺖ(ﻭSOUND RETRIEVER
)ﻣﺴﺘﺮﺟﻊﺍﻟﺼﻮﺕﺍﻟﻤﺘﻄﻮّﺭ(.
—ﻻﻳﻤﻜﻦﺗﺸﻐﻴﻞﻭﻇﻴﻔﺔﺍﻟﺘﺼﻔﺢﻣﻦﻫﺬﺍﺍﻟﺠﻬﺎﺯ.
Ar
<YRD5269-A
S>96
Page 97

Black plate (97,1)
ﺍﻟﻘﺴﻢ
٠٢
ﺗﺸﻐﻴﻞﻫﺬﺍﺍﻟﺠﻬﺎﺯ
ﺍﻻﺳﺘﻤﺎﻉﻟﻸﻏﻨﻴﺎﺕﺑﺘﺮﺗﻴﺐﻋﺸﻮﺍﺋﻲ
)ﺗﻐﻴﻴﺮﺗﺮﺗﻴﺐﺍﻟﻜﻞ(
ﻓﻲ
%ﺍﺿﻐﻂ/iPodﻟﺘﺸﻐﻴﻞﺗﻐﻴﻴﺮﺗﺮﺗﻴﺐﺍﻟﻜﻞ.
ﻳﺘﻢﻋﺮﺽﺟﻤﻴﻊﺍﻷﻏﻨﻴﺎﺕﺍﻟﻤﻮﺟﻮﺩﺓﻋﻠﻰﺟﻬﺎﺯiPodﺑﺘﺮﺗﻴﺐ
ﻋﺸﻮﺍﺋﻲ.
#ﻹﻳﻘﺎﻑﺗﻐﻴﻴﺮﺗﺮﺗﻴﺐﺍﻟﻜﻞ،ﺍﺿﺒﻂSHUFFLEﻓﻲﻗﺎﺋﻤﺔ
FUNCTIONﻹﻳﻘﺎﻓﻬﺎ.
ﻣﻼﺣﻈﺔ
ﻳﻤﻜﻨﻚﺃﻳﻀًﺎﺗﺸﻐﻴﻞﻫﺬﻩﺍﻟﻮﻇﻴﻔﺔﻓﻲﺍﻟﻘﺎﺋﻤﺔﺍﻟﺘﻲﺗﻈﻬﺮﺑﺎﺳﺘﻌﻤﺎﻝ
MULTI-CONTROL.
ً
ﻓﻲﺻﻔﺤﺔ١٢.
ﻓﻲﺻﻔﺤﺔ
ﺇﺧﺘﻴﺎﺭﻧﻄﺎﻕﺍﻟﻌﺮﺽﺍﻟﻤﺘﻜﺮﺭ
ﺭﺍﺟﻊ
ﺻﻔﺤﺔ١١.
ﻣﻊﺫﻟﻚﻓﺈﻥﻧﻄﺎﻗﺎﺕﺍﻟﻌﺮﺽﺍﻟﻤﺘﻜﺮﺭﺍﻟﺘﻲ
ﻳﻤﻜﻨﻚﺍﺧﺘﻴﺎﺭﻫﺎﺗﺨﺘﻠﻒﻋﻦﺗﻠﻚﺍﻟﺨﺎﺻﺔ
ﺑﻤﺸﻐّﻞﺍﺳﻄﻮﺍﻧﺎﺕCDﺍﻟﺪﺍﺧﻠﻲ.ﻧﻄﺎﻗﺎﺕ
ﺍﻟﻌﺮﺽﺍﻟﻤﺘﻜﺮﺭﻟﺠﻬﺎﺯiPodﻫﻲ:
!ONE–ﺗﻜﺮﺍﺭﺍﻷﻏﻨﻴﺔﺍﻟﺤﺎﻟﻴﺔ
!ALL–ﺗﻜﺮﺍﺭﻛﻞﺍﻷﻏﻨﻴﺎﺕﻓﻲ
ﺍﻟﻘﺎﺋﻤﺔﺍﻟﻤﺨﺘﺎﺭﺓ
ﺇﻳﻘﺎﻑﺍﻟﻌﺮﺽﻣﺆﻗﺘﺎ
ﺭﺍﺟﻊ
ﺍﺳﺘﻌﻤﺎﻝﻣﺴﺘﺮﺟﻊﺍﻟﺼﻮﺕ
SOUND RETRIEVER
١٢.
ﺍﺧﺘﻴﺎﺭﺍﻷﻏﻨﻴﺎﺕﻣﻦﻗﻮﺍﺋﻢﻣﺘﻌﻠﻘﺔ
ﺑﺎﻷﻏﻨﻴﺔﺍﻟﺘﻲﻳﺘﻢﺍﻻﺳﺘﻤﺎﻉﺇﻟﻴﻬﺎﺣﺎﻟﻴًﺎ
ﻳﺘﻢﻋﺮﺽﺍﻟﻘﻮﺍﺋﻢﺍﻟﻤﺘﻌﻠﻘﺔﺑﺎﻷﻏﻨﻴﺔﺍﻟﺘﻲﻳﺘﻢﺍﻻﺳﺘﻤﺎﻉﺇﻟﻴﻬﺎﺣﺎﻟﻴًﺎ.
ﻳﻤﻜﻨﻚﺍﺧﺘﻴﺎﺭﺍﻷﻏﻨﻴﺎﺕﻣﻦﺍﻟﻘﻮﺍﺋﻢﺍﻟﺘﺎﻟﻴﺔ.
—ﻗﺎﺋﻤﺔﺍﻷﻟﺒﻮﻡﻟﻠﻔﻨﺎﻥﺍﻟﺬﻱﻳﺘﻢﺍﻻﺳﺘﻤﺎﻉﺇﻟﻴﻪﺣﺎﻟﻴًﺎ
—ﻗﺎﺋﻤﺔﺍﻷﻏﻨﻴﺎﺕﻟﻸﻟﺒﻮﻡﺍﻟﺬﻱﻳﺘﻢﺍﻻﺳﺘﻤﺎﻉﺇﻟﻴﻪﺣﺎﻟﻴًﺎ
—ﻗﺎﺋﻤﺔﺍﻷﻟﺒﻮﻡﻟﻠﻔﺌﺔﺍﻟﻤﻮﺳﻴﻘﻴﺔﺍﻟﺘﻲﻳﺘﻢﺍﻻﺳﺘﻤﺎﻉﺇﻟﻴﻬﺎﺣﺎﻟﻴًﺎ
!ﺗﺒﻌًﺎﻟﻌﺪﺩﺍﻟﻤﻠﻔﺎﺕﺍﻟﻤﻮﺟﻮﺩﺓﻓﻲiPod،ﻗﺪﻳﻜﻮﻥﻫﻨﺎﻙﺗﺄﺧﻴﺮ
ﻋﻨﺪﻋﺮﺽﺍﻟﻘﺎﺋﻤﺔ.
/LISTﻟﻠﺘﺤﻮﻳﻞﺇﻟﻰﻭﺿﻊﻋﺮﺽ
١ﺍﺿﻐﻂﻭﺍﺳﺘﻤﺮﺑﻀﻐﻂ
DISP/BACK/SCRL.
SOUND RETRIEVER،ﻓﻘﻂﻋﻨﺪﻣﺎﻳﻜﻮﻥCONTROL
REPEAT
PAUSEﺭﺍﺟﻊ
ﻣﻼﺣﻈﺎﺕ
ﺍﻟﻌﺮﺽﺗﻠﻘﺎﺋﻴًﺎﺇﻟﻰﺍﻟﻌﺮﺽﺍﻟﻌﺎﺩﻱ.
ﻓﻲﻭﺿﻊﺍﻟﺘﺸﻐﻴﻞ.
ﺇﺳﻢﺍﻟﻮﻇﻴﻔﺔﺍﻟﺘﺸﻐﻴﻞ
ﺍﻟﻌﺮﺑﻴﺔ
!ﻟﻠﻌﻮﺩﺓﺇﻟﻰﺍﻟﻌﺮﺽﺍﻟﺴﺎﺑﻖ،ﺍﺿﻐﻂDISP/BACK/SCRL.
!ﻟﻠﻌﻮﺩﺓﺇﻟﻰﺍﻟﻘﺎﺋﻤﺔﺍﻟﺮﺋﻴﺴﻴﺔ،ﺍﺿﻐﻂﻭﺍﺳﺘﻤﺮﺑﻀﻐﻂ
!ﻟﻠﻌﻮﺩﺓﺇﻟﻰﺍﻟﻌﺮﺽﺍﻟﻌﺎﺩﻱ،ﺍﺿﻐﻂBAND/ESC.
!ﺇﺫﺍﻟﻢﺗﻘﻢﺑﺘﺸﻐﻴﻞﺍﻟﻮﻇﺎﺋﻒﺧﻼﻝﺣﻮﺍﻟﻲ٣٠ﺛﺎﻧﻴﺔ،ﺗﻌﻮﺩﻟﻮﺣﺔ
!ﻳﻤﻜﻦﺗﺸﻐﻴﻞCONTROLﻭPAUSEﻭ
ﺍﻟﺮﻭﺍﺑﻂ.
ﻳﺘﻢﻋﺮﺽLINK:ARTIST.
٢ﺍﺳﺘﻌﻤﻞMULTI-CONTROLﻻﺧﺘﻴﺎﺭﺍﻟﻮﺿﻊ
ﺍﻟﻤﺮﻏﻮﺏ.
ﺃﺩﺭﻟﺘﻐﻴﻴﺮﺍﻟﻮﺿﻊ،ﺍﺿﻐﻂﻟﺘﺨﺘﺎﺭ.
!ARTIST–ﻋﺮﺽﻗﺎﺋﻤﺔﺍﻷﻟﺒﻮﻡﻟﻠﻔﻨﺎﻥﺍﻟﺬﻱﻳﺘﻢﺍﻻﺳﺘﻤﺎﻉ
ﺇﻟﻴﻪﺣﺎﻟﻴًﺎ.
!ALBUM–ﻋﺮﺽﻗﺎﺋﻤﺔﺍﻷﻏﻨﻴﺎﺕﻟﻸﻟﺒﻮﻡﺍﻟﺬﻱﻳﺘﻢ
ﺍﻻﺳﺘﻤﺎﻉﺇﻟﻴﻪﺣﺎﻟﻴًﺎ.
!GENRE–ﻋﺮﺽﻗﺎﺋﻤﺔﺍﻷﻟﺒﻮﻡﻟﻠﻔﺌﺔﺍﻟﻤﻮﺳﻴﻘﻴﺔﺍﻟﺘﻲﻳﺘﻢ
ﺍﻻﺳﺘﻤﺎﻉﺇﻟﻴﻬﺎﺣﺎﻟﻴًﺎ.
ﺃﺛﻨﺎﺀﺍﻟﺒﺤﺚﻓﻲﺍﻟﻘﺎﺋﻤﺔ،ﻳﻮﻣﺾSEARCHING.
#ﻳﺘﻢﻋﺮﺽNOT FOUND،ﺇﺫﺍﻟﻢﻳﺘﻢﺇﻳﺠﺎﺩﺍﻷﻟﺒﻮﻣﺎﺕ/ﺍﻷﻏﺎﻧﻲ
ﺫﺍﺕﺍﻟﻌﻼﻗﺔ.
٣ﺍﺳﺘﻌﻤﻞMULTI-CONTROLﻻﺧﺘﻴﺎﺭﺃﻟﺒﻮﻡﺃﻭﺃﻏﻨﻴﺔ
ﺍﻻﺳﺘﻤﺎﻉﻟﻸﻏﻨﻴﺎﺕﺑﺘﺮﺗﻴﺐﻋﺸﻮﺍﺋﻲ
)ﻣﺘﻐﻴّﺮ(
١ﺇﺳﺘﻌﻤﻞMULTI-CONTROLﻻﺧﺘﻴﺎﺭSHUFFLEﻓﻲ
ﻗﺎﺋﻤﺔﺍﻟﻮﻇﺎﺋﻒ.
٢ﺍﺿﻐﻂMULTI-CONTROLﻟﻌﺮﺽﻭﺿﻊﺍﻟﺘﻬﻴﺌﺔ.
٣ﺍﺳﺘﻌﻤﻞMULTI-CONTROLﻻﺧﺘﻴﺎﺭﺍﻟﺘﻬﻴﺌﺔ
ﺍﻟﻤﺮﻏﻮﺑﺔ.
ﺃﺩﺭﻟﺘﻐﻴﻴﺮﺍﻟﺘﻬﻴﺌﺔ.
!SONGS–ﺗﻌﺮﺽﺍﻷﻏﻨﻴﺎﺕﻓﻲﺍﻟﻘﺎﺋﻤﺔﺍﻟﻤﺨﺘﺎﺭﺓﺑﺘﺮﺗﻴﺐ
ﻋﺸﻮﺍﺋﻲ.
!ALBUMS–ﺗﻌﺮﺽﺍﻷﻏﻨﻴﺎﺕﻣﻦﺃﻟﺒﻮﻡﻣﺨﺘﺎﺭﻋﺸﻮﺍﺋﻴًﺎ
ﺑﺎﻟﺘﺮﺗﻴﺐ.
!OFF–ﺇﻟﻐﺎﺀﺍﻟﻌﺮﺽﺑﺘﺮﺗﻴﺐﻋﺸﻮﺍﺋﻲ.
ﻣﻦﺍﻟﻘﺎﺋﻤﺔ.
ﻟﻤﺰﻳﺪﻣﻦﺍﻟﺘﻔﺎﺻﻴﻞﺣﻮﻝﺍﻟﻌﻤﻠﻴﺔﺍﻟﻤﺨﺘﺎﺭﺓ،ﻳﺮﺟﻰﻣﺮﺍﺟﻌﺔﺍﻟﺨﻄﻮﺓ
ﻓﻲﺍﻟﺼﻔﺤﺔ
ﺍﻟﺘﺼﻔّﺢﺑﺤﺜﺎًﻋﻦﺃﻏﻨﻴﺔ
2ﻓﻲﺍﻟﻘﺴﻢﺍﻟﺘﺎﻟﻲ.ﺭﺍﺟﻊ
٤ﺍﺿﻐﻂMULTI-CONTROLﻟﺘﺤﺪﻳﺪﺍﻻﺧﺘﻴﺎﺭ.
#ﺣﺘﻰﻟﻮﺗﻢﺇﻟﻐﺎﺀﺍﻟﻘﺎﺋﻤﺔﻗﺒﻞﺍﻟﺘﺤﺪﻳﺪ،ﻳﺘﻢﺗﺜﺒﻴﺖﺍﻟﻌﻤﻠﻴﺔ.
ﺍﻟﺴﺎﺑﻘﺔ.
<
YRD5269-A/S>97
١٦
Ar
Page 98

٠٢
Black plate (96,1)
ﺍﻟﻘﺴﻢ
ﺗﺸﻐﻴﻞﻫﺬﺍﺍﻟﺠﻬﺎﺯ
٣ﺃﺩﺭMULTI-CONTROLﻻﺧﺘﻴﺎﺭﺣﺮﻑﺍﻟﻬﺠﺎﺀ
ﺍﻟﻤﻄﻠﻮﺏ.
٤ﺍﺿﻐﻂMULTI-CONTROLﻟﻌﺮﺽﻗﺎﺋﻤﺔﺍﻟﺤﺮﻭﻑ
ﺍﻷﺑﺠﺪﻳﺔ.
ﻳﺘﻢﻋﺮﺽﺍﻟﻘﺎﺋﻤﺔﺑﺪﺀًﺍﻣﻦﺣﺮﻑﺍﻟﻬﺠﺎﺀﺍﻟﺬﻱﺗﻢﺍﺧﺘﻴﺎﺭﻩ.
#ﺇﺫﺍﺃﺧﻔﻖﺍﻟﺒﺤﺚﻋﻦﺣﺮﻭﻑﺍﻟﻬﺠﺎﺀ،ﻳﺘﻢﻋﺮﺽ
NOT FOUND.
ﻋﺮﺽﻣﻌﻠﻮﻣﺎﺕﺍﻟﻨﺺﻋﻠﻰﺟﻬﺎﺯiPod
%ﺍﺿﻐﻂDISP/BACK/SCRLﻻﺧﺘﻴﺎﺭﻣﻌﻠﻮﻣﺎﺕﺍﻟﻨﺺ
ﺍﻟﻤﺮﻏﻮﺑﺔ.
ﻣﺪﺓﺍﻟﻌﺮﺽ—ﻋﻨﻮﺍﻥﺍﻷﻏﻨﻴﺔ—ﺍﺳﻢﺍﻟﻔﻨﺎﻥ—ﻋﻨﻮﺍﻥﺍﻷﻟﺒﻮﻡ
#ﺇﺫﺍﻛﺎﻧﺖﺍﻟﺤﺮﻭﻑﺍﻟﻤﺴﺠﻠﺔﻋﻠﻰﺟﻬﺎﺯiPodﻏﻴﺮﻣﺘﻮﺍﻓﻘﺔﻣﻊﻫﺬﺍ
ﺍﻟﺠﻬﺎﺯﻓﻠﻦﻳﺘﻢﻋﺮﺽﺗﻠﻚﺍﻟﺤﺮﻭﻑ.
ﺍﻟﺘﺼﻔّﺢﺑﺤﺜﺎًﻋﻦﺃﻏﻨﻴﺔ
ﺍﻟﻌﻤﻠﻴﺎﺕﺍﻟﺘﻲﺗﺘﺤﻜﻢﺑﺠﻬﺎﺯiPodﻣﻊﻫﺬﺍﺍﻟﺠﻬﺎﺯﻣﺼﻤﻤﺔﺑﺤﻴﺚ
ﺗﻜﻮﻥﺃﻗﺮﺏﻣﺎﻳﻤﻜﻦﻣﻦﺟﻬﺎﺯiPodﻟﺘﺴﻬﻴﻞﺍﻟﺘﺸﻐﻴﻞﻭﺍﻟﺒﺤﺚﻋﻦ
ﺍﻷﻏﻨﻴﺎﺕ.
!ﺗﺒﻌًﺎﻟﻌﺪﺩﺍﻟﻤﻠﻔﺎﺕﺍﻟﻤﻮﺟﻮﺩﺓﻓﻲiPod،ﻗﺪﻳﻜﻮﻥﻫﻨﺎﻙﺗﺄﺧﻴﺮ
ﻋﻨﺪﻋﺮﺽﺍﻟﻘﺎﺋﻤﺔ.
!ﺇﺫﺍﻛﺎﻧﺖﺍﻟﺤﺮﻭﻑﺍﻟﻤﺴﺠﻠﺔﻋﻠﻰﺟﻬﺎﺯiPodﻏﻴﺮﻣﺘﻮﺍﻓﻘﺔﻣﻊ
ﻫﺬﺍﺍﻟﺠﻬﺎﺯﻓﻠﻦﻳﺘﻢﻋﺮﺽﺗﻠﻚﺍﻟﺤﺮﻭﻑ.
ﺍﻟﺒﺤﺚﻋﻦﺍﻷﻏﻨﻴﺎﺕﺑﺪﻻﻟﺔﺍﻟﻔﺌﺔ
١ﺍﺿﻐﻂ/LISTﻟﻠﺘﺤﻮّﻝﺇﻟﻰﻗﺎﺋﻤﺔﺍﻻﺧﺘﻴﺎﺭﺍﺕﺍﻟﺮﺋﻴﺴﻴﺔ
)ﺍﻟﻌﻠﻴﺎ(ﻟﺒﺤﺚﺍﻟﻘﺎﺋﻤﺔ.
٢ﺍﺳﺘﻌﻤﻞMULTI-CONTROLﻻﺧﺘﻴﺎﺭﺍﻟﻔﺌﺔ.
ﺃﺩﺭﻟﺘﻐﻴﻴﺮﺍﻟﻔﺌﺔ،ﺇﺿﻐﻂﻟﺘﺨﺘﺎﺭ.
PLAYLISTS)ﻗﻮﺍﺋﻢﺍﻟﻌﺮﺽ(—ARTISTS)ﺍﻟﻔﻨﺎﻧﻮﻥ(—
ﻣﻼﺣﻈﺎﺕ
!ﻳﻤﻜﻨﻚﺗﺤﺮﻳﻚﻣﻌﻠﻮﻣﺎﺕﺍﻟﻨﺺﺇﻟﻰﺍﻟﻴﺴﺎﺭﻋﻦﻃﺮﻳﻖﺿﻐﻂ
ﻭﺍﻻﺳﺘﻤﺮﺍﺭﺑﻀﻐﻂDISP/BACK/SCRL.
!ﻛﻠﻤﺎﻛﺎﻧﺖﻭﻇﻴﻔﺔﺍﻟﺘﺤﺮﻳﻚﺍﻟﻤﺴﺘﻤﺮEver Scrollﻣﻬﻴﺄﺓﻋﻠﻰ
ﻭﺿﻊﺍﻟﺘﺸﻐﻴﻞONﻓﻲﺍﻟﺘﻬﻴﺌﺔﺍﻟﻤﺒﺪﺋﻴﺔ،ﻓﺈﻥﻣﻌﻠﻮﻣﺎﺕﺍﻟﻨﺺ
ﺗﺤﻮﻳﻞﺍﻟﺘﺤﺮﻳﻚﺍﻟﺪﺍﺋﻢ
ﺗﺘﺤﺮﻙﺑﺎﺳﺘﻤﺮﺍﺭﻋﻠﻰﻟﻮﺣﺔﺍﻟﻌﺮﺽ.ﺭﺍﺟﻊ
ﻓﻲﺻﻔﺤﺔ٢٣.
ﺍﻟﺘﻌﺮﻳﻒﺑﻌﻤﻠﻴﺎﺕﺍﻟﺘﺸﻐﻴﻞﺍﻟﻤﺘﻄﻮّﺭﺓ
١ﺇﺿﻐﻂMULTI-CONTROLﻟﻌﺮﺽﻗﺎﺋﻤﺔﺍﻹﺧﺘﻴﺎﺭﺍﺕ
ﺍﻟﺮﺋﻴﺴﻴﺔ.
٢ﺇﺳﺘﺨﺪﻡMULTI-CONTROLﻹﺧﺘﻴﺎﺭFUNCTION.
ﺃﺩﺭﻟﺘﻐﻴﻴﺮﺧﻴﺎﺭﺍﻟﻘﺎﺋﻤﺔ.ﺍﺿﻐﻂﻟﻼﺧﺘﻴﺎﺭ.
٣ﺃﺩﺭMULTI-CONTROLﻹﺧﺘﻴﺎﺭﺍﻟﻮﻇﻴﻔﺔ.
REPEAT)ﺍﻟﻌﺮﺽﺍﻟﻤﺘﻜﺮﺭ(—SHUFFLE)ﺗﻐﻴﻴﺮﺍﻟﺘﺮﺗﻴﺐ(
—SHUFFLE ALL)ﺗﻐﻴﻴﺮﺗﺮﺗﻴﺐﺍﻟﻜﻞ(—LINK PLAY
)ﻋﺮﺽﺍﻟﺮﻭﺍﺑﻂ(—CONTROL)ﻭﺿﻊﺍﻟﺘﺤﻜﻢ(—PAUSE
)ﺍﻹﻳﻘﺎﻑﺍﻟﻤﺆﻗﺖ(—AUDIOBOOKS SPEED)ﺳﺮﻋﺔ
ﺍﻟﻜﺘﺎﺏﺍﻟﺼﻮﺗﻲ(—SOUND RETRIEVER)ﻣﺴﺘﺮﺟﻊ
ﺍﻟﺼﻮﺕ(
ALBUMS)ﺍﻷﻟﺒﻮﻣﺎﺕ(—SONGS)ﺍﻷﻏﻨﻴﺎﺕ(—
PODCASTS)ﺑﺚPodcast(—GENRES)ﺍﻟﻔﺌﺎﺕ
ﺍﻟﻤﻮﺳﻴﻘﻴﺔ(—COMPOSERS
)ﻣﻠﺤﻨﻮﻥ(—AUDIOBOOKS)ﻛﺘﺐﺻﻮﺗﻴﺔ(
ﻳﺘﻢﻋﺮﺽﻗﺎﺋﻤﺔﻟﻠﻔﺌﺔﺍﻟﻤﺨﺘﺎﺭﺓ.
#ﻳﻤﻜﻨﻚﺑﺪﺀﺍﻟﻌﺮﺽﻟﻜﻞﻣﺤﺘﻮﻳﺎﺕﺍﻟﻔﺌﺔﺍﻟﻤﺨﺘﺎﺭﺓﻋﻦﻃﺮﻳﻖﺿﻐﻂ
ﻭﺍﻻﺳﺘﻤﺮﺍﺭﺑﻀﻐﻂMULTI-CONTROL.ﻳﻤﻜﻨﻚﺃﻳﻀًﺎﺗﻨﻔﻴﺬﻫﺬﻩ
ﺍﻟﻌﻤﻠﻴﺔﻋﻦﻃﺮﻳﻖﺩﻓﻊﻭﺍﻻﺣﺘﻔﺎﻅﺑﺪﻓﻊMULTI-CONTROL
ﻟﻠﻴﻤﻴﻦ.
#ﻳﻤﻜﻨﻚﻛﺬﻟﻚﺗﻐﻴﻴﺮﺍﻟﻔﺌﺔﺑﺪﻓﻊMULTI-CONTROLﻟﻸﻋﻠﻰﺃﻭ
ﻟﻸﺳﻔﻞ.
#ﻳﻤﻜﻨﻚﺃﻳﻀﺎًﺍﺧﺘﻴﺎﺭﺍﻟﻔﺌﺔﻋﻦﻃﺮﻳﻖﺩﻓﻊMULTI-CONTROL
ﻟﻠﻴﻤﻴﻦ.
٣ﻛﺮّﺭﺍﻟﺨﻄﻮﺓ٢ﻹﻳﺠﺎﺩﺍﻟﻤﺴﺎﺭﺍﻟﺬﻱﺗﺮﻳﺪﺍﻻﺳﺘﻤﺎﻉﺇﻟﻴﻪ.
#ﻟﻠﻌﻮﺩﺓﺇﻟﻰﺍﻟﻔﺌﺔﺍﻟﺴﺎﺑﻘﺔ)ﺍﻷﻋﻠﻰﺑﻤﺴﺘﻮﻯﻭﺍﺣﺪ(،ﺍﺿﻐﻂ
DISP/BACK/SCRL.ﻳﻤﻜﻨﻚﺃﻳﻀًﺎﺗﻨﻔﻴﺬﻫﺬﻩﺍﻟﻌﻤﻠﻴﺔﻋﻦﻃﺮﻳﻖ
ﺩﻓﻊMULTI-CONTROLﻟﻠﻴﺴﺎﺭ.
#ﻟﻠﻌﻮﺩﺓﺇﻟﻰﺍﻟﻄﺒﻘﺔﺍﻟﻌﻠﻮﻳﺔﻣﻦﺍﻟﻔﺌﺎﺕ،ﺍﺿﻐﻂﻭﺍﺳﺘﻤﺮﺑﻀﻐﻂ
DISP/BACK/SCRL.
#ﻟﻠﻌﻮﺩﺓﺇﻟﻰﺍﻟﻌﺮﺽﺍﻟﻌﺎﺩﻱ،ﺍﺿﻐﻂBAND/ESC.
#ﺇﺫﺍﻟﻢﺗﻘﻢﺑﺘﺸﻐﻴﻞﺍﻟﻘﺎﺋﻤﺔﺧﻼﻝﺣﻮﺍﻟﻲ٣٠ﺛﺎﻧﻴﺔ،ﺗﻌﻮﺩﻟﻮﺣﺔ
ﺍﻟﻌﺮﺽﺗﻠﻘﺎﺋﻴًﺎﺇﻟﻰﺍﻟﻌﺮﺽﺍﻟﻌﺎﺩﻱ.
١٥
ﺍﻟﻮﻇﺎﺋﻒﻭﻋﻤﻠﻴﺎﺕﺍﻟﺘﺸﻐﻴﻞ
ﺍﻟﻌﻤﻠﻴﺎﺕREPEATﻭPAUSEﻭSOUND RETRIEVER
ﻫﻲﺑﺎﻷﺳﺎﺱﻧﻔﺴﻬﺎﻛﻤﺎﻓﻲﻣﺸﻐّﻞﺍﺳﻄﻮﺍﻧﺎﺕCDﺍﻟﺪﺍﺧﻠﻲ.
/LIST
ﺍﻟﺒﺤﺚﻓﻲﺍﻟﻘﺎﺋﻤﺔﺑﺪﻻﻟﺔﺍﻟﺤﺮﻭﻑﺍﻷﺑﺠﺪﻳﺔ
١ﺍﺳﺘﻌﻤﻞMULTI-CONTROLﻻﺧﺘﻴﺎﺭﺍﻟﻔﺌﺔ.
ﺃﺩﺭﻟﺘﻐﻴﻴﺮﺍﻟﻔﺌﺔ.ﺍﺿﻐﻂﻟﻼﺧﺘﻴﺎﺭ.
٢ﻋﻨﺪﻣﺎﻳﺘﻢﻋﺮﺽﻗﺎﺋﻤﺔﻟﻠﻔﺌﺔﺍﻟﻤﺨﺘﺎﺭﺓ،ﺍﺿﻐﻂ
ﻟﻠﺘﺤﻮﻳﻞﺇﻟﻰﻭﺿﻊﺍﻟﺒﺤﺚﺑﺪﻻﻟﺔﺍﻟﺤﺮﻭﻑﺍﻷﺑﺠﺪﻳﺔ.
ﻳﺘﻢﻋﺮﺽABC SEARCH.
Ar
<
YRD5269-A/S>98
Page 99

Black plate (95,1)
/
ﺍﻟﻘﺴﻢ
٠٢
ﺗﺸﻐﻴﻞﻫﺬﺍﺍﻟﺠﻬﺎﺯ
ﺍﻻﺳﺘﻤﺎﻉﻟﻸﻏﻨﻴﺎﺕﻋﻠﻰﺟﻬﺎﺯiPod
ﻳﻤﻜﻨﻚﺍﻟﺘﺤﻜﻢﻭﺍﻻﺳﺘﻤﺎﻉﺇﻟﻰﺍﻷﻏﻨﻴﺎﺕﻋﻠﻰﺟﻬﺎﺯiPod.
ﺗﻮﺍﻓﻖ
ﻓﻲﺻﻔﺤﺔ٢٩.
!ﺑﺨﺼﻮﺹﺍﻟﺘﻔﺎﺻﻴﻞﺣﻮﻝﺟﻬﺎﺯiPodﺍﻟﻤﺪﻋﻮﻡ،ﺭﺍﺟﻊ
ﻣﻊiPod
!ﻋﻨﺪﺍﺳﺘﻌﻤﺎﻝﺟﻬﺎﺯiPod،ﻓﺈﻧﻪﻳﺘﻄﻠﺐﺗﻮﺻﻴﻞﻣﻮﺻّﻞ
٣ﺃﺩﺭMULTI-CONTROLﻹﺧﺘﻴﺎﺭﺍﻟﻮﻇﻴﻔﺔ.
REPEAT)ﺍﻟﻌﺮﺽﺍﻟﻤﺘﻜﺮﺭ(—RANDOM)ﺍﻟﻌﺮﺽ
ﺍﻟﻌﺸﻮﺍﺋﻲ(—SCAN)ﺍﻟﻌﺮﺽﺍﻻﺳﺘﻄﻼﻋﻲ(—PAUSE
)ﺍﻹﻳﻘﺎﻑﺍﻟﻤﺆﻗﺖ(—SOUND RETRIEVER)ﻣﺴﺘﺮﺟﻊ
ﺍﻟﺼﻮﺕ(
iPod Dock ConnectorﺇﻟﻰﻛﺒﻞUSB.
ﺍﻟﻮﻇﺎﺋﻒﻭﻋﻤﻠﻴﺎﺕﺍﻟﺘﺸﻐﻴﻞ
ﺍﻟﻌﻤﻠﻴﺎﺕﺍﻷﺳﺎﺳﻴﺔ
SOUND RETRIEVERﻫﻲﺑﺎﻷﺳﺎﺱﻧﻔﺴﻬﺎﻛﻤﺎﻓﻲﻣﺸﻐّﻞ
%ﺇﺩﺧﺎﻝﻗﺎﺑﺲﺟﻬﺎﺯiPod
١ﻗﻢﺑﺈﺩﺧﺎﻝﻗﺎﺑﺲﺟﻬﺎﺯiPodﺑﻤﻨﻔﺬUSBﺑﺎﺳﺘﻌﻤﺎﻝﻛﺒﻞ
ﺗﻮﺻﻴﻞiPod Dock ConnectorﺇﻟﻰUSB.
ﻓﻲ
ﺍﻟﻮﺣﺪﺓﺍﻟﺮﺋﻴﺴﻴﺔ
)ﻋﻼﻣﺔﺍﻟﺘﺄﺷﻴﺮ((ﻋﻠﻰﺟﻬﺎﺯiPod.
ﻓﻲﺻﻔﺤﺔ٢٥.
ﺇﺧﻄﺎﺭﺍﺕﺍﻟﺨﻄﺄ
ﻓﻴﻤﺎﻳﺘﻌﻠﻖﺑﻤﻮﺿﻊﻣﻨﻔﺬUSB،ﺭﺍﺟﻊ
ﺻﻔﺤﺔ٦.
٢ﺍﺿﻐﻂSRC/OFFﻻﺧﺘﻴﺎﺭUSB-IPODﻛﻤﺼﺪﺭ.
ﻳﺒﺪﺃﺍﻟﻌﺮﺽ.
ﻓﻲ
%ﺍﻟﺘﻘﺪﻳﻢﺃﻭﺍﻟﺘﺮﺟﻴﻊﺍﻟﺴﺮﻳﻊ
ﺍﺩﻓﻊMULTI-CONTROLﻟﻠﻴﺴﺎﺭﺃﻭﻟﻠﻴﻤﻴﻦﻭﺃﺑﻘِﻪﻛﺬﻟﻚ.
%ﺍﺧﺘﻴﺎﺭﻣﺴﺎﺭ)ﻓﺼﻞ(
ﺍﺩﻓﻊMULTI-CONTROLﻟﻠﻴﺴﺎﺭﺃﻭﻟﻠﻴﻤﻴﻦ.
%ﻓﺼﻞﺟﻬﺎﺯiPod
ﺍﺳﺤﺐﻛﺒﻞﺗﻮﺻﻴﻞiPod Dock ConnectorﺇﻟﻰUSB
ﻟﻠﺨﺎﺭﺝ.
ﻣﻼﺣﻈﺎﺕ
!ﻗﻢﺑﻘﺮﺍﺀﺓﺍﻟﺘﻨﺒﻴﻬﺎﺕﺍﻻﺣﺘﻴﺎﻃﻴﺔﺍﻟﻤﺘﻌﻠﻘﺔﺑﺠﻬﺎﺯiPodﻓﻲﺍﻟﻘﺴﻢ
ﺍﻟﺘﺎﻟﻲ.ﺭﺍﺟﻊﺻﻔﺤﺔ٢٩.
!ﺑﻴﻨﻤﺎﻳﻜﻮﻥﺟﻬﺎﺯiPodﻣﻮﺻﻼًﺑﻬﺬﺍﺍﻟﺠﻬﺎﺯ،ﺗﻈﻬﺮﺍﻟﻌﺒﺎﺭﺓ
PIONEER)ﺃﻭ
!ﺇﺫﺍﺗﻢﻋﺮﺽﺇﺧﻄﺎﺭﺧﻄﺄ،ﺭﺍﺟﻊ
!ﻋﻨﺪﺿﺒﻂﻣﻔﺘﺎﺡﺗﺸﻐﻴﻞﺍﻟﻤﺤﺮﻙﻋﻠﻰﺃﺣﺪﺍﻟﻮﺿﻌﻴﻦACCﺃﻭ
ON،ﻳﺘﻢﺷﺤﻦﺑﻄﺎﺭﻳﺔﺟﻬﺎﺯiPodﺑﻴﻨﻤﺎﻳﻜﻮﻥﺟﻬﺎﺯiPod
ﻣﻮﺻﻼًﺑﻬﺬﻩﺍﻟﻮﺣﺪﺓ.
!ﻋﻨﺪﻣﺎﻳﻜﻮﻥﺟﻬﺎﺯiPodﻣﻮﺻﻼًﺑﻬﺬﺍﺍﻟﺠﻬﺎﺯ،ﻻﻳﻤﻜﻦﺗﺸﻐﻴﻞﺃﻭ
ﺇﻳﻘﺎﻑﺍﻟﺠﻬﺎﺯiPod.ﻋﻠﻰﺃﻧﻪﻋﻨﺪﺿﺒﻂﻭﺿﻊﺍﻟﺘﺤﻜﻢﻋﻠﻰ
ﺍﻟﻮﺿﻊIPOD،ﻳﻤﻜﻨﻚﺗﺸﻐﻴﻞﺟﻬﺎﺯiPodﺃﻭﺇﻳﻘﺎﻓﻪ.
!ﻗﺒﻞﺗﻮﺻﻴﻞﺍﻟﻤﻮﺻّﻞDockﻟﻬﺬﺍﺍﻟﺠﻬﺎﺯﺑﺠﻬﺎﺯiPod،ﻗﻢ
ﺑﻔﺼﻞﺳﻤﺎﻋﺎﺕﺍﻟﺮﺃﺱﻣﻦﺍﻟﺠﻬﺎﺯiPod.
!ﻳﺘﻢﺇﻳﻘﺎﻑﺟﻬﺎﺯiPodﺑﻌﺪﺣﻮﺍﻟﻲﺩﻗﻴﻘﺘﻴﻦﻣﻦﺿﺒﻂﻣﻔﺘﺎﺡﺗﺸﻐﻴﻞ
ﺍﻟﻤﺤﺮﻙﻋﻠﻰﻭﺿﻊﺍﻹﻳﻘﺎﻑOFF.
ﻓﻲ
ً
ﻓﻲﺻﻔﺤﺔ١٢.
ﻓﻲﺻﻔﺤﺔ
ﺇﺧﺘﻴﺎﺭﻧﻄﺎﻕﺍﻟﻌﺮﺽﺍﻟﻤﺘﻜﺮﺭ
ﺭﺍﺟﻊ
ﺻﻔﺤﺔ١١.
ﻣﻊﺫﻟﻚ،ﻓﺈﻥﻧﻄﺎﻗﺎﺕﺍﻟﻌﺮﺽﺍﻟﻤﺘﻜﺮﺭﺍﻟﺘﻲ
ﻳﻤﻜﻨﻚﺍﺧﺘﻴﺎﺭﻫﺎﺗﺨﺘﻠﻒﻋﻦﺗﻠﻚﺍﻟﺨﺎﺻﺔ
ﺑﻤﺸﻐّﻞﺍﺳﻄﻮﺍﻧﺎﺕCDﺍﻟﺪﺍﺧﻠﻲ.ﻧﻄﺎﻗﺎﺕ
ﺍﻟﻌﺮﺽﺍﻟﻤﺘﻜﺮﺭﻟﺠﻬﺎﺯﺍﻟﺘﺨﺰﻳﻦﺍﻟﺨﺎﺭﺟﻲ
)USB،SD(ﻫﻲ:
!TRACK–ﺗﻜﺮﺍﺭﺍﻟﻤﻠﻒﺍﻟﺤﺎﻟﻲﻓﻘﻂ
!FOLDER–ﺗﻜﺮﺍﺭﺍﻟﻔﻮﻟﺪﺭﺍﻟﺤﺎﻟﻲ
!ALL–ﺗﻜﺮﺍﺭﺟﻤﻴﻊﺍﻟﻤﻠﻔﺎﺕ
ﺍﻻﺳﺘﻤﺎﻉﻟﻠﻤﺴﺎﺭﺍﺕﺑﺘﺮﺗﻴﺐﻋﺸﻮﺍﺋﻲ
ﺭﺍﺟﻊ
ﻓﻲﺻﻔﺤﺔ١٢.
ﺭﺍﺟﻊ
ﺇﺳﺘﻄﻼﻉﺍﻟﻔﻮﻟﺪﺭﺍﺕﻭﺍﻟﻤﺴﺎﺭﺍﺕ
ﺻﻔﺤﺔ١٢.
ﺇﻳﻘﺎﻑﺍﻟﻌﺮﺽﻣﺆﻗﺘﺎ
ﺭﺍﺟﻊ
ﺍﺳﺘﻌﻤﺎﻝﻣﺴﺘﺮﺟﻊﺍﻟﺼﻮﺕ
SOUND RETRIEVER
١٢.
DISP/BACK/SCRL.
RANDOM
ﺍﻟﻌﻤﻠﻴﺎﺕREPEATﻭRANDOMﻭSCANﻭPAUSEﻭ
ﺍﺳﻄﻮﺍﻧﺎﺕCDﺍﻟﺪﺍﺧﻠﻲ.
ﺇﺳﻢﺍﻟﻮﻇﻴﻔﺔﺍﻟﺘﺸﻐﻴﻞ
ﺍﻟﻌﺮﺑﻴﺔ
REPEAT
SCAN
PAUSEﺭﺍﺟﻊ
ﻣﻼﺣﻈﺎﺕ
!ﻟﻠﻌﻮﺩﺓﺇﻟﻰﺍﻟﻌﺮﺽﺍﻟﺴﺎﺑﻖ،ﺍﺿﻐﻂDISP/BACK/SCRL.
!ﻟﻠﻌﻮﺩﺓﺇﻟﻰﺍﻟﻘﺎﺋﻤﺔﺍﻟﺮﺋﻴﺴﻴﺔ،ﺍﺿﻐﻂﻭﺍﺳﺘﻤﺮﺑﻀﻐﻂ
!ﻟﻠﻌﻮﺩﺓﺇﻟﻰﺍﻟﻌﺮﺽﺍﻟﻌﺎﺩﻱ،ﺍﺿﻐﻂBAND/ESC.
!ﺇﺫﺍﺍﺧﺘﺮﺕﻓﻮﻟﺪﺭًﺍﺁﺧﺮﺃﺛﻨﺎﺀﺍﻻﺳﺘﻤﺎﻉﺍﻟﻤﺘﻜﺮﺭﻓﺴﻴﺘﻐﻴّﺮﻧﻄﺎﻕ
ﺍﻻﺳﺘﻤﺎﻉﺍﻟﻤﺘﻜﺮﺭﺇﻟﻰﺗﻜﺮﺍﺭﺍﻻﺳﻄﻮﺍﻧﺔALL.
!ﺍﺫﺍﻗﻤﺖﺑﺈﺟﺮﺍﺀﺍﻟﺒﺤﺚﻋﻦﻣﺴﺎﺭﺍﻟﺘﻘﺪﻳﻢﺍﻟﺴﺮﻳﻊ/ﺍﻟﺘﺮﺟﻴﻊﺃﺛﻨﺎﺀ
ﺗﻜﺮﺍﺭﺍﻟﻤﺴﺎﺭTRACK،ﻓﺴﻴﺘﻐﻴّﺮﻧﻄﺎﻕﺍﻹﺳﺘﻤﺎﻉﺍﻟﻤﺘﻜﺮﺭﺇﻟﻰ
ﺗﻜﺮﺍﺭﺍﻟﻔﻮﻟﺪﺭFOLDER.
!ﺑﻌﺪﺍﻻﻧﺘﻬﺎﺀﻣﻦﺍﺳﺘﻄﻼﻉﺍﻟﻤﻠﻔﺎﺕﺃﻭﺍﻟﻔﻮﻟﺪﺭﺍﺕ،ﻳﺒﺪﺃﺍﻟﻌﺮﺽ
ﺍﻟﻌﺎﺩﻱﻟﻠﻤﻠﻔﺎﺕﻣﻦﺟﺪﻳﺪ.
!ﺇﺫﺍﻟﻢﺗﻘﻢﺑﺘﺸﻐﻴﻞﺍﻟﻮﻇﺎﺋﻒﺧﻼﻝﺣﻮﺍﻟﻲ٣٠ﺛﺎﻧﻴﺔ،ﺗﻌﻮﺩﻟﻮﺣﺔ
ﺍﻟﻌﺮﺽﺗﻠﻘﺎﺋﻴًﺎﺇﻟﻰﺍﻟﻌﺮﺽﺍﻟﻌﺎﺩﻱ.
<YRD5269-A
S>99
١٤
Ar
Page 100

٠٢
Black plate (94,1)
ﺍﻟﻘﺴﻢ
ﺗﺸﻐﻴﻞﻫﺬﺍﺍﻟﺠﻬﺎﺯ
%ﺍﻟﻌﻮﺩﺓﻟﻠﻔﻮﻟﺪﺭﺍﻟﺠﺬﺭﻱ
ﺇﺿﻐﻂﻭﺍﺳﺘﻤﺮﺑﻀﻐﻂBAND/ESC.
%ﻓﺼﻞﻗﺎﺑﺲﺟﻬﺎﺯﺍﻟﺘﺨﺰﻳﻦUSB
ﺍﺳﺤﺐﺟﻬﺎﺯﺍﻟﺘﺨﺰﻳﻦUSBﻟﻠﺨﺎﺭﺝ.
ﻓﻲﺃﻱﻭﻗﺖﺗﺮﻳﺪﺇﻧﻬﺎﺀﺍﻻﺳﺘﻤﺎﻉﻳﻤﻜﻨﻚﻓﺼﻞﺟﻬﺎﺯﺍﻟﺘﺨﺰﻳﻦ
USB.
%ﺇﺧﺮﺍﺝﺑﻄﺎﻗﺔﺫﺍﻛﺮﺓSD
١ﺍﻧﺰﻉﺍﻟﻠﻮﺣﺔﺍﻷﻣﺎﻣﻴﺔ.
ﻓﻲﺻﻔﺤﺔ٤.
ﻓﻲﺻﻔﺤﺔ٥.
ﻣﻌﻠﻮﻣﺎﺕ
ﻓﻲﺻﻔﺤﺔ٢٥.
ﺇﺧﻄﺎﺭﺍﺕﺍﻟﺨﻄﺄ
ﻧﺰﻉﺍﻟﻠﻮﺣﺔﺍﻷﻣﺎﻣﻴﺔ
ﺗﺮﻛﻴﺐﺍﻟﻠﻮﺣﺔﺍﻷﻣﺎﻣﻴﺔ
ﻟﻠﺘﻔﺎﺻﻴﻞ،ﺭﺍﺟﻊ
٢ﺍﺿﻐﻂﻋﻠﻰﺑﻄﺎﻗﺔﺍﻟﺬﺍﻛﺮﺓSDﺇﻟﻰﺃﻥﺗﺼﺪﺭﻋﻨﻬﺎﻃﻘﺔ.
ﻳﺘﻢﺇﺧﺮﺍﺝﺑﻄﺎﻗﺔﺫﺍﻛﺮﺓSD.
٣ﺍﺳﺤﺐﺑﻄﺎﻗﺔﺫﺍﻛﺮﺓSDﻟﻠﺨﺎﺭﺝ.
٤ﺗﺮﻛﻴﺐﺍﻟﻠﻮﺣﺔﺍﻷﻣﺎﻣﻴﺔ.
ﻟﻠﺘﻔﺎﺻﻴﻞ،ﺭﺍﺟﻊ
ﻣﻼﺣﻈﺎﺕ
!ﻗﻢﺑﻘﺮﺍﺀﺓﺍﻟﺘﻨﺒﻴﻬﺎﺕﺍﻻﺣﺘﻴﺎﻃﻴﺔﺍﻟﻤﺘﻌﻠﻘﺔﺑﺄﺟﻬﺰﺓﺍﻟﺘﺨﺰﻳﻦﺍﻟﺨﺎﺭﺟﻲ
)USB،SD(ﻭﻫﺬﺍﺍﻟﺠﻬﺎﺯﻓﻲﺍﻟﻘﺴﻢﺍﻟﺘﺎﻟﻲ.ﺭﺍﺟﻊ
ﺇﺿﺎﻓﻴﺔ
.
!ﺇﺫﺍﺗﻢﻋﺮﺽﺇﺧﻄﺎﺭﺧﻄﺄ،ﺭﺍﺟﻊ
!ﺇﺫﺍﻛﺎﻥﺍﻟﻔﻮﻟﺪﺭ٠١)ROOT(ﻻﻳﺤﺘﻮﻱﻋﻠﻰﻣﻠﻔﺎﺕ،ﻳﺒﺪﺃ
ﺍﻻﺳﺘﻤﺎﻉﻣﻦﺍﻟﻔﻮﻟﺪﺭ٠٢.
!ﻋﻨﺪﺗﻮﺻﻴﻞﻣﺸﻐّﻞﺳﻤﻌﻲﻧﻘّﺎﻝUSBﻳﺘﻀﻤّﻦﻭﻇﻴﻔﺔﺷﺤﻦ
ﺍﻟﺒﻄﺎﺭﻳﺔﺑﻬﺬﺍﺍﻟﺠﻬﺎﺯﻭﺿﺒﻂﻣﻔﺘﺎﺡﺗﺸﻐﻴﻞﺍﻟﻤﺤﺮﻙﻋﻠﻰﺃﺣﺪ
ﺍﻟﻮﺿﻌﻴﻦACCﺃﻭON،ﻳﺘﻢﺷﺤﻦﺍﻟﺒﻄﺎﺭﻳﺔ.
.
ﻓﻲ
ﻣﻌﻠﻮﻣﺎﺕﺇﺿﺎﻓﻴﺔ
ﺍﻟﻮﺣﺪﺓﺍﻟﺮﺋﻴﺴﻴﺔ
ﻓﻲﺻﻔﺤﺔ٤.
4150SD.
ﻧﺰﻉﺍﻟﻠﻮﺣﺔﺍﻷﻣﺎﻣﻴﺔ
ﻋﺮﺽﻣﻌﻠﻮﻣﺎﺕﺍﻟﻨﺺﻟﻤﻠﻒﺻﻮﺗﻲ
ﺍﻟﺘﺸﻐﻴﻞﻫﻮﻧﻔﺴﻪﻛﻤﺎﻓﻲﺍﻟﺼﻮﺕﺍﻟﻤﻀﻐﻮﻁﻓﻲﻣﺸﻐّﻞﺍﺳﻄﻮﺍﻧﺎﺕ
ﻓﻲ
ﻋﺮﺽﻣﻌﻠﻮﻣﺎﺕﺍﻟﻨﺺﻋﻠﻰﺍﺳﻄﻮﺍﻧﺔ
ﻓﻲﺻﻔﺤﺔ١١.(
CDﺍﻟﺪﺍﺧﻠﻲ.)ﺭﺍﺟﻊ
ﺻﻔﺤﺔ١١.(
ﺇﺧﺘﻴﺎﺭﺍﻟﻤﻠﻔﺎﺕﻣﻦﻗﺎﺋﻤﺔﺃﺳﻤﺎﺀﺍﻟﻤﻠﻔﺎﺕ
ﺍﻟﻮﺣﺪﺓﺍﻟﺮﺋﻴﺴﻴﺔ
ﻓﻲﺻﻔﺤﺔ٥.
ﺗﺮﻛﻴﺐﺍﻟﻠﻮﺣﺔﺍﻷﻣﺎﻣﻴﺔ
ﺍﻟﺘﺸﻐﻴﻞﻫﻮﻧﻔﺴﻪﻛﻤﺎﻓﻲﻣﺸﻐّﻞﺍﺳﻄﻮﺍﻧﺎﺕCDﺍﻟﺪﺍﺧﻠﻲ.)ﺭﺍﺟﻊ
ﺇﺧﺘﻴﺎﺭﺍﻟﻤﻠﻔﺎﺕﻣﻦﻗﺎﺋﻤﺔﺃﺳﻤﺎﺀﺍﻟﻤﻠﻔﺎﺕ
ﺍﻻﺳﺘﻤﺎﻉﻟﻸﻏﻨﻴﺎﺕﻋﻠﻰﺟﻬﺎﺯ
ﺗﺨﺰﻳﻦﺧﺎﺭﺟﻲ)SD ،USB(
ﻳﻤﻜﻨﻚﻋﺮﺽﻣﻠﻔﺎﺕﺍﻟﺼﻮﺕﺍﻟﻤﻀﻐﻮﻁﺍﻟﺘﻲﺗﻢﺗﺨﺰﻳﻨﻬﺎﻋﻠﻰ
ﺟﻬﺎﺯﺗﺨﺰﻳﻦﺧﺎﺭﺟﻲ)SD ،USB(.
!ﺑﻄﺎﻗﺔﺍﻟﺬﺍﻛﺮﺓSDﻣﺘﺎﺣﺔﻓﻘﻂﻣﻊﺍﻟﻤﻮﺩﻳﻞDEH-
!ﻟﻠﺘﻔﺎﺻﻴﻞﺣﻮﻝﺍﻟﺘﻮﺍﻓﻖ،ﺭﺍﺟﻊ
!ﻓﻲﺍﻟﺘﻌﻠﻴﻤﺎﺕﺍﻟﺘﺎﻟﻴﺔ،ﻳﺘﻢﺍﻹﺷﺎﺭﺓﺇﻟﻰﺑﻄﺎﻗﺎﺕﺫﺍﻛﺮﺓUSB
ﻭﺍﻟﻤﺸﻐﻞﺍﻟﺴﻤﻌﻲUSBﻭﺑﻄﺎﻗﺎﺕﺍﻟﺬﺍﻛﺮﺓSDﻣﺠﺘﻤﻌﺔًﺑﺎﺳﻢ
”ﺟﻬﺎﺯﺗﺨﺰﻳﻦﺧﺎﺭﺟﻲ)USB،SD(.“ﺇﺫﺍﻇﻬﺮﺕﺑﻄﺎﻗﺎﺕ
ﺍﻟﺬﺍﻛﺮﺓUSBﻭﺍﻟﻤﺸﻐّﻞﺍﻟﻨﻘّﺎﻝUSBﻓﻘﻂ،ﻳﺘﻢﺍﻹﺷﺎﺭﺓﺇﻟﻴﻬﻢ
ﺑﺎﺳﻢ”ﺟﻬﺎﺯﺍﻟﺘﺨﺰﻳﻦUSB.“
ﺍﻟﻌﻤﻠﻴﺎﺕﺍﻷﺳﺎﺳﻴﺔ
%ﺇﺩﺧﺎﻝﻗﺎﺑﺲﺟﻬﺎﺯﺍﻟﺘﺨﺰﻳﻦUSBﻭﺍﻟﻌﺮﺽ
١ﻗﻢﺑﺈﺩﺧﺎﻝﻗﺎﺑﺲﺟﻬﺎﺯﺍﻟﺘﺨﺰﻳﻦUSBﺑﻤﻨﻔﺬUSB.
ﻓﻴﻤﺎﻳﺘﻌﻠﻖﺑﻤﻮﺿﻊﻣﻨﻔﺬUSB،ﺭﺍﺟﻊ
ﺻﻔﺤﺔ٦.
٢ﺍﺿﻐﻂSRC/OFFﻻﺧﺘﻴﺎﺭUSBﻛﻤﺼﺪﺭ.
ﻳﺒﺪﺃﺍﻟﻌﺮﺽ.
#ﺍﺳﺘﻌﻤﻞﻛﺒﻞUSBﻟﺘﻮﺻﻴﻞﺟﻬﺎﺯﺍﻟﺘﺨﺰﻳﻦUSBﺑﻤﻨﻔﺬUSB.
ﻧﻈﺮًﺍﻟﺒﺮﻭﺯﺟﻬﺎﺯﺍﻟﺘﺨﺰﻳﻦUSBﻟﻸﻣﺎﻡﻣﻦﺍﻟﺠﻬﺎﺯ،ﻓﺈﻥﺍﻟﺘﻮﺻﻴﻞ
ﺍﻟﻤﺒﺎﺷﺮﻳﺸﻜﻞﺧﻄﻮﺭﺓ.
%ﺇﺩﺧﺎﻝﻳﻄﺎﻗﺔﺫﺍﻛﺮﺓSDﻭﺍﻟﻌﺮﺽ
١ﺍﻧﺰﻉﺍﻟﻠﻮﺣﺔﺍﻷﻣﺎﻣﻴﺔ.
ﻟﻠﺘﻔﺎﺻﻴﻞ،ﺭﺍﺟﻊ
٢ﻗﻢﺑﺈﺩﺧﺎﻝﺑﻄﺎﻗﺔﺫﺍﻛﺮﺓSDﺩﺍﺧﻞﻓﺘﺤﺔﺑﻄﺎﻗﺔSD.
ﻗﻢﺑﺈﺩﺧﺎﻟﻬﺎﺑﺤﻴﺚﻳﻜﻮﻥﺳﻄﺢﺍﻟﺘﻼﻣﺲﻣﺘﺠﻬًﺎﻟﻸﺳﻔﻞﻭﺍﺿﻐﻂ
ﺍﻟﺒﻄﺎﻗﺔﺇﻟﻰﺃﻥﺗﺼﺪﺭﻋﻨﻬﺎﻃﻘﺔﻭﺗﻨﻘﻔﻞﺑﺈﺣﻜﺎﻡ.
ﻓﻴﻤﺎﻳﺘﻌﻠﻖﺑﻤﻮﺿﻊﻓﺘﺤﺔﺑﻄﺎﻗﺔSD،ﺭﺍﺟﻊ
ﻓﻲﺻﻔﺤﺔ٦.
٣ﺗﺮﻛﻴﺐﺍﻟﻠﻮﺣﺔﺍﻷﻣﺎﻣﻴﺔ.
ﻟﻠﺘﻔﺎﺻﻴﻞ،ﺭﺍﺟﻊ
٤ﺍﺿﻐﻂSRC/OFFﻻﺧﺘﻴﺎﺭSDﻛﻤﺼﺪﺭ.
ﻳﺒﺪﺃﺍﻟﻌﺮﺽ.
١٣
ﺍﻟﺘﻌﺮﻳﻒﺑﻌﻤﻠﻴﺎﺕﺍﻟﺘﺸﻐﻴﻞﺍﻟﻤﺘﻄﻮّﺭﺓ
١ﺇﺿﻐﻂMULTI-CONTROLﻟﻌﺮﺽﻗﺎﺋﻤﺔﺍﻹﺧﺘﻴﺎﺭﺍﺕ
ﺍﻟﺮﺋﻴﺴﻴﺔ.
٢ﺇﺳﺘﺨﺪﻡMULTI-CONTROLﻹﺧﺘﻴﺎﺭFUNCTION.
ﺃﺩﺭﻟﺘﻐﻴﻴﺮﺧﻴﺎﺭﺍﻟﻘﺎﺋﻤﺔ.ﺍﺿﻐﻂﻟﻼﺧﺘﻴﺎﺭ.
Ar
<
YRD5269-A/S>100
ﺍﺩﻓﻊMULTI-CONTROLﻟﻸﻋﻠﻰﺃﻭﻟﻸﺳﻔﻞ.
%ﺍﻟﺘﻘﺪﻳﻢﺃﻭﺍﻟﺘﺮﺟﻴﻊﺍﻟﺴﺮﻳﻊ
ﺍﺩﻓﻊMULTI-CONTROLﻟﻠﻴﺴﺎﺭﺃﻭﻟﻠﻴﻤﻴﻦﻭﺃﺑﻘِﻪﻛﺬﻟﻚ.
%ﺍﺧﺘﻴﺎﺭﻣﺴﺎﺭ
ﺍﺩﻓﻊMULTI-CONTROLﻟﻠﻴﺴﺎﺭﺃﻭﻟﻠﻴﻤﻴﻦ.
%ﺍﺧﺘﻴﺎﺭﻓﻮﻟﺪﺭ
 Loading...