

Page 1

Owner’s Manual
Mode d’emploi
USB adapter
Adaptateur USB
CD-UB100
English ItalianoFrançaisDeutschEspañol
Page 2
Contents
Thank you for buying this Pioneer product.
Please read through these operating instructions so you will know how to operate
your model properly. After you have finished reading the instructions, keep this man-
ual in a safe place for future refer ence.
Before You Start
About this unit 3
About this manual 3
About WMA 4
About MP3 4
About AAC 4
Resetting the microprocessor 4
About handling the USB portable audio
player/USB memory 5
Connecting and disconnecting the USB
portable audio player/USB memory 5
Playing songs on USB portable audio
player/USB memory
Basic Operations 6
Selecting an audio file directly in the current
folder 7
Introduction of advanced operations 7
Selecting a repeat play range 7
Playing files in random order 7
Scanning folders and files 8
Pausing playback 8
Displaying text information of an audio
file 8
Scrolling text information in the display 9
Selecting files from the file name list 9
Operating with different head units
Using as an external unit 10
Function compatibility charts 10
– Head unit group 1 10
– Head unit group 2 11
– Head unit group 3 11
– Head unit group 4 12
Displaying text information 12
Selecting a repeat play range 12
Scanning folders and files 13
Playing files in random order 13
Connections
Connecting the units 15
Installation
Installing this unit 16
– Mounting with Velcro fasteners 16
Additional Information
Error messages 17
USB audio player/USB memory
compatibility 17
Compressed audio compatibility 17
– The sequence of audio files on USB
memory 18
– Compressed audio files 18
Specifications 19
2
En
Page 3
Before You Start
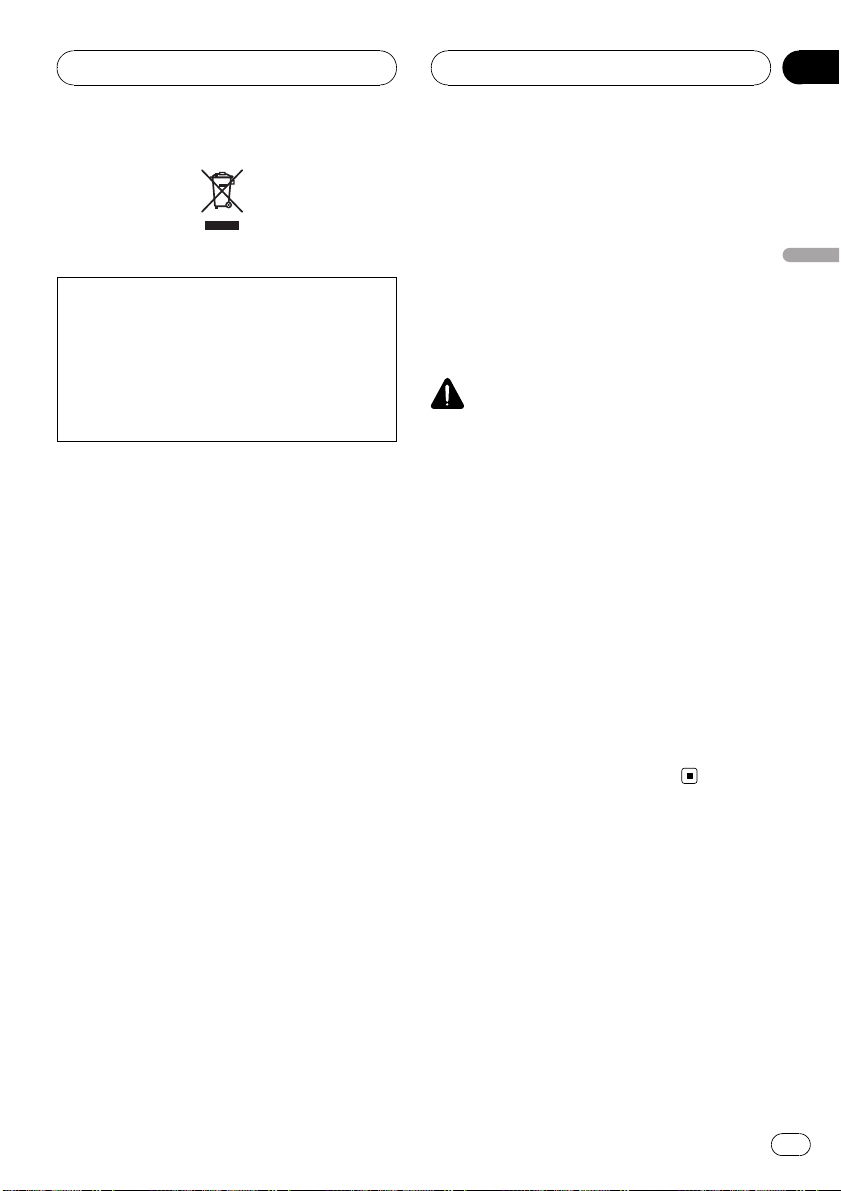
If you want to dispose this product, do not mix
it with general household waste. There is a separate collection system for used electronic
products in accordance with legislation that requires proper treatment, recovery and recycling.
Private households in the 25 member states of
the EU, in Switzerland and Norway may return
their used electronic products free of charge to
designated collection facilities or to a retailer (if
you purchase a similar new one).
For countries not mentioned above, please contact your local authorities for the correct method
of disposal.
By doing so you will ensure that your disposed
product undergoes the necessary treatment, recovery and recycling and thus prevent potential
negative effects on the environment and human
health.
About this unit
This unit is the adapter for a Pioneer head unit
featuring an IP-BUS input to control and listen
to songs on a portable audio player with a
USB interface.
You can listen to songs by connecting USB
portable audio player/USB memory that is
USB Mass Storage Class compliant. For details about the supported USB memory, refer
to USB audio player/USB memory compatibility
on page 17.
! This unit is designed for use in vehicles
only.
! This unit can play back WMA/MP3/AAC
files. For details about the supported file
Section
01
English
format, refer to Compressed audio compatibility on page 17.
CAUTION
! Do not allow this unit to come into contact
with liquids. Electrical shock could result.
Also, this unit damage, smoke, and overheat
could result from contact with liquids.
! Keep this manual handy as a reference for op-
erating procedures and precautions.
! Always keep the volume low enough so that
you can hear sounds from outside the vehicle.
! Protect this unit from moisture.
! Should this product fail to operate properly,
contact your dealer or nearest authorized
Pioneer Service Station.
About this manual
Operate this unit with the connected head
unit. Instructions in this manual use DEHP6980IB, DEH-P6950IB, DEH-P6900IB as an
example of head unit.
When using the head units other than DEHP6980IB, DEH-P6950IB, DEH-P6900IB, refer to
Operating with different head units on page 10.
We recommend that you familiarize yourself
with the functions and their operation by reading through the manual before you begin
using this unit. It is especially important that
you read and observe WARNINGs and CAU-
TIONs in this manual.
En
3
Page 4
Section
01
Before You Start
About WMA
The Windows Media™ logo printed on the box
indicates that this unit can play back WMA
data.
WMA is short for Windows Media™ Audio
and refers to an audio compression technology that is developed by Microsoft
Corporation. WMA data can be encoded by
using Windows Media Player version 7 or
later.
Windows Media and the Windows logo are trademarks or registered trademarks of Microsoft
Corporation in the United States and/or other
countries.
Note
This unit may not operate correctly depending on
the application used to encode WMA files.
About AAC
AAC is short for Advanced Audio Coding and
refers to an audio compression technology
standard used with MPEG 2 and MPEG 4.
Several applications can be used to encode
AAC files, but file formats and extensions differ depending on the application which is
used to encode.
This unit plays back AAC files encoded by
®
iTunes
version 6.0.5 and earlier.
iTunes is a trademark of Apple Computer, Inc.,
registered in the U.S. and other countries.
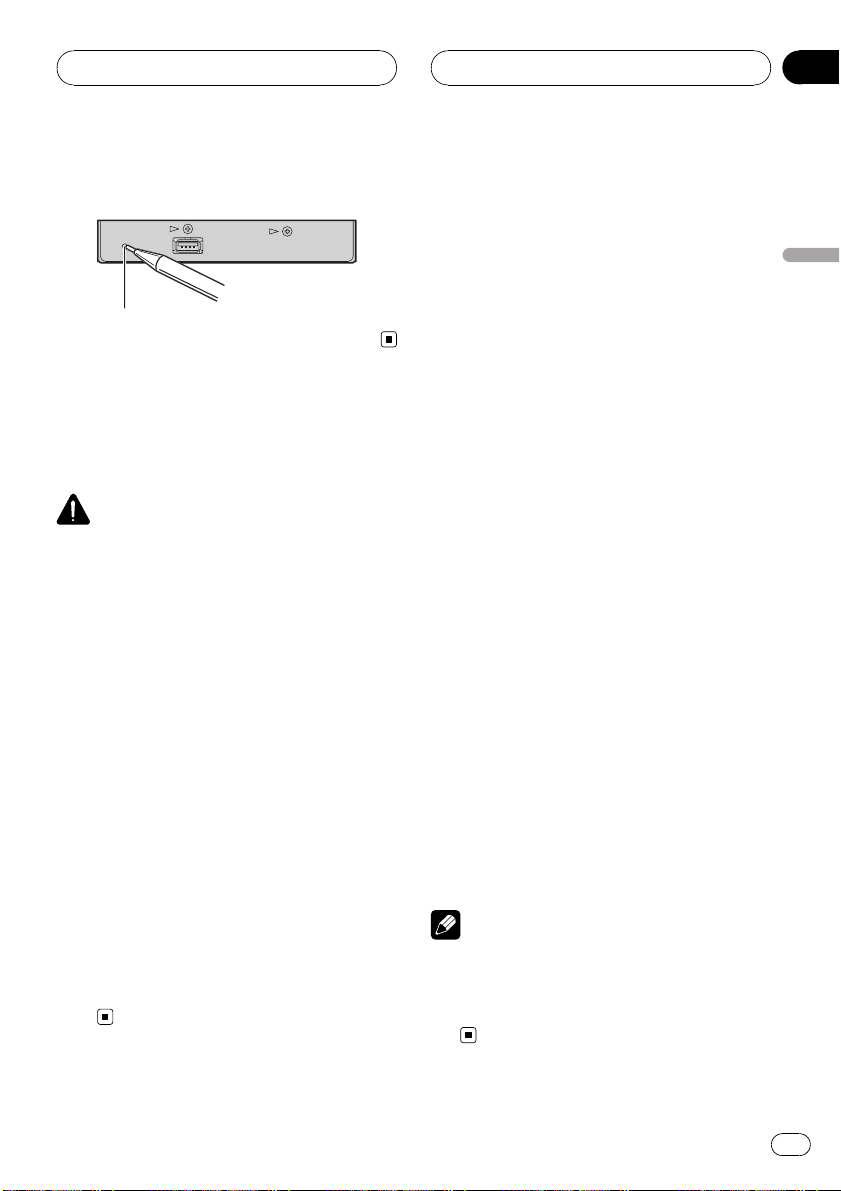
Resetting the microprocessor
The microprocessor must be reset under the
following conditions:
! Prior to using this unit for the first time
after installation
! If the unit fails to operate properly
! When strange or incorrect messages ap-
pear on the display
% Press RESET with a pen tip or other
pointed instrument.
About MP3
Supply of this product only conveys a license
for private, non-commercial use and does not
convey a license nor imply any right to use
this product in any commercial (i.e. revenuegenerating) real time broadcasting (terrestrial,
satellite, cable and/or any other media), broadcasting/streaming via internet, intranets and/
or other networks or in other electronic content distribution systems, such as pay-audio or
audio-on-demand applications. An independent license for such use is required. For details, please visit
http://www.mp3licensing.com.
4
En
RESET button
Page 5

Before You Start
Section
01
English
About handling the USB
portable audio player/USB
memory
CAUTION
! Pioneer accepts no responsibility for data lost
on the USB portable audio player/USB memory even if that data is lost while using this
unit.
! Do not leave the USB portable audio player/
USB memory in direct sunlight for extended
amounts of time. Extended exposure to direct
sunlight can result in USB portable audio
player/USB memory malfunction due to the
resulting high temperature.
! Do not leave the USB portable audio player/
USB memory in any location with a high temperature.
! Firmly secure the USB portable audio player/
USB memory when driving. Do not let the
USB portable audio player/USB memory fall
onto the floor, where it may become jammed
under the brake or accelerator pedal.
For more details, refer to the manual for the
USB portable audio player/USB memory.
audio player/USB memory that is compatible.
Some USB portable audio players/USB memory
devices which meet the compatibility requirements may not operate properly with this unit.
# Partitioned USB memory is not compatible
with this unit.
# Depending on the kind of USB portable audio
player/USB memory you use, this unit may not recognize the USB audio player/USB memory or
audio files may not be played back properly.
# You cannot connect a USB portable audio
player/USB memory to this unit via a USB hub.
# Do not connect anything other than the USB
portable audio player/USB memory.
Note
When the USB portable audio player having battery charging function connects to this unit and
the ignition switch is set to ACC or ON, the battery is charged.
Connecting and disconnecting
the USB portable audio player/
USB memory
% Connect the USB portable audio player/
USB memory to this unit.
About the way to connect the USB portable
audio player/USB memory to this unit , refer to
Connecting the units on page 15.
# You can disconnect the USB portable audio
player/USB memory anytime you want to finish
listening to.
# Refer to USB audio player/USB memory com-
patibility on page 17 and use a USB portable
En
5
Page 6
Section
02
Playing songs on USB
portable audio player/
USB memory
Basic Operations
This display is the example of DEH-P6900IB. In
the case of DEH-P6980IB and DEH-P6950IB, the
display differs slightly.
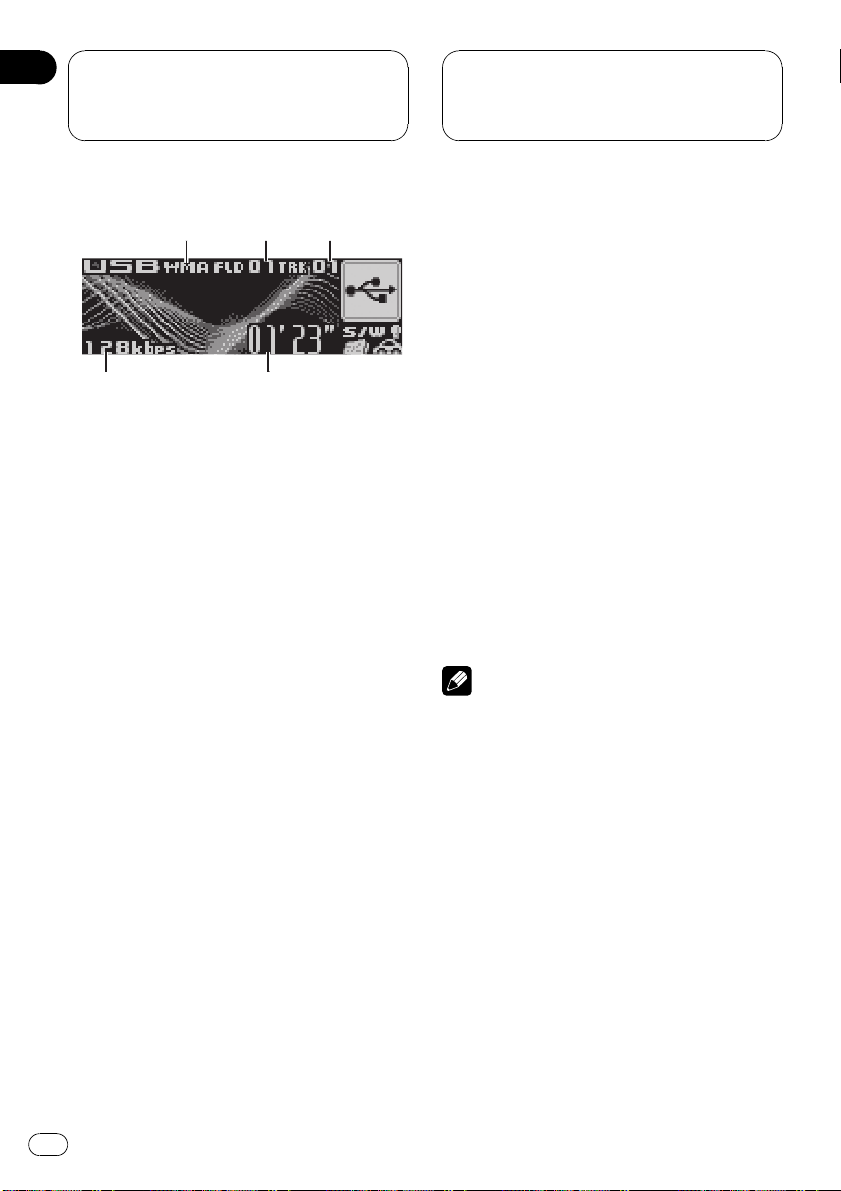
1 MP3/WMA/AAC indicator
Shows the type of file currently playing.
2 Folder number indicator
Shows the folder number currently playing.
3 Track number indicator
Shows the track (file) number currently playing.
4 Play time indicator
Shows the elapsed playing time of the current track (file).
5 Bit rate indicator
Shows the bit rate of the current audio file.
1 Press SOURCE to select USB.
Playback starts.
# There may be a slight delay when starting
playback of audio files depending on the kind of
USB portable audio player/USB memory used.
2 Push MULTI-CONTROL up or down to
select a folder.
# You cannot select a folder that does not have
a compressed audio file recorded in it.
# To return to folder 01 (ROOT), press and hold
BAND (BAND/ESC). However, if folder 01 (ROOT)
contains no files, playback commences with
folder 02.
3 To perform fast forward or reverse,
push and hold MULTI-CONTROL left or
right.
4 To skip back or forward to another
audio file, push MULTI-CONTROL left or
right.
Pushing MULTI-CONTROL right skips to the
start of the next audio file. Pushing
MULTI-CONTROL left once skips to the start
of the current audio file. Pushing again will
skip to the previous audio file.
Notes
! Playback is carried out in order of file number.
Folders are skipped if they contain no files. (If
folder 01 (ROOT) contains no files, playback
commences with folder 02.)
! When playing back files recorded as VBR
(variable bit rate) files, the play time will not be
correctly displayed if fast forward or reverse
operations are used.
! When playing back VBR-recorded WMA files,
the average bit rate value is displayed.
! When playing back VBR (variable bit rate)-re-
corded MP3 files, VBR is displayed instead of
bit rate value.
! There is no sound on fast forward or reverse.
! If an error message such as NO AUDIO is dis-
played, refer to Error messages on page 17.
! When the display setting is switched to the
text information by pressing DISPLAY, the text
automatically begin to scroll in the display.
When Ever Scroll is set to ON at the initial setting, folder and file name scroll continuously.
About Ever Scroll, refer to the operation manual of DEH-P6980IB, DEH-P6950IB, DEHP6900IB.
6
En
Page 7

Playing songs on USB
portable audio player/
USB memory
Section
02
English
Selecting an audio file
directly in the current folder
When using the remote control, you can select
an audio file directly by entering the desired
track number.
1 Press DIRECT.
Audio file number input display appears.
2 Press 0 to 9 buttons to enter the desired
track number.
# You can cancel the input number by pressing
CLEAR.
3 Press DIRECT.
The audio file of entered number will play.
Note
After entering the number input mode, if you do
not perform an operation within about eight seconds, the mode is automatically canceled.
Introduction of advanced
operations
1 Press MULTI-CONTROL to display the
main menu.
FUNC, AUDIO and ENTERTAINMENT appear
on the display.
2 Use MULTI-CONTROL to select FUNC.
Turn to change the menu option; press to select.
The function name appears on the display.
# You can also switch between the functions in
reverse order by turning MULTI-CONTROL counterclockwise.
# To return to the playback display, press
BAND (BAND/ESC).
Note
If you do not operate the function within about 30
seconds, the display is automatically returned to
the playback display.
Selecting a repeat play range
There are three repeat play ranges:
Track repeat (one-file repeat), Folder repeat
(folder repeat), and All repeat (repeat all files).
1 Use MULTI-CONTROL to select
Play mode in the function menu.
2 Press MULTI-CONTROL repeatedly to select the repeat range.
! Track repeat – Repeat just the current file
! Folder repeat – Repeat the current folder
! All repeat – Repeat all files
Notes
! If you select another folder during repeat play,
the repeat play range changes to All repeat.
! If you perform track search or fast forward/re-
verse during Track repeat, the repeat play
range changes to Folder repeat.
! When Folder repeat is selected, it is not pos-
sible to play back a subfolder of that folder.
3 Turn MULTI-CONTROL to switch between the functions in the following order:
Play mode (repeat play)—Random mode
(random play)—Scan mode (scan play)—
Pause (pause)
Playing files in random order
Random play lets you play back files in a random order within the repeat play range,
Folder repeat and All repeat.
En
7
Page 8
Section
02
Playing songs on USB
portable audio player/
USB memory
1 Select the repeat range.
Refer to Selecting a repeat play range on the
previous page.
2 Use MULTI-CONTROL to select
Random mode in the function menu.
3 Press MULTI-CONTROL to turn random
play on.
Audio files will play in a random order within
the previously selected Folder repeat or
All repeat ranges.
# To turn random play off, press
MULTI-CONTROL again.
Scanning folders and files
While you are using Folder repeat, the beginning of each file in the selected folder plays for
about 10 seconds. When you are using
All repeat, the beginning of the first file of
each folder is played for about 10 seconds.
1 Select the repeat range.
Refer to Selecting a repeat play range on the
previous page.
2 Use MULTI-CONTROL to select
Scan mode in the function menu.
3 Press MULTI-CONTROL to turn scan play
on.
The first 10 seconds of each file of the current
folder (or the first file of each folder) is played.
Pausing playback
1 Use MULTI-CONTROL to select Pause in
the function menu.
2 Press MULTI-CONTROL to turn pause
on.
Playback of the current track pauses.
# To turn pause off, press MULTI-CONTROL
again.
Displaying text information
of an audio file
% Press DISPLAY.
Press DISPLAY repeatedly to switch between
the following settings:
Play time—Folder name (folder name) and
File name (file name)—Artist name (artist
name) and Track title (track title)—
Artist name (artist name) and Album title
(album title) —Album title (album title) and
Track title (track title) —Track title (track title)
and play time—Comment (comment) and
playtime
# If the characters recorded on the audio file are
not compatible with a head unit, those characters
will not be displayed.
# If specific information has not been recorded
on an audio file, title or name is not displayed.
# The text information of some audio files may
not be correctly displayed.
4 When you find the desired file (or
folder) press MULTI-CONTROL to turn scan
play off.
The file (or folder) will continue to play.
# If the display has automatically returned to
the playback display, select Scan mode again by
using MULTI-CONTROL.
# After file or folder scanning is finished, normal playback of the files will begin again.
8
En
Page 9
Playing songs on USB
portable audio player/
USB memory
Section
02
English
Scrolling text information
in the display
This unit can display the first 14 letters only of
Folder name, File name, Track title,
Artist name and Album title. When the re-
corded information is longer than 14 letters,
you can scroll the text to the left so that the
rest of the text information can be seen.
% Press DISPLAY and hold until the text
information begins to scroll through the
display.
Note
When Ever Scroll is set to ON at the initial setting,
text information scrolls continuously in the display. Refer to the operation manual of DEHP6980IB, DEH-P6950IB, DEH-P6900IB.
Selecting files from the file
name list
File name list lets you see the list of file names
(or folder names) and select one of them to
playback.
# If the folder/file number is more than 100, last
2-digit of the folder/file number is displayed.
# Number of the folders/files in the currently selected folder will be indicated on the right side of
the display.
# If you do not operate the list within about 30
seconds, the file name list mode is canceled
automatically.
1 Press LIST to switch to the file name list
mode.
Names of files and folders appear in the display.
2 Use MULTI-CONTROL to select the desired file name (or folder name).
Turn to change the name of file or folder;
press to play; push right to see a list of the
files (or folders) in the selected folder.
# You can also change the name of file or folder
by pushing MULTI-CONTROL up or down.
# To return to the previous list (the folder one
level higher), push MULTI-CONTROL left.
En
9
Page 10
Section
03
Operating with different
head units
Using as an external unit
The following head units operate this unit as
an external unit. For more details about the external unit, refer to the head unit’s manual.
! 1KEY to 6KEY doesn’t be used to operate
this unit.
Head unit group 1
The following head units featuring FUNCTION
button operation or SOFT KEY operation.
DEH-P9650MP, DEH-P9600MP, DEH-P7700MP,
DEH-P6800MP, DEH-P6750MP, DEH-P6700MP,
DEH-P5980MP, DEH-P5950MP, DEH-P5900MP,
DEH-P5850MPH, DEH-P5800MP, DEHP5750MP, DEH-P5700MP, DEH-P4990MP, DEHP4980MP, DEH-P4950MP, DEH-P4900MP, DEHP4850MPH, DEH-P4850MP, DEH-P4800MP,
DEH-P4750MP, DEH-P3980MP, DEH-P3950MP,
DEH-P77MP, DEH-P65BT, DEH-P55BT
P40MP, DEX-P90RS, DVH-P5850MP, DVHP5000MP, DVH-P580MP
Head unit group 2
The following head units featuring
MULTI-CONTROL operation.
DEH-P9880BT, DEH-P9850BT, DEH-P9800BT,
DEH-P8980BT, DEH-P8950BT, DEH-P8850MP,
DEH-P8650MP, DEH-P8600MP, DEH-P7980UB,
DEH-P7950UB, DEH-P7900UB, DEH-P7750MP,
DEH-P6850MP, DEH-P88RS, DEH-P85BT, DEHP80MP, DEH-P70BT
Head unit group 3
The following head units featuring touch
panel key operation.
AVH-P7650DVD, AVH-P7500DVDN, AVHP5700DVD
Head unit group 4
The following head units are navigation units
featuring touch panel key operation.
AVIC-HD1BT, AVIC-X1R
*1
, DEH-
Function compatibility charts
Notes
! There may be a slight delay when starting
playback of audio files depending on the kind
of USB portable audio player/USB memory
used.
! You cannot select a folder that does not have
a compressed audio file recorded in it.
! Playback is carried out in order of file number.
Folders are skipped if they contain no files. (If
folder 01 (ROOT) contains no files, playback
commences with folder 02.)
! When playing back files recorded as VBR
(variable bit rate) files, the play time will not be
correctly displayed if fast forward or reverse
operations are used.
! There is no sound on fast forward or reverse.
! If an error message such as NO AUDIO is dis-
played, refer to Error messages on page 17.
Head unit group 1
Controls
Select USB as a
source
Select a folder Press a or b.
Skip back or forward
to another song
Fast forward/re-
*3
verse
Return to folder 01
*4
(ROOT)
.
Select a function Press FUNCTION (FUNC).
Pause a song Press a or b in FUNC1 (F1).
Switch the display Press a or b in FUNC2 (F2).
Scroll the title
Press SOURCE.
Press c or d .
*2
Press and hold c or d.
Press and hold BAND
(BAND/ESC).
Press and hold a or b in
FUNC2 (F2).
*1It is necessary to use remote control (sold separately) to perform the operations by a/b/c/d.
2
*
You can use this function when you select AUTO in AUTO/MANUAL (A/M).
3
*
You can use this function when you select MANUAL in AUTO/MANUAL (A/M).
4
*
If folder 01 (ROOT) contains no files, playback commences with folder 02.
10
En
Page 11
Operating with different
head units
Section
03
English
Controls
Turn scan play on or
off
Select a repeat play
range
Turn random play on
or off
Switch between
AUTO and MANUAL
Press a or b in FUNC3 (F3).
Press a or b in FUNC4 (F4).
Press and hold a or b in
FUNC4 (F4).
Press c or d in AUTO/
MANUAL (A/M).
Head unit group 2
Controls
Select USB as a
source
Select a folder
Skip back or forward
to another song
Fast forward/re-
*2
verse
Return to folder 01
*3
(ROOT)
.
Select a function Use MULTI-CONTROL.
Pause a song
Switch the display
Scroll the title
Turn scan play on or
off
Select a repeat play
range
Press SOURCE.
Push MULTI-CONTROL up
or down.
Push MULTI-CONTROL left
*1
or right.
Push and hold MULTI-CON-
TROL left or right.
Press and hold BAND
(BAND/ESC).
Press MULTI-CONTROL in
FUNC1 (F1).
Press MULTI-CONTROL in
FUNC2 (F2).
Press and hold MULTI-CON-
TROL in FUNC2 (F2).
Press MULTI-CONTROL in
FUNC3 (F3).
Press MULTI-CONTROL in
FUNC4 (F4).
Controls
Turn random play on
or off
Switch between
AUTO and MANUAL
Press and hold MULTI-CON-
TROL in FUNC4 (F4).
Press MULTI-CONTROL in
AUTO/MANUAL (A/M).
Head unit group 3
Controls
Select USB as a
source
Select a folder Touch a or b.
Skip back or forward
to another song
Fast forward/reverse
Return to folder 01
*3
(ROOT)
.
Select a function
Pause a song Touch ab in FUNCTION1.
Switch the display Touch ab in FUNCTION2.
Scroll the title
Turn scan play on or
off
Select a repeat play
range
Turn random play on
or off
Switch between
AUTO and MANUAL
Press SOURCE.
Tou c h c or d.
*1
*2
Keep touching c or d.
Keep touching BAND.
Tou c h A.MENU and then
touch FUNCTION.
Keep touching ab in FUNC-
TION2.
Tou c h ab in FUNCTION3.
Tou c h ab in FUNCTION4.
Keep touching ab in FUNC-
TION4.
Tou c h c or d in AUTO/
MANUAL.
*1You can use this function when you select AUTO in AUTO/MANUAL (A/M).
2
*
You can use this function when you select MANUAL in AUTO/MANUAL (A/M).
3
*
If folder 01 (ROOT) contains no files, playback commences with folder 02.
En
11
Page 12
Section
03
Operating with different
head units
Head unit group 4
Controls
Select USB as a
source
Select a folder Touch a or b.
Skip back or forward
to another song
Fast forward/re-
*2
verse
Return to folder 01
*3
(ROOT)
.
Select a function
Pause a song Touch SEND in FUNCTION1.
Switch the display Touch SEND in FUNCTION2.
Scroll the title
Turn scan play on or
off
Select a repeat play
range
Turn random play on
or off
Switch between
AUTO and MANUAL
Press SOURCE.
Tou c h c or d.
*1
Keep touching c or d.
Keep touching BAND.
Tou c h A.MENU and then
touch FUNCTION.
Keep touching SEND in
FUNCTION2.
Tou c h SEND in FUNCTION3.
Tou c h SEND in FUNCTION4.
Keep touching SEND in
FUNCTION4.
Tou c h AUTO/MANUAL.
Displaying text information
Text information recorded on the audio file can
be displayed.
% Select the desired information.
Refer to Function compatibility charts on page
10.
Folder number—track number—play time—
folder name—file name—album title—track
title—artist name
# If the characters recorded on the audio file are
not compatible with a head unit, those characters
will not be displayed.
Notes
! When using this unit as an external unit, head
units can display the first 8 letters of the folder
name, the file name, the album title, the song
title, the artist name.
! If the characters recorded on the audio file are
not compatible with a head unit, those characters will not be displayed.
! If specific information has not been recorded
on an audio file, title or name is not displayed.
! The text information of some audio files may
not be correctly displayed.
! You can scroll to the left the folder name, the
file name, the album title, the song title, the
artist name.
Selecting a repeat play range
There are three repeat play ranges: TRK (onefile repeat), FLD (folder repeat), and ALL (repeat all files).
% Select the repeat range.
Refer to Function compatibility charts on page
10.
! TRK – Repeat just the current file
! FLD – Repeat the current folder
! ALL – Repeat all files
Notes
! If you select another folder during repeat play,
the repeat play range changes to ALL.
*1You can use this function when you select AUTO in AUTO/MANUAL (A/M).
2
*
You can use this function when you select MANUAL in AUTO/MANUAL (A/M).
3
*
If folder 01 (ROOT) contains no files, playback commences with folder 02.
12
En
Page 13

Operating with different
head units
Section
03
English
! If you perform track search or fast forward/re-
verse during TRK, the repeat play range
changes to FLD.
! When FLD is selected, it is not possible to play
back a subfolder of that folder.
Scanning folders and files
While you are using FLD, the beginning of
each file in the selected folder plays for about
10 seconds. When you are using ALL, the beginning of the first file of each folder is played
for about 10 seconds.
1 Select the repeat range.
Refer to Function compatibility charts on page
10.
! FLD – the beginning of each file in the se-
lected folder plays for about 10 seconds
! ALL – the beginning of the first file of each
folder is played for about 10 seconds
2 Turn scan play on.
Refer to Function compatibility charts on page
10.
3 When you find the desired file (or
folder) turn scan play off.
The file (or folder) will continue to play.
# If the display has automatically returned to
the playback display, select scan play on/off
mode again.
# After file or folder scanning is finished, normal playback of the files will begin again.
2 Turn random play on.
Refer to Function compatibility charts on page
10.
Playing files in random order
Random play lets you play back files in a random order within the repeat play range, FLD
and ALL.
1 Select the repeat range.
Refer to Function compatibility charts on page
10.
! FLD – Play back audio files in a random
order within the selected folder
! ALL – Play back all the audio files in a ran-
dom order
En
13
Page 14

Section
04
Connections
Important
! Use this unit in other than the following condi-
tions could result in fire or malfunction.
— Vehicles with a 12-volt battery and negative
grounding.
! To prevent short-circuit, overheating or mal-
function, be sure to follow the directions
below.
— Disconnect the negative terminal of the
battery before installation.
— Secure the wiring with cable clamps or ad-
hesive tape. To protect the wiring, wrap adhesive tape around them where they lie
against metal parts.
— Place all cables away from moving parts,
such as gear shift and seat rails.
— Place all cables away from hot places,
such as near the heater outlet.
— Do not pass the yellow cable through a
hole into the engine compartment to connect to a battery.
— Do not shorten any cables.
— Never cut the insulation of the power cable
of this unit in order to share the power to
other equipment. Current capacity of the
cable is limited.
— Use a fuse of the rating prescribed.
! IP-BUS connectors are color-coded. Be sure
to connect connectors of the same color.
! Place antenna cable as far away as possible
from the other cables to prevent noise.
! Black cable is ground. This cable and other
product’s ground cable (especially, high-current products such as power amp) must be
wired separately. Otherwise, fire or malfunction may result if they are accidentally detached.
! Do not connect anything other than the USB
portable audio player/USB memory.
! Plug the terminal of the USB portable audio
player/USB memory firmly into the connector
to connect, otherwise this unit may not work
properly or an error may be displayed on the
head unit.
Cord function may differ according to the product, even if cord color is the same. When connecting this system, be sure to check all
manuals and connect cords correctly.
14
En
Page 15
ue
ack
t
y
.
Connections
Connecting the units
Section
04
English
Head unit
3 m
To IP-BUS input
(blue)
This uni
Connect the USB portable audio player
(sold separatel
If necessary, use a USB cable (sold separately)
to connect the USB portable audio player/USB memory.
Yellow
To terminal always supplied
with power regardless of
ignition switch position.
) or USB memory (sold separately)
USB cable
Bl
1.5 m
Fuse (3 A)
Multi-CD player
(sold separately)
IP-BUS cableIP-BUS cable
Bl
Black (ground)
To vehicle (metal) body.
15
En
Page 16
Section
05
Installation
Important
! Check all connections and systems before
final installation.
! Do not use unauthorized parts. The use of un-
authorized parts may cause malfunctions.
! Consult with your dealer if installation re-
quires drilling of holes or other modifications
of the vehicle.
! Do not install this unit where :
— it may interfere with operation of the vehi-
cle.
— it may cause injury to a passenger as a re-
sult of a sudden stop.
! When mounting this unit, make sure none of
the leads are trapped between this unit and
the surrounding metalwork or fittings.
! Do not mount this unit near the heater outlet,
where it would be affected by heat, or near the
doors, where rainwater might splash onto it.
! Before drilling any mounting holes always
check behind where you want to drill the
holes. Do not drill into the gas line, brake line,
electrical wiring or other important parts.
! If this unit installed in the passenger compart-
ment, anchor it securely so it does not break
free while the vehicle is moving, and cause injury or an accident.
! If this unit is installed under a front seat,
make sure it does not obstruct seat movement. Route all leads and cords carefully
around the sliding mechanism so they do not
caught or pinched in the mechanism and
cause a short-circuit.
% Mount this unit using the Velcro fasteners.
This unit
Velcro fastener (hard)
Velcro fastener (soft)
Car mat or chassis
Installing this unit
Mounting with Velcro fasteners
Thoroughly wipe off the surface before affixing
the Velcro fasteners.
! If the Velcro fasteners (hard) adhere to the
car mat directly, you may install this unit
without using the Velcro fasteners (soft).
16
En
Page 17
Additional Information
Appendix
English
Error messages
When you contact your dealer or your nearest
Pioneer Service Center, be sure to record the
error message.
Message Cause Action
N/A USB The USB device
connected to is
not supported by
this unit.
CHK USB The USB connec-
tor or USB cable
is short-circuited.
The connected
USB portable
audio player/
USB memory
consumes more
than 500 mA
(maximum allowable current).
NO AUDIO No songs Transfer the audio
USB memory
with security enabled is connected
DRM SKIP The connected
USB portable
audio player/
USB memory
contains WMA
files that are protected by
Windows Media
DRM 9/10
Connect a USB
portable audio
player or USB
memory that is
USB Mass Storage
Class compliant.
Confirm that the
USB connector or
USB cable is not
caught in something or damaged.
Disconnect the
USB portable
audio player/USB
memory and do
not use it. Turn the
ignition switch to
OFF, then to ACC
or ON and then
connect the compliant USB portable audio player/
USB memory.
files to the USB
portable audio
player/USB memory and connect.
Follow the USB
memory instructions to disable the
security.
Play an audio file
not protected by
Windows Media
DRM 9/10.
Message Cause Action
PROTECT All the files on
the connected
USB portable
audio player/
USB memory are
protected by
Windows Media
DRM 9/10
Transfer audio files
not protected by
Windows Media
DRM 9/10 to the
USB portable
audio player/USB
memory and connect.
USB audio player/USB
memory compatibility
! Specification: USB 2.0 full speed
! USB Class: MSC (Mass Storage Class) de-
vice
! Protocol: bulk
! Maximum amount of memory: 250 GB
! File system: FAT12, FAT16, FAT32
! Supply current: 500 mA
Notes
! Partitioned USB memory is not compatible
with this unit.
! Depending on the kind of USB portable audio
player/USB memory you use, this unit may
not recognize the USB audio player/USB
memory or audio files may not be played back
properly.
! You cannot connect a USB portable audio
player/USB memory to this unit via a USB
hub.
Compressed audio
compatibility
! Up to 15 000 files on a USB portable audio
player/USB memory can be played back.
En
17
Page 18
1
2
5
6
Appendix
Additional Information
! Up to 500 folders on a USB portable audio
player/USB memory can be played back.
! There may be a slight delay when starting
playback of audio files on a USB portable
audio player/USB memory with numerous
folder hierarchies.
! File extensions such as .wma, .mp3 or .m4a
must be used properly.
! Only 64 characters from the beginning can
be displayed as a file name (including the
extension such as .wma, .mp3 or .m4a) or a
folder name.
Depending on the character sets, only the
first 32 characters may be displayed.
! The text information of some audio files
may not be correctly displayed.
! There may be a slight delay when starting
playback of audio files encoded with image
data.
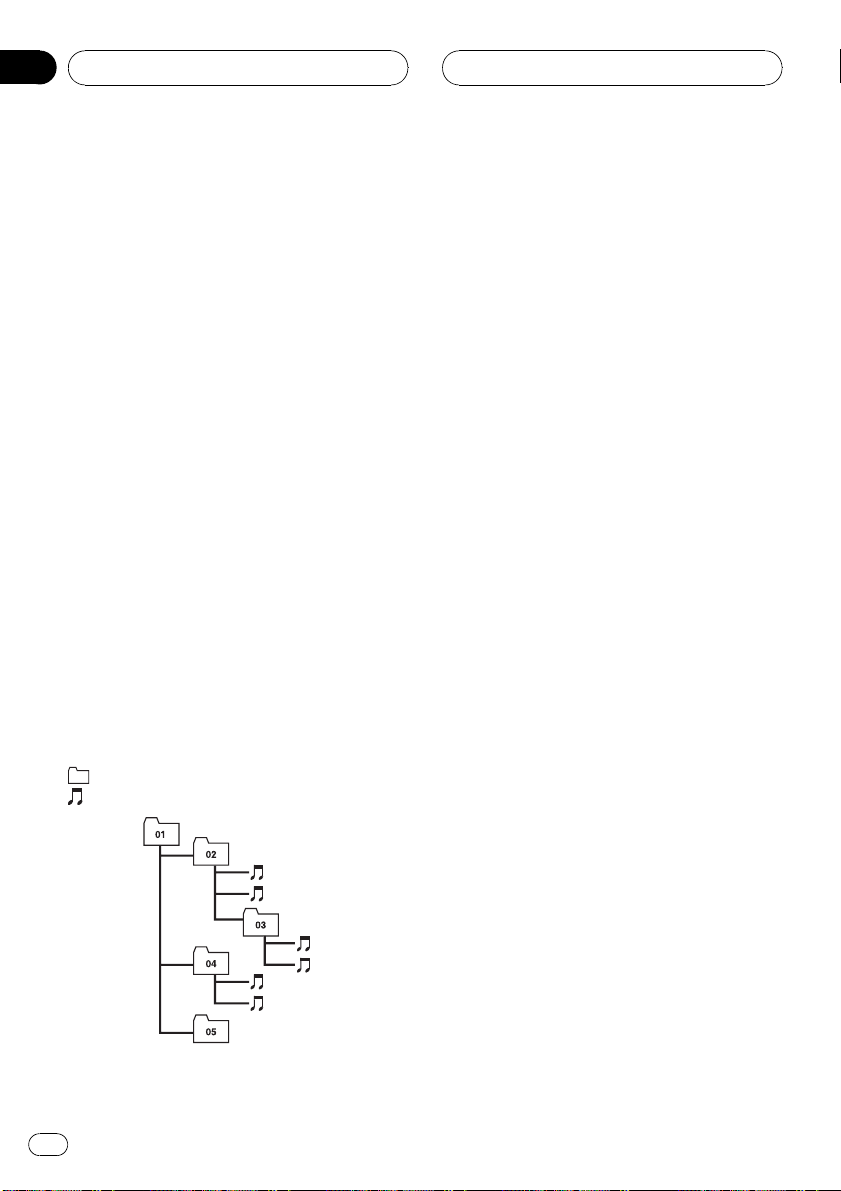
The sequence of audio files on
USB memory
For USB portable audio players, the sequence is
different from that of USB memory and depends on the player.
Example of a hierarchy
: Folder
: Compressed audio file
! 01 to 05 represent assigned folder num-
bers. 1 to 6 represent the playback sequence. The user cannot assign folder
numbers and specify the playback sequence with this unit.
! The sequence of audio files/folders to be
played back, selected by the scan play and
displayed in the file name list is determined
as follows:
— The sequence of files is given priority
over the sequence of subfolders.
— In a folder, the sequence of audio files/
subfolders is the same as the order you
copy from a personal computer to the
USB memory.
However, the sequence may be altered depending on the settings and the operating
system of the personal computer.
Also, when you select several folders/files
at one time and copy to the USB memory,
the expected sequence of audio files to be
played back, selected and displayed may
not coincide with the actual sequence.
! If you want to specify the sequence of the
audio files, refer to Example of a hierarchy
on this page and copy the folders/files in
order.
— We recommend that you specify the file
names in the desired playback se-
quence (e.g., 001xxxxx.mp3 for the first,
099yyyyy.wma for 99th, etc.).
Compressed audio files
WMA
! Compatible format: WMA encoded by
3
4
Level 1 Level 2 Level 3 Level 4
18
En
Windows Media Player Ver. 7, 7.1, 8, 9 or 10
! Bit rate: 5 kbps to 384 kbps (CBR), VBR
! Sampling frequency: 32 kHz, 44.1 kHz, 48
kHz
! Windows Media Audio 9 Professional, Loss-
less, Voice: No
Page 19
Additional Information
Appendix
English
MP3
! Compatible format: MPEG-1, 2, 2.5 Audio
Layer 3
! Bit rate: 8 kbps to 320 kbps (CBR), VBR
! Sampling frequency: 8 kHz to 48 kHz (32,
44.1, 48 kHz for emphasis)
! Compatible ID3 tag version: 1.0, 1.1, 2.2,
2.3, 2.4 (ID3 tag Version 2.x is given priority
than Version 1.x.)
! M3u playlist: No
! MP3i (MP3 interactive), mp3 PRO: No
AAC
! Compatible format: AAC encoded by
®
iTunes
version 6.0.5 and earlier
! Sampling frequency: 8 kHz to 48 kHz
! Transmission rate: 16 kbps to 320 kbps
! AAC file bought on the iTunes Music Store
(.m4p file extension): No
! Apple Lossless: No
Specifications
General
Rated power source ............... 14.4 V DC
Grounding system ................... Negative type
Max. current consumption
..................................................... 2.0 A
Dimensions (W × H × D) ...146 × 24 × 90 mm
Weight .......................................... 0.32 kg
USB
Specification .............................. USB 2.0 full speed
Supply current .......................... 500 mA
Maximum amount of memory
..................................................... 250 GB
File system .................................. FAT12, FAT16, FAT32
Maximum number of files ... 15 000
Maximum number of folders
..................................................... 500
MP3 decoding format ........... MPEG-1, 2 & 2.5 Audio Layer
WMA decoding format ......... Ver. 7, 7.1, 8, 9, 10 (2ch
AAC decoding format ............ MPEG-4 AAC (iTunes
Audio
Signal-to-noise ratio ............... 95 dB (1 kHz) (IEC-A net-
Dynamic range ......................... 95 dB (1 kHz)
Channel separation ................ 90 dB (1 kHz)
Number of channels .............. 2 (stereo)
(allowable voltage range:
12.0 V to 14.4 V DC)
3
audio)
(Windows Media Player)
coded only)
work)
®
en-
Note
Specifications and the design are subject to possible modifications without notice due to improvements.
En
19
Page 20
Contenido
Gracias por haber comprado este producto Pioneer.
Lea con detenimiento estas instrucciones sobre el funcionamiento del aparato,
para que pueda darle el mejor uso posible. Una vez que las haya leído, conserve
este manual en un lugar seguro para consultarlo en el futuro.
Antes de comenzar
Acerca de esta unidad 21
Acerca de este manual 21
Acerca de WMA 22
Acerca de MP3 22
Acerca de AAC 22
Reinicialización del microprocesador 22
Acerca del manejo del reproductor de audio
portátil USB/memoria USB 23
Conexión y desconexión del reproductor de
audio portátil USB/memoria USB 23
Reproducción de canciones en el
reproductor de audio portátil USB/
memoria USB
Funciones básicas 24
Selección directa de un fichero de audio en
la carpeta actual 25
Introducción a las funciones avanzadas 25
Selección de una gama de repetición de
reproducción 25
Reproducción de los ficheros en orden
aleatorio 26
Exploración de carpetas y ficheros 26
Pausa de la reproducción 26
Visualización de información de texto de un
fichero de audio 27
Desplazamiento de información de texto en
el display 27
Selección de ficheros de la lista de nombres
de ficheros 27
– Grupo 4 de unidades principales 31
Visualización de información de texto 32
Selección de una gama de repetición de
reproducción 32
Exploración de carpetas y ficheros 32
Reproducción de los ficheros en orden
aleatorio 33
Conexiones
Conexión de las unidades 35
Instalación
Instalación de esta unidad 36
– Montaje con sujetadores de Velcro 36
Información adicional
Mensajes de error 37
Compatibilidad del reproductor de audio
USB/memoria USB 37
Compatibilidad con audio comprimido 38
– Secuencia de ficheros de audio en la
memoria USB 38
– Archivos de audio comprimidos 39
Especificaciones 39
Funcionamiento con diferentes unidades
principales
Uso como una unidad externa 29
Tablas de compatibilidad de funciones 29
– Grupo 1 de unidades principales 30
– Grupo 2 de unidades principales 30
– Grupo 3 de unidades principales 31
20
Es
Page 21
Antes de comenzar
Si desea deshacerse de este producto, no lo
mezcle con los residuos generales de su
hogar. De conformidad con la legislación vigente, existe un sistema de recogida distinto
para los productos electrónicos que requieren
un procedimiento adecuado de tratamiento,
recuperación y reciclado.
Las viviendas privadas en los 25 estados miembros de la UE, en Suiza y Noruega pueden devolver gratuitamente sus productos electrónicos
usados en las instalaciones de recolección previstas o bien en las instalaciones de minoristas
(si adquieren un producto similar nuevo).
En el caso de los países que no se han mencionado en el párrafo anterior, póngase en contacto
con sus autoridades locales a fin de conocer el
método de eliminación correcto.
Al actuar siguiendo estas instrucciones, se asegurará de que el producto de desecho se somete
a los procesos de tratamiento, recuperación y reciclaje necesarios, con lo que se previenen los
efectos negativos potenciales para el entorno y la
salud humana.
la página 37 para obtener información sobre
la memoria USB compatible.
! Esta unidad está diseñada para ser utili-
zada únicamente en vehículos.
! Esta unidad puede reproducir ficheros
WMA/MP3/AAC. Consulte Compatibilidad
con audio comprimido en la página 38 para
obtener información sobre el formato de fichero compatible.
PRECAUCIÓN
! No permita que esta unidad entre en contacto
con líquidos, ya que ello puede producir una
descarga eléctrica. Además, el contacto con
líquidos puede causar daños en la unidad,
humo y recalentamiento.
! Conserve este manual a mano para que
pueda consultar los procedimientos de operación y las precauciones cuando sea necesario.
! Mantenga siempre el volumen lo suficiente-
mente bajo como para que pueda escuchar
los sonidos que provienen del exterior del vehículo.
! Proteja esta unidad de la humedad.
! En caso de que este producto no funcione co-
rrectamente, póngase en contacto con su
concesionario o con el centro de servicio
Pioneer autorizado más cercano.
Sección
01
Español
Acerca de esta unidad
Esta unidad es el adaptador para el control y
la escucha de canciones en un reproductor de
audio portátil con interfaz USB mediante una
unidad principal Pioneer con entrada IP-BUS.
Podrá escuchar canciones conectando un reproductor de audio portátil USB/memoria
USB que cumpla con la clase de almacenamiento masivo USB. Consulte Compatibilidad
del reproductor de audio USB/memoria USB en
Acerca de este manual
Haga funcionar esta unidad con la unidad
principal conectada. En las instrucciones de
este manual se utiliza el reproductor DEHP6980IB, DEH-P6950IB, DEH-P6900IB como
ejemplo de unidad principal.
Si se utilizan unidades principales que no
sean DEH-P6980IB, DEH-P6950IB, DEHP6900IB, consulte Funcionamiento con diferen-
tes unidades principales en la página 29.
Es
21
Page 22
Sección
01
Antes de comenzar
Le recomendamos que se familiarice con las
funciones y su operación leyendo el manual
antes de utilizar esta unidad. Es muy importante que lea y observe los mensajes de AD-
VERTENCIA y PRECAUCIÓN en este
manual.
Acerca de WMA
El logo de Windows Media™ impreso en la
caja indica que esta unidad puede reproducir
datos WMA.
WMA es la abreviatura de Windows Media™
Audio, y se refiere a la tecnología de compresión de audio desarrollada por Microsoft
Corporation. Los datos WMA se pueden cifrar
con la versión 7 o posterior del Windows
Media Player.
Windows Media y el logo de Windows son
marcas comerciales o registradas de
Microsoft Corporation en los EE.UU. y/o en
otros países.
po real (terrestres, vía satélite, por cable y/o
por cualquier otro medio), transmisiones/
streaming por Internet, intranets y/u otras
redes o en otros sistemas de distribución de
contenido electrónico, como por ejemplo, aplicaciones de pago por escucha (pay-audio) o
audio bajo demanda (audio-on-demand). Se
necesita una licencia independiente para su
uso comercial. Para obtener más información,
visite la página web
http://www.mp3licensing.com.
Acerca de AAC
AAC es la abreviatura de Advanced Audio Coding y alude a una norma de tecnología de
compresión de audio usada con MPEG 2 y
MPEG 4.
Es posible usar varias aplicaciones para codificar ficheros AAC, pero los formatos y extensiones de los ficheros varían según la aplicación
utilizada para la codificación.
Esta unidad reproduce ficheros AAC codificados con iTunes
iTunes es una marca comercial de Apple
Computer, Inc., registrada en los EE.UU. y
otros países.
®
versión 6.0.5 y anteriores.
Nota
Esta unidad puede no funcionar correctamente,
dependiendo de la aplicación utilizada para codificar ficheros WMA.
Acerca de MP3
La venta de este producto sólo otorga una licencia para su uso privado, no comercial. No
otorga ninguna licencia ni concede ningún
derecho a utilizar este producto en transmisiones comerciales (es decir, lucrativas) en tiem-
22
Es
Reinicialización del
microprocesador
Se debe reinicializar el microprocesador si se
presentan las siguientes condiciones:
! Antes de utilizar esta unidad por primera
vez después de su instalación
! Si la unidad no funciona correctamente
! Cuando aparecen mensajes extraños o in-
correctos en el display
Page 23
Antes de comenzar
Sección
01
% Pulse RESET con la punta de un lapicero
u otro instrumento con punta.
Botón RESET
Acerca del manejo del
reproductor de audio
portátil USB/memoria USB
PRECAUCIÓN
! Pioneer no asume responsabilidades por la
pérdida de datos en el reproductor de audio
portátil USB/memoria USB, incluso si la pérdida ocurre durante el uso de esta unidad.
! No deje el reproductor de audio portátil USB/
memoria USB expuesto a la luz solar directa
durante un largo periodo de tiempo. La exposición prolongada a la luz solar directa puede
causar un fallo de funcionamiento del reproductor de audio portátil USB/memoria USB
como consecuencia de la alta temperatura generada.
! No deje el reproductor de audio portátil USB/
memoria USB en un lugar con altas temperaturas.
! Asegure bien el reproductor de audio portátil
USB/memoria USB al conducir. No deje caer
el reproductor de audio portátil USB/memoria
USB al suelo, ya que puede quedar atascado
debajo del freno o del acelerador.
Para más información, consulte el manual del
reproductor de audio portátil USB/memoria
USB.
Conexión y desconexión
del reproductor de audio
portátil USB/memoria USB
% Conecte el reproductor de audio portátil USB/memoria USB a esta unidad.
Para saber cómo conectar el reproductor de
audio portátil USB/memoria USB a esta unidad, consulte Conexión de las unidades en la
página 35.
# Podrá desconectar el reproductor de audio
portátil USB/memoria USB en cualquier momento cuando desee dejar de escucharlo.
# Consulte Compatibilidad del r eproductor de
audio USB/memoria USB en la página 37 y utilice
un reproductor de audio portátil USB/memoria
USB que sea compatible. Puede que algunos reproductores de audio portátiles USB/dispositivos
de memoria USB cumplan los requisitos de compatibilidad, pero no funcionen bien con esta unidad.
# La memoria USB particionada no es compatible con esta unidad.
# Según el tipo de reproductor de audio portátil
USB/memoria USB que utilice, es posible que
esta unidad no reconozca el reproductor de
audio USB/memoria USB o que los ficheros de
audio no puedan ser reproducidos correctamente.
# No se puede conectar el reproductor de audio
portátil USB/memoria USB a esta unidad a través
de un concentrador USB.
# No conecte otro dispositivo que no sea un reproductor de audio portátil USB/memoria USB.
Nota
Si el reproductor de audio portátil USB tiene una
función de carga de la batería y se conecta a esta
unidad, la batería se cargará al colocar la llave de
encendido del automóvil en la posición ACC u
ON.
Español
23
Es
Page 24
Sección
02
Reproducción de canciones
en el reproductor de audio
portátil USB/memoria USB
Funciones básicas
Este display es el ejemplo de DEH-P6900IB. En
el caso de DEH-P6980IB y DEH-P6950IB, el display presenta leves diferencias.
1 Indicador MP3/WMA/AAC
Muestra el tipo de fichero que se está reproduciendo actualmente.
2 Indicador del número de carpeta
Muestra el número de la carpeta que se
está reproduciendo.
3 Indicador de número de pista
Muestra el número de pista (fichero) que se
está reproduciendo actualmente.
4 Indicador de tiempo de reproducción
Muestra el tiempo transcurrido de reproducción de la pista (fichero) actual.
5 Indicador de velocidad de grabación
Muestra la velocidad de grabación del fichero de audio actual.
1 Presione SOURCE para seleccionar USB.
Se inicia la reproducción.
# Puede producirse una pequena demora cuando se inicie la reproduccion de ficheros de audio
segun el tipo de reproductor de audio portatil
USB/memoria USB utilizado.
2 Pulse MULTI-CONTROL arriba o abajo
para seleccionar una carpeta.
# No se puede seleccionar una carpeta que no
tenga un fichero de audio comprimido grabado
en ella.
# Para volver a la carpeta 01 (RAÍZ), mantenga
presionado BAND (BAND/ESC). Sin embargo, si
la carpeta 01 (RAÍZ) no contiene ficheros, la reproducción comienza en la carpeta 02.
3 Para realizar el avance rápido o retroceso, mantenga pulsado MULTI-CONTROL izquierda o derecha.
4 Para saltar y retroceder o avanzar hasta
otro fichero de audio, pulse
MULTI-CONTROL izquierda o derecha.
Al pulsar MULTI-CONTROL derecha, se salta
al principio del fichero de audio siguiente. Al
pulsar MULTI-CONTROL izquierda una vez, se
salta al principio del fichero de audio actual.
Si pulsa otra vez, se salta al fichero de audio
anterior.
Notas
! Los discos se reproducen por orden del núme-
ro de fichero. Se saltan las carpetas que no
tienen ficheros. (Si la carpeta 01 (RAÍZ) no
contiene ficheros, la reproducción comienza
en la carpeta 02.)
! Al reproducir ficheros grabados como VBR
(velocidad de grabación variable), el tiempo
de reproducción no se visualizará correctamente si se utilizan las funciones de avance
rápido o retroceso.
! Al reproducir ficheros WMA grabados con
VBR, se visualiza el valor de velocidad de grabación promedio.
! Al reproducir ficheros MP3 grabados con VBR
(velocidad de grabación variable), se visualizará VBR en lugar del valor de velocidad de grabación.
! Cuando se utilizan las funciones de avance rá-
pido o retroceso no se emite sonido.
24
Es
Page 25
Reproducción de canciones
en el reproductor de audio
portátil USB/memoria USB
Sección
02
! Si aparece un mensaje de error como
NO AUDIO, consulte Mensajes de error en la
página 37.
! Cuando el ajuste del display cambie a la infor-
mación de texto al presionarse DISPLAY,el
texto comenzará automáticamente a desplazarse por el display. Si se activa la función de
desplazamiento continuo en el ajuste inicial,
los nombres de carpeta y archivo se desplazarán de manera ininterrumpida. Para obtener
información sobre esta función, consulte el
manual de instrucciones de DEH-P6980IB,
DEH-P6950IB, DEH-P6900IB.
Selección directa de un fichero
de audio en la carpeta actual
Al utilizar el mando a distancia, se puede seleccionar directamente un fichero de audio ingresando el número de la pista deseada.
1 Presione DIRECT.
Se visualiza en el display el área para ingresar
el número de fichero de audio.
2 Presione los botones 0 a 9 para ingresar
el numero de pista deseada.
# Se puede cancelar el número ingresado presionando CLEAR.
3 Presione DIRECT.
Se reproducirá el fichero de audio seleccionado.
Nota
Después de acceder al modo de ingreso de números, si no realiza una operación en unos ocho
segundos, el modo se cancelará automáticamente.
Introducción a las
funciones avanzadas
1 Presione MULTI-CONTROL para visualizar el menú principal.
FUNC, AUDIO y ENTERTAINMENT aparecen
en el display.
2 Utilice MULTI-CONTROL para seleccionar FUNC.
Haga girar el control para cambiar la opción
de menú y presione para seleccionarla.
Aparece el nombre de la función en el display.
3 Haga girar MULTI-CONTROL para cambiar entre las funciones en el siguiente
orden:
Play mode (repetición de reproducción)—
Random mode (reproducción aleatoria)—
Scan mode (reproducción con exploración)—
Pause (pausa)
# También puede cambiar entre las funciones
en sentido inverso si hace girar
MULTI-CONTROL hacia la izquierda.
# Para volver a la visualización de reproducción,
presione BAND (BAND/ESC).
Nota
Si no se utiliza la función en unos 30 segundos,
el display volverá automáticamente a la visualización de reproducción.
Selección de una gama de
repetición de reproducción
Hay tres gamas de repetición de reproducción: Track repeat (repetición de un fichero),
Folder repeat (repetición de carpeta) y
All repeat (repetición de todos los ficheros).
Español
1 Utilice MULTI-CONTROL para seleccionar Play mode en el menú de funciones.
25
Es
Page 26
Sección
02
Reproducción de canciones
en el reproductor de audio
portátil USB/memoria USB
2 Presione MULTI-CONTROL repetidamente para seleccionar la gama de repetición.
! Track repeat – Sólo repite el fichero actual
! Folder repeat – Repite la carpeta actual
! All repeat – Repite todos los ficheros
Notas
! Si se selecciona otra carpeta durante la repeti-
ción de reproducción, la gama de repetición
cambia a All repeat.
! Si se realiza una búsqueda de pistas o el avan-
ce rápido/retroceso durante la repetición
Track repeat, la gama de repetición cambia a
Folder repeat.
! Cuando se selecciona Folder repeat,nose
puede reproducir una subcarpeta de esa
carpeta.
Reproducción de los
ficheros en orden aleatorio
La reproducción aleatoria le permite reproducir los ficheros en un orden aleatorio dentro
de la gama de repetición de reproducción,
Folder repeat y All repeat.
1 Seleccione la gama de repetición.
Consulte Selección de una gama de repetición
de reproducción en la página anterior.
2 Utilice MULTI-CONTROL para seleccionar Random mode en el menú de funciones.
Exploración de carpetas y
ficheros
Cuando esté usando Folder repeat,elcomienzo de cada fichero de la carpeta seleccionada se reproduce durante alrededor de 10
segundos. Cuando esté usando All repeat,el
comienzo del primer fichero de cada carpeta
se reproduce durante alrededor de 10 segundos.
1 Seleccione la gama de repetición.
Consulte Selección de una gama de repetición
de reproducción en la página anterior.
2 Utilice MULTI-CONTROL para seleccionar Scan mode en el menú de funciones.
3 Presione MULTI-CONTROL para activar
la reproducción con exploración.
Se reproducirán los primeros 10 segundos de
cada fichero de la carpeta actual (o el primer
fichero de cada carpeta).
4 Cuando encuentre el fichero (o la carpeta) que desee, presione MULTI-CONTROL
para desactivar la reproducción con exploración.
El fichero (o carpeta) se continuará reproduciendo.
# Si el display vuelve automáticamente a la visualización de reproducción, seleccione
Scan mode de nuevo usando MULTI-CONTROL.
# Una vez finalizada la exploración de ficheros o
carpetas, volverá a comenzar la reproducción
normal de los ficheros.
3 Presione MULTI-CONTROL para activar
la reproducción aleatoria.
Los ficheros de audio se reproducirán en un
orden aleatorio en la gama de repetición
Folder repeat o All repeat seleccionada con
anterioridad.
# Vuelva a presionar MULTI-CONTROL para de-
sactivar la reproducción aleatoria.
26
Es
Pausa de la reproducción
1 Utilice MULTI-CONTROL para seleccionar Pause en el menú de funciones.
Page 27
Reproducción de canciones
en el reproductor de audio
portátil USB/memoria USB
Sección
02
2 Presione MULTI-CONTROL para activar
la pausa.
Se detiene temporalmente la reproducción de
la pista actual.
# Para desactivar la pausa, vuelva a presionar
MULTI-CONTROL.
Visualización de
información de texto de un
fichero de audio
% Presione DISPLAY.
Presione DISPLAY repetidamente para cam-
biar entre los siguientes ajustes:
Tiempo de reproducción—Folder name (nombre de la carpeta) y File name (nombre del fichero)—Artist name (nombre del artista) y
Track title (título de la pista)—Artist name
(nombre del artista) y Album title (título del
álbum) —Album title (título del álbum) y
Track title (título de la pista) —Track title (título de la pista) y tiempo de reproducción—
Comment (comentario) y tiempo de reproducción
# Si los caracteres grabados en el fichero de
audio no son compatibles con una unidad principal, no aparecerán en el display.
# Si determinada información no se grabó en
un fichero de audio, no se visualizará el título o el
nombre.
# Es posible que la información de texto de algunos ficheros de audio no se visualice
correctamente.
Desplazamiento de
información de texto en el
display
Esta unidad permite visualizar sólo las primeras 14 letras de Folder name, File name,
Track title, Artist name y Album title. Cuan-
do la información grabada tiene más de 14 letras, puede desplazar el texto hacia la
izquierda para ver el resto de la información
de texto.
% Mantenga presionado DISPLAY hasta
que la información de texto comience a
desplazarse por el display.
Nota
Si se activa la función de desplazamiento continuo en el ajuste inicial, la información de texto se
desplazará de manera ininterrumpida por el display. Consulte el manual de instrucciones de
DEH-P6980IB, DEH-P6950IB, DEH-P6900IB.
Selección de ficheros de la
lista de nombres de ficheros
Esta función le permite ver la lista de los nombres de los ficheros (o de las carpetas) y seleccionar uno de ellos para su reproducción.
1 Presione LIST para cambiar al modo de
lista de nombres de ficheros.
Los nombres de los ficheros y las carpetas
aparecen en el display.
2 Utilice MULTI-CONTROL para seleccionar el nombre del fichero deseado (o de la
carpeta deseada).
Haga girar el control para cambiar el nombre
del fichero o de la carpeta; presione para reproducirlo; pulse el control a la derecha para
ver una lista de los ficheros (o de las carpetas)
en la carpeta seleccionada.
# También puede cambiar el nombre del fichero
o de la carpeta, pulsando MULTI-CONTROL arriba o abajo.
# Para volver a la lista anterior (la carpeta de un
nivel superior), pulse MULTI-CONTROL izquierda.
Español
27
Es
Page 28

Sección
02
Reproducción de canciones
en el reproductor de audio
portátil USB/memoria USB
# Si el número de carpeta o fichero es superior
a 100, se visualizarán los últimos 2 dígitos de
dicho número.
# El número de las carpetas o ficheros presentes en la carpeta seleccionada actualmente aparecerá en el lado derecho del display.
# Si no se utiliza la lista en unos 30 segundos,
el modo de lista de nombres de ficheros se cancelará automáticamente.
28
Es
Page 29
Funcionamiento con
diferentes unidades
principales
Sección
03
Uso como una unidad externa
Las siguientes unidades principales funcionan
en esta unidad como unidad externa. Para obtener más detalles sobre la unidad externa,
consulte el manual de la unidad principal.
! 1KEY a 6KEY no se usan para hacer fun-
cionar esta unidad.
Grupo 1 de unidades principales
Las siguientes unidades utilizan el botón
FUNCTION o utilizan una SOFT KEY (tecla de
función variable).
DEH-P9650MP, DEH-P9600MP, DEH-P7700MP,
DEH-P6800MP, DEH-P6750MP, DEH-P6700MP,
DEH-P5980MP, DEH-P5950MP, DEH-P5900MP,
DEH-P5850MPH, DEH-P5800MP, DEHP5750MP, DEH-P5700MP, DEH-P4990MP, DEHP4980MP, DEH-P4950MP, DEH-P4900MP, DEHP4850MPH, DEH-P4850MP, DEH-P4800MP,
DEH-P4750MP, DEH-P3980MP, DEH-P3950MP,
DEH-P77MP, DEH-P65BT, DEH-P55BT
P40MP, DEX-P90RS, DVH-P5850MP, DVHP5000MP, DVH-P580MP
Grupo 2 de unidades principales
Las siguientes unidades principales utilizan el
MULTI-CONTROL.
DEH-P9880BT, DEH-P9850BT, DEH-P9800BT,
DEH-P8980BT, DEH-P8950BT, DEH-P8850MP,
DEH-P8650MP, DEH-P8600MP, DEH-P7980UB,
DEH-P7950UB, DEH-P7900UB, DEH-P7750MP,
DEH-P6850MP, DEH-P88RS, DEH-P85BT, DEHP80MP, DEH-P70BT
Grupo 3 de unidades principales
Las siguientes unidades principales utilizan el
teclado táctil.
AVH-P7650DVD, AVH-P7500DVDN, AVHP5700DVD
*
, DEH-
Grupo 4 de unidades principales
Las siguientes unidades principales son unidades de navegación que utilizan el teclado
táctil.
AVIC-HD1BT, AVIC-X1R
Tablas de compatibilidad
de funciones
Notas
! Puede producirse una pequena demora cuan-
do se inicie la reproduccion de ficheros de
audio segun el tipo de reproductor de audio
portatil USB/memoria USB utilizado.
! No se puede seleccionar una carpeta que no
tenga un fichero de audio comprimido grabado en ella.
! Los discos se reproducen por orden del núme-
ro de fichero. Se saltan las carpetas que no
tienen ficheros. (Si la carpeta 01 (RAÍZ) no
contiene ficheros, la reproducción comienza
en la carpeta 02.)
! Al reproducir ficheros grabados como VBR
(velocidad de grabación variable), el tiempo
de reproducción no se visualizará correctamente si se utilizan las funciones de avance
rápido o retroceso.
! Cuando se utilizan las funciones de avance rá-
pido o retroceso no se emite sonido.
! Si aparece un mensaje de error como
NO AUDIO, consulte Mensajes de error en la
página 37.
Español
* Es necesario utilizar el mando a distancia (se vende por separado) para ejecutar las operaciones de
a/b/c/d.
Es
29
Page 30
Sección
03
Funcionamiento con
diferentes unidades
principales
Grupo 1 de unidades principales
Controles
Seleccionar USB
como fuente
Seleccionar una carpeta
Saltar para retroceder
o avanzar a otra can-
*1
ción
Avance rápido/retro-
*2
ceso
Regresar a la carpeta
*3
01 (RAÍZ)
Seleccionar una función
Poner en pausa una
canción
Cambiar la visualización
Desplazar el título
Activar o desactivar
la reproducción con
exploración
Seleccionar una
gama de repetición
de reproducción
Activar o desactivar
la reproducción aleatoria
Cambiar entre AUTO
y MANUAL
.
Presione SOURCE.
Presione a o b.
Presione c o d.
Mantenga presionado c o d.
Mantenga presionado BAND
(BAND/ESC).
Presione FUNCTION (FUNC).
Presione a o b en FUNC1
(F1).
Presione a o b en FUNC2
(F2).
Mantenga presionado a o b
en FUNC2 (F2).
Presione a o b en FUNC3
(F3).
Presione a o b en FUNC4
(F4).
Mantenga presionado a o b
en FUNC4 (F4).
Presione c o d en AUTO/
MANUAL (A/M).
Grupo 2 de unidades principales
Controles
Seleccionar USB
como fuente
Seleccionar una carpeta
Saltar para retroceder
o avanzar a otra can-
*1
ción
Avance rápido/retro-
*2
ceso
Regresar a la carpeta
*3
01 (RAÍZ)
Seleccionar una función
Poner en pausa una
canción
Cambiar la visualización
Desplazar el título
Activar o desactivar
la reproducción con
exploración
Seleccionar una
gama de repetición
de reproducción
Activar o desactivar
la reproducción aleatoria
Cambiar entre AUTO
y MANUAL
.
Presione SOURCE.
Pulse MULTI-CONTROL arri-
ba o abajo.
Pulse MULTI-CONTROL iz-
quierda o derecha.
Mantenga pulsado MULTI-
CONTROL izquierda o derecha.
Mantenga presionado BAND
(BAND/ESC).
Use MULTI-CONTROL.
Presione MULTI-CONTROL
en FUNC1 (F1).
Presione MULTI-CONTROL
en FUNC2 (F2).
Mantenga presionado
MULTI-CONTROL en FUNC2
(F2).
Presione MULTI-CONTROL
en FUNC3 (F3).
Presione MULTI-CONTROL
en FUNC4 (F4).
Mantenga presionado
MULTI-CONTROL en FUNC4
(F4).
Presione MULTI-CONTROL
en AUTO/MANUAL (A/M).
*1Puede usar esta función si selecciona AUTO en AUTO/MANUAL (A/M).
2
*
Puede usar esta función si selecciona MANUAL en AUTO/MANUAL (A/M).
3
*
Si la carpeta 01 (RAÍZ) no contiene ficheros, la reproducción comienza en la carpeta 02.
30
Es
Page 31

Funcionamiento con
diferentes unidades
principales
Sección
03
Grupo 3 de unidades principales
Controles
Seleccionar USB
como fuente
Seleccionar una carpeta
Saltar para retroceder
o avanzar a otra can-
*1
ción
Avance rápido/retro-
*2
ceso
Regresar a la carpeta
*3
01 (RAÍZ)
Seleccionar una función
Poner en pausa una
canción
Cambiar la visualización
Desplazar el título
Activar o desactivar
la reproducción con
exploración
Seleccionar una
gama de repetición
de reproducción
Activar o desactivar
la reproducción aleatoria
Cambiar entre AUTO
y MANUAL
.
Presione SOURCE.
Toque a o b.
Toque c o d.
Continúe tocando c o d.
Continúe tocando BAND.
Toque A.MENU y luego
FUNCTION.
Toque ab en FUNCTION1.
Toque ab en FUNCTION2.
Continúe tocando ab en
FUNCTION2.
Toque ab en FUNCTION3.
Toque ab en FUNCTION4.
Continúe tocando ab en
FUNCTION4.
Toque c o d en AUTO/MA-
NUAL.
Grupo 4 de unidades principales
Controles
Seleccionar USB
como fuente
Seleccionar una carpeta
Saltar para retroceder
o avanzar a otra can-
*1
ción
Avance rápido/retro-
*2
ceso
Regresar a la carpeta
*3
01 (RAÍZ)
Seleccionar una función
Poner en pausa una
canción
Cambiar la visualización
Desplazar el título
Activar o desactivar
la reproducción con
exploración
Seleccionar una
gama de repetición
de reproducción
Activar o desactivar
la reproducción aleatoria
Cambiar entre AUTO
y MANUAL
.
Presione SOURCE.
Toque a o b.
Toque c o d.
Continúe tocando c o d.
Continúe tocando BAND.
Toque A.MENU y luego
FUNCTION.
Toque SEND en FUNCTION1.
Toque SEND en FUNCTION2.
Continúe tocando SEND en
FUNCTION2.
Toque SEND en FUNCTION3.
Toque SEND en FUNCTION4.
Continúe tocando SEND en
FUNCTION4.
Toque AUTO/MANUAL.
Español
*1Puede usar esta función si selecciona AUTO en AUTO/MANUAL (A/M).
2
*
Puede usar esta función si selecciona MANUAL en AUTO/MANUAL (A/M).
3
*
Si la carpeta 01 (RAÍZ) no contiene ficheros, la reproducción comienza en la carpeta 02.
31
Es
Page 32

Sección
03
Funcionamiento con
diferentes unidades
principales
Visualización de
información de texto
Se puede visualizar la información de texto
grabada en el fichero de audio.
% Seleccione la información deseada.
Consulte Tablas de compatibilidad de funciones
en la página 29.
Número de carpeta—número de pista—tiempo de reproducción—nombre de la carpeta—
nombre del fichero—título del álbum—título
de la pista—nombre del artista
# Si los caracteres grabados en el fichero de
audio no son compatibles con una unidad principal, no aparecerán en el display.
Notas
! Cuando utilice esta unidad como una unidad
externa, las unidades principales pueden
mostrar las primeras 8 letras del nombre de la
carpeta, el nombre del fichero, el título del
álbum, el título de la canción y el nombre del
artista.
! Si los caracteres grabados en el fichero de
audio no son compatibles con una unidad
principal, no aparecerán en el display.
! Si determinada información no se grabó en
un fichero de audio, no se visualizará el título
o el nombre.
! Es posible que la información de texto de al-
gunos ficheros de audio no se visualice correctamente.
! Puede desplazar hacia la izquierda el nombre
de la carpeta, el nombre del fichero, el título
del álbum, el título de la canción y el nombre
del artista.
Selección de una gama de
repetición de reproducción
Hay tres gamas de repetición de reproducción: TRK (repetición de un fichero), FLD (repetición de carpeta) y ALL (repetición de todos
los ficheros).
% Seleccione la gama de repetición.
Consulte Tablas de compatibilidad de funciones
en la página 29.
! TRK – Sólo repite el fichero actual
! FLD – Repite la carpeta actual
! ALL – Repite todos los ficheros
Notas
! Si se selecciona otra carpeta durante la repeti-
cion de reproduccion, la gama de repeticion
cambia a ALL.
! Si se realiza una busqueda de pistas o un
avance rapido/retroceso durante TRK,la
gama de repeticion cambia a FLD.
! Cuando se selecciona FLD, no se puede repro-
ducir una subcarpeta de esa carpeta.
Exploración de carpetas y
ficheros
Cuando esté usando FLD, el comienzo de
cada fichero de la carpeta seleccionada se reproduce durante alrededor de 10 segundos.
Cuando esté usando ALL, el comienzo del primer fichero de cada carpeta se reproduce durante alrededor de 10 segundos.
1 Seleccione la gama de repetición.
Consulte Tablas de compatibilidad de funciones
en la página 29.
! FLD – el comienzo de cada fichero de la
carpeta seleccionada se reproduce durante
alrededor de 10 segundos
32
Es
Page 33

Funcionamiento con
diferentes unidades
principales
! ALL – el comienzo del primer fichero de
cada carpeta se reproduce durante alrededor de 10 segundos
Sección
03
2 Active la reproducción con exploración.
Consulte Tablas de compatibilidad de funciones
en la página 29.
3 Cuando encuentre el fichero (o la carpeta) que desee, desactive la reproducción
con exploración.
El fichero (o carpeta) se continuará reproduciendo.
# Si el display vuelve automáticamente a la visualización de reproducción, seleccione de
nuevo el modo de activación/desactivación de la
reproducción con exploración.
# Una vez finalizada la exploración de ficheros o
carpetas, volverá a comenzar la reproducción
normal de los ficheros.
Reproducción de los
ficheros en orden aleatorio
La reproducción aleatoria le permite reproducir los ficheros en un orden aleatorio dentro
de la gama de repetición de reproducción,
FLD y ALL.
1 Seleccione la gama de repetición.
Consulte Tablas de compatibilidad de funciones
en la página 29.
! FLD – Reproduce los ficheros de audio en
un orden aleatorio dentro de la carpeta seleccionada
! ALL – Reproduce todos los ficheros de
audio en un orden aleatorio
Español
2 Active la reproducción aleatoria.
Consulte Tablas de compatibilidad de funciones
en la página 29.
33
Es
Page 34

Sección
04
Conexiones
Importante
! El uso de esta unidad en unas condiciones
distintas de las indicadas a continuación, podría causar un incendio o un fallo de funcionamiento.
— Vehículos con una batería de 12 voltios y
conexión a tierra negativa.
! Para evitar cortocircuitos, sobrecalentamiento
o fallos de funcionamiento, asegúrese de seguir las siguientes instrucciones.
— Desconecte el terminal negativo de la bate-
ría antes de la instalación.
— Asegure el cableado con pinzas para ca-
bles o cinta adhesiva. Para proteger el ca-
bleado, envuelva con cinta adhesiva las
partes en donde esté en contacto con pie-
zas metálicas.
— Coloque todos los cables alejados de las
partes móviles, como la palanca de cam-
bios y los rieles de los asientos.
— Coloque todos los cables alejados de luga-
res calientes, como cerca de la salida del
calefactor.
— No pase el cable amarillo a través de un
orificio en el compartimiento del motor
para conectarlo a la batería.
— No acorte ningún cable.
— Nunca corte el aislamiento del cable de ali-
mentación de esta unidad para compartir
la corriente con otros equipos. La capaci-
dad de corriente del cable es limitada.
— Utilice un fusible con la tensión nominal
indicada.
! Los conectores IP-BUS vienen con codifica-
ción de color. Asegúrese de conectar correctamente los conectores del mismo color.
! Coloque el cable de la antena alejado lo máxi-
mo posible de otros cables para evitar que se
genere ruido.
! El cable negro es el cable a tierra. Este cable y
el cable a tierra de otros productos (especialmente productos de alta tensión, como amplificadores de potencia) se deben conectar por
separado. De lo contrario, puede producirse
un incendio o un fallo de funcionamiento si
se desconectan por accidente.
! No conecte otro dispositivo que no sea un re-
productor de audio portátil USB/memoria
USB.
! Enchufe firmemente el terminal del reproduc-
tor de audio portatil USB/memoria al conector, de lo contrario es posible que la unidad no
funcione adecuadamente o que aparezca un
mensaje de error en la unidad principal.
La función del cable puede variar según el producto, aunque el color del cable sea el mismo.
A la hora de conectar este sistema, asegúrese
de consultar todos los manuales y conectar los
cables correctamente.
34
Es
Page 35

Conexiones
Conexión de las unidades
Sección
04
Español
35
Es
Page 36

Sección
05
Instalación
Importante
! Compruebe todas las conexiones y sistemas
antes de la instalación final.
! No utilice piezas no autorizadas. El uso de pie-
zas no autorizadas puede causar fallos de funcionamiento.
! Consulte a su concesionario si para la instala-
ción es necesario perforar orificios o hacer
otras modificaciones al vehículo.
! No instale esta unidad en un lugar donde:
— pueda interferir con el manejo del ve-
hículo.
— pueda lesionar a un pasajero como conse-
cuencia de un frenazo brusco.
! Al montar esta unidad, asegúrese de que nin-
guno de los cables quede atrapado entre esta
unidad y los accesorios o piezas metálicas
que la rodeen.
! No monte esta unidad cerca de la salida del
calefactor, en donde podría resultar afectada
por el calor, o cerca de las puertas, donde
puede sufrir salpicaduras de agua de lluvia.
! Antes de perforar orificios de montaje, siem-
pre revise detrás de donde desee hacer la perforación. No perfore hacia la línea de
combustible, la línea de frenos, el cableado
eléctrico u otras partes importantes.
! Si la unidad se instala en el compartimiento
del pasajero, fíjela firmemente de modo que
no se suelte cuando el vehículo se encuentre
en movimiento, pudiendo causar lesiones o
un accidente.
! Si la unidad se instala debajo de uno de los
asientos delanteros, asegúrese de que no obstruya el movimiento del asiento. Direccione
todos los cables y cordones cuidadosamente
alrededor del mecanismo de deslizamiento,
de modo que no queden atascados o atrapados en el mecanismo y sufran un cortocircuito.
Instalación de esta unidad
Montaje con sujetadores de
Velcro
Limpie completamente la superficie antes de
fijar los sujetadores de Velcro.
! Si los sujetadores de Velcro (duros) se ad-
hieren directamente al tapete del automóvil, puede instalar esta unidad sin utilizar
los sujetadores de Velcro (suaves).
% Monte esta unidad usando los sujetadores de Velcro.
Esta unidad
Sujetador de Velcro (duro)
Sujetador de Velcro (suave)
Tapete o chasís del automóvil
36
Es
Page 37

Información adicional
Apéndice
Mensajes de error
Cuando contacte con su concesionario o con
el servicio técnico Pioneer más cercano, asegúrese de anotar el mensaje de error.
Mensaje Causa Acción
N/A USB El dispositivo
USB conectado
no es compatible
con esta unidad.
CHK USB El conector USB
o el cable USB
está cortocircuitado.
El reproductor de
audio portátil
USB/memoria
USB conectado
consume más de
500 mA (corriente máxima admisible).
NO AUDIO No hay cancio-
nes
La memoria USB
está conectada
con la seguridad
activada
Conecte un reproductor de audio
portátil USB o una
memoria USB que
cumpla con la
clase de almacenamiento masivo
USB.
Verifique que no
este enganchado
en algo ni danado
el conector USB o
el cable USB.
Desconecte el reproductor de audio
portátil USB/memoria USB y no lo
utilice. Coloque la
llave de encendido
del automóvil en
posición OFF,
luego en ACC u
ON y ,a continuación, conecte el reproductor de audio
portátil USB/memoria USB compatible.
Transfiera ficheros
de audio al reproductor de audio
portátil USB/memoria USB y conéctelo.
Para desactivar la
seguridad, siga las
instrucciones de la
memoria USB.
Mensaje Causa Acción
DRM SKIP El reproductor de
audio portátil
USB/memoria
USB conectado
contiene ficheros
WMA protegidos
con Windows
Media DRM 9/10
PROTECT Todos los fiche-
ros del reproductor de audio
portátil USB/memoria USB conectado están
protegidos con
Windows Media
DRM 9/10
Reproduzca un fichero de audio que
no esté protegido
con Windows
Media DRM 9/10.
Transfiera ficheros
de audio no protegidos con
Windows Media
DRM 9/10 al reproductor de audio
portátil USB/memoria USB y conéctelo.
Compatibilidad del
reproductor de audio USB/
memoria USB
! Especificación: USB 2.0 velocidad máxima
! Clase USB: Dispositivo MSC (Mass Storage
Class)
! Protocolo: bulk
! Cantidad máxima de memoria: 250 GB
! Sistema de ficheros: FAT12, FAT16, FAT32
! Corriente suministrada: 500 mA
Notas
! La memoria USB particionada no es compati-
ble con esta unidad.
! Según el tipo de reproductor de audio portátil
USB/memoria USB que utilice, es posible que
esta unidad no reconozca el reproductor de
audio USB/memoria USB o que los ficheros
de audio no puedan ser reproducidos correctamente.
! No se puede conectar el reproductor de audio
portátil USB/memoria USB a esta unidad a
través de un concentrador USB.
Español
37
Es
Page 38

1
2
5
6
Apéndice
Información adicional
Compatibilidad con audio
comprimido
! Pueden reproducirse hasta 15 000 ficheros
en un reproductor de audio portátil USB/
memoria USB.
! Pueden reproducirse hasta 500 carpetas en
un reproductor de audio portátil USB/memoria USB.
! Puede producirse una pequeña demora
cuando se inicie la reproducción de ficheros de audio en un reproductor de audio
portátil USB/memoria USB con numerosas
jerarquías de carpetas.
! Las extensiones de fichero como .wma,
.mp3 o .m4a se deben utilizar adecuadamente.
! Se pueden visualizar sólo 64 caracteres
desde el principio como nombre de fichero
(incluida la extensión, como .wma, .mp3 o
.m4a) o nombre de carpeta.
Dependiendo de los conjuntos de caracteres, es posible que solo se visualicen los
primeros 32 caracteres.
! Es posible que la información de texto de
algunos ficheros de audio no se visualice
correctamente.
! Es posible que se produzca una pequena
demora al iniciarse la reproduccion de ficheros de audio codificados con datos de
imagen.
Secuencia de ficheros de audio
en la memoria USB
Para los reproductores de audio portátiles USB,
la secuencia es diferente de la hallada en la memoria USB y depende del tipo de reproductor.
Ejemplo de una jerarquía
: Carpeta
: Archivo de audio comprimido
3
4
Nivel 1 Nivel 2 Nivel 3 Nivel 4
! 01 a 05 representan números de carpeta
asignados. 1 a 6 representan la secuencia de reproducción. El usuario no puede
asignar números de carpeta ni especificar
la secuencia de reproducción con esta unidad.
! La secuencia de los ficheros de audio y car-
petas que se van a reproducir, seleccionada por la reproducción con exploración y
mostrada en la lista de nombres de fichero,
se determina del siguiente modo:
— La secuencia de ficheros tiene prioridad
sobre la secuencia de subcarpetas.
— En una carpeta, la secuencia de fiche-
ros de audio/subcarpetas es la misma
que el orden en que se copian desde un
ordenador personal a la memoria USB.
Sin embargo, la secuencia puede cambiar
según la configuración y el sistema operativo del ordenador personal.
Además, si selecciona varias carpetas/ficheros a la vez y los copia en la memoria
USB, puede que la secuencia esperada de
ficheros de audio que se van a reproducir,
seleccionar y mostrar no coincida con la
secuencia real.
38
Es
Page 39

Información adicional
Apéndice
! Si desea especificar la secuencia de fiche-
ros de audio, consulte Ejemplo de una jerar-
quía en la página anterior y copie las
carpetas/ficheros en orden.
— Le recomendamos que especifique los
nombres de los ficheros en la secuencia
de reproducción deseada (p. ej.,
001xxxxx.mp3 para el primero,
099yyyyy.wma para el 99º, etc.).
Archivos de audio comprimidos
WMA
! Formato compatible: WMA codificado por
Windows Media Player Ver. 7, 7.1, 8, 9 o 10
! Velocidad de grabación: 5 kbps a 384 kbps
(CBR), VBR
! Frecuencia de muestreo: 32 kHz, 44,1 kHz,
48 kHz
! Windows Media Audio 9 Professional, Loss-
less, Voice: No
MP3
! Formato compatible: MPEG-1, 2, 2.5 Audio
Layer 3
! Velocidad de grabación: 8 kbps a 320 kbps
(CBR), VBR
! Frecuencia de muestreo: 8 kHz a 48 kHz
(32, 44,1, 48 kHz para énfasis)
! Versiones de etiqueta ID3 compatibles: 1.0,
1.1, 2.2, 2.3, 2.4 (la etiqueta ID3 Versión 2.x
tiene prioridad sobre la Versión 1.x.)
! Lista de reproducción M3u: No
! MP3i (MP3 interactivo), mp3 PRO: No
AAC
! Formato compatible: AAC codificados con
! Frecuencia de muestreo: 8 kHz a 48 kHz
! Velocidad de transmisión: 16 kbps a 320
! Fichero AAC adquirido en la iTunes Music
! Apple Lossless: No
®
iTunes
versión 6.0.5 y anteriores
kbps
Store (extensión del fichero .m4p): no
Especificaciones
Generales
Fuente de alimentación nominal
..................................................... 14,4 V CC
Sistema de conexión a tierra
..................................................... Tipo negativo
Consumo máximo de corriente
..................................................... 2,0 A
Dimensiones (An × Al × Pr)
..................................................... 146 × 24 × 90 mm
Peso ............................................... 0,32 kg
USB
Especificación .......................... USB 2.0 velocidad máxima
Corriente suministrada ......... 500 mA
Cantidad máxima de memoria
..................................................... 250 GB
Sistema de ficheros ................ FAT12, FAT16, FAT32
Máximo número de ficheros
..................................................... 15 000
Máximo número de carpetas
..................................................... 500
Formato de decodificación MP3
..................................................... MPEG-1, 2 & 2.5 Audio Layer
Formato de decodificación WMA
..................................................... Ver. 7, 7.1, 8, 9, 10 (audio 2
Formato de decodificación AAC
..................................................... MPEG-4 AAC (sólo codifica-
Audio
Relación de señal a ruido .... 95 dB (1 kHz) (red IEC-A)
Gama dinámica ........................ 95 dB (1 kHz)
Separación canal .................... 90 dB (1 kHz)
Número de canales ................ 2 (estéreo)
Nota
Las especificaciones y el diseño están sujetos a
posibles modificaciones sin previo aviso.
(gama de tensión permisible: 12,0 V a 14,4 V CC)
3
canales)
(Windows Media Player)
®
do con iTunes
)
Español
39
Es
Page 40

Inhalt
Vielen Dank, dass Sie sich für dieses Pioneer-Produkt
entschieden haben.
Lesen Sie sich diese Bedienungsanleitung bitte aufmerksam durch, um sich mit
der richtigen Bedienungsweise für Ihr Modell vertraut zu machen. Anschließend
sollten Sie die Bedienungsanleitung an einem sicheren Ort griffbereit aufbewahren.
Bevor Sie beginnen
Zu diesem Gerät 41
Zu dieser Anleitung 41
Zu WMA 42
Zu MP3 42
Zu AAC 42
Zurücksetzen des Mikroprozessors 43
Zum Gebrauch von tragbaren USB-Audio-
Playern/USB-Speichermedien 43
Anschließen und Trennen des tragbaren
USB-Audio-Players/USBSpeichermediums 43
Wiedergabe von Musiktiteln auf dem
tragbaren USB-Audio-Player/USBSpeichermedium
Grundlegende Bedienvorgänge 45
Direktes Wählen einer Audio-Datei im
aktuellen Ordner 46
Einführung zu weiterführenden
Operationen 46
Wählen eines
Wiederholwiedergabebereichs 47
Abspielen von Dateien in zufälliger
Reihenfolge 47
Anspielen von Ordnern und Dateien 47
Pausieren der Wiedergabe 48
Anzeigen von Textinformationen in einer
Audio-Datei 48
Abrollen der Textinformationen im
Display 48
Wählen von Dateien aus der
Dateinamensliste 49
Unterschiedliche Bedienung je nach
Hauptgerät
Gebrauch als externes Gerät 50
Kompatibilität der Funktionen 50
– Hauptgeräte - Gruppe 1 51
– Hauptgeräte - Gruppe 2 51
– Hauptgeräte - Gruppe 3 52
– Hauptgeräte - Gruppe 4 52
Anzeigen von Textinformationen 53
Wählen eines
Wiederholwiedergabebereichs 53
Anspielen von Ordnern und Dateien 53
Abspielen von Dateien in zufälliger
Reihenfolge 54
Anschlüsse
Anschließen der Geräte 56
Installation
Installieren dieses Geräts 57
– Anbringen mithilfe von
Klettverschlüssen 57
Zusätzliche Informationen
Fehlermeldungen 58
USB-Audio-Player-/USB-Speichermedium-
Kompatibilität 58
Kompatibilität mit Audio-Kompression 59
– Reihenfolge der Audio-Dateien auf
einem USB-Speichermedium 59
– Komprimierte Audio-Dateien 60
Technische Daten 61
40
De
Page 41

Bevor Sie beginnen
Mischen Sie dieses Produkt, wenn Sie es entsorgen wollen, nicht mit gewöhnlichen Haushaltsabfällen. Es gibt ein getrenntes
Sammelsystem für gebrauchte elektronische
Produkte, über das die richtige Behandlung,
Rückgewinnung und Wiederverwertung
gemäß der bestehenden Gesetzgebung gewährleistet wird.
Privathaushalte in den 25 Mitgliedsstaaten der
EU, in der Schweiz und in Norwegen können ihre
gebrauchten elektronischen Produkte an vorgesehenen Sammeleinrichtungen kostenfrei zurückgeben oder aber an einen Händler zurückgeben
(wenn sie ein ähnliches neues Produkt kaufen).
Bitte wenden Sie sich in den Ländern, die oben
nicht aufgeführt sind, hinsichtlich der korrekten
Verfahrensweise der Entsorgung an die örtliche
Kommunalverwaltung.
Auf diese Weise stellen Sie sicher, dass das zu
entsorgende Produkt der notwendigen Behandlung, Rückgewinnung und Wiederverwertung unterzogen wird, und so mögliche negative
Einflüsse auf die Umwelt und die menschliche
Gesundheit vermieden werden.
sich um einen USB-Massenspeicher mit kompatibler Geräteklasse handelt. Für detaillierte
Angaben zu den unterstützten USB-Speichermedien siehe USB-Audio-Player-/USB-Speicher-
medium-Kompatibilität auf Seite 58.
! Dieses Gerät ist ausschließlich für eine Ver-
wendung in Kraftfahrzeugen vorgesehen.
! Mit diesem Gerät können Dateien im For-
mat WMA/MP3/AAC wiedergegeben werden. Für detaillierte Angaben zu den
unterstützten Dateiformaten siehe Kompa-
tibilität mit Audio-Kompression auf Seite 59.
VORSICHT
! Dieses Gerät darf keinesfalls mit Flüssigkeiten
in Berührung kommen, da dies einen elektrischen Schlag verursachen könnte. Darüber
hinaus kann der Kontakt mit Flüssigkeit eine
Beschädigung des Geräts, Rauchentwicklung
und Überhitzung nach sich ziehen.
! Bewahren Sie diese Anleitung zum Nach-
schlagen stets griffbereit auf.
! Wählen Sie stets eine Lautstärke, bei der Sie
Umgebungsgeräusche noch deutlich wahrnehmen können.
! Setzen Sie dieses Gerät keiner Feuchtigkeit
aus.
! Sollte dieses Produkt nicht ordnungsgemäß
funktionieren, dann wenden Sie sich bitte an
Ihren Händler oder an eine Pioneer-Kundendienststelle in Ihrer Nähe.
Abschnitt
01
Deutsch
Zu diesem Gerät
Bei diesem Gerät handelt es sich um einen
Adapter für ein Pioneer-Hauptgerät. Der Adapter stellt einen IP-BUS-Eingang bereit und ermöglicht die Bedienung und Wiedergabe von
Musik auf einem tragbaren Audio-Player mit
USB-Schnittstelle.
Die Musikwiedergabe ist über den Anschluss
eines tragbaren USB-Audio-Players bzw. eines
USB-Speichermediums möglich, sofern es
Zu dieser Anleitung
Die Bedienung dieses Geräts erfolgt über das
jeweils angeschlossene Hauptgerät. In dieser
Anleitung wird auf das Gerät DEH-P6980IB,
DEH-P6950IB, DEH-P6900IB als mögliches
Hauptgerät Bezug genommen.
De
41
Page 42

Abschnitt
01
Bevor Sie beginnen
Bei Verwendung eines anderen Hauptgeräts
als DEH-P6980IB, DEH-P6950IB, DEH-P6900IB
siehe Unterschiedliche Bedienung je nach
Hauptgerät auf Seite 50.
Wir empfehlen Ihnen, sich vor dem eigentlichen Betrieb mit den Funktionen des Geräts
und deren Bedienung vertraut zu machen,
indem Sie sich die Bedienungsanleitung
durchlesen. Beachten Sie dabei besonders die
Hinweise WARNUNG und VORSICHT und
halten Sie sich daran.
Zu WMA
Das auf der Verpackung ausgewiesene Logo
Windows Media™ verweist darauf, dass dieses Gerät die Wiedergabe von WMA-Daten unterstützt.
WMA steht für Windows Media™ Audio und
bezeichnet eine von der Microsoft Corporation
entwickelte Audio-Kompressionstechnologie.
Die Codierung von WMA-Daten erfolgt mit
Hilfe von Windows Media Player Version 7
oder höher.
Windows Media und das Windows-Logo sind
Marken oder eingetragene Marken der
Microsoft Corporation in den USA und/oder in
anderen Ländern.
Hinweis
Je nach der Anwendung, die für die Codierung
der WMA-Dateien verwendet wurde, funktioniert
dieses Gerät ggf. nicht ordnungsgemäß.
Zu MP3
Die Bereitstellung dieses Produkts erfolgt in
Verbindung mit einer Lizenz zur privaten,
nicht-kommerziellen Nutzung und impliziert
weder die Übertragung einer Lizenz noch die
Einräumung eines Rechts zur Verwendung
dieses Produkts in kommerziellen (d. h. ertragsorientierten) Live-Programmen (leitungsbasiert, per Satellit, Kabel und/oder über jedes
beliebige andere Medium), zum Broadcasting/
Streaming über das Internet, über Intranets
und/oder andere Netzwerke oder in anderen
elektronischen Inhalt-Vertriebssystemen, z. B.
“Pay-Audio”- oder “Audio-on-demand”-Anwendungen. Für eine derartige Nutzung ist eine
separate Lizenz erforderlich. Detaillierte Informationen hierzu finden Sie unter
http://www.mp3licensing.com.
Zu AAC
AAC steht für Advanced Audio Coding und bezieht sich auf einen mit MPEG 2 und MPEG 4
verwendeten Standard der Audio-Kompressionstechnologie.
Für die Codierung von AAC-Dateien können
verschiedene Anwendungen benutzt werden,
allerdings fallen Dateiformat und Dateinamenserweiterung je nach der für die Codierung verwendeten Anwendung
unterschiedlich aus.
Dieses Gerät unterstützt die Wiedergabe von
AAC-Dateien, für deren Codierung iTunes
Version 6.0.5 oder eine Vorgängerversion, verwendet wurde.
iTunes ist eine in den USA sowie in anderen
Ländern eingetragene Marke der Apple Computer, Inc.
®
,
42
De
Page 43

Bevor Sie beginnen
Abschnitt
01
Zurücksetzen des
Mikroprozessors
Der Mikroprozessor muss in folgenden Fällen
zurückgesetzt werden:
! Vor der ersten Verwendung dieses Geräts
nach der Installation
! Bei einer Betriebsstörung des Geräts
! Bei Anzeige ungewöhnlicher oder eindeu-
tig falscher Meldungen auf dem Display
% Drücken Sie RESET mit Hilfe eines Kugelschreibers oder eines anderen spitz zulaufenden Gegenstands.
Taste RESET
Zum Gebrauch von
tragbaren USB-AudioPlayern/USB-Speichermedien
VORSICHT
! Pioneer haftet in keinem Fall für den Verlust
von Daten auf dem tragbaren USB-AudioPlayer/USB-Speichermedium, selbst dann
nicht, wenn der Datenverlust während der Verwendung dieses Geräts aufgetreten ist.
! Setzen Sie den tragbaren USB-Audio-Player
bzw. das USB-Speichermedium keinesfalls
während eines längeren Zeitraums direkter
Sonneneinstrahlung aus. Aufgrund der dabei
entstehenden hohen Temperaturen kann es
zu einer Funktionsstörung des tragbaren USBAudio-Players/USB-Speichermediums kommen.
! Bewahren Sie den tragbaren USB-Audio-
Player bzw. das USB-Speichermedium nicht
an einem Ort auf, an dem hohe Temperaturen
herrschen.
! Achten Sie auf eine sichere, stabile Positionie-
rung des tragbaren USB-Audio-Players/USBSpeichermediums während der Fahrt. Lassen
Sie den tragbaren USB-Audio-Player bzw. das
USB-Speichermedium nicht auf den Boden
fallen, wo er bzw. es unter der Bremse oder
dem Gaspedal eingeklemmt werden könnte.
Detaillierte Informationen finden Sie in der Bedienungsanleitung Ihres tragbaren USBAudio-Players/USB-Speichermediums.
Anschließen und Trennen des
tragbaren USB-Audio-Players/
USB-Speichermediums
% Schließen Sie den tragbaren USBAudio-Player bzw. das USB-Speichermedium an dieses Gerät an.
Für detaillierte Anweisungen zum Anschluss
des tragbaren USB-Audio-Players/USB-Speichermediums siehe Anschließen der Geräte
auf Seite 56.
# Sie können den tragbaren USB-Audio-Player
bzw. das USB-Speichermedium jederzeit vom
Gerät trennen, wenn Sie die Wiedergabe der darauf gespeicherten Musik beenden möchten.
# Siehe USB-Audio-Player-/USB-Speichermedi-
um-Kompatibilität auf Seite 58. Sie müssen einen
kompatiblen tragbaren USB-Audio-Player bzw.
ein kompatibles USB-Speichermedium verwenden. Einige tragbare USB-Audio-Player/USB-Speichermedien, die den
Kompatibilitätsanforderungen entsprechen, funktionieren u. U. nicht ordnungsgemäß mit diesem
Gerät.
# Partitionierte USB-Speichermedien sind mit
diesem Gerat nicht kompatibel.
Deutsch
De
43
Page 44

Abschnitt
01
Bevor Sie beginnen
# Je nach dem Typ des verwendeten tragbaren
USB-Audio-Players/USB-Speichermediums erkennt dieses Gerät den USB-Audio-Player bzw.
das USB-Speichermedium nicht oder die AudioDateien werden nicht ordnungsgemäß wiedergegeben.
# Sie können einen tragbaren USB-Audio-Player
bzw. ein USB-Speichermedium nicht über einen
USB-Hub an dieses Gerät anschließen.
# Schließen Sie außer einem tragbaren USBAudio-Player/USB-Speichermedium kein anderes
Gerät an.
Hinweis
Wenn ein tragbarer USB-Audio-Player mit AkkuLadefunktion an dieses Gerät angeschlossen
wird, während sich der Zündschlüssel in der Position ACC oder ON befindet, wird der Akku
aufgeladen.
44
De
Page 45

Wiedergabe von Musiktiteln
auf dem tragbaren USB-AudioPlayer/USB-Speichermedium
Abschnitt
02
Grundlegende
Bedienvorgänge
Dieses Display ist ein Beispiel fur DEH-P6900IB.
Fur DEH-P6980IB und DEH-P6950IB weicht das
Display geringfugig ab.
1 MP3/WMA/AAC-Anzeige
Zeigt den Typ der momentan gespielten
Datei an.
2 Ordnernummer-Anzeige
Zeigt die Nummer des momentan abgespielten Ordners an.
3 Titelnummernanzeige
Zeigt die Nummer des momentan abgespielten Titels (Datei) an.
4 Wiedergabezeitanzeige
Zeigt die bereits abgelaufene Spielzeit des
momentanen Titels (Datei) an.
5 Bitratenanzeige
Zeigt die Bitrate der momentanen AudioDatei an.
1 Drücken Sie SOURCE, um USB zu wählen.
Die Titelwiedergabe beginnt.
# Abhangig von der Art des tragbaren USBPlayers/USB-Speichermediums kann es zu einer
geringfugigen Verzogerung beim Wiedergabebeginn von Audio-Dateien kommen.
2 Drücken Sie MULTI-CONTROL nach
oben oder unten, um einen Ordner zu wählen.
# Ordner, in denen keine komprimierten AudioDateien enthalten sind, konnen nicht gewahlt
werden.
# Um zu Ordner 01 (ROOT) zurückzukehren, halten Sie BAND (BAND/ESC) gedrückt. Sollte Ordner 01 (ROOT) keine Dateien enthalten, dann
beginnt die Wiedergabe mit Ordner 02.
3 Für einen schnellen Vor- oder Rücklauf
drücken und halten Sie MULTI-CONTROL
nach links oder rechts gedrückt.
4 Um zu einer anderen Audio-Datei voroder zurückzuspringen, drücken Sie
MULTI-CONTROL kurz nach links oder
rechts.
Durch Drücken von MULTI-CONTROL nach
rechts erfolgt ein Sprung direkt zum Anfang
der nächsten Audio-Datei. Durch einmaliges
Drücken von MULTI-CONTROL nach links
kehren Sie zum Anfang der aktuellen AudioDatei zurück. Erneutes Drücken bewirkt einen
Sprung zur vorhergehenden Audio-Datei.
Hinweise
! Die Wiedergabe erfolgt in der Reihenfolge der
Dateinummern. Ordner, die keine Dateien enthalten, werden übersprungen. (Wenn Ordner
01 (ROOT) keine Dateien enthält, beginnt die
Wiedergabe mit Ordner 02).
! Bei der Wiedergabe von im VBR-Modus (Va-
riable Bitrate) aufgezeichneten Dateien wird
die Wiedergabezeit nicht richtig angezeigt,
wenn Sie einen schnellen Vorlauf oder Rücklauf durchführen.
! Bei der Wiedergabe von im VBR (Variable Bi-
trate)-Modus aufgezeichneten WMA-Dateien
wird die durchschnittliche Bitrate angezeigt.
Deutsch
De
45
Page 46

Abschnitt
02
Wiedergabe von Musiktiteln
auf dem tragbaren USB-AudioPlayer/USB-Speichermedium
! Bei der Wiedergabe von im VBR-Modus (va-
riable Bitrate) aufgezeichneten MP3-Dateien
erscheint an Stelle der Bitrate die Angabe
VBR im Display.
! Während eines schnellen Vor- oder Rücklaufs
wird kein Ton ausgegeben.
! Sollte eine Fehlermeldung angezeigt werden,
z. B. NO AUDIO, dann siehe Fehlermeldungen
auf Seite 58.
! Wenn die Anzeige von Textinformationen
durch Drücken von DISPLAY aktiviert wird, beginnt der Text automatisch das Display zu
durchlaufen. Wenn die Nonstop-ScrollingFunktion Ever Scroll in den Grundeinstellungen eingeschaltet wurde, durchlaufen Ordnerund Dateinamen das Display kontinuierlich
immer wieder von neuem. Informationen zur
Nonstop-Scrolling-Funktion Ever Scroll finden
Sie in der Bedienungsanleitung der Geräte
DEH-P6980IB, DEH-P6950IB, DEH-P6900IB.
Direktes Wählen einer AudioDatei im aktuellen Ordner
Bei Verwendung der Fernbedienung haben Sie
die Möglichkeit, eine Audio-Datei direkt durch
Eingabe der entsprechenden Titelnummer zu
wählen.
1 Drücken Sie DIRECT.
Das Display schaltet auf die Audio-Dateinummerneingabe um.
2 Drucken Sie die Tasten 0 bis 9, um die
gewunschte Titelnummer einzugeben.
# Die Nummerneingabe kann durch Drücken
von CLEAR abgebrochen werden.
3 Drücken Sie DIRECT.
Die Audio-Datei mit der eingegebenen Nummer wird abgespielt.
Hinweis
Wenn nach Aktivierung des Nummerneingabemodus innerhalb von acht Sekunden keine Eingabe vorgenommen wird, wird der Modus
automatisch wieder aufgehoben.
Einführung zu
weiterführenden Operationen
1 Drücken Sie MULTI-CONTROL, um das
Hauptmenü anzuzeigen.
FUNC, AUDIO und ENTERTAINMENT erschei-
nen im Display.
2 Verwenden Sie MULTI-CONTROL, um
FUNC zu wählen.
Drehen Sie die Taste, um die Menüoption zu
wechseln, und drücken Sie sie, um die angezeigte Option zu wählen.
Der Name einer Funktion erscheint im Display.
3 Drehen Sie MULTI-CONTROL, um die
verfugbaren Funktionen in der folgenden
Reihenfolge zu durchlaufen:
Play mode (Wiederholwiedergabe)—
Random mode (Zufallsgesteuerte Wiederga-
be)—Scan mode (Anspielwiedergabe)—
Pause (Pause)
# Sie können die Funktionen auch in umgekehrter Reihenfolge durchlaufen, indem Sie
MULTI-CONTROL gegen den Uhrzeigersinn drehen.
# Zum Zurückschalten auf die Wiedergabeanzeige drücken Sie BAND (BAND/ESC).
Hinweis
Wenn die Funktion nicht innerhalb von 30 Sekunden aktiviert wird, schaltet das Display automatisch auf die Wiedergabeanzeige zurück.
46
De
Page 47

Wiedergabe von Musiktiteln
auf dem tragbaren USB-AudioPlayer/USB-Speichermedium
Abschnitt
02
Wählen eines Wiederholwiedergabebereichs
Es stehen drei Wiederholwiedergabebereiche
zur Auswahl: Track repeat (Einzeldatei-Wiederholung), Folder repeat (Ordner-Wiederholung) und All repeat (Globale DateiWiederholung).
1 Verwenden Sie MULTI-CONTROL, um im
Funktionsmenü die Funktion Play mode zu
wählen.
2 Drücken Sie MULTI-CONTROL wiederholt, um einen Wiederholwiedergabebereich zu wählen.
! Track repeat – Nur Wiederholung der mo-
mentanen Datei
! Folder repeat – Wiederholung des momen-
tan abgespielten Ordners
! All repeat – Wiederholung aller Dateien
Hinweise
! Wenn während der Wiederholwiedergabe ein
anderer Ordner gewählt wird, ändert sich der
Wiederholwiedergabebereich zu All repeat.
! Wenn während Track repeat der Titelsuchlauf
oder der schnelle Vor-/Rücklauf aktiviert wird,
ändert sich der Wiederholwiedergabebereich
zu Folder repeat.
! Wenn Folder repeat gewählt wird, können
keine Unterordner des betroffenen Ordners
wiedergegeben werden.
1 Wählen Sie den Wiederholwiedergabebereich.
Siehe Wählen eines Wiederholwiedergabebereichs auf Seite 47.
2 Verwenden Sie MULTI-CONTROL, um im
Funktionsmenü die Funktion
Random mode zu wählen.
3 Drücken Sie MULTI-CONTROL, um die
zufallsgesteuerte Wiedergabe einzuschalten.
Die Audio-Dateien innerhalb des zuvor gewählten Bereichs Folder repeat oder
All repeat werden in zufälliger Reihenfolge
abgespielt.
# Zum Ausschalten der zufallsgesteuerten Wiedergabe drücken Sie MULTI-CONTROL erneut.
Anspielen von Ordnern und
Dateien
Mit Folder repeat wird der Anfang jeder Datei
im gewählten Ordner etwa 10 Sekunden lang
abgespielt. Mit All repeat wird der Anfang der
ersten Datei in jedem Ordner etwa 10 Sekunden lang abgespielt.
1 Wählen Sie den Wiederholwiedergabebereich.
Siehe Wählen eines Wiederholwiedergabebereichs auf Seite 47.
Deutsch
Abspielen von Dateien in
zufälliger Reihenfolge
Die Funktion Random ermöglicht eine zufallsgesteuerte Wiedergabe der Dateien innerhalb
des Wiederholwiedergabebereichs
Folder repeat oder All repeat.
2 Verwenden Sie MULTI-CONTROL, um im
Funktionsmenü die Funktion Scan mode zu
wählen.
3 Drücken Sie MULTI-CONTROL, um die
Anspielwiedergabe einzuschalten.
Von jeder Datei des momentanen Ordners
(oder von der ersten Datei jedes Ordners) werden jeweils die ersten 10 Sekunden abgespielt.
De
47
Page 48

Abschnitt
02
Wiedergabe von Musiktiteln
auf dem tragbaren USB-AudioPlayer/USB-Speichermedium
4 Wenn Sie die gewünschte Datei (oder
den gewünschten Ordner) gefunden
haben, drücken Sie MULTI-CONTROL, um
die Anspielwiedergabe abzuschalten.
Die Datei (oder der Ordner) wird vollständig
abgespielt.
# Wenn die Anzeige automatisch auf Wiedergabe zurückgeschaltet wurde, wählen Sie
Scan mode mit Hilfe von MULTI-CONTROL erneut.
# Nach dem Anspielen aller Dateien oder Ordner beginnt wieder die normale
Titelwiedergabe.
Pausieren der Wiedergabe
1 Verwenden Sie MULTI-CONTROL, um im
Funktionsmenü die Funktion Pause zu
wählen.
2 Drücken Sie MULTI-CONTROL, um die
Pause einzuschalten.
Die Wiedergabe des momentanen Titels wird
auf Pause geschaltet.
# Zum Ausschalten der Pause drücken Sie
MULTI-CONTROL erneut.
me) und Wiedergabezeit—Comment (Kommentar) und Wiedergabezeit
# Wenn die in der Audio-Datei gespeicherten
Zeichen nicht mit dem Hauptgerät kompatibel
sind, werden sie nicht angezeigt.
# Wenn keine speziellen Informationen in einer
Audio-Datei aufgezeichnet wurden, werden Titel
und Namen nicht angezeigt.
# Die Textinformationen einiger Audio-Dateien
werden ggf. nicht ordnungsgemäß angezeigt.
Abrollen der
Textinformationen im Display
Bei diesem Gerät können jeweils nur die ersten 14 Zeichen von Folder name, File name,
Track title, Artist name und Album title angezeigt werden. Wenn die aufgezeichneten Informationen die Länge von 14 Zeichen
überschreiten, kann der Text nach links abgerollt werden, damit der Rest der Informationen
sichtbar wird.
% Drücken und halten Sie DISPLAY gedrückt, bis die Textinformationen das Display zu durchlaufen beginnen.
Anzeigen von
Textinformationen in einer
Audio-Datei
% Drücken Sie DISPLAY.
Drücken Sie DISPLAY wiederholt, um zwischen den folgenden Einstellungen umzuschalten:
Wiedergabezeit—Folder name (Ordnername)
und File name (Dateiname)—Artist name
(Künstlername) und Track title (Titelname)—
Artist name (Künstlername) und Album title
(Albumtitel) —Album title (Albumtitel) und
Track title (Titelname) —Track title (Titelna-
48
De
Hinweis
Wenn die Nonstop-Scrolling-Funktion Ever Scroll
in den Grundeinstellungen eingeschaltet wurde,
durchlaufen die Textinformationen das Display
kontinuierlich immer wieder von neuem. Siehe
die Bedienungsanleitung der Geräte DEHP6980IB, DEH-P6950IB, DEH-P6900IB.
Page 49

Wiedergabe von Musiktiteln
auf dem tragbaren USB-AudioPlayer/USB-Speichermedium
Wählen von Dateien aus
der Dateinamensliste
Die Dateinamensliste führt die Namen aller
verfügbaren Dateien (bzw. Ordner) auf, sodass
Sie direkt eine Auswahl für die Wiedergabe
treffen können.
1 Drücken Sie LIST, um in den Dateilistenmodus umzuschalten.
Die Datei- und Ordnernamen werden im Display angezeigt.
2 Verwenden Sie MULTI-CONTROL, um
den Namen der gewünschten Datei (bzw.
des gewünschten Ordners) zu wählen.
Drehen Sie die Taste, um den Datei- bzw. Ordnernamen zu wechseln, und drücken Sie sie,
um die angezeigte Datei bzw. den angezeigten
Ordner abzuspielen. Durch Drücken nach
rechts wird die Liste der im gewählten Ordner
enthaltenen Dateien (oder Ordner) angezeigt.
# Zum Wechseln des Datei- bzw. Ordnernamens
können Sie MULTI-CONTROL auch nach oben
oder unten drücken.
# Zum Zurückschalten zur vorhergehenden
Liste (zum übergeordneten Ordner) drücken Sie
MULTI-CONTROL nach links.
# Von den Ordner-/Dateinummern über 100 werden die letzten 2 Ziffern angezeigt.
# Am rechten Rand des Displays wird die Anzahl der Ordner/Dateien im derzeit gewählten
Ordner angegeben.
# Wenn die Liste nicht innerhalb von 30 Sekunden bedient wird, wird der Dateilistenmodus automatisch wieder aufgehoben.
Abschnitt
02
Deutsch
De
49
Page 50

Abschnitt
03
Unterschiedliche
Bedienung je nach
Hauptgerät
Gebrauch als externes Gerät
Die nachstehend aufgeführten Hauptgeräte
ermöglichen eine externe Bedienung dieses
Geräts. Detaillierte Informationen zum jeweiligen Hauptgerät finden Sie im zugehörigen
Handbuch.
! Die Tasten 1KEY bis 6KEY finden bei der
Bedienung dieses Geräts keine Verwendung.
Hauptgeräte - Gruppe 1
Die hierunter aufgeführten Hauptgeräte ermöglichen eine Bedienung über die Taste
FUNCTION bzw. per SOFT KEY.
DEH-P9650MP, DEH-P9600MP, DEH-P7700MP,
DEH-P6800MP, DEH-P6750MP, DEH-P6700MP,
DEH-P5980MP, DEH-P5950MP, DEH-P5900MP,
DEH-P5850MPH, DEH-P5800MP, DEHP5750MP, DEH-P5700MP, DEH-P4990MP, DEHP4980MP, DEH-P4950MP, DEH-P4900MP, DEHP4850MPH, DEH-P4850MP, DEH-P4800MP,
DEH-P4750MP, DEH-P3980MP, DEH-P3950MP,
DEH-P77MP, DEH-P65BT, DEH-P55BT
P40MP, DEX-P90RS, DVH-P5850MP, DVHP5000MP, DVH-P580MP
Hauptgeräte - Gruppe 2
Die hierunter aufgeführten Hauptgeräte ermöglichen eine Bedienung über
MULTI-CONTROL.
DEH-P9880BT, DEH-P9850BT, DEH-P9800BT,
DEH-P8980BT, DEH-P8950BT, DEH-P8850MP,
DEH-P8650MP, DEH-P8600MP, DEH-P7980UB,
DEH-P7950UB, DEH-P7900UB, DEH-P7750MP,
DEH-P6850MP, DEH-P88RS, DEH-P85BT, DEHP80MP, DEH-P70BT.
Hauptgeräte - Gruppe 3
Die hierunter aufgeführten Hauptgeräte ermöglichen eine Bedienung über Sensortasten.
*
, DEH-
AVH-P7650DVD, AVH-P7500DVDN, AVHP5700DVD.
Hauptgeräte - Gruppe 4
Bei den hierunter aufgeführten Hauptgeräten
handelt es sich um Navigationsgeräte, die
eine Bedienung über Sensortasten ermöglichen.
AVIC-HD1BT, AVIC-X1R.
Kompatibilität der Funktionen
Hinweise
! Abhangig von der Art des tragbaren USB-
Players/USB-Speichermediums kann es zu
einer geringfugigen Verzogerung beim Wiedergabebeginn von Audio-Dateien kommen.
! Ordner, in denen keine komprimierten Audio-
Dateien enthalten sind, konnen nicht gewahlt
werden.
! Die Wiedergabe erfolgt in der Reihenfolge der
Dateinummern. Ordner, die keine Dateien enthalten, werden übersprungen. (Wenn Ordner
01 (ROOT) keine Dateien enthält, beginnt die
Wiedergabe mit Ordner 02).
! Bei der Wiedergabe von im VBR-Modus (Va-
riable Bitrate) aufgezeichneten Dateien wird
die Wiedergabezeit nicht richtig angezeigt,
wenn Sie einen schnellen Vorlauf oder Rücklauf durchführen.
! Während eines schnellen Vor- oder Rücklaufs
wird kein Ton ausgegeben.
! Sollte eine Fehlermeldung angezeigt werden,
z. B. NO AUDIO, dann siehe Fehlermeldungen
auf Seite 58.
* Für eine Bedienung über die Tasten a/b/c/d muss eine (separat erhältliche) Fernbedienung
verwendet werden.
50
De
Page 51

Unterschiedliche
Bedienung je nach
Hauptgerät
Abschnitt
03
Hauptgeräte - Gruppe 1
Funktionssteuerung
Wählen von USB als
Programmquelle
Wählen eines Ordners
Vor- oder Zurückspringen zu einem
anderen Titel
Schnellvorlauf/-rücklauf
Zurückkehren zu Ordner 01 (ROOT)
Wählen einer Funktion
Pausieren der Titelwiedergabe
Umschalten der Anzeige
Abrollen des Titels
Ein-/Ausschalten der
Anspielwiedergabe
Wählen eines Wiederholwiedergabebereichs
Ein-/Ausschalten der
zufallsgesteuerten
Wiedergabe
Umschalten zwischen AUTO und
MANUAL
*1
*2
*3
Drücken Sie SOURCE.
Drücken Sie a oder b.
Drücken Sie c oder d.
Drücken und halten Sie c
oder d gedrückt.
Drücken und halten Sie
BAND (BAND/ESC) gedrückt.
Drücken Sie FUNCTION
(FUNC).
Drücken Sie a oder b in
FUNC1 (F1).
Drücken Sie a oder b in
FUNC2 (F2).
Drücken und halten Sie a
oder b in FUNC2 (F2) gedrückt.
Drücken Sie a oder b in
FUNC3 (F3).
Drücken Sie a oder b in
FUNC4 (F4).
Drücken und halten Sie a
oder b in FUNC4 (F4) gedrückt.
Drücken Sie c oder d in
AUTO/MANUAL (A/M).
Hauptgeräte - Gruppe 2
Funktionssteuerung
Wählen von USB als
Programmquelle
Wählen eines Ordners
Vor- oder Zurückspringen zu einem
anderen Titel
Schnellvorlauf/-rücklauf
Zurückkehren zu Ordner 01 (ROOT)
Wählen einer Funktion
Pausieren der Titelwiedergabe
Umschalten der Anzeige
Abrollen des Titels
Ein-/Ausschalten der
Anspielwiedergabe
Wählen eines Wiederholwiedergabebereichs
Ein-/Ausschalten der
zufallsgesteuerten
Wiedergabe
Umschalten zwischen AUTO und
MANUAL
*1
*2
*3
Drücken Sie SOURCE.
Drücken Sie MULTI-CON-
TROL nach oben oder unten.
Drücken Sie MULTI-CON-
TROL nach links oder rechts.
Drücken und halten Sie
MULTI-CONTROL nach links
oder rechts gedrückt.
Drücken und halten Sie
BAND (BAND/ESC) gedrückt.
Verwenden Sie MULTI-CON-
TROL.
Drücken Sie MULTI-CON-
TROL in FUNC1 (F1).
Drücken Sie MULTI-CON-
TROL in FUNC2 (F2).
Drücken und halten Sie
MULTI-CONTROL in FUNC2
(F2) gedrückt.
Drücken Sie MULTI-CONTROL in FUNC3 (F3).
Drücken Sie MULTI-CONTROL in FUNC4 (F4).
Drücken und halten Sie
MULTI-CONTROL in FUNC4
(F4) gedrückt.
Drücken Sie MULTI-CONTROL in AUTO/MANUAL
(A/M).
Deutsch
*1Sie können diese Funktion durch Auswahl von AUTO in AUTO/MANUAL (A/M) verwenden.
2
*
Sie können diese Funktion durch Auswahl von MANUAL in AUTO/MANUAL (A/M) verwenden.
3
*
Wenn Ordner 01 (ROOT) keine Dateien enthält, beginnt die Wiedergabe mit Ordner 02.
De
51
Page 52

Abschnitt
03
Unterschiedliche
Bedienung je nach
Hauptgerät
Hauptgeräte - Gruppe 3
Funktionssteuerung
Wählen von USB als
Programmquelle
Wählen eines Ordners
Vor- oder Zurückspringen zu einem
anderen Titel
Schnellvorlauf/-rücklauf
Zurückkehren zu Ordner 01 (ROOT)
Wählen einer Funktion
Pausieren der Titelwiedergabe
Umschalten der Anzeige
Abrollen des Titels
Ein-/Ausschalten der
Anspielwiedergabe
Wählen eines Wiederholwiedergabebereichs
Ein-/Ausschalten der
zufallsgesteuerten
Wiedergabe
Umschalten zwischen AUTO und
MANUAL
*1
*2
*3
Drücken Sie SOURCE.
Berühren Sie a oder b.
Berühren Sie c oder d.
Berühren Sie c oder d
etwas länger.
Berühren Sie BAND etwas
länger.
Berühren Sie A.MENU und
anschließend FUNCTION.
Berühren Sie ab in FUNC-
TION1.
Berühren Sie ab in FUNC-
TION2.
Berühren Sie ab in FUNC-
TION2 etwas länger.
Berühren Sie ab in FUNC-
TION3.
Berühren Sie ab in FUNC-
TION4.
Berühren Sie ab in FUNC-
TION4 etwas länger.
Berühren Sie c oder d in
AUTO/MANUAL.
Hauptgeräte - Gruppe 4
Funktionssteuerung
Wählen von USB als
Programmquelle
Wählen eines Ordners
Vor- oder Zurückspringen zu einem
anderen Titel
Schnellvorlauf/-rücklauf
Zurückkehren zu Ordner 01 (ROOT)
Wählen einer Funktion
Pausieren der Titelwiedergabe
Umschalten der Anzeige
Abrollen des Titels
Ein-/Ausschalten der
Anspielwiedergabe
Wählen eines Wiederholwiedergabebereichs
Ein-/Ausschalten der
zufallsgesteuerten
Wiedergabe
Umschalten zwischen AUTO und
MANUAL
*1
*2
*3
Drücken Sie SOURCE.
Berühren Sie a oder b.
Berühren Sie c oder d.
Berühren Sie c oder d
etwas länger.
Berühren Sie BAND etwas
länger.
Berühren Sie A.MENU und
anschließend FUNCTION.
Berühren Sie SEND in FUNC-
TION1.
Berühren Sie SEND in FUNC-
TION2.
Berühren Sie SEND in FUNC-
TION2 etwas länger.
Berühren Sie SEND in FUNC-
TION3.
Berühren Sie SEND in FUNC-
TION4.
Berühren Sie SEND in FUNC-
TION4 etwas länger.
Berühren Sie AUTO/MANU-
AL.
*1Sie können diese Funktion durch Auswahl von AUTO in AUTO/MANUAL (A/M) verwenden.
2
*
Sie können diese Funktion durch Auswahl von MANUAL in AUTO/MANUAL (A/M) verwenden.
3
*
Wenn Ordner 01 (ROOT) keine Dateien enthält, beginnt die Wiedergabe mit Ordner 02.
52
De
Page 53

Unterschiedliche
Bedienung je nach
Hauptgerät
Abschnitt
03
Anzeigen von
Textinformationen
Die in einer Audio-Datei aufgezeichneten Textinformationen können angezeigt werden.
% Wählen Sie die gewünschten Informationen.
Siehe Kompatibilität der Funktionen auf Seite
50.
Ordnernummer—Titelnummer—Wiedergabezeit—Ordnername—Dateiname—Albumtitel
—Titelname—Künstlername
# Wenn die in der Audio-Datei gespeicherten
Zeichen nicht mit dem Hauptgerät kompatibel
sind, werden sie nicht angezeigt.
Hinweise
! Wenn Sie dieses Gerät als externes Gerät ver-
wenden, können auf dem Hauptgerät jeweils
die ersten 8 Buchstaben des Ordnernamens,
des Dateinamens, des Albumtitels, des Titelnamens und des Künstlernamens angezeigt
werden.
! Wenn die in der Audio-Datei gespeicherten
Zeichen nicht mit dem Hauptgerät kompatibel
sind, werden sie nicht angezeigt.
! Wenn keine speziellen Informationen in einer
Audio-Datei aufgezeichnet wurden, werden
Titel und Namen nicht angezeigt.
! Die Textinformationen einiger Audio-Dateien
werden ggf. nicht ordnungsgemäß angezeigt.
! Ordnername, Dateiname, Albumtitel, Titelna-
me und Künstlername können im Display
nach links abgerollt werden.
Wählen eines Wiederholwiedergabebereichs
Es stehen drei Wiederholwiedergabebereiche
zur Auswahl: TRK (Einzeldatei-Wiederholung),
FLD (Ordner-Wiederholung) und ALL (Globale
Datei-Wiederholung).
% Wählen Sie den Wiederholwiedergabebereich.
Siehe Kompatibilität der Funktionen auf Seite
50.
! TRK – Nur Wiederholung der momentanen
Datei
! FLD – Wiederholung des momentanen Ord-
ners
! ALL – Wiederholung aller Dateien
Hinweise
! Wenn wahrend der Wiederholwiedergabe ein
anderer Ordner gewahlt wird, andert sich der
Wiederholwiedergabebereich zu ALL.
! Wenn wahrend TRK der Titelsuchlauf oder der
schnelle Vor-/Rucklauf aktiviert wird, andert
sich der Wiederholwiedergabebereich zu FLD.
! Wenn FLD gewahlt wird, konnen keine Unter-
ordner des betroffenen Ordners wiedergegeben werden.
Anspielen von Ordnern und
Dateien
Mit FLD wird der Anfang jeder Datei im gewählten Ordner etwa 10 Sekunden lang abgespielt. Mit ALL wird der Anfang der ersten
Datei in jedem Ordner etwa 10 Sekunden lang
abgespielt.
1 Wählen Sie den Wiederholwiedergabebereich.
Siehe Kompatibilität der Funktionen auf Seite
50.
! FLD – Der Anfang jeder Datei im gewählten
Ordner wird etwa 10 Sekunden lang abgespielt.
Deutsch
De
53
Page 54

Abschnitt
03
Unterschiedliche
Bedienung je nach
Hauptgerät
! ALL – Der Anfang der ersten Datei in jedem
Ordner wird etwa 10 Sekunden lang abgespielt.
2 Schalten Sie die Anspielwiedergabe
ein.
Siehe Kompatibilität der Funktionen auf Seite
50.
3 Sobald Sie die gewünschte Datei (oder
den gewünschten Ordner) gefunden
haben, schalten Sie die Anspielwiedergabe
wieder aus.
Die Datei (oder der Ordner) wird vollständig
abgespielt.
# Wenn die Anzeige automatisch auf Wiedergabe zurückgeschaltet wurde, wählen Sie den Ein-/
Ausschaltmodus für die Anspielwiedergabe erneut.
# Nach dem Anspielen aller Dateien oder Ordner beginnt wieder die normale
Titelwiedergabe.
Abspielen von Dateien in
zufälliger Reihenfolge
Die Funktion Random ermöglicht eine zufallsgesteuerte Wiedergabe der Dateien innerhalb
des Wiederholwiedergabebereichs FLD oder
ALL.
2 Schalten Sie die zufallsgesteuerte Wiedergabe ein.
Siehe Kompatibilität der Funktionen auf Seite
50.
1 Wählen Sie den Wiederholwiedergabebereich.
Siehe Kompatibilität der Funktionen auf Seite
50.
! FLD – Zufallsgesteuerte Wiedergabe der
Audio-Dateien innerhalb des gewählten
Ordners
! ALL – Zufallsgesteuerte Wiedergabe aller
Audio-Dateien
54
De
Page 55

Anschlüsse
Abschnitt
04
Wichtig
! Der Einsatz dieses Geräts in einer anderen als
der nachstehend angegebenen Betriebsumgebung kann einen Brand auslösen oder eine
Funktionsstörung zur Folge haben.
— Kraftfahrzeuge mit 12-Volt-Batterie und ne-
gativer Erdung.
! Um einen Kurzschluss, Überhitzung oder
Funktionsstörungen zu vermeiden, halten Sie
sich stets an die nachstehend aufgeführten
Anweisungen.
— Trennen Sie die Verbindung zur negativen
Anschlussklemme der Fahrzeugbatterie,
bevor Sie das Gerät installieren.
— Sichern Sie die Kabelführung mit Kabel-
klammern oder Klebeband. Zum Schutz
der Verkabelung sollten die Kabel an allen
Stellen, an denen sie mit Metallteilen in
Berührung kommen, mit Isolierband umwickelt werden.
— Bringen Sie die Kabel in sicherer Entfer-
nung von beweglichen Fahrzeugkomponenten an, wie z. B. Schalthebel und
Sitzschienen.
— Bringen Sie die Kabel in größtmöglicher
Entfernung von Stellen an, die sich erhitzen, wie z. B. die Heizungsöffnung.
— Führen Sie das gelbe Kabel nicht durch
ein Loch in den Motorraum, um die Verbindung mit der Fahrzeugbatterie herzustellen.
— Kürzen Sie die Kabel nicht.
— Entfernen Sie niemals die Isolierung des
Stromkabels dieses Geräts, um die Stromzufuhr mit einem anderen Gerät zu teilen.
Dadurch wird die Stromversorgungsleistung des Kabels beeinträchtigt.
— Verwenden Sie eine Sicherung, die den
vorgegebenen Leistungsmerkmalen entspricht.
! Die IP-BUS-Anschlüsse sind farbcodiert. Stel-
len Sie sicher, dass Sie jeweils Anschlüsse
derselben Farbe miteinander verbinden.
! Verlegen Sie das Antennenkabel so weit ent-
fernt wie möglich von allen anderen Kabeln,
um Störgeräusche zu vermeiden.
! Das schwarze Kabel gewährleistet die Erdung.
Dieses Kabel wie auch die Erdungskabel anderer Produkte (insbesondere von Hochstromprodukten wie Leistungsverstärker) müssen
separat verdrahtet werden. Andernfalls kann
es zu einem Brand oder einer Funktionsstörung kommen, wenn sich die Kabel versehentlich lösen.
! Schließen Sie außer einem tragbaren USB-
Audio-Player/USB-Speichermedium kein anderes Gerät an.
! Stecken Sie die Klemme des tragbaren USB-
Players/USB-Speichermediums fest in den
Anschluss, um eine entsprechende Verbindung zu gewahrleisten. Anderenfalls konnte
dieses Gerat entweder nicht ordungsgema?
funktionieren oder es konnte eine Fehlermeldung auf dem Hauptgerat angezeigt werden.
Die Kabel können je nach Produkt eine andere
Funktion erfüllen, selbst wenn sie dieselbe
Farbe aufweisen. Beim Anschluss dieses Systems sollten Sie deshalb alle relevanten Bedienungsanleitungen heranziehen und die
Kabel dann sachgemäß verbinden.
Deutsch
De
55
Page 56

Abschnitt
04
Anschlüsse
Anschließen der Geräte
56
De
Page 57

Installation
Abschnitt
05
Wichtig
! Überprüfen Sie vor der definitiven Installation
alle Anschlüsse und Systeme.
! Verwenden Sie ausschließlich autorisierte
Teile. Die Verwendung nicht autorisierter Teile
kann eine Funktionsstörung zur Folge haben.
! Wenden Sie sich an Ihren Fachhändler, wenn
für die Installation Löcher gebohrt oder andere Änderungen am Fahrzeug vorgenommen
werden müssen.
! Installieren Sie dieses Gerät keinesfalls an fol-
genden Orten:
— Orte, an denen das Gerät die Steuerung
des Fahrzeugs behindern könnte.
— Orte, an denen das Gerät die Insassen des
Fahrzeugs im Anschluss an eine Schnellbremsung verletzen könnte.
! Stellen Sie bei der Anbringung dieses Geräts
sicher, dass keine Kabel zwischen dem Gerät
und den angrenzenden Metallflächen oder Armaturenteilen eingeklemmt werden.
! Bringen Sie das Gerät weder in der Nähe
einer Heizungsöffnung an, wo es der Wärmeeinwirkung ausgesetzt ist, noch neben einer
Wagentür, wo es durch Regenwasser beschädigt werden kann.
! Prüfen Sie vor dem Bohren von Montagelö-
chern die Hinterseite der zu durchbohrenden
Fläche. Sie dürfen beim Bohren keinesfalls
die Benzinleitung, die Bremskabel, die elektrischen Leiter oder andere wichtige Fahrzeugteile beschädigen.
! Bei der Installation des Geräts im Fahrgast-
raum muss dieses sicher befestigt werden,
damit es während der Fahrt nicht herunterfällt
und Mitfahrer verletzt oder einen Unfall verursacht.
! Wenn Sie das Gerät unter einem der Vordersit-
ze anbringen, vergewissern Sie sich, dass es
das Gleiten des Sitzes nicht behindert. Führen
Sie alle Leiter und Kabel sorgfältig um die
Gleitvorrichtungen herum, damit sie nicht eingeklemmt oder abgedrückt werden und dadurch einen Kurzschluss verursachen.
Installieren dieses Geräts
Anbringen mithilfe von
Klettverschlüssen
Reinigen Sie die Oberfläche sorgfältig, bevor
Sie die Klettverschlüsse anbringen.
! Sollten die glatten Verschlussstücke direkt
an der Fußmatte haften, so benötigen Sie
die rauhen Verschlussstücke für die Installation dieses Geräts ggf. überhaupt nicht.
% Bringen Sie das Gerät mithilfe der Klettverschlüsse an.
Dieses Gerät
Klettverschluss (glattes
Verschlussstück)
Klettverschluss (rauhes
Verschlussstück)
Fußmatte oder Karosserie
Deutsch
De
57
Page 58

Anhang
Zusätzliche Informationen
Fehlermeldungen
Vor der Kontaktaufnahme mit Ihrem Händler
oder der nächstgelegenen Pioneer-Kundendienststelle sollten Sie sich die angezeigte
Fehlermeldung notieren.
Meldung Ursache Abhilfemaßnah-
N/A USB Das angeschlos-
sene USB-Gerät
wird von diesem
Gerät nicht unterstützt.
CHK USB Der USB-An-
schluss oder das
USB-Kabel
wurde kurzgeschlossen.
Der angeschlossene tragbare
USB-AudioPlayer bzw. das
USB-Speichermedium verbraucht mehr als
500 mA (maximal
zulässiger Stromverbrauch).
me
Schließen Sie
einen tragbaren
USB-Audio-Player
bzw. ein USB-Speichermedium an,
der bzw. das USB
Mass Storage
Class-kompatibel
ist.
Stellen Sie sicher,
dass die USBKlemme oder das
USB-Kabel nicht
eingeklemmt oder
beschadigt ist.
Trennen Sie den
tragbaren USBAudio-Player bzw.
das USB-Speichermedium von diesem Gerät und
verwenden Sie den
Player/das Medium
mit diesem Gerät
nicht mehr. Drehen
Sie den Zündschlüssel in die
Position OFF und
anschließend in
die Position ACC
oder ON. Schließen Sie dann einen
kompatiblen tragbaren USB-AudioPlayer bzw. ein
kompatibles USBSpeichermedium
an.
Meldung Ursache Abhilfemaßnah-
NO AUDIO Keine Musik Übertragen Sie die
Es wurde ein
USB-Speichermedium mit aktivierter Sicherheitsfunktion angeschlossen
DRM SKIP Der angeschlos-
sene tragbare
USB-AudioPlayer bzw. das
USB-Speichermedium enthält
WMA-Dateien,
die mit Windows
Media DRM 9/10
geschützt sind
PROTECT Alle Dateien auf
dem angeschlossenen tragbaren
USB-AudioPlayer/USB-Speichermedium
sind mit
Windows Media
DRM 9/10 geschützt
me
Audio-Dateien auf
den tragbaren
USB-Audio-Player
bzw. das USB-Speichermedium und
schließen Sie den
Player/das Medium
dann an dieses
Gerät an.
Halten Sie sich an
die Anweisungen
in der Bedienungsanleitung des
USB-Speichermediums, um die Sicherheitsfunktion
zu deaktivieren.
Spielen Sie eine
Audio-Datei ab, die
nicht mit Windows
Media DRM 9/10
geschützt ist.
Übertragen Sie
Audio-Dateien
ohne Windows
Media DRM 9/10Schutz auf den
tragbaren USBAudio-Player bzw.
das USB-Speichermedium und
schließen Sie das
Gerat dann an.
USB-Audio-Player-/USBSpeichermediumKompatibilität
! Technische Daten: USB 2.0 Full Speed
58
De
Page 59

1
2
5
6
Stufe 1Stufe 2Stufe 3Stufe
Zusätzliche Informationen
Anhang
! USB-Klasse: MSC-Gerät (Massenspeicher-
Klasse)
! Protokoll: Bulk
! Max. verfügbarer Speicher: 250 GB
! Dateisystem: FAT12, FAT16, FAT32
! Stromversorgung: 500 mA
Hinweise
! Partitionierte USB-Speichermedien sind mit
diesem Gerat nicht kompatibel.
! Je nach dem Typ des verwendeten tragbaren
USB-Audio-Players/USB-Speichermediums
erkennt dieses Gerät den USB-Audio-Player
bzw. das USB-Speichermedium nicht oder die
Audio-Dateien werden nicht ordnungsgemäß
wiedergegeben.
! Sie können einen tragbaren USB-Audio-Player
bzw. ein USB-Speichermedium nicht über
einen USB-Hub an dieses Gerät
anschließen.
Kompatibilität mit AudioKompression
! Es können bis zu 15 000 Dateien auf einem
tragbaren USB-Audio-Player/USB-Speichermedium wiedergegeben werden.
! Es können bis zu 500 Ordner auf einem
tragbaren USB-Audio-Player/USB-Speichermedium wiedergegeben werden.
! Beim Start der Wiedergabe von Audio-Da-
teien auf einem tragbaren USB-AudioPlayer/USB-Speichermedium, der bzw. das
eine komplexe Ordnerhierarchie aufweist,
ist der Ton u. U. erst mit einiger Verzögerung zu hören.
! Dateierweiterungen, wie .wma, .mp3 oder
.m4a, müssen richtig verwendet werden.
! Von Dateinamen (einschließlich der Erwei-
terung, beispielsweise .wma, .mp3 oder
.m4a) bzw. von Ordnernamen können je-
weils nur die ersten 64 Zeichen angezeigt
werden.
Je nach den verwendeten Zeichensatzen,
werden moglicherweise nur die ersten 32
Zeichen angezeigt.
! Die Textinformationen einiger Audio-Datei-
en werden ggf. nicht ordnungsgemäß angezeigt.
! Unter Umstanden kommt es zu einer kur-
zen Verzogerung, wenn die Wiedergabe
von mit Bilddaten codierten Audio-Dateien
gestartet wird.
Reihenfolge der Audio-Dateien
auf einem USB-Speichermedium
Die Dateireihenfolge bei tragbaren USB-AudioPlayern unterscheidet sich von derjenigen von
USB-Speichermedien und wird vom jeweils verwendeten Player bestimmt.
Beispiel für eine Disc-Struktur
: Ordner
: Komprimierte Audio-Datei
3
4
4
! 01 bis 05 entsprechen den zugewiesenen
Ordnernummern. 1 bis 6 kennzeichnen
die Wiedergabereihenfolge. Der Benutzer
kann keine Ordnernummern zuweisen und
auch die Wiedergabereihenfolge mit diesem Gerät nicht bestimmen.
Deutsch
De
59
Page 60

Anhang
Zusätzliche Informationen
! Für die Wiedergabe, die Auswahl bei der
Anspielwiedergabe und die Anzeige in der
Dateinamensliste wird die Reihenfolge der
Audio-Dateien/Ordner folgendermaßen bestimmt:
— Die Reihenfolge der Dateien erhält Vor-
rang vor der Reihenfolge der Unterord-
ner.
— Die Reihenfolge der Audio-Dateien/Un-
terordner in einem Ordner entspricht
der Reihenfolge, die beim Kopieren von
einem PC auf das USB -Speichermedi-
um übernommen wurde.
Je nach den spezifischen Einstellungen
und dem Betriebssystem des PCs kann
sich diese Reihenfolge jedoch ändern.
Wenn Sie mehrere Ordner/Dateien gleichzeitig ausgewählt und auf Ihr USB-Speichermedium kopiert haben, entspricht die
erwartete Reihenfolge der Audio-Dateien
bei der Wiedergabe, der Auswahl und der
Anzeige nicht unbedingt der tatsächlichen
Reihenfolge.
! Für Anweisungen zur Vorgabe der Reihen-
folge von Audio-Dateien siehe Beispiel für
eine Disc-Struktur auf Seite 59. Die Ordner/
Dateien müssen darüber hinaus in der entsprechenden Reihenfolge kopiert werden.
— Sie sollten deshalb die Dateinamen in
der gewünschten Wiedergabereihenfol-
ge angeben (Beispiel: 001xxxxx.mp3 für
die erste Datei, 099yyyyy.wma für die 99.
Datei usw.).
MP3
! Kompatibles Format: MPEG-1, 2, 2.5 Audio
Layer 3.
! Bitrate: 8 Kbit/s bis 320 Kbit/s (CBR), VBR
! Abtastfrequenz: 8 KHz bis 48 KHz (32; 44,1;
48 KHz für Emphase).
! Kompatible ID3-Tag-Version: 1.0, 1.1, 2.2,
2.3, 2.4 (ID3-Tag-Version 2.x erhält Vorrang
vor Version 1.x).
! M3u-Spielliste: Nein.
! MP3i (MP3 interaktiv), mp3 PRO: Nein.
AAC
! Kompatibles Format: AAC, Codierung mit
®
iTunes
, Version 6.0.5 und ältere Versionen.
! Abtastfrequenz: 8 KHz bis 48 KHz.
! Übertragungsgeschwindigkeit: 16 Kbit/s
bis 320 Kbit/s.
! AAC-Datei aus dem iTunes Music Store
(Dateinamenserweiterung .m4p): Nein.
! Apple Lossless: Nein.
Komprimierte Audio-Dateien
WMA
! Kompatibles Format: Mit Windows Media
Player Ver. 7, 7.1, 8, 9 oder 10 codiertes
WMA-Format
! Bitrate: 5 Kbit/s bis 384 Kbit/s (CBR), VBR
! Abtastfrequenz: 32 KHz; 44,1 KHz; 48 KHz
! Windows Media Audio 9 Professional, Loss-
less, Voice: Nein.
60
De
Page 61

Zusätzliche Informationen
Technische Daten
Allgemein
Nennleistung der Stromversorgung
..................................................... 14,4 V Gleichspannung
Erdungssystem ......................... Negativ
Max. Leistungsaufnahme .... 2,0 A
Abmessungen (B × H × T)
..................................................... 146 × 24 × 90 mm
Gewicht ........................................ 0,32 kg
USB
Spezifikation .............................. USB 2.0 Full Speed
Versorgungsstrom .................. 500 mA
Max. verfügbarer Speicher
..................................................... 250 GB
Dateisystem ............................... FAT12, FAT16, FAT32
Max. Dateianzahl ..................... 15 000
Max. Ordner anzahl ................. 500
MP3-Decodiermodus ............ MPEG-1, 2 und 2.5, Audio
WMA-Decodiermodus .......... Ver. 7, 7.1, 8, 9, 10 (Audio 2
AAC-Decodiermodus ............ MPEG-4 AAC (nur Codie-
(Toleranz: 12,0 V bis 14,4 V
Gleichspannung)
Layer 3
Kanäle)
(Windows Media Player)
®
rung mit iTunes
)
Anhang
Deutsch
Audio
Signal-Rauschabstand ......... 95 dB (1 kHz) (IEC-A-Netz)
Dynamikbereich ....................... 95 dB (1 kHz)
Kanaltrennung ......................... 90 dB (1 kHz)
Anzahl der Kanäle ................... 2 (Stereo)
Hinweis
Änderungen der technischen Daten und des Designs vorbehalten.
De
61
Page 62

Table des matières
Nous vous remercions d’avoir acheté cet appareil
Pioneer.
Afin d’utiliser votre appareil correctement, veuillez lire ce mode d’emploi entièrement. Après avoir lu ce mode d’emploi, conservez-le dans en endroit sûr pour pouvoir
vous y référer ultérieurement.
Avant de commencer
Quelques mots sur cet appareil 63
Quelques mots sur ce mode d’emploi 63
Quelques mots sur WMA 64
Quelques mots sur MP3 64
Quelques mots sur AAC 64
Réinitialisation du microprocesseur 64
Quelques mots sur la manipulation du
lecteur audio portable USB/de la mémoire
USB 65
Connexion et déconnexion du lecteur audio
portable USB/de la mémoire USB 65
Lecture de plages musicales sur le
lecteur audio portable USB/la mémoire
USB
Opérations de base 67
Sélection directe d’un fichier audio dans le
dossier en cours 68
Introduction aux opérations avancées 68
Sélection d’une étendue de répétition de
lecture 68
Lecture des fichiers dans un ordre
aléatoire 69
Examen du contenu des dossiers et des
fichiers 69
Pause de la lecture 70
Affichage des informations textuelles d’un
fichier audio 70
Défilement des informations textuelles sur
l’afficheur 70
Choix des fichiers à partir de la liste des
noms de fichiers 70
Utilisation avec différents appareils
centraux
Utilisation comme source extérieure 72
Tableaux de compatibilité des fonctions 72
– Appareils centraux du groupe 1 73
– Appareils centraux du groupe 2 73
– Appareils centraux du groupe 3 74
– Appareils centraux du groupe 4 74
Affichage des informations textuelles 75
Sélection d’une étendue de répétition de
lecture 75
Examen du contenu des dossiers et des
fichiers 75
Lecture des fichiers dans un ordre
aléatoire 76
Connexions
Connexion des appareils 78
Installation
Installation de l’appareil 79
– Montage avec des fixations Velcro 79
Informations complémentaires
Messages d’erreur 80
Compatibilité du lecteur audio USB/de la
mémoire USB 80
Compatibilité des formats audio
compressés 81
– La séquence des fichiers audio sur la
mémoire USB 81
– Fichiers audio compresses 82
Caractéristiques techniques 82
62
Fr
Page 63

Avant de commencer
Si vous souhaitez vous débarrasser de cet appareil, ne le mettez pas à la poubelle avec vos
ordures ménagères. Il existe un système de
collecte séparé pour les appareils électroniques usagés, qui doivent être récupérés, traités
et recyclés conformément à la législation.
Les habitants des 25 états membres de l’UE, de
Suisse et de Norvège peuvent retourner gratuitement leurs appareils électroniques usagés aux
centres de collecte agréés ou à un détaillant (si
vous rachetez un appareil similaire neuf).
Dans les pays qui ne sont pas mentionnés ci-dessus, veuillez contacter les autorités locales pour
savoir comment vous pouvez vous débarrasser de
vos appareils.
Vous garantirez ainsi que les appareils dont vous
vous débarrassez sont correctement récupérés,
traités et recyclés et préviendrez de cette façon
les impacts néfastes possibles sur l’environnement et la santé humaine.
! Cet appareil est conçu pour une utilisation
à bord de véhicules uniquement.
! Cet appareil peut lire des fichiers WMA/
MP3/AAC. Pour des détails sur les formats
de fichier supportés, reportez-vous à la
page 81, Compatibilité des formats audio
compressés.
PRÉCAUTION
! Ne laissez pas cet appareil venir en contact
avec des liquides. Cela pourrait provoquer une
électrocution. Tout contact avec des liquides
pourrait aussi provoquer des dommages, de
la fumée et une surchauffe de l’appareil.
! Conservez ce mode d’emploi à portée de main
afin de vous y référer pour les modes d’opération et les précautions.
! Maintenez toujours le niveau d’écoute à une
valeur telle que vous puissiez entendre les
sons provenant de l’extérieur du véhicule.
! Protégez l’appareil contre l’humidité.
! En cas d’anomalie, consultez le distributeur
ou le centre d’entretien agréé par Pioneer le
plus proche.
Section
01
Français
Quelques mots sur cet appareil
Cet appareil est un adaptateur permettant à
un appareil central Pioneer équipé d’une entrée IP-BUS de contrôler un lecteur audio portable équipé d’une interface USB et de lire des
plages sur ce lecteur.
Vous pouvez écouter des plages musicales en
connectant un lecteur audio portable USB/
une mémoire USB conforme au standard USB
Mass Storage Class. Pour des détails sur les
mémoires USB supportées, reportez-vous à la
page 80, Compatibilité du lecteur audio USB/de
la mémoire USB.
Quelques mots sur ce mode
d’emploi
Utilisez cet appareil avec l’appareil central
connecté. Les instructions de ce mode d’emploi utilisent DEH-P6980IB, DEH-P6950IB,
DEH-P6900IB comme exemple d’appareil central.
Si vous utilisez un appareil central autre que
DEH-P6980IB, DEH-P6950IB, DEH-P6900IB, reportez-vous à la page 72, Utilisation avec diffé-
rents appareils centraux.
Fr
63
Page 64

Section
01
Avant de commencer
Nous vous recommandons de vous familiariser avec les fonctions et leur utilisation en lisant l’ensemble du mode d’emploi avant de
commencer à utiliser l’appareil. Il est particulièrement important que vous lisiez et respectiez les indications ATTENTION et
PRÉCAUTION de ce mode d’emploi.
Quelques mots sur WMA
Le logo Windows Media™ imprimé sur le coffret indique que ce produit peut lire les données WMA.
WMA est une abréviation pour Windows
Media™ Audio et fait référence à une technologie de compression développée par
Microsoft Corporation. Les données WMA
peuvent être encodées en utilisant Windows
Media Player version 7 ou ultérieure.
Windows Media et le logo Windows sont des
marques commerciales ou des marques
commerciales déposées de Microsoft
Corporation aux États-Unis et/ou dans d’autres pays.
ni n’implique aucun droit d’utilisation de ce
produit pour une diffusion commerciale (c’està-dire générant des revenus) en temps réel
(terrestre, par satellite, câble et/ou tout autre
média), diffusion/streaming via Internet, des
intranets et/ou d’autres systèmes électroniques de distribution de contenu, telles que les
applications audio payantes ou audio sur demande. Une licence indépendante est requise
pour de telles utilisations. Pour les détails,
veuillez visiter le site
http://mp3licensing.com.
Quelques mots sur AAC
AAC est une abréviation pour Advanced Audio
Coding (Codage audio avancé) et fait référence à un standard de technologie de
compression audio utilisé avec MPEG 2 et
MPEG 4.
Plusieurs applications sont disponibles pour
encoder des fichiers AAC, mais les formats de
fichier et les extensions diffèrent selon les applications utilisées pour effectuer l’encodage.
Cet appareil lit les fichiers AAC encodés par
®
iTunes
version 6.0.5 et antérieures.
iTunes est une marque commerciale de Apple
Computer, Inc. déposée aux États-Unis et dans
d’autres pays.
Remarque
Cet appareil peut ne pas fonctionner correctement selon l’application utilisée pour encoder les
fichiers WMA.
Quelques mots sur MP3
La fourniture de ce produit comporte seulement une licence d’utilisation privée, non
commerciale, et ne comporte pas de licence
64
Fr
Réinitialisation du
microprocesseur
Le microprocesseur doit être réinitialisé dans
les conditions suivantes :
! Avant la première utilisation de cet appareil
après son installation
! En cas d’anomalie de fonctionnement de
l’appareil
! Quand des messages étranges ou incor-
rects s’affichent sur l’écran
Page 65

Avant de commencer
Section
01
% Appuyez sur RESET avec la pointe d’un
stylo ou un autre instrument pointu.
Touche RESET
Quelques mots sur la
manipulation du lecteur
audio portable USB/de la
mémoire USB
PRÉCAUTION
! Pioneer n’accepte aucune responsabilité pour
une perte de données sur le lecteur audio portable USB ou la mémoire USB même si cette
perte de données se produit pendant l’utilisation de cet appareil.
! Ne laissez pas le lecteur audio portable USB
ou la mémoire USB exposé à la lumière directe du soleil pour des périodes prolongées.
Une exposition prolongée à la lumière directe
du soleil peut entraîner un mauvais fonctionnement du lecteur audio portable USB ou de
la mémoire USB en raison de la température
élevée qui en résulterait.
! Ne laissez pas le lecteur audio portable USB
ou la mémoire USB dans un endroit soumis à
une température élevée.
! Fixez le lecteur audio portable USB ou la mé-
moire USB de façon sûre pendant que vous
conduisez. Ne laissez pas le lecteur audio portable USB ou la mémoire USB tomber sur le
plancher, où cela pourrait gêner le bon fonctionnement de la pédale de frein ou d’accélérateur.
Pour plus de détails, reportez-vous au mode
d’emploi du lecteur audio portable USB ou de
la mémoire USB.
Connexion et déconnexion
du lecteur audio portable
USB/de la mémoire USB
% Connecter le lecteur audio portable
USB ou la mémoire USB à cet appareil.
Pour ce qui concerne la méthode de connexion à cet appareil du lecteur audio portable
USB ou de la mémoire USB, reportez-vous à la
page 78, Connexion des appareils.
# Vous pouvez déconnecter le lecteur audio portable USB ou la mémoire USB à n’importe quel
moment où vous voulez en cesser l’écoute.
# Reportez-vous à la page 80, Compatibilité du
lecteur audio USB/de la mémoire USB et utilisez
un lecteur audio portable USB ou une mémoire
USB compatible. Certains lecteurs audio portables USB et certaines mémoires USB satisfaisant
les exigences de compatibilité peuvent ne pas
fonctionner correctement avec cet appareil.
# Une memoire USB partitionnee n’est pas
compatible avec cet appareil.
# Selon le type de lecteur audio portable USB/
de mémoire USB que vous utilisez, cet appareil
peut ne pas reconnaître le lecteur audio portable
USB/la mémoire USB, ou les fichiers audio peuvent ne pas être lus correctement.
# Vous ne pouvez pas connecter un lecteur
audio portable USB ou une mémoire USB à cet
appareil via un hub USB.
# Ne connectez que le lecteur audio portable
USB ou la mémoire USB.
Français
65
Fr
Page 66

Section
01
Avant de commencer
Remarque
Quand un lecteur audio portable USB disposant
d’une fonction de charge de la batterie se
connecte à cet appareil et quand le contact d’allumage est sur ACC ou ON, la batterie est
chargée.
66
Fr
Page 67

Lecture de plages musicales
sur le lecteur audio portable
USB/la mémoire USB
Section
02
Opérations de base
Cet exemple d’affichage est celui du DEHP6900IB. L’affichage differe legerement pour le
DEH-P6980IB et le DEH-P6950IB.
1 Indicateur MP3/WMA/AAC
Il indique le type du fichier en cours de lecture.
2 Indicateur du numéro de dossier
Il indique le numéro de dossier en cours de
lecture.
3 Indicateur du numéro de plage
Il indique le numéro de plage musicale (fichier) en cours de lecture.
4 Indicateur du temps de lecture
Il indique le temps de lecture depuis le
début de la plage musicale (fichier) en
cours de lecture.
5 Indicateur de débit binaire
Il indique le débit binaire du fichier audio en
cours de lecture.
1 Appuyez sur SOURCE pour choisir USB.
La lecture commence.
# Il peut se produire un leger retard lors du demarrage de la lecture de fichiers audio selon le
type de lecteur audio portable USB ou de memoire USB utilise.
2 Poussez MULTI-CONTROL vers le haut
ou vers le bas pour choisir un dossier.
# Vous ne pouvez pas selectionner un dossier
qui ne contient pas de fichier audio compresse
enregistre.
# Pour retourner au dossier 01 (ROOT), appuyez
sur BAND (BAND/ESC) et maintenez la pression.
Toutefois, si le dossier 01 (ROOT) ne contient pas
de fichier, la lecture commence au dossier 02.
3 Pour une avance rapide ou un retour rapide, poussez et maintenez
MULTI-CONTROL vers la gauche ou vers la
droite.
4 Pour atteindre un fichier audio précédent ou suivant, poussez MULTI-CONTROL
vers la gauche ou vers la droite.
Pousser MULTI-CONTROL vers la droite fait
sauter au début du fichier audio suivant. Pousser MULTI-CONTROL une fois vers la gauche
fait sauter au début du fichier audio en cours
de lecture. Pousser une nouvelle fois fera passer au fichier audio précédent.
Remarques
! La lecture s’effectue dans l’ordre des numéros
de fichier. Les dossiers qui ne contiennent pas
de fichiers sont sautés. (Si le dossier 01
(ROOT) ne contient pas de fichier, la lecture
commence au dossier 02.)
! Lors de la lecture de fichiers enregistrés
comme des fichiers VBR (débit binaire variable), le temps de lecture n’est pas affiché
correctement si on utilise des opérations d’avance rapide ou de retour rapide.
! Lors de la lecture de fichiers WMA enregistrés
en mode VBR, le débit binaire moyen est affiché.
! Lors de la lecture de fichiers MP3 enregistrés
en mode VBR (débit binaire variable), VBR est
affiché au lieu de la valeur de débit binaire.
! Il n’y a pas de son pendant l’avance rapide ou
le retour rapide.
Français
67
Fr
Page 68

Section
02
Lecture de plages musicales
sur le lecteur audio portable
USB/la mémoire USB
! Si un message d’erreur tel que NO AUDIO
s’affiche, reportez-vous à la page 80, Messa-
ges d’erreur.
! Quand le réglage de l’affichage est positionné
sur l’affichage de l’information textuelle en appuyant sur DISPLAY, le texte commence à dé-
filer sur l’écran automatiquement. Quand la
fonction Ever Scroll est mise en service lors
du réglage initial, les noms de fichier et de
dossier défilent en permanence. Pour des informations sur Ever Scroll, reportez-vous au
mode d’emploi de DEH-P6980IB, DEHP6950IB, DEH-P6900IB.
Sélection directe d’un fichier
audio dans le dossier en cours
Quand vous utilisez le boîtier de télécommande, vous pouvez sélectionner un fichier
audio directement en saisissant le numéro de
plage désiré.
1 Appuyez sur DIRECT.
L’écran de saisie du numéro de fichier audio
s’affiche.
2 Appuyez sur les touches 0 a 9 pour saisir le numero de plage desire.
# Vous pouvez annuler le numéro saisi en appuyant sur CLEAR.
Introduction aux
opérations avancées
1 Appuyez sur MULTI-CONTROL pour afficher le menu principal.
FUNC, AUDIO et ENTERTAINMENT apparais-
sent sur l’écran.
2 Utilisez MULTI-CONTROL pour choisir
FUNC.
Tournez pour changer l’option de menu, appuyez pour la sélectionner.
Le nom de la fonction s’affiche sur l’écran.
3 Tournez MULTI-CONTROL pour parcourir les fonctions dans l’ordre suivant :
Play mode (répétition de la lecture)—
Random mode (lecture aléatoire)—
Scan mode (examen du disque)—Pause
(pause)
# Vous pouvez aussi parcourir les fonctions
dans l’ordre inverse en tournant
MULTI-CONTROL dans le sens contraire des aiguilles d’une montre.
# Appuyez sur BAND (BAND/ESC) pour revenir
àl’affichage des conditions de lecture.
Remarque
Si vous ne réglez aucun paramètre de la fonction
pendant environ 30 secondes, l’afficheur indique
à nouveau les conditions de lecture.
3 Appuyez sur DIRECT.
Le fichier audio du numéro saisi est lu.
Remarque
Après être passé en mode saisie de numéro, ce
mode est automatiquement annulé si vous n’effectuez aucune opération dans les huit secondes
environ.
68
Fr
Sélection d’une étendue de
répétition de lecture
Il existe trois étendues de répétition de la lecture : Track repeat (répétition d’un seul fi-
chier), Folder repeat (répétition du dossier) et
All repeat (répétition de tous les fichiers).
Page 69

Lecture de plages musicales
sur le lecteur audio portable
USB/la mémoire USB
Section
02
1 Utilisez MULTI-CONTROL pour sélectionner Play mode dans le menu des fonctions.
2 Appuyez de façon répétée sur
MULTI-CONTROL pour choisir l’étendue de
répétition.
! Track repeat – Répétition du fichier en
cours de lecture seulement
! Folder repeat – Répétition du dossier en
cours de lecture
! All repeat – Répétition de tous les fichiers
Remarques
! Si vous choisissez un autre dossier pendant la
répétition de la lecture, l’étendue de répétition
changera en All repeat.
! Si pendant la répétition Track repeat, vous re-
cherchez une plage musicale, ou commandez
une avance rapide ou un retour rapide, l’étendue de répétition changera en Folder repeat.
! Quand Folder repeat est sélectionné, il n’est
pas possible de jouer un sous-dossier de ce
dossier.
Lecture des fichiers dans un
ordre aléatoire
Les fichiers sont joués dans un ordre aléatoire
àl’intérieur de l’étendue de répétition adop-
tée : Folder repeat ou All repeat.
1 Choisissez l’étendue de répétition.
Reportez-vous à la page précédente, Sélection
d’une étendue de répétition de lecture.
2 Utilisez MULTI-CONTROL pour sélectionner Random mode dans le menu des
fonctions.
3 Appuyez sur MULTI-CONTROL pour activer la lecture aléatoire.
Les fichiers audio seront lus dans un ordre
aléatoire à l’intérieur des limites
Folder repeat ou All repeat sélectionnées
précédemment.
# Appuyez à nouveau sur MULTI-CONTROL
pour mettre hors service la fonction lecture
aléatoire.
Examen du contenu des
dossiers et des fichiers
Quand vous utilisez Folder repeat, le début
de chaque fichier du dossier sélectionné est
joué pendant environ 10 secondes. Quand
vous utilisez All repeat, le début du premier fichier de chaque dossier est joué pendant environ 10 secondes.
1 Choisissez l’étendue de répétition.
Reportez-vous à la page précédente, Sélection
d’une étendue de répétition de lecture.
2 Utilisez MULTI-CONTROL pour sélectionner Scan mode dans le menu des fonctions.
3 Appuyez sur MULTI-CONTROL pour activer la lecture du contenu du disque.
Les 10 premières secondes de chaque fichier
du dossier en cours (ou du premier fichier de
chaque dossier) sont lues.
4 Quand vous trouvez le fichier désiré
(ou le dossier désiré) appuyez sur
MULTI-CONTROL pour arrêter la lecture du
contenu du disque.
La lecture du fichier (ou du dossier) se poursuit.
# Si les conditions de lecture se sont affichées
d’elles-mêmes, choisissez Scan mode une fois
encore en utilisant MULTI-CONTROL.
Français
69
Fr
Page 70

Section
02
Lecture de plages musicales
sur le lecteur audio portable
USB/la mémoire USB
# Lorsque l’examen des fichiers ou des dossiers
est terminé, la lecture normale des fichiers
reprend.
Pause de la lecture
1 Utilisez MULTI-CONTROL pour sélectionner Pause dans le menu des fonctions.
2 Appuyez sur MULTI-CONTROL pour activer la pause.
La lecture de la plage en cours se met en
pause.
# Appuyez à nouveau sur MULTI-CONTROL
pour mettre la pause hors service.
Affichage des informations
textuelles d’un fichier audio
% Appuyez sur DISPLAY.
Appuyez de manière répétée sur DISPLAY
pour passer d’un des paramètres à l’autre :
Temps de lecture—Folder name (nom du dossier) et File name (nom du fichier)—
Artist name (nom de l’interprète) et
Track title (titre de la plage)—Artist name
(nom de l’interprète) et Album title (titre de
l’album) —Album title (titre de l’album) et
Track title (titre de la plage) —Track title (titre
de la plage) et temps de lecture—Comment
(commentaire) et temps de lecture
# Si les caractères enregistrés sur le fichier
audio ne sont pas compatibles avec l’appareil
central, ils ne seront pas affichés.
# Si aucune information spécifique n’a été enre-
gistrée sur fichier audio, aucun titre ni nom n’est
affiché.
# L’information textuelle de certains fichiers
audio peut ne pas être affichée correctement.
Défilement des informations
textuelles sur l’afficheur
Cet appareil peut afficher les 14 premières lettres seulement de Folder name, File name,
Track title, Artist name et Album title.
Quand l’information enregistrée dépasse 14
lettres, vous pouvez faire défiler le texte vers la
gauche pour voir le reste des informations textuelles.
% Maintenez la pression sur DISPLAY jusqu’à ce que l’information textuelle
commence à défiler sur l’écran.
Remarque
Quand la fonction Ever Scroll est mise en service
lors du réglage initial, les informations textuelles
défilent en permanence. Reportez-vous au mode
d’emploi de DEH-P6980IB, DEH-P6950IB, DEHP6900IB.
Choix des fichiers à partir de
la liste des noms de fichiers
La fonction liste des noms des fichiers vous
permet de voir la liste des noms de fichiers (ou
de dossiers) et d’en choisir un pour le lire.
1 Appuyez sur LIST pour passer en mode
liste des noms de fichiers.
Les noms des fichiers et des dossiers apparaissent sur l’afficheur.
2 Utilisez MULTI-CONTROL pour sélectionner le nom de fichier (ou nom de dossier) désiré.
Tournez pour changer de nom de fichier ou de
dossier ; appuyez pour lire ; poussez vers la
droite pour voir une liste des fichiers (ou des
dossiers) contenus dans le dossier sélectionné.
70
Fr
Page 71

Lecture de plages musicales
sur le lecteur audio portable
USB/la mémoire USB
# Vous pouvez aussi changer le nom du fichier
ou du dossier en poussant MULTI-CONTROL vers
le haut ou vers le bas.
# Pour revenir à la liste précédente (le dossier
de niveau immédiatement supérieur), poussez
MULTI-CONTROL vers la gauche.
# Si le numéro de dossier/de fichier est supérieur à 100, les deux derniers chiffres du numéro
sont affichés.
# Le nombre de dossiers/fichiers dans le dossier
actuellement sélectionné sera affiché sur le côté
droit de l’écran.
# Si vous n’utilisez pas la liste dans les 30 se-
condes environ, le mode liste des noms des fichiers est annulé automatiquement.
Section
02
Français
71
Fr
Page 72

Section
03
Utilisation avec différents
appareils centraux
Utilisation comme source
extérieure
Les appareils centraux suivants peuvent
contrôler cet appareil en tant que source extérieure. Pour avoir plus de détails sur la source
extérieure correspondante, reportez-vous au
mode d’emploi de l’appareil central.
! Les touches 1KEY à 6KEY ne sont pas utili-
sées pour faire fonctionner cet appareil.
Appareils centraux du groupe 1
Les appareils centraux suivants disposent de
la touche FUNCTION ou du fonctionnement
par SOFT KEY (touches logicielles).
DEH-P9650MP, DEH-P9600MP, DEH-P7700MP,
DEH-P6800MP, DEH-P6750MP, DEH-P6700MP,
DEH-P5980MP, DEH-P5950MP, DEH-P5900MP,
DEH-P5850MPH, DEH-P5800MP, DEHP5750MP, DEH-P5700MP, DEH-P4990MP, DEHP4980MP, DEH-P4950MP, DEH-P4900MP, DEHP4850MPH, DEH-P4850MP, DEH-P4800MP,
DEH-P4750MP, DEH-P3980MP, DEH-P3950MP,
DEH-P77MP, DEH-P65BT, DEH-P55BT
P40MP, DEX-P90RS, DVH-P5850MP, DVHP5000MP, DVH-P580MP
Appareils centraux du groupe 2
Les appareils centraux suivants disposent de
MULTI-CONTROL.
DEH-P9880BT, DEH-P9850BT, DEH-P9800BT,
DEH-P8980BT, DEH-P8950BT, DEH-P8850MP,
DEH-P8650MP, DEH-P8600MP, DEH-P7980UB,
DEH-P7950UB, DEH-P7900UB, DEH-P7750MP,
DEH-P6850MP, DEH-P88RS, DEH-P85BT, DEHP80MP, DEH-P70BT
Appareils centraux du groupe 3
Les appareils centraux suivants disposent
d’un clavier tactile.
*
, DEH-
AVH-P7650DVD, AVH-P7500DVDN, AVHP5700DVD
Appareils centraux du groupe 4
Les appareils centraux suivants sont des appareils de navigation disposant d’un clavier tactile.
AVIC-HD1BT, AVIC-X1R
Tableaux de compatibilité
des fonctions
Remarques
! Il peut se produire un leger retard lors du de-
marrage de la lecture de fichiers audio selon
le type de lecteur audio portable USB ou de
memoire USB utilise.
! Vous ne pouvez pas selectionner un dossier
qui ne contient pas de fichier audio
compresse enregistre.
! La lecture s’effectue dans l’ordre des numéros
de fichier. Les dossiers qui ne contiennent pas
de fichiers sont sautés. (Si le dossier 01
(ROOT) ne contient pas de fichier, la lecture
commence au dossier 02.)
! Lors de la lecture de fichiers enregistrés
comme des fichiers VBR (débit binaire variable), le temps de lecture n’est pas affiché
correctement si on utilise des opérations d’avance rapide ou de retour rapide.
! Il n’y a pas de son pendant l’avance rapide ou
le retour rapide.
! Si un message d’erreur tel que NO AUDIO
s’affiche, reportez-vous a la page 80, Messa-
ges d’erreur.
* Il est nécessaire d’utiliser le boîtier de télécommande (vendu séparément) pour effectuer les
opérations avec a/b/c/d.
72
Fr
Page 73

Utilisation avec différents
appareils centraux
Section
03
Appareils centraux du groupe 1
Commandes
Sélection de USB
comme source
Sélection d’un dossier
Saut à une plage précédente ou suivante
Avance/retour ra-
*2
pide
Retour au dossier 01
*3
(ROOT)
.
Sélection d’une fonction
Pause d’une plage
musicale
Changement de l’affi-
chage
Défilement du titre
Mise en service ou
hors service de l’examen du disque
Sélection d’une étendue de répétition de
lecture
Mise en service ou
hors service de la lecture aléatoire
Basculement entre
AUTO et MANUAL
Appuyez sur SOURCE.
Appuyez sur a ou b.
Appuyez sur c ou d.
*1
Appuyez de façon continue
sur c ou d.
Appuyez sur BAND (BAND/
ESC) de façon continue.
Appuyez sur FUNCTION
(FUNC).
Appuyez sur a ou b dans
FUNC1 (F1).
Appuyez sur a ou b dans
FUNC2 (F2).
Appuyez de façon continue
sur a ou b dans FUNC2
(F2).
Appuyez sur a ou b dans
FUNC3 (F3).
Appuyez sur a ou b dans
FUNC4 (F4).
Appuyez de façon continue
sur a ou b dans FUNC4
(F4).
Appuyez sur c ou d dans
AUTO/MANUAL (A/M).
Appareils centraux du groupe 2
Commandes
Sélection de USB
comme source
Sélection d’un dossier
Saut à une plage précédente ou suivante
Avance/retour ra-
*2
pide
Retour au dossier 01
*3
(ROOT)
.
Sélection d’une fonction
Pause d’une plage
musicale
Changement de l’affi-
chage
Défilement du titre
Mise en service ou
hors service de l’examen du disque
Sélection d’une étendue de répétition de
lecture
Mise en service ou
hors service de la lecture aléatoire
Basculement entre
AUTO et MANUAL
Appuyez sur SOURCE.
Poussez MULTI-CONTROL
vers le haut ou vers le bas.
Poussez MULTI-CONTROL
vers la gauche ou vers la
*1
droite.
Poussez de façon continue
MULTI-CONTROL vers la
gauche ou vers la droite.
Appuyez sur BAND (BAND/
ESC) de façon continue.
Utilisez MULTI-CONTROL.
Appuyez sur MULTI-
CONTROL dans FUNC1 (F1).
Appuyez sur MULTI-
CONTROL dans FUNC2 (F2).
Appuyez de façon continue
sur MULTI-CONTROL dans
FUNC2 (F2).
Appuyez sur MULTI-
CONTROL dans FUNC3 (F3).
Appuyez sur MULTI-
CONTROL dans FUNC4 (F4).
Appuyez de façon continue
sur MULTI-CONTROL dans
FUNC4 (F4).
Appuyez sur MULTI-
CONTROL dans AUTO/MANUAL (A/M).
Français
*1Vous pouvez utiliser cette fonction quand vous sélectionnez AUTO dans AUTO/MANUAL (A/M).
2
*
Vous pouvez utiliser cette fonction quand vous sélectionnez MANUAL dans
AUTO/MANUAL (A/M).
3
*
Si le dossier 01 (ROOT) ne contient pas de fichier, la lecture commence au dossier 02.
73
Fr
Page 74

Section
03
Utilisation avec différents
appareils centraux
Appareils centraux du groupe 3
Commandes
Sélection de USB
comme source
Sélection d’un dossier
Saut à une plage précédente ou suivante
Avance/retour ra-
*2
pide
Retour au dossier 01
*3
(ROOT)
.
Sélection d’une fonction
Pause d’une plage
musicale
Changement de l’affi-
chage
Défilement du titre
Mise en service ou
hors service de l’examen du disque
Sélection d’une étendue de répétition de
lecture
Mise en service ou
hors service de la lecture aléatoire
Basculement entre
AUTO et MANUAL
Appuyez sur SOURCE.
Touchez a ou b.
Touchez c ou d.
*1
Touchez c ou d de façon
prolongée.
Touchez BAND de façon prolongée.
Touchez A.MENU puis
FUNCTION.
Touchez ab dans FUNC-
TION1.
Touchez ab dans FUNC-
TION2.
Touchez ab dans FUNC-
TION2 de façon prolongée.
Touchez ab dans FUNC-
TION3.
Touchez ab dans FUNC-
TION4.
Touchez ab dans FUNC-
TION4 de façon prolongée.
Touchez c ou d dans
AUTO/MANUAL.
Appareils centraux du groupe 4
Commandes
Sélection de USB
comme source
Sélection d’un dossier
Saut à une plage précédente ou suivante
Avance/retour ra-
*2
pide
Retour au dossier 01
*3
(ROOT)
.
Sélection d’une fonction
Pause d’une plage
musicale
Changement de l’affi-
chage
Défilement du titre
Mise en service ou
hors service de l’examen du disque
Sélection d’une étendue de répétition de
lecture
Mise en service ou
hors service de la lecture aléatoire
Basculement entre
AUTO et MANUAL
Appuyez sur SOURCE.
Touchez a ou b.
Touchez c ou d.
*1
Touchez c ou d de façon
prolongée.
Touchez BAND de façon prolongée.
Touchez A.MENU puis
FUNCTION.
Touchez SEND dans FUNC-
TION1.
Touchez SEND dans FUNC-
TION2.
Touchez SEND dans FUNC-
TION2 de façon prolongée.
Touchez SEND dans FUNC-
TION3.
Touchez SEND dans FUNC-
TION4.
Touchez SEND dans FUNC-
TION4 de façon prolongée.
Touchez AUTO/MANUAL.
*1Vous pouvez utiliser cette fonction quand vous sélectionnez AUTO dans AUTO/MANUAL (A/M).
2
*
Vous pouvez utiliser cette fonction quand vous sélectionnez MANUAL dans
AUTO/MANUAL (A/M).
3
*
Si le dossier 01 (ROOT) ne contient pas de fichier, la lecture commence au dossier 02.
74
Fr
Page 75

Utilisation avec différents
appareils centraux
Section
03
Affichage des informations
textuelles
Vous pouvez afficher les informations textuelles enregistrées sur le fichier audio.
% Sélectionnez les informations désirées.
Reportez-vous à la page 72, Tableaux de compatibilité des fonctions.
Numéro de dossier—numéro de plage—
temps de lecture—nom du dossier—nom du
fichier—titre de l’album—titre de la plage—
nom de l’interprète
# Si les caractères enregistrés sur le fichier
audio ne sont pas compatibles avec l’appareil
central, ils ne seront pas affichés.
Remarques
! Quand vous utilisez cet appareil comme une
source extérieure, les appareils centraux peuvent afficher les 8 premières lettres du nom
du dossier, du nom du fichier, du titre de l’album, du titre de la plage musicale et du nom
de l’interprète.
! Si les caractères enregistrés sur le fichier
audio ne sont pas compatibles avec l’appareil
central, ils ne seront pas affichés.
! Si aucune information spécifique n’a été enre-
gistrée sur fichier audio, aucun titre ni nom
n’est affiché.
! L’information textuelle de certains fichiers
audio peut ne pas être affichée correctement.
! Vous pouvez faire défiler vers la gauche le
nom du dossier, le nom du fichier, le titre de
l’album, le titre de la plage musicale et le nom
de l’interprète.
Sélection d’une étendue de
répétition de lecture
Il existe trois étendues de répétition de la lecture : TRK (répétition d’un seul fichier), FLD
(répétition du dossier) et ALL (répétition de
tous les fichiers).
% Choisissez l’étendue de répétition.
Reportez-vous à la page 72, Tableaux de compatibilité des fonctions.
! TRK – Répétition du fichier en cours de lec-
ture seulement
! FLD – Répétition du dossier en cours de lec-
ture
! ALL – Répétition de tous les fichiers
Remarques
! Si vous choisissez un autre dossier pendant la
repetition de la lecture, l’etendue de repetition
changera en ALL.
! Si pendant la repetition TRK, vous recherchez
une plage musicale ou commandez une
avance rapide ou un retour rapide, l’etendue
de repetition changera en FLD.
! Quand FLD est selectionne, il n’est pas pos-
sible de jouer un sous-dossier de ce
dossier.
Examen du contenu des
dossiers et des fichiers
Quand vous utilisez FLD, le début de chaque
fichier du dossier sélectionné est joué pendant
environ 10 secondes. Quand vous utilisez ALL,
le début du premier fichier de chaque dossier
est joué pendant environ 10 secondes.
1 Choisissez l’étendue de répétition.
Reportez-vous à la page 72, Tableaux de compatibilité des fonctions.
! FLD – le début de chaque fichier du dossier
sélectionné est joué pendant environ 10 secondes
! ALL – le début du premier fichier de chaque
dossier est joué pendant environ 10 secondes
Français
75
Fr
Page 76

Section
03
Utilisation avec différents
appareils centraux
2 Mettez la fonction examen du disque
en service.
Reportez-vous à la page 72, Tableaux de compatibilité des fonctions.
3 Quand vous trouvez le fichier désiré
(ou le dossier désiré), arrêtez l’examen du
contenu du disque.
La lecture du fichier (ou du dossier) se poursuit.
# Si les conditions de lecture se sont affichées
d’elles-mêmes, choisissez une fois encore le
mode examen du disque en service/hors service.
# Lorsque l’examen des fichiers ou des dossiers
est terminé, la lecture normale des fichiers
reprend.
Lecture des fichiers dans un
ordre aléatoire
Les fichiers sont joués dans un ordre aléatoire
àl’intérieur de l’étendue de répétition adop-
tée : FLD ou ALL.
1 Choisissez l’étendue de répétition.
Reportez-vous à la page 72, Tableaux de compatibilité des fonctions.
! FLD – Lecture des fichiers audio dans un
ordre aléatoire à l’intérieur du dossier sélectionné
! ALL – Lecture de tous les fichiers audio
dans un ordre aléatoire
2 Mettez la fonction lecture aléatoire en
service.
Reportez-vous à la page 72, Tableaux de compatibilité des fonctions.
76
Fr
Page 77

Connexions
Section
04
Important
! L’utilisation de cet appareil dans des condi-
tions autres que les conditions suivantes
pourrait provoquer un incendie ou un mauvais
fonctionnement.
— Véhicules avec une batterie 12 volts et une
mise à la masse du négatif
! Pour éviter un court-circuit, une surchauffe ou
un dysfonctionnement, assurez-vous de respecter les instructions suivantes.
— Déconnectez la borne négative de la batte-
rie avant l’installation.
— Fixez le câblage avec des serre-fils ou de la
bande adhésive. Pour protéger les câbles,
enroulez-les de bande adhésive là où ils
sont en contact avec des parties métalliques.
— Placez les câbles à l’écart de toutes les
parties mobiles, telles que le levier de
changement de vitesse et les rails des sièges.
— Placez les câbles à l’écart de tous les en-
droits chauds, par exemple les sorties de
chauffage.
— Ne faites pas passer le câble jaune à tra-
vers un trou dans le compartiment moteur
pour le connecter à la batterie.
— Ne raccourcissez pas les câbles.
— Ne coupez jamais l’isolation du câble d’ali-
mentation de cet appareil pour partager
l’alimentation avec un autre équipement.
La capacité en courant du câble est limitée.
— Utilisez un fusible correspondant aux ca-
ractéristiques spécifiées.
! Les connecteurs IP-BUS utilisent un codage
en couleurs. Assurez-vous de connecter ensemble des connecteurs de la même couleur.
! Placez le câble d’antenne aussi loin que pos-
sible des autres câbles pour éviter le bruit.
! Le câble noir est la masse. Ce câble et les au-
tres câbles de masse de produits (particulièrement les produits avec des courants élevés
tels que l’amplificateur de puissance) doivent
être câblés séparément. Sinon, un incendie
ou un mauvais fonctionnement peuvent se
produire si ces câbles sont déconnectés accidentellement.
! Ne connectez que le lecteur audio portable
USB ou la mémoire USB.
! Branchez fermement la prise du lecteur audio
portable USB ou de la memoire USB dans le
connecteur a connecter, sinon cet appareil
pourrait ne pas fonctionner correctement ou
une erreur pourrait s’afficher sur l’appareil
central.
La fonction du cordon peut différer selon le
produit, même si la couleur du cordon est la
même. Quand vous connectez ce système, assurez-vous de vérifier tous les manuels et de
brancher les cordons correctement.
Français
77
Fr
Page 78

Section
04
Connexions
Connexion des appareils
78
Fr
Page 79

Installation
Section
05
Important
! Vérifiez toutes les connexions et tous les systè-
mes avant l’installation finale.
! N’utilisez pas de pièces détachées non autori-
sées. L’utilisation de pièces non autorisées
peut provoquer des dysfonctionnements.
! Consultez votre revendeur si l’installation né-
cessite le percement de trous ou d’autres modifications du véhicule.
! N’installez pas cet appareil là où :
— il peut interférer avec l’utilisation du véhi-
cule.
— il peut blesser un passager en cas d’arrêt
soudain du véhicule.
! Lors du montage de cet appareil, assurez-vous
qu’aucun fil n’est coincé entre l’appareil et les
parties métalliques ou les équipements environnants.
! Ne montez pas cet appareil dans un endroit
situé près d’un orifice de chauffage, où il serait affecté par la chaleur, ou près des portes,
où il pourrait être mouillé par la pluie.
! Avant de percer un trou de montage vérifiez
toujours derrière l’emplacement où vous voulez percer le trou. Ne percez pas de trou dans
le conduit d’essence, le conduit de frein, un
câble électrique ou d’autres pièces importantes.
! Si l’appareil est installé dans le compartiment
passager, fixez-le solidement de façon qu’il ne
se détache pas quand le véhicule est en mouvement, ce qui risquerait de provoquer des
blessures ou un accident.
! Si l’appareil est installé sous un siège avant,
assurez-vous qu’il ne gêne pas le déplacement du siège. Faites passer tous les fils et les
cordons soigneusement autour du mécanisme de glissière de façon qu’ils ne soient
pas coincés dans le mécanisme ou pincés par
celui-ci, et ne provoquent pas de court-circuit.
Installation de l’appareil
Montage avec des fixations
Velcro
Essuyez parfaitement la surface avant de
poser les fixations Velcro.
! Si les fixations Velcro (dures) adhèrent di-
rectement au tapis de la voiture, vous pouvez installer cet appareil sans utiliser les
fixations Velcro (souples).
% Montez cet appareil en utilisant les fixations Velcro.
Cet appareil
Fixation Velcro (dure)
Fixation Velcro (souple)
Tapis ou châssis de la voiture
Français
79
Fr
Page 80

Annexe
Informations
complémentaires
Messages d’erreur
Quand vous contactez votre distributeur ou le
Service d’entretien agréé par Pioneer le plus
proche, n’oubliez pas de noter le message
d’erreur.
Message Causes possi-
bles
N/A USB L’appareil USB
connecté n’est
pas supporté par
cet appareil.
CHK USB Le connecteur
USB ou le câble
USB est en
court-circuit.
Le lecteur audio
portable USB
connecté ou la
mémoire USB
connectée
consomme plus
de 500 mA (courant maximum
autorisé).
NO AUDIO Aucune plage
musicale
La mémoire USB
avec la sécurité
activée est
connectée
Action corrective
Connectez un lecteur audio portable
USB ou une mémoire USB
conforme au standard USB Mass
Storage Class.
Verifiez que le
connecteur USB
ou le cable USB
n’est pas coince ou
endommage.
Déconnectez le lecteur audio portable
USB ou la mémoire USB et ne
l’utilisez pas. Mettez le contact sur
OFF, puis sur ACC
ou ON puis
connectez le lecteur audio portable
USB ou la mémoire USB compatible.
Transférez les fichiers audio au
lecteur audio portable USB ou à la
mémoire USB et
effectuez la connexion.
Suivez les instructions de la mémoire USB pour
désactiver la sécurité.
Message Causes possi-
bles
DRM SKIP Le lecteur audio
portable USB
connecté ou la
mémoire USB
connectée
contient des fichiers WMA qui
sont protégés par
Windows Media
DRM 9/10
PROTECT Tous les fichiers
sur le lecteur
audio portable
USB connecté
ou la mémoire
USB connectée
sont protégés par
Windows Media
DRM 9/10
Action corrective
Lisez un fichier
audio non protégé
par Windows
Media DRM 9/10.
Transférez des fichiers audio non
protégés par
Windows Media
DRM 9/10 sur le
lecteur audio portable USB ou sur
la mémoire USB et
effectuez la connexion.
Compatibilité du lecteur audio
USB/de la mémoire USB
! Spécification : USB 2.0 vitesse pleine
! Classe USB : appareil MSC (Mass Storage
Class)
! Protocole: en bloc
! Taille mémoire maximum : 250 Go
! Système de fichiers : FAT12, FAT16, FAT32
! Courant d’alimentation : 500 mA
Remarques
! Une memoire USB partitionnee n’est pas
compatible avec cet appareil.
! Selon le type de lecteur audio portable USB/
de mémoire USB que vous utilisez, cet appareil peut ne pas reconnaître le lecteur audio
portable USB/la mémoire USB, ou les fichiers
audio peuvent ne pas être lus correctement.
80
Fr
Page 81

1
2
5
6
eau
eau
eau
eau
Informations
complémentaires
Annexe
! Vous ne pouvez pas connecter un lecteur
audio portable USB ou une mémoire USB à
cet appareil via un hub USB.
Compatibilité des formats
audio compressés
! Le nombre maximum de fichiers pouvant
être lus sur un lecteur audio portable USB
ou une mémoire USB est 15 000.
! Le nombre maximum de dossiers pouvant
être lus sur un lecteur audio portable USB
ou une mémoire USB est 500.
! Il peut se produire un léger retard au début
de la lecture de fichiers audio sur un lecteur audio portable USB/une mémoire USB
avec de nombreuses hiérarchies de dossiers.
! Les extensions de fichier telles que .wma,
.mp3 ou .m4a doivent être utilisées correctement.
! Seuls les 64 premiers caractères d’un nom
de fichier (incluant l’extension telle que
.wma, .mp3 ou .m4a) ou d’un nom de dossier peuvent être affichés.
Selon les jeux de caracteres, seul les 32
premiers caracteres peuvent etre affiches.
! L’information textuelle de certains fichiers
audio peut ne pas être affichée correctement.
! Il peut se produire un leger retard lors du
demarrage de la lecture de fichiers audio
encodes avec des donnees image.
La séquence des fichiers audio
sur la mémoire USB
Pour les lecteurs audio portables USB, la séquence diffère de celle sur une mémoire USB et
dépend du lecteur.
Exemple de hiérarchie
: Dossier
: Fichier audio compresse
3
4
Niv
1 Niv
2 Niv
3 Niv
4
! 01 à 05 représentent les numéros des dos-
siers affectés. 1 à 6 représentent la séquence de lecture. Sur cet appareil,
l’utilisateur ne peut pas affecter de numéros de dossier ni spécifier la séquence de
lecture.
! La séquence des fichiers audio/dossiers à
lire sélectionnés par la fonction examen du
disque et affichés dans la liste des noms
de fichiers, est déterminée comme suit :
— La séquence des fichiers a priorité sur la
séquence des sous-dossiers.
— Dans un dossier, la séquence des fi-
chiers audio/sous-dossiers est la même
que l’ordre dans lequel vous les avez copiés d’un ordinateur personnel vers la
mémoire USB.
Toutefois, la séquence peut se trouver modifiée en fonction des paramétrages et du
système d’exploitation de l’ordinateur personnel.
Aussi, quand vous sélectionnez plusieurs
dossiers/fichiers en une seule fois et les copiez sur la mémoire USB, la séquence attendue des fichiers audio à lire,
sélectionner et afficher peut ne pas coïncider avec la séquence effective.
Français
81
Fr
Page 82

Annexe
Informations
complémentaires
! Si vous voulez spécifier la séquence des fi-
chiers audio, reportez-vous à la page précédente, Exemple de hiérarchie et copiez les
dossiers/fichiers dans l ’ordre.
— Nous vous recommandons de spécifier
les noms des fichiers dans la séquence
de lecture désirée (par exemple
001xxxxx.mp3 pour le premier,
099yyyyy.wma pour le 99ème, etc.).
Fichiers audio compresses
WMA
! Format compatible : WMA encodé par
Windows Media Player Ver. 7, 7.1, 8, 9 ou 10
! Débit binaire : 5 kbit/s à 384 kbit/s (CBR),
VBR
! Fréquence d’échantillonnage : 32 kHz, 44,1
kHz, 48 kHz
! Windows Media Audio 9 Professional, Loss-
less, Voice : Non
MP3
! Format compatible : MPEG-1, 2, 2.5 Audio
Layer 3
! Débit binaire : 8 kbit/s à 320 kbit/s (CBR),
VBR
! Fréquence d’échantillonnage : 8 kHz à 48
kHz (32, 44,1, 48 kHz pour accentuation)
! Compatible étiquette ID3 version : 1.0, 1.1,
2.2, 2.3, 2.4 (la Version 2.x de l’étiquette ID3
a priorité sur la Version 1.x.)
! Liste de lecture M3u : Non
! MP3i (MP3 interactif), mp3 PRO : Non
AAC
! Format compatible : AAC encodé par iTu-
®
nes
version 6.0.5 et antérieures
! Fréquence d’échantillonnage : 8 kHz à 48
kHz
! Débit de transmission : 16 kbit/s à 320 kbit/
s
! Fichier AAC acheté sur le iTunes Music
Store (extension de fichier .mp4): Non
! Apple Lossless : Non
Caractéristiques techniques
Généralités
Alimentation nominale ......... 14,4 V CC
Mise à la masse ....................... Pôle négatif
Consommation maximale ... 2,0 A
Dimensions (L × H × P) ...... 146 × 24 × 90 mm
Poids .............................................. 0,32 kg
USB
Spécification .............................. USB 2.0 vitesse pleine
Courant d’alimentation ........ 500 mA
Taille mémoire maximum .... 250 Go
Système de fichiers ................ FAT12, FAT16, FAT32
Nombre maximum de fichiers
..................................................... 15 000
Nombre maximum de dossiers
..................................................... 500
Format de décodage MP3 ...MPEG-1, 2 & 2.5 Couche
Format de décodage WMA
..................................................... Ver. 7, 7.1, 8, 9, 10 (2 canaux
Format de décodage AAC ...MPEG-4 AAC (fichiers enco-
Audio
Rapport signal/bruit ............... 95 dB (1 kHz) (Réseau
Dynamique ................................. 95 dB (1 kHz)
Séparation des canaux ......... 90 dB (1 kHz)
Nombre de canaux ................. 2 (stéréo)
Remarque
Les caractéristiques et la présentation peuvent
être modifiées sans avis préalable à fin
d’amélioration.
(plage de tension admissible : 12,0 V à 14,4 V CC)
Audio 3
audio)
(Windows Media Player)
®
dés iTunes
IEC-A)
seulement)
82
Fr
Page 83

Sommario
Grazie per aver acquistato questo prodotto Pioneer.
Leggere attentamente queste istruzioni operative, in modo da imparare come azionare correttamente il modello. Dopo aver terminato la lettura delle istruzioni, conser-
vare questo manuale in un luogo sicuro, per consultazione futura.
Prima di iniziare
Informazioni sull’unità 84
Informazioni su questo manuale 84
Informazioni sul formato WMA 85
Informazioni sul formato MP3 85
Informazioni sul formato AAC 85
Reimpostazione del microprocessore 85
Informazioni sul lettore audio portatile USB/
memoria USB 86
Collegamento e disconnessione del lettore
audio portatile USB/memoria USB 86
Riproduzione di brani sul lettore audio
portatile USB/memoria USB
Funzionamento di base 87
Selezione diretta di un file audio della cartella
corrente 88
Introduzione alle funzioni avanzate 88
Selezione di un intervallo di ripetizione 88
Riproduzione di file in ordine casuale 89
Scansione di cartelle e di file 89
Messa in pausa della riproduzione 89
Visualizzazione delle informazioni di testo di
un file audio 90
Scorrimento delle informazioni di testo sul
display 90
Selezione di file dall’elenco dei nomi dei
file 90
Funzionamento con unità principali
differenti
Uso del dispositivo come unità esterna 91
Tabelle di compatibilità delle funzioni 91
– Gruppo di unità principali 1 92
– Gruppo di unità principali 2 92
– Gruppo di unità principali 3 93
– Gruppo di unità principali 4 93
Visualizzazione delle informazioni di
testo 94
Selezione di un intervallo di ripetizione 94
Scansione di cartelle e di file 94
Riproduzione di file in ordine casuale 95
Collegamenti
Collegamento delle unità 97
Installazione
Installazione dell’unità 98
– Installazione con fermi in Velcro 98
Informazioni supplementari
Messaggi di errore 99
Compatibilità del lettore audio portatile USB/
memoria USB 99
Compatibilità audio compressa 100
– Sequenza di file audio nella memoria
USB 100
– File audio compressi 101
Dati tecnici 102
It
Italiano
83
Page 84

Sezione
01
Prima di iniziare
! Questa unità riproduce file WMA/MP3/
AAC. Per informazioni dettagliate sui formati di file supportati, vedere Compatibilità
audio compressa a pagina 100.
Se si vuole eliminare questo prodotto, non gettarlo insieme ai rifiuti domestici. Esiste un sistema di raccolta differenziata in conformità
alle leggi che richiedono appositi trattamenti,
recupero e riciclo.
I privati cittadini dei venticinque paesi membri
dell’UE, di Svizzera e Nor vegia, possono restituire
senza alcun costo i loro prodotti elettronici usati
ad appositi servizi di raccolta o a un rivenditore
(se si desidera acquistarne uno simile).
Per i paesi non citati qui sopra, si prega di prendere contatto con le autorità locali per il corretto
metodo di smaltimento.
In questo modo, si è sicuri che il proprio prodotto
eliminato subirà il trattamento, il recupero e il riciclo necessari per prevenire gli effetti potenzialmente negativi sull’ambiente e sulla vita
dell’uomo.
Informazioni sull’unità
Questa unità è l’adattatore per l’unità principale Pioneer con ingresso IP-BUS che consente
di controllare e ascoltare brani musicali tramite un lettore audio portatile con interfaccia
USB.
È possibile ascoltare i brani collegando un lettore audio portatile USB/memoria USB compatibile con la classe dei sistemi di
memorizzazione di massa USB. Per informazioni dettagliate sui dispositivi di memoria
USB supportati, vedere Compatibilità del letto-
re audio portatile USB/memoria USB a pagina
99.
! Questa unità è progettata per l’utilizzo
esclusivo su veicoli.
ATTENZIONE
! Non lasciare che questa unità entri a contatto
con liquidi, in caso contrario possono verificarsi scosse elettriche. Inoltre, se questa unità
entra a contatto con liquidi, può subire danni
oppure emettere fumo o surriscaldarsi.
! Tenere questo manuale a portata di mano
come riferimento per le procedure e le precauzioni operative.
! Mantenere sempre il volume abbastanza
basso, in modo da poter udire i suoni provenienti dall’esterno del veicolo.
! Proteggere questa unità dall’umidità.
! Nel caso che questo prodotto non funzioni
correttamente, contattare il rivenditore o il
Centro di assistenza autorizzato Pioneer più vicino.
Informazioni su questo
manuale
Azionare questa unità tramite l’unità principale collegata. Nelle istruzioni riportate in questo
manuale viene utilizzata l’unità DEH-P6980IB,
DEH-P6950IB, DEH-P6900IB come unità principale di esempio.
Se si utilizzano unità principali diverse dal modello DEH-P6980IB, DEH-P6950IB, DEHP6900IB, vedere Funzionamento con unità prin-
cipali differenti a pagina 91.
Raccomandiamo di familiarizzarsi con le funzioni e il loro significato leggendo completamente il manuale prima di iniziare a usare
l’unità. È particolarmente importante leggere
e osservare le precauzioni contrassegnate da
AVVERTENZA e ATTENZIONE in questo
manuale.
84
It
Page 85

Prima di iniziare
Sezione
01
Informazioni sul formato
WMA
Il logo Windows Media™ stampato sulla confezione indica che questa unità può riprodurre
dati WMA.
WMA è l’acronimo di Windows Media™
Audio e si riferisce a una tecnologia di compressione audio sviluppata da Microsoft
Corporation. I dati WMA possono essere codificati utilizzando Windows Media Player versione 7 o successiva.
Windows Media e il logo Windows sono marchi o marchi registrati di Microsoft
Corporation negli Stati Uniti e/o in altri Paesi.
Nota
A seconda dell’applicazione utilizzata per codificare i file WMA, questa unità potrebbe non funzionare correttamente.
Informazioni sul formato MP3
La fornitura di questo prodotto prevede il trasferimento di una licenza esclusivamente per
uso privato, non-commerciale e non prevede
la concessione di una licenza, né implica qualsiasi diritto a utilizzare questo prodotto in qualsiasi trasmissione in diretta commerciale
(ovvero, che generi profitti) terrestre, via satellite, cavo e/o tramite altro mezzo, trasmissioni/
diffusioni tramite Internet, Intranet e/o altre
reti o in altri sistemi elettronici di distribuzione
di contenuti, come applicazioni di trasmissione audio a pagamento o audio-on-demand.
Per tali usi è necessaria una licenza specifica.
Per dettagli, visitare
http://www.mp3licensing.com.
Informazioni sul formato AAC
AAC è l’acronimo di Advanced Audio Coding
e si riferisce a uno standard tecnologico per la
compressione audio utilizzato con gli standard
MPEG 2 e MPEG 4.
È possibile utilizzare diverse applicazioni per
codificare i file AAC, ma le estensioni e i formati file sono diversi a seconda dell’applicazione utilizzata per la codifica.
Questa unità riproduce i file AAC codificati
con iTunes
iTunes è un marchio di Apple Computer, Inc.,
registrato negli Stati Uniti e in altri Paesi.
®
versione 6.0.5 e precedente.
Reimpostazione del
microprocessore
È necessario reimpostare il microprocessore
nei seguenti casi:
! Prima di utilizzare questa unità per la
prima volta dopo l’installazione
! Se l’unità non funziona correttamente
! Quando sul display vengono visualizzati
messaggi inusuali o non corretti
% Premere RESET con la punta di una
penna o un altro strumento appuntito.
Tasto RESET
Italiano
85
It
Page 86

Sezione
01
Prima di iniziare
Informazioni sul lettore audio
portatile USB/memoria USB
ATTENZIONE
! Pioneer non si assume alcuna responsabilità
per l’eventuale perdita di dati dal lettore audio
portatile USB/memoria USB anche se i dati
vengono persi durante l’uso con questa unità.
! Non esporre il lettore audio portatile USB/me-
moria USB alla luce solare diretta per periodi
di tempo prolungati. L’esposizione prolungata
alla luce solare diretta può causare malfunzionamenti del lettore audio portatile USB/memoria USB provocati dalle conseguenti alte
temperature.
! Non lasciare il lettore audio portatile USB/me-
moria USB in ambienti con temperature elevate.
! Fissare saldamente il lettore audio portatile
USB/memoria USB durante la guida. Non lasciar cadere il lettore audio portatile USB/memoria USB sul fondo della vettura, dove
potrebbe incastrarsi sotto il pedale del freno o
dell’acceleratore.
Per ulteriori informazioni, vedere il manuale
del lettore audio portatile USB/memoria
USB.
# È possibile scollegare il lettore audio portatile
USB/memoria USB in qualsiasi momento per terminare l’ascolto della musica.
# Vedere Compatibilità del lettore audio portatile
USB/memoria USB a pagina 99 e utilizzare un let-
tore audio portatile USB/memoria USB compatibile. Alcuni lettori audio portatili USB/dispositivi
di memoria USB che rispondono ai requisiti di
compatibilità potrebbero non funzionare correttamente con questa unità.
# Dispositivi di memoria USB partizionati non
sono compatibili con questa unita.
# A seconda del tipo di lettore audio portatile
USB/memoria USB, questa unità potrebbe non riconoscere il lettore audio USB/memoria USB oppure alcuni file audio potrebbero non essere
riprodotti correttamente.
# Non è possibile collegare un lettore audio portatile USB/memoria USB a questa unità utilizzando un hub USB.
# Collegare esclusivamente lettori audio portatili
USB/memoria USB.
Nota
Quando l’interruttore della chiave di avviamento
è in posizione ACC o ON, la batteria del lettore
audio portatile USB con funzione di carica della
batteria si carica se il dispositivo è collegato a
questa unità.
Collegamento e
disconnessione del lettore
audio portatile USB/
memoria USB
% Collegare il lettore audio portatile USB/
memoria USB a questa unità.
Per istruzioni sul collegamento del lettore
audio portatile USB/memoria USB a questa
unità, vedereCollegamento delle unità a pagina
97.
86
It
Page 87

Riproduzione di brani sul
lettore audio portatile
USB/memoria USB
Sezione
02
Funzionamento di base
In questo esempio e raffigurato il display del
modello DEH-P6900IB. Nel caso dei modelli
DEH-P6980IB e DEH-P6950IB, il display risulta
leggermente diverso.
1 Indicatore MP3/WMA/AAC
Mostra il tipo di file correntemente in riproduzione.
2 Indicatore del numero della cartella
Mostra il numero della cartella correntemente in riproduzione.
3 Indicatore del numero di brano
Mostra il numero del brano (file) correntemente in riproduzione.
4 Indicatore del tempo di riproduzione
Mostra il tempo di riproduzione trascorso
del brano (file) corrente.
5 Indicatore della velocità in bit
Mostra la velocità in bit del file audio corrente.
1 Premere SOURCE per selezionare USB.
Viene avviata la riproduzione.
# Quando si avvia la riproduzione dei file audio
potrebbe intercorrere un ritardo di alcuni istanti,
a seconda del tipo di lettore audio portatile/memoria USB utilizzato.
2 Spingere MULTI-CONTROL in alto o in
basso per selezionare una cartella.
# Non e possibile selezionare una cartella in cui
non sono memorizzati file audio compressi.
# Per ritornare alla cartella 01 (PRINCIPALE),
premere e tenere premuto BAND (BAND/ESC).
Tuttavia, se la cartella 01 (PRINCIPALE) non contiene file, la riproduzione comincia dalla cartella
02.
3 Per eseguire l’avanzamento rapido o la
modalità inversa, spingere e tenere premuto MULTI-CONTROL a sinistra o a destra.
4 Per saltare a un altro file audio all’indietro o in avanti, spingere MULTI-CONTROL a
sinistra o a destra.
Spingendo MULTI-CONTROL a destra si salta
all’inizio del file audio successivo. Spingendo
una volta MULTI-CONTROL a sinistra si salta
all’inizio del file audio corrente. Spingendolo
di nuovo si salta al file audio precedente.
Note
! La riproduzione viene eseguita nell’ordine del
numero dei file. Se le cartelle non contengono
file, vengono ignorate. (Se la cartella 01 (PRINCIPALE) non contiene file, la riproduzione comincia dalla cartella 02.)
! Quando si riproducono file registrati con velo-
cità in bit variabile (VBR, variable bit rate), il
tempo di riproduzione non verrà visualizzato
correttamente se vengono utilizzate operazioni
come l’avanzamento rapido o la modalità inversa.
! Quando si riproducono file WMA registrati
come file VBR (variable bit rate, velocità in bit
variabile), viene visualizzato il valore medio
della velocità in bit.
! Quando si riproducono file MP3 registrati
come file VBR (variable bit rate, velocità in bit
variabile), al posto del valore della velocità in
bit, viene visualizzata l’indicazione VBR.
Italiano
87
It
Page 88

Sezione
02
Riproduzione di brani sul
lettore audio portatile
USB/memoria USB
! Durante l’avanzamento rapido e la modalità
inversa non viene emesso audio.
! Se viene visualizzato un messaggio di errore,
ad esempio NO AUDIO, vedere Messaggi di
errore a pagina 99.
! Quando l’impostazione del display passa alle
informazioni di testo tramite la pressione di
DISPLAY, sul display comincia a scorrere
automaticamente il testo. Quando la funzione
Scorrimento costante è attivata come impostazione iniziale, il nome del file e il nome
della cartella scorrono continuamente. Per informazioni sulla funzione Scorrimento costante, vedere il manuale d’istruzioni di DEHP6980IB, DEH-P6950IB, DEH-P6900IB.
Selezione diretta di un file
audio della cartella corrente
Se si utilizza il telecomando, è possibile selezionare direttamente un file audio immettendo
il numero di brano desiderato.
1 Premere DIRECT.
Viene visualizzato il display per l’immissione
del numero di file audio.
2 Premere i tasti da 0 a 9 per immettere il
numero di brano desiderato.
# È possibile annullare l’immissione del numero
premendo CLEAR.
Introduzione alle funzioni
avanzate
1 Premere MULTI-CONTROL per visualizzare il menu principale.
Sul display vengono visualizzate le indicazioni
FUNC, AUDIO e ENTERTAINMENT.
2 Utilizzare MULTI-CONTROL per selezionare FUNC.
Ruotare per modificare l’opzione di menu; premere per selezionare.
Sul display viene visualizzato il nome della funzione.
3 Se si ruota MULTI-CONTROL, sul display
vengono visualizzate le funzioni seguenti:
Play mode (riproduzione ripetuta)—
Random mode (riproduzione casuale)—
Scan mode (lettura a scansione)—Pause
(pausa)
# È inoltre possibile alternare le funzioni in ordine inverso ruotando MULTI-CONTROL in senso
antiorario.
# Per tornare al display della riproduzione, premere BAND (BAND/ESC).
Nota
Se non si attiva la funzione entro circa 30 secondi, il display torna automaticamente alla visualizzazione della riproduzione.
3 Premere DIRECT.
Viene riprodotto il file audio corrispondente al
numero immesso.
Nota
Dopo aver selezionato la modalità di immissione
del numero, se non si esegue alcuna operazione
entro circa otto secondi, la modalità viene automaticamente annullata.
88
It
Selezione di un intervallo
di ripetizione
Sono disponibili tre intervalli di riproduzione ripetuta: Track repeat (ripetizione di un file),
Folder repeat (ripetizione di una cartella) e
All repeat (ripetizione di tutti i file).
1 Utilizzare MULTI-CONTROL per selezionare Play mode nel menu delle funzioni.
Page 89

Riproduzione di brani sul
lettore audio portatile
USB/memoria USB
Sezione
02
2 Premere ripetutamente
MULTI-CONTROL per selezionare l’intervallo di ripetizione.
! Track repeat – Ripete solo il file corrente
! Folder repeat – Ripete la cartella corrente
! All repeat – Ripete tutti i file
Note
! Se durante la riproduzione ripetuta si selezio-
na un’altra cartella, l’intervallo di riproduzione
ripetuta cambia in All repeat.
! Se si esegue la ricerca di un brano o l’avanza-
mento rapido/la modalità inversa durante
Track repeat,l’intervallo di riproduzione ripe-
tuta cambia in Folder repeat.
! Quando viene selezionato Folder repeat, non
è possibile riprodurre i brani presenti nelle
cartelle secondarie della cartella.
Riproduzione di file in
ordine casuale
La riproduzione casuale consente di riprodurre
file in ordine casuale all’interno dell’intervallo
di riproduzione ripetuta, Folder repeat e
All repeat.
1 Selezionare l’intervallo di ripetizione.
Vedere Selezione di un intervallo di ripetizione
nella pagina precedente.
Scansione di cartelle e di file
Quando si usa l’intervallo Folder repeat,l’ini-
zio di ogni file della cartella selezionata viene
riprodotto per circa 10 secondi. Quando si usa
l’intervallo All repeat,l’inizio del primo file di
ogni cartella viene riprodotto per circa 10 secondi.
1 Selezionare l’intervallo di ripetizione.
Vedere Selezione di un intervallo di ripetizione
nella pagina precedente.
2 Utilizzare MULTI-CONTROL per selezionare Scan mode nel menu delle funzioni.
3 Premere MULTI-CONTROL per attivare
la lettura a scansione.
Vengono riprodotti i primi 10 secondi di ogni
file della cartella corrente (o il primo file di
ogni cartella).
4 Quando si trova il file (o la cartella) desiderato, premere MULTI-CONTROL per disattivare la lettura a scansione.
Continua l’esecuzione del file (o della cartella).
# Se il display è tornato automaticamente alla
visualizzazione della riproduzione, selezionare di
nuovo Scan mode utilizzando MULTI-CONTROL.
# Dopo il termine della scansione del file o della
cartella, viene avviata nuovamente la riproduzione dei file.
Italiano
2 Utilizzare MULTI-CONTROL per selezionare Random mode nel menu delle funzioni.
3 Premere MULTI-CONTROL per attivare
la riproduzione casuale.
I file audio vengono riprodotti in ordine casuale all’interno dell’intervallo Folder repeat o
All repeat selezionato in precedenza.
# Premere nuovamente MULTI-CONTROL per
disattivare la riproduzione casuale.
Messa in pausa della
riproduzione
1 Utilizzare MULTI-CONTROL per selezionare Pause nel menu delle funzioni.
2 Premere MULTI-CONTROL per attivare
la pausa.
La riproduzione del brano corrente viene
messa in pausa.
# Premere nuovamente MULTI-CONTROL per
disattivare la pausa.
It
89
Page 90

Sezione
02
Riproduzione di brani sul
lettore audio portatile
USB/memoria USB
Visualizzazione delle
informazioni di testo di un
file audio
% Premere DISPLAY.
Se si preme ripetutamente DISPLAY, sul display vengono visualizzate le impostazioni seguenti:
Tempo di riproduzione—Folder name (nome
della cartella) e File name (nome del file)—
Artist name (nome degli artisti) e Track title
(titolo del brano)—Artist name (nome degli
artisti) e Album title (titolo dell’album) —
Album title (titolo dell’album) e Track title (titolo del brano) —Track title (titolo del brano)
e tempo di riproduzione—Comment (commento) e tempo di riproduzione
# Se i caratteri registrati nel file audio non sono
compatibili con l’unità principale, tali caratteri
non verranno visualizzati.
# Se in un file audio non è stata registrata alcuna informazione specifica, il titolo o il nome non
vengono visualizzati.
# Le informazioni di testo di alcuni file audio potrebbero non essere visualizzate correttamente.
Scorrimento delle
informazioni di testo sul
display
Questa unità può visualizzare solo le prime 14
lettere di Folder name, File name, Track title,
Artist name e Album title. Se le informazioni
registrate sono più lunghe di 14 lettere, è possibile far scorrere il testo verso sinistra, in
modo da poter visualizzare anche il resto delle
informazioni di testo.
% Premere DISPLAY e tenerlo premuto
fino a quando le informazioni di testo iniziano a scorrere sul display.
Nota
Quando la funzione Scorrimento costante è attivata come impostazione iniziale, sul display scorrono continuamente le informazioni di testo.
Vedere il manuale d’istruzioni di DEH-P6980IB,
DEH-P6950IB, DEH-P6900IB.
Selezione di file dall’elenco
dei nomi dei file
L’elenco dei nomi dei file consente di visualiz-
zare la lista dei nomi dei file (o dei nomi delle
cartelle) e di selezionarne uno da riprodurre.
1 Premere LIST per passare alla modalità
dell’elenco dei nomi file.
Sul display vengono visualizzati i nomi dei file
e delle cartelle.
2 Utilizzare MULTI-CONTROL per selezionare il nome del file (o il nome della cartella) desiderato.
Ruotare per modificare il nome del file o della
cartella; premere per avviare la riproduzione;
spingere a destra per visualizzare un elenco
dei file (o delle cartelle) nella cartella selezionata.
# È inoltre possibile modificare il nome del file o
della cartella spingendo MULTI-CONTROL in alto
o in basso.
# Per tornare all’elenco precedente (la cartella
superiore di un livello), spingere
MULTI-CONTROL a sinistra.
# Se il numero della cartella/file è superiore a
100, vengono visualizzate le ultime 2 cifre del numero della cartella/file.
# Il numero della cartella/file nella cartella correntemente selezionata viene visualizzato a destra
del display.
# Se non si attiva l’elenco entro circa 30 secon-
di, la modalità dell’elenco dei nomi dei file viene
annullata automaticamente.
90
It
Page 91

Funzionamento con unità
principali differenti
Sezione
03
Uso del dispositivo come
unità esterna
Le unità principali elencate di seguito controllano questa unità come un’unità esterna. Per
ulteriori dettagli sulle unità esterne, vedere il
manuale dell’unità principale.
! Non è possibile utilizzare i tasti da 1KEY a
6KEY per controllare questa unità.
Gruppo di unità principali 1
Le unità principali riportate di seguito vengono
controllate tramite il tasto FUNCTION o tramite tasto SOFT KEY.
DEH-P9650MP, DEH-P9600MP, DEH-P7700MP,
DEH-P6800MP, DEH-P6750MP, DEH-P6700MP,
DEH-P5980MP, DEH-P5950MP, DEH-P5900MP,
DEH-P5850MPH, DEH-P5800MP, DEHP5750MP, DEH-P5700MP, DEH-P4990MP, DEHP4980MP, DEH-P4950MP, DEH-P4900MP, DEHP4850MPH, DEH-P4850MP, DEH-P4800MP,
DEH-P4750MP, DEH-P3980MP, DEH-P3950MP,
DEH-P77MP, DEH-P65BT, DEH-P55BT
P40MP, DEX-P90RS, DVH-P5850MP, DVHP5000MP, DVH-P580MP
Gruppo di unità principali 2
Le unità principali riportate di seguito vengono
controllate tramite MULTI-CONTROL.
DEH-P9880BT, DEH-P9850BT, DEH-P9800BT,
DEH-P8980BT, DEH-P8950BT, DEH-P8850MP,
DEH-P8650MP, DEH-P8600MP, DEH-P7980UB,
DEH-P7950UB, DEH-P7900UB, DEH-P7750MP,
DEH-P6850MP, DEH-P88RS, DEH-P85BT, DEHP80MP, DEH-P70BT
*
, DEH-
Gruppo di unità principali 4
Le unità principali e le unità di navigazione riportate di seguito vengono controllate tramite
i tasti del touch panel.
AVIC-HD1BT, AVIC-X1R
Tabelle di compatibilità
delle funzioni
Note
! Quando si avvia la riproduzione dei file audio
potrebbe intercorrere un ritardo di alcuni
istanti, a seconda del tipo di lettore audio portatile/memoria USB utilizzato.
! Non e possibile selezionare una cartella in cui
non sono memorizzati file audio compressi.
! La riproduzione viene eseguita nell’ordine del
numero dei file. Se le cartelle non contengono
file, vengono ignorate. (Se la cartella 01 (PRINCIPALE) non contiene file, la riproduzione comincia dalla cartella 02.)
! Quando si riproducono file registrati con velo-
cità in bit variabile (VBR, variable bit rate), il
tempo di riproduzione non verrà visualizzato
correttamente se vengono utilizzate operazioni
come l’avanzamento rapido o la modalità inversa.
! Durante l’avanzamento rapido e la modalità
inversa non viene emesso audio.
! Se viene visualizzato un messaggio di errore,
ad esempio NO AUDIO, vedere Messaggi di
errore a pagina 99.
Italiano
Gruppo di unità principali 3
Le unità principali riportate di seguito vengono
controllate tramite i tasti del touch panel.
AVH-P7650DVD, AVH-P7500DVDN, AVHP5700DVD
* È necessario utilizzare il telecomando (venduto a parte) per eseguire le operazioni da a/b/c/d.
91
It
Page 92

Sezione
03
Funzionamento con unità
principali differenti
Gruppo di unità principali 1
Comandi
Selezione di USB
come sorgente
Selezione di una cartella
Passaggio a un altro
brano all’indietro o in
*1
avanti
Avanzamento rapido/
modalità inversa rapi-
*2
da
Ritorno alla cartella
01 (PRINCIPALE)
Selezione di una funzione
Messa in pausa di un
brano
Commutazione del display
Scorrimento del titolo
Attivazione o disattivazione della lettura a
scansione
Selezione di un intervallo di ripetizione
Attivazione o disattivazione della riproduzione casuale
Commutazione tra
AUTO e MANUAL
Premere SOURCE.
Premere a o b.
Premere c o d.
Premere e tenere premuto c
o d.
Premere e tenere premuto
*3
.
BAND (BAND/ESC).
Premere FUNCTION (FUNC).
Premere a o b in FUNC1
(F1).
Premere a o b in FUNC2
(F2).
Premere e tenere premuto a
o b in FUNC2 (F2).
Premere a o b in FUNC3
(F3).
Premere a o b in FUNC4
(F4).
Premere e tenere premuto a
o b in FUNC4 (F4).
Premere c o d in AUTO/
MANUAL (A/M).
Gruppo di unità principali 2
Comandi
Selezione di USB
come sorgente
Selezione di una cartella
Passaggio a un altro
brano all’indietro o in
*1
avanti
Avanzamento rapido/
modalità inversa rapi-
*2
da
Ritorno alla cartella
01 (PRINCIPALE)
Selezione di una funzione
Messa in pausa di un
brano
Commutazione del display
Scorrimento del titolo
Attivazione o disattivazione della lettura a
scansione
Selezione di un intervallo di ripetizione
Attivazione o disattivazione della riproduzione casuale
Commutazione tra
AUTO e MANUAL
Premere SOURCE.
Spingere MULTI-CONTROL
in alto o in basso.
Spingere MULTI-CONTROL a
sinistra o a destra.
Spingere e tenere premuto
MULTI-CONTROL a sinistra
o a destra.
Premere e tenere premuto
*3
.
BAND (BAND/ESC).
Utilizzare MULTI-CONTROL.
Premere MULTI-CONTROL
in FUNC1 (F1).
Premere MULTI-CONTROL
in FUNC2 (F2).
Premere e tenere premuto
MULTI-CONTROL in FUNC2
(F2).
Premere MULTI-CONTROL
in FUNC3 (F3).
Premere MULTI-CONTROL
in FUNC4 (F4).
Premere e tenere premuto
MULTI-CONTROL in FUNC4
(F4).
Premere MULTI-CONTROL
in AUTO/MANUAL (A/M).
*1È possibile utilizzare questa funzione se si seleziona AUTO in AUTO/MANUAL (A/M).
2
*
È possibile utilizzare questa funzione se si seleziona MANUAL in AUTO/MANUAL (A/M).
3
*
Se la cartella 01 (PRINCIPALE) non contiene file, la riproduzione comincia dalla cartella 02.
92
It
Page 93

Funzionamento con unità
principali differenti
Sezione
03
Gruppo di unità principali 3
Comandi
Selezione di USB
come sorgente
Selezione di una cartella
Passaggio a un altro
brano all’indietro o in
*1
avanti
Avanzamento rapido/
modalità inversa rapi-
*2
da
Ritorno alla cartella
01 (PRINCIPALE)
Selezione di una funzione
Messa in pausa di un
brano
Commutazione del display
Scorrimento del titolo
Attivazione o disattivazione della lettura a
scansione
Selezione di un intervallo di ripetizione
Attivazione o disattivazione della riproduzione casuale
Commutazione tra
AUTO e MANUAL
Premere SOURCE.
Toccare a o b.
Toccare c o d.
Toccare e tenere premuto c
o d.
Toccare e tenere premuto
*3
.
BAND.
Toccare A.MENU e quindi
toccare FUNCTION.
Toccare ab in FUNCTION1.
Toccare ab in FUNCTION2.
Toccare e tenere premuto
ab in FUNCTION2.
Toccare ab in FUNCTION3.
Toccare ab in FUNCTION4.
Toccare e tenere premuto
ab in FUNCTION4.
Toccare c o d in AUTO/MA-
NUAL.
Gruppo di unità principali 4
Comandi
Selezione di USB
come sorgente
Selezione di una cartella
Passaggio a un altro
brano all’indietro o in
*1
avanti
Avanzamento rapido/
modalità inversa rapi-
*2
da
Ritorno alla cartella
01 (PRINCIPALE)
Selezione di una funzione
Messa in pausa di un
brano
Commutazione del display
Scorrimento del titolo
Attivazione o disattivazione della lettura a
scansione
Selezione di un intervallo di ripetizione
Attivazione o disattivazione della riproduzione casuale
Commutazione tra
AUTO e MANUAL
Premere SOURCE.
Toccare a o b.
Toccare c o d.
Toccare e tenere premuto c
o d.
Toccare e tenere premuto
*3
.
BAND.
Toccare A.MENU e quindi
toccare FUNCTION.
Toccare SEND in FUNC-
TION1.
Toccare SEND in FUNC-
TION2.
Toccare e tenere premuto
SEND in FUNCTION2.
Toccare SEND in FUNC-
TION3.
Toccare SEND in FUNC-
TION4.
Toccare e tenere premuto
SEND in FUNCTION4.
Toccare AUTO/MANUAL.
Italiano
*1È possibile utilizzare questa funzione se si seleziona AUTO in AUTO/MANUAL (A/M).
2
*
È possibile utilizzare questa funzione se si seleziona MANUAL in AUTO/MANUAL (A/M).
3
*
Se la cartella 01 (PRINCIPALE) non contiene file, la riproduzione comincia dalla cartella 02.
93
It
Page 94

Sezione
03
Funzionamento con unità
principali differenti
Visualizzazione delle
informazioni di testo
È possibile visualizzare le informazioni di testo
registrate nel file audio.
% Selezionare le informazioni desiderate.
Vedere Tabelle di compatibilità delle funzioni a
pagina 91.
Numero della cartella—numero del brano—
tempo di riproduzione—nome della cartella—
nome del file—titolo dell’album—titolo del
brano—nome degli artisti
# Se i caratteri registrati nel file audio non sono
compatibili con l’unità principale, tali caratteri
non verranno visualizzati.
Note
! Se si utilizza questa unità come unità esterna,
le unità principali possono visualizzare le
prime 8 lettere del nome della cartella, del
nome del file, del titolo dell’album, del titolo
del brano, del nome degli artisti.
! Se i caratteri registrati nel file audio non sono
compatibili con l’unità principale, tali caratteri
non verranno visualizzati.
! Se in un file audio non è stata registrata alcu-
na informazione specifica, il titolo o il nome
non vengono visualizzati.
! Le informazioni di testo di alcuni file audio po-
trebbero non essere visualizzate correttamente.
! È possibile scorrere a sinistra il nome della
cartella, il nome del file, il titolo dell’album, il
titolo del brano, il nome degli artisti.
Selezione di un intervallo
di ripetizione
Sono disponibili tre intervalli di riproduzione ripetuta: TRK (ripetizione di un file), FLD (ripeti-
zione di una cartella) e ALL (ripetizione di tutti
i file).
% Selezionare l’intervallo di ripetizione.
Vedere Tabelle di compatibilità delle funzioni a
pagina 91.
! TRK – Ripete solo il file corrente
! FLD – Ripete la cartella corrente
! ALL – Ripete tutti i file
Note
! Se durante la riproduzione ripetuta si selezio-
na un’altra cartella, l’intervallo di riproduzione
ripetuta cambia in ALL.
! Se si esegue la ricerca di un brano o l’avanza-
mento rapido/la modalita inversa durante
TRK,l’intervallo di riproduzione ripetuta cam-
bia in FLD.
! Quando viene selezionato FLD, non e possibile
riprodurre i brani presenti nelle cartelle secondarie della cartella.
Scansione di cartelle e di file
Quando si usa l’intervallo FLD,l’inizio di ogni
file della cartella selezionata viene riprodotto
per circa 10 secondi. Quando si usa l’intervallo
ALL,l’inizio del primo file di ogni cartella viene
riprodotto per circa 10 secondi.
1 Selezionare l’intervallo di ripetizione.
Vedere Tabelle di compatibilità delle funzioni a
pagina 91.
! FLD – l’inizio di ogni file della cartella sele-
zionata viene riprodotto per circa 10 secondi
! ALL – l’inizio del primo file di ogni cartella
viene riprodotto per circa 10 secondi
2 Attivare la lettura a scansione.
Vedere Tabelle di compatibilità delle funzioni a
pagina 91.
94
It
Page 95

Funzionamento con unità
principali differenti
3 Quando si trova il file (o la cartella) desiderato, disattivare la lettura a scansione.
Continua l’esecuzione del file (o della cartella).
# Se il display è tornato automaticamente alla
visualizzazione della riproduzione, selezionare di
nuovo la modalità di attivazione/disattivazione
della lettura a scansione.
# Dopo il termine della scansione del file o della
cartella, viene avviata nuovamente la riproduzione dei file.
Riproduzione di file in
ordine casuale
La riproduzione casuale consente di riprodurre
file in ordine casuale all’interno dell’intervallo
di riproduzione ripetuta, FLD e ALL.
1 Selezionare l’intervallo di ripetizione.
Vedere Tabelle di compatibilità delle funzioni a
pagina 91.
! FLD – Riproduce i file audio in ordine ca-
suale all’interno della cartella selezionata
! ALL – Riproduce tutti i file audio in ordine
casuale
Sezione
03
Italiano
2 Attivare la riproduzione casuale.
Vedere Tabelle di compatibilità delle funzioni a
pagina 91.
95
It
Page 96

Sezione
04
Collegamenti
Importante
! Se questa unità viene utilizzata in condizione
diverse dalle seguenti, potrebbero verificarsi
incendi o malfunzionamenti.
— Veicoli dotati di batteria da 12 volt e messa
a terra negativa.
! Per evitare rischi di cortocircuito, surriscalda-
mento o malfunzionamento, accertarsi di seguire le indicazioni riportate di seguito.
— Prima dell’installazione, scollegare il mor-
setto negativo della batteria.
— Assicurare i cavi con morsetti per cavi o
nastro adesivo. Per proteggere i cavi, avvolgere nastro adesivo attorno agli stessi nei
punti in cui entrano in contatto con parti
metalliche.
— Posizionare tutti i cavi in modo che non
possano entrare in contatto con componenti mobili, come la leva del cambio e i binari dei sedili.
— Non posizionare i cavi in luoghi soggetti a
surriscaldamento, come le bocchette dell’impianto di riscaldamento.
— Non instradare il cavo giallo attraverso fori
del vano motore per collegare la batteria.
— Non mettere in cortocircuito i cavi.
— Non condividere mai l’alimentazione con
altri apparecchi tagliando l’isolante del
cavo di alimentazione dell’unità. La capacità di carico di corrente del cavo è limitata.
— Utilizzare esclusivamente un fusibile con
la portata prescritta.
! I connettori IP-BUS sono codificati per colore.
Accertarsi di collegare connettori dello stesso
colore.
! Posizionare il cavo antenna il più lontano pos-
sibile dagli altri cavi per prevenire rumori.
! Il cavo nero è la messa a terra. Questo cavo e
l’altro cavo di messa a terra del prodotto (soprattutto per i prodotti ad alta tensione, quali
l’amplificatore di potenza) devono essere collegati separatamente. In caso contrario, se
scollegati accidentalmente, potrebbero provocare incendi o malfunzionamenti.
! Collegare esclusivamente lettori audio portatili
USB/memoria USB.
! Inserire saldamente il terminale del lettore
audio portatile USB/memoria USB nel connettore, in caso contrario questa unita potrebbe
non funzionare correttamente oppure un errore potrebbe essere visualizzato nell’unita principale.
La funzione del cavo potrebbe differire a seconda del prodotto, anche se il colore del cavo è lo
stesso. Per il collegamento di questo sistema,
leggere attentamente i manuali, quindi collegare correttamente i cavi.
96
It
Page 97

Collegamenti
Collegamento delle unità
Sezione
04
Italiano
97
It
Page 98

Sezione
05
Installazione
Importante
! Controllare tutti i collegamenti e i sistemi
prima dell’installazione finale.
! Non utilizzare componenti non approvati, poi-
ché potrebbero provocare malfunzionamenti.
! Consultare il rivenditore se l’installazione ri-
chiede la trapanatura di fori o altre modifiche
del veicolo.
! Non installare questa unità se:
— potrebbe interferire con il funzionamento
del veicolo.
— potrebbe procurare lesioni al passeggero
in caso di arresto improvviso del veicolo.
! Quando si installa questa unità, accertarsi
che nessuno dei cavi sia collegato tra l’unità e
i raccordi o le parti metalliche circostanti.
! Non installare questa unità in prossimità delle
bocchette dell’impianto di riscaldamento,
dove potrebbe surriscaldarsi, o in prossimità
delle portiere, dove potrebbe entrare in contatto con acqua piovana.
! Prima di trapanare eventuali fori di montag-
gio, controllare l’altro lato della superfici su
cui si intende praticare il foro. Fare attenzione
a non trapanare i condotti del carburante, i
condotti dell’impianto frenante, il cablaggio
elettrico o altri componenti importanti.
! Se questa unità viene installata nel vano del
passeggero, fissarla saldamente in modo che
non posso muoversi liberamente quando il
veicolo è in movimento, provocando eventuali
lesioni o incidenti.
! Se questa unità viene installata al di sotto di
un sedile anteriore, accertarsi che non impedisca i movimenti del sedile. Installare con
cura tutti i cavi e i fili in prossimità del meccanismo di scorrimento, in modo che non possano incastrarsi nel meccanismo e provocare
un cortocircuito.
Installazione dell’unità
Installazione con fermi in
Velcro
Pulire con cura la superficie prima di fissare i
fermi in Velcro.
! Se i fermi in Velcro (duri) aderiscono diret-
tamente al pianale del veicolo, è possibile
installare questa unità senza utilizzare i
fermi in Velcro (morbidi).
% Installazione dell’unità utilizzando i
fermi in Velcro.
Questa unità
Fermo in Velcro (duro)
Fermo in Velcro (morbido)
Telaio o pianale del veicolo
98
It
Page 99

Informazioni
supplementari
Appendice
Messaggi di errore
Quando si contatta il rivenditore o il Centro assistenza Pioneer più vicino, accertarsi di riportare il messaggio di errore.
Messaggio Causa Azione
N/A USB Il dispositivo
USB collegato
non è supportato
da questa unità.
CHK USB Il connettore
USB o il cavo
USB è in cortocircuito.
Il lettore audio
portatile USB/
memoria USB
consuma più di
500 mA (potenza
massima consentita).
NO AUDIO Nessun brano Trasferire i file
La memoria USB
collegata ha la
protezione attivata
Collegare un lettore audio portatile
USB o un dispositivo di memoria
USB compatibile
con la classe dei sistemi di memorizzazione di massa
USB.
Verificare che il
connettore USB o
il cavo USB non
sia incastrato o
danneggiato.
Scollegare il lettore
audio portatile
USB/memoria
USB e non utilizzarlo. Portare l’interruttore della
chiave di avviamento in posizione
OFF, quindi su ACC
o ON e infine collegare il lettore audio
portatile USB/memoria USB compatibile.
audio sul lettore
audio portatile
USB/memoria
USB e collegarlo.
Seguire le istruzioni della memoria
USB per disattivare
la protezione.
Messaggio Causa Azione
DRM SKIP Il lettore audio
portatile USB/
memoria USB
collegato contiene file WMA protetti da
tecnologia
Windows Media
DRM 9/10
PROTECT Tutti i file del let-
tore audio portatile USB/
memoria USB
sono protetti da
tecnologia
Windows Media
DRM 9/10
Riprodurre un file
audio non protetto
da tecnologia
Windows Media
DRM 9/10.
Trasferire file audio
non protetti da tecnologia Windows
Media DRM 9/10
sul lettore audio
portatile USB/memoria USB e collegarlo.
Compatibilità del lettore
audio portatile USB/
memoria USB
! Specifiche: USB 2.0 massima velocità
! Classe USB: Dispositivo MSC (Mass Stora-
ge Class)
! Protocollo: bulk
! Quantità massima di memoria: 250 GB
! File system: FAT12, FAT16, FAT32
! Corrente assorbita: 500 mA
Note
! Dispositivi di memoria USB partizionati non
sono compatibili con questa unita.
! A seconda del tipo di lettore audio portatile
USB/memoria USB, questa unità potrebbe
non riconoscere il lettore audio USB/memoria
USB oppure alcuni file audio potrebbero non
essere riprodotti correttamente.
! Non è possibile collegare un lettore audio por-
tatile USB/memoria USB a questa unità utilizzando un hub USB.
Italiano
99
It
Page 100

1
2
5
6
Appendice
Informazioni
supplementari
Compatibilità audio
compressa
! È possibile riprodurre fino a 15 000 file su
un lettore audio portatile USB/memoria
USB.
! È possibile riprodurre fino a 500 cartelle su
un lettore audio portatile USB/memoria
USB.
! In alcuni casi possono intercorrere alcuni
istanti prima dell’avvio della riproduzione di
file audio su un lettore audio portatile USB/
memoria USB con numerose gerarchie di
cartelle.
! È necessario utilizzare correttamente le
estensioni file come .wma, .mp3 o .m4a.
! Per i nomi dei file (incluse le estensioni
come .wma, .mp3 o .m4a) o i nomi delle
cartelle, è possibile visualizzare esclusivamente 64 caratteri.
A seconda del set di caratteri, e possibile visualizzare solo i primi 32 caratteri.
! Le informazioni di testo di alcuni file audio
potrebbero non essere visualizzate correttamente.
! Quando si avvia la riproduzione dei file
audio codificati con dati immagine, potrebbe intercorrere un ritardo di alcuni istanti.
Sequenza di file audio nella
memoria USB
Per i lettori audio portatili USB, la sequenza è diversa da quella della memoria USB e dipende
dal tipo di lettore.
Esempio di gerarchia
: Cartella
: File audio compresso
3
4
Livello 1 Livello 2 Livello 3 Livello 4
! I numeri da 01 a 05 rappresentano i numeri
delle cartelle. I numeri da 1 a 6 rappresentano la sequenza di riproduzione. Con
questa unità, l’utente non può assegnare i
numeri alle cartelle e specificare la sequenza di riproduzione.
! La sequenza dei file audio/cartelle che de-
vono essere riprodotti, selezionati dalla lettura a scansione e visualizzati nell’elenco
dei nomi dei file viene determinata nel
modo seguente:
— Viene data la priorità alla sequenza dei
file rispetto alla sequenza delle cartelle
secondarie.
— In una cartella, la sequenza dei file
audio/cartelle secondarie corrisponde
all’ordine con cui è stata eseguita la
copia dal personal computer alla memo-
ria USB.
Tuttavia, la sequenza potrebbe risultare differente a seconda delle impostazione e del
sistema operativo del personal computer.
Inoltre, quando vengono selezionate contemporaneamente più cartelle (o file) e vengono copiate nella memoria USB, la
sequenza prevista dei file audio da riprodurre, selezionare e visualizzare potrebbe non
coincidere con la sequenza effettiva.
100
It
 Loading...