

Page 1

Owner’s Manual
Mode d’emploi
SIRIUS BUS INTERFACE
INTERFACE DU BUS SIRIUS
CD-SB10
English Français
Page 2

Contents
Thank you for buying this Pioneer product.
Please read through these operating instructions so you will know how to operate
your model properly. After you have finished reading the instructions, keep this man-
ual in a safe place for future reference.
Before You Start
Information to User 3
About this unit 3
About this manual 3
Operating with different Pioneer head
units 3
Function compatibility charts 4
– Head unit group 2 4
– Head unit group 3 5
– Head unit group 4 5
– Head unit group 5 6
– Head unit group 6 7
– Head unit group 7 7
Detailed instructions on selecting a team 9
SIRIUS tuner
What’s What 10
– Head unit group 1(e.g. DEH-
P6000UB) 10
– Remote control 10
Selecting SIRIUS source 11
Listening to SIRIUS 11
– Selecting a SIRIUS channel
directly 11
– Switching the SIRIUS display 12
– Storing and recalling channels 12
– Displaying the Radio ID 12
Introduction of advanced operations 12
Selecting the SIRIUS channel select
mode 13
– Selecting a channel in the channel
category 13
Using the Game Alert function 14
– Selecting teams for Game Alert 14
– Switching the Game Alert on or off 14
– When the game of the selected team
starts 14
– Displaying game information 14
Using Instant Replay function 15
– Pausing playback 15
Installation
Connecting the units 16
Connections 17
Installing this unit 17
– Installing with hook and loop
fasteners 17
Additional Information
Specifications 19
2
En
Page 3
Before You Start
Section
01
English
Information to User
Alteration or modifications carried out without
appropriate authorization may invalidate the
user’s right to operate the equipment.
This device complies with part 15 of the FCC
Rules. Operation is subject to the following
two conditions:
(1) This device may not cause harmful interference, and (2) this device must accept any interference received, including interference that
may cause undesired operation.
About this unit
WARNING
Handling the cord on this product or cords associated with accessories sold with the product
may expose you to chemicals listed on proposition 65 known to the State of California and other
governmental entities to cause cancer and birth
defects or other reproductive harm. Wash hands
after handling.
CAUTION
! Do not allow this unit to come into contact
with liquids. Electrical shock could result.
Also, damage to this unit, smoke, and overheating could result from contact with liquids.
! Keep this manual handy as a reference for op-
erating procedures and precautions.
About this manual
Instructions in this manual use DEH-P6000UB
as an example head unit. When using other
head units, refer to Operating with different
Pioneer head units on this page.
Operating with different
Pioneer head units
Head units are divided into several groups;
find which group yours falls into and operate it
according to the corresponding function compatibility charts on the following pages.
! Select SIRIUS source when using this sys-
tem with head units grouped 1, 2 and 3. Select EXTERNAL source to use with other
head units. For detailes about EXTERNAL
source, refer to the head unit’s manual.
Head unit group 1
Operation of the following head units is the
same as the “DEH-P6000UB”. Refer to the instruction starting on page 10.
DEH-P600UB, DEH-P680MP, DEH-P690UB,
DEH-P700BT, DEH-P780MP, DEH-P790BT,
DEH-P800PRS, DEH-P880PRS, DEH-P980BT,
DEH-P6800MP, DEH-P6900UB, DEH-P7000BT,
DEH-P7800MP, DEH-P7900BT, DEH-P9800BT,
FH-P800BT, FH-P8000BT
Head unit group 2
When using this system with these head
units, operate while referring to the head unit
group 2 function compatibility chart.
DEH-P390MP, DEH-P480MP, DEH-P490MP,
DEH-P2900MP, DEH-P3800MP, DEH-P3900MP,
DEH-P4800MP, DEH-P4900MP
Head unit group 3
When using this system with these head
units, operate while referring to the head unit
group 3 function compatibility chart.
DEH-P400UB, DEH-P500UB, DEH-P3000IB,
DEH-P4000UB, DEH-P5000UB
En
3
Page 4

Section
01
Before You Start
Head unit group 4
When using this system with these head
units, operate while referring to the head unit
group 4 function compatibility chart.
DEH-P580MP, DEH-P960MP, DEH-P5800MP,
DEH-P9600MP, DVH-P5000MP, FH-P5000MP
Head unit group 5
When using this system with these head
units, operate while referring to the head unit
group 5 function compatibility chart.
DEH-P8MP, DEH-P80MP, DEH-P860MP, DEHP8600MP
Head unit group 6
When using this system with these head
units, operate while referring to the head unit
group 6 function compatibility chart.
AVH-P6600DVD, AVH-P7600DVD, AVXP8DVD*
! * ADD-ON mode (M) only.
Head unit group 7
When using this system with these head
units, operate while referring to the head unit
group 7 function compatibility chart.
AVIC-N2
Other head units
Operation of the following head units is fully
explained in the head units’ manual. Refer to
the instruction manual that came with your
head unit.
AVH-P4000DVD, AVH-P4900DVD, AVHP5000DVD, AVH-P5900DVD, AVH-P7800DVD,
AVIC-D2, AVIC-D3, AVIC-F700BT, AVIC-F900BT,
AVIC-N3, AVIC-Z1, AVIC-Z2
! FUNCTION 3 and FUNCTION 4 are not
available with AVIC-D2.
Function compatibility charts
Head unit group 2
Controls
Selecting the source Press SOURCE to select
Selecting channel Press c or d.
Changing bands Press BAND.
Storing presets Press and hold 1 to 6.
Recalling presets Press 1 to 6.
Recalling presets sequentially (in Channel
Number Select mode)
Selecting category (in
Channel Category Select mode)
Displaying the function
menu
Switching channel information
Switching the channel
select mode (in the
function menu)
Turning the game alert
function on/off (in the
function menu)
Selecting a league (in
the function menu)
Switching the display
to the team select
mode (in the function
menu)
Selecting a team (in
the function menu)
Storing the selected
team in memory (in the
function menu)
SIRIUS.
Press a or b.
Press a or b.
Press FUNCTION.
Press DISPLAY.
Select CHNUMBER/CATE-
GORY and press c or d.
Select TEAMSETTING and
press and hold a or b .
In the league select mode,
press a or b.
In the league select mode
and with a desired league
displayed, press and hold
a or b.
In the team select mode,
press a or b.
In the team select mode
and with a desired team
displayed, press and hold
a or b.
4
En
Page 5
Before You Start
Section
01
English
Controls
Deleting the team selection from memory
(in the function menu)
Displaying game information (in the function
menu)
In the team select mode
and with the selected team
displayed, press and hold
a or b.
Select GAME INFO and
press a or b.
Notes
! With some units, pressing and holding
CLOCK can directly change the channel select
mode.
! For detailed instructions on the Team Setting
function, refer to Detailed instructions on se-
lecting a team on page 9.
Head unit group 3
Controls
Selecting the source Press SRC (SOURCE) to se-
Selecting channel Push MULTI-CONTROL left
Changing bands Press BAND.
Storing presets Press LIST and then use
Recalling presets Press LIST and then use
Recalling presets sequentially (in Channel
Number Select mode)
Selecting category (in
Channel Category Select mode)
Displaying the function
menu
Switching channel information
Switching the channel
select mode (in the
function menu)
lect SIRIUS.
or right.
MULTI-CONTROL.
MULTI-CONTROL.
Push MULTI-CONTROL up
or down.
Push MULTI-CONTROL up
or down.
Use MULTI-CONTROL.
Press DISP.
Select CH SELECT MODE
and press MULTI-CON-
TROL.
Controls
Turning the game alert
function on/off (in the
function menu)
Selecting a league (in
the function menu)
Switching the display
to the team select
mode (in the function
menu)
Selecting a team (in
the function menu)
Storing the selected
team in memory (in the
function menu)
Deleting the team selection from memory
(in the function menu)
Displaying game information (in the function
menu)
Select GAME ALERT and
press MULTI-CONTROL.
In the league select mode,
turn MULTI-CONTROL.
In the league select mode
and with a desired league
displayed, press MULTI-
CONTROL.
In the team select mode,
turn MULTI-CONTROL.
In the team select mode
and with a desired team
displayed, press and hold
MULTI-CONTROL.
In the team select mode
and with the selected team
displayed, press and hold
MULTI-CONTROL.
Select GAME INFO and
press MULTI-CONTROL.
Note
! With some units, pressing and holding
SAT MODE can directly change the channel
select mode.
Head unit group 4
Controls
Selecting the source Press SOURCE to select an
Selecting channel Press c or d.
Changing bands Press BAND.
Storing presets Press and hold 1 to 6.
Recalling presets Press 1 to 6.
Recalling presets sequentially (in Channel
Number Select mode)
external source for SIRIUS.
Press a or b.
En
5
Page 6
Section
01
Before You Start
Controls
Selecting category (in
Channel Category Select mode)
Displaying the function
menu
Switching channel information (FUNC1)
Switching the channel
select mode (FUNC2)
Turning the game alert
function on/off
(FUNC3)
Selecting a league
(FUNC3)
Switching the display
to the team select
mode (FUNC3)
Selecting a team
(FUNC3)
Storing the selected
team in memory
(FUNC3)
Deleting the team selection from memory
(FUNC3)
Displaying game information (FUNC4)
Press a or b.
Press FUNCTION.
Press a or b.
Press a or b.
Press and hold a or b.
In the league select mode,
press a or b.
In the league select mode
and with a desired league
displayed, press and hold
a or b.
In the team select mode,
press a or b.
In the team select mode
and with a desired team
displayed, press and hold
a or b.
In the team select mode
and with the selected team
displayed, press and hold
a or b.
Press a or b.
Notes
! For detailed instructions on FUNCTION 3,
refer to Detailed instructions on selecting a
team on page 9.
! With some head units,
AUTO/MANUAL (A/M) may appear in the
function menu, but this function is not available with SIRIUS source.
Head unit group 5
Controls
Selecting the source Press SOURCE to select an
Selecting channel Push MULTI-CONTROL left
Changing bands Press BAND.
Storing presets Press and hold 1 to 6.
Recalling presets Press 1 to 6.
Recalling presets sequentially (in Channel
Number Select mode)
Selecting category (in
Channel Category Select mode)
Displaying the function
menu
Switching channel information (FUNC1)
Switching the channel
select mode (FUNC2)
Turning the game alert
function on/off
(FUNC3)
Selecting a league
(FUNC3)
Switching the display
to the team select
mode (FUNC3)
Selecting a team
(FUNC3)
Storing the selected
team in memory
(FUNC3)
external source for SIRIUS.
or right.
Push MULTI-CONTROL up
or down.
Push MULTI-CONTROL up
or down.
Use MULTI-CONTROL.
Press MULTI-CONTROL.
Press MULTI-CONTROL.
Press and hold MULTI-
CONTROL.
In the league select mode,
push MULTI-CONTROL up
or down.
In the league select mode
and with a desired league
displayed, press and hold
MULTI-CONTROL.
In the team select mode,
push MULTI-CONTROL up
or down.
In the team select mode
and with a desired team
displayed, press and hold
MULTI-CONTROL.
6
En
Page 7

Before You Start
Section
01
English
Controls
Deleting the team selection from memory
(FUNC3)
Displaying game information (FUNC4)
In the team select mode
and with the selected team
displayed, press and hold
MULTI-CONTROL.
Push MULTI-CONTROL up
or down.
Notes
! For detailed instructions on FUNCTION 3,
refer to Detailed instructions on selecting a
team on page 9.
! With some head units,
AUTO/MANUAL (A/M) may appear in the
function menu, but this function is not available with SIRIUS source.
Head unit group 6
Controls
Selecting the source Press SOURCE to select an
Selecting channel Touch c or d.
Changing bands Press BAND.
Storing presets Keep touching one of
Recalling presets Touch one of 1KEY to
Recalling presets sequentially (in Channel
Number Select mode)
Selecting category (in
Channel Category Select mode)
Displaying the function
menu
Switching channel information (FUNC1)
Switching the channel
select mode (FUNC2)
external source for SIRIUS.
1KEY to 6KEY.
6KEY.
Tou c h a or b.
Tou c h a or b.
Tou c h A.MENU and then
touch FUNCTION (FUNC).
Tou c h
.
Tou c h
.
Controls
Turning the game alert
function on/off
(FUNC3)
Selecting a league
(FUNC3)
Switching the display
to the team select
mode (FUNC3)
Selecting a team
(FUNC3)
Storing the selected
team in memory
(FUNC3)
Deleting the team selection from memory
(FUNC3)
Displaying game information (FUNC4)
Keep touching
In the league select mode,
touch
In the league select mode
and with a desired league
displayed, keep touching
.
In the team select mode,
touch
In the team select mode
and with a desired team
displayed, keep touching
.
In the team select mode
and with the selected team
displayed, keep touching
.
Tou c h
.
.
.
.
Notes
! For detailed instructions on FUNCTION 3,
refer to Detailed instructions on selecting a
team on page 9.
! With some head units,
AUTO/MANUAL (A/M) may appear in the
function menu, but this function is not available with SIRIUS source.
Head unit group 7
Controls
Selecting the source Touch the source icon and
Selecting channel Touch c or d.
Changing bands Touch BAND.
Storing presets Touch A.MENU and
touch an external source
for SIRIUS.
1-6KEY. Then, touch one of
1KEY to 6KEY.
En
7
Page 8

Section
01
Before You Start
Controls
Recalling presets Touch one of 1 to 6.
Recalling presets sequentially (in Channel
Number Select mode)
Selecting category (in
Channel Category Select mode)
Displaying the function
menu
Switching channel information (FUNCTION
1)
Switching the channel
select mode (FUNC-
TION 2)
Turning the game alert
function on/off (FUNC-
TION 3)
Selecting a league
(FUNCTION 3)
Switching the display
to the team select
mode (FUNCTION 3)
Selecting a team
(FUNCTION 3)
Storing the selected
team in memory
(FUNCTION 3)
Deleting the team selection from memory
(FUNCTION 3)
Displaying game information (FUNCTION 4)
Tou c h a or b.
Tou c h a or b.
Tou c h A.MENU and then
touch FUNCTION.
Tou c h SEND.
Tou c h SEND.
Keep touching SEND.
In the league select mode,
touch SEND.
In the league select mode
and with a desired league
displayed, keep touching
SEND.
In the team select mode,
touch SEND.
In the team select mode
and with a desired team
displayed, keep touching
SEND.
In the team select mode
and with the selected team
displayed, keep touching
SEND.
Tou c h SEND.
function menu, but this function is not available with SIRIUS source.
Notes
! For detailed instructions on FUNCTION 3,
refer to Detailed instructions on selecting a
team on the next page.
! With some head units,
AUTO/MANUAL (A/M) may appear in the
8
En
Page 9
g
ON
F
de
de
y
y
L
A
OS
L
L
y
:
*
LNFL
w
s.
Before You Start
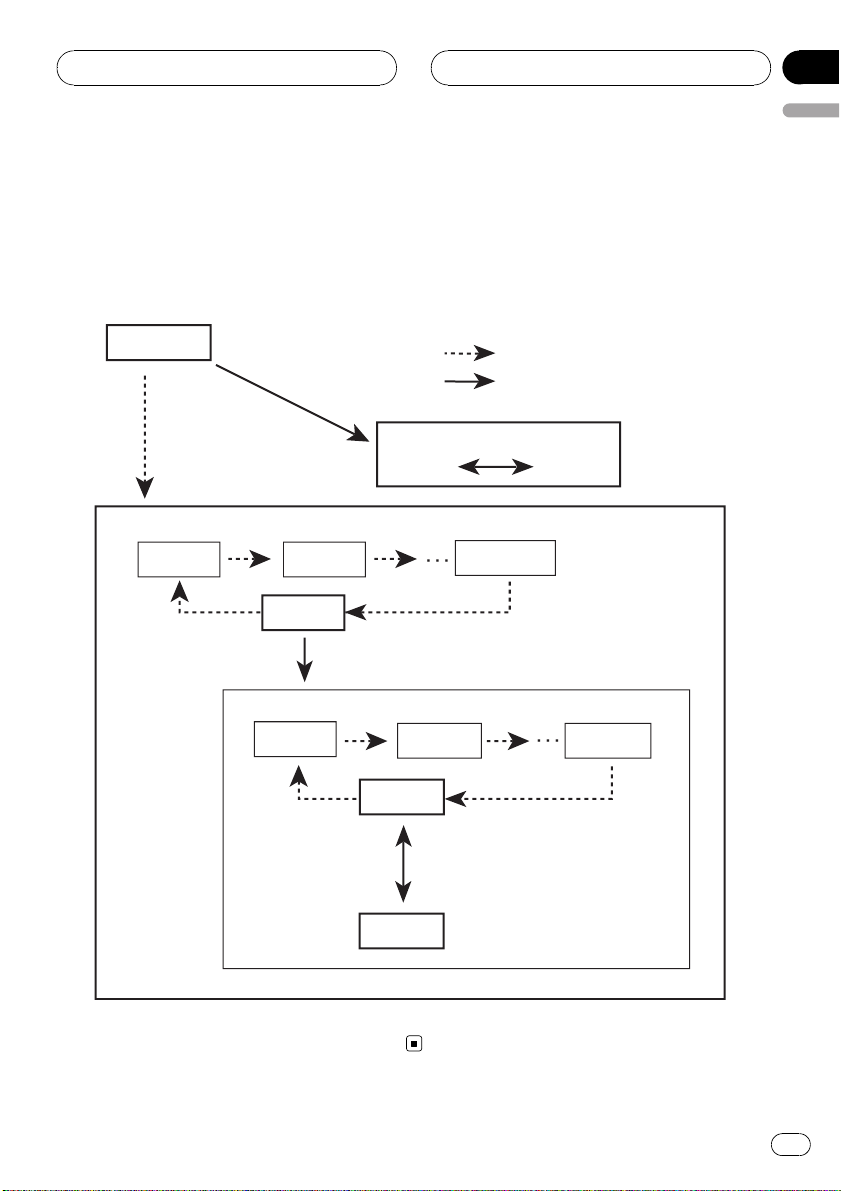
Detailed instructions on selecting a team
The chart below illustrates the Team Setting menu. Select teams for the Game Alert function referring to
this chart and the function compatibility chart for your head unit.
! “The key” referred to in the diagram below varies depending on the head unit.
Example: When selecting an NBA team Lakers
Section
01
English
CH displa
League select mo
NH
Team select mo
FF AT
Menu changes
Quick press of the ke
ress and hold the ke
Game alert ON/OFF settin
Alert
AlertOF
learALL
FF B
FF LA
FF CH
N LA
! * With the ClearAll selected, holding “the key” deletes all team selections.
! To return to the normal display, press BAND.
The game alert function no
omes effective on Laker
En
9
Page 10
6 5
Section
02
SIRIUS tuner
132 4
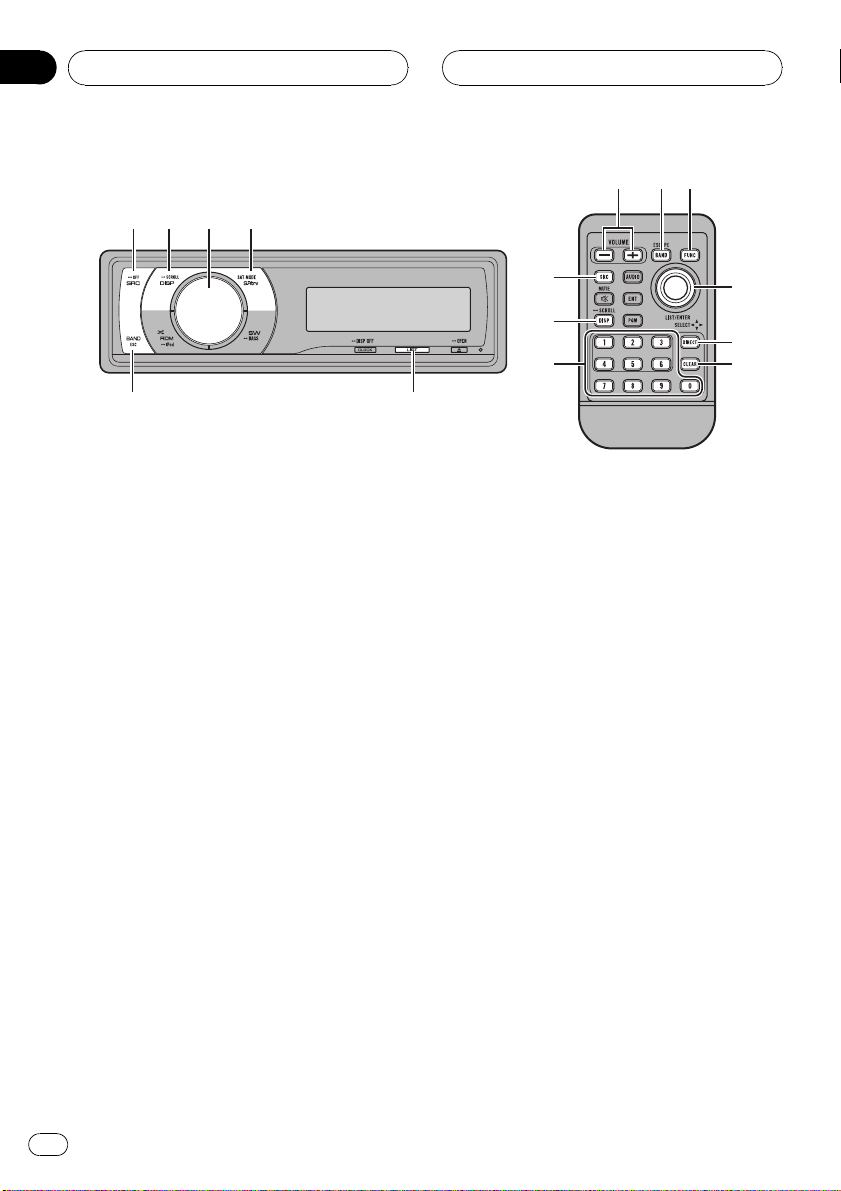
What’s What
Head unit group 1
(e.g. DEH-P6000UB)
1 SRC/OFF button
The head unit is turned on by selecting a
source. Press to cycle through all the available sources.
2 DISP/SCROLL button
Press to select different displays.
3 MULTI-CONTROL
Move to perform channel select, channel recall and category select. Also used for controlling functions.
Turn to increase or decrease the volume.
4 S.Rtrv/SAT MODE button
When XM tuner or SIRIUS tuner is selected
as the source, press to change the channel
select mode.
When SIRIUS tuner is selected as the
source, press and hold to perform the Instant Replay mode.
76
1
8
9
2
a
c
5 LIST button
Press to display the preset channel list.
6 BAND/ESC button
Press to select among three bands and cancel the control mode of functions.
b
Remote control
Operation is the same as when using the buttons on the head unit.
7 VOLUME buttons
Press to increase or decrease the volume.
8 FUNCTION button
Press to select functions.
9 Thumb pad
Move to perform channel select, channel recall and category select. Also used for controlling functions.
Functions are the same as
MULTI-CONTROL except for volume control.
a DIRECT button
Press to directly select the desired channel.
10
En
Page 11

SIRIUS tuner
Section
02
English
b CLEAR button
Press to cancel the input number when 0 to
9 are used.
c 0 to 9 buttons
Press to directly select the desired channel
or preset tuning. Buttons 1 to 6 can operate
the preset tuning.
Selecting SIRIUS source
% Press SRC to select SIRIUS.
Listening to SIRIUS
1 2 354
1 SIRIUS band indicator
2 SIRIUS channel number indicator
3 SIRIUS preset number indicator
4 SIRIUS channel select setting indicator
Shows what channel select setting has been
selected. CH is displayed when
Channel number is selected, and CAT is displayed when Category is selected.
I.R is displayed during the Instant Replay
mode.
5 SIRIUS channel name
Shows the channel name of broadcast
channel.
% Select a SIRIUS band.
Press BAND.
# Band can be selected from SR-1, SR-2 or
SR-3.
% Select a channel.
Push MULTI-CONTROL left or right.
# If you push and hold MULTI-CONTROL left or
right, you can increase or decrease channel number continuously.
# You can also perform tuning from a desired
channel category. (Refer to Selecting a channel in
the channel category on page 13.)
Notes
! It may take a few seconds before you can hear
anything while this system acquires and processes the satellite signal.
! When you change the channel, the channel
name is displayed, followed by the category
name.
Selecting a SIRIUS channel directly
When using the remote control, you can select
the SIRIUS channel directly by entering the desired channel number.
1 Press DIRECT.
Channel number input display appears.
2 Press 0 to 9 to enter the desired channel
number.
# You can cancel the input number by pressing
CLEAR.
3 Press DIRECT.
The SIRIUS channel of entered number is
selected.
# After entering the number input mode, if you
do not perform an operation within about eight
seconds, the mode is automatically canceled.
En
11
Page 12
Section
02
SIRIUS tuner
Switching the SIRIUS display
Various information, including channel number, name and category, song/program title,
artist/feature and composer, can be displayed
for the selected channel.
% Press DISP to switch the SIRIUS display.
Each press of DISP changes the SIRIUS display in the following order:
Play time—Channel number—Channel name
—Category name—Artist name—Song title/
program title—Composer name
# When you change the display, text automatically scrolls.
# Play time is displayed during the Instant Replay mode. Refer to Using Instant Replay function
on page 15.
# Play time display indicates the time inverted
from the live broadcast. Play time is displayed in
negative number.
Storing and recalling channels
You can easily store up to six broadcast stations for later recall.
! Only the remote control can operate this
function.
! Six stations for each band can be stored in
memory.
! Channels are stored and recalled on a
broadcast station basis. This means that if
the broadcast station you stored has been
assigned to a different channel by SIRIUS,
you can still recall the same broadcast station (though a different channel number
may appear in the display).
% When you find a station that you want
to store in memory press one of preset tuning buttons 1 to 6 and hold until the SIRIUS
preset number stops flashing.
The number you have pressed will flash in the
SIRIUS preset number indicator and then re-
main lit. The selected station has been stored
in memory.
The next time you press the same preset tuning button the station is recalled from memory.
# You can also recall stations assigned to preset
tuning numbers by pushing MULTI-CONTROL up
or down.
Note
If a channel cannot be recalled from memory, the
tuner automatically receives the channel 184.
Displaying the Radio ID
If you select CH 000, the ID code is displayed.
% Push MULTI-CONTROL left or right to
select CH 000.
Note
To select CH 000, set the channel select setting to
Channel number. About the channel select set-
ting, refer to Selecting the SIRIUS channel select
mode on the next page.
Introduction of advanced
operations
1 Press MULTI-CONTROL to display the
main menu.
2 Use MULTI-CONTROL to select
FUNCTION.
The function selection menu is displayed.
Turn to change the menu option. Press to
select.
12
En
Page 13

SIRIUS tuner
Section
02
English
3 Turn MULTI-CONTROL to select the
function.
Channel mode (channel select mode setting)
—Game alert (game alert setting)—
Team Setting (team setting)—Game Info
(game info)—Pause (pause)
Notes
! You can also select the function by pressing
FUNCTION on the remote control.
! To return to the ordinary display, press BAND.
! If you do not operate functions within about
30 seconds, the display is automatically returned to the ordinary display.
! During the Instant Replay mode, you can se-
lect Pause (pause). Refer to Using Instant Re-
play function on page 15.
Selecting the SIRIUS
channel select mode
You have two methods for selecting a channel:
by number and by category. When selecting
by number, channels in any category can be
selected. Select by category to narrow your
search down to only channels in a particular
category.
% Press SAT MODE repeatedly to select
the desired channel select setting.
Channel number (channel number select set-
ting)—Category (channel category select
setting)
Note
You can also perform this operation in the menu
that appears by using MULTI-CONTROL.
Selecting a channel in the
channel category
Channels are organized into various program
categories, e.g. Rock, Classic, Jazz. You can
specify channels by selecting the desired category.
1 Select the channel select settings to
Category.
Refer to Selecting the SIRIUS channel select
mode on this page.
2 Push MULTI-CONTROL up or down to
select the desired channel category.
Once you select a channel category, the tuner
searches for channels in that category. During
search, the channel category does not immediately change even if you push
MULTI-CONTROL. To successively change the
channel category, continue pushing
MULTI-CONTROL.
3 Push MULTI-CONTROL left or right to
select the desired channel in the selected
channel category.
The channel number moves up or down in the
selected channel category.
Channels that cannot currently be selected
are skipped, and the next channel in that
channel category is selected.
Note
If you select a channel of another category by
channel recall, etc., during step 2 and 3, the category selected in step 2 remains in memory. If you
push MULTI-CONTROL left or right, the channel
number moves up or down in the category selected in step 2 regardless of the category of the
preset channel.
En
13
Page 14

Section
02
SIRIUS tuner
Using the Game Alert function
This system can alert you when games involving your favorite teams are about to start. To
use this function you need in advance to set
up a game alert for the teams.
Selecting teams for Game Alert
1 Use MULTI-CONTROL to select
Team Setting in the function menu.
Refer to Introduction of advanced operations on
page 12.
2 Push MULTI-CONTROL left or right to
select a desired league.
League names are switched in the display.
3 Push MULTI-CONTROL up or down to
select a desired team.
Teams in the selected category are switched in
the display.
4 Press MULTI-CONTROL to store the selected team in memory.
The game alert function will start on that
team.
# To turn the Game Alert off of the selected
team, press MULTI-CONTROL again.
# When you have already made 12 team selections, FULL is displayed and additional team selection is not possible. In this case, first delete
the team selection and then try again.
1 Use MULTI-CONTROL to select
Game alert in the function menu.
Refer to Introduction of advanced operations on
page 12.
2 Press MULTI-CONTROL to turn the
Game Alert on.
The Game Alert function is now on.
# To turn the Game Alert function off, press
MULTI-CONTROL again.
When the game of the selected
team starts
When a game of the selected team is about to
start (or is currently playing) on a different station, Game alert info is displayed. Press and
hold MULTI-CONTROL to switch to that station, and you can listen to that game.
! If you do not operate the function within
about 10 seconds, the display is automatically returned.
Displaying game information
If games of your selected teams are currently
playing, you can display information of the
games and tune to the broadcast channel.
You can display information of the games
while enjoying the sound from currently tuning station. You can also tune to the broadcast
channel when you wish to.
5 Repeat these steps for selecting other
teams.
Up to 12 teams can be selected.
Switching the Game Alert on or off
Once you made team selections, you need to
turn the Game Alert function on.
! The Game Alert function is on at the default
setting.
14
En
1 Use MULTI-CONTROL to select
Game Info in the function menu.
The game information of your selected team is
displayed.
Refer to Introduction of advanced operations on
page 12.
2 Push MULTI-CONTROL up or down to
select a game.
The game is displayed, followed by more detailed game information.
Page 15

SIRIUS tuner
Section
02
English
! Game score will be updated automatically.
3 Press MULTI-CONTROL to switch to that
station to listen to the game.
Notes
! If you have not made any team selections,
NOT SET is displayed.
! When games involving your favorite teams are
not currently playing, NO GAME is displayed.
Using Instant Replay function
Following functions can be operated during
the Instant Replay mode.
! To use this function, Pioneer head unit
which is compatible with Instant Replay
Function is required.
! To use this function, SIRIUS plug-and-play
unit with Instant Replay Function is required.
% Performing the Instant Replay mode
When SIRIUS tuner is selected as the source,
press and hold SAT MODE.
# In the following conditions, tuner exits from
the Instant Replay mode.
— When BAND is pressed
— When another source is selected
1 Use MULTI-CONTROL to select Pause in
the function menu.
Refer to Introduction of advanced operations on
page 12.
2 Press MULTI-CONTROL to turn pause
on.
Playback of the current track pauses.
# To turn pause off, press MULTI-CONTROL
again.
% Select a track
Push MULTI-CONTROL left or right.
% Fast forward or reverse
Push and hold MULTI-CONTROL left or right.
Pausing playback
You can operate this function only during the Instant Replay mode.
En
15
Page 16

Section
03
Installation
Connecting the units
Multi-CD player
(sold separately)
IP-BUS cable
Blue
“SiriusConnect universal tuner” or
“SIRIUS Dock and play radio with
SiriusConnect vehicle kit”
(sold separately)
SiriusConnect Cable
(sold separately)
This unit
Black
To IP-BUS input
(blue)
16
En
Head unit
(sold separately)
IP-BUS cable
(supplied)
1.5 m (4 ft. 11 in.)
Fuse (2 A)
Yellow
Connect to the constant 12 V
supply terminal.
Black (chassis ground)
Connect to a clean, paint-free
metal location.
Page 17

Installation
Section
03
English
Connections
Important
! Use of this unit in conditions other than the
following could result in fire or malfunction.
— Vehicles with a 12-volt battery and negative
grounding.
! To prevent a short-circuit, overheating or mal-
function, be sure to follow the directions
below.
— Disconnect the negative terminal of the
battery before installation.
— Secure the wiring with cable clamps or ad-
hesive tape. To protect the wiring, wrap adhesive tape around them where they lie
against metal parts.
— Place all cables away from moving parts,
such as gear shift and seat rails.
— Place all cables away from hot places,
such as near the heater outlet.
— Do not pass the yellow cable through a
hole into the engine compartment to connect to a battery.
— Do not shorten any cables.
— Never cut the insulation of the power cable
of this unit in order to share the power
with other devices. Current capacity of the
cable is limited.
— Use a fuse of the rating prescribed.
! IP-BUS connectors are color-coded. Be sure
to connect connectors of the same color.
Installing this unit
! Do not install this unit where :
— it may interfere with operation of the vehi-
cle.
— it may cause injury to a passenger as a re-
sult of a sudden stop.
! When mounting this unit, make sure none of
the leads are trapped between this unit and
the surrounding metalwork or fittings.
! Do not mount this unit near heater outlets
where it would be affected by heat, or near the
doors where rainwater might splash onto it.
! Before drilling any mounting holes, always
check behind where you want to drill the
holes. Do not drill into the gas line, brake line,
electrical wiring or other important parts.
! If this unit is installed in the passenger com-
partment, anchor it securely so it does not
break free while the vehicle is moving, causing injury or an accident.
! If this unit is installed under the front seat,
make sure it does not obstruct seat movement. Route all leads and cords carefully
around the sliding mechanism so they do are
not caught or pinched in the mechanism and
cause a short-circuit.
Installing with hook and loop
fasteners
Thoroughly wipe off the surface before affixing
the hook and loop fasteners.
! If the hook fasteners adhere to the car mat
directly, you may install this unit without
using the loop fasteners.
Important
! Check all connections and systems before
final installation.
! Do not use unauthorized parts. Use of un-
authorized parts may cause malfunctions.
! Consult your dealer if installation requires dril-
ling of holes or other modifications to the vehicle.
En
17
Page 18

Section
03
Installation
% Mount this unit using the hook and
loop fasteners.
This unit
Hook fastener
Loop fastener
Car mat or chassis
18
En
Page 19

Additional Information
Specifications
General
Power source ............................. 14.4 V DC (10.8 V to 15.1 V
allowable)
Grounding system ................... Negative type
Max. current consumption
..................................................... 2.0 A
Dimensions (W × H × D) ...127 × 35 × 52 mm
(5 × 1-3/8 × 2 in.)
Weight .......................................... 185 g (6.53 oz)
Notes
! Specifications and the design are subject to
modifications without notice due to improvements.
! “SIRIUS”, “SiriusConnect”and the SIRIUS dog
logo and related marks are trademarks of SIRIUS Satellite Radio Inc. All rights reserved.
Appendix
English
En
19
Page 20

Table des matières
Nous vous remercions d’avoir acheté cet appareil
Pioneer.
Afin d’utiliser votre appareil correctement, veuillez lire ce mode d’emploi entièrement. Après avoir lu ce mode d’emploi, conservez-le dans en endroit sûr pour pouvoir
vous y référer ultérieurement.
Avant de commencer
Quelques mots sur cet appareil 21
Quelques mots sur ce mode d’emploi 21
Utilisation avec différents appareils centraux
Pioneer 21
Tableaux de compatibilité des fonctions 22
– Appareils centraux du groupe 2 22
– Appareils centraux du groupe 3 23
– Appareils centraux du groupe 4 24
– Appareils centraux du groupe 5 25
– Appareils centraux du groupe 6 25
– Appareils centraux du groupe 7 26
Instructions détaillées sur la sélection d’une
équipe 28
Syntoniseur SIRIUS
Description de l’appareil 29
– Appareils centraux du groupe 1(par
exemple DEH-P6000UB) 29
– Télécommande 29
Sélection de la source SIRIUS 30
Ecoute de SIRIUS 30
– Sélection directe d’un canal
SIRIUS 30
– Changement de l’affichage SIRIUS 31
– Mise en mémoire et rappel des
canaux 31
– Affichage de l’ID de la radio 32
Introduction aux opérations avancées 32
Choix du mode de sélection du canal
SIRIUS 32
– Sélection d’un canal dans la catégorie
de canal 32
Utilisation de la fonction Alerte Match 33
– Sélection des équipes pour l’Alerte
Match 33
– Mise en service ou hors service de
l’Alerte Match 34
– Quand le match de l’équipe
sélectionnée commence 34
– Affichage des informations sur les
matchs 34
Utilisation de la fonction Relecture
instantanée 34
– Pause de la lecture 35
Installation
Connexion des appareils 36
Connexions 37
Installation de l’appareil 37
– Installation avec des fixations
Velcro 38
Informations complémentaires
Caractéristiques techniques 39
20
Fr
Page 21

Avant de commencer
Section
01
Quelques mots sur cet appareil
PRÉCAUTION
! Ne laissez pas cet appareil entrer en contact
avec des liquides. Cela pourrait provoquer une
électrocution. Tout contact avec des liquides
pourrait aussi provoquer des dommages, de
la fumée et une surchauffe de l’appareil.
! Conservez ce mode d’emploi à portée de main
afin de vous y référer pour les modes d’opération et les précautions.
Quelques mots sur ce mode
d’emploi
Les instructions de ce mode d’emploi utilisent
DEH-P6000UB comme exemple d’appareil
central. Si vous utilisez un autre appareil central, reportez-vous à cette page, Utilisation
avec différents appareils centraux Pioneer.
Utilisation avec différents
appareils centraux Pioneer
Les appareils centraux sont divisés en plusieurs groupes ; trouvez le groupe auquel appartient votre appareil central et utilisez-le
selon les tableaux de compatibilité de fonctions correspondants figurant sur les pages
suivantes.
! Sélectionnez la source SIRIUS si vous utili-
sez ce système avec des appareils centraux
de groupes 1, 2 ou 3. Sélectionnez la
source EXTERNAL pour une utilisation
avec d’autres appareils centraux. Pour
avoir des détails sur la source EXTÉRIEURE, reportez-vous au mode d’emploi
de l’appareil central.
Appareils centraux du groupe 1
Le mode d’utilisation des appareils centraux
suivant est le même que celui de "DEHP6000UB". Reportez-vous aux instructions
commençant en page 29.
DEH-P600UB, DEH-P680MP, DEH-P690UB,
DEH-P700BT, DEH-P780MP, DEH-P790BT,
DEH-P800PRS, DEH-P880PRS, DEH-P980BT,
DEH-P6800MP, DEH-P6900UB, DEH-P7000BT,
DEH-P7800MP, DEH-P7900BT, DEH-P9800BT,
FH-P800BT, FH-P8000BT
Appareils centraux du groupe 2
Lors de l’utilisation de ce système avec ces appareils centraux, suivez le mode opératoire
correspondant au tableau de compatibilité des
fonctions pour les appareils centraux du
groupe 2.
DEH-P390MP, DEH-P480MP, DEH-P490MP,
DEH-P2900MP, DEH-P3800MP, DEH-P3900MP,
DEH-P4800MP, DEH-P4900MP
Appareils centraux du groupe 3
Lors de l’utilisation de ce système avec ces appareils centraux, suivez le mode opératoire
correspondant au tableau de compatibilité des
fonctions pour les appareils centraux du
groupe 3.
DEH-P400UB, DEH-P500UB, DEH-P3000IB,
DEH-P4000UB, DEH-P5000UB
Appareils centraux du groupe 4
Lors de l’utilisation de ce système avec ces appareils centraux, suivez le mode opératoire
correspondant au tableau de compatibilité des
fonctions pour les appareils centraux du
groupe 4.
DEH-P580MP, DEH-P960MP, DEH-P5800MP,
DEH-P9600MP, DVH-P5000MP, FH-P5000MP
Français
21
Fr
Page 22

Section
01
Avant de commencer
Appareils centraux du groupe 5
Lors de l’utilisation de ce système avec ces appareils centraux, suivez le mode opératoire
correspondant au tableau de compatibilité des
fonctions pour les appareils centraux du
groupe 5.
DEH-P8MP, DEH-P80MP, DEH-P860MP, DEHP8600MP
Appareils centraux du groupe 6
Lors de l’utilisation de ce système avec ces appareils centraux, suivez le mode opératoire
correspondant au tableau de compatibilité des
fonctions pour les appareils centraux du
groupe 6.
AVH-P6600DVD, AVH-P7600DVD, AVXP8DVD*
! * Mode ADD-ON (M) seulement.
Appareils centraux du groupe 7
Lors de l’utilisation de ce système avec ces appareils centraux, suivez le mode opératoire
correspondant au tableau de compatibilité des
fonctions pour les appareils centraux du
groupe 7.
AVIC-N2
Autres appareils centraux
L’utilisation des appareils centraux suivants
est décrite complètement dans le mode d’emploi des appareils centraux. Reportez-vous au
mode d’emploi fourni avec votre appareil central.
AVH-P4000DVD, AVH-P4900DVD, AVHP5000DVD, AVH-P5900DVD, AVH-P7800DVD,
AVIC-D2, AVIC-D3, AVIC-F700BT, AVIC-F900BT,
AVIC-N3, AVIC-Z1, AVIC-Z2
! FUNCTION 3 et FUNCTION 4 ne sont pas
disponible avec AVIC-D2.
Tableaux de compatibilité
des fonctions
Appareils centraux du groupe 2
Commandes
Sélection de la source Appuyez sur SOURCE pour
Sélection du canal Appuyez sur c ou d.
Changement de
gamme
Mémorisation des canaux présélectionnés
Rappel des canaux présélectionnés
Rappel séquentiel des
canaux présélectionnés
(en mode Sélection de
Numéro de Canal)
Sélection d’une catégorie (en mode Sélection
de Catégorie de Canal)
Afficher le menu de
fonctions
Changement des informations affichées sur
le canal
Changer le mode de sélection des canaux
(dans le menu de fonctions)
Mise en service/hors
service de la fonction
alerte match (dans le
menu des fonctions)
Sélection d’une ligue
(dans le menu de fonctions)
Basculement de l’affichage en mode sélection d’une équipe (dans
le menu de fonctions)
choisir SIRIUS.
Appuyez sur BAND.
Appuyez de façon prolongée sur une des touches 1
à 6.
Appuyez sur une des touches 1 à 6.
Appuyez sur a ou b.
Appuyez sur a ou b.
Appuyez sur FUNCTION.
Appuyez sur DISPLAY.
Sélectionnez CHNUMBER/
CATEGORY et appuyez sur
c ou d.
Sélectionnez TEAMSETT-
ING et appuyez de façon
prolongée sur a ou b.
Dans le mode sélection
d’une ligue, appuyez sur a
ou b.
Dans le mode sélection
d’une ligue, et si la ligue désirée est affichée, appuyez
de façon prolongée sur a
ou b.
22
Fr
Page 23

Avant de commencer
Section
01
Commandes
Sélection d’une équipe
(dans le menu de fonctions)
Mise en mémoire de
l’équipe sélectionnée
(dans le menu des
fonctions)
Suppression en mémoire de l’équipe sélectionnée (dans le menu
des fonctions)
Affichage d’informations sur les matchs
(dans le menu de fonctions)
Dans le mode sélection
d’une équipe, appuyez sur
a ou b.
Dans le mode sélection
d’une équipe,etsil’équipe
désirée est affichée, appuyez de façon prolongée
sur a ou b.
Dans le mode sélection
d’une équipe,etsil’équipe
sélectionnée est affichée,
appuyez de façon prolongée sur a ou b.
Sélectionnez GAME INFO
et appuyez sur a ou b .
Remarques
! Avec certains appareils, appuyer de façon pro-
longée sur CLOCK peut changer directement
le mode de sélection du canal.
! Pour avoir des instructions détaillées sur la
fonction Paramétrage de l’Equipe, reportezvous à la page 28, Instructions détaillées sur la
sélection d’une équipe.
Appareils centraux du groupe 3
Commandes
Sélection de la source Appuyez sur SRC
Sélection du canal Poussez MULTI-CONTROL
Changement de
gamme
Mémorisation des canaux présélectionnés
(SOURCE) pour choisir SIRIUS.
vers la gauche ou vers la
droite.
Appuyez sur BAND.
Appuyez sur LIST puis utili-
sez le bouton MULTI-
CONTROL.
Commandes
Rappel des canaux présélectionnés
Rappel séquentiel des
canaux présélectionnés
(en mode Sélection de
Numéro de Canal)
Sélection d’une catégorie (en mode Sélection
de Catégorie de Canal)
Afficher le menu de
fonctions
Changement des informations affichées sur
le canal
Changer le mode de sélection des canaux
(dans le menu de fonctions)
Mise en service/hors
service de la fonction
alerte match (dans le
menu des fonctions)
Sélection d’une ligue
(dans le menu de fonctions)
Basculement de l’affi-
chage en mode sélection d’une équipe (dans
le menu de fonctions)
Sélection d’une équipe
(dans le menu de fonctions)
Mise en mémoire de
l’équipe sélectionnée
(dans le menu des
fonctions)
Appuyez sur LIST puis utili-
sez le bouton MULTI-
CONTROL.
Poussez MULTI-CONTROL
vers le haut ou vers le bas.
Poussez MULTI-CONTROL
vers le haut ou vers le bas.
Utilisez MULTI-CONTROL.
Appuyez sur DISP.
Sélectionnez CH SELECT
MODE et appuyez sur
MULTI-CONTROL.
Sélectionnez GAME ALERT
et appuyez sur MULTI-
CONTROL.
Dans le mode sélection
d’une ligue, tournez
MULTI-CONTROL.
Dans le mode sélection
d’une ligue et si la ligue désirée est affichée, appuyez
sur MULTI-CONTROL.
Dans le mode sélection
d’une équipe, tournez
MULTI-CONTROL.
Dans le mode sélection
d’une équipe,etsil’équipe
désirée est affichée, appuyez de façon prolongée
sur MULTI-CONTROL.
Français
23
Fr
Page 24

Section
01
Avant de commencer
Commandes
Suppression en mémoire de l’équipe sélectionnée (dans le menu
des fonctions)
Affichage d’informations sur les matchs
(dans le menu de fonctions)
Dans le mode sélection
d’une équipe,etsil’équipe
sélectionnée est affichée,
appuyez de façon prolongée sur MULTI-CONTROL.
Sélectionnez GAME INFO
et appuyez sur MULTI-
CONTROL.
Remarque
! Avec certains appareils, un appui prolongé
sur SAT MODE peut changer directement le
mode de sélection du canal.
Appareils centraux du groupe 4
Commandes
Sélection de la source Appuyez sur SOURCE pour
Sélection du canal Appuyez sur c ou d.
Changement de
gamme
Mémorisation des canaux présélectionnés
Rappel des canaux présélectionnés
Rappel séquentiel des
canaux présélectionnés
(en mode Sélection de
Numéro de Canal)
Sélection d’une catégorie (en mode Sélection
de Catégorie de Canal)
Afficher le menu de
fonctions
Changement des informations affichées sur
le canal (FUNC1)
sélectionner une source extérieure pour SIRIUS.
Appuyez sur BAND.
Appuyez de façon prolongée sur une des touches 1
à 6.
Appuyez sur une des touches 1 à 6.
Appuyez sur a ou b.
Appuyez sur a ou b.
Appuyez sur FUNCTION.
Appuyez sur a ou b.
Commandes
Changer le mode de sélection du canal
(FUNC2)
Mise en service/hors
service de la fonction
alerte match (FUNC3)
Sélection d’une ligue
(FUNC3)
Basculer sur l’affichage
du mode sélection
d’une équipe (FUNC3)
Sélection d’une équipe
(FUNC3)
Mise en mémoire de
l’équipe sélectionnée
(FUNC3)
Suppression de la mémoire de la sélection
d’une équipe (FUNC3)
Affichage des informations sur les matchs
(FUNC4)
Appuyez sur a ou b.
Appuyez de façon continue
sur a ou b.
Dans le mode sélection
d’une ligue, appuyez sur a
ou b.
Dans le mode sélection
d’une ligue, et si la ligue désirée est affichée, appuyez
de façon prolongée sur a
ou b.
Dans le mode sélection
d’une équipe, appuyez sur
a ou b.
Dans le mode sélection
d’une équipe,etsil’équipe
désirée est affichée, appuyez de façon prolongée
sur a ou b.
Dans le mode sélection
d’une équipe,etsil’équipe
sélectionnée est affichée,
appuyez de façon prolongée sur a ou b.
Appuyez sur a ou b.
Remarques
! Pour avoir des informations détaillées sur
FUNCTION 3, reportez-vous à la page 28, Ins-
tructions détaillées sur la sélection d’une
équipe.
! Avec certains appareils centraux,
AUTO/MANUAL (A/M) peut s’afficher dans
le menu des fonctions, mais cette fonction
n’est pas disponible avec la source SIRIUS.
24
Fr
Page 25

Avant de commencer
Section
01
Appareils centraux du groupe 5
Commandes
Sélection de la source Appuyez sur SOURCE pour
Sélection du canal Poussez MULTI-CONTROL
Changement de
gamme
Mémorisation des canaux présélectionnés
Rappel des canaux présélectionnés
Rappel séquentiel des
canaux présélectionnés
(en mode Sélection de
Numéro de Canal)
Sélection d’une catégorie (en mode Sélection
de Catégorie de Canal)
Afficher le menu de
fonctions
Changement des informations affichées sur
le canal (FUNC1)
Changer le mode de sélection du canal
(FUNC2)
Mise en service/hors
service de la fonction
alerte match (FUNC3)
Sélection d’une ligue
(FUNC3)
Basculer sur l’affichage
du mode sélection
d’une équipe (FUNC3)
sélectionner une source extérieure pour SIRIUS.
vers la gauche ou vers la
droite.
Appuyez sur BAND.
Appuyez de façon prolongée sur une des touches 1
à 6.
Appuyez sur une des touches 1 à 6.
Poussez MULTI-CONTROL
vers le haut ou vers le bas.
Poussez MULTI-CONTROL
vers le haut ou vers le bas.
Utilisez MULTI-CONTROL.
Appuyez sur MULTI-
CONTROL.
Appuyez sur MULTI-
CONTROL.
Appuyez sur MULTI-
CONTROL de façon prolongée.
Dans le mode sélection
d’une ligue, poussez
MULTI-CONTROL vers le
haut ou vers le bas.
Dans le mode sélection
d’une ligue, et si la ligue désirée est affichée, appuyez
de façon prolongée sur
MULTI-CONTROL.
Commandes
Sélection d’une équipe
(FUNC3)
Mise en mémoire de
l’équipe sélectionnée
(FUNC3)
Suppression de la mémoire de la sélection
d’une équipe (FUNC3)
Affichage des informations sur les matchs
(FUNC4)
Dans le mode sélection
d’une équipe, poussez
MULTI-CONTROL vers le
haut ou vers le bas.
Dans le mode sélection
d’une équipe,etsil’équipe
désirée est affichée, appuyez de façon prolongée
sur MULTI-CONTROL.
Dans le mode sélection
d’une équipe,etsil’équipe
sélectionnée est affichée,
appuyez de façon prolongée sur MULTI-CONTROL.
Poussez MULTI-CONTROL
vers le haut ou vers le bas.
Remarques
! Pour avoir des informations détaillées sur
FUNCTION 3, reportez-vous à la page 28, Ins-
tructions détaillées sur la sélection d’une
équipe.
! Avec certains appareils centraux,
AUTO/MANUAL (A/M) peut s’afficher dans
le menu des fonctions, mais cette fonction
n’est pas disponible avec la source SIRIUS.
Appareils centraux du groupe 6
Commandes
Sélection de la source Appuyez sur SOURCE pour
Sélection du canal Touchez c ou d.
Changement de
gamme
Mémorisation des canaux présélectionnés
Rappel des canaux présélectionnés
sélectionner une source extérieure pour SIRIUS.
Appuyez sur BAND.
Touchez de façon prolongée une des touches 1KEY
à 6KEY.
Touchez une des touches
1KEY à 6KEY.
Français
25
Fr
Page 26

Section
01
Avant de commencer
Commandes
Rappel séquentiel des
canaux présélectionnés
(en mode Sélection de
Numéro de Canal)
Sélection d’une catégorie (en mode Sélection
de Catégorie de Canal)
Afficher le menu de
fonctions
Changement des informations affichées sur
le canal (FUNC1)
Changer le mode de sélection du canal
(FUNC2)
Mise en service/hors
service de la fonction
alerte match (FUNC3)
Sélection d’une ligue
(FUNC3)
Basculer sur l’affichage
du mode sélection
d’une équipe (FUNC3)
Sélection d’une équipe
(FUNC3)
Mise en mémoire de
l’équipe sélectionnée
(FUNC3)
Suppression de la mémoire de la sélection
d’une équipe (FUNC3)
Affichage des informations sur les matchs
(FUNC4)
Touchez a ou b.
Touchez a ou b.
Touchez A.MENU puis
FUNCTION (FUNC).
Touchez
Touchez
Touchez
longée.
Dans le mode sélection
d’une ligue, touchez
Dans le mode sélection
d’une ligue, et si la ligue désirée est affichée, touchez
Dans le mode sélection
d’une équipe, touchez
Dans le mode sélection
d’une équipe,etsil’équipe
désirée est affichée, touchez
gée.
Dans le mode sélection
d’une équipe,etsil’équipe
sélectionnée est affichée,
touchez
longée.
Touchez
.
.
de façon pro-
de façon prolongée.
de façon prolon-
de façon pro-
.
Remarques
! Pour avoir des informations détaillées sur
FUNCTION 3, reportez-vous à la page 28, Ins-
tructions détaillées sur la sélection d’une
équipe.
! Avec certains appareils centraux,
AUTO/MANUAL (A/M) peut s’afficher dans
le menu des fonctions, mais cette fonction
n’est pas disponible avec la source SIRIUS.
Appareils centraux du groupe 7
Commandes
Sélection de la source Touchez l’icône de la
Sélection du canal Touchez c ou d.
Changement de
gamme
Mémorisation des ca-
.
.
naux présélectionnés
Rappel des canaux présélectionnés
Rappel séquentiel des
canaux présélectionnés
(en mode Sélection de
Numéro de Canal)
Sélection d’une catégorie (en mode Sélection
de Catégorie de Canal)
Afficher le menu de
fonctions
Changement des informations affichées sur
le canal (FUNCTION 1)
Changer le mode de sélection du canal
(FUNCTION 2)
Mise en service/hors
service de la fonction
alerte match (FUNC-
TION 3)
Sélection d’une ligue
(FUNCTION 3)
source et touchez une
source extérieure pour SIRIUS.
Touchez BAND.
Touchez A.MENU et
1-6KEY. Puis touchez une
des touches 1KEY à 6KEY.
Touchez une des touches 1
à 6.
Touchez a ou b.
Touchez a ou b.
Touchez A.MENU puis
FUNCTION.
Touchez SEND.
Touchez SEND.
Touchez SEND de façon
prolongée.
Dans le mode sélection
d’une ligue, touchez SEND.
26
Fr
Page 27

Avant de commencer
Commandes
Basculer sur l’affichage
du mode sélection
d’une équipe (FUNC-
TION 3)
Sélection d’une équipe
(FUNCTION 3)
Mise en mémoire de
l’équipe sélectionnée
(FUNCTION 3)
Suppression de la mémoire de la sélection
d’une équipe (FUNC-
TION 3)
Affichage des informations sur les matchs
(FUNCTION 4)
Dans le mode sélection
d’une ligue, et si la ligue désirée est affichée, touchez
SEND de façon prolongée.
Dans le mode sélection
d’une équipe, touchez
SEND.
Dans le mode sélection
d’une équipe,etsil’équipe
désirée est affichée, touchez SEND de façon prolongée.
Dans le mode sélection
d’une équipe,etsil’équipe
sélectionnée est affichée,
touchez SEND de façon
prolongée.
Touchez SEND.
Section
01
Français
Remarques
! Pour avoir des informations détaillées sur
FUNCTION 3, reportez-vous à la page suivante,
Instructions détaillées sur la sélection d’une
équipe.
! Avec certains appareils centraux,
AUTO/MANUAL (A/M) peut s’afficher dans
le menu des fonctions, mais cette fonction
n’est pas disponible avec la source SIRIUS.
27
Fr
Page 28

Section
01
Avant de commencer
Instructions détaillées sur la sélection d’une équipe
Le tableau ci-dessous montre le menu Paramétrage d’une équipe. Sélectionne les équipes pour la fonction
Alerte Match en se référant à ce tableau et au tableau de compatibilité des fonctions pour votre appareil
central.
! “La touche” à laquelle se réfère le diagramme suivant dépend de l’appareil central.
! * Avec Effacer tout sélectionné, maintenir “la touche” enfoncée supprime toutes les sélections
d’équipe.
! Appuyez sur BAND pour revenir à l’affichage normal.
28
Fr
Page 29

6 5
Syntoniseur SIRIUS
Section
02
132 4
Description de l’appareil
Appareils centraux du groupe 1
(par exemple DEH-P6000UB)
1 Touche SRC/OFF
L’appareil central est mis en service en sé-
lectionnant une source. Appuyez sur cette
touche pour parcourir les différentes sources disponibles.
2 Touche DISP/SCROLL
Appuyez sur cette touche pour choisir un affichage différent.
3 MULTI-CONTROL
Déplacez pour effectuer une sélection de
canal, un rappel de canal et une sélection
de catégorie. Utilisé aussi pour contrôler les
fonctions.
Tournez ce bouton pour augmenter ou diminuer le niveau sonore.
4 Touche S.Rtrv/SAT MODE
Si le syntoniseur XM ou SIRIUS est sélectionné comme source, appuyez sur cette
touche pour changer le mode de sélection
du canal.
76
1
8
9
2
a
c
Si le syntoniseur SIRIUS est sélectionné
comme source, appuyez sur cette touche et
maintenez la pression pour exécuter le
mode relecture instantanée.
5 Touche LIST
Appuyez sur cette touche pour afficher la
liste de présélection.
6 Touche BAND/ESC
Appuyez pour sélectionner une des trois
gammes et annuler le mode commande des
fonctions.
b
Télécommande
Le fonctionnement est le même qu’avec l’utilisation des touches de l’appareil central.
7 Touches VOLUME
Appuyez sur ces touches pour augmenter
ou diminuer le niveau sonore.
8 Touche FUNCTION
Appuyez sur cette touche pour choisir des
fonctions.
Français
29
Fr
Page 30

Section
02
Syntoniseur SIRIUS
9 Sélecteur multidirectionnel
Déplacez pour effectuer une sélection de
canal, un rappel de canal et une sélection
de catégorie. Utilisé aussi pour contrôler les
fonctions.
Ses fonctions sont les mêmes que celles de
MULTI-CONTROL sauf pour la commande
du volume.
a Touche DIRECT
Appuyez sur cette touche pour choisir directement le canal désiré.
b Touche CLEAR
Appuyez sur cette touche pour annuler les
chiffres entrés quand vous utilisez les touches 0 à 9.
c Touches 0 à 9
Appuyez sur une de ces touches pour choisir le canal ou la présélection que vous désirez. Les touches 1 à 6 permettent
d’effectuer la présélection.
Sélection de la source SIRIUS
% Appuyez sur SRC pour choisir SIRIUS.
Ecoute de SIRIUS
1 2 354
3 Indicateur du numéro SIRIUS présélectionné
4 Indicateur de réglage de sélection du canal
SIRIUS
Indique quel réglage de sélection des canaux
a été sélectionné. CH est affiché quand
Channel number est sélectionné, et CAT est
affiché quand Category est sélectionné.
I.R s’affiche en mode relecture instantanée.
5 Nom du canal SIRIUS
Affiche le nom de canal du canal émis.
% Sélection d’une gamme SIRIUS.
Appuyez sur BAND.
# La gamme peut être sélectionnée parmi SR-1,
SR-2 ou SR-3.
% Sélectionnez un canal.
Poussez MULTI-CONTROL vers la gauche ou
vers la droite.
# Si vous poussez de façon prolongée
MULTI-CONTROL vers la gauche ou vers la
droite, vous pouvez augmenter ou diminuer le numéro de canal de façon continue.
# Vous pouvez aussi effectuer un accord dans
une catégorie de canaux désirée. (Reportez-vous
à la page 32, Sélection d’un canal dans la catégorie
de canal.)
Remarques
! Un délai de quelques secondes peut s’écouler
avant que vous entendiez quelque chose pendant que ce système acquiert et traite le signal satellite.
! Quand vous changez de canal, le nom du
canal est affiché, suivi du nom de la catégorie.
1 Indicateur de gamme SIRIUS
2 Indicateur du numéro de canal SIRIUS
30
Fr
Sélection directe d’un canal SIRIUS
Quand vous utilisez le boîtier de télécommande, vous pouvez sélectionner le canal SIRIUS directement en saisissant le numéro de
canal désiré.
Page 31

Syntoniseur SIRIUS
Section
02
1 Appuyez sur DIRECT.
L’écran de saisie du numéro de canal
s’affiche.
2 Appuyez sur les touches 0 à 9 pour saisir le numéro de canal désiré.
# Vous pouvez annuler le numéro saisi en appuyant sur CLEAR.
3 Appuyez sur DIRECT.
Le canal SIRIUS ayant le numéro saisi est
sélectionné.
# Après être passé en mode saisie de numéro,
ce mode est automatiquement annulé si vous
n’effectuez aucune opération dans les huit secondes environ.
Changement de l’affichage SIRIUS
Diverses informations incluant le numéro du
canal, son nom et sa catégorie, le titre de la
plage musicale/du programme, l’interprète/le
spectacle et le compositeur, peuvent être affichés pour le canal sélectionné.
% Appuyez sur DISP pour changer d’affi-
chage SIRIUS.
Chaque pression sur DISP modifie l’affichage
SIRIUS dans l’ordre suivant :
Temps de lecture—Numéro du canal—Nom
du canal—Nom de la catégorie—Nom de l’interprète—Titre de la plage musicale/du programme—Nom du compositeur
# Quand vous changez d’affichage, le texte dé-
file automatiquement.
# Le temps de lecture s’affiche en mode relec-
ture instantanée. Reportez-vous à la page 34, Uti-
lisation de la fonction Relecture instantanée.
# L’affichage du temps de lecture indique le
temps de façon décroissante par rapport à l’émission en direct. Le temps de lecture s’affiche en
chiffre négatif.
Mise en mémoire et rappel des
canaux
Vous pouvez facilement mettre en mémoire
jusqu’à six stations d’émission pour les rappeler ultérieurement.
! Cette fonction n’est accessible qu’à partir
de la télécommande.
! Vous pouvez mettre en mémoire six sta-
tions pour chaque gamme.
! Les canaux sont mis en mémoire et rappe-
lés sur la base de la station d’émission.
Cela signifie que si la station d’émission
que vous avez mise en mémoire a été affectée à un canal différent par SIRIUS, vous
pouvez toujours rappeler la même station
d’émission (bien qu’un numéro de canal
différent puisse apparaître dans l’affichage).
% Lorsque se présente une station que
vous désirez mettre en mémoire, maintenez la pression sur une des touches de présélection 1 à 6 jusqu’à ce que le numéro de
la présélection SIRIUS cesse de clignoter.
Le nombre sur lequel vous avez appuyé clignote sur l’indicateur de numéro de présélection SIRIUS puis reste allumé. La station
sélectionnée a été mise en mémoire.
Lorsque vous appuyez à nouveau sur cette
même touche de présélection, la station en
mémoire est rappelée.
# Vous pouvez aussi rappeler les stations mises
en mémoire dans les numéros de présélection en
poussant MULTI-CONTROL vers le haut ou vers
le bas.
Remarque
Si un canal ne peut pas être rappelé à partir de la
mémoire, le syntoniseur reçoit automatiquement
le canal 184.
Français
31
Fr
Page 32

Section
02
Syntoniseur SIRIUS
Affichage de l’ID de la radio
Si vous sélectionnez CH 000, le code ID est
affiché.
% Poussez MULTI-CONTROL vers la gauche ou vers la droite pour sélectionner
CH 000.
Remarque
Pour sélectionner CH 000, positionnez le réglage
de sélection des canaux sur Channel number.
Pour des informations sur le réglage de sélection
des canaux, reportez-vous à cette page, Choix du
mode de sélection du canal SIRIUS.
Introduction aux
opérations avancées
1 Appuyez sur MULTI-CONTROL pour afficher le menu principal.
2 Utilisez MULTI-CONTROL pour choisir
FUNCTION.
Le menu de sélection des fonctions s’affiche.
Tournez pour changer l’option de menu. Appuyez pour sélectionner.
3 Tourner MULTI-CONTROL pour sélectionner la fonction.
Channel mode (réglage du mode de sélection
du canal)—Game alert (paramétrage de l’alerte match)—Team Setting (paramétrage de
l’équipe)—Game Info (informations sur les
matchs)—Pause (pause)
Remarques
! Vous pouvez aussi effectuer cette opération
en appuyant sur FUNCTION de la télécommande.
! Appuyez sur BAND pour revenir à l’affichage
ordinaire.
! Si vous n’utilisez pas les fonctions pendant
environ 30 secondes, l’écran revient automatiquement à l’affichage ordinaire.
! En mode relecture instantanée, vous pouvez
sélectionner Pause (pause). Reportez-vous à
la page 34, Utilisation de la fonction Relecture
instantanée.
Choix du mode de sélection
du canal SIRIUS
Vous disposez de deux méthodes pour sélectionner un canal : par numéro et par catégorie.
Quand vous sélectionnez par numéro, des canaux appartenant à n’importe quelle catégorie
peuvent être sélectionnés. Sélectionnez par
catégorie pour restreindre votre recherche aux
seuls canaux d’une catégorie particulière.
% Appuyez de façon répétée sur
SAT MODE pour choisir le réglage de sélection du canal désiré.
Channel number (réglage de sélection par
numéro de canal)—Category (réglage de sélection par catégorie de canaux)
Remarque
Vous pouvez aussi effectuer cette opération dans
le menu qui s’affiche en utilisant
MULTI-CONTROL.
Sélection d’un canal dans la
catégorie de canal
Les canaux sont organisés en diverses catégories de programme, par exemple Rock, Classique, Jazz. Vous pouvez spécifier les canaux
en sélectionnant la catégorie désirée.
32
Fr
Page 33

Syntoniseur SIRIUS
Section
02
1 Sélectionnez les réglages de sélection
des canaux pour Category.
Reportez-vous à la page précédente, Choix du
mode de sélection du canal SIRIUS.
2 Poussez MULTI-CONTROL vers le haut
ou vers le bas pour sélectionner la catégorie de canal désirée.
Une fois que vous avez sélectionné une catégorie de canaux, le syntoniseur recherche les
canaux appartenant à cette catégorie. Pendant la recherche, la catégorie de canaux ne
change pas immédiatement même si vous
poussez MULTI-CONTROL. Pour changer successivement de catégorie de canaux, continuez à pousser MULTI-CONTROL.
3 Poussez MULTI-CONTROL vers la gauche ou vers la droite pour sélectionner le
canal désiré dans la catégorie de canal
sélectionnée.
Le numéro de canal augmente ou diminue
dans la catégorie de canaux sélectionnée.
Les canaux qui ne peuvent pas être sélectionnés actuellement sont sautés, et le canal suivant dans cette catégorie de canaux est
sélectionné.
Remarque
Si vous sélectionnez un canal d’une autre catégorie par un rappel de canal, etc., pendant les étapes 2 et 3, la catégorie sélectionnée à l’étape 2
reste en mémoire. Si vous poussez
MULTI-CONTROL vers la gauche ou vers la
droite, le numéro de canal augmente ou diminue
dans la catégorie sélectionnée dans l’étape 2
quelle que soit la catégorie du canal présélectionné.
Utilisation de la fonction
Alerte Match
Ce système peut vous alerter quand des
matchs auxquels participent vos équipes favorites sont sur le point de démarrer. Pour utiliser cette fonction vous devez définir à l’avance
une alerte match pour les équipes.
Sélection des équipes pour
l’Alerte Match
1 Utilisez MULTI-CONTROL pour sélectionner Team Setting dans le menu des
fonctions.
Reportez-vous à la page précédente, Introduction aux opérations avancées.
2 Poussez MULTI-CONTROL vers la gauche ou vers la droite pour sélectionner la
ligue désirée.
Les noms des ligues changent sur l’écran.
3 Poussez MULTI-CONTROL vers le haut
ou vers le bas pour sélectionner une équipe
désirée.
Les équipes de la catégorie sélectionnée changent sur l’écran.
4 Utilisez MULTI-CONTROL pour enregistrer l’équipe sélectionnée en mémoire.
La fonction alerte match commencera sur
cette équipe.
# Pour désactiver l’Alerte Match sur l’équipe sé-
lectionnée, appuyez à nouveau sur
MULTI-CONTROL.
# Quand vous avez déjà sélectionné 12 équipes,
FULL s’affiche et aucune sélection d’équipe addi-
tionnelle n’est possible. Dans ce cas, supprimez
d’abord la sélection d’équipe et réessayez.
Français
5 Répétez ces étapes pour sélectionner
d’autres équipes.
Vous pouvez sélectionner jusqu’à 12 équipes.
Fr
33
Page 34

Section
02
Syntoniseur SIRIUS
Mise en service ou hors service
de l’Alerte Match
Après avoir effectué les sélections d’équipes,
vous devez mettre en ser vice la fonction Alerte
Match.
! En réglage par défaut, la fonction Alerte
Match est en service.
1 Utilisez MULTI-CONTROL pour sélectionner Game alert dans le menu des
fonctions.
Reportez-vous à la page 32, Introduction aux
opérations avancées.
2 Appuyez sur MULTI-CONTROL pour activer l’Alerte Match.
La fonction Alerte Match est maintenant en
service.
# Appuyez à nouveau sur MULTI-CONTROL
pour mettre la fonction Alerte Match hors service.
Quand le match de l’équipe
sélectionnée commence
Quand un match de l’équipe sélectionnée est
sur le point de commencer (ou est en cours)
sur une autre station, une alerte de match
Game alert info est affichée. Appuyez sur
MULTI-CONTROL de façon prolongée pour
basculer sur cette station, et vous pouvez
écouter le match.
! Si vous n’utilisez pas la fonction dans un
délai d’environ 10 secondes, l’écran revient
àl’affichage précédent.
Affichage des informations sur
les matchs
Si des matchs de vos équipes sélectionnées
sont en cours, vous pouvez afficher des informations sur ces matchs et vous accorder sur
le canal qui les diffuse.
Vous pouvez afficher les informations relatives
aux matchs tout en profitant du son de la station sur laquelle vous êtes accordé. Vous pouvez aussi passer sur le canal qui diffuse les
matchs quand vous le souhaitez.
1 Utilisez MULTI-CONTROL pour sélectionner Game Info dans le menu des
fonctions.
Les informations sur le match de votre équipe
sélectionnée sont affichées.
Reportez-vous à la page 32, Introduction aux
opérations avancées.
2 Poussez MULTI-CONTROL vers le haut
ou vers le bas pour sélectionner un match.
Le match est affiché, suivi d’informations plus
détaillées sur ce match.
! Le score du match sera mis à jour auto-
matiquement.
3 Appuyez sur MULTI-CONTROL pour passer sur cette station et écouter le match.
Remarques
! Si vous n’avez effectué aucune sélection d’é-
quipes, NOT SET s’affiche.
! Quand aucun match impliquant vos équipes
favorites n’est en cours, NO GAME est
affiché.
Utilisation de la fonction
Relecture instantanée
Les fonctions suivantes peuvent être utilisées
en mode relecture instantanée.
! Pour utiliser cette fonction, un appareil
central Pioneer compatible avec la fonction
de relecture instantanée est requis.
! Pour utiliser cette fonction, l’unité plug-
and-play SIRIUS intégrant la fonction de relecture instantanée est requise.
34
Fr
Page 35

Syntoniseur SIRIUS
% Exécution du mode relecture instantanée
Lorsque le syntoniseur SIRIUS est choisi
comme source, appuyez de façon prolongée
sur SAT MODE.
# Le syntoniseur quitte le mode relecture instantanée dans les conditions suivantes.
— Si vous appuyez sur BAND
— Lorsqu’une autre source est sélectionnée
% Sélection d’une plage
Poussez MULTI-CONTROL vers la gauche ou
vers la droite.
% Avance ou retour rapide
Poussez et maintenez MULTI-CONTROL vers
la gauche ou vers la droite.
Pause de la lecture
Vous ne pouvez utiliser cette fonction qu’en
mode relecture instantanée.
Section
02
Français
1 Utilisez MULTI-CONTROL pour sélectionner Pause dans le menu des fonctions.
Reportez-vous à la page 32, Introduction aux
opérations avancées.
2 Appuyez sur MULTI-CONTROL pour activer la pause.
La lecture de la plage en cours se met en
pause.
# Appuyez à nouveau sur MULTI-CONTROL
pour mettre la pause hors service.
35
Fr
Page 36

Section
03
Installation
Connexion des appareils
Lecteur de CD à
chargeur (vendu
séparément)
Câble IP-BUS
Cet appareil
Bleu
“Syntoniseur universel SiriusConnect”
ou “Radio SIRIUS Dock and Play avec
un kit pour véhicule SiriusConnect”
(vendu séparément)
Câble SiriusConnect
(vendu séparément)
Noir
36
Appareil central
(vendu
séparément)
Vers l’entrée
IP-BUS (bleu)
Fr
Câble IP-BUS
(fourni)
1.5 m
Fusible (2 A)
Jaune
Connectez à la borne
d’alimentation 12 V
permanente.
Noir (masse du châssis)
Connectez sur un endroit
métallique propre, non
recouvert de peinture.
Page 37

Installation
Section
03
Connexions
Important
! L’utilisation de cet appareil dans des condi-
tions autres que les conditions suivantes
pourrait provoquer un incendie ou un mauvais
fonctionnement.
— Véhicules avec une batterie 12 volts et une
mise à la masse du négatif.
! Pour éviter un court-circuit, une surchauffe ou
un dysfonctionnement, assurez-vous de respecter les instructions suivantes.
— Déconnectez la borne négative de la batte-
rie avant l’installation.
— Fixez le câblage avec des serre-fils ou de la
bande adhésive. Pour protéger les câbles,
enroulez-les de bande adhésive là où ils
sont en contact avec des parties métalliques.
— Placez les câbles à l’écart de toutes les
parties mobiles, telles que le levier de vitesse et les rails des sièges.
— Placez les câbles à l’écart de tous les en-
droits chauds, par exemple les sorties de
chauffage.
— Ne faites pas passer le câble jaune à tra-
vers un trou dans le compartiment moteur
pour le connecter à la batterie.
— Ne raccourcissez pas les câbles.
— Ne coupez jamais l’isolation du câble d’ali-
mentation de cet appareil pour partager
l’alimentation avec d’autres appareils. La
capacité en courant du câble est limitée.
— Utilisez un fusible correspondant aux ca-
ractéristiques spécifiées.
! Les connecteurs IP-BUS utilisent un codage
en couleurs. Assurez-vous de connecter ensemble des connecteurs de la même
couleur.
Installation de l’appareil
Important
! Vérifiez toutes les connexions et tous les systè-
mes avant l’installation finale.
! N’utilisez pas de pièces détachées non autori-
sées. L’utilisation de pièces non autorisées
peut provoquer des dysfonctionnements.
! Consultez votre revendeur si l’installation né-
cessite le perçage de trous ou d’autres modifications du véhicule.
! N’installez pas cet appareil là où :
— il peut interférer avec l’utilisation du véhi-
cule.
— il peut blesser un passager en cas d’arrêt
soudain du véhicule.
! Lors du montage de cet appareil, assurez-vous
qu’aucun fil n’est coincé entre l’appareil et les
parties métalliques ou les équipements environnants.
! Ne montez pas cet appareil dans un endroit
situé près d’un orifice de chauffage, où il serait affecté par la chaleur, ou près des portes,
où il pourrait être mouillé par la pluie.
! Avant de percer un trou de montage, vérifiez
toujours derrière l’emplacement où vous voulez percer le trou. Ne percez pas de trou dans
le conduit d’essence, le conduit de frein, un
câble électrique ou d’autres pièces importantes.
! Si l’appareil est installé dans le compartiment
passager, fixez-le solidement de façon qu’il ne
se détache pas quand le véhicule est en mouvement, ce qui risquerait de provoquer des
blessures ou un accident.
! Si l’appareil est installé sous un siège avant,
assurez-vous qu’il ne gêne pas le déplacement du siège. Faites passer tous les fils et les
cordons soigneusement autour du mécanisme de glissière de façon qu’ils ne soient
pas coincés dans le mécanisme ou pincés par
celui-ci, et ne provoquent pas de court-circuit.
Français
37
Fr
Page 38

Section
03
Installation
Installation avec des fixations
Velcro
Essuyez parfaitement la surface avant de
poser les fixations Velcro.
! Si la partie crochets des fixations Velcro ad-
hère directement au tapis de la voiture,
vous pouvez installer cet appareil sans utiliser la partie boucles des fixations Velcro.
% Montez cet appareil en utilisant les fixations Velcro.
Cet appareil
Partie crochets
Partie boucles
38
Tapis ou châssis de la voiture
Fr
Page 39

Informations
complémentaires
Caractéristiques techniques
Généralités
Tension d’alimentation ......... 14,4 V CC (10,8 V à 15,1 V
acceptable)
Mise à la masse ....................... Pôle négatif
Consommation max. en courant
..................................................... 2,0 A
Dimensions (L x H x P) ......... 127 × 35 × 52 mm
Poids .............................................. 185 g
Remarques
! Les caractéristiques et la présentation peu-
vent être modifiées sans avis préalable à fin
d’amélioration.
! “SIRIUS”, “SiriusConnect” et le logo SIRIUS re-
présentant un chien et les marques associées
sont des marques commerciales de SIRIUS
Satellite Radio Inc. Tous droits réservés.
Annexe
Français
39
Fr
Page 40

PIONEER CORPORATION
4-1, MEGURO 1-CHOME, MEGURO-KU
TOKYO 153-8654, JAPAN
PIONEER ELECTRONICS (USA) INC.
P.O. Box 1540, Long Beach, California 90801-1540, U.S.A.
TEL: (800) 421-1404
PIONEER EUROPE NV
Haven 1087, Keetberglaan 1, B-9120 Melsele, Belgium
TEL: (0) 3/570.05.11
PIONEER ELECTRONICS ASIACENTRE PTE. LTD.
253 Alexandra Road, #04-01, Singapore 159936
TEL: 65-6472-7555
PIONEER ELECTRONICS AUSTRALIA PTY. LTD.
178-184 Boundary Road, Braeside, Victoria 3195, Australia
TEL: (03) 9586-6300
PIONEER ELECTRONICS OF CANADA, INC.
300 Allstate Parkway, Markham, Ontario L3R 0P2, Canada
TEL: 1-877-283-5901
TEL: 905-479-4411
PIONEER ELECTRONICS DE MEXICO, S.A. de C.V.
Blvd.Manuel Avila Camacho 138 10 piso
Col.Lomas de Chapultepec, Mexico, D.F. 11000
TEL: 55-9178-4270
先鋒股份有限公司
總公司 : 台北市中山北路二段44號13樓
電話 : (02) 2521-3588
先鋒電子(香港)有限公司
香港九龍尖沙咀海港城世界商業中心
9樓901-6室
電話 : (0852) 2848-6488
Published by Pioneer Corporation.
Copyright © 2007 by Pioneer Corporation.
All rights reserved.
Publié par Pioneer Corporation. Copyright
© 2007 par Pioneer Corporation. Tous
droits réservés.
<KMMZX> <07K00000>
Printed in China
Imprimé en Chine
<49.UTAPN.001> UC
 Loading...