

Page 1
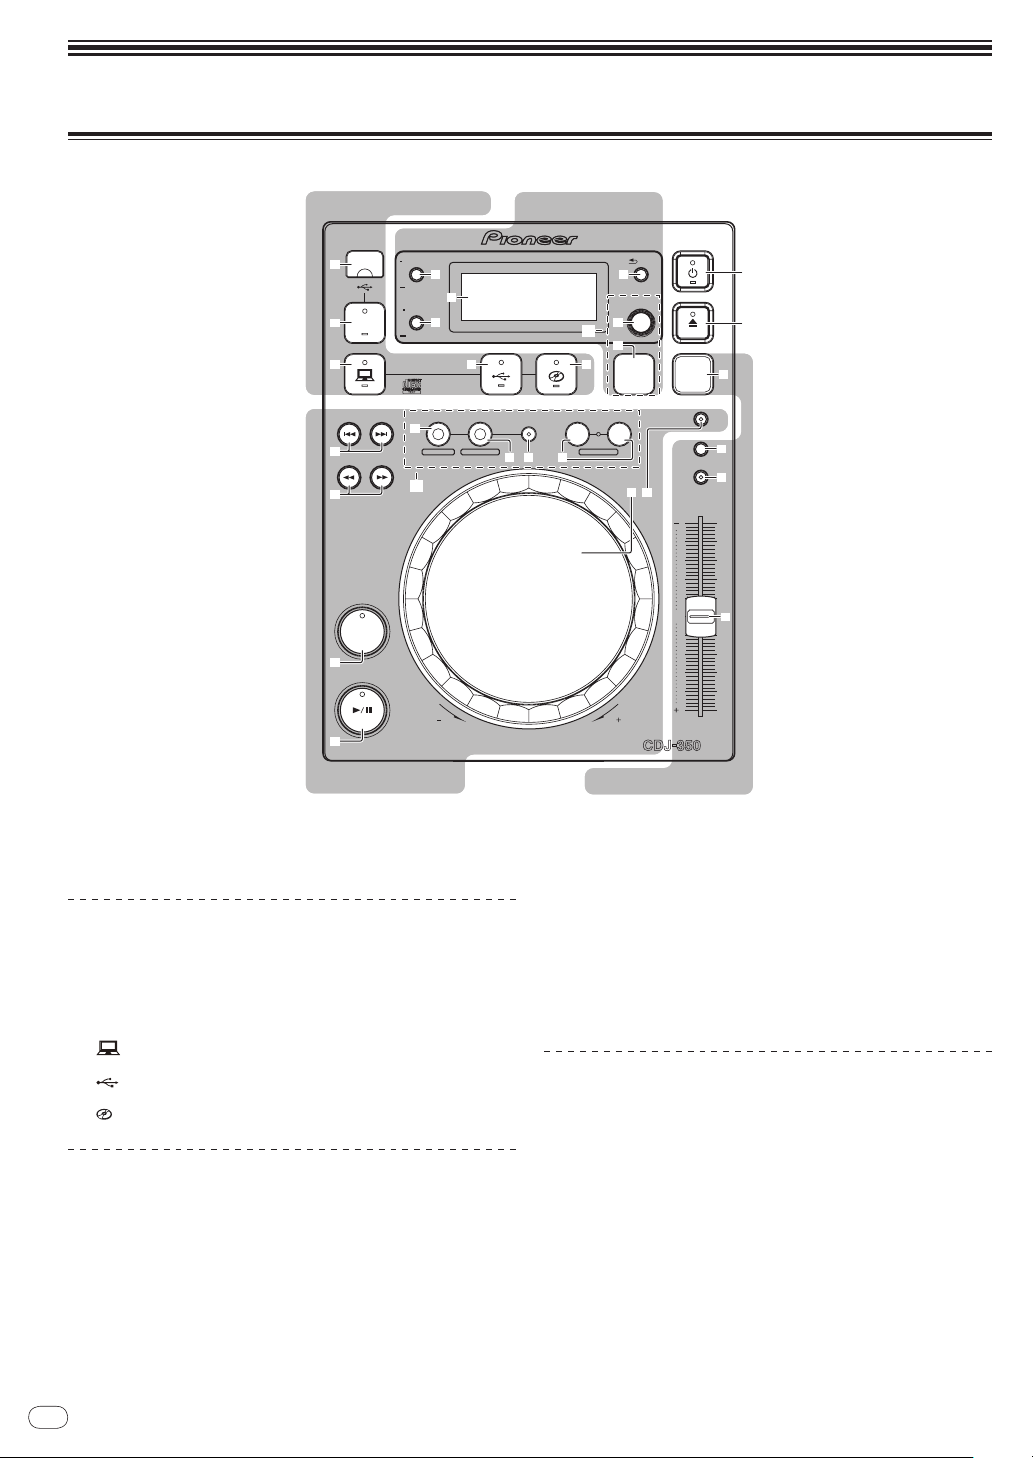
CDJ-350
MULTI PLAYER
LECTEUR DE MULTI
MULTI-PLAYER
http://www.prodjnet.com/support/
The Pioneer website listed above provides answers to frequently asked questions, information about
software, and other up-to-date data of assistance to our customers.
Le site Web de Pioneer ci-dessus fournit des réponses aux questions souvent posées, des informations
au sujet des logiciels et d’autres données mises à jour afin de venir en aide à notre clientèle.
Auf der oben angegebenen Pioneer-Website werden unseren Kunden Antworten auf häufig gestellte
Fragen, Informationen über Software und weitere Unterstützung mit neuesten Daten angeboten.
http://www.prodjnet.com/rekordbox/support/
For inquiries on rekordbox, please see the support site indicated above.
Pour toute demande d’informations au sujet de rekordbox, veuillez consulter le site d’assistance
indiqué ci-dessus.
Für Anfragen über rekordbox sehen Sie bitte die oben angegebene Support-Site.
Operating Instructions
Mode d’emploi
Bedienungsanleitung
Page 2
Thank you for buying this Pioneer product. Please read through these operating instructions so you will know how to operate your model prop-
The exclamation point within an equilateral
triangle is intended to alert the user to the
presence of important operating and
maintenance (servicing) instructions in the
literature accompanying the appliance.
The lightning flash with arrowhead symbol,
within an equilateral triangle, is intended to
alert the user to the presence of uninsulated
“dangerous voltage” within the product’s
enclosure that may be of sufficient
magnitude to constitute a risk of electric
shock to persons.
CAUTION:
TO PREVENT THE RISK OF ELECTRIC
SHOCK, DO NOT REMOVE COVER (OR
BACK). NO USER-SERVICEABLE PARTS
INSIDE. REFER SERVICING TO QUALIFIED
SERVICE PERSONNEL.
CAUTION
RISK OF ELECTRIC SHOCK
DO NOT OPEN
IMPORTANT
D3-4-2-1-1_A1_En
D3-4-2-1-2-2*_A2_En
Replacement and mounting of an AC plug on the power supply cord of this unit should be performed only by qualified
service personnel.
IMPORTANT: THE MOULDED PLUG
This appliance is supplied with a moulded three pin mains plug for your safety and convenience. A 5 amp fuse is fitted in this plug.
Should the fuse need to be replaced, please ensure that the replacement fuse has a rating of 5 amps and that it is approved by ASTA or BSI to
BS1362.
Check for the ASTA mark or the BSI mark on the body of the fuse.
If the plug contains a removable fuse cover, you must ensure that it is refitted when the fuse is replaced. If you lose the fuse cover the plug
must not be used until a replacement cover is obtained. A replacement fuse cover can be obtained from your local dealer.
If the fitted moulded plug is unsuitable for your socket outlet, then the fuse shall be removed and the plug cut off and disposed of
safely. There is a danger of severe electrical shock if the cut off plug is inserted into any 13 amp socket.
If a new plug is to be fitted, please observe the wiring code as shown below. If in any doubt, please consult a qualified electrician.
IMPORTANT: The wires in this mains lead are coloured in accordance with the following code:
Blue : Neutral Brown : Live
As the colours of the wires in the mains lead of this appliance may not correspond with the coloured markings identifying the terminals in
your plug, proceed as follows;
The wire which is coloured BLUE must be connected to the terminal which is marked with the
letter N or coloured BLACK.
The wire which is coloured BROWN must be connected to the terminal which is marked with the
letter L or coloured RED.
How to replace the fuse: Open the fuse compartment with a screwdriver and replace the fuse.
If you want to dispose this product, do not mix it with general household waste. There is a separate collection system for used
electronic products in accordance with legislation that requires proper treatment, recovery and recycling.
Private households in the member states of the EU, in Switzerland and Norway may return their used electronic products free of charge to
designated collection facilities or to a retailer (if you purchase a similar new one).
For countries not mentioned above, please contact your local authorities for the correct method of disposal.
By doing so you will ensure that your disposed product undergoes the necessary treatment, recovery and recycling and thus prevent potential
negative effects on the environment and human health.
K058b_A1_En
erly. After you have finished reading the instructions, put them away in a safe place for future reference.
In some countries or regions, the shape of the power plug and power outlet may sometimes differ from that shown in the explanatory drawings.
However the method of connecting and operating the unit is the same.
En
2
Page 3
WARNING
This equipment is not waterproof. To prevent a fire or
shock hazard, do not place any container filled with
liquid near this equipment (such as a vase or flower
pot) or expose it to dripping, splashing, rain or
moisture.
D3-4-2-1-3_A1_En
WARNING
Before plugging in for the first time, read the following
section carefully.
The voltage of the available power supply differs
according to country or region. Be sure that the
power supply voltage of the area where this unit
will be used meets the required voltage (e.g., 230 V
or 120 V) written on the rear panel.
D3-4-2-1-4*_A1_En
WARNING
To prevent a fire hazard, do not place any naked flame
sources (such as a lighted candle) on the equipment.
D3-4-2-1-7a_A1_En
VENTILATION CAUTION
When installing this unit, make sure to leave space
around the unit for ventilation to improve heat radiation
(at least 5 cm at rear, and 5 cm at each side).
WARNING
Slots and openings in the cabinet are provided for
ventilation to ensure reliable operation of the product,
and to protect it from overheating. To prevent fire
hazard, the openings should never be blocked or
covered with items (such as newspapers, table-cloths,
curtains) or by operating the equipment on thick carpet
or a bed.
D3-4-2-1-7b*_A1_En
Operating Environment
Operating environment temperature and humidity:
+5 °C to +35 °C (+41 °F to +95 °F); less than 85 %RH
(cooling vents not blocked)
Do not install this unit in a poorly ventilated area, or in
locations exposed to high humidity or direct sunlight (or
strong artificial light)
D3-4-2-1-7c*_A1_En
If the AC plug of this unit does not match the AC
outlet you want to use, the plug must be removed
and appropriate one fitted. Replacement and
mounting of an AC plug on the power supply cord of
this unit should be performed only by qualified
service personnel. If connected to an AC outlet, the
cut-off plug can cause severe electrical shock. Make
sure it is properly disposed of after removal.
The equipment should be disconnected by removing
the mains plug from the wall socket when left unused
for a long period of time (for example, when on
vacation).
D3-4-2-2-1a_A1_En
CAUTION
The switch on this unit will not completely shut off
all power from the AC outlet. Since the power cord
serves as the main disconnect device for the unit,
you will need to unplug it from the AC outlet to shut
down all power. Therefore, make sure the unit has
been installed so that the power cord can be easily
unplugged from the AC outlet in case of an accident.
To avoid fire hazard, the power cord should also be
unplugged from the AC outlet when left unused for a
long period of time (for example, when on vacation).
D3-4-2-2-2a*_A1_En
POWER-CORD CAUTION
Handle the power cord by the plug. Do not pull out the
plug by tugging the cord and never touch the power
cord when your hands are wet as this could cause a
short circuit or electric shock. Do not place the unit, a
piece of furniture, etc., on the power cord, or pinch the
cord. Never make a knot in the cord or tie it with other
cords. The power cords should be routed such that they
are not likely to be stepped on. A damaged power cord
can cause a fire or give you an electrical shock. Check
the power cord once in a while. When you find it
damaged, ask your nearest PIONEER authorized
service center or your dealer for a replacement.
S002*_A1_En
CAUTION
This product is a class 1 laser product classified
under the Safety of laser products, IEC 60825-1:2007.
CLASS 1 LASER PRODUCT
D58-5-2-2a_A1_En
When using this product, confirm the safety
information shown on the bottom of the unit.
D3-4-2-2-4_B1_En
En
3
Page 4

How to read this manual
The names of displays, menus, and buttons in this manual are
enclosed in brackets. (e.g. [MASTER] channel, [ON/ OFF], [File] menu)
! The Operating Instructions of rekordbox can be viewed from the
rekordbox [Help] menu after installing rekordbox.
Before start
Features .......................................................................................................5
System setup example ................................................................................5
What’s in the box .........................................................................................5
Before you start
Supported sources ...................................................................................... 6
Usable discs and USB devices ..................................................................6
Playable music file formats ........................................................................ 7
Functions usable in combination with a computer .................................8
About the rekordbox music management software ................................ 9
About the driver software (Windows) ......................................................10
Connections
Names of terminals...................................................................................12
Basic style ..................................................................................................12
Operations
Control panel .............................................................................................14
Front panel .................................................................................................15
Main unit display .......................................................................................15
Setting the source to be played (source select section)
Basic Operations (player, source select and browse sections) ............16
Operating the jog dial ............................................................................... 17
Setting loops (loop and beat loop part) ...................................................18
Displaying track information (browse section) ......................................18
Searching for tracks quickly using the library information ...................19
About the playback history (HISTORY) .................................................... 19
Using playlists ...........................................................................................20
Adjusting the playing speed (tempo control section)
Using [BPM LOCK] ................................................................................... 21
Operations in combination with a DJ mixer ...........................................21
Using the DJ software ..............................................................................21
Changing the settings ..............................................................................22
...........................15
............................20
Additional information
Troubleshooting ........................................................................................23
Error messages .........................................................................................24
List of icons displayed on the main unit display section
List of MIDI Messages ..............................................................................25
Cautions on use ........................................................................................25
Handling discs ..........................................................................................25
Disclaimer .................................................................................................. 26
Cautions on copyrights.............................................................................26
Using the support site ..............................................................................26
Specifications ............................................................................................ 27
En
4
.............................24
Page 5
Before start
MULTI PLAYER
TEMPO
0
PLAY/PAUSE
SEARCH
TRACK SEARCH
IN/CUE OUT
OUT ADJUSTHOT LOOP
RELOOP/EXIT
BEAT LOOP
LOOP DRIVE
VINYL MODE
TEMPO RANGE
MASTER TEMPO
LOOP
USB
STOP
SOURCE SELECT
MP3/AAC
WAV/AIFF
CUE
PLAYLIST
BPM
DISC
LOCK
REVFWD
BACK
SELECT PUSH
TIME MODE
AUTO CUE
DISPLAY
UTILITY
A.CUE
LOCK
16
REMAIN
MS
F TEMPO %
INFO
BROWSE
BPM
2 CHANNEL DJ MIXER
MIC /AUX
MIC
0
LEVEL
HI
AUX
LOW
MIC/AUX
ON
12
12
12
12
HEADPHONES
CUE
CH-1
CUE
MIXING
CUE MASTER
CH-2
LEVEL
PHONES
0
9
9
9
9
CD
PHONO
CH- 1
FADER
START
FADER
START
CH- 1 CH- 2
9
9
9
9
CH-2
THRU
CD
PHONO
TRIMTRIM
HI
MID
LOW
HI
MID
LOW
LEVEL
MASTER
LEVEL/DEPTH
FILTERCRUSH
GATE JET
MASTER EFFECT
0
PREVIEW
TRACK MARK SEARCH
PLAY
USB
STOP
REC
MASTER LEVEL
Headphones
Disc
CDJ-350CDJ-350 DJM-350
For checking the
audio input/output
Component, amplifier,
powered speaker, etc.
USB device USB device
For audio output
Computer
Music management
software
rekordbox
Features
This unit is a DJ player that carries over the technology of the Pioneer CDJ series, the world standard in club players. It is a multi player for DJs
supporting a variety of sources, enabling full-fledged DJ play easily.
English
MULTI MEDIA, MULTI FORMAT
This unit can play not only music CDs (CD-DA), but also music files
(MP3, AAC, WAV and AIFF) recorded on mass storage class USB
devices (flash memory devices and hard discs) and CD-R/ -RW discs. It
BEAT DISPLAY
The beat position corresponding to the track’s BPM and the playback
position are shown on the main unit display. This allows you to check
the beat visually for scratch and loop performances.
can also be used as DJ software controller and audio interface.
rekordbox
TM
rekordbox, a music management software application exclusively for
Pioneer DJ players, is included. It allows music files on a computer to
be managed in a variety of ways (analysis, setting, creation, storage
of playback history, etc.). Also, music files managed with rekordbox
BPM LOCK
When the master BPM is set in advance, the playing speed of the currently playing track can be automatically set to the master BPM at the
press of a button.
Full-fledged BPM mixing is possible easily, without moving the
TEMPO slider.
can be transferred to USB devices for convenience in selecting tracks,
operating playlists and so on when the USB device is connected to
this unit.
PLAYLIST
The currently playing or selected track can be registered on the play-
list, as desired (but only for tracks managed with rekordbox).
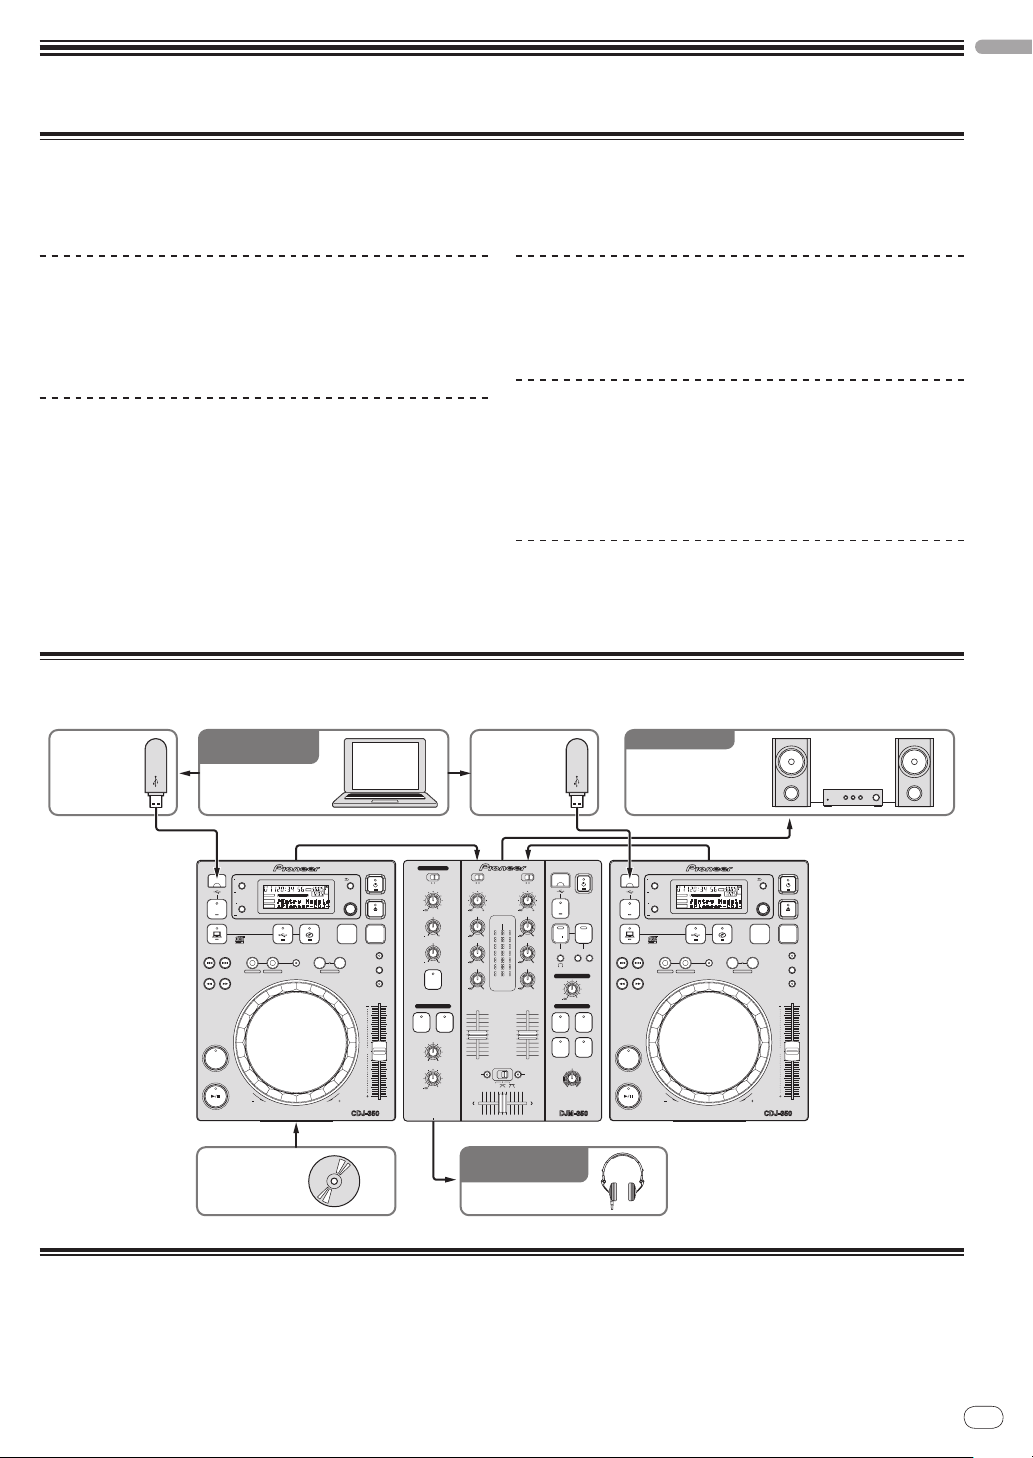
System setup example
A DJ system like the one shown on the diagram below can be set up by combining this unit with a DJ mixer and peripheral devices.
What’s in the box
! CD-ROM (rekordbox license key attached)
! Power cable
! Audio cable
! Control cord
! Disc force eject pin (mounted on bottom of product)
! Warranty card
! Operating instructions (this document)
En
5
Page 6

Before you start
Supported sources
This unit supports the sources listed below.
! Discs (page 6)
! USB devices (page 7)
! Computers (page 8)
Install the software onto the computer from the included CD-ROM.
The included CD-ROM contains the following two software programs.
— rekordbox music management software
— Driver software
Usable discs and USB devices
About discs
This unit can play the discs shown below.
Type Mark
CD
1
Compatible formats
! Music CD (CD-DA)
CD-R
! Music CD (CD-DA)
CD-RW
! MP3
! AAC
! WAV
! AIFF
2
CD-TEXT
Music CD (CD-DA)
1 Discs on which the marks on this table are indicated on the disc label, pack-
age or jacket can be played.
2 Titles, album names and artist names recorded in the CD-Text data are
displayed. When multiple text data are recorded on the disc, the information
for the first text data is displayed.
Discs that cannot be played
! DTS-CD
! Photo CDs
! Video CDs
! CD Graphics (CD-G) discs
! Unfinalized CDs
! DVD
About CD-R/ -RW discs
Music files (MP3/ AAC/ WAV/ AIFF) recorded on CD-R/ -RW discs can
be played.
Folder layers
Max. number of
folders
Max. number of
files
When there are many folders or files, some time may be required for loading.
Max. 8 levels (files in folders beyond the 8th level cannot
be played)
1 000 folders
1 000 files
About discs created on computers
Depending on the application settings and the computer’s environmental settings, it may not be possible to play certain discs. Record
the disc in a format supported on this unit. For details, contact your
application’s retailer.
If the recording quality is poor due to the disc’s properties, scratches
or dirt on the disc or dirt on the recording lens, it may not be possible
to play the disc.
Creating backup discs
When CD-R/ -RW discs are paused or left in the pause mode at cue
points for long periods of time, it may become difficult to play the disc
at that point, due to the properties of the disc. Also, when a specific
point is looped repeatedly an extremely large number of times, it may
become difficult to play that point.
When playing valuable discs, we recommend making backup discs.
About Copy Control CDs and DualDiscs
This unit is designed to CD standards. Operation and performance of
discs with standards other than CD standards is not guaranteed.
About 8 cm single CDs
8 cm single CDs cannot be played on the CDJ-350. Do not mount 8 cm
adapters on CDs and play them on the CDJ-350. The adapter could fall
off as the disc spins, damaging the disc or the player.
En
6
Page 7

About USB devices
This unit supports USB mass storage class USB devices (external
hard disks, portable flash memory devices, digital audio players, etc.).
Folder layers Max. 8 layers
Max. number of
folders
Max. number of
files
Supported file
systems
When there are many folders or files, some time may be required for loading.
Folders and files exceeding the limits cannot be displayed.
1 000 folders
10 000 files (1 000 files for files not managed by rekordbox)
FAT16, FAT32 and HFS+ (NTFS is not supported.)
USB devices that cannot be used
! Optical disk type devices such as external DVD/ CD drives, etc., are
not supported.
! USB hubs cannot be used.
Playable music file formats
This unit supports music files in the formats shown below.
English
Cautions on using USB devices
! Some USB devices may not operate properly. Please note that
Pioneer will accept no responsibility whatsoever for loss of data
recorded on USB devices.
! It may happen that, when a current above the allowable level is
detected in this unit’s USB port, the [USB STOP] indicator flashes,
the power supply to the USB device is cut off and communications
with the USB device are interrupted. To restore normal operation,
disconnect the USB device from this unit. Avoid reusing USB
devices for which an excess current has been detected. If normal
operation is not restored (if communications cannot be established) after the above procedure is performed, try turning off this
unit’s power then turning it back on.
! If multiple partitions are set for the USB device, the device may not
be recognized.
! USB devices equipped with flash card readers may not operate.
! Depending on the USB device you are using, the desired perfor-
mance may not be achieved.
Type File extension
MP3 .mp3 MPEG-1 16 bit 32 kbps to 320 kbps 32 kHz, 44.1 kHz, 48 kHz CBR, VBR
AAC .m4a, .aac and .mp4 MPEG-4 AAC LC 16 bit 16 kbps to 320 kbps 32 kHz, 44.1 kHz, 48 kHz CBR, VBR
WAV .wav WAV 16 bit, 24 bit — 44.1 kHz, 48 kHz Uncompressed PCM
AIFF .aif, .aiff AIFF 16 bit, 24 bit — 44.1 kHz, 48 kHz Uncompressed PCM
About MP3 files
MP3 files can have a constant bit rate (CBR) or a variable bit rate
(VBR). Both types of files can be played on the CDJ-350, but the search
and super fast search functions are slower with VBR files. If your priority is operability, we recommend recording MP3 files in CBR.
Compatible
formats
Bit depth Bit rate Sampling frequency
About AAC files
! AAC is the abbreviation of “Advanced Audio Coding”, a basic
format of audio compression technology used for MPEG-2 and
MPEG-4.
! The file format and extension of AAC data depends on the applica-
tion used to create the data.
! In addition to AAC files with the extension “.m4a” encoded with
iTunes®, files with the extensions “.aac” and “.mp4” can also be
played. Note, however, that copyright-protected AAC files purchased for example at the iTunes Music Store cannot be played.
Also, some files may not be playable, depending on the version of
iTunes used for encoding.
Encoding
method
En
7
Page 8

Functions usable in combination
with a computer
About the included CD-ROM
This unit can be used in combination with a computer when the software is installed onto the computer from the included CD-ROM.
The included CD-ROM contains the following two software programs.
rekordbox music management software
Music files used for DJ play can be managed. The management information can be transferred using USB devices (page 9).
Driver software
When operating DJ software on the computer using this unit, the
sound of the music file that is playing can be output from this unit
(page 10).
! There is no need to install the driver software when using Mac OS X.
Software end user license agreement
This Software End User License Agreement (“Agreement”) is between
you (both the individual installing the Program and any single
legal entity for which the individual is acting) (“You” or “Your”) and
PIONEER CORPORATION (“Pioneer”).
TAKING ANY STEP TO SET UP OR INSTALL THE PROGRAM MEANS
THAT YOU ACCEPT ALL OF THE TERMS OF THIS LICENSE AGREEMENT.
PERMISSION TO DOWNLOAD AND/ OR USE THE PROGRAM IS
EXPRESSLY CONDITIONED ON YOUR FOLLOWING THESE TERMS.
WRITTEN OR ELECTRONIC APPROVAL IS NOT REQUIRED TO MAKE
THIS AGREEMENT VALID AND ENFORCEABLE. IF YOU DO NOT
AGREE TO ALL OF THE TERMS OF THIS AGREEMENT, YOU ARE NOT
AUTHORIZED TO USE THE PROGRAM AND MUST STOP INSTALLING IT
OR UNINSTALL IT, AS APPLICABLE.
1 Definitions
1 “Documentation” means written documentation, specifica-
tions and help content made generally available by Pioneer to
aid in installing and using the Program.
2 “Program” means all or any part of Pioneer’s software
licensed to You by Pioneer under this Agreement.
2 Program license
1 Limited License. Subject to this Agreement’s restrictions,
Pioneer grants to You a limited, non-exclusive, nontransferable, license (without the right to sublicense):
a To install a single copy of the Program on the hard disk
drive of Your computer, to use the Program only for Your
personal purpose complying with this Agreement and the
Documentation (“Authorized Use”);
b To use the Documentation in support of Your Authorized
Use; and
c To make one copy of the Program solely for backup pur-
poses, provided that all titles and trademark, copyright and
restricted rights notices are reproduced on the copy.
2 Restrictions. You will not copy or use the Program or
Documentation except as expressly permitted by this
Agreement. You will not transfer, sublicense, rent, lease or
lend the Program, or use it for third-party training, commercial
time-sharing or service bureau use. You will not Yourself or
through any third party modify, reverse engineer, disassemble
or decompile the Program, except to the extent expressly permitted by applicable law, and then only after You have notified
Pioneer in writing of Your intended activities. You will not use
the Program on multiple processors without Pioneer’s prior
written consent.
3 Ownership. Pioneer or its licensor retains all right, title and
interest in and to all patent, copyright, trademark, trade secret
and other intellectual property rights in the Program and
Documentation, and any derivative works thereof. You do not
acquire any other rights, express or implied, beyond the limited license set forth in this Agreement.
4 No Support. Pioneer has no obligation to provide support,
maintenance, upgrades, modifications or new releases for the
Program or Documentation under this Agreement.
3 Warranty disclaimer
THE PROGRAM AND DOCUMENTATION ARE PROVIDED “AS IS”
WITHOUT ANY REPRESENTATIONS OR WARRANTIES, AND YOU
AGREE TO USE THEM AT YOUR SOLE RISK. TO THE FULLEST
EXTENT PERMISSIBLE BY LAW, PIONEER EXPRESSLY DISCLAIMS
ALL WARRANTIES OF ANY KIND WITH RESPECT TO THE
PROGRAM AND DOCUMENTATION, WHETHER EXPRESS, IMPLIED,
STATUTORY, OR ARISING OUT OF COURSE OF PERFORMANCE,
COURSE OF DEALING OR USAGE OF TRADE, INCLUDING
ANY WARRANTIES OF MERCHANTABILITY, FITNESS FOR A
PARTICULAR PURPOSE, SATISFACTORY QUALITY, ACCURACY,
TITLE OR NON-INFRINGEMENT.
4 Damages and remedies for breach
You agree that any breach of this Agreement’s restrictions would
cause Pioneer irreparable harm for which money damages alone
would be inadequate. In addition to damages and any other remedies
to which Pioneer may be entitled, You agree that Pioneer may seek
injunctive relief to prevent the actual, threatened or continued breach
of this Agreement.
5 Termination
Pioneer may terminate this Agreement at any time upon Your breach
of any provision. If this Agreement is terminated, You will stop using
the Program, permanently delete it from the computer where it
resides, and destroy all copies of the Program and Documentation in
Your possession, confirming to Pioneer in writing that You have done
so. Sections 2.2, 2.3, 2.4, 3, 4, 5 and 6 will continue in effect after this
Agreement’s termination.
6 General terms
1 Limitation of Liability. In no event will Pioneer or its subsidiar-
ies be liable in connection with this Agreement or its subject
matter, under any theory of liability, for any indirect, incidental, special, consequential or punitive damages, or damages
for lost profits, revenue, business, savings, data, use, or cost
of substitute procurement, even if advised of the possibility of
such damages or if such damages are foreseeable. In no event
will Pioneer’s liability for all damages exceed the amounts
actually paid by You to Pioneer or its subsidiaries for the
Program. The parties acknowledge that the liability limits and
risk allocation in this Agreement are reflected in the Program
price and are essential elements of the bargain between the
parties, without which Pioneer would not have provided the
Program or entered into this Agreement.
2 The limitations or exclusions of warranties and liability
contained in this Agreement do not affect or prejudice Your
statutory rights as consumer and shall apply to You only to the
extent such limitations or exclusions are permitted under the
laws of the jurisdiction where You are located.
3 Severability and Waiver. If any provision of this Agreement is
held to be illegal, invalid or otherwise unenforceable, that provision will be enforced to the extent possible or, if incapable
of enforcement, deemed to be severed and deleted from this
Agreement, and the remainder will continue in full force and
effect. The waiver by either party of any default or breach of
this Agreement will not waive any other or subsequent default
or breach.
4 No Assignment. You may not assign, sell, transfer, delegate or
otherwise dispose of this Agreement or any rights or obligations under it, whether voluntarily or involuntarily, by operation of law or otherwise, without Pioneer’s prior written consent. Any purported assignment, transfer or delegation by You
will be null and void. Subject to the foregoing, this Agreement
will be binding upon and will inure to the benefit of the parties
and their respective successors and assigns.
5 Entire Agreement. This Agreement constitutes the entire
agreement between the parties and supersedes all prior or
contemporaneous agreements or representations, whether
En
8
Page 9
written or oral, concerning its subject matter. This Agreement
may not be modified or amended without Pioneer’s prior and
express written consent, and no other act, document, usage or
custom will be deemed to amend or modify this Agreement.
6 You agree that this Agreement shall be governed and con-
strued by and under the laws of Japan.
Cautions on installing the software
Read Software end user license agreement carefully before installing
rekordbox and the driver software.
! The included CD-ROM contains installation programs in the fol-
lowing 12 languages.
English, French, German, Italian, Dutch, Spanish, Portuguese,
Russian, Chinese (simplified characters), Chinese (traditional
characters), Korean, Japanese.
! When using rekordbox with an operating system in a different
language, follow the instructions on the screen to select [English].
Supported operating systems rekordbox
Mac OS X (10.4.6 and later)
Windows® 7 Home Pre-
mium/ Professional/
Ultimate
Windows Vista®
Home Basic/ Home Premium/ Business/ Ultimate (SP1 and later)
Windows® XP Home edition/ Professional (SP3
and later)
1 There is no need to install the driver software when using Mac OS X.
2 When using a 64-bit version of Windows, the driver software can only be
used for 32-bit applications.
32-bit version
64-bit version
32-bit version
64-bit version
32-bit version
1
1 1
1 1
1 1
1 1
1 1
Driver
software
1
2
2
About the rekordbox music
English
management software
rekordbox is a software program for purchasers of the CDJ-350 or
other Pioneer DJ players to manage the music files they use for DJ
play.
— rekordbox may be used for classifying and searching for
music files stored on your computer as well as creating playlists, all of which can help improve your DJ performance.
— rekordbox allows the detecting, measuring, and editing of
beats, tempos (BPM), and other elements of your music files
prior to a performance.
Installing rekordbox
About the installation procedure (Macintosh)
Read Cautions on installing the software carefully before installing
rekordbox.
! Authorization of the computer’s administrator is required to install
and uninstall rekordbox.
Log on as the user which was set as the computer’s administrator
before installing.
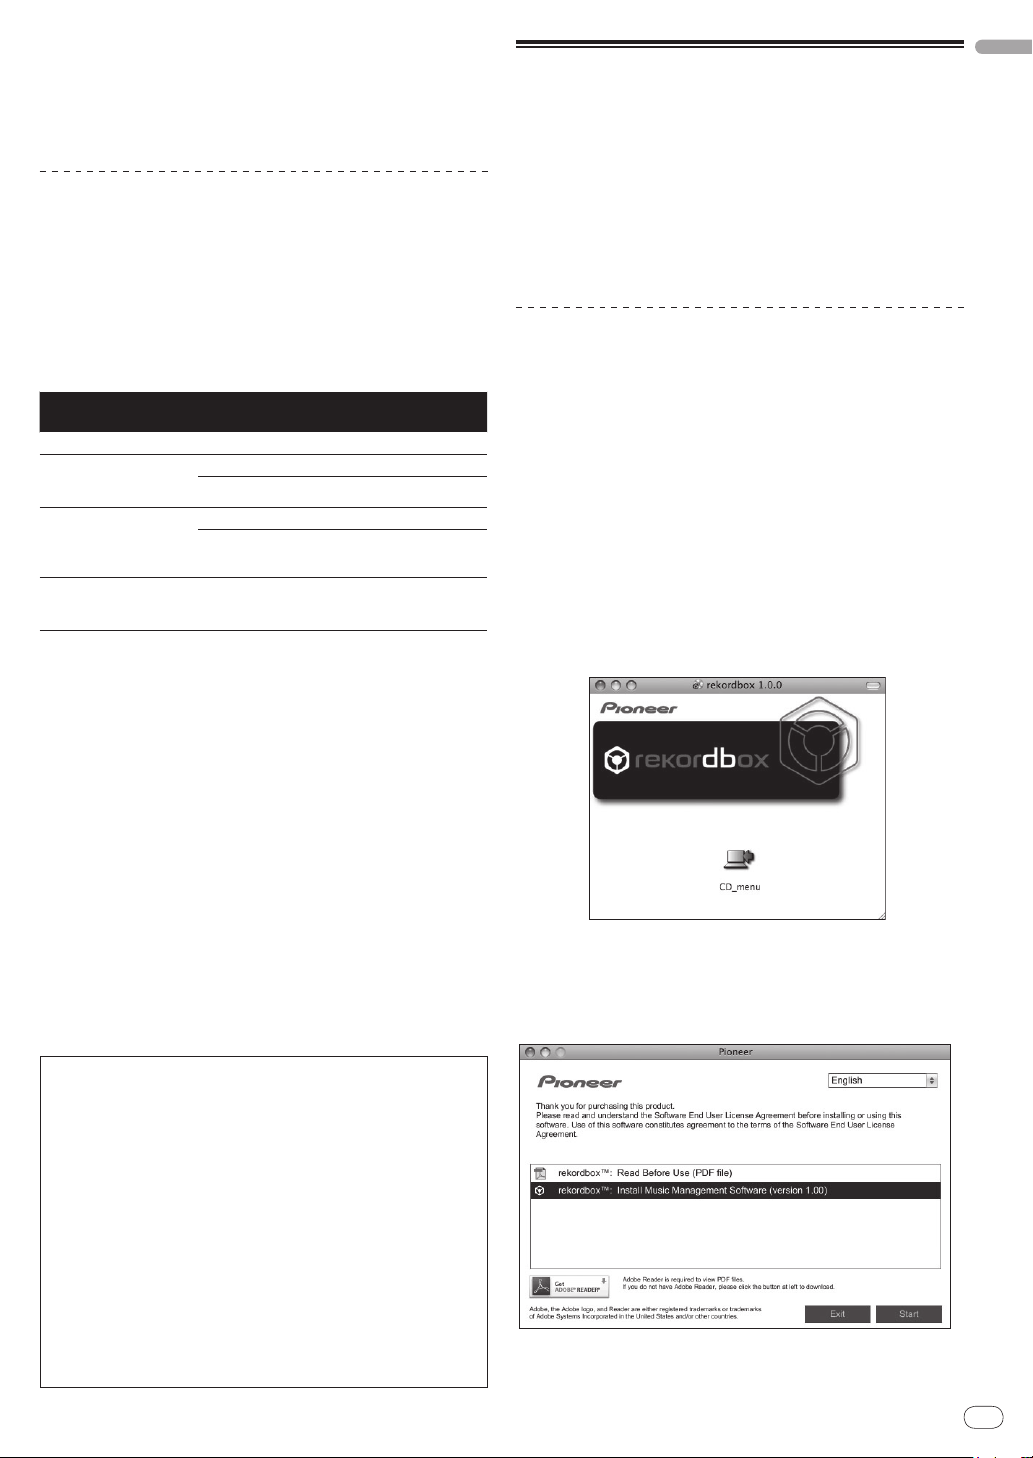
1 When the included CD-ROM is inserted into the
computer’s CD drive, the CD drive opens on the screen.
Double-click the [CD_menu.app] icon.
! If the CD drive does not open on the screen when the CD-ROM is
inserted, use Finder to open the CD drive, then double-click the
[CD_menu.app] icon.
<[CD.menu.app] icon>
Minimum operating environment for rekordbox
! CPU:
— For Mac OS X, Macintosh computer equipped with a 1.83 GHz
or greater Intel® Core™Duo (or compatible) processor
— For Windows® 7, Windows Vista® and Windows® XP, PC/ AT
compatible computer equipped with a 2 GHz or greater Intel®
Pentium® 4 (or compatible) processor
! Required memory: 1 GB or more of RAM
! Hard disc: 250 MB or more of free space (not including space for
storing music files, etc.)
! CD drive: Optical disc drive on which the CD-ROM can be read
! Sound: Audio output to speakers, headphones, etc. (internal or
external audio device)
! Internet connection: For user registration and inquiries, use a web
browser supporting 128-bit SSL (Safari 2.0 or greater, Internet
Explorer® 6.0 or greater, etc.).
! USB port: A USB port for connection of a USB device (flash mem-
ory, hard disc, etc.) is required to transfer music files to the USB
device.
! Operation is not guaranteed on all computers, even those with the
operating environment described above.
! Even with the required memory capacity indicated for the
operating environment above, in the cases described below the
software may not provide full functionality and performance due
to lack of memory. In this case, take the necessary measures
to ensure sufficient free memory. We recommend adding extra
memory in order to achieve stable performance.
— When there are many tracks being managed in the rekordbox
library
— When resident programs and services are running
! Depending on the computer’s power settings, etc., the CPU
and hard disc processing capacity may be insufficient. When
using laptop computers in particular, always keep the AC power
connected and set the computer to maximum performance
conditions when using rekordbox.
! Note that problems may arise in the operation of rekordbox due to
other software being used together with it.
2 When the CD-ROM’s menu is displayed, select
[rekordbox: Install Music Management Software], then
click [Start].
<CD-ROM menu>
! To close the CD-ROM menu, click [Exit].
En
9
Page 10
3 Install rekordbox following the instructions on the
screen.
About the installation procedure (Windows)
Read Cautions on installing the software carefully before installing
rekordbox.
! Authorization of the computer’s administrator is required to install
and uninstall rekordbox.
Log on as the user registered as the computer’s administrator
before installing rekordbox.
1 Insert the included CD-ROM into the computer’s CD
drive.
The CD-ROM menu is displayed.
! If the CD-ROM menu does not appear when the CD-ROM is
inserted, open the CD drive from [Computer (or My Computer)] in
the [Start] menu, then double-click the [CD_menu.exe] icon.
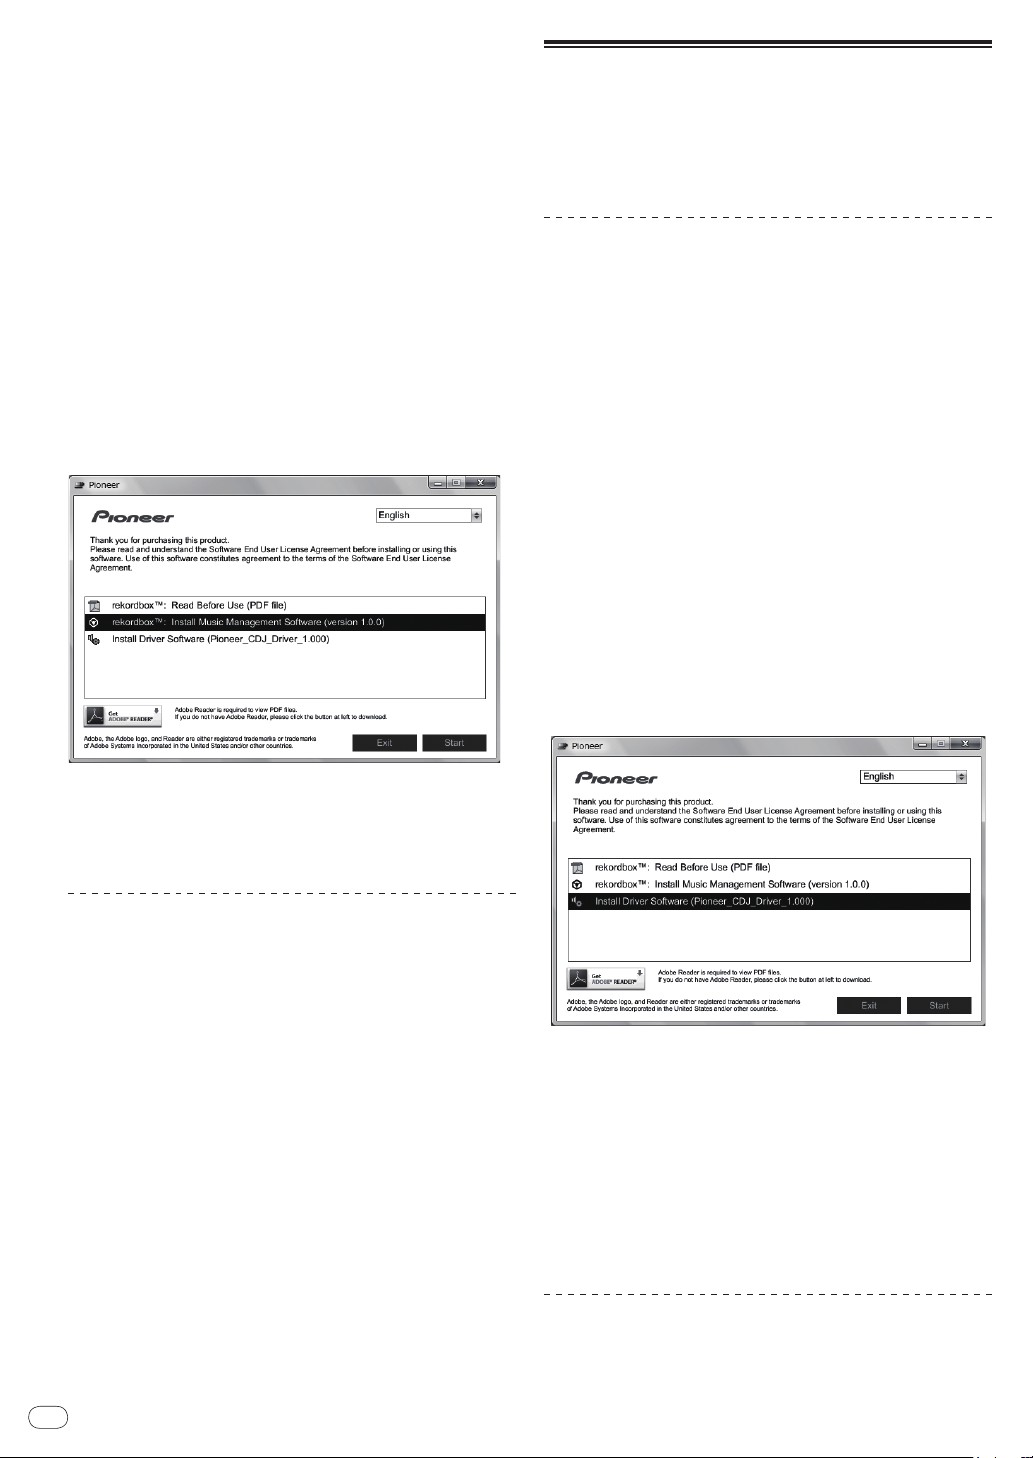
2 When the CD-ROM’s menu is displayed, select
[rekordbox: Install Music Management Software], then
click [Start].
<CD-ROM menu>
About the driver software
(Windows)
This driver software is an exclusive ASIO driver for outputting audio
signals from the computer. To use the CDJ-350 connected to a computer on which Windows is installed, install the driver software on the
computer beforehand.
Installing the driver software
Before installing the driver software
! Read Cautions on installing the software on page 9 carefully.
! Turn off this unit’s power switch, then disconnect the USB cable
connecting this unit and the computer.
! If any other programs are running on the computer, quit them.
! To install or uninstall the driver software, you need to be autho-
rized by the administrator of your computer. Log on as the administrator of your computer before proceeding with the installation.
! If you connect this unit to your computer without installing the
driver software first, an error may occur on your computer depending on the system environment.
! If installation of the driver software is interrupted after it has
started, start the installation procedure over again from the
beginning.
1 Insert the included CD-ROM into the computer’s CD
drive.
The CD-ROM menu is displayed.
! If the CD-ROM menu does not appear when the CD-ROM is
inserted, open the CD drive from [Computer (or My Computer)] in
the [Start] menu, then double-click the [CD_menu.exe] icon.
2 When the CD-ROM menu appears, select [Install
Driver Software (Pioneer_CDJ_Driver)], then click [Start].
! To close the CD-ROM menu, click [Exit].
3 Install rekordbox following the instructions on the
screen.
! Click [Cancel] to cancel installation after it has started.
Launching rekordbox
Log on as the user which was set as the computer’s administrator
before using rekordbox.
! When rekordbox is started up for the first time, the license key
must be input. The license key is affixed to the CD-ROM package.
! When rekordbox is started up, the operating instructions can be
viewed from the rekordbox [Help] menu.
For Mac OS X
Open the [Application] folder with Finder, then doubleclick [rekordbox 1.x.x.app].
! The 1.x.x indicates the rekordbox version.
For Windows® 7, Windows Vista® and Windows® XP
Click on the Windows [Start] menu button, then [All
Programs] > [Pioneer] > [rekordbox 1.x.x] > [rekordbox
1.x.x].
! The 1.x.x indicates the rekordbox version.
To close the CD-ROM menu, click [Exit].
3 Proceed with installation according to the
instructions on the screen.
If [Windows Security] appears on the screen while the installation is
in progress, click [Install this driver software anyway] and continue
with the installation.
! When installing on Windows XP
If [Hardware Installation] appears on the screen while the instal-
lation is in progress, click [Continue Anyway] and continue with
the installation.
! When the installation program is completed, a completion mes-
sage appears.
Connecting the CDJ-350 and computer
10
1 Connect this unit to your computer via a USB cable.
For instructions on connecting, see Using DJ software on page 13.
En
Page 11
2 Press [u].
Turn on the power of this unit.
3 Press [ ] for at least 1 second.
The [CONTROL MODE] screen appears on the main unit display.
! The message [Installing device driver software] may appear
when the CDJ-350 is connected to the computer for the first time or
when it is reconnected to the computer’s USB port. Wait until the
[Your devices are ready for use] message appears.
! When installing on Windows XP
— [Can Windows connect to Windows Update to search for
software?] may appear while the installation is in progress.
Select [No, not this time] and click [Next] to continue with
the installation.
— [What do you want the wizard to do?] may appear while the
installation is in progress. Select [Install the software auto-
matically (Recommended)] and click [Next] to continue with
the installation.
— If [Hardware Installation] appears on the screen while the
installation is in progress, click [Continue Anyway] and continue with the installation.
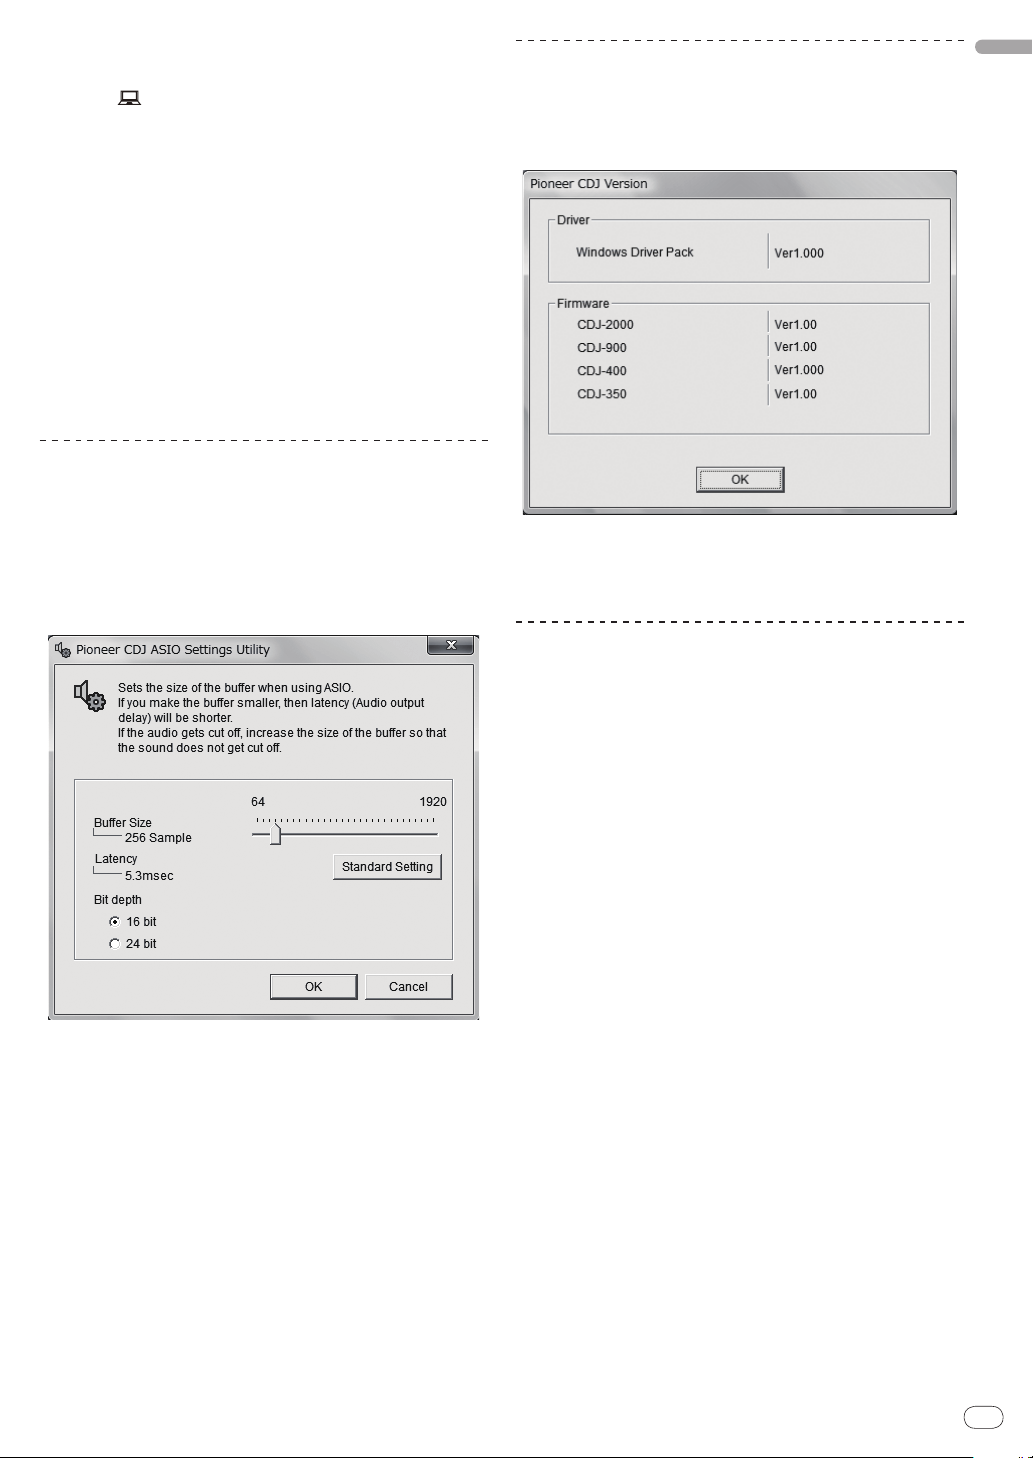
Adjusting the buffer size
This unit functions as an audio device conforming to the ASIO
standards.
! If an application using this unit as the default audio device (DJ
software, etc.) is running, quit that application before adjusting the
buffer size.
Click Windows [Start] menu > [All Programs] > [Pioneer] >
[Pioneer CDJ] > [Pioneer CDJ ASIO Settings Utility].
Checking the version of the driver
software
Click Windows [Start] menu > [All Programs] > [Pioneer] >
[Pioneer CDJ] > [Pioneer CDJ Version Display Utility].
! You can check the firmware version of this unit on the screen.
! The firmware version is not displayed when the CDJ-350 is not con-
nected to the computer or when the CDJ-350 and computer are not
properly communicating.
Checking the latest information on the
driver software
For the latest information on the driver software for exclusive use with
this unit, visit our website shown below.
http://www.prodjnet.com/support/
English
A sufficiently large buffer size decreases the chance of sound dropout
(sound interruption) but increases audio signal transmission delay
(latency).
En
11
Page 12

Connections
AC IN
AUDIO
OUT
RL
CONTROL
USB
1 2 543
DJ player DJ playerDJ mixer (example: DJM-350)
MULTI PLAYER
TEMPO
0
PLAY/PAUSE
SEARCH
TRACK SEARCH
IN/CUE OUT
OUT ADJUSTHOT LOOP
RELOOP/EXIT
BEAT LOOP
LOOP DRIVE
VINYL MODE
TEMPO RANGE
MASTER TEMPO
LOOP
USB
STOP
SOURCE SELECT
MP3/AAC
WAV/AIFF
CUE
PLAYLIST
BPM
DISC
LOCK
REVFWD
BACK
SELECT PUSH
TIME MODE
AUTO CUE
DISPLAY
UTILITY
A.CUE
LOCK
16
REMAIN
MS
F TEMPO %
INFO
BROWSE
BPM
MULTI PLAYER
TEMPO
0
PLAY/PAUSE
SEARCH
TRACK SEARCH
IN/CUE OUT
OUT ADJUSTHOT LOOP
RELOOP/EXIT
BEAT LOOP
LOOP DRIVE
VINYL MODE
TEMPO RANGE
MASTER TEMPO
LOOP
USB
STOP
SOURCE SELECT
MP3/AAC
WAV/AIFF
CUE
PLAYLIST
BPM
DISC
LOCK
REVFWD
BACK
SELECT PUSH
TIME MODE
AUTO CUE
DISPLAY
UTILITY
A.CUE
LOCK
16
REMAIN
MS
FTEMPO%
INFO
BROWSE
BPM
2 CHANNEL DJ MIXER
MIC /AUX
MIC
0
LEVEL
HI
AUX
LOW
MIC/AUX
ON
12
12
12
12
HEADPHONES
CUE
CH-1
CUE
MIXING
CUE MASTER
CH-2
LEVEL
PHONES
0
9
9
9
9
CD
PHONO
CH- 1
FADER
START
FADER
START
CH- 1CH- 2
9
9
9
9
CH-2
THRU
CD
PHONO
TRIMTRIM
HI
MID
LOW
HI
MID
LOW
LEVEL
MASTER
LEVEL/DEPTH
FILTERCRUSH
GATE JET
MASTER EFFECT
0
PREVIEW
TRACK MARK SEARCH
PLAY
USB
STOP
REC
MASTER LEVEL
AUDIO
OUT
RL
CONTROL
USB
AUDIO
OUT
RL
CONTROL
USB
L
CH-1
PHONO
CONTROL
L
R
CD
CH-2
PHONO
CONTROL
L
R
CD
R
L
Control cord
Audio cable
R
L
R
L
R L
Control cord
(included)
Audio cable
(included)
Be sure to turn off the power and unplug the power cord from the power outlet whenever making or changing connections.
Refer to the operating instructions for the component to be connected.
Connect the power cord after all the connections between devices have been completed.
Be sure to use the included power cord.
Names of terminals
Rear panel
1 AC IN
Connect this to a power outlet.
Connect the power cord after all the connections between devices
have been completed.
Be sure to use the included power cord.
2 Kensington security slot
3 USB (page 13)
Connect to a computer.
4 CONTROL (page 13)
Connect the control cord (included) here.
5 AUDIO OUT L/ R (page 12)
Connect the audio cables (included) here.
Basic style
When connected to a Pioneer DJ mixer using the control cord (included), operations such as starting playback on this unit can be controlled
using the DJ mixer’s fader (page 21).
The fader start function can only be used when connected to a Pioneer DJ mixer.
12
En
Page 13
Using the relay play function
AUDIO
OUT
RL
CONTROL
USB
AUDIO
OUT
RL
CONTROL
USB
L
CH-1
PHONO
CONTROL
L
R
CD
DJ player DJ player
MULTI PLAYER
TEMPO
0
PLAY/PAUSE
SEARCH
TRACK SEARCH
IN/CUE OUT
OUT ADJUSTHOT LOOP
RELOOP/EXIT
BEAT LOOP
LOOP DRIVE
VINYL MODE
TEMPO RANGE
MASTER TEMPO
LOOP
USB
STOP
SOURCE SELECT
MP3/AAC
WAV/AIFF
CUE
PLAYLIST
BPM
DISC
LOCK
REVFWD
BACK
SELECT PUSH
TIME MODE
AUTO CUE
DISPLAY
UTILITY
A.CUE
LOCK
16
REMAIN
MS
F TEMPO %
INFO
BROWSE
BPM
MULTI PLAYER
TEMPO
0
PLAY/PAUSE
SEARCH
TRACK SEARCH
IN/CUE OUT
OUT ADJUSTHOT LOOP
RELOOP/EXIT
BEAT LOOP
LOOP DRIVE
VINYL MODE
TEMPO RANGE
MASTER TEMPO
LOOP
USB
STOP
SOURCE SELECT
MP3/AAC
WAV/AIFF
CUE
PLAYLIST
BPM
DISC
LOCK
REVFWD
BACK
SELECT PUSH
TIME MODE
AUTO CUE
DISPLAY
UTILITY
A.CUE
LOCK
16
REMAIN
MS
FTEMPO%
INFO
BROWSE
BPM
2 CHANNEL DJ MIXER
MIC /AUX
MIC
0
LEVEL
HI
AUX
LOW
MIC/AUX
ON
12
12
12
12
HEADPHONES
CUE
CH-1
CUE
MIXING
CUE MASTER
CH-2
LEVEL
PHONES
0
9
9
9
9
CD
PHONO
CH- 1
FADER
START
FADER
START
CH- 1CH- 2
9
9
9
9
CH-2
THRU
CD
PHONO
TRIMTRIM
HI
MID
LOW
HI
MID
LOW
LEVEL
MASTER
LEVEL/DEPTH
FILTERCRUSH
GATE JET
MASTER EFFECT
0
PREVIEW
TRACK MARK SEARCH
PLAY
USB
STOP
REC
MASTER LEVEL
DJ mixer (example: DJM-350)
CH-2
PHONO
CONTROL
L
R
CD
R
L
Audio cable
R
L
R
L
R L
Control cord
(included)
Audio cable
(included)
AUDIO
OUT
RL
CONTROL
USB
AUDIO
OUT
RL
CONTROL
USB
L
CH-1
PHONO
CONTROL
L
R
CD
DJ player DJ player
MULTI PLAYER
TEMPO
0
PLAY/PAUSE
SEARCH
TRACK SEARCH
IN/CUE OUT
OUT ADJUSTHOT LOOP
RELOOP/EXIT
BEAT LOOP
LOOP DRIVE
VINYL MODE
TEMPO RANGE
MASTER TEMPO
LOOP
USB
STOP
SOURCE SELECT
MP3/AAC
WAV/AIFF
CUE
PLAYLIST
BPM
DISC
LOCK
REVFWD
BACK
SELECT PUSH
TIME MODE
AUTO CUE
DISPLAY
UTILITY
A.CUE
LOCK
16
REMAIN
MS
FTEMPO%
INFO
BROWSE
BPM
2 CHANNEL DJ MIXER
MIC /AUX
MIC
0
LEVEL
HI
AUX
LOW
MIC/AUX
ON
12
12
12
12
HEADPHONES
CUE
CH-1
CUE
MIXING
CUE MASTER
CH-2
LEVEL
PHONES
0
9
9
9
9
CD
PHONO
CH- 1
FADER
START
FADER
START
CH- 1 CH- 2
9
9
9
9
CH-2
THRU
CD
PHONO
TRIM TRIM
HI
MID
LOW
HI
MID
LOW
LEVEL
MASTER
LEVEL/DEPTH
FILTERCRUSH
GATE JET
MASTER EFFECT
0
PREVIEW
TRACK MARK SEARCH
PLAY
USB
STOP
REC
MASTER LEVEL
DJ mixer (example: DJM-350)
CH-2
PHONO
CONTROL
L
R
CD
R
L
Audio cable
R
L
R
L
R L
Audio cable
(included)
USB cableUSB cable
DJ software
Computer
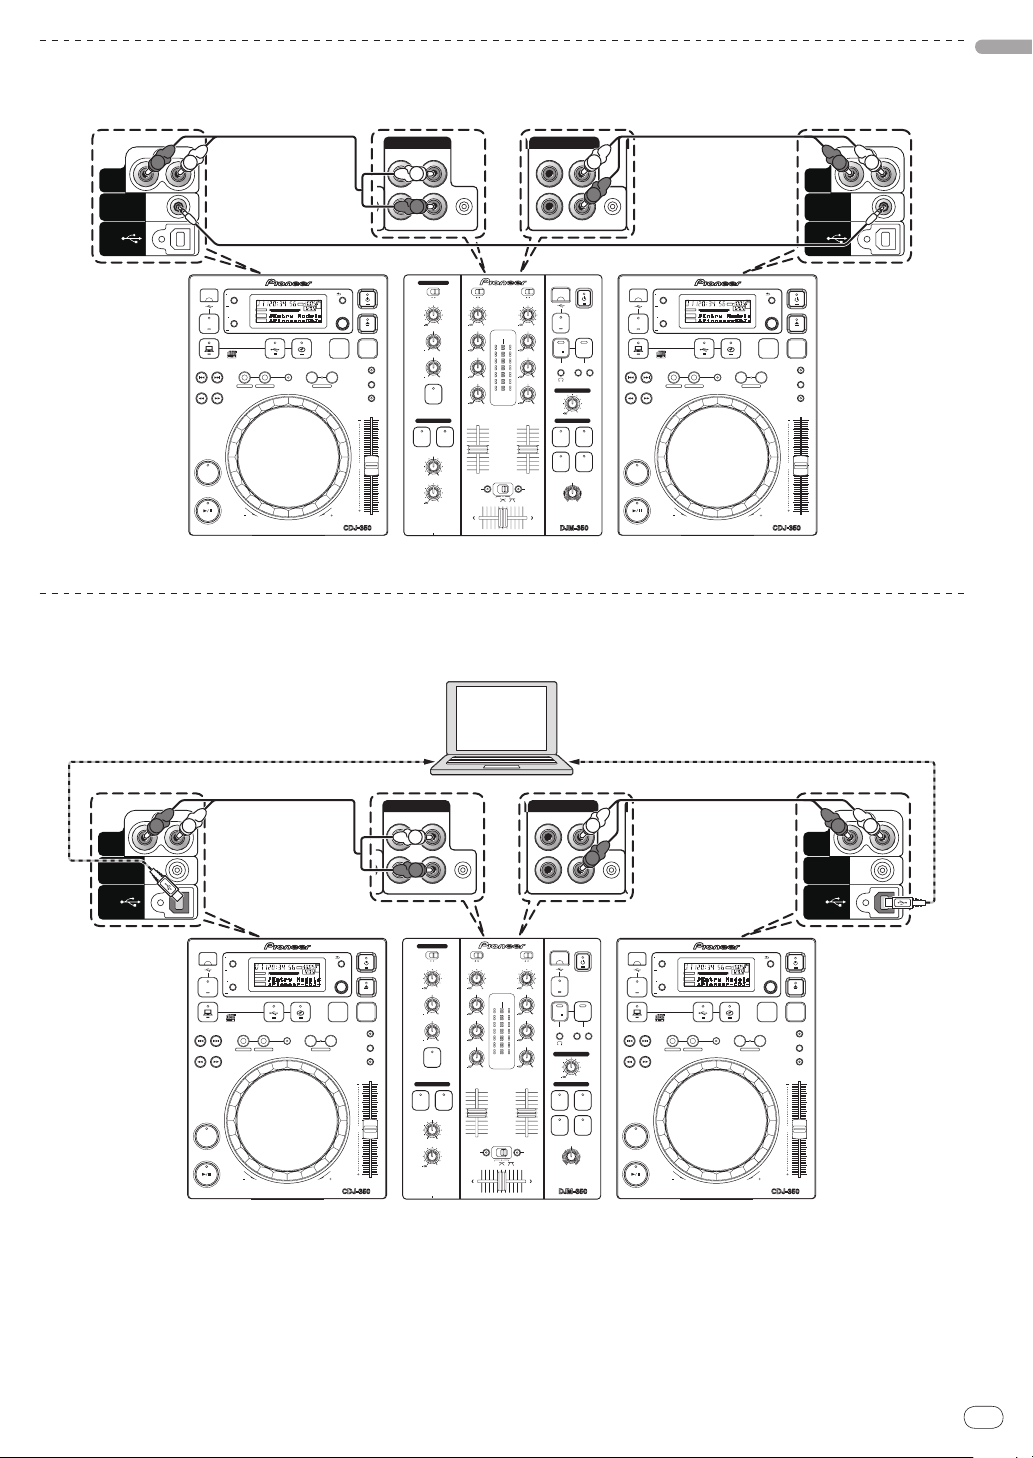
Relay playback on two DJ players is possible when the [CONTROL] terminals on this unit and the other Pioneer DJ player are interconnected
using a control cord (page 21).
Using DJ software
When connected to a computer by USB cable, the DJ software can be operated with this units (page 21).
The sound of music files playing on the computer can be output from this unit (page 10).
English
En
13
Page 14
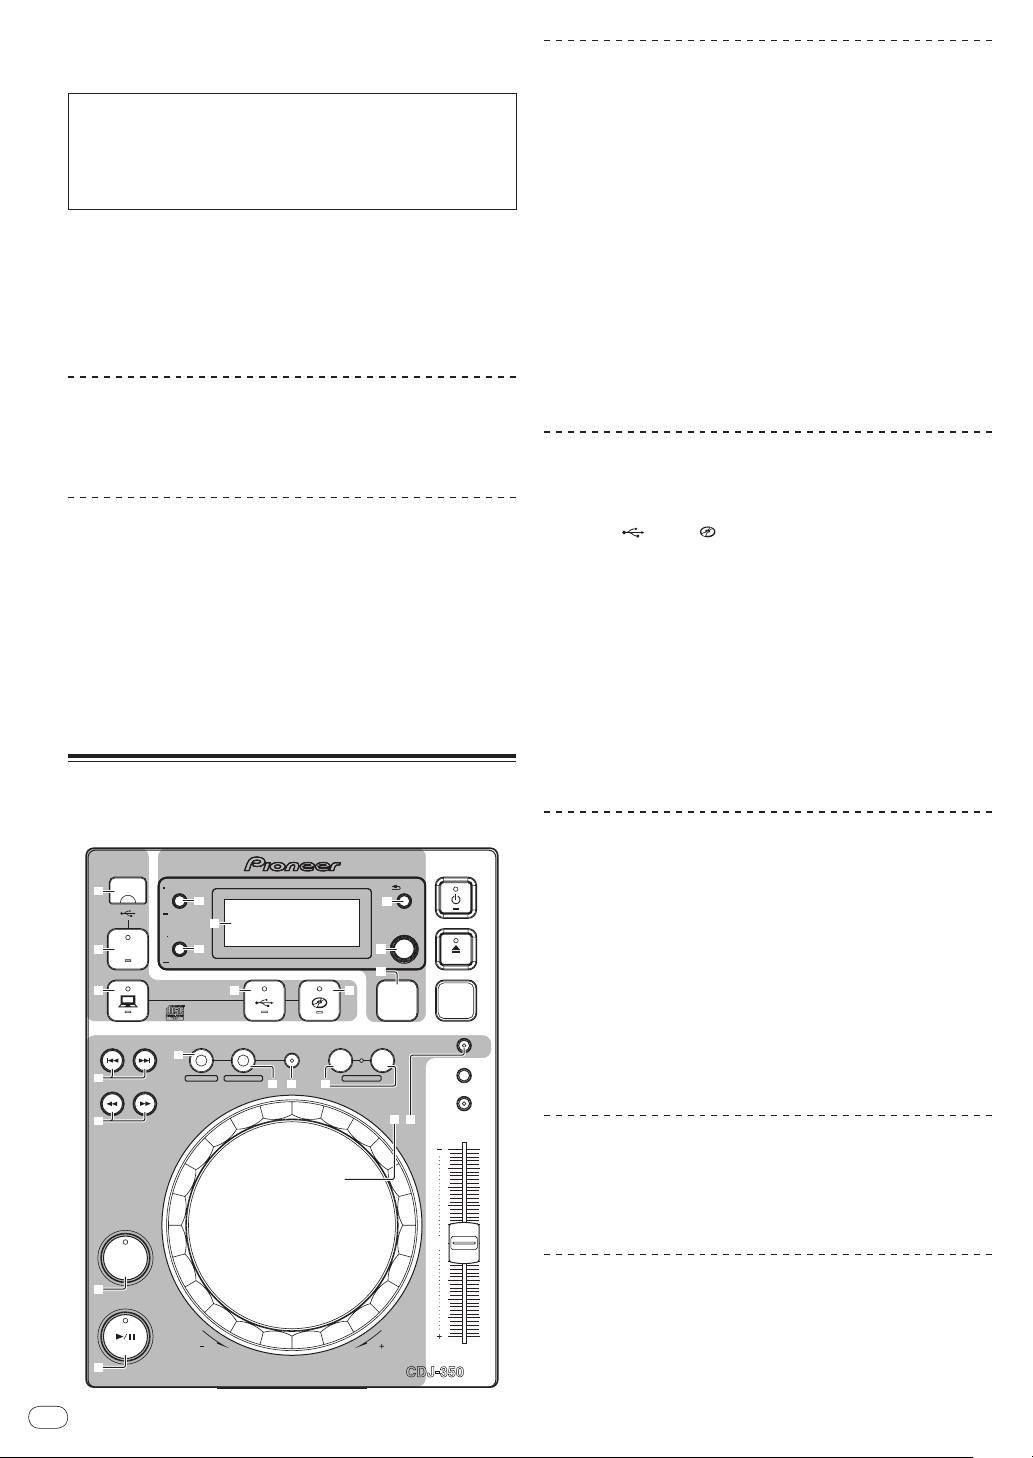
Operations
Player section Tempo control section
Source select section Browse section
MULTI PLAYER
TEMPO
0
PLAY/PAUSE
SEARCH
TRACK SEARCH
IN/CUE OUT
OUT ADJUSTHOT LOOP
RELOOP/EXIT
BEAT LOOP
LOOP DIVIDE—+
VINYL MODE
TEMPO RANGE
MASTER TEMPO
LOOP
USB
STOP
SOURCE SELECT
MP3/AAC
WAV/AIFF
CUE
PLAYLIST
BPM
DISC
LOCK
REV FWD
BACK
SELECT PUSH
TIME MODE
AUTO CUE
DISPLAY
UTILITY
3
k
l
m
n
1
2
4
5
e
f hg
a
b
c
8
9
6 7
d
p
q
r
o
i
j
1
2
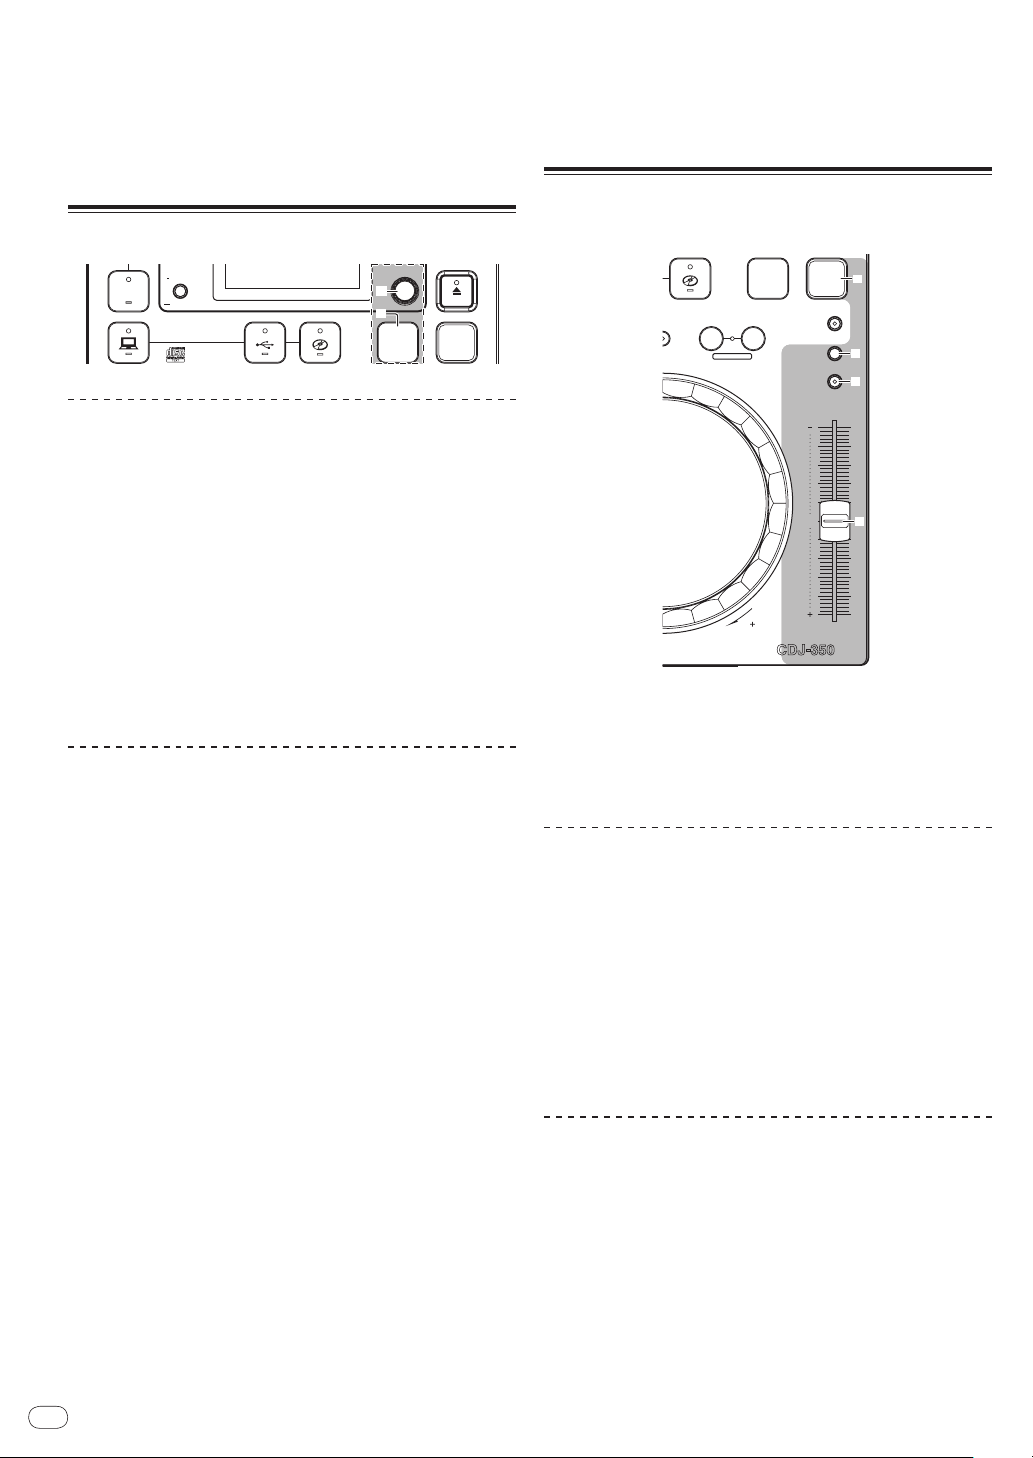
Control panel
1 u (Power switch) (page 16)
2 hDISC (page 15)
Select the source to be played with this unit here (page 15).
3 USB device insertion slot
4 USB STOP
5
6
7
(COMPUTER)
(USB)
(DISC)
Source select section
Player section
These controls can be used for such basic DJ player operations as playing
discs, setting cue/ loop points and operating the jog dial (page 16).
8 TRACK SEARCH o, p
9 SEARCH m, n
a CUE
b PLAY/PAUSE f
c Jog dial
14
En
d VINYL MODE
1 Loop and beat loop part
e LOOP IN/
CUE (HOT LOOP)
f LOOP OUT (OUT ADJUST)
g RELOOP/EXIT
h BEAT LOOP (LOOP DIVIDE)
Browse section
Information on the device loaded on this unit, loaded tracks, etc., is
displayed here (page 18).
i TIME MODE (AUTO CUE)
j DISPLAY (UTILITY)
k Main unit display
l BACK
2 Playlist part
m SELECT PUSH (rotary selector)
n PLAYLIST
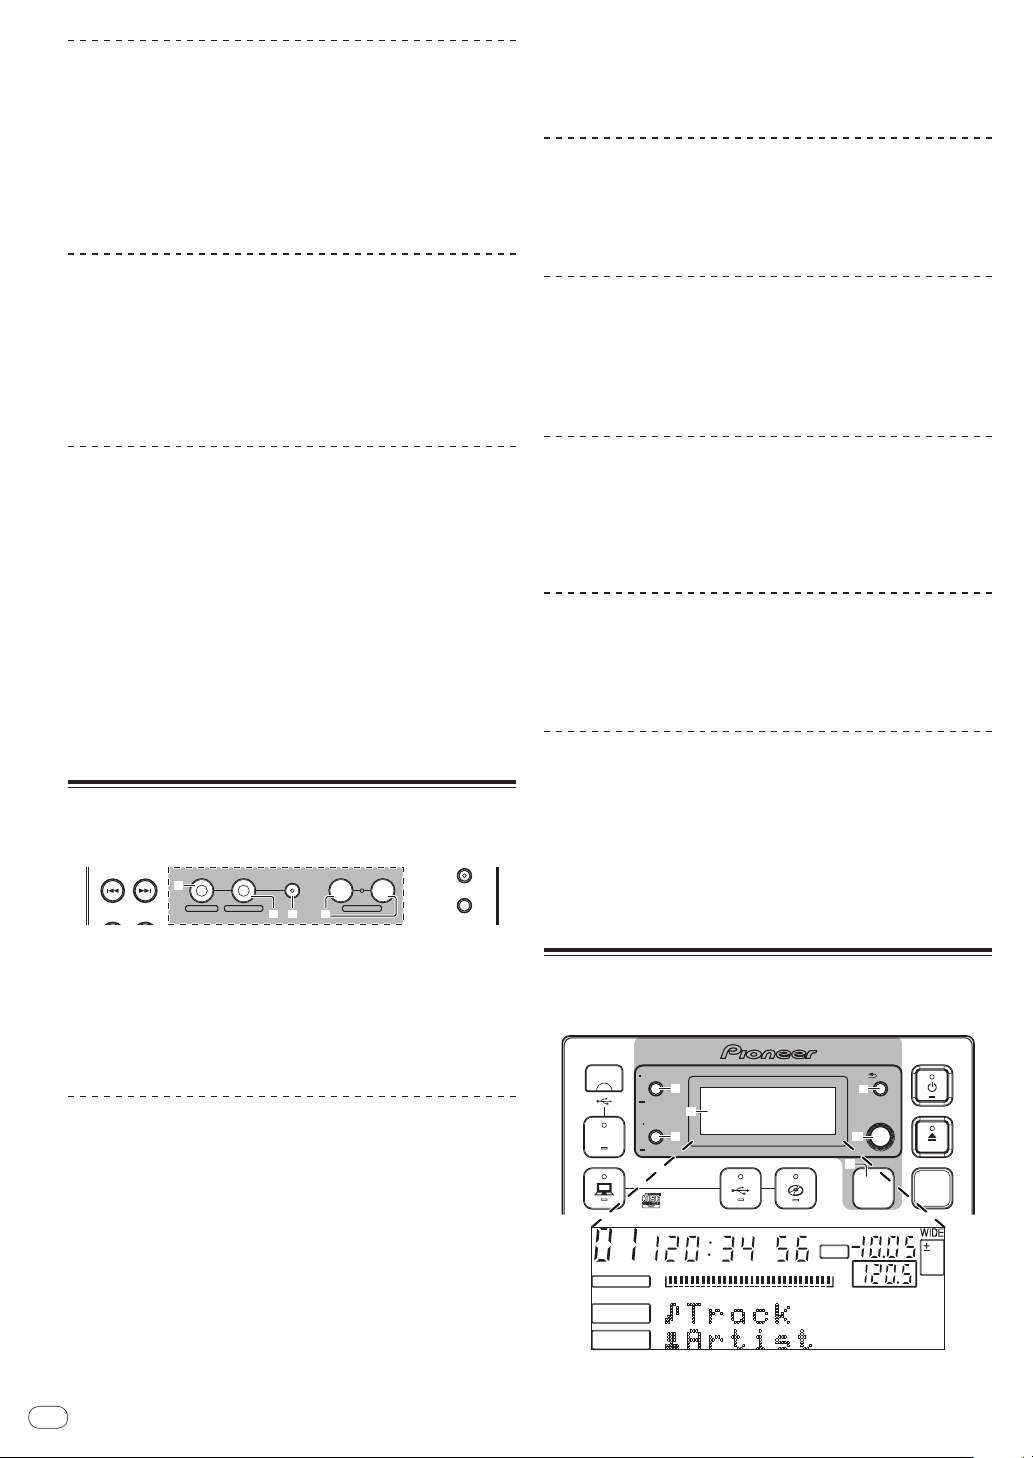
Page 15
Tempo control section
s
t
A.CUE
LOCK
16
REMAIN
MS
F
TEMPO %
INFO
BROWSE
BPM
1
a
c
b
2
3
4
5
6 7 8 9
s
t
USB
STOP
SOURCE SELECT
MP3/AAC
WAV/AIFF
PLAYLIST
BPM
DISC
LOCK
BACK
SELECT PUSH
TIME MODE
AUTO CUE
DISPLAY
UTILITY
3
4
5 6 7
Adjust the track playing speed here (page 20).
When [BPM LOCK] is used, the playing speeds of two tracks can be
matched easily (page 21).
o BPM LOCK
p TEMPO RANGE
q MASTER TEMPO
r TEMPO
9 TEMPO %
This indicates the percentage by which the playing speed is changed.
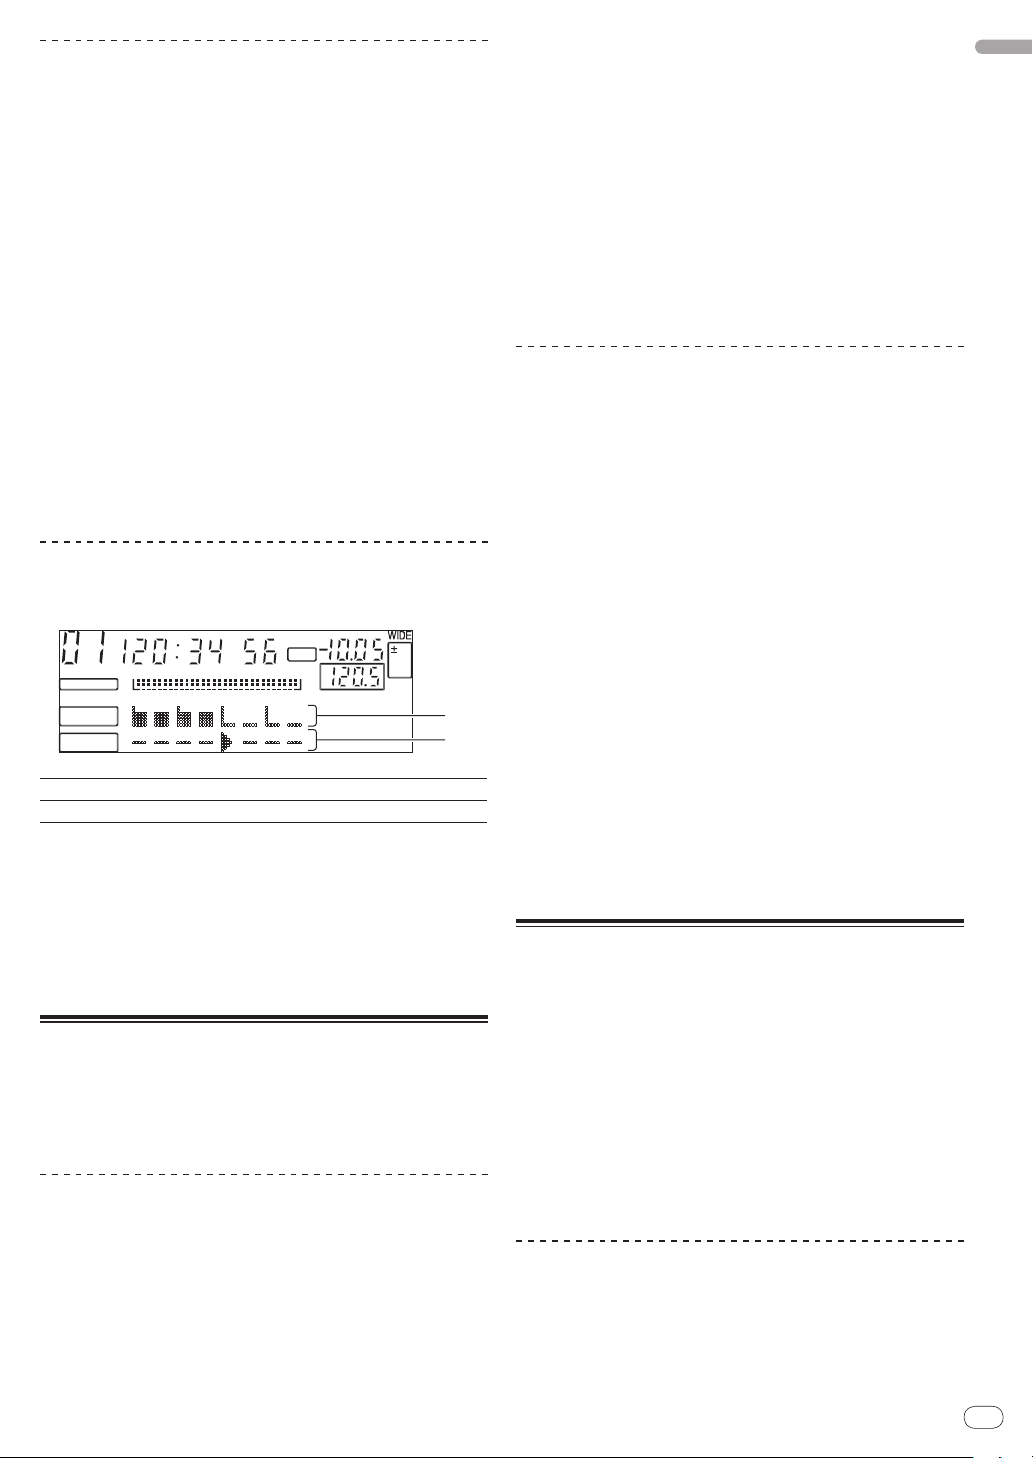
a WIDE, ±16, ±10, ±6
This indicates the range by which the playing speed can be adjusted.
b BPM
Displays BPM (Beats Per Minute) of the track currently being played.
c Information display section
Up to 13 characters can be displayed for each. The characters that
can be displayed are letters A to Z, numbers 0 to 9 and certain symbols. “?” is displayed for other characters.
English
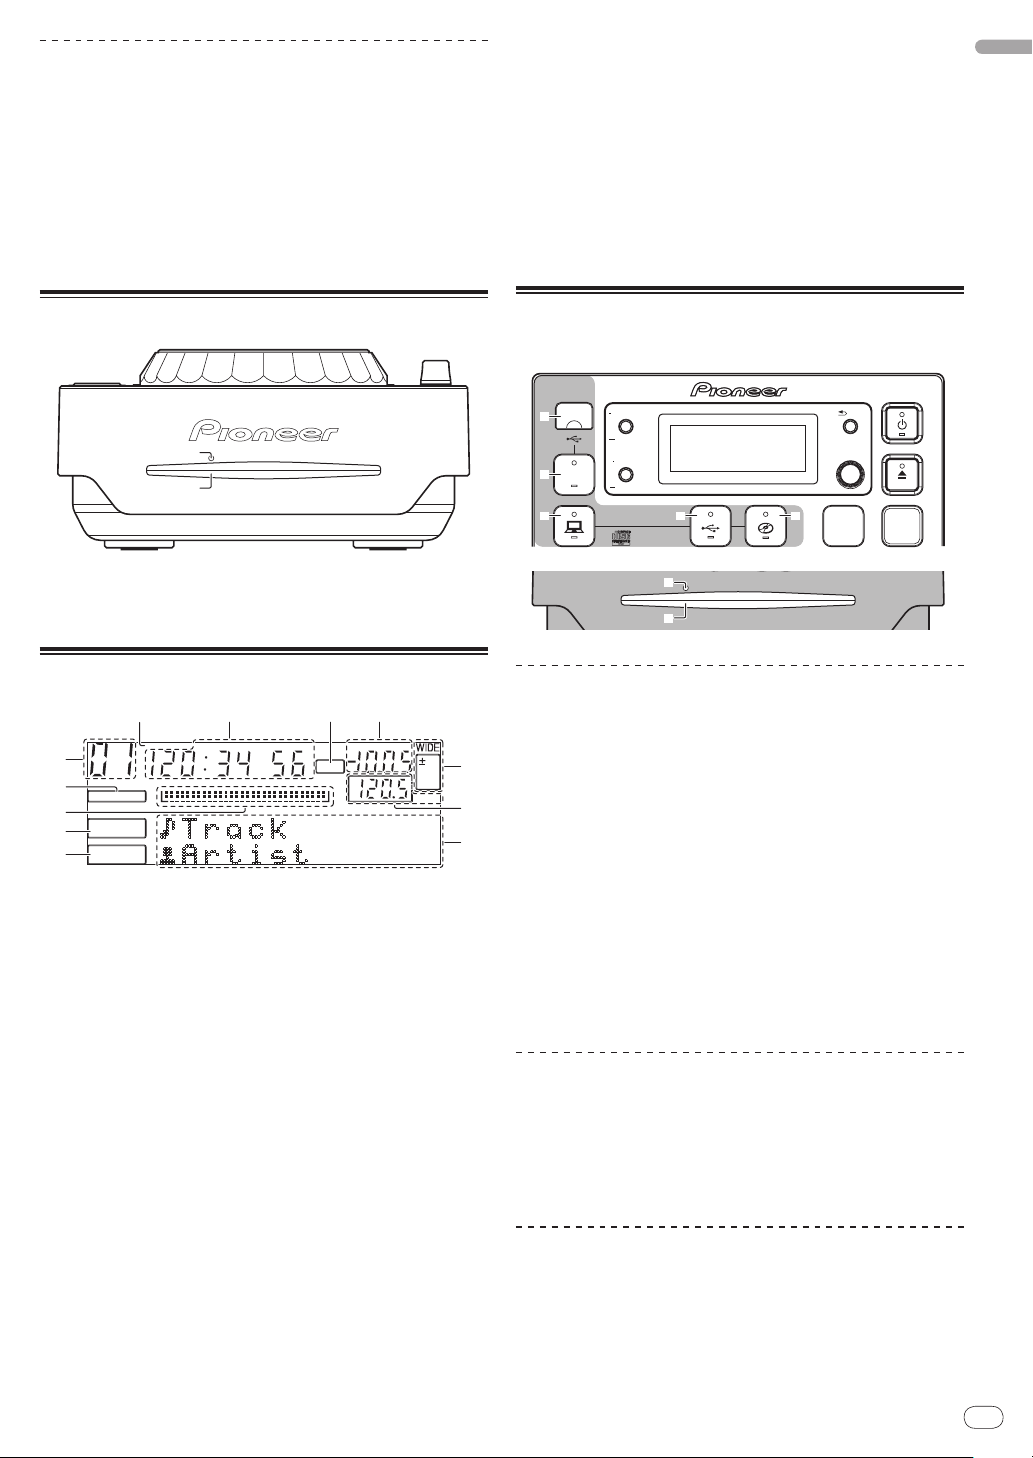
Front panel
s Disc force eject pin insertion hole (page 15)
t Disc insertion slot (page 15)
Main unit display
1 Track number
This displays the track number.
It is not possible to display more than 100 tracks.
2 A. CUE (page 17)
This lights when auto cue is set.
3 Playing address display
The track is displayed as a bar graph.
Turns off from the left side when the remaining time is displayed. The
entire graph flashes slowly when the remaining track time is under 30
seconds, then flashes quickly when the remaining track time is under
15 seconds.
4 INFO (page 19)
5 BROWSE (page 19)
6 REMAIN
This lights when the time display is set to the remaining time.
7 M, S, F (time display)
“M” indicates minutes, “S” seconds, “F” frames.
There are 75 frames to a second.
8 LOCK (page 21)
This lights when the BPM is locked.
Setting the source to be played
(source select section)
Loading discs
! Set the disc with the printed side facing up.
! Insert the disc horizontally into the disc insertion slot in the main
unit’s front panel.
! Do not load more than 1 disc.
! Do not force discs into the set’s disc insertion slot when the set’s
power is off. Doing so could damage the disc or the set.
! When the disc is being drawn in or ejected, do not apply any force
to the disc in the direction opposite its movement. Doing so could
damage the disc or the set.
1 Press [u] 1.
Turn on the power of this unit.
2 Insert the disc into the disc insertion slot t.
Playback starts.
! When auto cue is turned on, playback starts when
[PLAY/PAUSEf] is pressed. For details on the auto cue function,
see Setting auto cue on page 17.
Ejecting discs
Press [h DISC] 2.
The disc is ejected from the disc insertion slot.
! If you press [hDISC] by mistake, press [PLAY/PAUSEf] immedi-
ately to restore this unit to the status it was in just before [h DISC]
was pressed. (No sound is output during this time.)
About ejecting discs by force
! If the disc is not ejected when [h DISC] is pressed, eject the disc
forcibly by inserting the disc force eject pin into the disc force eject
pin insertion hole.
! When forcibly ejecting a disc, be sure to do so following the proce-
dure below.
En
15
Page 16
1 Press [u] 1 to turn this unit’s power off, then wait at
MULTI PLAYER
TEMPO
0
PLAY/PAUSE
SEARCH
TRACK SEARCH
IN/CUE OUT
OUT ADJUSTHOT LOOP
RELOOP/EXIT
BEAT LOOP
LOOP DIVIDE—+
VINYL MODE
TEMPO RANGE
MASTER TEMPO
LOOP
USB
STOP
SOURCE SELECT
MP3/AAC
WAV/AIFF
CUE
PLAYLIST
BPM
DISC
LOCK
REV FWD
BACK
SELECT PUSH
TIME MODE
AUTO CUE
DISPLAY
UTILITY
PLAYLIST
BACK
SELECT PUSH
TIME MODE
AUTO CUE
DISPLAY
UTILITY
3
4
5
e
f hg
a
b
c
8
9
6 7
d
k
l
m
n
i
j
least 1 minute.
About the power switch of this unit
Never forcibly eject a disc directly after turning off the set’s power.
Doing so is dangerous for the reasons described below.
! The disc will still be spinning when ejected and could hit your
fingers, etc., causing injury.
! Also, the disc clamp will rotate in an unstable way, and the disc
could get scratched.
2 Use the included disc force eject pin. (Do not use
anything else.)
The included disc force eject pin is mounted on the CDJ-350’s bottom
panel. When the pin is inserted all the way into the insertion hole, the
disc is ejected 5 mm to 10 mm out of the disc insertion slot. Grasp the
disc with your fingers and pull it out.
Loading USB devices
Connect the USB device to the USB device insertion slot 3.
The [USB STOP] indicator lights.
Removing USB devices from the set
! Be sure to follow the procedure below when removing USB
devices from the set. Removing a USB device without following
this procedure could erase the set’s management data and make it
impossible to read the USB device.
! When turning the set’s power off, be sure to remove the USB device
first.
1 Press [USB STOP] 4 for at least 2 seconds.
The [USB STOP] indicator turns off.
2 Disconnect the USB device.
Basic Operations (player, source
select and browse sections)
To turn the power on
Press [u] 1.
Turn on the power of this unit.
The [u] indicator lights green.
To set to the standby mode
When this unit’s power is on, press [u] 1 for at least 1
second.
This unit is set to the standby mode.
The [u] indicator lights red.
! When [u] is pressed again, the power turns on.
! This unit is equipped with an auto standby function. For details,
see About the auto standby function on page 22.
Playback
1 Load the source onto this unit.
2 Press [
This selects the source.
] 6 or [ ] 7 for at least 1 second.
3 Turn the rotary selector m.
Select the track.
! To move to lower layers in a folder, select the folder then press the
rotary selector.
! To return to higher layers, press [BACK] l.
! Press [BACK] for more than 1 second to move to the top layer.
4 Press the rotary selector m.
The track is loaded and playback begins.
! When a disc containing music files recorded with a hierarchical
structure is loaded, playback starts from the tracks in the uppermost level.
Pausing
During playback, press [PLAY/PAUSEf] b.
! Playback resumes when [PLAY/PAUSEf] is pressed again.
Resuming playback from the position playing
just before the disc was ejected (Resume)
After ejecting the disc, immediately reload that same disc
into this unit.
! The resume function only works when the same disc is ejected
then reloaded before loading another disc.
! The resume function does not work for USB devices.
Forward and reverse scanning
Press [SEARCH m, n] 9.
The disc is forwarded when [n] is pressed and held in.
The disc is reversed when [m] is pressed and held in.
Finding the beginnings of tracks (Track
Search)
Press [TRACK SEARCH o, p] 8.
Press the [p] to move to the beginning of the next track.
16
En
Page 17

When [o] is pressed, playback returns to the beginning of the currently playing track. When pressed twice in a row, playback returns to
the beginning of the previous track.
! When auto cue is turned on, the set searches for the beginning of
the track and pauses there (page 17).
Setting Cue
1 During playback, press [PLAY/PAUSEf] b.
Playback is paused.
2 Press [CUE] a.
The point at which the track is paused is set as the cue point.
The [PLAY/PAUSEf] indicator flashes and the [CUE] indicator
lights. No sound is output at this time.
! When a new cue point is set, the previously set cue point is
canceled.
Adjusting the cue point position
1 While pausing at the cue point, press [SEARCH m,
n] 9.
The [PLAY/PAUSEf] and [CUE] indicators flash.
2 Press [SEARCH m, n] 9.
The cue point can be fine-adjusted in units of single frames.
! The same operation is possible using the jog dial.
3 Press [CUE] a.
The position at which the button was pressed is set as the new cue
point.
! When a new cue point is set, the previously set cue point is
canceled.
! The auto cue level setting remains in the memory, even when the
power is turned off.
Changing the auto cue level
The acoustic pressure level identified as a silent section with the auto
cue function can be selected from eight levels.
–36 dB, –42 dB, –48 dB, –54 dB, –60 dB, –66 dB, –72 dB and –78 dB
! The auto cue level setting remains in the memory, even when the
power is turned off.
! The auto cue level can be changed using one of the procedures
described below.
Using [DISPLAY (UTILITY)] j
1 Press [DISPLAY (UTILITY)] j for at least 1 second.
The [UTILITY] screen is displayed.
2 Turn the rotary selector m, then press it.
Select [A. CUE LEVEL].
3 Turn the rotary selector m, then press it.
The auto cue level setting changes.
Using [TIME MODE (AUTO CUE)] i
1 Press [TIME MODE (AUTO CUE)] i for at least 5
seconds.
The auto cue level setting changing mode is set.
The current auto cue level is shown on the main unit display.
2 Turn the rotary selector m, then press it.
The auto cue level setting changes.
English
Returning to Cue Point (Back Cue)
During playback, press [CUE] a.
The set immediately returns to the currently set cue point and pauses.
! When [PLAY/PAUSEf] is pressed, playback starts from the cue
point.
Checking Cue Point (Cue Point Sampler)
After returning to the cue point, press and hold in [CUE] a.
Playback starts from the set cue point. Playback continues while the
button is held in.
Setting Cue Point during playback (Real
Time Cue)
During playback, press [LOOP IN/ CUE (HOT LOOP)] e.
The point at which the button was pressed is set as the cue point.
Setting auto cue
When a track is loaded or the track search operation is performed,
the silent section at the beginning of the track is skipped and the cue
point is automatically set at the point immediately before the sound
starts.
Press [TIME MODE (AUTO CUE)] i for at least 1 second.
Auto cue is set to on.
[A. CUE] lights on the main unit display.
! When [TIME MODE (AUTO CUE)] is pressed again for at least 1
second, auto cue is set to off.
Operating the jog dial
! The top of the jog dial has an embedded switch. Do not place
objects on the jog dial or subject it to strong forces.
! Water or other liquids getting into the set will lead to malfunction.
Switching the jog dial mode
Press [VINYL MODE] d.
The mode switches between VINYL and CDJ each time the button is
pressed.
The indicator lights when the VINYL mode is selected.
— VINYL mode: When the top of the jog dial is pressed during
playback, playback stops, and when the jog dial is spun at this
time sound is produced according to the direction in which
the jog dial is spun.
— CDJ mode: Playback does not stop even when the top of the
jog dial is pressed. Such operations as scratching cannot be
performed.
Scratch
1 Press [VINYL MODE] d.
Set the jog mode to VINYL.
2 During playback, press the top of the jog dial c.
Playback stops.
3 Spin the jog dial c in the direction you want to play
and at the desired speed.
The sound is played according to the direction and speed at which the
jog dial is spun by spinning the top of the jog dial while pressing it.
4 Release your hand from the top of the jog dial c.
Normal playback resumes.
En
17
Page 18
Pitch bend
SEARCH
TRACK SEARCH
IN/CUE OUT
OUT ADJUSTHOT LOOP
RELOOP/EXIT
BEAT LOOP
LOOP DIVIDE—+
VINYL MODE
TEMPO RANGE
LOOP
e
f hg
USB
STOP
SOURCE SELECT
MP3/AAC
WAV/AIFF
PLAYLIST
BPM
DISC
LOCK
BACK
SELECT PUSH
TIME MODE
AUTO CUE
DISPLAY
UTILITY
k
l
m
n
i
j
A.CUE
LOCK
16
REMAIN
MS
F
TEMPO %
INFO
BROWSE
BPM
During playback, spin the outer section without touching
the top of the jog dial c.
The playing speed increases when spun clockwise, decreases when
spun counterclockwise. When spinning is stopped, playback returns
to the normal speed.
! When the jog mode is set to the CDJ mode, the same operation
can be performed by spinning the top of the jog dial.
Frame search
In the pause mode, spin the jog dial c.
The pause position can be moved in units of single frames.
! The position is moved in the direction of playback when the jog
dial is spun clockwise, in the reverse direction when it is spun
counterclockwise. The position moves 135 for one revolution of the
jog dial.
3 Press [LOOP OUT (OUT ADJUST)] f.
Loop playback resumes.
! Loop playback also resumes if no operation is performed for over
10 seconds.
Canceling Loop playback (Loop Exit)
During loop playback, press [RELOOP/EXIT] g.
Playback continues beyond the Loop Out Point without returning to
the Loop In Point.
Returning to Loop playback (Reloop)
After canceling loop playback, press [RELOOP/EXIT] g
during playback.
The track returns to the previously set loop in point and loop playback
begins.
Super fast search
Spin the jog dial c while pressing [SEARCH m, n] 9.
The track is fast-forwarded/ fast-reversed in the direction in which the
jog dial is spun.
! This function is canceled when [SEARCH m, n] is released.
! When you stop the jog dial from spinning, normal playback
resumes.
! The fast-forward/ fast-reverse speed can be adjusted according to
the speed at which the jog dial is spun.
Super fast track search
When the jog dial c is spun while pressing [TRACK SEARCH o,
p] 8, tracks are searched at high speed in the direction in which the
jog dial is spun.
Setting loops (loop and beat loop
part)
1 During playback, press [LOOP IN/ CUE (HOT LOOP)] e.
Loop In Point is set.
! This operation is not necessary if you have already set a Cue Point
as a Loop In Point.
2 Press [LOOP OUT (OUT ADJUST)] f.
The loop out point is set, and loop playback begins.
Dividing loops (Loop Divide)
During loop playback, press [BEAT LOOP (LOOP DIVIDE)] h.
The length of loop playback is divided in half each time [–] is pressed.
When [+] is pressed, the loop playback length returns to the original
length.
Returning to the loop in point (Hot Loop)
During loop playback, press [LOOP IN/ CUE (HOT LOOP)] e.
The track instantaneously returns to the set loop in point and loop
playback starts.
Setting loops automatically based on the
track’s tempo (Beat Loop)
In the play or pause mode, press [BEAT LOOP
(LOOP DIVIDE)] h.
The loop out point is set automatically according to the track’s tempo
(BPM) and loop playback starts.
! Loop playback cannot be performed properly if the BPM value is
not displayed.
Displaying track information
(browse section)
Fine-adjusting the loop out point (loop
out adjust)
1 During loop playback, press [LOOP OUT
(OUT ADJUST)] f.
[LOOP OUT (OUT ADJUST)] starts flashing quickly and [LOOP IN/ CUE
(HOT LOOP)] turns off.
The loop out point’s time is displayed on the main unit display.
2 Press [SEARCH m, n] 9.
The loop out point can be adjusted in units of single frames.
! The same operation is possible using the jog dial.
! The loop out point adjustment range is anywhere after the loop in
point.
18
En
Page 19
About the [BROWSE] and [INFO] displays
A.CUE
LOCK
16
REMAIN
MS
F
TEMPO %
INFO
BROWSE
BPM
1
2
[BROWSE] display
This displays the loaded tracks, sorted in category or tree structure.
The display on the information display section differs according to
whether or not library information is recorded on the USB device.
— With library information d Library browsing: The music files are
displayed by the categories set in rekordbox (album, artist, etc.).
The category types can be changed in the Preferences (environ-
mental settings) in rekordbox.
— Without library information d Folder browsing: The folders/ tracks
on the medium are displayed with a tree structure.
[INFO] display
This displays detailed information on the loaded tracks.
The artist name, album name and beat display are displayed here.
Switching the display mode
Press [DISPLAY (UTILITY)] j.
The [BROWSE] and [INFO] displays switch each time the button is
pressed.
Using the beat display function
This displays the beat and playback position of the currently playing
track.
Beat position
1
Playback position
2
! The beat display screen is one item of the [INFO] display.
! When set to the [INFO] display, the display switches to the beat
display screen automatically when scratching and looping.
1 Press [DISPLAY (UTILITY)] j.
Switch to the [INFO] display.
2 Turn the rotary selector m.
Display the beat display screen.
Searching for tracks quickly using
the library information
When library information created using rekordbox is recorded on the
USB device, the library information can be used to quickly search for
tracks.
Searching by specifying the first
character (jump)
When the item names in the category are sorted in alphabetical order,
you can move to items beginning with the specified character.
! This function may not work for some categories.
1 Press [DISPLAY (UTILITY)] j.
Switch to the [BROWSE] display.
2 Turn the rotary selector m, then press it.
Select the category.
3 Press the rotary selector m for at least 1 second.
The display switches to the character input screen.
The following information is displayed in the information display
section.
— Upper section: Specified character
— Lower section: Items beginning with the character in the
upper section
4 Turn the rotary selector m.
The character displayed in the upper section of the information dis-
play switches.
The jump destination items corresponding to the character in the
upper section are displayed in the lower section.
5 Press the rotary selector m.
The display switches to the item selected in step 4.
Searching by inputting a character string
This function lets you display only the artists, albums, tracks or files
containing the character string you input.
! Categories not selected in the Preferences (environmental set-
tings) in rekordbox are not displayed.
1 Press [DISPLAY (UTILITY)] j.
Switch to the [BROWSE] display.
2 Turn the rotary selector m.
Select [SEARCH].
3 Press the rotary selector m.
The display switches to the character input screen.
4 Use the rotary selector m to input a character.
Turn the rotary selector and select the desired character, then press
the rotary selector to enter that character.
! Repeat this operation to input other characters.
5 Once you have completed inputting the character
string, press the rotary selector m.
Only items containing the character string you have input are
displayed.
The following information is displayed in the information display
section.
— Upper section: Number of items containing the input charac-
ter string
— Lower section: Names of items containing the input character
string
About the playback history
(HISTORY)
When tracks managed with rekordbox are played, the playback history
is registered at [HISTORY].
! The playback history is recorded on the USB device.
! The maximum number of tracks that can be recorded is 999.
! The playback history is not recorded if there is not enough free
space on the USB device or if the USB device is write-protected.
! Playlists can be made based on the playback history using rekord-
box. For details, see the rekordbox operating instructions.
! When a playback history is stored as a playlist using rekordbox,
the playback history is deleted.
! A new [HISTORY] is created each time the power is turned on and
off or the USB device is disconnected then reconnected.
Deleting the playback history
1 Turn the rotary selector m.
Select [HISTORY].
2 Press the rotary selector m for at least 1 second.
The delete menu is displayed.
En
English
19
Page 20
3 Turn the rotary selector m to select the range to be
USB
STOP
SOURCE SELECT
MP3/AAC
WAV/AIFF
PLAYLIST
BPM
DISC
LOCK
SELECT PUSH
DISPLAY
UTILITY
m
n
MULTI PLAYER
TEMPO
0
BEAT LOOP
LOOP DIVIDE—+
VINYL MODE
TEMPO RANGE
MASTER TEMPO
LOOP
PLAYLIST
BPM
LOCK
FWD
p
q
r
o
deleted.
— [CANCEL]: The [HISTORY]s are not deleted.
— [ONE]: The [HISTORY] selected with the cursor is deleted.
— [ALL]: All the [HISTORY]s are deleted.
4 Press the rotary selector m.
The range selected in step 3 is deleted.
Using playlists
Adding tracks to playlists
First load the USB device onto this unit.
! To add the currently playing track, switch to the [INFO] screen.
! To select and add a track, switch to the [BROWSE] screen.
! The maximum number of tracks that can be registered in one
playlist is 99.
1 Press [PLAYLIST] n.
The display switches to the [ADD TO] screen.
2 Turn the rotary selector m.
Select the playlist.
To create a new playlist, select [NEW PLAYLIST].
! Press [PLAYLIST] or [BACK] to return to the original screen.
3 Press the rotary selector m.
The track is added to the playlist.
Editing playlists
Changing the order of the tracks
Select the track whose order in the playlist you want to change
beforehand.
1 Press [PLAYLIST] n.
The resorting screen is displayed.
2 Turn the rotary selector m.
Select the position to which the track is to be moved.
The track is moved to the position between the two tracks displayed in
the information display section.
3 Press the rotary selector m.
The track order changes.
Removing tracks from playlists
Select the track you want to remove from the playlist beforehand.
1 Press [PLAYLIST] n for at least 1 second.
The remove menu is displayed.
2 Turn the rotary selector m, then press it.
Deleting playlists
Select the playlist you want to delete from the [PLAYLIST] category
beforehand.
En
20
— [CANCEL]: The track(s) is (are) not removed.
— [OK]: The track(s) is (are) removed.
1 Press [PLAYLIST] n for at least 1 second.
The delete menu is displayed.
2 Turn the rotary selector m, then press it.
— [CANCEL]: The playlist is not deleted.
— [OK]: The playlist is deleted.
Adjusting the playing speed (tempo
control section)
Move [TEMPO] r forward or backward.
The playing speed increases when the slider is moved to the [+] side
(towards you), decreases when the slider is moved to the [–] side
(away from you).
The percentage by which the playing speed is changed is displayed at
[TEMPO %] on the main unit display.
Selecting the playing speed adjustment
range
Press [TEMPO RANGE] p.
The playing speed adjustment range switches each time the button is
pressed.
[WIDE, ±16, ±10, ±6] lights on the main unit display.
! The speed can be adjusted in units of 0.02 % at [±6] %, in units of
0.05 % at [±10] %, in units of 0.05 % at [±16] %, and in units of 0.5 %
at [WIDE].
! The [WIDE] adjustment range is ±100 %. When set to –100 %,
playback stops.
! [WIDE] can only be selected when playing music CDs (CD-DA).
Adjusting the playing speed without
changing the pitch (Master Tempo)
Press [MASTER TEMPO] q.
The [MASTER TEMPO] indicator lights. The pitch does not change
even when the playing speed is changed with the [TEMPO] slider.
! The sound is digitally processed, so the sound quality changes.
Page 21

Using [BPM LOCK]
When the master BPM is set in advance, the playing speed of the currently playing track can be automatically set to the master BPM at the
press of a button.
Setting the master BPM
1 Press [BPM LOCK] o for at least 1 second.
The master BPM changing mode is set.
The current BPM value or the master BPM set the previous time is
displayed on the main unit display and [BPM] flashes.
2 Turn the rotary selector m.
Change the BPM value to the value you want to set as the master
BPM.
3 Press the rotary selector m.
The master BPM is set.
! If no operation is performed for over 10 seconds, the BPM value dis-
played in the information display section is set as the master BPM.
! When [BPM LOCK] is pressed for at least 1 second while in the
master BPM changing mode, the BPM value of the currently playing track is set as the master BPM.
! To change the master BPM, start over from step 1.
Using the BPM lock function
First set the master BPM.
! The BPM lock function cannot be used for tracks for which the
BPM cannot be measured correctly.
While the track is playing, press [BPM LOCK] o.
The BPM of the currently playing track is synchronized with the master BPM.
[LOCK] appears on the main unit display.
! [TEMPO RANGE] is set to [±16].
! [LOCK] flashes when the BPM of the currently playing track changes.
Press [BPM LOCK] while [LOCK] is flashing to re-lock the BPM.
About the tempo display in the BPM lock mode
When in the BPM lock mode, [TEMPO %] on the main unit display
switches at set intervals between the master BPM and the difference
with the position of the [TEMPO] slider.
— [INC]: To match the master BPM with the position of the [TEMPO]
slider, move [TEMPO] to the [+] side (towards you).
— [dEC]: To match the master BPM with the position of the [TEMPO]
slider, move [TEMPO] to the [–] side (away from you).
Canceling the BPM lock mode
There are four ways to cancel the BPM lock mode.
— By pressing [BPM LOCK] while in the BPM lock mode.
— Move the [TEMPO] slider to set the track’s playing speed to faster
or slower than the master BPM.
— By loading a track.
— By searching for a track (track search).
Operations in combination with a DJ
mixer
Also refer to the DJ mixer’s operating instructions.
Starting playback using a DJ mixer’s
fader (Fader Start)
1 Connect the CDJ-350 with a Pioneer DJ mixer using
the included control cord.
For instructions on connecting, see Basic style on page 12.
2 Turn on the fader start function from the DJ mixer.
3 Set the cue.
4 Move the DJ mixer’s channel fader or cross fader.
This unit’s pause mode is canceled and the track is played
instantaneously.
! When the channel fader or cross fader is set back to its original
position, playback cues back to the set cue point and the pause
mode is set (Back Cue).
Relay play on two DJ players
1 Connect the CDJ-350 and a DJ mixer.
For instructions on connecting, see Using the relay play function on
page 13.
2 Set the DJ mixer’s cross fader to the center position.
3 Turn auto cue on for both DJ players.
The DJ players’ auto cue indicators light.
4 Start playback on this unit.
When playback of the first track on this unit finishes, playback auto-
matically begins on the other DJ player. This unit cues at the begin-
ning of the next track and is set to the pause mode. This operation is
repeated for relay play on the two DJ players.
! The medium can be changed and the cue point set on the DJ
player that is in standby.
! The fader start function does not work during relay play.
! Relay play may not be possible if the two DJ players are not con-
nected to the same DJ mixer.
! If the power of the currently playing DJ player is turned off, play-
back may start on the other DJ player.
Using the DJ software
The CDJ-350 also outputs the operating data for the buttons and
dials in MIDI format. If you connect a computer with a built-in MIDI-
compatible DJ software via a USB cable, you can operate the DJ
software on this unit. The sound of music files being played on the
computer can also be output from the CDJ-350.
To use this unit as an audio device, install the driver software on the
computer beforehand (page 10). This unit must also be selected in the
DJ software’s audio output device settings. For details, see your DJ
software’s operating instructions.
1 Connect the USB port on this unit to your computer.
For instructions on connecting, see Using DJ software on page 13.
2 Press [ ] for at least 1 second.
The [CONTROL MODE] screen appears on the main unit display.
3 Start the DJ software.
Communication with the DJ software starts.
The DJ software can be operated using this unit’s buttons and
controls.
! It may not be possible to use some buttons to operate the DJ
software.
! For messages output by the CDJ-350, see List of MIDI Messages.
English
En
21
Page 22

Changing the MIDI channel setting
USB
STOP
SOURCE SELECT
MP3/AAC
WAV/AIFF
PLAYLIST
BPM
DISC
LOCK
BACK
SELECT PUSH
TIME MODE
AUTO CUE
DISPLAY
UTILITY
k
l
m
n
i
j
1 Press [DISPLAY (UTILITY)] j for at least 1 second.
The [UTILITY] screen is displayed.
2 Turn the rotary selector m, then press it.
Select [MIDI CH.].
3 Turn the rotary selector m, then press it.
Select the MIDI channel and change the setting. A setting from 1 – 16
can be selected.
4 Press the rotary selector m.
The changed MIDI channel settings are stored.
! To close the [UTILITY] screen, press [DISPLAY (UTILITY)] or
[BACK].
Changing the settings
1 Press [DISPLAY (UTILITY)] j for at least 1 second.
The [UTILITY] screen is displayed.
2 Use the rotary selector m to change the setting.
! Press [BACK] l to return to the previous screen.
3 Press the rotary selector m.
The changed settings are stored.
! To close the [UTILITY] screen, press [DISPLAY (UTILITY)] or
[BACK].
Setting preferences
Options
settings
A. CUE LEVEL
MIDI CHANNEL
AUTO STANDBY
LIBRARY CREATOR
VERSION No.
*: Setting upon purchase
About the auto standby function
When the auto standby function is turned on, the power is automatically set to the standby mode after the set time has passed with all of
the conditions below met.
— That this unit’s buttons, controls, etc., are not operated.
— That no track is played.
22
En
Selection items Descriptions
–42 dB/ –48 dB/
–36 dB/
–54 dB/ –60 dB*/ –66 dB/
–72 dB/ –78 dB
1* to 16 —
20 min*/ 40 min/ 60 min
OFF/
FOLDER
LIBRARY*/
—
For details, see Chang-
ing the auto cue level on
page 17.
For details, see About the
auto standby function on
page 22.
Sets the browsing method
for media on which Pioneer
MEP-7000 libraries are
recorded.
Displays the CDJ-350’s
software version.
Page 23

Additional information
Troubleshooting
! Incorrect operation is often mistaken for trouble or malfunction. If you think that there is something wrong with this component, check the points
below. Sometimes the trouble may lie in another component. Inspect the other components and electrical appliances being used. If the trouble cannot be rectified after checking the items below, ask your nearest Pioneer authorized service center or your dealer to carry out repair work.
! This unit may not operate properly due to static electricity or other external influences. In this case, proper operation may be restored by turn-
ing the power off, waiting 1 minute, then turning the power back on.
! Non-finalized (partial discs) CD-R/ -RW cannot be played on the CDJ-350.
! Irregularly shaped discs other than standard 12 cm discs cannot be played on the CDJ-350 (doing so will lead to damage or accidents).
! The BPM measured by the CDJ-350 may differ from the BPM indicated on the disc or that of a Pioneer DJ mixer, etc. This is due to the differ-
ent methods used for measuring the BPM, and is not a malfunction.
Problem Check Remedy
Disc cannot be ejected. —
Playback does not start when disc is loaded. Is the disc or file playable?
Is the auto cue function activated? Press [TIME MODE (AUTO CUE)] for at least 1 second to cancel
File cannot be played. Is the file copyright-protected (by DRM)? Copyright-protected files cannot be played.
No sound is produced, or sound is distorted
or noisy.
Loud noise is produced or playback stops
when a certain disc is played.
Track search operation takes too long. Is the auto cue function activated? Track searching may take some time when there are long silent
Back cue function does not work. Is a cue point set? Set a cue point. (page 17)
Loop play function does not work. Is a cue point set? Set a cue point. (page 17)
Settings are not stored in the memory. Has the power been turned off directly after
USB device is not recognized. Is the USB device properly connected? Connect the device securely (all the way in).
The playing address display is not displayed in
the remaining time mode.
Time is required to read USB devices (flash
memory drives and hard discs).
The category is not displayed. Are you playing a music CD? The category is not displayed for music CDs.
Nothing is displayed. Is the auto standby function activated? This unit is shipped with the auto standby function turned on.
The [u] indicator flashes and the power does
not turn on.
Are you operating the connected DJ mixer properly?
Is the CDJ-350 placed near a TV? Turn the TV’s power off, or install the CDJ-350 and TV away from
Is the disc scratched? Scratched discs may not play.
Is the disc dirty? Wipe the dirt off the disc. (page 25)
— If track searching is not possible within 10 seconds, a cue point is
changing the setting?
Is the USB device connected via a USB hub? USB hubs cannot be used.
Is the USB device supported by the CDJ-350? This player only supports USB mass storage class devices.
Is the file format supported by the CDJ-350? Check the file format of the connected USB device. For the file
Are you using a USB device (such as a bus powerdriven hard disk) whose current is higher than this
unit’s rated current (500 mA)?
— Turn the power off, wait 1 minute, then turn the power back on.
— When playing files recorded in VBR, it may happen that the set
Is there a large number of folders or files recorded
on the USB device?
Are files other than music files stored on the USB
device?
Is the library information recorded on the USB
device?
Is the USB device write-protected? Set the USB device so that files can be written on it.
— Normal operation can sometimes be restored by unplugging the
If [hDISC] does not work, eject the disc by inserting the pin into
the disc force eject hole. (page 15)
See About discs on page 6 or Playable music file formats on page 7.
the auto cue function. (page 17)
Check the operation of the DJ mixer.
one another.
sections between tracks.
set at the beginning of the track.
After changing settings, wait at least 10 seconds before turning
the power off.
This player supports portable flash memory and digital audio
playback devices.
formats supported by the CDJ-350, see About USB devices on
page 7.
Use a USB device within this unit’s rated current (such as a hard
disk driven by an AC adapter or other external power supply).
cannot detect the length of the track immediately and that some
time is required for the playing address display to appear.
When there are many folders or files, some time may be required
for loading.
When files other than music files are stored in folders, time is
required to read them as well. Do not store files or folders other
than music files on the USB device.
Use rekordbox to create the library information.
Set the USB device’s write-protect switch to the off position.
If you do not want to use the auto standby function, set [AUTO
STANDBY] to [OFF]. (page 22)
power cord, waiting at least 1 minute, then plugging the power
cord back in.
If the symptom persists, unplug the power cord and request
repairs.
English
En
23
Page 24
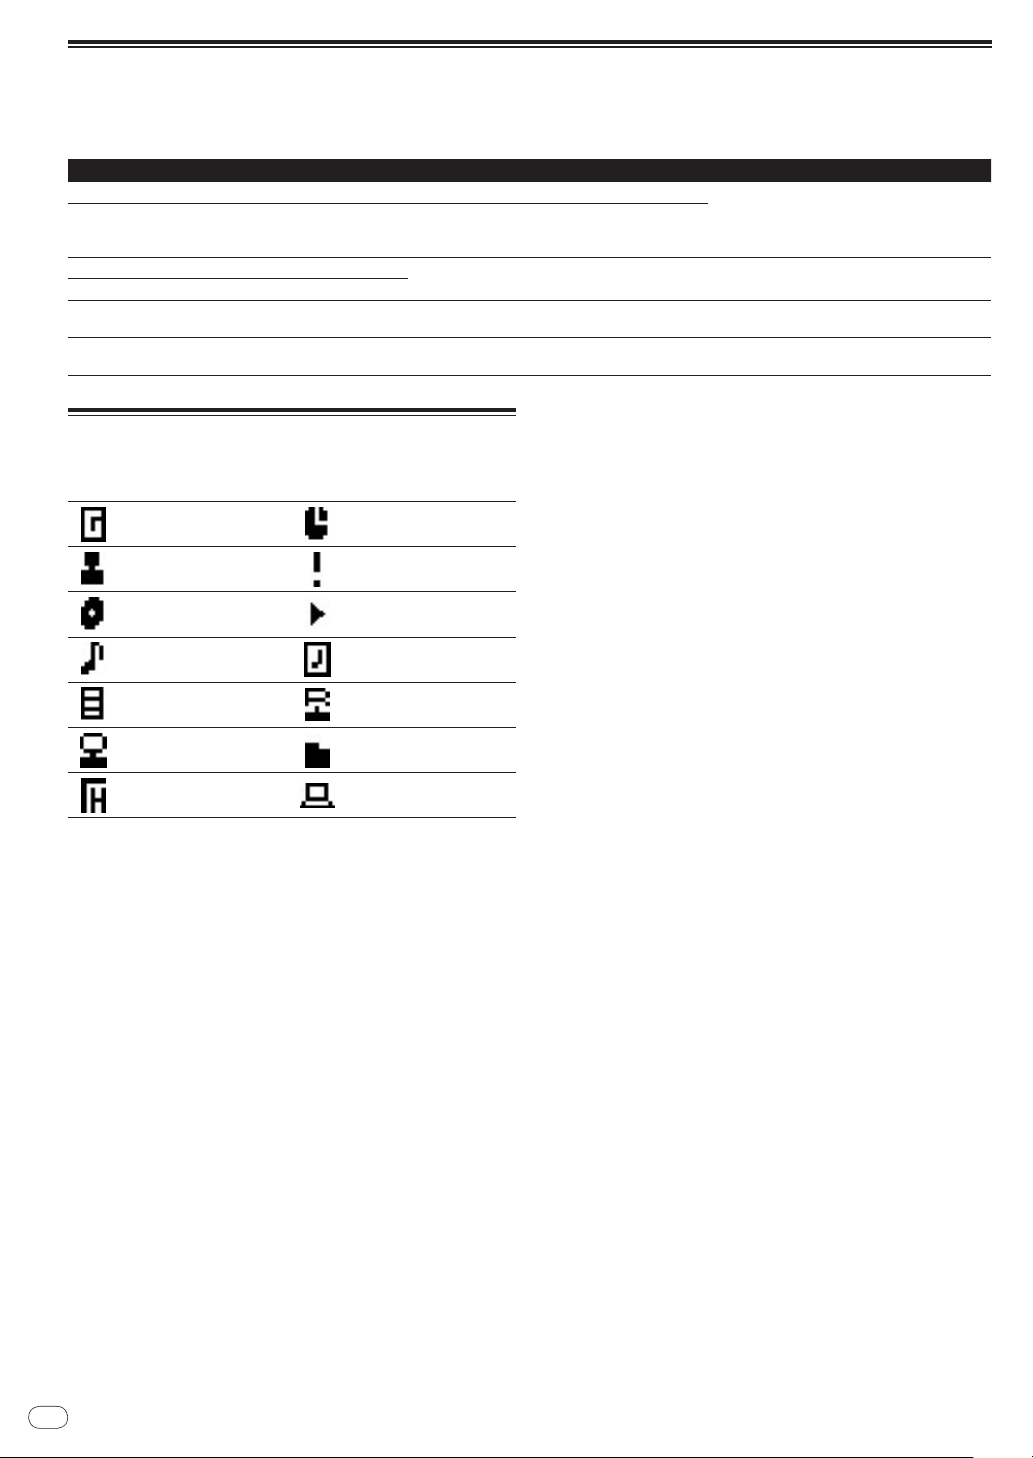
Error messages
When the CDJ-350 cannot operate normally, an error code appears on the display. Take the necessary measures, referring to the table below. If an
error code not indicated on the table below is displayed or if the same error code appears after the indicated action has been taken, contact your
store of purchase or nearby Pioneer service station.
Error code Error type Description of error Cause and action
E-7201 TOC READ ERROR TOC data cannot be read.
E-8301
E-8302
E-8303
E-8304 DECODE ERROR
E-8305 DATA FORMAT ERROR
E-8306 NO FILE
E-9101 MECHANICAL TIME OUT
PLAYER ERROR Disc that cannot be played normally is loaded.
Music files that cannot be played normally are
loaded.
Track recorded in the library, playlist, etc., has been
deleted from the USB device and cannot be played.
Mechanical operation has not stopped within specified time.
! Disc is cracked.dReplace the disc.
! Disc is dirty.dClean the disc.
! If operation is normal with other discs, the
problem is with that disc.
Format is wrong.dReplace with music files in
the proper format.
Do not delete that track from the USB device.
There is a foreign object in the disc insertion
slot.dRemove the foreign object.
List of icons displayed on the main
unit display section
Genre
Artist
Album
Track/ file name
Playlist
Original artist
History
Time
Playback is not possible
Playing
Played
Remixer
Folder
PC Control
24
En
Page 25
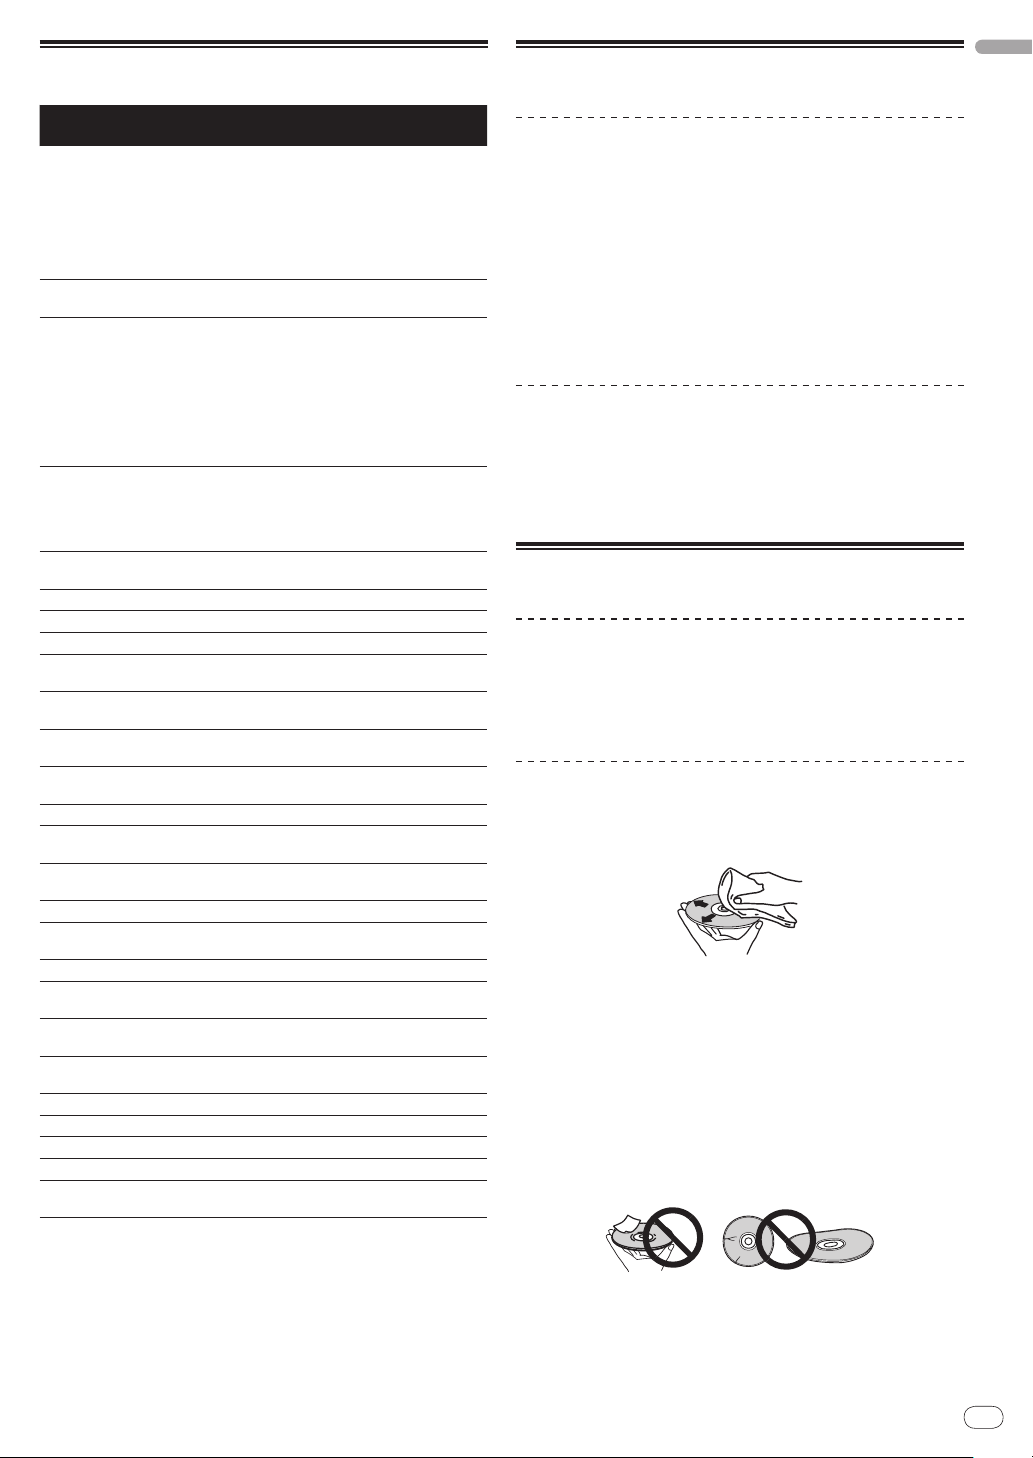
List of MIDI Messages
Cautions on use
English
SW Name SW Type
Jog dial
(scratch)
TEMPO
Jog dial (spin
outer section)
SELECT PUSH
(turn)
PAUSE
PLAY/
f
CUE
SEARCH n
SEARCH m
TRACK
SEARCH p
TRACK
SEARCH o
LOOP IN/
(HOT LOOP)
LOOP OUT
(OUT ADJUST)
RELOOP/
TIME MODE
(AUTO CUE)
DISPLAY (UTIL-
ITY)
TEMPO RANGE
MASTER
TEMPO
VINYL MODE
BEAT LOOP
(LOOP DIVIDE) +
BEAT LOOP
(LOOP DIVIDE) –
Jog dial (press
top)
BPM LOCK
PLAYLIST
hDISC
BACK
SELECT PUSH
(press)
n is the channel number.
General
Purpose
Controller
VR Bn 1D dd
General
Purpose
Controller
General
Purpose
Controller
SW 9n 00 dd OFF=00, ON=7F
SW 9n 01 dd OFF=00, ON=7F
SW 9n 02 dd OFF=00, ON=7F
SW 9n 03 dd OFF=00, ON=7F
SW 9n 04 dd OFF=00, ON=7F
SW 9n 05 dd OFF=00, ON=7F
CUE
SW 9n 06 dd OFF=00, ON=7F
SW 9n 07 dd OFF=00, ON=7F
EXIT
SW 9n 08 dd OFF=00, ON=7F
SW 9n 0E dd OFF=00, ON=7F
SW 9n 0F dd OFF=00, ON=7F
SW 9n 10 dd OFF=00, ON=7F
SW 9n 11 dd OFF=00, ON=7F
SW 9n 12 dd OFF=00, ON=7F
SW 9n 16 dd OFF=00, ON=7F
SW 9n 17 dd OFF=00, ON=7F
SW 9n 20 dd OFF=00, ON=7F
SW 9n 26 dd OFF=00, ON=7F
SW 9n 2E dd OFF=00, ON=7F
SW 9n 2F dd OFF=00, ON=7F
SW 9n 32 dd OFF=00, ON=7F
SW 9n 33 dd OFF=00, ON=7F
MIDI Messages
(3 Bytes)
Bn 10 dd
Bn 30 dd
Bn 4F dd
Notes
Linear value with
respect to speed from
stop to x4 speed. Stop:
40, FWD (CW) direction: 41 to 7F (x0.06 to
x4 speed), REV (CCW)
direction: 3F to 00 (x0.5
to x4 speed)
00 to 7F (00 at – side, 7F
at + side, 40 at center)
Linear value with
respect to speed from
x0.5 speed to x4 speed.
Stop (under x0.49
speed): 40, FWD (CW)
direction: 41 to 7F
(x0.5 to x4 speed), REV
(CCW) direction: 3F to
00 (x0.5 to x4 speed)
98 – 127, 1 – 30 Difference of count from
previous time is sent
(±1 – ±30) When over
±30, set at ±30
About condensation
Water droplets (condensation) may form inside the unit (on operating
parts and lenses) in the winter, for example, if the unit is moved from a
cold place into a warm room or if the temperature in the room in which
the unit is installed rises suddenly (through heating, etc.). The unit
will not operate properly and will not be playable with condensation
inside. Let the unit stand for 1 to 2 hours at room temperature (though
this time depends on the conditions of the condensation) without
turning on the power. The water droplets will evaporate and the unit
will become playable. Condensation can occur in the summer as well
if the unit is exposed to the direct wind from an air-conditioner, etc. If
this happens, move the unit to a different location.
Cleaning the lens
The player’s lens should not become dirty in normal use, but if for
some reason it should malfunction due to dust or dirt, consult your
nearest Pioneer authorized service center. Although lens cleaners
for players are commercially available, we advise against using them
since some may damage the lens.
Handling discs
Storing
! Always place discs in their cases and store them vertically, avoid-
ing hot, humid places, places exposed to direct sunlight and
extremely cold places.
! Be sure to read the cautions included with the disc.
Cleaning discs
! Discs may not play if there are fingerprints or dust on them. In this
case, use a cleaning cloth, etc., to gently wipe the disc from the
inside towards the outside. Do not use dirty cleaning cloths.
! Do not use benzene, thinner or other volatile chemicals. Also do
not use record spray or antistatic agents.
! For tough dirt, apply some water to a soft cloth, wring out thor-
oughly, wipe off the dirt, then wipe off the moisture with a dry
cloth.
! Do not use damaged (cracked or warped) discs.
! Do not let the signal surface of discs get scratched or dirty.
! Do not place two discs in the disc tray, one on top of the other.
! Do not attach pieces of paper or stickers to discs. Doing so could
warp discs, making it impossible to play them. Also note that
rental discs often have labels attached to them, and the label’s
glue may have oozed out. Check that there is no glue around the
edges of such labels before using rented discs.
En
25
Page 26
About specially shaped discs
Specially shaped discs (heart-shaped, hexagonal, etc.) cannot be
played on this player. Do not attempt to play such discs, as they could
damage the player.
About condensation on discs
Water droplets (condensation) may form on the surface of discs if
they are moved from a cold place (particularly in winter) into a warm
room. Discs may not play normally if there is condensation on them.
Carefully wipe the water droplets off the surface of the disc before
loading it.
Disclaimer
! Pioneer and rekordbox are trademarks or registered trademarks of
the Pioneer Corporation.
! Microsoft
are registered trademarks or trademarks in the United States and
other countries of the Microsoft Corporation of the United States.
! Apple, Macintosh, Mac OS, Safari, iTunes and Finder are reg-
istered trademarks of Apple Inc. in the United States and other
countries.
! Pentium is a registered trademark of Intel Corporation.
! Adobe and Reader are either registered trademarks or trademarks
of Adobe Systems Incorporated in the United States and/ or other
countries.
! ASIO is a trademark of Steinberg Media Technologies GmbH.
The names of companies and products mentioned herein are the
trademarks of their respective owners.
This product has been licensed for nonprofit use. This product has
not been licensed for commercial purposes (for profit-making use),
such as broadcasting (terrestrial, satellite, cable or other types
of broadcasting), streaming on the Internet, Intranet (a corporate
network) or other types of networks or distributing of electronic
information (online digital music distribution service). You need to
acquire the corresponding licenses for such uses. For details, visit
http:/
®
, Windows Vista®, Windows® and Internet Explorer®
/
www.mp3licensing.com.
Using the support site
Before making an inquiry about rekordbox operations and technical
support, refer to the operating instructions for rekordbox and check
the FAQs published on the support site for rekordbox.
rekordbox support site
http://www.prodjnet.com/rekordbox/support/
! To make an inquiry about rekordbox, you need to register as a user in
advance on the support site for rekordbox.
! You need to enter the license key for your user registration. Have
the license key ready. Also, be sure not to forget the login name
(your e-mail address) and the password specified for your user
registration, as well as the license key.
! Pioneer Corporation collects your personal information for the
following purposes:
1 To provide customer support for your purchased product
2 To inform you of product or event information by e-mail
3 To reflect your opinions collected by survey on product planning
— Your personal information is kept confidential corresponding to
the privacy policy set forth by our company.
— You can check our privacy policy on the support site for
rekordbox.
! When making inquiries regarding rekordbox, please be sure to
furnish your computer type and specifications (CPU, installed
memory, other connected peripherals, etc.), the operating system
and version used, as well as concrete information regarding the
issue at hand.
— For an inquiry about configuring your computer with peripheral
devices other than our products and the corresponding
technical support, contact each manufacturer or retailer.
! rekordbox is subject to upgrade for enhanced function and
performance. The upgrade program can be downloaded on the
support site. We strongly recommend you upgrade your software on
a regular basis to keep the latest updates on your system.
Cautions on copyrights
rekordbox restricts playback and duplication of copyright-protected
music contents.
! When coded data, etc., for protecting the copyright is embedded in
the music contents, it may not be possible to operate the program
normally.
! When rekordbox detects that coded data, etc., for protecting the
copyright is embedded in the music contents, processing (play-
back, reading, etc.) may stop.
Recordings you have made are for your personal enjoyment and
according to copyright laws may not be used without the consent of
the copyright holder.
! Music recorded from CDs, etc., is protected by the copyright laws
of individual countries and by international treaties. It is the full
responsibility of the person who has recorded the music to ensure
that it is used legally.
! When handling music downloaded from the Internet, etc., it is the
full responsibility of the person who has downloaded the music to
ensure that it is used in accordance with the contract concluded
with the download site.
En
26
Page 27

Specifications
Power requirements .................................. AC 220 V to 240 V, 50 Hz/ 60 Hz
Power consumption ..............................................................................16 W
Power consumption (standby) ............................................................ 0.3 W
Main unit weight .................................................................................. 2.3 kg
Max. dimensions .................. 220 mm (W) × 107 mm (H) × 288.5 mm (D)
Tolerable operating temperature ...................................... +5 °C to +35 °C
Tolerable operating humidity ....................5 % to 85 % (no condensation)
Analog audio output (AUDIO OUT L/ R)
Output terminal ....................................................................... RCA terminal
Output Level ....................................................................... 2.0 Vrms (1 kHz)
Frequency response .............................................................. 4 Hz to 20 kHz
S/ N ratio ...............................................................................................115 dB
Total harmonic distortion .................................................................0.006 %
USB downstream section (USB)
Port .......................................................................................................Type A
Power supply ...................................................................5 V/
USB upstream section (USB)
Port .......................................................................................................Type B
Control output (CONTROL)
Port .................................................................................................. Mini-jack
! The specifications and design of this product are subject to change
without notice.
! The articles concerning free repairs, etc., indicated on the warranty
do not apply to the rekordbox music management software. Before
installing or using rekordbox, carefully read the articles in Software
end user license agreement on page 8.
500 mA or less
English
En
27
Page 28

Nous vous remercions d’avoir acquis un produit Pioneer. Veuillez lire attentivement ce mode d’emploi afin de connaître la manière d’utiliser
Ce point d’exclamation, placé dans un
triangle équilatéral, a pour but d’attirer
l’attention de l’utilisateur sur la présence,
dans les documents qui accompagnent
l’appareil, d’explications importantes du
point de vue de l’exploitation ou de
l’entretien.
Ce symbole de l’éclair, placé dans un
triangle équilatéral, a pour but d’attirer
l’attention de l’utilisateur sur la présence, à
l’intérieur du coffret de l’appareil, de
“tensions dangereuses” non isolées d’une
grandeur suffisante pour représenter un
risque d’électrocution pour les êtres
humains.
ATTENTION :
POUR ÉVITER TOUT RISQUE
D’ÉLECTROCUTION, NE PAS ENLEVER LE
COUVERCLE (NI LE PANNEAU ARRIÈRE).
AUCUNE PIÈCE RÉPARABLE PA R
L’UTILISAT EUR NE SE TROUVE À
L’ INTÉRIEUR. CONFIER TOUT ENTRETIEN À
UN PERSONNEL QUALIFIÉ UNIQUEMENT.
ATTENTION
DANGER D´ELECTROCUTION
NE PAS OUVRIR
IMPORTANT
D3-4-2-1-1_A1_Fr
Si vous souhaitez vous débarrasser de cet appareil, ne le mettez pas à la poubelle avec vos ordures ménagères. Il existe un système de
collecte séparé pour les appareils électroniques usagés, qui doivent être récupérés, traités et recyclés conformément à la législation.
Les habitants des états membres de l’UE, de Suisse et de Norvège peuvent retourner gratuitement leurs appareils électroniques usagés aux
centres de collecte agréés ou à un détaillant (si vous rachetez un appareil similaire neuf).
Dans les pays qui ne sont pas mentionnés ci-dessus, veuillez contacter les autorités locales pour savoir comment vous pouvez vous débarrasser
de vos appareils.
Vous garantirez ainsi que les appareils dont vous vous débarrassez sont correctement récupérés, traités et recyclés et préviendrez de cette façon
les impacts néfastes possibles sur l’environnement et la santé humaine.
K058b_A1_Fr
l’appareil comme il convient. Cela fait, conservez le mode d’emploi de façon à pouvoir vous y référer en cas de nécessité.
Dans certains pays ou certaines régions, la forme de la fiche et de la prise d’alimentation est un peu différente de ce qui est montré dans les
illustrations. Toutefois, l’appareil se raccorde et fonctionne de la même façon.
Fr
2
Page 29

AVERTISSEMENT
Cet appareil n’est pas étanche. Pour éviter les risques
d’incendie et de décharge électrique, ne placez près de
lui un récipient rempli d’eau, tel qu’un vase ou un pot
de fleurs, et ne l’exposez pas à des gouttes d’eau, des
éclaboussures, de la pluie ou de l’humidité.
D3-4-2-1-3_A1_Fr
AVERTISSEMENT
Avant de brancher l’appareil pour la première, lisez
attentivement la section suivante.
La tension de l’alimentation électrique disponible
varie selon le pays ou la région. Assurez-vous que
la tension du secteur de la région où l’appareil sera
utilisé correspond à la tension requise (par ex. 230
V ou 120 V), indiquée sur le panneau arrière.
D3-4-2-1-4*_A1_Fr
AVERTISSEMENT
Pour éviter les risques d’incendie, ne placez aucune
flamme nue (telle qu’une bougie allumée) sur
l’appareil.
D3-4-2-1-7a_A1_Fr
PRÉCAUTION DE VENTILATION
Lors de l’installation de l’appareil, veillez à laisser un
espace suffisant autour de ses parois de manière à
améliorer la dissipation de chaleur (au moins 5 cm à
l’arrière et 5 cm de chaque côté).
AVERTISSEMENT
Les fentes et ouvertures du coffret sont prévues pour la
ventilation, pour assurer un fonctionnement stable de
l’appareil et pour éviter sa surchauffe. Pour éviter les
risques d’incendie, ne bouchez jamais les ouvertures et
ne les recouvrez pas d’objets, tels que journaux, nappes
ou rideaux, et n’utilisez pas l’appareil posé sur un tapis
épais ou un lit.
D3-4-2-1-7b*_A1_Fr
Milieu de fonctionnement
Température et humidité du milieu de fonctionnement :
De +5 °C à +35 °C (de +41 °F à +95 °F) ; Humidité
relative inférieure à 85 % (orifices de ventilation non
obstrués)
N’installez pas l’appareil dans un endroit mal ventilé ou
un lieu soumis à une forte humidité ou en plein soleil
(ou à une forte lumière artificielle).
D3-4-2-1-7c*_A1_Fr
Si la fiche d’alimentation secteur de cet appareil ne
convient pas à la prise secteur à utiliser, la fiche doit
être remplacée par une appropriée. Ce
remplacement et la fixation d’une fiche secteur sur le
cordon d’alimentation de cet appareil doivent être
effectués par un personnel de service qualifié. En cas
de branchement sur une prise secteur, la fiche de
coupure peut provoquer une sérieuse décharge
électrique. Assurez-vous qu’elle est éliminée
correctement après sa dépose.
L’ appareil doit être déconnecté en débranchant sa
fiche secteur au niveau de la prise murale si vous
prévoyez une période prolongée de non utilisation
(par exemple avant un départ en vacances).
D3-4-2-2-1a_A1_Fr
ATTENTION
L’ interrupteur de cet appareil ne coupe pas
complètement celui-ci de sa prise secteur. Comme le
cordon d’alimentation fait office de dispositif de
déconnexion du secteur, il devra être débranché au
niveau de la prise secteur pour que l’appareil soit
complètement hors tension. Par conséquent, veillez à
installer l’appareil de telle manière que son cordon
d’alimentation puisse être facilement débranché de la
prise secteur en cas d’accident. Pour éviter tout
risque d’incendie, le cordon d’alimentation sera
débranché au niveau de la prise secteur si vous
prévoyez une période prolongée de non utilisation (par
exemple avant un départ en vacances).
D3-4-2-2-2a*_A1_Fr
NOTE IMPORTANTE SUR LE CABLE
D’ALIMENTATION
Tenir le câble d’alimentation par la fiche. Ne pas
débrancher la prise en tirant sur le câble et ne pas
toucher le câble avec les mains mouillées. Cela risque
de provoquer un court-circuit ou un choc électrique. Ne
pas poser l’appareil ou un meuble sur le câble. Ne pas
pincer le câble. Ne pas faire de noeud avec le câble ou
l’attacher à d’autres câbles. Les câbles d’alimentation
doivent être posés de façon à ne pas être écrasés. Un
câble abîmé peut provoquer un risque d’incendie ou un
choc électrique. Vérifier le câble d’alimentation de
temps en temps. Contacter le service après-vente
PIONEER le plus proche ou le revendeur pour un
remplacement.
S002*_A1_Fr
Lorsque vous utilisez ce produit, vérifiez les
informations concernant la sécurité sous l’appareil.
D3-4-2-2-4_B1_Fr
ATTENTION
Cet appareil est un produit laser de Classe 1, classé
selon l’article IEC 60825-1:2007 relatif à la Sécurité
des produits laser.
APPAREIL Á LASER DE CLASSE 1
D58-5-2-2a_A1_Fr
Fr
3
Page 30

Comment lire ce manuel
Les noms d’écrans, de menus et de touches sont entre crochets dans
ce manuel. (ex. canal [MASTER], menu [ON/ OFF], [File])
! Le Mode d’emploi de rekordbox peut être consulté par le menu
[Aide] de rekordbox après l’installation de rekordbox.
Informations préliminaires
Caractéristiques .......................................................................................... 5
Exemple de configuration du système ......................................................5
Contenu du carton d’emballage ................................................................ 5
Avant de commencer
Sources prises en charge ...........................................................................6
Disques et dispositifs USB utilisables ......................................................6
Formats de fichiers de musique lisibles ...................................................7
Fonctions utilisables avec un ordinateur ..................................................8
À propos du logiciel de gestion de musique rekordbox
À propos du pilote (Windows) ..................................................................11
...............................9
Raccordements
Noms des prises ........................................................................................13
Style de base .............................................................................................. 13
Opérations
Panneau de commande ...........................................................................15
Face avant ..................................................................................................16
Écran de l’appareil principal ....................................................................16
Spécification de la source à lire (section de sélection de la source) ... 16
Opérations de base (sections lecteur, sélection de la source et
navigation) .................................................................................................17
Fonctionnement de la molette jog ...........................................................19
Pose de boucles (partie Boucle et Boucle selon le tempo)
Affichage des informations des morceaux (section de navigation) .....20
Recherche rapide de morceaux à l’aide des informations de
bibliothèques ............................................................................................. 20
À propos de l’historique de la lecture (HISTORY) .................................. 21
Utilisation de listes de lecture ..................................................................21
Réglage de la vitesse de la lecture (section de commande de tempo) 22
Utilisation de [BPM LOCK] .......................................................................22
Opérations avec une table de mixage DJ ...............................................23
Utilisation du logiciel DJ...........................................................................23
Changement des réglages .......................................................................23
..........................19
Informations supplémentaires
En cas de panne ........................................................................................ 25
Messages d’erreur ....................................................................................26
Liste des icônes s’affichant sur l’écran de l’appareil principal ............26
Liste de messages MIDI ........................................................................... 27
Précautions d’emploi................................................................................27
Manipulation des disques ........................................................................27
Avis de non responsabilité .......................................................................28
Précautions concernant les droits d’auteur ...........................................28
Utilisation du site d’assistance ................................................................28
Spécifications ............................................................................................ 29
Fr
4
Page 31

Informations préliminaires
MULTI PLAYER
TEMPO
0
PLAY/PAUSE
SEARCH
TRACK SEARCH
IN/CUE OUT
OUT ADJUSTHOT LOOP
RELOOP/EXIT
BEAT LOOP
LOOP DRIVE
VINYL MODE
TEMPO RANGE
MASTER TEMPO
LOOP
USB
STOP
SOURCE SELECT
MP3/AAC
WAV/AIFF
CUE
PLAYLIST
BPM
DISC
LOCK
REVFWD
BACK
SELECT PUSH
TIME MODE
AUTO CUE
DISPLAY
UTILITY
A.CUE
LOCK
16
REMAIN
MS
FTEMPO%
INFO
BROWSE
BPM
2 CHANNEL DJ MIXER
MIC /AUX
MIC
0
LEVEL
HI
AUX
LOW
MIC/AUX
ON
12
12
12
12
HEADPHONES
CUE
CH-1
CUE
MIXING
CUEMASTER
CH-2
LEVEL
PHONES
0
9
9
9
9
CD
PHONO
CH- 1
FADER
START
FADER
START
CH- 1CH- 2
9
9
9
9
CH-2
THRU
CD
PHONO
TRIM TRIM
HI
MID
LOW
HI
MID
LOW
LEVEL
MASTER
LEVEL/DEPTH
FILTERCRUSH
GATE JET
MASTER EFFECT
0
PREVIEW
TRACK MARK SEARCH
PLAY
USB
STOP
REC
MASTER LEVEL
Casque
Disque
CDJ-350CDJ-350 DJM-350
Pour vérifier l’ entrée/
la sortie audio
Composant, amplificateur,
enceinte amplifiée, etc.
Dispositif USB Dispositif USB
Pour une sortie audio
Ordinateur
Logiciel de gestion
de musique
rekordbox
Caractéristiques
Cet appareil est un lecteur DJ intégrant la technologie spécifique des CDJ Pioneer, la référence mondiale en matière de lecteurs pour discothèques. Ce multi-lecteur destiné aux DJ peut traiter une variété de sources et permet, sans difficulté, une véritable lecture DJ.
Français
MULTIMÉDIA, MULTIFORMAT
Cet appareil peut lire non seulement les CD de musique (CD-DA),
mais aussi les fichiers de musique (MP3, AAC, WAV et AIFF) enregistrés sur des dispositifs de stockage de masse USB (mémoires flash
et disques durs) et sur des disques CD-R/ -RW. Il peut aussi servir de
BEAT DISPLAY
La position du temps correspondant au BPM du morceau et la position de la lecture sont indiquées à l’écran de l’appareil principal. Ceci
permet de contrôler visuellement le temps pour effectuer des scratching et des boucles.
contrôleur de logiciel DJ et d’interface audio.
rekordbox
TM
rekordbox, un logiciel de gestion de musique destiné exclusivement
aux lecteurs DJ Pioneer, est fourni. Il permet de traiter de diverses
façons les fichiers de musique sur un ordinateur (analyser, paramétrer, créer, stocker l’historique de la lecture, etc.). De plus, les fichiers
BPM LOCK
Si le BPM principal est spécifié au préalable, une simple pression du
doigt sur une touche permettra de régler la vitesse du morceau en
cours de lecture sur le BPM principal.
Un véritable mixage au BPM est facile à exécuter, sans déplacer le
curseur TEMPO.
de musique traités avec rekordbox peuvent être transférés sur un
dispositif USB qui, raccordé à cet appareil, facilite la sélection des
morceaux, la gestion des listes de lecture, etc.
LISTE DE LECTURE
Le morceau en cours de lecture ou sélectionné peut être enregistré
dans la liste de lecture, si nécessaire (morceaux traités avec rekordbox
seulement).
Exemple de configuration du système
Un système DJ, similaire à celui qui figure sur le schéma ci-dessous, peut être obtenu à partir de cet appareil, d’une table de mixage DJ et de
périphériques.
Contenu du carton d’emballage
! CD-ROM (avec la clé de licence rekordbox)
! Câble d’alimentation
! Câble audio
! Cordon de commande
! Broche d’éjection forcée de disque (sous le produit)
! Carte de garantie
! Mode d’emploi (ce document)
Fr
5
Page 32

Avant de commencer
Sources prises en charge
Cet appareil prend en charge les sources suivantes.
! Disques (la page 6)
! Dispositifs USB (la page 7)
! Ordinateurs (la page 8)
Installez le logiciel sur l’ordinateur depuis le CD-ROM fourni.
Le CD-ROM fourni contient les deux programmes suivants.
— Logiciel de gestion de musique rekordbox
— Pilote
Disques et dispositifs USB utilisables
À propos des disques
Cet appareil peut lire les disques suivants.
Type Marque
CD
1
Formats compatibles
! CD de musique (CD-DA)
CD-R
! CD de musique (CD-DA)
CD-RW
! MP3
! AAC
! WAV
! AIFF
2
CD-TEXT
CD de musique (CD-DA)
1 Les disques sur l’étiquette, l’emballage ou la jaquette desquels les marques
figurant dans ce tableau sont imprimées peuvent être lus.
2 Les noms de titres, d’albums et d’auteurs enregistrés dans les données
CD-Text sont affichés. Lorsque plusieurs données alphanumériques sont
enregistrées sur le disque, les informations des premières d’entre elles sont
affichées.
À propos des disques CD-R/ -RW
Les fichiers de musique (MP3/ AAC/ WAV/ AIFF) enregistrés sur des
disques CD-R/
Niveaux de dossiers
Nombre maximal
de dossiers
Nombre maximal
de fichiers
Le chargement peut durer un certain temps si la quantité de dossiers ou de
fichiers est importante.
-RW peuvent être lus.
Maximum 8 niveaux (au-delà du 8e niveau de dossiers, les
fichiers ne peuvent plus être lus)
1 000 dossiers
1 000 fichiers
À propos des disques créés sur ordinateur
Il est possible que certains disques ne puissent pas être lus, selon
les réglages de l’application et de l’environnement de l’ordinateur.
Enregistrez le disque dans un format pris en charge par cet appareil.
Pour le détail, contactez le revendeur de l’application.
Si la qualité de l’enregistrement est mauvaise parce que le disque
n’est pas de bonne qualité, ou bien parce qu’il y a des éraflures sur le
disque ou parce qu’il y avait de la saleté sur la lentille lors de l’enregistrement, il peut être impossible de lire le disque.
Création de disques de sauvegarde
Lorsque des disques CD-R/ -RW sont mis en pause ou laissés en pause
pendant un certain temps aux points de repères, il peut être difficile
de lire ce point du disque, compte tenu des propriétés du disque.
Lorsqu’un point précis est repris trop souvent en boucle, il peut être
difficile de lire ce point.
Pendant la lecture de disques précieux, il est conseillé de faire des
disques de sauvegarde.
Disques illisibles
! DTS-CD
! CD Photos
! CD Vidéo
! CD Graphiques (CD-G)
! CD non clôturés
! DVD
Fr
6
À propos des CD protégés contre la copie et des
DualDiscs
Cet appareil est conçu pour les CD standard. Le fonctionnement et les
performances des CD non standard ne sont pas garantis.
À des mini CD de 8 cm
Les mini CD de 8 cm ne peuvent pas être lus sur le CDJ-350. Ne posez
pas d’adaptateurs 8 cm que le CD et ne lisez pas le disque de cette
façon sur le CDJ-350. L’adaptateur pourrait tomber quand le disque
tourne, endommageant le disque ou le lecteur.
Page 33

À propos des appareils USB
Cet appareil prend en charge les dispositifs USB de stockage de
masse (disques durs externes, mémoires flash portables, lecteurs
audio numériques, etc.).
Niveaux de dossiers
Nombre maximal
de dossiers
Nombre maximal
de fichiers
Systèmes de
fichiers pris en
charge
Le chargement peut durer un certain temps si la quantité de dossiers ou de
fichiers est importante.
Les dossiers et fichiers au-delà de ces limites n’apparaissent pas.
Max. 8 couches
1 000 dossiers
10 000 fichiers (1 000 fichiers dans le cas de fichiers non
gérés par rekordbox)
FAT16, FAT32 et HFS+ (NTFS n’est pas pris en charge.)
Dispositifs USB ne pouvant pas être utilisés
! Les dispositifs à disque optique, tels que les lecteurs DVD/ CD
externes, etc. ne sont pas pris en charge.
! Les concentrateurs USB ne peuvent pas être utilisés.
Précautions à prendre lors de l’utilisation de
dispositifs USB
! Certains dispositifs USB peuvent ne pas être reconnus correc-
tement. Veuillez noter que Pioneer décline toute responsabilité,
quelle qu’elle soit, quant aux pertes des données enregistrées sur
des dispositifs USB.
! Il se peut que, lorsqu’un courant supérieur au courant maxi-
mal autorisé est détecté au port USB de l’appareil, l’indicateur
[USB STOP] clignote, que l’alimentation du dispositif USB soit
coupée et que la communication avec le dispositif USB soit interrompue. Pour revenir à un fonctionnement normal, débranchez le
dispositif USB de cet appareil. Évitez de réutiliser des dispositifs
USB sur lesquels un courant excessif a été détecté. S’il n’est pas
possible de revenir à un fonctionnement normal (si la communication ne peut pas être rétablie) de la façon indiquée ci-dessus,
essayez d’éteindre cet appareil puis de le rallumer.
! Si le dispositif USB comprend plusieurs partitions, il risque de ne
pas être reconnu.
! Les dispositifs USB pourvus de lecteurs de cartes flash peuvent ne
pas fonctionner.
! Selon le dispositif USB utilisé, vous pouvez ne pas atteindre les
performances souhaitées.
Formats de fichiers de musique lisibles
Cet appareil prend en charge les fichiers de musique enregistrés dans les formats suivants.
Français
Type
MP3 .mp3 MPEG-1 16 bits 32 kbps à 320 kbps 32 kHz, 44,1 kHz, 48 kHz CBR, VBR
AAC .m4a, .aac et .mp4 MPEG-4 AAC LC 16 bits 16 kbps à 320 kbps 32 kHz, 44,1 kHz, 48 kHz CBR, VBR
WAV .wav WAV 16 bits, 24 bits — 44,1 kHz, 48 kHz PCM non compressé
AIFF .aif, .aiff AIFF 16 bits, 24 bits — 44,1 kHz, 48 kHz PCM non compressé
Extension de
fichier
À propos de fichiers MP3
Les fichiers MP3 peuvent avoir un débit binaire constant (CBR) ou un
débit binaire variable (VBR). Ces deux types de fichiers peuvent être
lus sur le CDJ-350, mais les fonctions de recherche et de recherche
super rapide agissent plus lentement dans le cas de fichiers VBR. Si
vous visez avant tout la maniabilité, il est conseillé d’enregistrer des
fichiers MP3 de type CBR.
Formats
compatibles
Profondeur de bit
Débit binaire
Fréquence
d’échantillonnage
Méthode
d’encodage
À propos des fichiers AAC
! AAC est l’abréviation de “Advanced Audio Coding”, le format de
base de compression audio utilisé pour le MPEG-2 et le MPEG-4.
! Le format de fichier et l’extension des données AAC dépendent de
l’application utilisée pour créer les données.
! Outre les fichiers AAC ayant l’extension “.m4a” codés avec iTu-
nes®, les fichiers ayant les extensions “.aac” et “.mp4” peuvent
également être lus. Notez, toutefois, que les fichiers AAC protégés
contre la copie, par exemple les fichiers achetés auprès de iTune
Music Store, ne peuvent pas être lus. De même, certains fichiers
ne pourront pas être lus du fait de la version d’iTunes utilisée pour
leur codage.
Fr
7
Page 34

Fonctions utilisables avec un
ordinateur
À propos du CD-ROM fourni
Cet appareil peut être utilisé avec un ordinateur si le logiciel présent
sur le CD-ROM fourni est installé sur l’ordinateur.
Le CD-ROM fourni contient les deux programmes suivants.
Logiciel de gestion de musique rekordbox
Ce logiciel permet de gérer les fichiers de musique utilisés pour la
lecture DJ. Les informations traitées peuvent être transférées sur des
dispositifs USB (la page 9).
Pilote
Si vous employez cet appareil avec le logiciel DJ sur l’ordinateur, le
son du fichier de musique en cours de lecture pourra être restitué par
cet appareil (la page 11).
! Il n’est pas nécessaire d’installer le pilote dans le cas de Mac OS X.
Accord de licence du logiciel
Cet accord de licence du logiciel (“accord”) est entre vous (aussi bien
la personne installant le programme que toute entité légale unique
pour laquelle cette personne agit) (“vous” ou “votre”) et PIONEER
CORPORATION (“Pioneer”).
TOUTE MESURE PRISE EN VUE DE CONFIGURER OU D’INSTALLER
LE PROGRAMME SIGNIFIE QUE VOUS ACCEPTEZ TOUS LES
TERMES DE CET ACCORD DE LICENCE. L’AUTORISATION
DE TÉLÉCHARGER ET/ OU D’UTILISER LE PROGRAMME EST
EXPRESSÉMENT CONDITIONNÉE À VOTRE RESPECT DE CES
TERMES. AUCUNE APPROBATION ÉCRITE OU ÉLECTRONIQUE
N’EST NÉCESSAIRE POUR VALIDER ET EXÉCUTER CET ACCORD.
SI VOUS N’ACCEPTEZ PAS LA TOTALITÉ DES TERMES DE
CET ACCORD, VOUS N’ÊTES PAS AUTORISÉ À UTILISER LE
PROGRAMME ET VOUS DEVEZ ARRÊTER SON INSTALLATION OU
LE DÉSINSTALLER, COMME APPLICABLE.
1 Définitions
1 Le mot “documentation” signifie la documentation écrite, les
spécifications et l’aide fournies par Pioneer pour aider à installer et à utiliser le programme.
2 Le mot “programme” signifie la totalité ou toute partie du
logiciel Pioneer et dont Pioneer vous concède la licence par
cet accord.
2 Licence de programme
1 Licence limitée. Sous réserve des restrictions stipulées dans
cet accord, Pioneer vous concède une licence limitée, nonexclusive, non-transférable (sans le droit de sous-licencier) :
a Pour installer une seule copie du programme sur le disque
dur de votre ordinateur, pour utiliser le programme seulement pour votre besoin personnel conformément à cet
accord et à la documentation (“Utilisation autorisée”) ;
b Pour utiliser la documentation d’assistance à votre utilisa-
tion autorisée; et
c Pour faire une copie du programme seulement à des fins
de sauvegarde, pourvu que tous les titres et marques,
copyright et avertissements de droits limités soient reproduits sur cette copie.
2 Restrictions. Vous ne pouvez pas copier ou utiliser le pro-
gramme ou la documentation de façon autre que celle
expressément permise par cet accord. Vous ne pouvez pas
transférer, sous-licencier, louer, louer à crédit bail ou prêter
le programmme, ou l’utiliser pour la formation d’une tierce
partie, dans une activité commerciale de service informatique
en temps partagé ou d’assistance. Vous ne pouvez pas, vousmême ou par l’intermédiaire d’une tierce partie, modifier,
désosser, désassembler ou décompiler le programme, sauf
dans la limite expressément permise par la loi en vigueur et, le
cas échéant, seulement après que vous ayez informé Pioneer
par écrit de vos intentions. Vous ne pouvez pas utiliser le
programme sur plusieurs processeurs sans le consentement
écrit préalable de Pioneer.
3 Propriété. Pioneer ou son concédant garde tout droit, titre
et intérêt dans et sur tout brevet, copyright, marque, secret
commercial et autres droits de propriété intellectuelle liés au
programme et à la documentation, ainsi qu’à tout produit qui
en dérive. Vous ne faites l’acquisition d’aucun droit, explicite
ou implicite, hors de la licence limitée décrite dans cet accord.
4 Pas d’assistance. Pioneer n’a aucune obligation de fournir
une assistance, une maintenance, des mises à niveau, des
modifications ou des nouvelles versions pour le programme
ou la documentation liés à cet accord.
3 Exclusion de garantie
LE PROGRAMME ET LA DOCUMENTATION SONT FOURNIS
“TELS QUELS” SANS CONDITION OU GARANTIE D’AUCUNE
SORTE, ET VOUS ACCEPTEZ DE LES UTILISER À VOS RISQUES
ET PÉRILS. DANS LA MESURE PERMISE PAR LA LOI, PIONEER
EXCLUT EXPLICITEMENT TOUTE GARANTIE DE TOUTE SORTE
DU PROGRAMME ET DE LA DOCUMENTATION, EXPRESSE,
IMPLICITE, OFFICIELLE, OU ÉMANANT DE L’UTILISATION, DE LA
TRANSACTION OU DE L’ÉCHANGE, Y COMPRIS LES GARANTIES
DE QUALITÉ MARCHANDE, D’ADÉQUATION À UN USAGE
PARTICULIER, DE QUALITÉ, DE PRÉCISION, DE TITRE OU DE
NONCONTREFACON.
4 Dommages-intérêts et recours pour infraction
Vous acceptez que toute infraction aux restrictions de cet accord
causerait à Pioneer un mal irréparable pour lequel des dommagesintérêts seuls seraient inadéquats. En plus des dommages-intérêts et
autres recours auxquels Pioneer peut avoir droit, vous acceptez que
Pioneer puisse saisir la justice pour empêcher toute infraction ou tout
risque d’infraction ou pour faire cesser toute infraction à cet accord.
5 Résiliation
Pioneer peut résilier cet accord à tout moment sur votre infraction à
n’importe quelle de ses clauses. Si cet accord est résilié, vous devez
arrêter d’utiliser le programme, le supprimer définitivement de l’ordinateur où il réside, et détruire toutes les copies du programme et
de la documentation en votre possession, avec confirmation écrite à
Pioneer de l’exécution de ces obligations. Les sections 2.2, 2.3, 2.4, 3,
4, 5 et 6 resteront en vigueur après la résiliation de cet accord.
6 Conditions générales
1 Limitation de responsabilité. En aucun cas Pioneer ou ses
filiales ne seront responsables au sujet de cet accord ou de
son contenu, quel que soit le fondement invoqué, de quelque
dommage que ce soit, indirect, direct, spécial, induit ou à
valeur répressive, ou de dommages en raison de perte de
bénéfices, de revenu, d’affaires, d’économies, de données,
d’utilisation, ou de coût d’acquisition d’un produit de substitution, même s’ils sont prévenus de la possibilité de tels
dommages ou si ces dommages sont prévisibles. En aucun
cas la responsabilité de Pioneer pour tous dommages ne
dépassera le montant que vous avez payé à Pioneer ou à ses
filiales pour le programme. Les parties admettent que les
limites de responsabilité et l’affectation de risque dans cet
accord sont reflétées dans le prix du programme et sont des
éléments intrinsèques du marché entre les parties, sans lesquels Pioneer n’aurait pas fourni le programme et n’aurait pas
été partie prenante de cet accord.
2 Les limitations ou exclusions de garantie et de responsabilité
contenues dans cet accord n’affectent ni n’entravent vos
droits légaux comme consommateur et vous seront applicables seulement dans la mesure où de telles limitations ou
exclusions sont permises sous les lois de la juridiction où
vous êtes situé.
3 Si une clause de cet accord s’avère être illégale, invalide ou
inapplicable d’une manière ou d’une autre, elle sera appliquée
dans la mesure du possible ou, si elle est totalement inapplicable, sera considérée comme coupée et supprimée de cet
accord, et le reste continuera d’être en vigueur. La renonciation par une partie ou l’autre à tout défaut ou manquement de
Fr
8
Page 35

cet accord ne donnera pas lieu à la suppression d’un défaut ou
manquement autre ou ultérieur.
4 Pas de cession. Vous ne pouvez pas céder, vendre, transférer,
déléguer ou altérer d’une manière ou d’une autre cet accord
ou tous droits ou obligations qui s’y rapportent, que ce soit
volontairement ou involontairement, par action légale ou
autre, sans le consentement écrit préalable de Pioneer. Toute
cession, tout transfert ou toute délégation émanant de votre
part sera nul et non avenant. Sujet aux faits précités, cet
accord engagera et liera les parties et leurs successeurs et
délégués respectifs.
5 Accord complet. Cet accord constitue l’intégralité de l’accord
entre les parties et remplace tous les accords ou propositions
antérieurs ou actuels, écrits ou verbaux, en ce qui concerne
son contenu. Cet accord ne peut pas être modifié ou amendé
sans le consentement écrit préalable de Pioneer, et aucun
autre acte, document, usage ou convention ne pourra amender ou modifier cet accord.
6 Vous acceptez que cet Accord soit régi par les lois du Japon et
interprété selon celles-ci.
Précautions à prendre lors de
l’installation du logiciel
Lisez attentivement Accord de licence du logiciel avant d’installer
rekordbox et le pilote.
! Le CD-ROM fourni contient des programmes d’installation dans
les 12 langues suivantes.
Anglais, Français, Allemand, Italien, Hollandais, Espagnol,
Portugais, Russe, Chinois (caractères simplifiés), Chinois (caractères traditionnels), Coréen, Japonais.
! Si rekordbox est utilisé avec un système d’exploitation utilisant
une autre langue, suivez les instructions à l’écran et sélectionnez
[English (Anglais)].
Systèmes d’exploitation pris en
charge
Mac OS X (10.4.6 et ultérieur)
Windows® 7 Édition Familiale Premium/ Professionnel/ Édition Intégrale
Windows Vista® Familiale Basique/ Familiale Premium/ Professionnel/ Intégrale (SP1 ou
ultérieur)
Windows® XP Édition Familiale/ Édition Professionnelle (SP3 ou
ultérieur)
1 Il n’est pas nécessaire d’installer le pilote dans le cas de Mac OS X.
2 Si une version de Windows à 64 bits est utilisée, le pilote ne pourra être
utilisé que pour les applications à 32 bits.
Version à 32
bits
Version à 64
bits
Version à 32
bits
Version à 64
bits
Version à 32
bits
Configuration minimale requise pour rekordbox
! Processeur :
— Pour Mac OS X, ordinateur Macintosh équipé d’un processeur
Intel® Core™Duo (ou compatible) d’au moins 1,83 GHz
— Pour Windows® 7, Windows Vista® ou Windows® XP, ordi-
nateur compatible PC/ AT équipé d’un processeur Intel®
Pentium® 4 (ou compatible) d’au moins 2 GHz
! Mémoire requise : 1 Go ou plus de RAM
! Disque dur : 250 Mo ou plus d’espace disponible (espace réservé à
la sauvegarde de fichiers de musique, etc. non compris)
! Lecteur CD : Lecteur de disque optique pouvant lire le CD-ROM
! Son : Sortie audio vers des enceintes, casques, etc. (dispositif
audio interne ou externe)
! Connexion Internet : Pour l’enregistrement de l’utilisateur et la
demande d’informations, utilisez un navigateur web prenant
en charge le SSL 128 bits (Safari 2.0 ou supérieur ou Internet
Explorer® 6.0 ou ultérieur).
rekordbox Pilote
1
1 1
1 1
1 1
1 1
1 1
1
2
2
! Port USB : Un port USB est nécessaire pour le raccordement du
dispositif USB (mémoire flash, disque dur, etc.) sur lequel le transfert de fichiers de musique est effectué.
! Le fonctionnement sur tous les ordinateurs n’est pas garanti,
même lorsque les conditions mentionnées ci-dessus sont
remplies.
! Même si la mémoire requise indiquée ci-dessus pour
l’environnement opérationnel est disponible, le logiciel peut ne
pas fonctionner au maximum de ses performances dans les cas
suivants à cause de l’insuffisance de mémoire. Le cas échéant,
prenez les mesures nécessaires pour libérer suffisamment de
mémoire. Il est conseillé d’ajouter de la mémoire pour améliorer
les performances du logiciel.
— Si la bibliothèque rekordbox gère de nombreux morceaux
— Si des programmes et services résidents sont ouverts
! Selon les réglages d’alimentation de l’ordinateur, etc. la
capacité de traitement du processeur et du disque dur peut être
insuffisante. En particulier, lorsqu’un ordinateur portable est
utilisé, laissez-le toujours raccordé au secteur et réglez-le pour une
performance optimale lorsque rekordbox utilisé.
! Notez que des problèmes peuvent apparaître lorsque rekordbox
est utilisé avec un autre logiciel.
À propos du logiciel de gestion de
musique rekordbox
rekordbox est un programme permettant aux personnes disposant
d’un CDJ-350 ou d’autres lecteurs DJ Pioneer de gérer les fichiers de
musique pour la lecture DJ.
— rekordbox peut être utilisé pour classer et rechercher des
fichiers de musique enregistrés sur un ordinateur et pour
créer des listes de lecture dans le but d’améliorer vos prestations DJ.
— rekordbox permet de détecter, mesurer et modifier les temps,
les tempos (BPM) et d’autres éléments de vos fichiers de
musique avant une prestation.
Installation de rekordbox
À propos de l’installation (Macintosh)
Lisez attentivement Précautions à prendre lors de l’installation du
logiciel avant d’installer rekordbox.
! L’autorisation de l’administrateur de l’ordinateur est nécessaire
pour pouvoir installer et désinstaller rekordbox.
Connectez-vous sous le nom de l’utilisateur spécifié comme admi-
nistrateur de l’ordinateur avant l’installation.
1 Lorsque le CD-ROM fourni est inséré dans le lecteur
CD de l’ordinateur, le lecteur CD s’ouvre sur l’écran.
Double-cliquez sur l’icône [CD_menu.app].
! Si le lecteur de CD ne s’ouvre pas sur l’écran lorsque le CD-ROM
est inséré, utilisez le Finder pour l’ouvrir, puis double-cliquez sur
l’icône [CD_menu.app].
<Icône [CD.menu.app] >
Français
Fr
9
Page 36

2 Lorsque le menu du CD-ROM apparaît, sélectionnez
[rekordbox: Installer le Logiciel de Gestion de Musique],
puis cliquez sur [Démarrer].
<Menu du CD-ROM>
Lancement de rekordbox
Connectez-vous sous le nom de l’utilisateur spécifié comme administrateur de l’ordinateur avantd’utiliser rekordbox.
! La première fois que rekordbox est mis en marche, le clé de licence
doit être spécifiée. La clé de licence se trouve sur le carton d’emballage du CD-ROM.
! Lorsque rekordbox démarre, les instructions peuvent être affichées
à partir du menu rekordbox [Aide].
Pour Mac OS X
Ouvrez le dossier [Application] avec le Finder, puis
double-cliquez sur [rekordbox 1.x.x.app].
! 1.x.x indique la version de rekordbox.
Pour Windows® 7, Windows Vista® et Windows® XP
! Pour fermer le menu du CD-ROM, cliquez sur [Quitter].
3 Installez rekordbox en suivant les instructions qui
apparaissent à l’écran.
À propos de l’installation (Windows)
Lisez attentivement Précautions à prendre lors de l’installation du
logiciel avant d’installer rekordbox.
! L’autorisation de l’administrateur de l’ordinateur est nécessaire
pour pouvoir installer et désinstaller rekordbox.
Connectez-vous comme administrateur de l’ordinateur avant l’ins-
tallation de rekordbox.
1 Insérez le CD-ROM fourni dans le lecteur CD de
l’ordinateur.
Le menu du CD-ROM apparaît.
! Si le menu du CD-ROM n’apparaît pas après l’insertion du
CD-ROM, ouvrez le lecteur CD dans [Ordinateur (ou Poste de tra-
vail)] à partir du menu [Démarrer], puis double-cliquez sur l’icône
[CD_menu.exe].
2 Lorsque le menu du CD-ROM apparaît, sélectionnez
[rekordbox: Installer le Logiciel de Gestion de Musique],
puis cliquez sur [Démarrer].
<Menu du CD-ROM>
Cliquez sur le bouton du menu [Démarrer] de Windows,
puis sur [Tous les programmes] > [Pioneer] > [rekordbox
1.x.x] > [rekordbox 1.x.x].
! 1.x.x indique la version de rekordbox.
! Pour fermer le menu du CD-ROM, cliquez sur [Quitter].
3 Installez rekordbox en suivant les instructions qui
apparaissent à l’écran.
! Cliquez sur [Annuler] pour annuler l’installation lorsqu’elle a
démarré.
Fr
10
Page 37

À propos du pilote (Windows)
Ce logiciel est un pilote ASIO prévu exclusivement pour transmettre
des signaux audio de l’ordinateur. Installez le logiciel au préalable sur
l’ordinateur pour pouvoir utiliser le CDJ-350, quand il est raccordé à un
ordinateur Windows.
Installation du pilote
Avant d’installer le pilote
! Lisez attentivement la page 9, Précautions à prendre lors de l’instal-
lation du logiciel.
! Éteignez cet appareil, puis débranchez le câble USB raccordé à cet
appareil et à l’ordinateur.
! Si des programmes sont ouverts sur l’ordinateur, fermez-les.
! Pour installer ou désinstaller le pilote, vous devez avoir l’autori-
sation de l’administrateur de votre ordinateur. Connectez-vous
comme administrateur de votre ordinateur avant de procéder à
l’installation.
! Le pilote doit être d’abord installé sur l’ordinateur puis cet appareil
raccordé à l’ordinateur sinon, selon l’environnement système, une
erreur peut se produire.
! Si l’installation du pilote est interrompue après le démarrage,
recommencez l’installation depuis le début.
1 Insérez le CD-ROM inclus dans le lecteur CD de
l’ordinateur.
Le menu du CD-ROM apparaît.
! Si le menu du CD-ROM n’apparaît pas après l’insertion du
CD-ROM, ouvrez le lecteur CD dans [Ordinateur (ou Poste de tra-
vail)] à partir du menu [Démarrer], puis double-cliquez sur l’icône
[CD_menu.exe].
2 Lorsque le menu du CD-ROM apparaît, sélectionnez
[Installer le Logiciel de pilotage (Pioneer_CDJ_Driver)],
puis cliquez sur [Démarrer].
Raccordement de la CDJ-350 et de
l’ordinateur
1 Raccordez cet appareil à votre ordinateur avec un
câble USB.
Pour les instructions sur le raccordement, reportez-vous à la page 14,
Utilisation du logiciel DJ.
2 Appuyez sur [u].
Allumez cet appareil.
3 Appuyez au moins 1 seconde sur [ ].
L’écran [CONTROL MODE] apparaît sur l’écran de l’appareil principal.
! Le message [Installation du pilote logiciel de périphérique] peut
apparaître la première fois que vous raccordez la CDJ-350 à l’ordinateur ou lorsque vous le raccordez au port USB de l’ordinateur.
Attendez que le message [Vos périphériques sont prêts à être
utilisés.] apparaisse.
! Installation sur Windows XP
— [Autorisez-vous Windows à se connecter à Windows
Update pour rechercher des mise à jour ?] peut apparaître au
cours de l’installation. Sélectionnez [Non, pas pour cette fois]
et cliquez sur [Suivant] pour continuer l’installation.
— [Quelle tâche voulez-vous que l'Assistant exécute ?] peut
apparaître au cours de l’installation. Sélectionnez [Installer
le logiciel automatiquement (recommandé)] et cliquez sur
[Suivant] pour continuer l’installation.
— Si [Installation matérielle] apparaît à l’écran au cours de l’ins-
tallation, cliquez sur [Continuer] et continuez l’installation.
Réglage de la taille de la mémoire
tampon
Cet appareil est un dispositif audio conforme aux normes ASIO.
! Si une application utilisant cet appareil comme appareil audio par
défaut (logiciel DJ, etc.) est ouverte, fermez-la avant de régler la
taille de la mémoire.
Cliquez sur le menu [Démarrer] de Windows > [Tous les
programmes] > [Pioneer] > [Pioneer CDJ] > [Utilitaire de
réglages ASIO Pioneer CDJ].
Français
Pour fermer le menu du CD-ROM, cliquez sur [Quitter].
3 Procédez à l’installation en suivant les instructions
qui apparaissent à l’écran.
Si [Sécurité de Windows] apparaît à l’écran au cours de l’installation, cliquez sur [Installer ce pilote quand même] et continuez
l’installation.
! Installation sur Windows XP
Si [Installation matérielle] apparaît à l’écran au cours de l’installa-
tion, cliquez sur [Continuer] et continuez l’installation.
! Lorsque le programme d’installation est terminé, le message
Installation terminée apparaît.
Le risque de perte sonore (interruption du son) diminue si une
mémoire suffisamment grande est attribuée mais le retard (latence)
dans la transmission du signal audio augmente.
Fr
11
Page 38

Vérification de la version du pilote
Cliquez sur le menu [Démarrer] de Windows > [Tous
les programmes] > [Pioneer] > [Pioneer CDJ] > [Utilitaire
d'affichage de version de Pioneer CDJ].
! La version du micrologiciel de cet appareil apparaît à l’écran.
! La version du microprogramme n’apparaît pas lorsque le CDJ-350
n’est pas raccordé à l’ordinateur ou lorsque le CDJ-350 et l’ordinateur ne communiquent pas correctement.
Vérification des toutes dernières
informations concernant le pilote
Les toutes dernières informations sur le pilote dédié exclusivement à
cet appareil se trouve sur notre site à l’adresse suivante.
http://www.prodjnet.com/support/
12
Fr
Page 39

Raccordements
AC IN
AUDIO
OUT
RL
CONTROL
USB
1 2 543
Lecteur DJ Lecteur DJ
Table de mixage DJ (exemple : DJM-350)
MULTI PLAYER
TEMPO
0
PLAY/PAUSE
SEARCH
TRACK SEARCH
IN/CUE OUT
OUT ADJUSTHOT LOOP
RELOOP/EXIT
BEAT LOOP
LOOP DRIVE
VINYL MODE
TEMPO RANGE
MASTER TEMPO
LOOP
USB
STOP
SOURCE SELECT
MP3/AAC
WAV/AIFF
CUE
PLAYLIST
BPM
DISC
LOCK
REVFWD
BACK
SELECT PUSH
TIME MODE
AUTO CUE
DISPLAY
UTILITY
A.CUE
LOCK
16
REMAIN
MS
F TEMPO %
INFO
BROWSE
BPM
MULTI PLAYER
TEMPO
0
PLAY/PAUSE
SEARCH
TRACK SEARCH
IN/CUE OUT
OUT ADJUSTHOT LOOP
RELOOP/EXIT
BEAT LOOP
LOOP DRIVE
VINYL MODE
TEMPO RANGE
MASTER TEMPO
LOOP
USB
STOP
SOURCE SELECT
MP3/AAC
WAV/AIFF
CUE
PLAYLIST
BPM
DISC
LOCK
REVFWD
BACK
SELECT PUSH
TIME MODE
AUTO CUE
DISPLAY
UTILITY
A.CUE
LOCK
16
REMAIN
MS
FTEMPO%
INFO
BROWSE
BPM
2 CHANNEL DJ MIXER
MIC /AUX
MIC
0
LEVEL
HI
AUX
LOW
MIC/AUX
ON
12
12
12
12
HEADPHONES
CUE
CH-1
CUE
MIXING
CUE MASTER
CH-2
LEVEL
PHONES
0
9
9
9
9
CD
PHONO
CH- 1
FADER
START
FADER
START
CH- 1CH- 2
9
9
9
9
CH-2
THRU
CD
PHONO
TRIMTRIM
HI
MID
LOW
HI
MID
LOW
LEVEL
MASTER
LEVEL/DEPTH
FILTERCRUSH
GATE JET
MASTER EFFECT
0
PREVIEW
TRACK MARK SEARCH
PLAY
USB
STOP
REC
MASTER LEVEL
AUDIO
OUT
RL
CONTROL
USB
AUDIO
OUT
RL
CONTROL
USB
L
CH-1
PHONO
CONTROL
L
R
CD
CH-2
PHONO
CONTROL
L
R
CD
R
L
Cordon de
commande
Câble audio
R
L
R
L
R L
Cordon de commande
(fourni)
Câble audio
(fourni)
Veillez à toujours éteindre les appareils et à débrancher le cordon d’alimentation de la prise secteur avant de raccorder un appareil ou de changer
les liaisons.
Reportez-vous au mode d’emploi de l’appareil devant être raccordé.
Lorsque tous les appareils ont été raccordés, vous pouvez brancher le cordon d’alimentation.
Veillez à utiliser le cordon d’alimentation fourni.
Noms des prises
Panneau arrière
Français
1 AC IN
À raccorder à une prise d’alimentation.
Lorsque tous les appareils ont été raccordés, vous pouvez brancher le
cordon d’alimentation.
Veillez à utiliser le cordon d’alimentation fourni.
2 Fente de sécurité Kensington
3 USB (la page 14)
Pour raccorder un ordinateur.
4 CONTROL (la page 14)
Pour raccorder le cordon de commande (fourni).
5 AUDIO OUT L/ R (la page 13)
Pour raccorder les câbles audio (fournis).
Style de base
Lorsqu’une table de mixage DJ Pioneer est raccordée à l’aide du cordon de commande (fourni), certaines opérations, comme le lancement de la
lecture, peuvent être guidées par le fader de la table de mixage DJ (la page 23).
Le lancement par le fader ne peut être utilisé que lorsqu’une table de mixage DJ Pioneer est raccordée.
Fr
13
Page 40

Utilisation de la lecture en relais
AUDIO
OUT
RL
CONTROL
USB
AUDIO
OUT
RL
CONTROL
USB
L
CH-1
PHONO
CONTROL
L
R
CD
Lecteur DJ Lecteur DJ
MULTI PLAYER
TEMPO
0
PLAY/PAUSE
SEARCH
TRACK SEARCH
IN/CUE OUT
OUT ADJUSTHOT LOOP
RELOOP/EXIT
BEAT LOOP
LOOP DRIVE
VINYL MODE
TEMPO RANGE
MASTER TEMPO
LOOP
USB
STOP
SOURCE SELECT
MP3/AAC
WAV/AIFF
CUE
PLAYLIST
BPM
DISC
LOCK
REVFWD
BACK
SELECT PUSH
TIME MODE
AUTO CUE
DISPLAY
UTILITY
A.CUE
LOCK
16
REMAIN
MS
F TEMPO %
INFO
BROWSE
BPM
MULTI PLAYER
TEMPO
0
PLAY/PAUSE
SEARCH
TRACK SEARCH
IN/CUE OUT
OUT ADJUSTHOT LOOP
RELOOP/EXIT
BEAT LOOP
LOOP DRIVE
VINYL MODE
TEMPO RANGE
MASTER TEMPO
LOOP
USB
STOP
SOURCE SELECT
MP3/AAC
WAV/AIFF
CUE
PLAYLIST
BPM
DISC
LOCK
REVFWD
BACK
SELECT PUSH
TIME MODE
AUTO CUE
DISPLAY
UTILITY
A.CUE
LOCK
16
REMAIN
MS
FTEMPO%
INFO
BROWSE
BPM
2 CHANNEL DJ MIXER
MIC /AUX
MIC
0
LEVEL
HI
AUX
LOW
MIC/AUX
ON
12
12
12
12
HEADPHONES
CUE
CH-1
CUE
MIXING
CUE MASTER
CH-2
LEVEL
PHONES
0
9
9
9
9
CD
PHONO
CH- 1
FADER
START
FADER
START
CH- 1CH- 2
9
9
9
9
CH-2
THRU
CD
PHONO
TRIMTRIM
HI
MID
LOW
HI
MID
LOW
LEVEL
MASTER
LEVEL/DEPTH
FILTERCRUSH
GATE JET
MASTER EFFECT
0
PREVIEW
TRACK MARK SEARCH
PLAY
USB
STOP
REC
MASTER LEVEL
Table de mixage DJ (exemple : DJM-350)
CH-2
PHONO
CONTROL
L
R
CD
R
L
Câble audio
R
L
R
L
R L
Cordon de commande
(fourni)
Câble audio
(fourni)
AUDIO
OUT
RL
CONTROL
USB
AUDIO
OUT
RL
CONTROL
USB
L
CH-1
PHONO
CONTROL
L
R
CD
Lecteur DJ Lecteur DJ
MULTI PLAYER
TEMPO
0
PLAY/PAUSE
SEARCH
TRACK SEARCH
IN/CUE OUT
OUT ADJUSTHOT LOOP
RELOOP/EXIT
BEAT LOOP
LOOP DRIVE
VINYL MODE
TEMPO RANGE
MASTER TEMPO
LOOP
USB
STOP
SOURCE SELECT
MP3/AAC
WAV/AIFF
CUE
PLAYLIST
BPM
DISC
LOCK
REVFWD
BACK
SELECT PUSH
TIME MODE
AUTO CUE
DISPLAY
UTILITY
A.CUE
LOCK
16
REMAIN
MS
FTEMPO%
INFO
BROWSE
BPM
2 CHANNEL DJ MIXER
MIC /AUX
MIC
0
LEVEL
HI
AUX
LOW
MIC/AUX
ON
12
12
12
12
HEADPHONES
CUE
CH-1
CUE
MIXING
CUE MASTER
CH-2
LEVEL
PHONES
0
9
9
9
9
CD
PHONO
CH- 1
FADER
START
FADER
START
CH- 1 CH- 2
9
9
9
9
CH-2
THRU
CD
PHONO
TRIM TRIM
HI
MID
LOW
HI
MID
LOW
LEVEL
MASTER
LEVEL/DEPTH
FILTERCRUSH
GATE JET
MASTER EFFECT
0
PREVIEW
TRACK MARK SEARCH
PLAY
USB
STOP
REC
MASTER LEVEL
Table de mixage DJ (exemple : DJM-350)
CH-2
PHONO
CONTROL
L
R
CD
R
L
Câble audio
R
L
R
L
R L
Câble audio
(fourni)
Câble USBCâble USB
Logiciel DJ
Ordinateur
La lecture en relais entre deux lecteurs DJ est possible lorsque les prises [CONTROL] de cet appareil et de l’autre lecteur DJ Pioneer sont reliées
par un cordon de commande (la page 23).
Utilisation du logiciel DJ
Quand cet appareil est raccordé à un ordinateur par un câble USB, le logiciel DJ peut fonctionner avec cet appareil (la page 23).
Le son des fichiers de musique lus sur l’ordinateur peut être restitué depuis cet appareil (la page 11).
14
Fr
Page 41

Opérations
Section lecteur Section de commande de tempo
Section de sélection de la source
Section de navigation
MULTI PLAYER
TEMPO
0
PLAY/PAUSE
SEARCH
TRACK SEARCH
IN/CUE OUT
OUT ADJUSTHOT LOOP
RELOOP/EXIT
BEAT LOOP
LOOP DIVIDE—+
VINYL MODE
TEMPO RANGE
MASTER TEMPO
LOOP
USB
STOP
SOURCE SELECT
MP3/AAC
WAV/AIFF
CUE
PLAYLIST
BPM
DISC
LOCK
REV FWD
BACK
SELECT PUSH
TIME MODE
AUTO CUE
DISPLAY
UTILITY
3
k
l
m
n
1
2
4
5
e
f hg
a
b
c
8
9
6 7
d
p
q
r
o
i
j
1
2
Panneau de commande
Français
1 u (Interrupteur d’alimentation) (la page 17)
2 hDISC (la page 16)
Section de sélection de la source
Pour sélectionner la source devant être lue par cet appareil (la page
16).
3 Fente d’insertion de dispositif USB
4 USB STOP
5
6
7
(ORDINATEUR)
(USB)
(DISQUE)
Section lecteur
Ces commandes peuvent être utilisées pour les opérations de base du
lecteur DJ, comme la lecture de disques, la pose de points de repères/
boucles et les manipulations de la molette jog (la page 17).
8 TRACK SEARCH o, p
9 SEARCH m, n
a CUE
b PLAY/PAUSE f
c Molette jog
d VINYL MODE
1 Partie Boucle et Boucle selon le tempo
e LOOP IN/
f LOOP OUT (OUT ADJUST)
CUE (HOT LOOP)
g RELOOP/EXIT
h BEAT LOOP (LOOP DIVIDE)
Section de navigation
Les informations sur le dispositif branché sur cet appareil, les mor-
ceaux chargés, etc. s’affichent ici (la page 20).
i TIME MODE (AUTO CUE)
j DISPLAY (UTILITY)
k Écran de l’appareil principal
l BACK
2 Partie Liste de lecture
m SELECT PUSH (sélecteur rotatif)
Fr
15
Page 42

n PLAYLIST
s
t
A.CUE
LOCK
16
REMAIN
MS
F
TEMPO %
INFO
BROWSE
BPM
1
a
c
b
2
3
4
5
6 7 8 9
s
t
USB
STOP
SOURCE SELECT
MP3/AAC
WAV/AIFF
PLAYLIST
BPM
DISC
LOCK
BACK
SELECT PUSH
TIME MODE
AUTO CUE
DISPLAY
UTILITY
3
4
5 6 7
Section de commande de tempo
Pour ajuster la vitesse de lecture d’un morceau (la page 22).
Lorsque [BPM LOCK] est utilisé, les vitesses de lecture de deux morceaux peuvent être facilement synchronisées (la page 22).
o BPM LOCK
p TEMPO RANGE
q MASTER TEMPO
r TEMPO
8 LOCK (la page 22)
S’allume lorsque le BPM est verrouillé.
9 TEMPO %
Indique le changement de la vitesse de lecture en pourcentage.
a WIDE, ±16, ±10, ±6
Indique la plage dans laquelle la vitesse de lecture peut être ajustée.
b BPM
Indique les BPM (temps par minute) du morceau en cours de lecture.
c Section d’affichage des informations
Un maximum de 13 caractères peuvent être affichés pour chaque élément. Des caractères alphabétiques A à Z et numériques 0 à 9, ainsi
que certains symboles, peuvent être affichés. “?” apparaît à la place
des autres caractères.
Face avant
s Trou d’insertion de la broche d’éjection forcée du
disque (la page 17)
t Fente d’insertion de disque (la page 16)
Écran de l’appareil principal
1 Numéro de morceau
Indique le numéro de morceau.
Il n’est pas possible d’indiquer plus de 100 morceaux.
2 A. CUE (la page 18)
S’éclaire lorsqu’un repère automatique est posé.
3 Affichage des adresses de lecture
Le morceau apparaît sous forme de graphique en barres.
Le côté gauche s’éteint lorsque le temps restant est affiché. Le graphique complet clignote lentement lorsque le temps restant du morceau est inférieur à 30 secondes, puis clignote rapidement lorsque le
temps restant du morceau est inférieur à 15 secondes.
4 INFO (la page 20)
5 BROWSE (la page 20)
6 REMAIN
S’éclaire lorsque l’affichage du temps restant est spécifié.
7 M, S, F (affichage du temps)
“M” indique les minutes, “S” les secondes, “F” les trames.
Il y a 75 trames par seconde.
Fr
16
Spécification de la source à lire
(section de sélection de la source)
Insertion de disques
! Posez le disque en orientant sa face imprimée vers le haut.
! Insérez le disque horizontalement dans la fente d’insertion de disque
sur la face avant de l’appareil.
! N’insérez pas plus d’un disque.
! Ne pas insérer le disque en forçant dans la fente d’insertion de
disque quand l’appareil est éteint. Le disque ou l’appareil pourraient
être endommagés.
! Lorsque le disque est tiré à l’intérieur ou éjecté, ne pas exercer de
force dans le sens opposé au mouvement du disque. Le disque ou
l’appareil pourraient être endommagés.
1 Appuyez sur [u] 1.
Allumez cet appareil.
2 Insérez le disque dans la fente d’insertion de disque t.
La lecture commence.
! Quand la fonction de repère automatique est en service, la lecture
commence dès que [PLAY/PAUSEf] est pressée. Pour le détail
sur la fonction de repère automatique, reportez-vous à la page 18,
Pose d’un repère automatique.
Éjection d’un disque
Appuyez sur [h DISC] 2.
Le disque est éjecté de la fente d’insertion de disque.
! Si vous appuyez par erreur sur [hDISC], appuyez immédiatement
sur [PLAY/PAUSEf] pour revenir à l’état où se trouvait cet appareil juste avant que [h DISC] soit pressée. (À ce moment le son est
coupé.)
Page 43

À propos de l’éjection forcée de disques
MULTI PLAYER
TEMPO
0
PLAY/PAUSE
SEARCH
TRACK SEARCH
IN/CUE OUT
OUT ADJUSTHOT LOOP
RELOOP/EXIT
BEAT LOOP
LOOP DIVIDE—+
VINYL MODE
TEMPO RANGE
MASTER TEMPO
LOOP
USB
STOP
SOURCE SELECT
MP3/AAC
WAV/AIFF
CUE
PLAYLIST
BPM
DISC
LOCK
REV FWD
BACK
SELECT PUSH
TIME MODE
AUTO CUE
DISPLAY
UTILITY
PLAYLIST
BACK
SELECT PUSH
TIME MODE
AUTO CUE
DISPLAY
UTILITY
3
4
5
e
f hg
a
b
c
8
9
6 7
d
k
l
m
n
i
j
! Si le disque ne s’éjecte pas par une pression sur [h DISC], éjec-
tez-le de force en insérant la broche d’éjection forcée dans le trou
d’insertion correspondant.
! Pour éjecter de force un disque, procédez de la façon suivante.
1 Appuyez sur [u] 1 pour éteindre cet appareil et
attendez au moins 1 minute.
N’éjectez jamais de force un disque directement après l’extinction
de l’appareil. Ceci est dangereux pour les raisons suivantes.
! Le disque est encore en train de tourner quand il est éjecté et, de
ce fait, causer des blessures en frappant les doigts, etc.
! D’autre part, la fixation du disque tourne de manière instable et
le disque peut être rayé.
2 Utilisez la broche d’éjection forcée de disque fournie.
(Ne pas utiliser d’autres objets.)
La broche d’éjection forcée du disque fournie se trouve sur le panneau
inférieur du CDJ-350. Lorsque la broche est insérée à fond dans le trou
d’insertion, le disque ressort de 5 mm à 10 mm de la fente d’insertion
du disque. Saisissez le disque avec les doigts et tirez-le.
Insertion d’un dispositif USB
Insérez le dispositif USB dans la fente d’insertion du
dispositif USB 3.
L’indicateur [USB STOP] s’allume.
Opérations de base (sections lecteur,
sélection de la source et navigation)
Français
Retrait d’un dispositif USB de l’appareil
! Veillez à procéder de la façon suivante pour retirer un dispositif USB
de l’appareil. Retirer le dispositif USB d’une autre façon peut effacer
les données de gestion de l’appareil et empêcher la lecture du
dispositif USB.
! Avant d’éteindre l’appareil, veillez à retirer le dispositif USB.
1 Appuyez au moins 2 secondes sur [USB STOP] 4.
L’indicateur [USB STOP] s’éteint.
2 Débranchez le dispositif USB.
À propos de l’interrupteur d’alimentation
de cet appareil
Pour allumer l’appareil
Appuyez sur [u] 1.
Allumez cet appareil.
L’indicateur [u] s’allume en vert.
Pour mettre l’appareil en veille
Lorsque cet appareil est allumé, appuyez au moins 1
seconde sur [u] 1.
L’appareil se met en veille.
L’indicateur [u] s’allume en rouge.
! Lorsque vous appuyez une nouvelle fois sur [u], l’appareil
s’allume.
! Cet appareil présente une fonction de mise en veille automatique.
Pour le détail, reportez-vous à la page 24, À propos de la mise en
veille automatique.
Lecture
1 Chargez la source sur cet appareil.
2 Appuyez au moins 1 seconde sur [
La source est sélectionnée.
3 Tournez le sélecteur rotatif m.
Sélectionnez le morceau.
! Pour aller aux niveaux inférieurs d’un dossier, sélectionnez le
dossier puis appuyez sur le sélecteur rotatif.
! Pour revenir aux niveaux supérieurs, appuyez sur [BACK] l.
] 6 ou [ ] 7.
Fr
17
Page 44

! Appuyez plus de 1 seconde sur [BACK] pour aller au niveau
supérieur.
4 Appuyez sur le sélecteur rotatif m.
Le morceau est chargé et la lecture commence.
! Si un disque contenant des fichiers de musique enregistrés dans
une structure hiérarchique est inséré, la lecture commence par les
plages du niveau supérieur.
! La même opération peut être effectuée avec la molette jog.
3 Appuyez sur [CUE] a.
Le point où la touche a été pressée est posé comme nouveau point de
repère.
! Lorsqu’un nouveau point de repère est posé, le point de repère
antérieur est supprimé.
Pause
Pendant la lecture, appuyez sur [PLAY/PAUSEf] b.
! La lecture se poursuit par une nouvelle pression sur
[PLAY/PAUSEf].
Reprise de la lecture au point de lecture juste
avant l’éjection du disque (Reprise)
Après avoir éjecté le disque, réinsérez-le immédiatement
dans cet appareil.
! La reprise de la lecture ne fonctionne que si le même disque est
éjecté puis réinséré avant d’insérer un autre disque.
! La reprise de la lecture ne fonctionne pas avec les dispositifs USB.
Recherche avant et arrière
Appuyez sur [SEARCH m, n] 9.
Le disque est exploré vers l’avant lorsque vous appuyez sur [n] et
maintenez la pression.
Le disque est exploré vers l’arrière lorsque vous appuyez sur [m] et
maintenez la pression.
Localisation du début de morceaux
(Recherche de morceaux)
Appuyez sur [TRACK SEARCH o, p] 8.
Appuyez sur [p] pour localiser le début du morceau suivant.
Une pression du doigt sur [o] ramène au début du morceau en
cours de lecture. Deux pressions successives ramènent au début du
morceau précédent.
! Lorsque la fonction de repère automatique est en service, l’appa-
reil localise le début du premier morceau et s’y arrête (la page 18).
Pose d’un repère
1 Pendant la lecture, appuyez sur [PLAY/PAUSEf] b.
La lecture se met en pause.
2 Appuyez sur [CUE] a.
Le point où le morceau se met en pause est posé comme point de
repère.
L’indicateur [PLAY/PAUSEf] clignote et l’indicateur [CUE] s’allume.
À ce moment le son est coupé.
! Lorsqu’un nouveau point de repère est posé, le point de repère
antérieur est supprimé.
Ajustement de la position d’un point de
repère
1 Pendant la pause au point de repère, appuyez sur
[SEARCH m, n] 9.
Les indicateurs [PLAY/PAUSEf] et [CUE] clignotent.
2 Appuyez sur [SEARCH m, n] 9.
Le point de repère peut être ajusté à la trame près.
Retour au point de repère (Back Cue)
Pendant la lecture, appuyez sur [CUE] a.
L’appareil revient immédiatement au point de repère actuellement
posé et s’y arrête.
! Lorsque [PLAY/PAUSEf] est pressée, la lecture démarre au
point de repère.
Vérification du point de repère (Cue Point
Sampler)
Après être revenu au point de repère, appuyez sur [CUE]
a et maintenez la pression.
La lecture commence au point de repère posé. La lecture continue tant
que la touche est maintenue enfoncée.
Pose d’un point de repère pendant la
lecture (Real Time Cue)
Pendant la lecture, appuyez sur [LOOP IN/ CUE
(HOT LOOP)] e.
Le point où la touche a été pressée est posé comme point de repère.
Pose d’un repère automatique
Lorsqu’un morceau est chargé ou une recherche de morceau effectuée, la partie silencieuse au début du morceau est ignoré et le point
de repère est automatiquement posé au point précédant immédiatement le début du son.
Appuyez au moins 1 seconde sur [TIME MODE
(AUTO CUE)] i.
La pose de repères automatiques est mise en service.
[[A. CUE] s’éclaire sur l’écran de l’appareil principal.
! Une nouvelle pression du doigt d’au moins 1 seconde sur
[TIME MODE (AUTO CUE)] met la fonction hors service.
! Le réglage de niveau du repère automatique reste en mémoire
même après la mise hors tension.
Changement de niveau d’un repère
automatique
Vous avez le choix entre huit niveaux de pression acoustique
pour l’identification d’une partie silencieuse et la pose de repères
automatiques.
–36 dB, –42 dB, –48 dB, –54 dB, –60 dB, –66 dB, –72 dB et –78 dB
! Le réglage de niveau du repère automatique reste en mémoire
même après la mise hors tension.
! Le niveau de pose de repères automatiques peut être changé d’une
des façons suivantes.
Utilisation de [DISPLAY (UTILITY)] j
1 Appuyez au moins 1 seconde sur [DISPLAY (UTILITY)] j.
L’écran [UTILITY] apparaît.
2 Tournez le sélecteur rotatif m, puis appuyez dessus.
Sélectionnez [A. CUE LEVEL].
18
Fr
Page 45

3 Tournez le sélecteur rotatif m, puis appuyez dessus.
SEARCH
TRACK SEARCH
IN/CUE OUT
OUT ADJUSTHOT LOOP
RELOOP/EXIT
BEAT LOOP
LOOP DIVIDE—+
VINYL MODE
TEMPO RANGE
LOOP
e
f hg
Le réglage du niveau du repère automatique change.
Recherche de trame
Utilisation de [TIME MODE (AUTO CUE)] i
1 Appuyez au moins 5 seconde sur [TIME MODE
(AUTO CUE)] i.
Le mode de changement du réglage du niveau du repère automatique
est en service.
Le niveau actuel de pose de repères automatiques est indiqué sur
l’écran de l’appareil principal.
2 Tournez le sélecteur rotatif m, puis appuyez dessus.
Le réglage du niveau du repère automatique change.
Fonctionnement de la molette jog
! Le haut de la molette jog intègre un commutateur. Ne posez pas
d’objets sur la molette jog et ne la soumettez pas à une force
excessive.
! L’infiltration d’eau ou de liquide dans l’appareil peut causer une
panne.
Commutation du mode de la molette jog
Appuyez sur [VINYL MODE] d.
Le mode bascule sur VINYL ou CDJ à chaque pression du doigt sur la
touche.
L’indicateur s’éclaire lorsque le mode VINYL est sélectionné.
— Le mode VINYL : Lorsque le haut de la molette jog est pressée
pendant la lecture, la lecture s’arrête, et à ce moment si la
molette jog est tournée, un son est produit selon la direction
de rotation de la molette.
— Mode CDJ : La lecture ne s’arrête pas même si vous appuyez
sur le haut de la molette jog. Les opérations telles que le scratching ne sont pas possibles.
Scratching
1 Appuyez sur [VINYL MODE] d.
Réglez le mode de jog sur VINYL.
2 Pendant la lecture, appuyez sur le haut de la molette
jog c.
La lecture s’arrête.
3 Faites tourner la molette jog c dans le sens de
lecture souhaité et à la vitesse souhaitée.
Le son change selon le sens et la vitesse de rotation de la molette jog
obtenue en faisant tourner le haut de la molette jog et en appuyant
dessus.
4 Levez la main du haut de la molette jog c.
La lecture normale se poursuit.
Pitch bend
Pendant la lecture, faites tourner la section extérieure
dans toucher le haut de la molette job c.
La vitesse de lecture augmente quand la rotation s’effectue dans le
sens horaire et elle diminue quand elle s’effectue dans le sens antihoraire. Lorsque la rotation est arrêtée, la vitesse de lecture redevient
normale.
! Lorsque le mode jog est réglé sur CDJ, cette opération peut aussi
s’effectuer en faisant tourner le haut de la molette jog.
En pause, faites tourner la molette c.
La position en pause peut être décalée à la trame près.
! La position se déplace dans le sens de la lecture lorsque la molette
jog est tournée dans le sens horaire, dans le sens inverse quand
elle est tournée dans le sens antihoraire. La position bouge de 135
lorsque la molette fait un tour complet.
Recherche super rapide
Faites tourner la molette c tout en appuyant sur
[SEARCH m, n] 9.
L’exploration rapide avant/ arrière du morceau s’effectue dans le sens
de rotation de la molette jog.
! Cette fonction est annulée quand [SEARCH m, n] est relâchée.
! Lorsque vous cessez de faire tourner la molette jog, la lecture
redevient normale.
! La vitesse d’exploration rapide avant/
vitesse de rotation de la molette jog.
arrière peut s’ajuster à la
Recherche de morceau super rapide
Si vous faites tourner la molette jog c tout en appuyant sur
[TRACK SEARCH o, p] 8, les morceaux sont explorés très rapide-
ment dans le sens de rotation de la molette.
Pose de boucles (partie Boucle et
Boucle selon le tempo)
1 Pendant la lecture, appuyez sur [LOOP IN/ CUE
(HOT LOOP)] e.
Le point d’entrée de la boucle est posé.
! Cette opération n’est pas nécessaire si vous avez déjà posé un
point de repère comme point d’entrée de la boucle.
2 Appuyez sur [LOOP OUT (OUT ADJUST)] f.
Le point de sortie de boucle est spécifié et la lecture de la boucle
commence.
Réglage précis du point de sortie de
boucle (ajustement de la sortie de la
boucle)
1 Pendant la lecture de la boucle, appuyez sur
[LOOP OUT (OUT ADJUST)] f.
[LOOP OUT (OUT ADJUST)] se met à clignoter rapidement et
[LOOP IN/ CUE (HOT LOOP)] s’éteint.
Le temps du point de sortie de boucle est indiqué sur l’écran de l’ap-
pareil principal.
2 Appuyez sur [SEARCH m, n] 9.
Le point de sortie de boucle peut être ajusté à la trame près.
! La même opération peut être effectuée avec la molette jog.
! La plage d’ajustement du point de sortie de boucle peut être n’im-
porte quel passage après le point d’entrée de boucle.
3 Appuyez sur [LOOP OUT (OUT ADJUST)] f.
La lecture de la boucle reprend.
! La lecture de la boucle se reprend aussi si aucune opération n’est
effectuée pendant plus de 10 secondes.
Français
Fr
19
Page 46

Annulation de la lecture d’une boucle
USB
STOP
SOURCE SELECT
MP3/AAC
WAV/AIFF
PLAYLIST
BPM
DISC
LOCK
BACK
SELECT PUSH
TIME MODE
AUTO CUE
DISPLAY
UTILITY
k
l
m
n
i
j
A.CUE
LOCK
16
REMAIN
MS
F
TEMPO %
INFO
BROWSE
BPM
A.CUE
LOCK
16
REMAIN
MS
F
TEMPO %
INFO
BROWSE
BPM
1
2
(Loop Exit)
À propos des affichages de [BROWSE] et
[INFO]
Pendant la lecture de la boucle, appuyez sur
[RELOOP/EXIT] g.
La lecture continue après le point de sortie de la boucle sans revenir
au point d’entrée de la boucle.
Retour à la lecture d’une boucle (Reloop)
Après avoir annulé la lecture de la boucle, appuyez sur
[RELOOP/EXIT] g pendant la lecture.
Le morceau revient au point d’entrée de la boucle spécifié précédemment, et la lecture de la boucle commence.
Division de boucles (Loop Divide)
Pendant la lecture d’une boucle, appuyez sur [BEAT LOOP
(LOOP DIVIDE)] h.
Le temps de lecture de la boucle est divisé en deux à chaque pression
sur [–].
Il suffit d’appuyer sur [+] pour revenir au temps original de lecture de
la boucle.
Retour au point d’entrée d’une boucle
(Hot Loop)
Pendant la lecture de la boucle, appuyez sur [LOOP IN/
CUE (HOT LOOP)] e.
Le morceau revient instantanément au point d’entrée de la boucle
posé, et la lecture de la boucle commence.
Affichage [BROWSE]
Indique les morceaux chargés, triés par catégorie ou en arborescence.
L’affichage dans la section d’affichage des informations est différent
selon que les informations des bibliothèques ont été ou non enregistrées sur le dispositif USB.
— Avec les informations des bibliothèques d Exploration de biblio-
thèques : Les fichiers de musique sont indiqués selon les catégories spécifiées dans rekordbox (album, artiste, etc.).
Les types de catégories peuvent être changés dans Préférences
(réglages environnementaux) dans rekordbox.
— Sans les informations des bibliothèques d Exploration de dos-
siers : Les dossiers/ morceaux présents sur le support sont indiqués selon une structure arborescente.
Affichage [INFO]
Donne des informations détaillées sur les morceaux chargés.
Le nom de l’auteur, le nom de l’album et le temps sont indiqués ici.
Commutation du mode d’affichage
Appuyez sur [DISPLAY (UTILITY)] j.
Les affichages [BROWSE] et [INFO] changent à chaque pression sur
la touche.
Utilisation de l’écran d’indication du
temps
Indique le temps et la position de lecture du morceau en cours de
lecture.
20
Pose automatique de boucles en fonction
du tempo du morceau (Beat Loop)
En mode de lecture ou en pause, appuyez sur
[BEAT LOOP (LOOP DIVIDE)] h.
Le point de sortie de la boucle est automatiquement posé selon le
tempo du morceau (BPM) et la lecture de la boucle commence.
! La lecture de boucles ne peut pas s’effectuer correctement si la
valeur BPM n’est pas indiquée.
Affichage des informations des
morceaux (section de navigation)
Fr
Position du temps
1
Position de lecture
2
! L’écran d’indication du temps fait partie de l’affichage [INFO].
! Quand l’affichage [INFO] est sélectionné, l’écran d’indication du
temps s’affiche automatiquement pendant un scratching ou un
bouclage.
1 Appuyez sur [DISPLAY (UTILITY)] j.
Basculez sur l’affichage [INFO].
2 Tournez le sélecteur rotatif m.
Affichez l’écran d’indication du temps.
Recherche rapide de morceaux
à l’aide des informations de
bibliothèques
Les informations de bibliothèques créées avec rekordbox et enregistrées sur un dispositif USB peuvent être utilisées pour localiser rapidement des morceaux.
Page 47

Recherche par spécification du premier
USB
STOP
SOURCE SELECT
MP3/AAC
WAV/AIFF
PLAYLIST
BPM
DISC
LOCK
SELECT PUSH
DISPLAY
UTILITY
m
n
caractère (saut)
Lorsque les éléments d’une catégorie sont triés par ordre alphabétique, vous pouvez passer directement aux éléments commençant par
le caractère spécifié.
! Cette fonction n’agit pas avec certaines catégories.
1 Appuyez sur [DISPLAY (UTILITY)] j.
Basculez sur l’affichage [BROWSE].
2 Tournez le sélecteur rotatif m, puis appuyez dessus.
Sélectionnez la catégorie.
3 Appuyez au moins 1 seconde sur le sélecteur rotatif m.
L’affichage bascule sur l’écran de saisie de caractères.
Les informations suivantes apparaissent dans la section d’affichage
des informations.
— Section supérieure : Caractère spécifié
— Section inférieure : Éléments commençant par le caractère
dans la section supérieure
4 Tournez le sélecteur rotatif m.
Le caractère affiché dans la section supérieure de l’affichage d’informations change.
Les éléments à localiser correspondant au caractère dans la section
supérieure apparaissent dans la section inférieure.
5 Appuyez sur le sélecteur rotatif m.
L’élément sélectionné à l’étape 4 s’affiche.
Recherche par saisie d’une suite de
caractères
Cette fonction permet d’afficher seulement les auteurs, albums, morceaux ou fichiers contenant la suite de caractères saisis.
! Les catégories non sélectionnées dans Préférences (réglages
environnementaux) dans rekordbox n’apparaissent pas.
1 Appuyez sur [DISPLAY (UTILITY)] j.
Basculez sur l’affichage [BROWSE].
2 Tournez le sélecteur rotatif m.
Sélectionnez [SEARCH].
3 Appuyez sur le sélecteur rotatif m.
L’affichage bascule sur l’écran de saisie de caractères.
4 Utilisez le sélecteur rotatif m pour saisir un caractère.
Tournez le sélecteur rotatif et sélectionnez le caractère souhaité, puis
appuyez sur le sélecteur rotatif pour valider le caractère.
! Répétez cette opération pour saisir d’autres caractères.
5 Lorsque vous avez saisi la suite de caractères,
appuyez sur le sélecteur rotatif m.
Seuls les éléments contenant la suite de caractères saisis
apparaissent.
Les informations suivantes apparaissent dans la section d’affichage
des informations.
— Section supérieure : Nombre d’éléments contenant la suite de
caractères saisis
— Section inférieure : Noms des éléments contenant la suite de
caractères saisis
! L’historique de la lecture n’est pas enregistré si l’espace disponi-
ble sur le dispositif USB n’est pas suffisant ou si le dispositif USB
est protégé.
! Des listes de lecture peuvent être créées à partir de l’historique de
la lecture avec rekordbox. Pour le détail, reportez-vous au mode
d’emploi de rekordbox.
! L’historique de la lecture est effacé après avoir été enregistré
comme liste de lecture avec rekordbox.
! Un nouvel [HISTORY] est créé à chaque mise sous et hors tension
ou débranchement puis branchement du dispositif USB.
Suppression de l’historique de la lecture
1 Tournez le sélecteur rotatif m.
Sélectionnez [HISTORY].
2 Appuyez au moins 1 seconde sur le sélecteur rotatif m.
Le menu de suppression apparaît.
3 Tournez le sélecteur rotatif m pour sélectionner la
plage à supprimer.
— [CANCEL]: Les [HISTORY] ne sont pas supprimés.
— [ONE]: L’[HISTORY] sélectionné avec le curseur est supprimé.
— [ALL]: Tous les [HISTORY] sont supprimés.
4 Appuyez sur le sélecteur rotatif m.
La plage sélectionnée à l’étape 3 est supprimée.
Utilisation de listes de lecture
Ajout de morceaux aux listes de lecture
Branchez d’abord le dispositif USB sur cet appareil.
! Pour ajouter le morceau en cours de lecture, basculez sur l’écran
[INFO].
! Pour sélectionner et ajouter un morceau, basculez sur l’écran
[BROWSE].
! Le nombre maximal de morceaux pouvant être consignés dans une
liste de lecture s’élève à 99.
1 Appuyez sur [PLAYLIST] n.
L’affichage bascule sur l’écran [ADD TO].
2 Tournez le sélecteur rotatif m.
Sélectionnez la liste de lecture.
Pour créer une nouvelle liste de lecture, sélectionnez [NEW PLAYLIST].
! Appuyez sur [PLAYLIST] ou [BACK] pour revenir à l’écran original.
3 Appuyez sur le sélecteur rotatif m.
Le morceau est ajouté à la liste de lecture.
Édition de listes de lecture
Français
À propos de l’historique de la
lecture (HISTORY)
Lors de la lecture de morceaux gérés avec rekordbox, l’historique de la
lecture est enregistré dans [HISTORY].
! L’historique de la lecture est enregistré sur le dispositif USB.
! Le nombre maximal de morceaux pouvant être enregistrés est de
999.
Changement de l’ordre des morceaux
Sélectionnez d’abord le morceau dont vous voulez changer l’ordre
dans la liste de lecture.
1 Appuyez sur [PLAYLIST] n.
L’écran de tri apparaît.
2 Tournez le sélecteur rotatif m.
Sélectionnez la position où le morceau doit être placé.
Fr
21
Page 48

Le morceau est inséré entre les deux morceaux indiqués dans la sec-
MULTI PLAYER
TEMPO
0
BEAT LOOP
LOOP DIVIDE—+
VINYL MODE
TEMPO RANGE
MASTER TEMPO
LOOP
PLAYLIST
BPM
LOCK
FWD
p
q
r
o
tion d’affichage des informations.
3 Appuyez sur le sélecteur rotatif m.
L’ordre des morceaux change.
Retrait de morceaux de listes de lecture
Sélectionnez d’abord le morceau que vous voulez retirer de la liste de
liste.
1 Appuyez au moins 1 seconde sur [PLAYLIST] n.
Le menu de retrait apparaît.
2 Tournez le sélecteur rotatif m, puis appuyez dessus.
— [CANCEL] : Le ou les morceaux ne sont pas retirés.
— [OK] : Le ou les morceaux sont retirés.
Suppression de listes de lecture
Sélectionnez d’abord la liste de lecture que vous voulez supprimer de
la catégorie [PLAYLIST].
1 Appuyez au moins 1 seconde sur [PLAYLIST] n.
Le menu de suppression apparaît.
2 Tournez le sélecteur rotatif m, puis appuyez dessus.
— [CANCEL] : La liste de lecture n’est pas supprimée.
— [OK] : La liste de lecture est supprimée.
! La vitesse peut être réglée par incréments de 0,02 % à [±6] %, par
incréments de 0,05 % à [±10] %, par incréments de 0,05 % à [±16] %
et par incréments de 0,5 % à [WIDE].
! La plage de réglage [WIDE] est de ±100 %. Lorsqu’elle est réglée
sur –100 %, la lecture s’arrête.
! [WIDE] ne peut être sélectionné que lors de la lecture de CD de
musique (CD-DA).
Réglage de la vitesse de lecture sans
changement du pitch (Tempo principal)
Appuyez sur [MASTER TEMPO] q.
L’indicateur [MASTER TEMPO] s’allume. Le pitch ne change pas
même lorsque la vitesse de lecture est changée avec le curseur
[TEMPO].
! Le son est traité numériquement si bien que sa qualité change.
Utilisation de [BPM LOCK]
Si le BPM principal est spécifié au préalable, une simple pression du
doigt sur une touche permettra de régler la vitesse du morceau en
cours de lecture sur le BPM principal.
Réglage du BPM principal
Réglage de la vitesse de la lecture
(section de commande de tempo)
Déplacez [TEMPO] r vers l’avant ou l’arrière.
La vitesse de lecture augmente quand le curseur est déplacé vers le
côté [+] (vers vous) et diminue quand le curseur est déplacé vers le
côté [–] (sens opposé).
Le taux de changement de la vitesse de lecture est indiqué dans
[TEMPO %] sur l’écran de l’appareil principal.
1 Appuyez au moins 1 seconde sur [BPM LOCK] o.
Le mode de changement du BPM principal est sélectionné.
La valeur actuelle du BPM ou le BPM principal réglé sur le temps précédent est indiqué sur l’écran de l’appareil principal et [BPM] clignote.
2 Tournez le sélecteur rotatif m.
Changez la valeur du BPM et spécifiez la valeur souhaitée comme
BPM principal.
3 Appuyez sur le sélecteur rotatif m.
Le BPM principal est spécifié.
! Si aucune opération n’est effectuée durant plus de 10 secondes, la
valeur du BPM indiquée dans la section d’affichage des informations est spécifiée comme BPM principal.
! Le BPM du morceau en cours de lecture se règle sur la valeur du
BPM principal si l’on appuie au moins 1 seconde sur [BPM LOCK]
en mode de changement de BPM principal.
! Pour changer le BPM principal, recommencez depuis l’étape 1.
Utilisation du verrouillage du BPM
Spécifiez d’abord le BPM principal.
! Le BPM ne peut pas être verrouillé dans le cas de morceaux pour
lesquels le BPM n’a pas été mesuré correctement.
Quand le morceau est en cours de lecture, appuyez sur
[BPM LOCK] o.
Le BPM du morceau en cours de lecture se synchronise sur le BPM
principal.
[LOCK] apparaît sur l’écran de l’appareil principal.
! [TEMPO RANGE] est réglé sur [±16].
! [LOCK] clignote lorsque le BPM du morceau en cours de lecture
change. Appuyez sur [BPM LOCK] lorsque [LOCK] clignote pour
reverrouiller le BPM.
Sélection de la plage de réglage de la
vitesse de lecture
Appuyez sur [TEMPO RANGE] p.
La plage de réglage de la vitesse de lecture change à chaque pression
sur la touche.
[WIDE, ±16, ±10, ±6] s’éclaire sur l’écran de l’appareil principal.
Fr
22
À propos de l’affichage du tempo en mode de
verrouillage de BPM
En mode de verrouillage de BPM, [TEMPO %] sur l’écran de l’appareil
principal change à intervalles réguliers entre le BPM principal et la
différence par rapport à la position du curseur [TEMPO].
— [INC] : Pour adapter le BPM principal à la position du curseur
[TEMPO], déplacez [TEMPO] vers le côté [+] (vers vous).
— [dEC] : Pour adapter le BPM principal à la position du curseur
[TEMPO], déplacez [TEMPO] vers le côté [–] (sens opposé).
Page 49

Annulation du mode de verrouillage du BPM
USB
STOP
SOURCE SELECT
MP3/AAC
WAV/AIFF
PLAYLIST
BPM
DISC
LOCK
BACK
SELECT PUSH
TIME MODE
AUTO CUE
DISPLAY
UTILITY
k
l
m
n
i
j
Le mode de verrouillage du BPM peut être annulé de quatre façons
différentes.
— En appuyant sur [BPM LOCK] en mode de verrouillage de BPM.
— Bougez le curseur [TEMPO] pour augmenter ou réduire la vitesse
de lecture du morceau par rapport au BPM principal.
— En chargeant un morceau.
— En recherchant un morceau (recherche de morceau).
Opérations avec une table de
mixage DJ
Reportez-vous aussi au mode d’emploi de la table de mixage DJ.
Lancement de la lecture avec le fader
d’une table de mixage DJ (Lancement par
le fader)
1 Raccordez le CDJ-350 à une table de mixage DJ
Pioneer avec le câble de commande fourni.
Pour les instructions sur le raccordement, reportez-vous à la page 13,
Style de base.
2 Mettez le lancement par le fader de la table de
mixage DJ en service.
3 Spécifiez le repère.
4 Déplacez le fader ou le crossfader du canal sur la
table de mixage DJ.
Le mode de pause est annulée sur cet appareil et le morceau est lu
instantanément.
! Lorsque le fader ou le crossfader du canal est ramené à sa position
originale, la lecture revient au point de repère posé et le lecteur se
remet en pause (Repèrage arrière).
pourrez utiliser le logiciel DJ depuis cet appareil. Le son des fichiers
de musique lus sur l’ordinateur peut aussi être restitué par le CDJ-350.
Pour utiliser cet appareil comme dispositif audio, installez d’abord le
pilote sur l’ordinateur (la page 11). Cet appareil doit aussi être sélec-
tionné dans les réglages de dispositifs audio du logiciel DJ. Pour le
détail, reportez-vous au mode d’emploi de votre logiciel DJ.
1 Raccordez le port USB de cet appareil à votre
ordinateur.
Pour les instructions sur le raccordement, reportez-vous à la page 14,
Utilisation du logiciel DJ.
2 Appuyez au moins 1 seconde sur [ ].
L’écran [CONTROL MODE] apparaît sur l’écran de l’appareil principal.
3 Lancez le logiciel DJ.
La communication avec le logiciel DJ commence.
Les touches et commandes de cet appareil peuvent être utilisées pour
la commande du logiciel DJ.
! Il est possible que certaines touches ne puissent pas être utilisées
pour l’exploitation du logiciel DJ.
! Pour les messages provenant du CDJ-350, reportez-vous à Liste de
messages MIDI.
Changement de réglage du canal MIDI
1 Appuyez au moins 1 seconde sur [DISPLAY (UTILITY)] j.
L’écran [UTILITY] apparaît.
2 Tournez le sélecteur rotatif m, puis appuyez dessus.
Sélectionnez [MIDI CH.].
3 Tournez le sélecteur rotatif m, puis appuyez dessus.
Sélectionnez le canal MIDI et changez le réglage. Le canal 1 – 16 peut
être sélectionné.
4 Appuyez sur le sélecteur rotatif m.
Les réglages effectués sur le canal MIDI sont sauvegardés.
! Pour fermer l’écran [UTILITY], appuyez sur [DISPLAY (UTILITY)] ou
[BACK].
Français
Lecture en relais sur deux lecteurs DJ
1 Raccordez le CDJ-350 et une table de mixage DJ.
Pour les instructions sur le raccordement, reportez-vous à la page 14,
Utilisation de la lecture en relais.
2 Mettez le crossfader de la table de mixage DJ à la
position centrale.
3 Tournez auto cue sur les deux lecteurs DJ.
Les indicateurs auto cue des lecteurs DJ s’éclairent.
4 Démarrez la lecture sur cet appareil.
Lorsque la lecture du premier morceau est terminée sur cet appareil,
elle commence automatiquement sur l’autre lecteur DJ. L’appareil se
positionne au début du morceau suivant puis se met en pause. Cette
opération se répète et la lecture en relais s’effectue sur les deux lecteurs DJ.
! Le support peut être changé et un point de repère posé sur le lec-
teur DJ en attente.
! Le lancement par le fader n’est pas disponible pendant la lecture
en relais.
! Si les deux lecteurs DJ ne sont pas raccordés à la même table de
mixage DJ, la lecture en relais peut être impossible.
! Si l’alimentation du lecteur DJ en cours de lecture est coupée, il se
peut que la lecture démarre sur l’autre lecteur DJ.
Utilisation du logiciel DJ
La CDJ-350 fournit aussi les données de fonctionnement des touches
et molettes dans le format MIDI. Si vous raccordez un ordinateur
contenant un logiciel DJ compatible MIDI avec un câble USB, vous
Changement des réglages
1 Appuyez au moins 1 seconde sur [DISPLAY (UTILITY)] j.
L’écran [UTILITY] apparaît.
2 Utilisez le sélecteur rotatif m pour changer le réglage.
! Appuyez sur [BACK] l pour revenir à la page précédente.
3 Appuyez sur le sélecteur rotatif m.
Les réglages effectués sont sauvegardés.
! Pour fermer l’écran [UTILITY], appuyez sur [DISPLAY (UTILITY)] ou
[BACK].
Fr
23
Page 50

Réglage des préférences
Réglages des
options
A. CUE LEVEL
MIDI CHANNEL
AUTO STANDBY
LIBRARY CREATOR
VERSION No.
*: Réglage après l’achat
Éléments sélectionnés Descriptions
–42 dB/ –48 dB/
–36 dB/
–54 dB/ –60 dB*/ –66 dB/
–72 dB/ –78 dB
1* à 16 —
20 min*/ 40 min/ 60 min
OFF/
LIBRARY*/ FOLDER
—
Pour le détail, reportez-vous
à la page 18, Changement
de niveau d’un repère
automatique.
Pour le détail, reportez-vous
à la page 24, À propos de la
mise en veille automatique.
Précise la méthode d’exploration pour un support sur
lequel des bibliothèques
MEP-7000 Pioneer sont
enregistrées.
Affiche la version du logiciel du CDJ-350.
À propos de la mise en veille automatique
Lorsque la mise en veille automatique est en service, l’appareil se met
automatiquement en mode de veille quand le temps réglé s’est écoulé
dans la mesure où toutes les conditions suivantes sont remplies.
— Les touches, commandes, etc. de cet appareil ne sont pas activées.
— Aucun morceau n’est lu.
24
Fr
Page 51

Informations supplémentaires
En cas de panne
! Une erreur de commande est souvent prise pour une anomalie de fonctionnement ou une panne. Si vous estimez que cet appareil ne fonc-
tionne pas correctement, vérifiez les points ci-dessous. Parfois, le problème peut provenir d’un autre composant. Examinez les autres composants et les appareils électriques utilisés. Si le problème persiste malgré les vérifications des points suivants, confiez les réparations au
service après-vente Pioneer le plus proche ou à votre revendeur.
! De l’électricité statique ou des influences externes ont peut être déréglé cet appareil. Dans ce cas, il est possible de faire fonctionner à nou-
veau l’appareil en l’éteignant, puis rallumant 1 minute plus tard.
! Les CD-R/ -RW non clôturés (disques partiels) ne peuvent pas être lus sur le CDJ-350.
! Les disques de forme irrégulière, autres que les disques standard de 12 cm, ne peuvent pas être lus sur le CDJ-350 (ils peuvent causer des
dommages et des accidents).
! Le BPM mesuré par le CDJ-350 peut être différent du BPM indiqué sur le disque ou sur une table de mixage Pionner, etc. Ceci est dû aux
différentes méthodes utilisées pour mesurer le BPM et non pas à une défectuosité de ce lecteur.
Problème Vérification Solution
Le disque ne peut pas être éjecté. —
La lecture ne commence pas lorsqu’un disque
est chargé.
Le fichier ne peut pas être lu. Est-ce que le fichier est protégé (par le système
Aucun son produit ou son déformé ou parasité. Est-ce que la table de mixage DJ raccordée fonc-
Un bruit fort est produit ou la lecture s’arrête
lorsqu’un certain disque est lu.
La recherche de morceau prend trop de temps. Est-ce que la fonction de repère automatique est
La fonction de recherche arrière ne fonctionne
pas.
La lecture de boucle ne fonctionne pas. Est-ce qu’un point de repère a été posé ? Posez un point de repère. (la page 18)
Les réglages ne sont pas enregistrés dans la
mémoire.
Le dispositif USB n’est pas reconnu. Est-ce que le dispositif USB est raccordé correc-
L’affichage d’adresse de lecture n’apparaît pas
en mode de temps restant.
Il faut un certain temps pour lire un dispositif
USB (lecteur à mémoire flash et disque dur).
Est-ce que le disque ou le fichier peut être lu ? Sélectionnez la page 6, À propos des disques ou la page 7, For-
Est-ce que la fonction de repère automatique est
en service ?
DRM) ?
tionne correctement ?
Est-ce que le CDJ-350 est près d’un téléviseur ? Éteignez le téléviseur ou installez le CDJ-350 à l’écart du télévi-
Est-ce que le disque est rayé ? Les disques rayés peuvent ne pas être lus.
Est-ce que le disque est sale ? Essuyez la saleté du disque. (la page 27)
en service ?
— S’il n’est pas possible de localiser le morceau en l’espace de 10
Est-ce qu’un point de repère a été posé ? Posez un point de repère. (la page 18)
Est-ce que l’alimentation a été coupée directement après le changement de réglage ?
tement ?
Est-ce que l’appareil USB est raccordé par l’inter-
médiaire d’un concentrateur USB ?
Est-ce que le dispositif USB est pris en charge par
le CDJ-350 ?
Est-ce que le format de fichier est pris en charge
par le CDJ-350 ?
Utilisez-vous un dispositif USB (par ex. un disque dur
alimenté par bus) dont le courant est supérieur au
courant nominal de cet appareil (500 mA) ?
— Éteignez l’appareil, puis rallumez-le 1 minute plus tard.
— Lors de la lecture de fichiers enregistrés en VBR, il arrive parfois
Est-ce qu’un grand nombre de dossiers ou fichiers
sont enregistrés sur le dispositif USB ?
Est-ce que des fichiers qui ne sont pas des fichiers
de musique sont enregistrés sur le dispositif
USB ?
Si [hDISC] ne fonctionne pas, éjectez le disque en insérant la
broche dans le trou d’éjection forcée du disque. (la page 17)
mats de fichiers de musique lisibles.
Appuyez au moins 1 seconde sur [TIME MODE (AUTO CUE)] pour
annuler la pose de repères automatiques. (la page 18)
Les fichiers protégés contre la copie ne peuvent pas être lus.
Assurez-vous que la table de mixage DJ fonctionne.
seur.
La recherche de morceau peut être longue quand il y a des passages silencieux entre les morceaux.
secondes, un point de repère est posé au début du morceau.
Après un changement de réglage, attendez au moins 10 secondes
avant de couper l’alimentation.
Raccordez l’appareil correctement (bien enfoncé).
Les concentrateurs USB ne peuvent pas être utilisés.
Ce lecteur prend en charge seulement les appareils USB de
stockage de masse.
Ce lecteur prend en charge les lecteurs à mémoire flash et audio
numériques portables.
Vérifiez le format des fichiers du dispositif USB raccordé. Pour
les formats de fichiers pris en charge par le CDJ-350, reportezvous à la page 7, À propos des appareils USB.
Utilisez un dispositif USB dont la tension ne dépasse pas la tension nominale de cet appareil (par ex. un disque dur alimenté par
un adaptateur secteur ou une autre source d’alimentation).
que l’appareil ne détecte pas immédiatement la longueur du morceau et, dans ce cas, il faut attendre un peu avant que l’affichage
d’adresse de lecture apparaisse.
Le chargement peut durer un certain temps si la quantité de
dossiers ou de fichiers est importante.
Lorsque des fichiers autres que des fichiers de musique sont
enregistrés dans des dossiers, il faut un certain temps pour les
lire. N’enregistrez pas de fichiers ou de dossiers autres que des
fichiers de musique sur le dispositif USB.
Français
Fr
25
Page 52

Problème Vérification Solution
La catégorie n’est pas indiquée. Un CD de musique est-il en cours de lecture ? La catégorie n’est pas indiquée pour les CD de musique.
Est-ce que les informations des bibliothèques sont
enregistrées sur le dispositif USB ?
Est-ce que le dispositif USB est protégé contre
l’écriture ?
Rien de ne s’affiche. Est-ce que la veille automatique est en service ? En usine, la veille automatique a été mise en service sur cet appa-
L’indicateur [u] clignote et l’appareil ne
s’allume pas.
— Il est parfois possible de remettre en état de fonctionnement
Utilisez rekordbox pour créer les informations des bibliothèques.
Réglez le dispositif USB pour permettre l’écriture de fichiers
dessus.
Mettez le commutateur de protection du dispositif USB en position d’écriture.
reil. Si vous ne voulez pas utiliser la veille automatique, réglez
[AUTO STANDBY] sur [OFF]. (la page 24)
l’appareil en débranchant le cordon d’alimentation, puis le
rebranchant 1 minute plus tard.
Si le symptôme persiste, débranchez le cordon d’alimentation et
faites réparer l’appareil.
Messages d’erreur
Lorsque le CDJ-350 ne peut pas fonctionner normalement, un code d’erreur apparaît à l’écran. Prenez les mesures nécessaires en vous référant
au tableau suivant. Si le code d’erreur affiché ne se trouve pas dans le tableau ci-dessous, ou si le même code d’erreur apparaît de nouveau bien
que la mesure suggérée ait été prise, contactez votre revendeur ou le service après-vente Pioneer le plus proche.
Code d’erreur Type d’erreur Description de l’erreur Cause et solution
E-7201 TOC READ ERROR Les données de la TOC ne peuvent pas être lues.
E-8301
E-8302
E-8303
E-8304 DECODE ERROR
E-8305 DATA FORMAT ERROR
E-8306 NO FILE
E-9101 MECHANICAL TIME OUT
PLAYER ERROR
Un disque ne pouvant pas être lu normalement est
inséré.
Des fichiers de musique ne pouvant pas être lus
normalement sont chargés.
Le morceau enregistré dans la bibliothèque, la liste
de lecture, etc., a été supprimé du dispositif USB et
ne peut pas être lu.
Le mécanisme ne s’est pas arrêté dans le temps
spécifié.
! Le disque est craquelé.dRemplacez le
disque.
! Le disque est sale.dNettoyez le disque.
! Si le lecteur fonctionne normalement avec
d’autres disques, le problème vient de ce
disque.
Mauvais format.dRemplacez les fichiers par des
fichiers de musique enregistrés dans le format
approprié.
Ne supprimez pas ce morceau du dispositif USB.
Un objet étranger se trouve dans la fente d’insertion du disque.dRetirez l’objet étranger.
Liste des icônes s’affichant sur
l’écran de l’appareil principal
Genre
Auteur
Album
Nom de morceau/ fichier
Liste de lecture
Auteur original
Historique
Heure
La lecture n’est pas possible
Lecture
Lu
Remixeur
Dossier
Commande d’ordinateur
26
Fr
Page 53

Liste de messages MIDI
Précautions d’emploi
Nom SW Type SW
Molette jog
(scratch)
TEMPO
Molette jog
(rotation de la
section extérieure)
SELECT PUSH
(rotation)
PAUSE
PLAY/
f
CUE
SEARCH n
SEARCH m
TRACK
SEARCH p
TRACK
SEARCH o
LOOP IN/
(HOT LOOP)
LOOP OUT
(OUT ADJUST)
RELOOP/
TIME MODE
(AUTO CUE)
DISPLAY
(UTILITY)
TEMPO RANGE
MASTER
TEMPO
VINYL MODE
BEAT LOOP
(LOOP DIVIDE) +
BEAT LOOP
(LOOP DIVIDE) –
Molette jog
(pression haut)
BPM LOCK
PLAYLIST
hDISC
BACK
SELECT PUSH
(pression)
n est le numéro de canal.
Commande
universelle
VR Bn 1D dd
Commande
universelle
Commande
universelle
SW 9n 00 dd OFF=00, ON=7F
SW 9n 01 dd OFF=00, ON=7F
SW 9n 02 dd OFF=00, ON=7F
SW 9n 03 dd OFF=00, ON=7F
SW 9n 04 dd OFF=00, ON=7F
SW 9n 05 dd OFF=00, ON=7F
CUE
SW 9n 06 dd OFF=00, ON=7F
SW 9n 07 dd OFF=00, ON=7F
EXIT
SW 9n 08 dd OFF=00, ON=7F
SW 9n 0E dd OFF=00, ON=7F
SW 9n 0F dd OFF=00, ON=7F
SW 9n 10 dd OFF=00, ON=7F
SW 9n 11 dd OFF=00, ON=7F
SW 9n 12 dd OFF=00, ON=7F
SW 9n 16 dd OFF=00, ON=7F
SW 9n 17 dd OFF=00, ON=7F
SW 9n 20 dd OFF=00, ON=7F
SW 9n 26 dd OFF=00, ON=7F
SW 9n 2E dd OFF=00, ON=7F
SW 9n 2F dd OFF=00, ON=7F
SW 9n 32 dd OFF=00, ON=7F
SW 9n 33 dd OFF=00, ON=7F
Message MIDI
(3 octets)
Bn 10 dd
Bn 30 dd
Bn 4F dd
Remarques
Valeur linéaire par rapport à la vitesse de l’arrêt à la vitesse x4. Arrêt
: 40, direction FWD
(CW) : 41 à 7F (x0,06 à
vitesse x4), direction
REV (CCW) : 3F à 00
(x0,5 à vitesse x4)
00 à 7F (00 au côté –,
7F au côté + , 40 au
centre)
Valeur linéaire par
rapport à la vitesse de la
vitesse x0,5 à la vitesse
x4. Arrêt (à la vitesse
x0,49) : 40, direction
FWD (CW) : 41 à 7F (x0,5
à vitesse x4), direction
REV (CCW) : 3F à 00 (x0,5
à vitesse x4)
98 – 127, 1 – 30 Différence de compte depuis
le dernier envoi (±1
– ±30) Si supérieur à
±30, régler sur ±30
À propos de la condensation
Des gouttelettes d’eau (condensation) peuvent se former à l’intérieur
de l’appareil (sur les pièces et les lentilles) en hiver, par exemple, si
vous transportez sans transition l’appareil d’un endroit froid dans un
pièce chaude, ou si la température de la pièce où se trouve l’appareil
augmente rapidement (un appareil de chauffage, par exemple, est mis
en marche). Cet appareil ne fonctionne pas correctement et la lecture
n’est pas possible si de la condensation s’est formée dans l’appa-
reil. Laissez l’appareil éteint pendant 1 ou 2 heures à la température
ambiante (selon l’intensité de la condensation). Les gouttelettes d’eau
s’évaporeront et la lecture sera de nouveau possible. De la conden-
sation peut aussi se former en été si l’appareil est exposé à l’air d’un
climatiseur, etc. Dans ce cas, installez l’appareil à un autre endroit.
Nettoyage de la lentille
La lentille de ce lecteur ne devrait pas se salir normalement mais si,
pour une raison quelconque, de la poussière ou de la saleté causait un
problème, consultez un service après-vente agréé Pioneer. Bien que
divers produits de nettoyage pour lentille de lecteur soient en vente
dans le commerce, nous déconseillons leur utilisation, car certains
d’entre eux risquent, en fait, d’endommager la lentille.
Manipulation des disques
Rangement
! Remettez toujours les disques dans leurs boîtiers et rangez-les à la
verticale, à l’abri de la chaleur, de l’humidité, des rayons directs du
soleil et d’un froid extrême.
! Veillez à lire les précautions fournies avec le disque.
Nettoyage des disques
! Les disques couverts de traces de doigts ou de poussière risquent
de ne pas être lus. Si le cas se présente, essuyez doucement le
disque avec un tissu de nettoyage, etc. en allant du centre vers la
périphérie du disque. N’utilisez pas de tissu de nettoyage sale.
! N’utilisez pas de benzène, diluant ni d’autres produits chimiques
volatils. N’utilisez pas non plus de vaporisateur pour microsillons
ni de produits antistatiques.
! Pour enlever les taches rebelles, imprégnez d’eau un chiffon doux,
tordez bien le chiffon, essuyez la saleté, puis passez un chiffon sec
sur le disque.
! N’utilisez pas de disques endommagés (fendus ou déformés).
! Faites attention de ne pas rayer ni salir la face enregistrée des
disques.
! Ne posez pas deux disques sur le tiroir à disque, l’un sur l’autre.
! Ne collez pas de morceaux de papier ni d’étiquettes sur les dis-
ques. Ceci risque des déformer les disques et ceux-ci ne pourront
plus être lus. Faites attention aussi aux disques loués sur lesquels
des étiquettes sont souvent collées, parce que la colle de l’étiquette peut salir le disque. Vérifiez si la colle ne déborde pas de
ces étiquettes avant d’utiliser des disques loués.
Français
Fr
27
Page 54

À propos des disques à formes spéciales
Les disques à formes spéciales (en coeur, hexagonaux, etc.) ne peuvent pas être lus sur ce lecteur. N’essayez pas de lire de tels disques
car ils pourraient endommager le lecteur.
À propos de la condensation sur les
disques
Si les disques sont portés d’un endroit froid (en particulier en hiver)
dans une pièce chaude, des gouttelettes d’eau (condensation) peuvent se former sur leur surface. Les disques risquent de ne pas pouvoir
être lus correctement s’il y a de la condensation dessus. Essuyez
doucement les gouttelettes d’eau sur la surface du disque avant de
l’insérer.
Avis de non responsabilité
! Pioneer et rekordbox sont des marques commerciales ou des
marques déposées de Pioneer Corporation.
! Microsoft®, Windows Vista®, Windows® et Internet Explorer® sont des
marques déposées ou des marques commerciales aux États-Unis et
dans d’autres pays de Microsoft Corporation des États-Unis.
! Apple, Macintosh, Mac OS, Safari, iTunes et Finder sont des mar-
ques déposées de Apple Inc. aux États-Unis et dans d’autres pays.
! Pentium est une marque déposée de Intel Corporation.
! Adobe et Reader sont soit des marques déposées soit des marques
commerciales de Adobe Systems Incorporated aux États-Unis et/
ou dans d’autres pays.
! ASIO est une marque commerciale de Steinberg Media
Technologies GmbH.
Les noms de sociétés et de produits mentionnés ici sont des marques
commerciales de leurs détenteurs respectifs.
La licence de ce produit a été accordée pour un usage non lucratif.
La licence n’a pas été accordée à ce produit pour un usage commercial (but lucratif), comme la diffusion radiotélévision (terrestre,
satellite, câblée ou autre), la diffusion sur Internet ou Intranet
(réseau d’entreprise) ou sur tout autre type de réseaux ou de services de distribution d’informations électroniques (services de distribution de musique numérique en ligne). Pour de tels usages vous
devez acquérir les licences appropriées. Pour le détail, consultez le
site: http:/
/
www.mp3licensing.com.
Utilisation du site d’assistance
Avant toute question sur le fonctionnement de rekordbox et l’assistance technique, reportez-vous au mode d’emploi derekordbox et
consultez la FAQ publiée sur le site de l’assistance de rekordbox.
Site de support de rekordbox
http://www.prodjnet.com/rekordbox/support/
! Pour pouvoir poser une question sur rekordbox, vous devez vous
enregistrer à l’avance comme utilisateur sur le site de l’assistance de
rekordbox.
! Pour vous enregistrer comme utilisateur vous devez spécifier la clé
de licence. Ayez à disposition la clé de la licence. Veillez aussi à ne
pas oublier le nom de connexion (votre adresse email) et le mot de
passe utilisé lors de votre enregistrement comme utilisateur, ainsi
que la clé de licence.
! Pioneer Corporation recueille les informations personnelles dans les
but suivants :
1 Pour fournir une assistance au sujet du produit acheté ;
2 Pour vous tenir au courant de produits ou d’événements par
email ;
3 Pour prendre en compte l’opinion de la clientèle dans la
planification de futurs produits
— Les informations vous concernant restent confidentielles,
conformément à la politique de protection de la vie privée de
notre société.
— Vous pouvez vérifier notre politique relative à la protection de la
vie privée sur le site d’assistance de rekordbox.
! Lors d’une demande d’informations sur rekordbox, n’oubliez pas
d’indiquer le type d’ordinateur utilisé ainsi que ses caractéristiques
(processeur, mémoire installée, autres périphériques raccordés,
etc.), le système d’exploitation et la version utilisée, ainsi que des
détails concrets sur le problème rencontré.
— Pour toute question sur la configuration de votre ordinateur
avec d’autres dispositifs que nos produits et l’assistance
technique correspondante, contactez chaque fabricant ou
détaillant.
! rekordbox est susceptible d’être mis à jour en vue de l’amélioration
de ses fonctions et performances. La mise à jour peut être
téléchargée depuis le site d’assistance. Il est vivement conseillé
de mettre à jour le logiciel régulièrement pour disposer de la toute
dernière version sur votre système.
Précautions concernant les droits
d’auteur
rekordbox limite la lecture et la copie de contenus musicaux protégés
par des droits d’auteur.
! Si des données codées sont insérées dans le contenu musical,
par exemple pour la protection des droits d’auteur, le programme
risque de ne pas fonctionner normalement.
! Lorsque rekordbox détecte que des données codées sont insérées
dans le contenu musical, par exemple pour la protection des droits
d’auteur, l’opération en cours (lecture d’un morceau, lecture de
données, etc.) peut s’arrêter.
Les enregistrements effectués sont destinés à votre usage personnel
et, conformément aux lois sur les droits d’auteur, il se peut que leur
utilisation soit soumise au consentement du détenteur des droits.
! La musique enregistrée à partir de CD, etc. est protégée par les lois
sur les droits d’auteur de divers pays et par des traités internatio-
naux. La personne qui effectue des enregistrements de musique
est responsable de leur utilisation légale.
! Lorsque de la musique est téléchargée d’Internet, etc., la personne
qui a effectué le téléchargement est responsable de l’utilisation
de cette musique conformément à l’accord conclus avec le site de
téléchargement.
Fr
28
Page 55

Spécifications
Alimentation .................................................CA 220 V à 240 V, 50 Hz/ 60 Hz
Consommation ....................................................................................... 16 W
Consommation (en veille) .................................................................... 0,3 W
Poids de l’appareil principal ............................................................... 2,3 kg
Dimensions maximales ........220 mm (L) × 107 mm (H) × 288,5 mm (P)
Température de fonctionnement tolérée ...........................+5 °C à +35 °C
Humidité de fonctionnement tolérée .... 5 % à 85 % (sans condensation)
Sortie audio analogique (AUDIO OUT L/ R)
Prise de sortie................................................................................Prise RCA
Niveau de sortie ................................................................. 2,0 Vrms (1 kHz)
Réponse en fréquence ............................................................4 Hz à 20 kHz
Rapport S/ B .........................................................................................115 dB
Distorsion harmonique totale ..........................................................0,006 %
Section aval USB (USB)
Port .......................................................................................................Type A
Alimentation ...........................................................5 V/
Section amont USB (USB)
Port .......................................................................................................Type B
Sortie de commande (CONTROL)
Port ....................................................................................................Minijack
! Les caractéristiques et la présentation peuvent être modifiées, sans
avis préalable, dans un souci d’amélioration.
! Les articles concernant les réparations gratuites, etc., présents
dans la garantie ne s’appliquent pas au logiciel de gestion de la
musique rekordbox. Avant d’installer ou d’utiliser rekordbox, lisez
attentivement les articles dans la page 8, Accord de licence du
logiciel.
500 mA ou inférieur
Français
Fr
29
Page 56

Vielen Dank, dass Sie sich für dieses Pioneer-Produkt entschieden haben. Bitte lesen Sie diese Bedienungsanleitung gründlich durch, um
Ein Ausrufezeichen in einem Dreieck weist
den Benutzer auf wichtige Bedienungs- und
Wartungsanweisungen in den Dokumenten
hin, die dem Gerät beiliegen.
Das Blitzsymbol in einem Dreieck weist den
Benutzer darauf hin, dass eine
Berührungsgefahr mit nicht isolierten Teilen
im Geräteinneren, die eine gefährliche
Spannung führen, besteht. Die Spannung
kann so hoch sein, dass sie die Gefahr eines
elektrischen Schlages birgt.
ACHTUNG:
UM SICH NICHT DER GEFAHR EINES
ELEKTRISCHEN SCHLAGES
AUSZUSETZEN, DÜRFEN SIE NICHT DEN
DECKEL (ODER DIE RÜCKSEITE)
ENTFERNEN. IM GERÄTEINNEREN
BEFINDEN SICH KEINE VOM BENUTZER
REPARIERBAREN TEILE. ÜBERLASSEN SIE
REPARATUREN DEM QUALIFIZIERTEN
KUNDENDIENST.
CAUTION
RISK OF ELECTRIC SHOCK
DO NOT OPEN
WICHTIG
D3-4-2-1-1_A1_De
Mischen Sie dieses Produkt, wenn Sie es entsorgen wollen, nicht mit gewöhnlichen Haushaltsabfällen. Es gibt ein getrenntes
Sammelsystem für gebrauchte elektronische Produkte, über das die richtige Behandlung, Rückgewinnung und Wiederverwertung
gemäß der bestehenden Gesetzgebung gewährleistet wird.
Privathaushalte in den Mitgliedsstaaten der EU, in der Schweiz und in Norwegen können ihre gebrauchten elektronischen Produkte an
vorgesehenen Sammeleinrichtungen kostenfrei zurückgeben oder aber an einen Händler zurückgeben (wenn sie ein ähnliches neues Produkt
kaufen).
Bitte wenden Sie sich in den Ländern, die oben nicht aufgeführt sind, hinsichtlich der korrekten Verfahrensweise der Entsorgung an die örtliche
Kommunalverwaltung.
Auf diese Weise stellen Sie sicher, dass das zu entsorgende Produkt der notwendigen Behandlung, Rückgewinnung und Wiederverwertung
unterzogen wird, und so mögliche negative Einflüsse auf die Umwelt und die menschliche Gesundheit vermieden werden.
K058b_A1_De
sich mit der Bedienung des Geräts vertraut zu machen. Nachdem Sie die Bedienungsanleitung gelesen haben, legen Sie sie griffbereit zum
Nachschlagen ab.
In manchen Ländern oder Regionen können sich die Formen von Netzstecker und Netzsteckdose von denen in den Erklärungszeichnungen unterscheiden. Das Verfahren zum Anschließen und Bedienen des Geräts sind aber gleich.
De
2
Page 57

WARNUNG
Dieses Gerät ist nicht wasserdicht. Zur Vermeidung der
Gefahr von Brand und Stromschlag keine Behälter mit
Flüssigkeiten (z.B. Blumenvasen und -töpfe) in die
Nähe des Gerätes bringen und dieses vor Tropfwasser,
Spritzwasser, Regen und Nässe schützen.
D3-4-2-1-3_A1_De
WARNUNG
Vor dem erstmaligen Anschluss des Gerätes an das
Stromnetz bitte den folgenden Hinweis sorgfältig
beachten.
Die Netzspannung ist je nach Land verschieden.
Vor der Inbetriebnahme des Gerätes sicherstellen,
dass die örtliche Netzspannung mit der auf dem
Ty penschild an der Rückwand des Gerätes
angegebenen Nennspannung (z.B. 230 V oder 120
V) übereinstimmt.
D3-4-2-1-4*_A1_De
WARNUNG
Keine Quellen offener Flammen (z.B. eine brennende
Kerze) auf dieses Gerät stellen.
D3-4-2-1-7a_A1_De
VORSICHTSHINWEIS ZUR BELÜFTUNG
Bei der Aufstellung dieses Gerätes muss für einen
ausreichenden Freiraum gesorgt werden, um eine
einwandfreie Wärmeabfuhr zu gewährleisten
(mindestens 5 cm hinter dem Gerät und jeweils 5 cm
an der Seite des Gerätes).
WARNUNG
Im Gerätegehäuse sind Ventilationsschlitze und andere
Öffnungen vorgesehen, die dazu dienen, eine
Überhitzung des Gerätes zu verhindern und einen
zuverlässigen Betrieb zu gewährleisten. Um
Brandgefahr auszuschließen, dürfen diese Öffnungen
auf keinen Fall blockiert oder mit Gegenständen (z.B.
Zeitungen, Tischdecken und Gardinen) abgedeckt
werden, und das Gerät darf beim Betrieb nicht auf
einem dicken Teppich oder Bett aufgestellt sein.
D3-4-2-1-7b*_A1_De
Betriebsumgebung
Betriebstemperatur und Betriebsluftfeuchtigkeit:
+5 °C bis +35 °C, 85 % rel. Feuchte max.
(Ventilationsschlitze nicht blockiert)
Eine Aufstellung dieses Gerät an einem unzureichend
belüfteten, sehr feuchten oder heißen Ort ist zu
vermeiden, und das Gerät darf weder direkter
Sonneneinstrahlung noch starken Kunstlichtquellen
ausgesetzt werden.
D3-4-2-1-7c*_A1_De
Falls der Netzstecker des Netzkabels dieses Gerätes
nicht in die Zusatzsteckdose einer anderen
Komponente passt, muss er gegen einen Netzstecker
der geeigneten Ausführung ausgewechselt werden.
Ein derartiger Austausch des Netzsteckers muss vom
Kundendienstpersonal vorgenommen werden. Wenn
der vom Netzkabel abgeschnittene ursprüngliche
Netzstecker in eine Netzsteckdose eingesteckt wird,
besteht akute Stromschlaggefahr! Daher ist
unbedingt dafür zu sorgen, dass der abgeschnittene
Netzstecker sofort vorschriftsmäßig entsorgt wird.
Vor einem längeren Nichtgebrauch des Gerätes,
beispielsweise während des Urlaubs, sollte der
Netzstecker aus der Netzsteckdose gezogen werden,
um das Gerät vollständig vom Netz zu trennen.
D3-4-2-2-1a_A1_De
ACHTUNG
Der -Schalter dieses Gerätes trennt das Gerät nicht
vollständig vom Stromnetz. Um das Gerät vollständig
vom Netz zu trennen, muss der Netzstecker aus der
Netzsteckdose gezogen werden. Daher sollte das
Gerät so aufgestellt werden, dass stets ein
unbehinderter Zugang zur Netzsteckdose
gewährleistet ist, damit der Netzstecker in einer
Notsituation sofort abgezogen werden kann. Um
Brandgefahr auszuschließen, sollte der Netzstecker
vor einem längeren Nichtgebrauch des Gerätes,
beispielsweise während des Urlaubs, grundsätzlich
von der Netzsteckdose getrennt werden.
D3-4-2-2-2a*_A1_De
VORSICHT MIT DEM NETZKABEL
Fassen Sie das Netzkabel immer am Stecker. Ziehen Sie
nicht am Kabel selbst, und fassen Sie das Netzkabel
niemals mit nassen Händen an, da dies einen
Kurzschluss oder elektrischen Schlag verursachen
kann. Stellen Sie nicht das Gerät, Möbelstücke o.ä. auf
das Netzkabel; sehen Sie auch zu, dass es nicht
eingeklemmt wird. Machen Sie niemals einen Knoten
in das Netzkabel, und binden Sie es nicht mit anderen
Kabeln. Das Netzkabel sollte so gelegt werden, dass
niemand darauf tritt. Ein beschädigtes Netzkabel kann
einen Brand oder elektrischen Schlag verursachen.
Prüfen Sie das Netzkabel von Zeit zu Zeit. Sollte es
beschädigt sein, wenden Sie sich an Ihre nächste
autorisierte PIONEER-Kundendienststelle oder Ihren
Händler, um es zu ersetzen.
S002*_A1_De
Bei Verwendung dieses Produktes machen Sie sich
bitte mit der Sicherheitsinformationen auf der
Unterseite des Gerätes vertraut.
D3-4-2-2-4_B1_De
ACHTUNG
Bei diesem Gerät handelt es sich zwar um ein
Laserprodukt der Klasse 1, das entsprechend dem
Standard Sicherheit für Laserprodukte IEC
60825-1:2007 klassifiziert ist.
LASER KLASSE 1
D58-5-2-2a_A1_De
De
3
Page 58

Zum Lesen dieser Anleitung
Die Namen von Anzeigen, Menüs und Tasten sind in dieser Anleitung
in eckigen Klammern angegeben. (z.B. Kanal [MASTER], Menü [ON/
OFF], [File])
! Die Bedienungsanleitung von rekordbox kann aus dem Menü
[Hilfe] von rekordbox betrachtet werden, nachdem rekordbox
installiert ist.
Vor der Inbetriebnahme
Merkmale ..................................................................................................... 5
Beispiel für System-Setup ..........................................................................5
Lieferumfang ...............................................................................................5
Bevor Sie beginnen
Unterstützte Quellen ................................................................................... 6
Verwendbare Duscs und USB-Geräte .......................................................6
Abspielbare Musikdateiformate ................................................................7
Funktionen, die in Kombination mit einem Computer verwendet
werden können ............................................................................................ 8
Über die rekordbox Music Management Software ..................................9
Über die Treibersoftware (Windows) .......................................................11
Anschlüsse
Bezeichnungen der Anschlüsse .............................................................13
Basic-Stil .................................................................................................... 13
Bedienungen
Bedienpult .................................................................................................15
Frontplatte .................................................................................................. 16
Hauptgerät-Display ................................................................................... 16
Wählen Sie die abzuspielende Quelle (Quellenwahl-Sektion) ..............16
Grundlegender Betrieb (Player-, Quellenwahl- und Durchsuchen-
Sektionen) .................................................................................................. 17
Bedienung der Jog-Scheibe .....................................................................19
Automatisches Setzen von Loops (Loop und Beat Loop Part)..............19
Anzeige von Track-Information des Tracks (Durchsuchen-Sektion) .... 20
Schnelles Suchen nach Tracks mit der Bibliothek-Information ...........21
Über den Wiedergabe-Verlauf (HISTORY) .............................................. 21
Verwendung von Playlists ........................................................................22
Einstellen der Wiedergabegeschwindigkeit (Temporegelung-
Sektion) ......................................................................................................22
Verwendung von [BPM LOCK] ................................................................23
Bedienungen in Kombination mit einem DJ-Mixer ...............................23
Verwendung der DJ-Software ..................................................................23
Ändern der Einstellungen ........................................................................24
Zusätzliche Informationen
Störungssuche .......................................................................................... 25
Fehlermeldungen ......................................................................................26
Liste von Icons in der Display-Sektion des Hauptgeräts
Liste von MIDI-Meldungen .......................................................................27
Vorsichtshinweise ..................................................................................... 27
Handhabung von Discs ............................................................................ 27
Haftungsausschluss ................................................................................. 28
Hinweise zum Urheberrechte ..................................................................28
Verwendung der Support-Site..................................................................28
Technische Daten ..................................................................................... 29
De
4
............................26
Page 59

Vor der Inbetriebnahme
MULTI PLAYER
TEMPO
0
PLAY/PAUSE
SEARCH
TRACK SEARCH
IN/CUEOUT
OUT ADJUSTHOT LOOP
RELOOP/EXIT
BEAT LOOP
LOOP DRIVE
VINYL MODE
TEMPO RANGE
MASTER TEMPO
LOOP
USB
STOP
SOURCE SELECT
MP3/AAC
WAV/AIFF
CUE
PLAYLIST
BPM
DISC
LOCK
REVFWD
BACK
SELECT PUSH
TIME MODE
AUTO CUE
DISPLAY
UTILITY
A.CUE
LOCK
16
REMAIN
MS
FTEMPO%
INFO
BROWSE
BPM
MULTI PLAYER
TEMPO
0
PLAY/PAUSE
SEARCH
TRACK SEARCH
IN/CUE OUT
OUT ADJUSTHOT LOOP
RELOOP/EXIT
BEAT LOOP
LOOP DRIVE
VINYL MODE
TEMPO RANGE
MASTER TEMPO
LOOP
USB
STOP
SOURCE SELECT
MP3/AAC
WAV/AIFF
CUE
PLAYLIST
BPM
DISC
LOCK
REVFWD
BACK
SELECT PUSH
TIME MODE
AUTO CUE
DISPLAY
UTILITY
A.CUE
LOCK
16
REMAIN
MS
FTEMPO%
INFO
BROWSE
BPM
2 CHANNEL DJ MIXER
MIC /AUX
MIC
0
LEVEL
HI
AUX
LOW
MIC/AUX
ON
12
12
12
12
HEADPHONES
CUE
CH-1
CUE
MIXING
CUE MASTER
CH-2
LEVEL
PHONES
0
9
9
9
9
CD
PHONO
CH- 1
FADER
START
FADER
START
CH- 1 CH- 2
9
9
9
9
CH-2
THRU
CD
PHONO
TRIM TRIM
HI
MID
LOW
HI
MID
LOW
LEVEL
MASTER
LEVEL/DEPTH
FILTERCRUSH
GATE JET
MASTER EFFECT
0
PREVIEW
TRACK MARK SEARCH
PLAY
USB
STOP
REC
MASTER LEVEL
HI
LOW
Kopfhörer
Disc
CDJ-350CDJ-350 DJM-350
Zum Prüfen von
Audio-Eingang/Ausgang
Komponente, Verstärker,
aktiver Lautsprecher usw.
USB-Gerät USB-Gerät
Für Audio-Ausgang
Computer
Music Management
Software
rekordbox
Merkmale
Dieses Gerät ist ein DJ-Player, der die Technologie der Pioneer CDJ-Serie fortführt, dem Weltstandard bei Club-Playern. Es ist ein Multi-Player für
DJs, der eine Reihe verschiedener Quellen unterstützt und umfassende DJ-Auftritte leicht macht.
MULTI-MEDIA, MULTI-FORMAT
Das Gerät kann nicht nur Musik-CDs (CD-DA) abspielen, sondern
auch Musikdateien (MP3, AAC, WAV und AIFF), aufgezeichnet auf von
USB-Massenspeichergeräten (Flash-Speichersticks und Festplatten)
sowie CD-R/ -RW-Discs. Es kann auch als DJ Software-Controller und
BEAT DISPLAY
Die Beat-Position entsprechend dem BPM des Tracks und der
Wiedergabeposition werden auf dem Display der Haupteinheit angezeigt. Dies erlaubt es Ihnen, den Beat visuell für Scratch-and-Loop
Auftritte zu prüfen.
Audio-Schnittstelle verwendet werden.
rekordbox
TM
rekordbox, eine Software-Anwendung zur Musikverwaltung speziell
für Pioneer DJ-Player, ist mitgeliefert. Sie erlaubt es, Musikdatauen
auf einem Computer auf eine Reihe verschiedener Weisen zu
verwalten (Analyse, Einstellung, Erzeugung, Speicherung des
BPM LOCK
Wenn der Master-BPM im Voraus eingestellt ist, kann die
Wiedergabegeschwindigkeit des aktuell spielenden Tracks automatisch auf Tastendruck auf den Master-BPM gestellt werden.
Vollständiges BPM-Mischen ist leicht möglich, ohne den TEMPO-
Schieberegler zu bewegen.
Wiedergabeverlaufs, usw.). Außerdem können mit rekordbox verwaltete Musikdateien zu USB-Geräten übertragen werden, was Auswahl
von Tracks, Bedienung von Playlists und so weiter erleichtert, wenn
das USB-Gerät an diese Einheit angeschlossen ist.
PLAYLIST
Der aktuell spielende oder ausgewählte Track kann in der Playlist
nach Wunsch registriert werden (aber nur für Tracks, die mit rekord-
box verwaltet werden).
Beispiel für System-Setup
Ein DJ-System wie das in der Zeichnung unten gezeigte kann eingerichtet werden, indem dieses Gerät mit einem DJ-Mixer und Peripheriegeräten
verbunden wird.
Deutsch
Lieferumfang
! CD-ROM (rekordbox Lizenzschlüssel liegt bei)
! Netzkabel
! Audiokabel
! Steuerkabel
! Eindrückstift zum Disc-Zwangsausschub (unten am Produkt
angeordnet)
! Garantiekarte
! Bedienungsanleitung (dieses Dokument)
De
5
Page 60

Bevor Sie beginnen
Unterstützte Quellen
Diese Einheit unterstützt die unten aufgeführten Quellen.
! Discs (Seite 6)
! USB-Geräte (Seite 7)
! Computer (Seite 8)
Installieren Sie die Software auf den Computer von der mitgelieferten CD-ROM.
Die mitgelieferte CD-ROM enthält die folgenden beiden Software-Programme.
— rekordbox Music Management Software
— Treiber-Software
Verwendbare Duscs und USB-Geräte
Hinweise zu Discs
Diese Einheit kann die unten aufgeführten Discs abspielen.
Typ Markierung
CD
1
Kompatible Formate
! Musik-CD (CD-DA)
CD-R
! Musik-CD (CD-DA)
CD-RW
! MP3
! AAC
! WAV
! AIFF
2
CD-TEXT
Musik-CD (CD-DA)
1 Discs, deren Beschriftung, Verpackung oder Außenhülle eine der Markierungen
wie in dieser Tabelle angegeben aufweist, können abgespielt werden.
2 In CD-Text-Daten aufgezeichnete Titel, Albumnamen und Interpretennamen
werden angezeigt. Wenn mehrere Text-Datensätze auf der Disc aufgezeichnet sind, wird die Information für den ersten Text-Datensatz angezeigt.
Nicht abspielbare Discs
! DTS-CD
! Foto-CDs
! Video-CDs
! CD-Grafik (CD-G)-Discs
! Nicht finalisierte CDs
! DVD
Hinweise zu CD-R/ -RW-Discs
Musikdateien (MP3/ AAC/ WAV/ AIFF), die auf CD-R/ -RW-Discs aufgezeichnet sind, können wiedergegeben werden.
Ordner-Ebenen
Max. Anzahl der
Ordner
Max. Anzahl der
Dateien
Wenn es viele Ordner oder Dateien gibt, kann einige Zeit kann für das Laden
erforderlich sein.
Max. 8 Ebenen (Dateien in Ordnern außerhalb der 8. Ebene
können nicht wiedergegeben werden)
1 000-Ordner
1 000-Dateien
Hinweise zu Discs, die auf Computern erstellt
wurden
Je nach den Einstellungen der Anwendung und den
Umgebungseinstellungen des Computers kann es unmöglich sein,
bestimmte Discs abzuspielen. Nehmen Sie die Disc in einem Format
auf, das von dieser Einheit unterstützt wird. Für Einzelheiten wenden
Sie sich an den Verkäufer Ihrer Anwendung.
Wenn die Aufnahmequalität aufgrund von Disc-Eigenschaften,
Kratzern oder Schmutz auf der Disc oder auf der Aufnahmelinse ist
kann es unmöglich sein, die Disc abzuspielen.
Erstellen von Backup-Discs
Wenn CD-R/ -RW-Discs auf Pause gestellt sind oder bei Cue-Punkten
längere Zeit pausiert werden, kann es aufgrund der Eigenschaften
der Disc schwierig sein, die Disc an diesem Punkt abzuspielen. Wenn
außerdem ein bestimmter Punkt extrem oft auf Schleife gestellt wird,
kann es schwierig sein, an diesem Punkt abzuspielen.
Bei der Wiedergabe wertvoller Discs empfehlen wir das Erstellen von
Backup-Discs.
Hinweise zu Copy Control CDs und DualDiscs
Dieses Gerät ist nach CD-Standards konstruiert. Betrieb und Leistung
von Discs anderer Standards als CD-Standards wird nicht garantiert.
Über 8-cm-Single-CDs
8-cm-Single-CDs können nicht auf dem CDJ-350 abgespielt werden.
Setzen Sie keine 8-cm-Adapter auf CDs und spielen sie auf dem CDJ350 ab. Der Adapter könnte abfallen, während die Disc dreht, und
Beschädigung der Disc oder des Players bewirken.
De
6
Page 61

Über USB-Geräte
Dieses Gerät unterstützt USB-Massenspeichergeräte (externe
Festplatten, portable Flash-Speicher-Geräte, digitale Audio-Player
usw.).
Ordner-Ebenen Max. 8 Ebenen
Max. Anzahl der
Ordner
Max. Anzahl der
Dateien
Unterstützte
Dateisysteme
Wenn es viele Ordner oder Dateien gibt, kann einige Zeit kann für das Laden
erforderlich sein.
Ordner und Dateien, die die Grenzwerte überschreiten, können nicht angezeigt
werden.
1 000-Ordner
10 000 Dateien (1 000 Dateien für Dateien, die nicht von
rekordbox verwaltet werden)
FAT16, FAT32 und HFS+ (NTFS ist nicht unterstützt.)
USB-Geräte, die nicht verwendet werden können
! Optische Disc-Geräte wie externe DVD/ CD-Laufwerke usw. werden
nicht unterstützt.
! USB-Hubs können nicht verwendet werden.
Abspielbare Musikdateiformate
Diese Einheit unterstützt Musikdateien in den unten gezeigten Formaten.
Vorsichtshinweise zur Verwendung von USB-
Geräten
! Manche USB-Geräte arbeiten möglicherweise nicht ordnungsge-
mäß. Bitte beachten Sie, dass Pioneer keine Verantwortung für
den Verlust von Daten auf USB-Geräten übernimmt.
! Es kann vorkommen, dass wenn ein Strom im am USB-Anschluss
dieses Geräts erkannt wird, der über dem zulässigen Pegel
liegt, die Anzeige [USB STOP] blinkt, die Stromversorgung zum
USB-Gerät abgetrennt wird und die Kommunikation mit dem
USB-Gerät unterbrochen wird. Zur Wiederherstellung des normalen Betriebs trennen Sie das USB-Gerät von diesem Gerät ab.
Vermeiden Sie die Wiederverwendung von USB-Geräten, für die
Überstrom erkannt wurde. Wenn normaler Betrieb nach der oben
beschriebenen Maßnahme nicht wieder hergestellt wird, (wenn die
Kommunikation nicht hergestellt werden kann,) schalten Sie das
Gerät aus und wieder ein.
! Wenn mehrere Partitionen für das USB-Gerät gesetzt sind, kann
das Gerät möglicherweise nicht erkannt werden.
! USB-Geräte mit Flash-Card-Lesern arbeiten möglichweise nicht.
! Je nach verwendetem USB-Gerät wird die gewünschte Leistung
möglicherweise nicht erzielt.
Deutsch
Typ
MP3 .mp3 MPEG-1 16 Bit 32 kbps bis 320 kbps 32 kHz, 44,1 kHz, 48 kHz CBR, VBR
AAC .m4a, .aac und .mp4 MPEG-4 AAC LC 16 Bit 16 kbps bis 320 kbps 32 kHz, 44,1 kHz, 48 kHz CBR, VBR
WAV .wav WAV 16 Bit, 24 Bit — 44,1 kHz, 48 kHz
AIFF .aif, .aiff AIFF 16 Bit, 24 Bit — 44,1 kHz, 48 kHz
Dateierweiterung
Über MP3-Dateien
MP3-Dateien können eine konstante Bitrate (CBR) oder variable
Bitrate (VBR) haben. Beide Arten von Dateien können auf dem
CDJ-350 abgespielt werden, aber die Such- und die SuperschnellSuchfunktionen sind bei VBR-Dateien langsamer. Wenn Ihre Priorität
einfache Handhabung ist, empfehlen wir die Aufnahme von MP3Dateien in CBR.
Kompatible
Formate
Bittiefe Bit-Rate Samplingfrequenz
Über AAC-Dateien
! AAC ist die Abkürzung von „Advanced Audio Coding“, ein
Basisformat der Audio-Kompressionstechnologie, die für MPEG-2
und MPEG-4 verwendet wird.
! Das Dateiformat und Erweiterung von AAC-Daten hängt von der
Anwendung für die Erstellung der Daten ab.
! Zusätzlich zu den mit iTunes® codierten AAC-Dateien mit der
Erweiterung „.m4a” können auch Dateien mit den Erweiterungen
„.aac” und „.mp4” abgespielt werden. Beachten Sie aber, dass
durch Copyright geschützte AAC-Dateien, die beispielsweise im
iTunes Music Store erworben wurden, nicht wiedergegeben werden können. Auch andere Dateien können ggf. nicht wiedergegeben werden, abhängig von der iTunes-Version, die zur Codierung
benutzt wurde.
Kodierungsverfahren
Unkomprimiertes PCM
Unkomprimiertes PCM
De
7
Page 62

Funktionen, die in Kombination mit
einem Computer verwendet werden
können
Hinweise zur mitgelieferten CD-ROM
Dieses Gerät kann in Kombination mit einem Computer verwendet
werden, wenn die Software auf der mitgelieferten CD-ROM in dem
betreffenden Computer installiert wird.
Die mitgelieferte CD-ROM enthält die folgenden beiden SoftwareProgramme.
rekordbox Music Management Software
Musikdateien für DJ-Wiedergabe können verwaltet werden. Die
Verwaltungsinformationen können mit USB-Geräten übertragen werden (Seite 9).
Treiber-Software
Bei Bedienung von DJ-Software auf dem Computer mit diesem Gerät
kann der Sound von spielender Musik von diesem Gerät (Seite 11)
ausgegeben werden.
! Bei Verwendung von Mac OS X ist es nicht nötig, die
Treibersoftware zu installieren.
Software-Lizenzvereinbarung
Diese Software-Lizenzvereinbarung („Vereinbarung“) wird zwischen
Ihnen (sowohl einem Einzelbenutzer, der das Programm installiert,
und einer einzigen juristischen Person, für die der Einzelbenutzer handelt) („Sie“ oder „Ihr“) und der PIONEER CORPORATION („Pioneer“)
abgeschlossen.
FALLS SIE SCHRITTE DURCHFÜHREN, DAS PROGRAMM
EINZURICHTEN ODER ZU INSTALLIEREN, BEDEUTET
DIES, DASS SIE ALLEN BESTIMMUNGEN DIESER
LIZENZVEREINBARUNG ZUSTIMMEN. DIE ERLAUBNIS, DAS
PROGRAMM HERUNTERZULADEN UND/ ODER ZU BENUTZEN,
HÄNGT AUSDRÜCKLICH VON IHRER BEFOLGUNG DIESER
BESTIMMUNGEN AB. ES IST KEINE GESCHRIEBENE ODER
ELEKTRONISCHE GENEHMIGUNG ERFORDERLICH, DAMIT DIESE
VEREINBARUNG IN KRAFT TRITT UND DURCHSETZBAR IST. FALLS
SIE NICHT ALLEN BESTIMMUNGEN DIESER VEREINBARUNG
ZUSTIMMEN, IST ES IHNEN NICHT ERLAUBT, DIESES PROGRAMM
ZU BENUTZEN UND SIE MÜSSEN DIE INSTALLATION ABBRECHEN
BZW. DAS PROGRAMM DEINSTALLIEREN.
1 Definitionen
1 „Dokumentierung“ bedeutet die schriftliche Dokumentierung, die
technischen Daten und der Hilfe-Inhalt, die von Pioneer allgemein
zur Verfügung gestellt werden, um Ihnen bei den Installation und
dem Gebrauchs des Programms behilflich zu sein.
2 „Programm“ bedeutet die gesamte Pioneer-Software, oder
einen Teil davon, die Sie gemäß dieser Vereinbarung unter
Lizenz von Pioneer erhalten.
2 Programmlizenz
1 eschränkte Lizenz. Entsprechend den Einschränkungen dieser
Vereinbarung erteilt Ihnen Pioneer eine beschränkte, nicht
ausschließliche, nicht übertragbare Lizenz (ohne das Recht
auf eine Unterlizenz):
a Zur Installation einer einzigen Kopie dieses Programms
auf der Festplatte Ihres Computers, um das Programm
ausschließlich für Ihren persönlichen Gebrauch entsprechend dieser Vereinbarung und der Dokumentierung
(„Autorisierter Gebrauch“) zu verwenden;
b Zur Verwendung der Dokumentierung für die
Unterstützung des autorisierten Gebrauchs; und
c Zur Anfertigung einer Programmkopie ausschließlich
für Sicherungszwecke, vorausgesetzt, dass alle Titel
und Warenzeichen, das Copyright und alle Hinweise auf
eingeschränkte Rechte auf der Kopie reproduziert werden.
2 Einschränkungen. Sie dürfen das Programm oder die
Dokumentierung nicht kopieren oder verwenden, außer wie
ausdrücklich durch diese Vereinbarung erlaubt. Sie dürfen
das Programm nicht übertragen, unterlizenzieren, mieten,
vermieten oder verleihen bzw. für das Training von Dritten,
das kommerzielle Timesharing oder die Verwendung in einem
Service-Büro gebrauchen. Sie dürfen das Programm weder
selbst noch durch Dritte abändern, rekonstruieren, auseinander nehmen oder dekompilieren, außer bis zu dem vom
geltenden Gesetz zugelassenen Ausmaß, und auch dann nur,
nachdem Sie Pioneer schriftlich von ihren beabsichtigten
Tätigkeiten informiert haben. Sie dürfen das Programm nicht
auf mehreren Prozessoren installieren, ohne vorher die schriftliche Zustimmung von Pioneer eingeholt zu haben.
3 Eigentum. Pioneer oder sein Lizenzgeber behält sich
alle Rechte, Titel und Anteile am gesamten Patent, das
Urheberrecht, Warenzeichen, Geschäftsgeheimnis und die
Rechte des geistigen Eigentums am Programm und der
Dokumentierung, sowie allen Derivaten davon, vor. Sie
erwerben keine weiteren Rechte, weder ausdrücklich noch
impliziert, die über die beschränkte Lizenz, die in dieser
Vereinbarung angeführt ist, hinausgehen.
4 Keine Unterstützung. Pioneer ist nicht verpflichtet,
das Programm oder die Dokumentierung unter dieser
Vereinbarung zu unterstützen, warten, aktualisieren, verändern oder neue Veröffentlichungen bekanntzugeben.
3 Garantie-Verzichtserklärung
DAS PROGRAMM UND DIE DOKUMENTIERUNG WERDEN „WIE
VORHANDEN“ ANGEBOTEN, OHNE JEGLICHE DARSTELLUNGEN
ODER GARANTIEN, UND SIE STIMMEN DAMIT ÜBEREIN, SIE AUF
EIGENES RISIKO ZU VERWENDEN. BIS ZU DEM VOM GESETZ
ZUGELASSENEN MASS STREITET PIONEER AUSDRÜCKLICH ALLE
GARANTIEN JEGLICHER ART MIT BEZUG AUF DAS PROGRAMM
UND DIE DOKUMENTIERUNG AB, SEIEN SIE AUSDRÜCKLICH,
IMPLIZIERT, SATZUNGSGEMÄSS ODER SICH AUS EINEM
LEISTUNGSKURS ERGEBEND, BZW. EINEM HANDELSKURS
ODER GEBRAUCH, EINSCHLIESSLICH ALLER GARANTIEN DER
VERMARKTBARKEIT, EIGNUNG FÜR EINEN BESTIMMTEN ZWECK,
AUSREICHENDER QUALITÄT, GENAUIGKEIT, DES TITELS ODER
DER NICHTVERLETZUNG.
4 Schadensersatz und Rechtsbehelfe für Vertragsbruch
Sie stimmen damit überein, dass jede Verletzung der
Einschränkungen dieser Vereinbarung Pioneer irreparable Schäden
zufügen würde, für die eine monetäre Entschädigung allein unzureichend wäre. Zusätzlich zu den Schadensersatzforderungen und
anderen Rechtbehelfen, zu denen Pioneer berechtigt sein kann, stimmen Sie damit überein, dass Pioneer das Recht hat, eine richterliche
Verfügung einzureichen, um den tatsächlichen, drohenden oder wiederholten Vertragsbruch dieser Vereinbarung zu verhindern.
5 Beendigung
Pioneer kann diese Vereinbarung jederzeit beenden, falls Sie irgendwelche Bestimmungen verletzt haben. Falls diese Vereinbarung beendet wird, dürfen Sie das Programm nicht weiter verwenden und müssen es von dem Computer, auf dem es installiert ist, dauerhaft löschen
sowie alle in Ihrem Besitz befindlichen Kopien des Programms und
der Dokumentierung zerstören und Pioneer dann schriftlich davon
informieren. Die Abschnitte 2.2, 2.3, 2.4, 3, 4, 5 und 6 bleiben auch
nach der Beendigung dieser Vereinbarung weiterhin in Kraft.
6 Allgemeine Bestimmungen
1 Beschränkung der Haftbarkeit. Unter keinen Umständen sind
Pioneer oder seine Tochtergesellschaften in Zusammenhang mit dieser Vereinbarung oder ihrem Inhalt, unter keiner Haftbarkeitstheorie,
haftbar für indirekte Schäden, Folgeschäden, spezielle oder
nachfolgende Schäden sowie verschärften Schadensersatz oder
für Schadensersatz für verlorene Profite, Einkommen, Geschäfte,
Ersparnisse, Daten, den Gebrauch oder die Kosten für den Erwerb
eines Ersatzprogramms, selbst wenn Pioneer auf die Möglichkeit
einer solchen Schadensersatzforderung aufmerksam gemacht
wurde bzw. eine solche Schadensersatzforderung vorhersehbar
ist. Unter keinen Umständen wird die Haftbarkeit von Pioneer für
De
8
Page 63

alle Schadensersatzforderungen den Betrag überschreiten, den
Sie Pioneer oder seinen Tochtergesellschaften für den Erwerb des
Programms bezahlt haben. Die Vertragsparteien geben zu, dass
die Haftbarkeitsgrenzen und die Risikoverteilung, die in dieser
Vereinbarung angeführt sind, im Programmpreis widerspiegelt sind
und einen wesentlichen Teil des Abkommens zwischen den Parteien
darstellen, da Pioneer dieses Programm anderenfalls nicht angeboten noch auch diese Vereinbarung abgeschlossen hätte.
2 Die in dieser Vereinbarung enthaltenen Beschränkungen
oder Ausschlüsse der Garantien und Haftbarkeit betreffen
oder beeinträchtigen Ihre gesetzlichen Rechte als Kunde
nicht und gelten für Sie nur in dem Maße, in dem solche
Beschränkungen oder Ausschlüsse unter den Gesetzen der
Gerichtsbarkeit an Ihrem Wohnort erlaubt sind.
3 Trennbarkeit und Verzicht. Falls irgendeine Bestimmung die-
ser Vereinbarung als illegal, ungültig oder auf andere Weise
nicht durchsetzbar eingestuft wird, wird diese Bestimmung
bis zum erlaubten Maße durchgesetzt oder, falls eine
Durchsetzung nicht möglich ist, als trennbar angesehen und
daher aus dieser Vereinbarung ausgeschlossen, während die
restlichen Bestimmungen der Vereinbarung weiterhin voll in
Kraft bleiben. Der Verzicht einer der Parteien im Falle eines
Versäumnisses oder Vertragsbruchs dieser Vereinbarung
bedeutet nicht, dass im Falle eines späteren Versäumnisses
oder Vertragsbruchs ebenfalls ein Verzicht erfolgt.
4 Keine Übereignung. Sie dürfen diese Vereinbarung oder
irgendwelche darin enthaltenen Rechte oder Pflichten
nicht übereignen, verkaufen, übertragen, delegieren oder
sich ihrer auf andere Weise entledigen, weder gewollt noch
ungewollt, sei es gesetzmäßig oder auf andere Weise, ohne
vorher die schriftliche Zustimmung von Pioneer eingeholt
zu haben. Jede angebliche Übereignung, Übertragung oder
Delegation durch Sie ist null und nichtig. Vorbehaltlich des
Obengenannten ist diese Vereinbarung für die Parteien und
ihre jeweiligen Nachfolger und Rechtsnachfolger bindend.
5 Gesamte Vereinbarung. Diese Vereinbarung stellt die gesamte
Vereinbarung zwischen den Parteien dar und löst alle vorherigen oder gleichzeitigen Vereinbarungen oder Vertretungen
bezüglich des Inhalts, seien sie schriftlich oder mündlich,
ab. Diese Vereinbarung darf ohne die vorherige und ausdrückliche schriftliche Zustimmung von Pioneer nicht modifiziert oder berichtigt werden, und keine weitere Akte, kein
Dokument, Verwendung oder Gewohnheitsrecht kann diese
Vereinbarung berichtigen oder modifizieren.
6 Sie erklären Ihr Einverständnis damit, dass diese
Vereinbarung durch japanische Gesetzgebung geregelt und
gemäß dieser ausgelegt wird
Vorsichtshinweise zur Installation der
Software
Lesen Sie den Abschnitt Software-Lizenzvereinbarung vor der
Installation von rekordbox und der Treibersoftware sorgfältig durch.
! Die mitgelieferte CD-ROM enthält Installationsprogramme in den
folgenden 12 Sprachen.
Englisch, Französisch, Deutsch, Italienisch, Niederländisch,
Spanisch, Portugiesisch, Russisch, Chinesisch (vereinfachte
Zeichen), Chinesisch (traditionelle Zeichen), Koreanisch,
Japanisch.
! Bei der Verwendung von rekordbox mit einem Betriebssystem in
einer anderen Sprache befolgen Sie die Anweisungen auf dem
Bildschirm, um die Option [English (Englisch)] zu wählen.
Unterstützte Betriebssysteme rekordbox
Mac OS X (10.4.6 und höher)
Windows® 7 Home Pre-
mium/ Professional/
Ultimate
Windows Vista®
Home Basic/ Home Premium/ Business/ Ultimate (SP1 und höher)
32-Bit-Version
64-Bit-Version
32-Bit-Version
64-Bit-Version
1
1 1
1 1
1 1
1 1
Treiber-
Software
1
2
2
Unterstützte Betriebssysteme rekordbox
Windows® XP Home edition/ Professional (SP3 und
höher)
1 Bei Verwendung von Mac OS X ist es nicht nötig, die Treibersoftware zu
installieren.
2 Bei Verwendung einer 64-Bit-Version von Windows kann die Treibersoft-
ware nur für 32-Bit Anwendungen verwendet werden.
32-Bit-Version
1 1
Treiber-
Software
Minimale Betriebsumgebung für rekordbox
! CPU:
— Für Mac OS X, Macintosh Computer mit einem 1,83 GHz oder
höheren Intel® Core™ Duo (oder kompatiblen) Prozessor
— Für Windows® 7, Windows Vista® und Windows® XP, PC/
AT-kompatiblen Computer mit einem 2 GHz oder höheren
Intel® Pentium® 4 (oder kompatiblen) Prozessor
! Speicherbedarf: 1 GB RAM oder mehr
! Festplatte: 250 MB oder mehr freier Speicherplatz (ohne Platz für
die Speicherung von Musikdateien usw.)
! CD-Laufwerk: Optical Disc-Laufwerk, auf dem die CD-ROM gele-
sen werden können
! Sound: Audio-Ausgang zu den Lautsprechern, Kopfhörern, usw.
(internes oder externes Audio-Gerät)
! Internet-Verbindung: Für Anmeldung und Anfragen verwenden
Sie einen Webbrowser, der 128-Bit SSL unterstützt (Safari 2.0 oder
höher oder Internet Explorer® 6.0 oder höher).
! USB-Anschluss: Ein USB-Anschluss zum Anschließen eines
USB-Geräts (Flash-Speicher, Festplatte, usw.) wird benötigt, um
Musikdateien auf das USB-Gerät zu übertragen.
! Die richtige Funktion kann nicht auf allen Computern garantiert
werden, auch wenn diese mit der oben beschriebenen
Betriebssystem-Umgebung übereinstimmen.
! Auch wenn der erforderlichen Speicherplatz für die oben
beschriebene Betriebsumgebung vorhanden ist, kann es in den
unten beschriebenen Fällen sein, dass die Software nicht die volle
Funktionalität und Leistung aufgrund fehlenden Speicherplatzes
erzielt. In diesem Fall treffen Sie die erforderlichen Maßnahmen,
um ausreichend freien Speicherplatz zu schaffen. Wir empfehlen
Hinzufügung zusätzlichen Speichers, um stabile Leistung zu erzielen.
— Wenn viele Tracks in der rekordbox-Bibliothek verwaltet
werden
— Wenn residente Programme und Dienste laufen
! Je nach den Energieeinstellungen des Computers, usw. kann die
CPU- und Festplatten-Verarbeitungs-Kapazität nicht ausreichen.
Insbesondere bei der Verwendung von Laptops lassen Sie
immer das Netzteil angeschlossen und stellen den Computer auf
maximale Leistung, wenn Sie rekordbox verwenden.
! Beachten Sie, dass Probleme beim Betrieb von rekordbox
auftreten können, wenn andere Software in Kombination damit
verwendet wird.
Über die rekordbox Music
Management Software
rekordbox ist ein Softwareprogramm für Käufer des CDJ-350 oder
eines anderen Pioneer DJ-Players zum Verwalten der Musikdateien,
die sie für DJ-Wiedergabe verwenden.
— rekordbox kann verwendet werden, um auf Ihrem Computer
gespeicherte Musikdateien zu klassifizieren und danach
zu suchen sowie Playlists zu erstellen, um Sie bei Ihren
DJ-Vorführungen zu unterstützen.
— rekordbox erlaubt es Ihnen, die Taktschläge, Tempos (BPM)
und andere Elemente Ihrer Musik vor dem Auftritt zu erkennen, zu messen und anzupassen.
Deutsch
De
9
Page 64

Installieren von rekordbox
Hinweise zum Installationsverfahren (Macintosh)
Lesen Sie den Abschnitt Vorsichtshinweise zur Installation der
Software vor der Installation von rekordbox sorgfältig durch.
! Genehmigung des Computer-Administrators ist für die Installation
und Deinstallation von rekordbox erforderlich.
Melden Sie sich vor der Installation als der als Benutzer an, der als
Administrator des Computers registriert war.
1 Wenn die mitgelieferte CD-ROM in das CD-Laufwerk
des Computers eingesetzt wird, öffnet sich das CDLaufwerk auf dem Bildschirm. Doppelklicken Sie auf das
[CD_menu.app]-Icon.
! Wenn sich das CD-Laufwerk nicht auf dem Bildschirm öffnet,
wenn die CD-ROM eingesetzt wird, verwenden Sie Finder,
um das CD-Laufwerk zu öffnen und doppelklicken Sie auf das
[CD_menu.app]-Icon.
<[CD.menu.app]-Symbol>
1 Setzen Sie die mitgelieferte CD-ROM in das CDLaufwerk Ihres Computers ein.
Die CD-ROM-Menü wird angezeigt.
! Wenn das CD-ROM-Menü nicht angezeigt wird, wenn die CD-ROM
eingesetzt wird, öffnen Sie das CD-Laufwerk von [Computer (oder
Arbeitsplatz)] im Menü [Start], und doppelklicken Sie auf das
[CD_menu.exe]-Icon.
2 Wenn das CD-ROM-Menü angezeigt wird, wählen Sie
[rekordbox: Music Management Software installieren]
und klicken dann auf [Start].
<CD-ROM-Menü>
! Zum Schließen des CD-ROM-Menüs klicken Sie auf [Verlassen].
3 Installieren Sie rekordbox entsprechend den
Anweisungen auf dem Bildschirm.
! Klicken Sie auf [Abbrechen], um die Installation nach dem Start
abzubrechen.
2 Wenn das CD-ROM-Menü angezeigt wird, wählen Sie
[rekordbox: Music Management Software installieren]
und klicken dann auf [Start].
<CD-ROM-Menü>
! Zum Schließen des CD-ROM-Menüs klicken Sie auf [Verlassen].
3 Installieren Sie rekordbox entsprechend den
Anweisungen auf dem Bildschirm.
Hinweise zum Installationsverfahren (Windows)
Lesen Sie den Abschnitt Vorsichtshinweise zur Installation der
Software vor der Installation von rekordbox sorgfältig durch.
! Genehmigung des Computer-Administrators ist für die Installation
und Deinstallation von rekordbox erforderlich.
Melden Sie sich vor der Installation von rekordbox als der als
Administrator Ihres Computers registrierte Benutzer an.
Starten von rekordbox
Melden Sie sich vor der Verwendung von rekordbox als der als
Benutzer an, der als Administrator des Computers registriert war.
! Wenn rekordbox zum ersten Mal gestartet wird, muss der
Lizenzschlüssel eingegeben werden. Der Lizenzschlüssel ist auf
der CD-ROM-Hülle angebracht.
! Beim Starten von rekordbox kann die Bedienungsanleitung vom
Menü rekordbox [Hilfe] aus aufgerufen werden.
Für Mac OS X
Öffnen Sie den [Anwendung]-Ordner mit Finder und
doppelklicken Sie auf [rekordbox 1.x.x.app].
! Die Kennzeichnung 1.x.x zeigt die Version von rekordbox an.
Für Windows® 7, Windows Vista® und Windows® XP
Klicken Sie auf die Windows [Start] Menü-Schaltfläche,
und dann auf [Alle Programme] > [Pioneer] > [rekordbox
1.x.x] > [rekordbox 1.x.x].
! Die Kennzeichnung 1.x.x zeigt die Version von rekordbox an.
10
De
Page 65

Über die Treibersoftware (Windows)
Diese Treiber-Software ist ein exklusiver ASIO-Treiber für die Ausgabe
von Audio-Signalen vom Computer. Zur Verwendung des CDJ-350 mit
Anschluss an einen Computer, auf dem Windows installiert ist, installieren Sie zuerst die Treiber-Software auf dem Computer.
Installieren der Treibersoftware
Vor dem Installieren der Treibersoftware
! Lesen Sie den Abschnitt Vorsichtshinweise zur Installation der
Software auf Seite 9 sorgfältig durch.
! Schalten Sie den Netzschalter des Geräts aus, und trennen Sie das
USB-Kabel ab, das dieses Gerät mit dem Computer verbindet.
! Falls andere Programme auf dem Computer laufen, beenden Sie
diese.
! Zum Installieren oder Deinstallieren der Treibersoftware müssen
Sie vom Administrator Ihres Computers autorisiert sein. Melden
Sie sich als Administrator Ihres computers an, bevor Sie mit der
Installation fortfahren.
! Wenn Sie dieses Gerät an Ihren Computer anschließen, ohne vor-
her die Treibersoftware zu installieren, kann ein Fehler auf Ihrem
Computer je nach der Systemumgebung auftreten.
! Wenn die Installation der Treibersoftware unterbro-
chen wird, nachdem sie gestartet wurde, starten Sie das
Installationsverfahren von Anfang an neu.
1 Setzen Sie die mitgelieferte CD-ROM in das CDLaufwerk Ihres Computers ein.
Die CD-ROM-Menü wird angezeigt.
! Wenn das CD-ROM-Menü nicht angezeigt wird, wenn die CD-ROM
eingesetzt wird, öffnen Sie das CD-Laufwerk von [Computer (oder
Arbeitsplatz)] im Menü [Start], und doppelklicken Sie auf das
[CD_menu.exe]-Icon.
2 Wenn das CD-ROM-Menü erscheint, wählen Sie
[Treiber-Software (Pioneer_CDJ_Driver) installieren ] und
klicken dann auf [Start].
Verbinden des CDJ-350 mit dem
Computer
1 Schließen Sie dieses Gerät über ein USB-Kabel an
Ihren Computer an.
Anweisungen zum Anschließen finden Sie in Verwenden der
DJ-Software auf Seite 14.
2 Drücken Sie [u].
Schalten Sie die Stromversorgung dieses Geräts ein.
3 Drücken Sie [ ] mindestens 1 Sekunde lang.
Der Bildschirm [CONTROL MODE] erscheint im Hauptgerät-Display.
! Die Meldung [Installieren von Gerätetreibersoftware] kann
erscheinen, wenn Sie den CDJ-350 zum ersten Mal an Ihren
Computer anschließen oder wenn Sie die Verbindung zu dem
USB-Anschluss des Computers herstellen. Warten Sie, bis
die Meldung [Die Geräte können jetzt verwendet werden.]
erscheint.
! Bei Installation unter Windows XP
— [Soll eine Verbindung mit Windows Update hergestellt
werden, um nach Software zu suchen?] kann erscheinen,
während die Installation abläuft. Wählen Sie [Nein, diesmal
nicht] und klicken Sie auf [Weiter], um mit der Installation
fortzufahren.
— [Wie möchten Sie vorgehen?] kann erscheinen, während die
Installation abläuft. Wählen Sie [Software automatisch ins-
tallieren (empfohlen)] und klicken Sie auf [Weiter], um mit
der Installation fortzufahren.
— Wenn während der Installation [Hardwareinstallation] auf
dem Bildschirm erscheint, klicken Sie auf [Installation fort-
setzen] und fahren mit der Installation fort.
Einstellen der Puffergröße
Dieses Gerät fungiert als ein Audiogerät, das den ASIO-Standards
entspricht.
! Wenn Anwendungen dieses Gerät verwenden, während das
Standard-Audiogerät läuft (DJ-Software usw.) läuft, beenden Sie
diese Anwendung vor dem Anpassen der Puffergröße.
Klicken Sie auf das Windows [Start] Menü > [Alle
Programme] > [Pioneer] > [Pioneer CDJ] > [Pioneer CDJ ASIO-
Einstellungsdienstprogramm].
Deutsch
Zum Schließen des CD-ROM-Menüs klicken Sie auf [Verlassen].
3 Fahren Sie mit der Installation entsprechend den
Anweisungen auf dem Bildschirm fort.
Wenn während der Installation [Windows-Sicherheit] auf dem
Bildschirm erscheint, klicken Sie auf [Diese Treibersoftware trotz-
dem installieren] und fahren mit der Installation fort.
! Bei Installation unter Windows XP
Wenn während der Installation [Hardwareinstallation] auf dem
Bildschirm erscheint, klicken Sie auf [Installation fortsetzen] und
fahren mit der Installation fort.
! Wenn das Installationsprogramm fertiggestellt wird, erscheint
eine Fertigstellungsmeldung.
Eine ausreichend großer Pufferspeicher verringert die Gefahr von
Sound-Droputs (Tonaussetzern), aber steigert die Audiosignal-
Übertragungsverzögerung (Latenz).
De
11
Page 66

Prüfen der Version der Treibersoftware
Klicken Sie auf das Windows [Start] Menü > [Alle
Programme] > [Pioneer] > [Pioneer CDJ] > [Pioneer CDJ
Versionsanzeige-Dienstprogramm].
! Sie können die Firmware-Version dieses Geräts auf dem
Bildschirm prüfen.
! Die Firmware-Version wird nicht angezeigt, wenn der CDJ-350 ist
nicht mit dem Computer verbunden ist, oder wenn der CDJ-350
und der Computer nicht richtig kommunizieren.
Prüfen der neuesten Informationen über
die Treibersoftware
Für die neuesten Informationen zur Treibersoftware zur exklusiven
Verwendung mit diesem Gerät besuchen Sie unsere Website wie
unten gezeigt.
http://www.prodjnet.com/support/
12
De
Page 67

Anschlüsse
AC IN
AUDIO
OUT
RL
CONTROL
USB
1 2 543
DJ-Player DJ-PlayerDJ-Mixer (Beispiel: DJM-350)
MULTI PLAYER
TEMPO
0
PLAY/PAUSE
SEARCH
TRACK SEARCH
IN/CUE OUT
OUT ADJUSTHOT LOOP
RELOOP/EXIT
BEAT LOOP
LOOP DRIVE
VINYL MODE
TEMPO RANGE
MASTER TEMPO
LOOP
USB
STOP
SOURCE SELECT
MP3/AAC
WAV/AIFF
CUE
PLAYLIST
BPM
DISC
LOCK
REVFWD
BACK
SELECT PUSH
TIME MODE
AUTO CUE
DISPLAY
UTILITY
A.CUE
LOCK
16
REMAIN
MS
F TEMPO %
INFO
BROWSE
BPM
MULTI PLAYER
TEMPO
0
PLAY/PAUSE
SEARCH
TRACK SEARCH
IN/CUE OUT
OUT ADJUSTHOT LOOP
RELOOP/EXIT
BEAT LOOP
LOOP DRIVE
VINYL MODE
TEMPO RANGE
MASTER TEMPO
LOOP
USB
STOP
SOURCE SELECT
MP3/AAC
WAV/AIFF
CUE
PLAYLIST
BPM
DISC
LOCK
REVFWD
BACK
SELECT PUSH
TIME MODE
AUTO CUE
DISPLAY
UTILITY
A.CUE
LOCK
16
REMAIN
MS
FTEMPO%
INFO
BROWSE
BPM
2 CHANNEL DJ MIXER
MIC /AUX
MIC
0
LEVEL
HI
AUX
LOW
MIC/AUX
ON
12
12
12
12
HEADPHONES
CUE
CH-1
CUE
MIXING
CUE MASTER
CH-2
LEVEL
PHONES
0
9
9
9
9
CD
PHONO
CH- 1
FADER
START
FADER
START
CH- 1CH- 2
9
9
9
9
CH-2
THRU
CD
PHONO
TRIMTRIM
HI
MID
LOW
HI
MID
LOW
LEVEL
MASTER
LEVEL/DEPTH
FILTERCRUSH
GATE JET
MASTER EFFECT
0
PREVIEW
TRACK MARK SEARCH
PLAY
USB
STOP
REC
MASTER LEVEL
AUDIO
OUT
RL
CONTROL
USB
AUDIO
OUT
RL
CONTROL
USB
L
CH-1
PHONO
CONTROL
L
R
CD
CH-2
PHONO
CONTROL
L
R
CD
R
L
Steuerkabel
Audiokabel
R
L
R
L
R L
Steuerkabel
(mitgeliefert)
Audiokabel
(mitgeliefert)
Schalten Sie die Stromversorgung aus und ziehen Sie das Netzkabel aus der Netzsteckdose, bevor Sie Geräte anschließen oder die Anschlüsse
ändern.
Beachten Sie die Bedienungsanleitung der angeschlossenen Komponente.
Schließen Sie das Netzkabel an, nachdem alle Anschlüsse zwischen den Geräten vorgenommen wurden.
Verwenden Sie immer das mitgelieferte Netzkabel.
Bezeichnungen der Anschlüsse
Rückseite
1 AC IN
Schließen Sie dies an eine Netzsteckdose an.
Schließen Sie das Netzkabel an, nachdem alle Anschlüsse zwischen
den Geräten vorgenommen wurden.
Verwenden Sie immer das mitgelieferte Netzkabel.
2 Kensington-Diebstahlsicherung
3 USB (Seite 14)
Schließen Sie einen Computer an.
4 CONTROL (Seite 14)
Schließen Sie das Steuerkabel (mitgeliefert) hier an.
5 AUDIO OUT L/ R (Seite 13)
Schließen Sie die Audiokabel (mitgeliefert) hier an.
Basic-Stil
Bei Anschluss an einen Pioneer DJ-Mixer über das Steuerkabel (mitgeliefert) können Bedienungen wie Starten der Wiedergabe auf diesem Gerät
über den Fader des DJ-Mixers (Seite 23) gestartet werden.
Die Fader-Start-Funktion steht nur zur Verfügung, wenn ein Pioneer DJ-Mixer angeschlossen ist.
Deutsch
De
13
Page 68

Verwendung der Relais-Wiedergabefunktion
AUDIO
OUT
RL
CONTROL
USB
AUDIO
OUT
RL
CONTROL
USB
L
CH-1
PHONO
CONTROL
L
R
CD
DJ-Player DJ-Player
MULTI PLAYER
TEMPO
0
PLAY/PAUSE
SEARCH
TRACK SEARCH
IN/CUE OUT
OUT ADJUSTHOT LOOP
RELOOP/EXIT
BEAT LOOP
LOOP DRIVE
VINYL MODE
TEMPO RANGE
MASTER TEMPO
LOOP
USB
STOP
SOURCE SELECT
MP3/AAC
WAV/AIFF
CUE
PLAYLIST
BPM
DISC
LOCK
REVFWD
BACK
SELECT PUSH
TIME MODE
AUTO CUE
DISPLAY
UTILITY
A.CUE
LOCK
16
REMAIN
MS
F TEMPO %
INFO
BROWSE
BPM
MULTI PLAYER
TEMPO
0
PLAY/PAUSE
SEARCH
TRACK SEARCH
IN/CUE OUT
OUT ADJUSTHOT LOOP
RELOOP/EXIT
BEAT LOOP
LOOP DRIVE
VINYL MODE
TEMPO RANGE
MASTER TEMPO
LOOP
USB
STOP
SOURCE SELECT
MP3/AAC
WAV/AIFF
CUE
PLAYLIST
BPM
DISC
LOCK
REVFWD
BACK
SELECT PUSH
TIME MODE
AUTO CUE
DISPLAY
UTILITY
A.CUE
LOCK
16
REMAIN
MS
FTEMPO%
INFO
BROWSE
BPM
2 CHANNEL DJ MIXER
MIC /AUX
MIC
0
LEVEL
HI
AUX
LOW
MIC/AUX
ON
12
12
12
12
HEADPHONES
CUE
CH-1
CUE
MIXING
CUE MASTER
CH-2
LEVEL
PHONES
0
9
9
9
9
CD
PHONO
CH- 1
FADER
START
FADER
START
CH- 1CH- 2
9
9
9
9
CH-2
THRU
CD
PHONO
TRIMTRIM
HI
MID
LOW
HI
MID
LOW
LEVEL
MASTER
LEVEL/DEPTH
FILTERCRUSH
GATE JET
MASTER EFFECT
0
PREVIEW
TRACK MARK SEARCH
PLAY
USB
STOP
REC
MASTER LEVEL
DJ-Mixer (Beispiel: DJM-350)
CH-2
PHONO
CONTROL
L
R
CD
R
L
Audiokabel
R
L
R
L
R L
Steuerkabel
(mitgeliefert)
Audiokabel
(mitgeliefert)
AUDIO
OUT
RL
CONTROL
USB
AUDIO
OUT
RL
CONTROL
USB
L
CH-1
PHONO
CONTROL
L
R
CD
DJ-Player DJ-Player
MULTI PLAYER
TEMPO
0
PLAY/PAUSE
SEARCH
TRACK SEARCH
IN/CUE OUT
OUT ADJUSTHOT LOOP
RELOOP/EXIT
BEAT LOOP
LOOP DRIVE
VINYL MODE
TEMPO RANGE
MASTER TEMPO
LOOP
USB
STOP
SOURCE SELECT
MP3/AAC
WAV/AIFF
CUE
PLAYLIST
BPM
DISC
LOCK
REVFWD
BACK
SELECT PUSH
TIME MODE
AUTO CUE
DISPLAY
UTILITY
A.CUE
LOCK
16
REMAIN
MS
FTEMPO%
INFO
BROWSE
BPM
2 CHANNEL DJ MIXER
MIC /AUX
MIC
0
LEVEL
HI
AUX
LOW
MIC/AUX
ON
12
12
12
12
HEADPHONES
CUE
CH-1
CUE
MIXING
CUE MASTER
CH-2
LEVEL
PHONES
0
9
9
9
9
CD
PHONO
CH- 1
FADER
START
FADER
START
CH- 1 CH- 2
9
9
9
9
CH-2
THRU
CD
PHONO
TRIM TRIM
HI
MID
LOW
HI
MID
LOW
LEVEL
MASTER
LEVEL/DEPTH
FILTERCRUSH
GATE JET
MASTER EFFECT
0
PREVIEW
TRACK MARK SEARCH
PLAY
USB
STOP
REC
MASTER LEVEL
DJ-Mixer (Beispiel: DJM-350)
CH-2
PHONO
CONTROL
L
R
CD
R
L
Audiokabel
R
L
R
L
R L
Audiokabel
(mitgeliefert)
USB-KabelUSB-Kabel
DJ-Software
Computer
Relais-Wiedergabe zwischen zwei DJ-Playern ist möglich, indem die [CONTROL]-Anschlüsse an diesem Gerät und dem anderen Pioneer
DJ-Player über ein Steuerkabel (Seite 23) verbunden werden.
Verwenden der DJ-Software
Bei Anschluss an einen Computer über USB-Kabel kann die DJ-Software mit diesen Geräten bedient werden (Seite 23).
Der Musikton von auf dem Computer abgespielten Musikdateien kann von diesem Gerät (Seite 11) ausgegeben werden.
14
De
Page 69

Bedienungen
Player-Sektion Temporegler-Sektion
Quellenwahl-Sektion Durchsuchen-Sektion
MULTI PLAYER
TEMPO
0
PLAY/PAUSE
SEARCH
TRACK SEARCH
IN/CUE OUT
OUT ADJUSTHOT LOOP
RELOOP/EXIT
BEAT LOOP
LOOP DIVIDE—+
VINYL MODE
TEMPO RANGE
MASTER TEMPO
LOOP
USB
STOP
SOURCE SELECT
MP3/AAC
WAV/AIFF
CUE
PLAYLIST
BPM
DISC
LOCK
REV FWD
BACK
SELECT PUSH
TIME MODE
AUTO CUE
DISPLAY
UTILITY
3
k
l
m
n
1
2
4
5
e
f hg
a
b
c
8
9
6 7
d
p
q
r
o
i
j
1
2
Bedienpult
Deutsch
1 u (Netzschalter) (Seite 17)
2 hDISC (Seite 16)
Wählen Sie die mit diesem Gerät abzuspielende Quelle hier (Seite 16).
3 USB-Gerät-Einsetzschacht
4 USB STOP
5
6
7
(COMPUTER)
(USB)
(DISC)
Quellenwahl-Sektion
Player-Sektion
Diese Regler können für grundlegende DJ-Player-Bedienungen wie
Abspielen von Discs, Einstellen von Cue/ Loop-Punkten und Bedienen
der Job-Scheibe (Seite 17) verwendet werden.
8 TRACK SEARCH o, p
9 SEARCH m, n
a CUE
b PLAY/PAUSE f
c Jog-Scheibe
d VINYL MODE
1 Loop und Beat-Loop Part
e LOOP IN/
f LOOP OUT (OUT ADJUST)
CUE (HOT LOOP)
g RELOOP/EXIT
h BEAT LOOP (LOOP DIVIDE)
Durchsuchen-Sektion
Informationen über das in dieser Einheit eingesetzte Gerät, die gelade-
nen Tracks usw. wird hier angezeigt (Seite 20).
i TIME MODE (AUTO CUE)
j DISPLAY (UTILITY)
k Hauptgerät-Display
l BACK
2 Playlist-Part
m SELECT PUSH (Drehregler)
De
15
Page 70

n PLAYLIST
s
t
A.CUE
LOCK
16
REMAIN
MS
F
TEMPO %
INFO
BROWSE
BPM
1
a
c
b
2
3
4
5
6 7 8 9
s
t
USB
STOP
SOURCE SELECT
MP3/AAC
WAV/AIFF
PLAYLIST
BPM
DISC
LOCK
BACK
SELECT PUSH
TIME MODE
AUTO CUE
DISPLAY
UTILITY
3
4
5 6 7
Temporegler-Sektion
Stellen Sie die Track-Wiedergabegeschwindigkeit hier ein (Seite 22).
Bei Verwendung von [BPM LOCK] können die
Wiedergabegeschwindigkeiten der beiden Tracks leicht aneinander
angepasst werden (Seite 23).
o BPM LOCK
p TEMPO RANGE
q MASTER TEMPO
r TEMPO
8 LOCK (Seite 23)
Leuchtet auf, wenn der Wert für BPM gesperrt ist.
9 TEMPO %
Dies zeigt den Prozentsatz ein, mit dem die
Wiedergabegeschwindigkeit geändert wird.
a WIDE, ±16, ±10, ±6
Dies zeigt den Bereich an, in dem die Wiedergabegeschwindigkeit
eingestellt werden kann.
b BPM
Zeigt BPM (Taktschläge pro Minute) des laufenden Tracks an.
c Informationdisplay-Abschnitt
Bis zu 13 Zeichen können für jeden angezeigt werden. Die anzeigbaren Zeichen sind die Buchstaben A bis Z, die Ziffern 0 bis 9 und
bestimmte Symbole. “?” wird für alle anderen Zeichen angezeigt.
Frontplatte
s Stift-Eindrückloch zum Disc-Zwangsausschub (Seite 17)
t Disc-Einsetzschacht (Seite 16)
Hauptgerät-Display
1 Track-Nummer
Dies zeigt die Track-Nummer an.
Es ist nicht möglich, mehr als 100 Tracks anzuzeigen.
2 A. CUE (Seite 18)
Dies leuchtet, wenn Auto Cue eingestellt ist.
3 Abspieladresse-Anzeige
Der Track wird als Balkendiagramm dargestellt.
Erlischt im Modus für Anzeige der verbleibenden Zeit von der linken
Seite her. Die gesamte Grafik blinkt langsam, wenn weniger als 30
Sekunden in dem Track verbleiben, und beginnt dann schnell zu
blinken, wenn weniger als 15 Sekunden verbleiben.
4 INFO (Seite 20)
5 BROWSE (Seite 20)
6 REMAIN
Diese leuchtet auf, wenn die Zeitanzeige auf Restzeit gestellt ist.
7 M, S, F (Zeitanzeige)
“M” zegt Minuten an, “S” Sekunden, “F” Frames.
Es gibt 75 Frames pro Sekunde.
De
16
Wählen Sie die abzuspielende Quelle
(Quellenwahl-Sektion)
Einlegen von Discs
! Legen Sie die Disc mit der bedruckten Seite nach oben ein.
! Setzen Sie die Disc waagerecht in den Disc-Einsetzschacht an der
Vorderseite des Hauptgeräts ein.
! Legen Sie nicht mehr als 1 Disc ein.
! Schieben Sie nicht mit Gewalt Discs in den Disc-Einsetzschacht,
wenn der Set ausgeschaltet ist. Dadurch könnte die Disc oder der
Set beschädigt werden.
! Wenn die Disc eingezogen oder ausgeschoben wird, wenden Sie
keine Gewalt auf die Disc in Gegenrichtung an. Dadurch könnte die
Disc oder der Set beschädigt werden.
1 Drücken Sie [u] 1.
Schalten Sie die Stromversorgung dieses Geräts ein.
2 Setzen Sie die Disc in den Disc-Einsetzschacht t.
Die Wiedergabe startet.
! Wenn Auto Cue eingeschaltet wird, startet die Wiedergabe, wenn
[PLAY/PAUSEf] gedrückt wird. Einzelheiten über die Funktion
Auto Cue siehe Einstellung Auto Cue auf Seite 18.
Ausschieben von Discs
Drücken Sie [h DISC] 2.
Die dies wird aus dem Disc-Einsetzschacht ausgeschoben.
! Wenn Sie versehentlich [hDISC] drücken, drücken Sie sofort
[PLAY/PAUSEf], den Status vor dem Drücken von [h DISC] wiederherzustellen. (Zu diesem Zeitpunkt wird kein Ton ausgegeben.)
Page 71

Über das zwangsweise Ausschieben von
MULTI PLAYER
TEMPO
0
PLAY/PAUSE
SEARCH
TRACK SEARCH
IN/CUE OUT
OUT ADJUSTHOT LOOP
RELOOP/EXIT
BEAT LOOP
LOOP DIVIDE—+
VINYL MODE
TEMPO RANGE
MASTER TEMPO
LOOP
USB
STOP
SOURCE SELECT
MP3/AAC
WAV/AIFF
CUE
PLAYLIST
BPM
DISC
LOCK
REV FWD
BACK
SELECT PUSH
TIME MODE
AUTO CUE
DISPLAY
UTILITY
PLAYLIST
BACK
SELECT PUSH
TIME MODE
AUTO CUE
DISPLAY
UTILITY
3
4
5
e
f hg
a
b
c
8
9
6 7
d
k
l
m
n
i
j
Discs
! Wenn Disc nicht durch Drücken von [h DISC] ausgeschoben wird,
schieben Sie sie zwangsweise aus, indem Sie den Stift für DiscZwangsausschub vollständig in das Stift-Einsetzloch für DiscZwangsausschub drücken.
! Beim zwangsweisen Ausschieben einer Disc verfahren Sie immer
wie folgt.
1 Drücken Sie [u] 1 zum Ausschalten der
Stromversorgung des Geräts und warten Sie dann
mindestens 1 Minute.
Führen Sie niemals Zwangsausschub einer Disc direkt nach dem
Ausschalten des Sets aus. Das ist aus den unten aufgeführten Gründen gefährlich.
! Die Disc dreht sich nach dem Ausschieben noch und kann Ihre
Finger berühren usw., was Verletzungsgefahr in sich birgt.
! Außerdem dreht die Disc-Klammer in instabiler Weise, und die
Disc kann zerkratzt werden.
2 Verwenden Sie den mitgelieferten Stift für DiscZwangsausschub. (Verwenden Sie keinen anderen
Gegenstand.)
Der mitgelieferte Stift für Disc-Zwangsausschub ist an der Unterseite
des CDJ-350 angebracht. Wenn der mitgelieferte Stift vollständig in
das Einsetzloch eingesteckt wird, wird die Disc etwa 5 mm bis 10 mm
aus dem Disc-Einsetzschacht geschoben. Greifen Sie die Disc mit den
Fingern und ziehen Sie sie heraus.
Grundlegender Betrieb (Player-,
Quellenwahl- und Durchsuchen-
Sektionen)
Deutsch
Laden von USB-Geräten
Stecken Sie das USB-Gerät im USB-Geräte-Einsetzschacht
ein 3.
Die Anzeige [USB STOP] leuchtet.
Abnehmen von USB-Geräten vom Set
! Verfahren Sie immer wie unten beschrieben, wenn Sie USB-Geräte
vom Set abnehmen. Durch Abnehmen eines USB-Geräts auf andere
Weise könnten die Verwaltungsdaten des Sets gelöscht und das
Lesen des USB-Geräts unmöglich gemacht werden.
! Beim Ausschalten der Stromversorgung des Set nehmen Sie immer
zuerst das USB-Gerät ab.
1 Drücken Sie [USB STOP] 4 mindestens 2 Sekunden
lang.
Die [USB STOP]-Anzeige erlischt.
2 Trennen Sie das USB-Gerät ab.
Über den Netzschalter dieses Geräts
Zum Einschalten
Drücken Sie [u] 1.
Schalten Sie die Stromversorgung dieses Geräts ein.
Die [u]-Anzeige leuchtet grün.
Zum Umschalten auf Standby-Modus
Wenn das Gerät eingeschaltet ist, drücken Sie [u] 1
mindestens 1 Sekunde lang.
Dieses Gerät ist auf Standby-Modus geschaltet.
Die [u]-Anzeige leuchtet rot.
! Wenn [u] erneut gedrückt wird, wird die Stromversorgung
eingeschaltet.
! Dieses Gerät hat eine Auto-Standby-Funktion. Einzelheiten siehe
Über die Auto-Standby-Funktion auf Seite 24.
Wiedergabe
1 Legen Sie die Quelle in das Gerät.
2 Drücken Sie [
lang.
Dies wählt die Quelle.
3 Drehen Sie den Drehregler m.
Wählen Sie den Track.
! Zum verschieben zu niedrigeren Ebenen in einem Ordner wählen
Sie den Ordner und drücken dann den Drehregler.
] 6 oder [ ] 7 mindestens 1 Sekunde
De
17
Page 72

! Um zu höheren Ebenen zurückzukehren, drücken Sie [BACK] l.
! Drücken Sie [BACK] über 1 Sekunde lang, zum zur oberen Ebene
zu verschieben.
4 Drücken Sie den Drehregler m.
Der Track wird geladen, und die Wiedergabe beginnt.
! Wenn eine mit hierarchischer Struktur aufgenommene
Musikdateien enthaltende Disc eingelegt wird, startet die
Wiedergabe von den Tracks in der obersten Ebene.
Pausieren
2 Drücken Sie [SEARCH m, n] 9.
Der Cue-Punkt kann in Schritten von einzelnen Frames fein justiert
werden.
! Der gleiche Vorgang kann auch mit der Jog-Scheibe ausgeführt
werden.
3 Drücken Sie [CUE] a.
Die Position, bei der die Taste gedrückt wurde, wird als neuer CuePunkt gesetzt.
! Wenn ein neuer Cue-Punkt gesetzt ist, wird der zuvor gesetzte Cue-
Punkt aufgehoben.
Drücken Sie während der Wiedergabe [PLAY/PAUSEf] b.
! Wiedergabe wird fortgesetzt, wenn Sie [PLAY/PAUSEf] erneut
drücken.
Fortsetzen der Wiedergabe von der Spielposition
kurz vor dem Ausschieben der Disc (Fortsetzen)
Nach dem Ausschieben der Disc legen Sie sofort die
gleiche Disc im Gerät ein.
! Die Fortsetzungsfunktion arbeitet nur, wenn die gleiche Disc aus-
geschoben und dann wieder eingesetzt wird, bevor eine andere
Disc eingesetzt wird.
! Die Fortsetzungsfunktion arbeitet nicht für USB-Geräte.
Vorwärts- und Rückwärtssuchlauf
Drücken Sie [SEARCH m, n] 9.
Die Disc wird vorgefahren, wenn [n] gedrückt gehalten wird.
Die Disc wird zurückgefahren, wenn [m] gedrückt gehalten wird.
Finden der Anfänge von Tracks (TrackSuche)
Drücken Sie [TRACK SEARCH o, p] 8.
Drücken Sie [p], um zum Anfang des nächsten Tracks zu gehen.
Wenn [o] gedrückt wird, schaltet die Wiedergabe zum Anfang des
aktuell abgespielten Tracks zurück. Wenn zweimal nacheinander
gedrückt, schaltet die Wiedergabe zum Anfang des vorherigen Tracks
zurück.
! Wenn Auto Cue eingeschaltet ist, sucht der Set nach dem Anfang
eines Tracks und schaltet dort auf Pause (Seite 18).
Einstellung Cue
1 Drücken Sie während der Wiedergabe
[PLAY/PAUSEf] b.
Die Wiedergabe wird auf Pause geschaltet.
2 Drücken Sie [CUE] a.
Der Punkt, an dem der Track auf Pause gestellt wird, wird als CuePunkt eingestellt.
Die [PLAY/PAUSEf]-Anzeige blinkt, und die [CUE]-Anzeige leuchtet. Zu diesem Zeitpunkt wird kein Ton ausgegeben.
! Wenn ein neuer Cue-Punkt gesetzt ist, wird der zuvor gesetzte Cue-
Punkt aufgehoben.
Anpassung der Cue-Punkt-Position
Zurückschalten zum Cue Point (Back Cue)
Drücken Sie während der Wiedergabe [CUE] a.
Der Set kehrt sofort zum aktuell eingestellten Cue-Punkt zurück und
schaltet dort auf Pause.
! Wenn [PLAY/PAUSEf] gedrückt wird, beginnt die Wiedergabe
vom cue point.
Markieren von Cue Point (Cue Point
Sampler)
Nach der Rückkehr zum Cue-Punkt halten Sie [CUE] a
gedrückt.
Die Wiedergabe startet ab dem gesetzten Cue-Punkt. Die Wiedergabe
setzt fort, während die Taste gedrückt gehalten wird.
Einstellung von Cue Point während der
Wiedergabe (Real Time Cue)
Drücken Sie während der Wiedergabe [LOOP IN/ CUE
(HOT LOOP)] e.
Der Punkt, an dem die Taste gedrückt wurde, wird als Cue-Punkt
eingestellt.
Einstellung Auto Cue
Wenn ein Track geladen ist oder die Track-Suche ausgeführt wird,
wird der stille Abschnitt am Anfang des Tracks übersprungen und
der Cue-Punkt wird automatisch an der Stelle unmittelbar vor den
Einsetzen des Tons gesetzt.
Drücken Sie [TIME MODE (AUTO CUE)] i mindestens 1
Sekunde lang.
Auto Cue wird auf Ein geschaltet.
[A. CUE] leuchtet am Hauptgerät-Display.
! Wenn [TIME MODE (AUTO CUE)] erneut mindestens 1 Sekunde
lang gedrückt wird, wird Auto Cue auf Aus geschaltet.
! Die Auto-Cue-Pegeleinstellung bleibt im Speicher, auch wenn das
Gerät ausgeschaltet wird.
Ändern des Auto-Cue-Pegels
Der Schalldruckpegel für die Identifikation einer Passage als still kann
unter den folgenden acht Pegeln gewählt werden.
–36 dB, –42 dB, –48 dB, –54 dB, –60 dB, –66 dB, –72 dB und –78 dB
! Die Auto-Cue-Pegeleinstellung bleibt im Speicher, auch wenn das
Gerät ausgeschaltet wird.
! Der Auto Cue-Pegel kann auf eine der unten beschriebenen
Weisen geändert werden.
1 Drücken Sie, während beim Cue-Punkt auf Pause
geschaltet ist, [SEARCH m, n] 9.
Die Anzeigen [PLAY/PAUSEf] und [CUE] blinken.
De
18
Page 73

Verwendung von [DISPLAY (UTILITY)] j
SEARCH
TRACK SEARCH
IN/CUE OUT
OUT ADJUSTHOT LOOP
RELOOP/EXIT
BEAT LOOP
LOOP DIVIDE—+
VINYL MODE
TEMPO RANGE
LOOP
e
f hg
1 Drücken Sie [DISPLAY (UTILITY)] j mindestens 1
Sekunde lang.
Die [UTILITY]-Bildschirm wird angezeigt.
2 Drehen Sie den Drehregler m, und drücken Sie ihn
dann.
Wählen Sie [A. CUE LEVEL].
3 Drehen Sie den Drehregler m, und drücken Sie ihn
dann.
Die Auto Cue-Pegeleinstellung ändert sich.
Pitch bend
Während der Wiedergabe wirbeln Sie die Außensektion,
ohne die Oberseite der Jog-Scheibe c zu berühren.
Die Wiedergabegeschwindigkeit nimmt zu beim Wirbeln im
Uhrzeigersinn und nimmt ab beim Wirbeln gegen den Uhrzeigersinn.
Wenn das Wirbeln stoppt, schaltet die Wiedergabe auf normale
Geschwindigkeit zurück.
! Wenn der Jog-Modus auf den Modus CDJ gestellt ist, kann der
gleiche Vorgang durch Wirbeln der Oberseite der Jog-Scheibe
ausgeführt werden.
Verwendung von [TIME MODE (AUTO CUE)] i
1 Drücken Sie [TIME MODE (AUTO CUE)] i mindestens
5 Sekunden lang.
Der Auto Cue-Pegeleinstellung-Änderungsmodus ist gewählt.
Der aktuelle Auto-Cue-Pegel erscheint im Hauptgerät-Display.
2 Drehen Sie den Drehregler m, und drücken Sie ihn
dann.
Die Auto Cue-Pegeleinstellung ändert sich.
Bedienung der Jog-Scheibe
! Die Oberseite der Jog-Scheibe hat einen integrierten Schalter.
Stellen Sie keine Gegenstände die Jog-Scheibe oder setzen Sie sie
starker Belastung aus.
! Eindringen von Wasser oder anderen Flüssigkeiten in den Set
Fehlfunktionen verursacht werden.
Umschalten des Jog-Scheiben-Modus
Drücken Sie [VINYL MODE] d.
Der Modus schaltet bei jedem Tastendruck zwischen VINYL und CDJ um.
Die Anzeige leuchtet, wenn der Modus VINYL ausgewählt ist.
— VINYL-Modus: Wenn die Oberseite der Jog-Scheibe bei der
Wiedergabe gedrückt wird, stoppt die Wiedergabe und wenn
die Jog-Scheibe jetzt gedreht wird, wird Sound entsprechend
der Drehrichtung erzeugt.
— CDJ-Modus: Die Wiedergabe stoppt nicht, auch wenn die
Oberseite der Jog-Scheibe gedrückt wird. Techniken wie
Scratchen können nicht ausgeführt werden.
Frame-Suche
Im Pause-Modus wirbeln Sie die Jog-Scheibe c.
Die Pause-Position kann in Schritten von einzelnen Frames justiert
werden.
! Die Position wird in der Wiedergaberichtung verschoben,
wenn die Jog-Scheibe im Uhrzeigersinn gewirbelt wird, und in
Reverse-Richtung wenn Sie gegen den Uhrzeigersinn gewirbelt
wird. Die Position bewegt 135 für eine Umdrehung der JogScheibe.
Superschnelle Suche
Wirbeln Sie die Jog-Scheibe c, während Sie [SEARCH
m, n] 9 eindrücken.
Der Track wird schnell vorwärts/ rückwärts in der Richtung, in der Jog-
Scheibe gewirbelt wird, gespult.
! Diese Funktion wird aufgehoben, wenn [SEARCH m, n] losge-
lassen wird.
! Wenn Sie das Wirbeln der Jog-Scheibe stoppen, wird die normale
Wiedergabe fortgesetzt.
! Die schnelle Vorwärts/ Reverse-Geschwindigkeit kann entspre-
chend der Geschwindigkeit justiert, in der die Jog-Scheibe gewirbelt wird.
Superschnelle Track-Suche
Wenn die Jog-Scheibe c gewirbelt wird, während [TRACK SEARCH
o, p] 8 gedrückt gehalten wird, werden Tracks in hoher
Geschwindigkeit in der Richtung durchsucht, in der die Jog-Scheibe
gewirbelt wird.
Deutsch
Scratch
1 Drücken Sie [VINYL MODE] d.
Stellen Sie den Jog-Modus auf VINYL.
2 Während der Wiedergabe drücken Sie die Oberseite
der Jog-Scheibe c.
Die Wiedergabe stoppt.
3 Wirbeln Sie die Jog-Scheibe c in der zu spielen
gewünschten Richtung und in der gewünschten
Geschwindigkeit.
Der Ton wird entsprechend der Richtung und Geschwindigkeit abgespielt, in der die Jog-Scheibe gewirbelt wird, indem die Oberseite der
Jog-Scheibe bei Eindrücken gewirbelt wird.
4 Lassen Sie die Hand von der Oberseite der JogScheibe c los.
Die normale Wiedergabe wird fortgesetzt.
Automatisches Setzen von Loops
(Loop und Beat Loop Part)
1 Drücken Sie während der Wiedergabe [LOOP IN/ CUE
(HOT LOOP)] e.
Loop In Point wird eingestellt.
! Dieser Vorgang ist nicht erforderlich, wenn Sie bereits einen Cue
Point als Loop In Point eingestellt haben.
2 Drücken Sie [LOOP OUT (OUT ADJUST)] f.
Der Loop-Out-Punkt wird automatisch eingestellt, und die Loop-
Wiedergabe beginnt.
De
19
Page 74

Feinjustieren des Loop-out-Punkt (Loop-
USB
STOP
SOURCE SELECT
MP3/AAC
WAV/AIFF
PLAYLIST
BPM
DISC
LOCK
BACK
SELECT PUSH
TIME MODE
AUTO CUE
DISPLAY
UTILITY
k
l
m
n
i
j
A.CUE
LOCK
16
REMAIN
MS
F
TEMPO %
INFO
BROWSE
BPM
out-Justierung)
1 Drücken Sie während der Loop-Wiedergabe
[LOOP OUT (OUT ADJUST)] f.
[LOOP OUT (OUT ADJUST)] beginnt schnell zu blinken, und [LOOP IN/
CUE (HOT LOOP)] schaltet aus.
Die Zeit des Loop-out-Punkts wird auf dem Hauptgerät-Display
angezeigt.
2 Drücken Sie [SEARCH m, n] 9.
Der Loop-out-Punkt kann in Schritten von einzelnen Frames justiert
werden.
! Der gleiche Vorgang kann auch mit der Jog-Scheibe ausgeführt
werden.
! Der Einstellbereich für den Loop-out-Punkt liegt an beliebiger
Stelle nach dem Loop-in-Punkt.
3 Drücken Sie [LOOP OUT (OUT ADJUST)] f.
Loop-Wiedergabe wird fortgesetzt.
! Loop-Wiedergabe wird auch fortgesetzt wenn länger als 10
Sekunden keine Bedienung vorgenommen wird.
Abbrechen der Loop-Wiedergabe (Loop
Exit)
Drücken Sie während der Loop-Wiedergabe
[RELOOP/EXIT] g.
Die Wiedergabe wird nach dem Loop Out Point fortgesetzt, ohne zum
Loop In Point zurückzukehren.
Automatisches Setzen von Loops,
basierend auf dem Tempo des Tracks
(Beat Loop)
Während des Wiedergabe- oder Pause-Modus drücken
Sie [BEAT LOOP (LOOP DIVIDE)] h.
Der Loop-aus-Punkt wird automatisch entsprechend dem Tempo des
Tracks (BPM) gesetzt, und die Loop-Wiedergabe startet.
! Loop-Wiedergabe kann nicht richtig ausgeführt werden, wenn der
BPM-Wert nicht angezeigt wird.
Anzeige von Track-Information des
Tracks (Durchsuchen-Sektion)
Zurückkehren zur Loop-Wiedergabe
(Reloop)
Nach dem Abbrechen der Loop-Wiedergabe drücken Sie
[RELOOP/EXIT] g während der Wiedergabe.
Der Track schaltet zum vorher eingestellten Loop-in-Punkt zurück, und
die Loop-Wiedergabe beginnt.
Teilen von Loops (Loop teilen)
Drücken Sie während der Loop-Wiedergabe [BEAT LOOP
(LOOP DIVIDE)] h.
Die Länge der Loop-Spielzeit wird bei jedem Drücken von [–] um die
Hälfte verringert.
Wenn [+] gedrückt wird, kehrt die Loop-Wiedergabelänge auf die
Originallänge zurück.
Zurückkehren zum Loop-in-Punkt (Hot
Loop)
Drücken Sie während der Loop-Wiedergabe [LOOP IN/
CUE (HOT LOOP)] e.
Der Track schaltet sofort zum gesetzten Loop-in-Punkt zurück, und die
Loop-Wiedergabe startet.
20
De
Hinweise zu den [BROWSE]- und [INFO]Anzeigen
[BROWSE]-Anzeige
Dies zeigt die geladenen Tracks an, sortiert in einer Kategorie-oder
Baumstruktur.
Die Anzeige im in der Informationsanzeige-Sektion ist unterschiedlich, je nachdem ob Bibliothek-Information auf dem USB-Gerät aufgezeichnet ist oder nicht.
— Mit Bibliothek-Informationen d Bibliothek durchsuchen: Die
Musikdateien werden in den in rekordbox eingestellten Kategorien
(Album, Interpret usw.) angezeigt.
Die Kategorie-Typen können in Voreinstellungen
(Umgebungseinstellungen) in rekordbox geändert werden.
— Ohne Bibliothek-Informationen d Ordner durchsuchen: Die
Ordner/ Tracks auf dem Datenträger werden in einer Baumstruktur
angezeigt.
[INFO]-Anzeige
Dies zeigt detaillierte Informationen über die geladenen Tracks an.
Der Interpretenname, Albumname und die Beat-Anzeige werden hier
angezeigt.
Umschalten des Anzeige-Modus
Drücken Sie [DISPLAY (UTILITY)] j.
Die [BROWSE]- und [INFO]-Anzeigen schalten bei jedem Tastendruck um.
Verwendung der Beat-Anzeige-Funktion
Dies zeigt den Beat und die Wiedergabeposition des aktuell spielenden Tracks an.
Page 75

A.CUE
LOCK
16
REMAIN
MS
F
TEMPO %
INFO
BROWSE
BPM
1
2
Beat-Position
1
Wiedergabe-Position
2
! Der Beat-Anzeigebildschirm ist ein Element in der [INFO]-Anzeige.
! Bei Einstellung auf die [INFO]-Anzeige schaltet das Display auto-
matisch auf den Beat-Anzeigebildschirm um, wenn Scratch und
Loop ausgeführt wird.
1 Drücken Sie [DISPLAY (UTILITY)] j.
Schalten Sie auf die [INFO]-Anzeige um.
2 Drehen Sie den Drehregler m.
Rufen Sie den Beat-Anzeigebildschirm auf.
Schnelles Suchen nach Tracks mit
der Bibliothek-Information
Wenn mit rekordbox erstellte Bibliothek-Information auf dem USBGerät aufgezeichnet ist, kann die Bibliothek-Information verwendet
werden, um Tracks schnell zu suchen.
Suchen durch Eingabe des ersten
Zeichens (Sprung)
Wenn die Eintragsnamen in der Kategorie alphabetisch sortiert sind,
können Sie zu den mit dem spezifizierten Zeichen beginnenden
Einträgen gehen.
! Es kann sein, dass diese Funktion bei bestimmten Kategorien
nicht richtig funktioniert.
1 Drücken Sie [DISPLAY (UTILITY)] j.
Schalten Sie auf die [BROWSE]-Anzeige um.
2 Drehen Sie den Drehregler m, und drücken Sie ihn
dann.
Wählen Sie die Kategorie.
3 Drücken Sie den Drehregler m mindestens 1 Sekunde
lang.
Die Anzeige schaltet auf den Zeicheneingabe-Bildschirm um.
Die folgende Information wird in der Informationsanzeige-Sektion
angezeigt.
— Obere Sektion: Spezifiziertes Zeichen
— Untere Sektion: Einträge, die mit dem Zeichen in der oberen
Sektion beginnen
4 Drehen Sie den Drehregler m.
Das in der oberen Sektion der Informationsanzeige gezeigte Zeichen
wechselt um.
Die Sprungziel-Einträge entsprechend dem Zeichen in der oberen
Sektion werden in der unteren Sektion angezeigt.
5 Drücken Sie den Drehregler m.
Die Anzeige schaltet dann auf den in Schritt 4 gewählten Eintrag um.
1 Drücken Sie [DISPLAY (UTILITY)] j.
Schalten Sie auf die [BROWSE]-Anzeige um.
2 Drehen Sie den Drehregler m.
Wählen Sie [SEARCH].
3 Drücken Sie den Drehregler m.
Die Anzeige schaltet auf den Zeicheneingabe-Bildschirm um.
4 Verwenden Sie den Drehregler m zur Eingabe eines
Zeichens.
Drehen Sie den Drehregler und wählen das gewünschte Zeichen, und
drücken Sie dann den Drehregler zur Eingabe des Zeichens.
! Wiederholen Sie diesen Vorgang zur Eingabe anderer Zeichen.
5 Wenn Sie die Eingabe der Zeichenfolge ausgeführt
haben, drücken Sie den Drehregler m.
Nur Einträge, die die eingegebene Zeichenfolge enthalten, werden
angezeigt.
Die folgende Information wird in der Informationsanzeige-Sektion
angezeigt.
— Obere Sektion: Anzahl der Einträge, die die eingegebene
Zeichenfolge enthalten
— Untere Sektion: Namen der Einträge, die die eingegebene
Zeichenfolge enthalten
Über den Wiedergabe-Verlauf
(HISTORY)
Wenn mit rekordbox verwaltete Tracks abgespielt werden, wird der
Wiedergabeverlauf bei [HISTORY] registriert.
! Der Wiedergabe-Verlauf wird auf dem USB-Gerät aufgezeichnet.
! Die maximale Anzahl von aufnehmbaren Tracks beträgt 999.
! Der Wiedergabe-Verlauf wird nicht aufgezeichnet, wenn nicht
genug freier Platz auf dem USB-Gerät vorhanden ist oder wenn das
USB-Gerät schreibgeschützt ist.
! Playlists können basierend auf dem Wiedergabe-Verlauf mit
rekordbox erstellt werden. Einzelheiten siehe Bedienungsanleitung
für rekordbox.
! Wenn ein Wiedergabe-Verlauf mit rekordbox als Playlist gespei-
chert ist, wird der Wiedergabe-Verlauf gelöscht.
! Ein neuer [HISTORY] wird jedesmal angelegt, wenn das Gerät ein-
oder ausgeschaltet wird oder wenn das USB-Gerät abgetrennt und
dann wieder angeschlossen wird.
Löschen des Wiedergabe-Verlaufs
1 Drehen Sie den Drehregler m.
Wählen Sie [HISTORY].
2 Drücken Sie den Drehregler m mindestens 1 Sekunde
lang.
Das Löschen-Menü wird angezeigt.
3 Drehen Sie den Drehregler m zum Wählen des zu
löschenden Bereichs.
— [CANCEL]: Die [HISTORY] werden nicht gelöscht.
— [ONE]: Der mit dem Cursor gewählte [HISTORY] wird
gelöscht.
— [ALL]: Alle [HISTORY] werden gelöscht.
4 Drücken Sie den Drehregler m.
Der in Schritt 3 gewählte Bereich wird gewählt.
Deutsch
Suchen durch Eingeben einer
Zeichenfolge
Diese Funktion erlaubt es, nur die Interpreten, Alben, Tracks oder
Dateien anzuzeigen, die die eingegebene Zeichenfolge enthalten.
! Nicht in Voreinstellungen (Umgebungseinstellungen) in rekord-
box gewählte Kategorien werden nicht angezeigt.
De
21
Page 76

Verwendung von Playlists
USB
STOP
SOURCE SELECT
MP3/AAC
WAV/AIFF
PLAYLIST
BPM
DISC
LOCK
SELECT PUSH
DISPLAY
UTILITY
m
n
MULTI PLAYER
TEMPO
0
BEAT LOOP
LOOP DIVIDE—+
VINYL MODE
TEMPO RANGE
MASTER TEMPO
LOOP
PLAYLIST
BPM
LOCK
FWD
p
q
r
o
Hinzufügen von Tracks zu Playlisten
Legen Sie zuerst das USB-Gerät in diese Einheit ein.
! Zum Hinzufügen des momentan abgespielten Tracks schalten Sie
auf den [INFO]-Bildschirm um.
! Zum Auswählen und Hinzufügen eines Tracks schalten Sie auf den
[BROWSE]-Bildschirm um.
! Die maximale Anzahl von in einer Playlist registrierbaren Tracks in
beträgt 99.
1 Drücken Sie [PLAYLIST] n.
Die Anzeige schaltet auf den [ADD TO]-Bildschirm um.
2 Drehen Sie den Drehregler m.
Wählen Sie die Playlist.
Zum Erzeugen einer neuen Playlist wählen Sie [NEW PLAYLIST].
! Drücken Sie [PLAYLIST] oder [BACK], um zum Originalbildschirm
zurückzukehren.
3 Drücken Sie den Drehregler m.
Der Track wird zu der Playlist hinzugefügt.
2 Drehen Sie den Drehregler m, und drücken Sie ihn
dann.
— [CANCEL]: Die Playlist wird nicht gelöscht.
— [OK]: Die Playlist wird gelöscht.
Einstellen der
Wiedergabegeschwindigkeit
(Temporegelung-Sektion)
Bearbeiten von Playlists
Ändern der Reihenfolge der Tracks
Wählen Sie den Track, dessen Reihenfolge in der Playlist Sie vorher
ändern wollen.
1 Drücken Sie [PLAYLIST] n.
Der Neusortieren-Bildschirm wird angezeigt.
2 Drehen Sie den Drehregler m.
Wählen Sie die Position, zu der der Track verschoben wird.
Der Track wird zu der Position zwischen den beiden Tracks, wie in der
Informationsanzeige-Sektion angezeigt, verschoben.
3 Drücken Sie den Drehregler m.
Die Track-Reihenfolge ändert sich.
Entfernen von Tracks aus Playlisten
Wählen Sie den Track vorher zum Entfernen aus der Playlist.
1 Drücken Sie [PLAYLIST] n mindestens 1 Sekunde
lang.
Das Entfernen-Menü wird angezeigt.
2 Drehen Sie den Drehregler m, und drücken Sie ihn
dann.
— [CANCEL]: Der (die) gewählte Track(s) wird (werden) nicht
entfernt.
— [OK]: Der (die) Track(s) wird (werden) entfernt.
Bewegen Sie [TEMPO] r vorwärts oder rückwärts.
Die Wiedergabegeschwindigkeit nimmt zu, wenn der Schieber
zur Seite [+] (zu Ihnen hin) bewegt wird, und nimmt ab, wenn der
Schieber zur Seite [–] (von Ihnen weg) bewegt wird.
Der Prozentsatz, mit dem die Wiedergabegeschwindigkeit geändert
wird, wird bei [TEMPO %] im Display der Haupteinheit angezeigt.
Wählen des WiedergabegeschwindigkeitEinstellbereichs
Drücken Sie [TEMPO RANGE] p.
Der Wiedergabegeschwindigkeit-Einstellbereich wird bei jedem
Drücken der Taste umgeschaltet.
[WIDE, ±16, ±10, ±6] leuchtet am Hauptgerät-Display.
! Die Geschwindigkeit kann in Einheiten von 0,02 % bei [±6] %,
in Einheiten von 0,05 % bei [±10] %, in Einheiten von 0,05 % bei
[±16] % und in Einheiten von 0,5 % bei [WIDE] eingestellt werden.
! Der Einstellbereich beträgt von [WIDE] beträgt ±100 %. Bei
Einstellung auf –100 % stoppt die Wiedergabe.
! [WIDE] kann nur eingestellt werden, wenn Musik-CDs (CD-DA)
abgespielt werden.
Einstellen der
Wiedergabegeschwindigkeit ohne
Ändern der Tonlage (Master Tempo)
Löschen von Playlisten
Wählen Sie die Playlist zum Löschen vorher aus der [PLAYLIST]Kategorie.
1 Drücken Sie [PLAYLIST] n mindestens 1 Sekunde
lang.
Das Löschen-Menü wird angezeigt.
De
22
Drücken Sie [MASTER TEMPO] q.
Die Anzeige [MASTER TEMPO] leuchtet. Die Tonlage ändert sich
nicht, auch wenn die Wiedergabegeschwindigkeit mit dem Schieber
[TEMPO] geändert wird.
! Der Ton wird digital verarbeitet, so dass sich die Tonqualität
ändert.
Page 77

Verwendung von [BPM LOCK]
Wenn der Master-BPM im Voraus eingestellt ist, kann die
Wiedergabegeschwindigkeit des aktuell spielenden Tracks automatisch auf Tastendruck auf den Master-BPM gestellt werden.
Bedienungen in Kombination mit
einem DJ-Mixer
Siehe auch Bedienungsanleitung des DJ-Mixers.
Einstellen des Master-BPM
1 Drücken Sie [BPM LOCK] o mindestens 1 Sekunde
lang.
Der Modus Master-BMP ändern ist eingestellt.
Der aktuelle BPM-Wert oder der Master-BPM für die vorherige Zeit
wird auf dem Hauptgerät-Display angezeigt, und [BPM] blinkt.
2 Drehen Sie den Drehregler m.
Ändern Sie den BPM-Wert zu dem Wert, der als Master-BPM eingestellt werden soll.
3 Drücken Sie den Drehregler m.
Der Master-BMP ist eingestellt.
! Wenn länger als 10 Sekunden lang keine Bedienung ausgeführt
wird, wird der in der Informationsanzeige-Sektion angezeigte
BPM-Wert als Master-BPM angezeigt.
! Wenn [BPM LOCK] mindestens 1 Sekunde lang gedrückt wird,
während der Master-BPM-Änderungsmodus eingestellt ist, wird
der aktuell spielende BPM-Wert als Master-BPM eingestellt.
! Um den Master-BPM zu ändern beginnen Sie erneut ab Schritt 1.
Verwendung der BPM-Sperre-Funktion
Stellen Sie zuerst den Master-BPM ein.
! Die BPM-Sperre-Funktion kann nicht für Tracks verwendet wer-
den, für die der BPM nicht richtig gemessen werden kann.
Während der Track spielt, drücken Sie [BPM LOCK] o.
Der BPM des aktuell spielenden Tracks wird mit dem Master-BPM
synchronisiert.
[LOCK] erscheint am Hauptgerät-Display.
! [TEMPO RANGE] ist auf [±16] eingestellt.
! [LOCK] blinkt, wenn sich der BPM des aktuell spielenden Tracks
ändert. Drücken Sie [BPM LOCK], während [LOCK] blinkt, um den
BPM erneut zu sperren.
Hinweise zur Tempo-Anzeige im BPM-Sperre-
Modus
Wenn der BPM-Sperr-Modus eingeschaltet ist, schaltet [TEMPO %]
am Hauptgerät-Display bei eingestellten Intervallen zwischen dem
Master-BPM und dem Unterschied mit der Position des [TEMPO]Schiebers um.
— [INC]: Zum Anpassen des Master-BPM an die Position des
[TEMPO]-Schiebers bewegen Sie [TEMPO] zur Seite [+] (zu Ihnen
hin).
— [dEC]: Zum Anpassen des Master-BPM an die Position des
[TEMPO]-Schiebers bewegen Sie [TEMPO] zur Seite [–] (von Ihnen
weg).
Abbrechen des BPM-Sperre-Modus
Es gibt vier Weisen zum Abbrechen des BPM-Sperre-Modus.
— Durch Drücken von [BPM LOCK] im BPM-Sperr-Modus.
— Schieben Sie den Schieberegler [TEMPO], um die
Wiedergabegeschwindigkeit des Tracks schneller oder langsamer
als den Master-BPM einzustellen.
— Durch Laden eines Tracks.
— Durch Suchen nach einem Track (Track-Suche).
Starten Sie die Wiedergabe mit dem
Fader eines DJ-Mixers (Fader Start)
1 Verbinden Sie den CDJ-350 mit einem DJ-Mixer von
Pioneer mit dem mitgelieferten Steuerkabel an.
Anweisungen zum Anschließen finden Sie in Basic-Stil auf Seite 13.
2 Schalten Sie die Fader-Start-Funktion vom DJ-Mixer
ein.
3 Setzen Sie den Cue.
4 Bewegen Sie den Kanal-Fader oder Cross-Fader des
DJ-Mixers.
Der Pause-Modus dieses Geräts wird aufgehoben, und der Track wird
sofort abgespielt.
! Wenn der Kanal-Fader oder Cross-Fader auf die Ausgangsposition
zurückgestellt wird, wird die Wiedergabe mit Cue zurück zu dem CuePunkt gestellt, und der Pause-Modus wird eingestellt (Back Cue).
Relais-Wiedergabe auf zwei DJ-Playern
1 Verbinden Sie den CDJ-350 und einen DJ-Mixer.
Anweisungen zum Anschließen finden Sie in Verwendung der Relais-
Wiedergabefunktion auf Seite 14.
2 Stellen Sie den Cross-Fader des DJ-Mixers auf die
mittlere Position.
3 Schalten Sie Auto Cue für beide DJ-Player ein.
Die Auto-Cue-Anzeigen des DJ-Players leuchten.
4 Starten Sie die Wiedergabe auf diesem Gerät.
Wenn die Wiedergabe des ersten Tracks auf diesem Gerät beendet
ist, beginnt automatisch die Wiedergabe auf dem anderen DJ-Player.
Dieses Gerät geht mit Cue zum Anfang des nächsten Tracks und wird
auf Pause gestellt. Dieser Vorgang wird für Relais-Wiedergabe auf
zwei DJ-Playern wiederholt.
! Der Datenträger kann gewechselt werden, und der Cue-Punkt ist
auf dem DJ-Player eingestellt, der auf Standby ist.
! Die Fader-Start-Funktion arbeitet nicht bei der Relais-Wiedergabe.
! Relais ist möglicherweise nicht möglich, wenn zwei DJ-Player
nicht am gleichen DJ-Mixer angeschlossen sind.
! Wenn der aktuell laufende DJ-Player ausgeschaltet wird, kann die
Wiedergabe auf dem anderen DJ-Player starten.
Verwendung der DJ-Software
Der CDJ-350 gibt auch die Betriebsdaten für die Tasten und Regler im
MIDI-Format aus. Wenn Sie einen Computer mit einer eingebauten
MIDI-kompatiblen DJ-Software über ein USB-Kabel anschließen,
können Sie die DJ-Software auf diesem Gerät bedienen. Der Ton von
auf dem Computer abgespielten Musikdateien kann ebenfalls vom
CDJ-350 ausgegeben werden.
Zur Verwendung dieses Geräts als Audiogerät installieren Sie die
Treibersoftware vorher auf dem Computer (Seite 11). Dieses Gerät
muss außerdem in den Audiogerät-Ausgabeeinstellungen der
DJ-Software gewählt werden. Einzelheiten siehe Bedienungsanleitung
für Ihre DJ-Software.
1 Verbinden Sie den USB-Anschluss an diesem Gerät
mit Ihrem Computer.
Anweisungen zum Anschließen finden Sie in Verwenden der
DJ-Software auf Seite 14.
Deutsch
De
23
Page 78

2 Drücken Sie [ ] mindestens 1 Sekunde lang.
USB
STOP
SOURCE SELECT
MP3/AAC
WAV/AIFF
PLAYLIST
BPM
DISC
LOCK
BACK
SELECT PUSH
TIME MODE
AUTO CUE
DISPLAY
UTILITY
k
l
m
n
i
j
Der Bildschirm [CONTROL MODE] erscheint im Hauptgerät-Display.
3 Starten der DJ-Software.
Die Kommunikation mit der DJ-Software beginnt.
Die DJ-Software kann mit den Tasten und Reglern dieses Geräts
bedient werden.
! Es kann u.U. nicht möglich sein, einzelne Tasten zur Bedienung
der DJ-Software zu verwenden.
! Für vom CDJ-350 ausgegebene Meldungen siehe Liste von MIDI-
Meldungen.
Ändern der MIDI-Kanal Einstellung
Sonstige
Einstellungen
AUTO STANDBY
LIBRARY CREATOR
VERSION No.
*: Einstellung nach dem Kauf
Auswahlpunkte Beschreibungen
20 min*/ 40 min/ 60 min
OFF/
LIBRARY*/ FOLDER
—
Einzelheiten siehe Über die
Auto-Standby-Funktion auf
Seite 24.
Stellen Sie die Durchsuchmethode für Datenträger
ein, auf denen Pioneer
MEP-7000-Bibliotheken
aufgezeichnet sind.
Zeigt die Software-Version
des CDJ-350.
1 Drücken Sie [DISPLAY (UTILITY)] j mindestens 1
Sekunde lang.
Die [UTILITY]-Bildschirm wird angezeigt.
2 Drehen Sie den Drehregler m, und drücken Sie ihn
dann.
Wählen Sie [MIDI CH.].
3 Drehen Sie den Drehregler m, und drücken Sie ihn
dann.
Wählen Sie den MIDI-Kanal und ändern Sie die Einstellung. Eine
Einstellung von 1 – 16 kann gewählt werden.
4 Drücken Sie den Drehregler m.
Die geänderten MIDI-Kanal-Einstellungen werden gespeichert.
! Zum Schließen des [UTILITY]-Bildschirms drücken Sie [DISPLAY
(UTILITY)] oder [BACK].
Ändern der Einstellungen
Über die Auto-Standby-Funktion
Wenn die Auto-Standby-Funktion eingeschaltet wird, wird automatisch auf den Standby-Modus geschaltet, nachdem die Zeit mit allen
unten aufgeführten Bedingungen abgelaufen ist.
— Das die Tasten, Regler usw. dieses Geräts nicht bedient werden.
— Das kein Track spielt.
1 Drücken Sie [DISPLAY (UTILITY)] j mindestens 1
Sekunde lang.
Die [UTILITY]-Bildschirm wird angezeigt.
2 Verwenden Sie den Drehregler m zum Ändern der
Einstellung.
! Drücken Sie [BACK] l, um zum vorherigen Bildschirm
zurückzukehren.
3 Drücken Sie den Drehregler m.
Die geänderten Einstellungen werden gespeichert.
! Zum Schließen des [UTILITY]-Bildschirms drücken Sie [DISPLAY
(UTILITY)] oder [BACK].
Bevorzugte Einstellungen
24
Sonstige
Einstellungen
A. CUE LEVEL
MIDI CHANNEL
De
Auswahlpunkte Beschreibungen
–42 dB/ –48 dB/
–36 dB/
–54 dB/ –60 dB*/ –66 dB/
–72 dB/ –78 dB
1* bis 16 —
Einzelheiten siehe Ändern
des Auto-Cue-Pegels auf
Seite 18.
Page 79

Zusätzliche Informationen
Störungssuche
! Bedienungsfehler werden oft irrtümlich für Störungen oder Ausfälle gehalten. Wenn Sie den Eindruck haben, dass diese Komponente nicht
ordnungsgemäß funktioniert, überprüfen Sie bitte die folgenden Punkte. Manchmal wird eine Störung auch durch ein externes Gerät verursacht. Überprüfen Sie die anderen verwendeten Komponenten und elektrischen Geräte. Wenn Sie die Störung nicht beheben können, wenden
Sie sich an die nächste Pioneer-Kundendienststelle oder an Ihren Händler.
! Dieses Gerät kann möglicherweise aufgrund von statischer Elektrizität oder anderen externen Faktoren nicht richtig arbeiten. In diesem Fall
kann richtiger Betrieb durch Ausschalten, mindestens 1 Minute Warten und dann erneutes Einschalten wieder hergestellt werden.
! Nicht finalisierte (partielle Discs) CD-R/ -RW können nicht auf dem CDJ-350 abgespielt werden.
! Andere als standardmäßige 12-cm-Discs, wie zum Beispiel Discs mit ungewöhnlichen Formen, können nicht auf dem CDJ-350 abgespielt
werden (dabei besteht die Gefahr von Schäden oder Unfällen).
! Die am CDJ-350 gemessene BPM-Zahl kann sich von der BPM unterscheiden, wie auf der Disc oder eines Pioneer DJ-Mixer usw. angegeben.
Dies liegt an den unterschiedlichen Methoden zur Messung des BPM und ist keine Fehlfunktion.
Problem Prüfen Abhilfe
Disc kann nicht ausgeworfen werden. —
Die Wiedergabe startet nicht, wenn eine Disc
eingelegt ist.
Datei kann nicht abgespielt werden. Ist die Datei urheberrechtlich geschützt (durch
Es wird kein Ton produziert, oder der Ton ist
verzerrt oder laut.
Lauter Lärm wird produziert, oder die Wiedergabe stoppt, wenn eine bestimmte Disc
gespielt wird.
Track-Suche dauert zu lange. Ist die Funktion Auto Cue aktiviert? Track-Suche kann einige Zeit dauern, wenn es zu lange stille
Back-Cue-Funktion funktioniert nicht. Ist ein Cue-Punkt gesetzt? Setzen Sie einen Cue-Punkt. (Seite 18)
Loop Play-Funktion funktioniert nicht. Ist ein Cue-Punkt gesetzt? Setzen Sie einen Cue-Punkt. (Seite 18)
Einstellungen werden nicht gespeichert. Wurde die Stromversorgung sofort nach dem
USB-Speichergerät wird nicht erkannt. Ist das USB-Gerät richtig angeschlossen? Schließen Sie das Gerät sicher (vollständig) an.
Die Wiedergabe-Adresse wird nicht im Restzeit-Modus angezeigt.
Zeit wird benötigt, um USB-Geräte (Flash-Speicher-Laufwerke und Festplatten) zu lesen.
Ist die Disc oder Datei abspielbar? Siehe Hinweise zu Discs auf Seite 6 oder Abspielbare Musikdatei-
Ist die Funktion Auto Cue aktiviert? Drücken Sie [TIME MODE (AUTO CUE)] für mindestens 1
DRM)?
Bedienen Sie den angeschlossenen DJ-Mixer
richtig?
Befindet sich der CDJ-350 in der Nähe eines
Fernsehers?
Ist die Disc zerkratzt? Eine verkratzte Disc lässt sich möglicherweise nicht abspielen.
Ist die Disc verschmutzt? Wischen Sie die Disc sauber. (Seite 27)
— Wenn Track-Suche innerhalb von 10 Sekunden nicht möglich ist,
Ändern der Einstellung ausgeschaltet?
Ist das USB-Gerät richtig über einen USB-Hub
angeschlossen?
Wird das USB-Gerät vom CDJ-350 unterstützt? Dieser Spieler unterstützt die USB-Massenspeicherklasse.
Wird das Dateiformat vom CDJ-350 unterstützt? Überprüfen Sie das Dateiformat des angeschlossenen USB-
Verwenden Sie ein USB-Gerät (wie eine Festplatte
mit Stromversorgung über Bus), dessen Stromstärke höher als die Nennstärke dieses Geräts ist
(500 mA)?
— Schalten Sie das Gerät aus, warten Sie 1 Minuten, und schalten
— Bei der Wiedergabe von im VBR aufgezeichneten Dateien kann
Gibt es eine große Anzahl von Ordnern oder
Dateien auf dem USB-Gerät?
Sind andere Dateien als Musikdateien auf dem
USB-Gerät gespeichert?
Wenn [hDISC] nicht arbeitet, schieben Sie die Disc aus, indem
Sie den Stift in das Disc-Ausschubloch stecken. (Seite 17)
formate auf Seite 7.
Sekunde, um die Funktion Auto Cue abzubrechen. (Seite 18)
Urheberrechtlich geschützte Dateien können nicht abgespielt
werden.
Überprüfen Sie die Funktion des DJ-Mixers.
Schalten Sie den Fernseher aus oder stellen Sie den CDJ-350 und
den Fernseher weiter voneinander entfernt auf.
Abschnitte zwischen den Tracks gibt.
ist ein Cue-Punkt am Anfang des Tracks gesetzt.
Warten Sie nach dem Ändern der Einstellungen mindestens 10
Sekunden, bevor Sie das Gerät ausschalten.
USB-Hubs können nicht verwendet werden.
Dieser Spieler unterstützt portablen Flash-Speicher und digitale
Audio-Wiedergabegeräte.
Geräts. Für die vom CDJ-350 unterstützten Dateiformate siehe
Über USB-Geräte auf Seite 7.
Verwenden Sie ein USB-Gerät innerhalb der Nennleistung dieses
Geräts (wie eine Festplatte mit Stromversorgung über ein Netzteil
oder eine andere externe Stromversorgung).
Sie das Gerät wieder ein.
es vorkommen, dass das Set nicht die Länge des Tracks erkennen
kann dass einige Zeit für die Anzeige der Wiedergabe-Anzeige
benötigt wird.
Wenn es viele Ordner oder Dateien gibt, kann einige Zeit kann für
das Laden erforderlich sein.
Wenn andere Dateien als Musikdateien in Ordnern gespeichert
sind, ist ebenfalls einige Zeit erforderlich, um sie zu lesen. Speichern Sie keine anderen Dateien oder Ordner als Musikdateien
auf dem USB-Gerät.
Deutsch
De
25
Page 80

Problem Prüfen Abhilfe
Die Kategorie wird nicht angezeigt. Spielen Sie eine Musik-CD ab? Die Kategorie wird für Musik-CDs nicht angezeigt.
Wird die Bibliothek-Information auf dem USBGerät angezeigt?
Ist das USB-Gerät schreibgeschützt? Stellen Sie das USB-Gerät so ein, dass darauf Dateien geschrie-
Nichts wird angezeigt. Ist die Funktion Auto-Standby aktiviert? Dieses Gerät ist werkseitig auf aktivierte Auto-Standby-Funktion
Die [u]-Anzeige blinkt, und das Gerät schaltet
nicht ein.
— Normaler Betrieb kann manchmal wiederhergestellt werden,
Verwenden Sie rekordbox, um die Bibliothek-Information zu
erstellen.
ben werden können.
Stellen Sie den Schreibschutz-Schalter des USB-Geräts in Aus-
Stellung.
eingestellt. Wenn Sie die Auto-Standby-Funktion nicht verwenden wollen, stellen Sie [AUTO STANDBY] auf [OFF]. (Seite 24)
indem das Netzkabel abgezogen wird, dann mindestens 1 Minute
gewartet wird, und das Netzkabel dann wieder eingesteckt wird.
Wenn das Symptom weiter besteht, ziehen Sie das Netzkabel ab
und reichen das Gerät zur Reparatur ein.
Fehlermeldungen
Wenn der CDJ-350 nicht normal funktioniert, wird eine Fehlermeldung erscheint auf dem Display angezeigt. Treffen Sie die erforderlichen
Maßnahmen entsprechend der Tabelle unten. Wenn ein Fehlercode nicht in der Tabelle aufgeführt ist oder wenn der gleiche Fehlercode
erscheint, nachdem die angegebenen Maßnahmen getroffen worden sind, wenden Sie sich an das Geschäft, in dem das Gerät gekauft wurde,
oder an eine Pioneer-Kundendienstvertretung in Ihrer Nähe.
Fehlercode Fehlertyp Beschreibung des Fehlers Ursache und Abhilfe
E-7201 TOC READ ERROR TOC-Daten können nicht gelesen werden.
E-8301
E-8302
E-8303
E-8304 DECODE ERROR
E-8305 DATA FORMAT ERROR
E-8306 NO FILE
E-9101 MECHANICAL TIME OUT
PLAYER ERROR
Eine Disc, die nicht normal abgespielt werden kann,
ist eingesetzt.
Musikdateien, die nicht normal abgespielt werden
können, sind geladen.
In der Bibliothek, Playlist usw. aufgezeichneter
Track wurde von dem USB-Gerät gelöscht und kann
nicht abgespielt werden.
Der mechanische Betrieb hat nicht innerhalb der
angegebenen Zeit gestoppt.
! Disc hat Risse.dErsetzen Sie die Disc.
! Disc ist verschmutzt.dReinigen Sie die Disc.
! Wenn der Betrieb bei anderen Discs normal
ist, liegt das Problem an der Disc.
Das Format ist falsch.dDurch Musikdateien im
richtigen Format ersetzen.
Löschen Sie nicht den betreffenden Track von
dem USB-Gerät.
Es befindet sich ein Fremdkörper im
Einsetzschacht.dEntfernen Sie den Fremdkörper.
Liste von Icons in der DisplaySektion des Hauptgeräts
Genre
Interpret
Album
Track-/ Dateiname
Playlist
Originaler Interpret
Verlauf
Zeit
Die Wiedergabe ist nicht
möglich
Spielen
Abgespielt
Remixer
Ordner
PC Control
26
De
Page 81

Liste von MIDI-Meldungen
Vorsichtshinweise
SW Name SW Typ
Jog-Scheibe
(Scratch)
TEMPO
Jog-Dial (Spin
Außensektion)
SELECT PUSH
(Drehung)
PAUSE
PLAY/
f
CUE
SEARCH n
SEARCH m
TRACK
SEARCH p
TRACK
SEARCH o
LOOP IN/
(HOT LOOP)
LOOP OUT
(OUT ADJUST)
RELOOP/
TIME MODE
(AUTO CUE)
DISPLAY
(UTILITY)
TEMPO RANGE
MASTER
TEMPO
VINYL MODE
BEAT LOOP
(LOOP DIVIDE) +
BEAT LOOP
(LOOP DIVIDE) –
Jog-Scheibe
(oben drücken)
BPM LOCK
PLAYLIST
hDISC
BACK
SELECT PUSH
(drücken)
n ist die Kanalnummer.
Universalregler
VR Bn 1D dd
Universalregler
Universalregler
SW 9n 00 dd OFF=00, ON=7F
SW 9n 01 dd OFF=00, ON=7F
SW 9n 02 dd OFF=00, ON=7F
SW 9n 03 dd OFF=00, ON=7F
SW 9n 04 dd OFF=00, ON=7F
SW 9n 05 dd OFF=00, ON=7F
CUE
SW 9n 06 dd OFF=00, ON=7F
SW 9n 07 dd OFF=00, ON=7F
EXIT
SW 9n 08 dd OFF=00, ON=7F
SW 9n 0E dd OFF=00, ON=7F
SW 9n 0F dd OFF=00, ON=7F
SW 9n 10 dd OFF=00, ON=7F
SW 9n 11 dd OFF=00, ON=7F
SW 9n 12 dd OFF=00, ON=7F
SW 9n 16 dd OFF=00, ON=7F
SW 9n 17 dd OFF=00, ON=7F
SW 9n 20 dd OFF=00, ON=7F
SW 9n 26 dd OFF=00, ON=7F
SW 9n 2E dd OFF=00, ON=7F
SW 9n 2F dd OFF=00, ON=7F
SW 9n 32 dd OFF=00, ON=7F
SW 9n 33 dd OFF=00, ON=7F
MIDI-Meldungen
(3 Byte)
Bn 10 dd
Bn 30 dd
Bn 4F dd
Hinweise
Linearer Wert entsprechend der Geschwindigkeit von Stopp bis x4
Geschwindigkeit. Stopp:
40, FWD (Uhrzeigersinn)
Richtung: 41 bis 7F
(x0,06 bis x4 Geschwindigkeit), REV (Gegenuhrzeigersinn) Richtung:
3F bis 00 (x0,5 bis x4
Geschwindigkeit)
00 bis 7F (00 bei – Seite,
7F bei + Seite, 40 bei
Mitte)
Linearer Wert entsprechend der Geschwindigkeit x0,5 bis x4
Geschwindigkeit. Stopp
(unter x0,49 Geschwindigkeit): 40, FWD (Uhrzeigersinn) Richtung:
41 bis 7F (x0,5 bis x4
Geschwindigkeit), REV
(Gegenuhrzeigersinn)
Richtung: 3F bis 00 (x0,5
bis x4 Geschwindigkeit)
98 – 127, 1 – 30 Differenz der Zählung von
vorheriger Zeit wird
gesendet wird (±1 –
±30). Wenn mehr als
±30, auf ±30 stellen
Über Kondensation
Wassertröpfchen (Kondensation) können sich im Gerät (auf
Funktionsteilen und Linsen) im Winter absetzen, zum Beispiel wenn
das Gerät von einem kalten Ort in einen warmen Raum gebracht wird
oder wenn die Temperatur im Raum, in dem das Gerät installiert ist,
plötzlich ansteigt (durch Heizung usw.). Das Gerät funktioniert nicht
richtig und kann nicht zur Wiedergabe verwendet werden, wenn sich
im Inneren Kondensation gebildet hat. Lassen Sie das Gerät 1 bis 2
Stunden lang bei Raumtemperatur stehen (die genaue erforderliche
Zeit ist je nach Bedingungen der Kondensation unterschiedlich), ohne
es einzuschalten. Die Wassertröpfchen verdampfen, und das Gerät
wird betriebsbereit. Kondensation kann auch im Sommer auftreten,
z.B. wenn das Gerät dem direkten Luftstrom von einer Klimaanlage,
usw. ausgesetzt ist. In diesem Fall stellen Sie das Gerät an einem
anderen Ort auf.
Reinigen der Linse
Die Linse des Players verschmutzt bei normalem Gebrauch praktisch
nicht. Sollte sie dennoch auf Grund von Staub oder Schmutz versa-
gen, wenden Sie sich an die nächste Pioneer-Kundendienstvertretung.
Von der Verwendung im Fachhandel erhältlicher Linsen-Reiniger wird
abgeraten, da einige dieser Reiniger die Linse beschädigen können.
Handhabung von Discs
Lagerung
! Bewahren Sie Discs stets in ihren Hüllen auf, und lagern Sie die
Hüllen senkrecht. Vermeiden Sie die Aufbewahrung an Orten, die
hohen Temperaturen, direktem Sonnenlicht oder sehr niedrigen
Temperaturen ausgesetzt sind.
! Lesen Sie die Vorsichtshinweise, die der Disc beiliegen.
Reinigen der Discs
! Discs mit Fingerabdrücken und Staub können nicht ordnungsge-
mäß abgespielt werden. Reinigen Sie die Disc in diesem Fall durch
sanftes Abwischen mit einem Reinigungstuch usw. von der Mitte
zum Rand. Verwenden Sie keine verschmutzen Reinigungstücher.
! Verwenden Sie weder Benzin, Verdünner noch andere flüch-
tige Chemikalien. Verwenden Sie kein Schallplattenspray oder
Antistatikspray.
! Tragen Sie bei hartnäckigen Verschmutzungen ein wenig Wasser
auf ein weiches Tuch auf. Wringen Sie das Tuch sorgfältig aus,
wischen Sie den Schmutz ab, und wischen Sie mit einem trockenen Tuch nach.
! Verwenden Sie keine beschädigten (gebrochenen oder verboge-
nen) Discs.
! Achten Sie darauf, dass die Datenträgeroberfläche der Disc nicht
zerkratzt oder verschmutzt wird.
! Legen Sie niemals zwei Discs übereinander in der Disc-Schublade
ein.
! Bringen Sie nicht Papierstücke oder Aufkleber auf Discs an.
Dadurch können sich Discs verwellen und damit nicht abspielbar
werden. Beachten Sie auch, dass Leih-Discs häufig Aufkleber tragen, an deren Rändern Klebstoff austreten kann. Prüfen Sie, dass
kein Klebstoff im Bereich der Aufkleberränder vorhanden ist, wenn
Sie Leih-Discs verwenden.
De
Deutsch
27
Page 82

Hinweise zu speziell geformten Discs
Speziell geformte Discs (Herzform, sechseckig, usw.) können mit
diesem Spieler nicht abgespielt werden. Verwenden Sie keine solchen
Discs, da diese den Spieler beschädigen.
internationale Abkommen geschützt. Es liegt in der vollen
Verantwortung der Person, die die Musik aufgenommen hat, sicherzustellen, dass die Aufnehmen nicht gesetzwidrig verwendet werden.
! Beim Umgang mit Musik, die aus dem Internet heruntergeladen
wurde usw., liegt es in der vollen Verantwortung der Person, die
den Musik-Download ausgeführt hat, sicherzustellen, dass die
aufgenommenen Inhalte entsprechend den Vorschriften auf der
Download-Site verwendet werden.
Verwendung der Support-Site
Bevor Sie eine Anfrage über die Bedienung und den technischen
Support von rekordbox einsenden, schlagen Sie bitte zuerst in der
Bedienungsanleitung für rekordboxnach und prüfen Sie die FAQs
(häufig gestellten Fragen) auf der Support-Website für rekordbox.
Hinweise zu Kondensation auf Discs
Wenn Discs plötzlich von einem kalten Ort in einen warmen
Raum gebracht werden (z. B. im Winter), können sich auf der
Disc-Oberfläche Wassertropfen (Kondensation) bilden. Wenn
Kondensation auf der Oberfläche vorhanden ist, können Discs nicht
ordnungsgemäß abgespielt werden. Wischen Sie die Wassertropfen
sorgfältig von der Disc-Oberfläche ab, bevor Sie die Disc einlegen.
Haftungsausschluss
! Pioneer und rekordbox sind eingetragene Markenzeichen der
Pioneer Corporation.
! Microsoft®, Windows Vista®, Windows® und Internet Explorer®
sind eingetragene Markenzeichen oder Markenzeichen von
Microsoft Corporation of the United States in den USA und/ oder
anderen Ländern.
! Apple, Macintosh, Mac OS, Safari, iTunes und Finder sind einge-
tragene Markenzeichen von Apple Inc. in den USA und/ oder anderen Ländern.
! Pentium ist ein eingetragenes Markenzeichen der Intel
Corporation.
! Adobe und Reader sind eingetragene Markenzeichen oder
Markenzeichen von Adobe Systems Incorporated in den USA und/
oder anderen Ländern.
! ASIO ist ein Markenzeichen von Steinberg Media Technologies
GmbH.
Die hier erwähnten Produkt- oder Firmennamen sind Markenzeichen
der jeweiligen Eigentümer.
Dieses Produkt wurde für Nonprofit-Verwendung lizensiert. Dieses
Produkt ist nicht zu den Handelszwecken (für Gewinn bringenden Gebrauch), wie Sendung (terrestrisch, Satelliten-, Kabel oder
andere Arten von Sendungen), streaming im Internet, Intranet
(ein privates Kommunikationsnetz) oder anderen Typen von
Netzwerken oder zum Vertrieb elektronischer Information (online
digitale Musikvertriebsdienste) lizensiert worden. Für derartige
Verwendungszwecke müssen sie die entsprechenden Lizenzen erhalten. Für Einzelheiten besuchen Sie http:/ / www.mp3licensing.com.
rekordbox-Support-Website
http://www.prodjnet.com/rekordbox/support/
! Um eine Anfrage zu rekordbox einzusenden, müssen Sie sich
als Benutzer im Voraus über die Support-Website für rekordbox
registrieren.
! Sie müssen den Lizenzschlüssel für Ihre Benutzerregistrierung
eingeben. Halten Sie den Lizenzschlüssel bereit. Stellen Sie auch
sicher, dass Sie nicht den Login-Namen (Ihre E-Mail-Adresse)
sowie das Kennwort für Ihre Benutzer-Registrierung, sowie die
Lizenzschlüssel vergessen.
! Pioneer Corporation sammelt Ihre persönlichen Daten für folgende
Zwecke:
1 Um Kunden-Support für Ihre gekauften Produkte zu bieten
2 Um Sie mittels E-Mail über Produkte oder Events zu informieren
3 Um Ihre durch Umfragen ermittelten Meinungen bei der
Produktplanung zu berücksichtigen
— Ihre persönlichen Daten werden vertraulich behandelt,
entsprechend den Richtlinien für Datenschutz unseres
Unternehmens.
— Sie können unsere Datenschutzerklärung auf der Support-
Website für rekordbox einsehen.
! Bitte geben Sie bei Anfragen zu rekordbox den Typ und die
technischen Daten Ihres Computers (Prozessor, installierter
Speicher, sonstige angeschlossene Peripherie, usw.), das
verwendete Betriebssystem und die verwendete Version sowie alle
konkreten Information zum jeweiligen Problem an.
— Für Anfragen über das Konfigurieren Ihres Computers mit
anderen Peripheriegeräten als unseren Produkten und den
entsprechenden technischen Support wenden Sie sich bitte an
denjeweiligen Hersteller oder Händler.
! rekordbox wird Aktualisierungen für verbesserte Funktion und
Leistung unterzogen. Das Upgrade-Programm können Sie auf der
Support-Website herunterladen. Wir empfehlen Ihnen dringend,
Ihre Software regelmäßig zu aktualisieren, um immer die neuesten
Updates auf Ihrem System zu haben.
Hinweise zum Urheberrechte
rekordbox beschränkt die Wiedergabe und Vervielfältigung von urheberrechtlich geschützten Musik-Inhalten.
! Wenn codierte Daten, usw. zum Schutz der Urheberrechte in
Musik-Inhalten eingebettet sind, kann es unmöglich sein, das
Programm normal auszuführen.
! Wenn rekordbox erkennt, dass kodierte Daten usw., für den Schutz
der Urheberrechte in Musik-Inhalten eingebettet ist, kann der
ablaufende Vorgang (Wiedergabe, Lesen, usw.) stoppen.
Aufnahmen, die Sie vornehmen, sind für persönlichen Genuss
gedacht und dürfen nach dem Urheberrecht nicht ohne Zustimmung
des Urheberrechtsinhabers anderweitig verwendet werden.
! Musik, die von CDs, usw. aufgenommen wurde, ist durch
die Urheberrechtsgesetze der einzelnen Länder sowie durch
De
28
Page 83

Technische Daten
Stromanforderungen .... 220 V bis 240 V Wechselspannung, 50 Hz/ 60 Hz
Leistungsaufnahme ............................................................................... 16 W
Leistungsaufnahme (Standby) ...........................................................0,3 W
Gewicht des Hauptgeräts ................................................................... 2,3 kg
Max. Abmessungen ...............220 mm (B) × 107 mm (H) × 288,5 mm (T)
Betriebstemperatur ...........................................................+5 °C bis +35 °C
Betriebsluftfeuchtigkeit ..................... 5 % bis 85 % (keine Kondensation)
Analoger Audioausgang (AUDIO OUT L/ R)
Ausgangsbuchse ...................................................................Cinch-Buchse
Ausgangspegel .....................................................................2,0 Veff (1 kHz)
Frequenzgang....................................................................... 4 Hz bis 20 kHz
Signalrauschabstand ......................................................................... 115 dB
Gesamtklirrfaktor ...............................................................................0,006 %
USB Downstream-Bereich (USB)
Port .........................................................................................................Typ A
Stromversorgung ................................................ 5 V/
USB-Upstream-Bereich (USB)
Port .........................................................................................................Typ B
Steuerausgang (CONTROL)
Anschluss ................................................................................. Mini-Buchse
! Änderungen der technischen Daten und das Design dieses Geräts
ohne vorherige Ankündigung bleiben vorbehalten.
! Die Angaben über kostenlose Reparatur usw. in der Garantie
gelten nicht für die rekordbox Musikverwaltung-Software. Vor der
Installation oder Verwendung von rekordbox lesen Sie die Angaben
in Software-Lizenzvereinbarung auf Seite 8 sorgfältig durch.
500 mA oder weniger
Deutsch
De
29
Page 84

PIONEER CORPORATION
1-1, Shin-ogura, Saiwai-ku, Kawasaki-shi, Kanagawa 212-0031, Japan
Корпорация Пайонир
1-1, Син-Огура, Сайвай-ку, г. Кавасаки, префектура Канагава, 212-0031, Япония
Импортер: ООО "ПИОНЕР РУС"
125040, Россия, г. Москва, ул. Правды, д.26 Тел.: +7(495) 956-89-01
PIONEER EUROPE NV
Haven 1087, Keetberglaan 1, B-9120 Melsele, Belgium TEL: 03/570.05.11
K002_PSV_SY
Published by Pioneer Corporation.
Copyright © 2010 Pioneer Corporation.
All rights reserved.
Publication de Pioneer Corporation.
© 2010 Pioneer Corporation.
Tous droits de reproduction et de
traduction réservés.
<DRB1508-C>Printed in / Imprimé au
 Loading...